Designing a premium fairy lights party setup instantly creates high-end vibes without venue rental costs. Smart material sourcing and strategic layering completely transform ordinary spaces. These budget-friendly blueprints guarantee stunning evening atmospheres.
Design Snapshot Key Principles
- Layered Lighting: Combine ambient, accent, and focal lighting at varying heights to create depth and visual interest.
- Strategic Placement: Position lights to highlight architectural features, pathways, and gathering zones while maintaining even distribution.
- Color Temperature: Warm white LEDs (2700-3000K) create inviting atmospheres, while cooler tones suit modern aesthetics.
- Power Planning: Use battery-operated units for flexibility or solar options for eco-friendly outdoor installations.
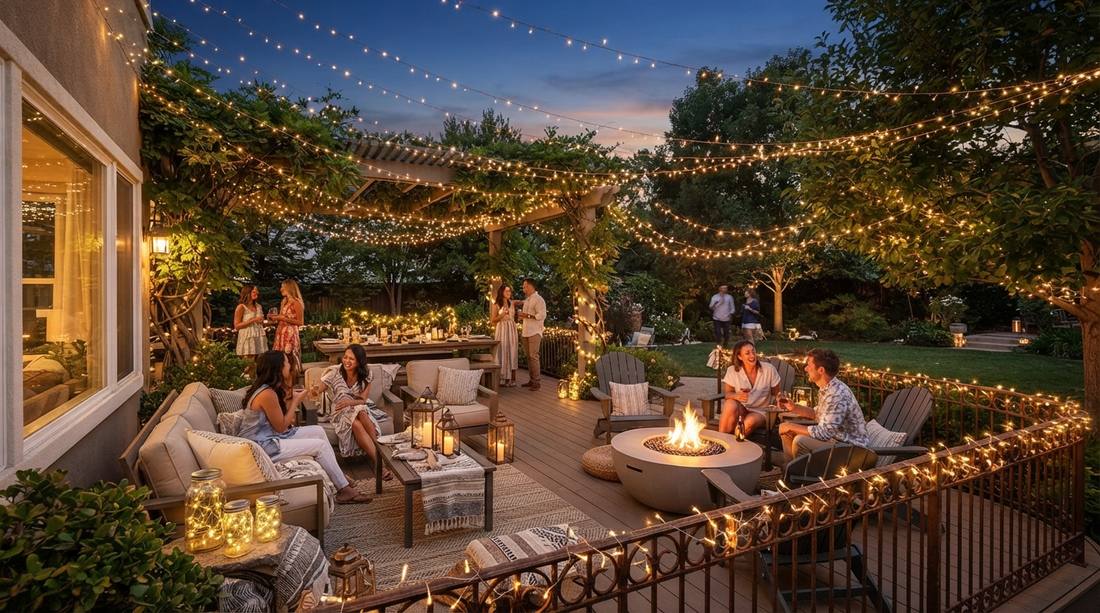
Overhead Canopy Designs That Command Attention
Ceiling installations create immersive environments by surrounding guests with ambient light from above. These overhead arrangements work exceptionally well for tented outdoor events or covered patio spaces where structural anchor points allow secure mounting.
1. Cascading Fairy Light Ceiling Canopy
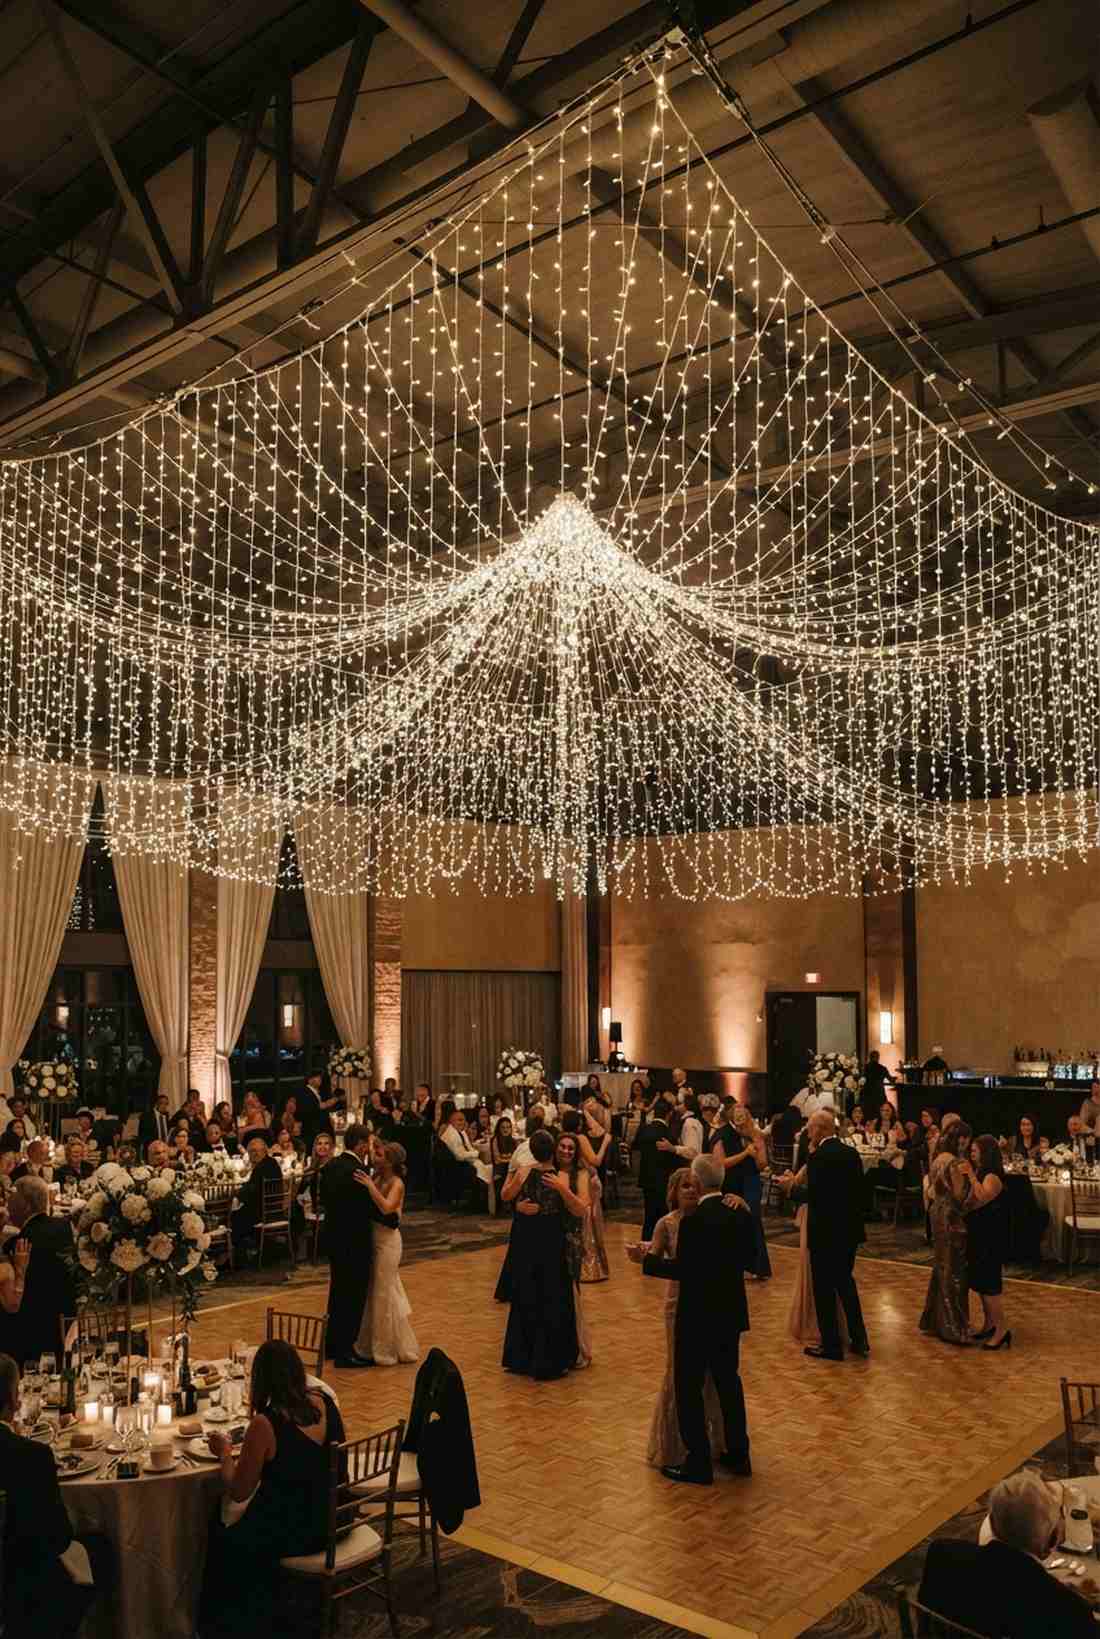
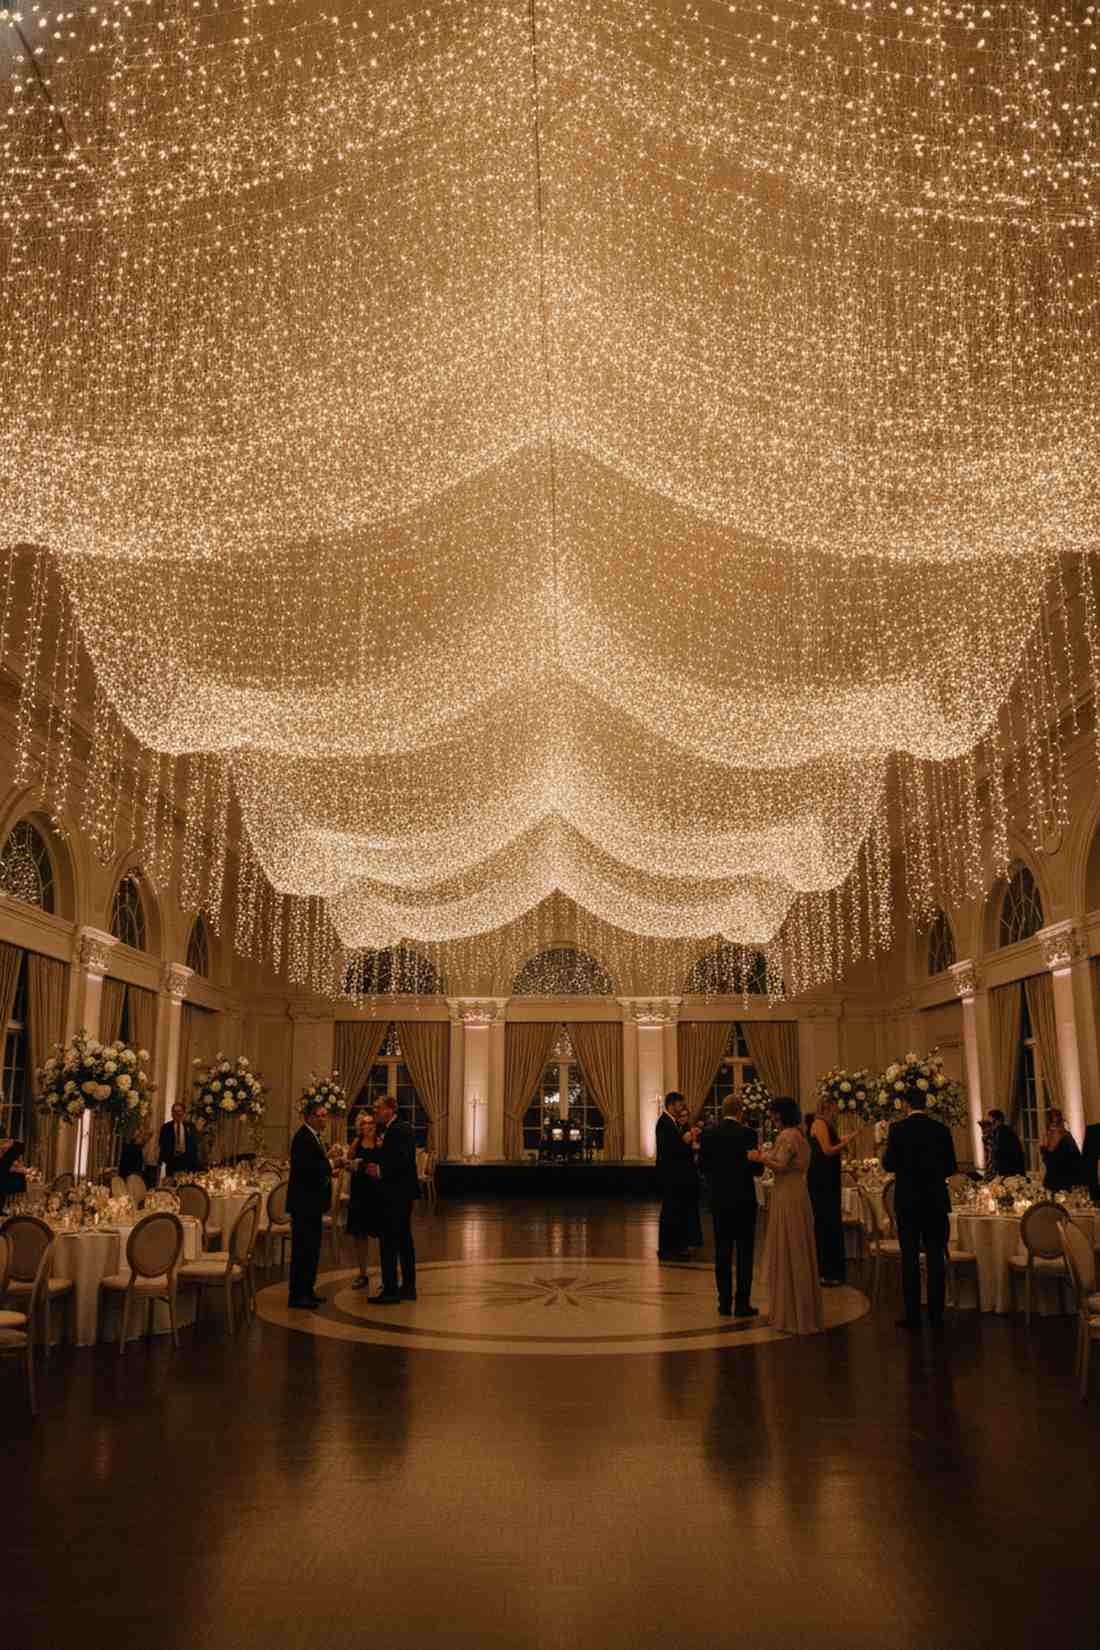
Feels like a magical starlight shower right above your head. Hanging ceiling fairy light canopy works exceptionally well for large wedding tents or high-ceiling living rooms.
Many DIYers mistakenly use standard indoor strands that easily tangle, but utilizing heavy-duty commercial string lights guarantees a flawless, designer-level finish. Hang these downwards in varied lengths from a central point to create breathtaking vertical depth.
You can easily pull this off for around $40–$80 depending on the square footage. Save this to your DIY outdoor wedding board!
- Key Materials: Hanging ceiling wire hooks, commercial string lights
- Vibe / Style: Elegant evening gala
- Difficulty: Intermediate aerial setup
- Budget Breakdown: Wiring kits: $25 | Hanging strands: $45
- Creator’s Tip: Use transparent fishing line to anchor the lower ends if it gets breezy.
- Smart Sourcing: shatterproof LED cascade strands (bulk pack) and heavy-duty clear adhesive ceiling hooks.
2. Tent Perimeter String Light Framework
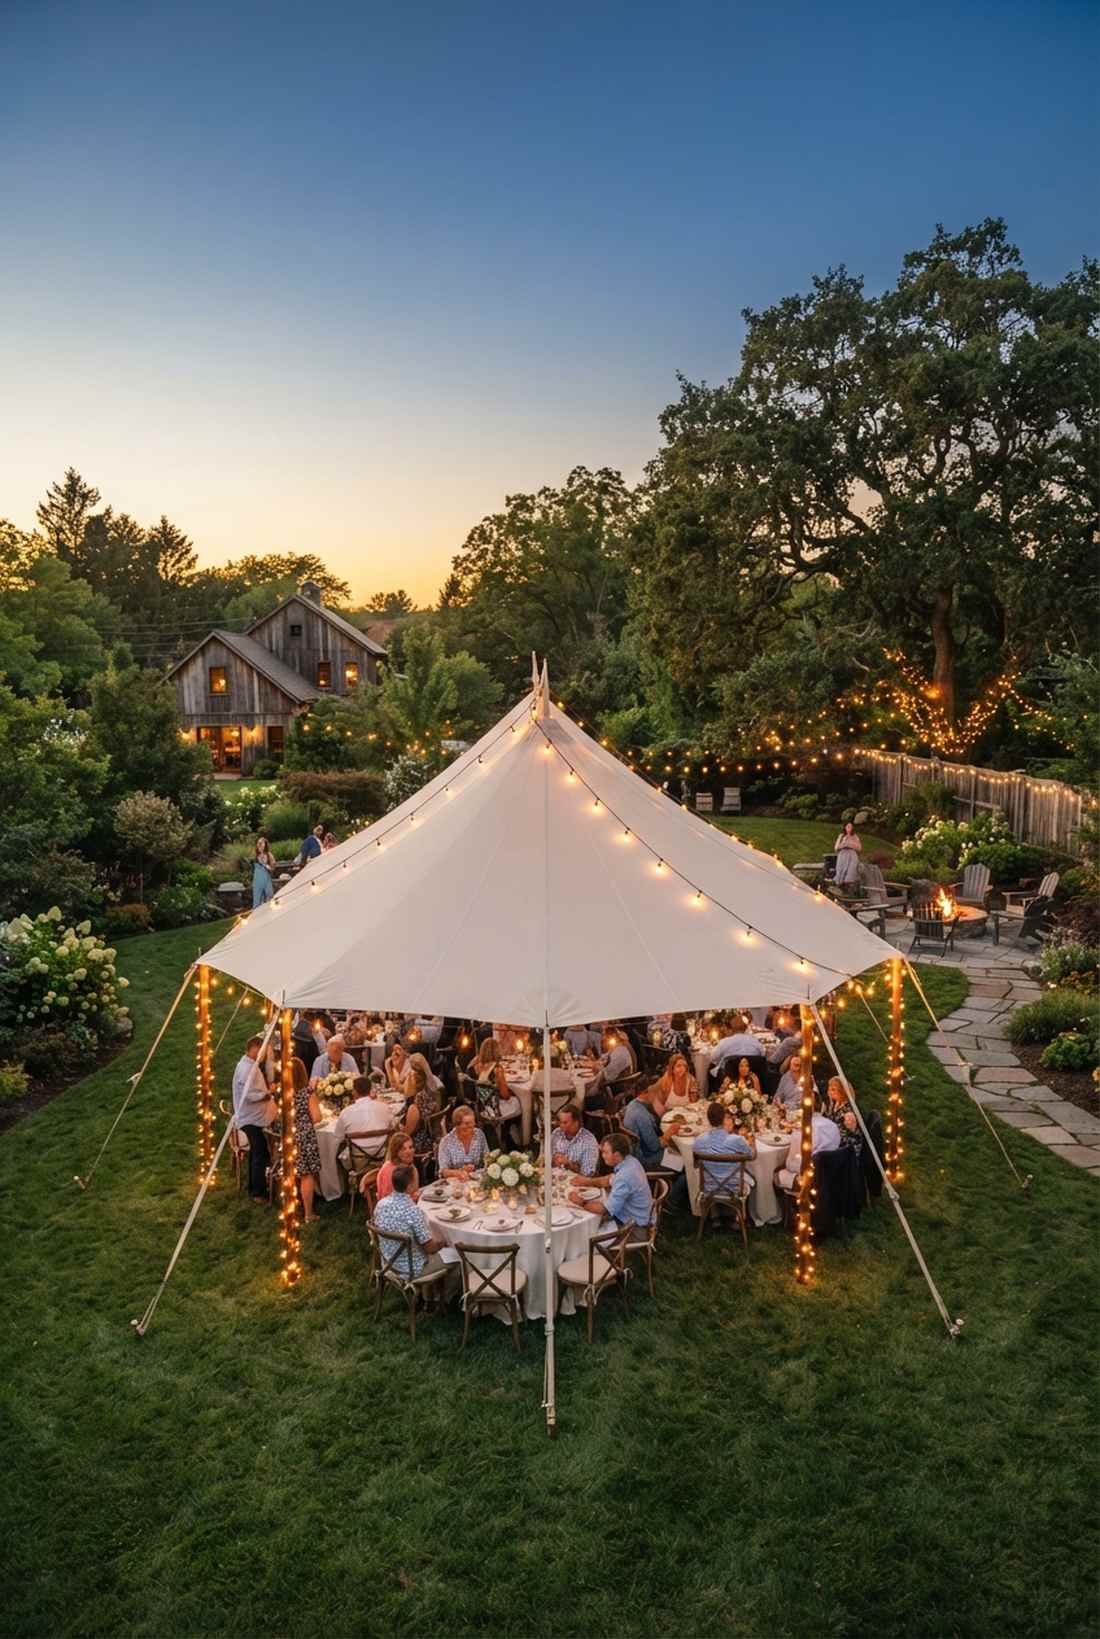
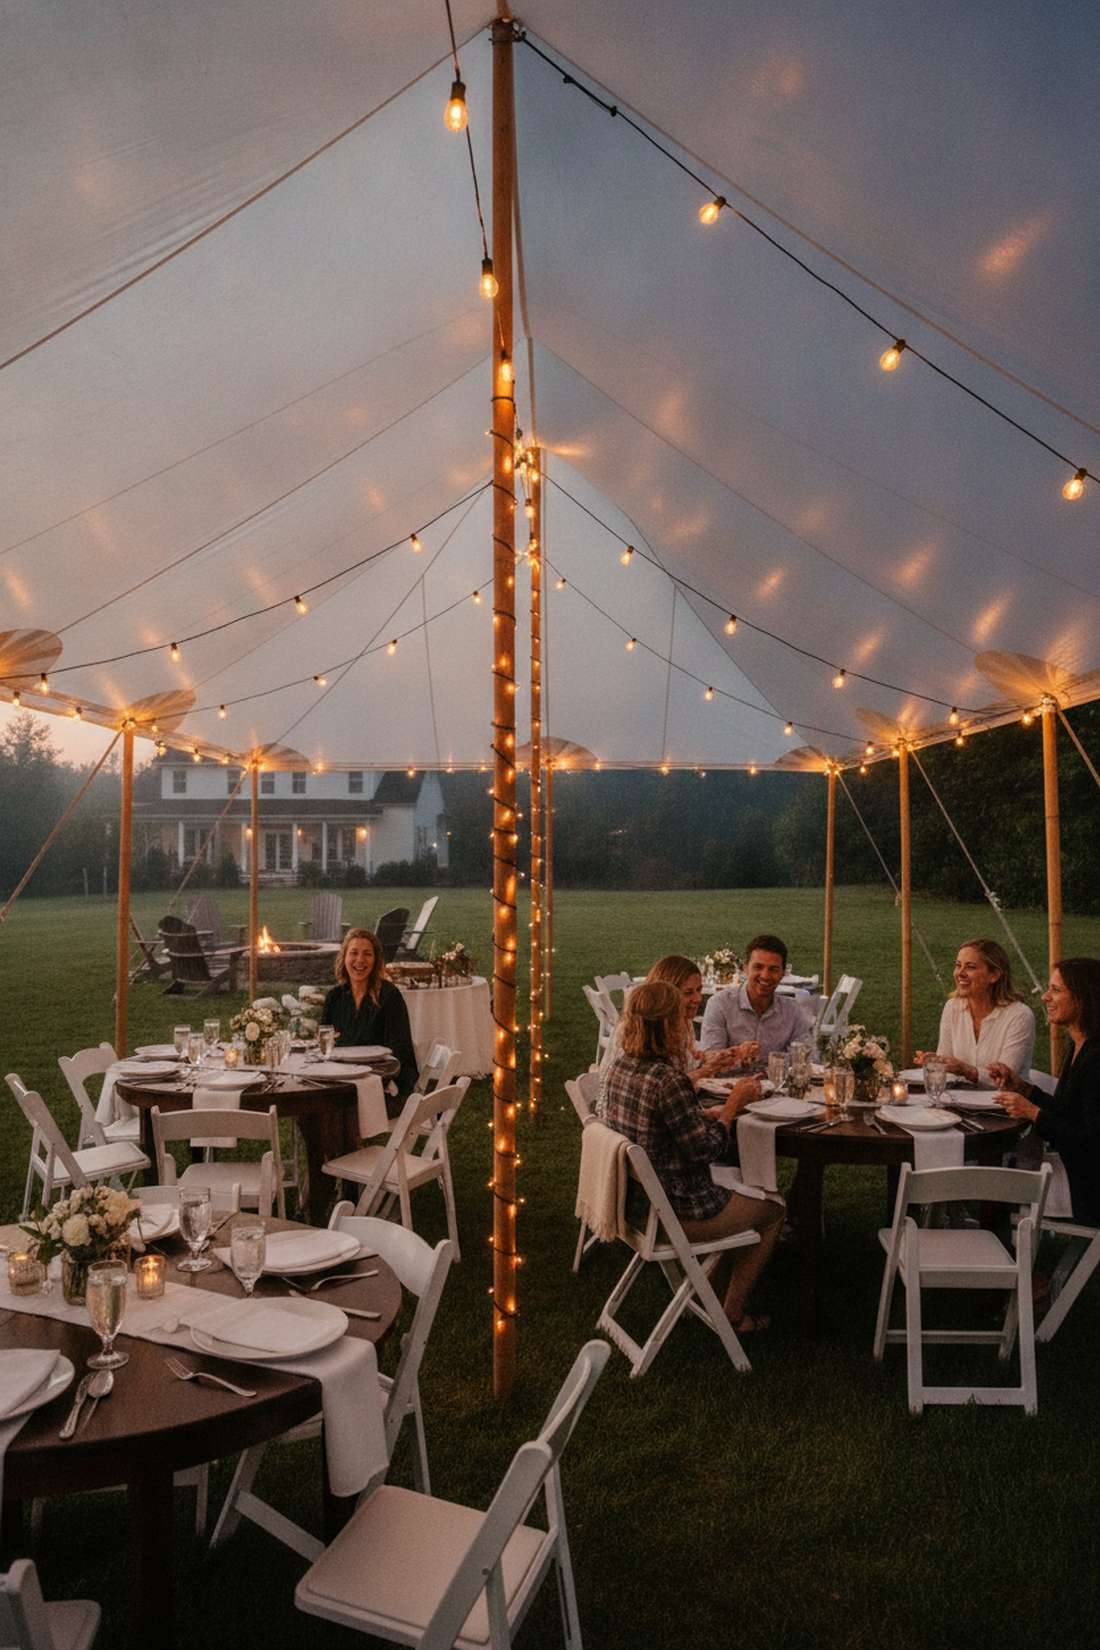
Delivers that charming vintage bistro feeling instantly. Outdoor tent perimeter lighting is an absolute must-have for defining dining areas in open grassy yards.
Skimping on weather-proofing is why most layouts fail mid-event, yet investing in waterproof outdoor fairy lights ensures reliable execution even during unexpected rain. Wrap them tightly along support poles and drape them softly across the upper canvas frame.
This setup runs about $60 for a medium-sized canopy structure. It’s a highly recommended upgrade for any evening celebration.
- Key Materials: Outdoor-rated bistro bulbs, heavy-duty zip ties
- Vibe / Style: Rustic backyard reception
- Difficulty: Easy perimeter tracing
- Budget Breakdown: Outdoor strands: $50 | Fasteners: $10
- Creator’s Tip: Leave a slight dip between poles to soften the rigid tent lines.
- Smart Sourcing: commercial-grade outdoor bistro lights (shatterproof) and UV-resistant mounting zip ties.
3. Zigzag Pattern Ceiling Installation
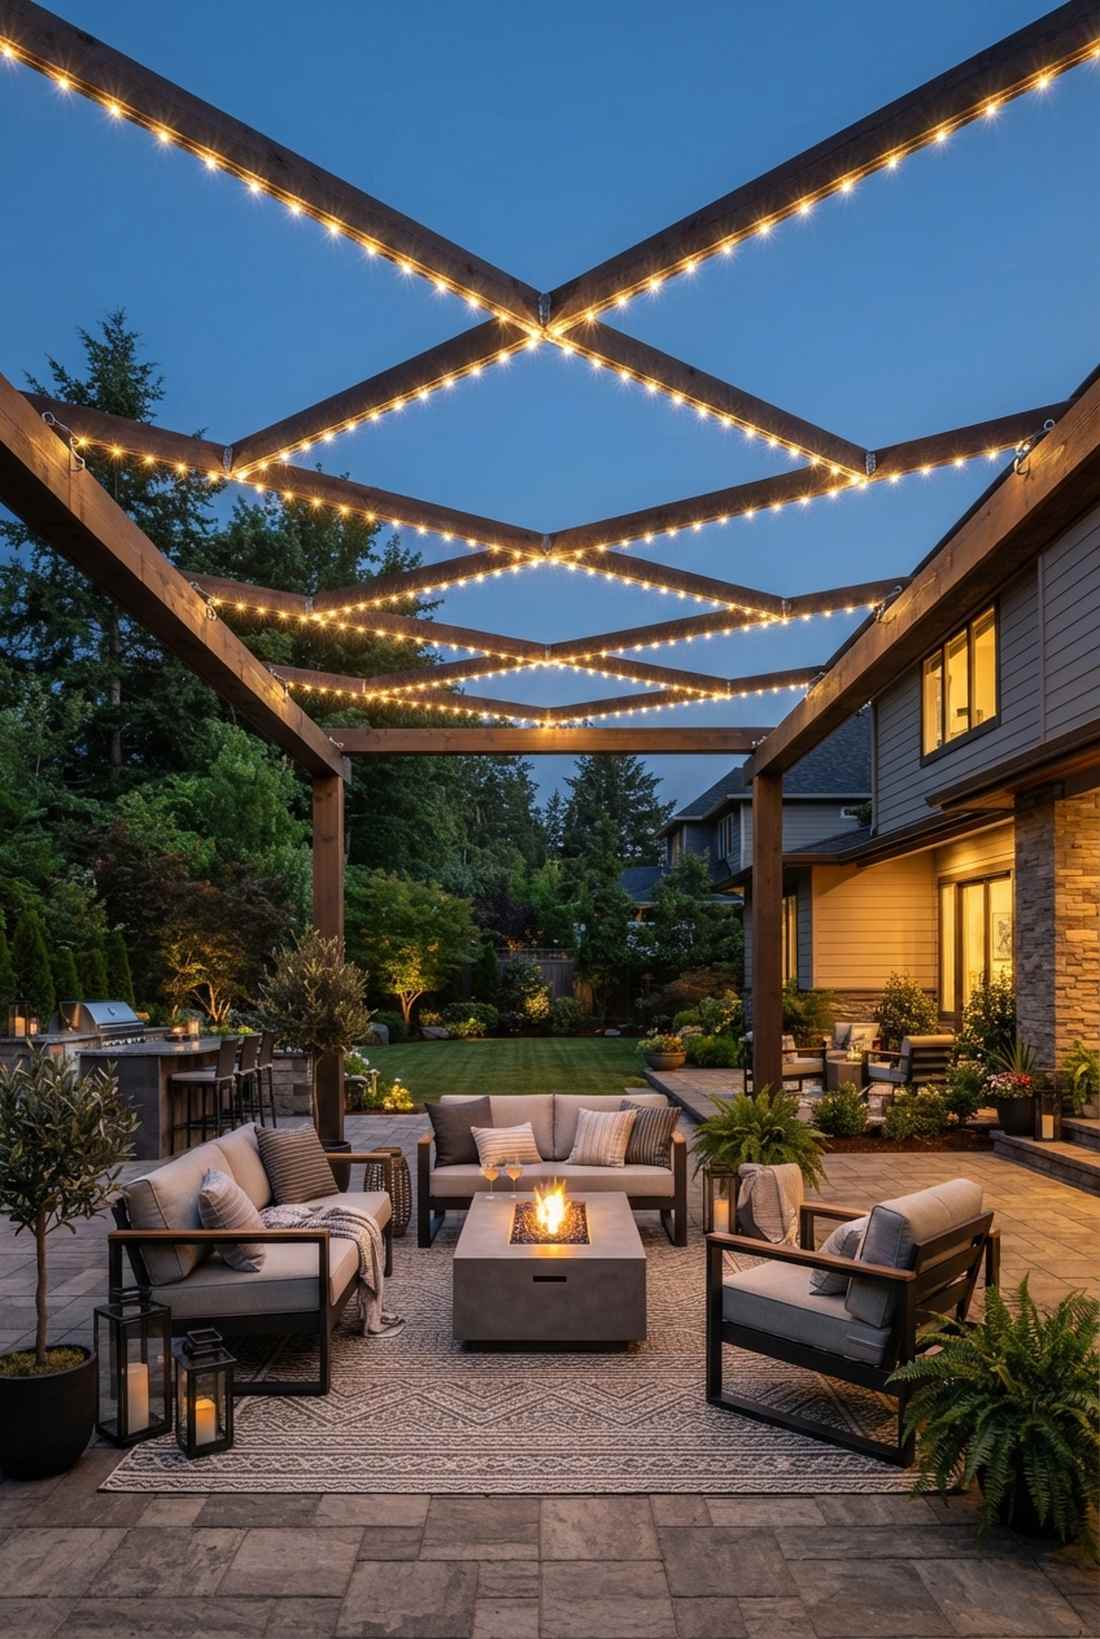
Creates a surprisingly modern geometry overhead. This structured zigzag lighting design is perfect for framing outdoor courtyards or modern patio spaces.
A simple parallel hang looks incredibly basic, but alternating anchor points across opposite beams completely transforms the spatial dynamics. Weaving high-CPC smart LED light kits back and forth forms a crisp, expensive-looking architectural canopy.
Expect to spend about $30 to $50 to cover a standard patio space. Pin this if you’re planning a modern backyard transformation!
- Key Materials: Long LED string lights, screw-in eye hooks
- Vibe / Style: Contemporary cocktail lounge
- Difficulty: Requires accurate measuring
- Budget Breakdown: Smart LEDs: $40 | Anchor hardware: $8
- Creator’s Tip: Use a chalk line on the beams first to ensure your zigzag angles are perfectly symmetrical.
- Smart Sourcing: app-controlled LED string kits and stainless steel eyelet hooks (bulk pack).
4. Globe Lantern Mixed Canopy
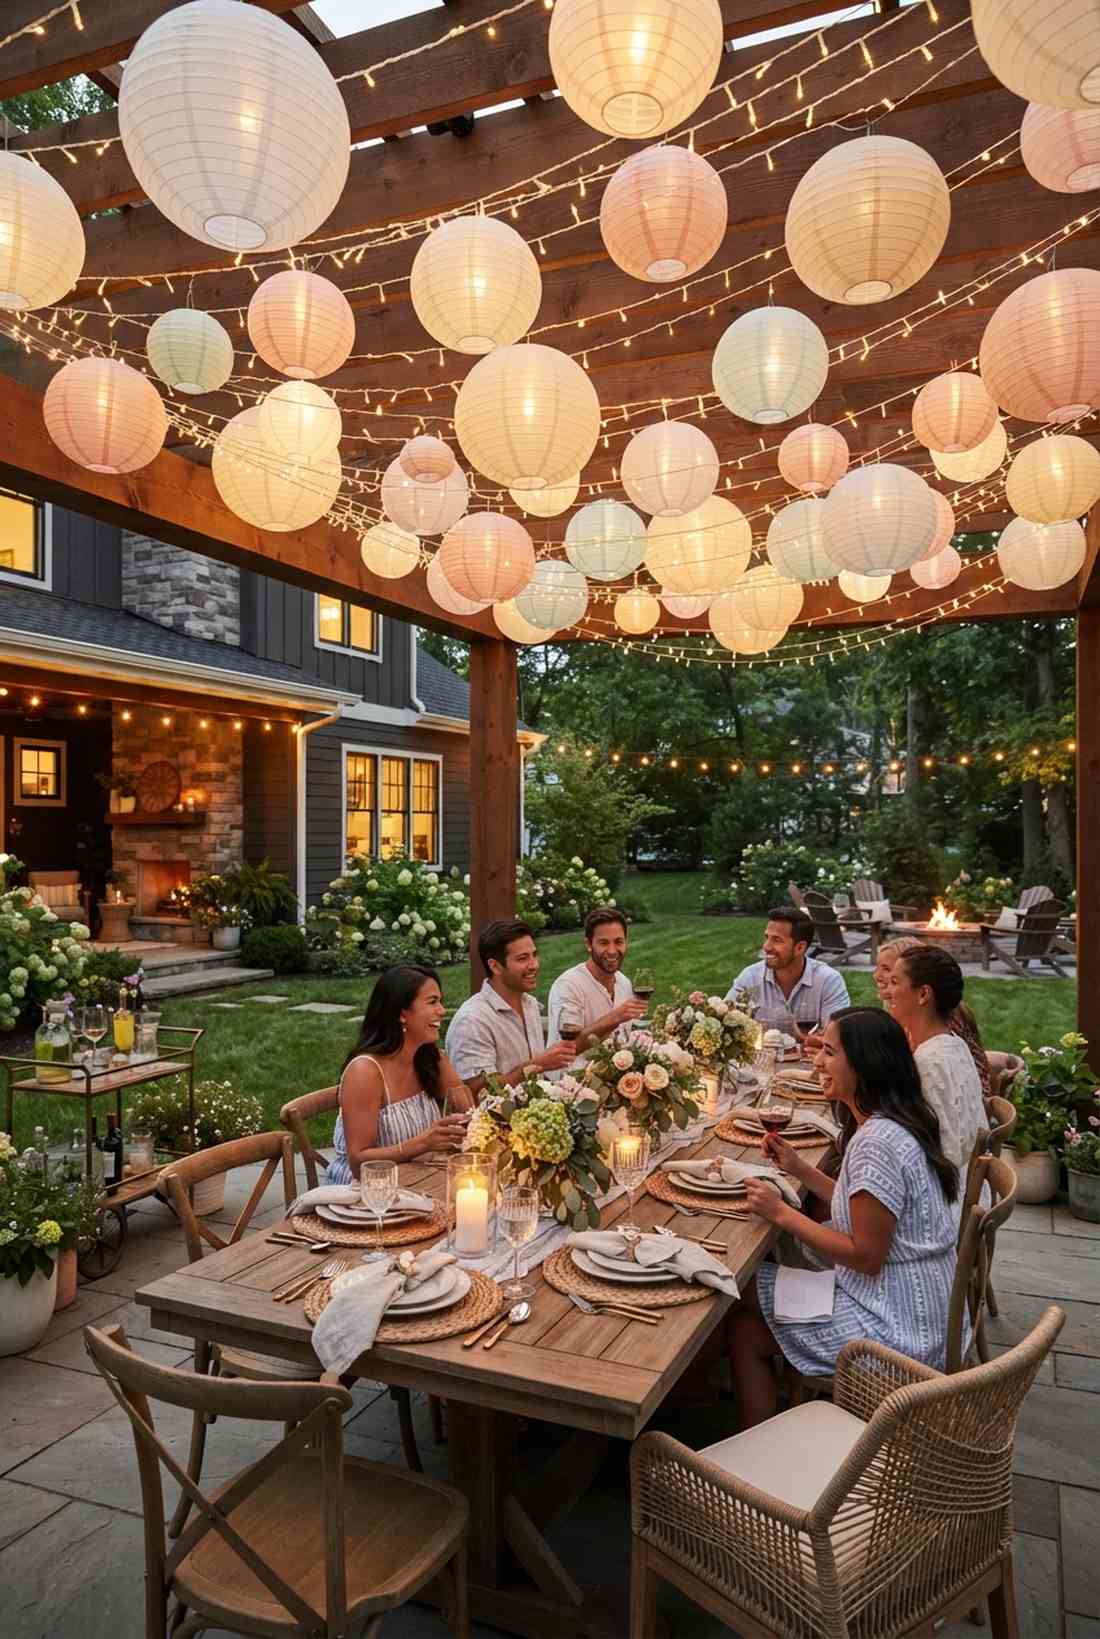
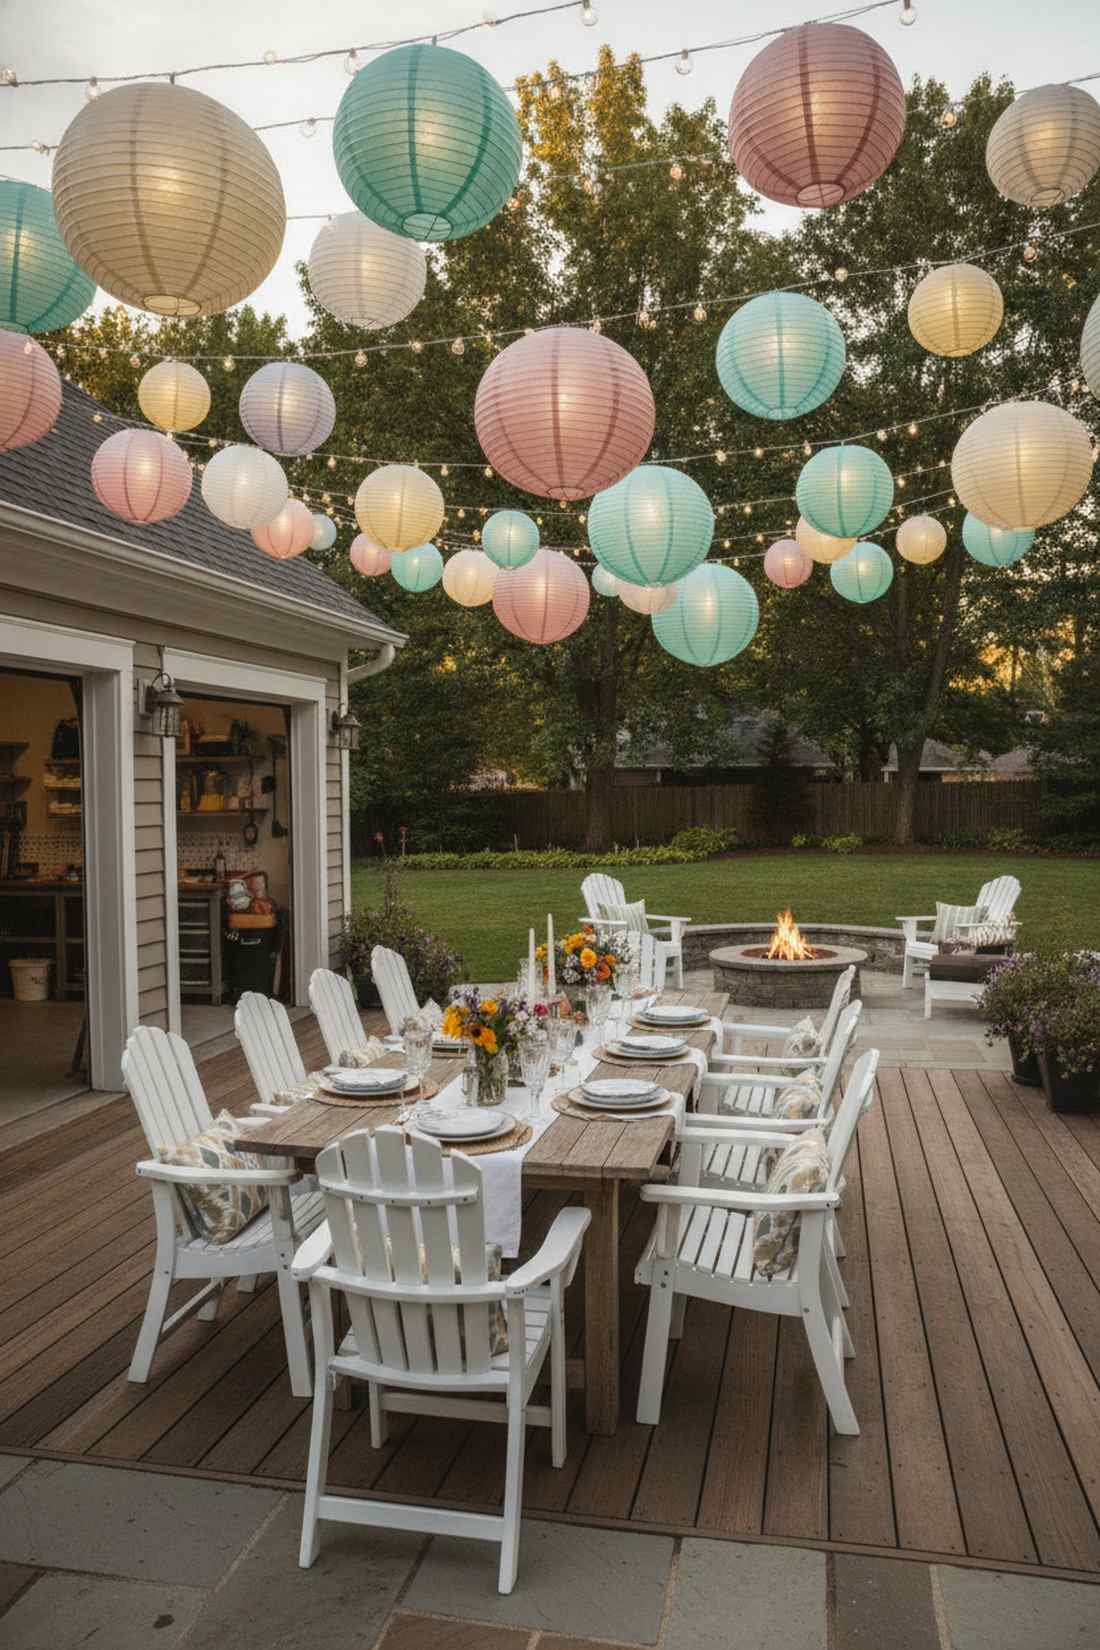
Straight out of a whimsical summer festival. A mixed paper lantern and light canopy is the ultimate hack for covering unsightly garage ceilings or plain event halls.
Standard uniform lighting can feel completely flat, whereas mixing oversized globe fixtures with delicate fairy strands offers layered depth that looks incredibly premium. You can seamlessly sneak in remote-controlled lighting modules inside the larger lanterns to vary the brightness.
You can assemble this entire layered look for under $45. The resulting contrast completely shifts the room’s energy.
- Key Materials: Assorted paper lanterns, warm-white fairy strands
- Vibe / Style: Whimsical garden party
- Difficulty: Beginner-friendly hanging
- Budget Breakdown: Lanterns: $20 | Fairy lights: $25
- Creator’s Tip: Keep the largest lanterns concentrated over the main dining or dancing area to create a focal zone.
- Smart Sourcing: assorted nylon outdoor lanterns (weatherproof pack) and remote-control LED fairy strands.
This next lighting layout is ridiculously cheap but gives off the illusion of a $500 custom event display…
5. Radial Starburst Ceiling Design
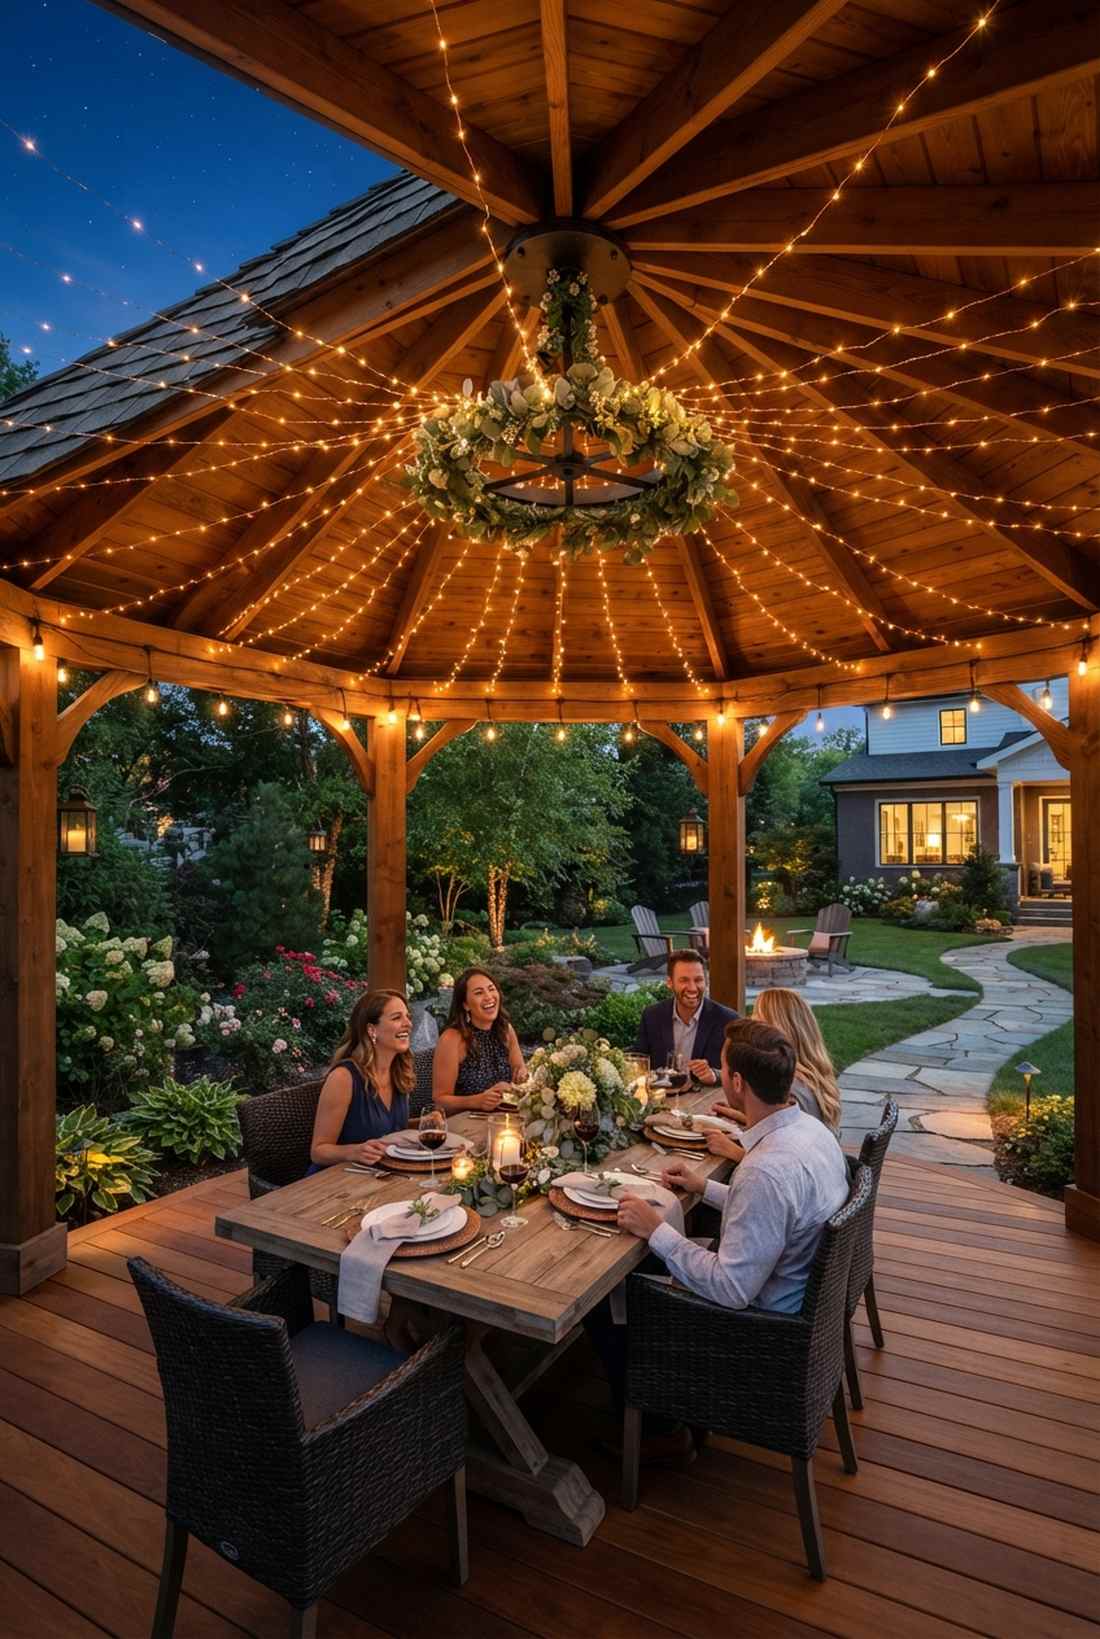
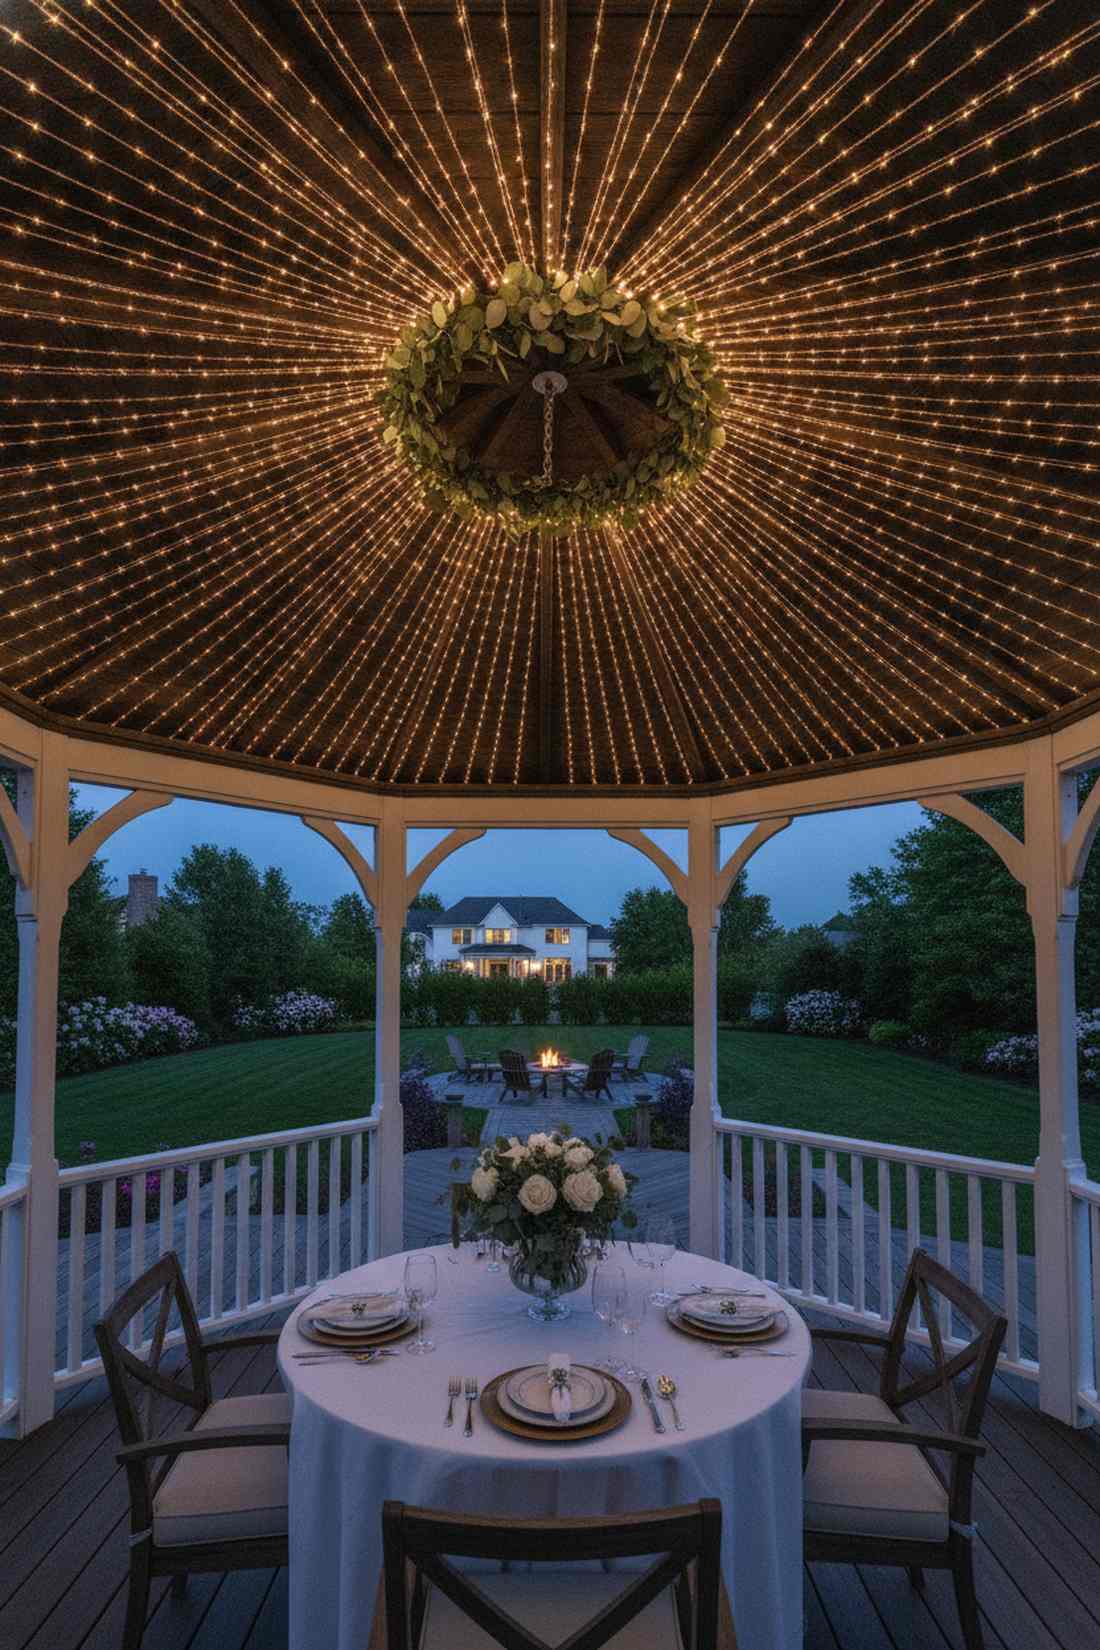
Feels like dining under an explosive galaxy. The radial starburst ceiling design acts as a dramatic centerpiece for circular pavilions or gazebo structures.
Failing to secure the center weight often causes sagging, but utilizing a heavy-duty chandelier anchor creates a tensioned, luxurious starburst effect. By radiating copper wire fairy lights outward from a singular hub, it visually expands the overhead space.
This dramatic layout costs a surprisingly low $35 in materials. Save this to your high-impact party decor board.
- Key Materials: Central mounting ring, lightweight copper string lights
- Vibe / Style: Glamorous starry night
- Difficulty: Moderate tension balancing
- Budget Breakdown: Copper wire lights: $25 | Hub mount: $10
- Creator’s Tip: Wrap the central ring in faux eucalyptus to hide the zip-tie connection points.
- Smart Sourcing: waterproof copper wire lights (bulk pack) and heavy-duty ceiling anchor hooks.
Centerpiece & Table Illumination For Intimate Dining
Table-level lighting creates warmth for dining experiences, encouraging conversation through soft, flattering illumination. These arrangements transform standard tables into memorable gathering spaces.
6. Mason Jar Fairy Light Centerpieces

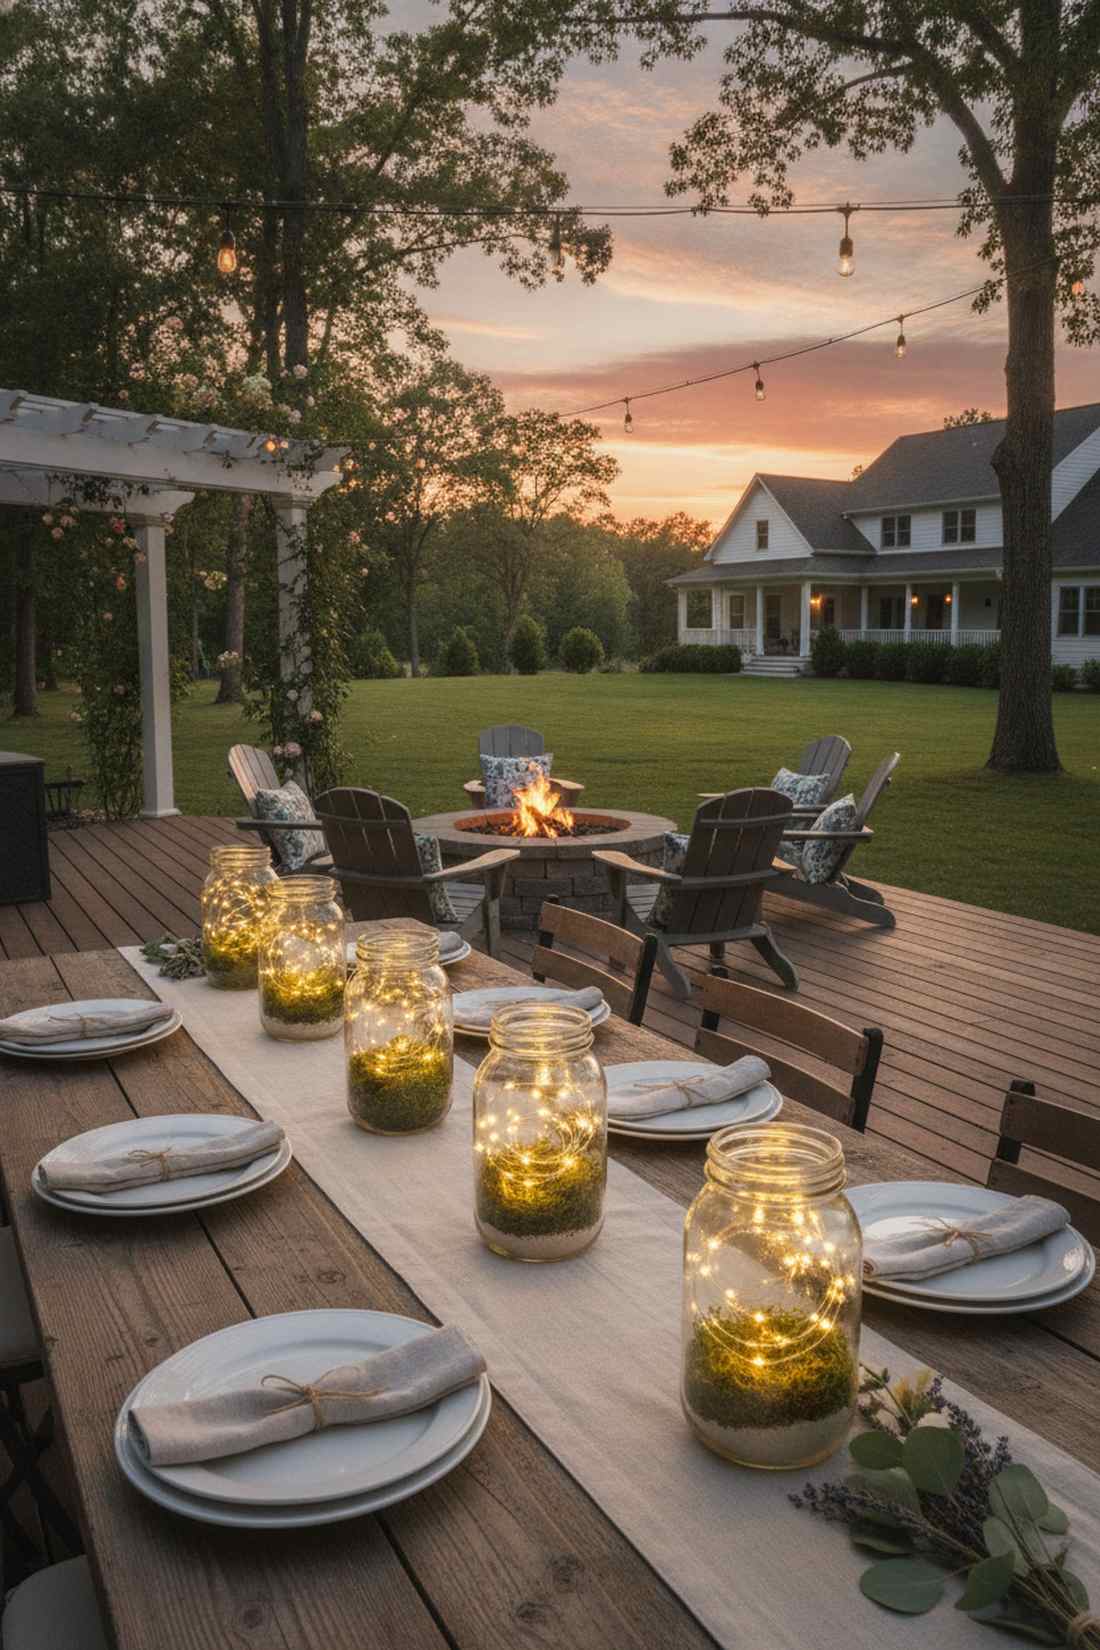
Gives the tablescapes a captured firefly aesthetic. These illuminated mason jar centerpieces are brilliant for rustic outdoor weddings or casual sunset barbecues.
Leaving battery packs exposed completely ruins the magic, yet burying them under decorative sand or moss results in a highly polished, expensive-looking fixture. Grabbing weather-resistant battery packs allows these jars to glow flawlessly even when condensation builds.
Creating a set of six will only cost you around $25. It’s an easy DIY win that everyone will compliment.
- Key Materials: Clear glass jars, micro LED strands, decorative filler
- Vibe / Style: Rustic farmhouse charm
- Difficulty: Very quick and easy
- Budget Breakdown: Jars: $10 | Lights/Batteries: $15
- Creator’s Tip: Gently coil the wire around a pencil before dropping it in for a perfect spiral effect.
- Smart Sourcing: micro LED fairy lights (battery operated multi-pack) and pre-cut preserved moss filler.
7. Table Runner Woven Light Strands

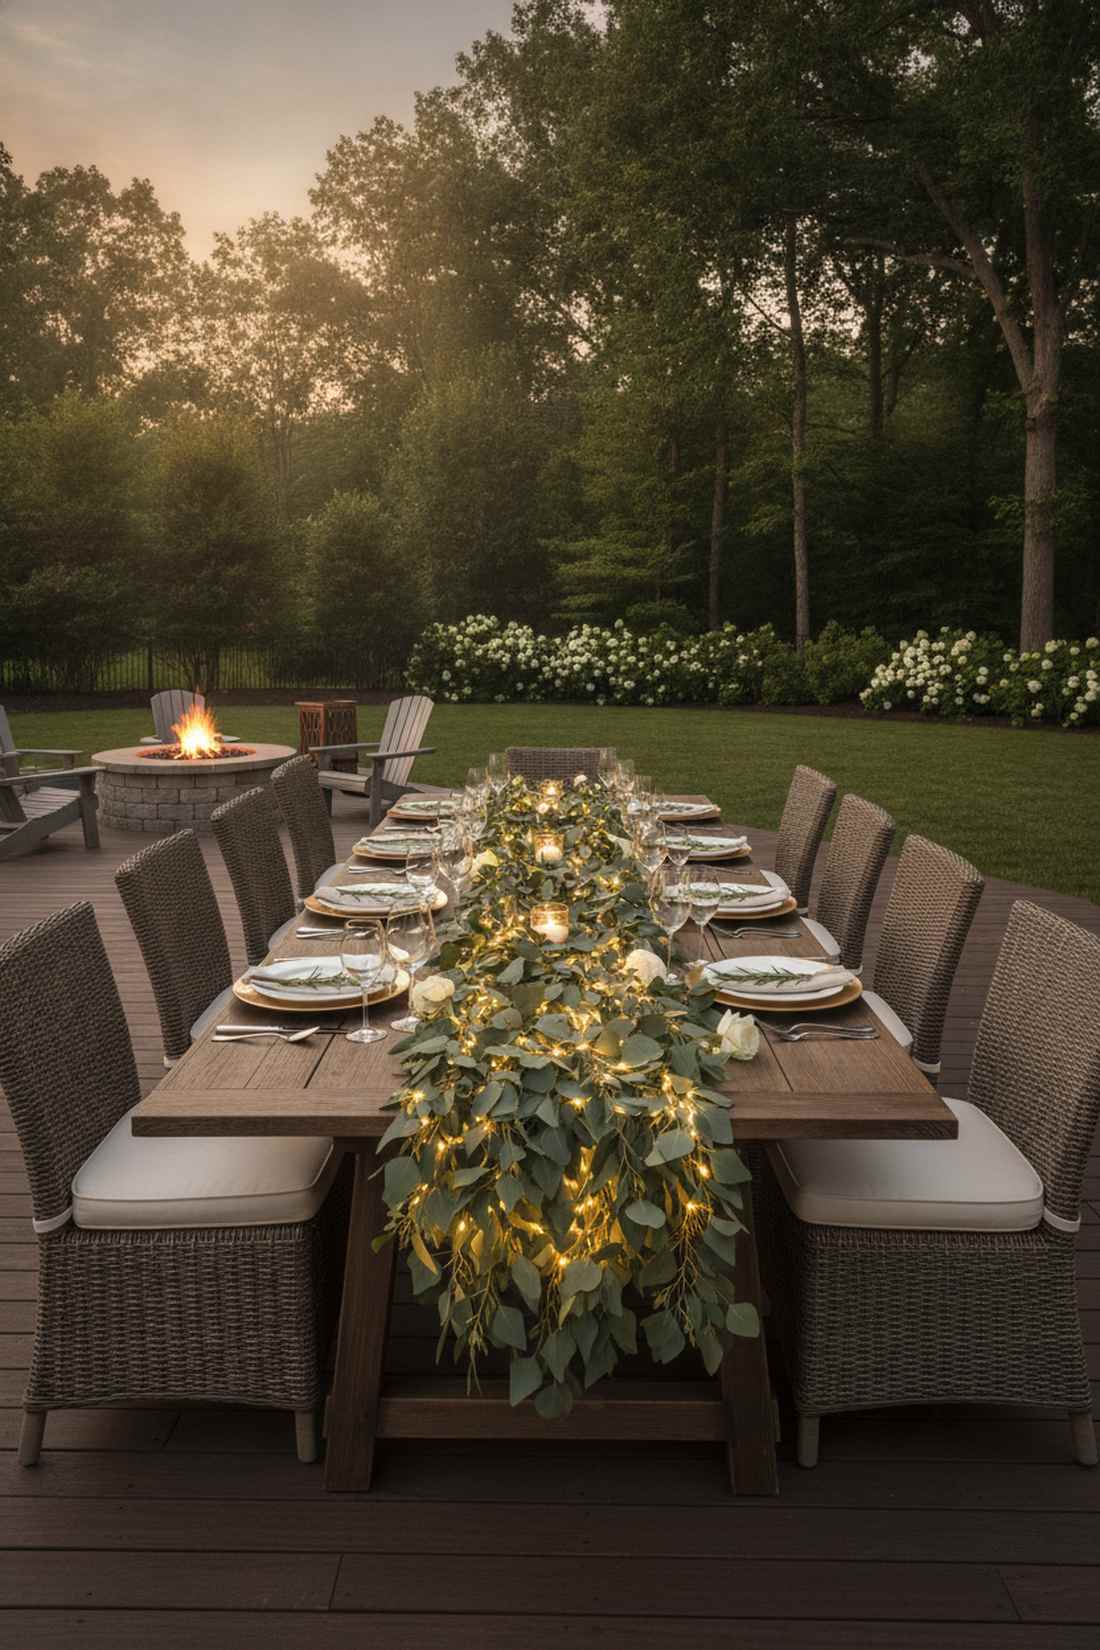
Transforms your dining table into a glowing runway. The woven illuminated table runner provides gorgeous ambient lighting for long banquet-style seating.
A bare string of lights down the center feels lazy and harsh, but intertwining them through thick chiffon or eucalyptus garlands softens the glow into a high-end designer statement. Using high-CPC floral arrangement supplies ensures the wiring stays completely hidden among the leaves.
You can execute this luxury dining look for roughly $30 per table. Pin this to your holiday tablescape inspiration board!
- Key Materials: Fabric runner, artificial greenery, warm LED wire
- Vibe / Style: Romantic organic elegance
- Difficulty: Easy weaving technique
- Budget Breakdown: Greenery: $15 | Lighting: $15
- Creator’s Tip: Use floral wire to gently tack the light strand to the underside of the greenery so it won’t shift during dinner.
- Smart Sourcing: realistic eucalyptus garland (bulk pack) and ultra-thin warm white wire lights.
8. Floating Candle & Light Combination
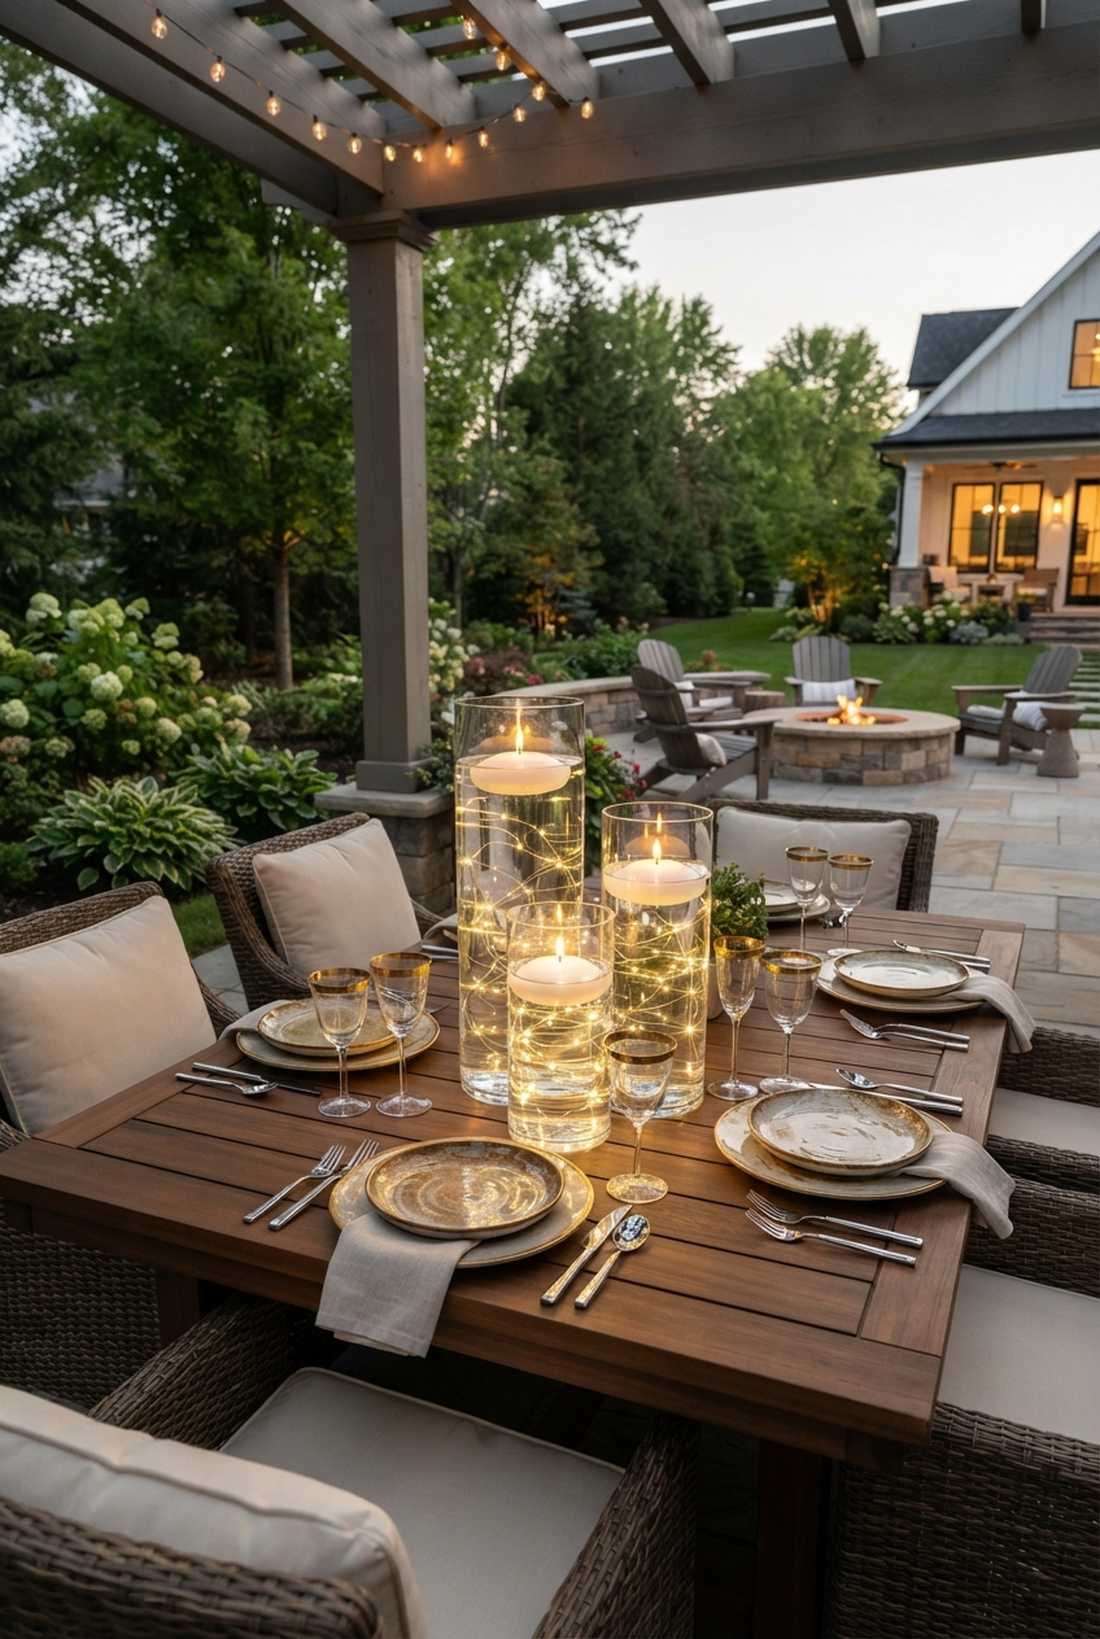
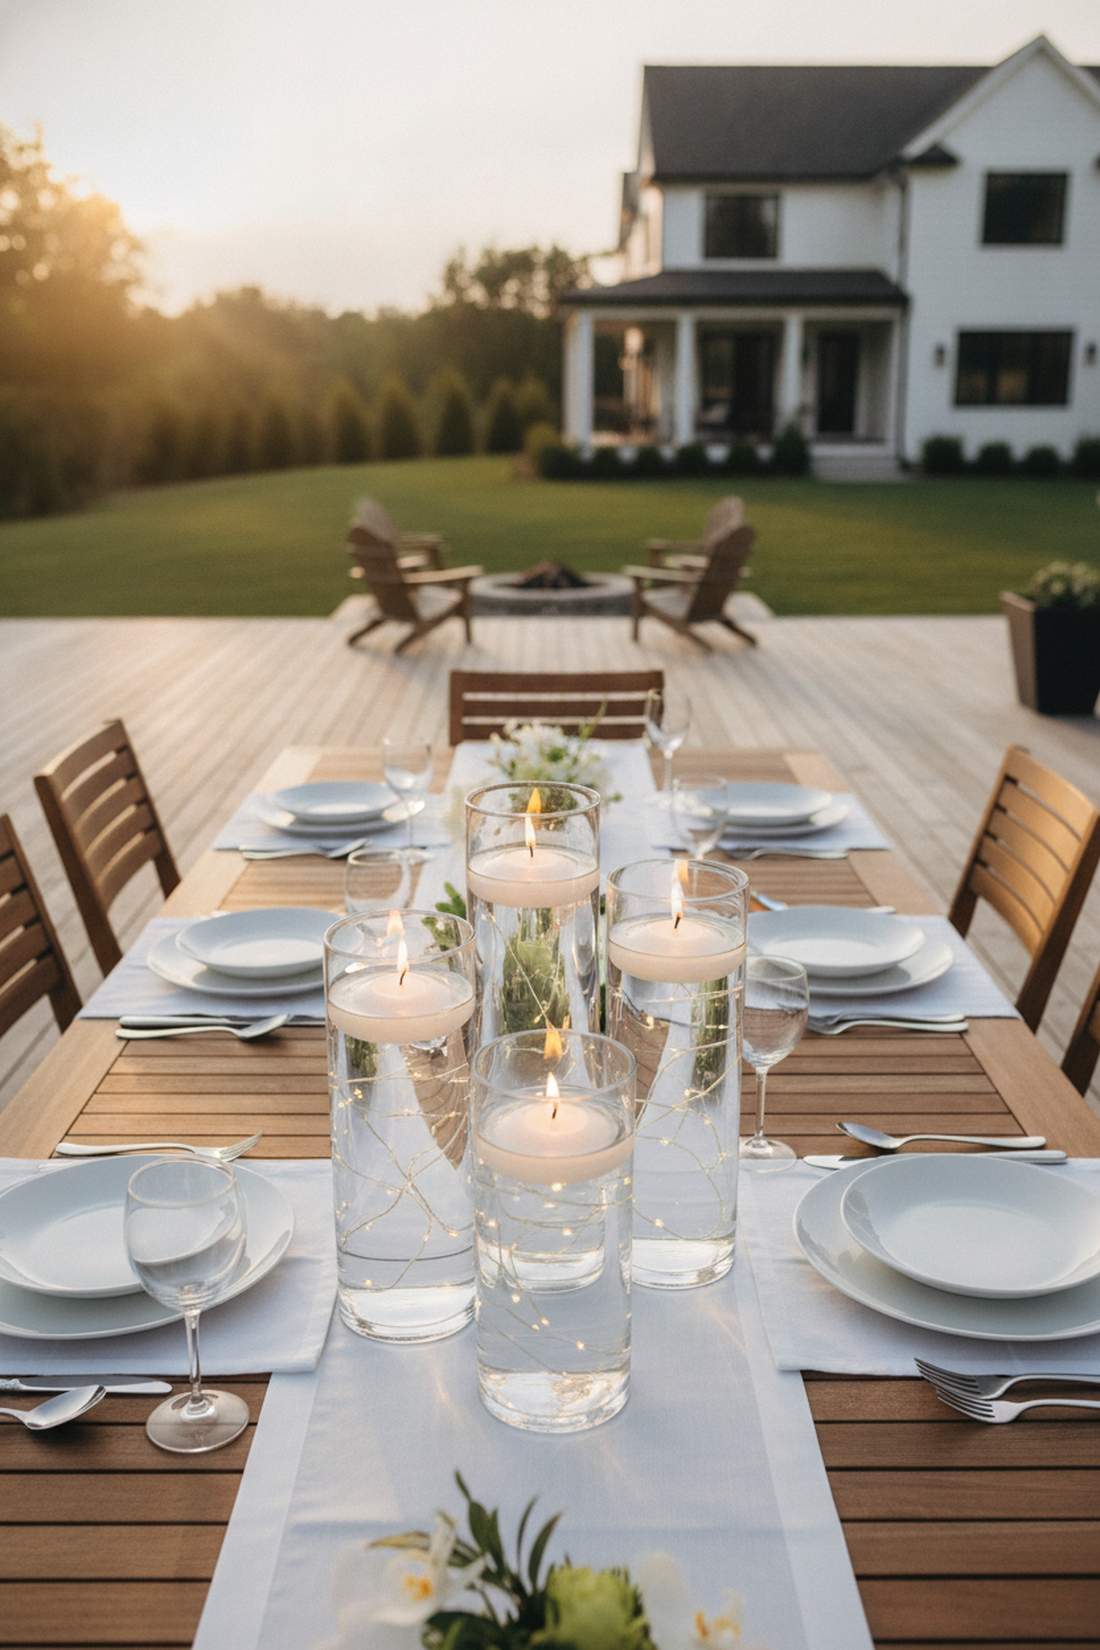
Looks like a high-end luxury resort dining setup. Integrating submerged underwater fairy lights beneath floating candles elevates standard glass vases immediately.
Many hosts are terrified of mixing electronics and water, but utilizing specifically rated submersible LED kits guarantees a safe and stunning refraction effect. The glowing water visually magnifies the candlelight, creating incredible dimension on the table.
Expect to invest around $35 for a beautiful cluster of three vases. Highly recommended if you want maximum elegance with minimal effort.
- Key Materials: Glass cylinders, waterproof light kits, floating candles
- Vibe / Style: Modern luxury gala
- Difficulty: Quick assembly
- Budget Breakdown: Cylinders: $15 | Waterproof LEDs/Candles: $20
- Creator’s Tip: Use distilled water to prevent the glass from fogging up or forming bubbles along the sides.
- Smart Sourcing: submersible LED fairy lights (waterproof starter kit) and long-burn floating wax candles.
9. Wine Bottle Upcycled Luminaries
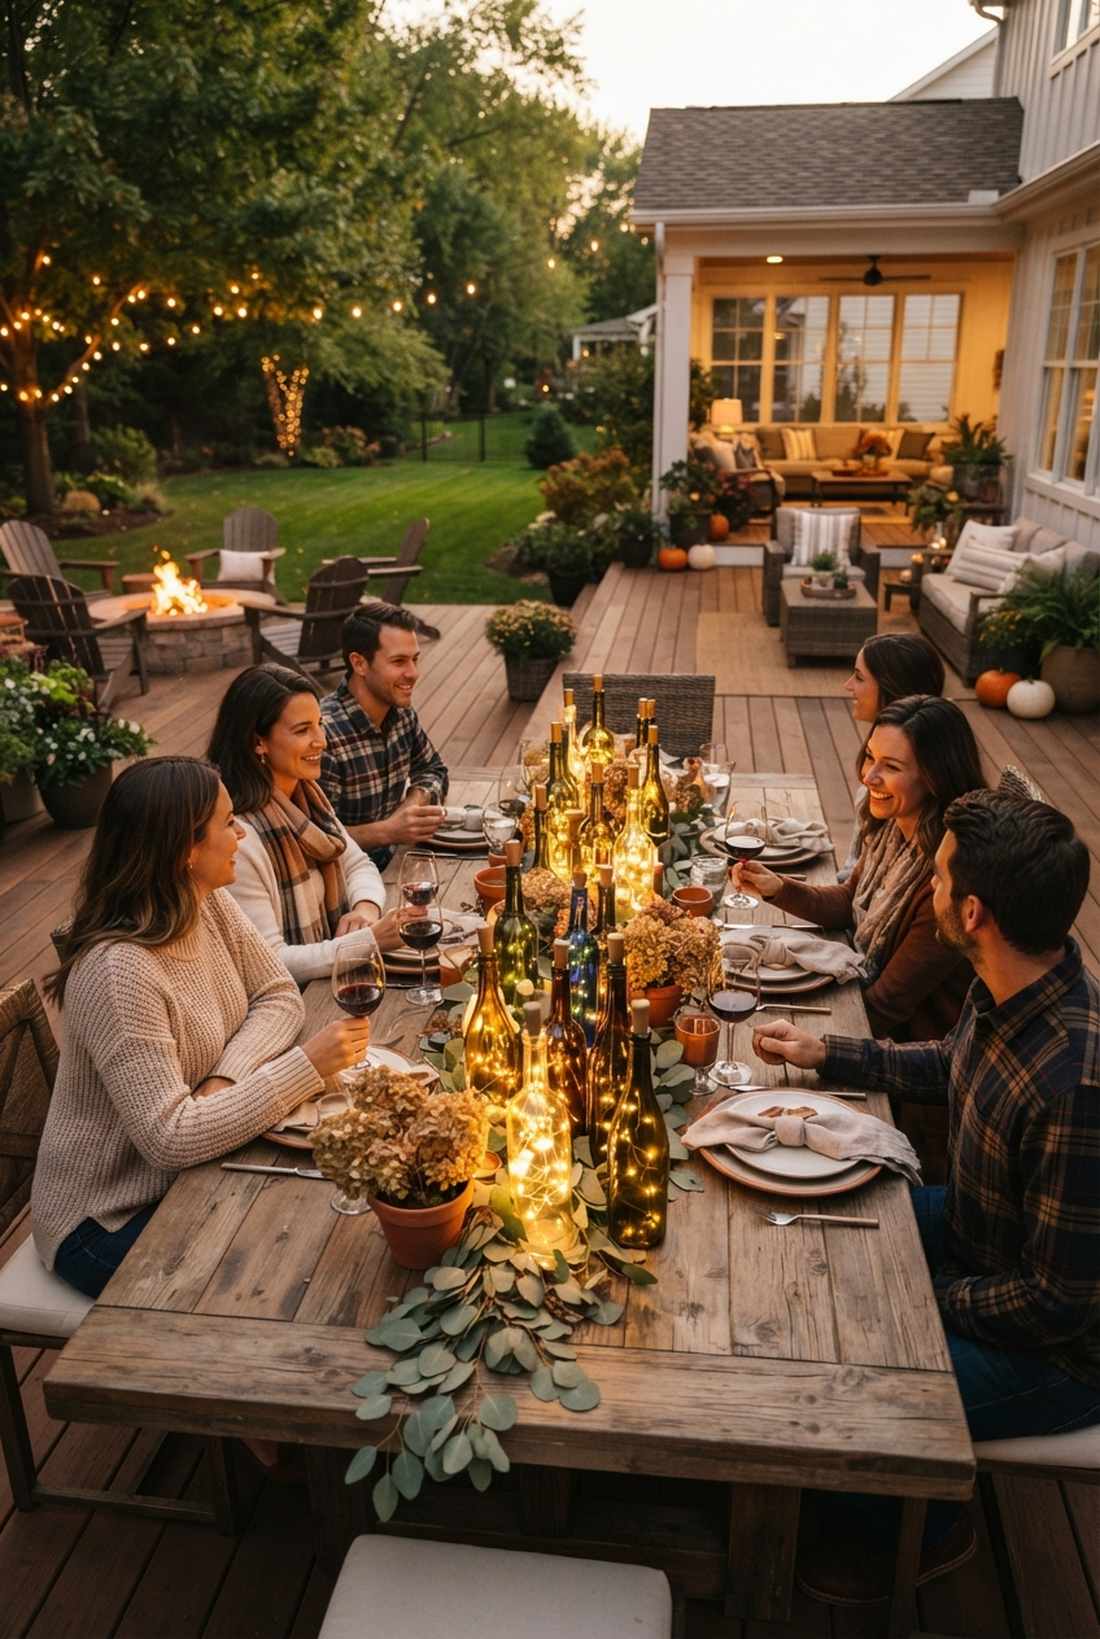
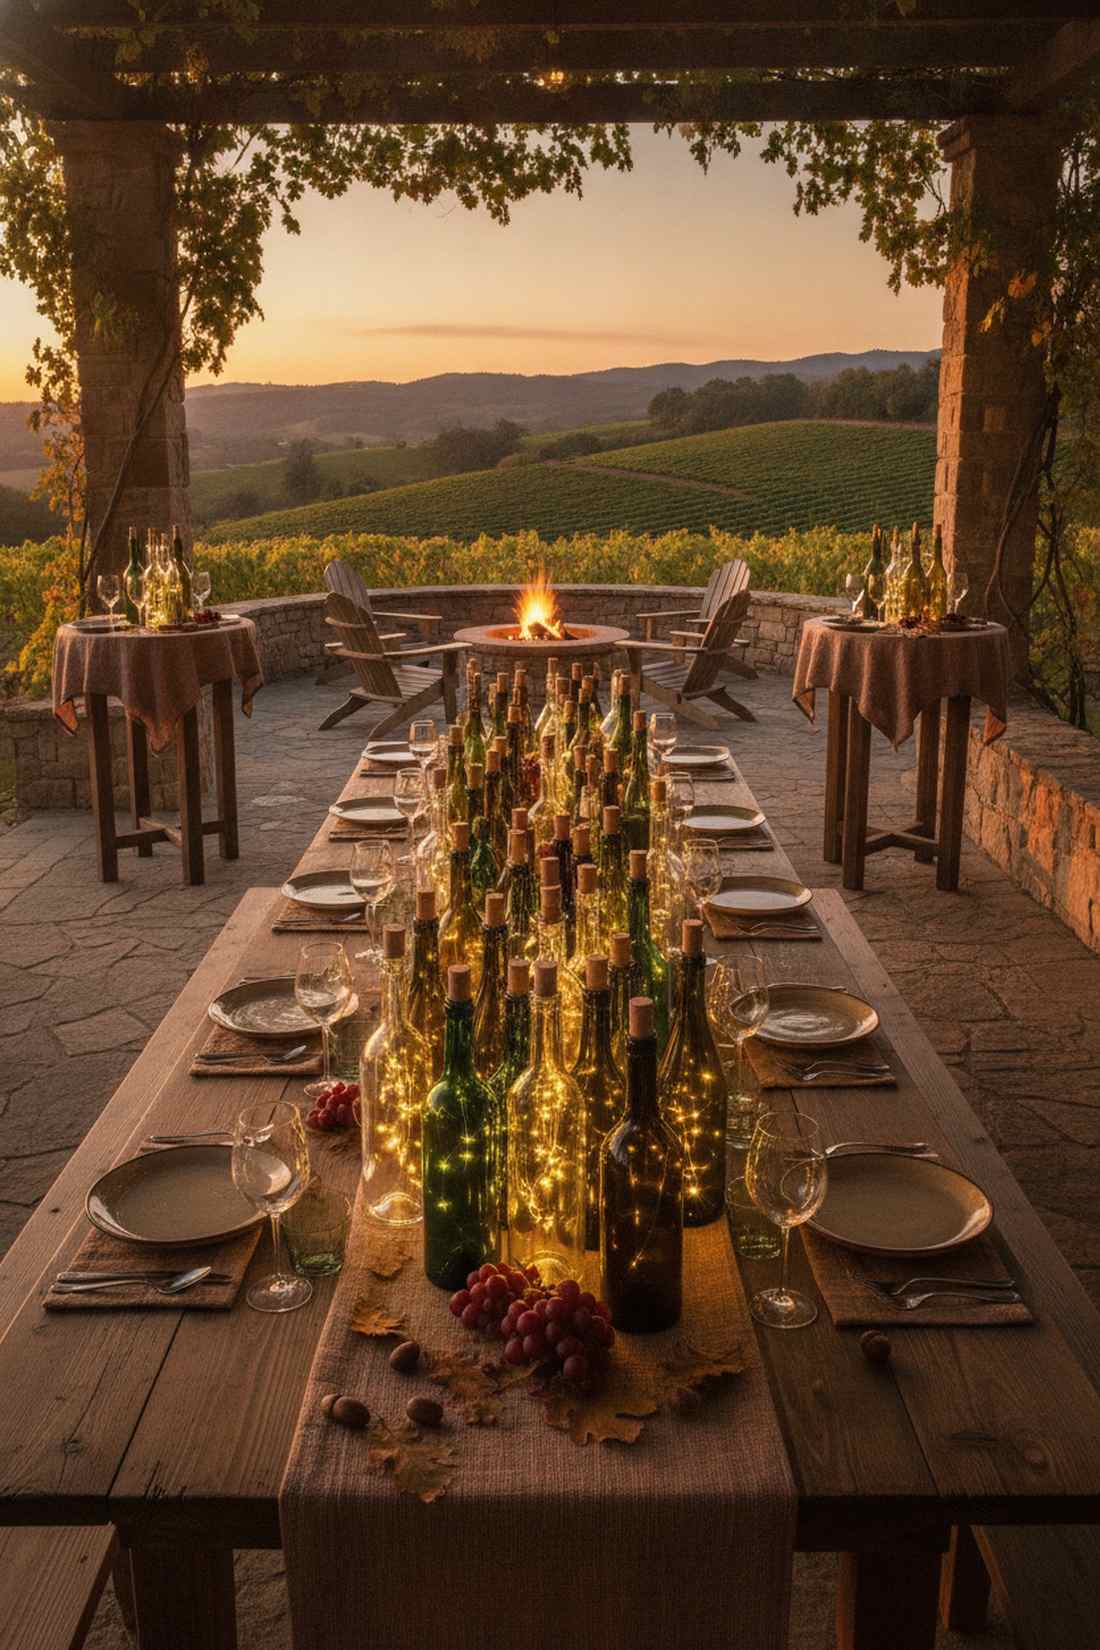
Radiates a cozy, intimate wine cellar aesthetic. These upcycled bottle cork luminaries are brilliant for cocktail tables or deep moody autumn events.
Throwing away empty wine bottles is a missed design opportunity, as slipping specialized cork-battery LEDs inside them creates instant premium table accents. The colored glass automatically filters the harsh bulbs into a rich, tinted ambient glow without any extra effort.
You can light up a dozen bottles for less than $15. Pin this genius recycling trick for your next dinner party!
- Key Materials: Empty wine bottles, LED cork inserts
- Vibe / Style: Tuscan vineyard dinner
- Difficulty: Literally takes 30 seconds
- Budget Breakdown: Cork LEDs: $15 | Bottles: Free/Upcycled
- Creator’s Tip: Mix green, clear, and amber bottles together to create a multi-dimensional lighting cluster.
- Smart Sourcing: LED wine bottle cork lights (bulk pack) and adhesive label remover spray.
Don’t finalize your table decor until you see the genius placement trick coming up next—it changes everything.
10. Garland Swag Table Edge Draping
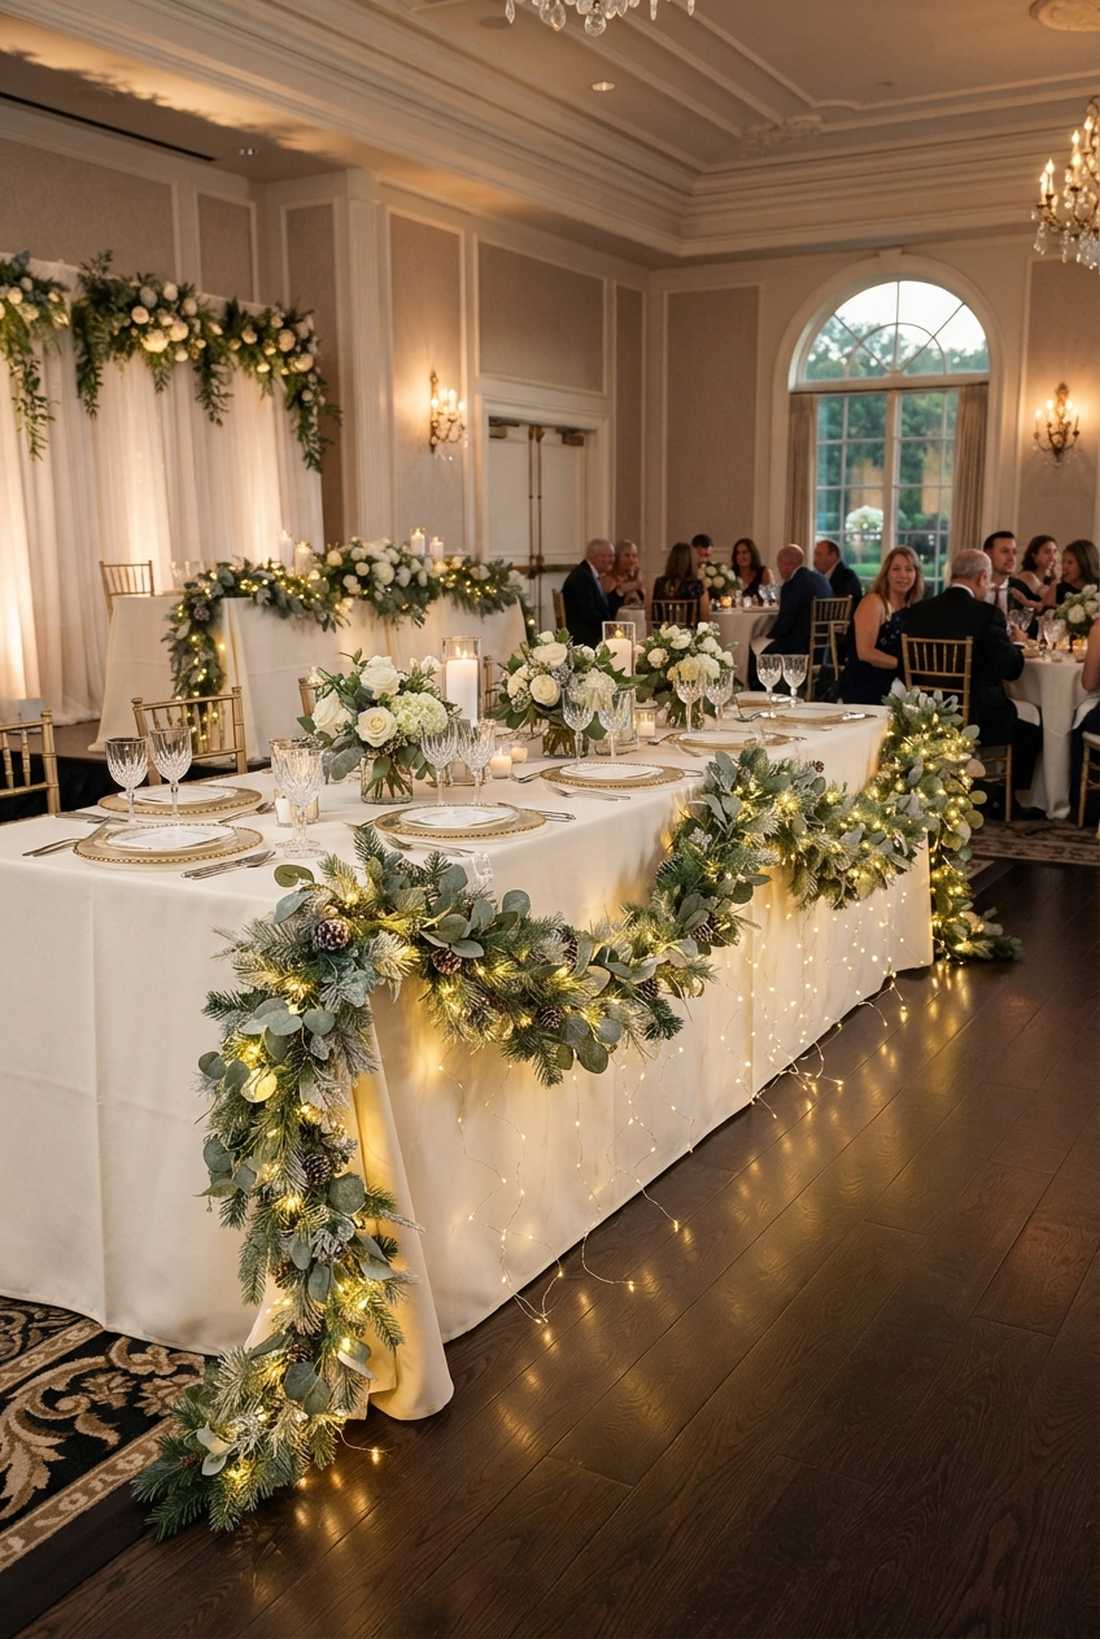
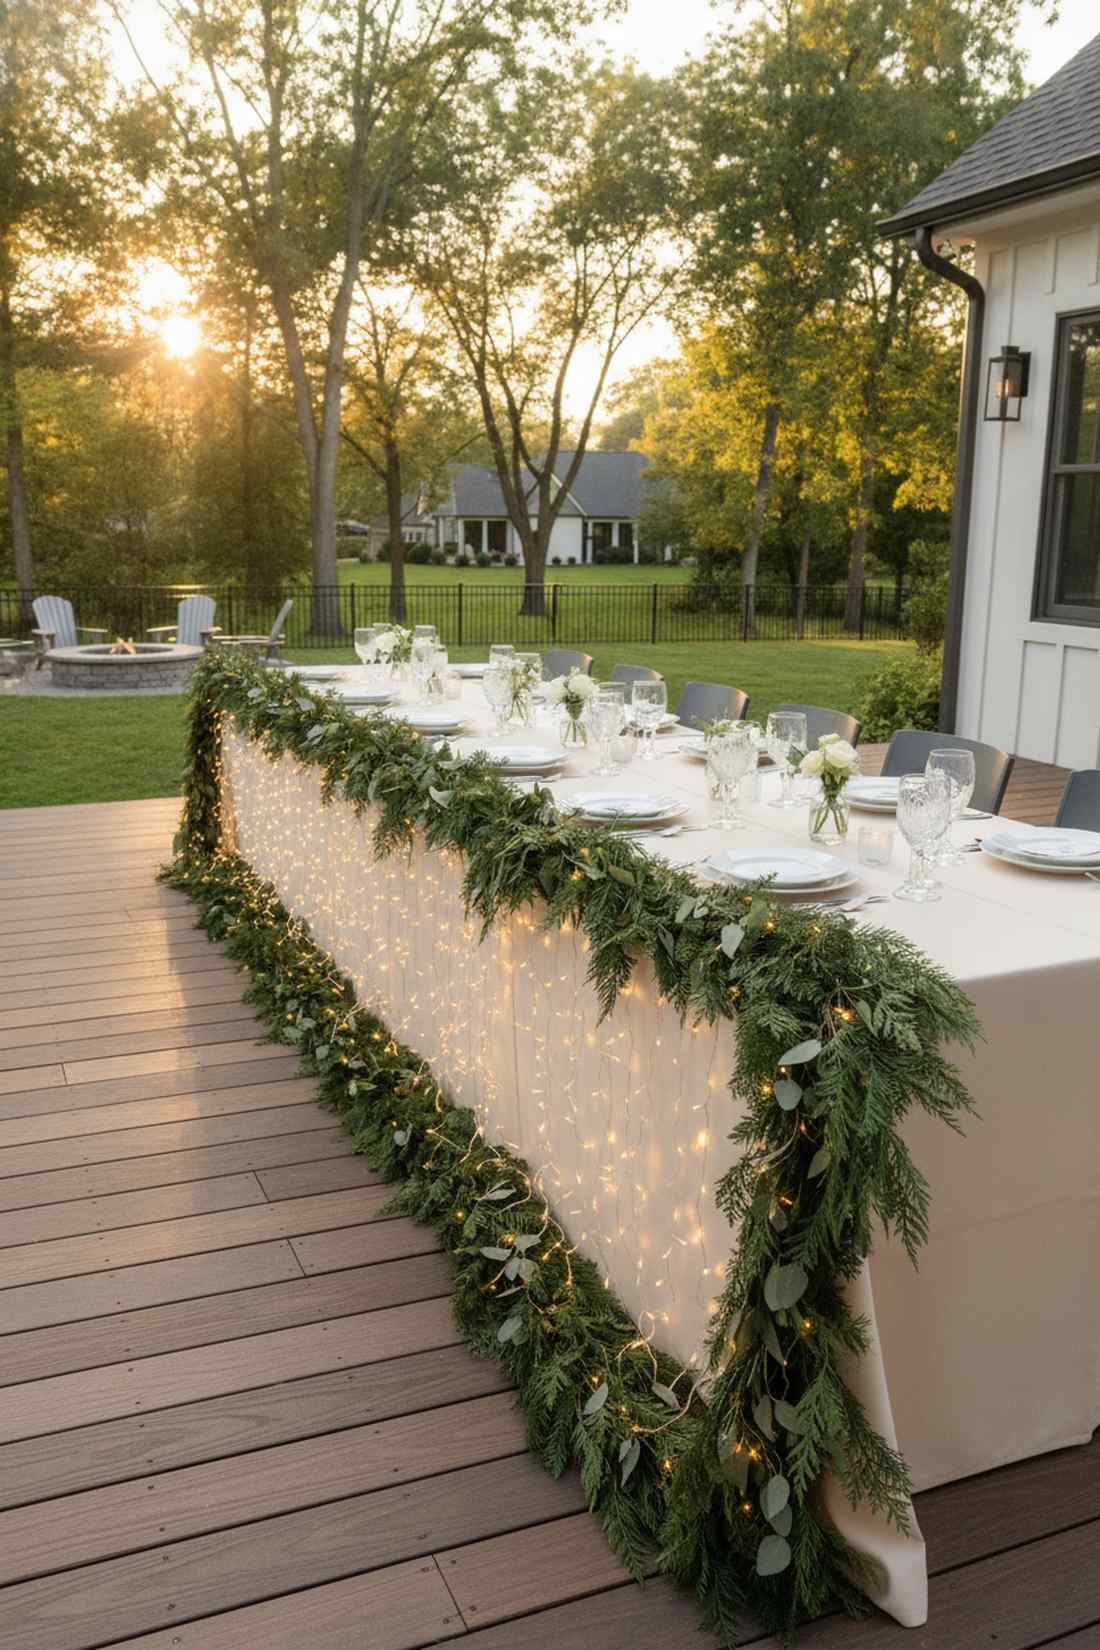
Creates a cascading waterfall of greenery and light. The illuminated table edge swag is perfect for head tables, gift stations, or grand buffet displays.
Just pinning greenery to the edge looks flat and uninspired, but weaving in battery-operated fairy strands turns a basic tablecloth into a dramatic focal feature. Sourcing premium artificial foliage prevents the cheap plastic look and makes the lighting blend naturally.
This lush accent costs around $40 to execute properly. It completely transforms the front of any focal table.
- Key Materials: Thick artificial garland, battery fairy lights, table clips
- Vibe / Style: Grand ballroom classic
- Difficulty: Requires careful clipping
- Budget Breakdown: Garland: $25 | Lights & Clips: $15
- Creator’s Tip: Hide the battery packs by taping them directly under the table lip with heavy-duty masking tape.
- Smart Sourcing: premium faux pine/eucalyptus garland and clear adhesive table skirting clips.
💡 Must-Have Supplies for High-End Setups
To build these setups faster and ensure they last, skip the generic craft aisles and invest in the right foundational kits.
- Base & Support: UV-coated commercial string lighting kits
- Setup Tools: heavy-duty transparent adhesive hooks (bulk pack)
- Weather/Durability Protection: waterproof battery enclosure boxes
Backdrop & Photo Opportunities That Capture Memories
Dedicated photo zones encourage social media sharing while providing controlled environments for memorable shots. Well-designed backdrops become party focal points that guests naturally gravitate toward.
11. Sheer Curtain Twinkle Light Backdrop
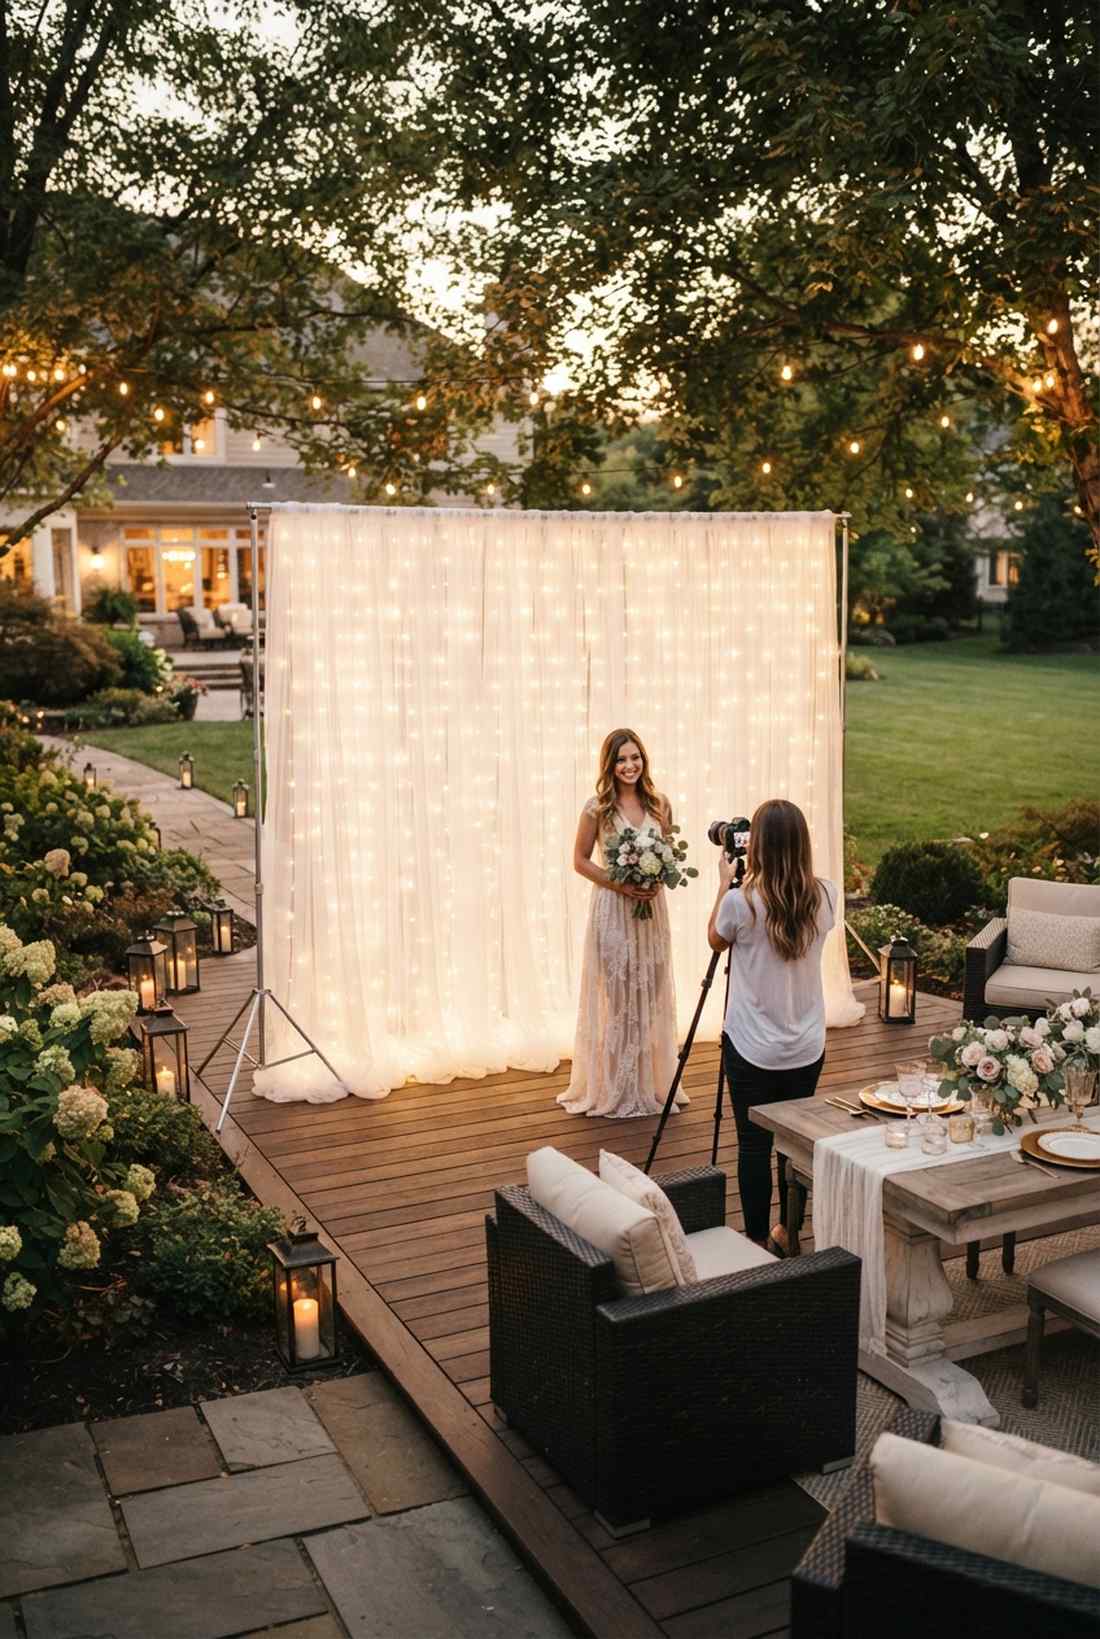
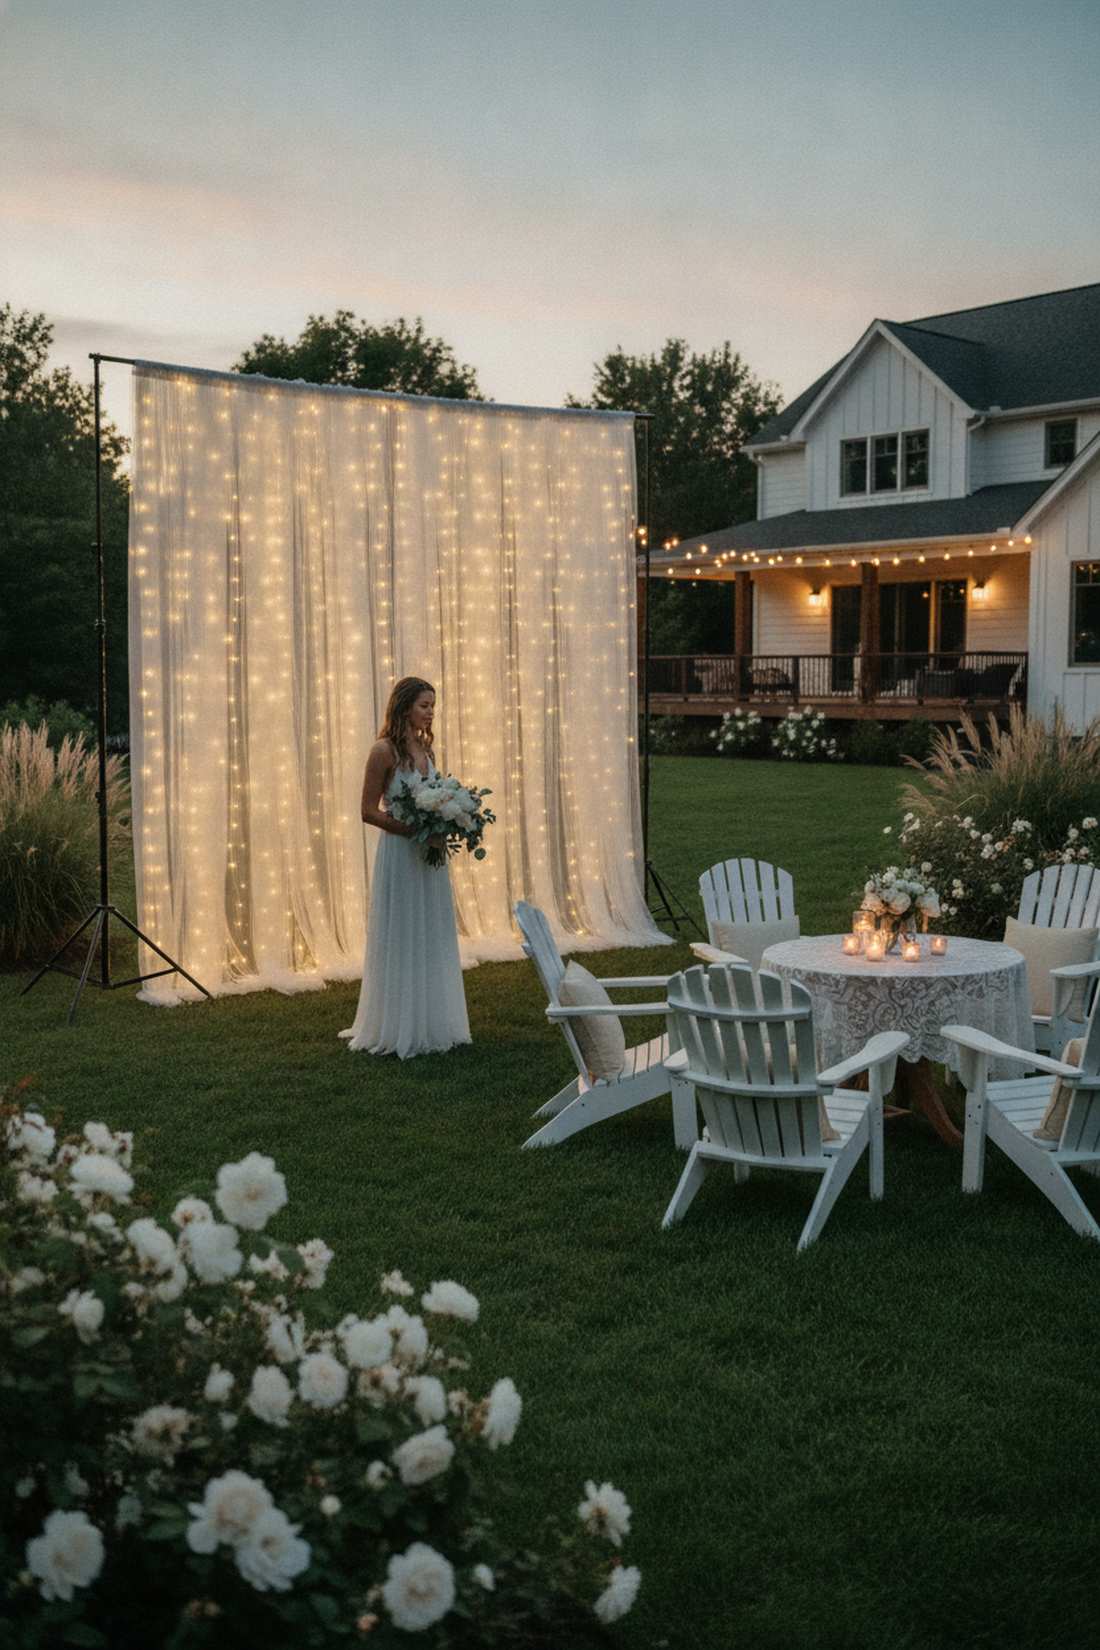
Looks like a glowing cloud of soft light. This tulle and twinkle light photo backdrop is the absolute standard for bridal showers, sweet sixteens, and romantic portraits.
Hanging bare bulbs against a wall casts terrible shadows, but layering a sheer organza curtain over the lights diffuses the bulbs into a highly flattering, professional-grade glow. Utilizing high-end photography background frames ensures the entire structure stays stable all night.
You can build this professional photo zone for about $60. Save this to your ultimate event planning board!
- Key Materials: Backdrop stand, LED curtain lights, sheer white tulle
- Vibe / Style: Ethereal portrait studio
- Difficulty: Easy to assemble
- Budget Breakdown: Stand & Fabric: $40 | Curtain Lights: $20
- Creator’s Tip: Use a double-bar backdrop stand so the fabric hangs a few inches away from the lights for maximum blur.
- Smart Sourcing: LED curtain lights (remote controlled) and pre-cut sheer backdrop drapes (bulk pack).
12. Living Wall Integrated Lighting
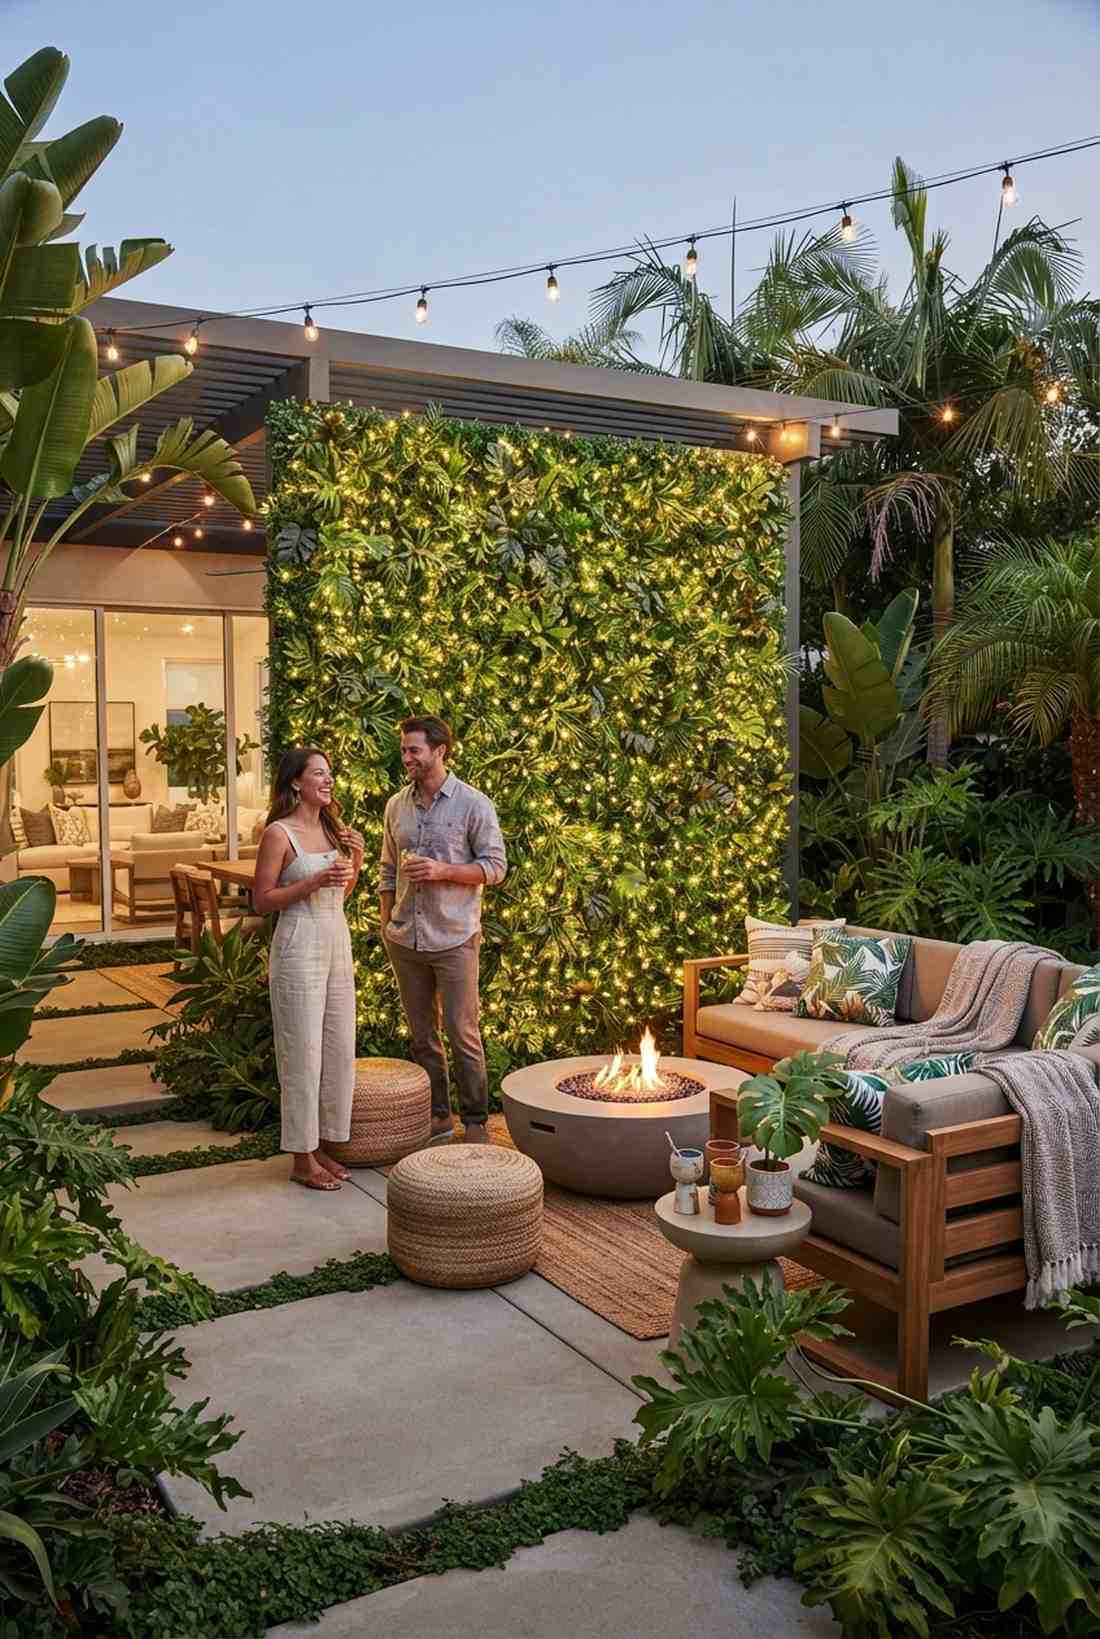
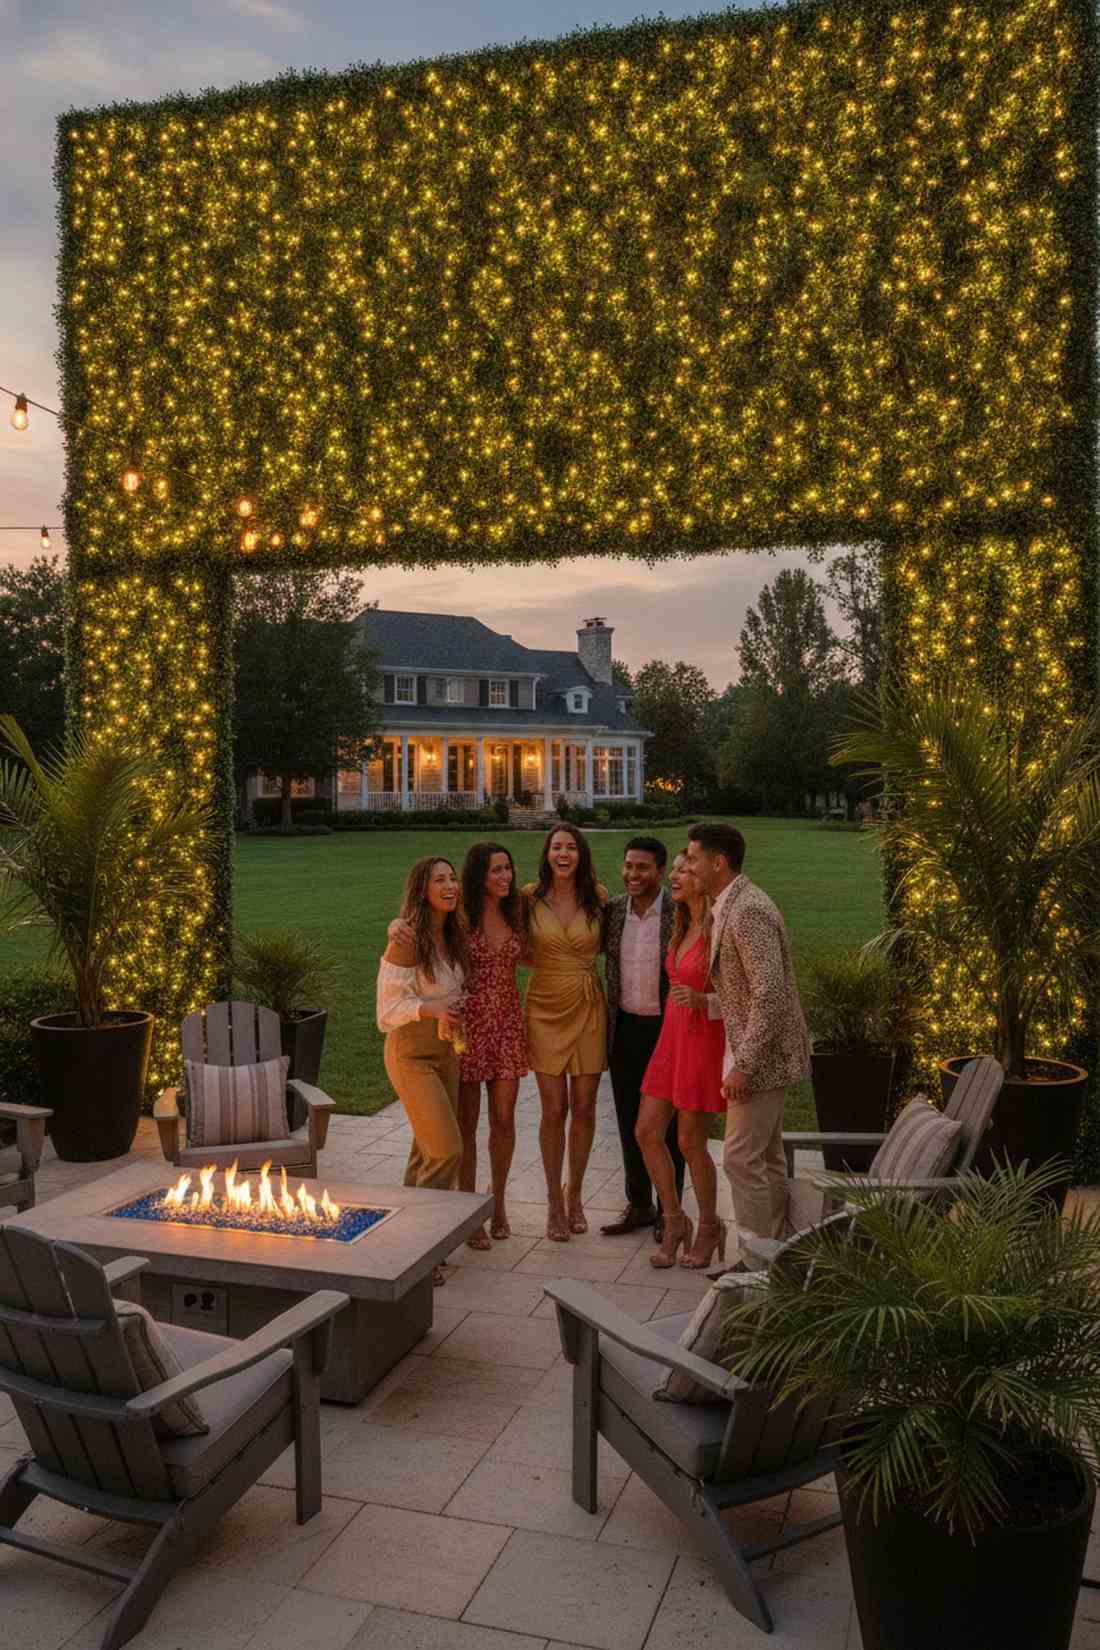
Feels like a hidden neon jungle. This botanical illuminated greenery wall is perfect for modern branding events or tropical-themed patio parties.
A plain fake leaf wall can look incredibly tacky, yet embedding micro fairy lights throughout the foliage completely masks the plastic and adds incredible photographic depth. Grabbing UV-resistant boxwood panels prevents the backdrop from fading if you use it for outdoor daytime setups.
This lush backdrop setup averages around $80 to $100. The dramatic texture makes it the ultimate selfie station.
- Key Materials: Faux greenery wall panels, copper wire lights, zip ties
- Vibe / Style: Modern botanical lounge
- Difficulty: Moderate grid assembly
- Budget Breakdown: Greenery panels: $70 | Lights: $15
- Creator’s Tip: Push the lights out from behind the panels rather than wrapping them on top to create a backlit glow.
- Smart Sourcing: UV-resistant faux boxwood panels (bulk pack) and green-wire fairy string lights.
13. Balloon Arch Illuminated Framework
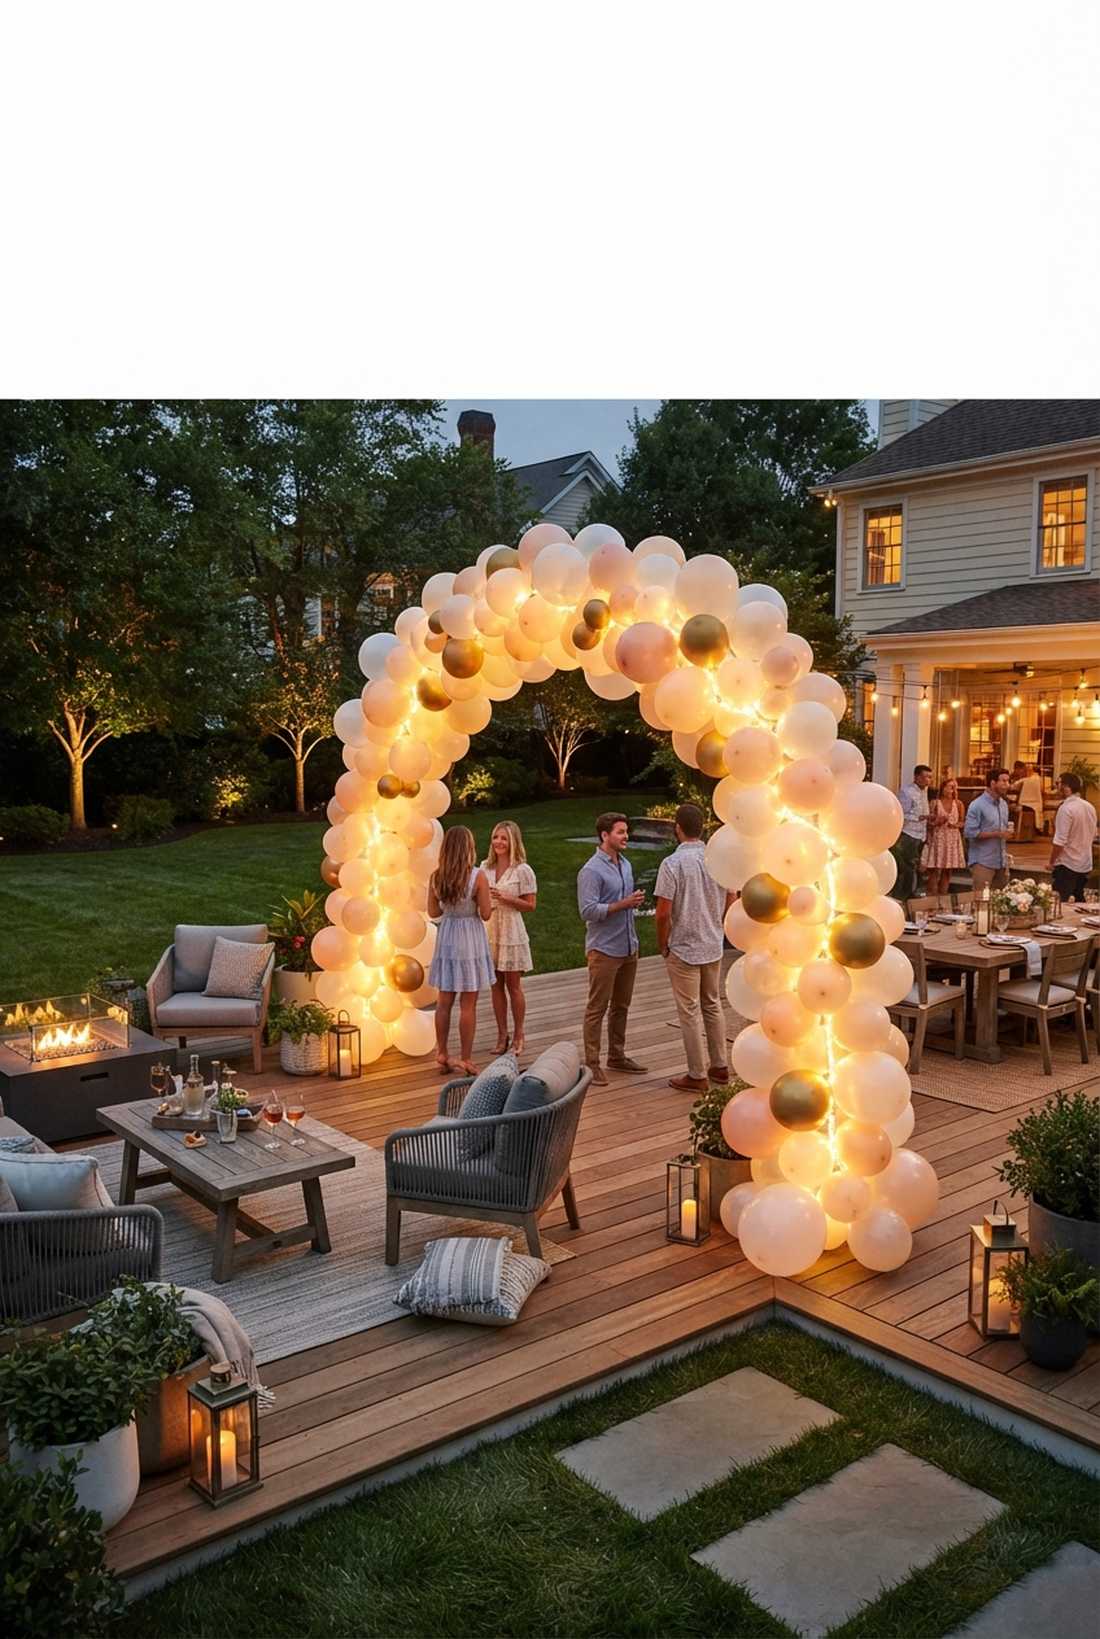
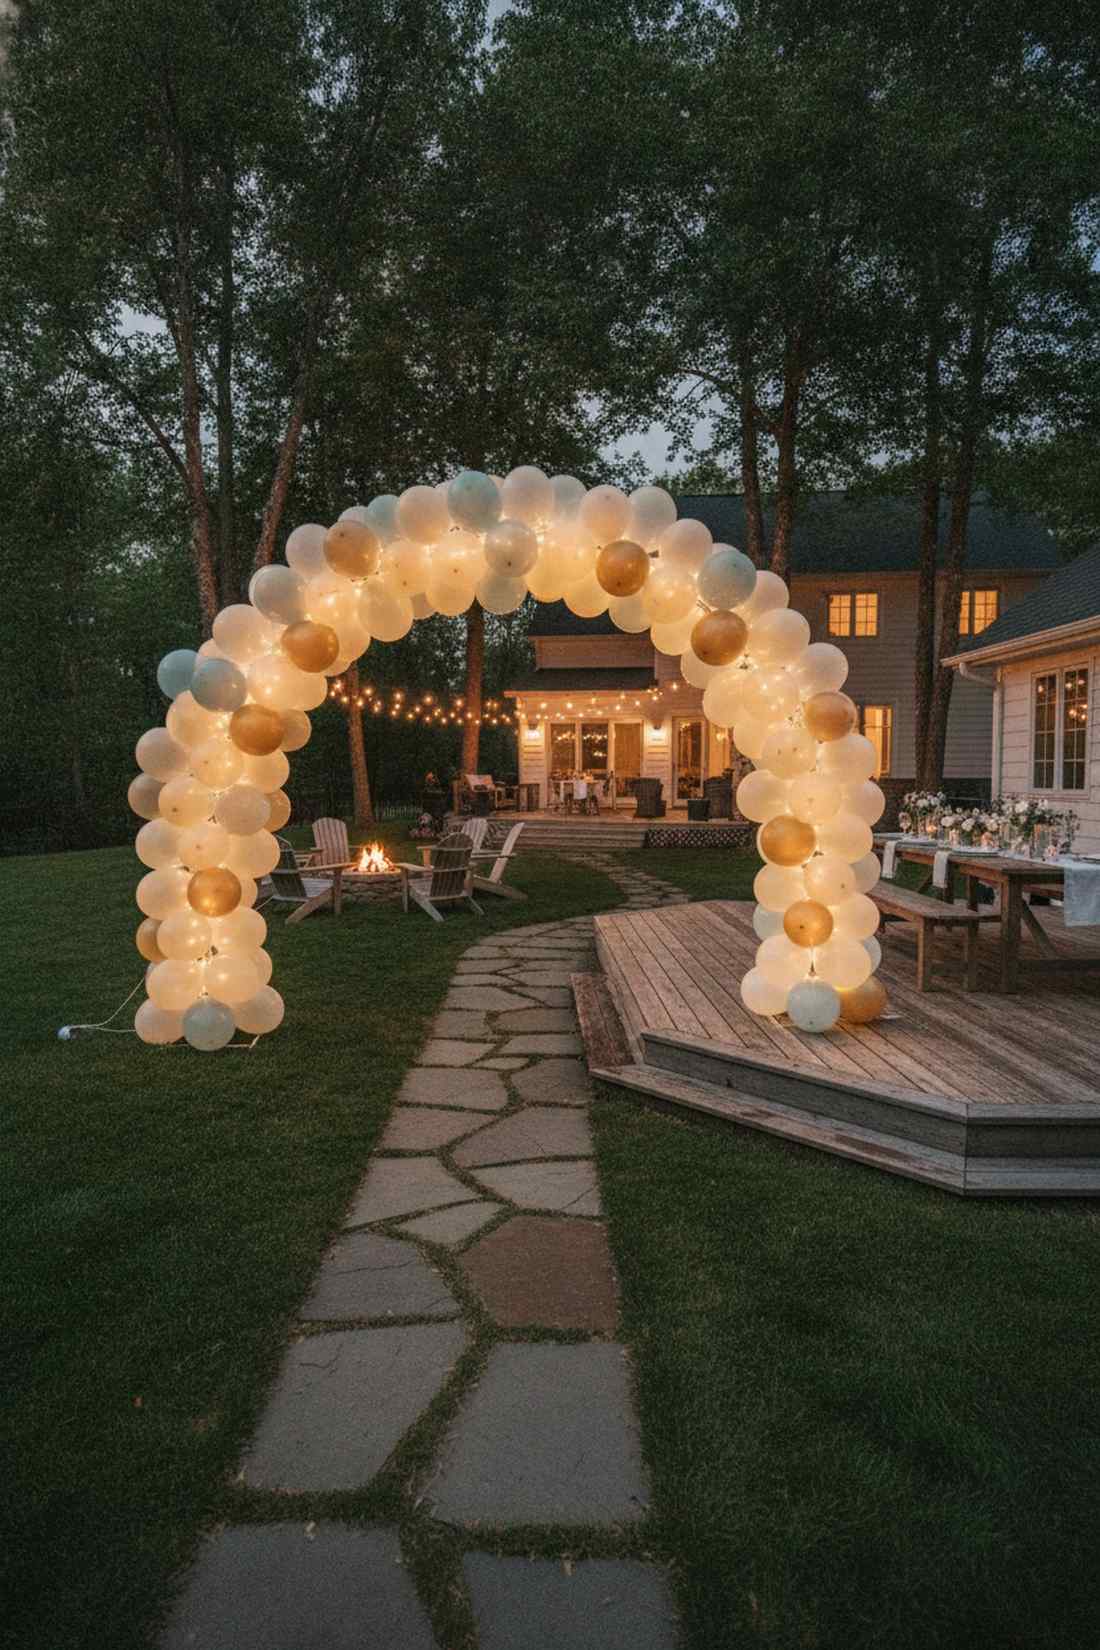
Looks like floating orbs of pure energy. An LED illuminated balloon garland creates a massive wow-factor for entranceways or birthday photo booths.
Standard balloon arches have been done to death, but threading battery-powered LED strips through the core framework completely revitalizes the concept. The internal light hits the translucent latex, making cheap balloons look like expensive custom light sculptures.
You can supercharge your balloon arch for just an extra $20 in lighting. Pin this if you want to make a massive visual impact on a budget!
- Key Materials: Balloon arch kit, flexible LED strip lights
- Vibe / Style: High-energy celebration
- Difficulty: Time-consuming but easy
- Budget Breakdown: Balloons/Arch: $30 | LED Strips: $20
- Creator’s Tip: Use double-stuffed light-colored balloons to hide the actual LED tape while letting the light bleed through softly.
- Smart Sourcing: battery-operated LED strip lights and professional balloon arch starter kit.
14. Macramé Tapestry Light Integration
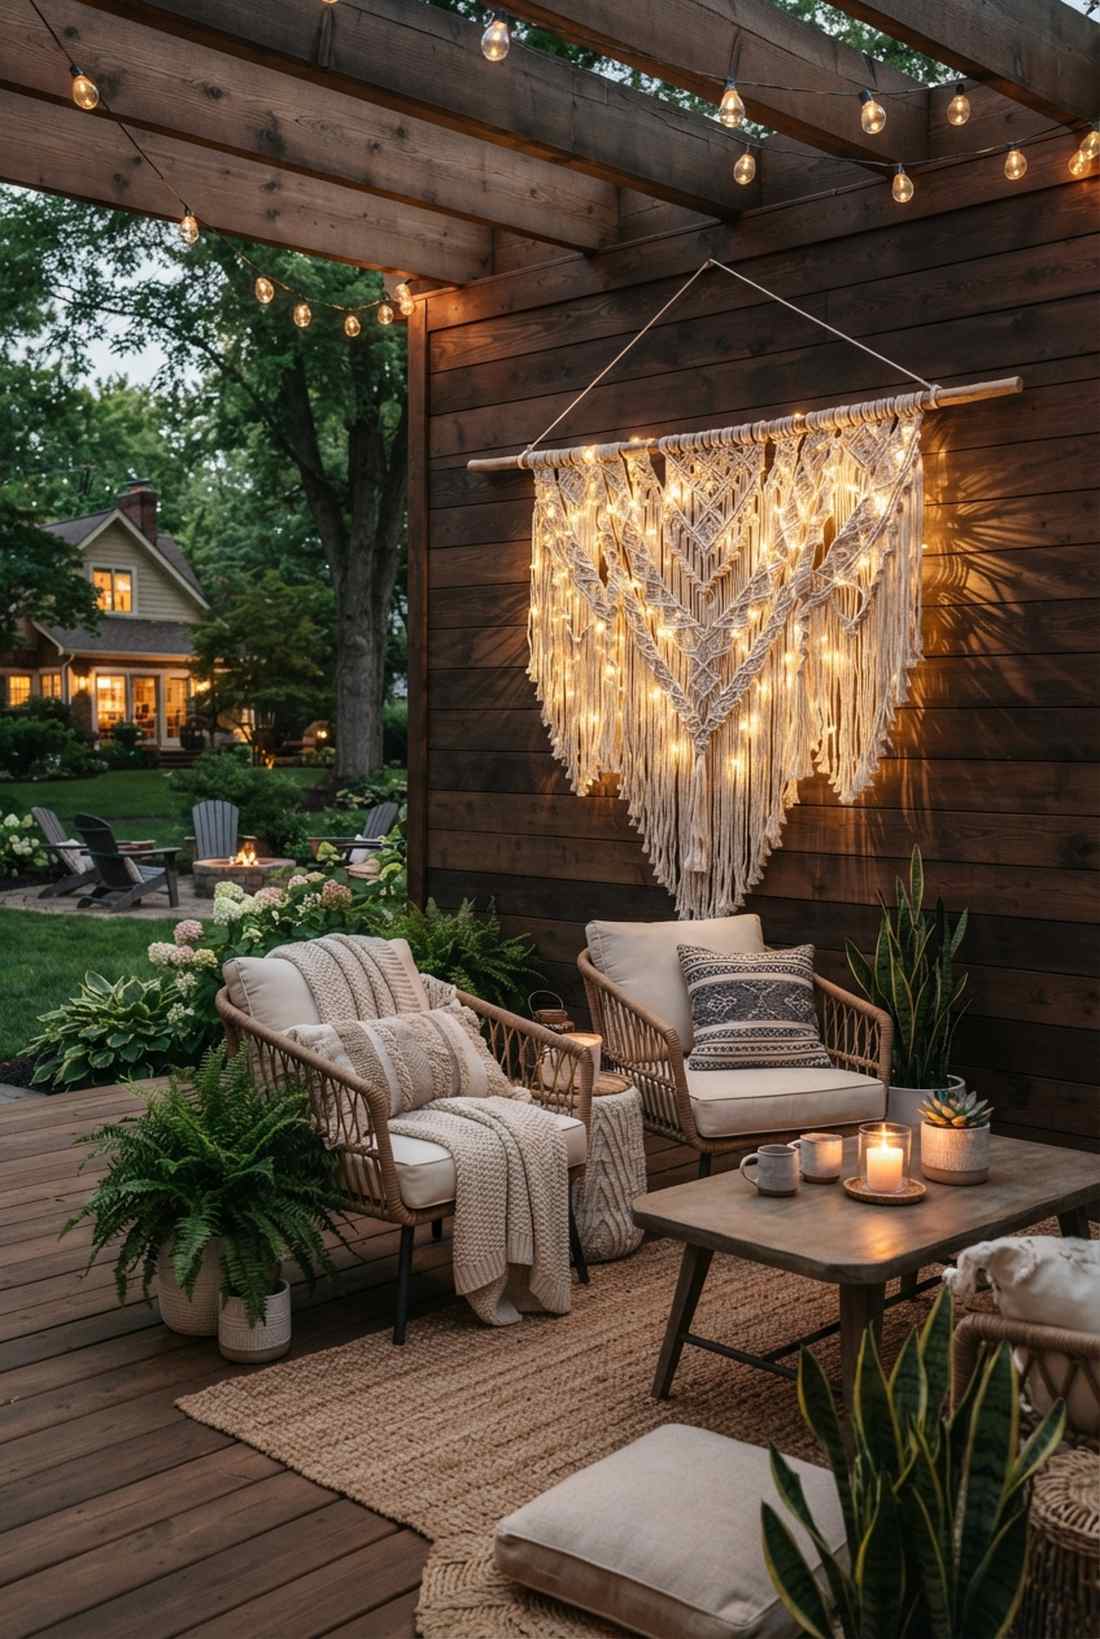
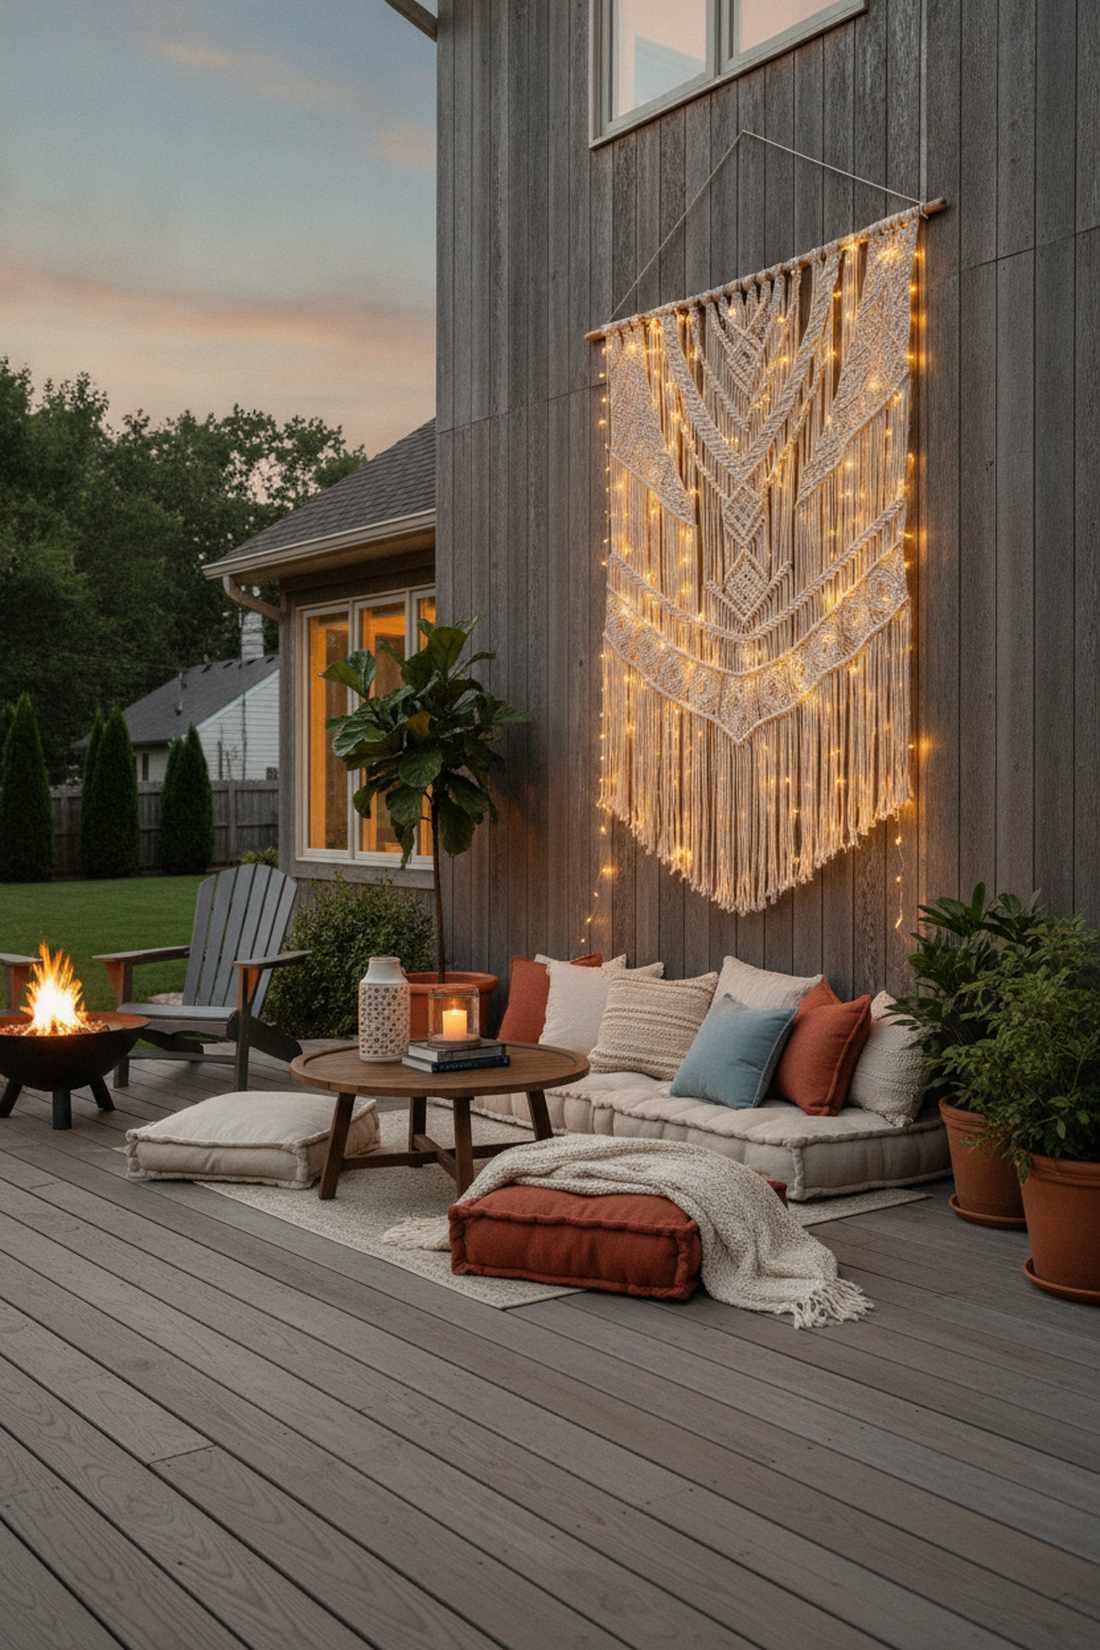
Radiates major cozy bohemian festival vibes. A backlit macramé wall hanging works perfectly to soften blank apartment walls or outdoor lounge zones.
Hanging macramé in the dark totally hides its beautiful knotting, whereas backlighting it with warm LEDs casts stunning, intricate shadow patterns across your venue. Sneaking in a battery-operated pack behind the wooden dowel keeps the installation totally wireless and clean.
This textile lighting trick costs roughly $35 if you already own a tapestry. It’s an instant room-warming hack.
- Key Materials: Large macramé tapestry, warm fairy strings
- Vibe / Style: Cozy boho chic
- Difficulty: Quick back-taping
- Budget Breakdown: Tapestry: $25 | Lighting: $10
- Creator’s Tip: Weave a few strands loosely through the lower fringe so the light trickles down to the bottom edges.
- Smart Sourcing: large woven macramé tapestry and warm-white micro LED strings (starter pack).
Most people get their backdrop lighting completely wrong… until they try the exact framework secret below.
15. Geometric Frame Light Curtain
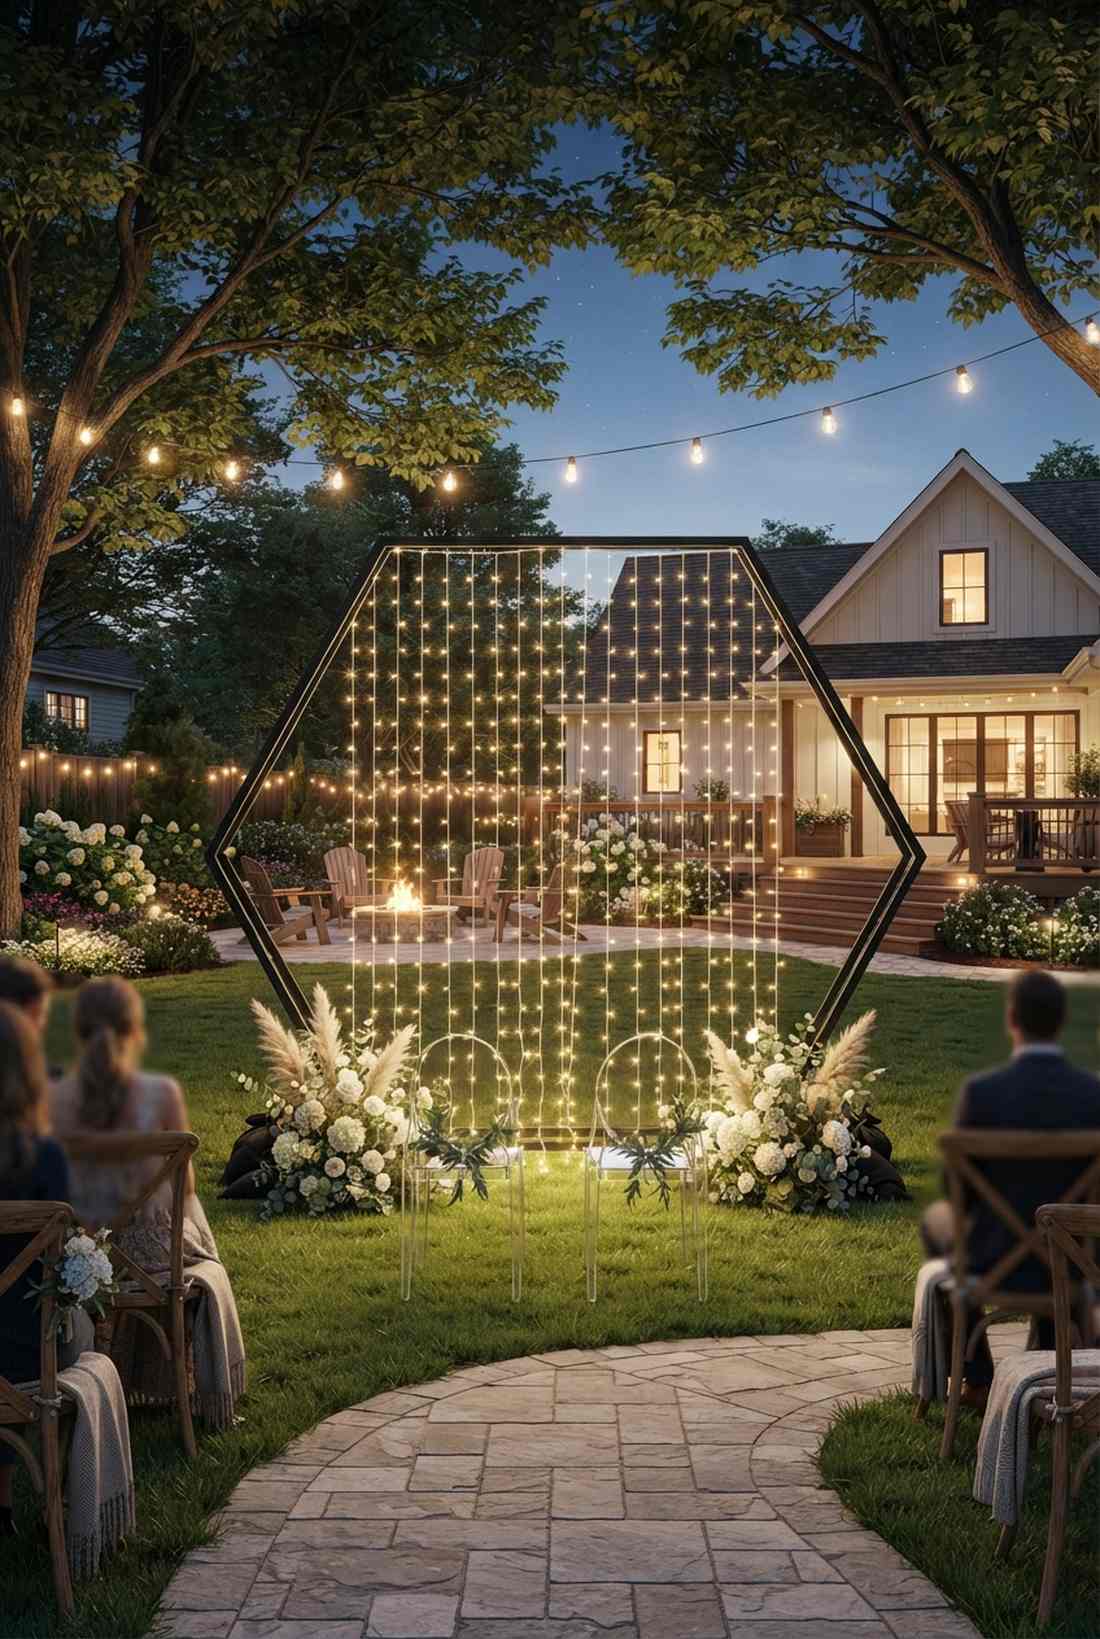
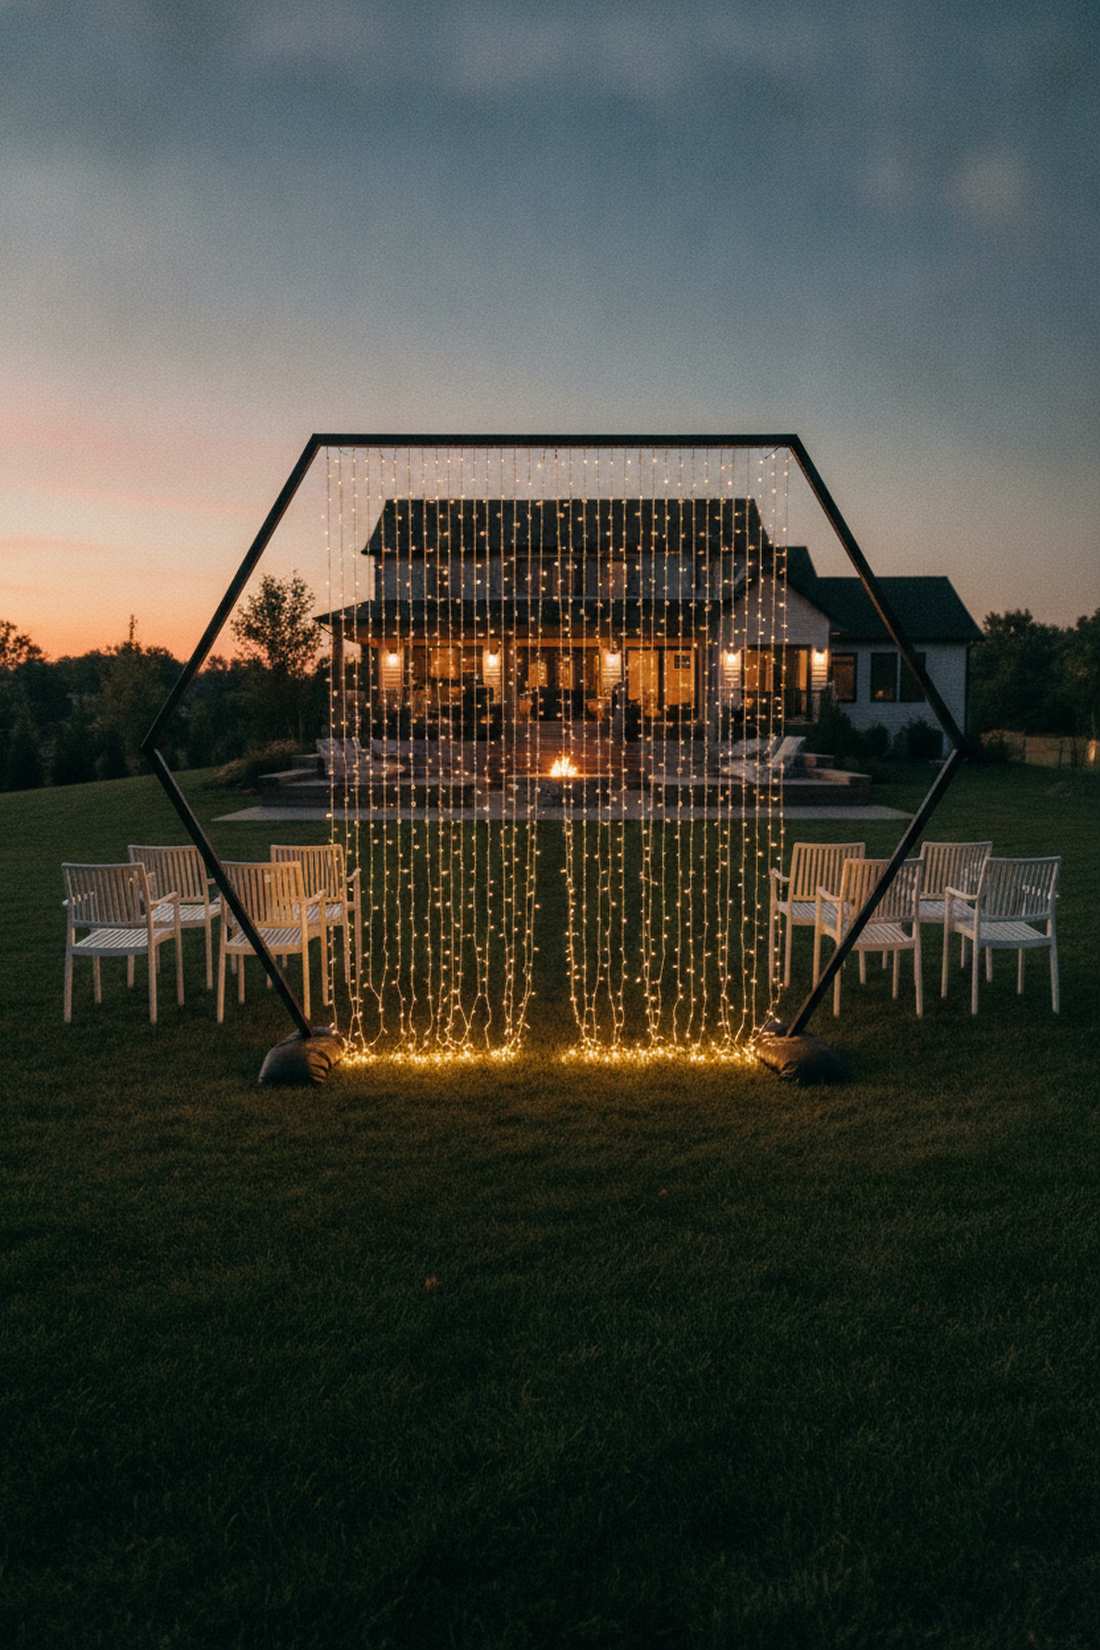
Looks like a glowing portal to another dimension. The illuminated geometric metal frame is a highly requested layout for modern minimalist weddings.
Clunky wooden arches are heavy and expensive, but using a sleek hexagon metal frame draped in cascading lights delivers a far more premium, sculptural aesthetic. Tying the lights strictly to the top bar allows them to drop down like a glowing waterfall inside the shape.
You can assemble this architectural showstopper for about $75. Save this to your modern wedding decor board!
- Key Materials: Metal hexagon/circle arch, long fairy light strands
- Vibe / Style: Minimalist sculptural modern
- Difficulty: Intermediate balancing
- Budget Breakdown: Metal Arch: $50 | Cascading Lights: $25
- Creator’s Tip: Secure the base with discreet sandbags wrapped in black fabric so it doesn’t tip over during photo sessions.
- Smart Sourcing: hexagon metal backdrop stand and plug-in cascading curtain lights.
Outdoor Perimeter Lighting For Open-Air Events
Boundary lighting defines party spaces within larger outdoor areas while ensuring safe navigation. These arrangements blend functional illumination with decorative appeal.
16. Pathway Solar Jar Luminaries
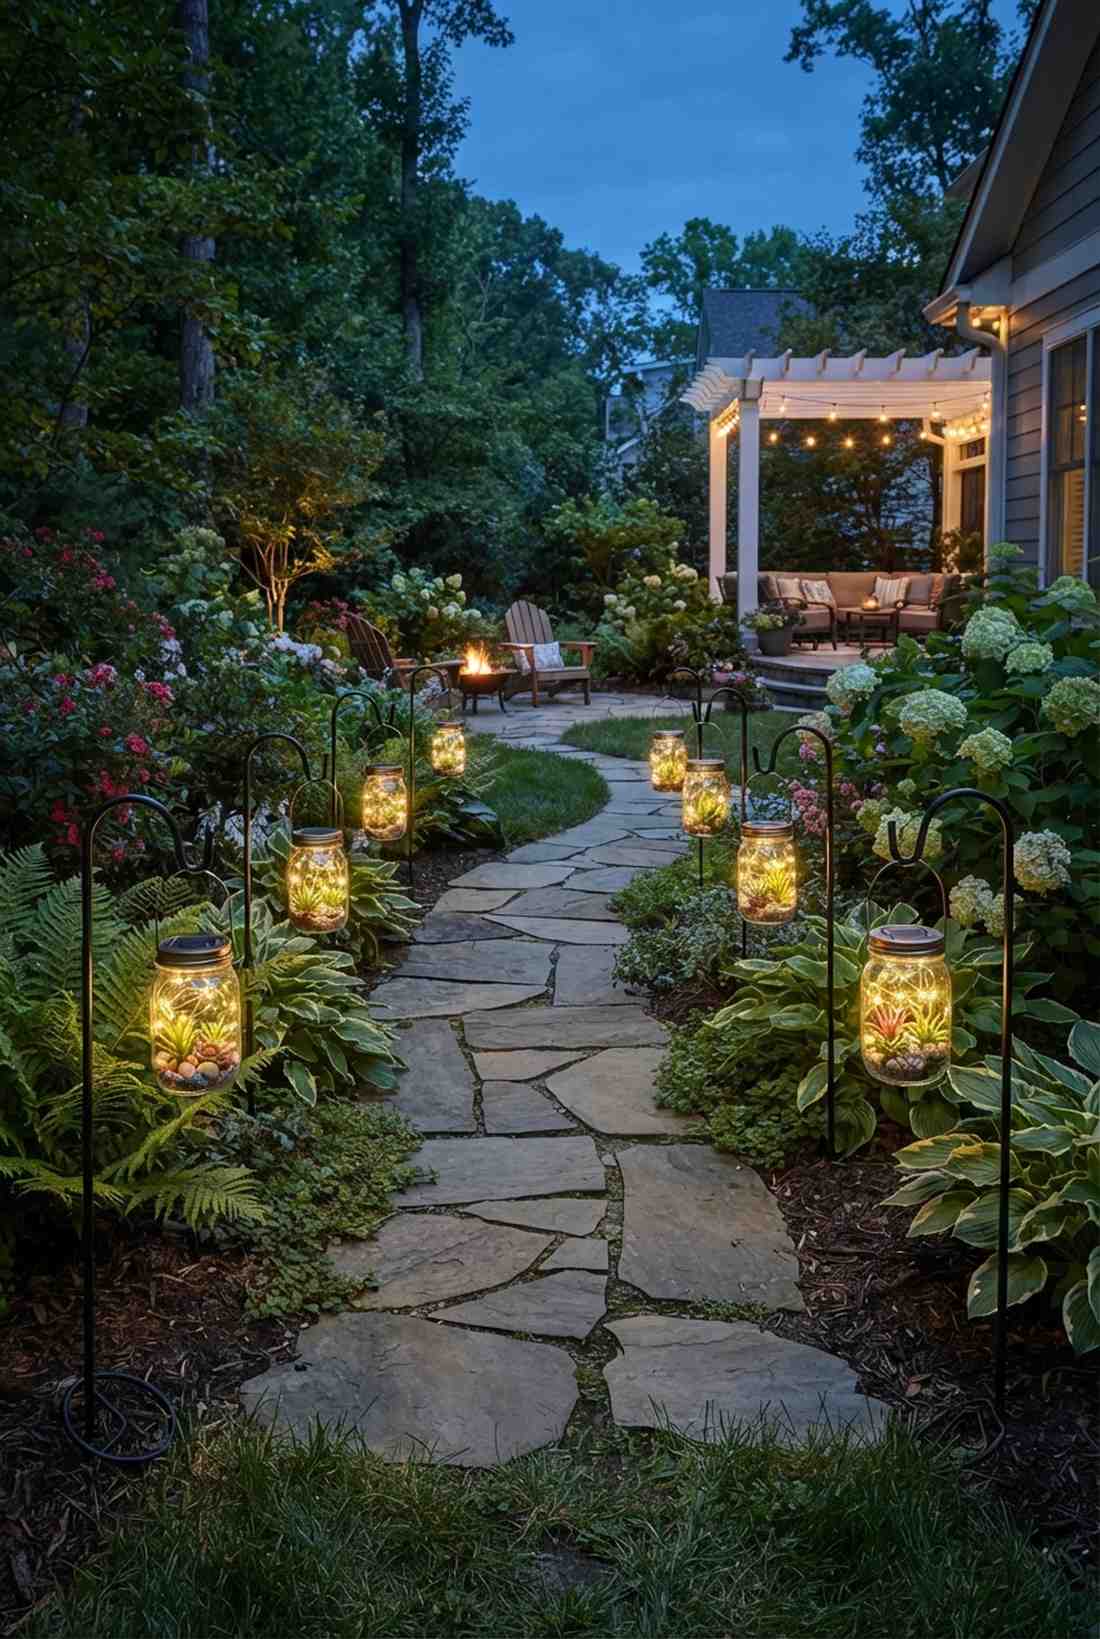
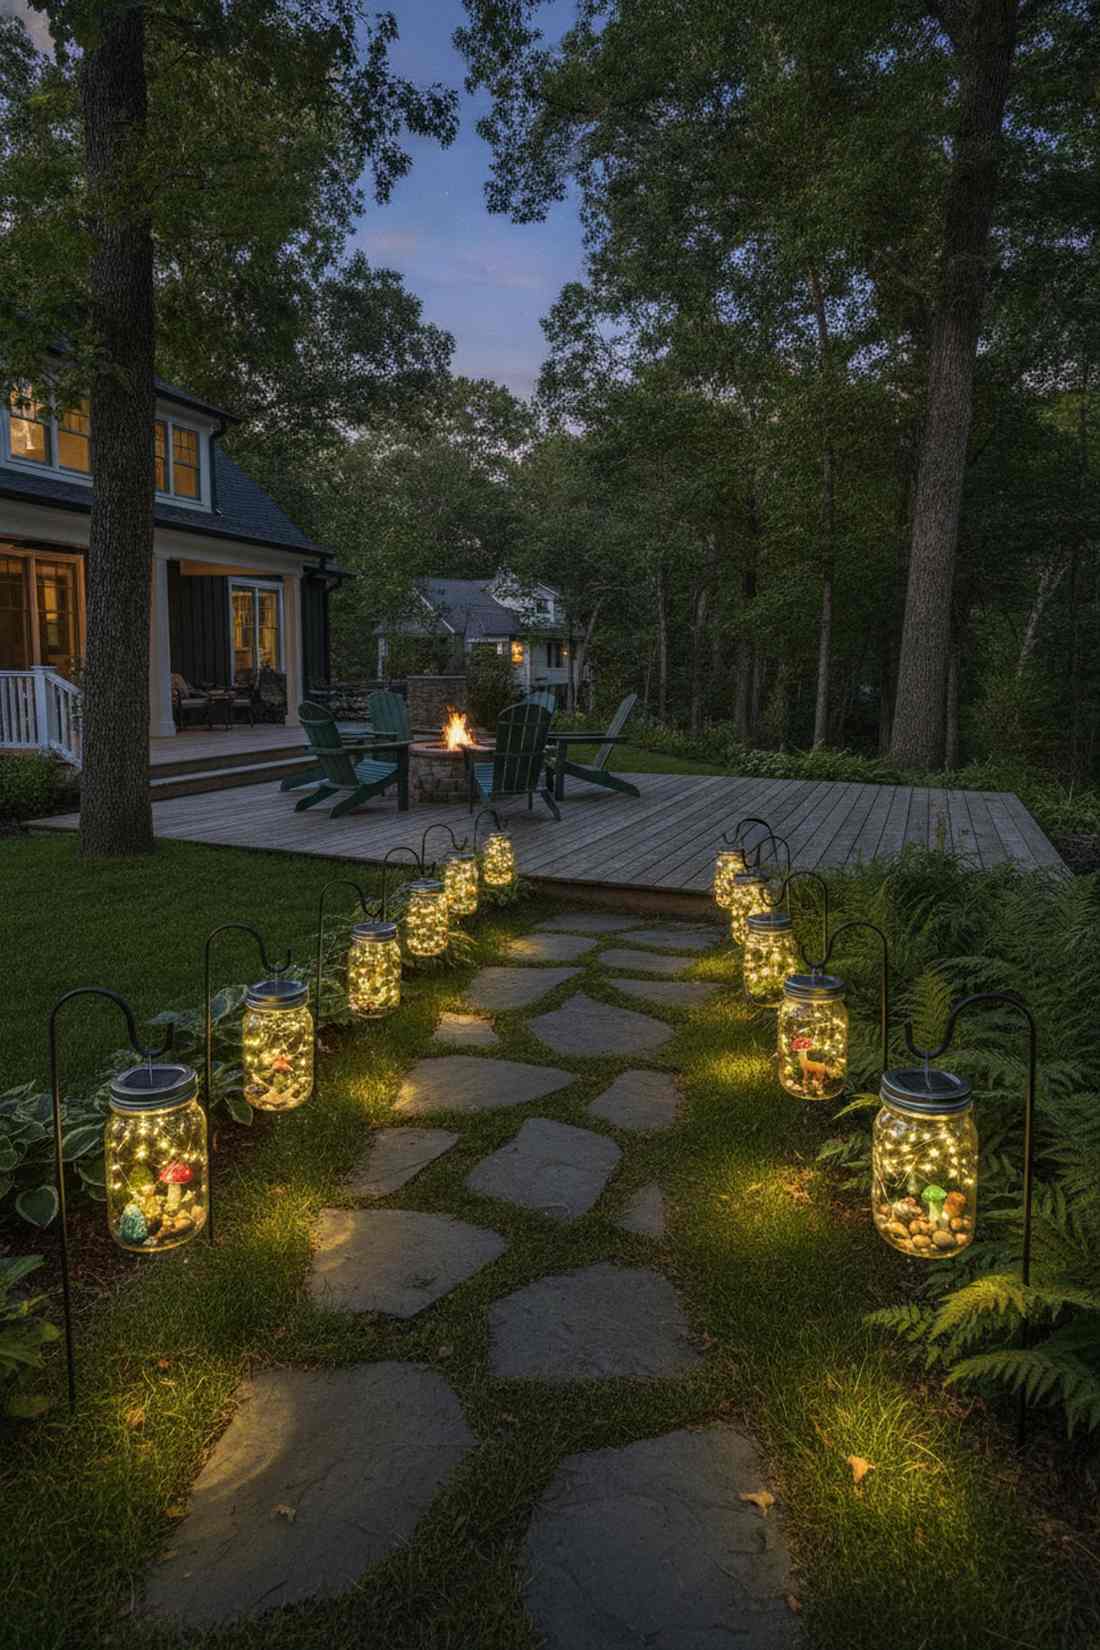
Feels like an enchanted garden path leading to a secret gathering. Solar mason jar pathway lights are the perfect hands-free solution for guiding guests across dark lawns.
Running extension cords through grass is a massive tripping hazard, but utilizing self-charging solar jar lids provides brilliant, eco-friendly boundary markers without any wiring. Popping in high-quality fairy garden supplies inside the jars elevates them from basic lighting to miniature art pieces.
Setting up a path of 10 jars runs about $45. It’s completely hassle-free since they turn on automatically at dusk.
- Key Materials: Mason jars, solar-powered LED lids, shepherds hooks
- Vibe / Style: Enchanted woodland walkway
- Difficulty: Zero wiring required
- Budget Breakdown: Solar lids/Jars: $30 | Hooks: $15
- Creator’s Tip: Charge the lids in direct, harsh sunlight for a full 48 hours before your party to ensure maximum battery capacity.
- Smart Sourcing: solar mason jar lid lights (bulk pack) and heavy-duty steel shepherd hooks.
17. Tree Trunk Spiral Wrap Technique
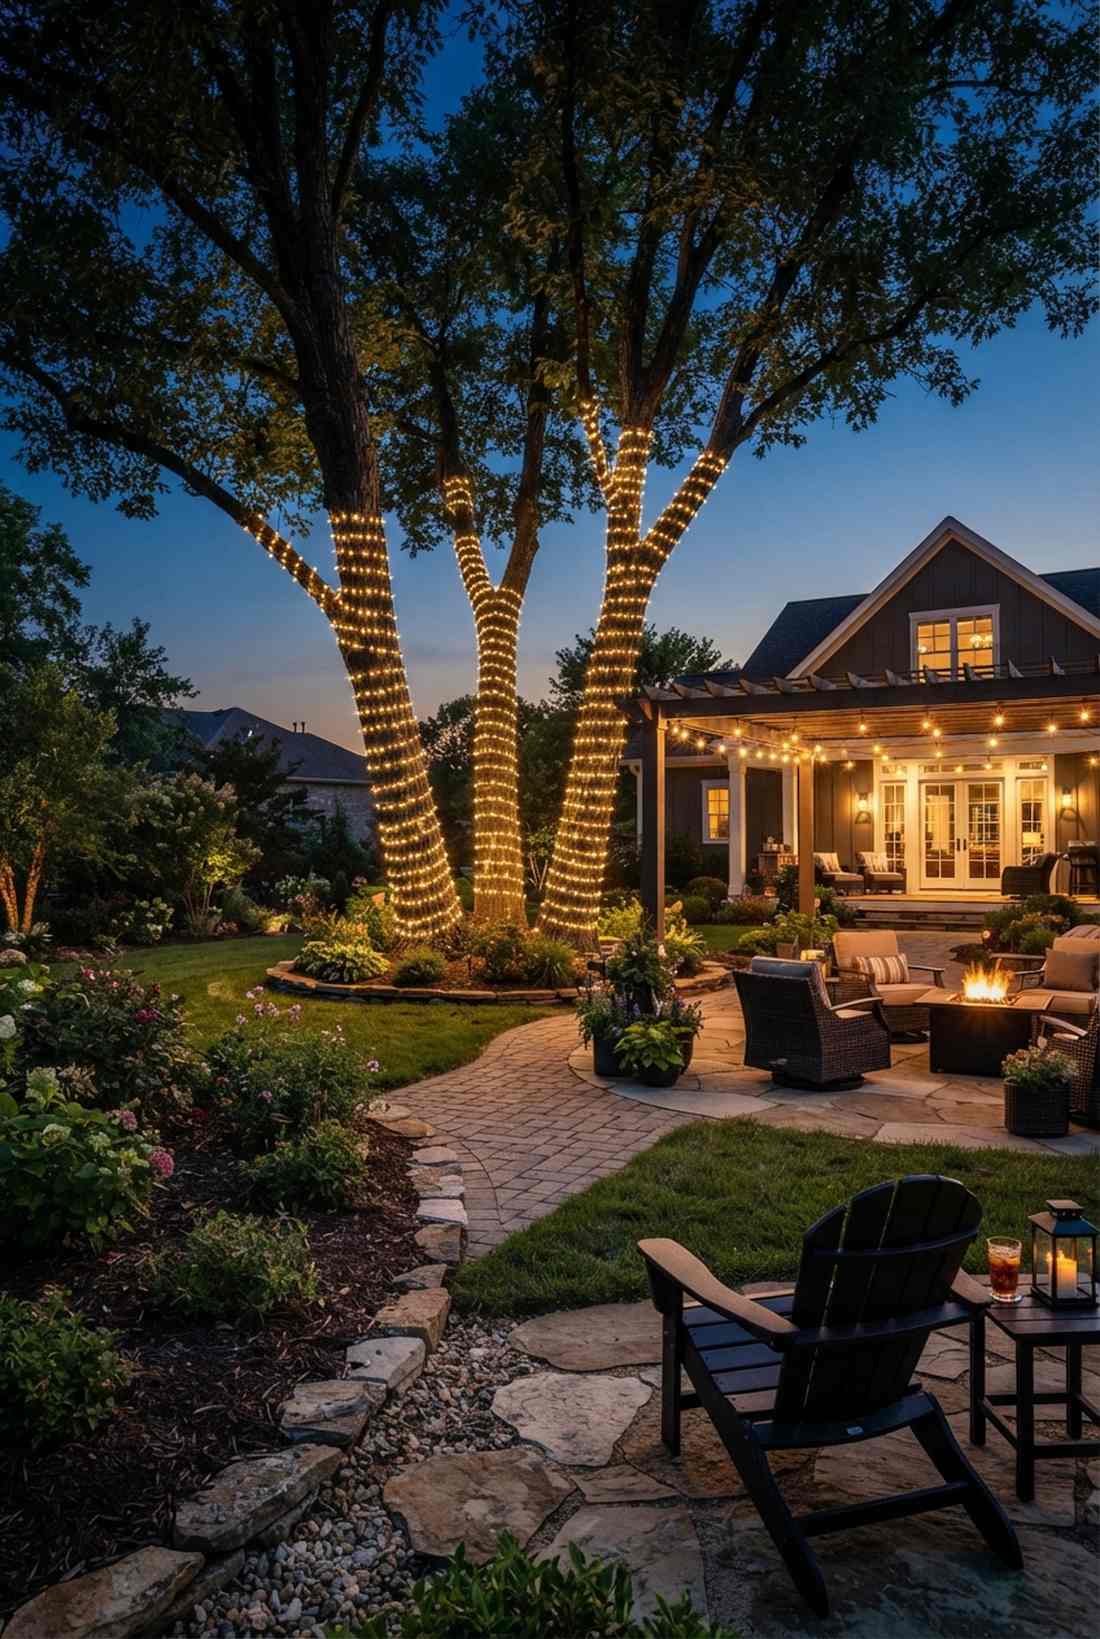
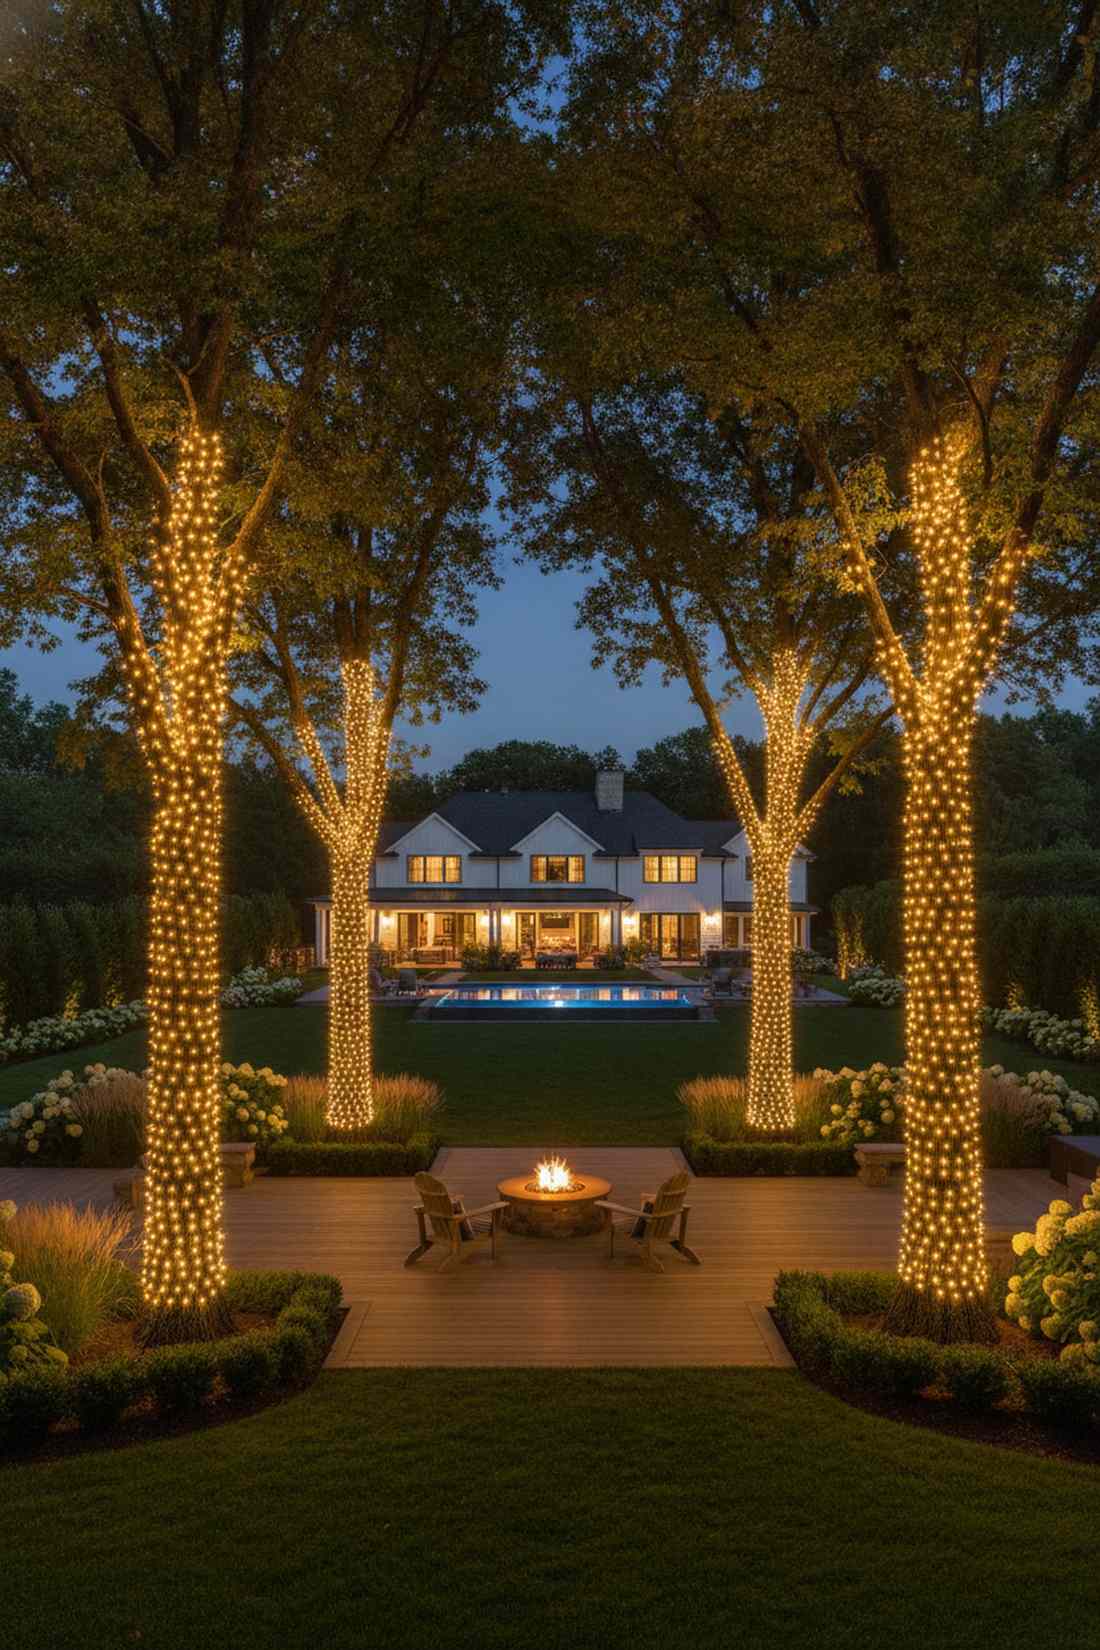
Turns your backyard foliage into glowing architectural pillars. The tree trunk spiral lighting wrap anchors wide-open outdoor spaces with incredible vertical presence.
Messy, loose wrapping makes a yard look chaotic, whereas tight, evenly spaced 6-inch spirals deliver a surprisingly premium, resort-like finish. Securing the strands with commercial-grade landscape supplies ensures they won’t slip down the bark when the wind picks up.
You can wrap three focal trees for roughly $50. Pin this layout to elevate your permanent backyard ambiance!
- Key Materials: Long outdoor fairy strands, dark zip ties, ladder
- Vibe / Style: Luxury estate garden
- Difficulty: Requires a ladder and patience
- Budget Breakdown: Extra-long lights: $40 | Fasteners: $10
- Creator’s Tip: Always use dark green or black zip ties to secure the wire—clear ones turn yellow and become highly visible outdoors.
- Smart Sourcing: extra-long outdoor LED fairy strings (commercial grade) and UV-rated black cable ties.
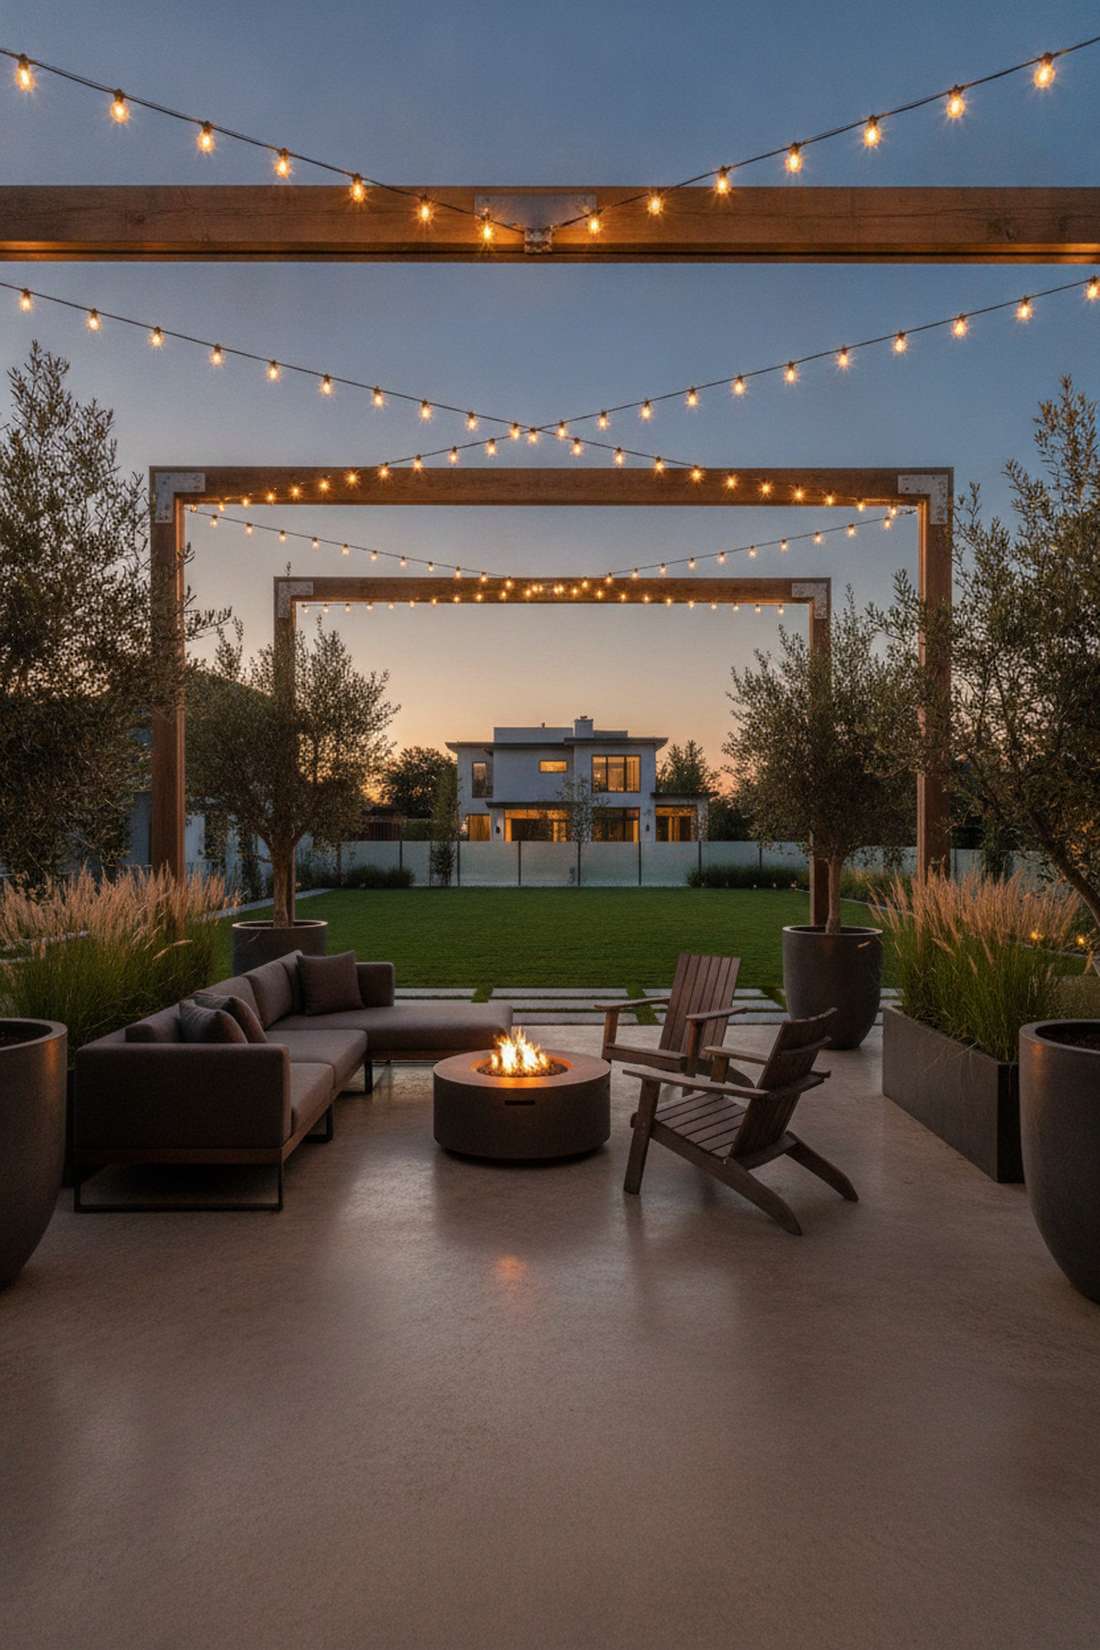
18. Pergola Draped Bistro Lights
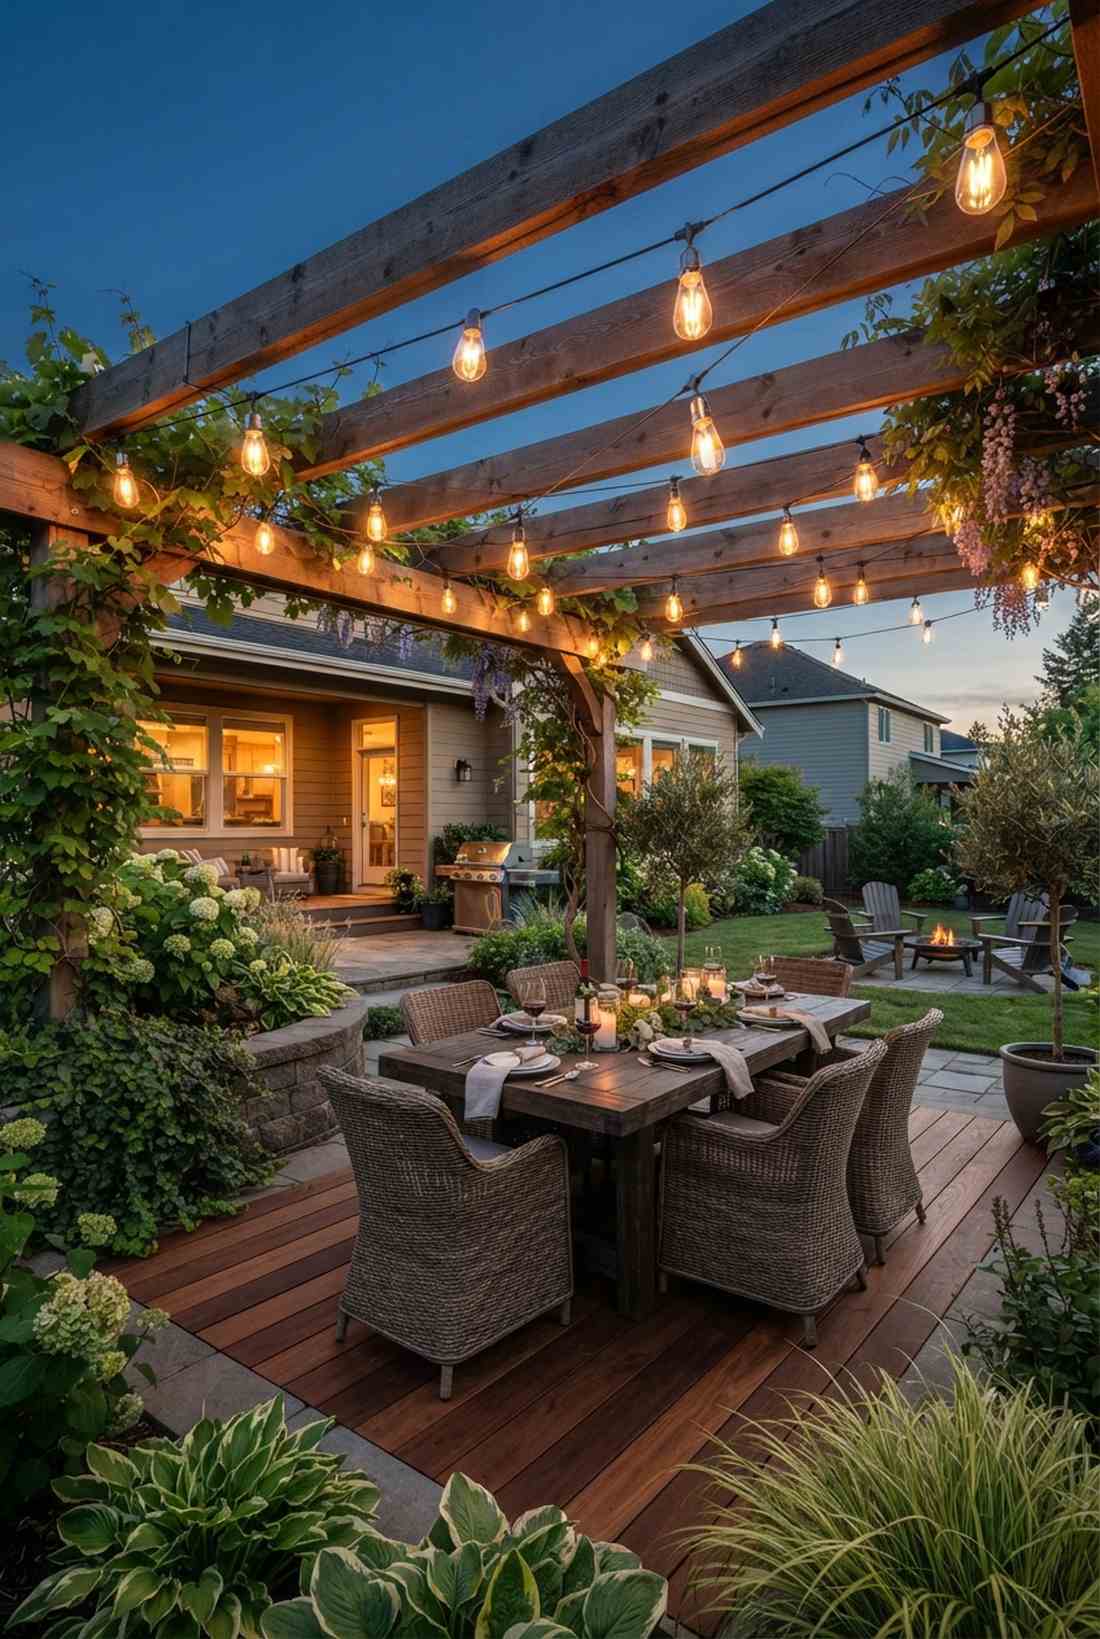

Sets the perfect mood for a late-night al fresco dinner. The overhead pergola bistro drape transforms bare wooden patio structures into luxurious Mediterranean dining spaces.
Nailing lights directly into wood causes cord damage and sagging, but installing a proper steel tension wire support system gives a designer-level finish that lasts all year. The oversized Edison bulbs provide significantly better task lighting than tiny micro LEDs.
This professional patio upgrade costs around $70. It completely changes how you use your outdoor space at night.
- Key Materials: Bistro string lights, steel wire hanging kit, eye hooks
- Vibe / Style: Italian villa courtyard
- Difficulty: Requires basic drilling tools
- Budget Breakdown: Bistro lights: $45 | Suspension kit: $25
- Creator’s Tip: Remove the glass bulbs before hanging the cord to prevent accidental shattering, then screw them in last.
- Smart Sourcing: shatterproof Edison string lights (heavy duty) and stainless steel wire suspension kit.
Material Guide: Cheap vs. Premium Aesthetic
Knowing exactly where to save and where to spend makes all the difference in achieving that “looks expensive but isn’t” vibe.
- Standard vs. UV-Resistant/Premium: Standard indoor wires turn brittle and snap after one week outside. Upgrading to UV-coated commercial string lights prevents weather damage and keeps your setup intact through multiple events.
- Pre-made Kits vs. Sourcing Locally: Buying individual pieces at a craft store triples the cost. Utilizing pre-packaged starter kits and bulk hardware packs saves time and guarantees everything is electrically compatible.
If you think ground lighting is expensive, this next brilliant hack will completely blow your mind.
19. Fence Line Horizontal Light Strips
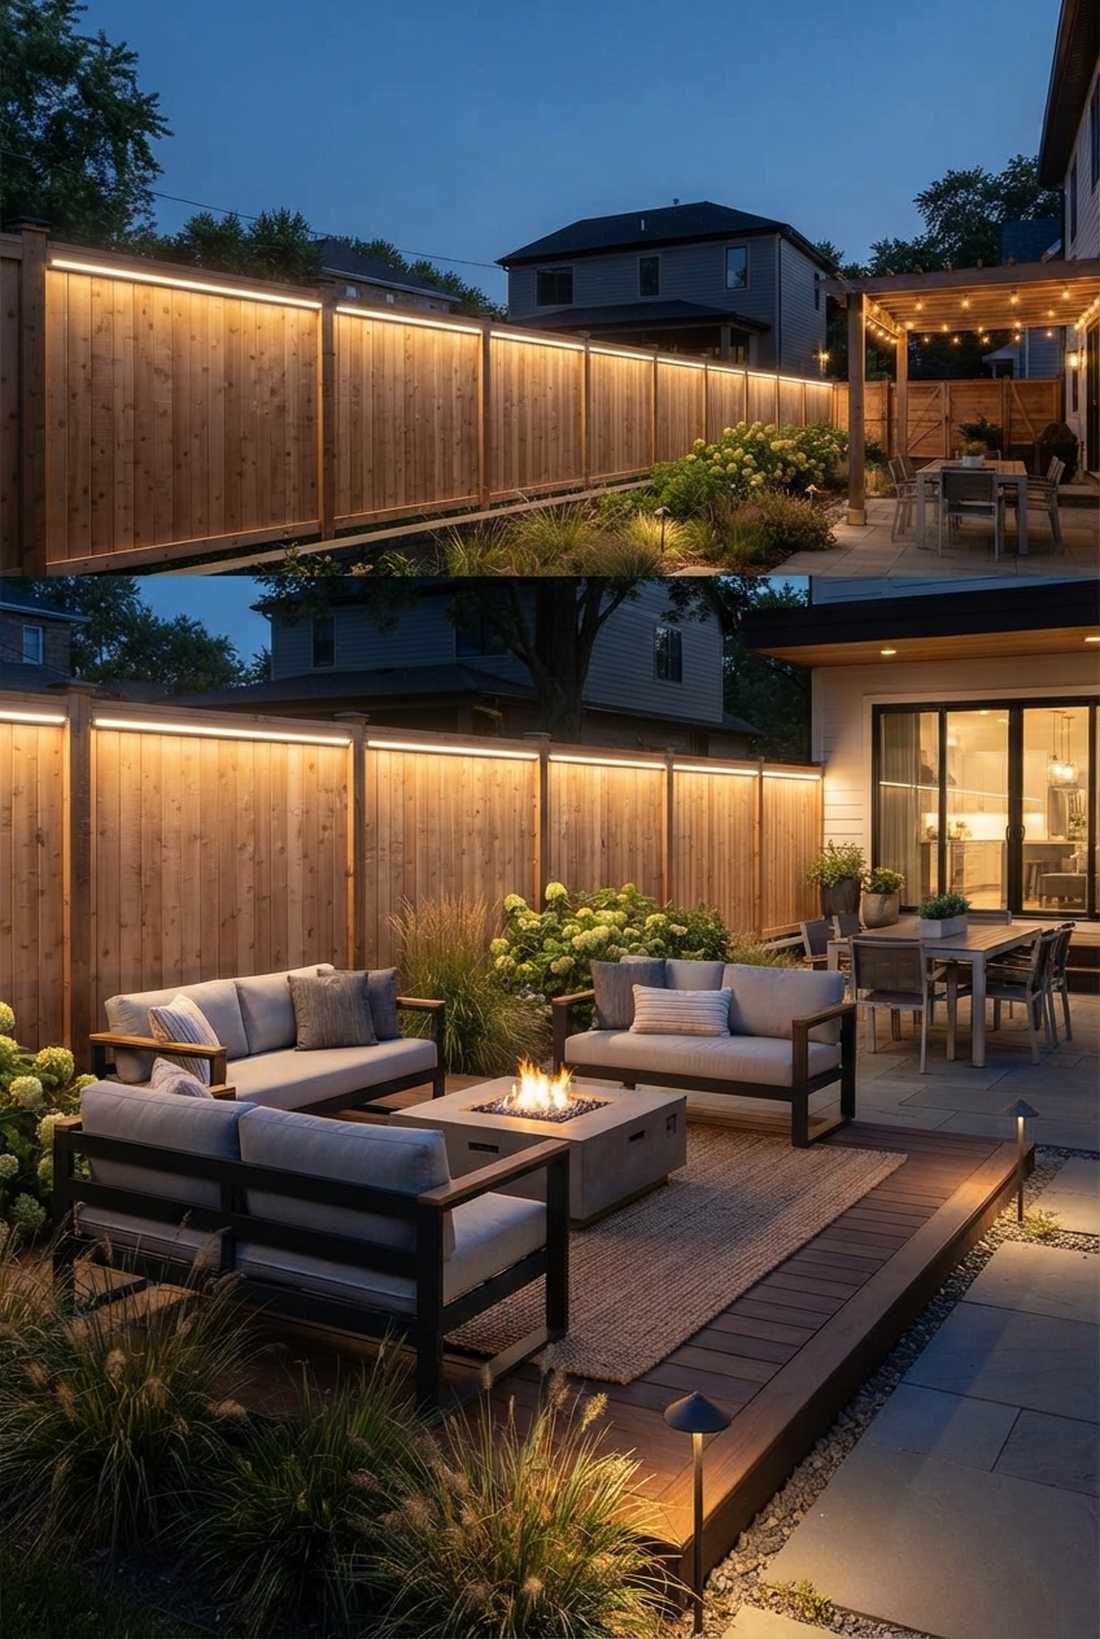
Gives your yard a sharp, modern glowing perimeter. Running horizontal fence line lighting creates highly defined spatial boundaries to keep guests gathered in the right areas.
Traditional dangling icicle lights can look a bit dated, but installing clean, continuous LED tape under the top rail looks far more expensive than it is. Utilizing outdoor-rated silicone-coated strips protects the LEDs from rain while throwing a smooth, continuous wash of light down the wood.
You can outline an entire seating section for about $45. Save this trick for upgrading boring wooden privacy fences!
- Key Materials: Waterproof LED strip lights, mounting brackets
- Vibe / Style: Sleek contemporary patio
- Difficulty: Easy straight-line mounting
- Budget Breakdown: LED Strip kits: $35 | Brackets: $10
- Creator’s Tip: Do not rely on the built-in adhesive tape outdoors; always screw in silicone mounting clips every 2 feet.
- Smart Sourcing: waterproof outdoor LED strip lights (starter kit) and silicone mounting bracket clips (bulk pack).
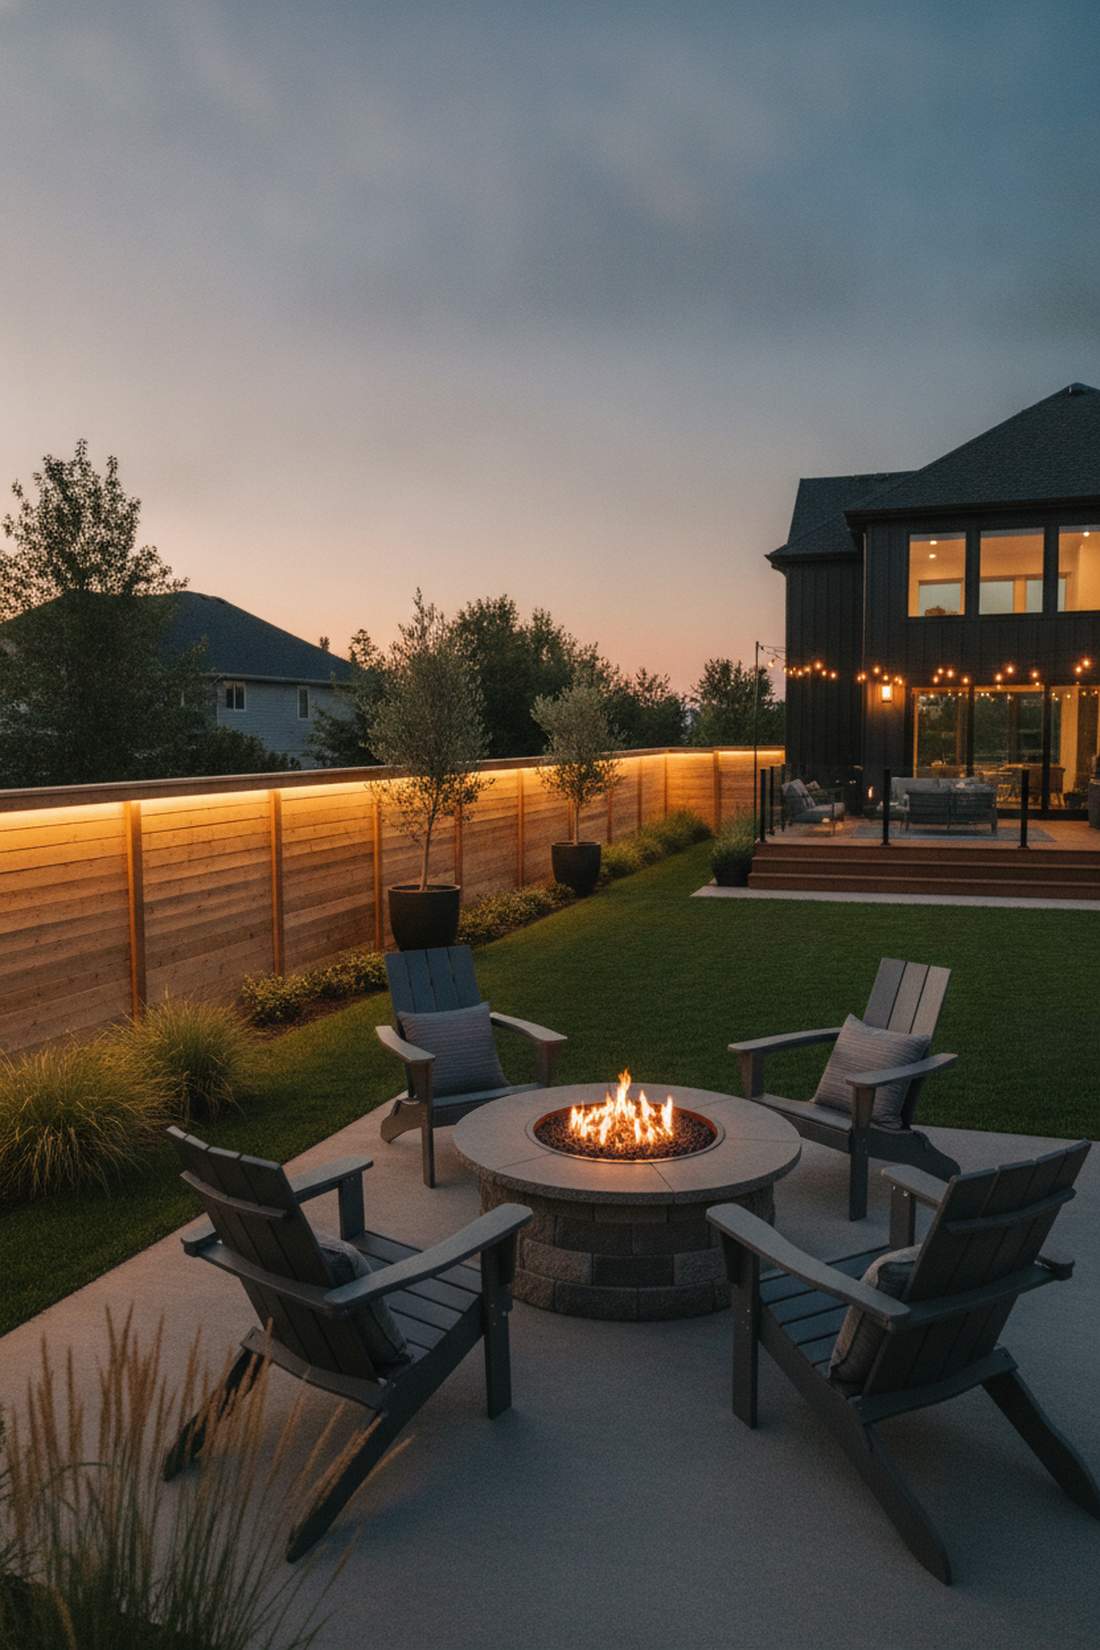
20. Ground Spike Uplighting For Features
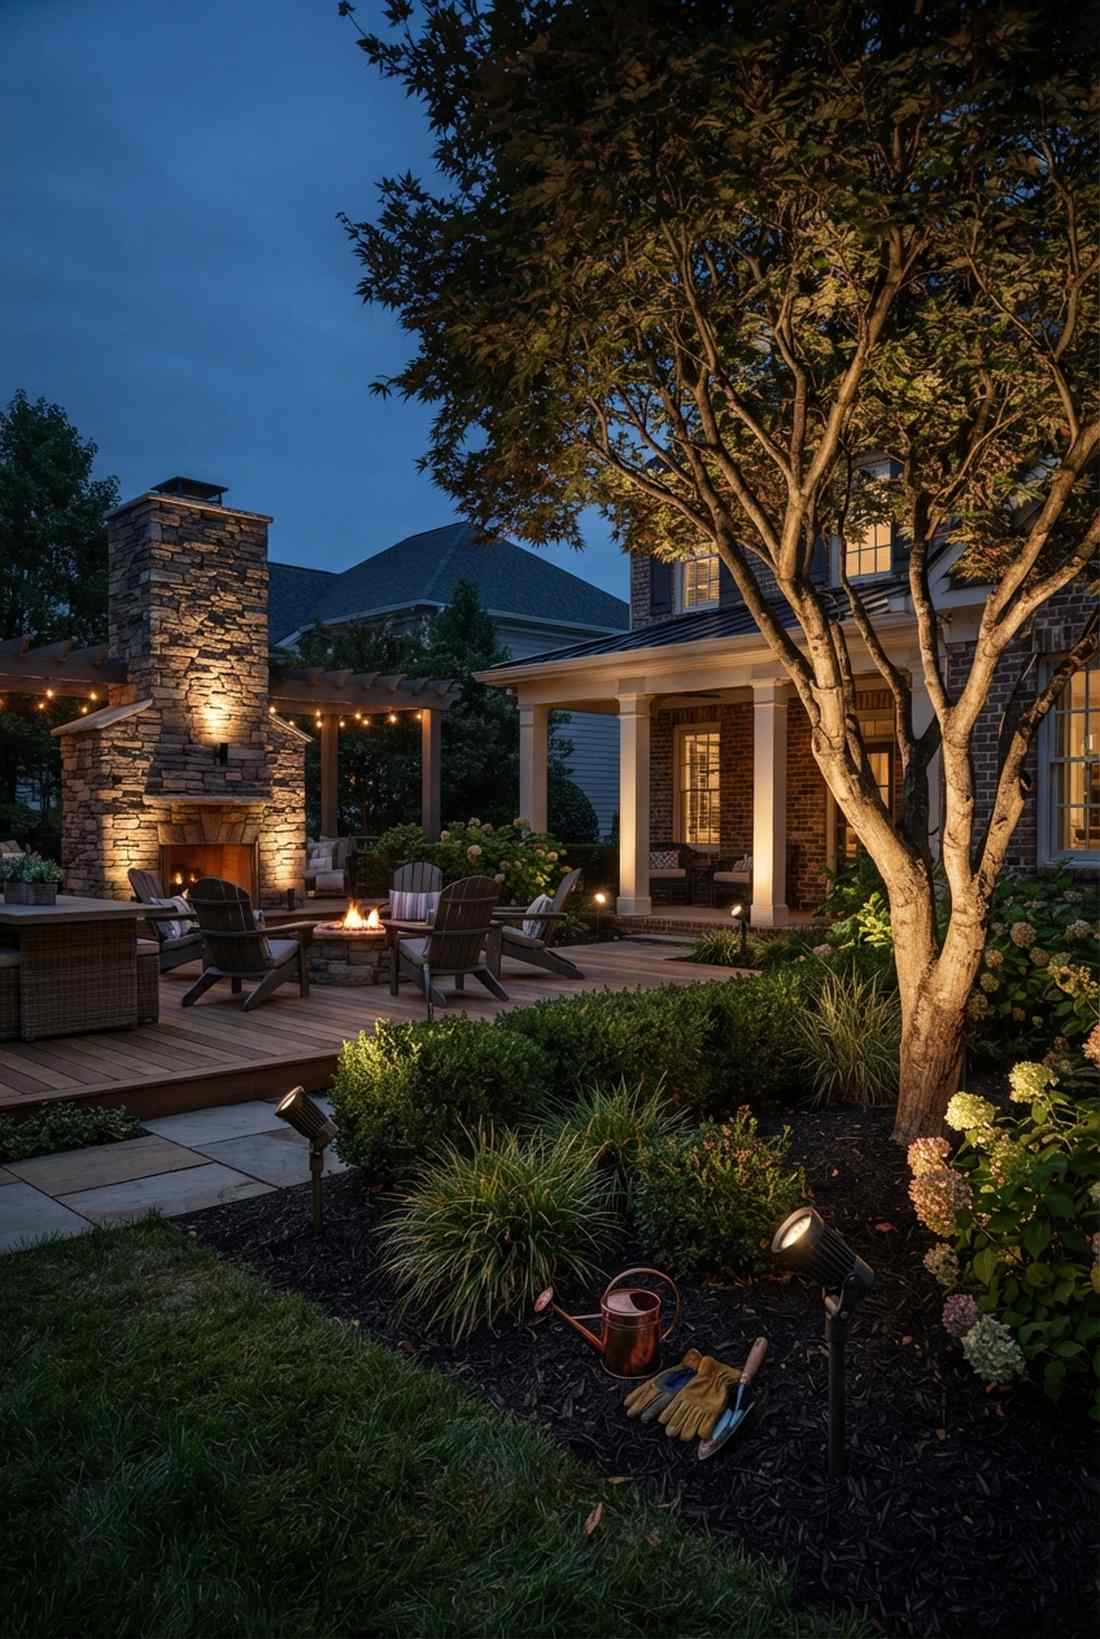
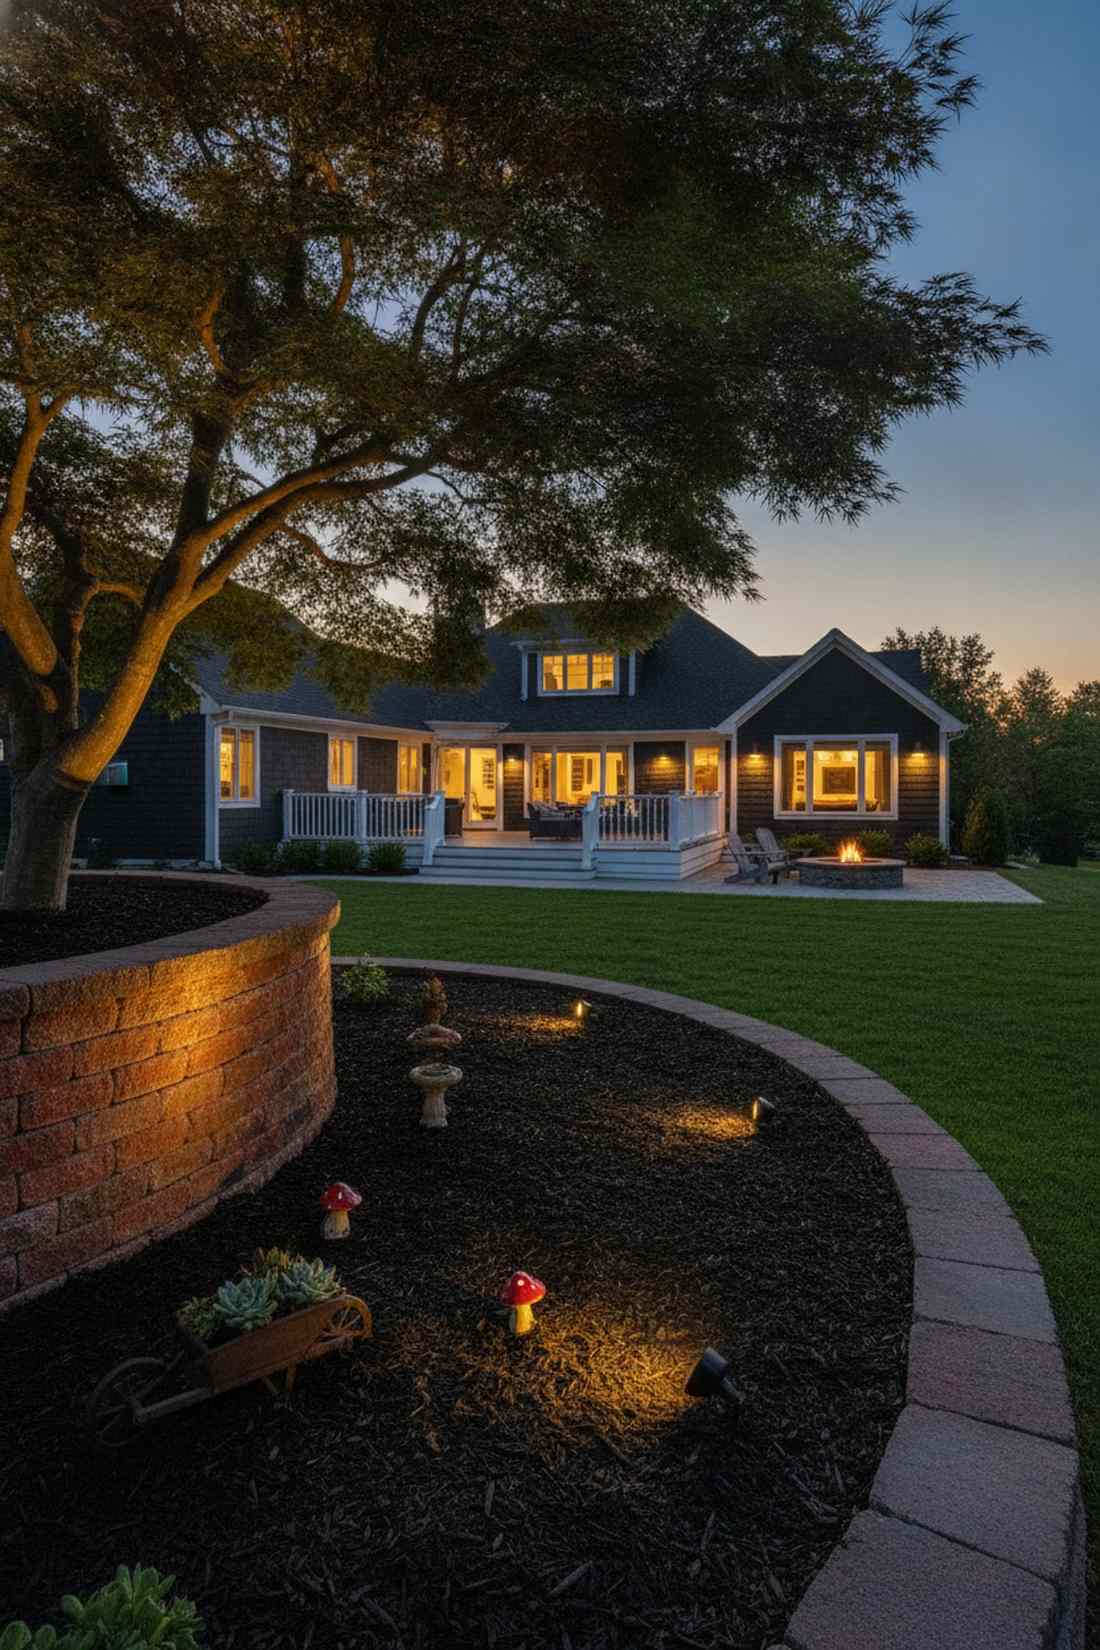
Instantly makes your landscaping look like it was done by a high-end firm. Strategic ground spike uplighting emphasizes architectural textures and specimen plants brilliantly.
Flooding the yard with overhead spots washes out the space, whereas grazing a brick wall or textured tree from the bottom up delivers a surprisingly premium, dramatic shadow effect. Tucking miniature garden supplies and solar spots into the mulch hides the hardware completely.
A four-pack of adjustable spots only runs about $35. It’s the ultimate secret weapon for expensive-looking yards.
- Key Materials: Solar landscape spotlights, adjustable ground stakes
- Vibe / Style: Dramatic estate landscaping
- Difficulty: Simply stick in the dirt
- Budget Breakdown: Solar spots (4-pack): $35
- Creator’s Tip: Angle the light at exactly 45 degrees relative to the object to maximize the depth of the shadows.
- Smart Sourcing: adjustable solar uplights (weatherproof 4-pack) and miniature garden supplies (accent decor).
Architectural Accent Displays For Indoor Elegance
Interior architectural features gain new prominence through strategic lighting placement. These arrangements highlight existing design elements while adding festive atmosphere.
21. Staircase Banister Wrapped Strands
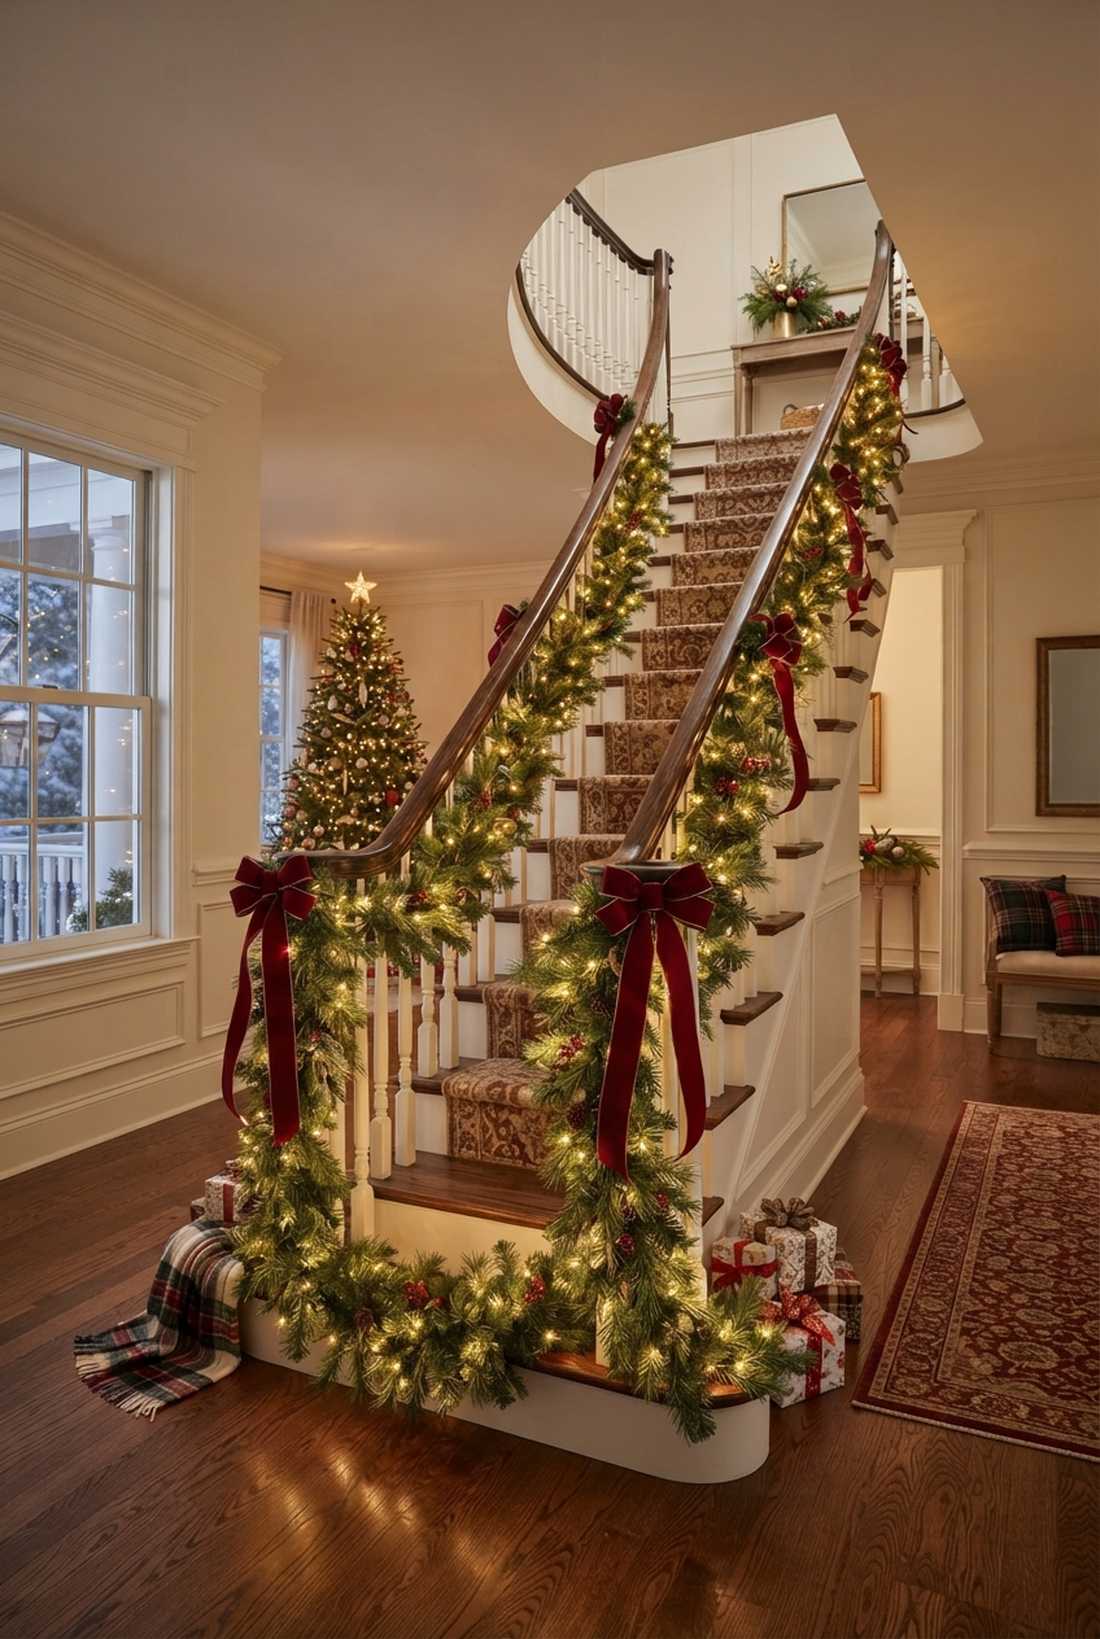
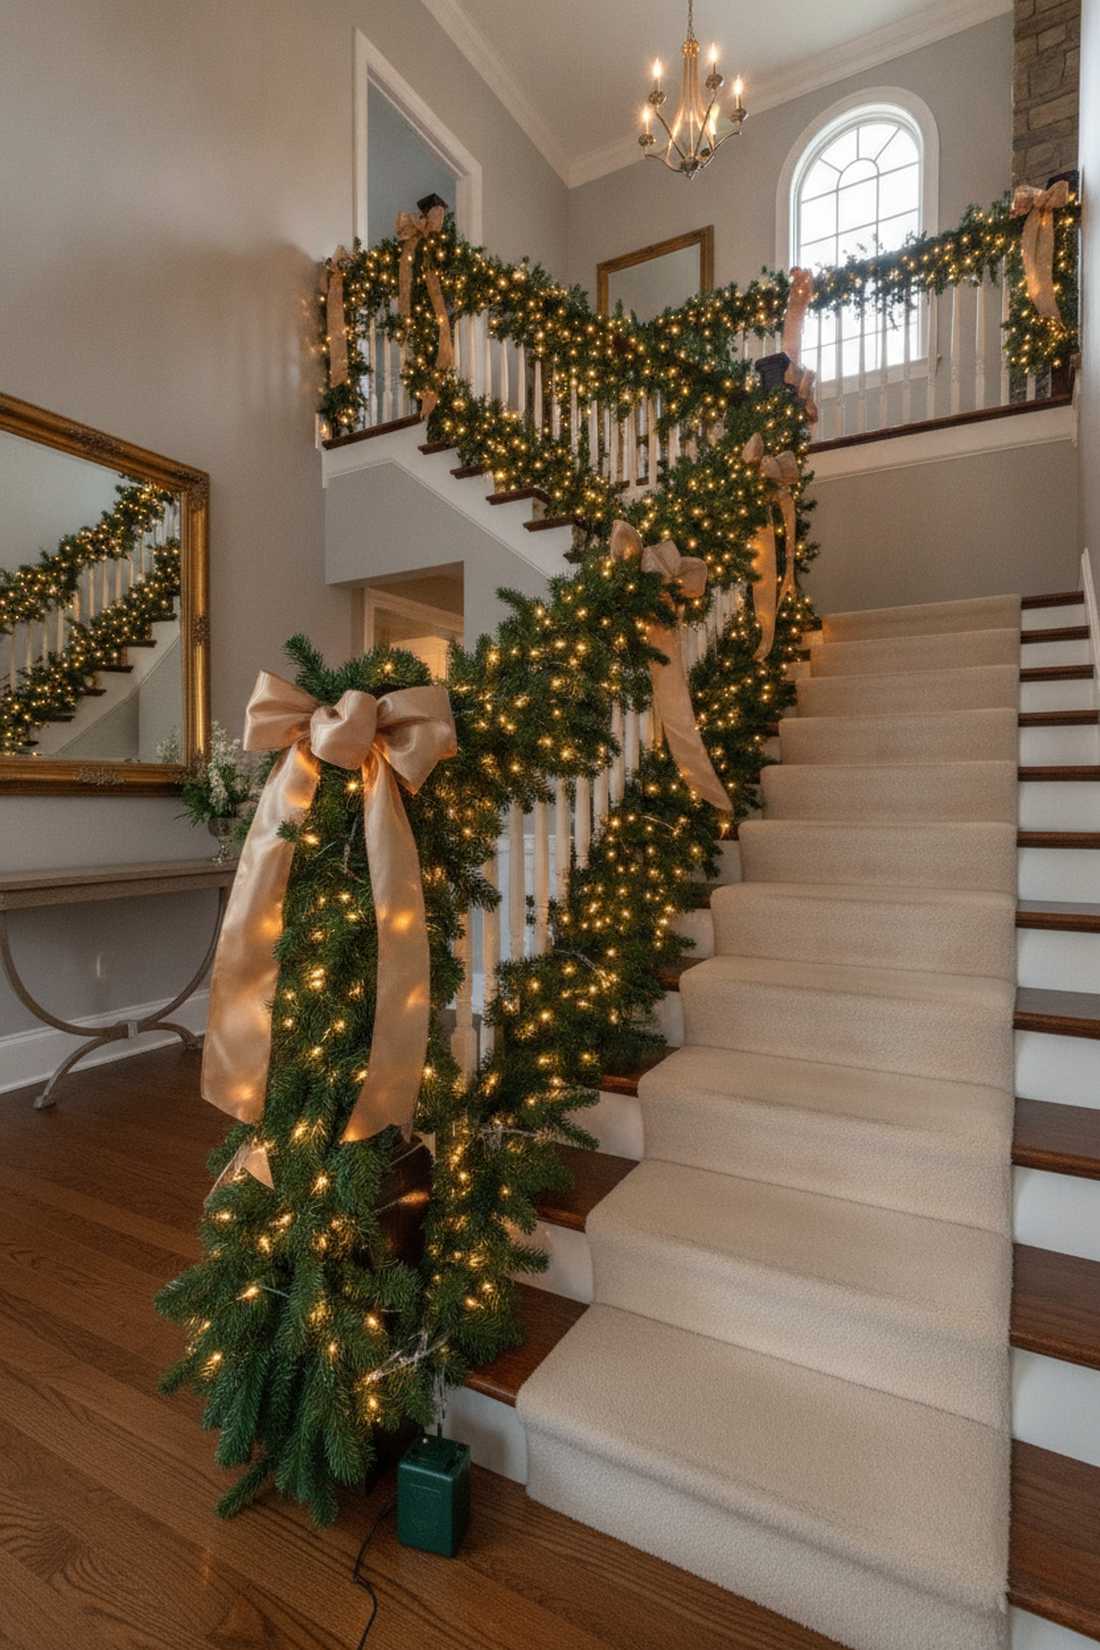
Creates a magical, glowing ascent to the second floor. A wrapped staircase banister display acts as a brilliant transition piece during indoor holiday gatherings or home weddings.
Leaving the wiring exposed on a handrail feels messy, but weaving the lights tightly through thick artificial garland gives a designer-level finish that hides the power cords completely. Tying it off with premium silk ribbons elevates a basic staircase into a grand entryway feature.
You can completely transform your stairs for around $40. Pin this to your interior holiday decor inspiration board!
- Key Materials: Faux garland, battery string lights, zip ties
- Vibe / Style: Grand classic entry
- Difficulty: Requires tight wrapping
- Budget Breakdown: Garland: $25 | Lights/Fasteners: $15
- Creator’s Tip: Ensure the battery pack is secured out of sight at the bottom of the stairs, not the top, for easier access.
- Smart Sourcing: pre-lit artificial pine garland (thick cut) and reusable clear zip ties (bulk pack).
22. Mantelpiece Layered Light Display
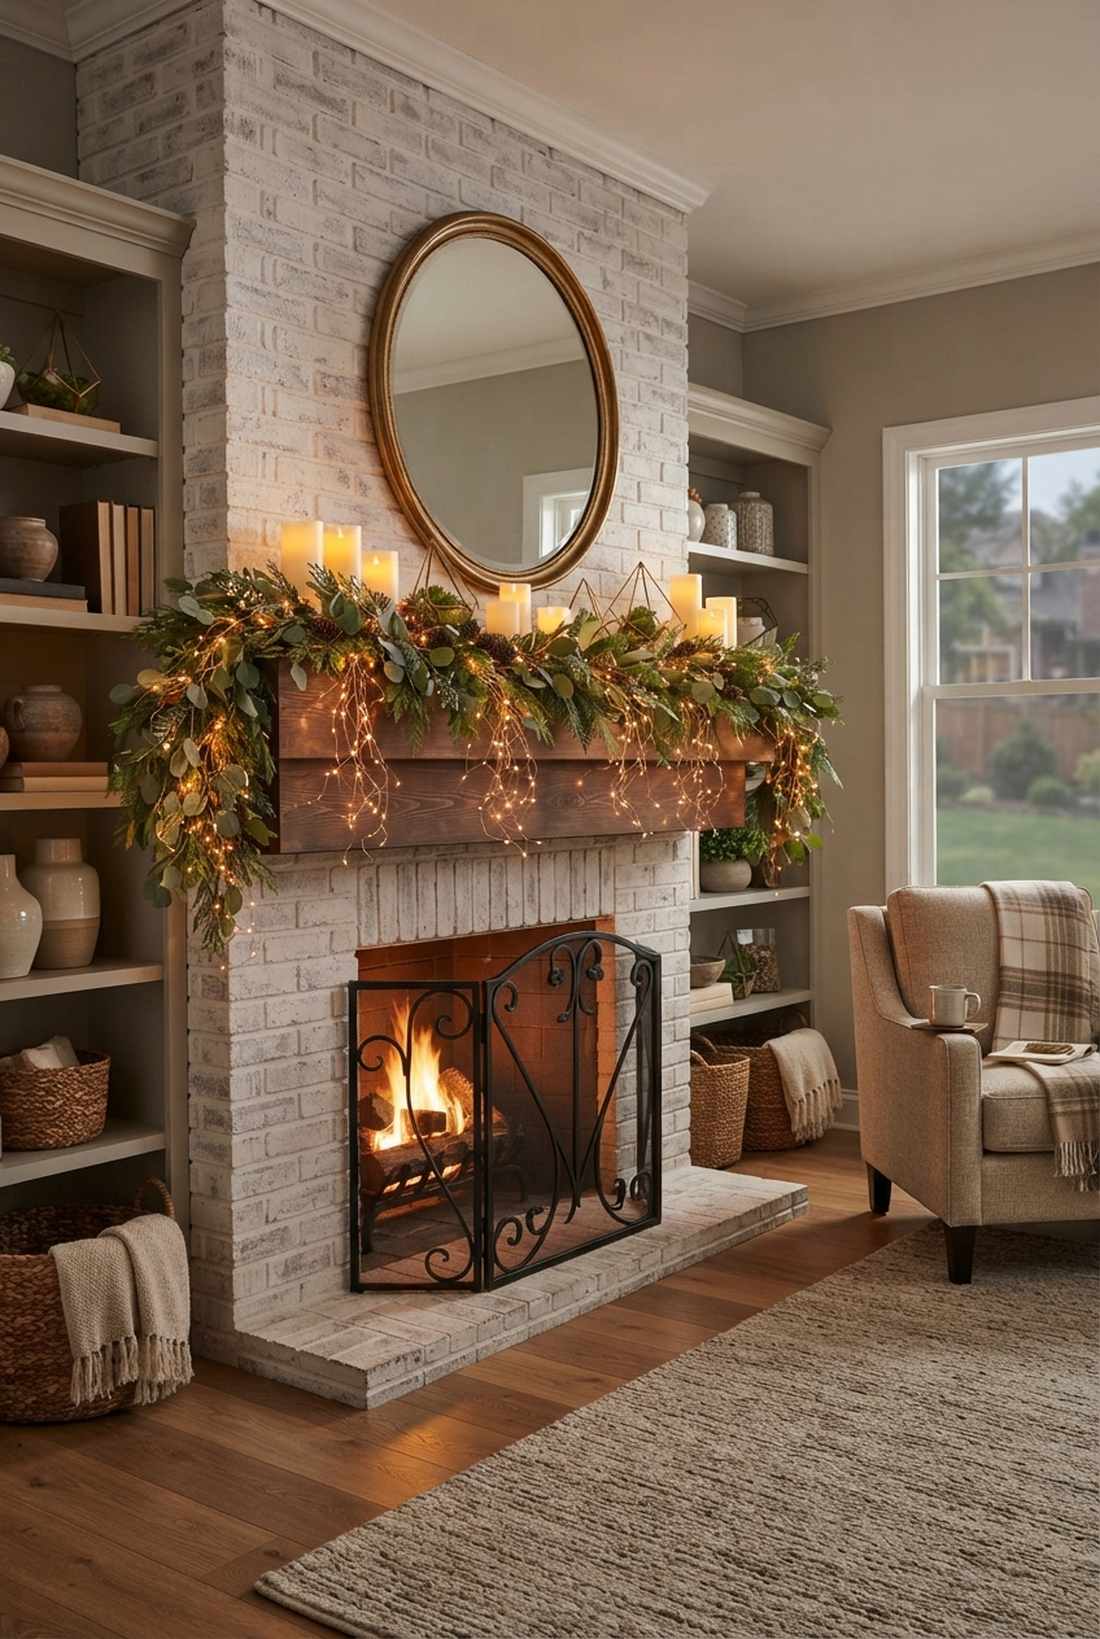
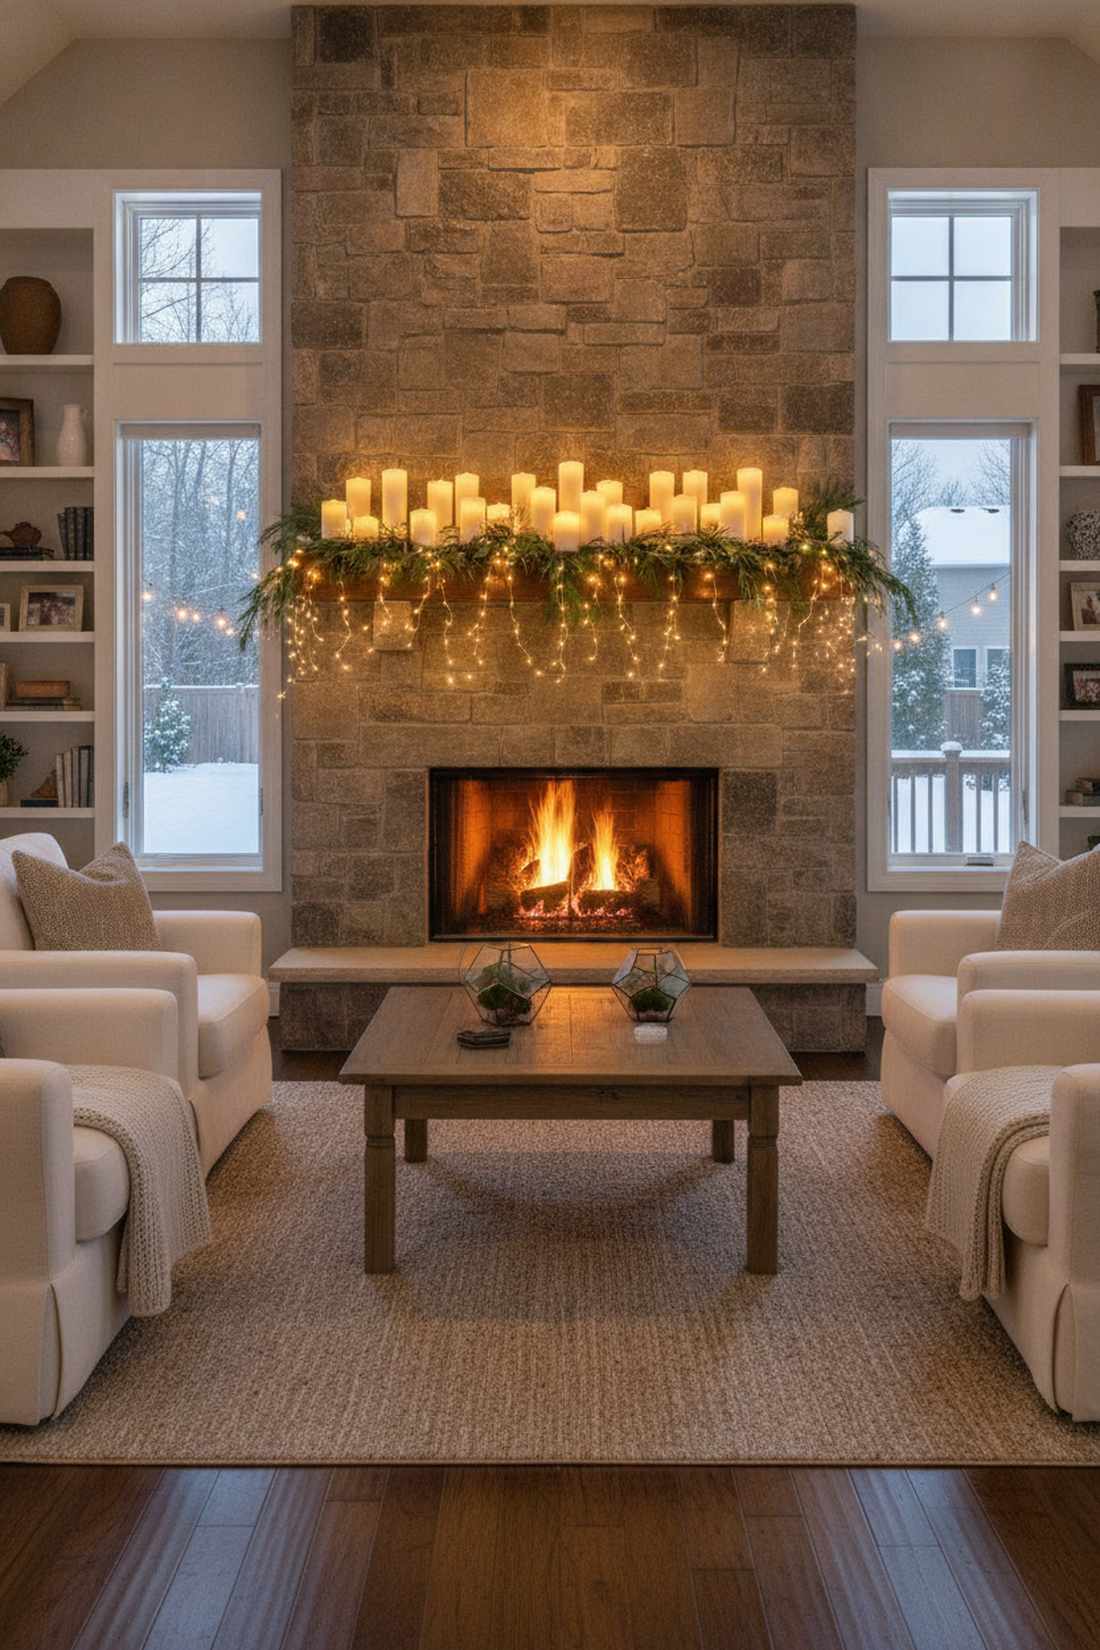
Turns your fireplace into a glowing, cozy focal point. The layered mantelpiece light arrangement draws the eye up and warms the entire living room.
A single string of lights thrown on a shelf looks sparse, but burying cascading fairy strands beneath varying heights of candles and greenery creates a luxurious, expensive-looking composition. Mixing high-CPC terrarium accessories among the lights adds unexpected, intricate details.
This lush mantel display costs about $30 using items you probably already own. It’s a fast upgrade that completely changes the vibe.
- Key Materials: Fairy lights, pillar candles, assorted greenery
- Vibe / Style: Warm intimate hearth
- Difficulty: Easy styling/layering
- Budget Breakdown: Accent Lights: $15 | Decorative fillers: $15
- Creator’s Tip: Let the ends of the light strands softly spill over the edge of the mantel to create a beautiful cascading waterfall effect.
- Smart Sourcing: copper wire fairy strands (plug-in kit) and flameless LED pillar candles (multi-pack).
23. Doorway Arch Framing Lights
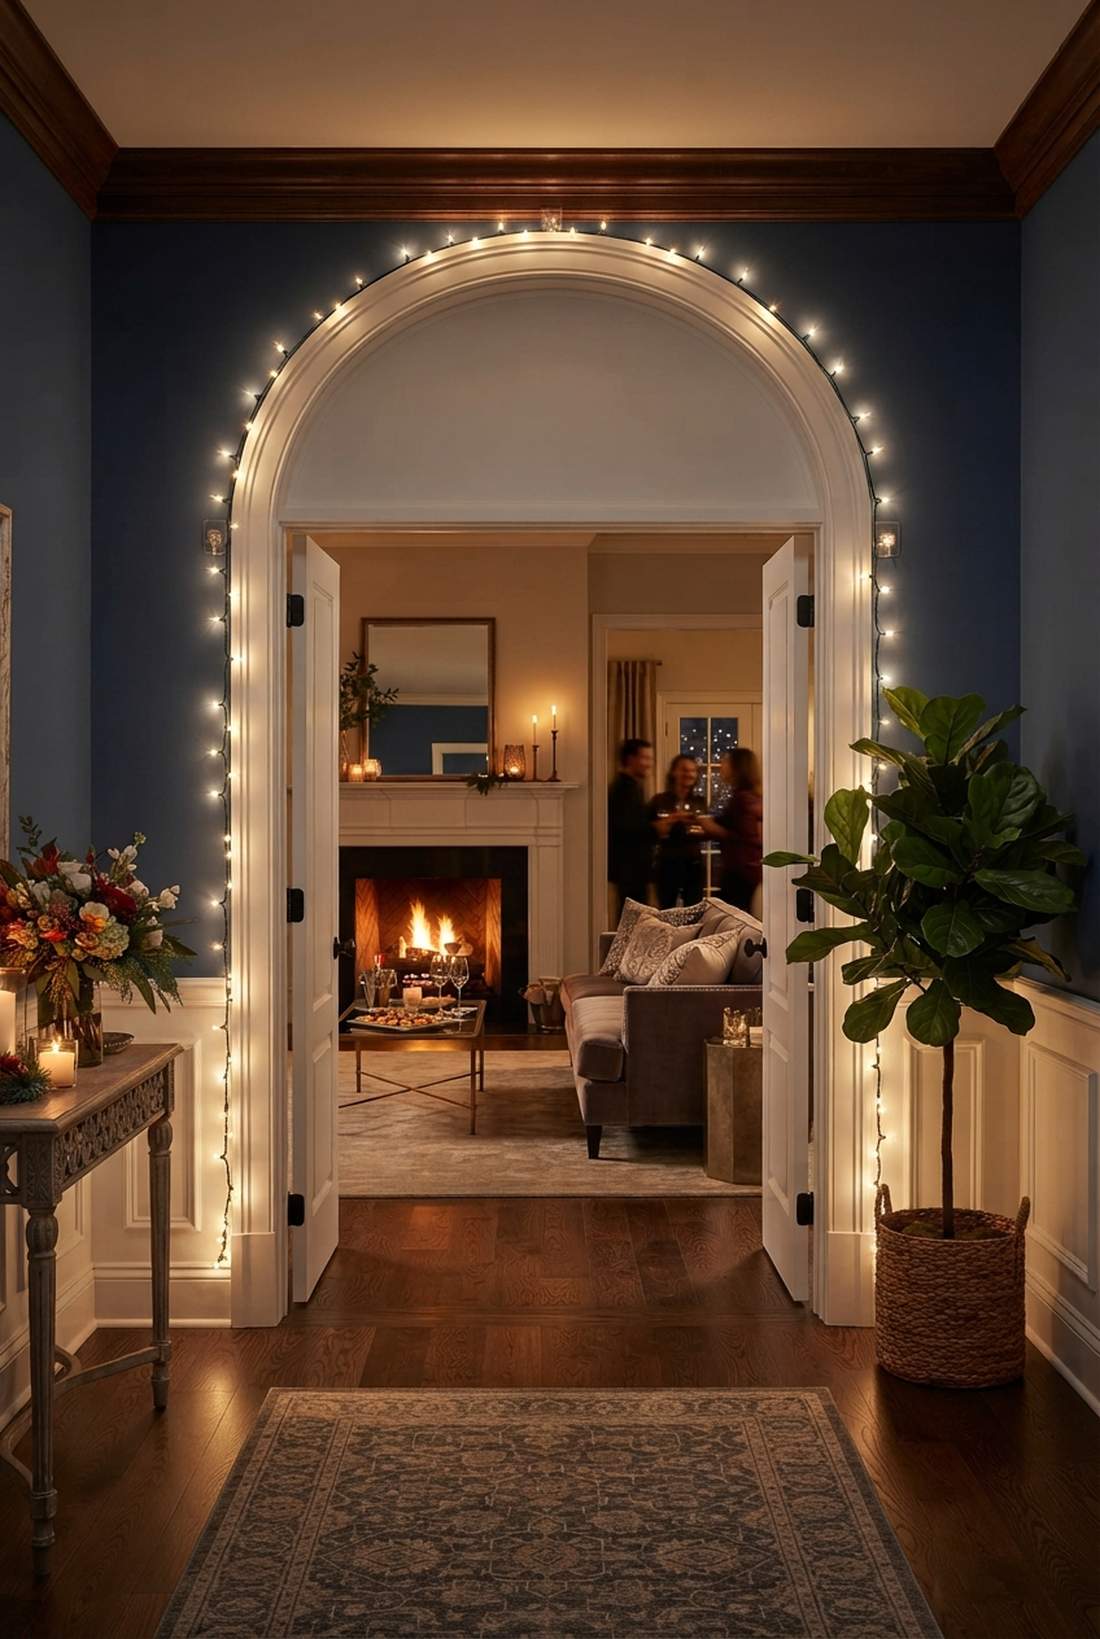
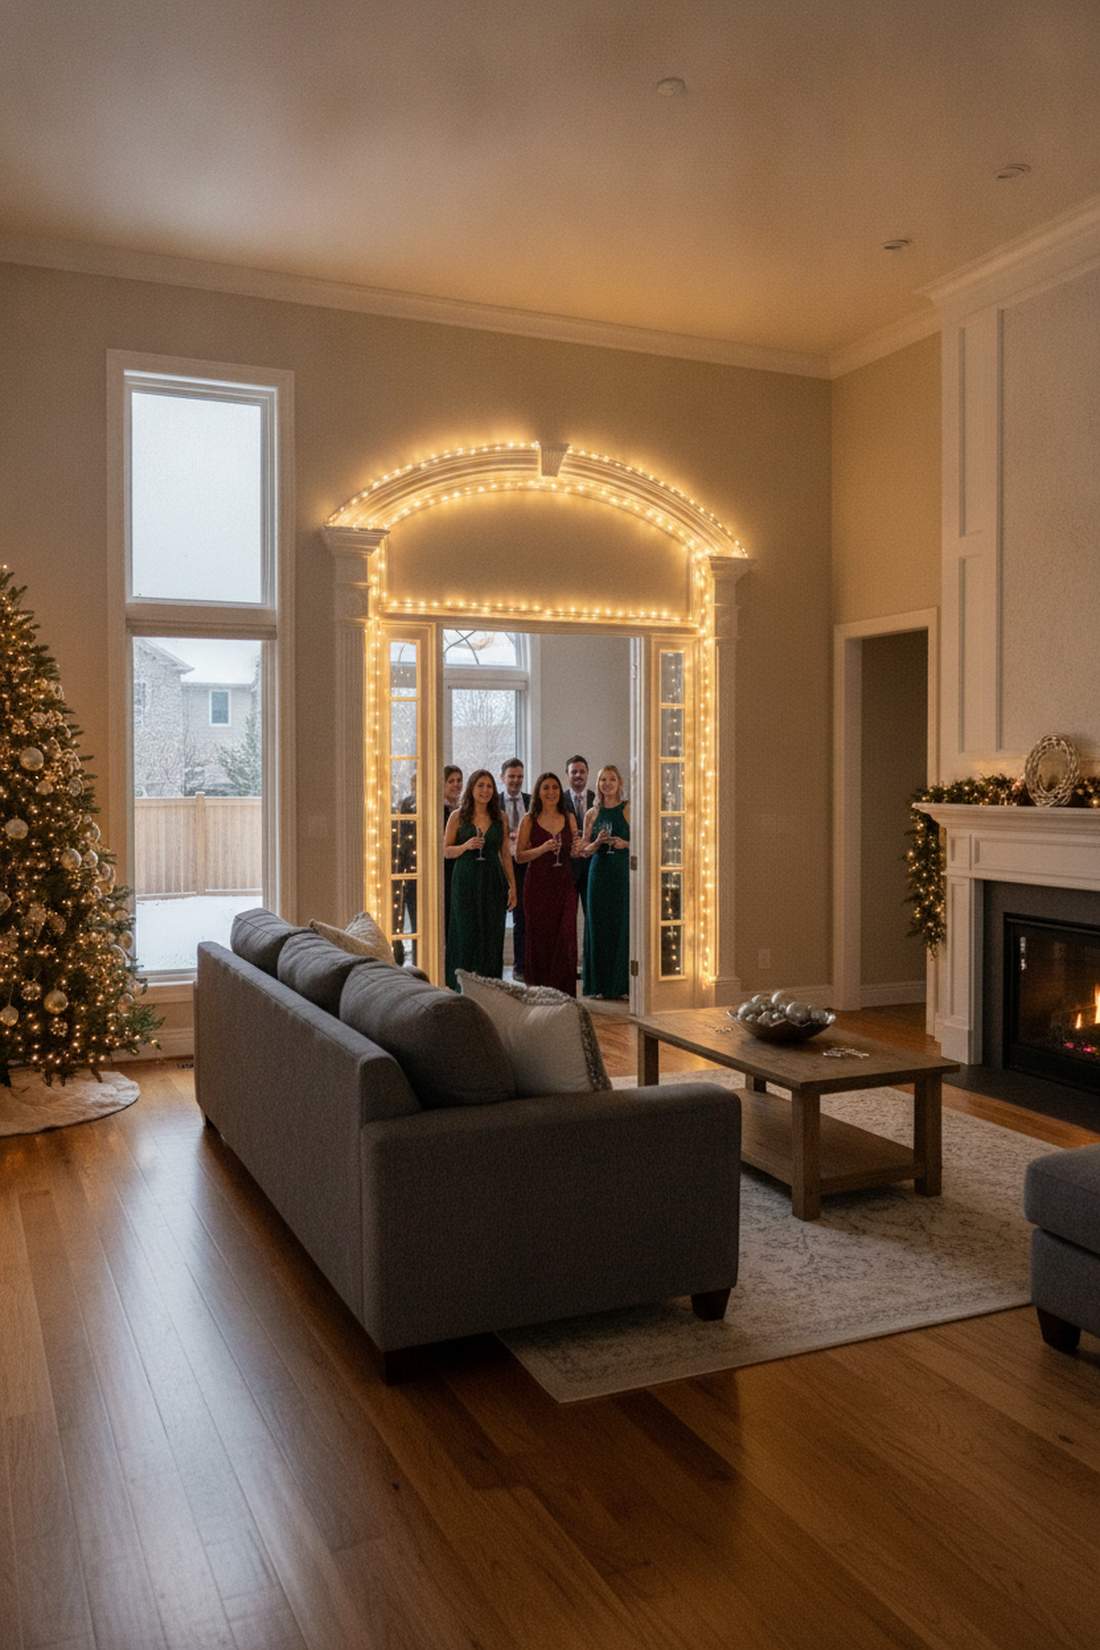
Acts as a glowing portal drawing guests into the main event room. Creating an illuminated doorway arch frame highlights the architectural transitions in your home beautifully.
Using tape that rips the paint off your trim is a classic mistake, yet utilizing specialized clear adhesive hooks delivers a seamless outline that damages nothing. Maintaining perfectly straight, taut lines around the molding ensures the frame looks intentional and architectural.
Framing a standard double doorway runs roughly $20. Pin this if you’re hosting an indoor New Year’s or evening party!
- Key Materials: Long plug-in fairy lights, clear damage-free hooks
- Vibe / Style: Welcoming glowing portal
- Difficulty: Quick measuring/hooking
- Budget Breakdown: String lights: $12 | Hooks: $8
- Creator’s Tip: Place the hooks precisely on the outer edge of the door casing so the door can still open and close without snagging the wires.
- Smart Sourcing: extra-long indoor fairy lights (plug-in) and clear adhesive decorating hooks (bulk pack).
24. Window Curtain Waterfall Effect
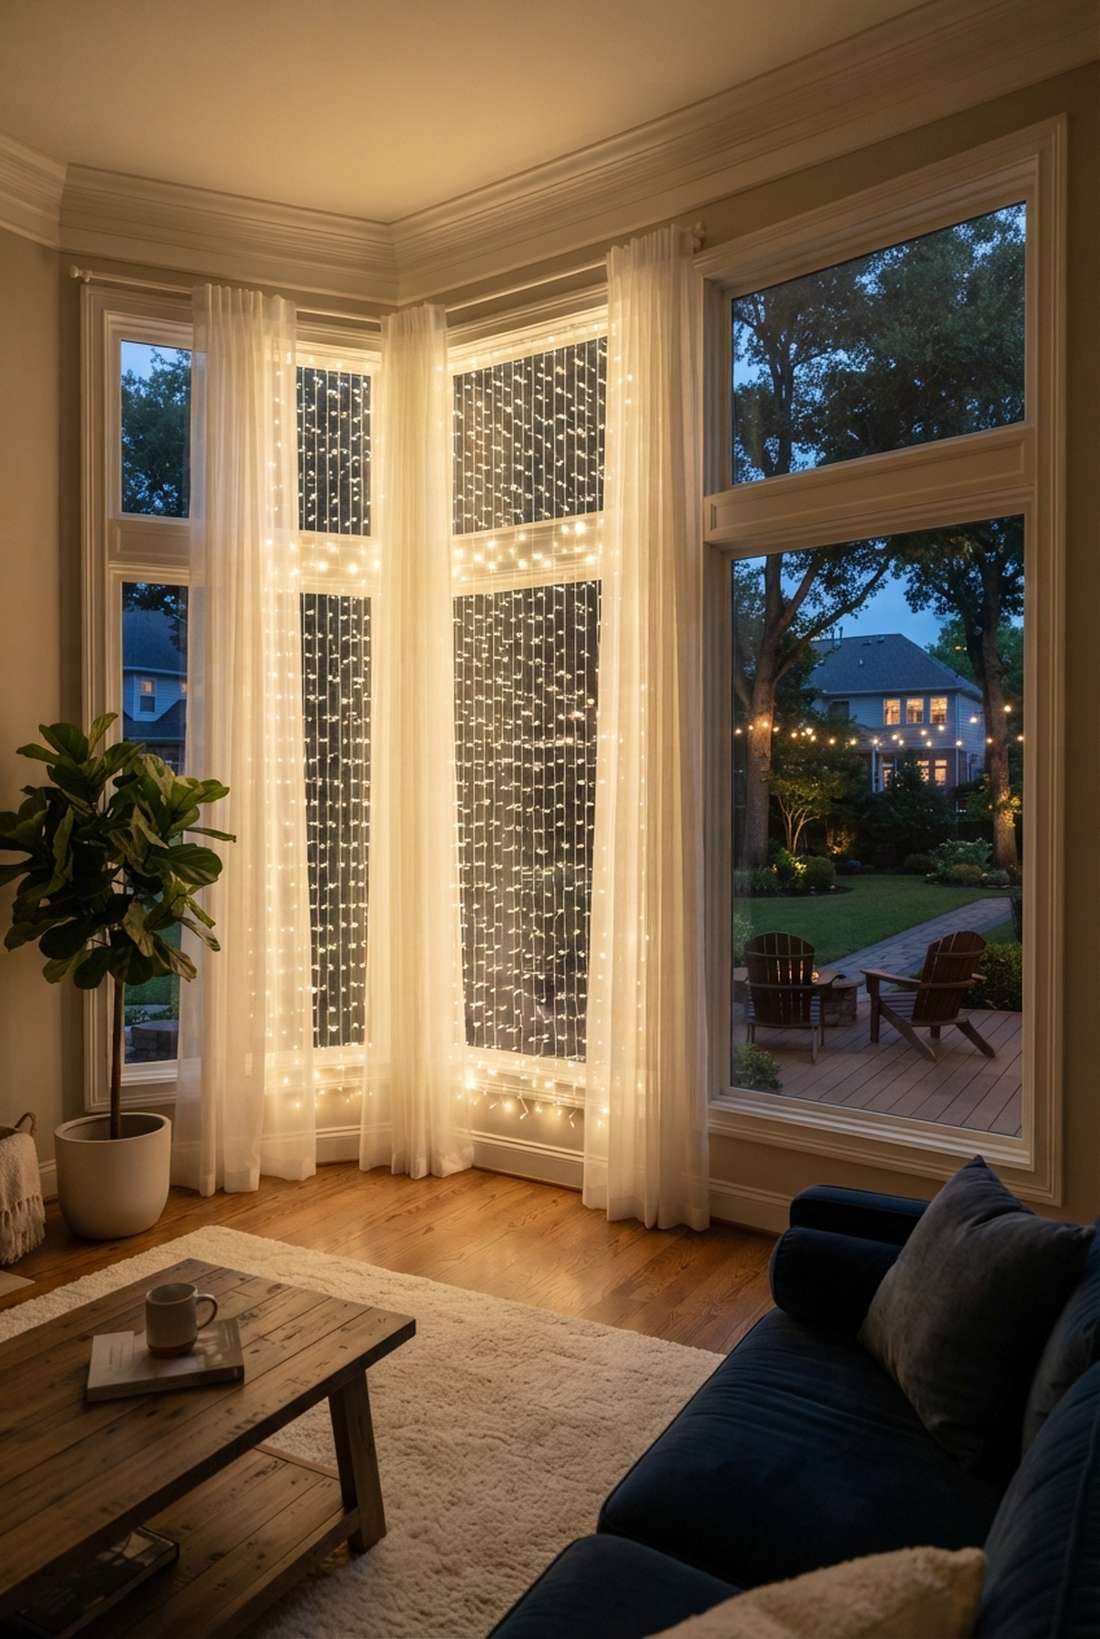
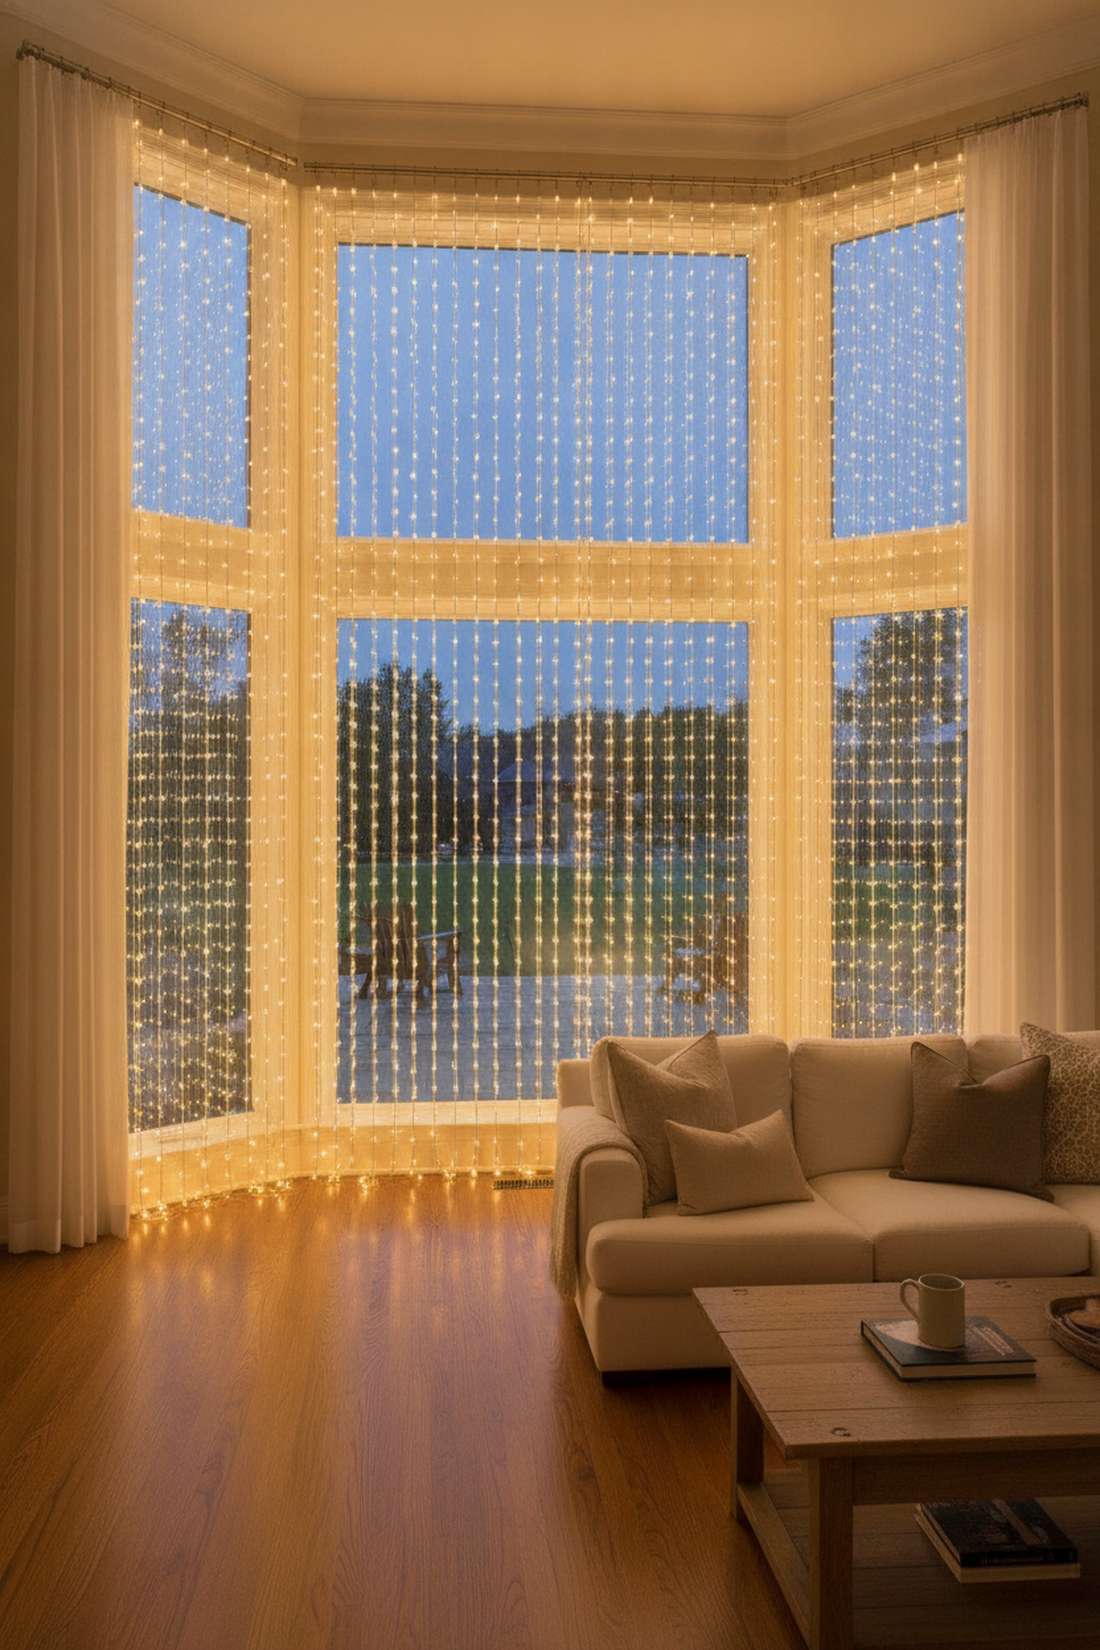
Looks like a sheet of shimmering rain against the glass. The window cascading curtain light display looks incredible from the inside while giving your home massive curb appeal outdoors.
Hanging individual strands takes hours and looks crooked, whereas buying a pre-spaced curtain light grid installs in minutes and delivers a surprisingly premium, symmetrical look. Tucking these lights directly behind sheer white drapes softens the individual bulbs into a solid glowing wall.
You can cover a large bay window for under $35. It is the absolute best way to maximize lighting with minimal effort.
- Key Materials: LED curtain light grid, tension rod, sheer curtains
- Vibe / Style: Elegant shimmering backdrop
- Difficulty: Hangs just like a curtain
- Budget Breakdown: Light grid: $25 | Tension rod: $10
- Creator’s Tip: Do NOT untie the vertical drop strands until the main horizontal wire is completely hung and secured.
- Smart Sourcing: LED cascading curtain lights (pre-spaced kit) and heavy-duty window tension rods.
Wait until you see how this final architectural trick makes cheap wooden beams look incredibly luxurious…
25. Exposed Beam Wrapped Accents
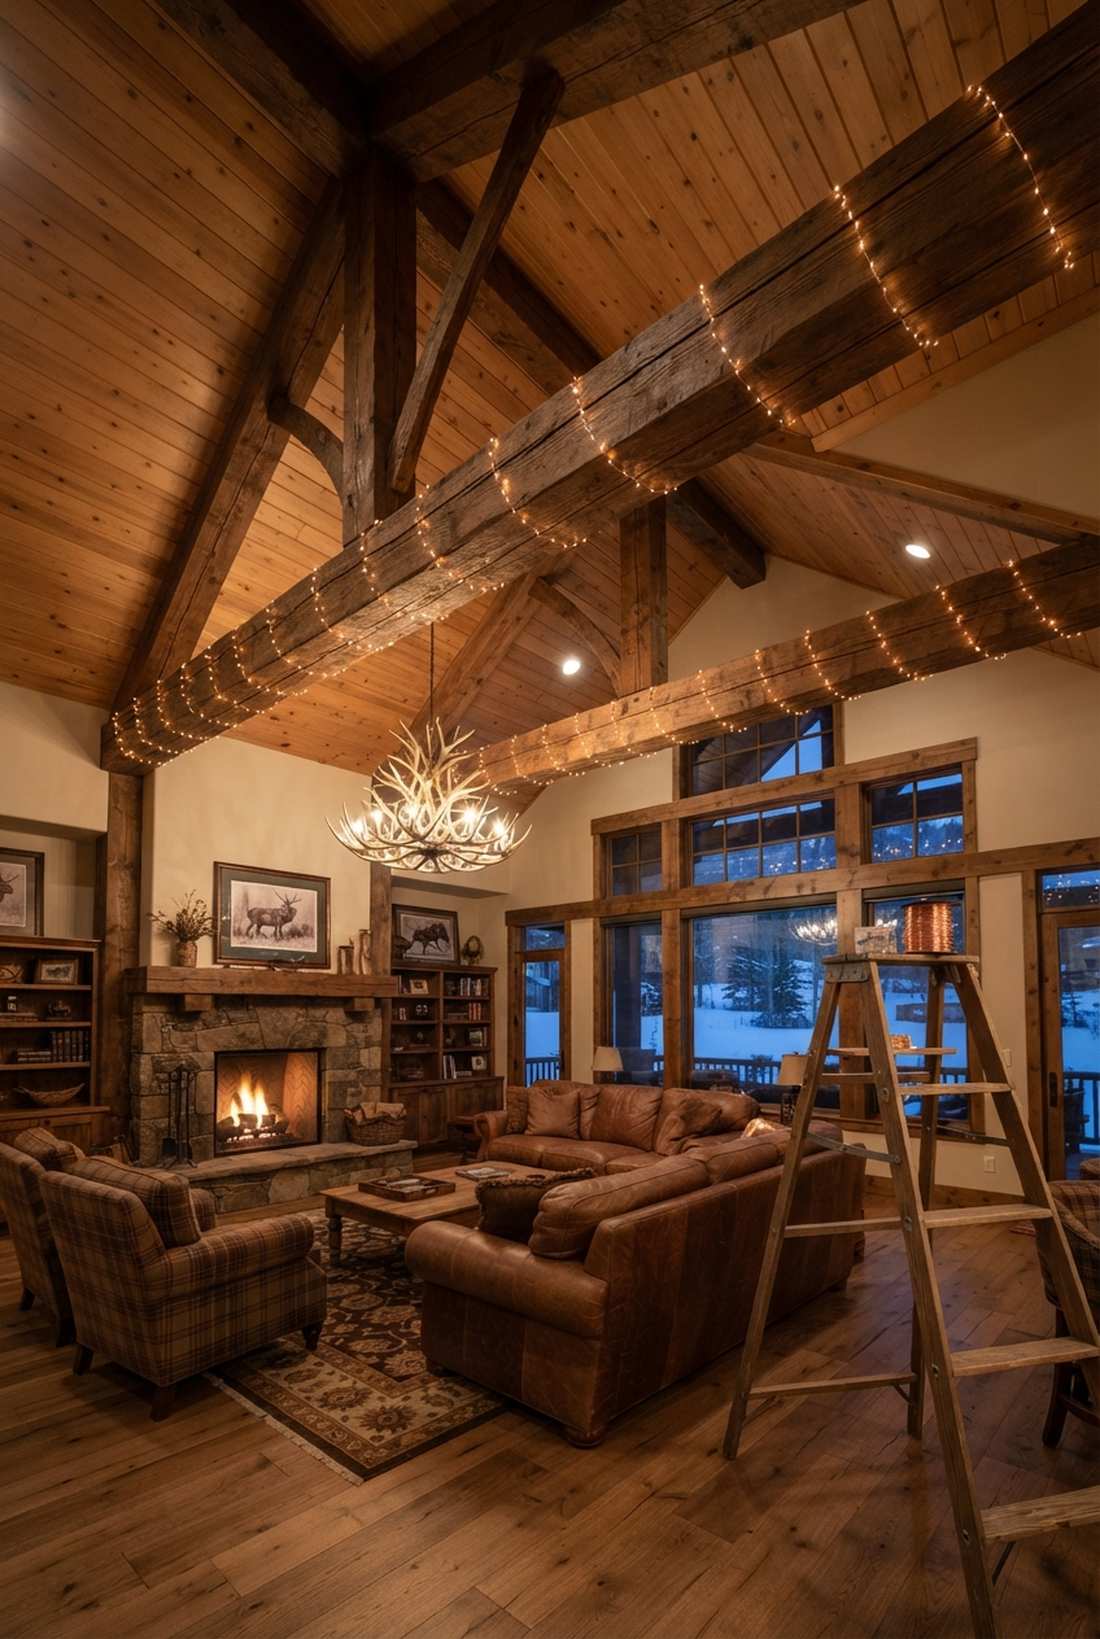
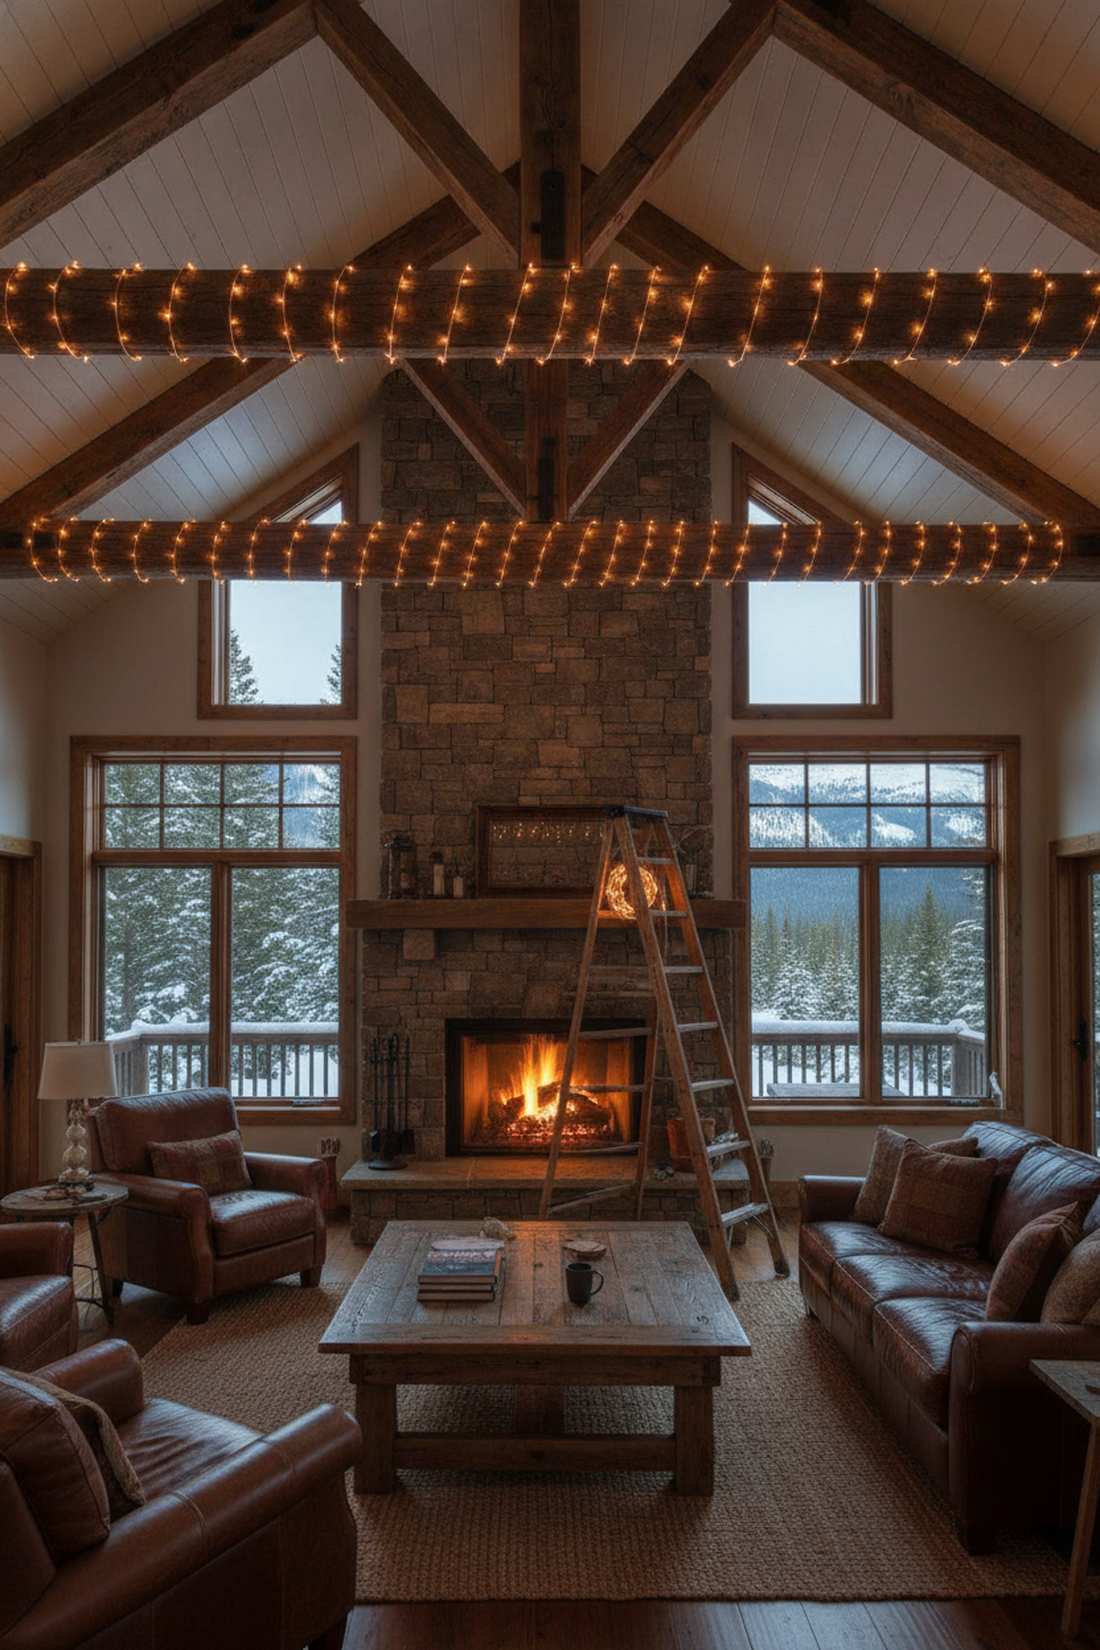
Transforms high ceilings into a cozy, rustic lodge ceiling. Wrapping exposed wooden ceiling beams brings the lighting up high, eliminating the need for harsh overhead floodlights.
Stapling wires into wood is a terrible idea that ruins the timber, but using clear specialized cable clips gives a designer-level finish while protecting your home’s architecture. The contrast between rough-hewn wood and delicate micro-LEDs creates stunning visual friction.
Wrapping three main beams will cost roughly $45. Save this to your vaulted ceiling decor board!
- Key Materials: Copper wire lights, clear cable clips, tall ladder
- Vibe / Style: Rustic mountain lodge
- Difficulty: Requires ladder balancing
- Budget Breakdown: Copper strands: $30 | Clips: $15
- Creator’s Tip: Spacing the coils wider (about 12 inches apart) makes the beam look elegant; coiling too tightly looks cluttered.
- Smart Sourcing: copper wire fairy lights (super long spool) and clear adhesive cable routing clips (bulk pack).
Creating Your Signature Fairy Light Experience
Strategic fairy lights party arrangements transform ordinary gathering spaces into premium, memorable destinations through smart material sourcing and high-end styling. By executing these exactly 25 expert blueprints—ranging from waterproof outdoor canopies to illuminated table runners—you can achieve a luxury aesthetic without the custom planner price tag. Remember that investing in commercial-grade string lights and UV-coated hardware ensures your lighting layout lasts well beyond a single night. Start with a dramatic focal point, grab a premium starter kit, and watch your space completely shift as the sun goes down.
Frequently Asked Questions
How many fairy lights do I need for a party space?
To avoid a sparse look, calculate roughly 100 lights per 10 square feet for ambient coverage, or upgrade to 200 lights per 10 square feet for a dense, premium photographic effect. Using bulk pack copper wire lights is the most cost-effective way to achieve high density, while high-CPC commercial grade string lights provide better overhead coverage for tents. Always buy a starter kit with 20% more length than you measured to account for wrapping and draping.
What’s the difference between fairy lights and bistro lights for parties?
Fairy lights utilize micro-LEDs on flexible, bendable wire, making them perfect for close-up centerpiece styling, wrapping banisters, and miniature garden supplies setups. Bistro lights (or Edison bulbs) feature large, heavy-duty glass or shatterproof acrylic bulbs spaced 2 feet apart, providing the intense task lighting required for outdoor dining. For the ultimate expensive-looking party, combine bistro lights overhead with fairy lights at eye level.
Can I leave outdoor fairy lights up during rain?
You can only leave them exposed if you specifically invest in waterproof outdoor fairy lights with an IP65 rating or higher. Cheap indoor craft lights will short out and rust immediately, ruining your setup. To ensure maximum durability for multi-day events, utilize heavy-duty battery enclosure boxes or solar-powered waterproof starter kits that are designed to handle heavy precipitation without failing.
How do I hang fairy lights without damaging walls or ceilings?
Never use nails or staples; instead, rely on heavy-duty transparent adhesive hooks or clear cable routing clips that remove cleanly without stripping paint. For brick or rough outdoor surfaces, utilizing UV-resistant mounting zip ties along existing pipes or utilizing tension rods inside window frames are brilliant damage-free alternatives. Investing in the right damage-free mounting hardware kit saves hundreds in home repairs.
Are battery-operated or plug-in fairy lights better for parties?
Battery-operated starter kits are strictly best for remote setups like floating centerpieces, mason jars, and remote pathways where extension cords are trip hazards. However, for large overhead canopies or backdrop frameworks, you must use plug-in commercial string lighting to guarantee consistent brightness and zero risk of the batteries dying mid-party. For long-term outdoor perimeters, upgrading to high-capacity solar LED kits is the smartest investment.