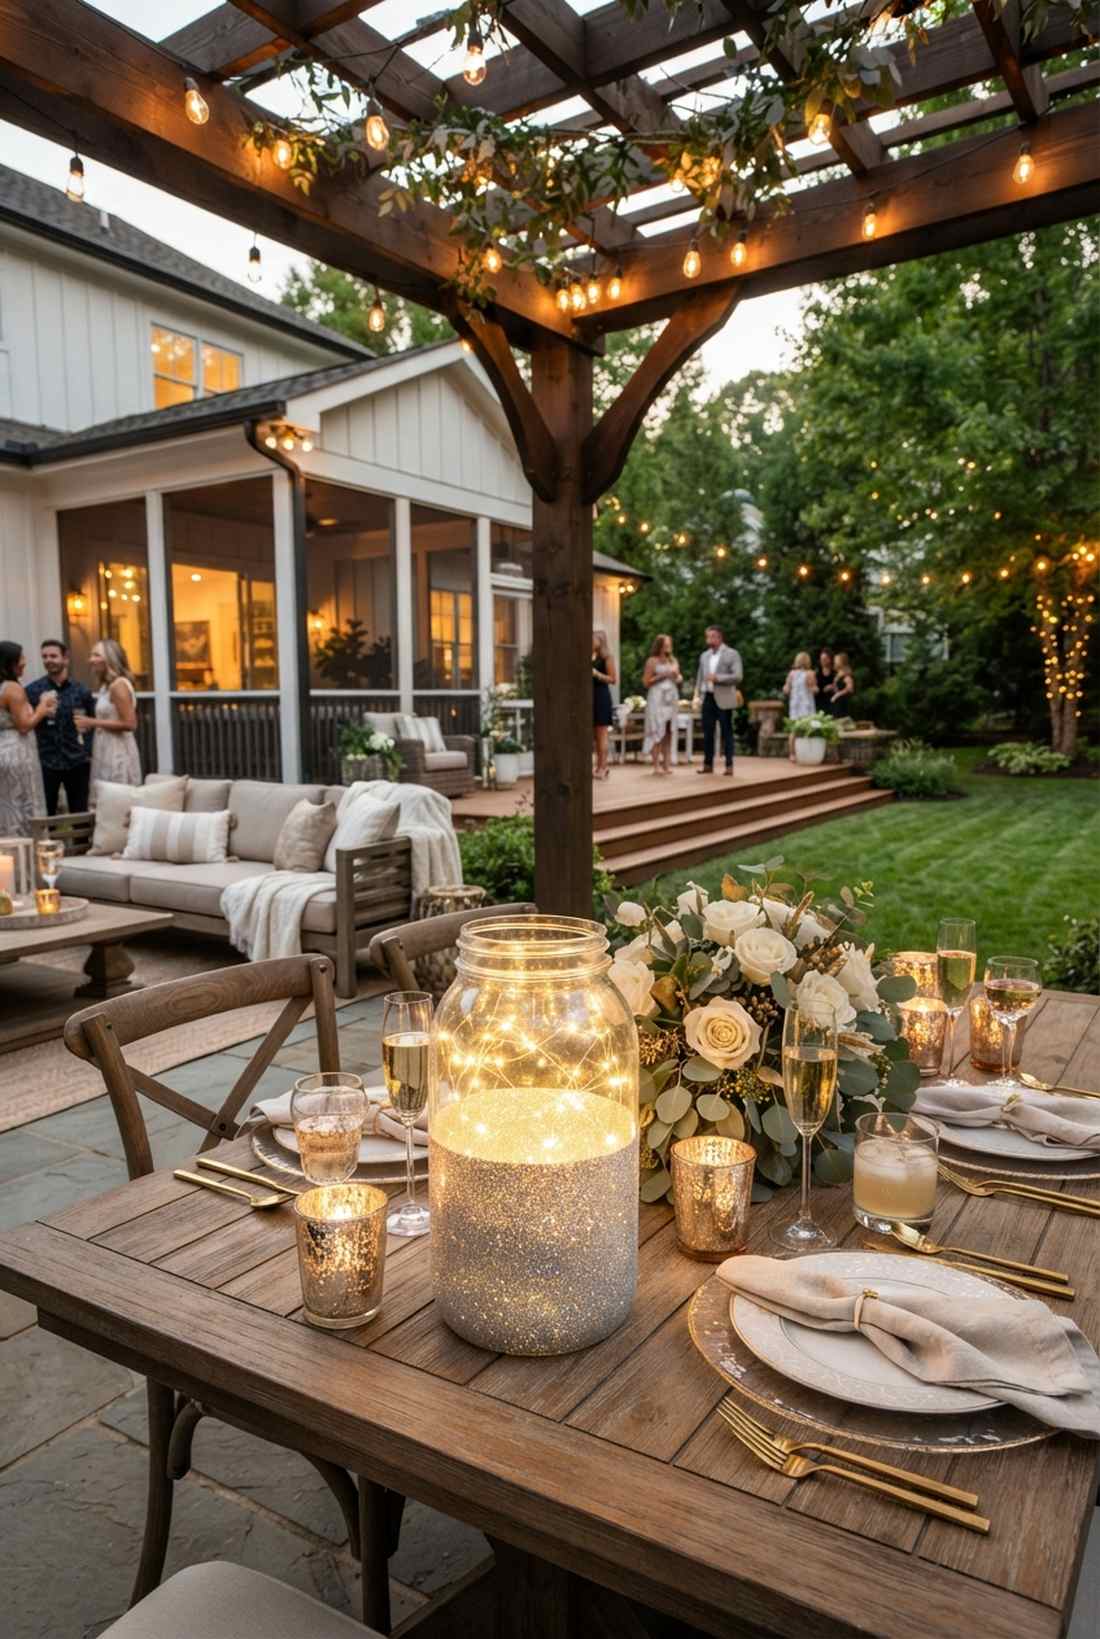
Creating a premium fairy lights mason jar setup instantly elevates your space for pennies. We break down the exact materials and budget blueprints for these stunning displays. Steal these designer-level techniques right now.
Design Snapshot Key Principles
- Light Source Selection: Use waterproof LED strings to prevent failure, or auto-on solar lids for zero-maintenance outdoor garden scaling.
- Surface Preparation: Wipe glass with commercial isopropyl prep pads before applying adhesives to guarantee commercial-grade durability.
- Material Sourcing: Ditch expensive craft stores and buy pre-cut and bulk-packed accessories to cut centerpiece costs by 70%.
- Visual Balance: Layer dense organic elements at the bottom while keeping the top airy to maximize high-end ambient light diffusion.
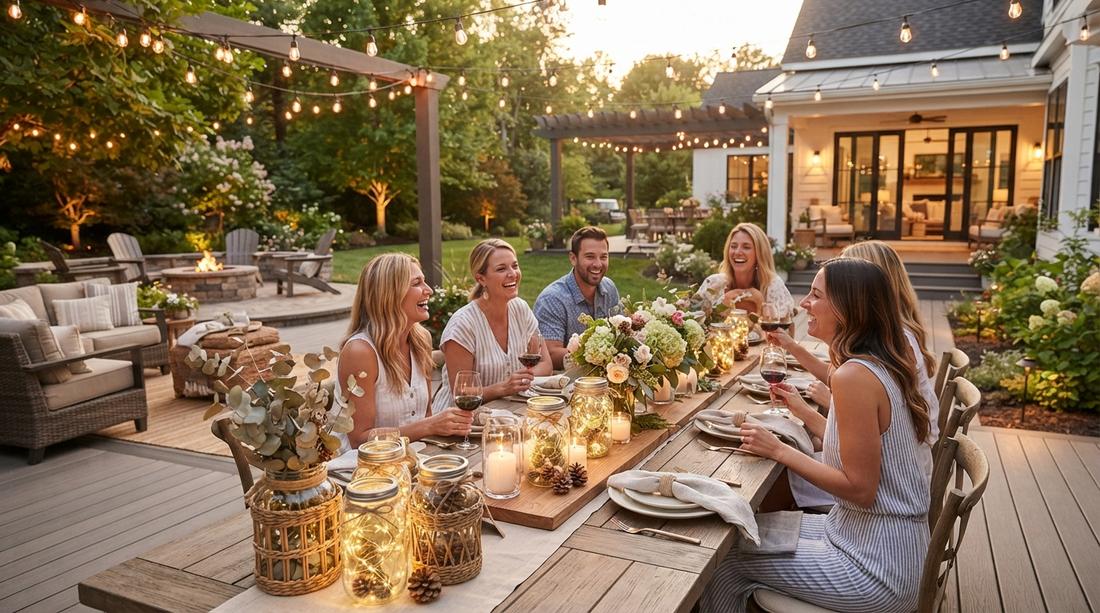
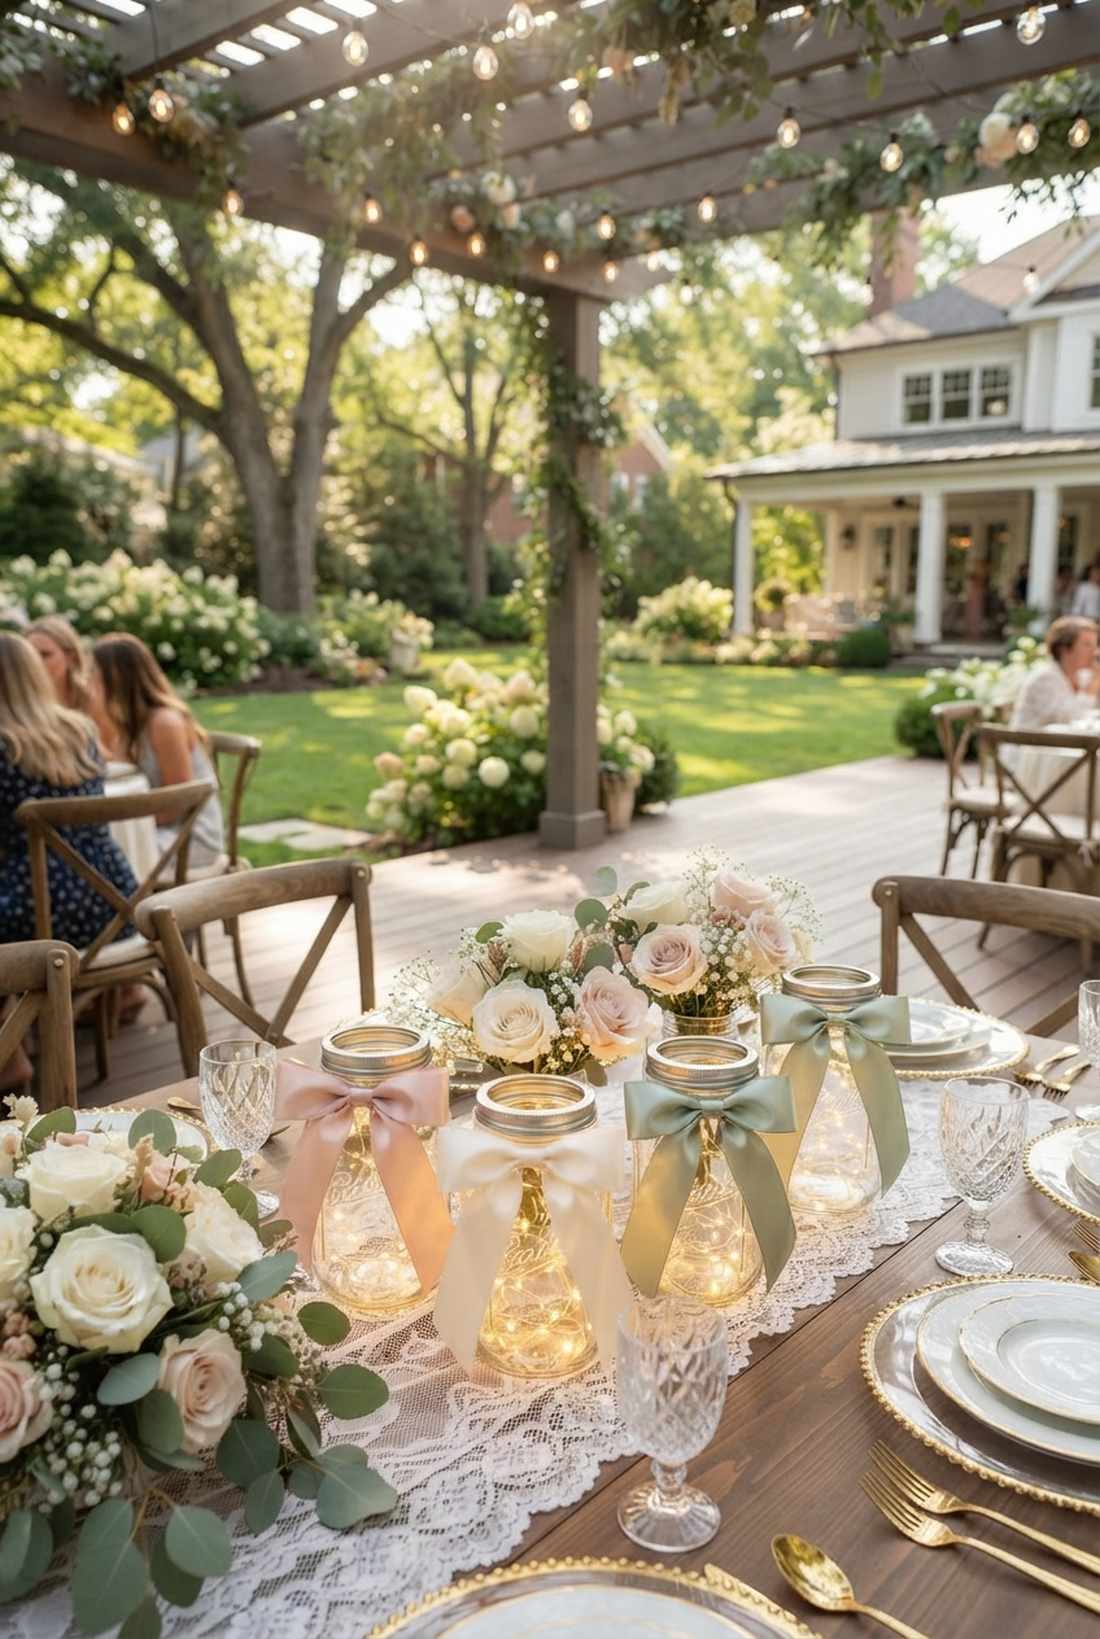
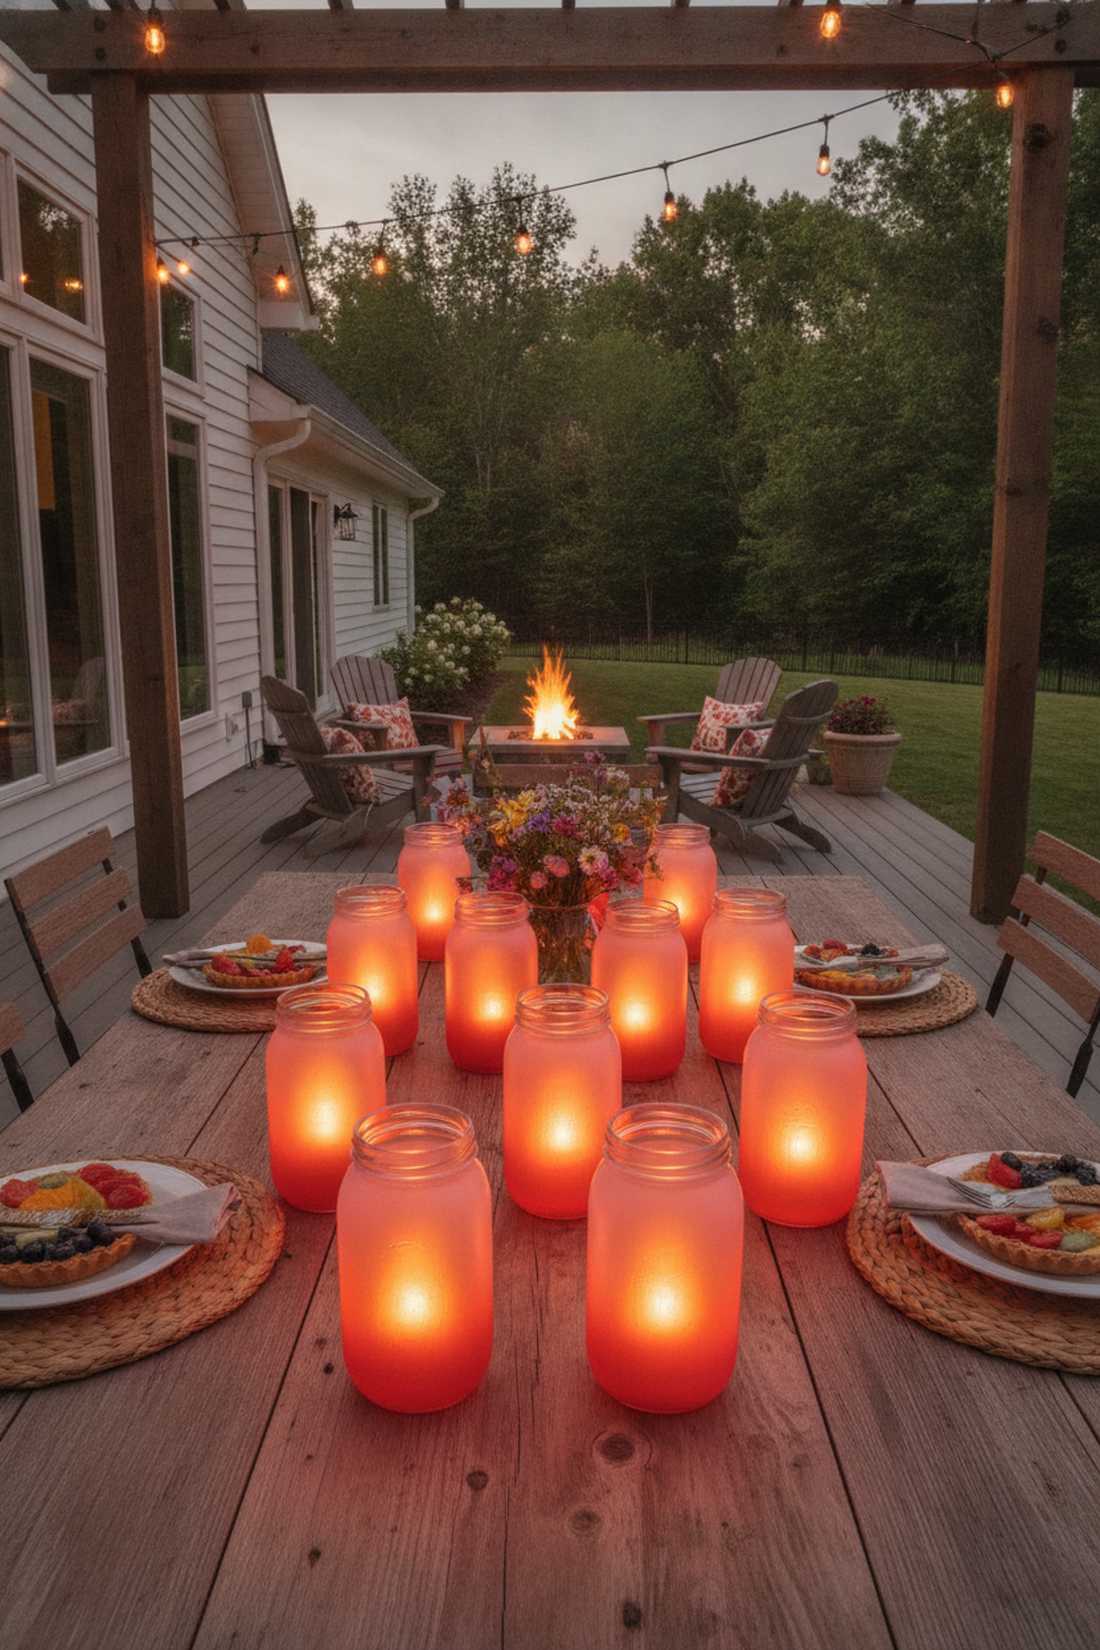
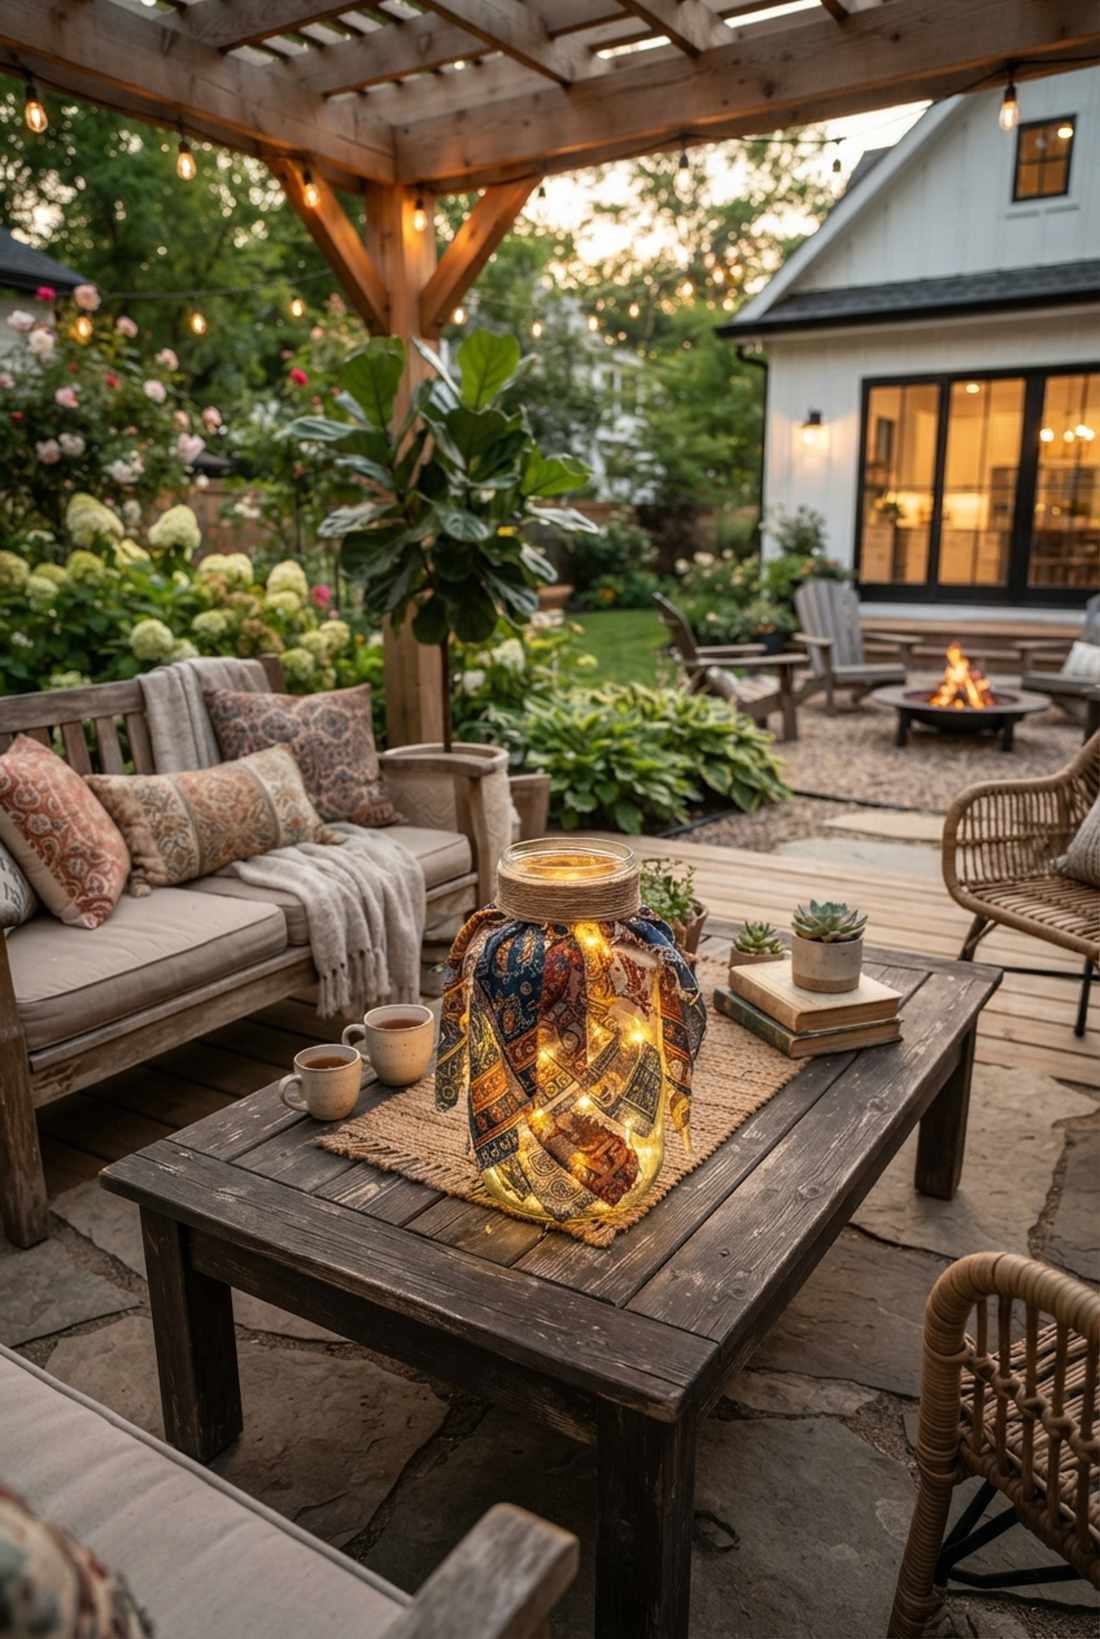
Romantic Fairy Lights Centerpiece Ideas
Basic tablescapes look cheap without proper illumination. These setups utilize targeted fairy lights table decor to transform standard dining areas into immersive, expensive-looking environments using brilliant sourcing tricks.
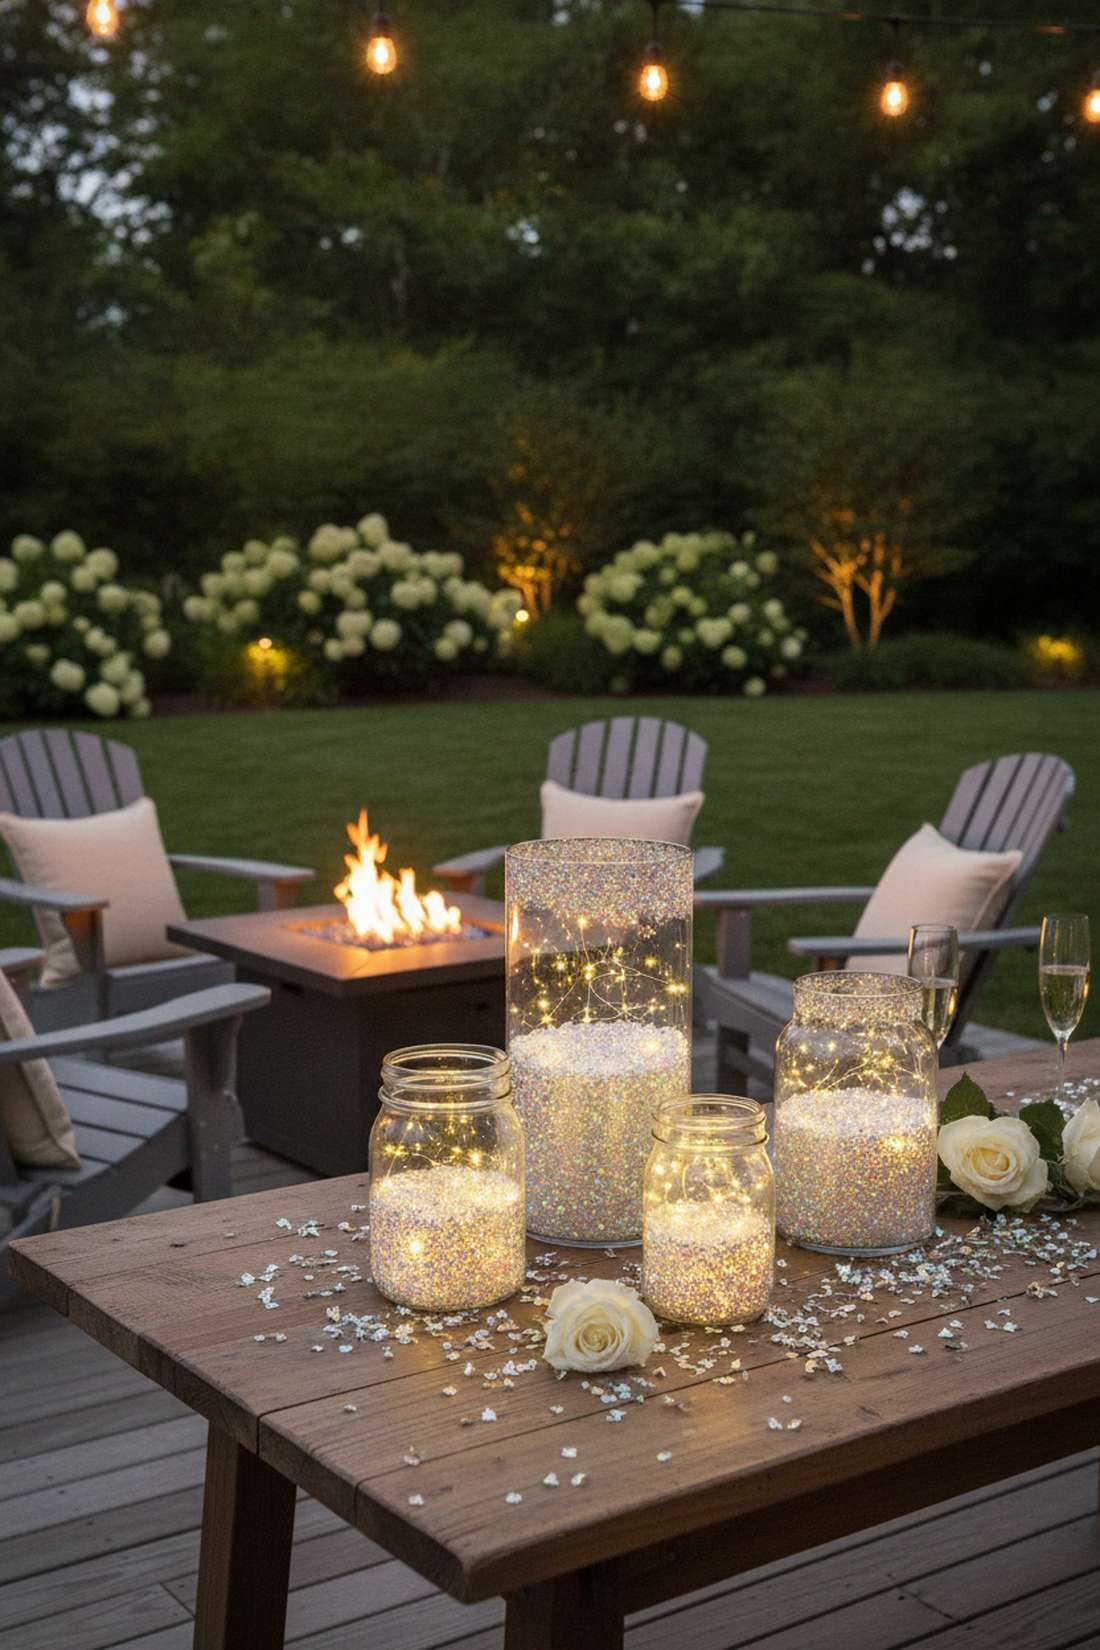
1. Hydrangea and Twinkle Lights Centerpiece
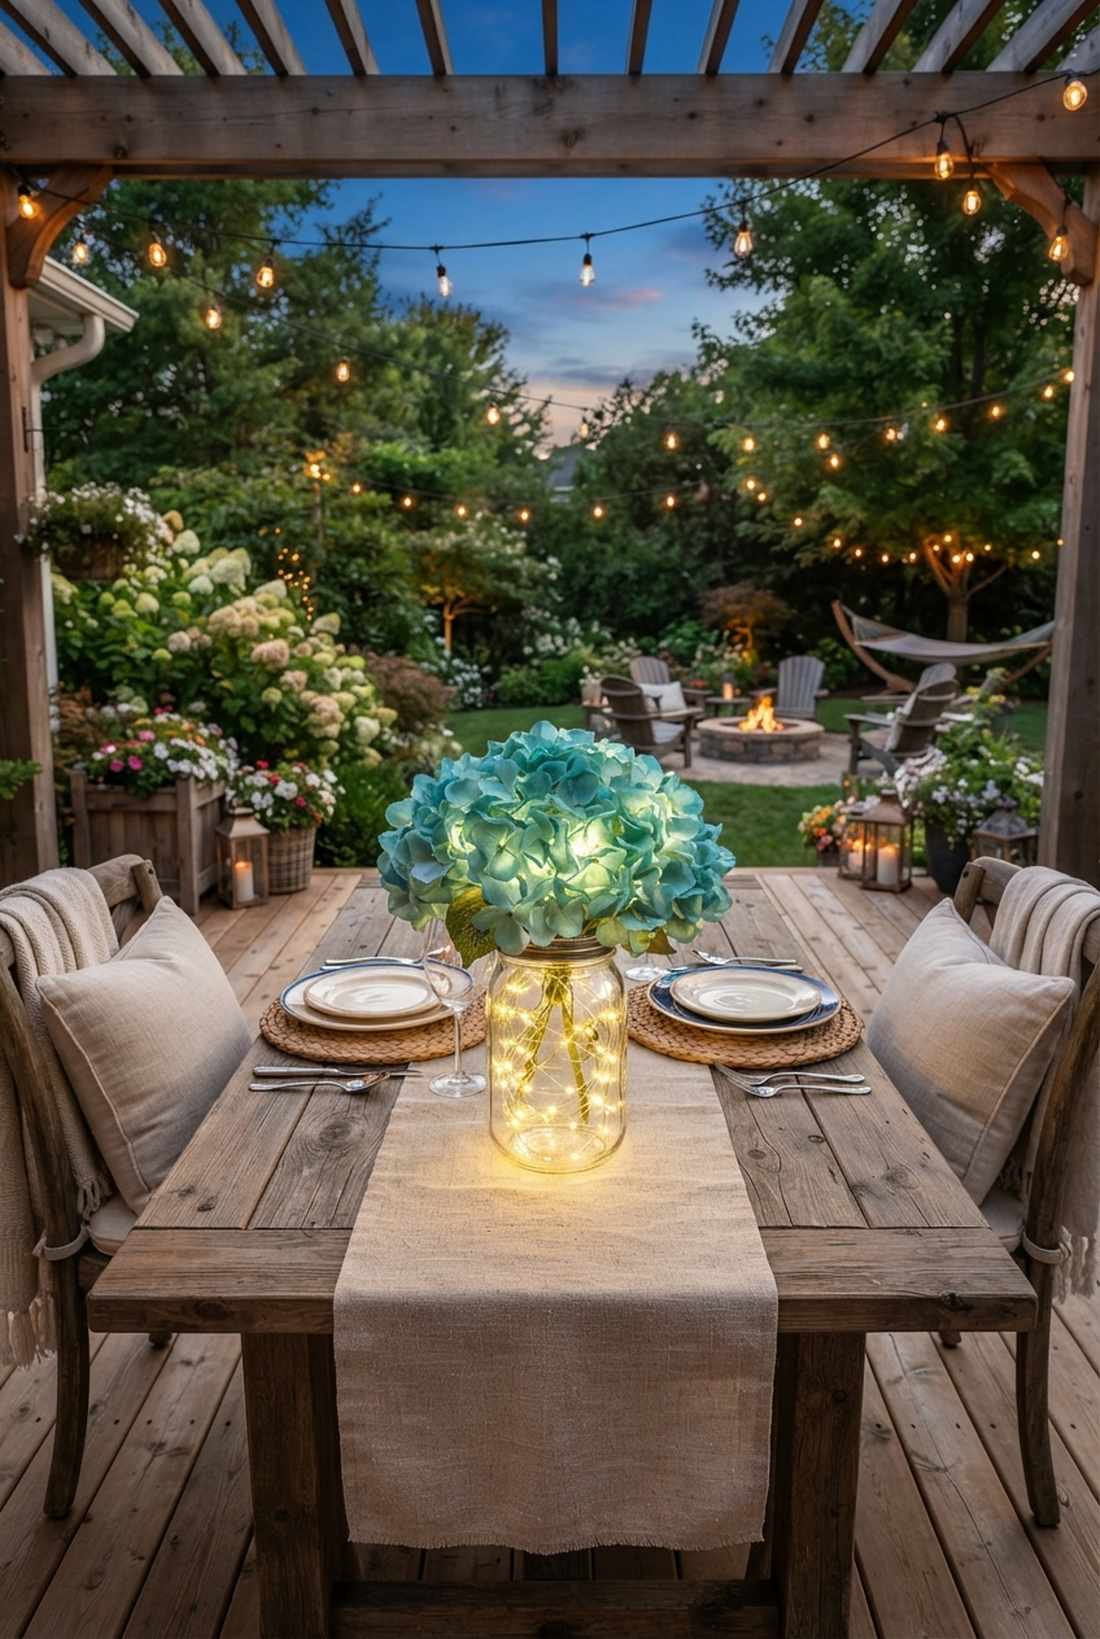
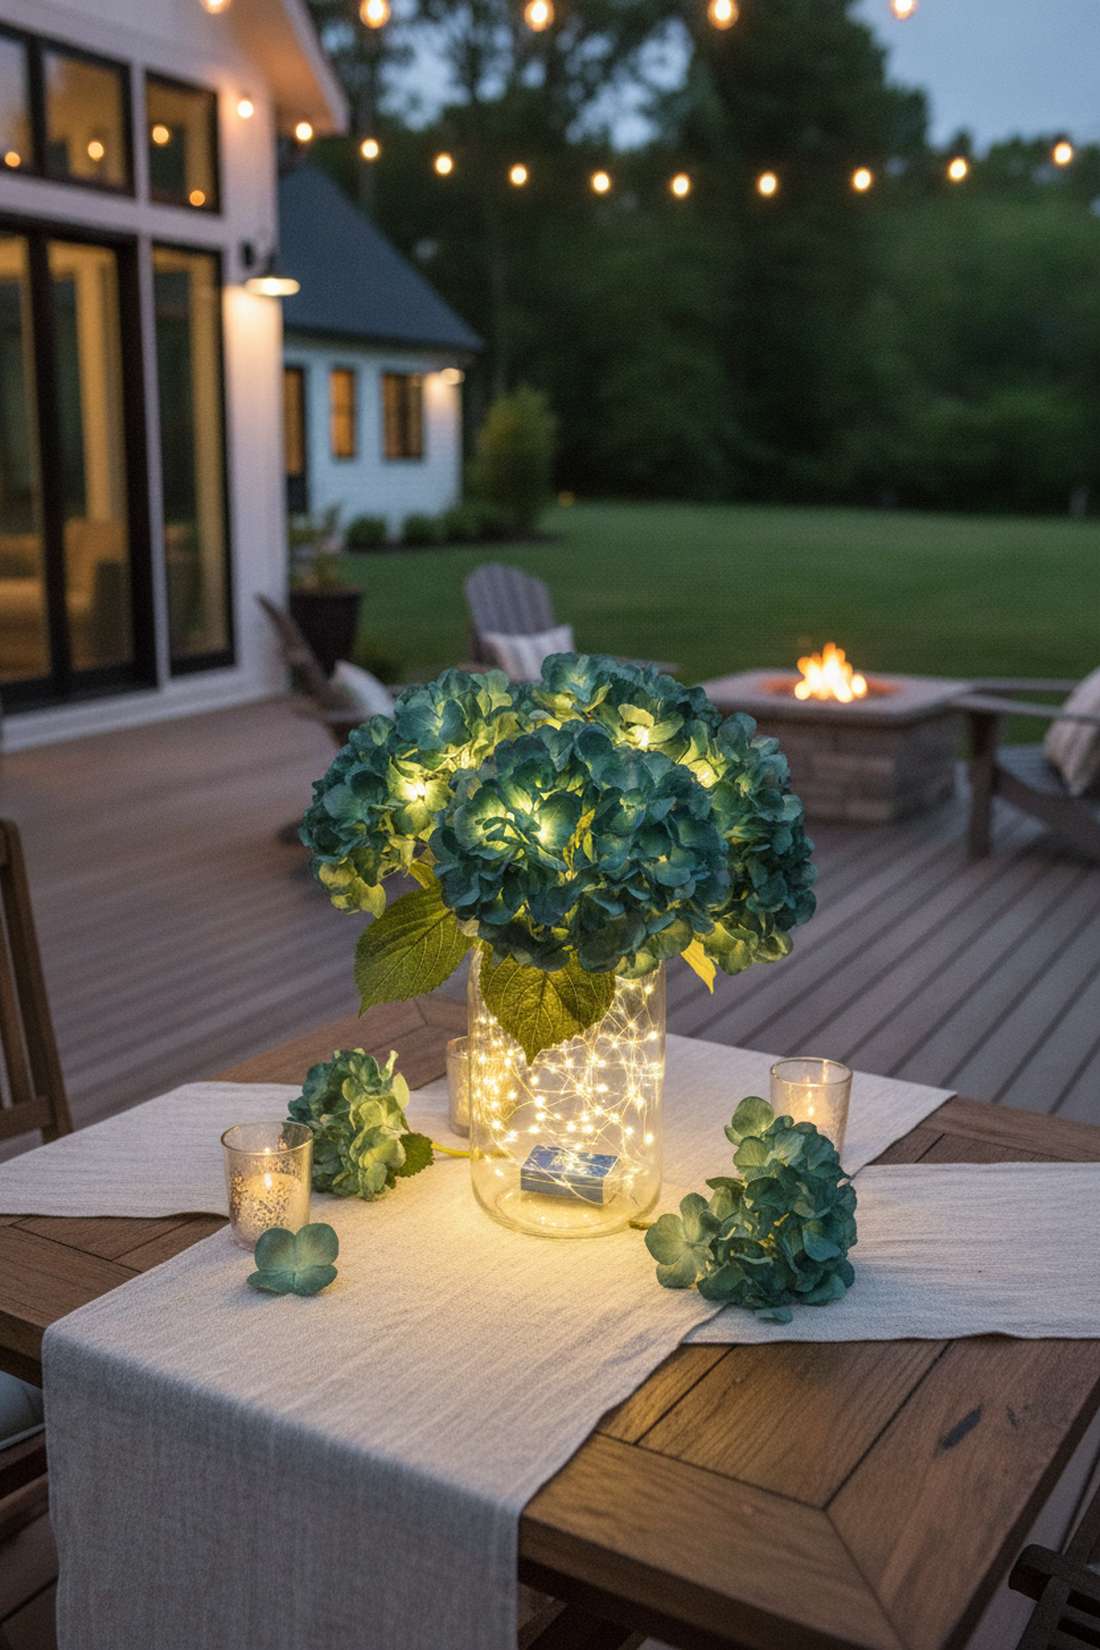
This rustic floral centerpiece feels straight out of a botanical fairy tale. It works exceptionally well as a primary focal point for a sweetheart table or outdoor patio dining.
While standard faux flowers look incredibly plastic, dropping them over a hidden fairy lights centerpiece illuminates the petals from within, masking imperfections. This layout delivers a surprisingly premium look by glowing through the translucent blooms.
You can effortlessly assemble this for under $15 per table. Save this to your DIY wedding board!
- Key Materials: Teal silk hydrangeas and micro LED wire strands
- Vibe / Style: Enchanted summer evening
- Difficulty: Absolute beginner
- Budget Breakdown: Lights: $5 | Florals: $8 | Jar: $2
- Creator’s Tip: Tuck the battery box under the lowest leaf layer to keep the magic alive without exposed plastic.
- Smart Sourcing: Use a bulk pack micro LED fairy lights and premium real-touch faux hydrangeas.
2. Baby’s Breath Cloud Lanterns
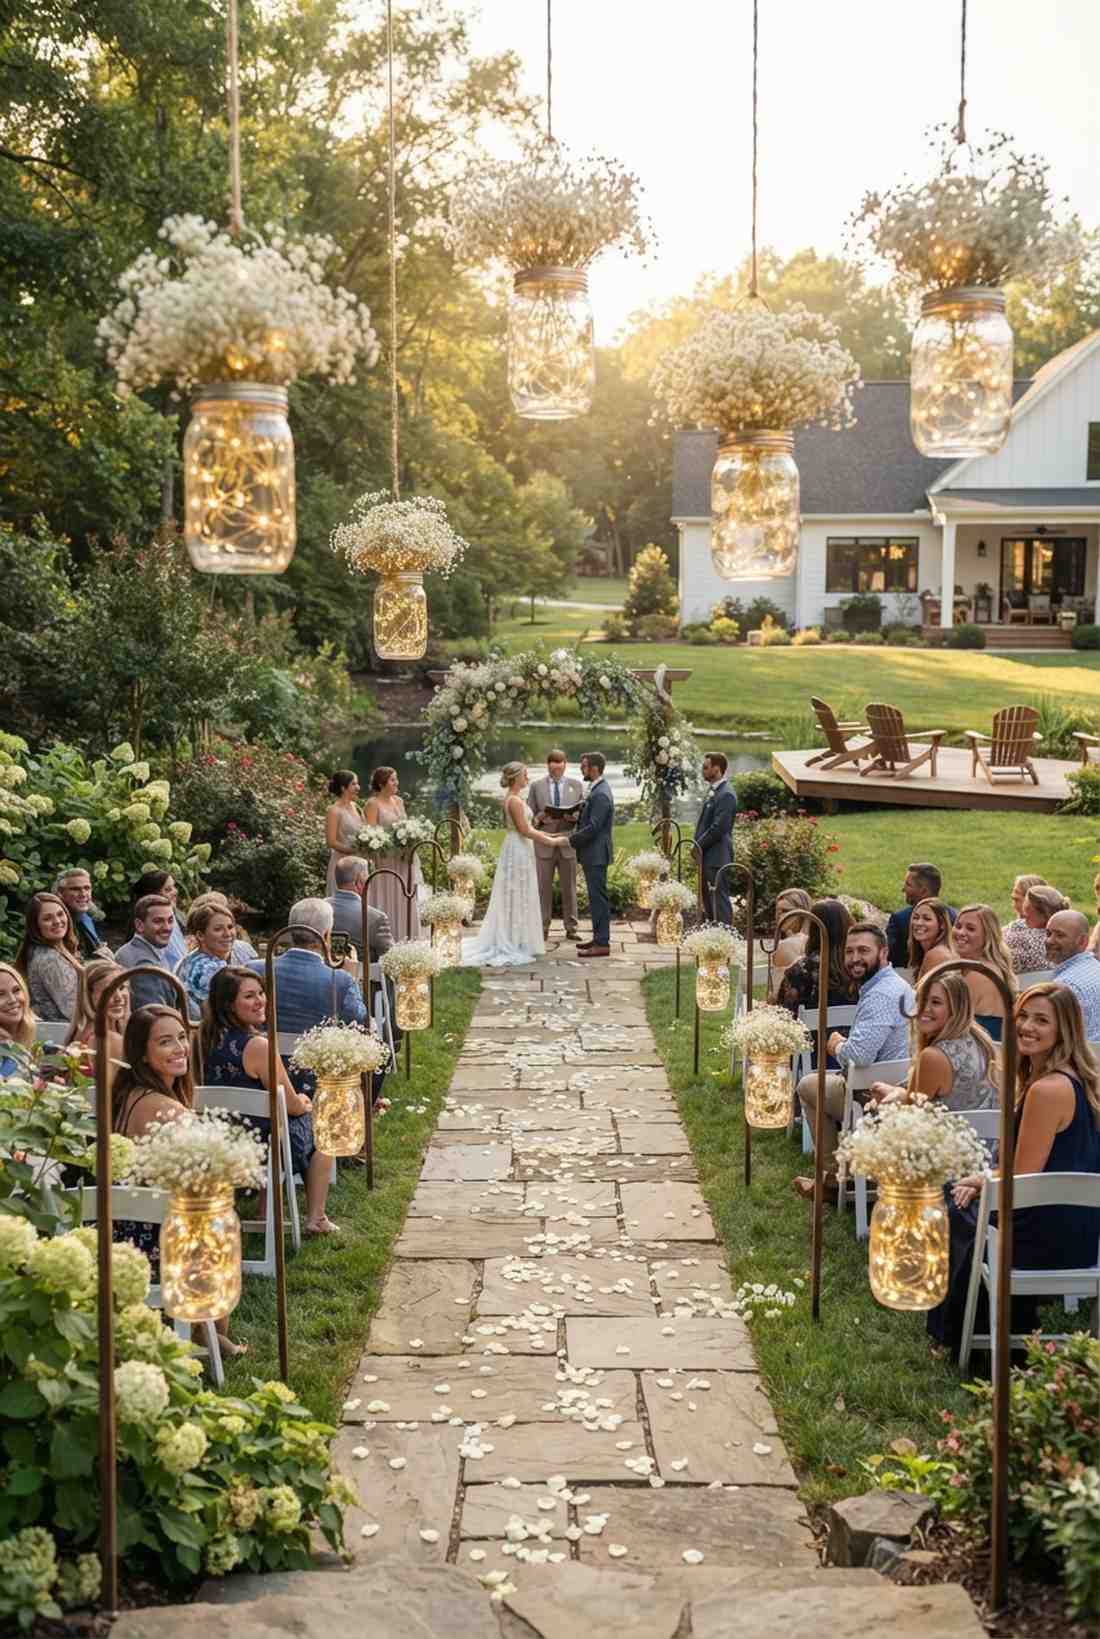
A floating floral lantern feels like capturing an actual cloud in glass. This airy concept is perfect for lining long, romantic wedding aisles or highlighting an entryway console.
Most DIYers overstuff their jars, but utilizing delicate white stems creates a high-end designer-level finish. The tiny blooms catch and fracture the light, simulating a miniature galaxy inside the glass.
Expect to spend around $10 for this setup. Highly recommended for a fast weekend win.
- Key Materials: Preserved baby’s breath, clear mason jars
- Vibe / Style: Ethereal minimalist
- Difficulty: Fast and easy
- Budget Breakdown: Botanicals: $6 | Lighting: $4
- Creator’s Tip: Pre-fluff the stems outside the jar to ensure maximum volume before insertion.
- Smart Sourcing: Order preserved bleached baby’s breath bundles and warm-white copper wire LEDs.
3. Rose Bush Cylinder Vases
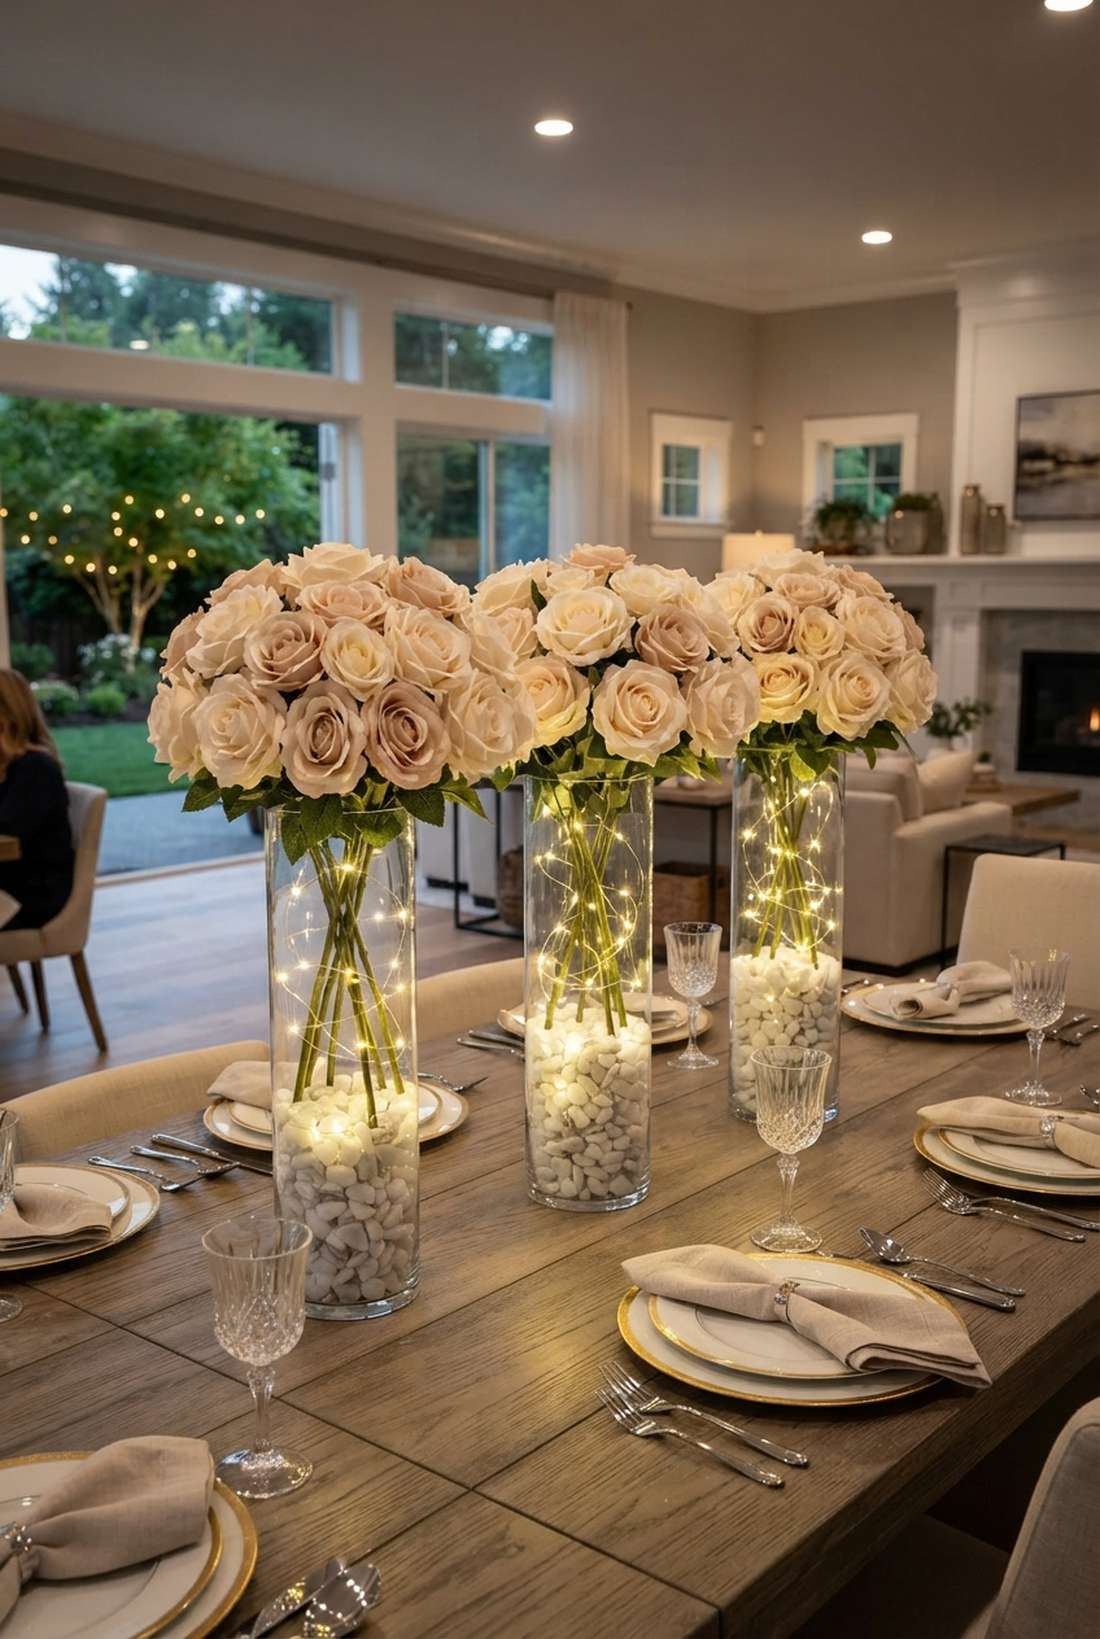
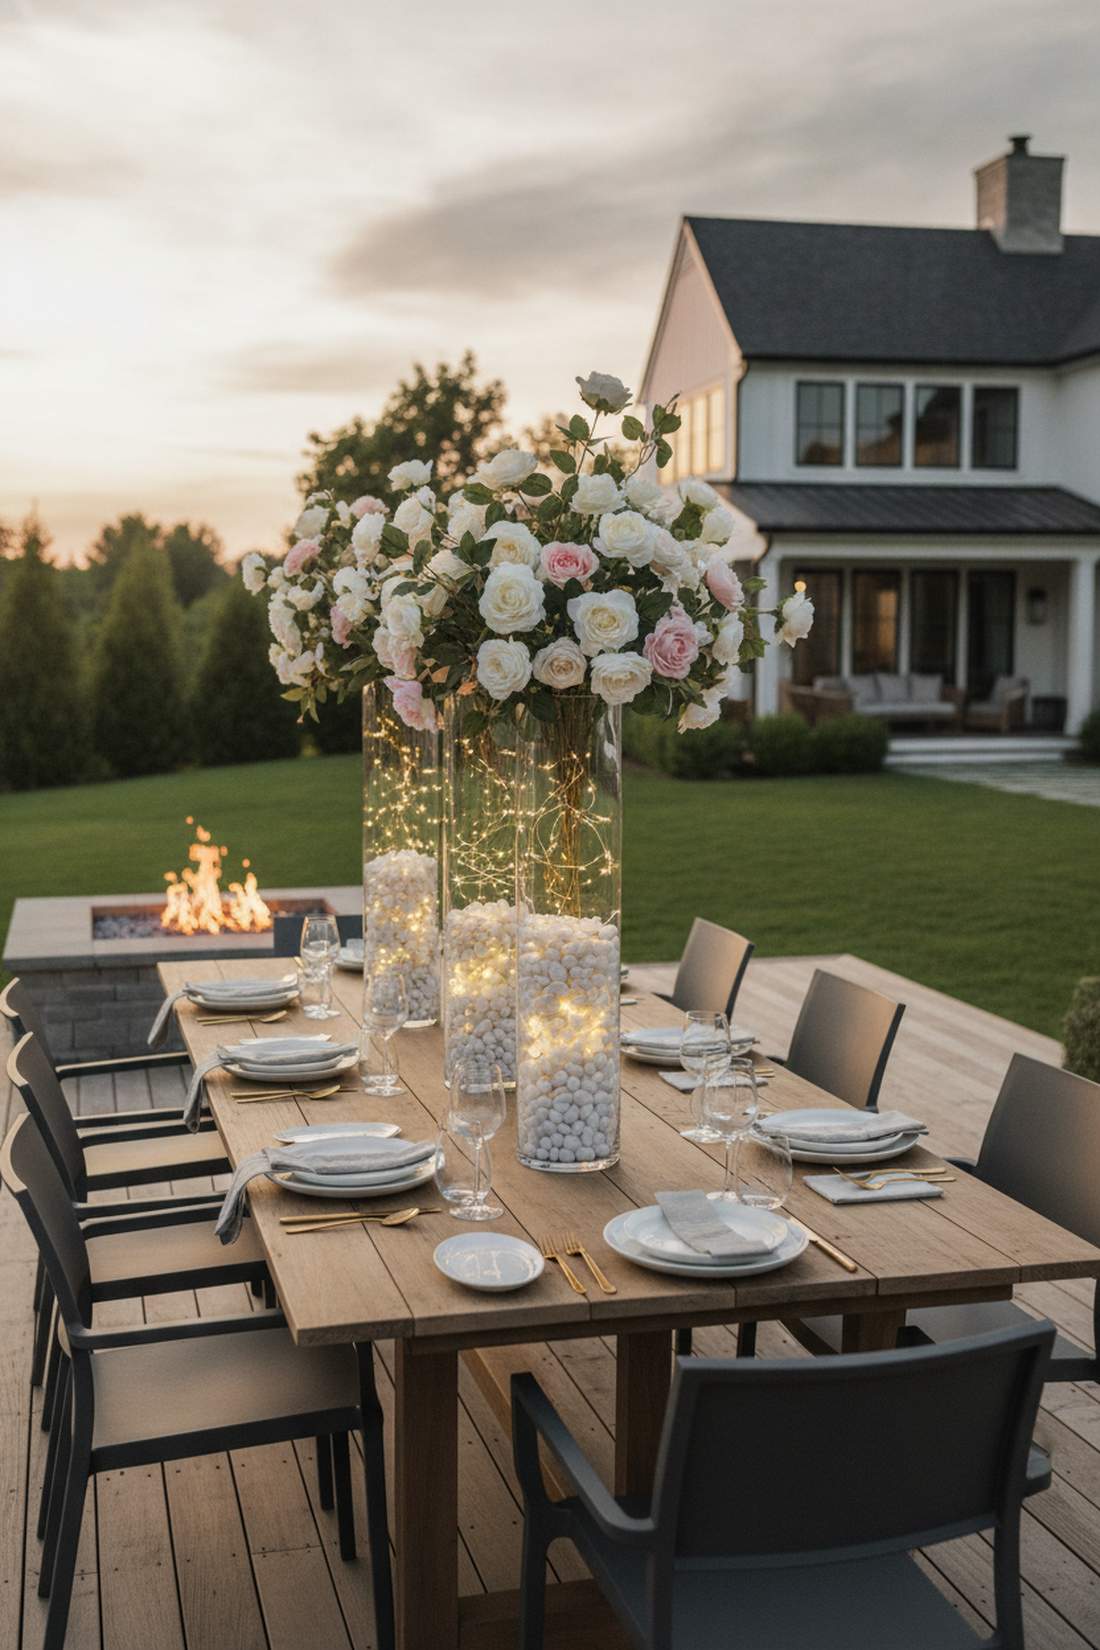
This tall illuminated cylinder arrangement feels distinctly modern and elegant. It acts as the perfect luxury placement for upscale dinner parties or corporate event tables.
Using basic craft materials often fails here, but anchoring the display with marble chips looks far more expensive than it is. Wrapping a fairy lights vase strand through the stones blasts a spotlight effect directly into the rose canopy.
This impressive build costs roughly $14. Pin this if you want an upscale look on a tight budget!
- Key Materials: Faux rose stems, white marble accent stones
- Vibe / Style: Contemporary luxury
- Difficulty: Moderate placement required
- Budget Breakdown: Stones: $4 | Roses: $7 | Cylinder/Lights: $3
- Creator’s Tip: Wash the marble stones before use to remove chalky dust that clouds the glass.
- Smart Sourcing: Pick up polished white marble vase fillers (bulk) and submersible LED string kits.
4. Rustic Jute-Wrapped Jars
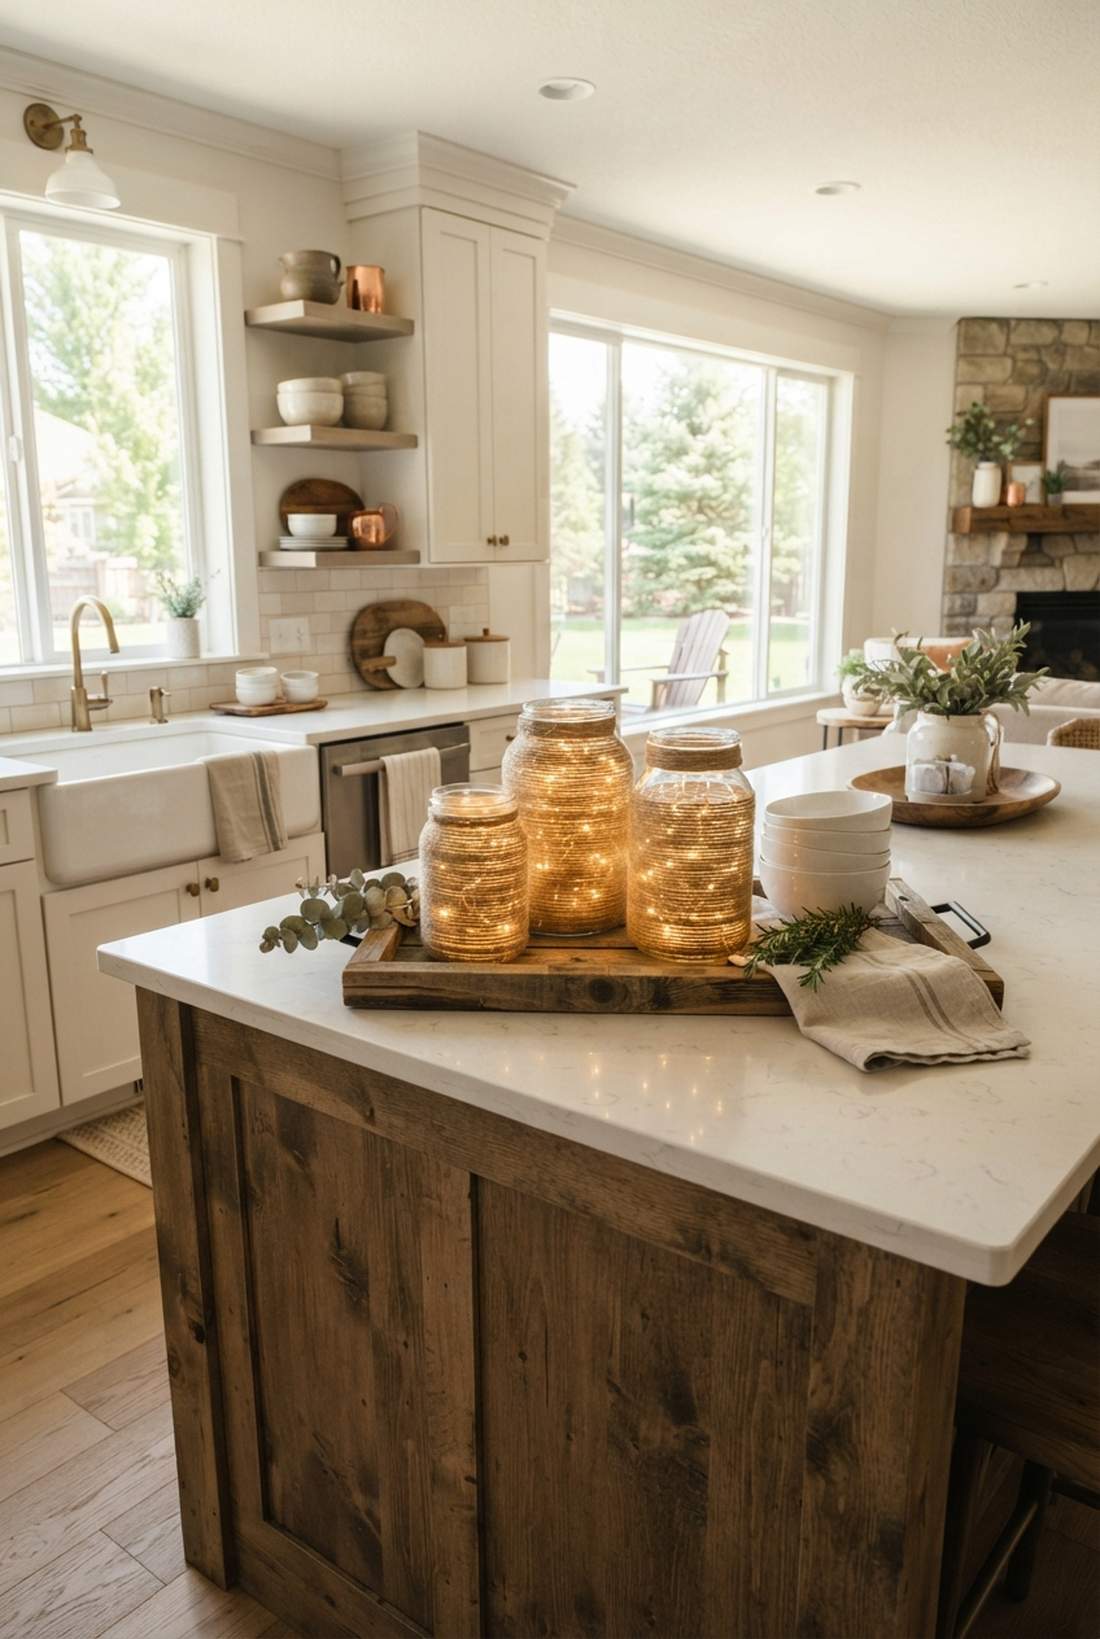
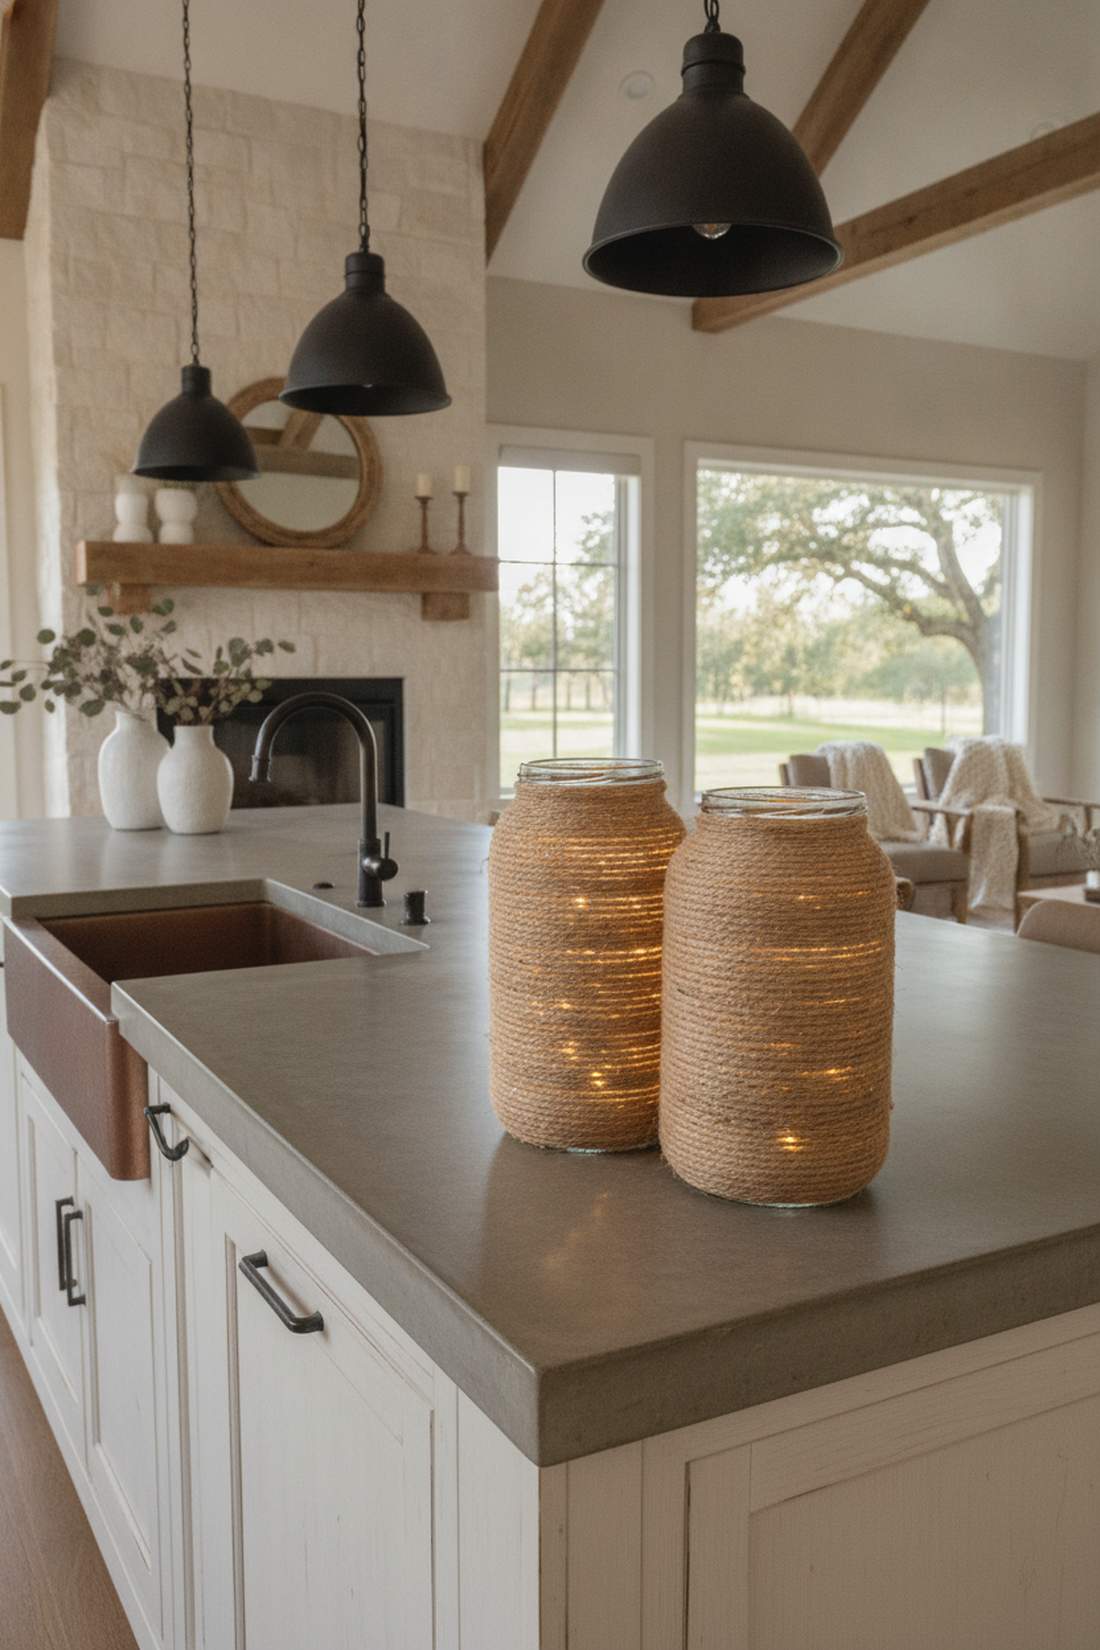
A texture-wrapped ambient jar brings a cozy, grounded farmhouse energy. It serves beautifully as an anchor piece for a rustic kitchen island or living room mantle.
People assume raw twine looks messy, but wrapping it with architectural precision gives a designer-level finish. The thick fiber naturally conceals the battery pack while letting the exposed glass radiate a warm glow.
You can execute this textured upgrade for just $6. It’s a fantastic, low-stress craft night project.
- Key Materials: Natural jute twine, hot glue
- Vibe / Style: Modern farmhouse
- Difficulty: Beginner wrapping
- Budget Breakdown: Twine: $2 | Lights: $4
- Creator’s Tip: Use a tiny dot of hot glue every third wrap to keep the tension incredibly tight.
- Smart Sourcing: Use industrial-grade jute twine spools and ultra-thin silver wire LEDs.
Most people get this completely wrong… until they try the exact layout coming up next.
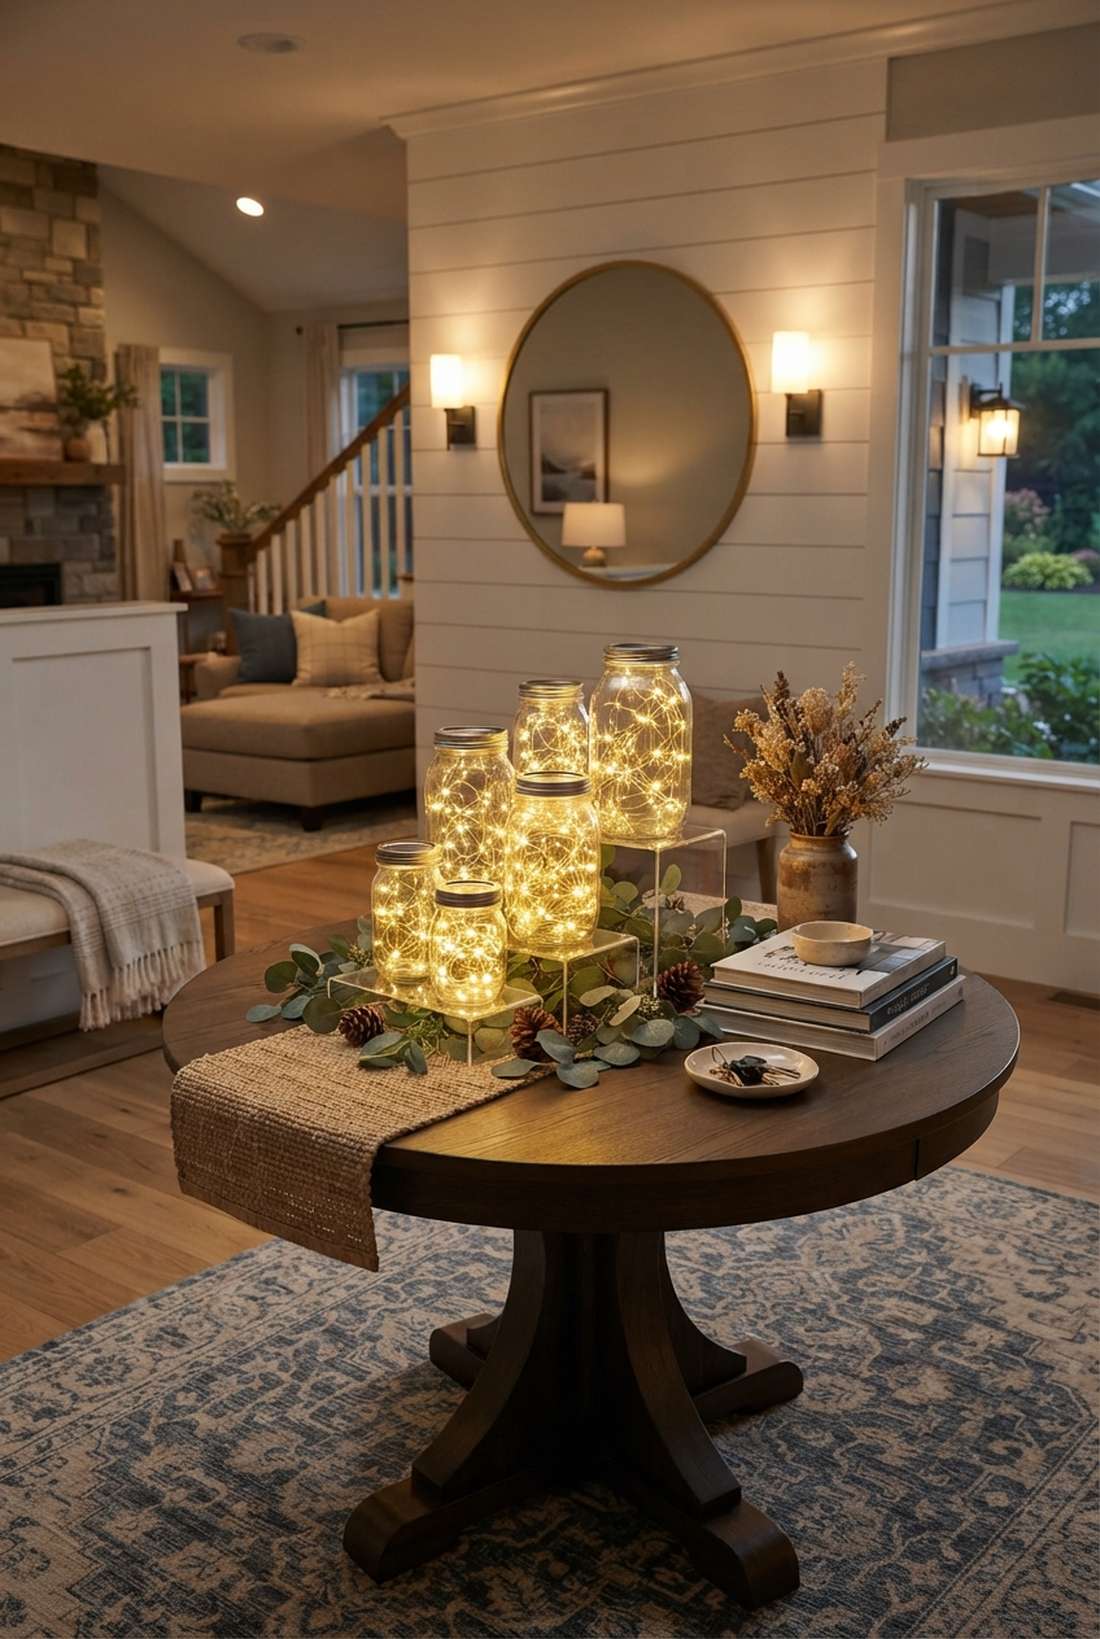
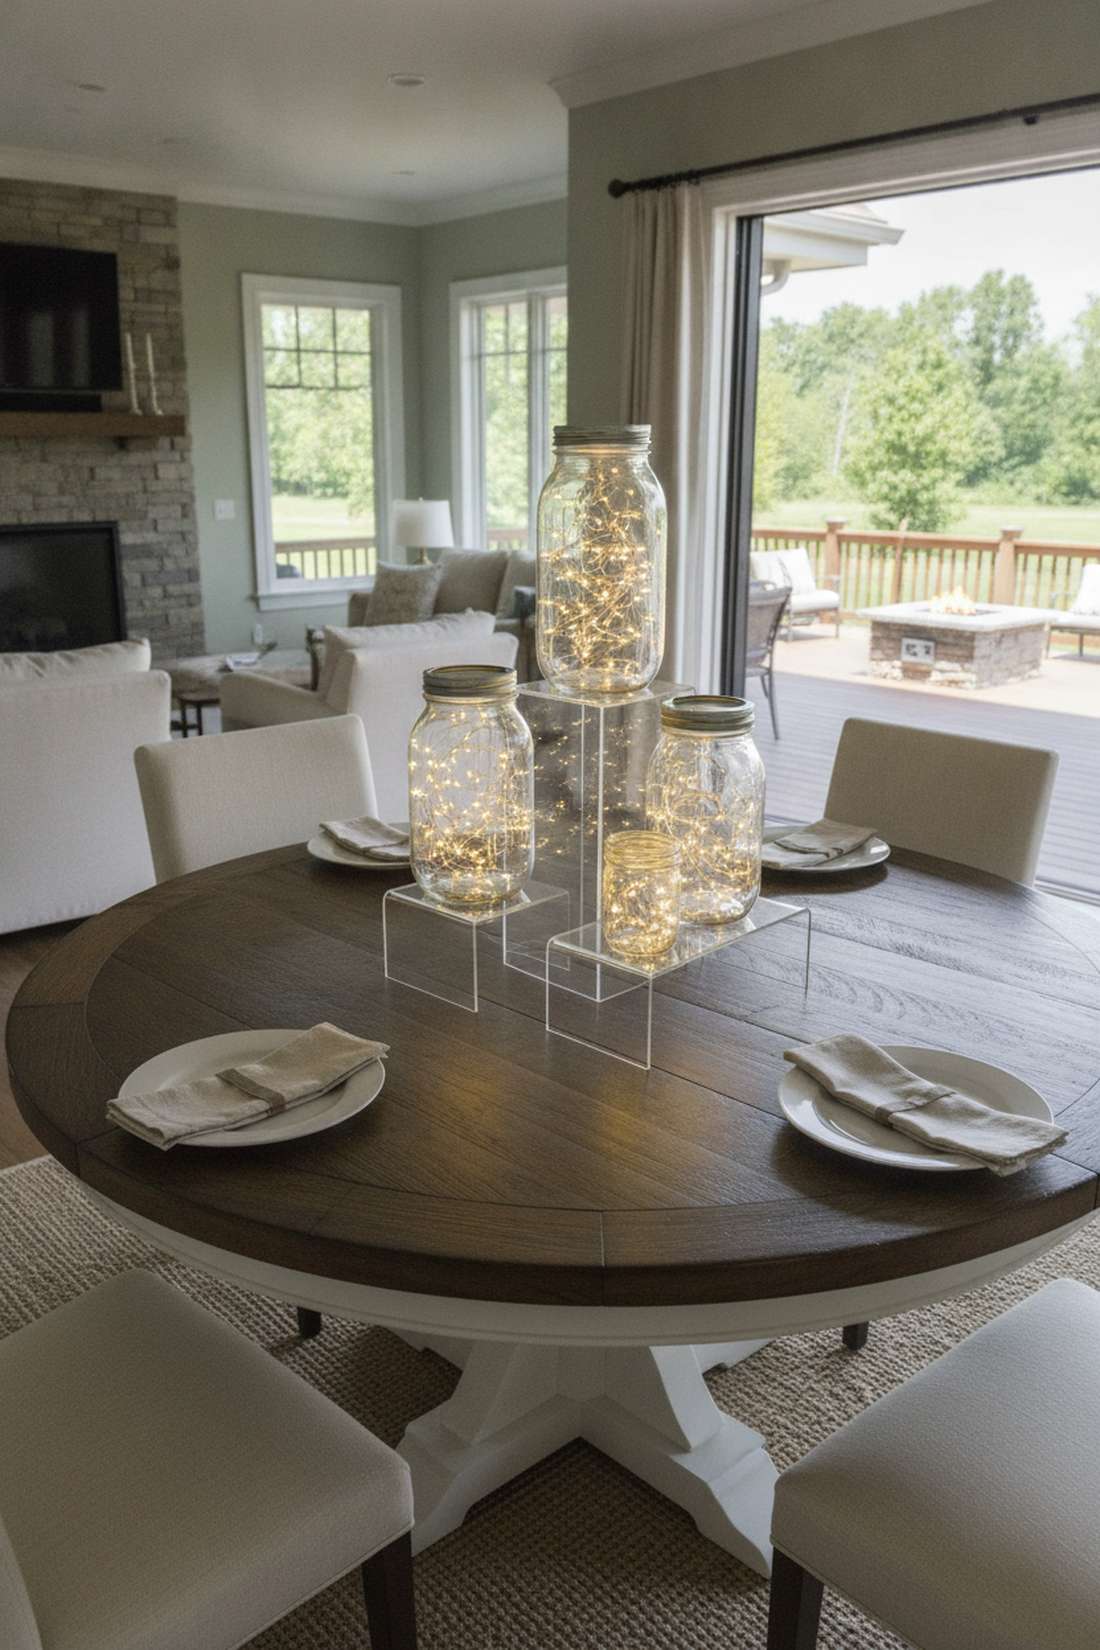
5. Stacked Jar Tower Displays
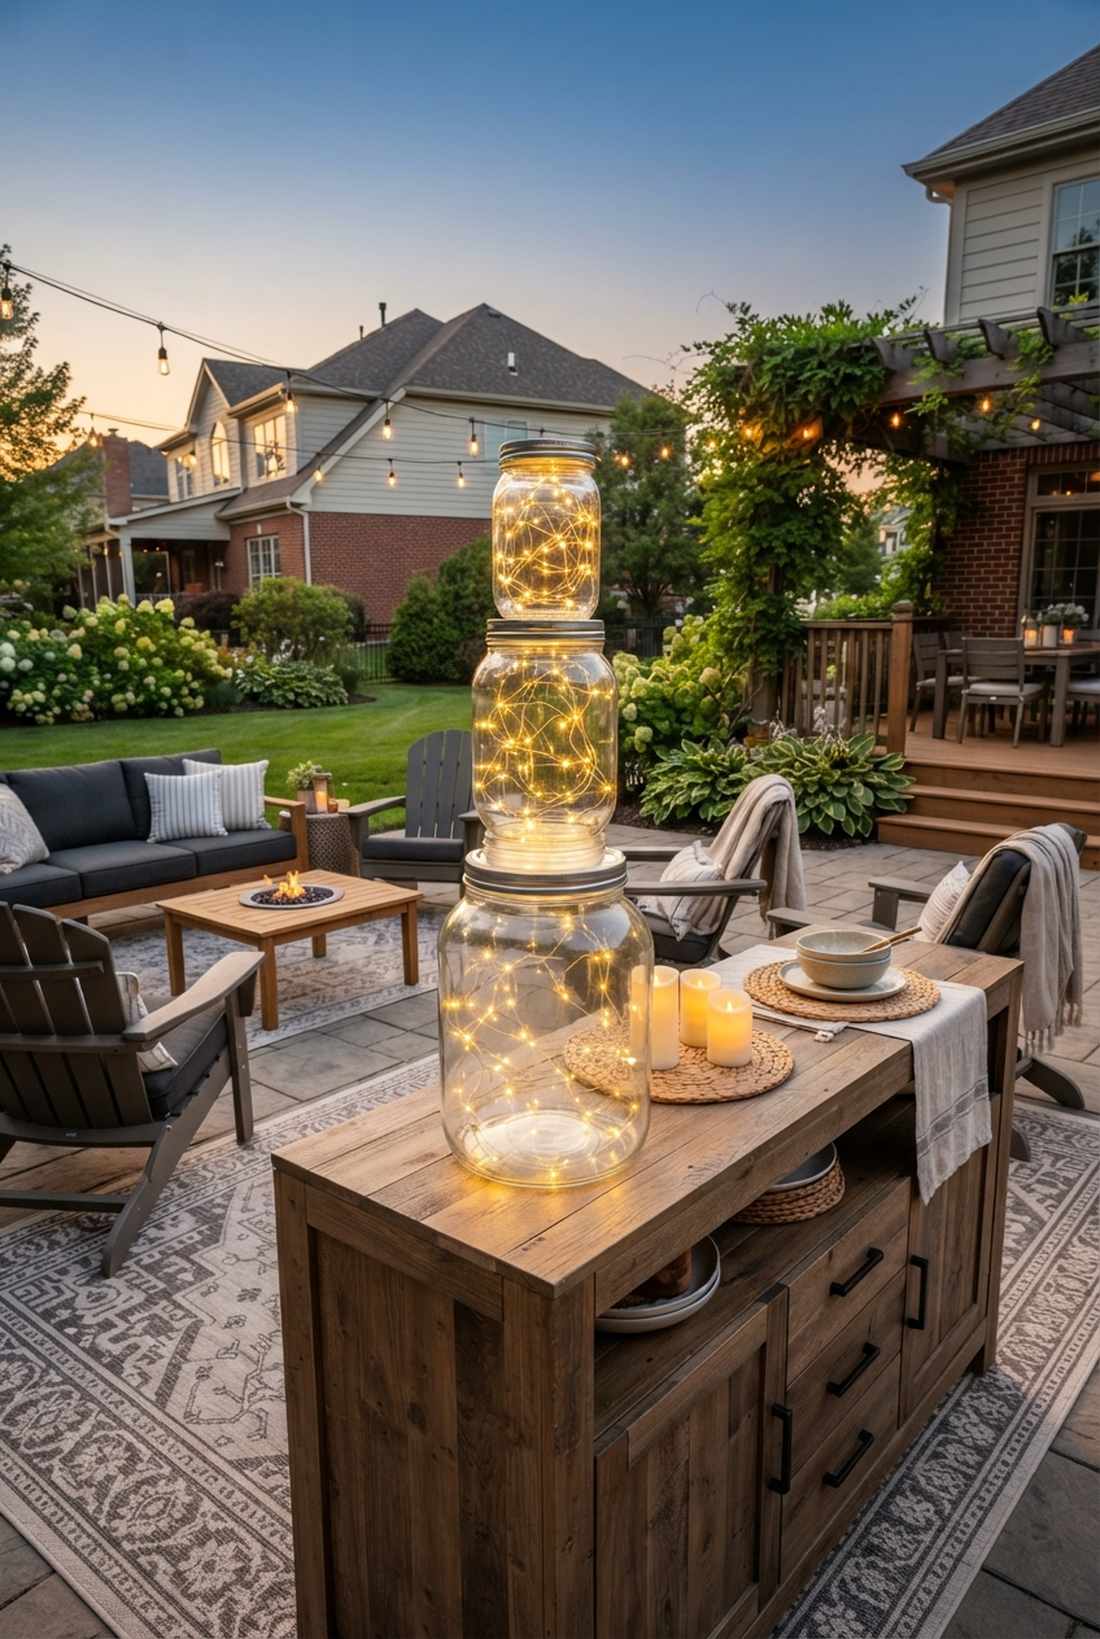
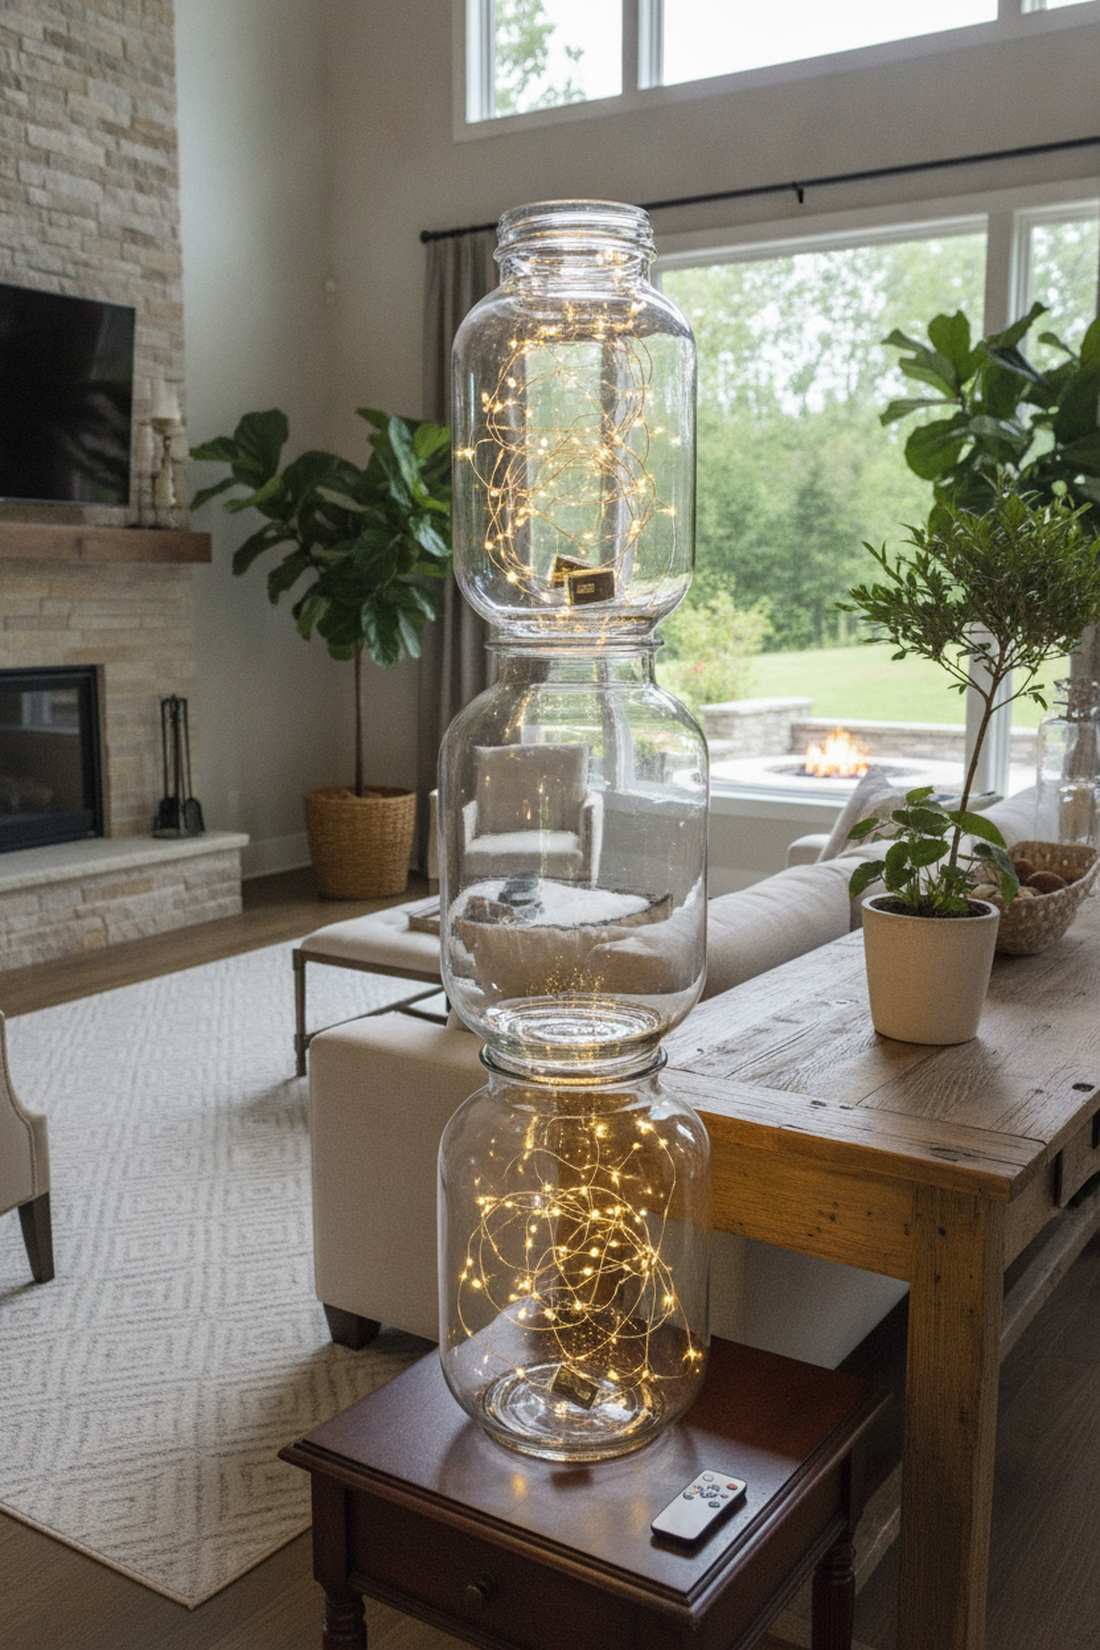
This vertical glass light tower feels like an intentional architectural sculpture. It is the ultimate statement piece for barren corners or large, empty buffet tables.
Instead of scattering single jars randomly, stacking them vertically instantly elevates the aesthetic to professional event standards. Securing these tiers correctly is the secret to a high-dollar look that won’t topple.
Building a three-tier tower runs about $20. Save this to your event styling inspiration board!
- Key Materials: Assorted jar sizes, museum putty
- Vibe / Style: Dynamic & structural
- Difficulty: Requires balancing
- Budget Breakdown: Jars: $8 | Putty: $4 | Lights: $8
- Creator’s Tip: Only stack empty inverted base jars, putting the battery packs entirely in the top-facing vessels.
- Smart Sourcing: Invest in clear museum-grade adhesive gel and remote-controlled fairy light multi-packs.
6. Copper Wire Cascade Design
An overflowing light waterfall feels incredibly magical and slightly rebellious. It is perfectly suited to drape over the edge of a tall bookshelf or a high window ledge.
While many tuck the wire completely inside, letting it spill out delivers a surprisingly premium look. The raw copper wire acts as a metallic decor element even when the lights are switched off.
This dramatic drape costs roughly $9 to assemble. Highly effective for instant room makeovers.
- Key Materials: Extra-long copper wire LEDs, decorative base sand
- Vibe / Style: Bohemian overflow
- Difficulty: Quick setup
- Budget Breakdown: Wire Strand: $7 | Sand: $2
- Creator’s Tip: Gently coil the cascading wire around a pencil first to create intentional, bouncy spirals.
- Smart Sourcing: Source extra-long 33ft copper wire lights and coarse golden decorative sand.
7. Ribbon Bow Accent Jars
A satin-tied light vessel adds an instant touch of tailored softness. It acts as a flawless, color-coordinated accent for bridal showers or elegant baby showers.
Tying a generic craft bow looks cheap, but using thick, double-looped fabric creates a lavish, bespoke aesthetic. Adding this simple fabric texture instantly breaks up the harshness of the glass.
You can upgrade your jars for under $8. Pin this if you love customizing event color palettes!
- Key Materials: Wide satin or velvet ribbon
- Vibe / Style: Classic elegance
- Difficulty: Basic knotting
- Budget Breakdown: Ribbon: $4 | Jar & Lights: $4
- Creator’s Tip: Cut the ribbon tails at a sharp 45-degree angle and lightly singe the edges to prevent fraying.
- Smart Sourcing: Buy double-faced satin ribbon spools and warm-toned LED coin-battery lights.
8. Lace Overlay Romantic Jars
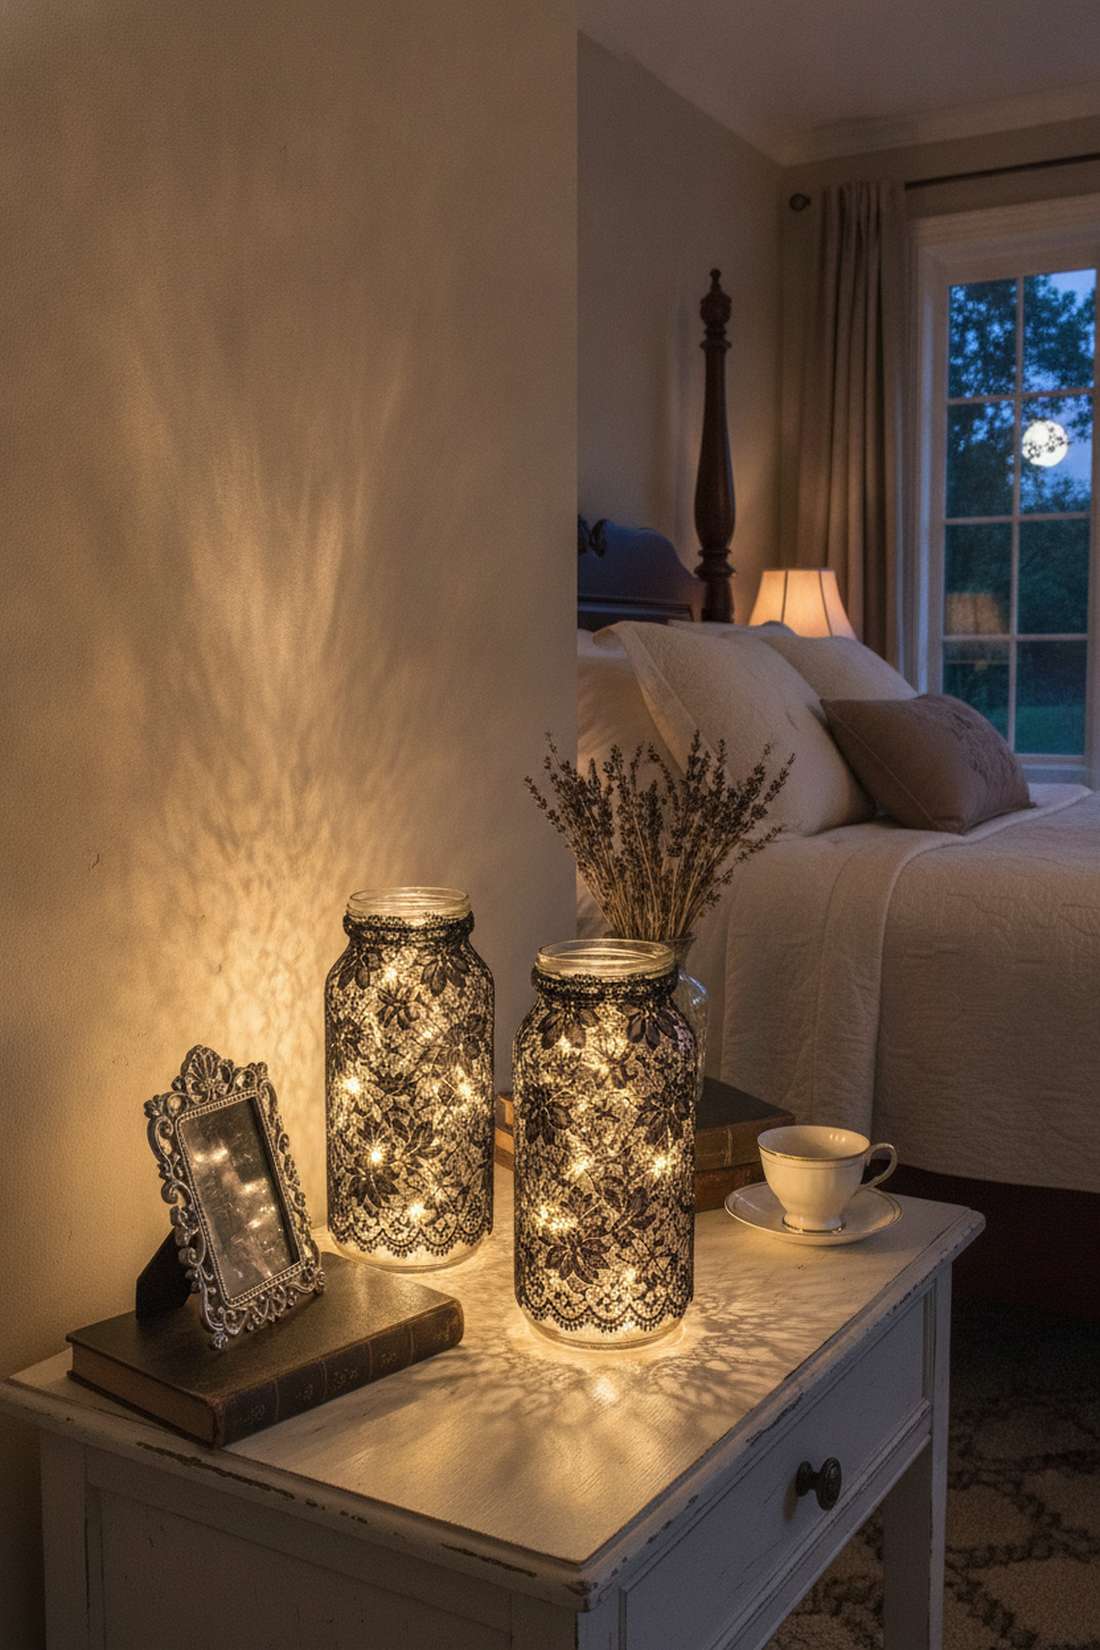
This vintage lace luminary casts intricate, moody shadows that feel incredibly romantic. Use this specifically for dimly lit vintage weddings or cozy bedroom nightstands.
Slapping lace on glass usually bubbles, but using proper decoupling mediums ensures a flawless, skin-tight application. The patterned fabric acts as a custom diffuser, turning harsh LED bulbs into soft, patterned art.
This heirloom-quality piece costs around $12. It’s a stunning upgrade that completely changes the room’s vibe.
- Key Materials: Vintage lace scraps, decoupage glue
- Vibe / Style: Victorian gothic / Shabby chic
- Difficulty: Requires drying time
- Budget Breakdown: Lace/Glue: $6 | Lights: $6
- Creator’s Tip: Stretch the lace tightly while the adhesive is wet to prevent structural sagging.
- Smart Sourcing: Use a matte-finish decoupage starter kit and stretch-lace fabric trims.
This next setup is ridiculously cheap but looks like a $100 custom display…
💡 Must-Have Supplies for High-End Setups
To build these setups faster and ensure they last, skip the generic craft aisles and invest in the right foundational kits.
- Base & Support: Pre-cut adhesive cork bottoms (bulk pack)
- Setup Tools: Precision craft tweezer starter kits
- Weather/Durability Protection: UV-resistant clear acrylic sealant spray
Painted and Frosted Jar Designs
Applying surface treatments completely alters how light escapes the glass. These techniques turn simple recycling bin finds into stunning, diffused lanterns perfect for any aesthetic.
9. Frosted Glass Spray Pattern
A semi-opaque geometric lantern offers a cool, icy glow that feels highly curated. This design shines as a subtle shelf accent in minimalist or Scandinavian-inspired rooms.
Creating DIY frosted glass usually ends up streaky, but using the rubber band masking technique delivers sharp, professional-grade lines. Stripping the bands away reveals clear windows that beam light beautifully against the matte finish.
Achieve this high-end retail look for about $10. Save this to your modern DIY decor board!
- Key Materials: Frosted glass spray paint, assorted rubber bands
- Vibe / Style: Modern minimalist
- Difficulty: Spraying technique required
- Budget Breakdown: Paint: $6 | Lights: $4
- Creator’s Tip: Remove the rubber bands while the paint is still slightly tacky to prevent chipping the edges.
- Smart Sourcing: Grab a can of premium frosted glass finish spray and high-tension craft bands.
10. Milk Glass Paint Technique
This opaque vintage glow jar feels wonderfully nostalgic and soft. It is the ultimate tabletop piece for spring garden parties or traditional Easter brunches.
While heavy paints block illumination, a properly thinned milk-glass coat creates an expensive porcelain illusion. The sheer white surface captures the fairy lights inside, making the entire jar appear to hum with energy.
You can paint a whole set for roughly $15. A brilliant technique for upcycling old jars.
- Key Materials: White chalk paint or glass medium
- Vibe / Style: Vintage cottage
- Difficulty: Brush control needed
- Budget Breakdown: Paint Medium: $8 | Lights/Jars: $7
- Creator’s Tip: Use a high-density cosmetic sponge instead of a brush to eliminate streak marks completely.
- Smart Sourcing: Order acrylic enamel glass paint kits and high-density foam daubers.
11. Sea Glass Krylon Finish
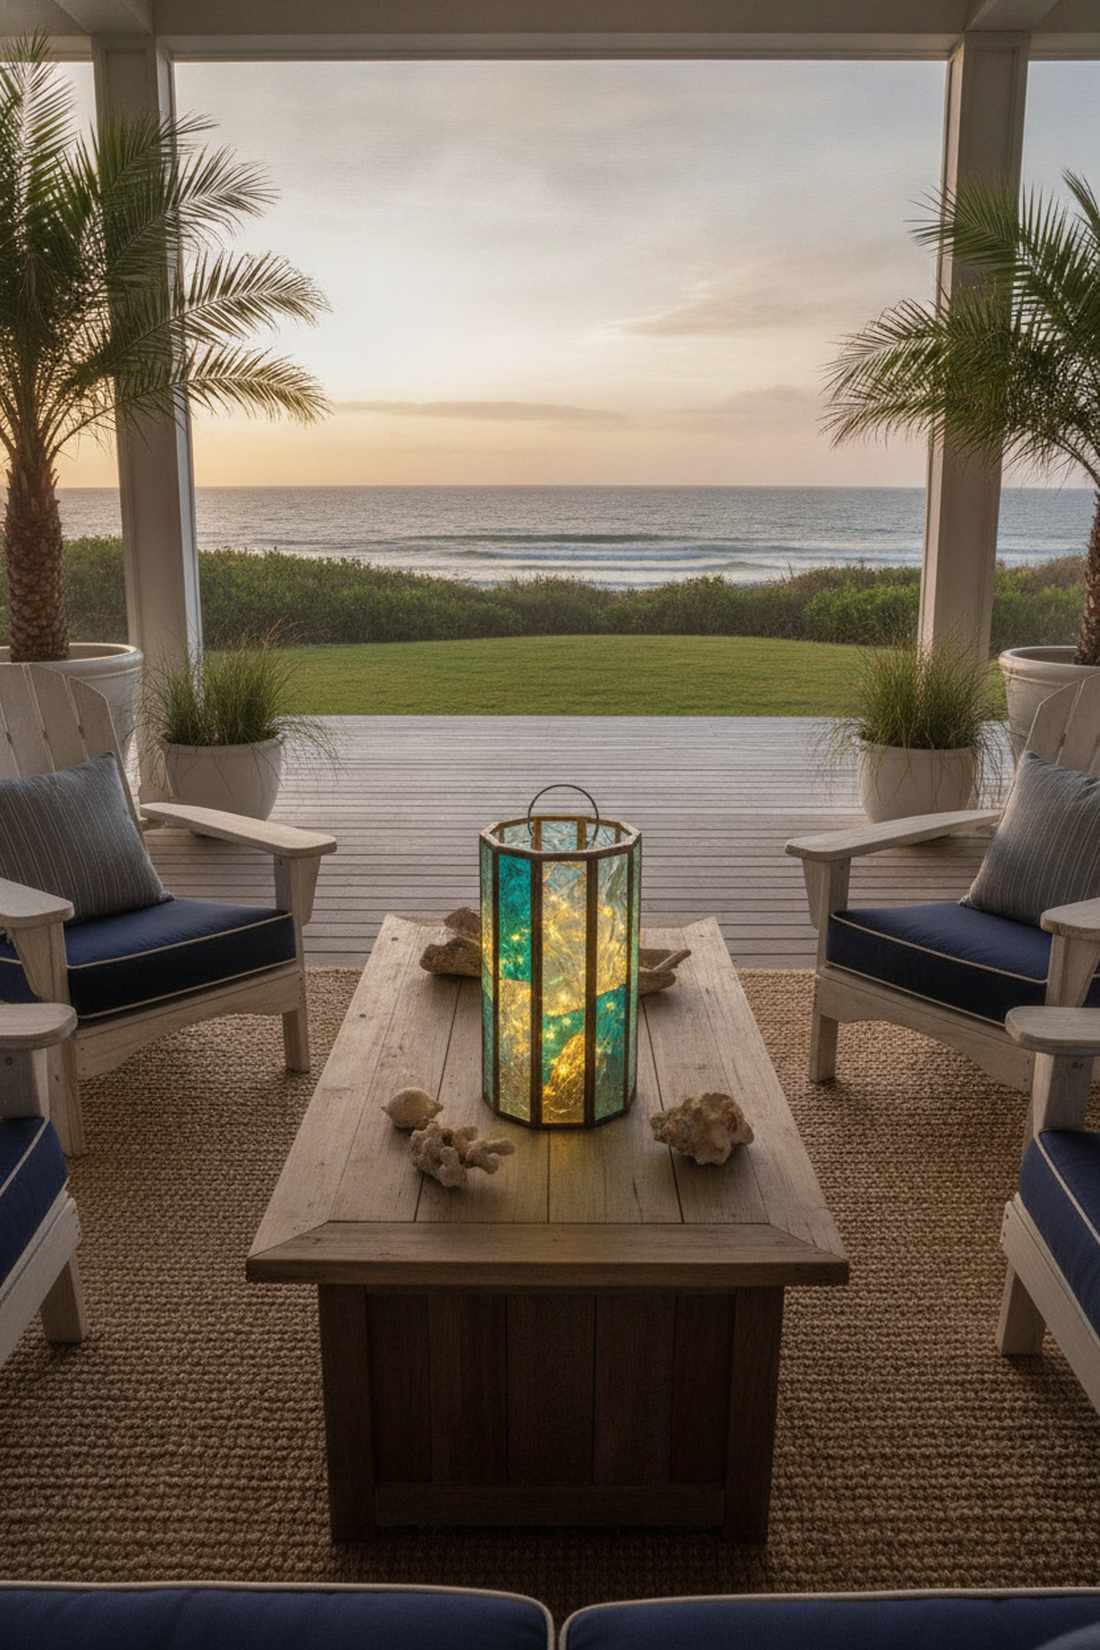
A coastal faux-beach glass lantern feels like a treasure washed ashore. It provides flawless ambient lighting for nautical bathrooms or outdoor beach-themed patios.
True sea glass is hard to find, but specialty translucent sprays mimic decades of ocean tumbling perfectly. Combining these cool aqua tones with warm fairy lights creates an irresistible, high-contrast visual pop.
This faux-glass hack costs around $12. Pin this if you’re upgrading your summer beach house vibes!
- Key Materials: Translucent sea glass spray paint
- Vibe / Style: Breezy coastal
- Difficulty: Easy spray application
- Budget Breakdown: Spray Paint: $8 | Lights: $4
- Creator’s Tip: Apply three ultra-thin coats rather than one thick one to prevent messy dripping.
- Smart Sourcing: Try Krylon sea glass aerosol (aqua finish) and waterproof fairy light strings.
12. Ombre Gradient Painted Jars
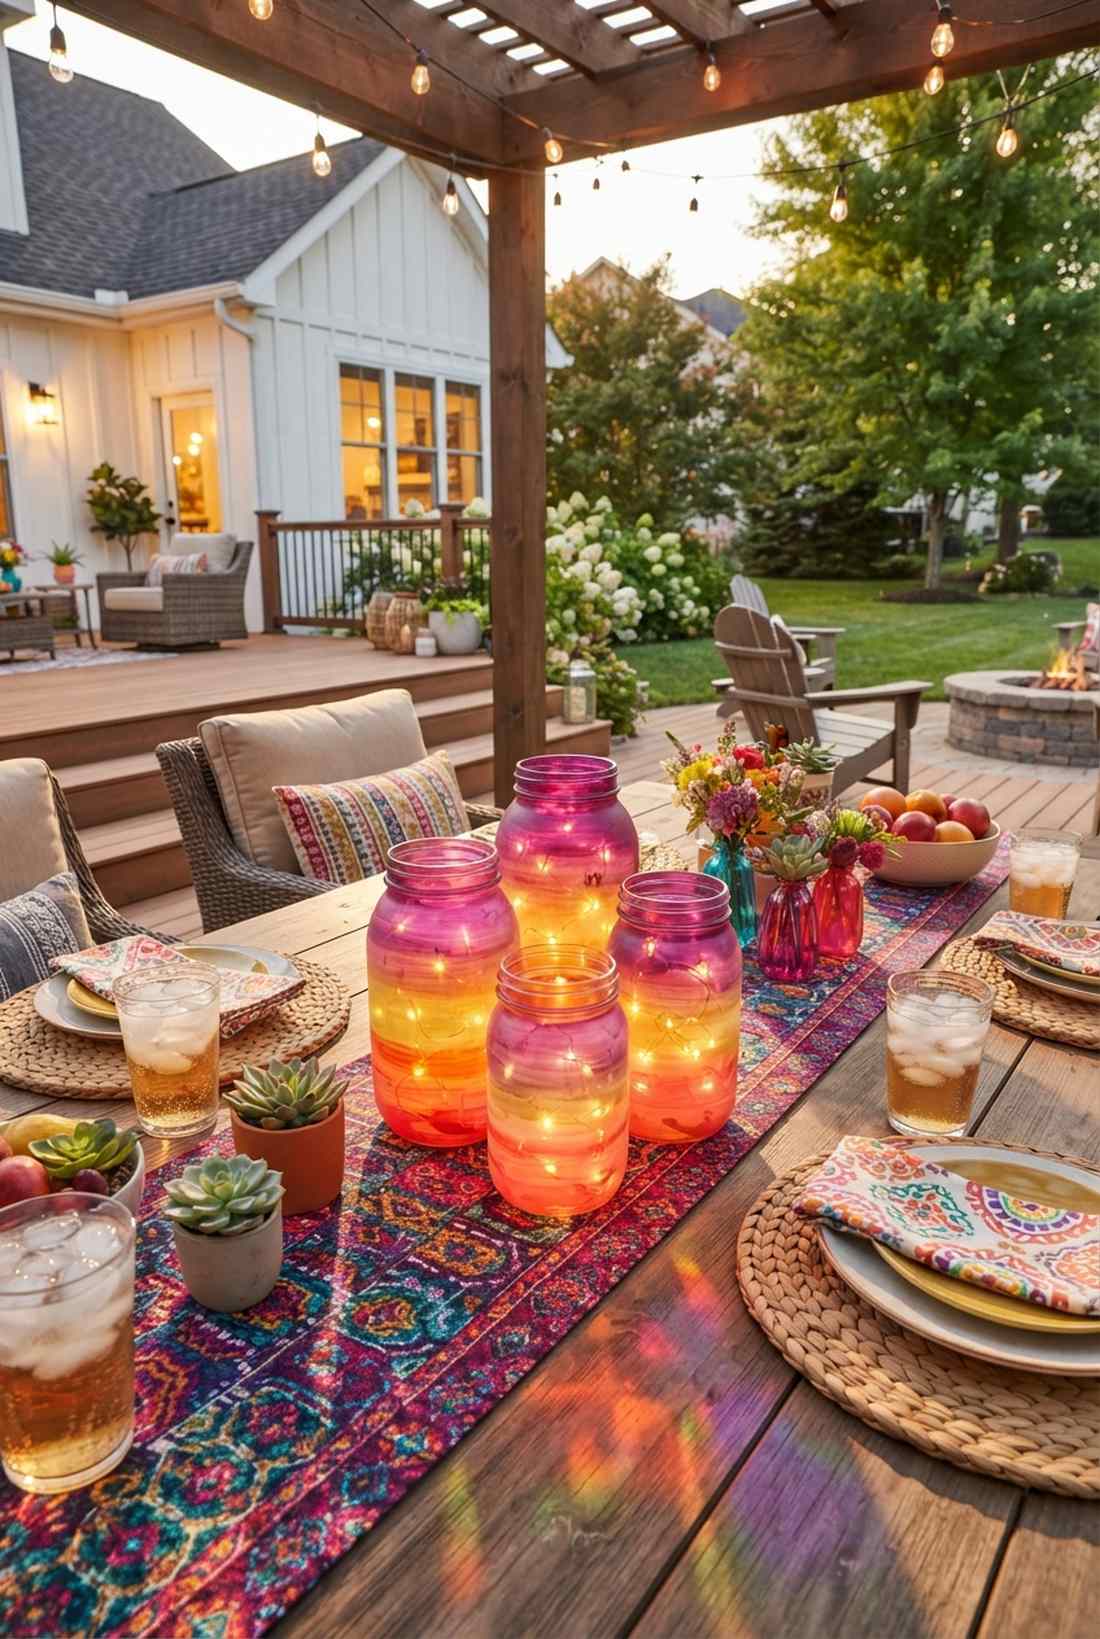
This sunset gradient light vessel offers a bold, artistic statement piece. It works brilliantly for colorful summer event tables or vibrant teen bedroom decor.
Standard color blocking looks amateur, but seamlessly blending two tones with a sponge delivers a designer-level finish. The color transition manipulates the internal lighting, casting dynamic, multi-hued shadows onto the table.
This colorful project runs about $14. Highly recommended for injecting personality into dull spaces.
- Key Materials: Two complementary glass paint colors
- Vibe / Style: Vibrant & artsy
- Difficulty: Blending skills required
- Budget Breakdown: Paints: $10 | Lights: $4
- Creator’s Tip: Wet your sponge slightly before stippling the middle boundary to force a smooth color merge.
- Smart Sourcing: Pick up multi-surface acrylic paint sets and fine-pore art sponges.
13. Stenciled Pattern Designs
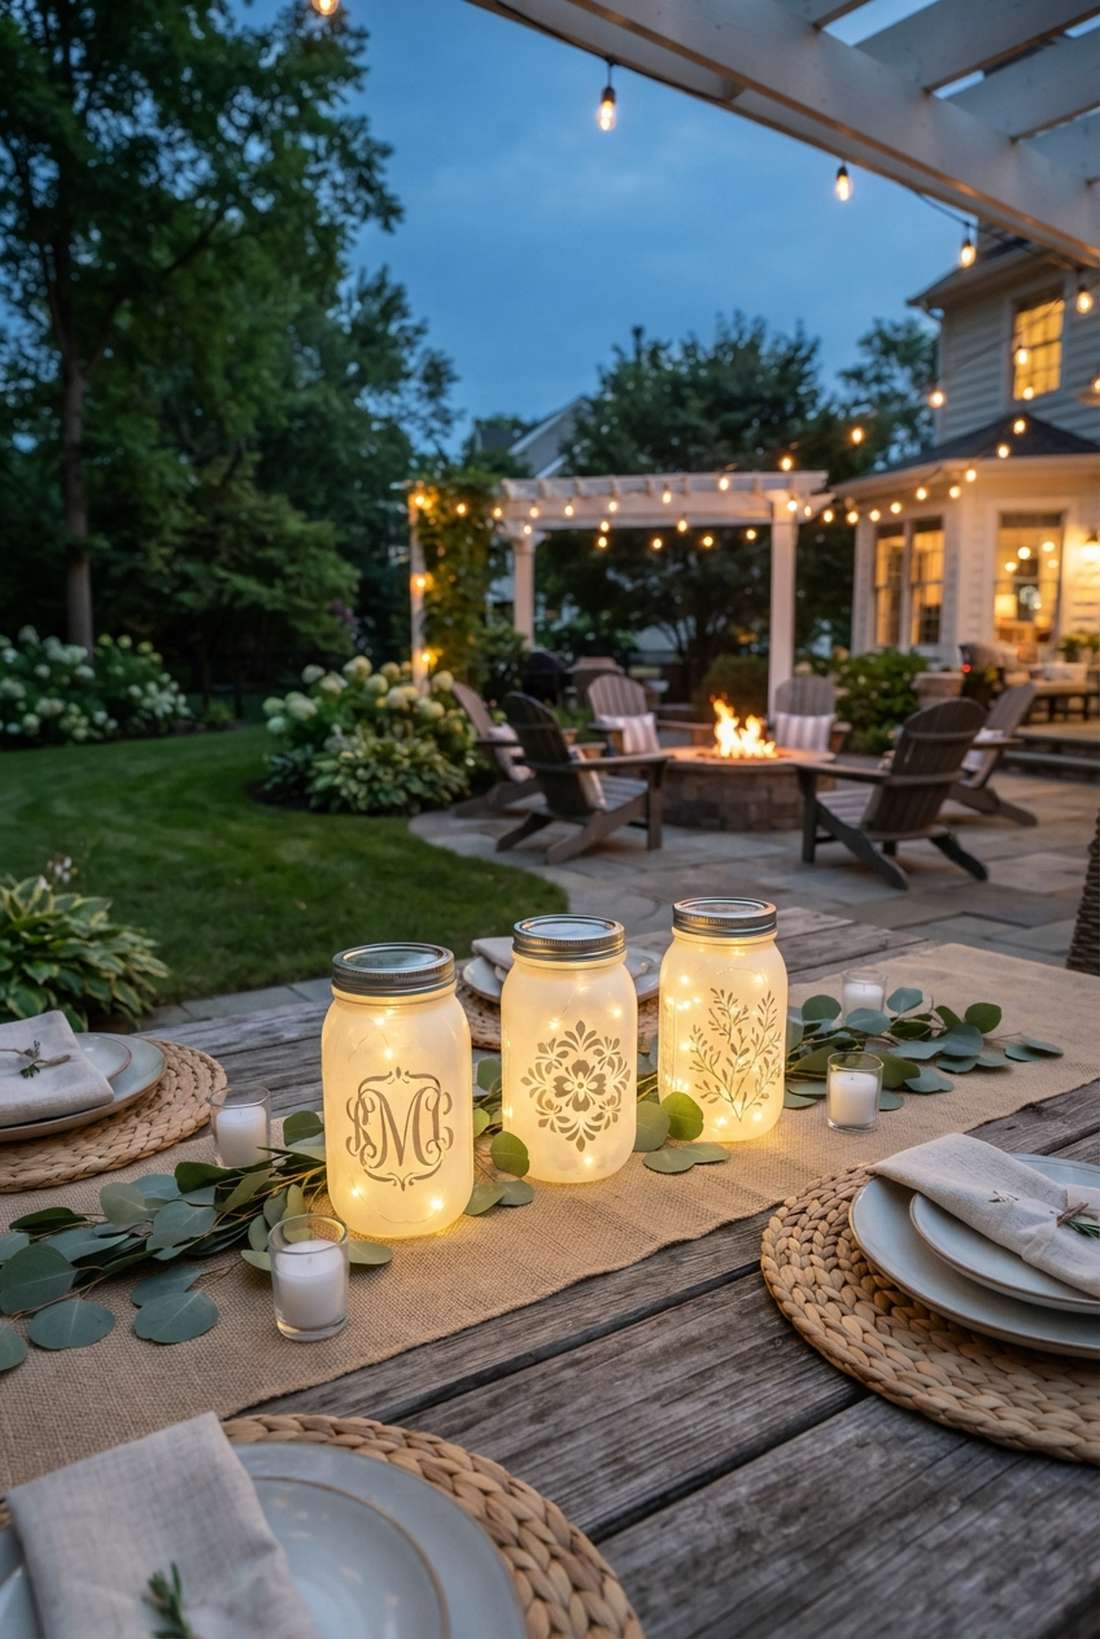
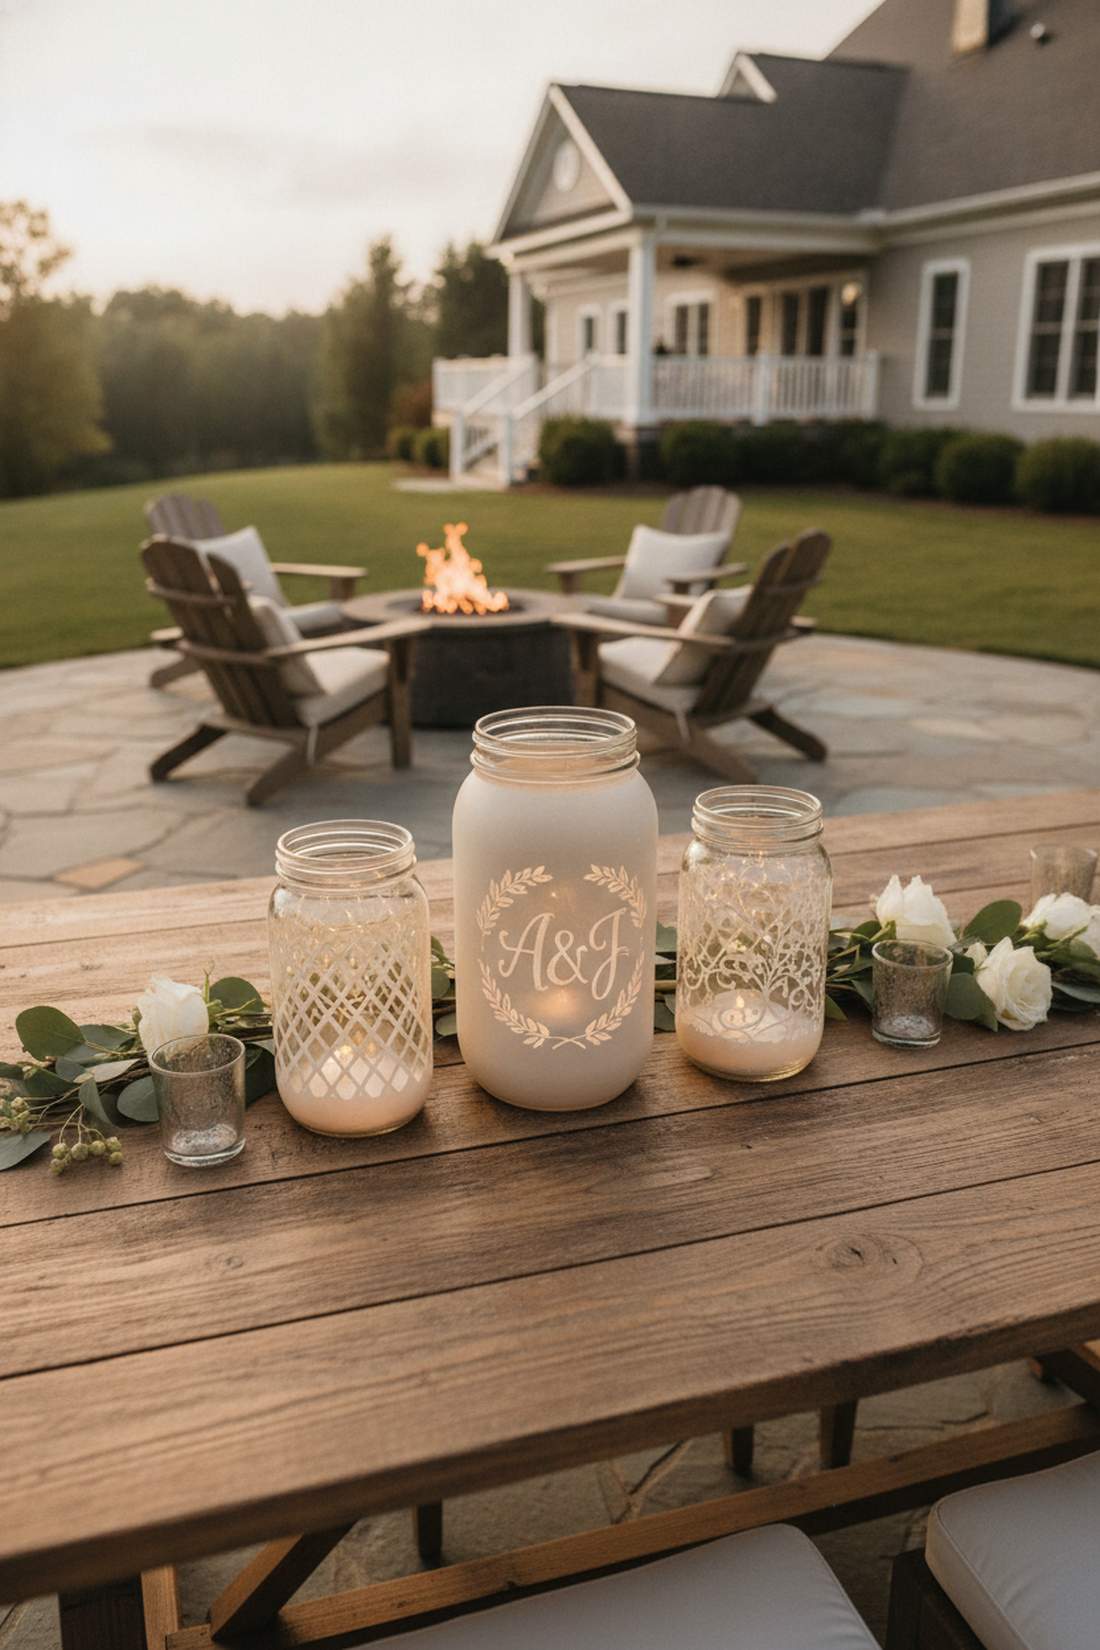
A negative-space stenciled luminary feels bespoke and highly personalized. This is the perfect layout for creating custom monogrammed centerpieces for weddings or anniversaries.
Painting freehand is risky, but using high-tack adhesive stencils guarantees razor-sharp imagery. Once peeled, the glowing silhouette completely transforms a cheap jar into a customized boutique item.
Customizing these pieces costs around $15. Save this to your personalized DIY gift board!
- Key Materials: Adhesive vinyl stencils, matte spray paint
- Vibe / Style: Custom boutique
- Difficulty: Intermediate peeling
- Budget Breakdown: Stencils: $7 | Paint: $5 | Lights: $3
- Creator’s Tip: Hit the stencil edges with a clear coat first to seal it and prevent the colored paint from bleeding underneath.
- Smart Sourcing: Use reusable adhesive silk stencils and chalk-finish spray paint.
Most people stop trying DIYs because they use the wrong glue. The trick in this next one changes everything.
14. Glitter-Infused Glass Coating
This diamond-dust reflective lantern feels like a captured starfield. It creates intense, eye-catching glamour for New Year’s Eve parties or sweet sixteen celebrations.
Loose glitter always sheds, but sealing ultra-fine diamond dust inside the wet paint locks the magic in permanently. The internal fairy lights bounce off thousands of micro-facets, multiplying the brightness tenfold.
Achieve extreme sparkle for about $11. A fun, flashy upgrade that demands attention.
- Key Materials: Ultra-fine crystal glitter, clear internal adhesive
- Vibe / Style: High-glam sparkle
- Difficulty: Messy but easy
- Budget Breakdown: Glitter: $6 | Adhesive/Lights: $5
- Creator’s Tip: Only coat the inside lower half of the jar so the top remains clear for maximum light escape.
- Smart Sourcing: Buy extra-fine holographic glitter dust and spray-on craft adhesive.
15. Chalkboard Paint Message Jars
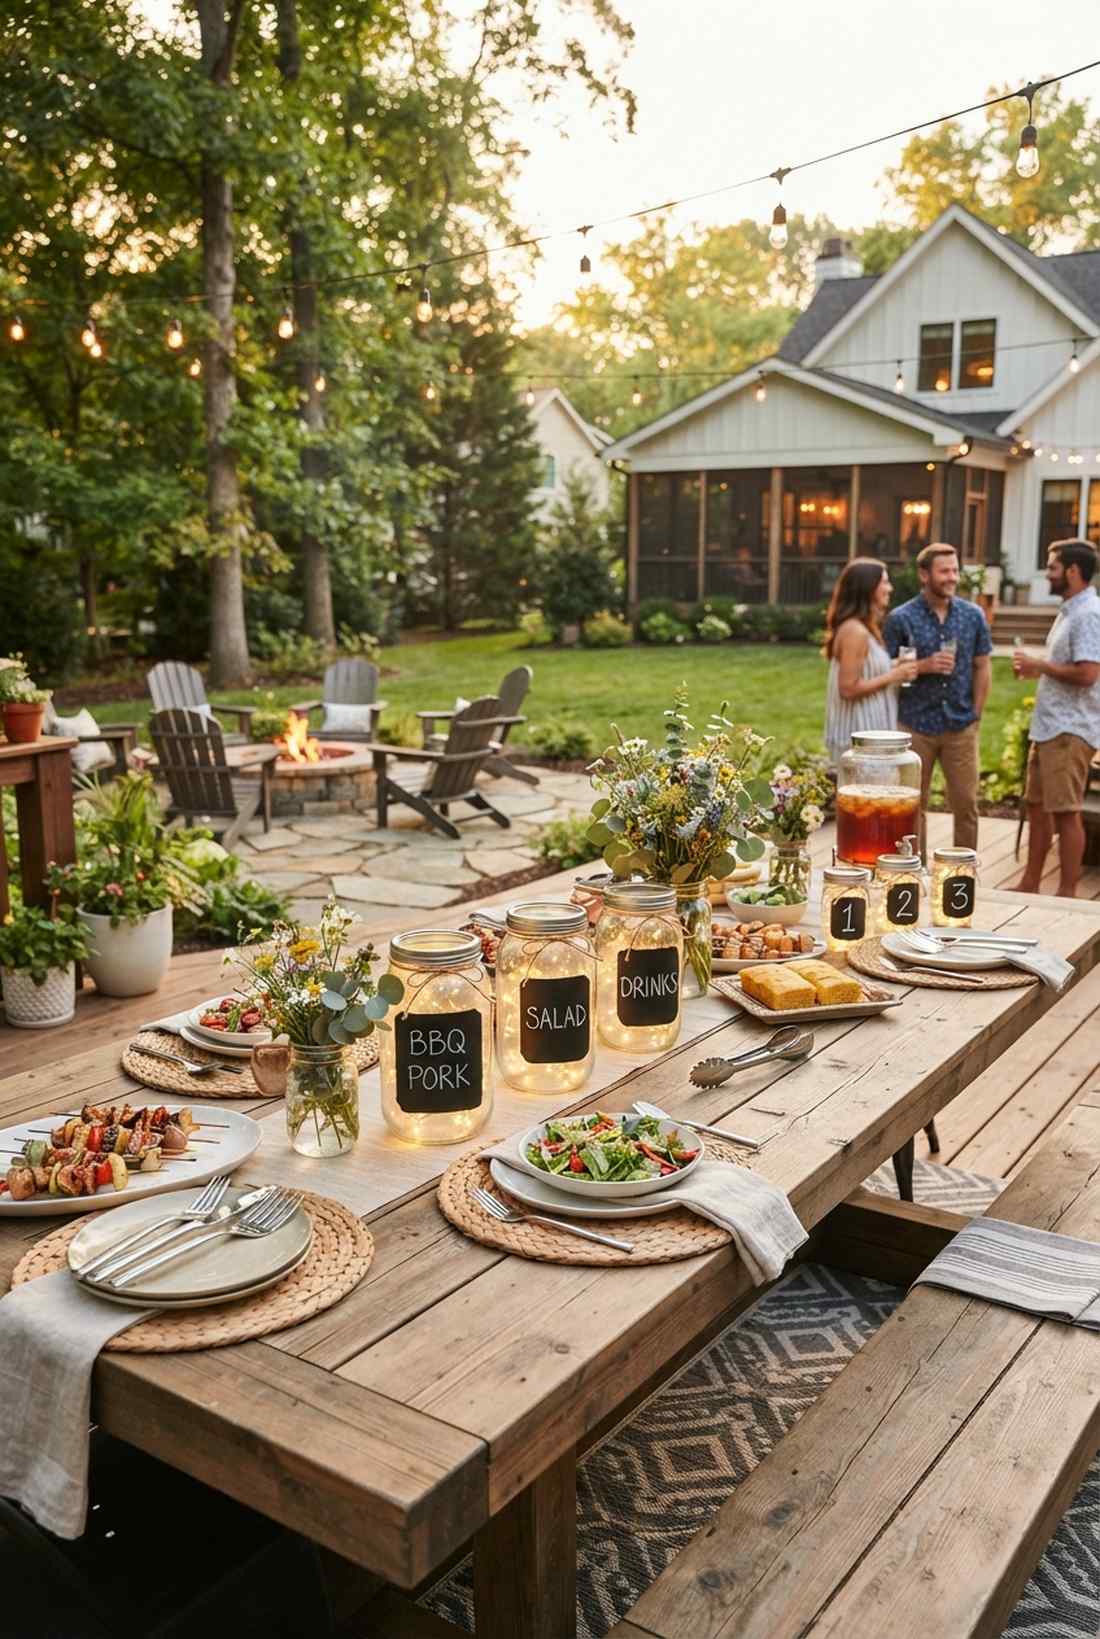
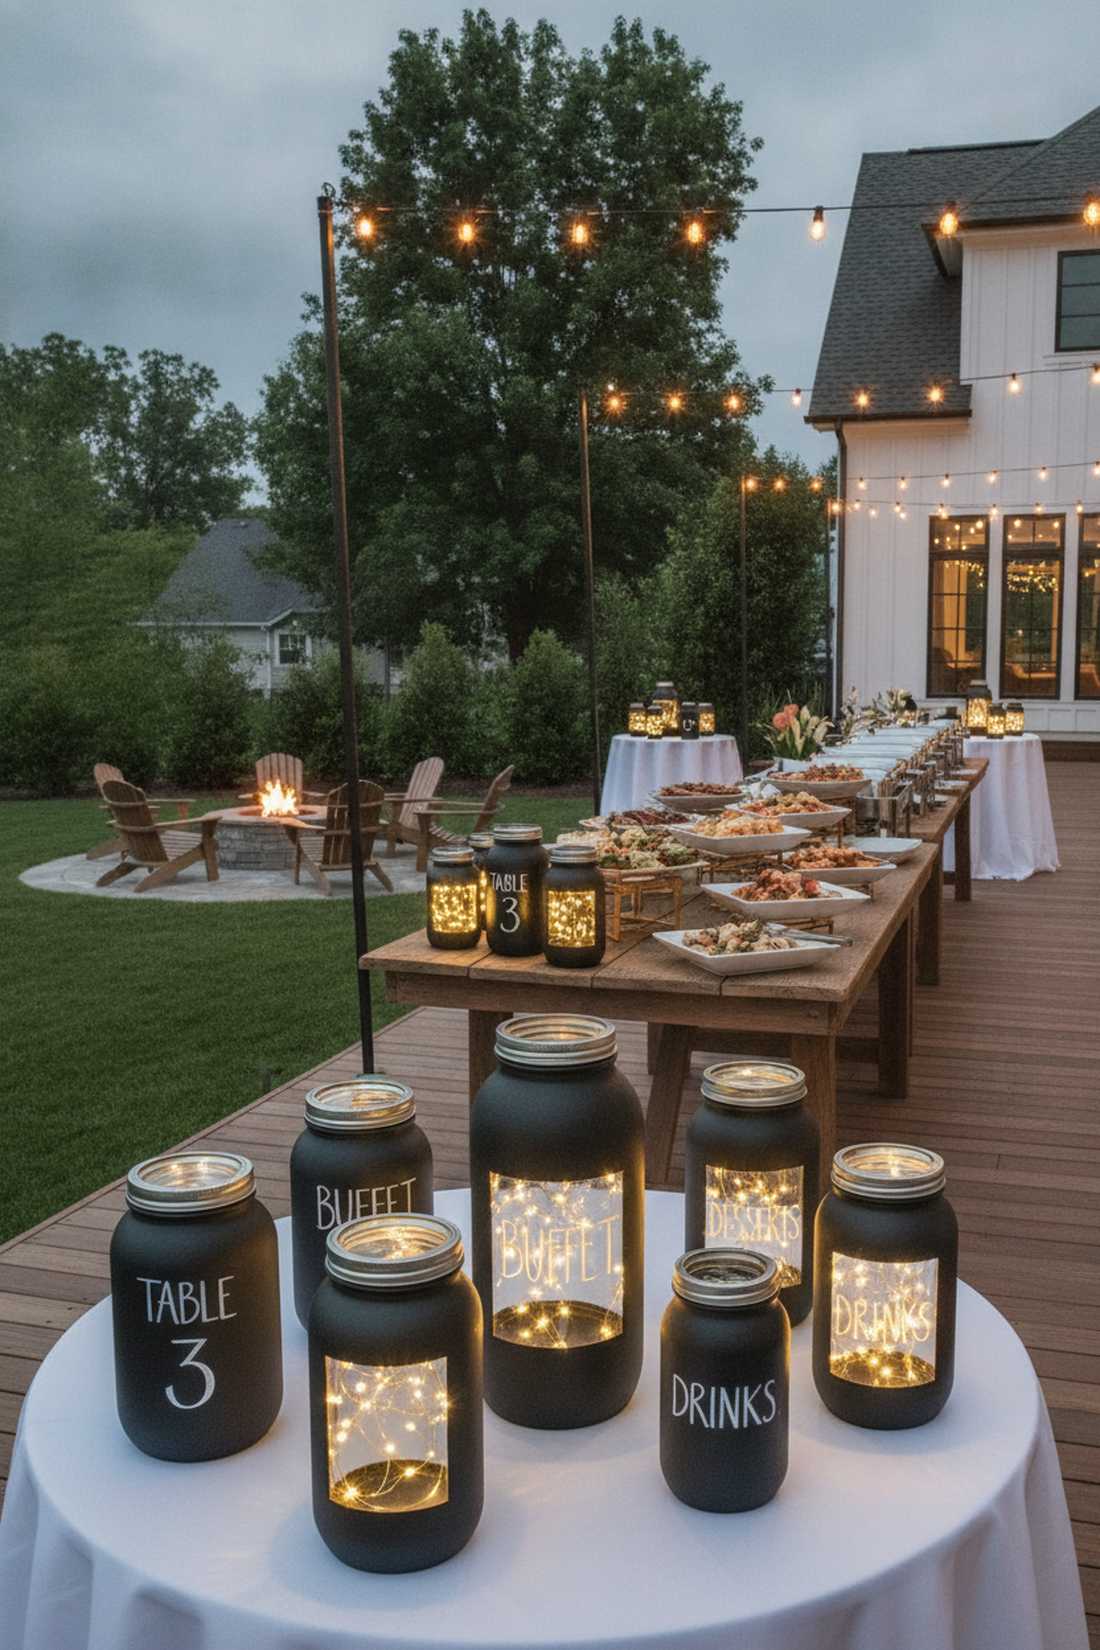
A writable matte-black luminary feels both industrial and incredibly interactive. It is essential for organizing buffet table labels or directing guests with glowing table numbers.
Ordinary labels peel off, but blocking out a chalkboard section gives a designer-level finish that is infinitely reusable. The harsh black contrast makes the illuminated glass window pop intensely.
You can prep a set of these for $13. Pin this if you love functional, reusable event decor!
- Key Materials: Chalkboard paint, painter’s tape
- Vibe / Style: Industrial functional
- Difficulty: Simple taping
- Budget Breakdown: Paint: $8 | Tape/Lights: $5
- Creator’s Tip: “Prime” the chalkboard area by rubbing the side of a piece of chalk over it and erasing before your first use.
- Smart Sourcing: Order brush-on chalkboard acrylic and fine-tip liquid chalk markers.
16. Metallic Rose Gold Accents
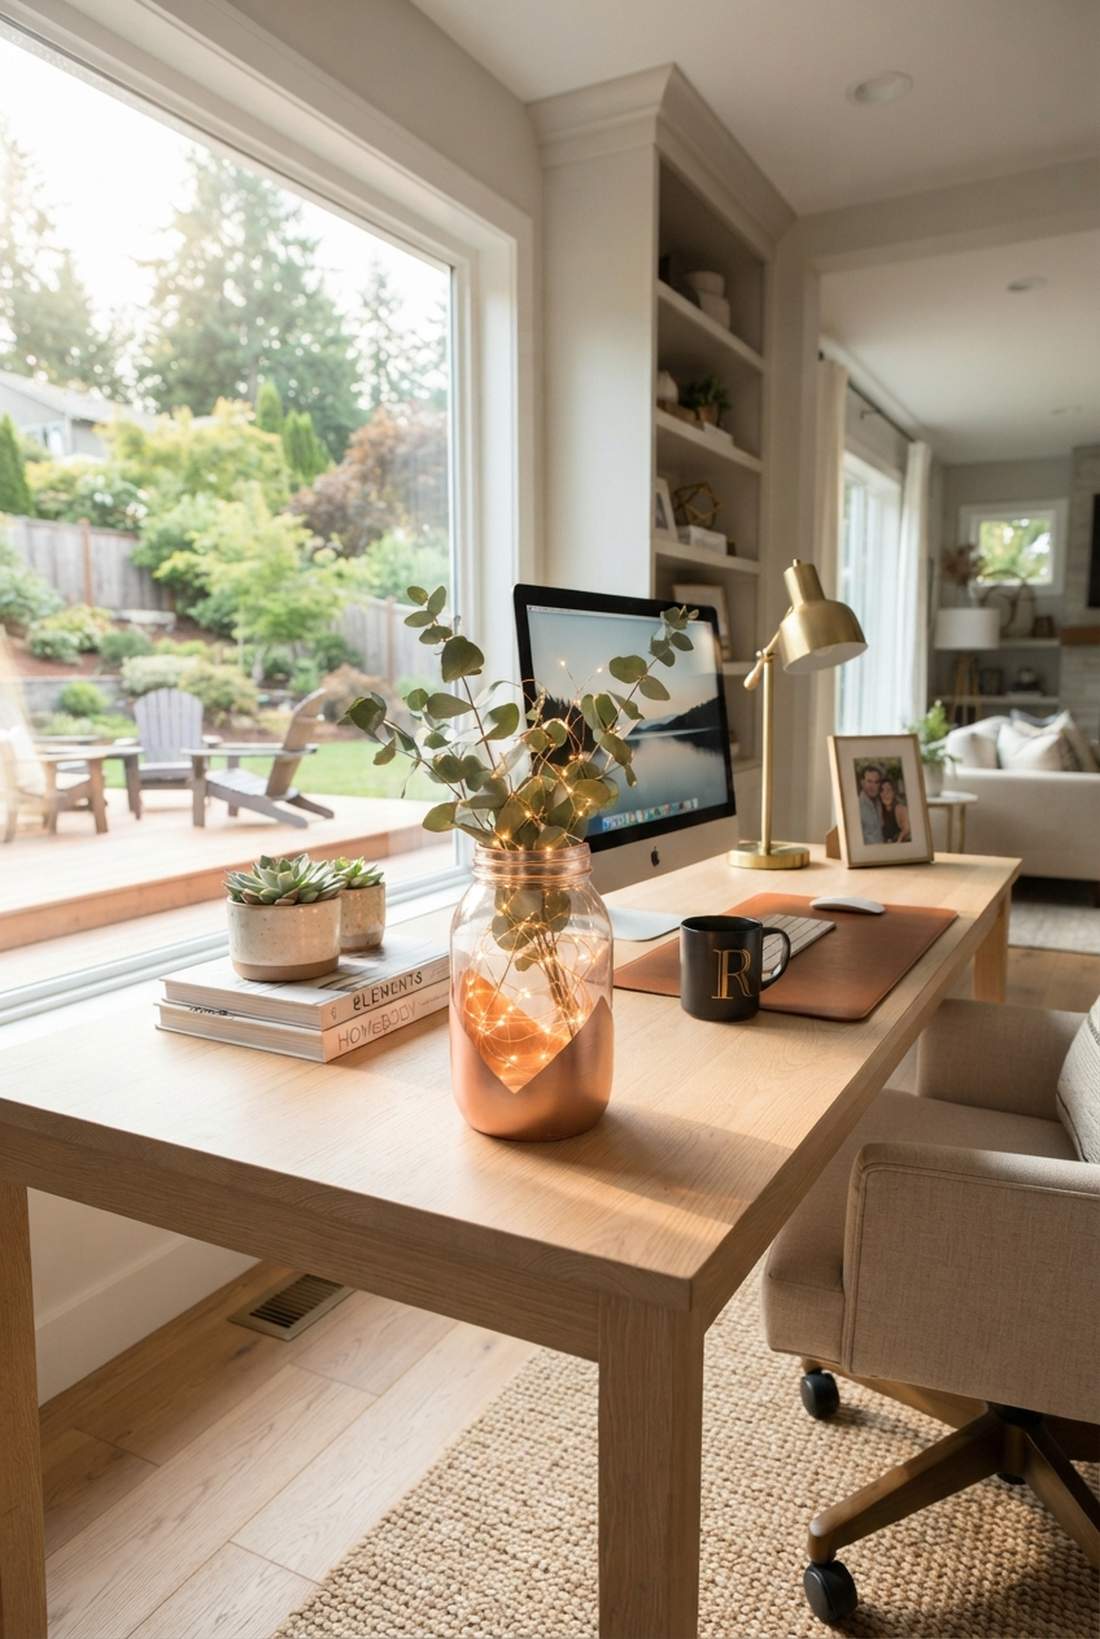
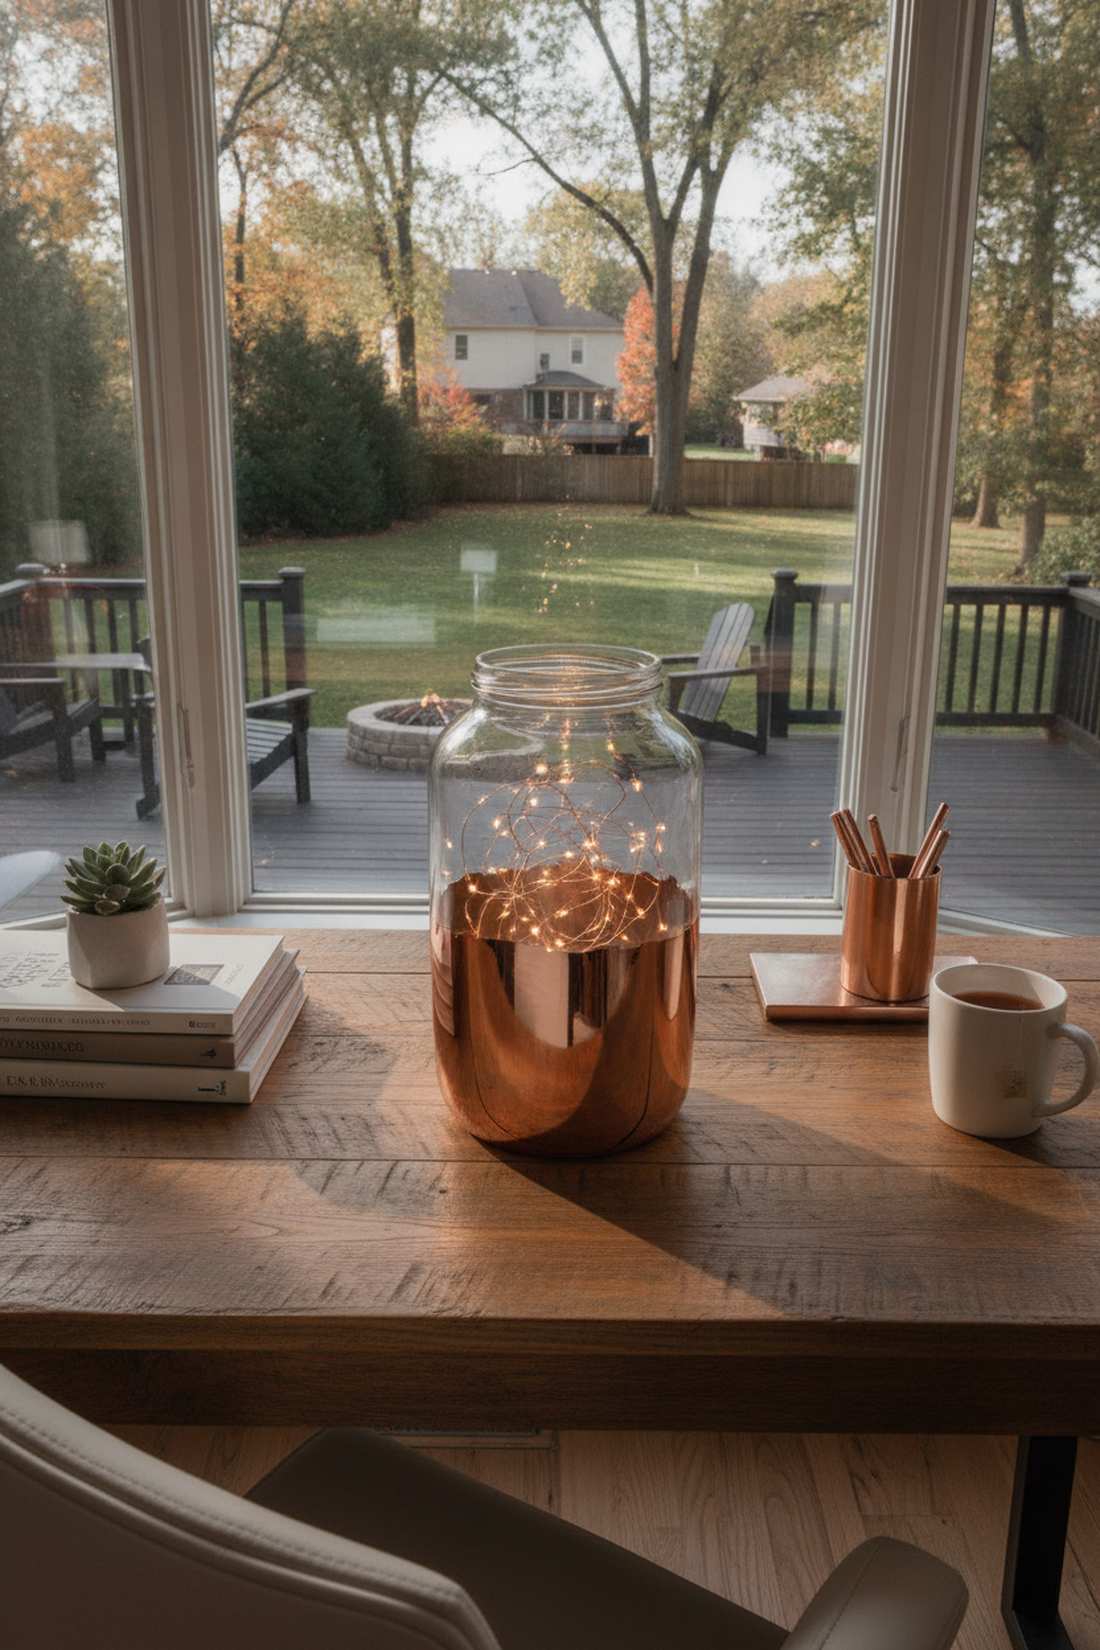
This copper-dipped glowing vessel brings a sleek, warm metallic sophistication. It serves as an ultra-trendy accent for modern bridal showers or stylish home office desks.
A fully painted metallic jar blocks light, but taping off a geometric dip-dye effect looks far more expensive than it is. The reflective rose gold naturally harmonizes with warm LED copper wires.
This trendy metallic upgrade costs around $12. It perfectly balances raw glass with modern luxury.
- Key Materials: Rose gold metallic spray paint
- Vibe / Style: Modern chic
- Difficulty: Quick and satisfying
- Budget Breakdown: Metallic Spray: $8 | Lights: $4
- Creator’s Tip: Bag the top half of the jar tightly with plastic grocery bags to prevent metallic overspray mist from ruining the clear glass.
- Smart Sourcing: Grab premium metallic rose-gold spray and rose-gold wire fairy lights.
17. Distressed Shabby Chic Finish
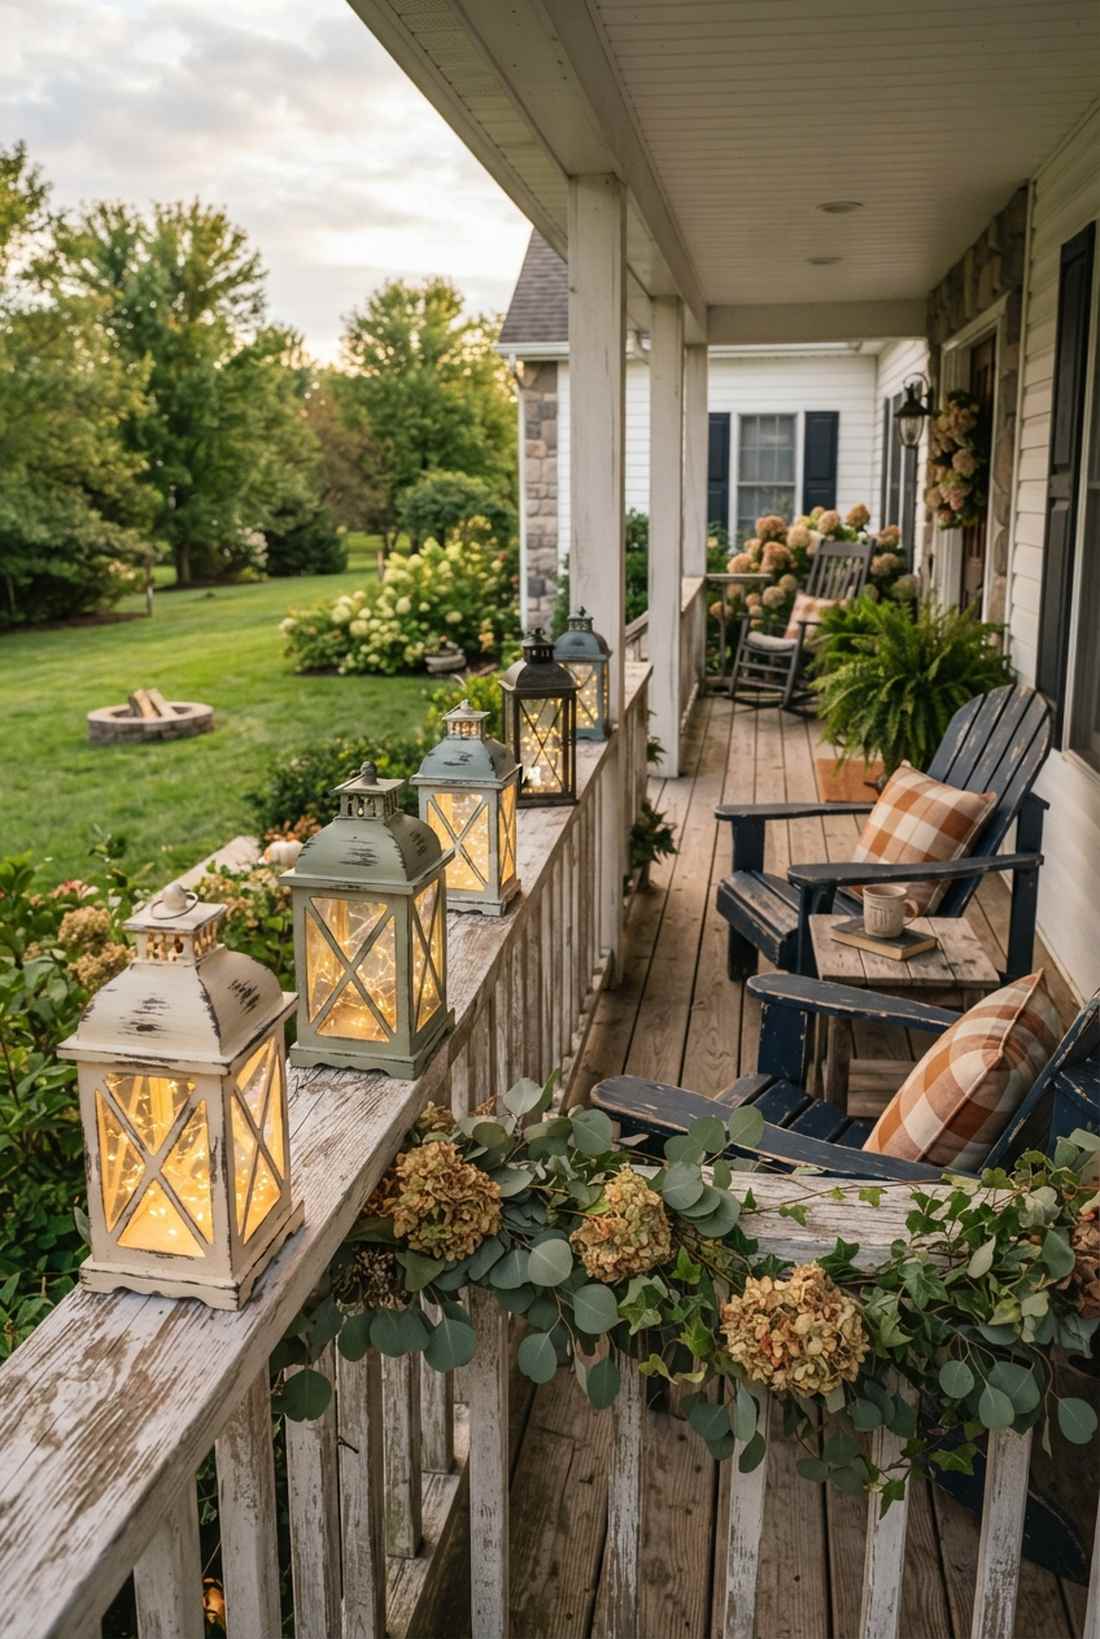
A weathered painted lantern offers a beautifully aged, lived-in charm. Place these along a rustic porch railing to welcome guests with cozy, nostalgic lighting.
Perfection looks mass-produced, but intentionally sanding down the high ridges delivers a surprisingly premium look of authentic wear and tear. The light sneaks through the scratched paint, creating unique, glowing distressed patterns.
This weathering technique costs under $10. Save this for your next vintage upcycling session!
- Key Materials: Chalk paint, fine-grit sandpaper
- Vibe / Style: Weathered vintage
- Difficulty: Hands-on sanding
- Budget Breakdown: Paint: $7 | Sandpaper/Lights: $3
- Creator’s Tip: Only sand the areas that would naturally experience friction over time—the rim, the bottom edge, and the embossed lettering.
- Smart Sourcing: Use ultra-matte chalk finish paints and flexible sanding sponges (bulk pack).
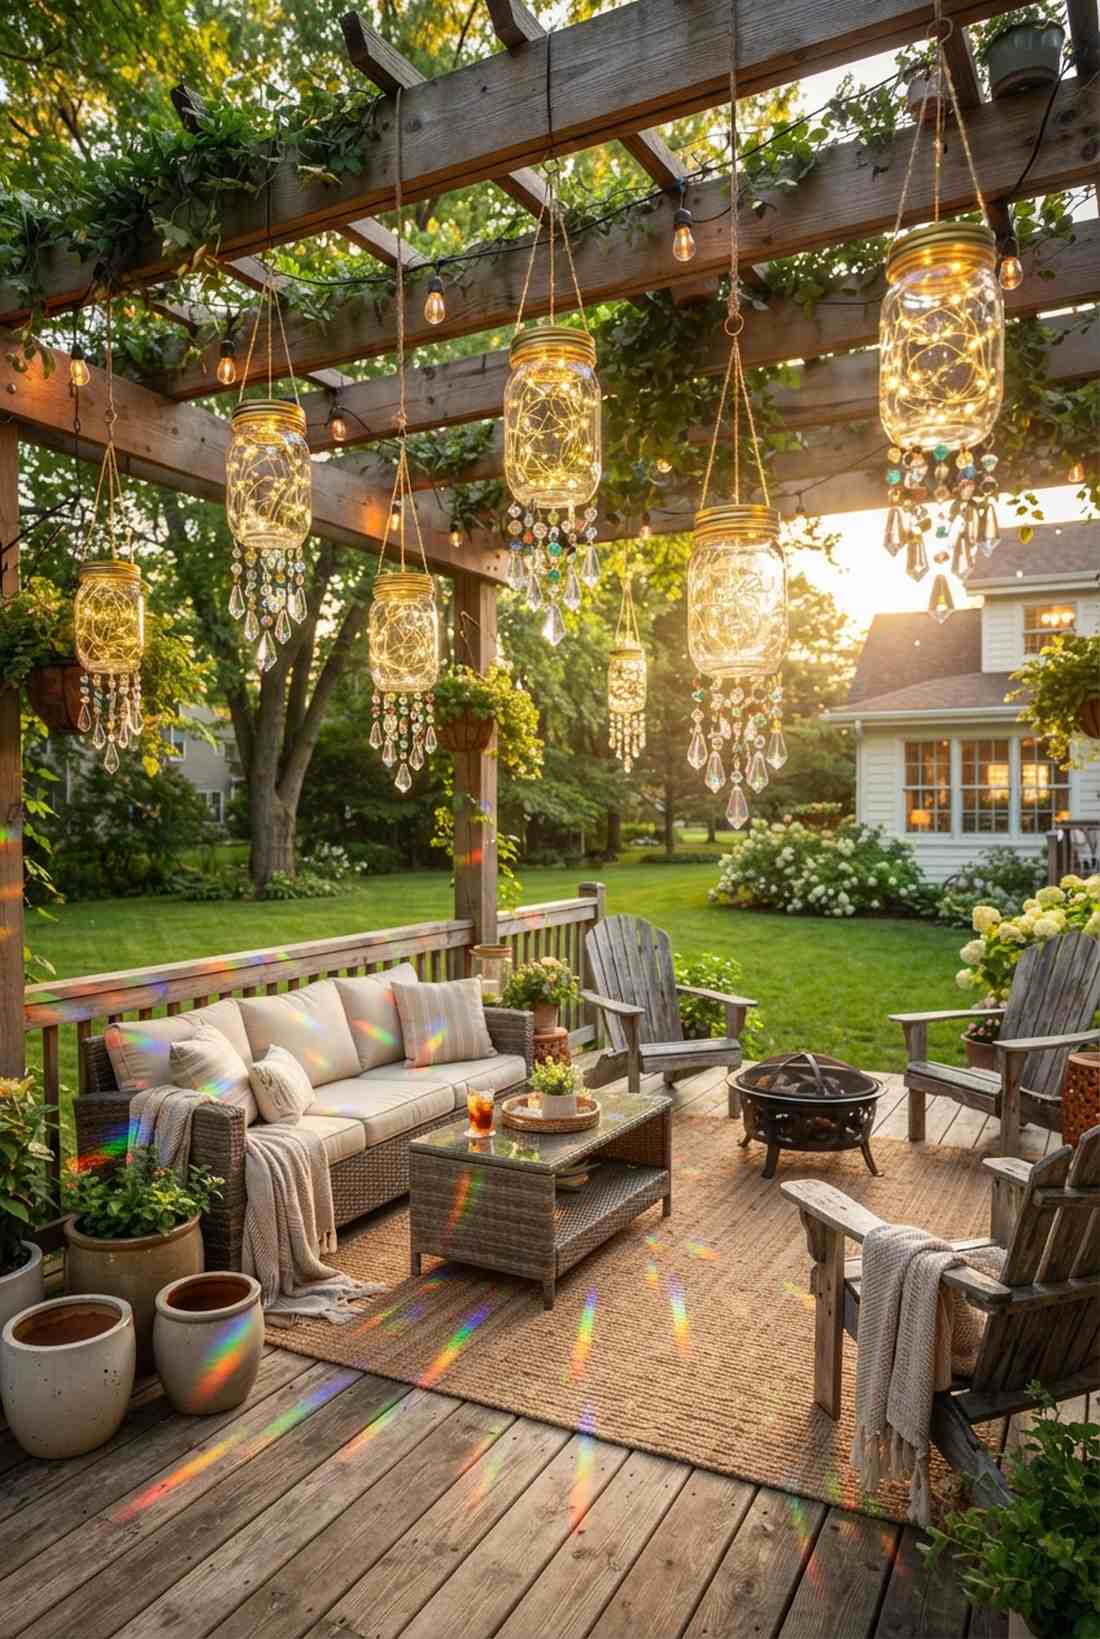
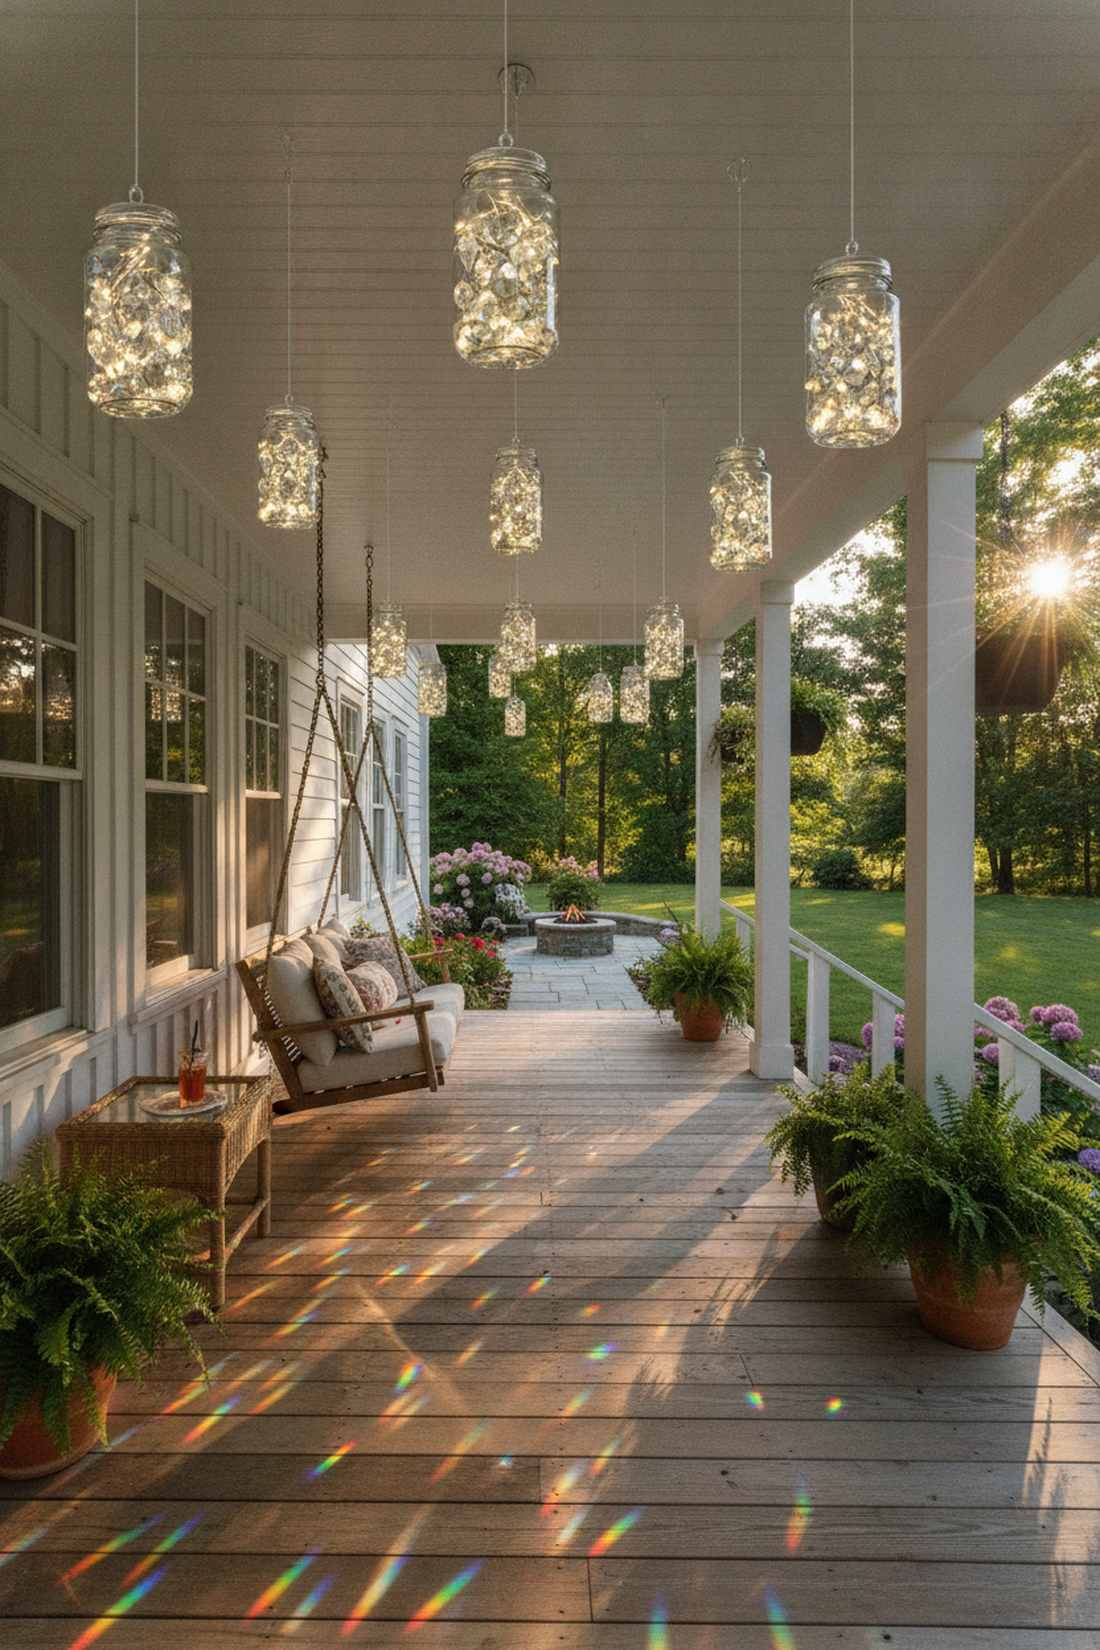
Stop putting basic jars on your deck. This next hack makes outdoor lighting completely hands-free.
Outdoor Hanging Lanterns
Taking mason jars outside requires weatherproofing and smart mounting. These heavy-duty hanging setups provide gorgeous overhead and pathway illumination that outlasts the elements.
18. Solar-Powered Hanging Jars
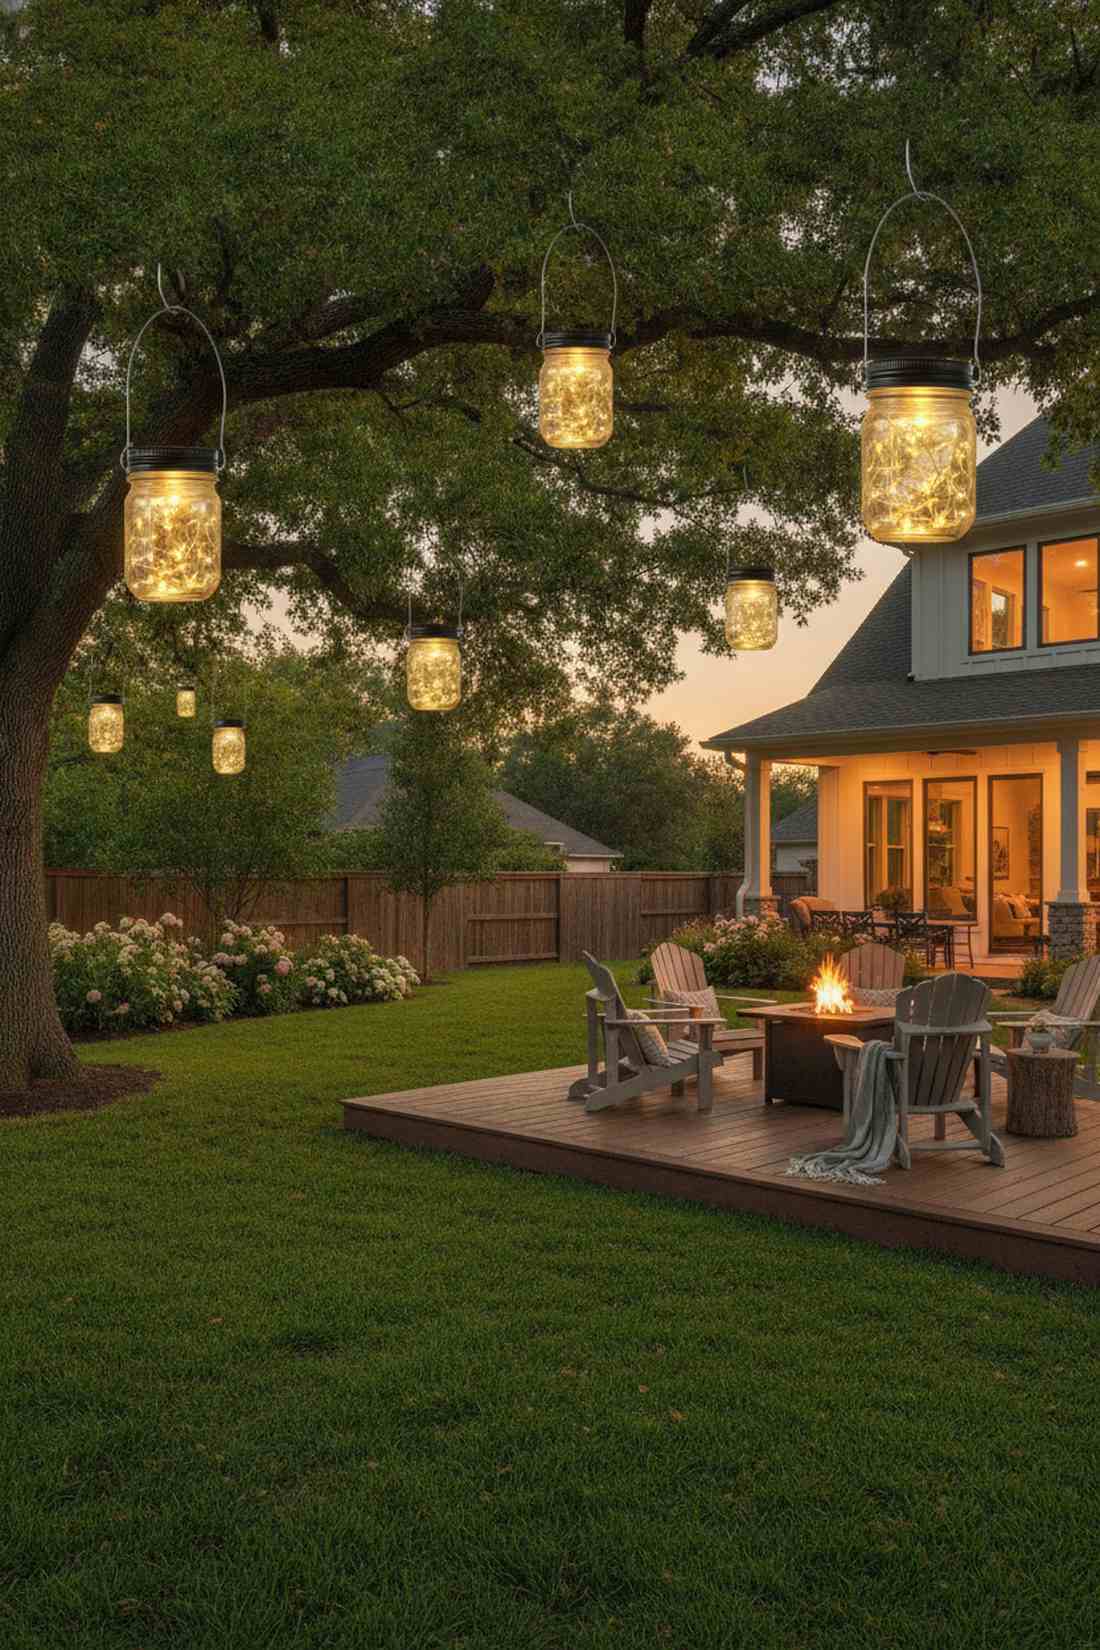
A self-charging solar lantern feels like an effortless, eco-friendly magic trick. Hanging these in a sunny backyard tree canopy guarantees brilliant, automatic evening ambiance.
Constantly swapping batteries is a nightmare, but using specialized auto-on lids gives a designer-level finish with zero daily maintenance. These lids snap right onto standard jars, fully weatherproofing the electronics inside.
You can build an autonomous outdoor setup for $18. Pin this if you want set-and-forget patio lighting!
- Key Materials: Mason jar solar lids, hanging wire
- Vibe / Style: Smart garden tech
- Difficulty: Snap and go
- Budget Breakdown: Solar Lids: $15 | Jars: $3
- Creator’s Tip: Periodically wipe the top solar panel with a damp microfiber cloth to ensure maximum charging efficiency.
- Smart Sourcing: Buy waterproof mason jar solar lids (bulk pack) and stainless steel hanger handles.
19. Wire Handle Lantern Hangers
This heavy-gauge suspended jar feels incredibly rugged and utilitarian. It is exactly what you need to hang durable lighting from pergola crossbeams or shepherd hooks.
Flimsy twine rots outdoors, but twisting galvanized wire creates an architectural handle that looks far more expensive than it is. This sturdy bale ensures your glass won’t shatter during heavy summer windstorms.
Creating these heavy-duty handles costs around $8. A must-know skill for outdoor decor enthusiasts.
- Key Materials: Heavy-gauge craft wire, pliers
- Vibe / Style: Industrial farmhouse
- Difficulty: Requires hand strength
- Budget Breakdown: Wire: $4 | Lights: $4
- Creator’s Tip: Twist the wire directly under the lowest threaded lip of the jar to ensure a locked, slip-proof grip.
- Smart Sourcing: Pick up galvanized 16-gauge steel wire and heavy-duty jewelry pliers.
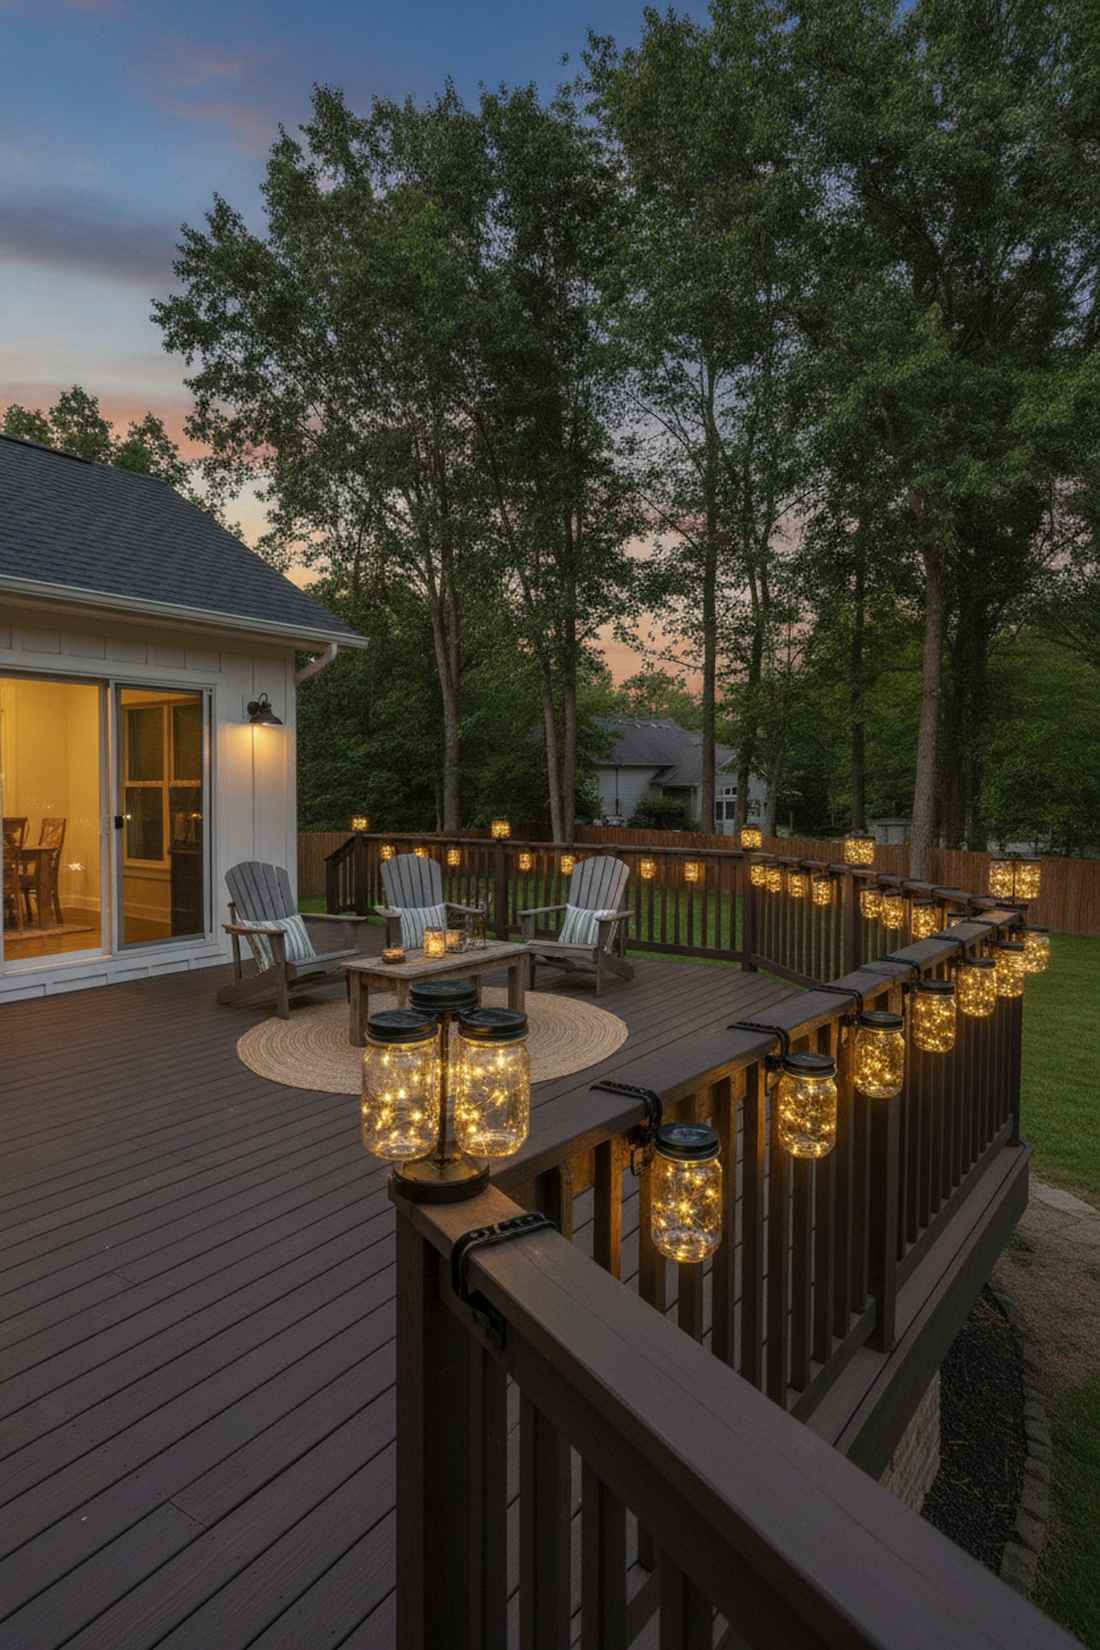
20. Shepherd Hook Pathway Lights
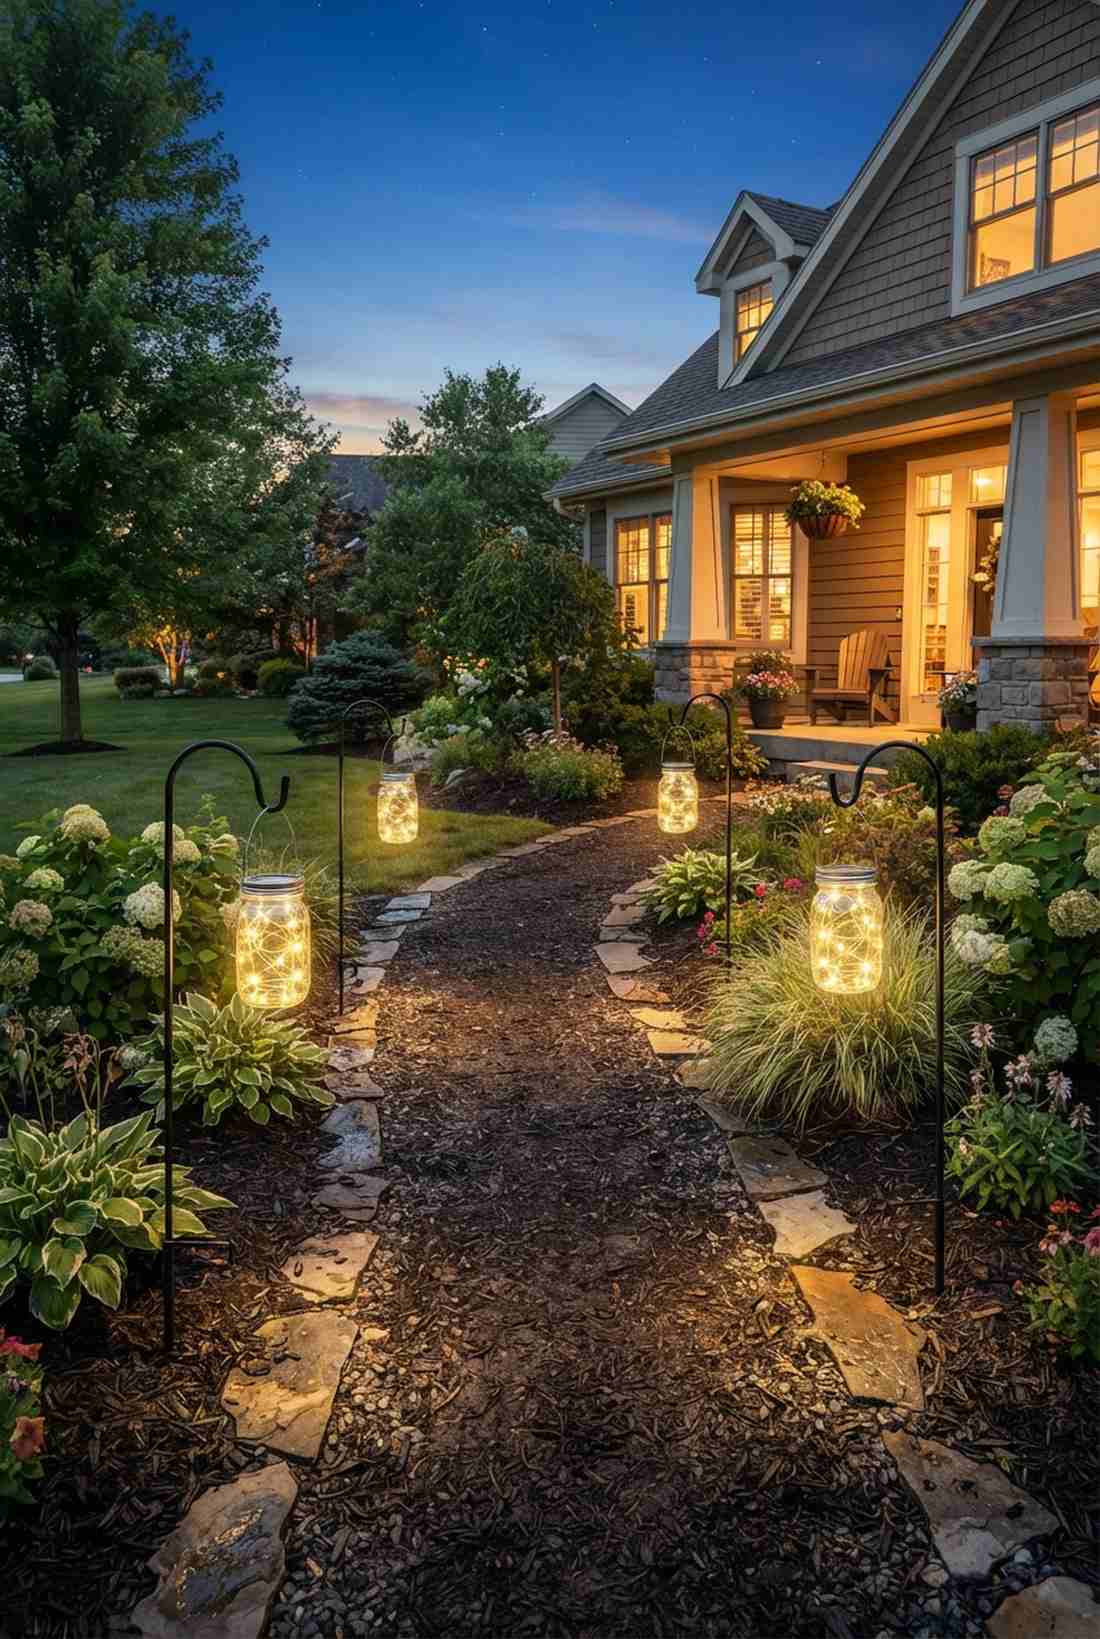
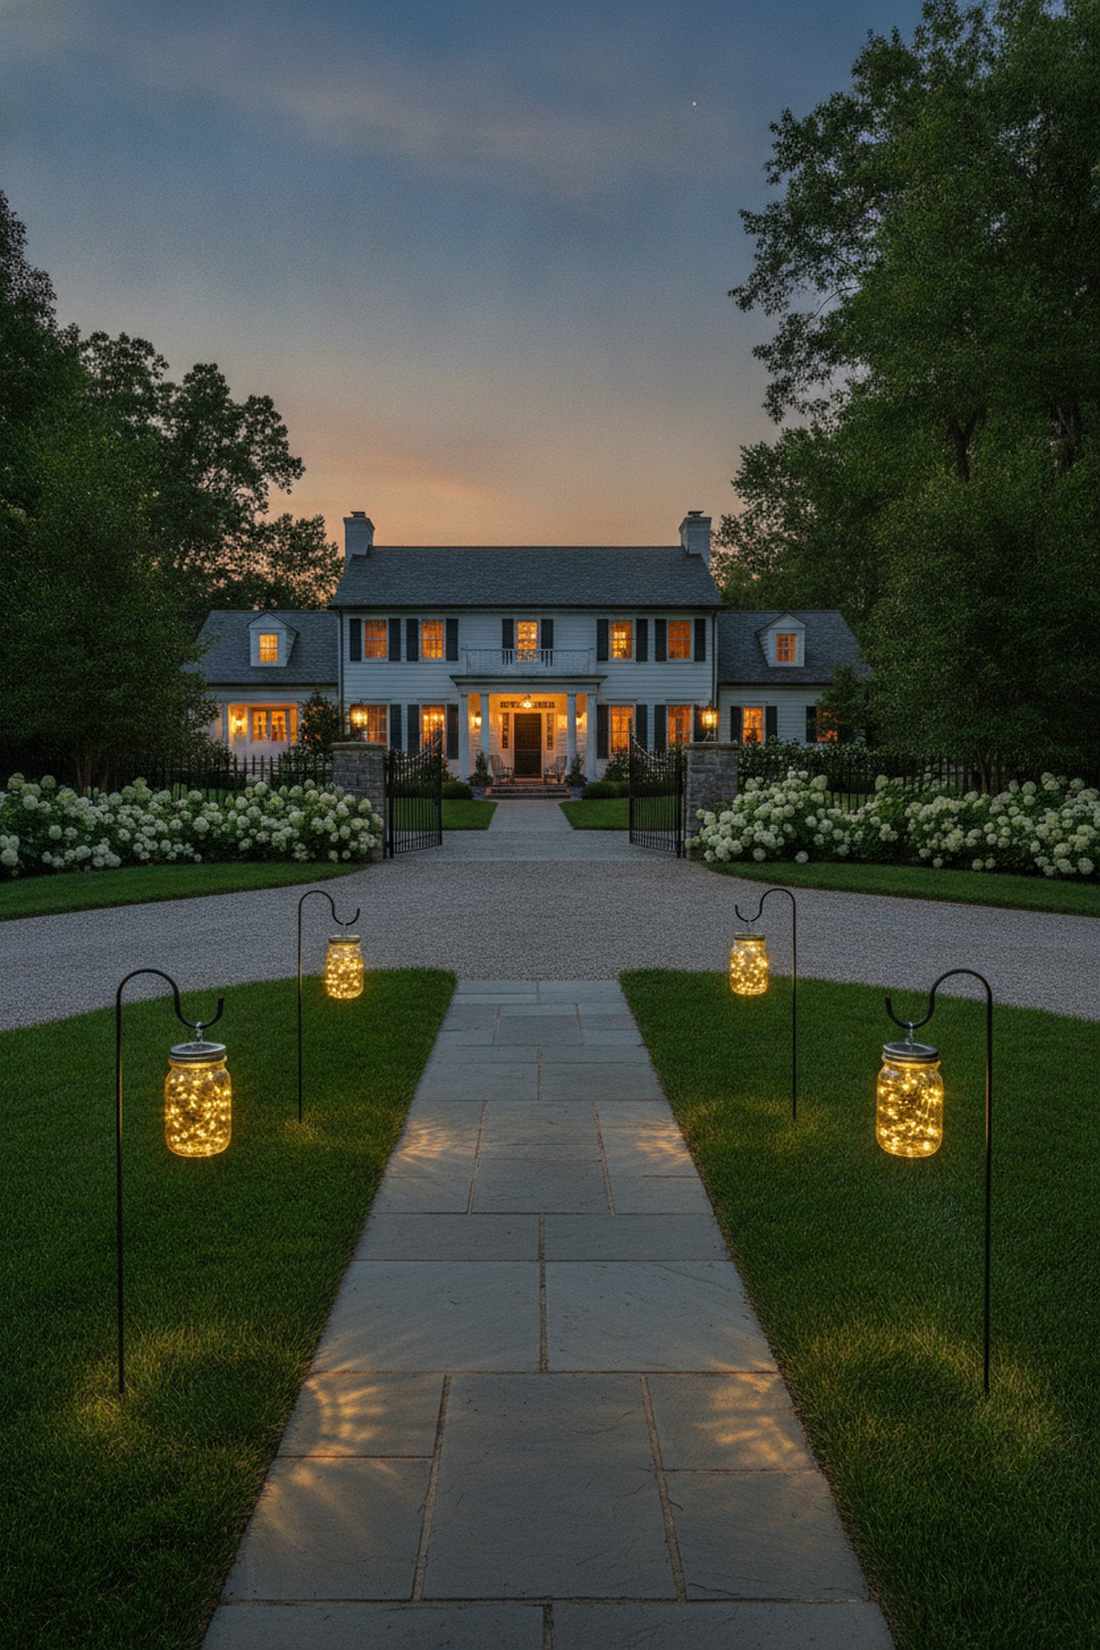
A floating illuminated walkway feels welcoming and distinctly high-end. Lining your front driveway or garden path with these elevated lanterns creates a grand entrance for any gathering.
Ground-level lights easily get covered in mud, but suspending a fairy lights in a jar setup at knee-height delivers a surprisingly premium look. The suspended glass casts wide, functional light pools that safely guide your guests.
Setting up a path of 4 hooks costs roughly $35. Save this to your exterior landscaping board!
- Key Materials: Iron shepherd hooks, hanging solar jars
- Vibe / Style: Estate entrance
- Difficulty: Ground staking
- Budget Breakdown: Hooks (x4): $25 | Jars/Lights: $10
- Creator’s Tip: Step on the base stakes firmly when the soil is damp to ensure the hooks stand perfectly vertical.
- Smart Sourcing: Invest in rust-resistant iron shepherd hooks and shatterproof acrylic mason jars.
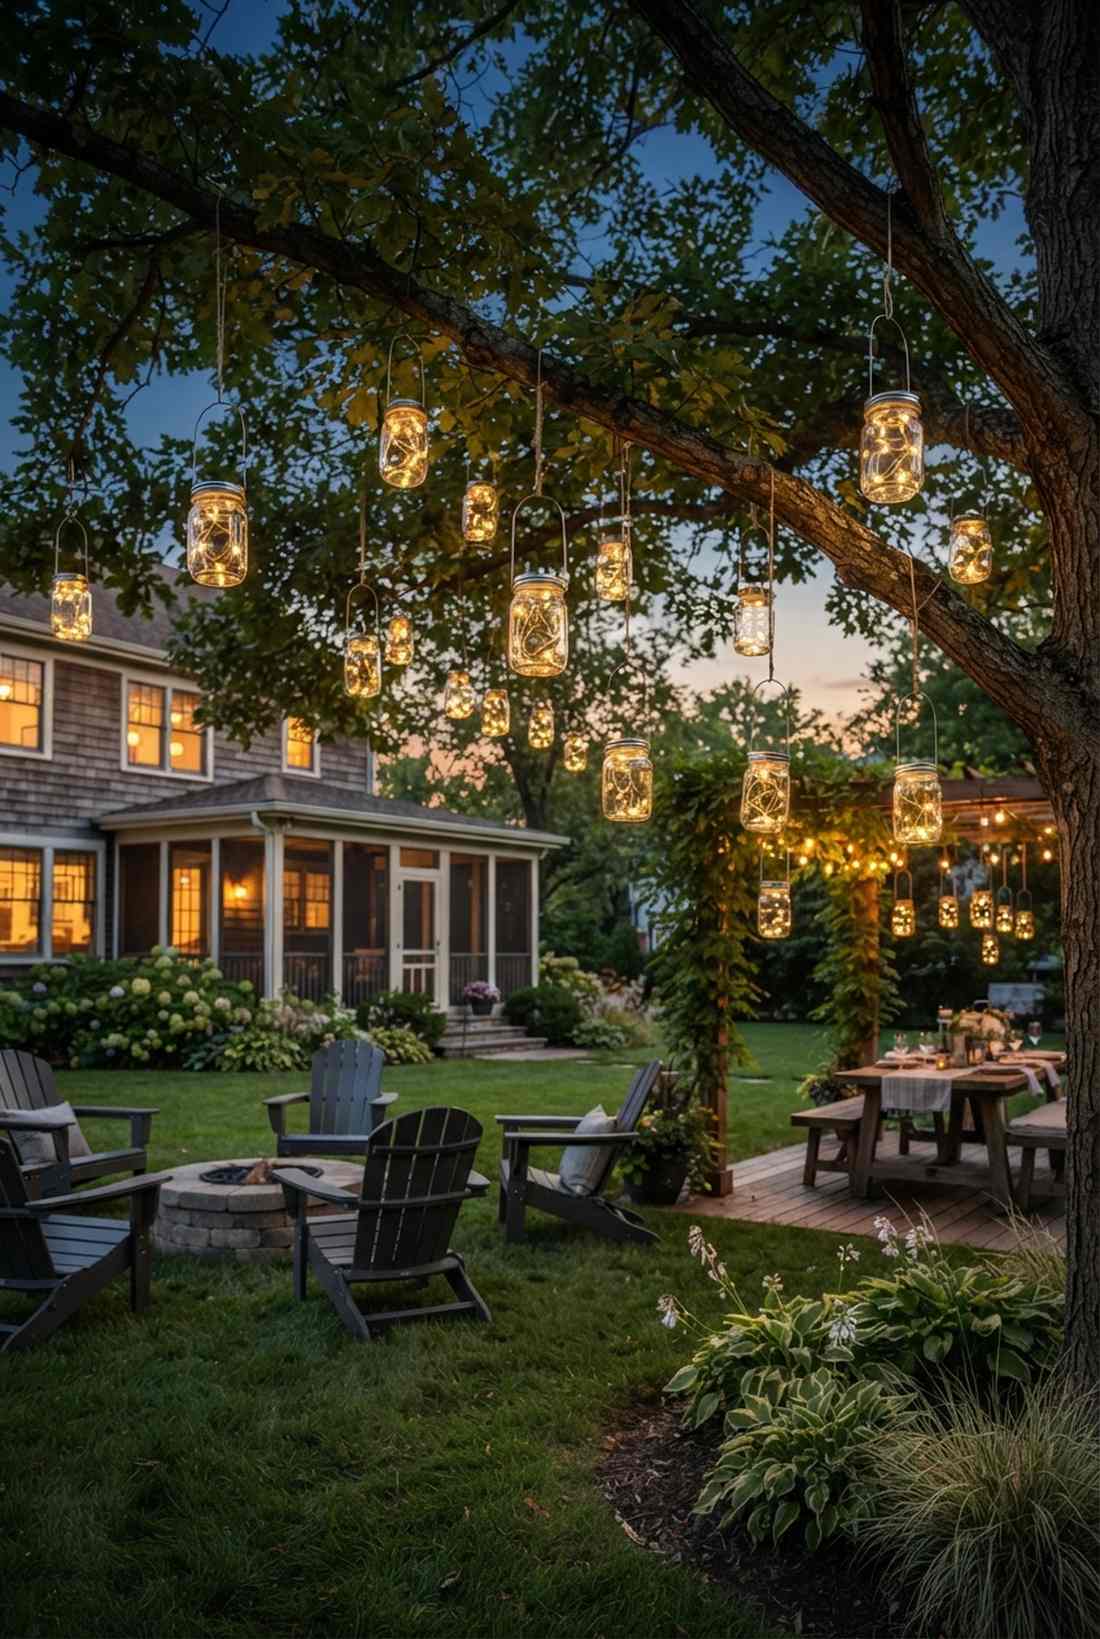
21. Tree Branch Canopy Lighting
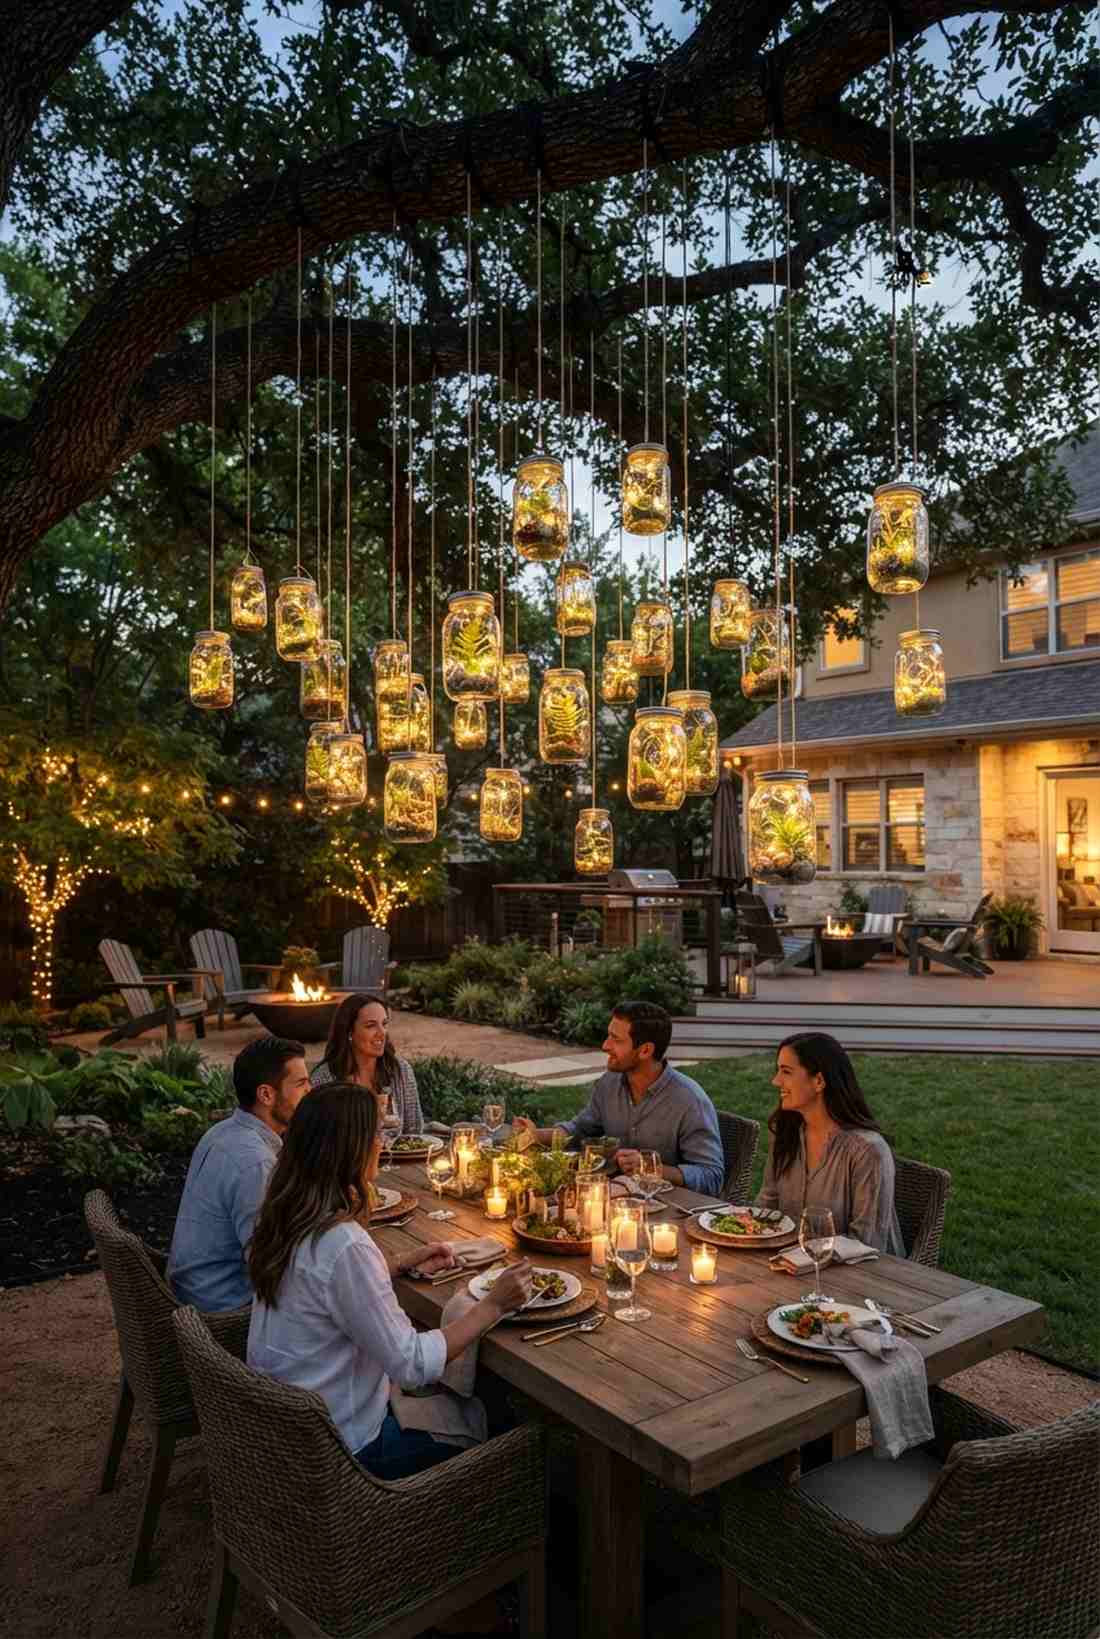

This staggered branch light canopy feels like an enchanted forest festival. Draping these irregularly over an outdoor dining table replaces the need for harsh floodlights entirely.
Uniform spacing looks overly engineered, but varying the drop lengths mimics natural fireflies. Including high-quality miniature garden supplies or moss inside the jars elevates them from basic lighting to suspended terrariums.
This magical canopy effect costs about $25 to assemble. Highly recommended for backyard entertaining.
- Key Materials: Dark twine or fishing line, outdoor LEDs
- Vibe / Style: Enchanted woodland
- Difficulty: Ladder work required
- Budget Breakdown: Suspension Line: $5 | Multi-Jars/Lights: $20
- Creator’s Tip: Use UV-resistant black zip ties on the tree branches to secure the hanging lines safely without damaging the bark.
- Smart Sourcing: Source heavy-duty clear fluorocarbon line and timer-equipped outdoor fairy lights.
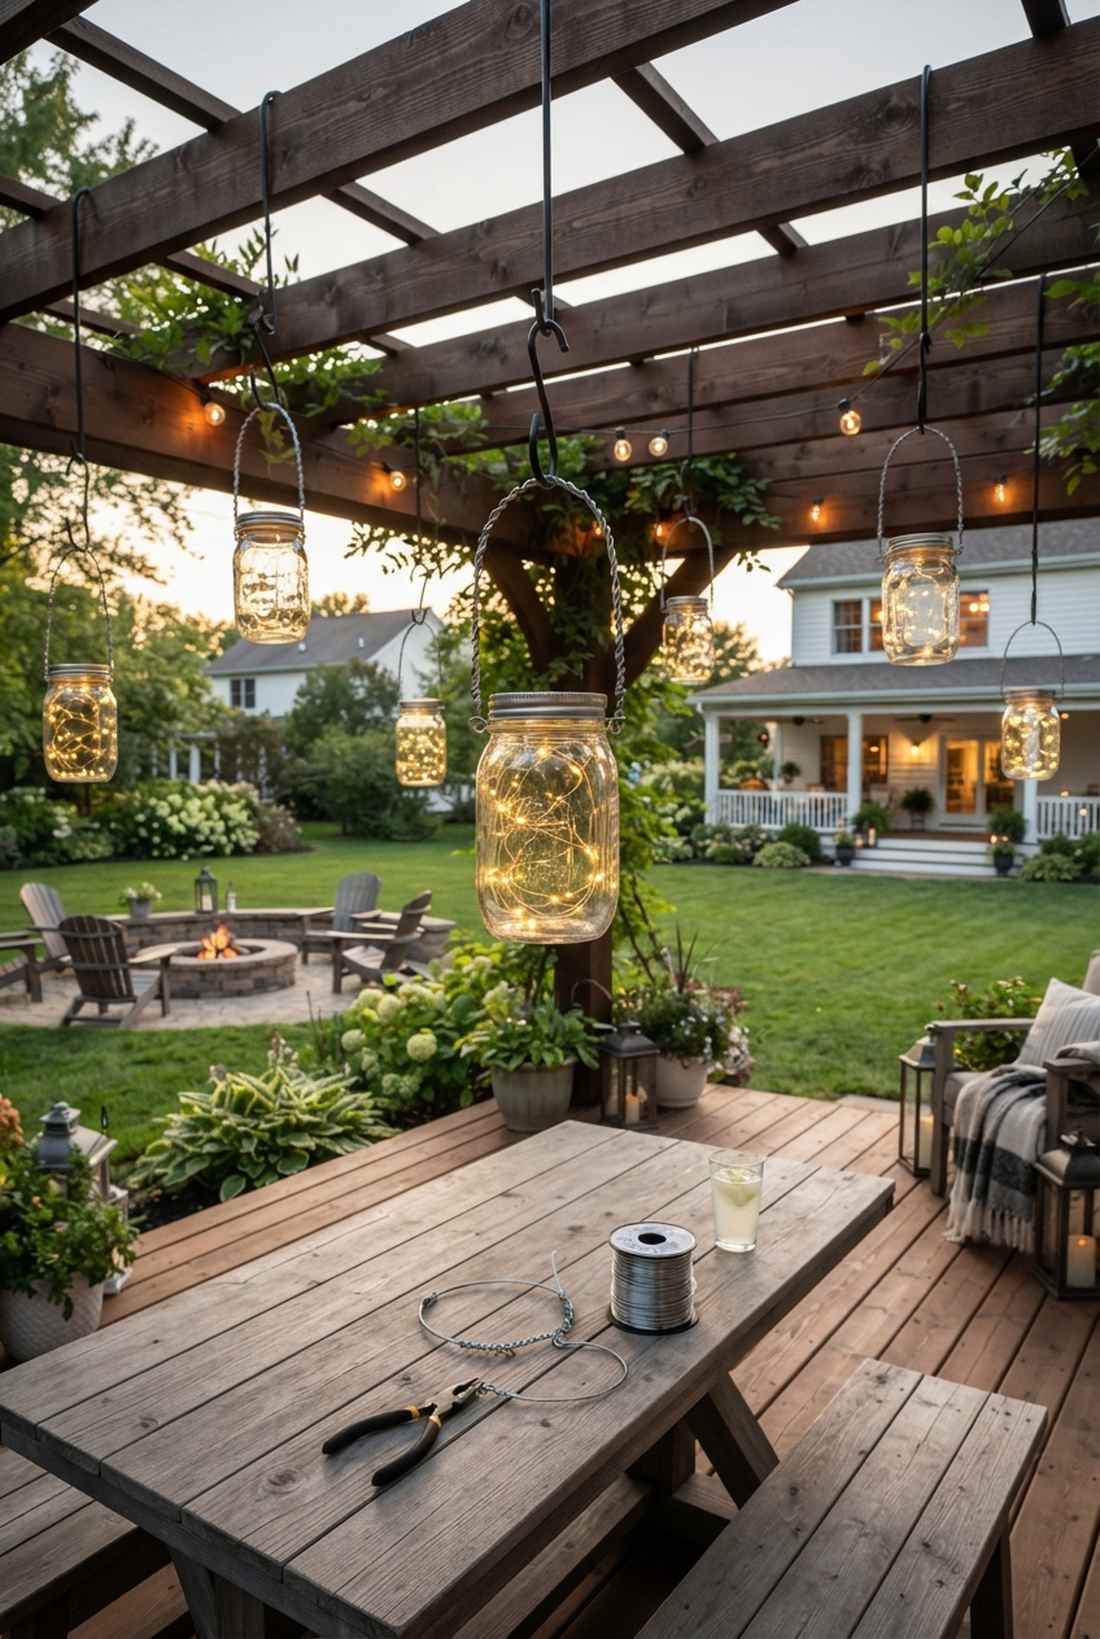
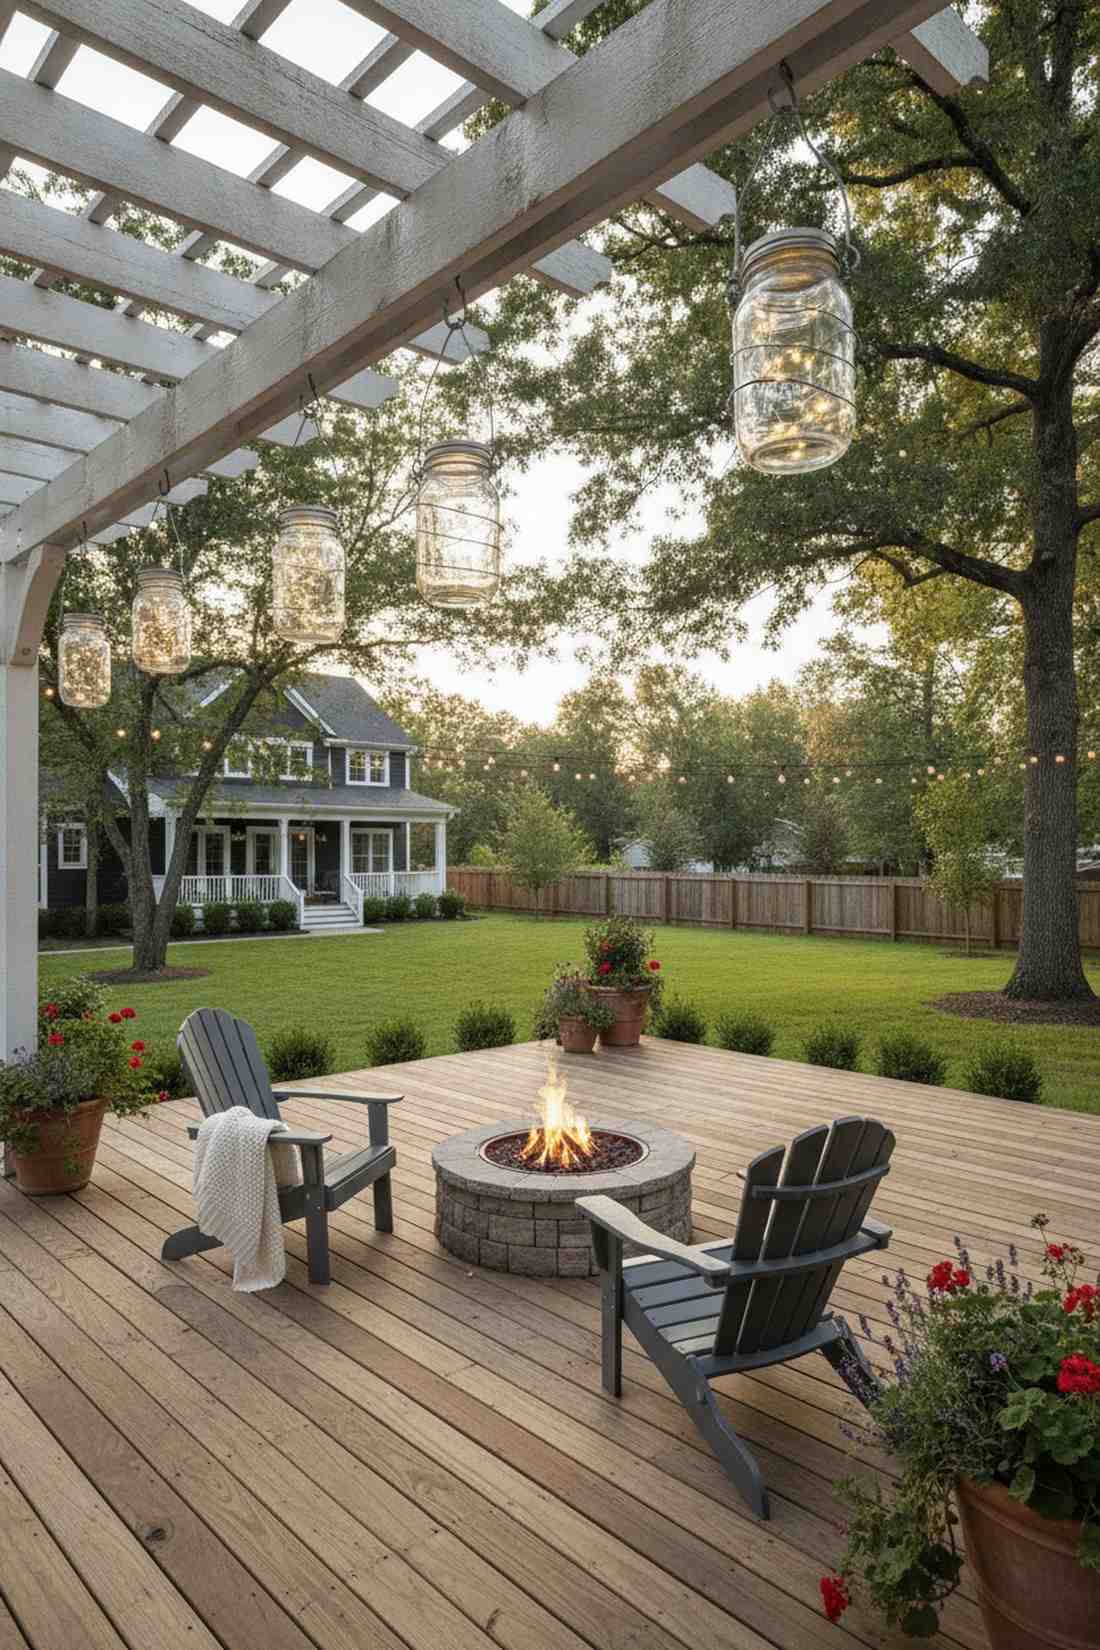
22. Pergola Overhead Installation
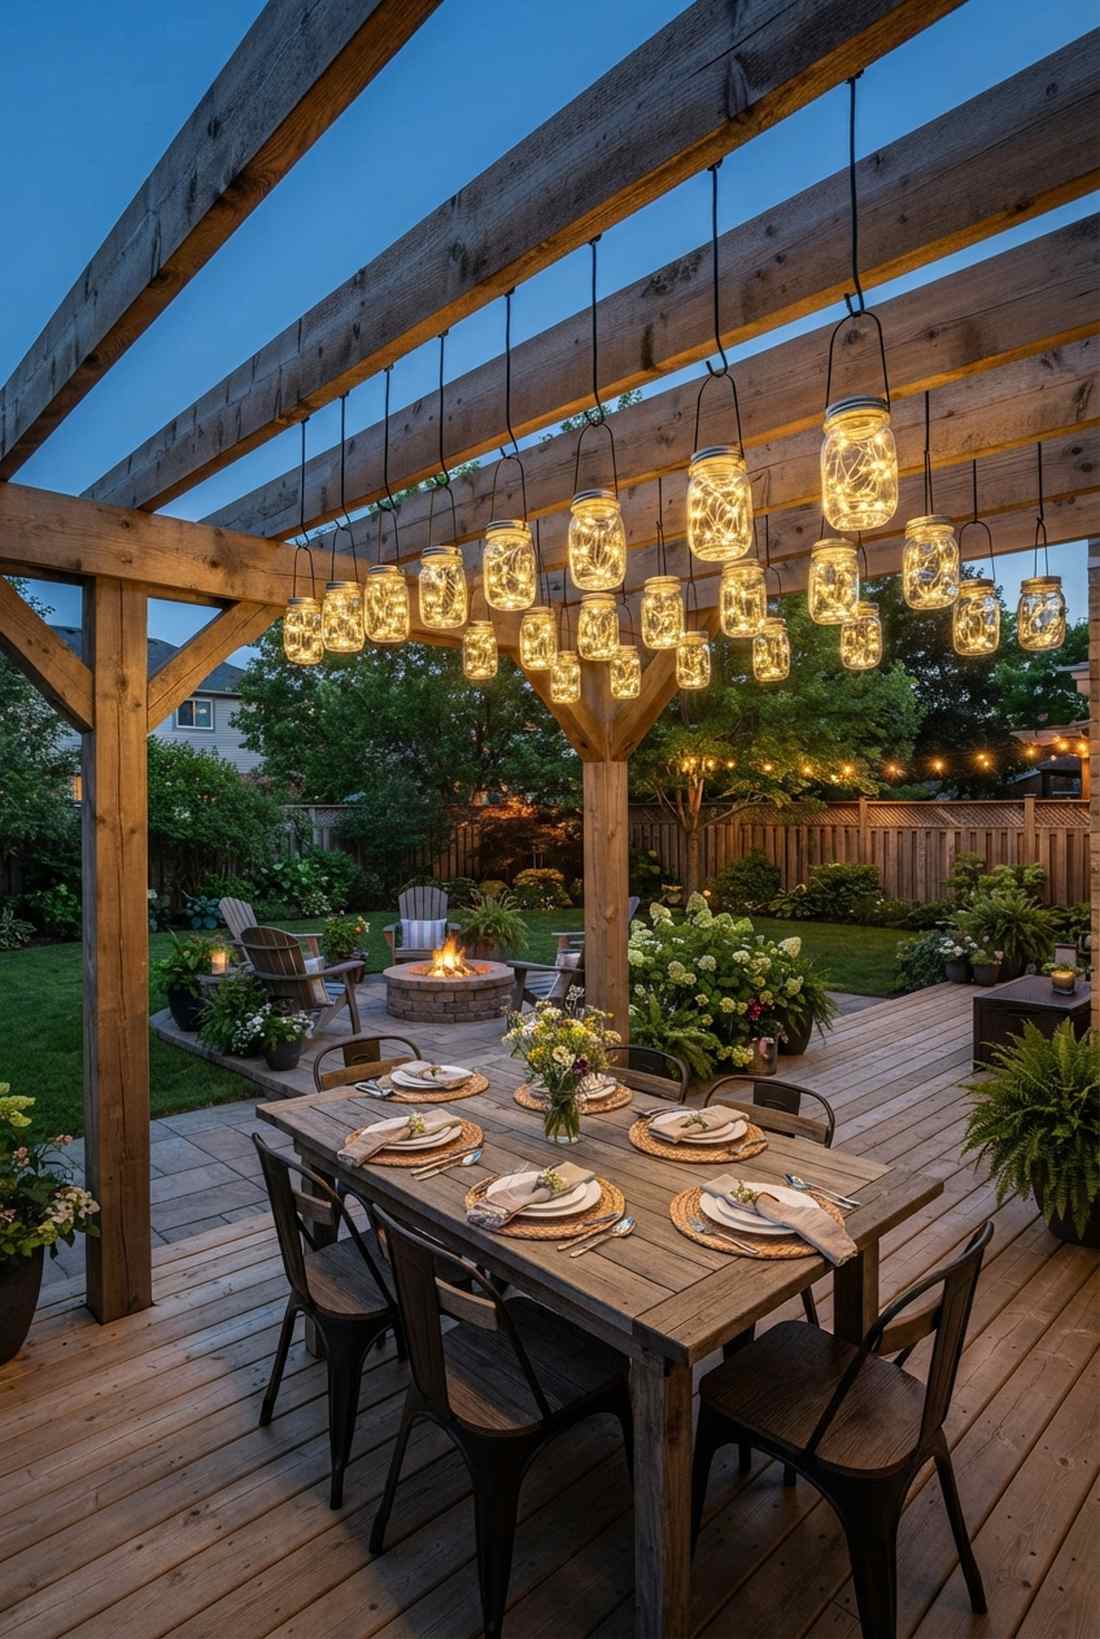
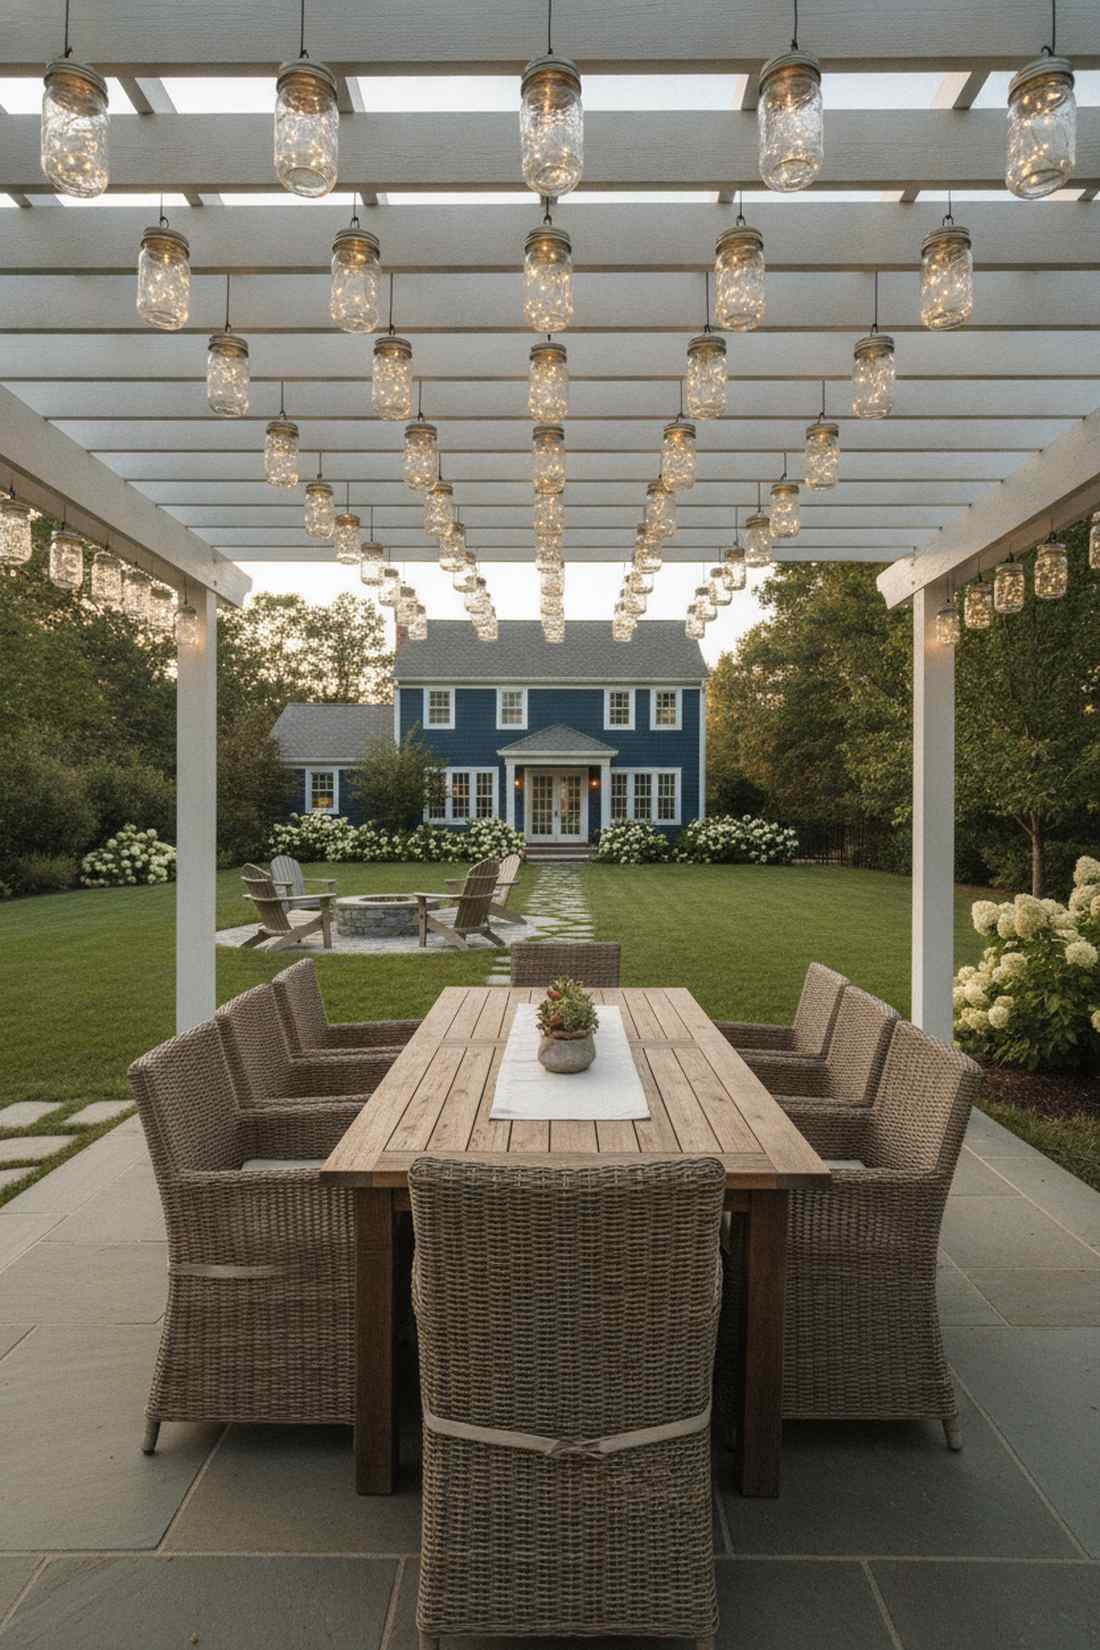
A linear architectural jar display brings structured, comforting illumination to outdoor living rooms. It perfectly defines the dining space underneath a wooden pergola or gazebo.
Stringing bare bulbs is standard, but mounting clustered fairy lights in a jar gives a designer-level finish with a rustic twist. The glass shields the delicate wiring from rain while amplifying the output.
A structured pergola setup runs about $40. Pin this if you are remodeling your backyard patio!
- Key Materials: Screw-in cup hooks, hanging wire jars
- Vibe / Style: Structured outdoor living
- Difficulty: Overhead drilling
- Budget Breakdown: Hardware: $10 | Jars/Lights: $30
- Creator’s Tip: Measure your spacing exactly with a chalk line to ensure the hanging jars look like a custom architectural fixture.
- Smart Sourcing: Use vinyl-coated exterior screw hooks and warm white solar jar inserts.
Stop paying for expensive outdoor fixtures. The bracket trick coming up changes everything about fence lighting.
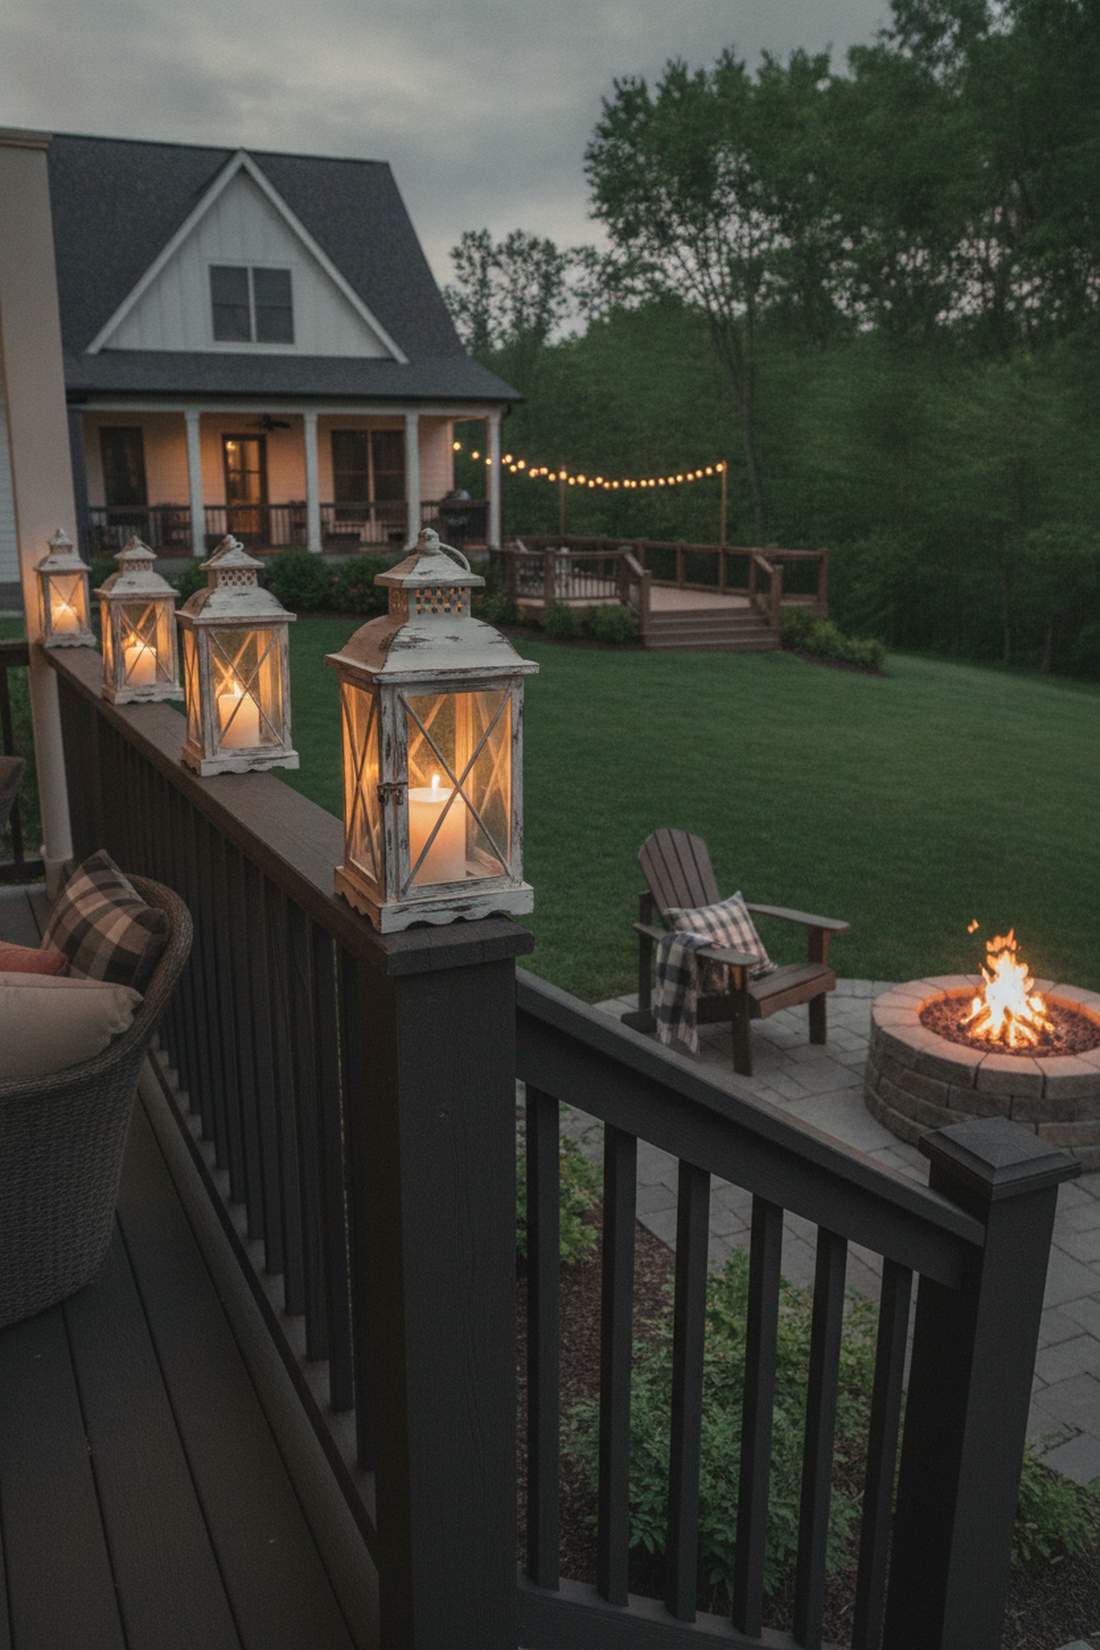
23. Fence-Mounted Bracket Lights
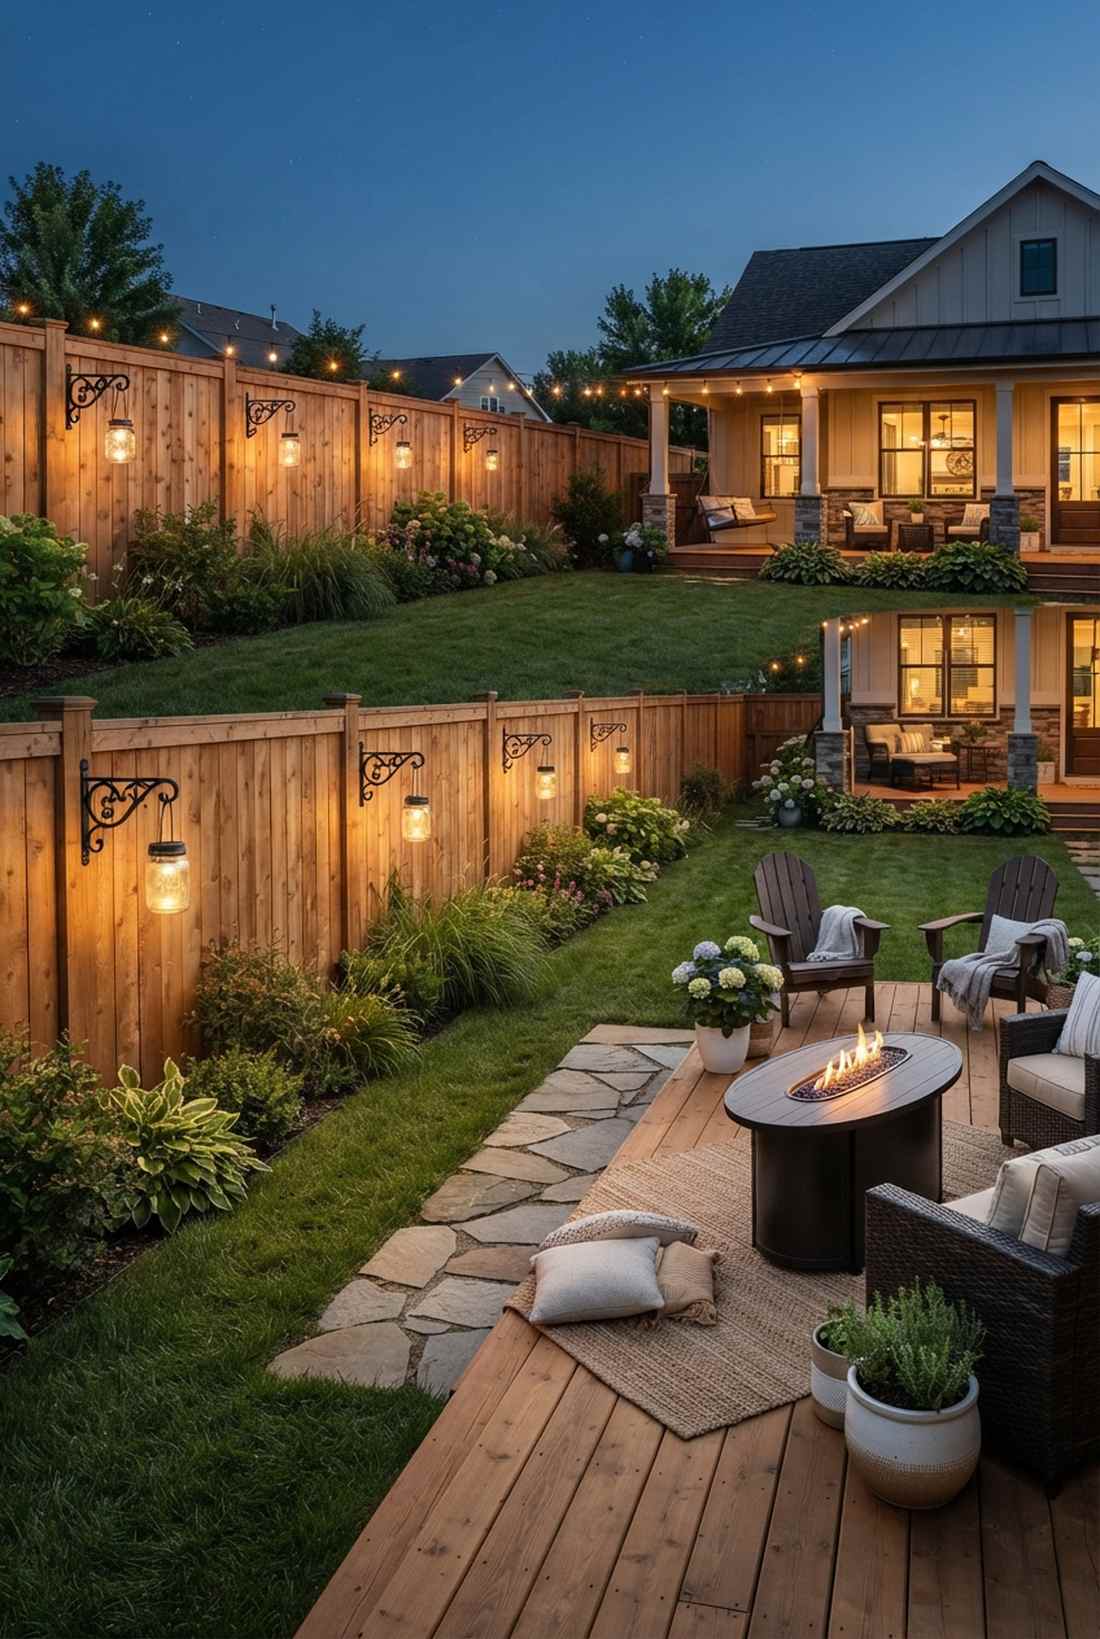
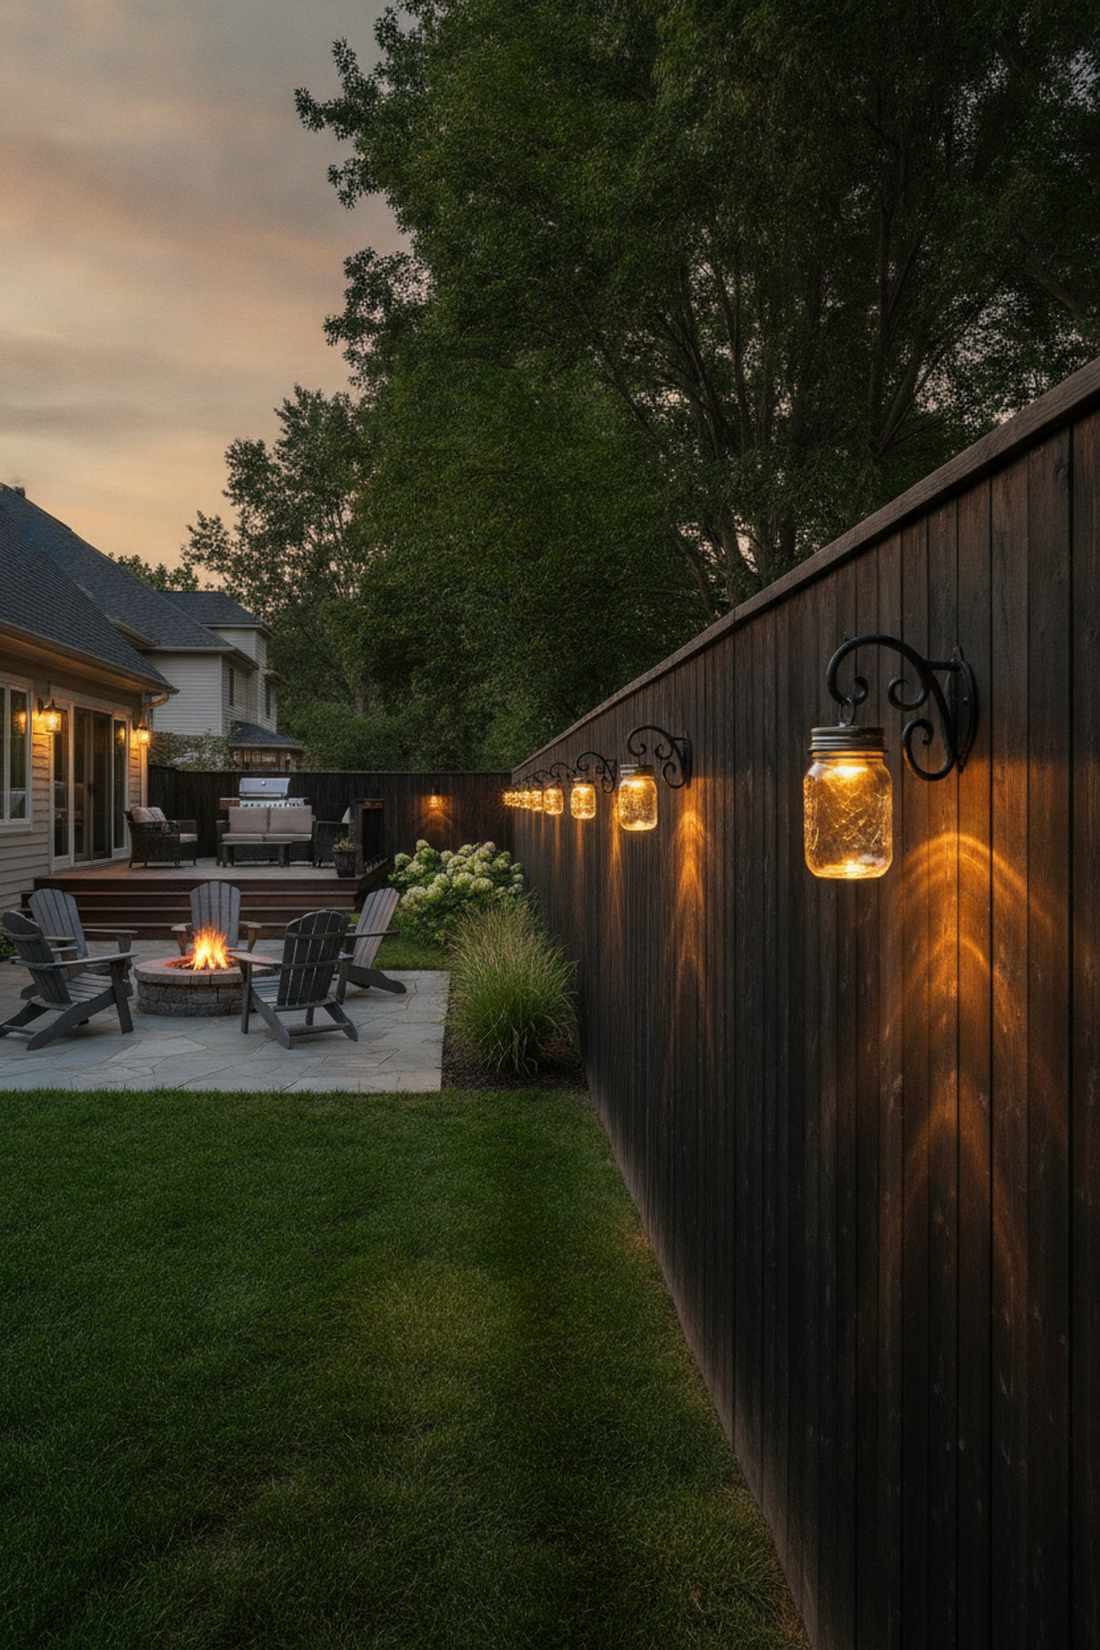
This wall-mounted perimeter lighting makes a plain wooden privacy fence look like a luxury resort boundary. It is perfect for wrapping your backyard in a warm, secure glow.
Nailing jars directly looks sloppy, but hanging them from extended cast-iron plant brackets looks far more expensive than it is. This permanent installation keeps the lanterns safely away from the wood to maximize light scatter.
You can mount 5 of these for around $45. A brilliant, high-impact exterior upgrade.
- Key Materials: Metal plant brackets, wood screws
- Vibe / Style: Resort perimeter
- Difficulty: Power drill required
- Budget Breakdown: Brackets: $25 | Jars/Lights: $20
- Creator’s Tip: Mount them exactly at 5.5 feet high—eye level creates the most flattering ambient light for standing guests.
- Smart Sourcing: Order decorative cast-iron wall brackets and auto-sensor outdoor solar lights.
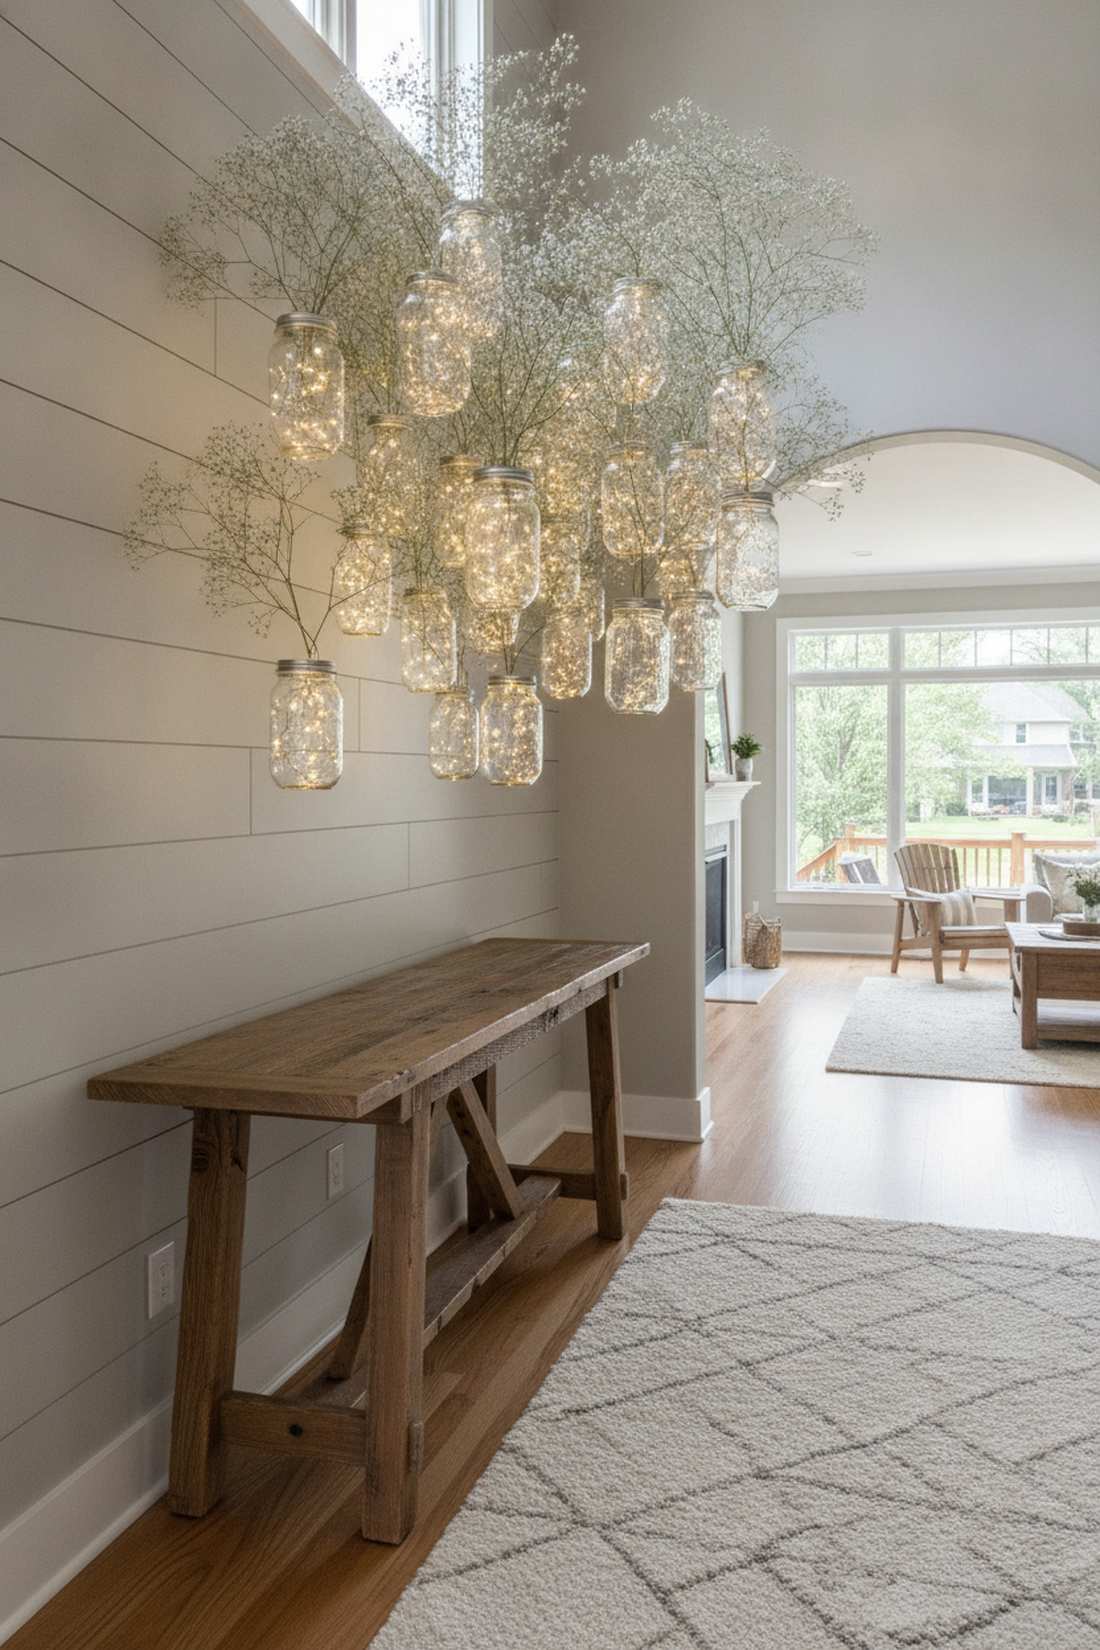
24. Chandelier-Style Multi-Jar Fixture
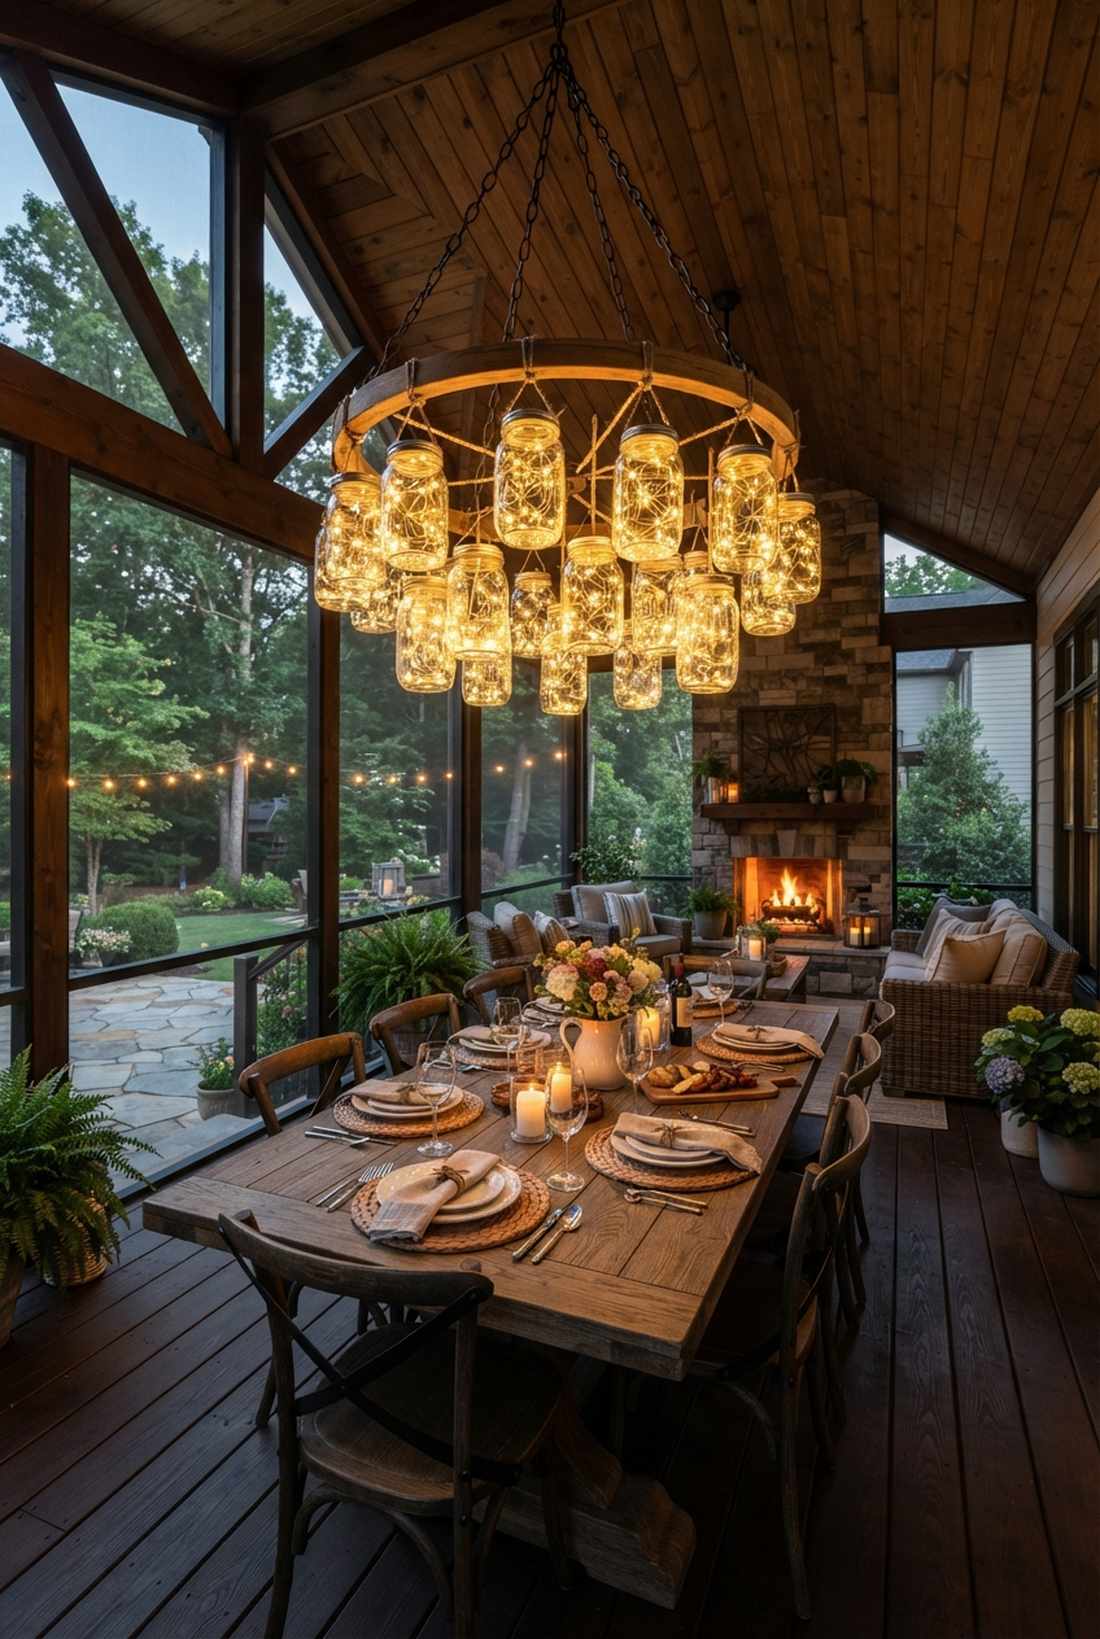
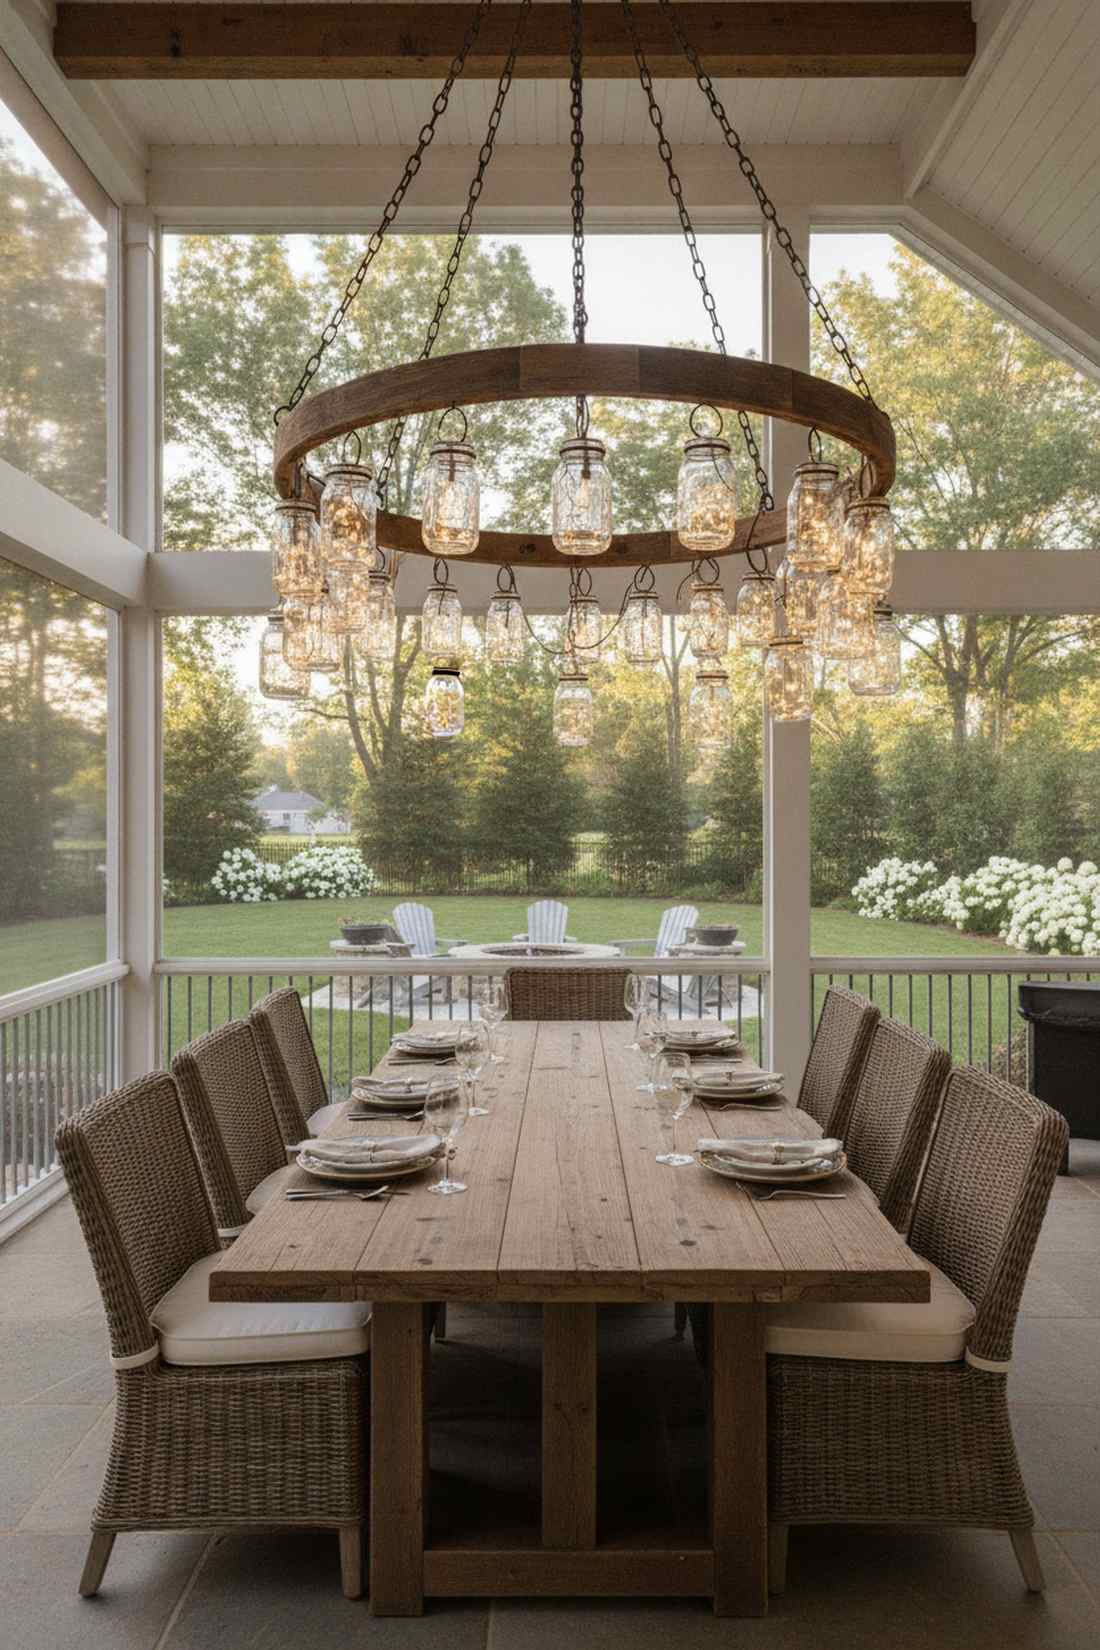
A centralized jar chandelier acts as a massive, awe-inspiring focal point. Hang this masterpiece directly over an outdoor dining table or in the center of a screened-in porch.
Buying a rustic chandelier costs hundreds, but securing multiple jars to a wooden frame or wagon wheel delivers a surprisingly premium look for a fraction of the price. The clustered output provides excellent task lighting for eating.
Build this massive statement piece for roughly $50. Save this to your advanced DIY lighting board!
- Key Materials: Wooden hoop or frame, heavy chain, multiple jars
- Vibe / Style: Grand rustic
- Difficulty: Advanced assembly
- Budget Breakdown: Frame/Chain: $20 | Jars/Lights: $30
- Creator’s Tip: Use a central battery hub hidden on top of the frame to power all the jars at once with a single remote.
- Smart Sourcing: Grab a large wooden embroidery hoop or wreath base and a multi-strand fairy light splitter kit.
25. Deck Railing-Mounted Lanterns
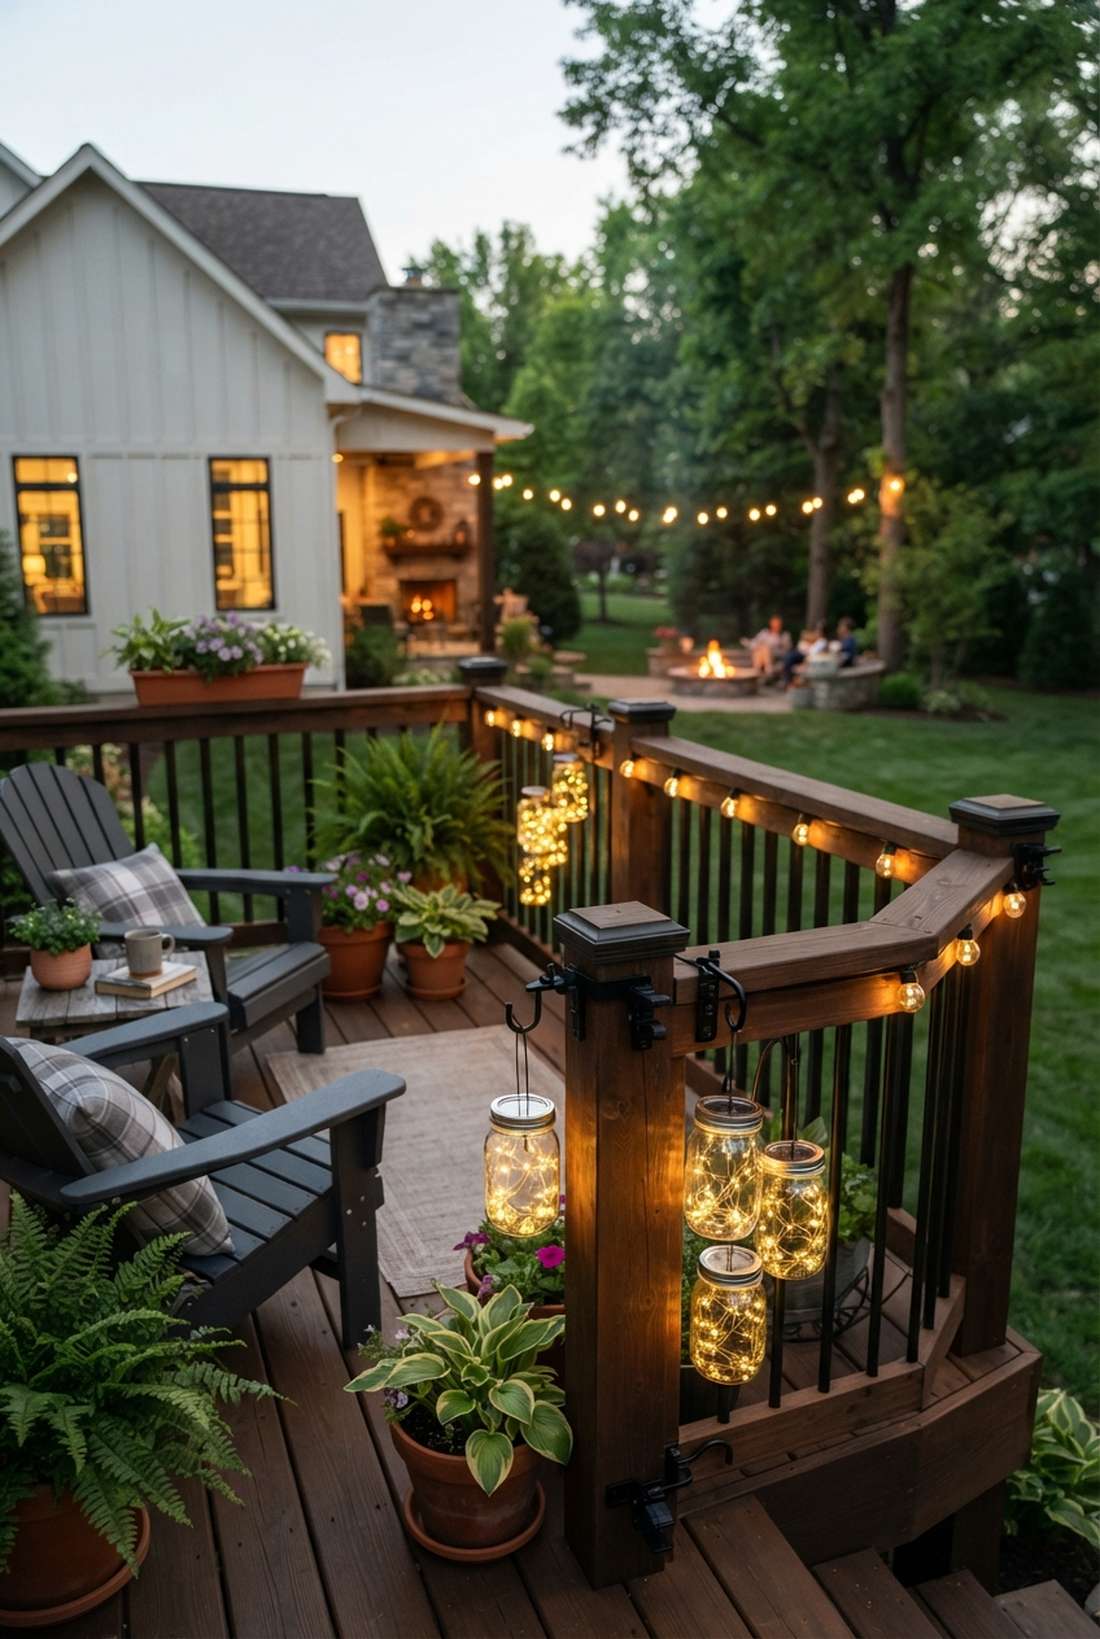
This railing-hugger light display creates a brilliantly illuminated safety border. It works perfectly for apartment balconies or large wraparound wooden decks.
Screwing into rented decks loses your deposit, but using tension-clamp brackets keeps the fairy lights table decor aesthetic without any permanent damage. Elevating the jars off the floor prevents kicking hazards and water pooling.
Equip your railings for about $30. Highly recommended for renters craving better outdoor aesthetics.
- Key Materials: Railing clamp hooks, solar jars
- Vibe / Style: Balcony bistro
- Difficulty: No-tool attachment
- Budget Breakdown: Clamps: $15 | Jars/Lights: $15
- Creator’s Tip: Cluster three jars of different heights on a single corner clamp for a styled vignette rather than a straight, boring line.
- Smart Sourcing: Use adjustable deck railing clamps and shatter-resistant plastic mason jars.
Material Guide: Cheap vs. Premium Aesthetic
Knowing exactly where to save and where to spend makes all the difference in achieving that “looks expensive but isn’t” vibe.
- Standard vs. UV-Resistant/Premium: Standard faux florals fade to a gross blue-gray in the sun within weeks. Upgrading to UV-coated greens ensures your outdoor centerpieces survive the whole summer.
- Pre-made Kits vs. Sourcing Locally: Buying individual LEDs at a craft store costs $8 each. Buying specialized fairy garden kits or bulk LED packs drops the price to $1.50 per unit, leaving more budget for premium glass.
Seasonal and Holiday Themes
Why buy expensive seasonal decor you only use once? By rotating the fillers in your mason jars, you can create high-end holiday centerpieces year-round on a massive discount.
26. Christmas Evergreen and Spice Jars
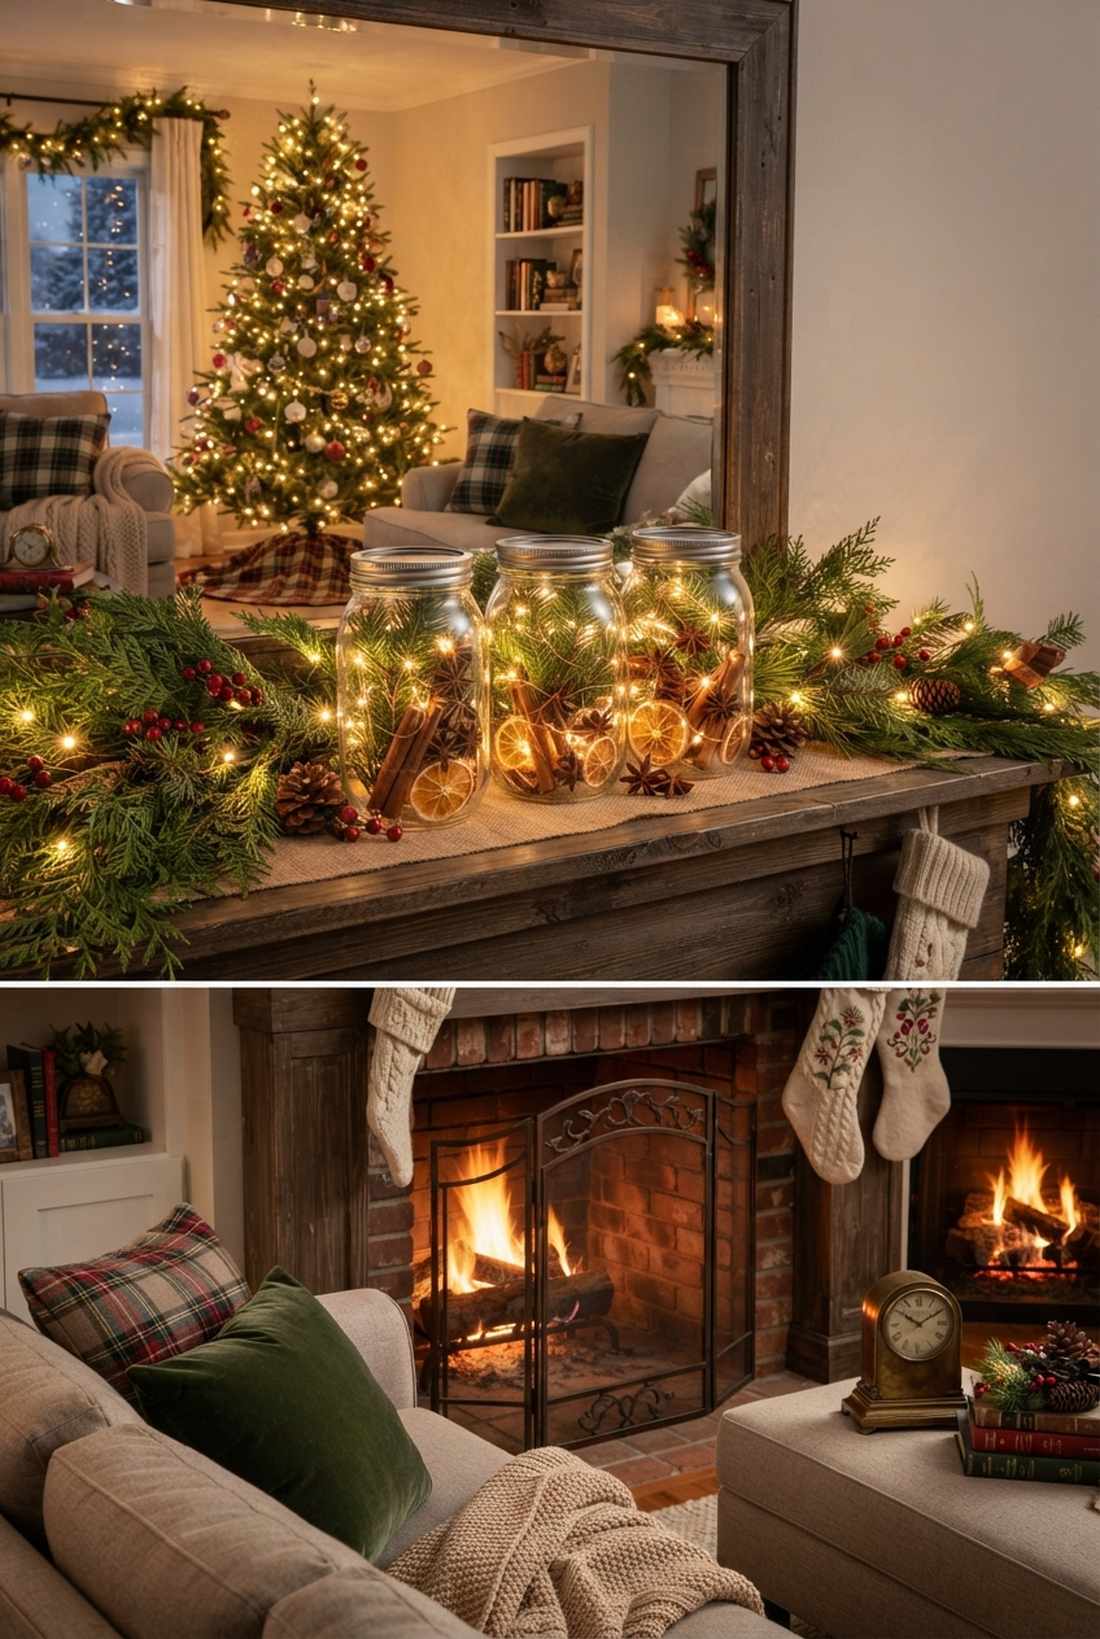
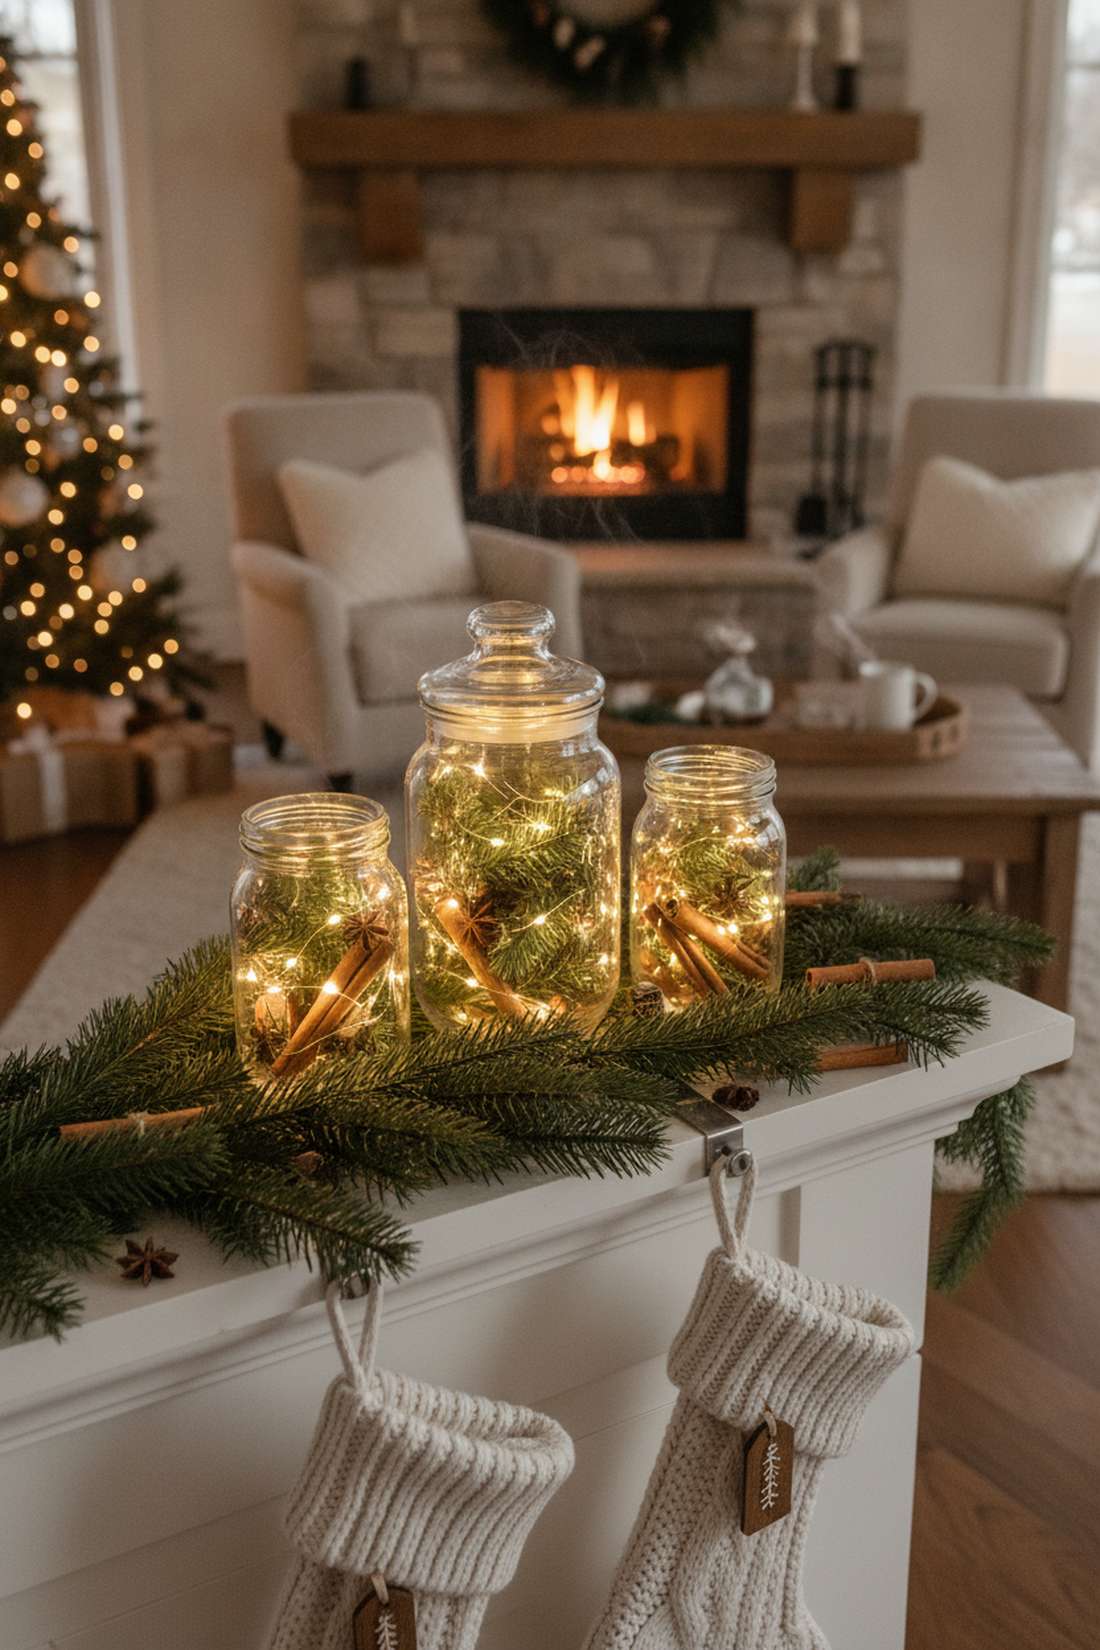
A festive aromatic light jar feels like capturing the spirit of winter indoors. This layout creates an intensely cozy vibe on Christmas mantles or holiday dining tables.
Plastic pine looks incredibly tacky, but layering real evergreen clippings with star anise gives a designer-level finish that naturally deodorizes the room. The slight heat from the LED wire gently warms the cinnamon, acting as a natural diffuser.
You can create this fragrant setup for about $8. Pin this to your DIY holiday decor board!
- Key Materials: Fresh pine sprigs, cinnamon sticks, star anise
- Vibe / Style: Cozy woodland Christmas
- Difficulty: Easy layering
- Budget Breakdown: Spices: $4 | Lights: $4 | Greens: Free (Foraged)
- Creator’s Tip: Wipe the inside of the jar with rubbing alcohol first to prevent the natural pine sap from clouding the glass.
- Smart Sourcing: Buy whole star anise bulk bags and warm white micro-LED string lights.
27. Halloween Spooky Silhouette Lanterns
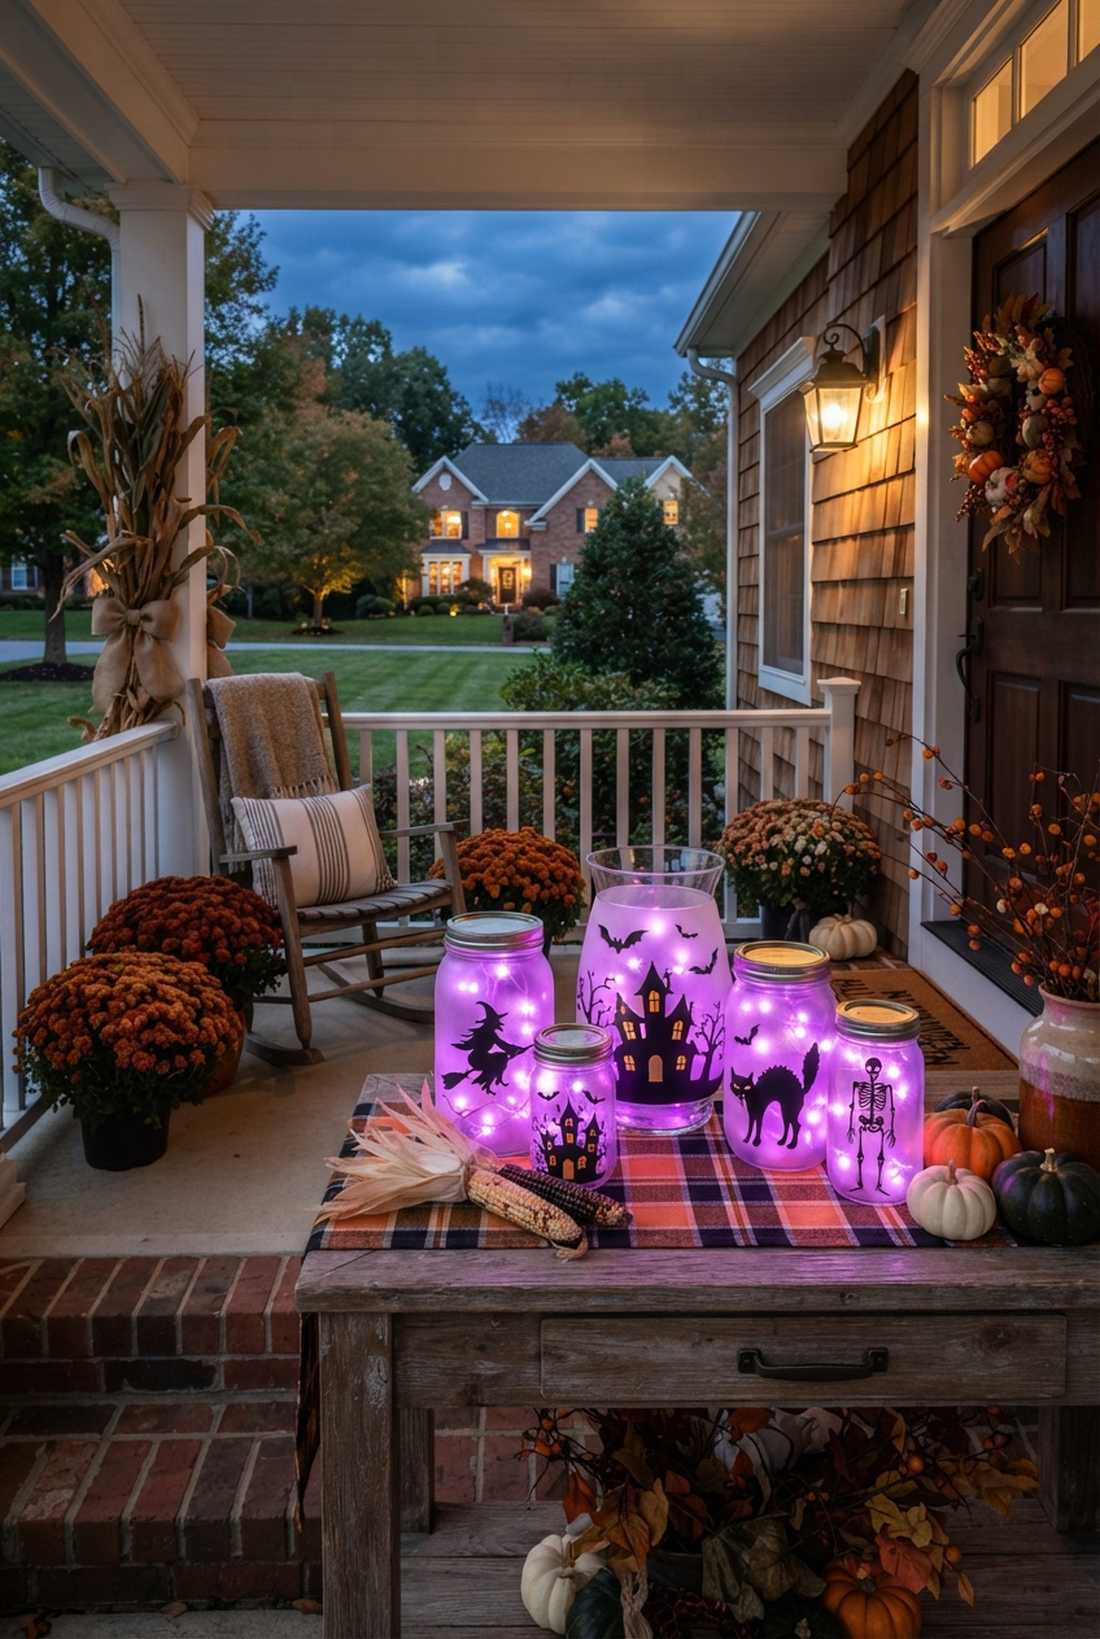
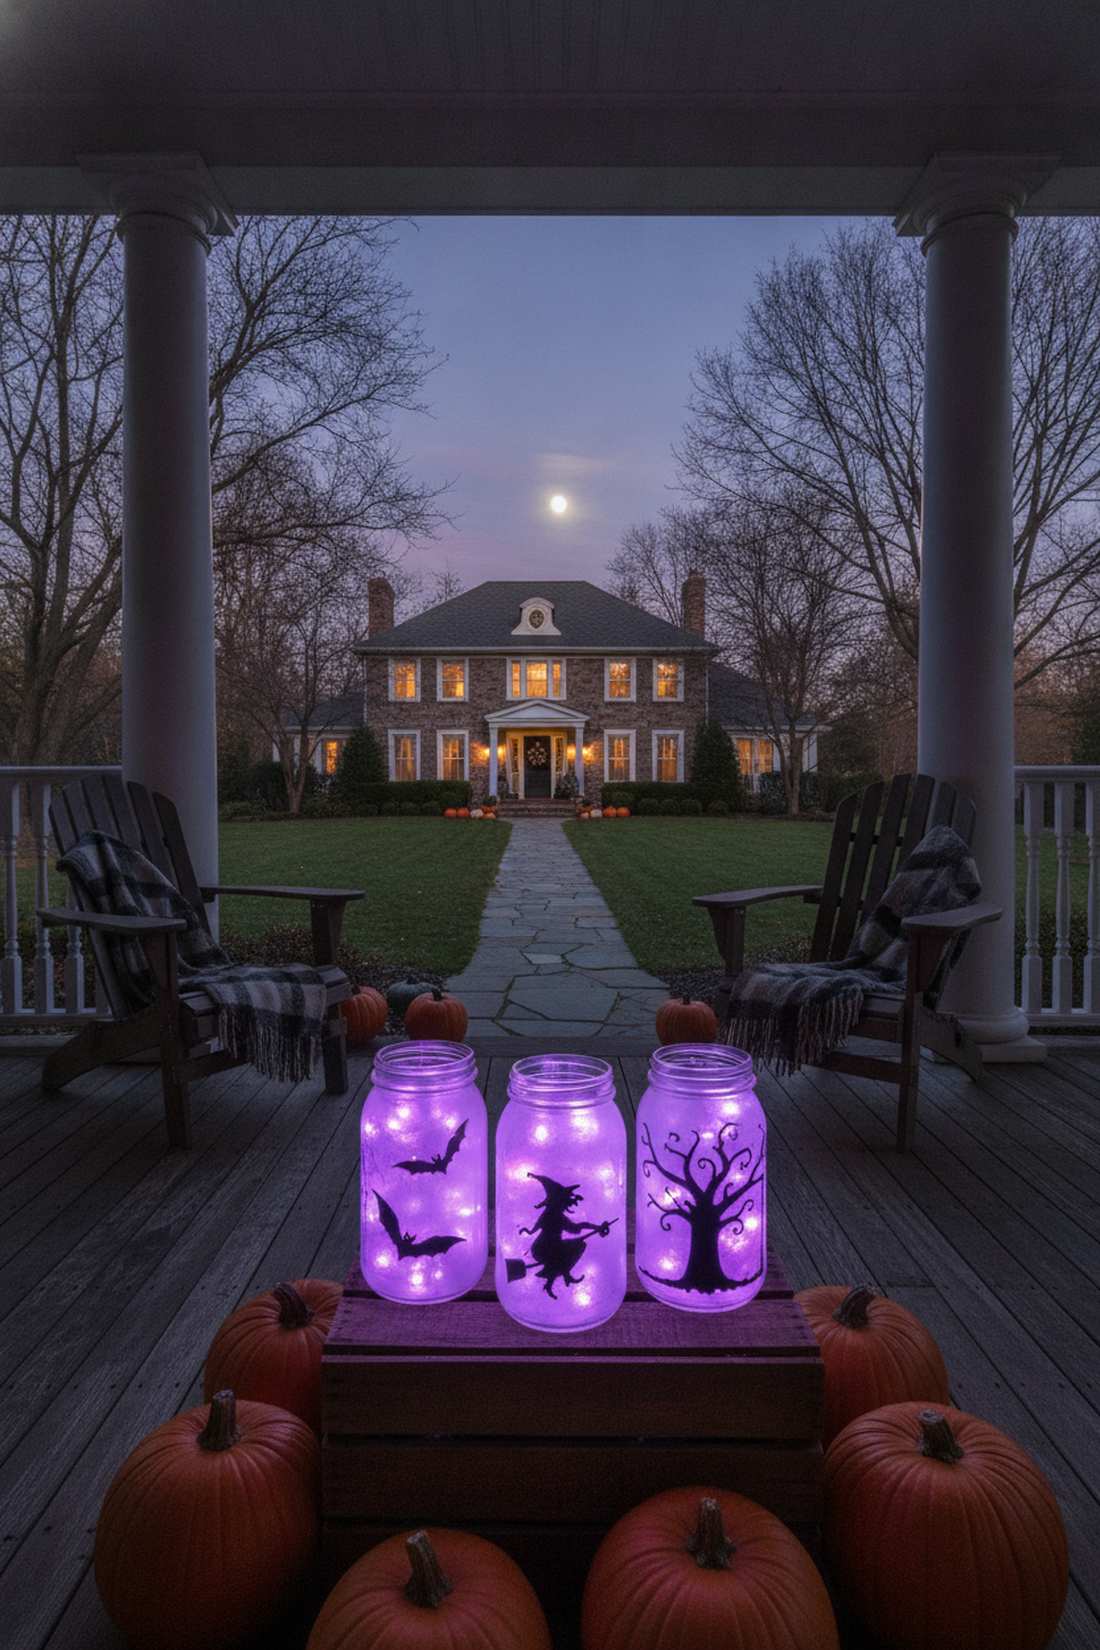
This glowing shadow-caster lantern offers a playfully eerie, haunted aesthetic. It’s the perfect non-messy alternative to carved pumpkins for a front porch display.
Applying stickers directly to the glass looks childish, but backing the jar with glowing frosted paint while mounting crisp black silhouettes delivers a surprisingly premium look. The stark contrast makes the shadowy bats and witches pop violently in the dark.
Build your spooky lanterns for under $10. A fun, highly visual craft for spooky season.
- Key Materials: Black craft foam, frosted spray paint
- Vibe / Style: Haunted mansion
- Difficulty: Scissor cutting required
- Budget Breakdown: Foam/Paint: $6 | Lights: $4
- Creator’s Tip: Use purple or bright orange fairy lights inside instead of white to push the Halloween theme over the top.
- Smart Sourcing: Grab pre-cut Halloween vinyl silhouettes and purple LED fairy wires.
Most seasonal decor looks tacky. This next Thanksgiving setup proves you can do holidays with absolute elegance.
28. Thanksgiving Autumn Harvest Display
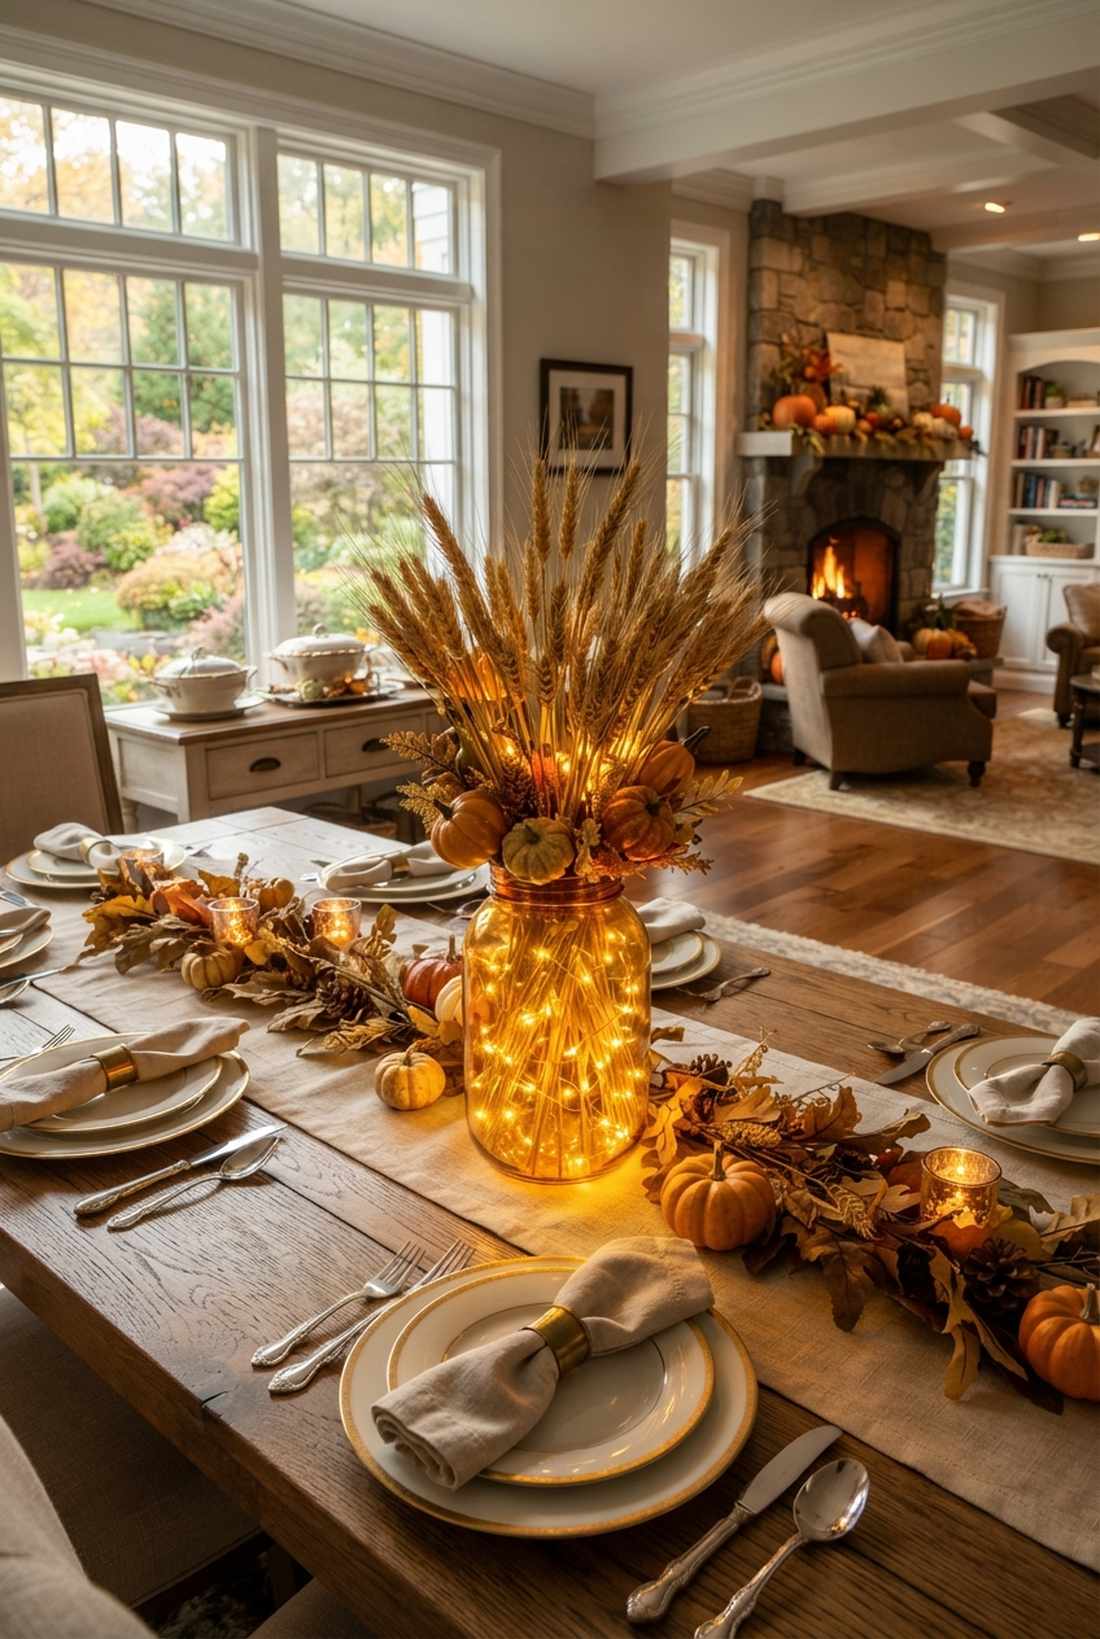
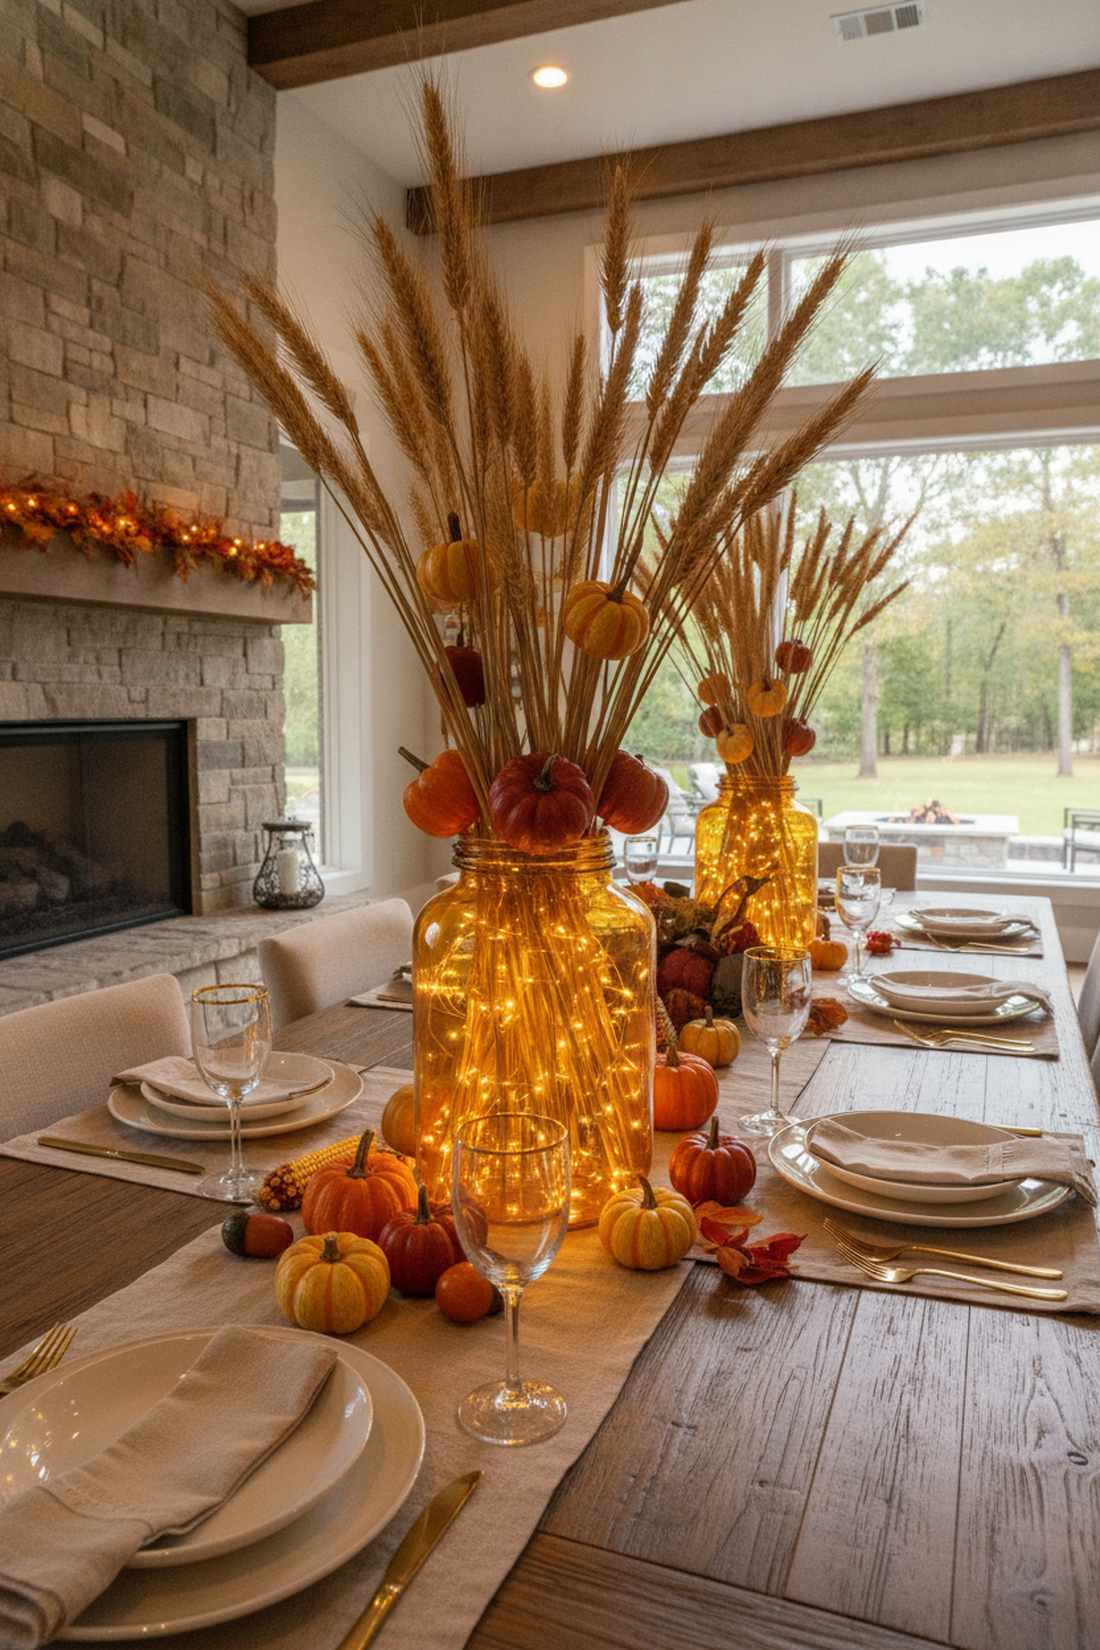
An amber-glowing harvest jar brings an incredibly warm, abundant energy to the room. It is the absolute perfect centerpiece for a luxurious Thanksgiving feast.
Dumping fake plastic leaves inside looks chaotic, but carefully framing a fairy lights centerpiece with tall wheat stalks and mini pumpkins looks far more expensive than it is. Using amber-tinted glass multiplies the autumn warmth beautifully.
This elegant harvest setup runs about $15. Save this for your sophisticated fall tablescapes!
- Key Materials: Dried wheat, mini faux pumpkins, amber lights
- Vibe / Style: Elegant autumn harvest
- Difficulty: Quick arrangement
- Budget Breakdown: Botanicals: $8 | Lights/Jar: $7
- Creator’s Tip: Snip the wheat stalks to varying heights so they fan out elegantly from the jar opening rather than bunching up.
- Smart Sourcing: Source dried golden wheat stalk bundles and amber-colored LED strings.
29. Valentine’s Day Romantic Pink Glow
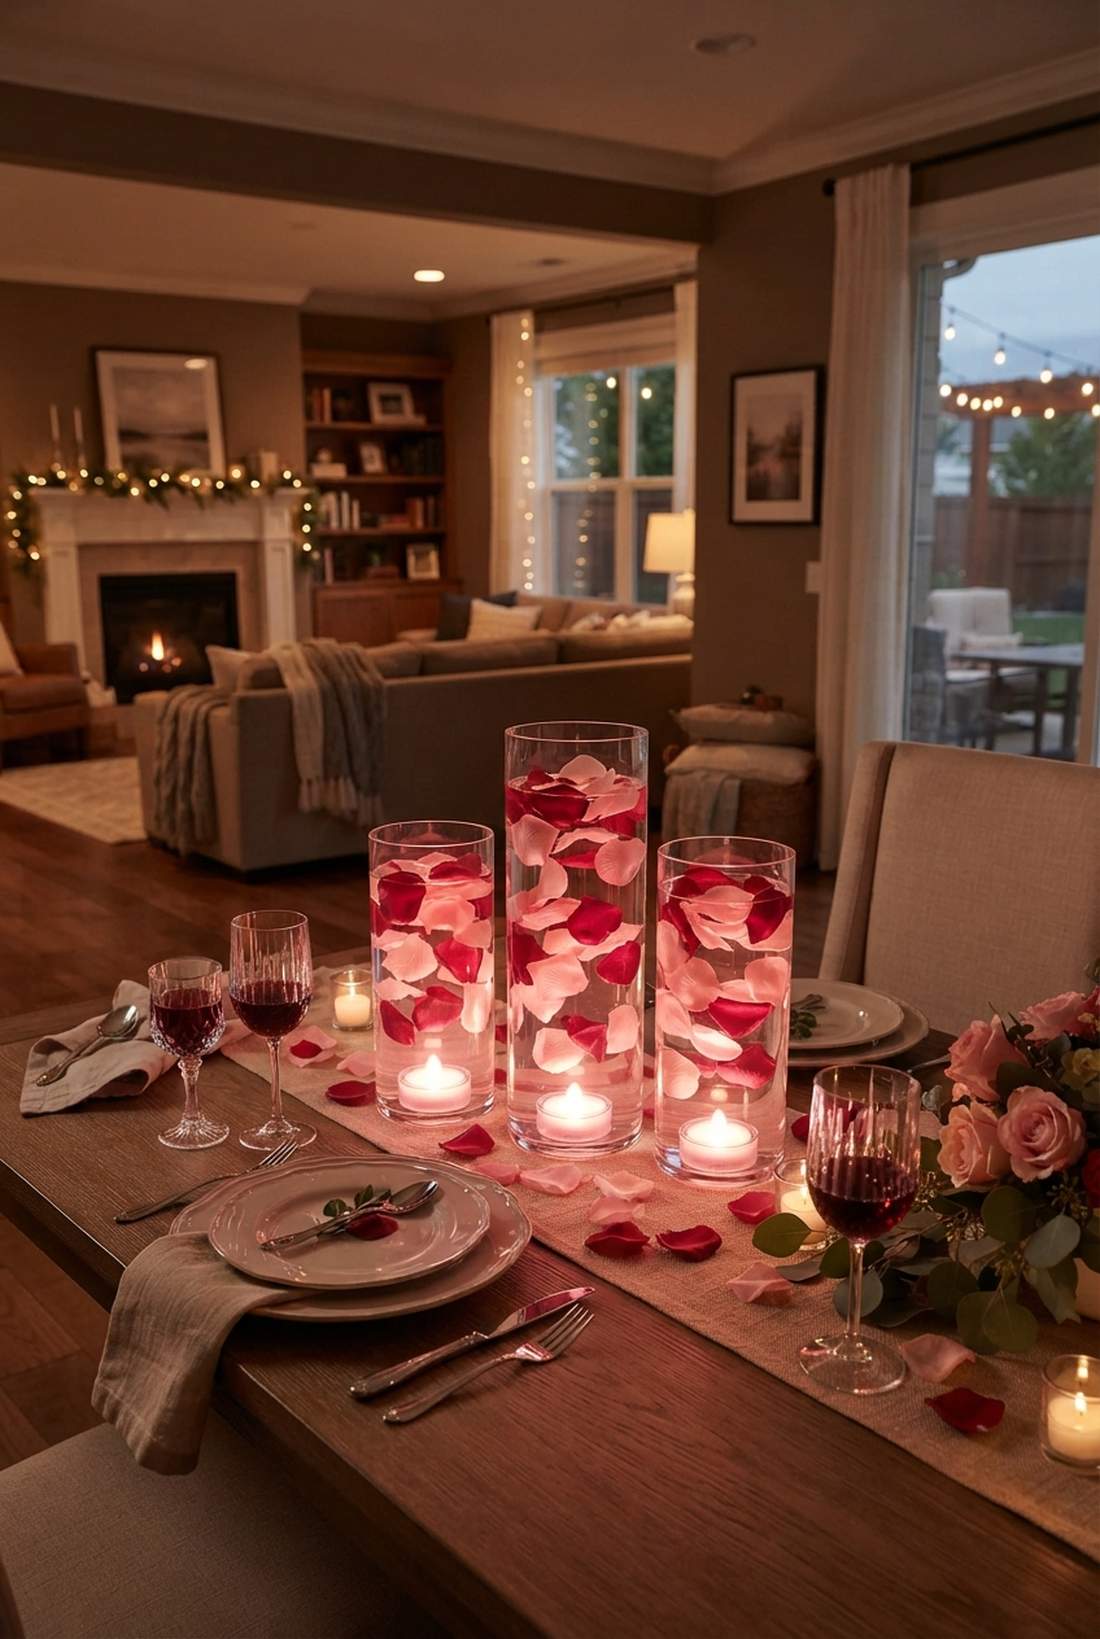
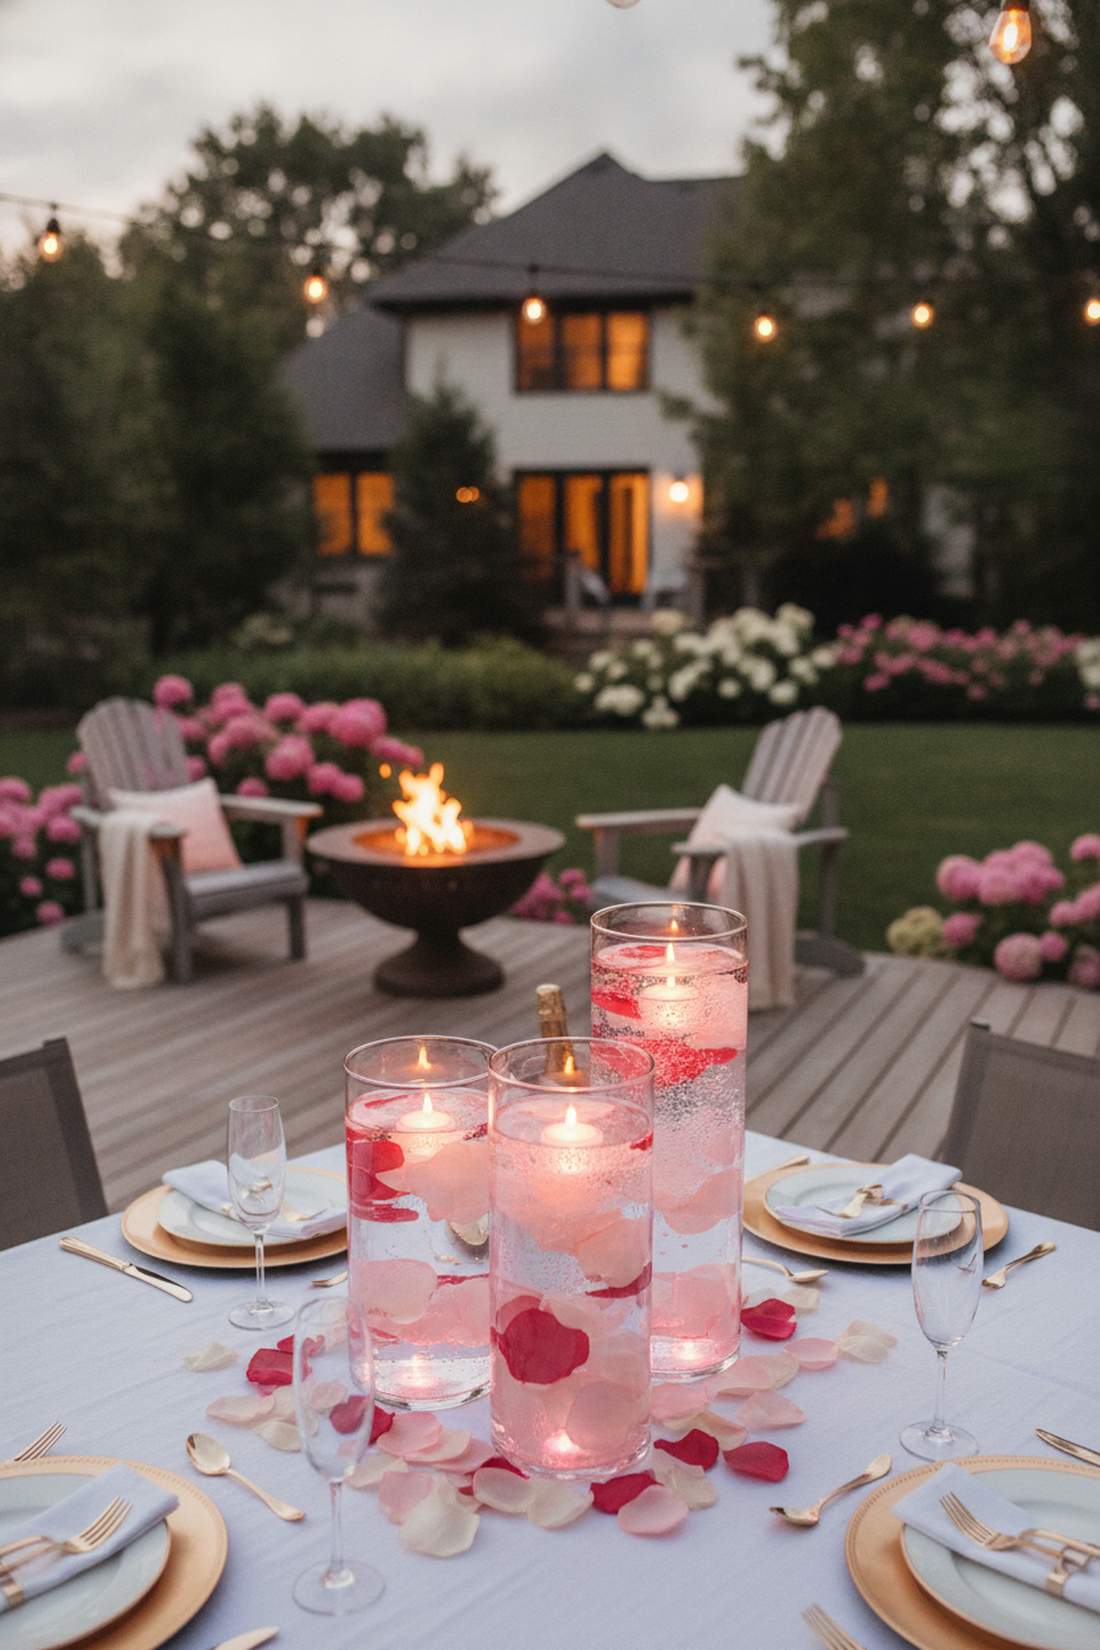
This blushing petal luminary sets a deeply intimate, romantic mood instantly. Use it to upgrade a simple Valentine’s dinner at home into a premium date night experience.
Red paper hearts feel juvenile, but suspending high-quality silk rose petals inside a water-filled fairy lights vase gives a designer-level finish. The water magnifies the light and makes the petals look like they are floating in mid-air.
Create this romantic ambiance for just $10. It completely transforms the dining table aesthetic.
- Key Materials: Silk rose petals, submersible LED lights, water
- Vibe / Style: Intimate romance
- Difficulty: Just add water
- Budget Breakdown: Petals: $5 | Submersible Lights: $5
- Creator’s Tip: Add a drop of clear dish soap to the water to break the surface tension, allowing petals to sink and suspend evenly.
- Smart Sourcing: Purchase premium realistic silk rose petals and waterproof submersible tea lights.
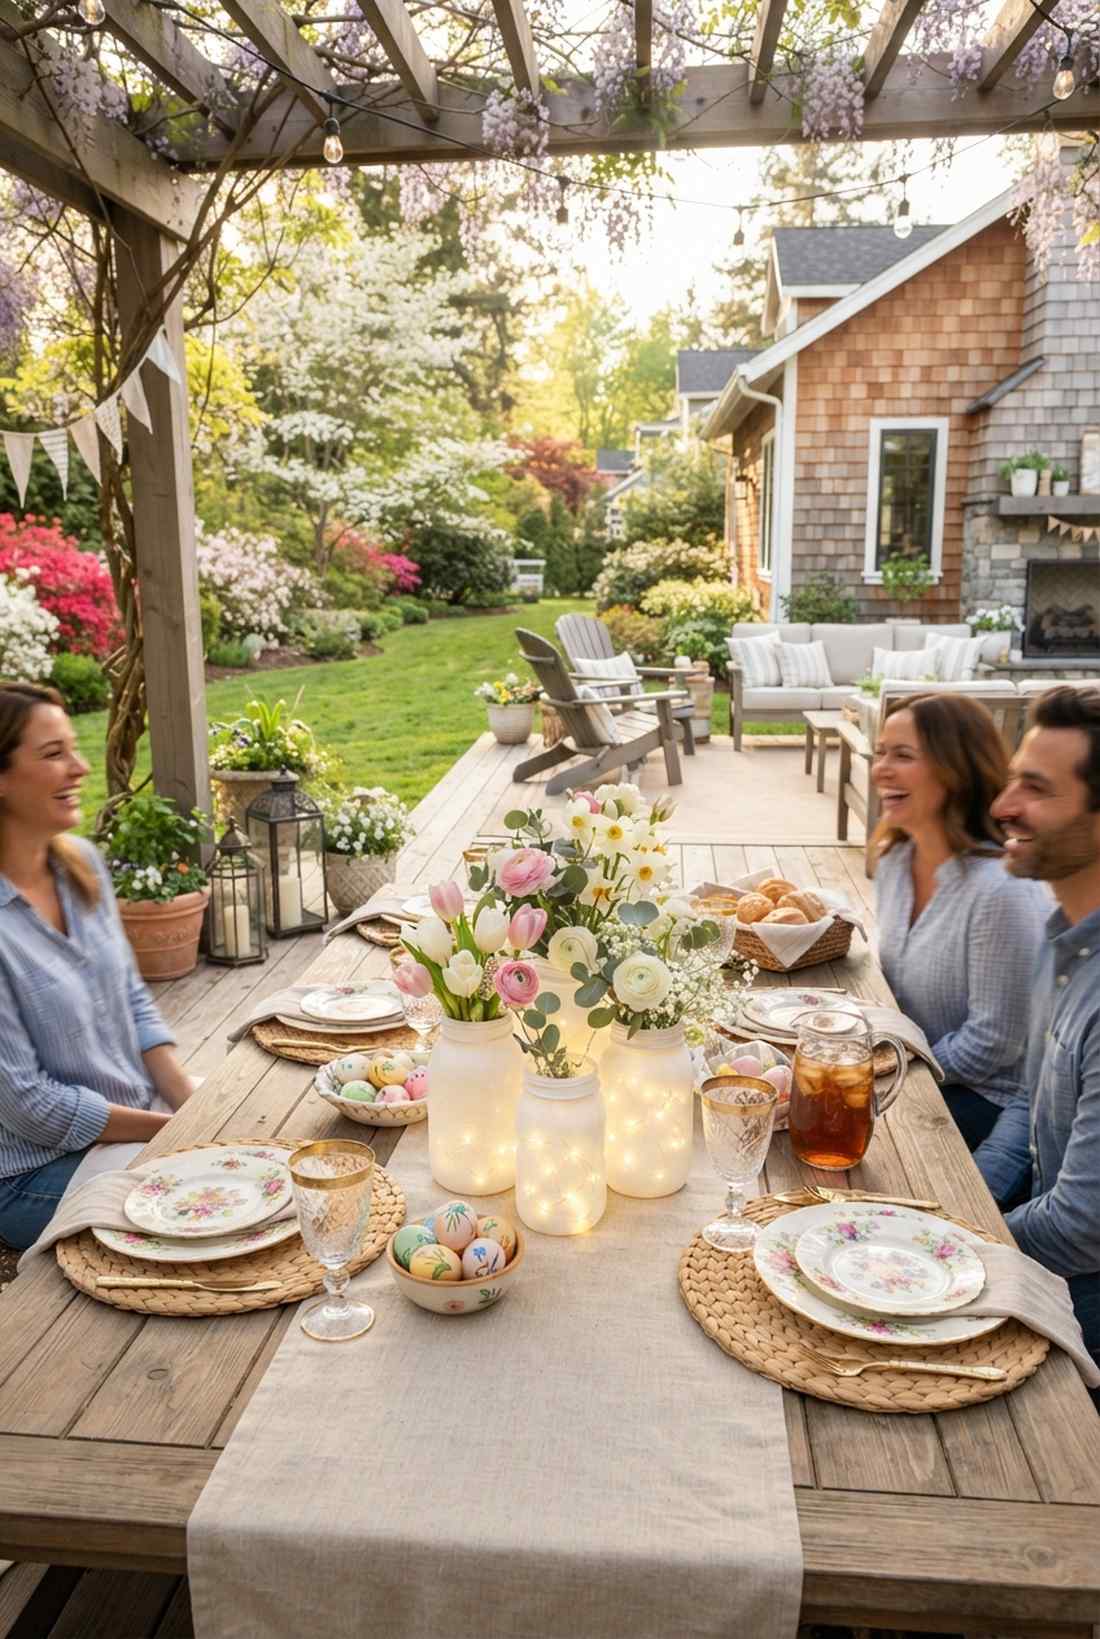
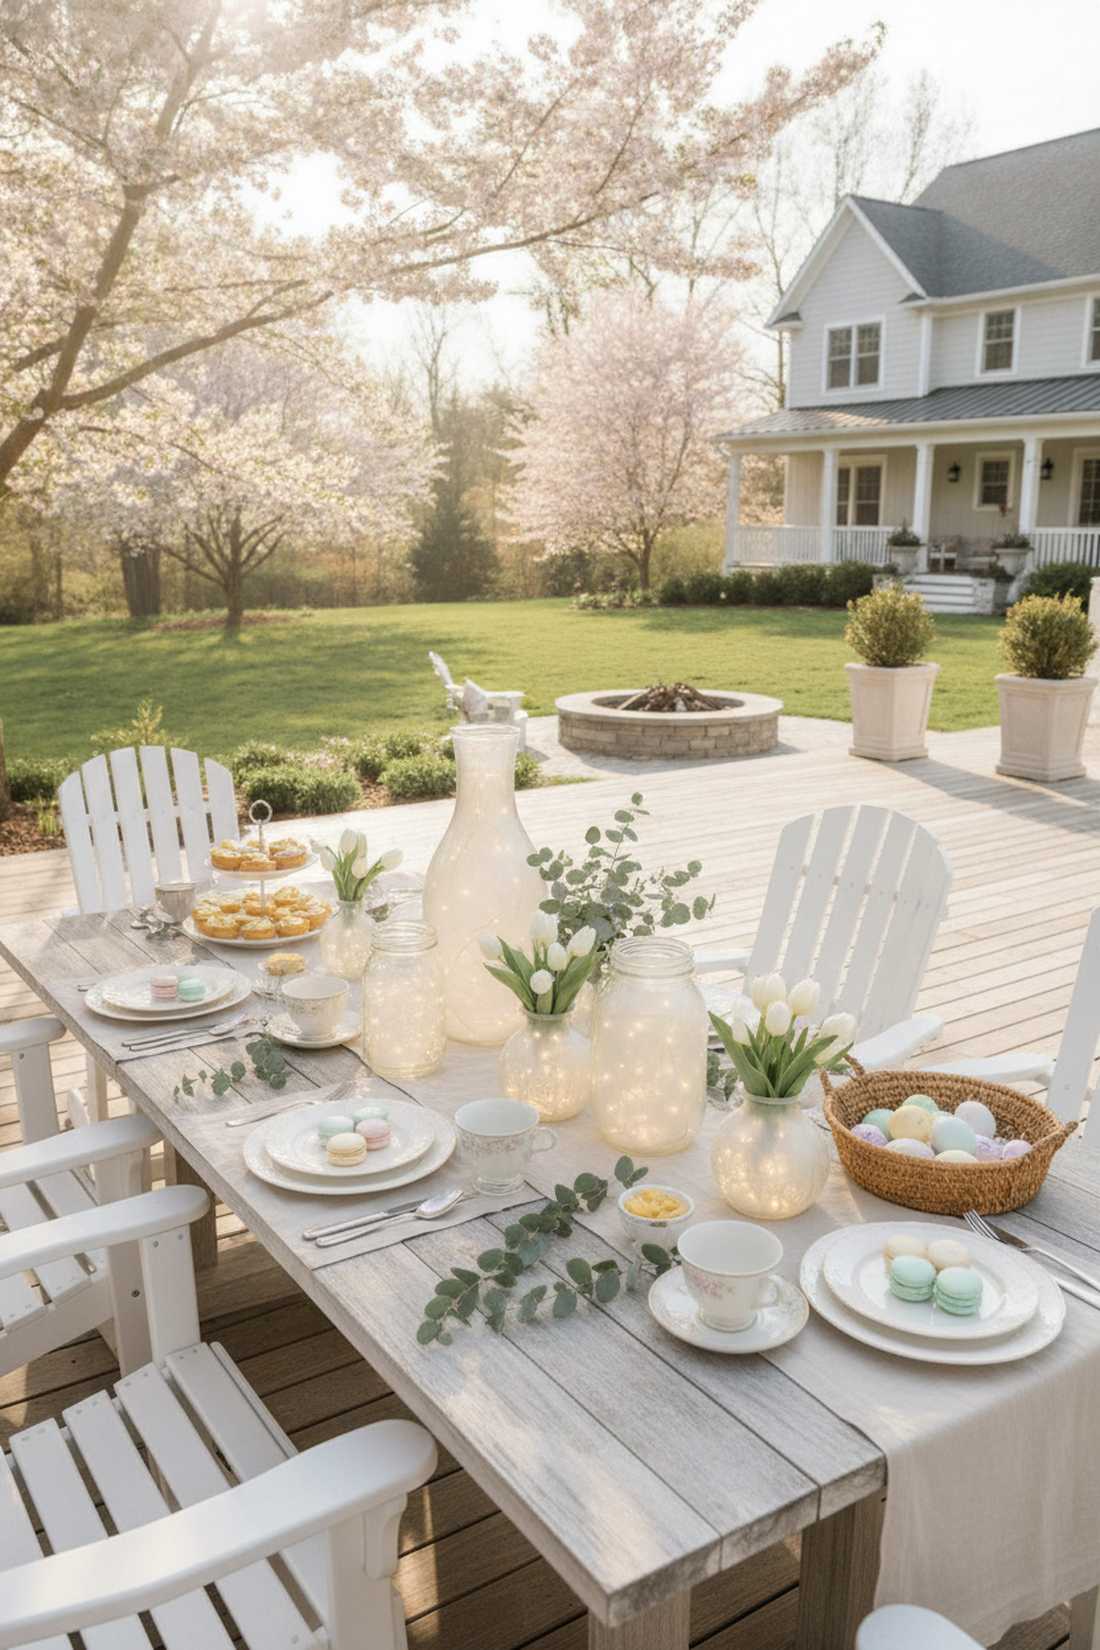
30. Spring Garden Party Pastels
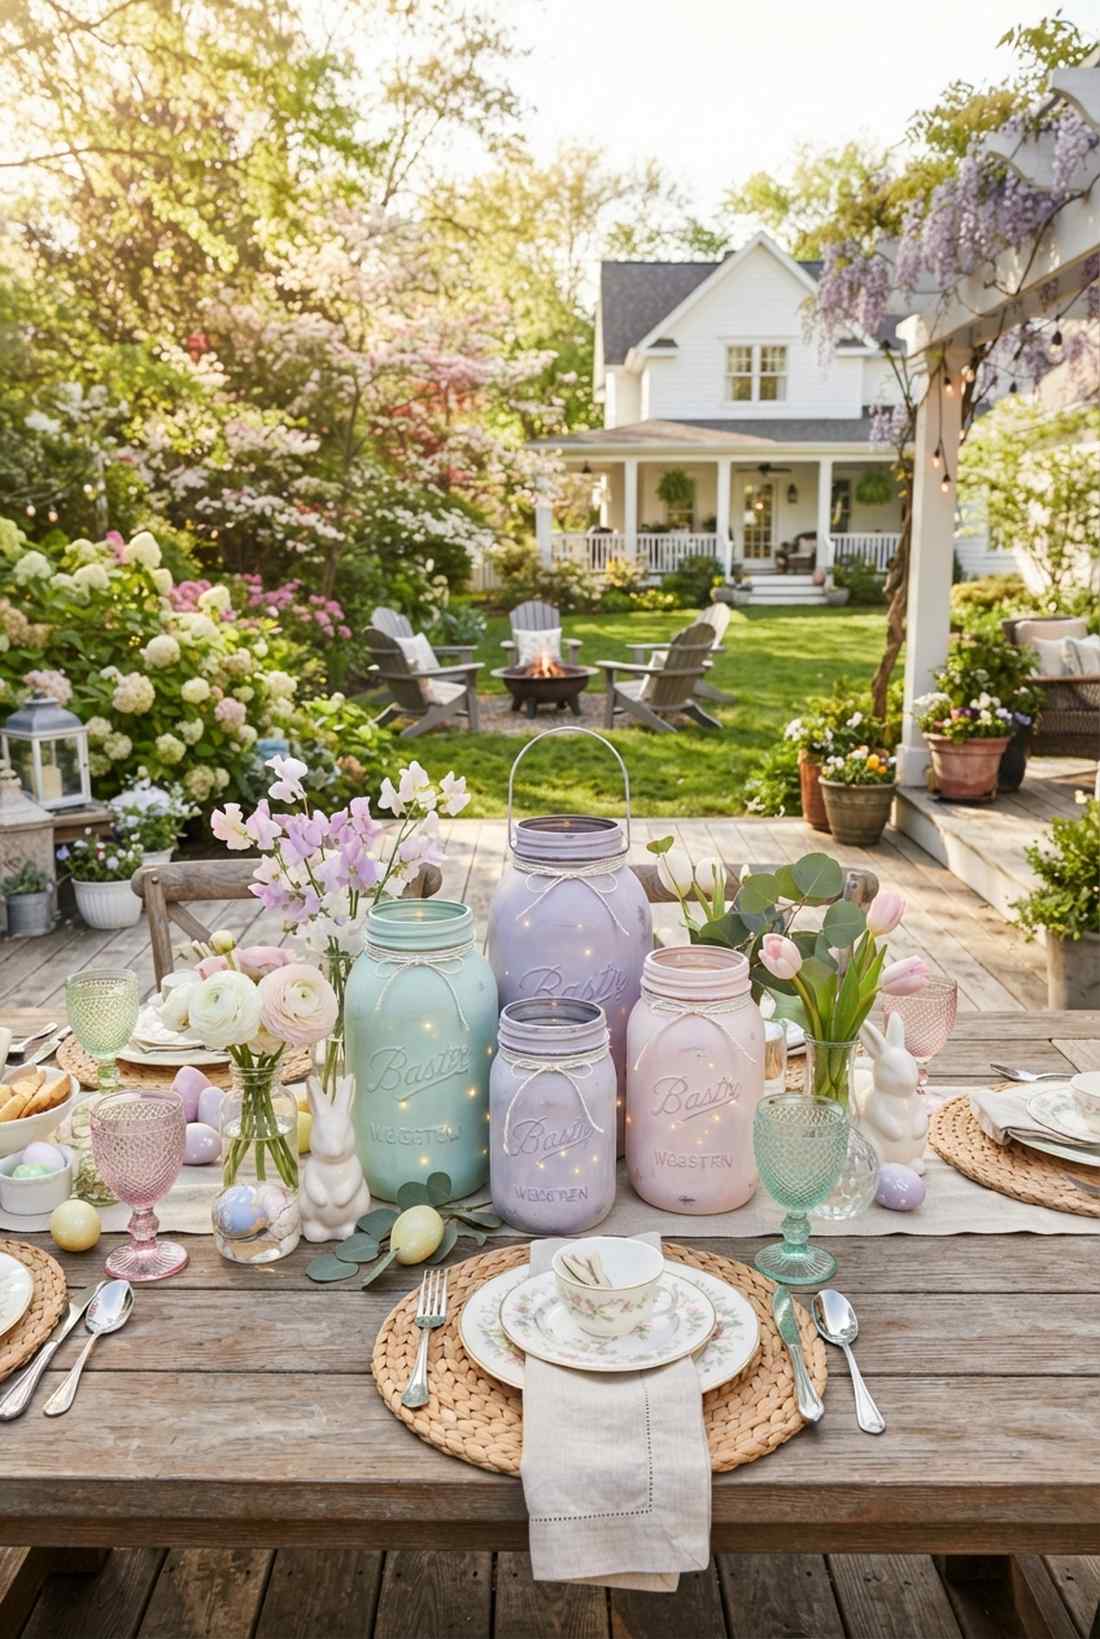
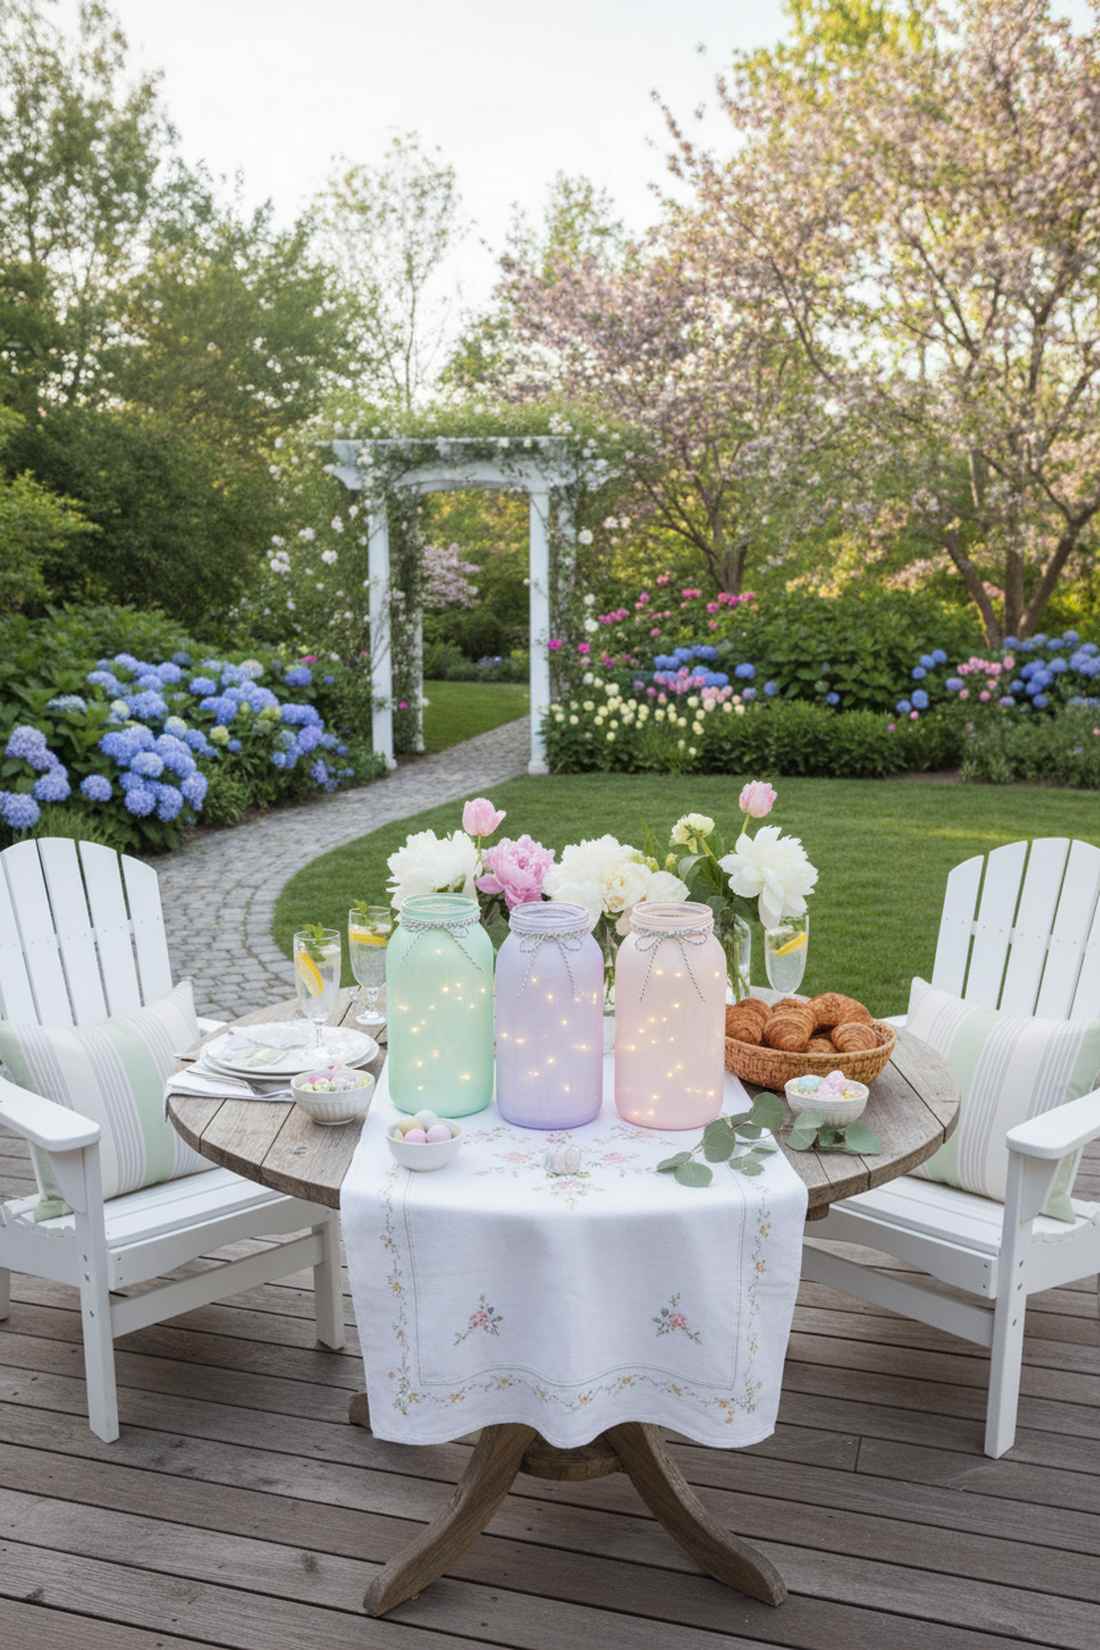
A pastel-washed spring lantern feels incredibly fresh and optimistic. It serves perfectly as table decor for Easter brunches or baby shower garden parties.
Bright neon paints ruin the vibe, but applying a sheer, chalky mint or lavender wash delivers a surprisingly premium look that catches the daytime sun. When evening falls, the internal lights push softly through the pastel hues.
You can paint a beautiful spring set for $12. Pin this if you love soft, feminine aesthetic decor!
- Key Materials: Pastel chalk paint, matte sealer
- Vibe / Style: Fresh spring cottage
- Difficulty: Easy painting
- Budget Breakdown: Paints: $8 | Lights: $4
- Creator’s Tip: Wrap the jar necks with a simple piece of white baker’s twine to tie the pastel look together effortlessly.
- Smart Sourcing: Use pastel chalk paint sampler sets and matte acrylic finishing spray.
31. Fourth of July Patriotic Trio
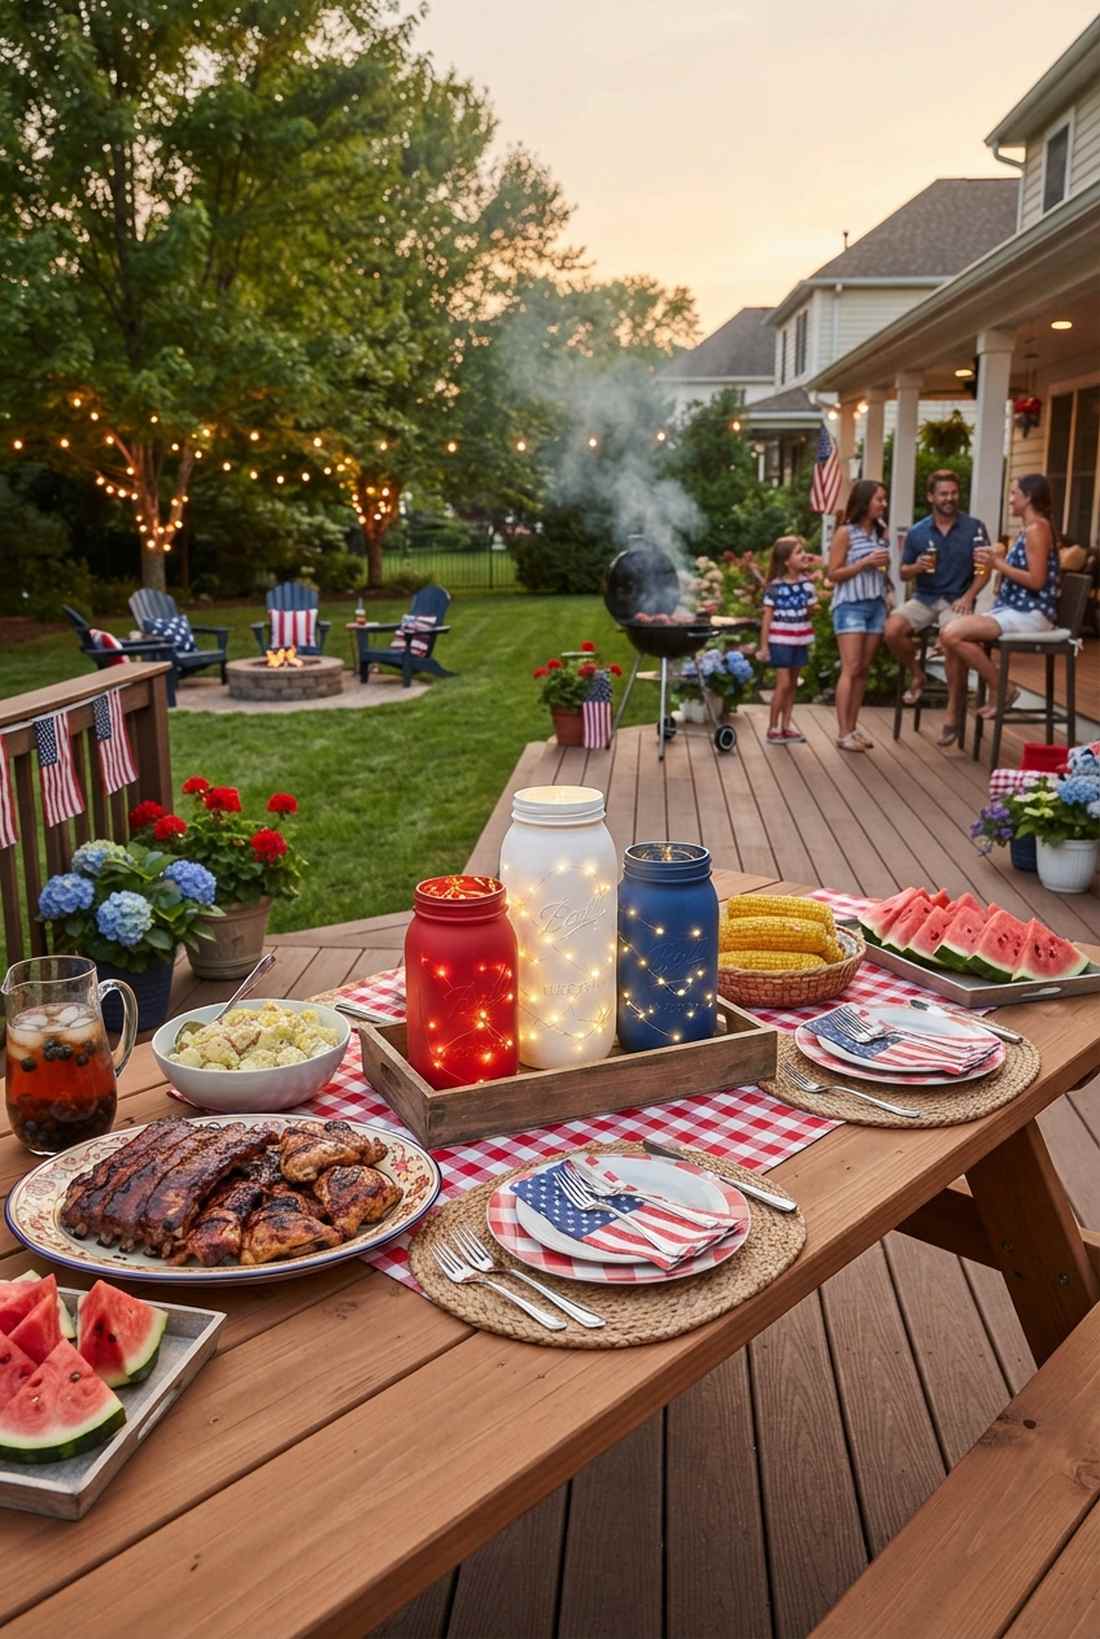
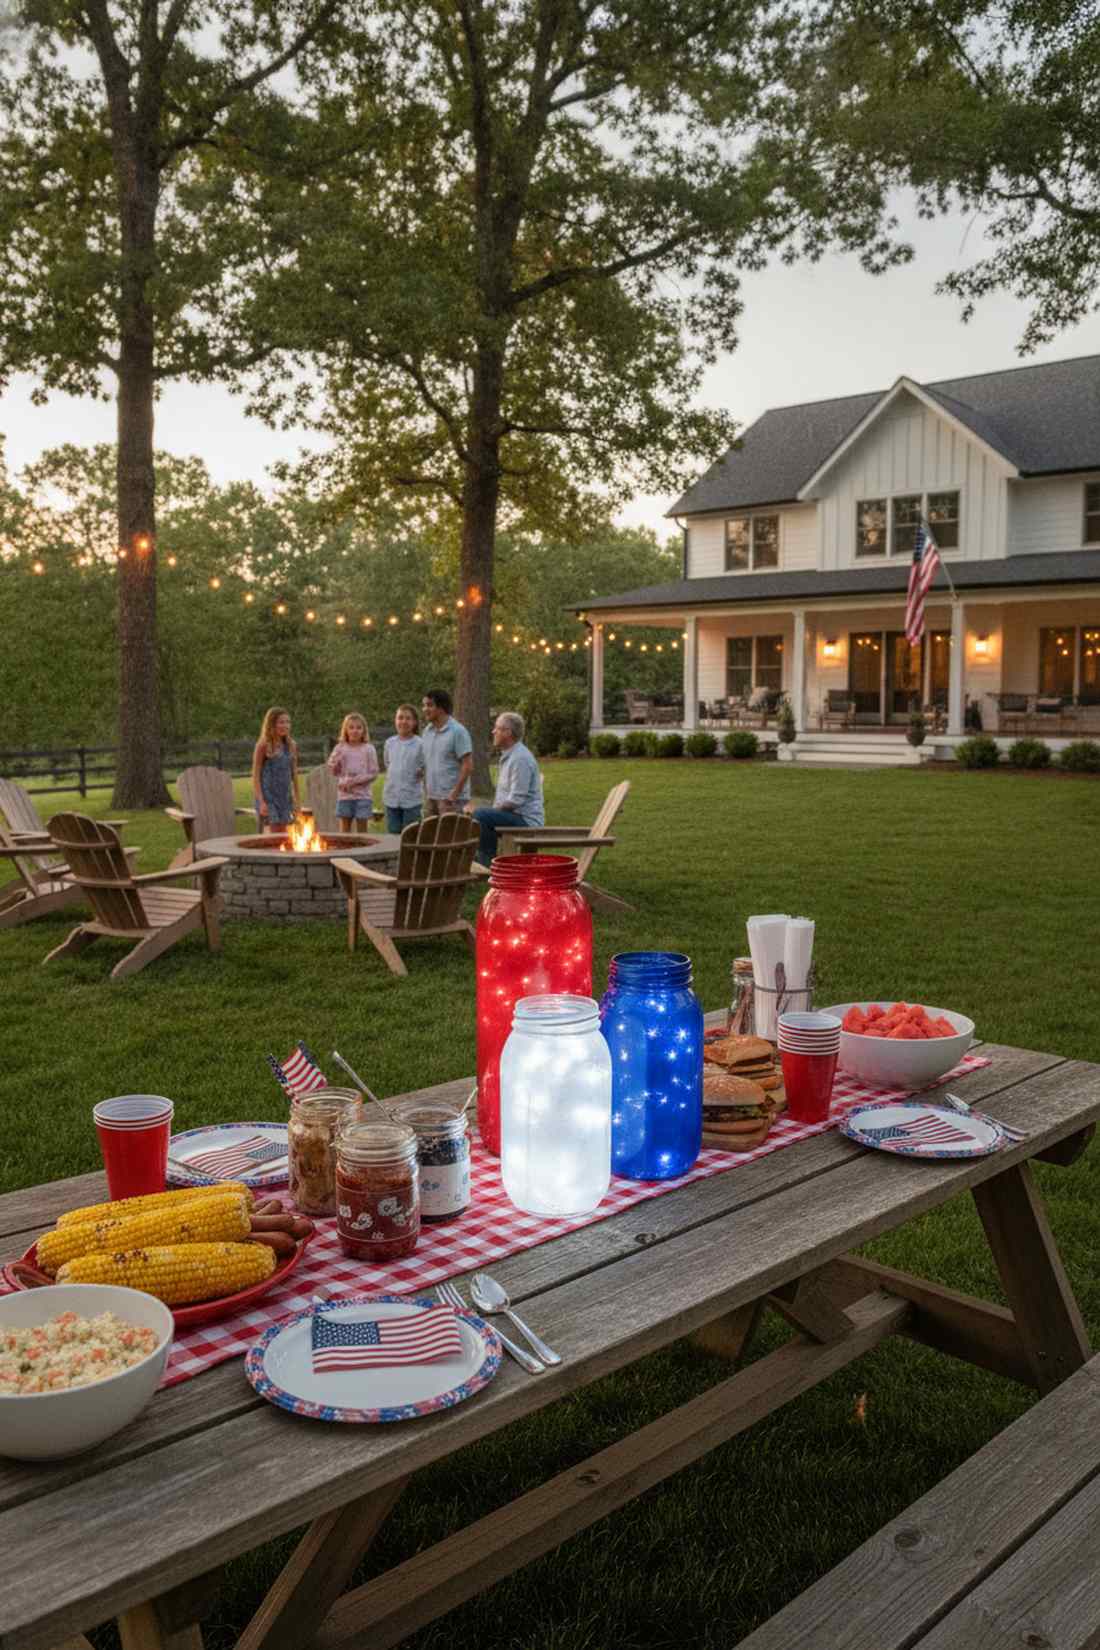
This bold Americana light trio acts as a proud, glowing centerpiece for summer celebrations. It is the perfect anchor for a patriotic BBQ buffet or picnic table.
Flag stickers peel off in the summer humidity, but using three separate jars—painted distinctly red, white, and blue—looks far more expensive than it is. Staggering their heights creates a clean, architectural homage rather than a cluttered mess.
Build this patriotic trio for roughly $18. A fantastic, reusable holiday investment.
- Key Materials: Red, white, and blue spray paint
- Vibe / Style: Classic Americana
- Difficulty: Basic spray painting
- Budget Breakdown: Paint: $10 | Jars/Lights: $8
- Creator’s Tip: Use ultra-bright pure white LEDs inside all three jars to ensure the exterior paint colors pop accurately in the dark.
- Smart Sourcing: Grab a primary color acrylic spray pack and high-lumen white fairy lights.
32. Winter Snowflake Wonderland Jars
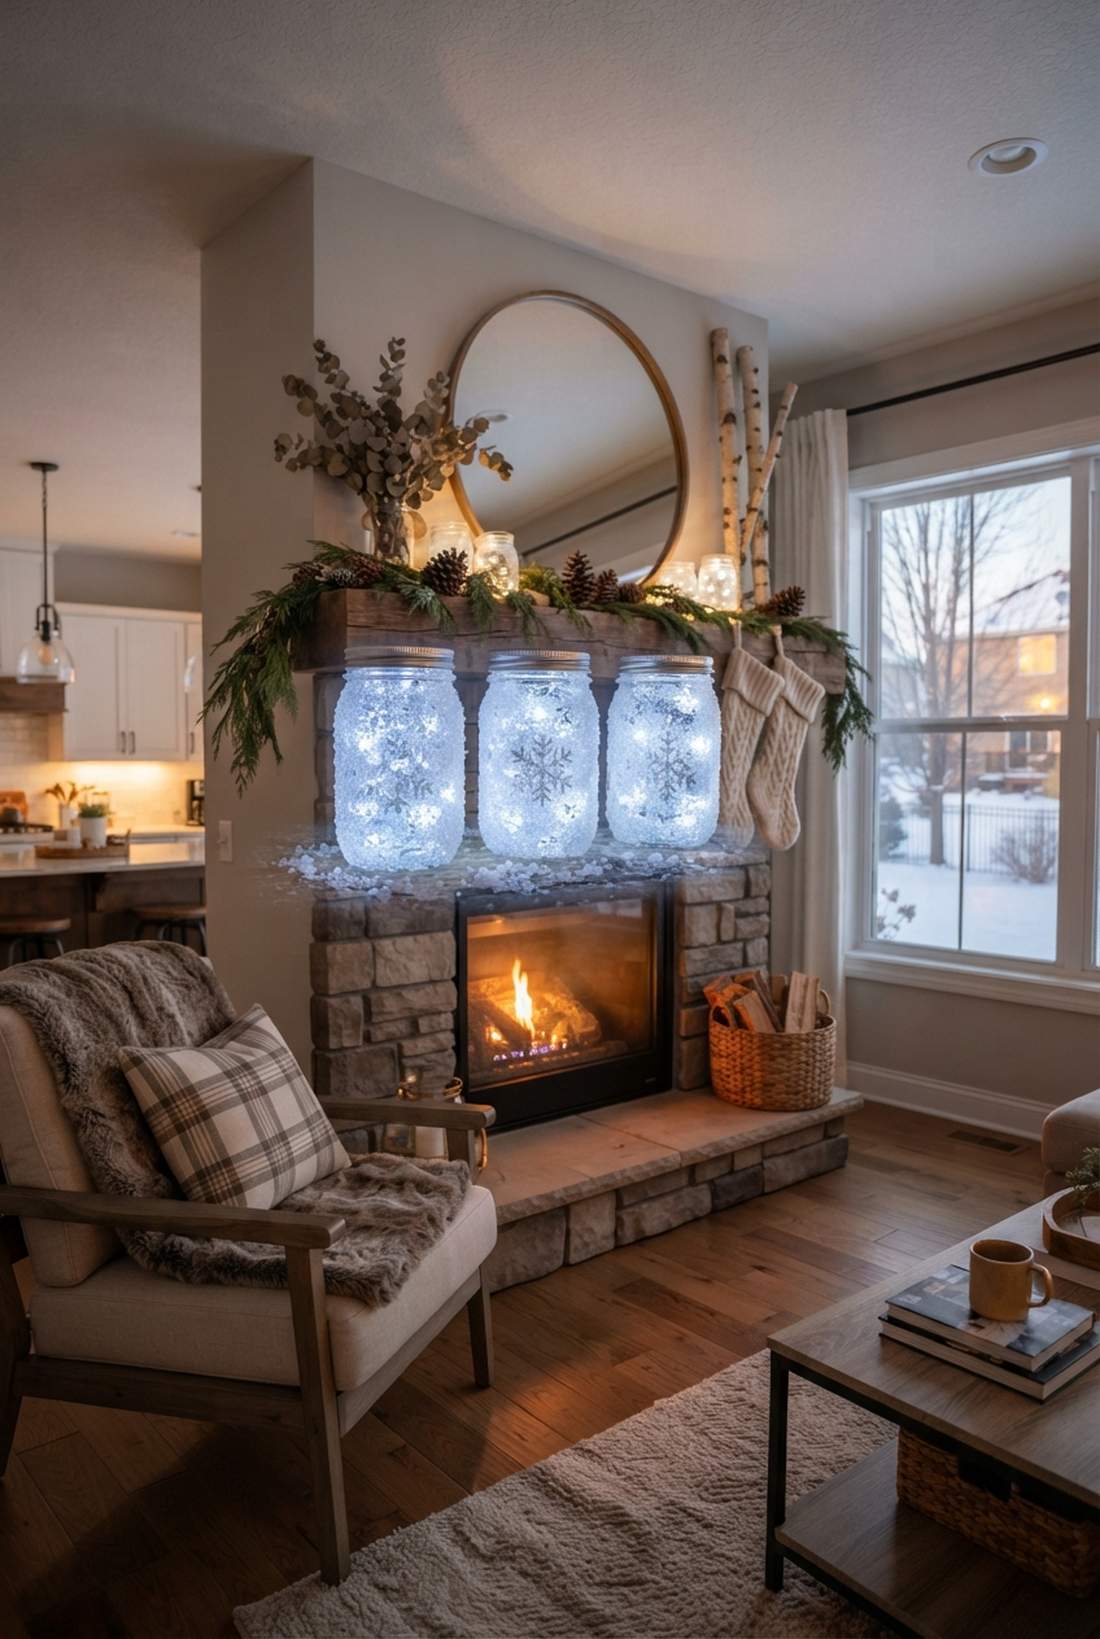
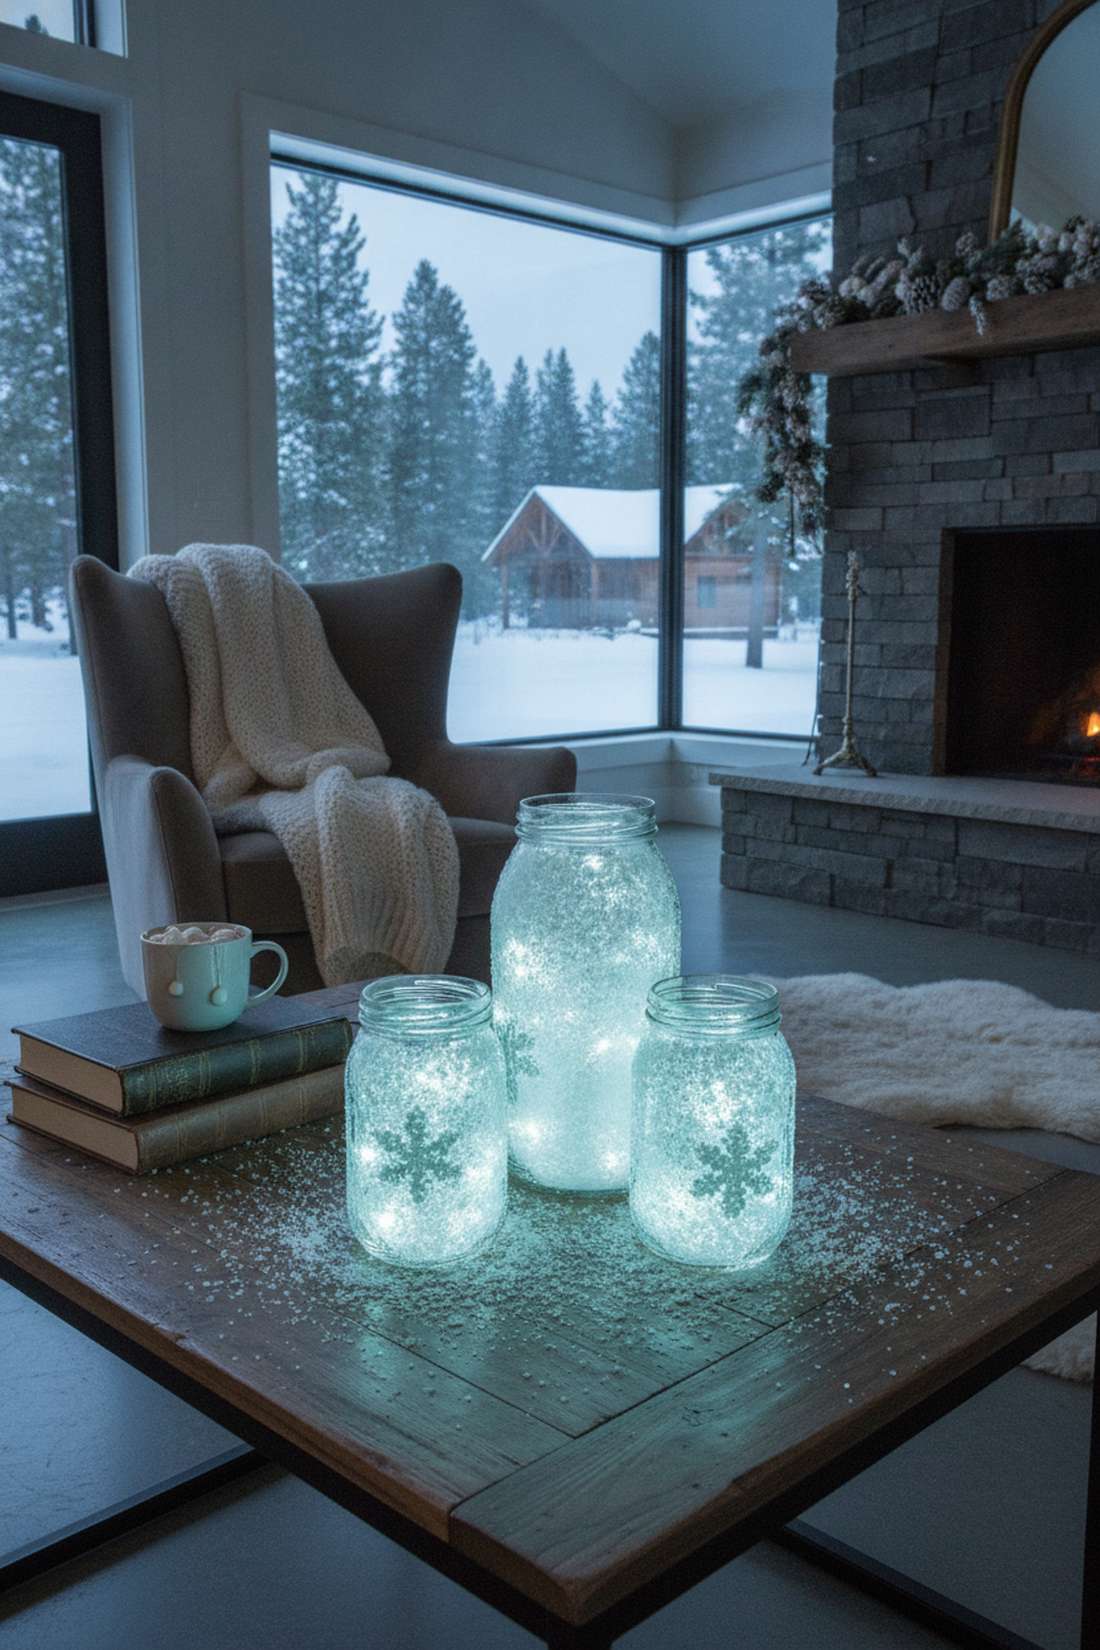
A frosted icy wonderland luminary feels like a chic, upscale winter lodge. This layout works beautifully for January home decor long after the Christmas tree is packed away.
Standard white paint looks flat, but coating the wet glass with coarse epsom salt gives a designer-level finish that perfectly mimics crushed ice. The cool-toned LEDs shine through the salt crystals, creating authentic winter sparkle.
This icy transformation costs barely $7. Save this to your cozy winter home decor board!
- Key Materials: Epsom salt, Mod Podge, cool-white LEDs
- Vibe / Style: Frosted winter chic
- Difficulty: Messy application
- Budget Breakdown: Salt/Glue: $4 | Lights: $3
- Creator’s Tip: Seal the dried epsom salt with a heavy clear coat, or it will eventually melt and flake off in humid environments.
- Smart Sourcing: Order coarse-grain pure epsom salt and cool-white (bluish) fairy lights.
Most people throw away their jars when the season ends. This next sun-catcher technique works year-round.
33. Summer Solstice Sun Catchers
This prismatic hanging sun-catcher brings an energetic, boho-chic vibe to bright spaces. It does double-duty, refracting rainbows by day and glowing intensely by night.
Basic clear jars don’t catch the sun, but adding geometric glass beads inside a fairy lights vase setup delivers a surprisingly premium look. The heavy glass elements act as prisms, turning your patio into a kaleidoscope.
Assemble these dual-purpose catchers for about $14. Highly recommended for sun-drenched porches.
- Key Materials: Glass prism beads, clear hanging jars
- Vibe / Style: Boho summer energy
- Difficulty: Simple filling
- Budget Breakdown: Prism Beads: $9 | Lights: $5
- Creator’s Tip: Position these on east or west-facing hooks to catch the dramatic, low-angle morning or evening sun rays.
- Smart Sourcing: Pick up crystal chandelier prism drops (bulk) and solar-powered lid inserts.
Nature-Inspired Botanical Jars
Bringing the outdoors inside is a massive Pinterest trend. Embedding high-end botanical elements with subtle lighting creates living art pieces that breathe life into dead room corners.
34. Pressed Flower Mod Podge Lanterns
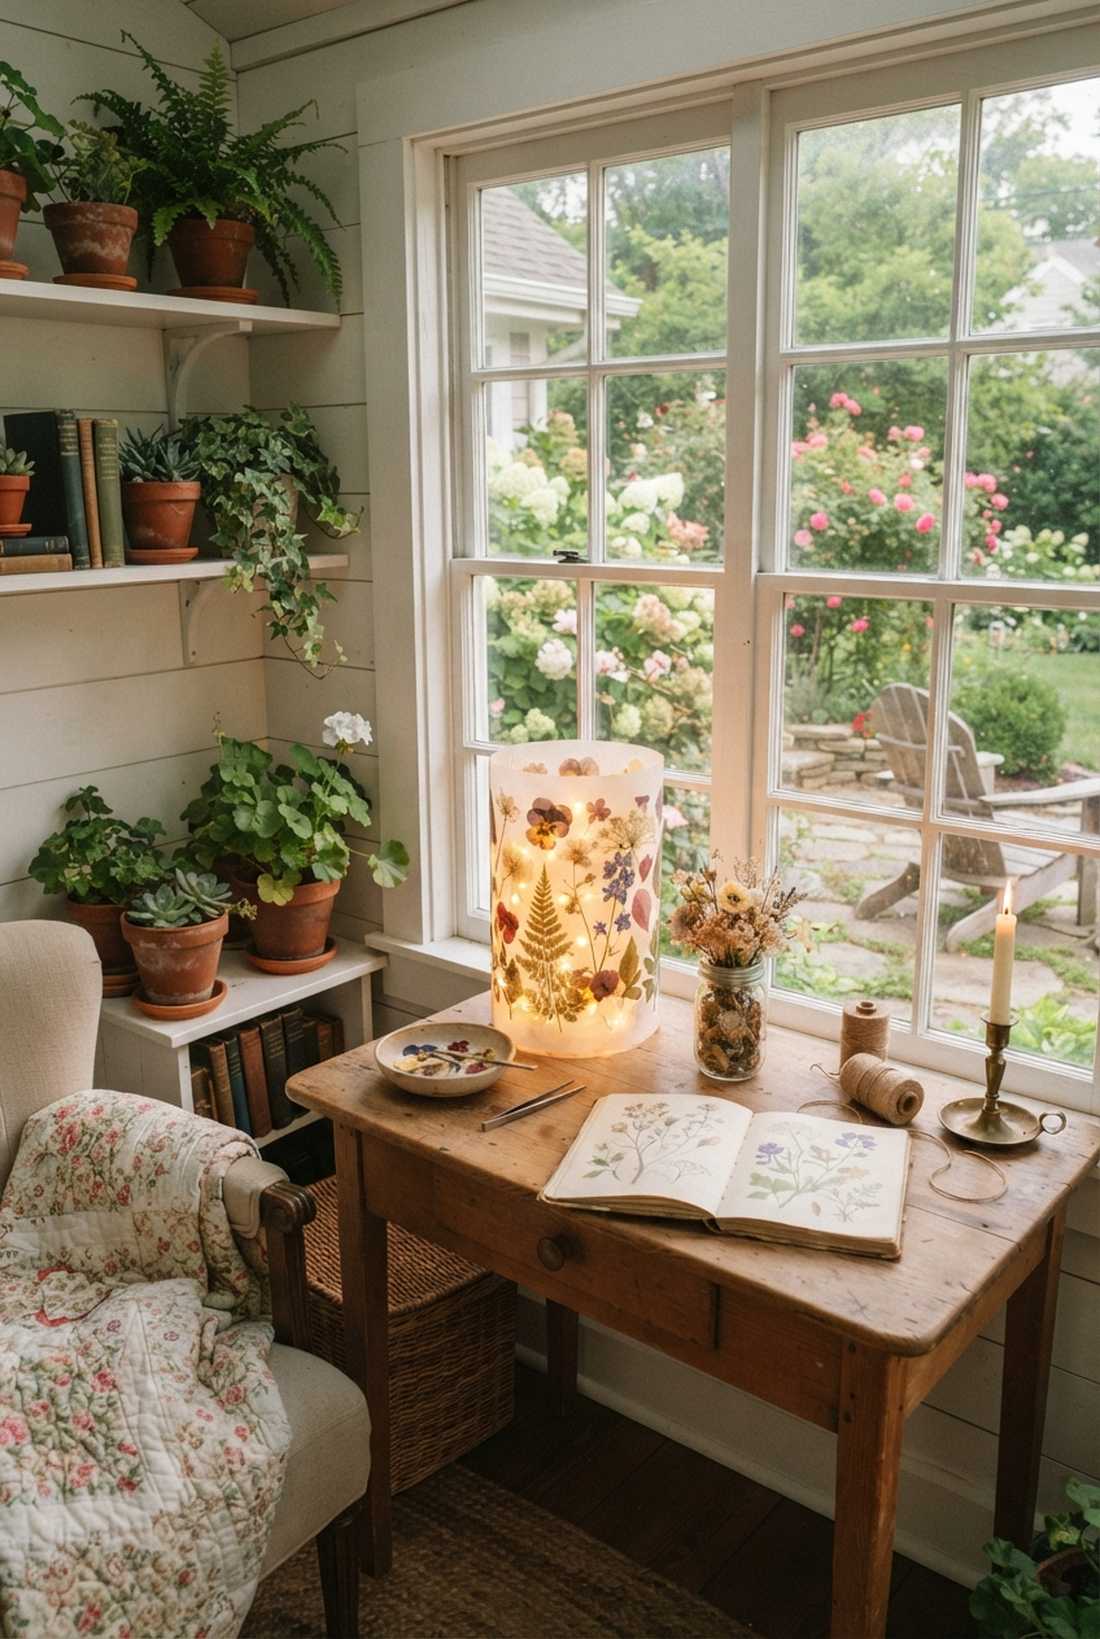
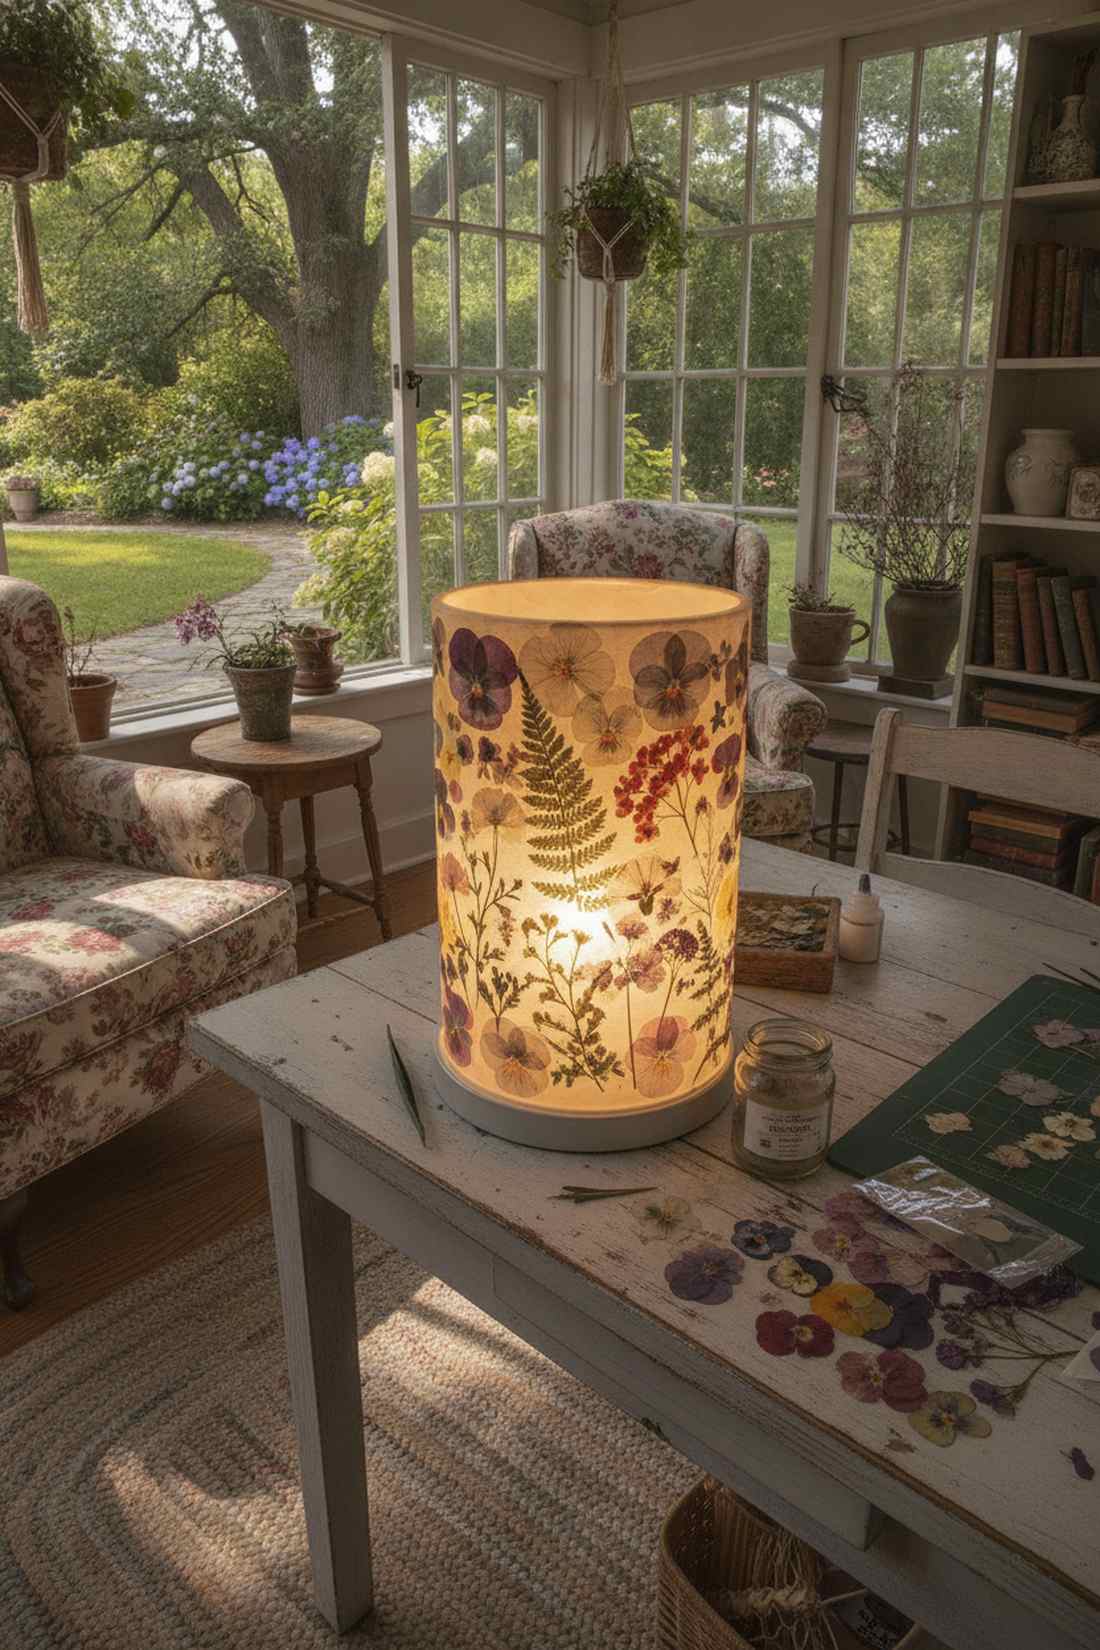
A botanical pressed-flower luminary feels like a glowing, vintage biology textbook. This delicate art piece fits perfectly on a sunroom table or a cottagecore aesthetic desk.
Gluing thick flowers creates lumpy disasters, but flattening delicate pansies and sealing them tight gives a designer-level finish. When backlit, the translucent petals reveal all their microscopic, natural vein structures.
This gorgeous custom art piece costs around $12. Pin this if you love preserving garden blooms!
- Key Materials: Dried pressed flowers, matte decoupage
- Vibe / Style: Cottagecore botanical
- Difficulty: Delicate handling
- Budget Breakdown: Pressed Florals: $7 | Glue/Lights: $5
- Creator’s Tip: Use craft tweezers to place the fragile dried flowers onto the wet glue to prevent tearing the petals with your fingers.
- Smart Sourcing: Buy pre-pressed real flower variety packs and precision craft tweezers.
35. Moss and Fern Terrarium Lights
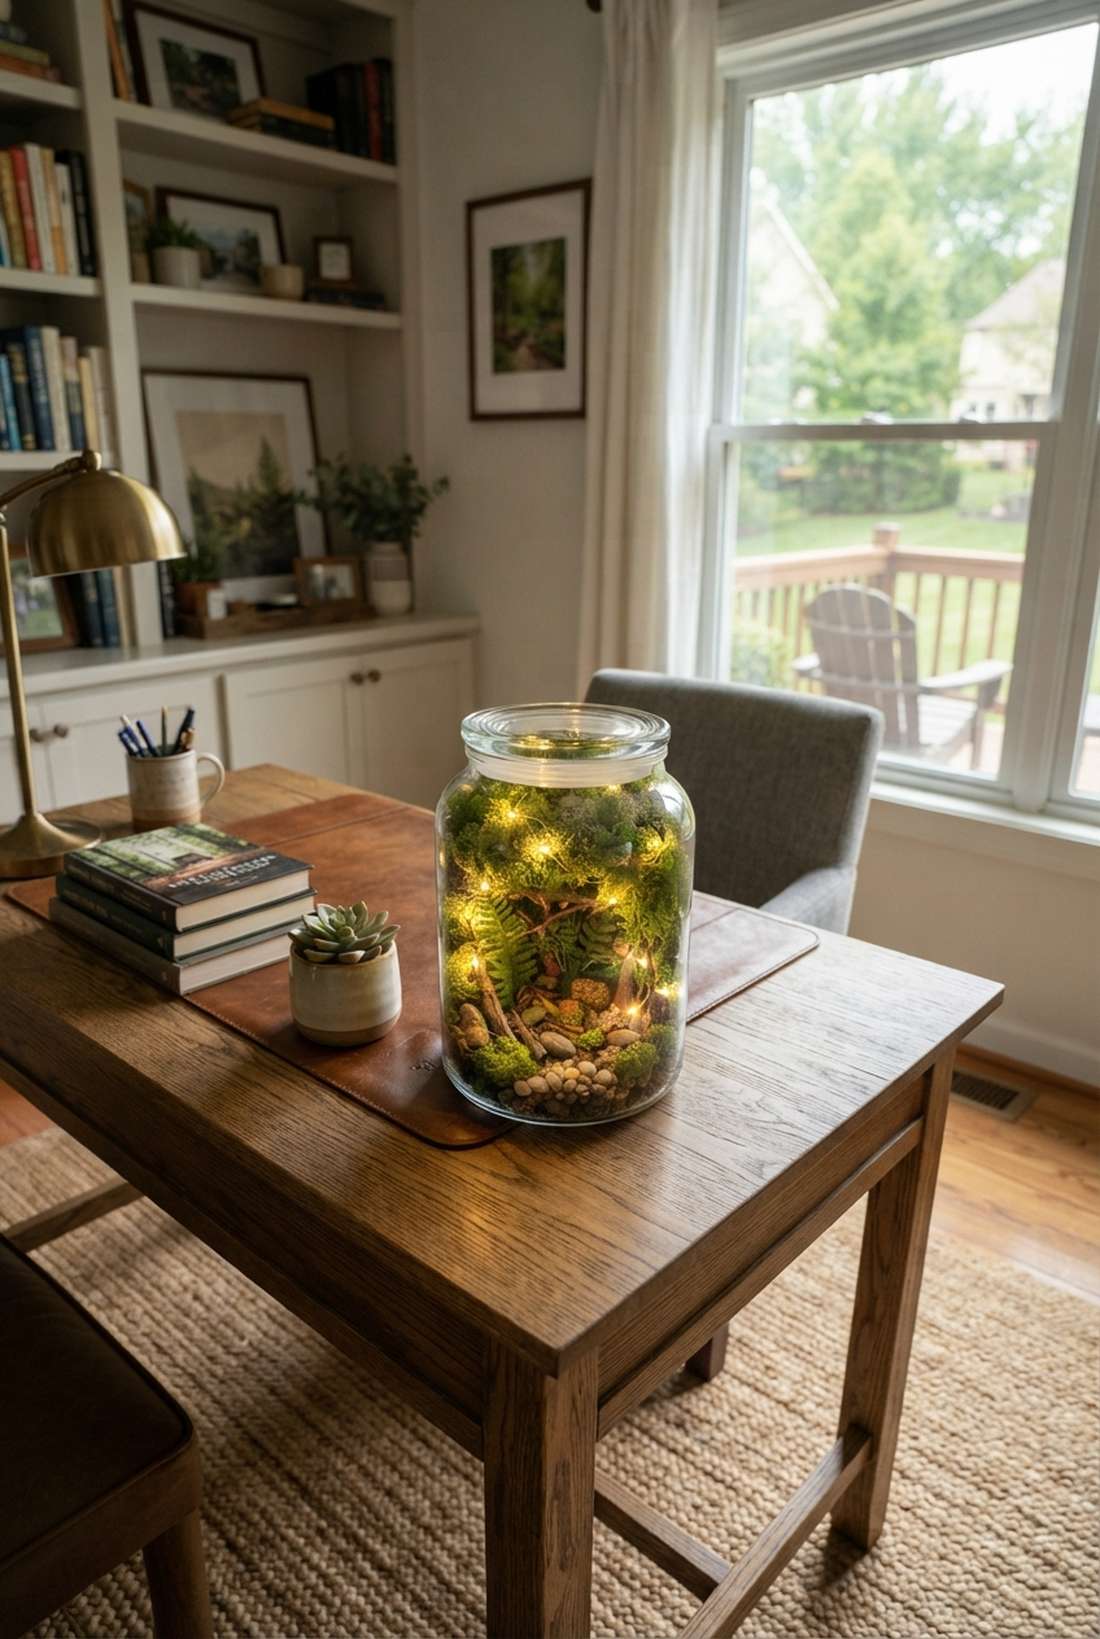
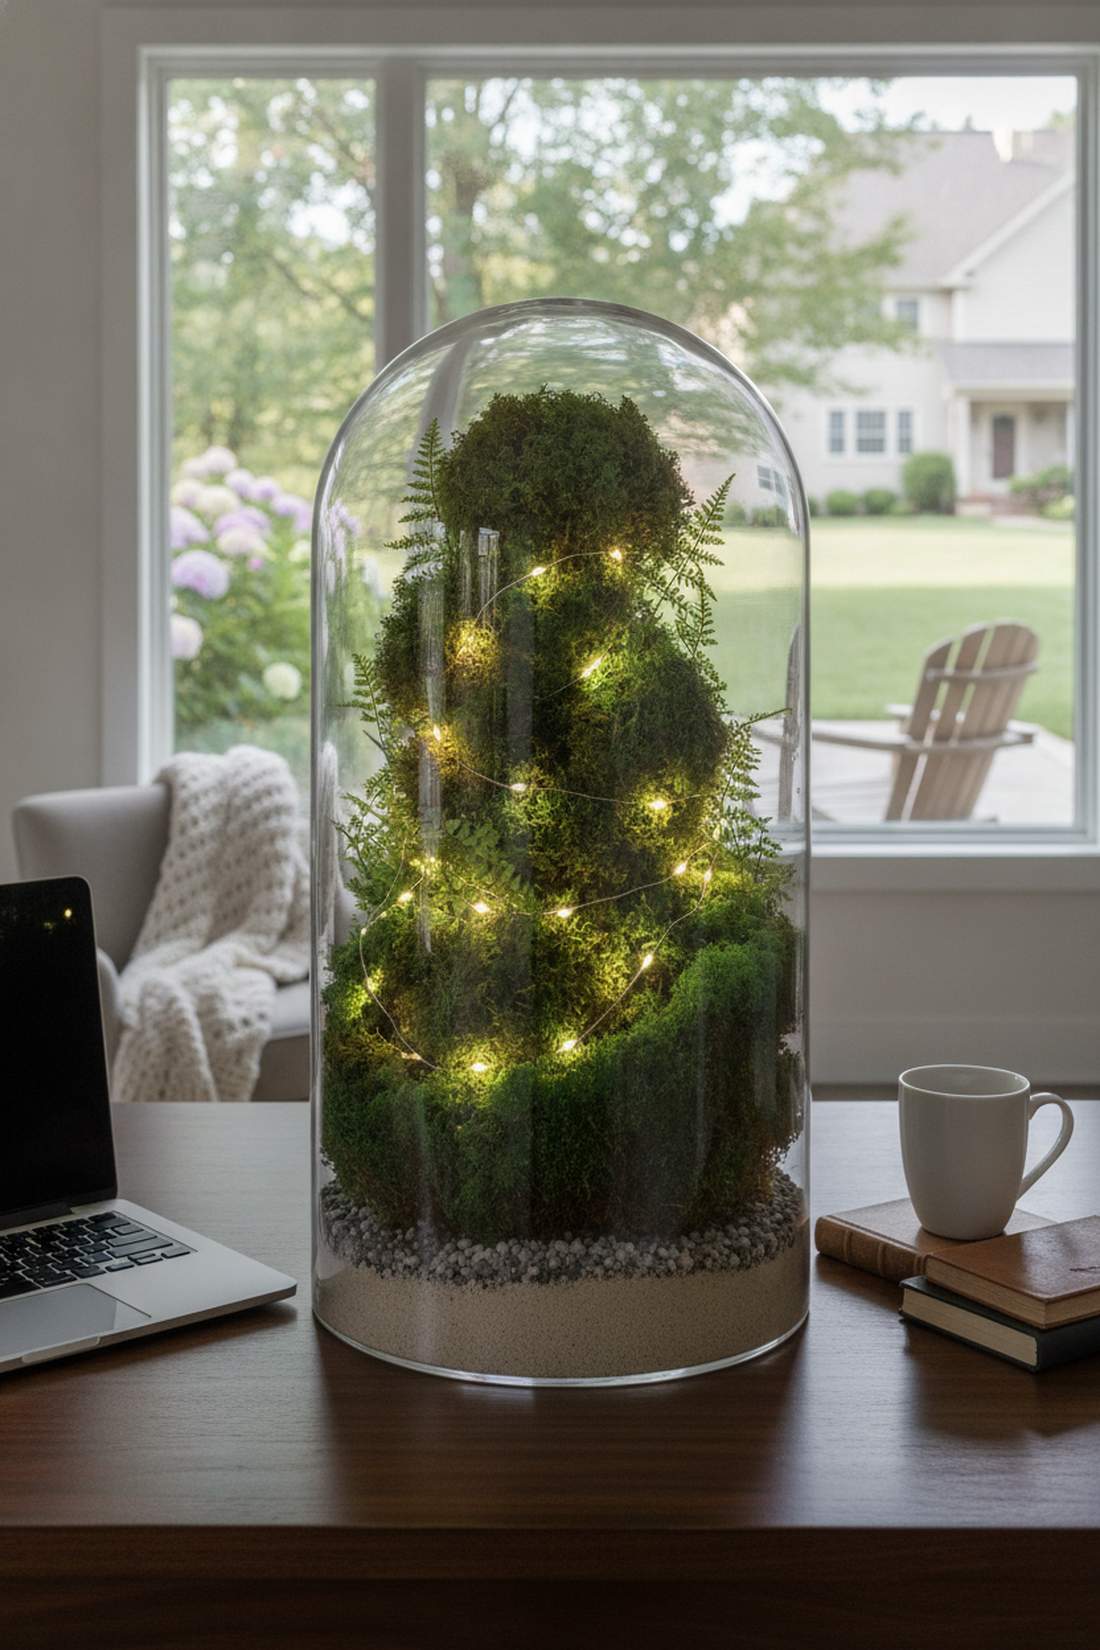
This miniature glowing forest feels like a hidden magical realm you accidentally discovered. It serves as an incredibly engaging desktop buddy or whimsical shelf decor.
Using live moss inside an electric jar invites mold, but utilizing high-quality miniature garden supplies and preserved moss looks far more expensive than it is. The lush green textures wrap around the lights, creating a hyper-realistic enchanted forest floor.
You can build this zero-maintenance terrarium for $16. A massive upgrade for your home office.
- Key Materials: Preserved reindeer moss, faux mini ferns
- Vibe / Style: Enchanted woodland
- Difficulty: Fun and creative
- Budget Breakdown: Moss/Ferns: $10 | Jar/Lights: $6
- Creator’s Tip: Layer sand and small pebbles at the absolute bottom to fake a realistic drainage layer before adding the moss.
- Smart Sourcing: Order preserved green reindeer moss (bulk) and miniature terrarium faux ferns.
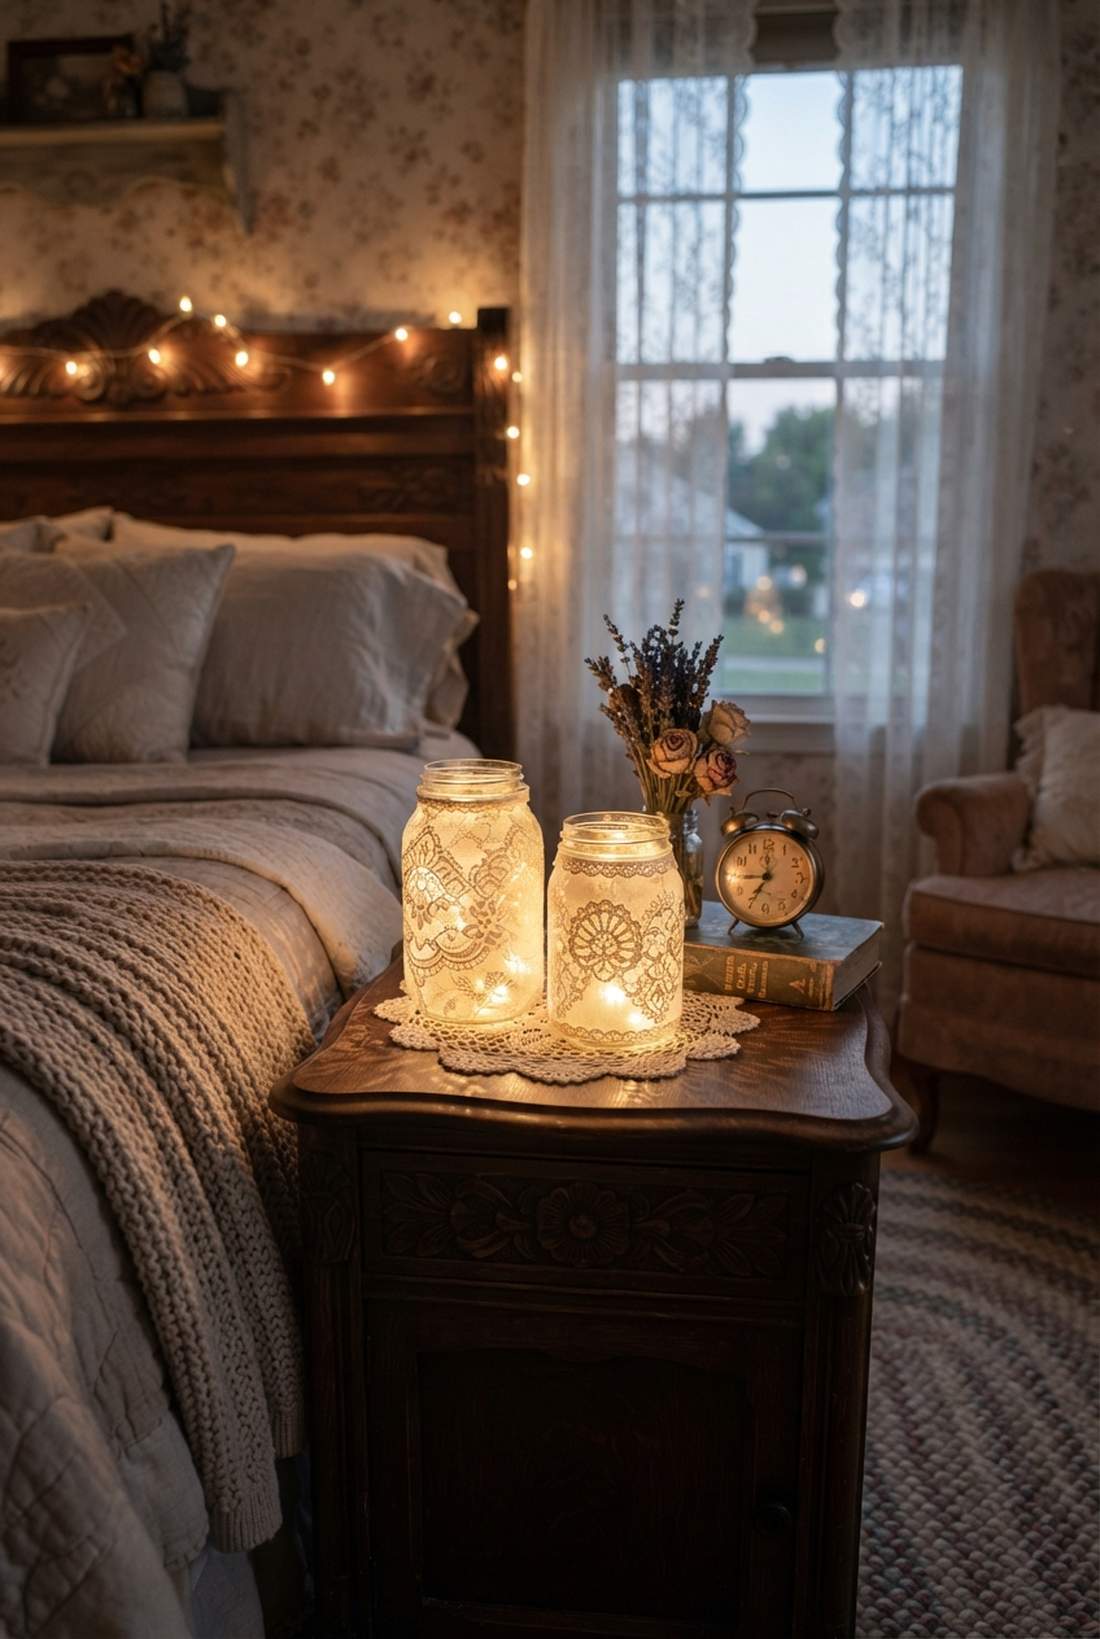
36. Dried Lavender Bundle Inserts
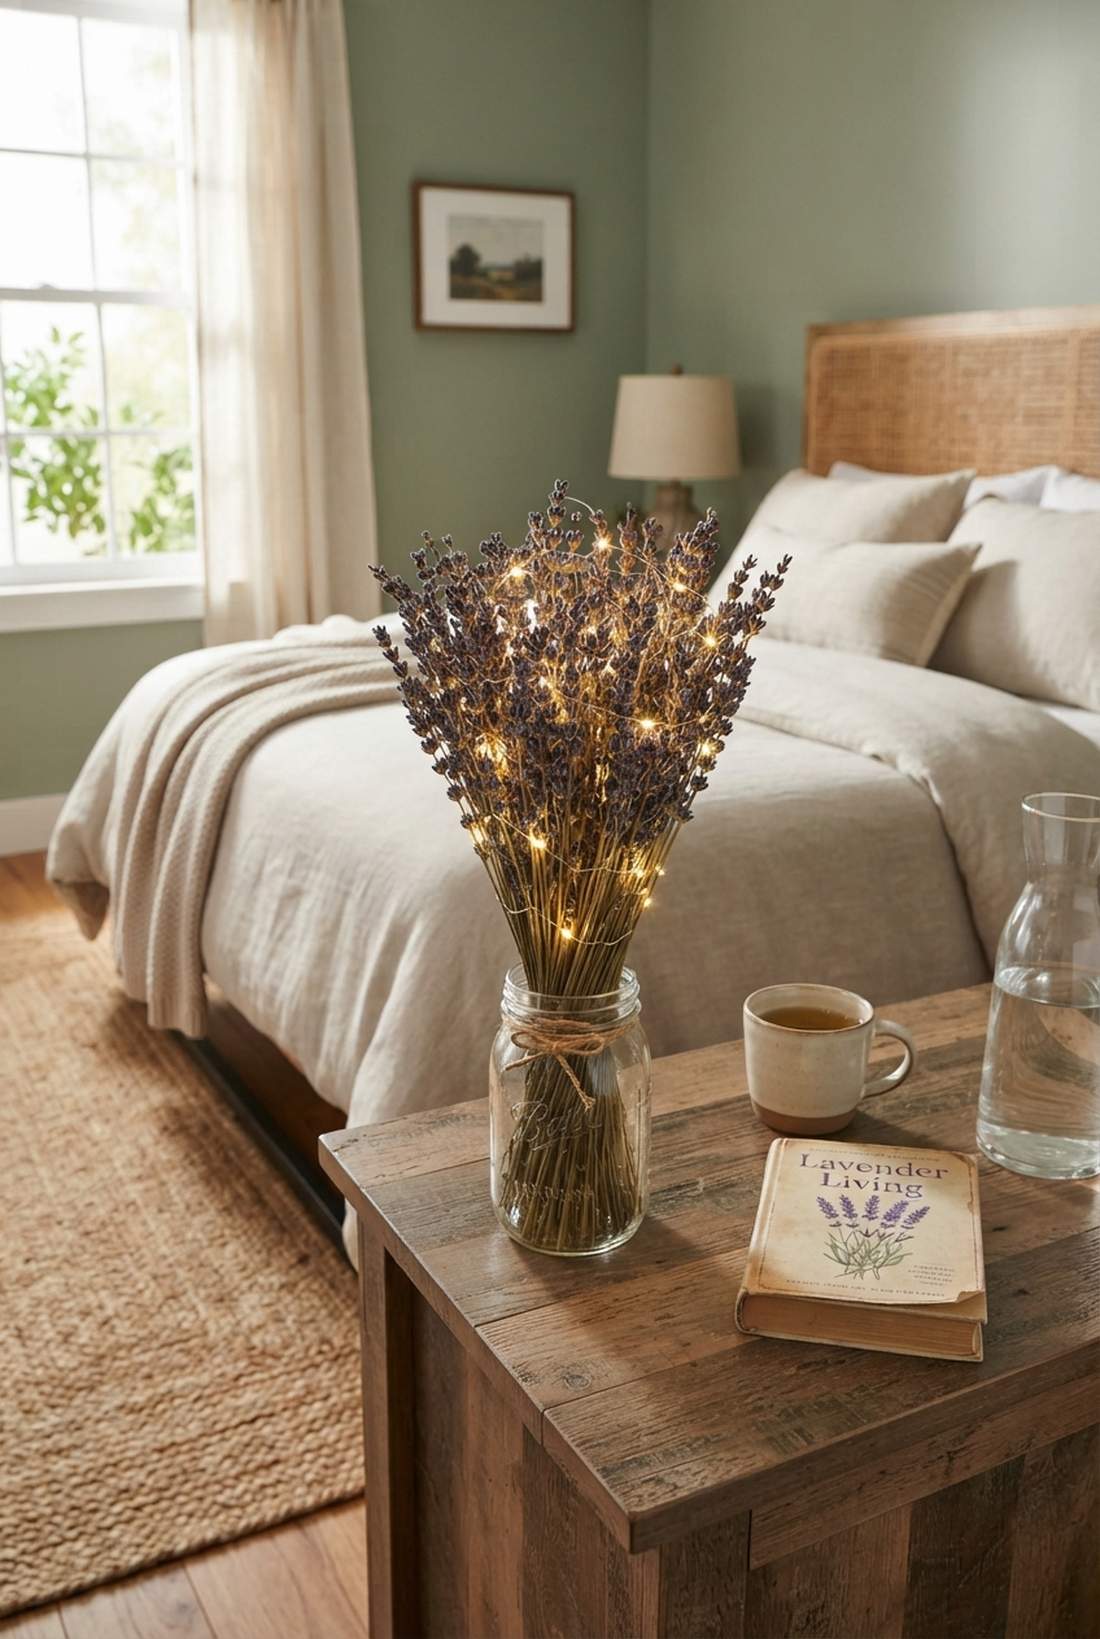
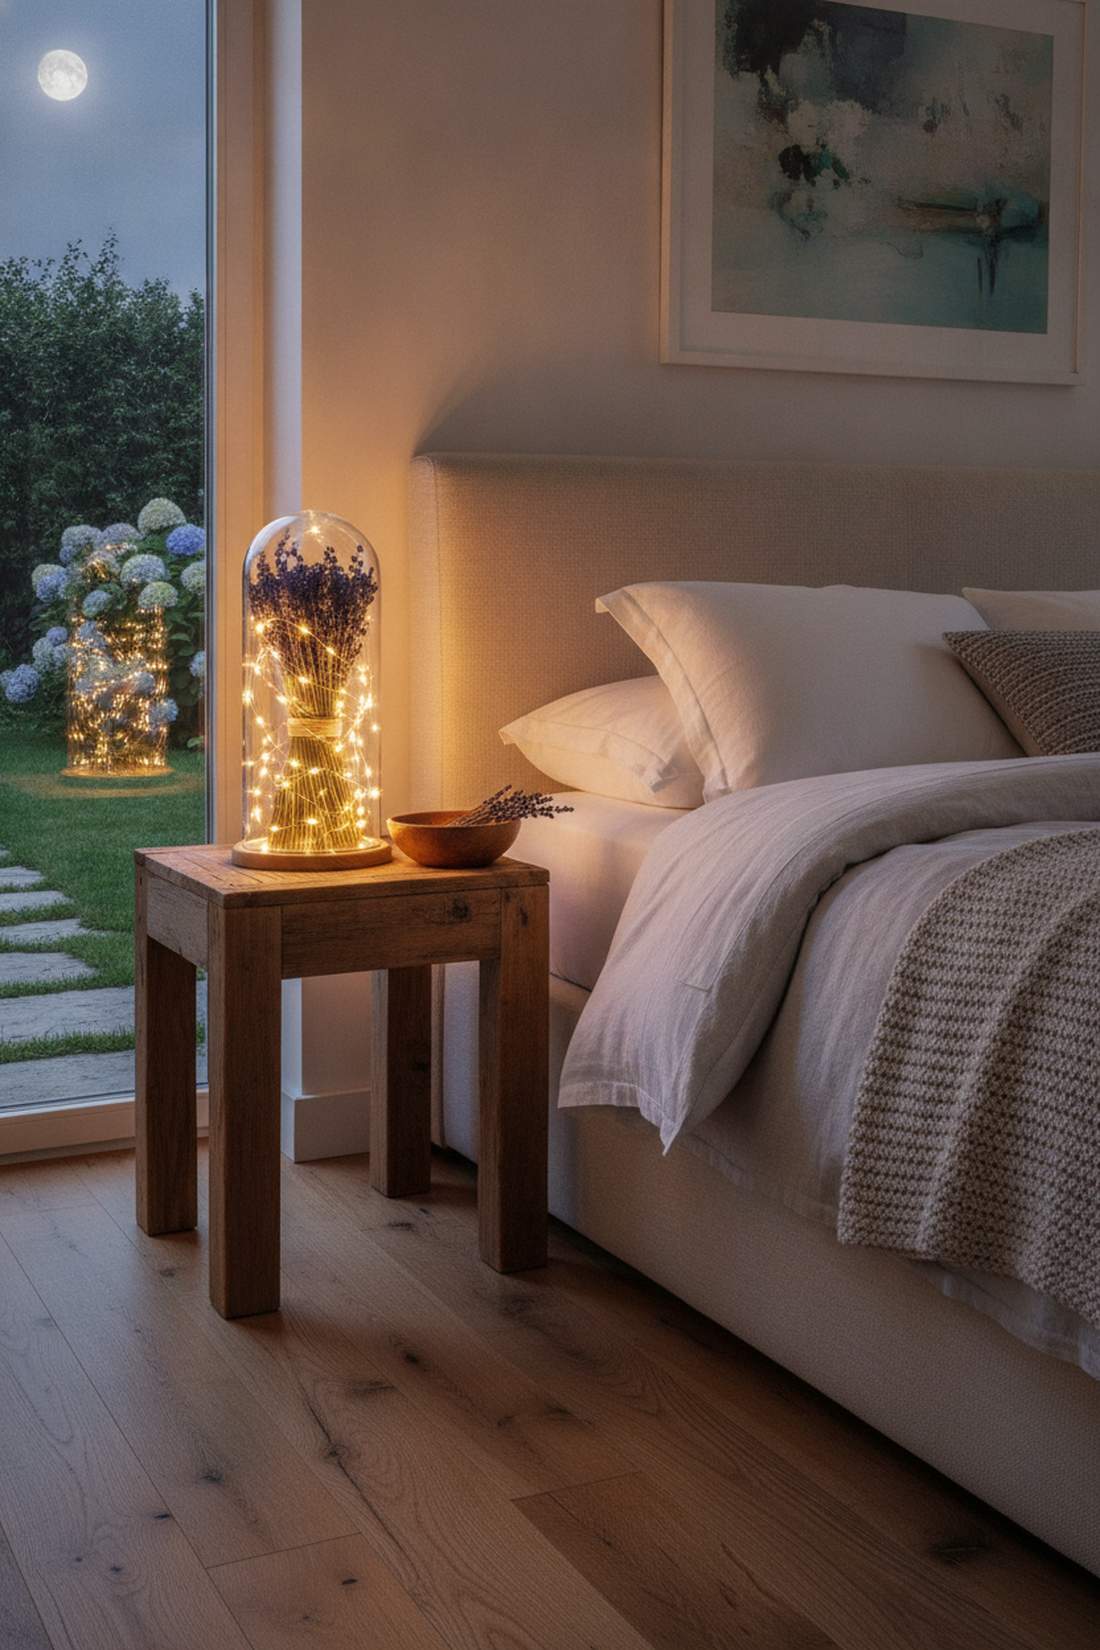
A glowing lavender sheath feels incredibly calming and spa-like. Place this directly on your bedside nightstand for a soothing, aromatic pre-sleep ambiance.
Randomly shoving stems inside breaks the buds, but carefully bundling them upright around a fairy lights centerpiece gives a designer-level finish. The faint heat from the LED wire gently activates the essential oils in the dried lavender.
This functional aromatherapy light costs about $14. Save this to your relaxing bedroom upgrade board!
- Key Materials: Dried French lavender stems, twine
- Vibe / Style: Rustic French spa
- Difficulty: Gentle placement
- Budget Breakdown: Lavender: $9 | Lights: $5
- Creator’s Tip: Tie the stems tightly with twine *before* inserting them into the jar to maintain a perfectly upright, clean arrangement.
- Smart Sourcing: Purchase dried culinary-grade lavender bundles and warm-white copper fairy wires.
37. Eucalyptus and Silver Dollar Leaves
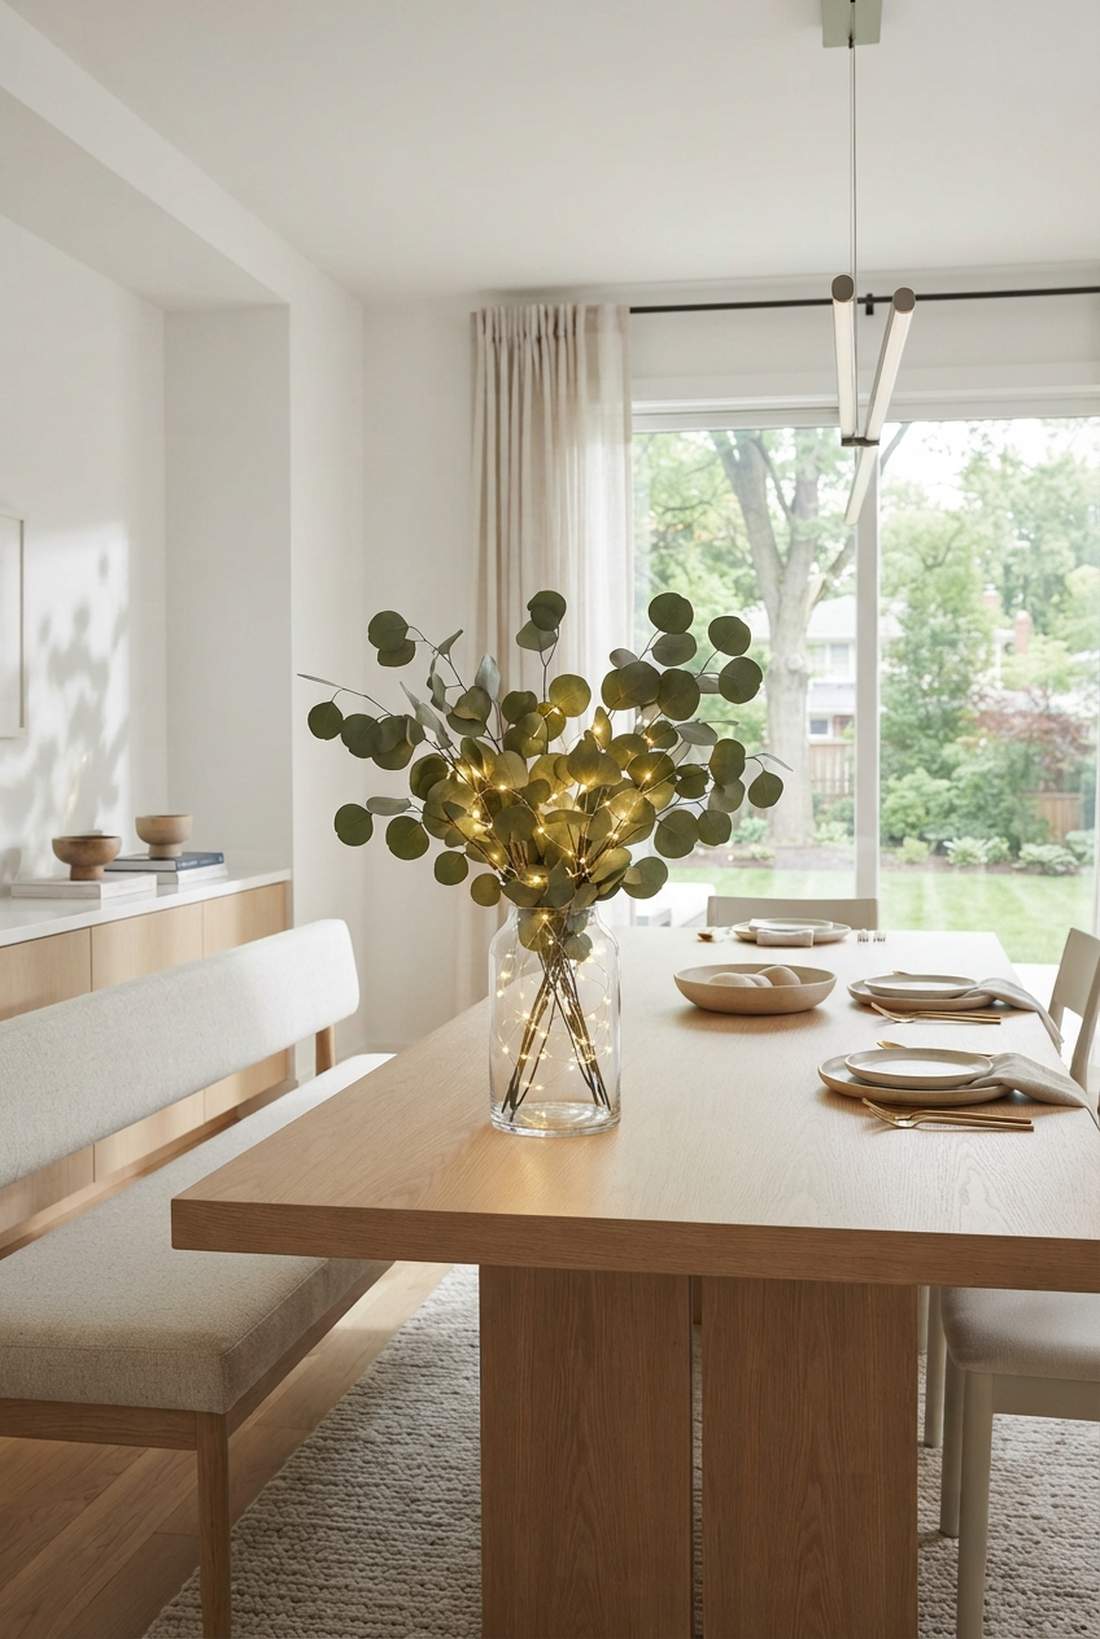
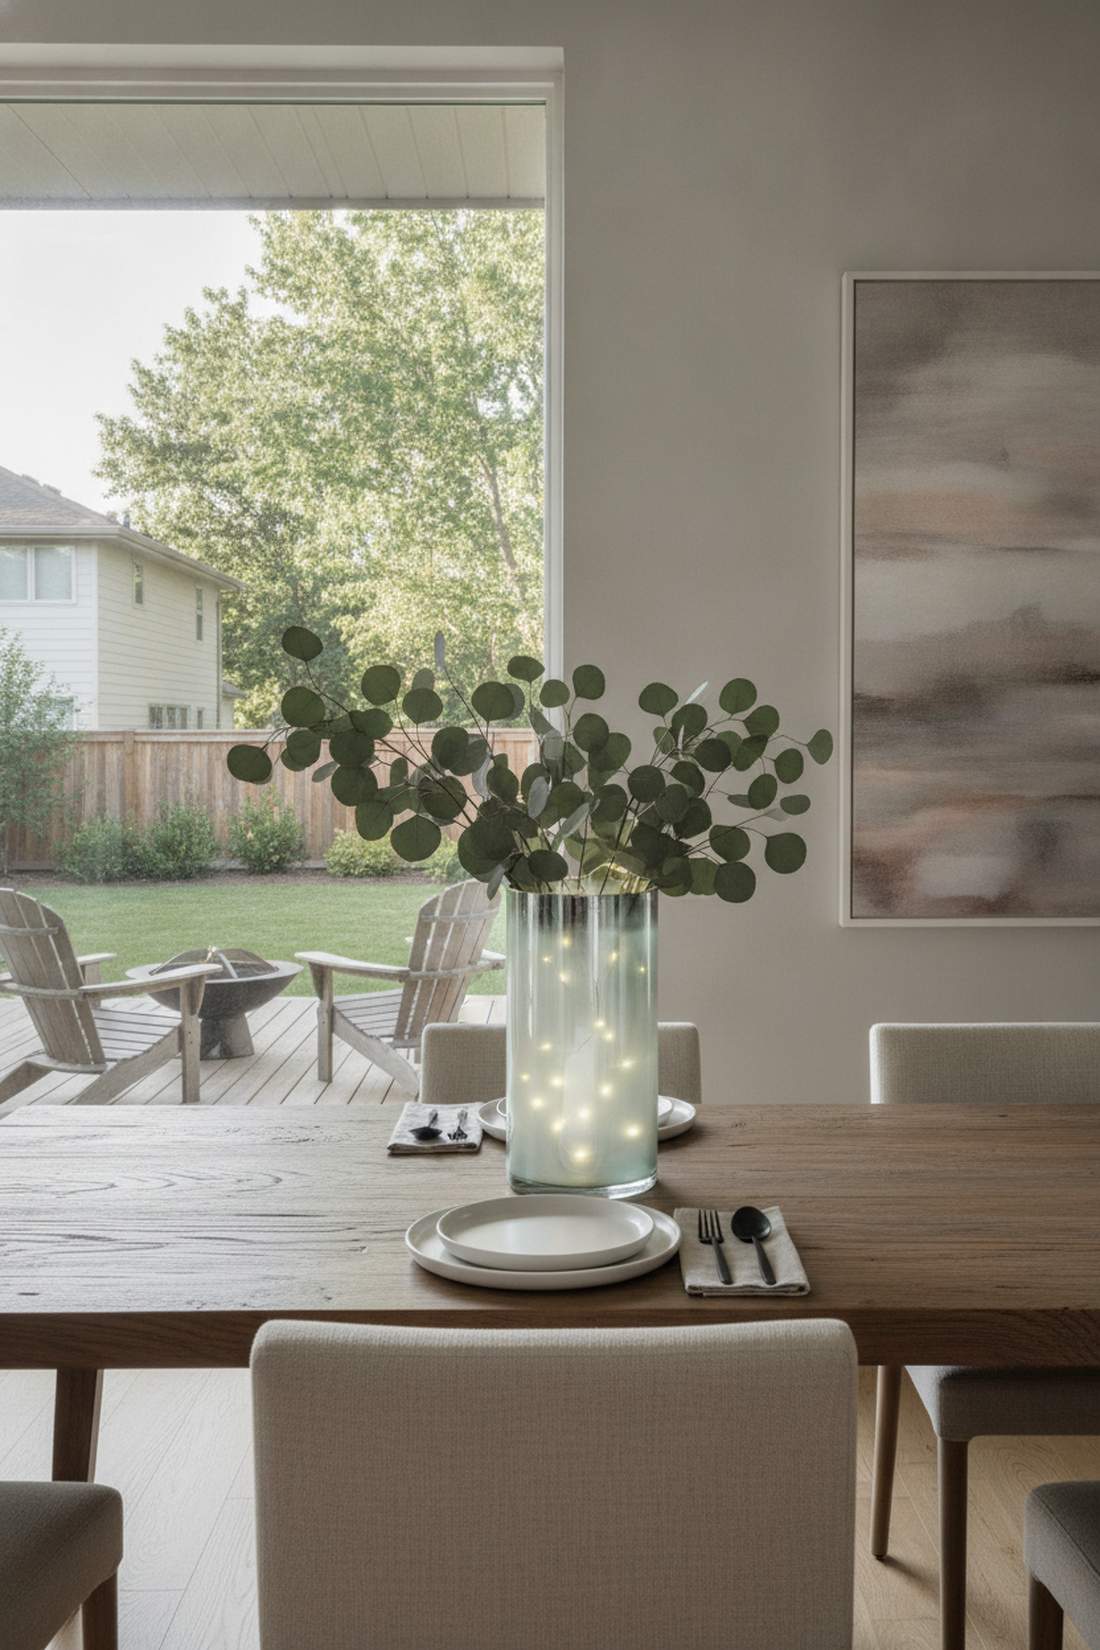
This silver-green botanical glow vase provides a clean, spa-quality modern aesthetic. It works beautifully as a muted, sophisticated centerpiece for minimalist dining rooms.
Overcrowding the jar blocks the light completely, but stripping the lower leaves and displaying just the top canopy delivers a surprisingly premium look. The iconic round eucalyptus leaves create beautiful, sweeping shadows on the walls.
This chic greenery setup runs roughly $13. Highly recommended for a fast, modern refresh.
- Key Materials: Preserved silver dollar eucalyptus
- Vibe / Style: Modern organic
- Difficulty: Minimalist trimming
- Budget Breakdown: Eucalyptus: $8 | Jar/Lights: $5
- Creator’s Tip: Use preserved eucalyptus rather than fresh; it maintains its soft, flexible look for years without turning brittle.
- Smart Sourcing: Grab preserved silver dollar eucalyptus stems and slim battery-pack LEDs.
Stop putting plastic greens in your displays. This exact dried-grass trick makes everything look incredibly high-end.
38. Wheat and Dried Grass Arrangements

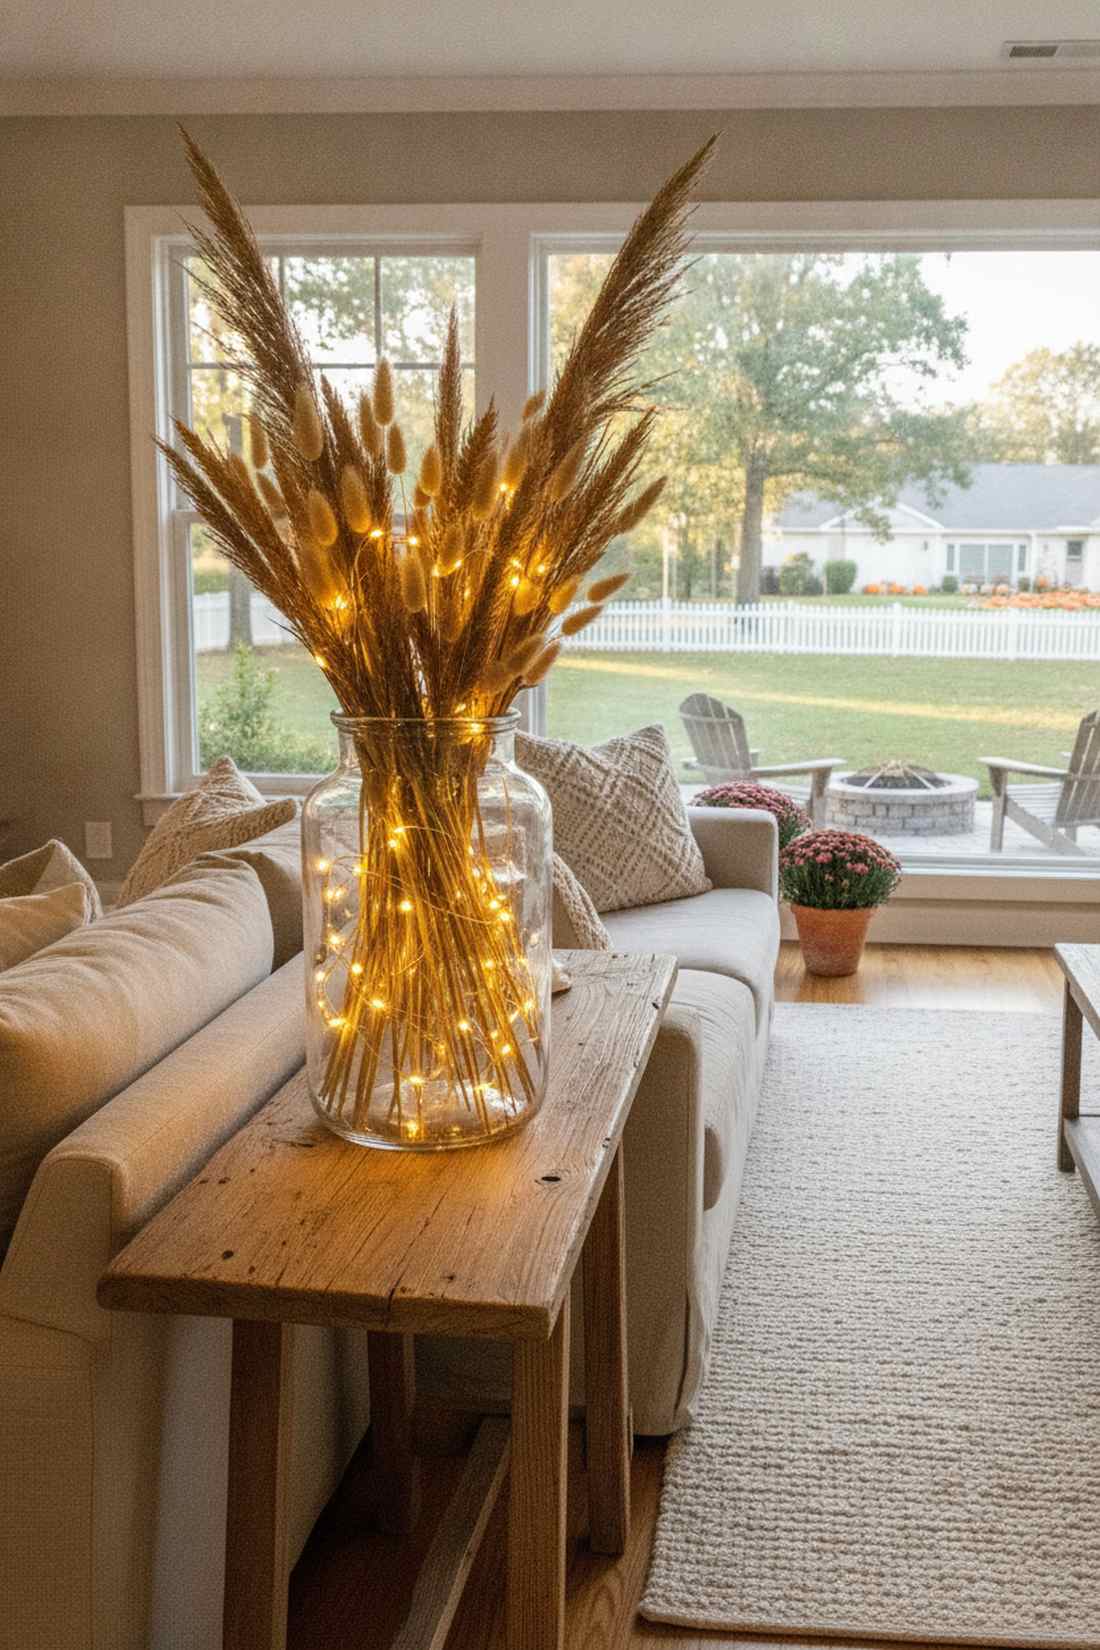
A textured pampas and wheat jar brings a highly coveted, warm bohemian texture. It acts as the perfect filler decor for neutral-toned living rooms or fall porch steps.
Large pampas grass is too massive for jars, but utilizing dried bunny tails and wheat stalks looks far more expensive than it is. The warm, golden tones of the dried grass amplify the yellow warmth of the fairy lights brilliantly.
You can create this trendy boho accent for about $15. Pin this if you love neutral, earthy aesthetics!
- Key Materials: Dried bunny tail grass, wheat stalks
- Vibe / Style: Earthy bohemian
- Difficulty: Simple trimming
- Budget Breakdown: Grasses: $10 | Lights: $5
- Creator’s Tip: Hit the dried grasses with a light coat of hairspray before inserting them to stop the fluffy seeds from shedding inside the glass.
- Smart Sourcing: Buy dried natural bunny tail grass (bulk pack) and amber LED string lights.
39. Succulent-Topped Jar Gardens
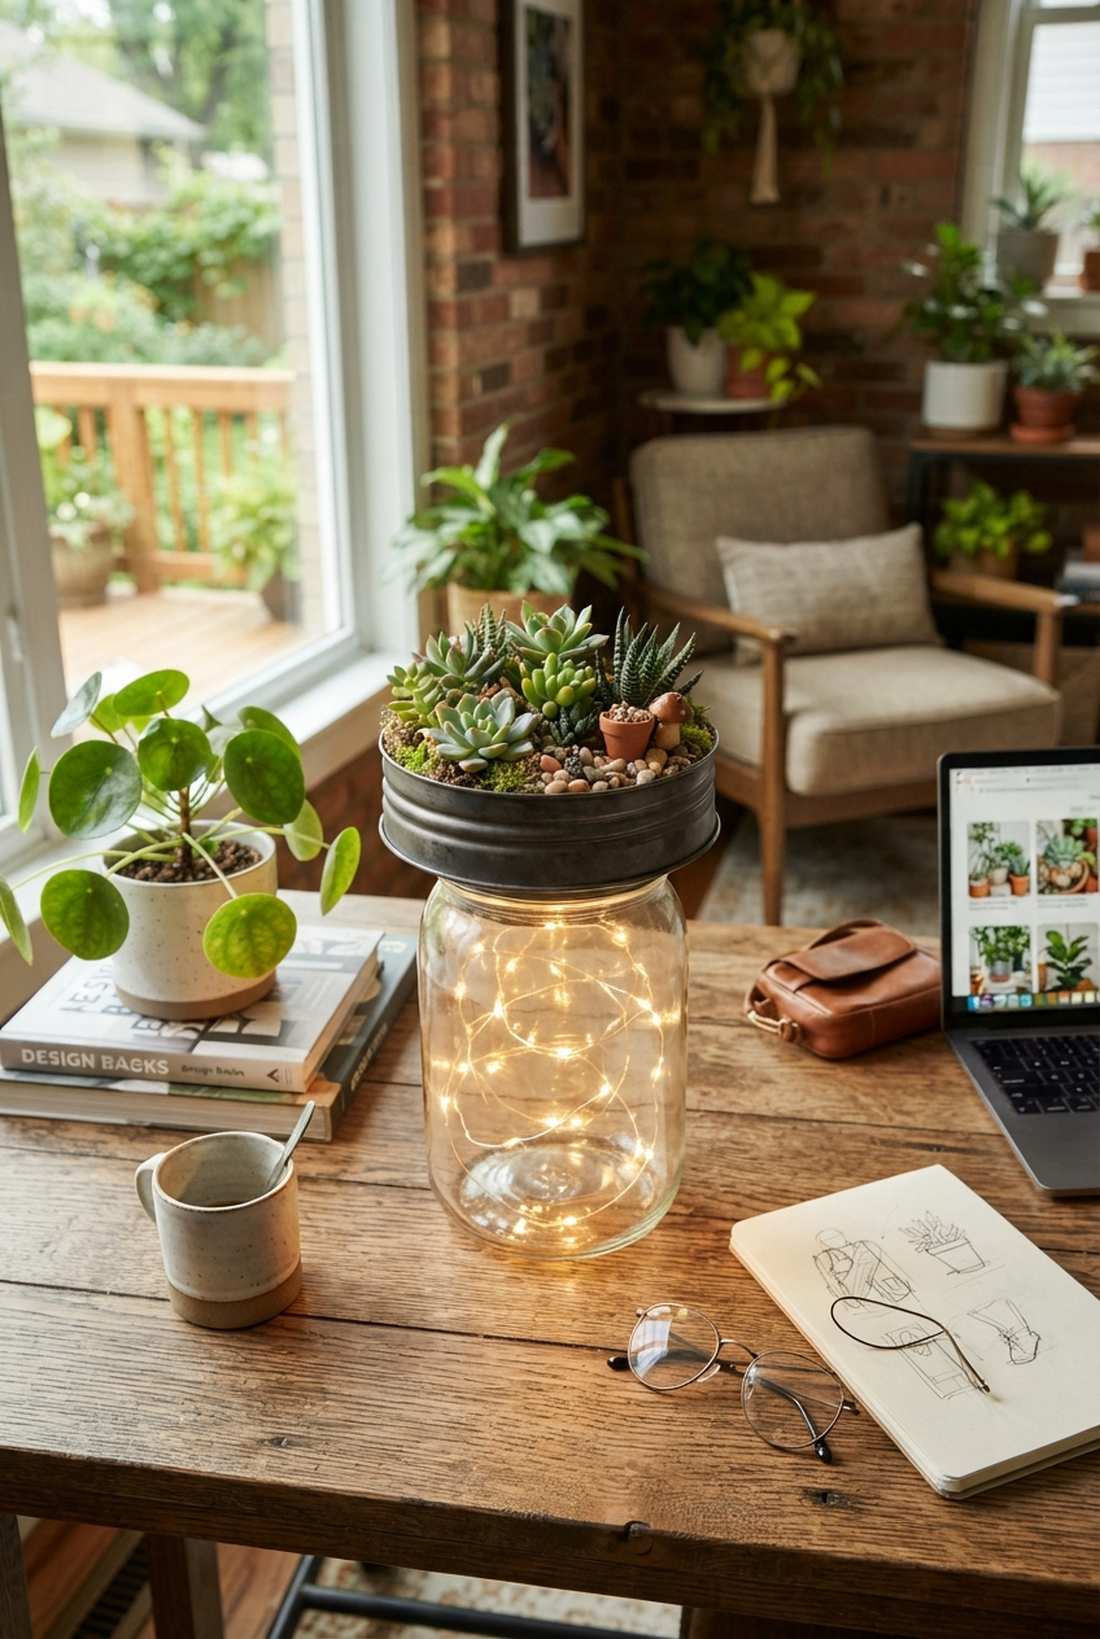
This split-level living lantern feels incredibly inventive and modern. It’s an ingenious way to combine a functional desk lamp with a low-maintenance houseplant.
Putting dirt directly over lights is a disaster, but building a shallow planter in the metal lid gives a designer-level finish that separates the moisture from the electrics safely. The fairy garden kits aesthetic lives up top, while the bottom radiates clean light.
This dual-purpose planter costs around $18. A phenomenal, creative gift idea.
- Key Materials: Live mini succulents, jar lid, soil
- Vibe / Style: Urban jungle
- Difficulty: Requires lid modification
- Budget Breakdown: Succulents/Soil: $10 | Jar/Lights: $8
- Creator’s Tip: Drill three tiny drainage holes in the lid, and remove the lid entirely when watering so no water drips onto the battery pack.
- Smart Sourcing: Source 2-inch live succulent assortments and diamond drill bits for metal lids.
40. Herb Garden Aromatic Displays
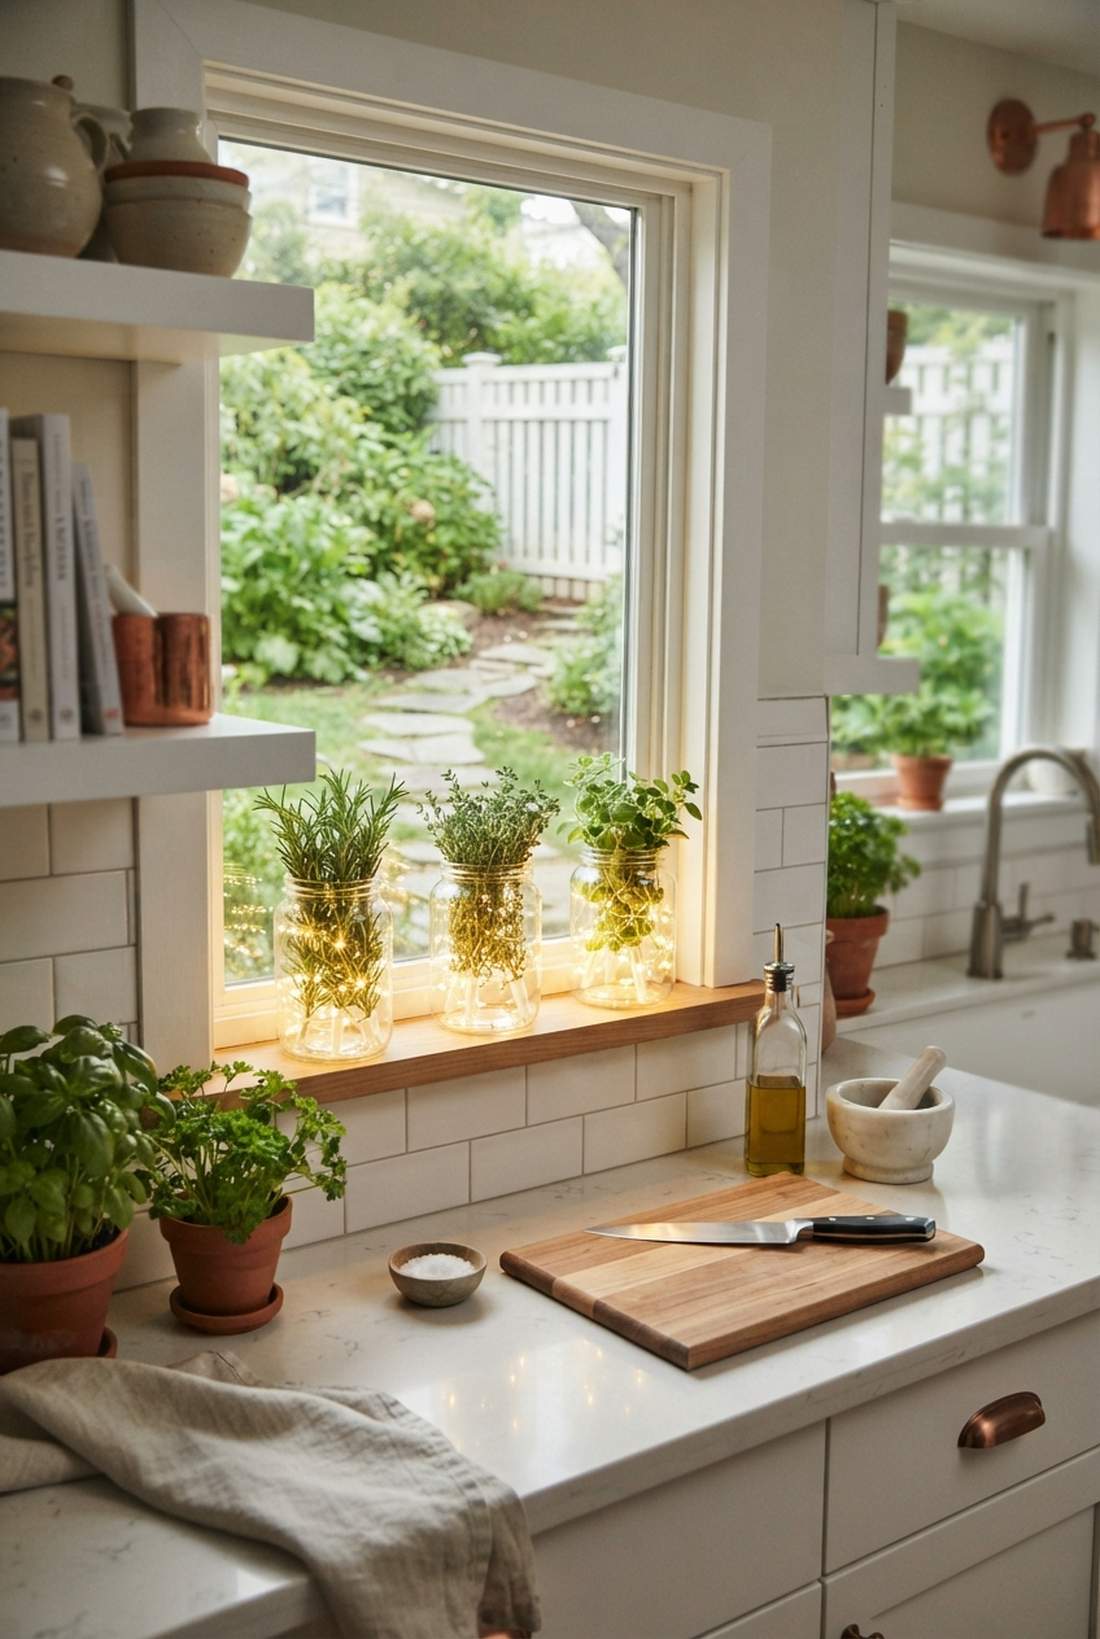
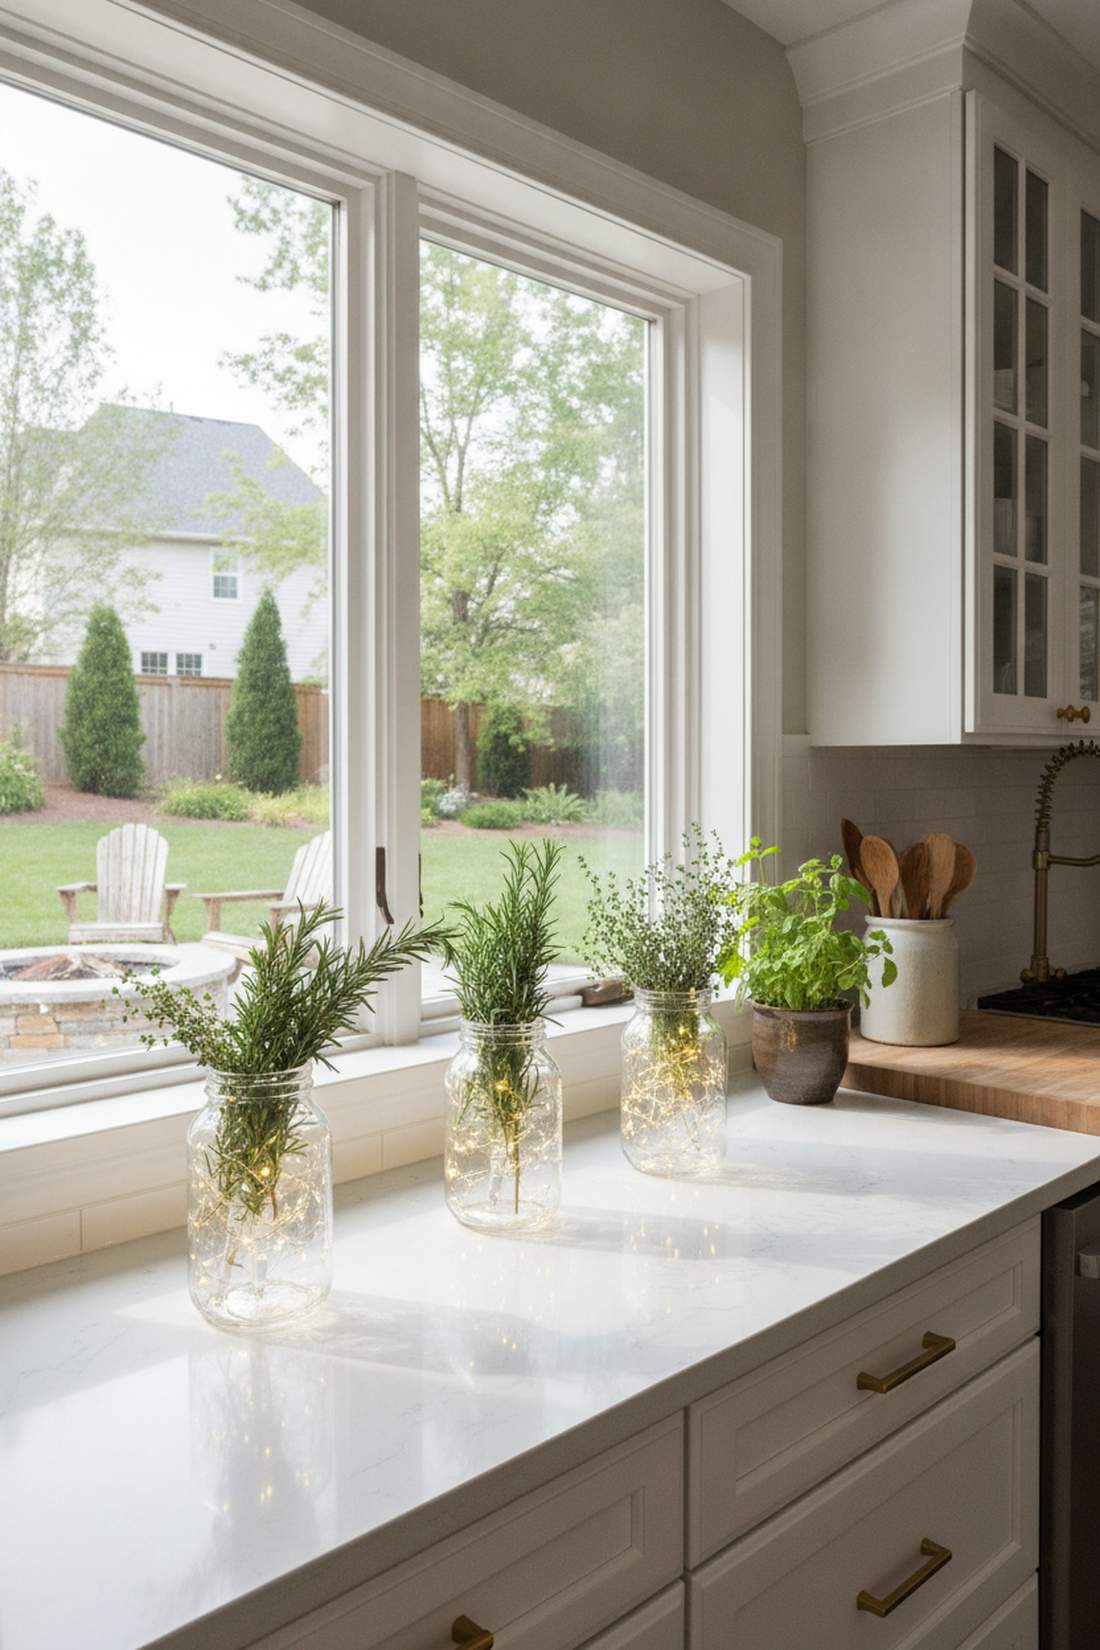
An illuminated culinary herb jar brings fresh, functional life to your kitchen workspace. Sit these glowing jars on a kitchen windowsill to keep fresh aromatics at arms reach.
Standard herb pots look messy indoors, but dropping fresh rosemary or thyme over a fairy lights vase delivers a surprisingly premium look. The green stems look vibrant and alive when backlit, instantly elevating the kitchen’s vibe.
Setup these glowing herb stations for roughly $12. Pin this for your next kitchen organization day!
- Key Materials: Fresh rosemary or thyme, small water tube
- Vibe / Style: Chef’s kitchen
- Difficulty: Easy assembly
- Budget Breakdown: Herbs/Tubes: $6 | Lights/Jar: $6
- Creator’s Tip: Put the fresh herb stems inside a hidden plastic floral water tube so they stay alive without flooding the electronics in the jar.
- Smart Sourcing: Use plastic floral water picks (bulk) and waterproof fairy lights.
41. Pinecone and Acorn Woodland Jars

This foraged woodland floor lantern feels deeply grounding and autumnal. It’s an excellent, practically free decor piece for cabin aesthetics or rustic living rooms.
Giant pinecones won’t fit through the mouth, but layering mini hemlock cones and polished acorns looks far more expensive than it is. The dark, rich browns contrast beautifully against the sharp, bright LED stars.
Build this rustic piece for about $5 (mostly lights). Highly recommended for budget-friendly fall staging.
- Key Materials: Mini pinecones, clean acorns
- Vibe / Style: Rustic cabin
- Difficulty: Foraging required
- Budget Breakdown: Cones: Free | Lights: $5
- Creator’s Tip: Bake foraged pinecones at 200°F for 30 minutes to kill any hidden bugs before bringing them into your home.
- Smart Sourcing: Grab mini hemlock pinecones (craft grade) and warm yellow string lights.
Most people put their jars flat on the table. The tiering secret coming up makes your decor look professionally styled.
Fairy Lights Table Decor Arrangements
How you place your jars is just as important as what is inside them. These architectural fairy lights table decor layouts maximize visual impact and manipulate room lighting perfectly.
42. Tiered Height Groupings
A multi-level glowing cluster feels intentional, balanced, and highly styled. This is the ultimate layout strategy for round dining tables or wide entryway consoles.
Placing identical jars in a flat line looks boring, but elevating them on hidden risers gives a designer-level finish. The staggered heights draw the eye upward, creating a voluminous centerpiece that feels grand but takes up minimal space.
Structuring this dynamic layout costs about $25. Save this to your professional table staging board!
- Key Materials: 3-5 varying jar sizes, wooden risers
- Vibe / Style: Professional tablescape
- Difficulty: Spatial balancing
- Budget Breakdown: Multiple Jars/Lights: $20 | Risers: $5
- Creator’s Tip: Always use an odd number of jars (3 or 5)—the human eye naturally finds asymmetrical odd groupings more aesthetically pleasing.
- Smart Sourcing: Use assorted mason jar multi-packs and acrylic clear display risers.
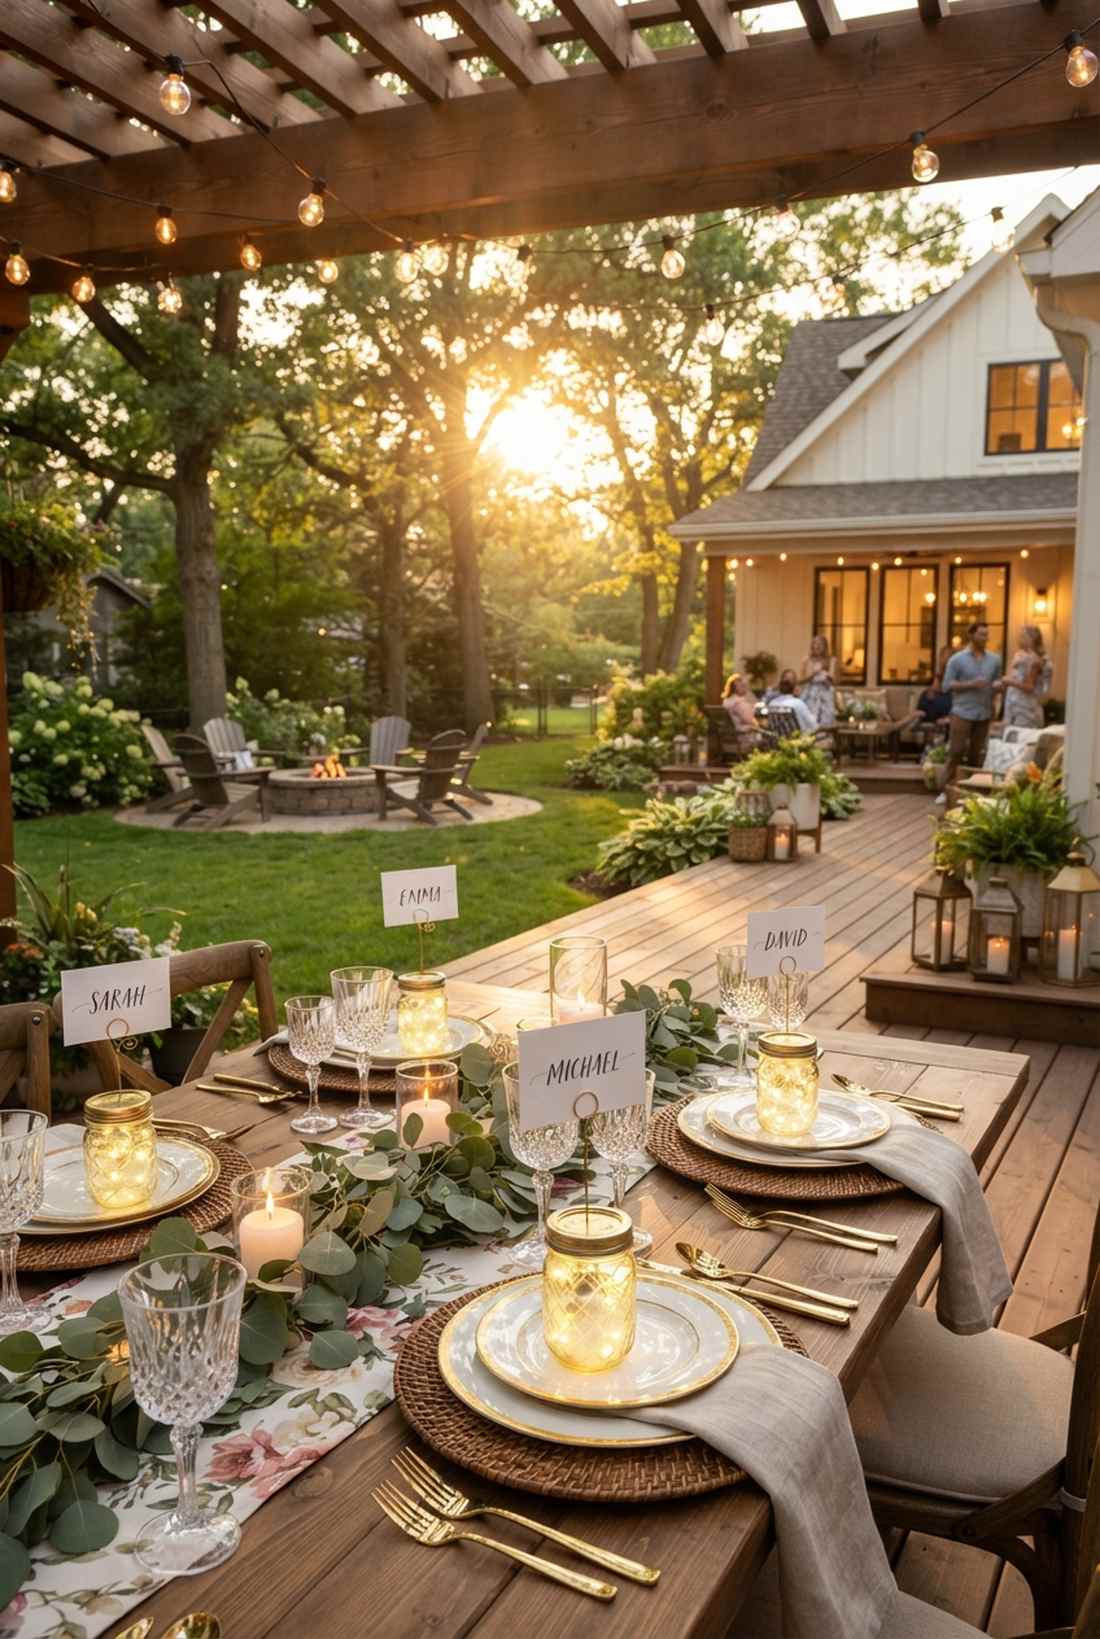
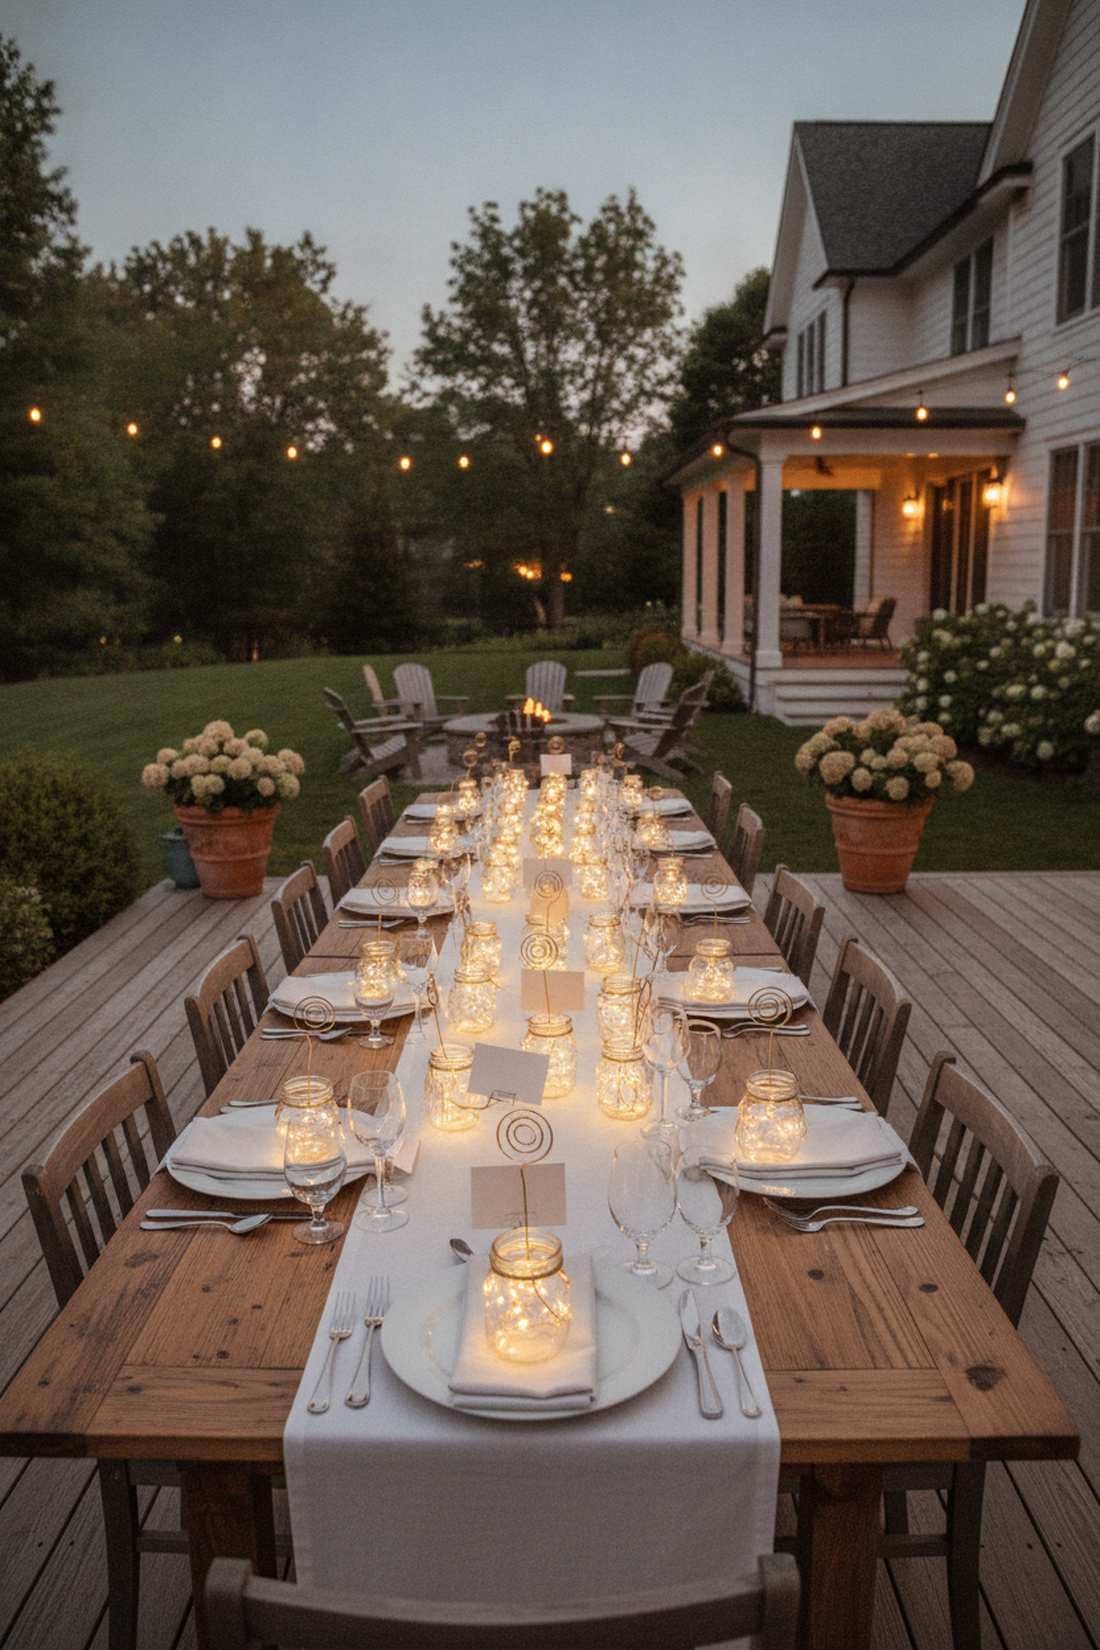
43. Runner-Aligned Repetition
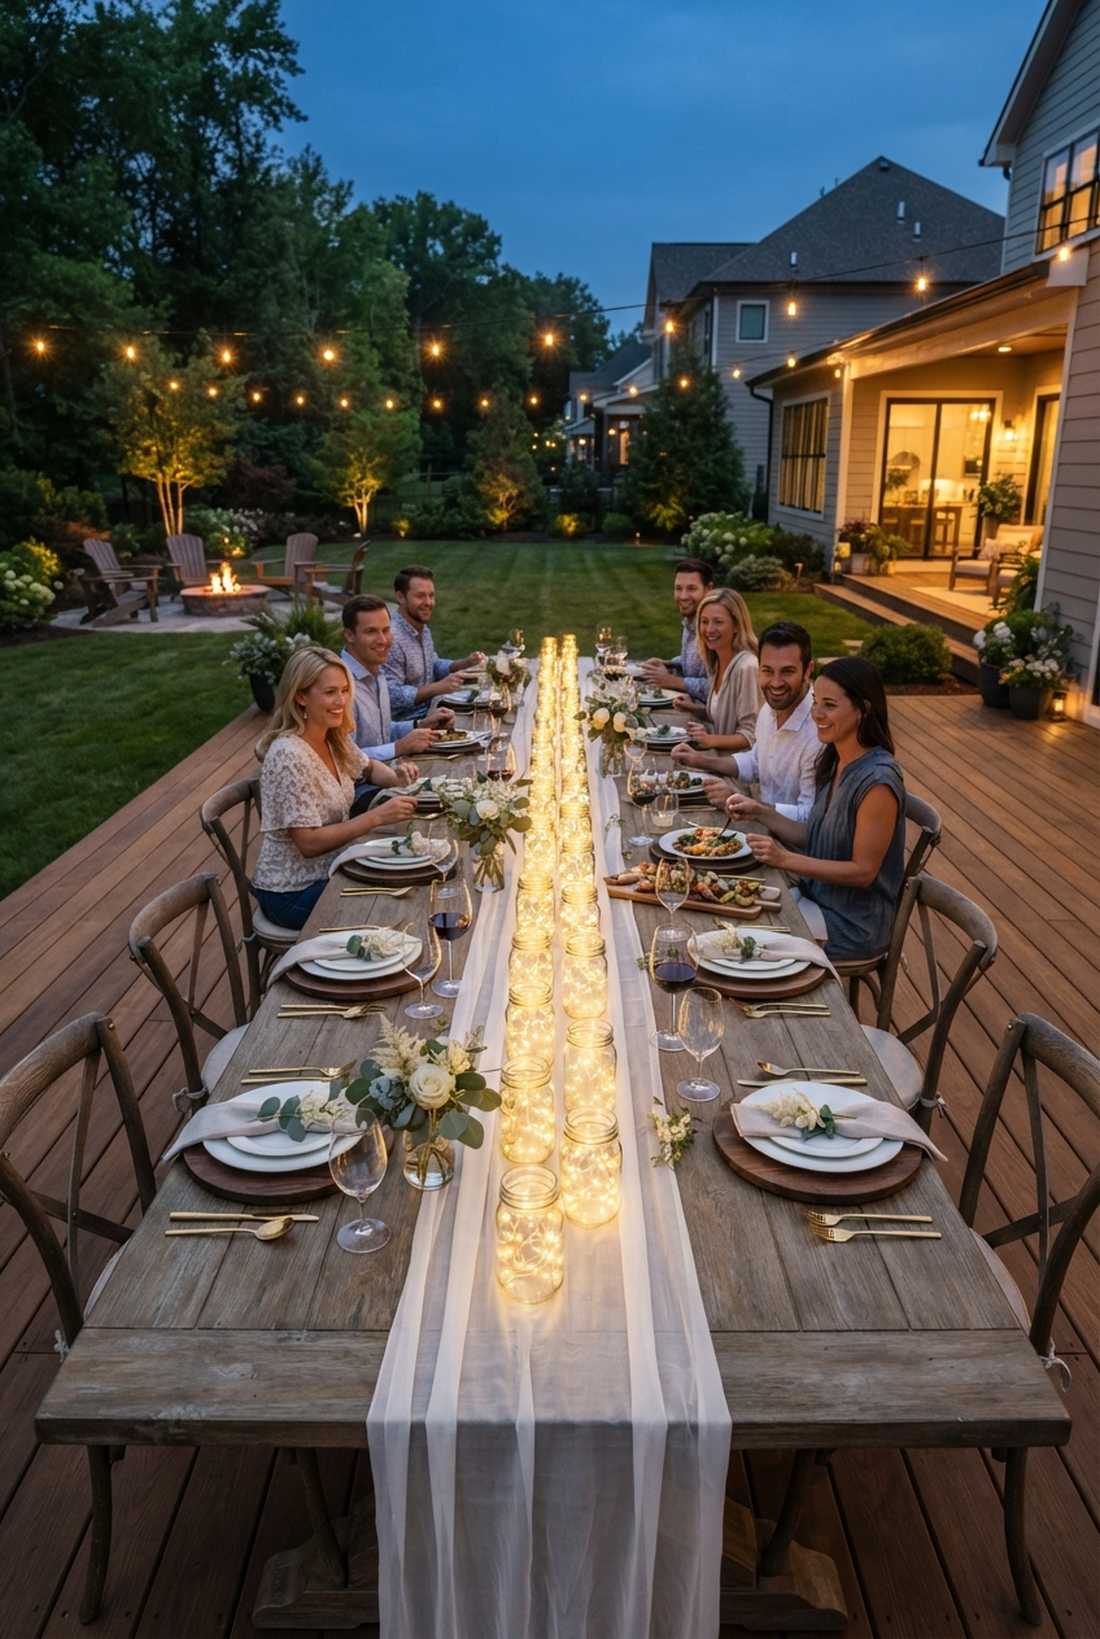
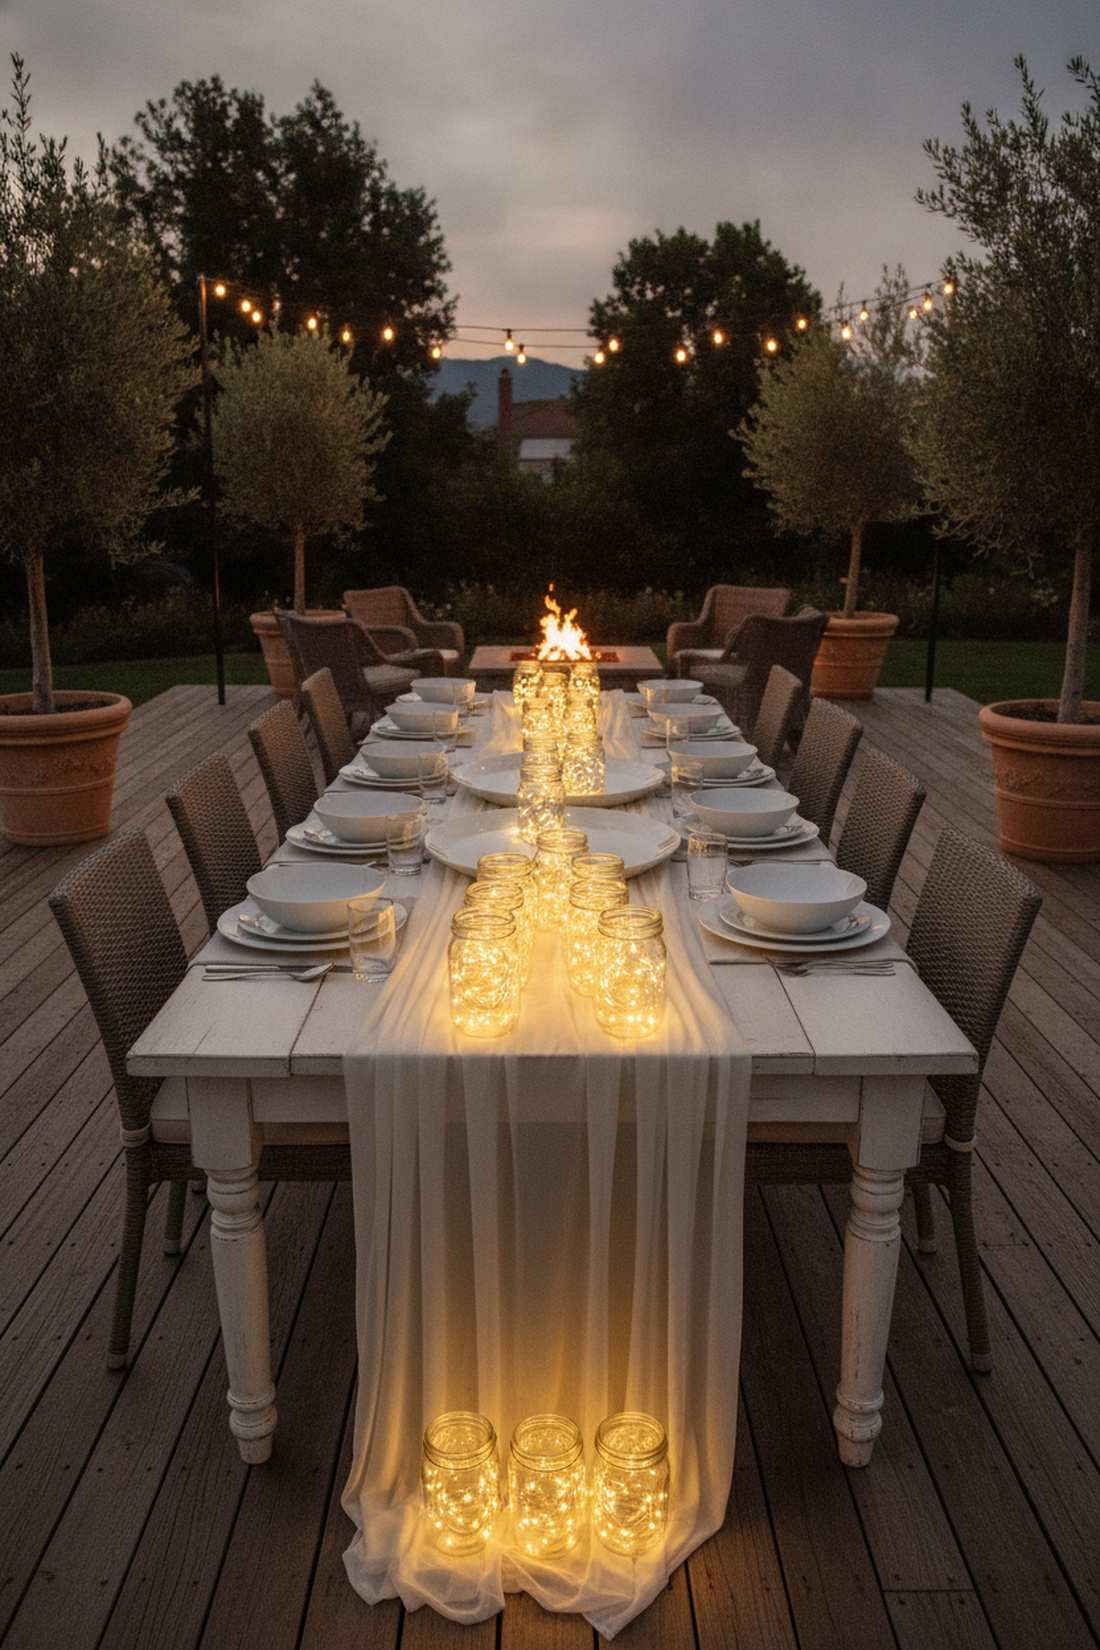
This linear glowing runway provides a striking, modern, and clean presentation. It is absolutely essential for long, rectangular farmhouse tables or extensive wedding banquet setups.
Scattering jars randomly creates visual chaos, but measuring them perfectly along a fabric runner delivers a surprisingly premium look. The uniform repetition mimics high-end architectural lighting down the center of the feast.
Equipping a long table runs roughly $35. A brilliant solution for massive guest counts.
- Key Materials: Identical jars, sheer table runner
- Vibe / Style: Modern banquet
- Difficulty: Precise measurement
- Budget Breakdown: Runner: $15 | Jars/Lights (x5): $20
- Creator’s Tip: Space the jars exactly 18 inches apart to allow enough room for family-style food platters without blocking guests’ sightlines.
- Smart Sourcing: Order sheer chiffon table runners and identical pint-sized mason jars (bulk).
44. Lazy Susan Rotating Centerpiece
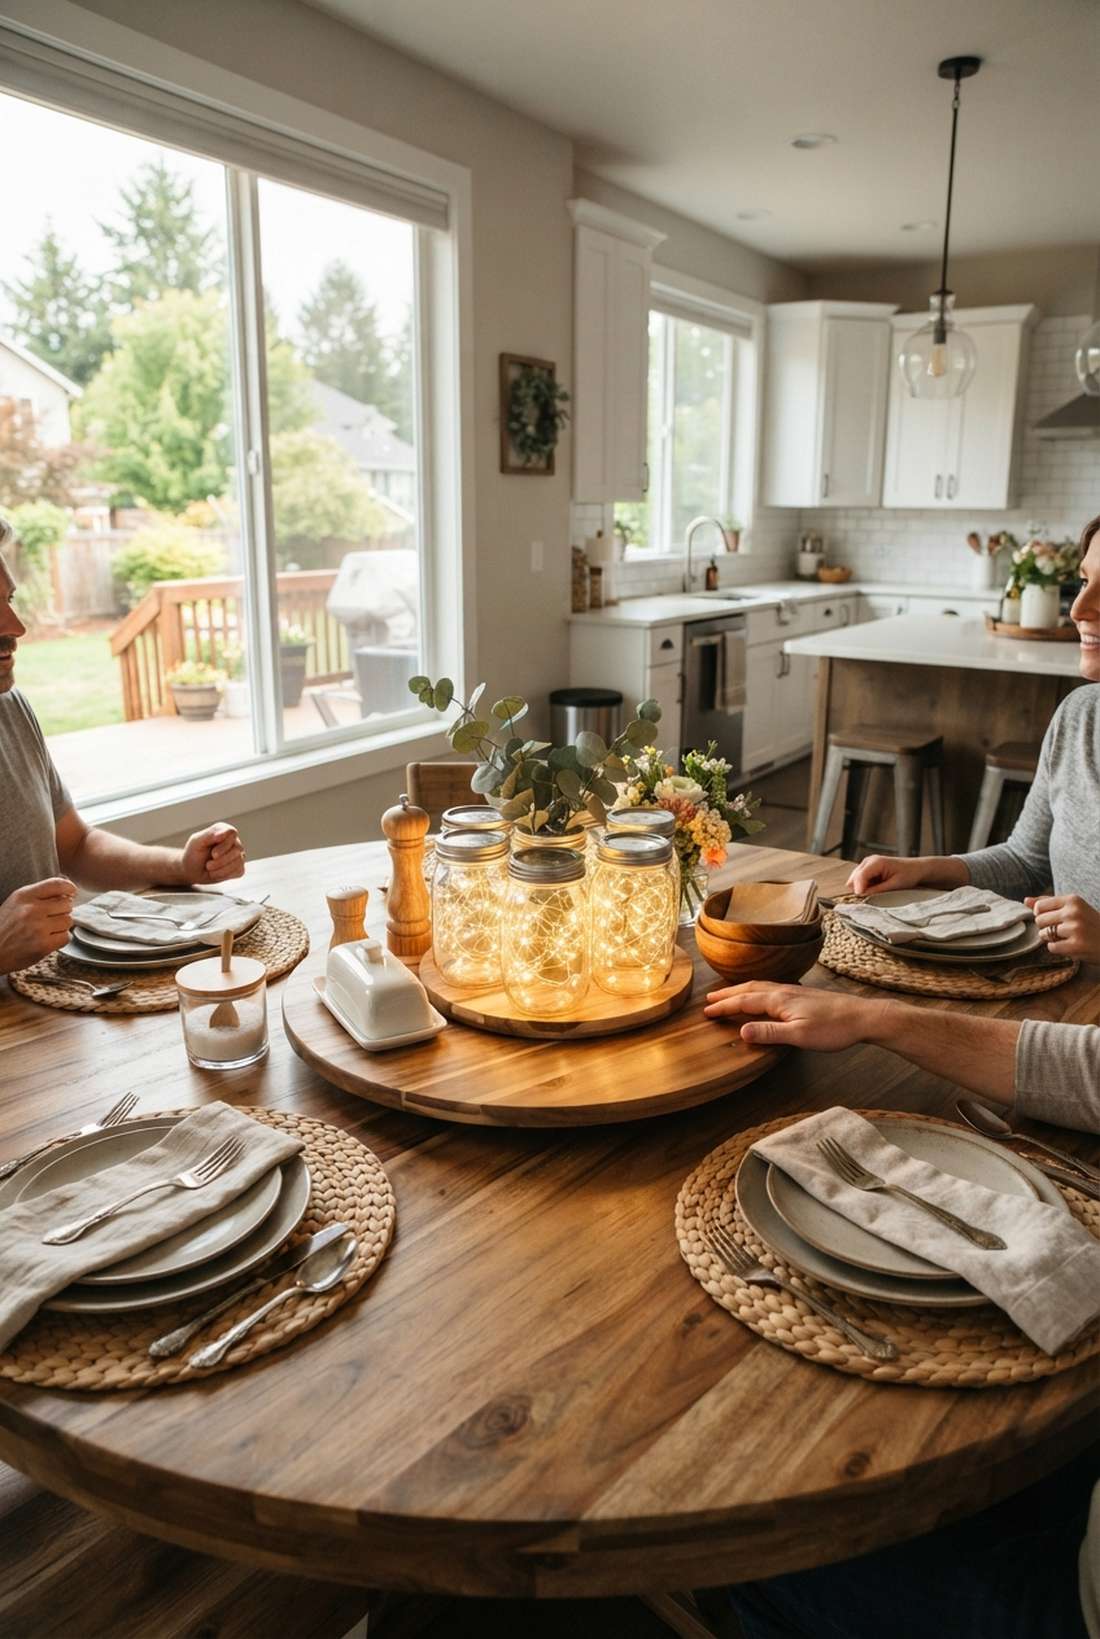

A spinning illuminated hub feels incredibly interactive and functional. It acts as the perfect anchor for a busy kitchen table, allowing everyone to reach the salt while enjoying the glow.
Static centerpieces get in the way during meals, but adhering a fairy lights centerpiece to a wooden turntable looks far more expensive than it is. It marries high-end ambiance with supreme dinner-time practicality.
Upgrading to a rotating base costs about $25. Pin this if you love practical, functional decor!
- Key Materials: Wooden lazy susan base, museum gel
- Vibe / Style: Functional farmhouse
- Difficulty: Base securing
- Budget Breakdown: Turntable: $15 | Jars/Lights: $10
- Creator’s Tip: Lock the jars down with clear museum gel so they don’t fly off the edge when someone spins the board too fast.
- Smart Sourcing: Buy an acacia wood lazy susan base and clear museum mounting gel.
45. Place Card Holder Individual Jars
This personalized glowing place setting offers a deeply intimate, VIP experience for guests. Use these tiny luminaries at weddings or upscale dinner parties to guide seating assignments.
Paper name cards blow away, but wrapping wire holders around tiny illuminated jars gives a designer-level finish. It provides a dedicated mini-spotlight for the guest’s name, doubling as a luxury party favor they can take home.
Creating these bespoke markers costs around $4 per seat. Highly recommended for upscale event detailing.
- Key Materials: Quarter-pint mini jars, wire card picks
- Vibe / Style: VIP boutique
- Difficulty: Detailed assembly
- Budget Breakdown: Mini Jars/Lights: $3 | Wire/Card: $1
- Creator’s Tip: Use the ultra-short 3-foot fairy light strings so you don’t have to aggressively cram excess wire into the tiny glass.
- Smart Sourcing: Source 4oz mini quilted mason jars (bulk pack) and gold wire floral card holders.
46. Mirror-Base Light Multiplication
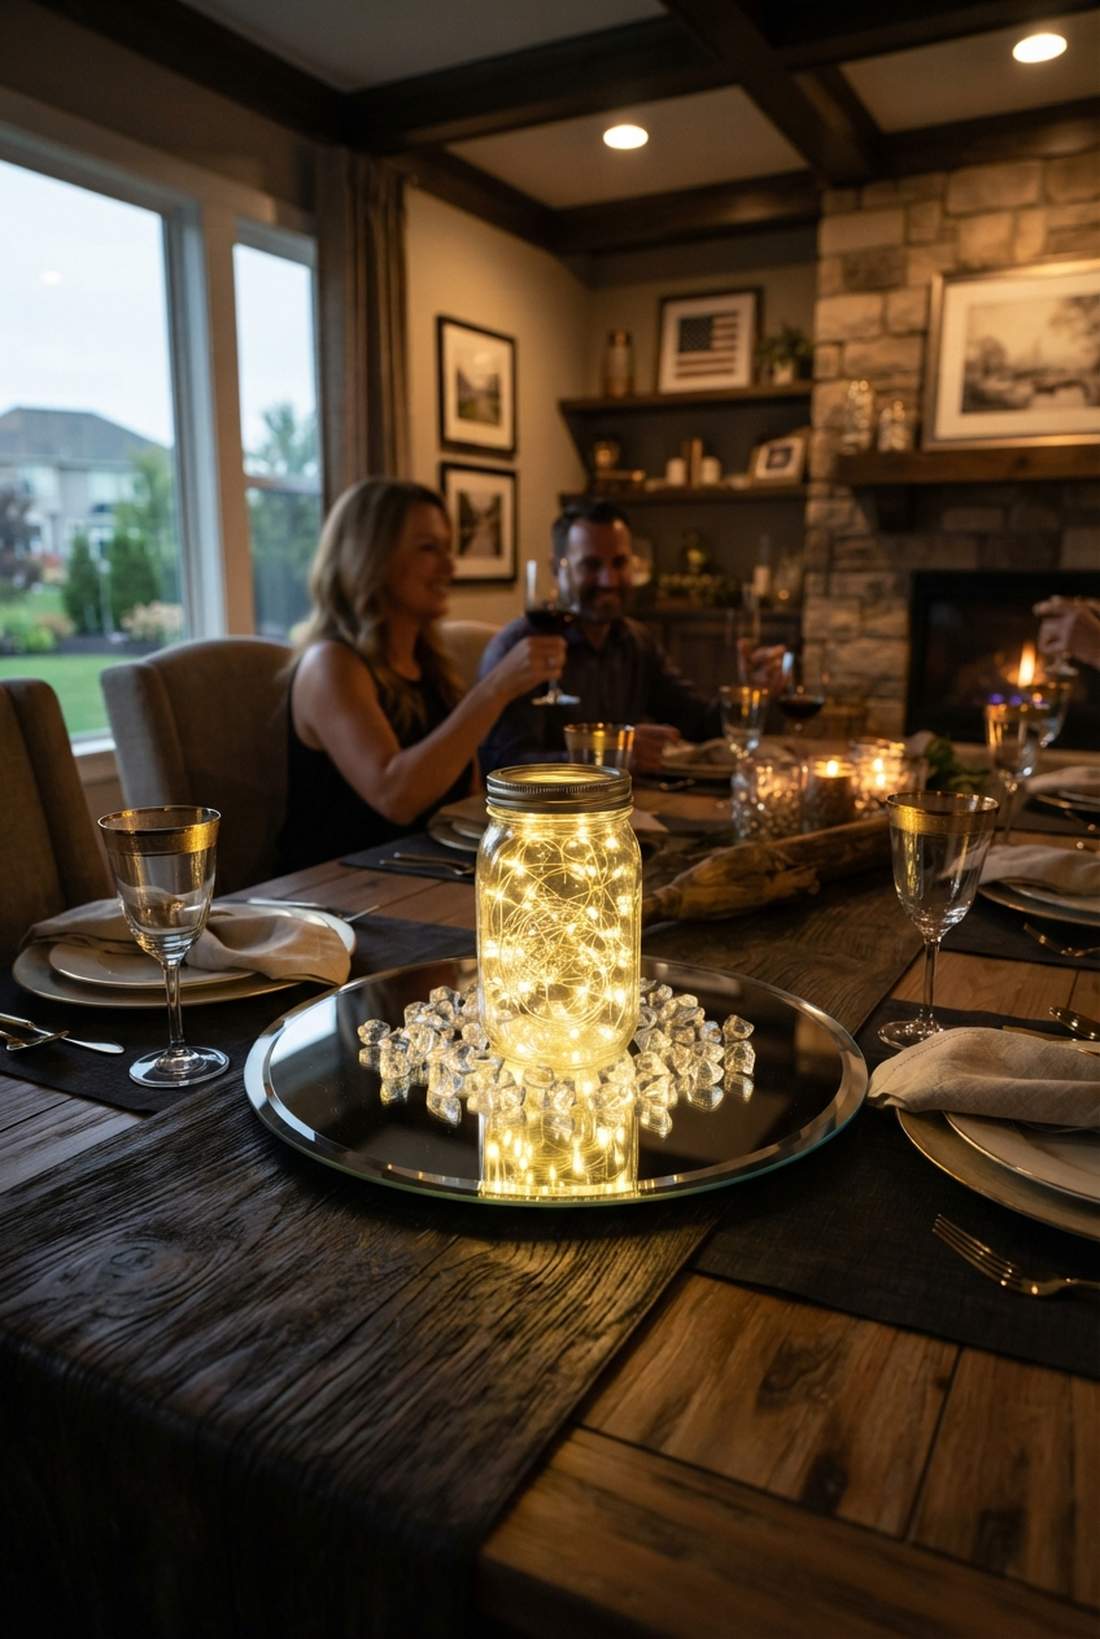

A reflected infinite-light plateau feels like a lavish, high-budget ballroom fixture. It is the absolute best way to brighten up dark, windowless event halls or moody dining rooms.
Using more jars gets expensive, but dropping your fairy lights centerpiece onto a cheap mirror tile delivers a surprisingly premium look by doubling the perceived light output. The mirror bounces the glow straight up, illuminating the ceiling.
This optical illusion trick costs just $15. Save this to your event lighting hack board!
- Key Materials: Beveled edge mirror plates
- Vibe / Style: Ballroom glamour
- Difficulty: Zero effort
- Budget Breakdown: Mirror Tile: $7 | Jars/Lights: $8
- Creator’s Tip: Scatter a few diamond acrylic vase fillers on the mirror around the jar base to fracture the reflected light even further.
- Smart Sourcing: Pick up 10-inch round beveled mirror plates and clear acrylic ice rocks.
Most people leave their walls completely dead at night. This floating shelf trick changes the entire room’s geometry.
47. Floating Shelf Wall Display
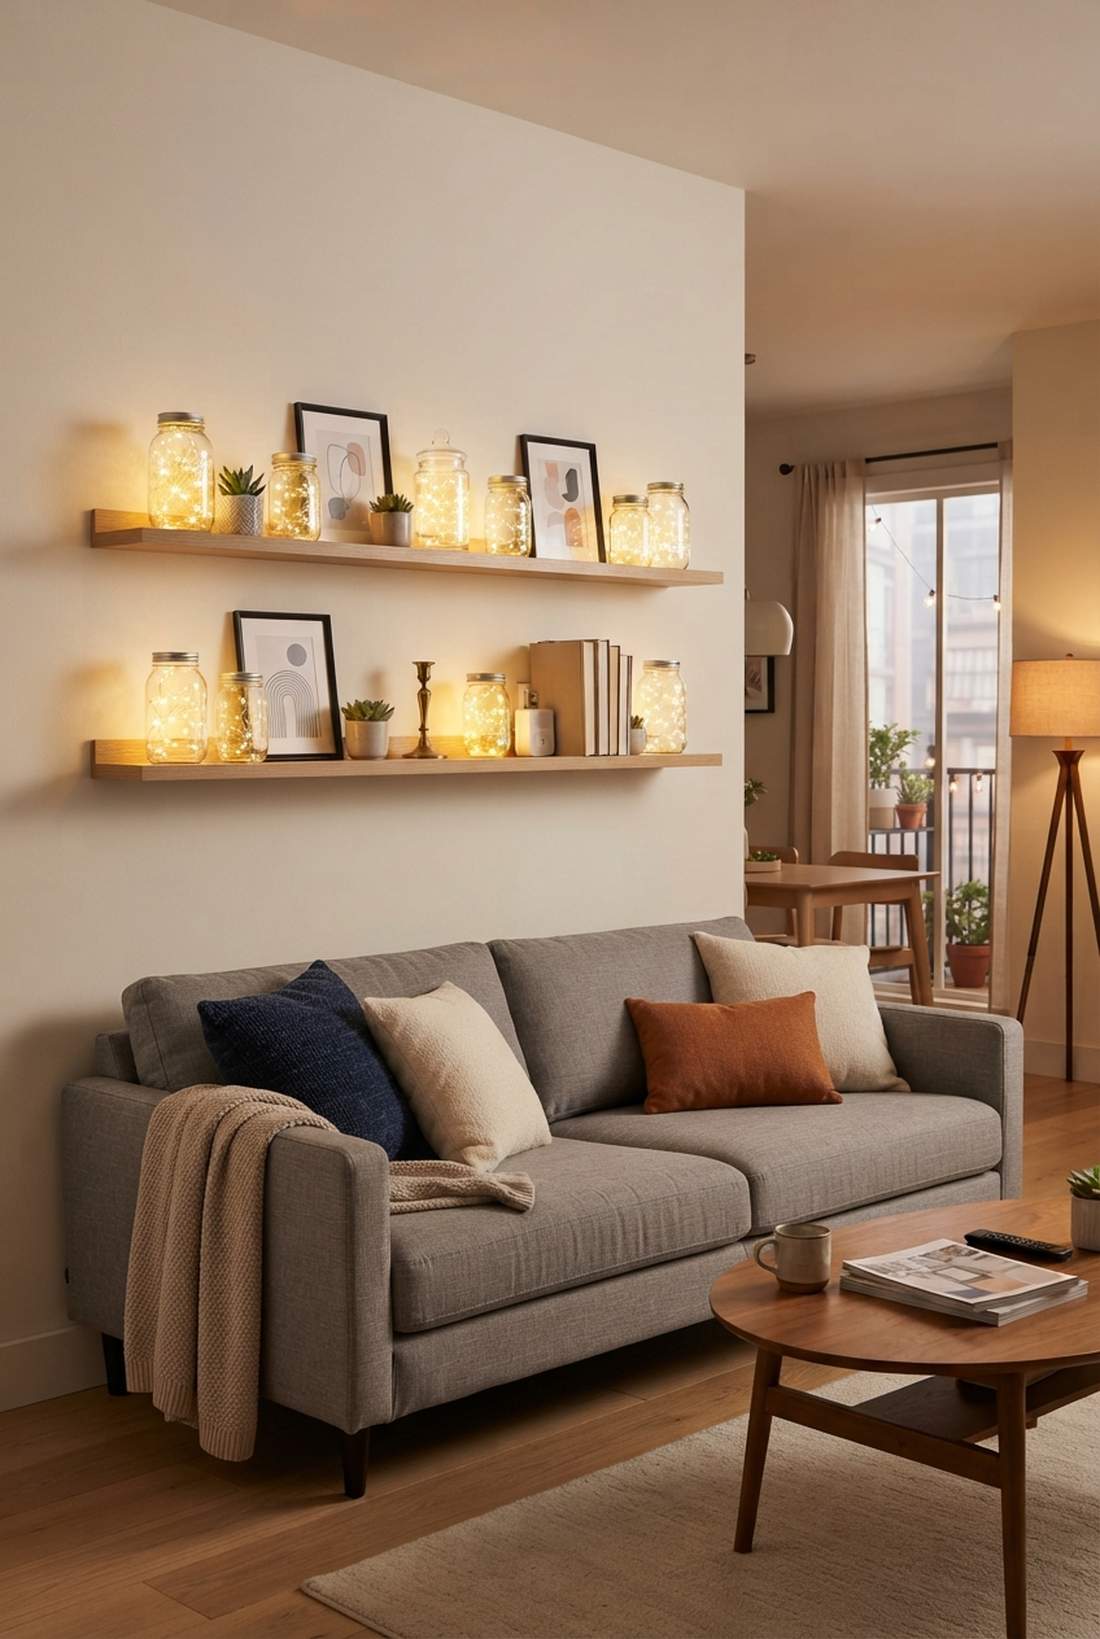
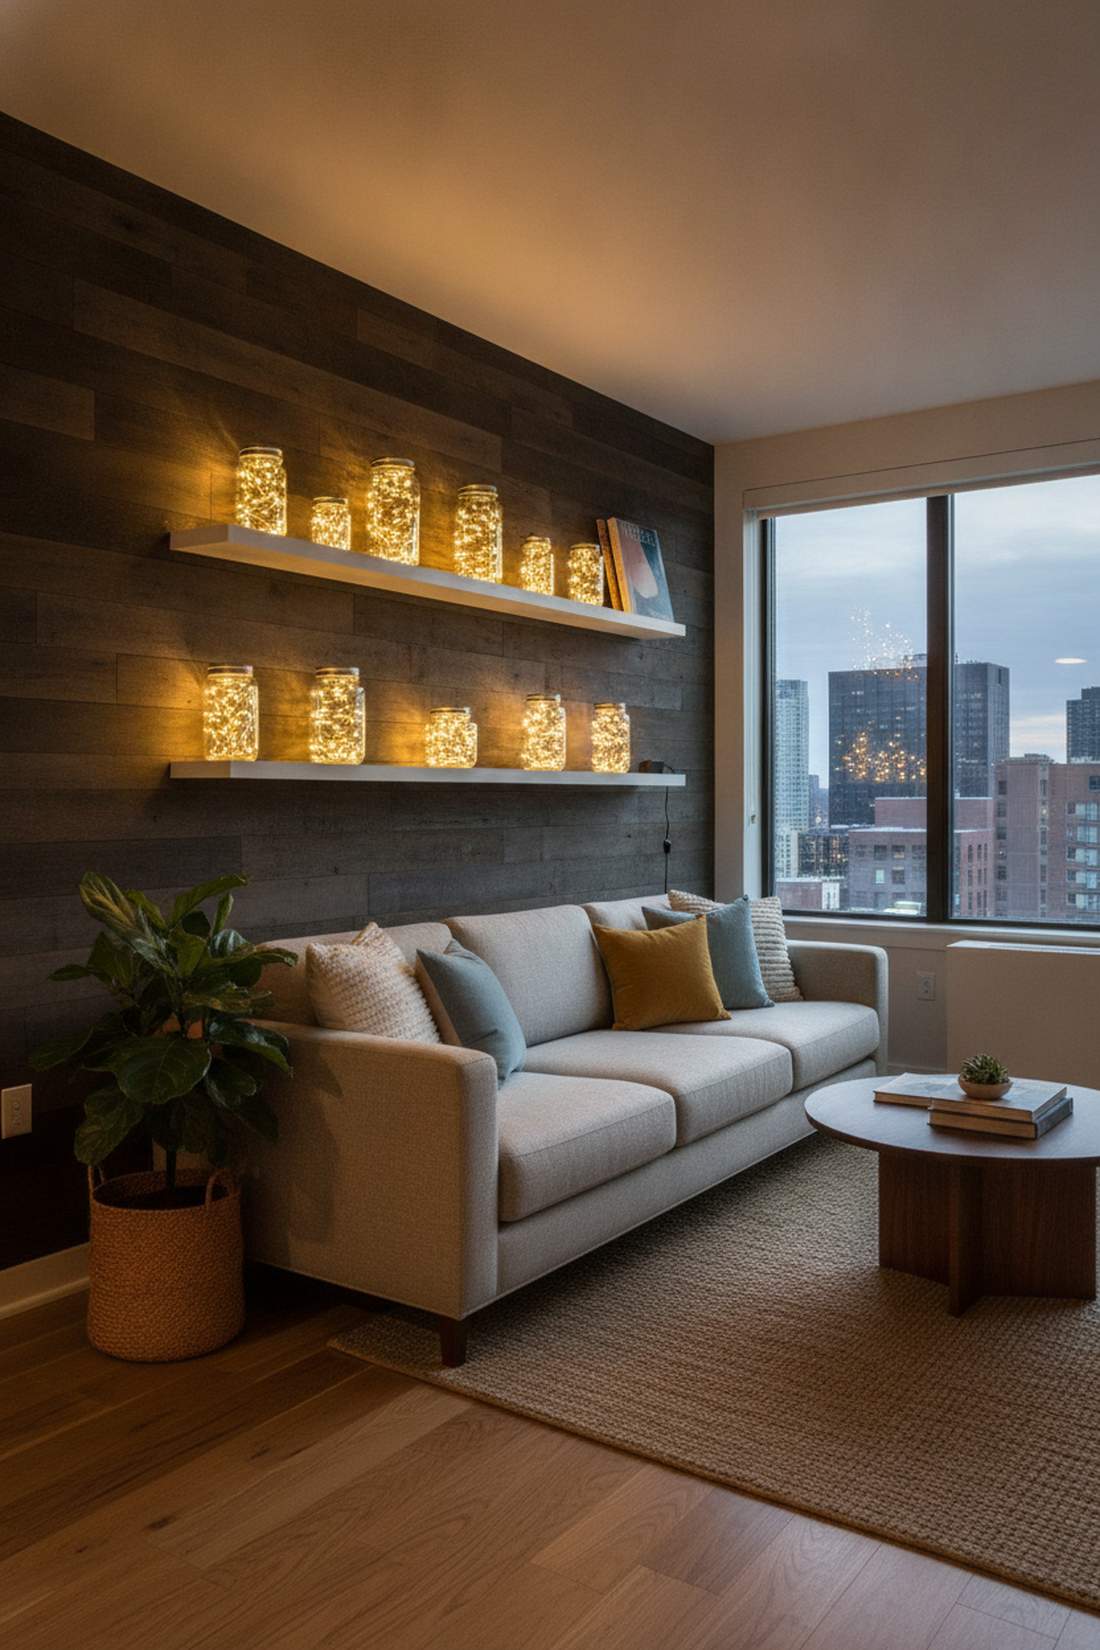
This elevated ambient wall gallery brings warm, glowing architecture to flat spaces. It’s an incredible way to free up table space in tight apartments while maintaining gorgeous mood lighting.
Harsh overhead lights ruin the vibe, but lining shallow shelves with glowing jars looks far more expensive than it is. Moving the light source to eye-level washes the wall in a flattering, soft-focus ambiance.
Installing this glowing shelf setup runs about $35. Pin this if you are decorating a small space!
- Key Materials: Shallow floating picture ledge, multi-jars
- Vibe / Style: Modern gallery
- Difficulty: Wall mounting needed
- Budget Breakdown: Wall Ledge: $20 | Jars/Lights: $15
- Creator’s Tip: Hide a smart-plug or central battery pack behind a larger book on the shelf so you can turn them all on simultaneously.
- Smart Sourcing: Use a slim floating picture ledge shelf and remote-control fairy light packs.
48. Tray-Contained Portable Vignettes
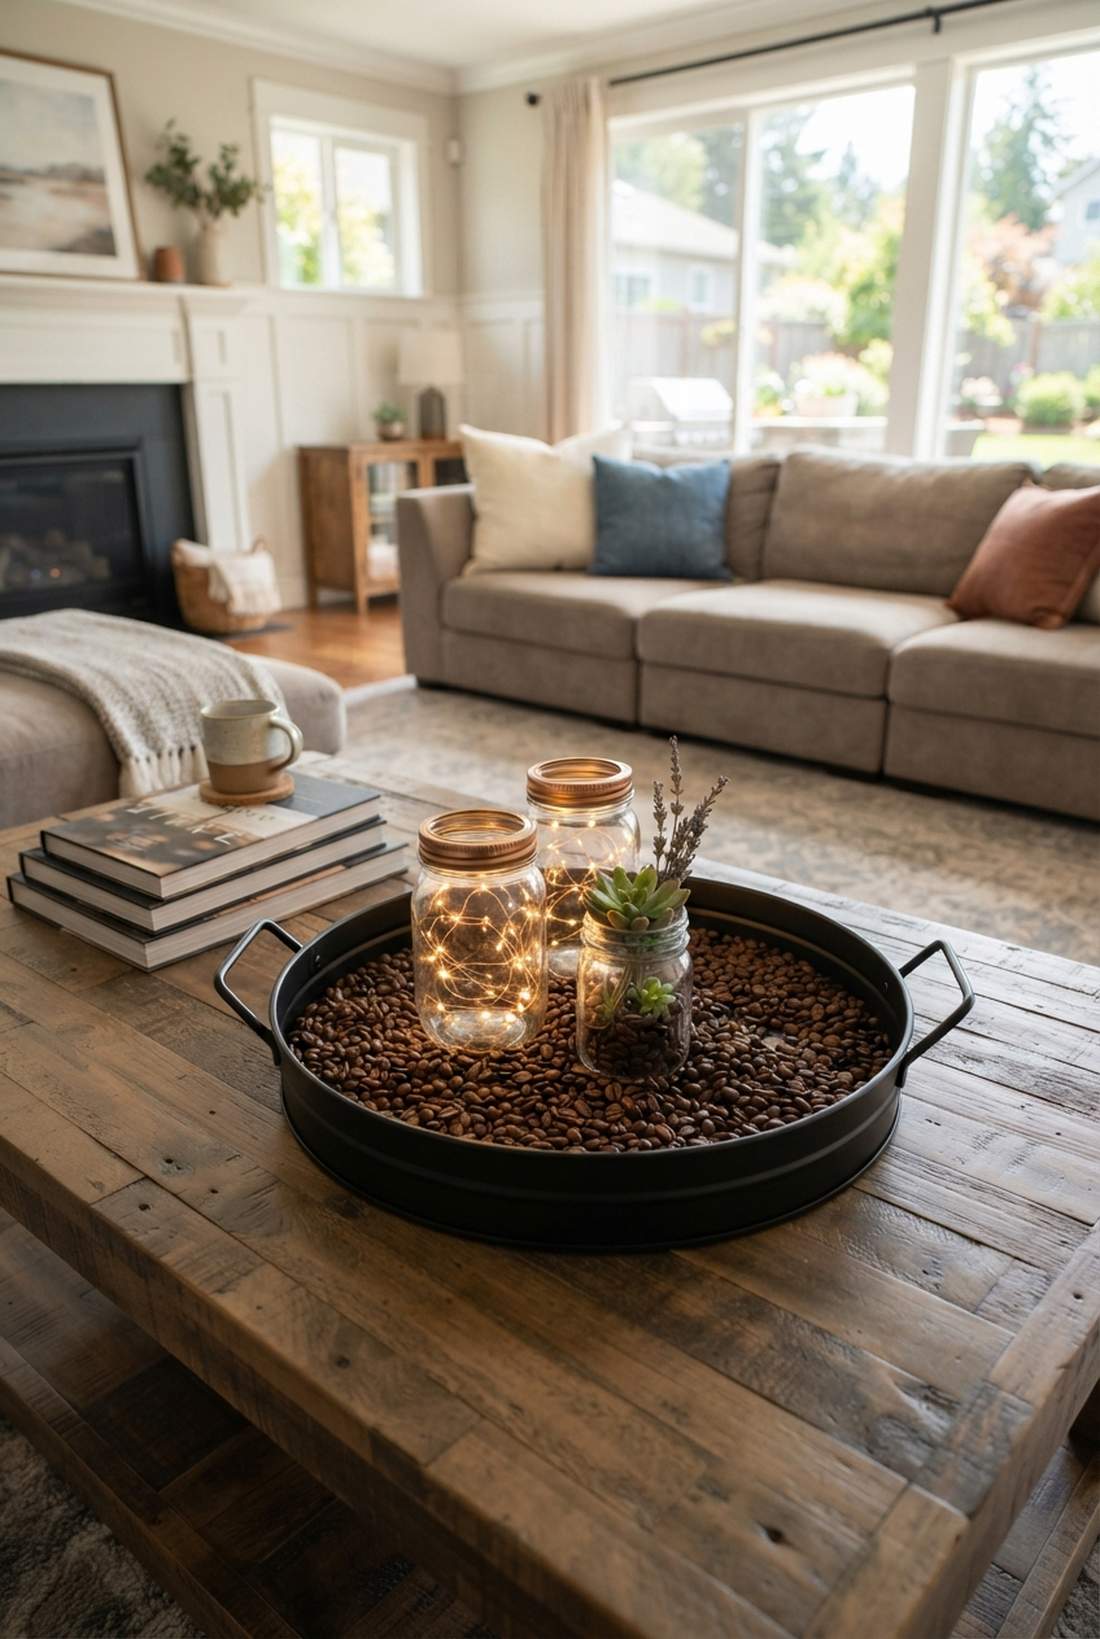
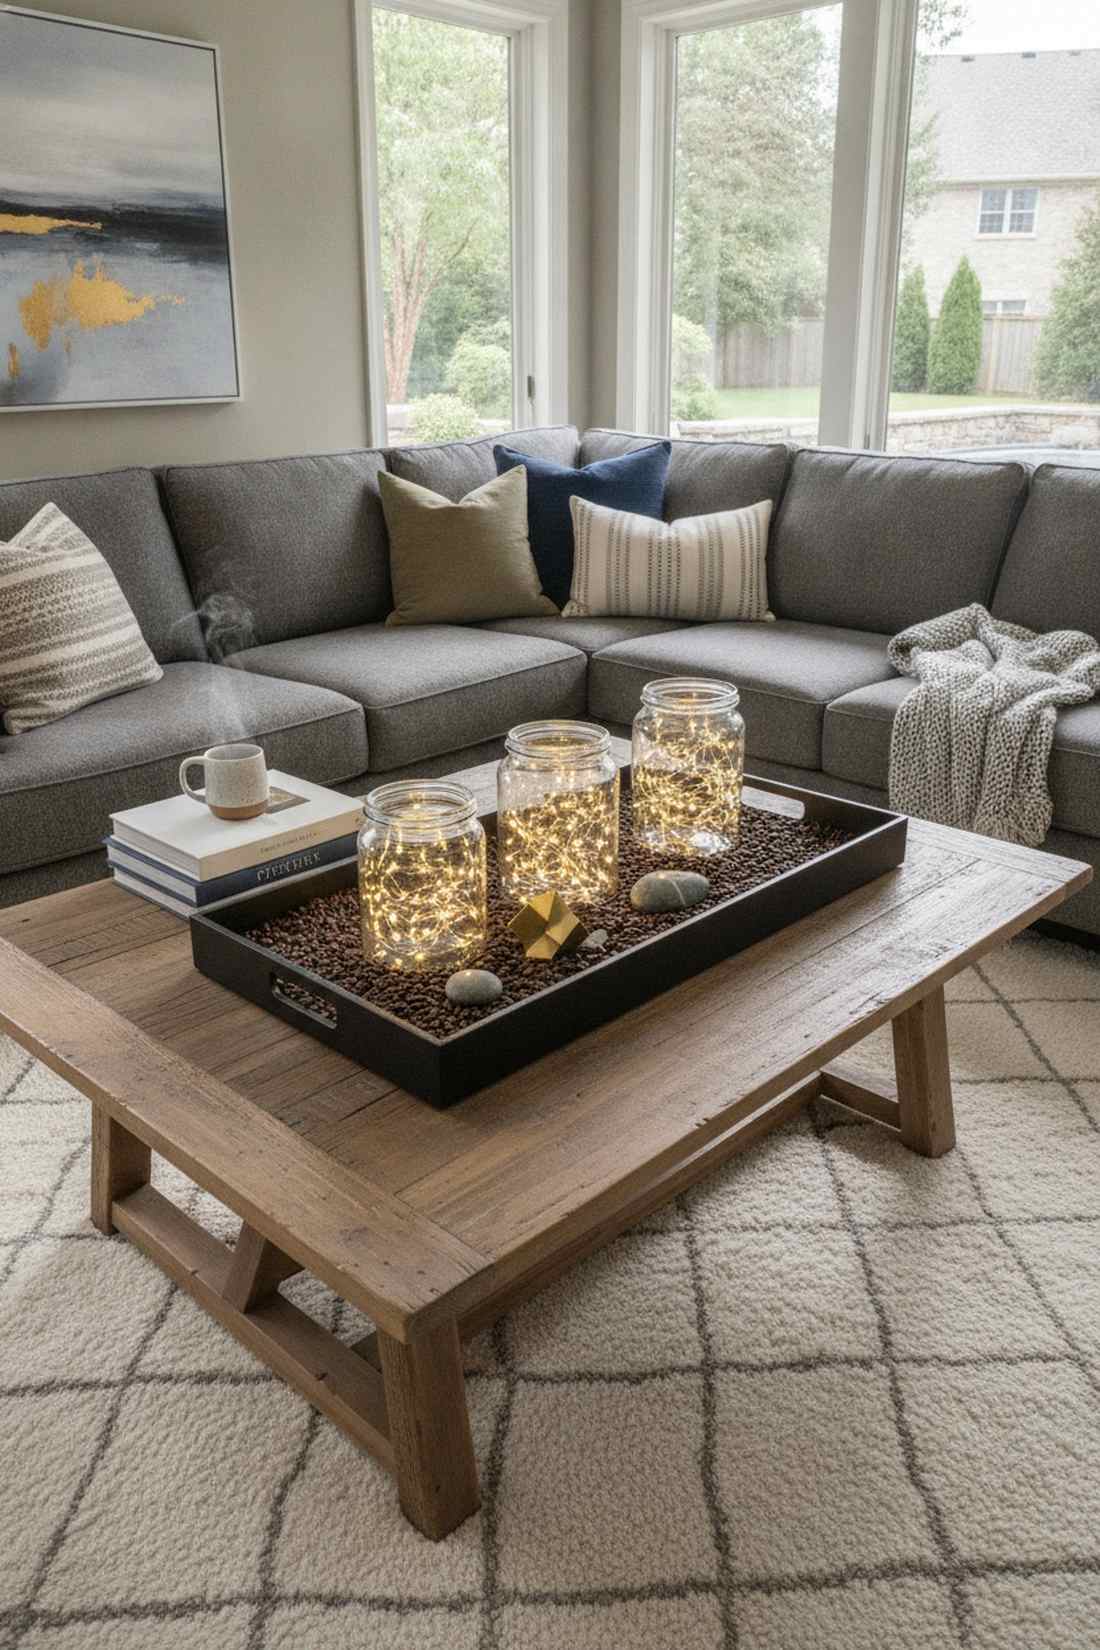
A contained roaming centerpiece feels highly curated and intentionally styled. This is perfect for coffee tables, allowing you to easily lift and move the entire setup when guests arrive.
Loose jars slide around, but grounding them inside a gorgeous metal or wooden tray gives a designer-level finish. The tray creates a distinct boundary, making the arrangement look like a singular, expensive decor piece rather than clutter.
Building this portable vignette costs around $25. Highly recommended for versatile living rooms.
- Key Materials: Decorative serving tray, base filler
- Vibe / Style: Curated transitional
- Difficulty: Simple staging
- Budget Breakdown: Tray: $15 | Jars/Lights: $10
- Creator’s Tip: Fill the bottom of the tray with coffee beans; the heat from the jars will gently warm them, making your room smell amazing.
- Smart Sourcing: Buy a matte black metal vanity tray and whole roasted coffee beans (bulk).
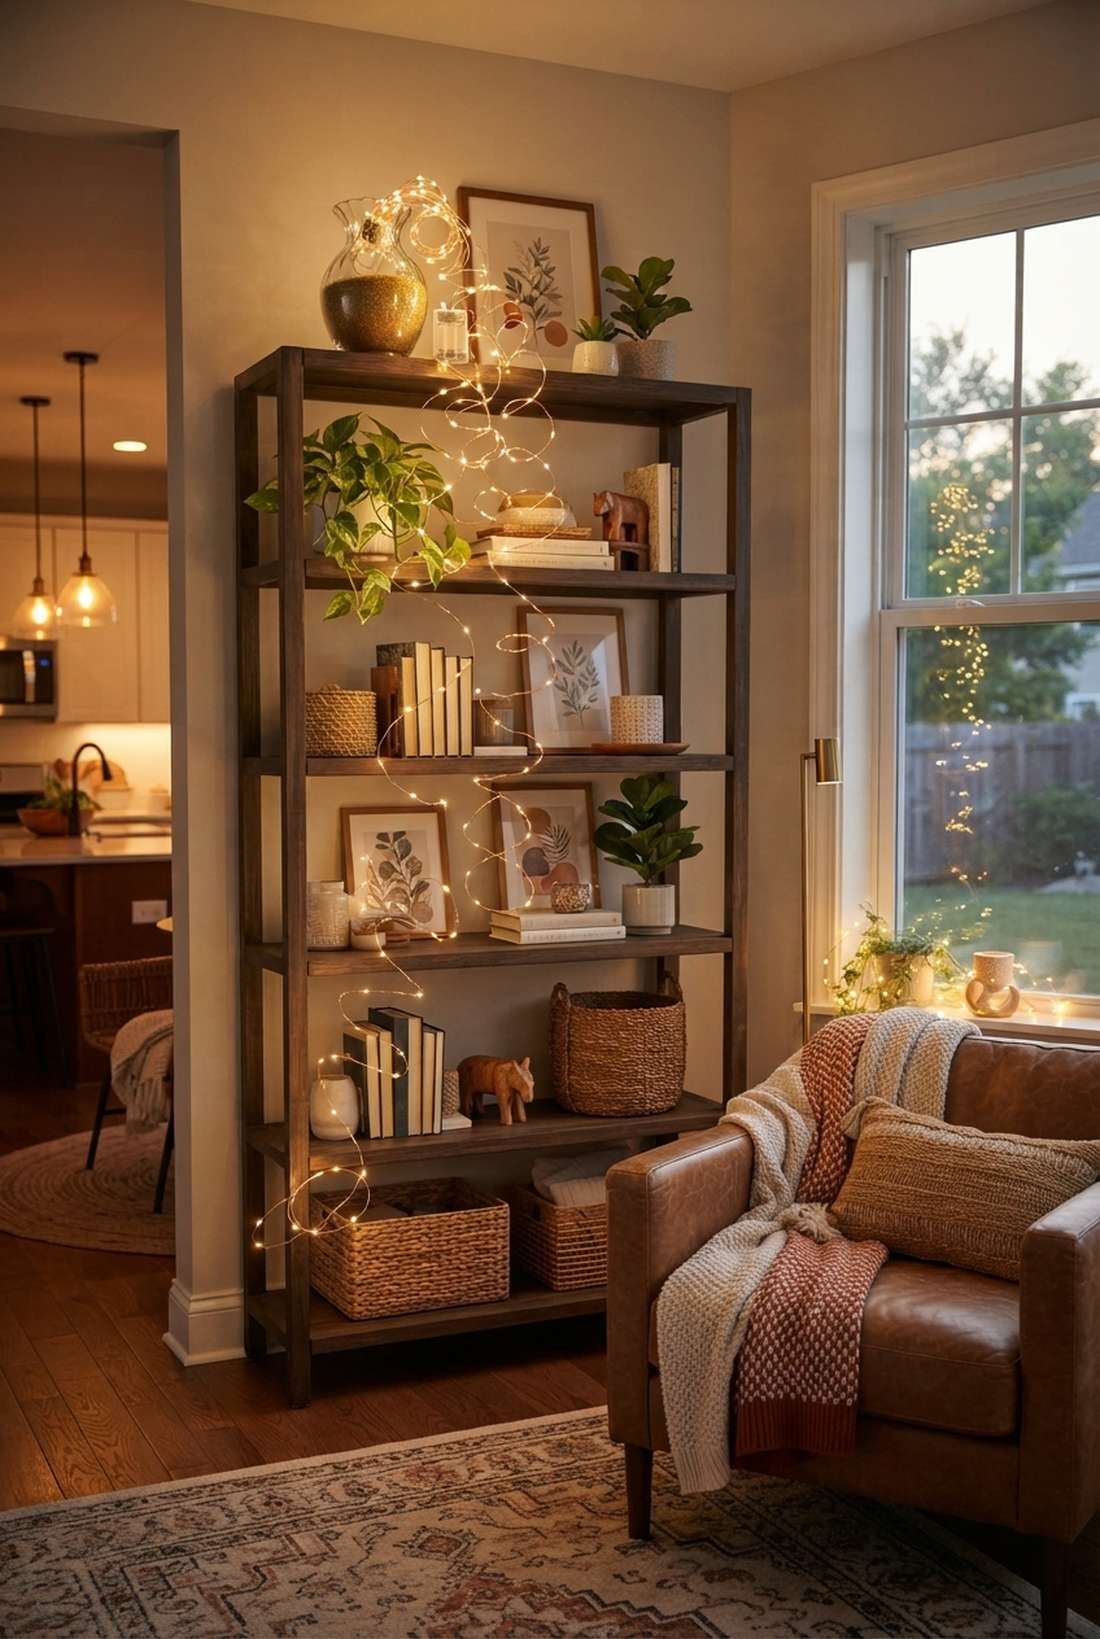
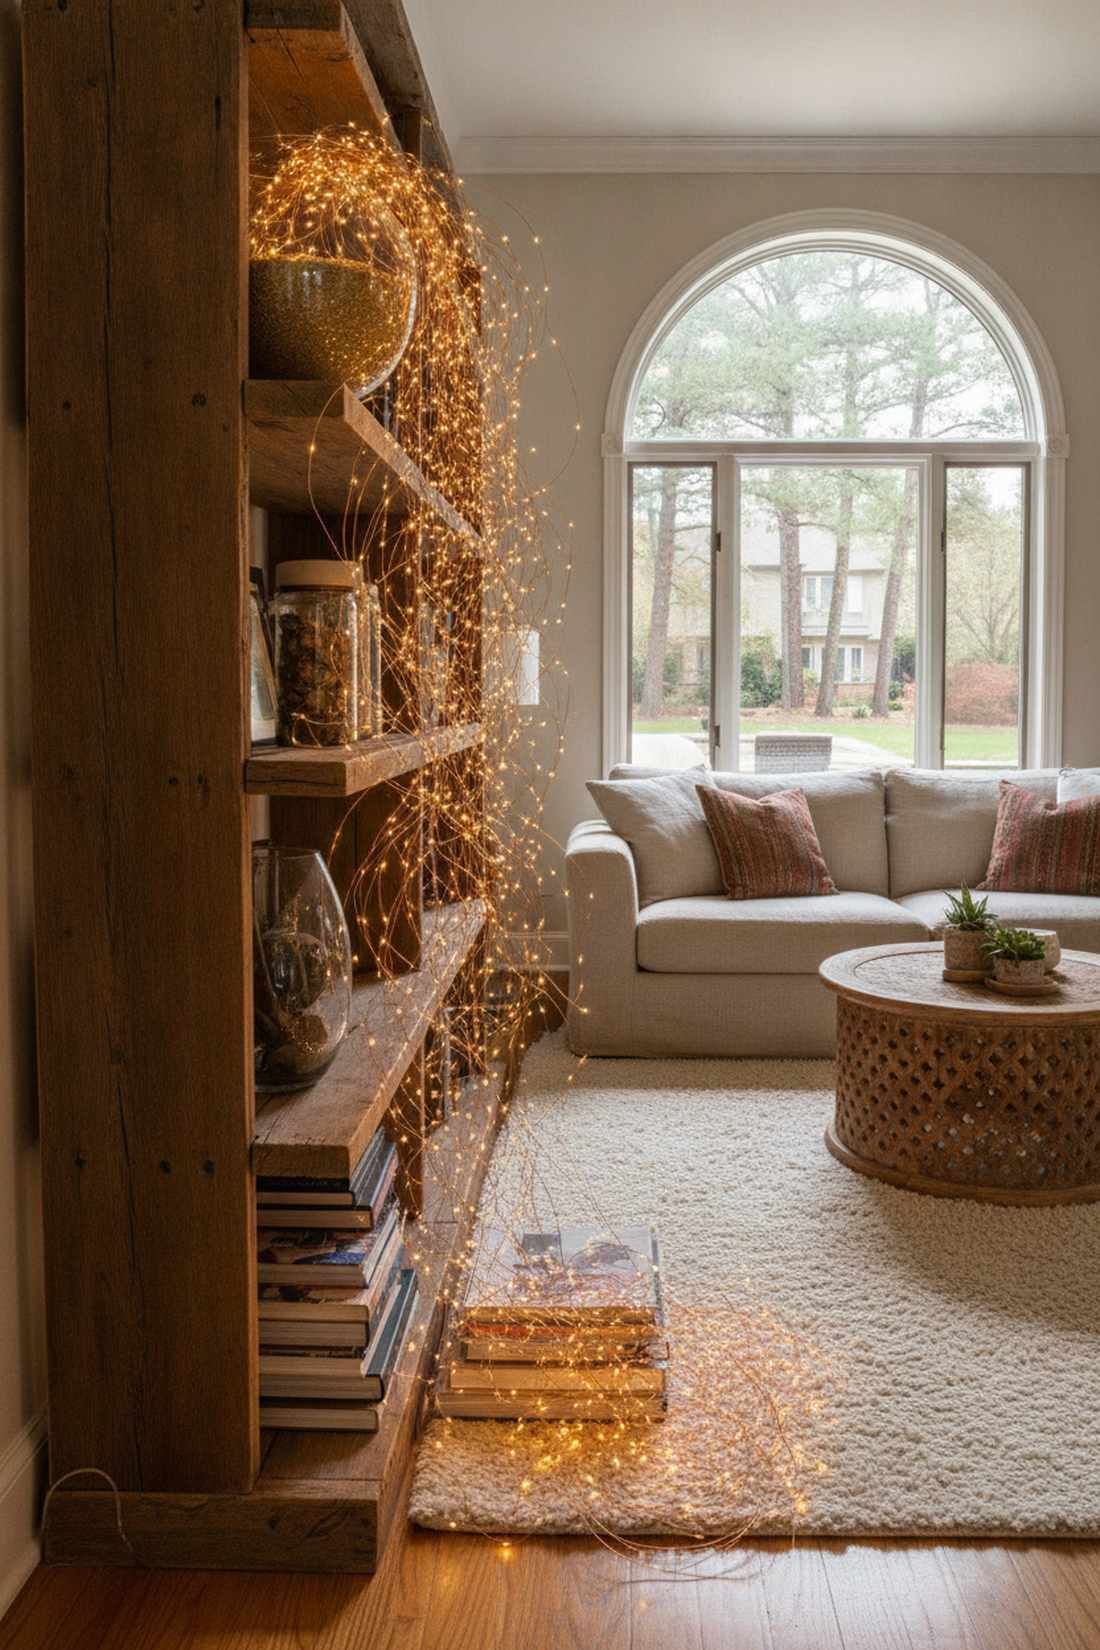
49. Bookshelf-Integrated Lighting
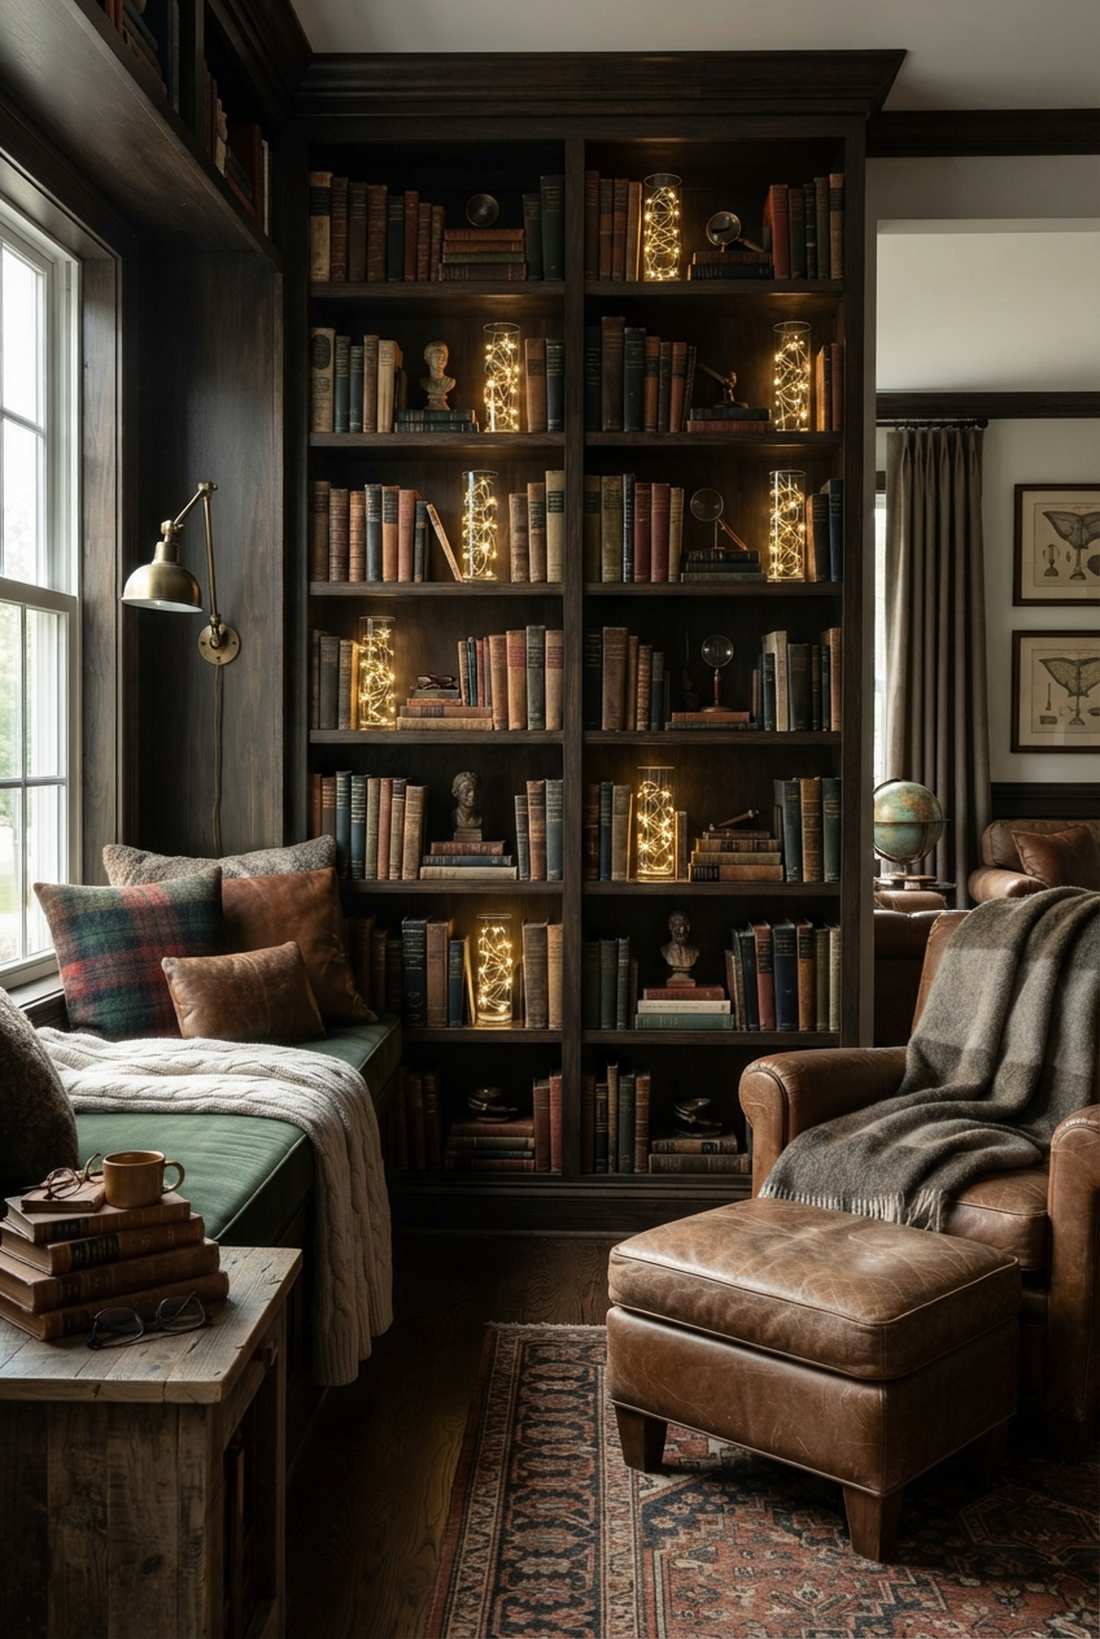
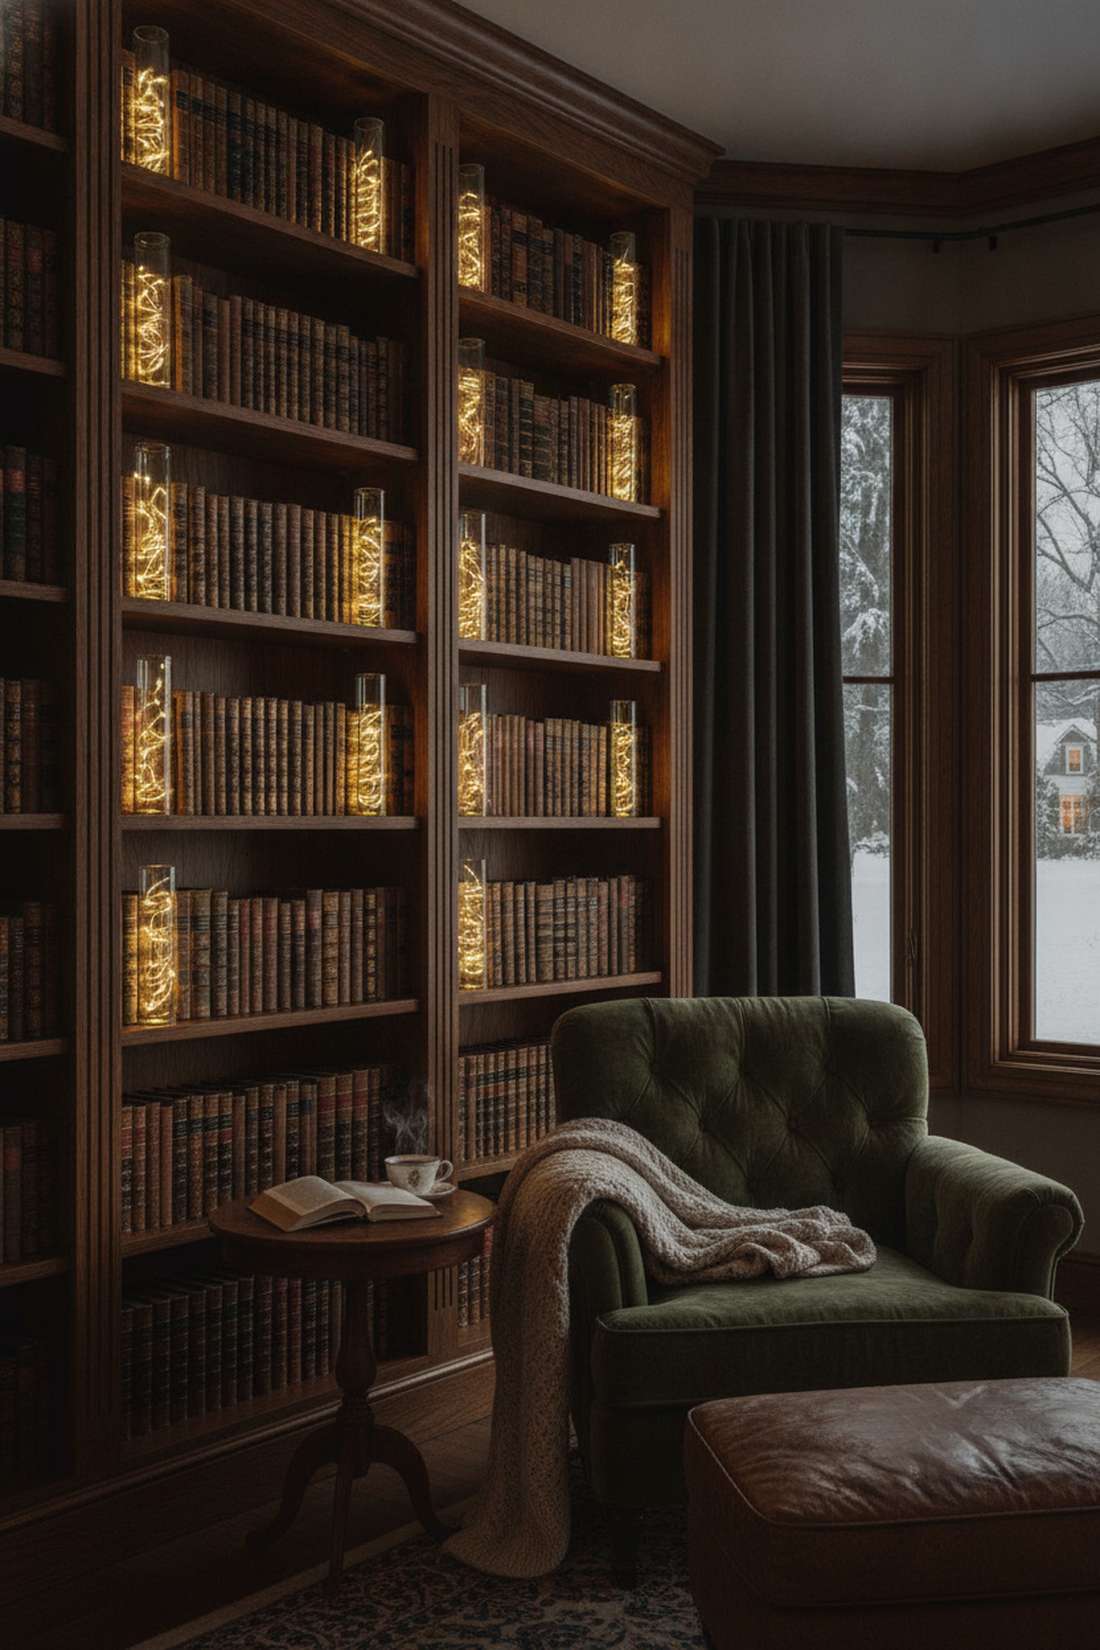
This library nook glow integration feels incredibly cozy and deeply intellectual. Tucking these into a dense bookshelf creates the ultimate moody reading corner for dark winter evenings.
Adding bulky lamps wastes shelf space, but wedging a slim fairy lights vase between heavy books delivers a surprisingly premium look. The light highlights the book spines and adds profound depth to flat shelving units.
You can upgrade your library for about $10 a shelf. Save this to your cozy book-nook inspiration board!
- Key Materials: Slim glass jars, warm-white wires
- Vibe / Style: Dark academia
- Difficulty: Easy placement
- Budget Breakdown: Slim Jars: $4 | Lights: $6
- Creator’s Tip: Tape the battery pack flush against the back wall of the bookshelf so it is completely invisible behind the glass.
- Smart Sourcing: Order tall slim glass cylinder vases and flat-wire LED fairy lights.
Specialty Fairy Lights Vase Creations
Basic jars are fine, but adding advanced material layers pushes these projects into premium territory. These specialty fairy lights vase concepts rival expensive boutique art pieces.
50. Tissue Paper Stained Glass Effect
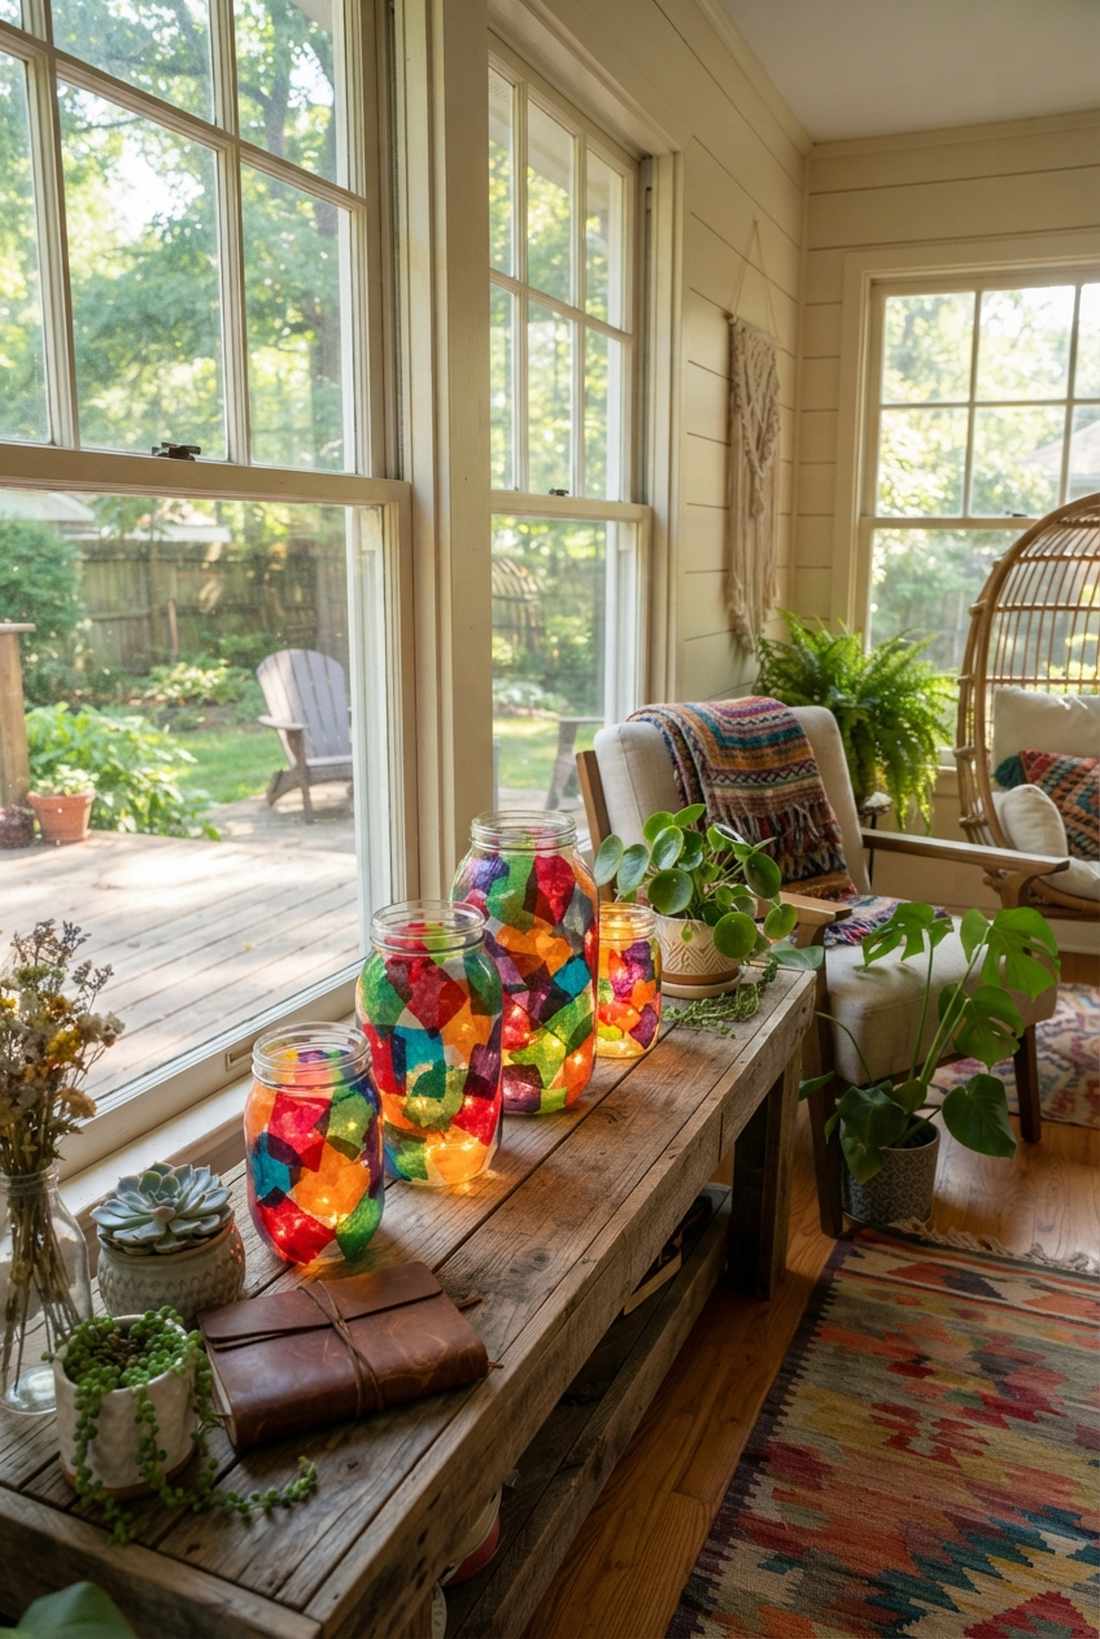
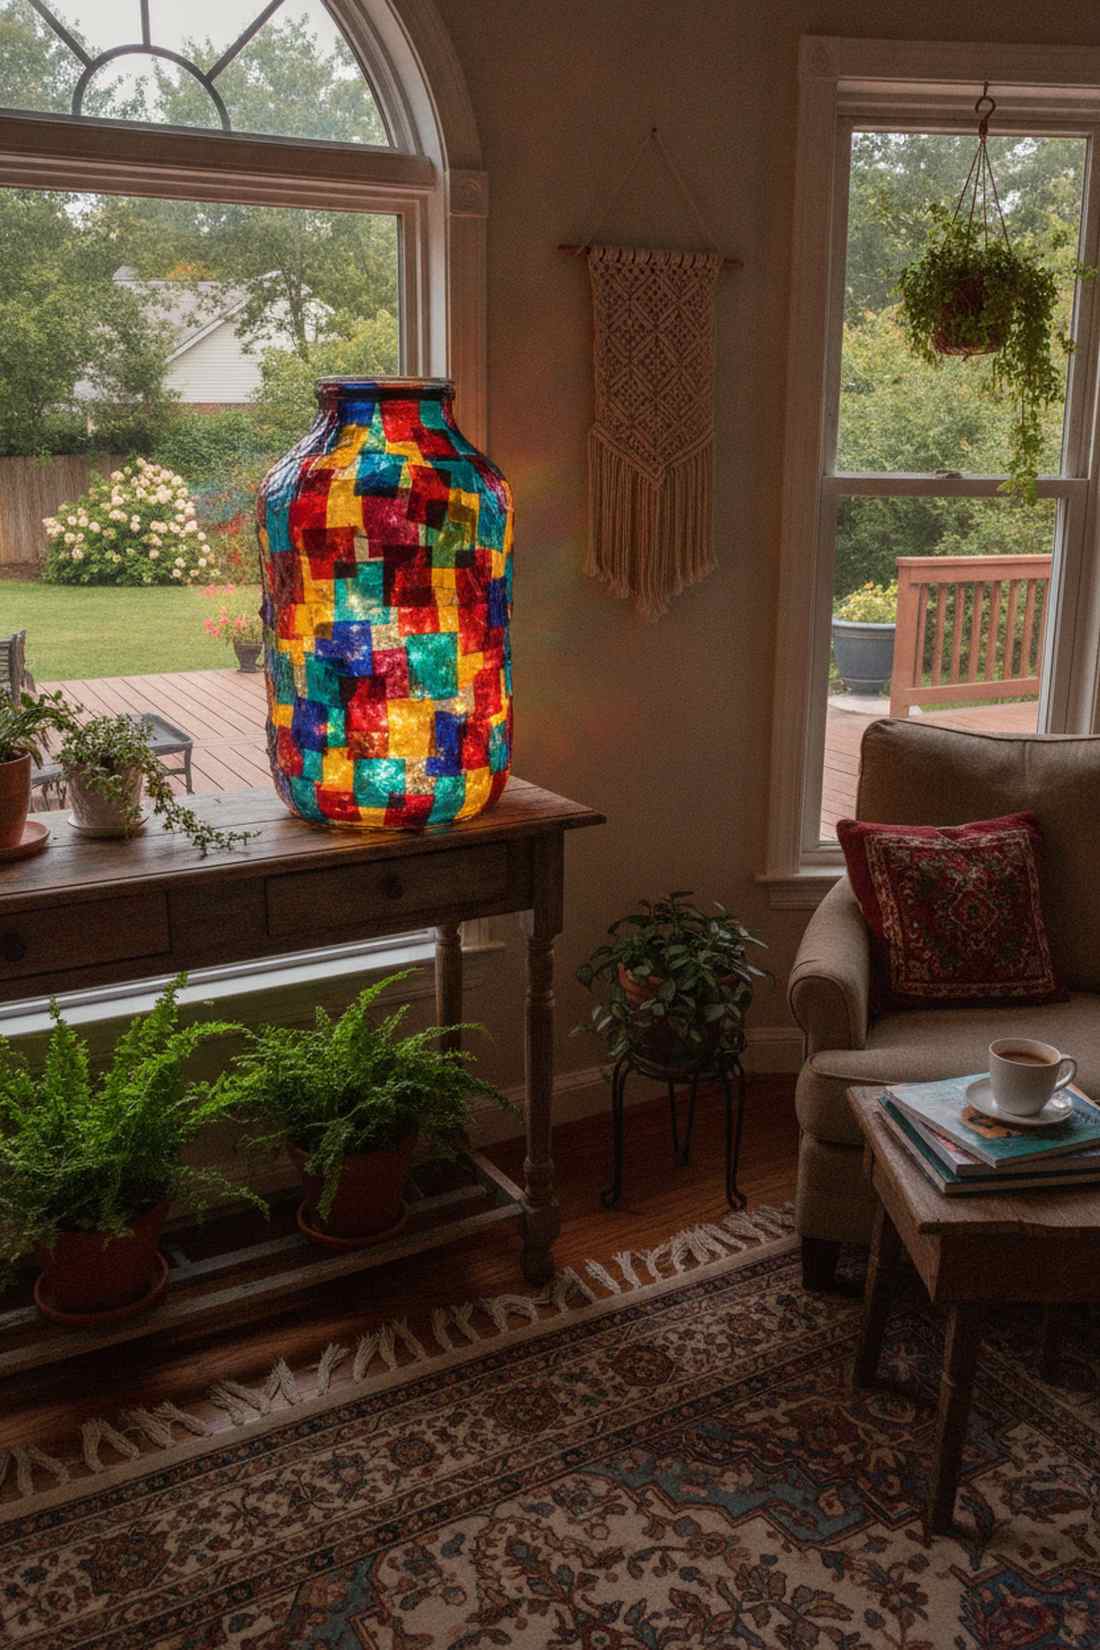
A faux stained-glass mosaic luminary feels like an antique church window. It provides a striking, deeply saturated color pop for sunrooms or artistic bohemian bedrooms.
Painting geometric lines is tedious, but overlapping torn tissue paper with decoupage glue looks far more expensive than it is. As the internal light pushes through the overlapping layers, it mixes new, vivid tertiary colors on the fly.
This stunning artistic hack costs barely $8. Pin this if you love vibrant, colorful DIYs!
- Key Materials: Colored tissue paper, Mod Podge
- Vibe / Style: Bohemian mosaic
- Difficulty: Messy but forgiving
- Budget Breakdown: Tissue/Glue: $4 | Lights/Jar: $4
- Creator’s Tip: Tear the paper instead of cutting it with scissors; the frayed, organic edges blend seamlessly when glued down.
- Smart Sourcing: Use vibrant art-grade tissue paper squares and gloss finish decoupage medium.
51. Fairy Silhouette Shadow Lanterns
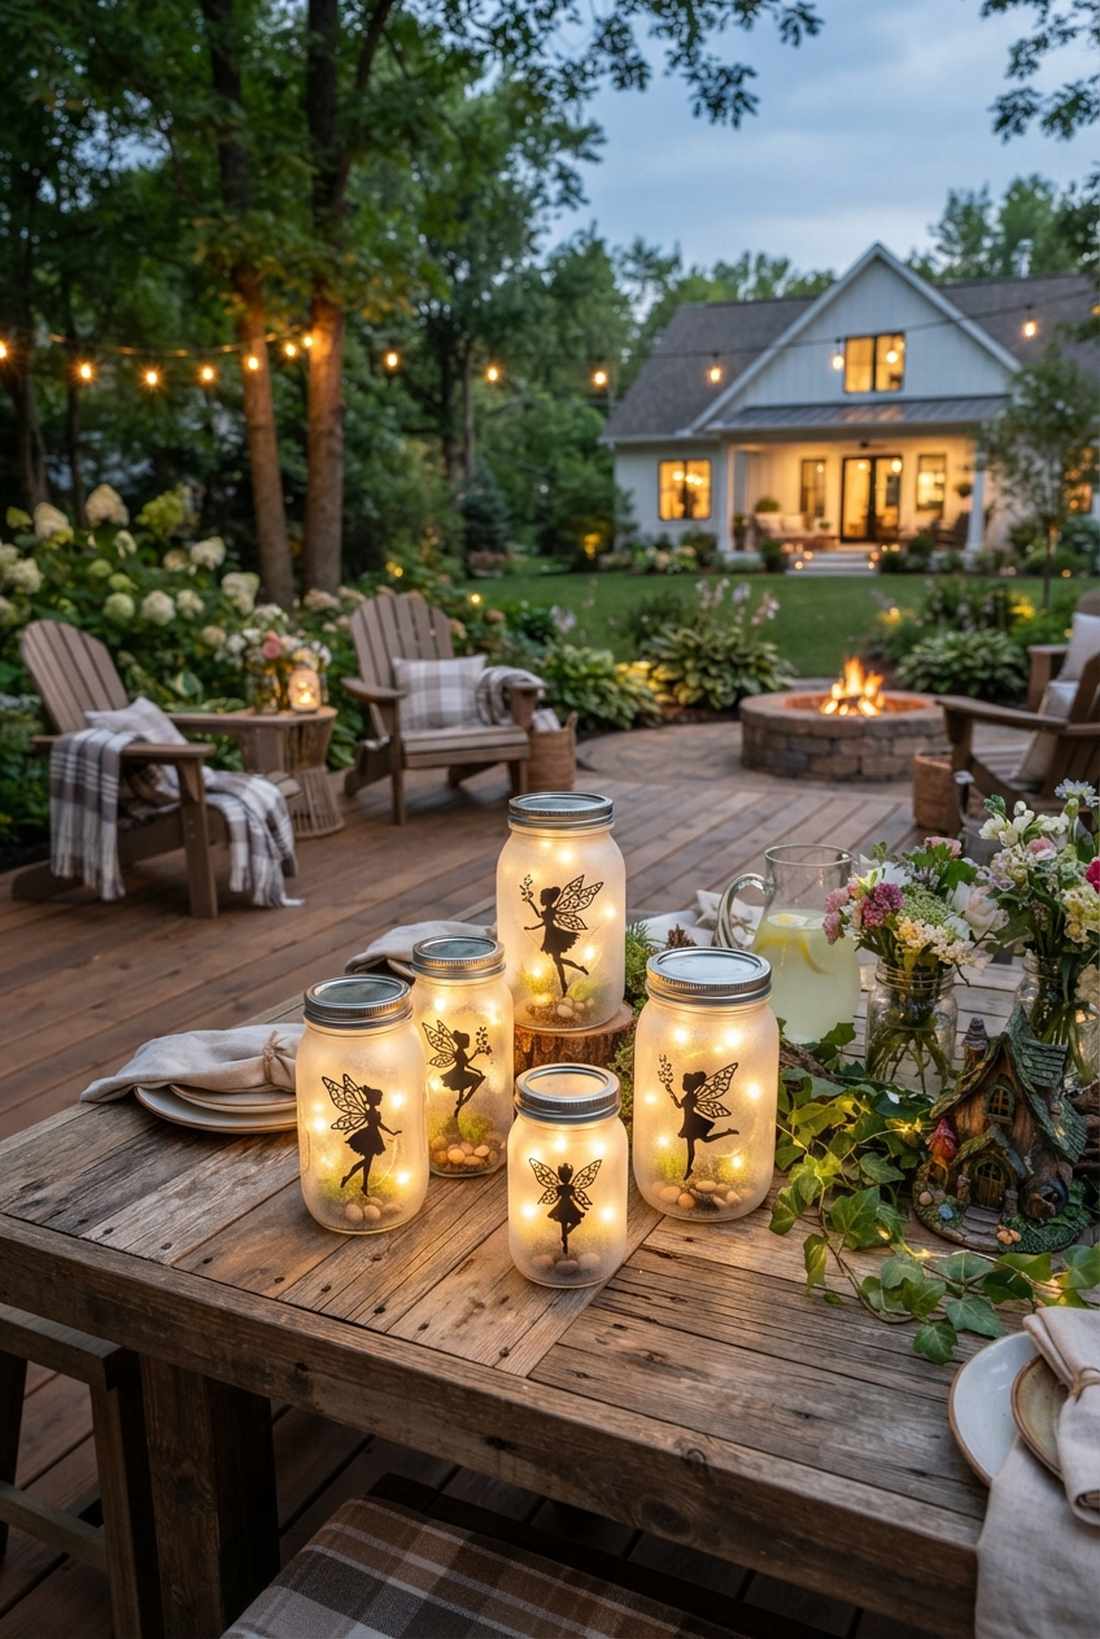
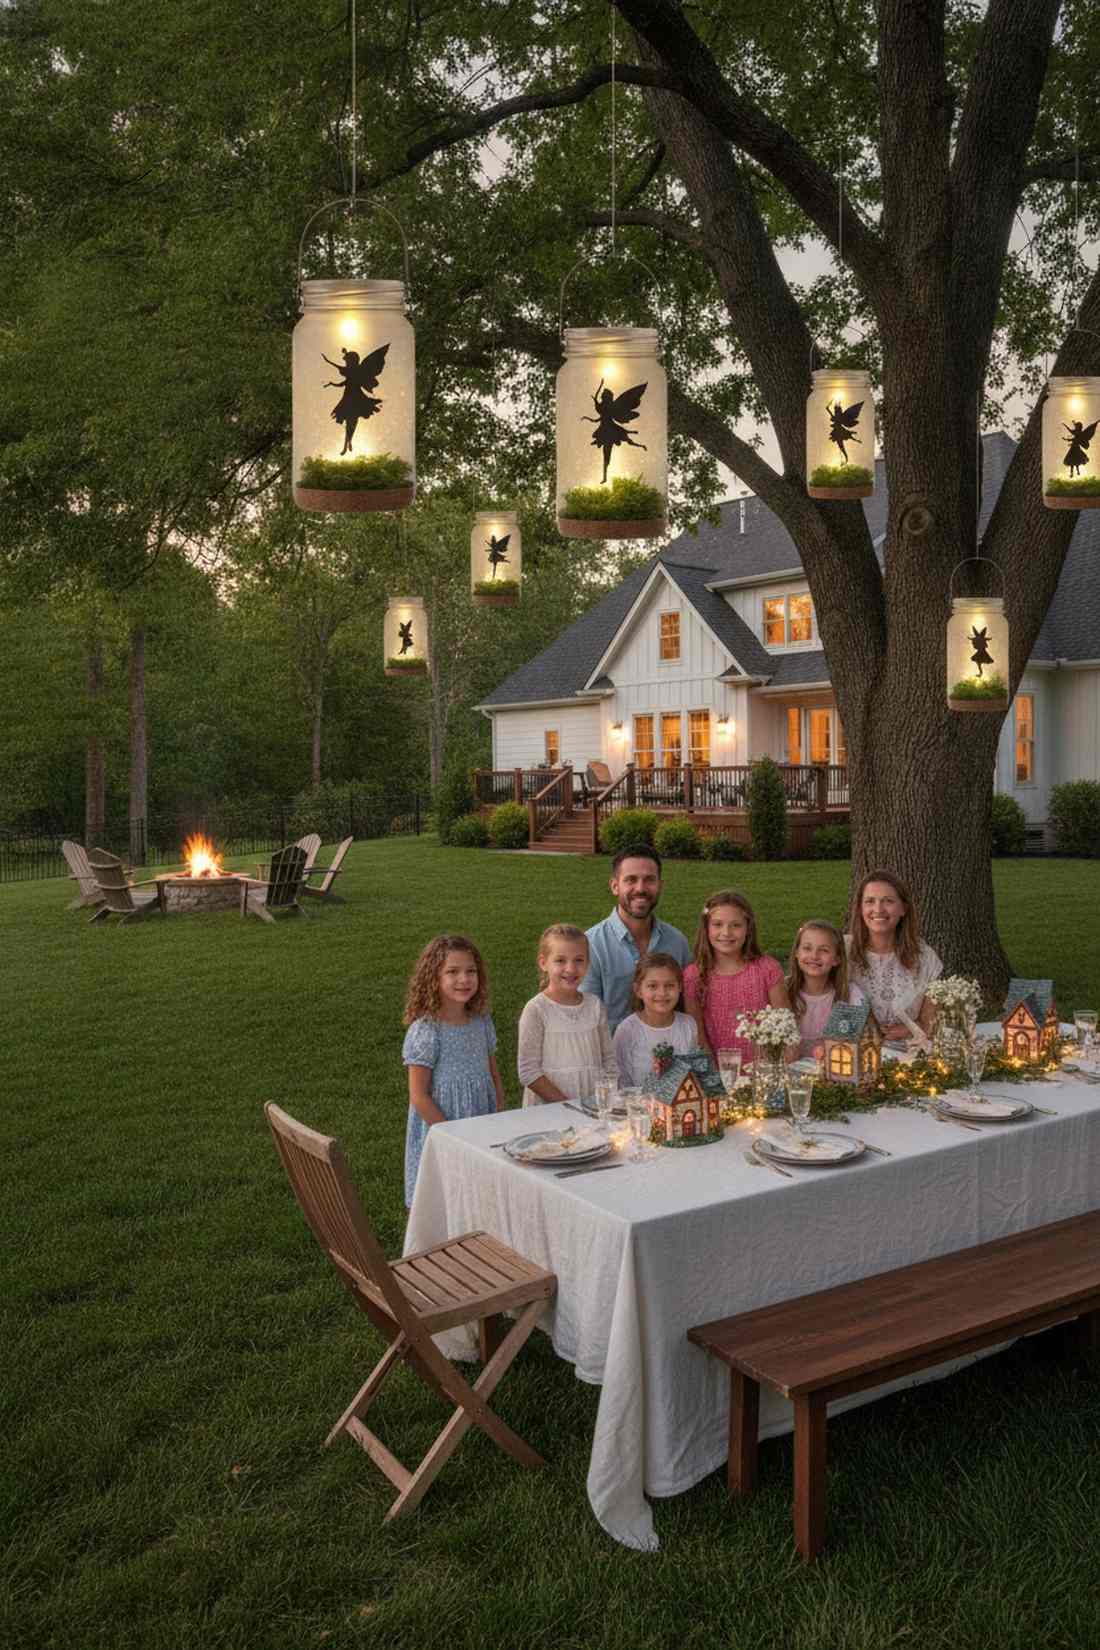
This enchanted mythical shadowbox feels like a literal captured fairy. It is an absolutely spellbinding nightlight for a child’s bedroom or a magical garden party.
Just dropping a cutout inside looks flat, but elevating the silhouette on a hidden cork base gives a designer-level finish. Pressing the figure close to the frosted glass creates a sharp, unmistakable shadow when the lights kick on.
Create this childhood magic for roughly $12. A phenomenal project to build with kids.
- Key Materials: Fairy silhouettes, frosted spray, cork base
- Vibe / Style: Storybook magic
- Difficulty: Precision cutting
- Budget Breakdown: Silhouettes/Frost: $8 | Lights/Jar: $4
- Creator’s Tip: Glue a tiny piece of real moss to the cork base so the fairy looks like she is standing on a real forest floor.
- Smart Sourcing: Grab UV-coated resin fairy cottage kits and pre-cut cardstock fairy silhouettes.
Most people just use clear glass. The twilight gradient trick coming up completely alters the atmosphere of the room.
52. Twilight Gradient Sky Jars
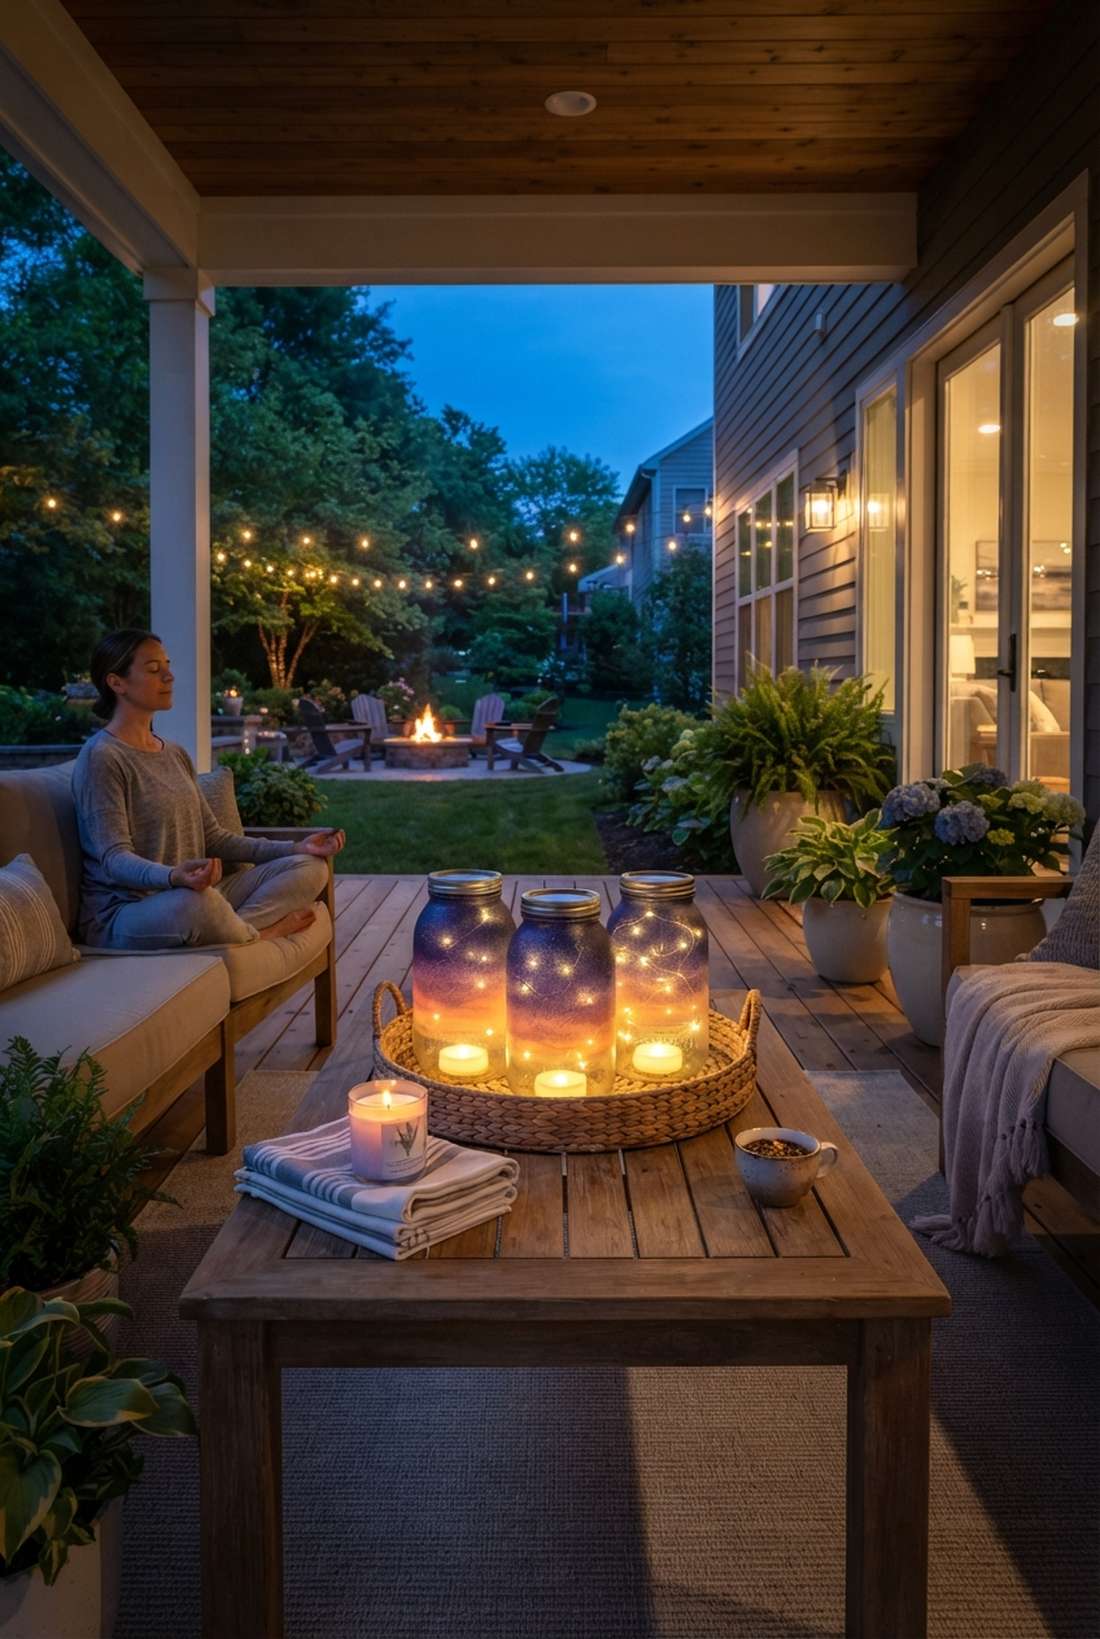
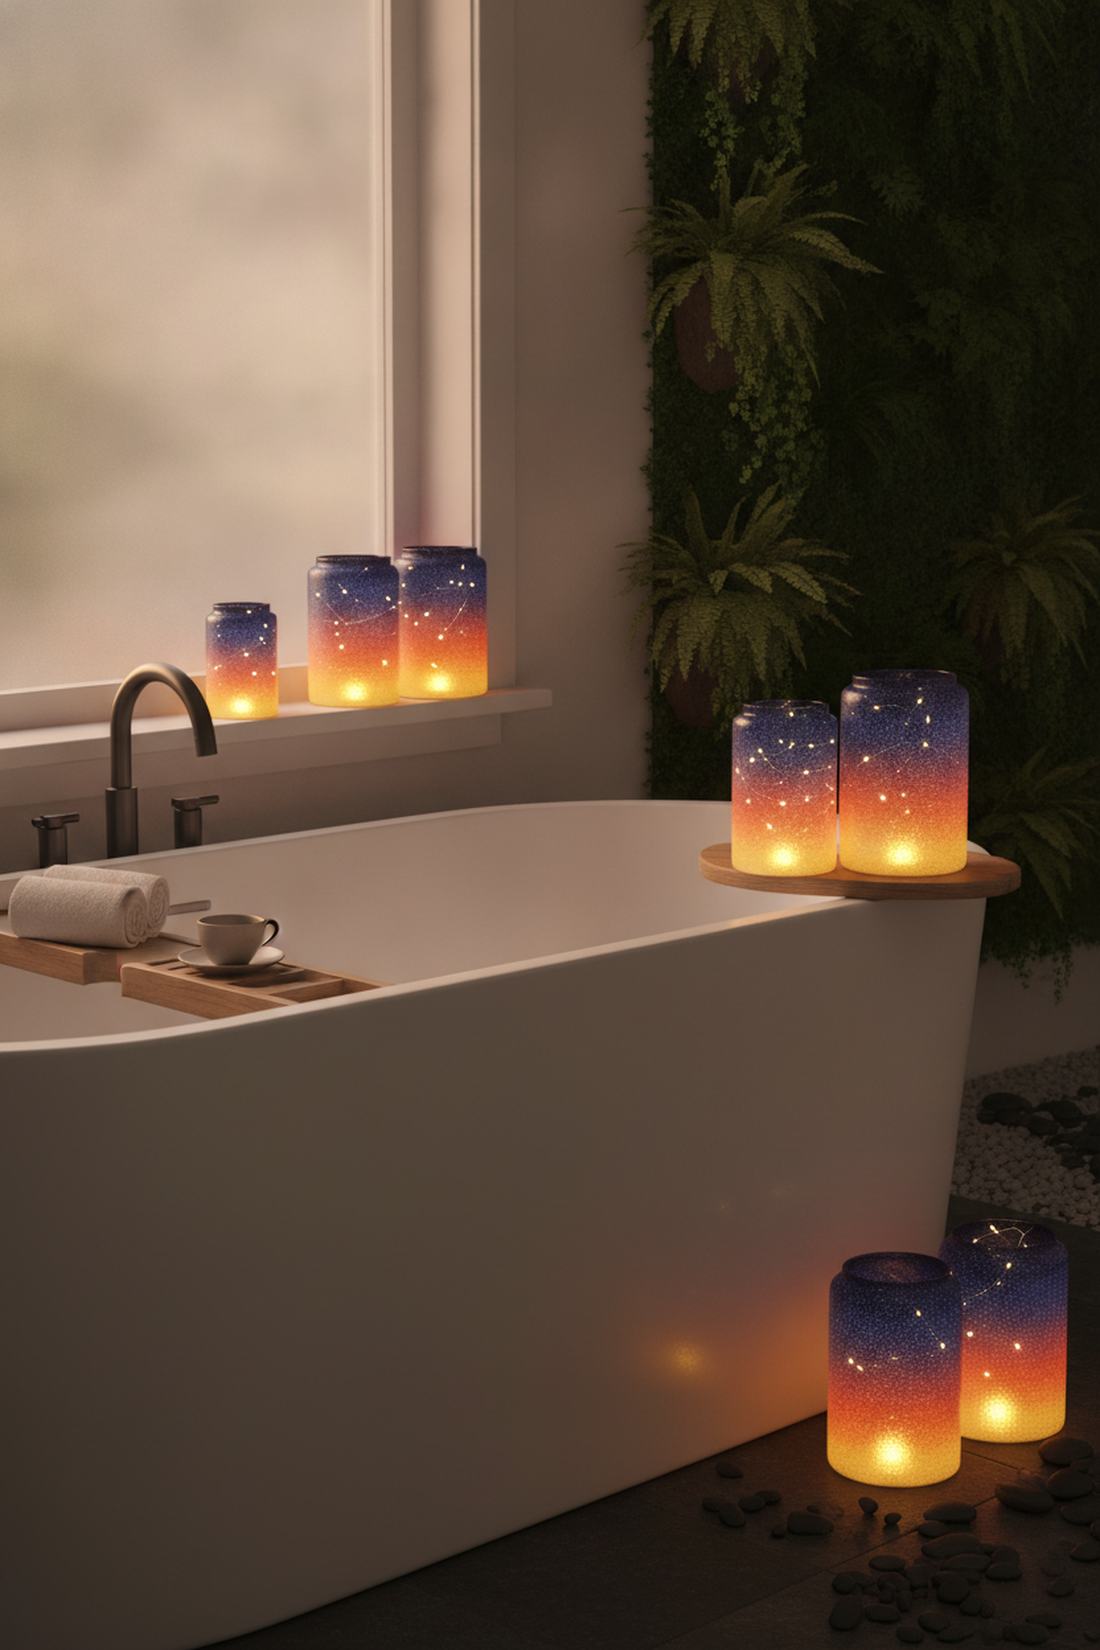
A dusk-to-dawn atmospheric lantern feels moody, expansive, and deeply calming. This is the ultimate mood lighting for a relaxing bathroom soak or a yoga meditation space.
Flat purple paint looks dull, but stippling a dark-to-light gradient delivers a surprisingly premium look of an infinite sky. Positioning the LED primarily at the bottom mimics the sun setting below the horizon line.
This relaxing gradient project costs about $14. Save this to your home spa upgrade board!
- Key Materials: Purple and orange paints, sponge
- Vibe / Style: Twilight meditation
- Difficulty: Paint blending
- Budget Breakdown: Paints: $10 | Lights: $4
- Creator’s Tip: Use a bright white tea-light at the very bottom, and standard fairy wires up top to create a realistic sunset hot-spot.
- Smart Sourcing: Source high-pigment acrylic paint sets and ultra-bright LED puck lights.
53. Submersible LED Water Features
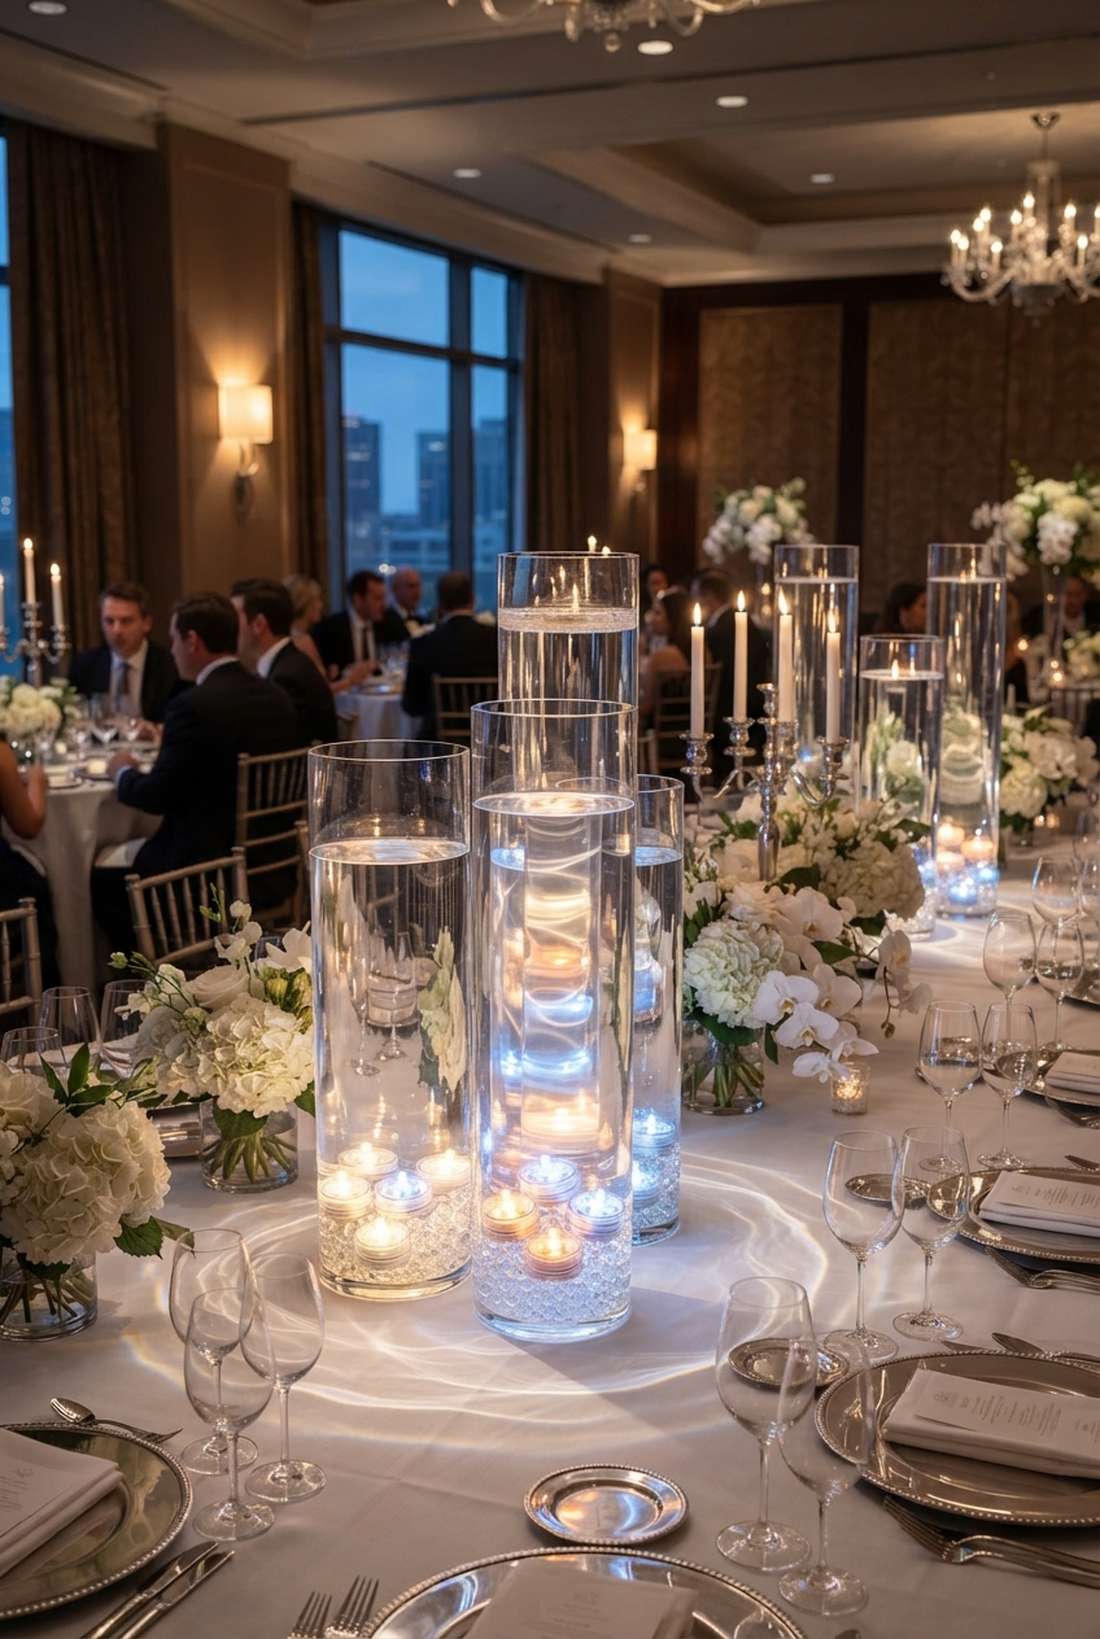
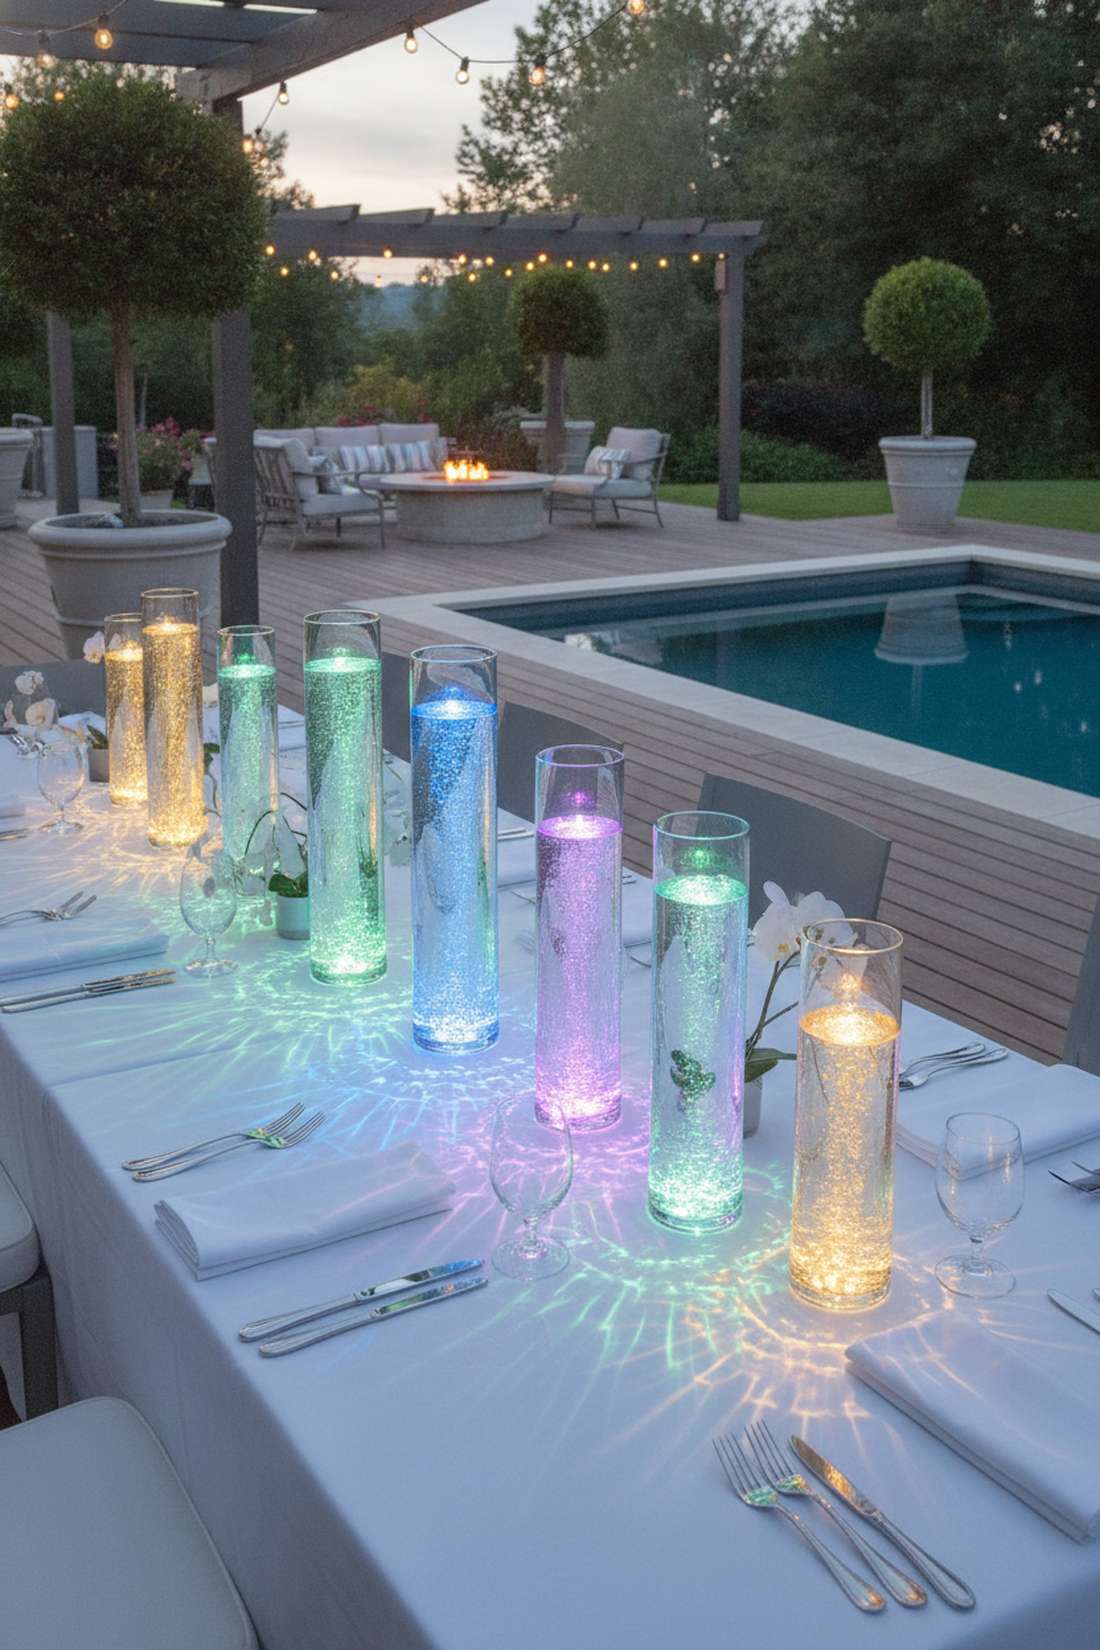
This liquid refractive light pillar offers an incredibly sleek, dynamic, and modern energy. It is a show-stopping luxury centerpiece for high-end banquets or corporate events.
Standard wire strings short out in liquid, but dropping waterproof pucks into a water-filled fairy lights centerpiece looks far more expensive than it is. The water magnifies the bulb, creating undulating light ripples across the tablecloth.
This high-end liquid illusion costs roughly $15. Pin this if you want maximum event impact!
- Key Materials: Submersible LED pucks, distilled water
- Vibe / Style: Modern luxury
- Difficulty: Just add water
- Budget Breakdown: Waterproof Lights: $10 | Jar/Fillers: $5
- Creator’s Tip: Always use distilled water instead of tap water to prevent mineral bubbles from clinging to the glass and ruining the clarity.
- Smart Sourcing: Buy remote-control submersible LED pucks (bulk) and clear water-gel beads.
54. Beaded Curtain Light Strands
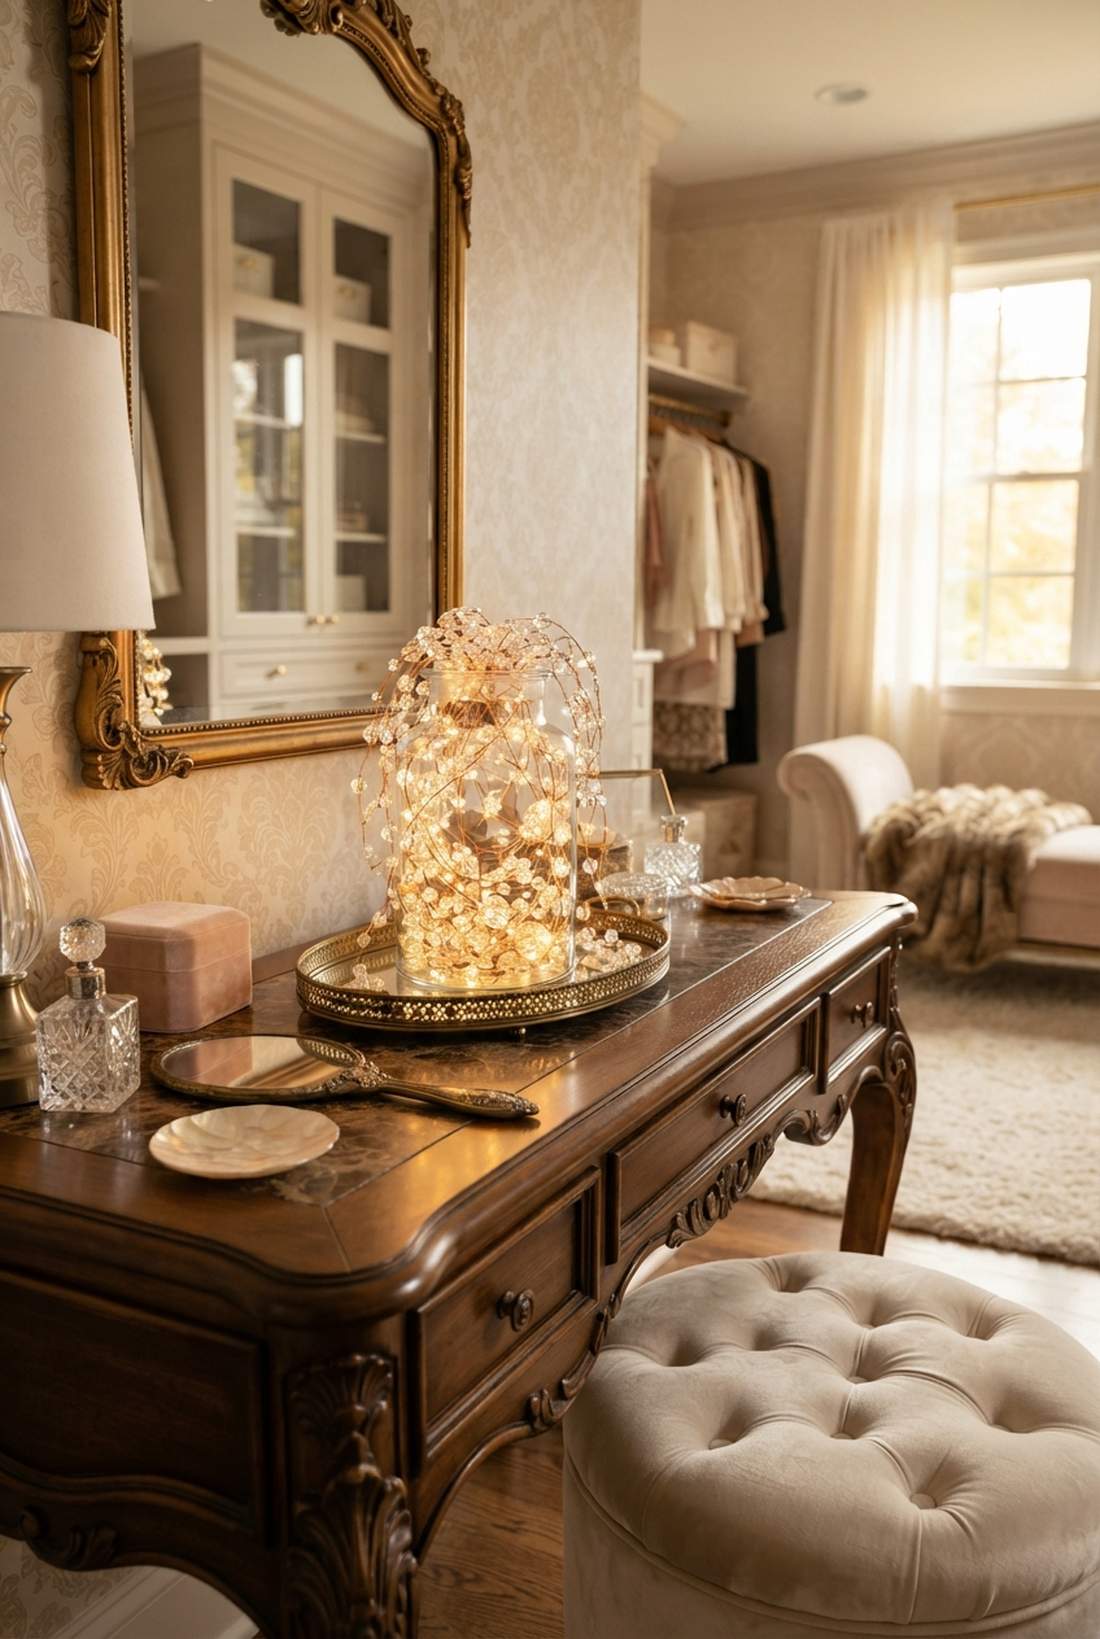
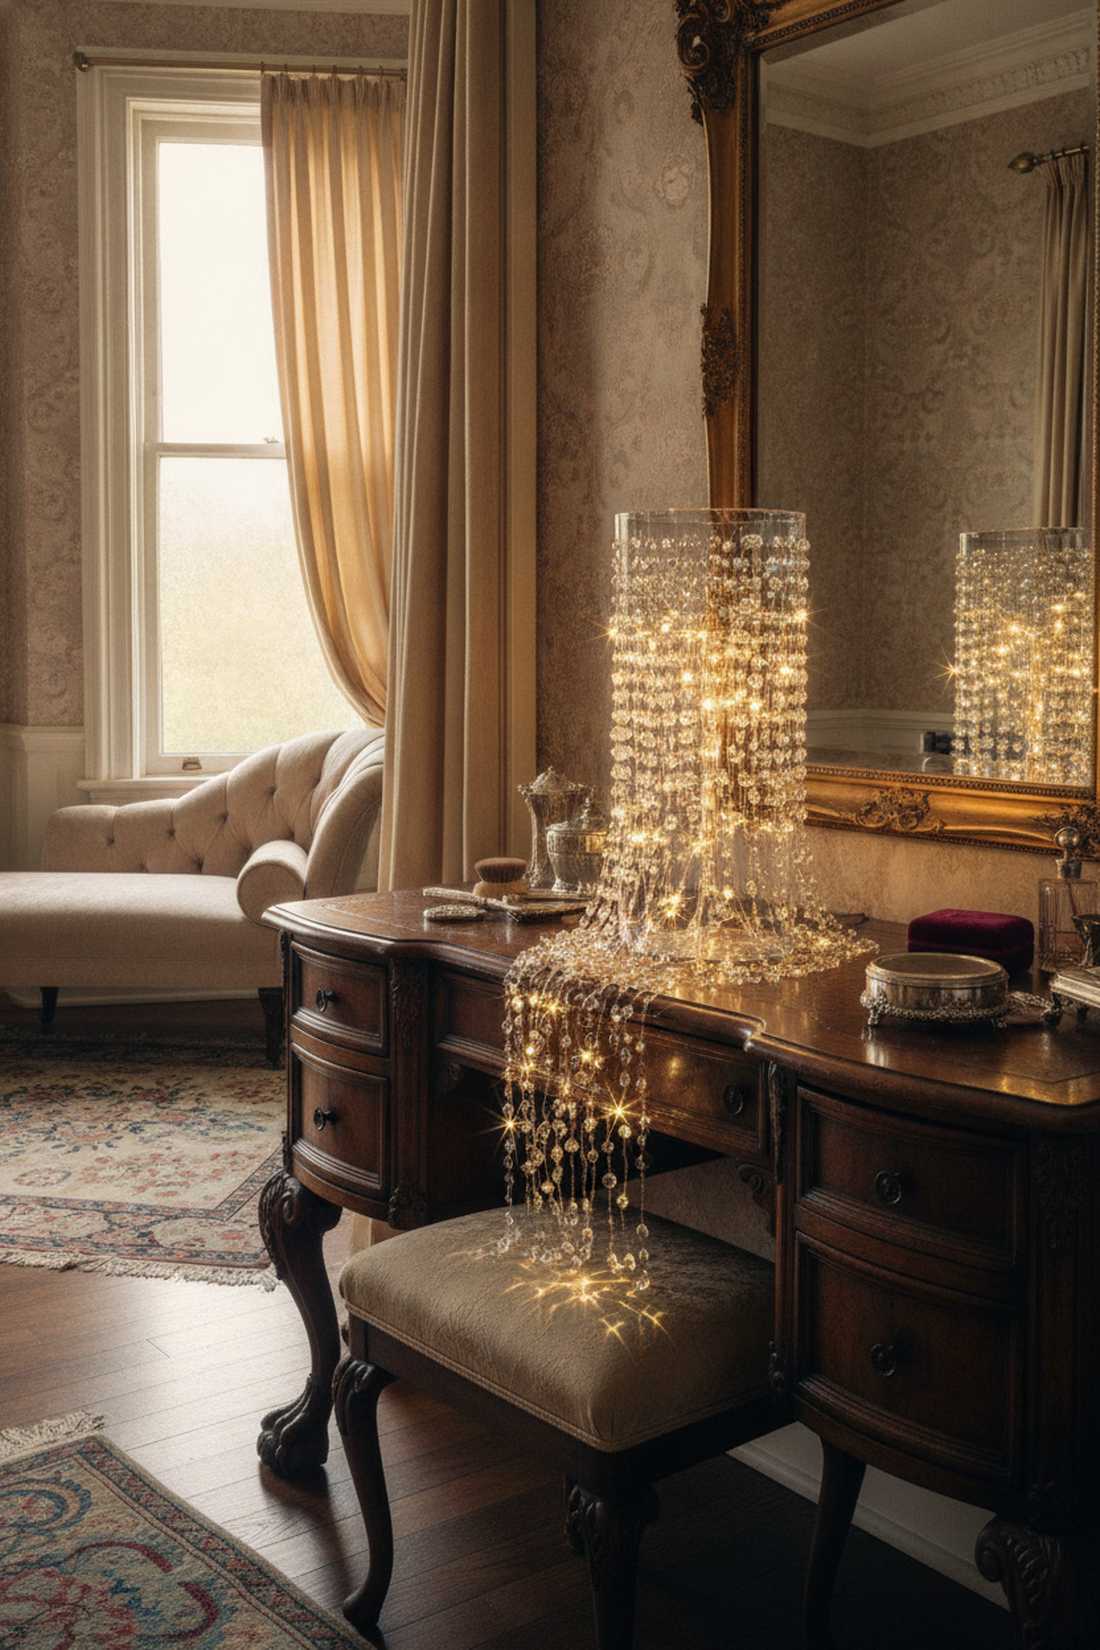
A jeweled crystal refractive lantern feels dripping with opulence and glamour. It serves as a stunning, highly detailed accent for vintage vanity desks or elegant dressing rooms.
Bare wire can look industrial, but threading faceted acrylic beads between the LED nodes gives a designer-level finish. The beads act as secondary light sources, catching and scattering the beam in dozens of directions.
You can achieve this jeweled look for about $16. Highly recommended for spaces needing extra sparkle.
- Key Materials: Faceted acrylic beads, copper wire LEDs
- Vibe / Style: Vintage opulent
- Difficulty: Tedious threading
- Budget Breakdown: Beads: $10 | Lights/Jar: $6
- Creator’s Tip: Use a drop of clear superglue on the wire under each bead so they don’t all slide to the bottom of the jar.
- Smart Sourcing: Order faceted crystal glass beads (bulk pack) and stiff copper fairy wires.
55. Photo Transfer Memory Jars
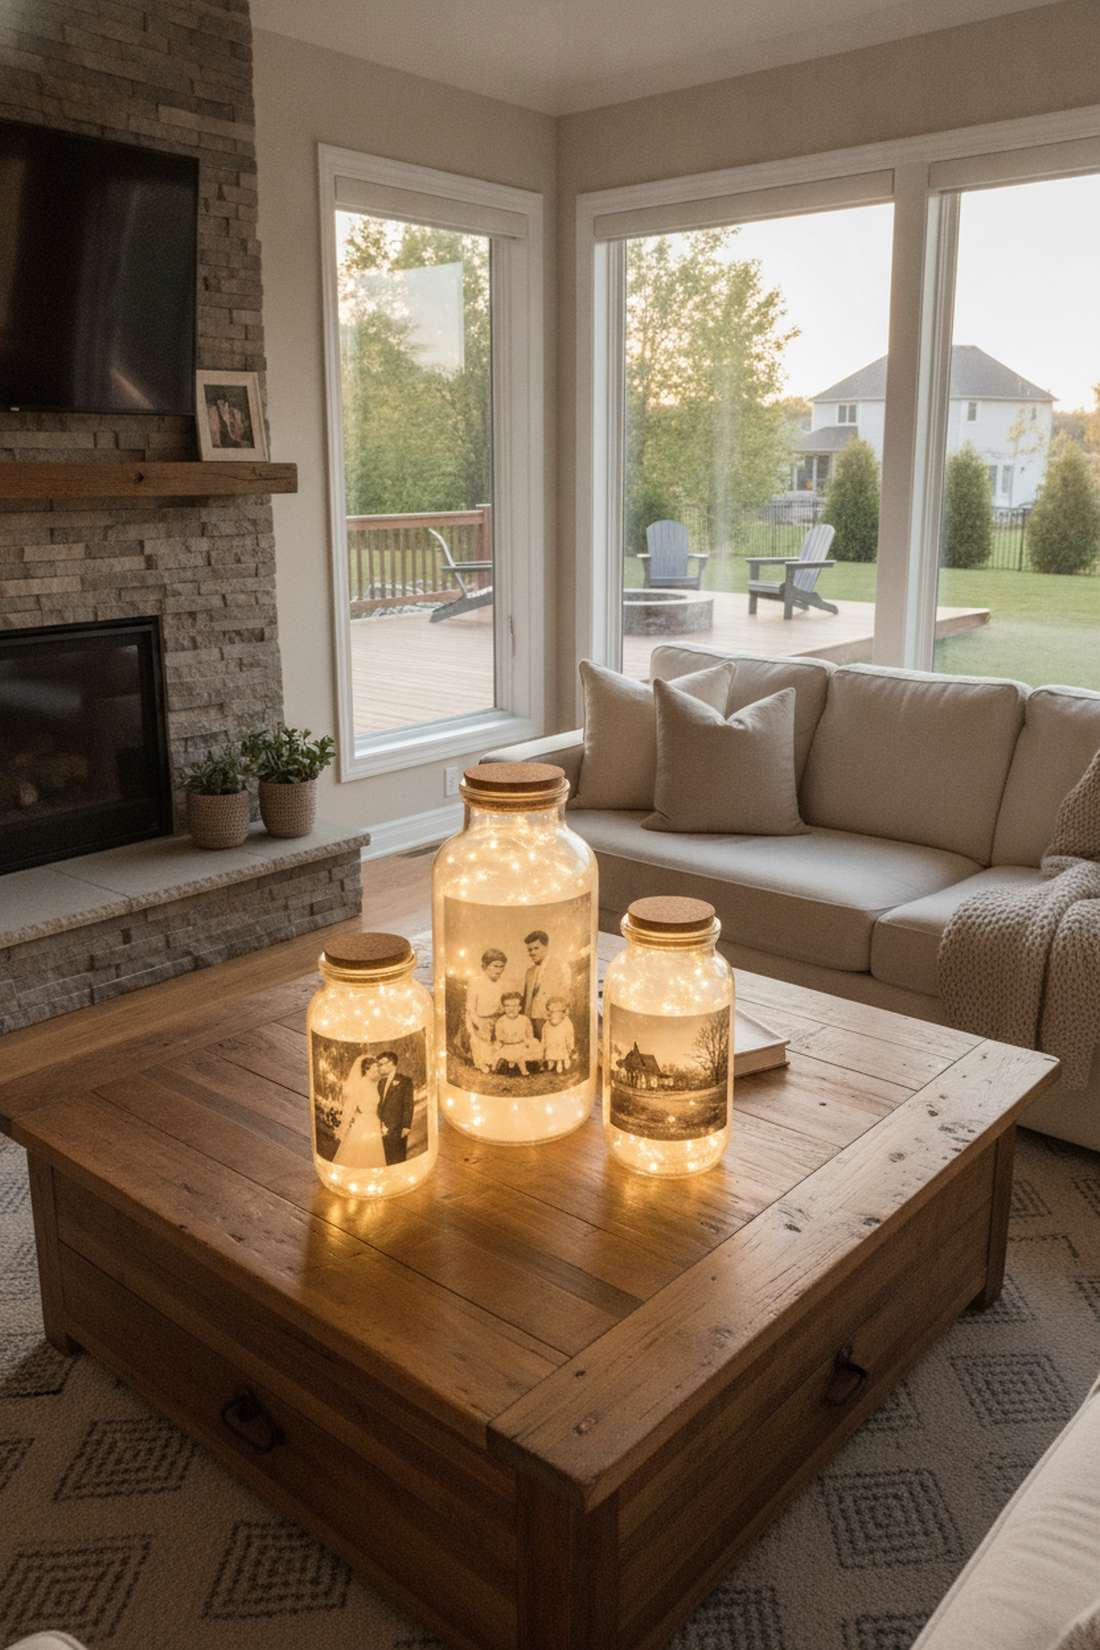
This translucent glowing memory vessel provides an incredibly sentimental, bespoke tribute. It is the ultimate personalized anniversary gift or glowing memorial for a wedding table.
Taping a photo inside looks cheap, but using a chemical transfer medium to print the image directly onto the glass delivers a surprisingly premium look. The sepia or black-and-white image glows warmly from within like a vintage film reel.
Creating this heirloom gift costs around $18. Save this to your personalized DIY gift ideas board!
- Key Materials: Laser-printed photo, photo transfer medium
- Vibe / Style: Sentimental vintage
- Difficulty: Careful rubbing required
- Budget Breakdown: Transfer Medium: $12 | Lights/Jar: $6
- Creator’s Tip: You MUST use a laser printer for the image; inkjet ink will smear and dissolve instantly when the transfer medium is applied.
- Smart Sourcing: Buy glass photo transfer gel and warm-white LED cork lights.
56. Gemstone Base Crystal Healing
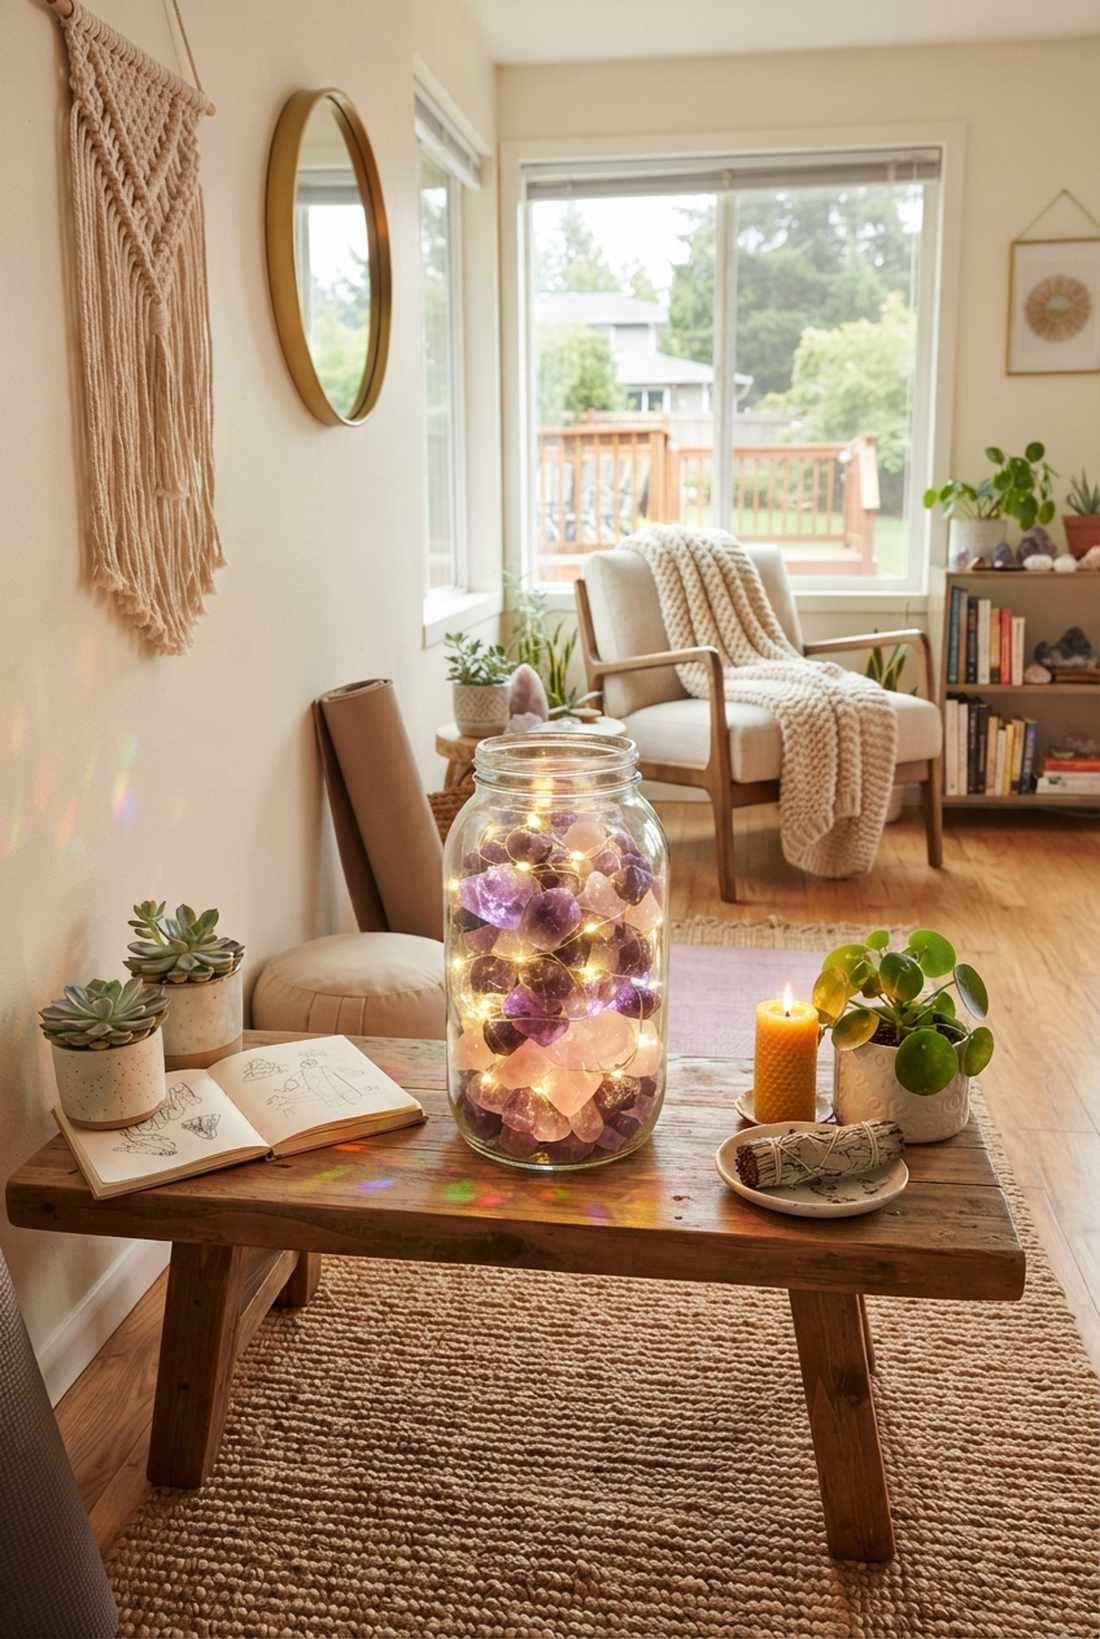
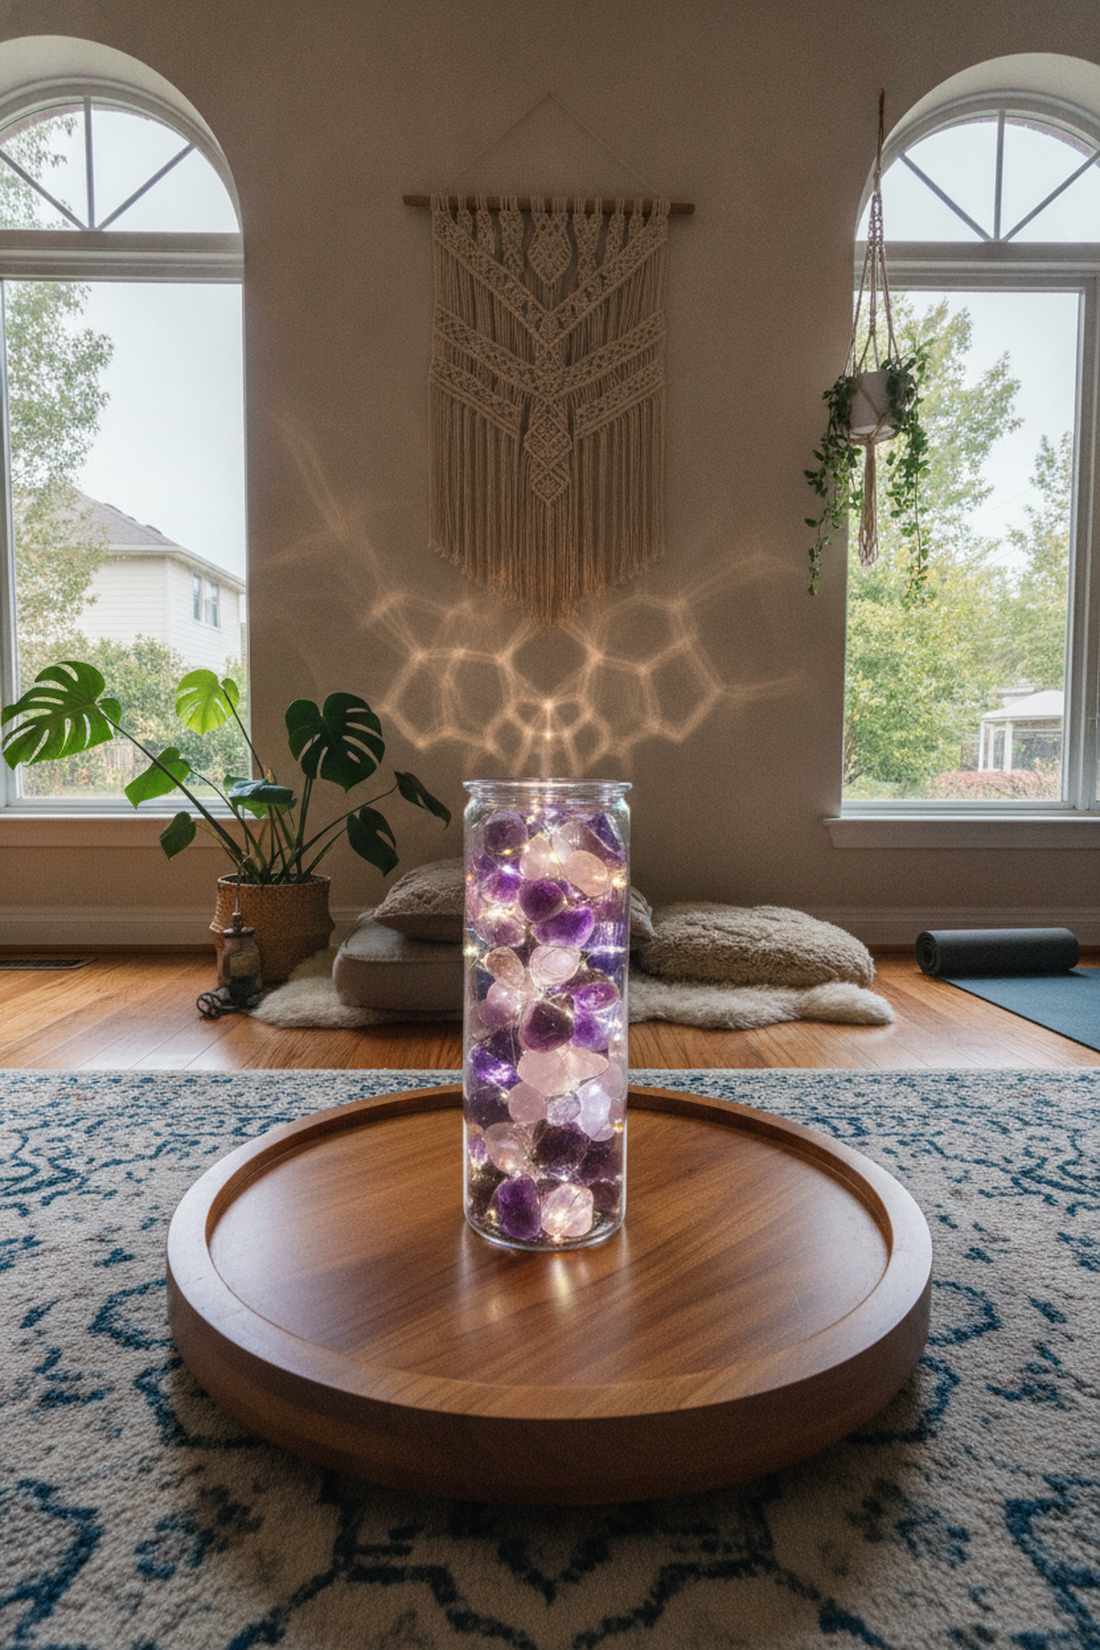
An illuminated crystal energy pillar feels deeply mystical, holistic, and grounded. It is a fantastic functional decor piece for yoga studios, bohemian bedrooms, or meditation altars.
Empty jars lack weight, but anchoring the base with raw tumbled amethyst or rose quartz looks far more expensive than it is. The heavy crystals stabilize the jar while fracturing the light into gorgeous, colorful geometric patterns.
This mystical crystal upgrade costs roughly $20. Pin this if you love holistic, earthy aesthetics!
- Key Materials: Tumbled raw crystals, LED lights
- Vibe / Style: Mystical bohemian
- Difficulty: Easy pouring
- Budget Breakdown: Crystals: $14 | Lights/Jar: $6
- Creator’s Tip: Wash the raw crystals thoroughly with soap before jarring them; the rock dust will stick to the glass and ruin the light transmission.
- Smart Sourcing: Use raw tumbled amethyst stones (bulk pack) and bright white fairy string kits.
Forget messy painting. This final fabric scrap trick is the fastest way to add massive texture to cheap glass.
57. Fabric Scrap Bohemian Wraps
This textile-wrapped glowing vessel brings a heavily textured, global-nomad energy. It is an amazing way to inject bold fabric patterns onto a plain wooden outdoor patio table.
Bare glass can feel cold, but binding the exterior tightly with vintage scarf scraps gives a designer-level finish. The thin fabric acts as a custom lampshade, softening the harsh LEDs into a warm, patterned, ambient glow.
You can execute this textile hack for under $8. A brilliant upcycling project for old clothes.
- Key Materials: Thin patterned fabric scraps, hidden rubber bands
- Vibe / Style: Global bohemian
- Difficulty: Simple wrapping
- Budget Breakdown: Fabric: Free | Lights/Jar: $8
- Creator’s Tip: Secure the fabric with a tight rubber band at the neck, then wrap over the band with jute twine to hide the mechanics completely.
- Smart Sourcing: Grab vintage bohemian fabric quarters and ultra-bright LED strands.
58. Rope Coil Nautical Lanterns
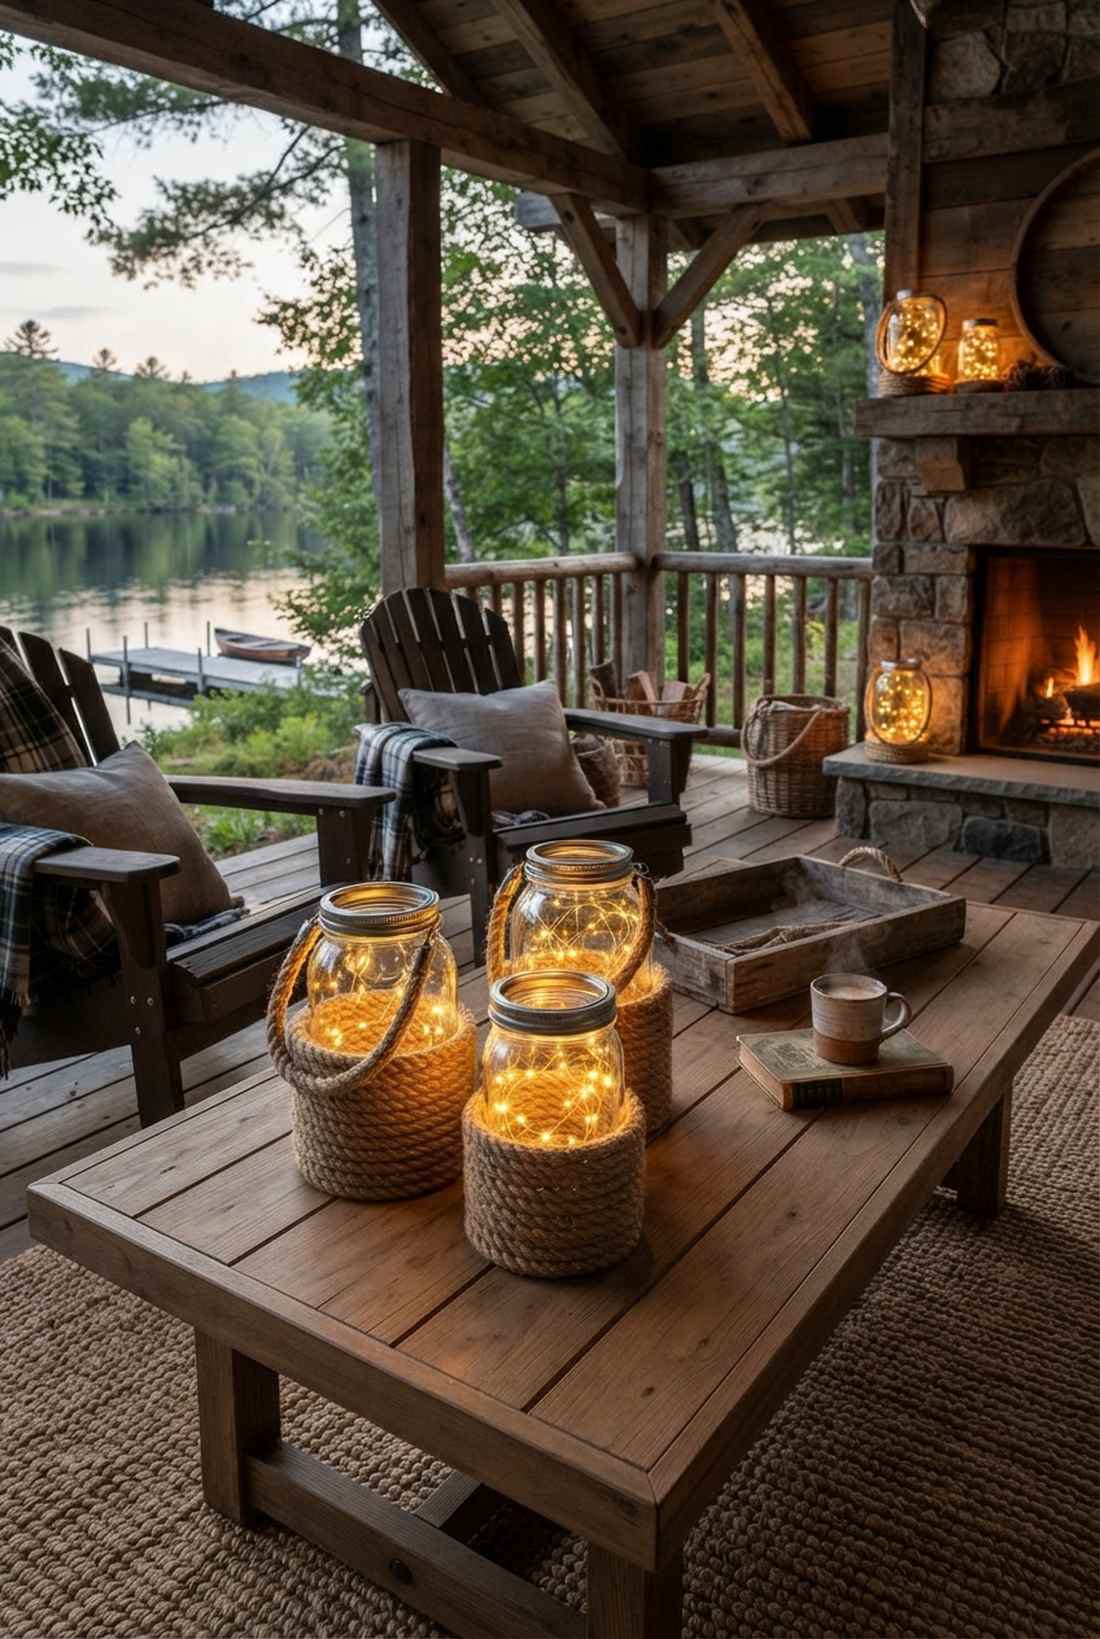
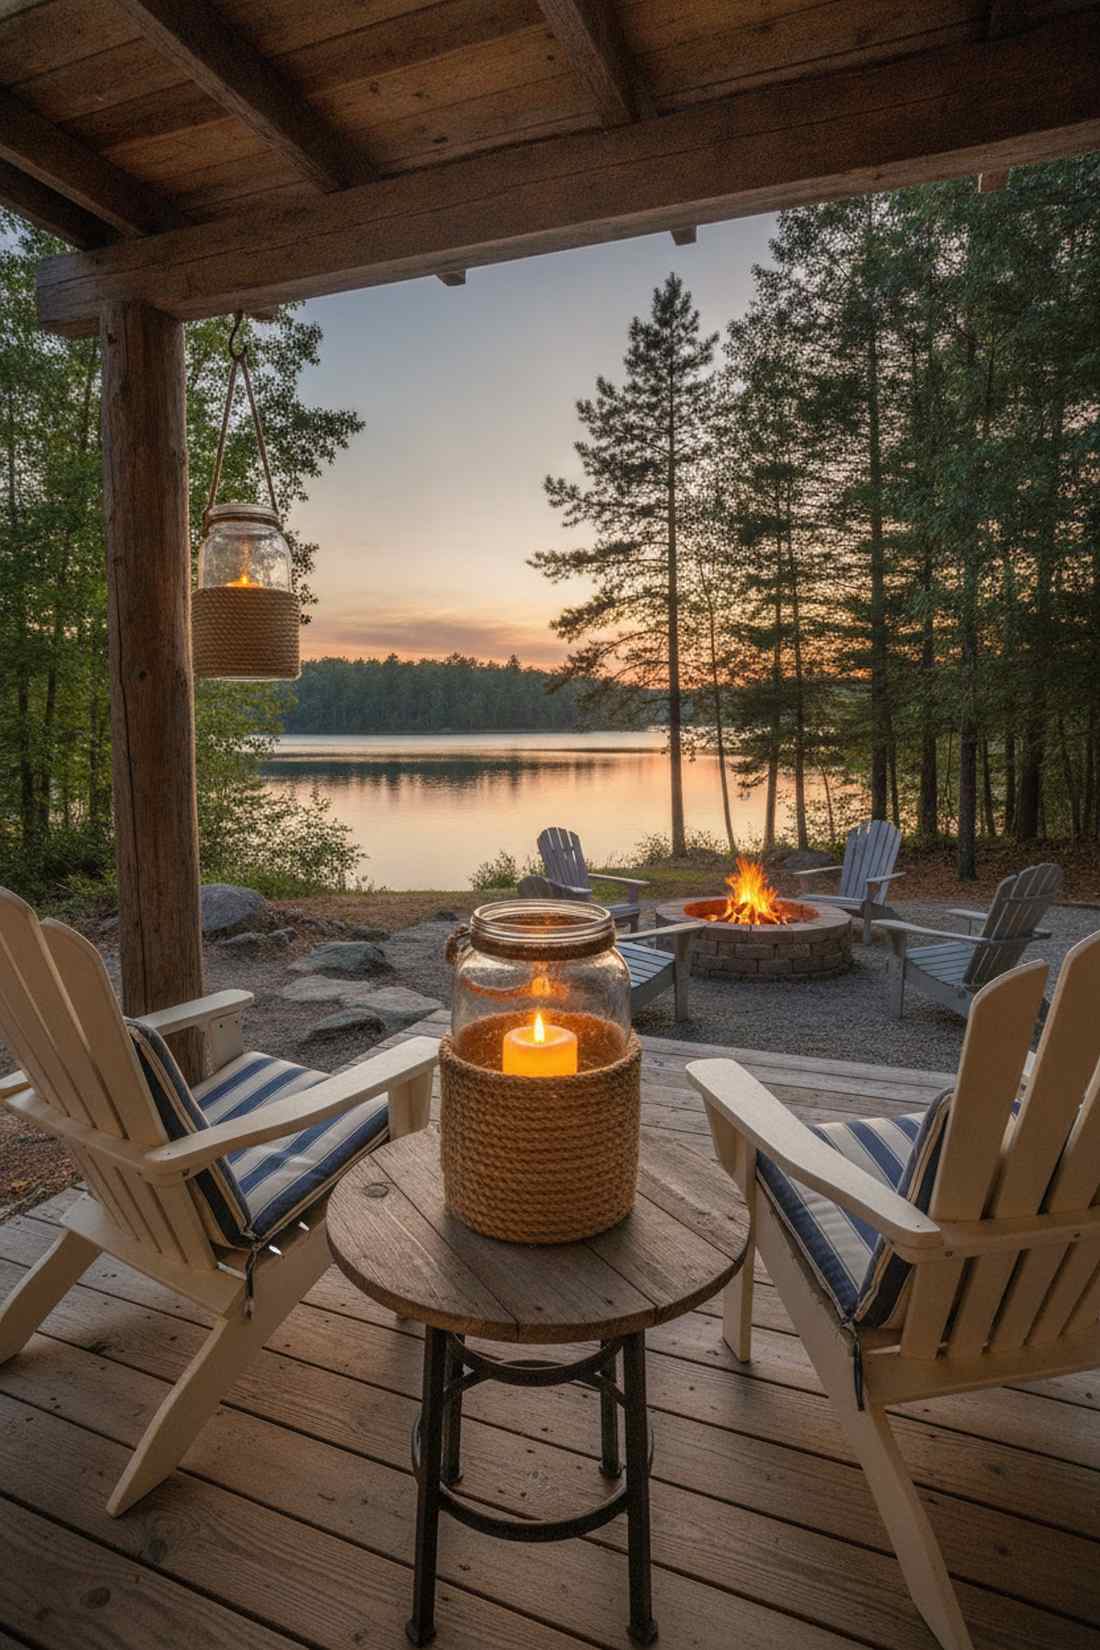
A hemp-coiled coastal lantern feels incredibly rugged, durable, and beach-ready. This heavily textured setup is mandatory for nautical-themed bathrooms or lakeside cabin porches.
Leaving jars bare outside looks flimsy, but spiraling thick manila rope around the bottom half delivers a surprisingly premium look that protects the glass from shattering. The raw fiber perfectly compliments the warm glow escaping from the top.
This heavy-duty nautical upgrade costs about $12. Save this for your next coastal decor project!
- Key Materials: Thick hemp rope, industrial hot glue
- Vibe / Style: Rugged coastal
- Difficulty: Glue gun skills
- Budget Breakdown: Rope: $6 | Lights/Jar: $6
- Creator’s Tip: Work in 2-inch sections with the hot glue. If you apply glue to the whole jar at once, it will dry before you can coil the heavy rope.
- Smart Sourcing: Pick up thick twisted manila hemp rope (bulk) and heavy-duty hot glue sticks.
Conclusion
Executing these 58 stunning fairy lights mason jar projects proves you don’t need a massive budget to achieve a premium, designer-level aesthetic. By skipping retail markups and utilizing smart bulk sourcing, UV-resistant materials, and specialized fairy garden kits, you can transform cheap glass into high-end decor. Whether you are building an elaborate suspended event canopy, an intimate table arrangement, or a weather-proof patio lighting rig, these practical blueprints guarantee maximum visual impact. Stop settling for basic, uninspired lighting—grab a starter kit, apply these pro-level layering techniques, and instantly elevate the atmosphere of your space today.
Frequently Asked Questions
What type of lights work best for mason jar projects?
For a truly premium aesthetic, ditch cheap plastic strings and invest in bulk packs of ultra-thin copper wire LEDs. These micro-strands are virtually invisible during the day but provide massive lumen output at night. For outdoor scaling, buying a starter kit of waterproof auto-on solar lids is the ultimate premium alternative to daily battery swapping.
How do I remove stubborn labels from mason jars?
Don’t waste hours scraping. The fastest way to prep a flawless fairy lights centerpiece base is to soak the jars in hot soapy water, peel the paper, and hit the adhesive with a commercial-grade citrus solvent. Always follow up with a commercial isopropyl prep pad to strip the oils—this is why most DIY paint jobs fail.
Can I use fresh flowers with fairy lights in mason jars?
Using real water with live electronics is a fast way to ruin your setup. If you want a luxury look without the hazard, swap fresh flowers for high-end, UV-coated real-touch faux florals. If you must use fresh greens, invest in waterproof submersible LED pucks (often sold in bulk packs) that are explicitly designed to live fully submerged in your fairy lights vase.
How long do battery-operated fairy lights last?
Cheap craft store lights die in 12 hours, but sourcing premium LEDs with built-in 6-hour timers stretches your battery life across weeks. To save serious cash on large table decor setups, always buy bulk packs of lights that run on standard AA batteries rather than expensive, hard-to-find coin cells.
What size mason jars work best for centerpieces?
Scale matters. For a high-end fairy lights table decor layout, standard 32-ounce quart jars are the sweet spot—they hold enough floral volume without blocking guest conversations. However, mixing cheap pint jars with premium quart jars on an elevated display creates the coveted “expensive” tiered look on a budget.
Are mason jar fairy lights safe for outdoor use?
Only if you source the right materials. Standard battery packs will rust and fail after one rainstorm. For a durable patio setup, you must use specialized outdoor fairy garden kits that feature heavy-duty rubberized battery gaskets, or upgrade entirely to shatterproof acrylic jars paired with UV-resistant solar lids.