Upgrading your outdoor lighting instantly delivers a high-end architectural finish. These exact blueprints reveal budget-friendly material sourcing for premium nighttime aesthetics. Turn basic yards into sophisticated illuminated retreats.
Design Snapshot Key Principles
- Layered Illumination: Combine ambient, task, and accent lighting to create depth and prevent flat, one-dimensional nighttime landscapes
- Beam Control: Precision fixtures with focused angles minimize light pollution while maximizing visual impact on target features
- Warm Color Temperature: 2700K-3000K LEDs create inviting outdoor environments that complement natural materials and plantings
- Smart Integration: App-based controls, timers, and sensors optimize energy efficiency while adapting to seasonal changes and usage patterns
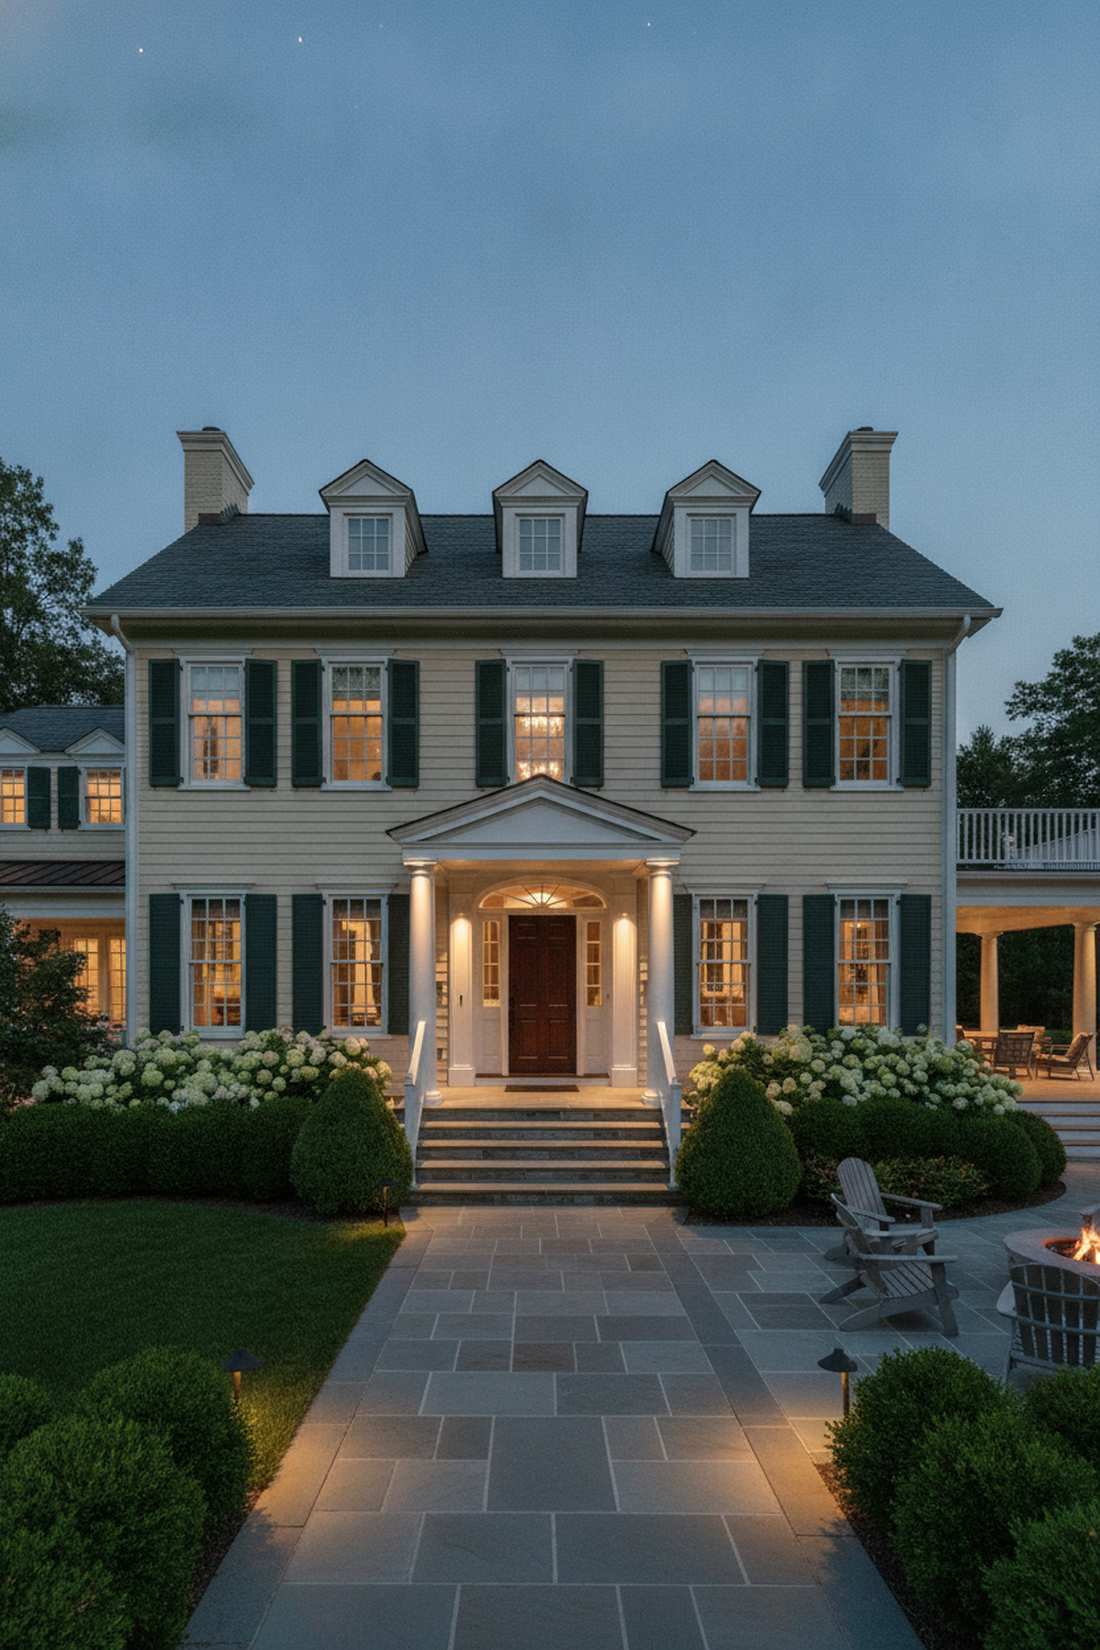
Welcoming Approaches Front of House Lighting
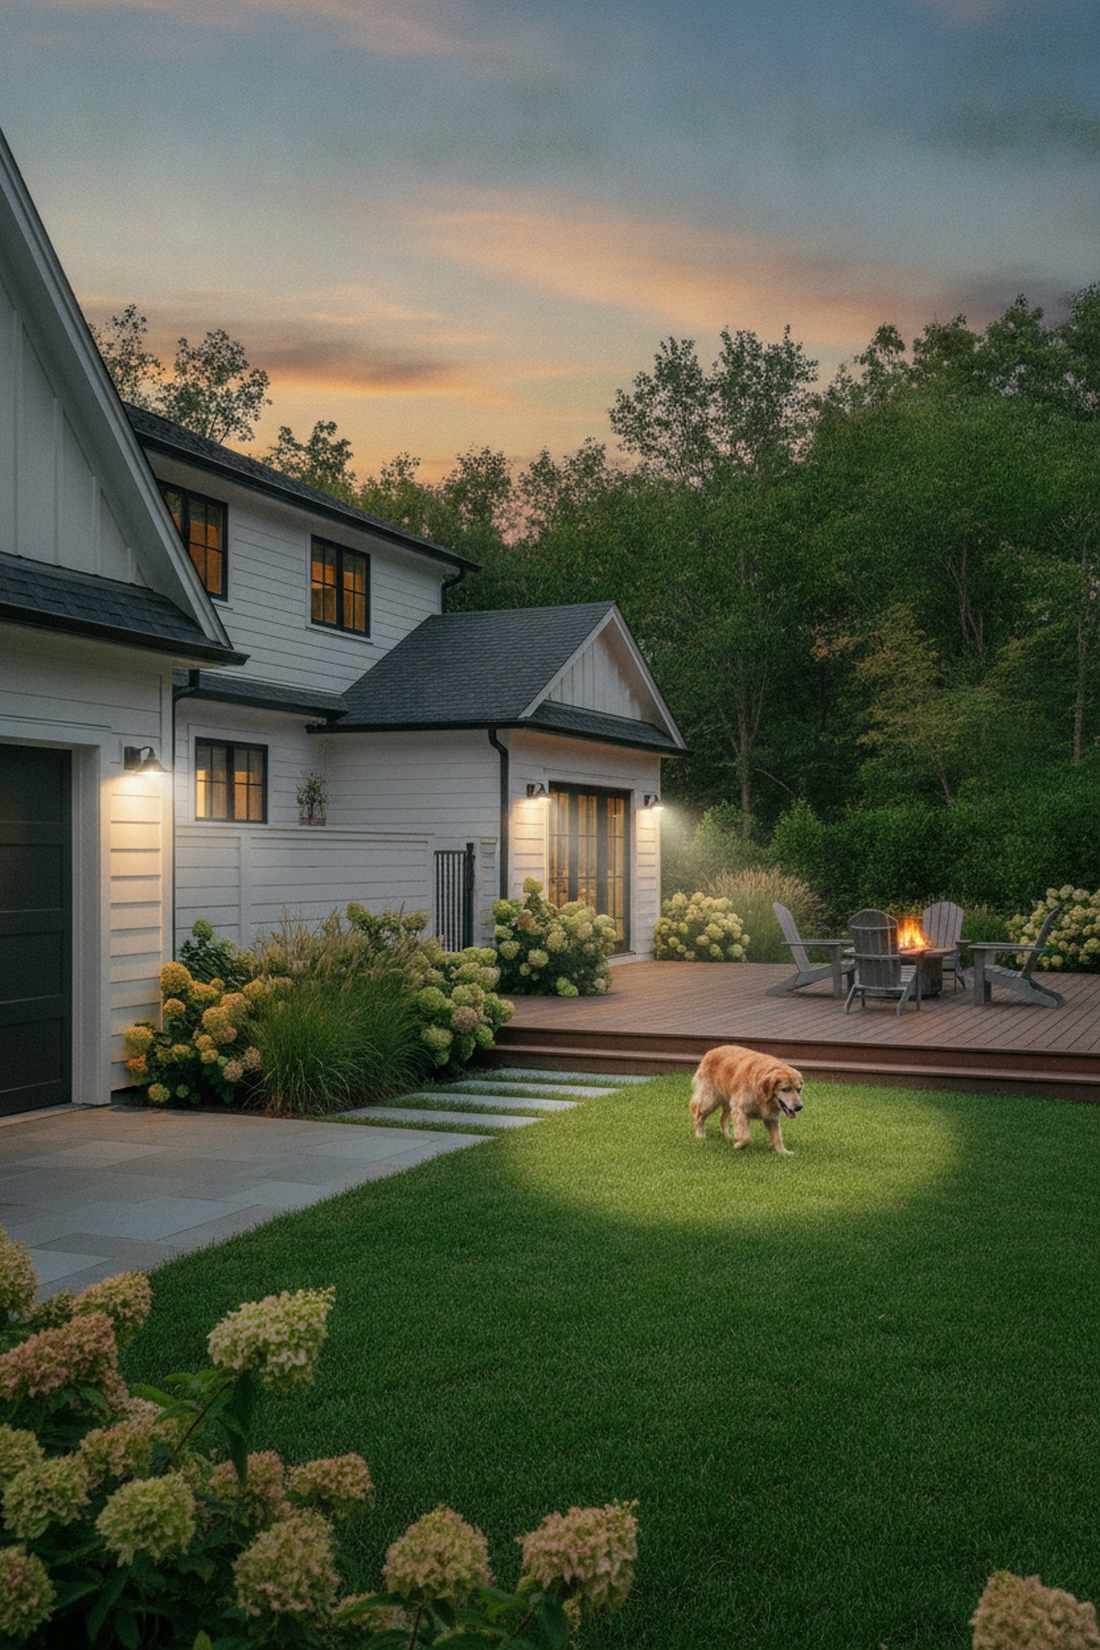
First impressions form in seconds. Front yard lighting establishes curb appeal, guides visitors safely to entries, and signals occupancy for security. Designers focus on symmetry, proportional brightness, and architectural harmony when illuminating primary facades.
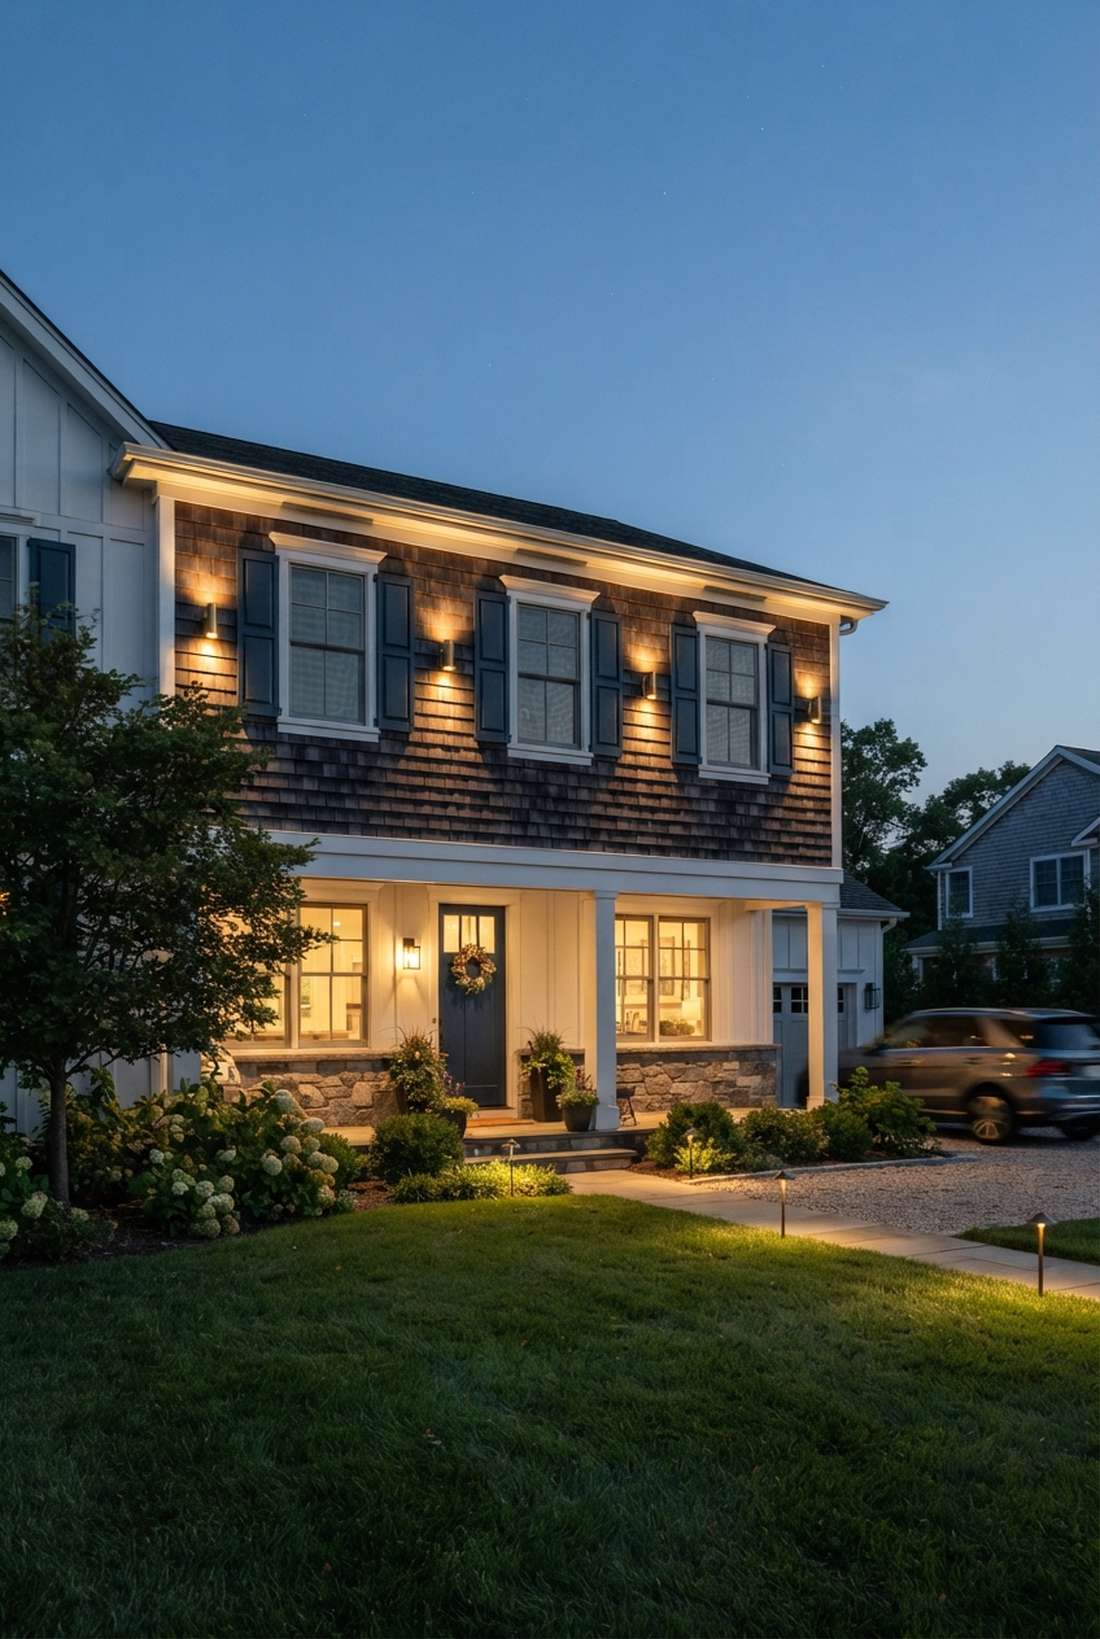
1. Symmetrical Column Downlighting
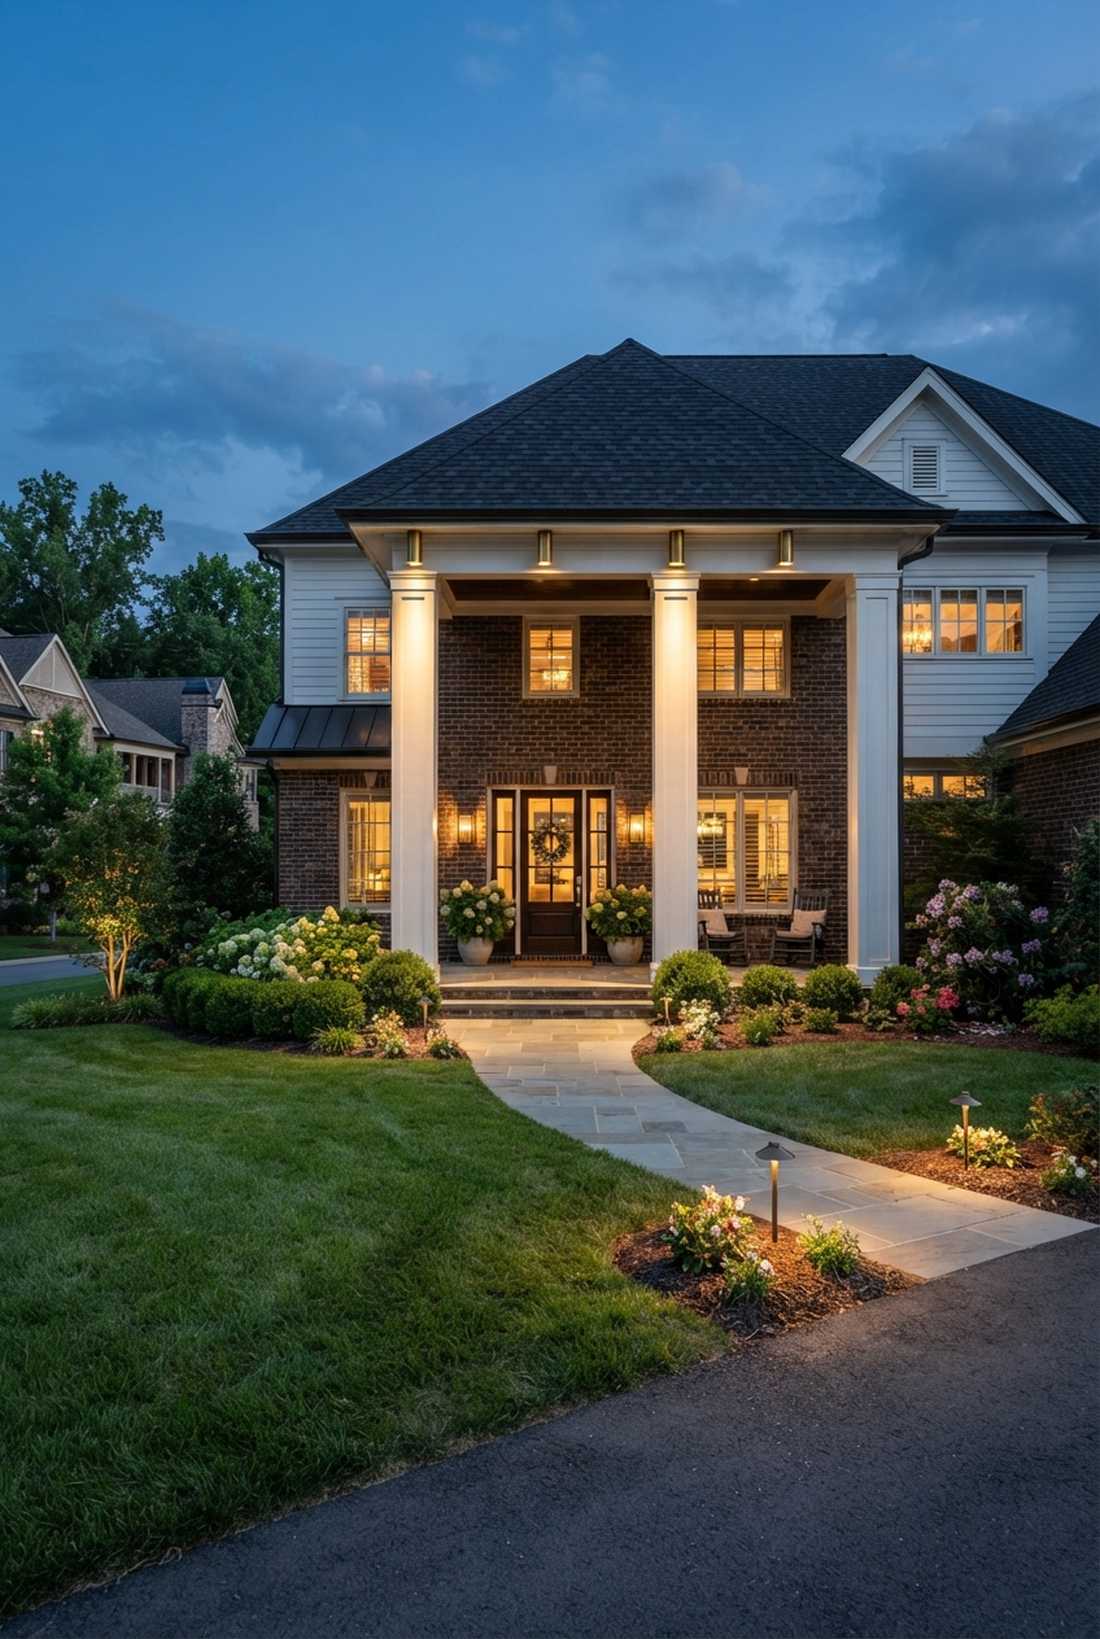
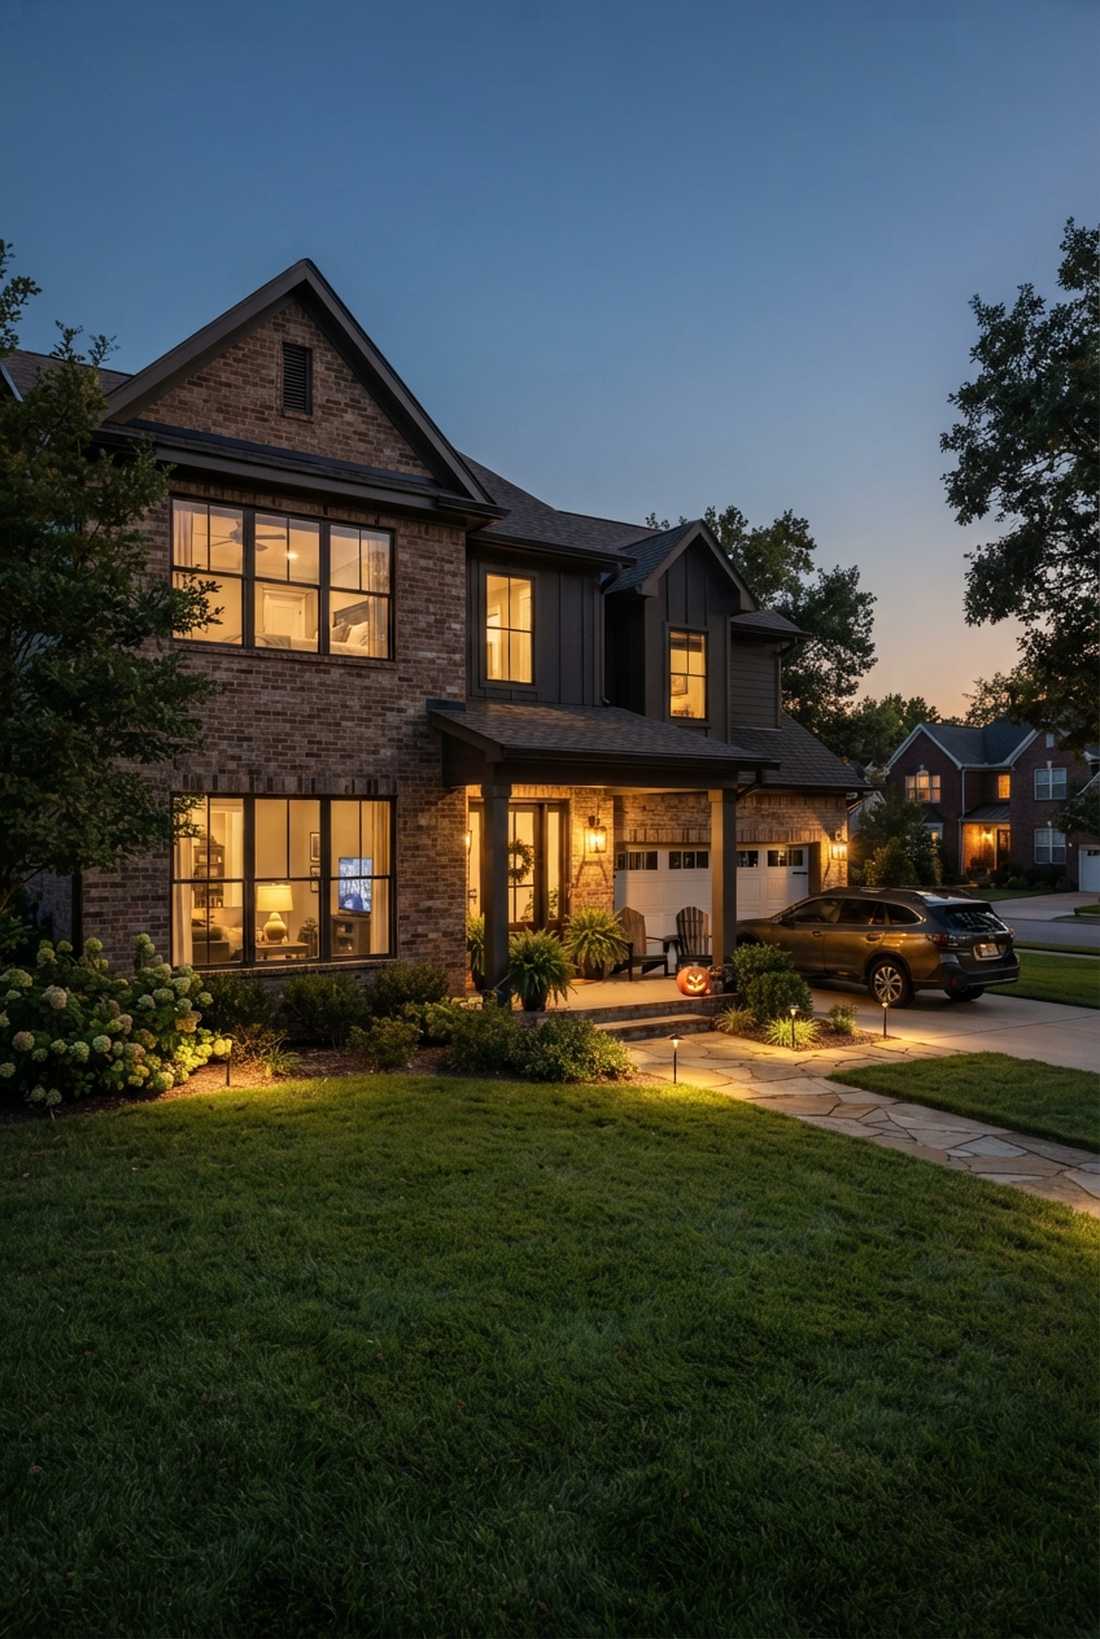
This layout feels like arriving at a luxury estate every single evening. Deploying symmetrical front porch illumination works exceptionally well for framing craftsman or colonial facades.
Designers usually gatekeep this exact configuration because it instantly elevates property value. By casting crisp downward beams, you eliminate unflattering facial shadows while maximizing premium outdoor lighting for house exteriors. It delivers a surprisingly sophisticated glow.
You can easily pull this off for around $80–$140 depending on your voltage choice. Save this to your exterior renovation board for quick reference later!
- Key Materials: Narrow-beam LED cylinder spots
- Vibe / Style: Upscale traditional estate
- Difficulty: Intermediate weekend install
- Budget Breakdown: Fixtures: $90 | Wiring: $30.
- Creator’s Tip: Mount exactly at matching heights to avoid a lopsided aesthetic at night.
- Smart Sourcing: architectural-grade brass downlights (2-pack) and weatherproof low-voltage starter kits.
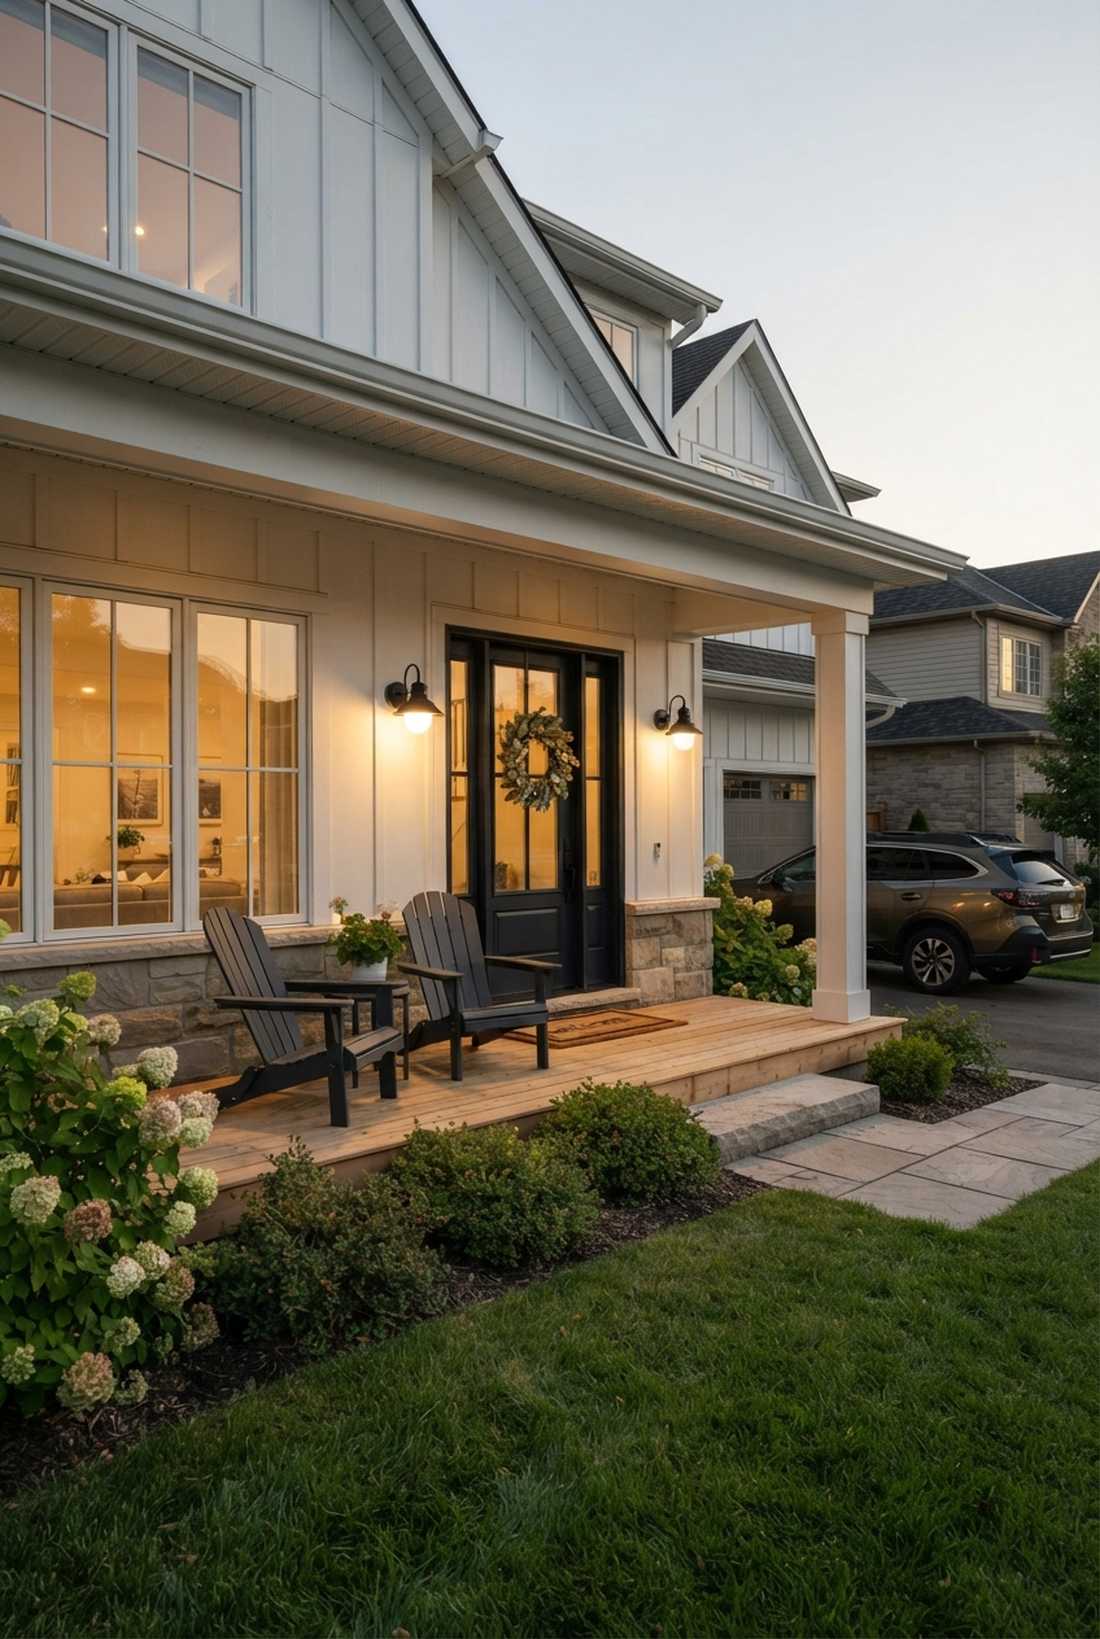
2. Entryway Wall Sconce Layering
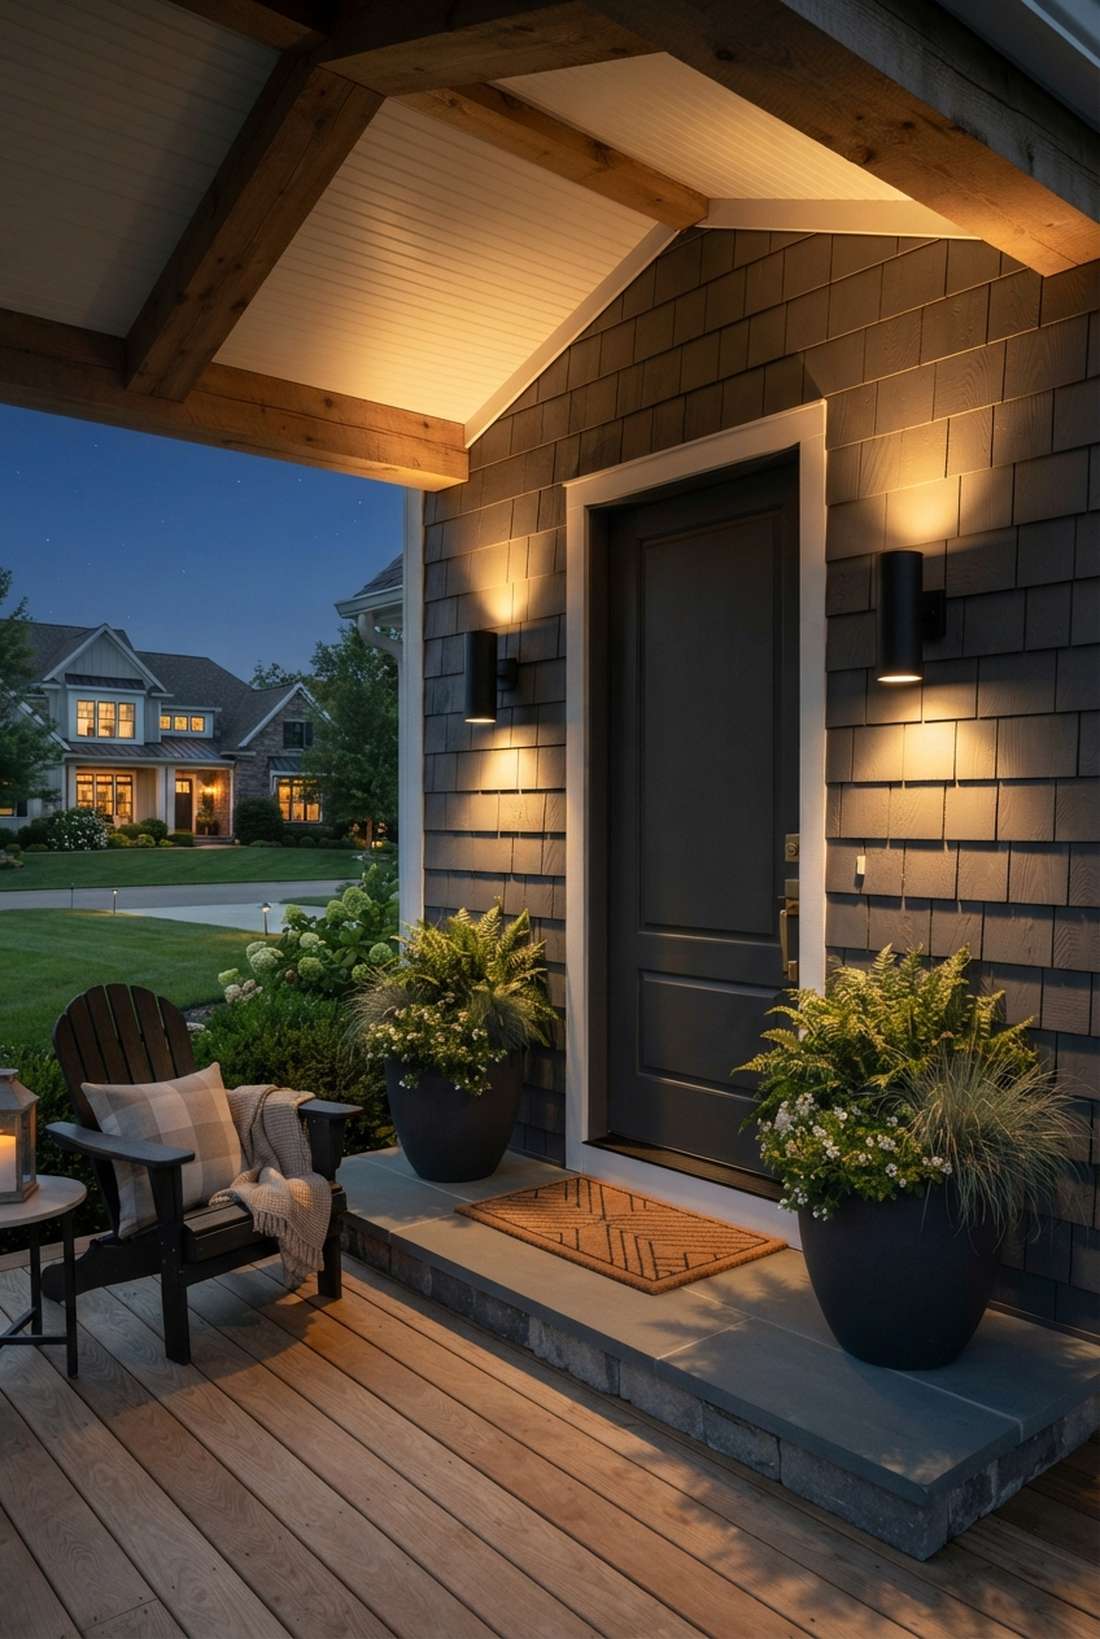
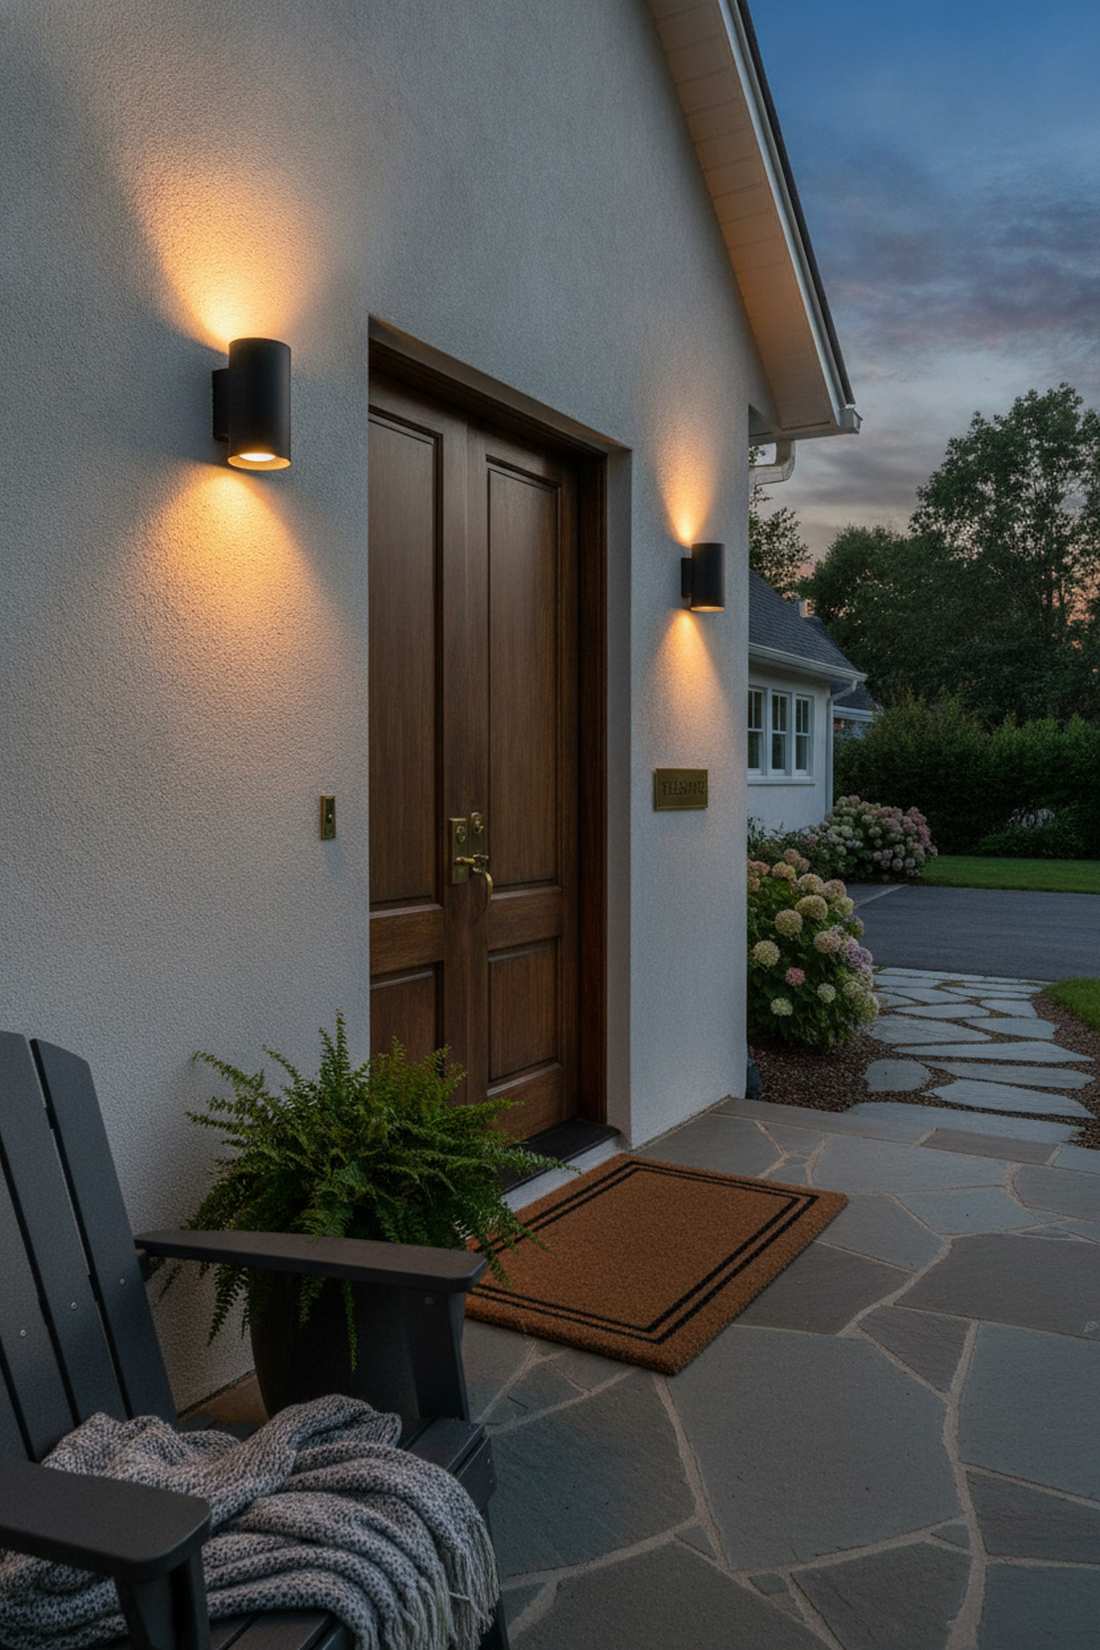
Nothing screams cozy more than a glowing doorway that feels like a boutique hotel entrance. This mid-level sconce layout is perfect for drawing the eye directly to premium door hardware and welcome signs.
Most beginners ruin entryways by using glaring, unshielded bulbs that blind guests. Utilizing opaque shades distributes the wash up and down, which gives a designer-level finish. This is standard protocol in modern outdoor lighting design.
Expect to spend about $50–$120 for quality hardware. It’s a fast upgrade that completely changes the nighttime vibe.
- Key Materials: Opaque smart LED sconces
- Vibe / Style: Modern boutique hospitality
- Difficulty: Beginner-friendly
- Budget Breakdown: Sconces: $80 | LED Bulbs: $20.
- Creator’s Tip: Position fixtures exactly 60-66 inches off the ground to hit perfect eye-level illumination.
- Smart Sourcing: matte black up/down exterior sconces and warm-dimming LED smart bulbs.
3. Driveway Edge Delineation
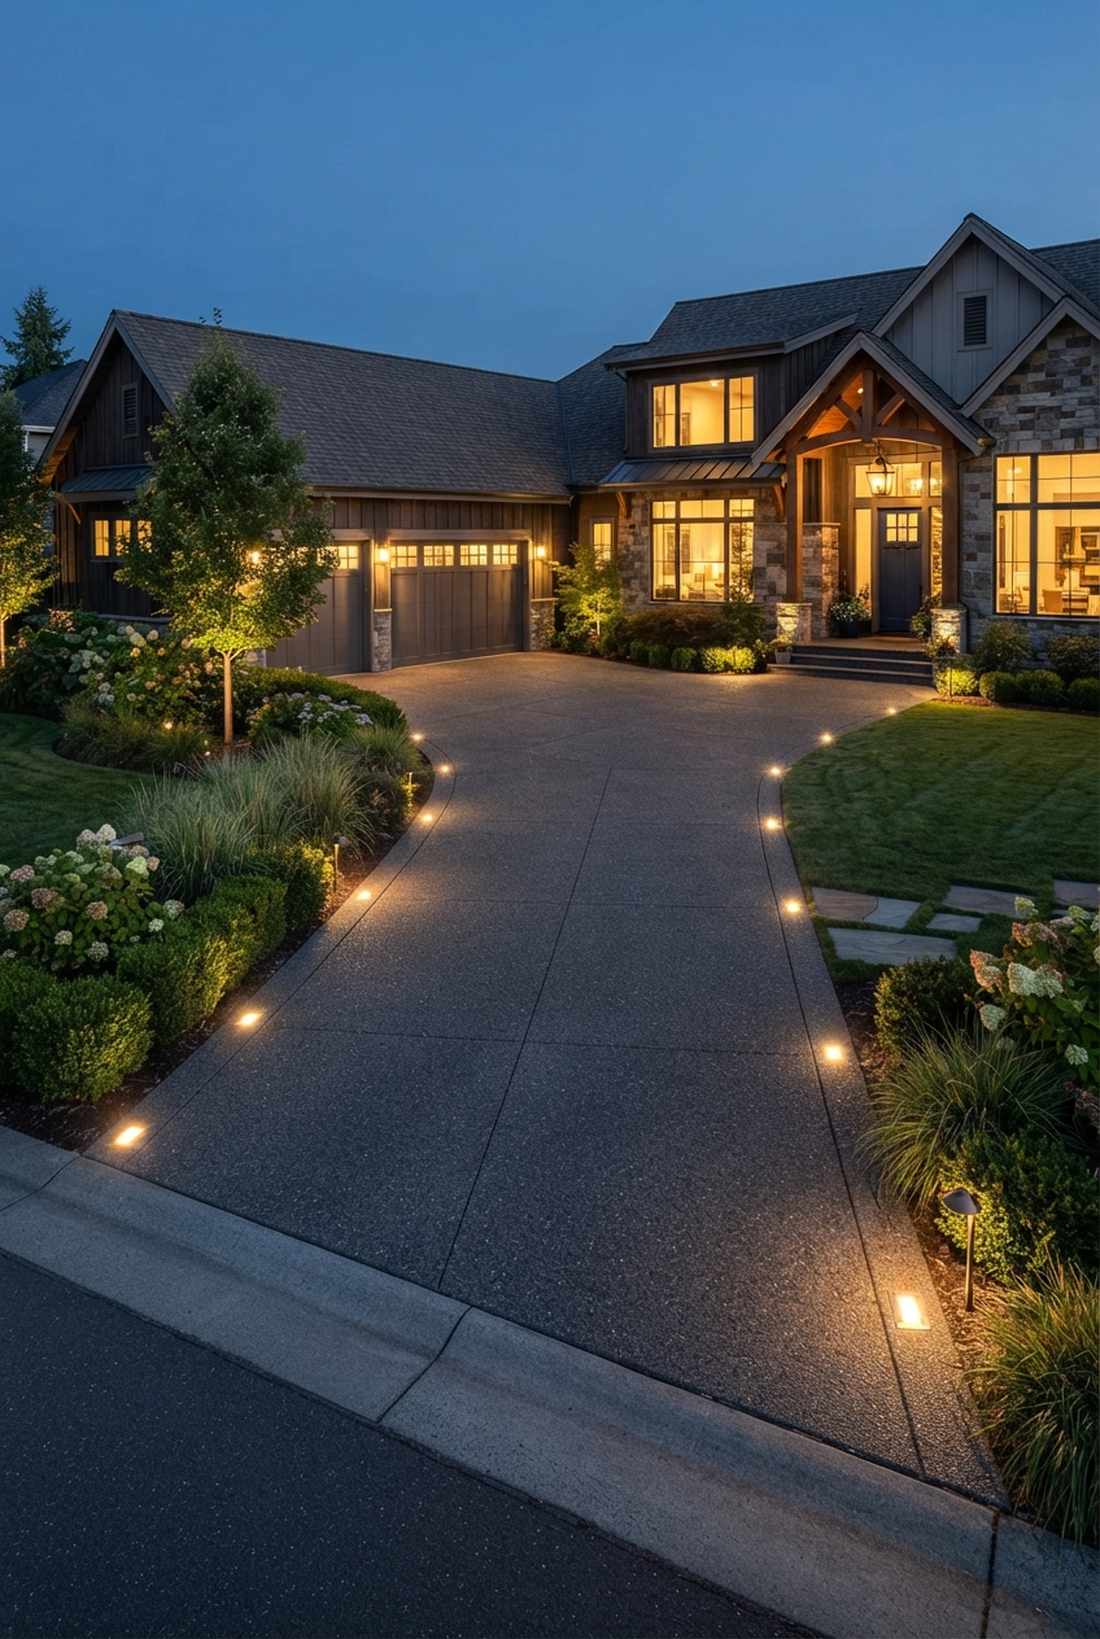
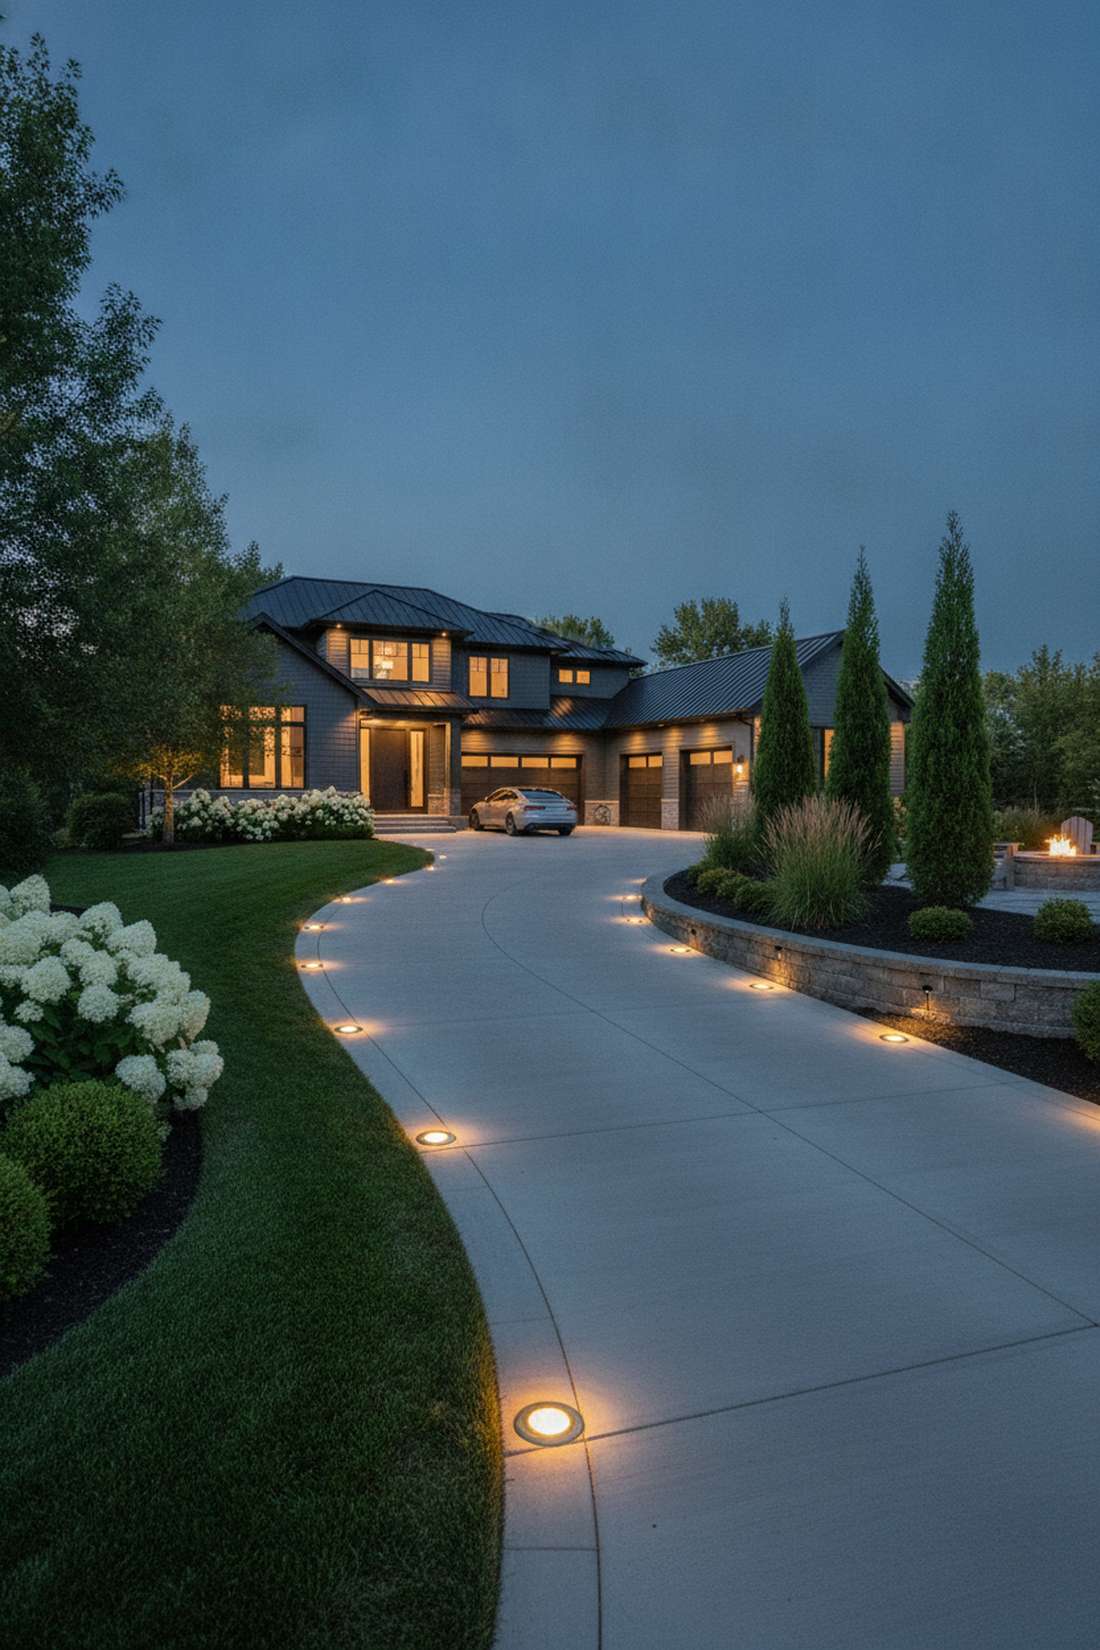
Driving up to this setup feels like navigating a private airport runway. Implementing flush illuminated driveway perimeters works wonders for protecting your expensive landscaping from stray tires.
Skipping this step is exactly why cheap setups look incomplete and chaotic. Installing heavy-duty markers prevents light pollution while heavily utilizing commercial-grade landscape lighting elements. It looks far more expensive than it actually is.
This layout runs roughly $150–$300 depending on driveway length. Pin this if you’re overhauling your curb appeal this spring!
- Key Materials: Driveway-rated ground markers
- Vibe / Style: Ultra-modern precision
- Difficulty: Advanced DIY
- Budget Breakdown: Marker pack: $140 | Direct-burial wire: $50.
- Creator’s Tip: Space them exactly 8-12 feet apart to create a runway effect without overcrowding.
- Smart Sourcing: driveway-rated solar LED pucks (bulk pack) or low-voltage brass well lights.
4. House Number Spotlight
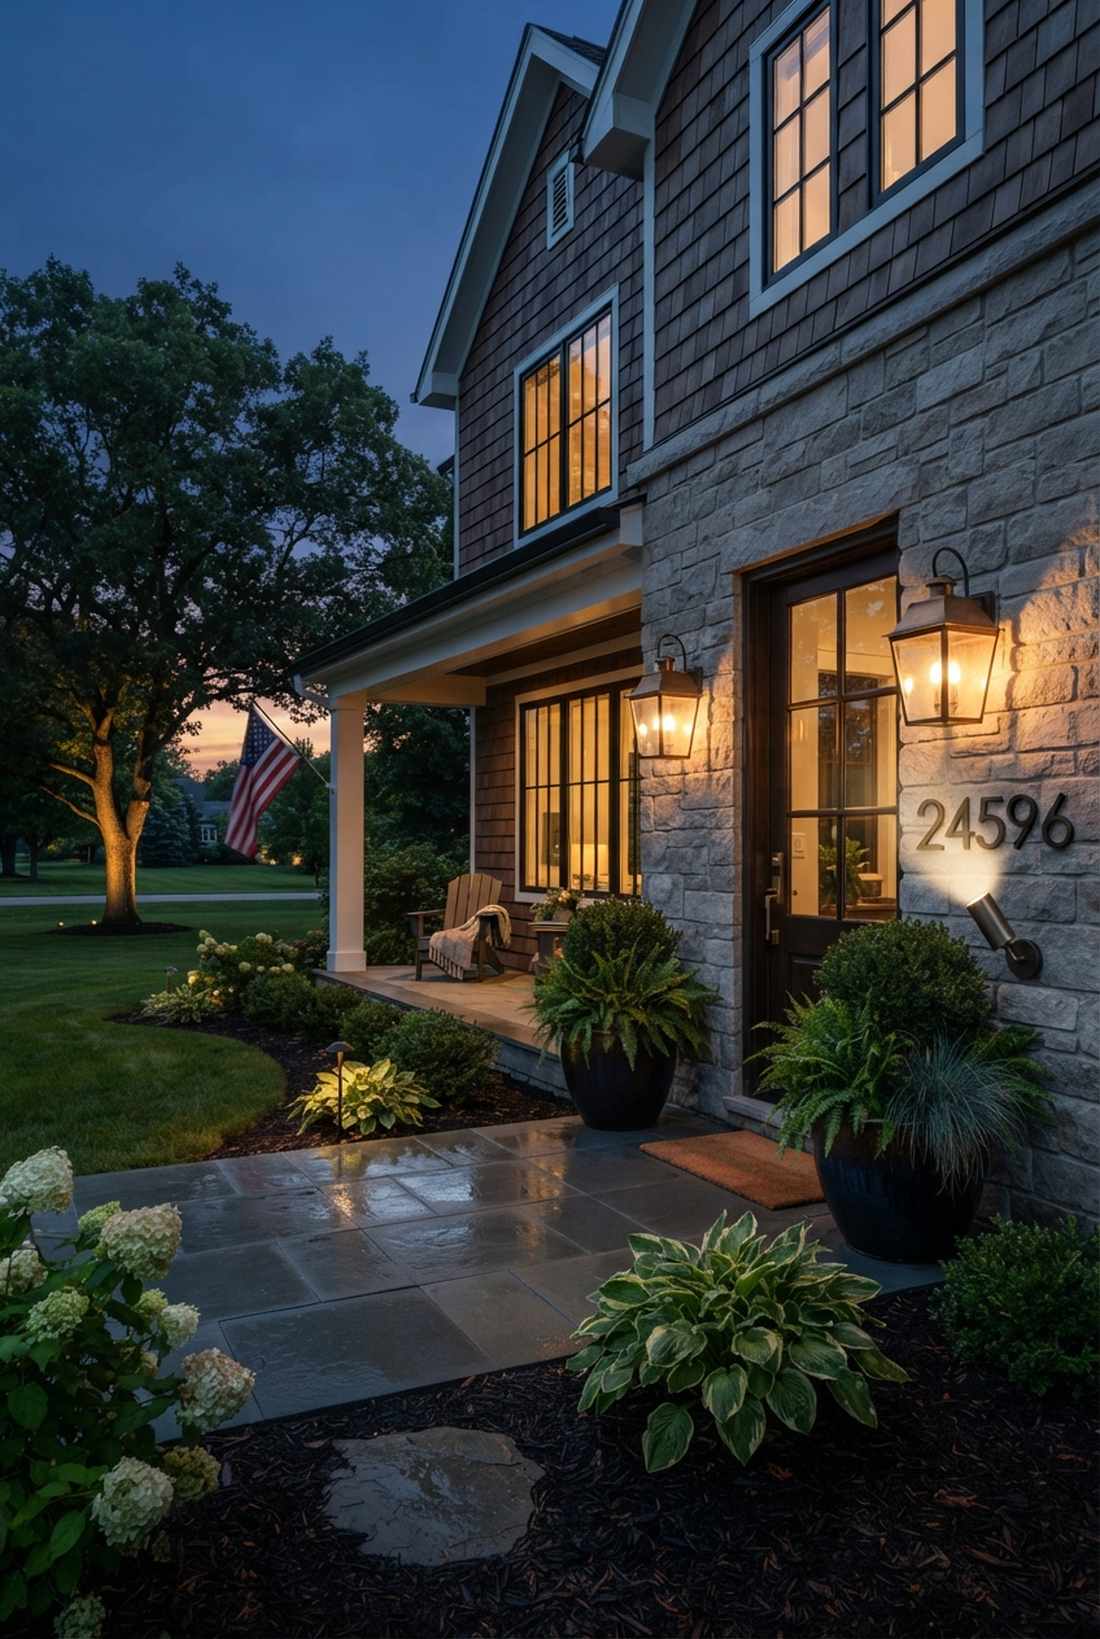
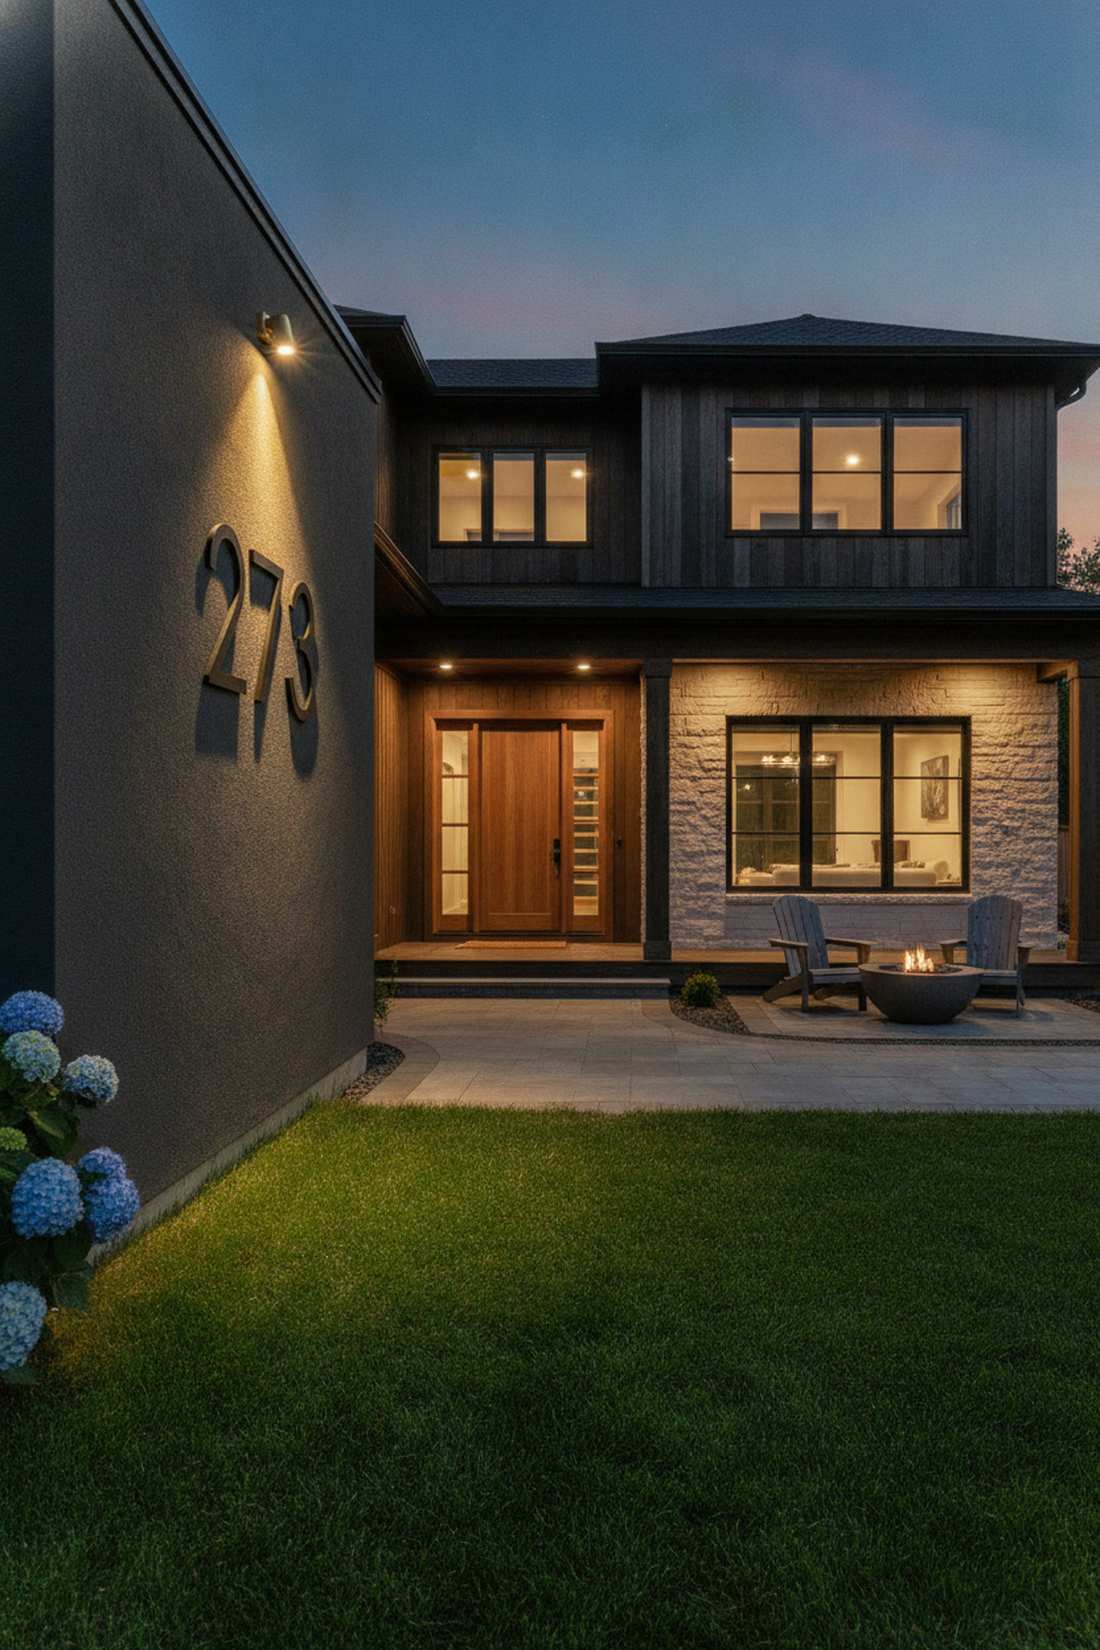
It feels like a cinematic spotlight revealing a secret address. A dedicated address numeral illuminator is highly practical and perfect for modern residential curb appeal.
People completely ignore this detail, yet it transforms the entire facade into a cohesive visual. A narrow 15-degree beam guarantees no sloppy light spill, instantly creating that sought-after premium outdoor lighting night aesthetic. The crisp shadow play is unmatched.
A quick $30–$60 investment makes this happen. Highly recommended for a high-impact, low-effort win.
- Key Materials: Micro adjustable LED spotlight
- Vibe / Style: Crisp architectural focus
- Difficulty: Easy quick-fix
- Budget Breakdown: Micro-spot: $40 | Mounting plate: $10.
- Creator’s Tip: Angle the light to eliminate reflective glare if you have glossy painted numbers.
- Smart Sourcing: compact 12V mini brass spotlights and matte floating house numbers.
Most people get this completely wrong… until they try the exact ceiling layout coming up next. The visual depth is absolutely insane.
5. Porch Ceiling Recessed Fixtures
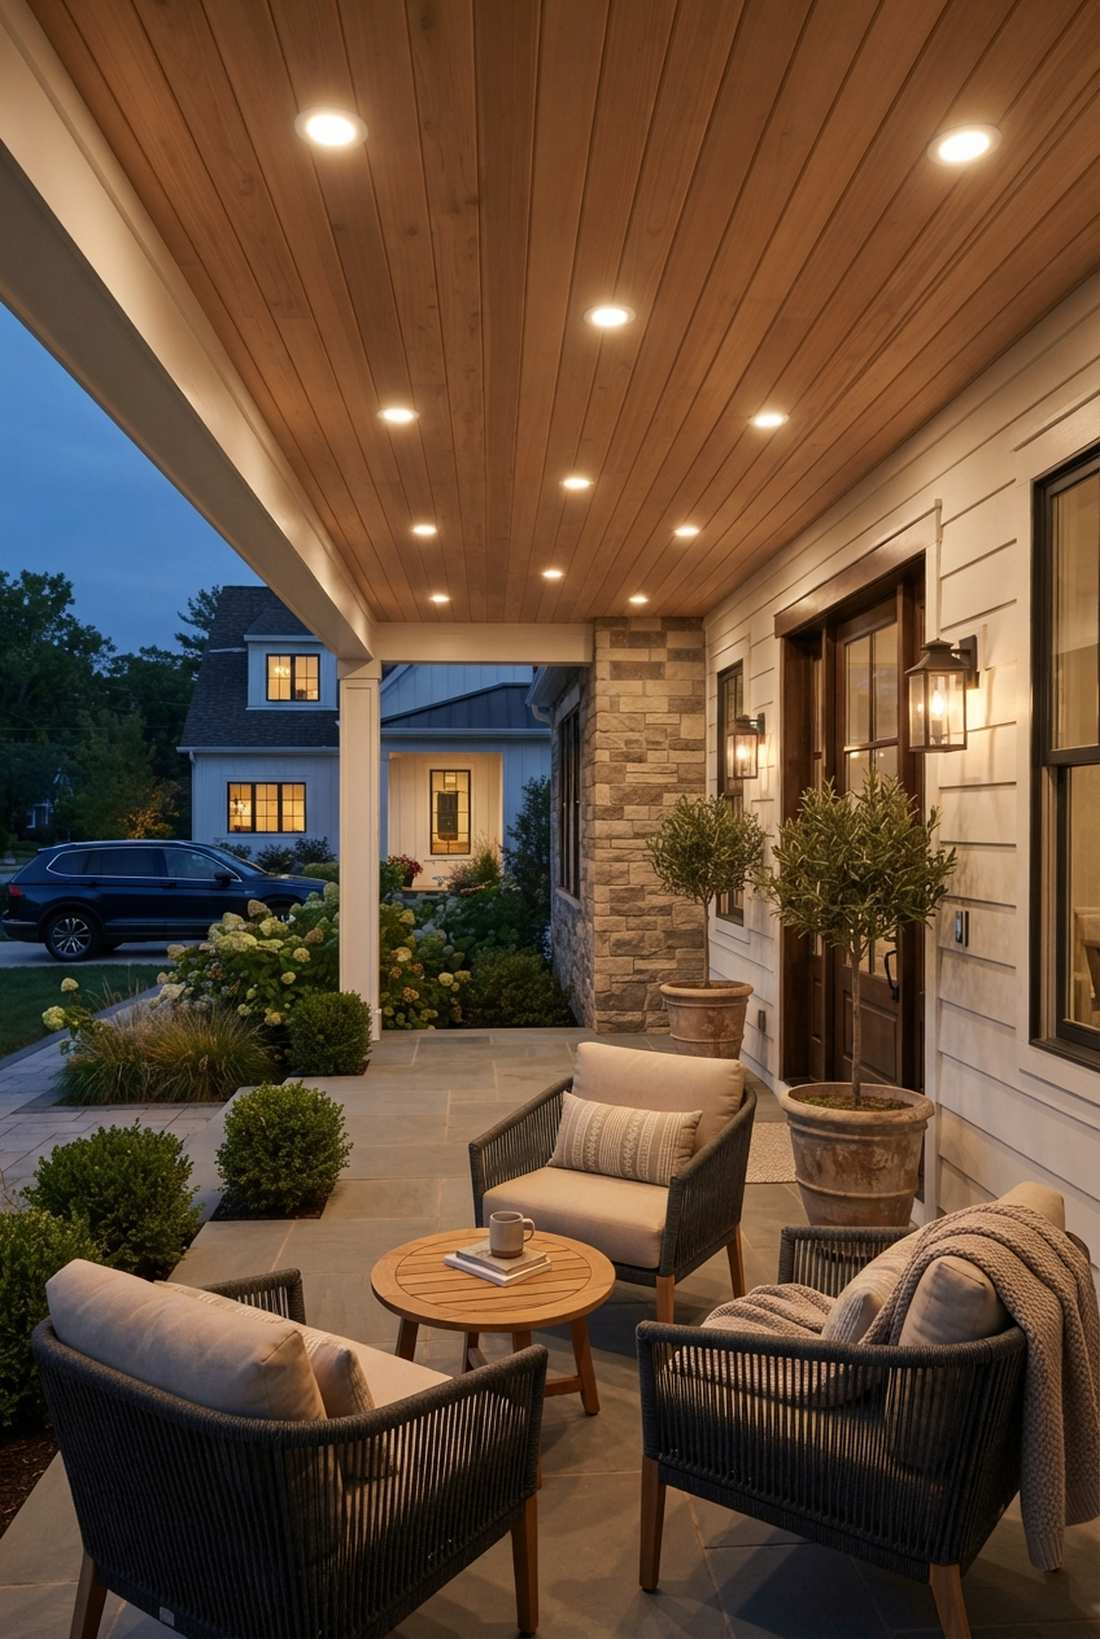
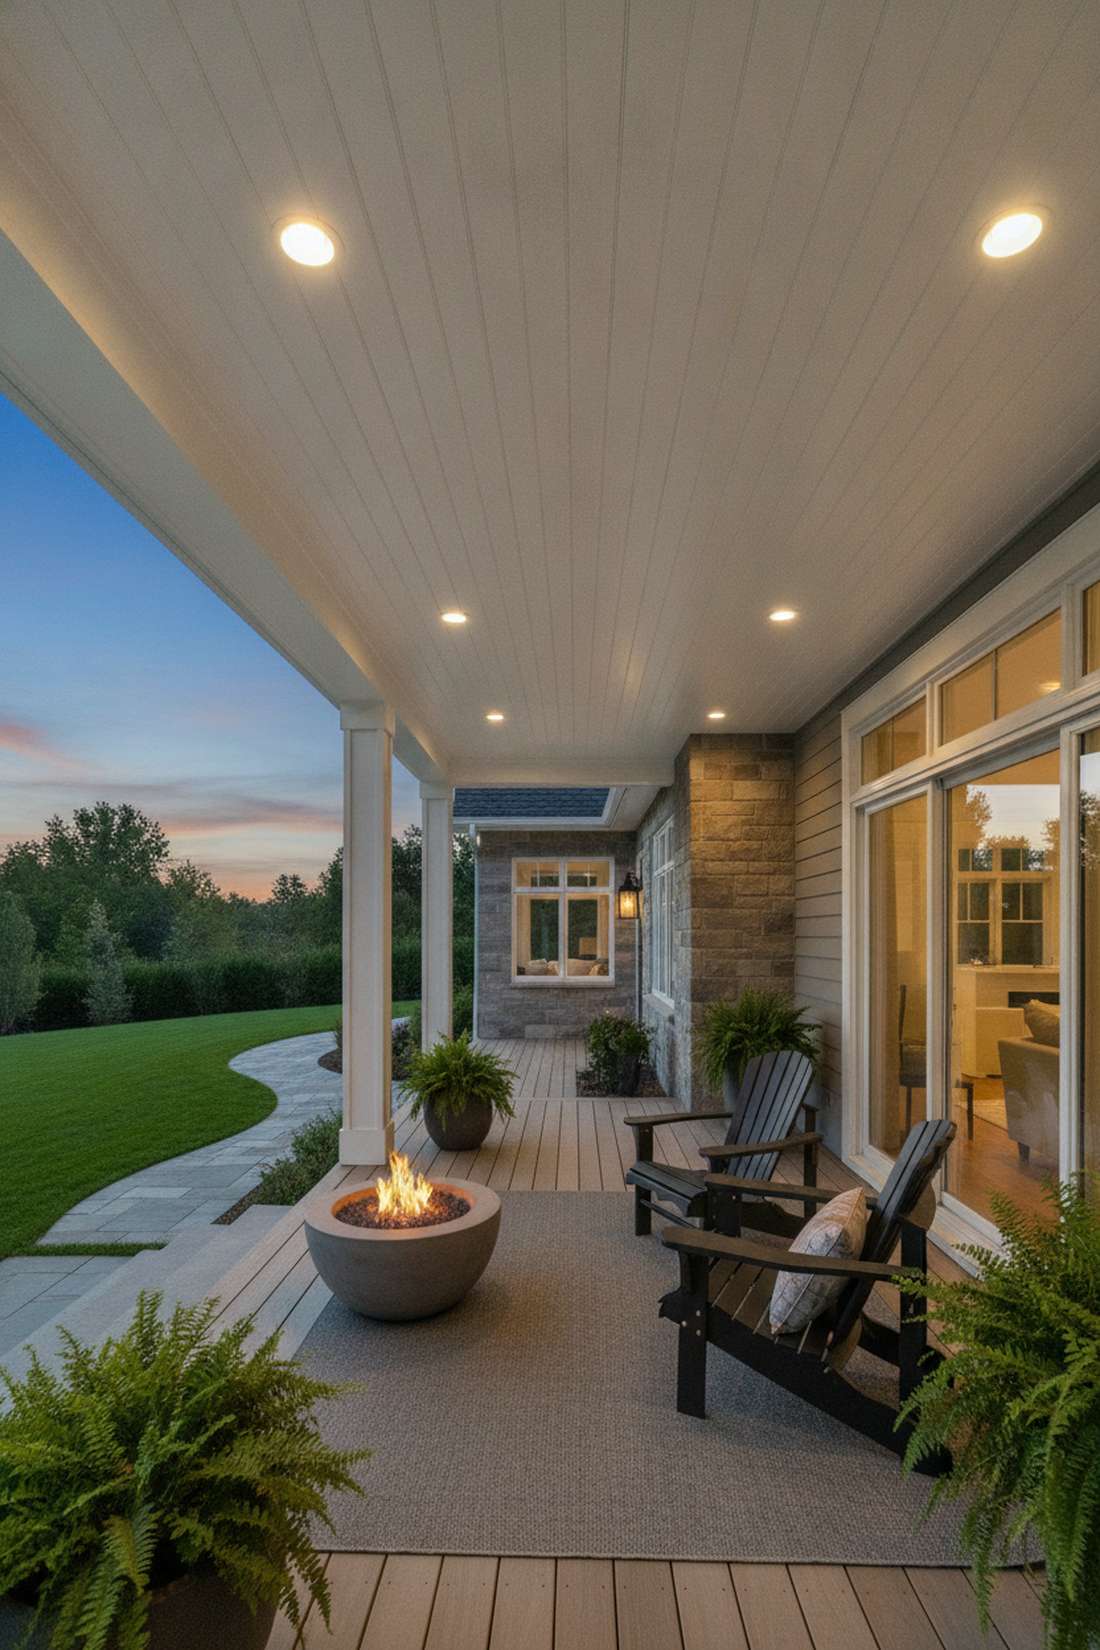
Walking under this feels like stepping into a flawlessly designed outdoor living room. Utilizing flush-mount overhead downlights works exceptionally well for covered front porches seeking a minimalist profile.
Surface-mounted dome lights are an outdated eyesore that ruin rooflines. Sinking wet-rated LED housings directly into the soffit gives a designer-level finish that hides visual clutter. It’s a foundational trick for high-end outdoor lighting residential layouts.
You can achieve this clean look for around $100–$250. Save this to your modern porch inspiration board!
- Key Materials: Wet-rated recessed LED trims
- Vibe / Style: Seamless modern minimal
- Difficulty: Intermediate to Advanced
- Budget Breakdown: Housings: $80 | Trims/LEDs: $70.
- Creator’s Tip: Put these on a smart dimmer switch to transition from bright security to a soft welcoming glow.
- Smart Sourcing: wet-rated ultra-thin LED recessed kits and smart home exterior dimmers.
6. Stair Tread Integrated Strips


This aesthetic feels like a glowing staircase leading to a modern sanctuary. Embedding low-profile stair nose strips is absolutely vital for steep entryways or deck transitions.
You don’t need a pro to achieve this dimensional depth, but you must use the right extrusions. Hiding the diodes inside aluminum channels creates a continuous neon-like bar, heavily leaning into top-tier lighting outdoor decor trends. It screams luxury.
Budget around $70–$150 depending on the number of steps. It’s a weekend upgrade you won’t regret.
- Key Materials: IP65 LED strips and aluminum channels
- Vibe / Style: Sleek safety-first modernism
- Difficulty: Intermediate
- Budget Breakdown: Strip roll: $40 | Aluminum channels: $50.
- Creator’s Tip: Never expose the raw strip to weather; always route them through a frosted protective channel.
- Smart Sourcing: IP65-rated neon LED rope light (cuttable) and angled aluminum diffuser channels (multi-pack).
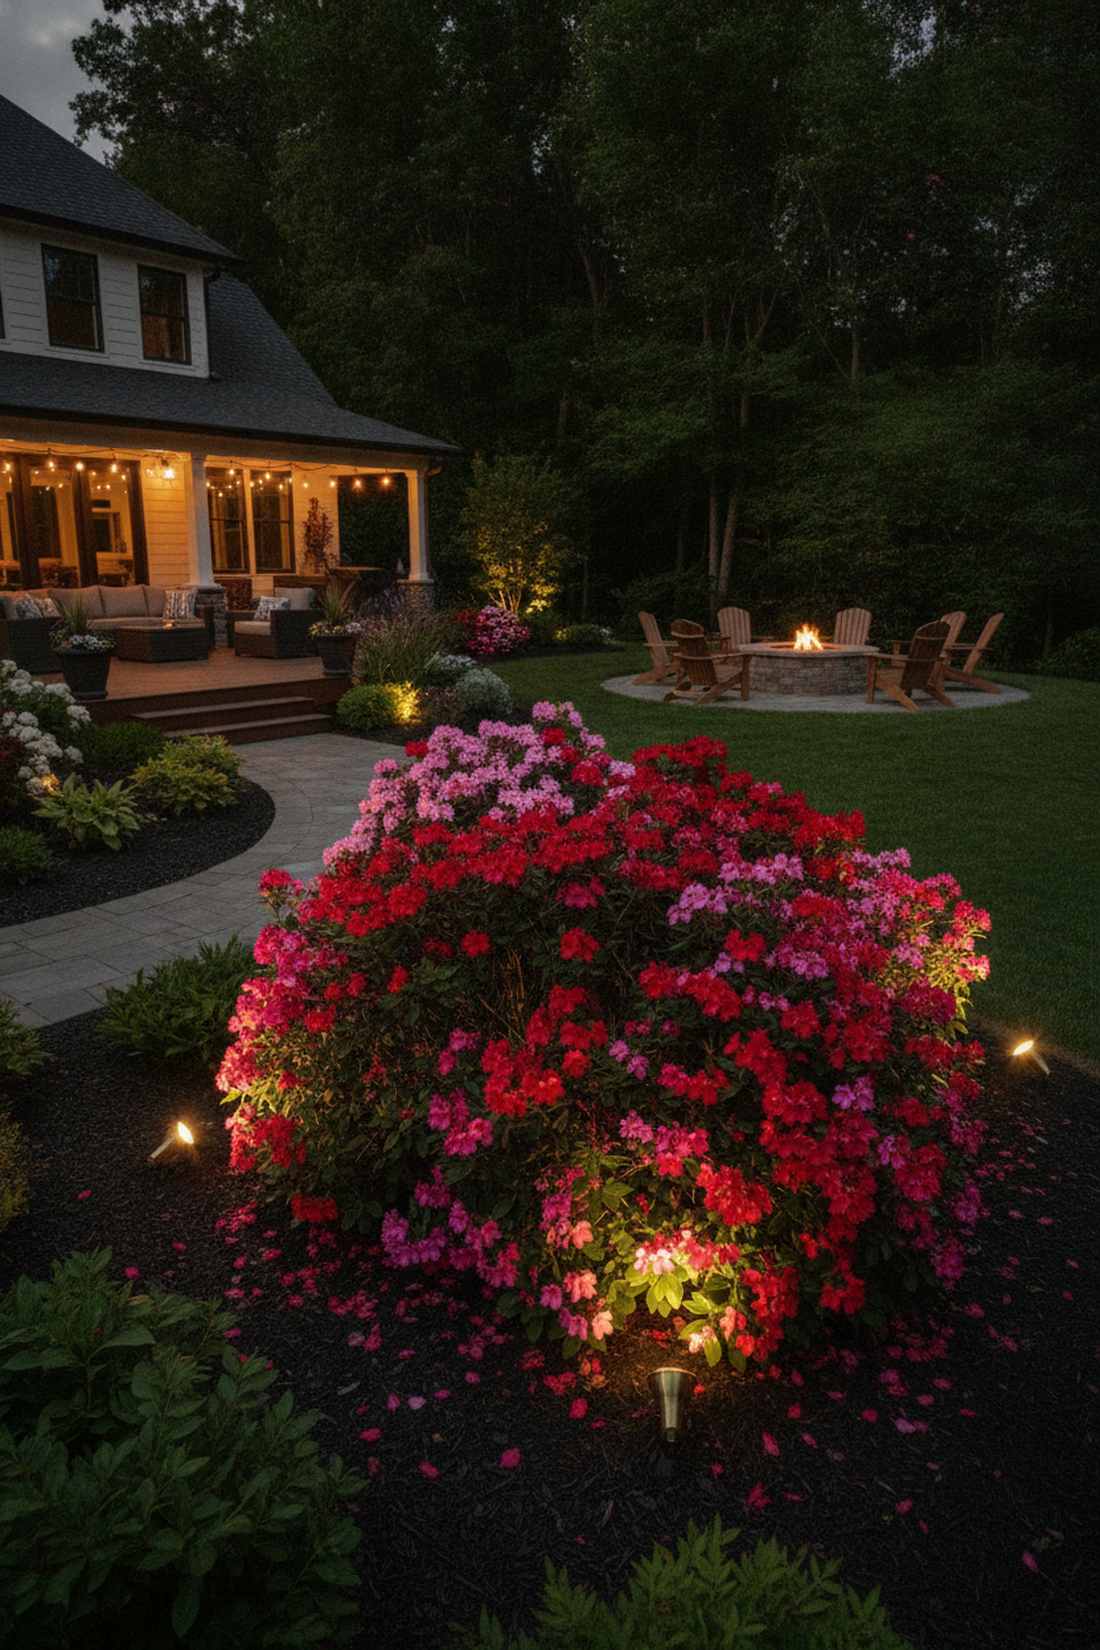
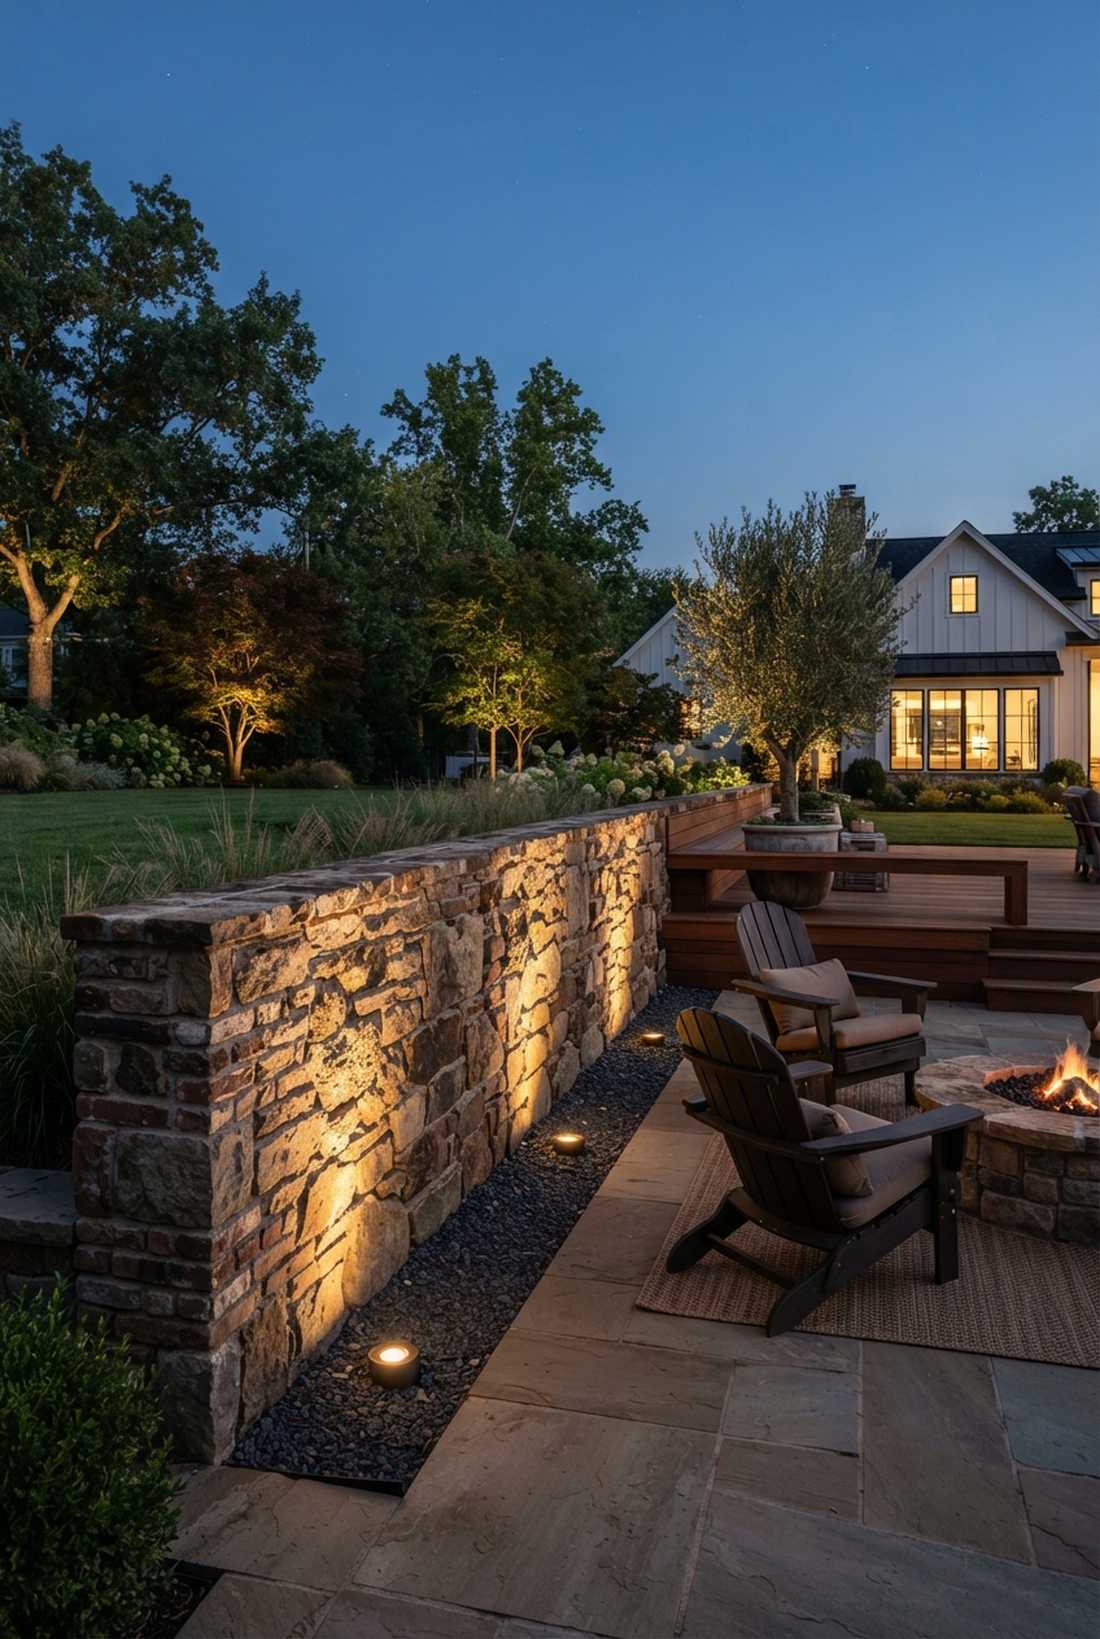
7. Landscape Bed Accent Washing
This layout straight-up looks like an enchanted botanical garden at midnight. A soft foundation planting wash is the ultimate hack for making standard shrubs look insanely majestic.
Using cheap solar stakes from the hardware store is a guaranteed way to make your yard look tacky. Instead, broad 40-degree low-voltage washes seamlessly inject premium outdoor lighting yard vibes into your space. It naturally expands the footprint of your home.
Expect to spend $90–$180 to cover the front beds. Pin this to your landscape facelift board!
- Key Materials: Wide-angle brass floodlights
- Vibe / Style: Lush botanical estate
- Difficulty: Easy beginner setup
- Budget Breakdown: Flood fixtures: $120 | Wire: $30.
- Creator’s Tip: Aim upward at a 45-degree angle to catch the foliage without creating aggressive hot spots on the siding.
- Smart Sourcing: heavy-duty low-voltage wash lights and waterproof gel-filled wire connectors.
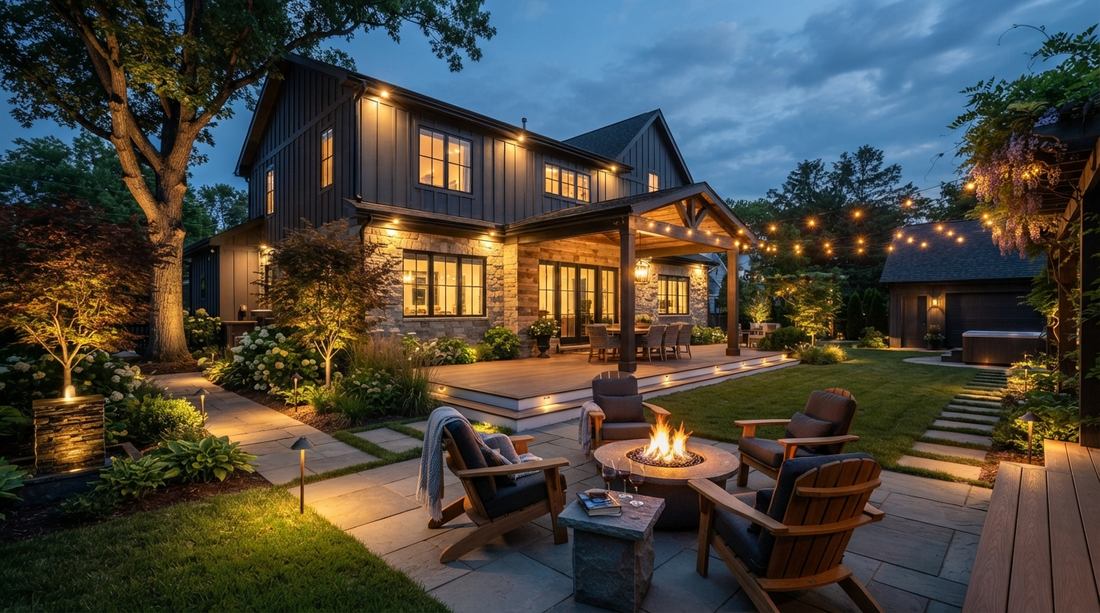
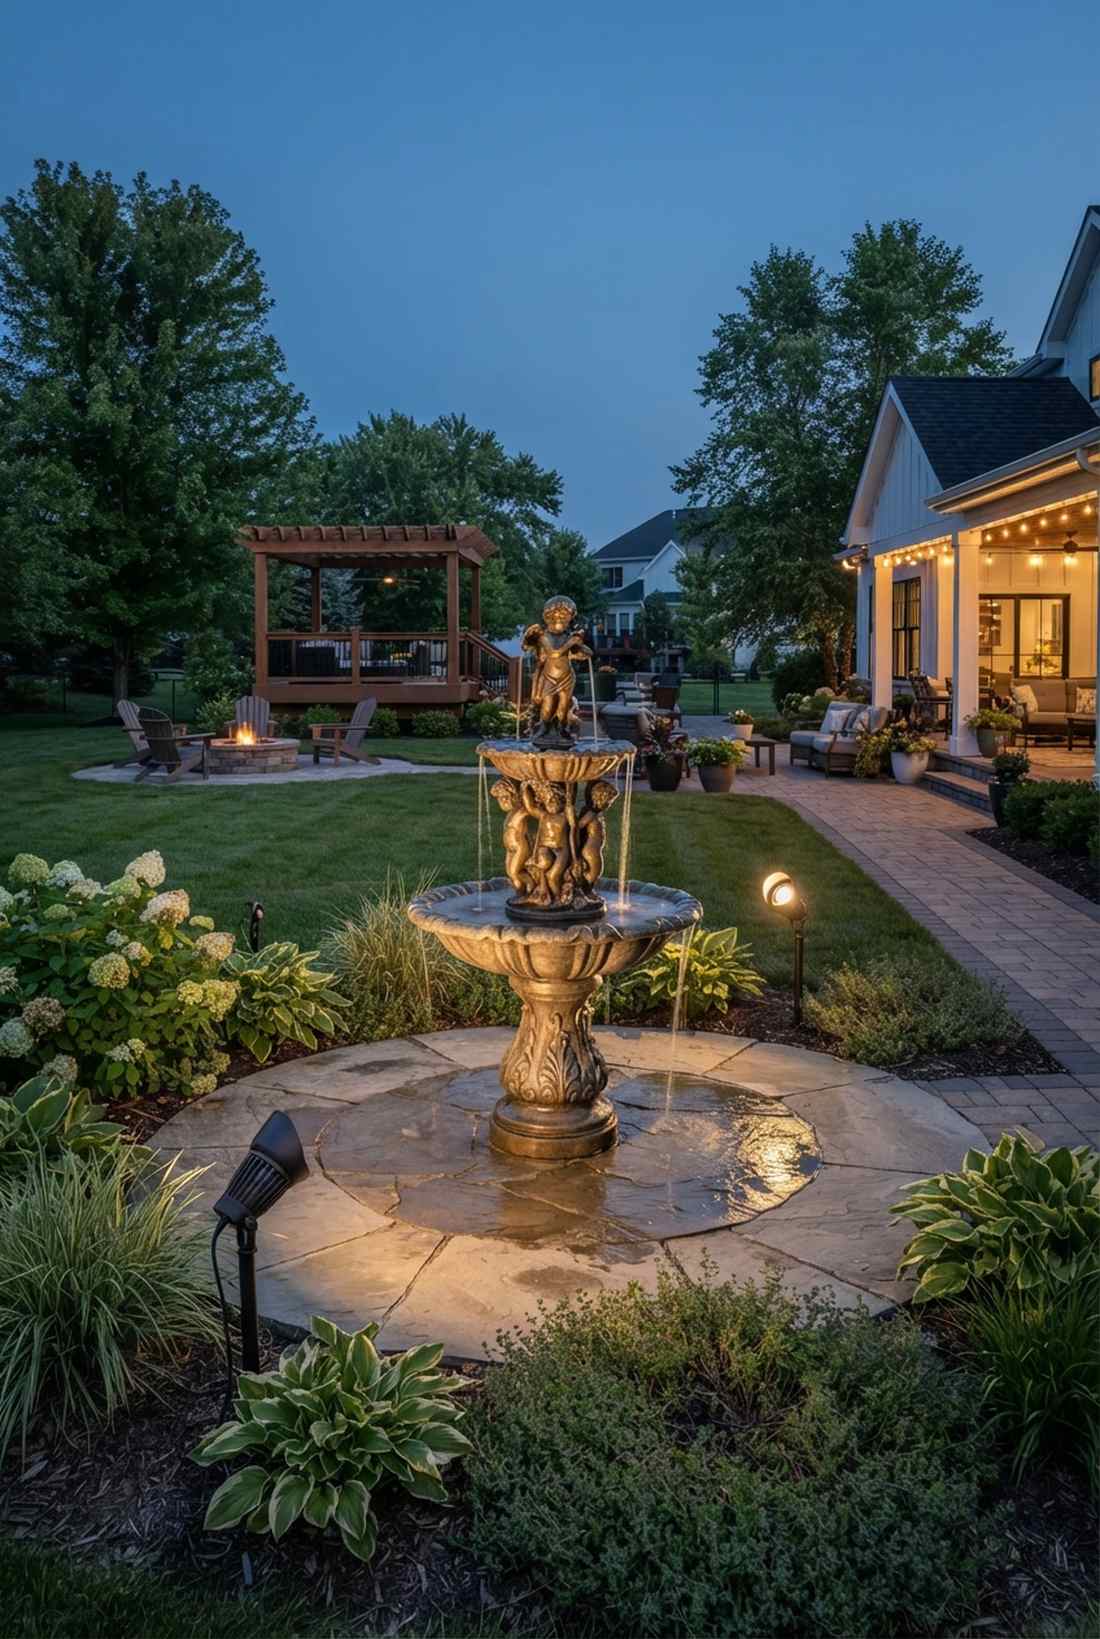
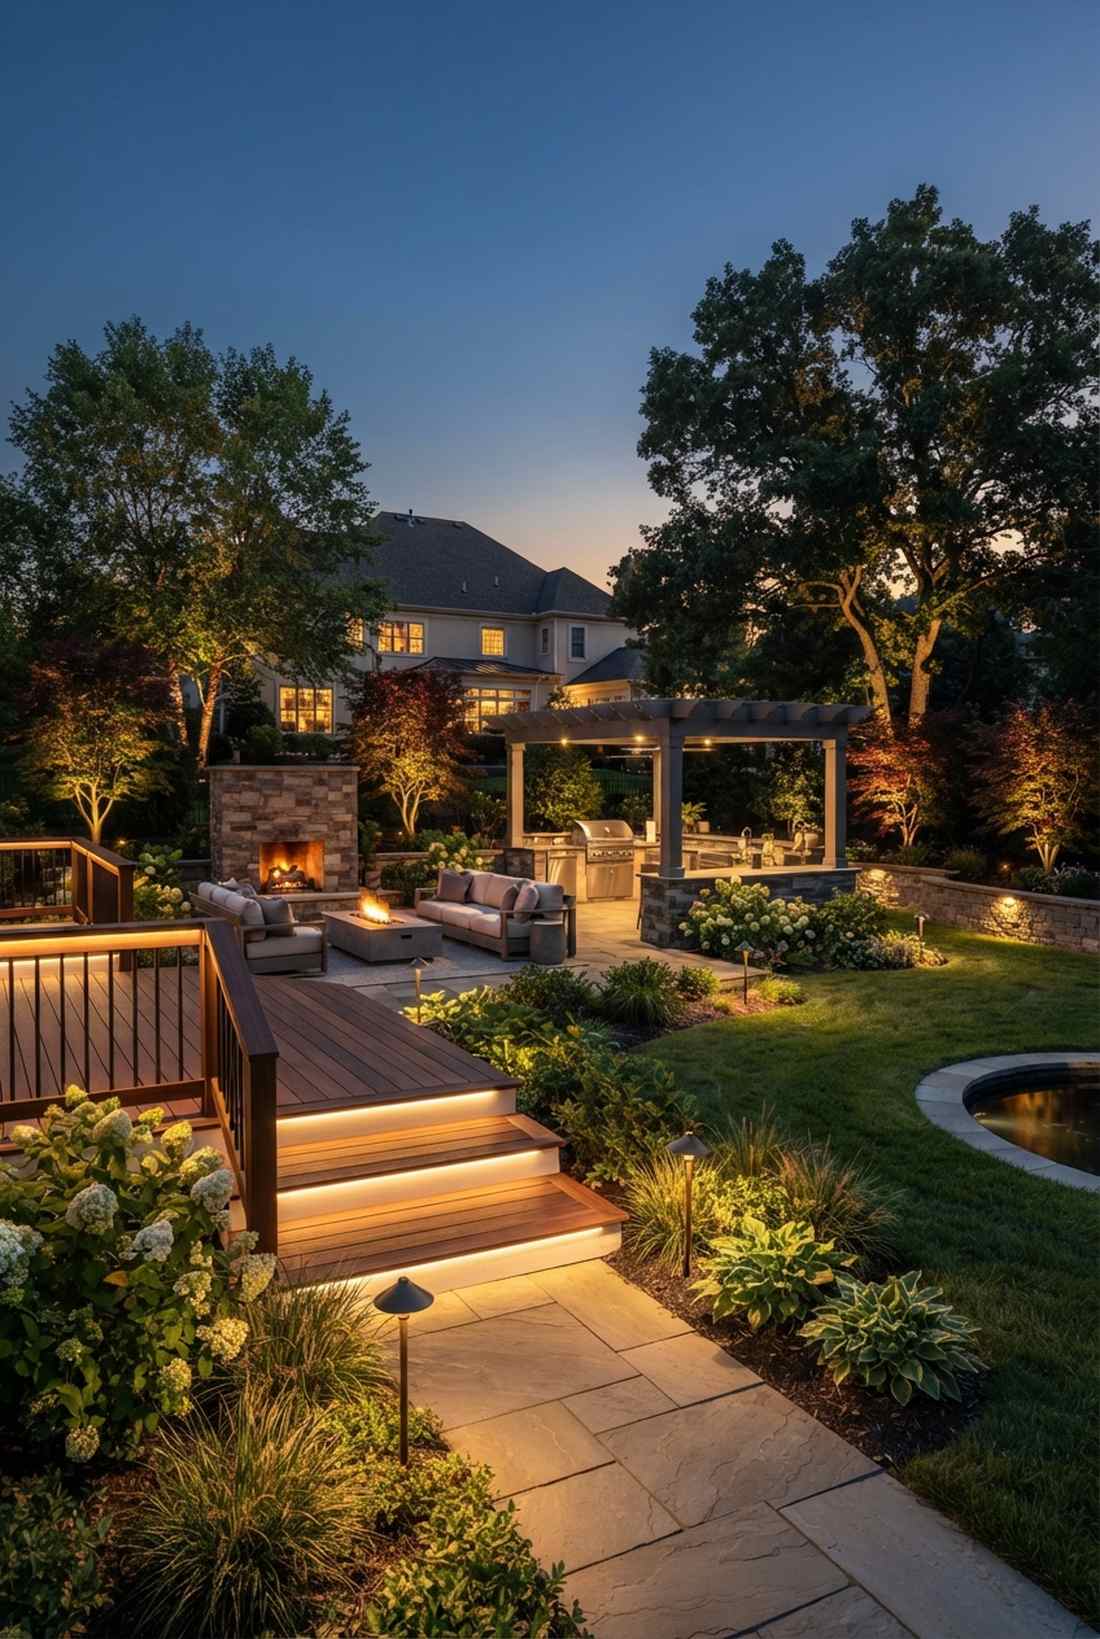
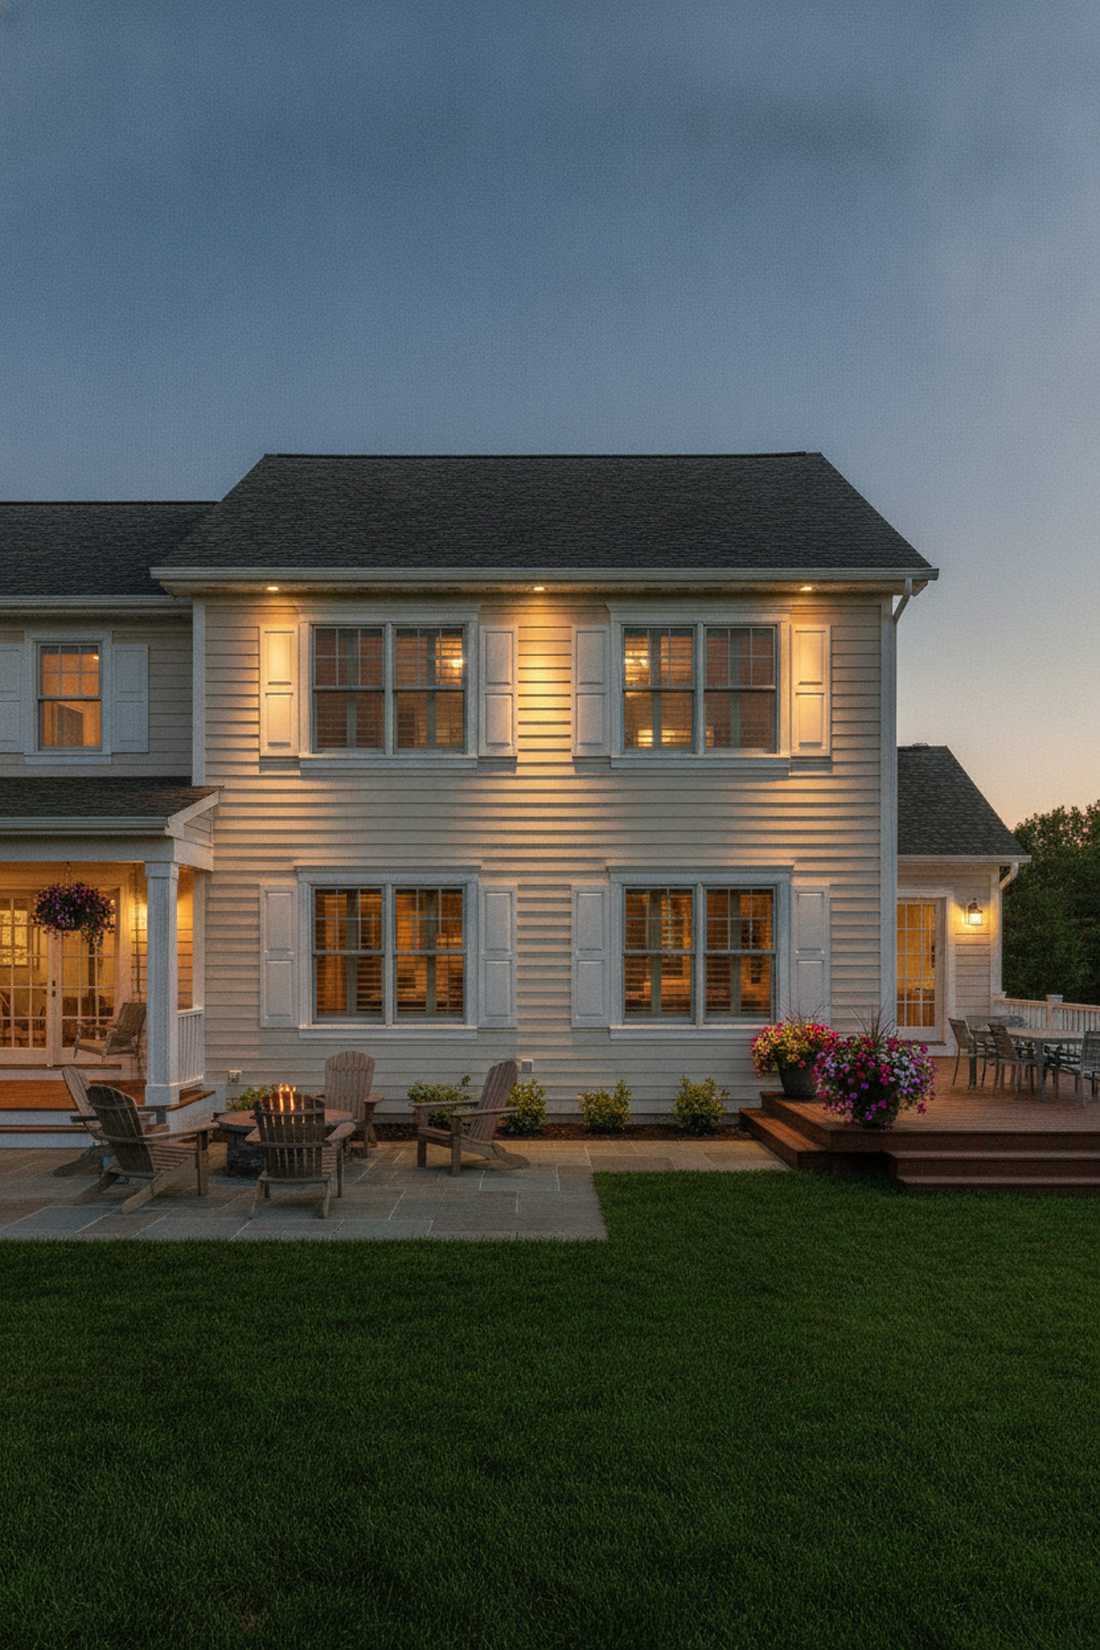
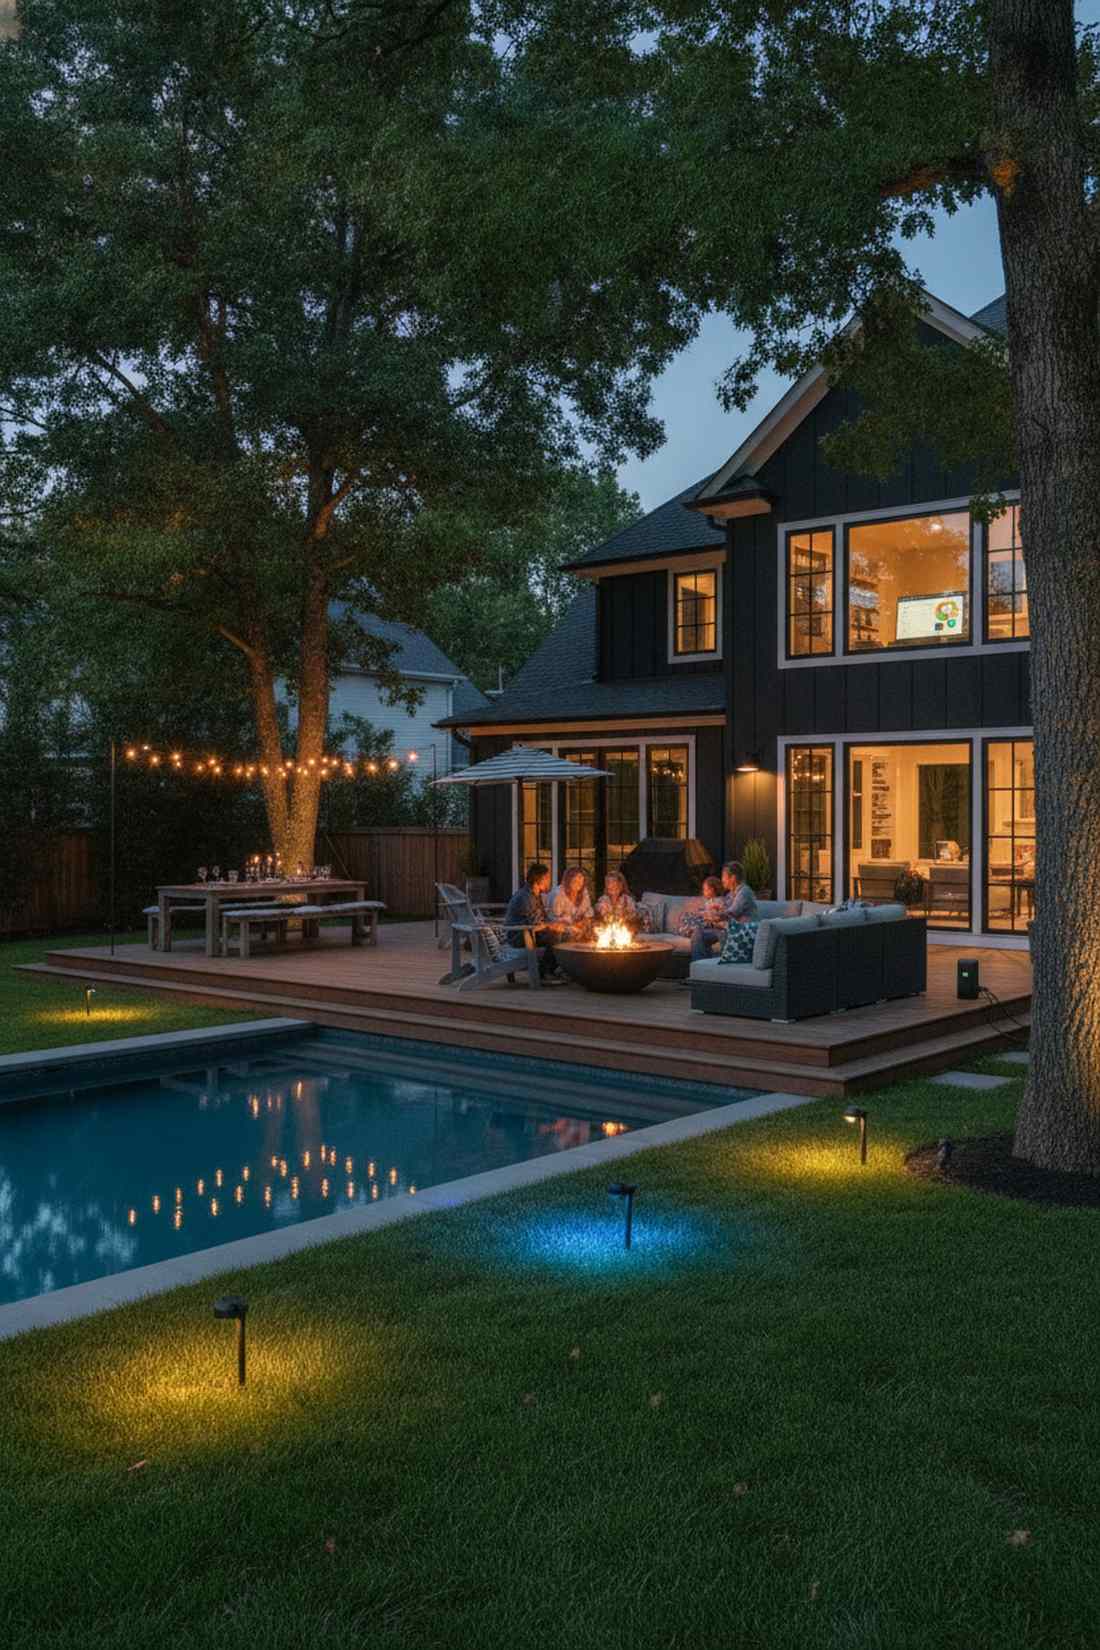
Backyard Living Zones
Backyards serve as extensions of interior living space. Lighting design here prioritizes comfort, functionality for evening activities, and creation of intimate zones within larger areas. Designers balance ambient illumination with targeted task lighting for cooking, dining, and conversation areas.
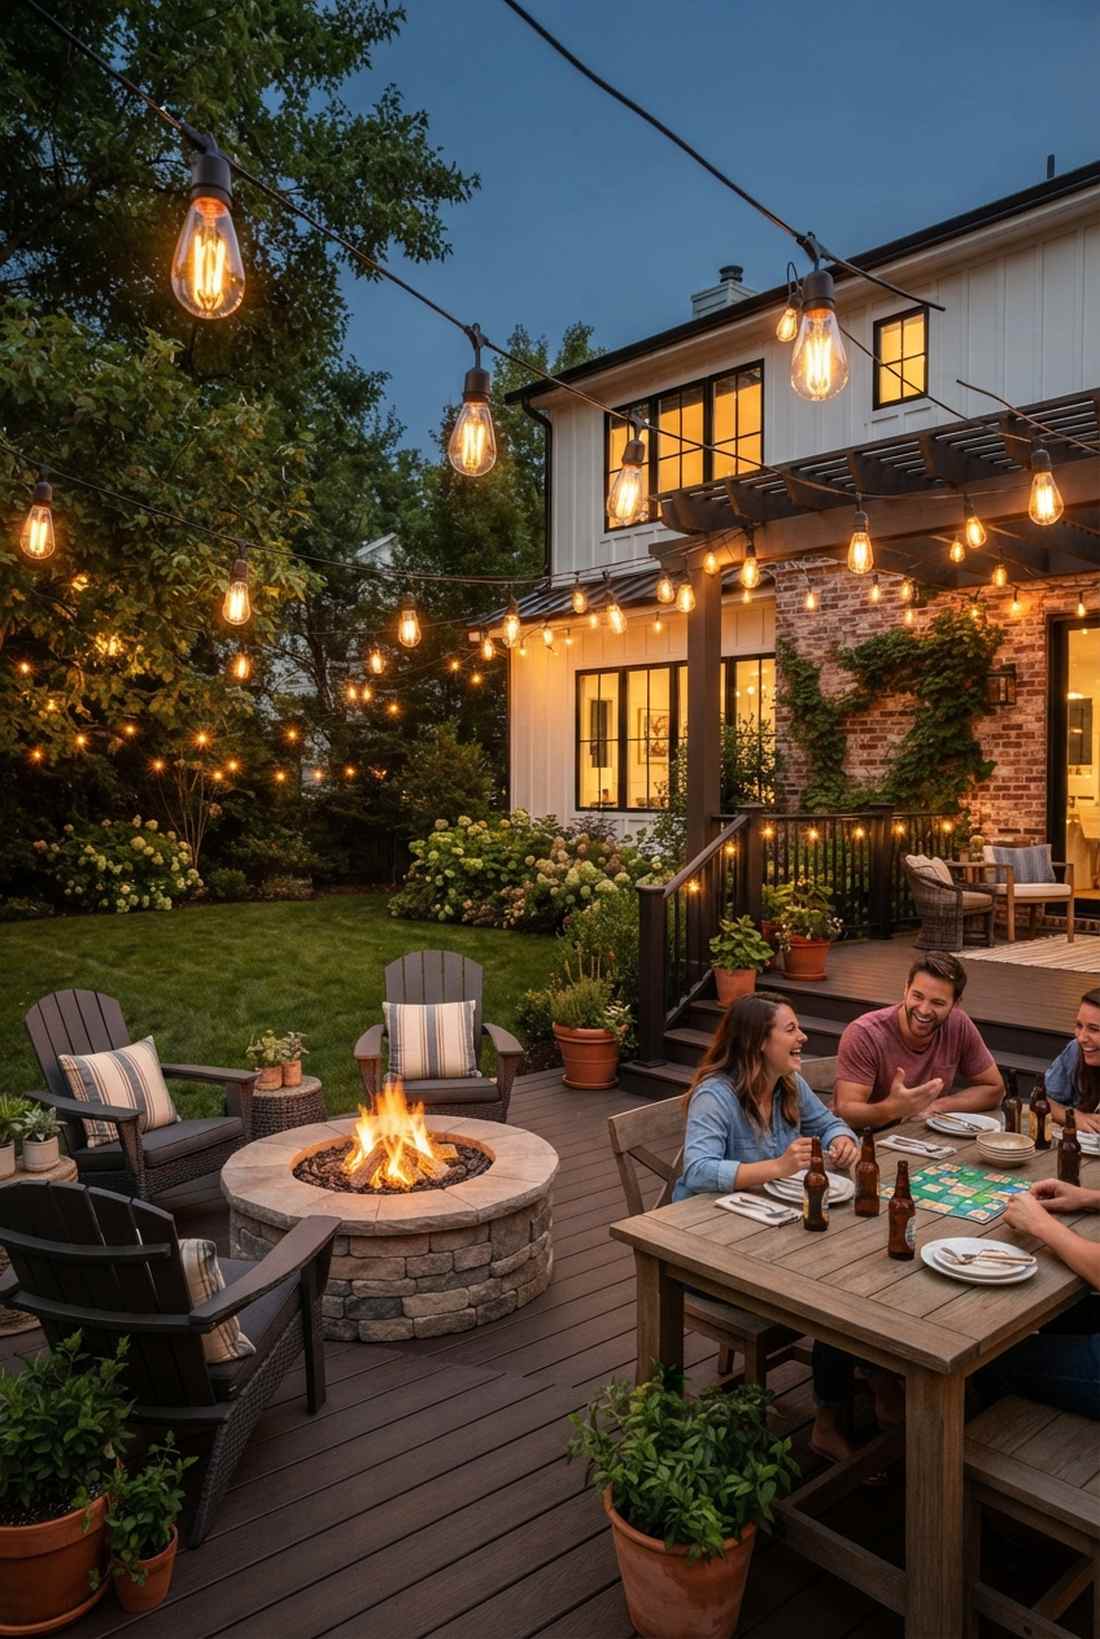
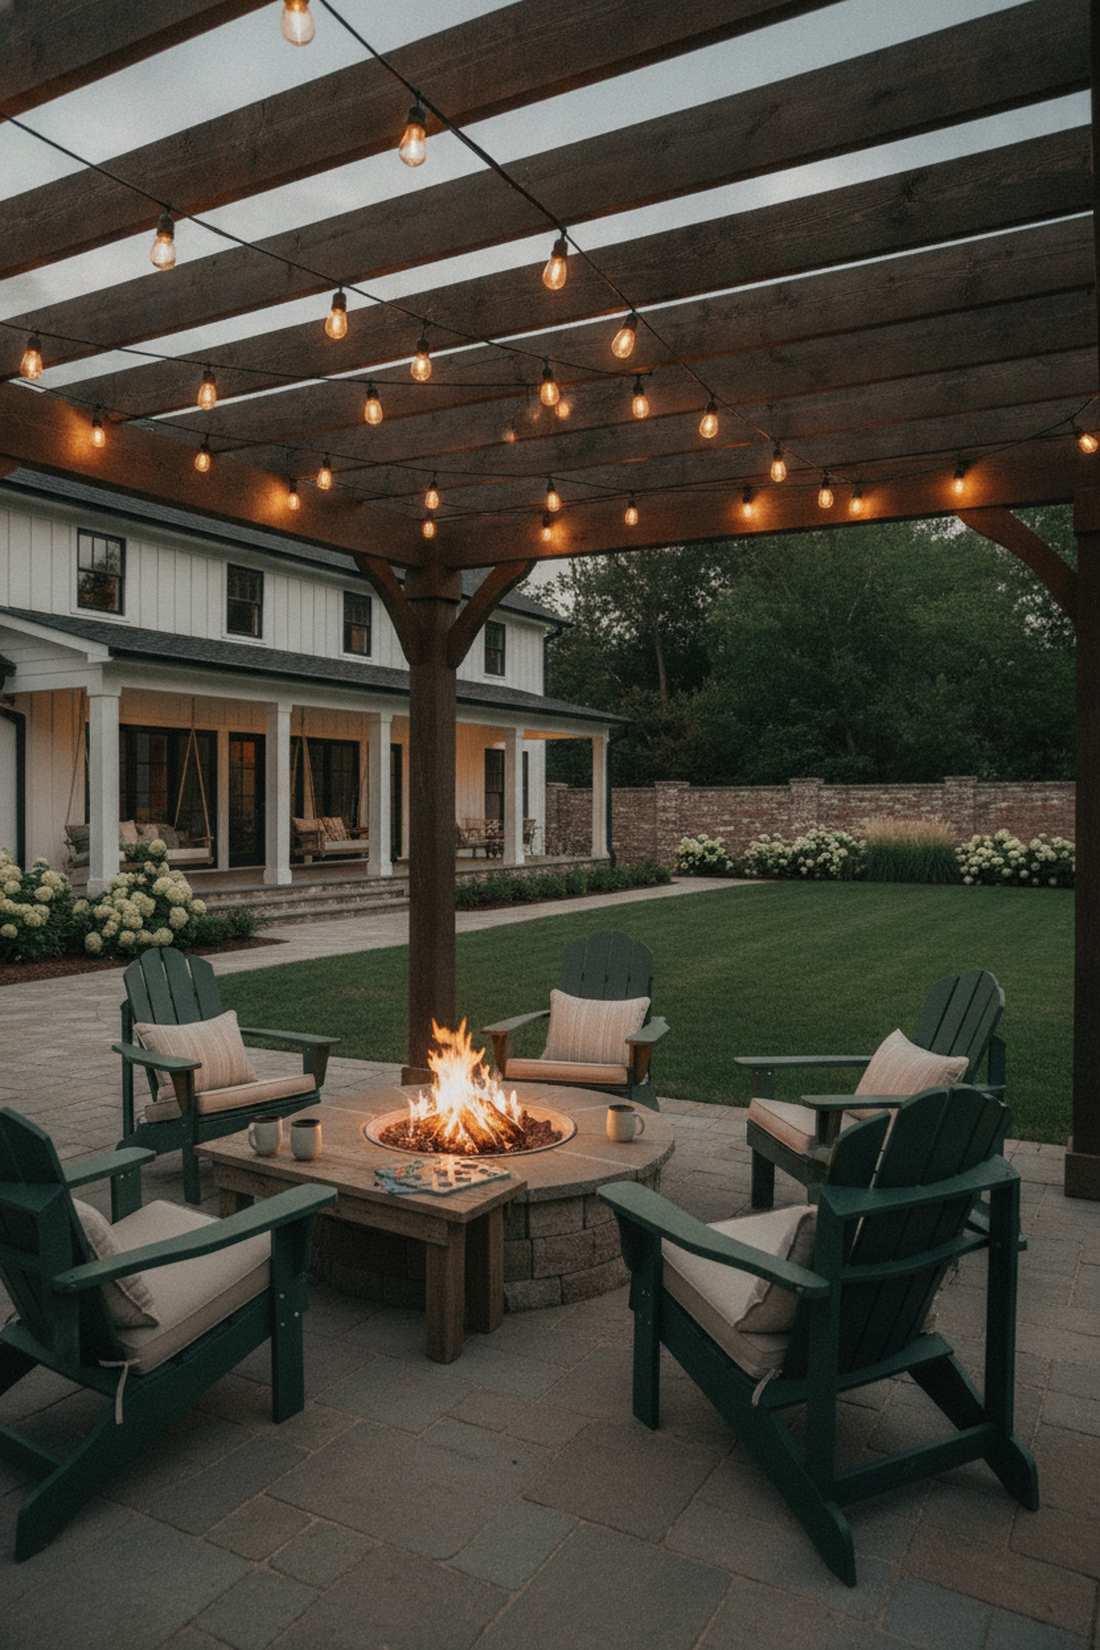
8. Pergola Draped String Lighting
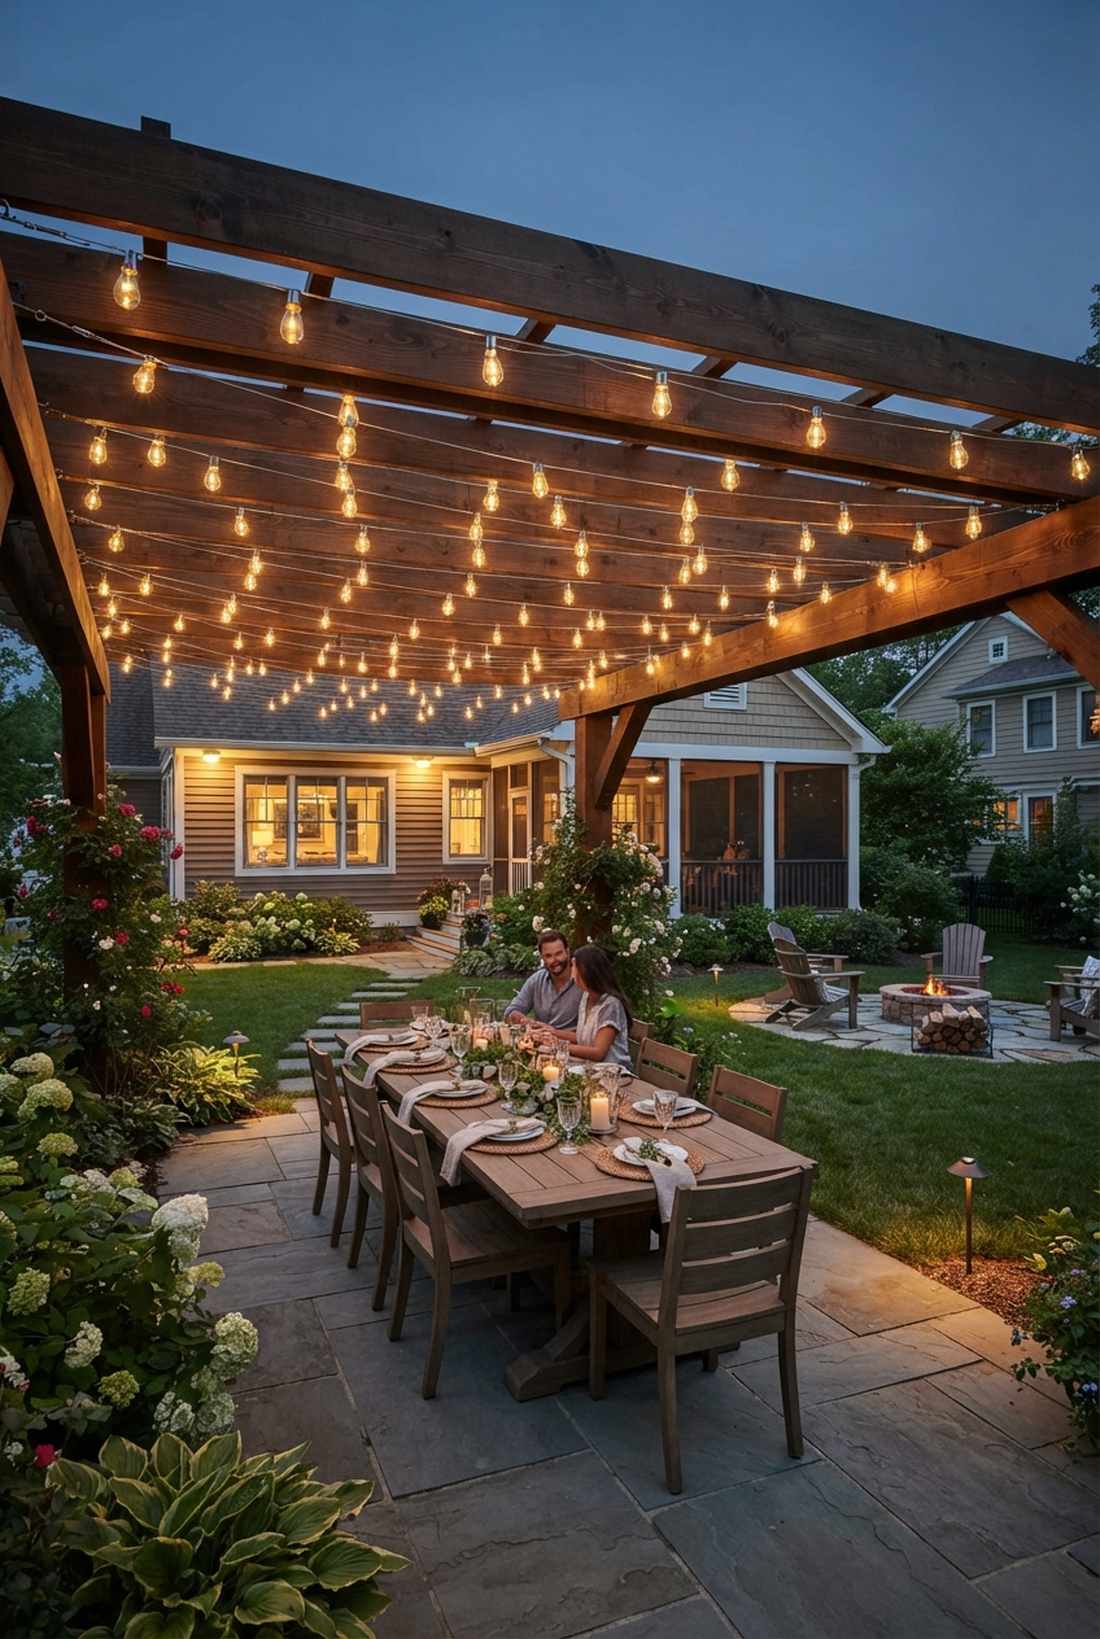
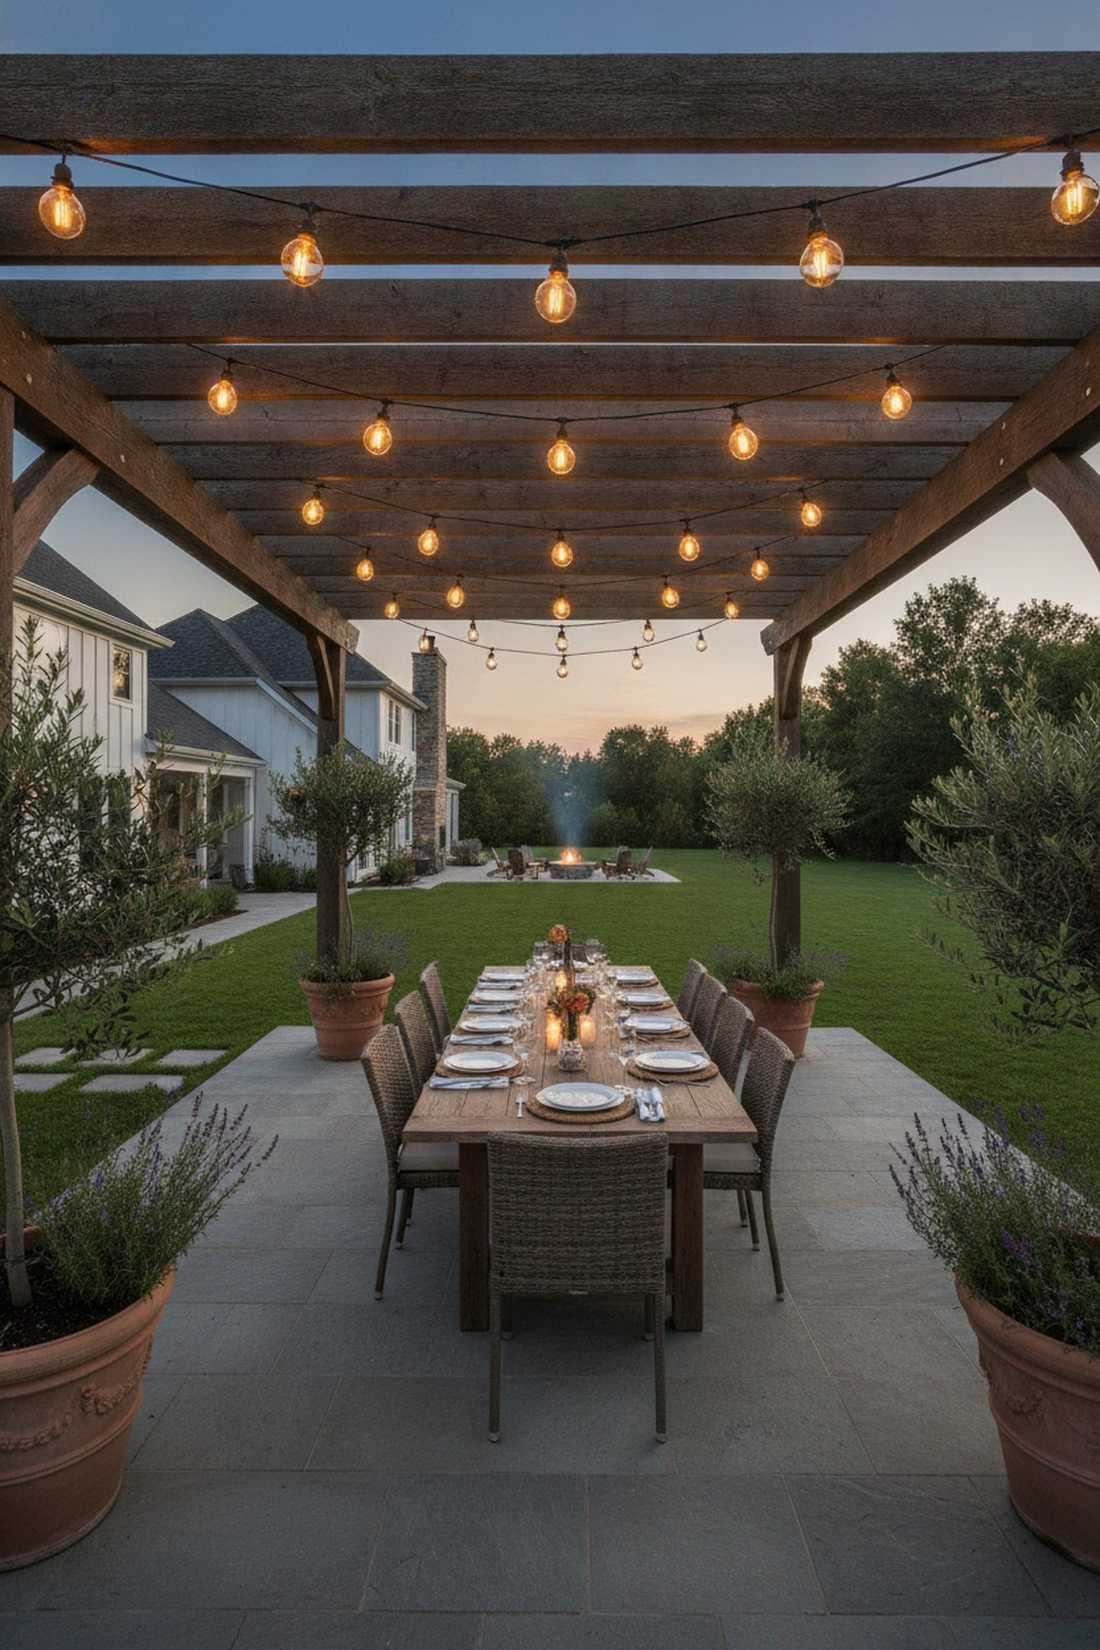
Sitting under this feels like dining at a high-end Tuscan vineyard. Utilizing a catenary draped canopy creates the perfect ambient festival vibe for backyard dining.
Flimsy consumer-grade fairy lights snap after one storm, ruining the entire aesthetic. Upgrading to commercial-grade shatterproof bulbs delivers a surprisingly premium look that transforms standard outdoor lighting backyard setups. It’s the ultimate mood setter.
You can easily pull this off for around $50–$90. Pin this if you love hosting summer dinner parties!
- Key Materials: Commercial-grade Edison strings
- Vibe / Style: Festive European patio
- Difficulty: Beginner-friendly
- Budget Breakdown: String lights: $60 | Suspension cable kit: $25.
- Creator’s Tip: Always use a steel guide wire to suspend the strings; never rely on the electrical cord to hold the tension.
- Smart Sourcing: shatterproof LED outdoor string lights (bulk length) and stainless steel globe light suspension kits.
This next setup is ridiculously cheap but looks like a $1000 custom deck display… wait until you see the glow.
9. Deck Perimeter Post Caps
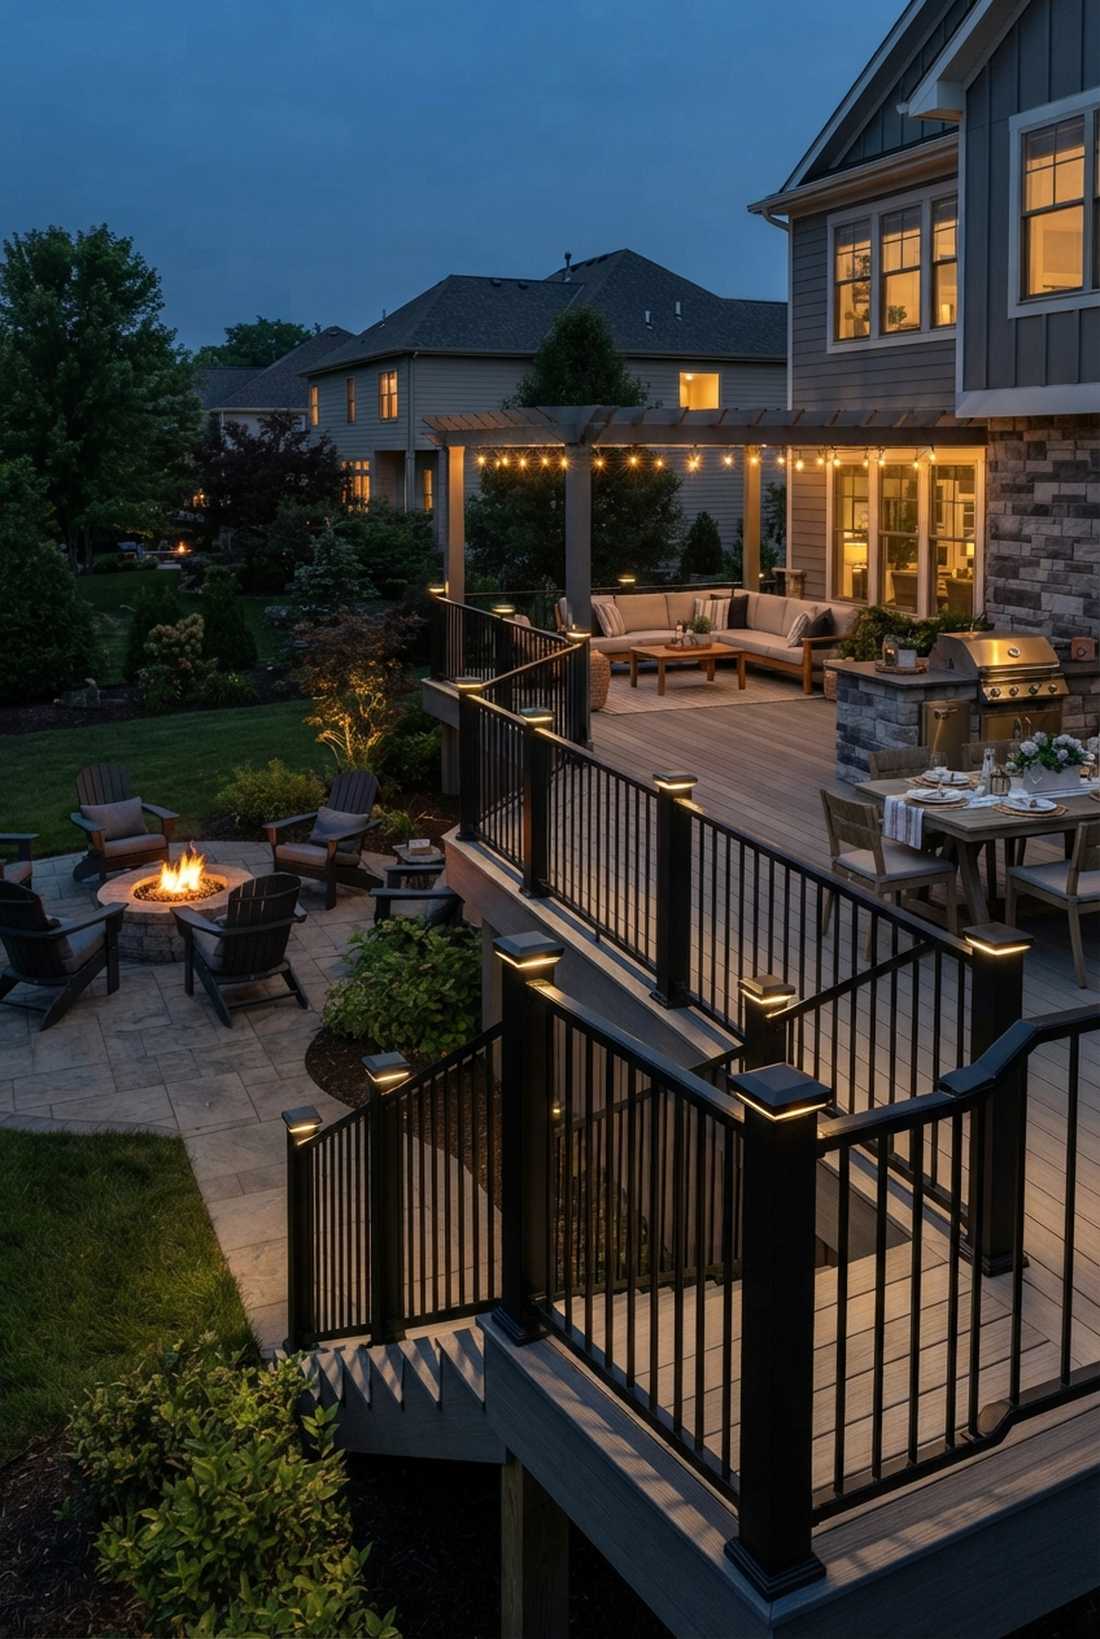
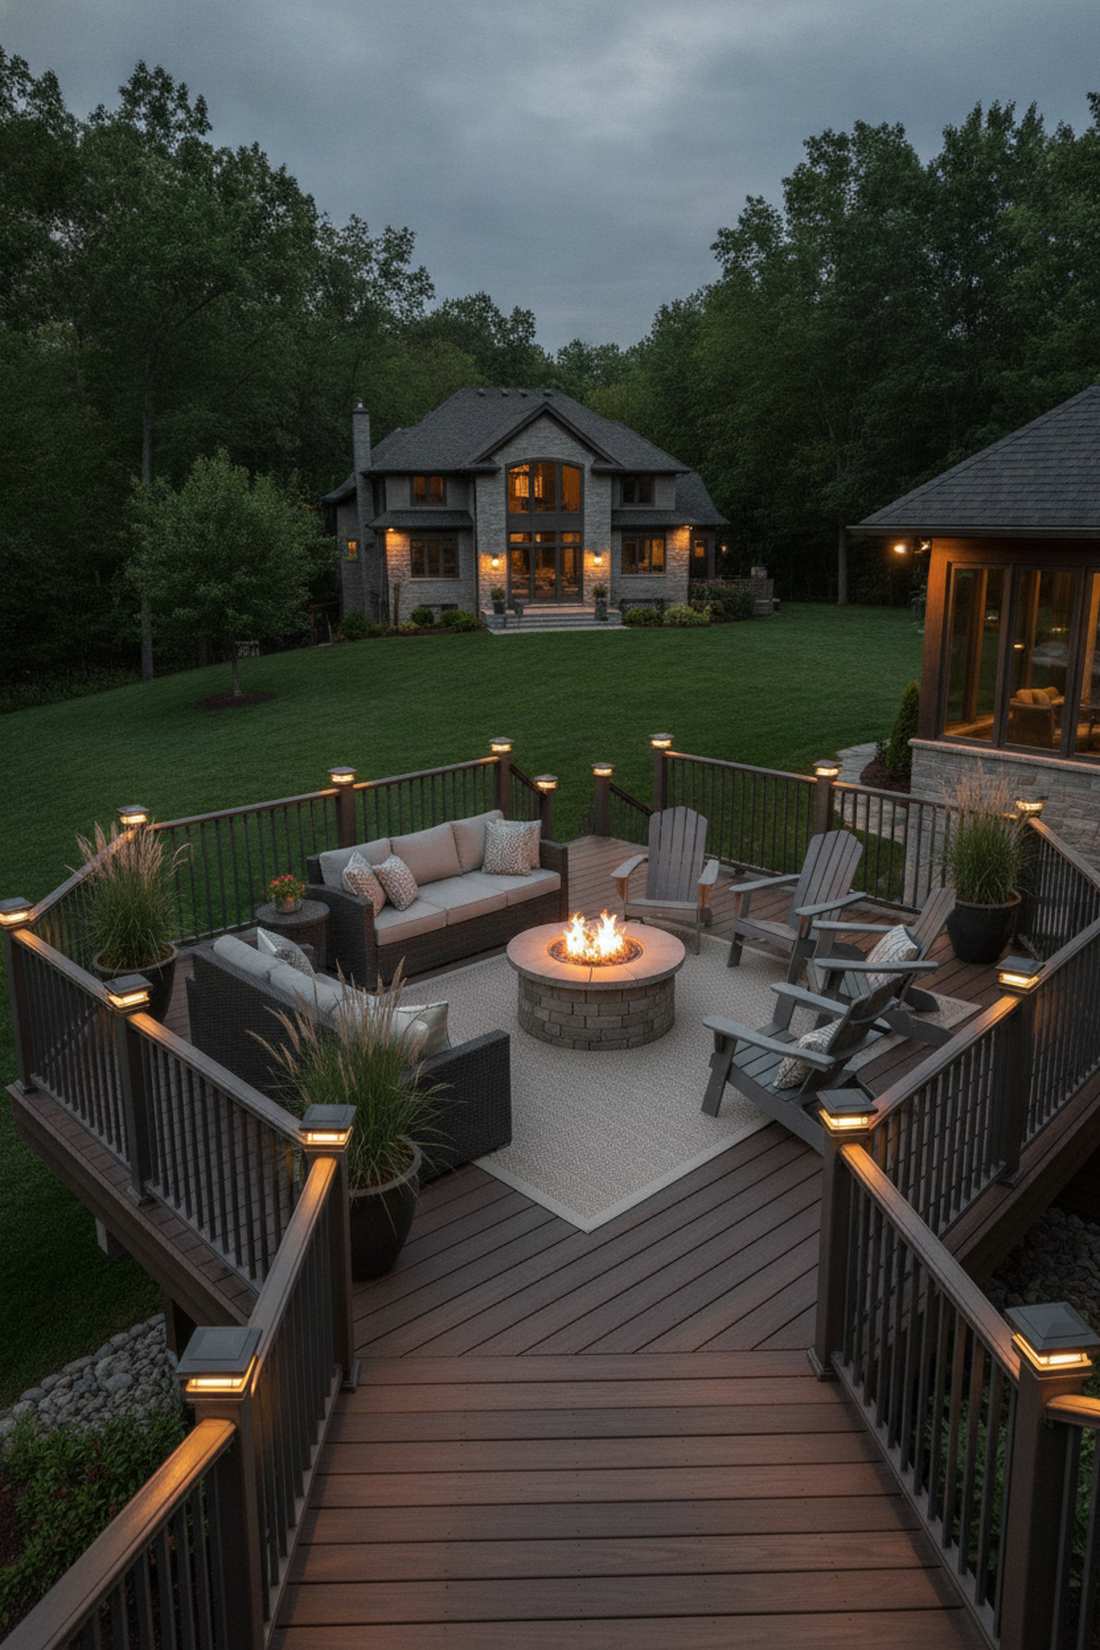
This layout feels like a glowing fortress boundary wrapping your outdoor lounge. Installing integrated LED rail caps is the sleekest way to define deck edges without tripping hazards.
Most DIYers ruin deck flow with harsh, blinding security floods. Dropping low-voltage caps onto your existing posts gives a designer-level finish while completely eliminating dark corners. It is the gold standard for integrated lighting outdoor decor.
Budget around $150–$250 depending on your railing count. Highly recommended for a fast architectural boost.
- Key Materials: Low-voltage LED post caps
- Vibe / Style: Structured contemporary deck
- Difficulty: Intermediate
- Budget Breakdown: Cap multipack: $180 | Transformer: $40.
- Creator’s Tip: Match the cap material strictly to your railing—use powder-coated aluminum for metal rails to ensure seamless blending.
- Smart Sourcing: powder-coated LED deck post caps (4-pack) and 12V slimline magnetic transformers.
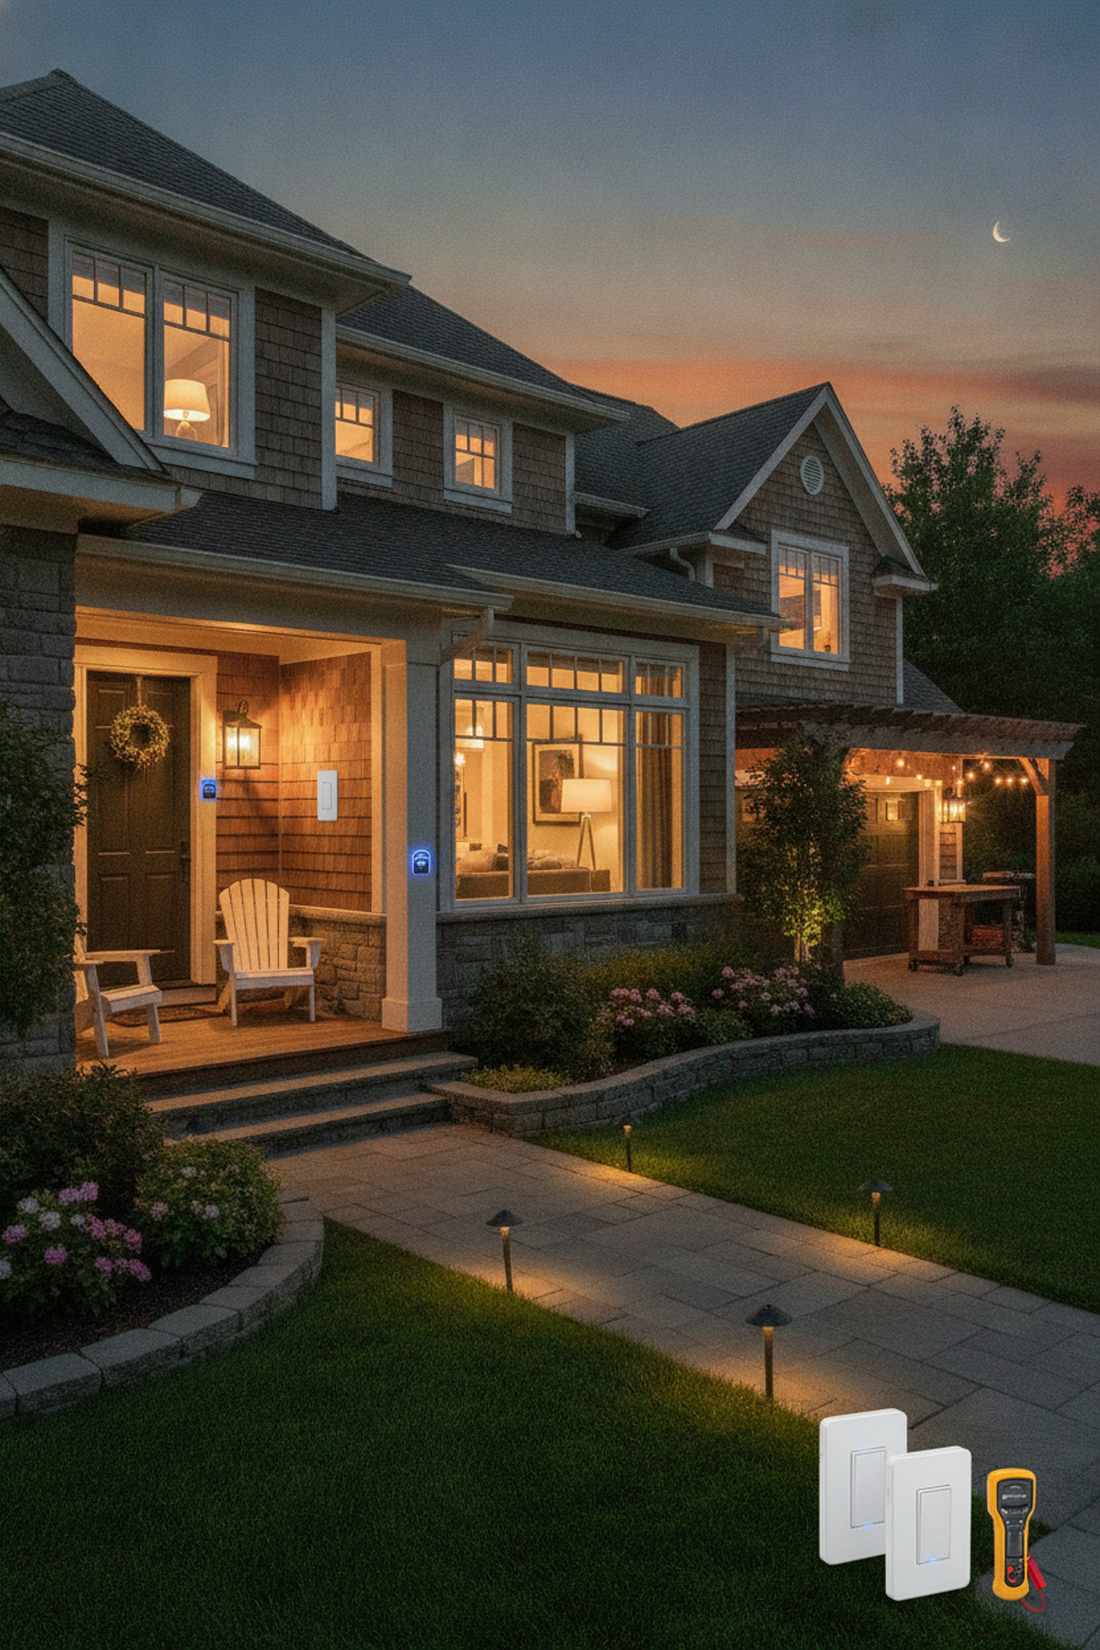
💡 Must-Have Supplies for High-End Setups
To build these setups faster and ensure they last, skip the generic craft aisles and invest in the right foundational kits.
- Base & Support: commercial-grade direct burial landscape wire (250ft spool)
- Setup Tools: smart Wi-Fi enabled low-voltage transformers
- Weather/Durability Protection: silicone-filled waterproof wire nuts (bulk pack)
10. Under-Deck Soffit Strips
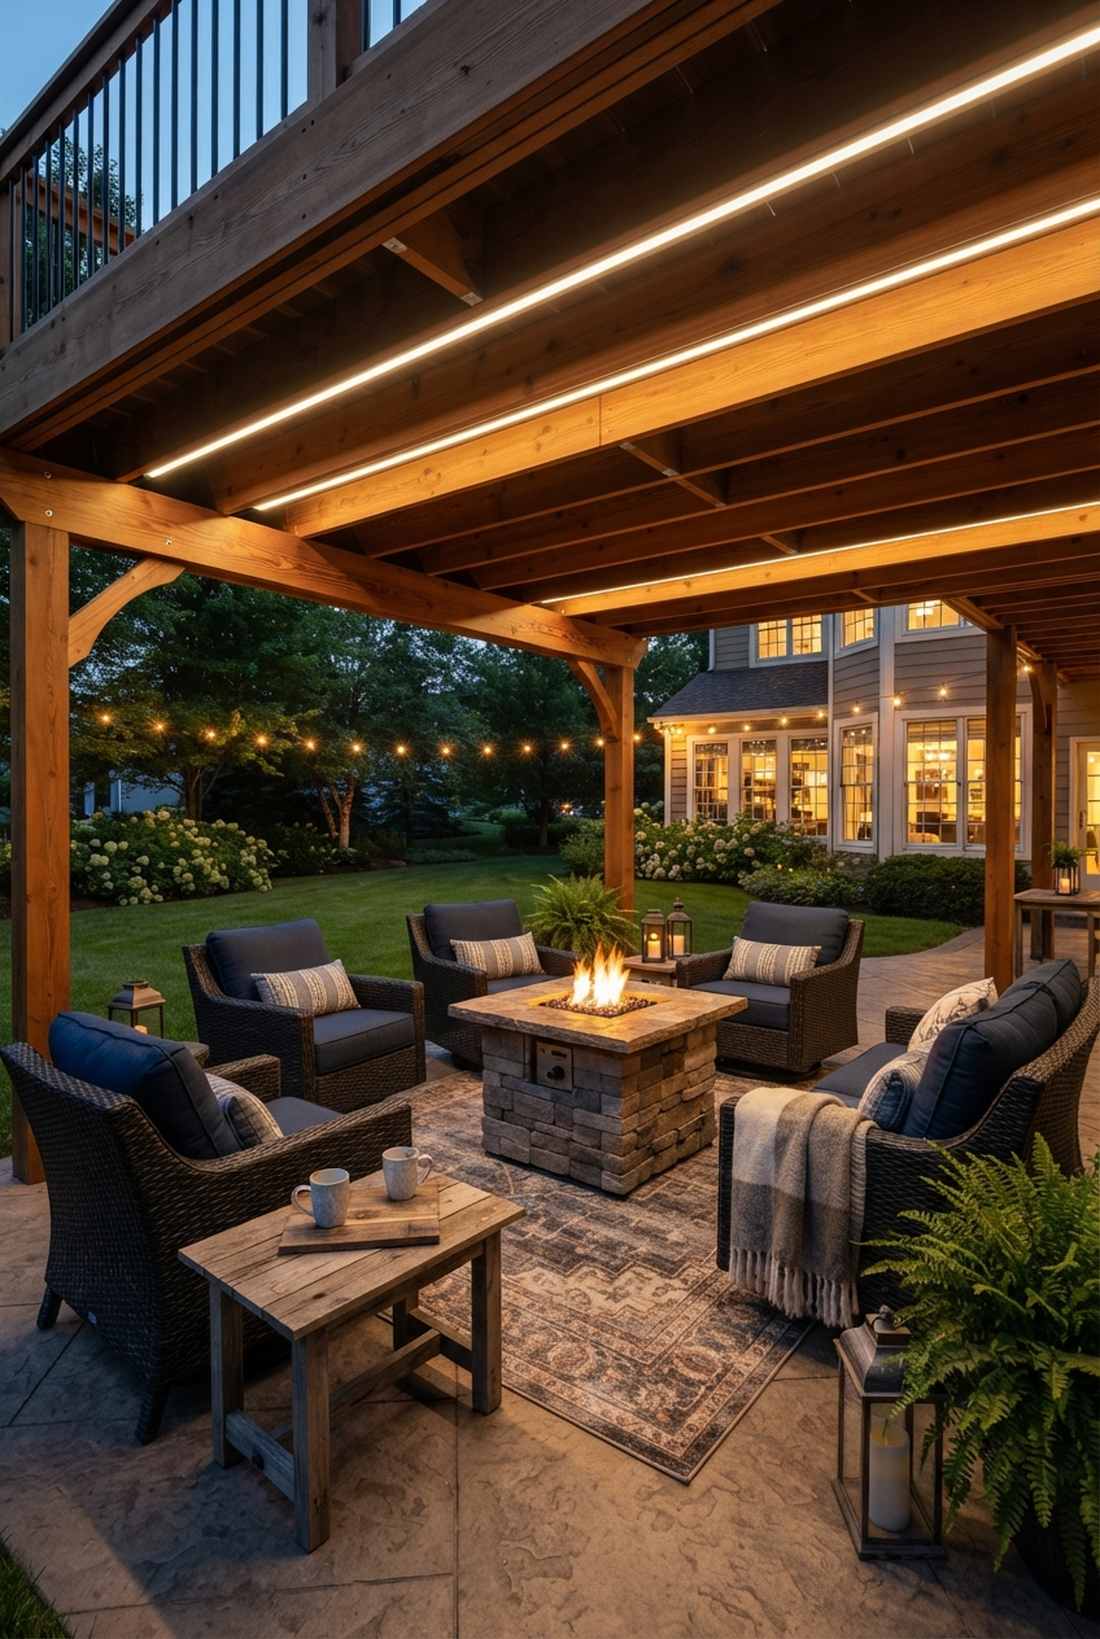
This aesthetic feels like uncovering a hidden VIP lounge right in your backyard. Mounting under-joist LED channels reclaims dead space and turns it into a functional outdoor room.
Leaving the area under an elevated deck as a creepy, dark void is a massive wasted opportunity. Running diffused strips parallel to the joists looks far more expensive than it is, completely altering the outdoor lighting design hierarchy. It doubles your usable real estate.
You can execute this for roughly $100–$200. Save this idea if you have a multi-level deck structure!
- Key Materials: Exterior LED strips & diffusers
- Vibe / Style: Speakeasy outdoor lounge
- Difficulty: Intermediate DIY
- Budget Breakdown: LEDs: $80 | Extrusions: $60.
- Creator’s Tip: Group the strips into grids and put them on dual zones so you can control the brightness dynamically.
- Smart Sourcing: IP67 waterproof COB LED strip lights and deep aluminum LED channel tracks.
11. Patio Pendant Clusters
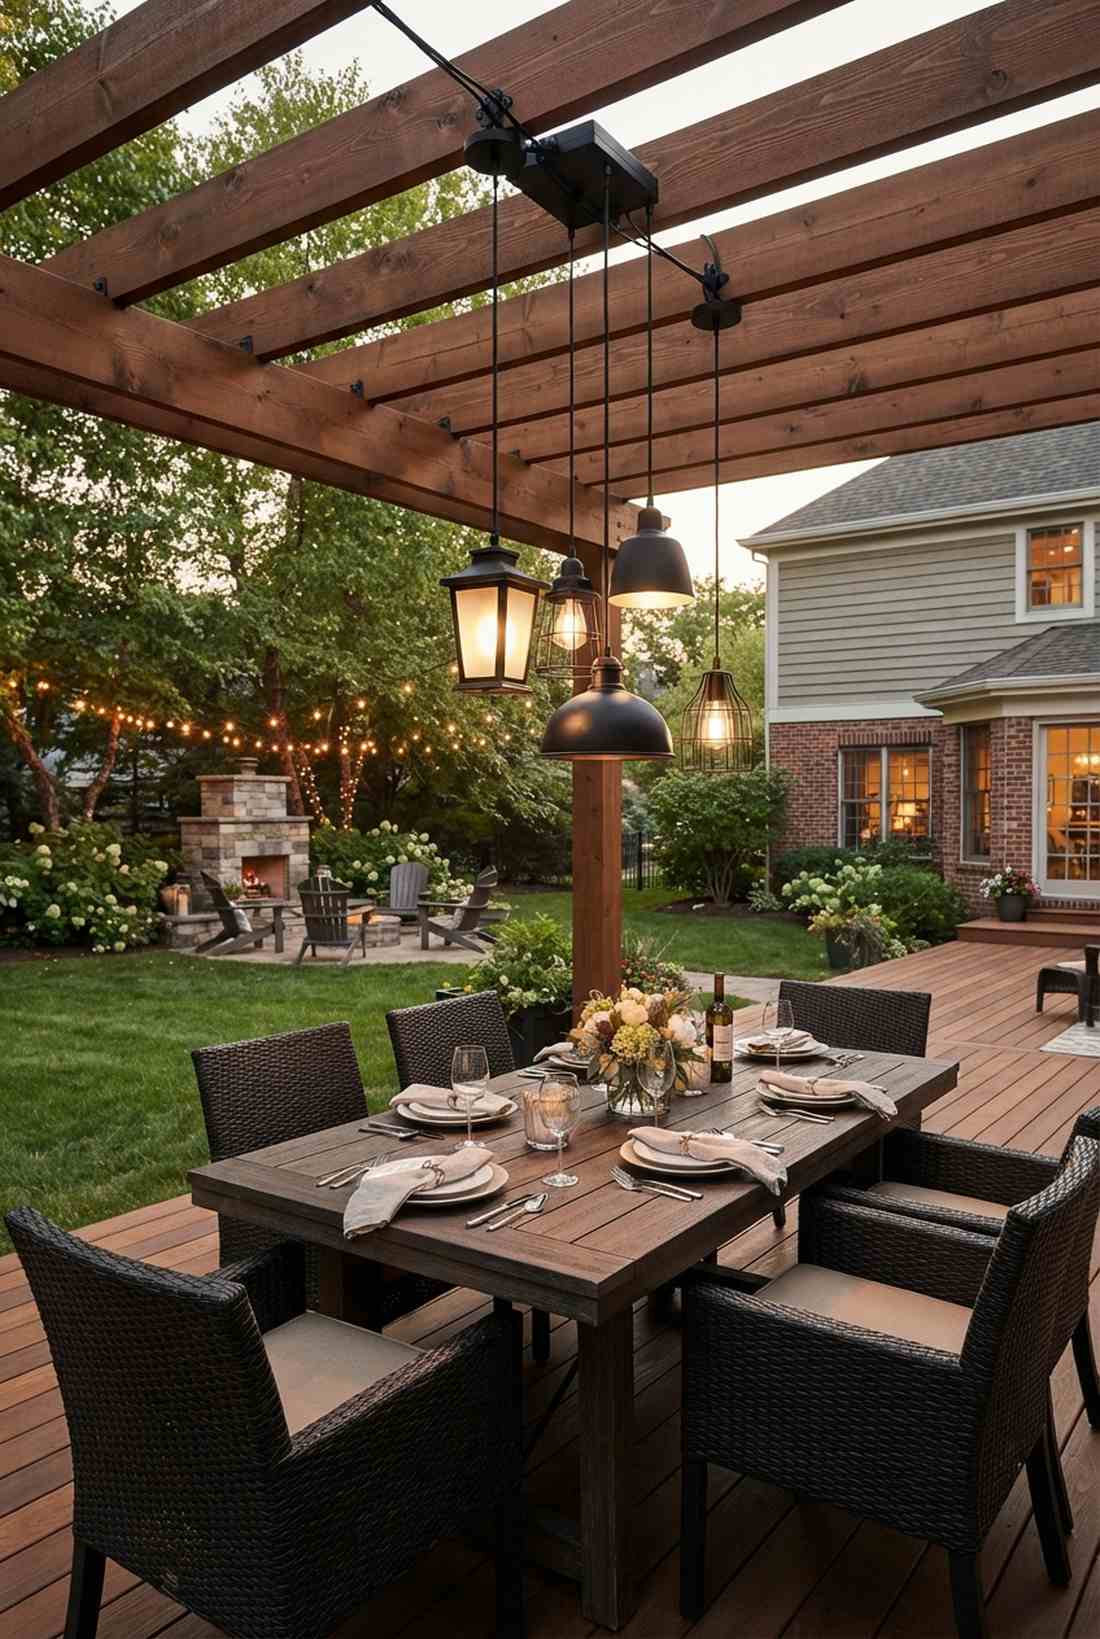
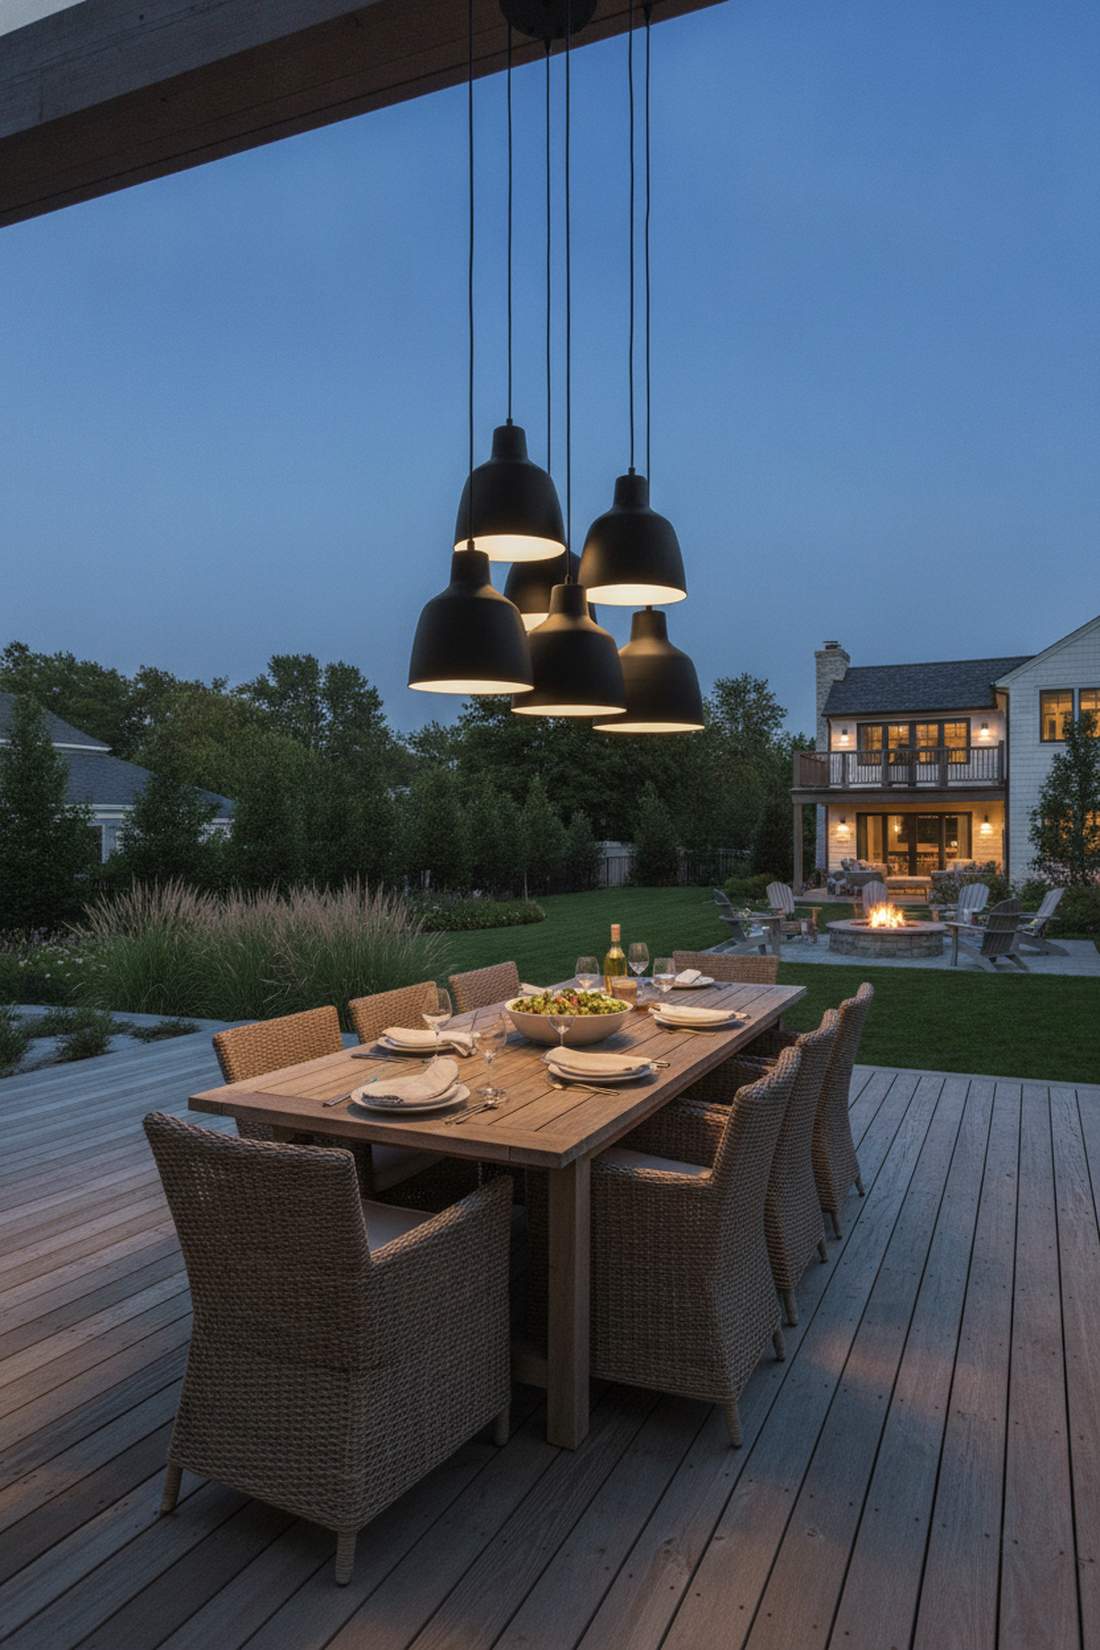
Dining underneath this setup feels like eating at an exclusive rooftop restaurant. Hanging a multi-height pendant cluster directly over an outdoor table guarantees perfect food visibility.
Stop settling for the harsh glare of a single, overpowering back porch floodlight. Staggering 3 to 5 opaque fixtures delivers a surprisingly premium look that acts as the ultimate conversation starter. It brings interior design rules firmly into the backyard.
A solid cluster setup will run $150–$350. It’s a statement piece that completely changes the vibe.
- Key Materials: Wet-rated outdoor pendants
- Vibe / Style: Upscale al fresco dining
- Difficulty: Advanced (requires overhead wiring)
- Budget Breakdown: Pendants: $200 | Canopy/Wiring: $50.
- Creator’s Tip: Hang them exactly 28-34 inches above the table surface so the shades block glare from guests’ eyes.
- Smart Sourcing: matte black outdoor pendant lights (wet-rated) and heavy-duty outdoor junction boxes.
12. Grill Station Task Lighting
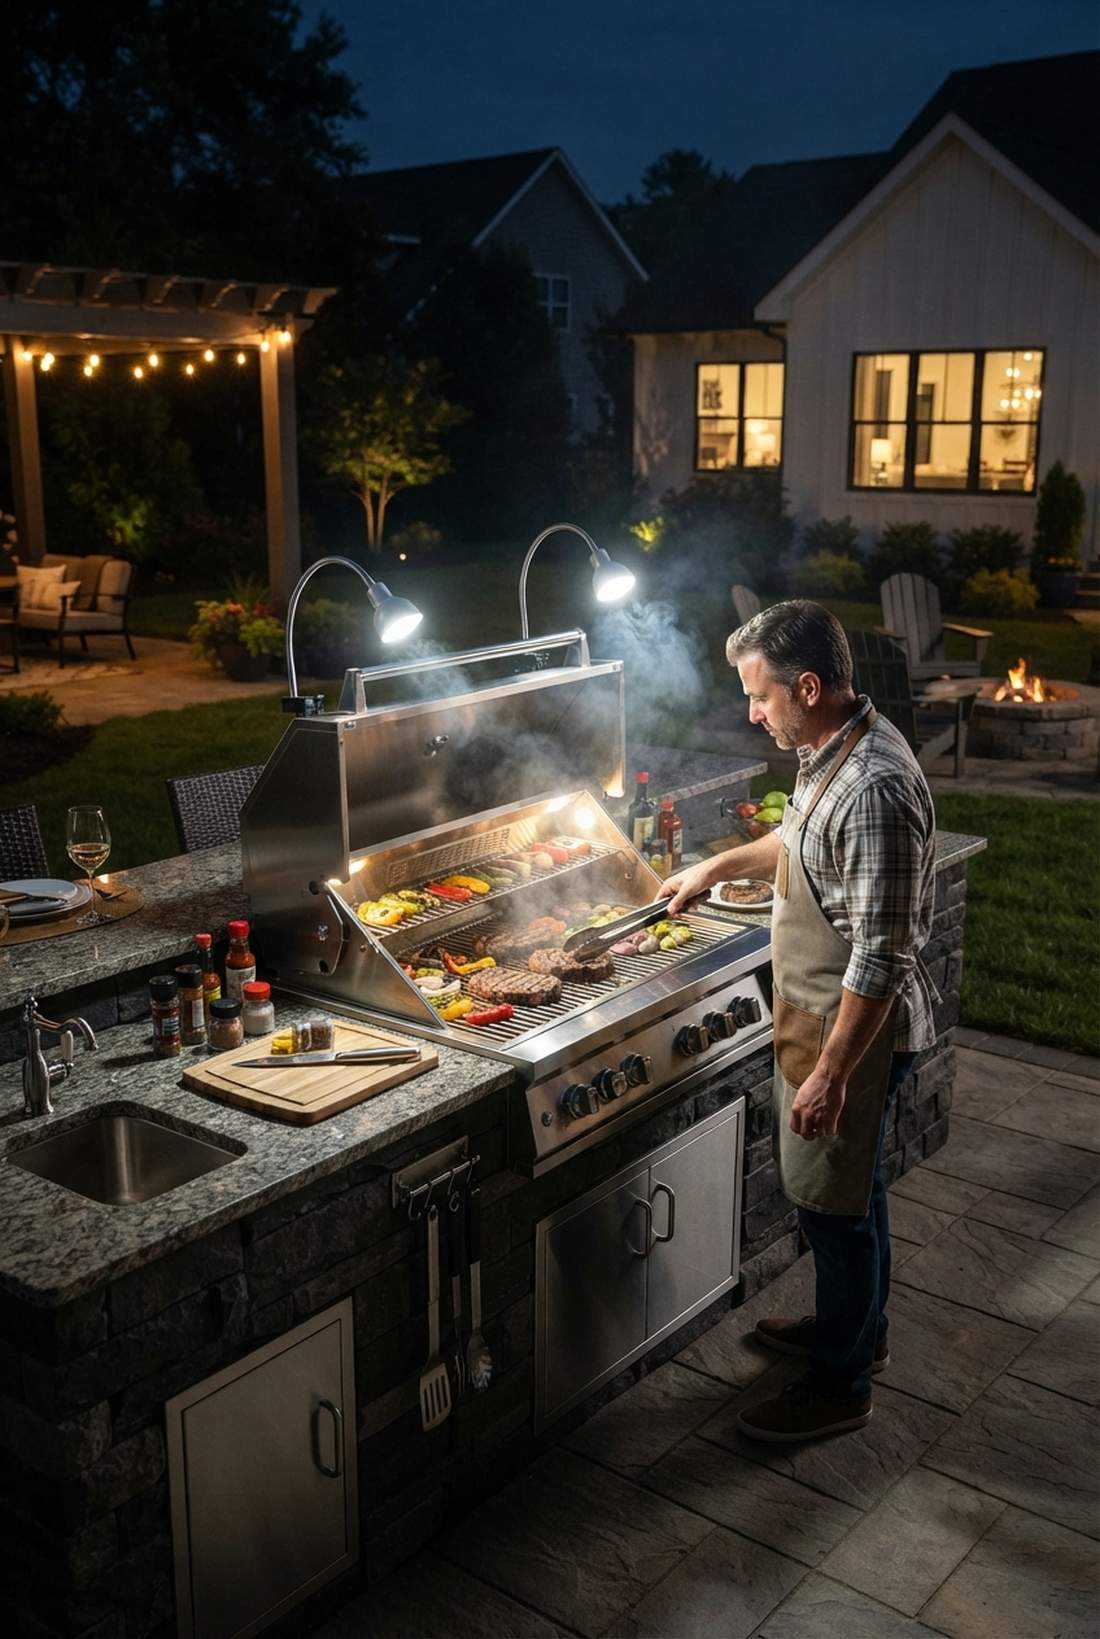
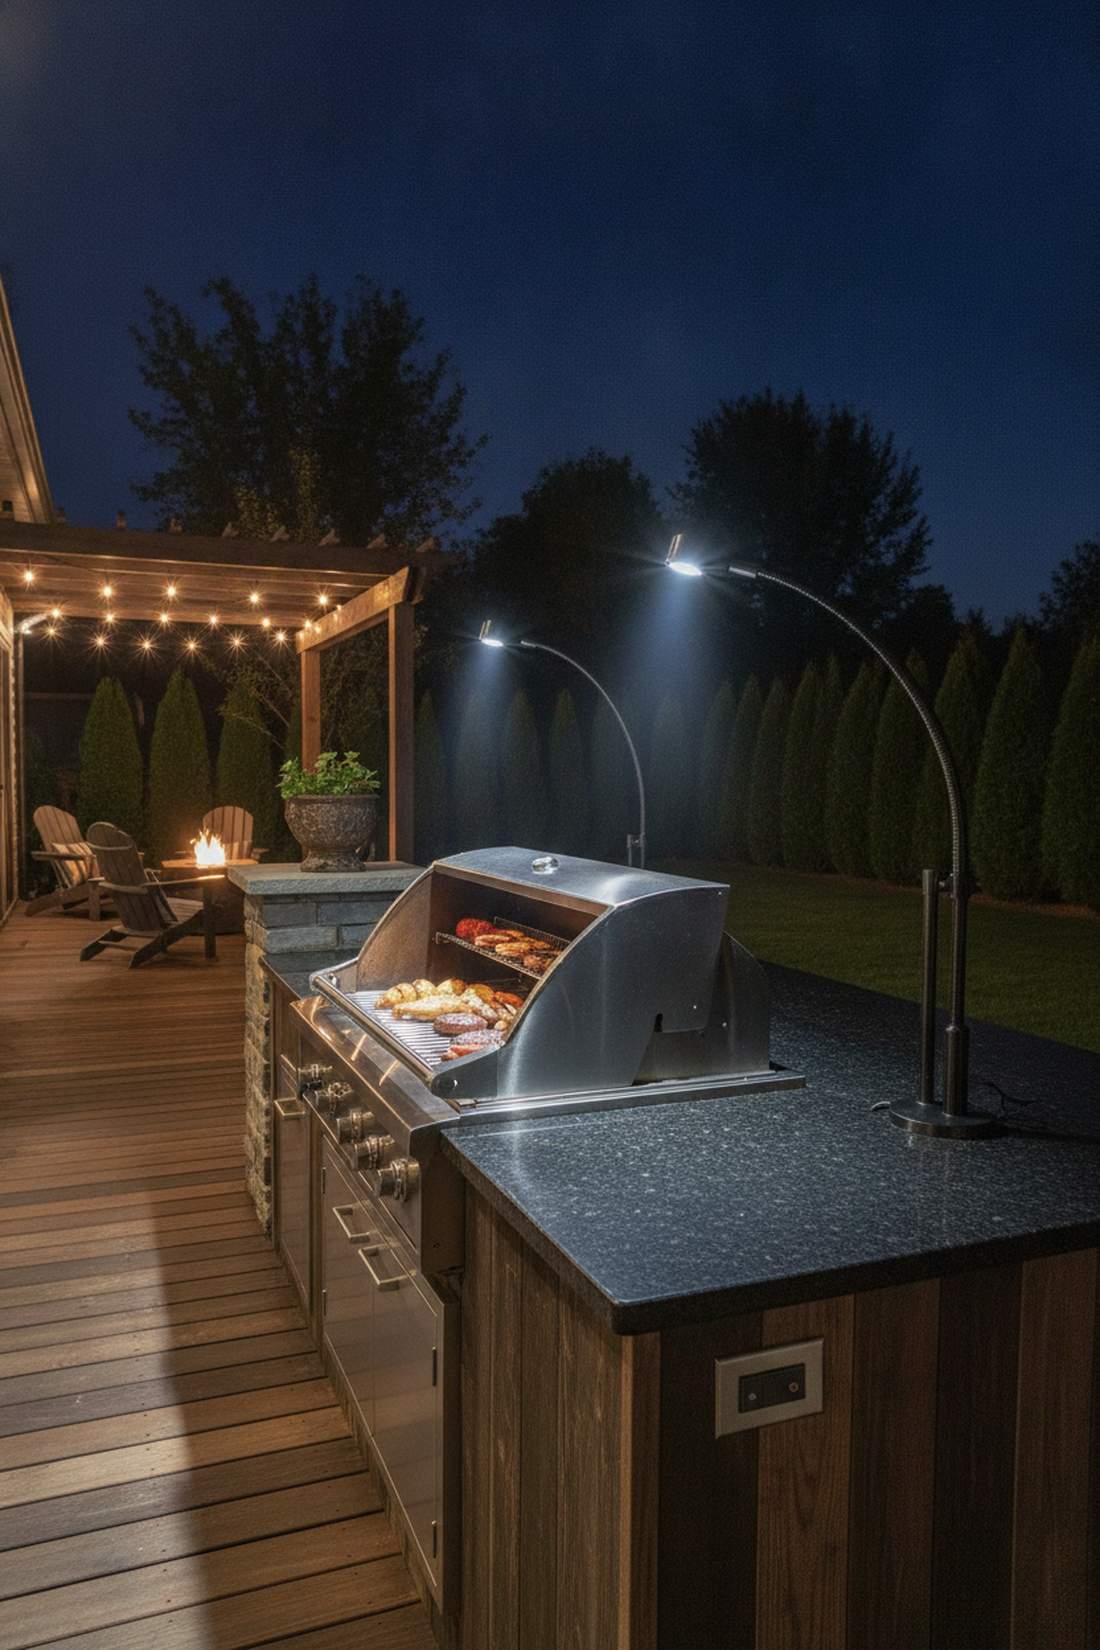
This feels like cooking on a professional television set at midnight. Installing high-CRI grill task spots is a non-negotiable for safe, late-night barbecue sessions.
Using standard warm ambient lights around a grill means you’ll probably serve undercooked chicken. Stepping up to 4000K-5000K precise LEDs seamlessly injects professional outdoor lighting backyard functionality without ruining the surrounding mood. Clarity is king here.
You can dial this in for $60–$130. Pin this if you’re building an outdoor kitchen!
- Key Materials: Adjustable high-output LED spots
- Vibe / Style: Culinary precision workspace
- Difficulty: Intermediate
- Budget Breakdown: Task light: $80 | Mounts: $20.
- Creator’s Tip: Wire this on a completely separate switch from your patio lights so you don’t ruin the party ambiance while flipping burgers.
- Smart Sourcing: flexible BBQ grill gooseneck lights and high-CRI 5000K LED spot bulbs.
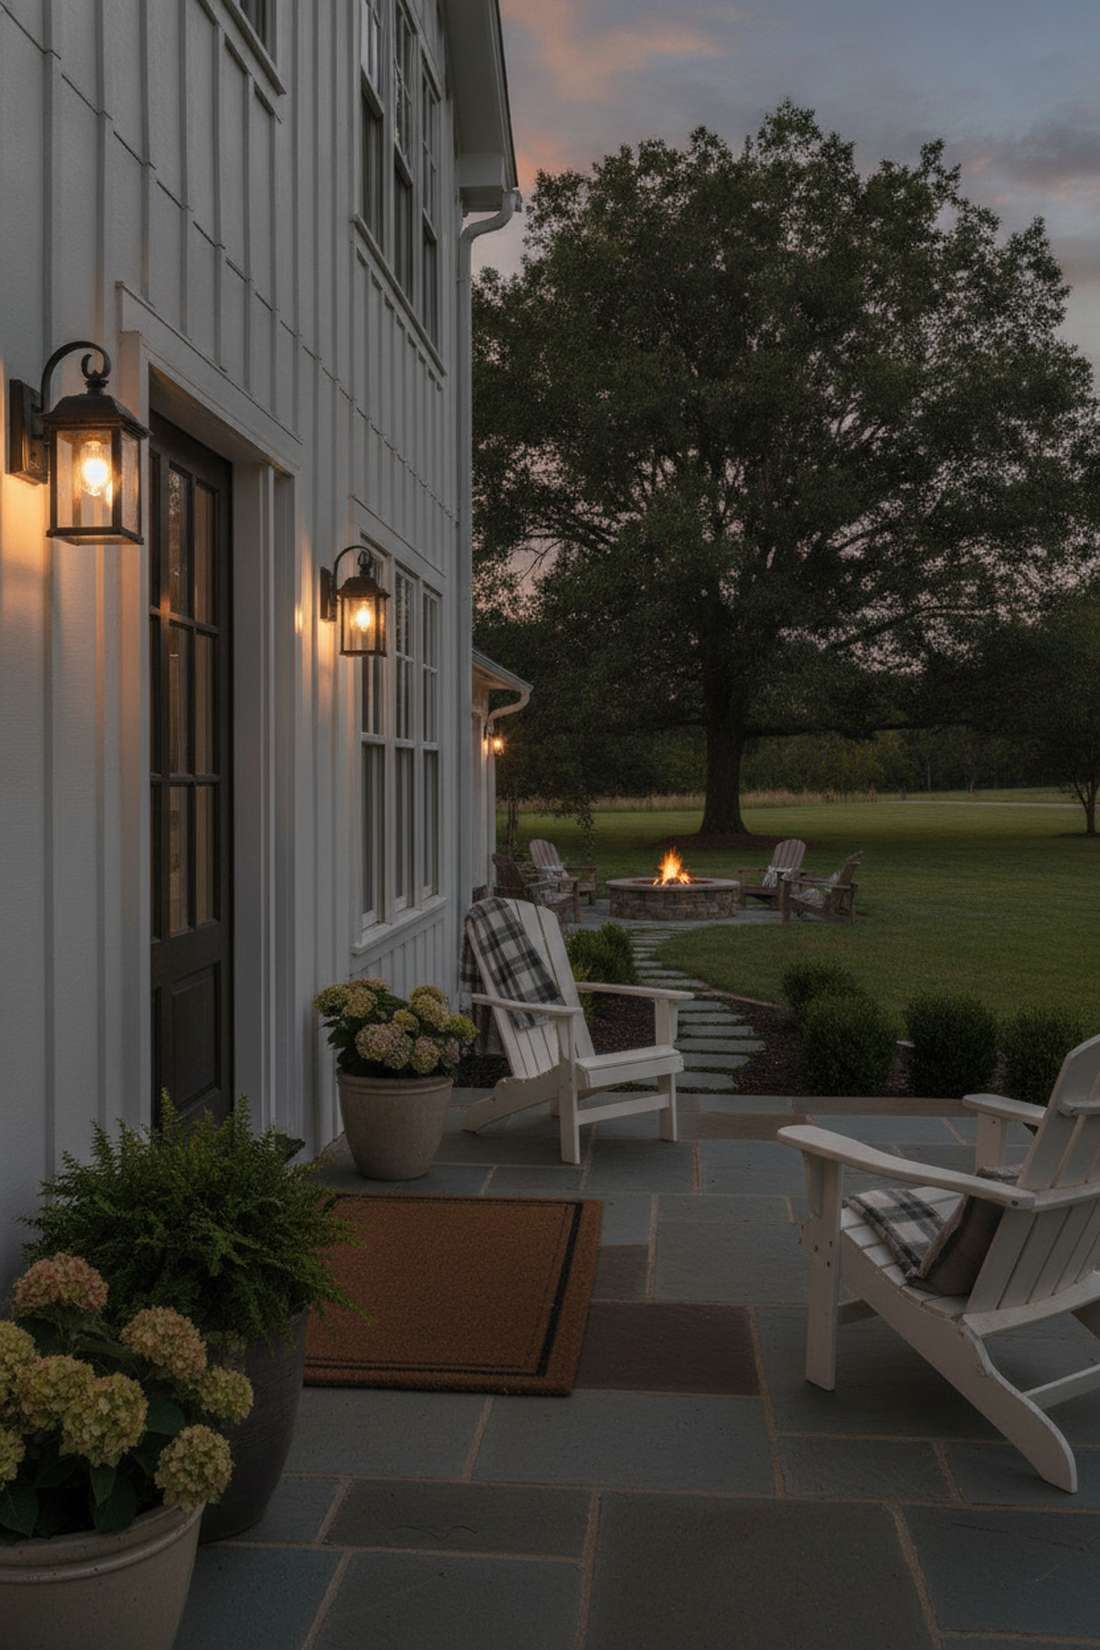
13. Fire Pit Ring PerimeterLights
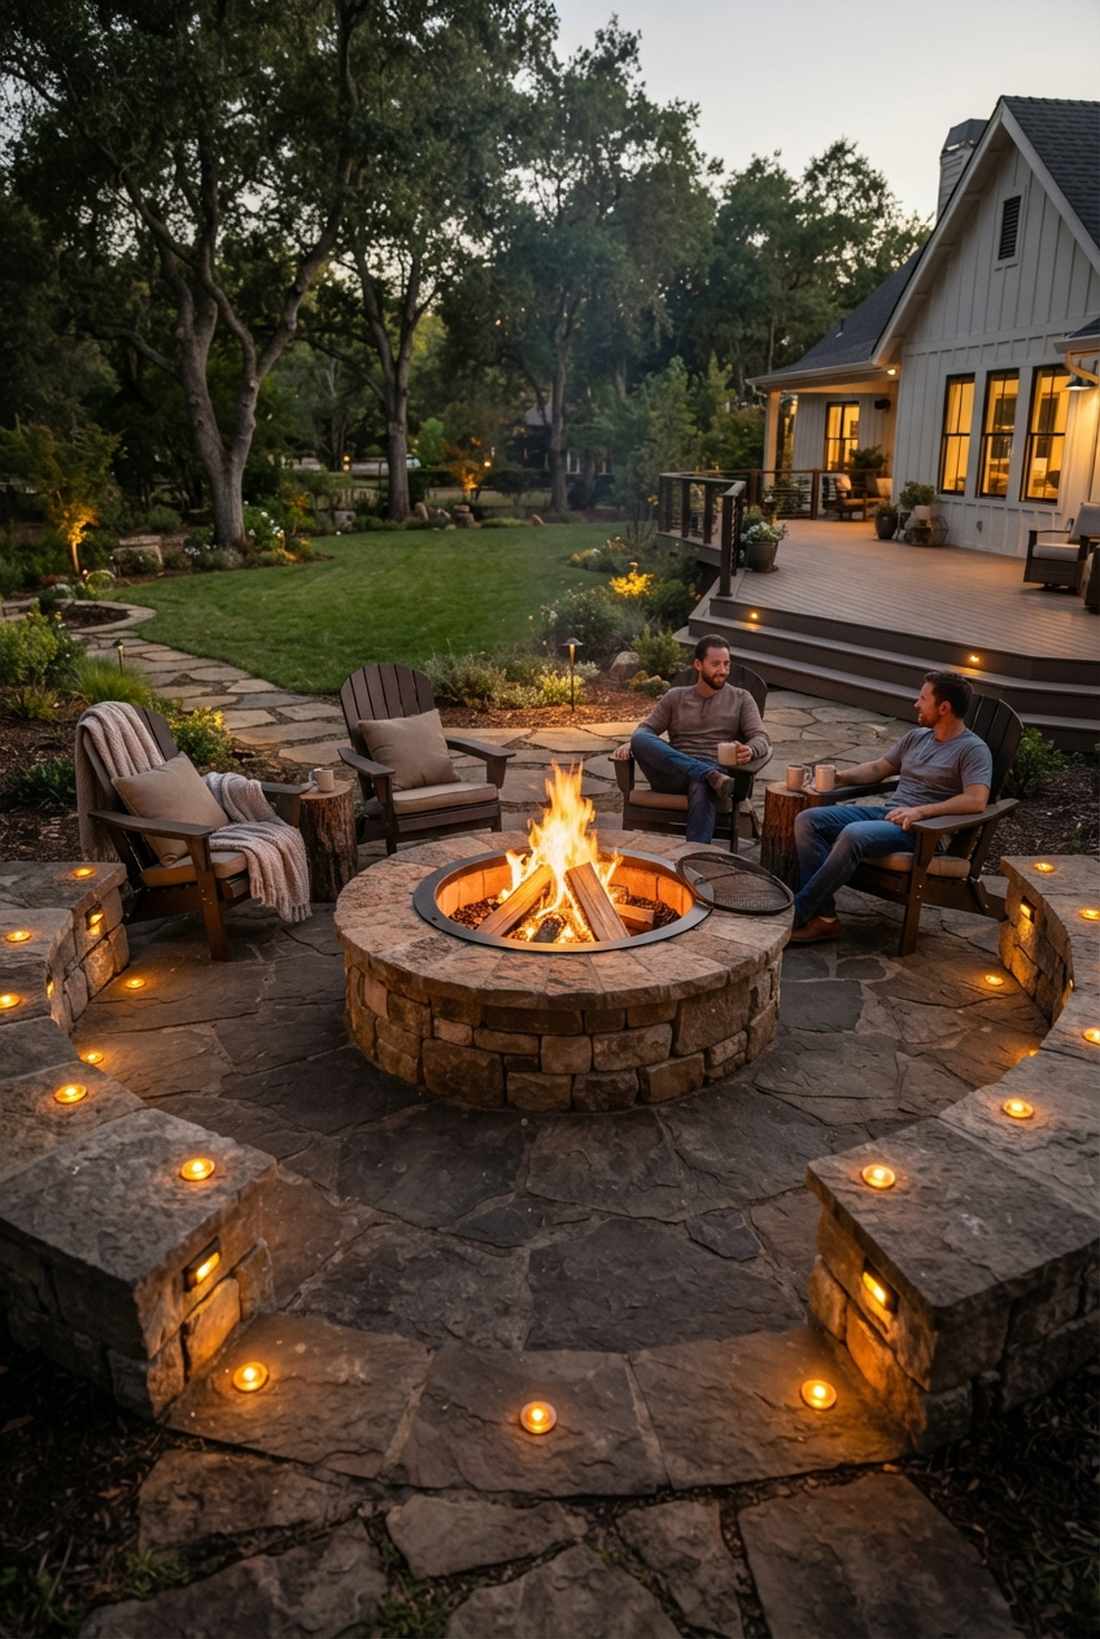

Walking toward this feels like approaching a magical woodland campfire. Recessing amber-hued perimeter markers around seating blocks ensures nobody trips while carrying drinks in the dark.
The biggest mistake is overpowering a fire pit with bright white lights that completely wash out the flames. Using low-wattage, warm LEDs gives a designer-level finish that strictly complements the natural firelight. It balances safety with absolute coziness.
A ring of these markers costs around $100–$180. Save this to your ultimate fire pit design board!
- Key Materials: Flush paver dot lights
- Vibe / Style: Rustic glowing hearth
- Difficulty: Advanced (masonry cuts required)
- Budget Breakdown: Dot lights: $90 | Core bits: $30.
- Creator’s Tip: Angle the recessed beams slightly away from the center to prevent blinding guests sitting around the pit.
- Smart Sourcing: IP67 low-voltage LED paver lights (bulk pack) and masonry diamond core drill bits.
Most folks settle for static lighting, but this next portable trick creates a five-star resort aesthetic you can move anywhere…
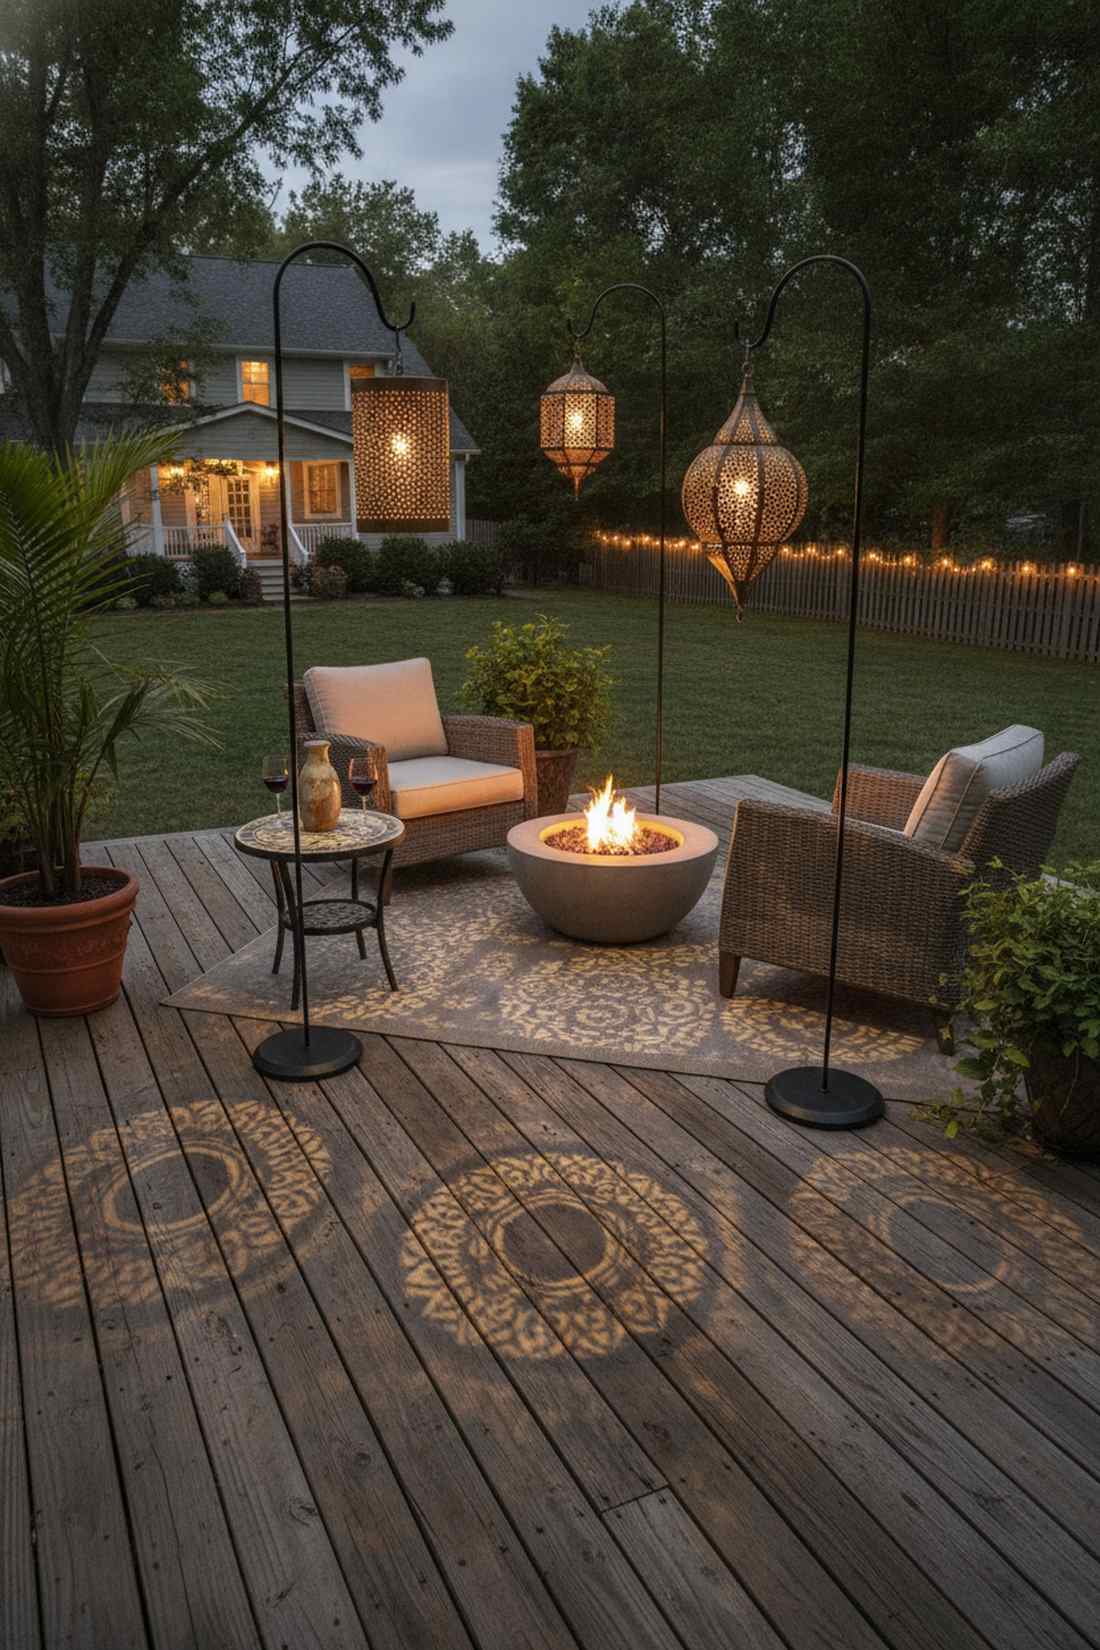
14. Lounge Area Portable Lanterns
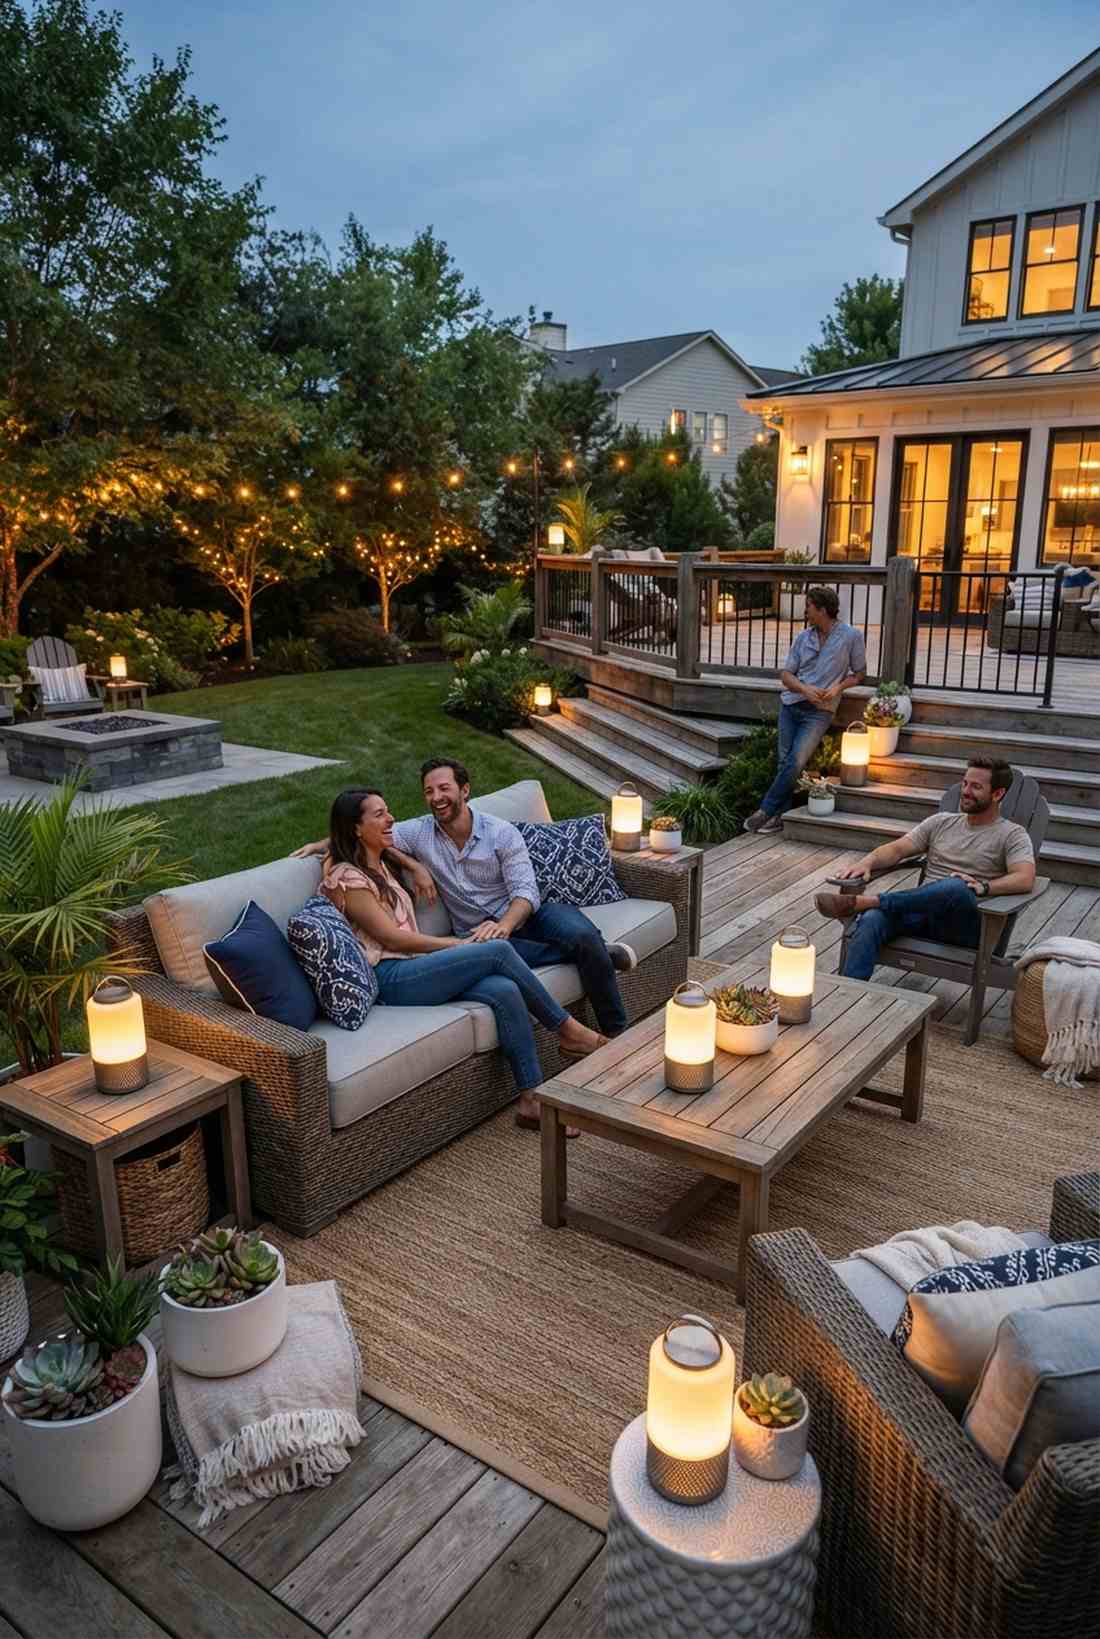
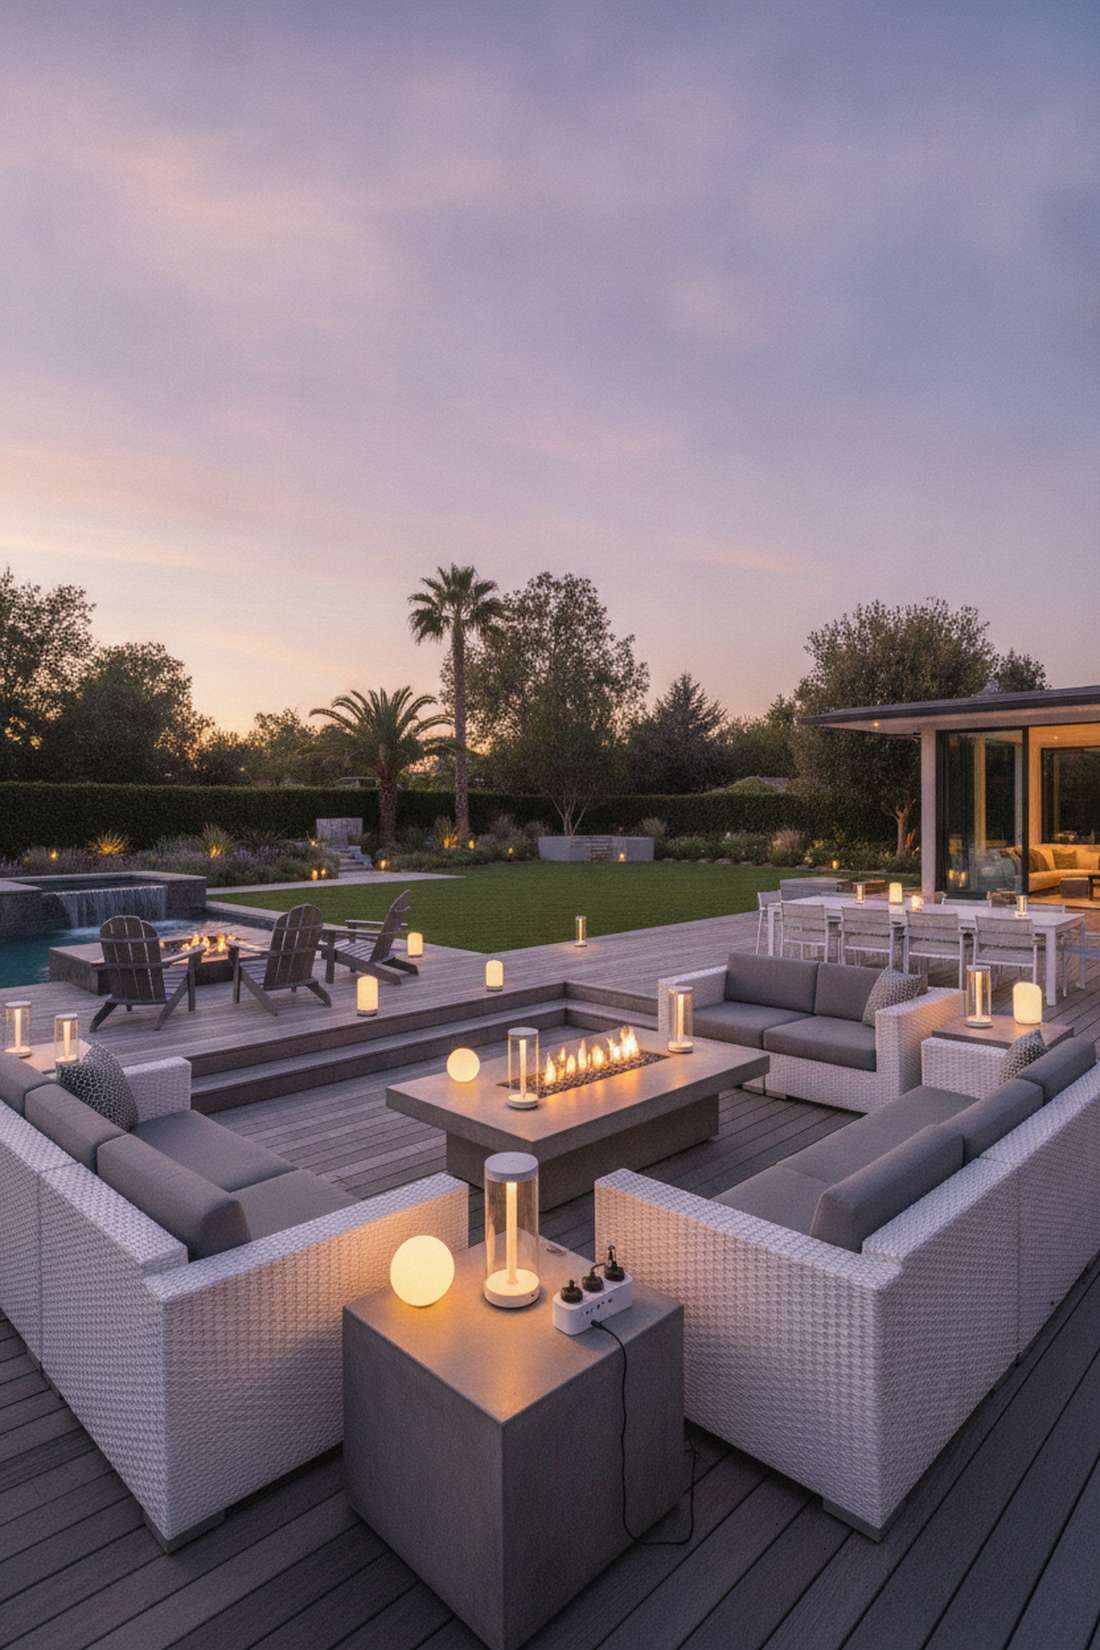
This layout feels like a high-end beach club that adapts to your exact mood. Scattering rechargeable LED glow lanterns is the ultimate hack for flexible, wire-free gathering zones.
Permanent installations are great, but they lack the organic flow needed for impromptu parties. Dropping touch-controlled lanterns across a lounge looks far more expensive than it is, serving as dynamic lighting outdoor decor. It’s functional art.
You can snag a pair of premium lanterns for $80–$150. It’s an instant upgrade requiring zero tools.
- Key Materials: Touch-dimming outdoor lanterns
- Vibe / Style: Fluid resort-style chic
- Difficulty: Zero setup required
- Budget Breakdown: Lantern set: $120.
- Creator’s Tip: Pick models that offer warm color temperature adjustments (2700K) to match your hardwired landscape fixtures.
- Smart Sourcing: rechargeable IP54 modern LED table lanterns and multi-port fast charging stations.
15. Outdoor Ceiling Fan Light Kits
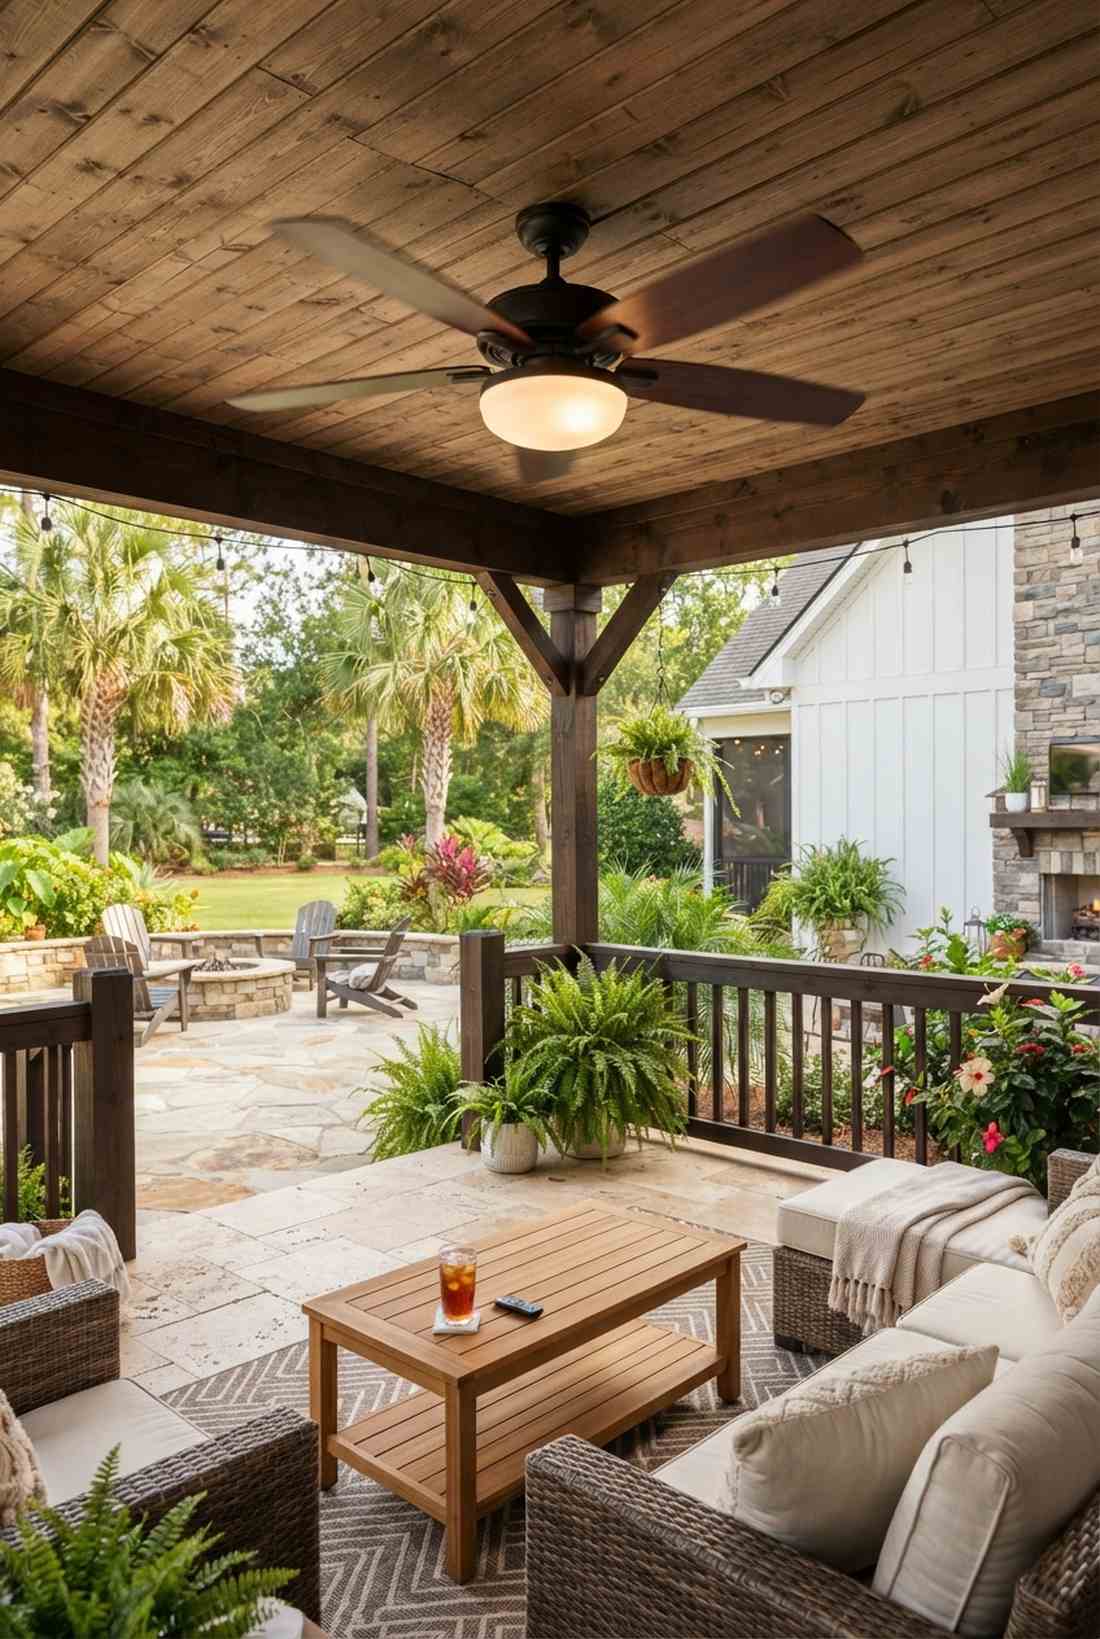
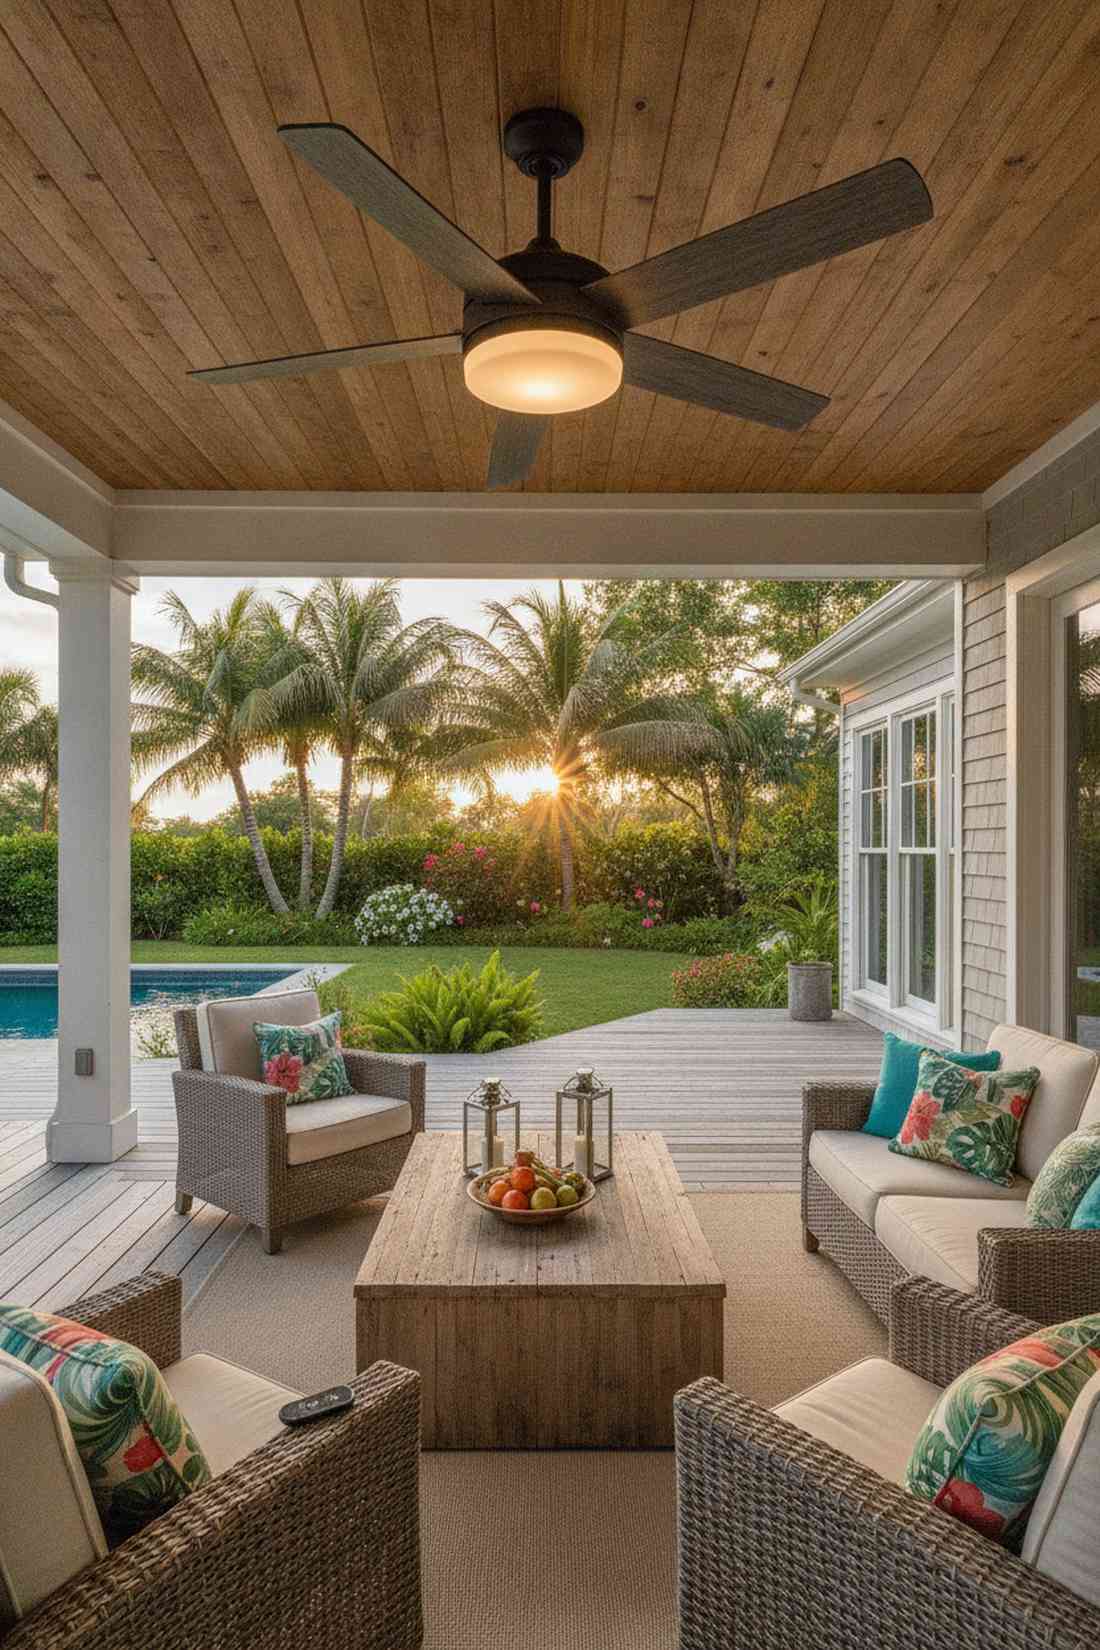
Sitting below this feels like relaxing on a breezy Caribbean veranda. Combining a frosted LED ceiling fan kit solves both climate control and ambient illumination in one massive sweep.
Exposed bulb fans attract swarms of bugs and cast terrible, dizzying shadows as the blades spin. Utilizing a smooth frosted diffuser seamlessly injects premium outdoor lighting residential value while maintaining a clean ceiling profile. It’s simple but highly effective.
Expect to invest $200–$400 for a quality wet-rated unit. Pin this to your covered patio inspiration board!
- Key Materials: Wet-rated integrated LED fan
- Vibe / Style: Breezy tropical comfort
- Difficulty: Advanced (requires bracing)
- Budget Breakdown: Fan unit: $280 | Bracket: $25.
- Creator’s Tip: Always wire the fan motor and the light kit to two separate switches so you can enjoy the breeze without the glare.
- Smart Sourcing: damp-rated smart outdoor ceiling fans (with remote) and heavy-duty ceiling fan support braces.
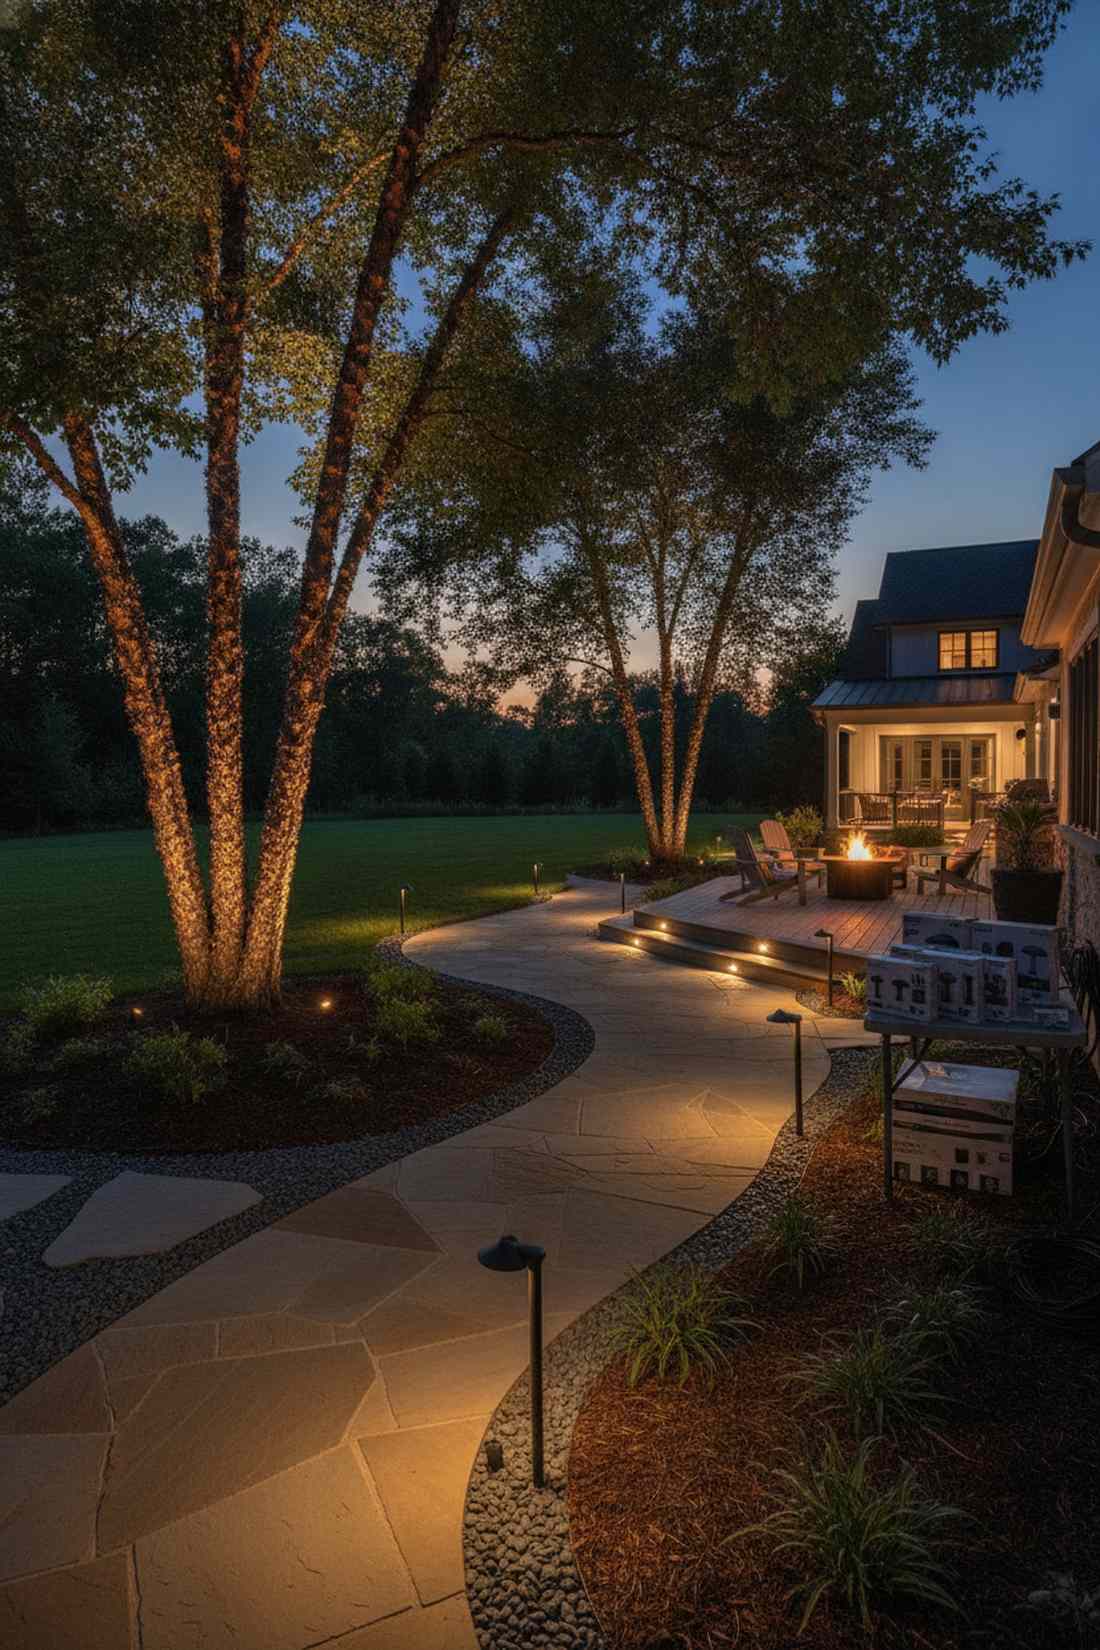
Landscape and Yard Illumination
Yard lighting extends visual interest across the entire property while defining outdoor spaces and highlighting landscape investments. Strategic placement guides movement through gardens, emphasizes specimen plantings, and creates depth through foreground-background relationships.
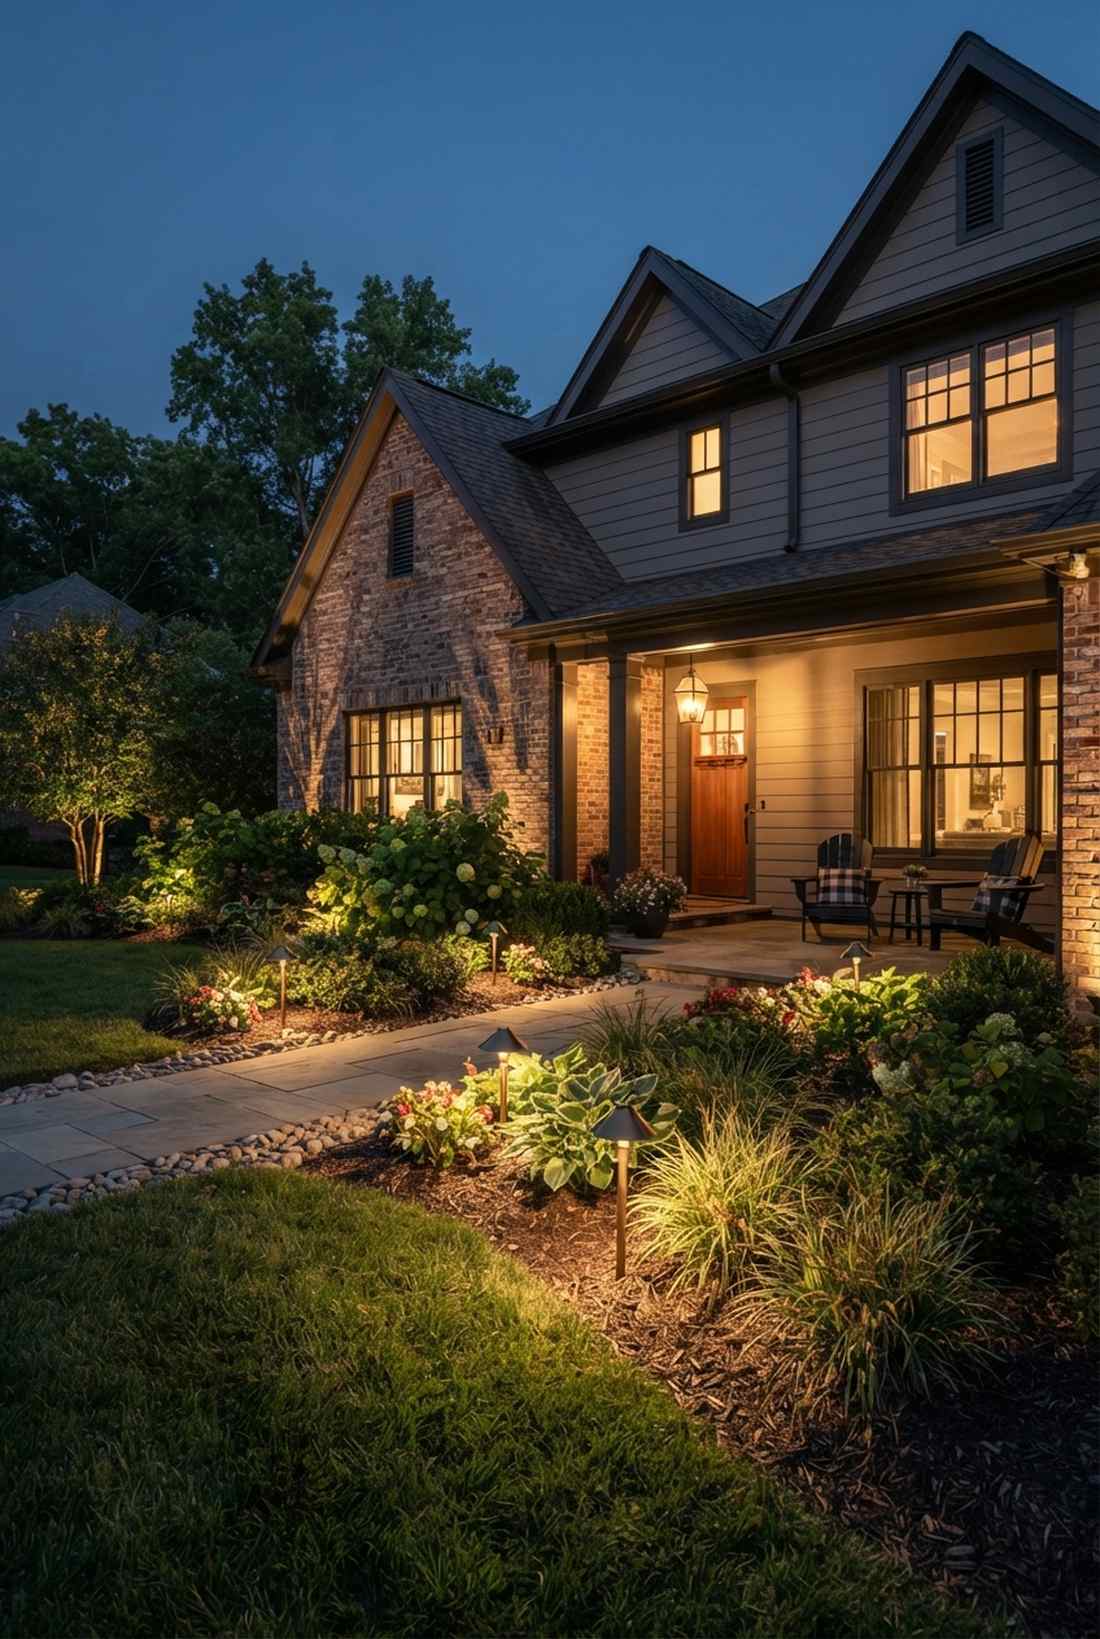
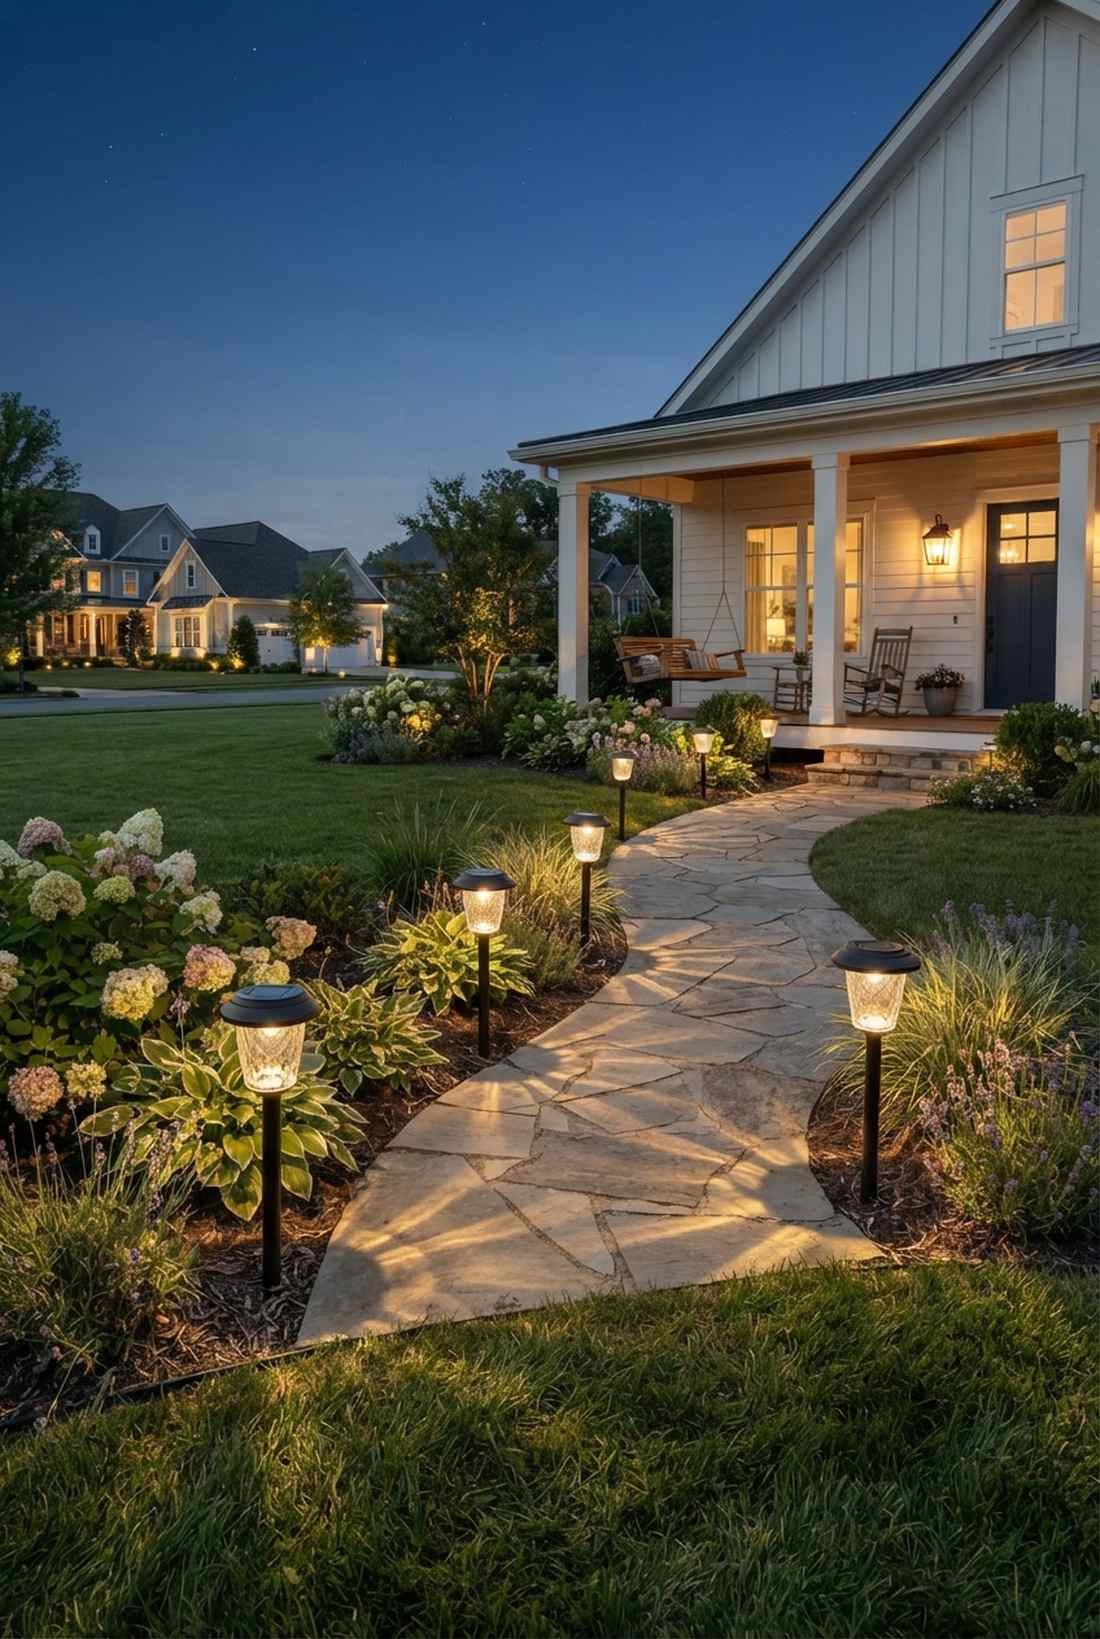
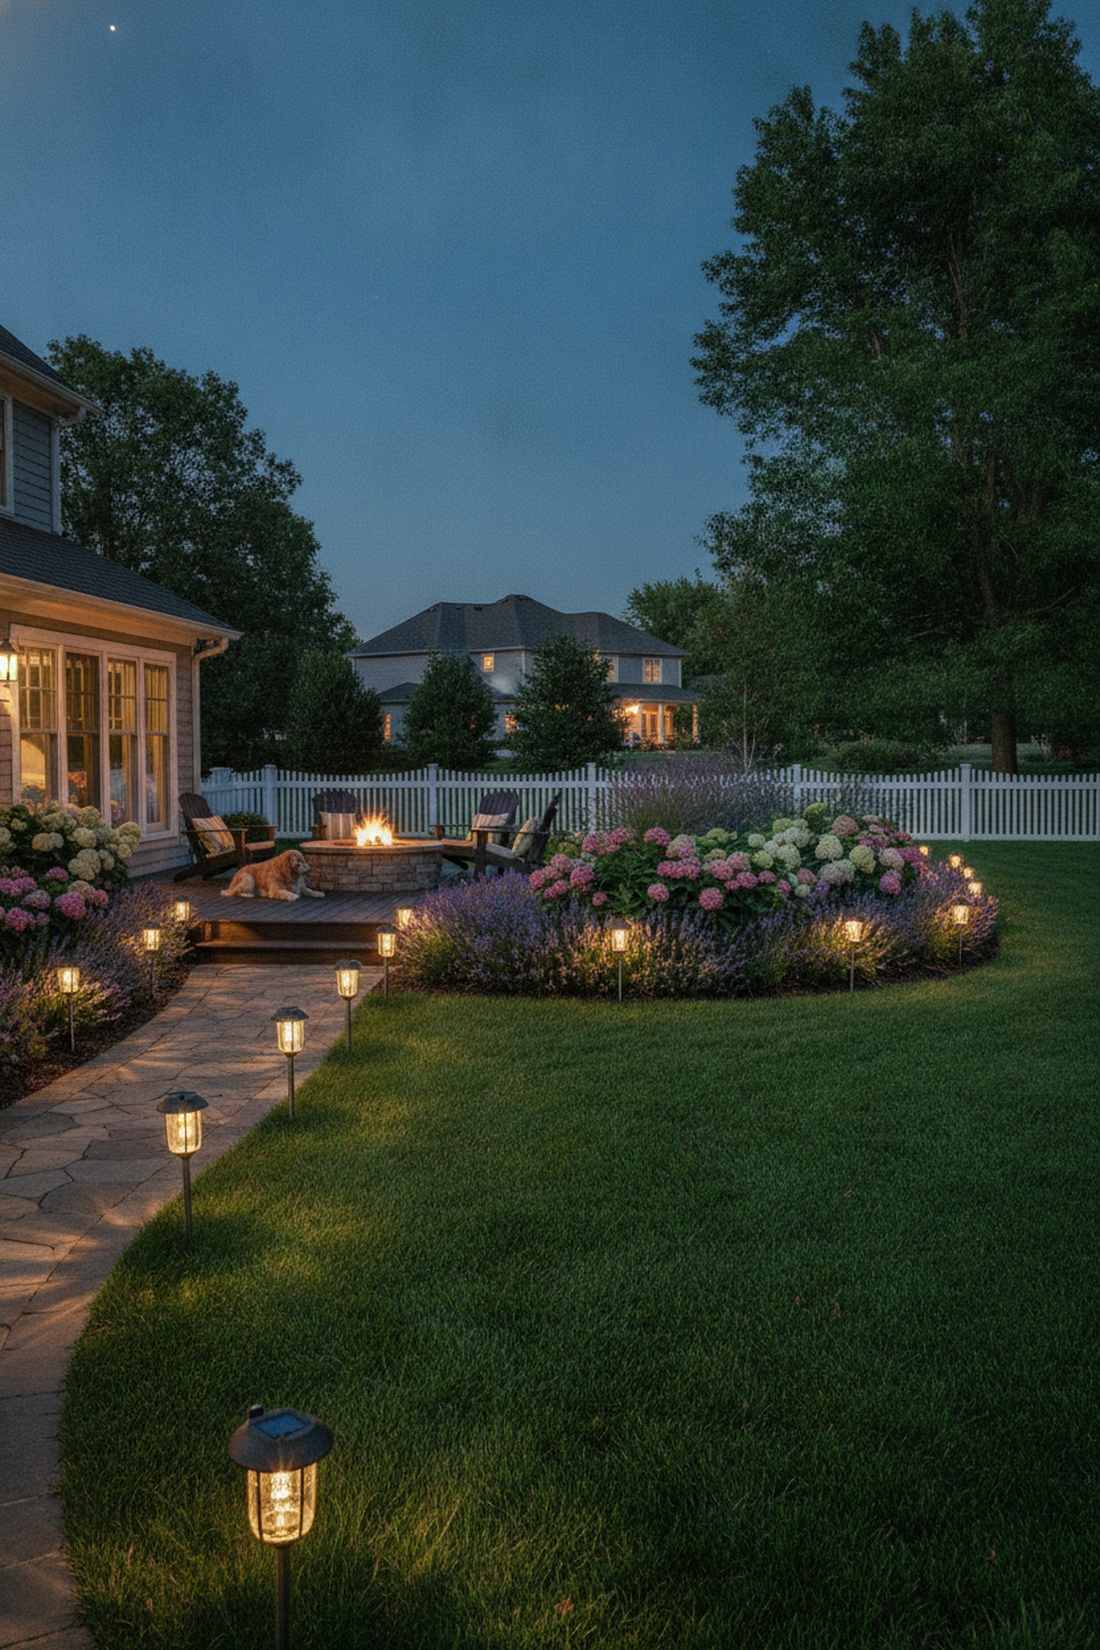
16. Pathway Aligned Bollard Series
Walking this path feels like strolling through an exclusive botanical garden after hours. Deploying a staggered linear bollard sequence keeps foot traffic perfectly guided without blinding your guests.
Cheap plastic solar stakes fade in weeks and look incredibly flimsy. Upgrading to 24-inch architectural metal bollards gives a designer-level finish that serves as the absolute backbone of proper outdoor lighting yard systems. It defines boundaries beautifully.
A quality bollard setup runs $200–$400. Highly recommended for establishing an elegant first impression.
- Key Materials: Low-profile metal LED bollards
- Vibe / Style: Crisp architectural pathway
- Difficulty: Intermediate
- Budget Breakdown: Bollard pack: $250 | Wire: $40.
- Creator’s Tip: Alternate them in a zig-zag pattern along curved paths to emphasize the flowing geometry of your landscaping.
- Smart Sourcing: architectural aluminum LED pathway bollards (6-pack) and waterproof direct burial wire splices.
17. Garden Bed Mushroom Fixtures

This lighting style feels straight out of an enchanted fairy tale. Placing broad-cast mushroom hoods inside low groundcover creates spectacular pools of ambient light across your plants.
Most beginners ruin gardens by aiming harsh spotlights directly at delicate flowers. Using pagoda-style diffusers looks far more expensive than it is, providing gentle downward washes that highlight textures without washing out colors. It’s pure magic.
You can easily pull this off for around $120–$250. Pin this if you have deep, layered planting beds!
- Key Materials: Wide-spread pagoda path lights
- Vibe / Style: Whimsical cottage garden
- Difficulty: Easy DIY
- Budget Breakdown: Mushroom fixtures: $150 | Connectors: $20.
- Creator’s Tip: Raise the stems at least 3 inches above the mature height of the surrounding plants so the light isn’t swallowed by leaves.
- Smart Sourcing: solid brass mushroom landscape lights (starter kit) and heavy-duty composite ground stakes.
Before you light another bush, stop! The upcoming uplighting technique is what actually adds vertical drama to a flat yard…
18. Specimen Tree Uplighting
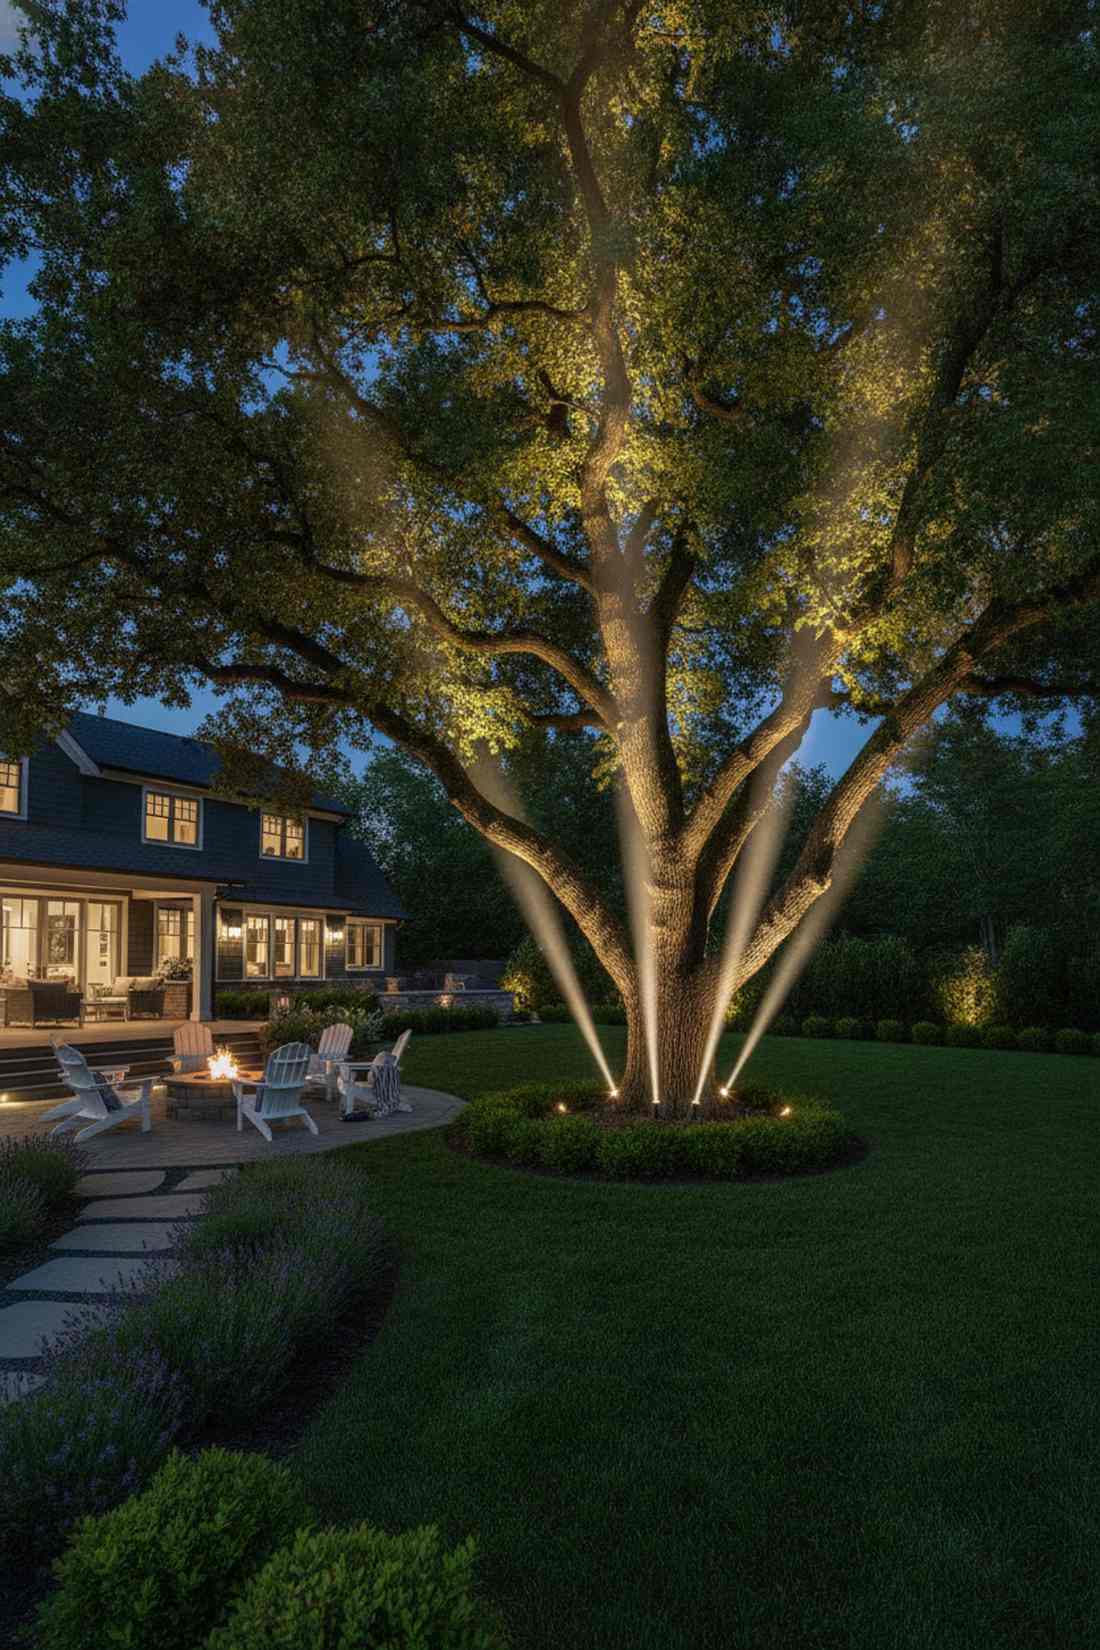
Looking at this feels like viewing a living sculpture in an outdoor museum. Utilizing narrow-beam trunk uplighting turns any mature tree into a dramatic vertical focal point against the night sky.
Flat yard designs usually suffer from a severe lack of vertical contrast. Firing a tight 15-degree beam straight up through the branch canopy delivers a surprisingly premium look that anchors the entire landscape. It commands immediate attention.
This high-impact trick costs just $50–$90 per tree. It’s a fast upgrade that completely changes the vibe.
- Key Materials: Directional brass bullet spotlights
- Vibe / Style: Dramatic estate anchor
- Difficulty: Easy quick-fix
- Budget Breakdown: Bullet spot: $50 | LED MR16 Bulb: $15.
- Creator’s Tip: Mount the fixture 12-24 inches away from the trunk to catch the bark texture perfectly without creating a blinding hot spot.
- Smart Sourcing: heavy-cast brass bullet uplights and narrow-beam 15-degree MR16 LED bulbs.
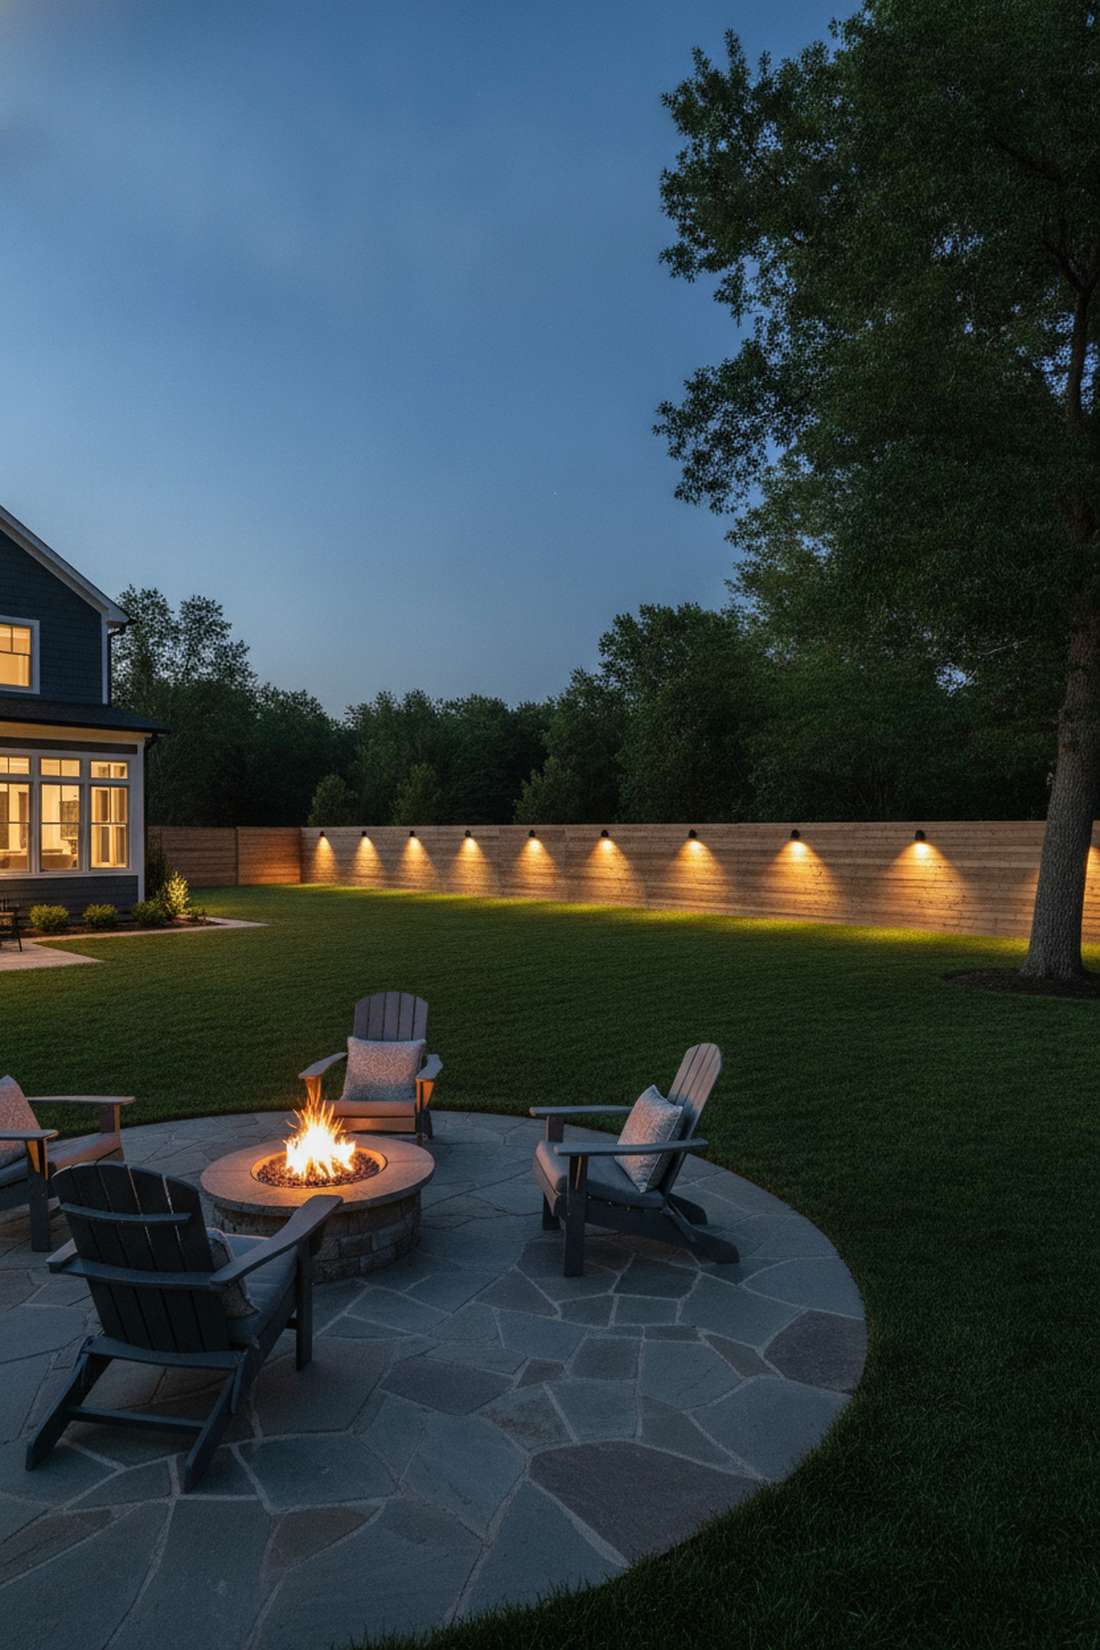
19. Hedge Line Grazing
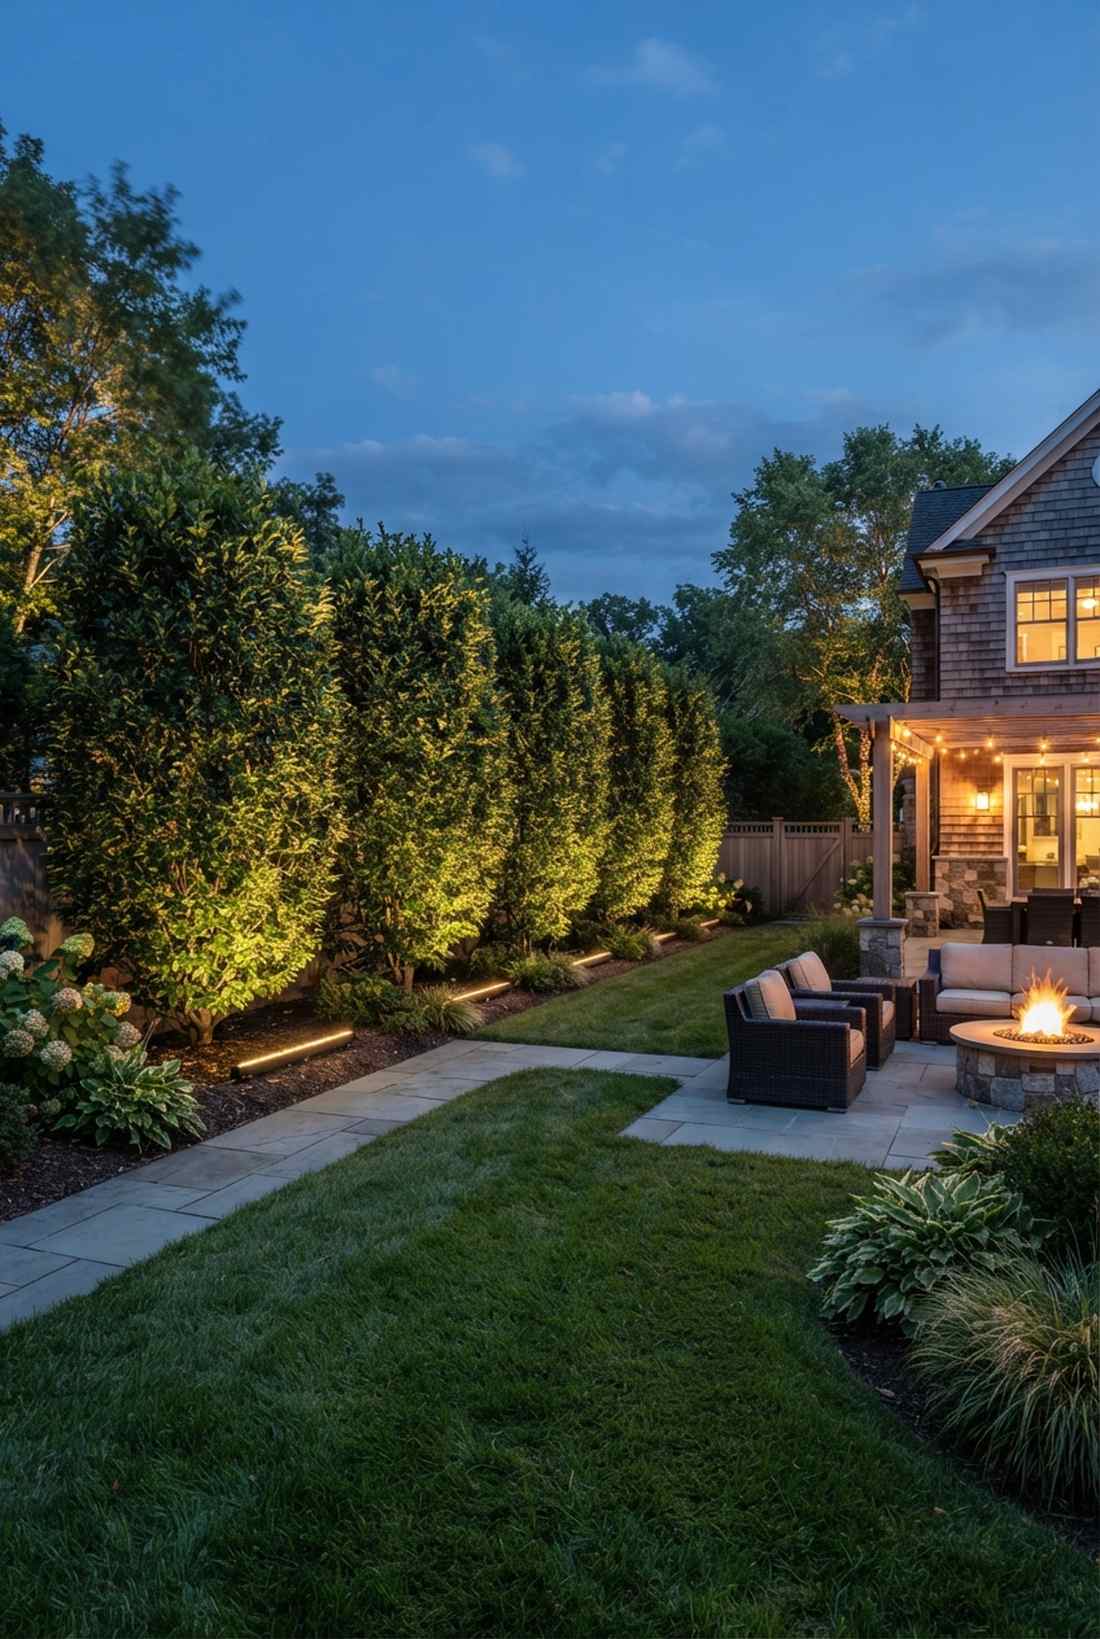
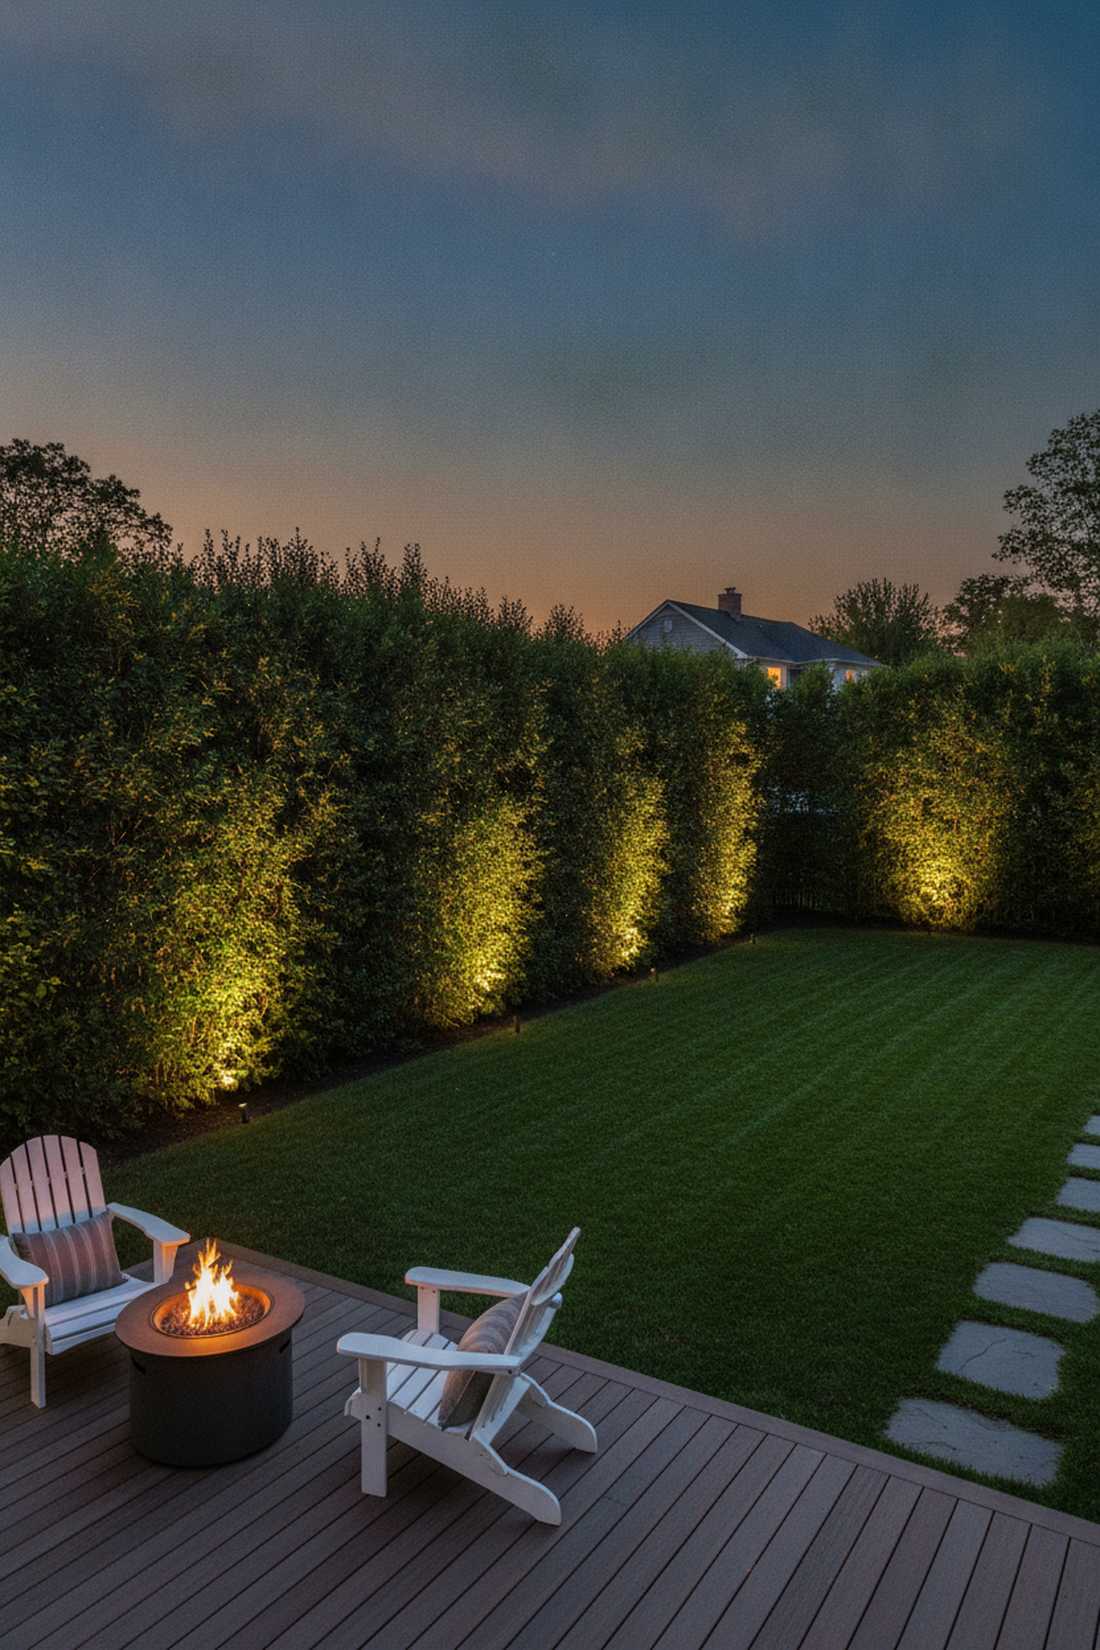
This layout feels like a glowing velvet wall wrapping your property. Installing tight upward grazing fixtures along a formal hedge turns basic boundary plants into structural architecture.
Designers usually charge thousands just to recommend this specific boundary layout. By positioning lights right at the base, you reveal incredible leaf textures while heavily utilizing advanced outdoor lighting design principles. It establishes massive property depth.
You can cover a standard hedge line for around $150–$300. Save this to your modern landscaping board!
- Key Materials: Linear wash lights or wide floods
- Vibe / Style: Structured formal perimeter
- Difficulty: Intermediate
- Budget Breakdown: Flood pack: $180 | Wire: $40.
- Creator’s Tip: Use extremely narrow beams to keep the light tight against the hedge face and prevent it from spilling into the neighbor’s yard.
- Smart Sourcing: linear LED wall wash light bars and anti-glare honeycomb fixture louvers.
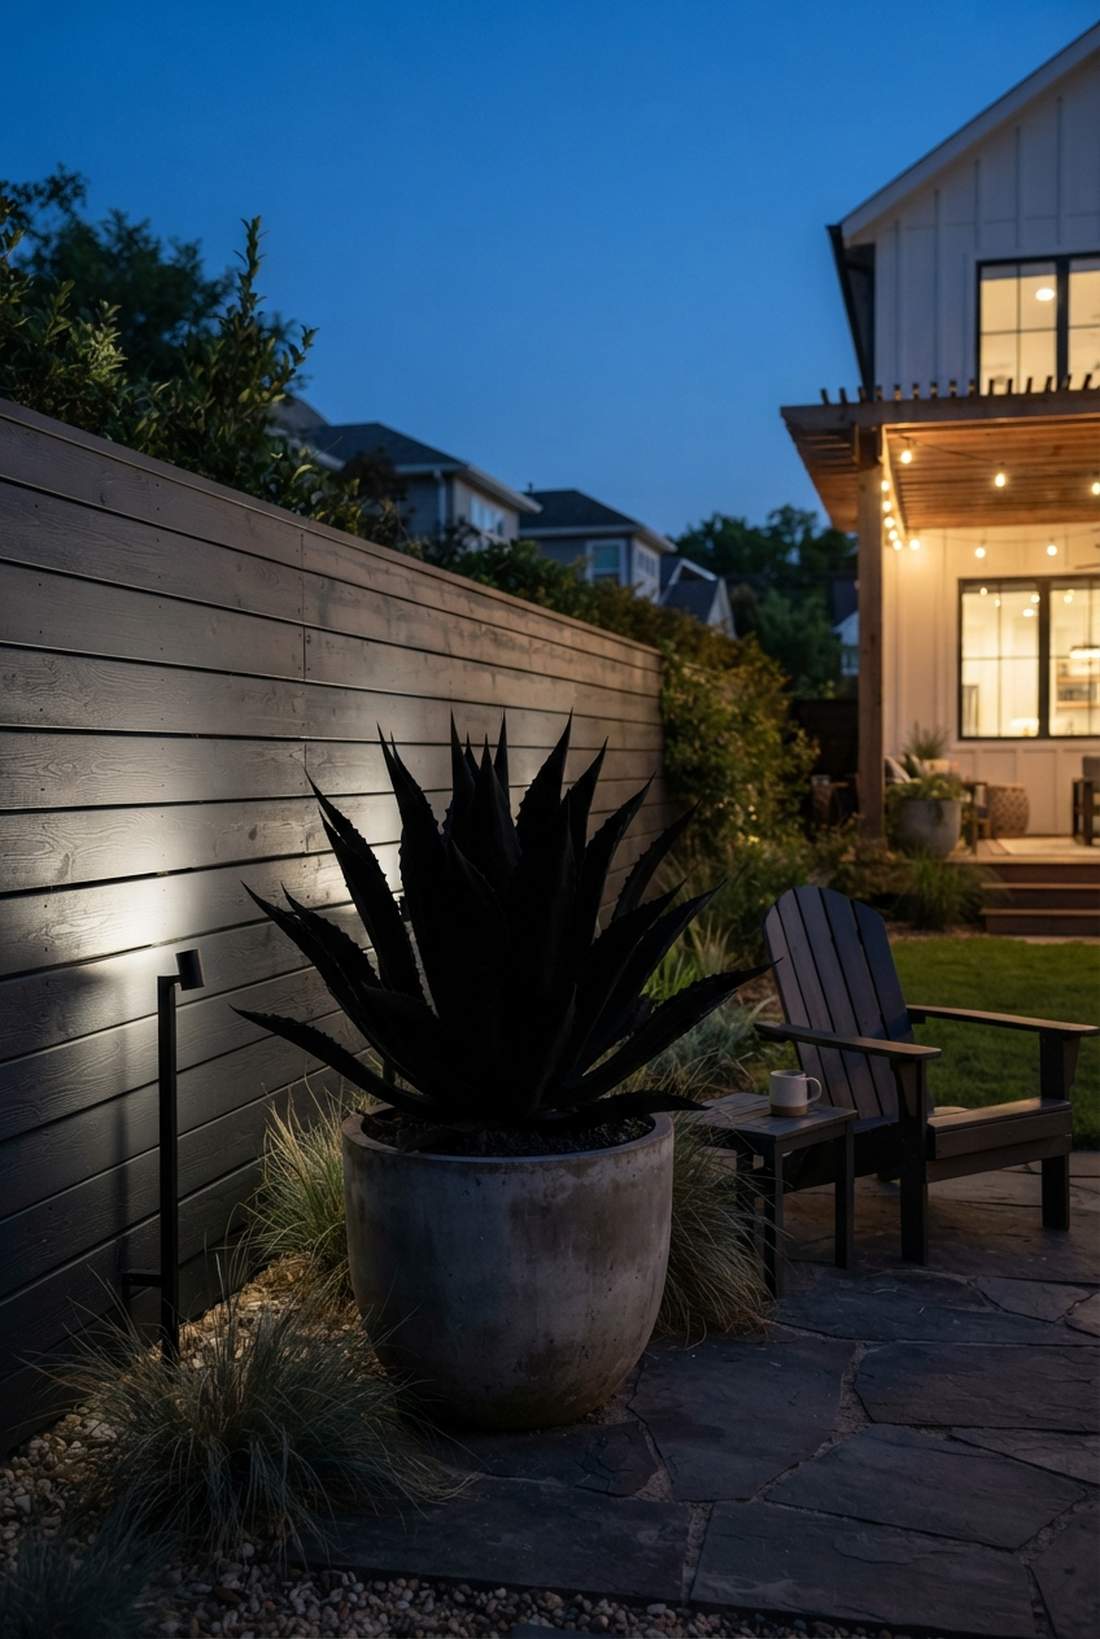
20. Flowering Shrub Accent Spots
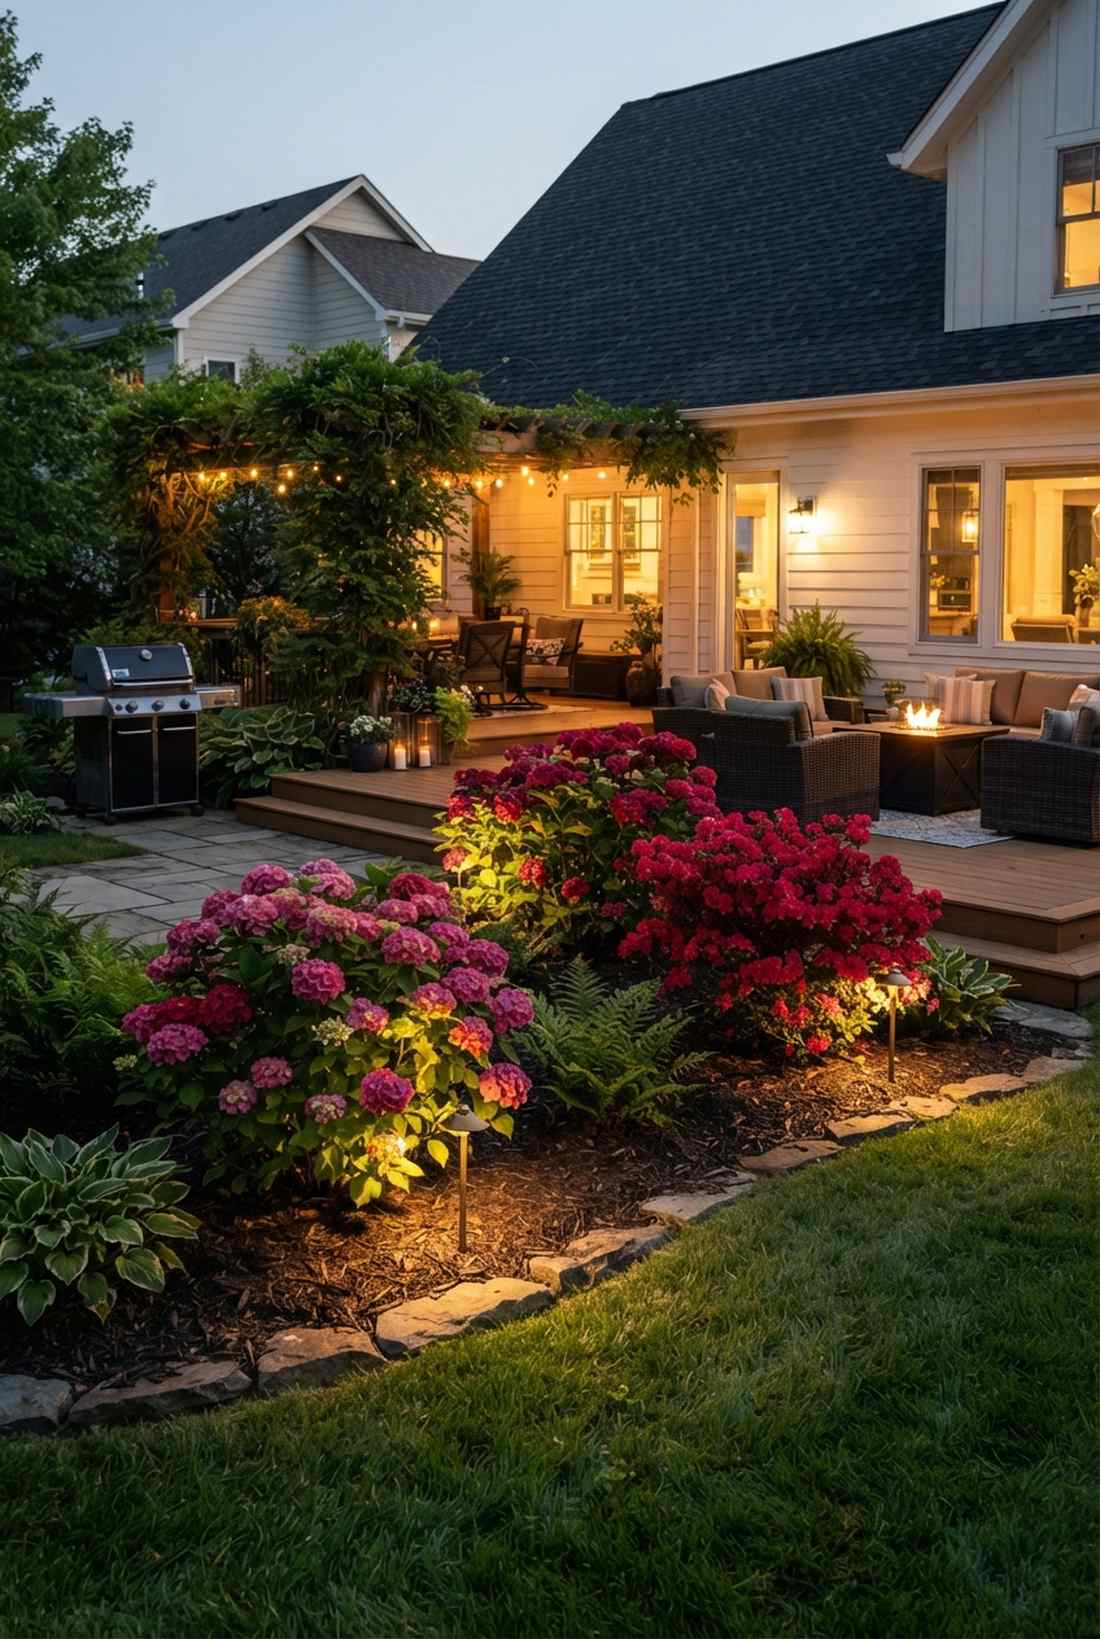
This setup feels like a vibrant nighttime art gallery for your plants. Adding adjustable warm-color accent spots extends the life of your seasonal blooms well into the evening hours.
Using cool blue LEDs completely destroys the natural reds and pinks of flowering shrubs. Dropping in a 2700K warm spot seamlessly injects premium outdoor lighting yard aesthetics that make the colors pop wildly against the dark. The contrast is stunning.
Expect to spend about $40–$80 per focal shrub. Highly recommended for a high-impact color boost.
- Key Materials: Micro accent spotlights (Warm White)
- Vibe / Style: Vibrant botanical showcase
- Difficulty: Easy beginner setup
- Budget Breakdown: Accent spot: $45 | Cabling: $10.
- Creator’s Tip: Continuously adjust the aim throughout the growing season as the blooms shift and the plant expands.
- Smart Sourcing: miniature low-voltage brass spotlights and high-CRI warm white LED replacement bulbs.
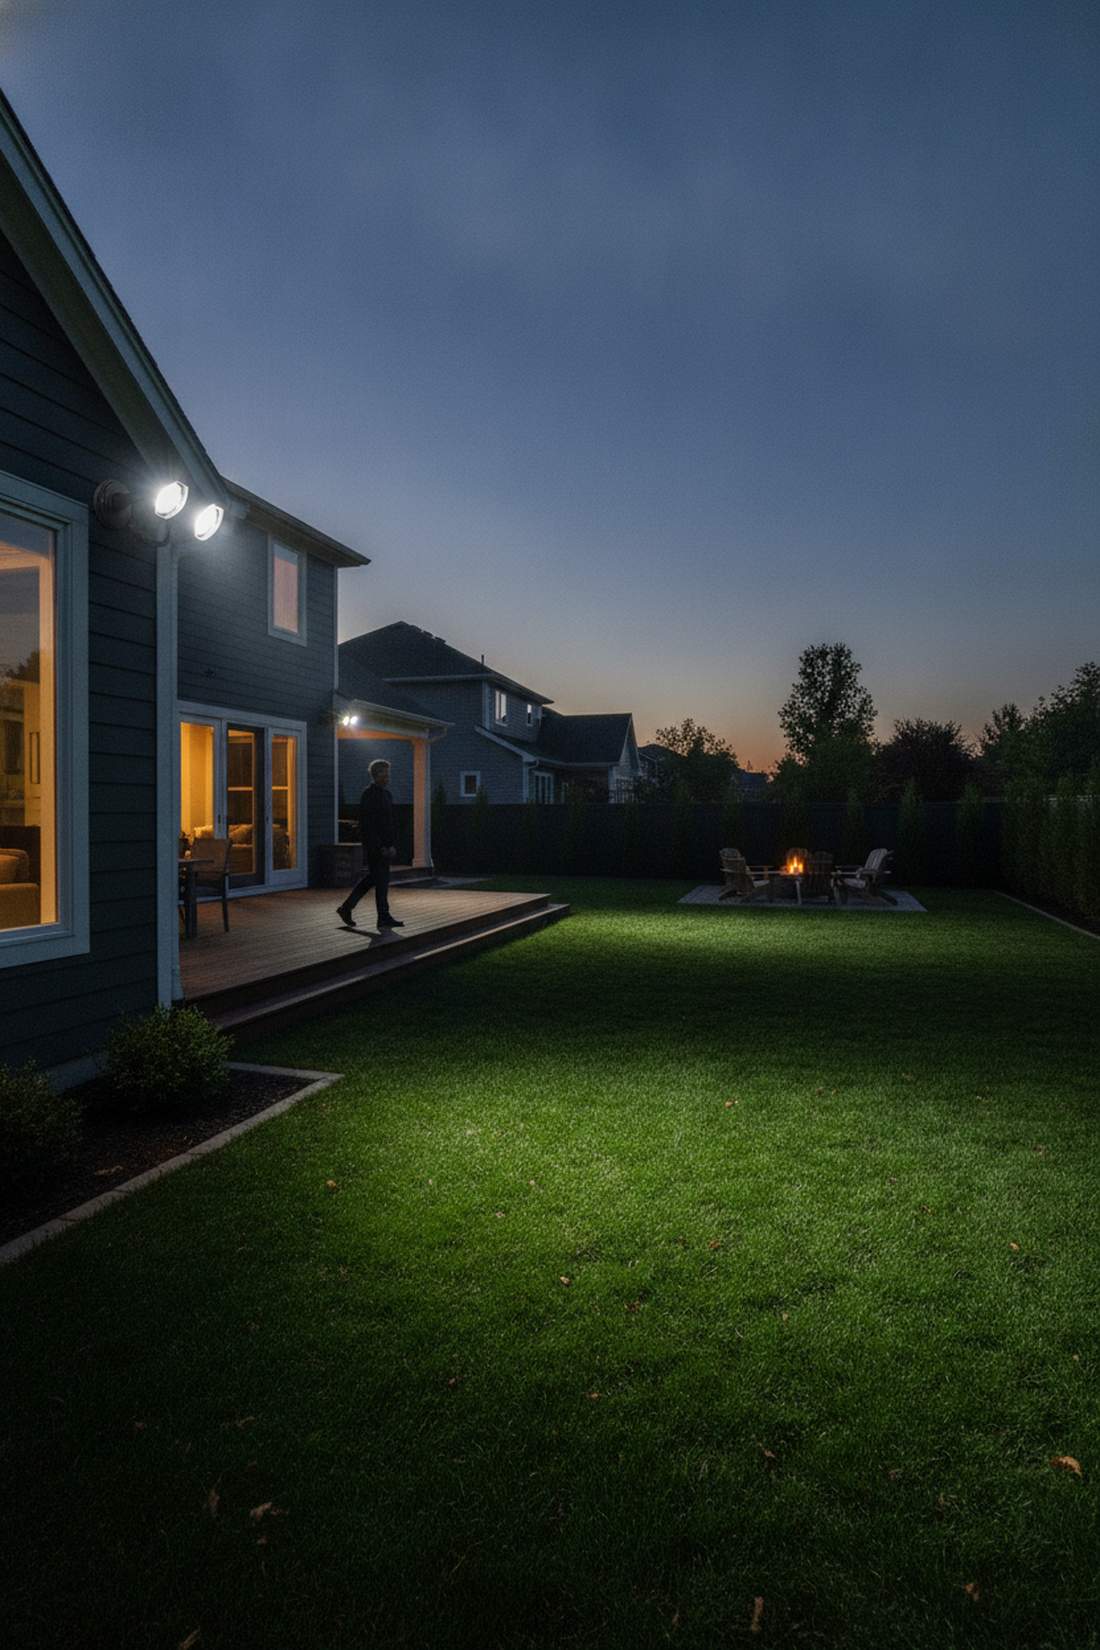
21. Lawn Area Moonlighting
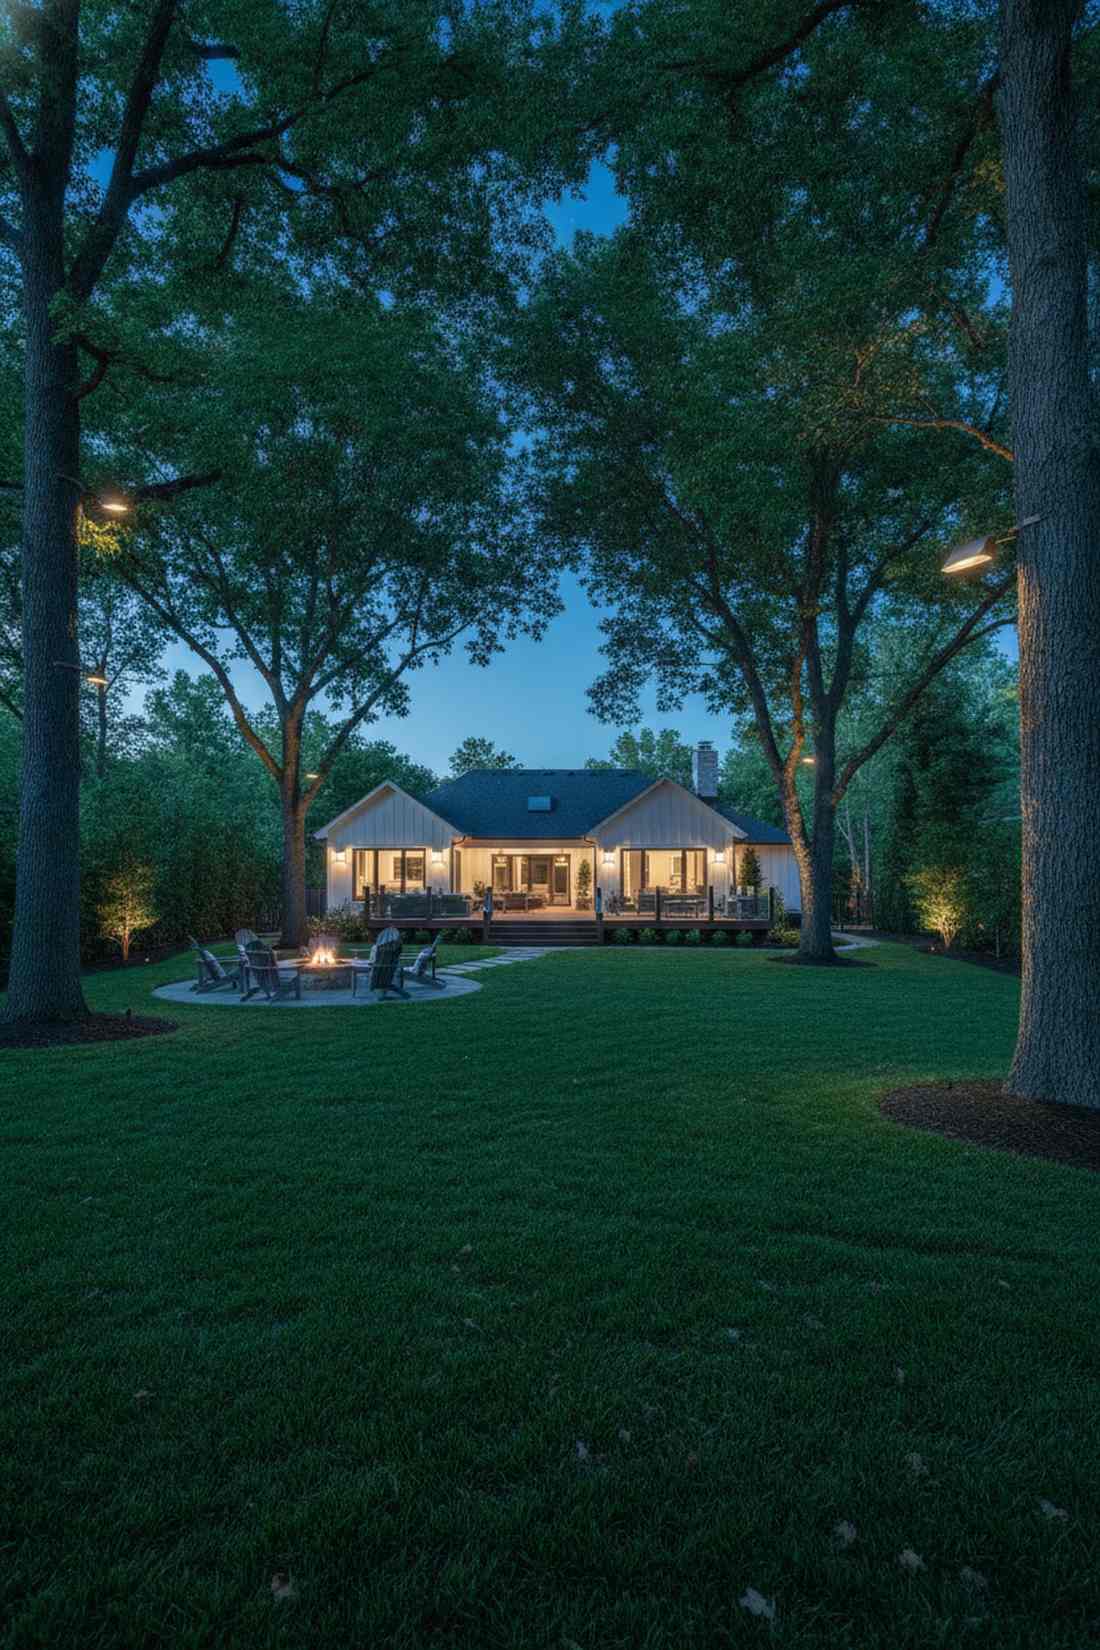
Standing here feels like basking under a permanent, romantic full moon. Employing canopy-mounted downward washes creates gorgeous dappled shadows across massive open lawn spaces.
Everyone ignores this angle, but it transforms the entire yard into a natural oasis. By mounting wide 50-degree beams 20 feet up in a tree, it gives a designer-level finish that mimics pure moonlight without visible ground fixtures. It is the ultimate stealth lighting.
This pro-level technique runs $150–$300 per tree. Pin this if you have massive mature trees in your yard!
- Key Materials: Tree-mount downlights & shields
- Vibe / Style: Serene natural romance
- Difficulty: Advanced (requires climbing/ladders)
- Budget Breakdown: Downlights: $120 | Tree mounts: $40.
- Creator’s Tip: Use special tree-safe mounting hardware that expands as the tree grows so you don’t kill the branches over time.
- Smart Sourcing: tree-safe mounting bracket kits and long-cowl brass downlight fixtures.
Most folks never consider lighting from behind… but this next shadow trick is what makes basic plants look insanely expensive.
22. Ornamental Grass Backlighting
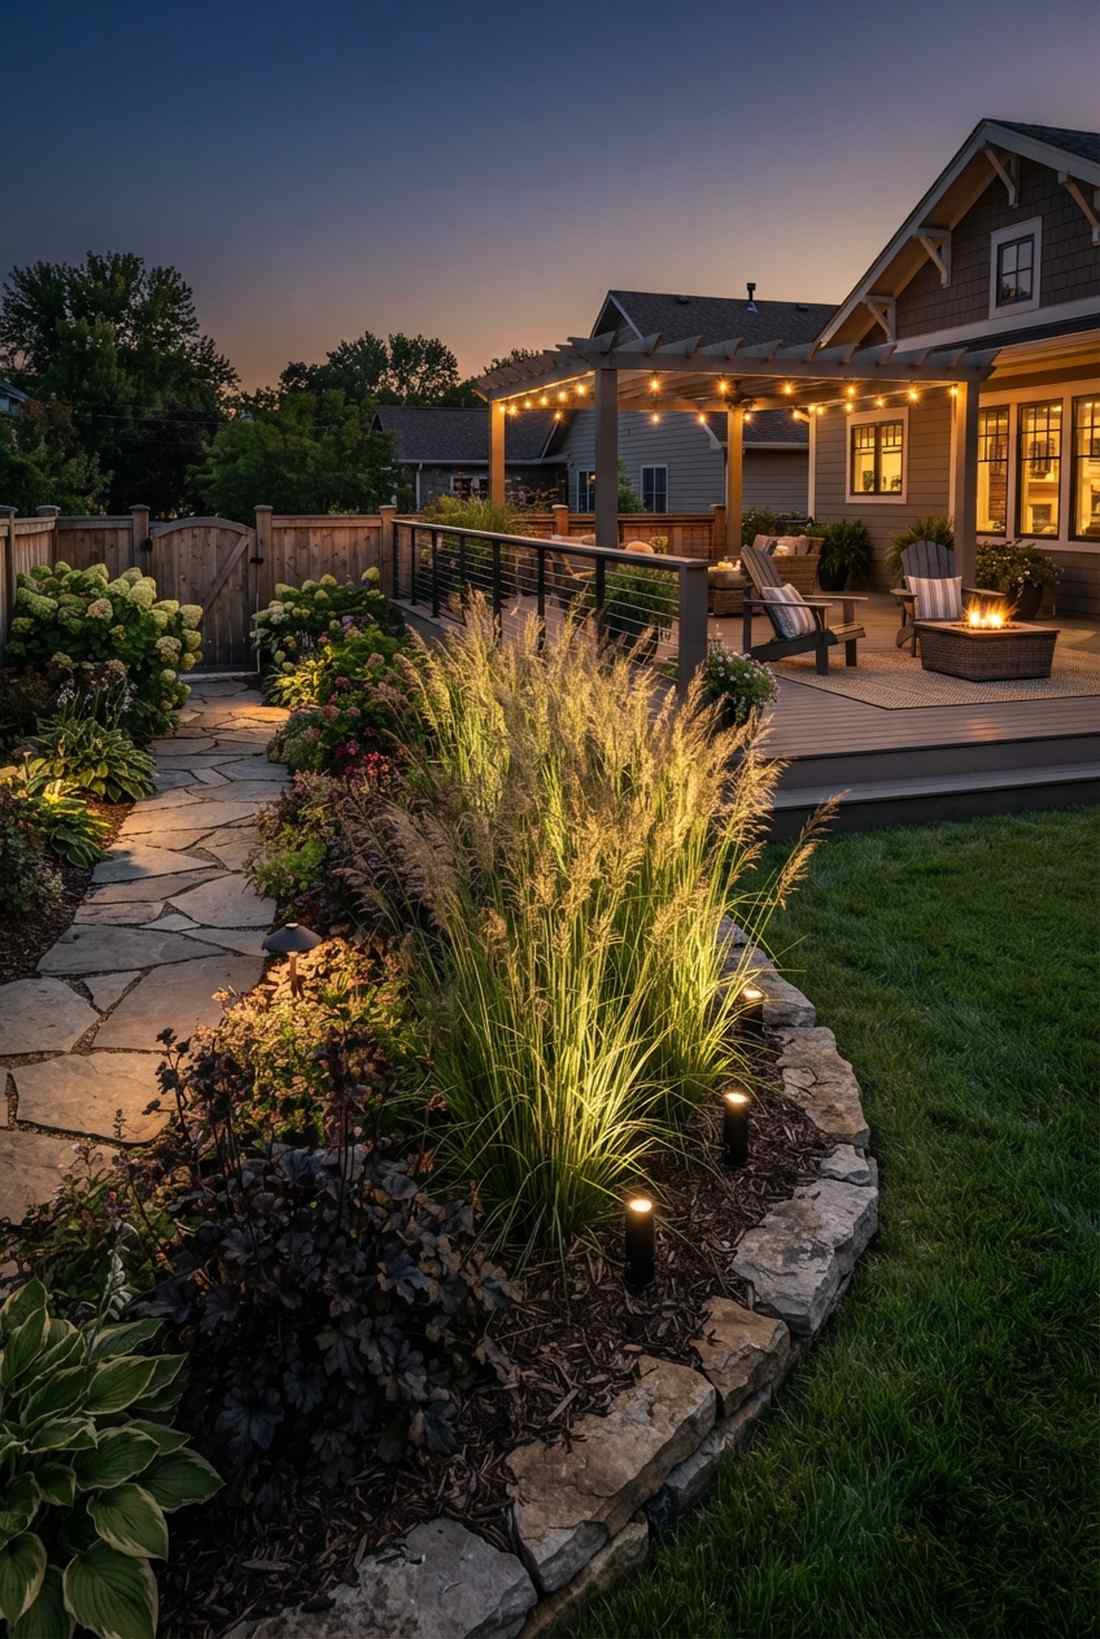
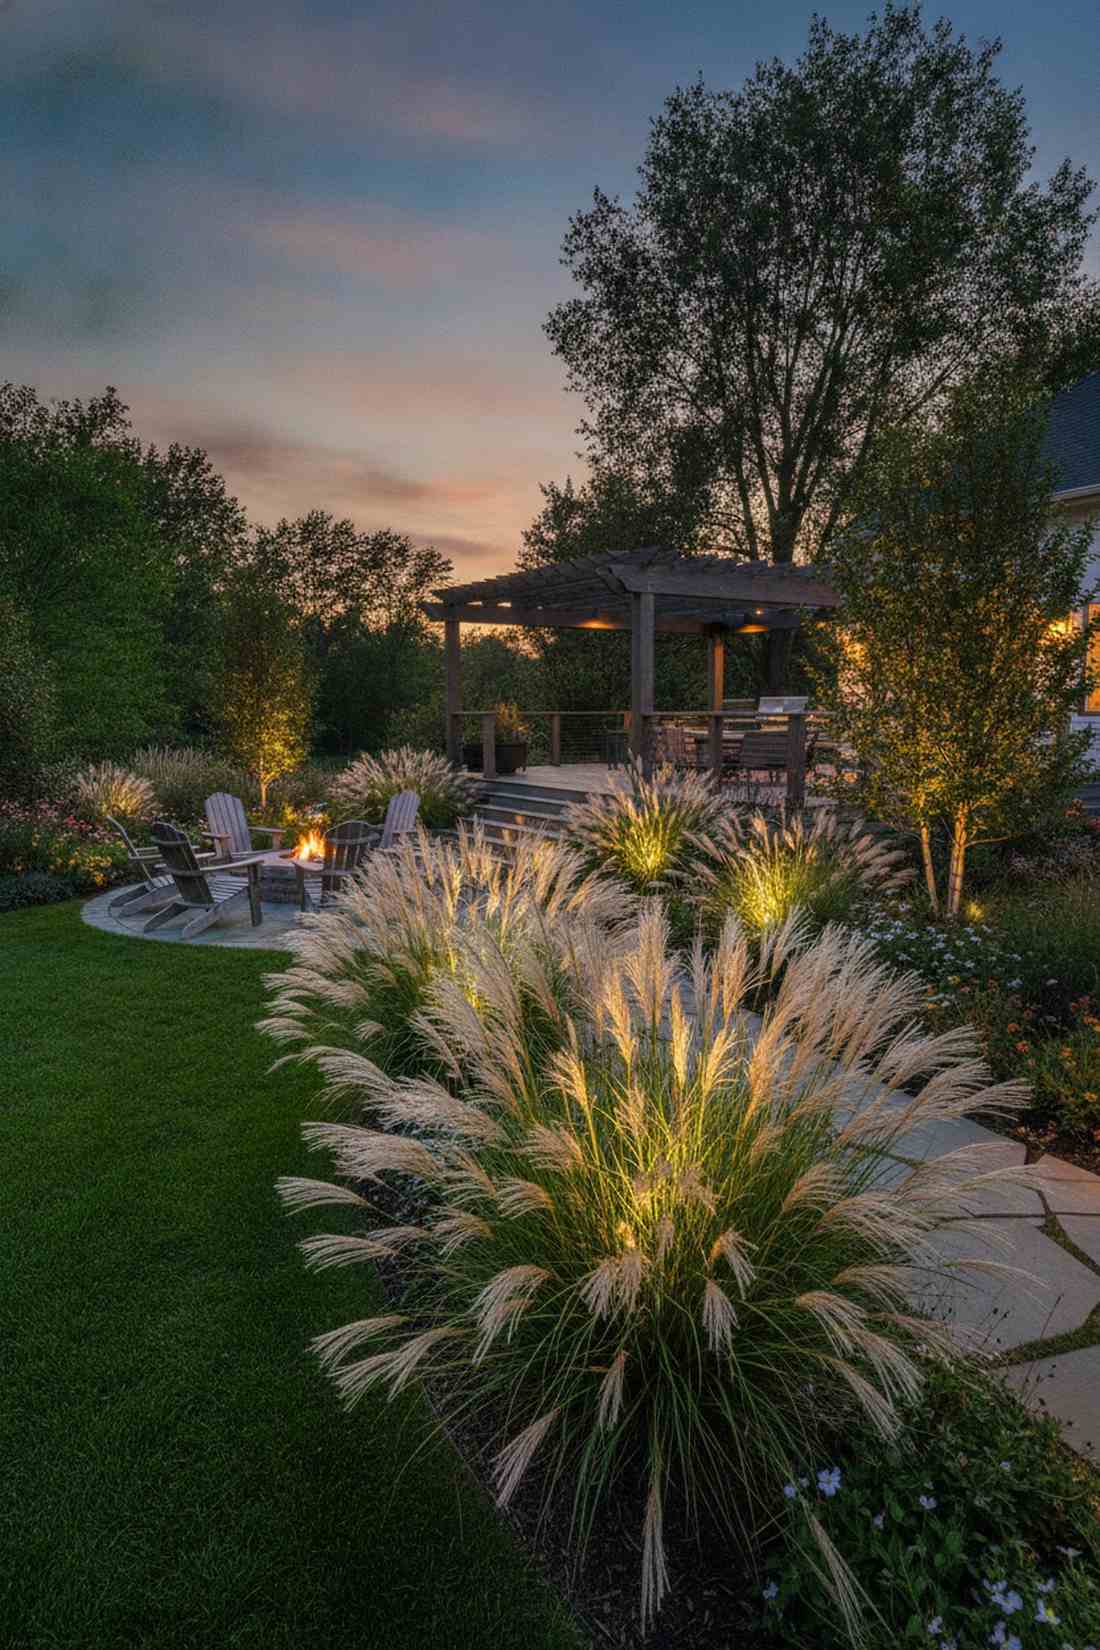
This aesthetic feels like catching a glowing sunset frozen in time. Using hidden rear-position spotlights on fine-textured grasses creates a striking, luminous silhouette effect.
Front-lighting ornamental grasses usually just makes them look like flat, dead hay. Hiding the fixture behind the clump looks far more expensive than it is, transforming the grass into a glowing centerpiece of lighting outdoor decor. The wind movement makes it hypnotic.
You can easily pull this off for around $40–$70. It’s a fast weekend upgrade that completely changes the vibe.
- Key Materials: Hidden bullet spotlights
- Vibe / Style: Dynamic glowing silhouette
- Difficulty: Easy quick-fix
- Budget Breakdown: Hidden fixture: $50.
- Creator’s Tip: Use a narrow beam to ensure the light only hits the grass and doesn’t spill out visibly into the surrounding yard.
- Smart Sourcing: compact LED well lights (in-ground) and matte black glare shields.
23. Rock Garden Shadow Play
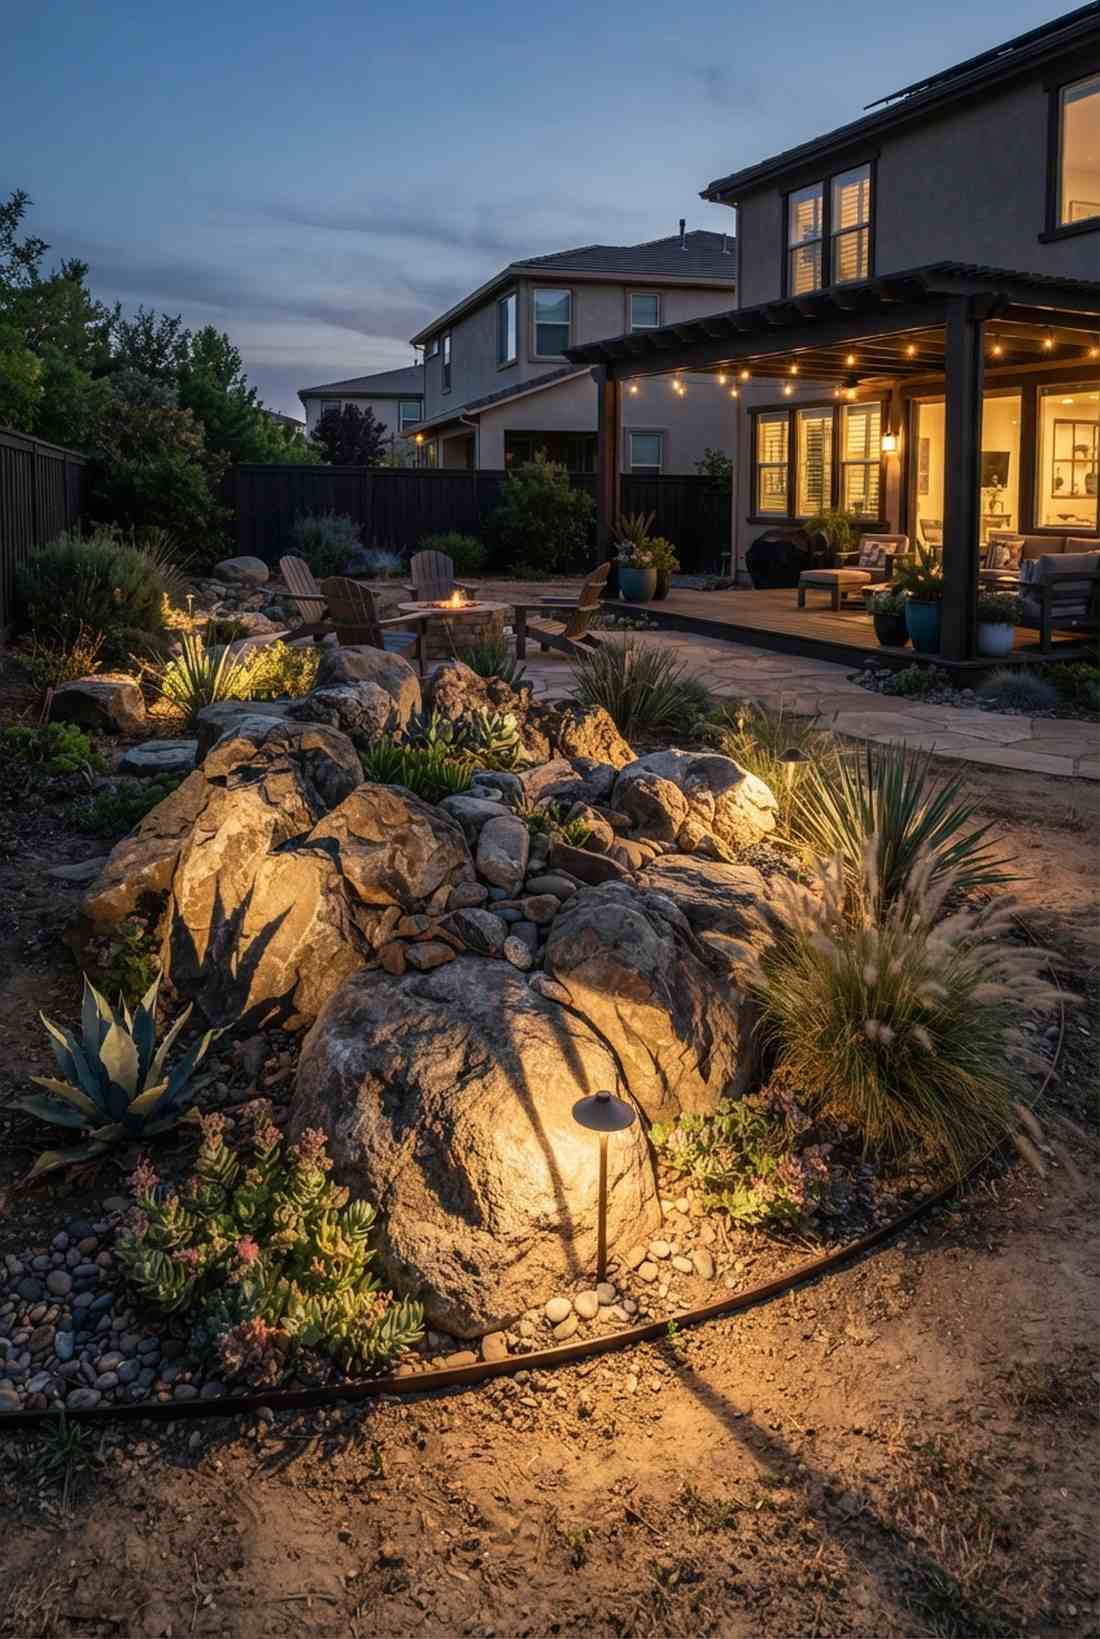

Looking at this feels like staring at a rugged, dramatically lit mountain canyon. Applying extreme low-angle grazing across boulders completely reveals the harsh, beautiful textures of the stone.
Overhead lighting completely flattens out expensive landscaping rocks. Shooting light nearly parallel to the ground seamlessly injects premium outdoor lighting design techniques that force extreme shadow patterns. It brings xeriscapes to life.
Budget around $80–$150 to light up a rock feature. Save this to your arid landscaping inspiration board!
- Key Materials: Low-profile wash lights
- Vibe / Style: Rugged dimensional drama
- Difficulty: Intermediate
- Budget Breakdown: Wash fixtures: $100 | Wiring: $30.
- Creator’s Tip: Experiment with the fixture distance at night; moving it back just one inch can drastically lengthen the shadows.
- Smart Sourcing: wide-angle brass flood lights and low-voltage landscape wire kits.
Professional Lighting Techniques
Understanding core techniques enables homeowners to communicate effectively with designers and make informed decisions. These foundational approaches apply across diverse landscape styles and functional requirements.
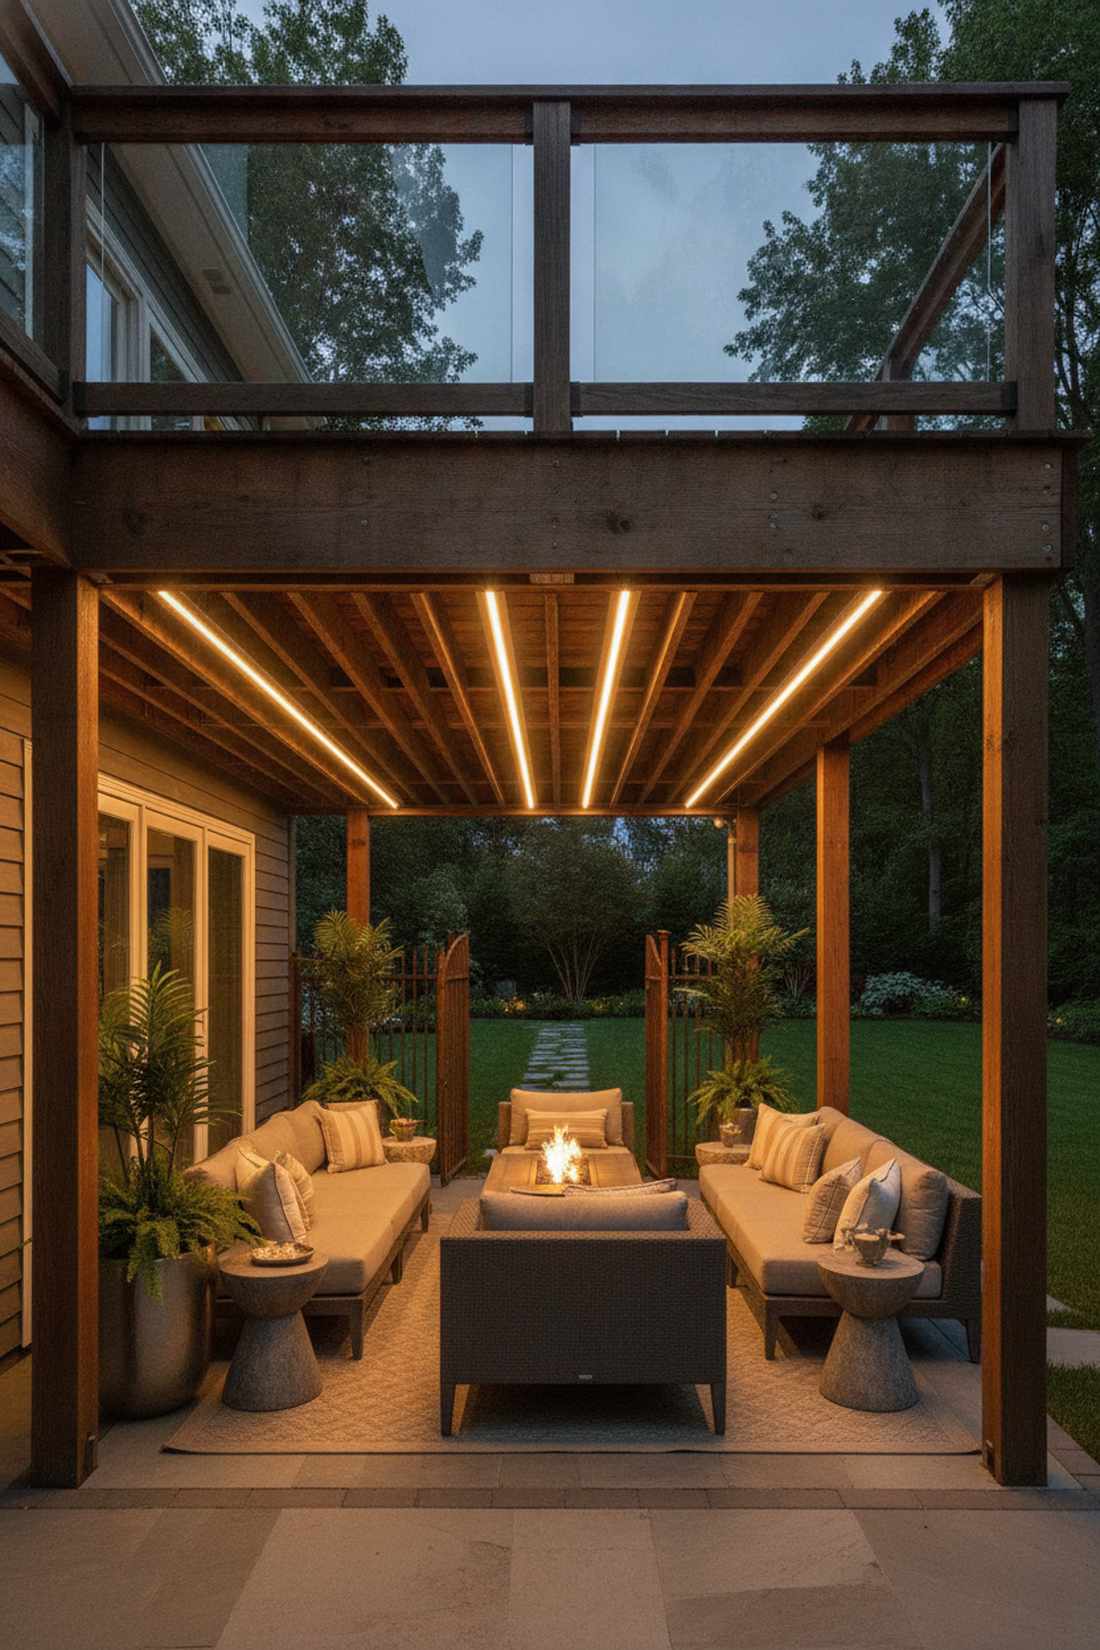
24. Downlighting from Overhead Structures
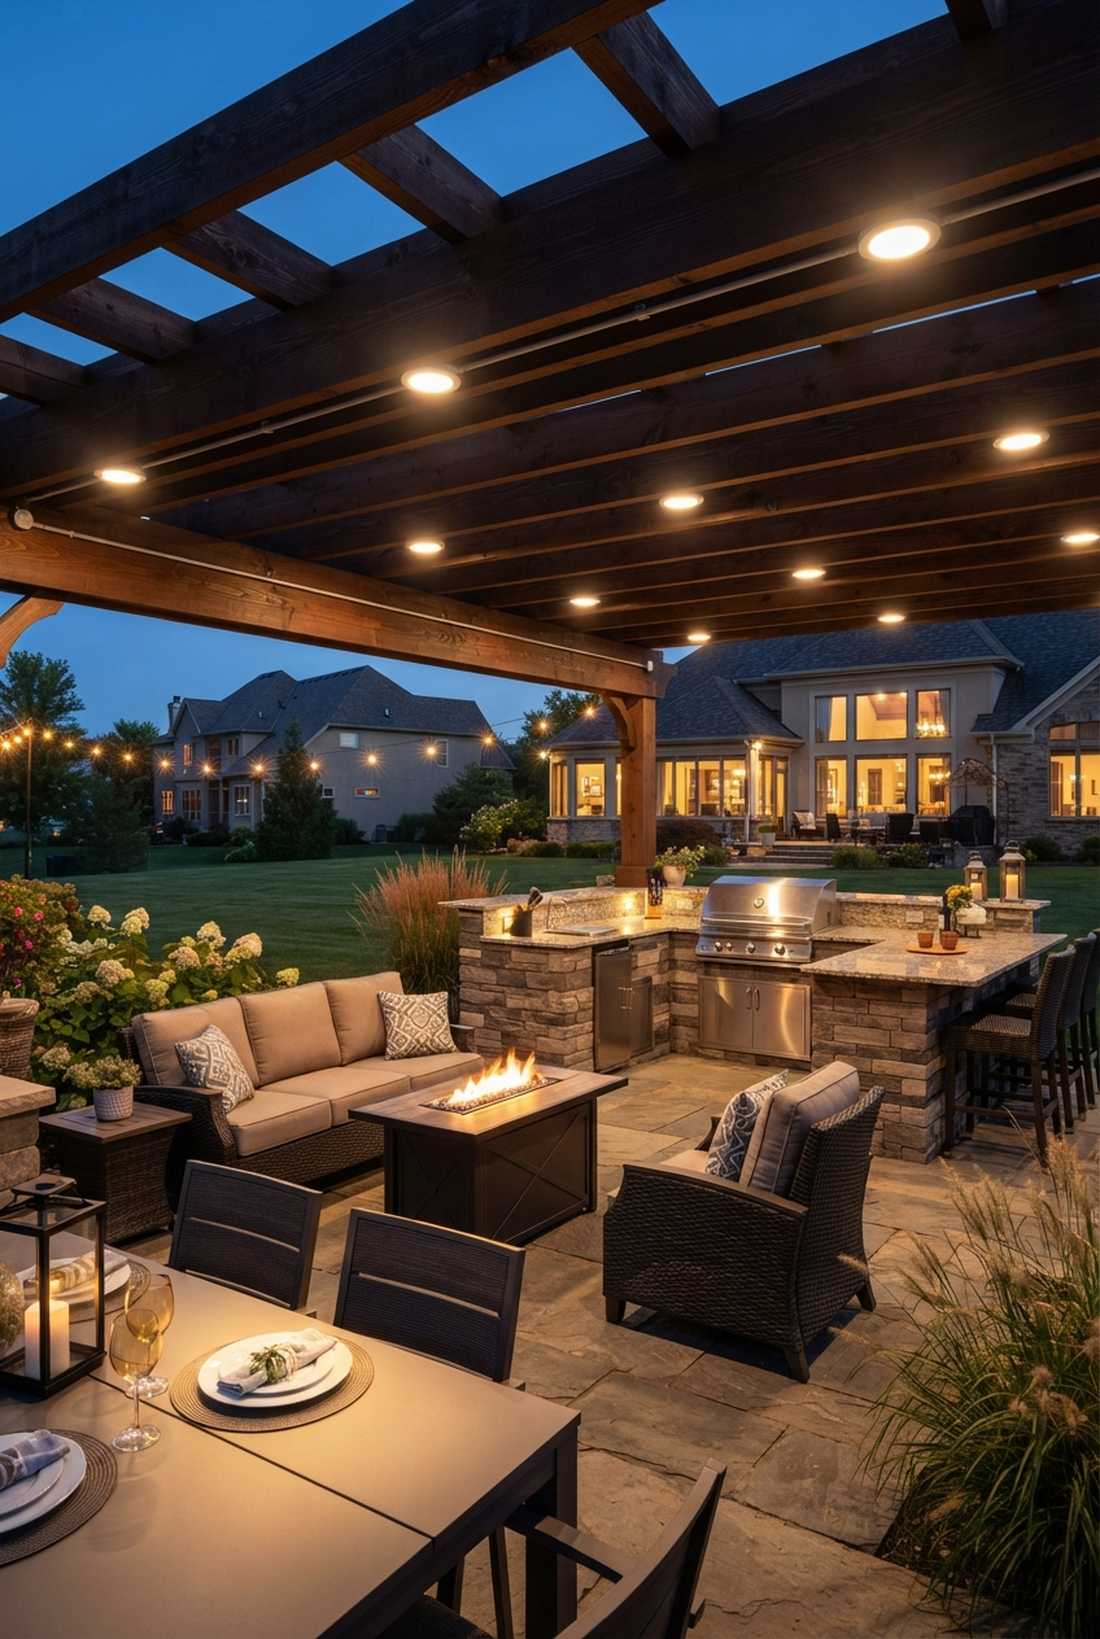
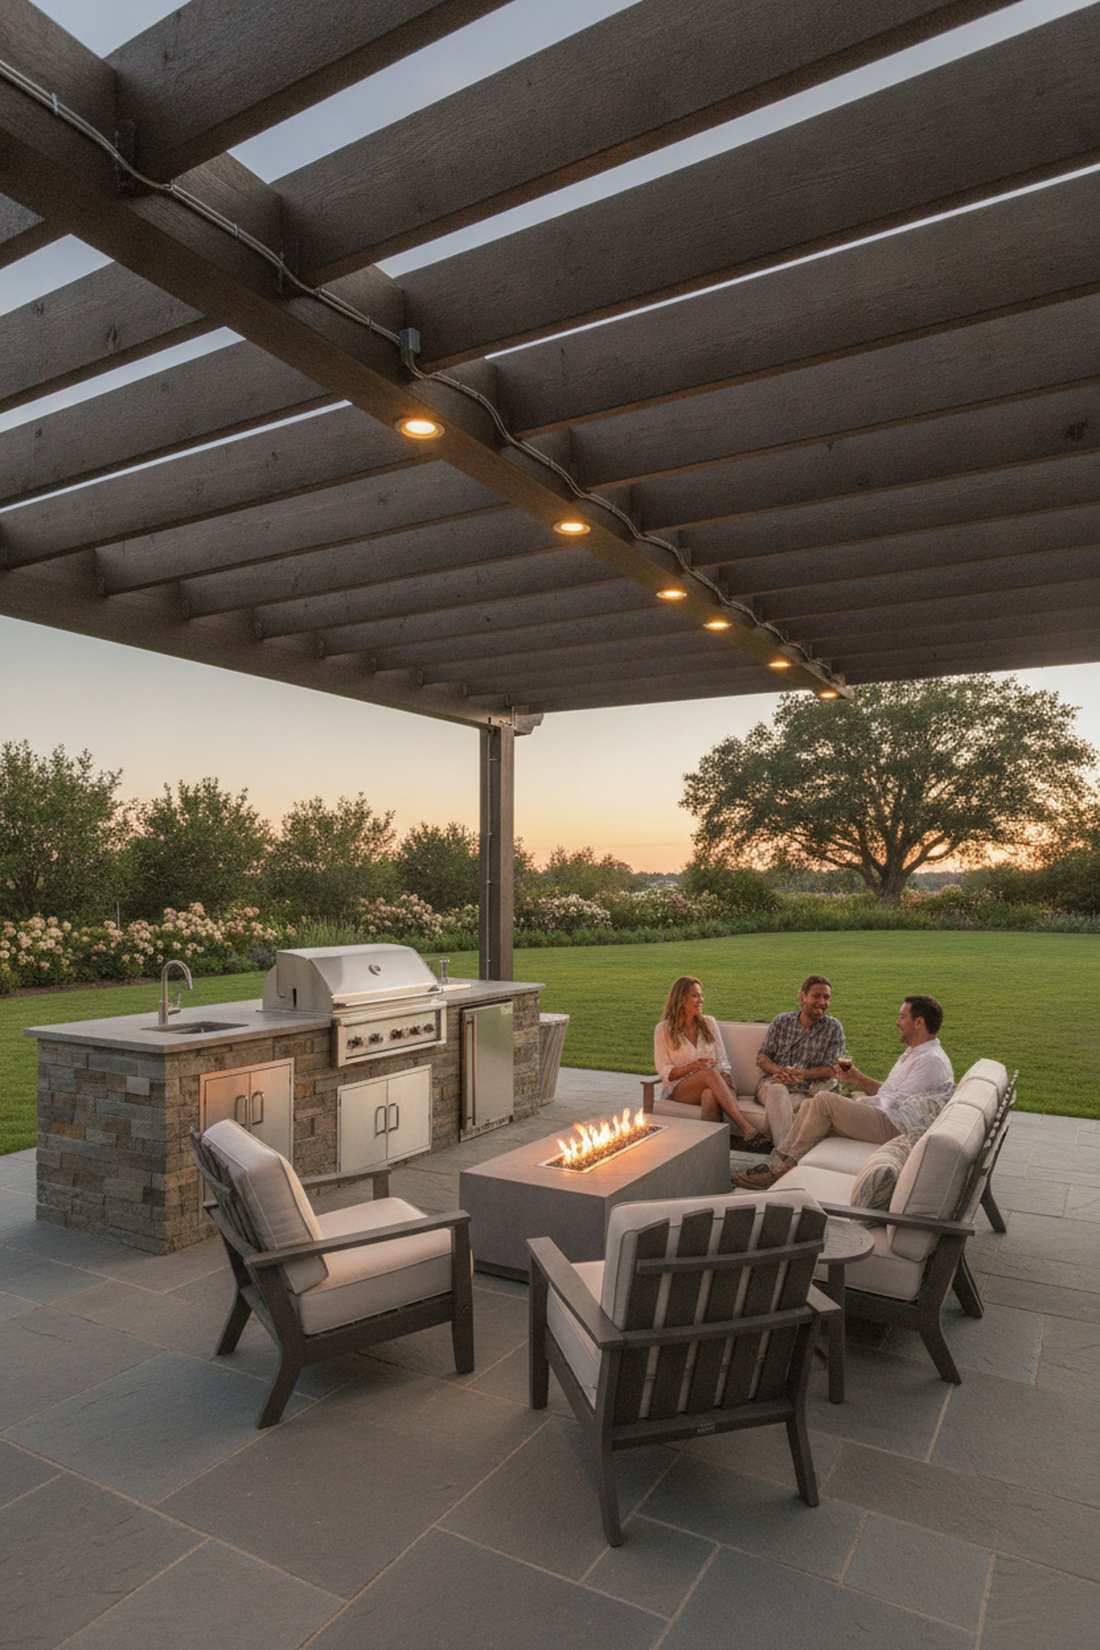
This layout feels incredibly natural, mimicking the comfort of interior recessed lighting but outdoors. Rigging overhead pergola downlights provides exceptional visibility for outdoor kitchens or seating areas.
Relying on glaring side-floods is why cheap setups look tacky and cause massive eye strain. Dropping light straight down delivers a surprisingly premium look that eliminates harsh facial shadows completely. It is foundational for usable outdoor spaces.
You can execute this core technique for roughly $150–$300. Highly recommended for any covered outdoor structure.
- Key Materials: Surface-mount wet-rated pucks
- Vibe / Style: Familiar indoor-outdoor comfort
- Difficulty: Intermediate (wire routing needed)
- Budget Breakdown: Puck lights: $120 | Wire hiders: $40.
- Creator’s Tip: Ensure proper weatherproofing on exposed joints, even under a roof, to stop condensation from destroying the diodes.
- Smart Sourcing: wet-rated LED surface mount puck lights and outdoor-rated wire raceway kits.
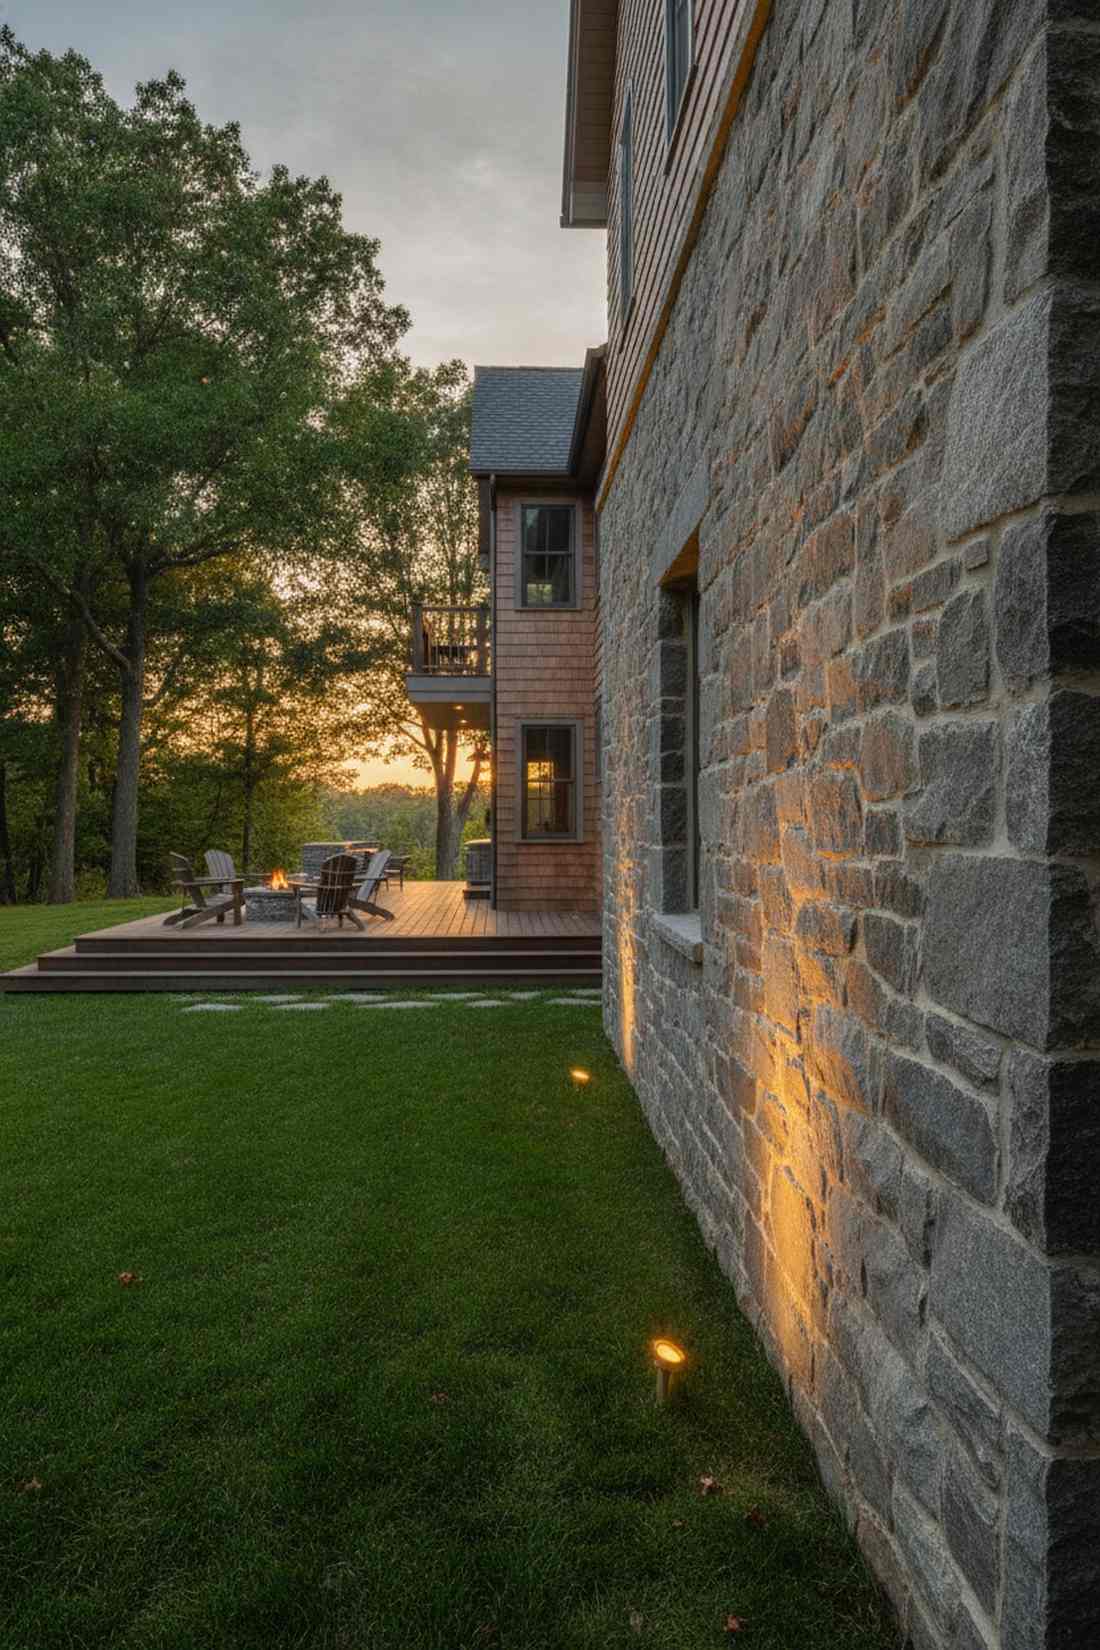
25. Uplighting Architectural Elements
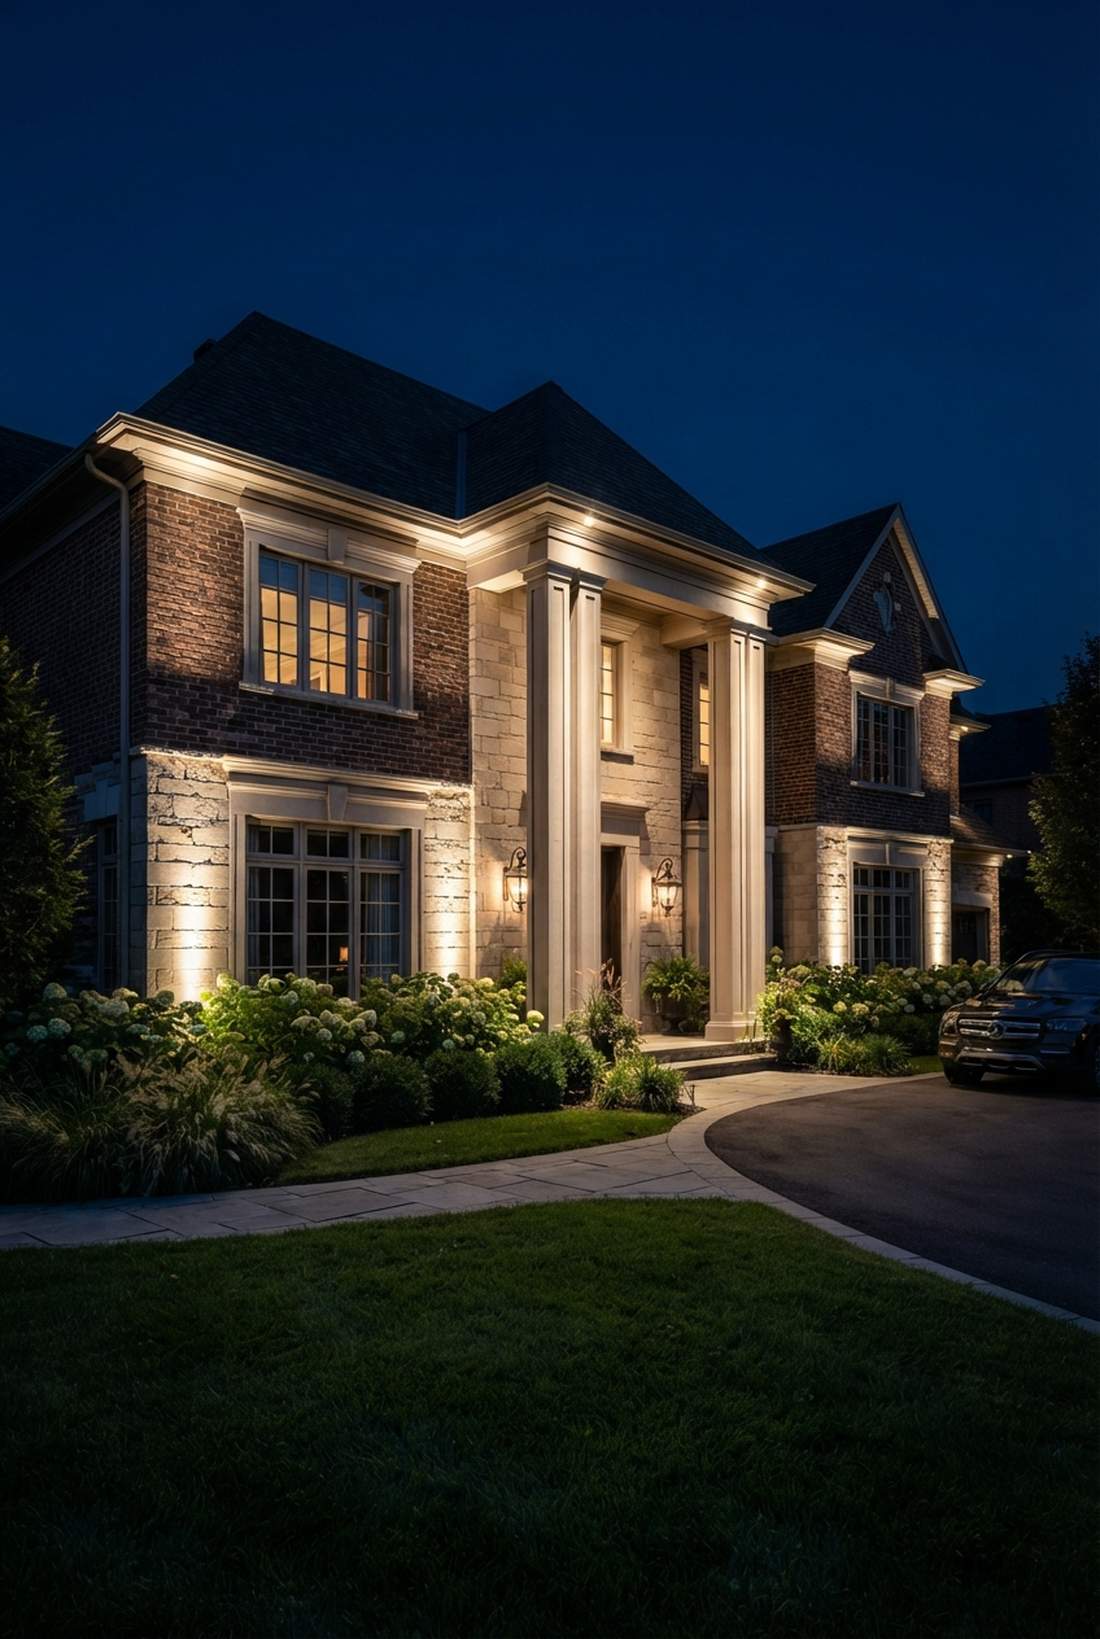
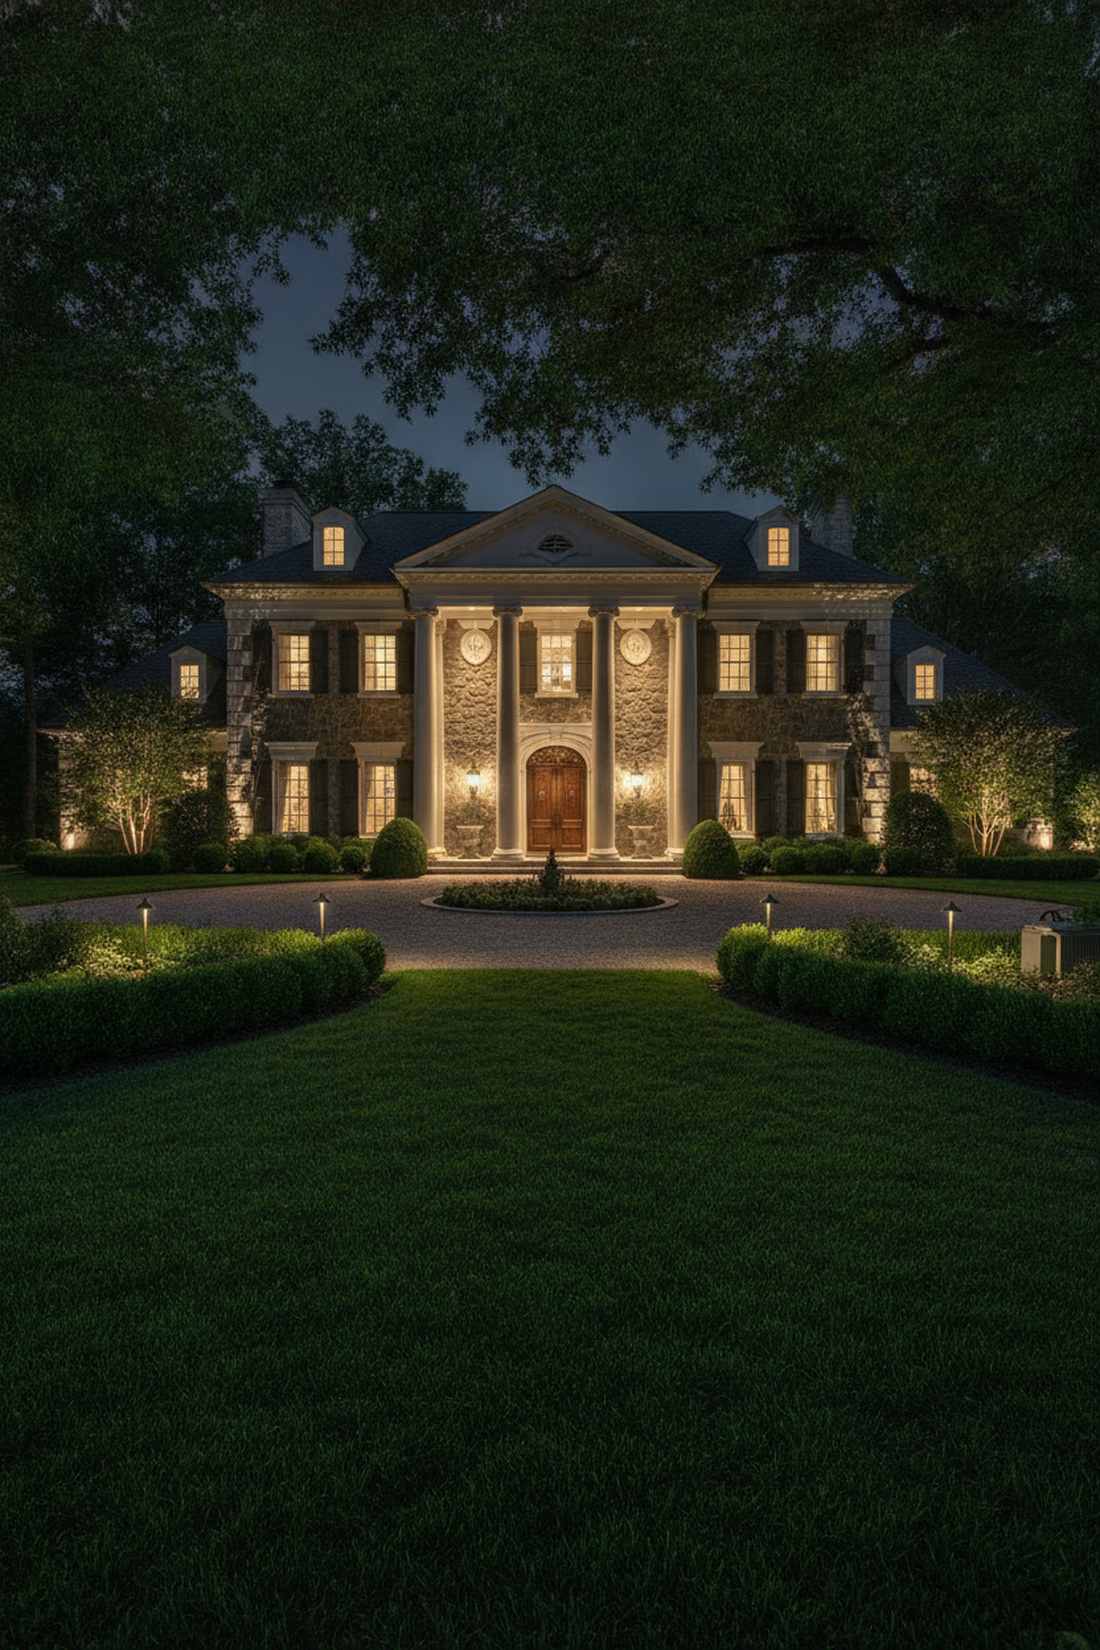
This approach feels like pulling up to a historically preserved city landmark. Strategic ground-to-wall uplighting forces extreme contrast between your home’s façade and the pitch-black sky.
Designers usually gatekeep this exact layout because it is the number one driver of perceived home value. Punching beams up structural columns gives a designer-level finish that heavily utilizes premium outdoor lighting for house exteriors. It creates instant neighborhood dominance.
A full facade uplight system runs $300–$600. Pin this if you want to dramatically boost your curb appeal!
- Key Materials: Narrow-beam brass up-lights
- Vibe / Style: Majestic estate prominence
- Difficulty: Intermediate to Advanced
- Budget Breakdown: Fixture kit: $350 | Transformer: $100.
- Creator’s Tip: Keep the fixtures 12-36 inches off the wall to prevent a blinding hot spot right at the foundation line.
- Smart Sourcing: pro-grade brass uplight starter kits and 300W stainless steel landscape transformers.
Skip this next cross-lighting technique, and your statues or fountains will look like flat cardboard cutouts at night…
26. Cross-Lighting for Dimension
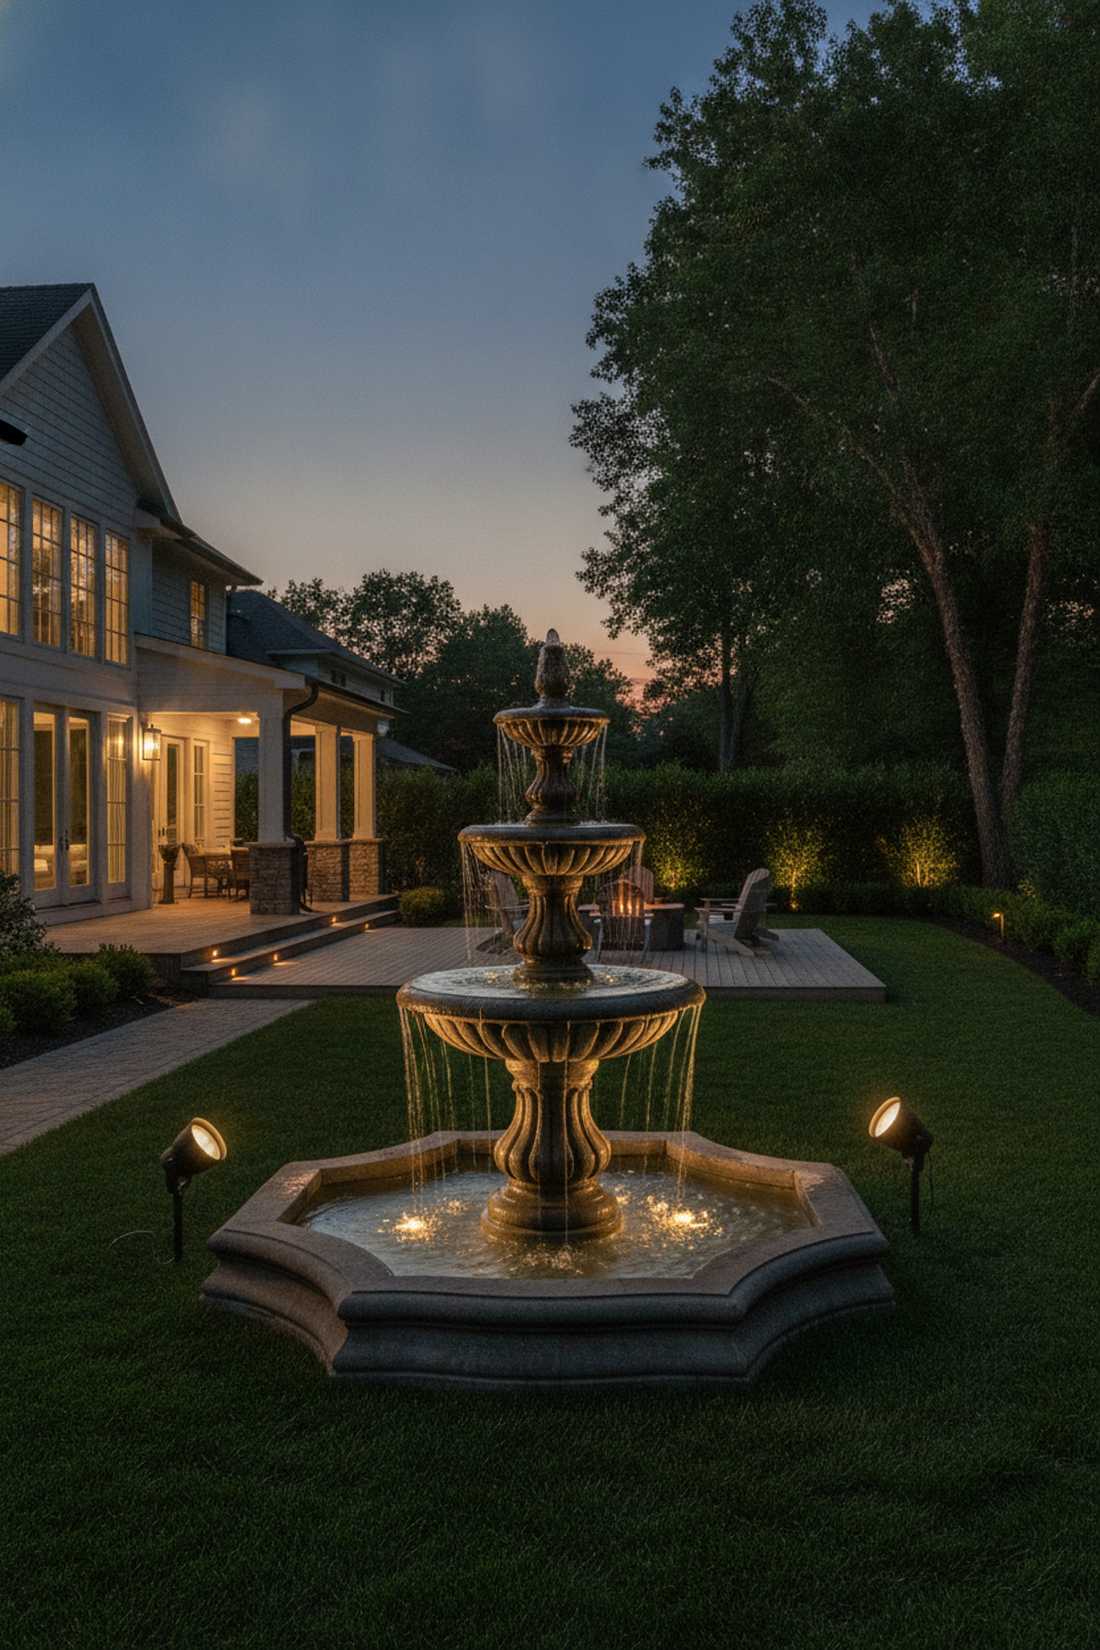
Observing this feels like viewing a 3D masterpiece in a museum exhibit. Utilizing dual-angle cross illumination absolutely destroys harsh shadows and brings full dimensional life to statues or fountains.
Most people hit an object with one bright light, which flattens the details and creates a massive black shadow behind it. Hitting it from opposing angles seamlessly injects professional outdoor lighting design depth that looks incredibly expensive. It is the secret to 360-degree perfection.
You can dial this in for $100–$180 per focal point. It’s an advanced trick that completely changes the vibe.
- Key Materials: Dual low-wattage spotlights
- Vibe / Style: Gallery-level 3D perfection
- Difficulty: Intermediate
- Budget Breakdown: Spotlight pair: $110 | Wiring: $30.
- Creator’s Tip: Make one light slightly dimmer than the other to create natural modeling instead of perfectly flat lighting.
- Smart Sourcing: dimmable low-voltage LED spotlights (2-pack) and adjustable glare guard cowls.
27. Grazing Textured Surfaces
This layout feels like running your hands over a luxurious, ancient stone wall. Applying extreme close-proximity grazing turns flat brick or stucco into a highly dynamic, textured focal point.
Shooting light directly at a brick wall washes out all the character. Moving the fixture within inches of the surface looks far more expensive than it is, creating aggressive shadow pockets that highlight every mortar joint. The visual drama is undeniable.
Expect to invest $80–$150 per wall section. Save this to your architectural details board!
- Key Materials: Close-mount linear washes
- Vibe / Style: Aggressive textural drama
- Difficulty: Intermediate
- Budget Breakdown: Wash bars: $120.
- Creator’s Tip: Test the angle multiple times before burying the wire; a one-inch shift completely changes the shadow intensity.
- Smart Sourcing: heavy-duty brass in-ground well lights and frosted spread lenses.
28. Silhouetting Distinctive Forms
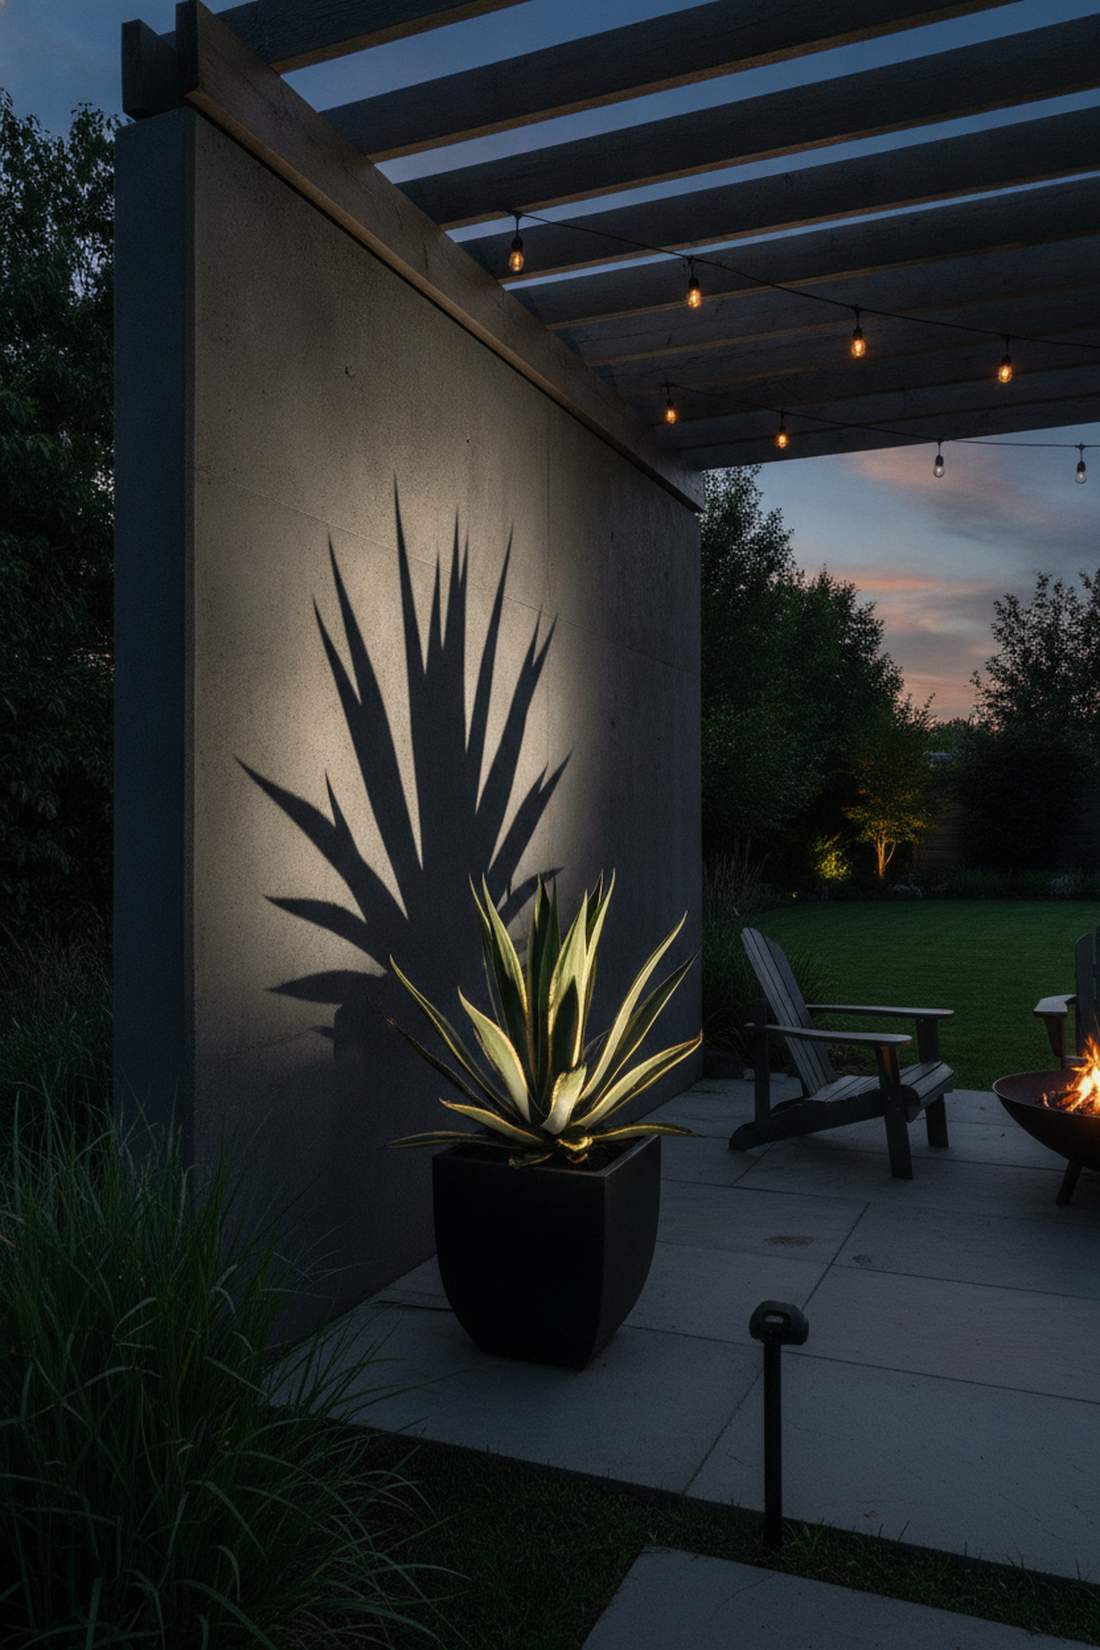
Looking at this feels like watching a bold shadow puppet theater against your fence. Implementing reverse-background silhouetting completely blacks out an object’s detail to emphasize its striking outline.
Everyone ignores this angle, but it transforms funky, sculptural plants like agave into bold art pieces. Lighting the wall behind the plant instead of the plant itself delivers a surprisingly premium look that screams modern art. It requires high contrast to work.
You can execute this for roughly $60–$100. Pin this if you have a massive blank wall behind your planters!
- Key Materials: Wide wash light (aimed at wall)
- Vibe / Style: Bold contemporary art
- Difficulty: Easy quick-fix
- Budget Breakdown: Wall wash: $70 | Mount: $10.
- Creator’s Tip: The object must be closer to the background wall than to the light fixture for the silhouette to pop correctly.
- Smart Sourcing: high-output LED wall wash fixtures and matte black finish yard stakes.
29. Shadowing for Visual Effects
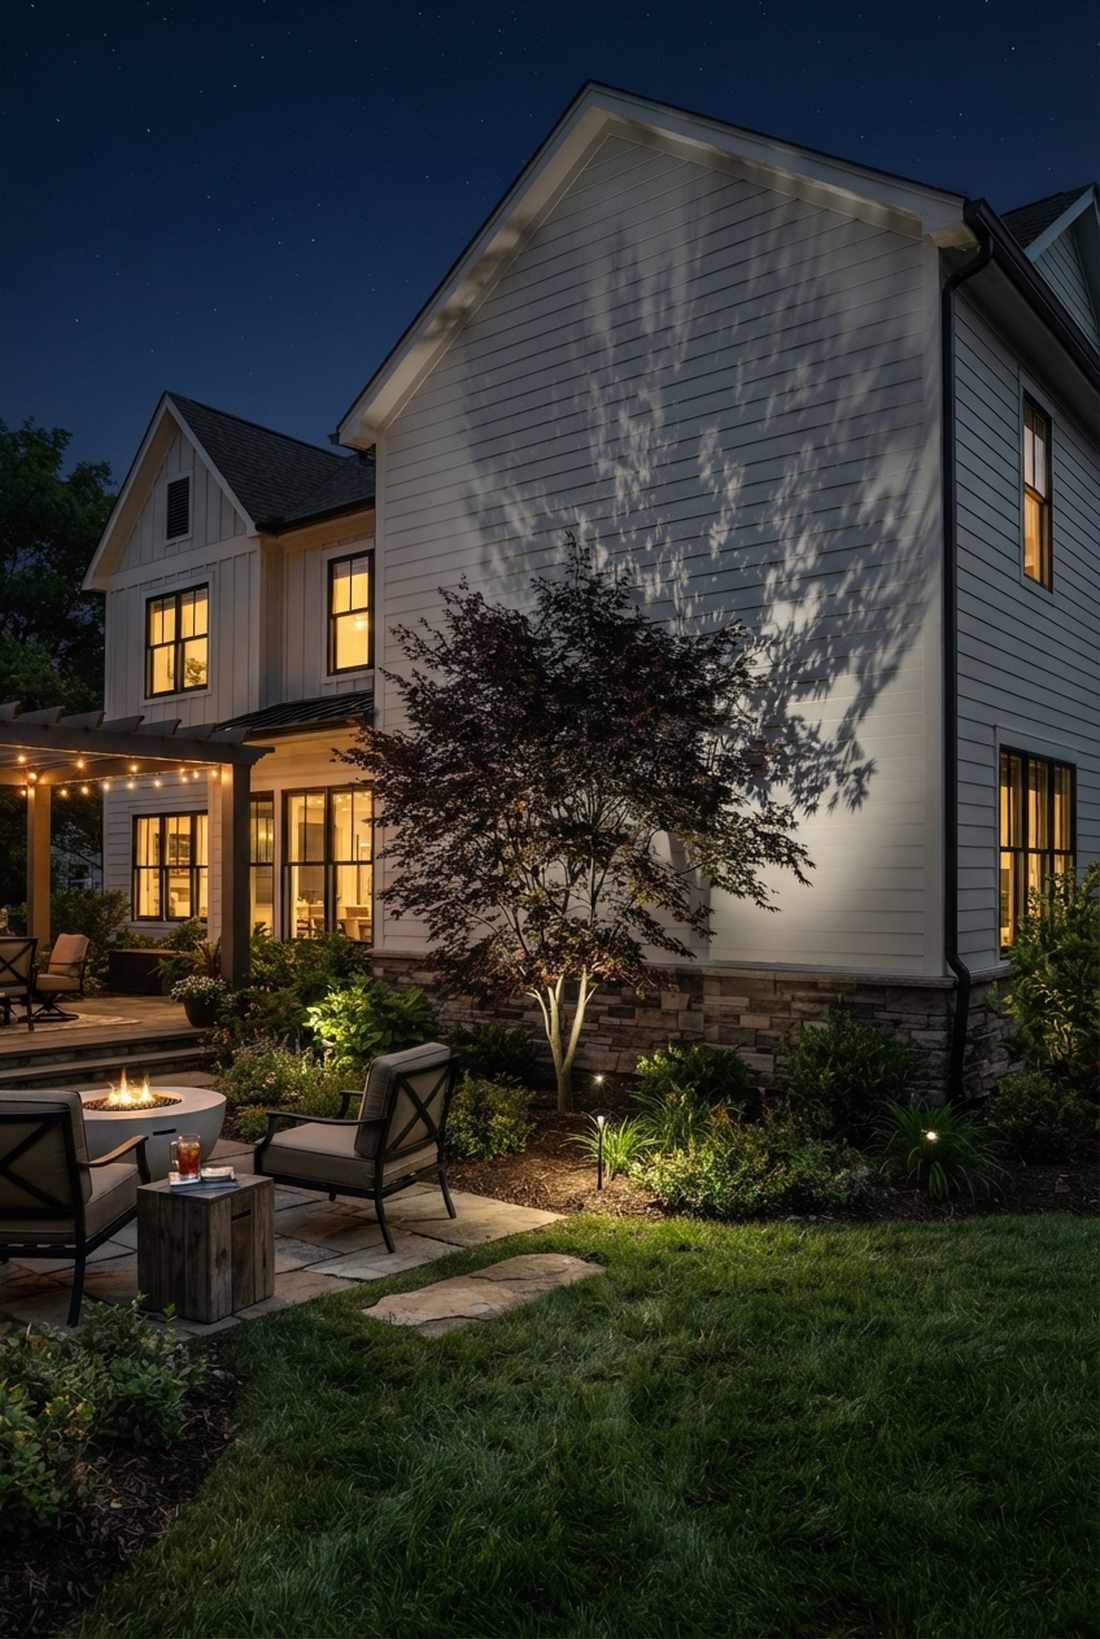
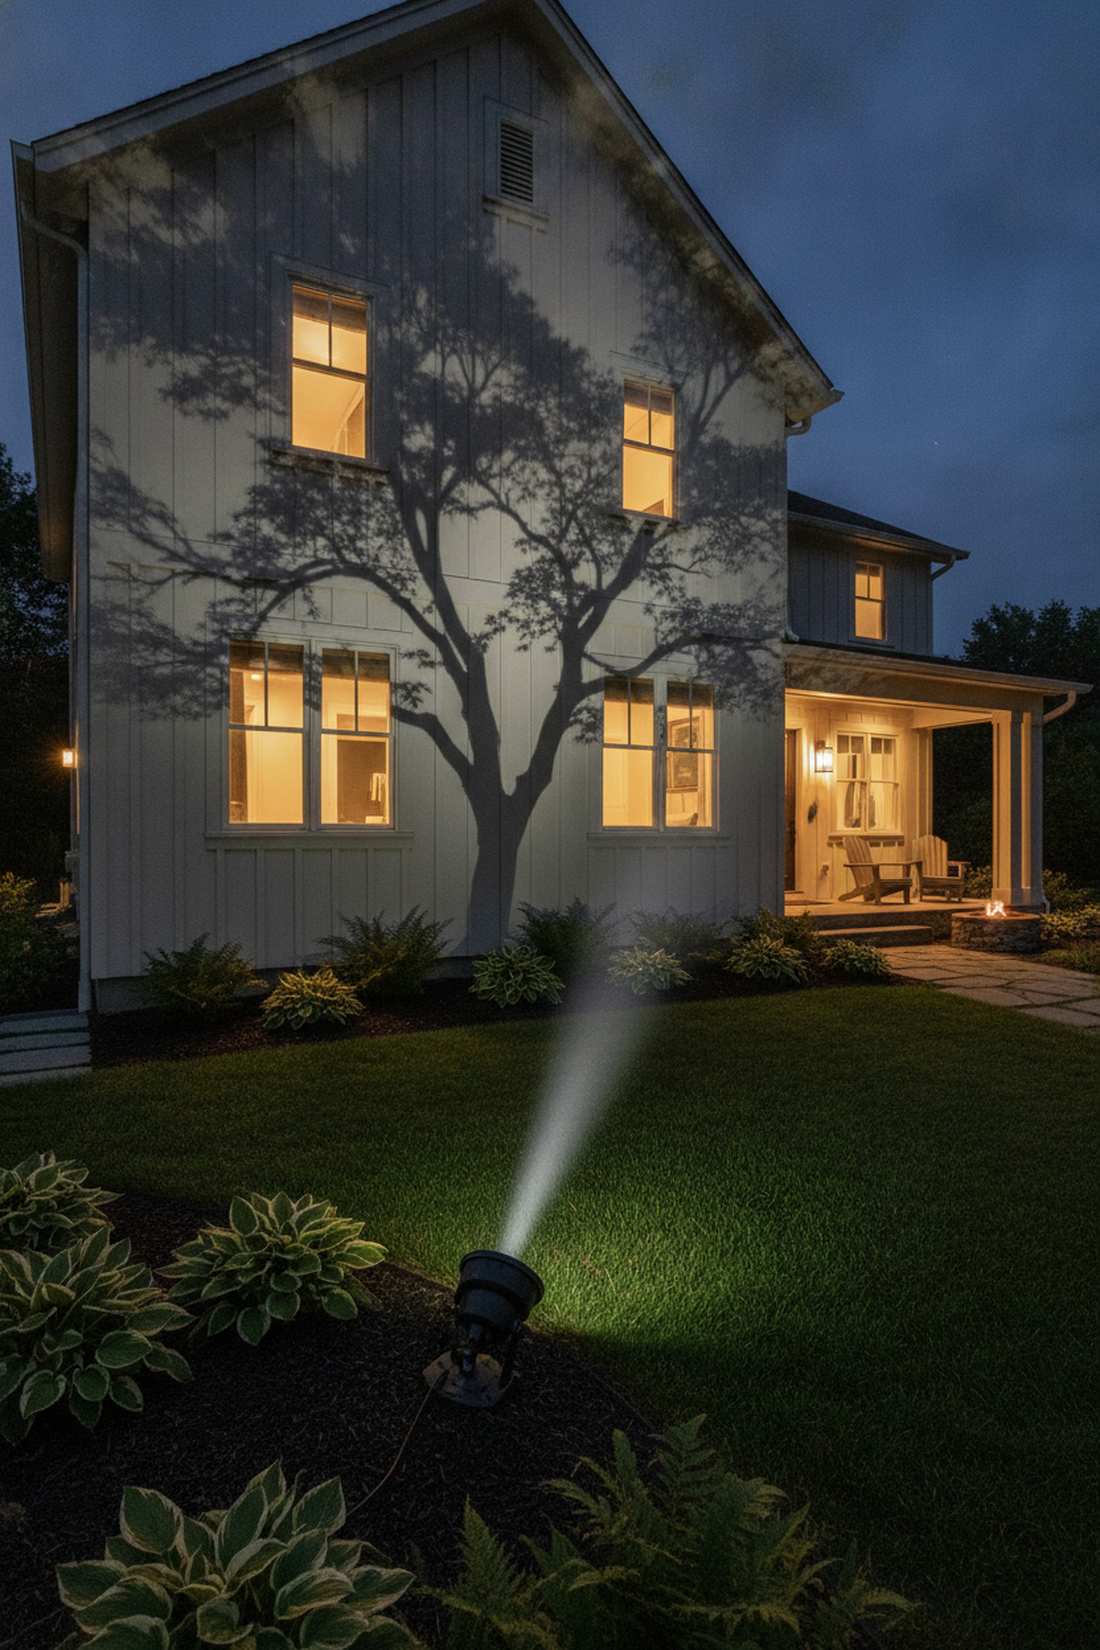
This aesthetic feels like an eerie, beautiful forest projected right onto your house. Using forward-projection shadowing uses tree branches to cast massive, theatrical patterns across blank siding.
Leaving large exterior walls totally dark creates a depressing, prison-like vibe at night. Pushing light through a Japanese Maple gives a designer-level finish that turns your siding into a dynamic, moving canvas. It’s essentially free architectural wallpaper.
Budget around $70–$130 for the projection setup. Highly recommended for a high-impact creative win.
- Key Materials: High-lumen directional spot
- Vibe / Style: Theatrical moving canvas
- Difficulty: Intermediate (requires precise aiming)
- Budget Breakdown: Spot fixture: $80 | High-power LED: $30.
- Creator’s Tip: Place the fixture low and far back to blow the shadow up to a massive size on the wall.
- Smart Sourcing: narrow-beam high-output LED spotlights and heavy-duty composite ground spikes.
If your yard looks flat and boring at night, you are absolutely missing the 3-layer rule outlined in the next step…
30. Layered Ambient-Task-Accent
This configuration feels like stepping into a perfectly balanced, professionally designed showroom. Mastering the 3-tier layered lighting approach is the holy grail of transforming flat, lifeless yards.
Relying on just one massively bright security floodlight is why cheap setups look tacky and aggressive. Balancing soft ambient glow with punchy accents seamlessly injects premium outdoor lighting night harmony without overwhelming the senses. It creates pure visual depth.
A full 3-layer system scales from $500–$1500+. Save this blueprint before planning your total yard overhaul!
- Key Materials: Mixed path, spot, and wash lights
- Vibe / Style: Master-planned estate
- Difficulty: Advanced (full system planning)
- Budget Breakdown: Transformer: $150 | Mixed Fixtures: $600+.
- Creator’s Tip: Put your ambient, task, and accent lights on completely separate smart zones so you can dial in the perfect mood.
- Smart Sourcing: multi-zone smart Wi-Fi landscape transformers and bulk pack mixed LED landscape kits.
Architectural Accent Strategies
Architectural lighting enhances home design features, increases perceived value, and establishes neighborhood presence. Strategic placement reveals the designer’s intent while creating visual hierarchy across building facades.
31. Column Base Uplighting
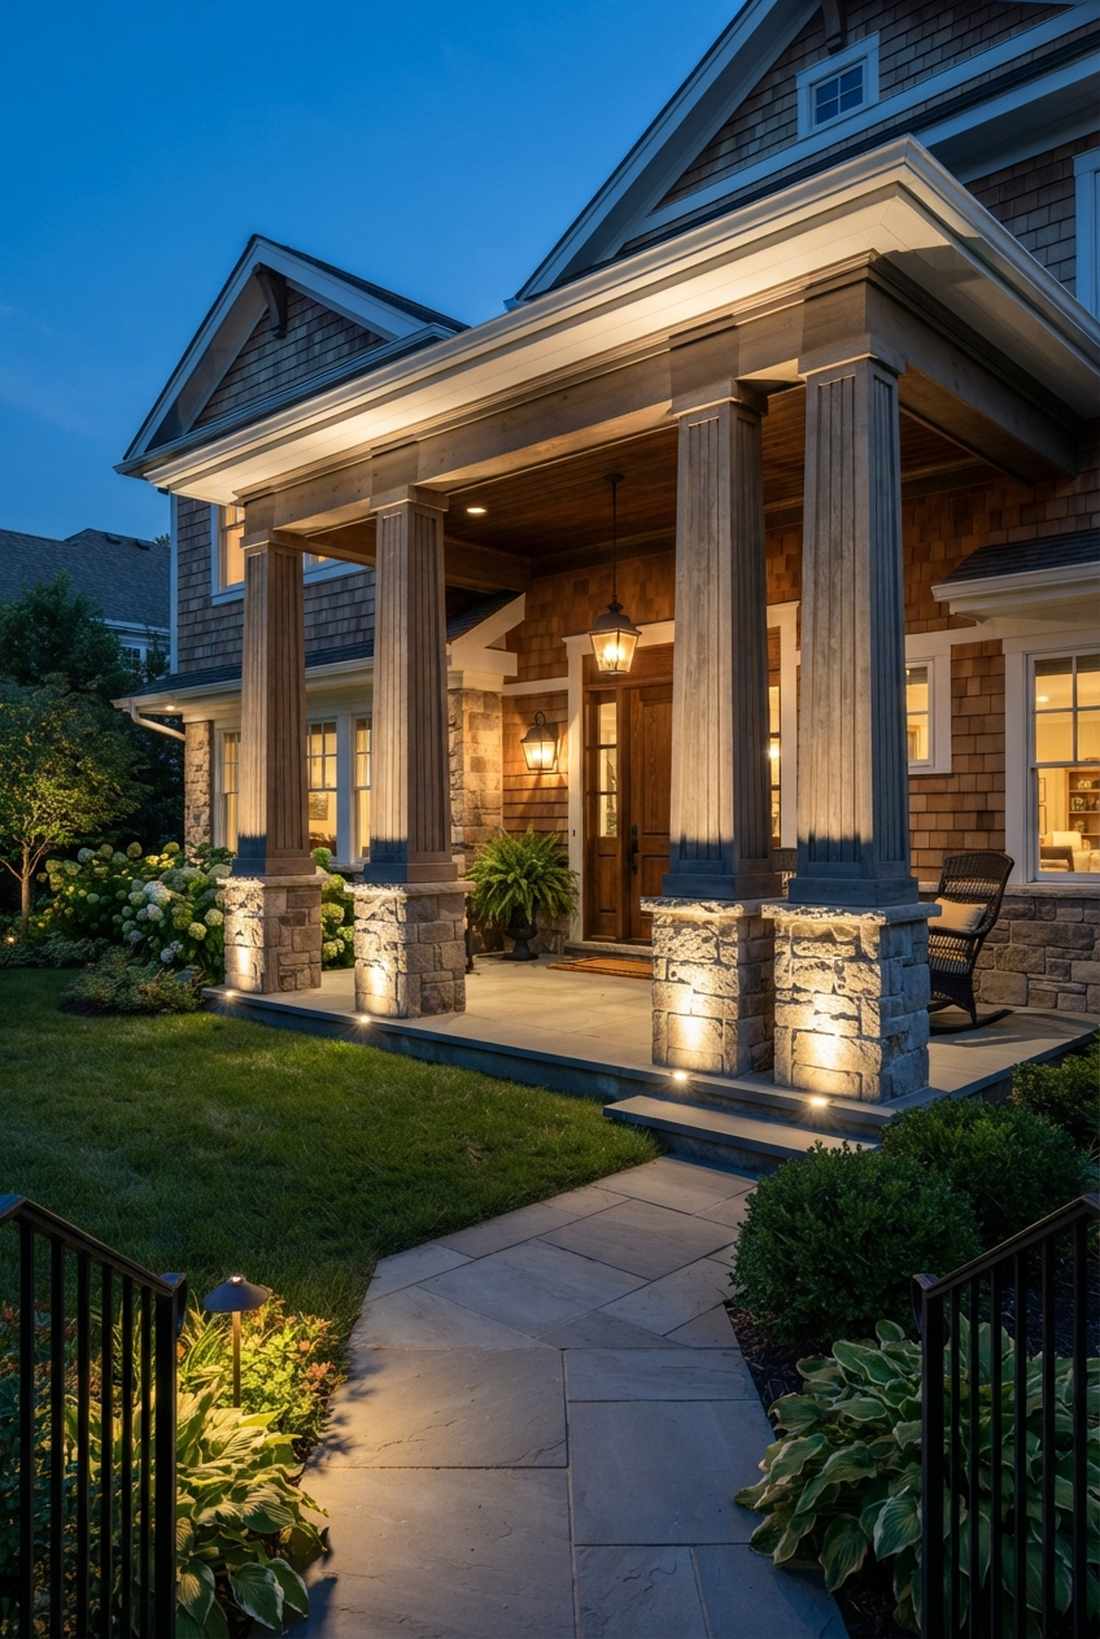
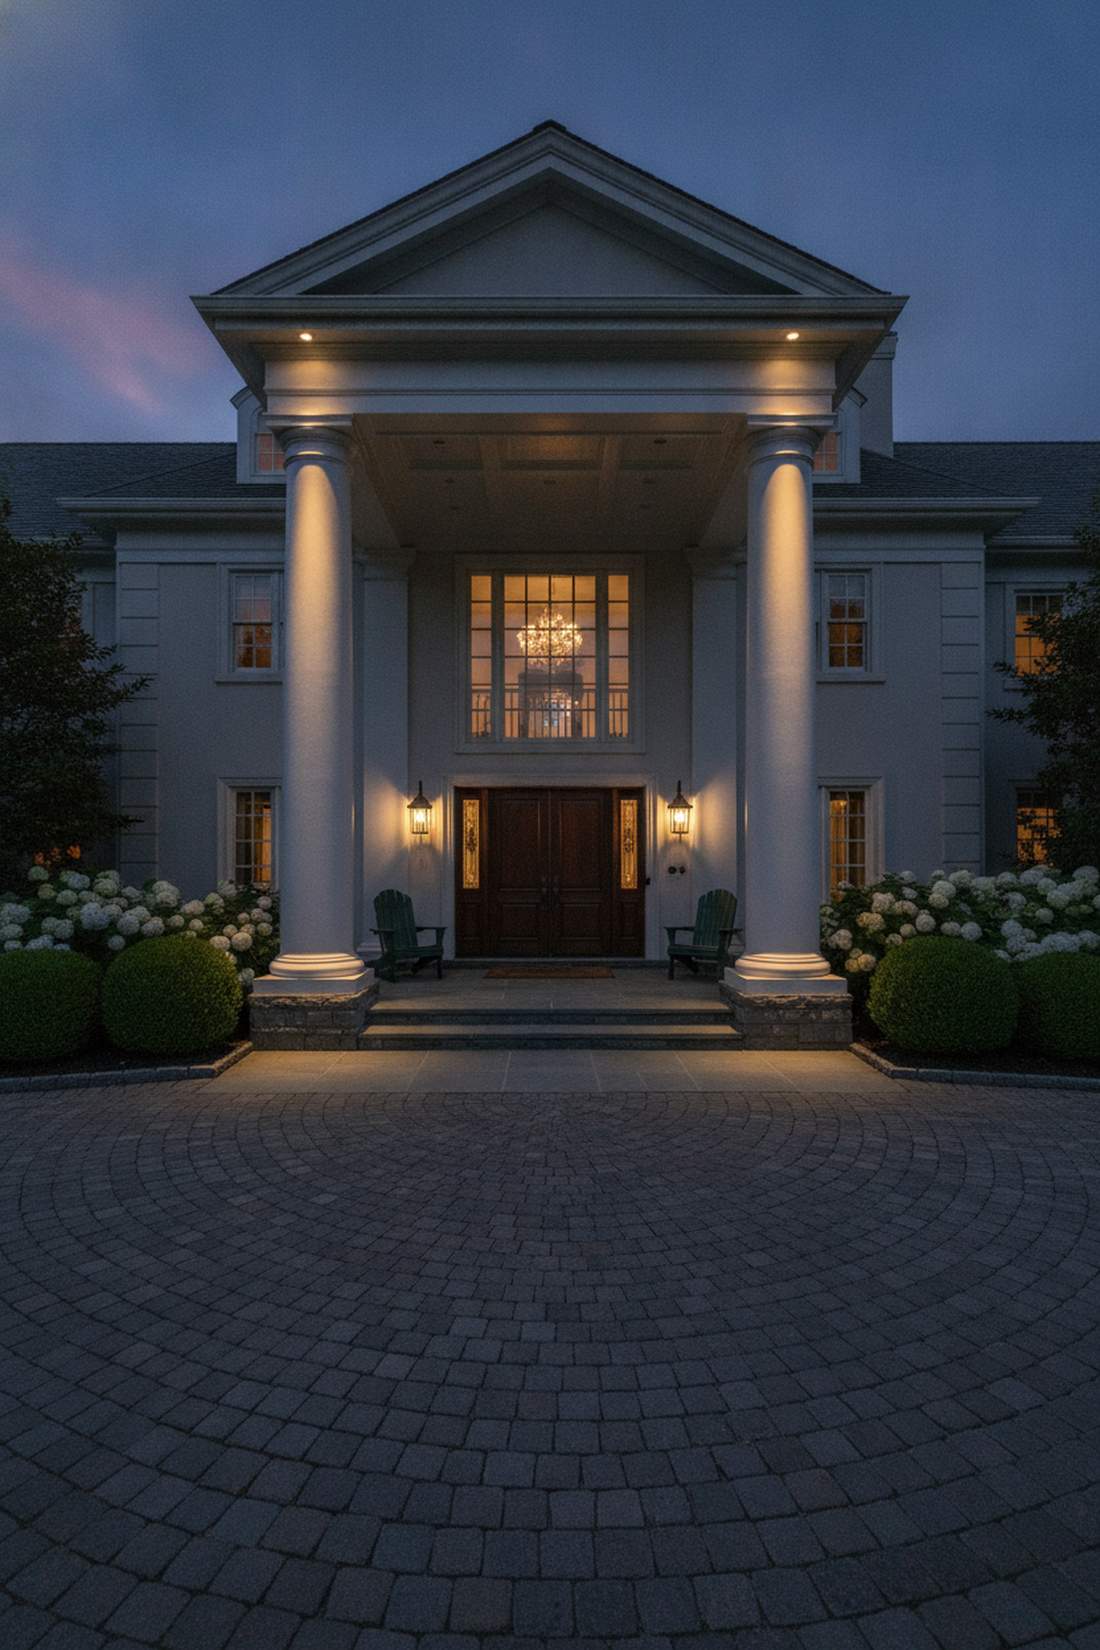
Approaching this feels like walking up the steps of a grand courthouse or museum. Sinking recessed column base up-lights perfectly highlights vertical pillars without cluttering the porch.
Designers usually charge thousands just to recommend this specific structural highlight. By grazing up the column face, it gives a designer-level finish that heavily anchors traditional outdoor lighting for house facades. It screams wealth and permanence.
You can execute this for roughly $150–$300 depending on column count. Pin this if you have a craftsman or colonial porch!
- Key Materials: Recessed well lights (drive-over rated)
- Vibe / Style: Majestic structural anchor
- Difficulty: Advanced (deck/concrete cutting)
- Budget Breakdown: Well lights: $200 | Hole saw: $30.
- Creator’s Tip: Offset the light slightly forward rather than dead-center to cast a more interesting shadow across the column flutes.
- Smart Sourcing: IP67 drive-over recessed LED well lights and waterproof silicone wire splices.
32. Eave Soffit Washing
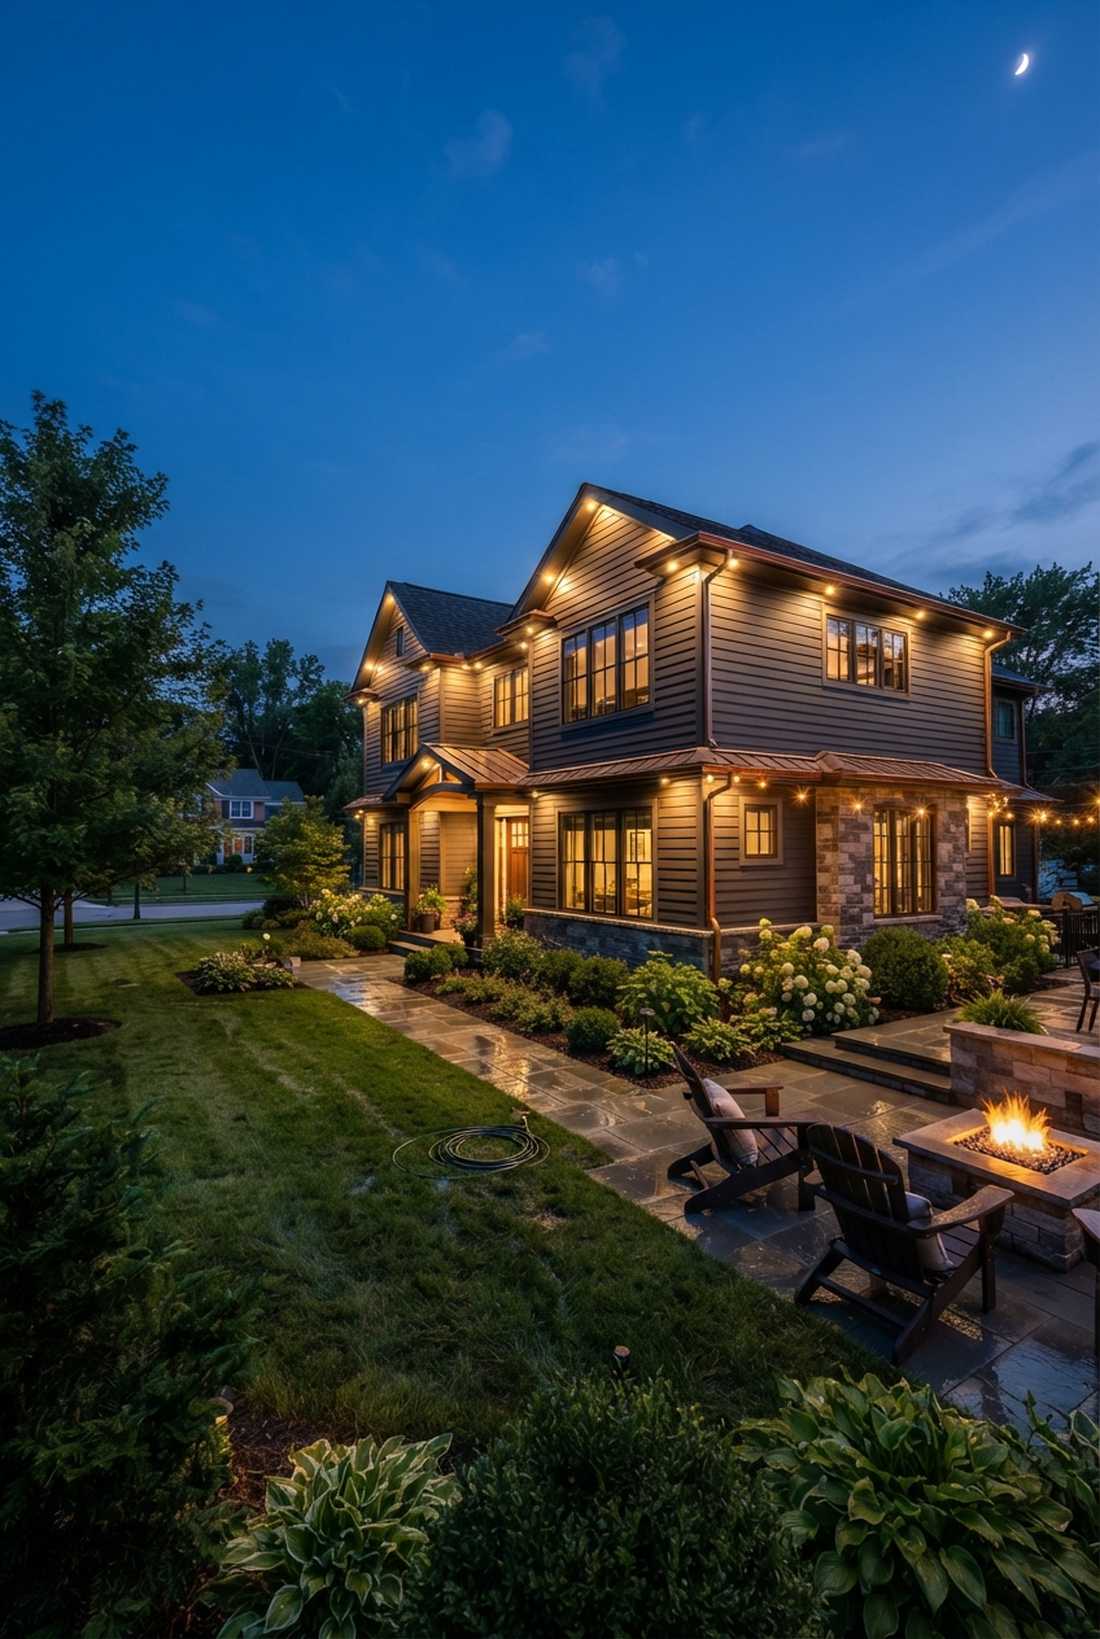
This layout feels like a soft, glowing crown resting on top of your home. Utilizing wall-mounted soffit washes provides beautiful indirect light that outlines your entire roofline perfectly.
Stapling cheap string lights to your gutters is exactly why cheap setups look tacky. Bouncing light off the underside of the eaves looks far more expensive than it is, dropping a gorgeous ambient glow down the siding. It defines the architectural boundary safely.
Expect to invest $200–$500 for a wrap-around setup. Highly recommended for a massive curb appeal boost.
- Key Materials: Wide-beam brass wash fixtures
- Vibe / Style: Elegant glowing crown
- Difficulty: Intermediate
- Budget Breakdown: Wash fixtures: $300 | Cable runs: $80.
- Creator’s Tip: Space them every 8-12 feet to ensure an even, continuous glow without dark striping between the beams.
- Smart Sourcing: wide-angle brass wall wash lights and heavy-duty low voltage cable (250ft).
33. Window Trim Accent Lighting
This aesthetic feels like peering into an illuminated gingerbread house. Mounting micro-accent spots between windows brings incredible symmetry and highlights expensive trim work instantly.
Everyone ignores this angle, but it transforms flat, boring second stories into highly detailed facades. Using heavily shielded fixtures seamlessly injects premium outdoor lighting residential detail without blinding the people inside the bedrooms. It is precision work.
You can dial this in for $100–$200 per upper window section. Save this to your exterior renovation board!
- Key Materials: Micro-shielded LED accents
- Vibe / Style: Symmetrical architectural detail
- Difficulty: Advanced (ladder work required)
- Budget Breakdown: Micro fixtures: $120 | Siding clips: $20.
- Creator’s Tip: Angle the shield specifically to dump light on the shutters and trim, absolutely avoiding the glass to stop interior glare.
- Smart Sourcing: compact shielded brass accent lights and vinyl siding mounting blocks.
If you have a two-story home, the next trick is the absolute secret to making it look massive at night…
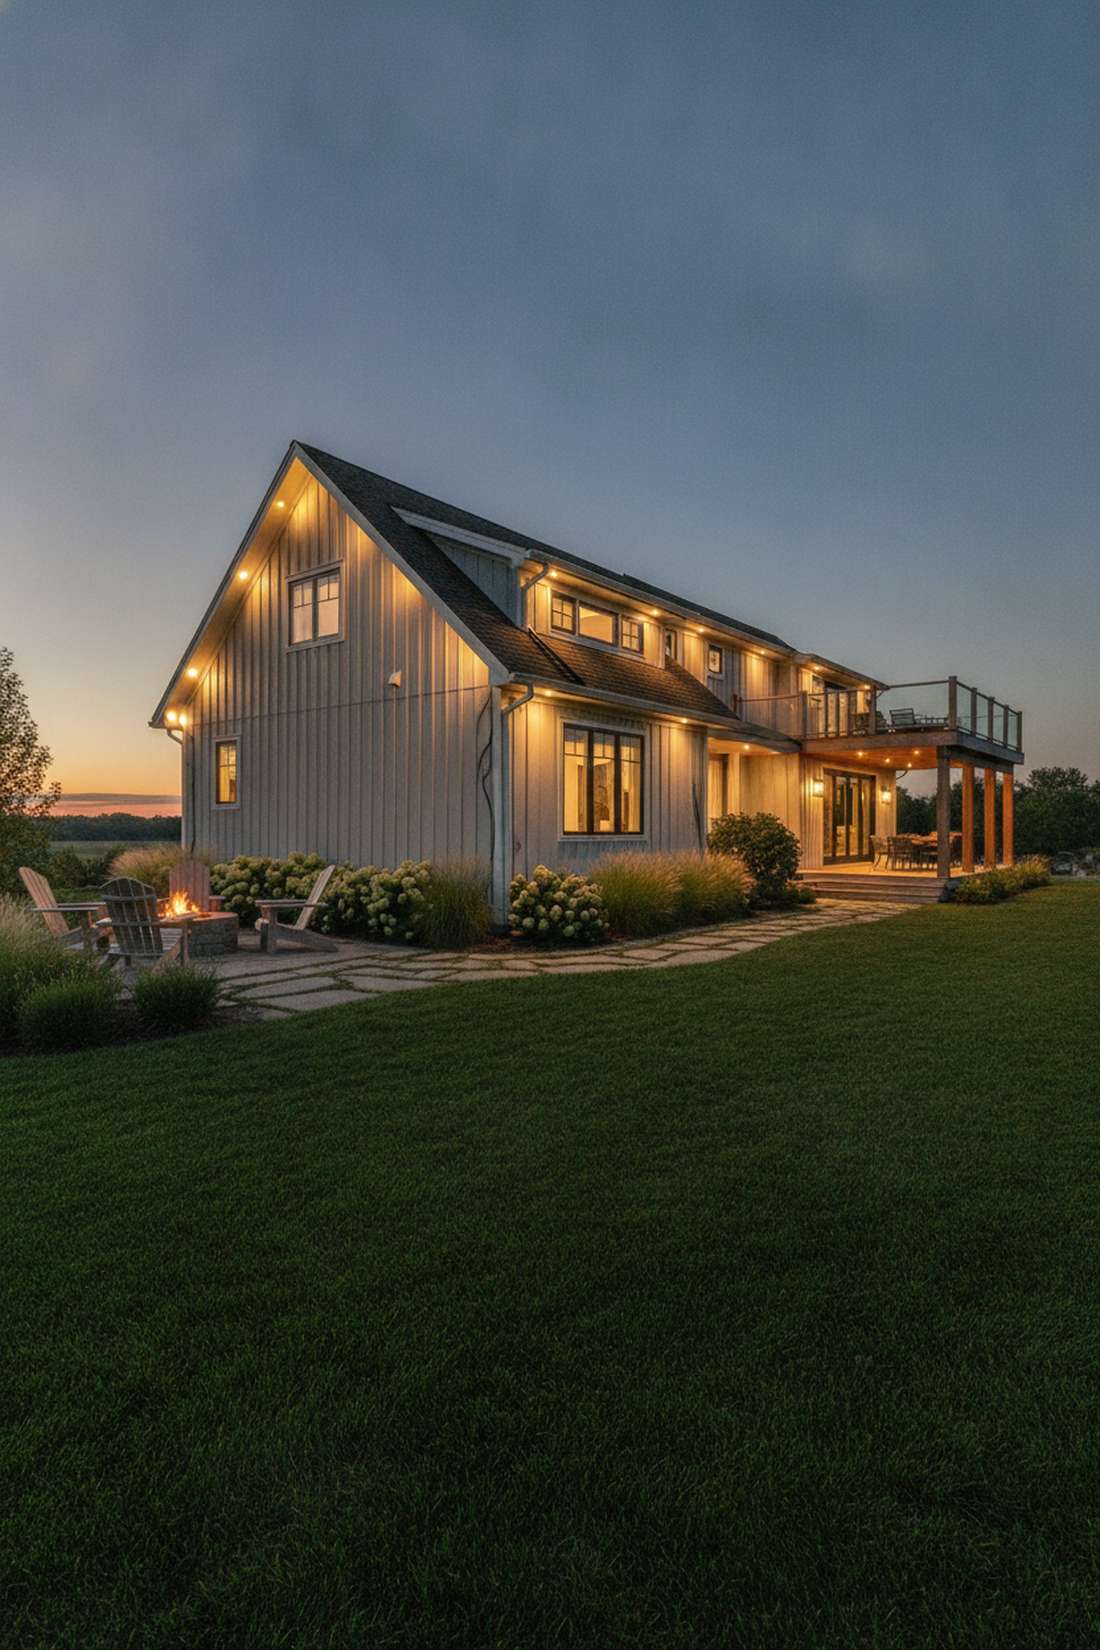
34. Gable End Feature Lighting
Looking up at this feels like admiring a towering Gothic cathedral. Firing a high-powered spot into the gable peak completely eliminates the “floating roof” effect that ruins most two-story homes.
Skipping this step is why massive homes look short and squatty in the dark. Hitting the decorative vents or bargeboards delivers a surprisingly premium look that draws the eye upward to the true height of the architecture. It’s an instant mansion upgrade.
This high-impact trick costs just $60–$120. It’s a fast upgrade that completely changes the nighttime silhouette.
- Key Materials: High-output narrow beam spot
- Vibe / Style: Towering vertical prominence
- Difficulty: Easy (if ground mounted)
- Budget Breakdown: Powerful spot: $80 | Ground stake: $15.
- Creator’s Tip: Position the fixture 15-25 feet away from the foundation and use a tight 10-degree beam to punch light all the way to the top.
- Smart Sourcing: high-output 12V LED bullet spotlights and extra-long composite ground stakes.
35. Chimney Masonry Grazing
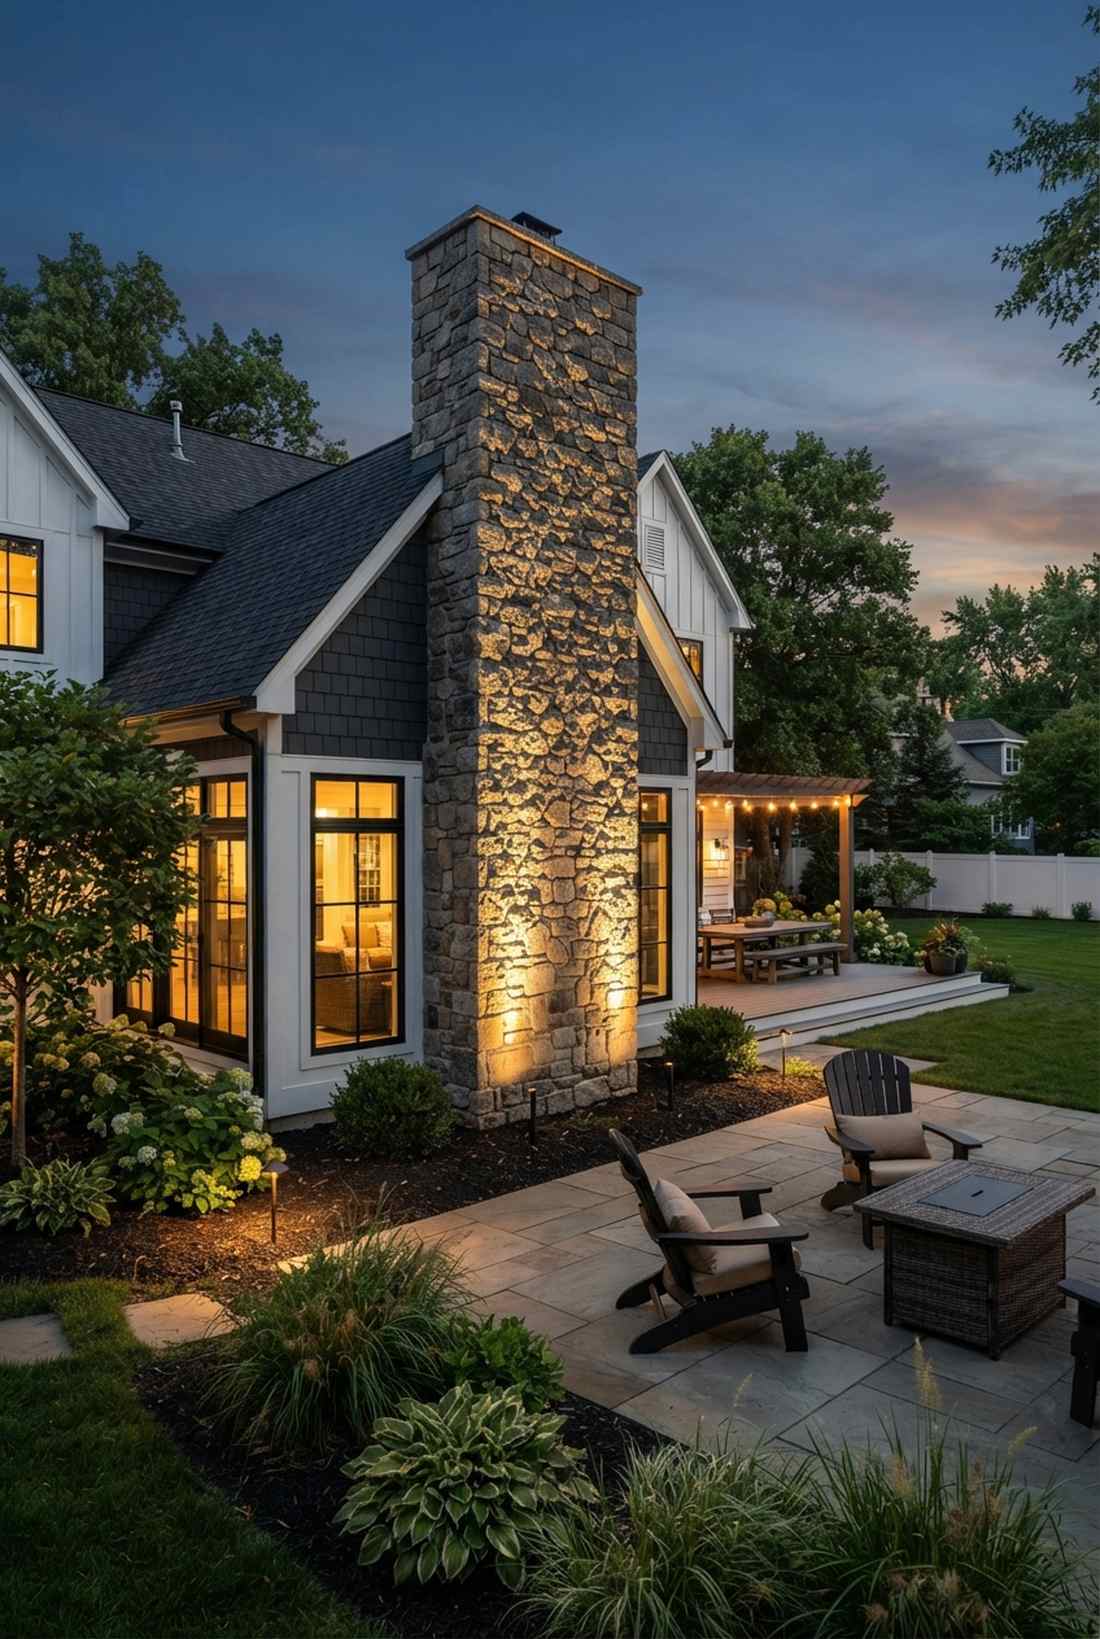
This layout feels like a glowing stone monolith anchored to your house. Applying vertical chimney base grazing absolutely explodes the texture of brick and stone into a dramatic focal point.
Most folks leave their massive stone chimneys totally dark, completely wasting their best masonry feature. Scraping light tightly up the stone looks far more expensive than it is, highlighting the craftsmanship of every single mortar joint. It is rugged perfection.
You can easily pull this off for around $50–$90. Pin this if you have a massive exterior fireplace!
- Key Materials: Narrow-beam ground spot
- Vibe / Style: Rugged stone monolith
- Difficulty: Easy beginner setup
- Budget Breakdown: Spot fixture: $60.
- Creator’s Tip: Mount the fixture within 6 inches of the base; pulling it back will wash out the shadows and flatten the stone.
- Smart Sourcing: narrow-beam brass landscape spotlights and matte black glare cowls.
36. Transom Window Illumination
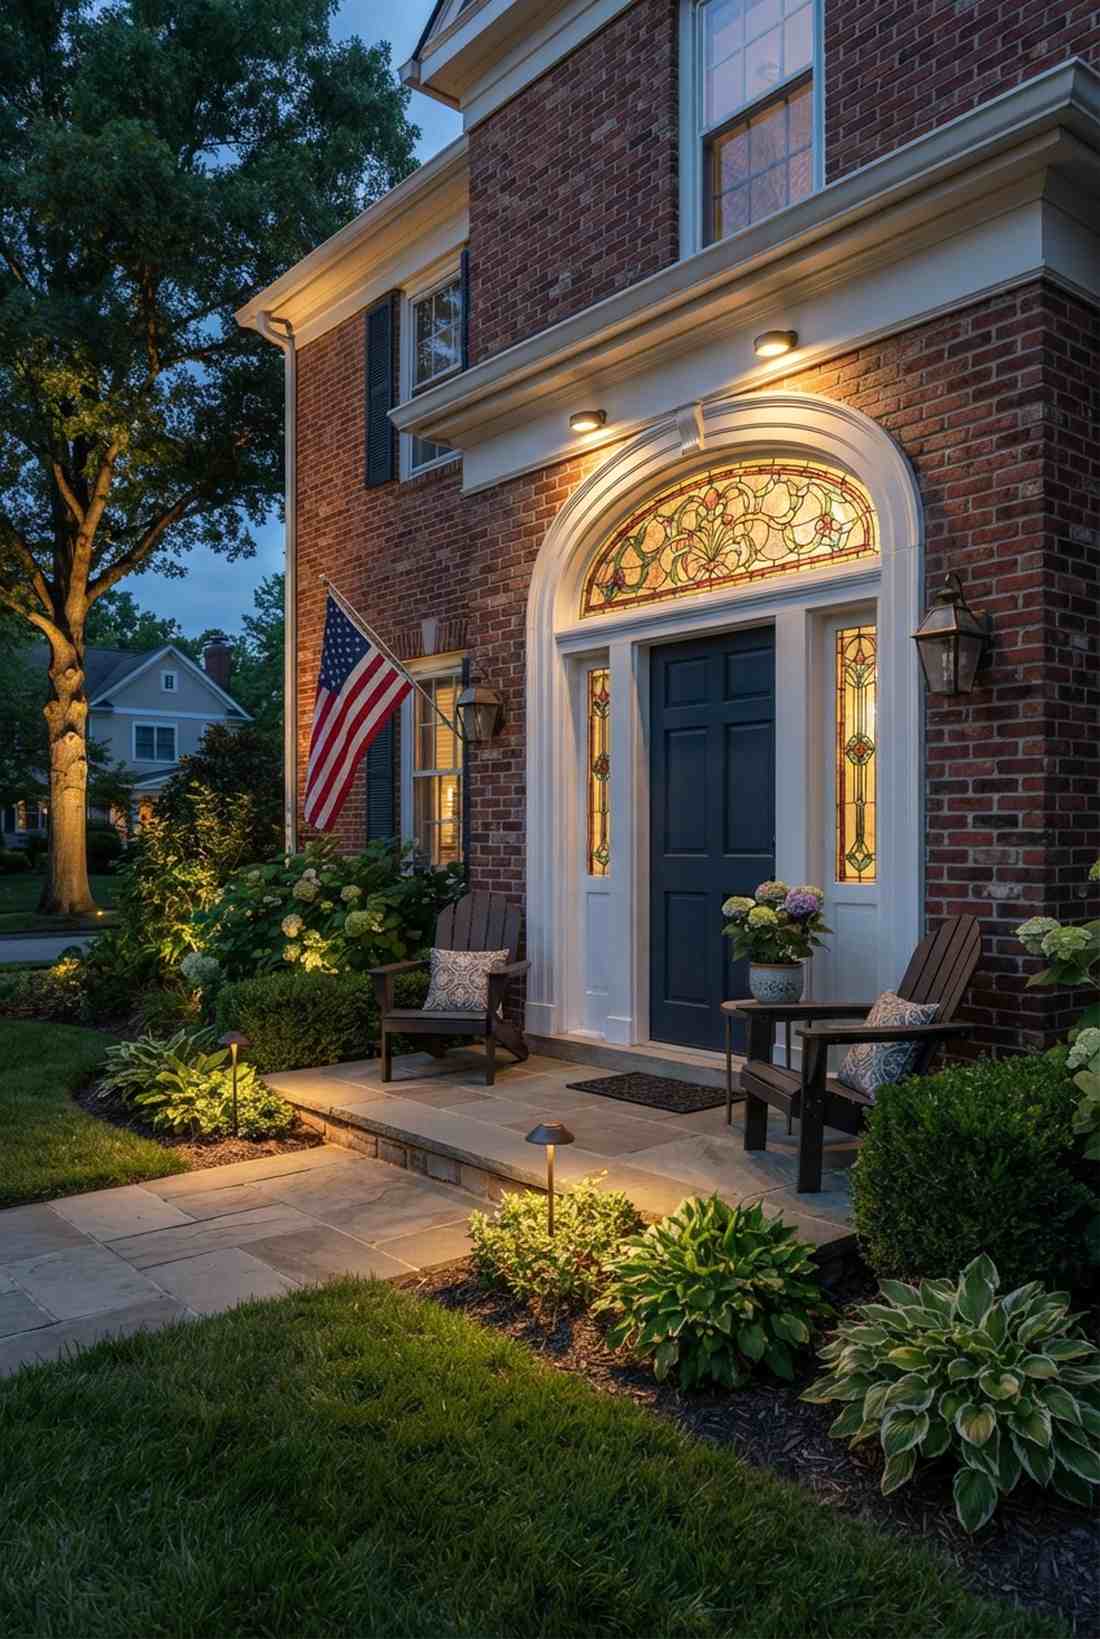

Walking up to this feels like approaching a glowing, historic stained-glass exhibit. Installing micro-spots above the doorway specifically to light the transom window creates a stunning glowing panel.
Designers usually gatekeep this exact layout because it highlights expensive front-door glass perfectly. By aiming directly at the decorative panels, it gives a designer-level finish that makes the entry look incredibly inviting from the street. It’s pure curb appeal magic.
A quick $40–$80 investment makes this happen. Highly recommended for colonial or historic homes.
- Key Materials: Micro accent light
- Vibe / Style: Historic glowing entry
- Difficulty: Intermediate (door trim mounting)
- Budget Breakdown: Micro fixture: $50 | Wiring: $15.
- Creator’s Tip: Use a frosted lens on the fixture to prevent a harsh hot spot from reflecting off the glass into visitors’ eyes.
- Smart Sourcing: miniature low-voltage LED accent lights and frosted glass spread lenses.
Material Guide: Cheap vs. Premium Aesthetic
Knowing exactly where to save and where to spend makes all the difference in achieving that “looks expensive but isn’t” vibe.
- Standard vs. Premium Brass Housings: Cheap aluminum pits and flakes after one winter. Solid brass naturally patinas and guarantees the fixture survives weed whackers and snow piles.
- Pre-made Kits vs. Sourcing Locally: Buying a unified low-voltage starter kit often saves hours of frustration compared to piecing together incompatible big-box store transformers and thin wires.
37. Arched Opening Definition
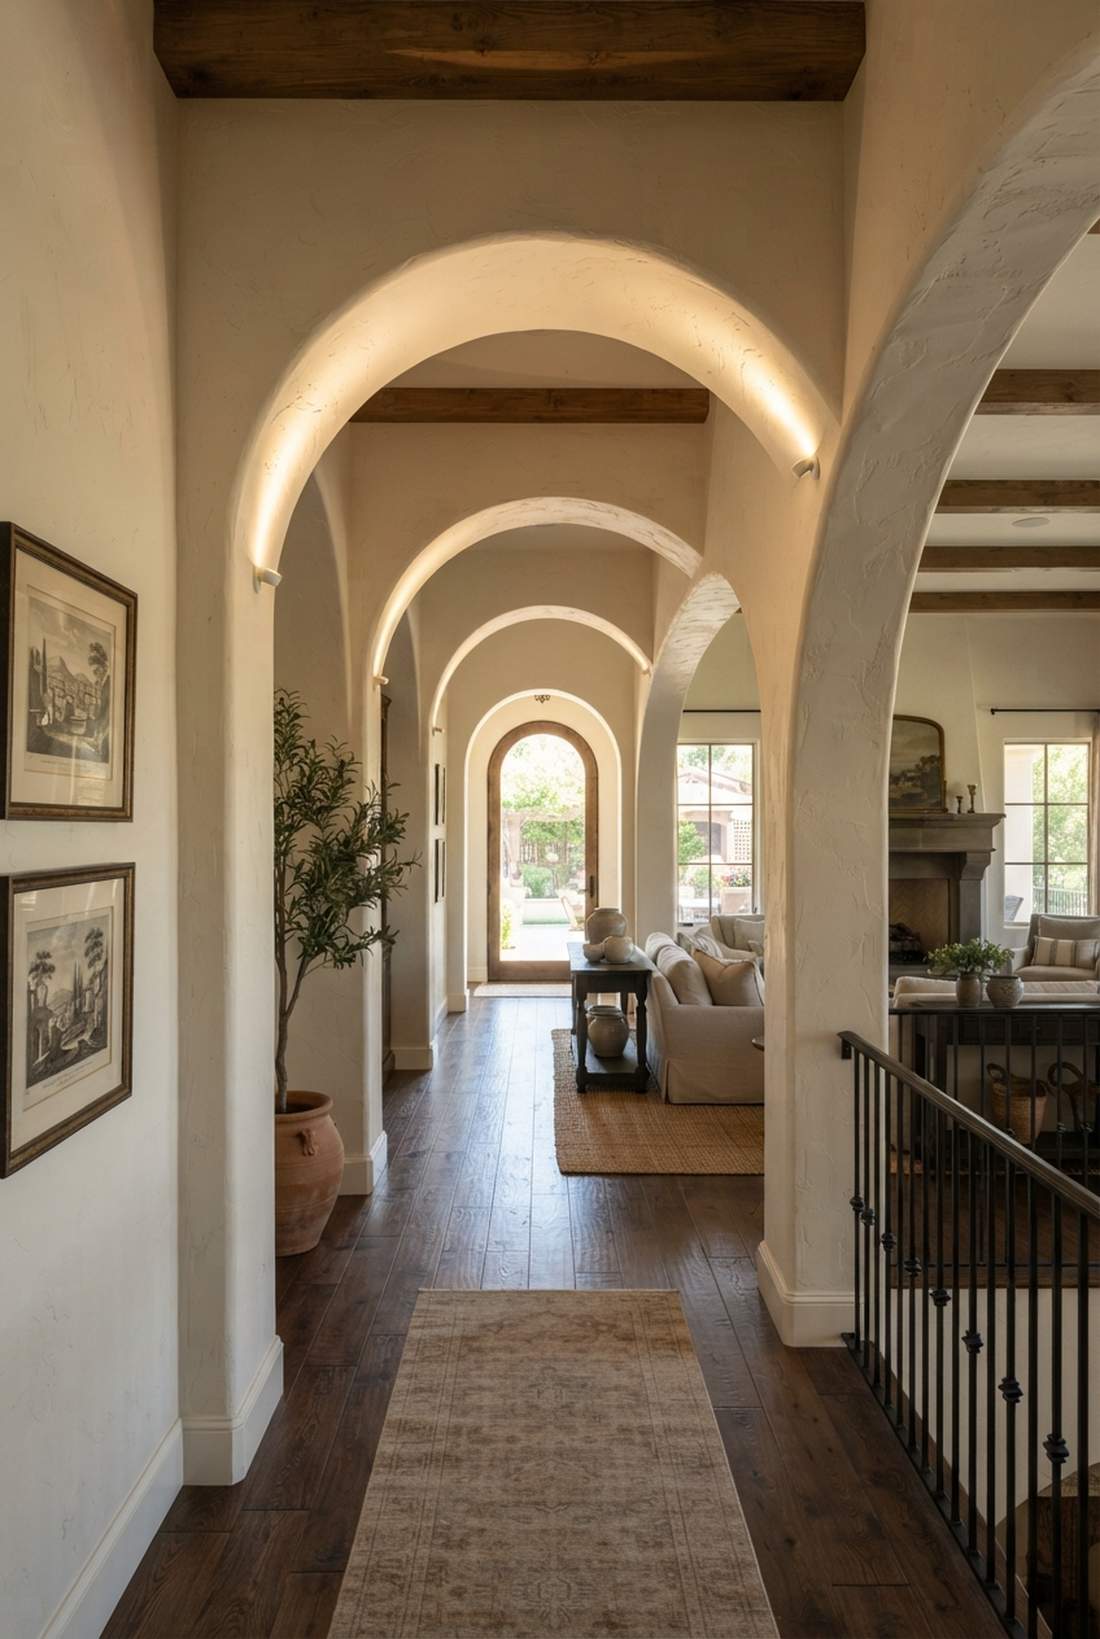
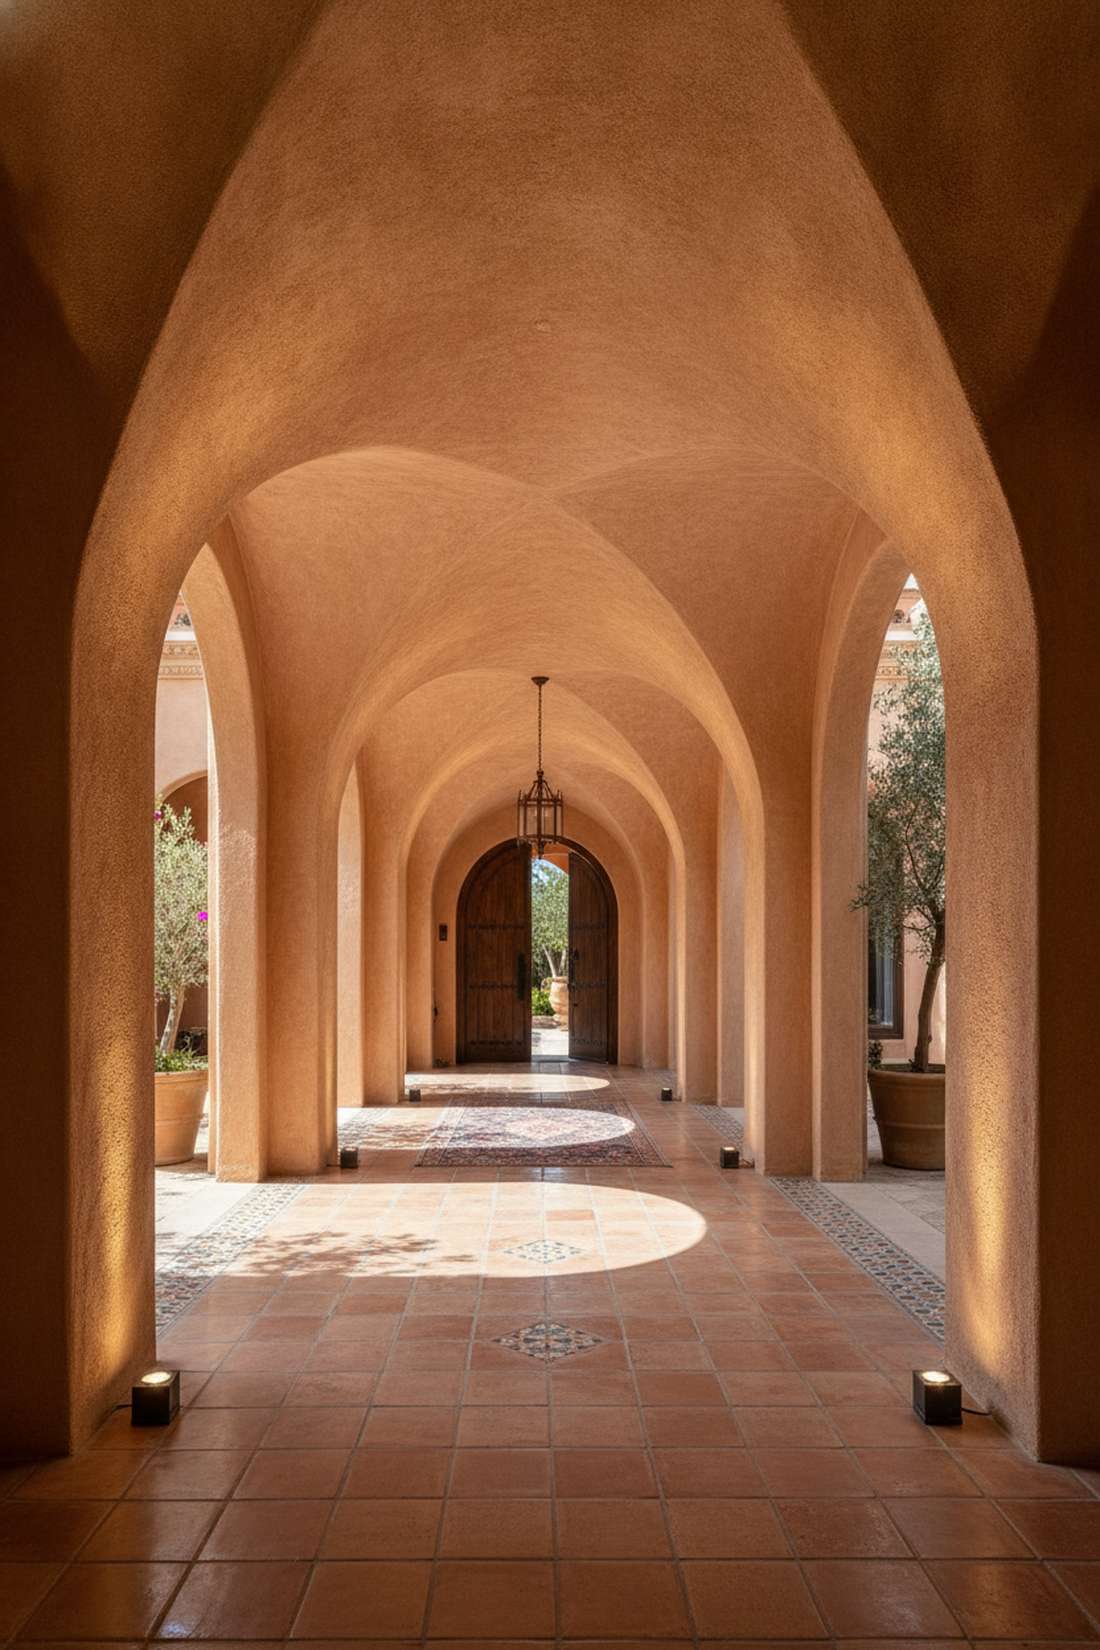
This layout feels like walking through a luxury Mediterranean villa corridor. Using interior archway grazing perfectly highlights the sweeping curves of your home’s most distinct masonry features.
Flat floodlights completely erase the depth of a beautiful arch. Tucking a fixture right at the inner base seamlessly injects premium outdoor lighting design aesthetics that celebrate the three-dimensional depth of the niche. It is breathtakingly dramatic.
Expect to spend about $60–$120 per arch. Save this to your Mediterranean or Spanish-style home board!
- Key Materials: Recessed or micro-surface spot
- Vibe / Style: Sweeping Mediterranean elegance
- Difficulty: Intermediate
- Budget Breakdown: Micro spots: $80 | Drill bits: $20.
- Creator’s Tip: Experiment heavily with the angle; shooting up the inner curve creates a totally different shadow than shooting across it.
- Smart Sourcing: surface-mount micro LED spots (warm white) and masonry mounting anchor kits.
Tired of hardwired setups? This next section drops the best visual decor hacks that require almost zero tools…
Decorative Lighting Elements
Decorative fixtures serve dual roles as functional illumination and design objects. These elements contribute to outdoor style through form, finish, and light quality during both day and night.
38. Vintage Edison String Lights
Sitting under these feels like chilling at a trendy, exposed-brick industrial brewery. Draping heavy-duty oversized Edison filaments adds instant nostalgic warmth to any bland patio space.
Using basic Christmas lights for a summer patio is why cheap setups look tacky and out of place. Suspending thick, visible filaments delivers a surprisingly premium look that acts as pure lighting outdoor decor even when turned off. It’s the ultimate vibe check.
You can execute this for roughly $40–$80. Pin this if you love hosting casual backyard beers!
- Key Materials: Commercial Edison light strings
- Vibe / Style: Casual industrial farmhouse
- Difficulty: Easy beginner setup
- Budget Breakdown: Edison strings: $50 | Hooks: $15.
- Creator’s Tip: Use a dimmer plug so you can blast them for board games, then dim them down for late-night fireside chats.
- Smart Sourcing: shatterproof LED Edison outdoor string lights (bulk pack) and outdoor-rated smart dimmer plugs.
39. Moroccan Pattern Lanterns
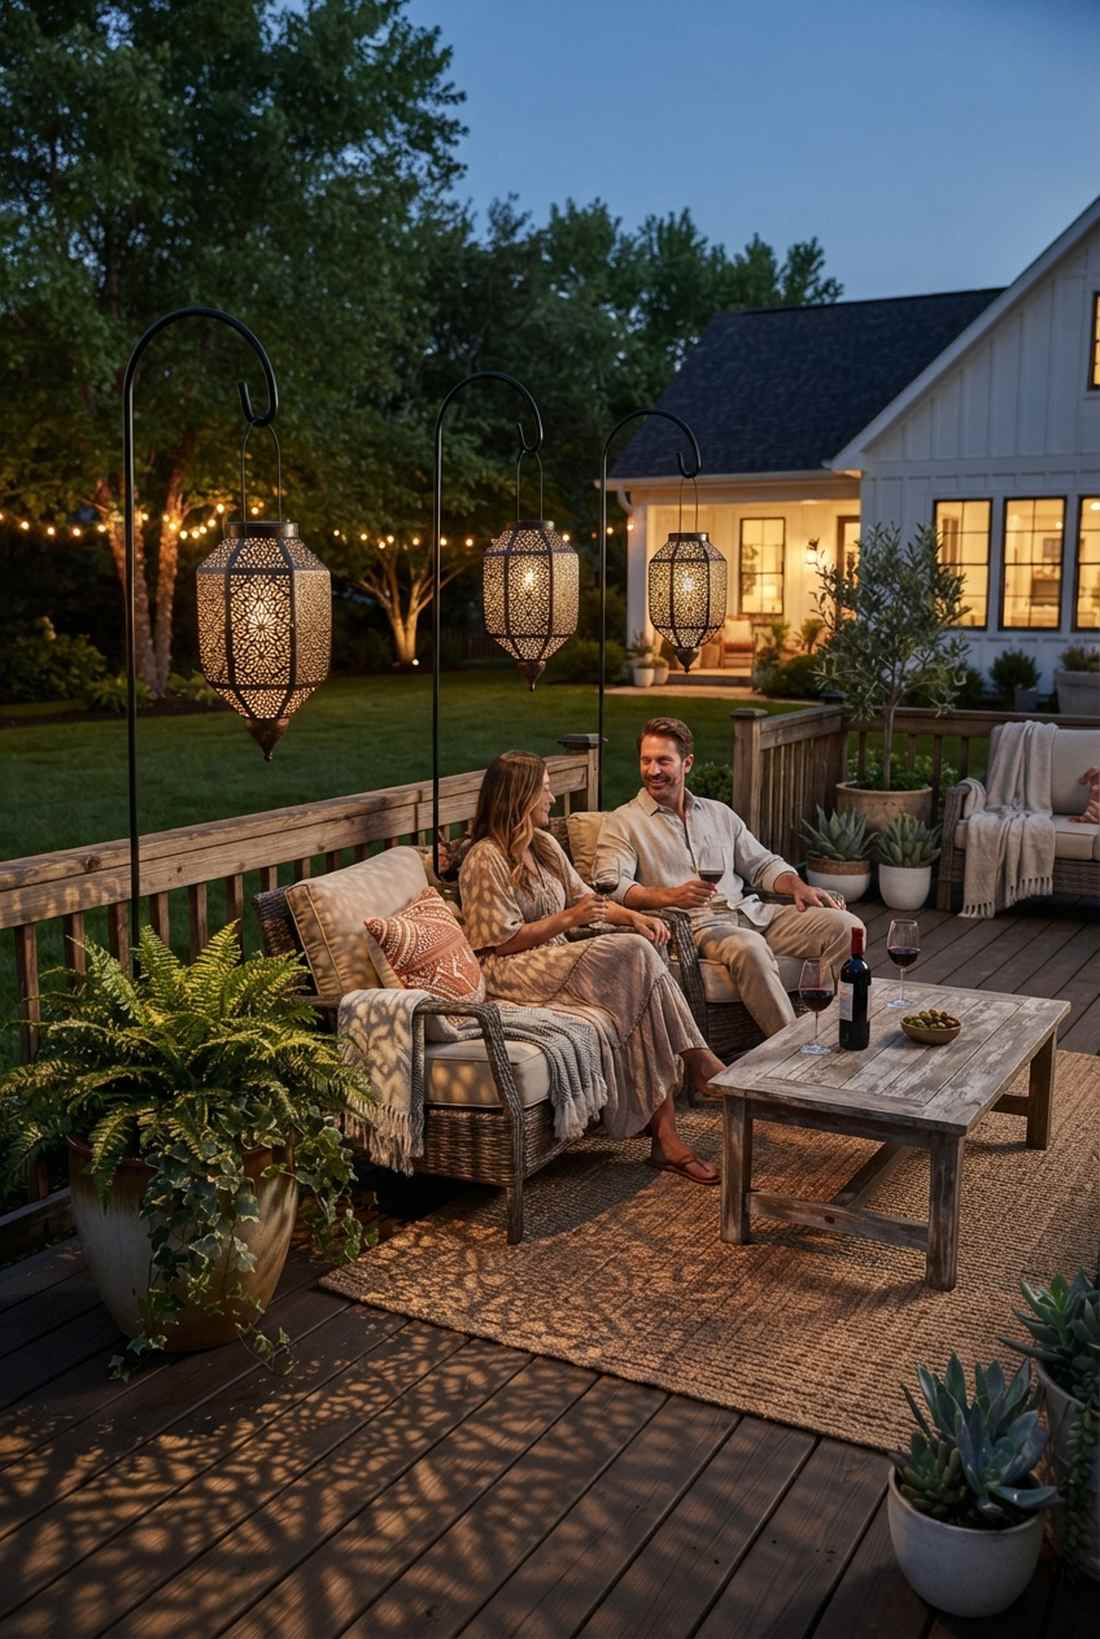
This lighting style feels like a hidden, exotic desert oasis right on your deck. Scattering perforated metal shadow lanterns casts incredibly intricate geometric patterns all over your seating area.
Everyone ignores this angle, but it transforms flat wood decks into textured masterpieces. Hanging these intricate metal pieces looks far more expensive than it is, providing an atmospheric, cultural aesthetic. It is perfect for intimate wine nights.
Budget around $60–$120 for a trio of lanterns. It’s a fast upgrade that completely changes the vibe.
- Key Materials: Perforated metal LED lanterns
- Vibe / Style: Exotic bohemian retreat
- Difficulty: Zero setup required
- Budget Breakdown: Lantern trio: $90.
- Creator’s Tip: Hang them at slightly different heights to make the shadow patterns overlap and dance on the ground.
- Smart Sourcing: solar-powered Moroccan metal outdoor lanterns and heavy-duty shepherd hooks.
40. Solar Garden Stake Lights
Walking past these feels like a playful, glowing boundary line guiding you home. Placing upgraded high-capacity solar stakes is the absolute fastest way to define a garden bed without burying a single wire.
Most beginners ruin solar setups by buying the $2 plastic ones that die in three weeks. Investing in modern glass-and-metal versions seamlessly injects premium outdoor lighting yard functionality that actually survives the elements. It’s the ultimate renter-friendly hack.
A quality 6-pack will run $50–$90. Pin this if you want instant garden charm with zero electrical work!
- Key Materials: High-capacity glass solar stakes
- Vibe / Style: Cheerful garden borders
- Difficulty: Extremely Easy
- Budget Breakdown: Premium stakes: $70.
- Creator’s Tip: Replace the internal rechargeable batteries every 2 years to keep them shining at maximum brightness all night long.
- Smart Sourcing: glass lens LED solar pathway lights (6-pack) and high-capacity rechargeable AA solar batteries.
41. Globe Pendant Clusters
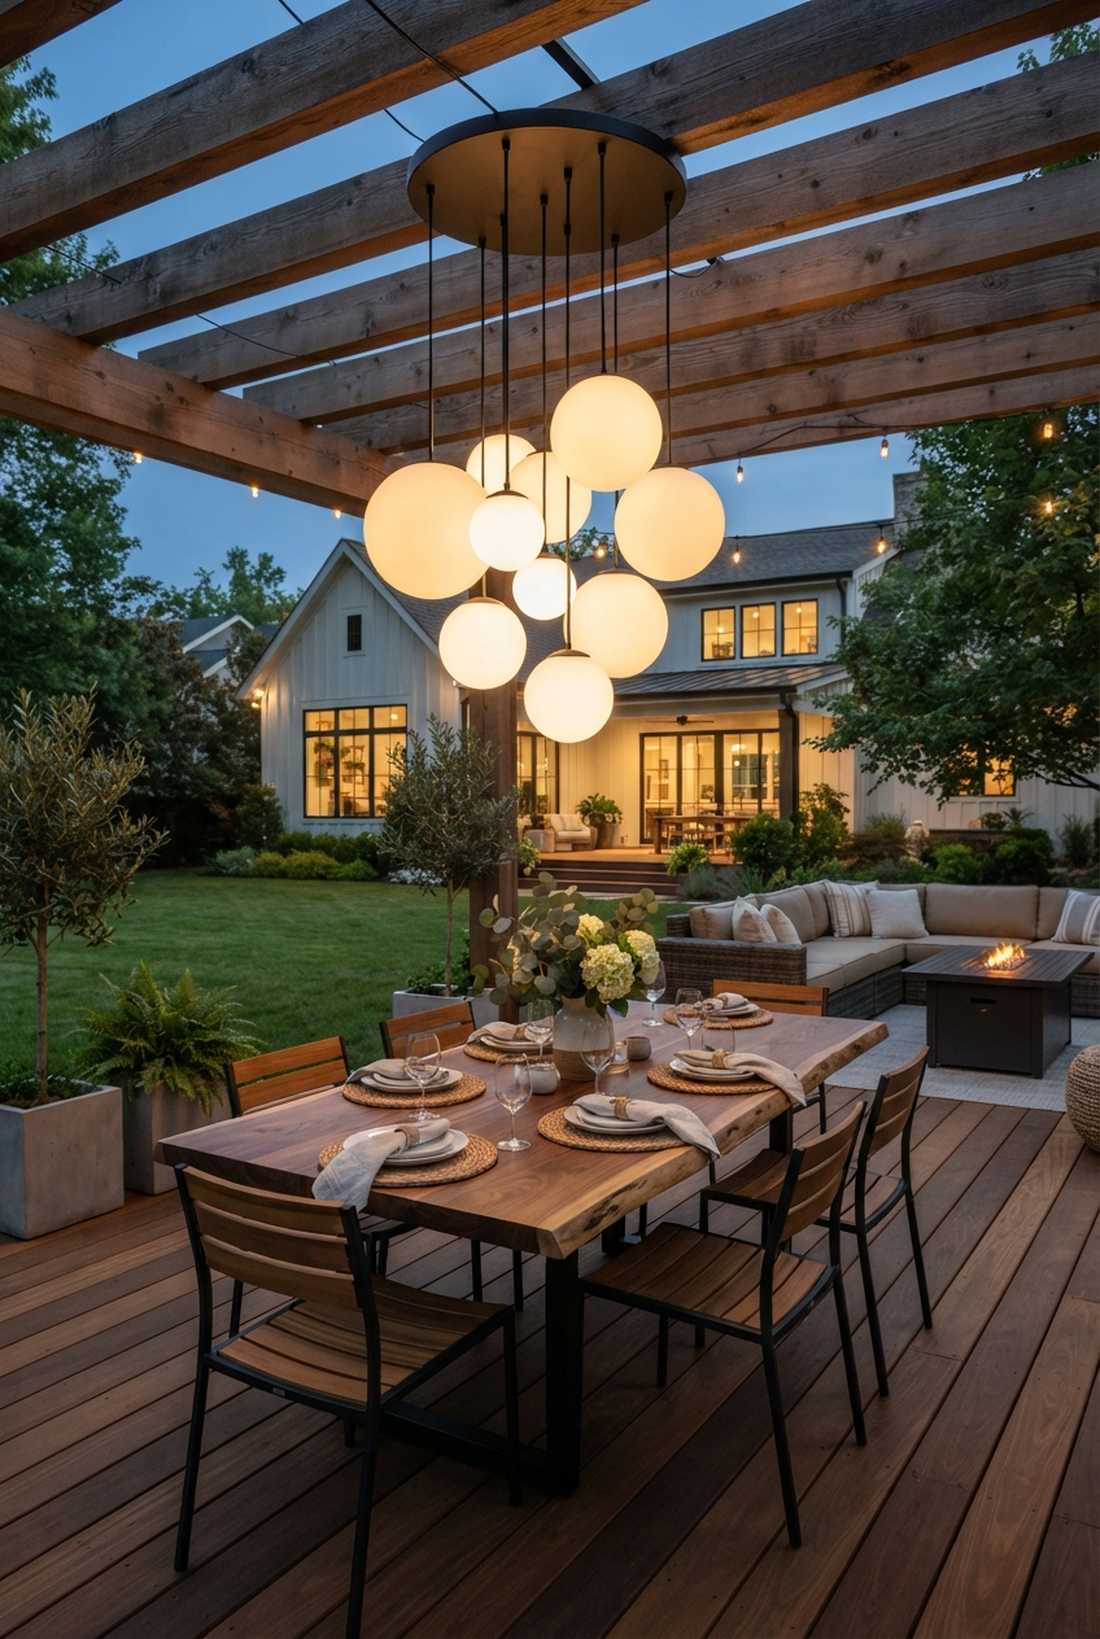
Dining underneath this setup feels like sitting in a mid-century modern architectural digest shoot. Suspending spherical opal globe clusters injects massive sculptural volume over any outdoor table.
Using standard utility floods ruins modern furniture aesthetics immediately. Dropping soft, glowing orbs gives a designer-level finish that provides perfectly even, glare-free illumination for late-night lounging. It screams contemporary luxury.
Expect to invest $150–$300 depending on the cluster size. Save this to your modern patio design board!
- Key Materials: Opal acrylic outdoor globes
- Vibe / Style: Mid-century sculptural chic
- Difficulty: Advanced (overhead mounting)
- Budget Breakdown: Globe pendants: $200 | Suspension kit: $40.
- Creator’s Tip: Always use acrylic or shatterproof polycarbonate globes outside; glass globes are a massive hazard in high winds.
- Smart Sourcing: shatterproof acrylic outdoor globe pendants and weatherproof multi-port ceiling canopies.
Skip the stinky tiki fuel! This next fire-alternative trick looks way better and actually keeps you safe…
42. Tiki Torch Perimeter Lighting
This layout feels like an upscale tropical island resort right in your backyard. Lining the fence with flickering LED flame torches establishes a brilliant symbolic boundary for wild pool parties.
Real oil torches spill, smell terrible, and are a massive fire hazard near dry brush. Upgrading to modern LED flame-effect poles delivers a surprisingly premium look that perfectly mimics the dance of real fire without the risk. It heavily boosts the party ambiance.
You can cover a standard perimeter for roughly $80–$140. Highly recommended for pool decks and patios.
- Key Materials: LED flame-effect poles
- Vibe / Style: Tropical resort party
- Difficulty: Easy quick-fix
- Budget Breakdown: LED torches: $100 | Heavy bases: $30.
- Creator’s Tip: Space them exactly 6 to 10 feet apart; any closer and it starts looking like a runway instead of a relaxed perimeter.
- Smart Sourcing: solar flickering flame LED outdoor torches (4-pack) and heavy-duty metal torch ground spikes.
43. Color-Changing LED Accents
Operating this system feels like controlling a Las Vegas nightclub from your phone. Integrating smart RGB Wi-Fi floodlights allows you to instantly flip your yard from elegant white to crazy holiday colors.
Swapping out colored bulbs every Halloween and Christmas is an absolute chore. Installing an app-controlled system looks far more expensive than it is, giving you millions of color options for ultimate lighting outdoor decor flexibility. It’s technology-forward entertaining.
A smart flood setup runs $100–$250. Pin this if you love dominating neighborhood holiday decorations!
- Key Materials: Wi-Fi enabled RGB landscape floods
- Vibe / Style: Dynamic high-tech entertainment
- Difficulty: Intermediate (app pairing required)
- Budget Breakdown: RGB floods: $150 | Smart hub: $40.
- Creator’s Tip: Set a schedule in the app to run warm white 90% of the year, automatically shifting to team colors on game days.
- Smart Sourcing: smart RGBW low-voltage landscape spotlights and outdoor-rated Wi-Fi range extenders.
44. Floating Pool Orbs
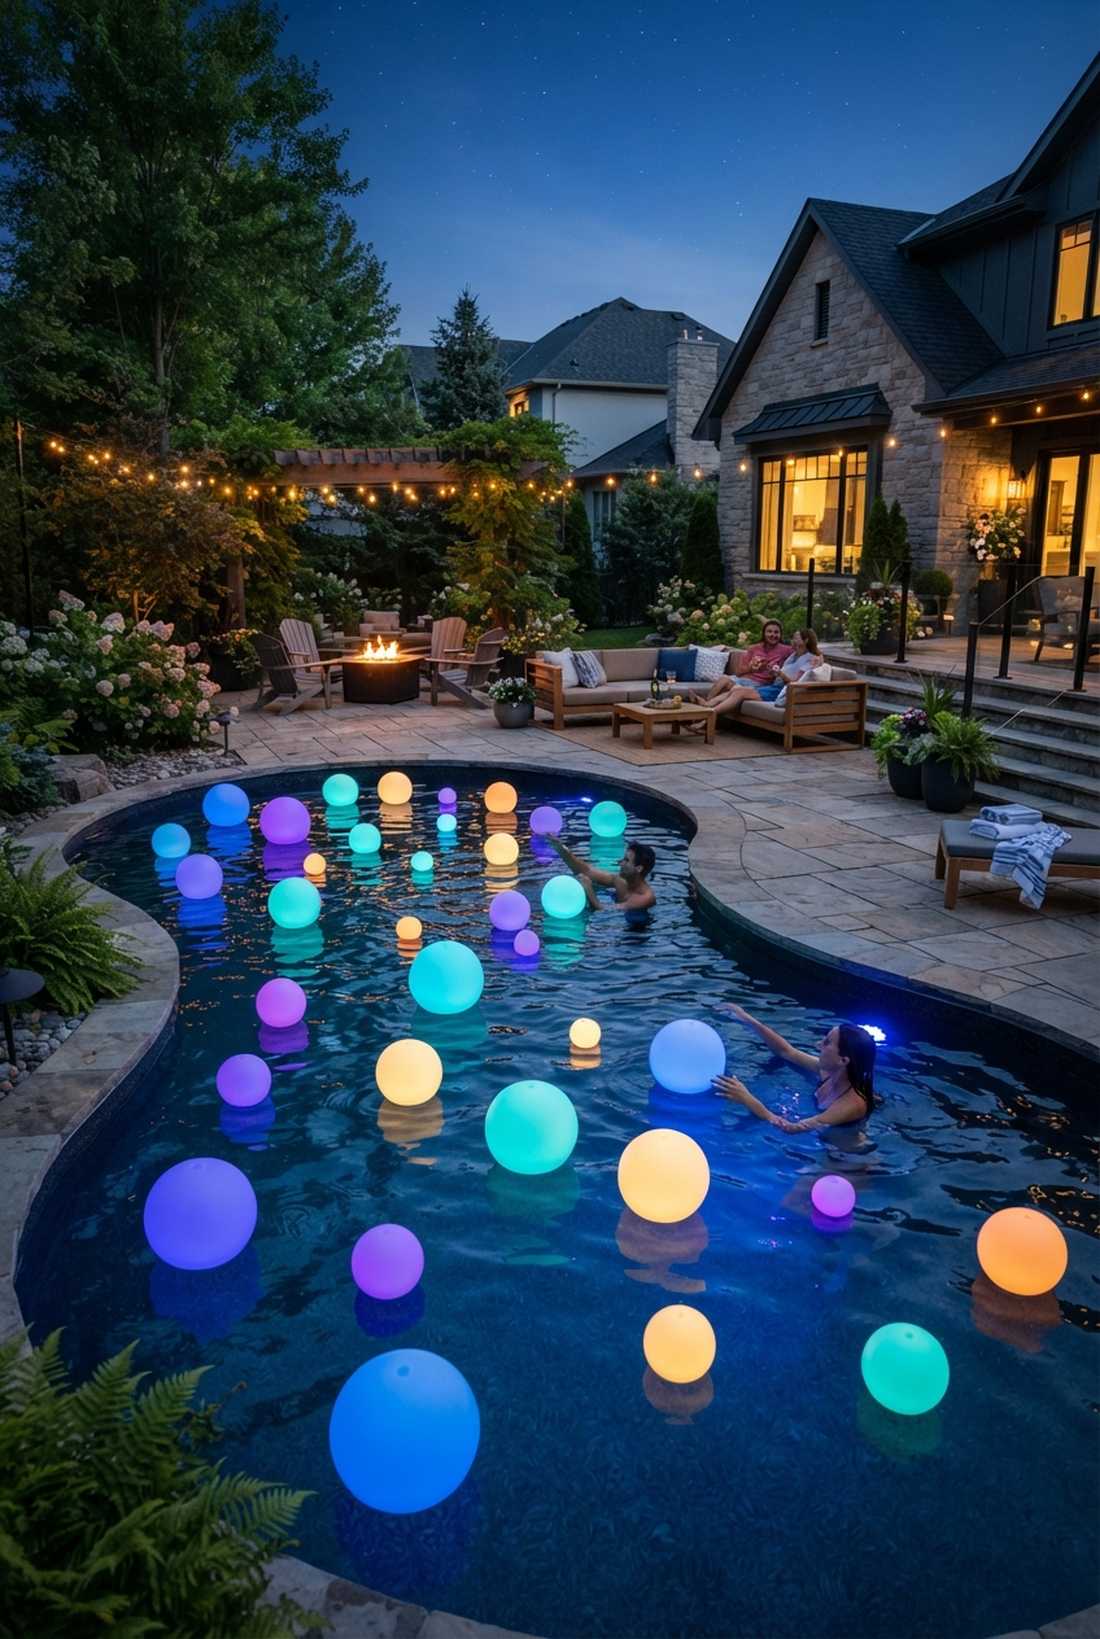
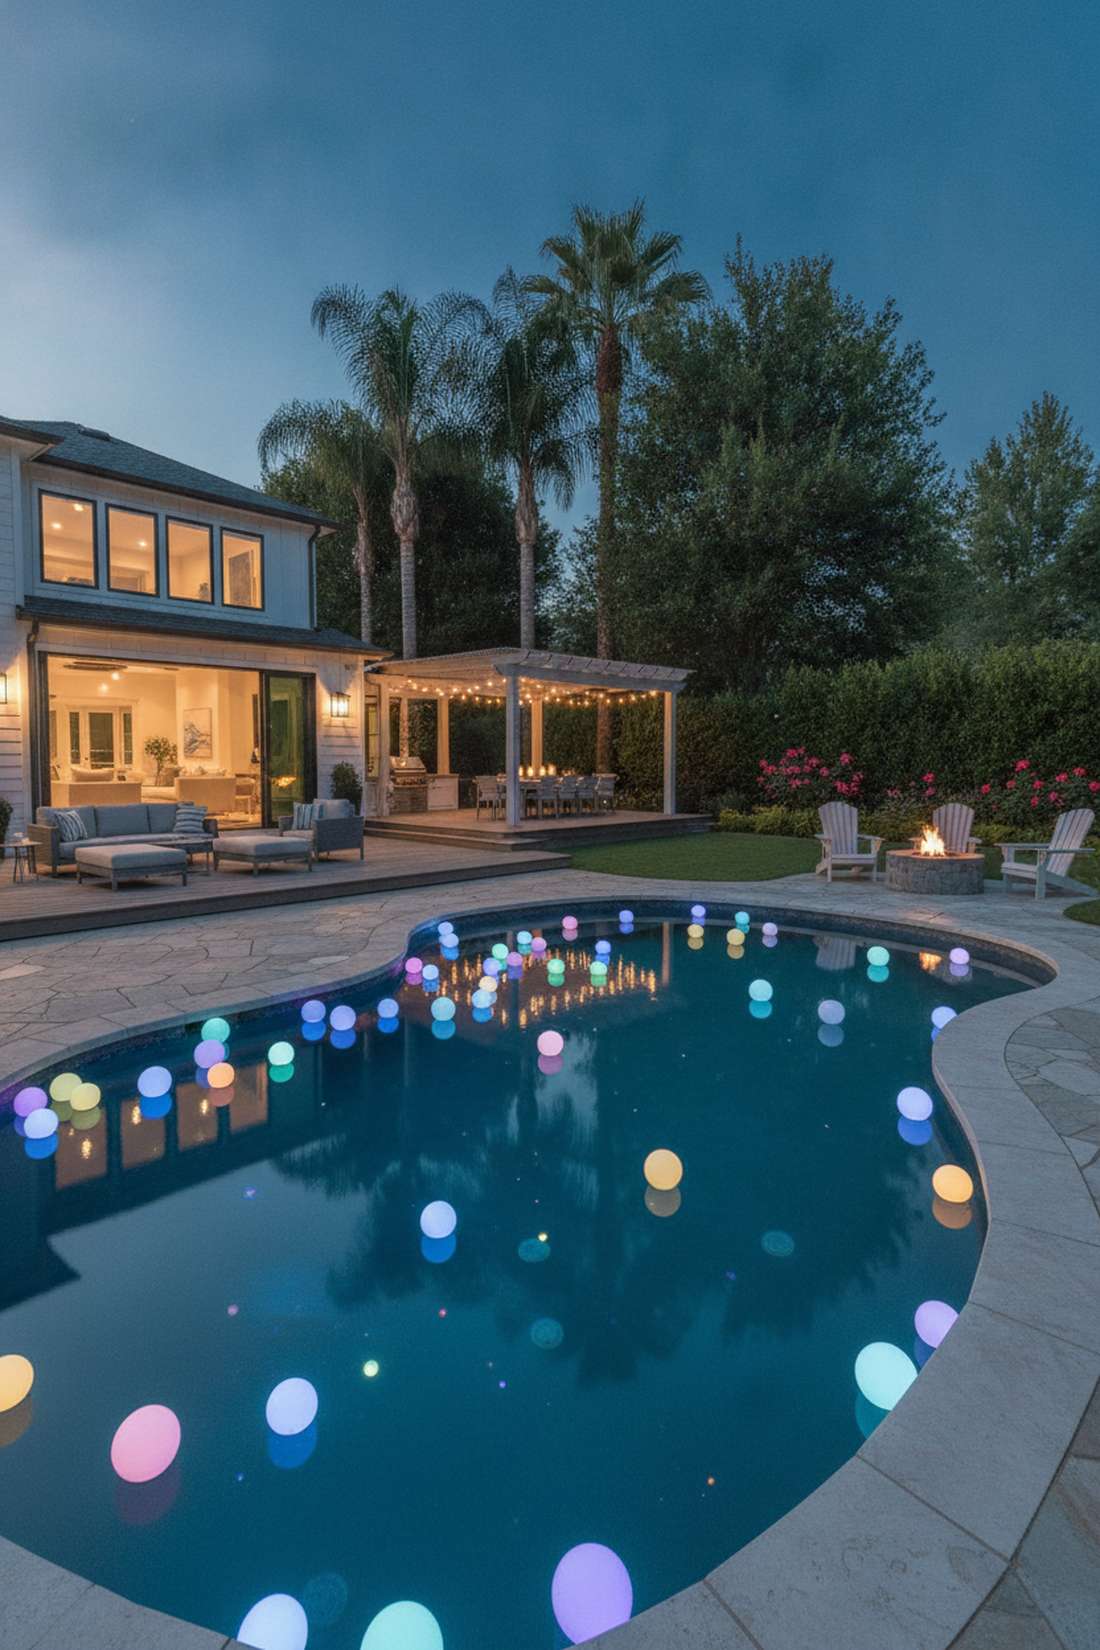
Swimming with these feels like floating through a surreal, glowing galaxy. Tossing waterproof LED floating spheres into the pool adds an insanely playful, magical layer to evening swims.
Most folks rely purely on the glaring underwater pool light, which leaves the surface looking dead and flat. Dropping rechargeable orbs seamlessly injects premium outdoor lighting backyard fun that mesmerizes guests. They double as incredible table centerpieces too.
You can easily pull this off for around $60–$100. It’s a fast weekend upgrade that completely changes the vibe.
- Key Materials: IP68 floating LED spheres
- Vibe / Style: Playful aquatic galaxy
- Difficulty: Zero setup required
- Budget Breakdown: Orb multi-pack: $80.
- Creator’s Tip: Buy varied sizes (8-inch, 12-inch, 16-inch) to create organic visual interest rather than uniform, boring clusters.
- Smart Sourcing: IP68 waterproof floating LED pool lights (multi-size pack) and rapid USB charging blocks.
Night Security and Safety
Security lighting deters intruders while providing safe navigation for residents and guests. Modern systems balance security needs with energy efficiency through smart controls and motion activation.
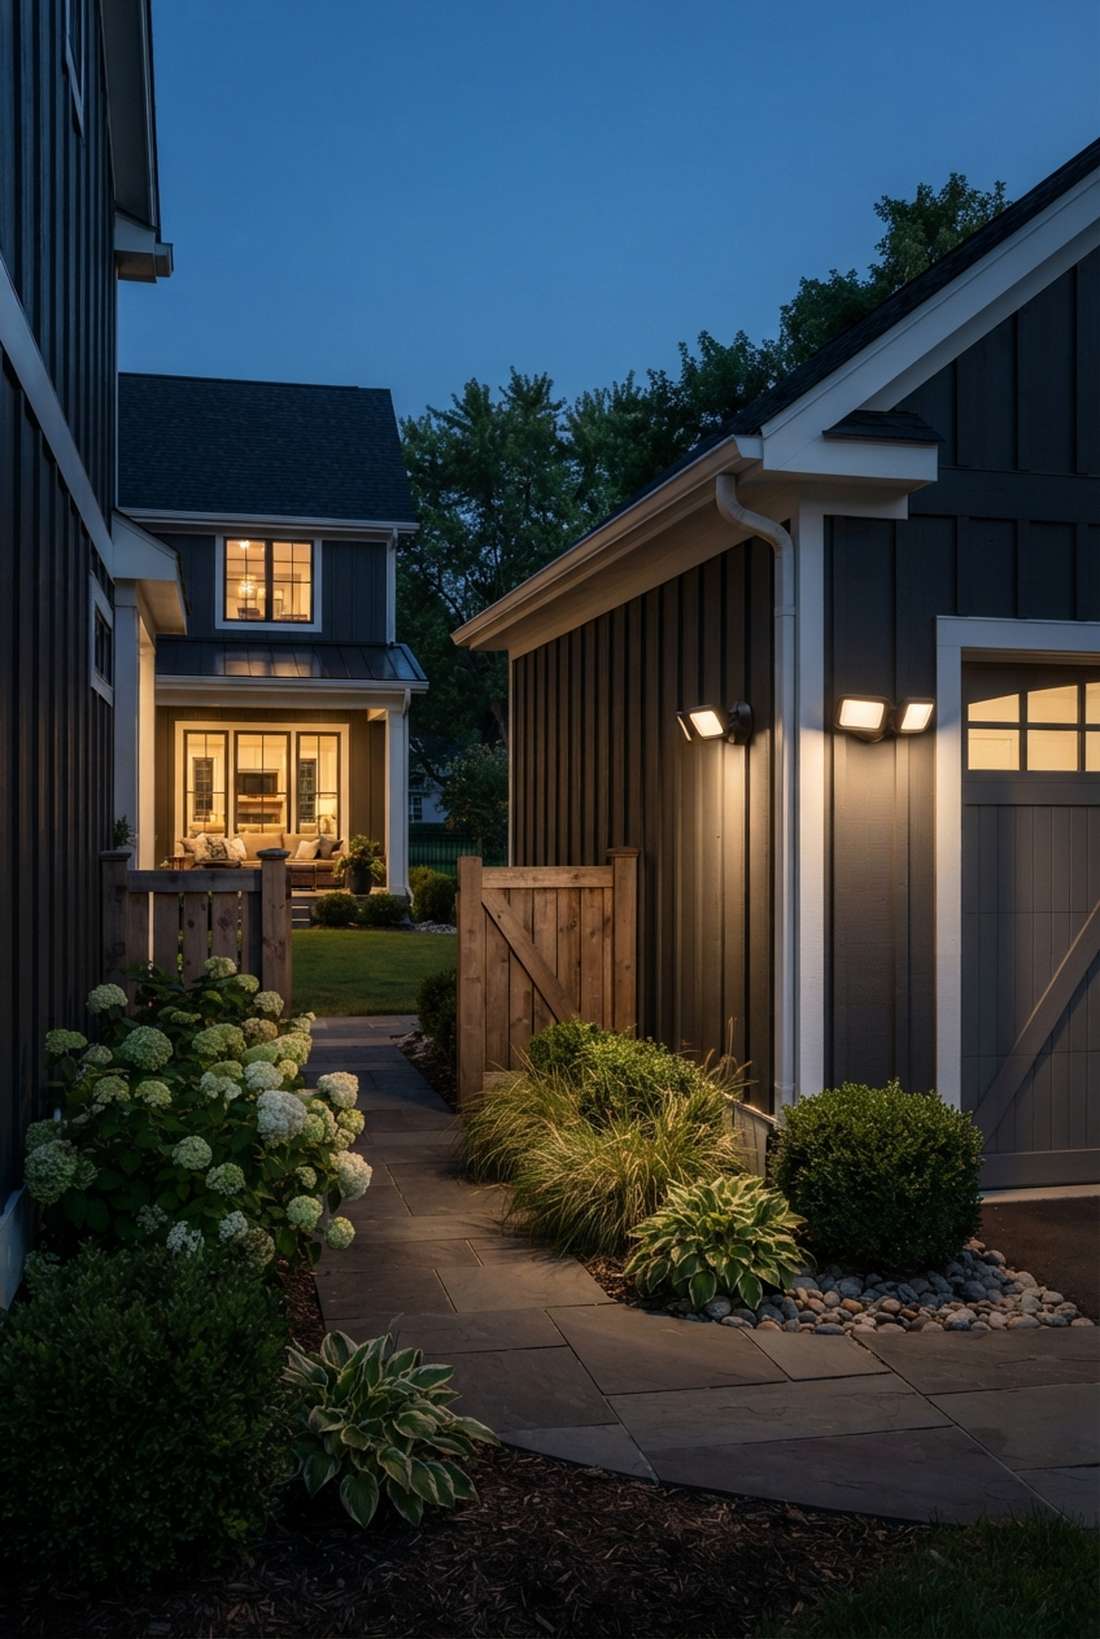
45. Motion Sensor Flood Lights
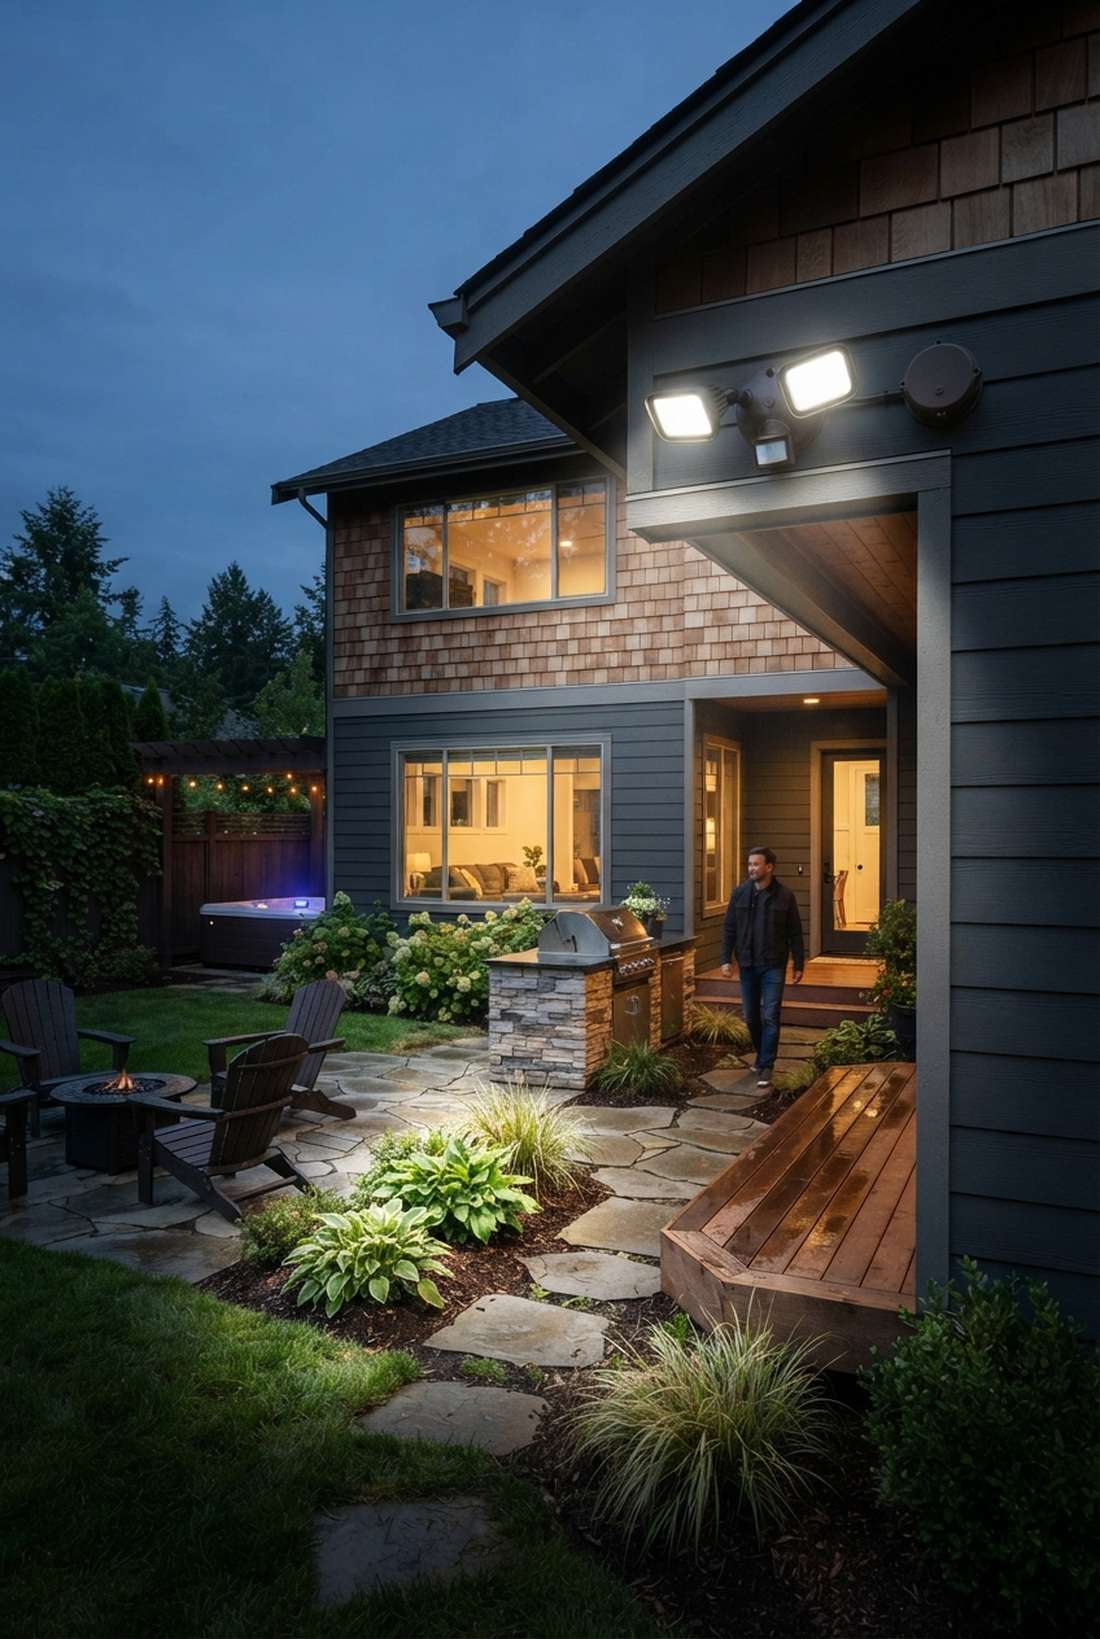
Walking into this zone feels like a high-security vault instantly waking up to greet you. Installing adjustable PIR motion floods is the undisputed king of shocking intruders while saving massive energy.
Designers usually gatekeep this exact layout because it balances neighborhood peace with hardcore security. Leaving 5000-lumen floods on all night pisses off the neighbors, but motion activation gives a designer-level finish that strictly provides light only when needed. It is pure peace of mind.
Expect to invest $50–$120 per corner. Save this to your home security checklist!
- Key Materials: Dual-head LED motion floods
- Vibe / Style: Stealthy impenetrable fortress
- Difficulty: Intermediate (120V wiring)
- Budget Breakdown: Motion fixture: $70 | Junction box: $15.
- Creator’s Tip: Adjust the sensitivity dials to ignore small raccoons or wind-blown branches to prevent annoying false triggers.
- Smart Sourcing: high-lumen dual-head LED motion security lights and weatherproof round electrical boxes.
Security doesn’t have to mean blinding lights. This next dusk-to-dawn trick is how mansions stay softly lit and secure all night long…
46. Dusk-to-Dawn Entry Lights
This layout feels like a loyal butler turning the porch lights on for you every single evening. Utilizing photocell-activated sconces guarantees your entry is never pitch black when you come home late.
Relying on manual switches means you’ll inevitably forget and leave your house vulnerable. Installing automatic dawn/dusk sensors looks far more expensive than it is, ensuring continuous outdoor lighting night safety without wasting electricity during the day. It’s the ultimate “set it and forget it” hack.
You can execute this for roughly $40–$80. Highly recommended for primary and side doors.
- Key Materials: Photocell LED bulbs or fixtures
- Vibe / Style: Reliable automated welcome
- Difficulty: Easy quick-fix
- Budget Breakdown: Photocell bulbs: $30.
- Creator’s Tip: If you love your current fixtures, simply swap the standard bulbs for LED photocell bulbs to instantly automate them.
- Smart Sourcing: dusk-to-dawn sensor LED outdoor bulbs (4-pack) and matte black porch sconces.
47. Dual-Brightness Security Lights
This aesthetic feels like a smart home that politely observes until there’s actual danger. Deploying bi-level security fixtures maintains a gorgeous low glow that instantly blasts to full brightness upon detecting motion.
Everyone ignores this angle, but it solves the ultimate security dilemma. Instead of shocking darkness to blinding light, it seamlessly injects premium outdoor lighting residential aesthetics that keep the perimeter softly visible 24/7. It is incredibly sophisticated.
Budget around $80–$150 per unit. Pin this if you hate pitch-black side yards!
- Key Materials: Dual-mode smart security floods
- Vibe / Style: Sophisticated adaptive defense
- Difficulty: Intermediate
- Budget Breakdown: Dual-bright fixture: $110.
- Creator’s Tip: Position these primarily near the garage or side gates where constant low-level awareness is extremely valuable.
- Smart Sourcing: dual-brightness LED motion sensor lights and silicone weatherproof sealant.
48. Perimeter Zone Lighting
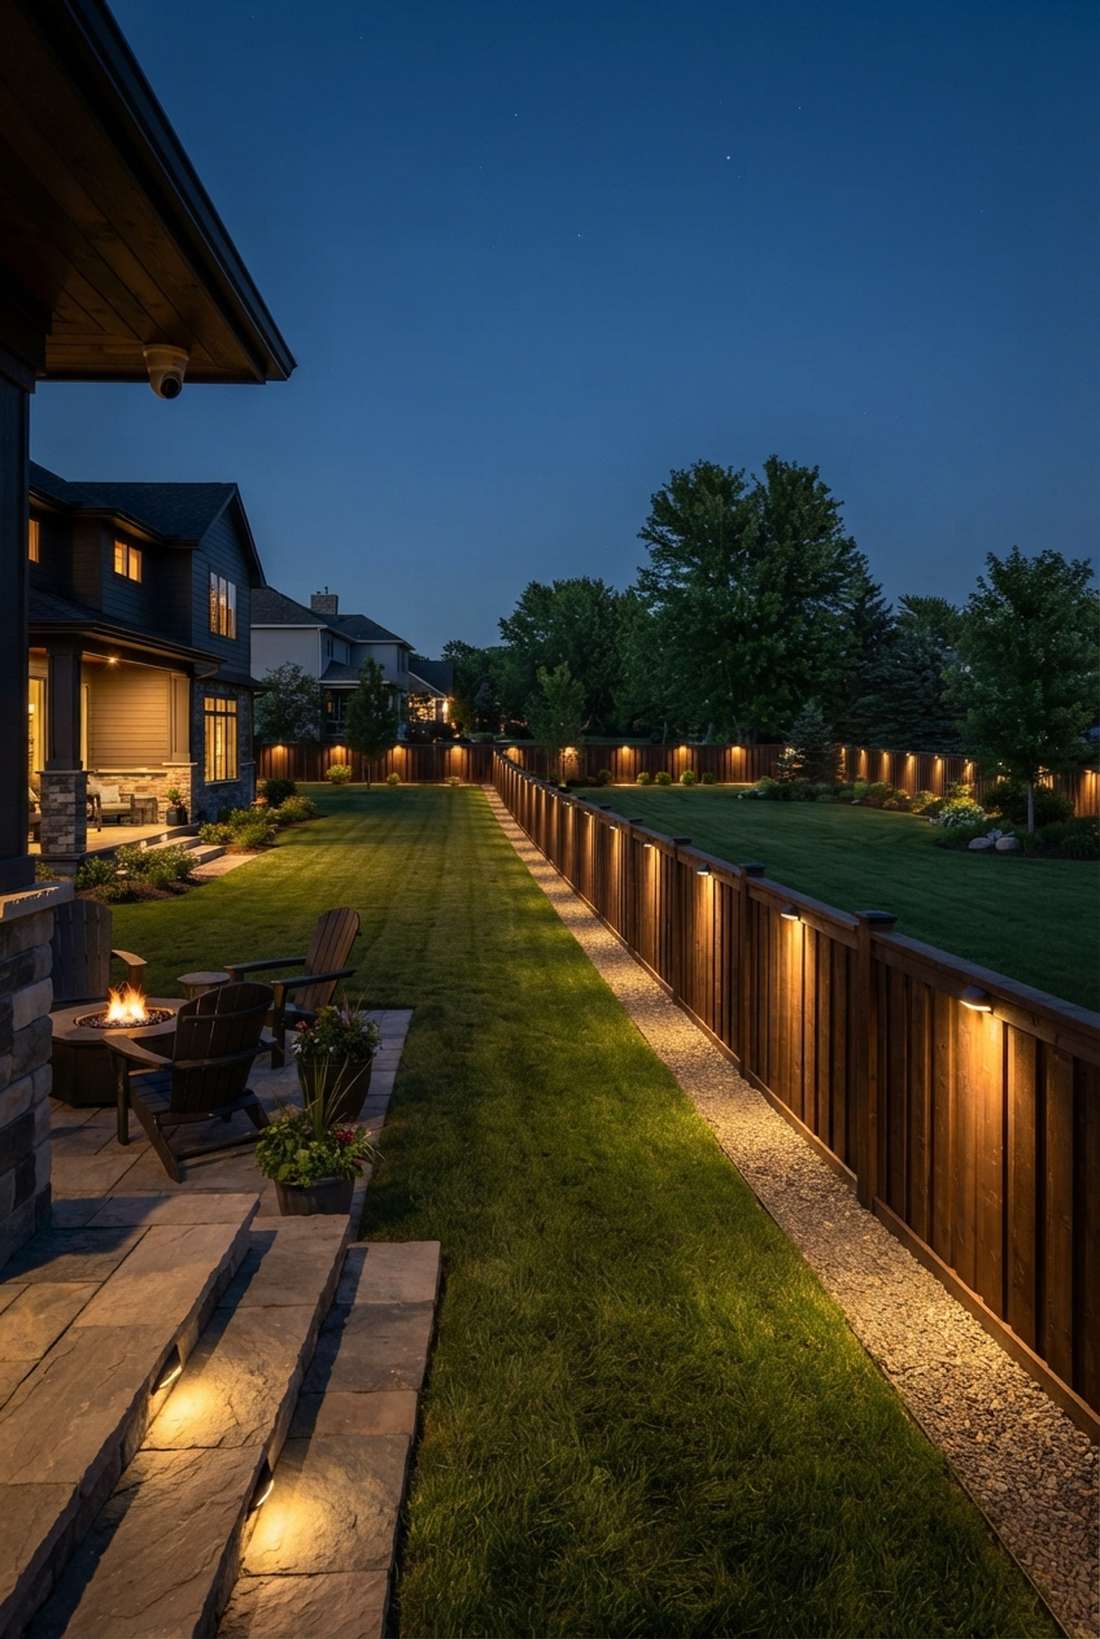
Looking at this feels like staring down a secure, illuminated runway defining your exact property lines. Installing fence-line wash lights completely eliminates the creepy shadows where intruders love to hide.
Leaving the deep corners of your yard totally unlit renders your expensive security cameras absolutely useless. Pushing light to the very edges delivers a surprisingly premium look that visually expands the yard while locking down the perimeter. It reclaims your defensible space.
A full fence line setup runs $200–$500. Save this idea for ultimate property protection.
- Key Materials: Shielded fence-mount downlights
- Vibe / Style: Expansive secure boundary
- Difficulty: Intermediate
- Budget Breakdown: Fence lights: $250 | Cabling: $60.
- Creator’s Tip: Mount the fixtures aimed directly down your fence line, not outward, to completely avoid blinding your neighbors.
- Smart Sourcing: low-voltage LED fence and deck lights (bulk pack) and heavy-duty landscape wire staples.
49. Smart Integration Alerts
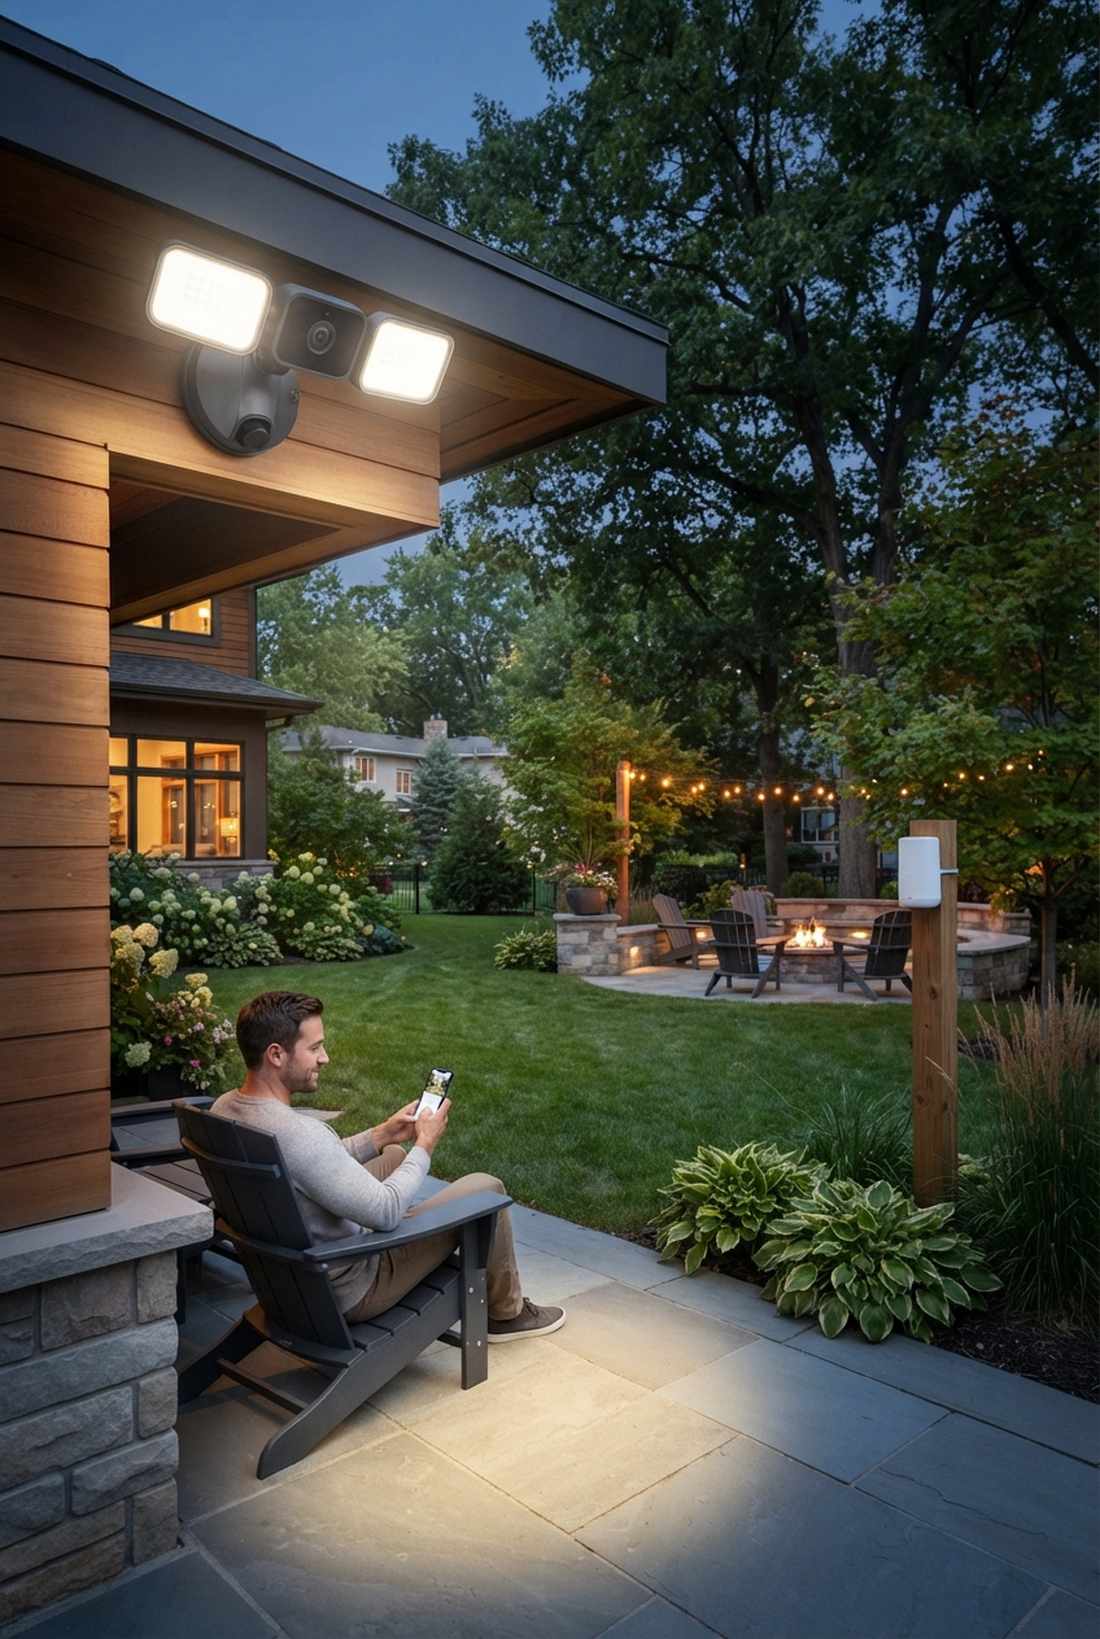

Operating this system feels like having a private digital security guard in your pocket. Syncing Wi-Fi motion light cameras to your smartphone gives you instant visual verification the second a light triggers.
Standard dumb floods turn on for stray cats, leaving you paranoid in bed. Integrating camera/light hybrids gives a designer-level finish that brings modern outdoor lighting design directly into the smart home era. It stops false alarms immediately.
Expect to invest $150–$300 per smart fixture. It’s an advanced tech upgrade that completely changes the vibe.
- Key Materials: Smart floodlight with HD camera
- Vibe / Style: Ultra-modern digital fortress
- Difficulty: Intermediate (Wi-Fi setup)
- Budget Breakdown: Smart camera flood: $200.
- Creator’s Tip: Test the Wi-Fi signal strength at the mounting location with your phone BEFORE you drill holes and wire the fixture.
- Smart Sourcing: 1080p smart Wi-Fi floodlight cameras and outdoor-rated Wi-Fi mesh nodes.
Leaving for vacation? This next automation trick guarantees your house never looks empty while you’re away…
50. Vacation Mode Programming
This layout feels like a bustling, fully occupied home even when you are a thousand miles away. Activating randomized smart switch schedules absolutely destroys the predictable patterns that criminals look for.
Using old-school rotary timers that click on exactly at 7:00 PM every night is a massive dead giveaway to burglars. Utilizing app-based randomized zones seamlessly injects premium outdoor lighting yard security that perfectly mimics human behavior. It is ultimate psychological defense.
You can execute this for roughly $60–$120 in smart switches. Pin this before your next big family trip!
- Key Materials: Smart Wi-Fi wall switches
- Vibe / Style: Stealthy simulated occupancy
- Difficulty: Intermediate (switch wiring)
- Budget Breakdown: Smart switches: $80.
- Creator’s Tip: Combine exterior lights with a few interior living room lamps on the same randomized app schedule for a totally convincing simulation.
- Smart Sourcing: smart Wi-Fi light switches (multi-pack) and non-contact voltage testers.
51. Garage Area Security Lighting
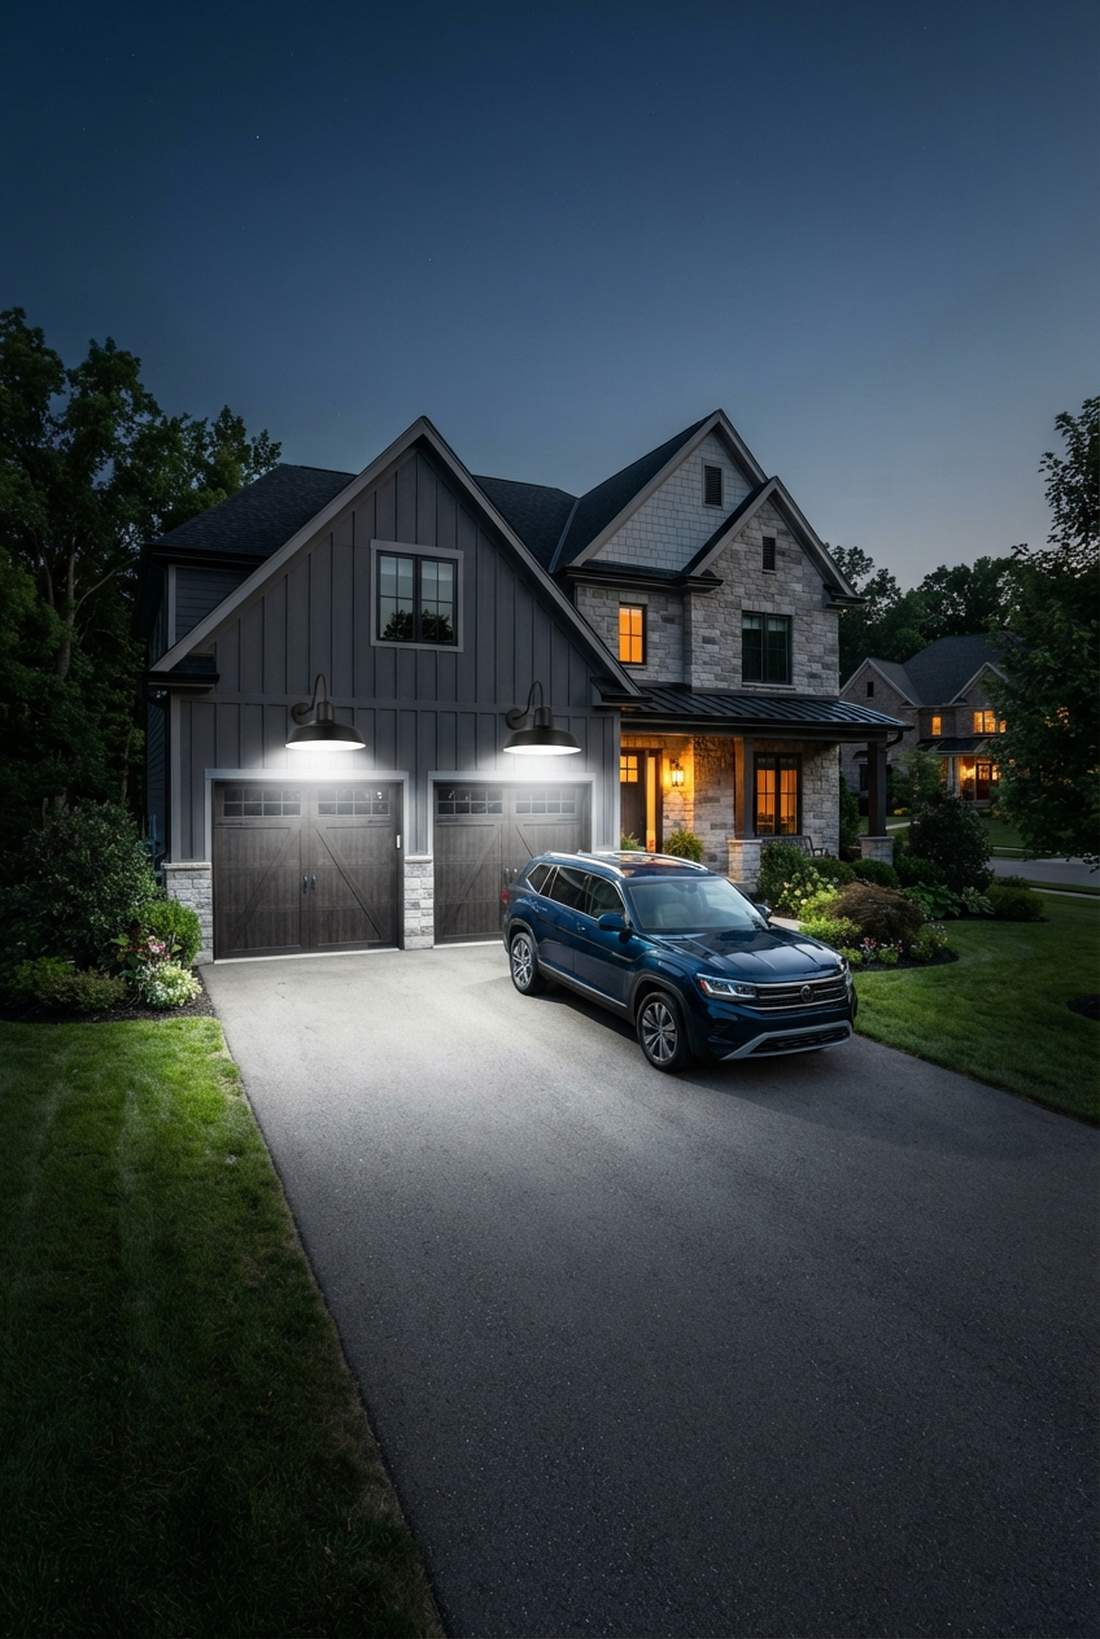
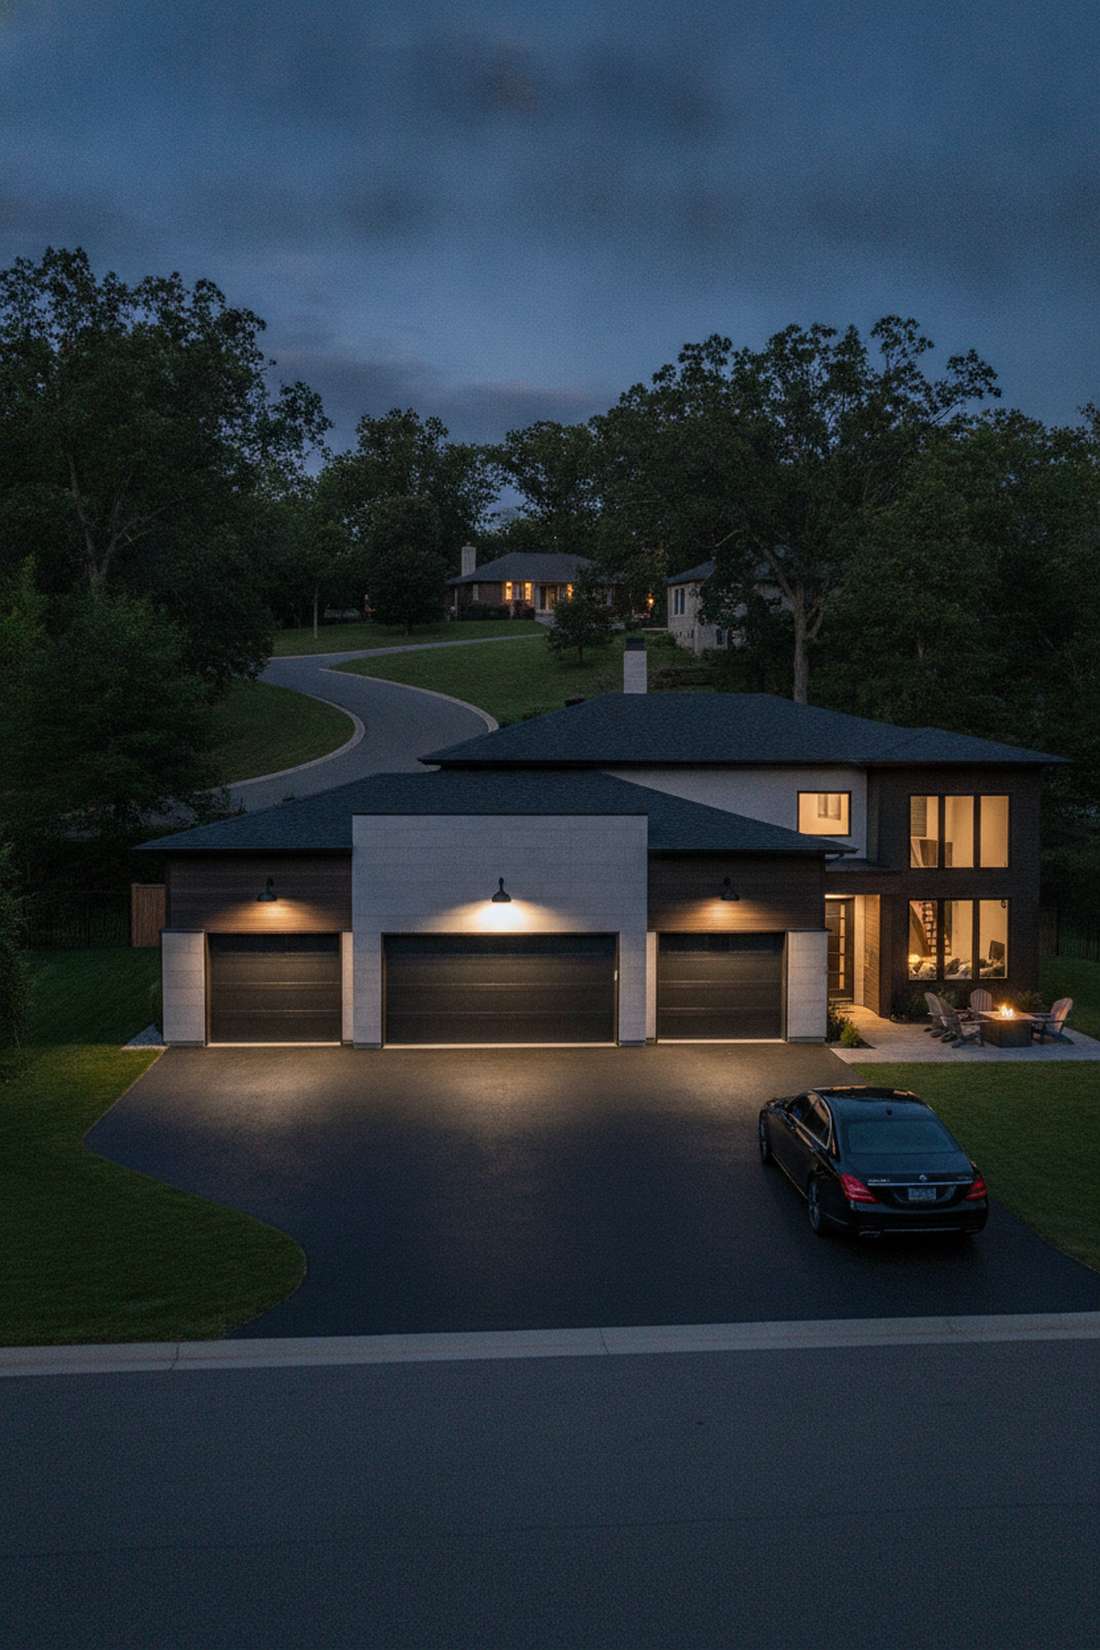
Driving up to this feels like pulling into an exclusive, highly secured VIP parking bay. Deploying high-output targeted driveway illumination directly over the garage doors stops vehicle break-ins instantly.
Criminals specifically target dark driveways to check for unlocked car doors. Blasting the approach with crisp 4000K light looks far more expensive than it is, providing crucial visibility while completely locking down your most vulnerable access point. It is non-negotiable for modern homes.
A solid garage setup costs around $100–$250. Highly recommended for a high-impact security win.
- Key Materials: Wide-throw LED barn lights or floods
- Vibe / Style: Crisp impenetrable parking
- Difficulty: Intermediate
- Budget Breakdown: Barn lights: $150 | LED Bulbs: $30.
- Creator’s Tip: Mount fixtures directly above the doors aimed outward to light the pavement, not the hood of the car, to prevent windshield glare.
- Smart Sourcing: modern LED gooseneck barn lights and high-lumen 4000K security bulbs.
Conclusion
Deploying these exact 51 outdoor lighting blueprints instantly transforms standard residential properties into high-end, secure, and visually stunning architectural masterpieces. By leveraging these specific material sourcing strategies and smart kits, you bypass the cheap big-box store look and achieve a truly premium nighttime aesthetic on a realistic budget.
Begin your upgrade by securing the right foundational supplies—invest heavily in premium brass fixtures, heavy-duty burial wires, and weather-resistant LED kits. Build your design in layers, establishing safety perimeters first, then layering in the high-contrast architectural uplighting that creates that coveted dramatic depth.
With smart transformers and commercial-grade components now wildly accessible, achieving designer-level outdoor lighting design is completely in your hands. Implement these 51 tested layouts systematically, zone by zone, to dramatically skyrocket your property value, enhance your outdoor entertaining hours, and lock down your home’s nighttime security.
Frequently Asked Questions
What color temperature is best for outdoor lighting?
If you want that premium, expensive estate look, you absolutely must stick to 2700K-3000K warm white LEDs. This temperature range flawlessly highlights natural stone and wood tones while maintaining a cozy, high-end vibe. Avoid cheap, institutional 5000K blue-spectrum bulbs unless you are lighting a specific task area like a BBQ grill. To nail this aesthetic easily, always source premium warm-white landscape kits and check the box for exact Kelvin ratings before installing.
How many lumens do I need for pathway lighting?
For high-end residential pathway lighting, aim for a subtle 50-150 lumens per fixture. Blasting paths with 500-lumen mega-floods completely destroys the nighttime ambiance and creates blinding glare. Space your markers 8-15 feet apart to create soft, overlapping pools of light rather than an aggressive airport runway. We highly recommend using dimmable low-voltage LED pathway starter kits so you can dial in the exact brightness based on your paver colors.
Should outdoor lights stay on all night?
For ultimate safety and curb appeal, keep your primary architectural and security lights on dusk-to-dawn, while shutting off decorative patio accents around 11 PM. This tiered approach saves massive energy while maintaining an impenetrable security boundary. The smartest way to execute this is by investing in a multi-zone Wi-Fi landscape transformer, allowing you to set completely independent schedules for your front yard spotlights and your backyard bistro strings right from your phone.
What’s the difference between line voltage and low voltage outdoor lighting?
Line voltage (120V) requires deep trenching, expensive conduit, and usually a licensed electrician—perfect for heavy-duty security floods. Low voltage (12V) runs through a plug-in transformer, is incredibly safe to handle, and allows for massive DIY flexibility when shifting fixtures as your garden grows. If you want a fast, premium upgrade, grab a 300W low-voltage landscape transformer kit and some bulk direct-burial wire; you can transform your entire yard in a single weekend safely.
How do I prevent outdoor lights from attracting insects?
Bugs are incredibly drawn to cool, blue-spectrum lighting (4000K+). By switching to 2700K warm white or specifically sourcing amber-hued LEDs, you drastically cut down insect swarms around your seating areas. Furthermore, push your brightest wash lights toward the perimeter of your yard to draw bugs away from the patio. For extreme bug zones, heavily consider upgrading your deck areas with amber LED deck post caps and completely ditching unshielded bright white floods.
What is the most energy-efficient outdoor lighting option?
Integrated LED fixtures absolutely dominate the efficiency game, consuming 80% less power than outdated halogens while surviving for decades. While solar is free to run, it often fades by midnight. To achieve a zero-compromise, ultra-efficient setup that looks expensive but costs pennies to run, invest in a smart low-voltage LED landscape bundle paired with motion sensors. This ensures maximum brightness only when needed, practically eliminating your outdoor energy footprint.