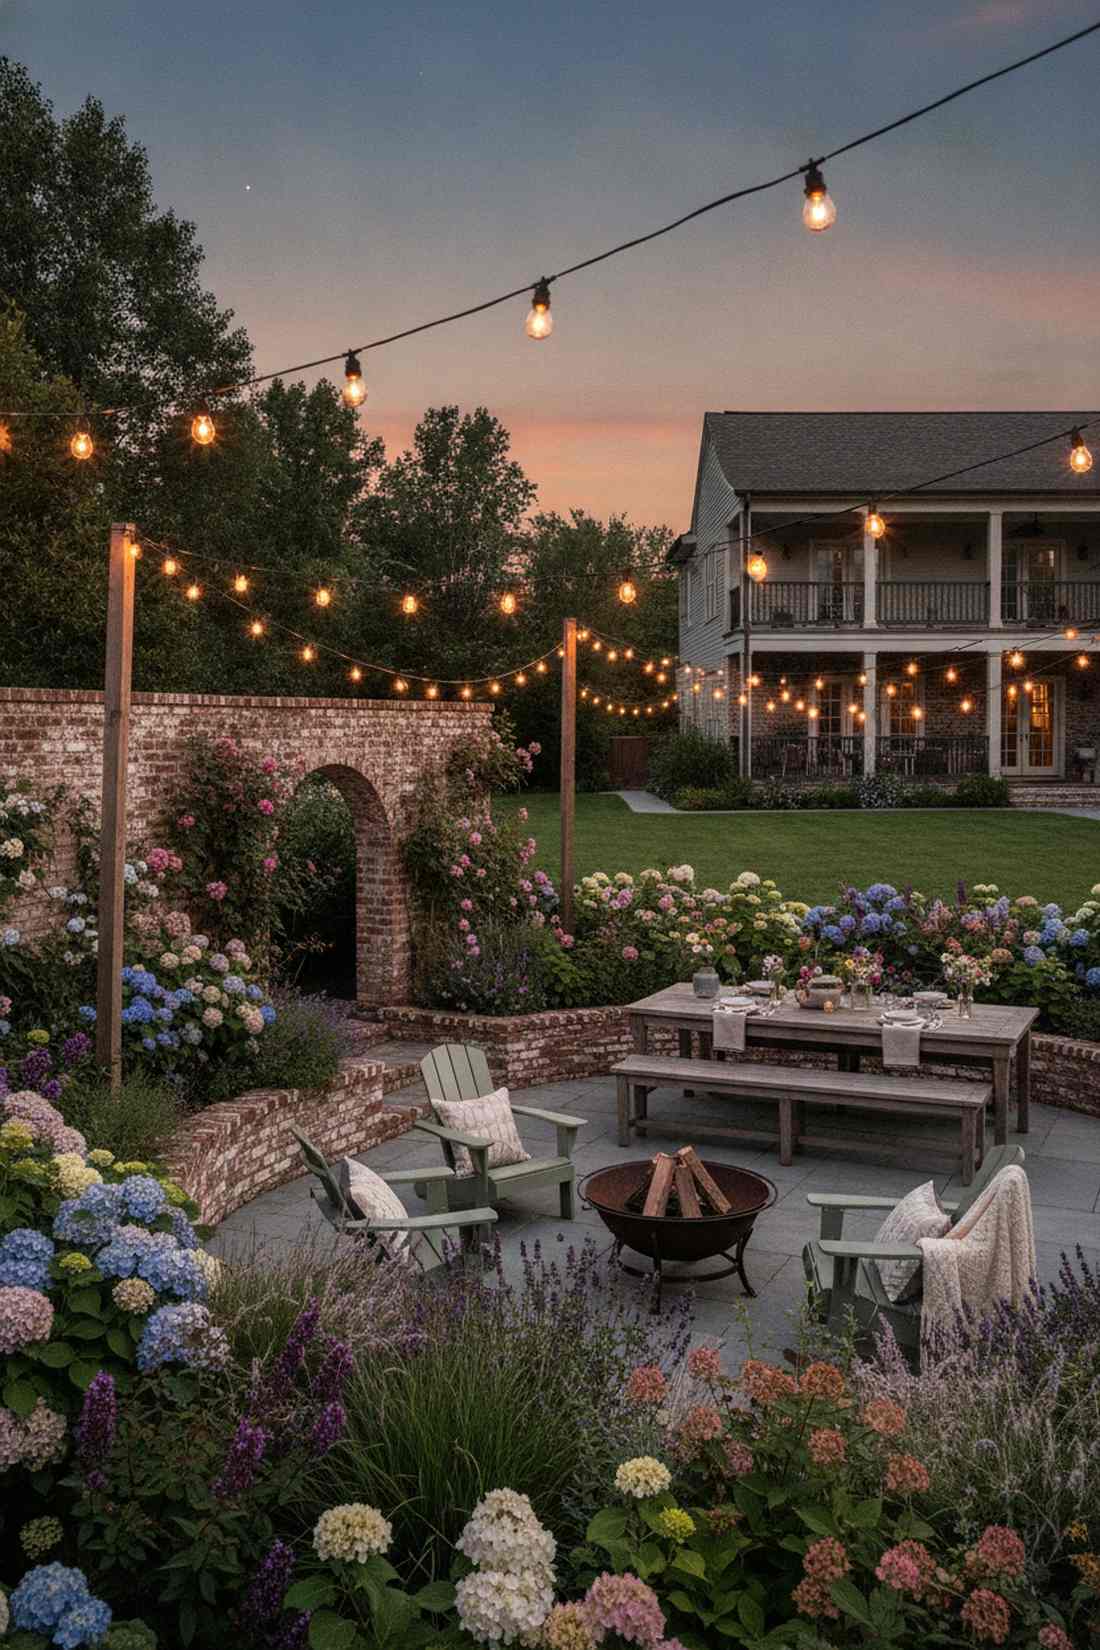
Professional outdoor lighting string lights instantly elevate any backyard retreat. Discover premium DIY blueprints without the designer price tag. Perfect for weekend patio upgrades and smart material sourcing.
Design Snapshot Key Principles
- Layered Illumination: Combine overhead canopies with accent lighting to maximize visual depth and boost property value aesthetics.
- Bulb Selection: Shatterproof LED outdoor lighting globes deliver vintage warmth while slashing electricity costs by 80%.
- Installation Structure: Sturdy pergolas and custom posts act as essential anchor points for commercial-grade tension kits.
- Weather Resistance: Always prioritize IP65-rated waterproof housings and heavy-duty UV-resistant cords for permanent, year-round durability.
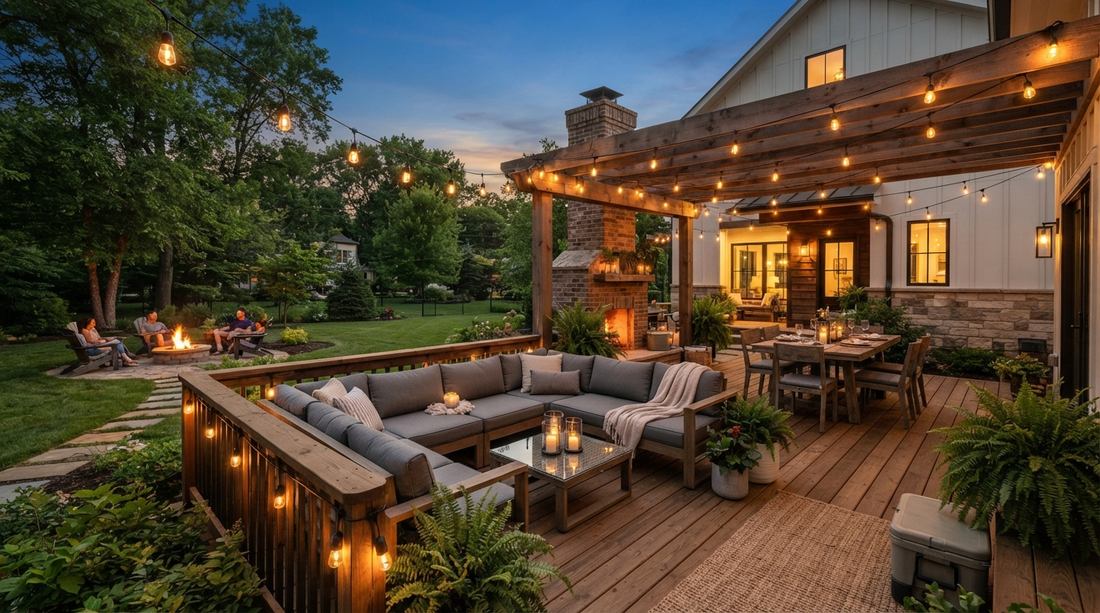
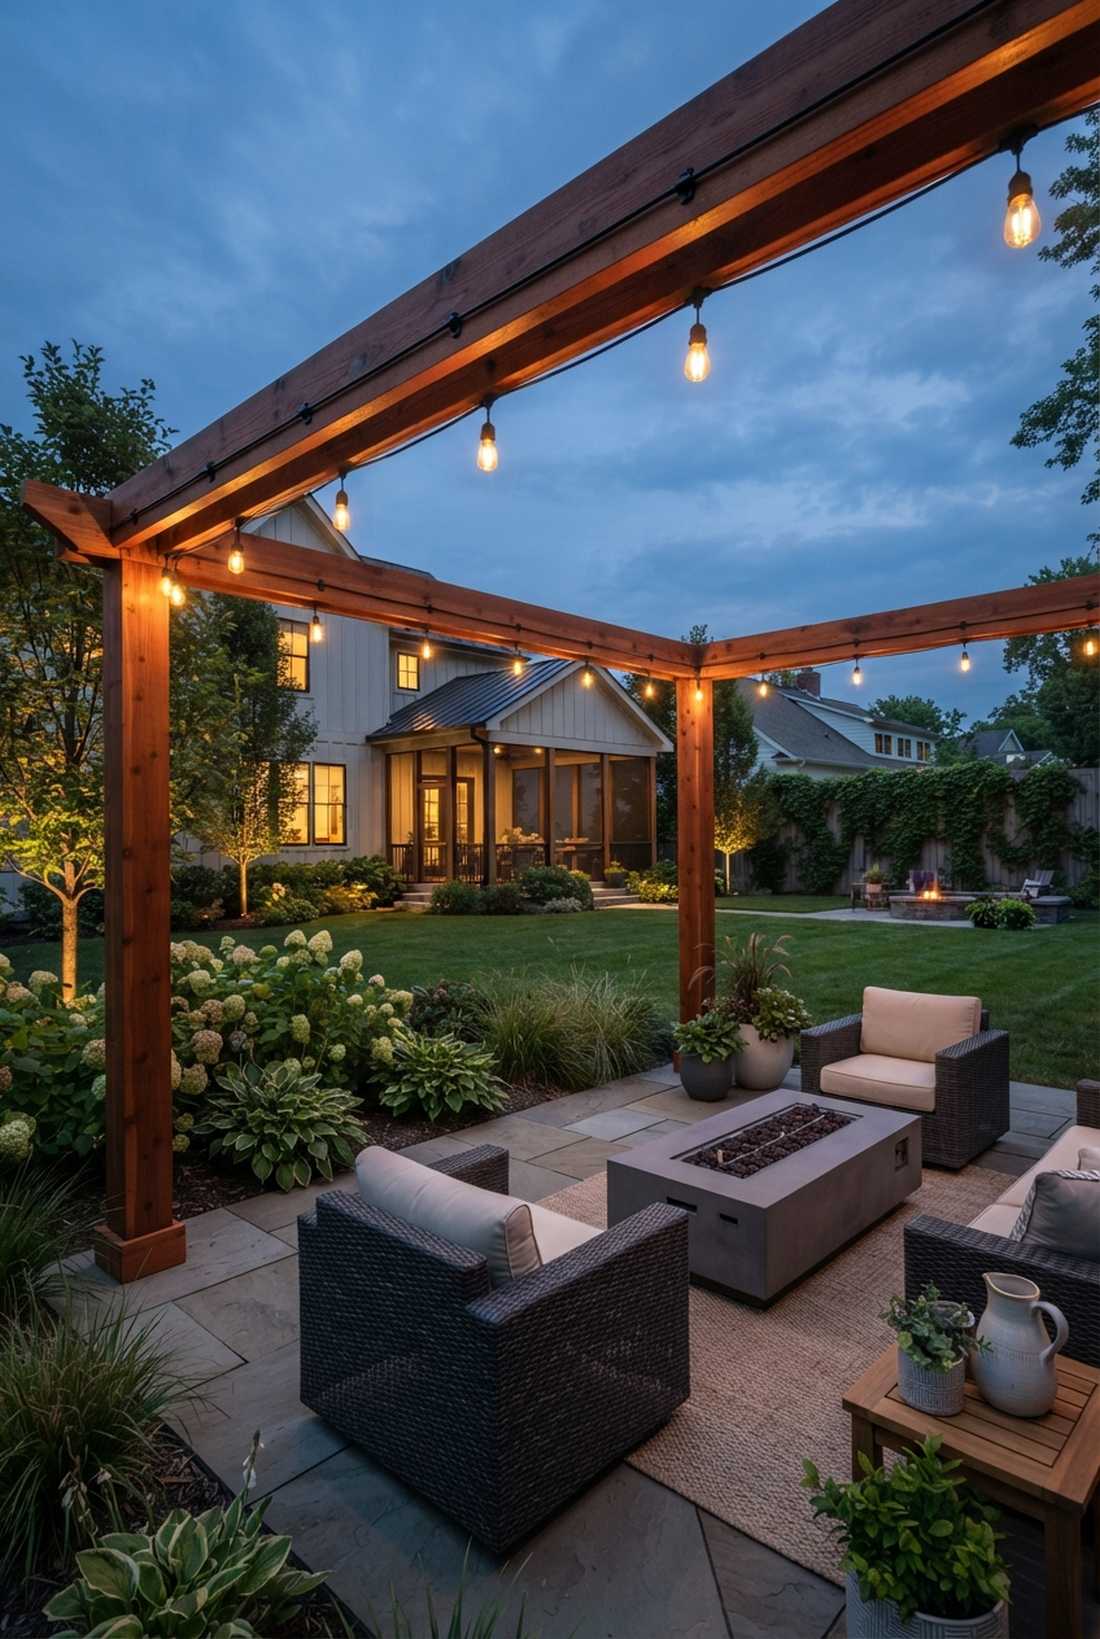
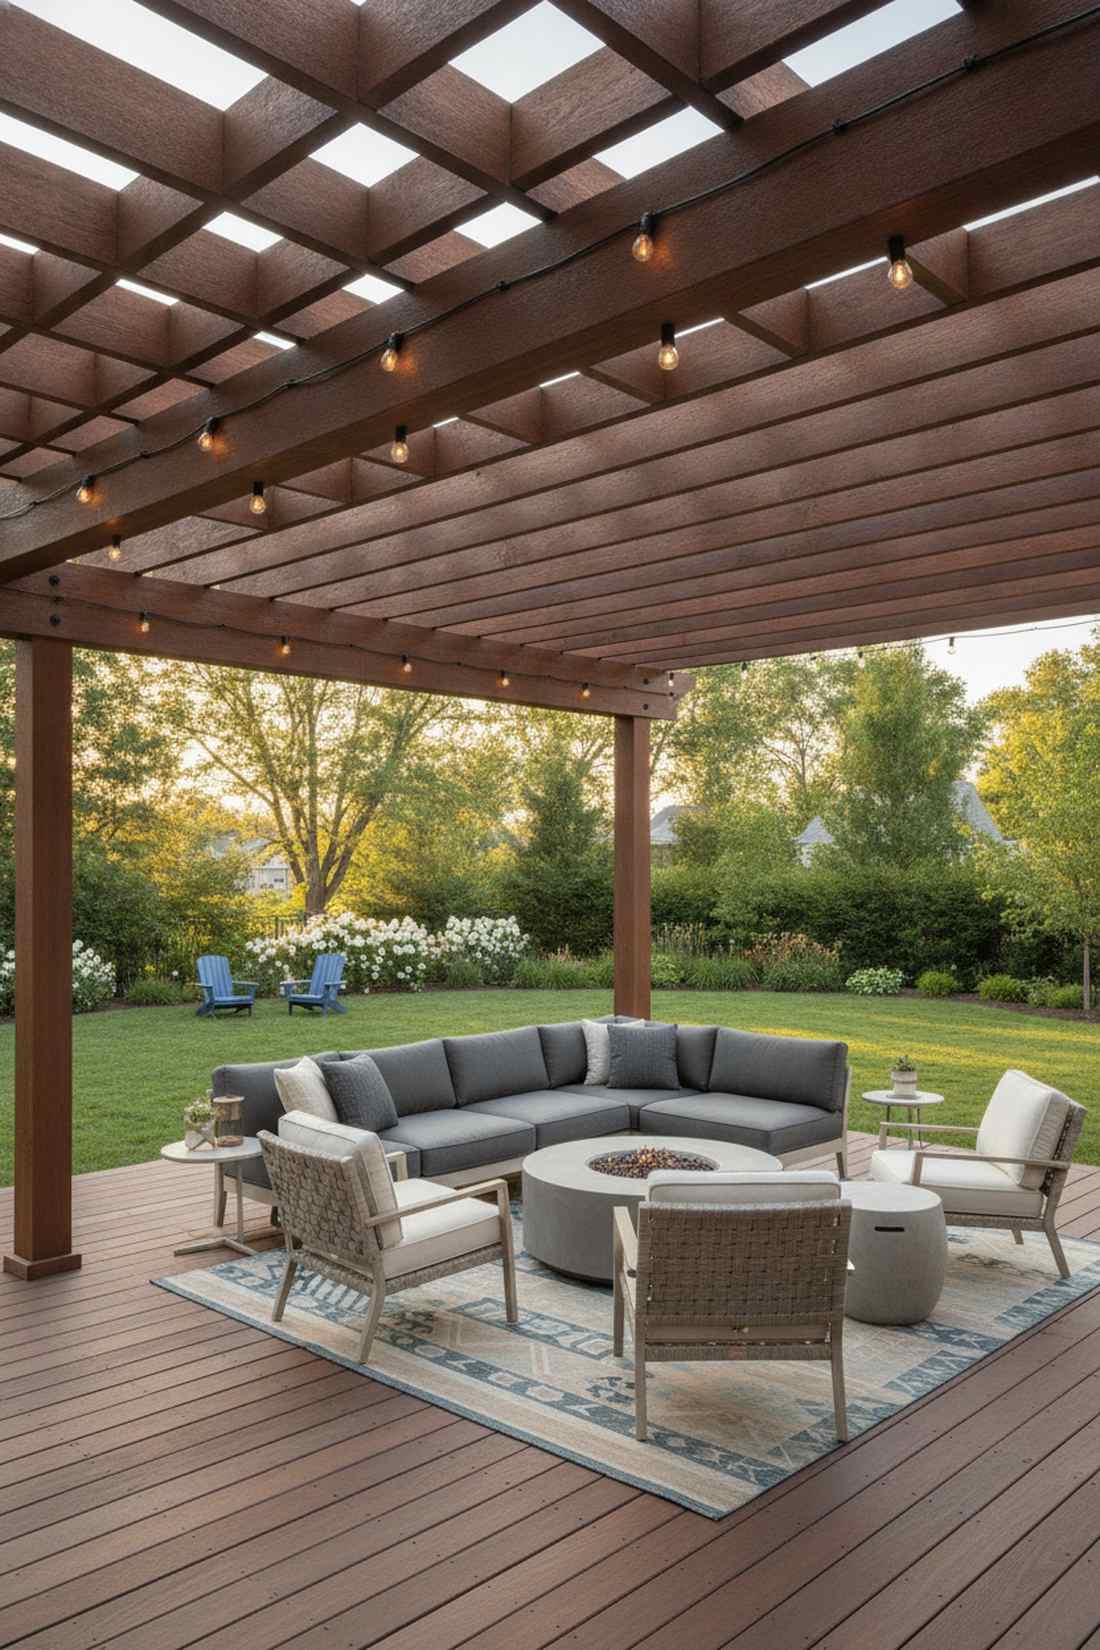
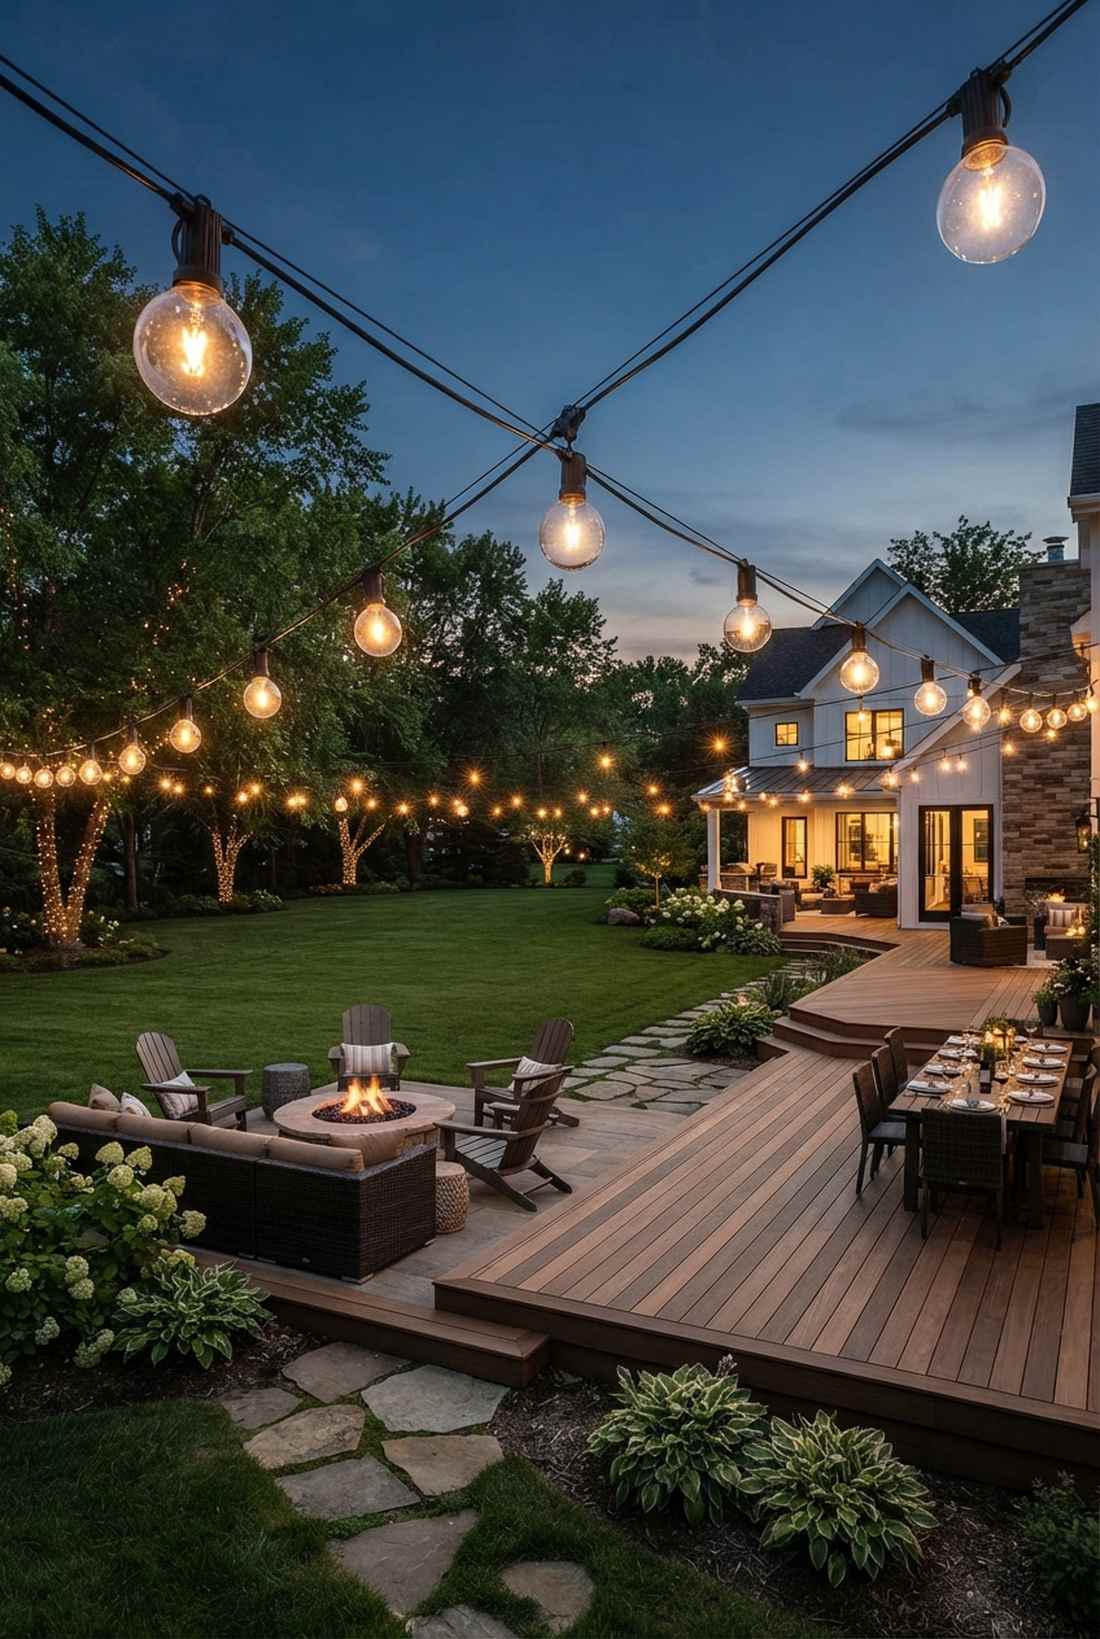
Overhead Canopy Designs for Ambient Coverage
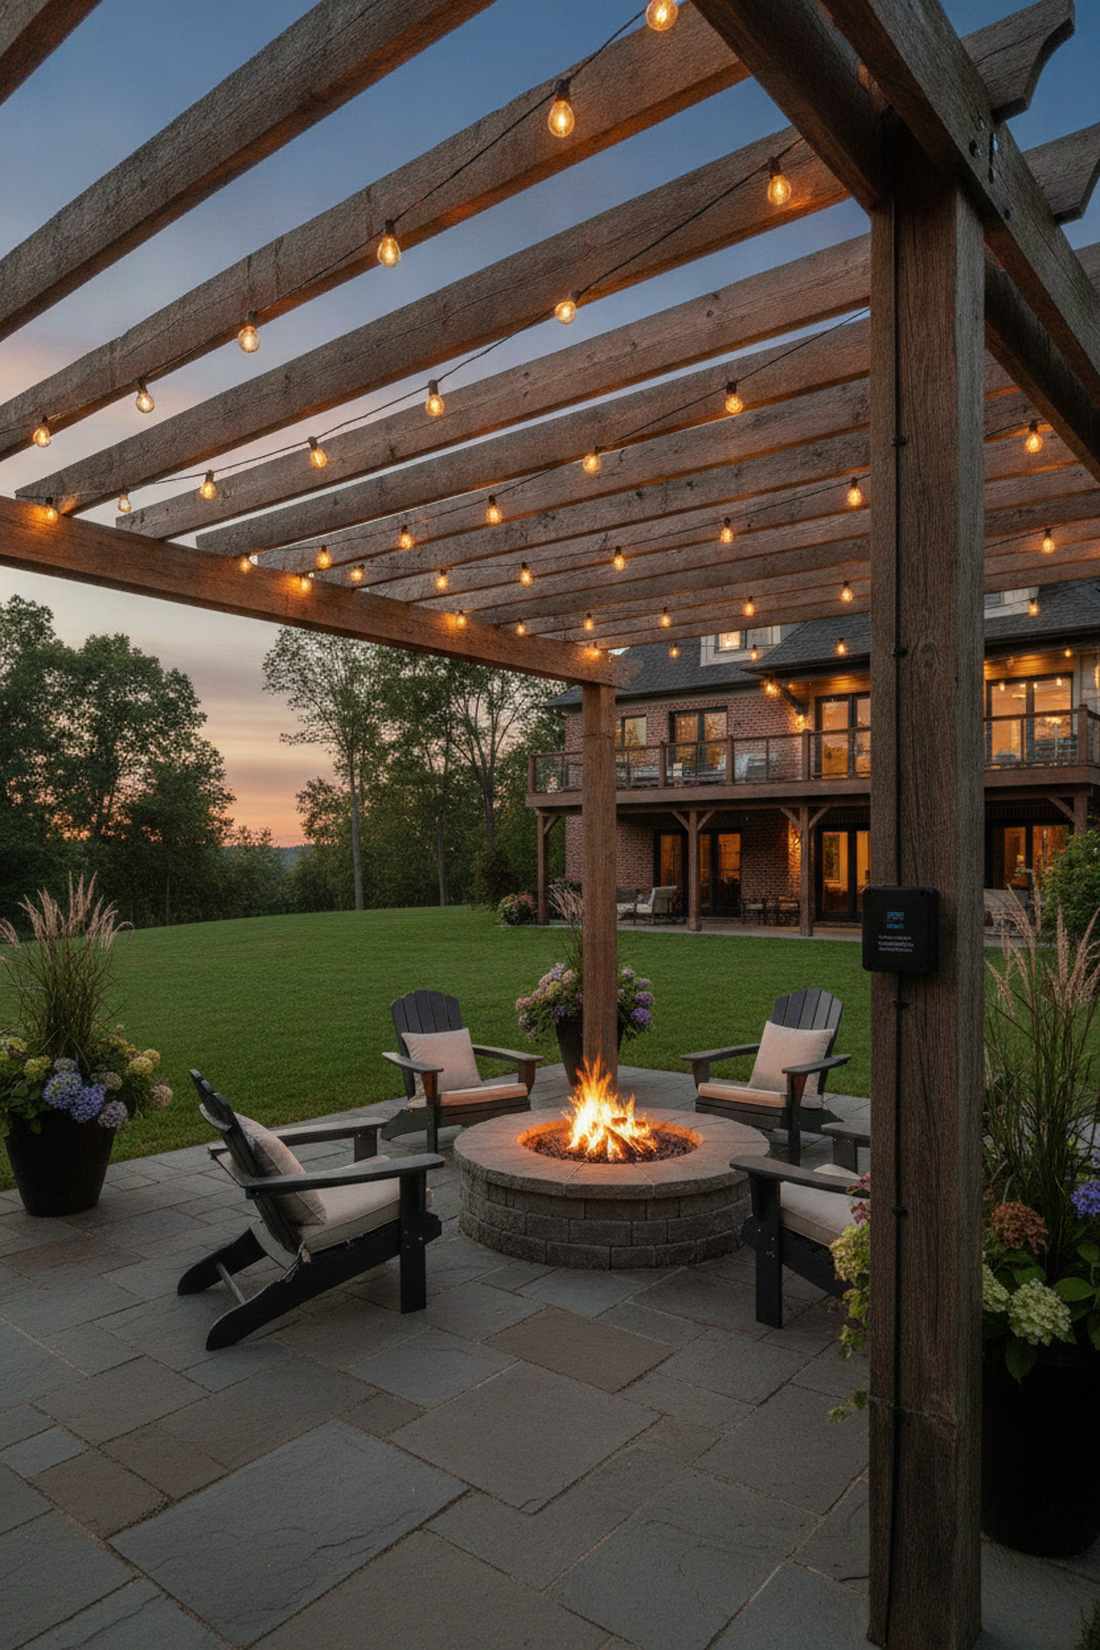
Overhead installations distribute light evenly across seating areas while defining outdoor rooms. Designers position strands at 8 to 10 feet above finished grade to balance headroom with luminous intensity.
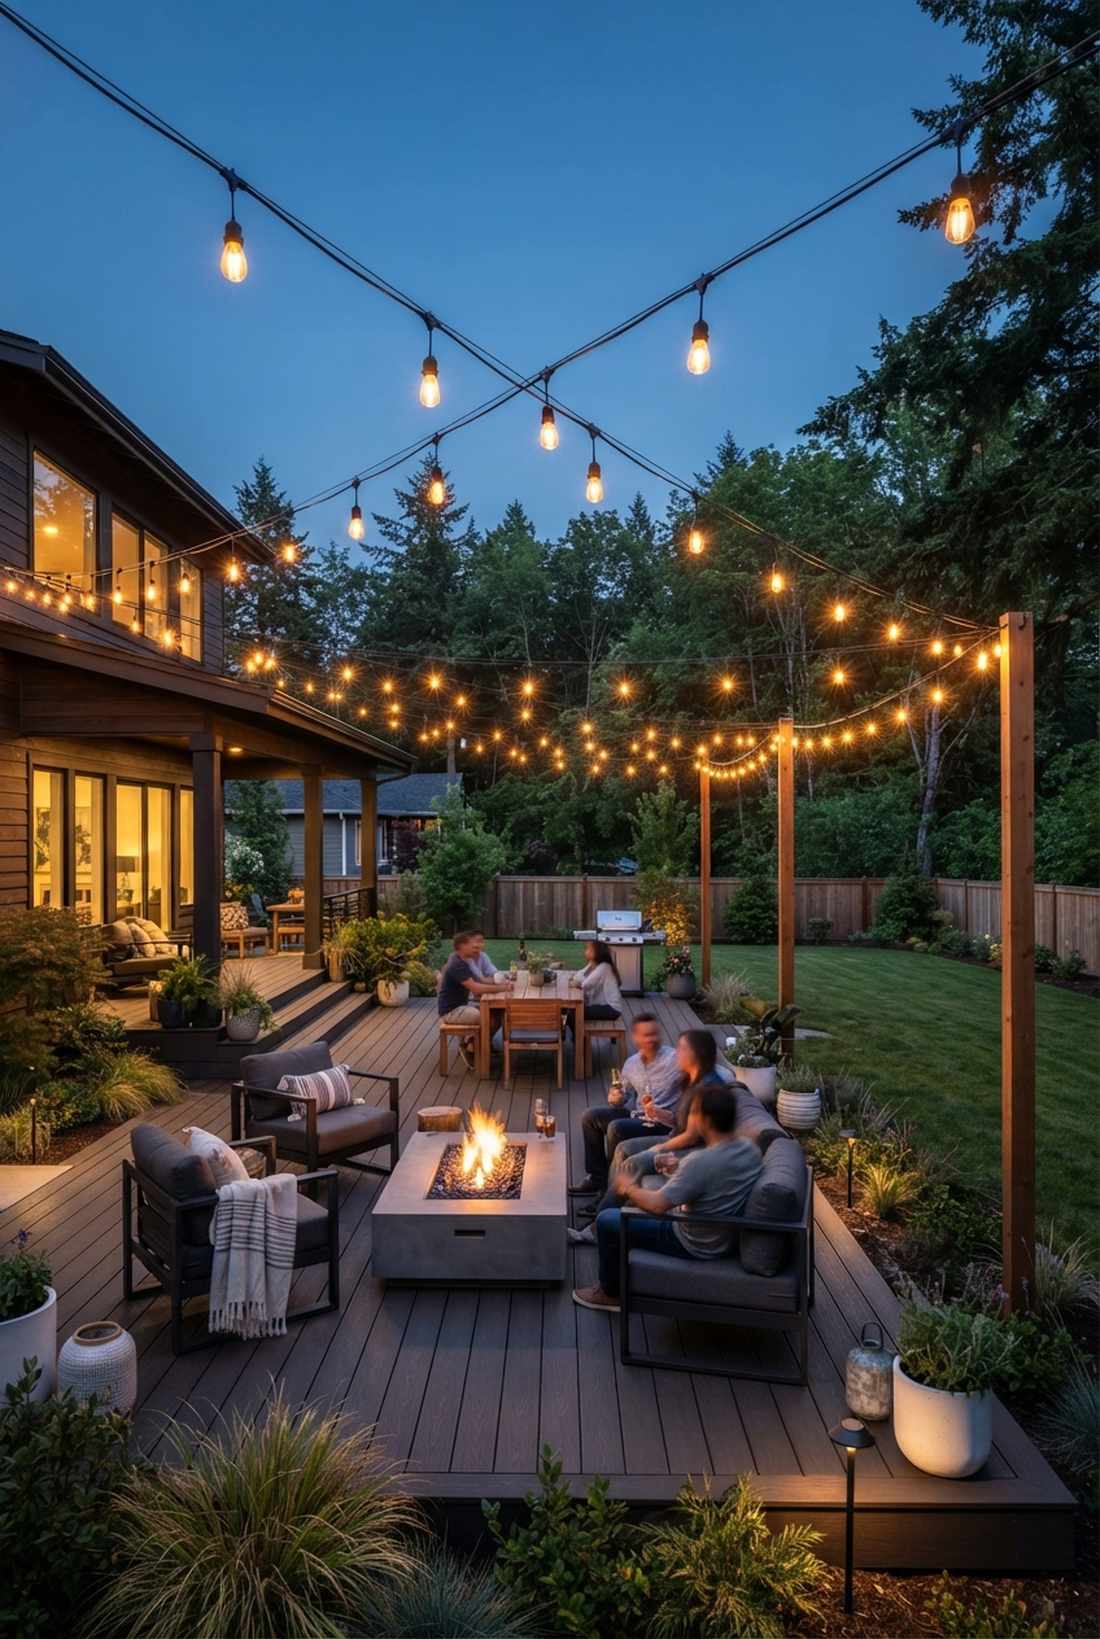
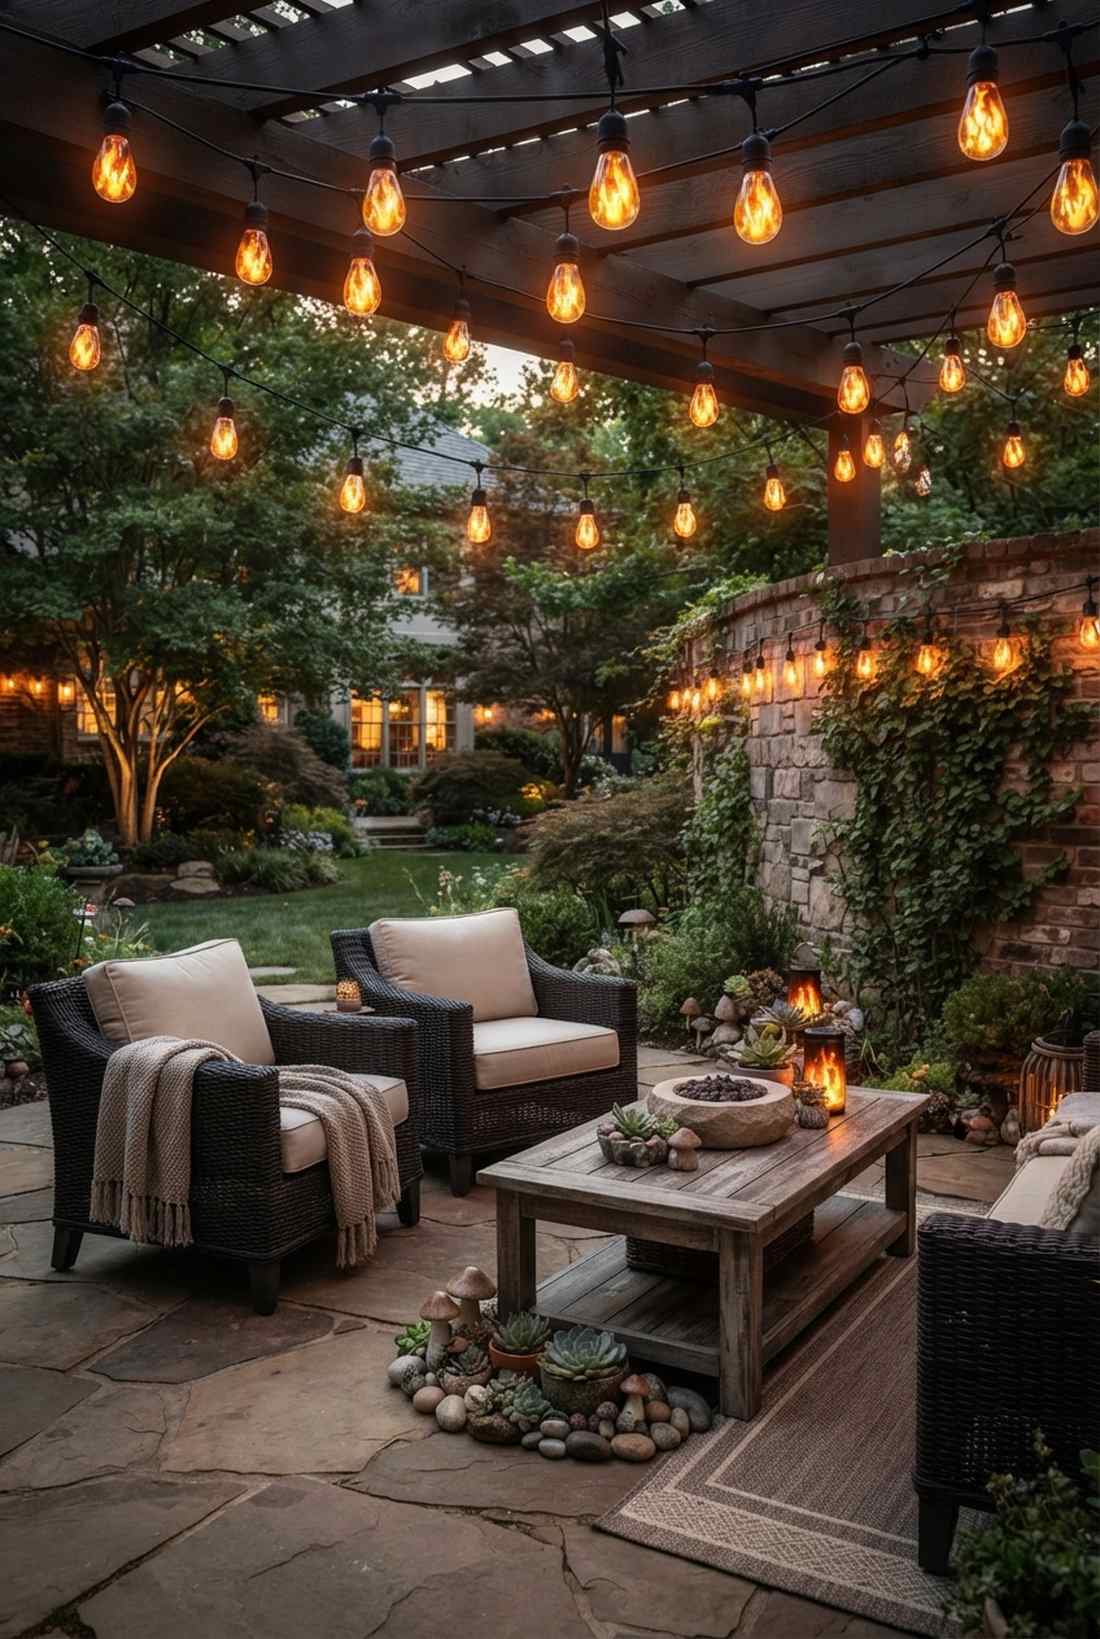
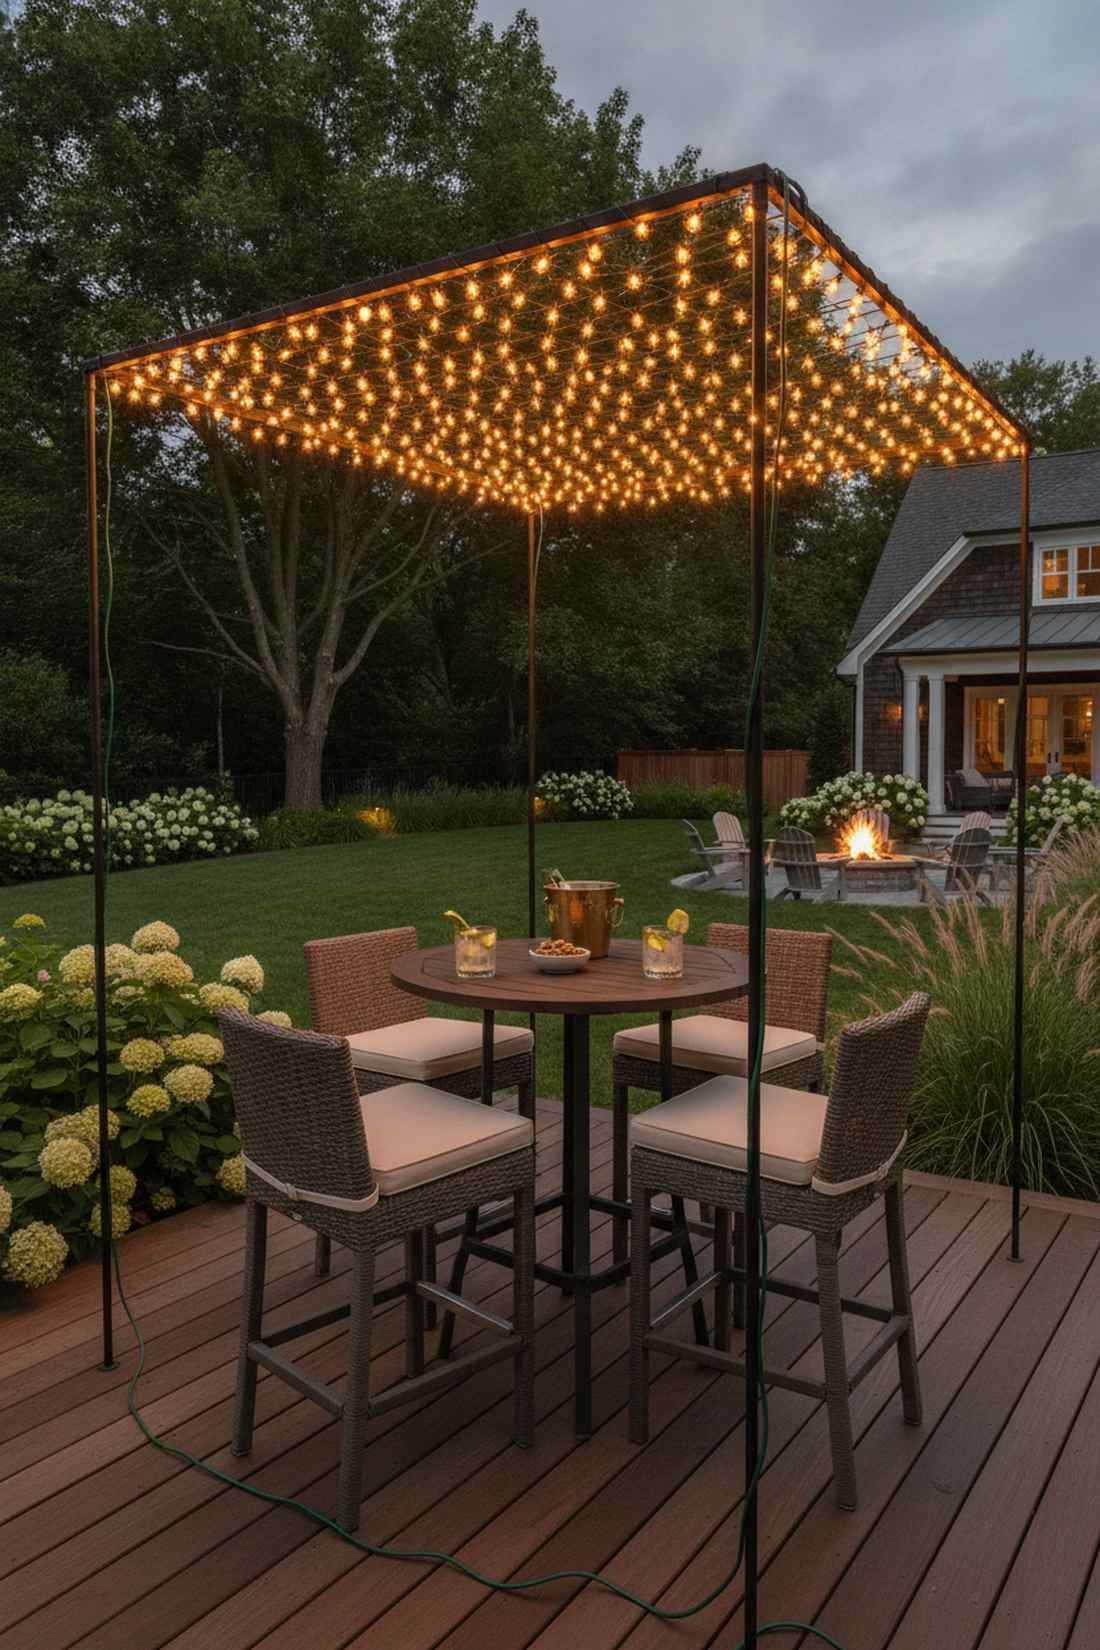
1. Crisscross Patio Canopy
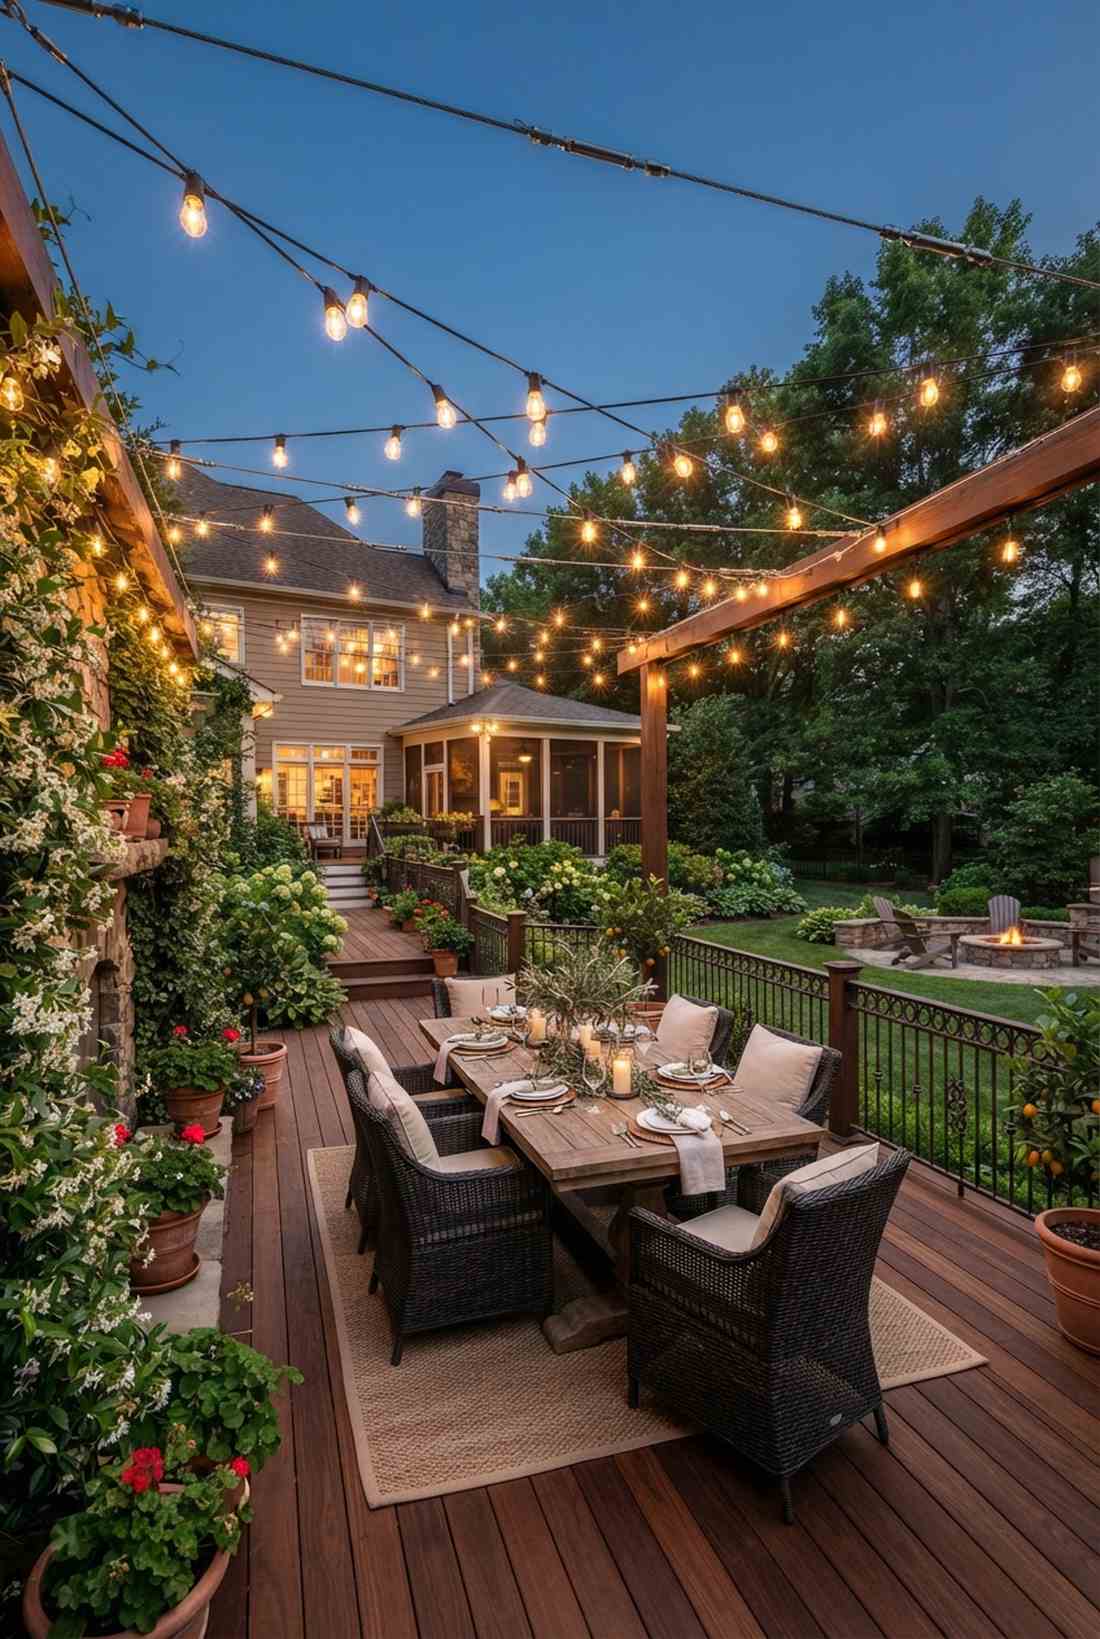

This illuminated outdoor dining canopy feels like a hidden Italian courtyard you accidentally discovered. It works exceptionally well for an open-air rectangular deck looking for comprehensive brightness.
Many homeowners overcomplicate grid setups, but this straightforward intersection delivers a surprisingly premium look with minimal effort. Secure heavy-duty commercial strands with a robust steel cable suspension system to eliminate sagging entirely.
You can easily pull this off for around $45–$80 depending on the square footage. Save this to your DIY weekend garden board for easy reference.
- Key Materials: Heavy-duty guide wire kits
- Vibe / Style: European cafe aesthetic
- Difficulty: Beginner friendly
- Budget Breakdown: Lights: $40 | Wire Kit: $25.
- Creator’s Tip: Use turnbuckles on every anchor to effortlessly tighten the lines when they naturally stretch in summer heat.
- Smart Sourcing: shatterproof S14 LED strands (bulk pack) and pre-cut stainless steel tension kits.
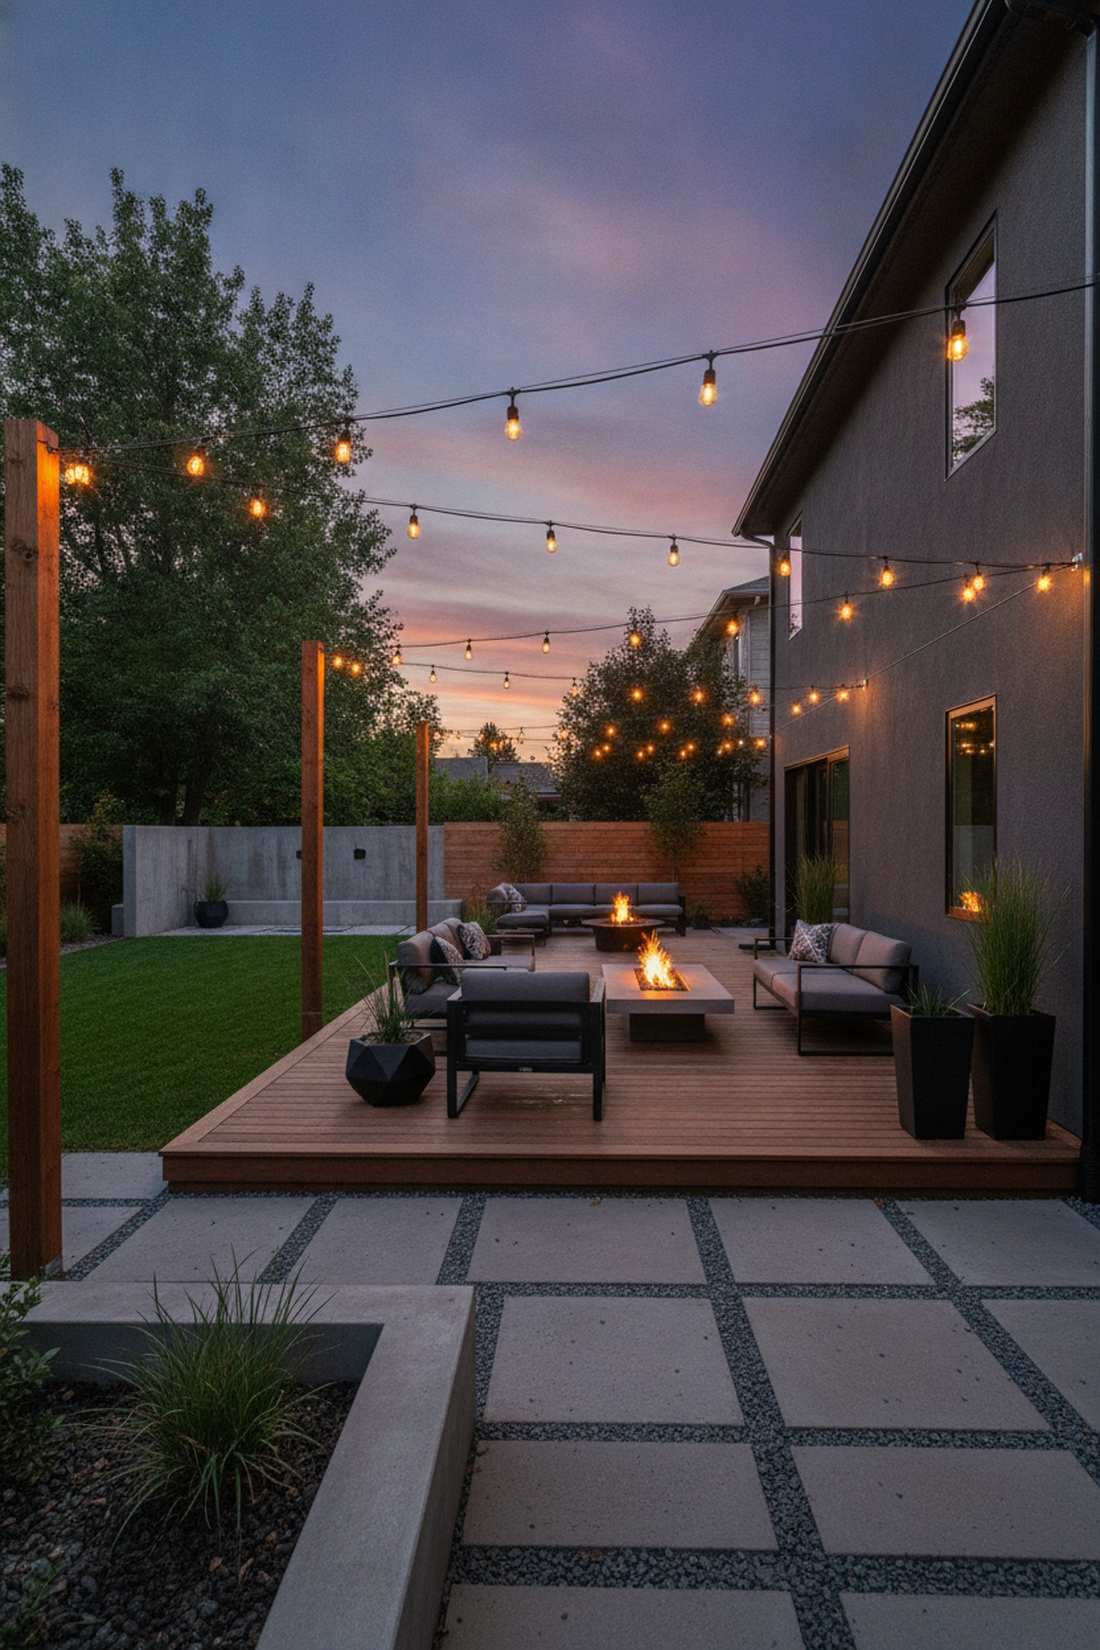
2. Parallel Bistro Strand Layout
A flawless modern bistro lighting run feels like an exclusive rooftop lounge reserved for VIPs. It is absolutely perfect for long, narrow side yards or contemporary patio extensions.
People often think straight lines are boring, yet this disciplined geometric approach looks far more expensive than it is. Integrate smart Wi-Fi dimmer controllers to transition smoothly from bright dinner lighting to a sultry midnight glow.
Expect to invest approximately $50–$90 for a complete, weather-safe setup. It’s a fast upgrade that completely changes the vibe of long spaces.
- Key Materials: Dimmable LED cafe bulbs
- Vibe / Style: Urban modern minimalism
- Difficulty: Quick afternoon project
- Budget Breakdown: LED Strands: $55 | Dimmers: $20.
- Creator’s Tip: Space your parallel lines exactly 3 feet apart to prevent awkward overlapping shadows on dining tables.
- Smart Sourcing: weatherproof outdoor smart plug dimmers and heavy-duty 48ft bistro light bundles.
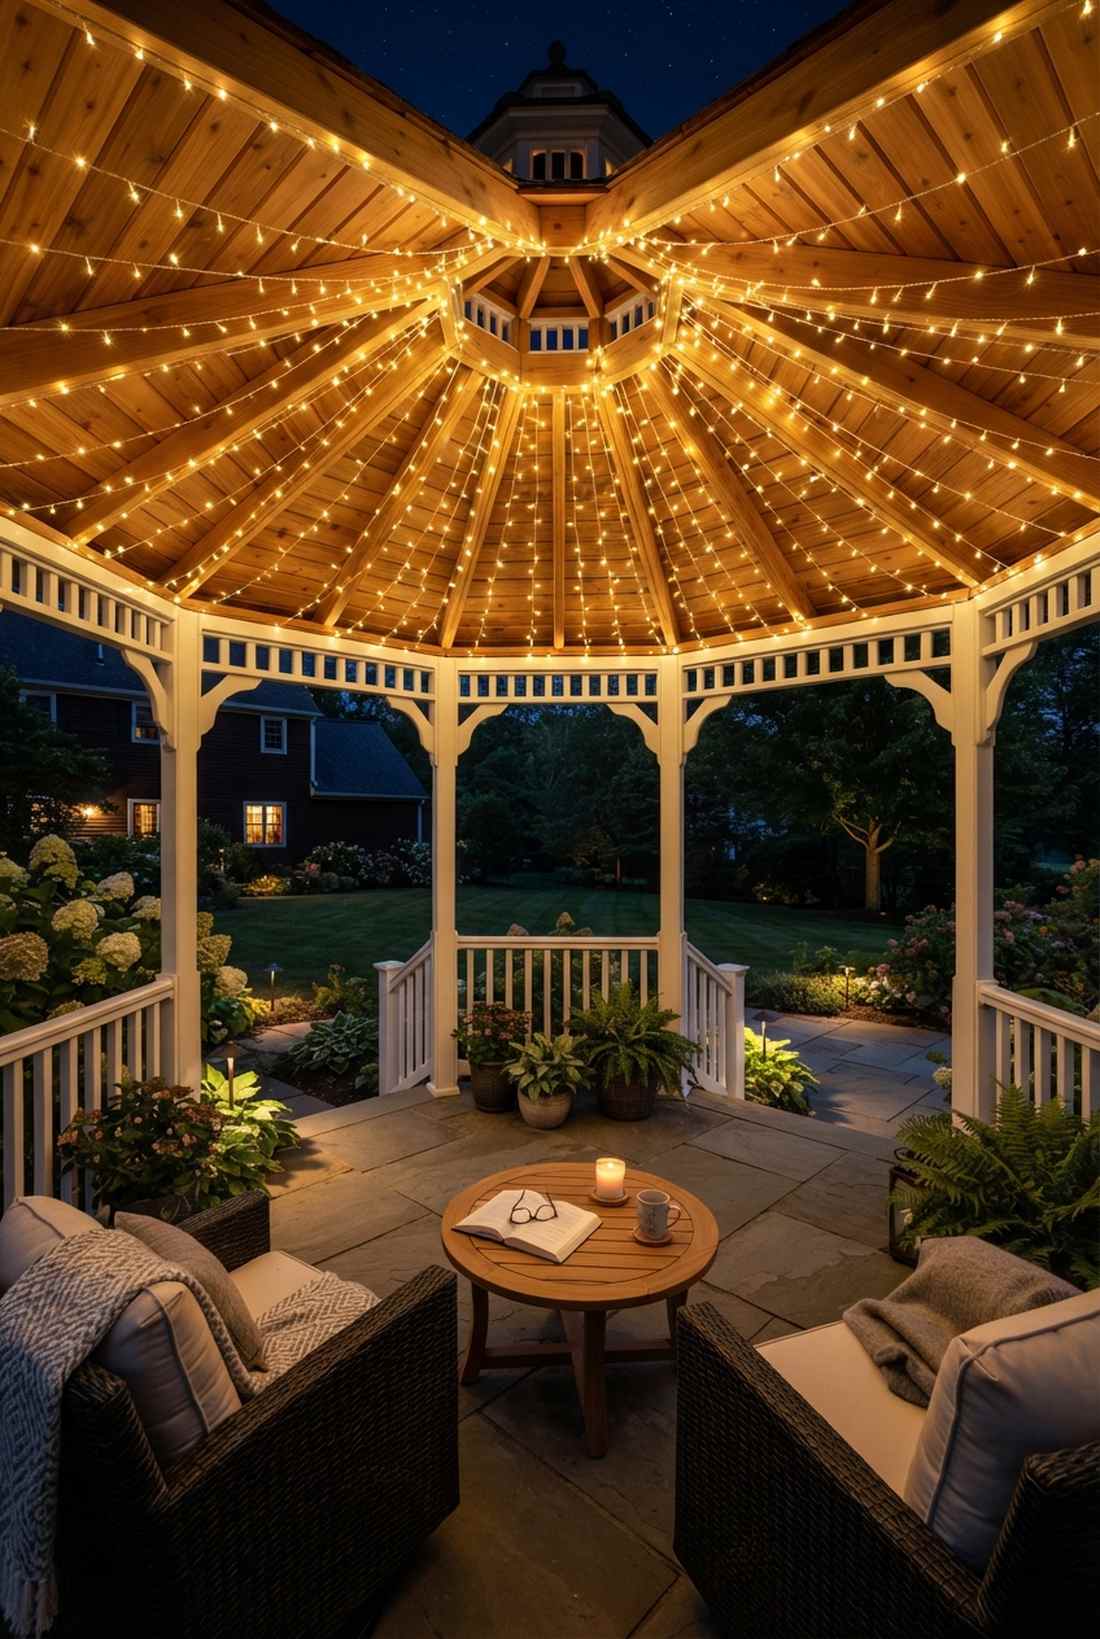
3. Radial Sunburst Pattern
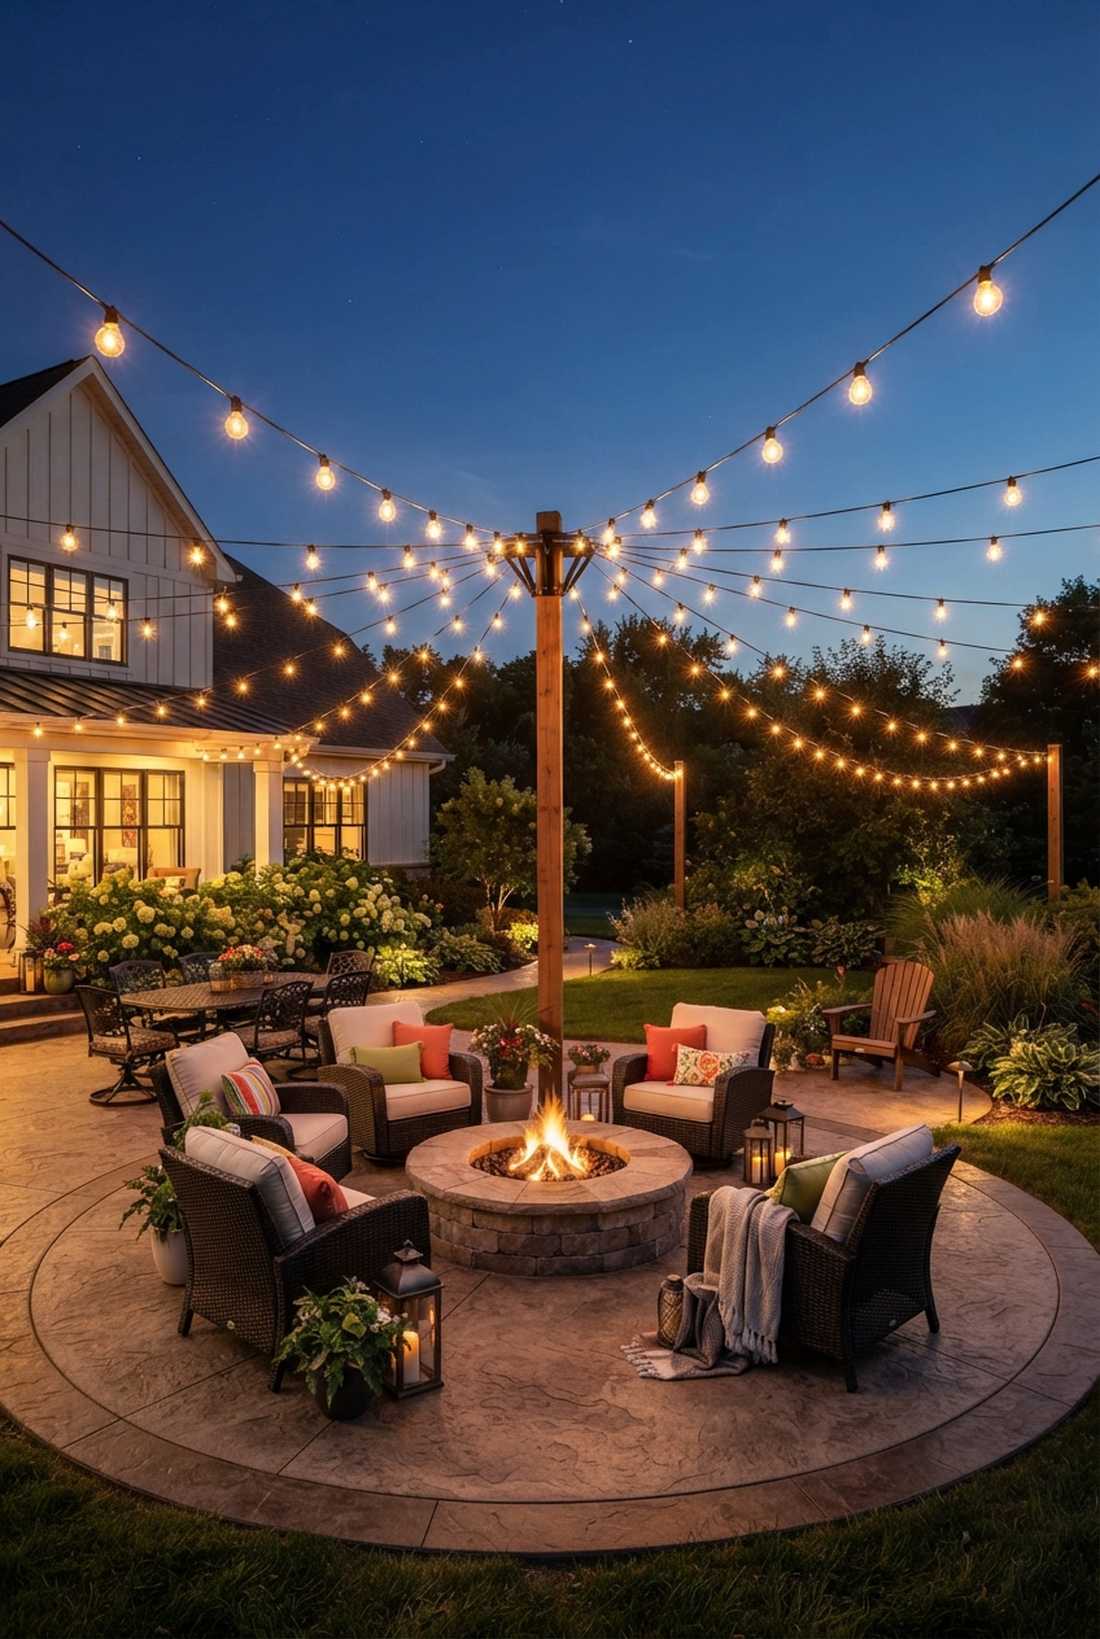
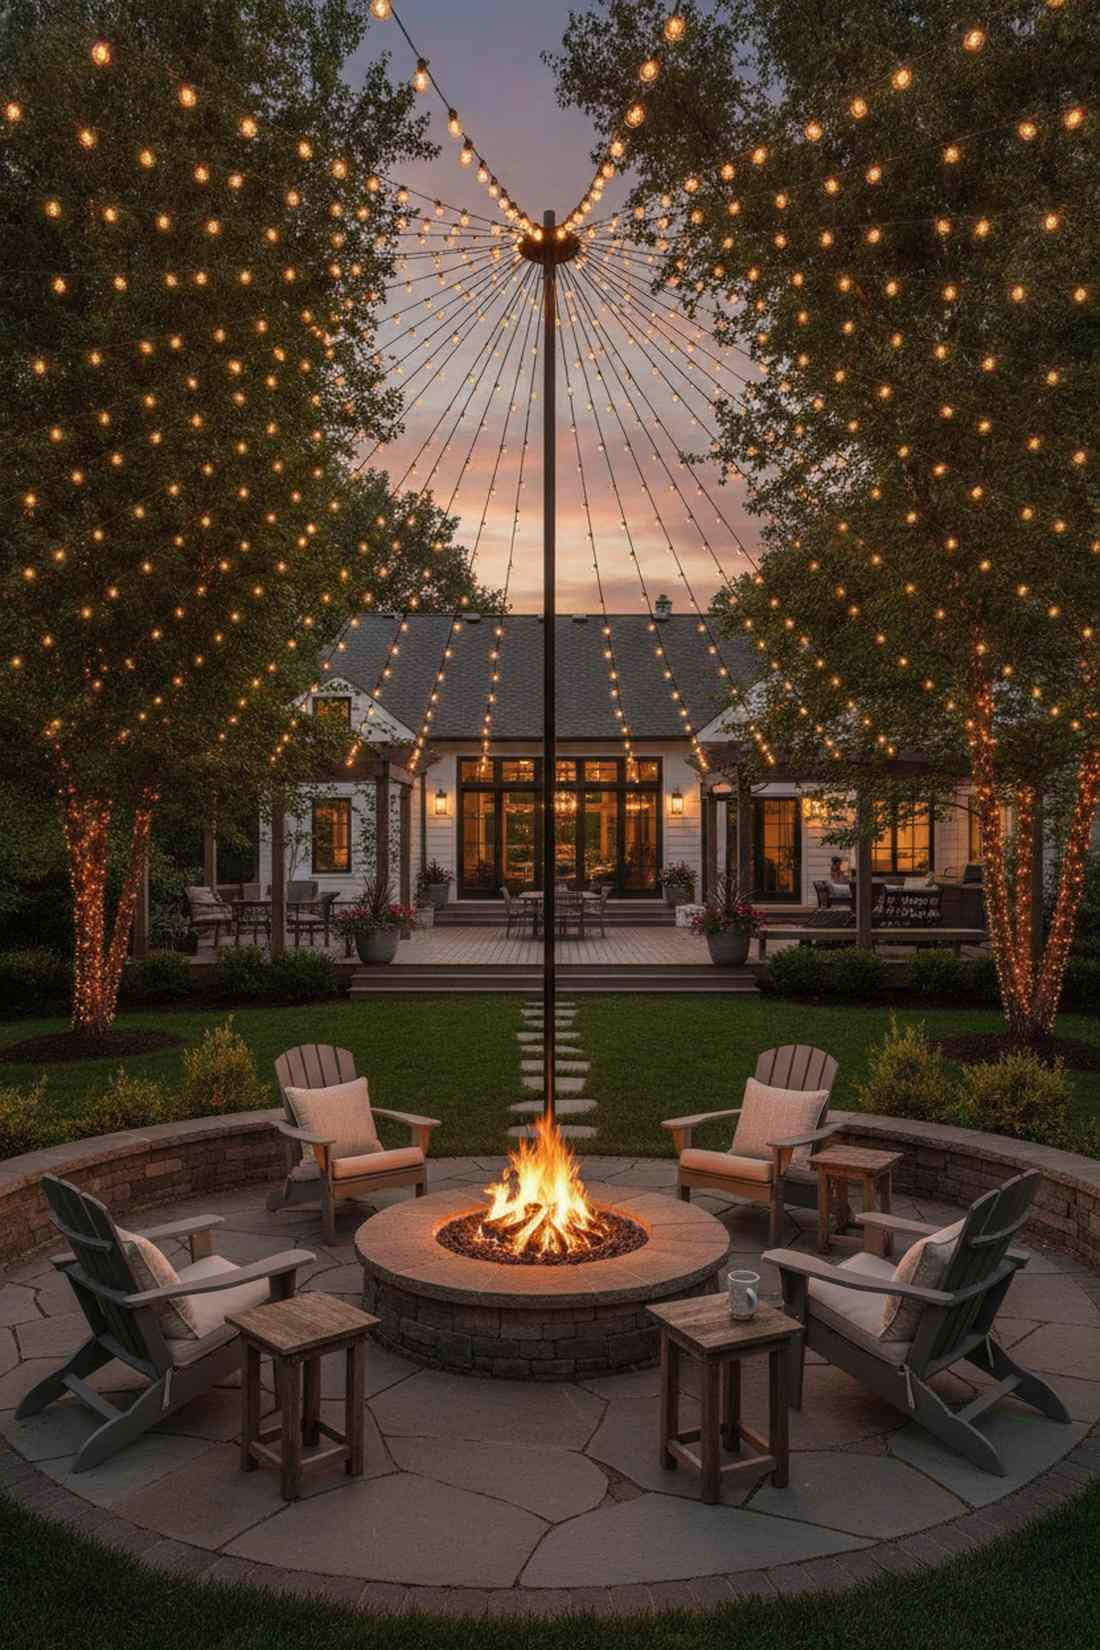
The striking sunburst overhead light display feels like you’re sitting beneath a glowing festival tent. This specific configuration is phenomenal for circular fire pit areas or freestanding circular patios.
Skeptics avoid center-point designs worrying about weight, but a solid central mast makes this gives a designer-level finish instantly. Leverage commercial canopy hardware to distribute the tension evenly across all radiating spokes.
Pulling together this dramatic look runs roughly $80–$130 for the specialized center hub. Pin this if you’re planning a central fire pit upgrade this fall.
- Key Materials: Central mounting bracket pole
- Vibe / Style: Festive event glamour
- Difficulty: Intermediate measuring required
- Budget Breakdown: Bracket/Pole: $40 | Lights: $75.
- Creator’s Tip: Ensure your central post is at least 10 feet tall to allow a dramatic, sweeping downward slope to the edges.
- Smart Sourcing: multi-point ring anchor plates and shatter-resistant G40 globe string sets.
4. Swag Draped Festoon Lighting
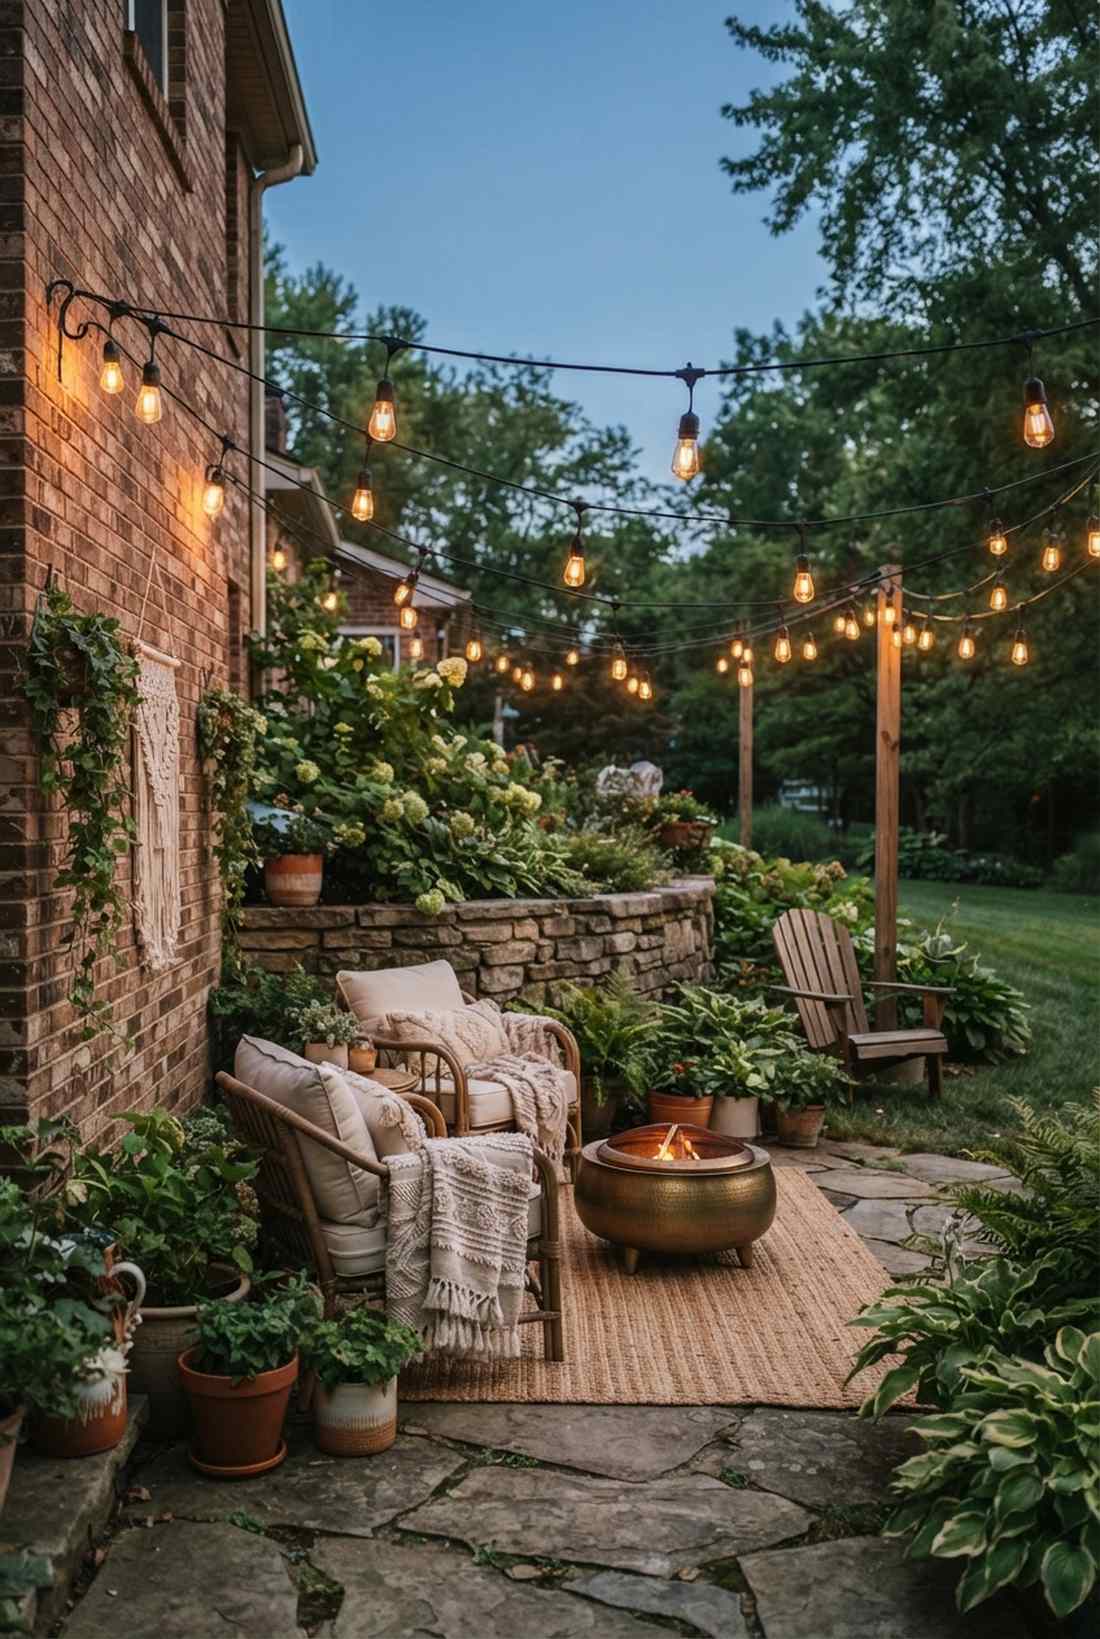
This scalloped garden festoon draping feels like a scene straight out of a romantic period romance movie. It remains a top choice for softening the rigid edges of hardscape retaining walls and brick facades.
While tight wires are trendy, intentional drooping delivers an elegant, relaxed aesthetic that most outdoor decorators miss. Use vintage-style filament bulbs to amplify that nostalgic warmth without spiking your energy bill.
You can achieve this whimsical ambiance for just $35–$60. Highly recommended for a quick weekend win if your space feels too stiff.
- Key Materials: Vintage Edison style strands
- Vibe / Style: Romantic bohemian retreat
- Difficulty: Extremely simple
- Budget Breakdown: Festoon Lights: $45 | Anchor Hooks: $10.
- Creator’s Tip: Allow exactly 8 inches of sag per 10 feet of line to get that perfect, intentional drape rather than a messy droop.
- Smart Sourcing: amber-tinted ST38 LED bulbs (shatterproof pack) and black vinyl-coated cup hooks.
Warning: This next layout is the exact geometric secret luxury resorts use to make outdoor lounges feel incredibly exclusive. Do not skip this!
5. Zigzag Dynamic Overhead Coverage
An aggressive geometric zigzag patio lighting pattern feels like stepping into a high-energy art district. It is undeniably perfect for awkward, asymmetrical backyards that lack clear boundary lines.
Most basic setups ignore space flow, but bouncing the light path back and forth dramatically increases the perceived size of your yard. Utilize UV-resistant heavy gauge wiring so the sharp angles hold tension flawlessly through winter storms.
This high-impact layout typically costs around $60–$110 depending on the anchor count. Save this to your modern landscaping Pinterest board right now!
- Key Materials: Carabiners and eye-lags
- Vibe / Style: Edgy contemporary lounge
- Difficulty: Requires sturdy anchor points
- Budget Breakdown: Commercial Wire: $65 | Hardware: $25.
- Creator’s Tip: Map the zigzag out on the ground with chalk first to ensure the angles look proportional before drilling any holes.
- Smart Sourcing: heavy-duty locking carabiners (stainless multipack) and thick-gauge commercial string kits.
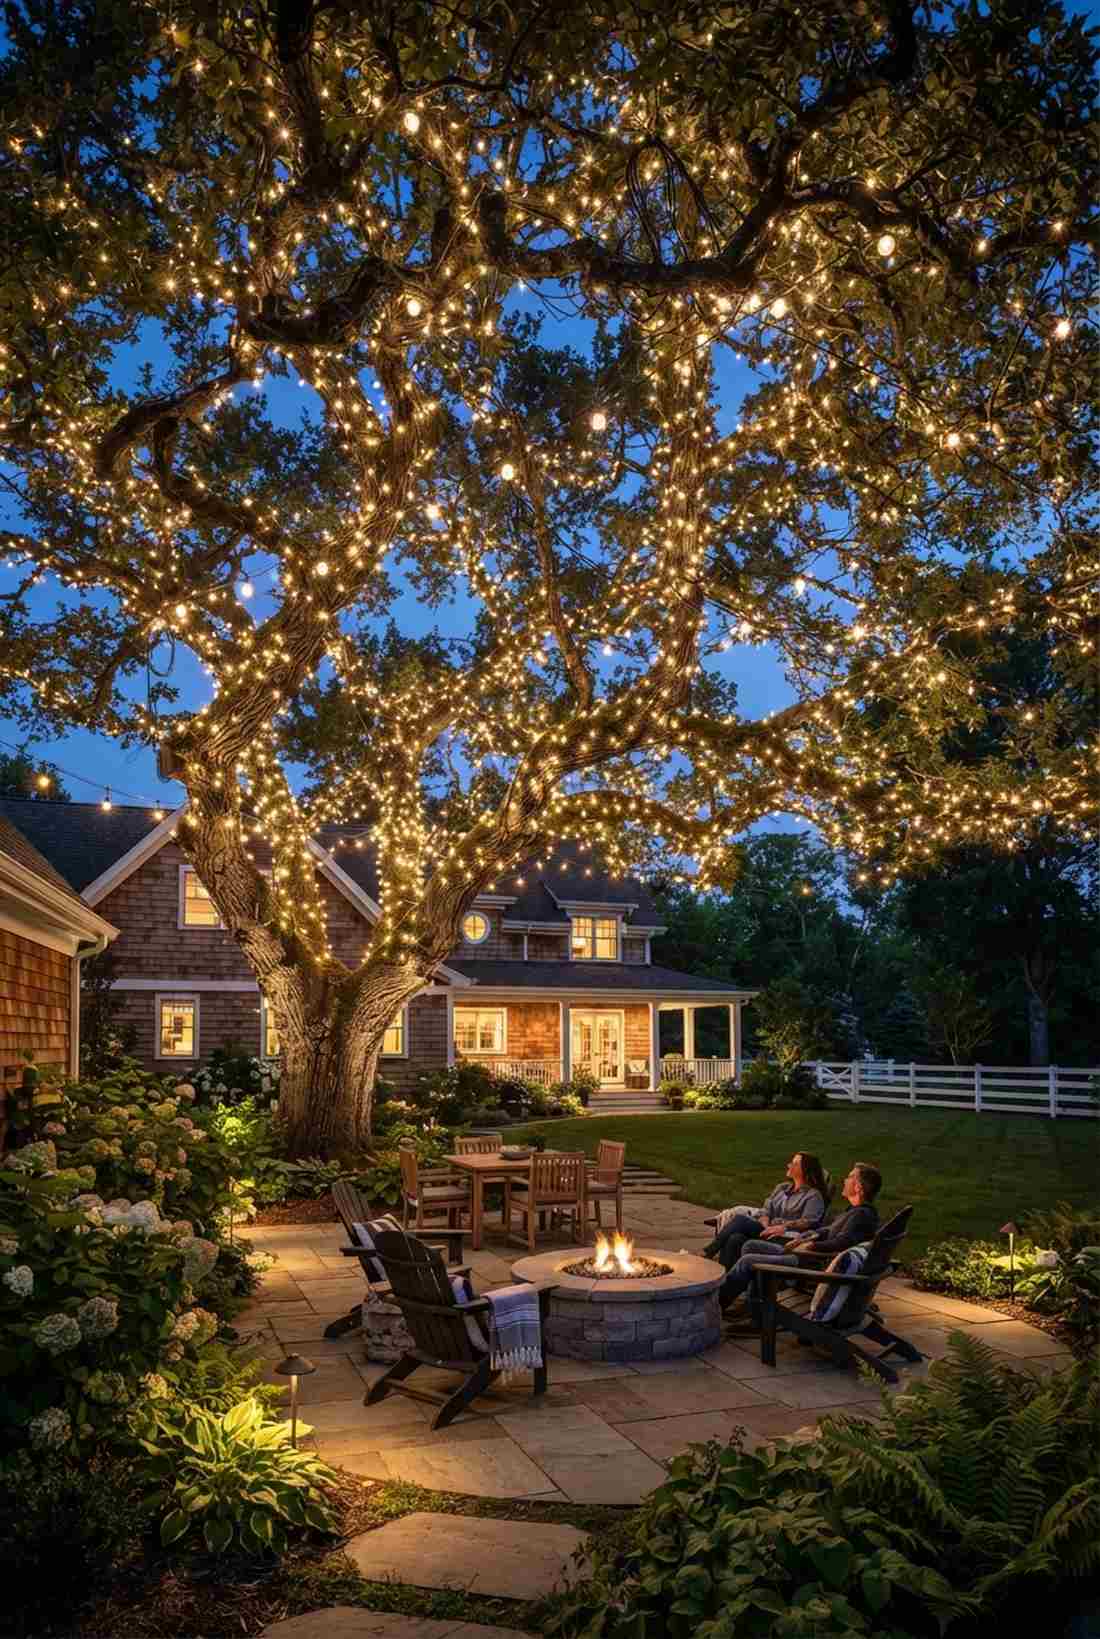
6. Hub and Spoke Central Focus
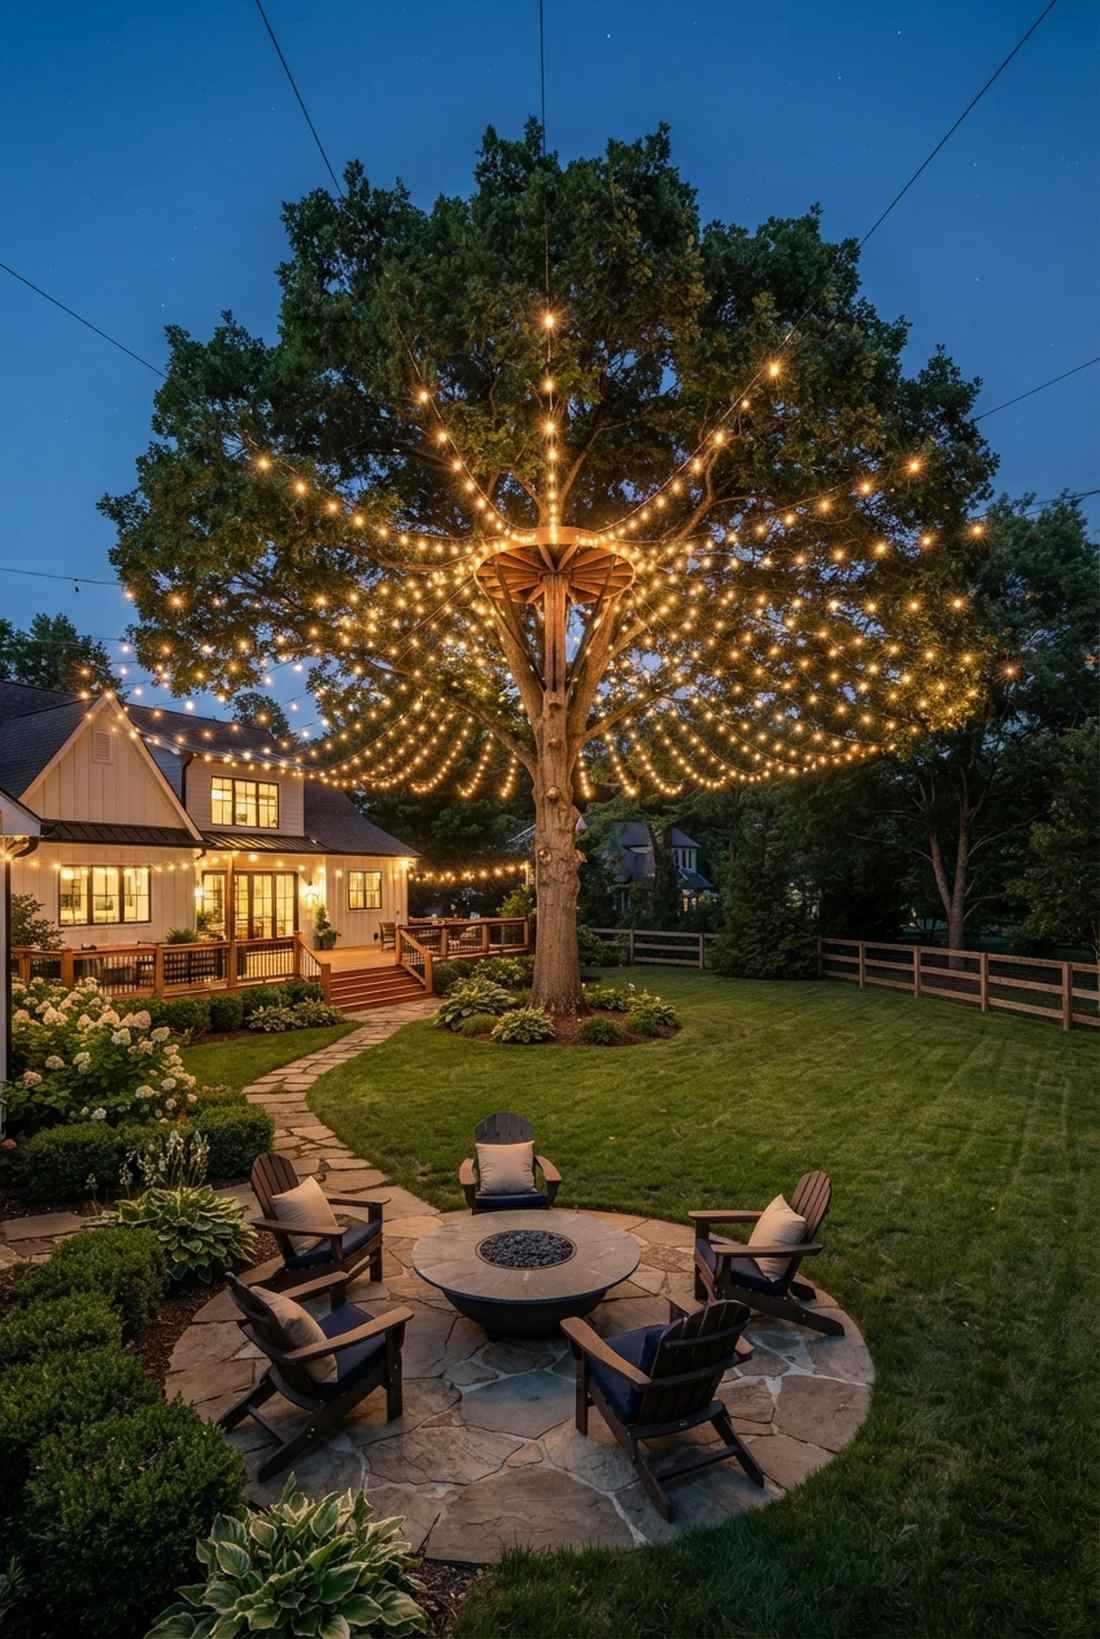
This immersive circular tree-canopy lighting feels like a magical pavilion materializing in the middle of your lawn. It’s an ideal setup for highlighting a massive, solitary oak tree or a custom-built central gazebo.
Rather than randomly hanging strands, anchoring everything to one powerful central axis totally transforms basic yards into structured destinations. Implementing high-grade miniature garden supplies and weatherproof straps ensures tree bark remains undamaged.
Expect a material cost of $70–$120 for tree-safe mounting gear and extensive strand lengths. A spectacular choice for massive, open properties.
- Key Materials: Tree-safe mounting straps
- Vibe / Style: Enchanted focal point
- Difficulty: Requires a tall ladder
- Budget Breakdown: Straps/Hub: $35 | Light Strands: $80.
- Creator’s Tip: Never screw directly into a live tree for a central hub; always use heavy-duty ratcheting straps designed for outdoor gear.
- Smart Sourcing: heavy-duty tree mounting straps (UV-coated) and shatter-resistant outdoor globes.
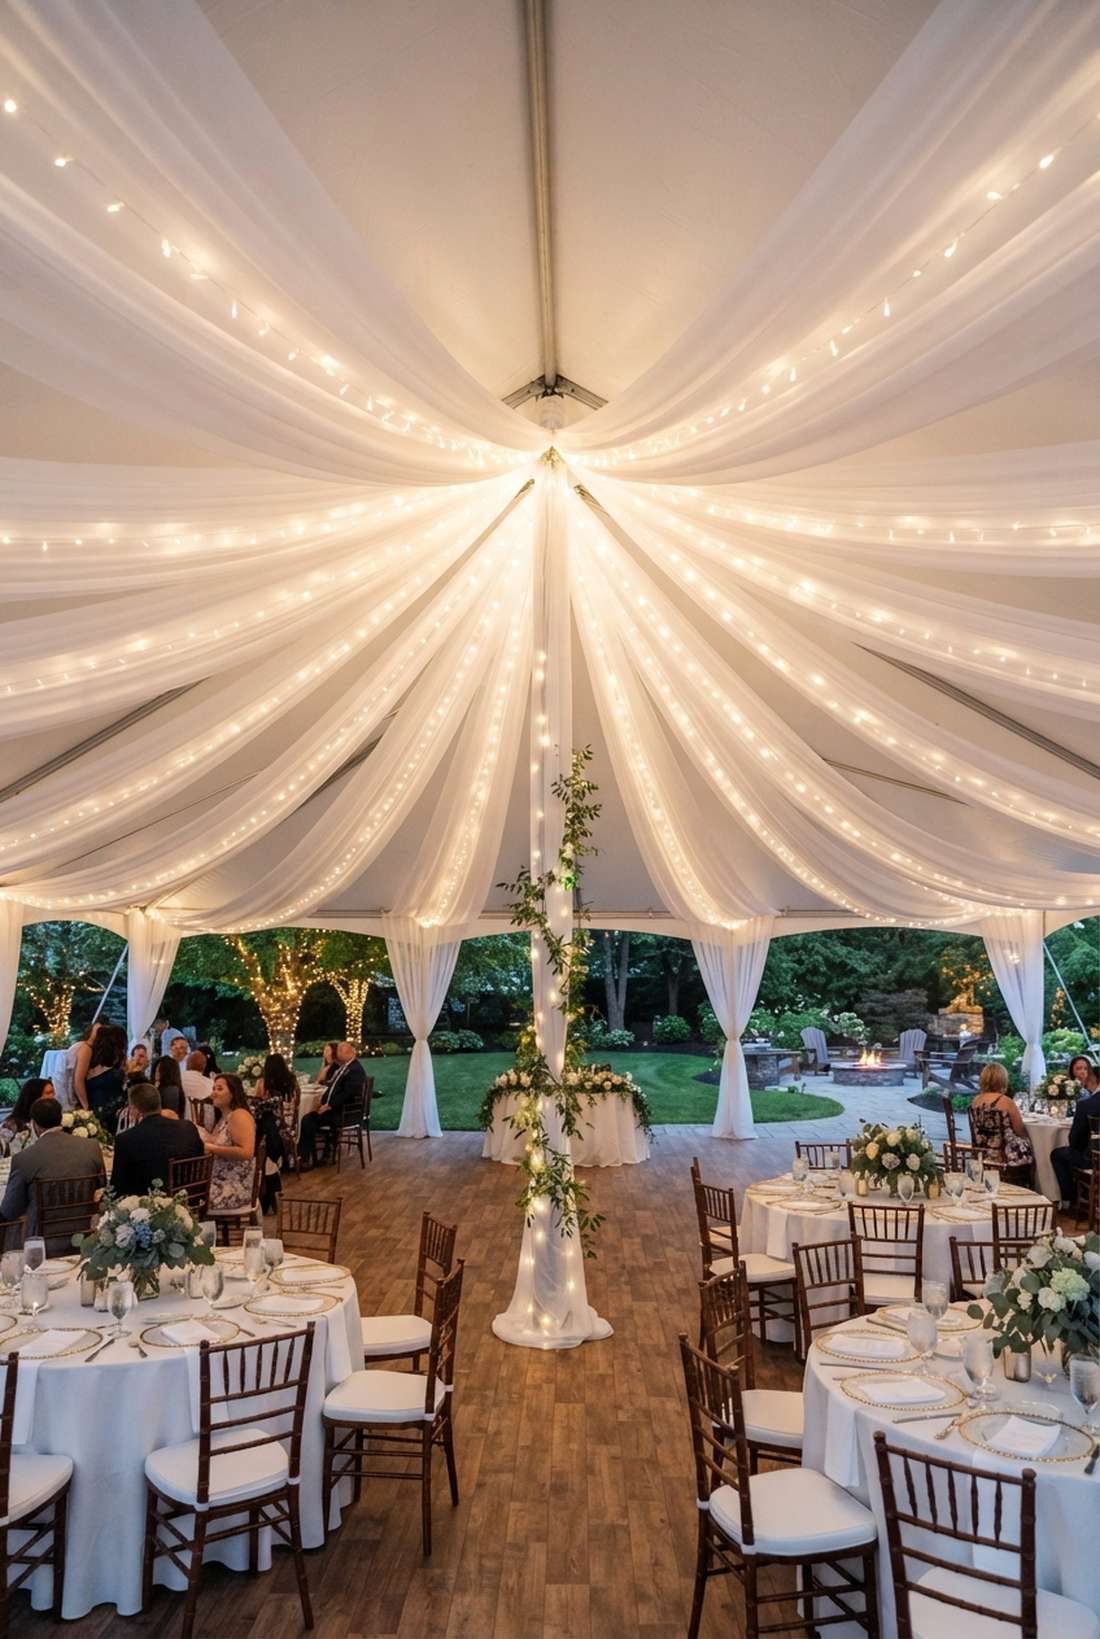
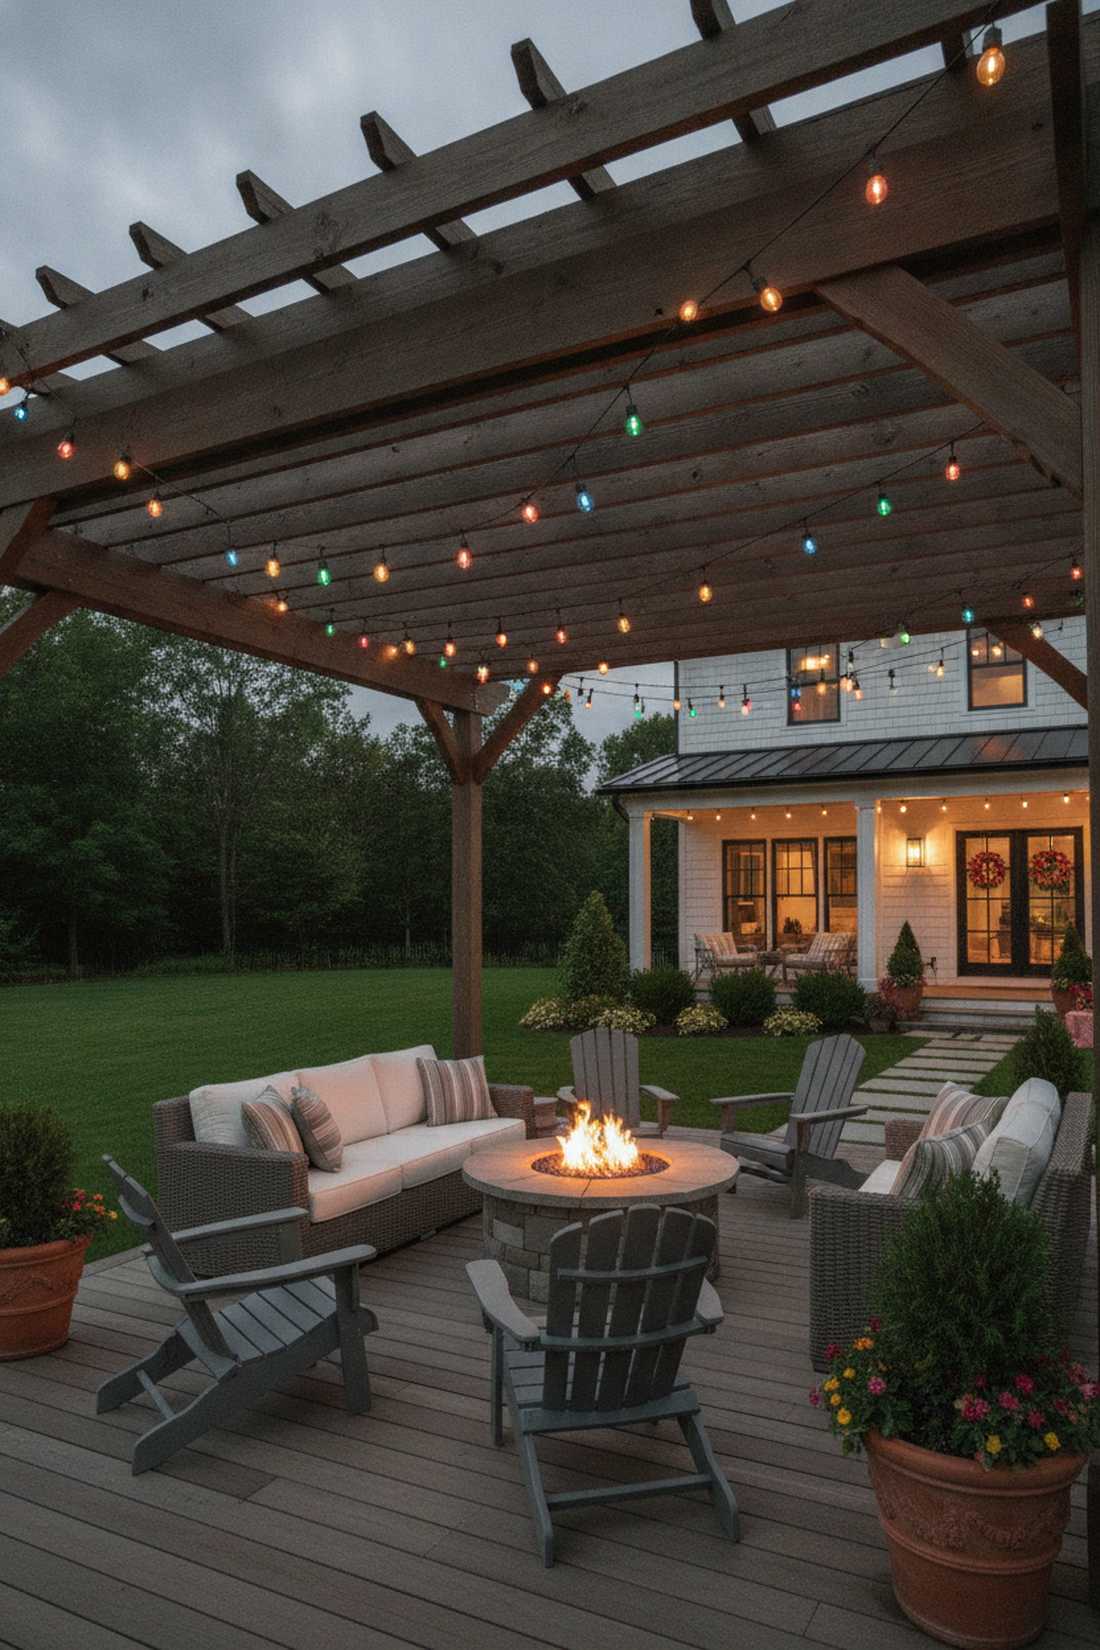
7. Layered Double-Height Canopy
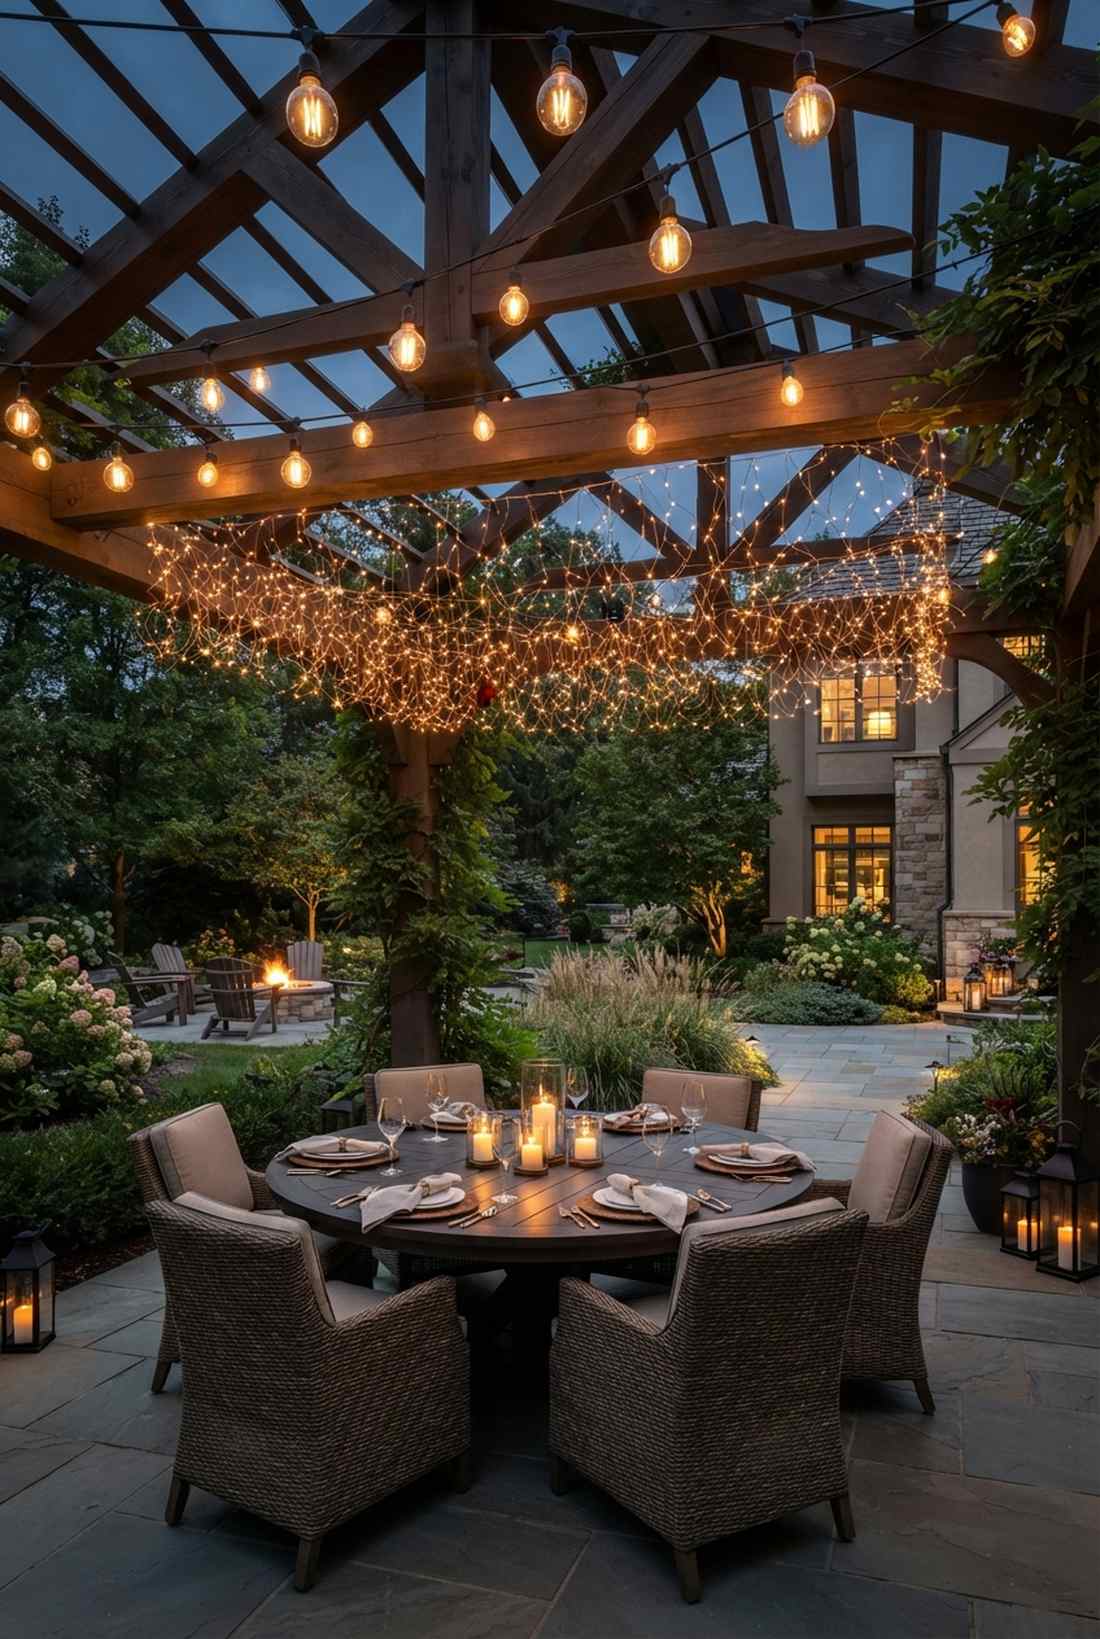
Creating a dual-tier illuminated ceiling feels like dining under a massive, floating crystal chandelier. This approach is absolutely stunning for ultra-tall pergolas or expansive enclosed courtyards.
Amateurs stick to a single flat plane, but layering different heights creates an incredibly rich visual depth that commands attention. Mix globe sizes—large on top, micro-LEDs underneath—to create a textured, premium aesthetic.
This multi-dimensional project runs roughly $120–$180. Save this if you want to impress guests with a professional-grade atmosphere.
- Key Materials: Mixed-size LED strands
- Vibe / Style: Opulent courtyard dining
- Difficulty: Advanced planning needed
- Budget Breakdown: Large Bulbs: $90 | Fairy Lights: $45.
- Creator’s Tip: Keep exactly a 2-foot vertical drop between the upper and lower layers to prevent the strands from tangling in high winds.
- Smart Sourcing: oversized G40 commercial sets and heavy-duty outdoor copper fairy strings.
Architectural Accent Lighting with Outdoor String Globes
Strategic placement along beams, rafters, and columns highlights structural features while providing functional illumination. Designers integrate strands into the architecture to enhance rather than obscure building elements.
8. Pergola Beam Tracing
This sleek wooden pergola beam lighting feels like a high-end architectural showcase in a modern design magazine. It is the perfect subtle integration for freshly stained cedar or redwood outdoor structures.
Draping lights loosely looks messy, whereas running them perfectly flush against the wood framing gives a bespoke, built-in appearance. Utilize UV-resistant cable clips to pin the wiring tight, making the black cord disappear against dark timber.
You can execute this flush-mount upgrade for an easy $30–$55. It’s a precise finish that elevates the whole backyard.
- Key Materials: Screw-in cable clips
- Vibe / Style: Clean architectural lines
- Difficulty: Simple but tedious
- Budget Breakdown: Lights: $40 | Hardware Clips: $12.
- Creator’s Tip: Mount the strand on the *inside* upper lip of the beam so the bulbs are visible but the ugly wiring is hidden from below.
- Smart Sourcing: black UV-coated cable mounting clips (bulk pack) and flat-wire bistro light sets.
9. Gazebo Rafter Draping
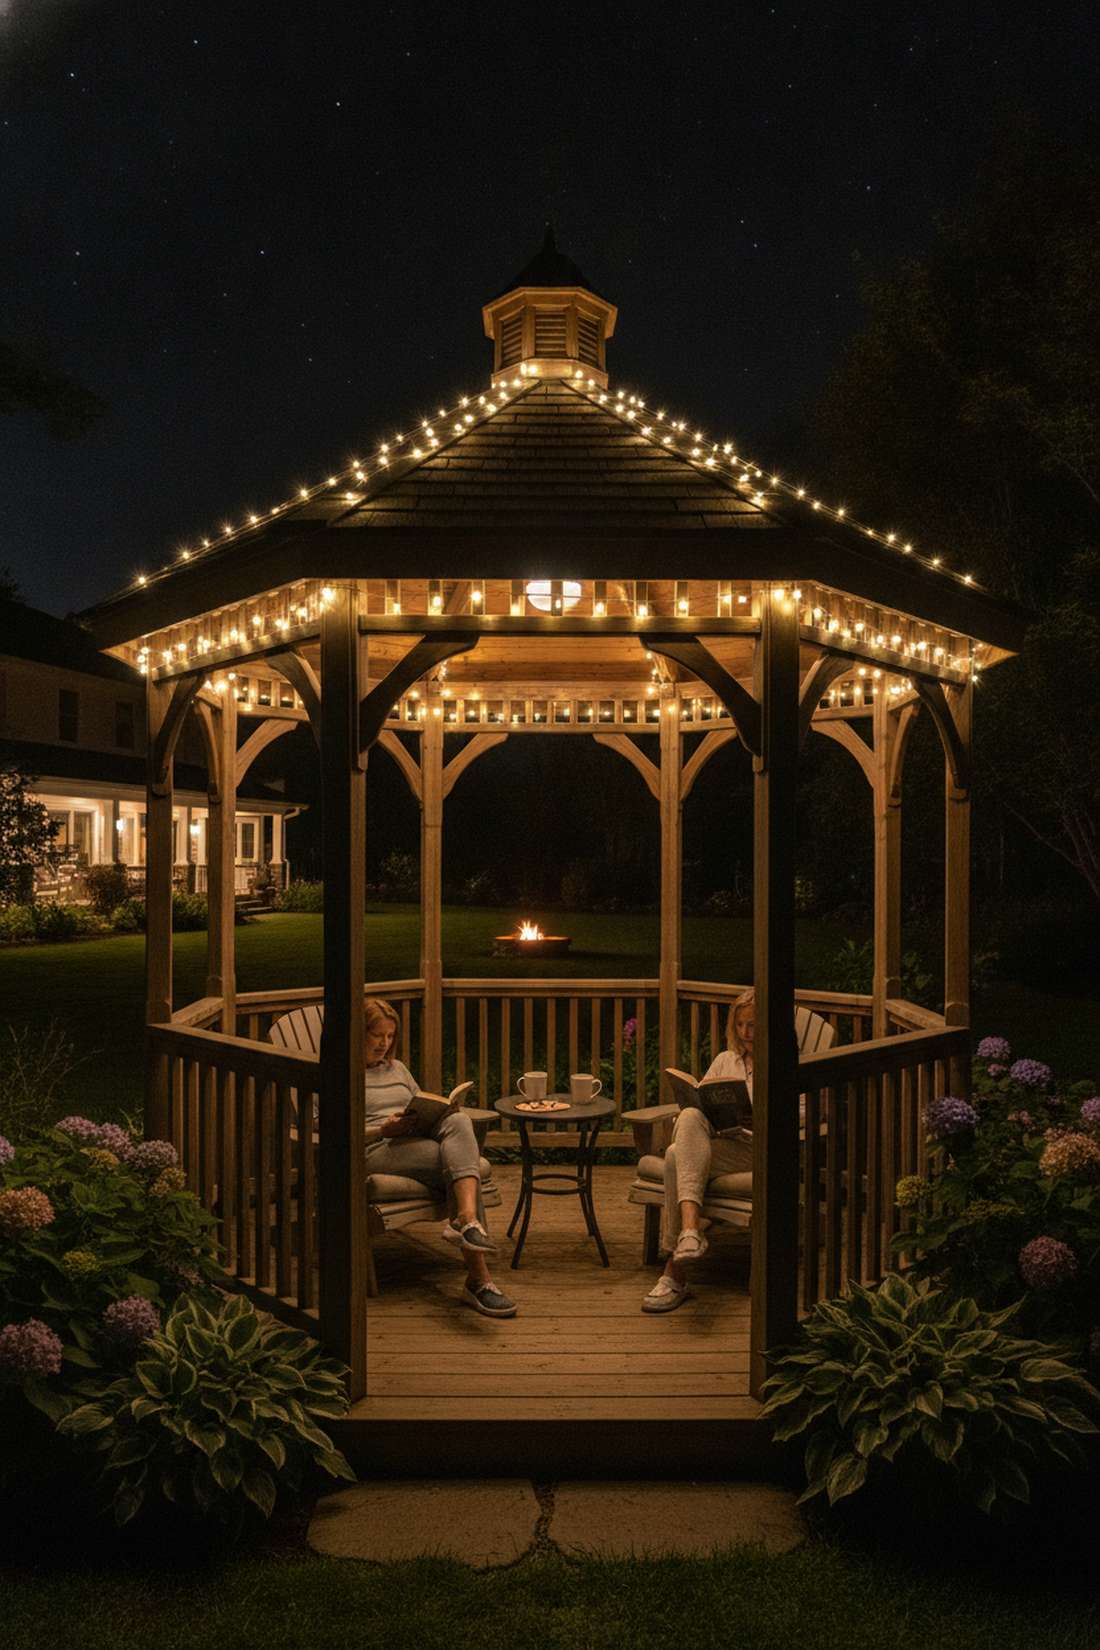
The radiant illuminated gazebo roof lining feels like walking into a cozy, glowing jewel box at midnight. Works beautifully for hexagonal or octagonal garden structures that need a nighttime identity.
People usually just wrap the outside railings, but illuminating the interior roof peaks draws the eye upward, making the space feel twice as tall. This trick visually expands small gazebos while providing excellent task lighting for late-night reading.
Pulling off this interior glow costs about $45–$75. Pin this idea for your next spring garden remodel!
- Key Materials: Clear wire micro-globes
- Vibe / Style: Intimate jewel box
- Difficulty: Beginner with a ladder
- Budget Breakdown: Clear Wire LEDs: $50 | Staple Gun/Clips: $15.
- Creator’s Tip: Start from the top center cupola and work your way down the rafters to ensure the plug ends up exactly at the bottom base.
- Smart Sourcing: clear-wire shatterproof globe sets and outdoor-rated adhesive hook packs.
💡 Must-Have Supplies for High-End Setups
To build these setups faster and ensure they last, skip the generic craft aisles and invest in the right foundational kits.
- Base & Support: Heavy-duty vinyl-coated stainless steel guide wire kits
- Setup Tools: Outdoor-rated tension turnbuckles and carabiner multipacks
- Weather/Durability Protection: IP65 commercial-grade silicone socket sealants
10. Porch Column Wrapping
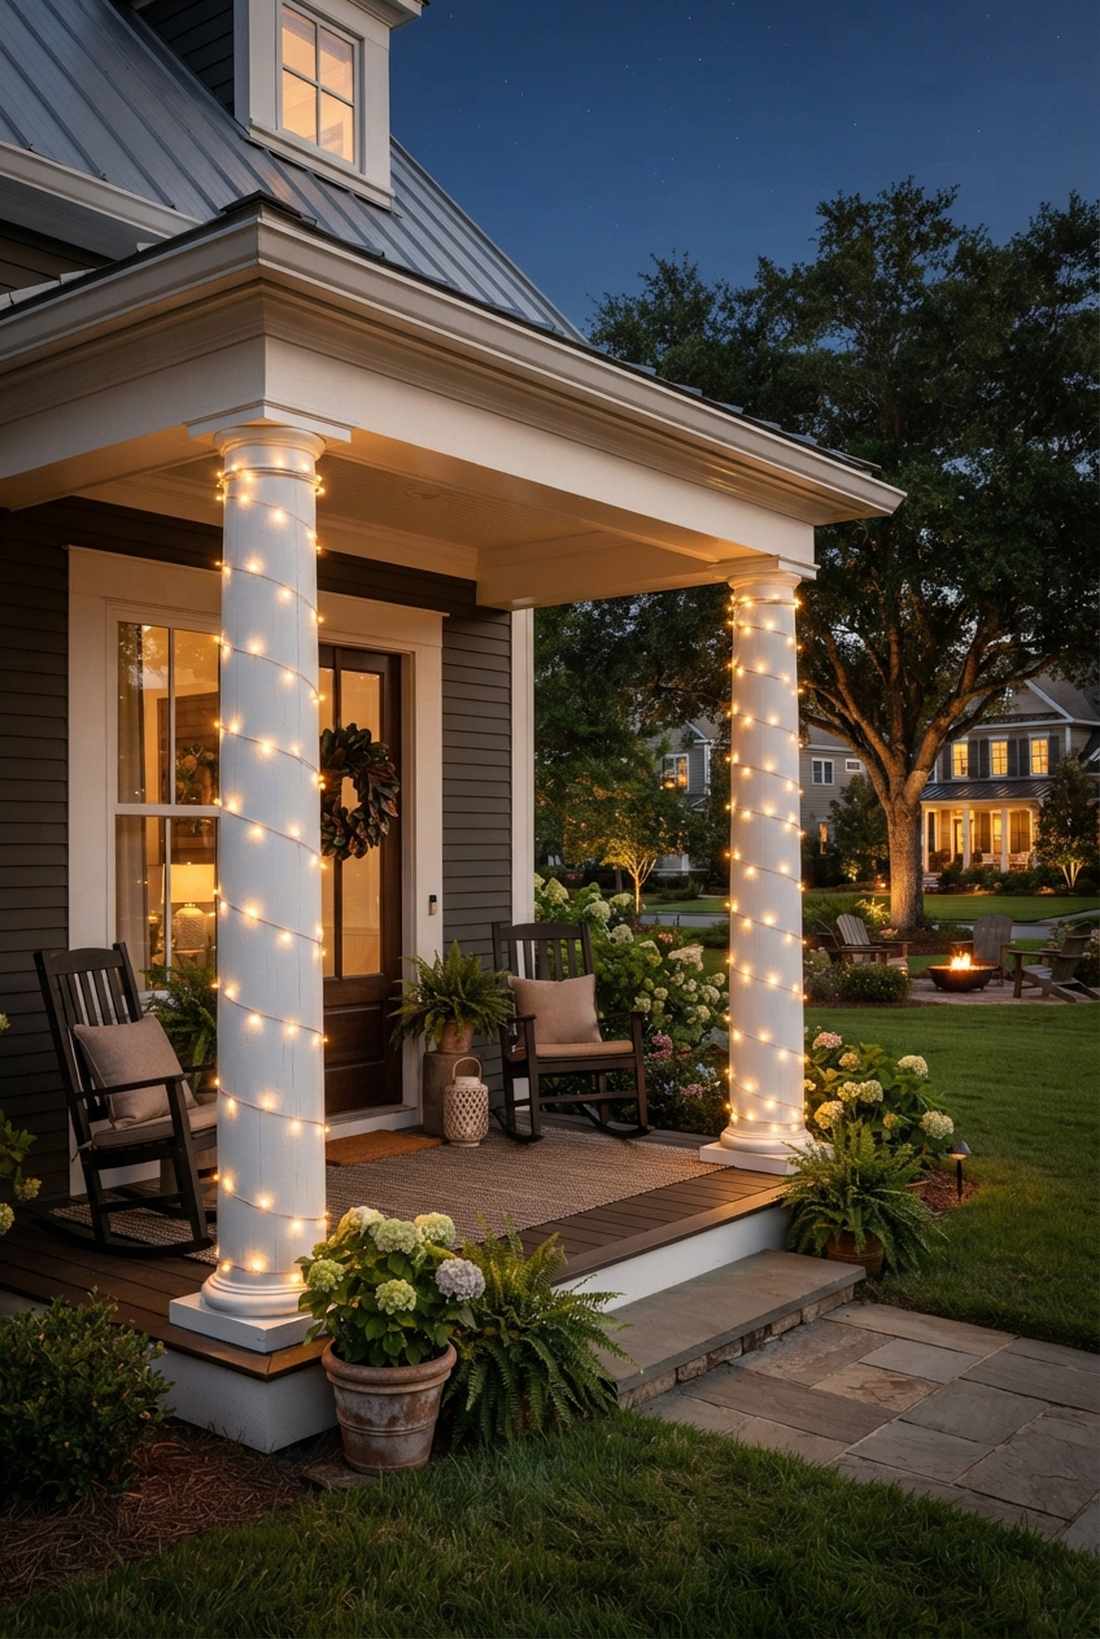
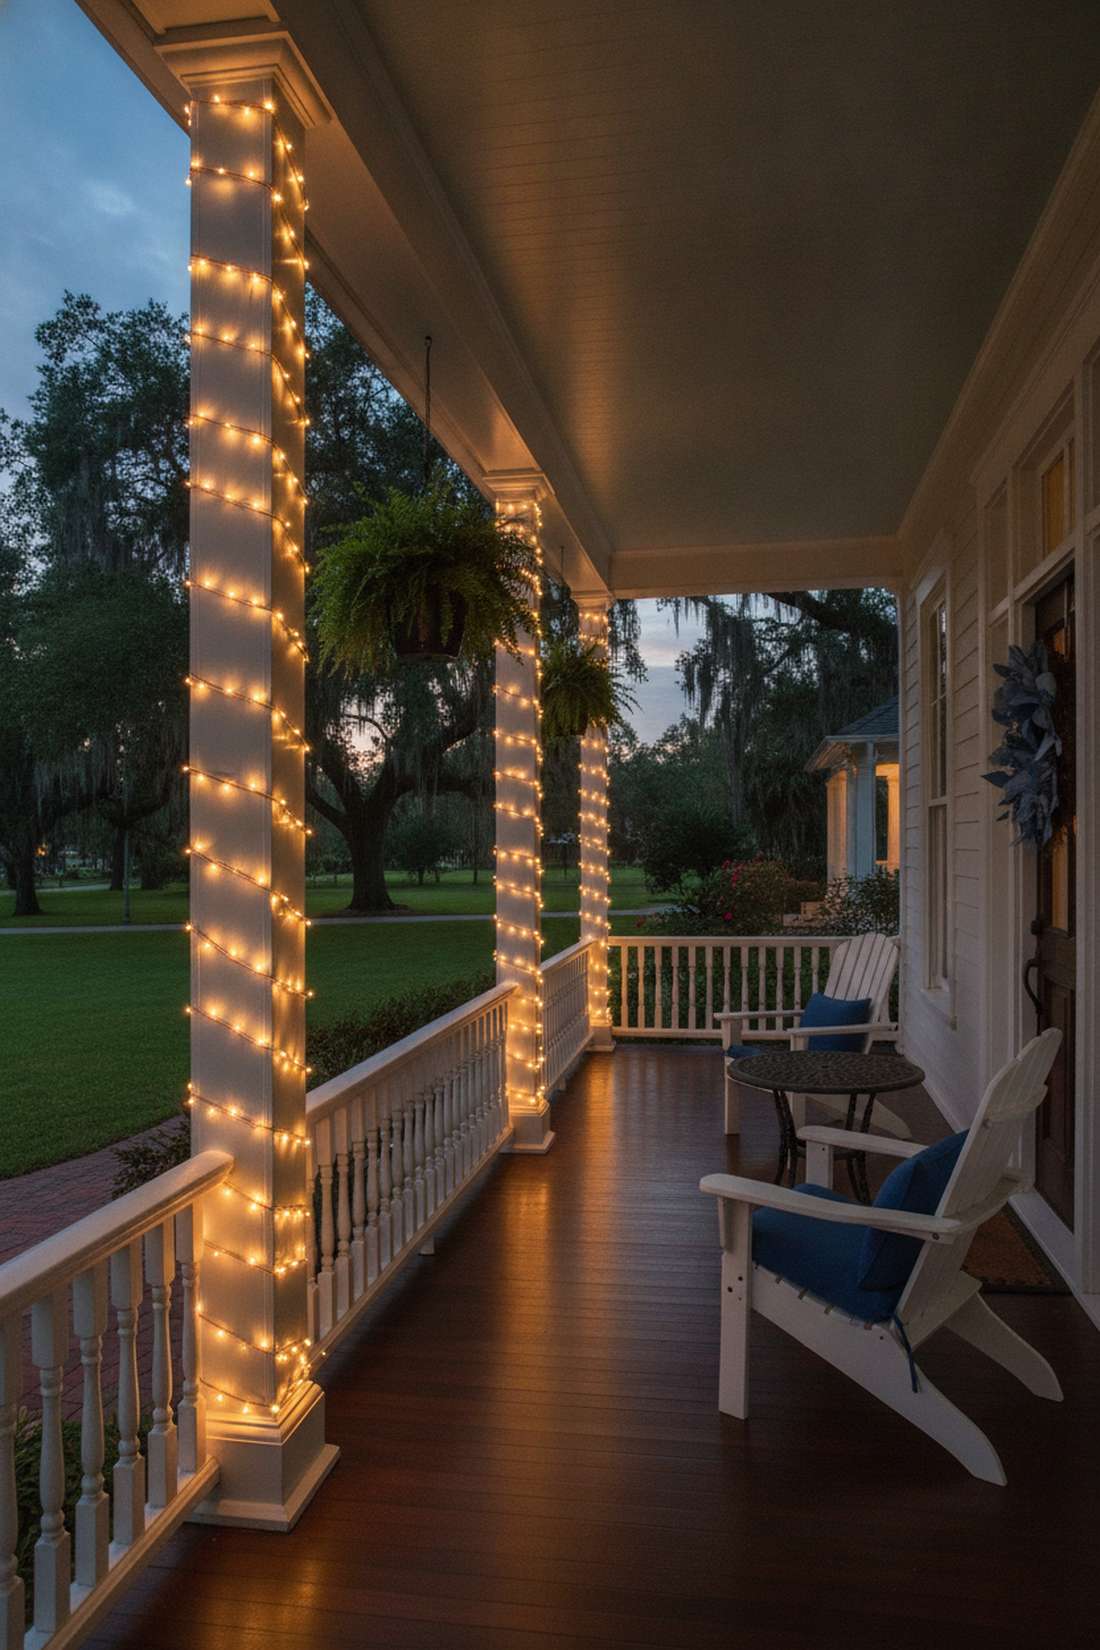
A tightly wound vertical column fairy wrap feels like stepping onto the porch of a magical southern plantation home. This is incredibly effective for thick brick pillars or classic white wooden front porch posts.
Sloppy, loose wrapping looks cheap, but maintaining a precise 3-inch gap between each rotation delivers a stunningly premium, uniform spiral. Opt for high-density fairy garden kits with copper wiring that blends seamlessly against wood or masonry.
You can upgrade your entryway for as little as $25–$45 per column. Pin this to easily boost your curb appeal tonight.
- Key Materials: Extra-long copper wire LEDs
- Vibe / Style: Classic welcoming charm
- Difficulty: Very easy
- Budget Breakdown: Copper LEDs: $30 | Clear Tape/Hooks: $5.
- Creator’s Tip: Use a tiny dab of hot glue on the backside of the column every third wrap to stop the wire from sliding down the slick surface over time.
- Smart Sourcing: 100ft waterproof copper wire lights (starter kits) and transparent heavy-duty outdoor tape.
If you think fences are just for privacy, wait until you see how this next lighting trick turns them into the best feature of your yard.
11. Fence Top Rail Mounting
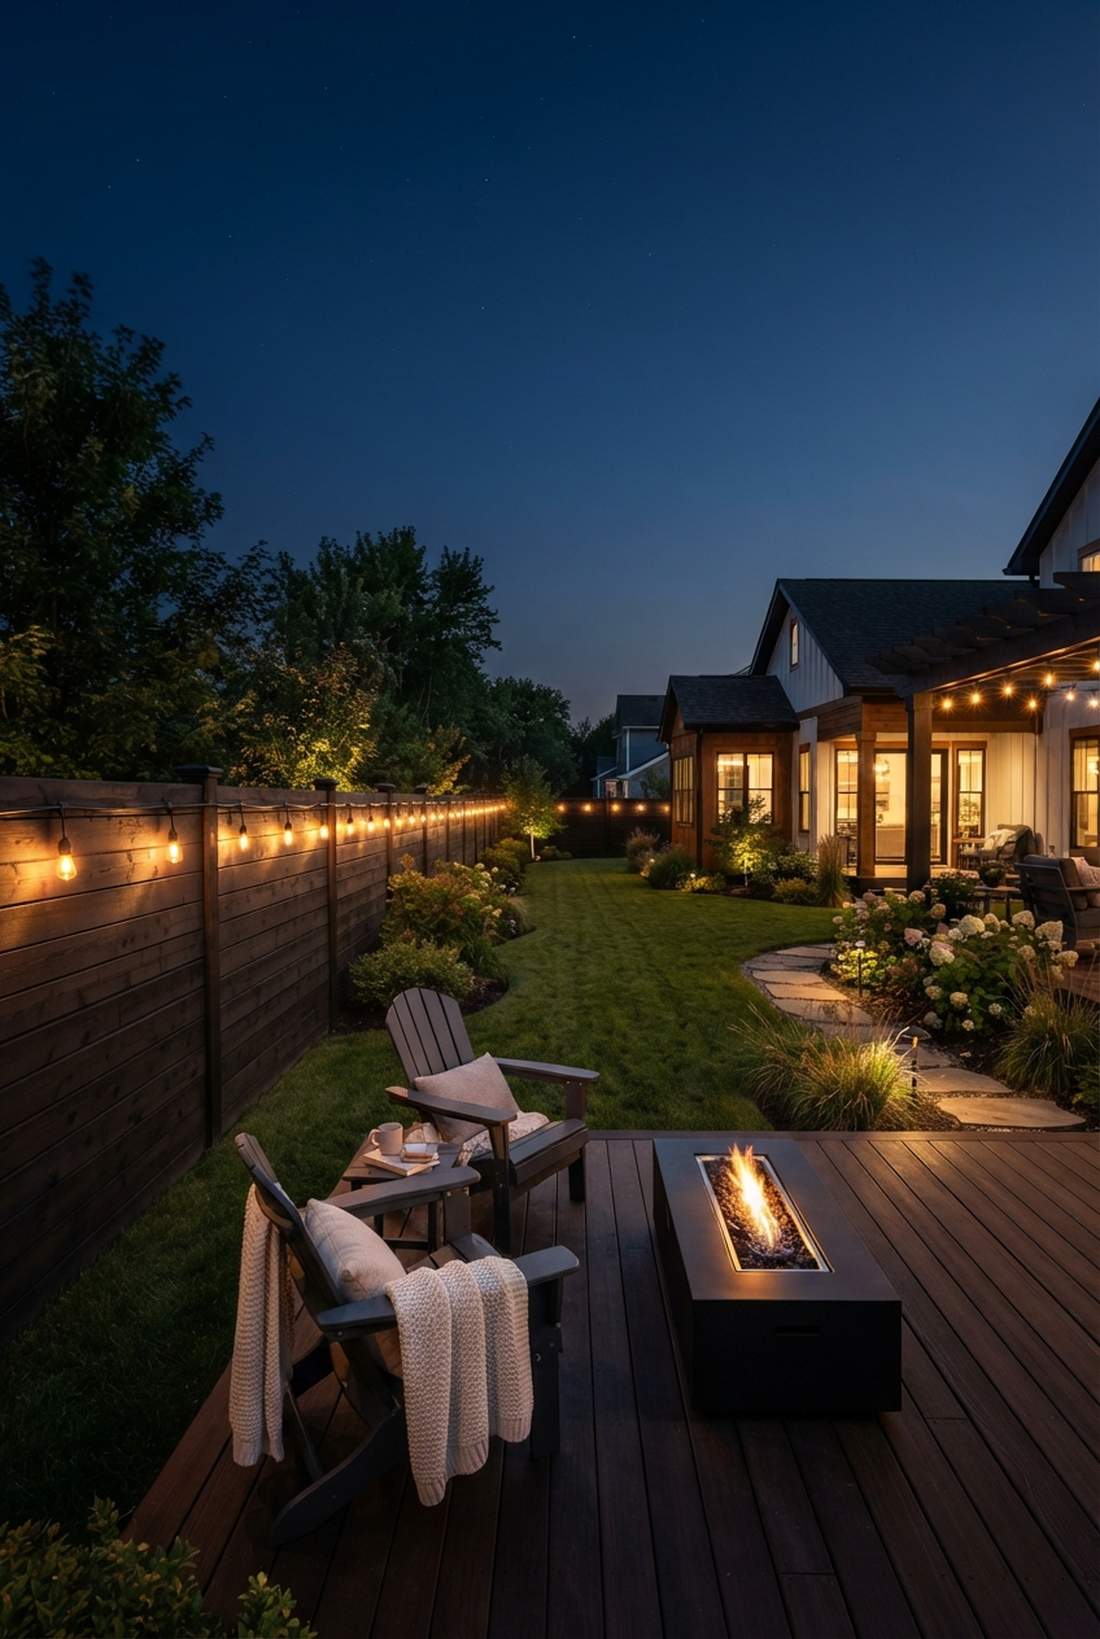
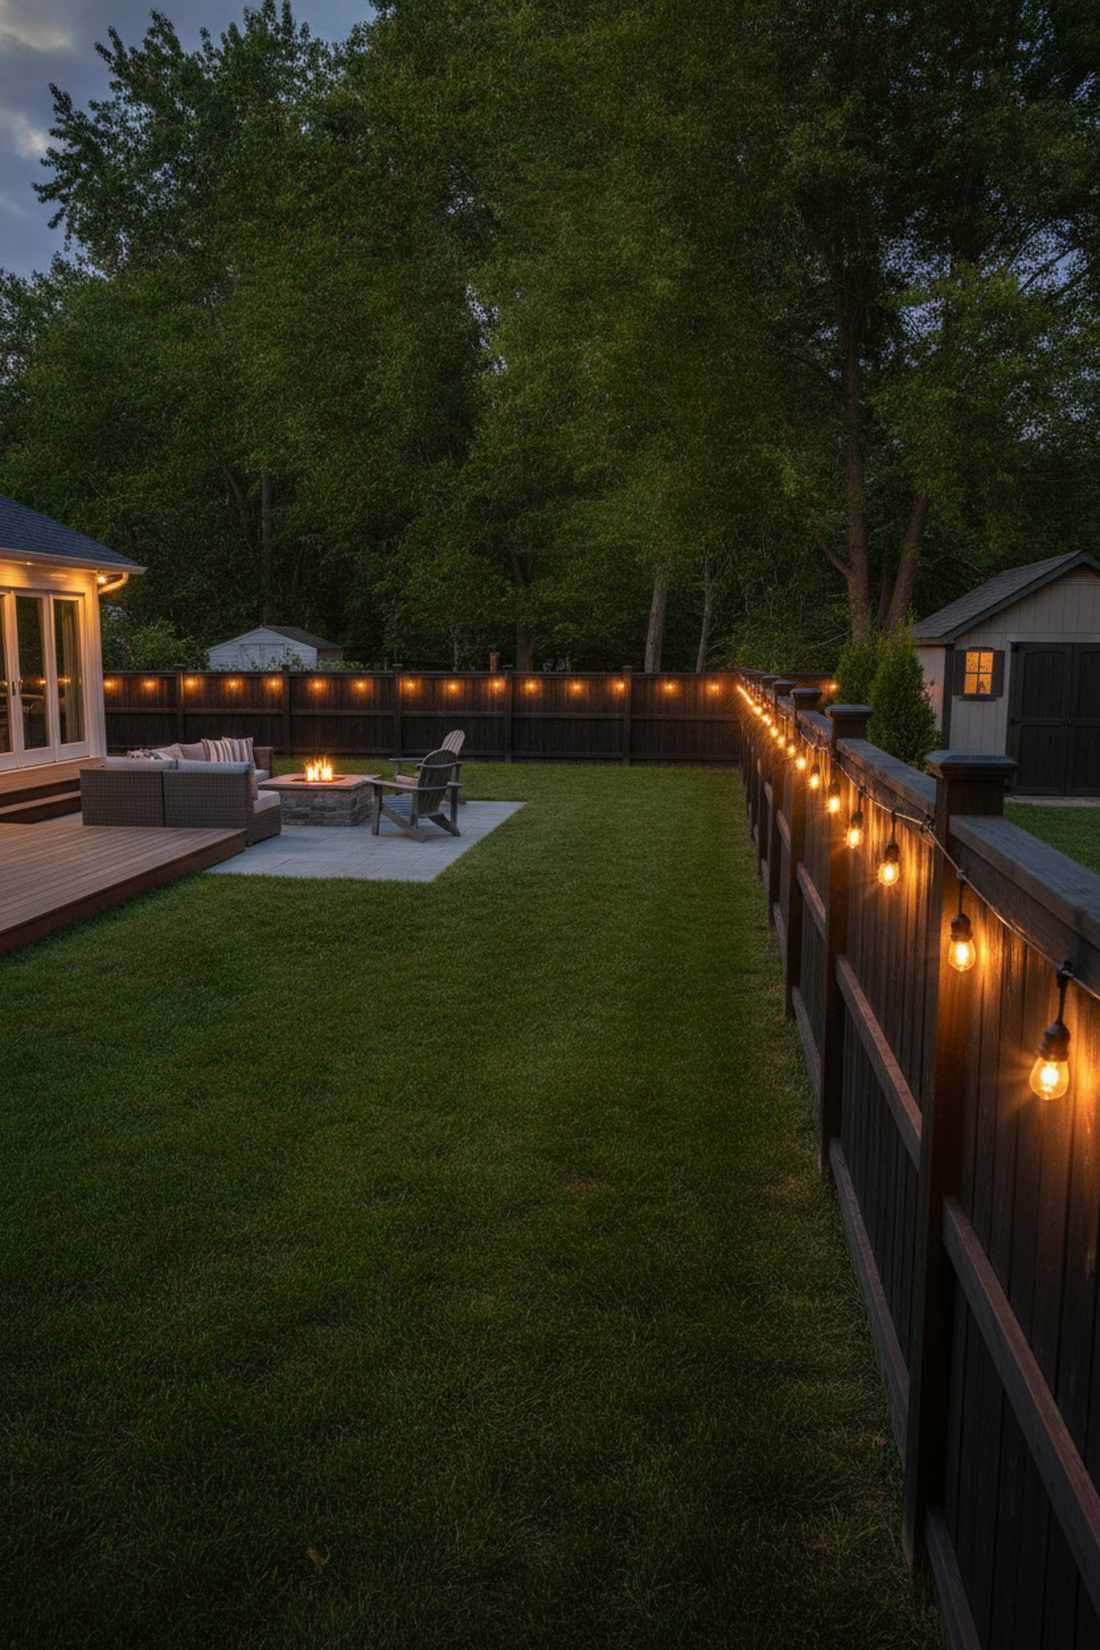
This linear illuminated privacy fence border feels like a sleek security perimeter wrapped in luxury ambiance. It perfectly solves the problem of pitch-black property lines in deep suburban backyards.
Instead of leaving the edges of your yard dead and dark, tracing the top rail visually pushes the boundaries of your property outward, making the lot feel massive. Make sure to use thick, commercial-grade black wiring that vanishes against the dark night sky.
Depending on fence length, expect to spend around $70–$150. A brilliant solution for deep, narrow suburban lots.
- Key Materials: Low-voltage LED stringers
- Vibe / Style: Expansive modern border
- Difficulty: Lots of walking, easy mounting
- Budget Breakdown: 100ft String Set: $85 | Rail Mounts: $25.
- Creator’s Tip: Mount the lights on the side of the top rail facing the yard, rather than directly on top, to prevent birds from perching and breaking the bulbs.
- Smart Sourcing: commercial-grade 100ft Edison strands and heavy-duty fence rail mounting brackets.
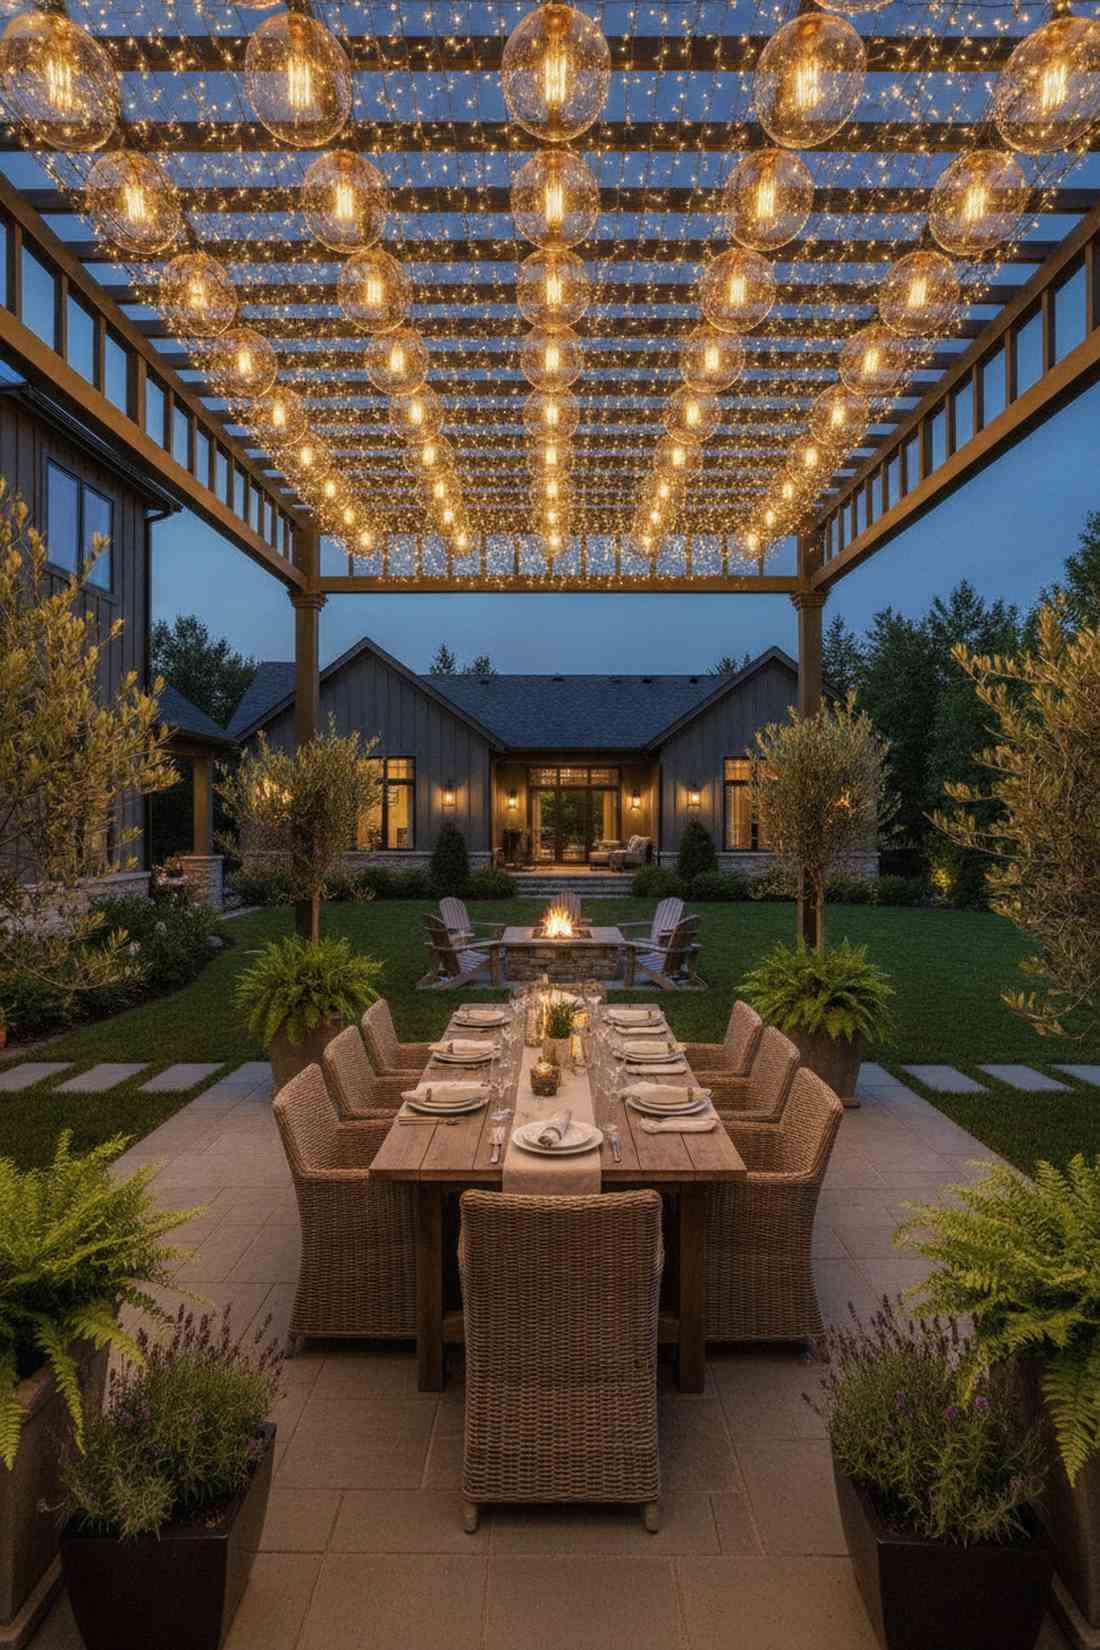
12. Overhead Beam Crosshatch
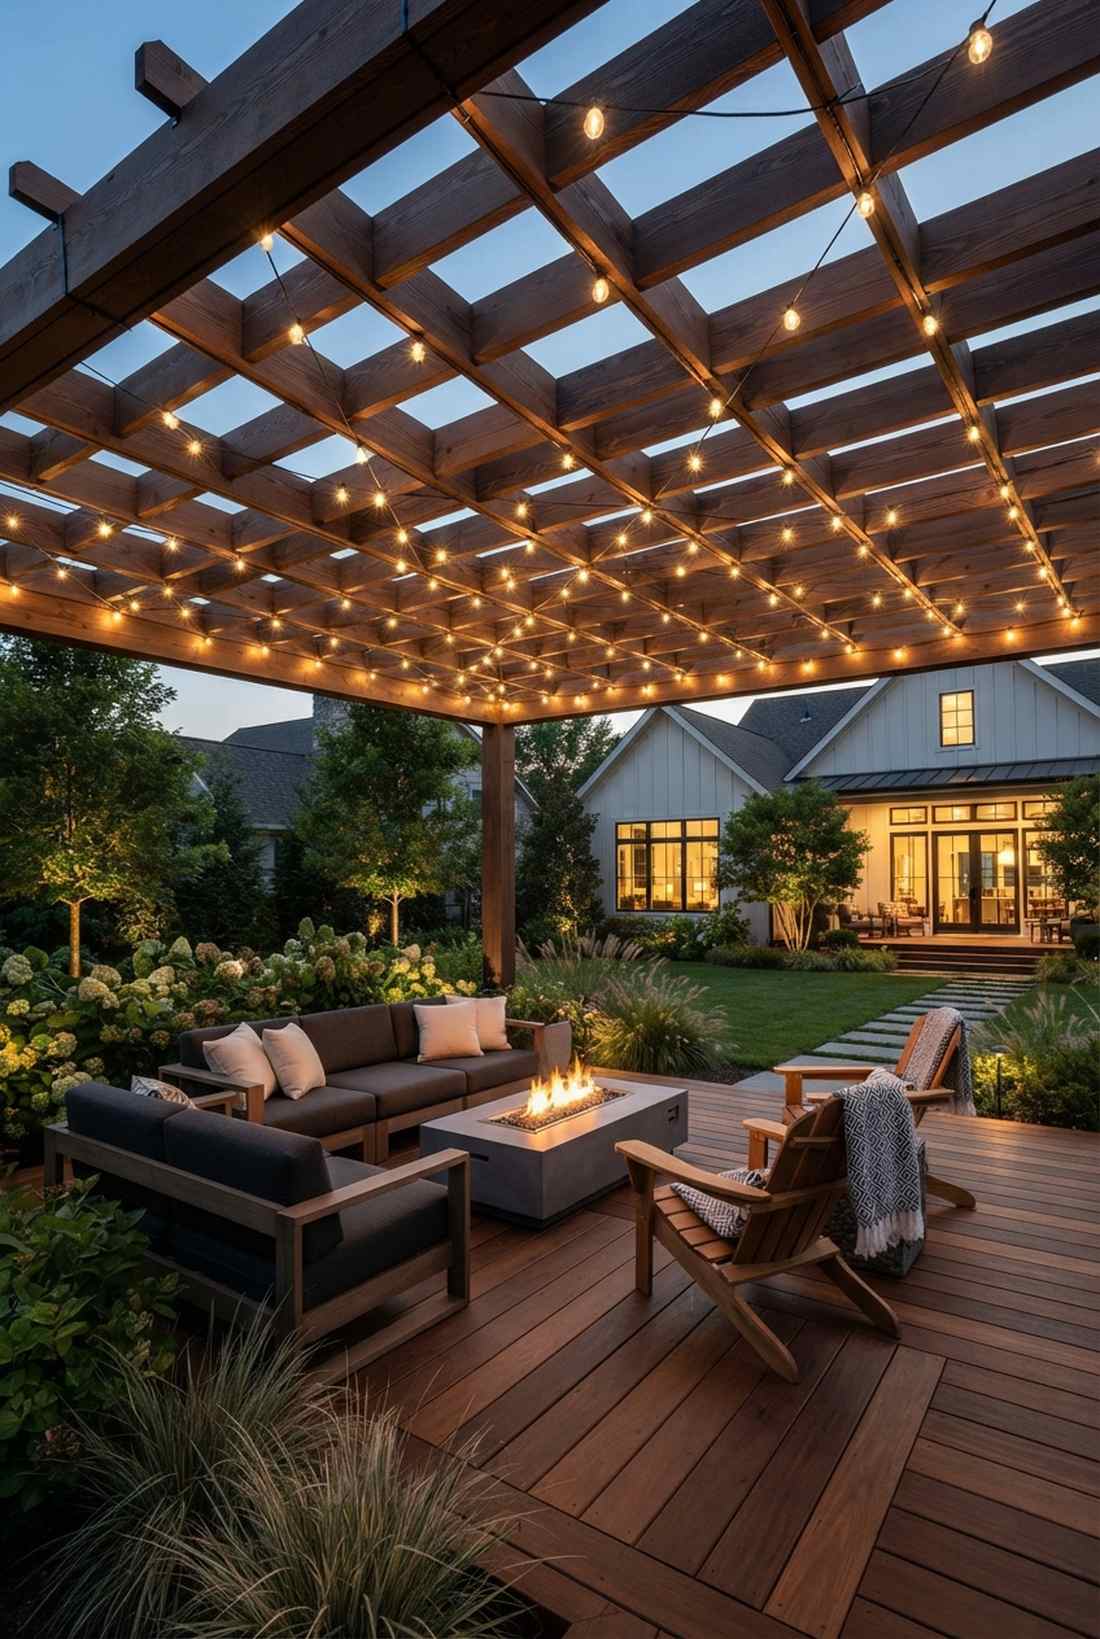
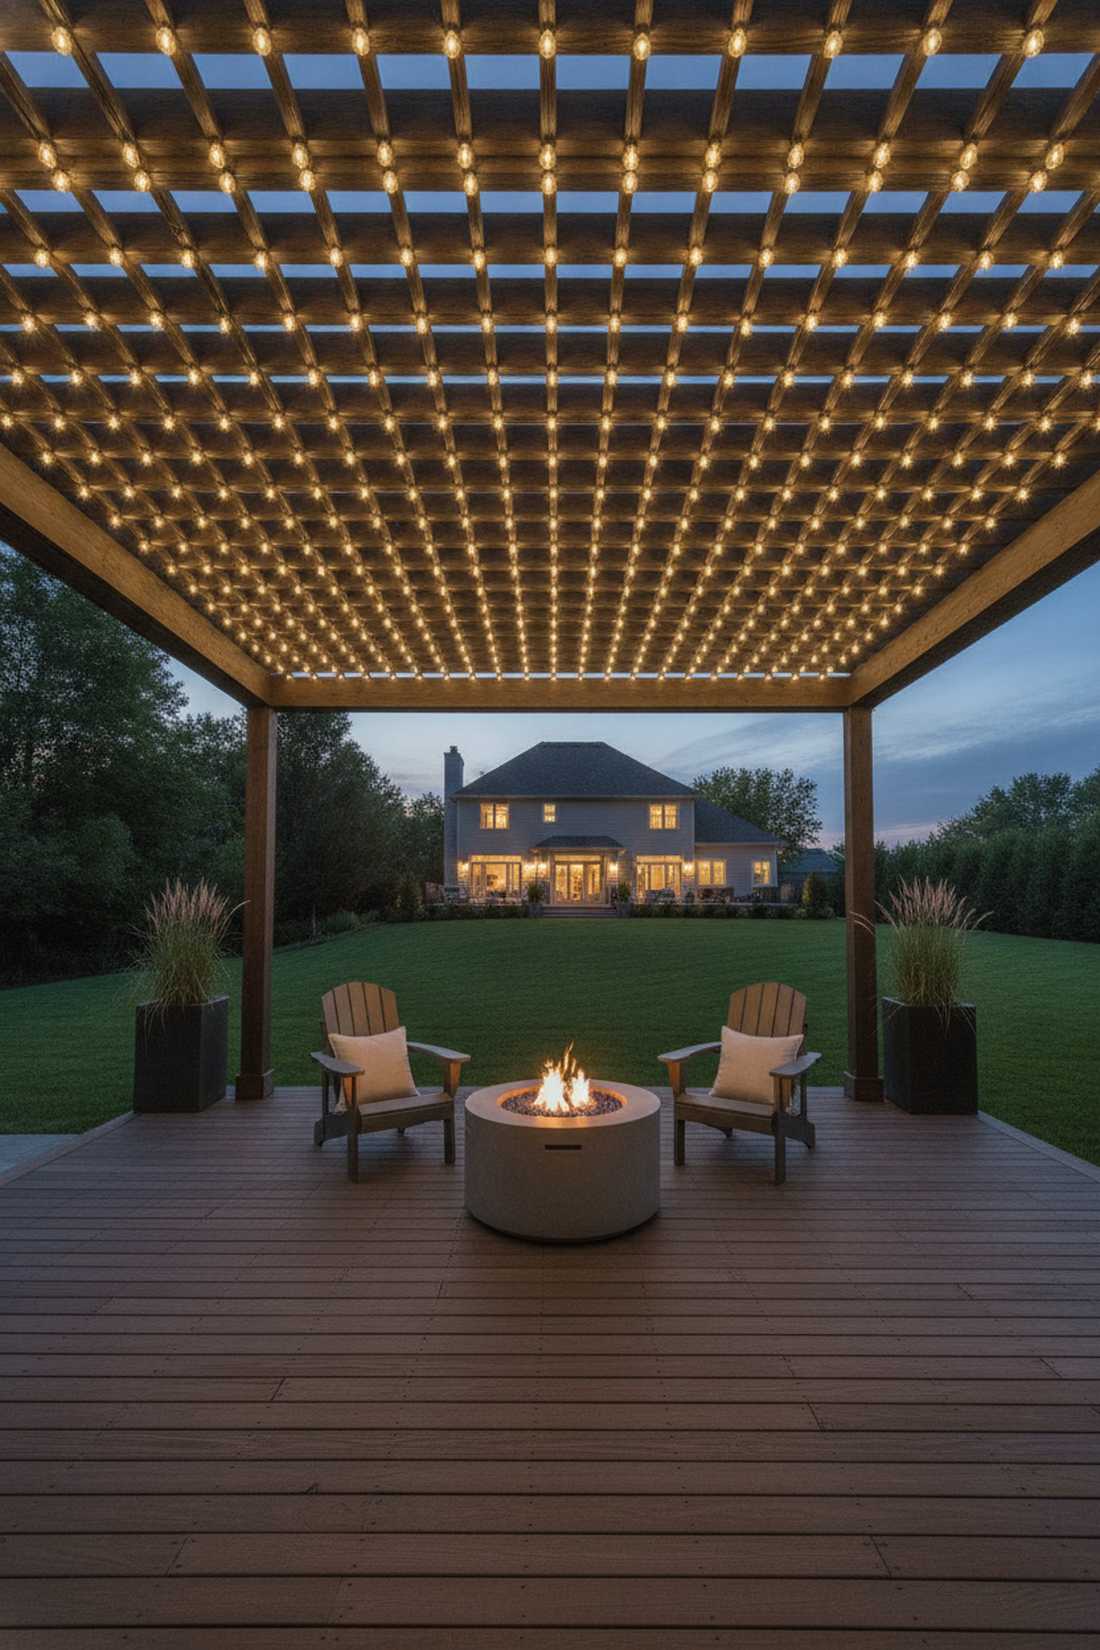
An intricate illuminated ceiling grid display feels like you are lounging inside a glowing architectural blueprint. Best suited for slatted pergolas where modern, sharp right angles dominate the landscaping.
Random stringing ruins modern aesthetics, whereas a strict 90-degree crosshatch pattern completely reinforces high-end contemporary design language. Grab pre-cut exact length strands to ensure there is zero sloppy overhang at the ends of your beams.
This meticulous layout runs roughly $80–$130. Save this to your modern outdoor architecture board for precise execution.
- Key Materials: Exact-fit string lengths
- Vibe / Style: Sharp modern geometry
- Difficulty: Precision measuring required
- Budget Breakdown: Custom Length Strands: $95 | Zip Ties: $10.
- Creator’s Tip: Use UV-resistant black zip ties instead of metal clips; they hold the wires flush to the beams and won’t rust and stain your wood.
- Smart Sourcing: UV-resistant black zip ties (bulk pack) and shatter-resistant S14 LED outdoor lighting string lights.
13. Arbor Archway Framing
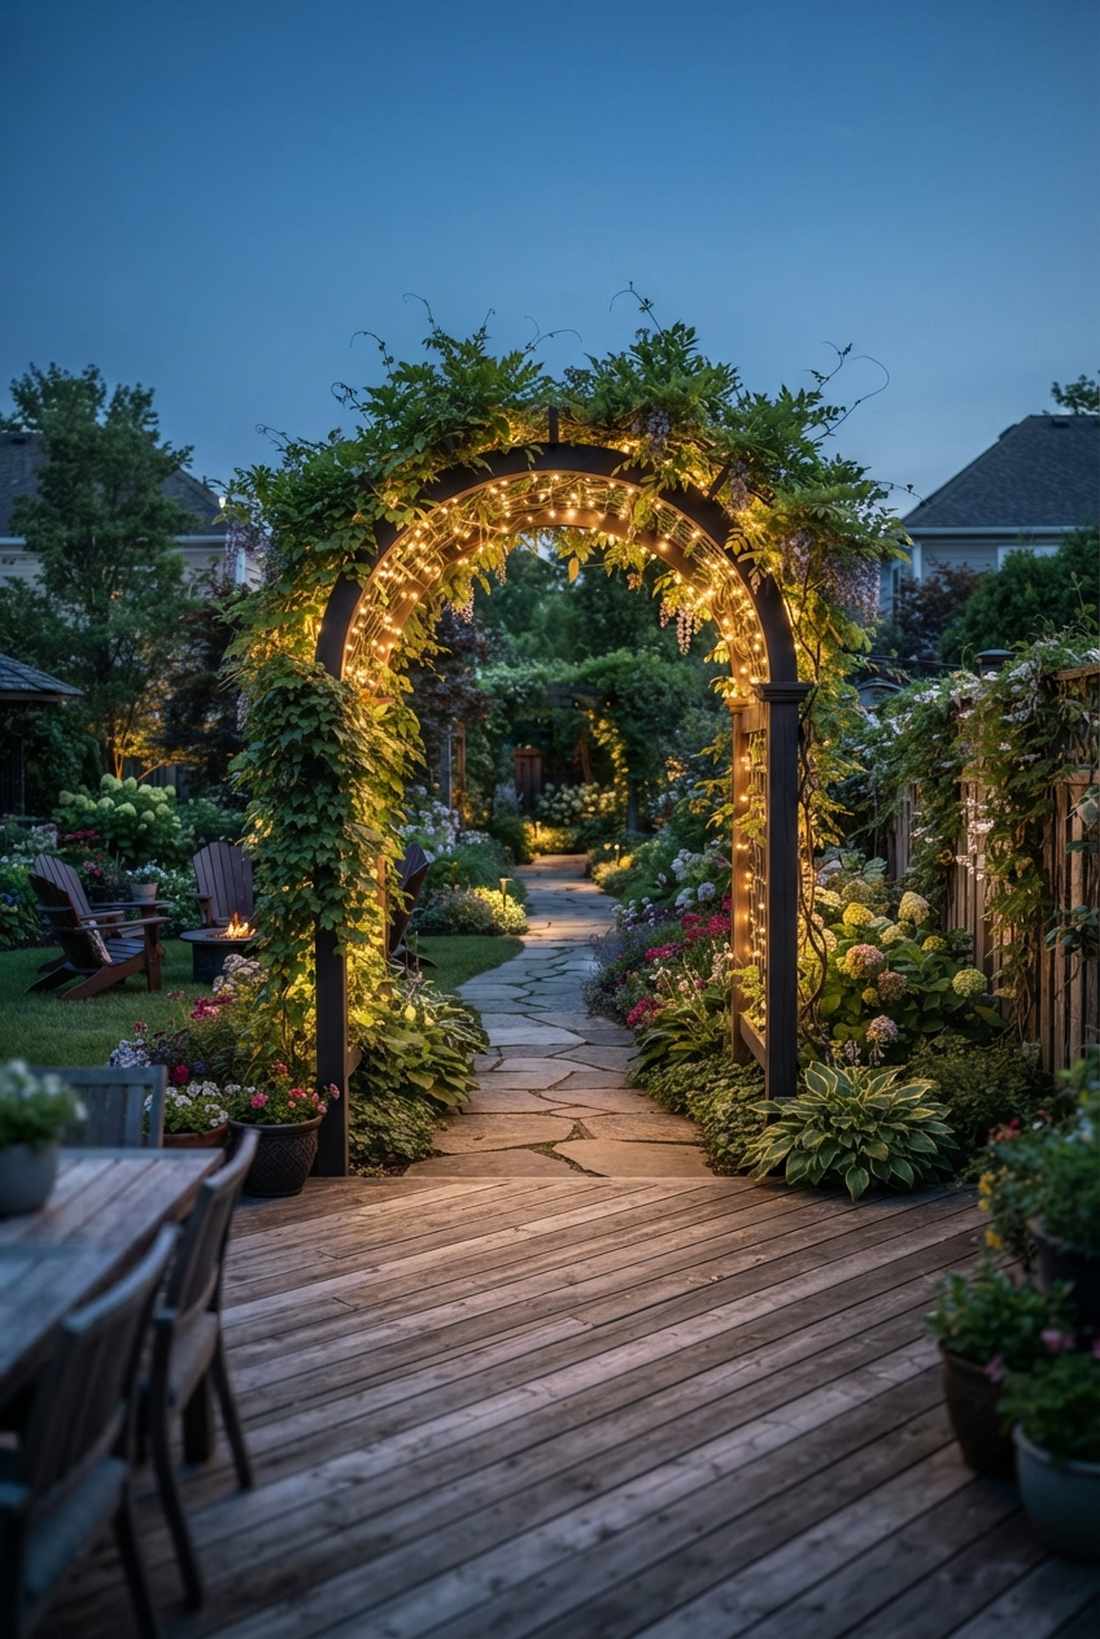
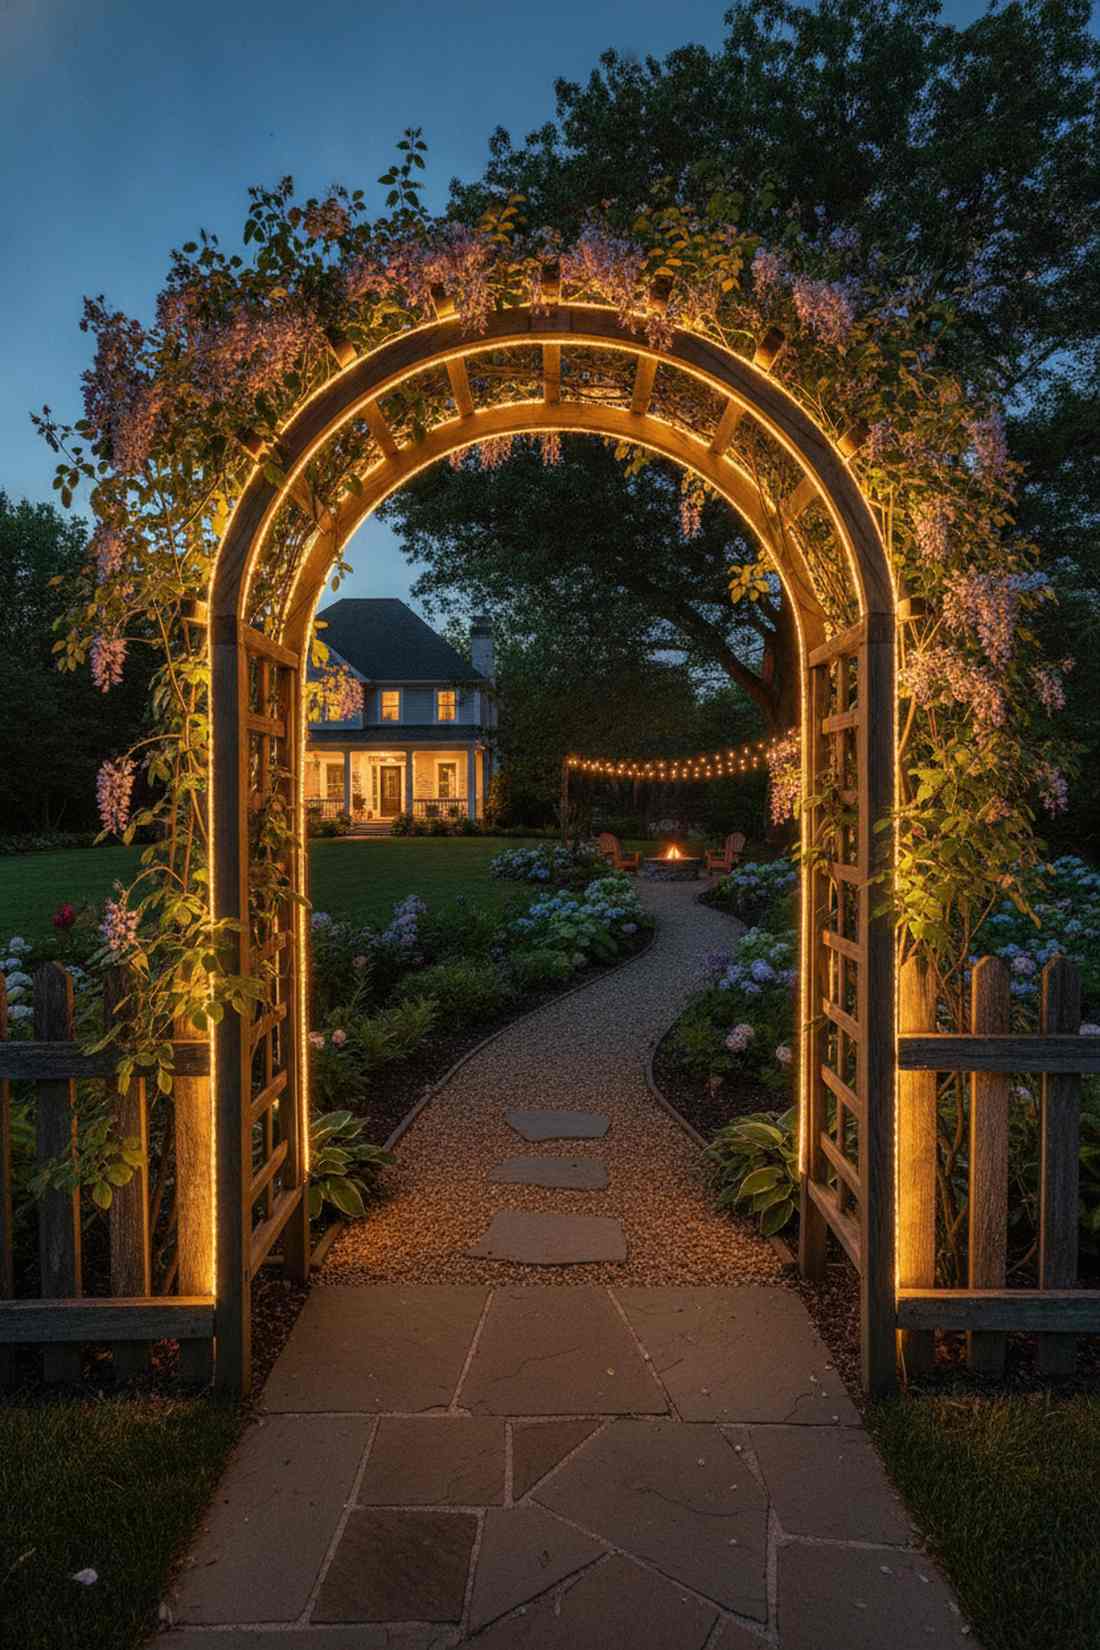
A brilliantly lit garden arbor entrance arch feels like a glowing portal into a secret botanical wonderland. It acts as the ultimate welcoming threshold for pathways leading from the front to the back yard.
Most entryways get lost at night, but outlining the specific curve of an archway guarantees an unforgettable first impression for evening guests. It’s the perfect place to utilize miniature garden supplies and micro-LEDs to keep the wood and vines visible.
This quick weekend glow-up costs barely $20–$40. Pin this if you love bringing magical garden paths to life.
- Key Materials: Flexible rope lights or micro-LEDs
- Vibe / Style: Magical garden threshold
- Difficulty: Beginner setup
- Budget Breakdown: Flex LEDs: $25 | Twist Ties: $8.
- Creator’s Tip: Weave the lights *behind* the climbing vines rather than over them so the leaves glow softly from the back.
- Smart Sourcing: flexible outdoor LED rope lighting and green garden twist tie spools.
14. Trellis Vertical Integration
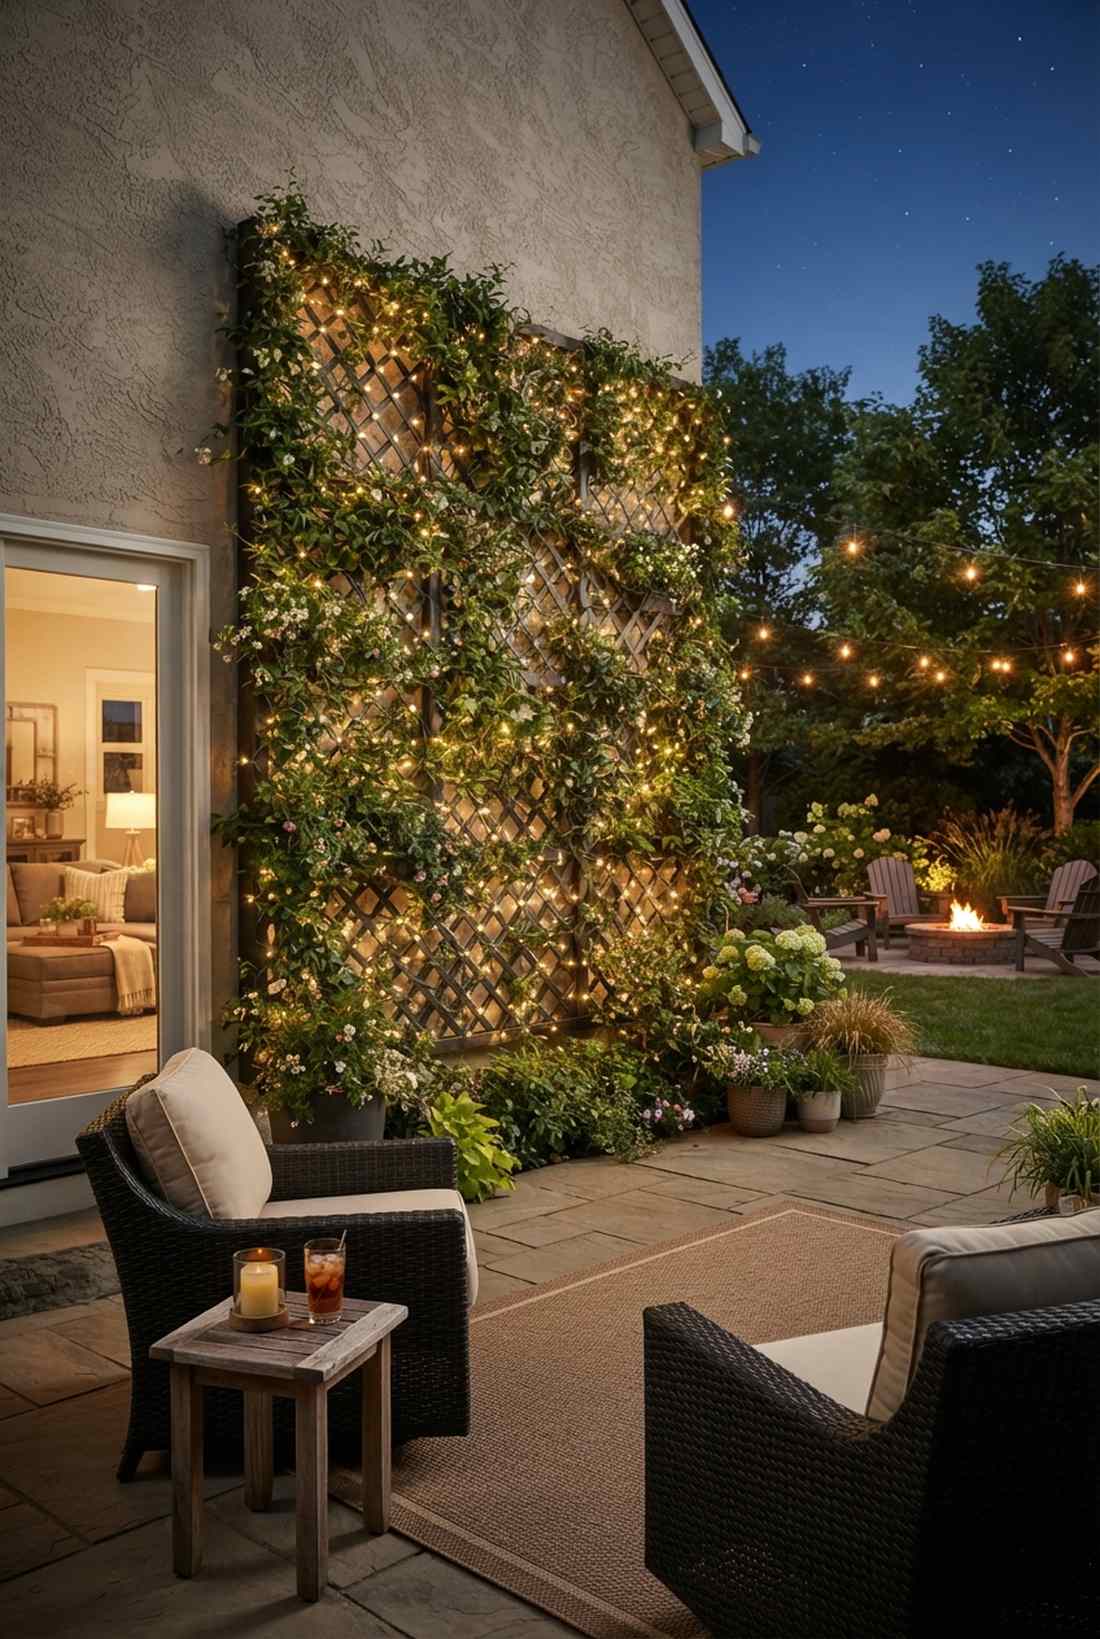
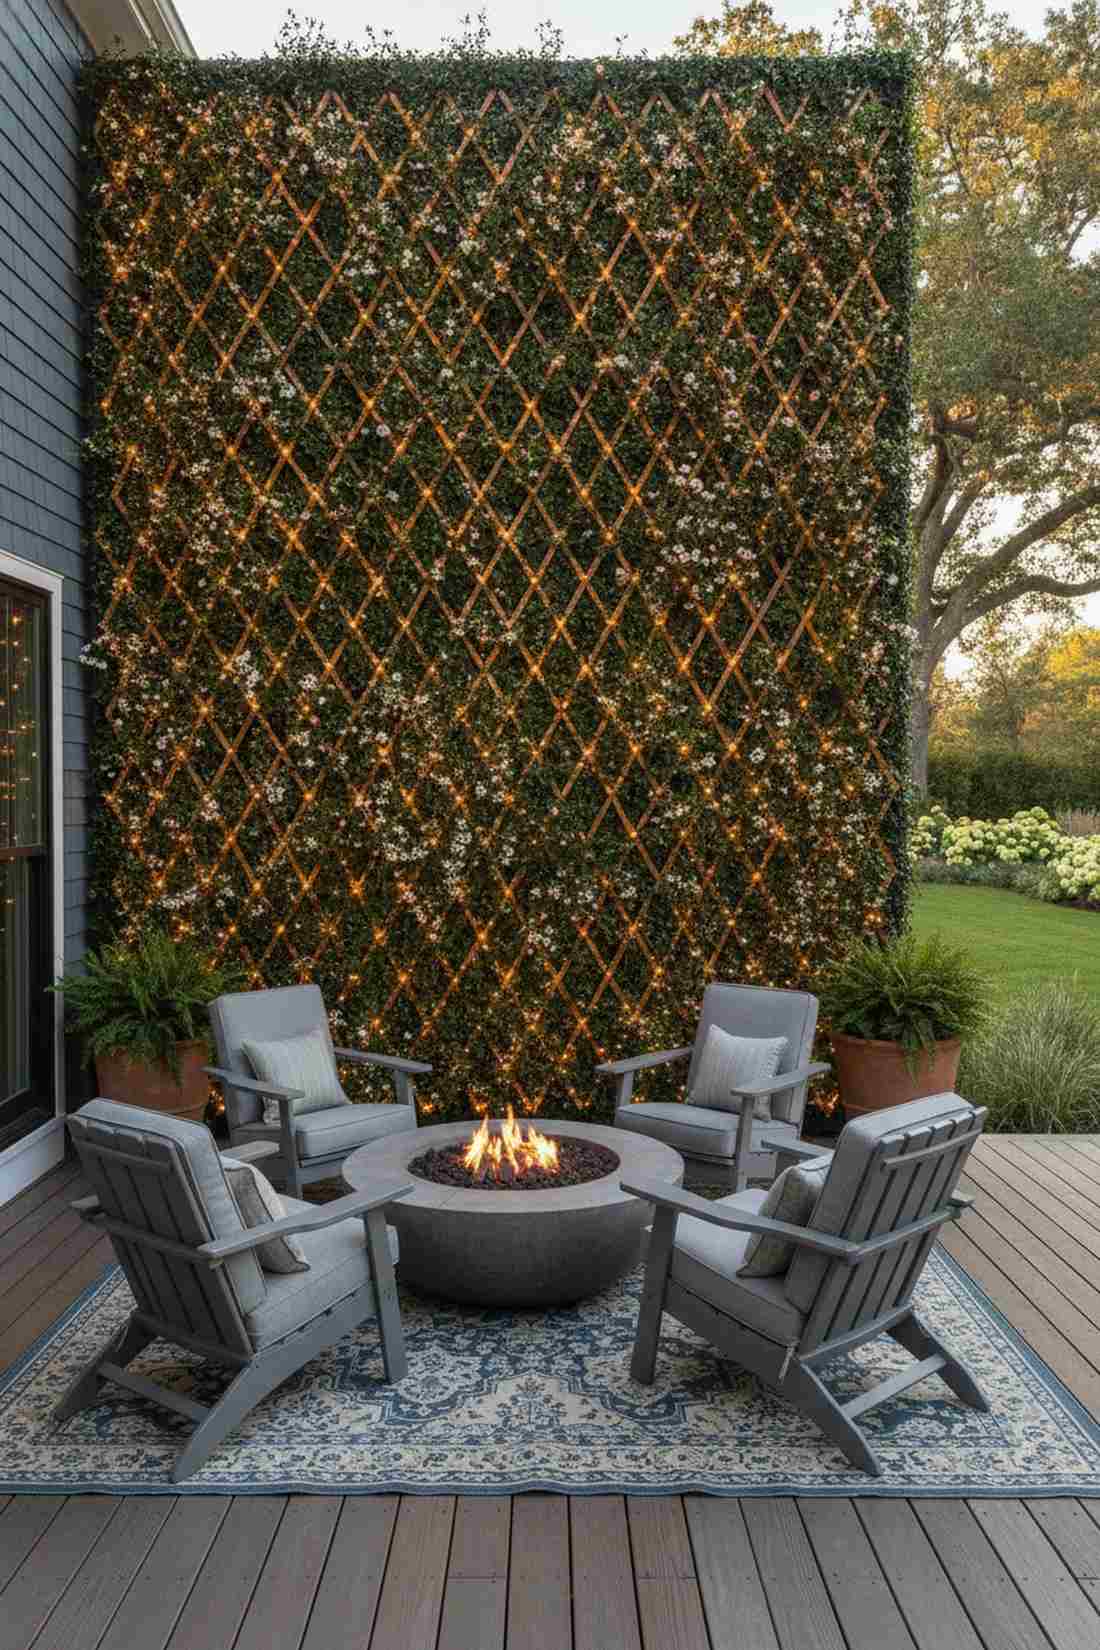
This woven illuminated plant trellis wall feels like living artwork covered in starlight and ivy. Excellent for boring blank exterior walls or small apartment balconies that need vertical visual interest.
Slapping lights over a trellis often looks messy, but carefully weaving the strand through every single lattice diamond creates a customized, built-in fixture. Utilize terrarium accessories and waterproof fairy strings to handle daily plant watering without shorting out.
Expect to drop around $30–$55 on high-waterproof rated strands. It’s an absolute game changer for bare patio walls.
- Key Materials: Submersible/waterproof fairy strings
- Vibe / Style: Lush botanical glow
- Difficulty: Time-consuming weaving
- Budget Breakdown: Waterproof Strands: $35 | Plant Clips: $12.
- Creator’s Tip: Choose strands with a green wire base so the electrical lines completely vanish into the foliage during the day.
- Smart Sourcing: green-wire outdoor fairy lights (waterproof kit) and invisible acrylic plant climbing clips.
Decks are notorious for trip hazards in the dark. This next lighting placement instantly fixes that while making your deck look incredibly high-end.
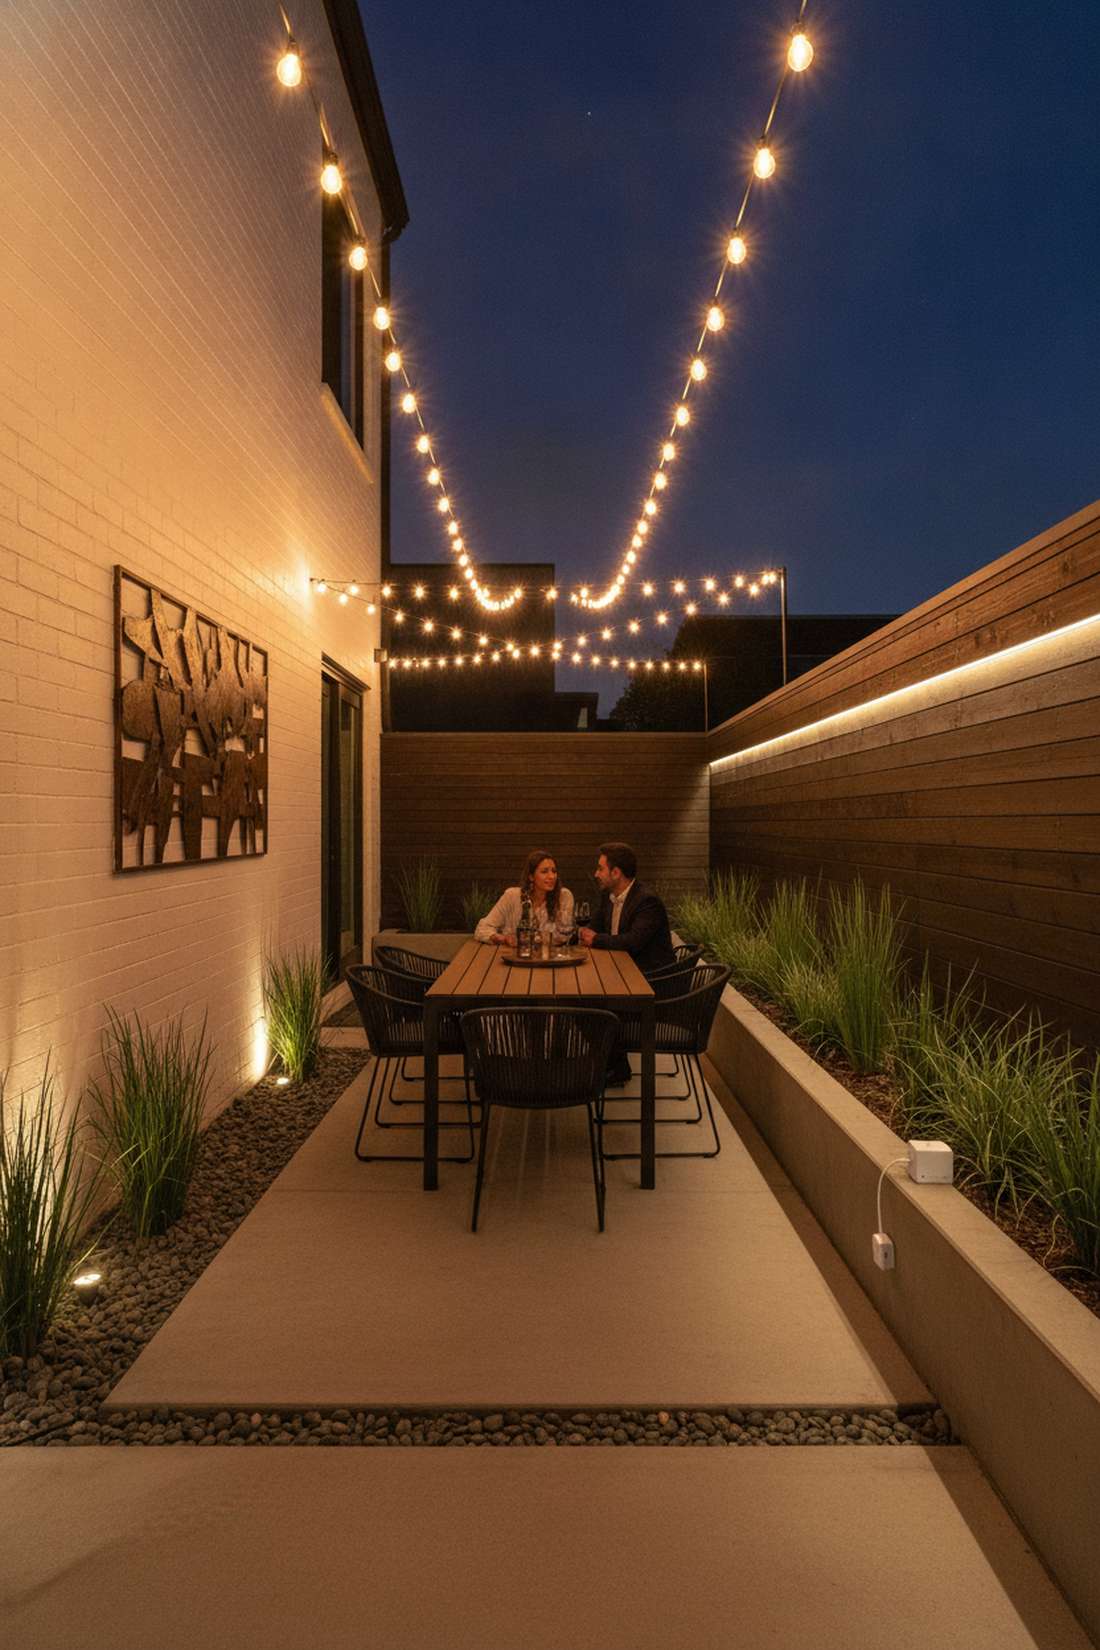
Perimeter and Pathway Illumination Techniques
Border lighting defines outdoor room boundaries while guiding movement along circulation routes. Designers position strands at edges to separate functional zones and improve navigation safety.
15. Deck Railing Attachment
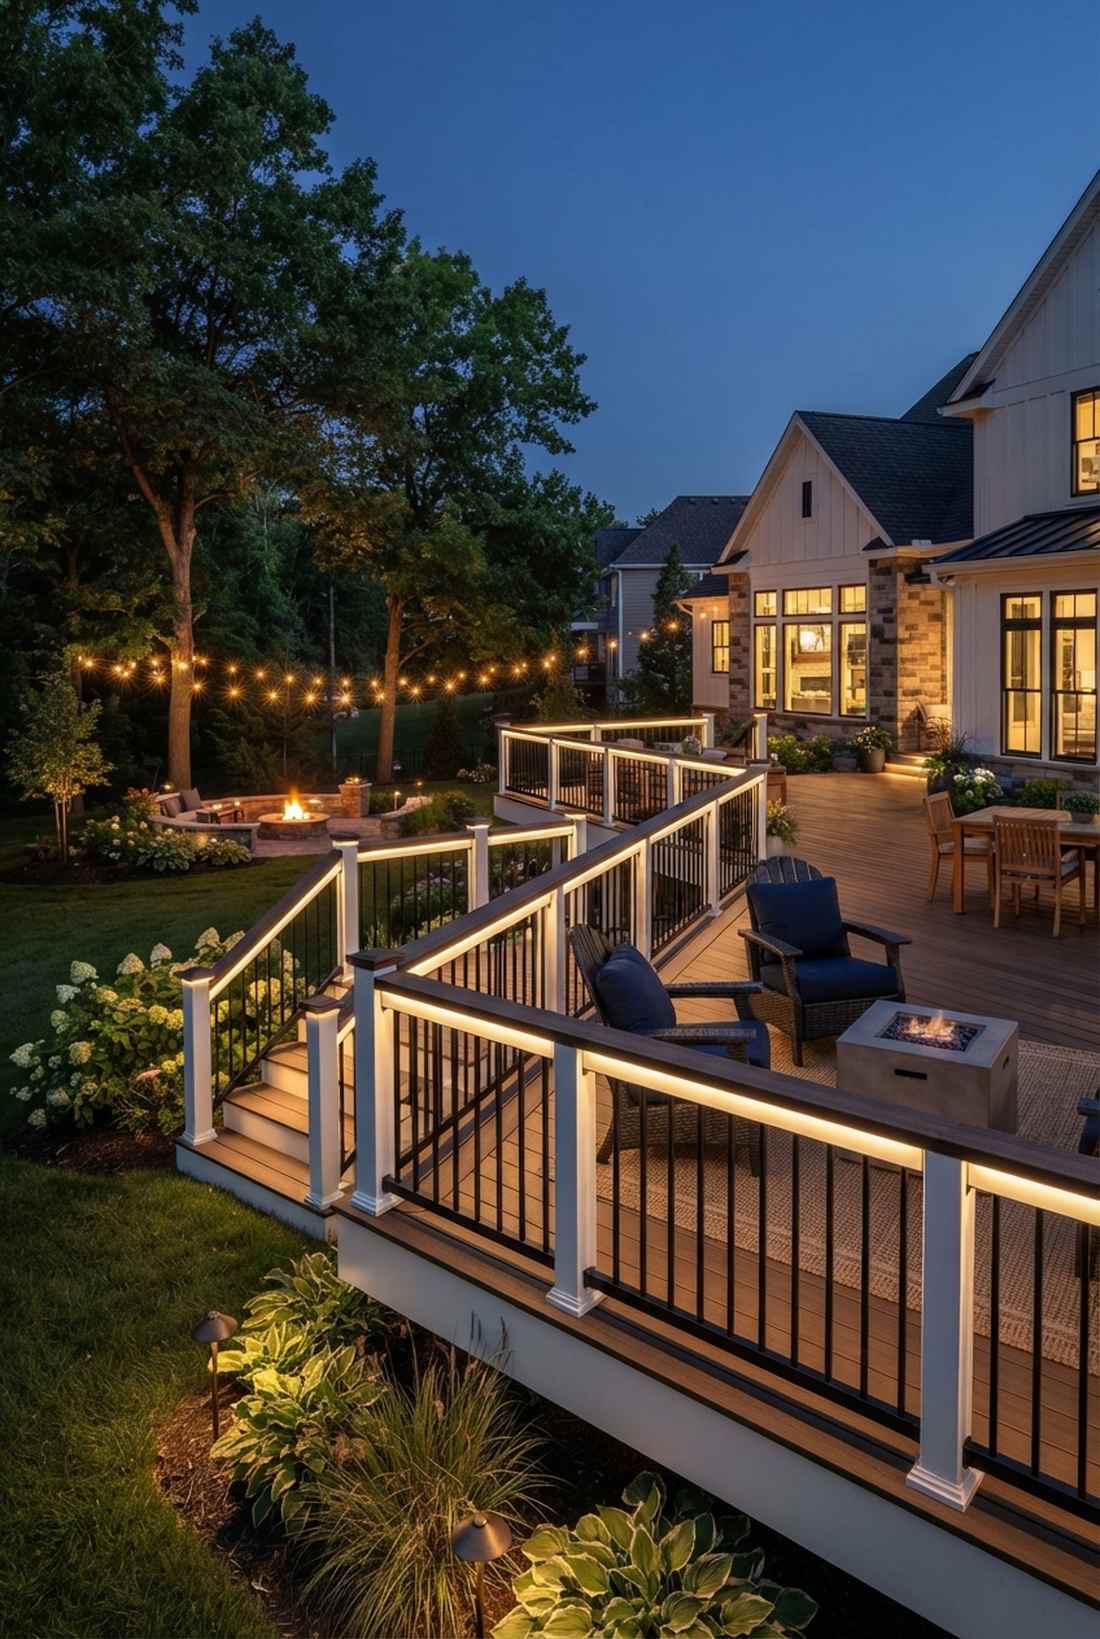
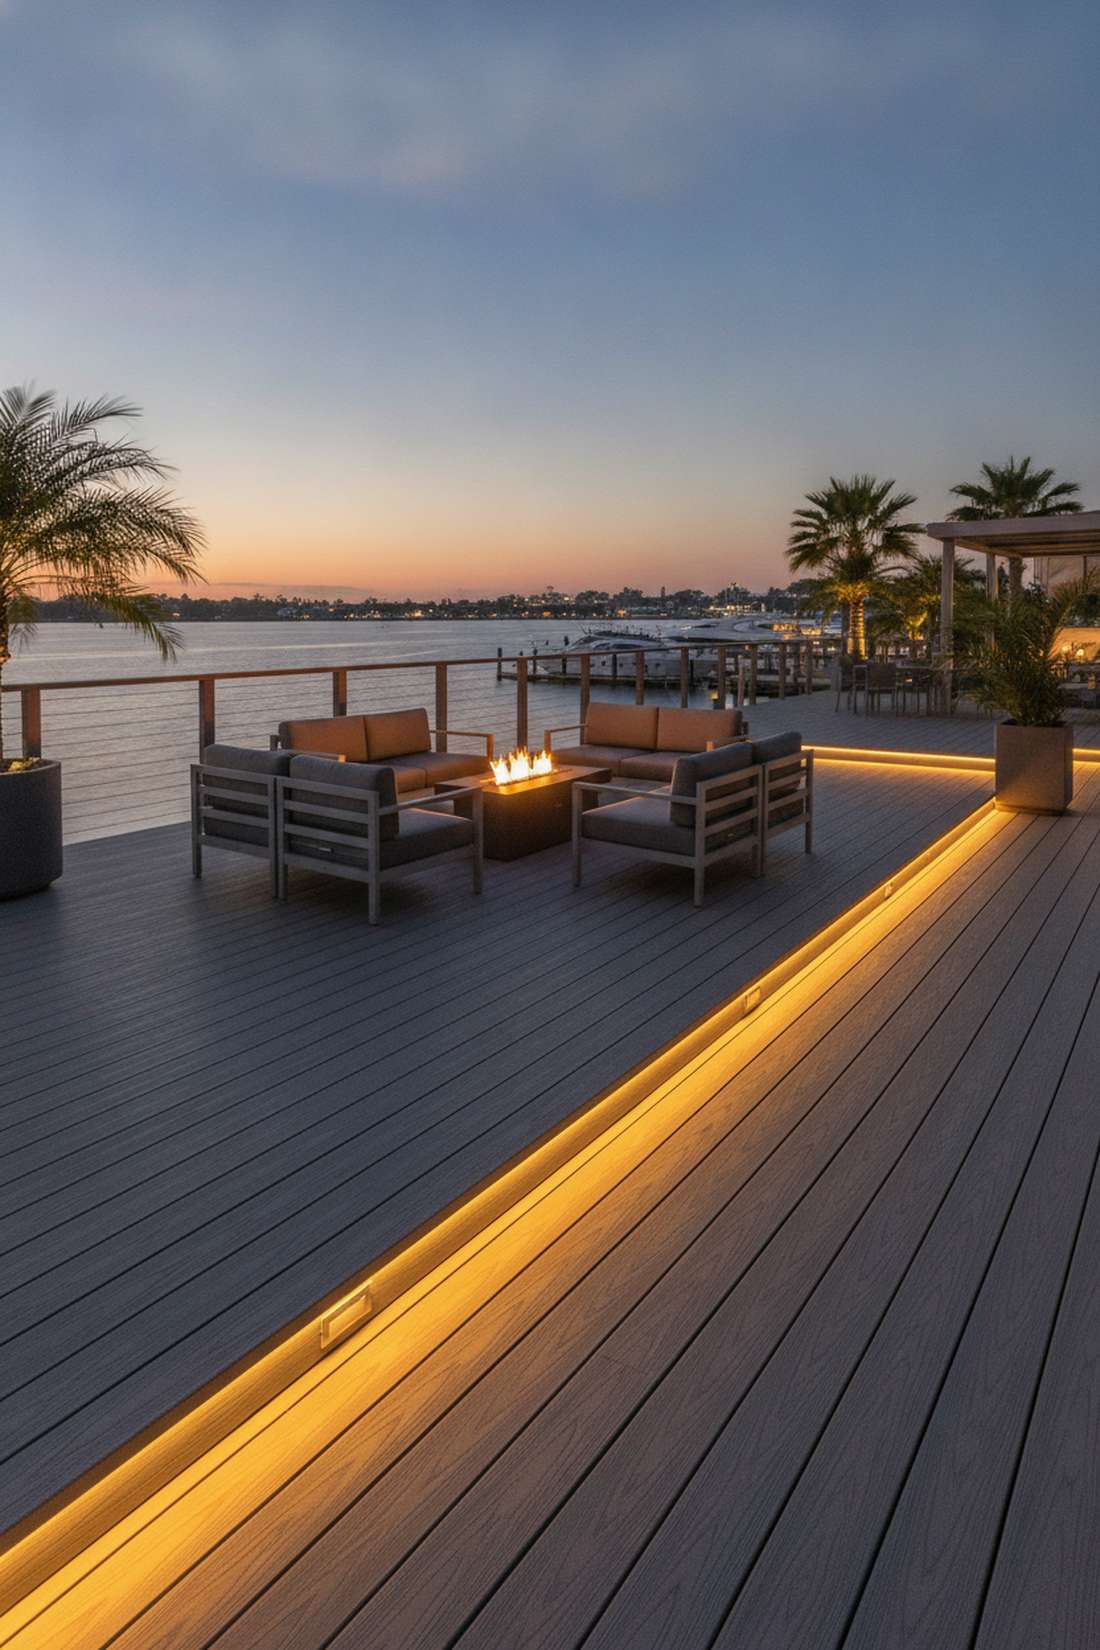
A seamless under-rail deck glow feels like a chic VIP section at a luxury marina. It’s the ultimate way to light up raised wooden or composite decks without blinding guests with overhead glare.
Top-mounted lights look cluttered and block your view, but tucking a crisp line of LEDs tightly under the railing lip delivers a flawless, hidden designer aesthetic. Snag a pre-cut LED strip or tight-spaced bistro strand encased in a UV-resistant tube for longevity.
This sleek safety upgrade comes in around $45–$80. Save this to your deck renovation inspiration board!
- Key Materials: Under-lip LED strip or micro-bulbs
- Vibe / Style: Sleek marina luxury
- Difficulty: Easy linear mounting
- Budget Breakdown: Strip/Strand: $55 | Mounting Channel: $20.
- Creator’s Tip: Use an aluminum mounting channel under the wood railing—it dissipates heat and keeps the light strip perfectly straight.
- Smart Sourcing: waterproof outdoor LED strip kits (silicone coated) and aluminum under-rail mounting channels.
16. Pathway Edge Marking
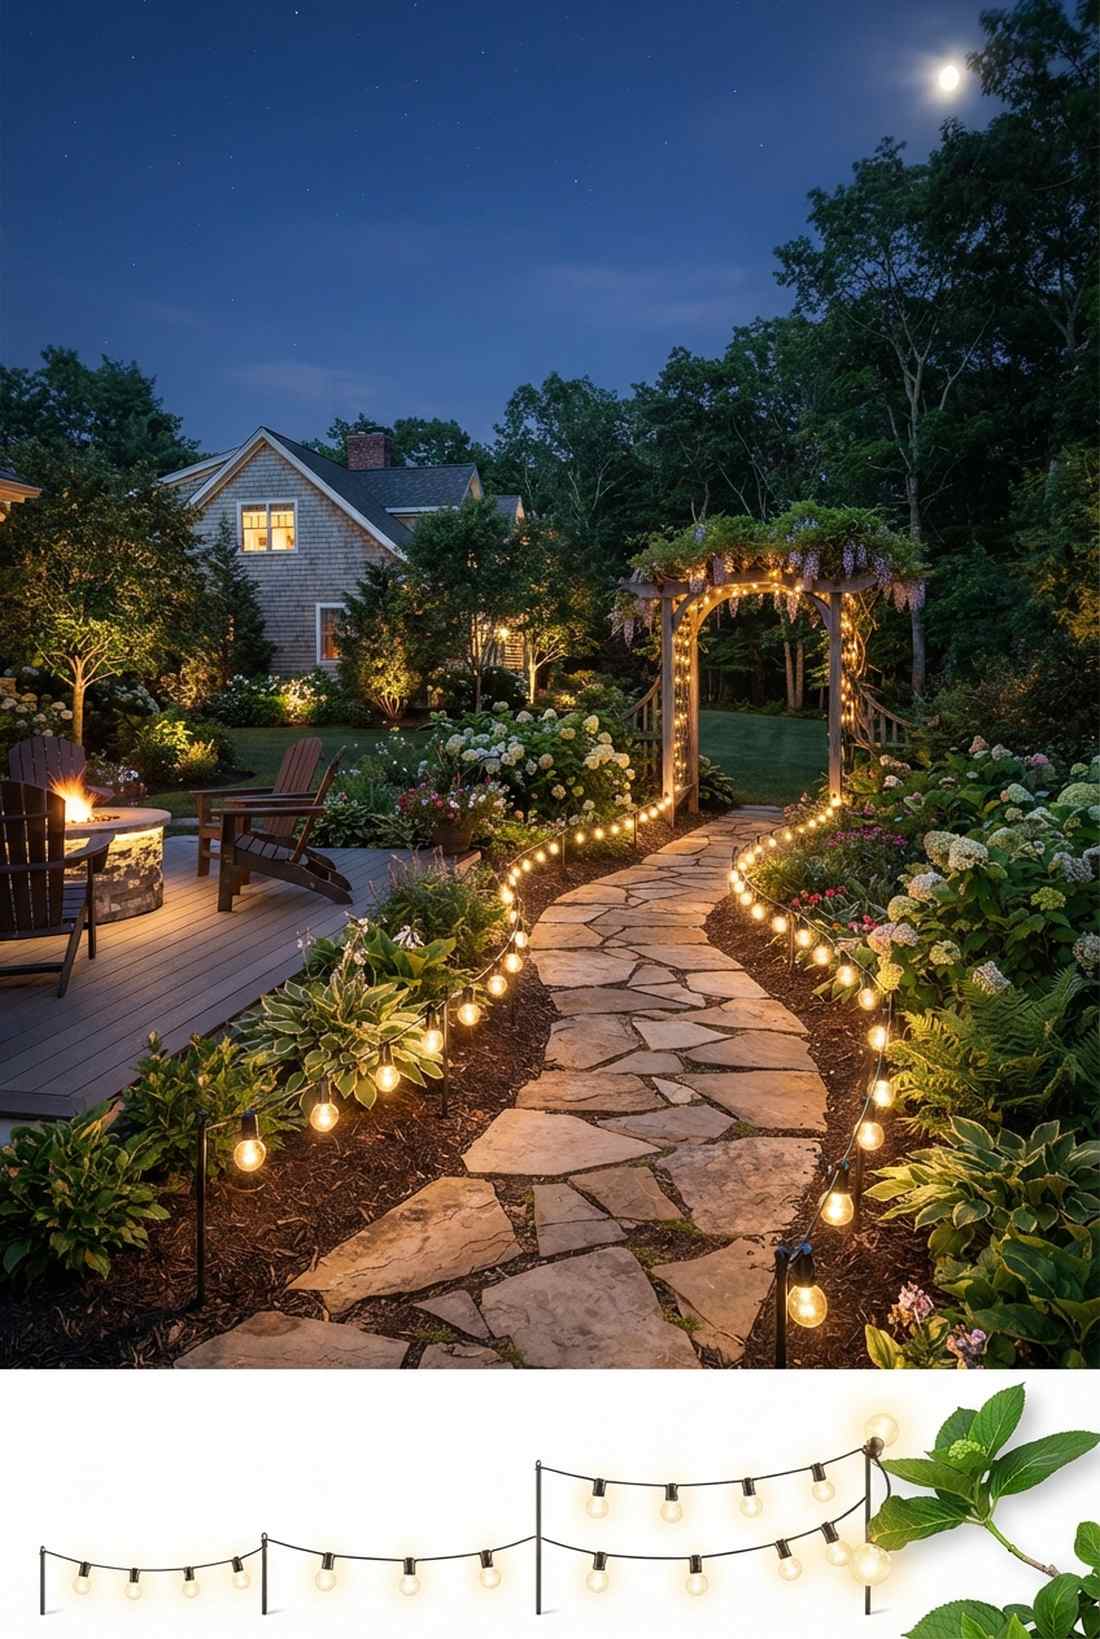
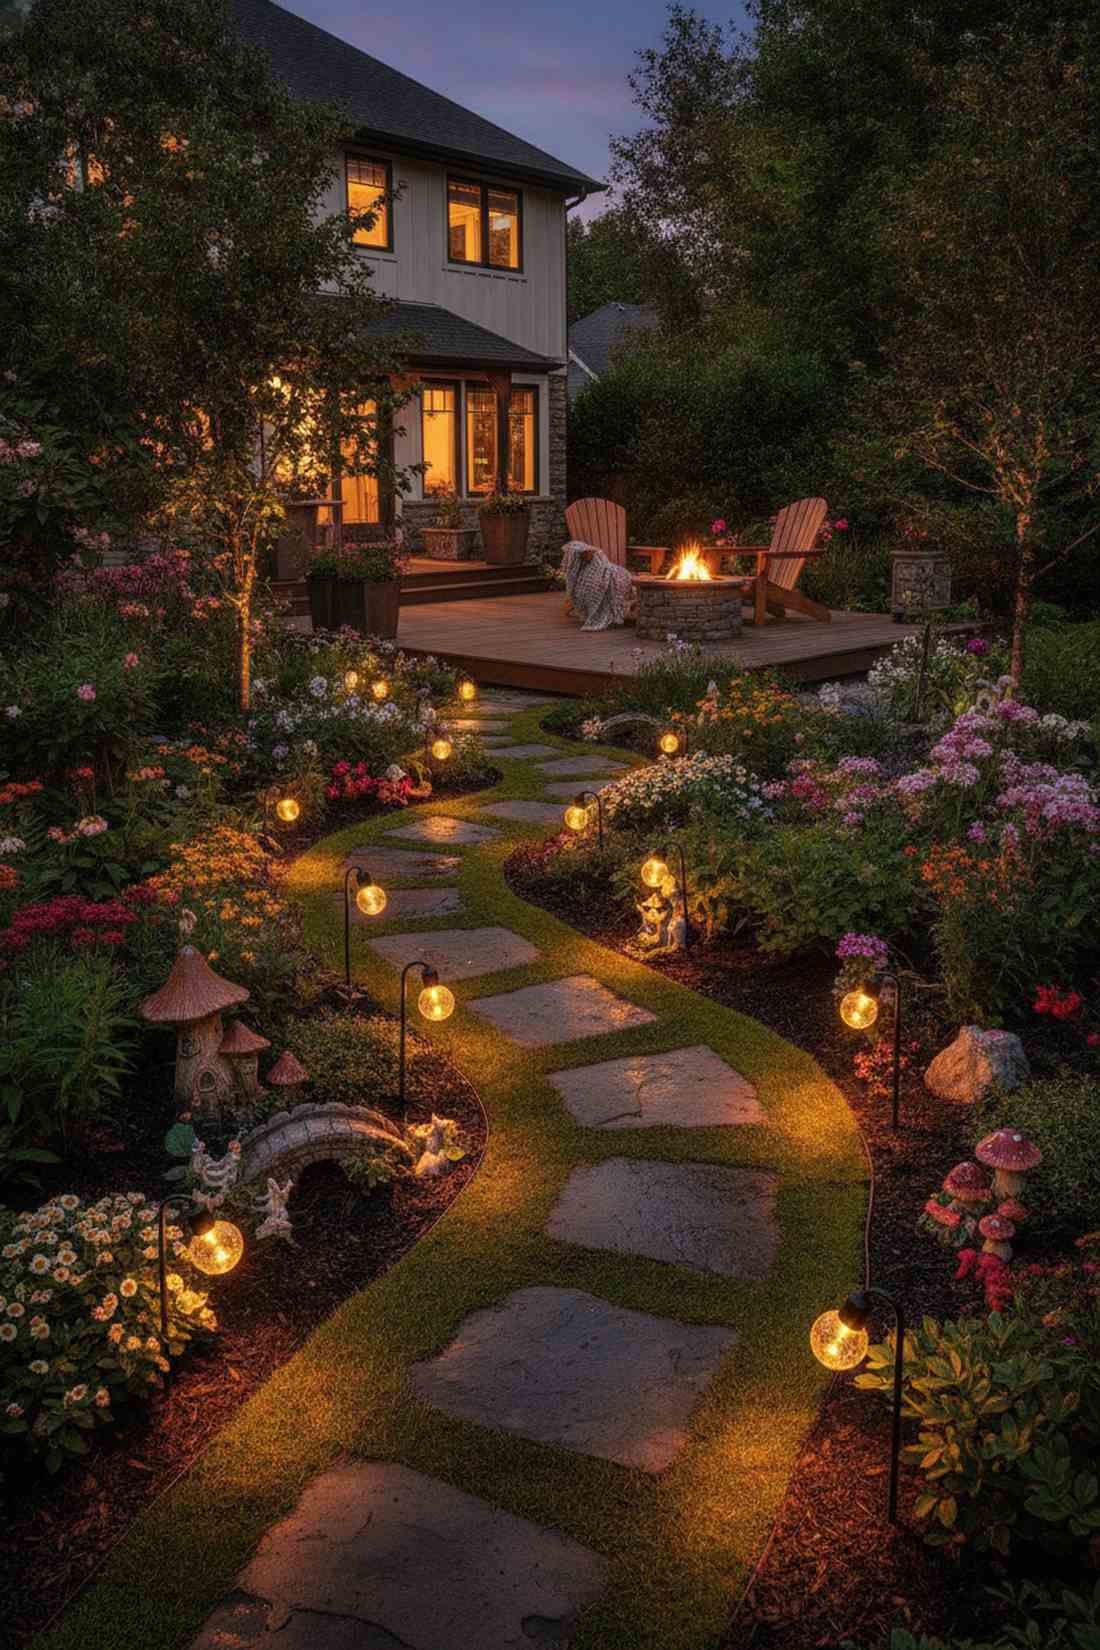
This low-profile illuminated garden walkway feels like a whimsical fairy garden pathway inviting you into the woods. Highly recommended for winding stone paths or deep garden borders where traditional solar stakes look clunky.
Instead of cheap plastic stakes that snap, running a continuous, low-slung string of durable mini-globes outlines the exact curve of the path beautifully. It’s a brilliant way to incorporate fairy garden kits and weather-sealed strands into a functional safety feature.
You can create this guiding light for $40–$70. A must-do project to stop guests from stepping on your prize flowers at night.
- Key Materials: Mini globe strands and metal ground stakes
- Vibe / Style: Enchanted safety path
- Difficulty: Fast ground installation
- Budget Breakdown: Mini Globes: $45 | Metal Stakes: $15.
- Creator’s Tip: Keep the wire exactly 4 inches off the soil to prevent mulch rot and keep it above light snowfall.
- Smart Sourcing: shatterproof mini G40 bulb strings and heavy-duty steel pathway light stakes (bulk pack).
17. Stairway Step Outlining
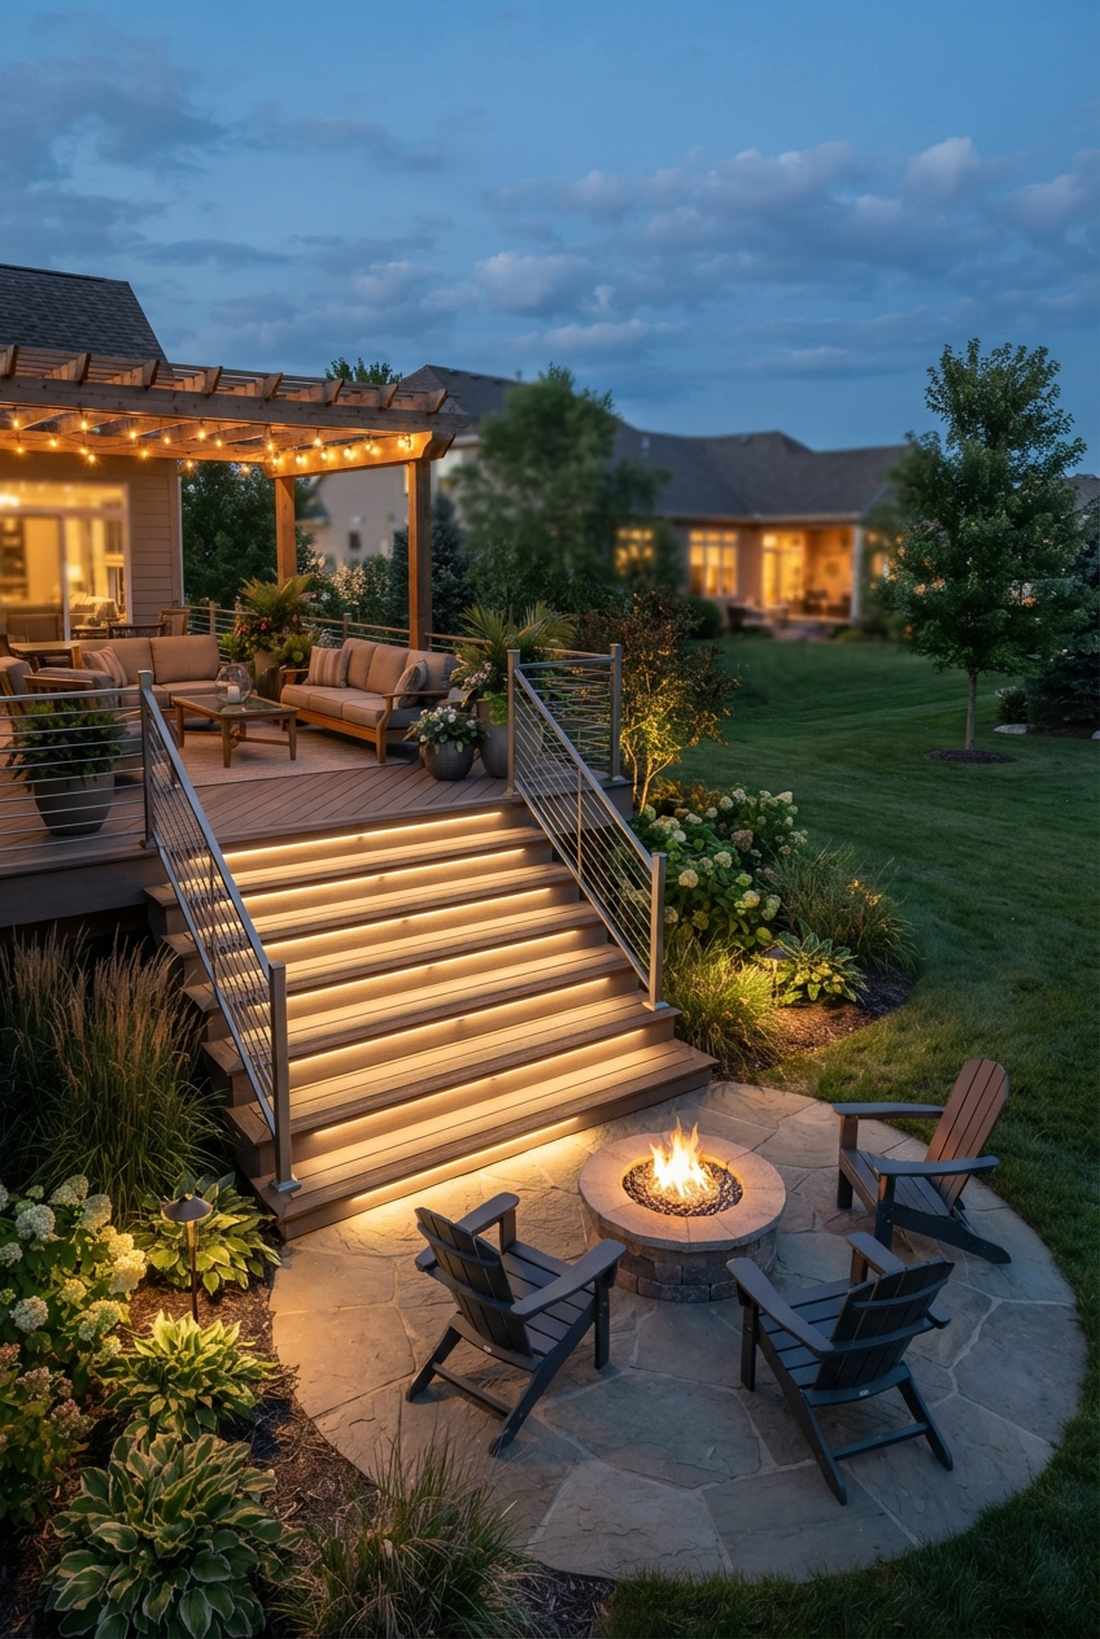
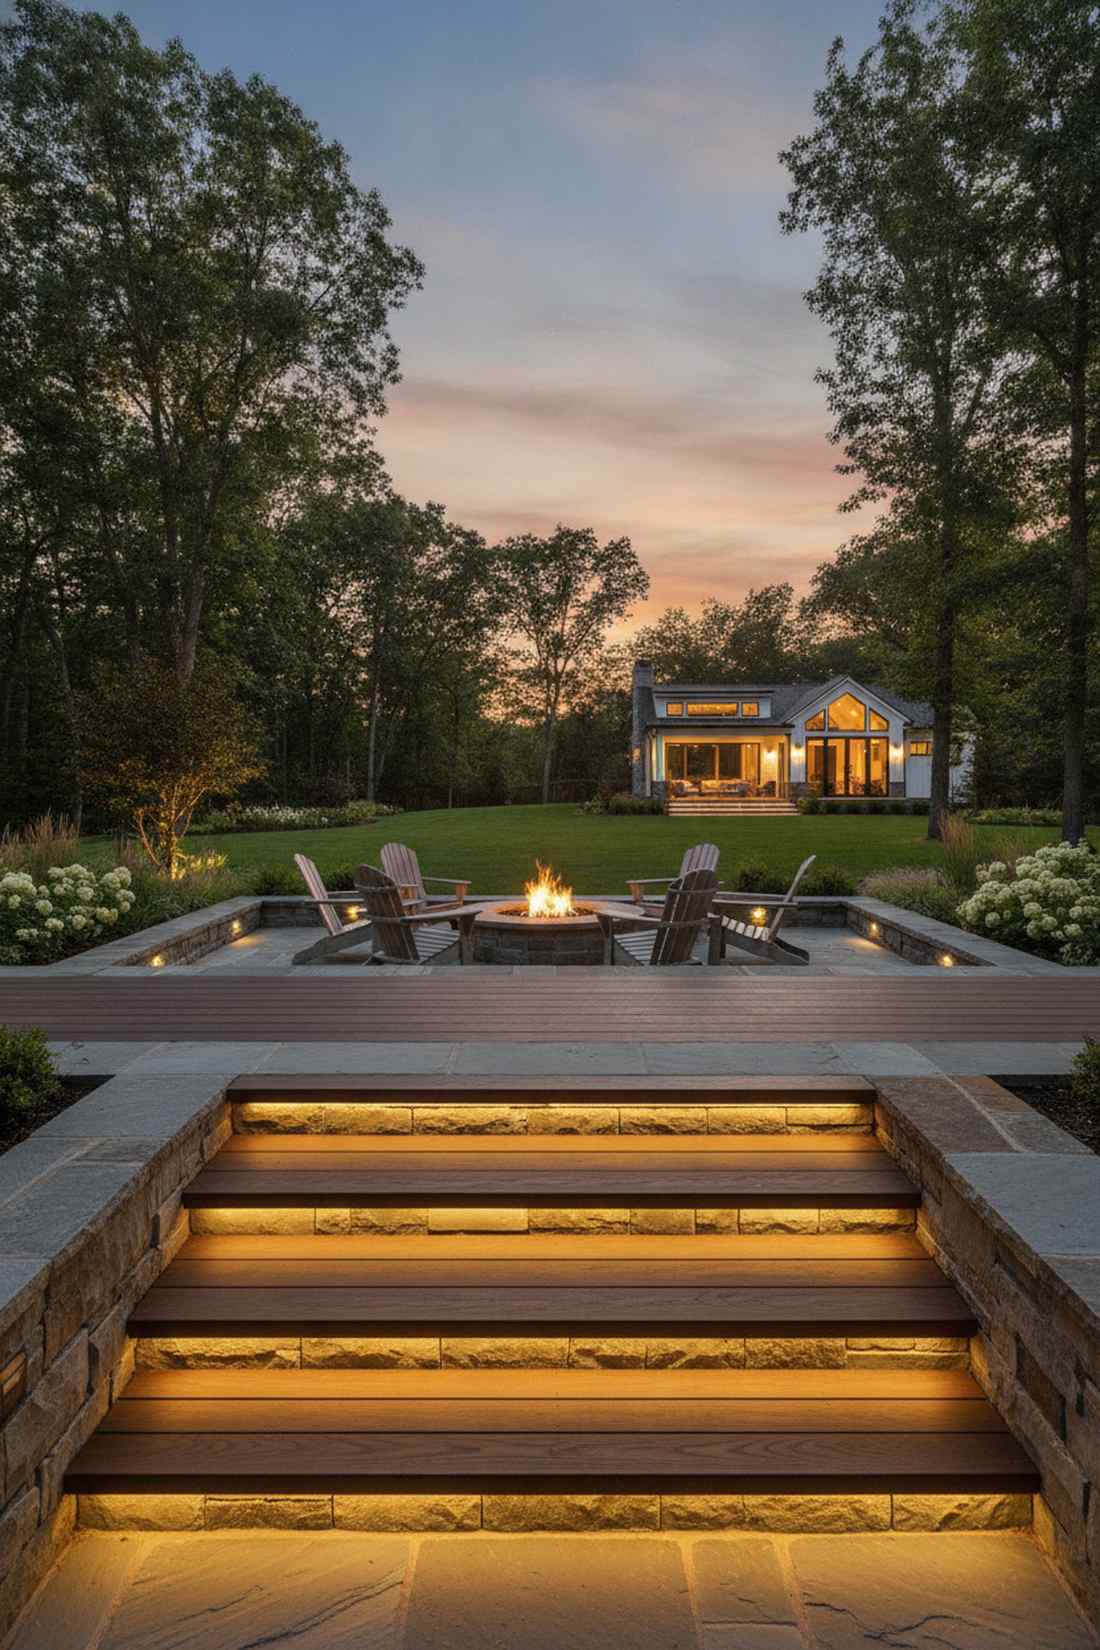
Crisp illuminated stairway riser lighting feels like you’re walking into a luxury resort lobby. It solves the massive safety hazard of invisible outdoor stairs leading down to fire pits or lower lawns.
Stairway accidents are common, yet this simple flush-mount technique completely eradicates the danger while looking incredibly expensive. Secure the outdoor lighting string directly into the crease where the tread meets the riser for a hidden, indirect glow.
This high-end safety feature runs roughly $35–$65 per staircase. Pin this right now to make your backyard safer and more beautiful.
- Key Materials: Flexible LED rope or low-profile strings
- Vibe / Style: High-end hotel safety
- Difficulty: Requires careful cord hiding
- Budget Breakdown: Rope Light: $40 | Corner Clips: $12.
- Creator’s Tip: Always place the light source facing downwards or outward from the riser to avoid blinding people as they walk up.
- Smart Sourcing: low-profile outdoor LED rope lighting and clear silicone mounting brackets.
18. Garden Bed Border Lighting
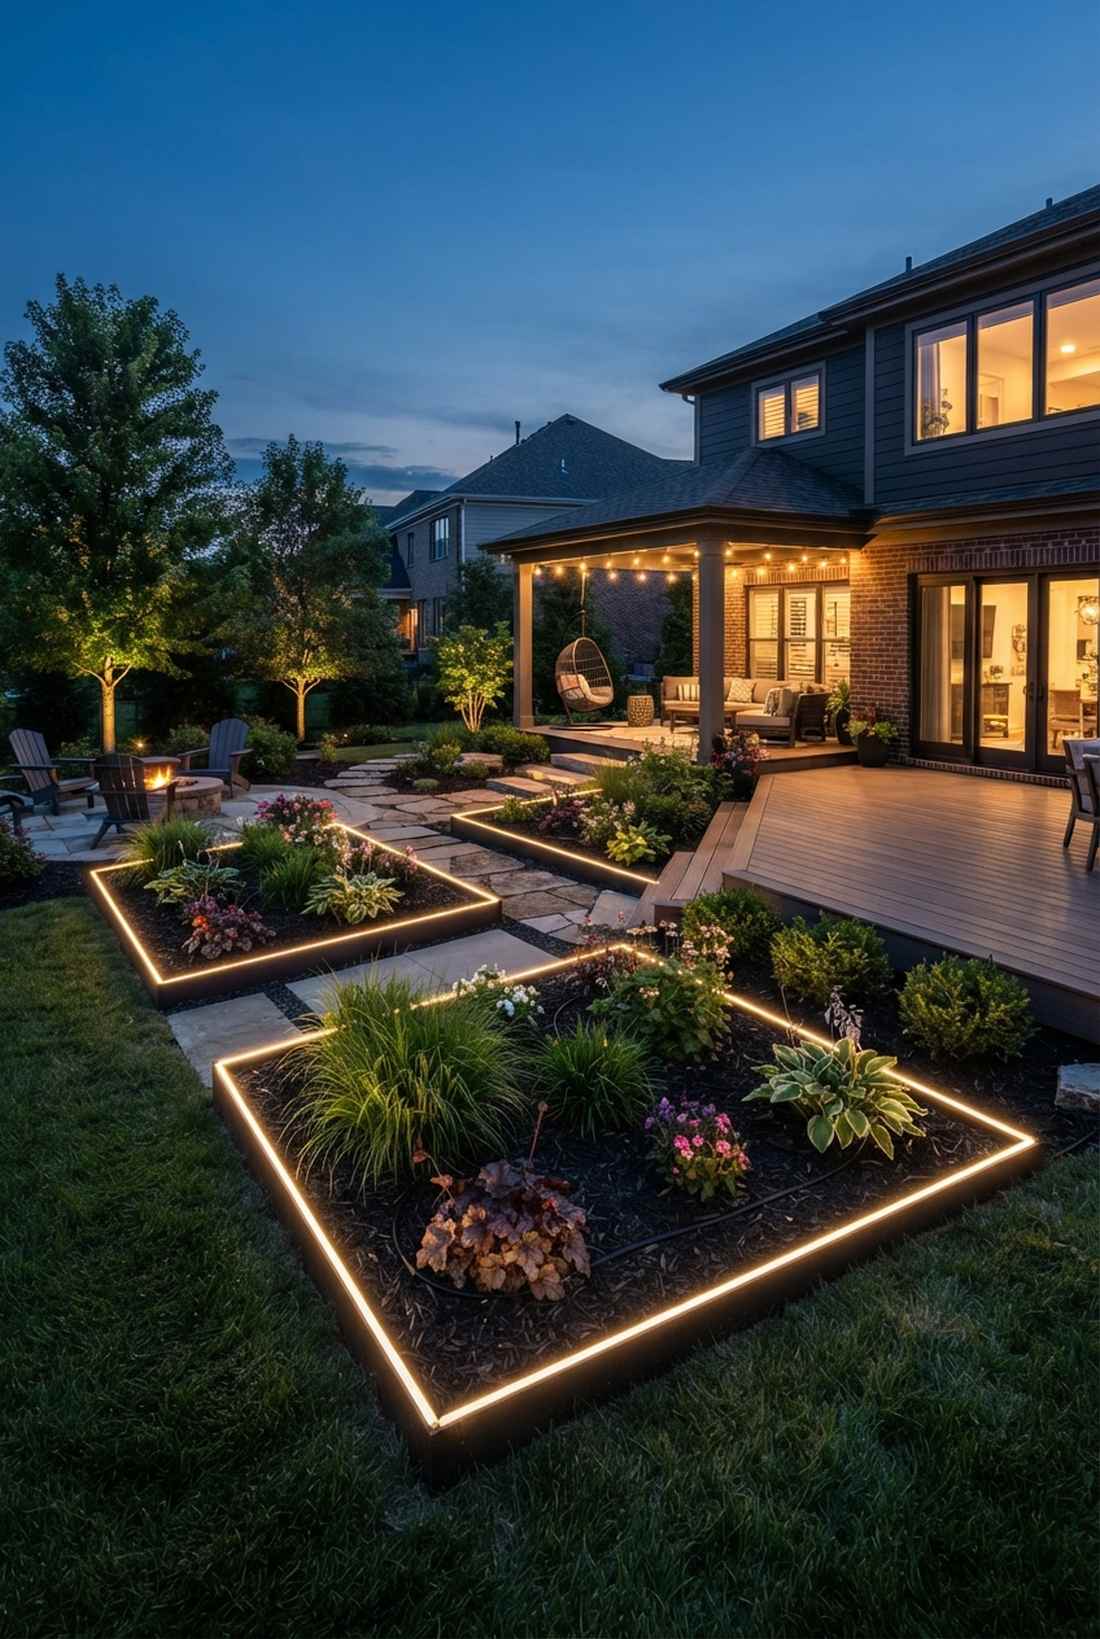
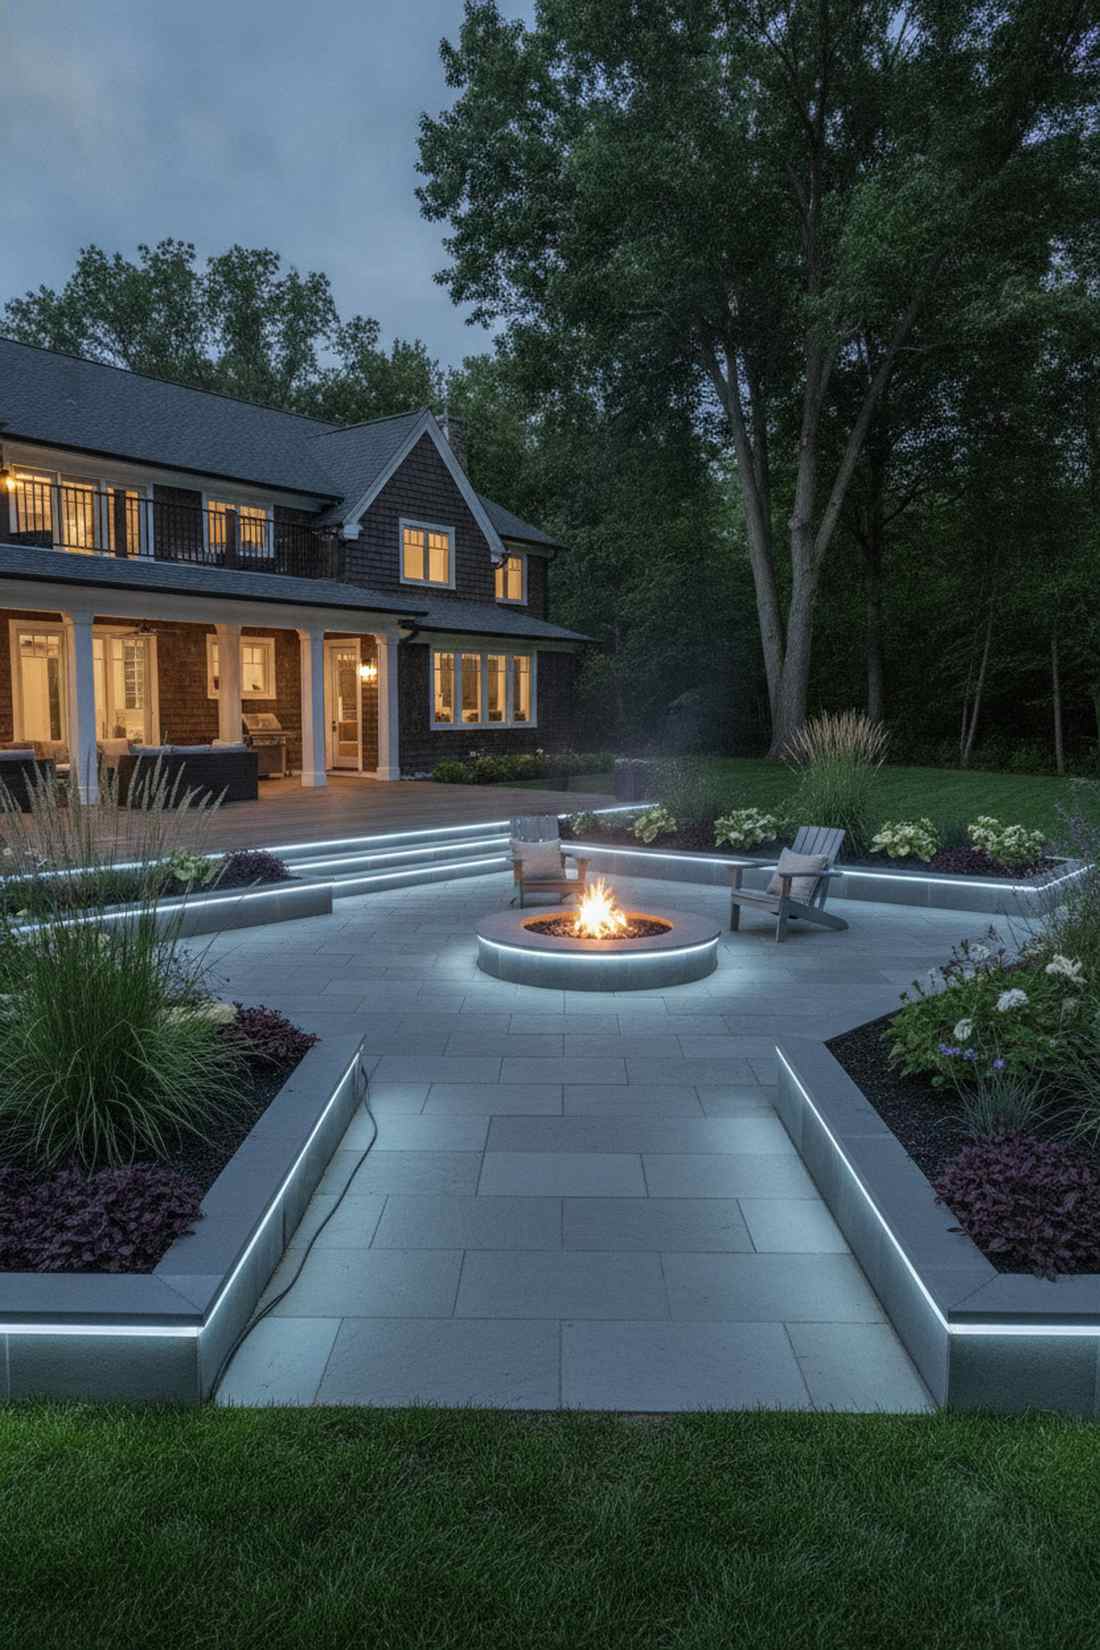
This glowing flower bed perimeter line feels like a futuristic botanical exhibit. It is phenomenally effective for showcasing crisp, geometric modern landscaping beds after the sun sets.
Many ignore their plants at night, but a continuous glowing border highlights your expensive landscaping work rather than letting it disappear into the dark. Opt for commercial-grade waterproof housings to handle daily sprinkler system bombardments.
Expect to spend about $50–$85 to frame a large bed. It’s a fantastic trick that completely transforms yard depth.
- Key Materials: Submersible rope strings
- Vibe / Style: Modern botanical showcase
- Difficulty: Easy peg-and-run setup
- Budget Breakdown: Submersible String: $60 | Ground Pegs: $15.
- Creator’s Tip: Bury the power cord beneath a thin layer of mulch to keep the sleek aesthetic uninterrupted between plant beds.
- Smart Sourcing: IP68 rated waterproof outdoor string tubing and heavy-duty landscaping fabric staples (bulk pack).
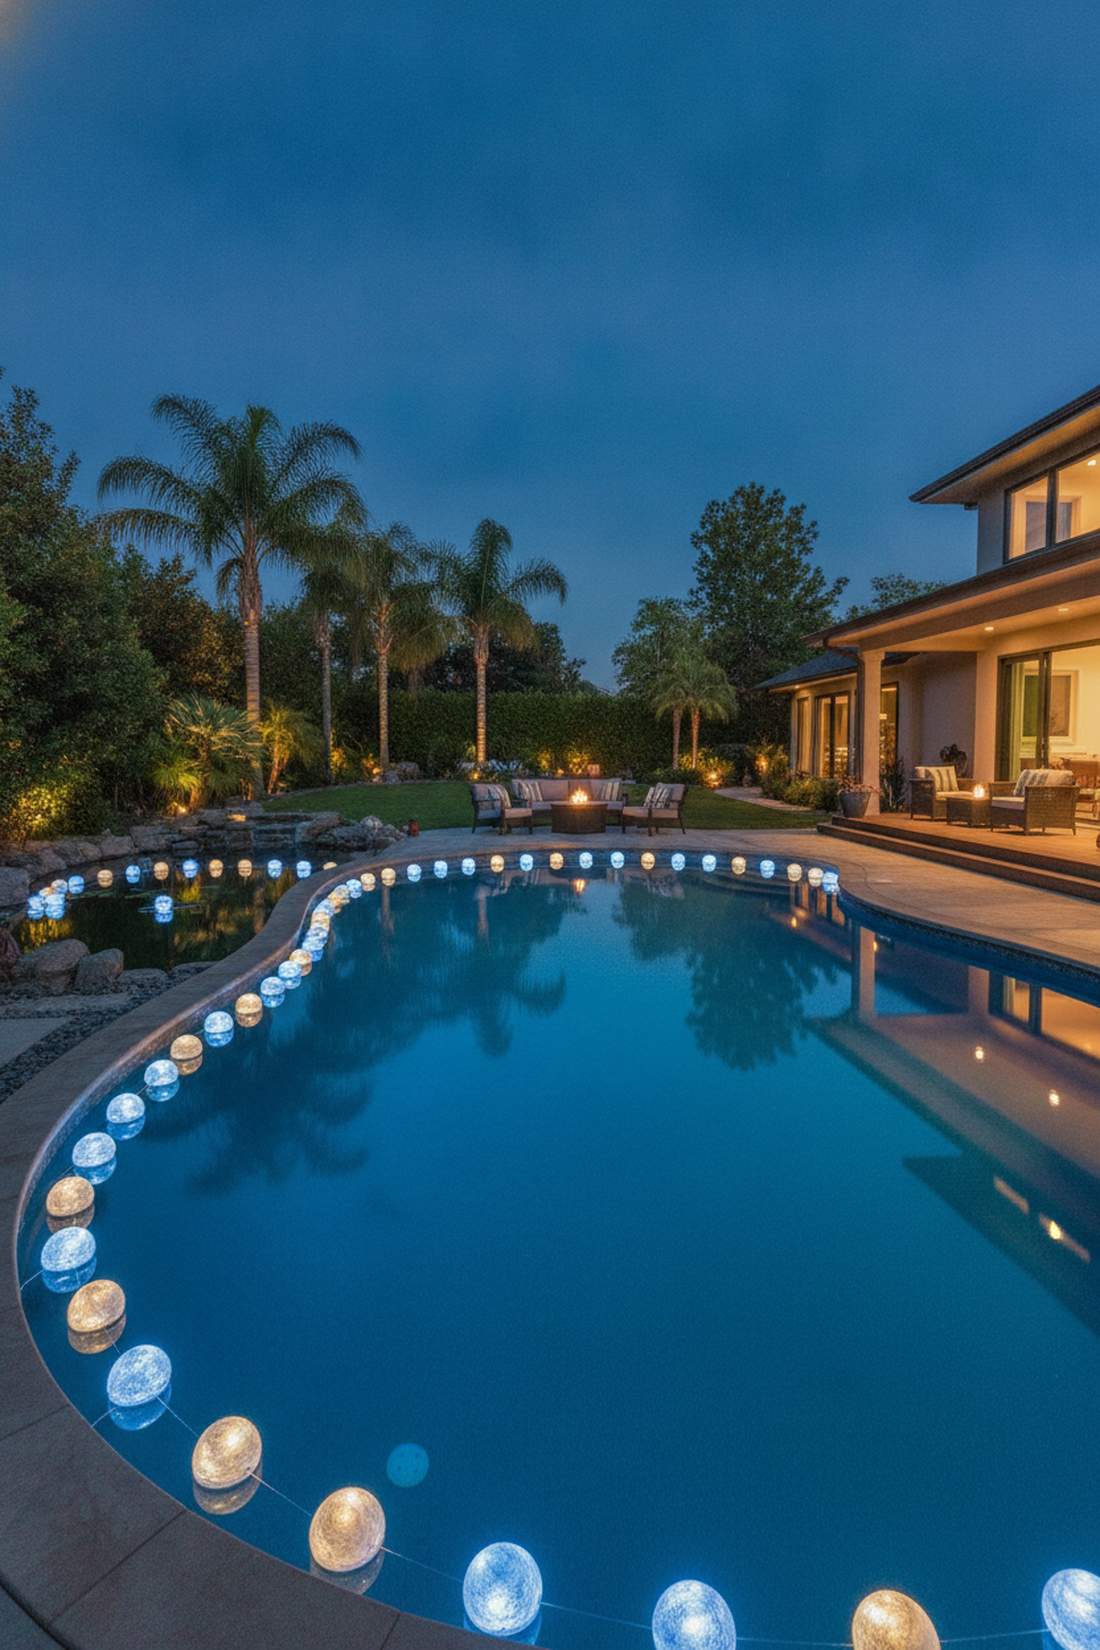
19. Pool Deck Perimeter Wrapping
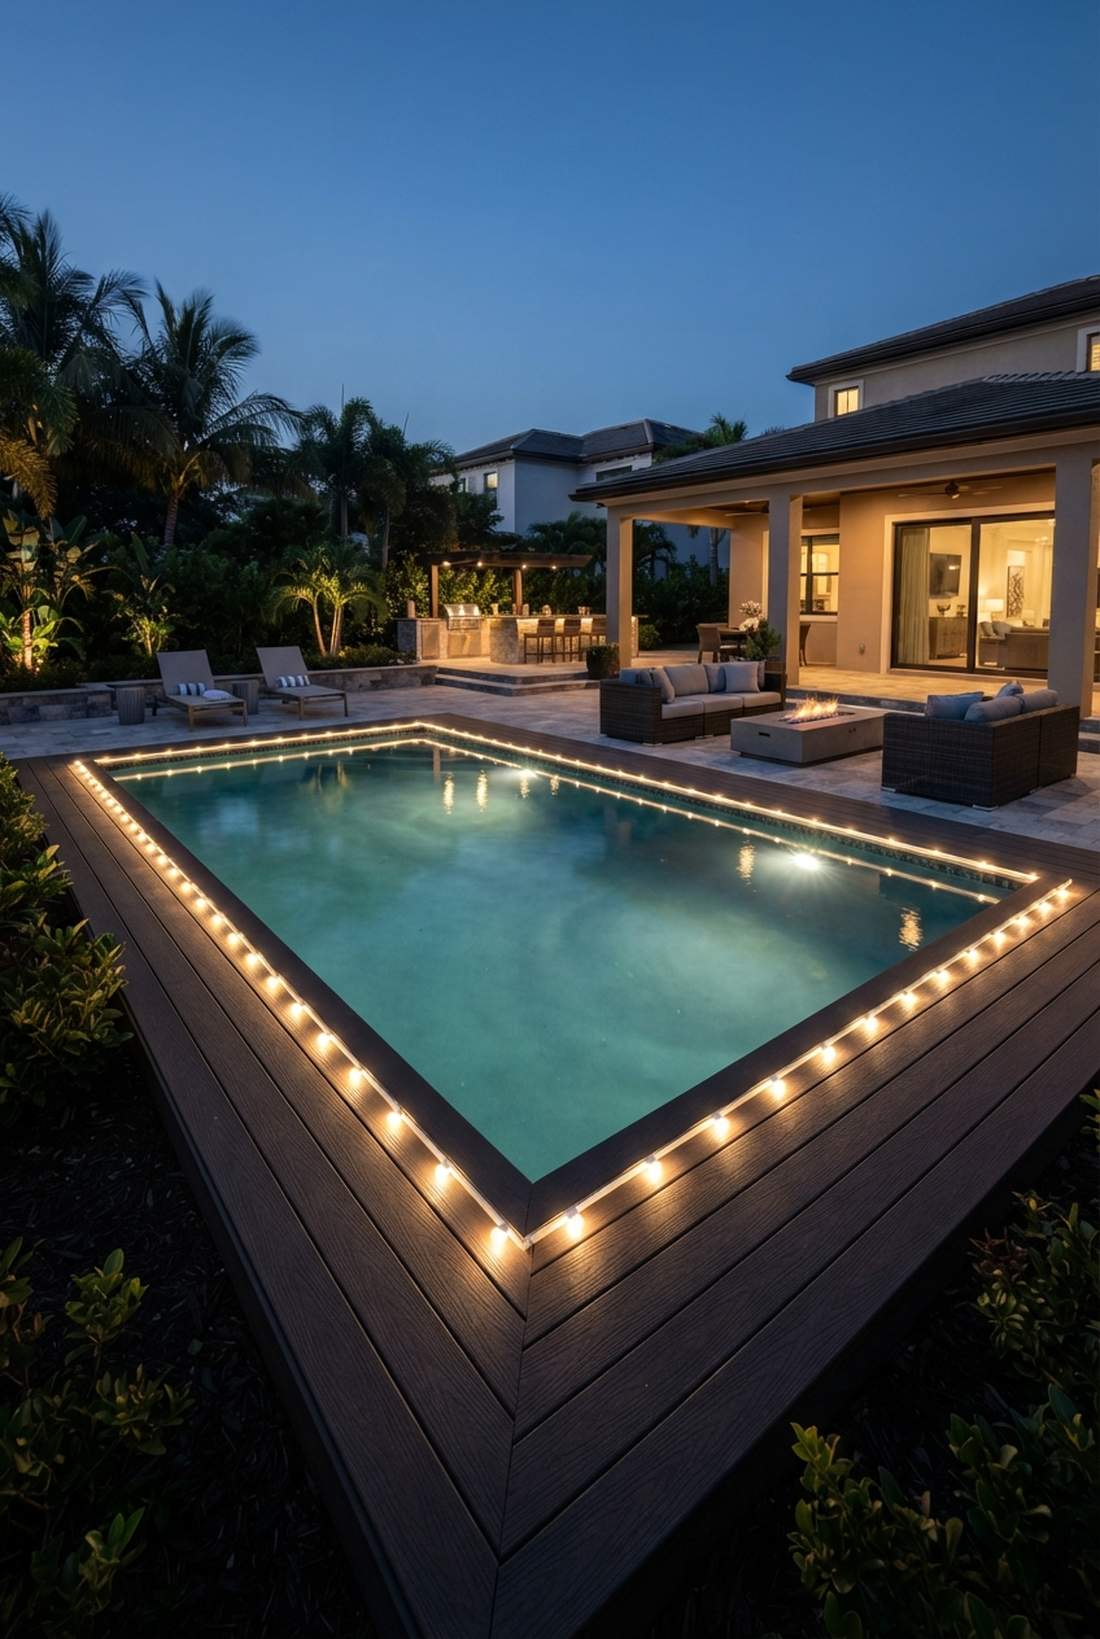
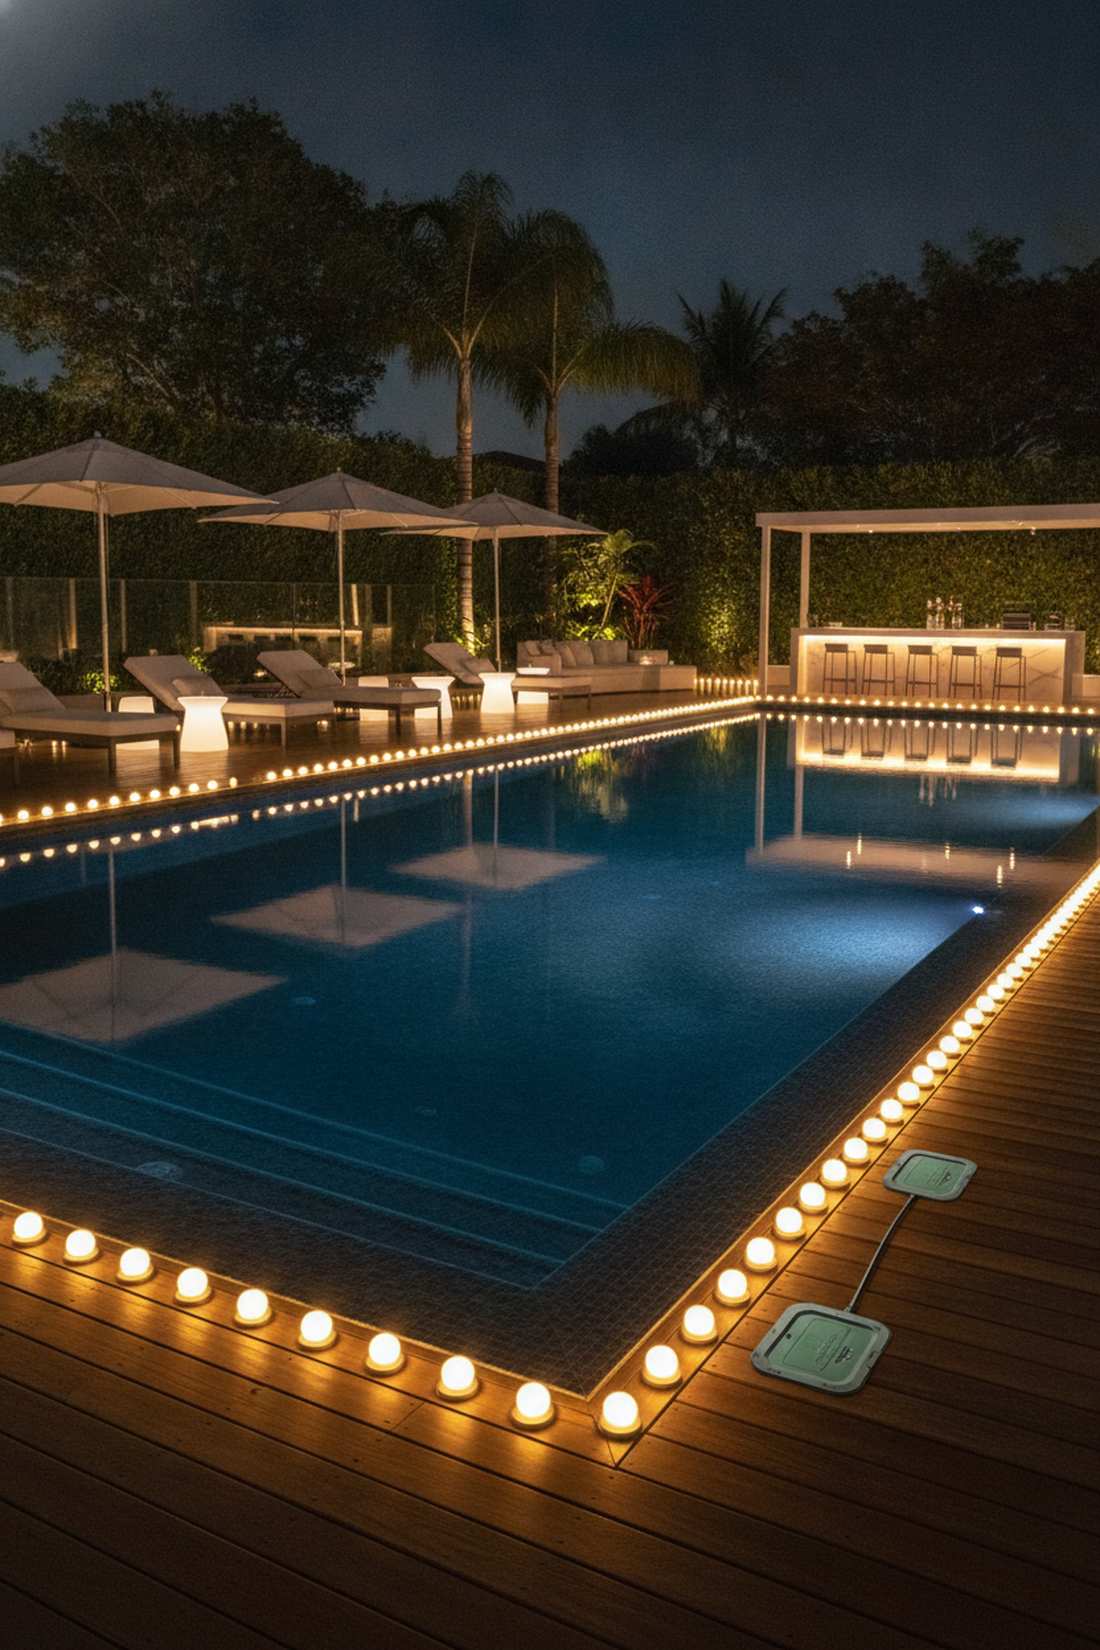
A vibrant poolside deck perimeter wrap feels like an exclusive Miami beach club at midnight. Perfect for creating a clear, illuminated safety barrier around the water’s edge for late-night swims.
Pool lighting is often terribly insufficient, but adding a low-level perimeter wrap creates stunning reflections on the water while doubling the usable space. You absolutely must use IP65-rated waterproof housings to prevent any risk from splashing chlorine water.
Securing this aquatic ambiance costs around $80–$140. Save this if you love hosting massive summer pool parties.
- Key Materials: Commercial waterproof strands
- Vibe / Style: VIP beach club
- Difficulty: Intermediate (routing power safely)
- Budget Breakdown: Waterproof Lights: $100 | Safe Outlets: $30.
- Creator’s Tip: Keep the strand at least 3 feet away from the actual water edge to comply with most outdoor electrical safety codes.
- Smart Sourcing: IP65 commercial-grade LED outdoor lighting globes and waterproof outdoor extension cord shields.
Think you need an electrician to get those fancy driveway entrance lights? You don’t. This next trick saves you hundreds of dollars.
20. Driveway Entrance Definition
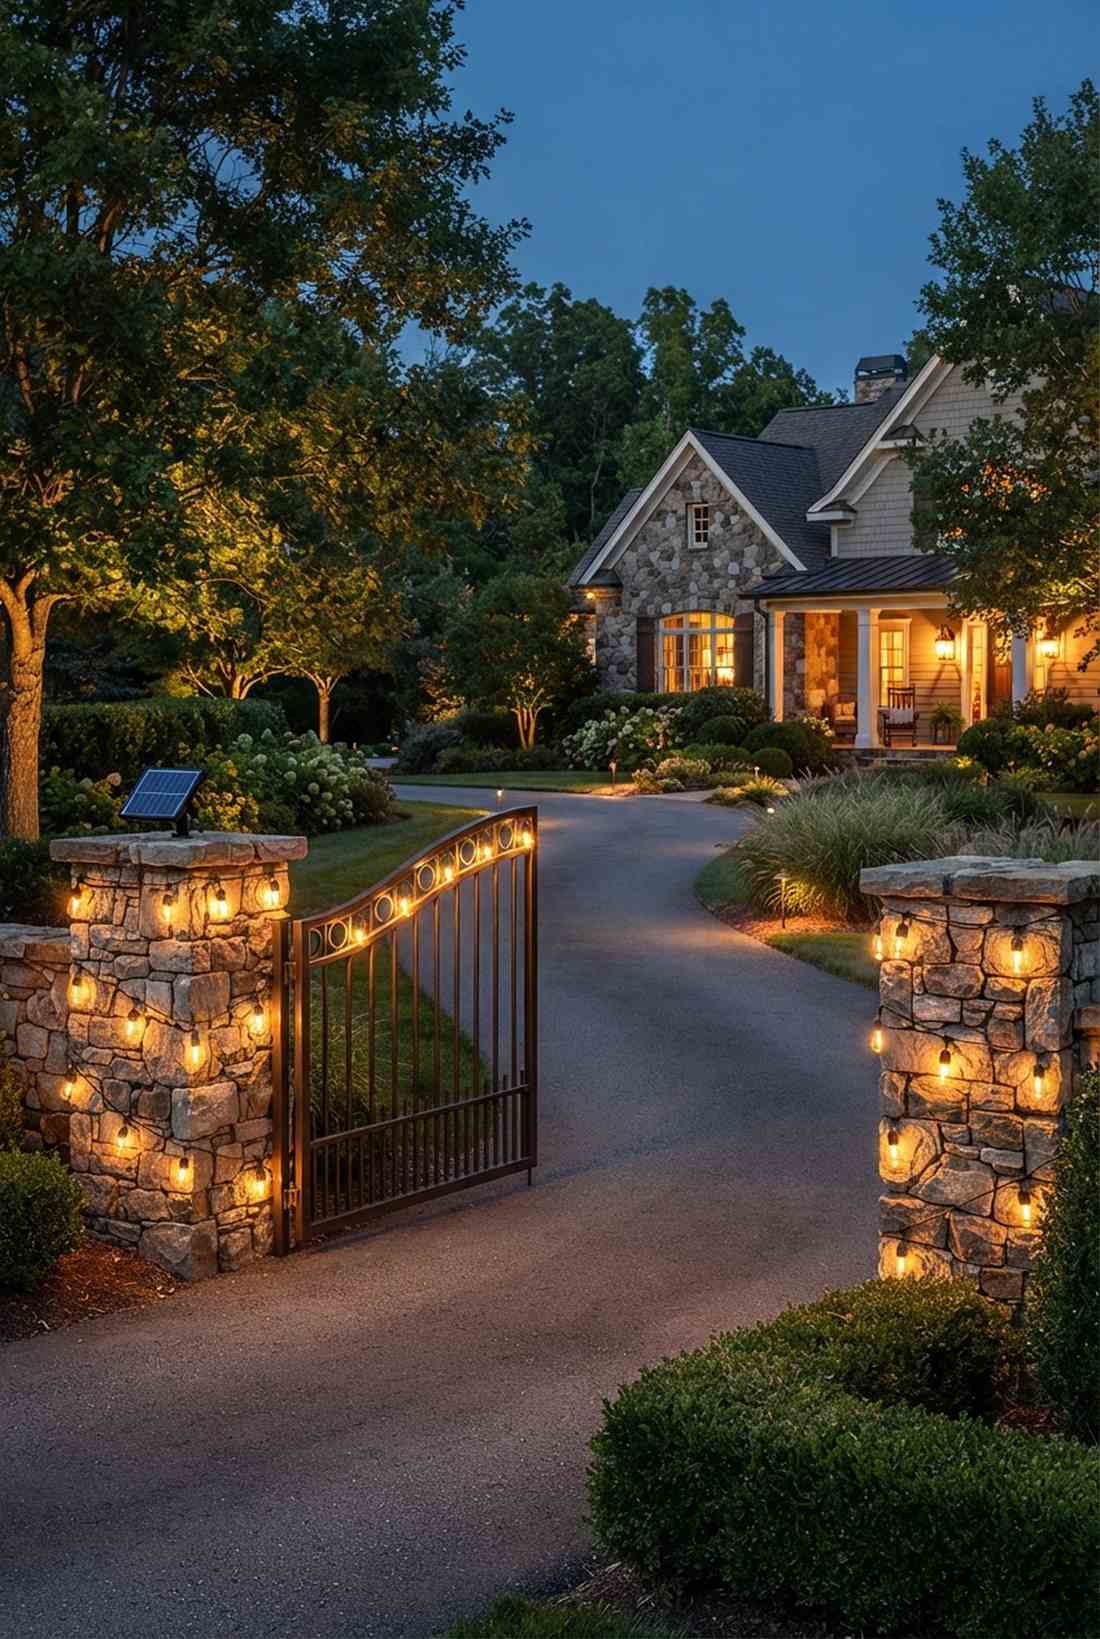
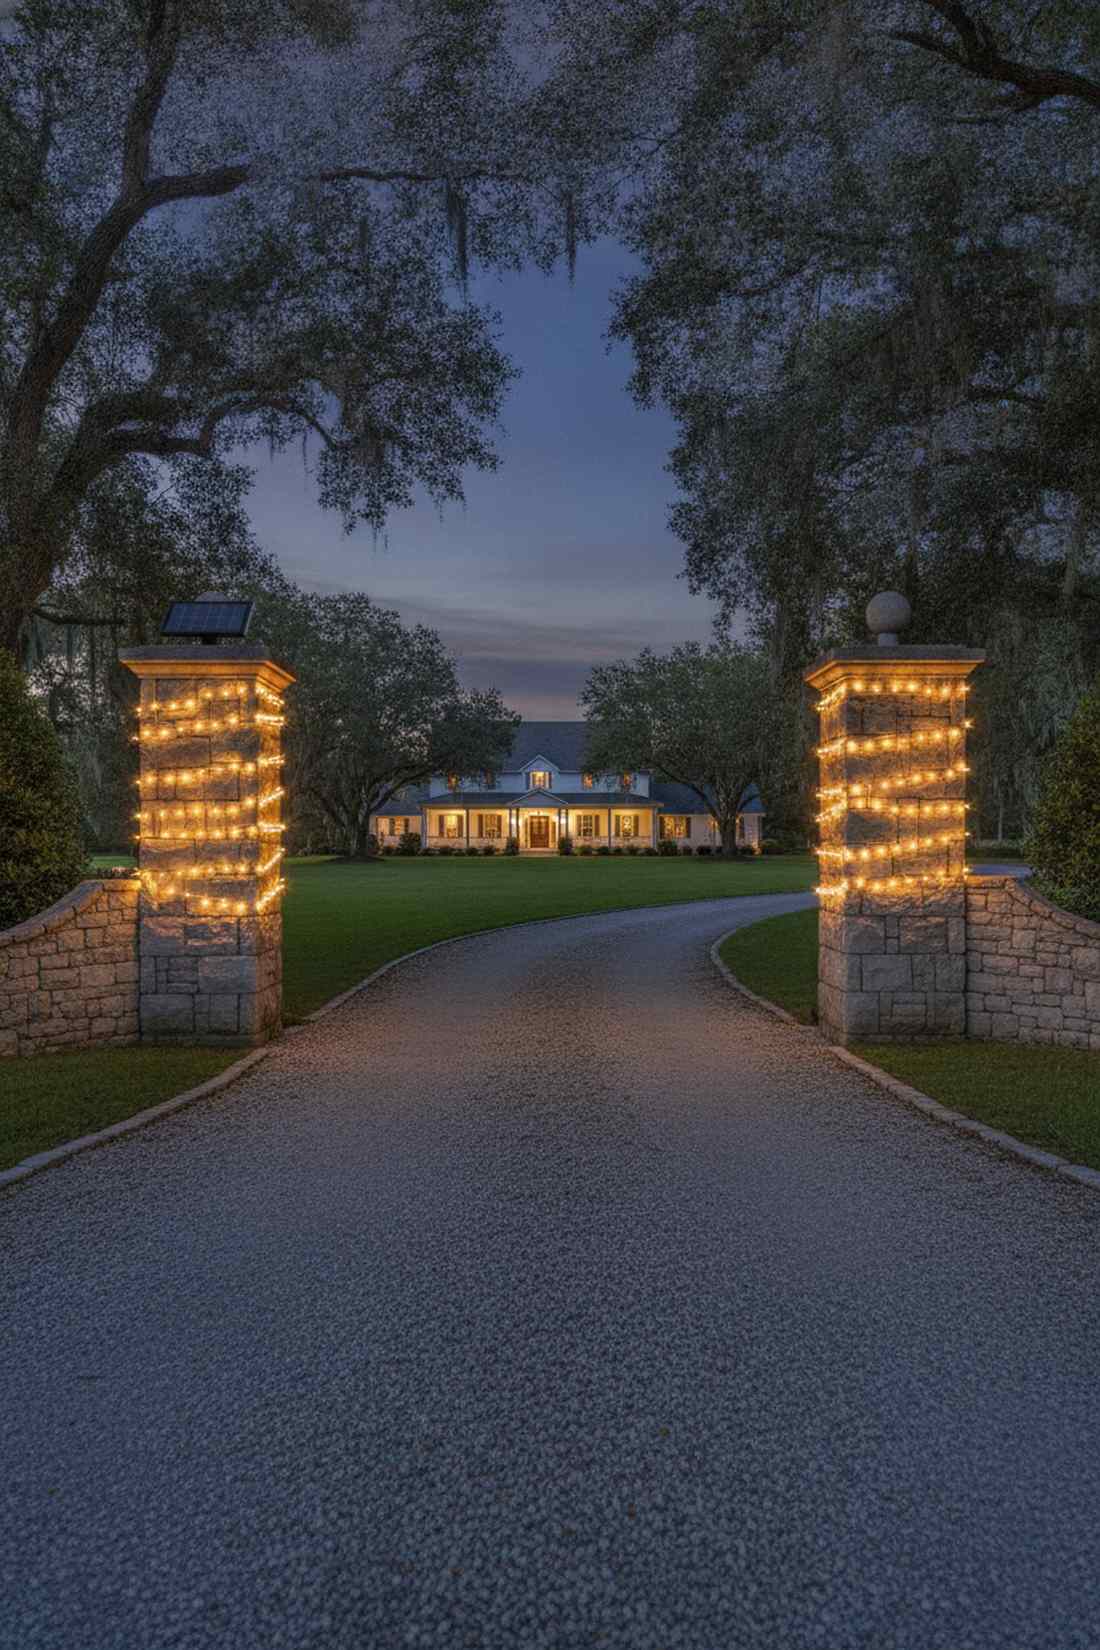
A brightly defined illuminated driveway entrance gate feels like you’re pulling into a grand country estate. It’s incredibly practical for dark, rural roads where guests constantly miss the turn.
Most people hire professionals for stone pillar lights, but cleanly wrapping the existing entry posts gives a designer-level finish for a fraction of the cost. Using solar-powered heavy-duty strings here completely eliminates the need for expensive trenching for power lines.
You can execute this grand entrance for just $45–$75. Highly recommended to dramatically increase your home’s curb appeal at night.
- Key Materials: High-capacity solar string sets
- Vibe / Style: Grand estate entrance
- Difficulty: Very easy wrap job
- Budget Breakdown: Solar Strings: $55 | Mounting Putty: $10.
- Creator’s Tip: Position the solar panel on the very top of the pillar facing true south to ensure the lights stay bright until dawn.
- Smart Sourcing: high-efficiency solar-powered outdoor Edison strings and heavy-duty masonry mounting putty.
21. Retaining Wall Cap Mounting
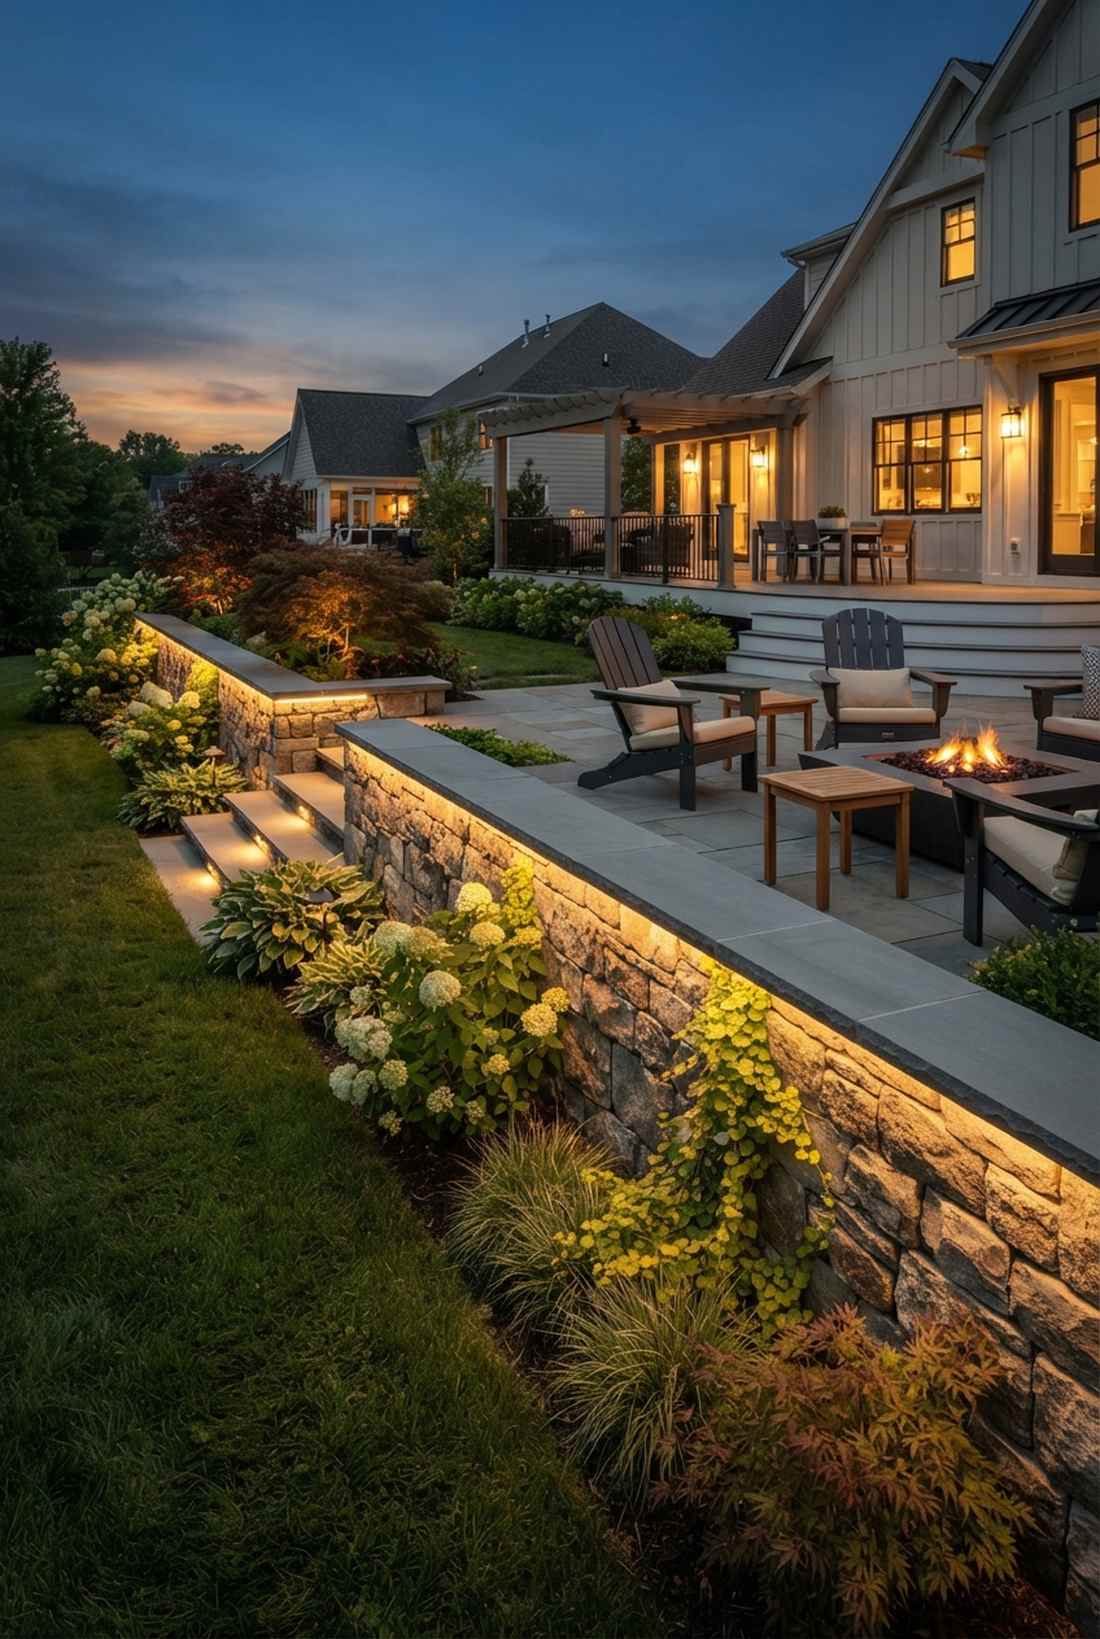
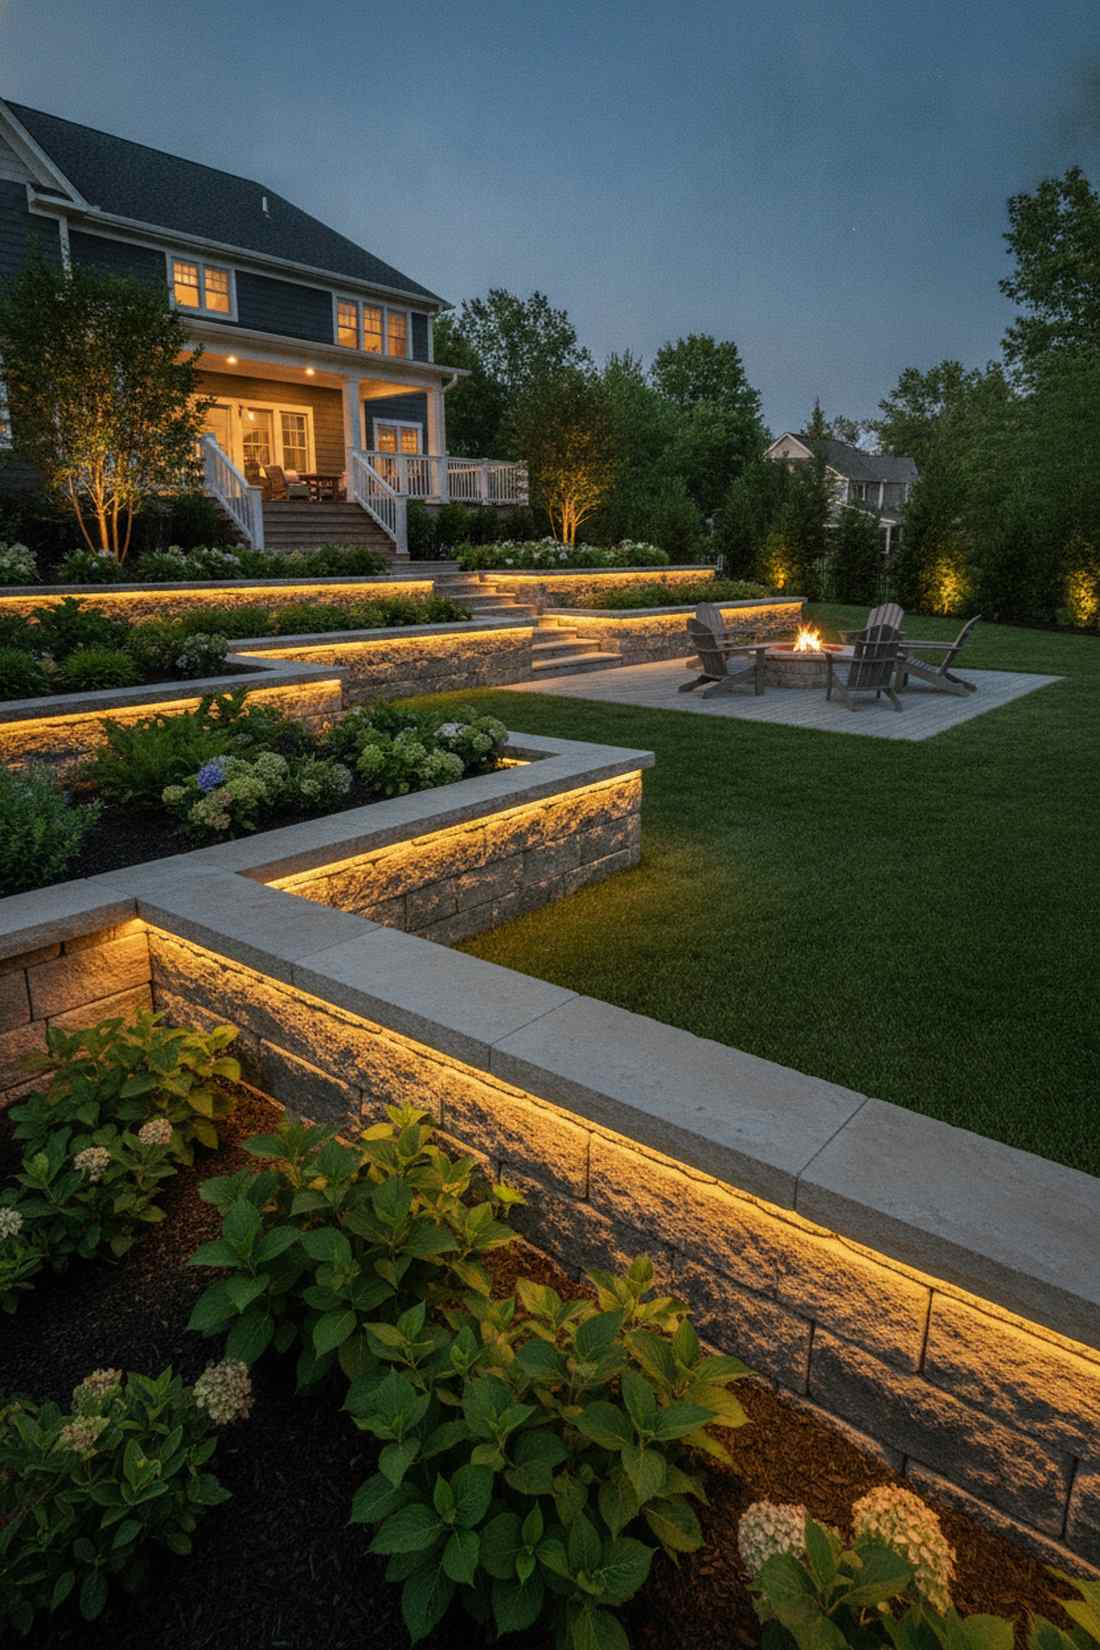
This sharp illuminated retaining wall ledge feels like a meticulously engineered terraced garden in a luxury plaza. Excellent for yards with intense elevation changes and heavy stone hardscaping.
Exposed retaining walls can feel cold and imposing, but casting a warm linear wash of light just beneath the capstone completely softens the masonry. Rely on heavy-duty adhesive clips to secure the line without having to drill into expensive paving stones.
This high-end masonry lighting upgrade runs about $50–$90. Pin this if you want to make your stone walls look spectacular.
- Key Materials: Outdoor masonry adhesive and flat cords
- Vibe / Style: Upscale terraced garden
- Difficulty: Requires clean masonry adhesion
- Budget Breakdown: Flat Cord LEDs: $60 | Adhesive: $20.
- Creator’s Tip: Clean the underside of the wall cap with a wire brush and rubbing alcohol before applying adhesive clips, or they will fall off instantly.
- Smart Sourcing: flat-wire architectural LED strings and outdoor-rated construction adhesive tape.
Material Guide: Cheap vs. Premium Aesthetic
Knowing exactly where to save and where to spend makes all the difference in achieving that “looks expensive but isn’t” vibe.
- Standard vs. UV-Resistant/Premium: Standard green PVC wires crack and turn white in the sun after one summer. Upgrading to UV-coated commercial jackets ensures your investment survives extreme heat and winter freezes.
- Pre-made Kits vs. Sourcing Locally: Buying individual pieces at a big-box store often costs 40% more. Leveraging complete steel tension starter kits online guarantees you get exact-fit components and professional-grade rust resistance in one shot.
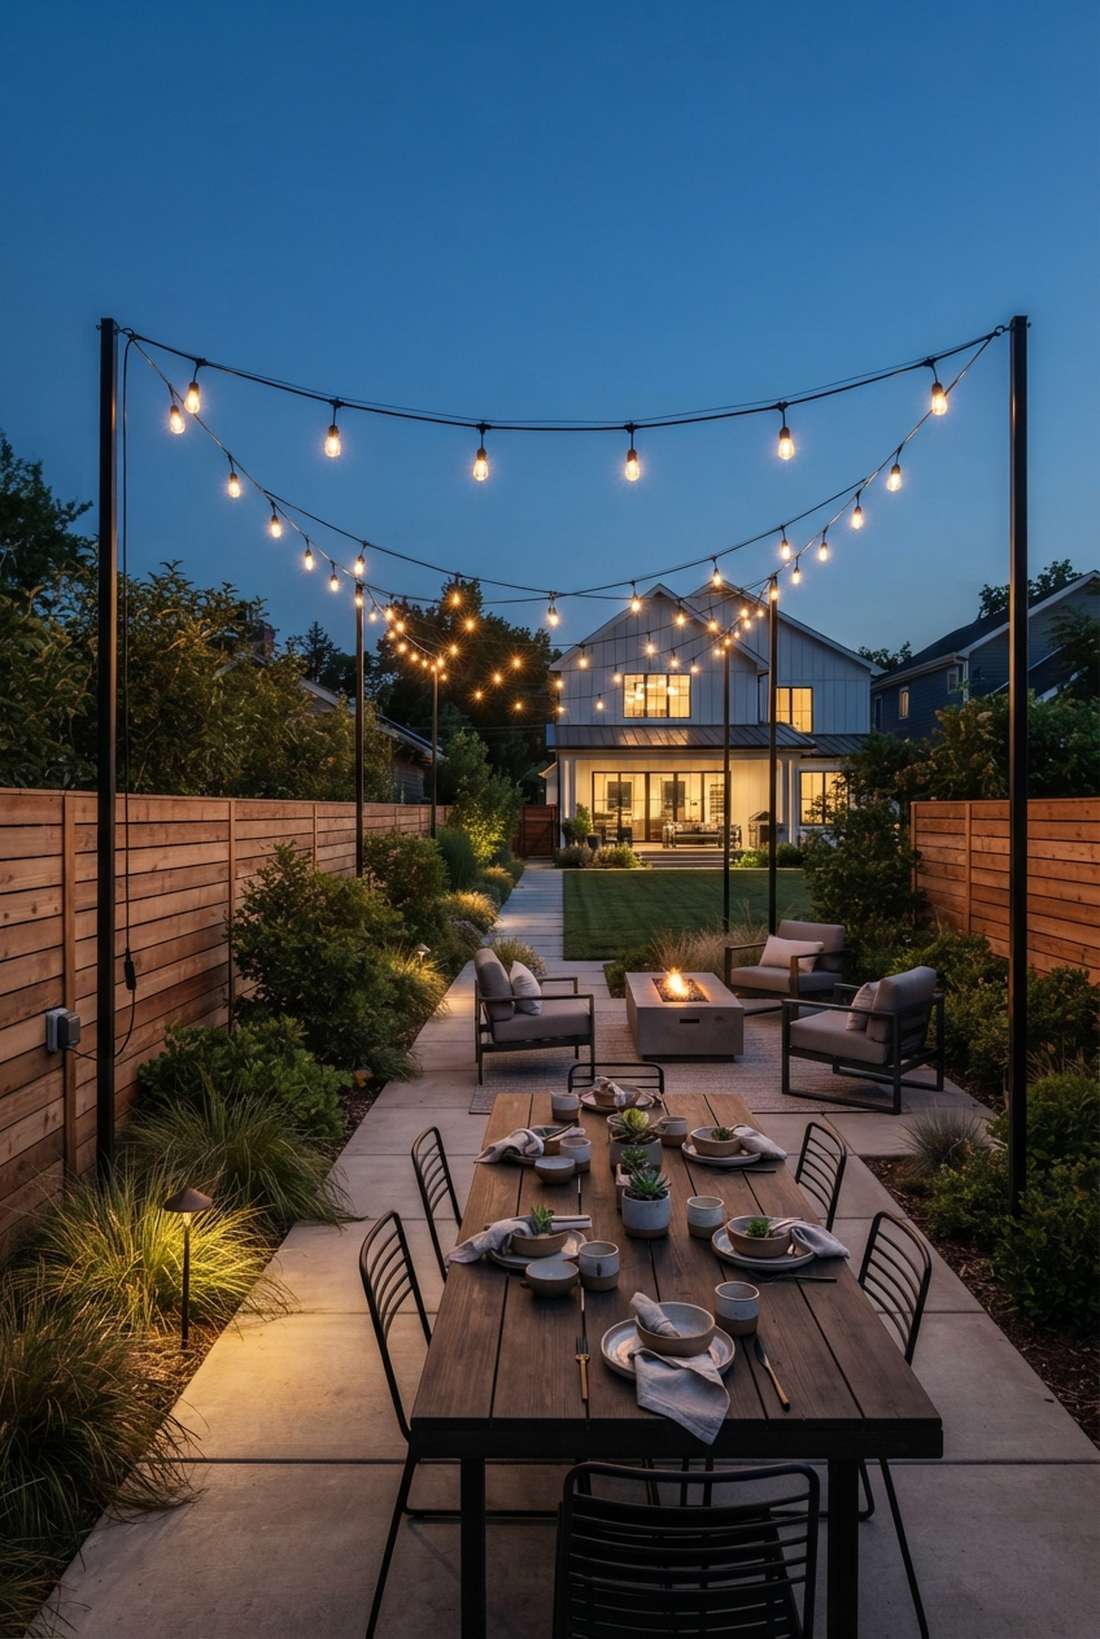
Freestanding Post Installations for Flexible Layouts
Permanent and portable posts anchor string lights in areas lacking existing structures. Landscape architects specify posts to establish lighting grids across open lawns and large entertainment zones.
22. Treated Wood Light Poles
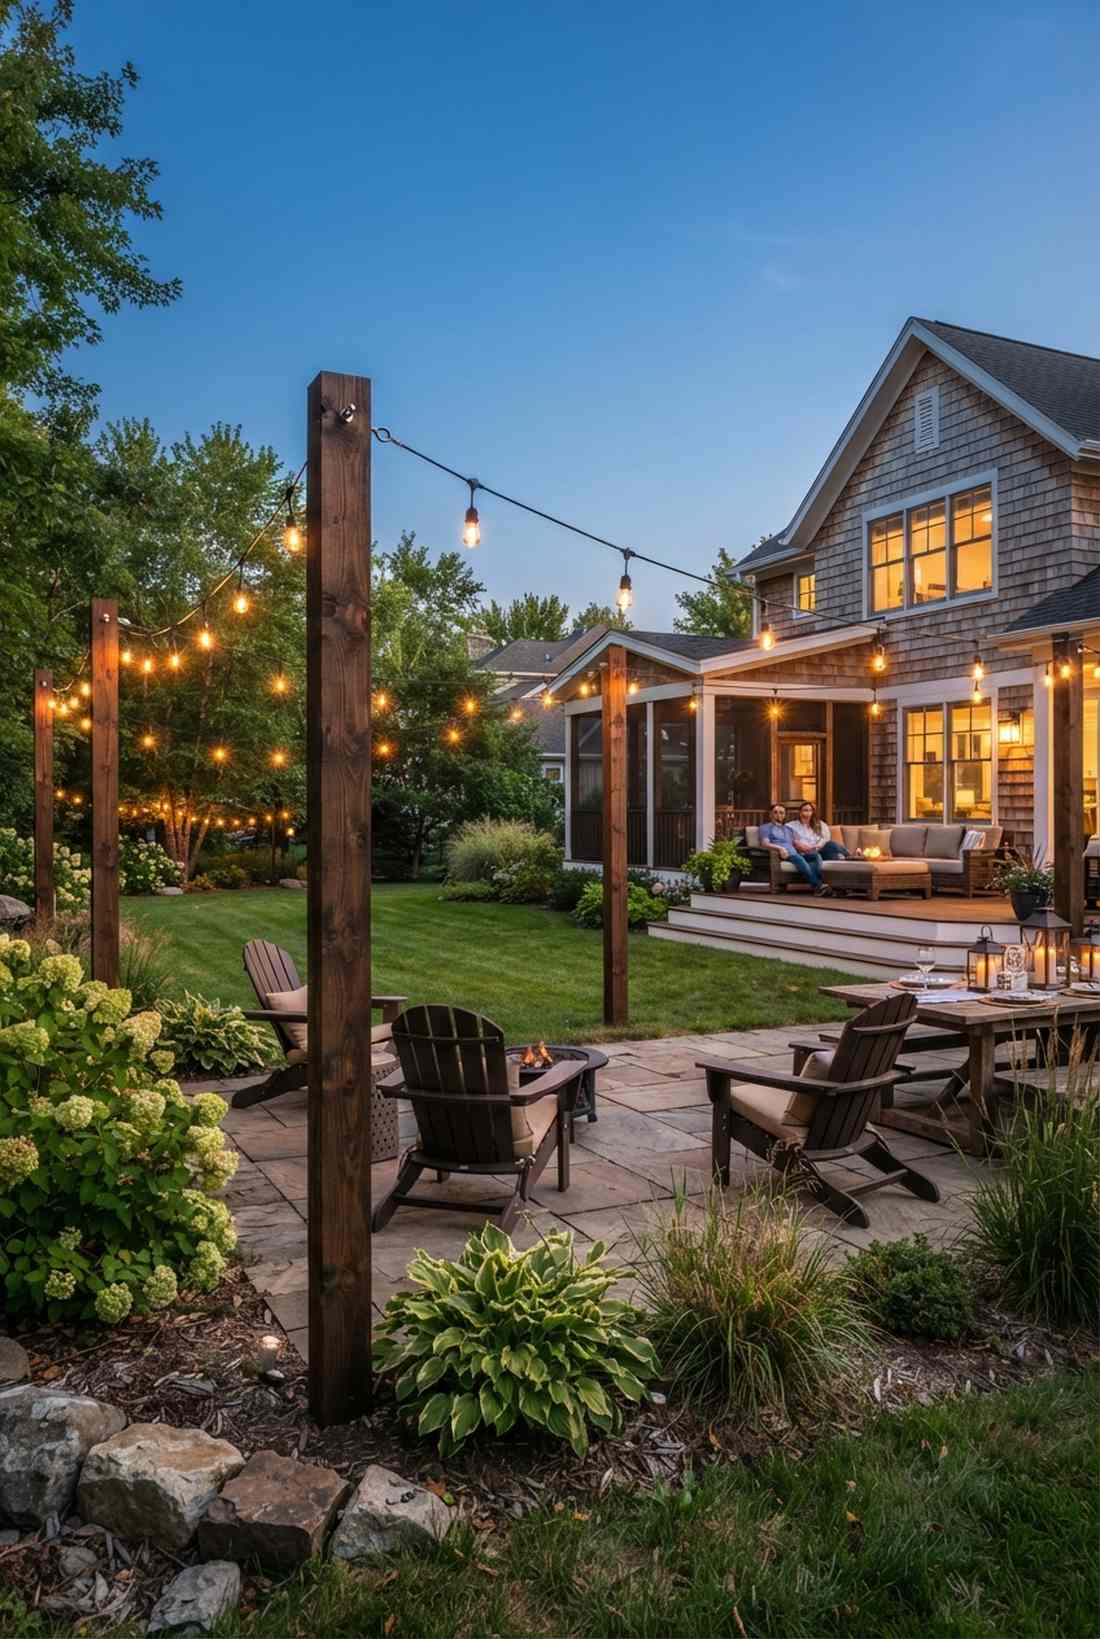
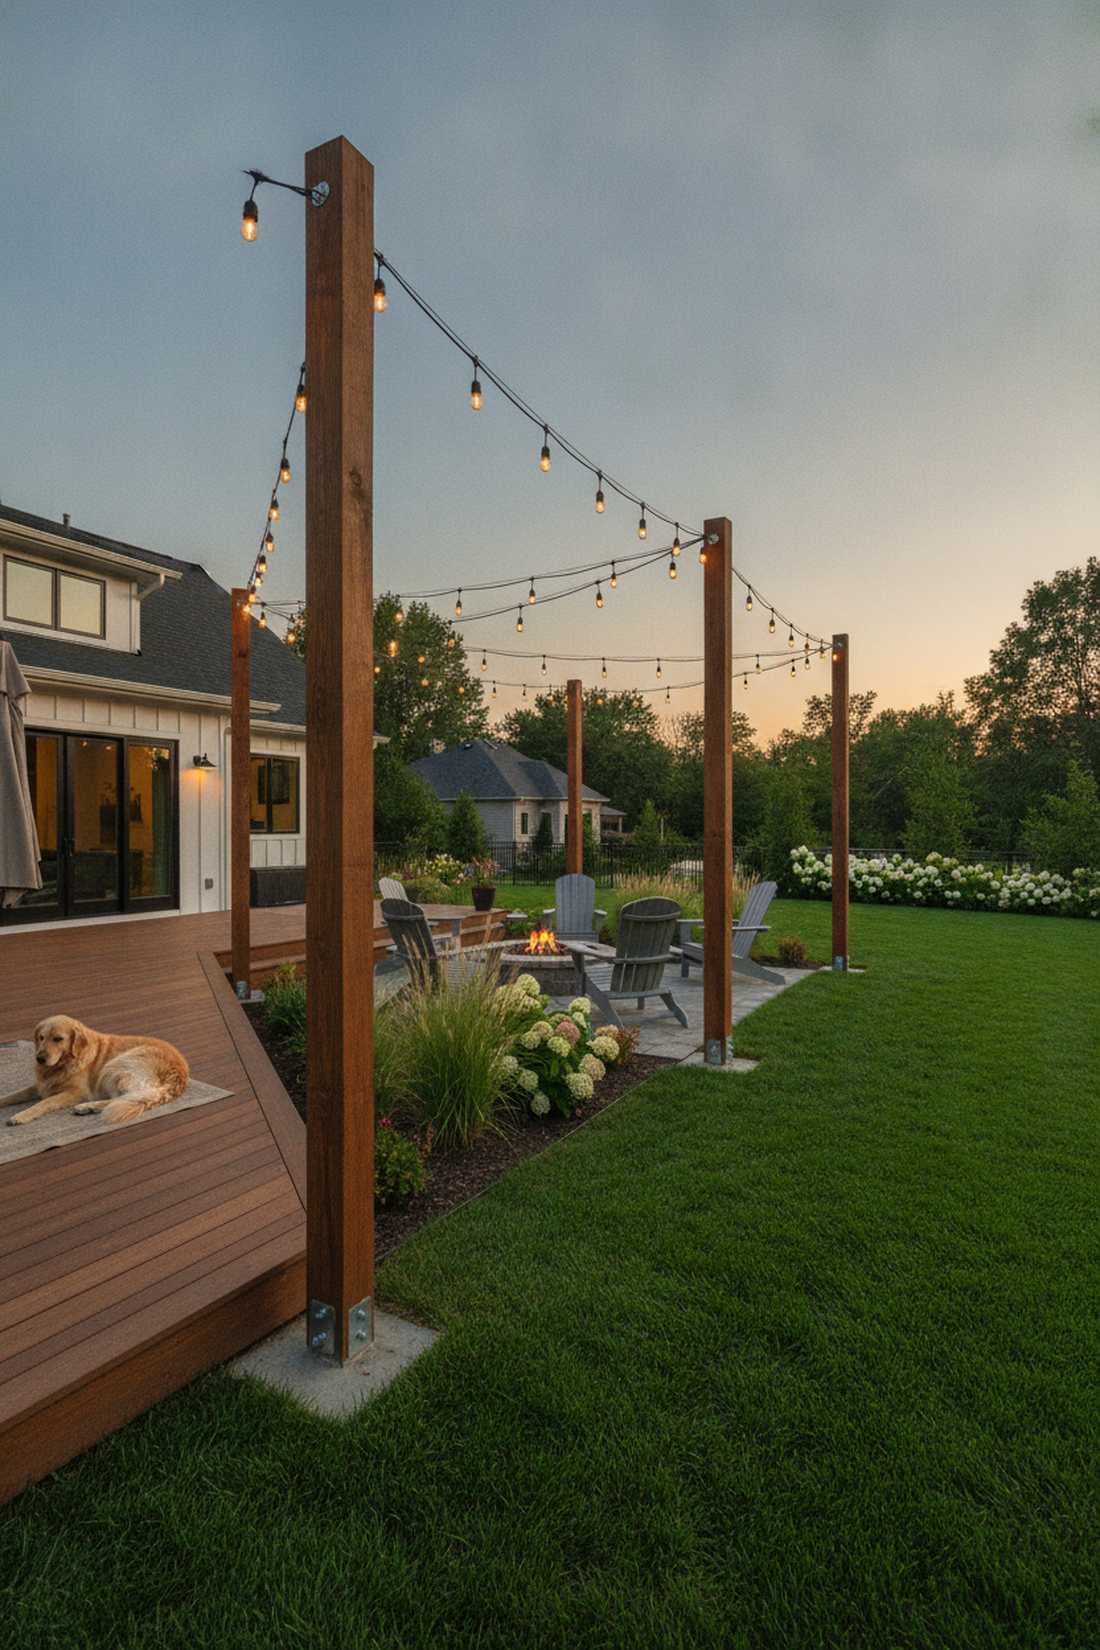
These robust custom wooden bistro posts feel like the solid foundation of a rustic outdoor wedding venue. This is the ultimate solution for massive, empty backyards that lack any tall trees or pergolas for anchoring.
Flimsy metal poles lean and snap under tension, but sinking a 4×4 pressure-treated wood post into concrete delivers a permanent, bulletproof anchor. You can stain them to perfectly match your deck, making them look like a highly expensive custom architectural build.
Constructing permanent poles costs roughly $60–$90 per post. Save this blueprint to permanently solve your lack of hanging structures.
- Key Materials: 4×4 posts, concrete, heavy eye-bolts
- Vibe / Style: Permanent rustic infrastructure
- Difficulty: Requires digging and concrete mixing
- Budget Breakdown: Lumber/Concrete: $50 | Hardware: $25.
- Creator’s Tip: Set the posts at a slight 2-degree outward angle so that when the heavy light strings pull them inward, they stand perfectly straight.
- Smart Sourcing: heavy-duty stainless steel eye-bolts (rust-proof pack) and commercial-grade outdoor lighting string.
23. Metal Shepherd Hook Stakes
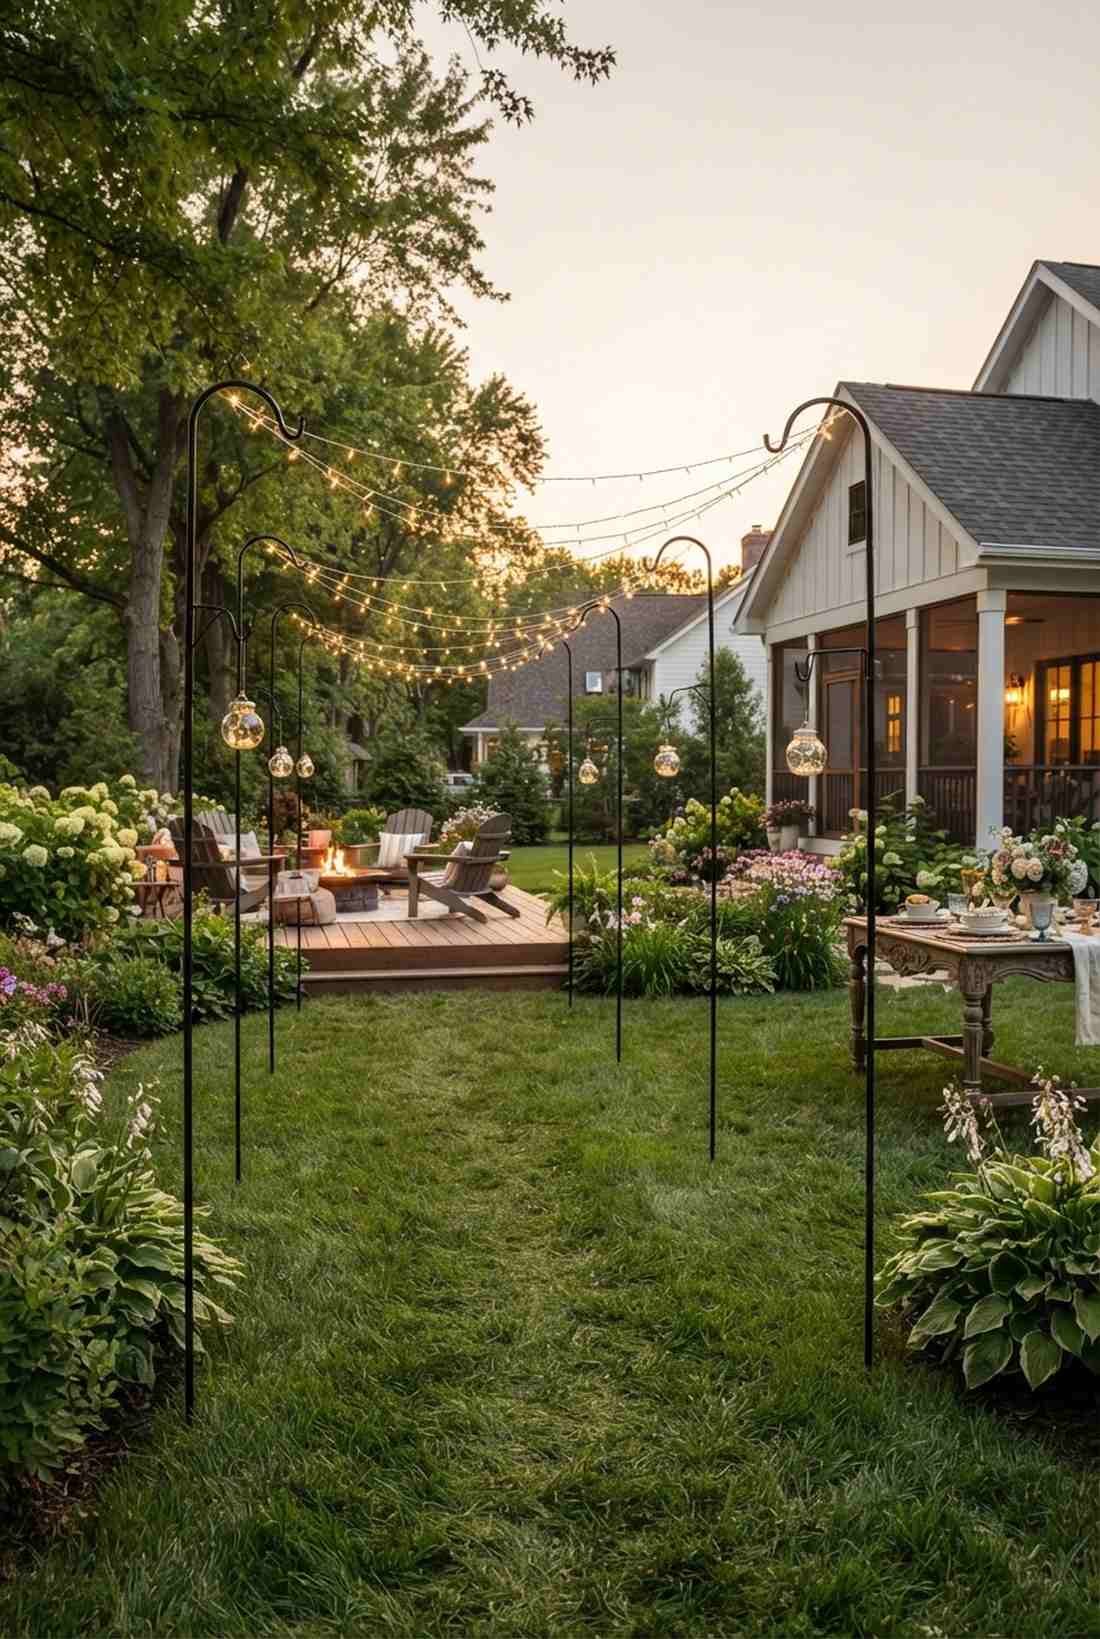
A whimsical shepherd hook pathway canopy feels like a delicate vintage garden party waiting for guests. Perfect for temporary summer event lighting over grassy lawns where you don’t want to pour concrete.
People often ruin their lawns for a single party, but driving sleek, black iron hooks into the turf provides adequate height without a trace of permanent damage. Pair these with lightweight fairy garden supplies and small globes to avoid bending the metal.
This portable setup costs a mere $45–$75 for a bundle of tall stakes. An absolute lifesaver for temporary backyard celebrations.
- Key Materials: 8-foot metal stakes
- Vibe / Style: Portable garden elegance
- Difficulty: Just push into the dirt
- Budget Breakdown: Tall Stakes: $55 | Light Strands: $20.
- Creator’s Tip: Water the lawn deeply the night before installation; the soft soil makes pushing the 5-prong stake bases in a breeze.
- Smart Sourcing: extra-tall heavy-duty shepherd hooks (multi-pack) and lightweight LED micro-bulbs.
24. Umbrella Base Post Adapters
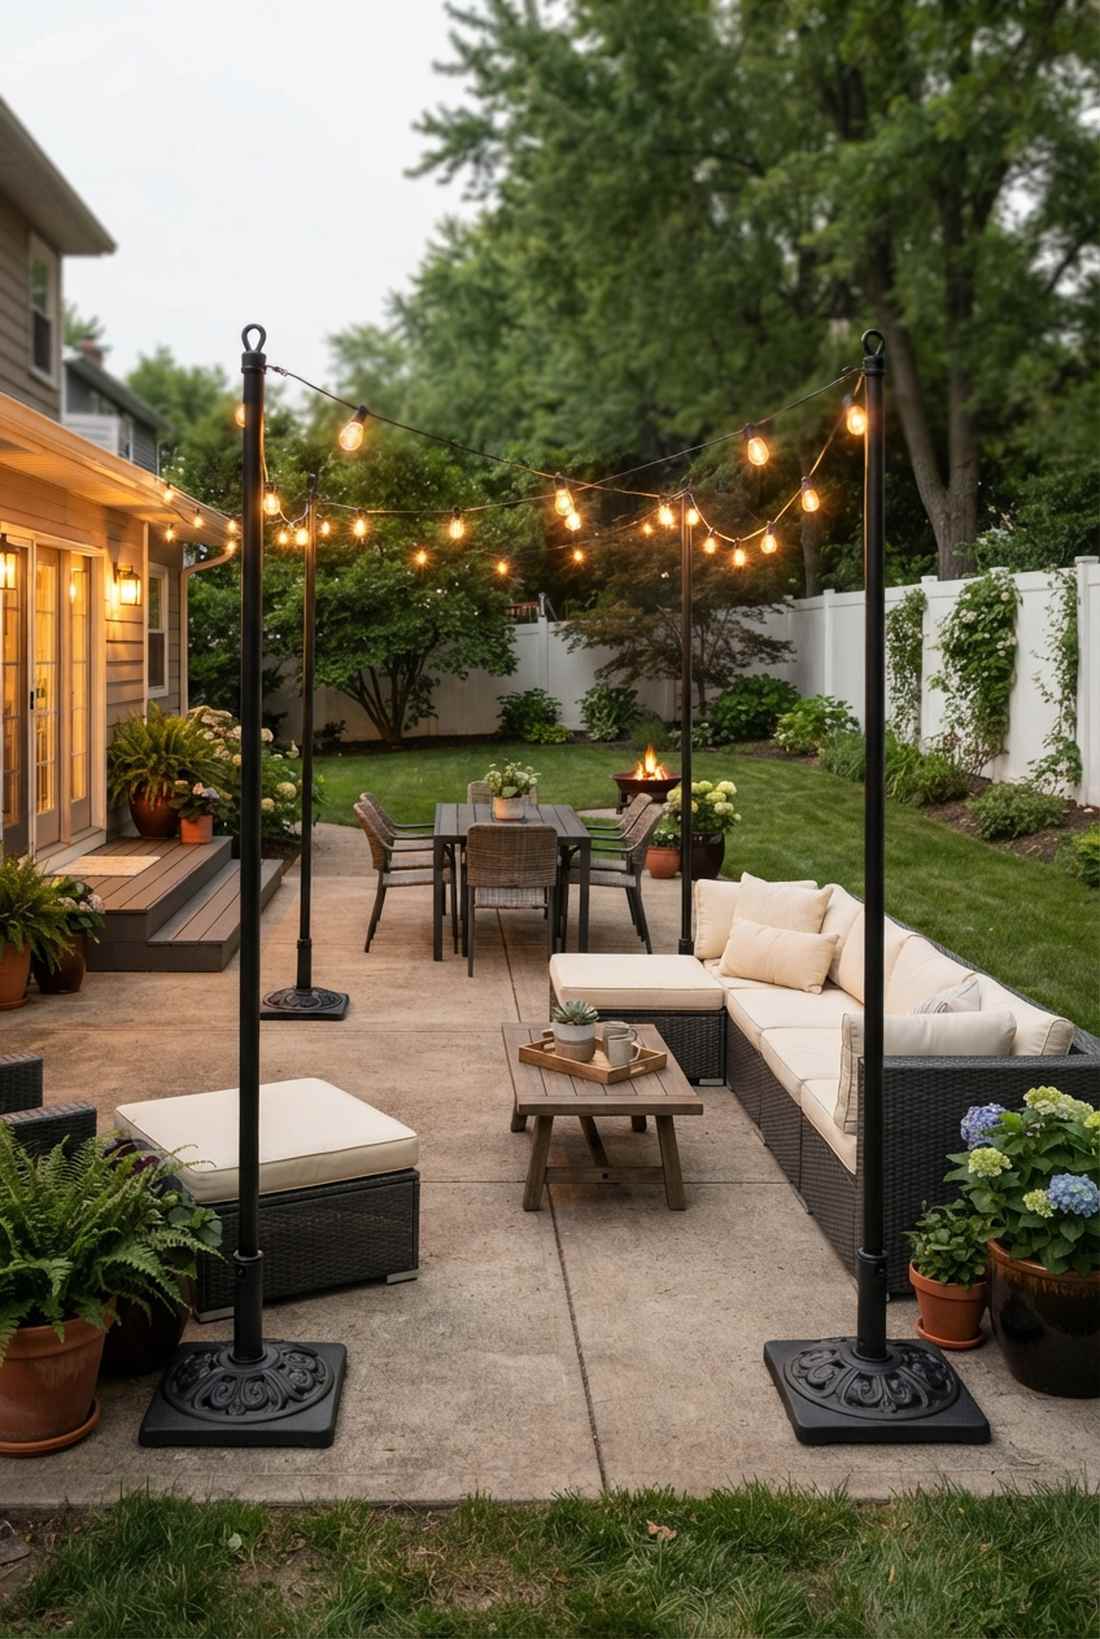
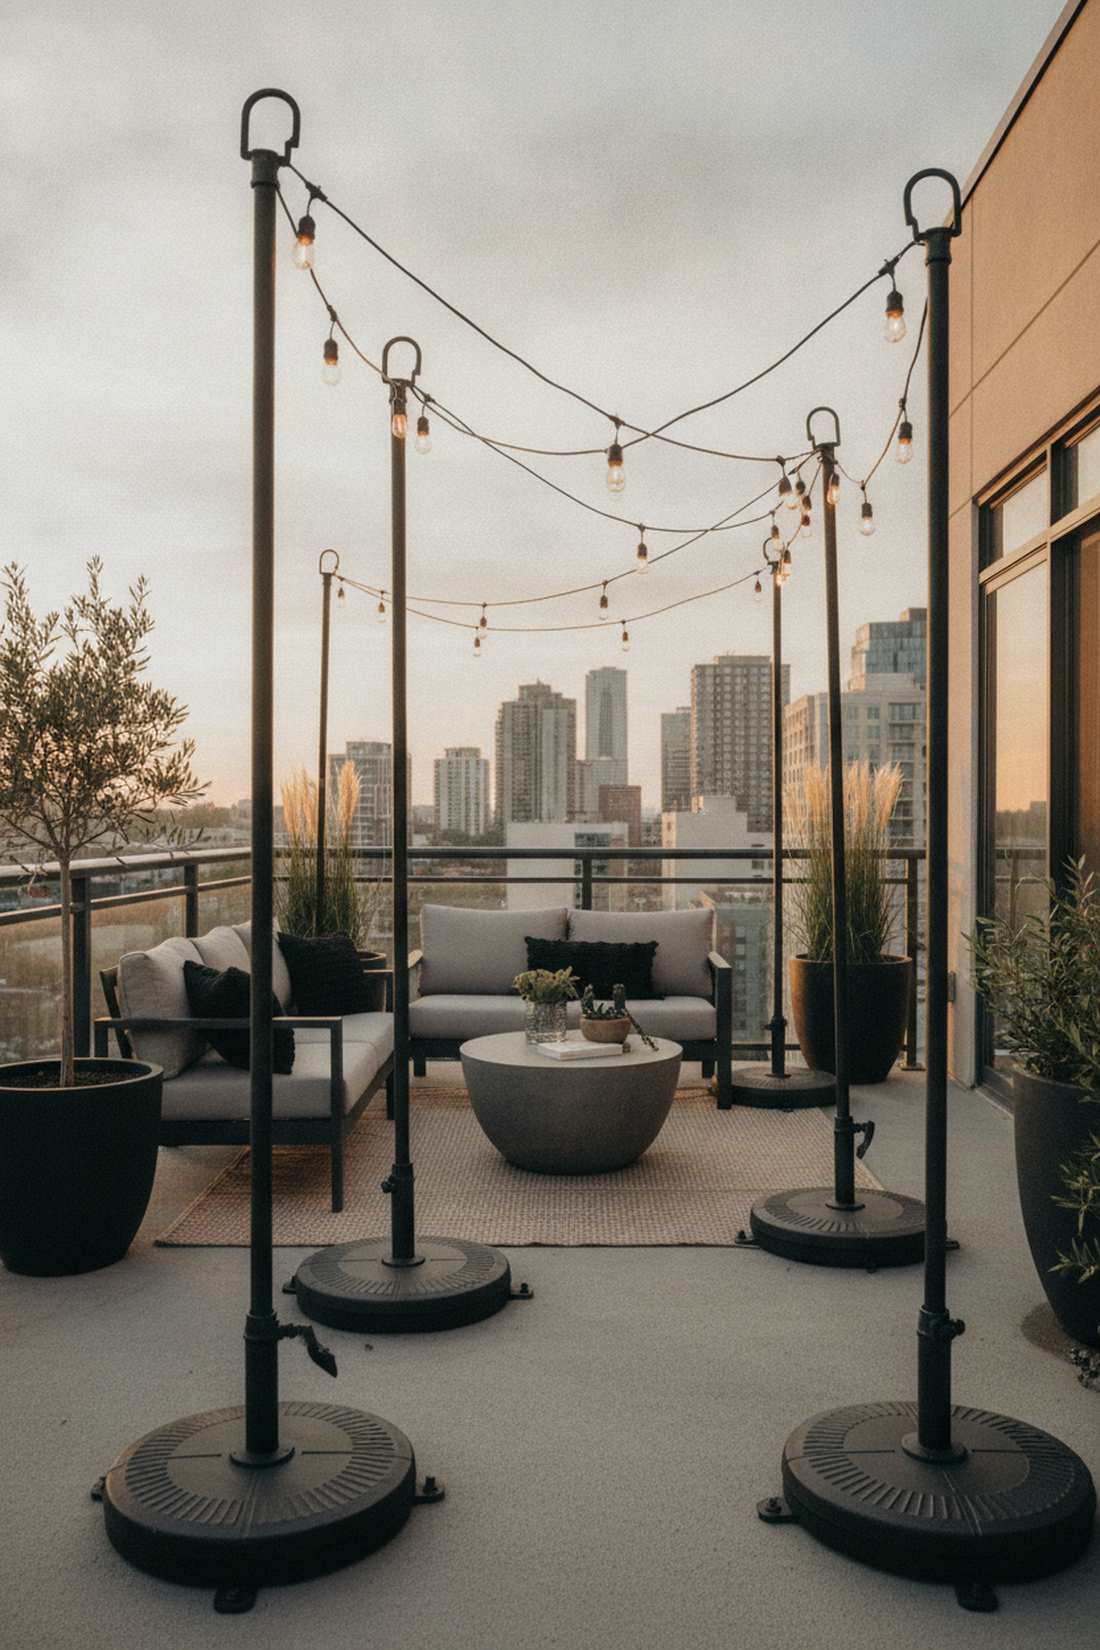
This ingenious weighted base lighting post feels like a clever designer hack you’d see on a high-end patio makeover show. It works brilliantly for concrete patios or apartment balconies where drilling into the ground is strictly prohibited.
Renting a space usually means no permanent lighting, but repurposing cast-iron umbrella bases creates an incredibly stable, movable anchor that looks entirely intentional. Swap the umbrella for a sleek black steel pipe fitted with a secure top loop.
You can hack this together for about $50–$80 per base. Pin this immediately if you rent your home and want epic patio lights!
- Key Materials: Heavy umbrella bases, steel pipe
- Vibe / Style: Renter-friendly industrial
- Difficulty: Zero-tool assembly
- Budget Breakdown: Base/Pole: $60 | Hardware: $15.
- Creator’s Tip: Use a flat black rust-oleum spray paint to make the mismatched umbrella base and steel pipe look perfectly uniform and custom-made.
- Smart Sourcing: heavyweight cast iron patio umbrella bases and matte black outdoor lighting string adaptors.
Want to hide your lighting poles completely? This next integrated design is the smartest way to blend infrastructure into your landscaping.
25. Planter-Integrated Light Posts

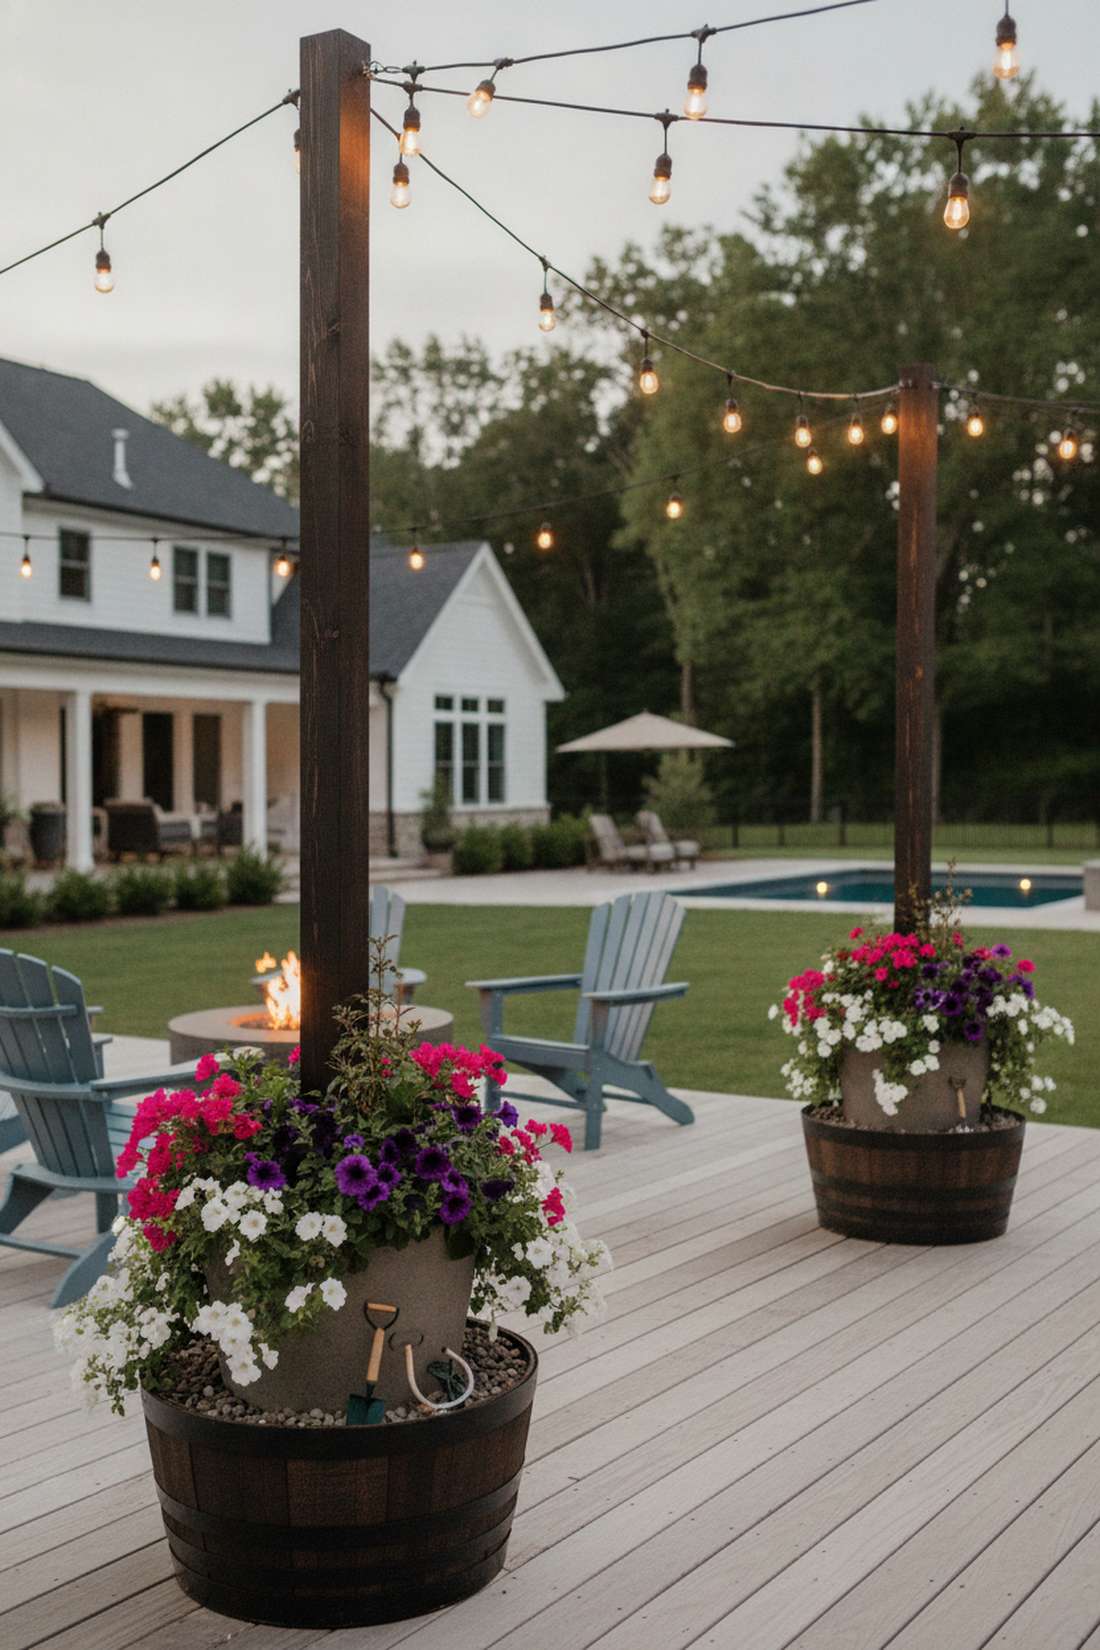
A lush planter box lighting anchor feels like a luxurious botanical pillar straight out of a Mediterranean resort. It is undeniably perfect for defining the corners of an outdoor seating area while adding brilliant floral color.
Exposed concrete footings are an eyesore, but burying the structural pole inside a massive planter filled with gravel and blooming flowers completely camouflages the utility. Incorporating miniature garden supplies at the base creates a stunning multi-level visual masterpiece.
Building these gorgeous anchor planters runs about $75–$120 each. Save this if you love combining carpentry with live plants.
- Key Materials: Large barrel planters, 4×4 posts, quick-crete
- Vibe / Style: Mediterranean garden resort
- Difficulty: Intermediate DIY weekend
- Budget Breakdown: Planters: $60 | Post/Concrete: $30.
- Creator’s Tip: Fill the bottom half of the planter with concrete for weight, drill drainage holes right above the concrete line, and fill the top half with potting soil.
- Smart Sourcing: weather-resistant resin half-barrel planters and pre-cut outdoor string light poles.
26. Bamboo Tiki Style Poles
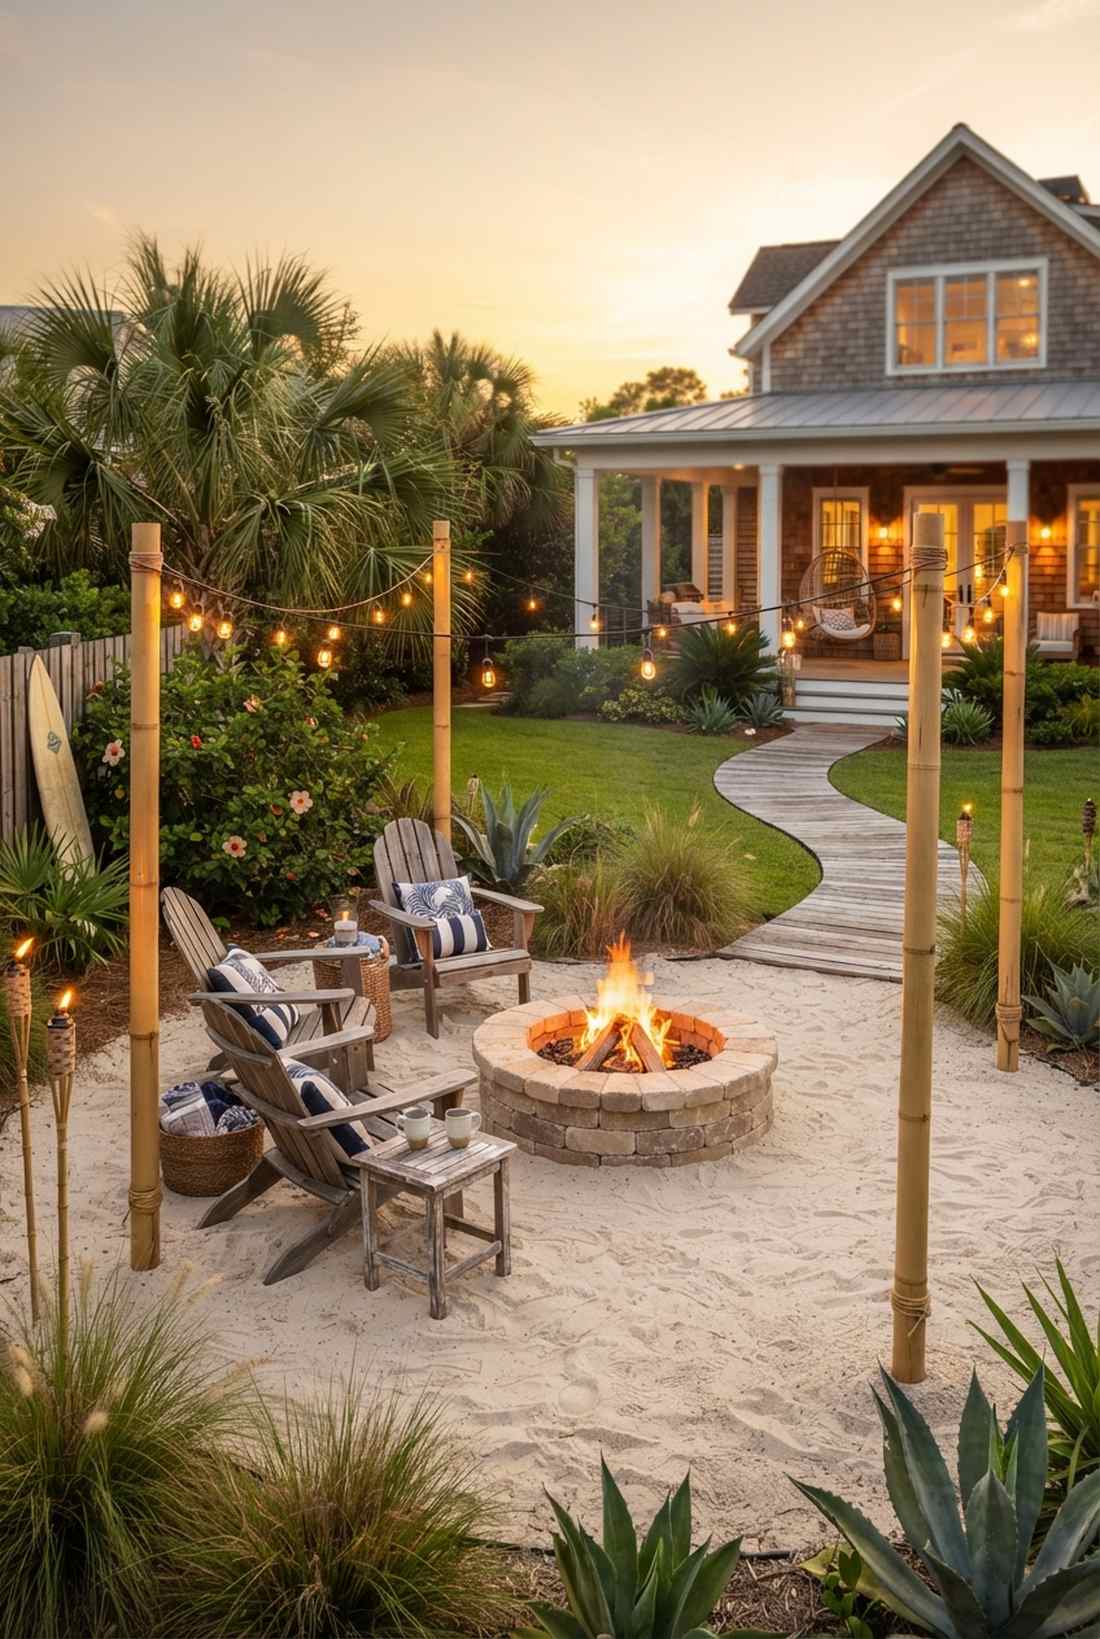
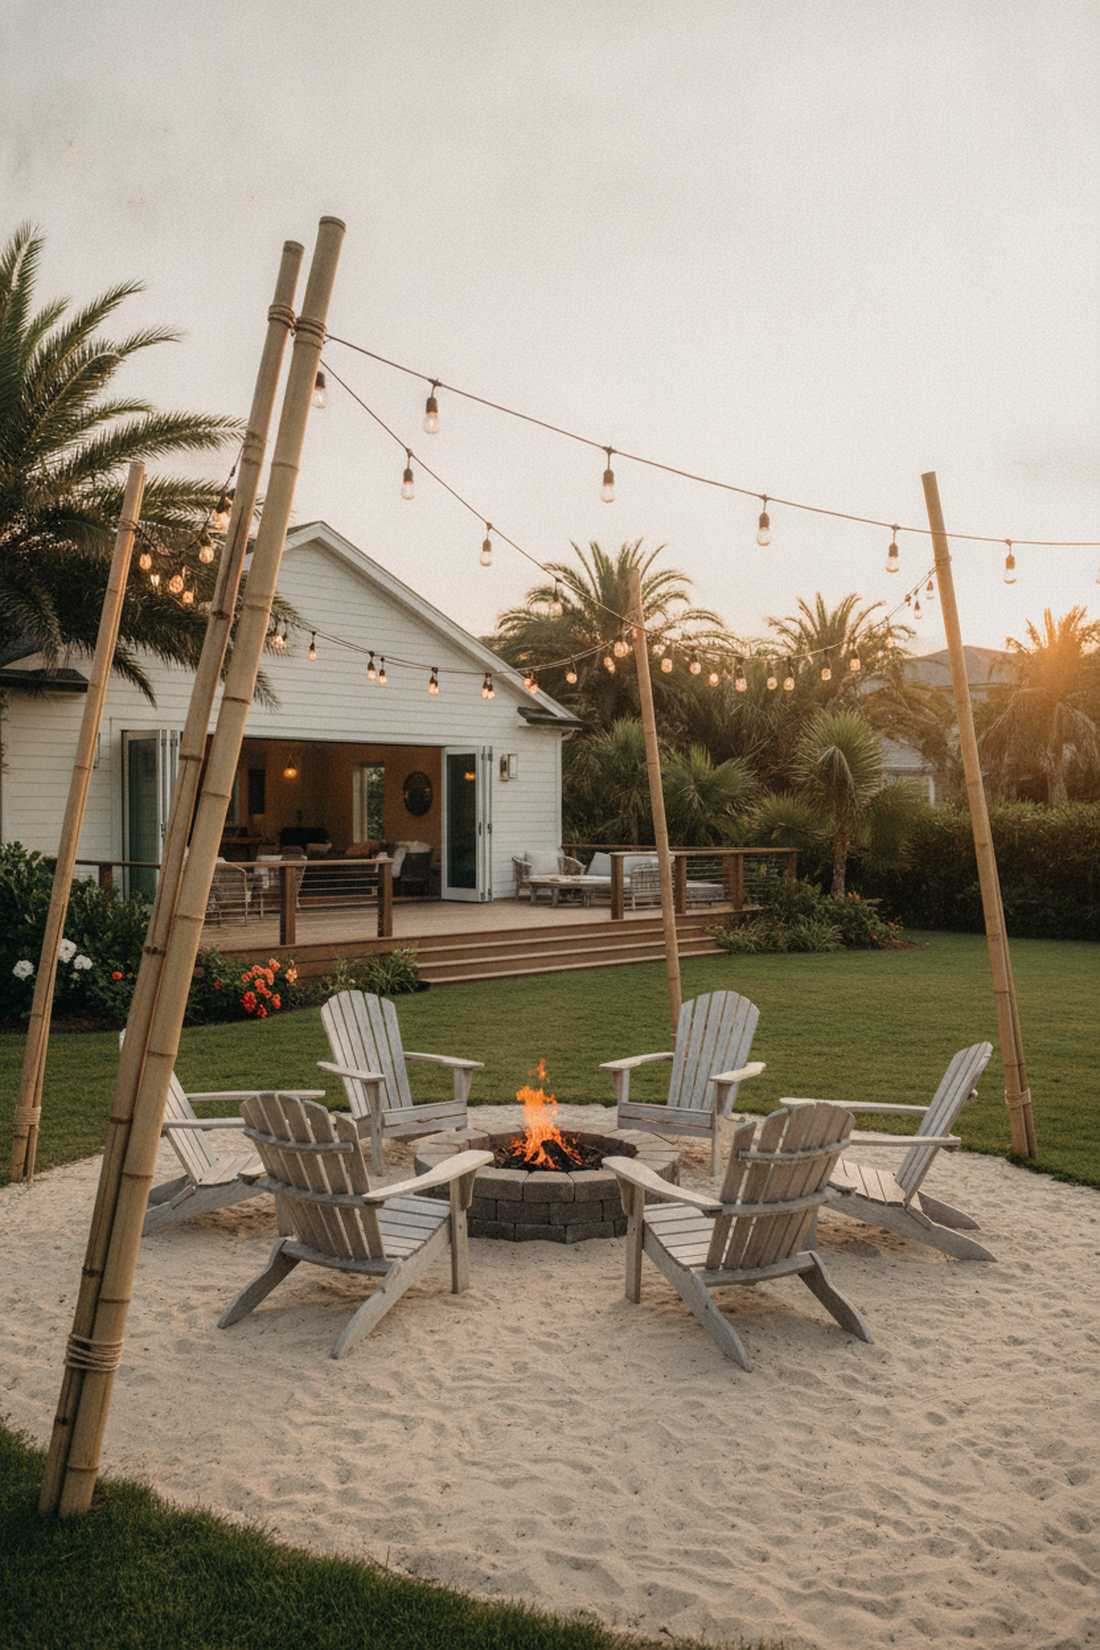
This breezy bamboo pole string display feels like an exclusive beachfront tiki lounge hidden in the tropics. Ideal for sandy backyard fire pits, coastal homes, or heavily themed summer luaus.
Standard metal poles clash with beachy aesthetics, whereas thick, natural bamboo poles sway slightly in the wind and deliver an incredibly authentic island vibe. Because bamboo flexes, it naturally absorbs high wind gusts without snapping the taut lighting wires.
Creating this tropical escape costs roughly $40–$75. A fast, fun upgrade that completely changes the atmosphere of your yard.
- Key Materials: 2-inch thick bamboo poles
- Vibe / Style: Coastal tiki retreat
- Difficulty: Easy digging setup
- Budget Breakdown: Bamboo Poles: $45 | Lashing Twine: $15.
- Creator’s Tip: Coat the bottom 2 feet of the bamboo pole in liquid rubber before burying it to prevent the natural wood from rotting in damp soil.
- Smart Sourcing: thick-cut natural bamboo structural poles (bulk bundle) and weatherproof outdoor lashing twine.
27. Steel Pipe Industrial Posts
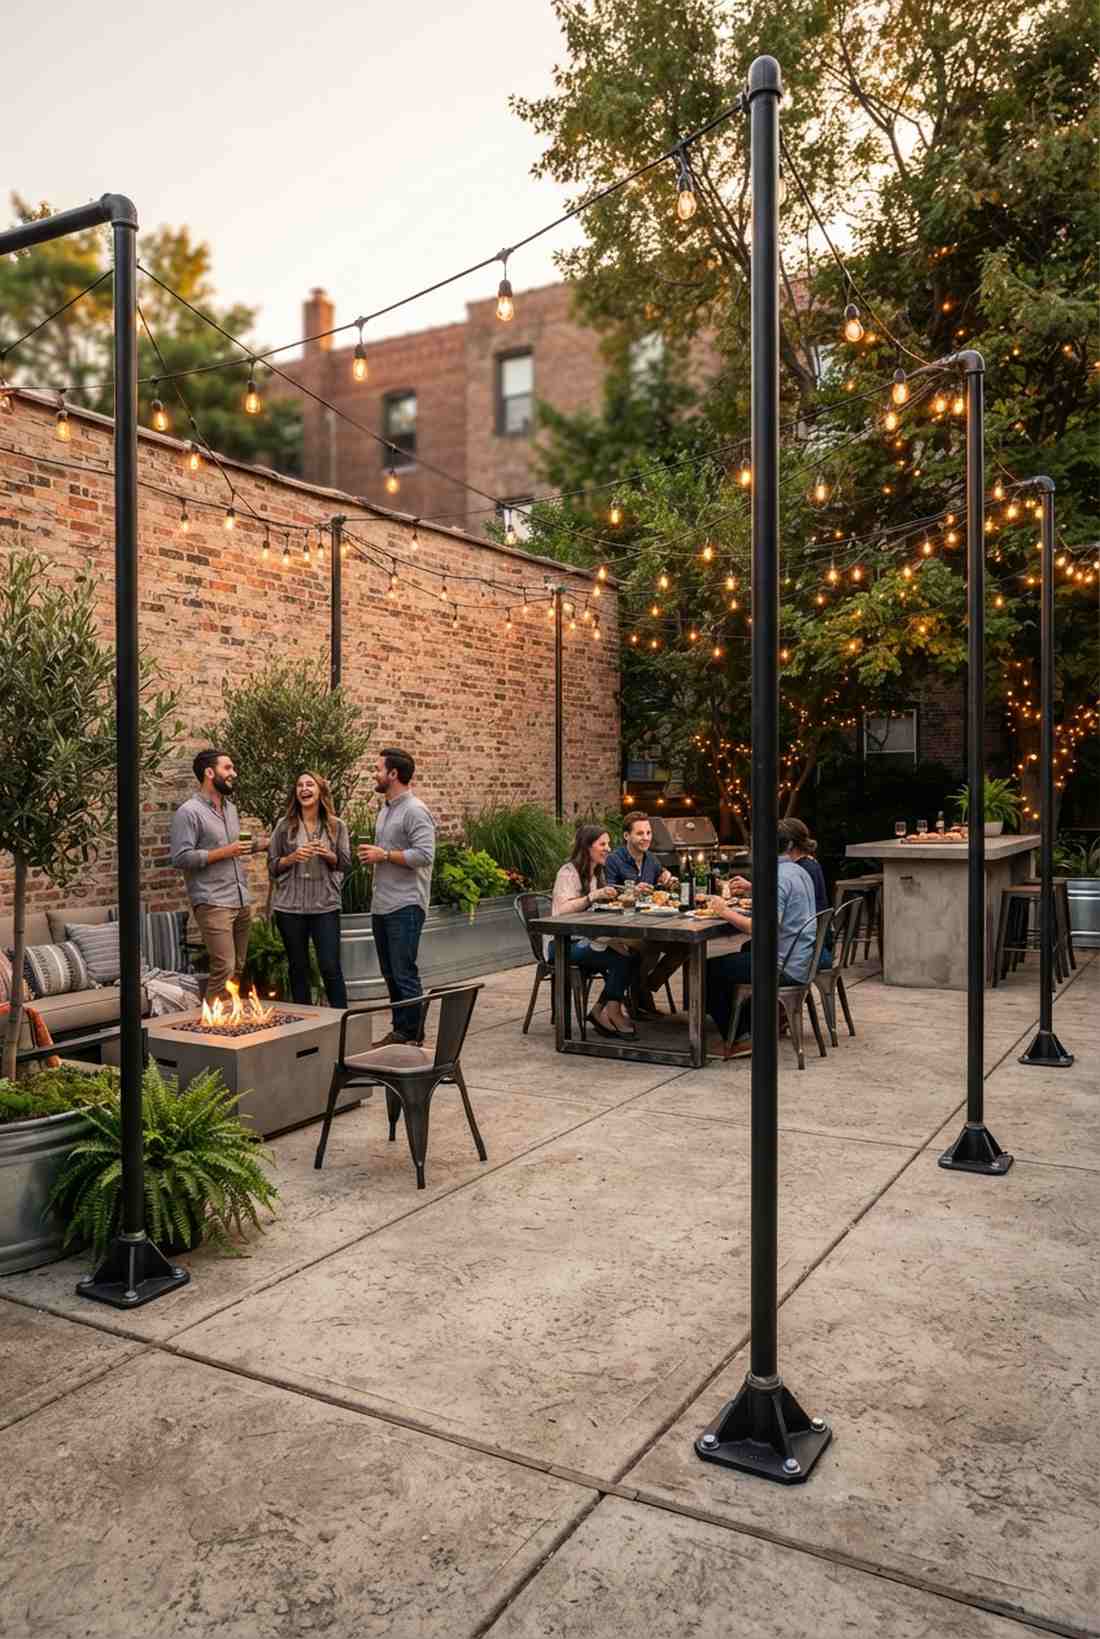
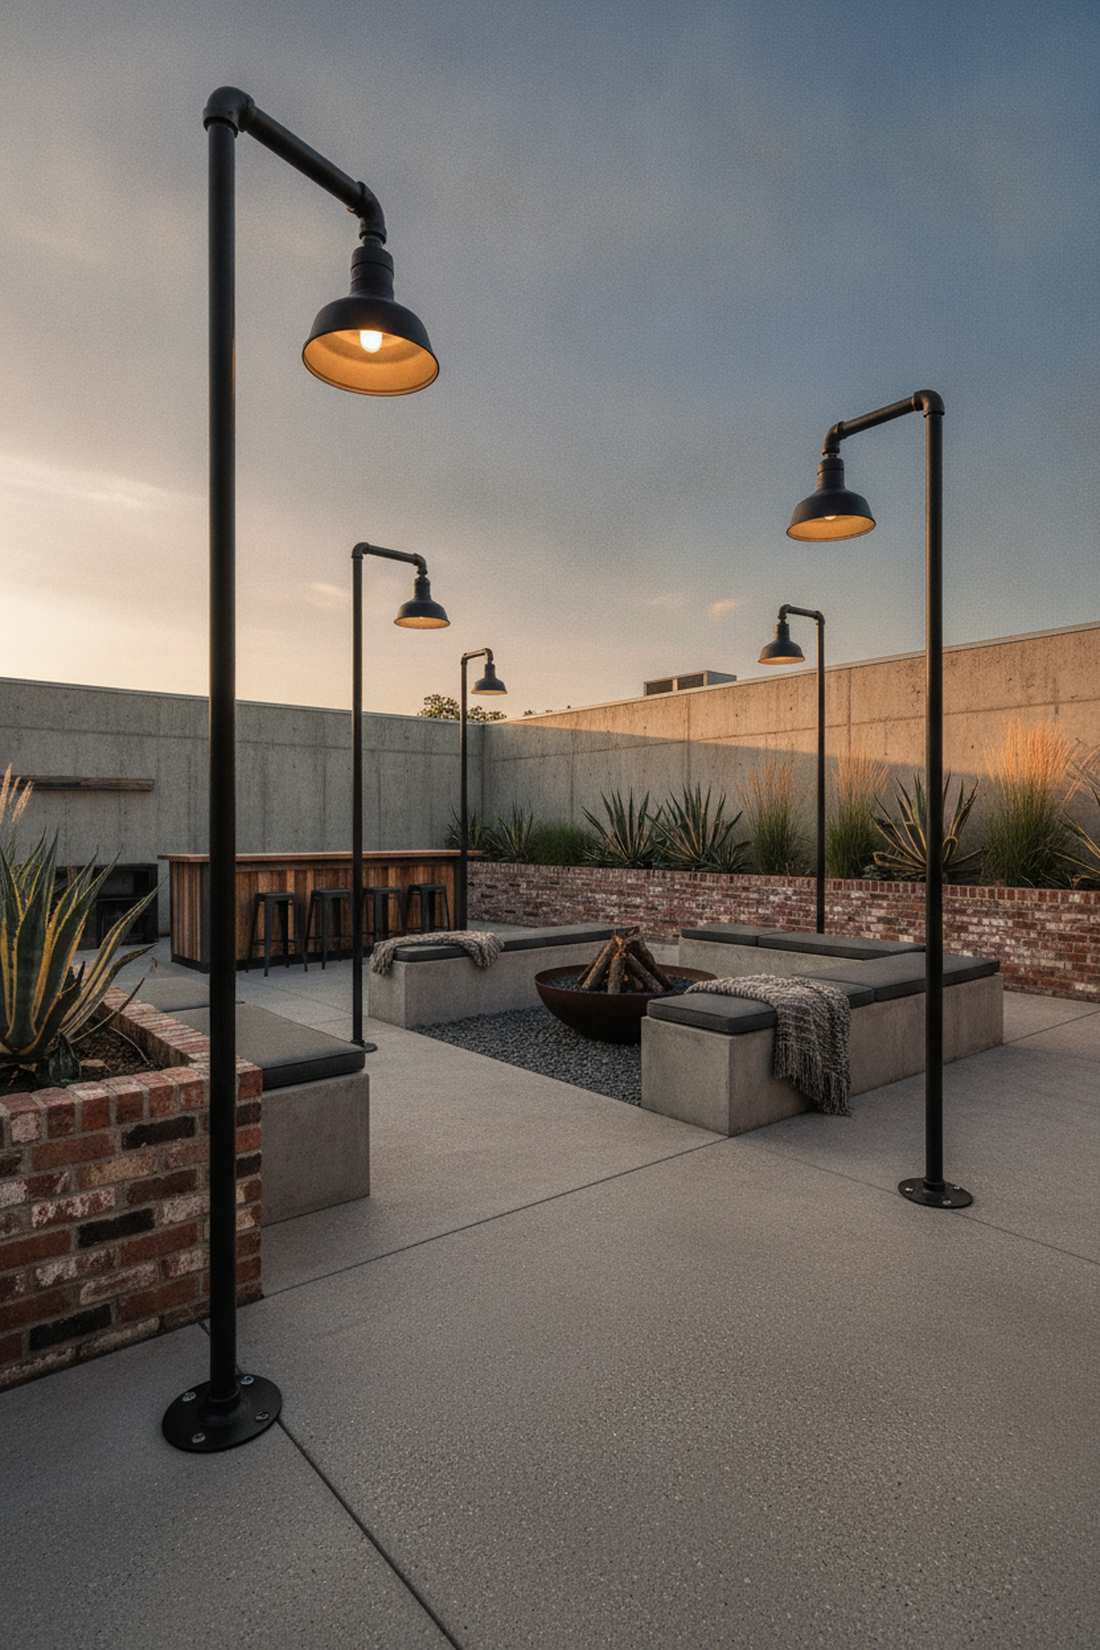
Sleek black steel industrial lighting masts feel like you are sitting on the patio of a high-end downtown microbrewery. Perfect for stark, concrete-heavy urban backyards with an edgy design aesthetic.
Wood posts can warp and rot over time, but using thick galvanized plumbing pipes provides a bulletproof, slim-profile anchor that lasts literally forever. Thread them tightly and bolt the flanged base directly into your concrete pad for unshakeable stability.
This heavy-duty modern setup runs about $60–$100 per post. Pin this to your urban patio inspiration board.
- Key Materials: Galvanized steel pipes and floor flanges
- Vibe / Style: Urban industrial chic
- Difficulty: Requires a hammer drill for concrete
- Budget Breakdown: Steel Pipes/Flanges: $75 | Concrete Anchors: $15.
- Creator’s Tip: Wipe the pipes down with degreaser and spray them with an outdoor matte black enamel; plumbing pipes come coated in a greasy rust-preventative oil.
- Smart Sourcing: pre-threaded black industrial steel pipe kits and heavy-duty concrete wedge anchors.
28. Concrete-Filled Post Anchors
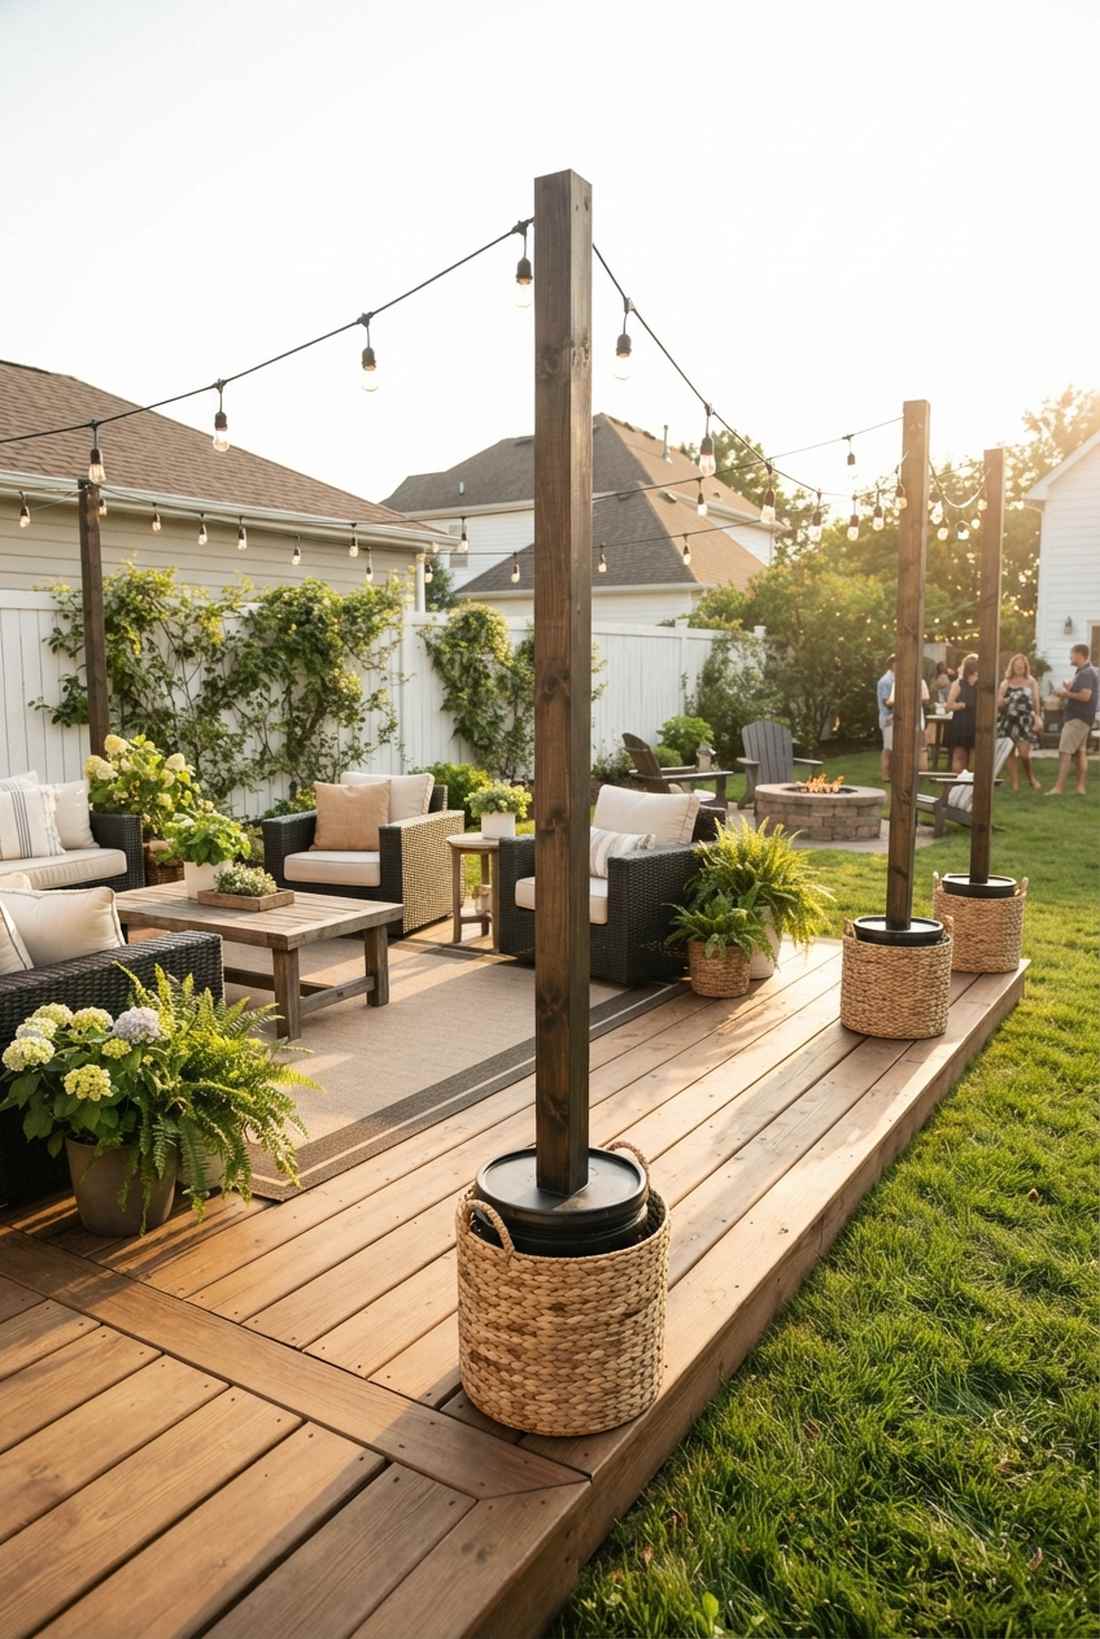
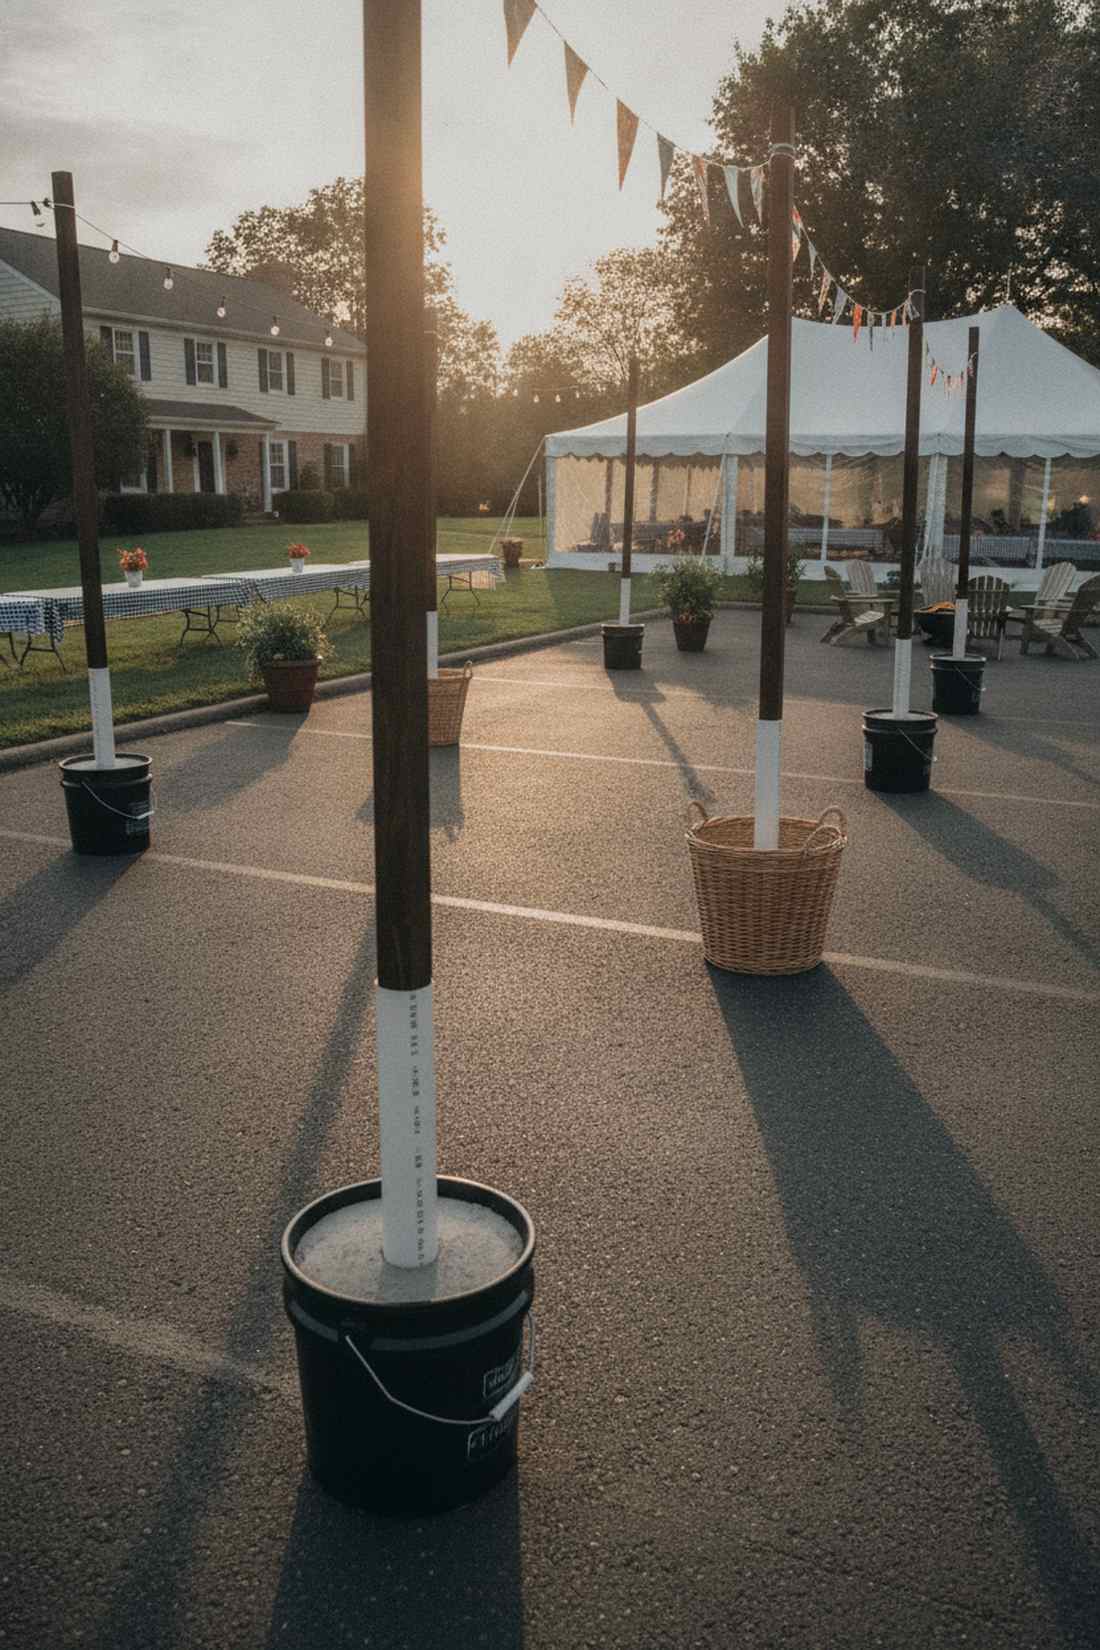
These ultra-stable concrete bucket post anchors feel like a genius hack straight from a professional event planner’s playbook. They are the absolute best choice for large parking lot parties or rented driveways where no drilling is possible.
Most portable bases blow over in strong winds, but a 5-gallon bucket filled with solid concrete delivers the immense mass needed to support long, heavy spans safely. Paint the buckets black or drop them inside decorative wicker baskets to completely hide the cheap plastic.
You can manufacture these beasts for under $25 each. Highly recommended for heavy-duty, temporary event layouts.
- Key Materials: 5-gallon buckets, concrete, PVC sleeves
- Vibe / Style: Heavy-duty event modular
- Difficulty: Heavy lifting required
- Budget Breakdown: Buckets/PVC: $10 | Concrete: $10.
- Creator’s Tip: Don’t stick the wooden pole directly in the wet concrete. Embed a PVC pipe sleeve instead, so you can slide the wooden poles in and out for easy storage.
- Smart Sourcing: fast-setting quikrete bags and heavy-duty 5-gallon work buckets.
Specialty Globe Configurations for Distinctive Character
Bulb selection and arrangement patterns create specific moods and functional light levels. Designers specify globe shapes, sizes, and spacing to align illumination quality with intended use.
29. Oversized Globe Statement Lighting
A bold oversized G40 globe display feels like you are sitting underneath glowing vintage theater marquee lights. This look is exceptionally powerful for massive, expansive outdoor spaces that swallow up tiny, standard bulbs.
Standard bulbs look dinky when strung over a massive lawn, whereas using 3-inch or larger globes delivers a substantial visual presence and a luxurious, confident aesthetic. Opt for shatterproof acrylic materials to ensure these massive targets don’t break during severe hailstorms.
Upgrading to jumbo bulbs costs about $60–$110. Pin this to immediately inject some dramatic scale into your backyard.
- Key Materials: 3-inch or 4-inch LED globes
- Vibe / Style: Vintage theater grandeur
- Difficulty: Easy plug-and-play
- Budget Breakdown: Oversized Strands: $80 | Hanging Wire: $20.
- Creator’s Tip: Space oversized bulbs at least 3 to 4 feet apart. If they are too close together, they look cluttered and emit way too much glare.
- Smart Sourcing: oversized G40 acrylic outdoor lighting globes and heavy-duty commercial suspension cables.
30. Miniature Fairy Light Clusters
This dense clustered fairy light canopy feels like a thick, glowing tapestry of fireflies suspended in midair. Perfectly suited for tiny, intimate garden nooks or romantic dining tables tucked under low tree branches.
Most string lights overpower small spaces, but bunching hundreds of micro-LEDs together creates a breathtakingly soft, delicate glimmer that provides ambiance without blinding you. Sneak in some terrarium accessories beneath the lights to build a cohesive, magical micro-environment.
You can create this fairy-tale magic for a mere $25–$45. It’s an unbelievably cheap way to make a space feel incredibly special.
- Key Materials: Copper wire micro-LEDs
- Vibe / Style: Whimsical firefly forest
- Difficulty: Tedious bundling
- Budget Breakdown: Fairy Light Spools: $30 | Zip Ties: $5.
- Creator’s Tip: Twist three separate fairy light strands together into one thick rope before hanging it to instantly triple the density and visual impact.
- Smart Sourcing: warm-white copper fairy lights (multi-spool starter kits) and invisible mini zip ties.
Edison bulbs are everywhere, but this next specific vintage configuration is the one trick that separates amateur setups from professional designs.
31. Edison Vintage Filament Display
A glowing exposed filament Edison strand feels like stepping into an old-world speakeasy or a rustic farmhouse barn. It is the absolute quintessential choice for spaces featuring reclaimed wood, exposed brick, and vintage iron accents.
Frosty white bulbs completely kill the rustic mood, whereas amber-tinted exposed filaments deliver an intoxicating, nostalgic warmth that looks far more expensive than it actually is. Make sure to purchase shatterproof LED variations so you get the vintage look without the terrible energy drain and fragile glass.
This classic aesthetic will run you about $45–$85. Save this to your rustic backyard board right away!
- Key Materials: ST58 or ST38 LED Edison bulbs
- Vibe / Style: Rustic vintage speakeasy
- Difficulty: Very easy
- Budget Breakdown: Edison Strands: $65 | Dimmer: $15.
- Creator’s Tip: Edison bulbs MUST be put on an outdoor dimmer. Running them at 60% power exposes the intricate glowing filament pattern beautifully.
- Smart Sourcing: amber-tinted ST38 LED shatterproof strings and outdoor-rated smart plug dimmers.
32. Color-Changing Smart Globes
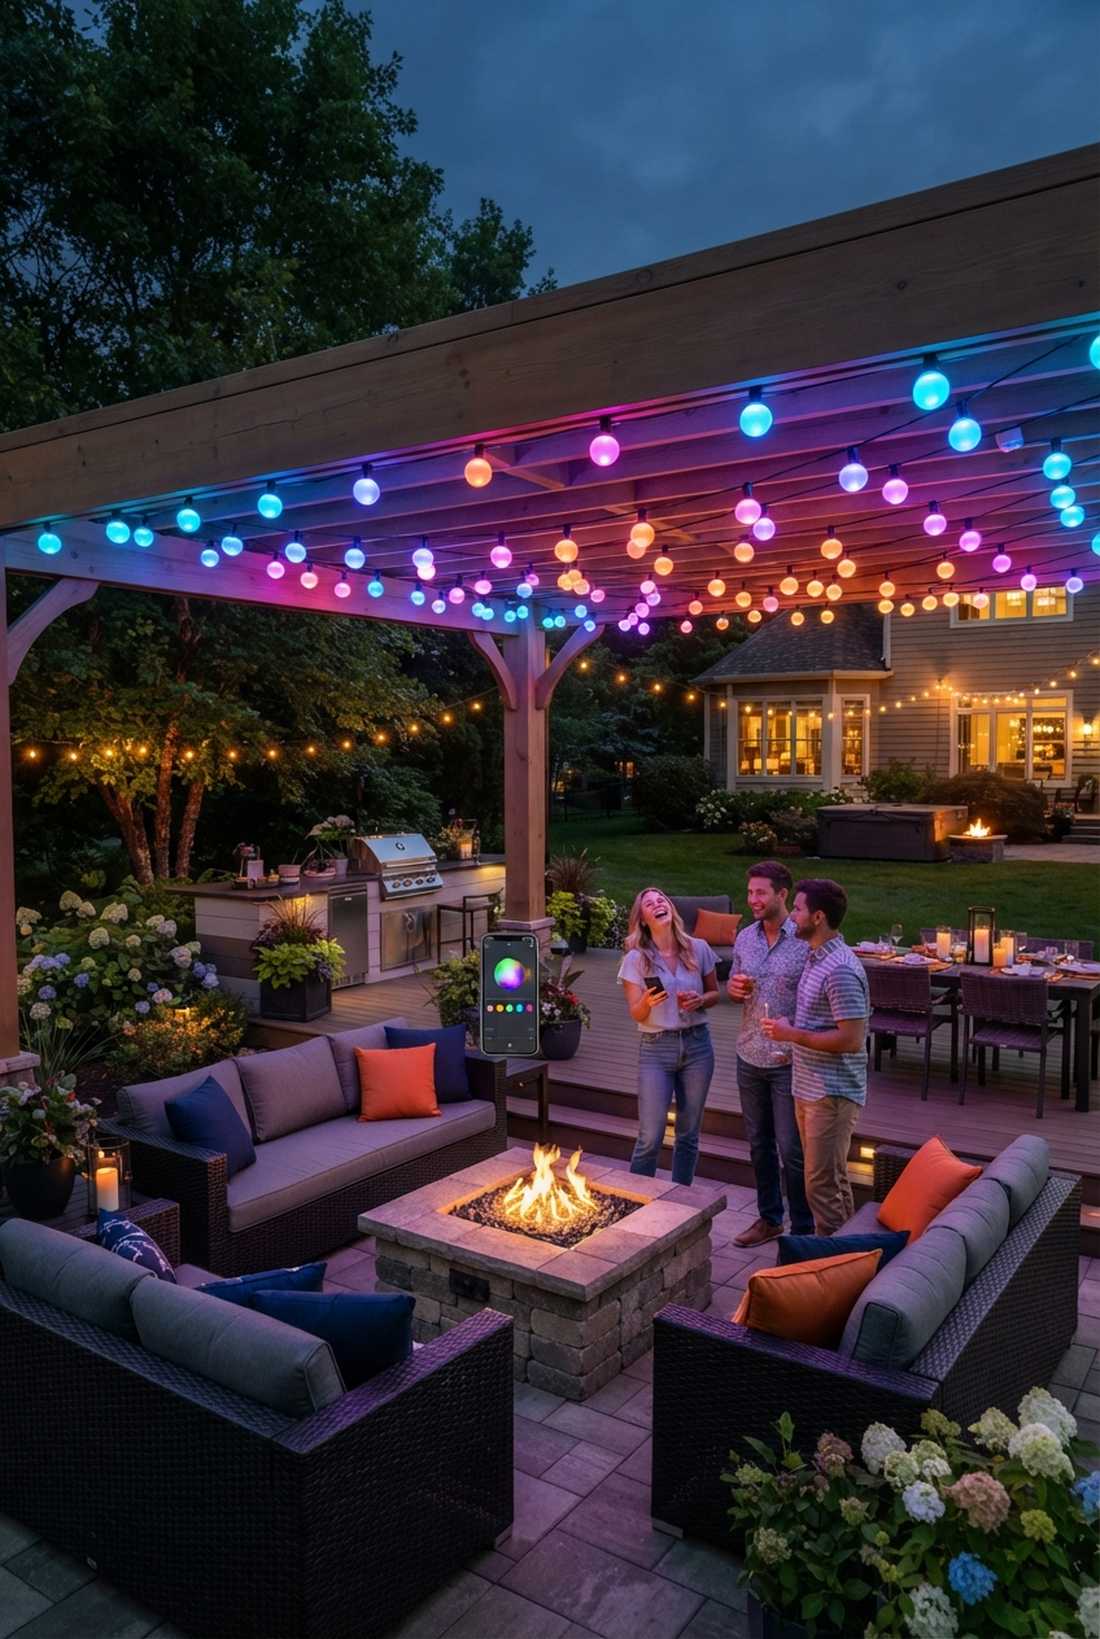
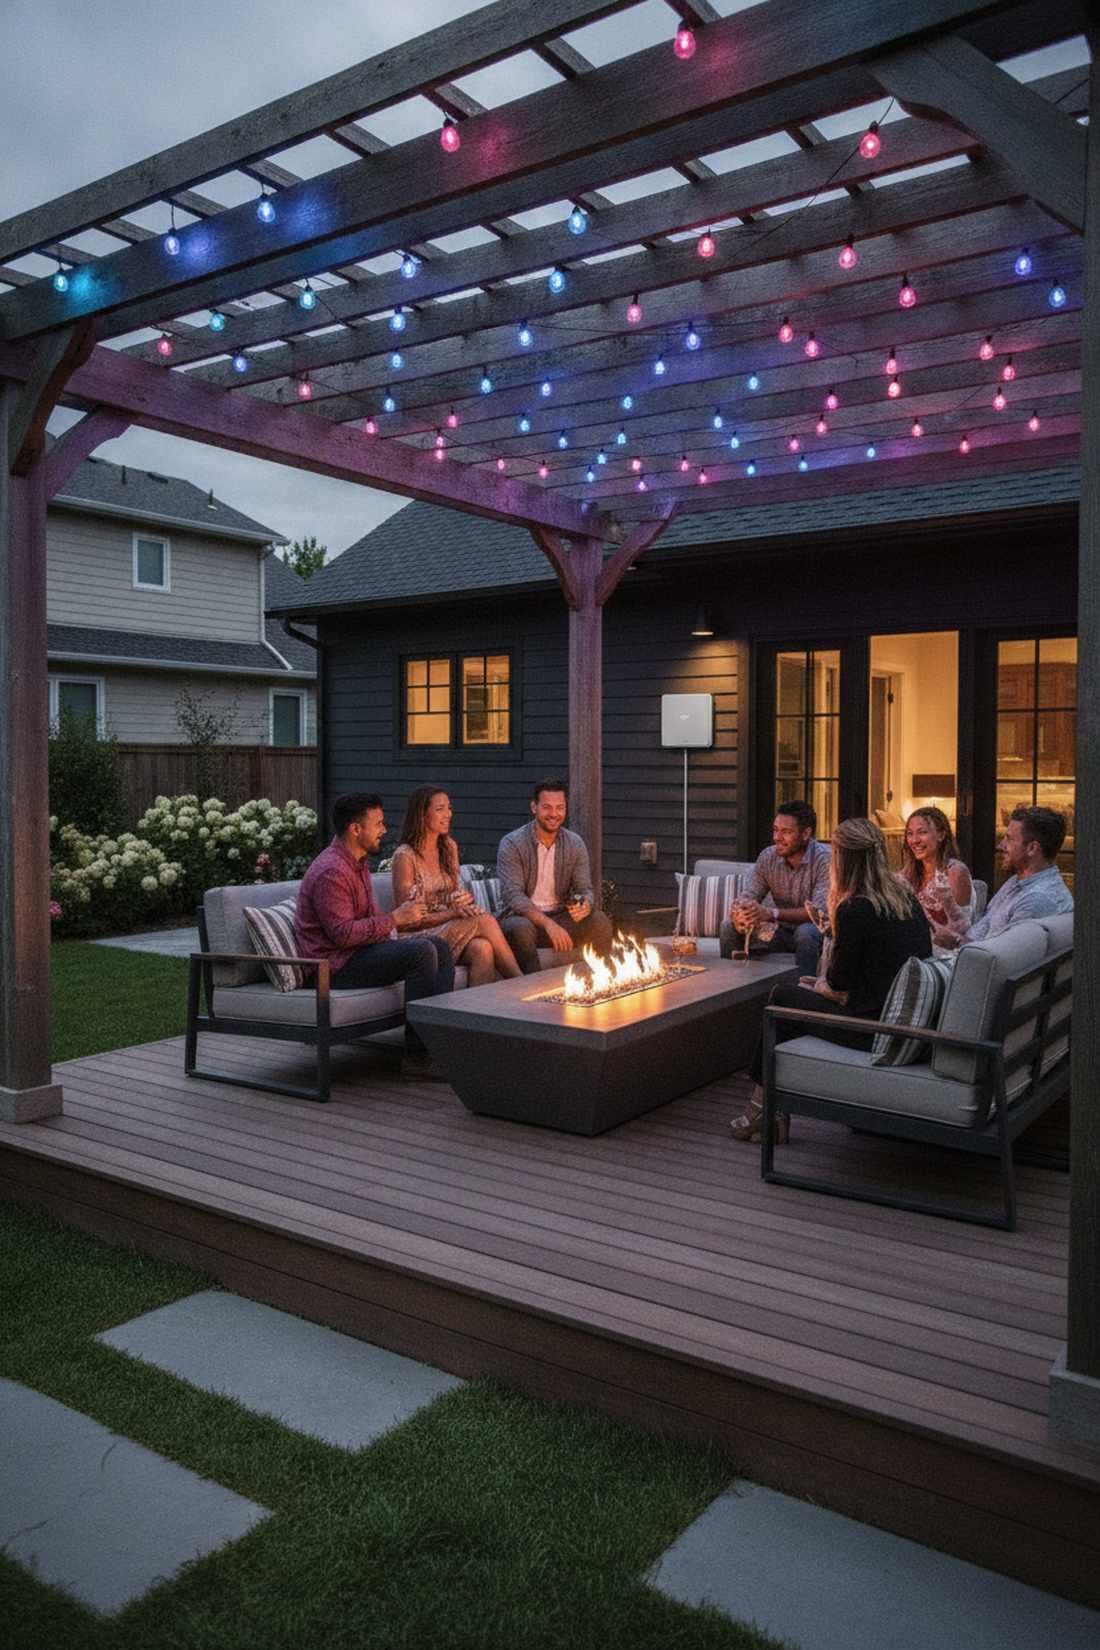
A dynamic smart RGB color canopy feels like a high-tech entertainment lounge ready for a massive party. This setup is indispensable for homeowners who love hosting diverse events, moving from a warm dinner to a vibrant neon dance party instantly.
Being stuck with one color is severely limiting, but installing Wi-Fi-enabled RGB strands gives you a completely customized designer-level finish at the tap of a smartphone. Invest in premium commercial-grade smart kits to ensure the Wi-Fi receivers actually survive heavy rainstorms.
Upgrading to a smart backyard system costs roughly $70–$130. A thrilling investment that completely modernizes your outdoor entertaining.
- Key Materials: App-controlled RGB string lights
- Vibe / Style: Dynamic high-tech lounge
- Difficulty: Easy install, requires Wi-Fi setup
- Budget Breakdown: Smart LED Kit: $95 | Mounting Gear: $15.
- Creator’s Tip: Ensure your outdoor router or Wi-Fi extender can reach the exact spot where the light’s power supply box (the receiver) is plugged in.
- Smart Sourcing: Wi-Fi enabled outdoor RGB string kits and weatherproof outdoor Wi-Fi extenders.
33. Solar-Charged Sustainable Strands
An eco-friendly solar-powered canopy setup feels like a brilliant, off-grid oasis deep in nature. It completely solves the nightmare scenario of trying to light up a distant garden corner that has zero electrical outlets nearby.
Trenching electrical wires across a lawn costs a fortune, but a high-capacity solar setup delivers stunning illumination and looks just as bright as a wired system. Look for kits with oversized monocrystalline solar panels to guarantee the lights stay lit past midnight, even on cloudy days.
You can achieve off-grid brilliance for around $40–$80. Pin this if you hate dealing with ugly orange extension cords!
- Key Materials: High-capacity solar string lights
- Vibe / Style: Off-grid eco-retreat
- Difficulty: Zero wiring required
- Budget Breakdown: Solar Strings: $60 | Mounting Hardware: $10.
- Creator’s Tip: Mount the solar panel on the roof of a nearby shed or high on a pole to prevent tall summer plants from eventually casting a shadow over it.
- Smart Sourcing: high-capacity commercial solar string kits and adjustable solar panel mounting brackets.
34. Multi-Tone Temperature Mixing
A beautifully blended mixed-temperature bulb layout feels like a sophisticated, multi-dimensional art installation. Best utilized in massive overhead installations where a single, monotonous color temperature makes the space feel flat and artificial.
Most people buy a single box and call it a day, but alternating warm amber and crisp white bulbs creates an incredible visual depth that professionals charge thousands for. This subtle designer trick mimics the natural variation of firelight and moonlight blending together.
This nuanced custom look costs about $60–$100. Save this to elevate your lighting design from basic to brilliant.
- Key Materials: Alternating 2200K and 3000K bulbs
- Vibe / Style: Sophisticated visual depth
- Difficulty: Requires swapping bulbs manually
- Budget Breakdown: Base Strand: $50 | Extra Bulbs: $35.
- Creator’s Tip: Buy a standard 2700K warm white strand, then manually unscrew every other bulb and replace it with a hyper-warm 2200K amber Edison bulb.
- Smart Sourcing: commercial empty-socket stringer wires and multi-temperature LED bulb bulk packs.
35. Flame Flicker Simulation Bulbs

A mesmerizing flickering flame bulb display feels like your patio is entirely lit by organic, dancing torches. It provides an undeniably romantic and relaxing atmosphere for enclosed courtyards or intimate seating areas.
Static lights are functional, but the random movement of gravity-sensing LED flame bulbs introduces a natural unpredictability that feels incredibly relaxing. Mix these sparingly with fairy garden supplies around an unlit fire pit for a completely fire-safe evening ambiance.
Upgrading to simulation bulbs runs roughly $70–$120. Highly recommended to mimic real fire without the smoke or hazard.
- Key Materials: Gravity-sensing LED flame bulbs
- Vibe / Style: Ancient torch-lit courtyard
- Difficulty: Simple bulb swap
- Budget Breakdown: Empty Socket Strand: $40 | Flame Bulbs: $70.
- Creator’s Tip: Do not use these for overhead task lighting; they are too dim to eat under. Keep them strictly as perimeter or accent lighting for mood.
- Smart Sourcing: gravity-sensing LED flame bulbs (multipack) and heavy-duty outdoor socket stringers.
Hosting a big event soon? This next tent-draping technique is exactly how wedding planners justify their massive design fees.
Entertaining and Event Setups for Special Occasions
Temporary installations transform outdoor spaces for weddings, parties, and seasonal celebrations. Event designers layer string lights with other decorative elements to create immersive themed environments.
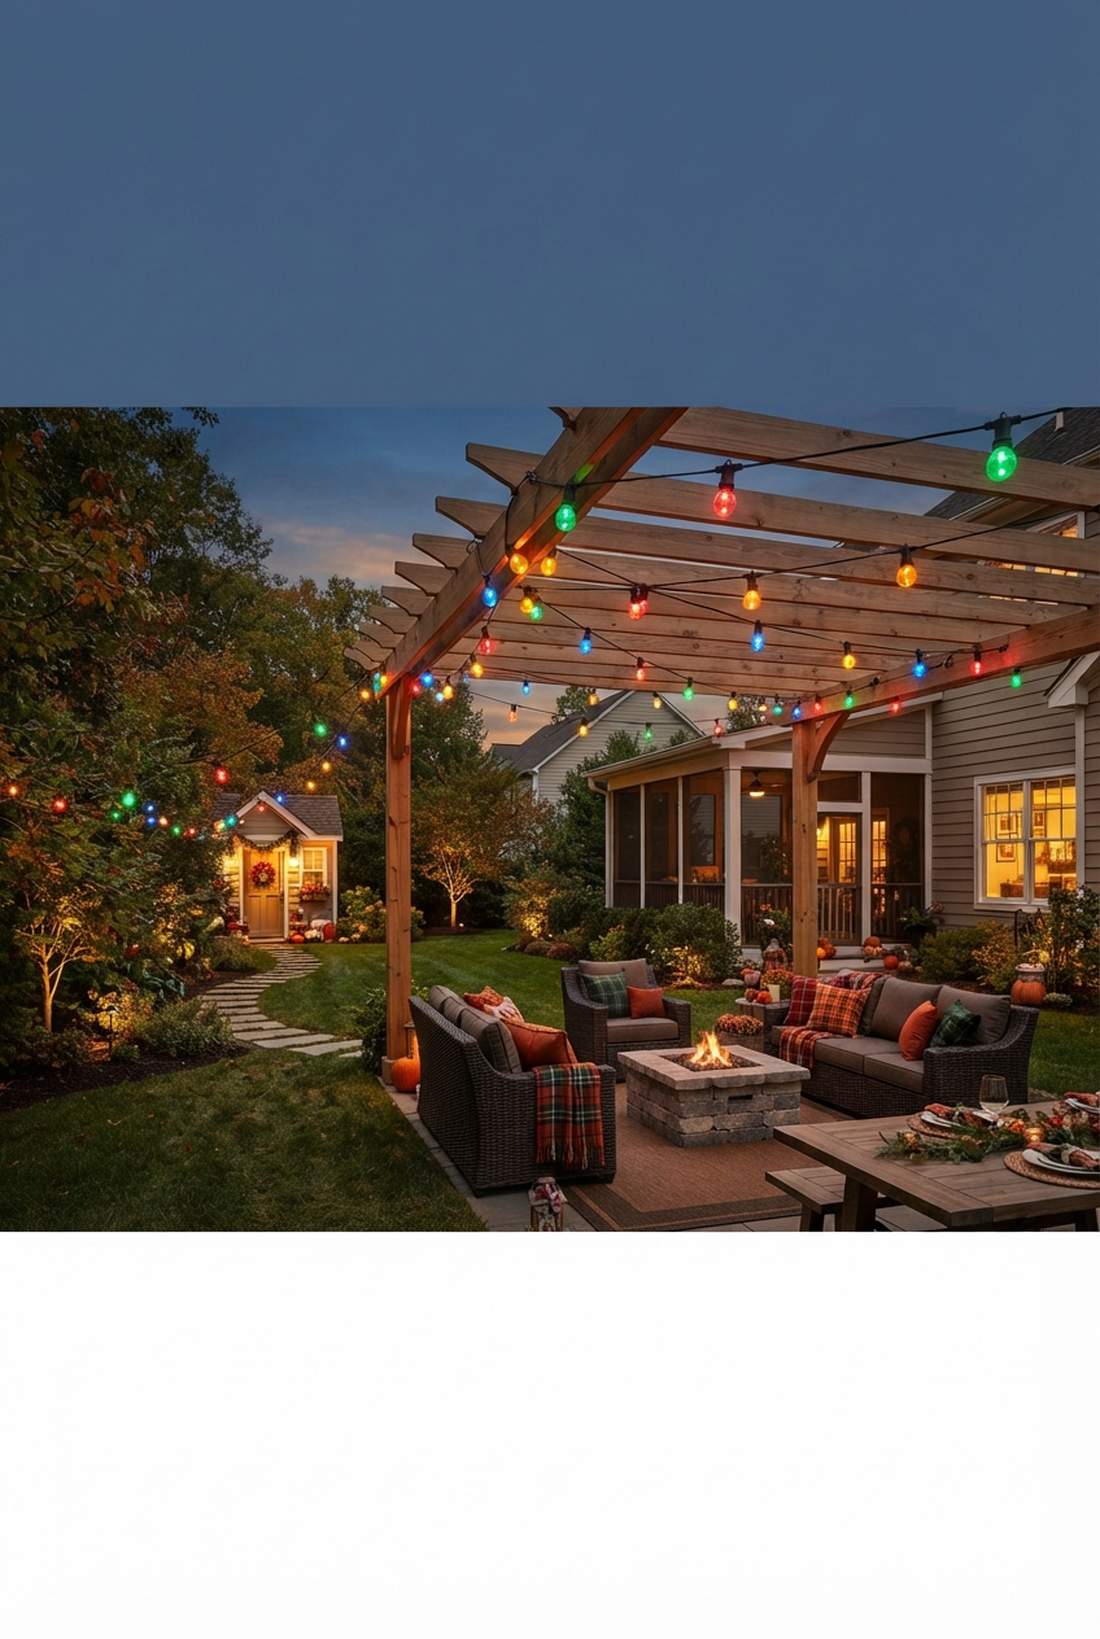
36. Tent Canopy Interior Draping
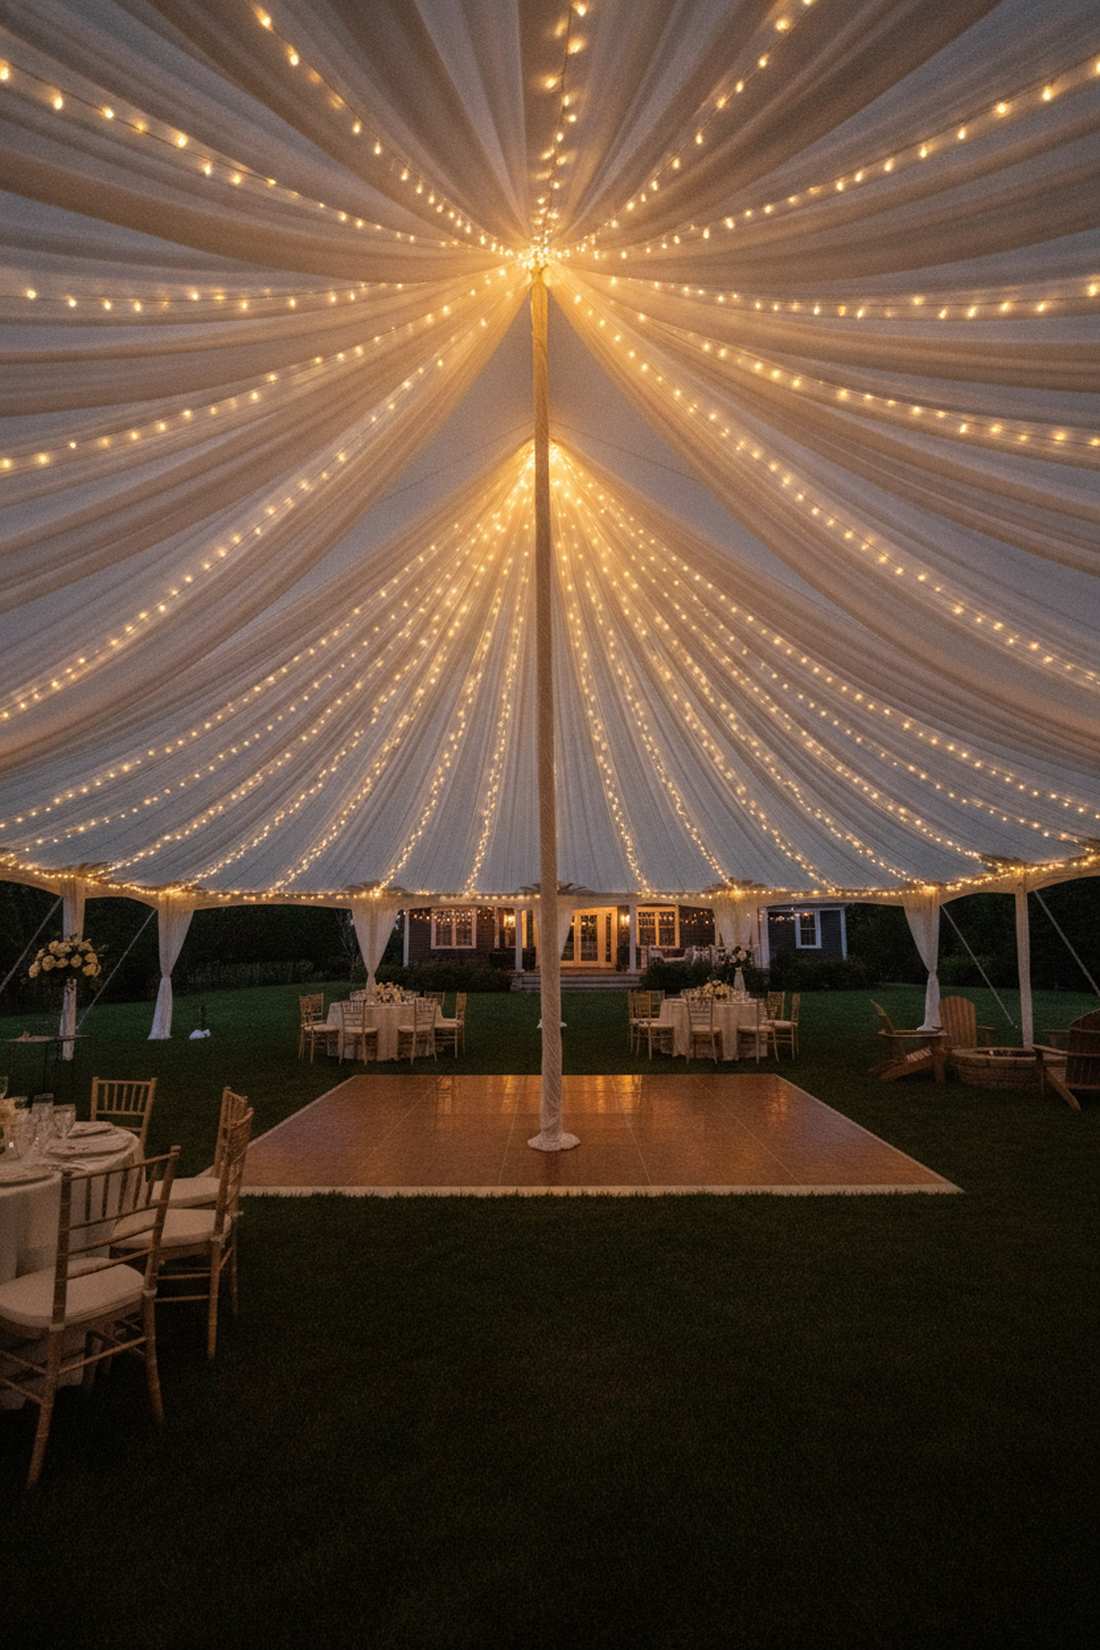
An opulent illuminated event tent ceiling feels like dancing inside a glowing, magical cathedral. This is an absolute mandatory upgrade for any rented wedding marquee or temporary backyard party tent.
Leaving a white vinyl tent ceiling bare looks incredibly cheap and industrial, whereas draping swooping lines from the center pole creates a jaw-dropping, premium outcome. Use lightweight, white-wire strings so the cords completely vanish into the ceiling fabric during daylight hours.
You can transform a boring tent for about $80–$150. Pin this to your DIY wedding inspiration board immediately!
- Key Materials: White-wire LED globes, sheer fabric
- Vibe / Style: Elegant wedding cathedral
- Difficulty: Requires ladders and zip ties
- Budget Breakdown: White Wire Strings: $90 | Fabric/Ties: $40.
- Creator’s Tip: Layer cheap, sheer organza fabric directly over the white wires to diffuse the harsh LED spots into a soft, glowing, cloud-like ceiling.
- Smart Sourcing: white-wire outdoor lighting string sets and bulk rolls of white sheer organza.
37. Dance Floor Perimeter Framing
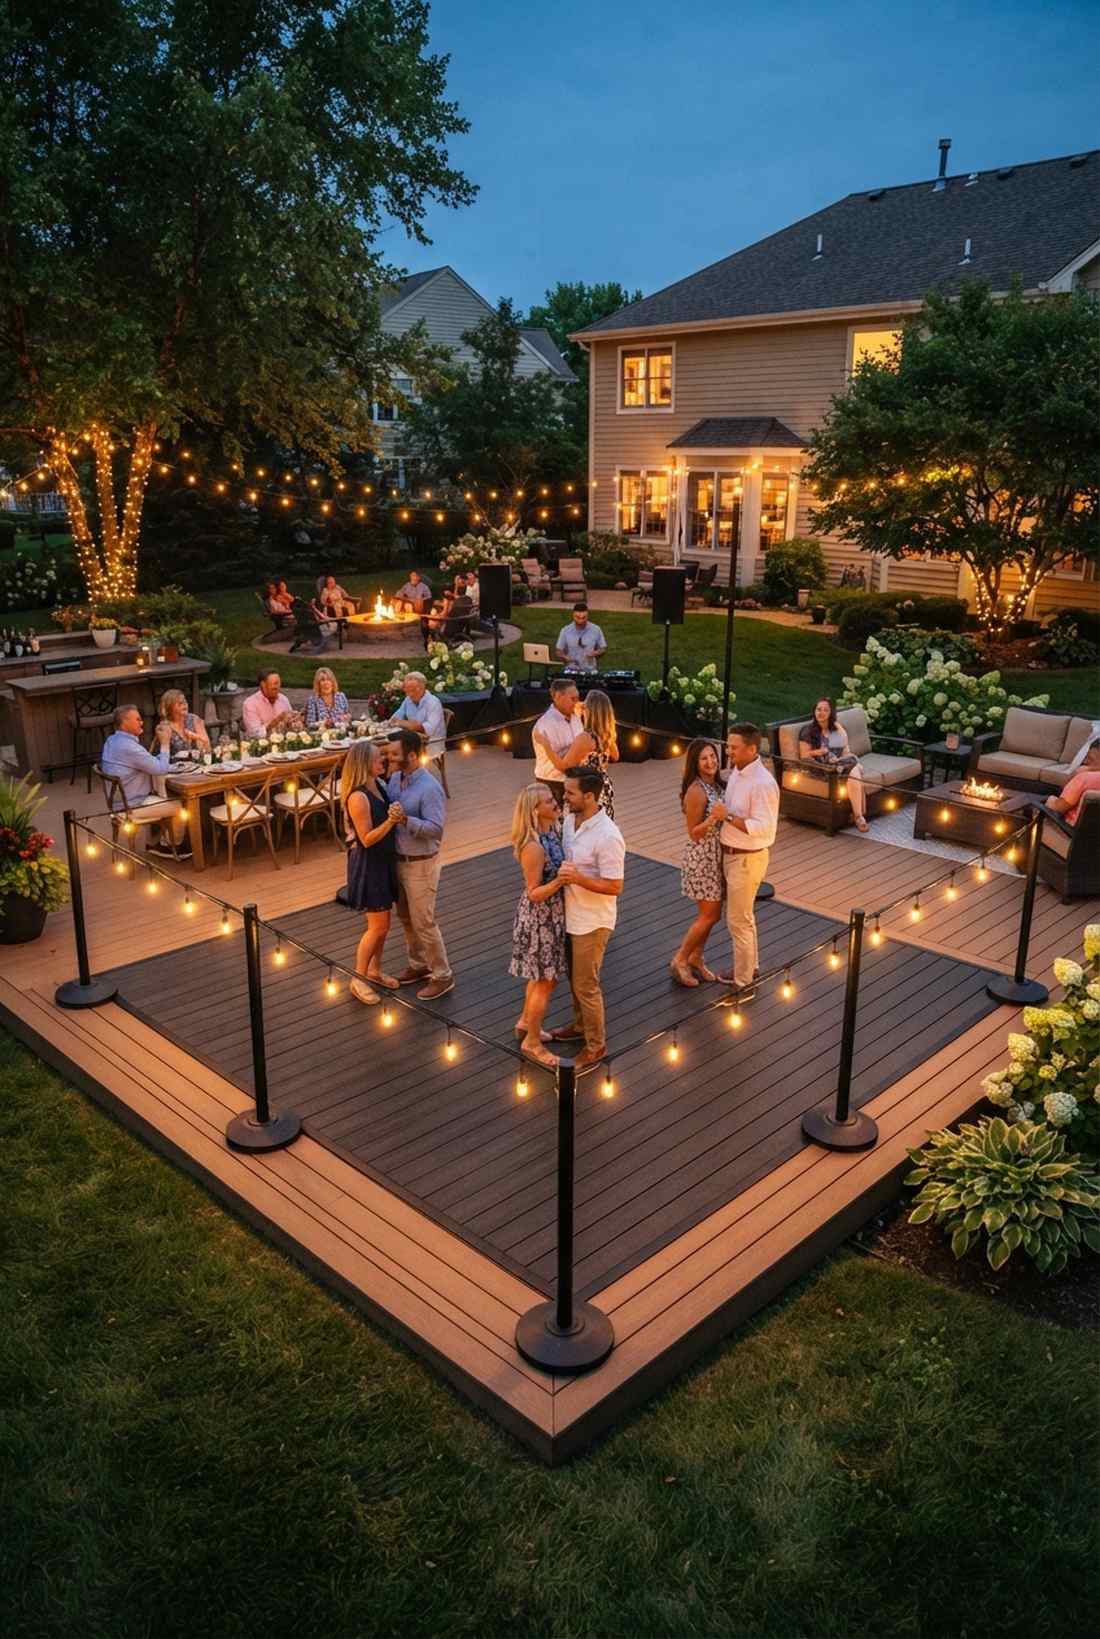
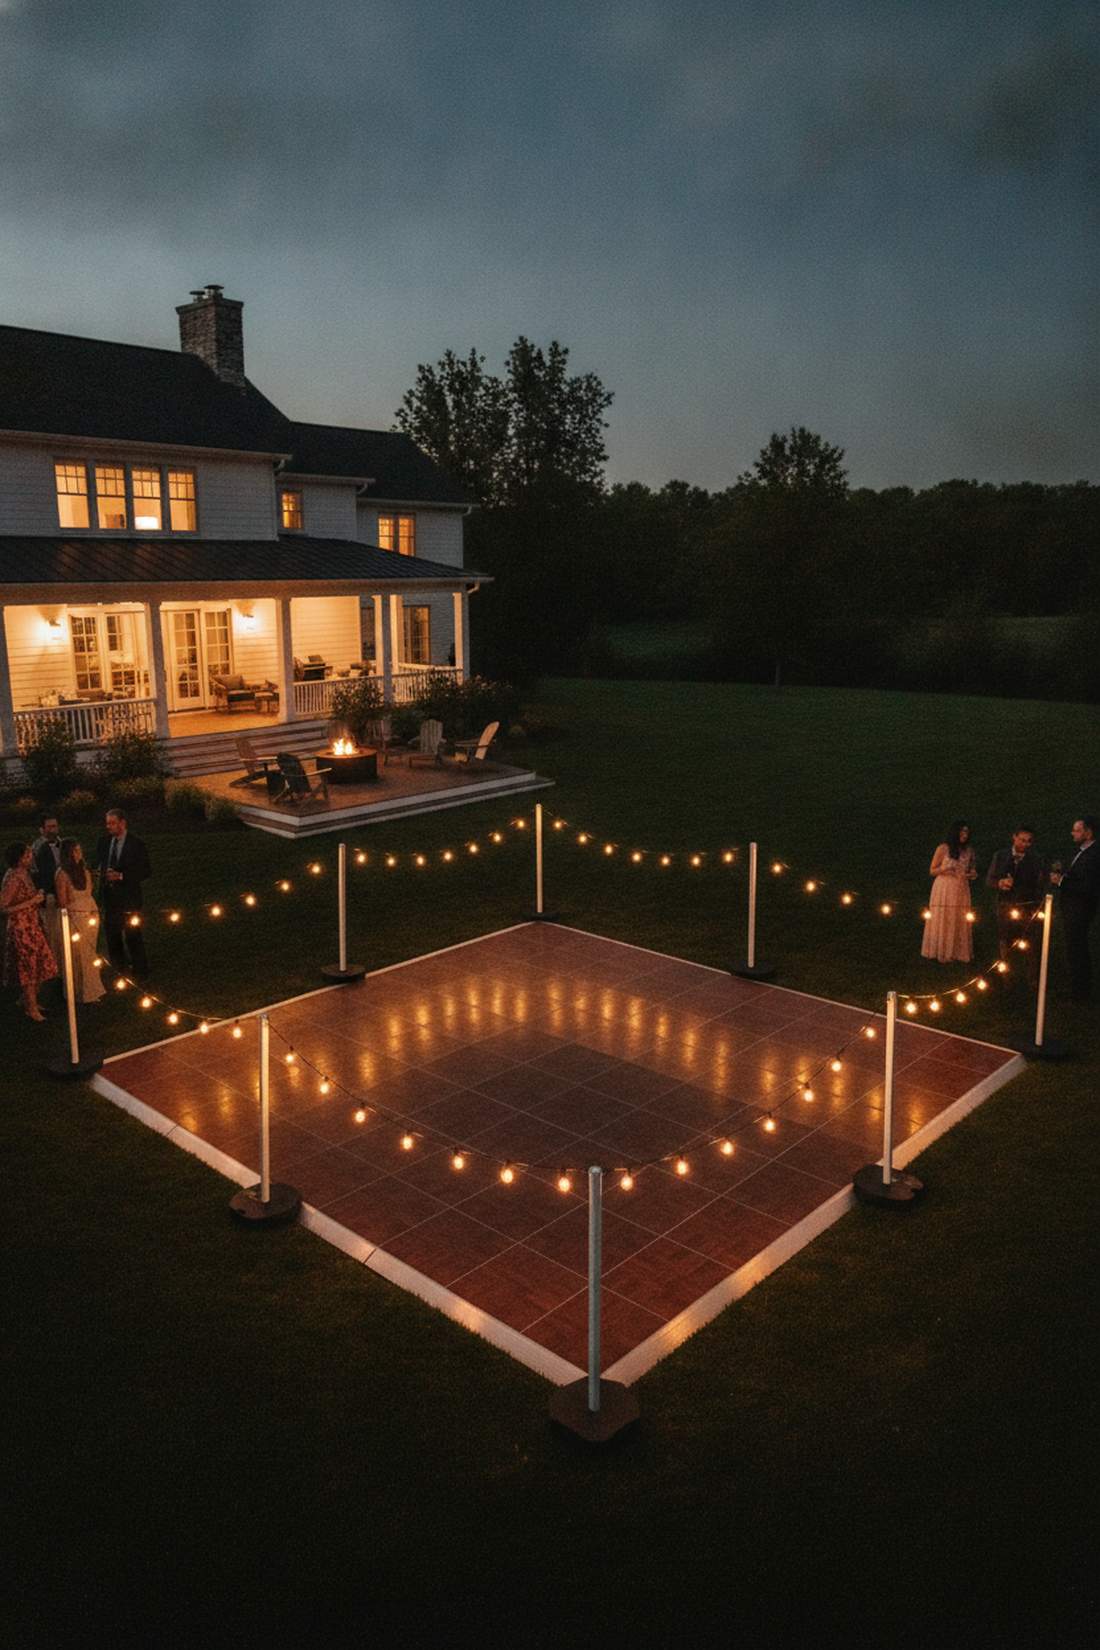
A brightly bordered outdoor dance floor boundary feels like an exclusive VIP stage just waiting for the music to start. It is crucial for keeping party guests safely contained and focused during late-night backyard receptions.
Without clear lighting, people trip over the raised edges of rented dance floors, but a sharp perimeter border instantly solves the safety issue while looking highly intentional. Incorporate heavy-duty pre-cut string lengths on waist-high stanchions to create a premium club-like enclosure.
This crowd-control lighting hack costs roughly $50–$95. Save this to guarantee your next outdoor party is perfectly organized.
- Key Materials: Portable stanchions, low-hanging bistros
- Vibe / Style: VIP outdoor club
- Difficulty: Easy temporary setup
- Budget Breakdown: Light Strands: $50 | Portable Poles: $40.
- Creator’s Tip: Keep the lights hung exactly at waist level (about 3.5 feet high) so they define the space without blinding people who are sitting down nearby.
- Smart Sourcing: portable outdoor string light poles (weighted base) and shatterproof acrylic bistro strings.
38. Vertical Light Curtain Backdrop
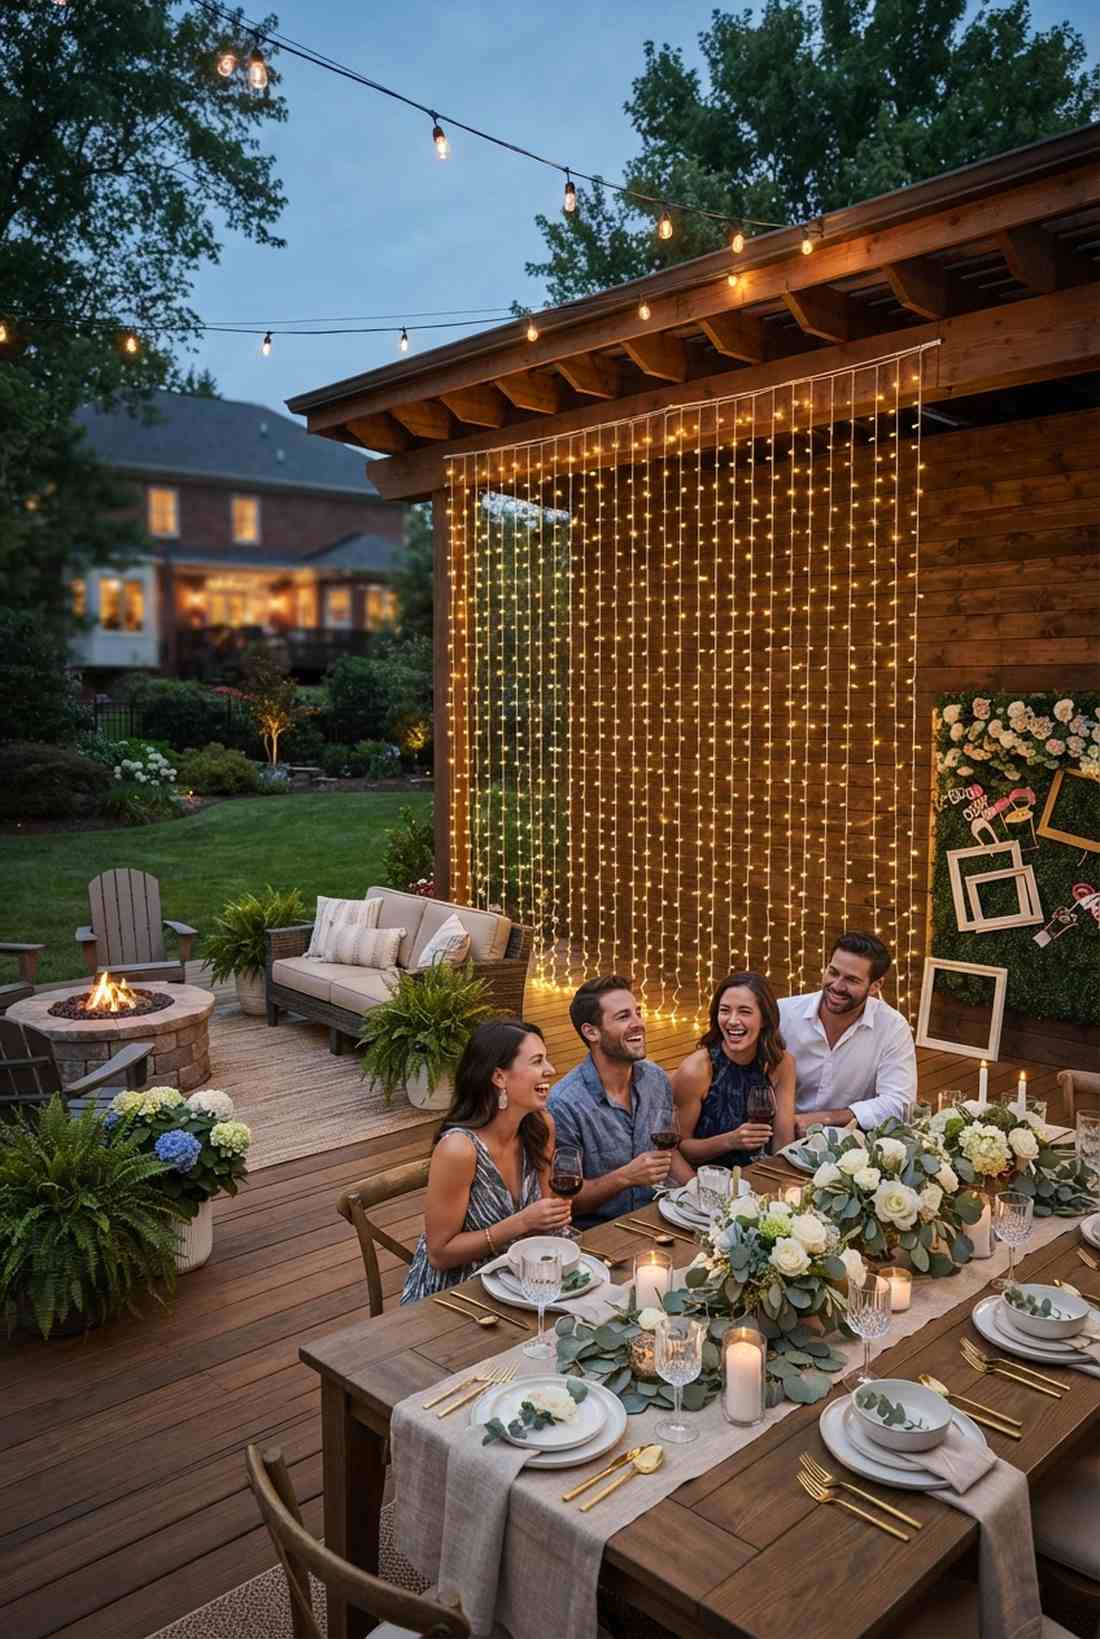
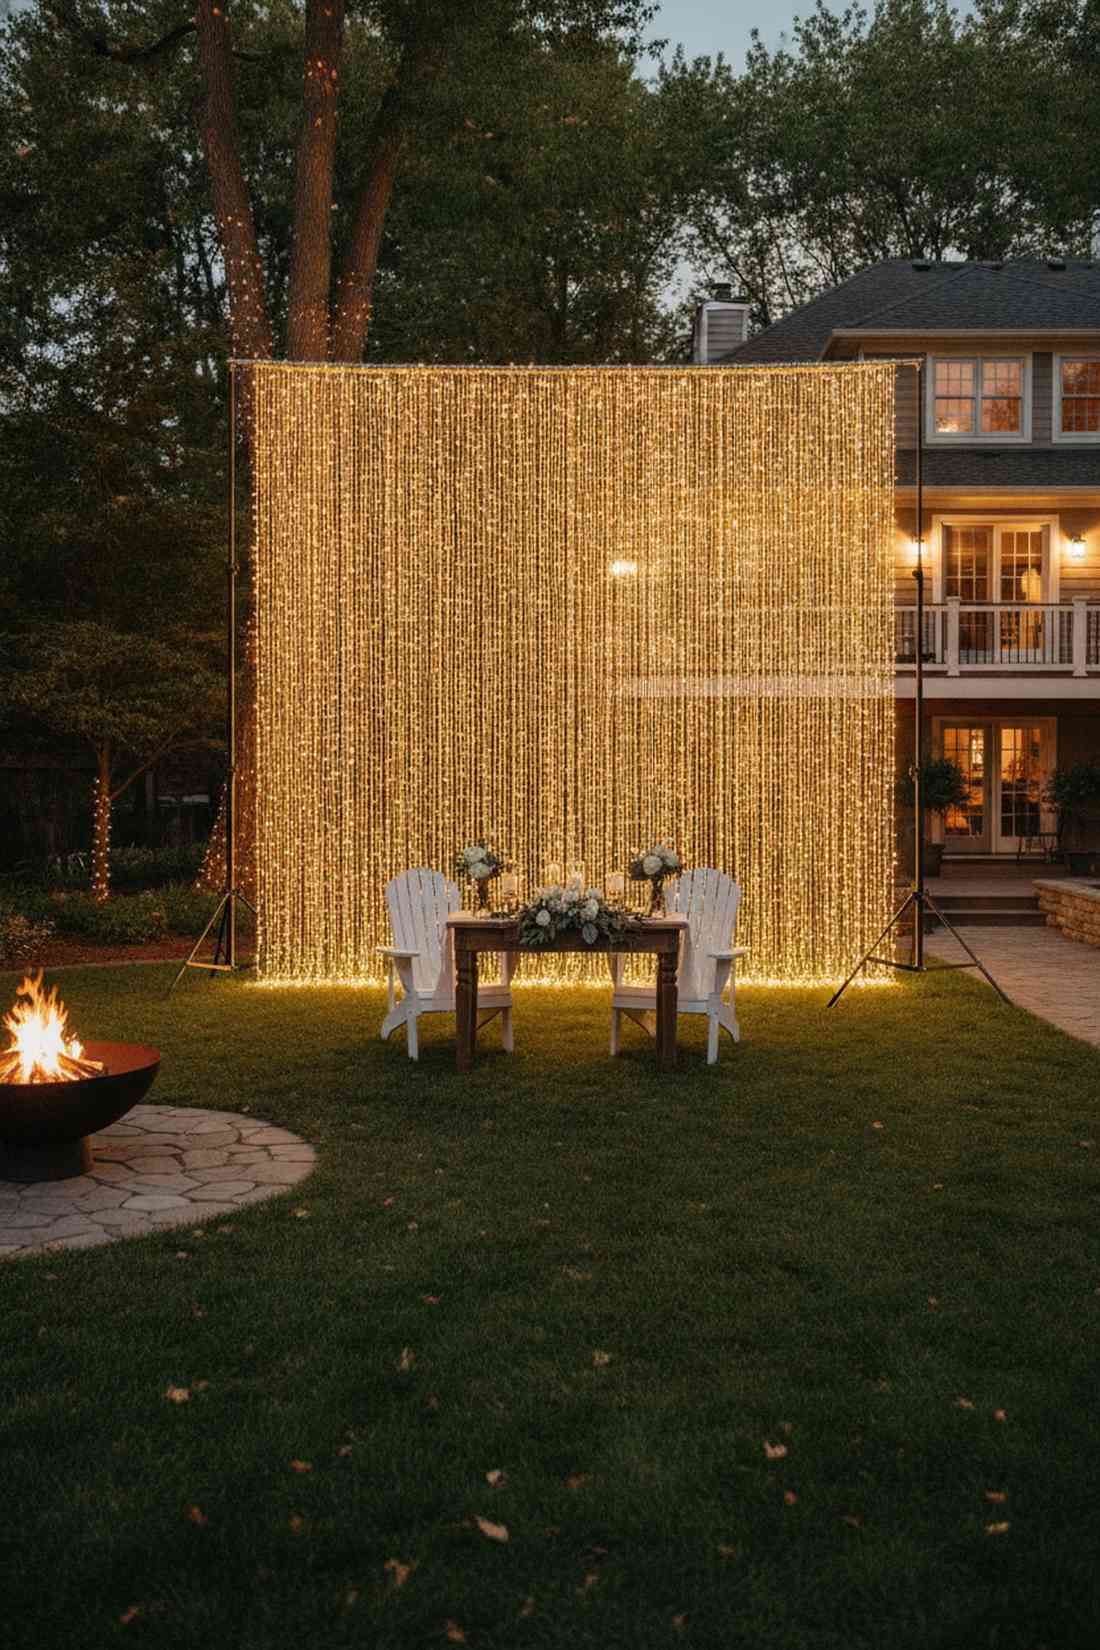
A cascading vertical fairy light waterfall feels like a glamorous Hollywood red carpet photo op. It acts as the ultimate backdrop behind head tables, DIY photo booths, or ugly garage walls during an event.
Standard horizontal stringing is expected, but hanging densely packed vertical lines creates a stunning wall of light that looks far more expensive than it is. Purchase a pre-wired curtain kit rather than hanging individual lines to save hours of frustrating, tangled labor.
This show-stopping backdrop runs about $35–$65. Pin this if you need an incredible photo background on a tight budget.
- Key Materials: LED curtain string lights
- Vibe / Style: Glamorous photo backdrop
- Difficulty: Unpack carefully to avoid tangles
- Budget Breakdown: Curtain LED Kit: $45 | Command Hooks: $10.
- Creator’s Tip: Hang the main horizontal support wire first, and ONLY untie the vertical cascading bundles once the top is securely mounted to avoid a massive knot.
- Smart Sourcing: 300-LED warm white curtain light kits and heavy-duty outdoor command hooks.
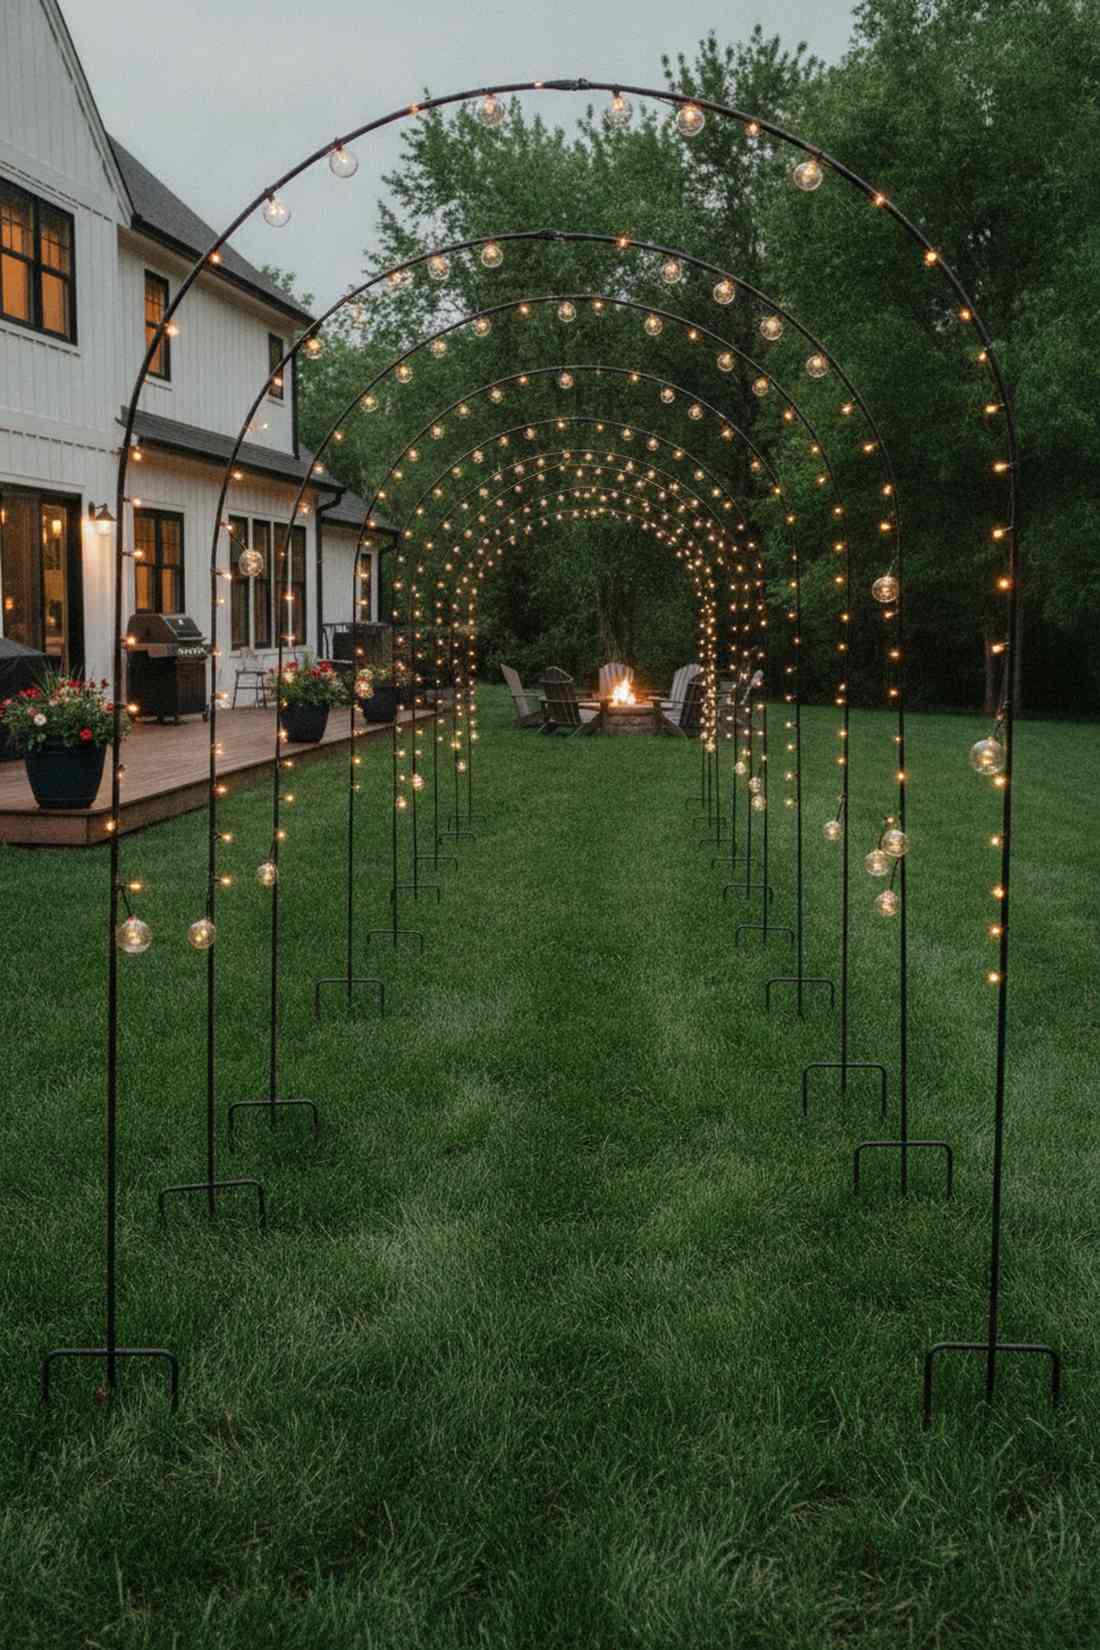
39. Pathway Entry Lighting Tunnel
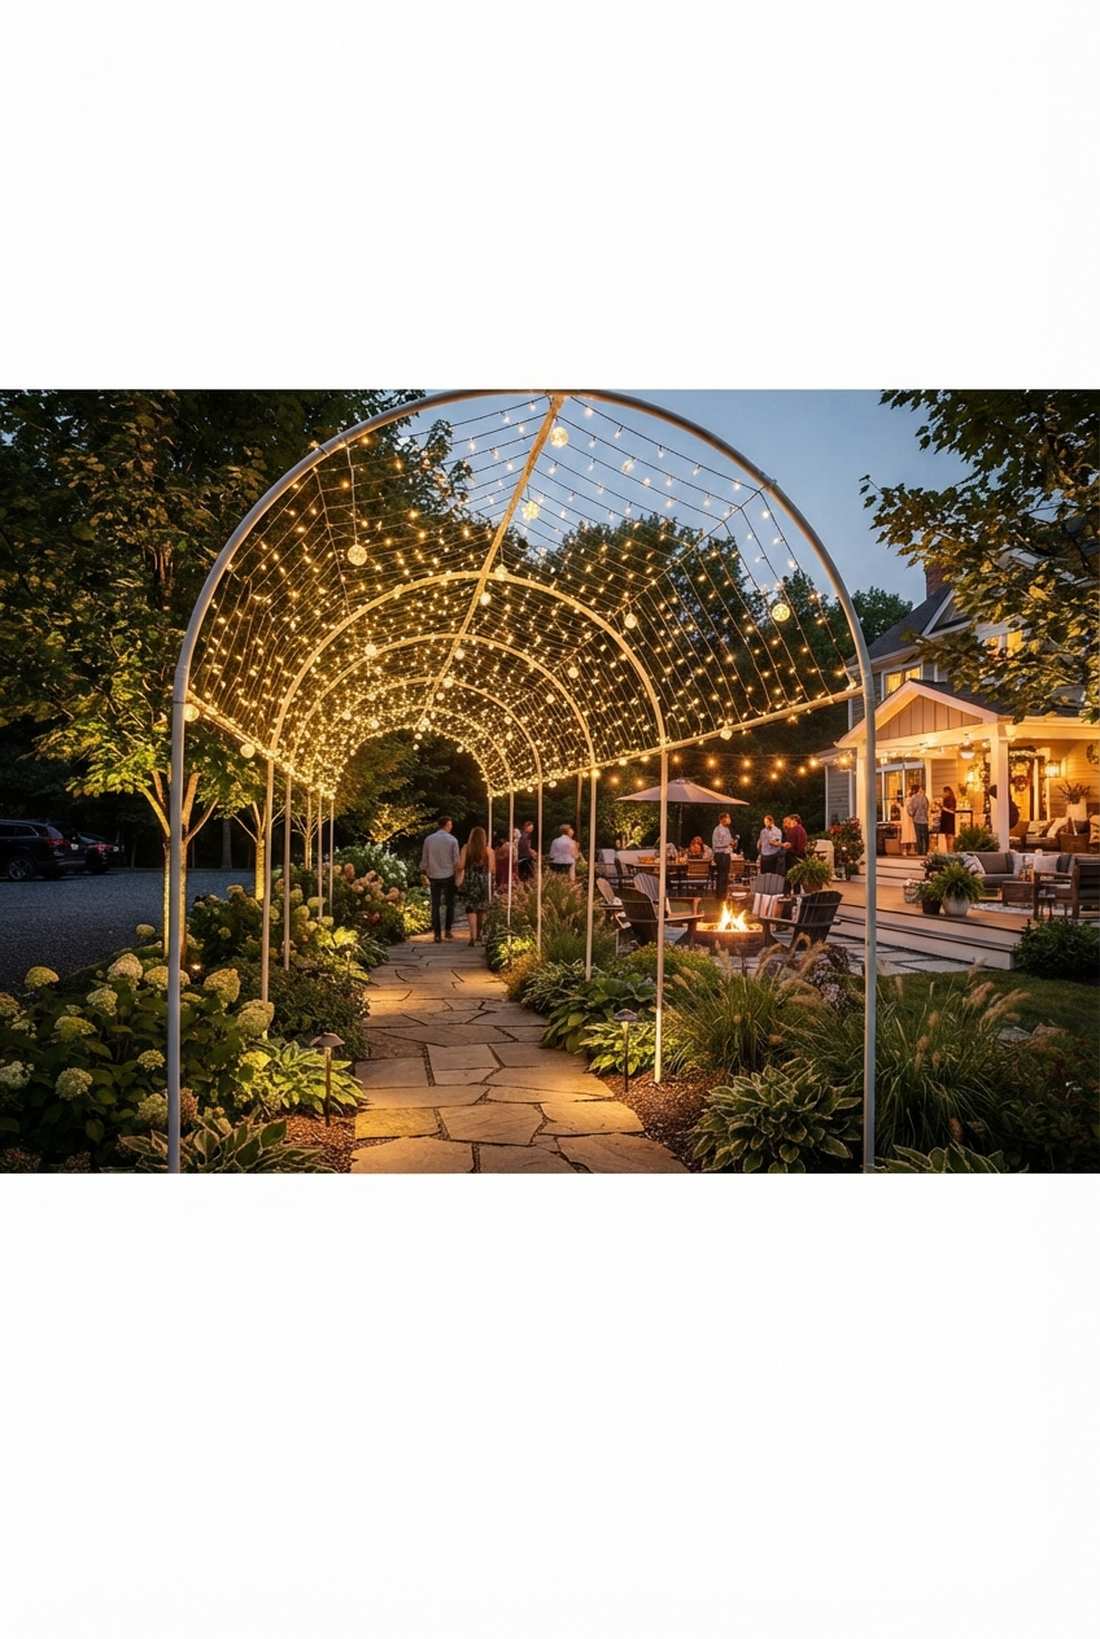
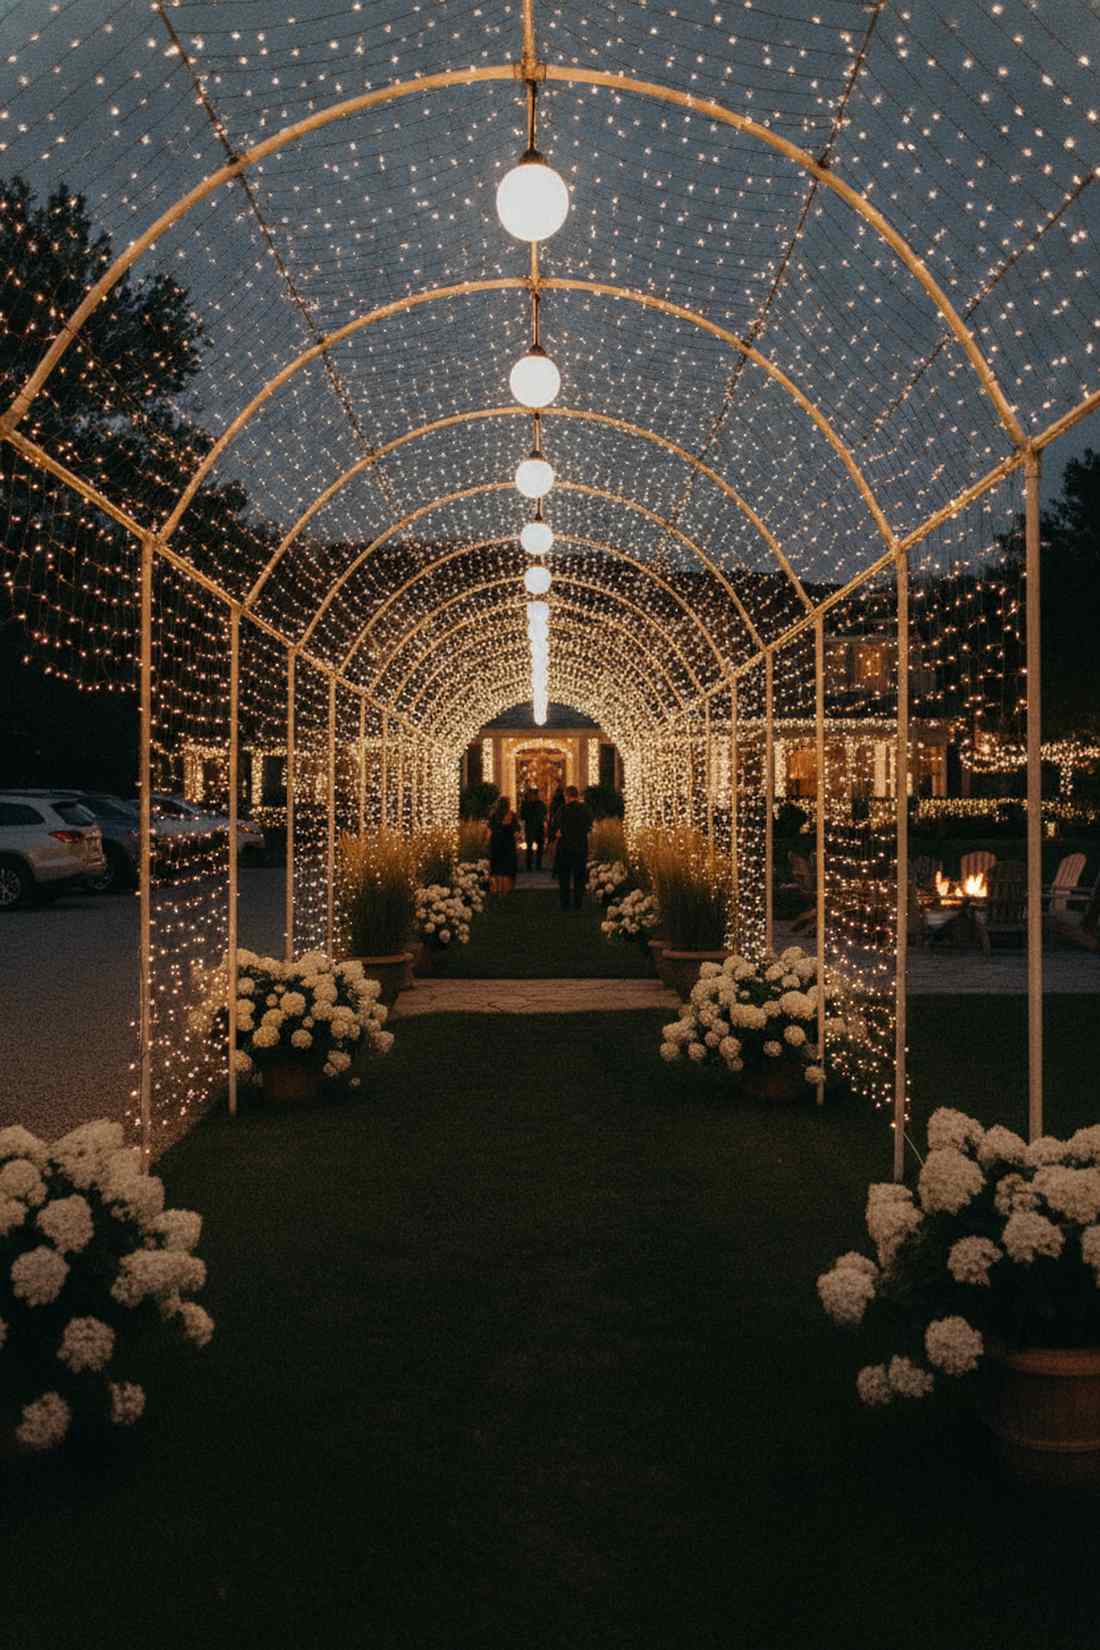
An immersive overhead fairy light tunnel feels like you are walking through a magical, glowing stargate. This is the absolute best way to transition guests from a dark parking area into your brightly lit main event space.
A single line of path lights is boring, but weaving an overhead archway creates massive anticipation and a designer-level finish for your entrance. Utilize flexible fiberglass tent poles or PVC pipes to create a cheap, sturdy framework to drape your waterproof lights over.
Creating this unforgettable entrance costs about $75–$130. A highly recommended project to wow your guests before they even grab a drink.
- Key Materials: PVC archways, dense fairy or globe lights
- Vibe / Style: Magical event entrance
- Difficulty: Intermediate structural bending
- Budget Breakdown: Arch Framework: $40 | Lights: $80.
- Creator’s Tip: Stagger the archways exactly 4 feet apart. The closer the arches, the denser and more magical the tunnel effect will be for your guests.
- Smart Sourcing: flexible outdoor LED rope light bulk packs and flexible PVC pipe framing kits.
40. Cocktail Area Intimate Zones

A softly lit low-hanging cocktail canopy feels like a cozy, private conversation corner at an upscale speakeasy. It is brilliant for breaking up massive lawns into smaller, human-scaled spaces that encourage mingling.
Flooding a whole yard with bright light kills intimacy, whereas dropping a small, dense canopy of micro-bulbs right over a high-top table naturally draws people together. Use warm 2200K outdoor lighting globes to keep the mood relaxed and flattering for photos.
This zone-defining trick costs barely $30–$55 per seating area. Pin this to master the art of outdoor party flow.
- Key Materials: Warm amber micro-globes
- Vibe / Style: Intimate private lounge
- Difficulty: Quick targeted hanging
- Budget Breakdown: Short Strands: $25 | Extension Cords: $15.
- Creator’s Tip: Drop the center of this mini canopy down to 7 feet above the ground. Lowering the ceiling visually “encloses” the space, making it feel highly private.
- Smart Sourcing: short-length 15ft Edison bulb strands and green outdoor-rated extension cords.
This final natural integration trick is exactly what landscape architects charge thousands of dollars to execute.
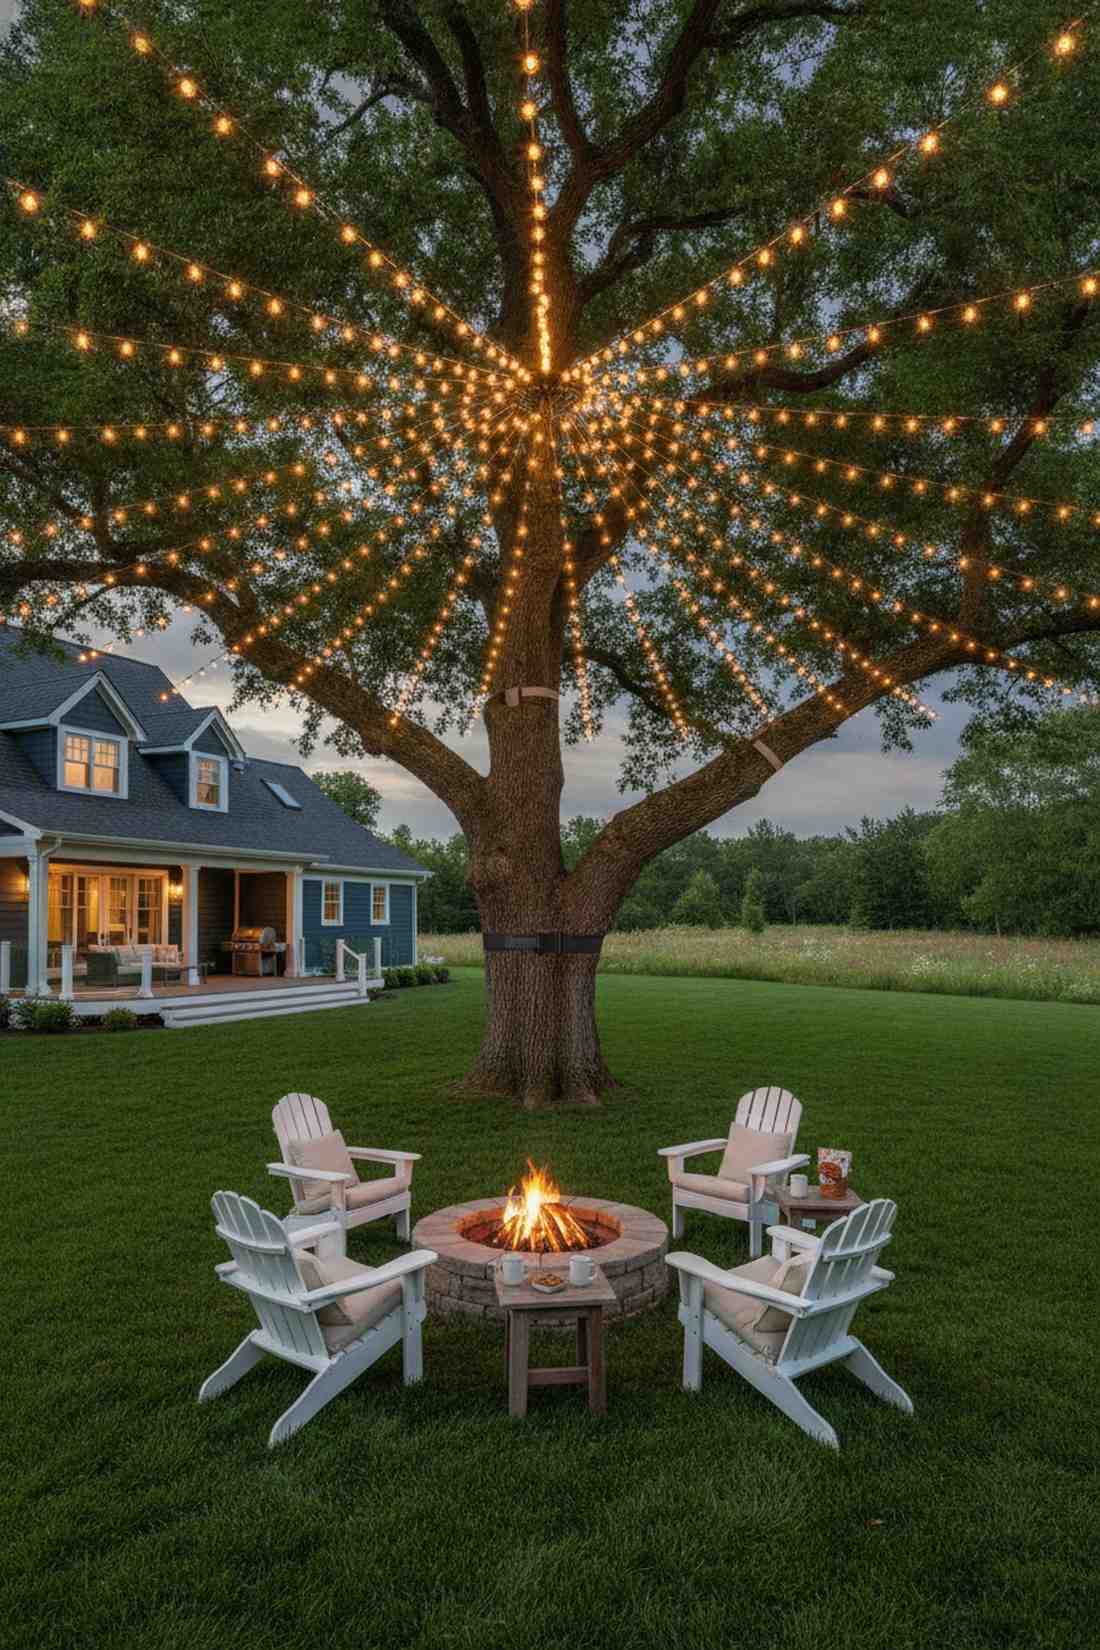
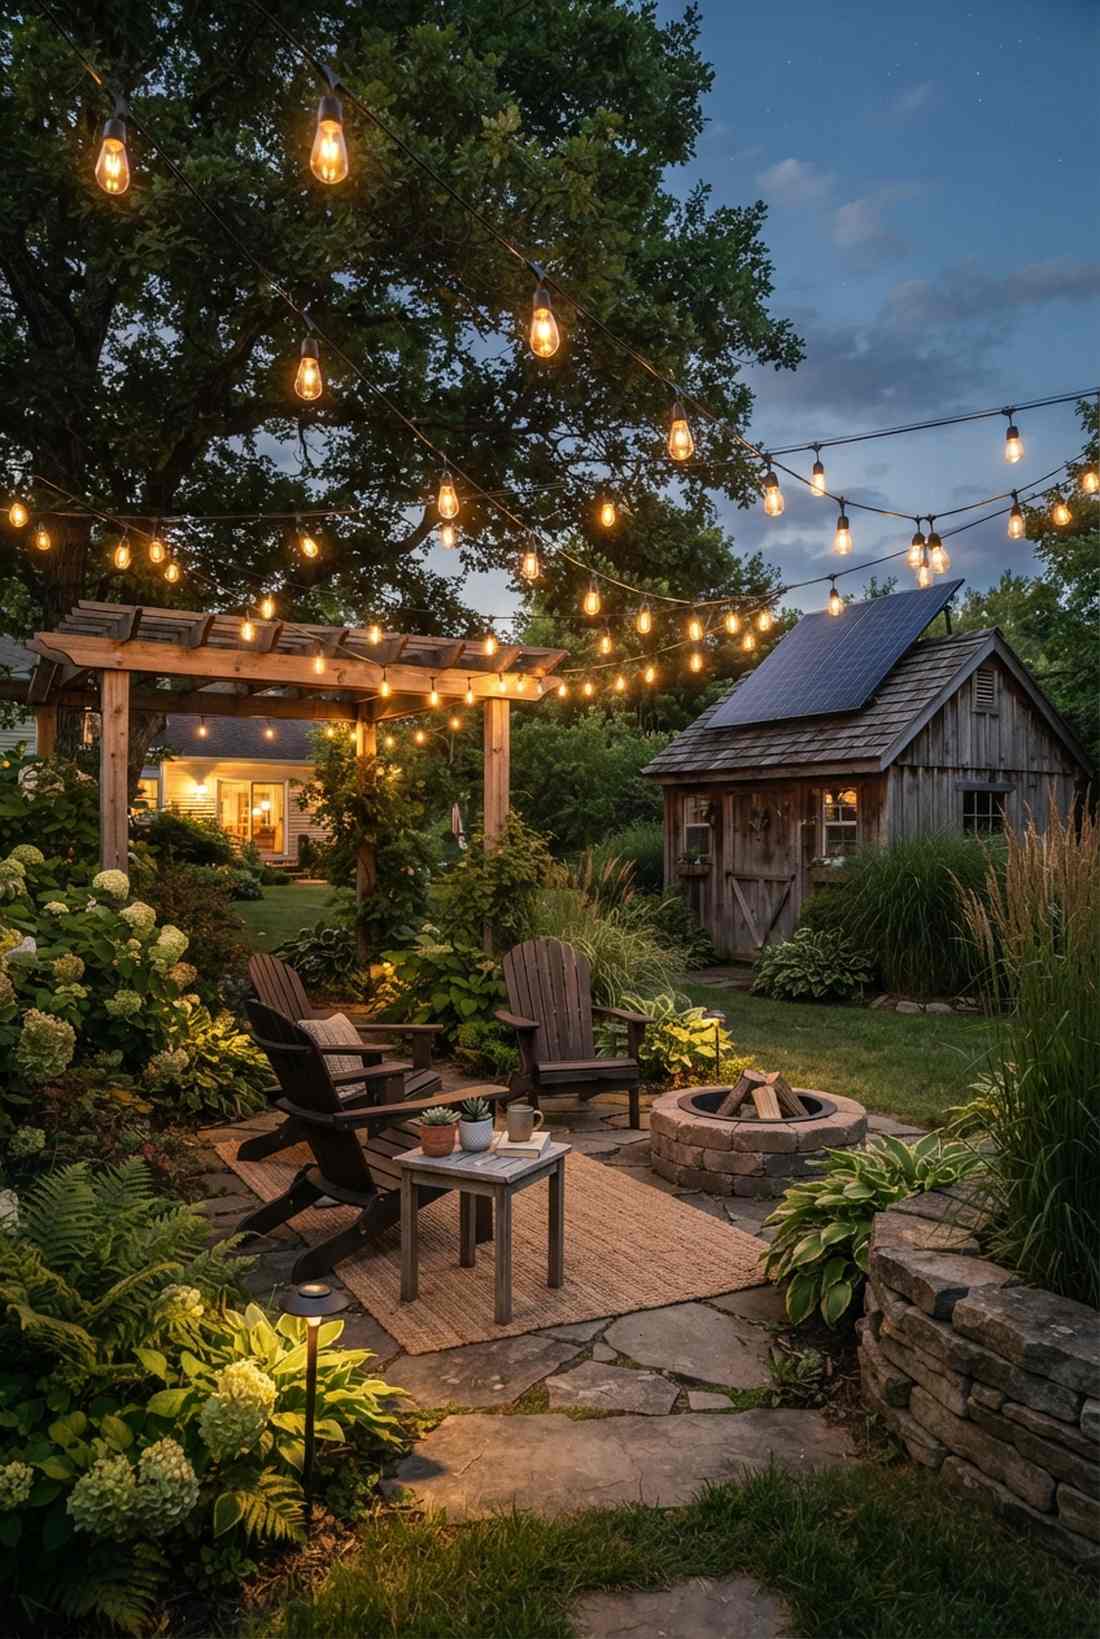
41. Tree Canopy Integration
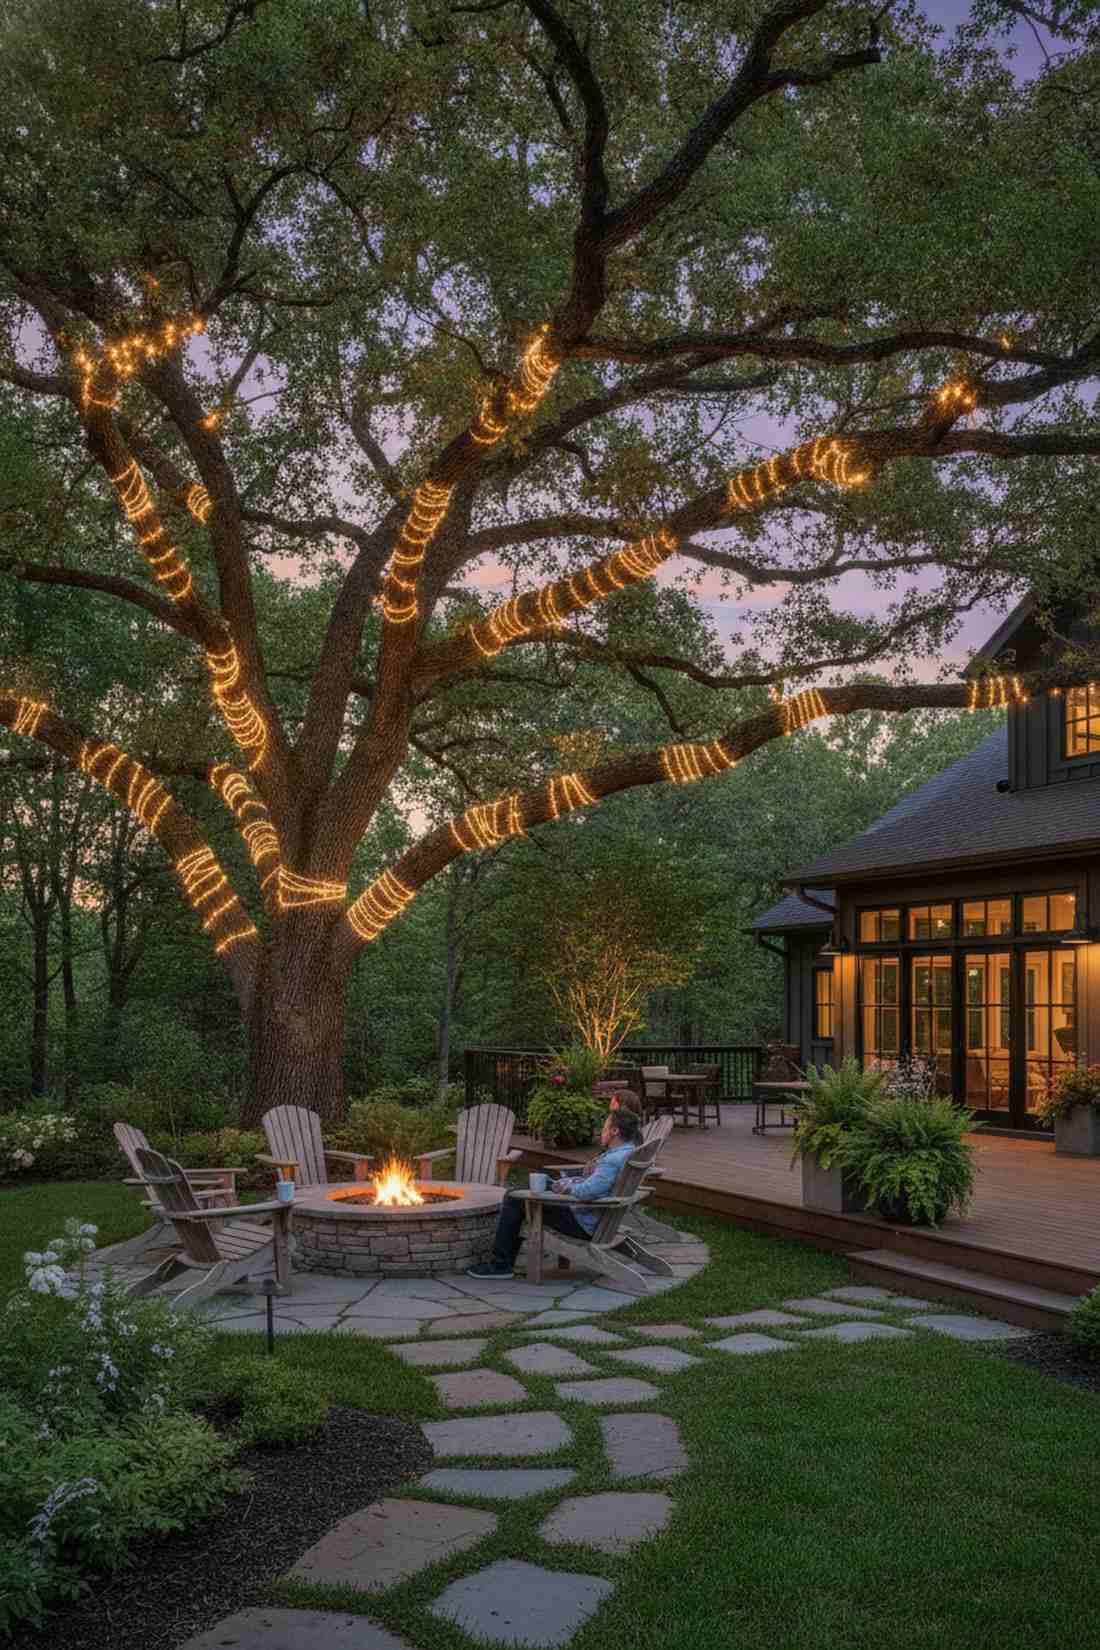
A sprawling illuminated oak tree canopy feels like an ancient, glowing spirit tree right out of a fantasy novel. This is the ultimate, breathtaking way to utilize massive mature trees as the primary architectural feature of your yard.
Most people lazily wrap the trunk, but running strands meticulously out along the sprawling horizontal branches delivers a jaw-dropping, premium outcome. You must use UV-coated commercial wires and allow plenty of slack so the tree can sway in heavy winds without snapping your setup.
Expect to invest around $100–$200 for a massive tree. Save this to your master landscaping board to create absolute yard envy.
- Key Materials: Commercial-grade dark wire strings
- Vibe / Style: Breathtaking natural majesty
- Difficulty: Requires tall ladders and patience
- Budget Breakdown: Heavy Duty Wire: $150 | Tree Ties: $20.
- Creator’s Tip: Leave a 10% slack loop between every branch tie-off point. When the wind blows, the branches move independently, and tight wires will instantly snap.
- Smart Sourcing: commercial 100ft black-wire LED globes and expandable rubber tree ties.
42. Floating Water Feature Lighting
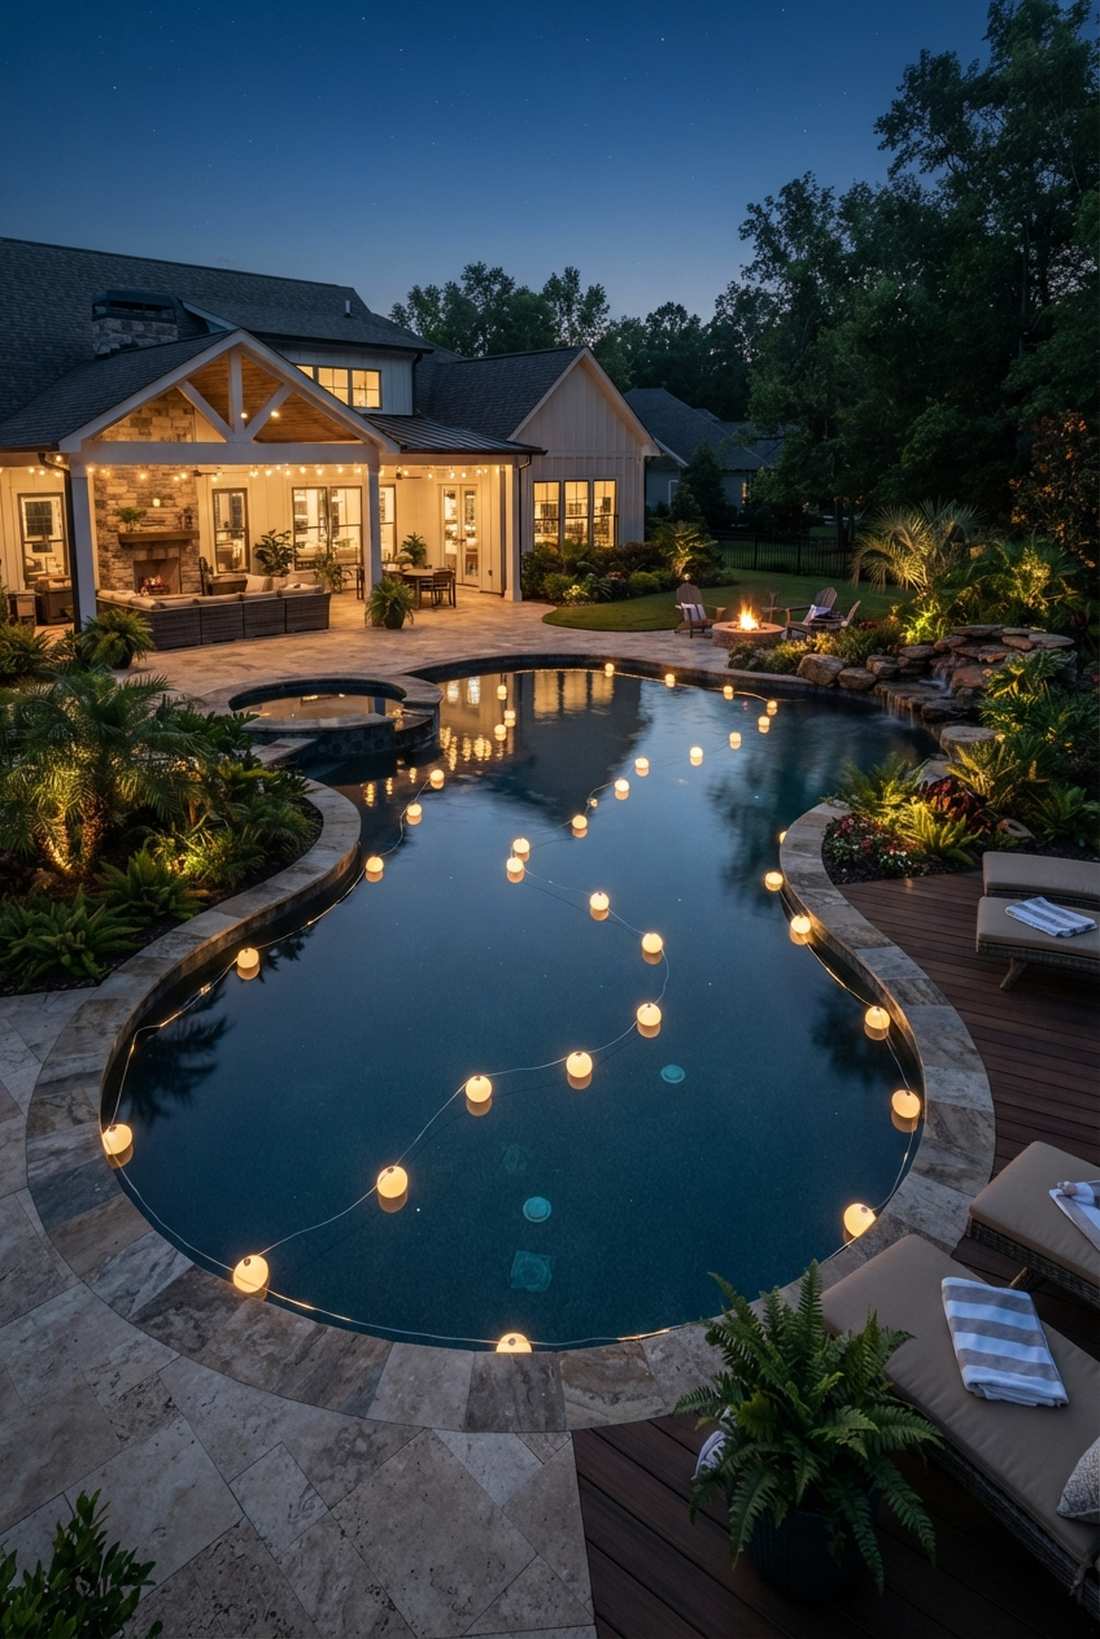
A glowing floating pool perimeter reflection feels like a luxurious midnight lagoon at a five-star island resort. Highly effective for large swimming pools, koi ponds, or expansive garden water features that disappear in the dark.
While underwater lights are expensive to install, floating waterproof globe lines on the surface creates stunning reflections that look far more expensive than it is. You absolutely must verify that the product is fully IP68 submersible to prevent catastrophic electrical hazards.
This resort-level aquatic upgrade runs about $60–$100. Pin this if you want to double the visual impact of your backyard water features.
- Key Materials: IP68 submersible string or orb lights
- Vibe / Style: Five-star resort lagoon
- Difficulty: Easy surface deployment
- Budget Breakdown: IP68 Strings: $70 | Edge Anchors: $15.
- Creator’s Tip: Anchor the floating strand to the edges using clear fishing line so the glowing orbs appear to be magically hovering on the water’s surface.
- Smart Sourcing: IP68 fully submersible waterproof LED strands and invisible fluorocarbon fishing line.
43. Seasonal Holiday Transformations
A fully adaptable seasonal colored canopy feels like a festive, ever-changing holiday village display. It is the absolute smartest strategy for homeowners who love celebrating every major holiday without buying entirely new light setups.
Most people rip down and rehang lights every winter, but utilizing an empty-socket commercial stringer allows you to simply unscrew the bulbs and swap colors seamlessly. Buy into a solid starter kit of heavy-duty black wiring, and just rotate out bulk packs of colored bulbs throughout the year.
This highly adaptable baseline costs roughly $80–$140 to start. Highly recommended for a one-time setup that lasts all year.
- Key Materials: Empty socket commercial stringers, multi-color bulb packs
- Vibe / Style: Dynamic holiday festive
- Difficulty: Fast bulb swapping
- Budget Breakdown: Empty Stringer: $60 | Colored Bulbs: $40.
- Creator’s Tip: Keep the empty socket wire permanently tensioned on your patio, and store your fragile colored glass bulbs in padded egg cartons in the garage when not in use.
- Smart Sourcing: heavy-duty empty socket commercial stringers and shatterproof multi-colored LED replacement bulbs (bulk pack).
Bringing Your Outdoor Lighting Vision to Life
Executing any of these 43 breathtaking outdoor lighting string lights blueprints completely transforms a dull backyard into a premium, highly usable evening retreat. The secret to achieving that “looks expensive but isn’t” aesthetic lies entirely in smart material sourcing—skipping flimsy retail boxes and opting for UV-resistant PVC jackets, heavy-duty suspension cables, and shatterproof LED outdoor lighting globes. By combining a rock-solid permanent infrastructure with strategic budget planning, you guarantee your new illuminated patio, pergola, or event space survives harsh weather while delivering spectacular, designer-level ambiance all year round.
Frequently Asked Questions
What bulb spacing works best for patio string lights?
Spacing heavily dictates your vibe. For bright task lighting over an outdoor kitchen, source 12 to 24-inch spaced commercial-grade LED outdoor lighting globes. If you want a moody, premium restaurant aesthetic, push that spacing to 24 to 36 inches to reduce glare and mimic high-end architectural setups. Always check the bulb density on bulk packs before buying.
How do I prevent string lights from sagging between posts?
Never rely on the electrical wire itself for tension—it will snap. The professional secret is sourcing heavy-duty stainless steel guide wire kits. Run this tensioned aircraft cable first, lock it tight with turnbuckles, and then zip-tie your outdoor lighting string directly to the cable. This gives a crisp, modern line and prevents wind damage.
Are LED or incandescent bulbs better for outdoor string lighting?
LEDs dominate the market for a reason. Modern shatterproof LED outdoor lighting string lights consume 80% less energy and won’t shatter into dangerous glass shards on your patio. While cheap incandescent bulbs look warm, premium LED starter kits now offer hyper-warm 2200K “Edison-style” coloring, giving you that vintage look without the massive electricity bill.
What weather rating should outdoor string lights have?
Do not buy anything rated under IP65 if you want it to survive. You must source IP65 or IP68 waterproof strands that feature UV-resistant PVC jackets. This heavy-duty rating guarantees that your sockets are silicone-sealed against heavy rain and your wires won’t dry-rot and crack under intense summer sun exposure.
Can I leave outdoor string lights up year-round?
Yes, but only if you buy the right gear. Commercial-grade setups with UV-coated suspension wires and shatterproof acrylic outdoor lighting globes are designed for permanent 365-day exposure. Avoid leaving cheap, thin-wire fairy kits out in the snow, as the plastic becomes brittle. Always invest in premium bulk kits for permanent outdoor installs.
How many string light strands can I connect together?
This entirely depends on the wattage. Standard incandescent bulbs limit you to 3 or 4 strands before you risk a fire hazard. However, highly efficient LED outdoor lighting string kits often allow you to safely daisy-chain up to 15 or 20 strands on a single standard outlet. Always verify the manufacturer’s maximum run length on the box before plugging them in.