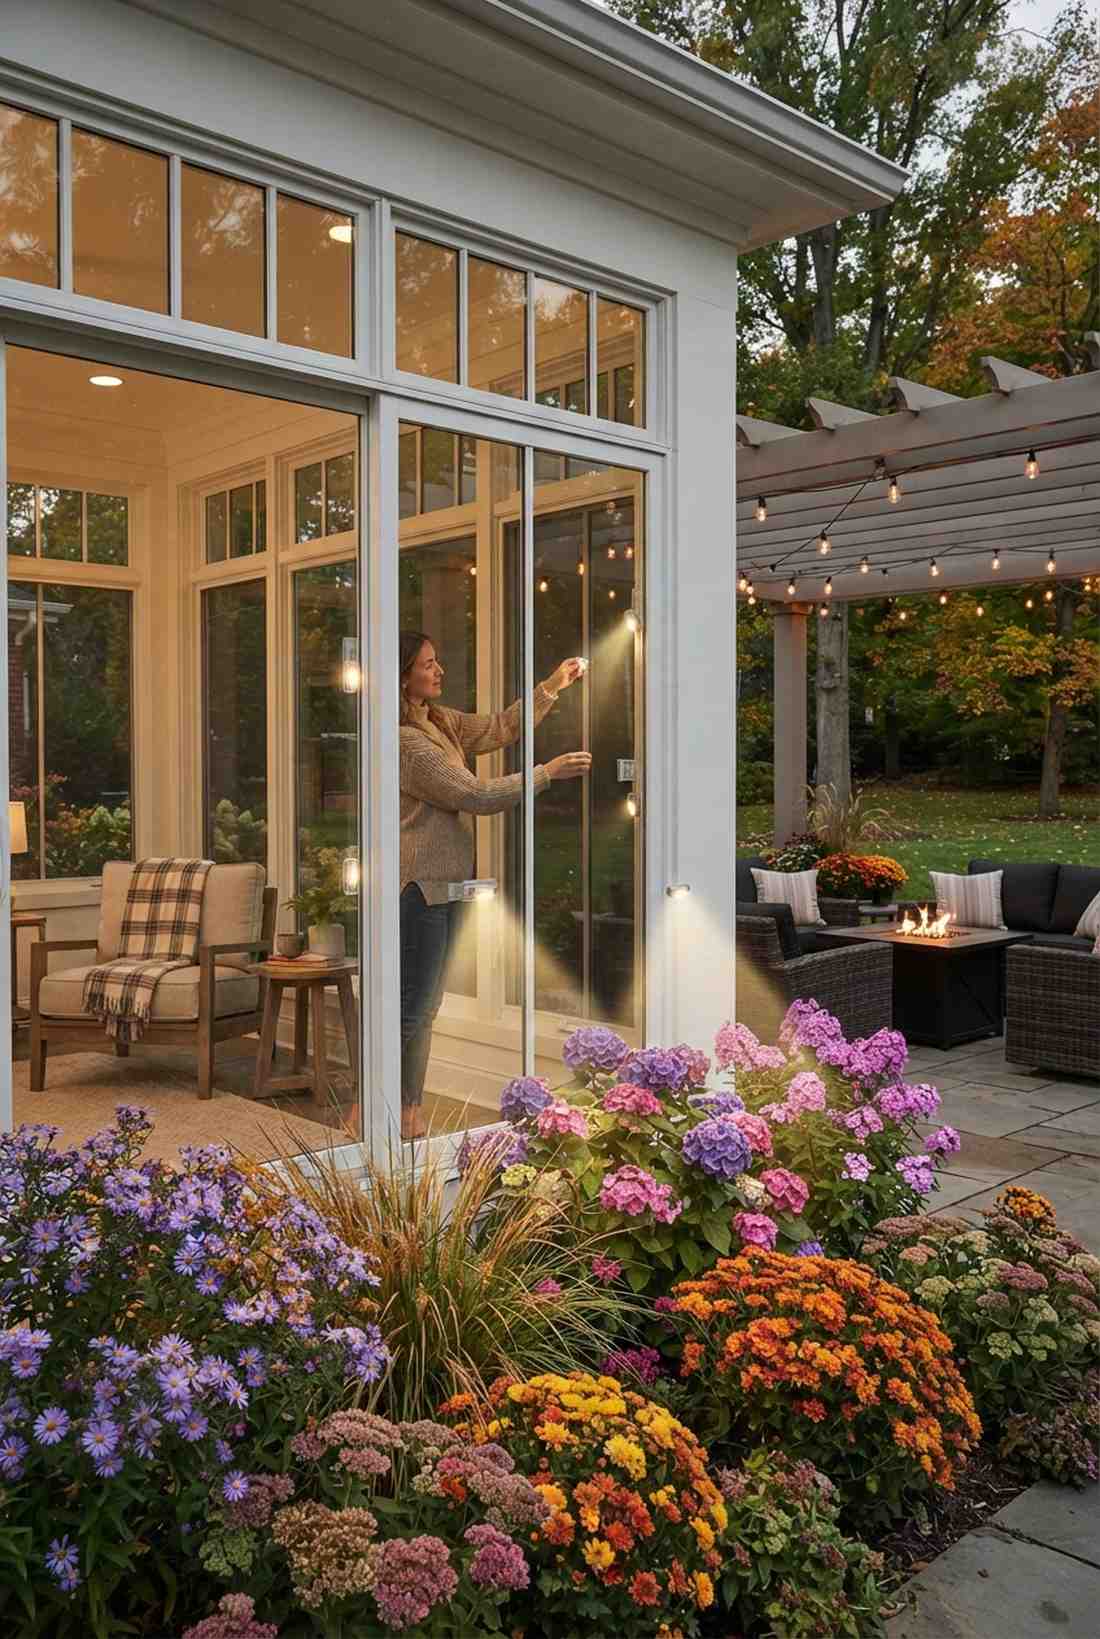
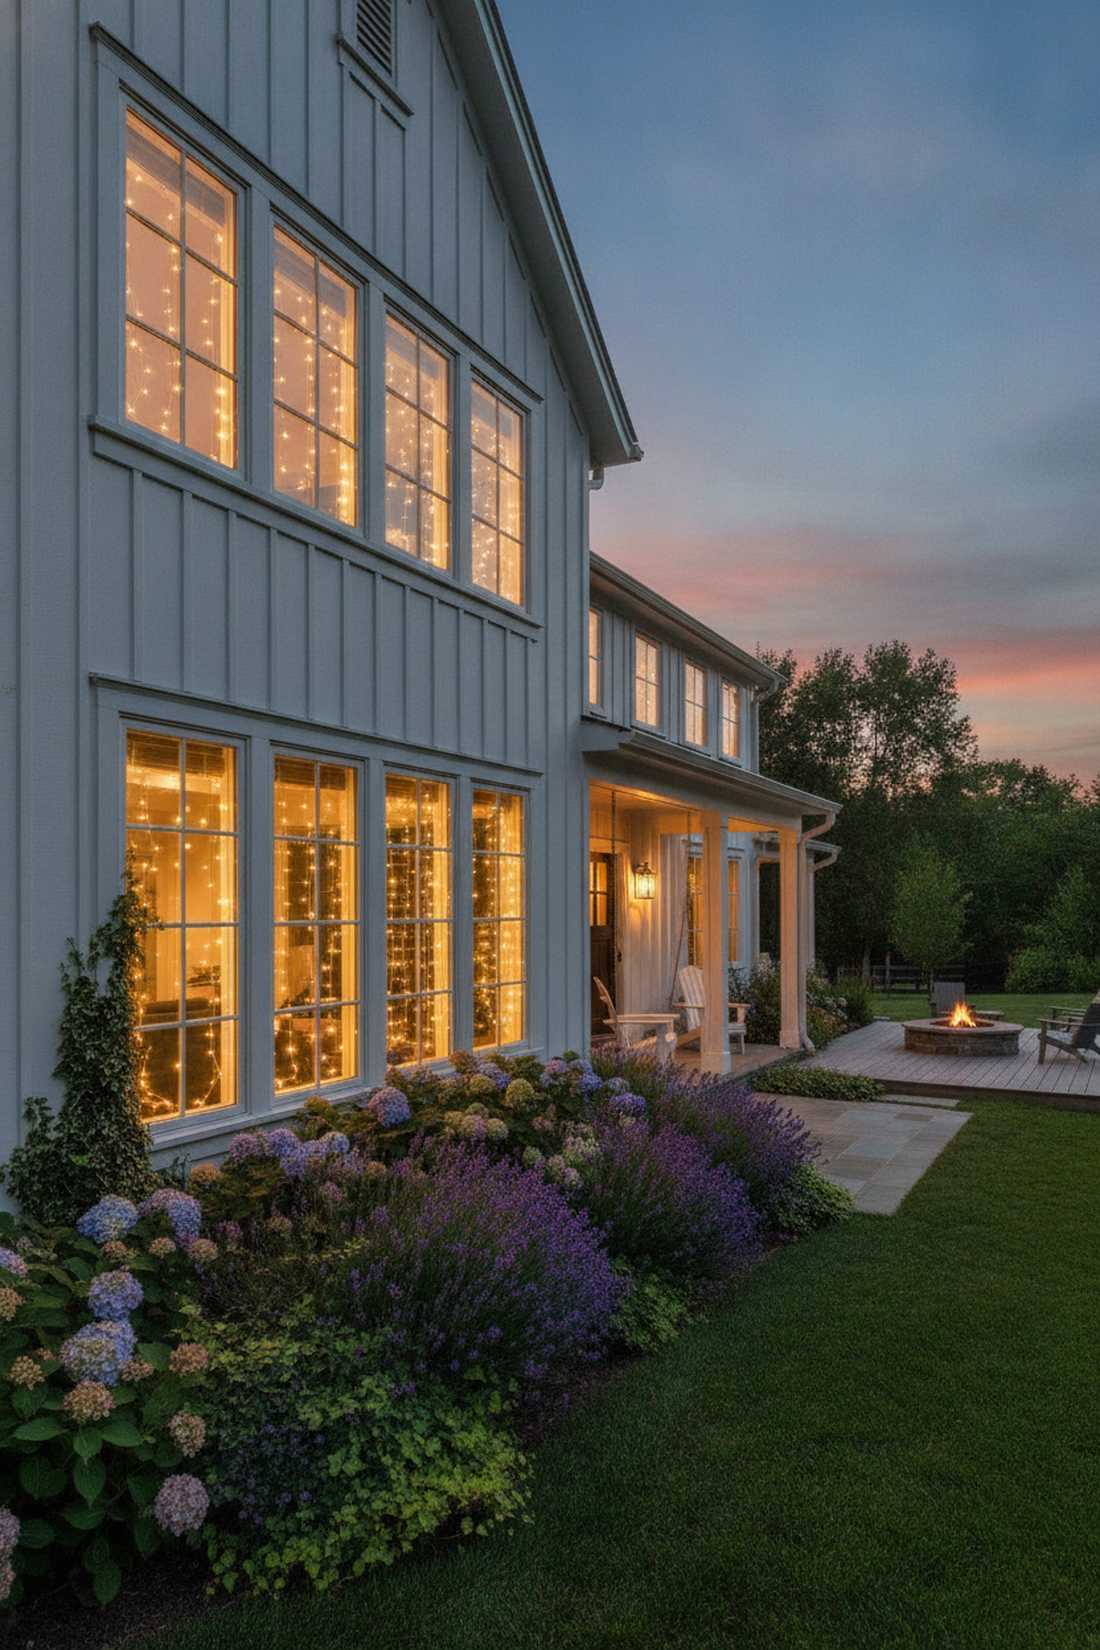
Transform any dull glass pane into a high-end glowing frame using strategic fairy lights on window displays. You get premium designer aesthetics without breaking your budget by leveraging bulk-pack wire kits.
Design SnapshotKey Principles
- Layered Illumination: Combine window lights with garden uplighting to create dimensional depth
- Wire Discipline: Use thin copper or silver wire strands that disappear during daylight hours
- View Alignment: Position lights to direct eye movement toward focal garden elements
- Color Temperature: Match warm whites (2700K-3000K) to garden mood; cool whites for contemporary spaces
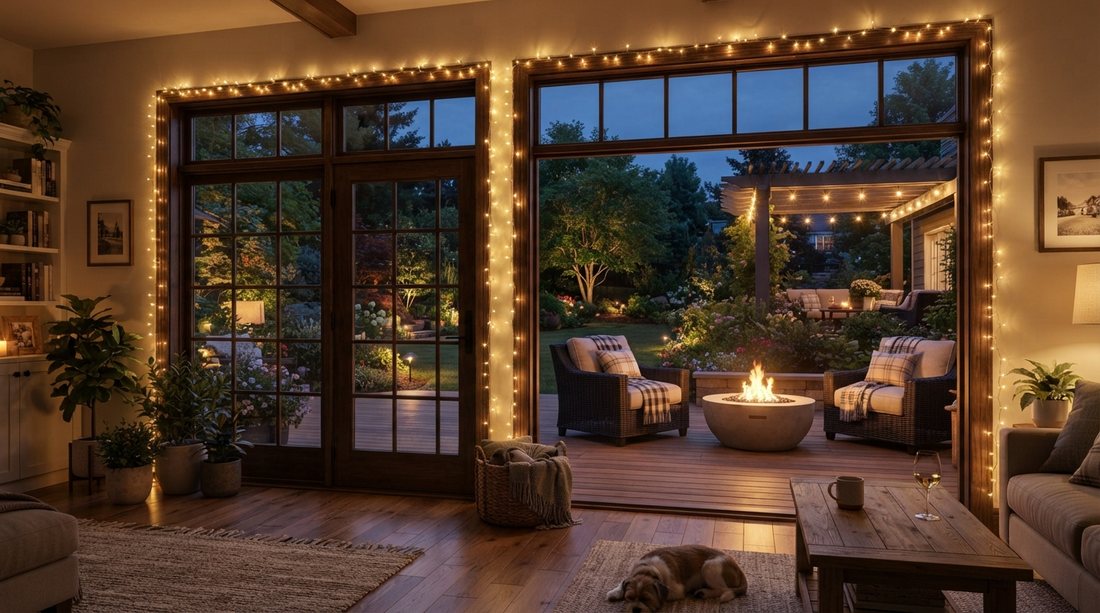
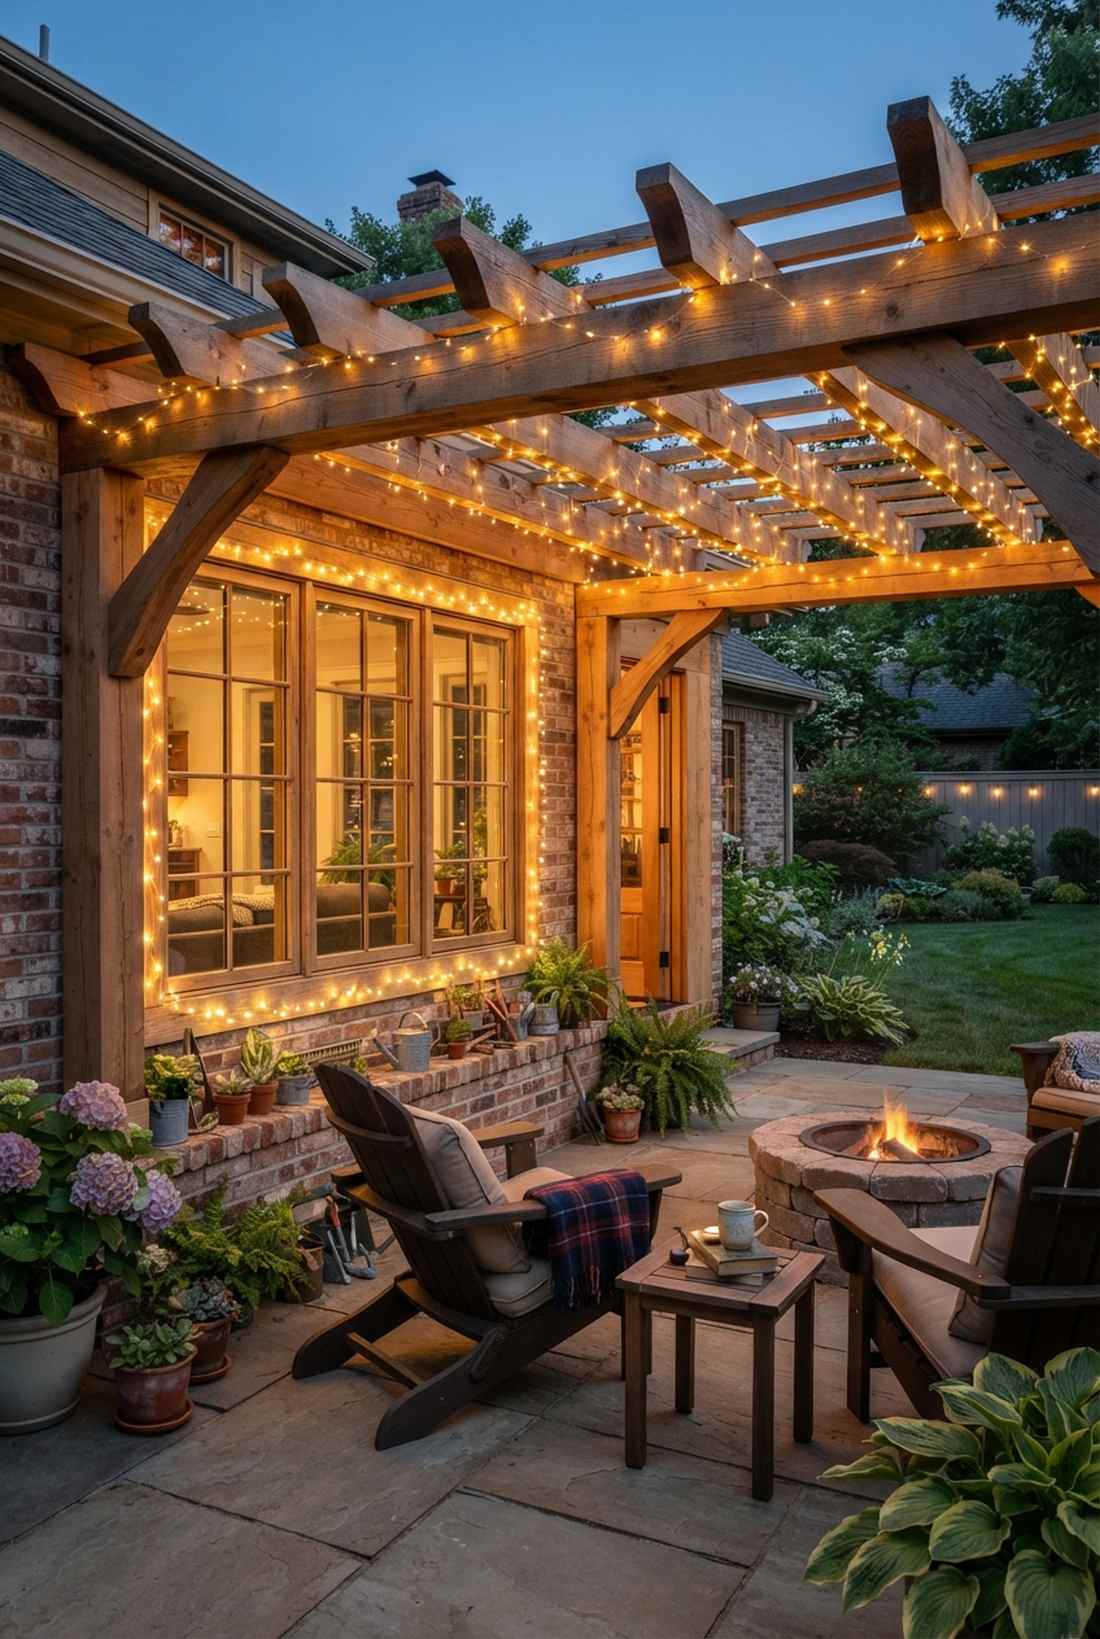
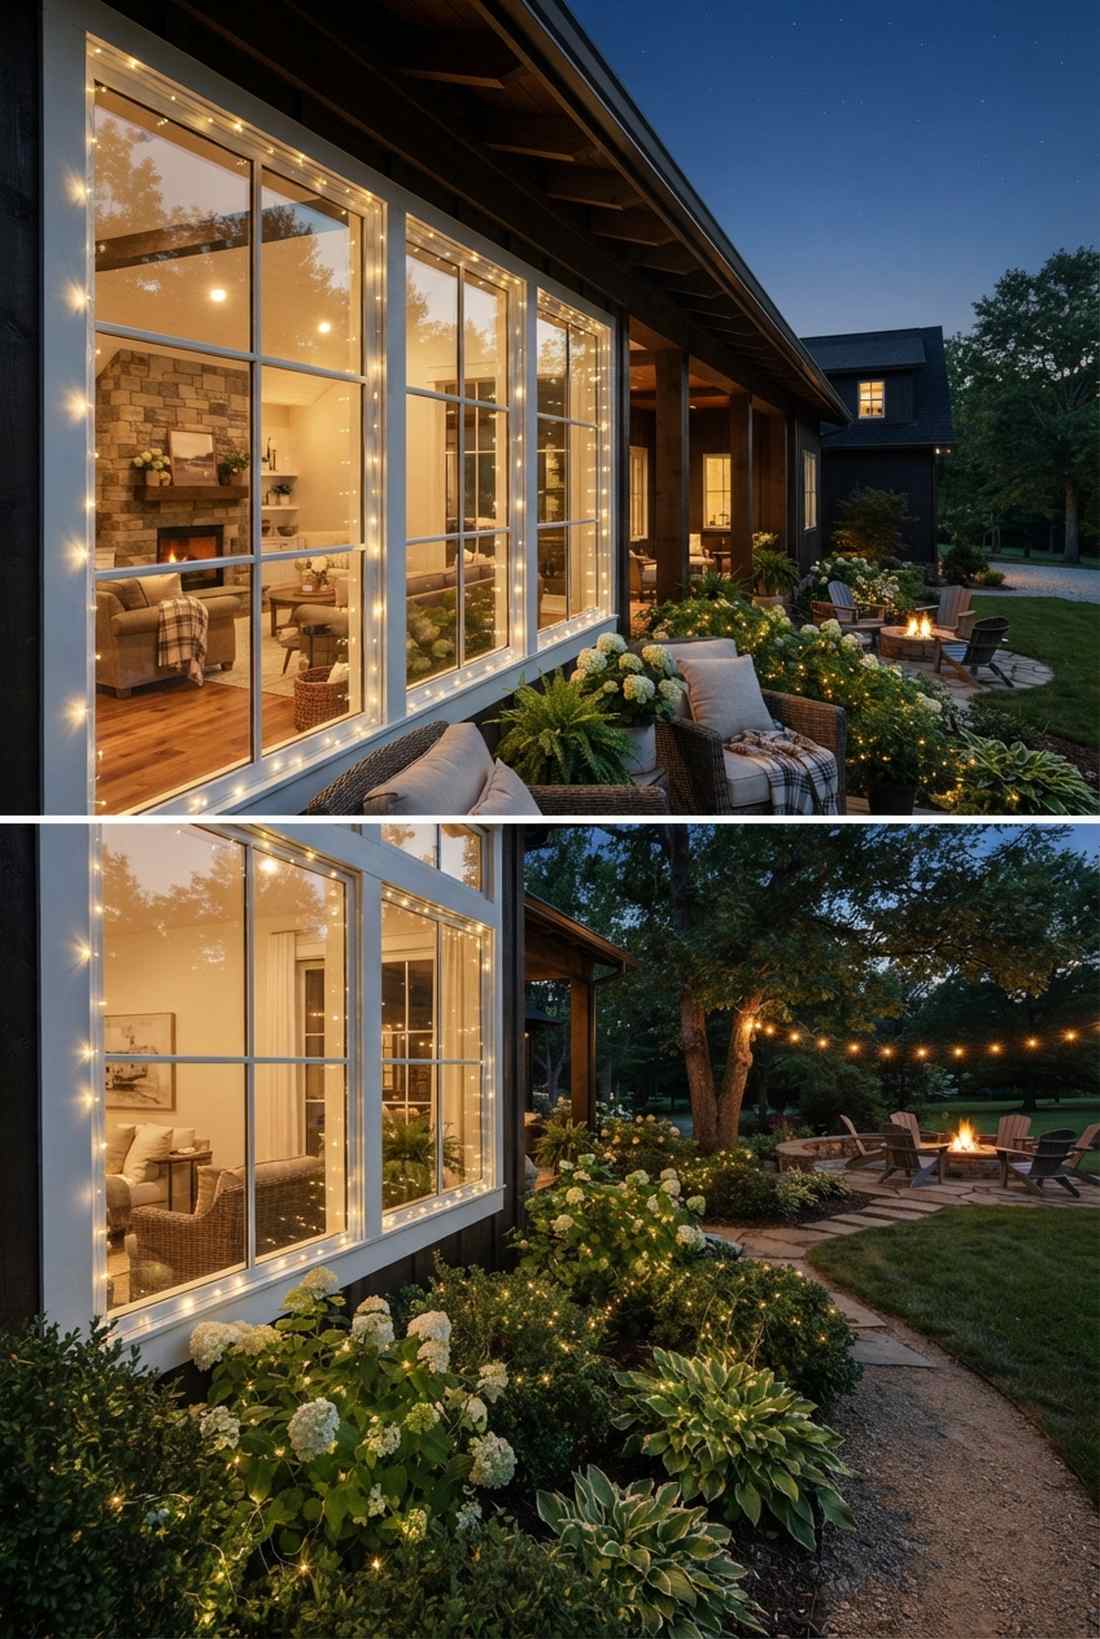
Classic Fairy Lights Window Frames That Elevate Garden Perspectives
Traditional window perimeter lighting establishes clean boundaries that emphasize the architectural frame while directing focus outward. These foundational approaches work across all window sizes and garden styles.
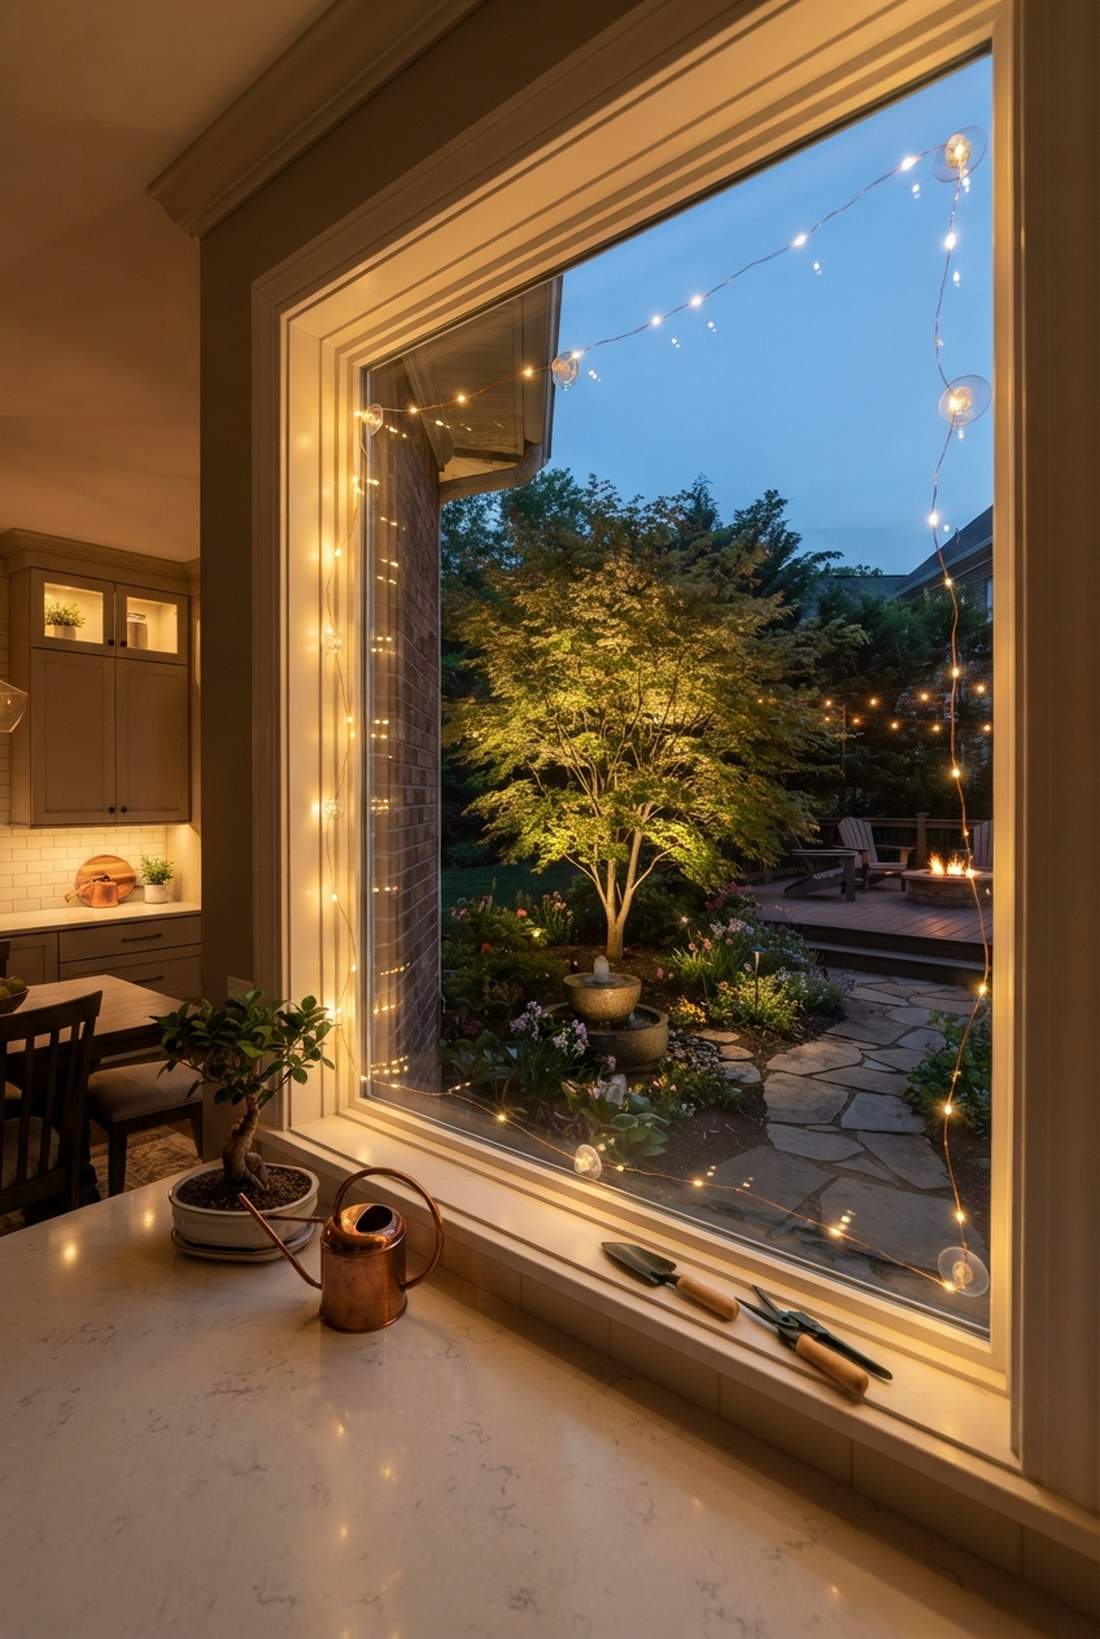
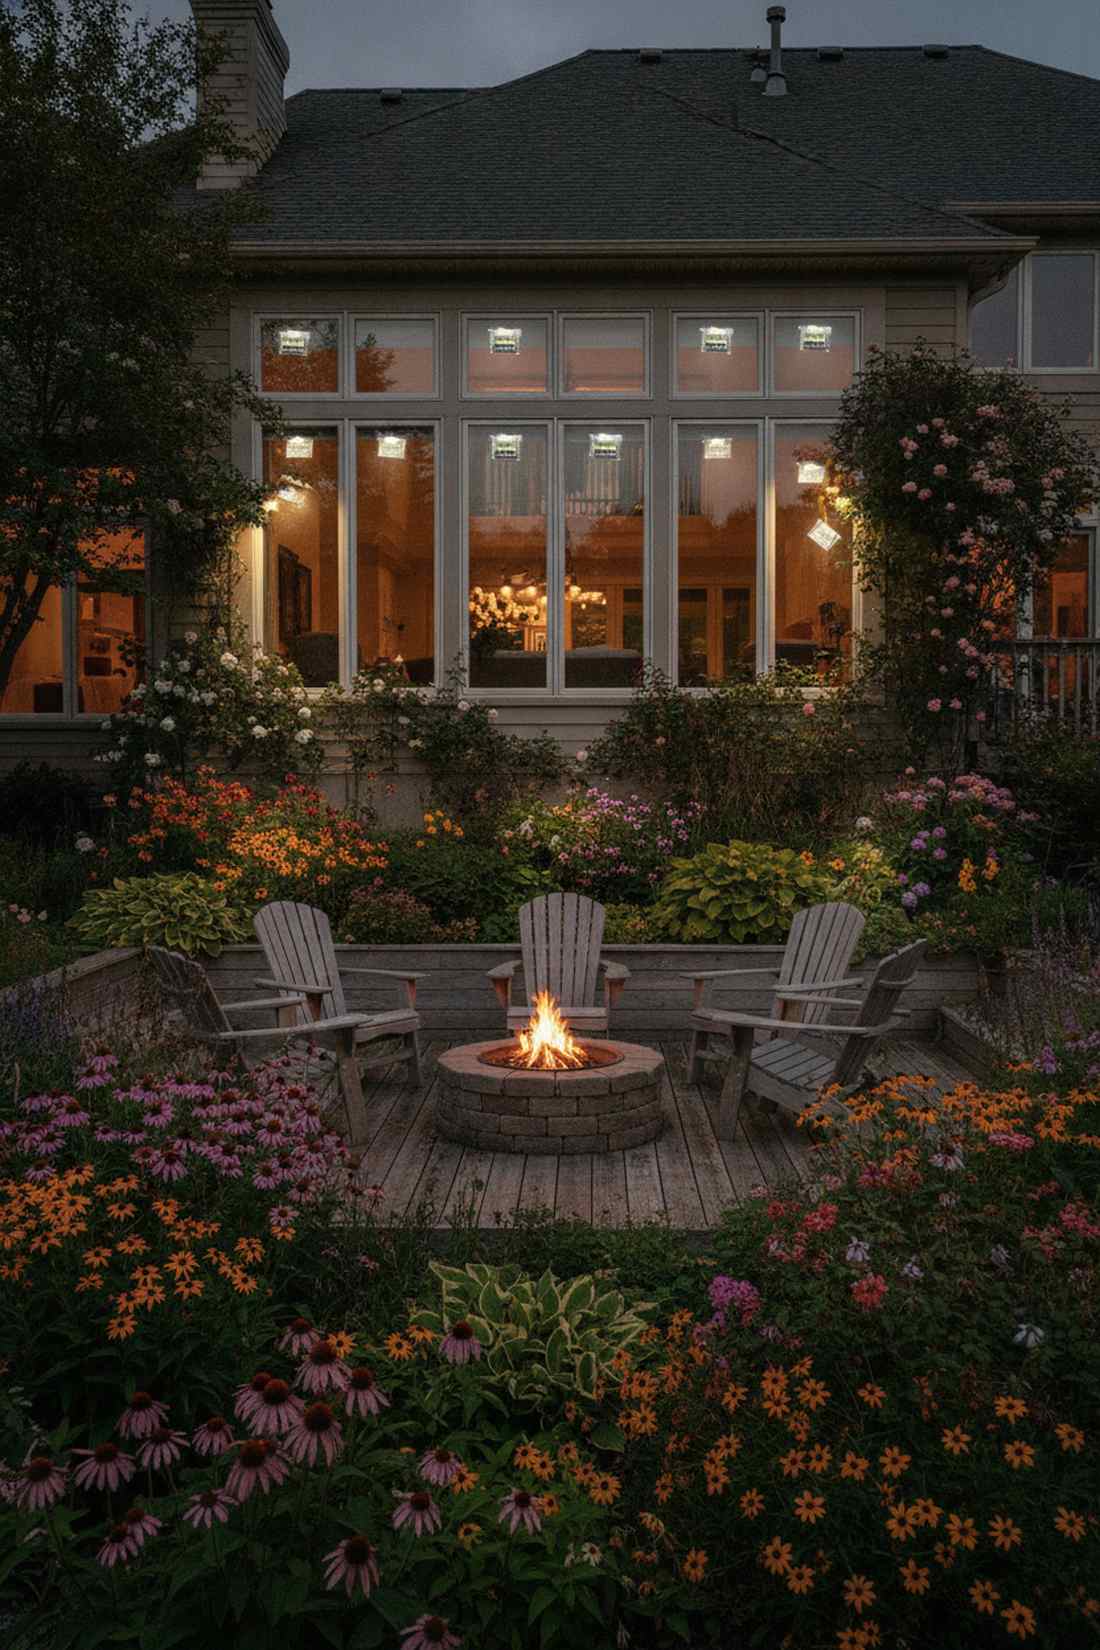
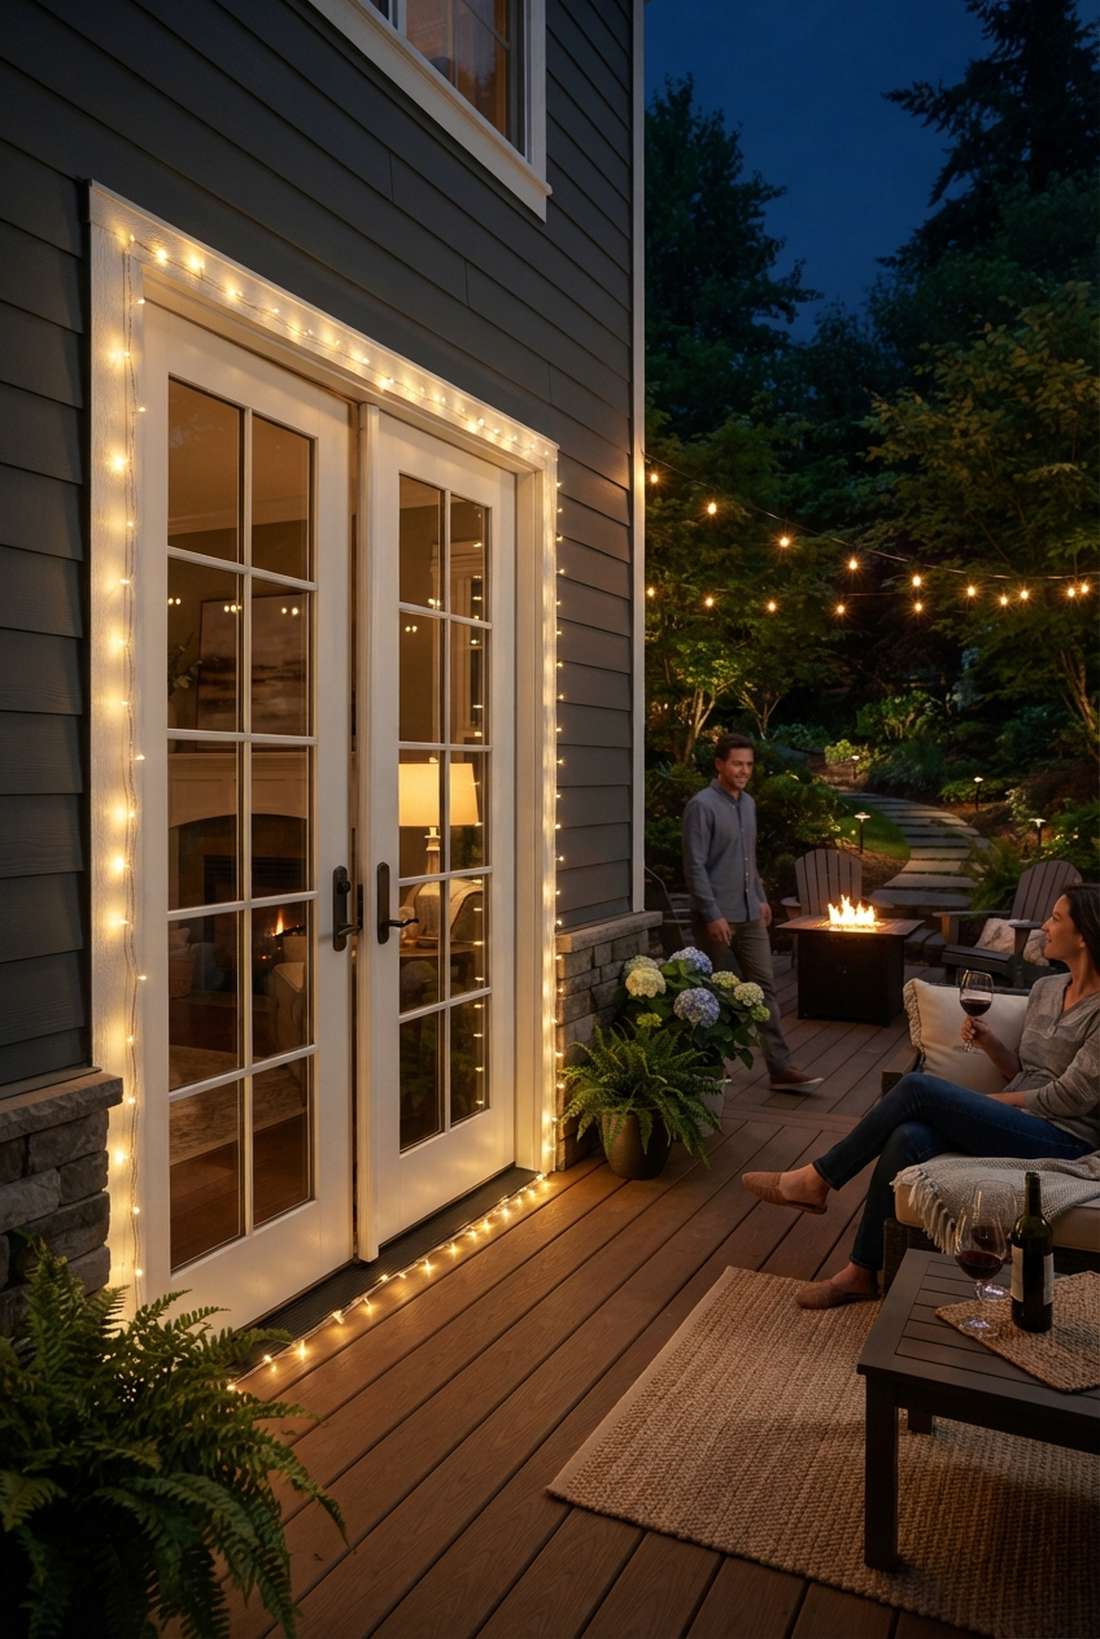
1. Simple Perimeter Outline

Feels like framing a live midnight painting in your own living room. Classic perimeter fairy lights window trim is perfect for drawing eyes to a standard suburban garden view from a cozy reading nook.
A lot of homeowners skip this basic step, yet it gives a designer-level finish when executed properly with tight wire tension. Grabbing pre-cut transparent clips keeps the aesthetic completely invisible during bright daylight hours while holding everything flush against the trim.
You can easily pull this off for around $12–$20 depending on window size. Save this to your DIY weekend garden board for quick reference!
- Key Materials: Barely-there silver wire micro-LEDs and clear mini adhesive hooks.
- Vibe / Style: Clean, elegant, and perfectly structured.
- Difficulty: Very easy beginner setup.
- Budget Breakdown: String lights: $12 | Clear hooks: $5.
- Creator’s Tip: Clean your window trim with rubbing alcohol before placing adhesive clips to prevent drooping.
- Smart Sourcing: ultra-thin silver wire fairy string lights (100 LED pack), clear 3M mini adhesive light clips (bulk pack).
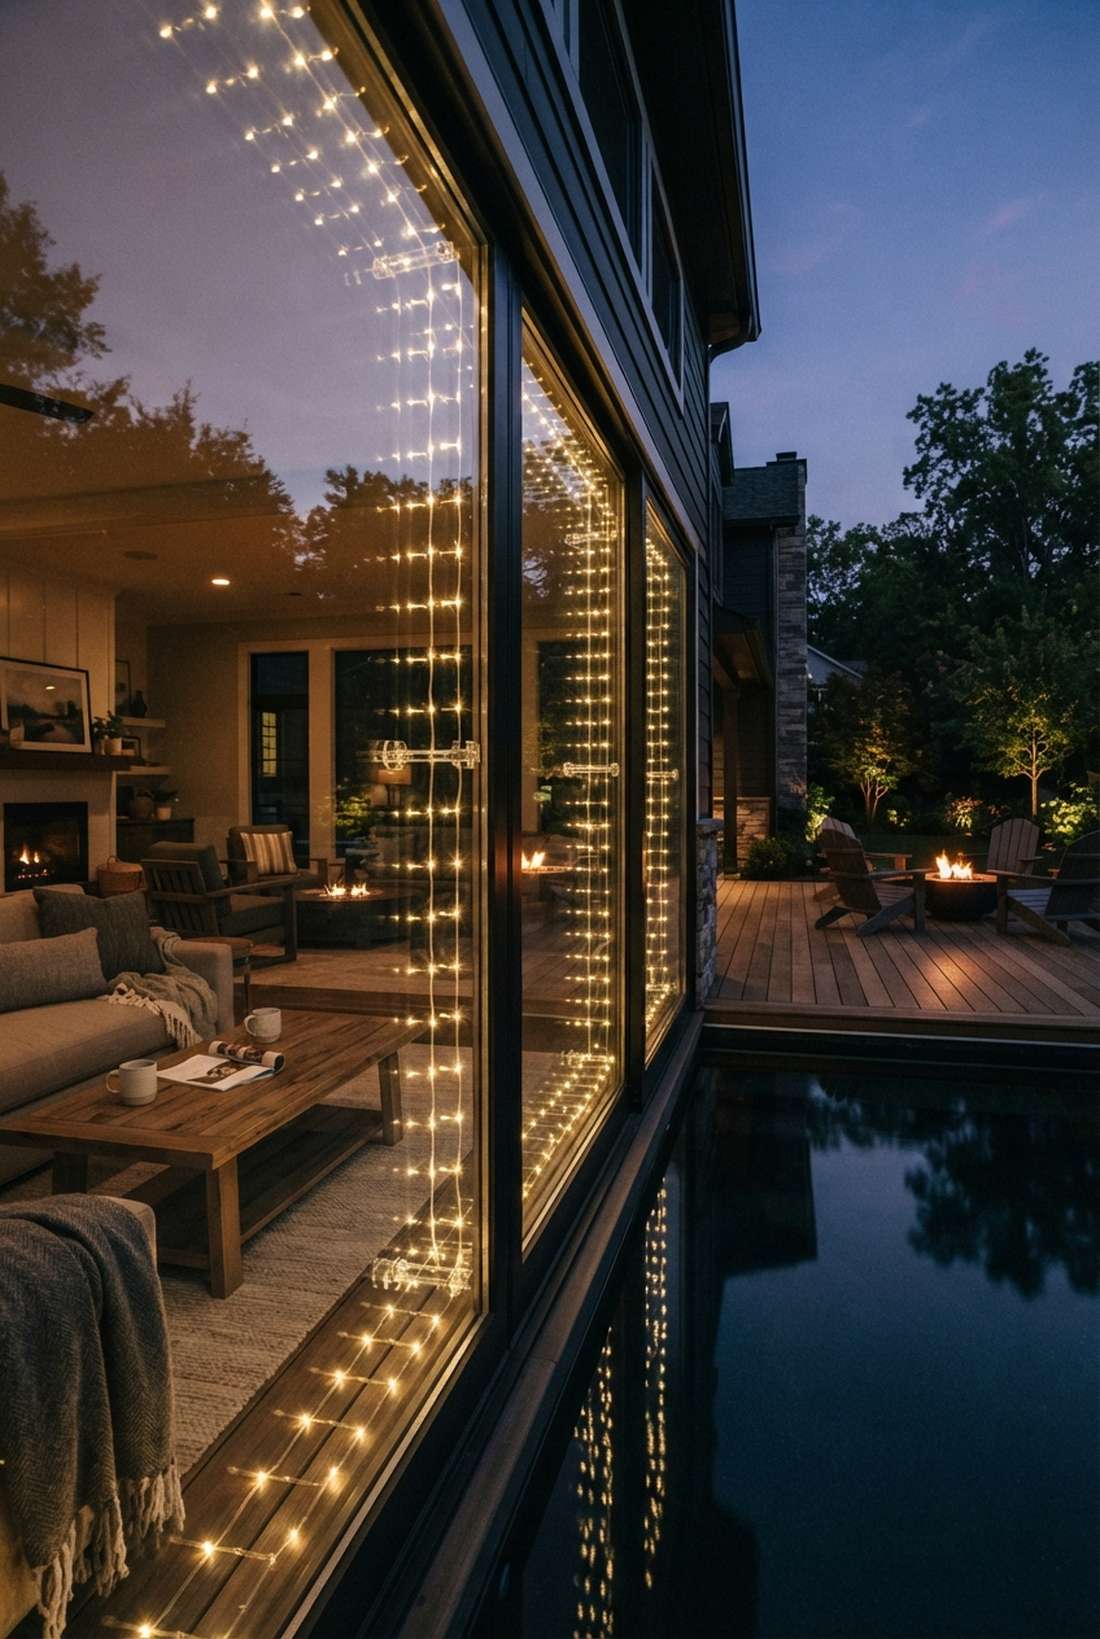
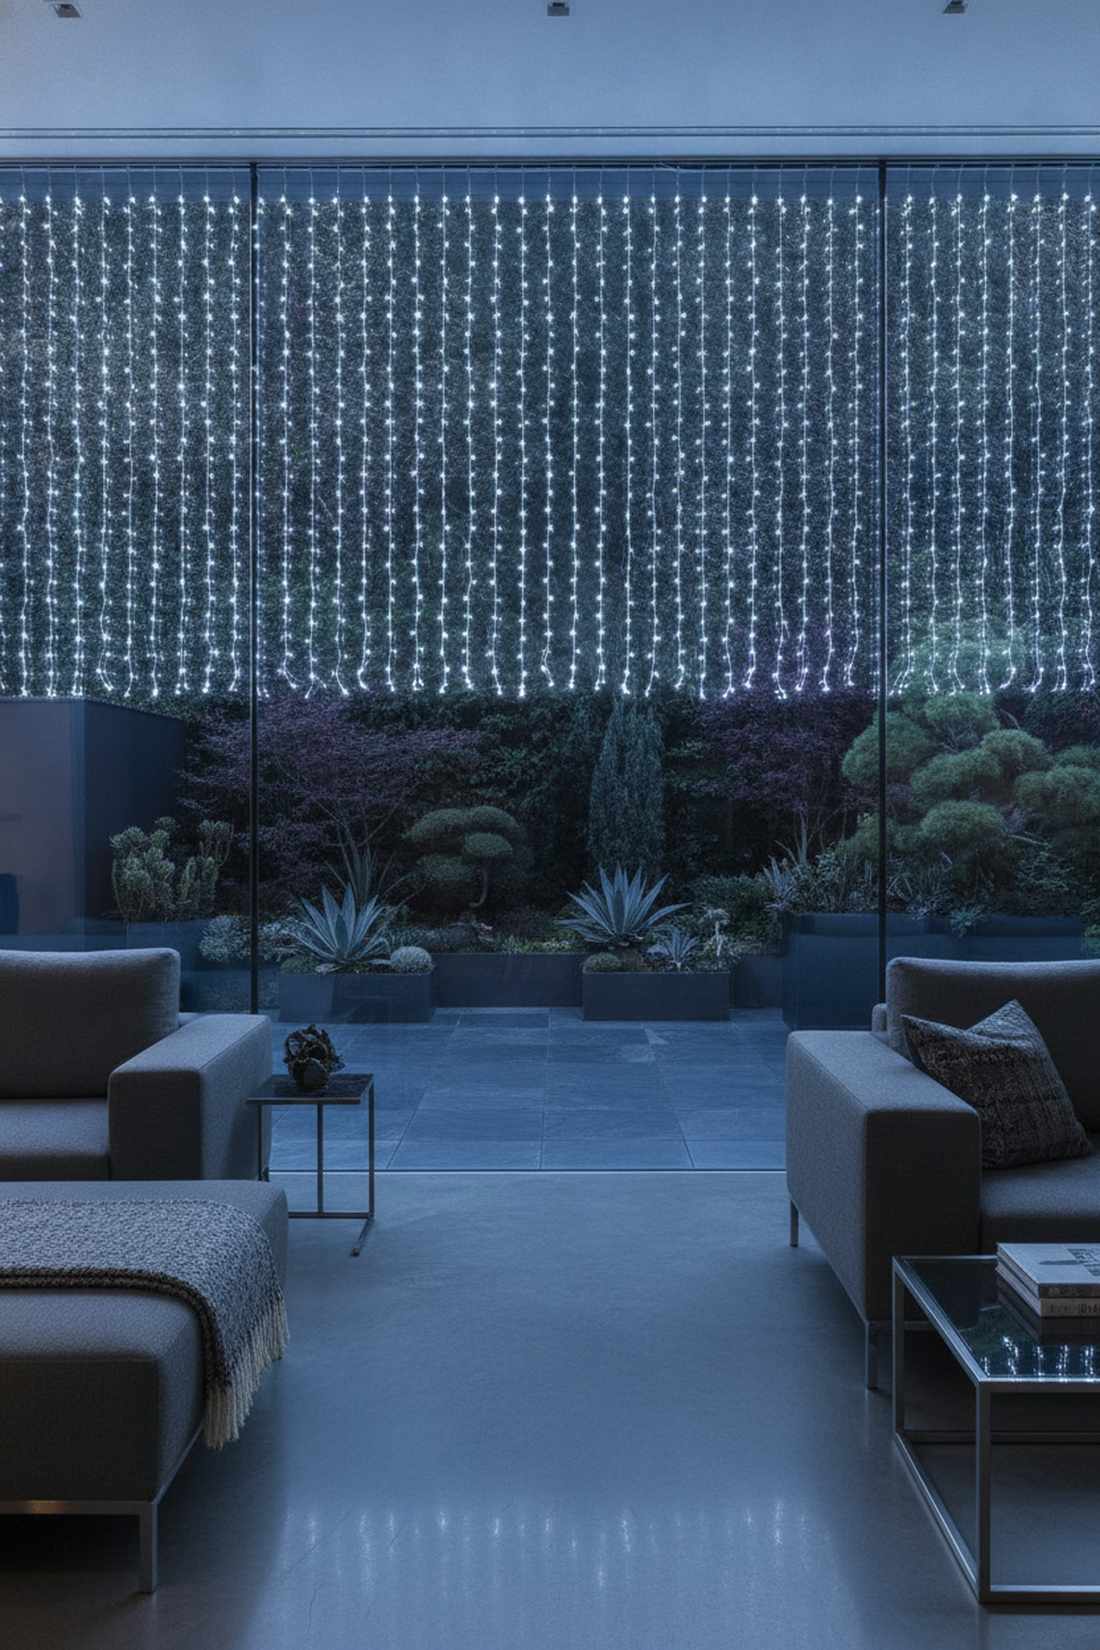
2. Cascading Curtain Effect
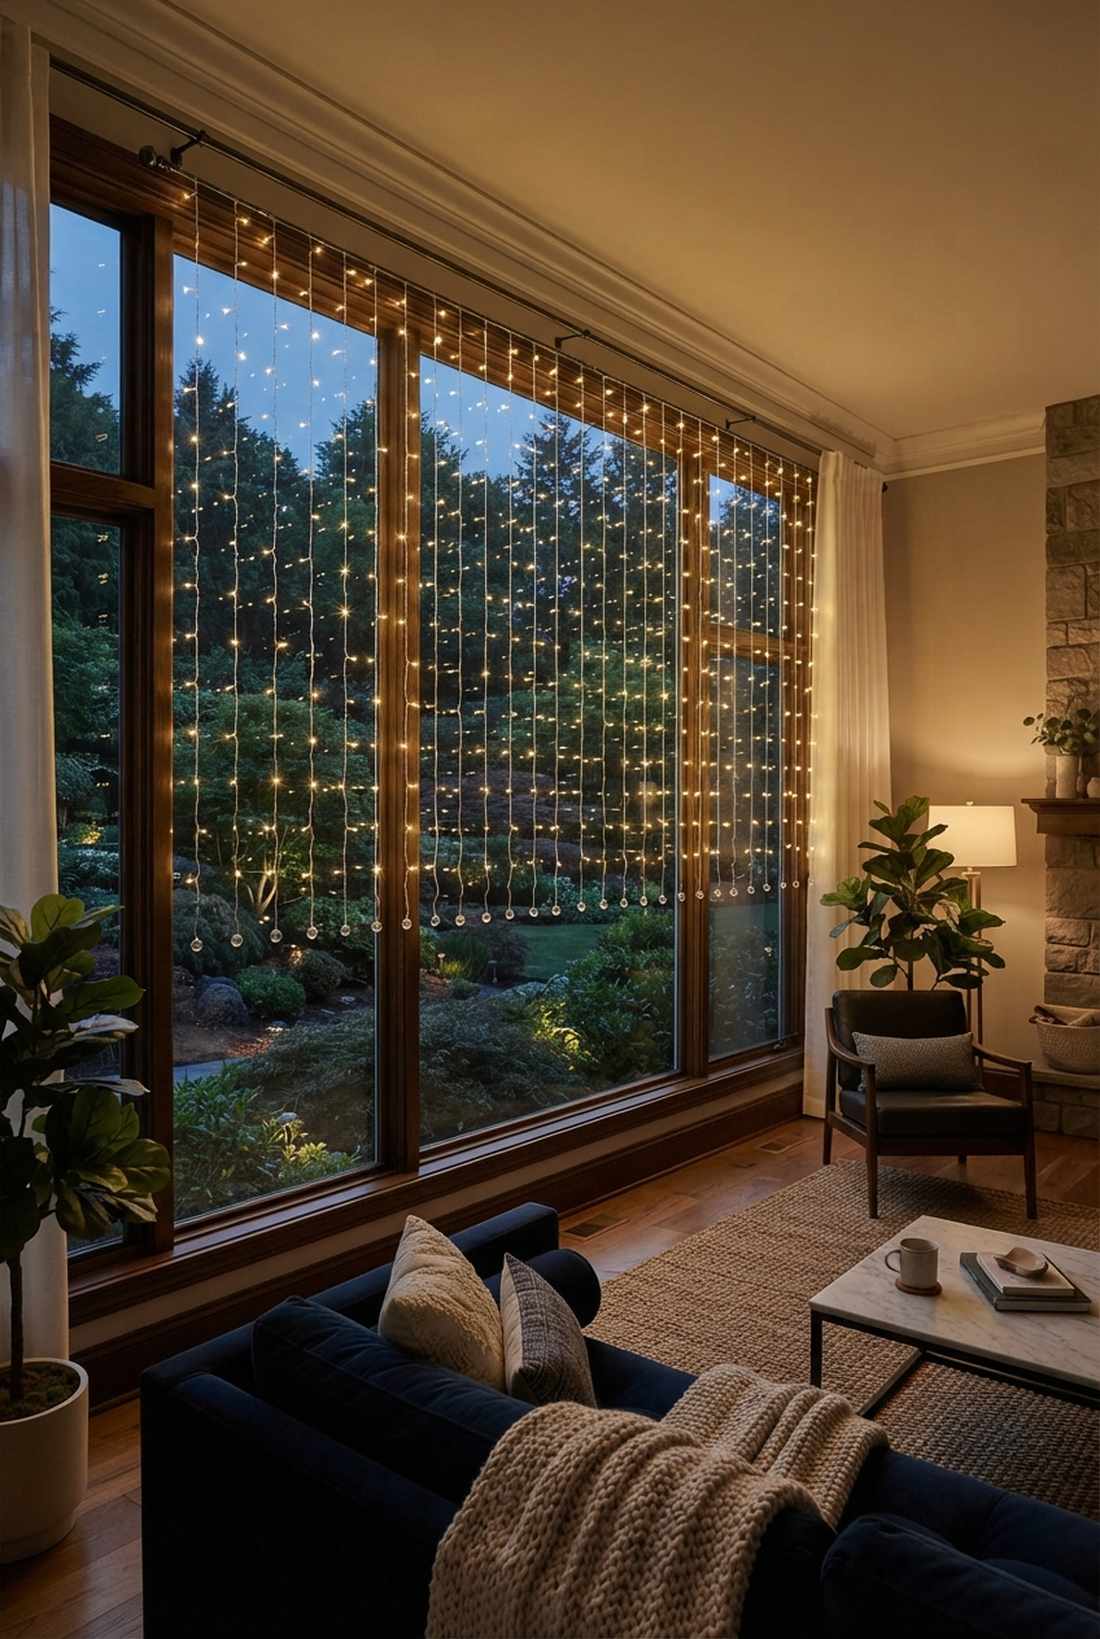
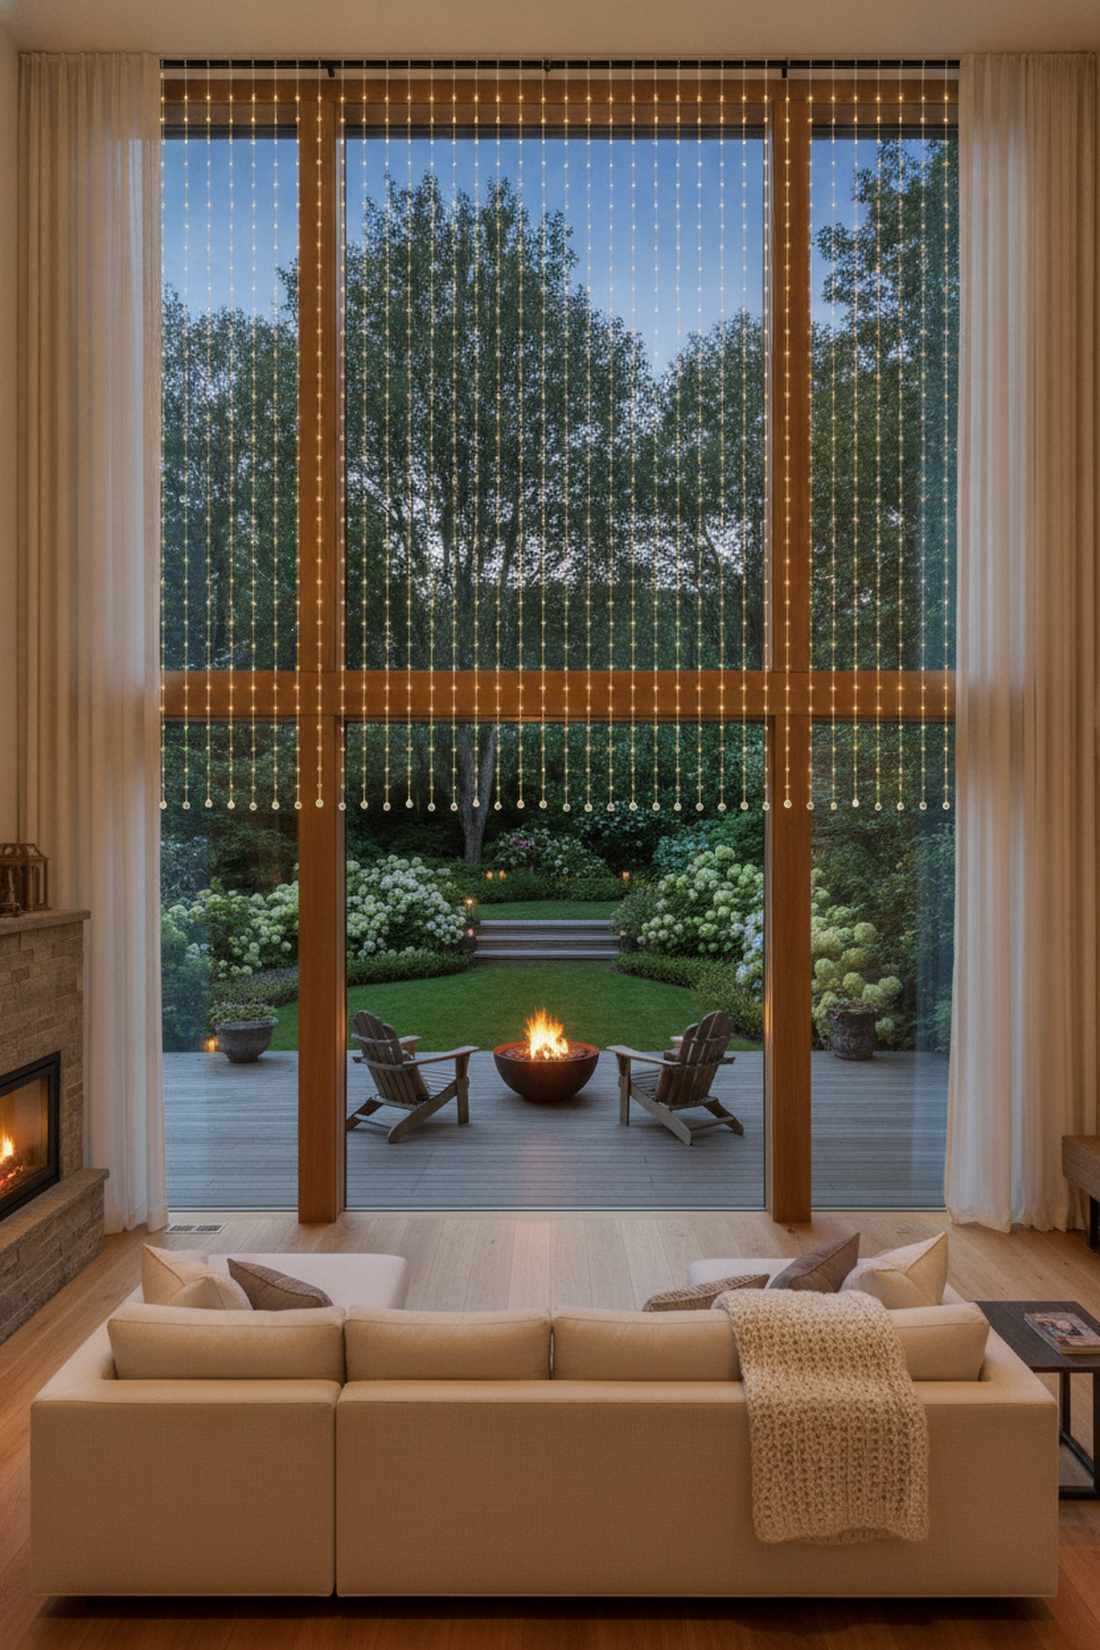
Evokes the feeling of standing behind a gently glowing waterfall. A cascading fairy lights curtain display works exceptionally well for tall, grand windows overlooking layered garden beds or dense tree lines.
People often assume this looks messy, but spacing the strands perfectly delivers a surprisingly premium look that mimics high-end boutique hotels. Hanging them from a discreet tension rod ensures the sheer magic remains intact without damaging any expensive moldings.
Expect to spend about $25–$40 for a dense, high-quality curtain effect. It’s a fast upgrade that completely changes the room’s energy after dark.
- Key Materials: Pre-measured curtain string lights and a spring-loaded tension rod.
- Vibe / Style: Romantic, immersive, and dramatic.
- Difficulty: Moderate, requires careful spacing.
- Budget Breakdown: Curtain LEDs: $25 | Adjustable rod: $15.
- Creator’s Tip: Weight the bottom of each vertical strand with a single glass bead to keep the lines perfectly straight.
- Smart Sourcing: pre-measured LED light curtains (plug-in kit), heavy-duty blackout curtain tension rods.
3. Corner Cluster Accent
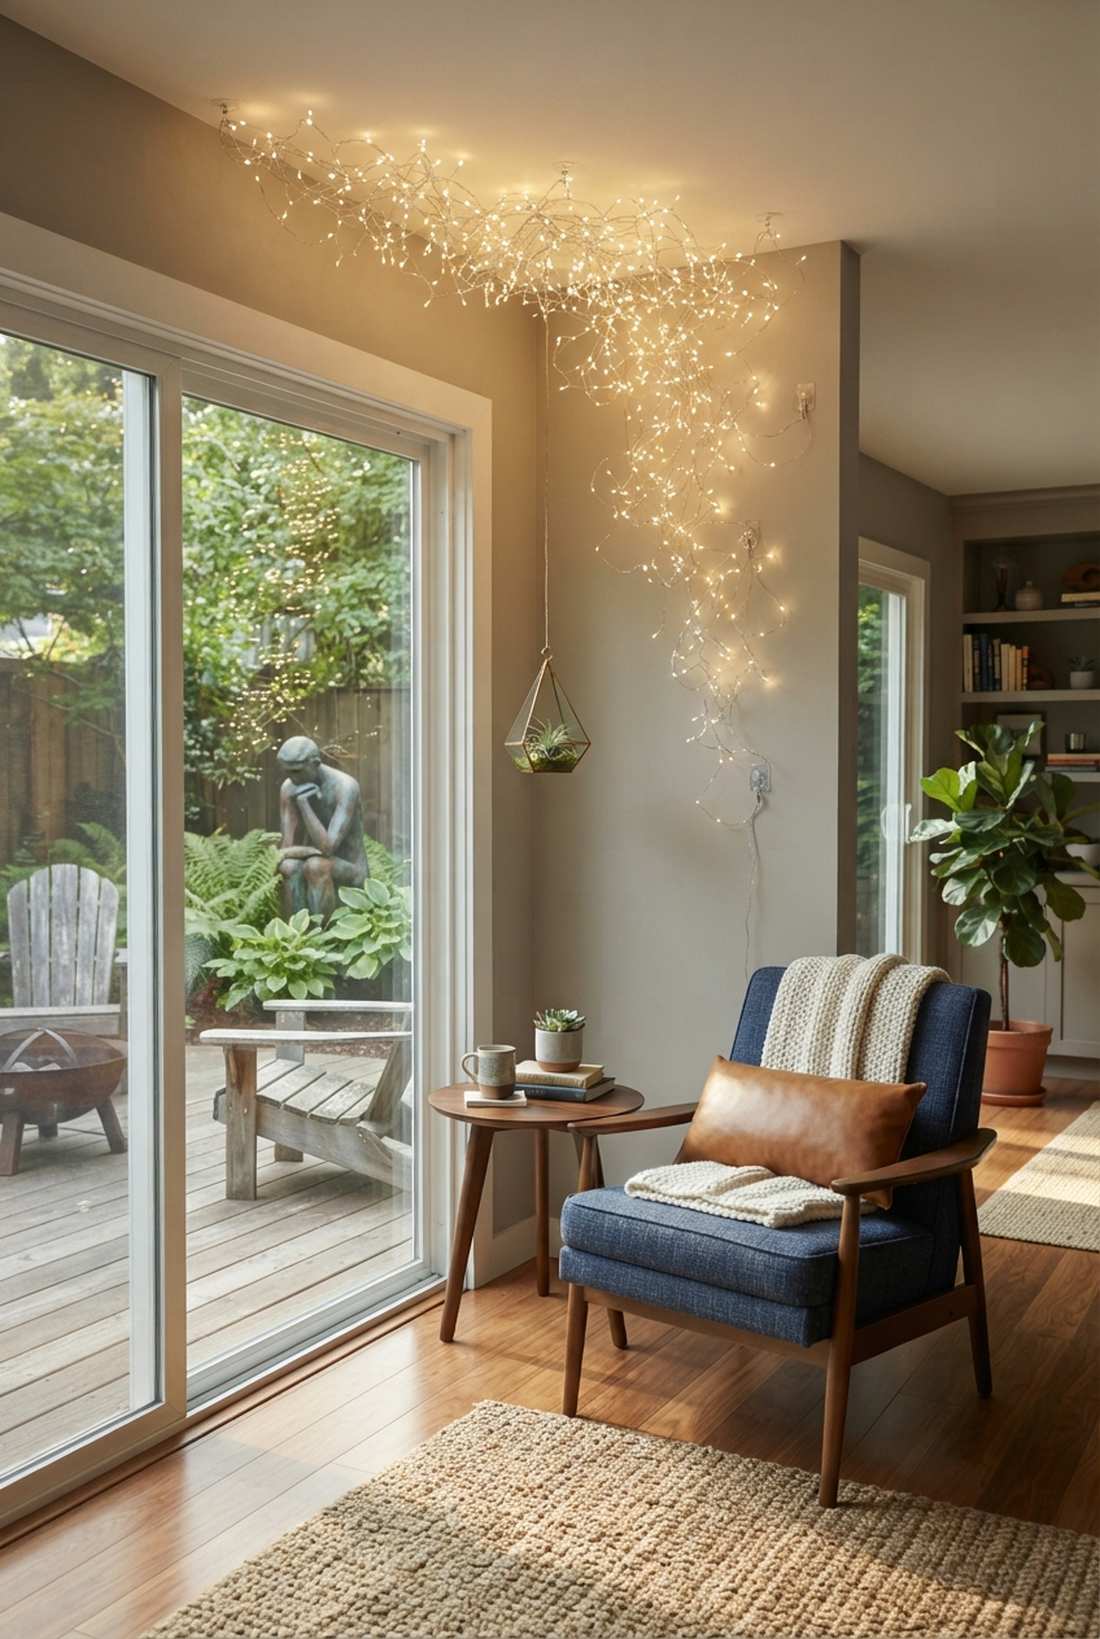
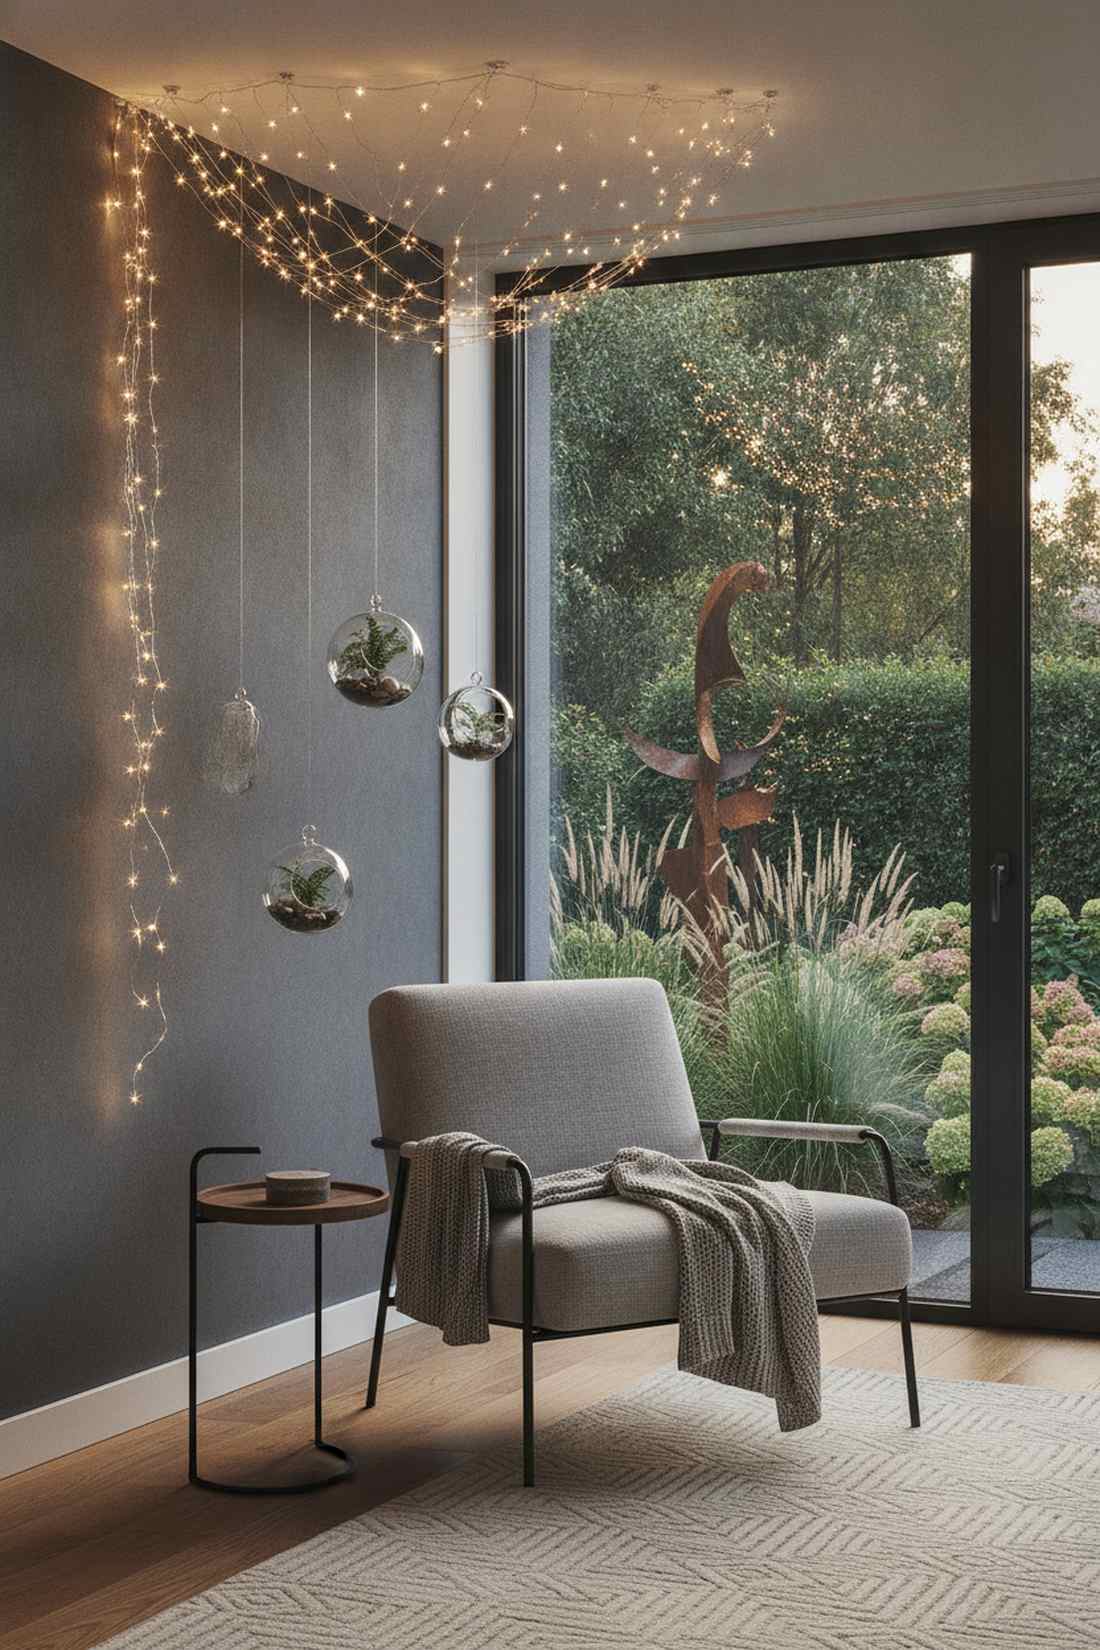
Gives off an artsy, deliberately asymmetrical energy that catches the eye immediately. The upper corner clustered fairy light design shines best in contemporary apartments or reading corners overlooking specific garden sculptures.
Most decorators overcomplicate their lighting, but throwing focused weight into one corner looks far more expensive than scattering lights everywhere. Sneaking in small hanging terrarium accessories nearby completely sells the illusion of an indoor-outdoor transitional space.
This minimalist setup rarely costs more than $15. Pin this if you’re planning a quick small space upgrade with major impact.
- Key Materials: High-density cluster lights and heavy-duty ceiling tacks.
- Vibe / Style: Modern chic and effortlessly moody.
- Difficulty: Quick 10-minute installation.
- Budget Breakdown: Cluster wire: $12 | Mounting hardware: $3.
- Creator’s Tip: Let a few stray wires dangle organically rather than tying them into a tight knot.
- Smart Sourcing: high-density firecracker LED string lights, UV-coated clear command hooks (starter pack).
4. Double Frame Layering
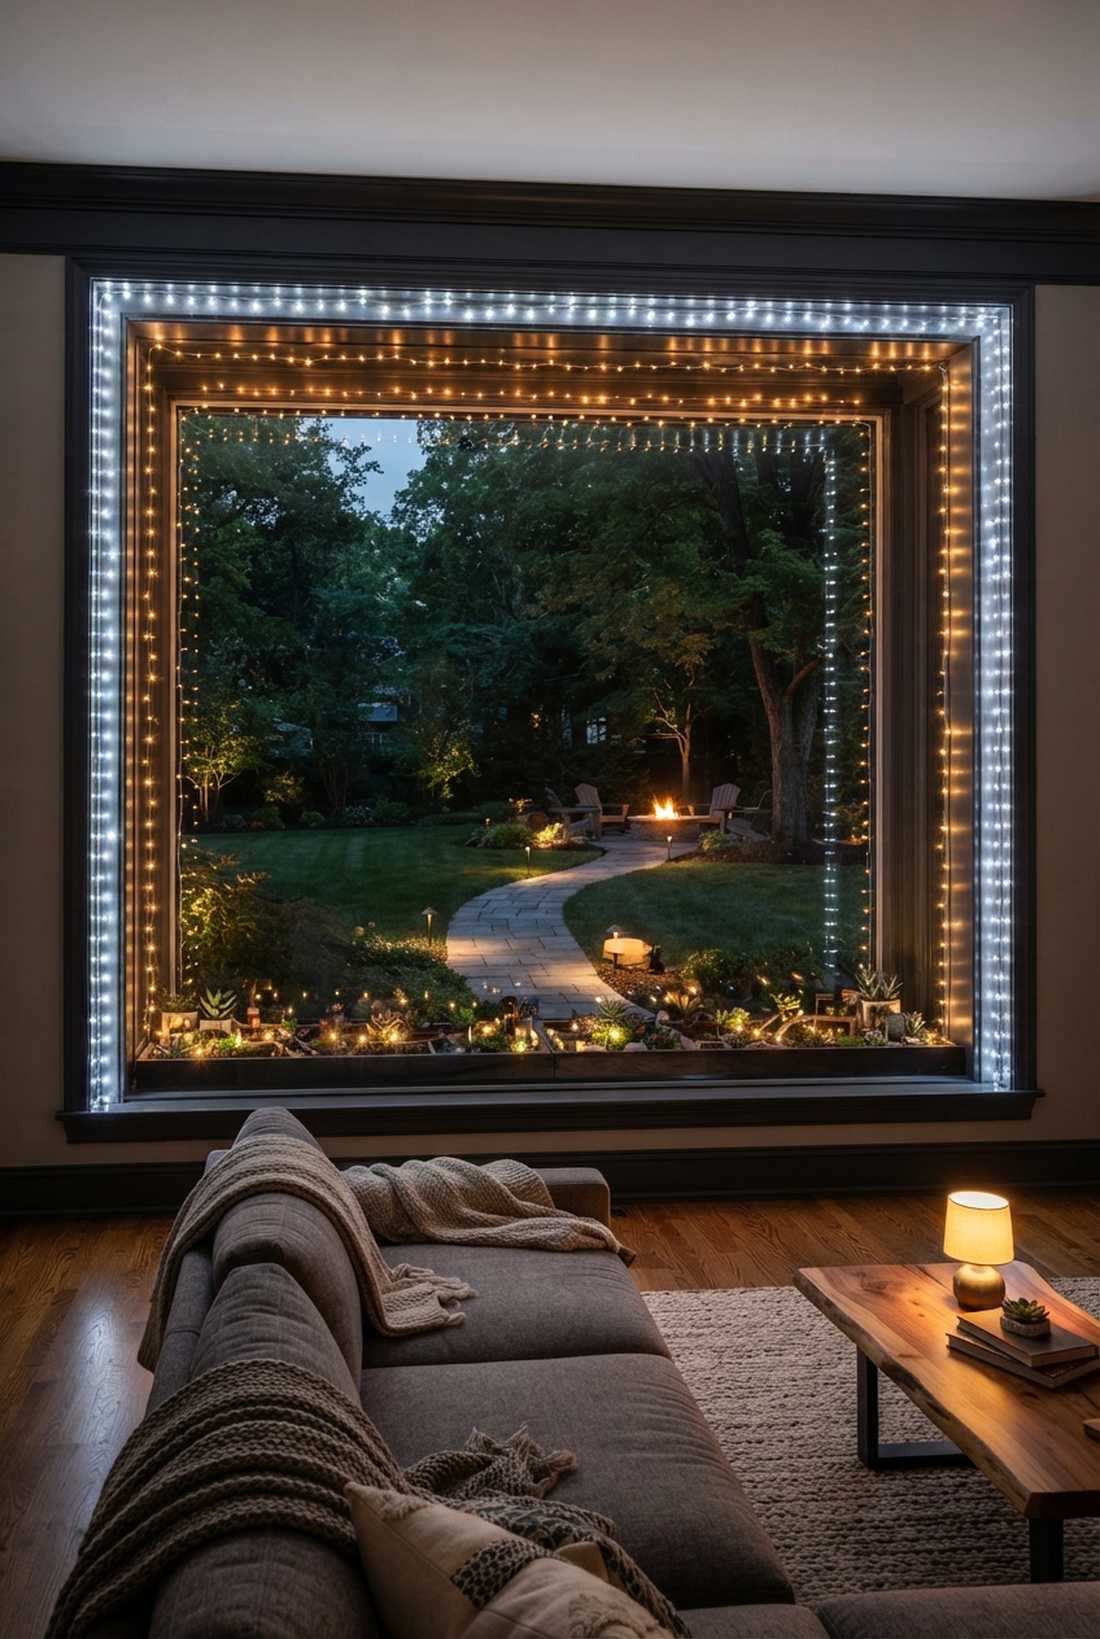
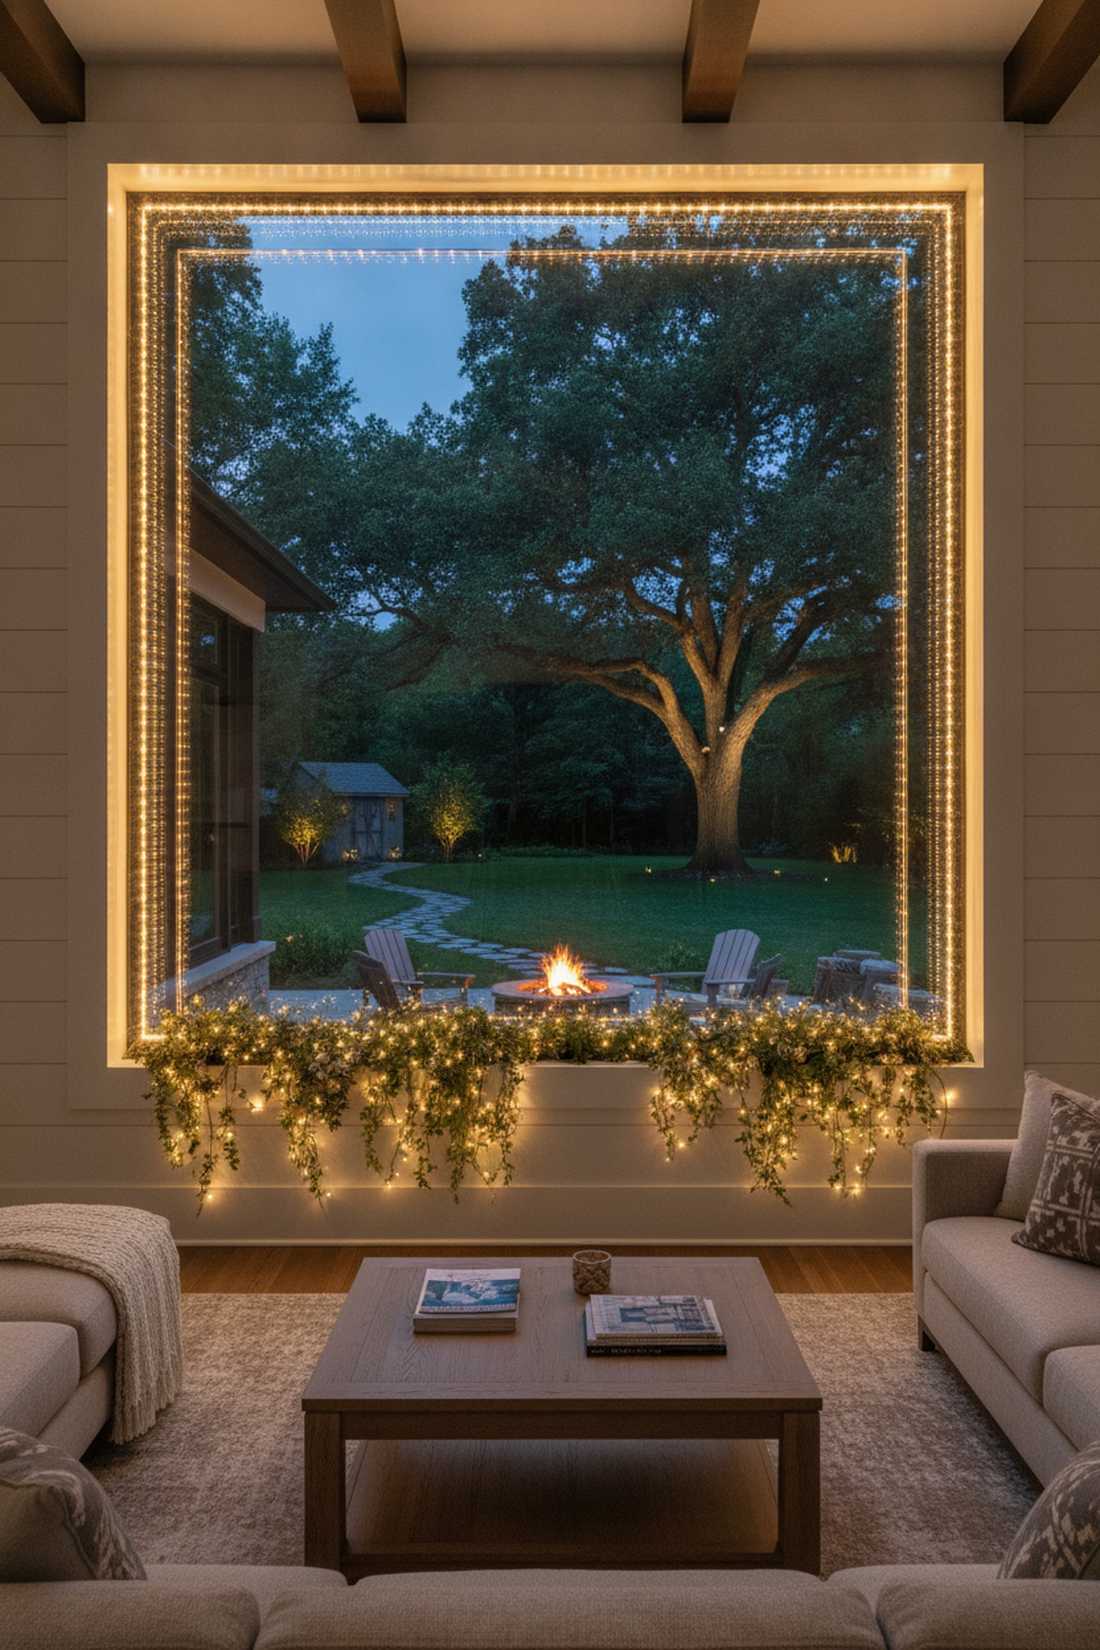
Feels like looking through a futuristic, glowing portal into your backyard. Double layered fairy light framing is the ultimate trick for massive living room picture windows facing deep, expansive lawns.
Standard outlines can feel flat, but running two concentric lines creates extreme depth that tricks the eye into seeing a larger room. Tucking premium outdoor-rated fairy garden kits into the window box outside amplifies this multi-layered architectural illusion.
You can achieve this complex optical trick for roughly $30–$50. Highly recommended for spaces that need a serious nighttime architectural boost.
- Key Materials: Two differing densities of string lights and transparent mounting tape.
- Vibe / Style: Architectural, deep, and sophisticated.
- Difficulty: Requires precise measuring.
- Budget Breakdown: Dense outer wire: $20 | Thin inner wire: $15.
- Creator’s Tip: Use a slightly warmer color temperature for the inner frame to pull it visually forward.
- Smart Sourcing: dual-tone LED micro string lights, heavy-duty transparent double-sided mounting tape.
This next setup is ridiculously cheap but looks like a $100 custom display installed by a professional landscaper…
Strategic Fairy Lights Window Placement for Garden View Drama
Positioning window lights to complement specific garden features creates intentional visual narratives. These techniques require understanding your garden’s strongest seasonal assets and sight lines.
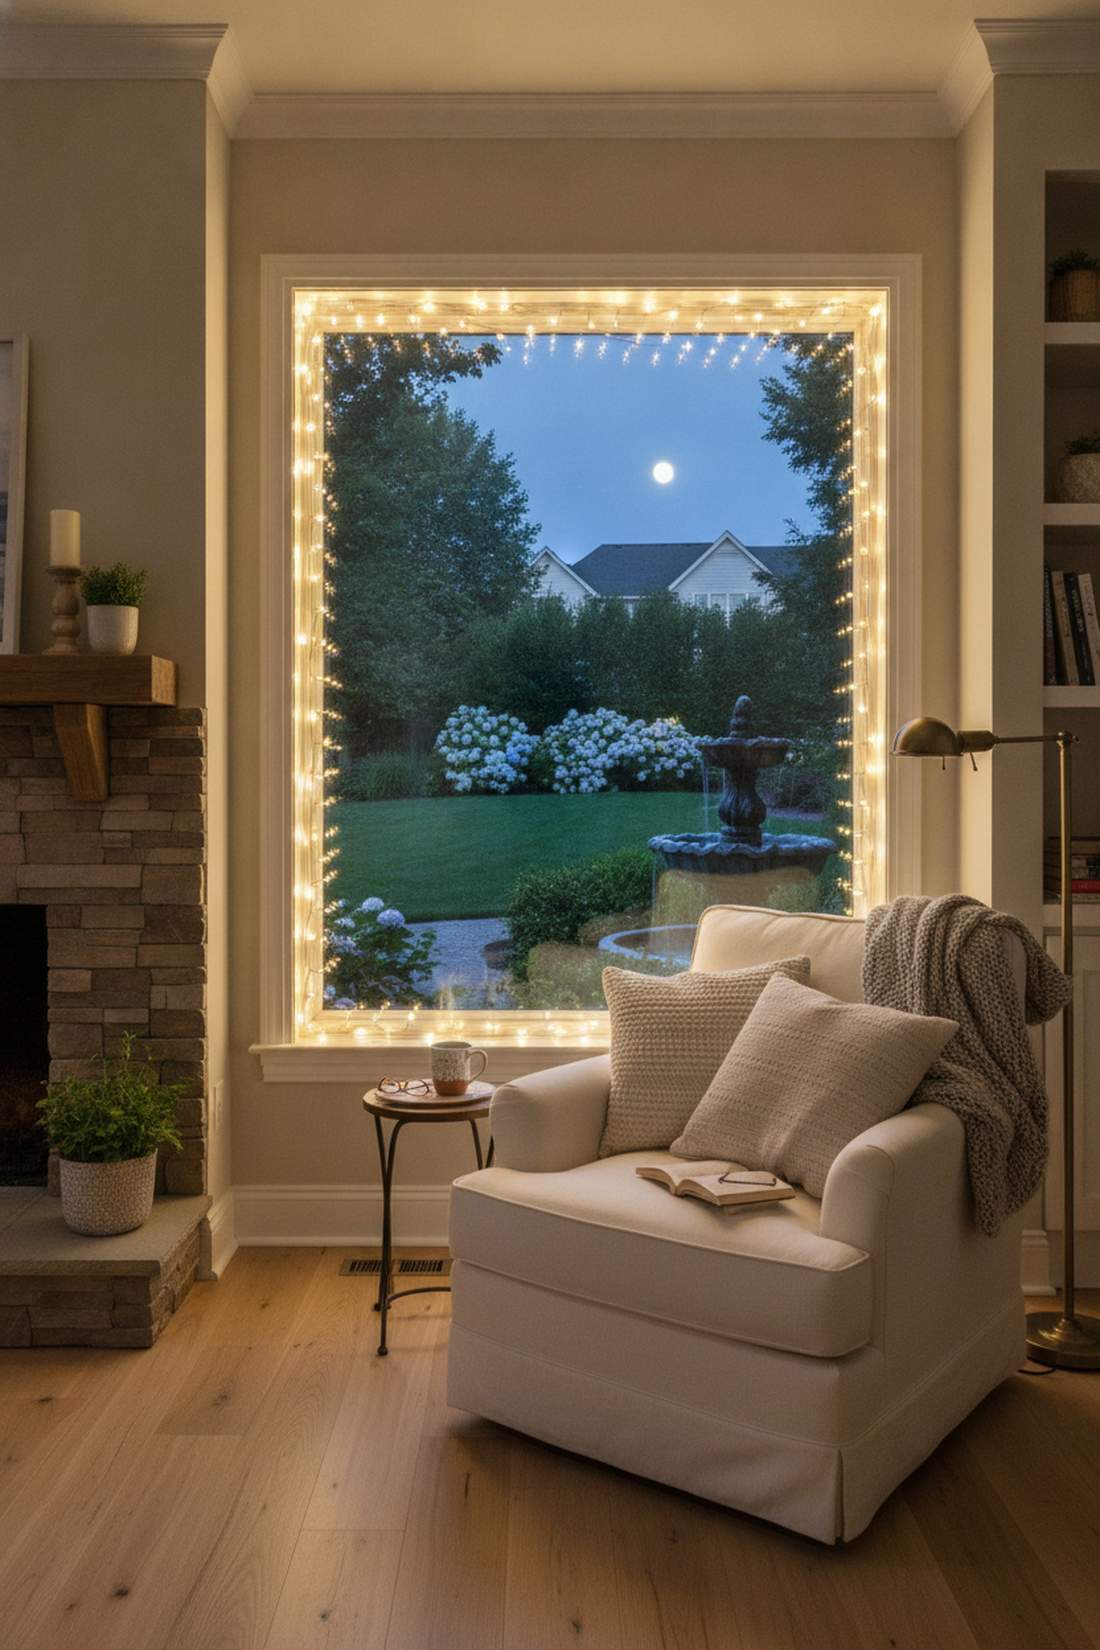
5. Focal Point Framing
Acts like a glowing spotlight pointing directly to your backyard’s best feature. Asymmetric focal point window lighting is brilliant for highlighting a prized Japanese maple or a bubbling water fountain visible from the kitchen.
Symmetrical setups are common, but intentionally unbalancing the light weight creates a powerful visual magnet that forces the eye outward. Mixing in high-end miniature garden supplies on the interior sill bridges the gap between the glass and the yard seamlessly.
You only need about $15 to execute this strategic layout. Save this layout for when your spring blooms finally hit their peak.
- Key Materials: Flexible warm-white string lights and small suction cup mounts.
- Vibe / Style: Intentional, curated, and gallery-like.
- Difficulty: Easy, just requires a good eye.
- Budget Breakdown: LED strands: $10 | Suction cups: $5.
- Creator’s Tip: Stand in your primary viewing spot while someone else marks the exact sightline on the glass.
- Smart Sourcing: bendable copper wire LED string lights, premium clear window suction cups (bulk pack).
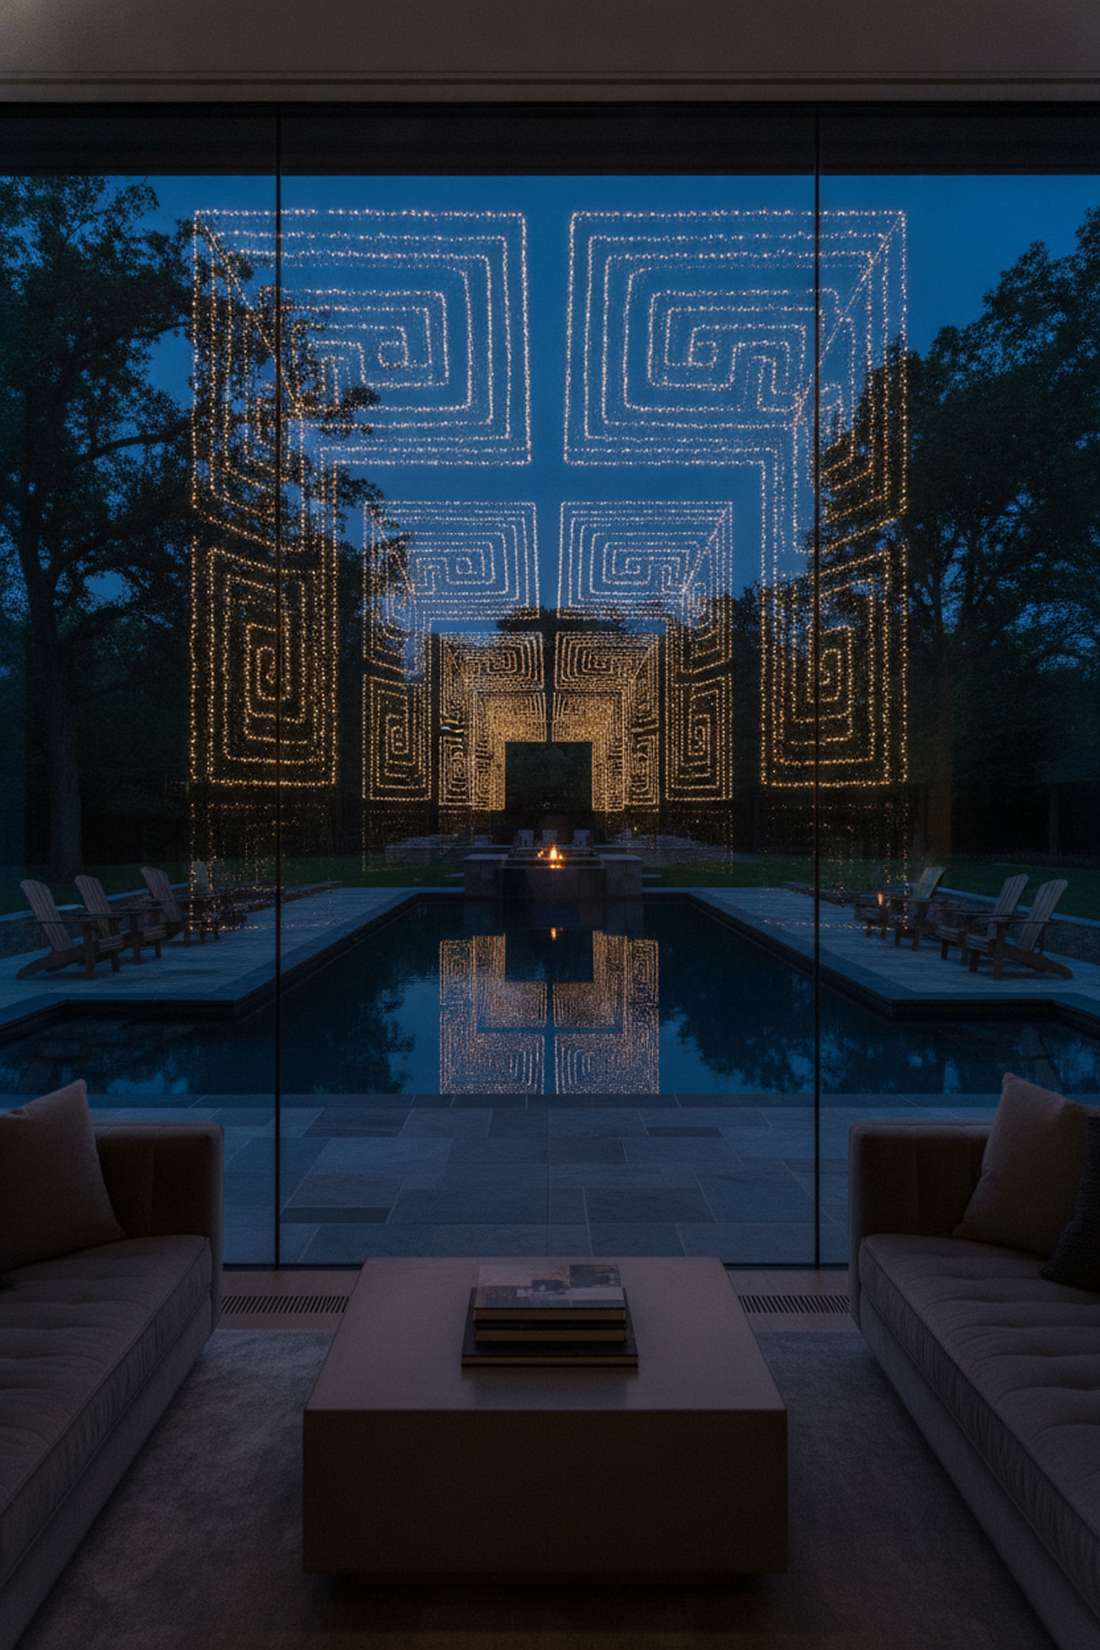
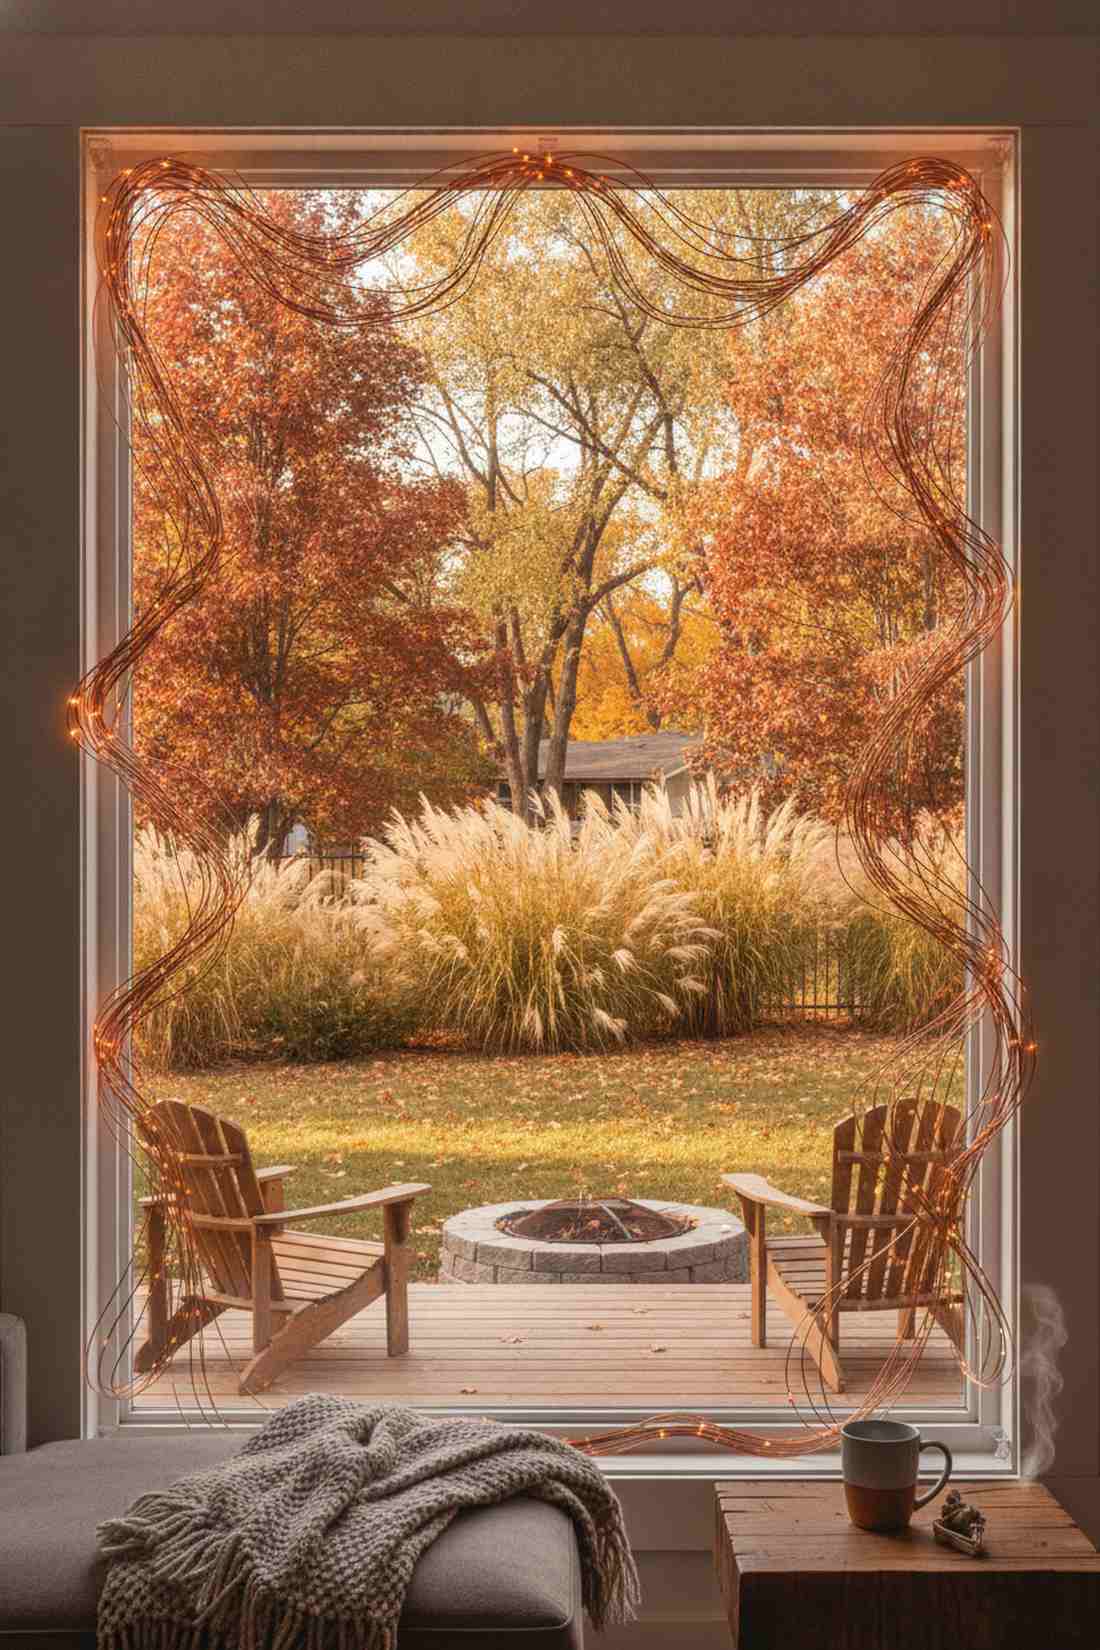
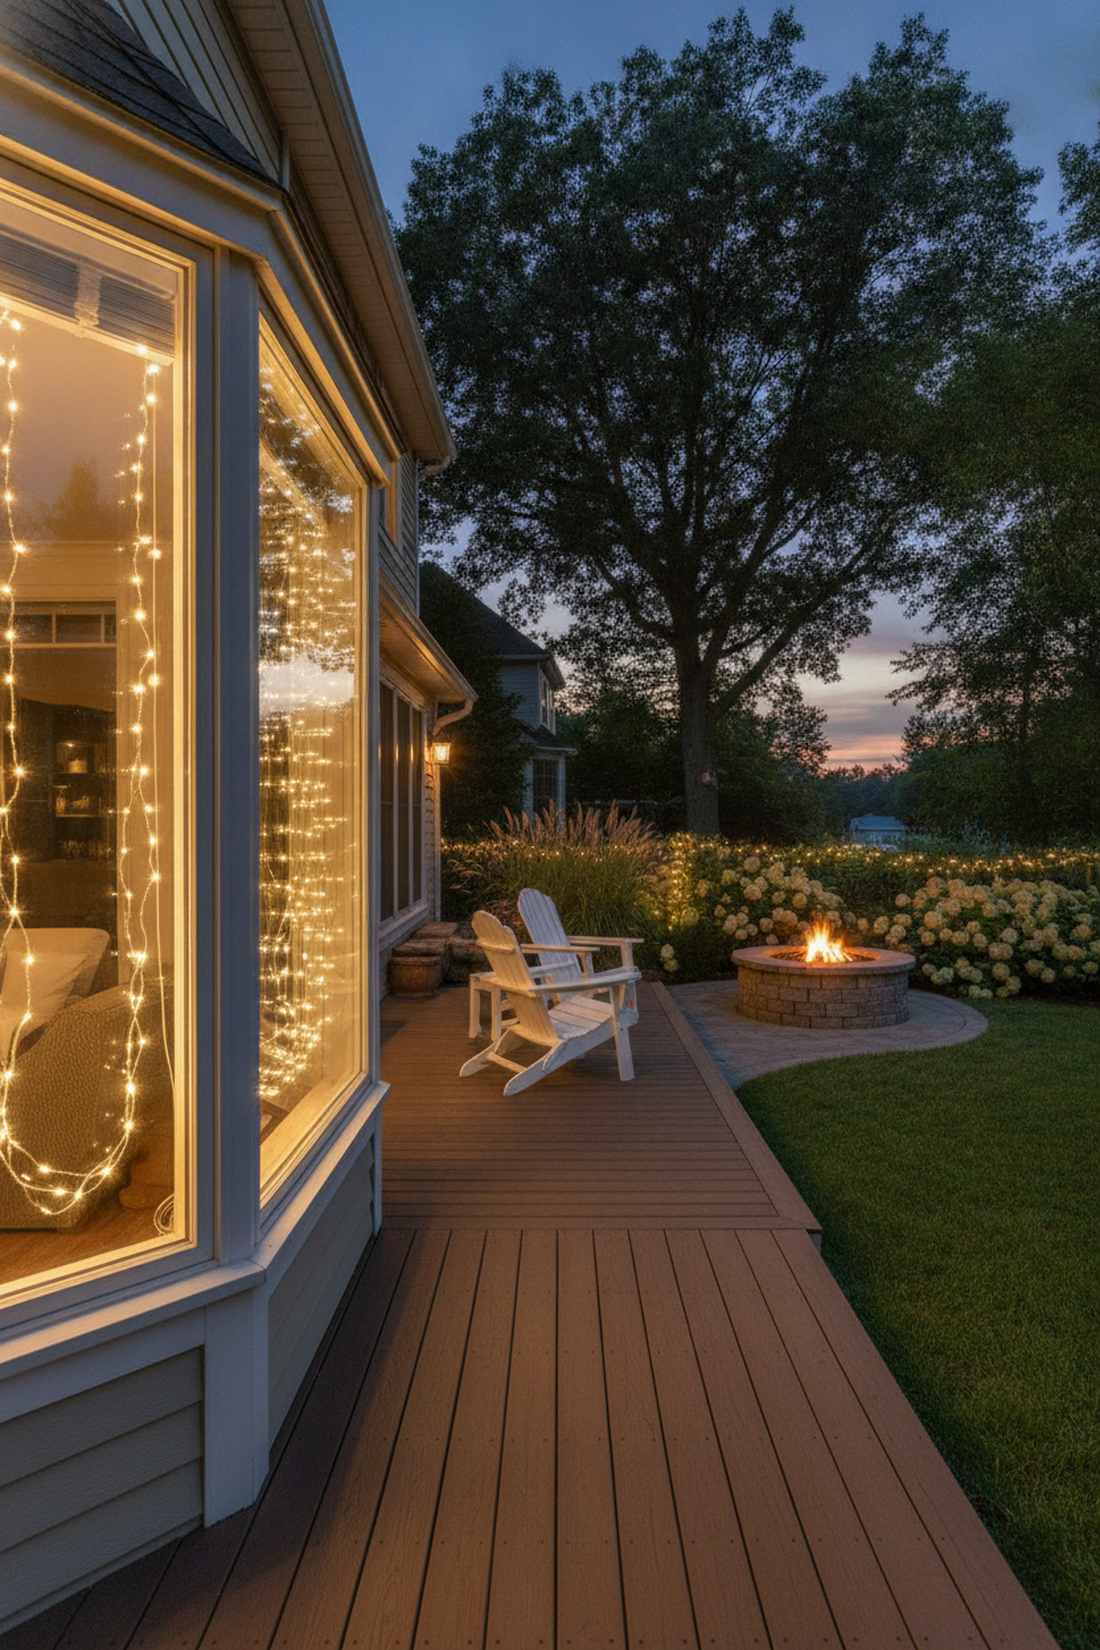
6. Layered Depth Perspective
Transforms a flat, dark glass pane into a sprawling 3D landscape theater. Graduated depth fairy lights window decor works miracles for deep backyards with multiple viewing zones like patios, paths, and distant trees.
Most yards disappear at night, but matching your interior window glow with synchronized outdoor pathway lights instantly makes your property look twice as large. Ensuring your outdoor fixtures are fully weather-proofed is the secret to making this connection last all year.
Coordinating this indoor-outdoor bridge costs around $40–$60. It’s a masterclass in professional exterior staging.
- Key Materials: Dimmable indoor fairy lights and matching smart outdoor uplights.
- Vibe / Style: Expansive, expensive, and professional.
- Difficulty: Moderate, involves balancing light levels.
- Budget Breakdown: Dimmable indoor wire: $20 | Syncing smart plug: $20.
- Creator’s Tip: Always keep the window frame lights 20% dimmer than your brightest outdoor focal point.
- Smart Sourcing: dimmable fairy lights with remote control, weatherproof smart outdoor plug-in timers.
7. Seasonal Bloom Highlighting
Feels like an interactive gallery exhibit that changes with the weather. Repositionable seasonal highlighting lights are exactly what you need for large windows facing rotating perennial garden beds.
Static displays eventually get boring, but sliding your illumination to follow the active bloom cycles keeps the space feeling incredibly dynamic. Using damage-free adhesives means you can literally chase the visual interest across the glass without leaving a sticky mess behind.
A highly adaptable kit will run you roughly $20. Pin this trick if your garden completely transforms from spring to fall!
- Key Materials: Battery-operated mobile light packs and removable putty.
- Vibe / Style: Playful, dynamic, and ever-changing.
- Difficulty: Very simple.
- Budget Breakdown: Battery light pack: $15 | Mounting putty: $5.
- Creator’s Tip: Buy rechargeable batteries to keep this constantly shifting display eco-friendly.
- Smart Sourcing: battery-operated micro LEDs (4-pack), reusable transparent mounting putty strips.
8. Reflection Amplification
Creates a mesmerizing infinity mirror effect that blurs the line between indoors and outdoors. Projected reflection window lights are the absolute best choice for spaces directly overlooking dark pools or reflective garden ponds.
Pushing the lights directly against the glass kills the magic, but floating them just an inch away doubles the visual impact through sheer reflection. This trick delivers an incredibly premium aesthetic that makes standard string lights look like custom architectural fixtures.
You can unlock this optical illusion for about $25. It’s an unforgettable upgrade for evening dinner parties.
- Key Materials: Stiff shape-holding wire lights and one-inch standoff mounts.
- Vibe / Style: Mysterious, expansive, and luxurious.
- Difficulty: Moderate precision required.
- Budget Breakdown: Stiff wire LEDs: $15 | Standoff mounts: $10.
- Creator’s Tip: Turn off all other room lights to maximize the doubled-glass reflection over your yard.
- Smart Sourcing: stiff shapeable wire LED string lights, acrylic 1-inch standoff wall mounts (bulk pack).
Most people get this completely wrong… until they try the exact layout coming up next to fake an expensive garden arch.
Seasonal Window Display Concepts With Fairy Lights
Adapting window light installations to seasonal garden transitions maintains visual interest and celebrates natural cycles. These approaches respect each season’s unique character while maintaining cohesive design language.
9. Spring Blossom Echo
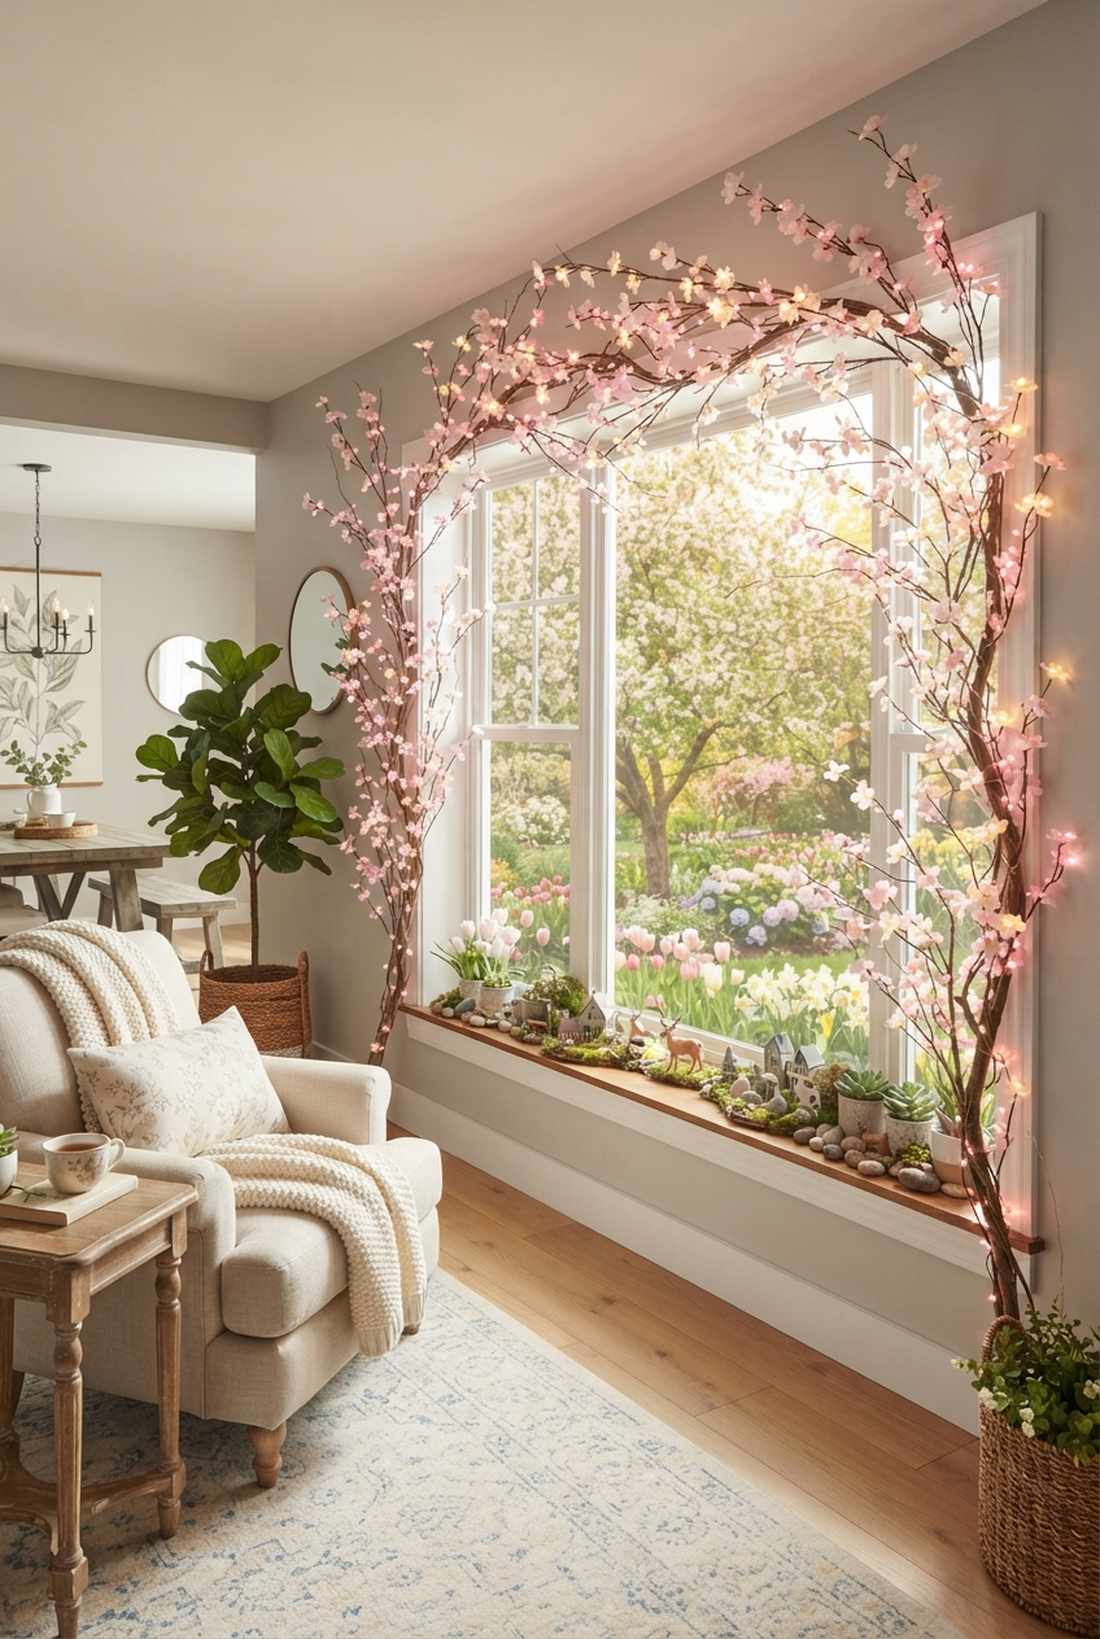
Feels exactly like a cherry blossom tree blooming right inside your house. An organic floral fairy lights window display is perfect for framing actual fruit trees or soft pastel spring flower beds.
Straight lines are too harsh for spring, but twisting soft pink LEDs through preserved branches creates a breathtakingly soft indoor-outdoor transition. Intertwining premium fairy garden kits featuring tiny mossy elements brings the whole springtime woodland fantasy to life.
This botanical fusion costs around $35 to put together. Pin this immediately to your spring home decor refresh board!
- Key Materials: Soft pink or warm white micro lights and faux blossom branches.
- Vibe / Style: Whimsical, soft, and deeply romantic.
- Difficulty: Fun and creative crafting.
- Budget Breakdown: Pink LEDs: $15 | Faux branches: $20.
- Creator’s Tip: Mix real dried branches with artificial ones to give the light strand structural support.
- Smart Sourcing: pastel pink micro LED fairy strands, flexible faux cherry blossom branches (bulk pack).
💡 Must-Have Supplies for High-End Setups
To build these setups faster and ensure they last, skip the generic craft aisles and invest in the right foundational kits.
- Base & Support: ultra-clear 3M adhesive window clip kits
- Setup Tools: bendable copper shaping tool starter kits
- Weather/Durability Protection: UV-coated silicone wire protective sealants
10. Summer Twilight Glow
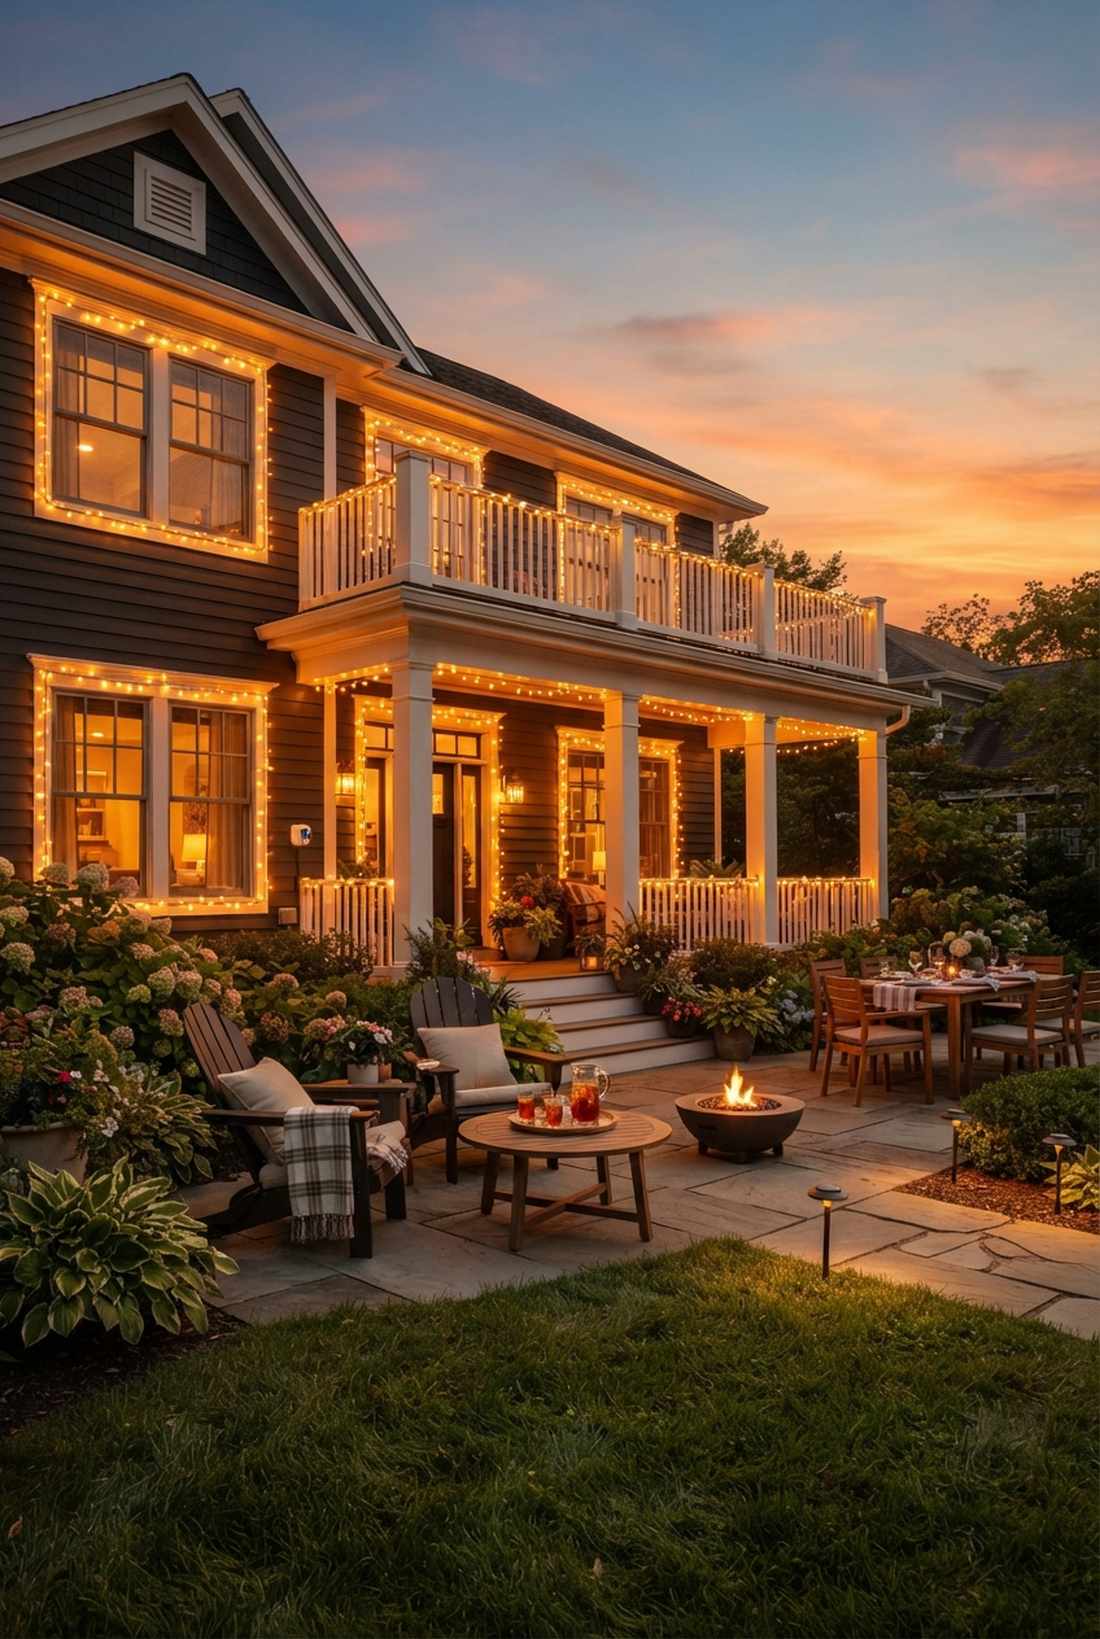
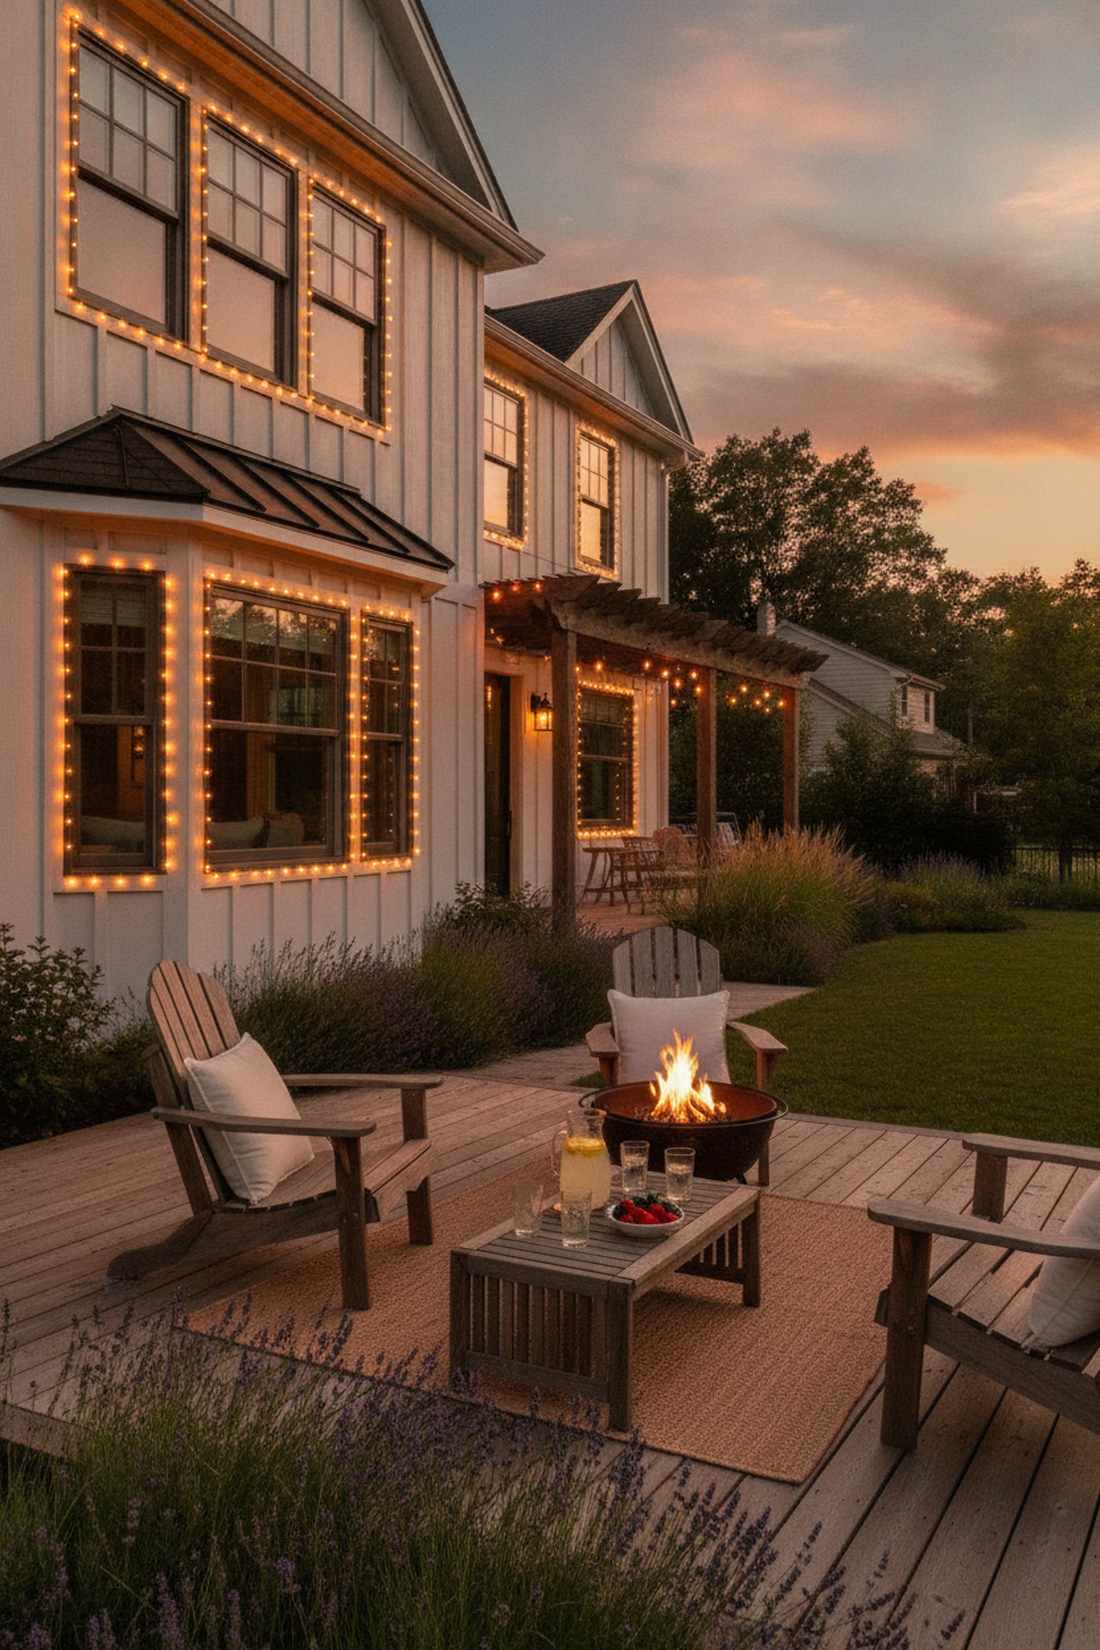
Captures the golden, lazy feeling of a warm July sunset that never ends. Amber twilight fairy lights on window frames are the ultimate backdrop for late-night patio lounging and summer garden parties.
Cool white lights completely ruin the summer vibe, but blasting high-density golden-yellow bulbs aggressively competes with the lingering evening sun for a flawless transition. Opting for UV-resistant outdoor fairy lights around the exterior trim extends the summer glow straight into the yard.
Setting up this golden hour hack will cost around $20–$35. It guarantees your house will be the most inviting on the block.
- Key Materials: High-density amber LED strings and heavy-duty plug-in adapters.
- Vibe / Style: Warm, inviting, and highly social.
- Difficulty: Simple plug-and-play.
- Budget Breakdown: Amber LEDs: $25 | Timer plug: $10.
- Creator’s Tip: Set your timer to turn these on exactly 30 minutes before actual sunset to bridge the light gap.
- Smart Sourcing: golden amber high-density string lights, dusk-to-dawn sensor smart plugs.
11. Autumn Harvest Warmth
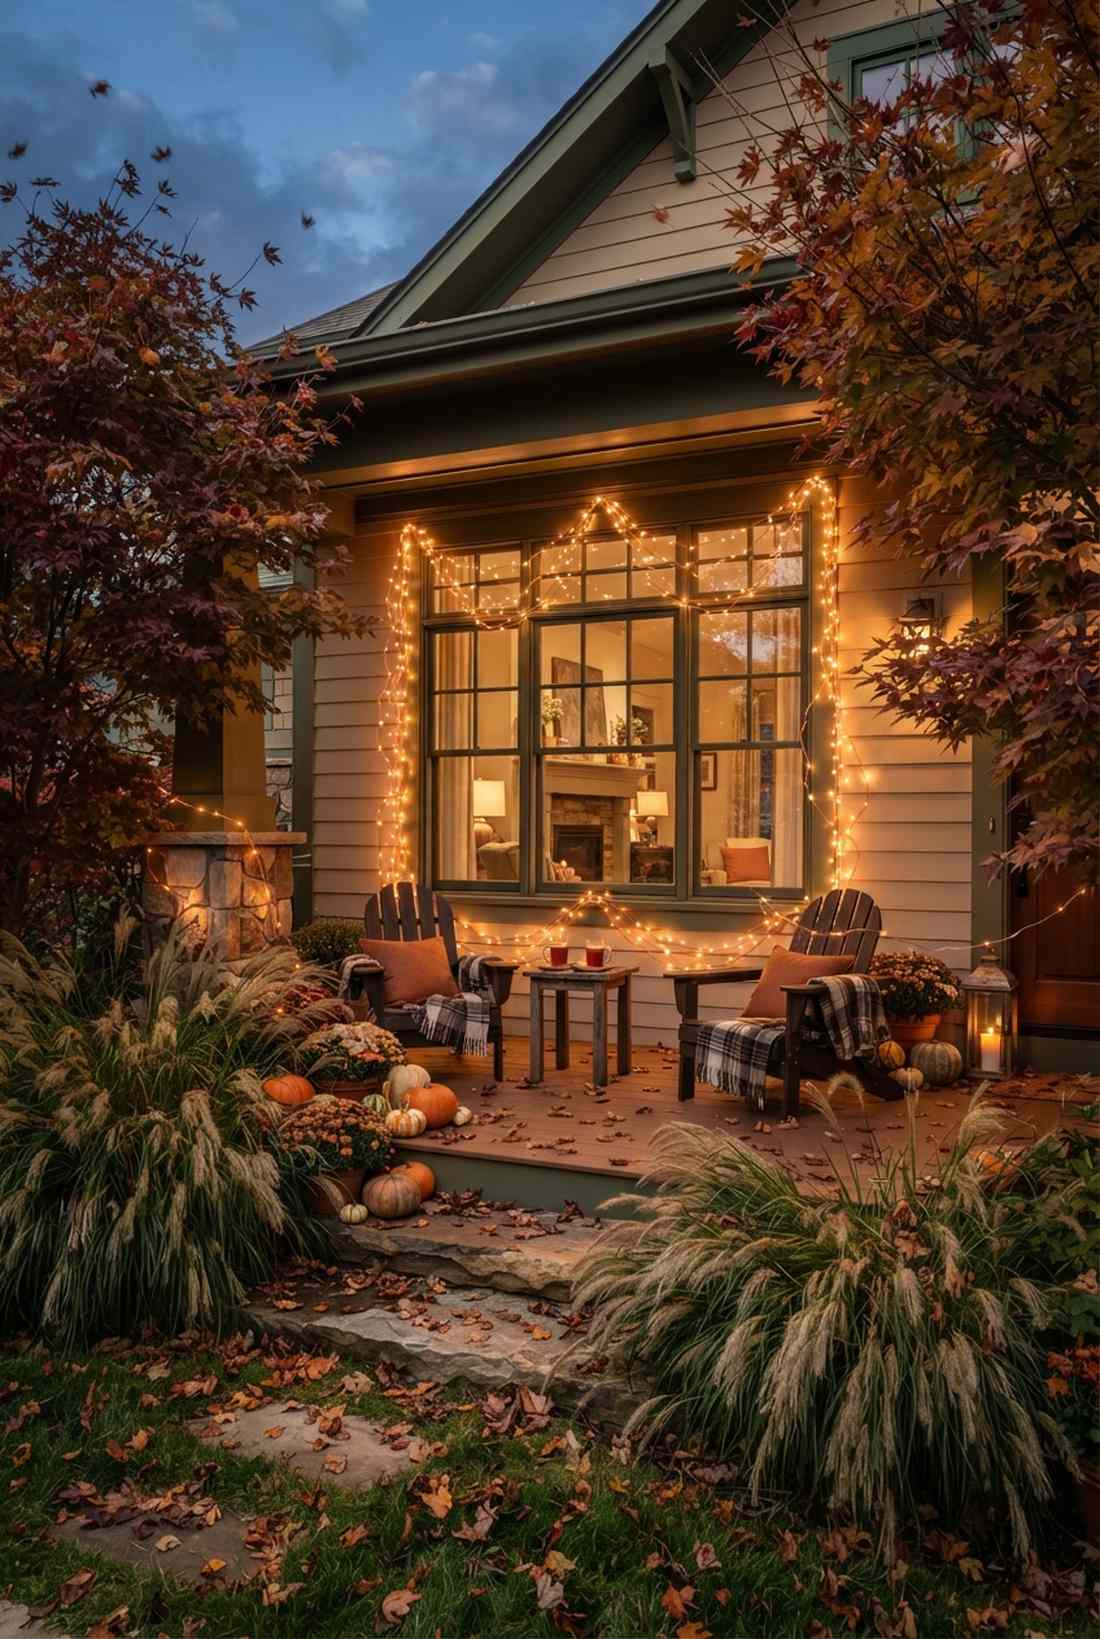
Feels like sipping hot cider surrounded by falling amber leaves. Sweeping autumn copper fairy lights window decor perfectly frames wind-blown ornamental grasses and deep red maple trees.
Rigid geometric grids clash with fall, so letting the wire drape in heavy, loose curves totally transforms the space with zero extra effort. The exposed metallic wire actually acts as a stunning piece of daytime jewelry when the sun hits it right.
You can weave this cozy autumnal upgrade for under $25. Save this to your cozy fall aesthetic Pinterest board!
- Key Materials: Thick bare copper wire lights and discreet corner tacks.
- Vibe / Style: Organic, warm, and slightly rustic.
- Difficulty: Easy and forgiving.
- Budget Breakdown: Copper wire lights: $20 | Tacks: $5.
- Creator’s Tip: Don’t pull the wire tight—the lazy sags are what make it look like natural falling leaves.
- Smart Sourcing: exposed copper wire warm LED lights, clear architectural thumb tacks (starter pack).
12. Winter Structure Definition
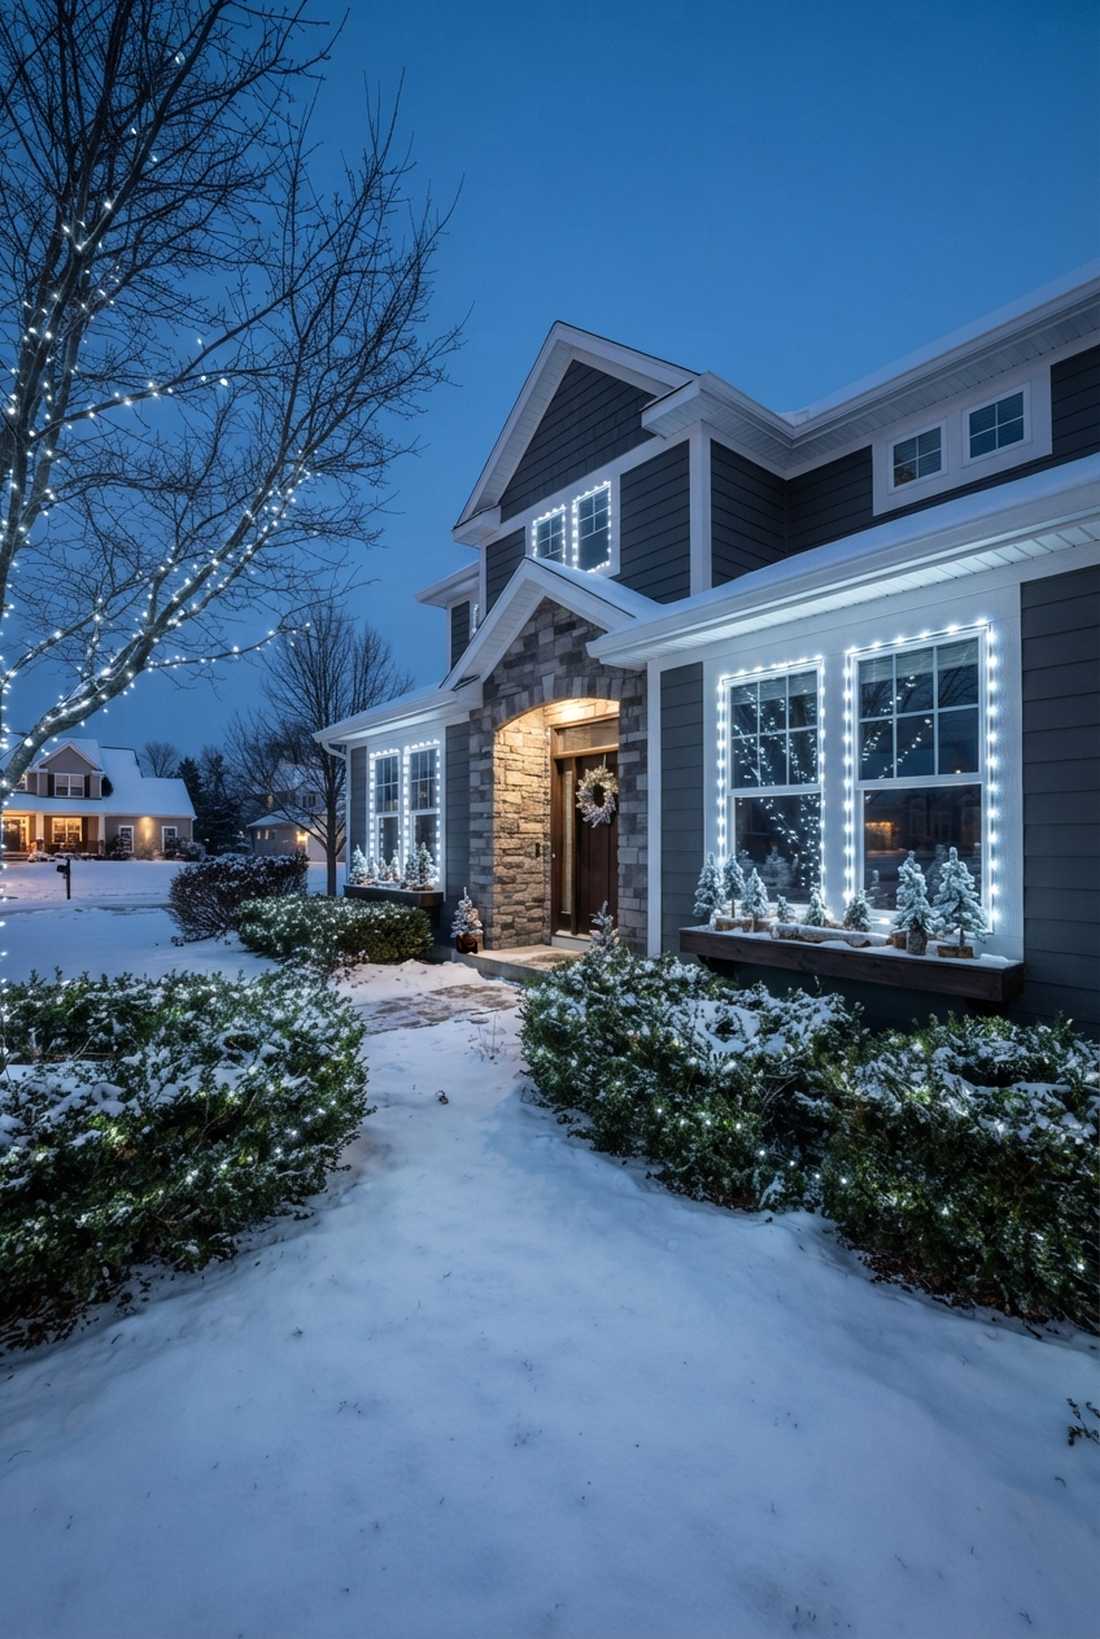
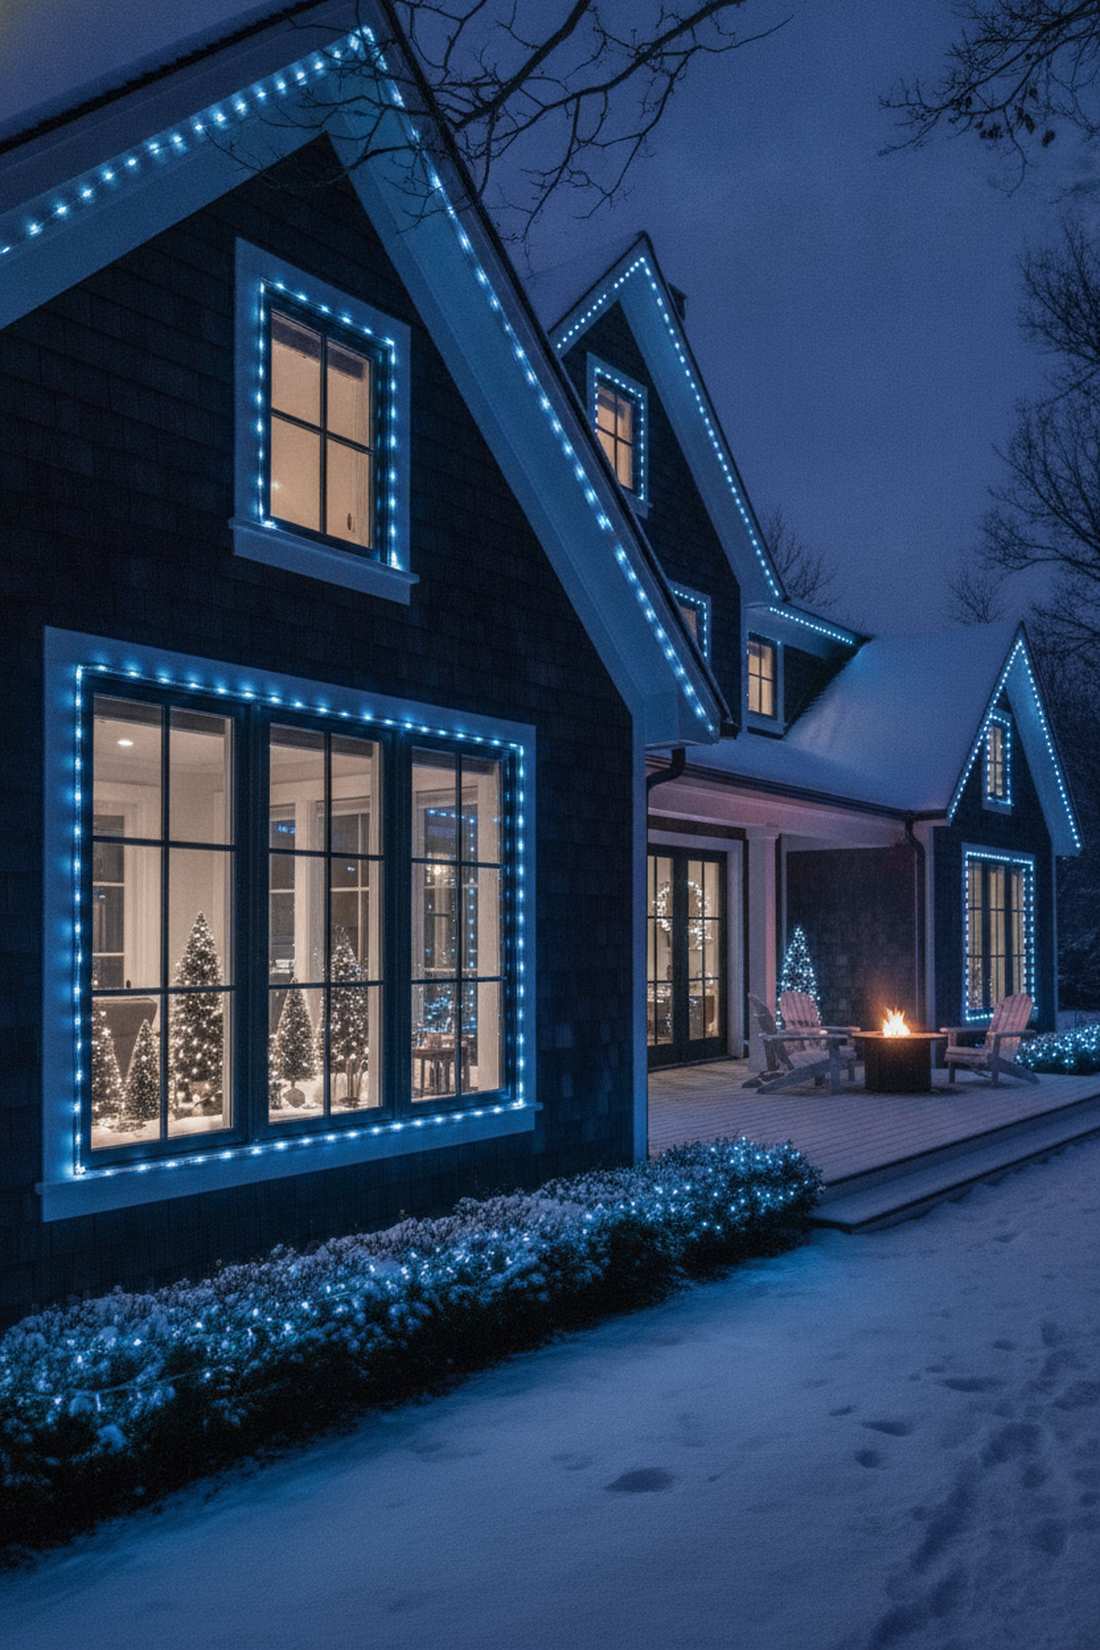
Brings a crisp, icy majesty to those long, dark winter evenings. Cool ice-blue window fairy light outlines are spectacular for highlighting snow-covered evergreen hedges or bare architectural branches.
Warm lights can look muddy against snow, but switching to a sharp 5000K cool white creates an intensely clean, modern contrast that looks incredibly high-end. Throwing some miniature garden supplies like tiny faux-snow dusted pines on the sill completes the icy diorama.
You can execute this crisp winter framing for $15–$30. It’s a lifesaver for making dark winter days feel magical instead of gloomy.
- Key Materials: Ice white or cool blue micro-LEDs and heavy duty tension clips.
- Vibe / Style: Sharp, majestic, and crystalline.
- Difficulty: Requires straight, taut lines.
- Budget Breakdown: Cool white LEDs: $15 | Tension clips: $10.
- Creator’s Tip: Keep the lines perfectly rigid to mirror the stark, graphic nature of winter landscapes.
- Smart Sourcing: pure white 5000K fairy string lights, high-tension transparent window cord clips.
Wait until you see how simple the next approach is—it completely changes a room’s energy without needing a single nail.
Innovative Pattern Designs Using Fairy Lights On Window Surfaces
Moving beyond perimeter outlines, these pattern-based installations create distinct visual signatures while maintaining garden view transparency. Pattern selection should complement both window architecture and garden style.
13. Geometric Grid System

Feels like looking out from an ultra-modern city penthouse or industrial loft. Architectural grid fairy lights window styling thrives in minimalist dining rooms overlooking sharp, formal landscaping.
Skip the chaotic, messy draping; this highly organized method instantly makes cheap glass look like expensive custom mullions. Using a small laser level ensures the lines are mathematically perfect, giving you a designer-level finish for pennies.
Expect to spend about $35 for perfectly mapped strands. Pin this if you love clean, contemporary interior hacks!
- Key Materials: Straight-edge LED light strips or stiff wire, plus a leveling tool.
- Vibe / Style: Urban, structured, and flawlessly modern.
- Difficulty: High precision required.
- Budget Breakdown: Stiff LEDs: $25 | Leveling tape: $10.
- Creator’s Tip: Use matte black tape behind the lights to create the illusion of real iron window panes.
- Smart Sourcing: pre-measured geometric LED light grids, UV-coated acrylic leveling tools.
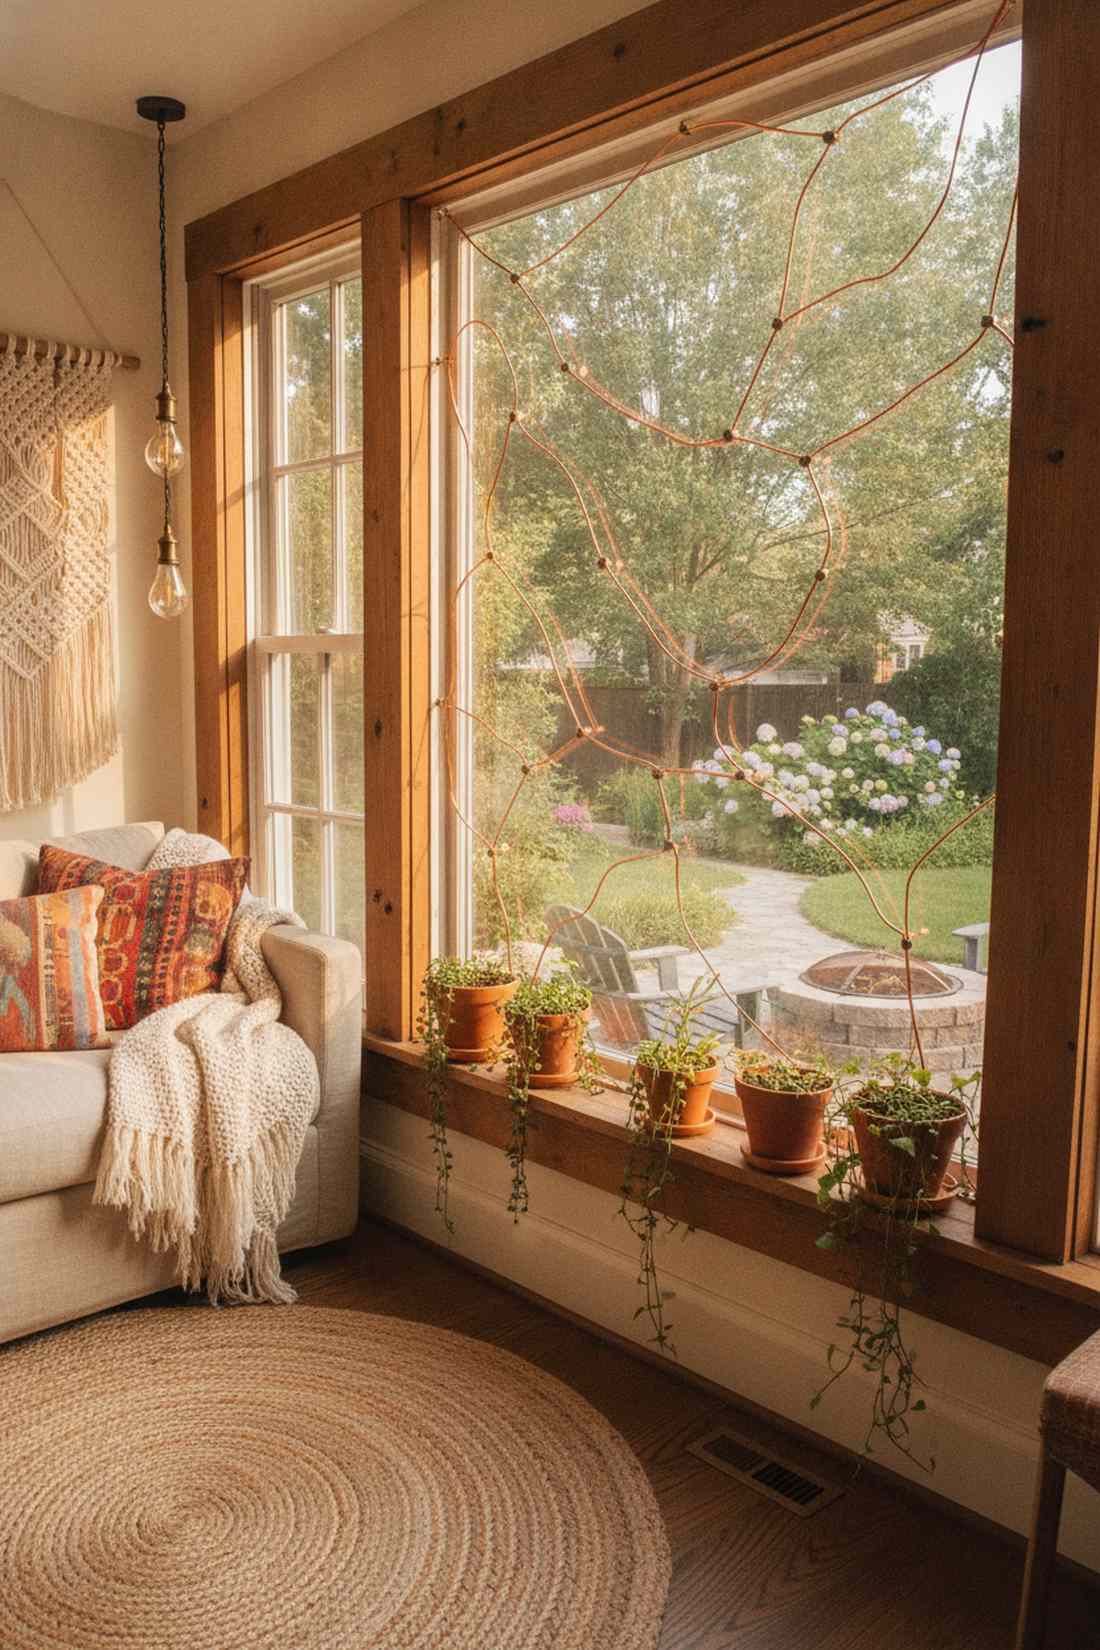
14. Organic Vine Pattern
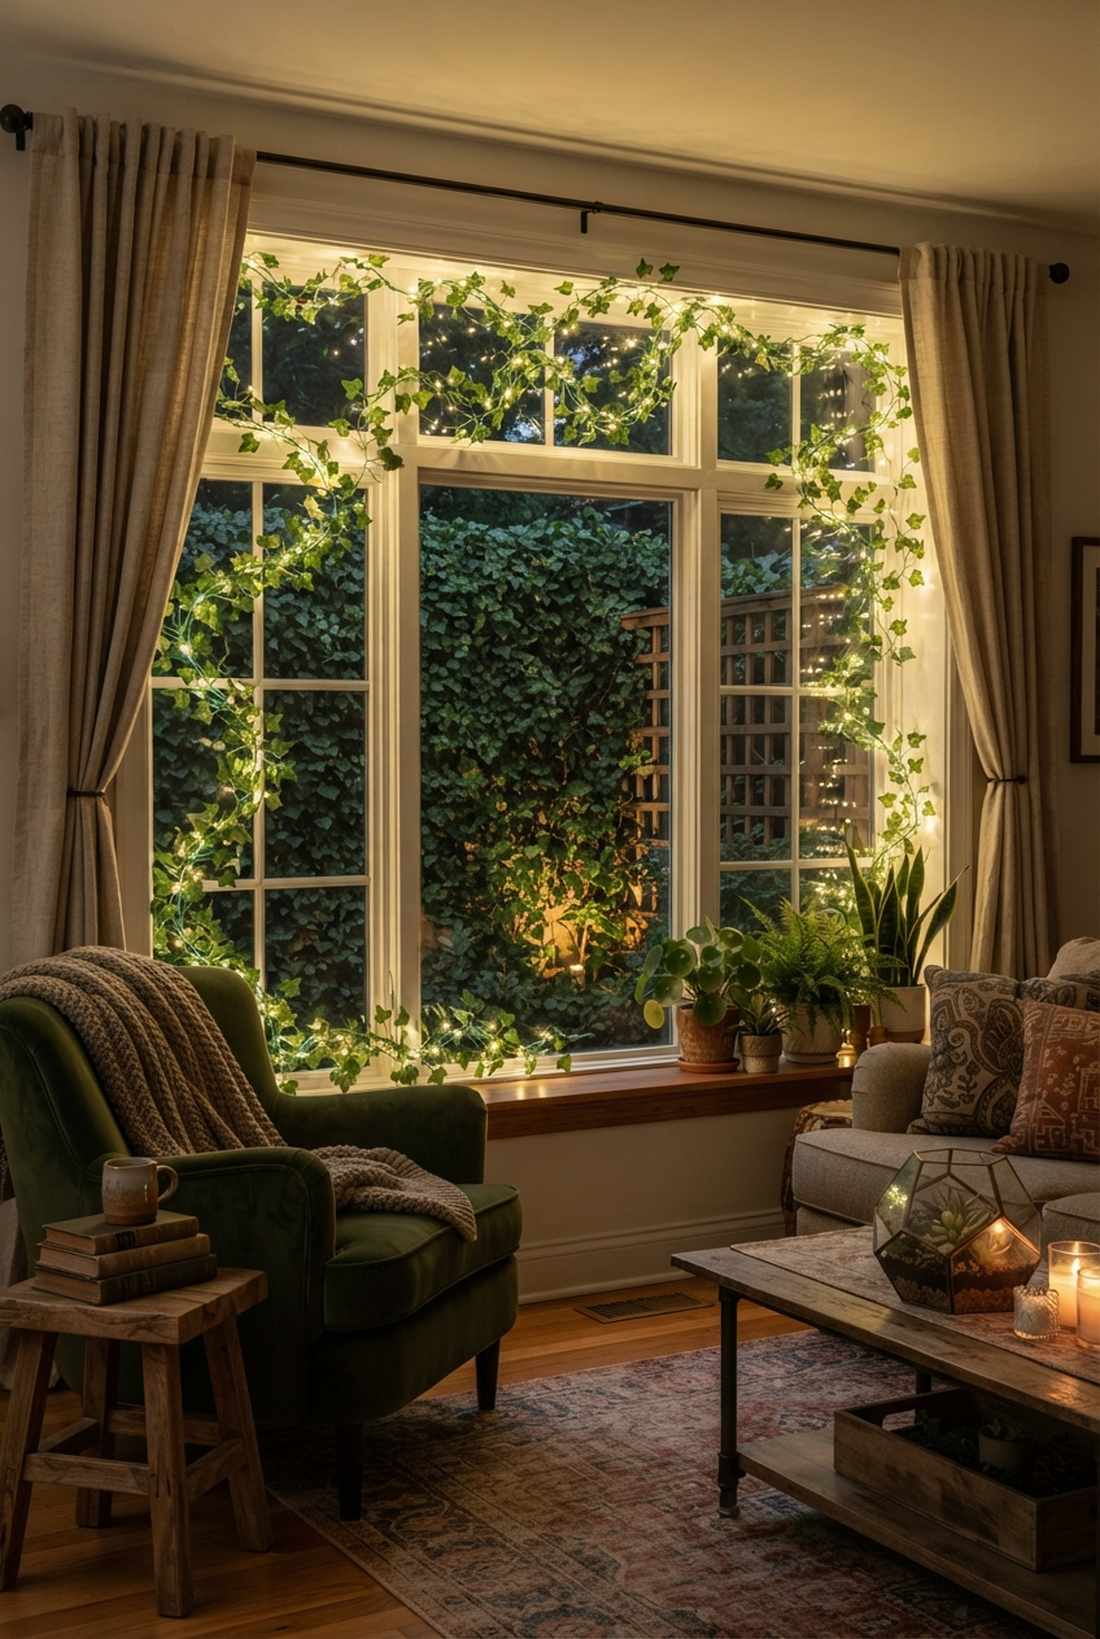
Transforms your living room into a magical, overgrown secret garden. An illuminated climbing vine window design is absolutely flawless for windows that face outdoor trellises or heavy ivy walls.
Straight borders are fine, but snaking the wire organically upwards creates a breathtaking visual bridge between your indoor space and the living yard outside. Weaving in realistic terrarium accessories or faux ivy leaves along the wire hides the tech and amplifies the fairytale aesthetic.
You can create this botanical light sculpture for $20–$40. It’s an absolute must for cottage-core enthusiasts.
- Key Materials: Green-coated fairy wires and artificial ivy garland.
- Vibe / Style: Enchanting, wild, and incredibly cozy.
- Difficulty: Freeform and creatively relaxing.
- Budget Breakdown: Green wire lights: $15 | Faux ivy: $15.
- Creator’s Tip: Start from the bottom corner and work up, just like a real plant would naturally grow.
- Smart Sourcing: green-coated copper wire LED lights, realistic silk ivy garland (bulk pack).
15. Starburst Focal Design
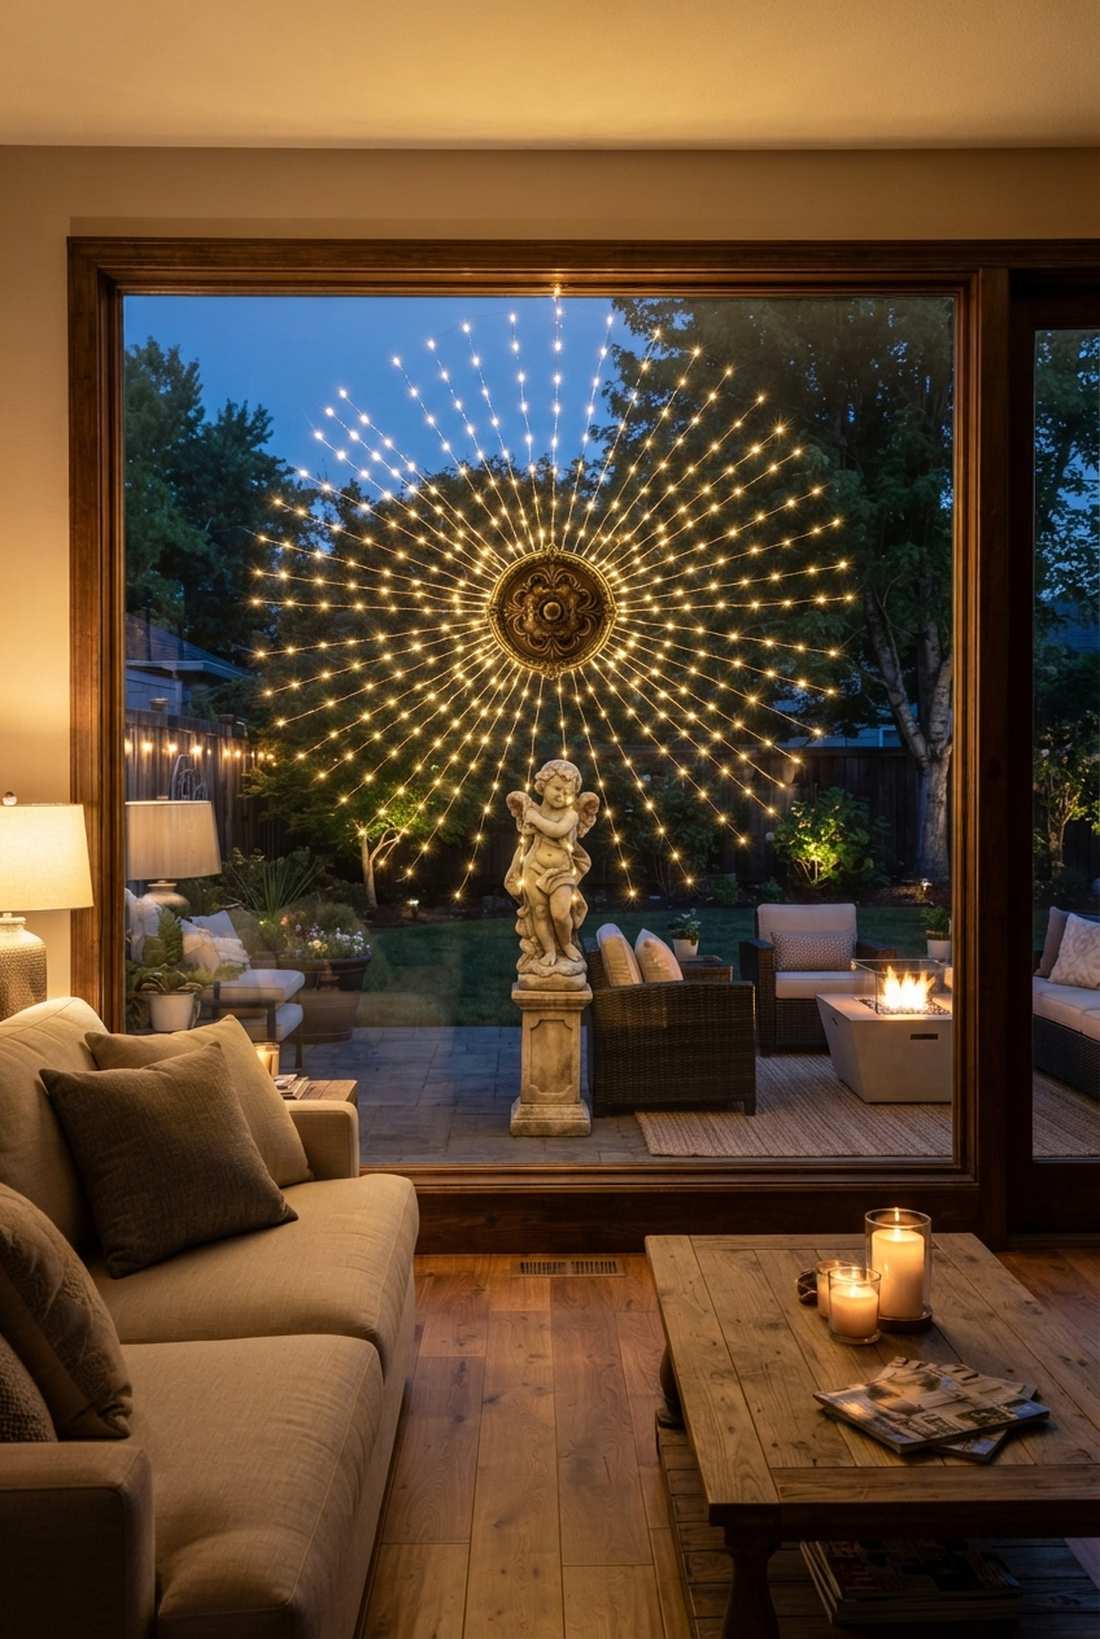
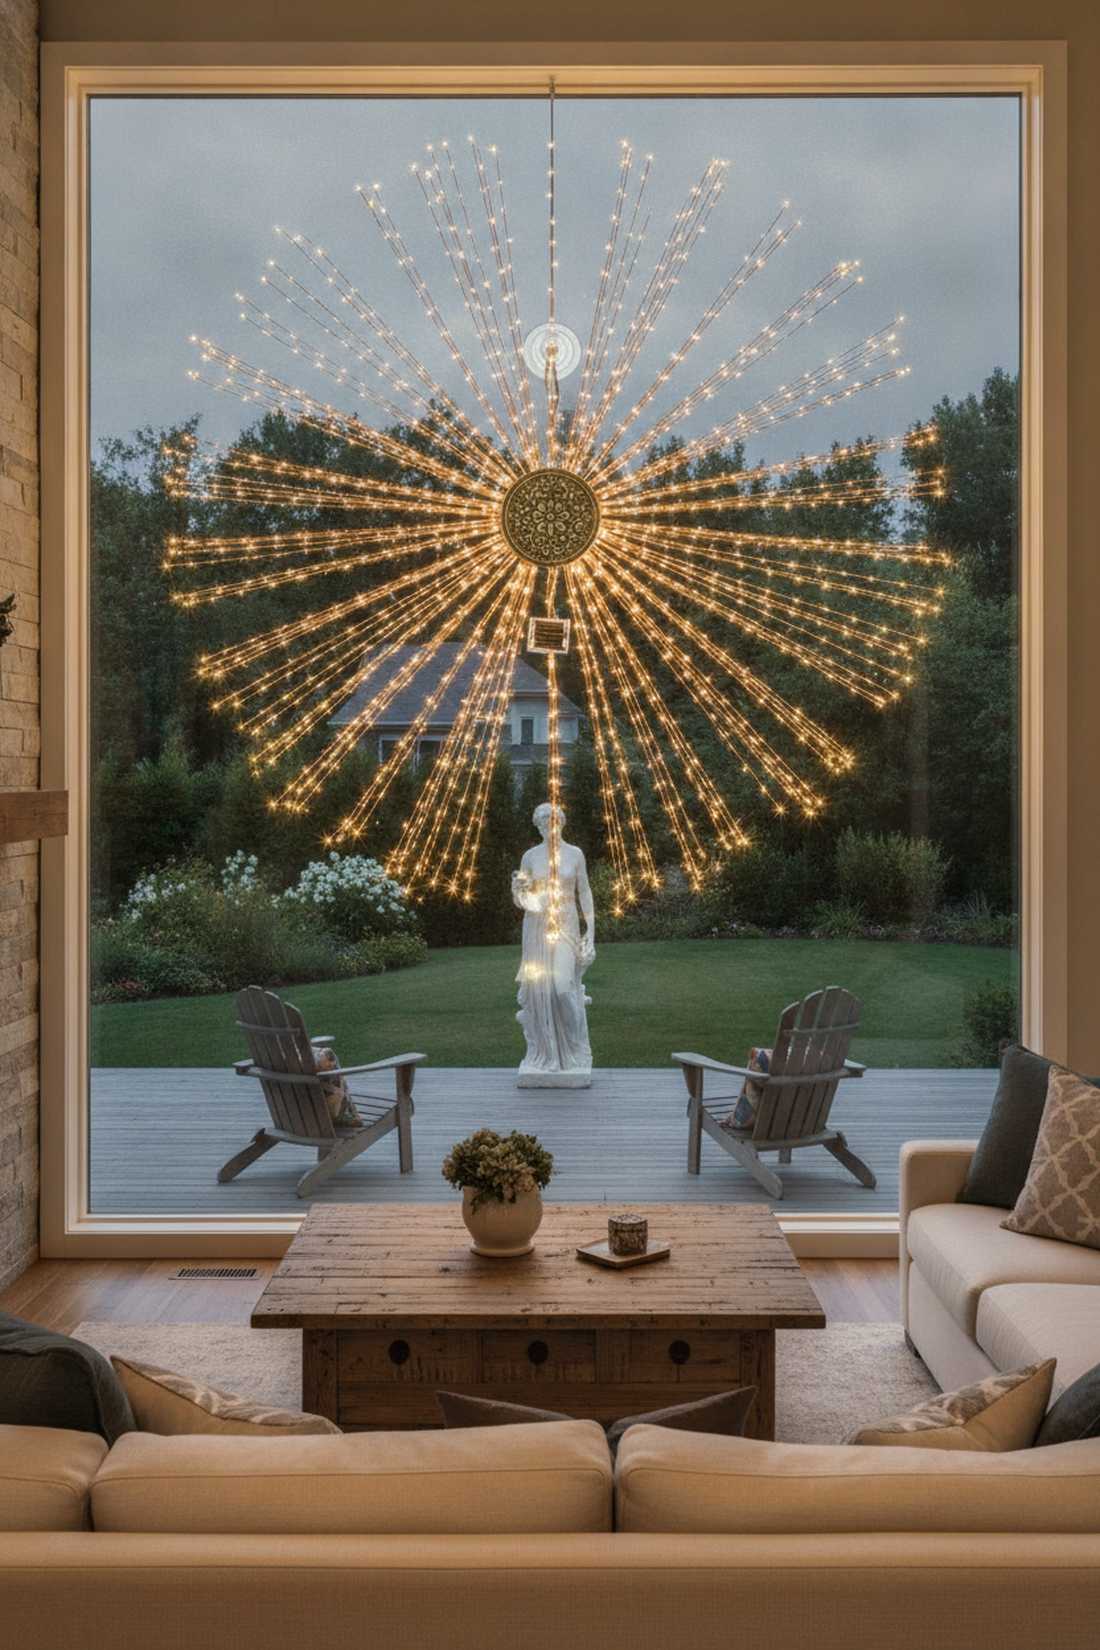
Acts like an explosive visual magnet that demands attention from across the room. The radiating starburst window fairy light layout brings massive dynamic energy to flat, boring single-pane glass.
Most basic setups frame the edges, but anchoring everything to a central point forces a shockingly premium, art-installation vibe. If you align the center hub directly over a prized garden statue, it literally looks like the landscape is emitting light into your house.
This high-energy design costs around $30 to rig up. Save this idea if you want a true conversation starter for your next party!
- Key Materials: Multi-strand bunch lights and a central heavy-duty suction anchor.
- Vibe / Style: Explosive, artistic, and highly energetic.
- Difficulty: Moderate untangling required.
- Budget Breakdown: Bunch lights: $25 | Center anchor: $5.
- Creator’s Tip: Use a decorative medallion to hide the ugly central battery pack or knot of wires.
- Smart Sourcing: multi-strand copper firefly bunch lights, heavy-duty clear center suction anchors.
16. Wave Flow Pattern
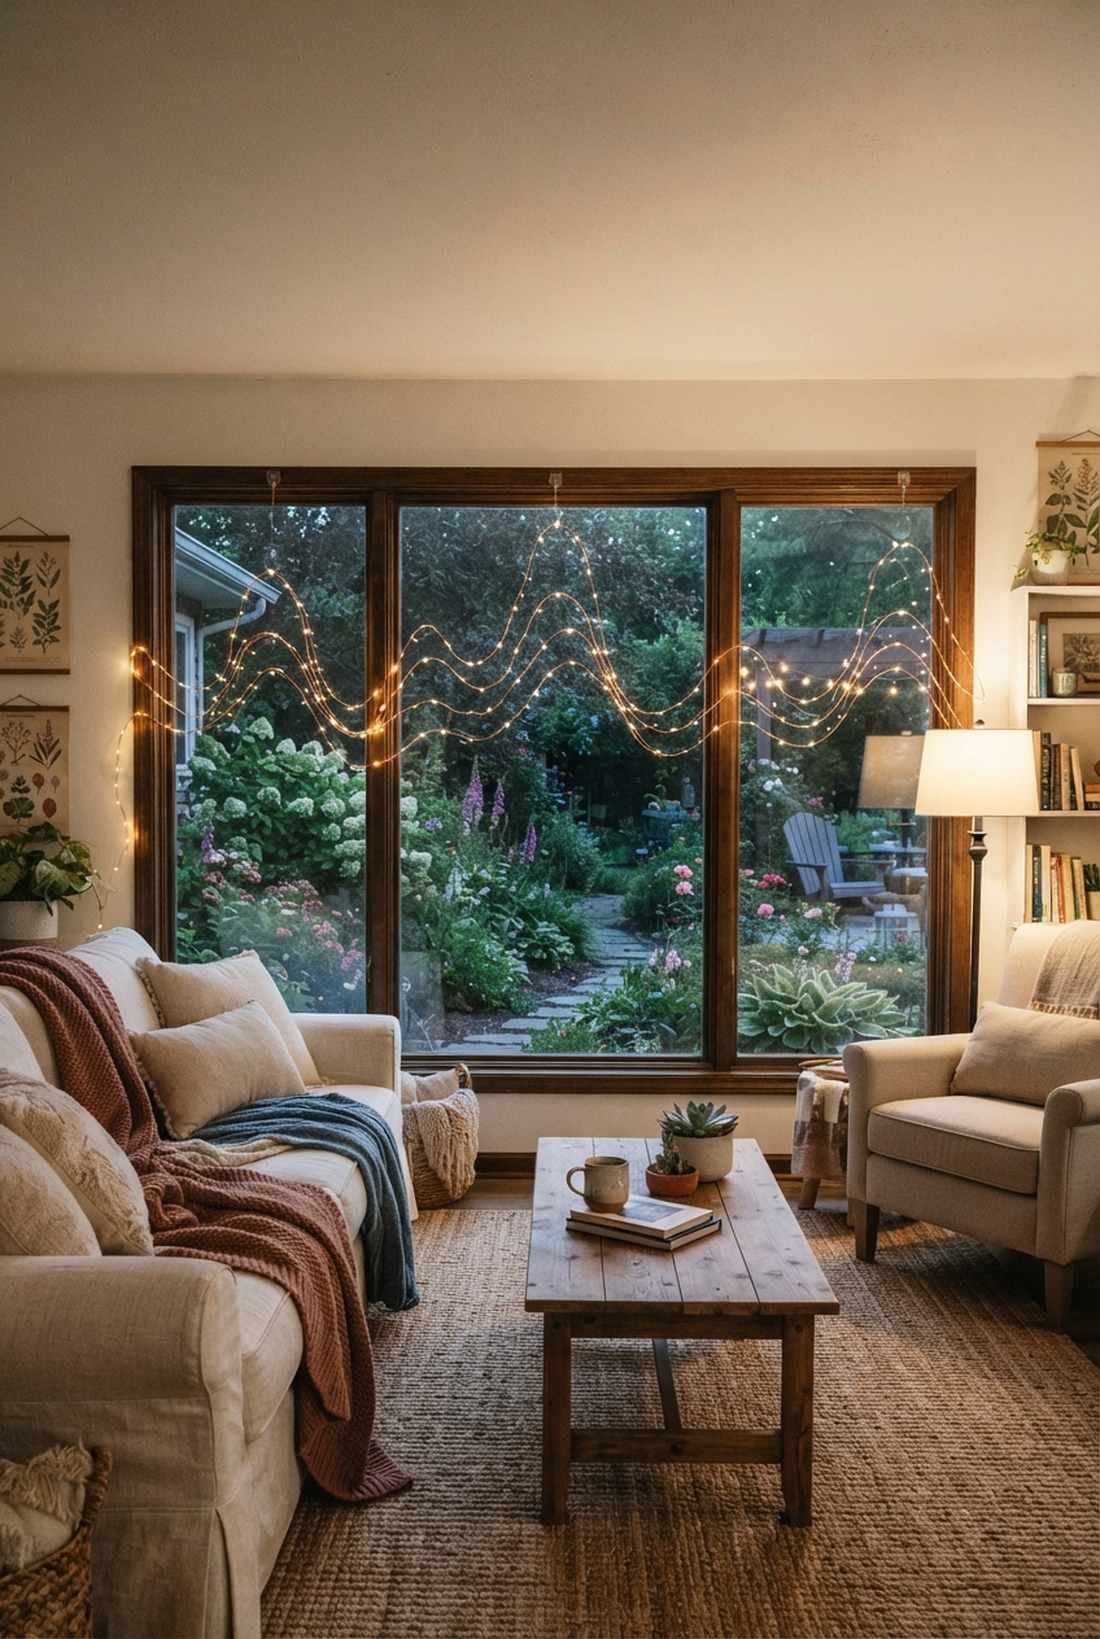
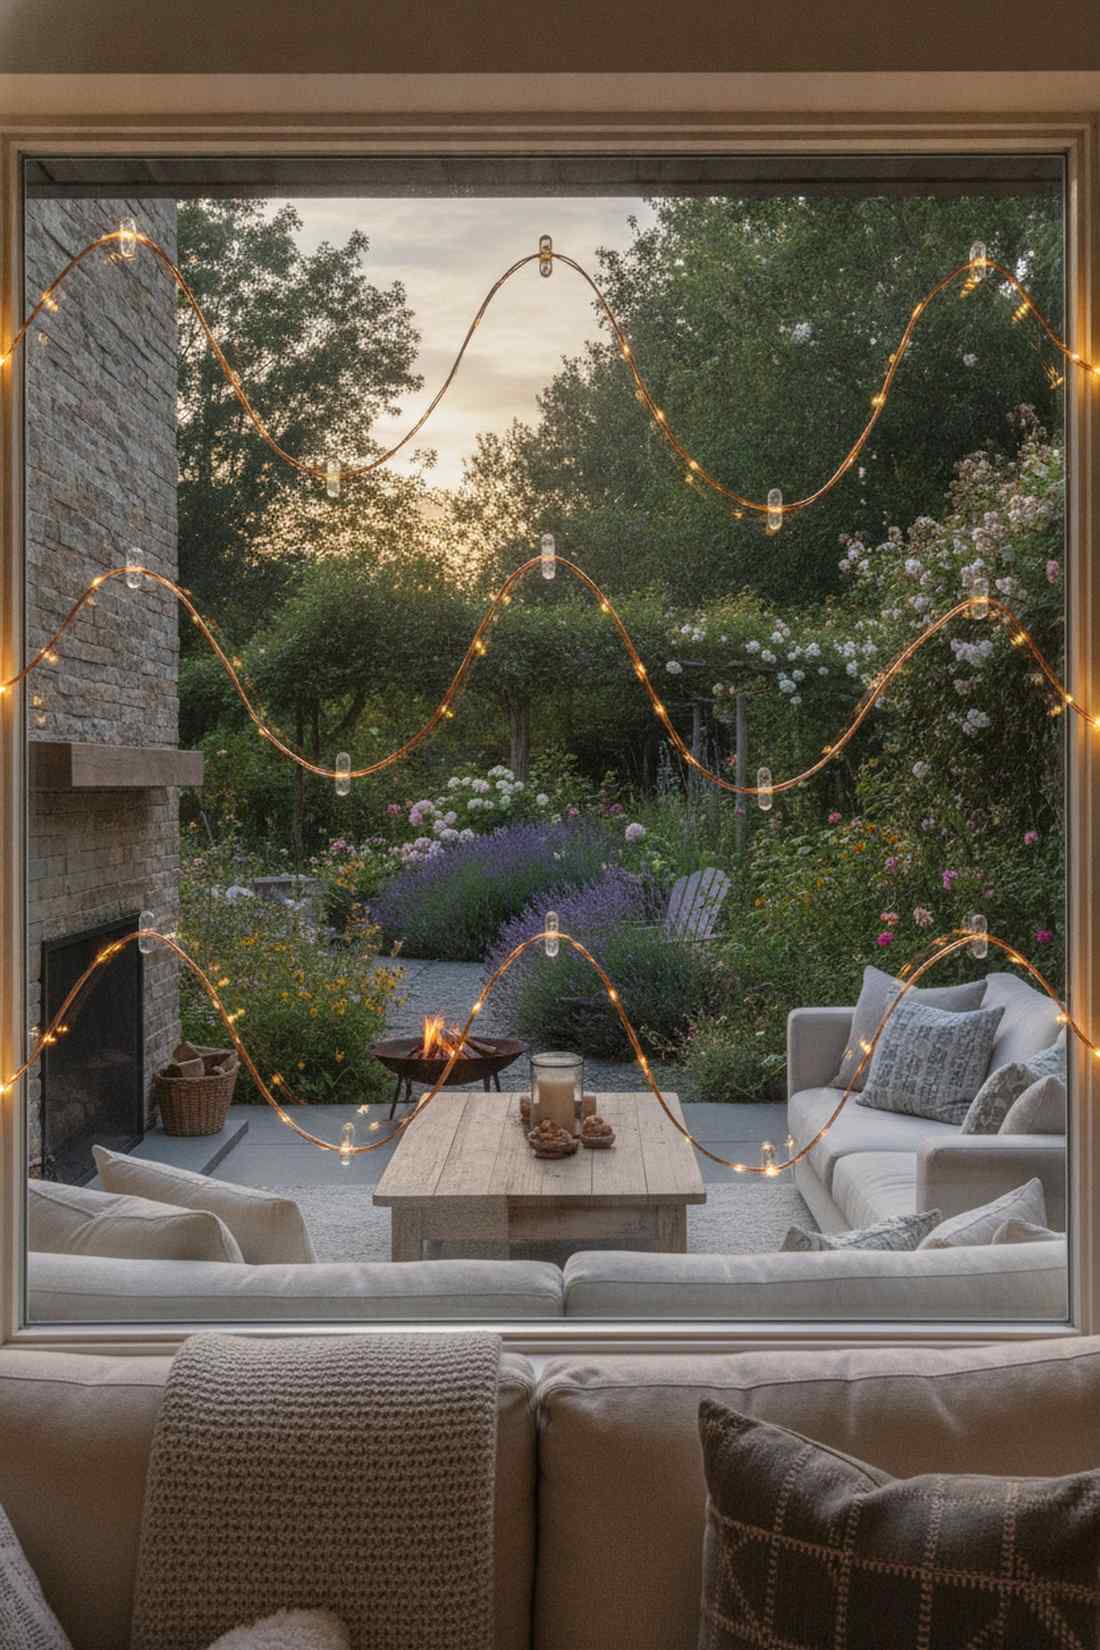
Emanates the soothing, rhythmic energy of a gentle ocean tide or a rolling meadow. Undulating wave fairy lights window decor effortlessly softens harsh, boxy rooms overlooking wild cottage gardens.
Rigid lines can feel sterile, but locking your wire into smooth, flowing peaks and valleys delivers a surprisingly premium look that feels bespoke. The trick is to use heavy gauge wire that actually holds its curved shape without sagging back into a straight line.
You can map out these fluid waves for about $20–$30. Highly recommended to break up the monotony of standard square windows.
- Key Materials: Thick shape-memory wire lights and evenly spaced clear hooks.
- Vibe / Style: Relaxing, fluid, and wonderfully soft.
- Difficulty: Requires patience to shape.
- Budget Breakdown: Shapeable wire: $18 | Spaced hooks: $8.
- Creator’s Tip: Draw the wave pattern on the glass with a dry-erase marker first, then follow it with your wire.
- Smart Sourcing: thick-gauge memory copper LED wire, dry-erase window layout markers (starter kit).
Don’t buy any expensive outdoor fixtures before looking at this incredibly clever minimalist workaround coming up next.
17. Minimalist Single Accent

Proves that sometimes a mere whisper of light is louder than a shout. A single-line minimalist fairy light accent is the ultimate flex for stunning, unobstructed panoramic garden views.
Wrapping the entire window can sometimes look cluttered, but a single glowing slash down one corner looks fiercely modern and ridiculously upscale. By keeping the light footprint tiny, you ensure that the deep, natural beauty of your expensive landscaping remains the undisputed star.
This restrained approach will barely cost you $10. Pin this if you prefer a sleek, “less is more” interior aesthetic.
- Key Materials: One short, ultra-bright LED strand and invisible micro-tape.
- Vibe / Style: Restrained, confident, and gallery-chic.
- Difficulty: The easiest setup on the list.
- Budget Breakdown: Short LED strand: $7 | Micro-tape: $3.
- Creator’s Tip: Place the single line on the side of the window opposite your garden’s brightest feature to balance the frame.
- Smart Sourcing: short-run battery micro LED string, invisible double-sided micro-tape strips.
Color Temperature and Texture Variations in Fairy Lights Window Design
Light color and wire finish dramatically affect how window displays read during day and night. These variations allow customization to specific garden palettes and architectural styles.
18. Warm White Garden Harmony

Wraps the room in a nostalgic, fireside glow that practically begs you to sit down with a book. Warm white 2700K fairy lights window styling perfectly complements natural wood frames and brick garden patios.
Harsh white bulbs can make a room feel like a hospital, but matching the 3000K golden spectrum completely transforms the space into an inviting sanctuary. If you weave some premium miniature garden supplies along the bottom edge, the golden light makes them look incredibly lifelike.
Securing this timeless, cozy aesthetic runs around $15–$25. It’s a foolproof upgrade that works in 99% of homes.
- Key Materials: 2700K-3000K warm white LED strings and matching wire color.
- Vibe / Style: Timeless, comforting, and universally flattering.
- Difficulty: Simple perimeter stringing.
- Budget Breakdown: Warm string lights: $15 | Clear clips: $5.
- Creator’s Tip: Check the box for the exact Kelvin rating; anything over 3000K will lose that buttery golden glow.
- Smart Sourcing: true 2700K warm white copper string lights, vintage-style ambient light dimmers.
Material Guide: Cheap vs. Premium Aesthetic
Knowing exactly where to save and where to spend makes all the difference in achieving that “looks expensive but isn’t” vibe.
- Standard vs. UV-Resistant/Premium: Standard wires crack and yellow when baked against hot window glass. UV-coated wires stay invisible and safe.
- Pre-made Kits vs. Sourcing Locally: Scavenging craft aisles usually results in mismatched wire colors. Buying a pre-cut, remote-controlled starter kit ensures flawless synchronization and saves you hours of frustration.
19. Cool White Contemporary Edge
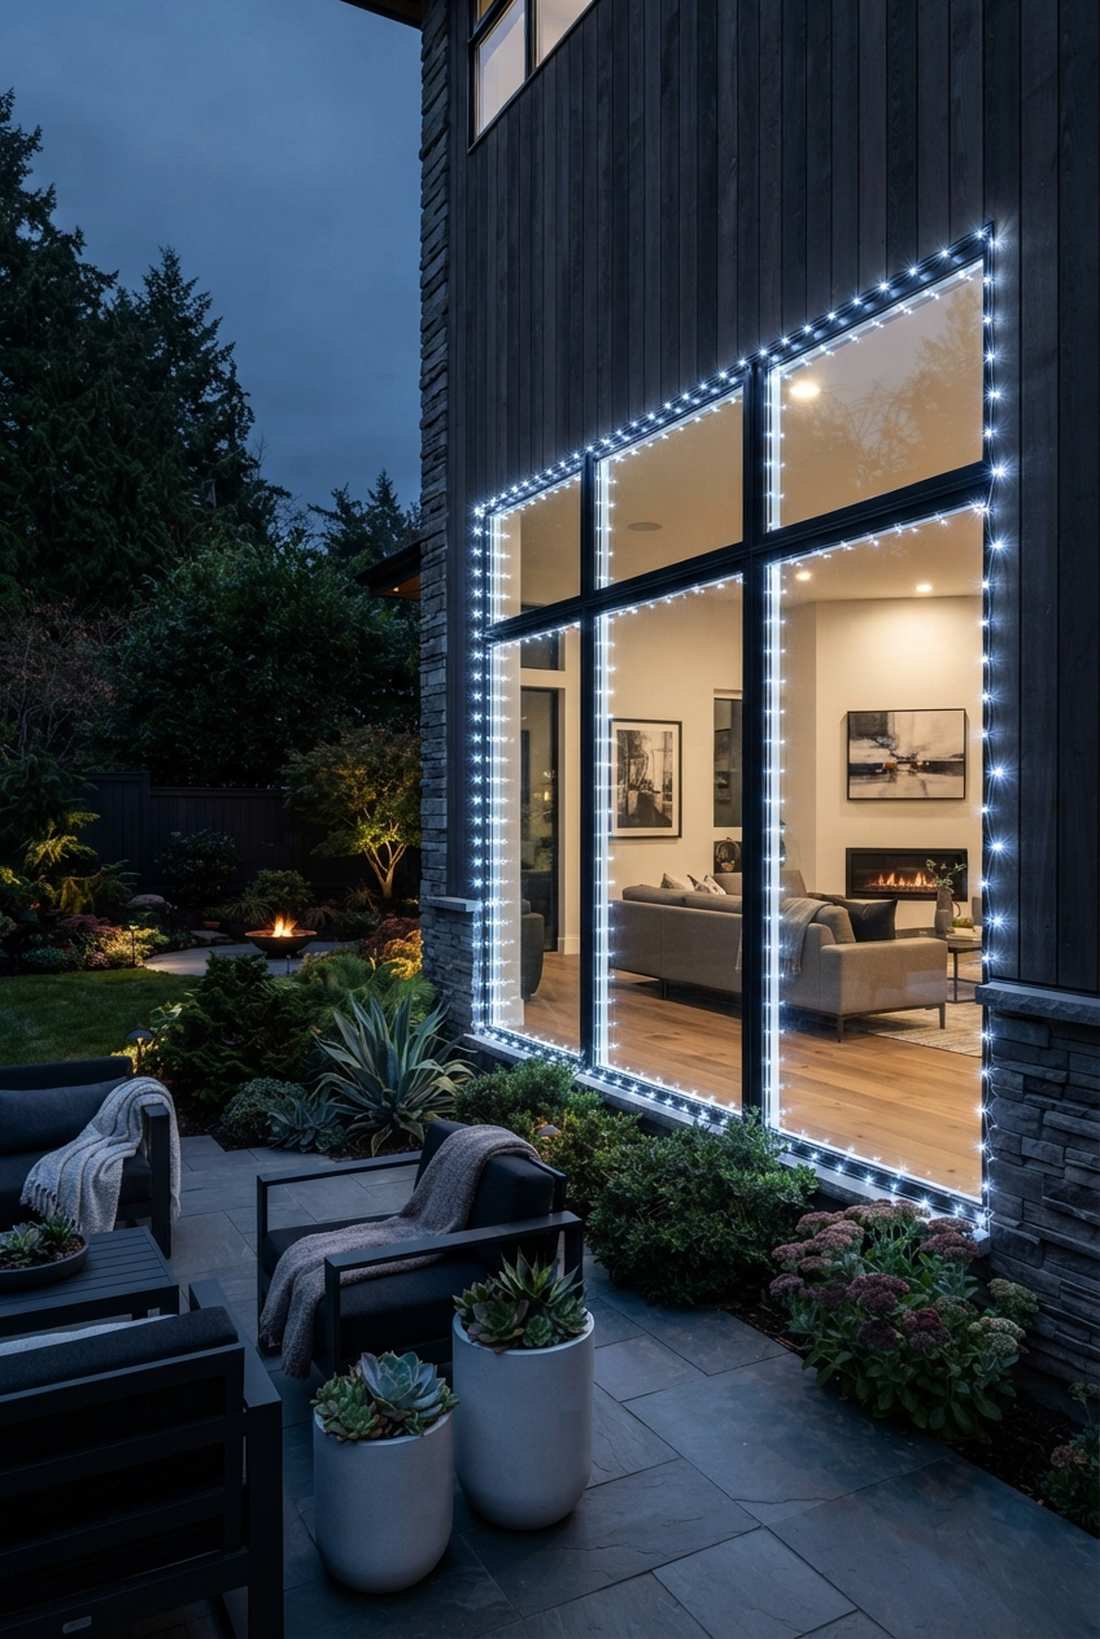
Injects a sharp, museum-quality clarity that instantly modernizes older spaces. The crisp cool-white fairy lights window setup is an absolute powerhouse for rooms overlooking slate patios or stark architectural succulents.
A lot of people shy away from cool tones, but pushing 5000K against dark winter evergreens delivers a surprisingly premium look that feels intensely luxurious. The icy contrast actually enhances the deep greens and purples of your nighttime garden, making it pop like a high-def photograph.
You can achieve this hyper-modern gallery look for about $20. Save this if you are upgrading a sleek, modern condo!
- Key Materials: 4000K-5000K cool white LED strands on silver wire.
- Vibe / Style: Crisp, professional, and razor-sharp.
- Difficulty: Easy standard hanging.
- Budget Breakdown: Cool white LEDs: $15 | Silver clips: $5.
- Creator’s Tip: Pair cool white lights strictly with silver or transparent wire; copper wire clashes terribly with icy bulbs.
- Smart Sourcing: 5000K daylight cool white micro string lights, invisible silver wire LED starter kits.
20. Copper Wire Elegance
Serves double duty as a gorgeous metallic decor piece even when the power is off. Exposed copper fairy lights on window glass look breathtaking when afternoon sunlight catches the rich, reddish metal.
Most setups try to hide the cables, but leaning into the thick, visible copper wire gives a designer-level finish perfect for rustic or bohemian rooms. Blending these warm metallic tones with terracotta pots right outside the window bridges the material palette beautifully.
Investing in heavy-gauge copper lighting will cost roughly $25–$35. It’s a fantastic hack for spaces that get a lot of direct daytime sun.
- Key Materials: Premium thick-gauge bare copper wire lights.
- Vibe / Style: Earthy, bohemian, and material-focused.
- Difficulty: Requires careful shaping to look neat.
- Budget Breakdown: Premium copper strand: $25 | Wire shapers: $5.
- Creator’s Tip: Wipe the copper wire down with a dry microfiber cloth before hanging to maximize its daytime shine.
- Smart Sourcing: heavy-gauge visible copper wire string lights, metallic-finish decorative wire tacks (bulk pack).
21. Silver Wire Subtlety
Performs a magical disappearing act the second the sun comes up. Ultra-thin silver fairy lights window trimming is the undisputed champion for homeowners who refuse to compromise their pristine daytime garden views.
Thick green wires look cheap and bulky, but high-grade silver micro-strands blend seamlessly into the glass, making the lights appear to float from nowhere at night. This is the exact secret landscapers use when they want maximum illumination without any ugly mechanical footprint.
You can lock in this invisible magic trick for around $18. Pin this if you are a strict perfectionist about clean windows!
- Key Materials: Hair-thin silver wire LEDs and micro clear-gel dots.
- Vibe / Style: Invisible, magical, and pristine.
- Difficulty: Requires gentle handling to avoid snapping the wire.
- Budget Breakdown: Silver wire LEDs: $12 | Gel dots: $6.
- Creator’s Tip: Never pull silver wire too tight around sharp corners, as the micro-filaments snap easily.
- Smart Sourcing: invisible silver wire micro LED strings, clear silicone micro-gel mounting dots.
This next technique is a designer secret that instantly makes any small patio look incredibly dynamic all year round…
22. Multi-Color Seasonal Shifts

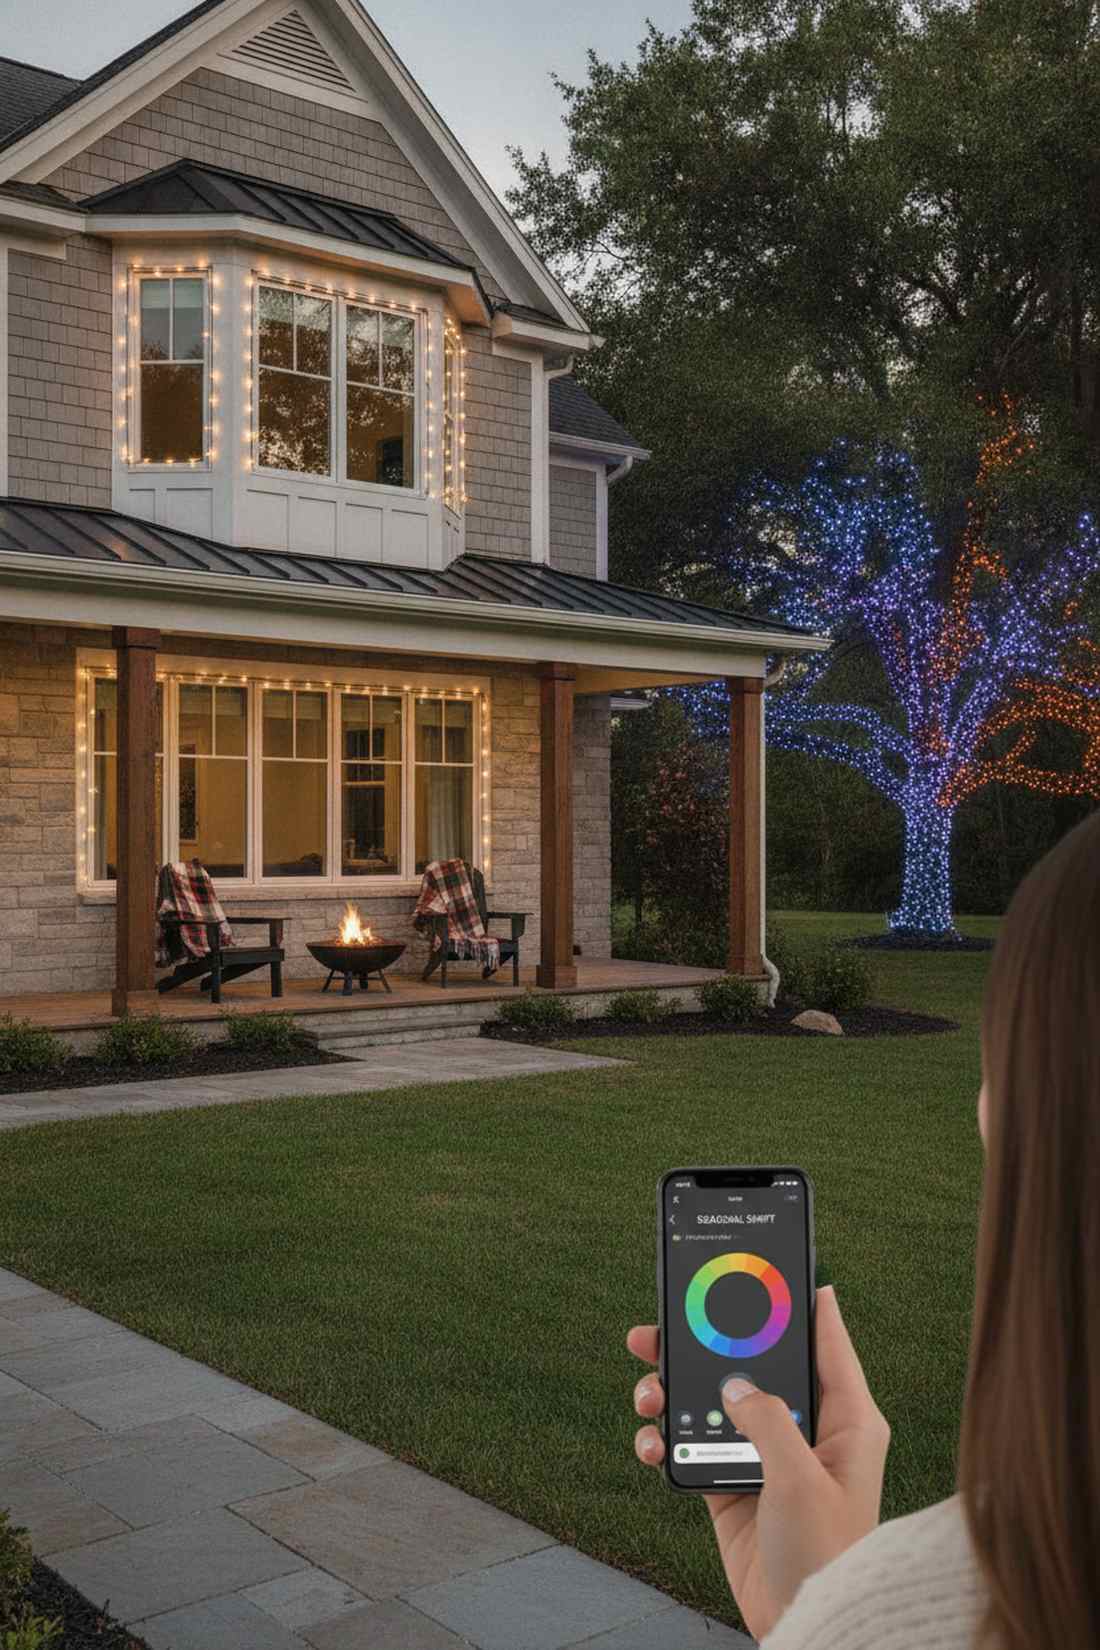
Puts total atmospheric control right in the palm of your hand. Smart RGB fairy lights window integration allows you to shift from a spooky purple autumn to a festive red winter with a single tap.
Swapping physical light strands every holiday is exhausting, but installing app-controlled smart lights looks far more expensive than it is and saves hours on ladders. Upgrading to UV-resistant outdoor fairy lights systems means your colors will never fade, no matter how brutal the summer sun gets.
A reliable smart RGB kit runs about $35–$55. Highly recommended for tech-lovers who want maximum holiday impact with zero hassle.
- Key Materials: App-controlled RGB LED string lights and a reliable WiFi connection.
- Vibe / Style: High-tech, festive, and infinitely customizable.
- Difficulty: Easy physical setup, requires basic app pairing.
- Budget Breakdown: Smart RGB lights: $45 | Cable management clips: $5.
- Creator’s Tip: Program a slow, 60-minute fade from warm white to deep blue to naturally transition your evening mood.
- Smart Sourcing: app-controlled smart RGB fairy string kits, clear wire routing cable management clips.
Architectural Window Integration Methods for Maximum Garden Connection
Coordinating fairy lights with existing window architecture creates seamless installations that appear intentional rather than applied. These methods respect building character while enhancing garden relationships.
23. Mullion and Muntin Emphasis

Turns historic divided glass into a stunning glowing grid of pure charm. Detailed mullion fairy lights window tracing is absolutely perfect for older farmhouse aesthetics overlooking cottage-style planting beds.
Slapping lights around the perimeter ignores the architecture, but carefully tracing the interior window grids completely transforms the space into a high-end heritage showpiece. Hiding the wires deep in the shadow lines of the wood gives a designer-level finish that looks built-in.
This detailed architectural trace costs roughly $25–$40 in materials. Save this if you live in a historic home with beautiful glass dividers!
- Key Materials: Flexible micro-LEDs and tiny transparent shadow-line tape.
- Vibe / Style: Historic, bespoke, and incredibly charming.
- Difficulty: High patience required for all the corners.
- Budget Breakdown: Long micro strand: $25 | Shadow tape: $10.
- Creator’s Tip: Use a flat plastic putty knife to gently push the wire into the crevice where the glass meets the wood.
- Smart Sourcing: extra-long micro copper wire LED string, ultra-thin transparent double-sided shadow tape.
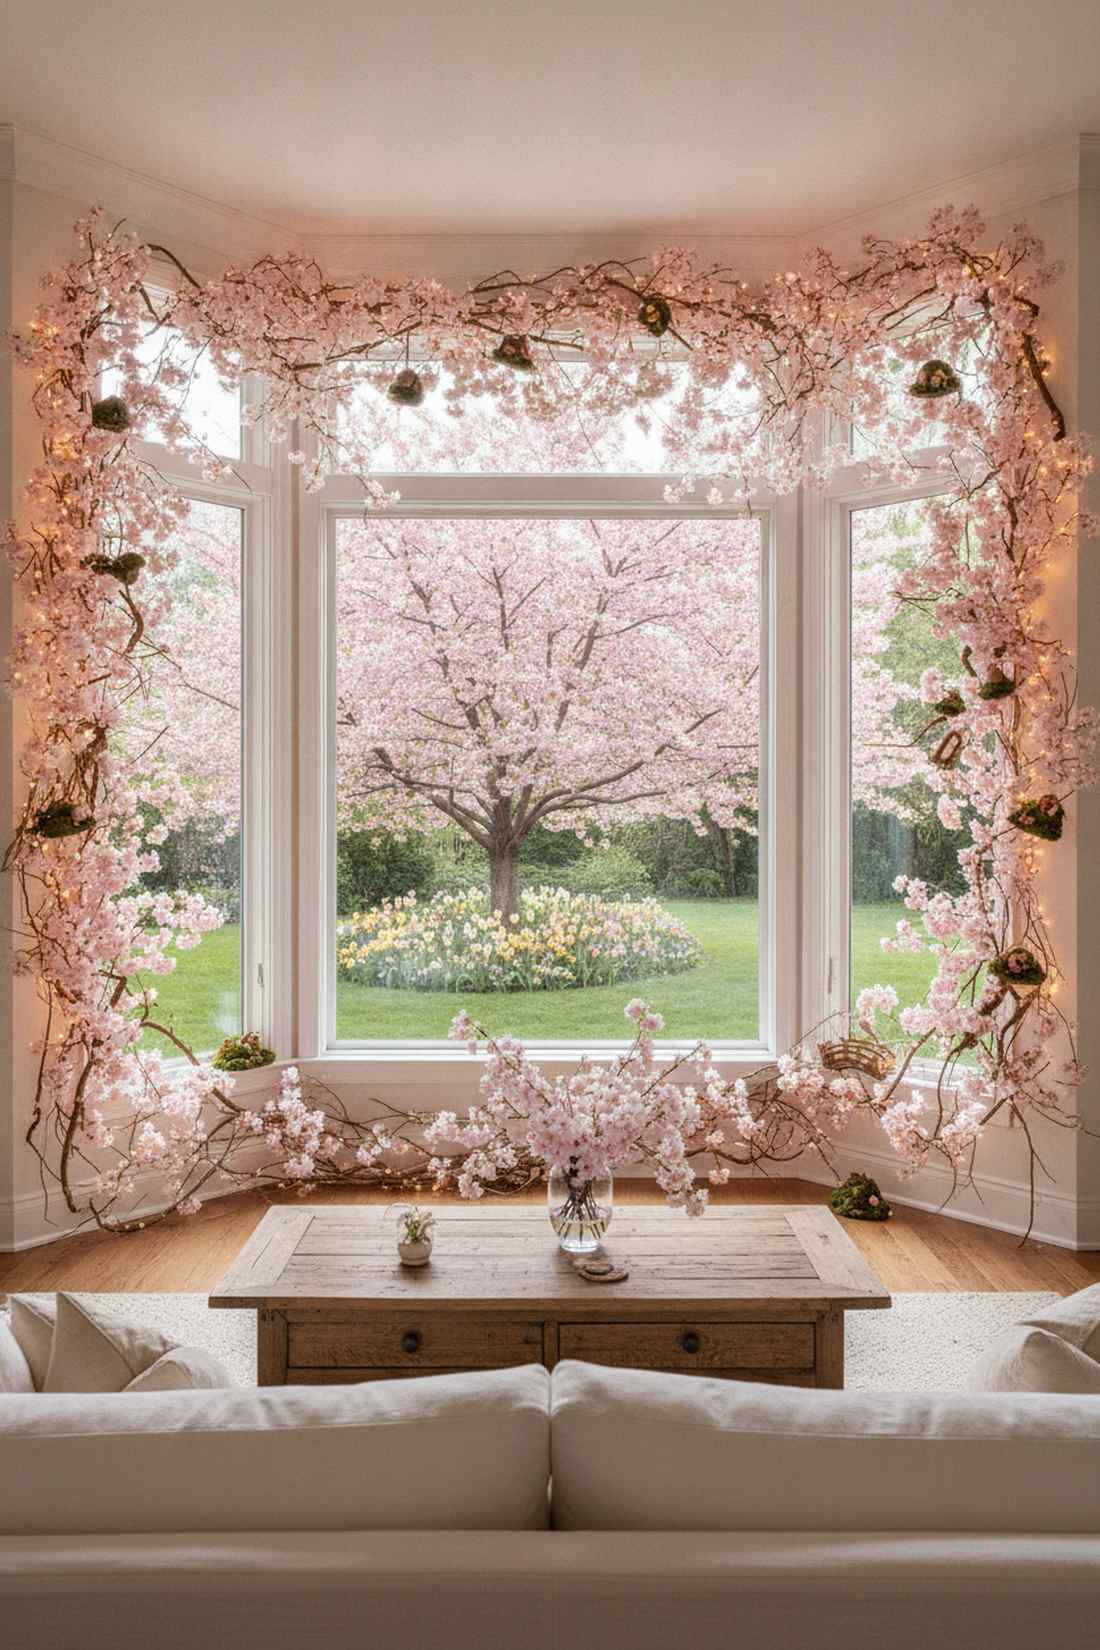
24. Bay Window Panorama
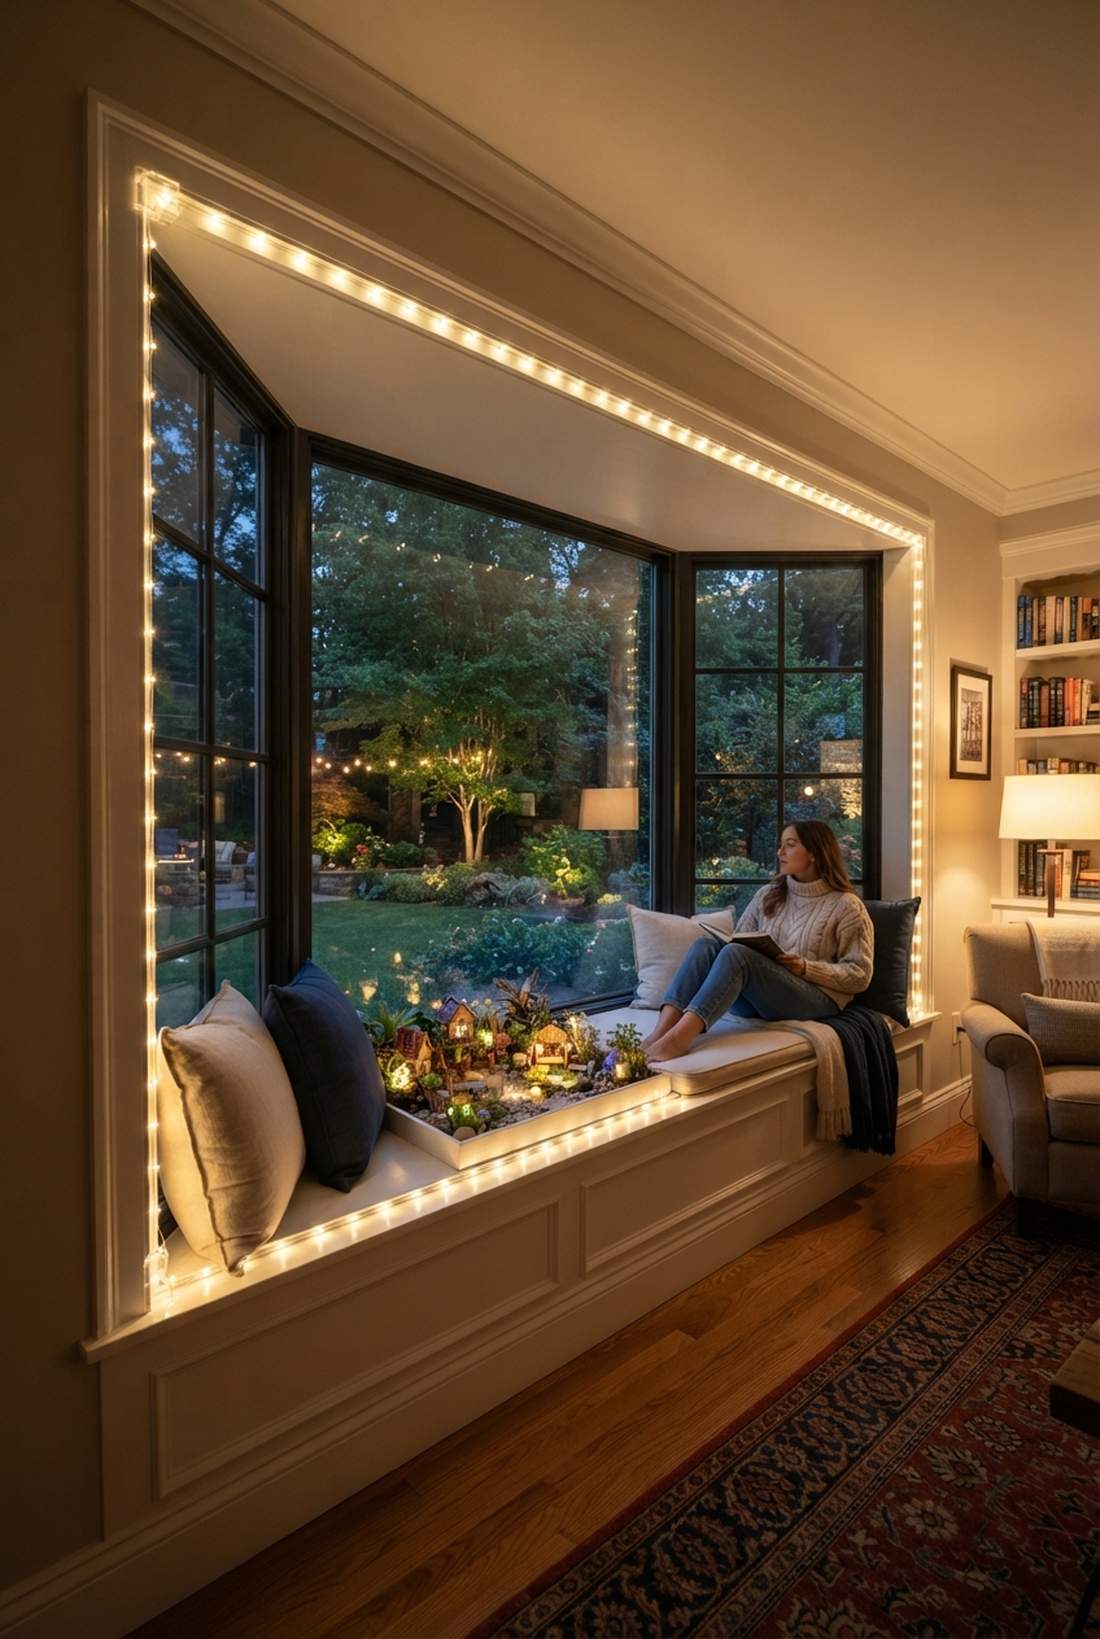

Creates a brilliantly lit stage that pulls you directly into the outdoor scenery. The panoramic bay window fairy light frame excels at making projecting seating nooks feel like a cozy, floating lantern.
Amateurs usually mess up the sharp angles, but locking down precise mitered corners with rigid clips delivers a surprisingly premium look that respects the geometry. If you set up luxury fairy garden kits on the bay window sill, the surrounding lights turn it into a magical miniature display case.
You can wrap a large bay window perfectly for around $30–$50. It’s an essential upgrade to make your reading nook irresistible at night.
- Key Materials: Long-run string lights and rigid 90-degree corner brackets.
- Vibe / Style: Theatrical, expansive, and deeply cozy.
- Difficulty: Moderate, corner management is key.
- Budget Breakdown: Long string: $30 | Corner brackets: $10.
- Creator’s Tip: Never bend the actual LED bulb around a sharp corner; make sure only the flexible wire takes the bend.
- Smart Sourcing: 100ft continuous fairy string lights, transparent 90-degree wire routing corner clips (bulk pack).
25. Picture Window Simplicity
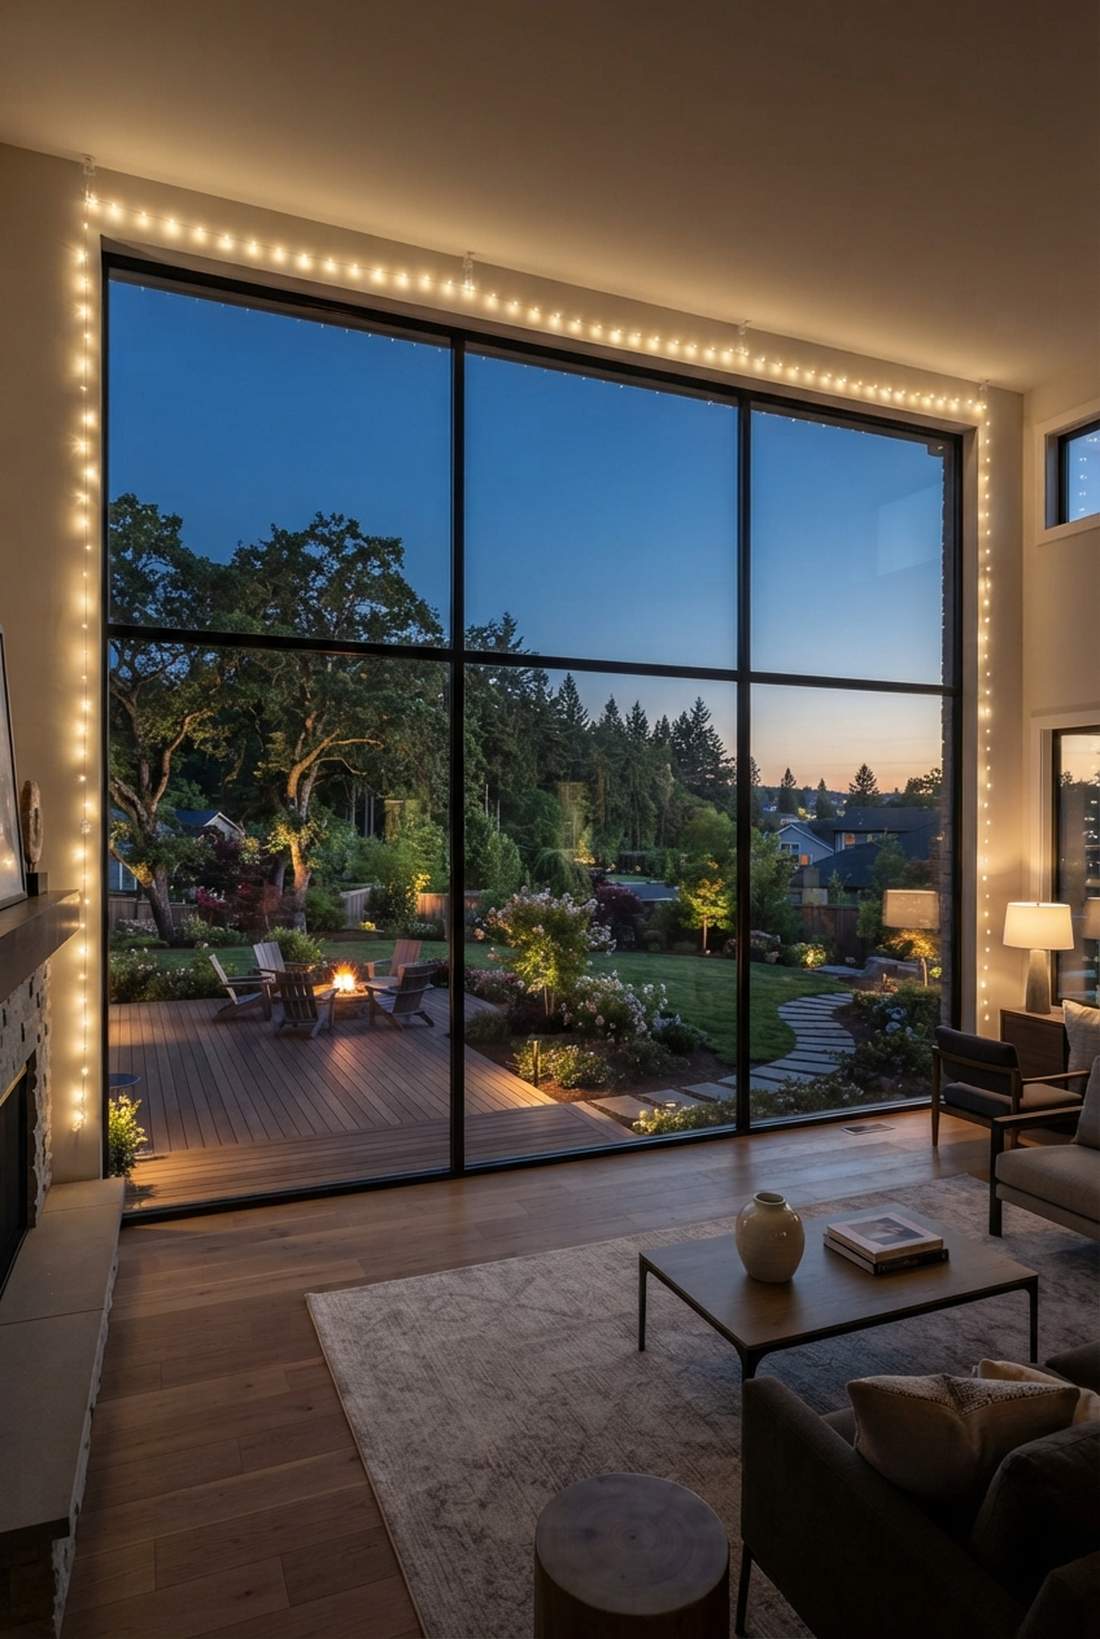
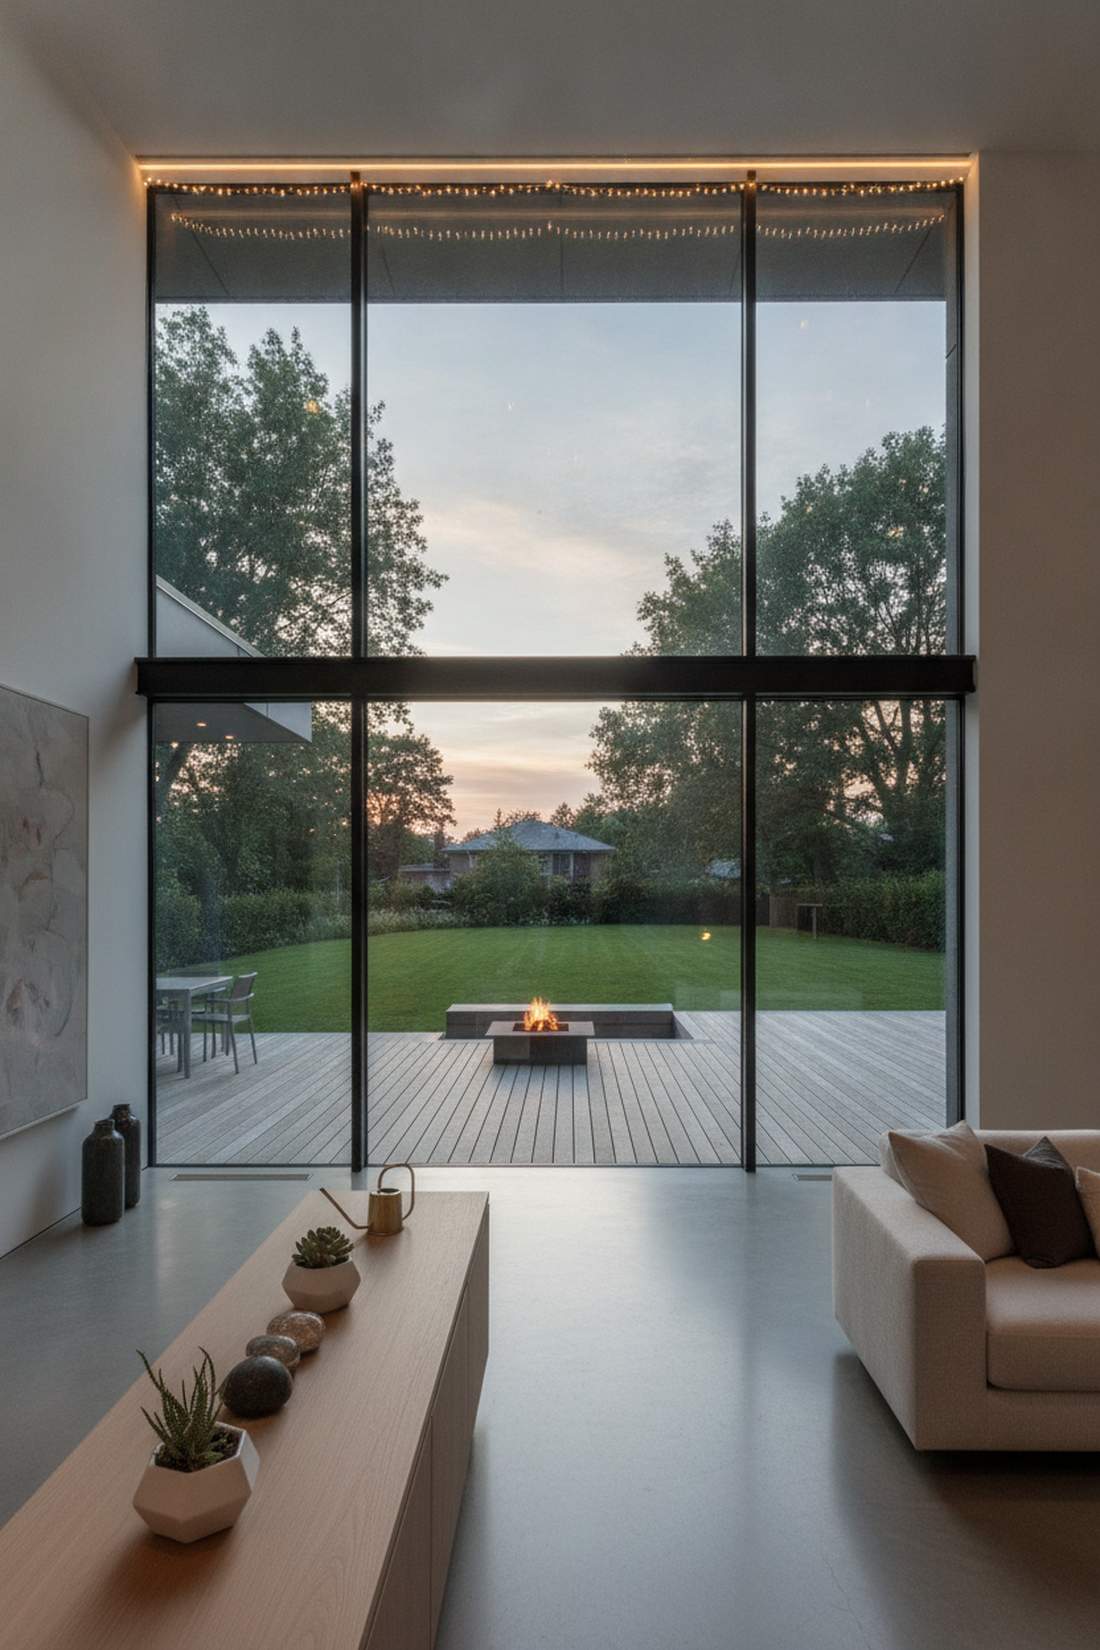
Maintains the breathtaking scale of a massive glass expanse without adding unnecessary visual clutter. Minimalist picture window fairy light framing is the holy grail for modern homes with million-dollar backyard views.
Over-decorating massive glass is a rookie mistake, but running a single, razor-straight glowing line just below the ceiling looks far more expensive than it is. Using high-grade miniature garden supplies softly lit in the foreground grounds the massive view without stealing the spotlight.
This ultra-clean execution will cost about $15–$25. Pin this if you have massive windows and hate cluttered decor.
- Key Materials: Single bright LED strand and a laser level for perfect straightness.
- Vibe / Style: Grand, understated, and highly architectural.
- Difficulty: Easy, as long as it’s perfectly level.
- Budget Breakdown: Bright LED strand: $20 | Command clips: $5.
- Creator’s Tip: Suspend the wire 6 inches away from the actual glass to prevent harsh glare bouncing back into the living room.
- Smart Sourcing: high-lumens architectural LED fairy string, damage-free clear command hooks (starter kit).
This final trick is the ultimate bridge between indoor comfort and outdoor magic—don’t skip this one.
26. French Door Garden Portal
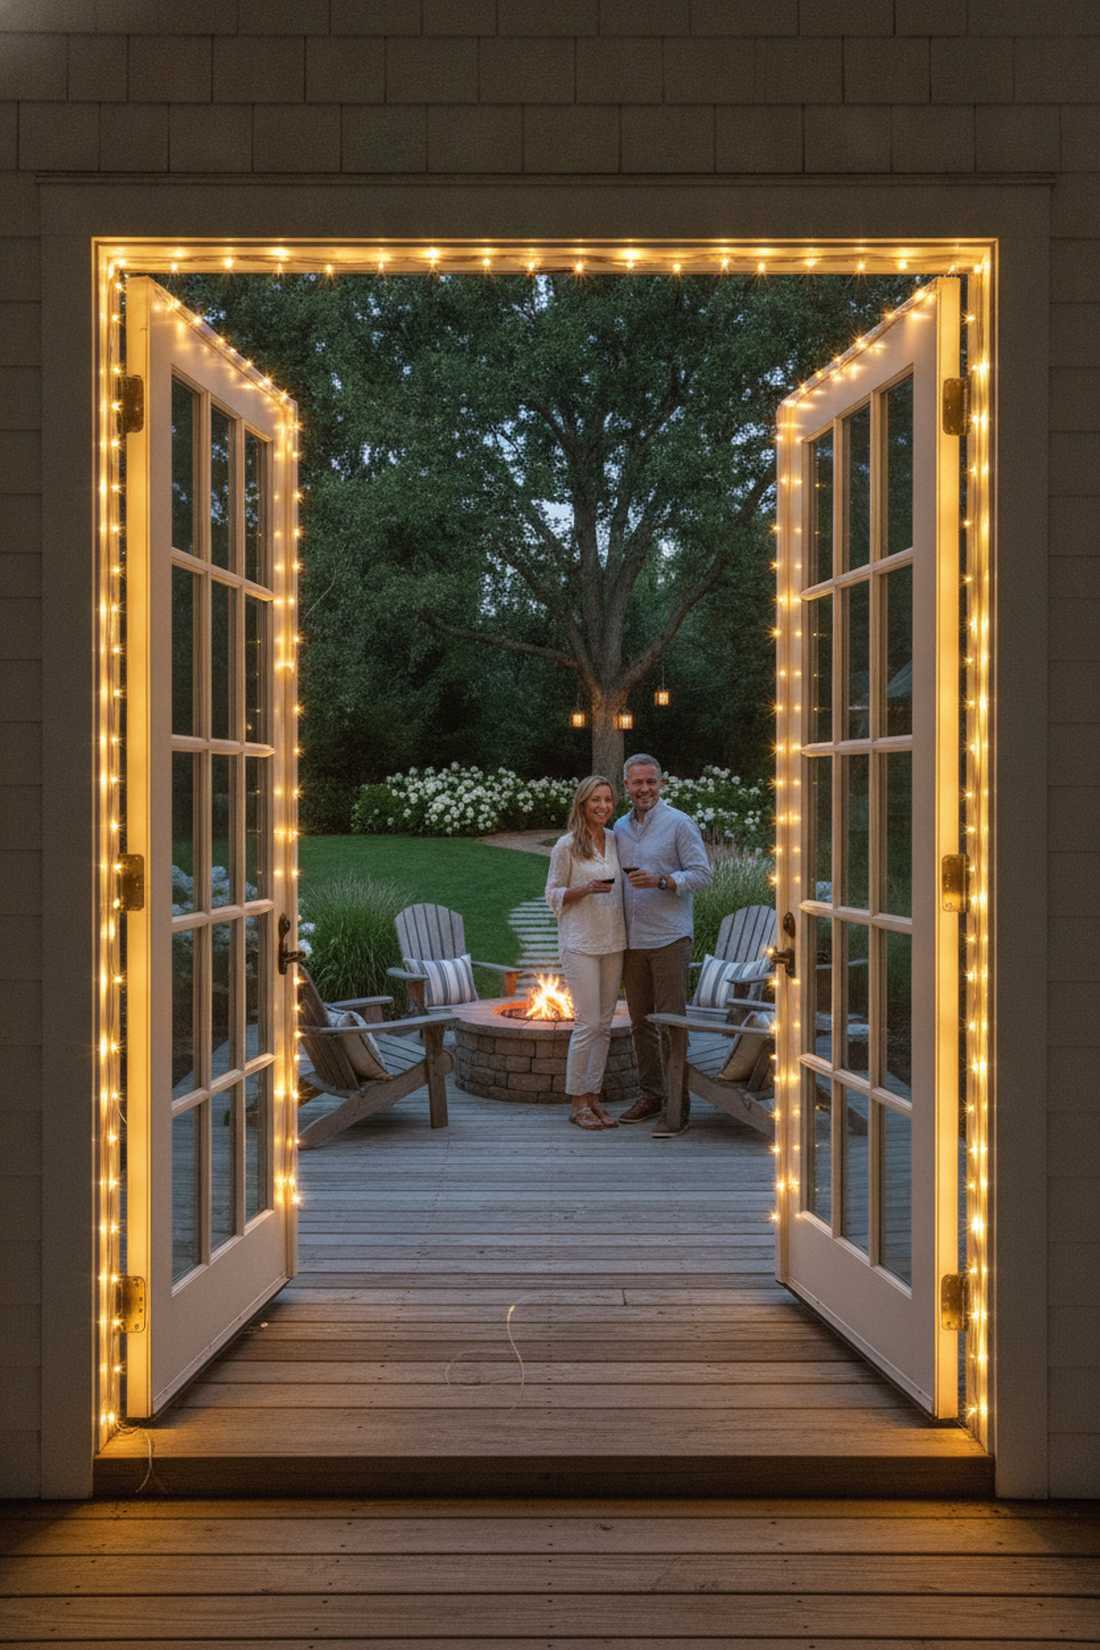
Transforms a standard exit into an enchanting gateway to your nighttime sanctuary. Illuminated French door fairy lighting practically begs guests to step out onto your patio with a glass of wine.
Most people forget their doors, but framing the moving panels completely transforms the space and gives a designer-level finish to your threshold. Securing the wires tightly with transparent routing clips ensures the magic portal survives constant opening and closing without snapping.
You can build this glowing threshold for $25–$40. It completely redefines how your home flows into your garden.
- Key Materials: Durable flex-wire LEDs and heavy-duty pivot-safe clips.
- Vibe / Style: Welcoming, romantic, and highly interactive.
- Difficulty: Moderate, requires slack for door hinges.
- Budget Breakdown: Durable LED string: $25 | Hinge clips: $10.
- Creator’s Tip: Always leave a small “S” curve of slack wire near the hinges so the door can open fully without ripping the lights down.
- Smart Sourcing: reinforced durable copper fairy string lights, high-adhesion flex-routing wire clips.
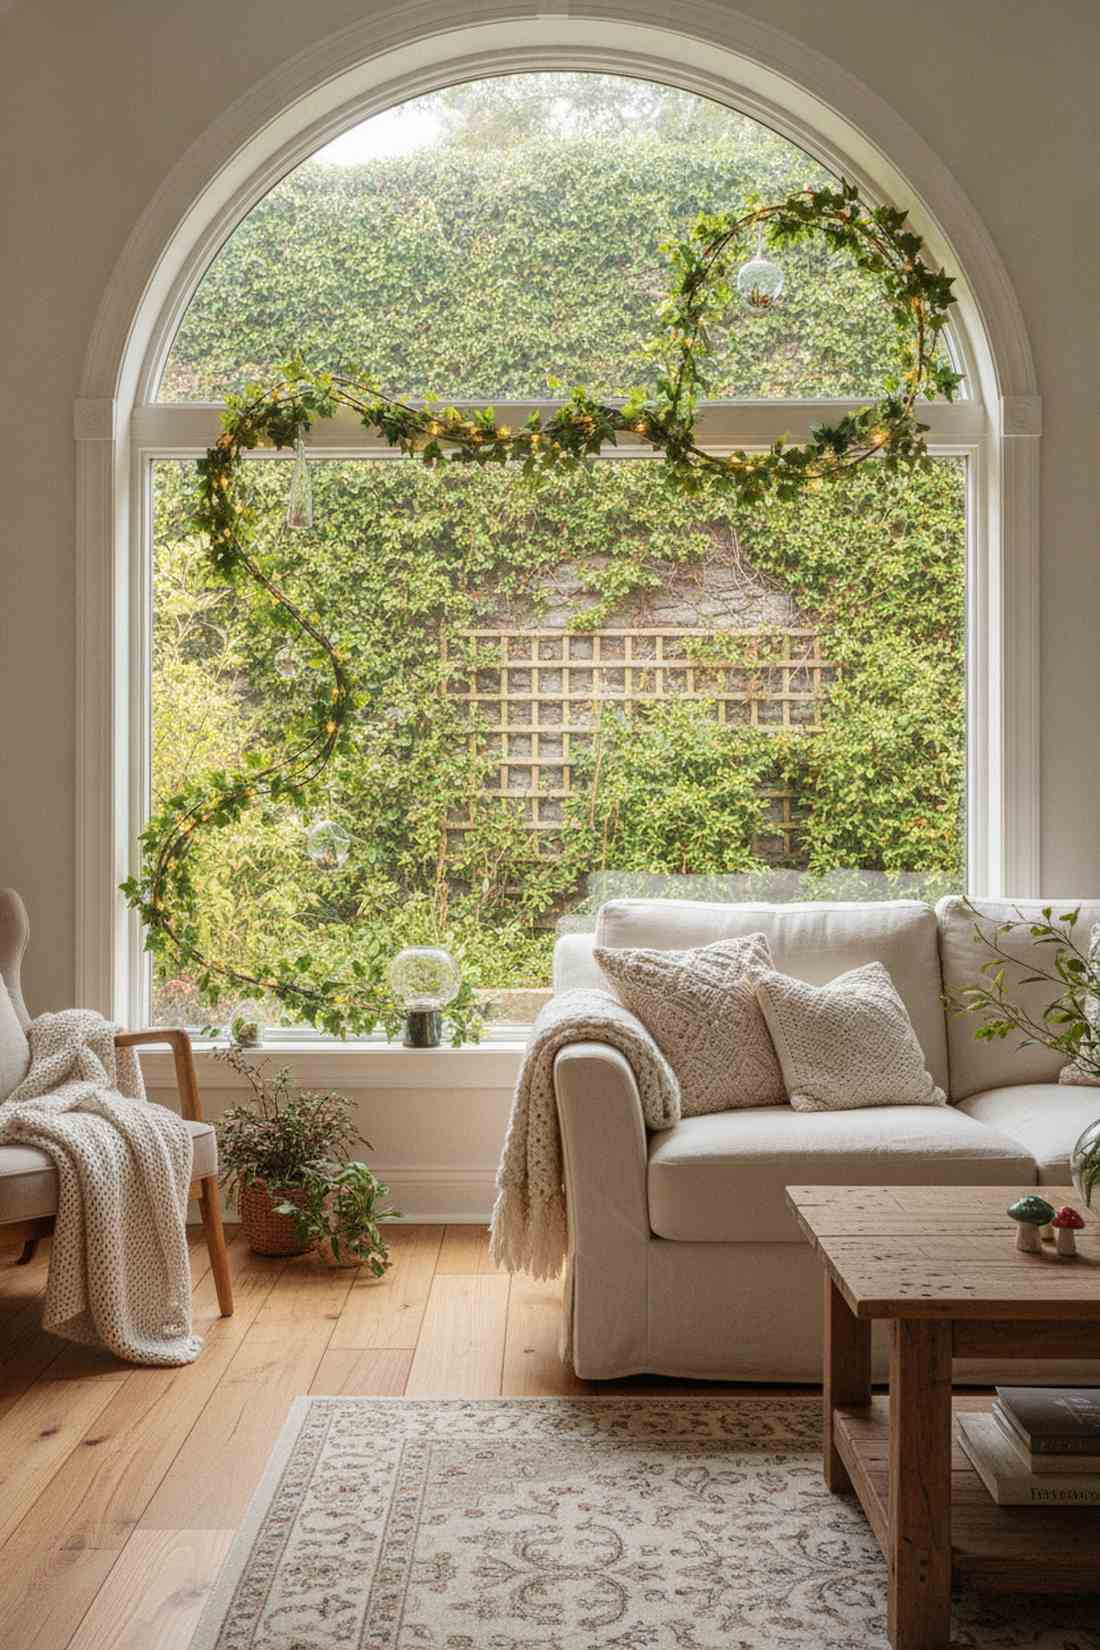
27. Arched Window Elegance
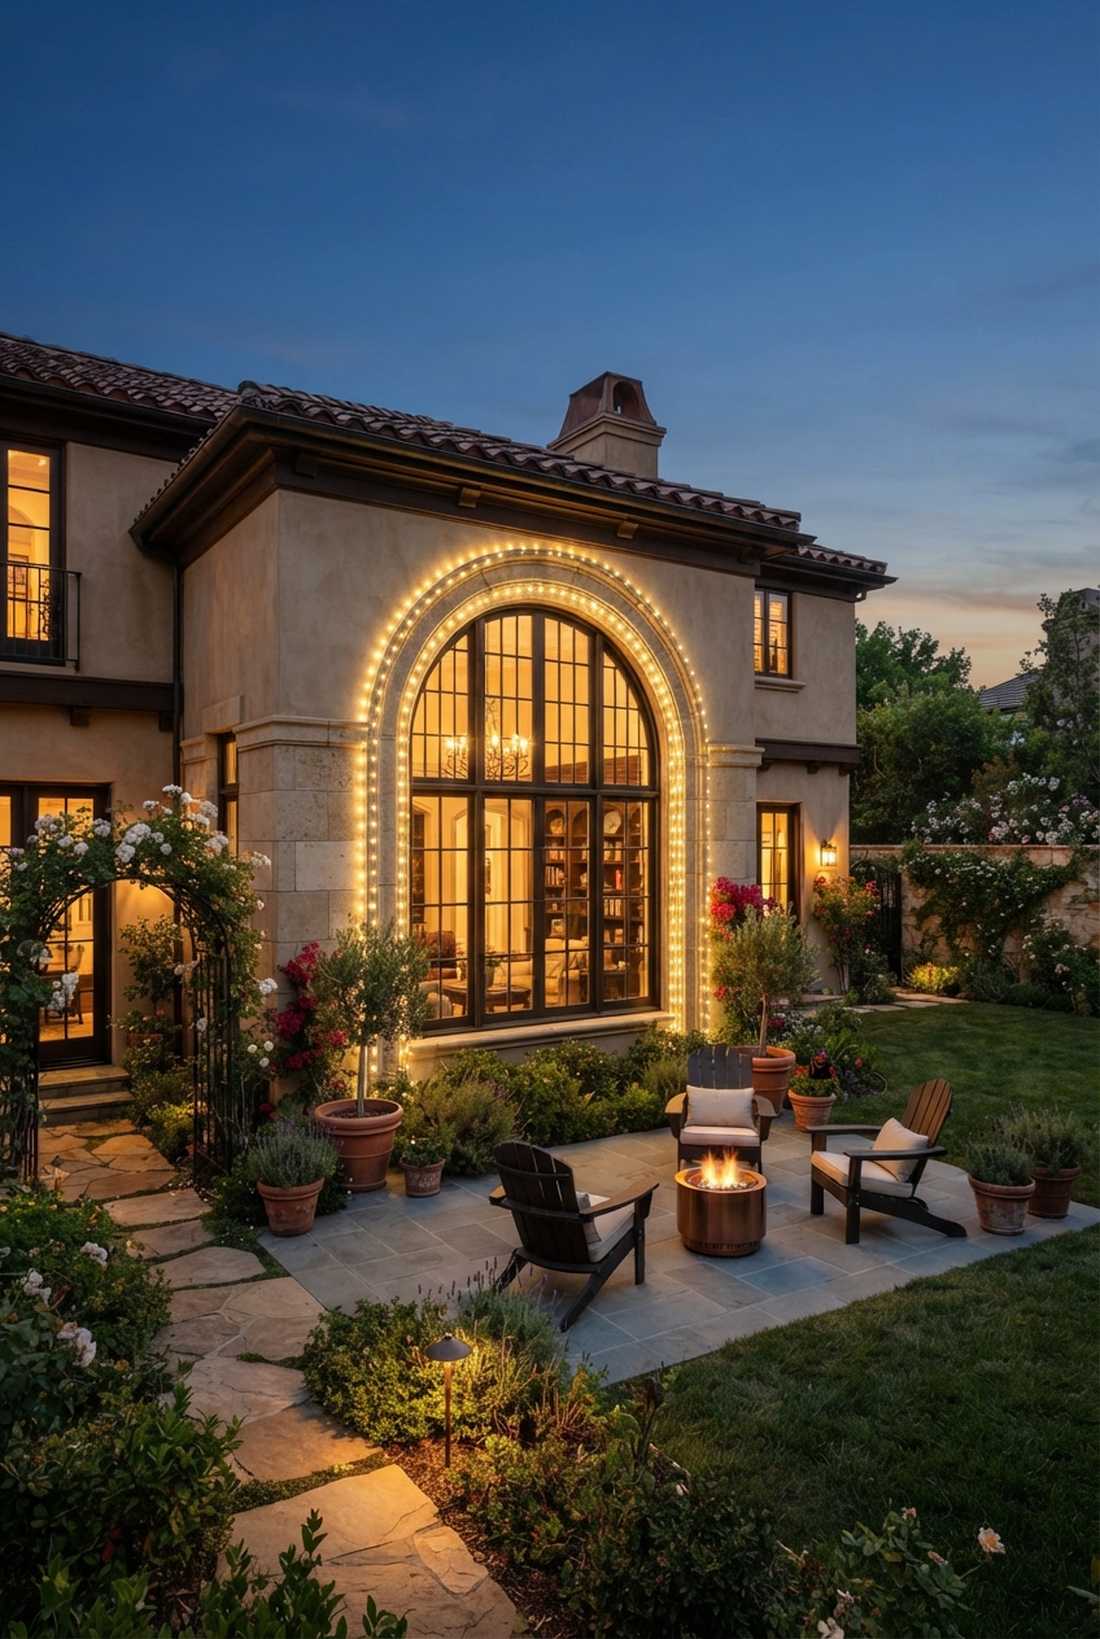
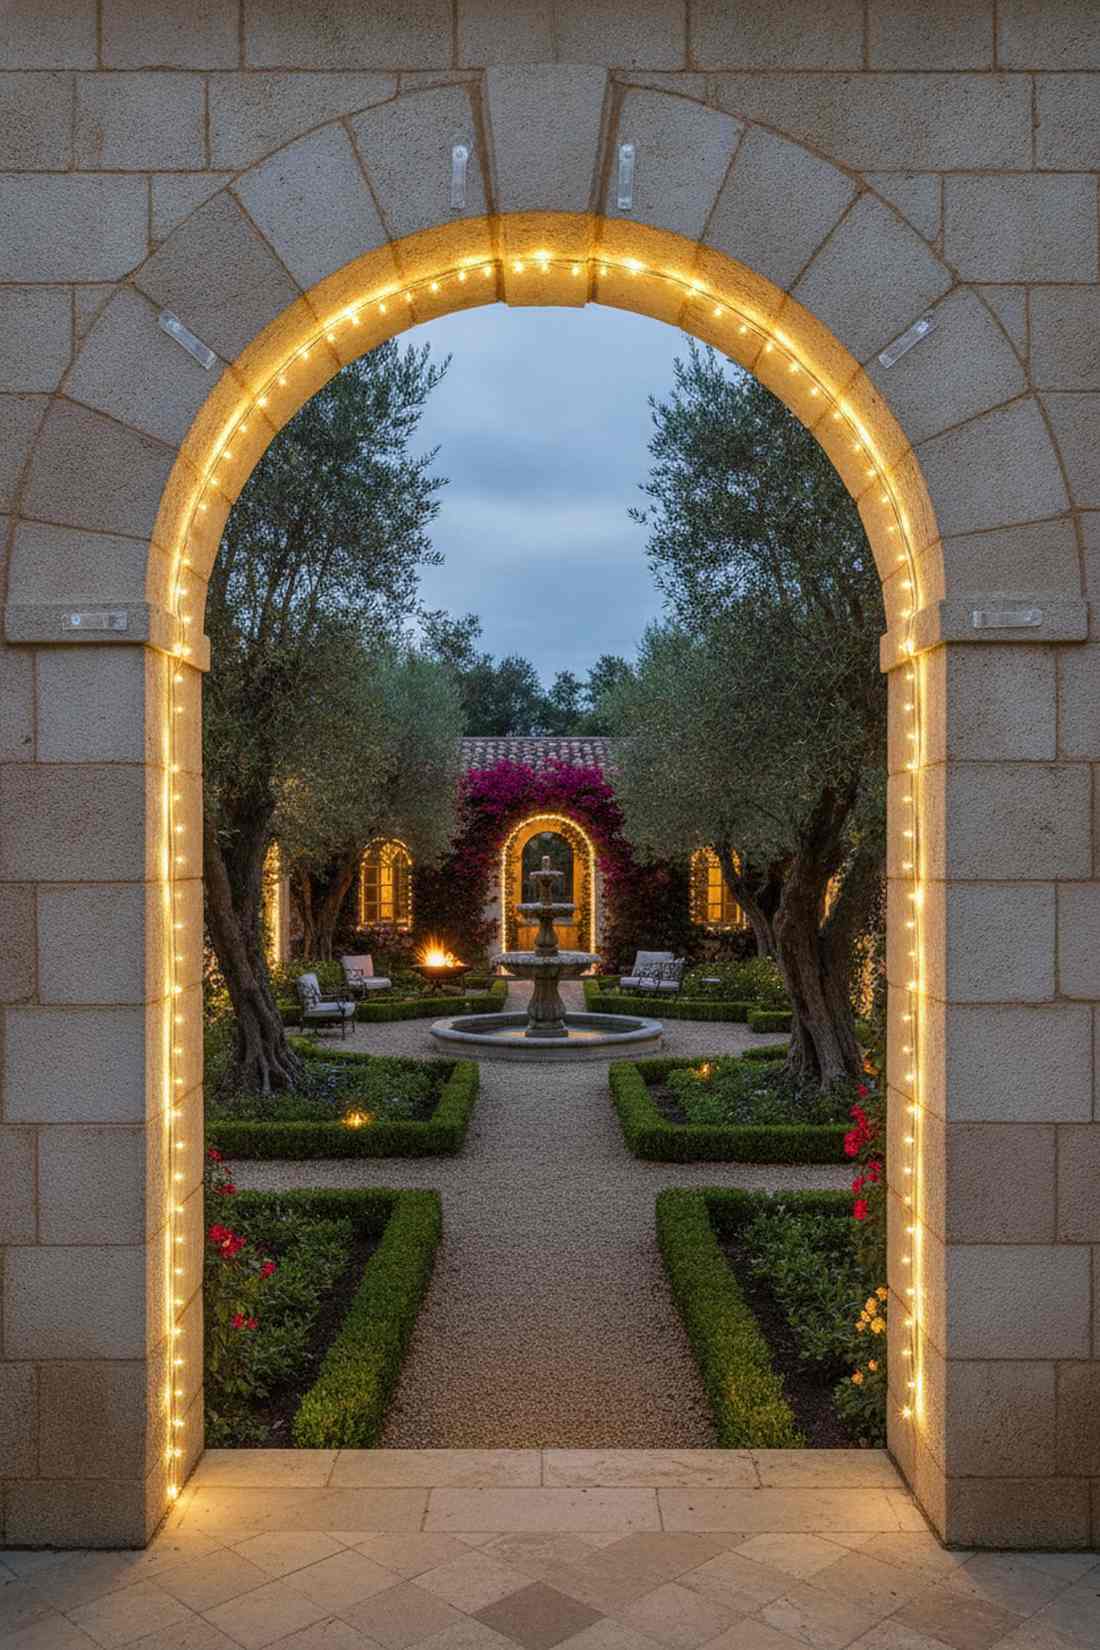
Highlights the absolute best architectural feature in your home with a sweep of soft light. Curved arched fairy lights window tracing is magnificent for framing classic Mediterranean or Gothic-inspired estate gardens.
Leaving arches in the dark is a missed opportunity, but pinning lights perfectly along the curve looks ridiculously upscale and romantic. Integrating UV-resistant outdoor fairy lights on the exterior arch perfectly mirrors the inside, creating an unbelievable tunnel of light effect.
Nailing this elegant archway costs around $20–$35. Save this to your dream home architecture board immediately!
- Key Materials: Highly flexible micro-LEDs and closely spaced adhesive anchors.
- Vibe / Style: Elegant, historic, and incredibly sophisticated.
- Difficulty: Requires meticulous spacing around the curve.
- Budget Breakdown: Flexible LEDs: $20 | Curve anchors: $10.
- Creator’s Tip: Place your adhesive clips exactly 2 inches apart along the top of the curve to prevent any ugly flat spots in the wire.
- Smart Sourcing: ultra-flexible micro fairy string lights, clear curved-surface adhesive wire anchors (bulk pack).
Illuminating the Garden-Window Connection
Executing these 27 strategic fairy lights on window layouts instantly transforms boring glass barriers into high-end, dynamic design centerpieces. By utilizing smart sourcing—like grabbing pre-cut UV-resistant wires or premium starter kits—you achieve a ridiculously expensive aesthetic for a fraction of a designer’s fee. Whether you stick to a simple minimalist line or build an intricate organic vine pattern, mastering these techniques blurs the line between your cozy living room and your sprawling outdoor sanctuary. Start with a fast perimeter outline today, and watch your nighttime garden views come vividly to life.
Frequently Asked Questions
What type of fairy lights work best for window displays framing garden views?
To get a premium aesthetic without spending a fortune, UV-resistant outdoor fairy lights and ultra-thin copper wire starter kits are your best bet. You want high-density LED strands (at least 100 lights per spool) that remain invisible during the day but pop beautifully against your miniature garden supplies at night. Warm white LEDs (2700K) are universally flattering, but always opt for bulk-pack plug-in kits if you want to avoid burning through batteries every weekend.
How do I attach fairy lights to windows without damaging frames or glass?
Ditch the cheap tape and invest in pre-cut transparent 3M adhesive window clips or high-end acrylic suction mounts. These damage-free starter kits lock your fairy lights window layouts in place without leaving nasty sticky residue on your expensive trim. For renters, using a heavy-duty tension rod across the frame is a brilliant hack to hang cascading curtain lights without making a single hole.
Can I leave fairy lights on windows year-round or should I change them seasonally?
You can absolutely leave them up permanently if you invest in a weatherproof smart LED light string kit right from the start. However, swapping out basic bulbs for programmable RGB terrarium accessories allows you to seamlessly shift from cozy fall ambers to crisp winter whites with an app. Grabbing a high-quality UV-coated base kit means the wire won’t turn yellow or brittle, letting you enjoy your glowing garden frames 365 days a year.
What safety considerations apply to fairy lights near windows and garden views?
Always source UL-certified plug-in string light kits and keep power banks away from areas prone to heavy window condensation. If you are integrating miniature garden supplies or faux botanical vines, ensure your LED nodes run completely cool to the touch to prevent fire hazards. Upgrading to an automated smart plug timer starter kit not only extends the life of your lights but ensures you never accidentally leave them burning overnight.
How do I coordinate window fairy lights with existing garden lighting?
The secret to a million-dollar look is matching the exact color temperatures and syncing your indoor fairy lights window frames with your smart outdoor landscaping light kits. Run your interior window strands at a 30% dimmer setting to create a soft foreground, allowing your heavy-duty exterior uplights to punch through the darkness in the background. Buying a unified app-controlled lighting starter kit ensures your indoor frame and your outdoor fairy garden kits all turn on at the exact same majestic moment at dusk.