Upgrade any outdoor lighting patio setup immediately. Discover designer-level layouts using affordable, commercial-grade components. This blueprint reveals exactly how to layer fixtures perfectly.
Design Snapshot: High-End Principles
- Layered Illumination: Combine overhead ambient light, mid-level task fixtures, and low accent sources.
- Zone Separation: Use brightness levels to delineate dining areas from lounge spaces.
- Height Variation: Install lights at three specific vertical levels to guide eyes through the space.
- Warm Temperature Range: Select 2700-3000K bulbs for social areas to mimic expensive hospitality venues.
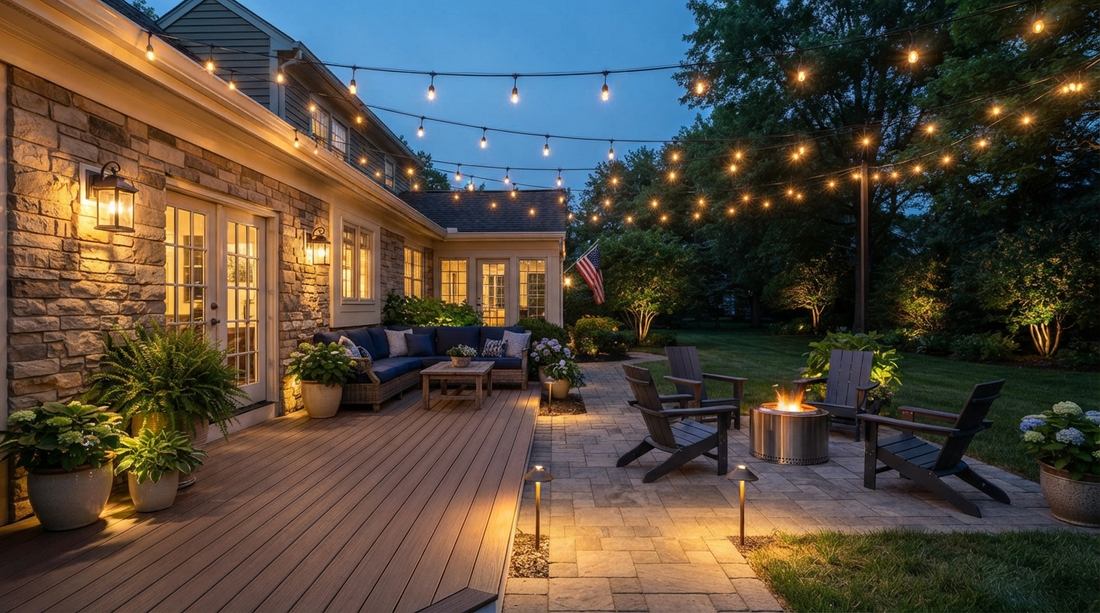
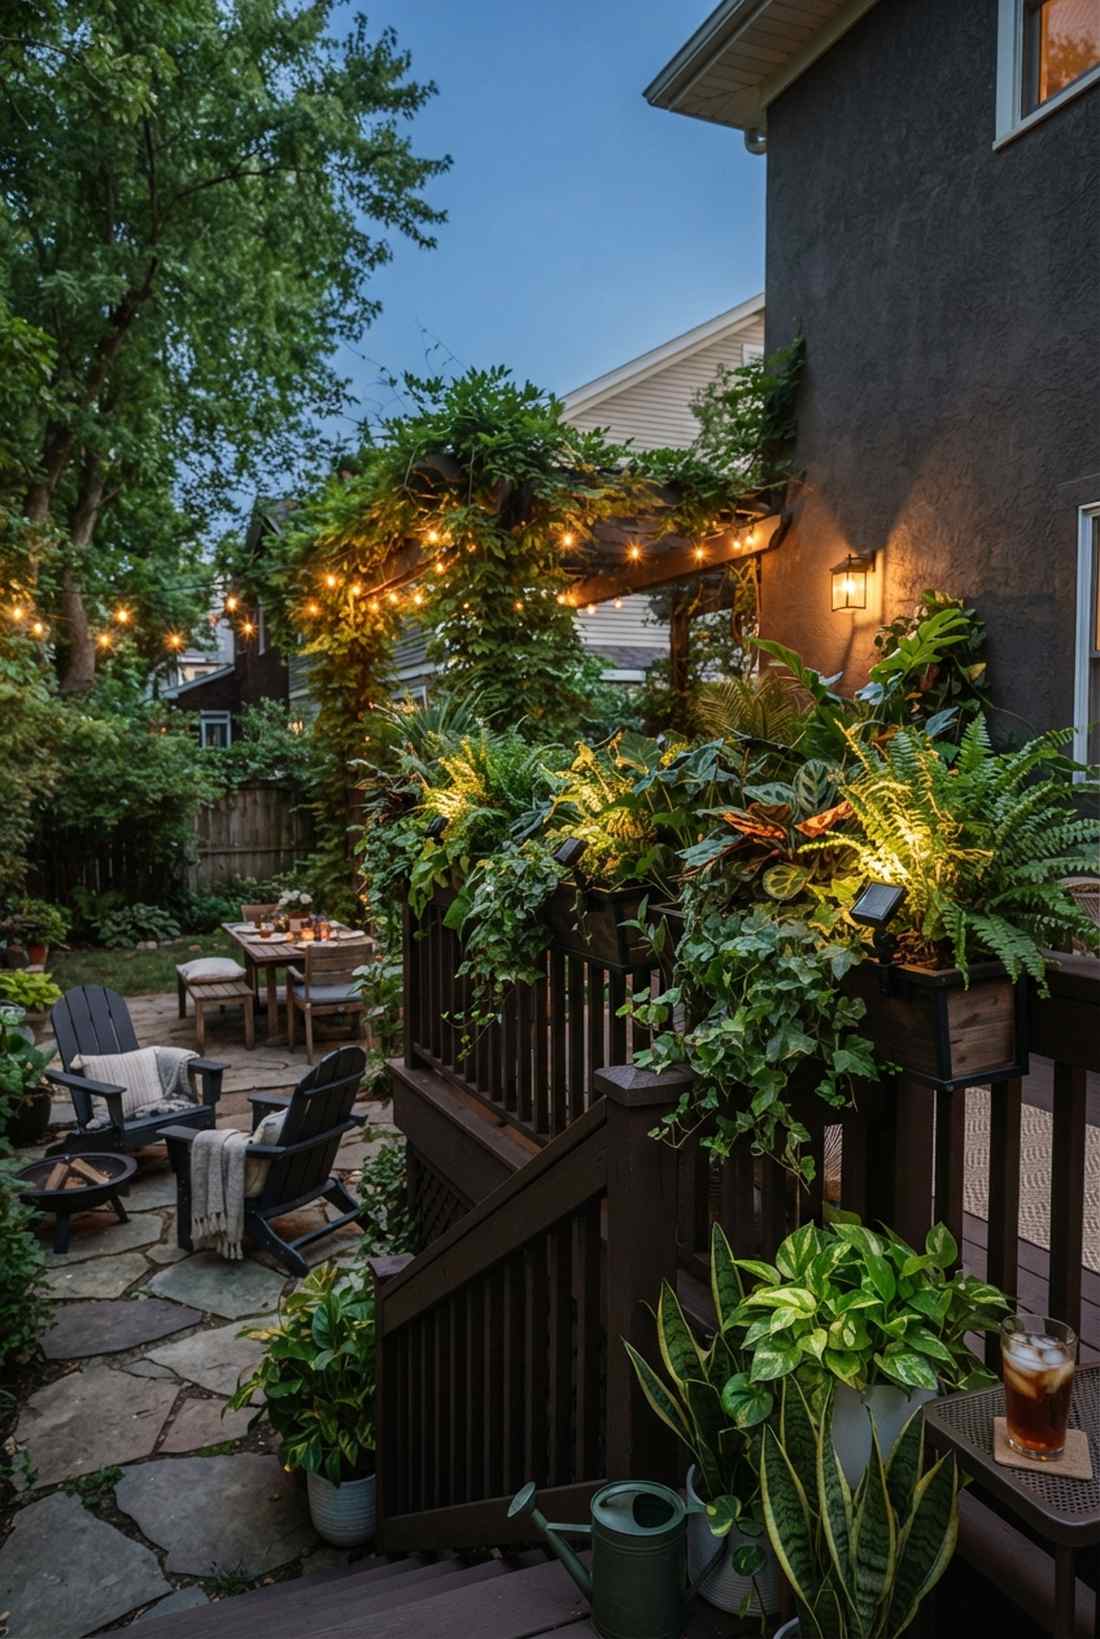
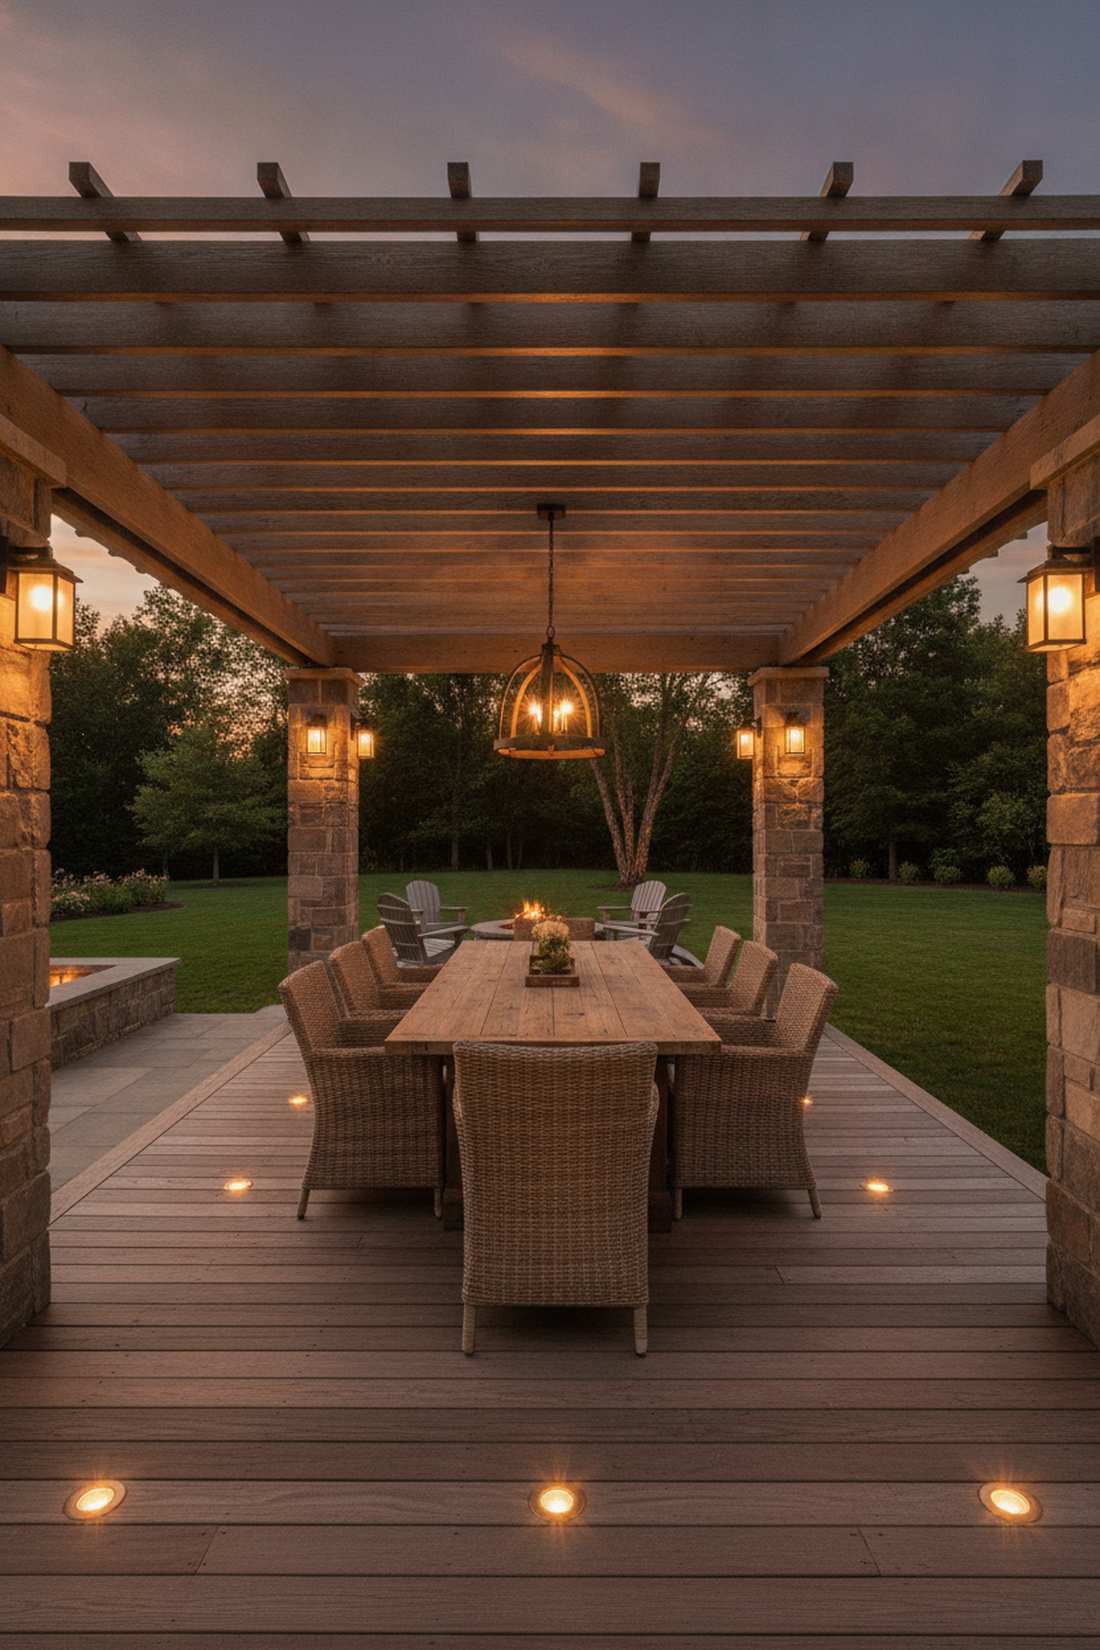
Overhead Canopy Lighting Layouts
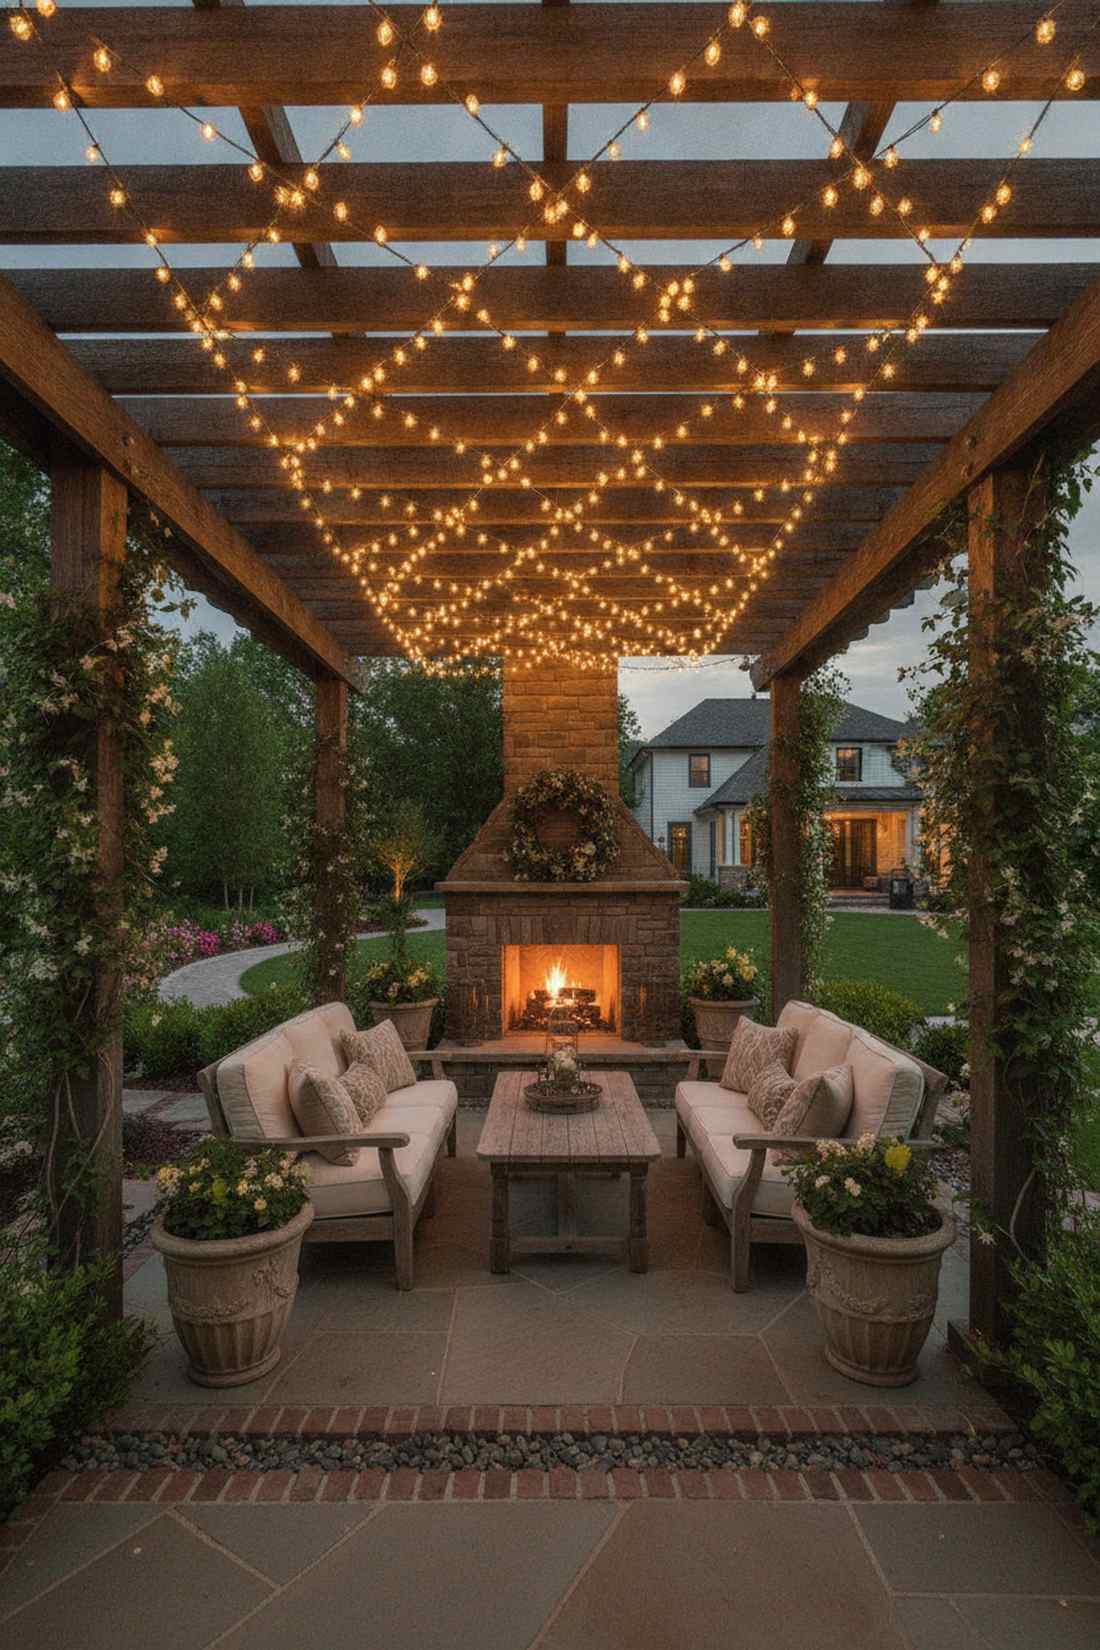
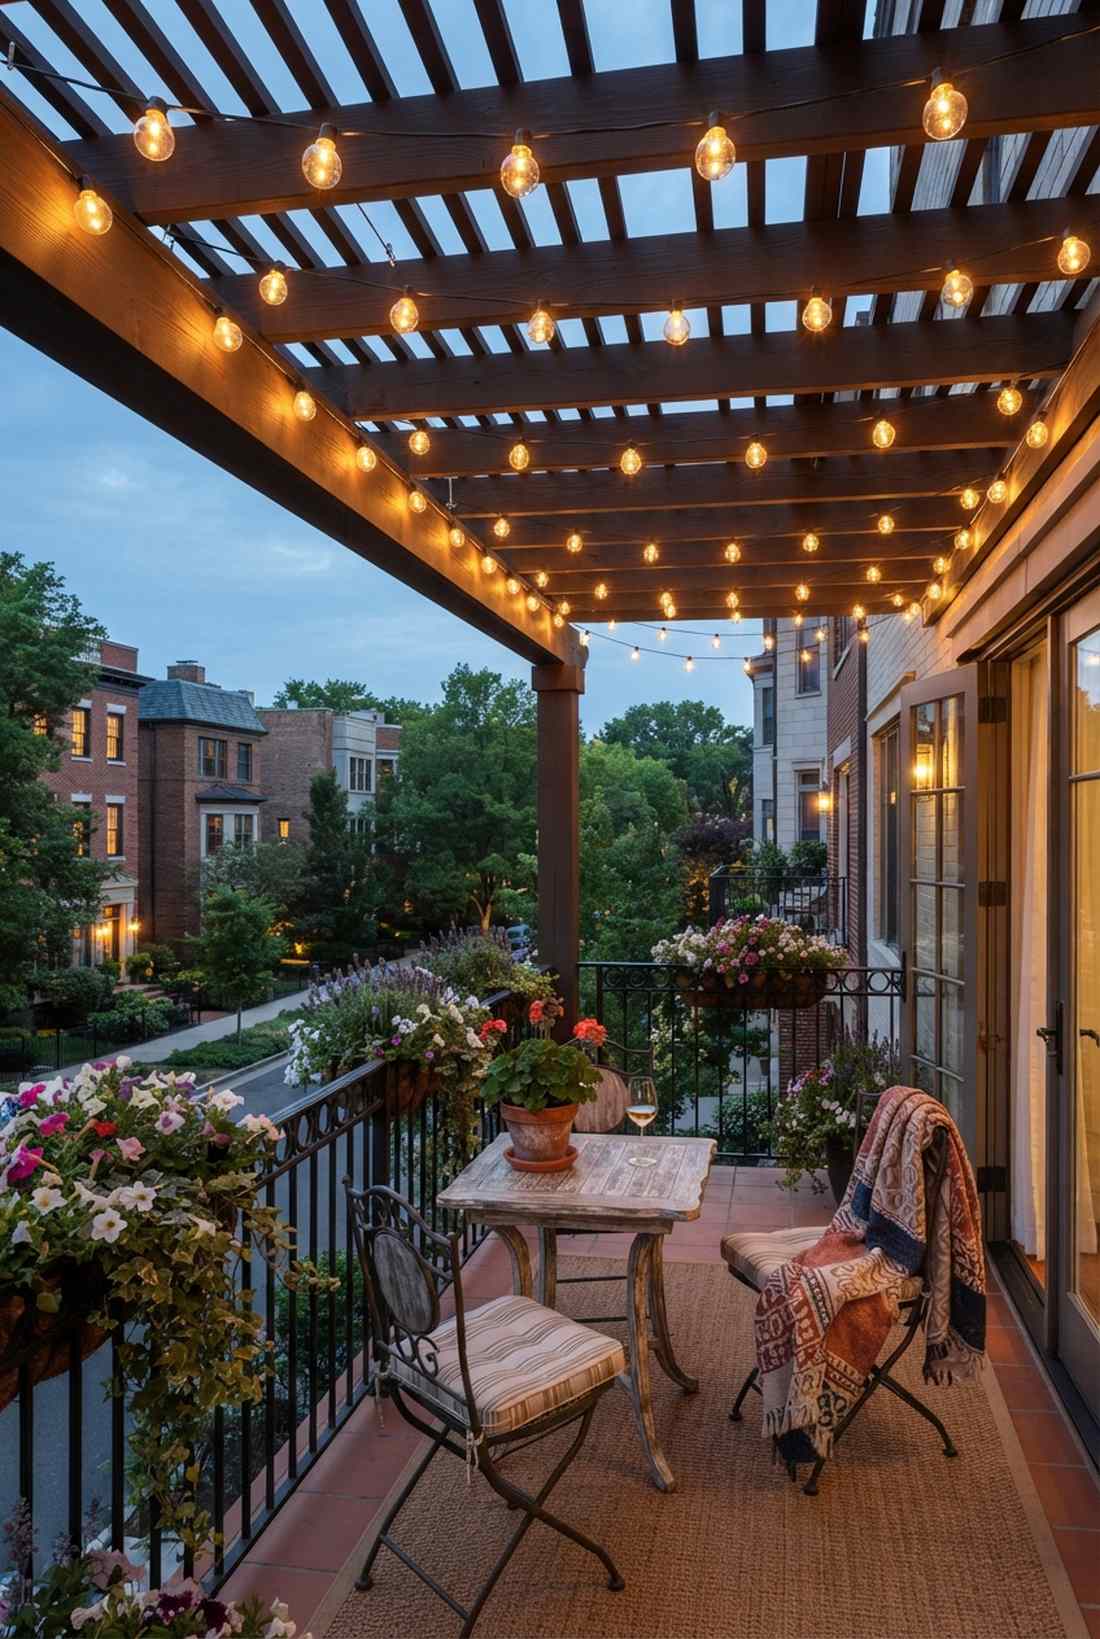
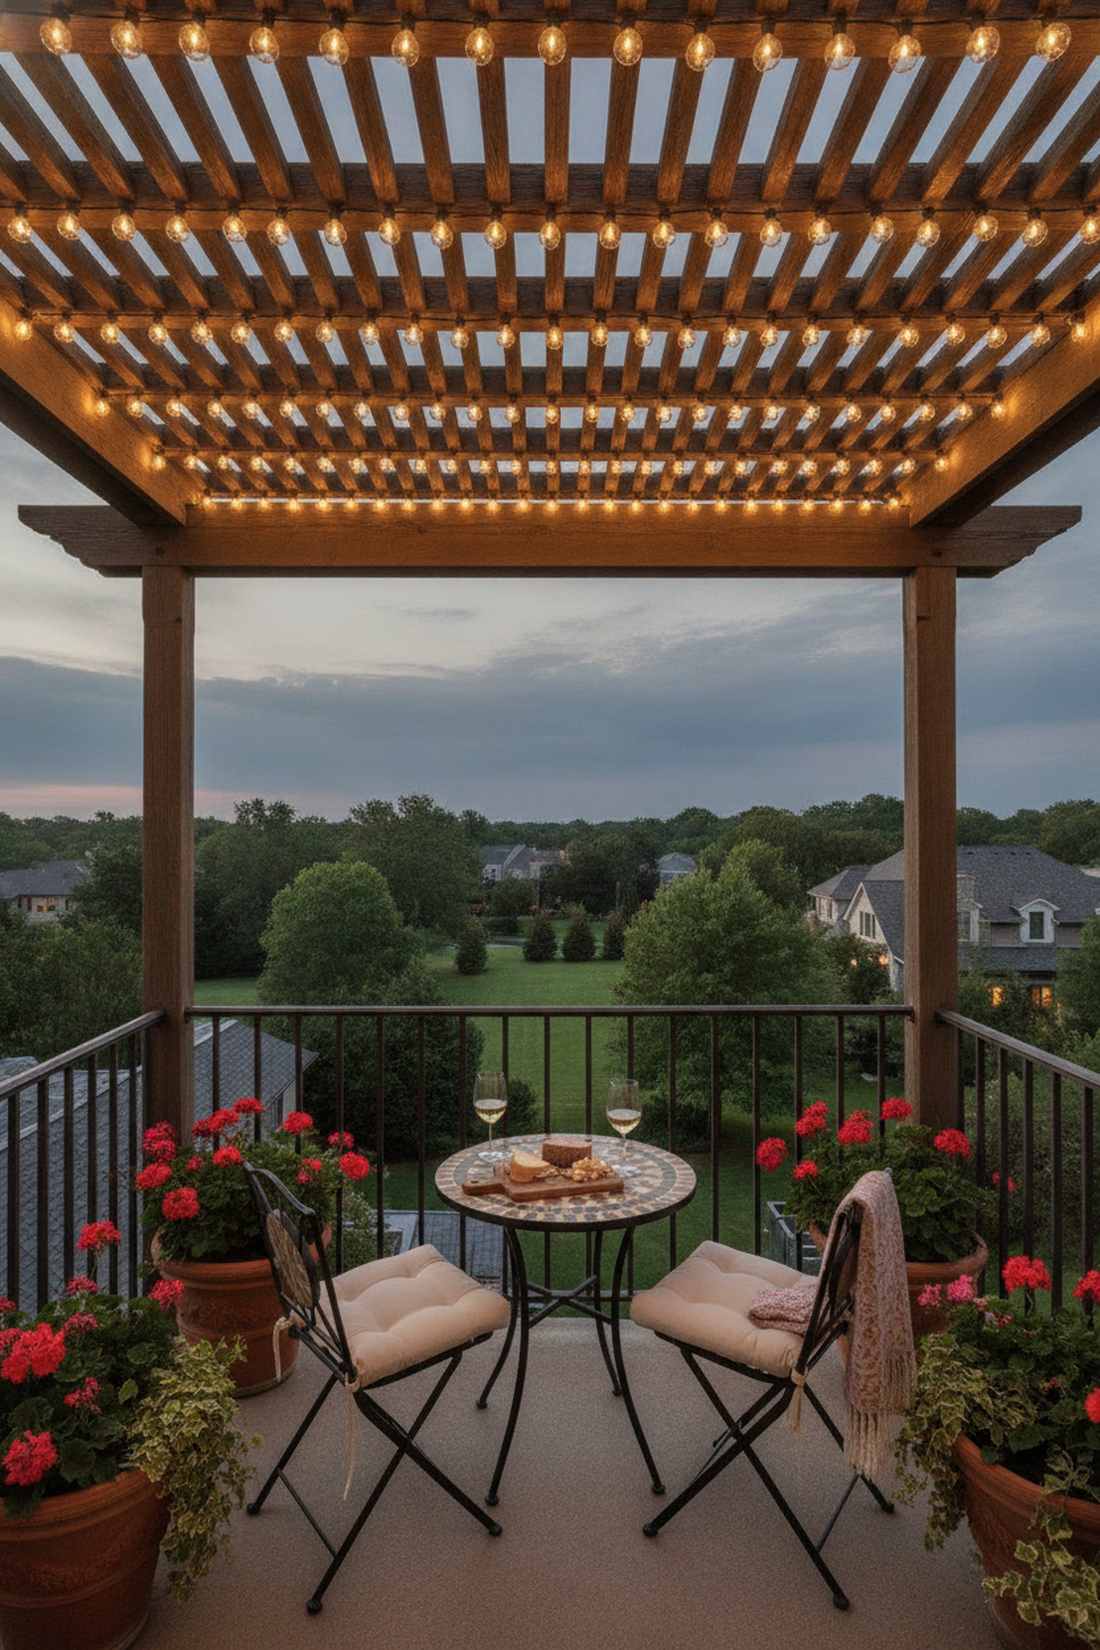
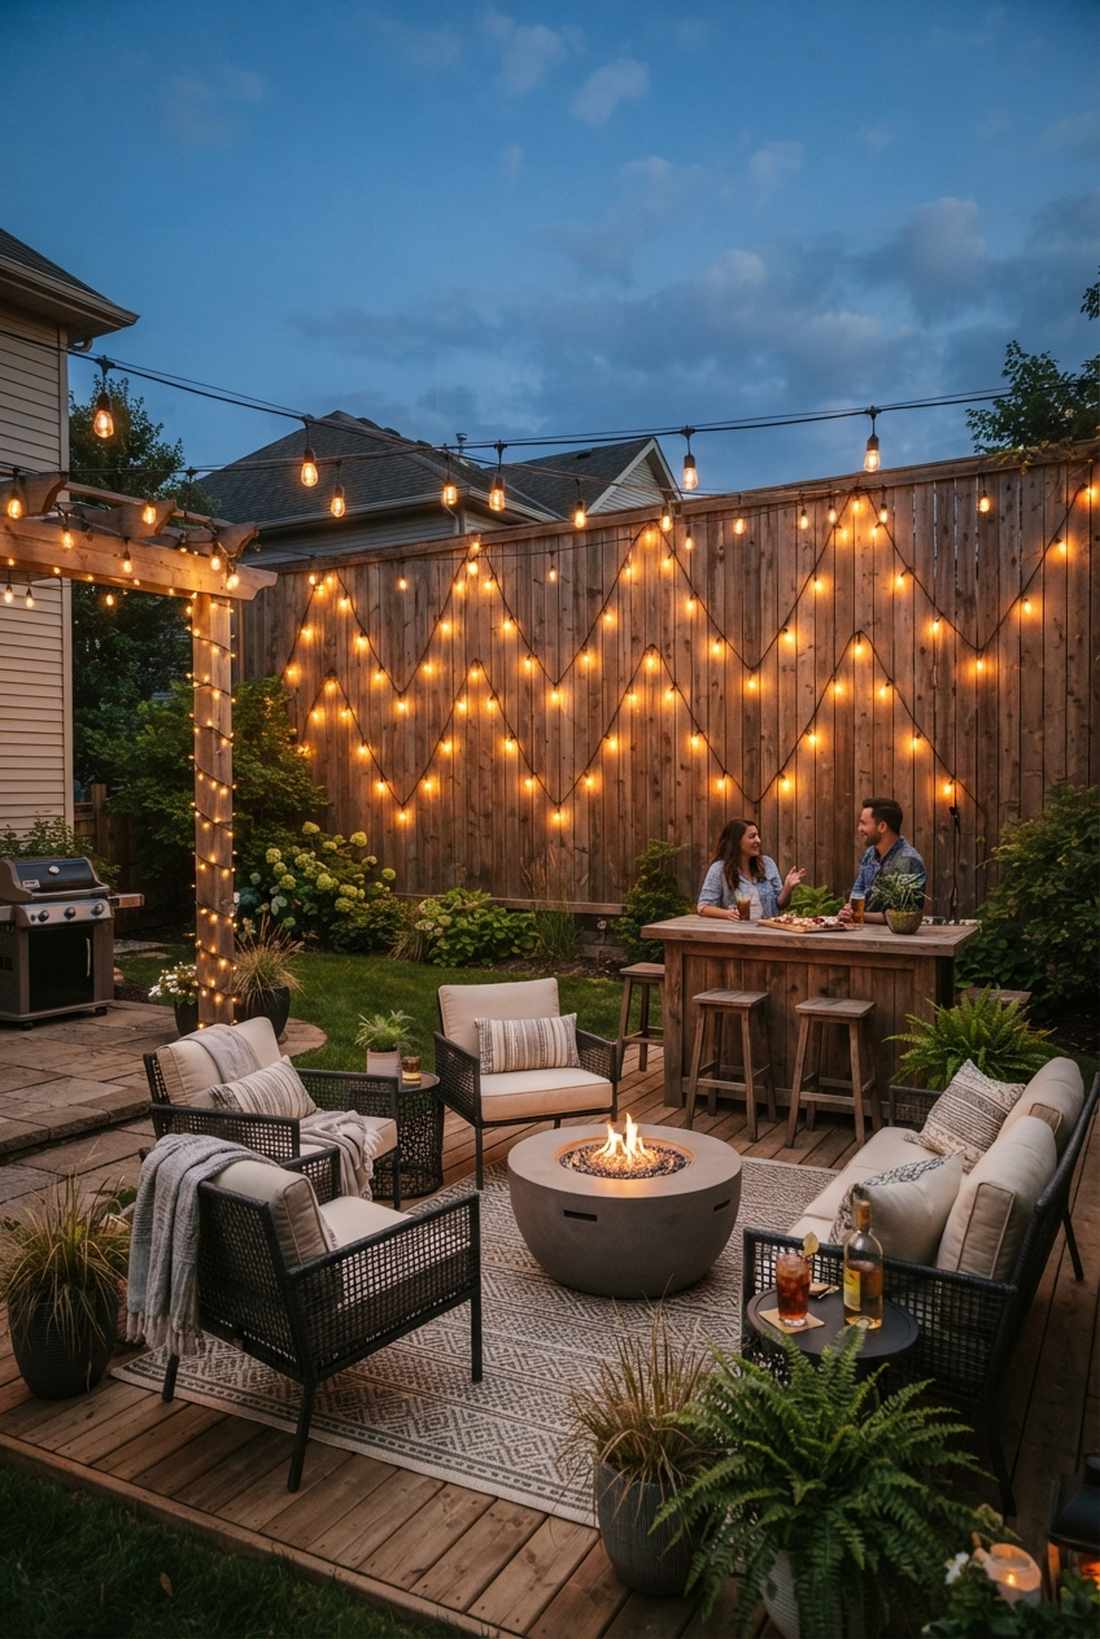
1. Parallel String Light Grid
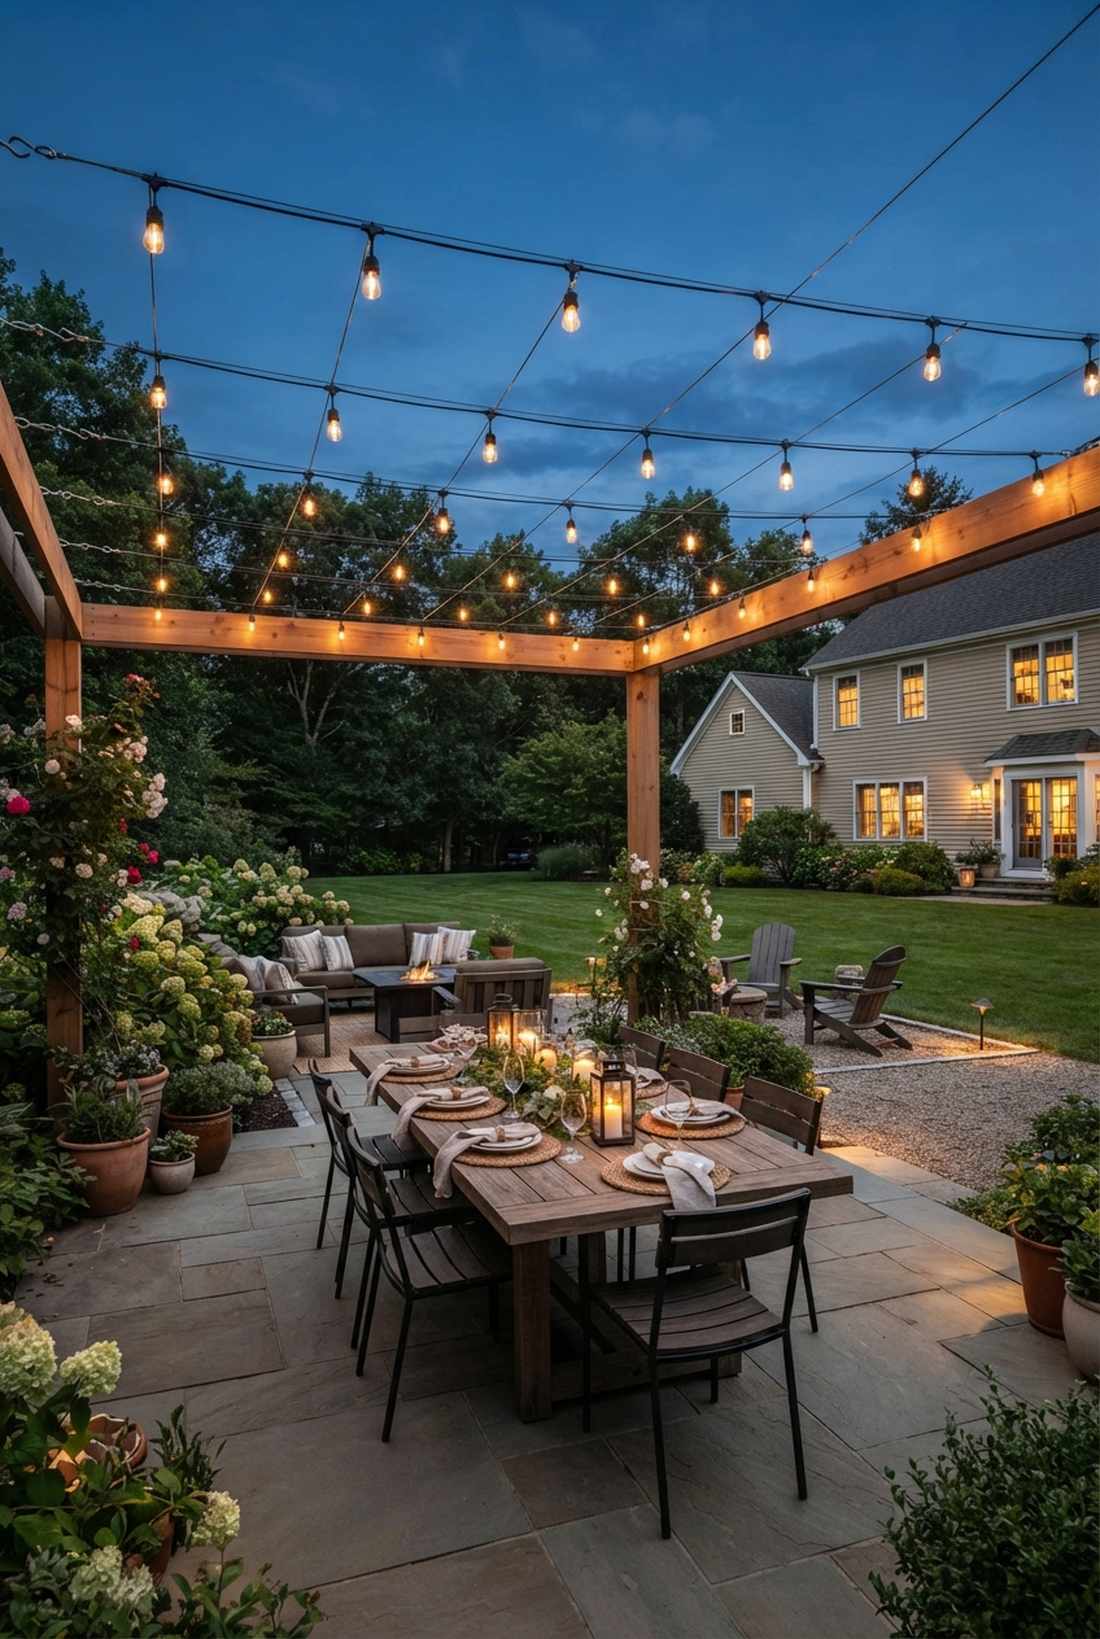
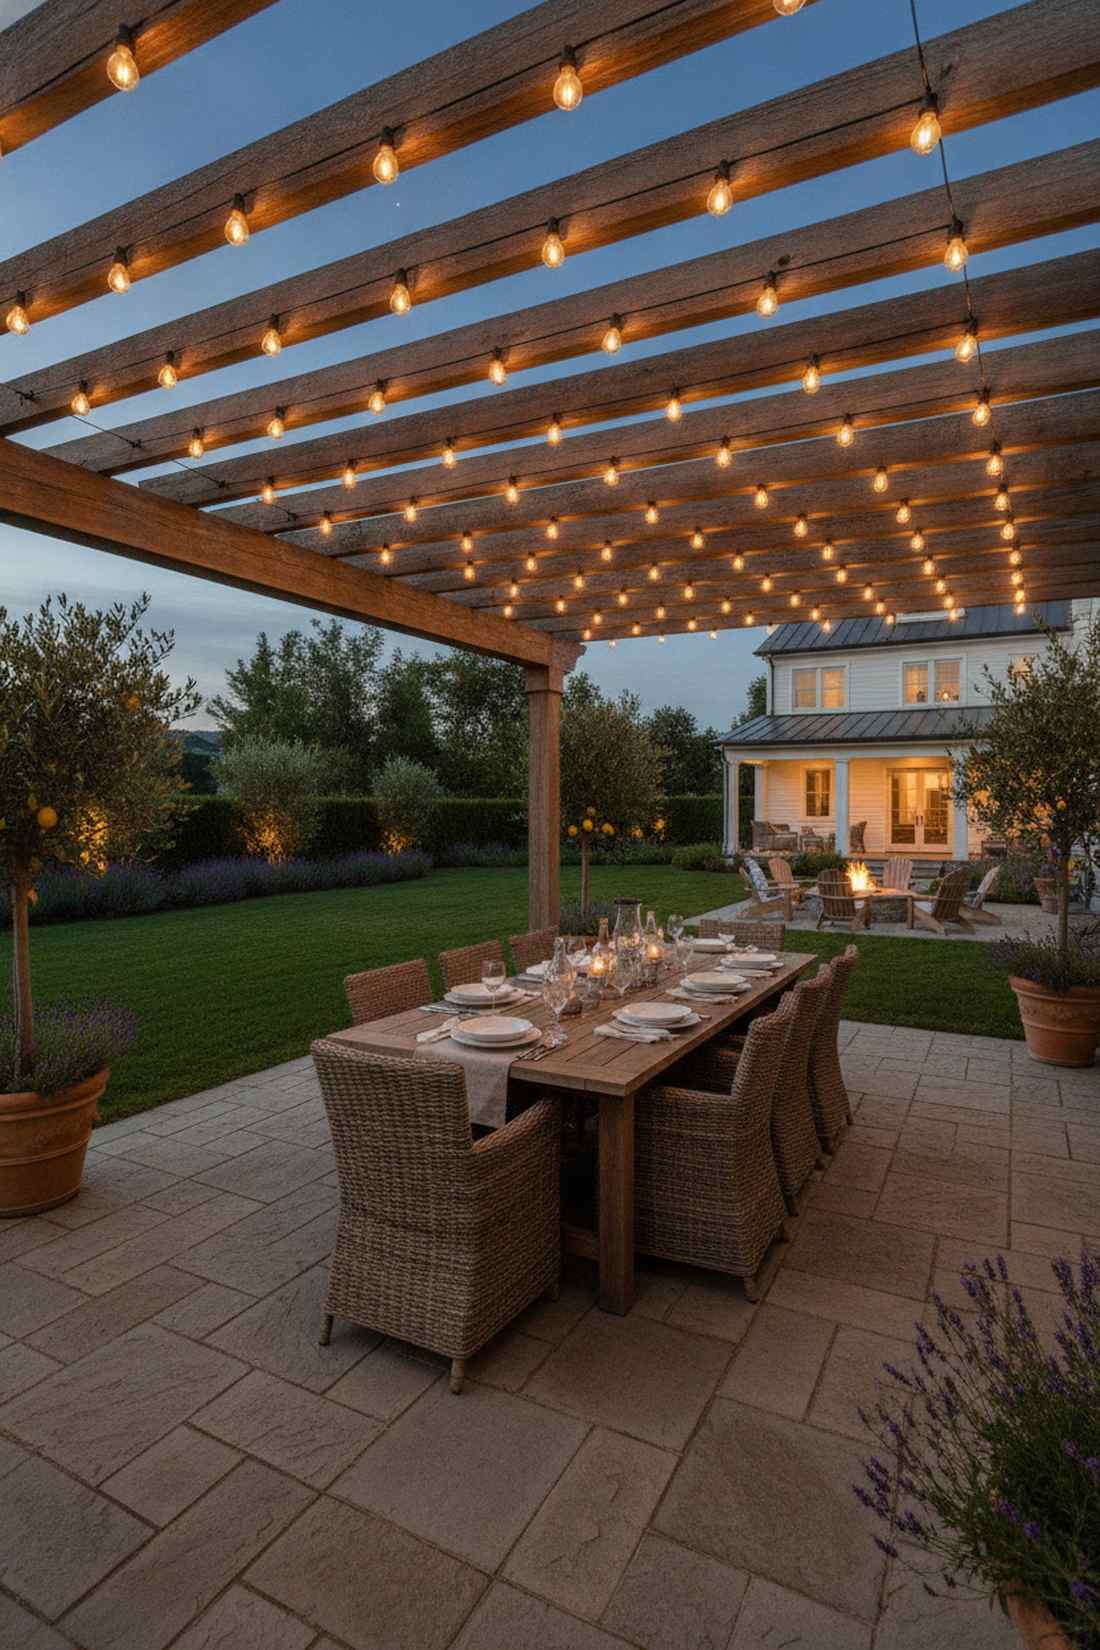
Feels like a cozy Mediterranean courtyard you accidentally discovered. This classic pergola canopy lighting works exceptionally well for large rectangular dining zones.
Running café bulbs in straight, tight rows gives a surprisingly premium look that defies the cheap price tag. Ditching loose hangs for taut, heavy-duty suspension wire prevents that amateur sagging effect.
You can easily pull this off for around $40–$60 depending on the square footage. Save this to your DIY summer garden board for weekend inspiration.
- Key Materials: Weatherproof Edison strands, metal tension hooks
- Vibe / Style: Classic Italian Alfresco
- Difficulty: Easy beginner setup
- Budget Breakdown: Lights: $35 | Wire kits: $15.
- Creator’s Tip: Use a plug-in dimmer to completely change the mood after dinner.
- Smart Sourcing: Grab commercial-grade Edison strings (bulk pack) and a pre-cut stainless steel guide wire kit.
2. Radial Festoon Burst
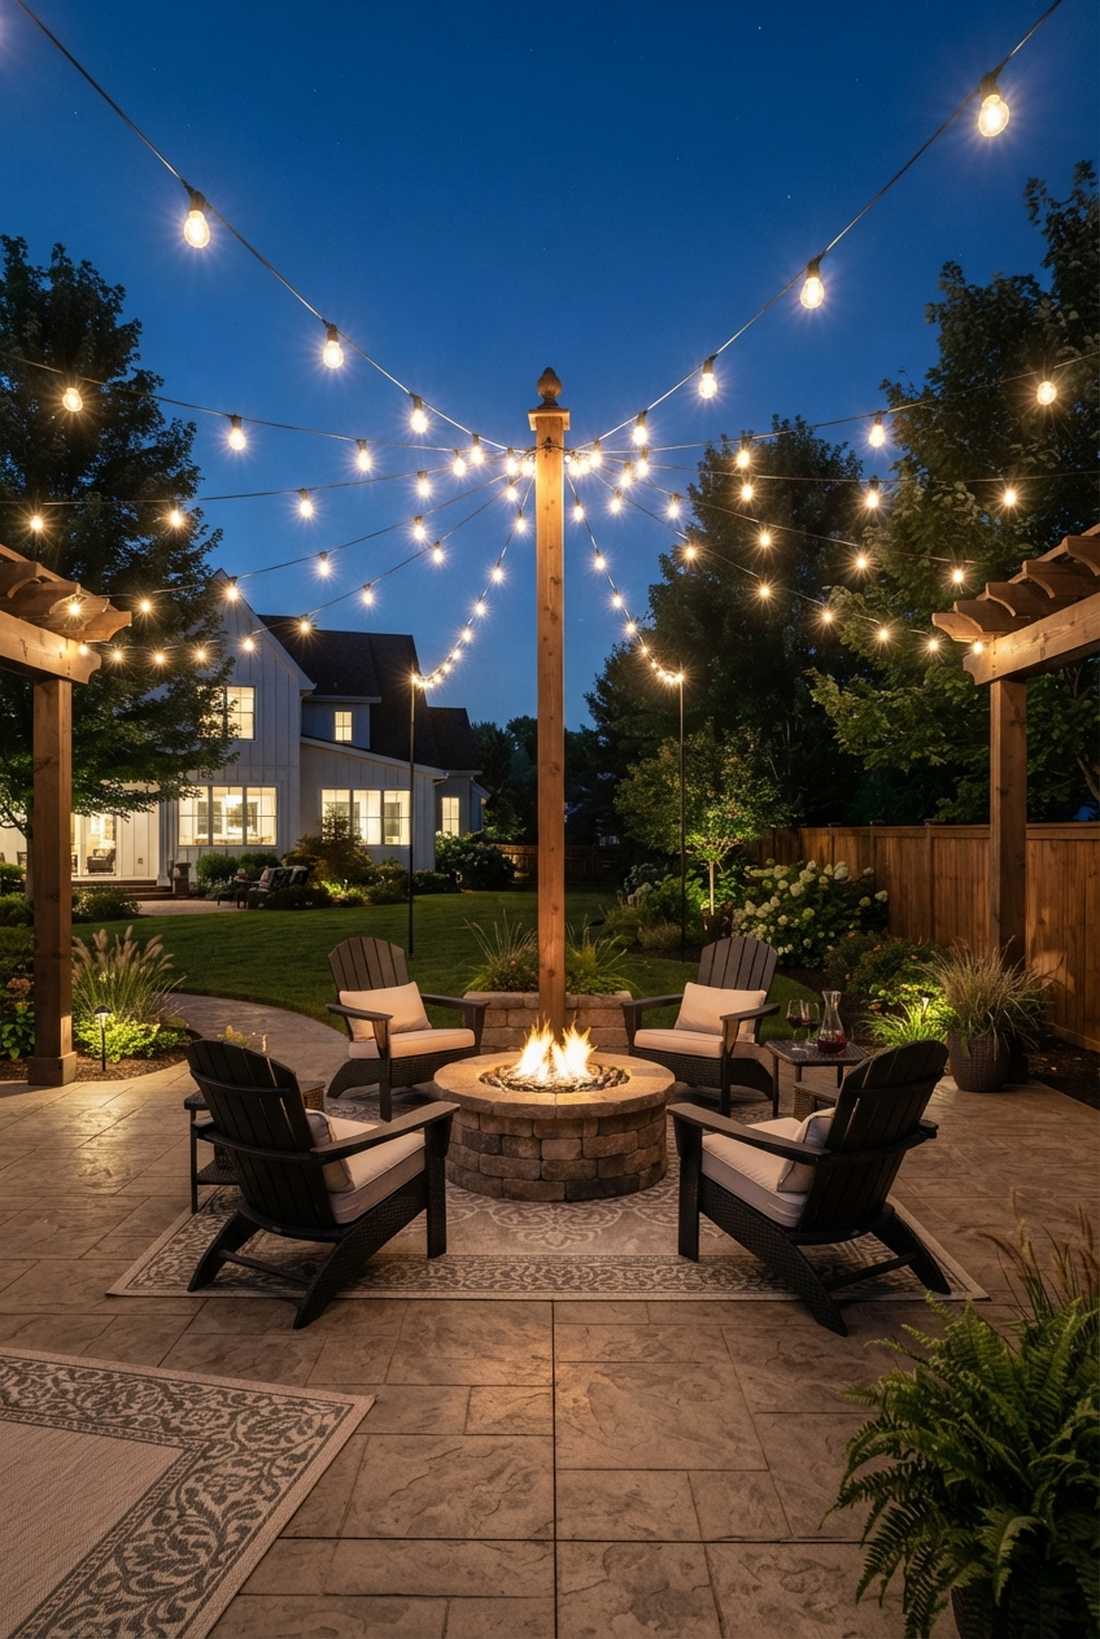
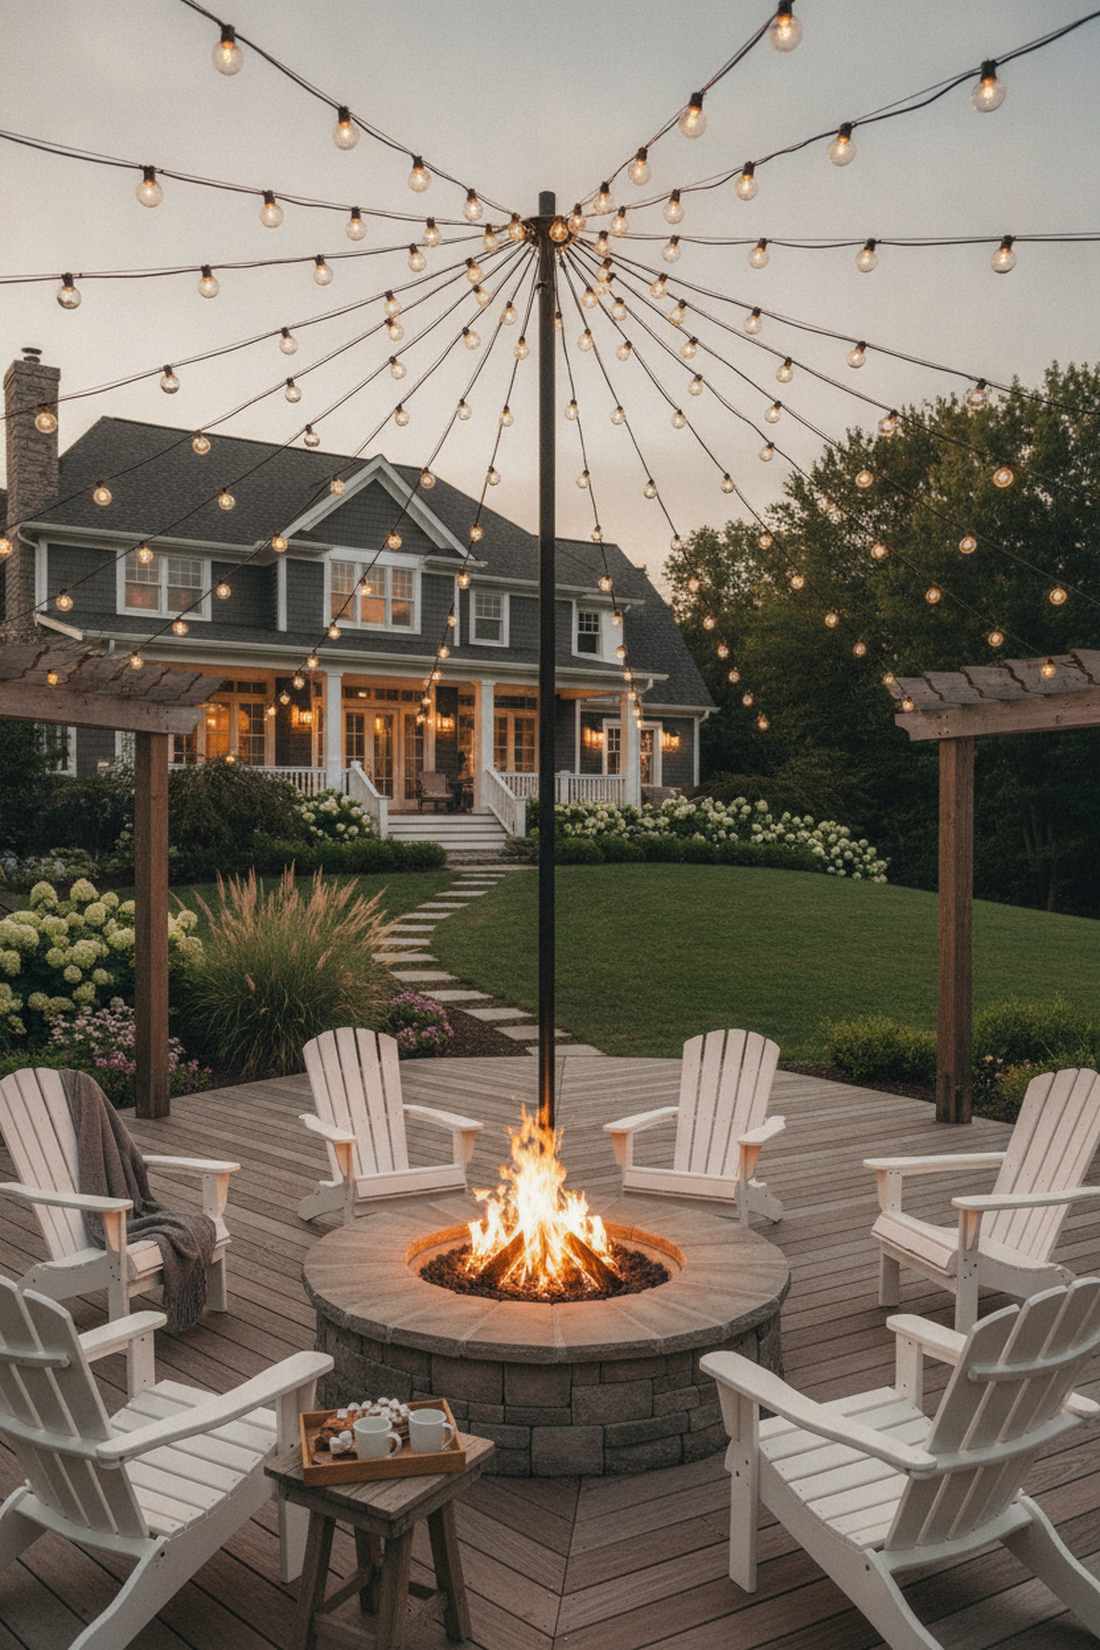
Straight out of a luxury wedding reception. This central hub festoon display is perfect for focusing attention over a fire pit or circular seating arrangement.
Creating a spoke-like pattern from a center pole delivers a dramatic visual impact without requiring a complex hardwired installation. Integrating high-lumen outdoor patio lighting string kits ensures the center stays brilliantly illuminated.
Expect to spend roughly $70 to get the tension and anchors right.
- Key Materials: Globe string lights, central anchor pole
- Vibe / Style: Festive Event Tent
- Difficulty: Moderate (requires central mounting)
- Budget Breakdown: Lights: $50 | Hardware: $20.
- Creator’s Tip: Ensure the center anchor point is at least 9 feet high for proper head clearance.
- Smart Sourcing: Invest in shatterproof LED globe lights (commercial rated) and heavy-duty carabiner anchor clips.
3. Zigzag Canopy Drape
Feels effortlessly bohemian and laid-back. This diagonal patio lighting web works exceptionally well for oddly shaped or L-shaped deck spaces.
Crossing strands back and forth cheats the system by maximizing light coverage while using fewer actual strands. This aggressive geometry looks far more expensive than a basic parallel run.
This layout usually costs around $30–$50 to complete. Pin this if you are working with an asymmetrical backyard.
- Key Materials: Flexible fairy lights or mini bistro bulbs
- Vibe / Style: Boho Chic Lounge
- Difficulty: Very easy
- Budget Breakdown: Strands: $30 | Hooks: $10.
- Creator’s Tip: Keep the angles sharp and symmetrical for a deliberate, designer look.
- Smart Sourcing: Use UV-coated mini bistro strings and adhesive outdoor cable clips (bulk pack).
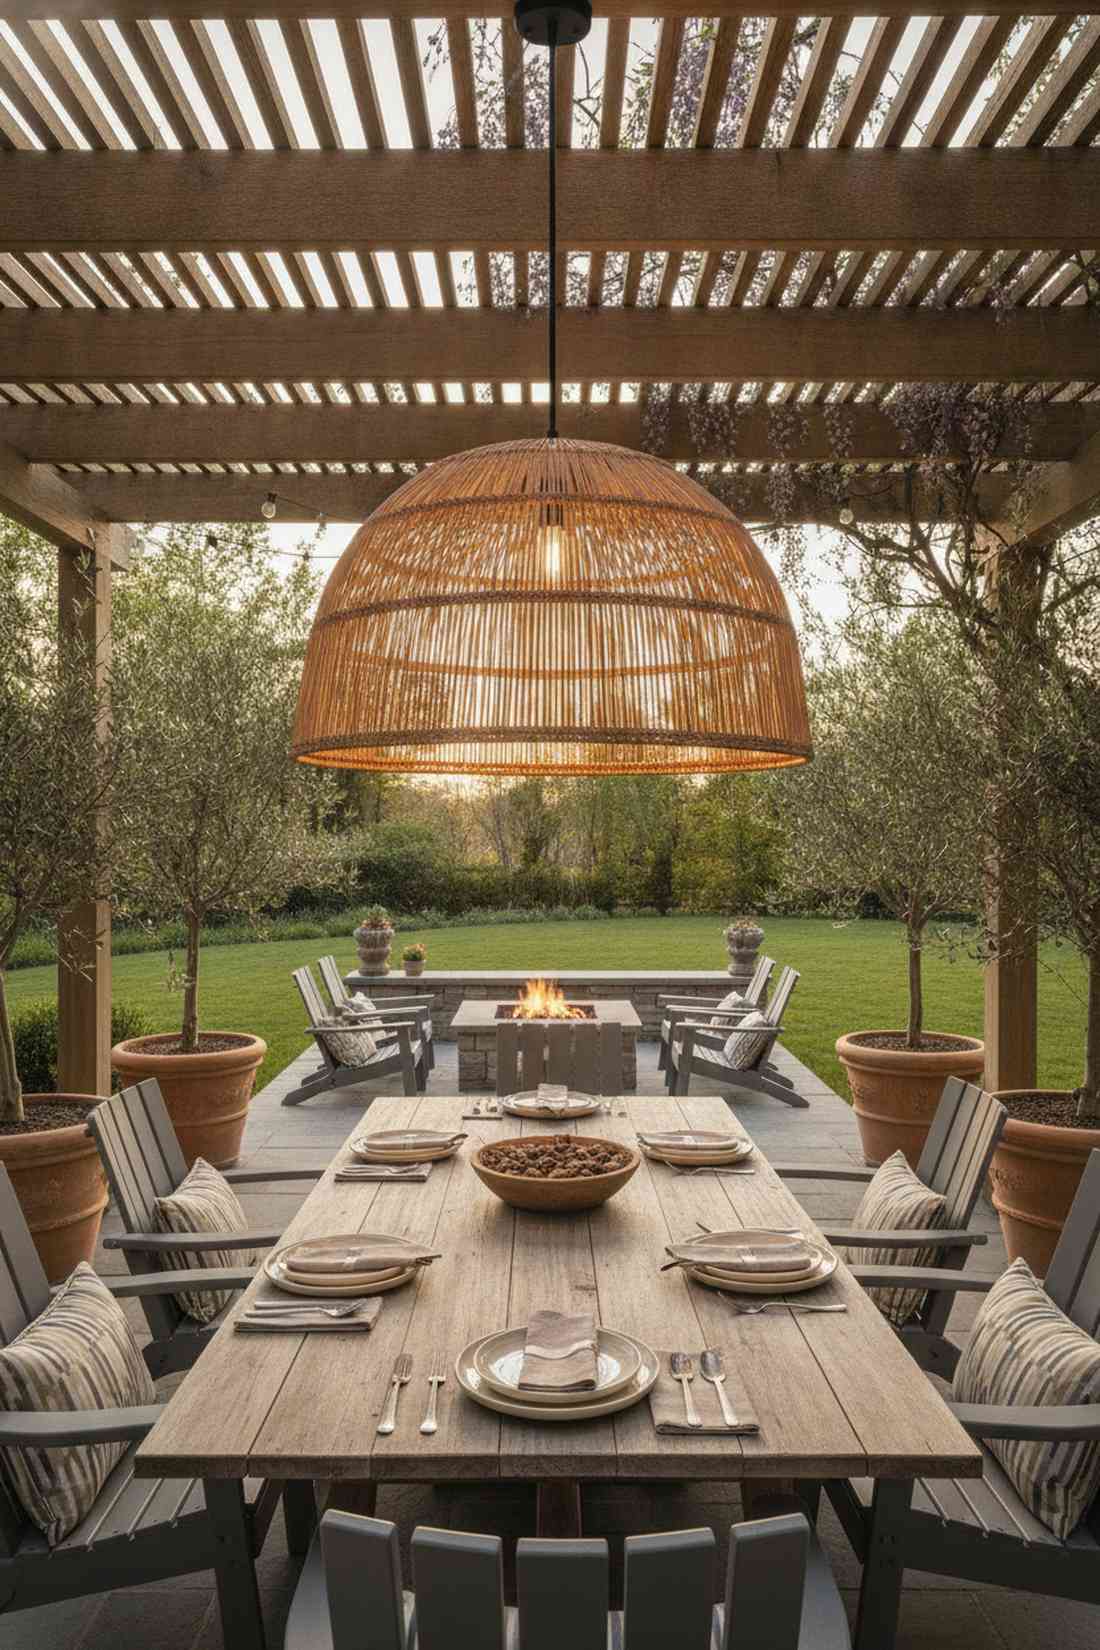
4. Pendant Cluster Arrangement
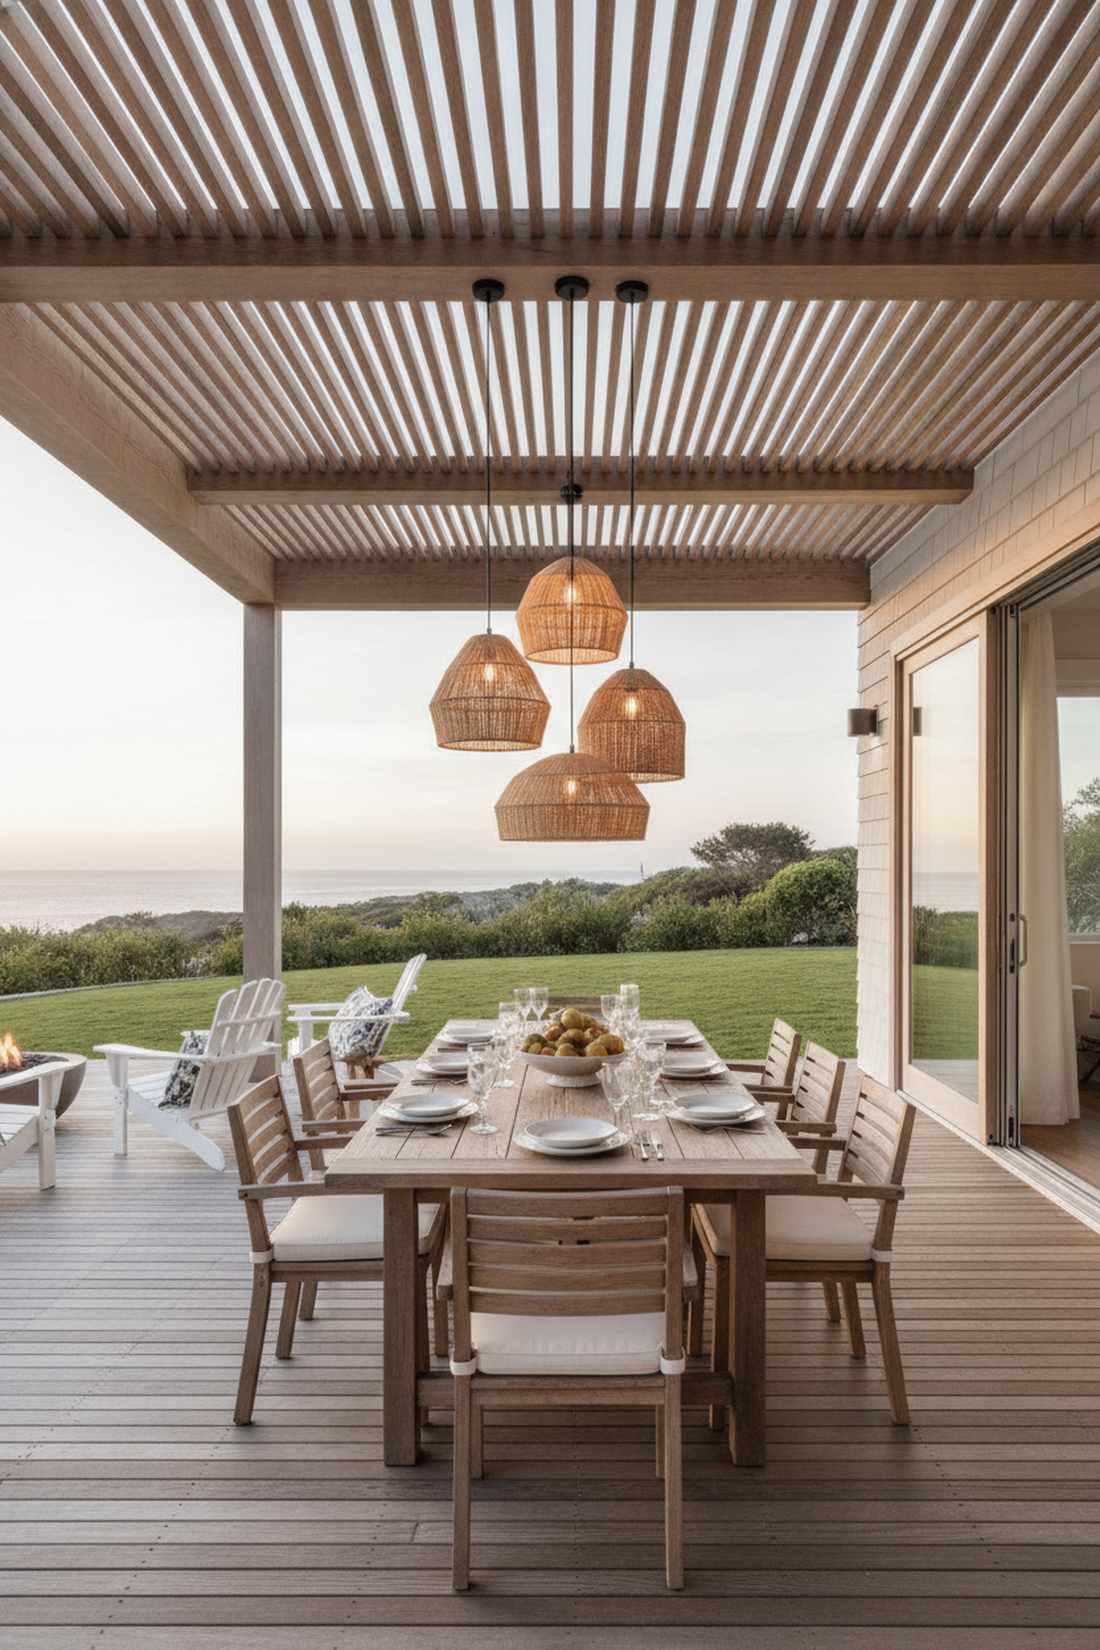
Like a modern art installation floating above your table. This hanging ambient focal point is perfect for defining the main dining area under a solid roof.
Grouping mismatched pendants instantly upgrades generic spaces into designer-level dining rooms. Seamlessly sneaking in low-voltage hanging patio lights ensures it stays safe from weather elements.
Plan for a $100–$150 budget for quality fixtures.
- Key Materials: Woven or metal outdoor pendants
- Vibe / Style: Modern Coastal
- Difficulty: Advanced (requires wiring)
- Budget Breakdown: Fixtures: $120 | Wiring: $30.
- Creator’s Tip: Stagger the drops by exactly 6 inches each to create visual movement.
- Smart Sourcing: Buy pre-wired outdoor pendant cord kits and weatherproof rattan lampshades.
Most people get this completely wrong… until they try the exact layout coming up next.
5. Linear Track Spotlight System
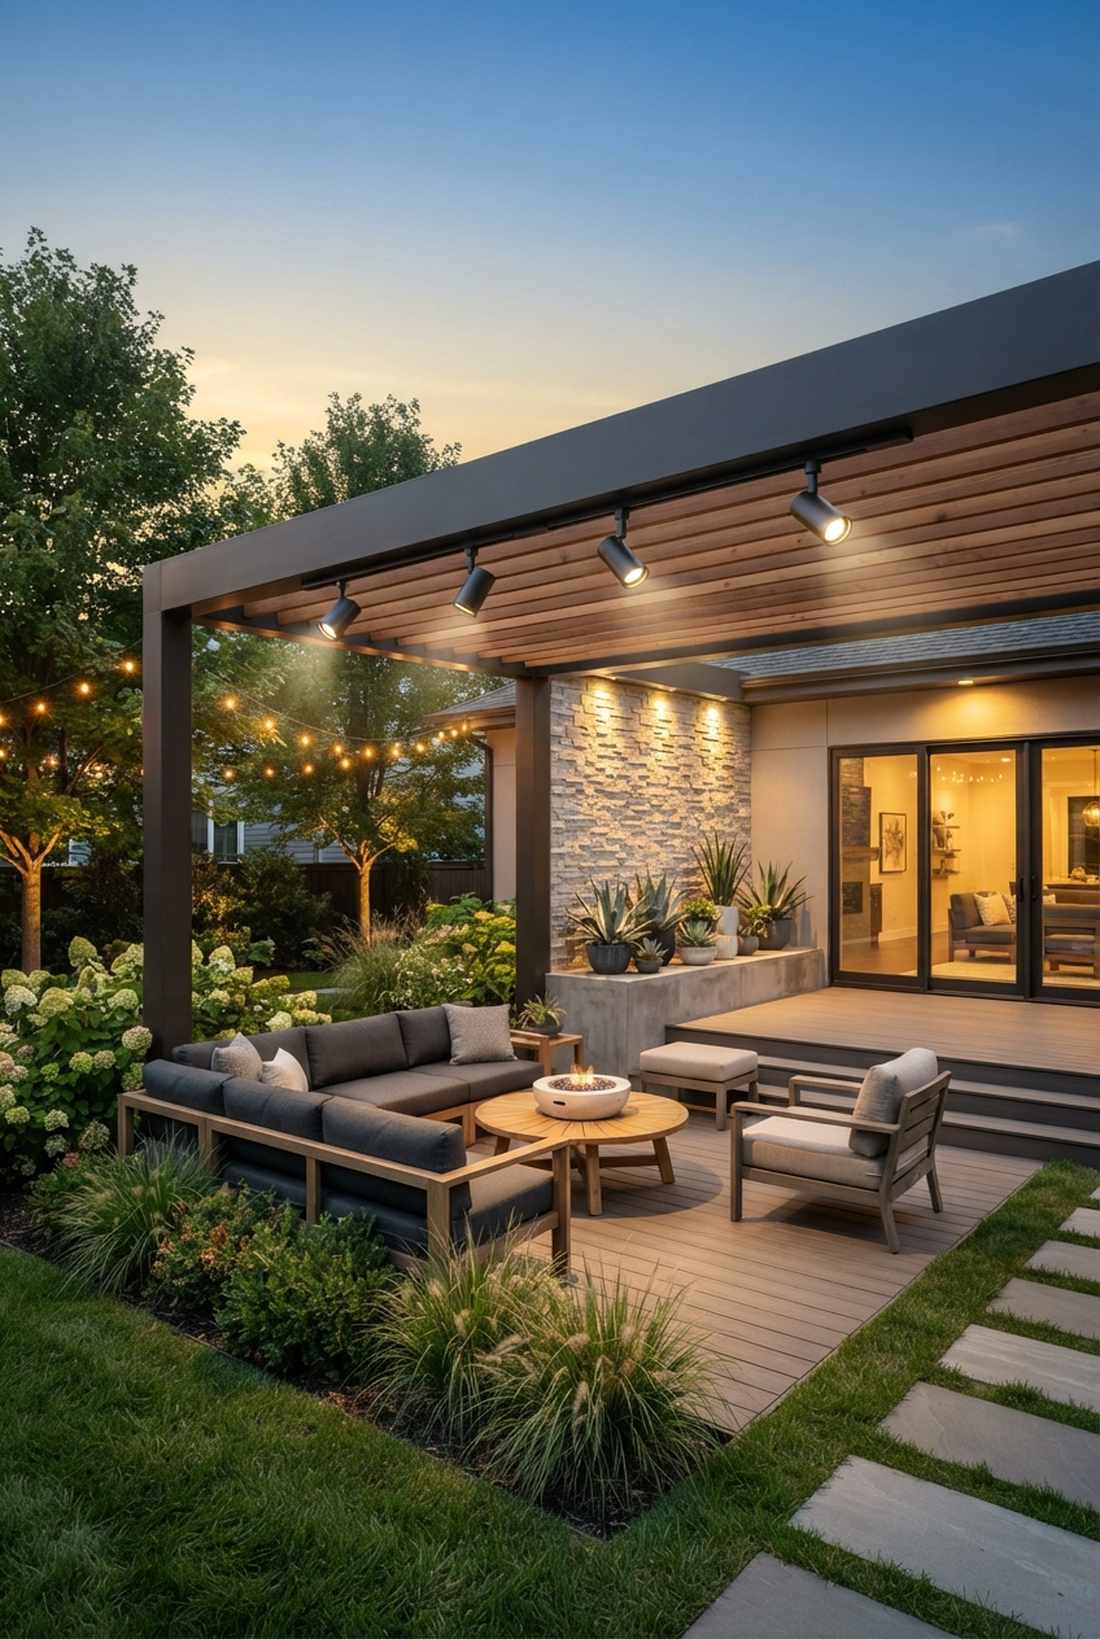
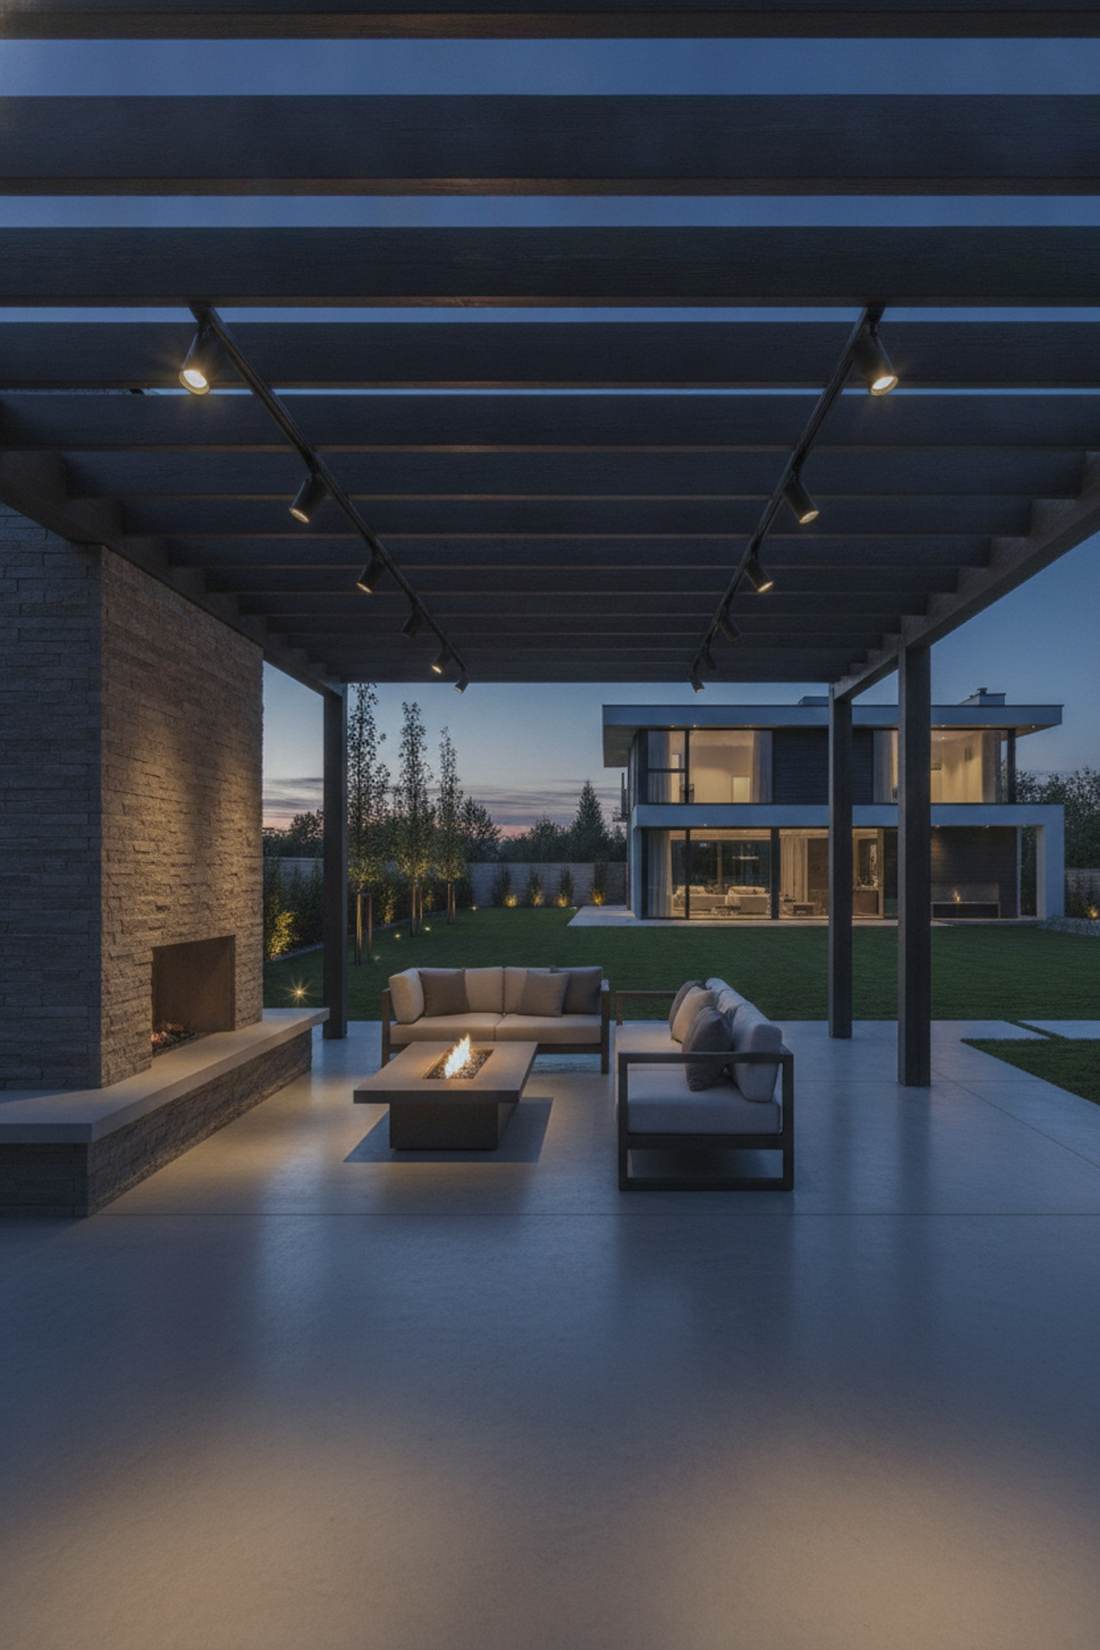
Feels like a high-end gallery exhibit brought outdoors. This directional pergola track lighting works exceptionally well for highlighting specific architectural features.
Using pivoting heads delivers a surprisingly premium look that lets you change the lighting focus whenever you move your furniture. This is how the pros avoid washing out the whole yard.
This usually runs about $120 for a reliable track kit. Save this to your architectural upgrade board.
- Key Materials: Outdoor-rated LED track rails, spotlight heads
- Vibe / Style: Contemporary Minimalist
- Difficulty: Advanced (electrical required)
- Budget Breakdown: Track system: $90 | LED heads: $30.
- Creator’s Tip: Aim the spots down at a 45-degree angle to avoid blinding seated guests.
- Smart Sourcing: Order an IP65-rated outdoor track lighting starter kit and dimmable GU10 LED bulbs (multi-pack).
6. Woven Bistro Light Canopy
Feels like sitting under a glowing net of stars. This crosshatched overhead patio lighting works exceptionally well for intimate, low-ceiling pergolas.
Weaving strands perpendicularly creates a dense, luxurious canopy that looks incredibly custom. It forces the eye upward, instantly making cramped spaces feel expansive.
You can easily pull this off for around $80–$100. It is a fast upgrade that completely changes the vibe.
- Key Materials: S14 bistro string lights, zip ties
- Vibe / Style: Enchanted Garden
- Difficulty: Moderate (time-consuming)
- Budget Breakdown: Double strands: $80 | Fasteners: $10.
- Creator’s Tip: Secure the intersections with tiny clear zip ties to keep the grid perfectly square in the wind.
- Smart Sourcing: Grab commercial-grade S14 string lights (100ft spool) and UV-resistant clear zip ties (bulk pack).
7. Chandelier Statement Piece
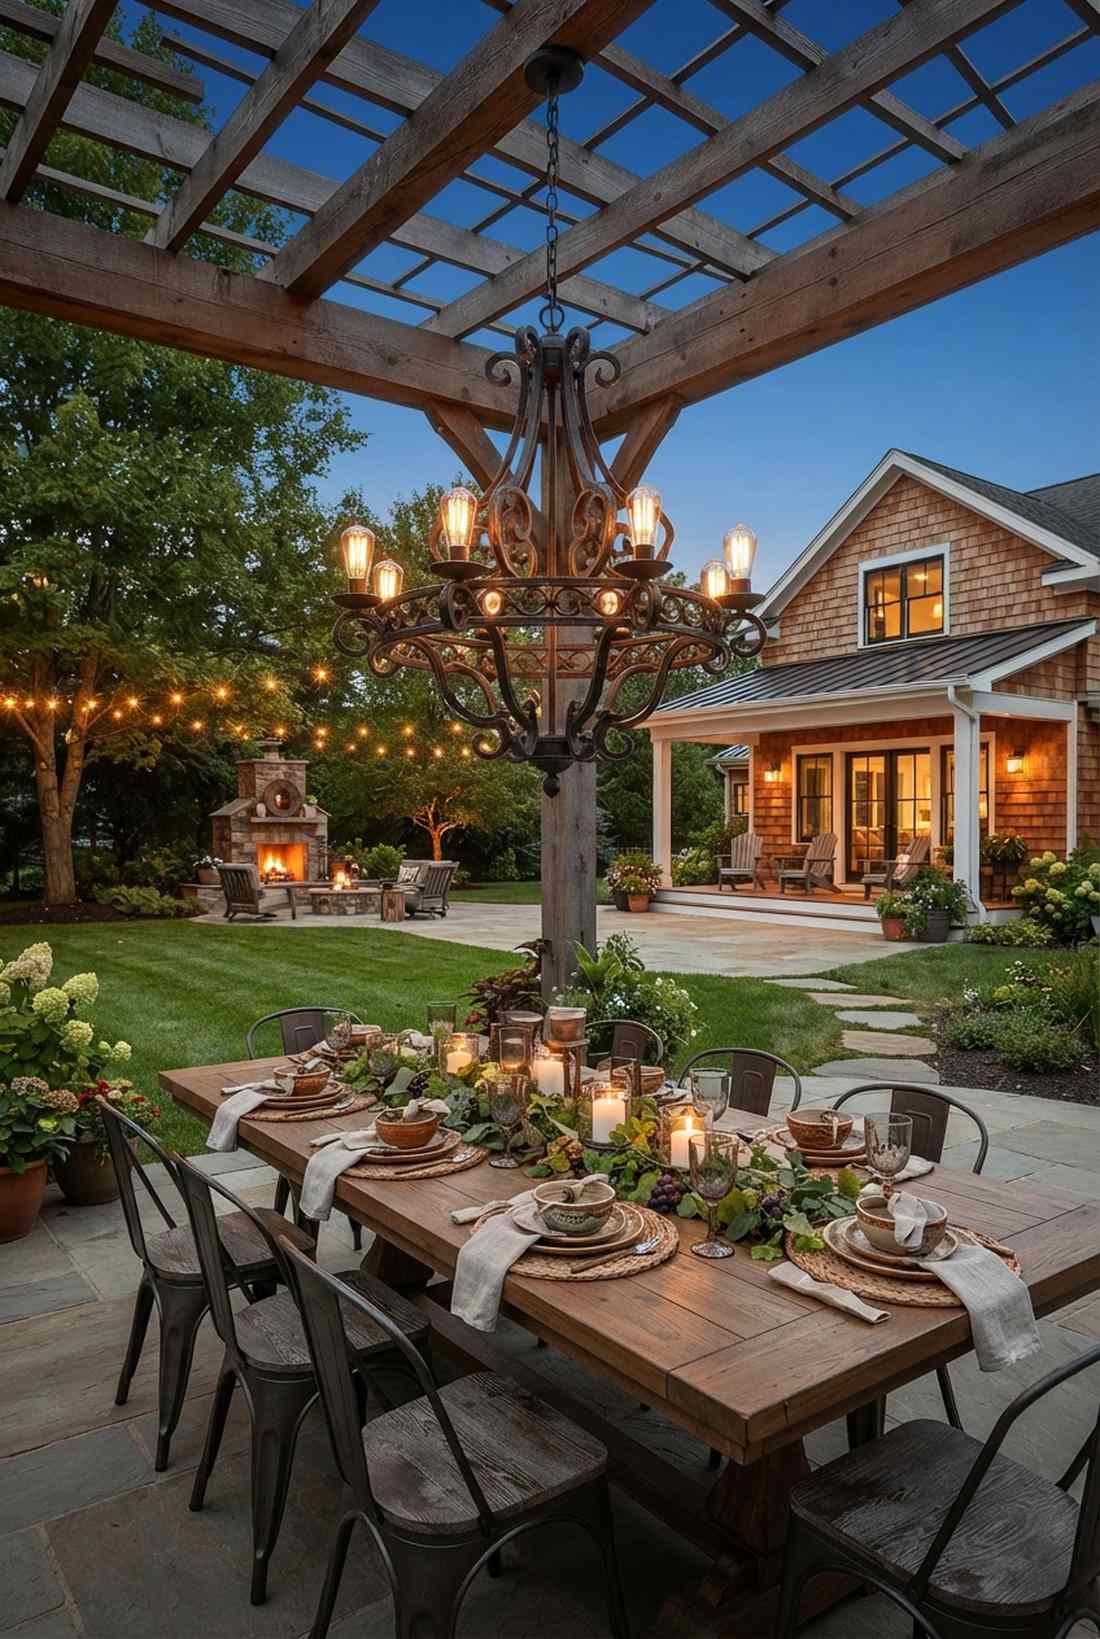

Straight out of a rustic winery estate. This oversized outdoor fixture is perfect for anchoring a massive farmhouse table.
Dropping a single, massive chandelier bypasses the need for multiple smaller lights and screams high-end luxury. Investing in a heavy-duty resin or treated metal piece ensures it outlasts seasonal humidity.
Expect to spend $150–$250 for a substantial centerpiece.
- Key Materials: Weather-resistant chandelier, heavy chain
- Vibe / Style: Rustic Elegance
- Difficulty: Advanced
- Budget Breakdown: Fixture: $200 | Mounting hardware: $20.
- Creator’s Tip: Hang it exactly 36 inches above the table surface for perfect illumination.
- Smart Sourcing: Look for outdoor-rated faux iron chandeliers and heavy-duty ceiling canopy kits.
8. Sail Shade Integrated Lighting
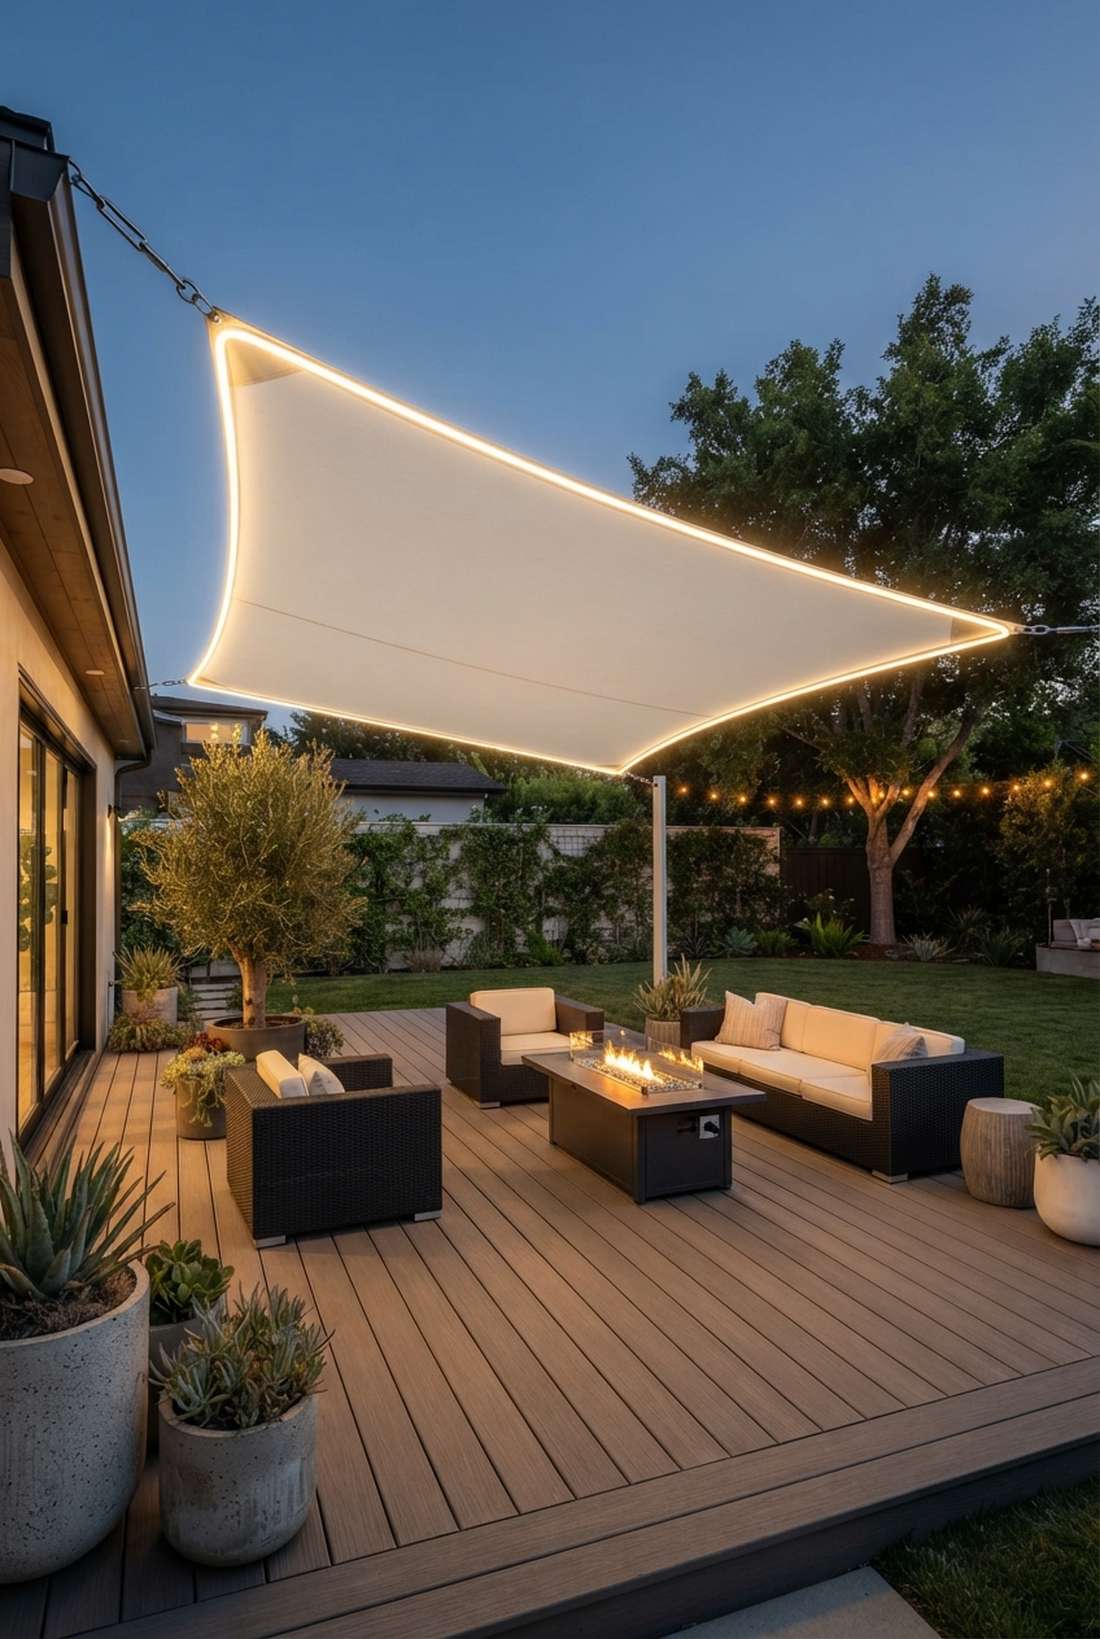
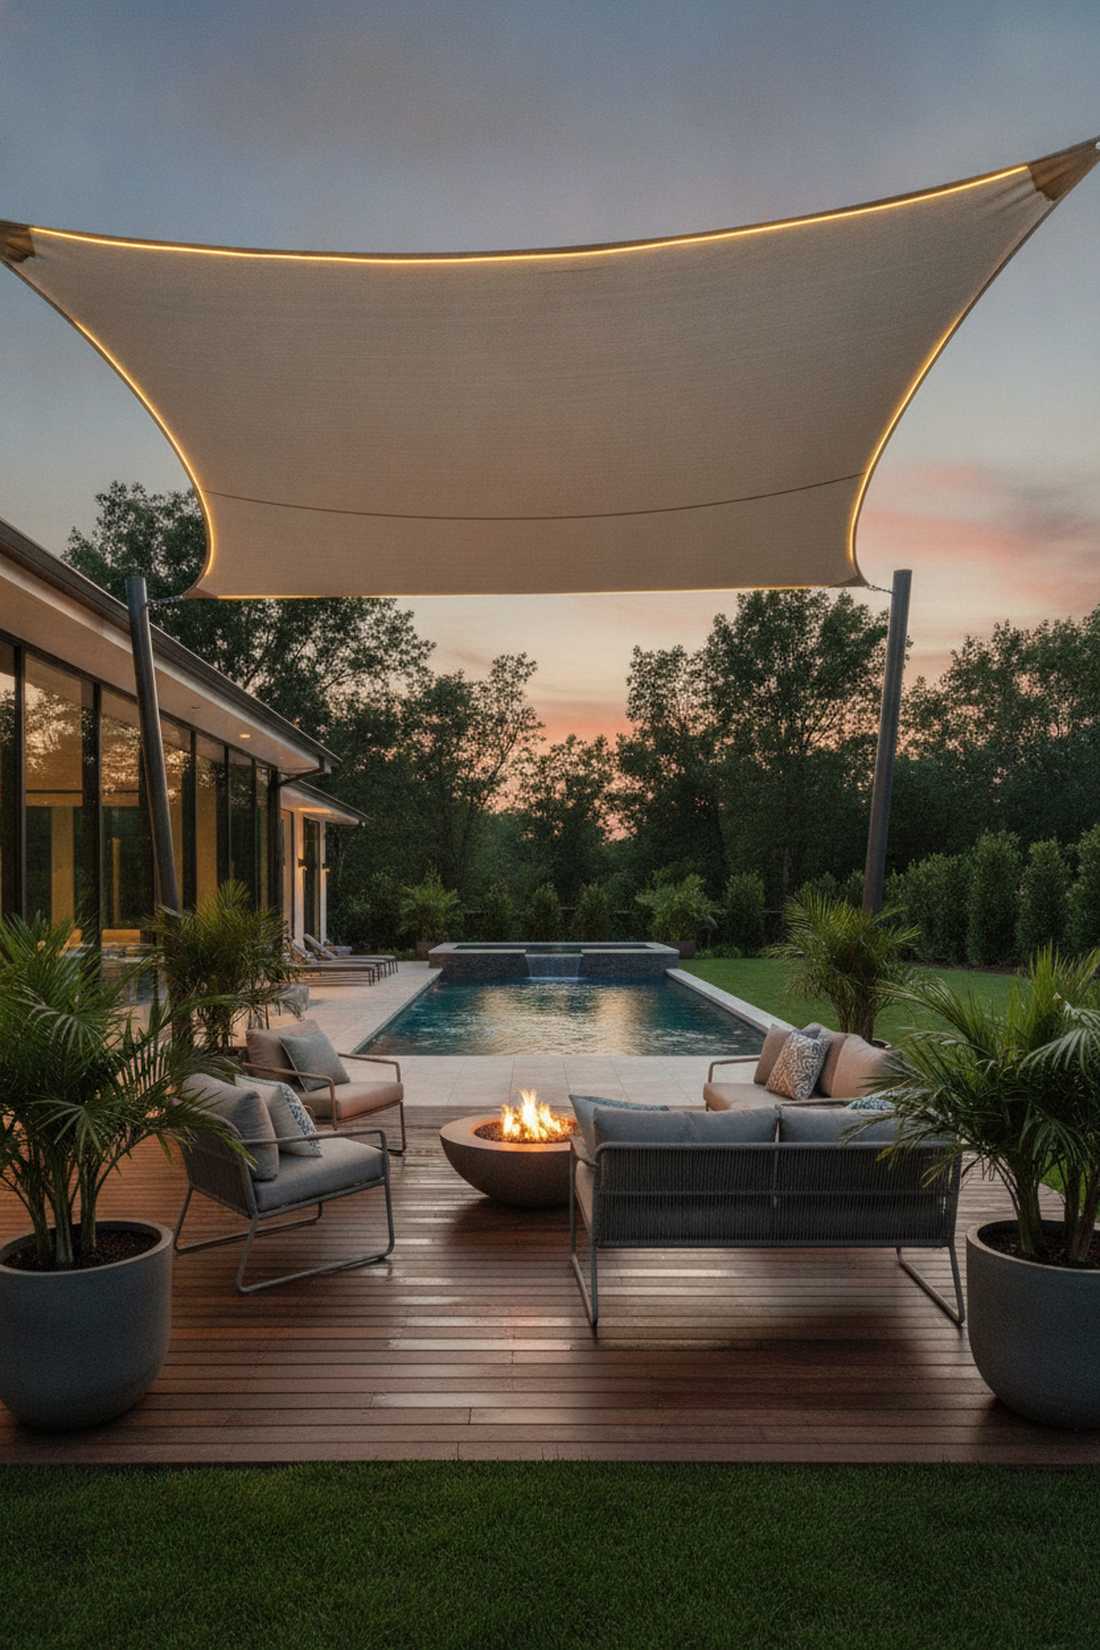
Feels like a luxury beach club cabana. This perimeter glow lighting works exceptionally well for modern, shade-heavy backyard setups.
Running sleek LED strips along the tension fabric delivers a seamless, glowing edge that looks far more expensive than standard bulky bulbs. The fabric acts as a massive natural diffuser.
This minimalist look costs around $50–$70. Pin this if you love clean, modern lines.
- Key Materials: Waterproof LED neon rope, shade sail clips
- Vibe / Style: Modern Resort
- Difficulty: Easy
- Budget Breakdown: LED Rope: $45 | Clips: $15.
- Creator’s Tip: Sew small pockets into the sail corners to hide the battery packs or wire connections.
- Smart Sourcing: Use flexible silicone LED neon strips (waterproof) and marine-grade stainless sail hardware.
💡 Must-Have Supplies for High-End Setups
To build these setups faster and ensure they last, skip the generic craft aisles and invest in the right foundational kits.
- Base & Support: Industrial-grade stainless steel wire tension kits
- Setup Tools: Outdoor-rated waterproof junction boxes (bulk pack)
- Weather/Durability Protection: UV-coated protective cable sleeves
Outdoor Lighting Floor Strategies
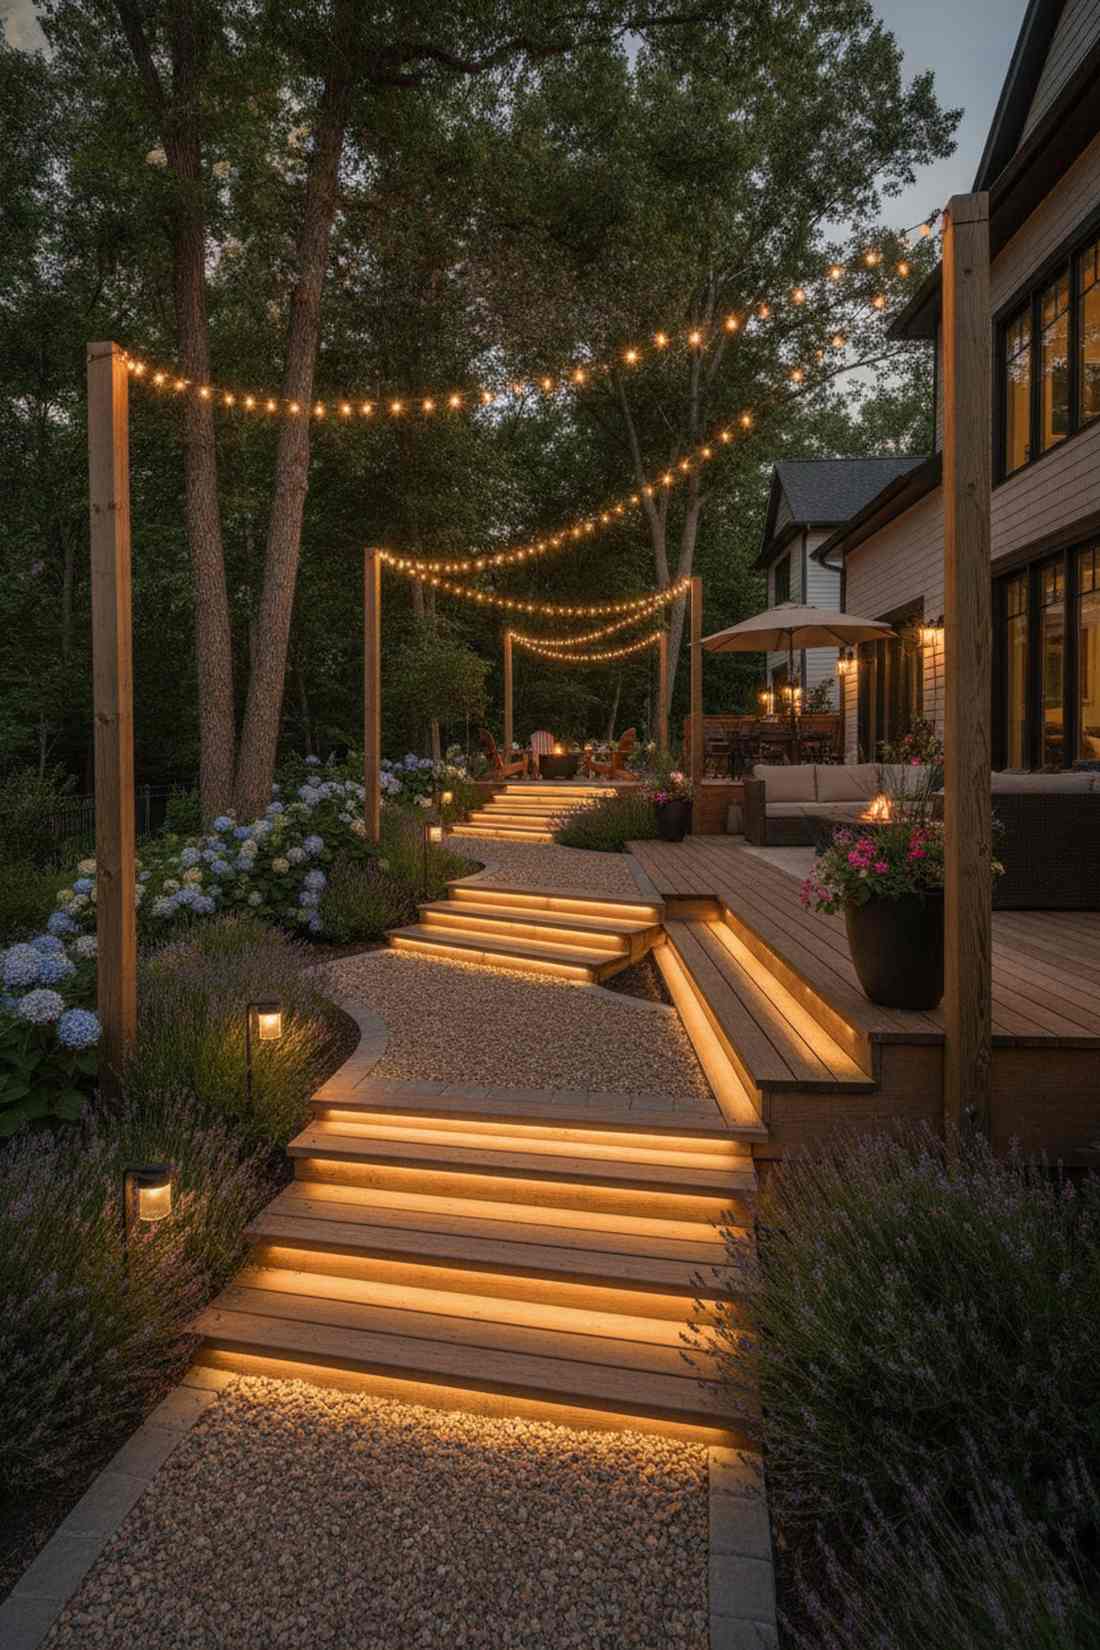
9. Recessed Deck Perimeter Lights
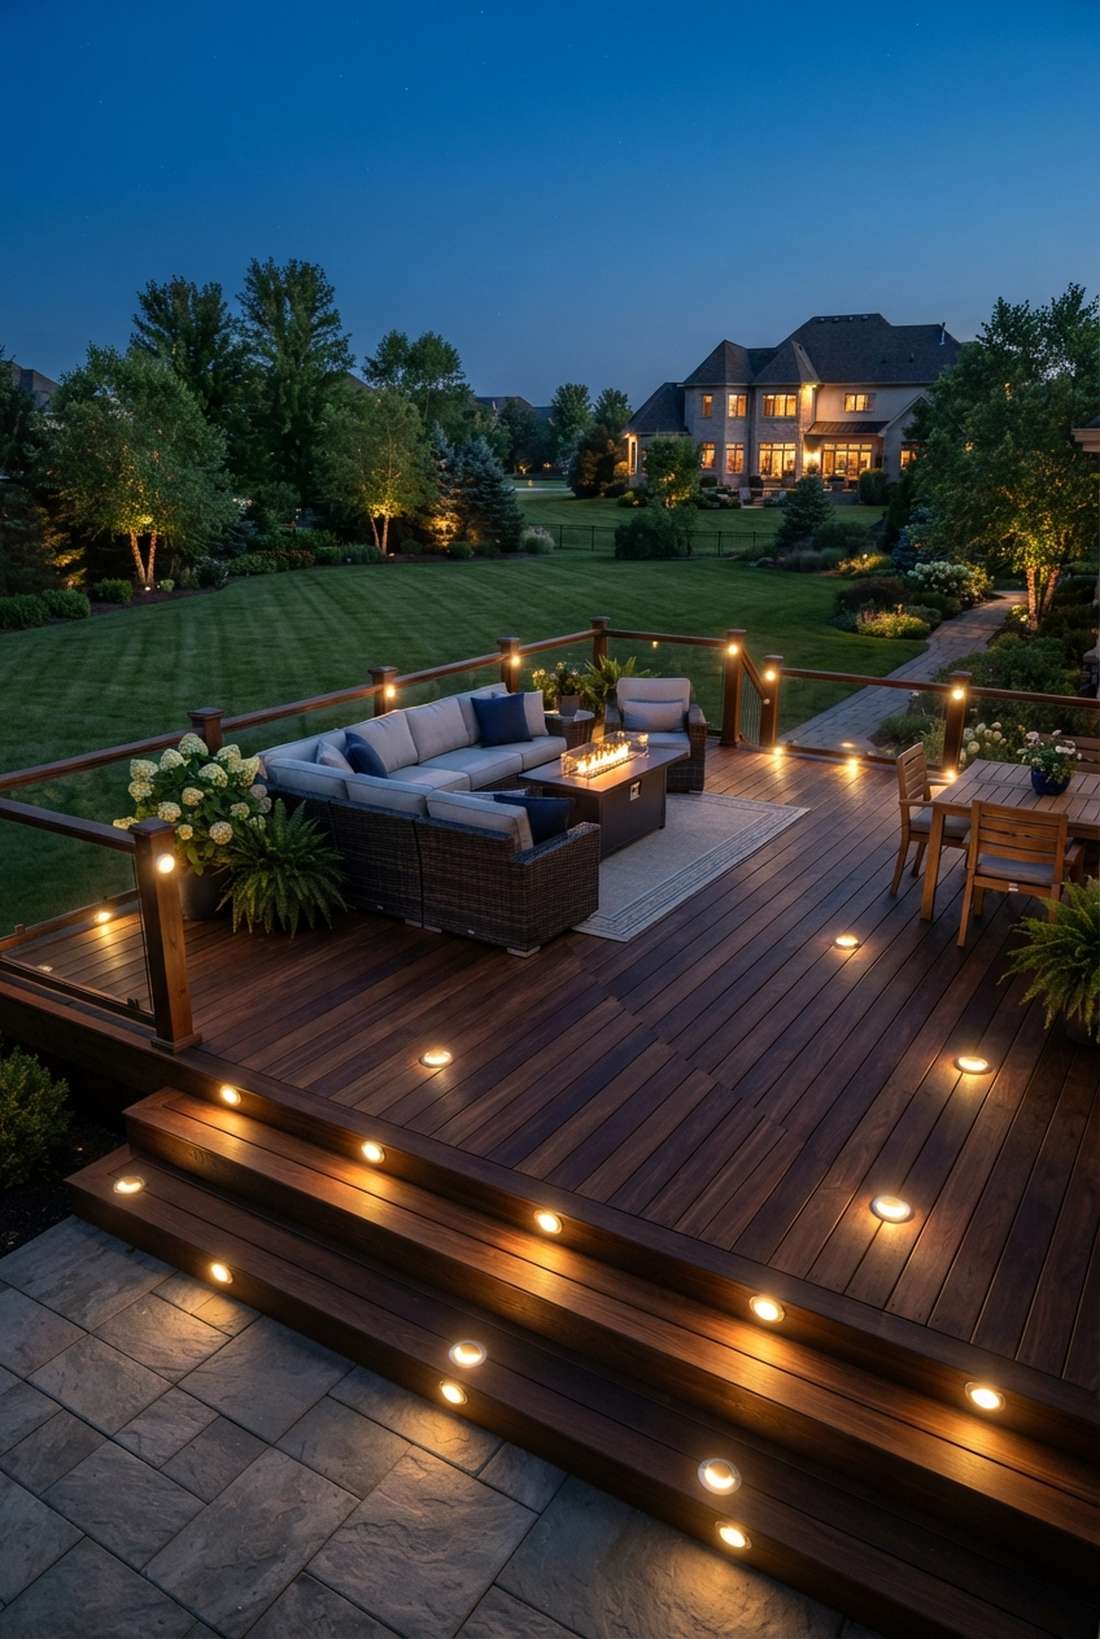
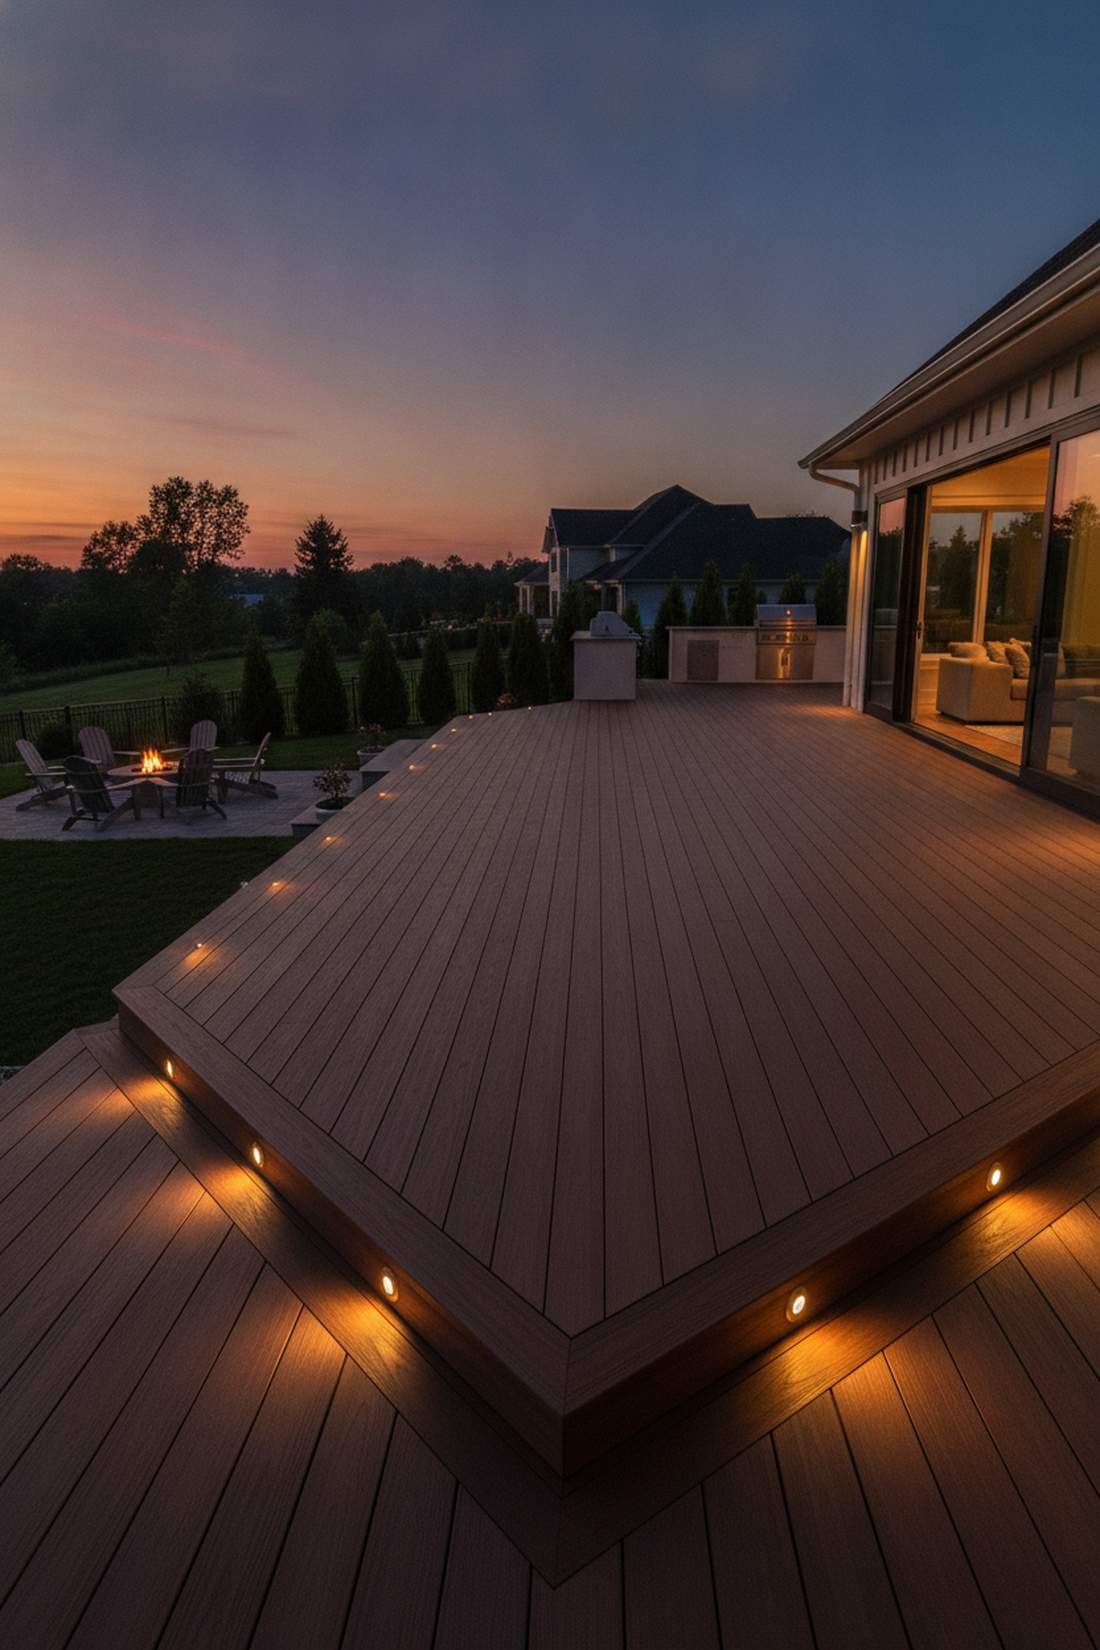
Feels like walking the deck of a multi-million dollar yacht. This outdoor lighting floor boundary works exceptionally well for elevated wooden or composite decks.
Sinking flush-mount lights directly into the boards gives a sleek, trip-free finish that looks meticulously planned. This hidden low-voltage approach is the ultimate secret to expensive-looking footways.
A basic starter layout runs about $80–$120. Highly recommended for a massive safety and style upgrade.
- Key Materials: LED disc lights, hole saw drill bit
- Vibe / Style: High-End Marine
- Difficulty: Moderate (requires drilling)
- Budget Breakdown: Light kit: $90 | Transformer: $25.
- Creator’s Tip: Use a template to ensure every hole is perfectly spaced exactly 4 feet apart.
- Smart Sourcing: Buy an expandable LED deck light starter kit and a premium low-voltage transformer box.
This next setup is ridiculously cheap but completely transforms dead corners…
10. Solar Pathway Stake Rhythm
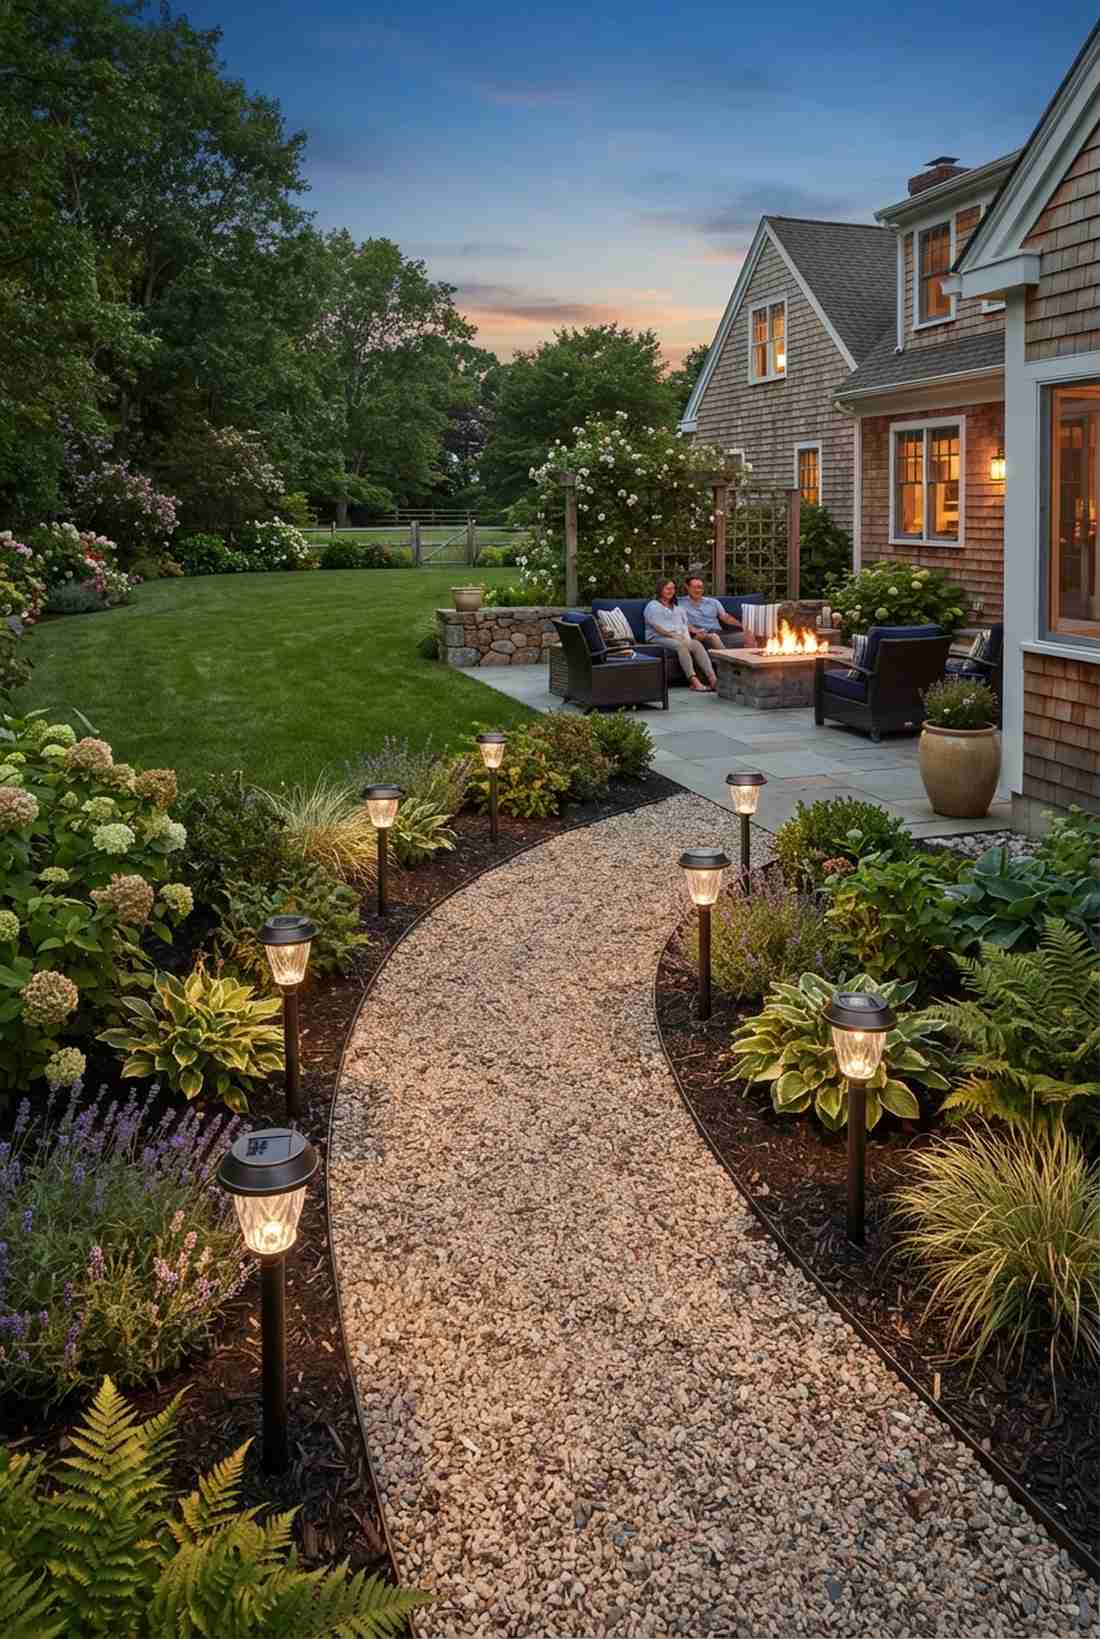
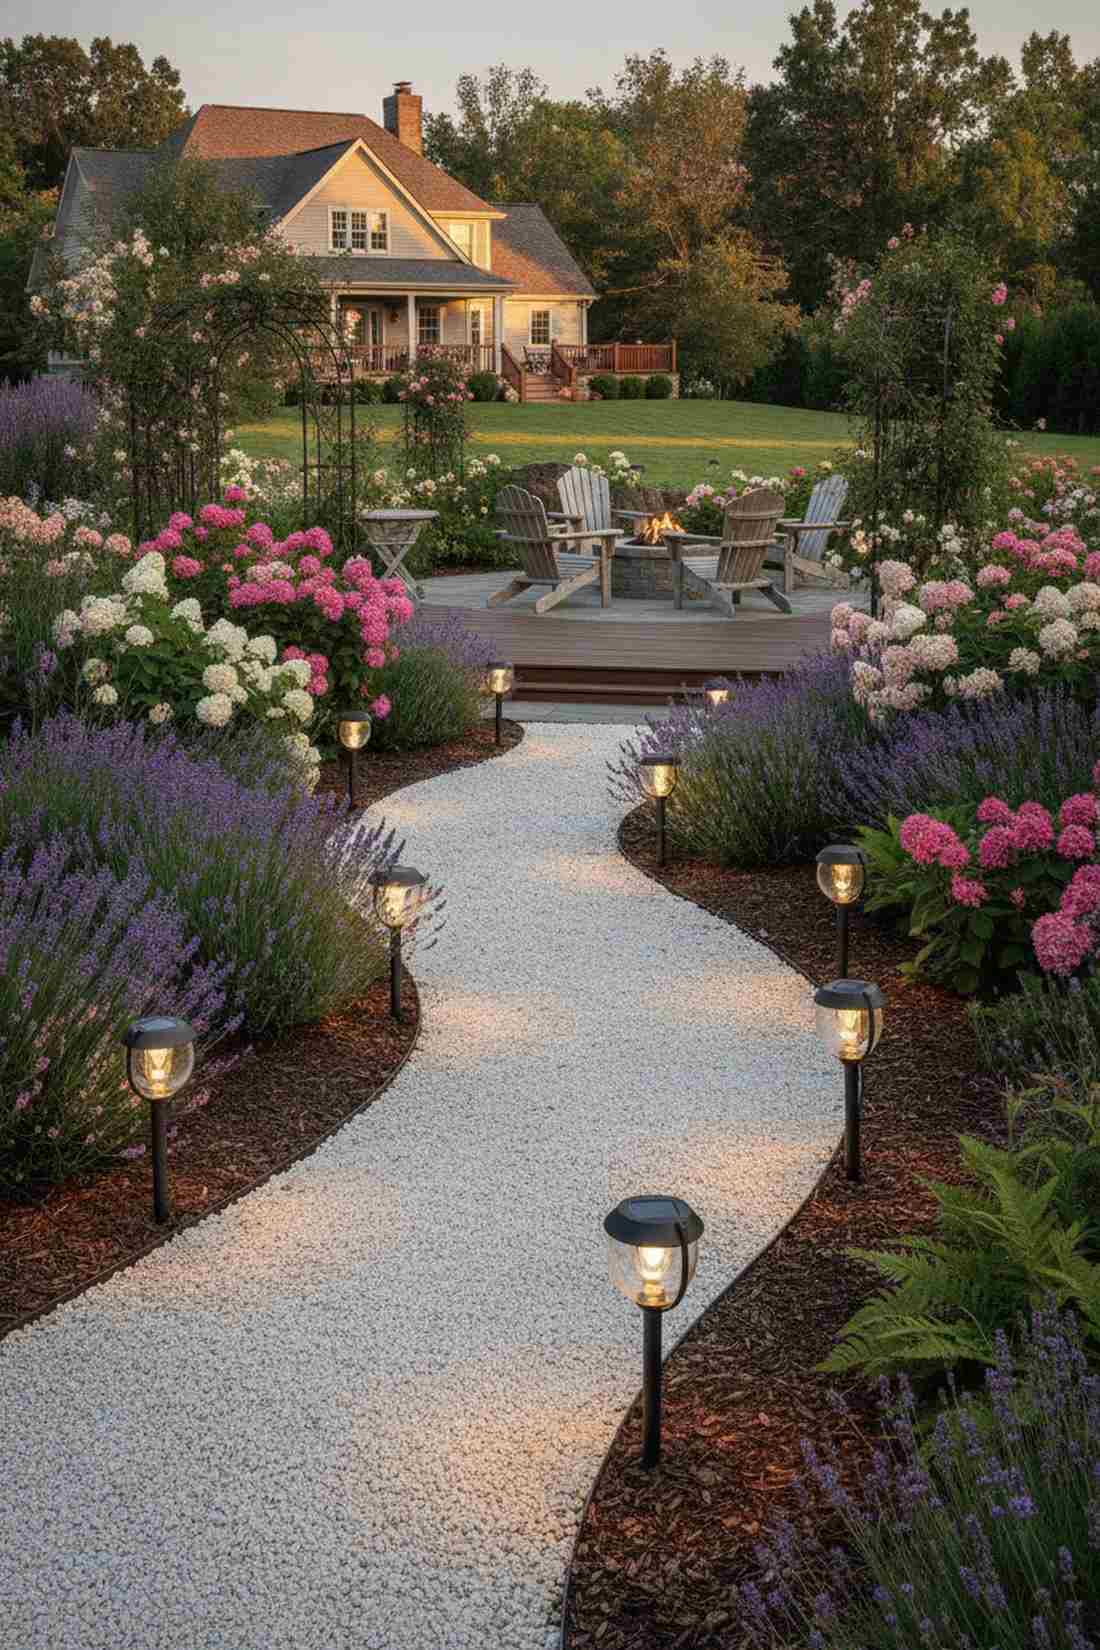
Feels like a guided stroll through a botanical garden. This wayfinding ground light setup works exceptionally well for gravel paths leading to the main patio.
Staggering stakes off-center rather than in straight, rigid lines delivers a surprisingly organic, premium look. High-efficiency solar pathway systems have finally become reliable enough to ditch the ugly extension cords entirely.
You can easily pull this off for around $30–$50 for a full path.
- Key Materials: Glass-lens solar stakes
- Vibe / Style: English Garden
- Difficulty: Very easy
- Budget Breakdown: 6-pack stakes: $40.
- Creator’s Tip: Push them deep enough so only the glass housing shows above the mulch layer.
- Smart Sourcing: Always choose glass and metal solar stakes (bulk pack) over cheap plastic alternatives.
11. Strip Light Stair Risers
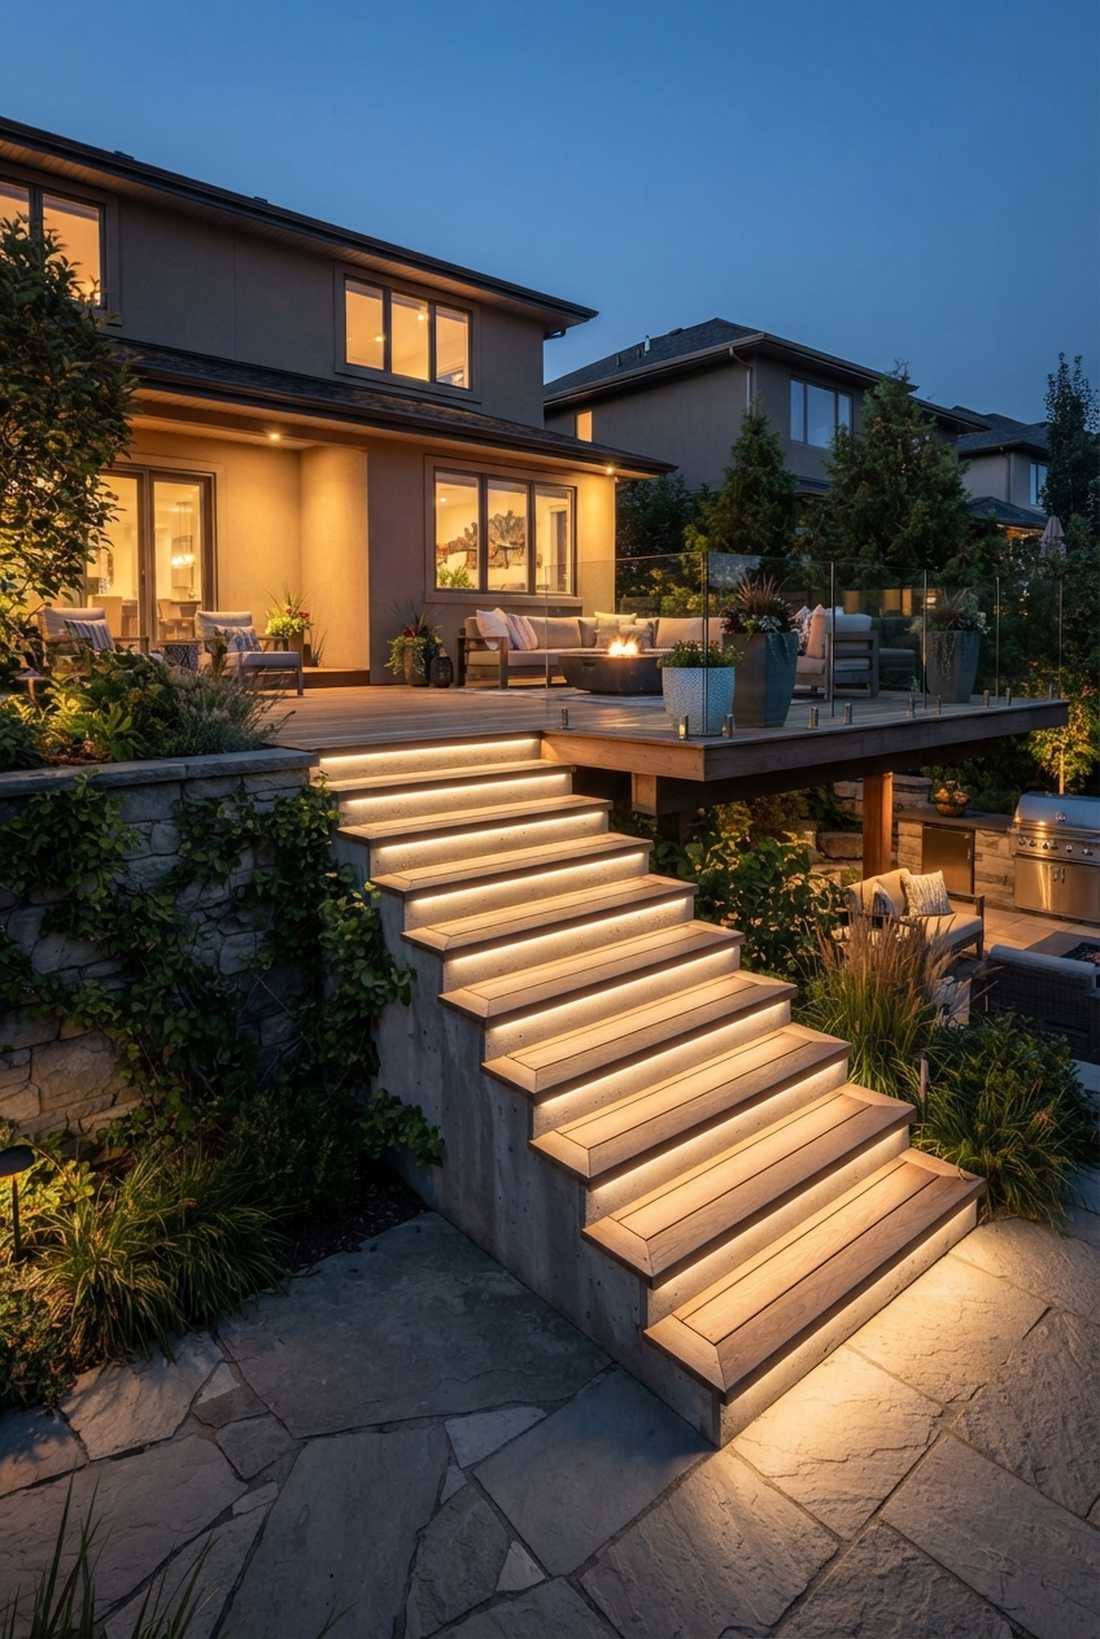
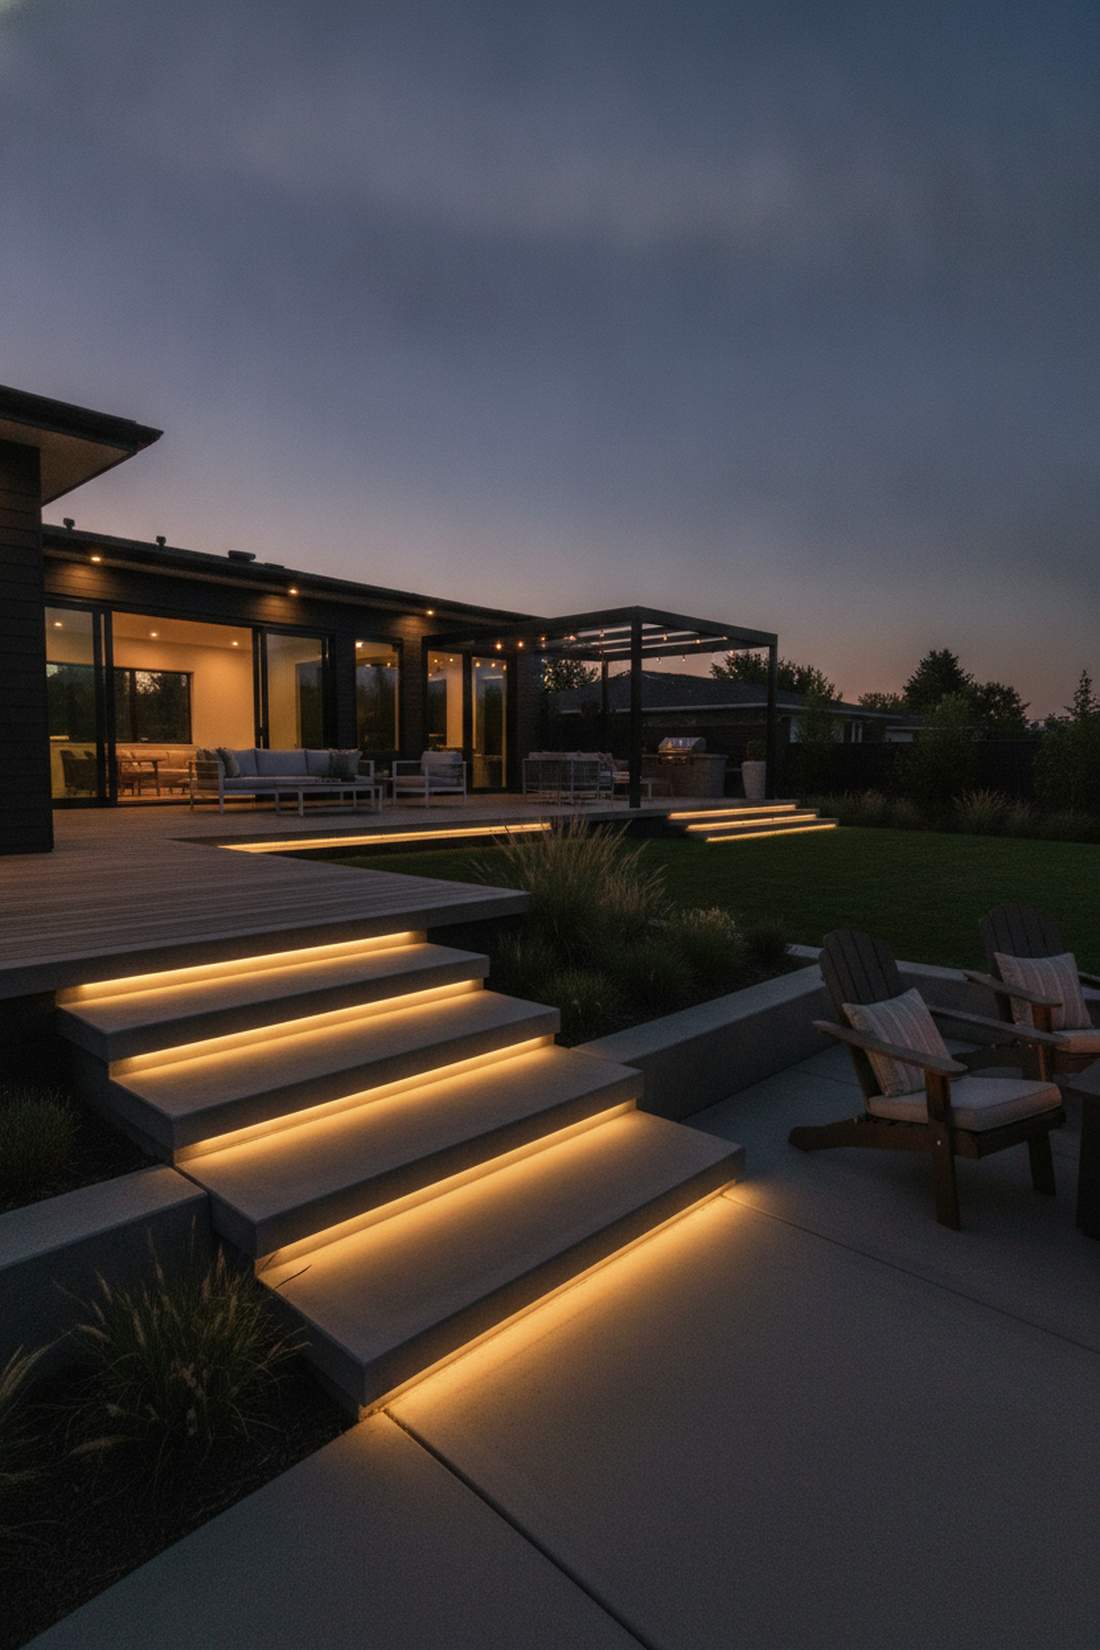
Straight out of an upscale hotel courtyard. This floating step illumination works exceptionally well for multi-level hardscapes.
Tucking bright LED tape directly under the stair nosing cheats the system, making concrete or wood steps look like they are floating. This eliminates trip hazards while providing a moody, cinematic wash of light.
Expect to spend $50–$75. Save this to your deck renovation board.
- Key Materials: Waterproof LED tape, aluminum channels
- Vibe / Style: Cinematic Modern
- Difficulty: Moderate
- Budget Breakdown: Tape: $30 | Channels: $25.
- Creator’s Tip: Always use frosted aluminum channels to hide the individual LED dots from reflecting on the steps below.
- Smart Sourcing: Pick up IP67 waterproof LED strip rolls and pre-cut frosted aluminum diffusers.
12. Well Light Uplighting Corners
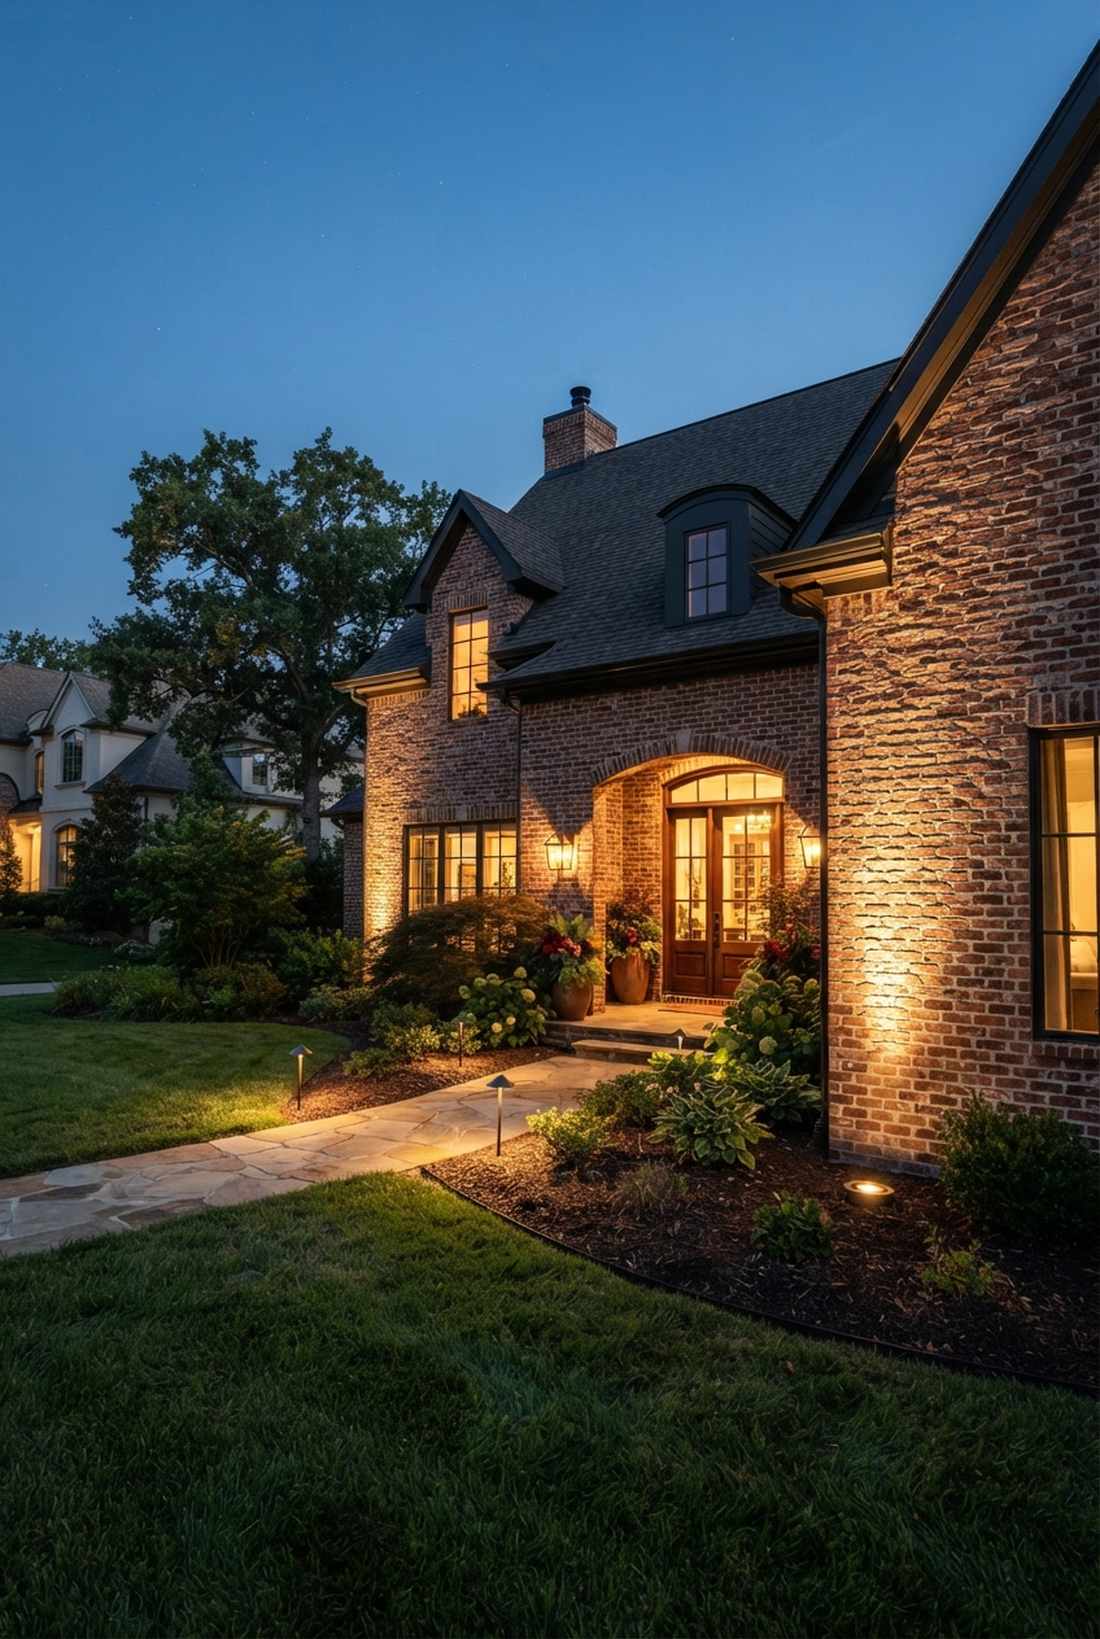
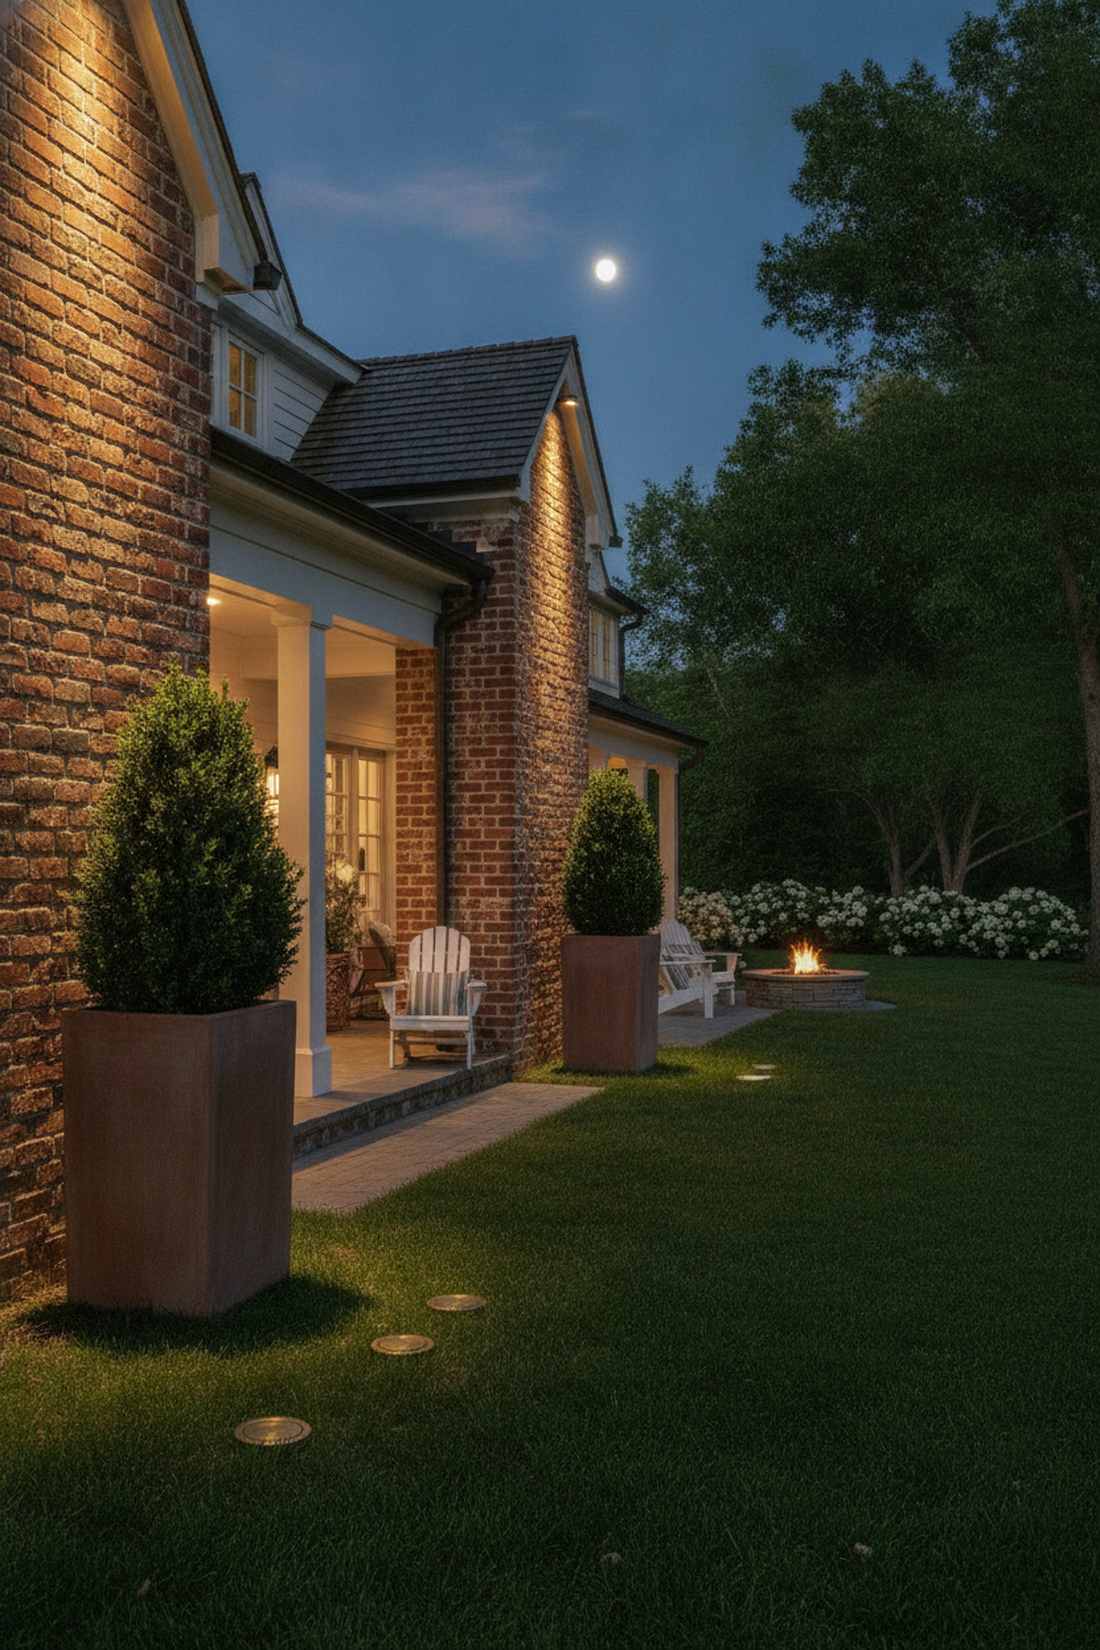
Feels like a grand estate entrance. This architectural corner uplighting works exceptionally well for highlighting textured brick, columns, or tall planters.
Burying the fixture flush with the dirt bypasses visual clutter and pushes all the focus onto the dramatic vertical light beam. Using professional-grade landscape uplighting kits guarantees the beam reaches the roofline.
This dramatically upscale trick costs about $60 per corner.
- Key Materials: Brass well lights, low-voltage wire
- Vibe / Style: Resort Architecture
- Difficulty: Moderate (trenching required)
- Budget Breakdown: Brass fixtures: $45 | Wire: $15.
- Creator’s Tip: Angle the internal bulb slightly toward the wall to maximize the texture-grazing effect.
- Smart Sourcing: Use heavy cast-brass well light covers and direct-burial landscape wire (100ft spool).
13. Linear Floor Channel Lighting
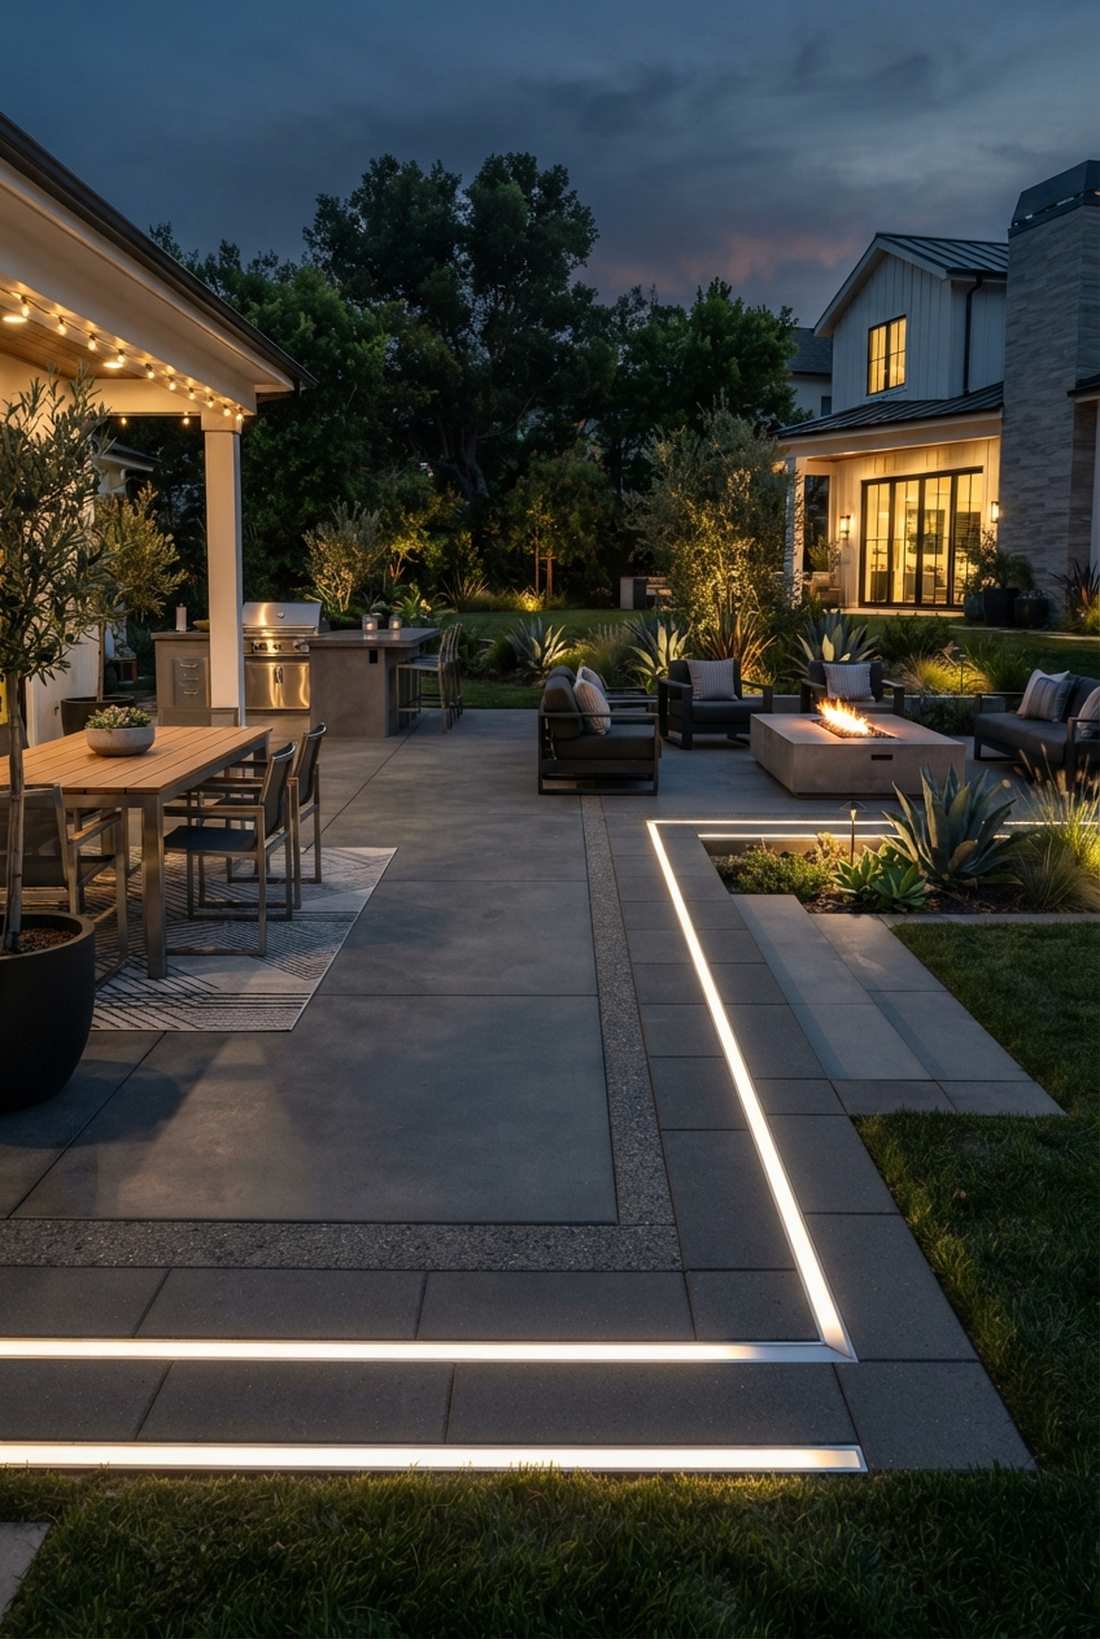
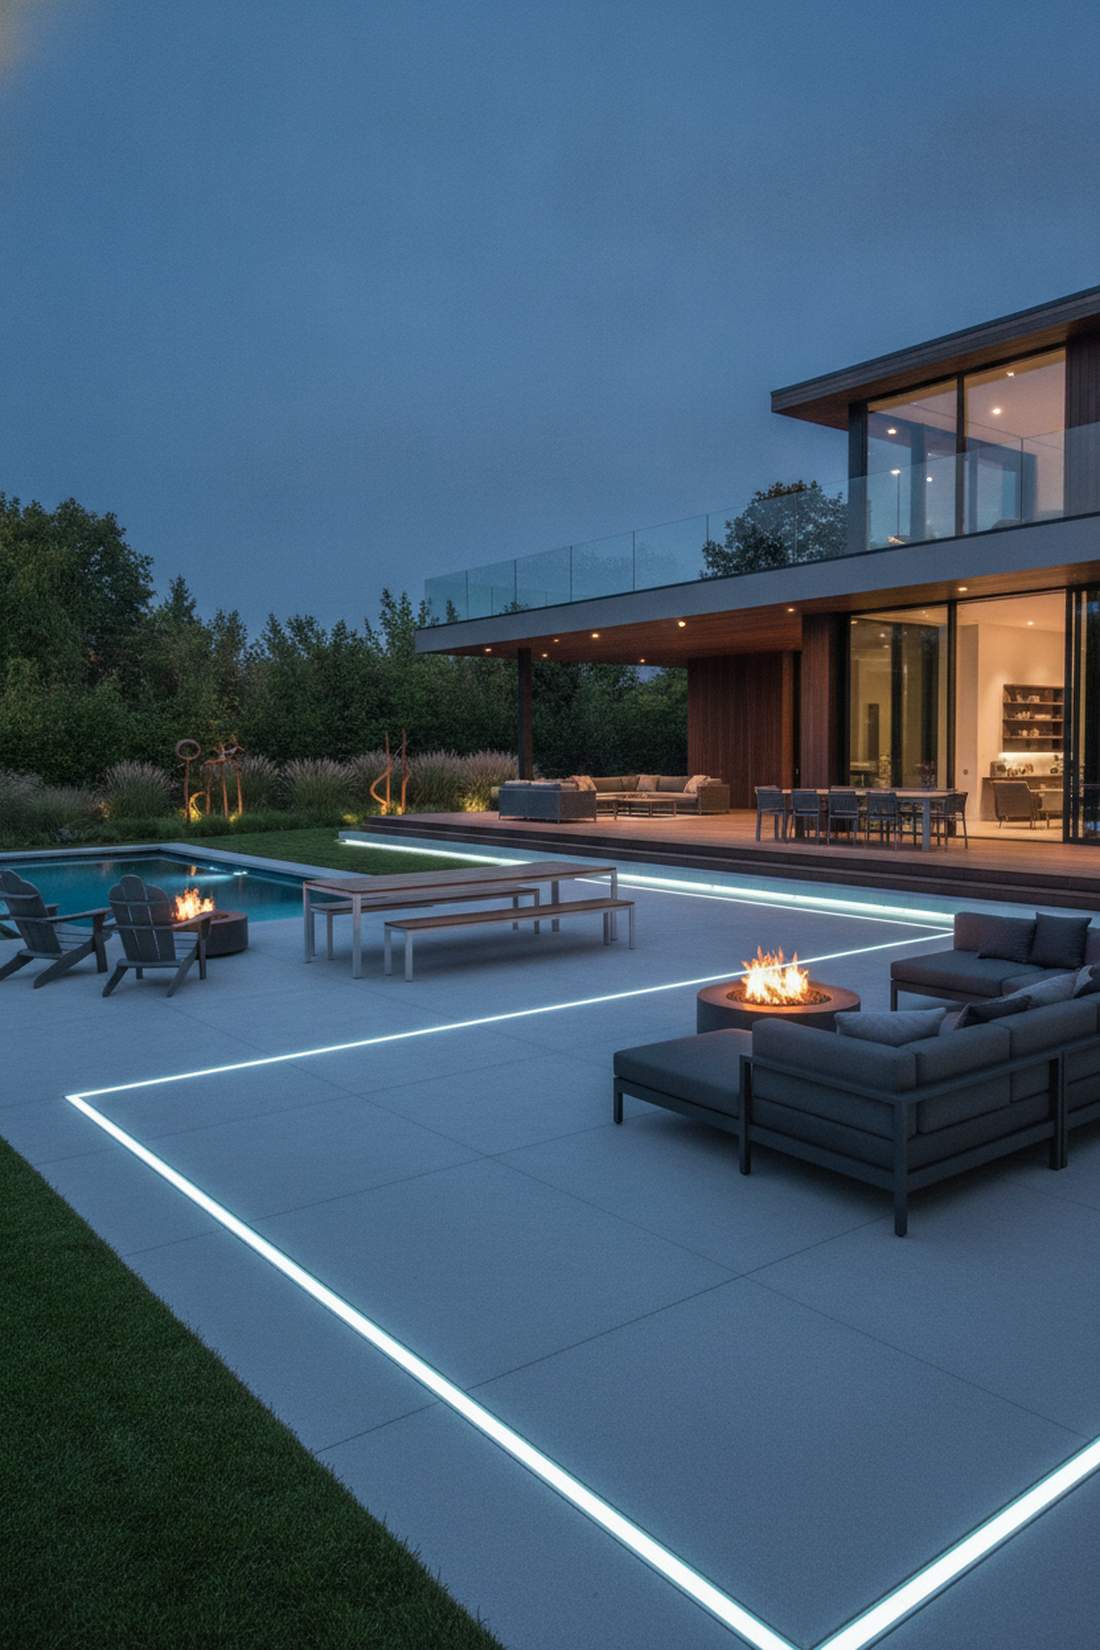
Feels like a futuristic outdoor lounge. This flush paver line lighting works exceptionally well for bordering sleek concrete patios or separating dining from seating.
Slicing light directly into the ground gives a flawless designer-level finish that defines spatial boundaries without walls. It is an aggressive, ultra-modern tactic that makes a massive impact after dark.
Expect a budget of $150+ due to the concrete cutting required. Pin this if you are pouring new hardscaping soon.
- Key Materials: Heavy-duty drive-over LED profiles, silicone sealant
- Vibe / Style: Ultra-Modern
- Difficulty: Advanced (masonry work)
- Budget Breakdown: LED channels: $100 | Sealant/tools: $50.
- Creator’s Tip: Connect to a smart controller so you can dim the floor lines independently of the overheads.
- Smart Sourcing: Secure heavy-duty drive-over aluminum profiles and waterproof potting compound.
Most backyard DIYers ignore this next trick, but it is the fastest way to add luxury…
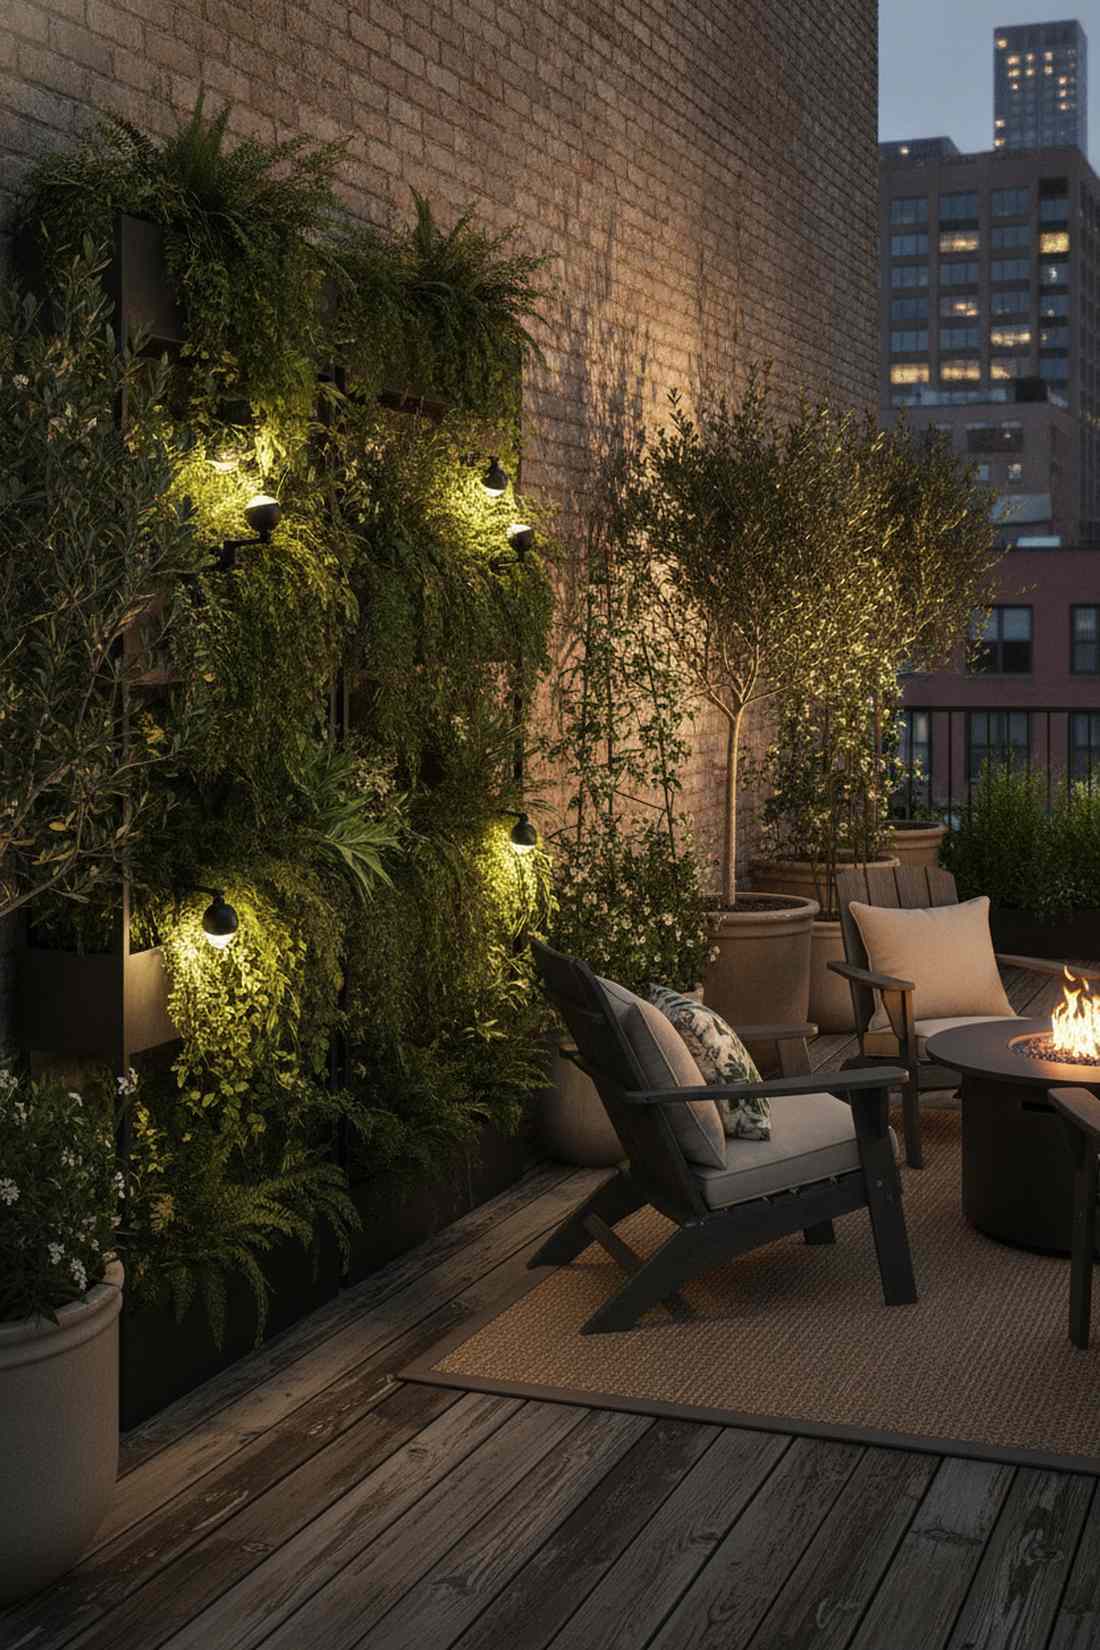
14. Mushroom Bollard Groupings
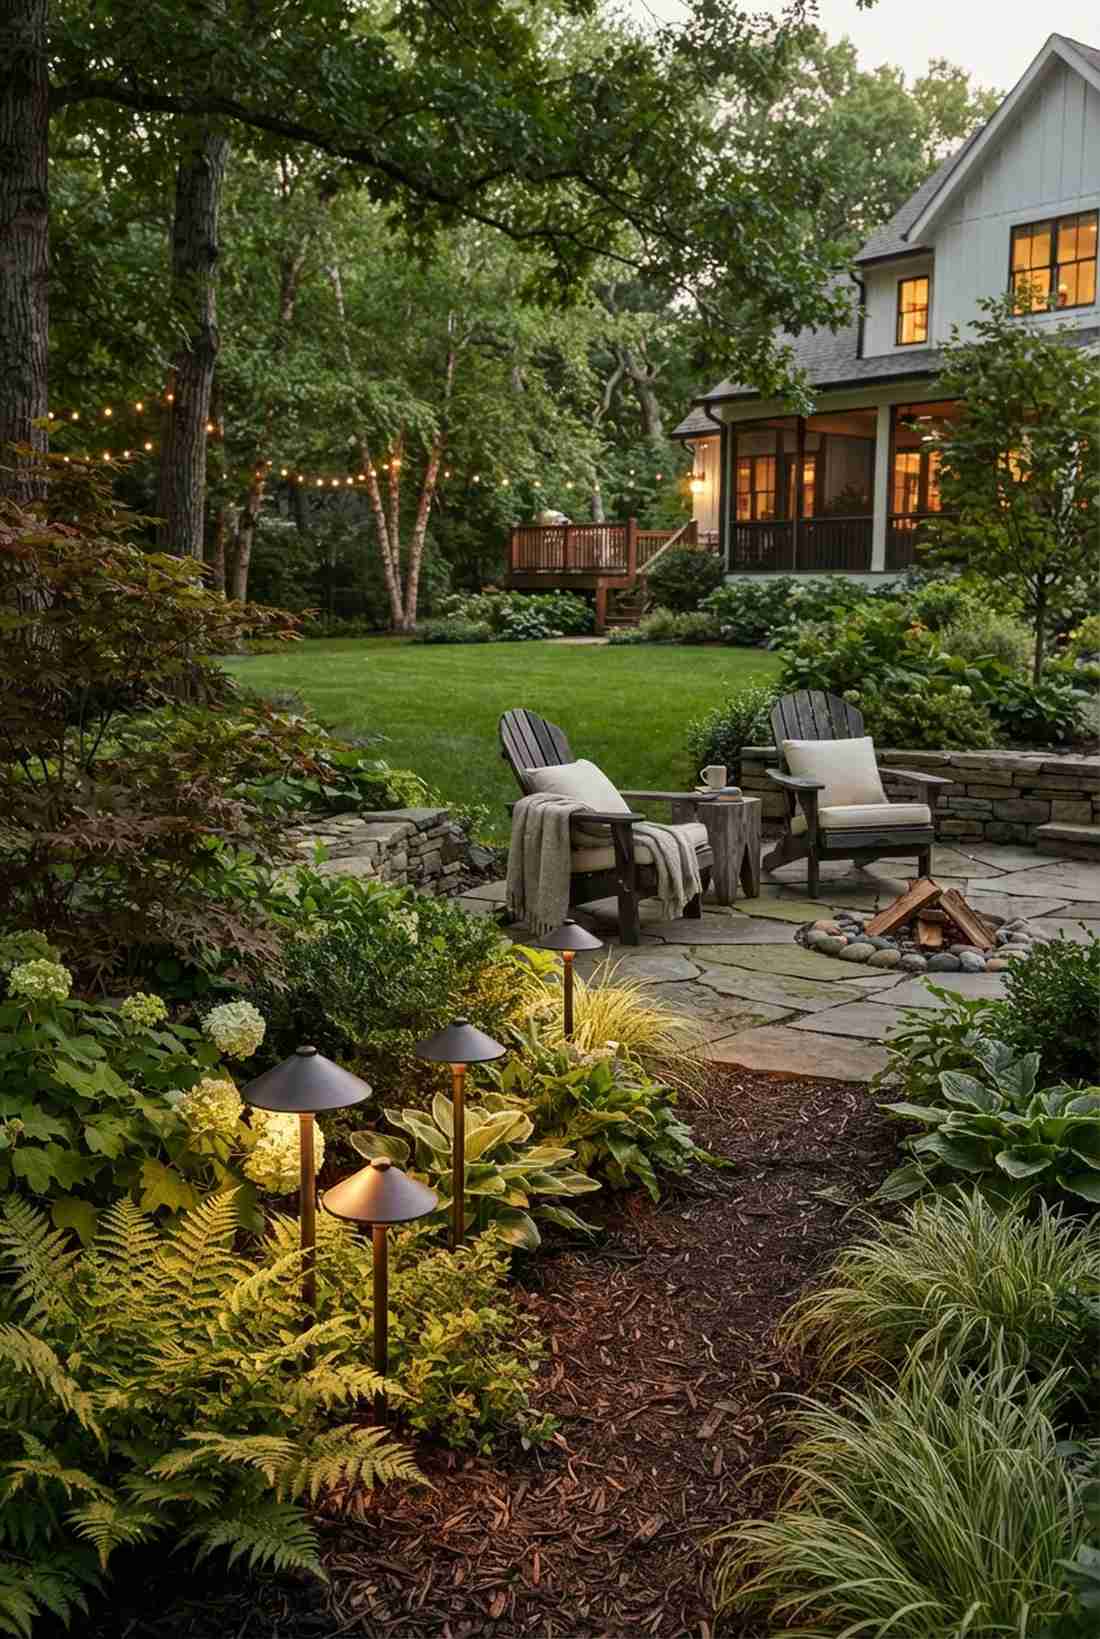
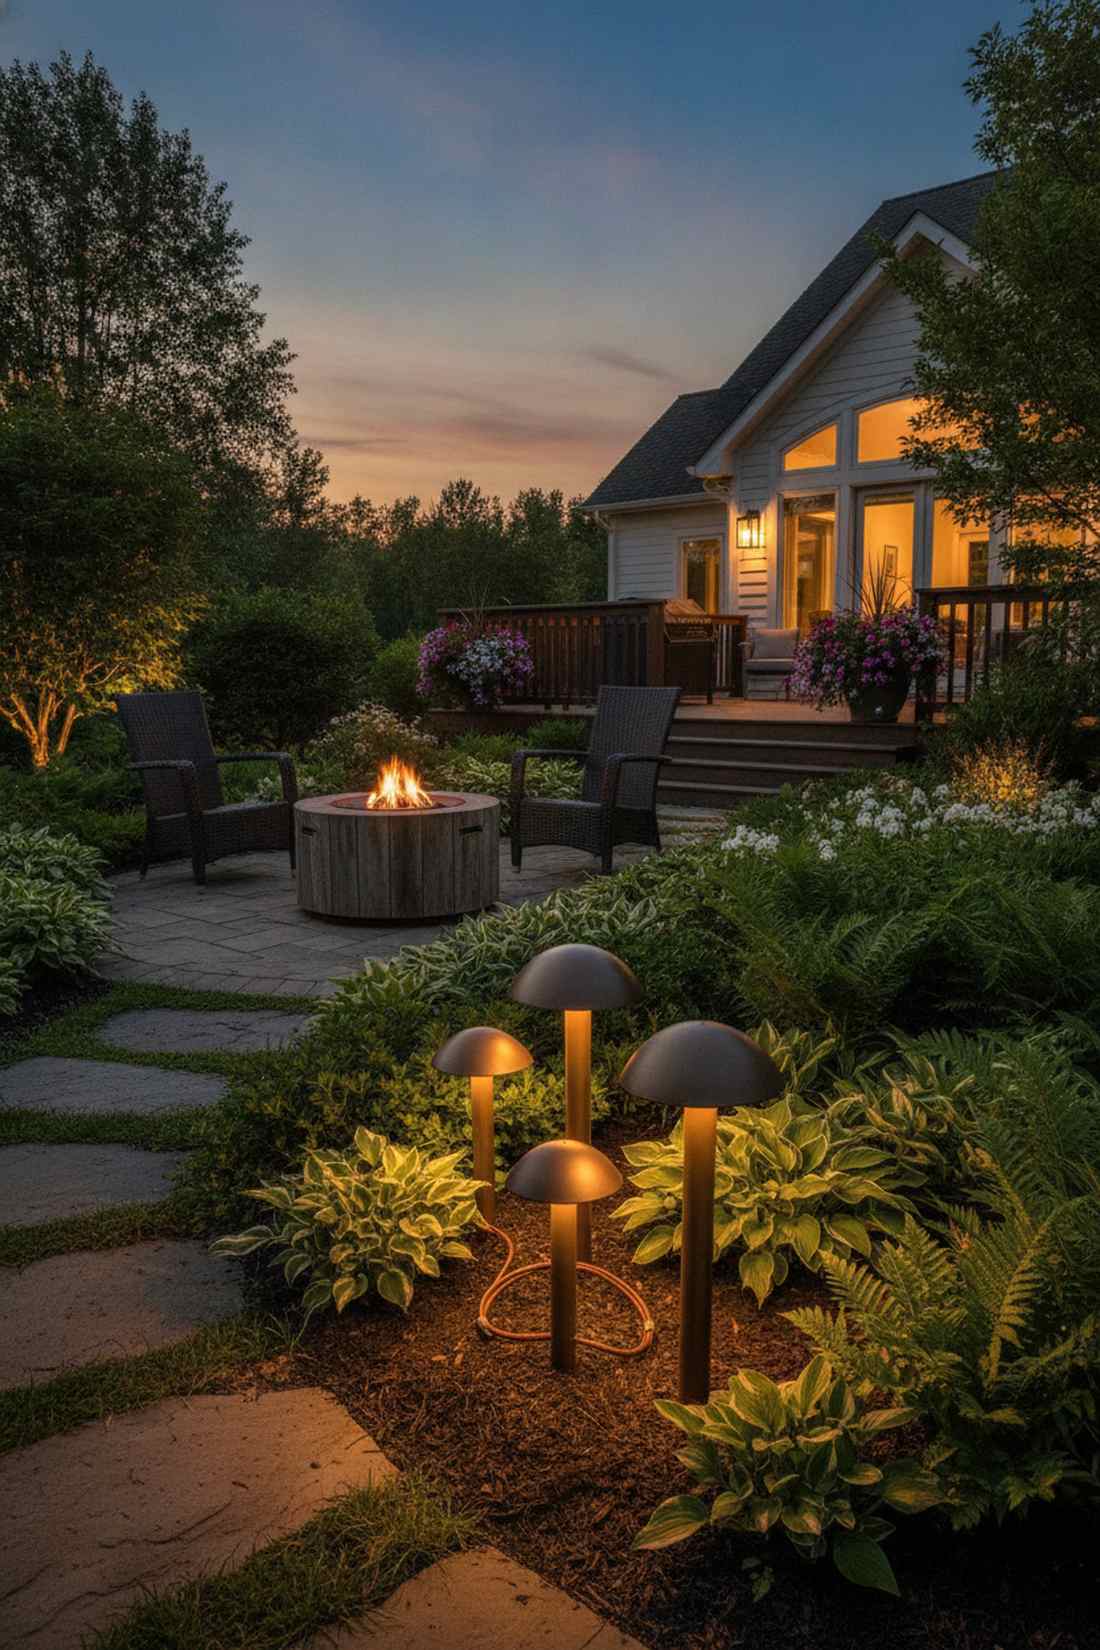
Feels like a peaceful woodland retreat. This low-profile plant lighting works exceptionally well for dense garden beds right next to seating zones.
Clustering small downward-facing shades delivers a surprisingly premium look by preventing harsh glare from hitting your guests in the eyes. It washes the foliage in soft pools rather than blinding spotlights.
A trio of these costs around $90–$120.
- Key Materials: Bronze mushroom pathway lights
- Vibe / Style: Organic Tranquility
- Difficulty: Easy
- Budget Breakdown: Fixture trio: $100 | Connectors: $10.
- Creator’s Tip: Stagger the heights slightly (e.g., 12″, 18″, 24″) if your plant canopy allows it.
- Smart Sourcing: Find powder-coated bronze mushroom light kits and gel-filled waterproof wire nuts.
15. Strip Lighting Under Built-In Benches
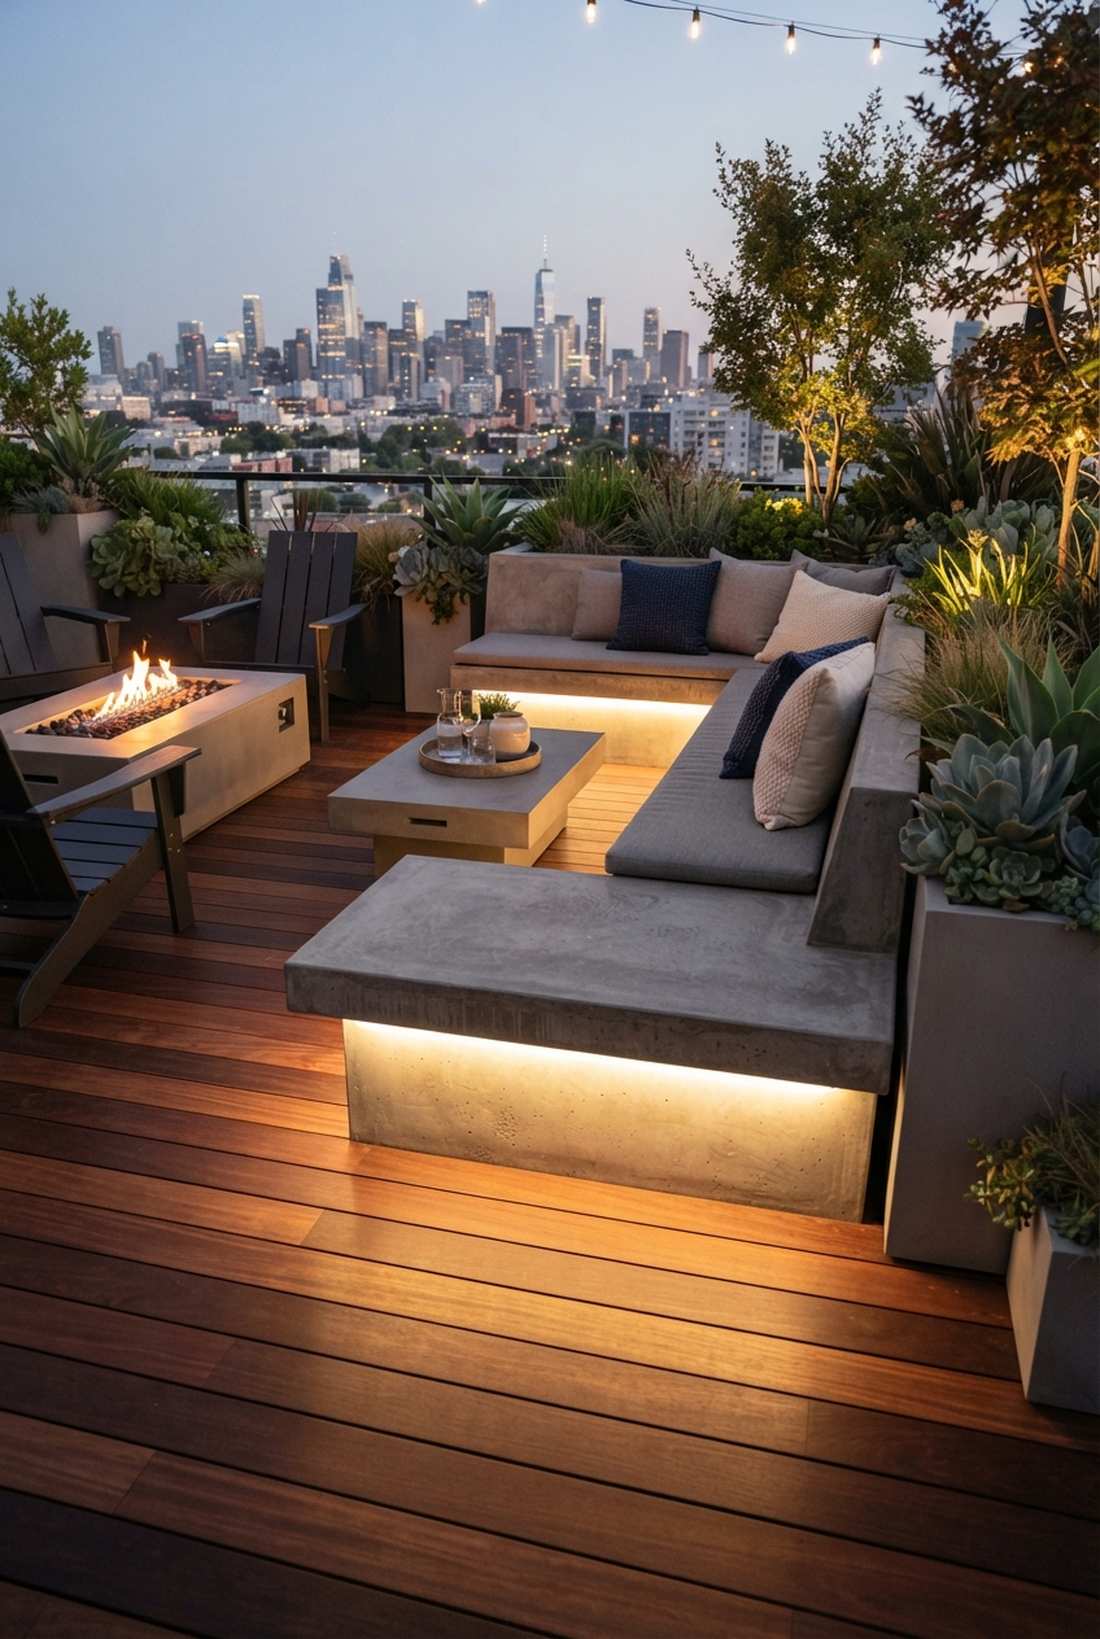
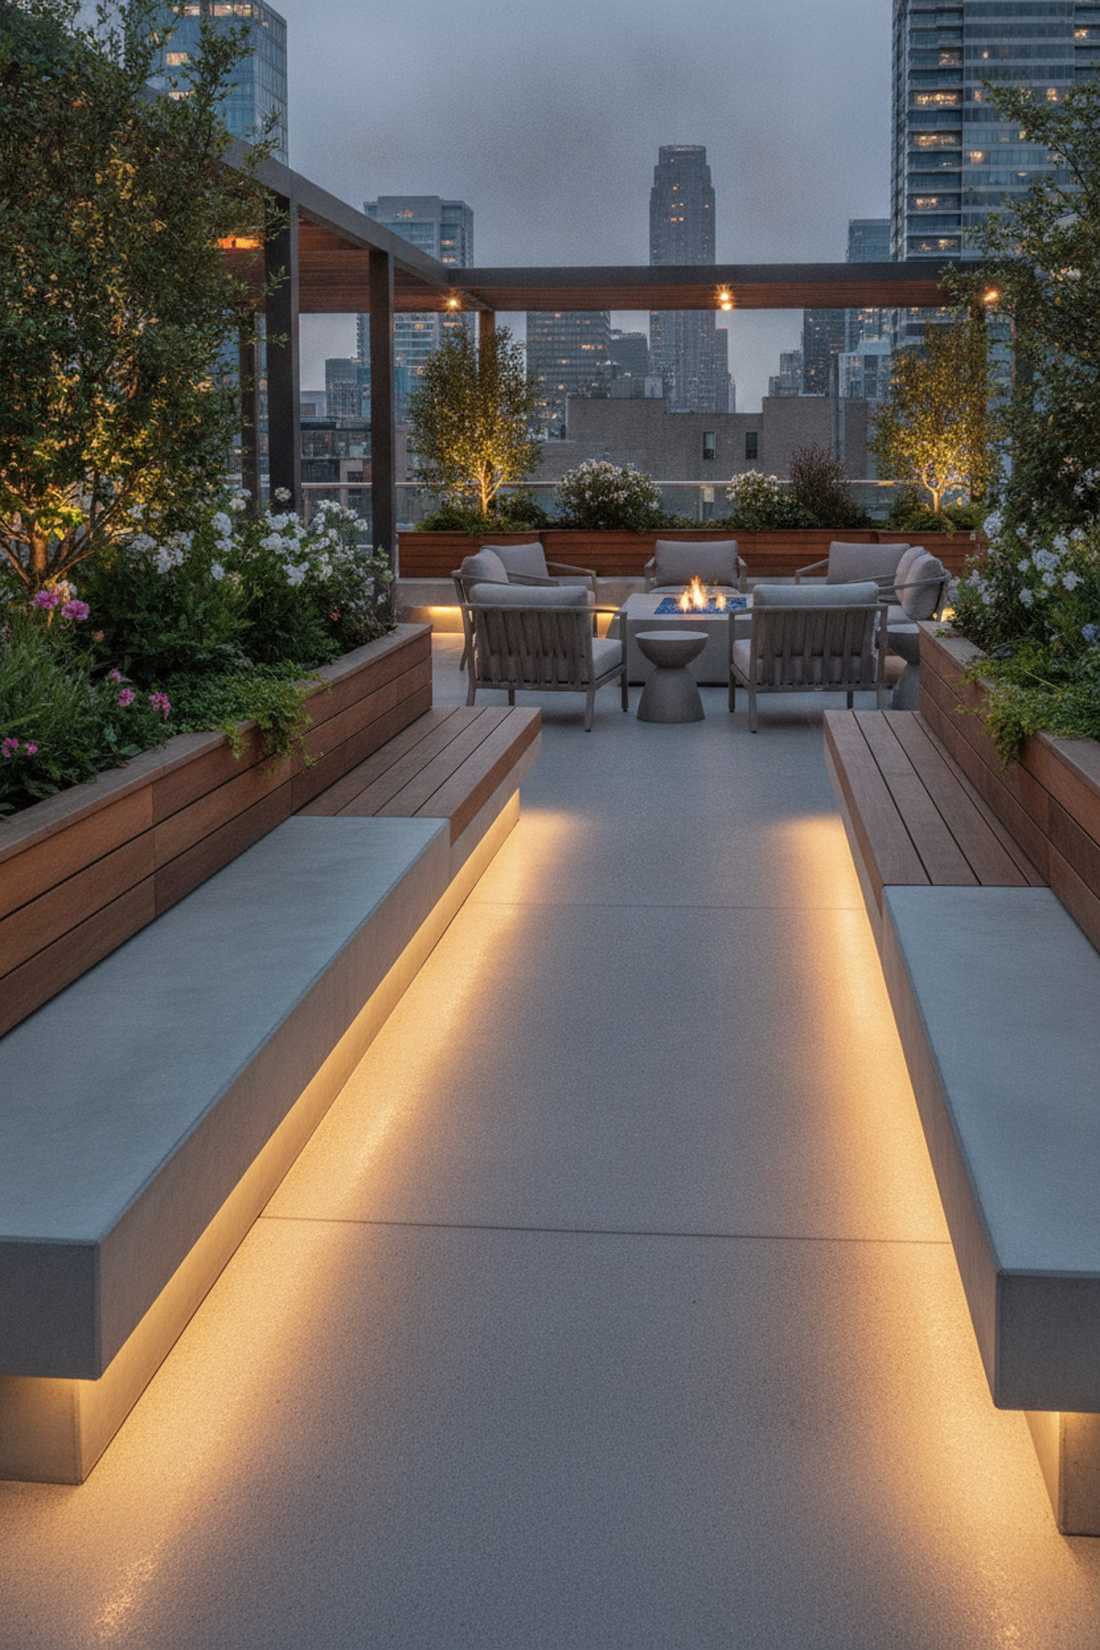
Straight out of a luxury rooftop bar. This hidden under-seat wash works exceptionally well for built-in wooden planters or concrete seating walls.
Washing light directly downward over the floor cheats the system by making heavy block seating look like it’s magically floating. It is a brilliant way to add functional footway light without adding tripping hazards.
You can easily pull this off for around $40. Save this to your patio seating ideas board.
- Key Materials: Outdoor LED tape, mounting clips
- Vibe / Style: Urban Lounge
- Difficulty: Easy to Moderate
- Budget Breakdown: LED spool: $30 | Clips: $10.
- Creator’s Tip: Recess the tape at least 2 inches back from the edge to ensure the bulbs are never visible.
- Smart Sourcing: Use heavy-duty silicone encased LED tape and screw-in silicone mounting brackets (bulk pack).
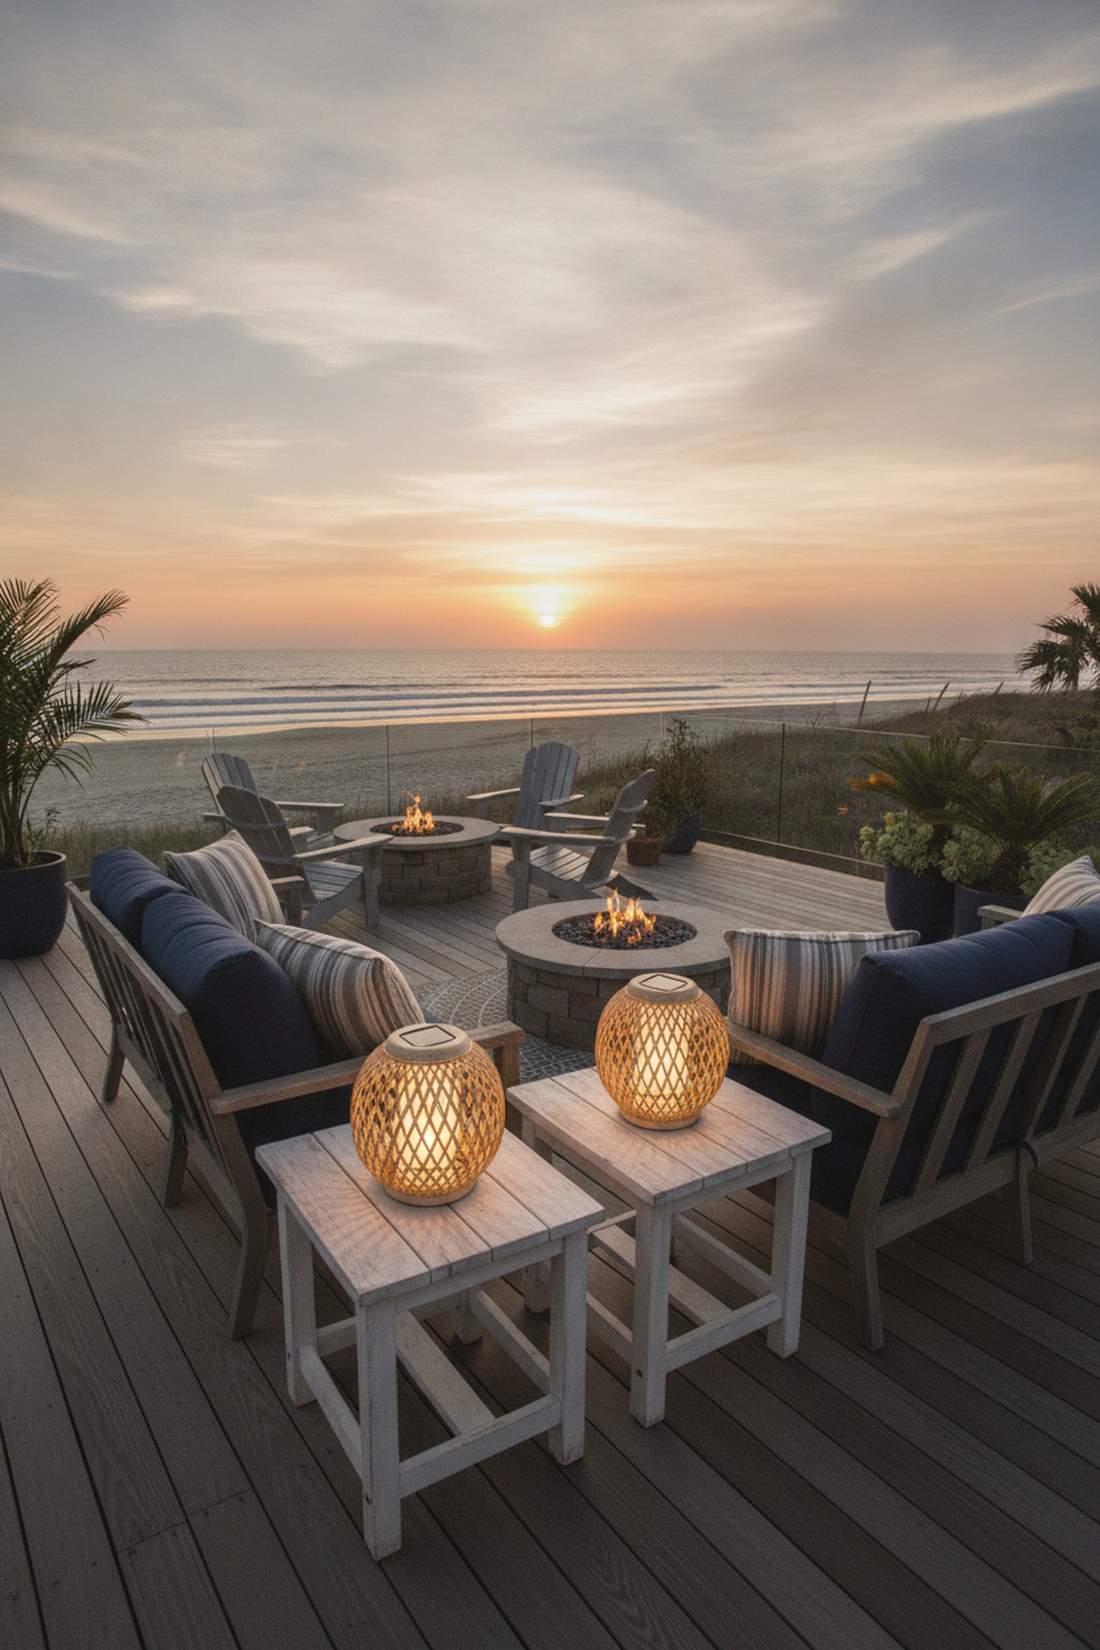
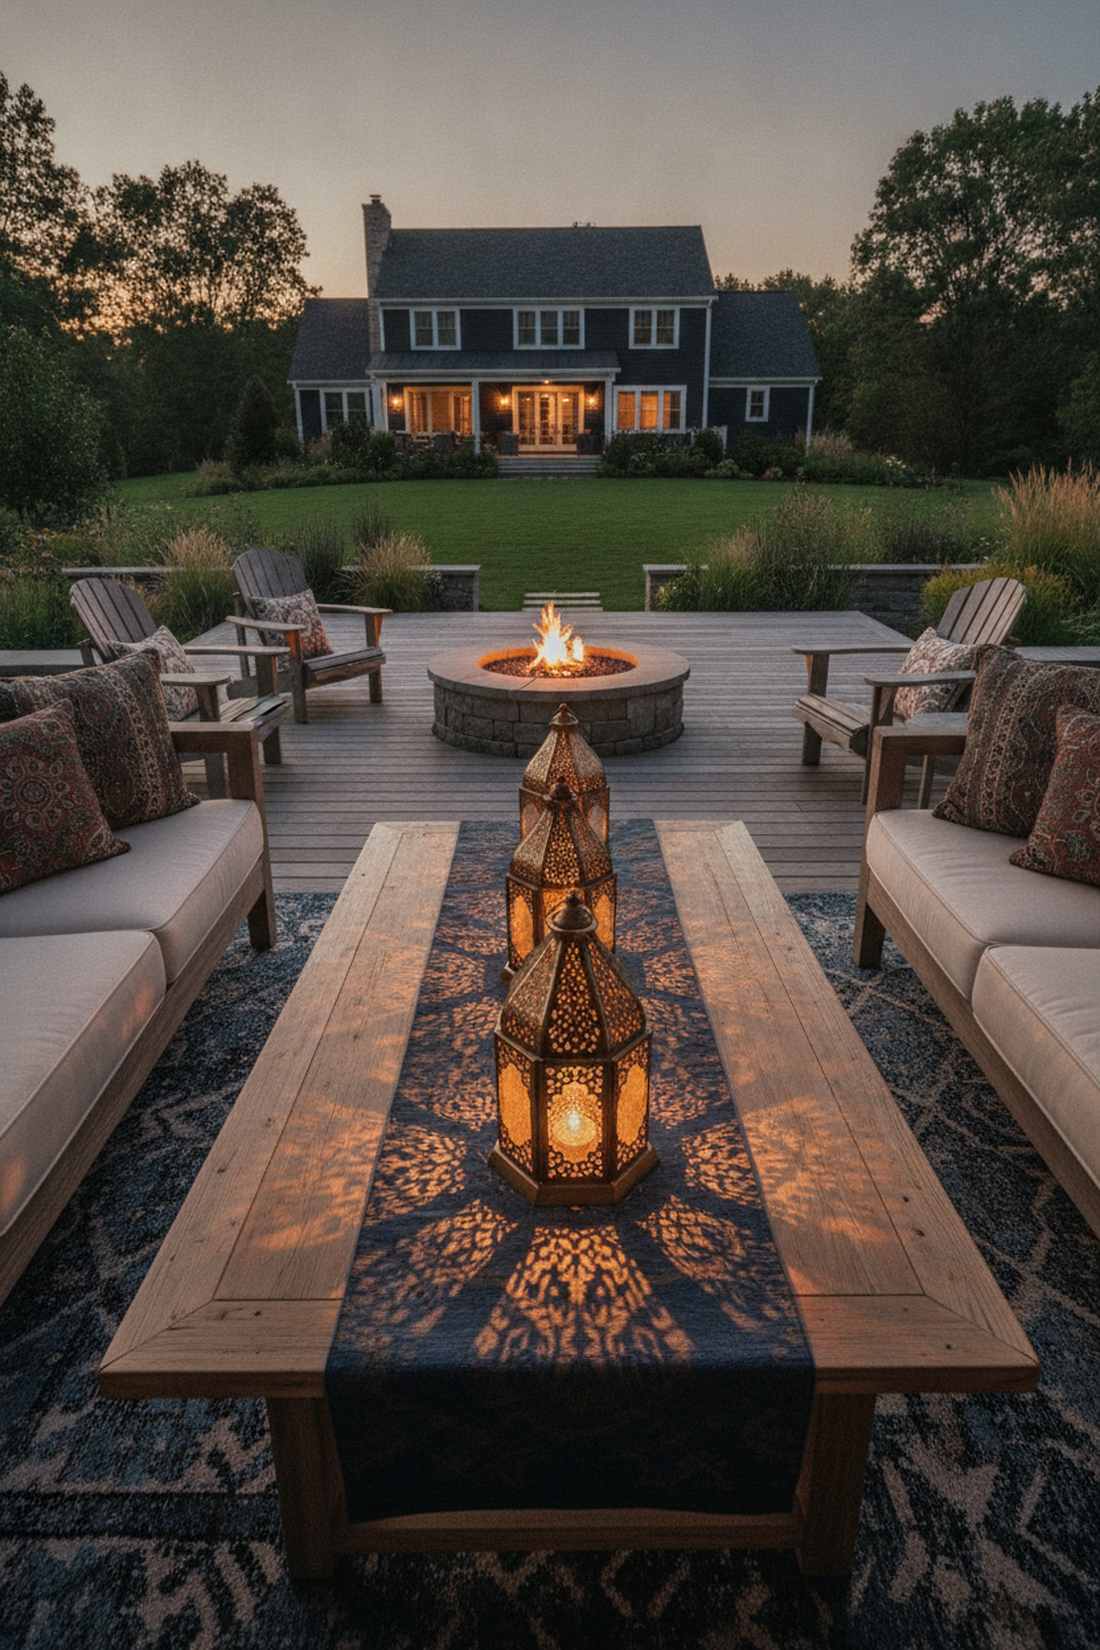
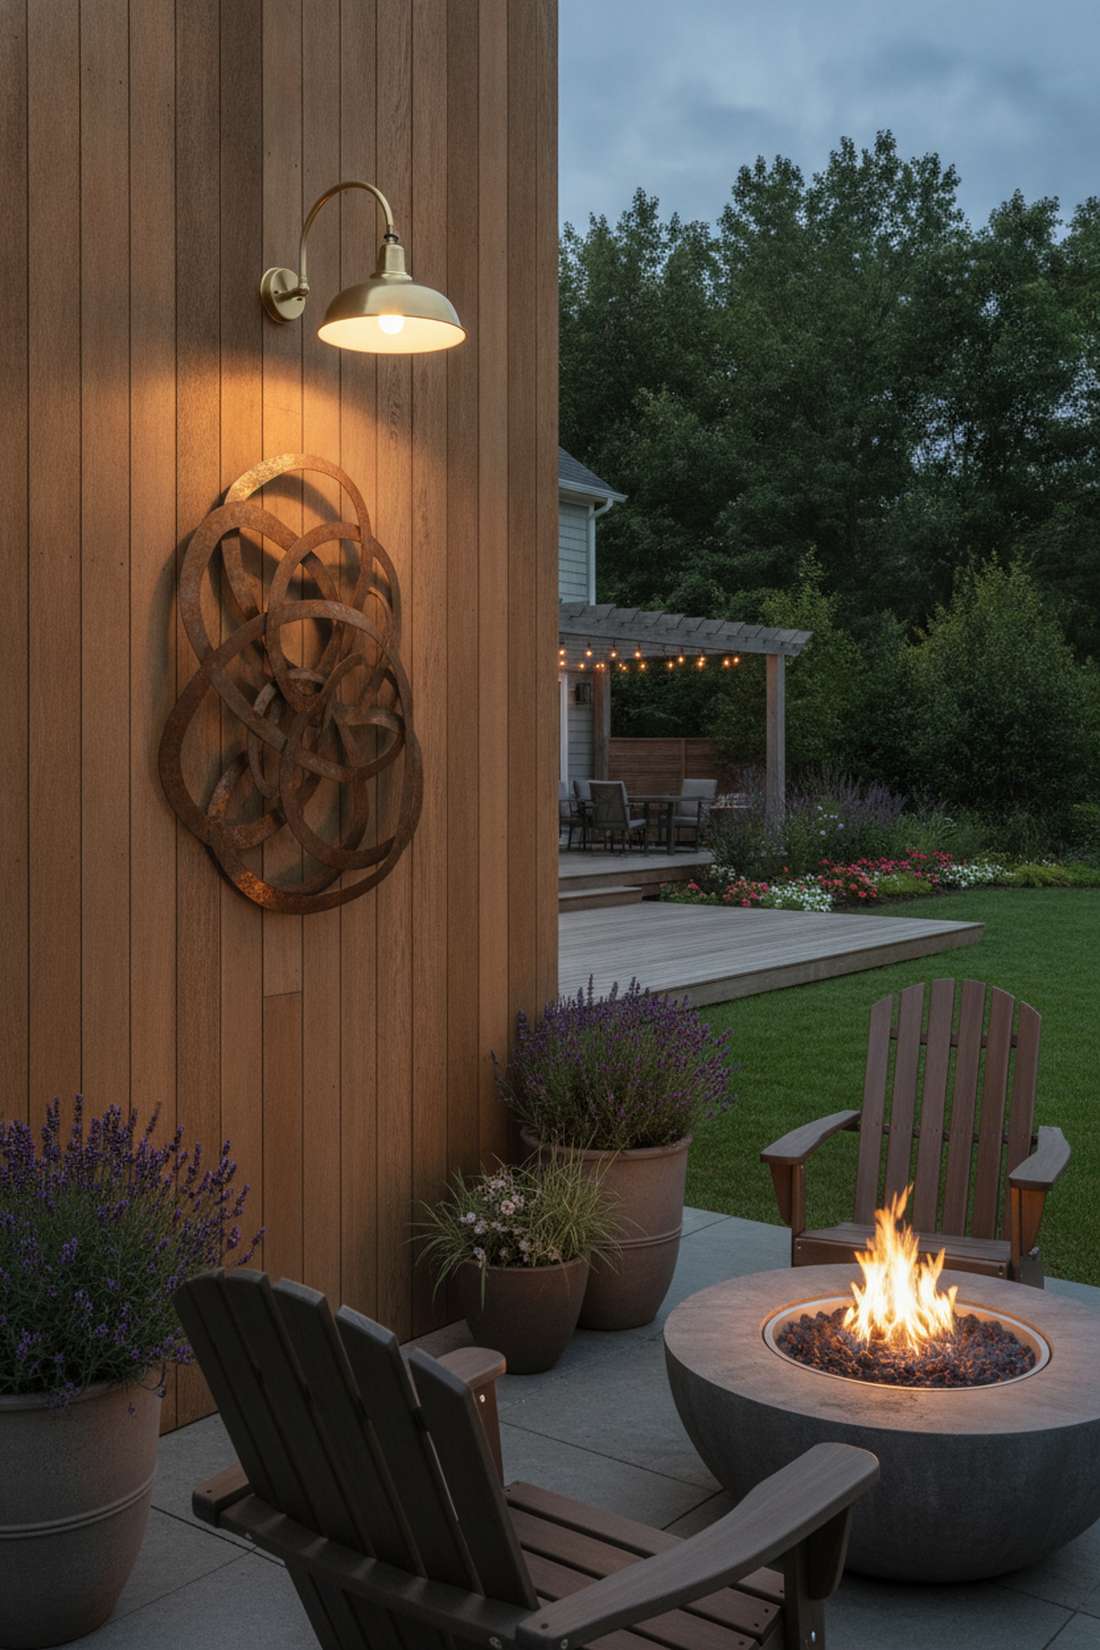
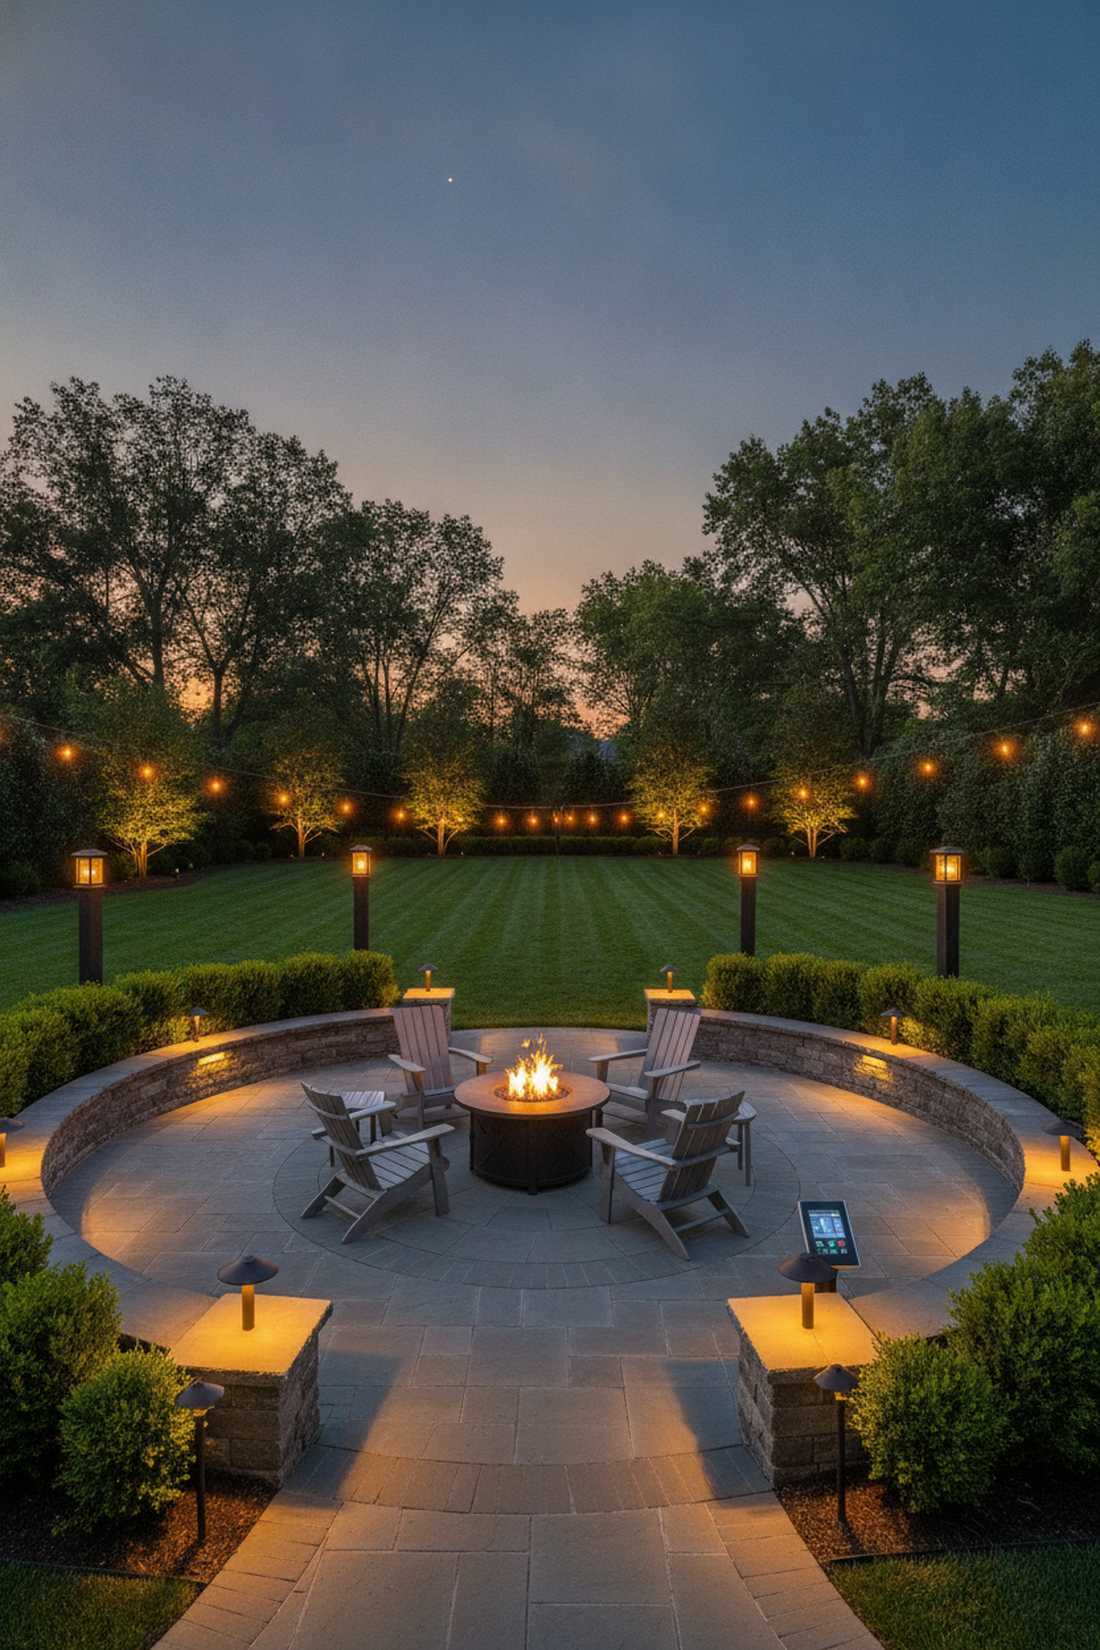
16. Fire Feature Perimeter Ring

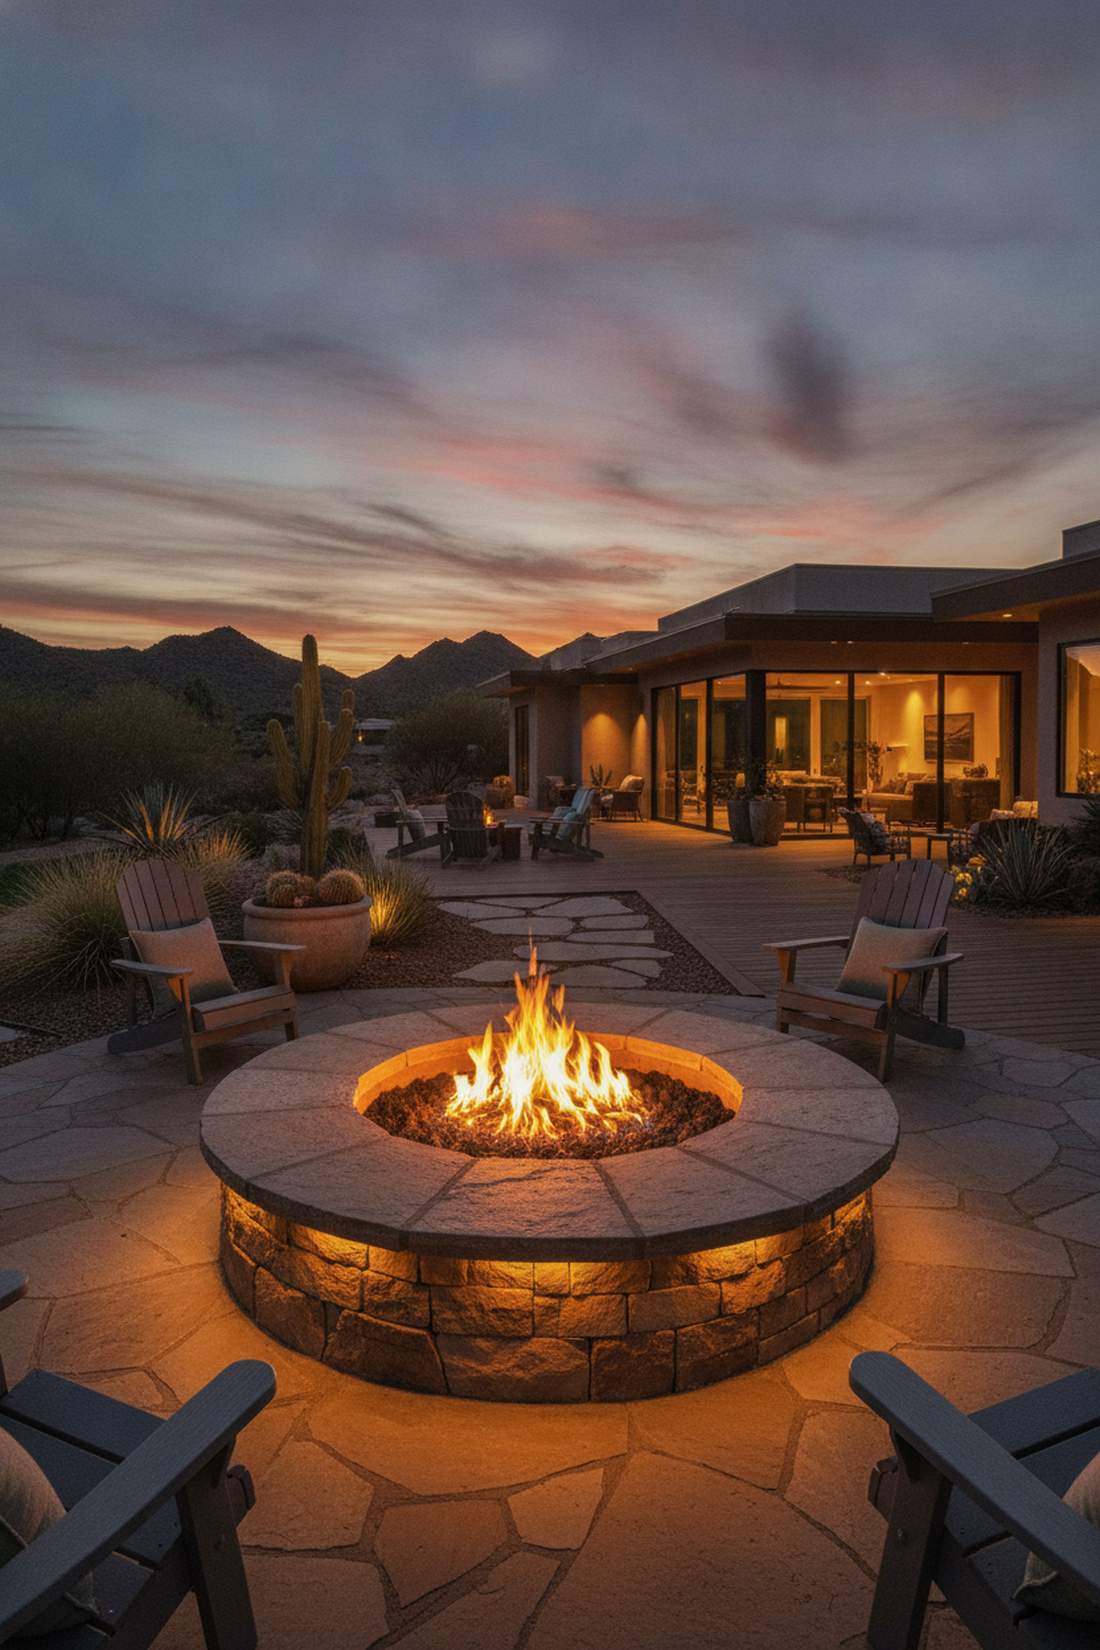
Feels like an exclusive desert resort campfire. This circular safety glow works exceptionally well for defining the stone edge of a built-in fire pit.
Embedding tiny puck lights around the coping gives a designer-level finish that ensures no one trips over the hearth in the dark. Matching the LED color temperature to the warm amber of the flames is critical here.
Plan for roughly $75 to circle a standard pit.
- Key Materials: Low-voltage puck lights, masonry bit
- Vibe / Style: Desert Luxury
- Difficulty: Moderate
- Budget Breakdown: Puck lights: $60 | Drill bit: $15.
- Creator’s Tip: Use 2200K ultra-warm LEDs so the artificial light doesn’t clash with the real fire.
- Smart Sourcing: Invest in IP68 rated masonry puck lights and a diamond-tipped masonry drill bit.
Outdoor Lighting Table Arrangements
17. Cordless LED Table Lamp Pairs
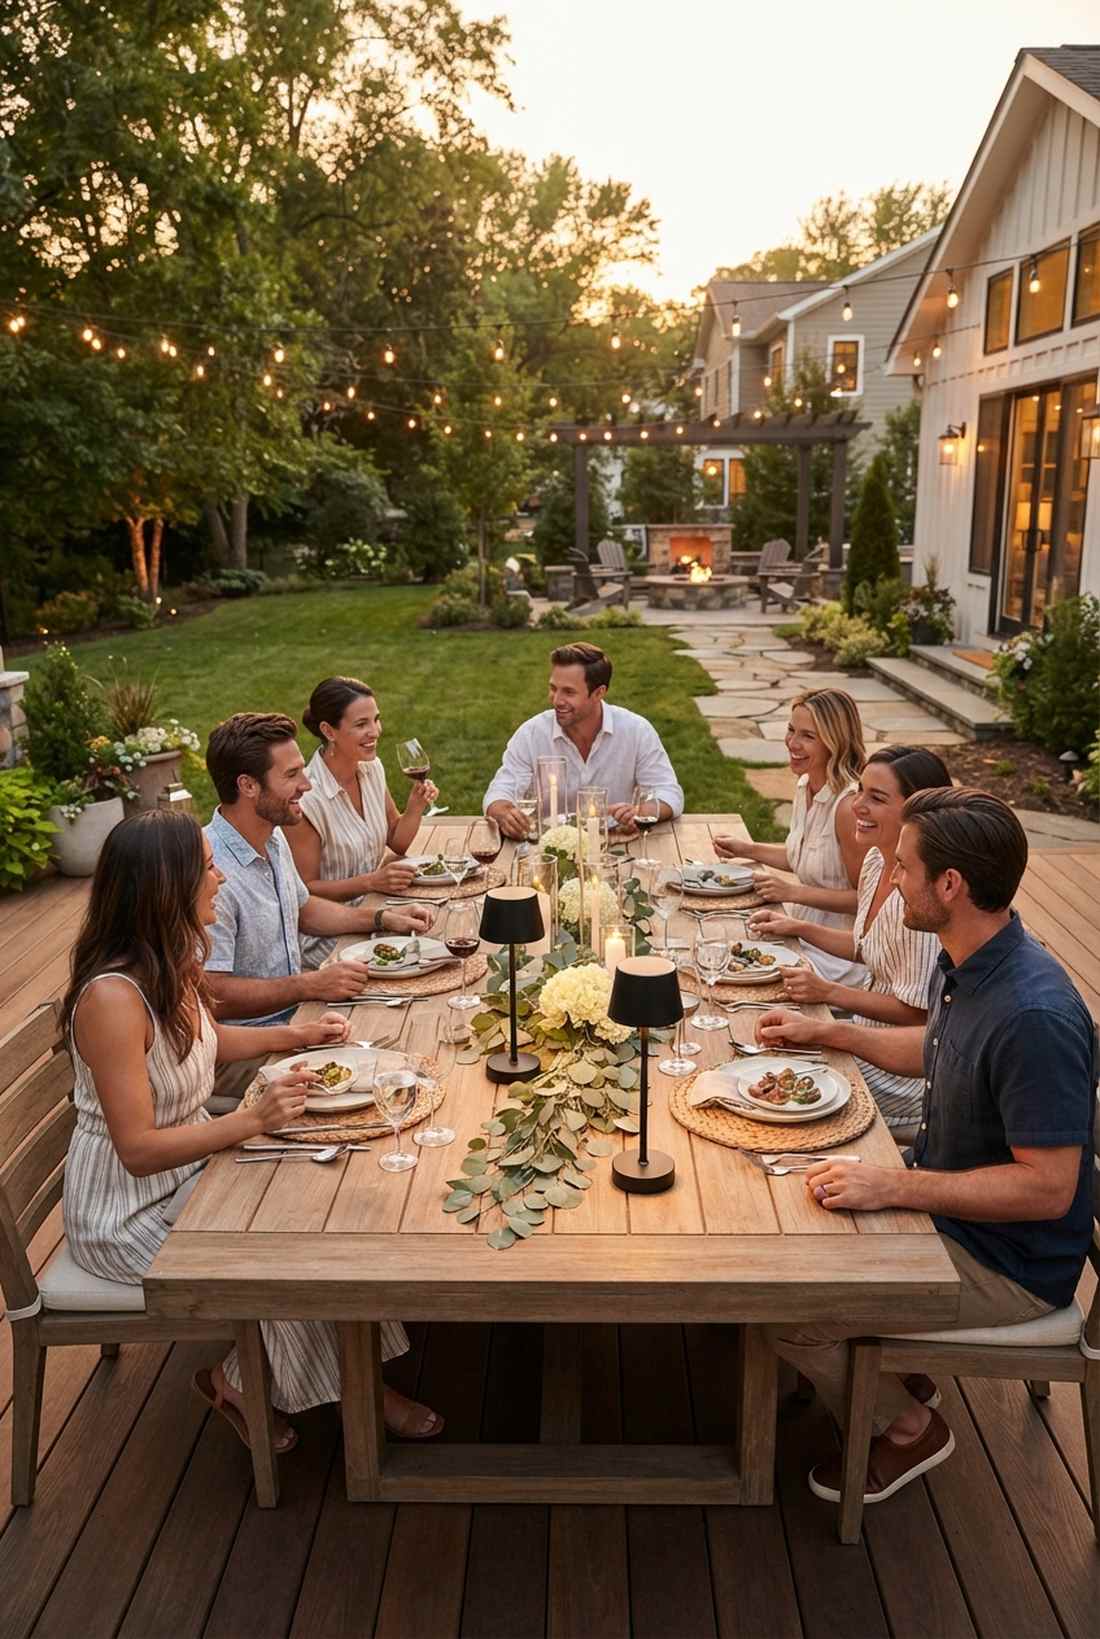
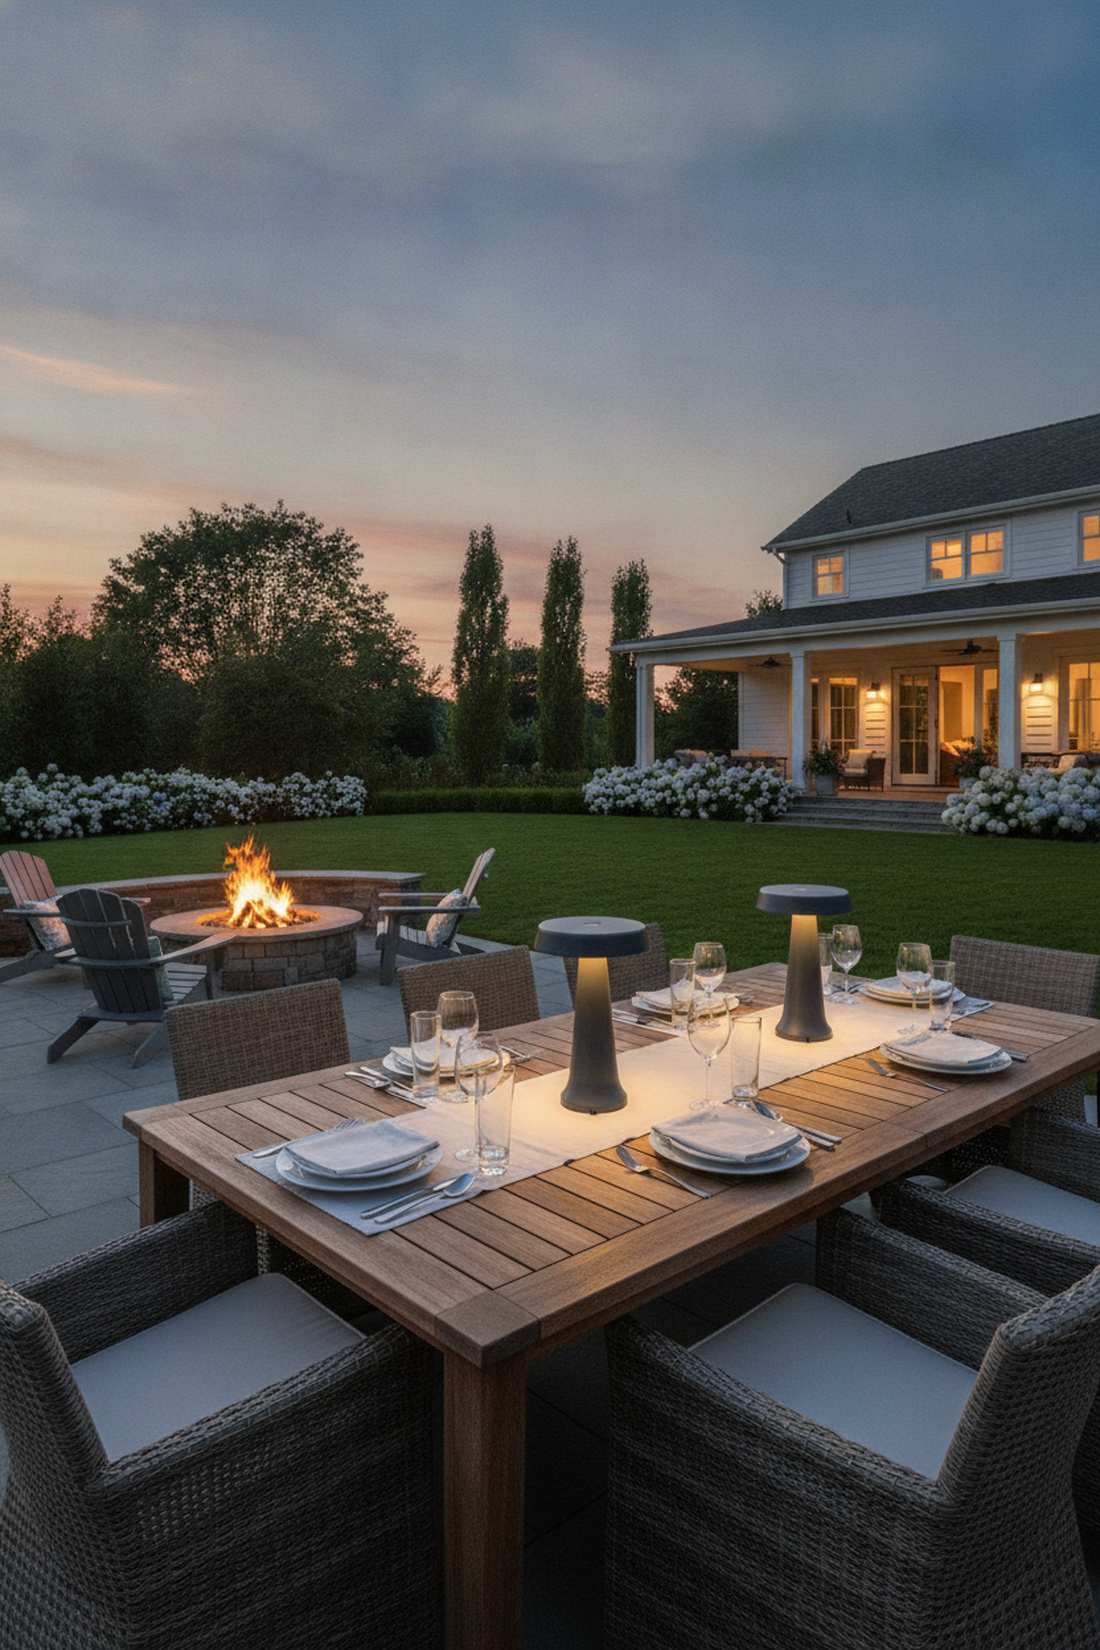
Feels like dining at a five-star Michelin restaurant outdoors. This outdoor lighting table accent works exceptionally well for long rectangular dining tables.
Ditching ugly extension cords for heavy-weighted rechargeable lamps screams high-end luxury instantly. Modern patio table lighting has evolved, meaning these minimalist metal lamps easily hold a charge all weekend.
Expect to spend $60–$90 for a solid, wind-resistant pair.
- Key Materials: Heavy-base rechargeable LED lamps
- Vibe / Style: High-End Bistro
- Difficulty: Zero (just charge and place)
- Budget Breakdown: Lamp pair: $80.
- Creator’s Tip: Buy models with tap-to-dim features so you can lower the light when the food is cleared.
- Smart Sourcing: Choose die-cast aluminum cordless table lamps (2-pack) that are explicitly rainproof.
18. Lantern Centerpiece Cluster
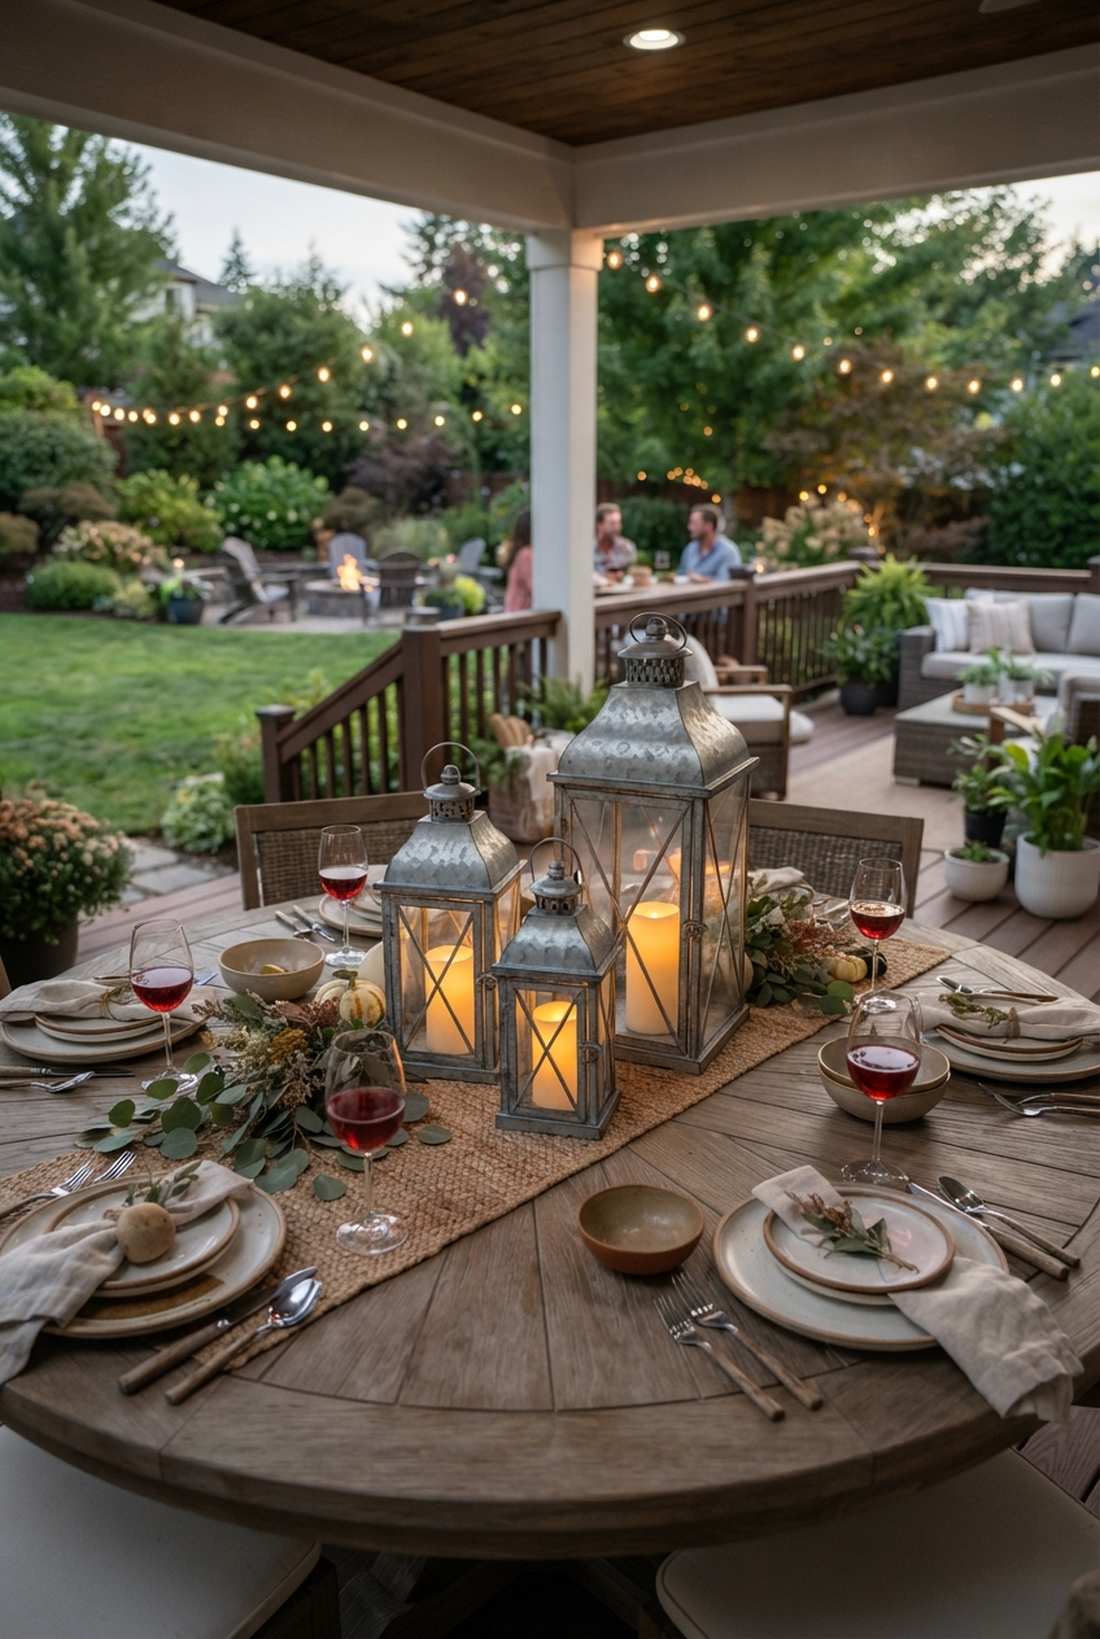
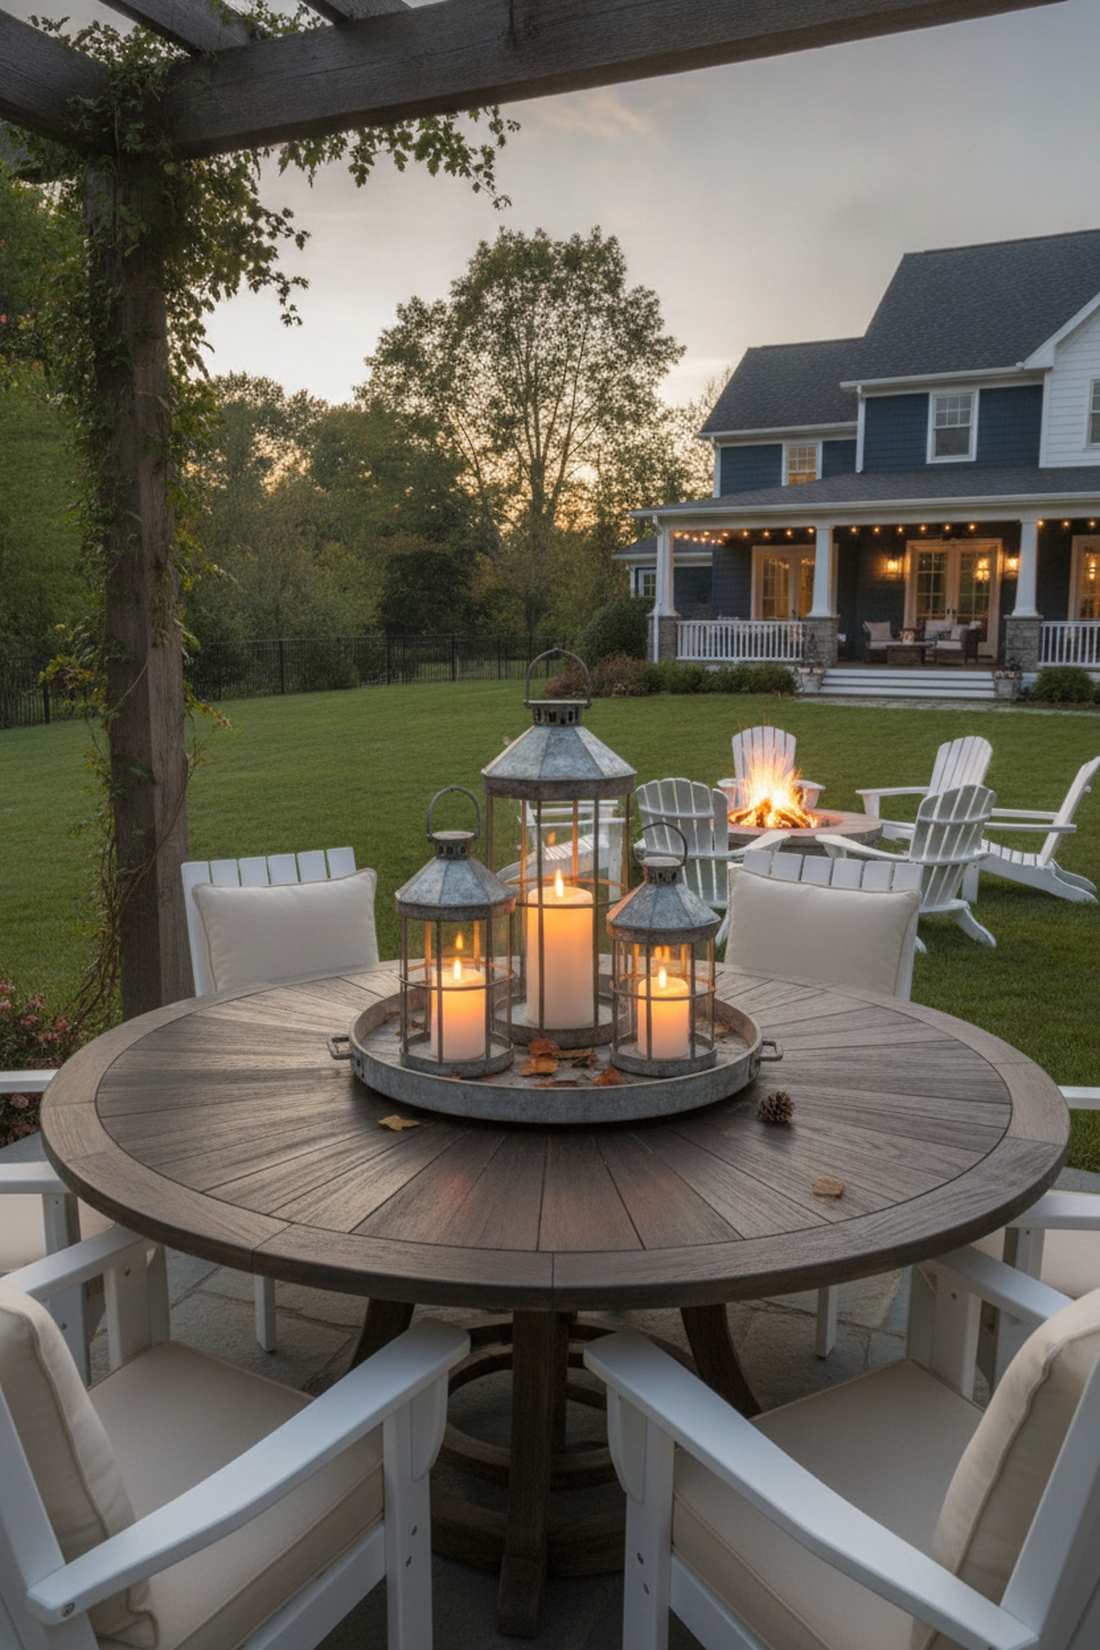
Feels like a rustic farmhouse feast. This flameless candle grouping works exceptionally well for round tables or deep lounge coffee tables.
Clustering three different heights together delivers a surprisingly premium look that builds massive volume and texture in the center of the space. Moving to waterproof LED pillars bypasses the mess of melted wax entirely.
You can assemble this for under $50. Save this for your next dinner party tablescape.
- Key Materials: Metal lanterns, outdoor LED pillar candles
- Vibe / Style: Rustic Charm
- Difficulty: Very easy
- Budget Breakdown: Lantern trio: $35 | Candles: $15.
- Creator’s Tip: Set the candles on an auto-timer so they magically flicker to life right at sunset.
- Smart Sourcing: Order a galvanized lantern set (varying heights) and resin waterproof LED candles (multi-pack).
This next overhead table trick completely removes the need for annoying tabletop clutter…
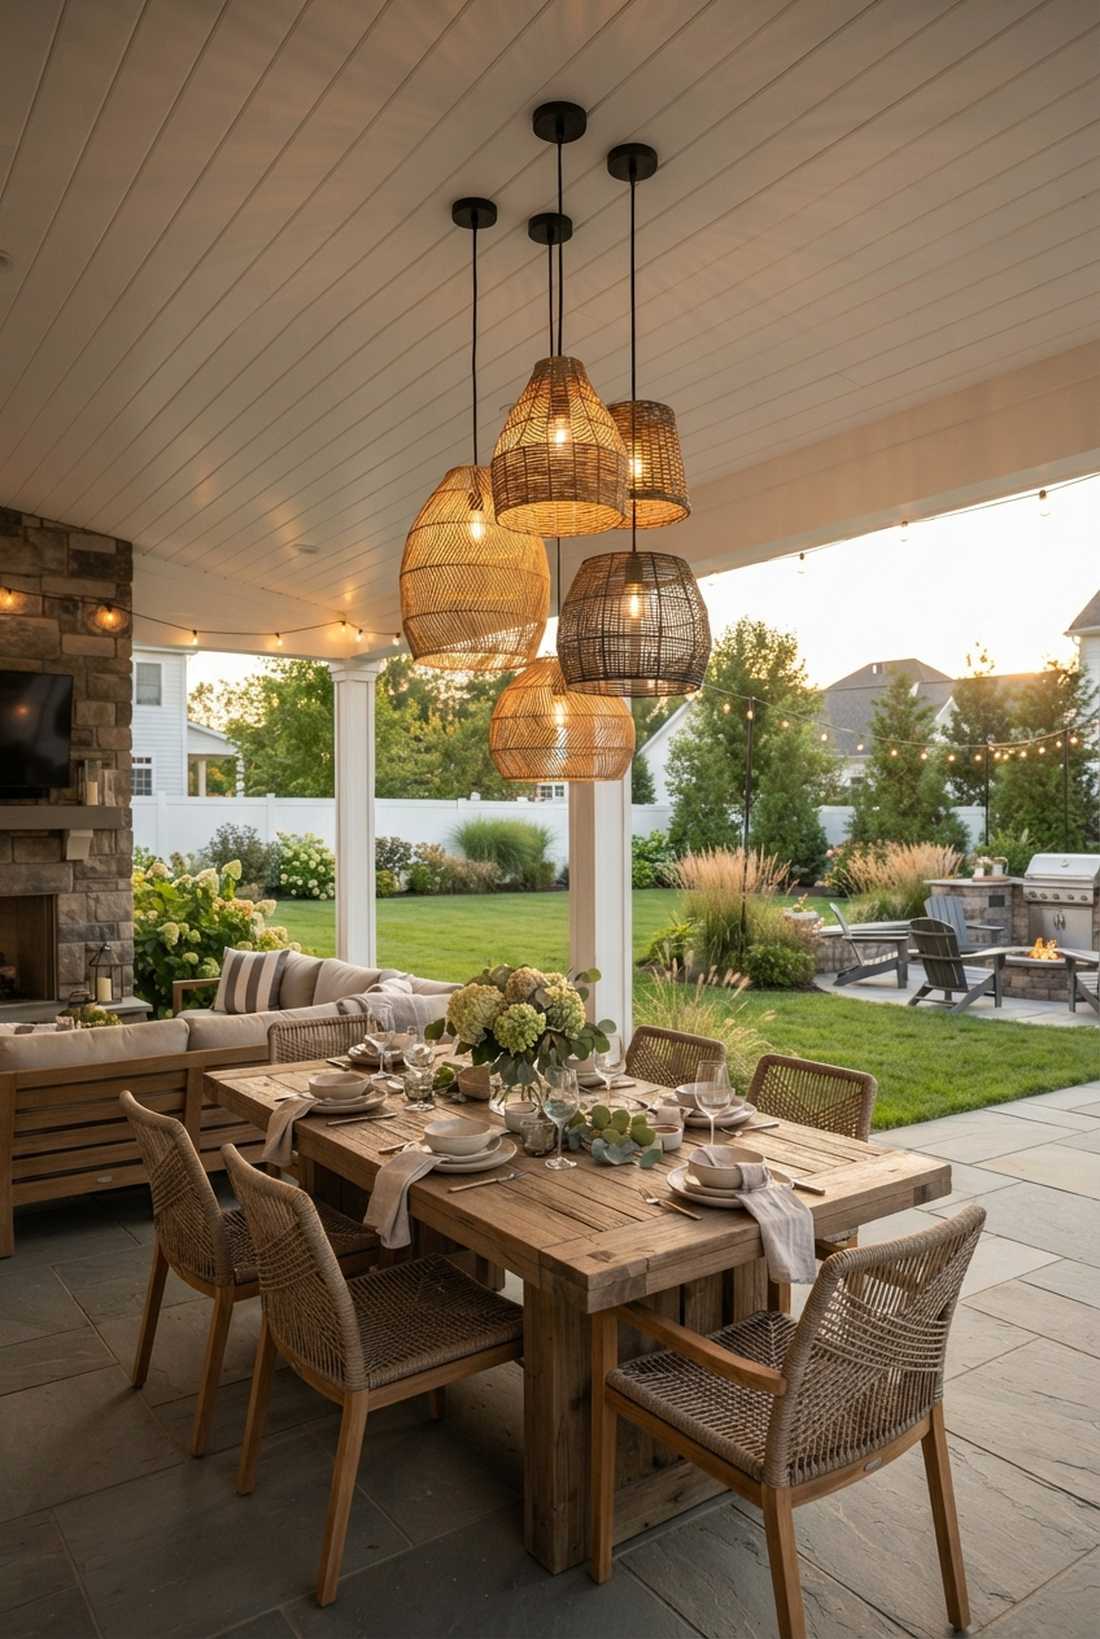
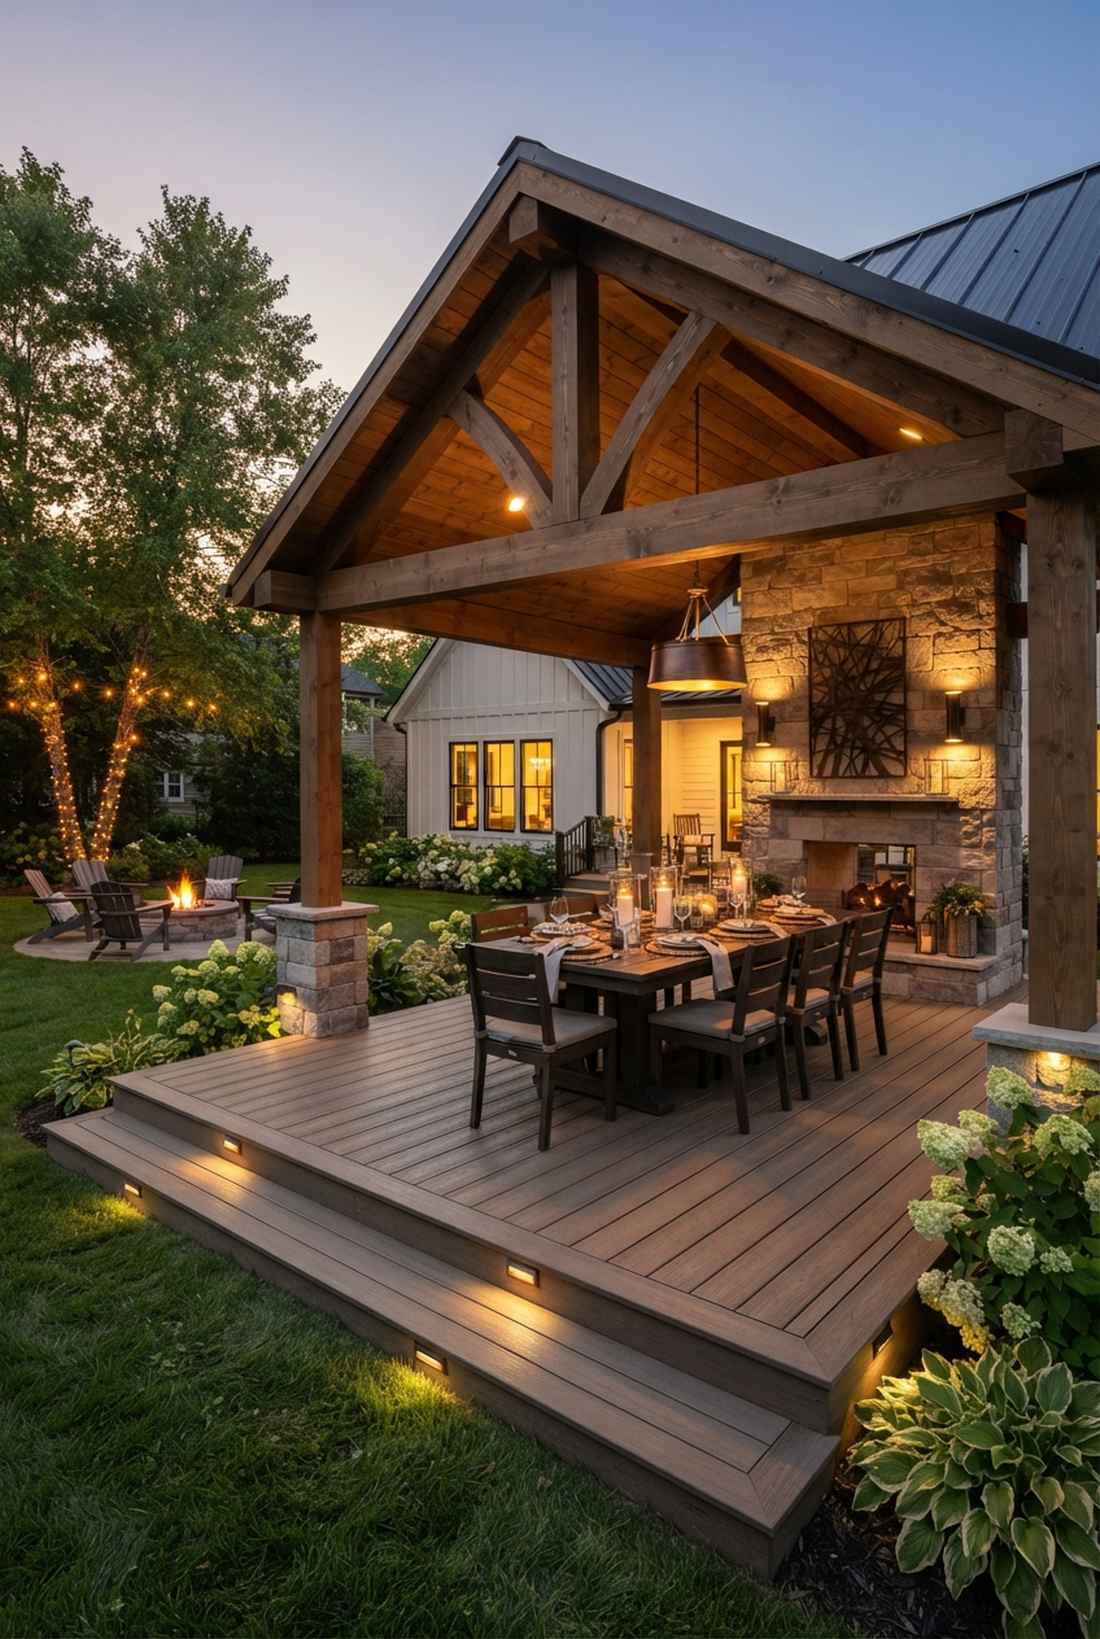
19. Hanging Pendant Above Dining Table
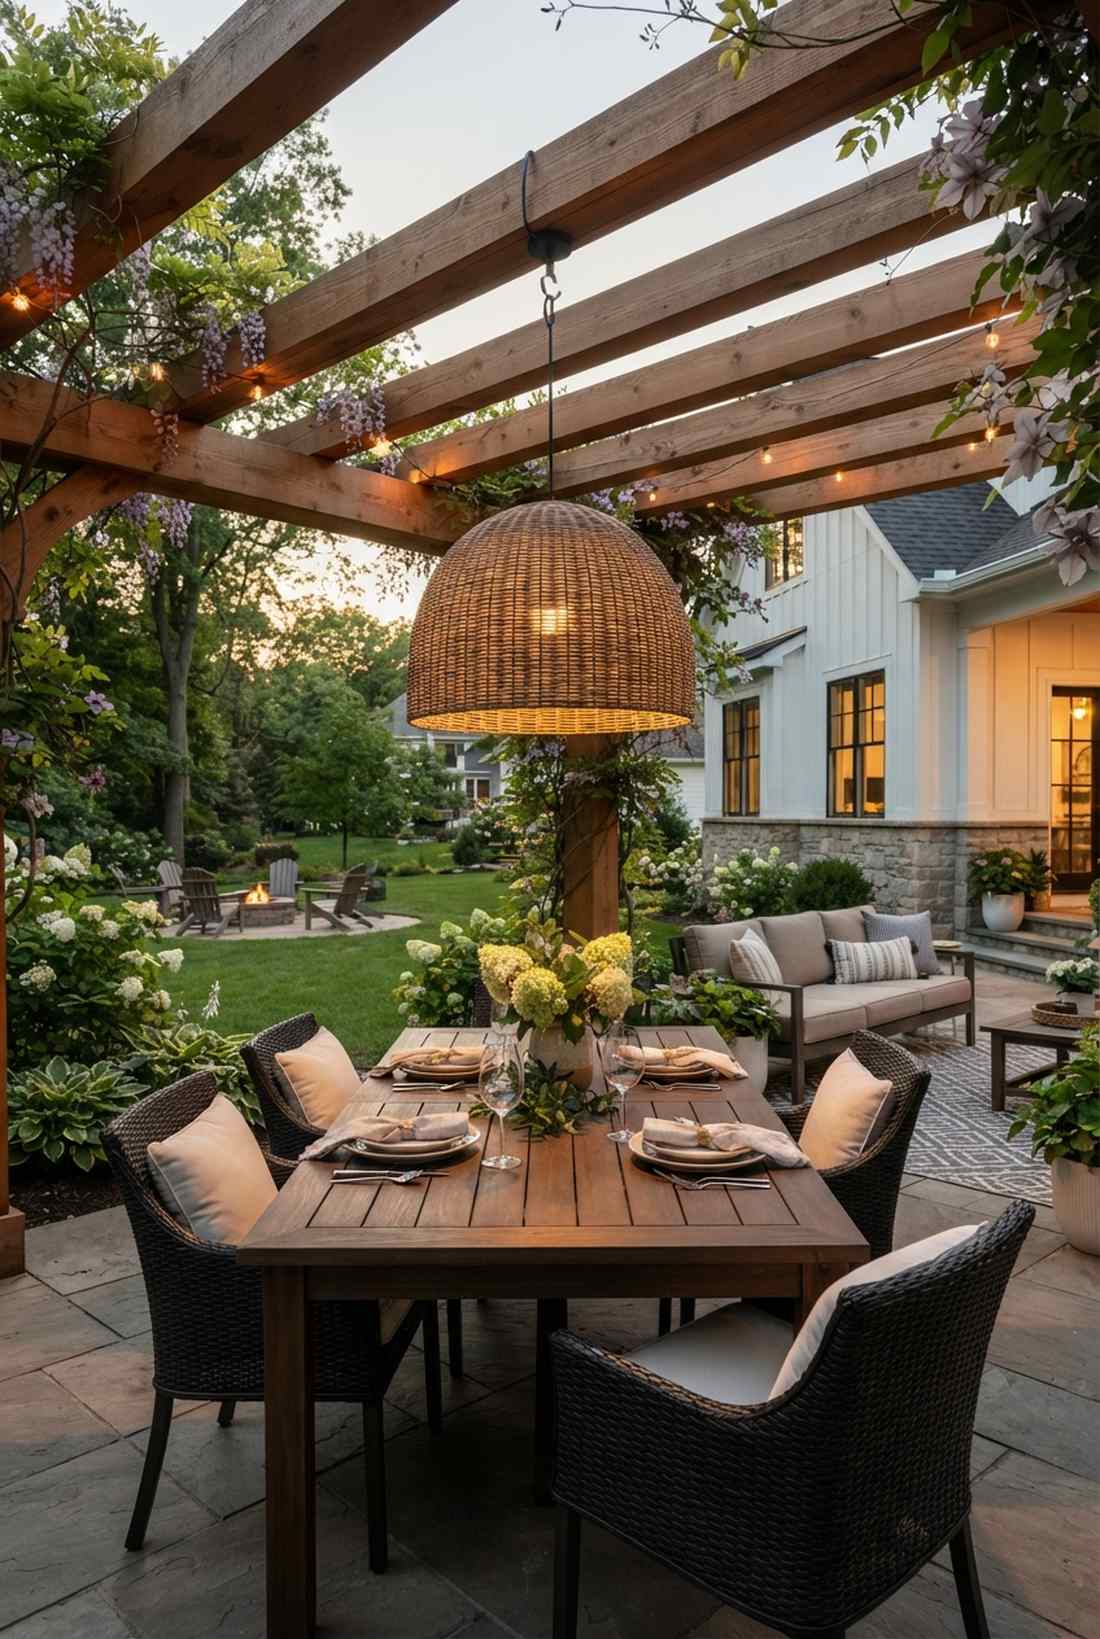
Straight out of a chic interior design magazine, but outside. This targeted dining drop light works exceptionally well for tables situated under solid awnings or sturdy pergolas.
Bringing interior design rules outside cheats the system, making the patio feel like a true extension of your house. Centering a massive, dimmable dome pushes perfect task lighting directly onto the plates.
This layout usually costs around $80–$120. Pin this to your covered patio board.
- Key Materials: Wet-rated pendant, ceiling hook
- Vibe / Style: Transitional Indoor/Outdoor
- Difficulty: Moderate
- Budget Breakdown: Pendant: $90 | Mount: $15.
- Creator’s Tip: Hang it low—around 30 inches above the tabletop—to create a highly intimate dining zone.
- Smart Sourcing: Use a weatherproof rattan dome pendant and an outdoor-rated suspension cord kit.
20. Solar Table Lamp Accents
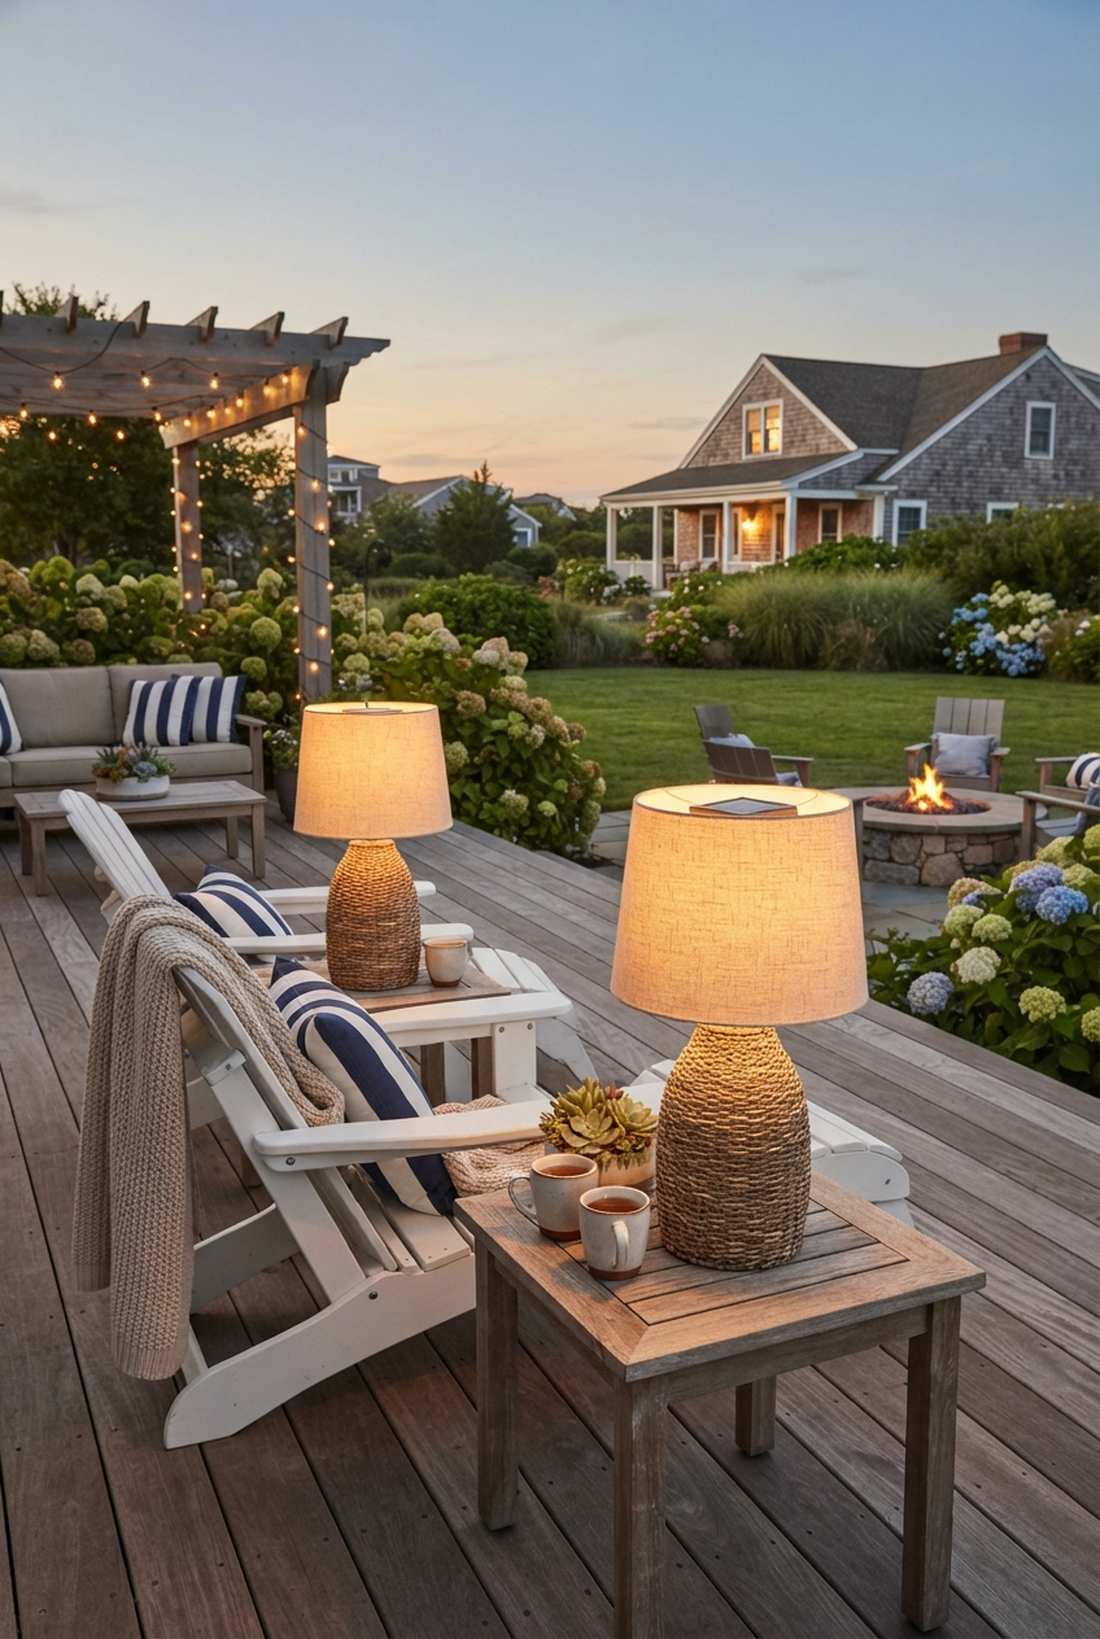
Feels like a sunny, casual beach house. This scattered ambient surface light works exceptionally well for side tables flanking adirondack chairs or outdoor sofas.
Using small, self-charging fixtures gives a designer-level finish without taking up vital electrical outlets. The newest micro-solar panels are barely visible, making these look like traditional decorative ceramics.
A pair will run you about $40. Highly recommended for lazy, zero-maintenance setups.
- Key Materials: Ceramic or resin solar lamps
- Vibe / Style: Coastal Casual
- Difficulty: Zero
- Budget Breakdown: Lamp pair: $40.
- Creator’s Tip: Make sure they are positioned to get at least 6 hours of direct midday sun to last past midnight.
- Smart Sourcing: Pick up woven resin solar table lamps and replacement rechargeable AA solar batteries for longevity.
21. Clamp-Mount Task Lights
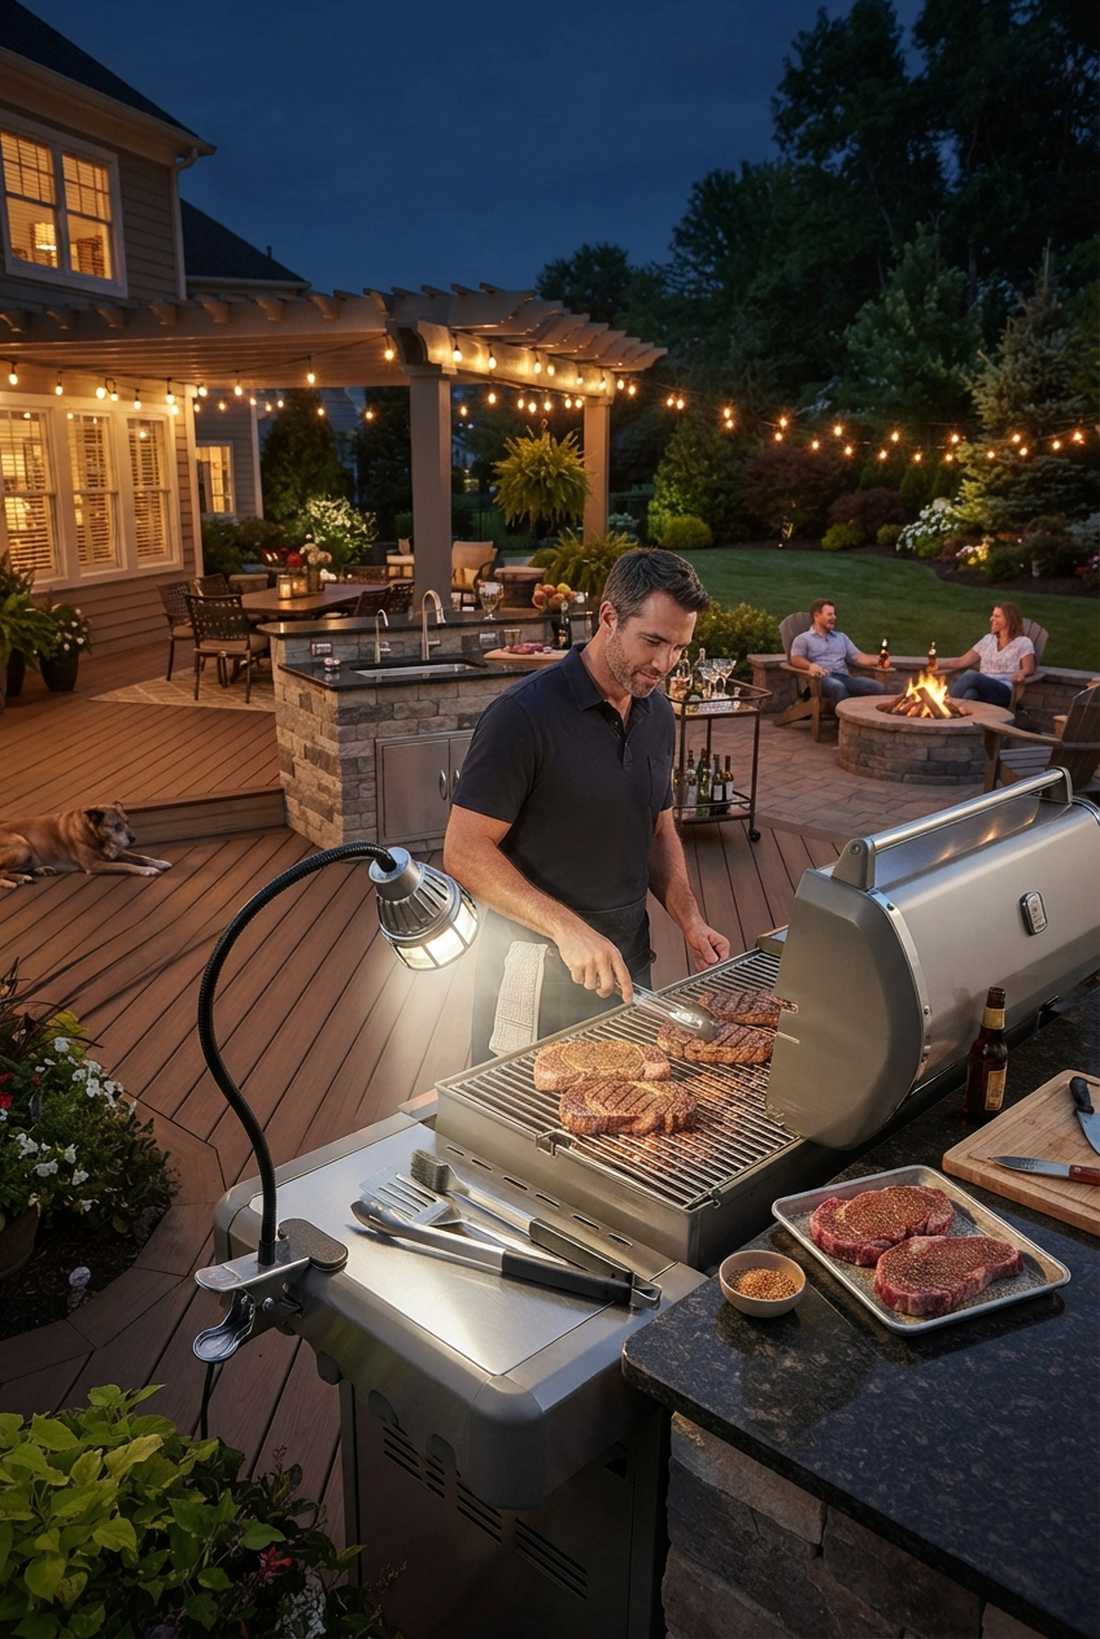
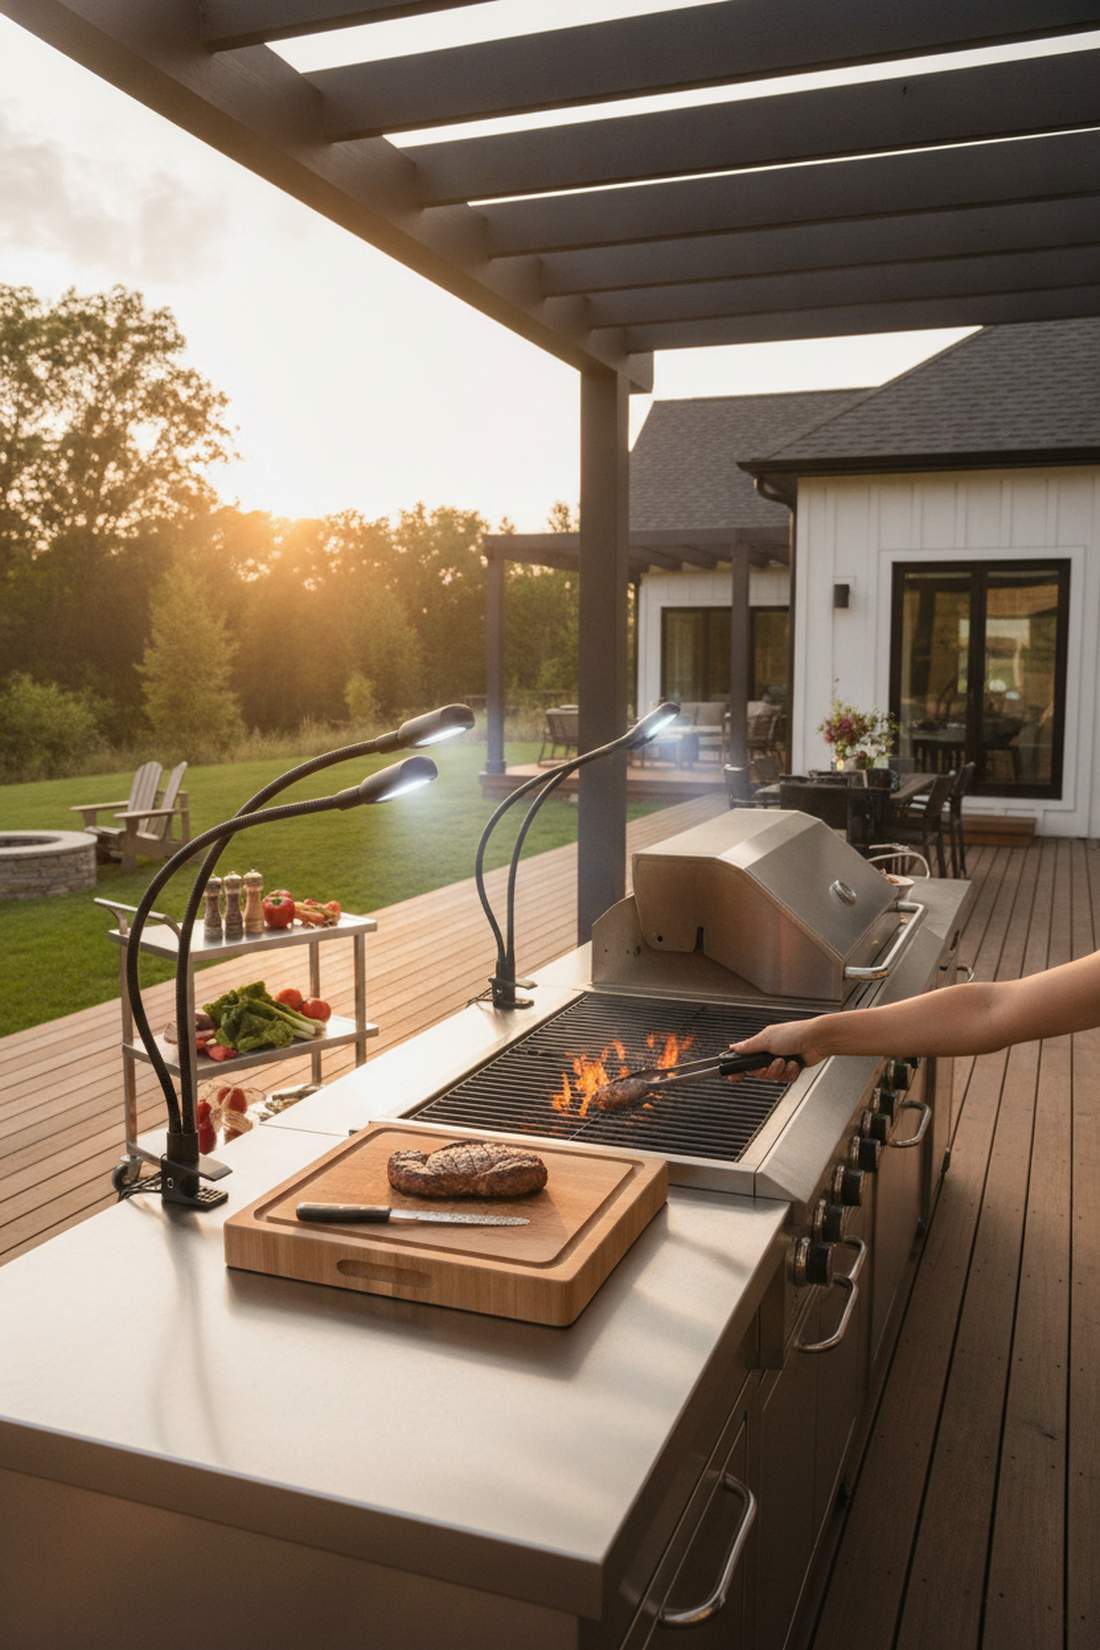
Feels like a professional outdoor chef’s kitchen. This flexible BBQ prep light works exceptionally well for outdoor kitchen counters or rolling bar carts.
Biting onto the edge of a counter with a heavy-duty clamp avoids taking up precious chopping space. The bendable gooseneck is aggressive, purely functional task lighting that ensures perfectly grilled steaks every time.
You can easily pull this off for around $25–$40.
- Key Materials: Rechargeable gooseneck clamp lights
- Vibe / Style: Functional Industrial
- Difficulty: Zero
- Budget Breakdown: Clamp light: $30.
- Creator’s Tip: Choose a model with a 4000K daylight setting to accurately judge meat color on the grill.
- Smart Sourcing: Snag a heavy-duty waterproof grill clamp light and a magnetic mount base adapter.
22. Moroccan Lantern Arrangement
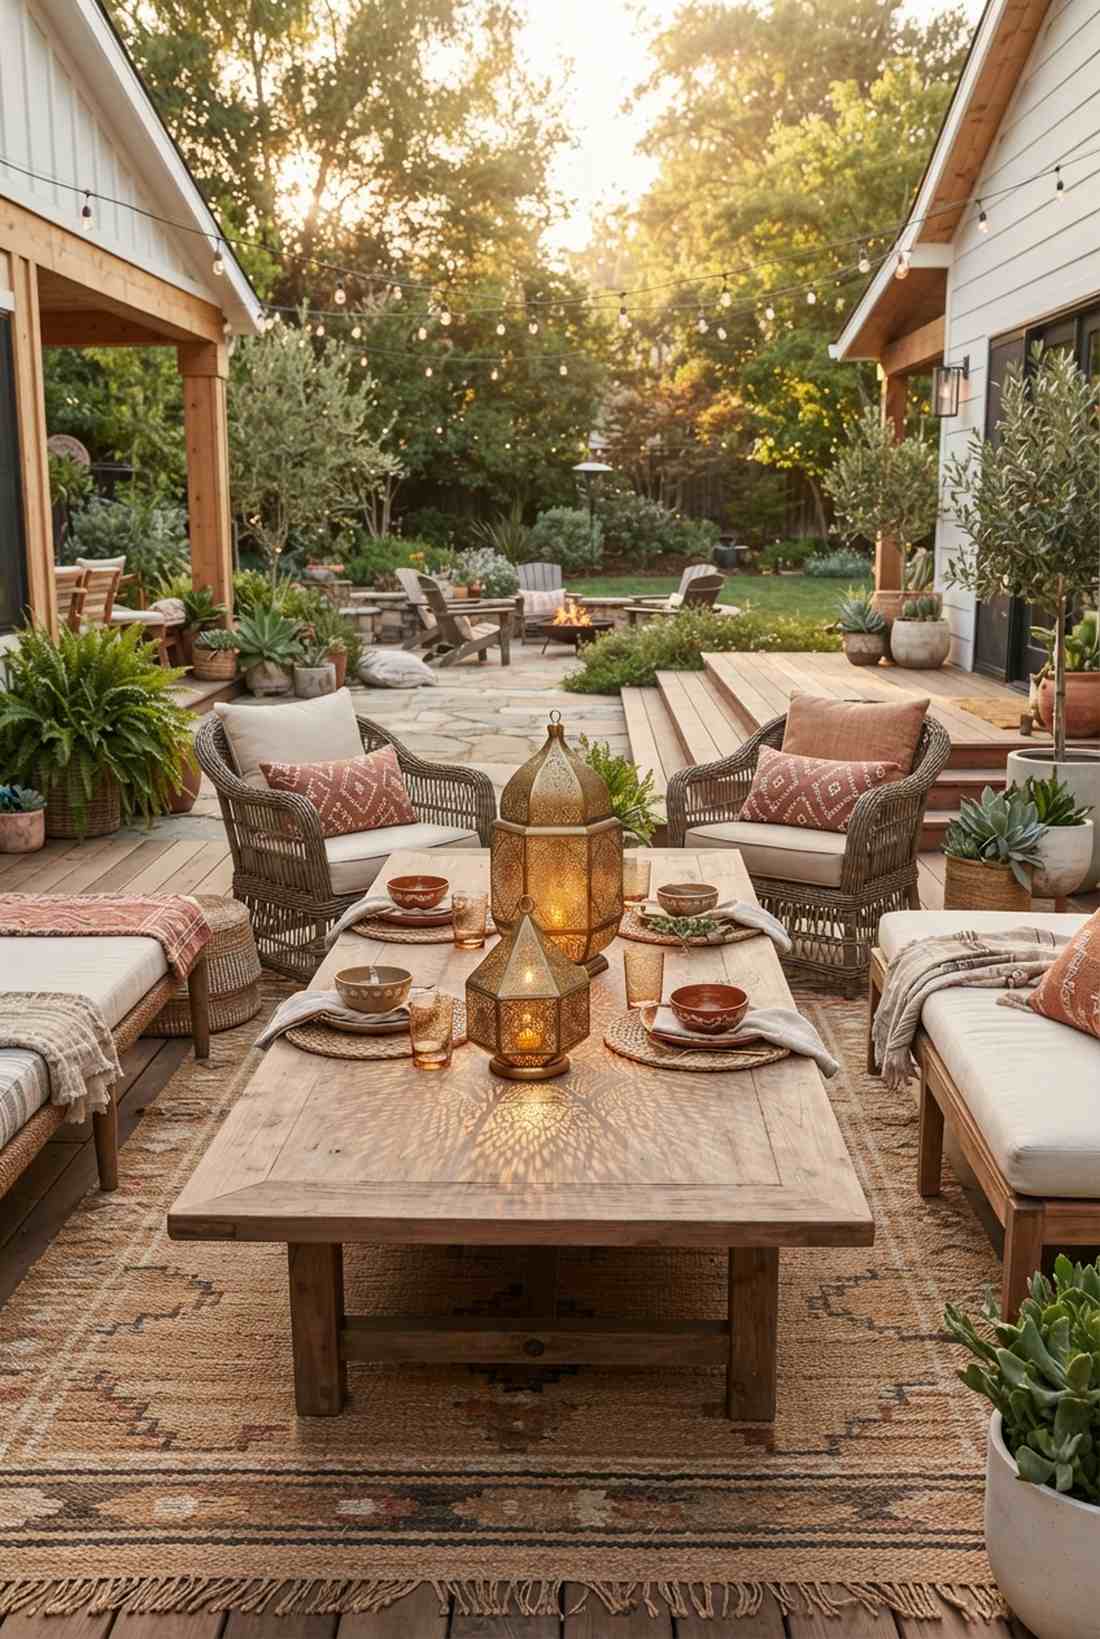
Feels like an exotic global escape in your backyard. This pattern-casting table runner works exceptionally well for low, long wooden lounge tables.
Lining up intricately pierced metal screens delivers a surprisingly premium look that paints the tabletop in shadow art. It is a stunning, low-cost way to make a boring flat surface look incredibly dynamic.
Expect to spend $50 for a row of three. Save this if you love boho aesthetics.
- Key Materials: Pierced metal lanterns, LED tea lights
- Vibe / Style: Global Eclectic
- Difficulty: Very easy
- Budget Breakdown: Lanterns: $40 | Tea lights: $10.
- Creator’s Tip: Use amber-colored tea lights to amplify the rich brass and copper tones of the metal.
- Smart Sourcing: Find authentic punched brass Moroccan lanterns (set of 3) and long-lasting LED tea lights (bulk pack).
23. Hurricane Votive Grouping
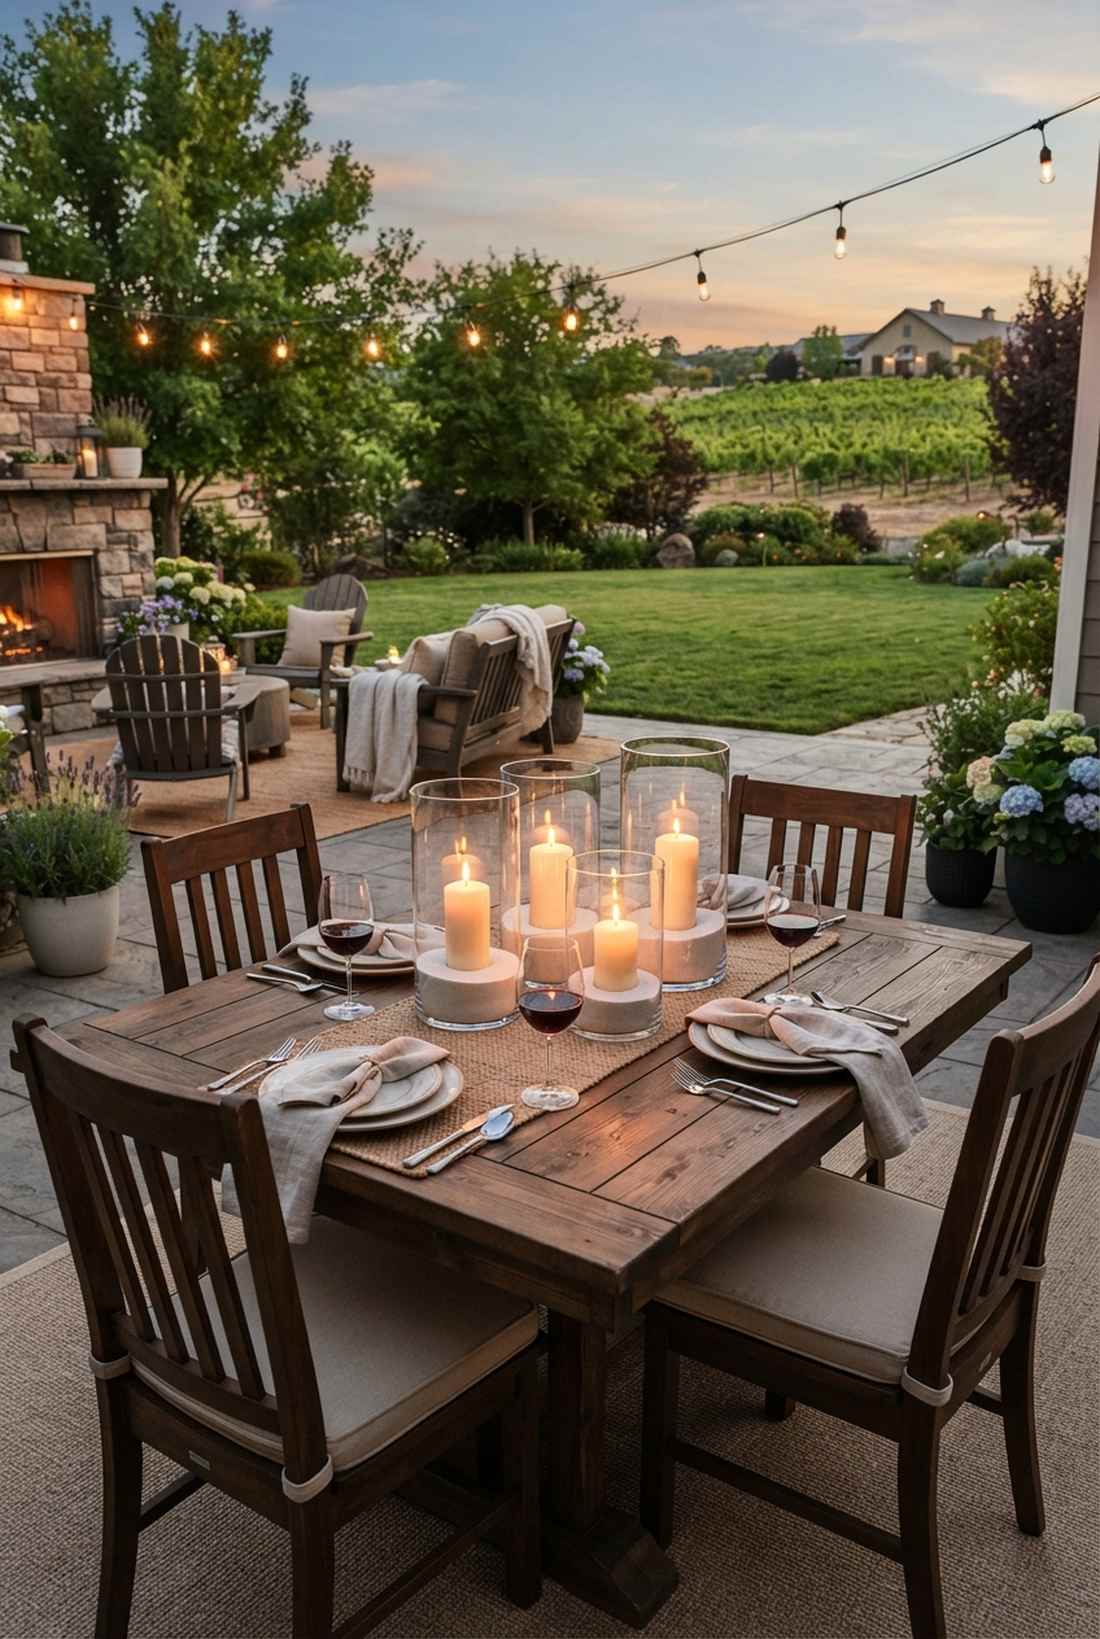
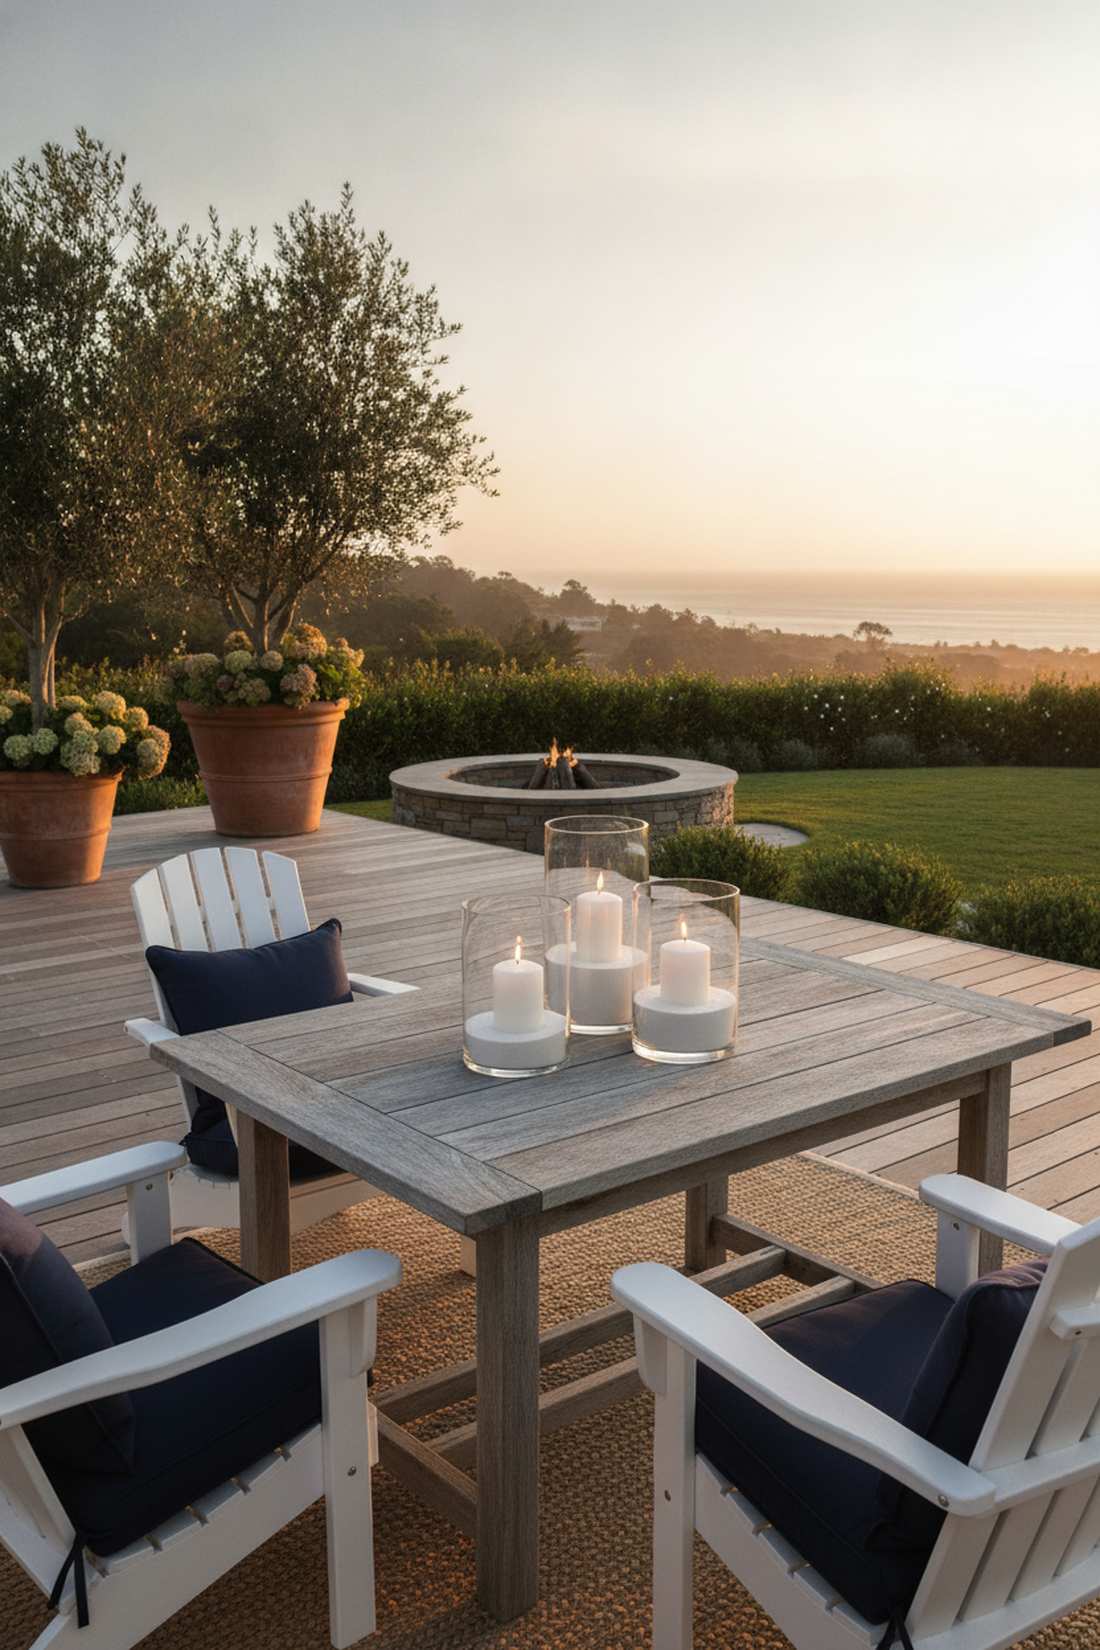
Straight out of a classy coastal winery. This glass-shielded candle cluster works exceptionally well for breezy evenings where exposed flames would die instantly.
Varying the heights of thick glass cylinders cheats the system by adding massive volume and reflections to the table. The heavy glass prevents the wind from ruining the mood while multiplying the glow.
You can assemble this for under $35.
- Key Materials: Glass hurricane vases, pillar candles
- Vibe / Style: Classic Elegance
- Difficulty: Very easy
- Budget Breakdown: Glass cylinders: $25 | Candles: $10.
- Creator’s Tip: Pour two inches of white sand or small river rocks into the bottom before adding the candle for a high-end look.
- Smart Sourcing: Buy a multi-size glass cylinder vase set and bulk decorative white sand.
Most DIYers completely forget the underneath of their surfaces. This next trick fixes that…
24. Strip Lighting Under Bar Counter
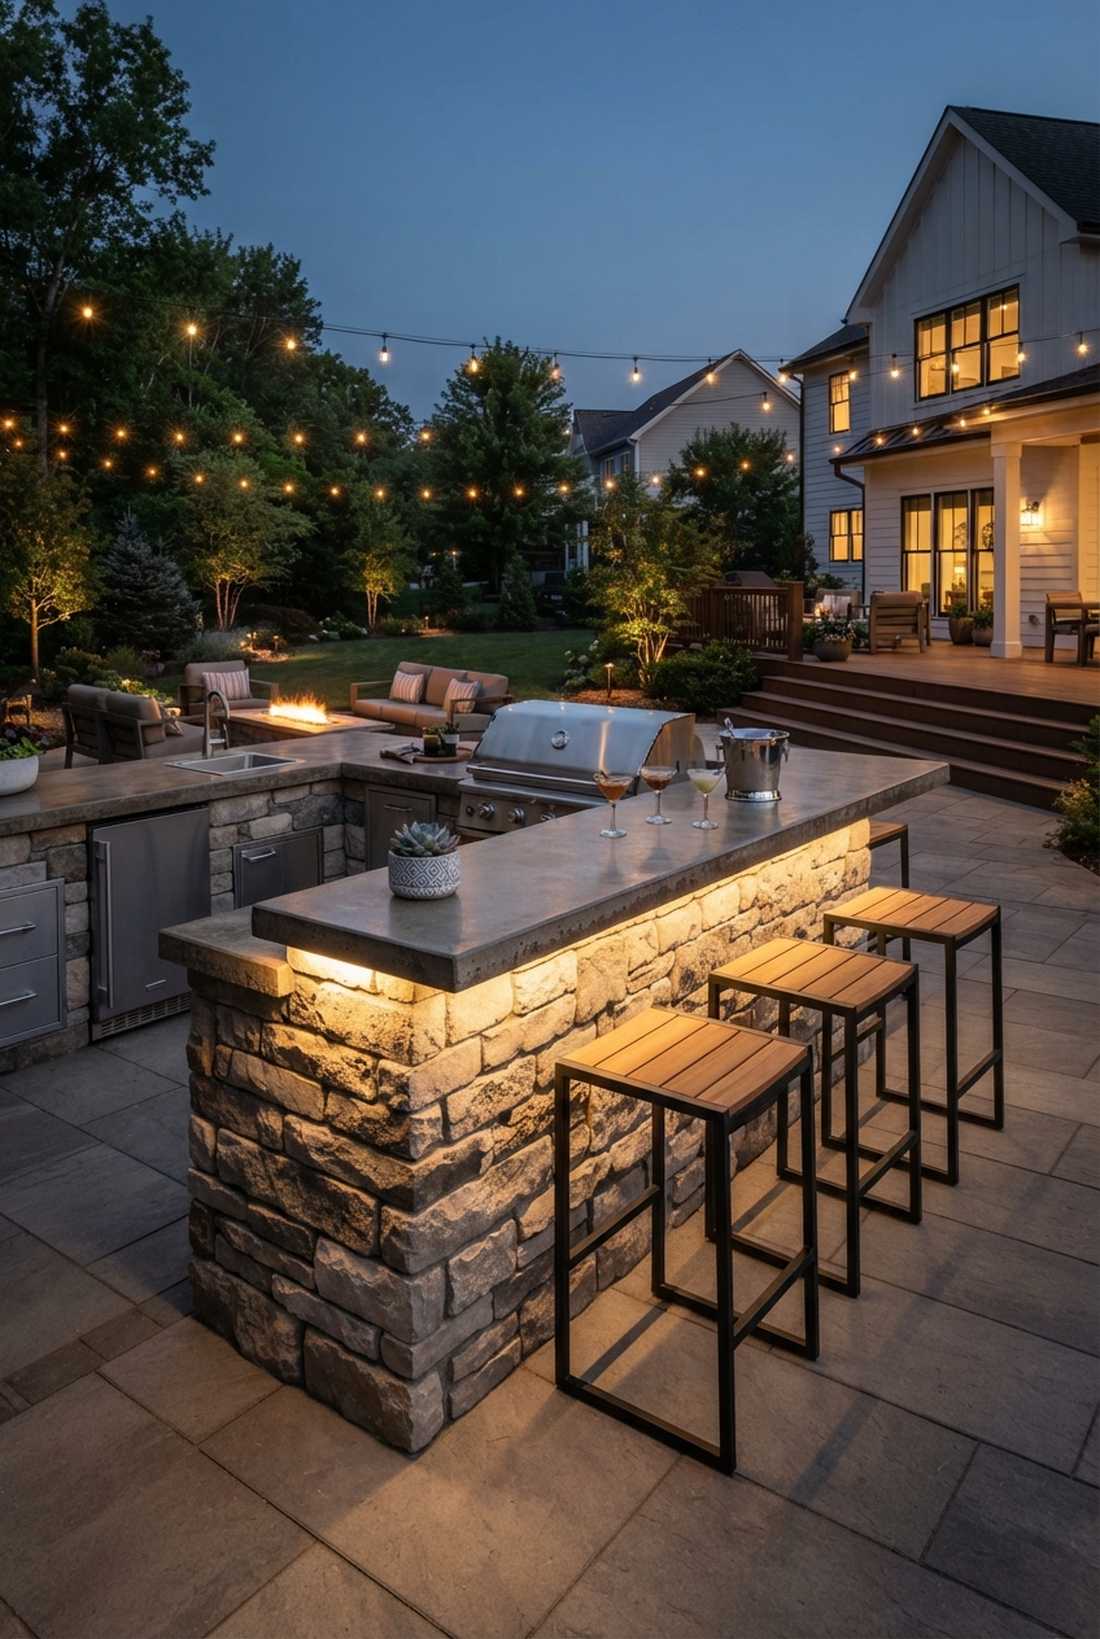

Feels like a VIP cabana bar. This hidden under-lip illumination works exceptionally well for outdoor kitchen islands or elevated bar ledges.
Washing light down the face of the stonework gives a designer-level finish that highlights the expensive masonry. It acts as the perfect late-night safety light without blinding people sitting on the barstools.
Plan for a $40–$60 budget. Pin this if you are building an outdoor bar.
- Key Materials: LED tape light, low-voltage power supply
- Vibe / Style: Modern Nightclub
- Difficulty: Moderate
- Budget Breakdown: Tape light: $35 | Power adapter: $15.
- Creator’s Tip: Route the strip inside a 45-degree angle aluminum channel to push the light perfectly down the stone face.
- Smart Sourcing: Grab exterior-grade RGBW LED strip kits and 45-degree corner aluminum channels (pre-cut).
Outdoor Lighting Balcony Configurations
25. Railing-Mounted Post Cap Lights
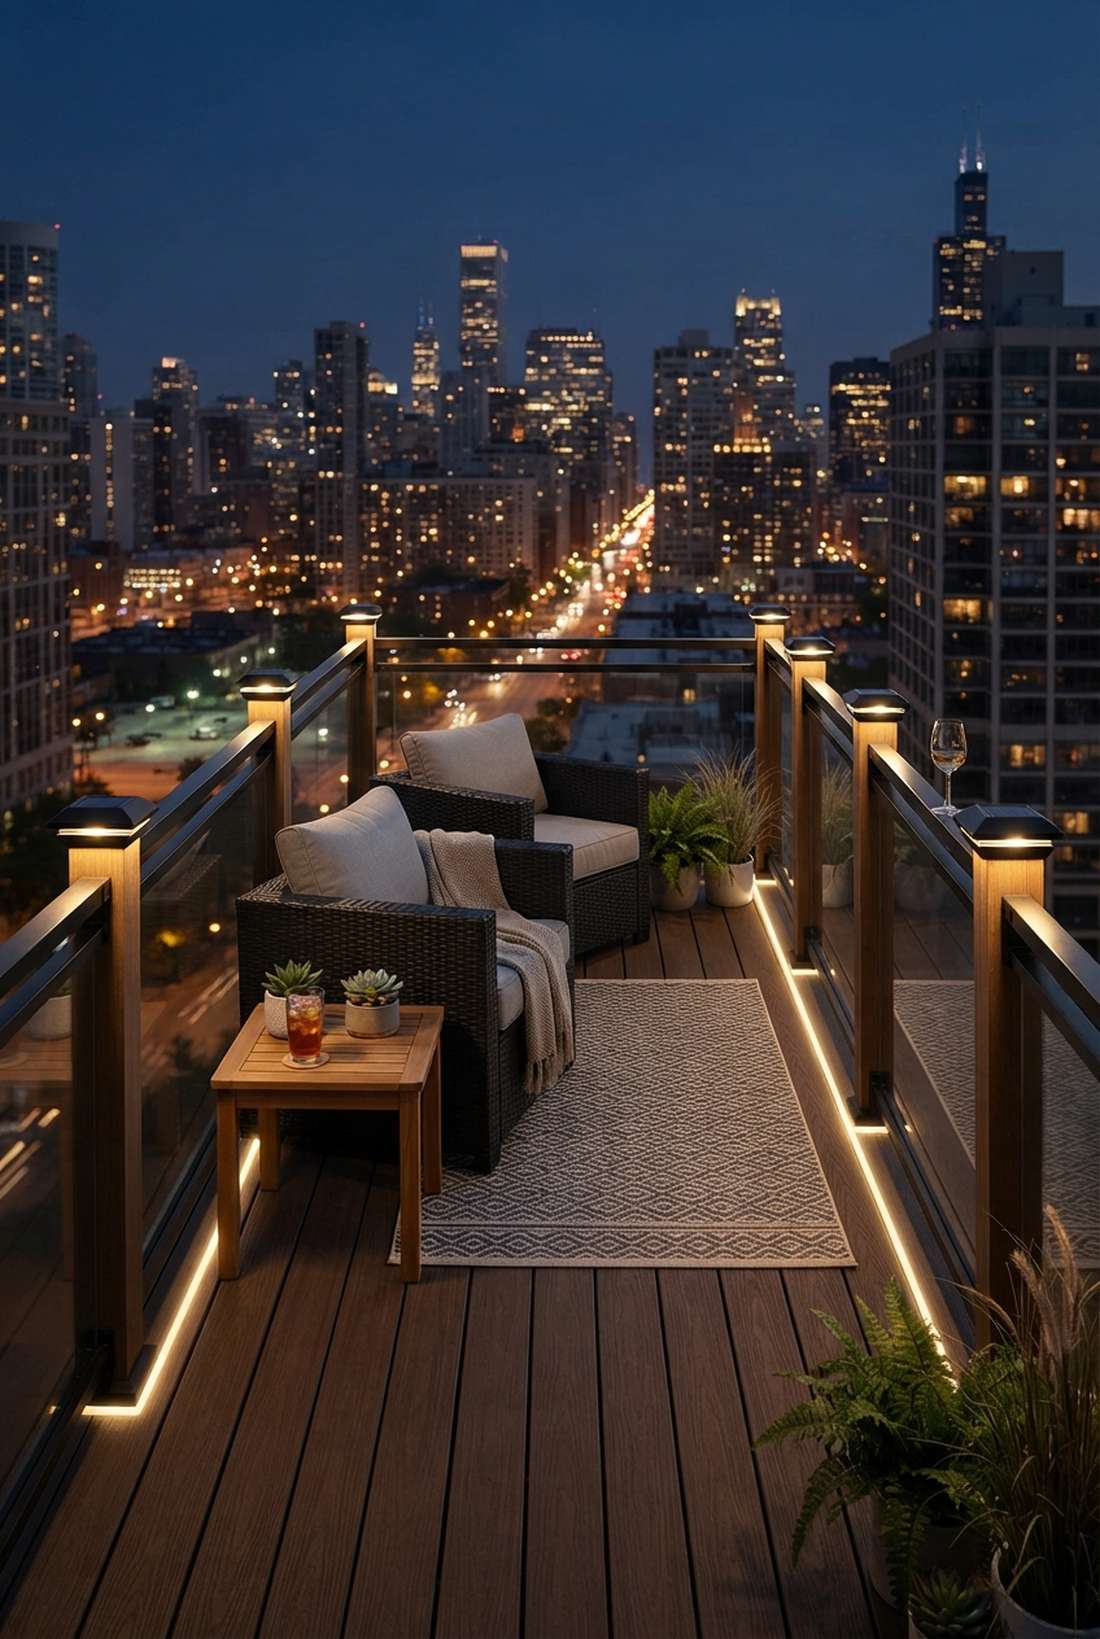
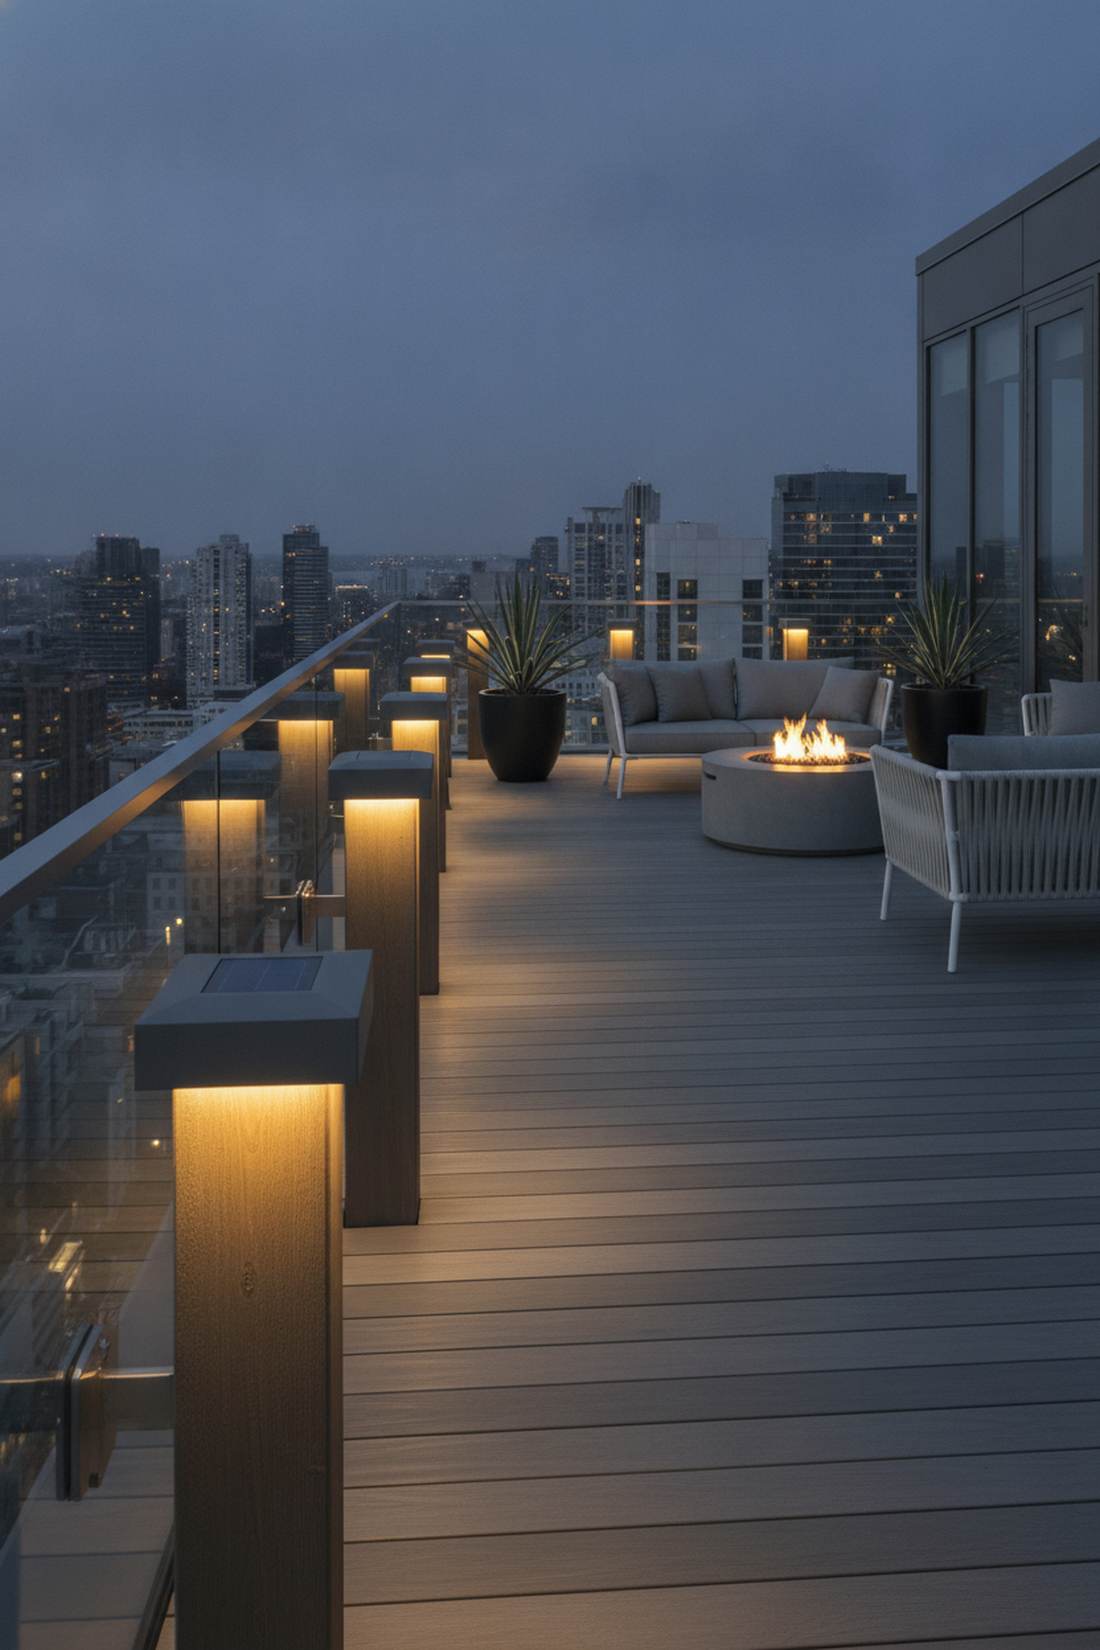
Feels like a premium luxury high-rise. This outdoor lighting balcony boundary works exceptionally well for wooden or composite railing posts in tight spaces.
Capping the vertical posts with integrated downlights bypasses the need to take up zero precious floor space. This structured approach outlines the exact footprint of your balcony with a clean, architectural glow.
Four caps usually cost around $60–$80.
- Key Materials: Solar or low-voltage post caps
- Vibe / Style: Structured Modern
- Difficulty: Easy
- Budget Breakdown: 4-pack post caps: $65.
- Creator’s Tip: Measure your posts exactly (nominal 4×4 is actually 3.5×3.5) before ordering so they sit perfectly flush.
- Smart Sourcing: Use universal fit solar post cap lights (4-pack) and UV-resistant construction adhesive.
26. String Light Railing Drape

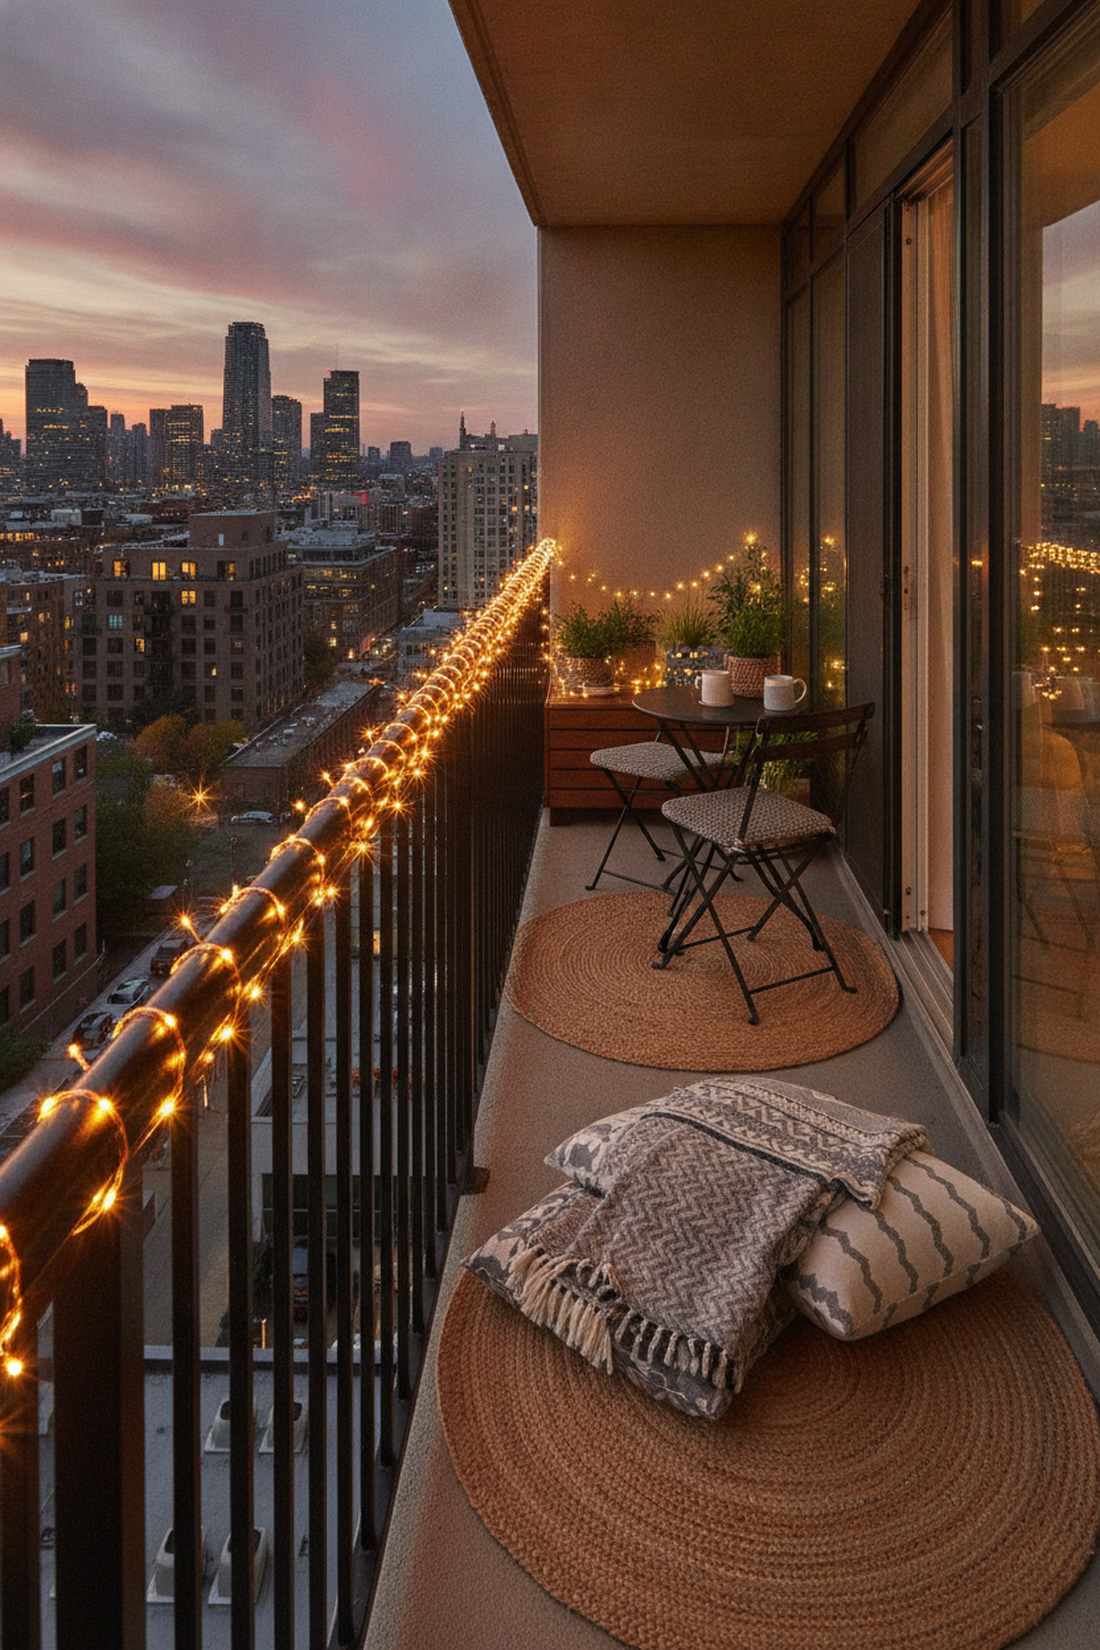
Feels like a cozy urban rooftop. This wrapped edge illumination works exceptionally well for iron or thin-spindle apartment balconies.
Weaving micro-LEDs tightly along the top rail gives a surprisingly premium look that avoids drilling any holes into the building. It creates an instant festive boundary without blocking your city view.
You can easily pull this off for just $20. Save this to your apartment decor board.
- Key Materials: Solar fairy lights, black zip ties
- Vibe / Style: Urban Cozy
- Difficulty: Very easy
- Budget Breakdown: Fairy lights: $15 | Zip ties: $5.
- Creator’s Tip: Wrap the lights in a tight spiral around the top bar rather than just letting them droop for a cleaner look.
- Smart Sourcing: Order copper wire solar fairy lights (2-pack) and micro outdoor zip ties.
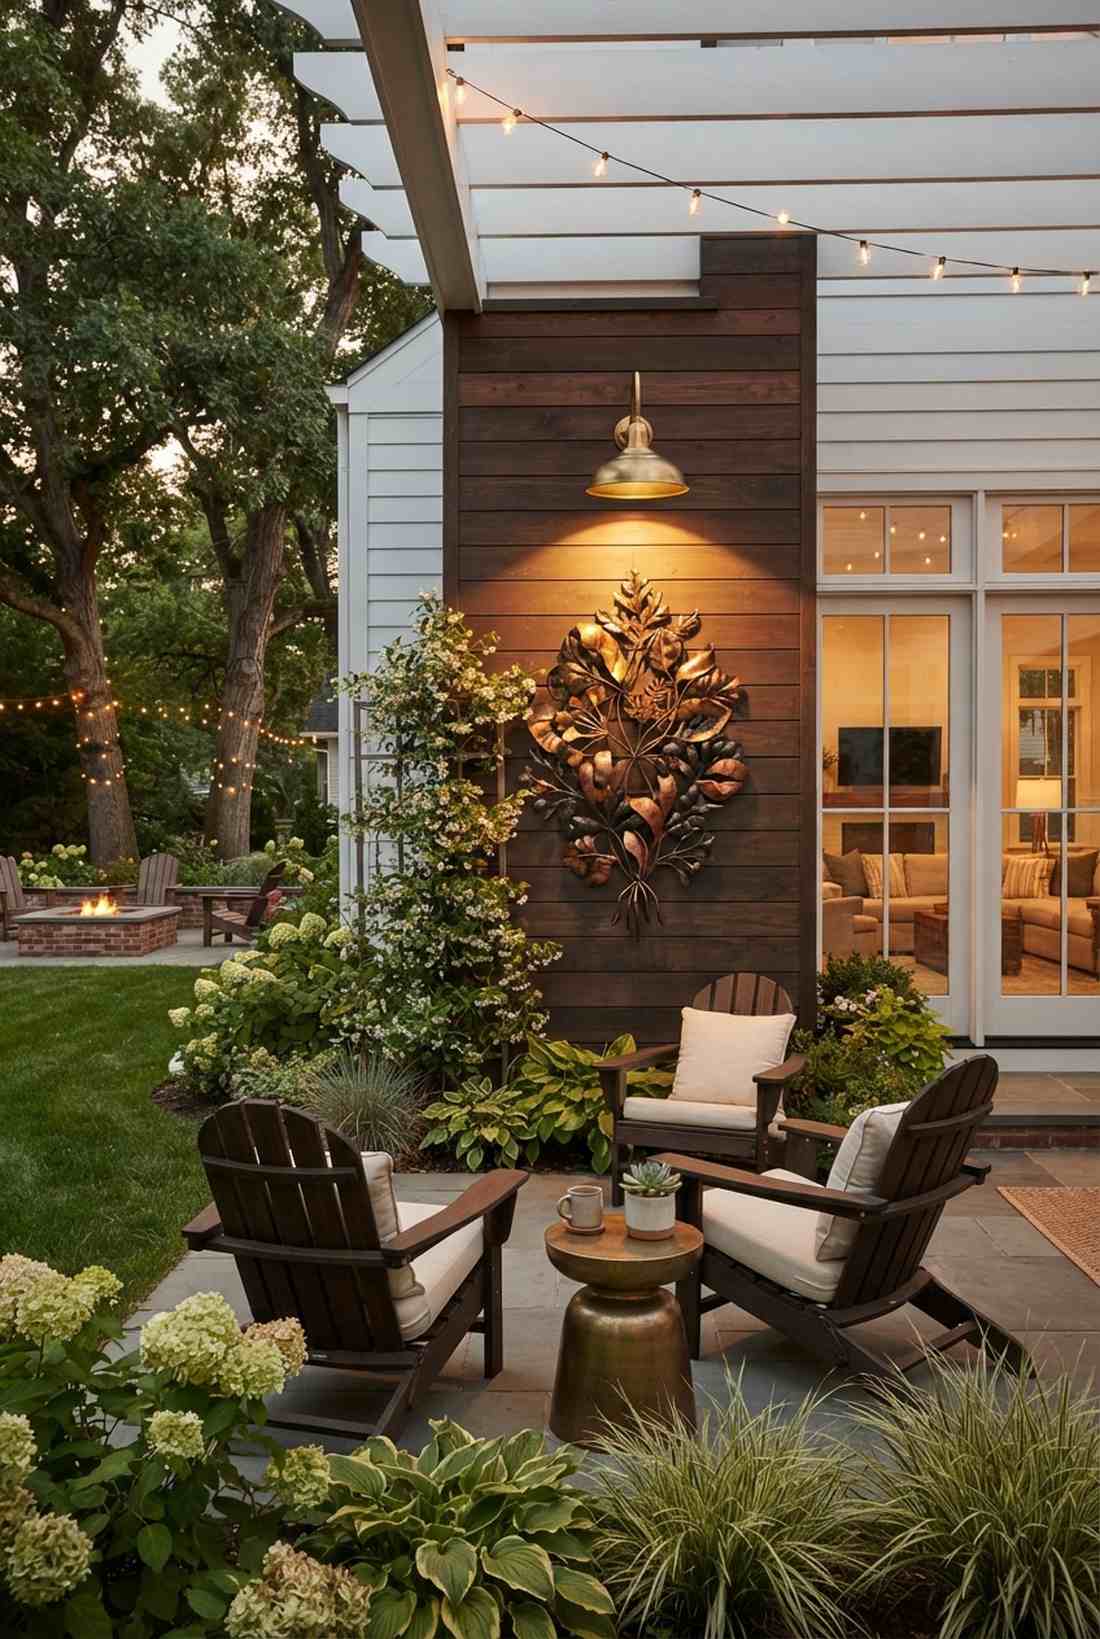
27. Wall-Mounted Sconce Pair
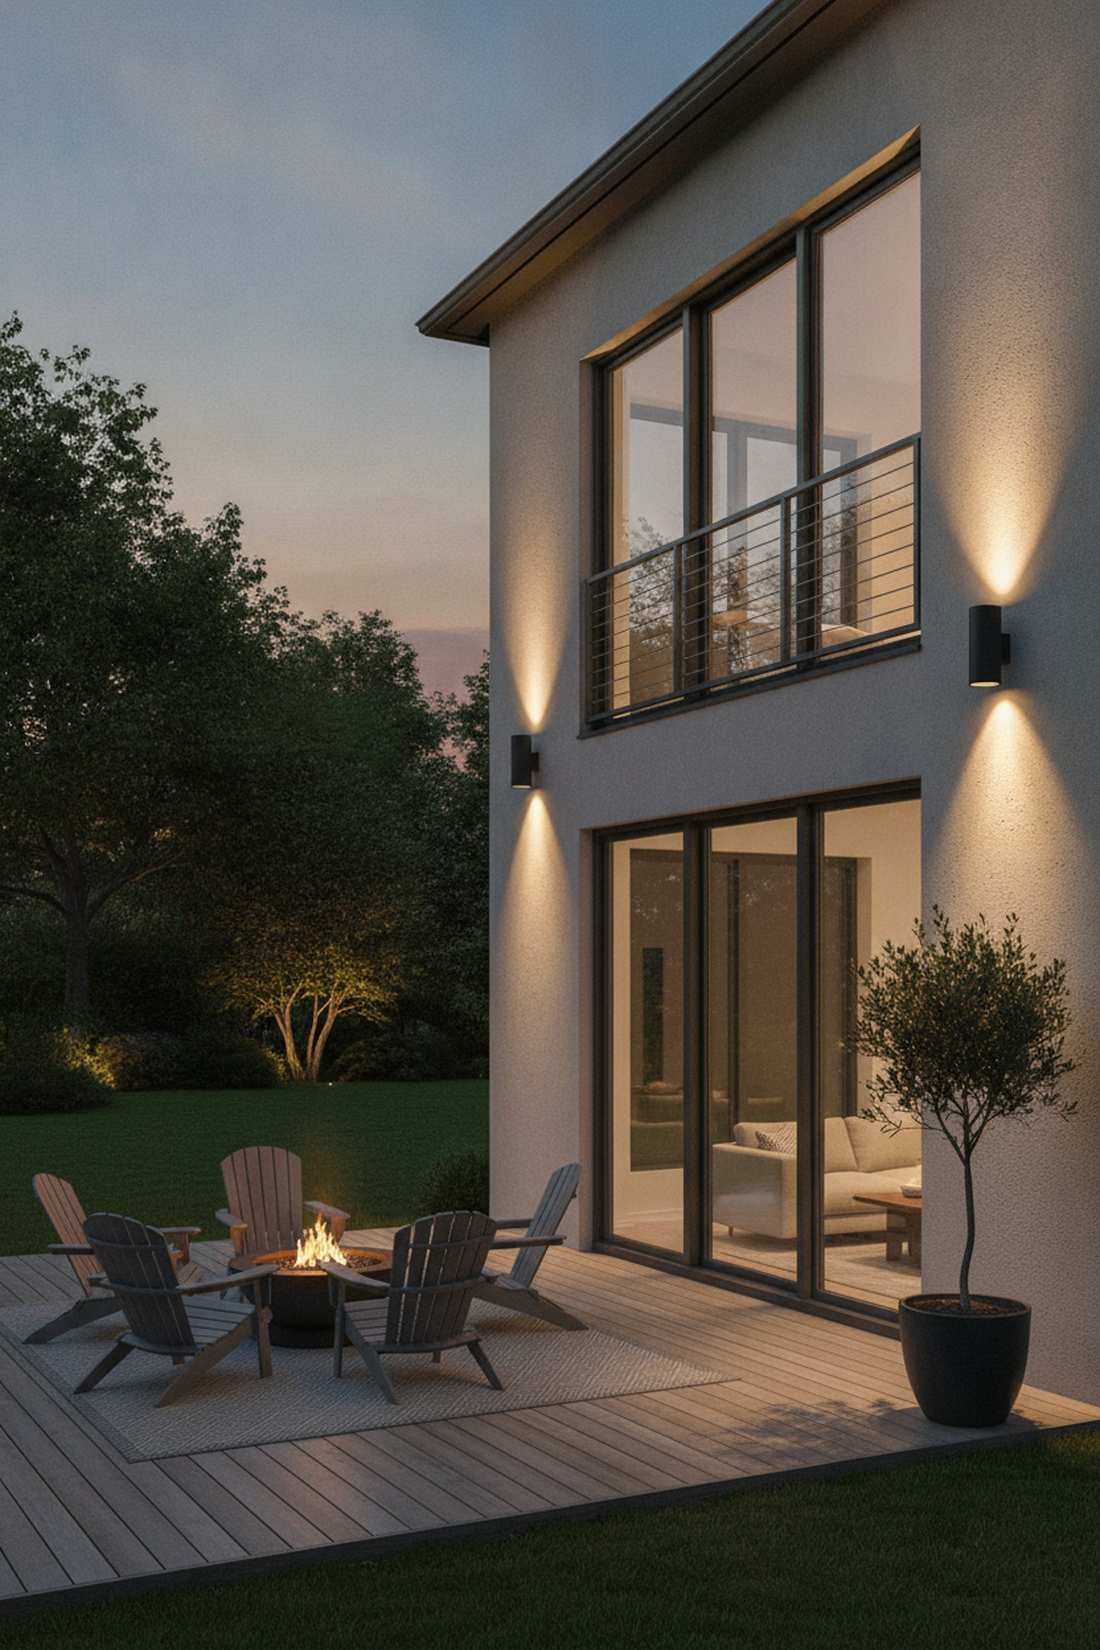
Straight out of an upscale boutique hotel. This classic flanking wall light setup works exceptionally well next to sliding glass balcony doors.
Upgrading builder-grade fixtures to modern matte black cylinders screams high-end luxury instantly. Choosing “up-down” directional designs washes the wall with light without spilling glare into your neighbor’s window.
Expect to spend $80–$120 for a quality pair.
- Key Materials: Up-down exterior sconces
- Vibe / Style: Contemporary Boutique
- Difficulty: Advanced (requires electrical swap)
- Budget Breakdown: Sconce pair: $90 | Weatherstripping: $10.
- Creator’s Tip: Seal the top edge of the fixture base with clear outdoor silicone to prevent rain from shorting the wires.
- Smart Sourcing: Grab matte black up-down exterior wall sconces and clear exterior silicone caulk.
This next corner hack fixes the most common apartment balcony problem instantly…
28. Portable Floor Lamp Corner
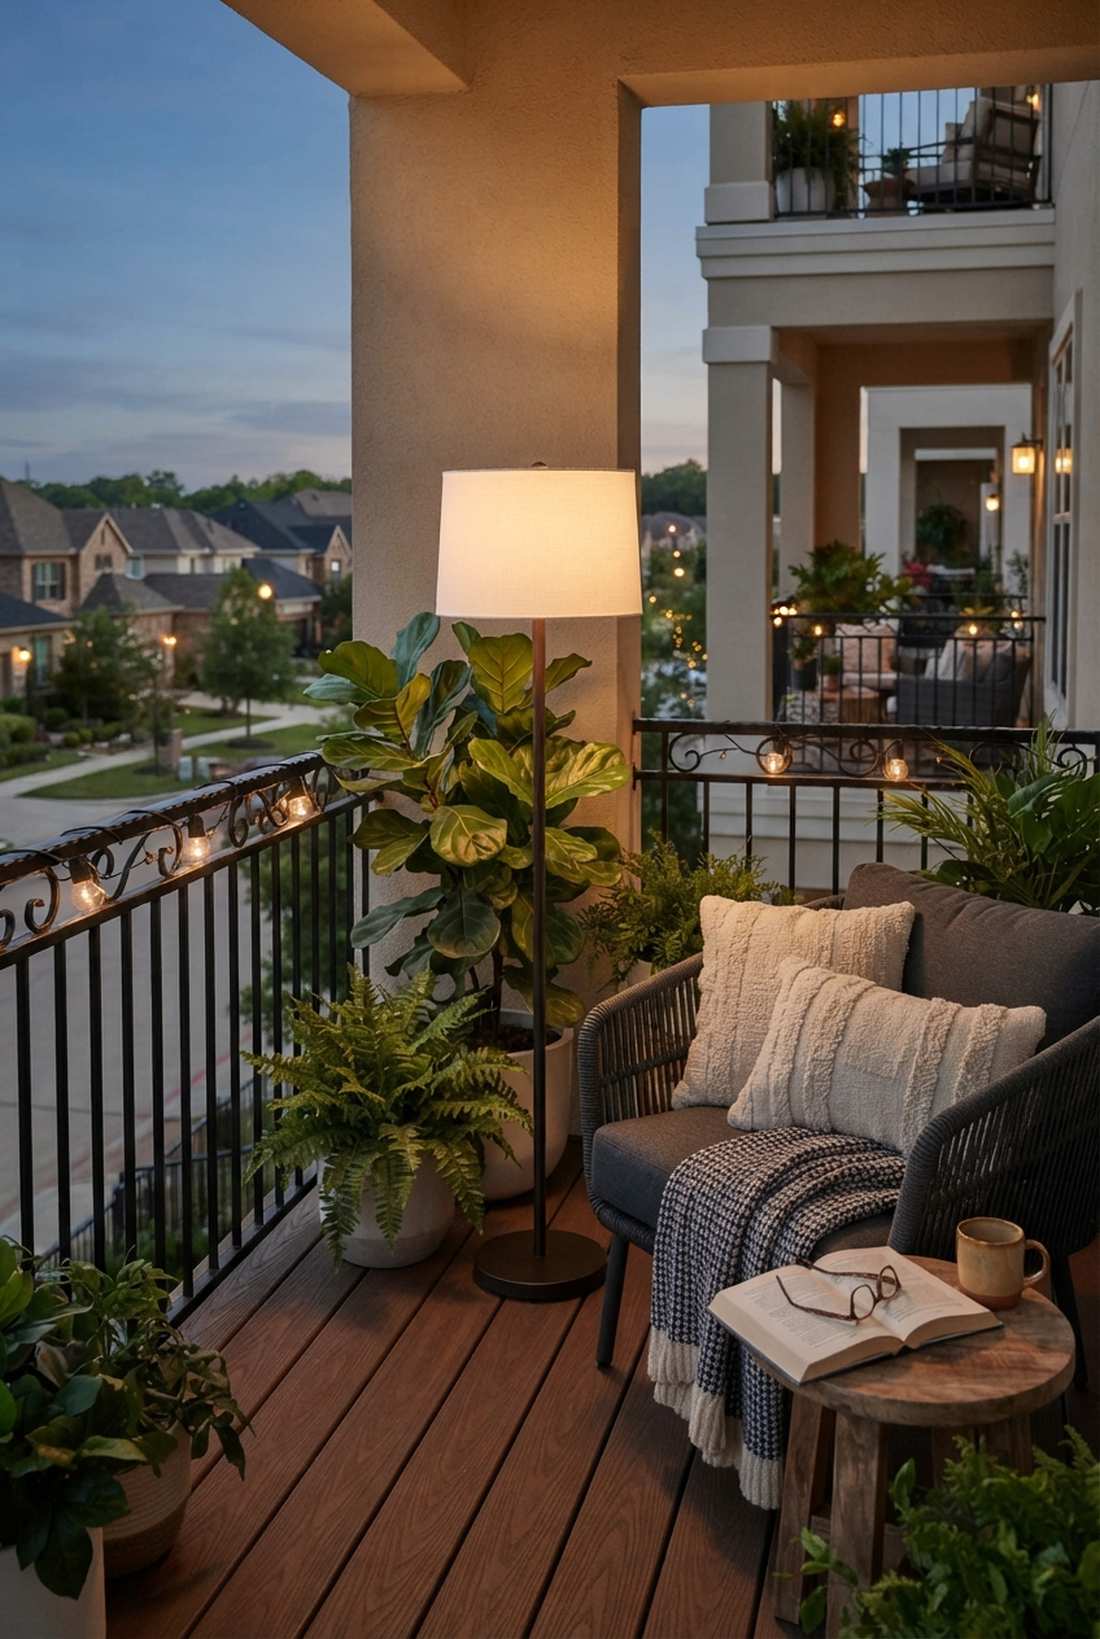
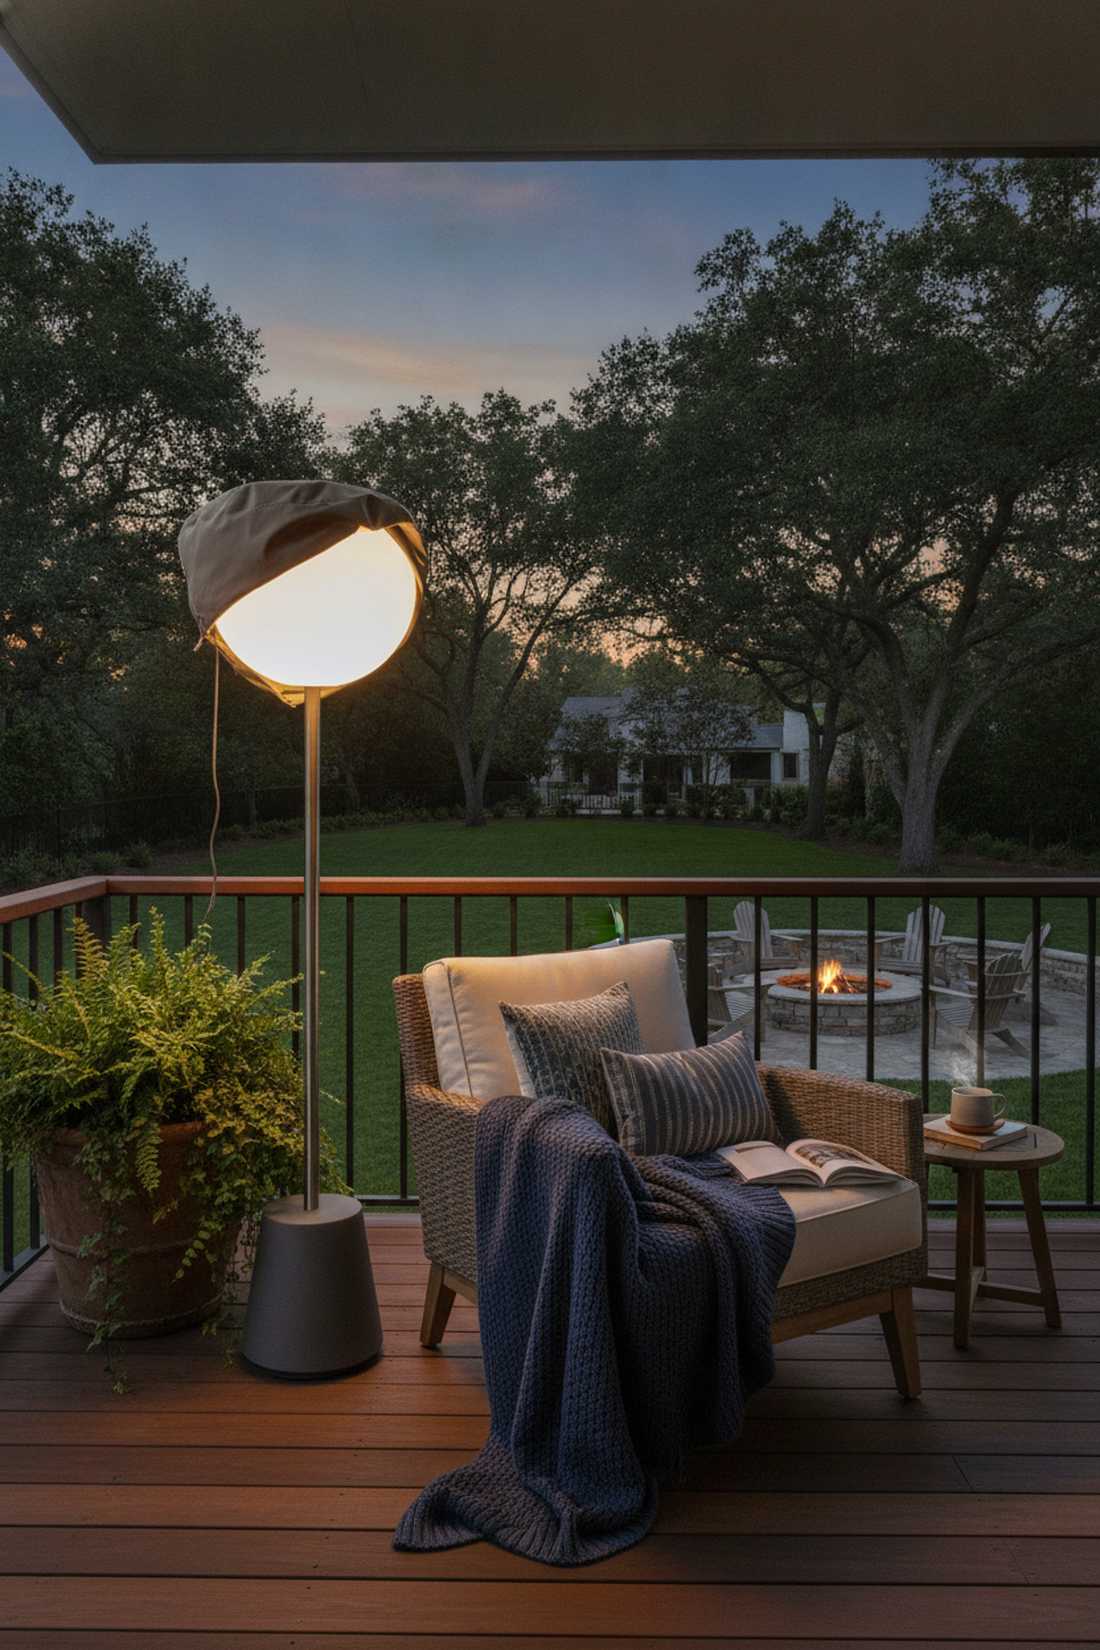
Feels like an outdoor reading room. This freestanding corner ambient light works exceptionally well for styling a single lounge chair on a deep balcony.
Bringing a heavy-duty, weatherproof floor lamp outside cheats the system by adding massive vertical height without any ceiling hardware. The newest rechargeable models eliminate trip hazards completely.
Plan for a $90–$130 budget. Pin this if you love reading outside at night.
- Key Materials: Weighted outdoor floor lamp
- Vibe / Style: Cozy Residential
- Difficulty: Zero
- Budget Breakdown: Floor lamp: $110.
- Creator’s Tip: Tuck the heavy base slightly behind a potted plant so the light seems to organically rise out of the foliage.
- Smart Sourcing: Look for IP65-rated cordless floor lamps (weighted base) and an outdoor protective lamp cover.
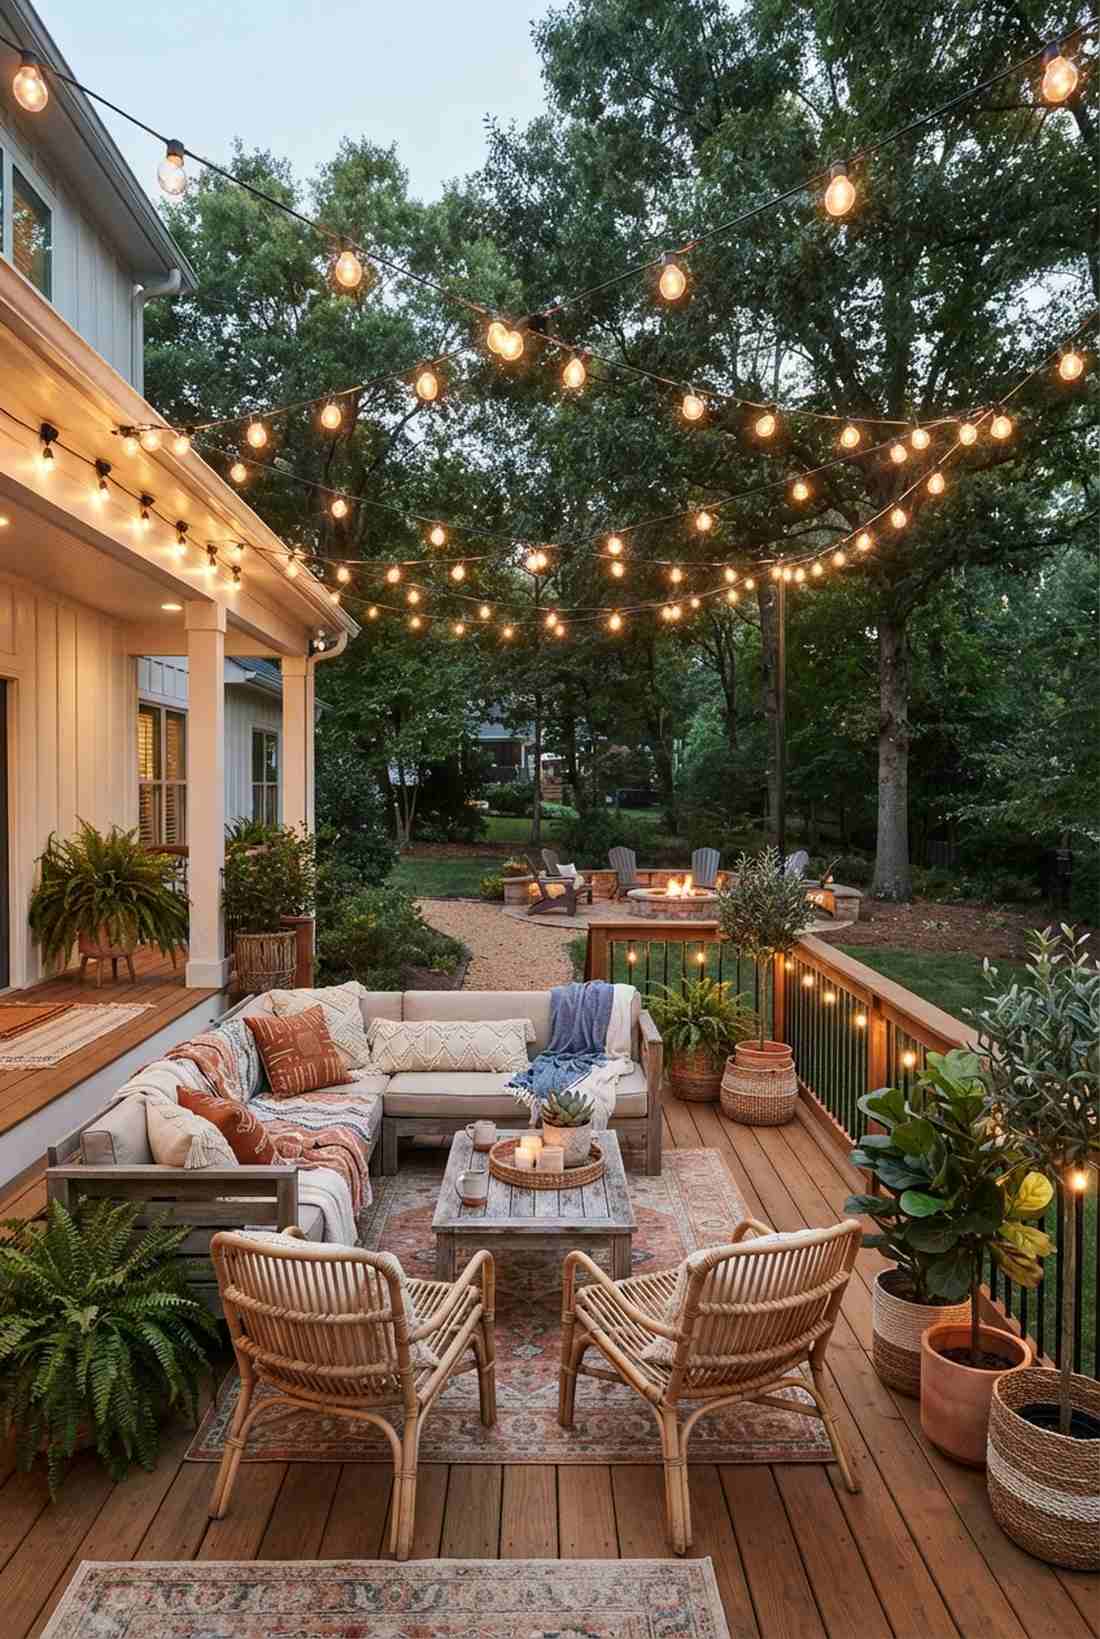
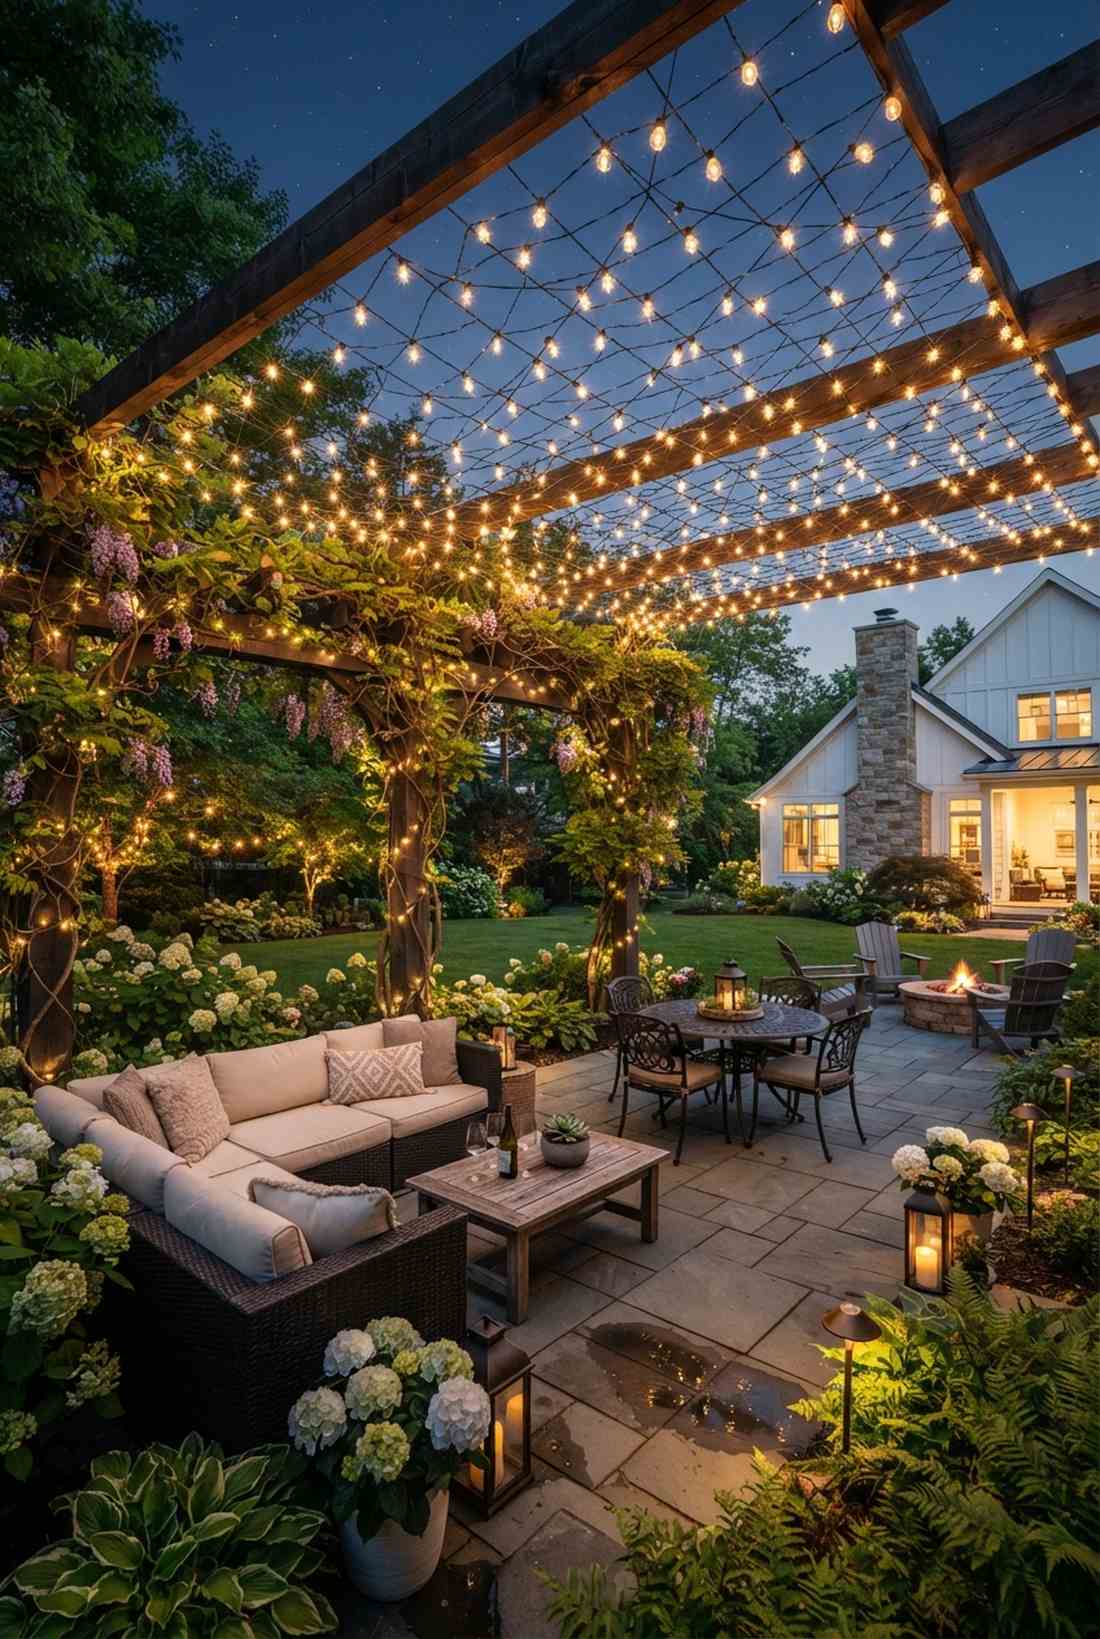
29. Overhead Pergola Mini String Lights
Feels like a secret European Juliet balcony. This miniature canopy grid works exceptionally well for top-floor balconies with an existing slatted roof.
Running tight rows of tiny bulbs overhead delivers a surprisingly premium look that makes low ceilings feel magical rather than claustrophobic. Utilizing commercial patio lighting kits ensures they withstand high-elevation winds.
You can easily assemble this for $40–$60.
- Key Materials: G40 mini globe lights, screw hooks
- Vibe / Style: Romantic European
- Difficulty: Moderate
- Budget Breakdown: Mini globes: $35 | Hooks: $15.
- Creator’s Tip: Keep the spacing between rows exactly 18 inches to prevent the space from feeling cluttered.
- Smart Sourcing: Secure shatterproof G40 string lights (starter kit) and vinyl-coated ceiling cup hooks.
30. Hanging Lantern from Ceiling Hook

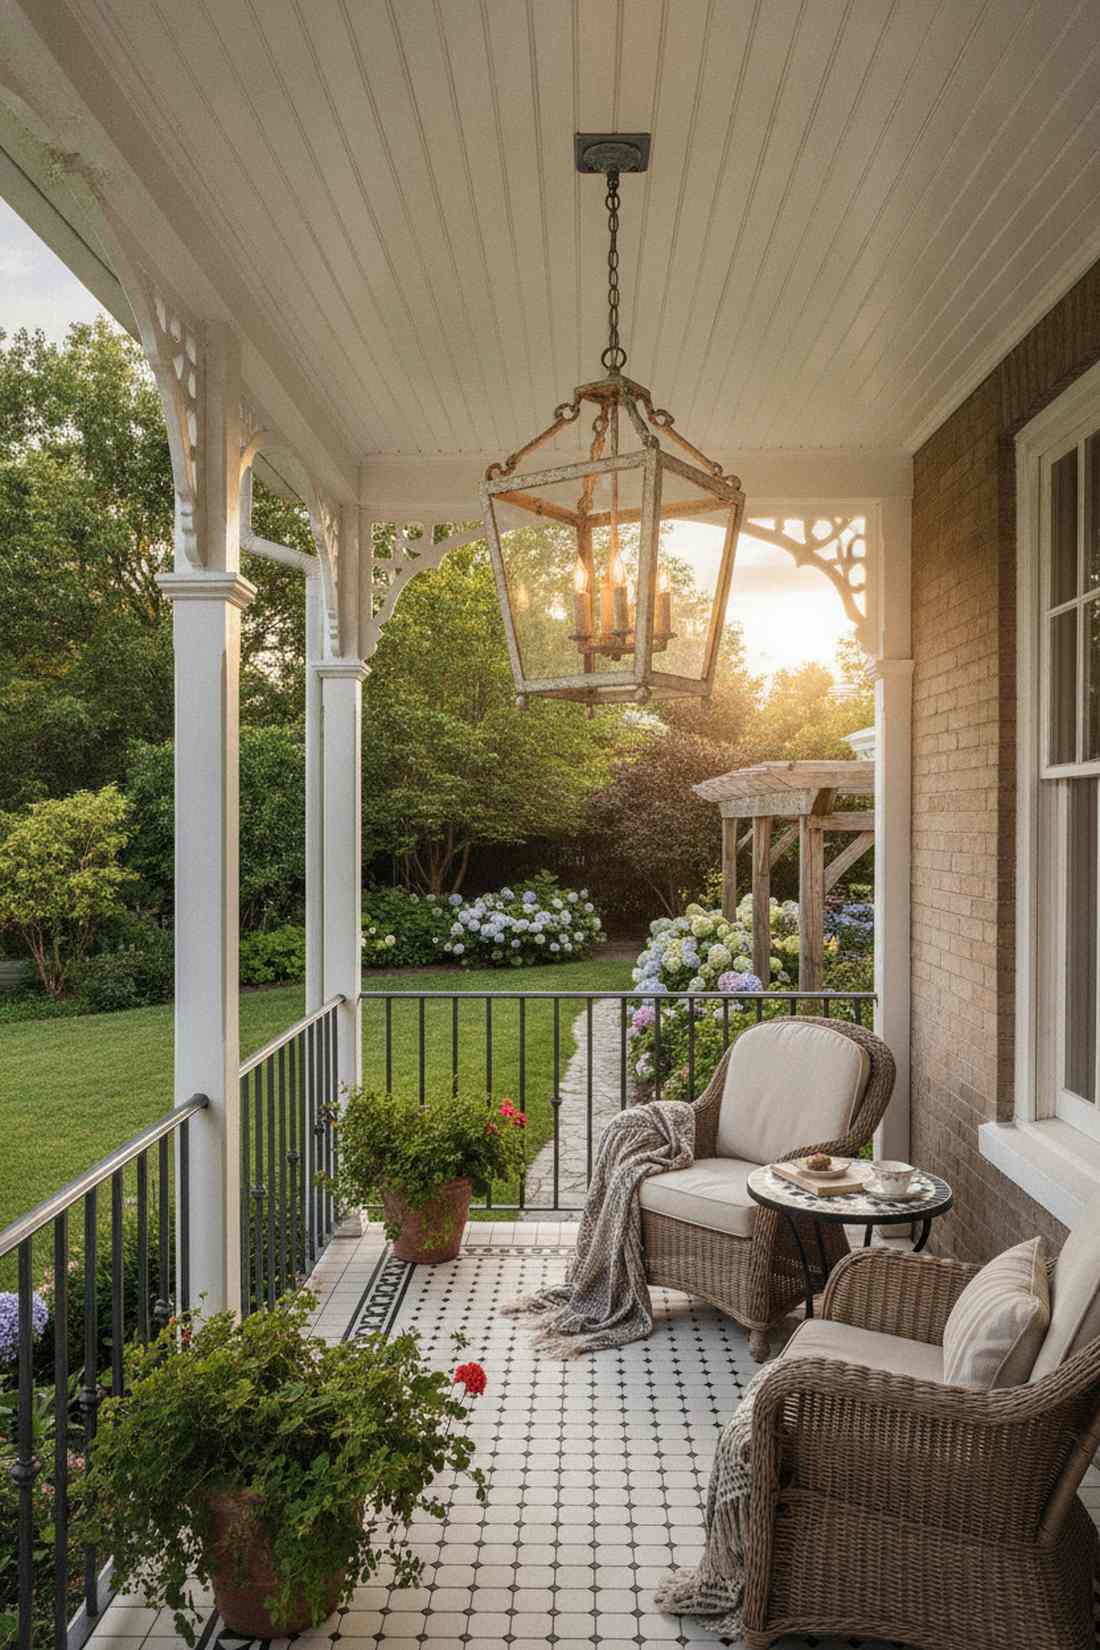
Feels like a vintage veranda. This single drop-point accent works exceptionally well for completely covered, small-square-footage balconies.
Suspending one oversized decorative piece bypasses expensive electrical work while still drawing the eye up. Using a massive, multi-wick LED candle provides enough ambient glow to light the whole space softly.
Expect to spend roughly $45. Highly recommended for renters.
- Key Materials: Large lightweight lantern, heavy-duty adhesive hook
- Vibe / Style: Vintage Veranda
- Difficulty: Very easy
- Budget Breakdown: Lantern: $30 | Hook/Chain: $15.
- Creator’s Tip: If you can’t drill, use a 15-pound rated exterior adhesive hook on a perfectly clean ceiling surface.
- Smart Sourcing: Buy an oversized lightweight resin lantern and heavy-duty exterior command hooks (bulk pack).
Material Guide: Cheap vs. Premium Aesthetic
Knowing exactly where to save and where to spend makes all the difference in achieving that “looks expensive but isn’t” vibe.
- Standard vs. UV-Resistant/Premium: Upgrading to UV-coated cables stops the wires from turning white and brittle after one summer in the sun.
- Pre-made Kits vs. Sourcing Locally: Buying complete starter kits often saves both time and money because you aren’t hunting down mismatched wire tensioners and transformers at the hardware store.
31. Clip-On Planter Accent Lights
Feels like a lush, glowing jungle oasis. This foliage spotlight technique works exceptionally well for railing planter boxes or vertical garden walls.
Clipping tiny micro-spots directly onto the pots gives a designer-level finish that casts dramatic shadows of the leaves onto the walls. It is an incredibly cheap way to make basic ferns look exotic.
You can pull this off for just $25. Save this to your urban gardening board.
- Key Materials: Solar clip-on spotlights
- Vibe / Style: Urban Jungle
- Difficulty: Zero
- Budget Breakdown: Clip lights: $25.
- Creator’s Tip: Aim the light slightly upward through the leaves rather than pointing it down at the dirt.
- Smart Sourcing: Grab mini solar clip-on spotlights (4-pack) that feature adjustable tilt heads.
Perimeter and Wall Lighting Systems
32. Downlight Wall Sconce Series
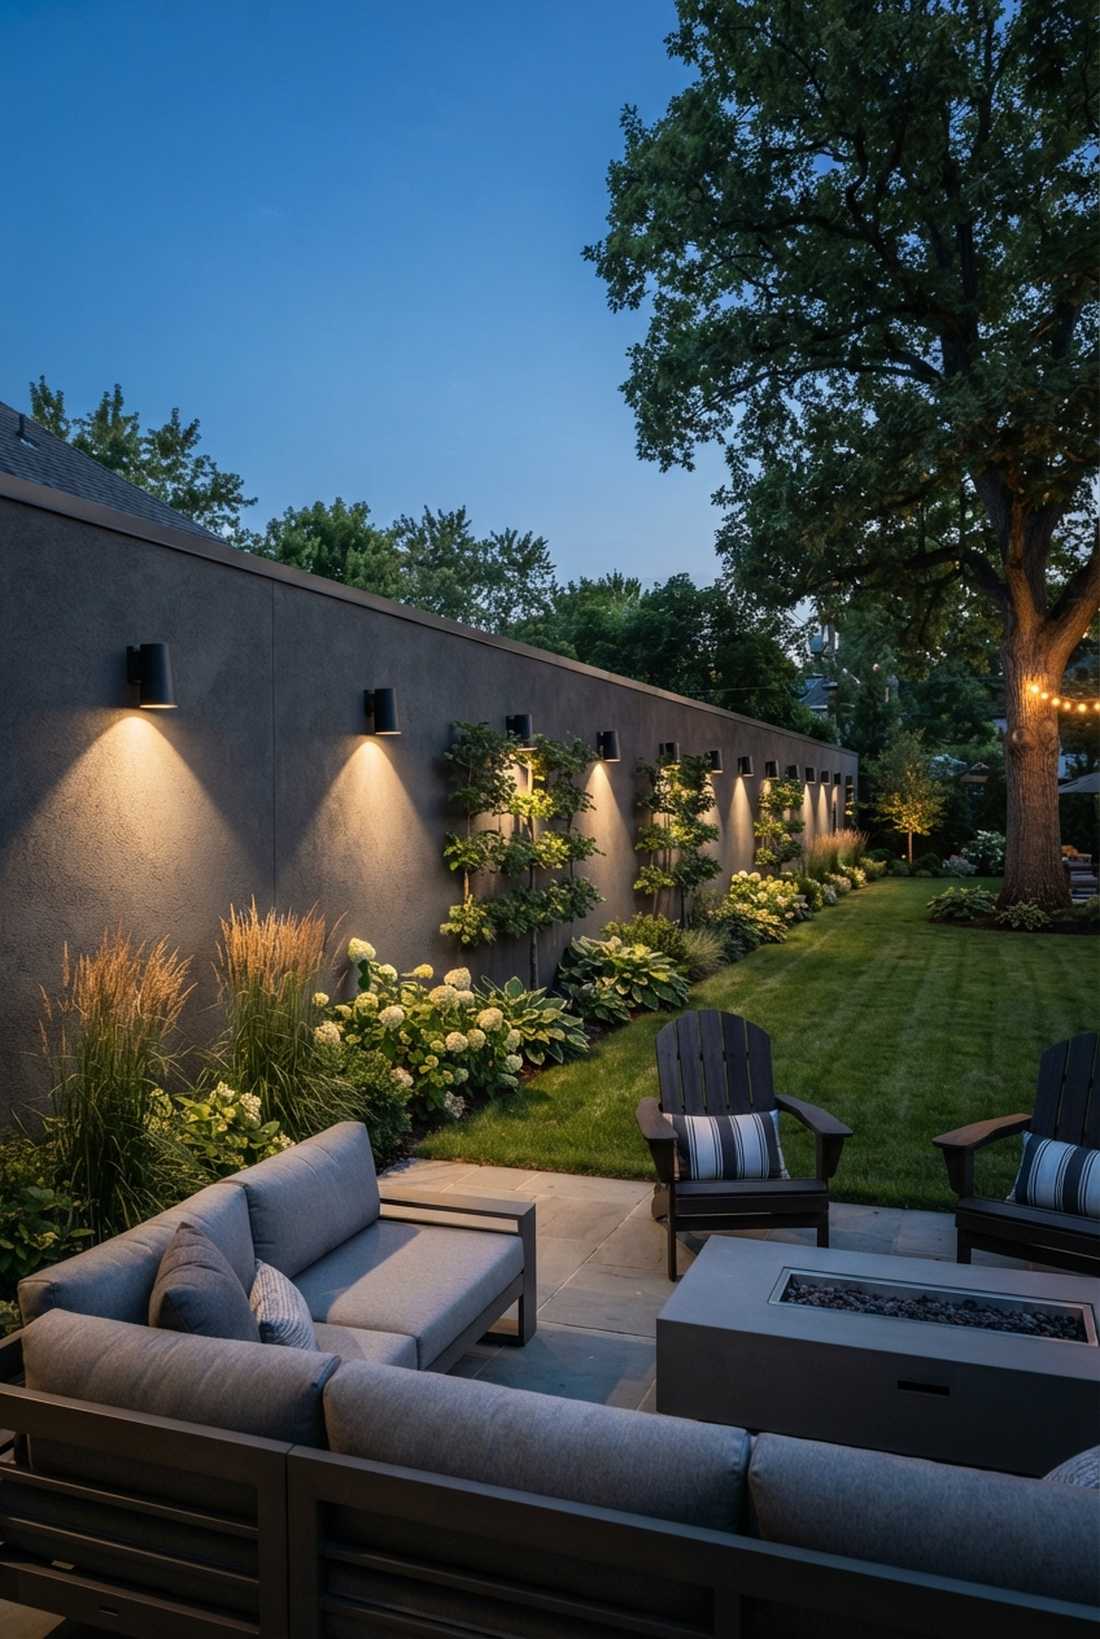
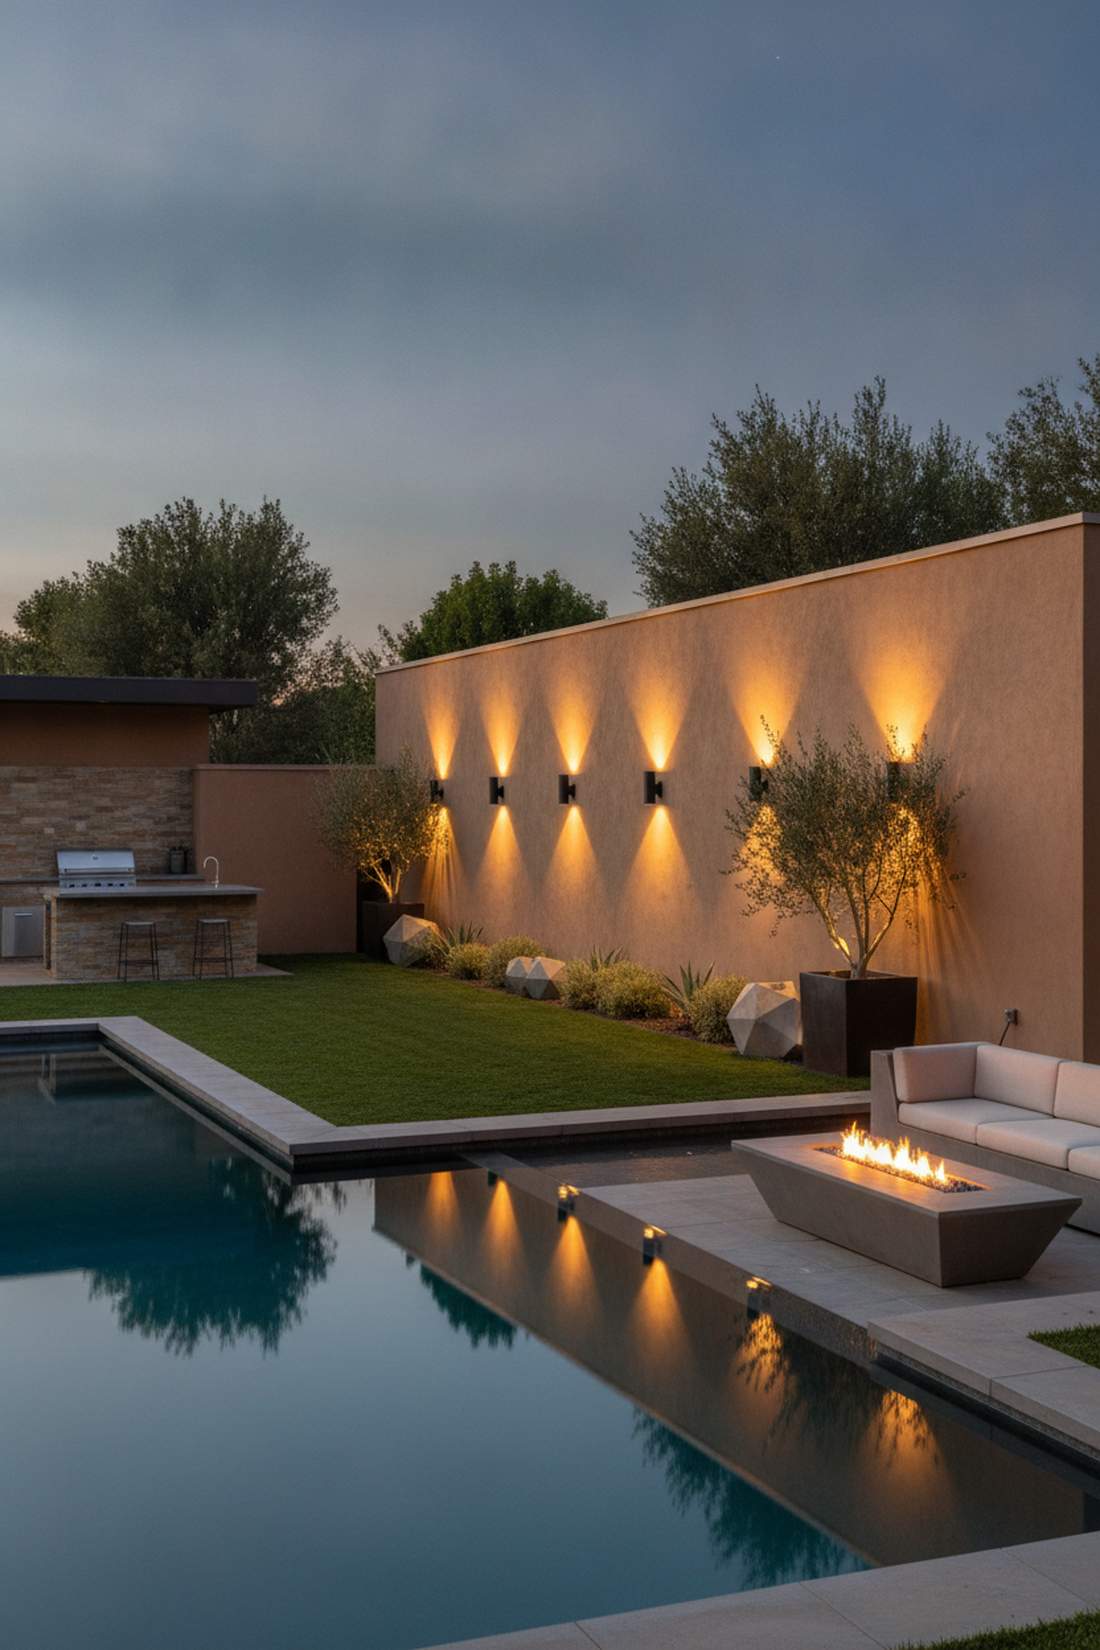
Feels like an exclusive walled garden. This rhythmic boundary wash works exceptionally well for long, tall privacy fences or stucco retaining walls.
Spacing identical down-facing shields every 6 feet screams high-end luxury and visually pushes the walls outward, making the yard feel twice as big. Utilizing proper hardwired fixtures here elevates the entire property value.
Expect a budget of $200+ for a long wall, plus wiring.
- Key Materials: Shielded wall sconces, low-voltage wiring
- Vibe / Style: Architectural Modern
- Difficulty: Advanced (requires wire routing)
- Budget Breakdown: Sconce set: $150 | Wire/Transformer: $60.
- Creator’s Tip: Mount them exactly 60 inches off the ground to hit the golden ratio for eye-level viewing.
- Smart Sourcing: Order dark sky compliant outdoor wall sconces (multi-pack) and low-voltage landscape transformers.
Most fences look like cheap wood panels until you try this specific lighting trick…
33. Uplighting Architectural Columns
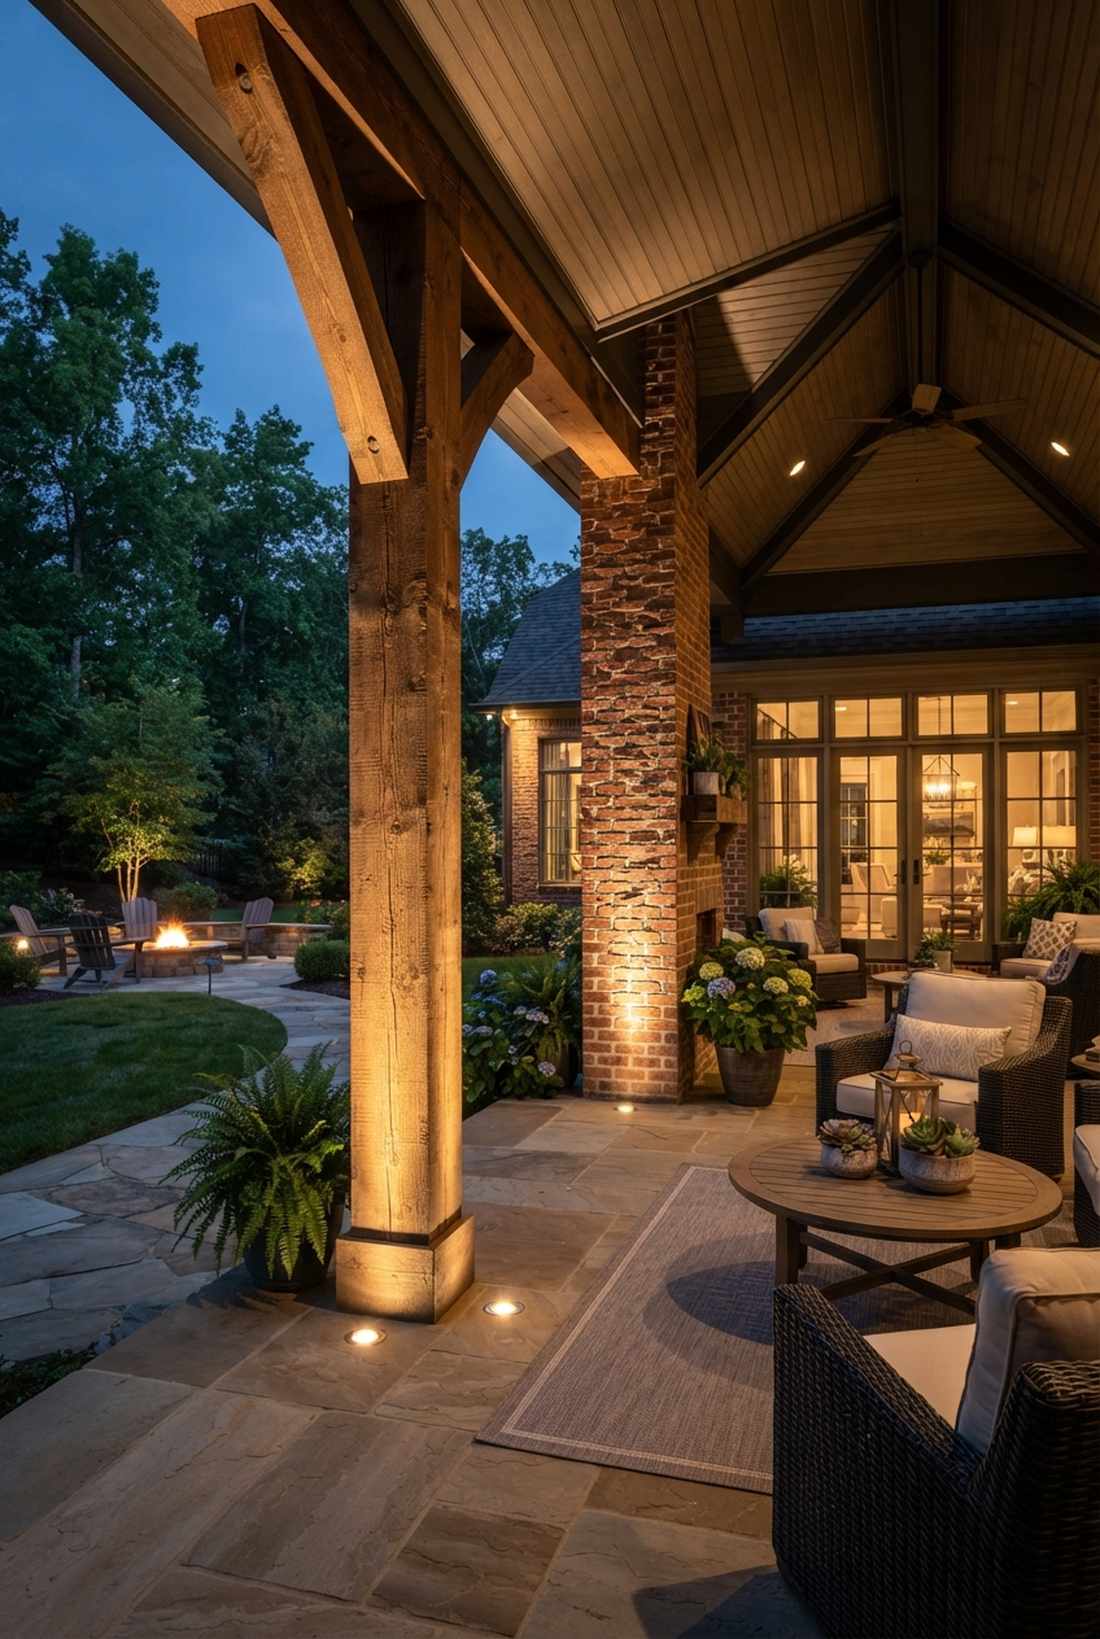
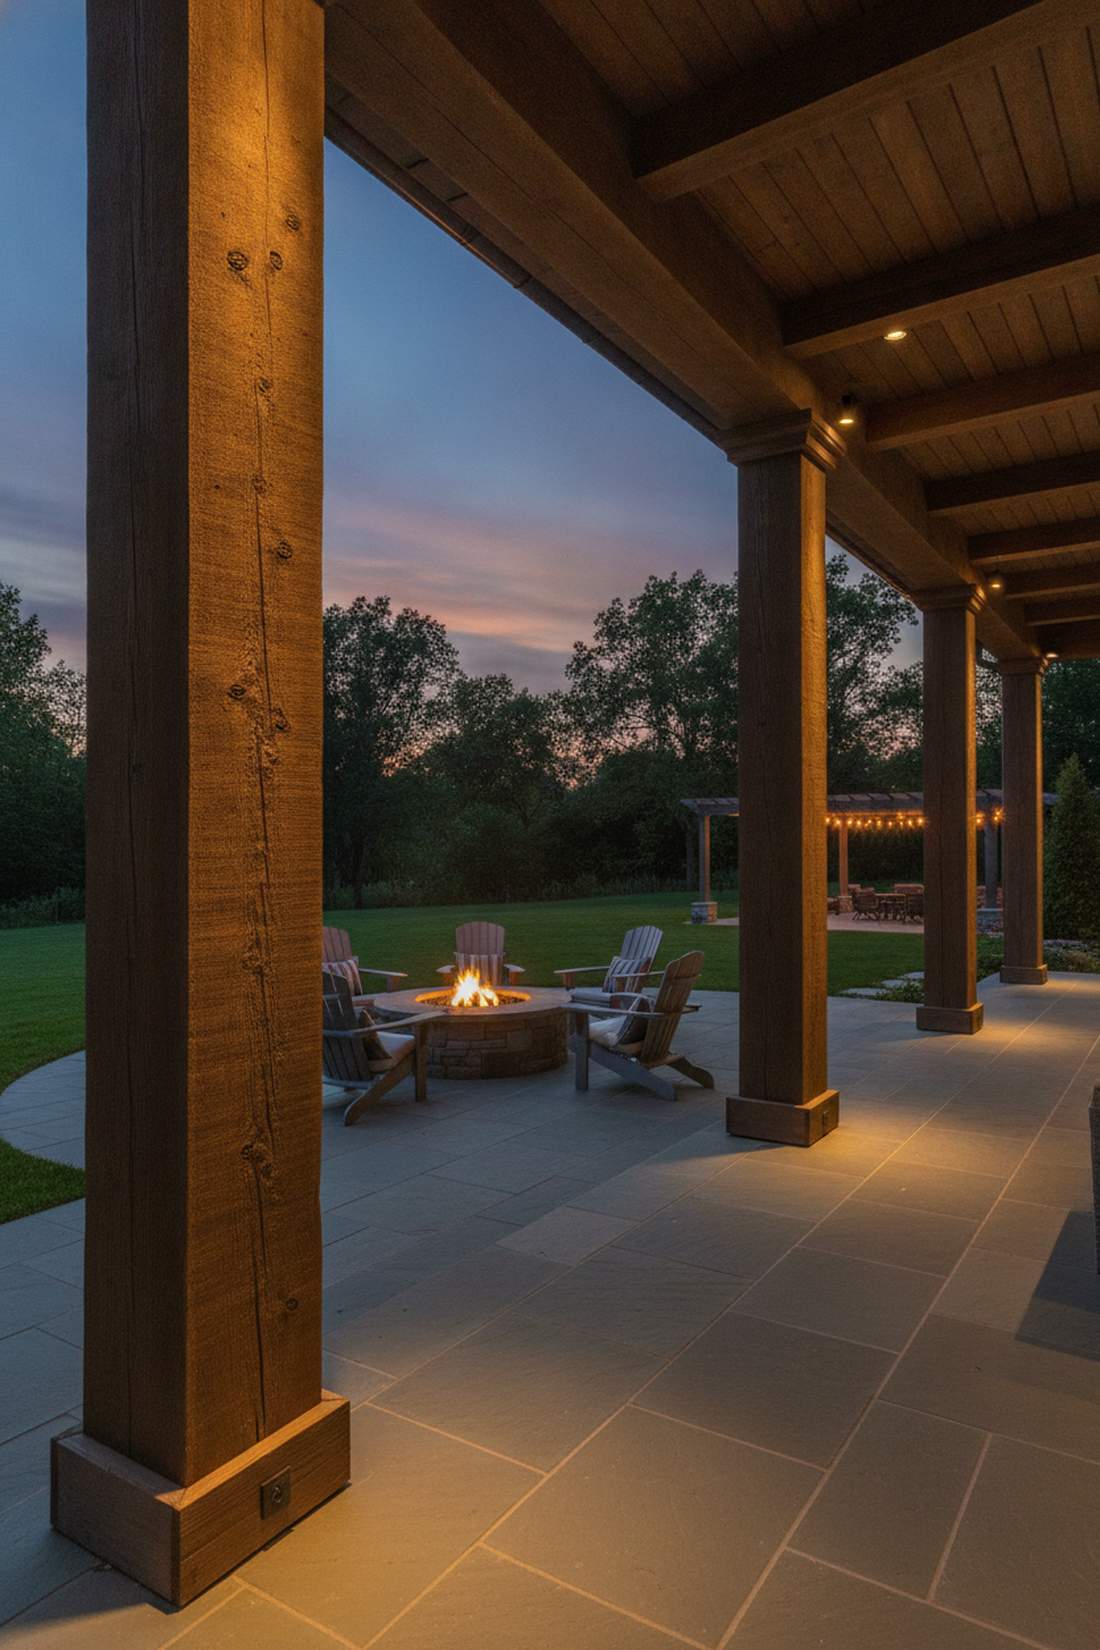
Straight out of a grand Roman villa. This vertical pillar emphasis works exceptionally well for covered patios with thick wooden or brick support posts.
Tucking a tight, narrow-beam light at the exact base of the column delivers a surprisingly premium look that accentuates height. It turns basic structural supports into majestic focal points.
This layout usually costs around $40 per column. Pin this if you have a large covered porch.
- Key Materials: Narrow-beam well lights
- Vibe / Style: Majestic Classical
- Difficulty: Moderate
- Budget Breakdown: Spotlights: $35 | Wire caps: $5.
- Creator’s Tip: Use a 15-degree narrow beam bulb to keep the light tight against the wood instead of spilling into the yard.
- Smart Sourcing: Find 15-degree narrow beam LED landscape spots and weatherproof silicone wire nuts.
34. Linear Wall Washer Strips
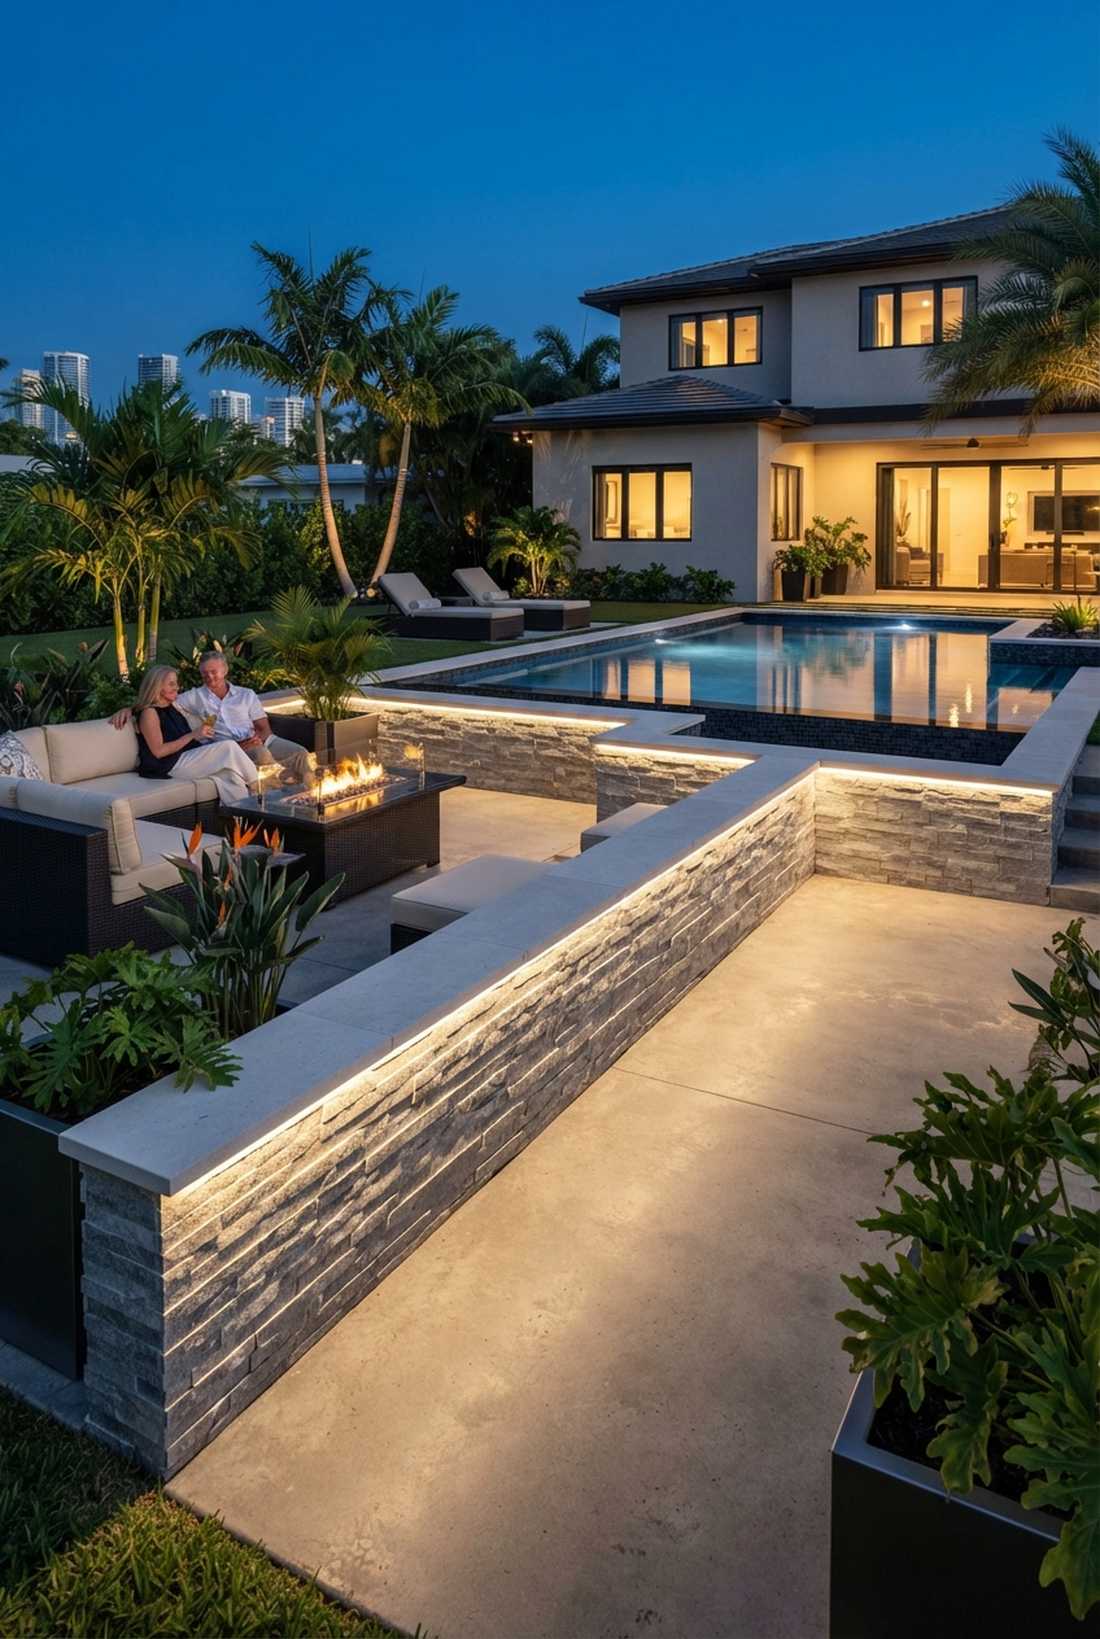
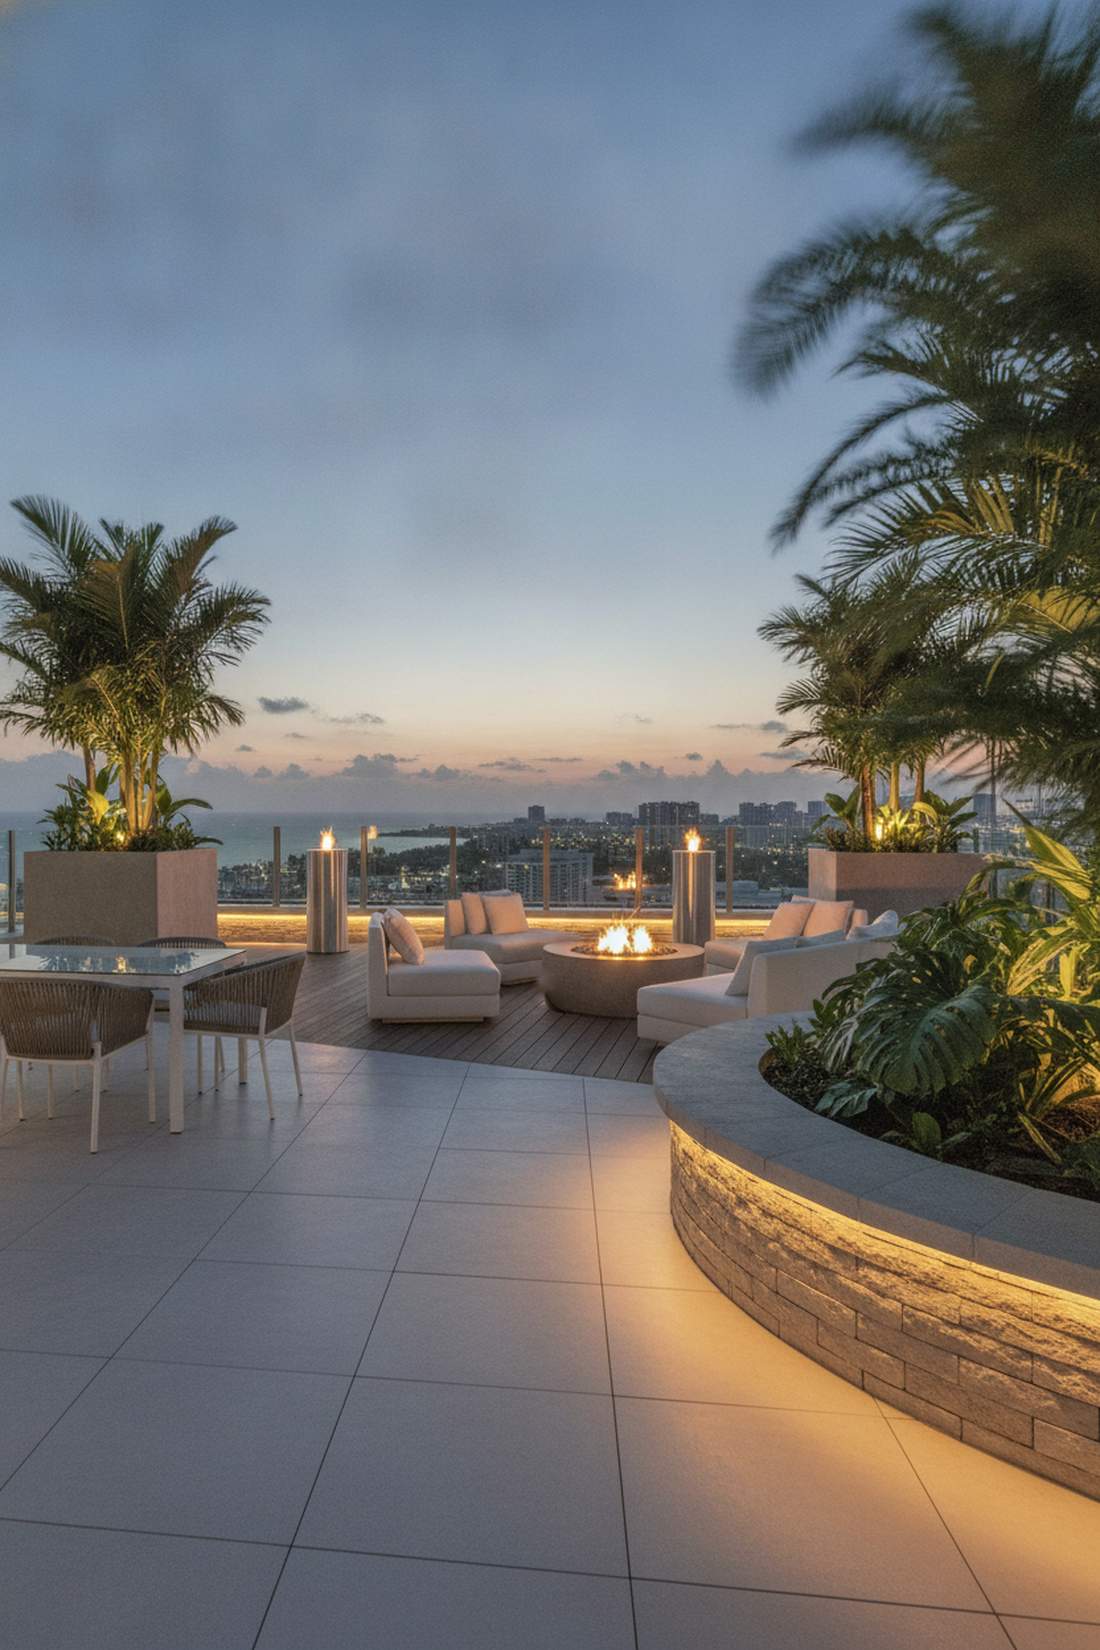
Feels like a slick Miami rooftop lounge. This continuous ledge glow works exceptionally well for capping off short retaining walls or built-in stone planters.
Hiding a continuous line of LEDs right under the wall cap cheats the system, creating a floating perimeter without the dotted look of individual fixtures. Integrating waterproof LED tape lighting completely modernizes old masonry.
You can easily pull this off for around $80 for a 16-foot section.
- Key Materials: Exterior LED strips, masonry adhesive
- Vibe / Style: Miami Modern
- Difficulty: Moderate
- Budget Breakdown: LED spool: $60 | Adhesive: $20.
- Creator’s Tip: Paint the aluminum channel to perfectly match your stonework before installing the lights inside.
- Smart Sourcing: Invest in continuous COB LED outdoor strip lights and heavy-duty exterior construction adhesive.
35. Bistro Bulb Wall Zigzag

Feels like an eclectic downtown beer garden. This flat-plane focal lighting works exceptionally well for giant, boring sections of plain wooden fencing.
Pinning the string directly to the wall in a sharp zigzag pattern gives a designer-level finish that acts as instant luminous wall art. It entirely bypasses the need to build overhead structures just to hang lights.
Expect to spend about $40. Highly recommended for massive, empty fence lines.
- Key Materials: Café string lights, screw-in cable clips
- Vibe / Style: Downtown Industrial
- Difficulty: Easy
- Budget Breakdown: String lights: $30 | Clips: $10.
- Creator’s Tip: Leave exactly 2 inches of slack between each clip so the wire doesn’t snap during temperature changes.
- Smart Sourcing: Pick up shatterproof Edison bulb patio strings and screw-in outdoor wire clips (bulk pack).
36. Picture Light Style Wall Grazers
Feels like an exclusive outdoor art gallery. This targeted artwork illumination works exceptionally well for highlighting outdoor metal wall art, address plaques, or trellis features.
Mounting an extended-arm light above the focal point delivers a surprisingly premium look that makes cheap wall decor look expensive. Choosing brass or copper finishes ages beautifully outside.
You can assemble this for around $60. Save this to your exterior styling board.
- Key Materials: Gooseneck or picture-style wall fixture
- Vibe / Style: Gallery Chic
- Difficulty: Advanced (electrical required)
- Budget Breakdown: Fixture: $50 | Hardware: $10.
- Creator’s Tip: Aim the hood perfectly so the light hits the center of the art without glaring onto the seating area behind it.
- Smart Sourcing: Buy an exterior-rated brass gooseneck barn light and dimmable warm-white LED bulbs.
Layered Zone Lighting Combinations
37. Three-Tier Dining Zone Layer
Feels like a professionally designed outdoor dining pavilion. This comprehensive dimensional setup works exceptionally well for permanent, high-traffic entertainment areas.
Stacking a pendant, wall sconces, and deck lights screams high-end luxury by eliminating flat, single-source shadows entirely. Sourcing premium outdoor lighting patio kits ensures all three zones match in color temperature flawlessly.
Plan for a $200–$300 budget to get all three layers perfect.
- Key Materials: Pendant, wall sconces, recessed floor lights
- Vibe / Style: Ultimate Entertainer
- Difficulty: Advanced (requires planning)
- Budget Breakdown: Pendants: $100 | Sconces: $80 | Floor: $100.
- Creator’s Tip: Wire all three layers on completely separate dimmer switches to dial in the exact mood.
- Smart Sourcing: Snag a smart outdoor dimmer switch kit (3-gang) and an integrated LED landscape lighting starter bundle.
Most people just blast a single floodlight… this next technique is how you actually build ambiance.
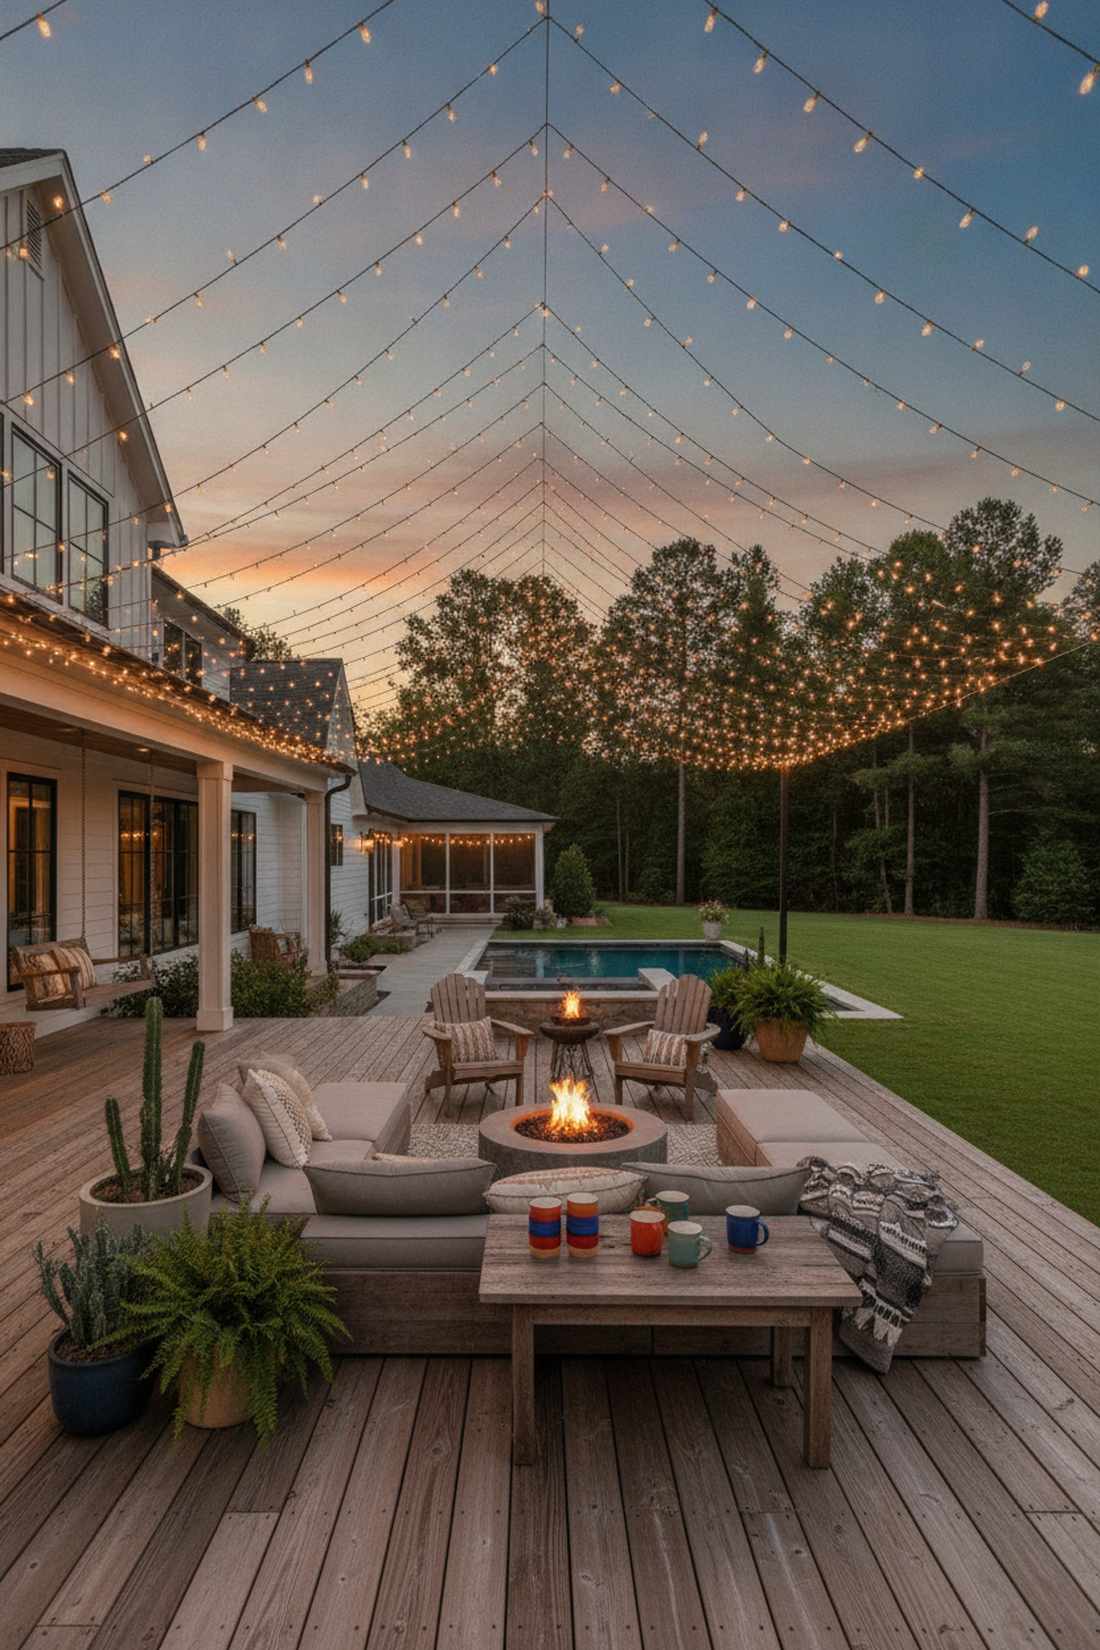
38. Lounge Zone Ambient and Accent Mix
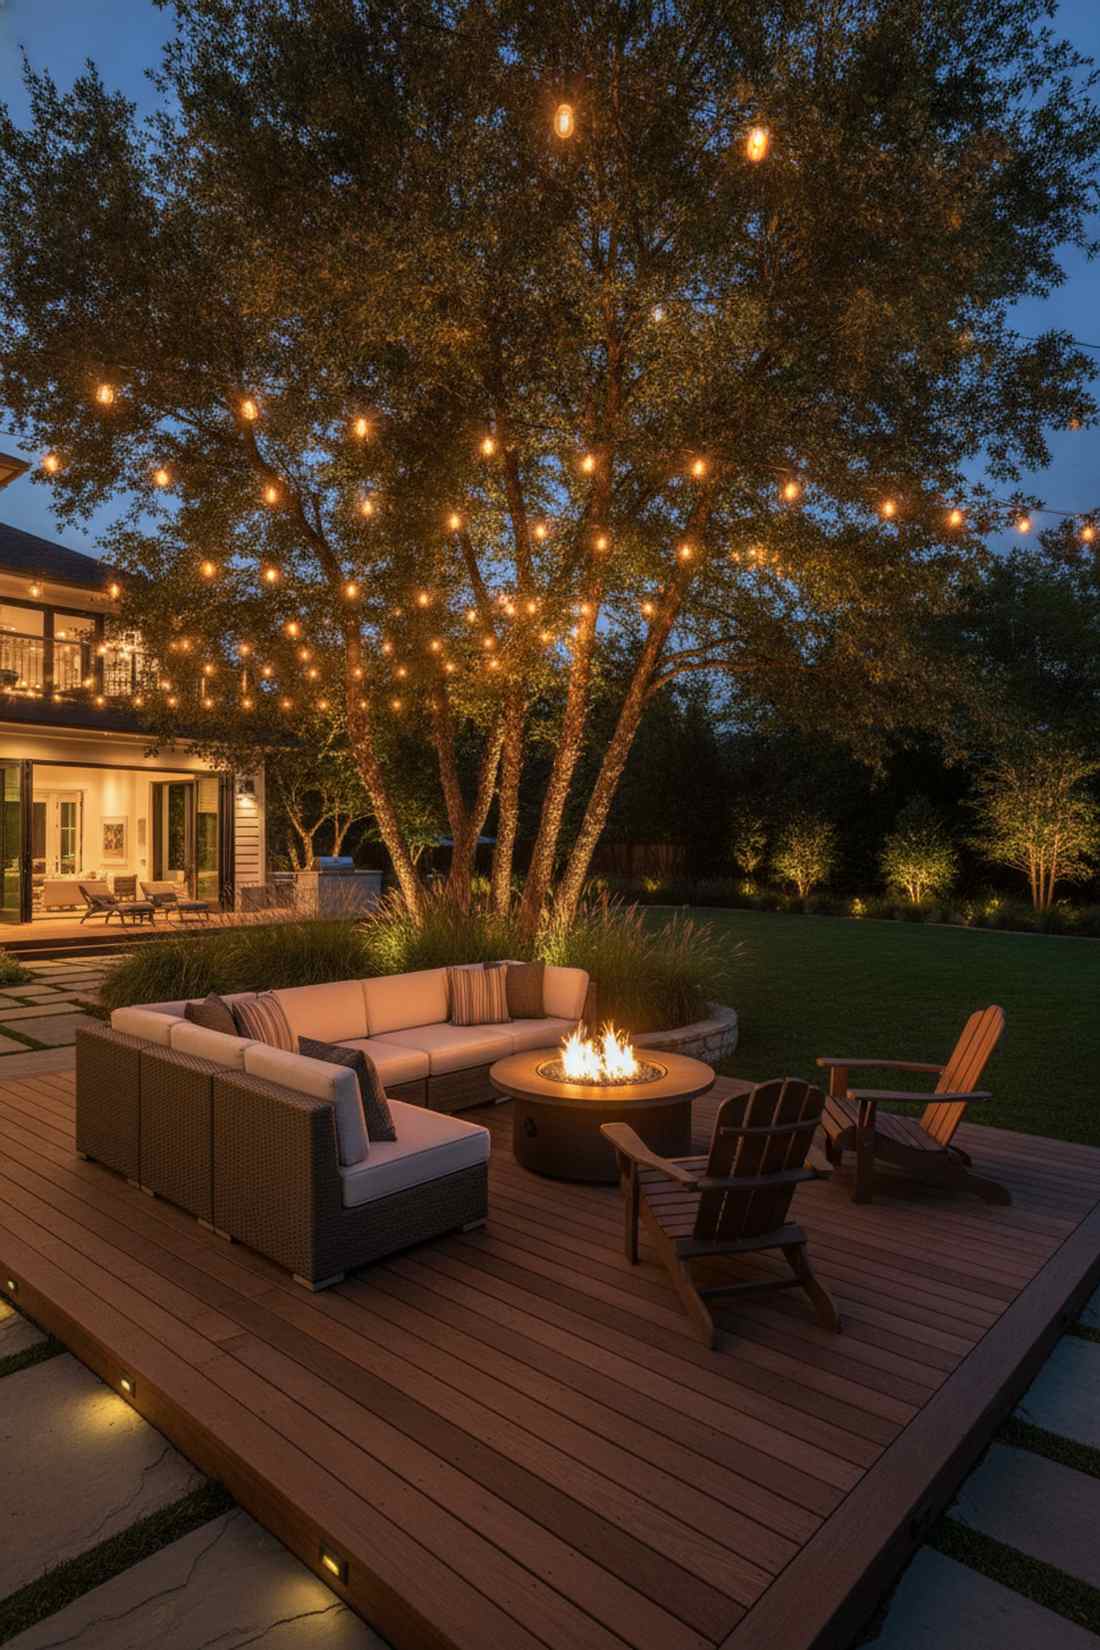
Straight out of a luxury cliffside resort. This relaxed multidirectional glow works exceptionally well for deep seating areas surrounded by nature.
Mixing dim overhead bistro strings with bright uplights on the trees behind the sofa gives a designer-level finish that adds immense depth. This prevents the “black hole” effect that happens when the yard outside the patio goes completely dark.
You can easily pull this off for around $120. Pin this to your ultimate backyard makeover board.
- Key Materials: Dimmer-controlled bistro lights, tree uplights
- Vibe / Style: Resort Lounge
- Difficulty: Moderate
- Budget Breakdown: Overhead: $50 | Uplights: $70.
- Creator’s Tip: Push the tree uplights at least 15 feet back from the seating to create a visually massive backyard.
- Smart Sourcing: Order heavy-duty plug-in outdoor dimmers and high-lumen brass landscape spotlights.
39. Circulation Path Three-Level Guidance
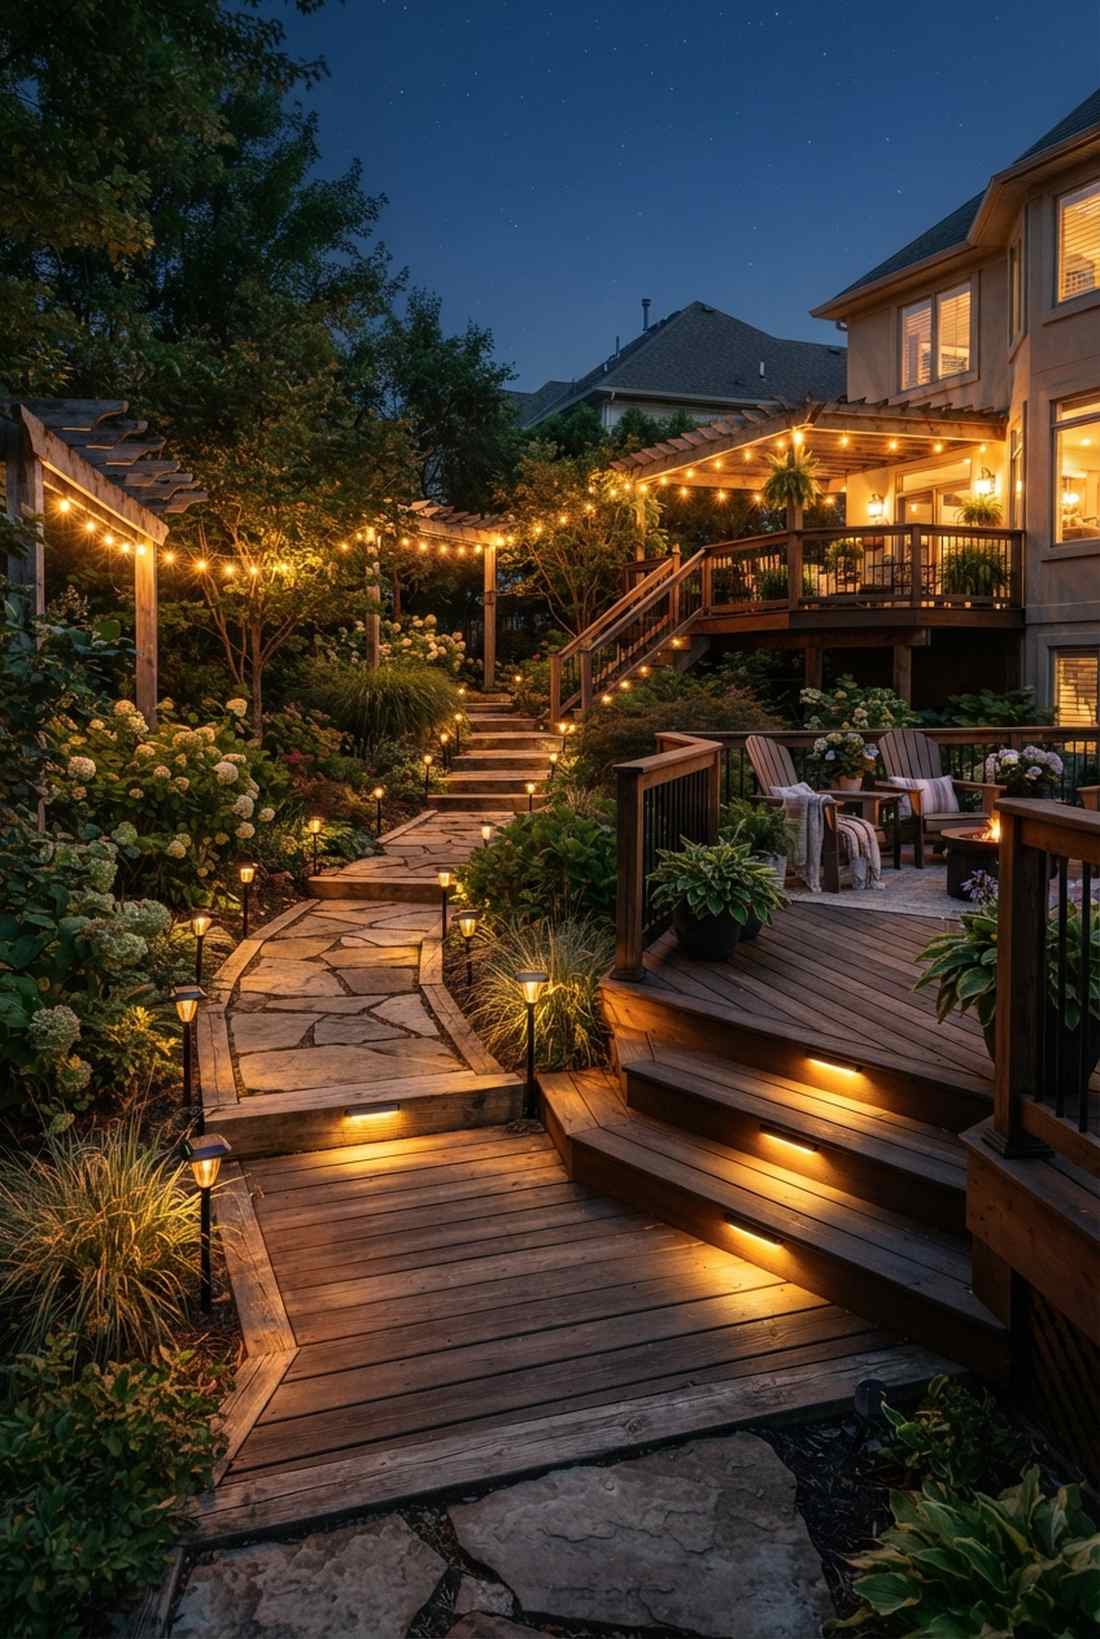
Feels like navigating a magical, enchanted estate. This multi-height safety routing works exceptionally well for long, winding paths connecting different deck levels.
Combining overhead guidance, knee-level stakes, and step risers bypasses the clinical runway look and creates a safe, deeply textured journey. It proves you don’t need blinding floodlights to walk safely.
Expect to spend about $150 to layer a 20-foot path.
- Key Materials: Overhead strings, solar stakes, stair strips
- Vibe / Style: Enchanted Journey
- Difficulty: Moderate
- Budget Breakdown: Strings: $40 | Stakes: $50 | Strips: $60.
- Creator’s Tip: Keep the pathway lighting intensity at about 50% of the destination area’s brightness to naturally draw people forward.
- Smart Sourcing: Use a low-voltage pathway lighting starter kit and cut-to-length outdoor LED tape.
40. Perimeter Definition Layered Boundary
Feels like an impenetrable fortress of cozy vibes. This 3D border framing works exceptionally well for fully enclosing open-air hardscapes.
Layering plant uplighting, corner post caps, and fence wash lighting cheats the system by defining exactly where the “room” ends without building actual walls. This gradient effect makes a tiny enclosed patio feel infinitely open.
You can pull this comprehensive boundary off for around $180. Highly recommended for finalizing your landscape.
- Key Materials: Well lights, post caps, wall washers
- Vibe / Style: Borderless Luxury
- Difficulty: Advanced
- Budget Breakdown: Post caps: $60 | Wall wash: $70 | Uplights: $50.
- Creator’s Tip: Use slightly cooler 3000K bulbs on the far perimeter to create an illusion of distance, while keeping the seating area at a warm 2700K.
- Smart Sourcing: Invest in a comprehensive smart landscape lighting system and color-tunable LED yard kits.
Transform Your Outdoor Lighting Patio Tonight
Professional outdoor lighting patio design relies on strategic layering across multiple zones and heights rather than throwing up a single, blinding floodlight. By combining these smart, commercial-grade overhead setups with targeted task lights and premium accent kits, you create functional areas that look incredibly expensive. Start with one primary zone—like the dining table or fire pit—and build outward using the exact three-tier principles outlined.
Evaluate your space after installing each layer, ensuring your UV-resistant cables and heavy-duty dimmers are dialed in before moving on. This prevents over-lighting and keeps the budget strictly controlled. Review these exact 40 layouts to identify the high-end combinations that fit your layout, then grab the bulk starter kits to execute them like a professional designer.
Frequently Asked Questions
What is the ideal spacing for string lights on a patio?
Space commercial string light strands exactly 4-6 feet apart for parallel layouts to get that premium, even glow without cluttering the sky. For tight radial patterns, maintaining 3-4 feet at the perimeter stops the yard from looking like a messy web. Grabbing a pre-cut stainless steel tension kit ensures you maintain this spacing permanently without the wires drooping over time.
How many lumens do I need for outdoor patio dining areas?
You need around 800-1200 lumens focused on the table surface for a premium outdoor lighting table setup that mimics an upscale restaurant. However, never blast this from a single bulb; layer it using heavy-base cordless LED table lamps and a dimmable overhead pendant. Installing a heavy-duty outdoor dimmer switch kit is the ultimate secret to dropping those lumens down instantly when dinner finishes.
What color temperature works best for outdoor social spaces?
Always stick strictly to 2700K-3000K warm white bulbs to achieve that expensive, inviting hospitality vibe. Anything above 4000K looks like a cheap gas station and casts horrific blue shadows on your guests’ faces. When buying your integrated LED landscape lighting starter bundles, check the box twice to ensure every single fixture matches that warm temperature perfectly.
How do I prevent outdoor lighting from disturbing neighbors?
The trick is using dark sky compliant outdoor wall sconces and heavy cast-brass well light covers that direct the beam entirely downward or strictly onto your own focal points. Bypassing massive 500-watt halogens for targeted low-voltage LED deck starter kits ensures you get a luxury aesthetic without light pollution. Proper shielding makes your space look expensive, not obnoxious.
Can I mix solar and wired lighting in the same patio layout?
Absolutely, mixing them is the smartest way to balance a budget while achieving a designer look. Use premium low-voltage transformer boxes for the main overhead and architectural lights so they never flicker or die, then sprinkle in glass and metal solar pathway stakes for the distant garden beds. This hybrid method saves hundreds on trenching wire while keeping the core outdoor lighting patio zones flawless.