Every truly stunning outdoor seating patio relies on precision layout and smart material sourcing. This curated blueprint reveals exact setups for maximum aesthetic impact. Achieve a premium residential exterior without expensive designer fees.
Design Snapshot Key Principles
- Spatial Hierarchy: Define primary gathering zones, secondary lounging areas, and circulation paths with clear material transitions and level changes
- Focal Point Strategy: Anchor each outdoor seating area with a dominant visual element—fire features, water elements, specimen plantings, or architectural structures
- Material Palette: Select weather-resistant surfaces and furniture—teak for natural patina, aluminum for coastal environments, synthetic wicker for cushioned comfort, concrete for permanence
- Microclimate Response: Position seating to capture sun exposure, wind protection, and views while integrating shade structures—pergolas, canopies, or planted screens
Conversation-Focused Outdoor Seating Area Garden Designs
Designers prioritize face-to-face interaction by arranging seating in circular, U-shaped, or sunken configurations. These outdoor seating area garden layouts minimize visual barriers and create intimate social zones. Material choices reinforce the enclosure—built-in benches, modular sectionals, or individual lounge chairs positioned 6-8 feet apart optimize conversation distance.
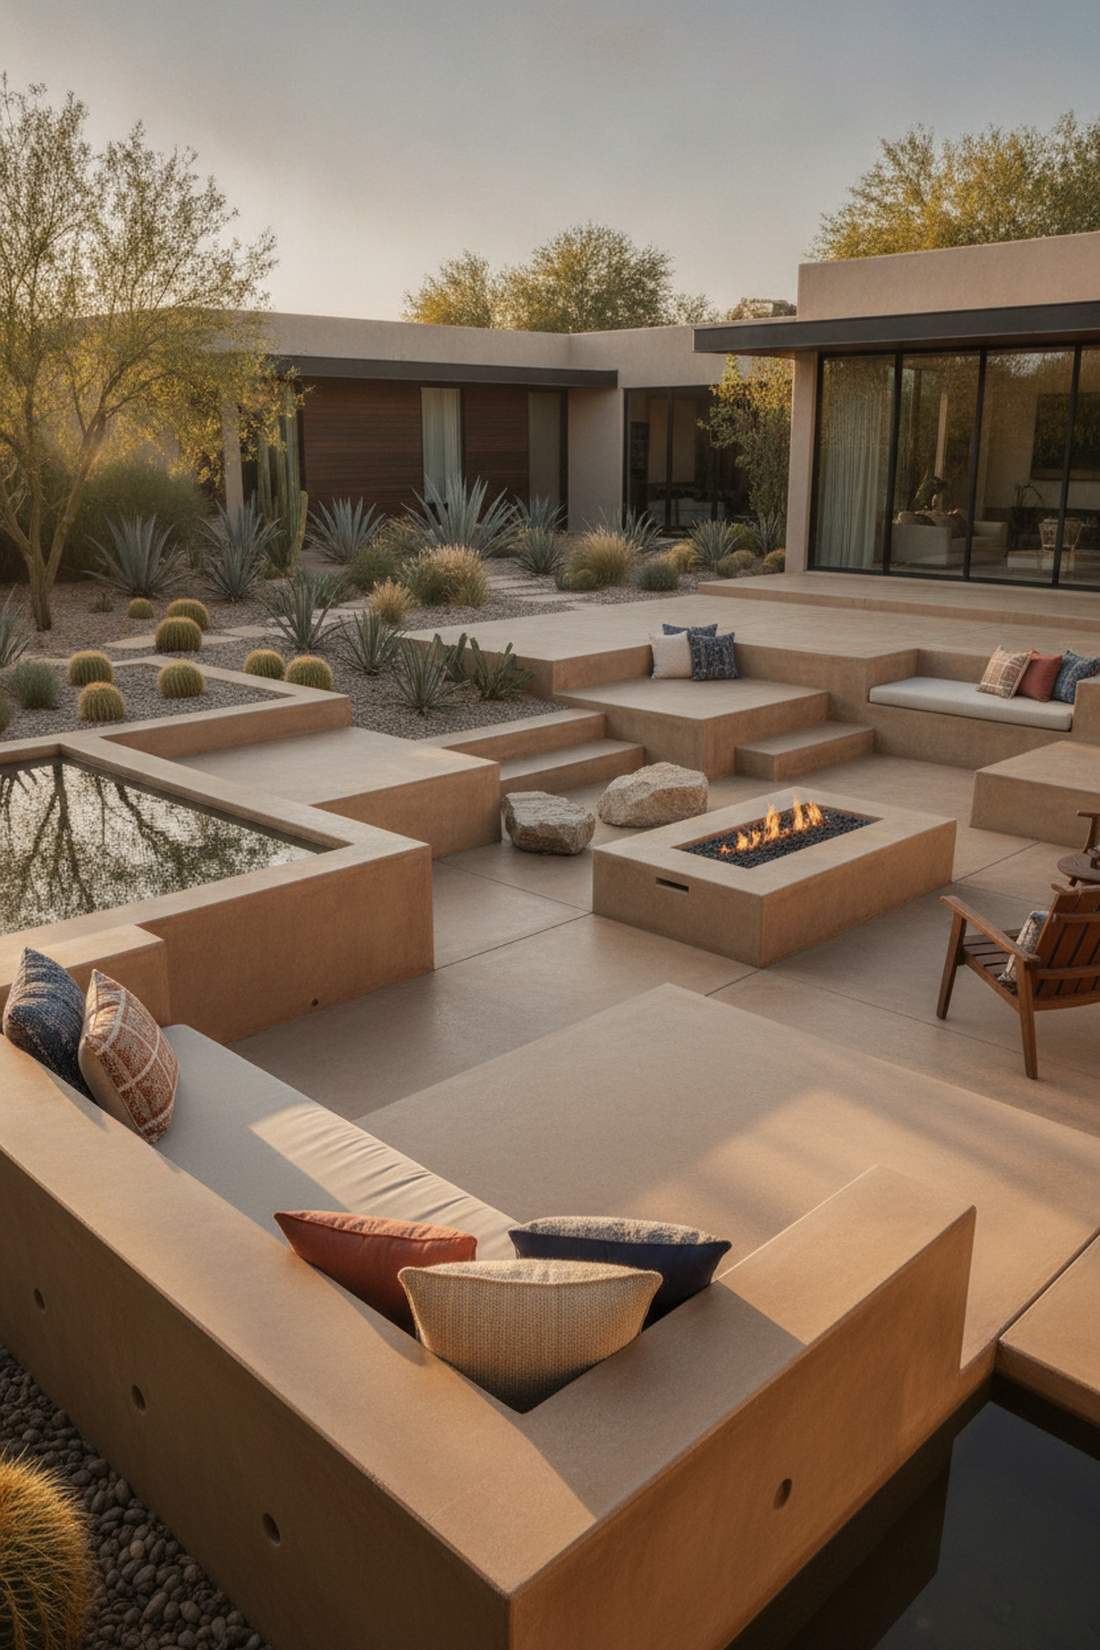
1. Sunken Conversation Pit with Central Fire Bowl
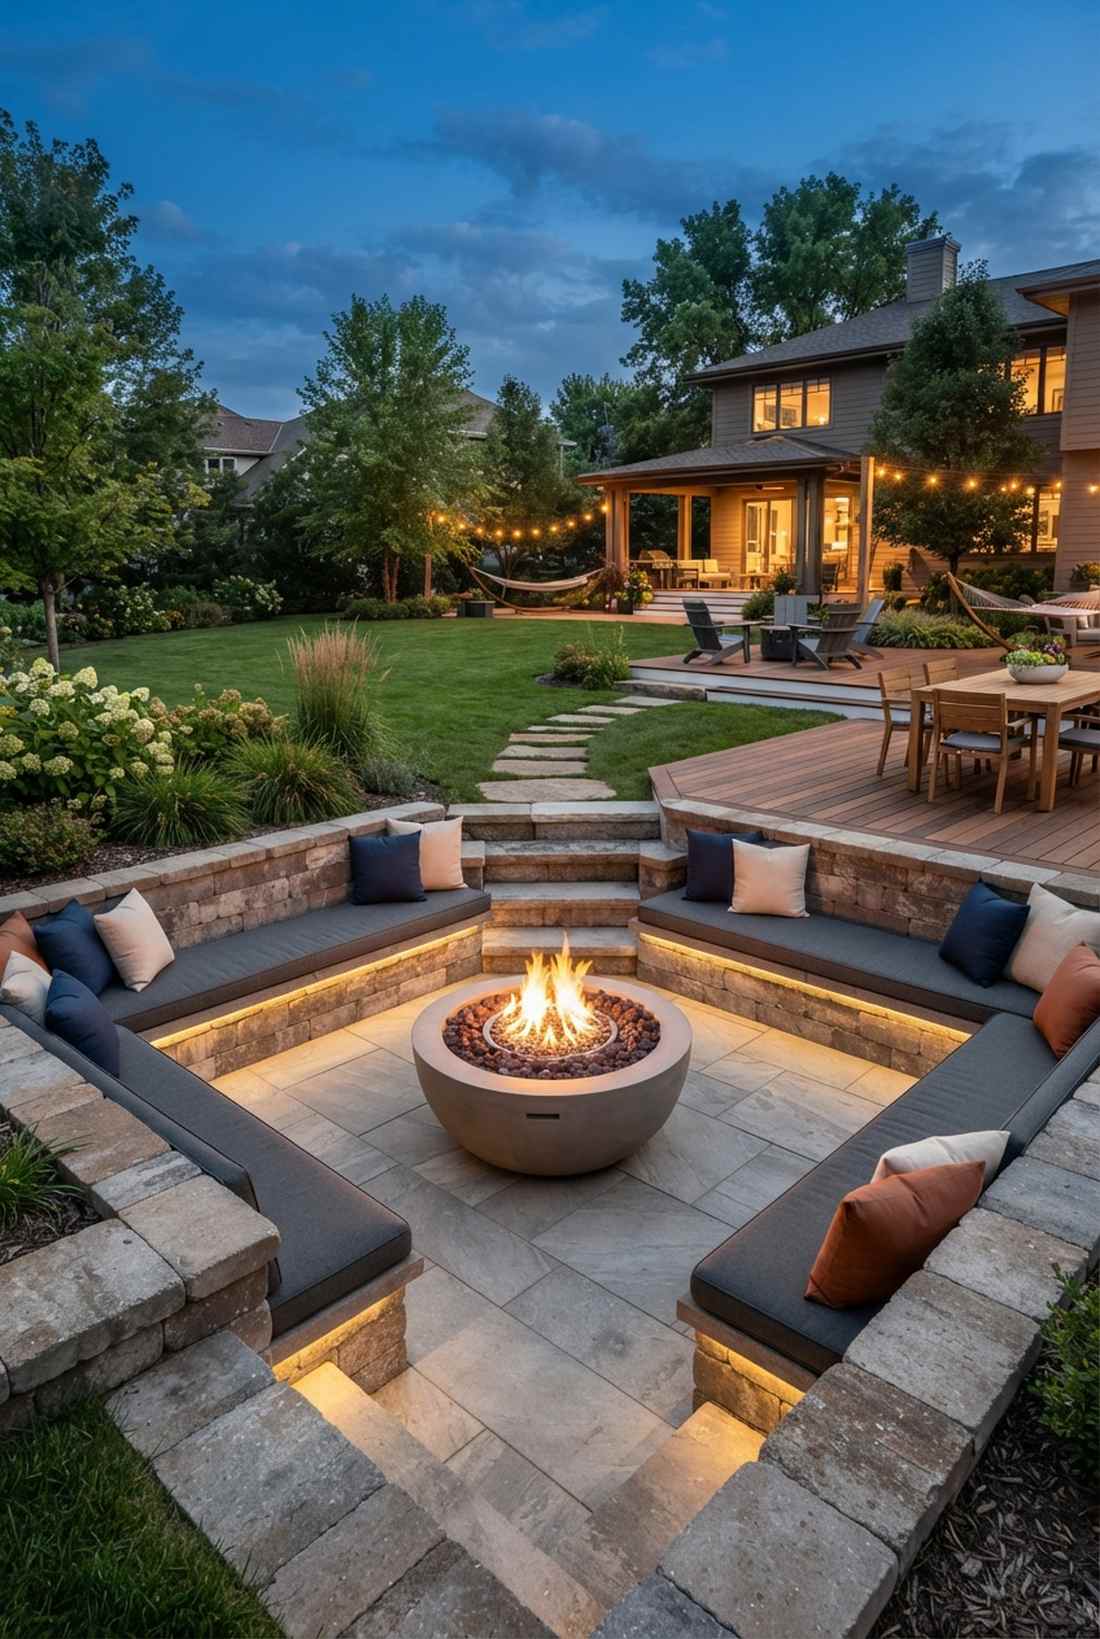
Feels like an exclusive resort lounge you accidentally stumbled into. This sunken patio seating concept works flawlessly for flat yards needing instant wind protection and acoustic intimacy.
Skip generic surface arrangements; dropping the seating plane delivers a surprisingly premium look. Lock in warmth with a commercial-grade central gas fire bowl and weather-proof masonry retaining blocks.
You can execute this major architectural shift for around $1,500–$3,500 depending on excavation needs. Save this to your ultimate yard upgrade board!
- Key Materials: Cast concrete fire bowl, retaining wall blocks, LED strip lighting
- Vibe / Style: Modern luxury escape
- Difficulty: Advanced weekend project
- Budget Breakdown: Excavation: $500 | Fire Bowl: $800 | Hardscaping: $1,200
- Creator’s Tip: Install drainage channels beneath the seating before laying the final surface to prevent seasonal flooding.
- Smart Sourcing: Pre-cast concrete firepit kits and weather-resistant outdoor cushion sets (bulk pack).
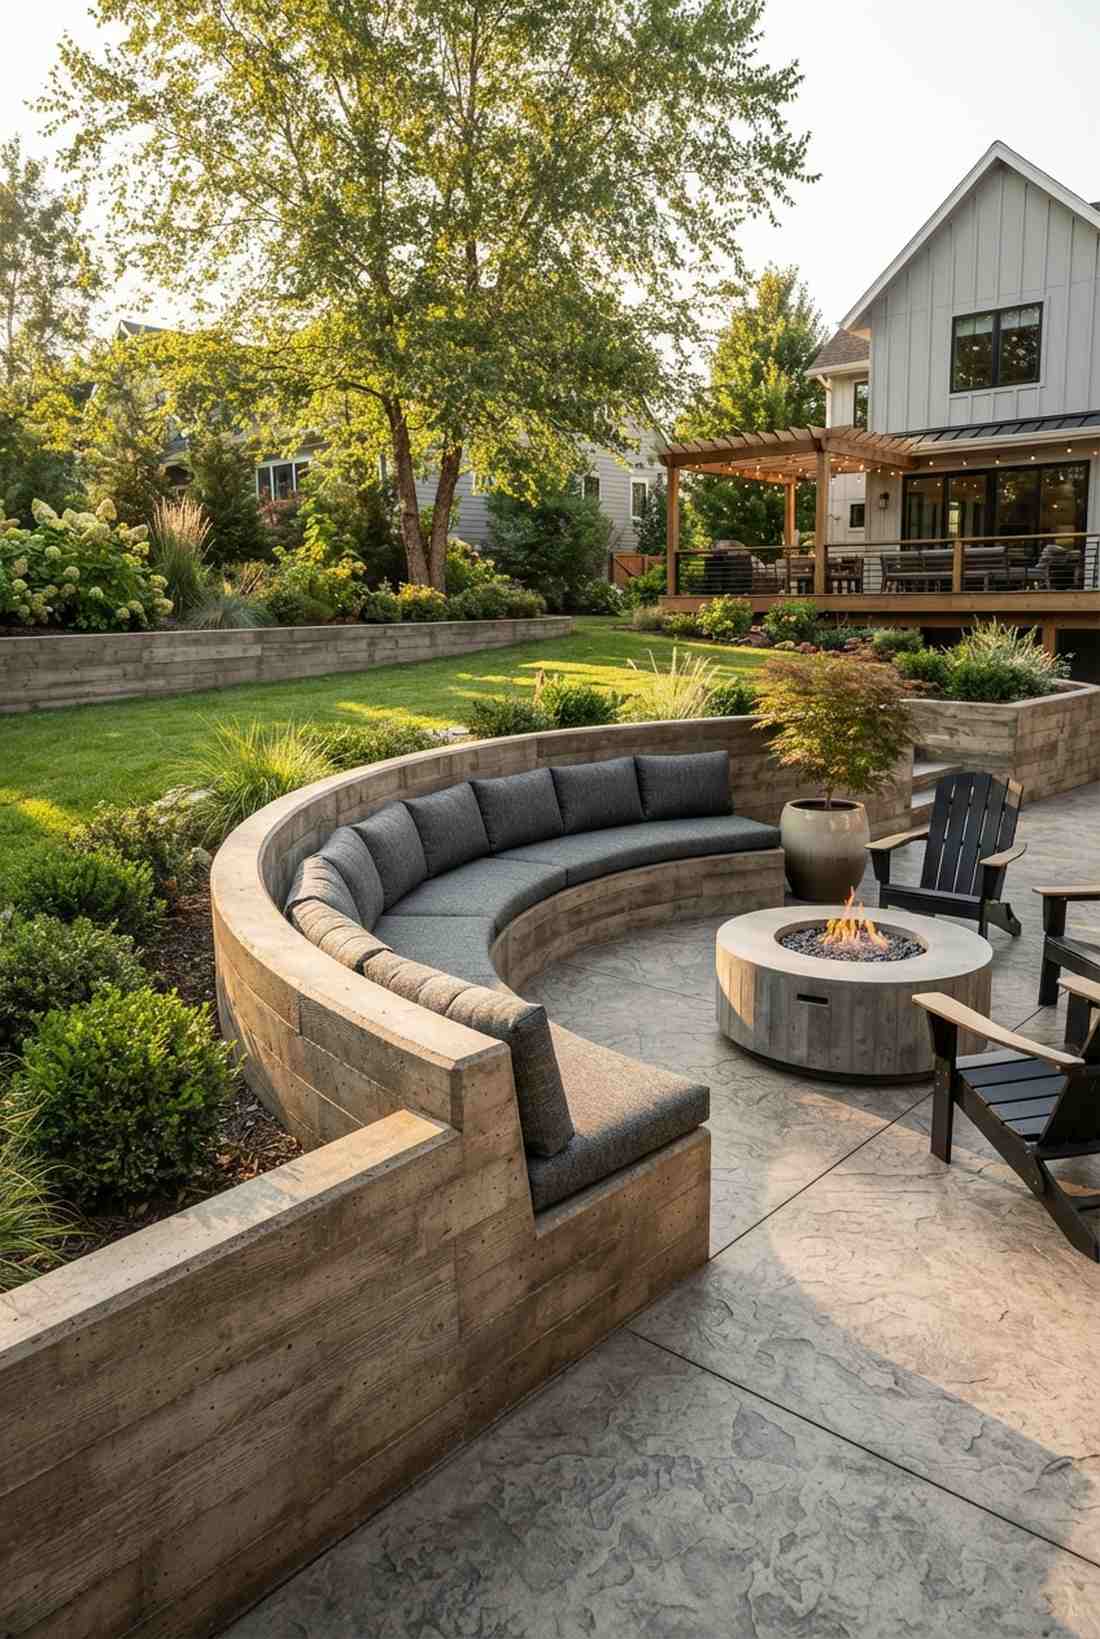
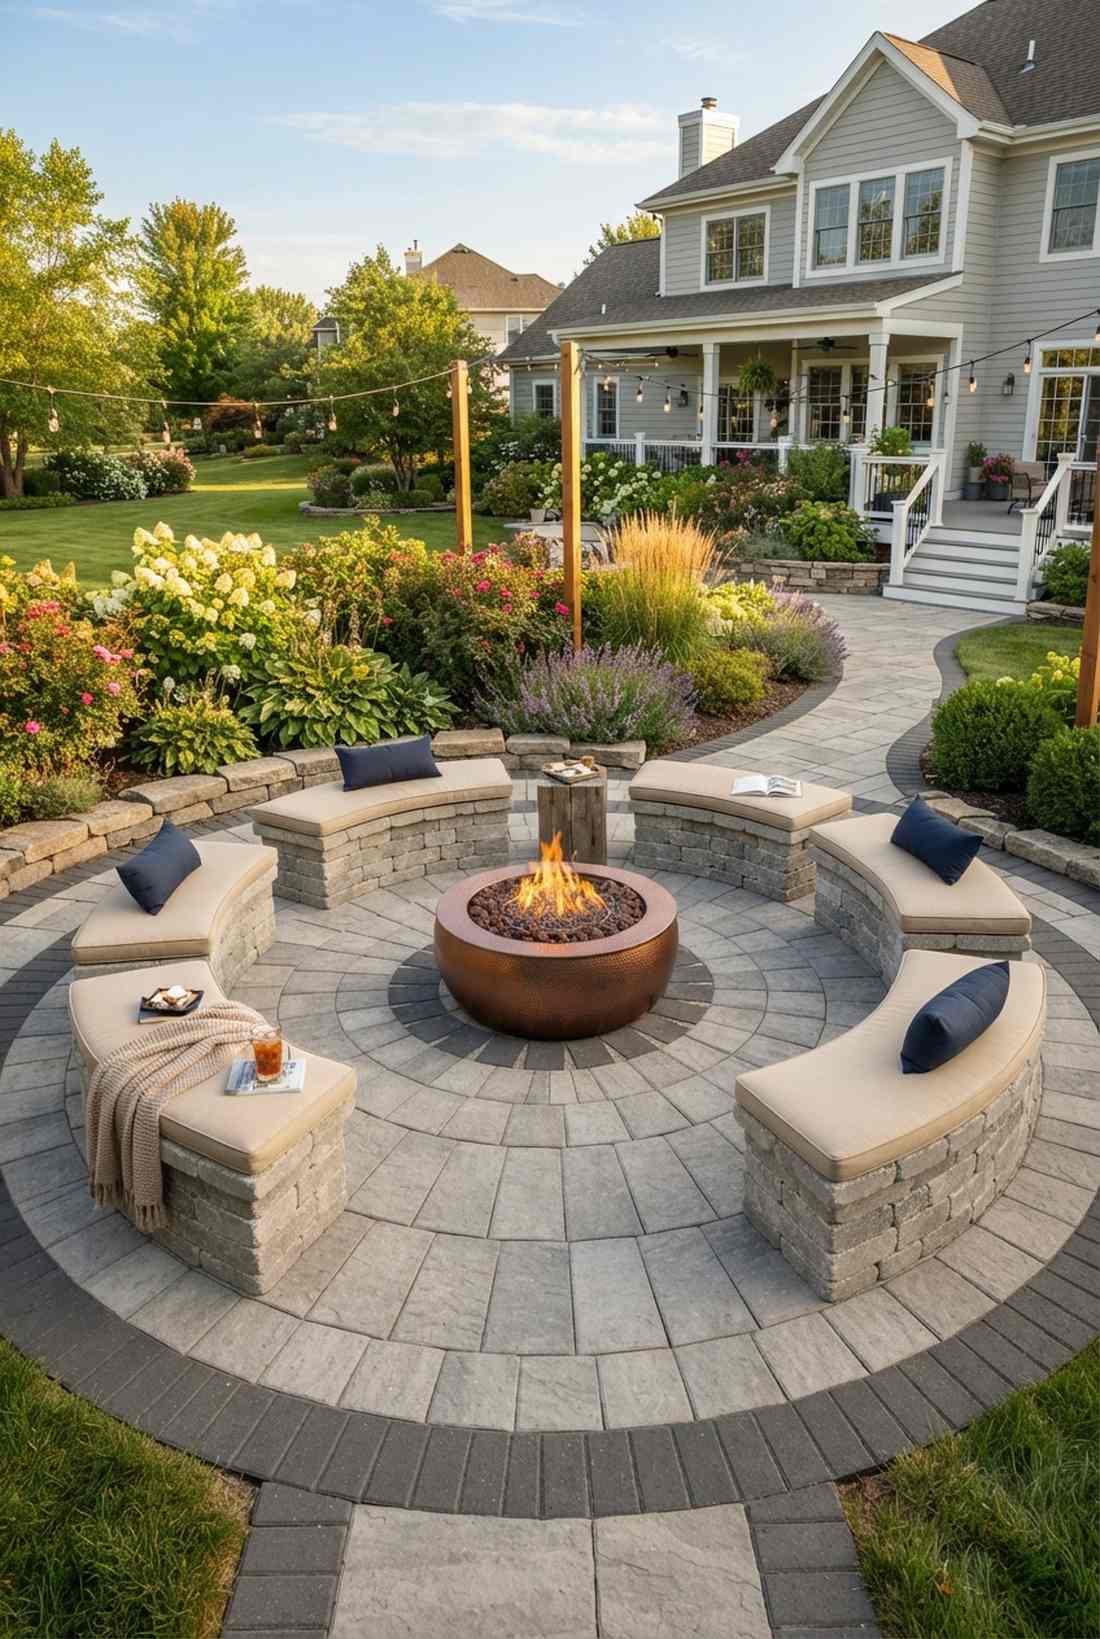
2. Circular Sectional Around Raised Firepit
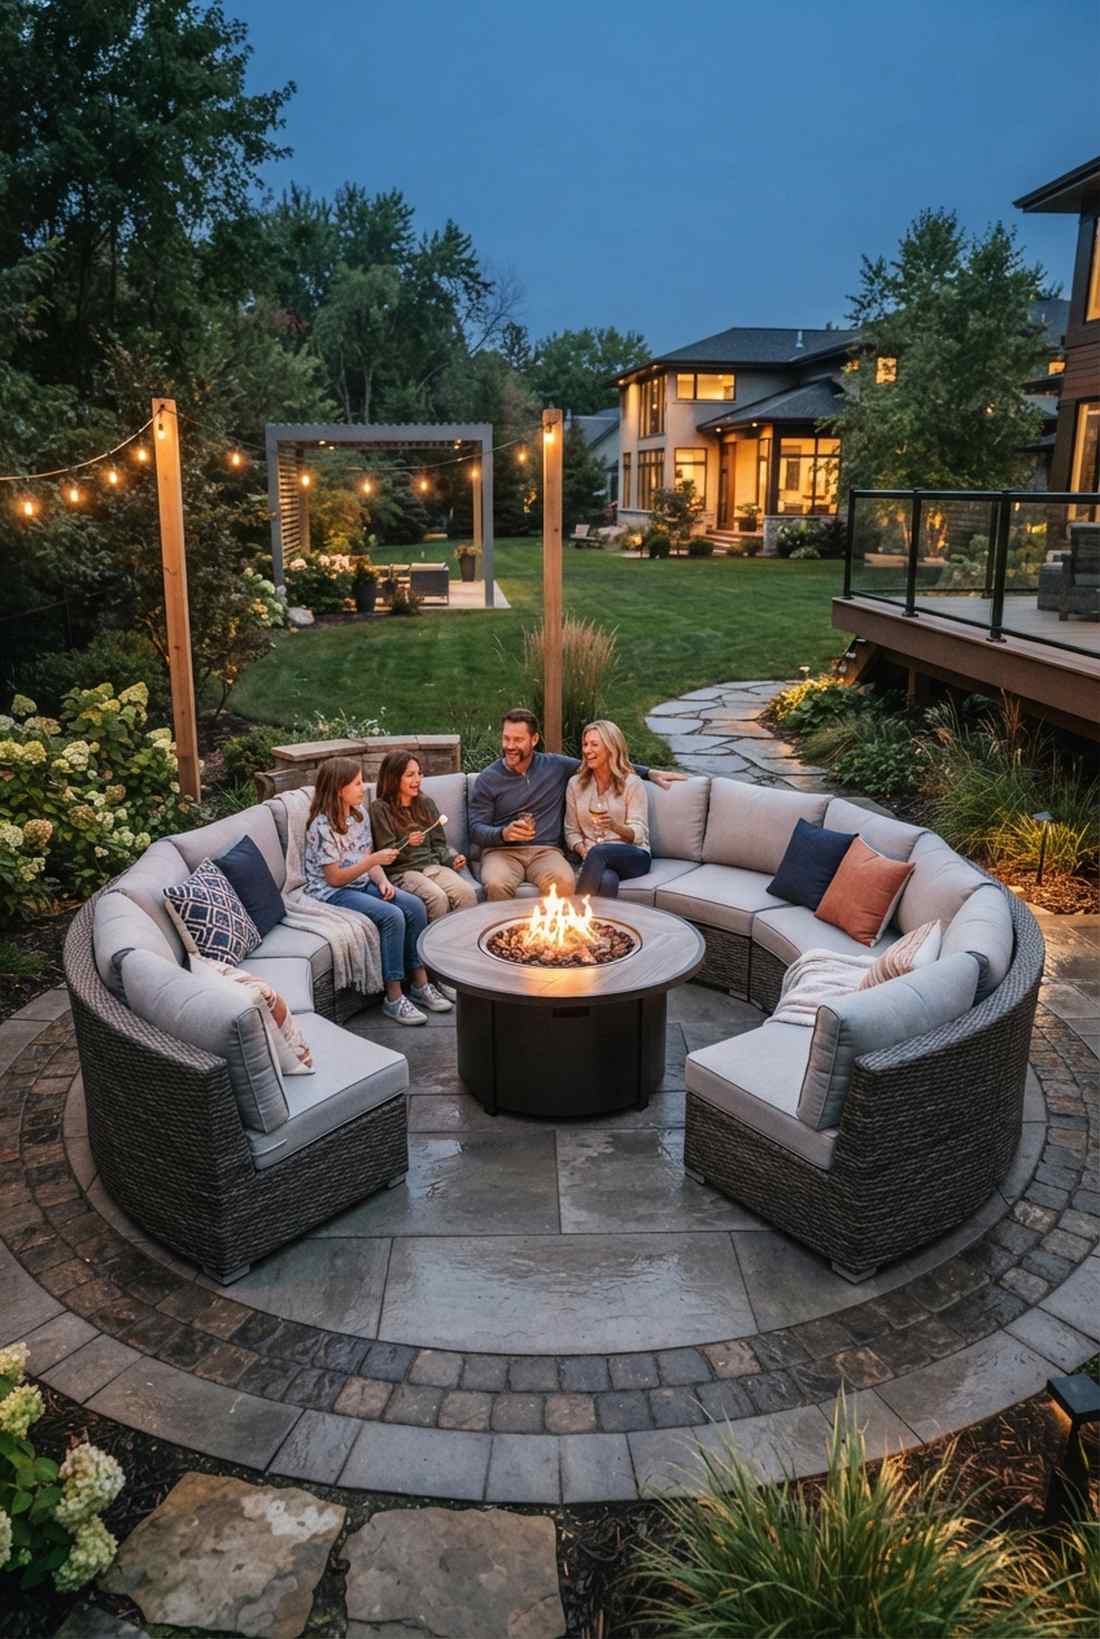
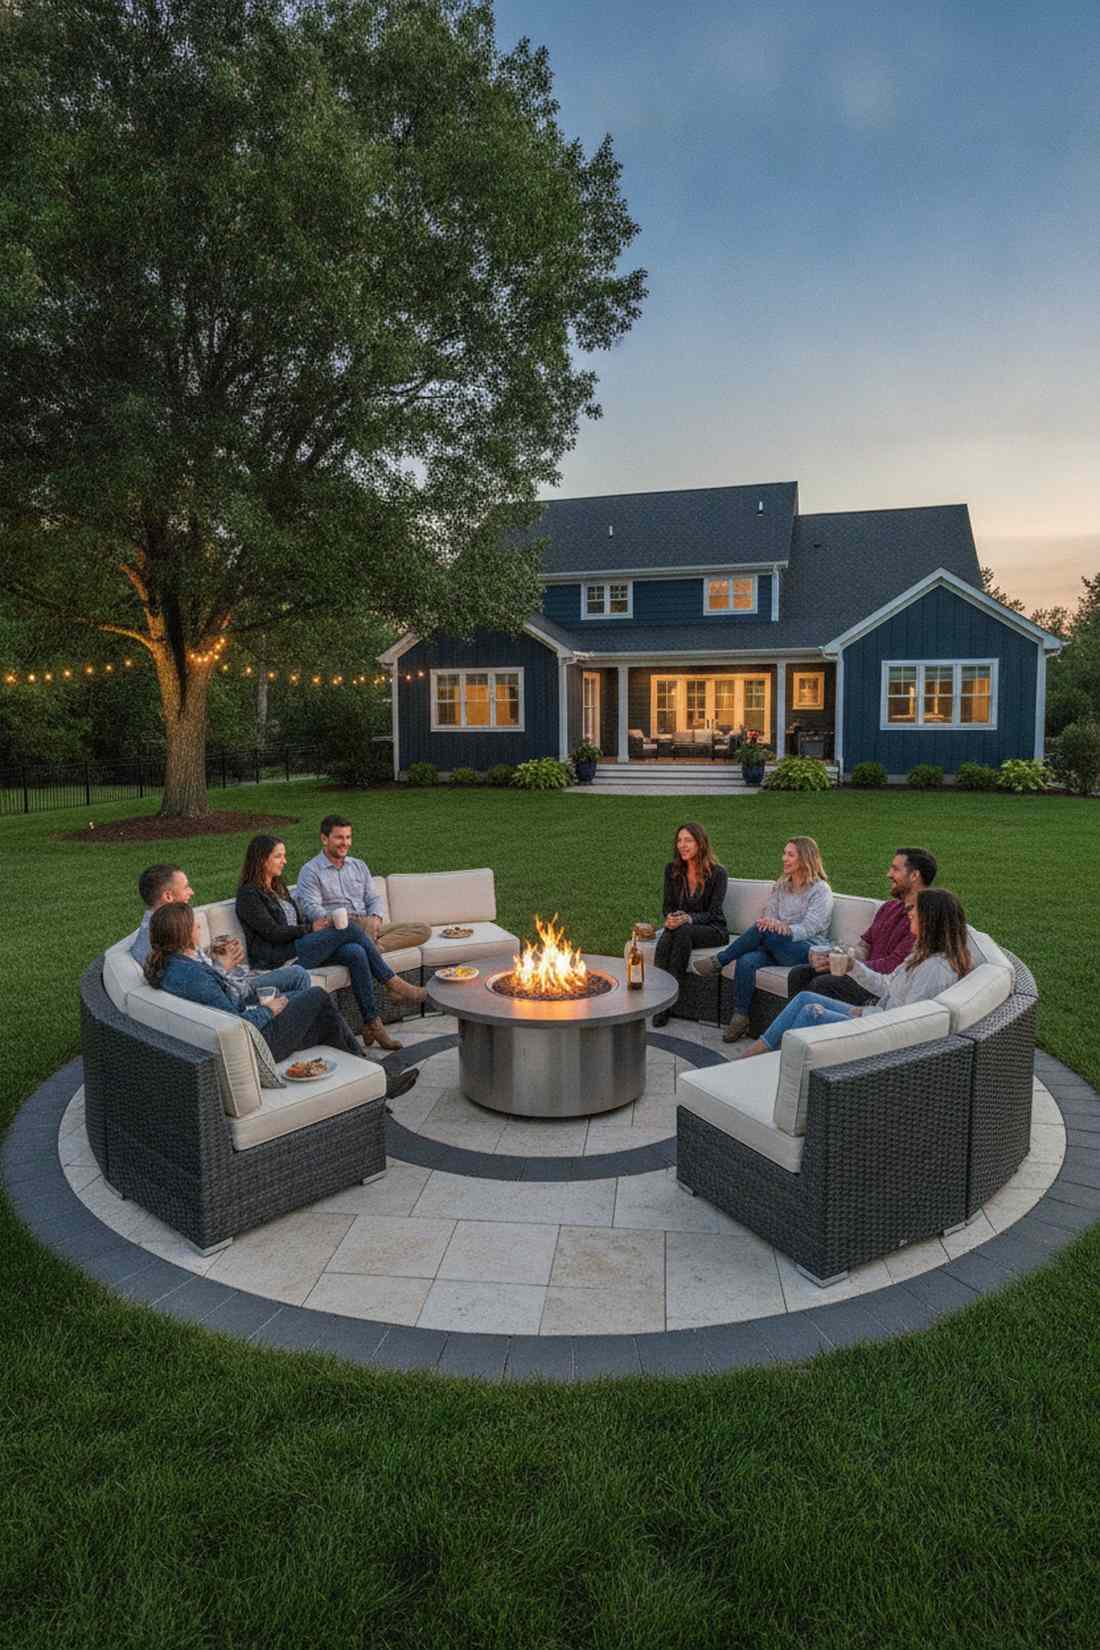
Radiates the cozy energy of a midnight storytelling circle. This curved sectional outdoor arrangement is perfectly suited for open-air suburban backyards.
Ditching right angles completely changes the space, forcing eye contact and creating a magnetic social hub. Protect your investment by opting for heavy-duty aluminum frames and high-density foam.
Expect to invest $800–$2,000 for a solid sectional and fire feature combo. It’s a fast upgrade that completely changes the vibe.
- Key Materials: Curved modular sofa, elevated propane fire table, circular paving stones
- Vibe / Style: Contemporary campfire
- Difficulty: Easy beginner setup
- Budget Breakdown: Sectional: $1,200 | Firepit: $400 | Accessories: $150
- Creator’s Tip: Use contrasting stone bands on the ground to visually anchor the circular geometry.
- Smart Sourcing: UV-coated curved wicker sectionals and smokeless stainless steel fire pits.
3. L-Shaped Built-In Bench with Corner Accent
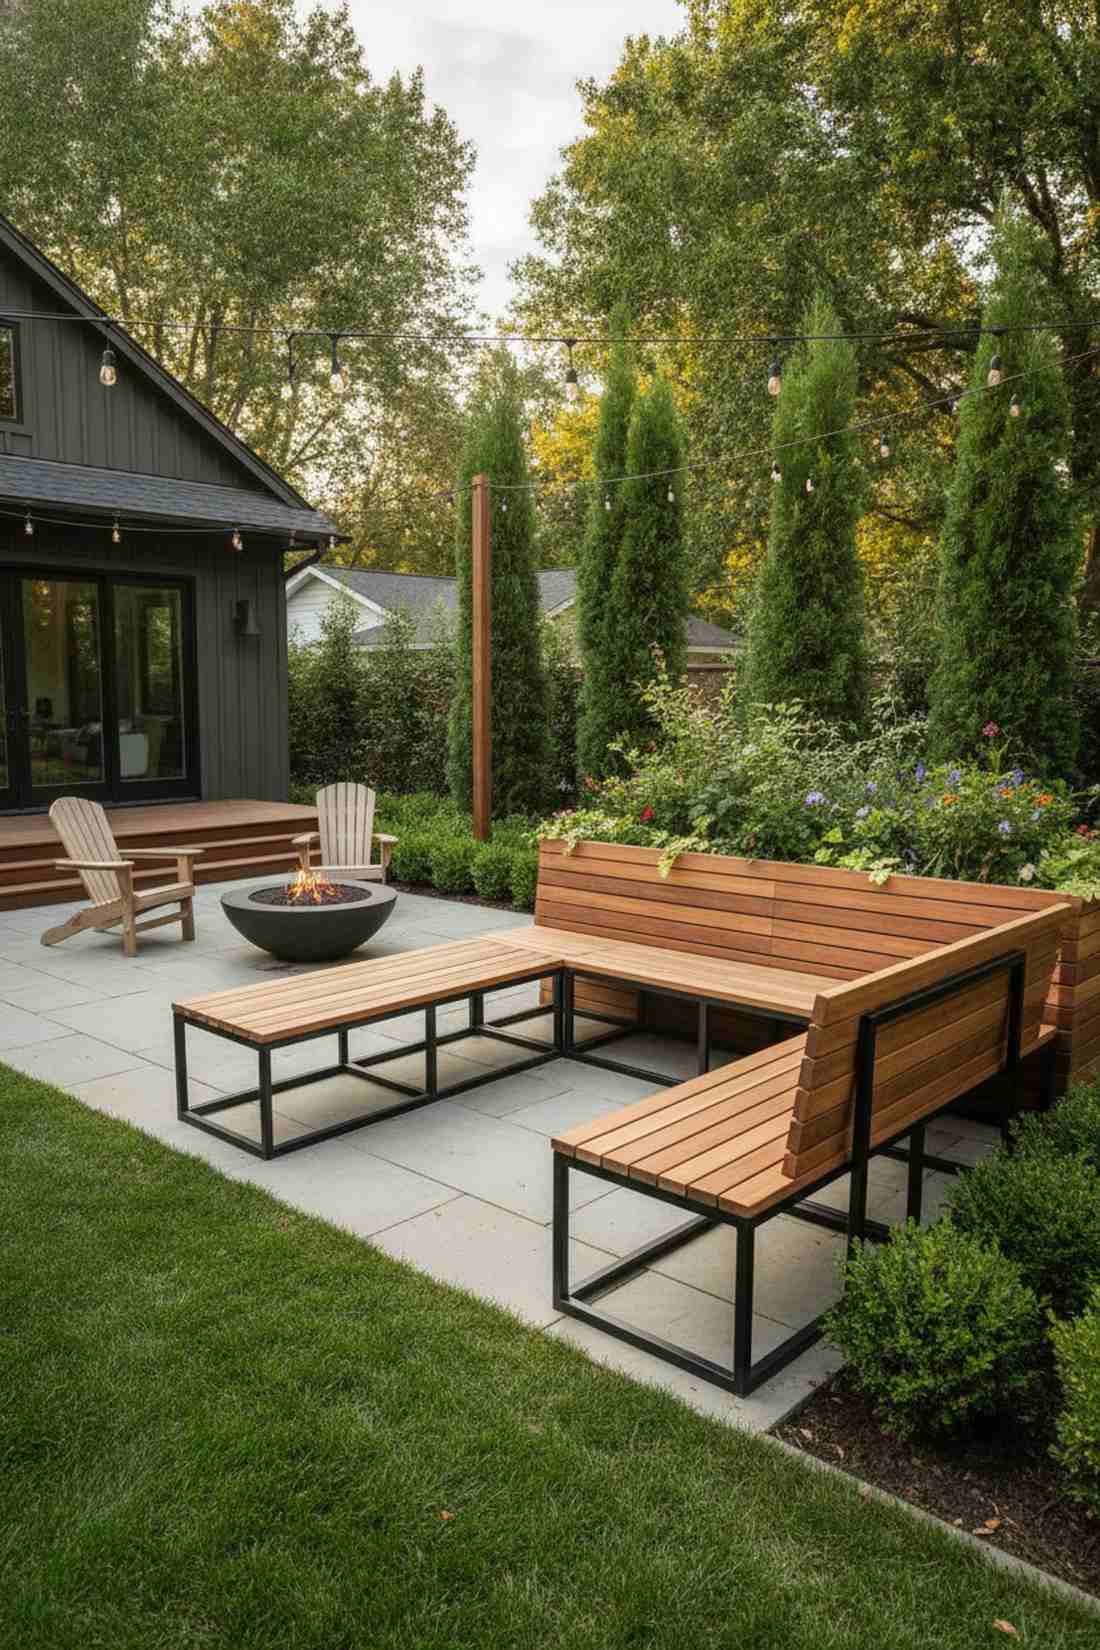
Has the structured, clean aesthetic of a boutique hotel courtyard. This built-in corner seating design maximizes capacity in tight, L-shaped property lines.
Most overlook corner potential, but welding steel frames with timber tops looks far more expensive than it is. Integrate a sleek planter at the junction to soften the hard boundaries.
Building this from scratch runs about $400–$900 in lumber and hardware. Pin this if you’re planning a small space upgrade!
- Key Materials: Pressure-treated lumber, teak slats, corner planter box
- Vibe / Style: Architectural minimalism
- Difficulty: Intermediate carpentry
- Budget Breakdown: Lumber: $300 | Fasteners: $50 | Finish/Stain: $80
- Creator’s Tip: Angle the backrest back by 15 degrees for ergonomic lounging rather than rigid upright sitting.
- Smart Sourcing: Pre-cut composite decking boards (multi-pack) and marine-grade wood sealant.
4. Adirondack Chairs Facing Specimen Tree
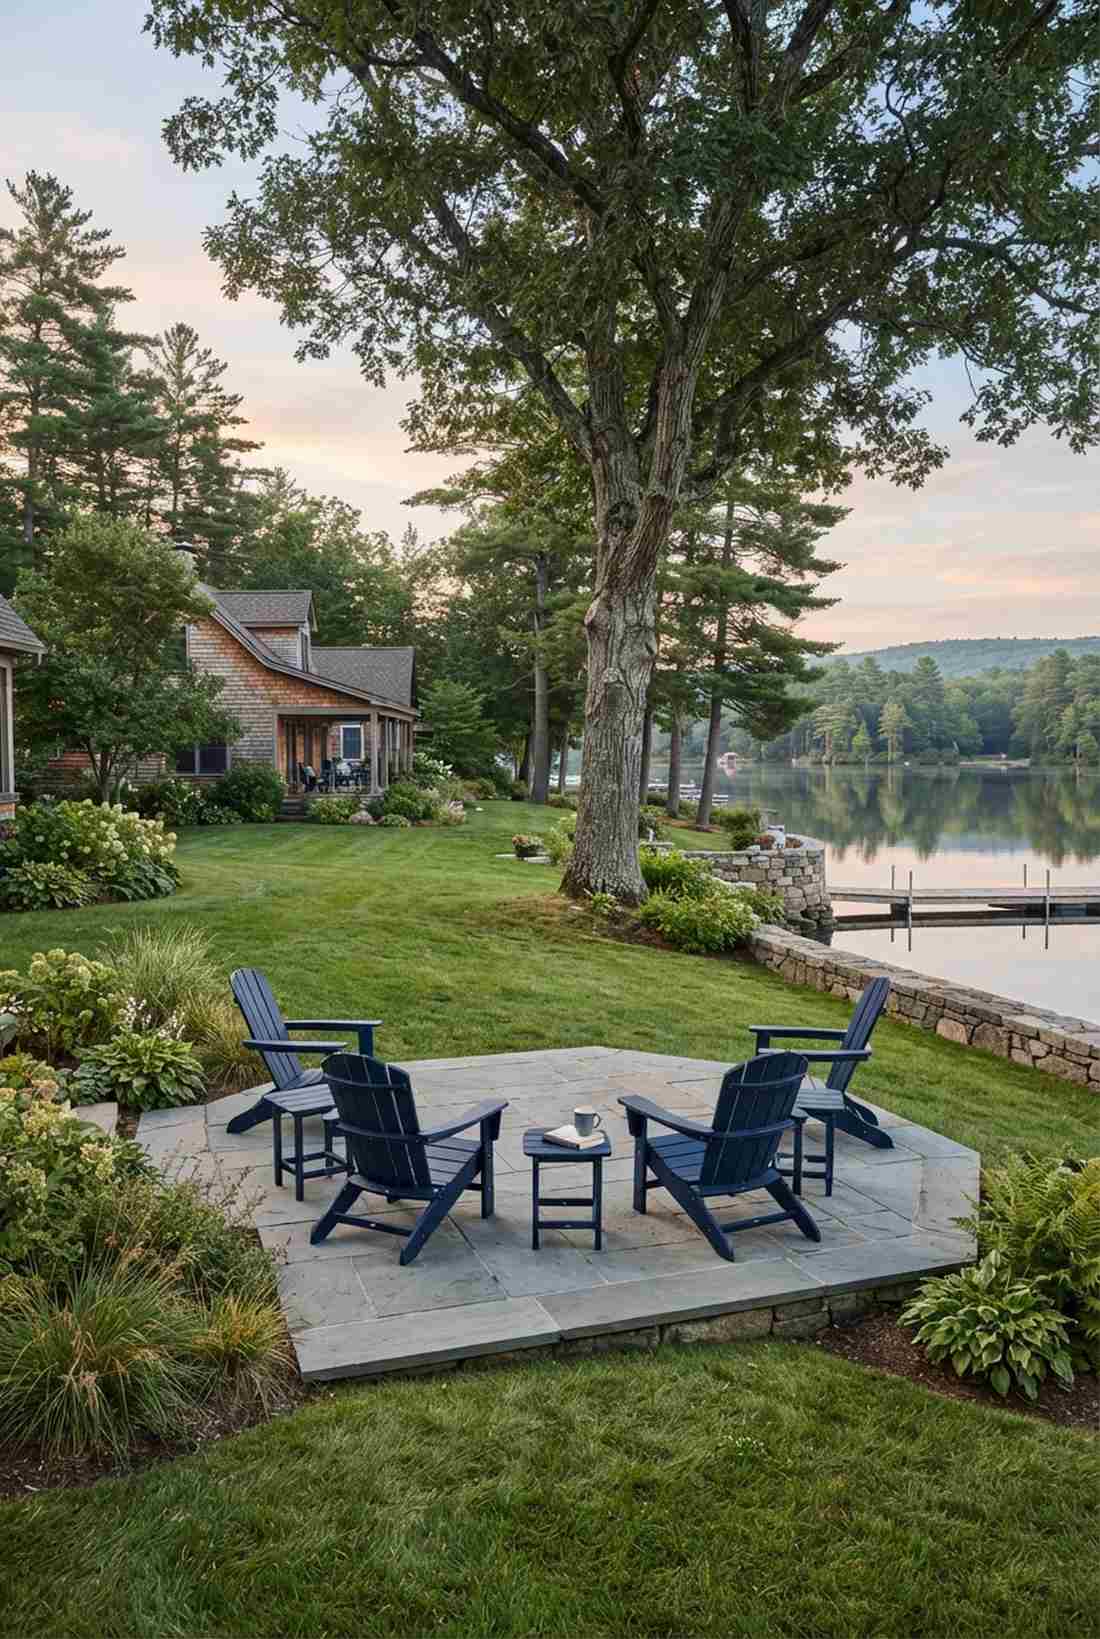
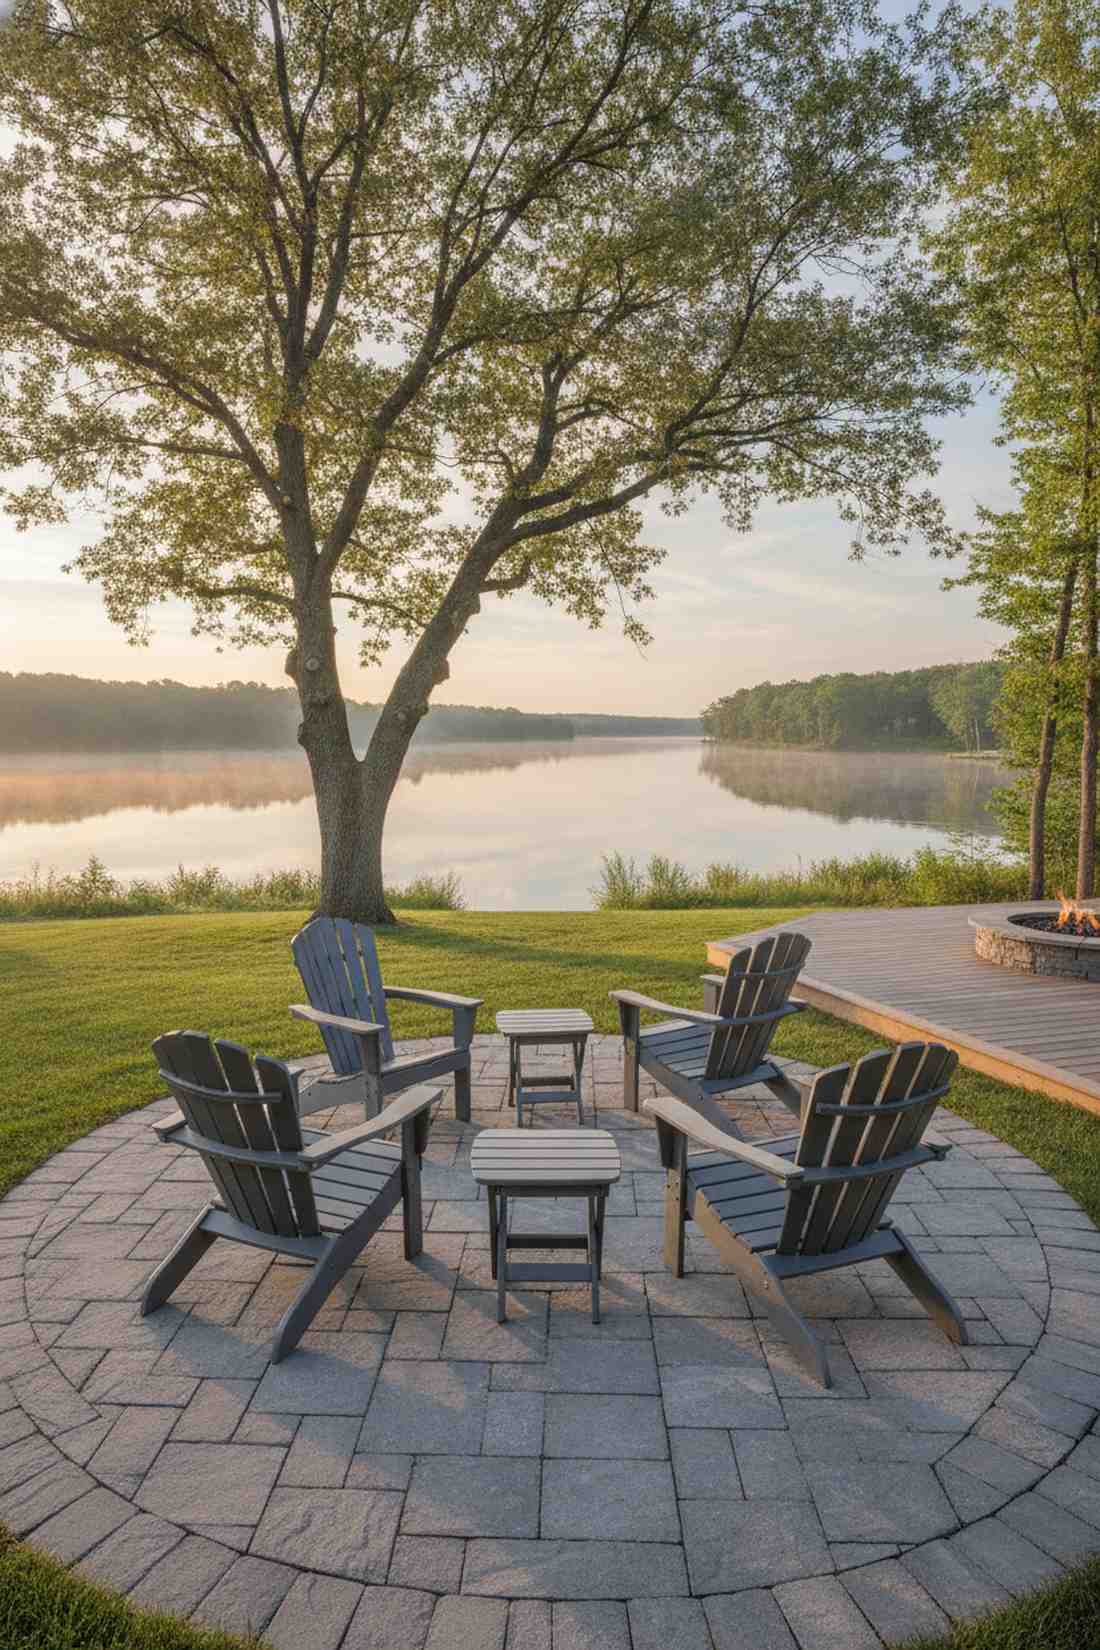
Captures the peaceful stillness of a lakeside retreat at dawn. This focal-point lounging layout works exceptionally well for properties boasting mature trees or distant views.
Don’t just throw chairs on the grass; placing them on an elevated stone platform gives a designer-level finish. Utilize poly-lumber materials to completely eliminate the nightmare of yearly repainting.
A set of high-quality chairs and side tables typically costs $500–$900. Highly recommended for a quick weekend win.
- Key Materials: Poly-lumber Adirondack chairs, stone pavers, accent side tables
- Vibe / Style: Classic pastoral relaxation
- Difficulty: Extremely simple
- Budget Breakdown: Chairs (x4): $600 | Pavers: $200 | Tables: $100
- Creator’s Tip: Space chairs exactly 18 inches apart to allow conversation without feeling cramped.
- Smart Sourcing: Fade-resistant resin Adirondack chairs (set of 4) and interlocking patio deck tiles.
This next setup is ridiculously cheap to implement but looks like a custom $5,000 display…
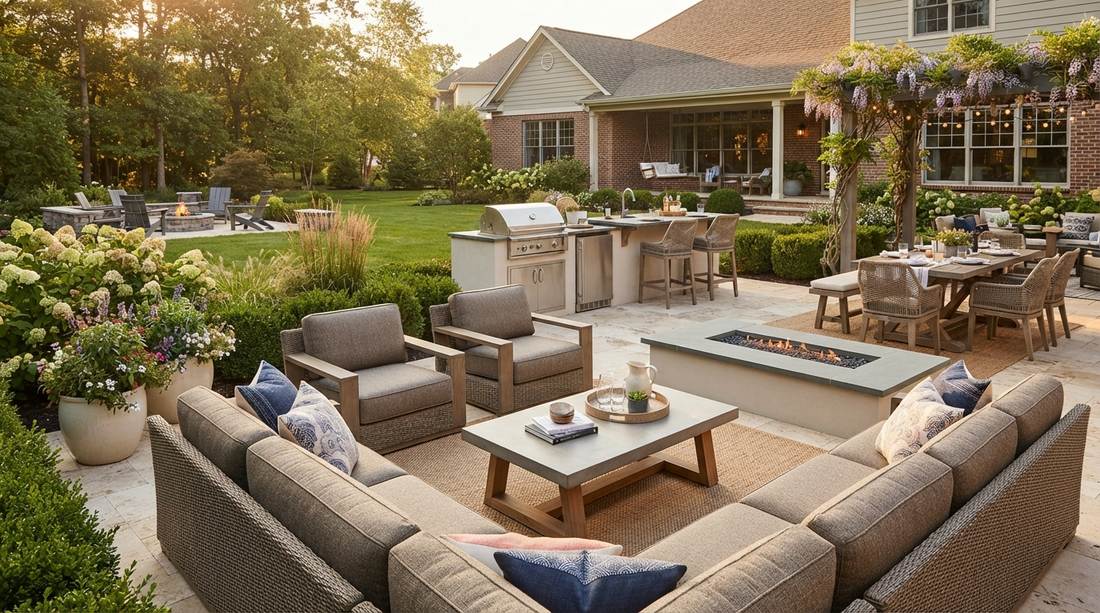
5. U-Shaped Wicker Sectional with Ottoman Center
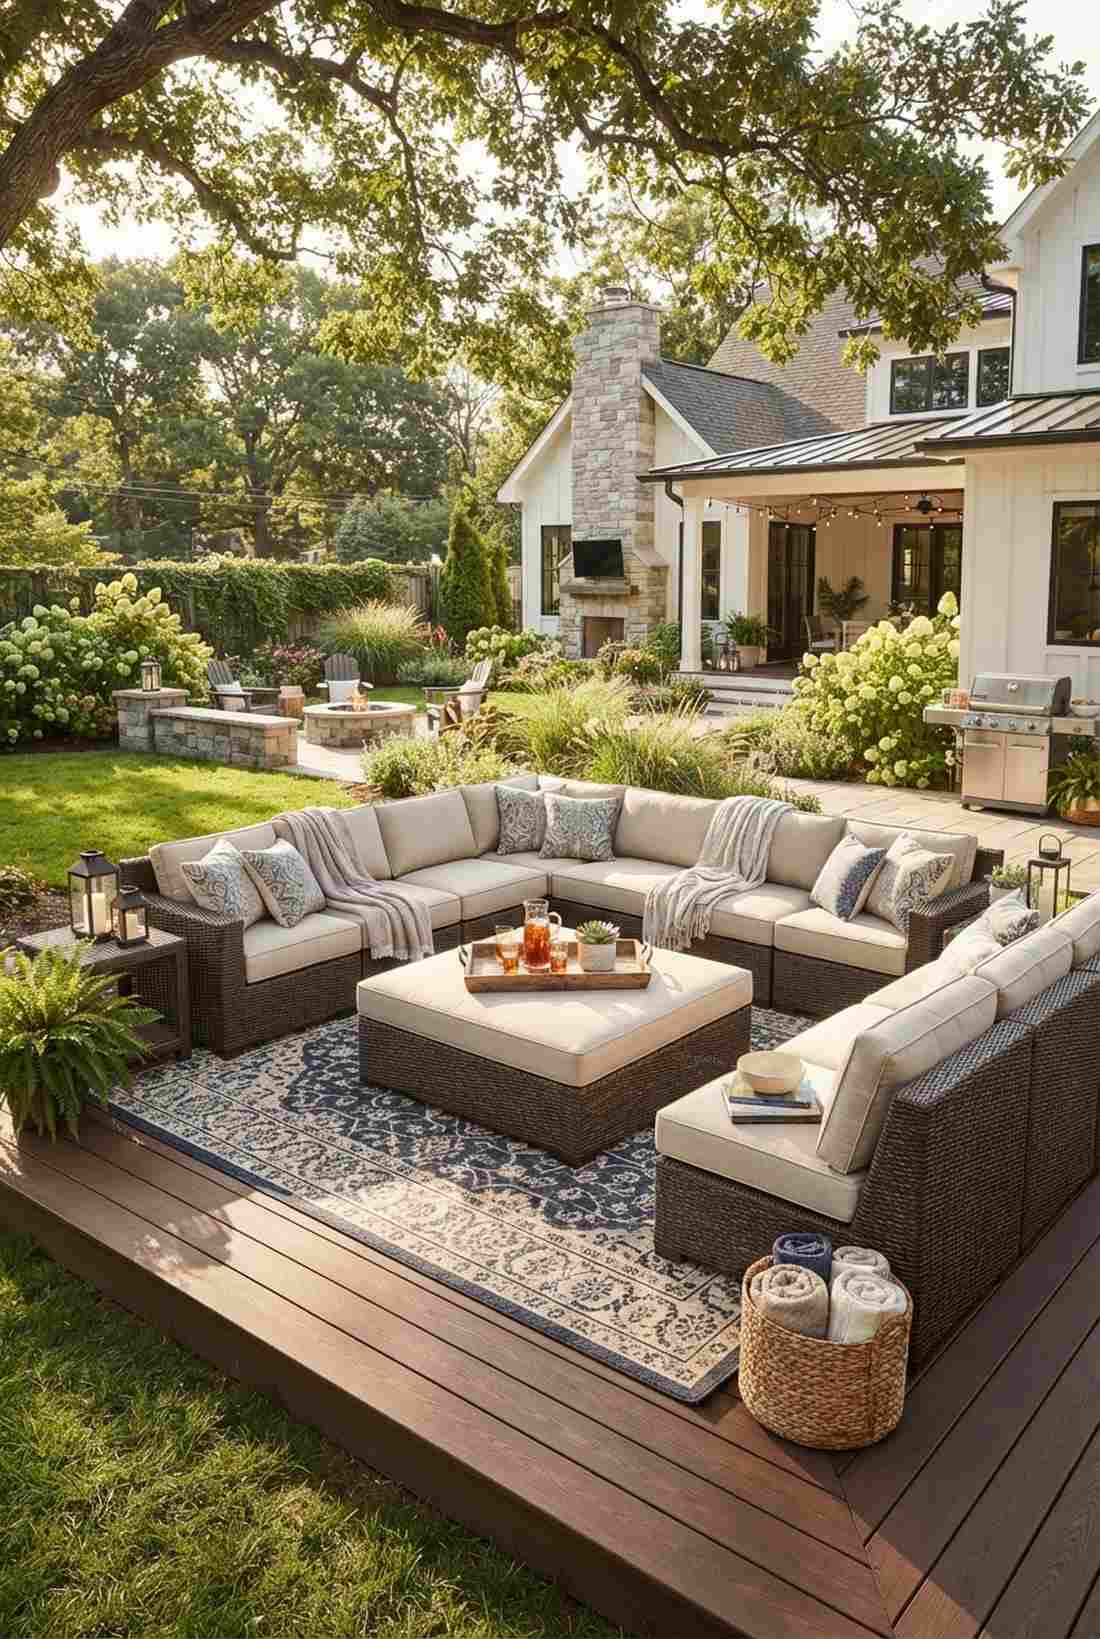
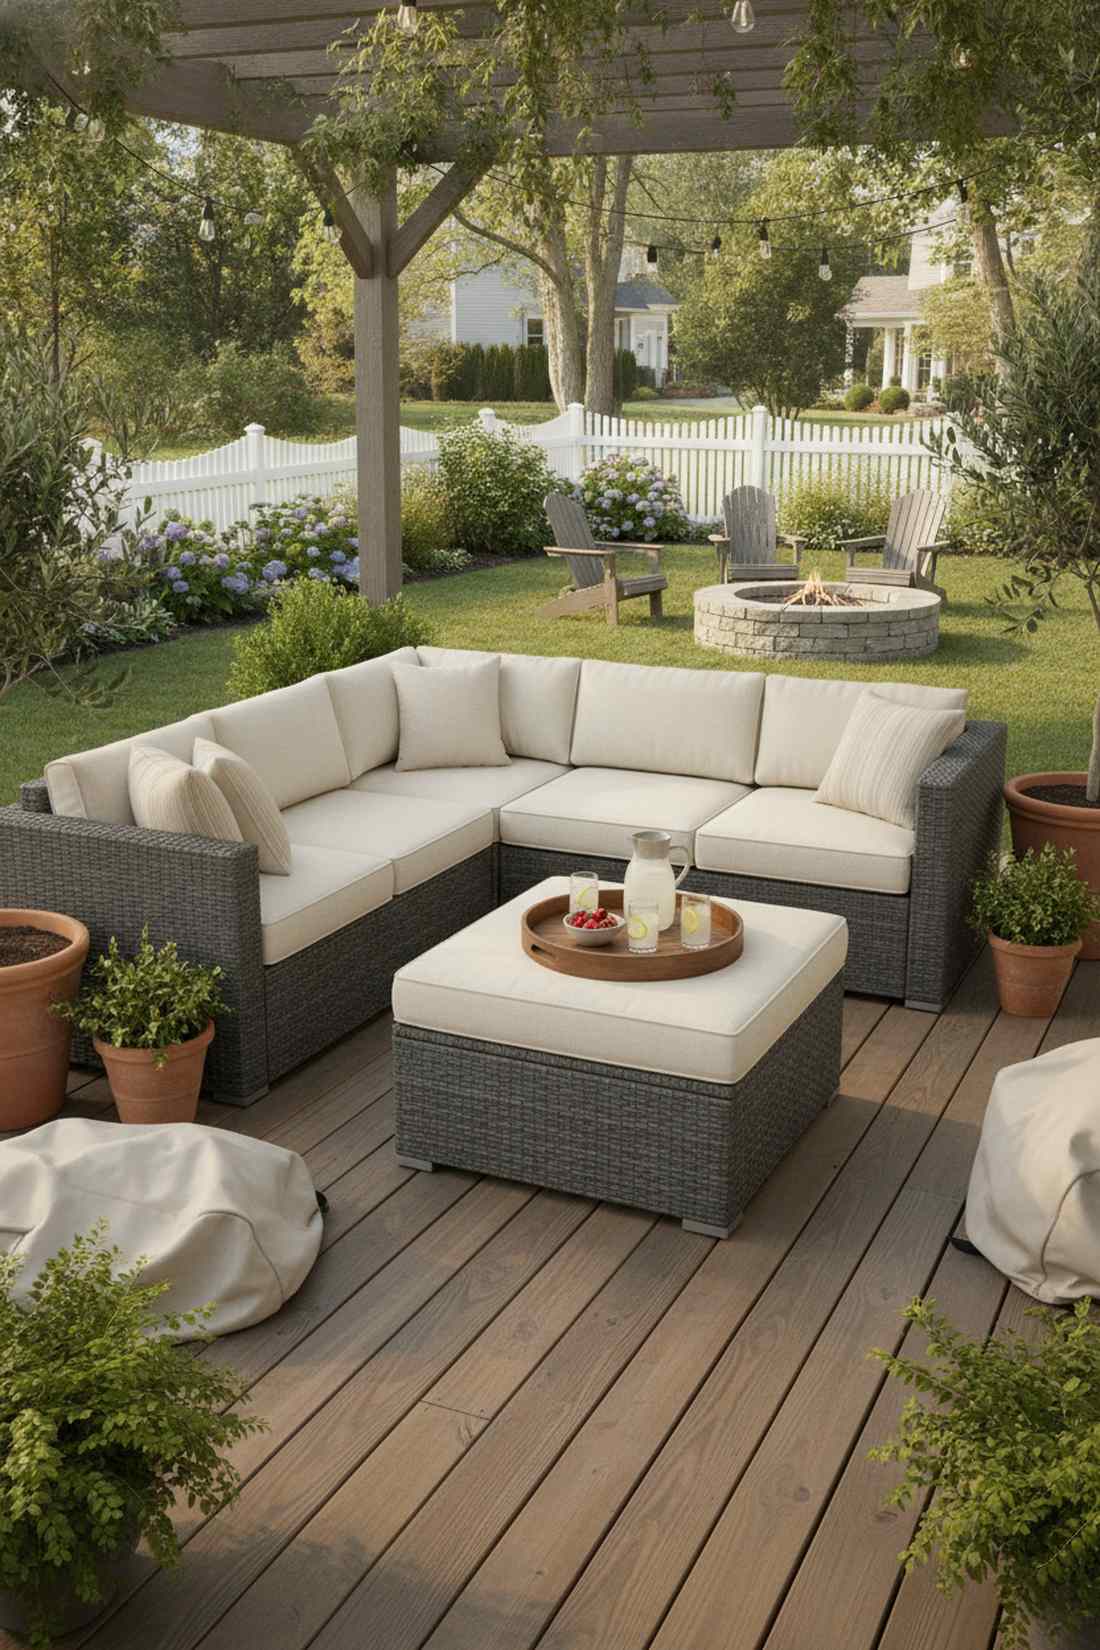
Brings the comfort of your indoor living room directly into the sunlight. This U-shaped outdoor seating area garden layout is the ultimate choice for large families who love to entertain.
Standard seating feels disjointed, but enclosing three sides instantly builds an intimate entertainment zone. Make sure to source performance fabrics to combat unexpected rain showers and harsh UV rays.
You can pull off this luxurious look for roughly $1,200–$2,500. Save this to your summer hosting inspiration board!
- Key Materials: All-weather synthetic wicker, Sunbrella cushions, central multi-use ottoman
- Vibe / Style: Transitional comfort
- Difficulty: Just requires assembly
- Budget Breakdown: Sectional: $1,500 | Performance Cushions: included | Trays/Decor: $150
- Creator’s Tip: Use a massive central ottoman with a hard serving tray instead of a coffee table to double your footrest space.
- Smart Sourcing: Modular all-weather wicker furniture kits and waterproof outdoor furniture covers.
6. Bench Swing Facing Lounge Chairs
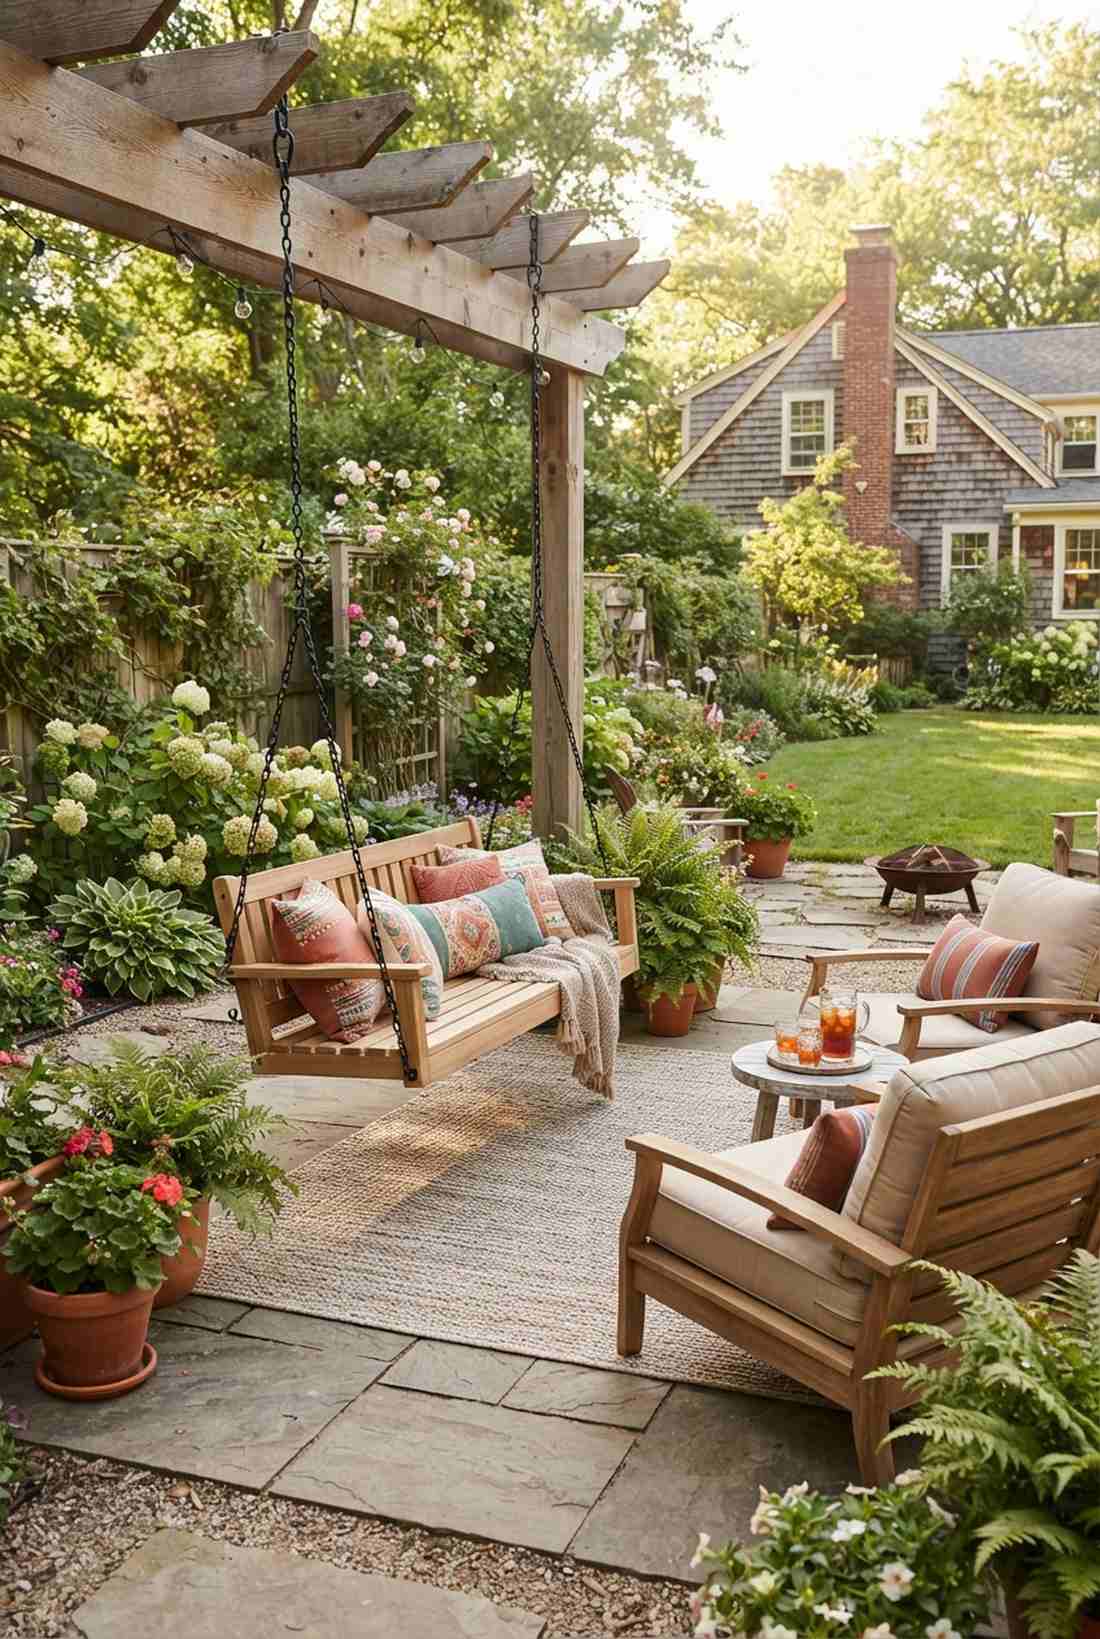
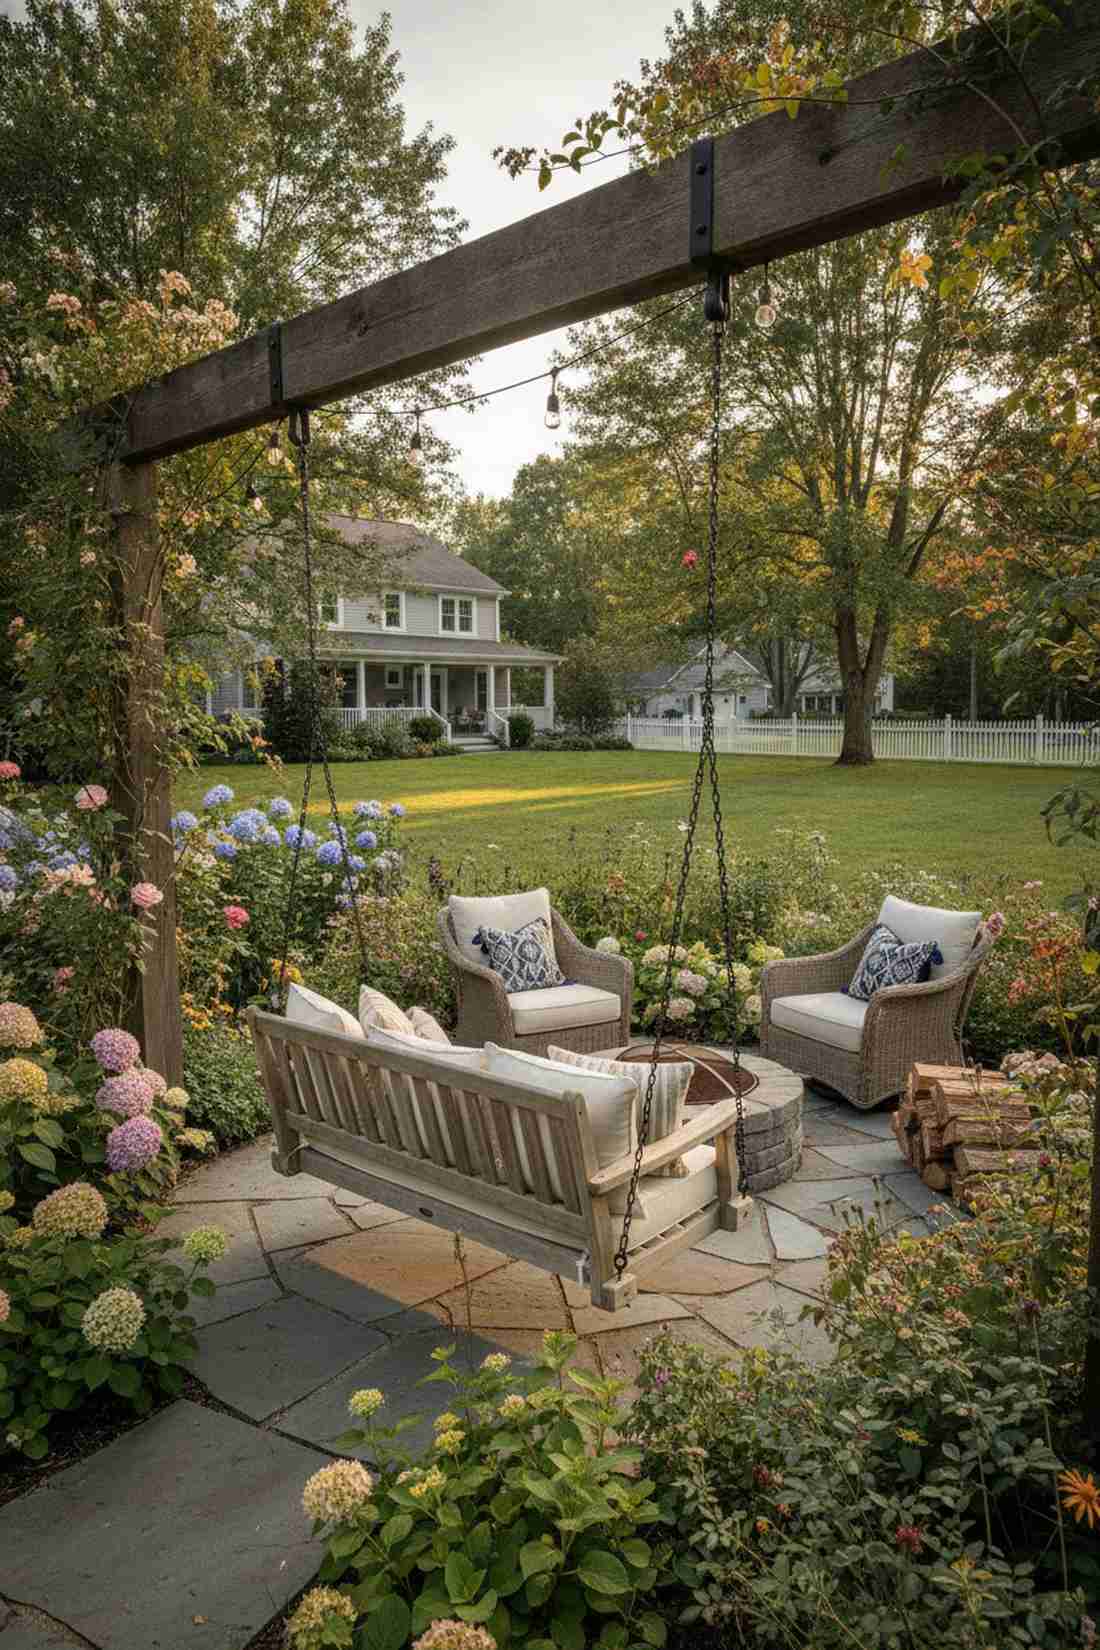
Feels like a playful secret garden hidden right in your backyard. This asymmetrical patio swing setup is perfect for casual family patios needing a touch of motion.
Rigid chairs get boring fast; introducing suspended seating creates instant dynamic tension that guests love. Support the hardware on a dedicated pergola beam to handle active use safely.
Installing a heavy-duty swing and companion chairs ranges from $600–$1,400.
- Key Materials: Suspended wooden swing, heavy-duty hanging hardware, cushioned lounge chairs
- Vibe / Style: Whimsical bohemian
- Difficulty: Moderate (structural mounting needed)
- Budget Breakdown: Swing Bench: $350 | Hardware/Mount: $150 | Lounge Chairs: $500
- Creator’s Tip: Maintain exactly 30 inches of clearance around the swing to prevent collisions.
- Smart Sourcing: Heavy-duty porch swing hanging kits and weather-treated cedar swing benches.
7. Curved Concrete Bench with Back Wall
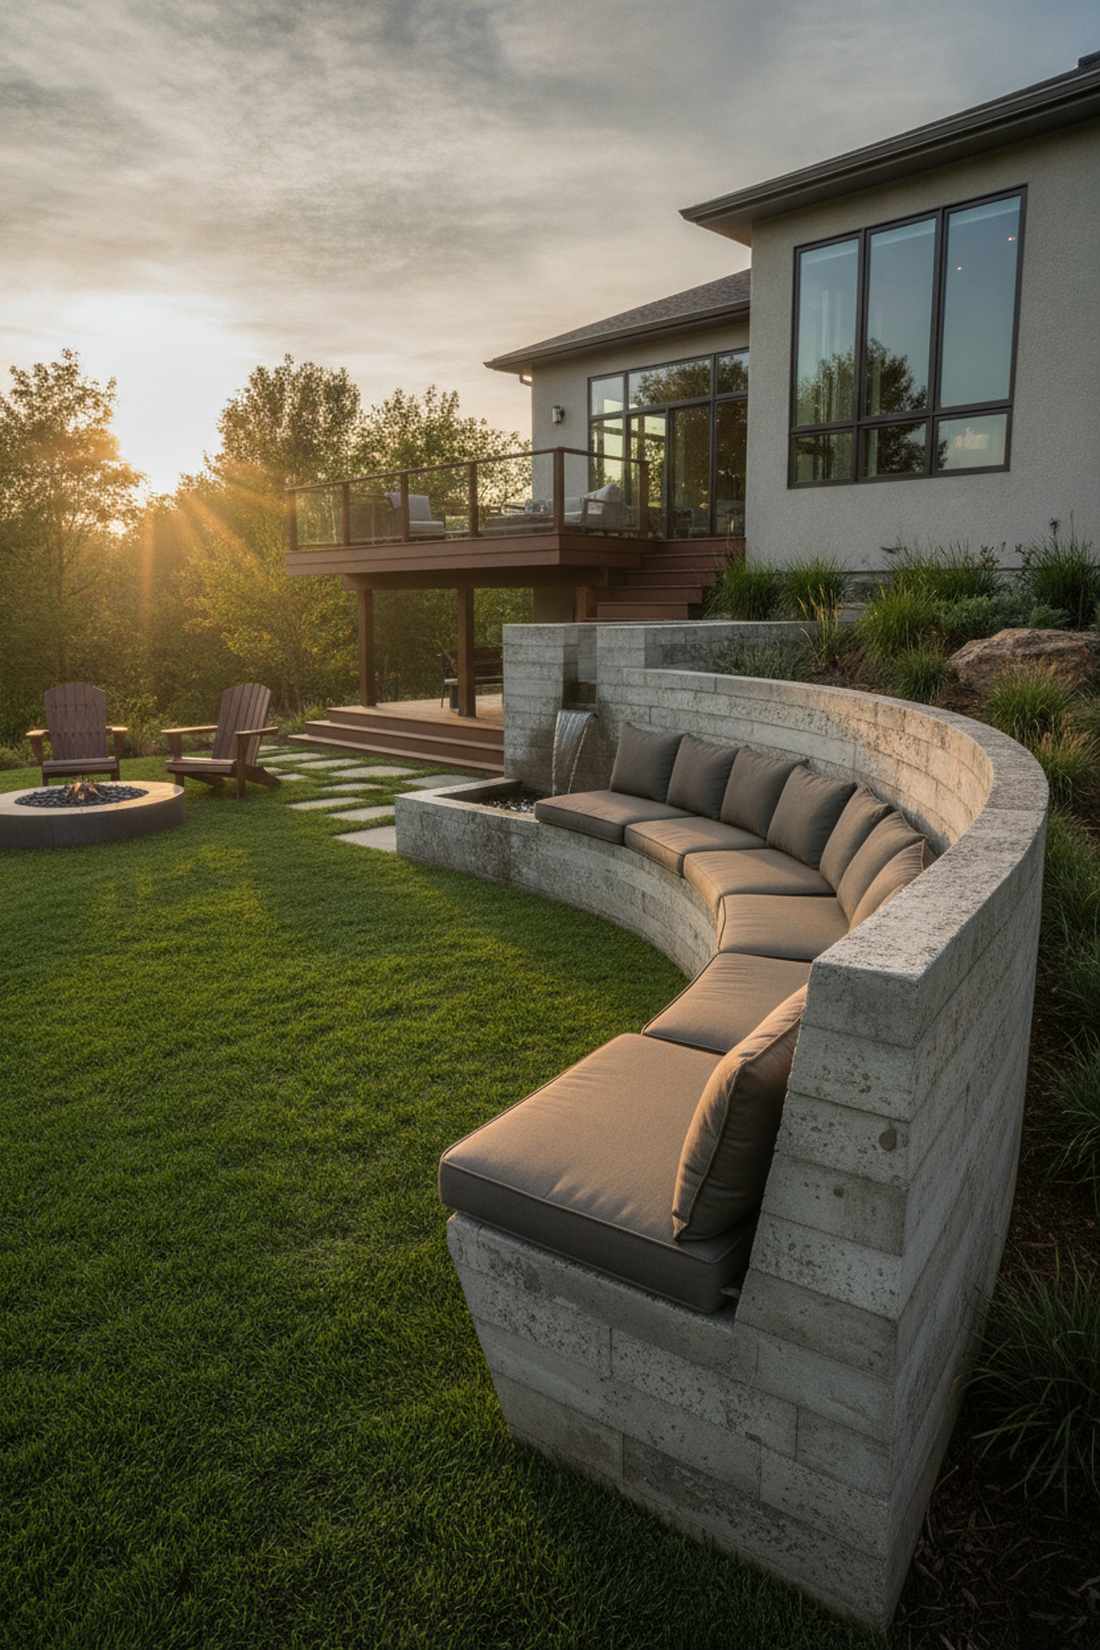
Radiates the permanence and sleekness of a modern art museum plaza. This architectural concrete seating design anchors slope-heavy yards with dramatic flair.
Flimsy furniture blows away, but cast-in-place concrete forms an indestructible, high-end landscape feature. Embed rigid foam during the pour to stop the concrete from freezing your guests in cooler months.
Custom concrete work usually runs $1,500–$4,000 depending on linear footage. Pin this if you love brutalist or modern aesthetics!
- Key Materials: Board-formed concrete, rebar, custom outdoor cushions
- Vibe / Style: Sleek industrial permanence
- Difficulty: Professional installation recommended
- Budget Breakdown: Concrete/Labor: $2,500 | Formwork: $500 | Cushions: $400
- Creator’s Tip: Acid stain the concrete once cured to give it an organic, mottled stone look instead of stark grey.
- Smart Sourcing: High-density custom outdoor bench cushions and concrete acid stain kits.
8. Modular Cubes in Shifting Configurations
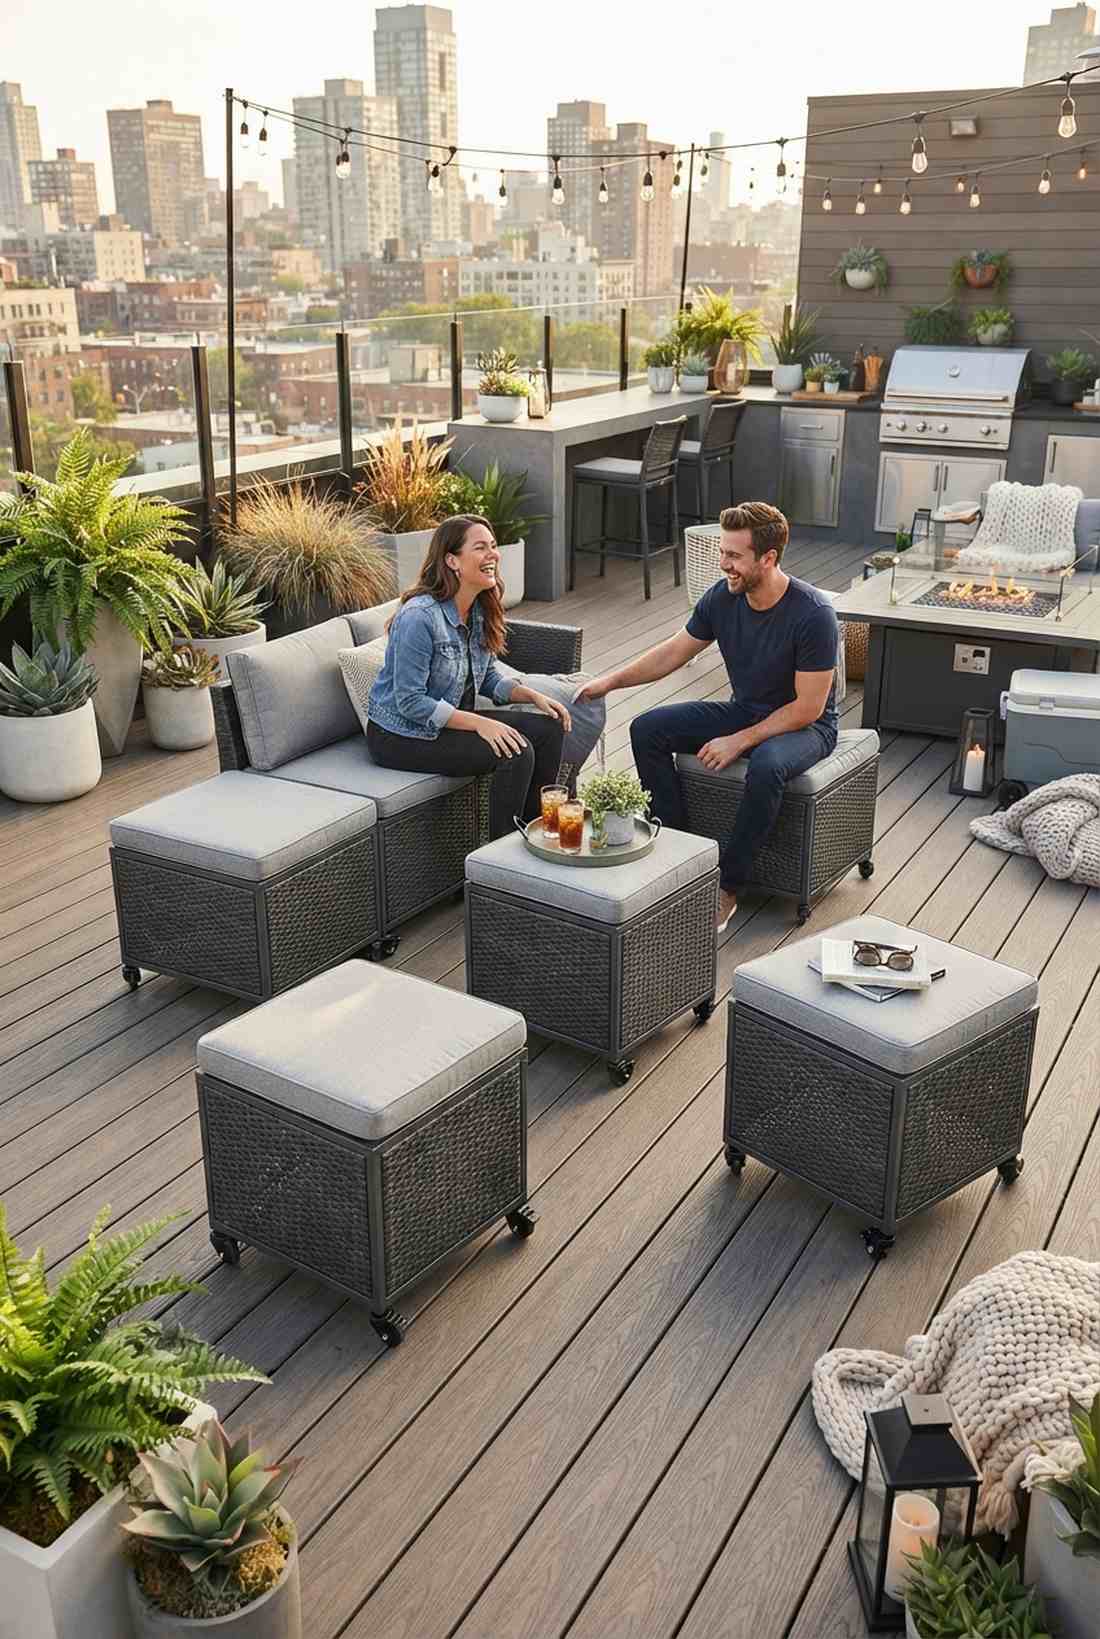
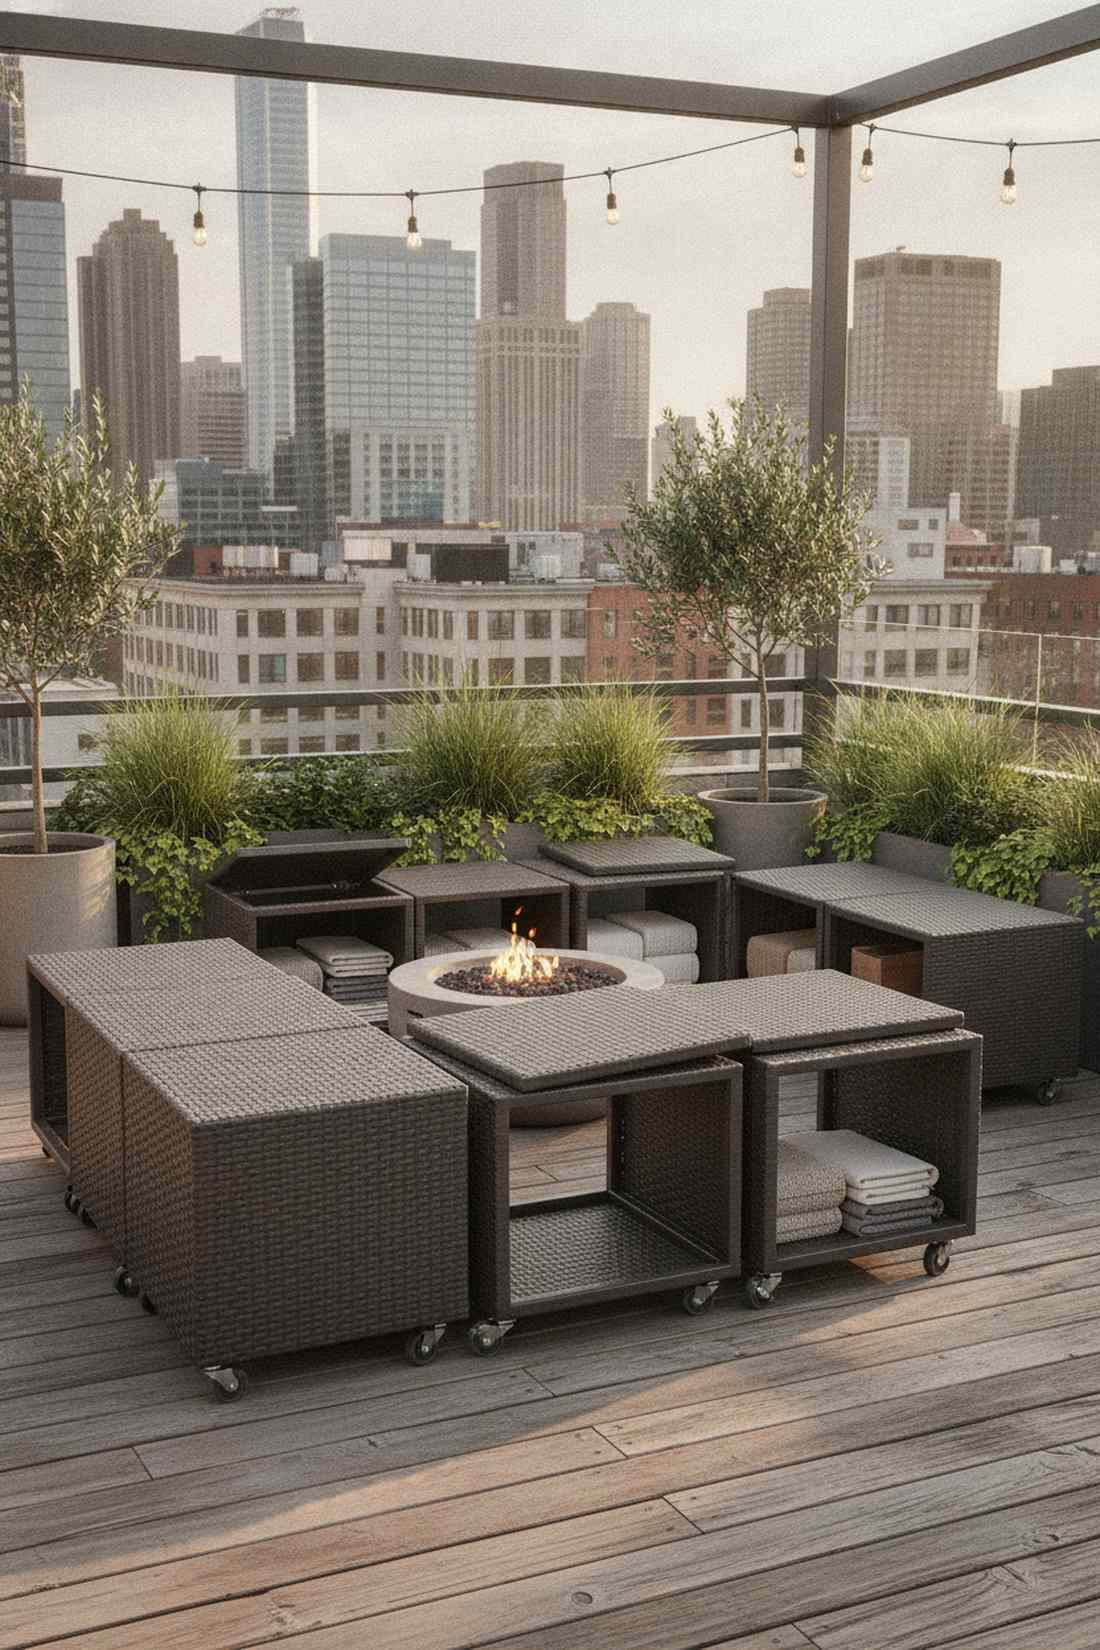
Brings a fast-paced, urban loft energy to your exterior space. This flexible cube seating layout is the ultimate hack for tight decks that host varying group sizes.
Static layouts waste space; utilizing hollow, caster-wheeled ottomans means your patio adapts in seconds. The hidden storage inside completely eliminates the need for bulky deck boxes.
A set of premium modular cubes will cost around $300–$800. Highly functional and visually uncluttered.
- Key Materials: Powder-coated aluminum cubes, locking casters, synthetic wicker wrapping
- Vibe / Style: Urban adaptive
- Difficulty: Zero setup required
- Budget Breakdown: Cube Set (x6): $600 | Caster Upgrades: $60
- Creator’s Tip: Always buy cubes with locking casters so they don’t roll away on slightly sloped drainage grades.
- Smart Sourcing: Hollow storage ottoman cubes (set of 4) and heavy-duty locking caster wheels.
Dining-Centric Patio Arrangements
Outdoor dining layouts prioritize table accessibility, adequate circulation space, and weather protection for extended meal service. Designers allocate 36 inches between table edge and obstructions for chair pullout and server passage. Material selections emphasize cleanable surfaces—sealed stone, powder-coated metals, marine-grade polymers—that withstand food spills and beverage staining.
9. Rectangular Table Under Pergola Canopy
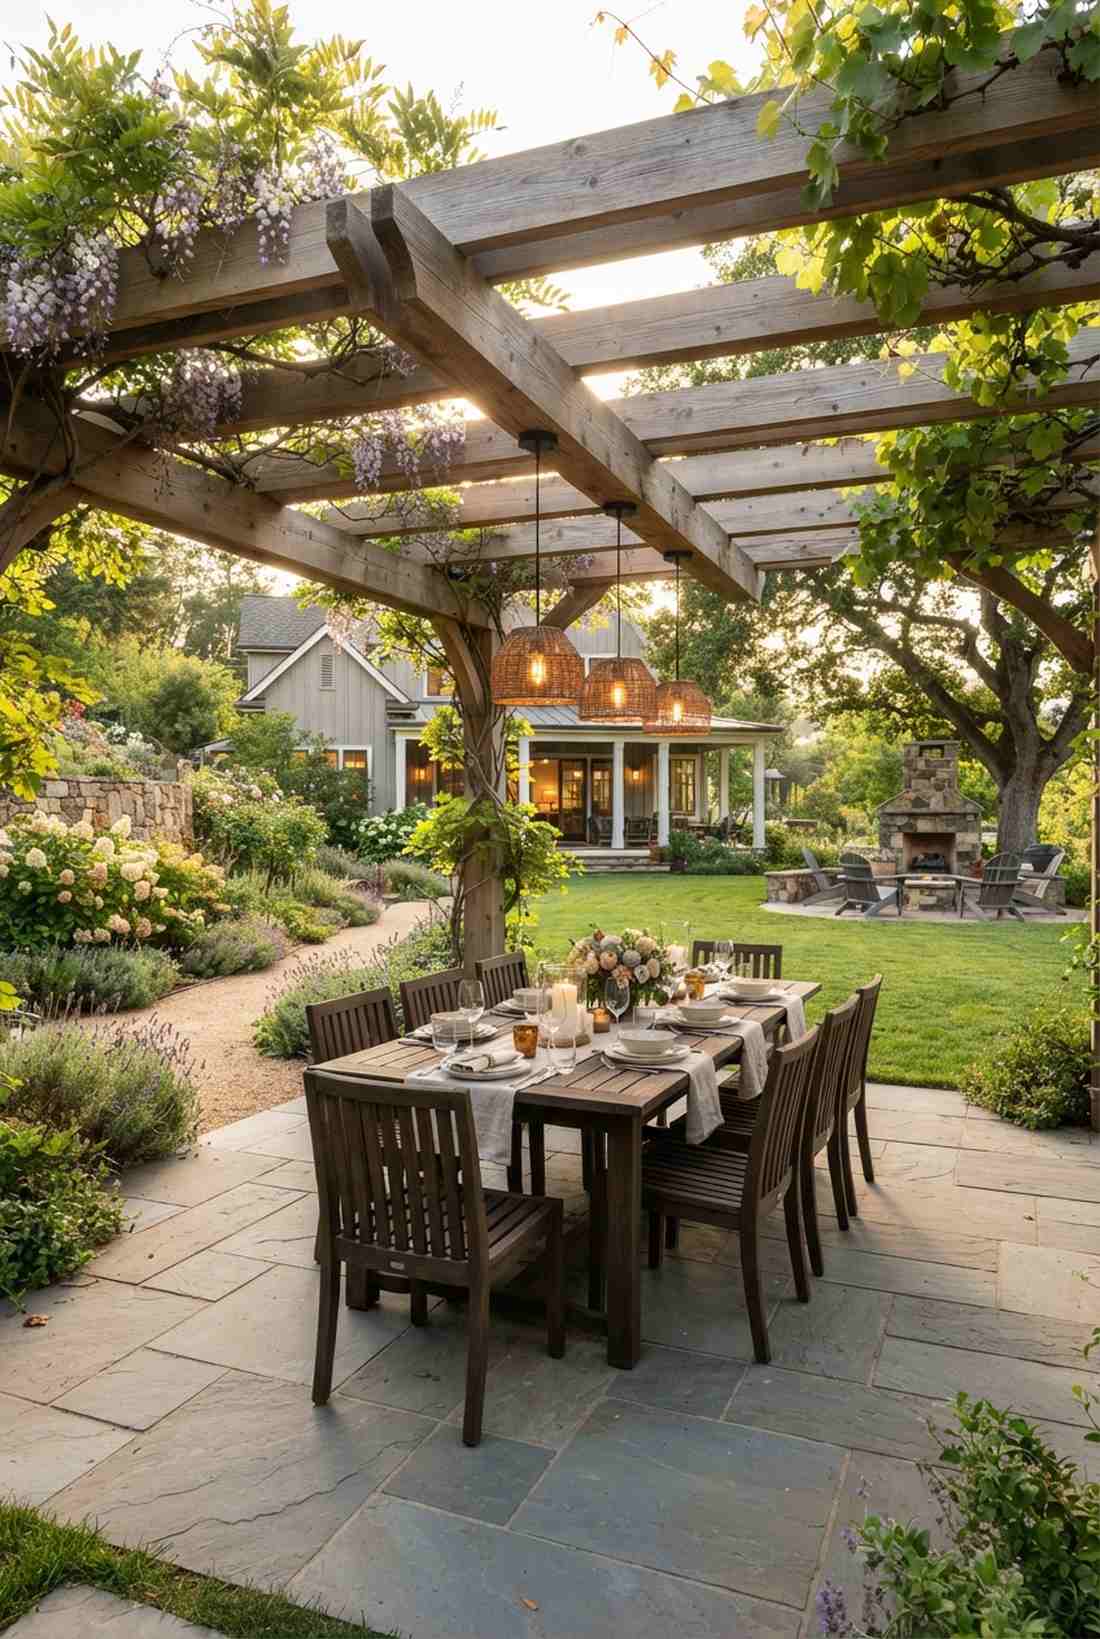
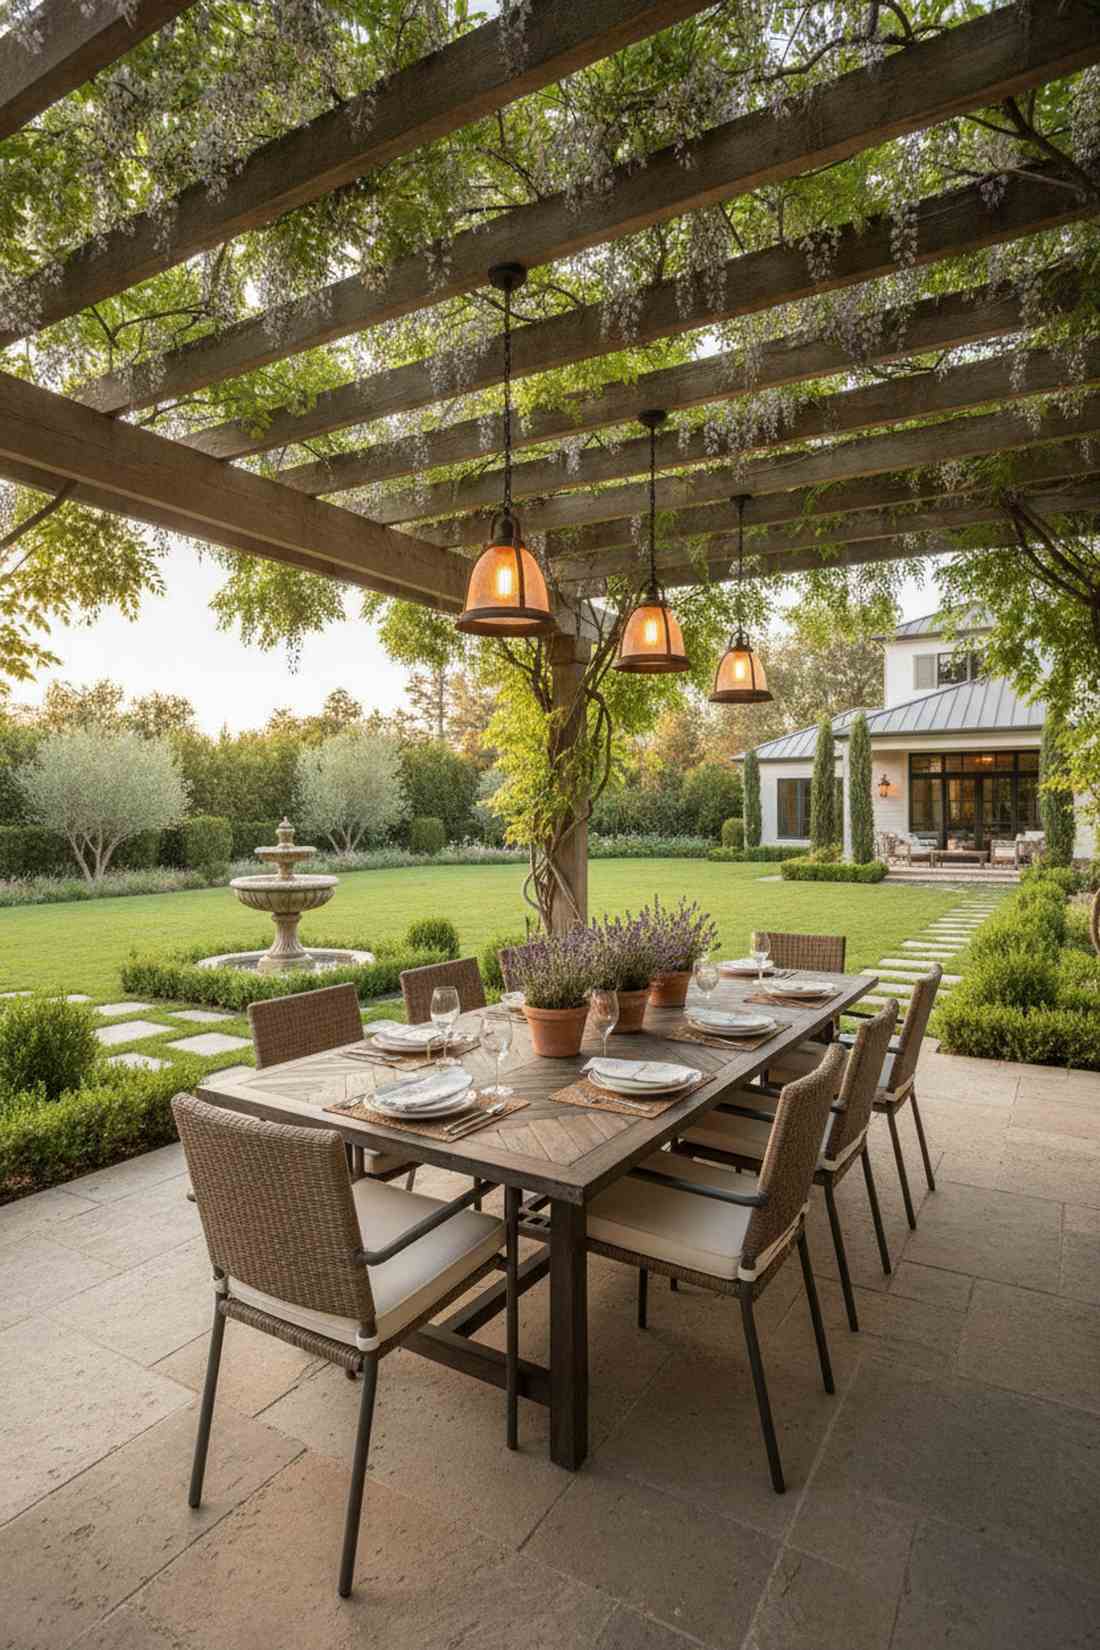
Feels like dining al fresco at a Tuscan vineyard estate. This shaded outdoor dining patio creates a stunning focal point for sprawling backyard gardens.
An exposed table ruins dinner parties when the sun hits; framing it with a pergola adds immediate structural luxury. Train climbing vines over the beams to naturally filter harsh light and cool the ambient temperature.
Executing this architectural canopy setup ranges from $2,500–$6,000. Save this to your dream dinner party board!
- Key Materials: Cedar pergola framing, 8-person rectangular table, outdoor pendant lighting
- Vibe / Style: Elegant Mediterranean dining
- Difficulty: Advanced weekend build
- Budget Breakdown: Pergola Kit: $1,800 | Table Set: $1,200 | Lighting: $250
- Creator’s Tip: Orient the table perpendicular to the house to maximize the number of seats facing your landscape view.
- Smart Sourcing: Pre-cut cedar pergola kits and commercial-grade outdoor pendant lights.
Most people get their outdoor dining completely wrong… until they try the exact layout coming up next.
10. Round Table for Intimate Conversation Dining
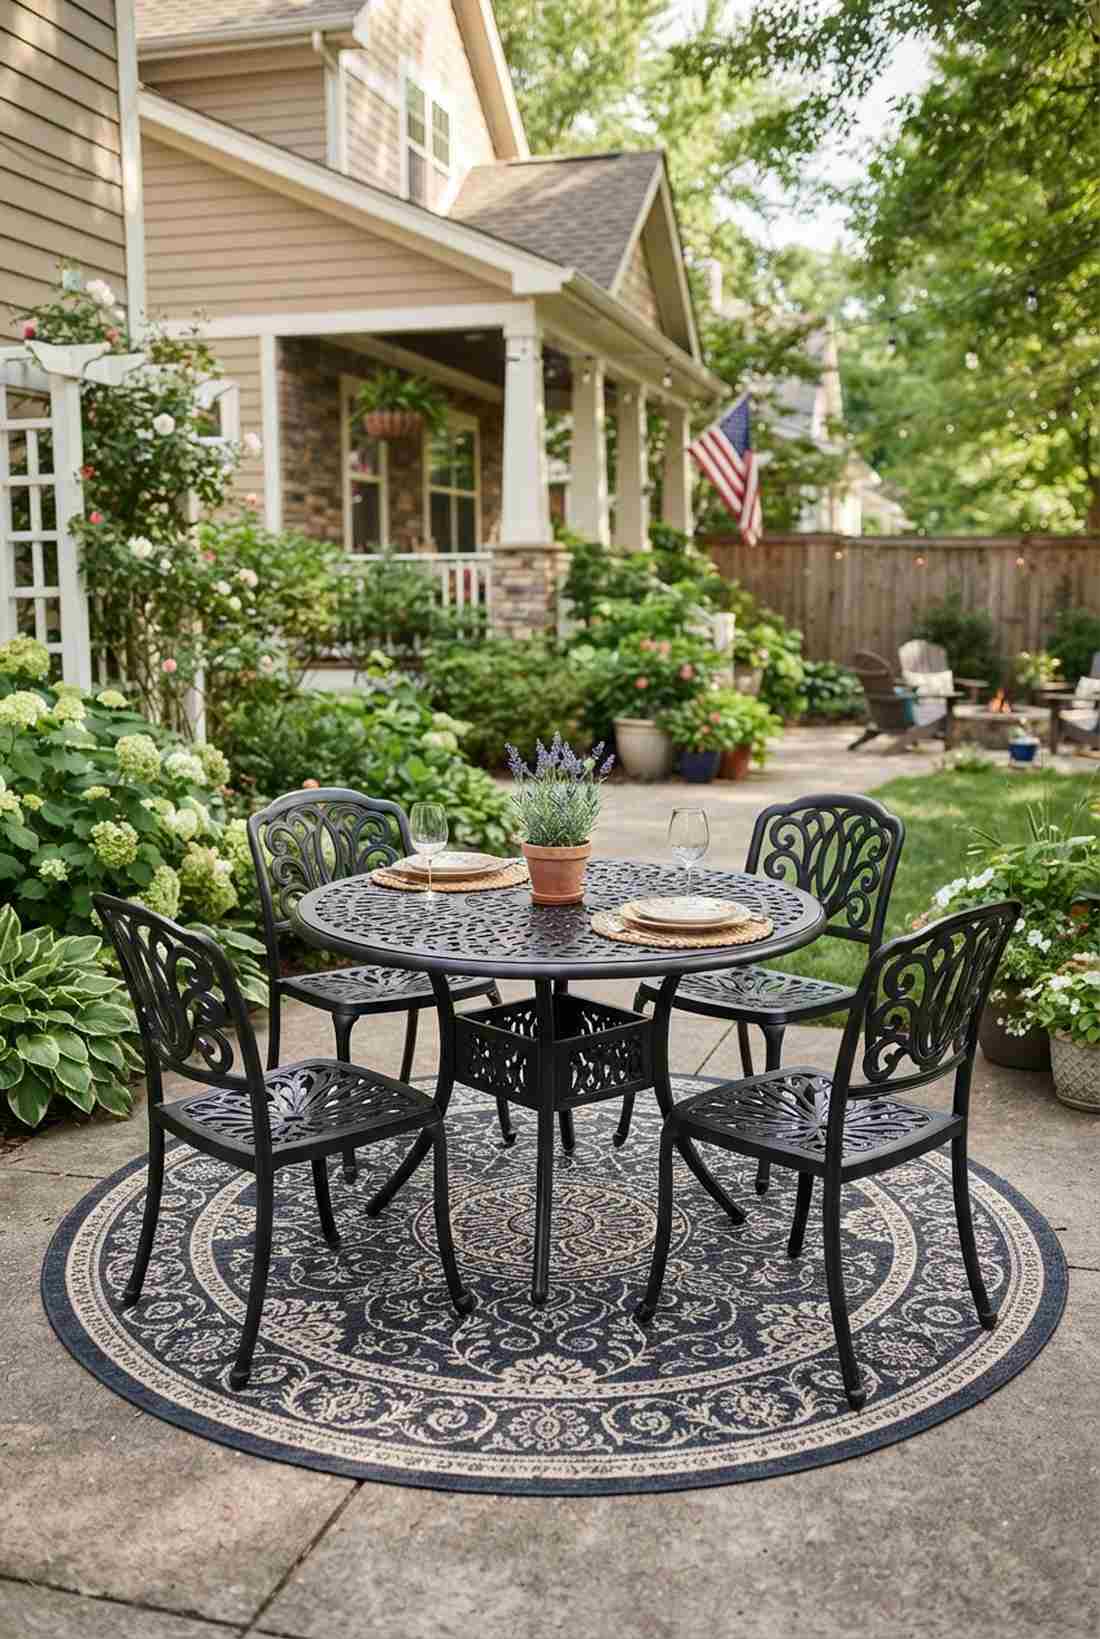
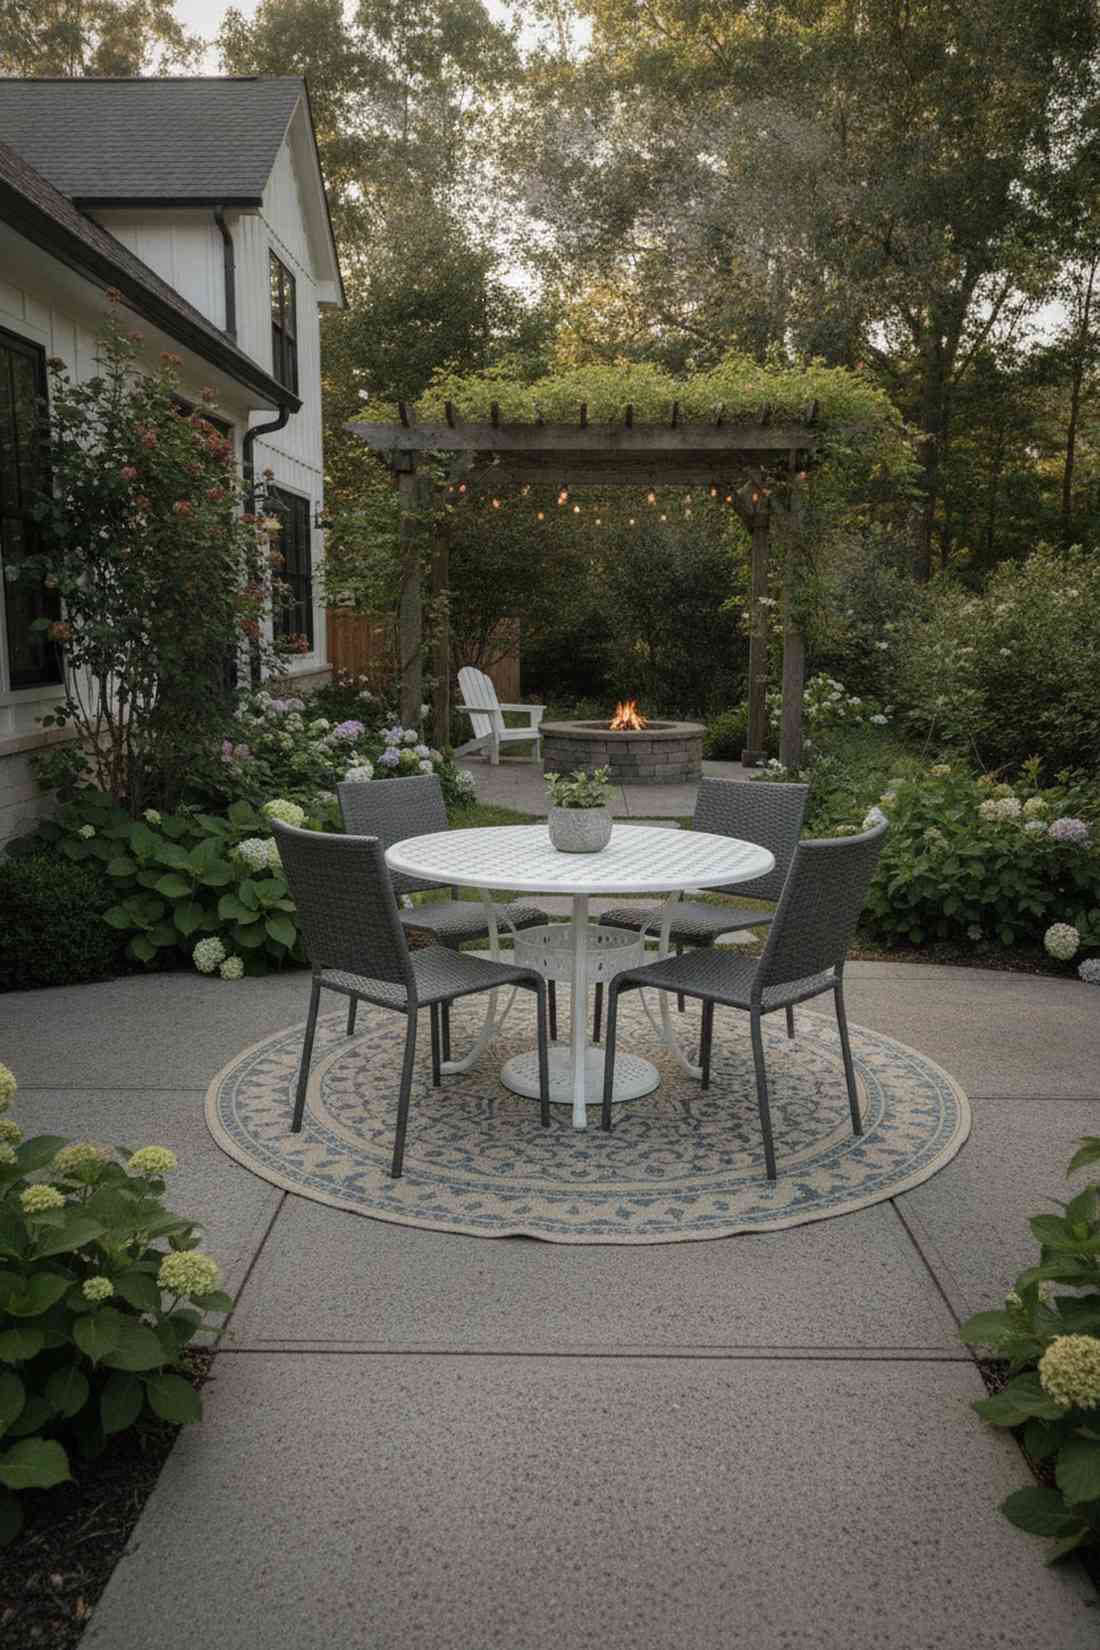
Gives off the charming intimacy of a hidden Parisian bistro corner. This circular dining layout works magic on small, square concrete pads where bulky furniture fails.
Harsh rectangular tables block traffic flow, but a pedestal-based round table naturally smooths out circulation paths. Using armless chairs allows everything to tuck away, instantly doubling your usable square footage.
You can easily pull this off for around $400–$900 depending on the table material.
- Key Materials: 48-inch round pedestal table, armless bistro chairs, circular outdoor rug
- Vibe / Style: Cozy cafe elegance
- Difficulty: Quick drop-in setup
- Budget Breakdown: Table: $300 | Chairs: $200 | Rug: $100
- Creator’s Tip: Place a large circular outdoor rug underneath to visually define the dining zone on a larger patio.
- Smart Sourcing: Cast aluminum round outdoor tables and weather-safe armless patio chairs (4-pack).
💡 Must-Have Supplies for High-End Setups
To build these setups faster and ensure they last, skip the generic craft aisles and invest in the right foundational kits.
- Base & Support: Interlocking composite deck tiles (bulk box) for instant ground elevation.
- Setup Tools: Heavy-duty exterior masonry adhesive starter kits to lock retaining blocks permanently.
- Weather/Durability Protection: UV-blocking marine-grade sealant sprays to keep fabrics and woods looking brand new.
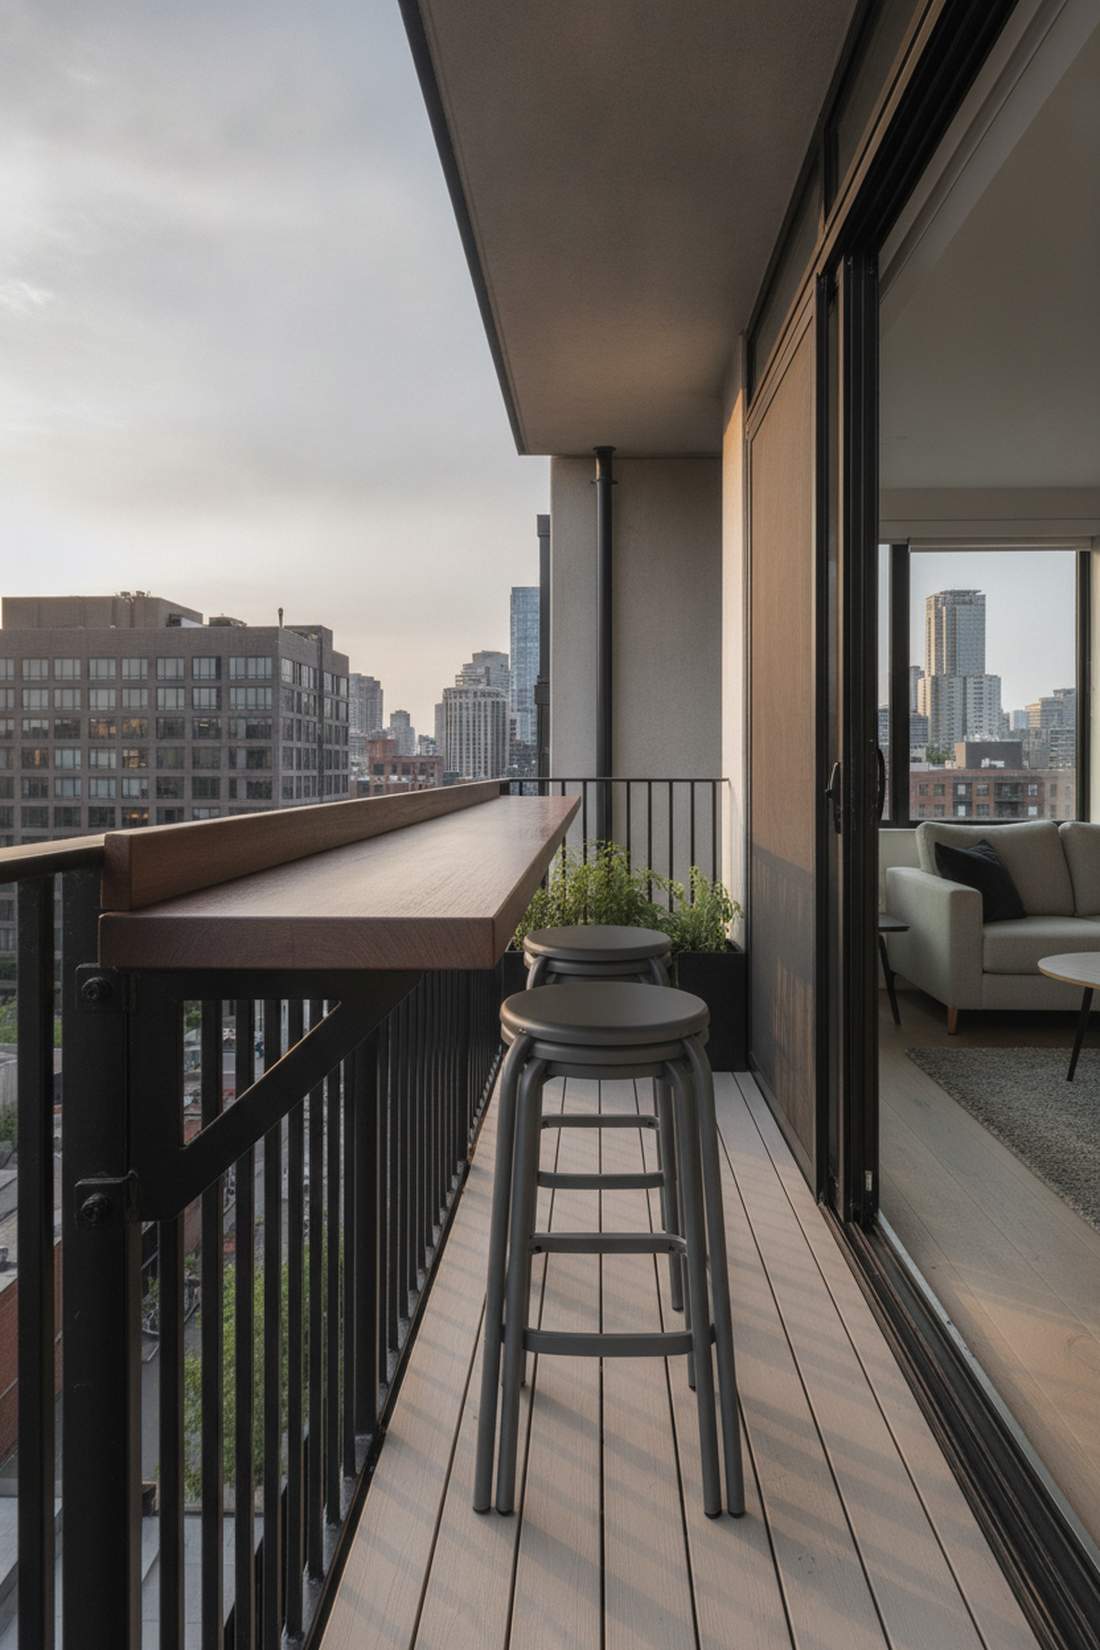
11. Bar Height Table with Swivel Stools
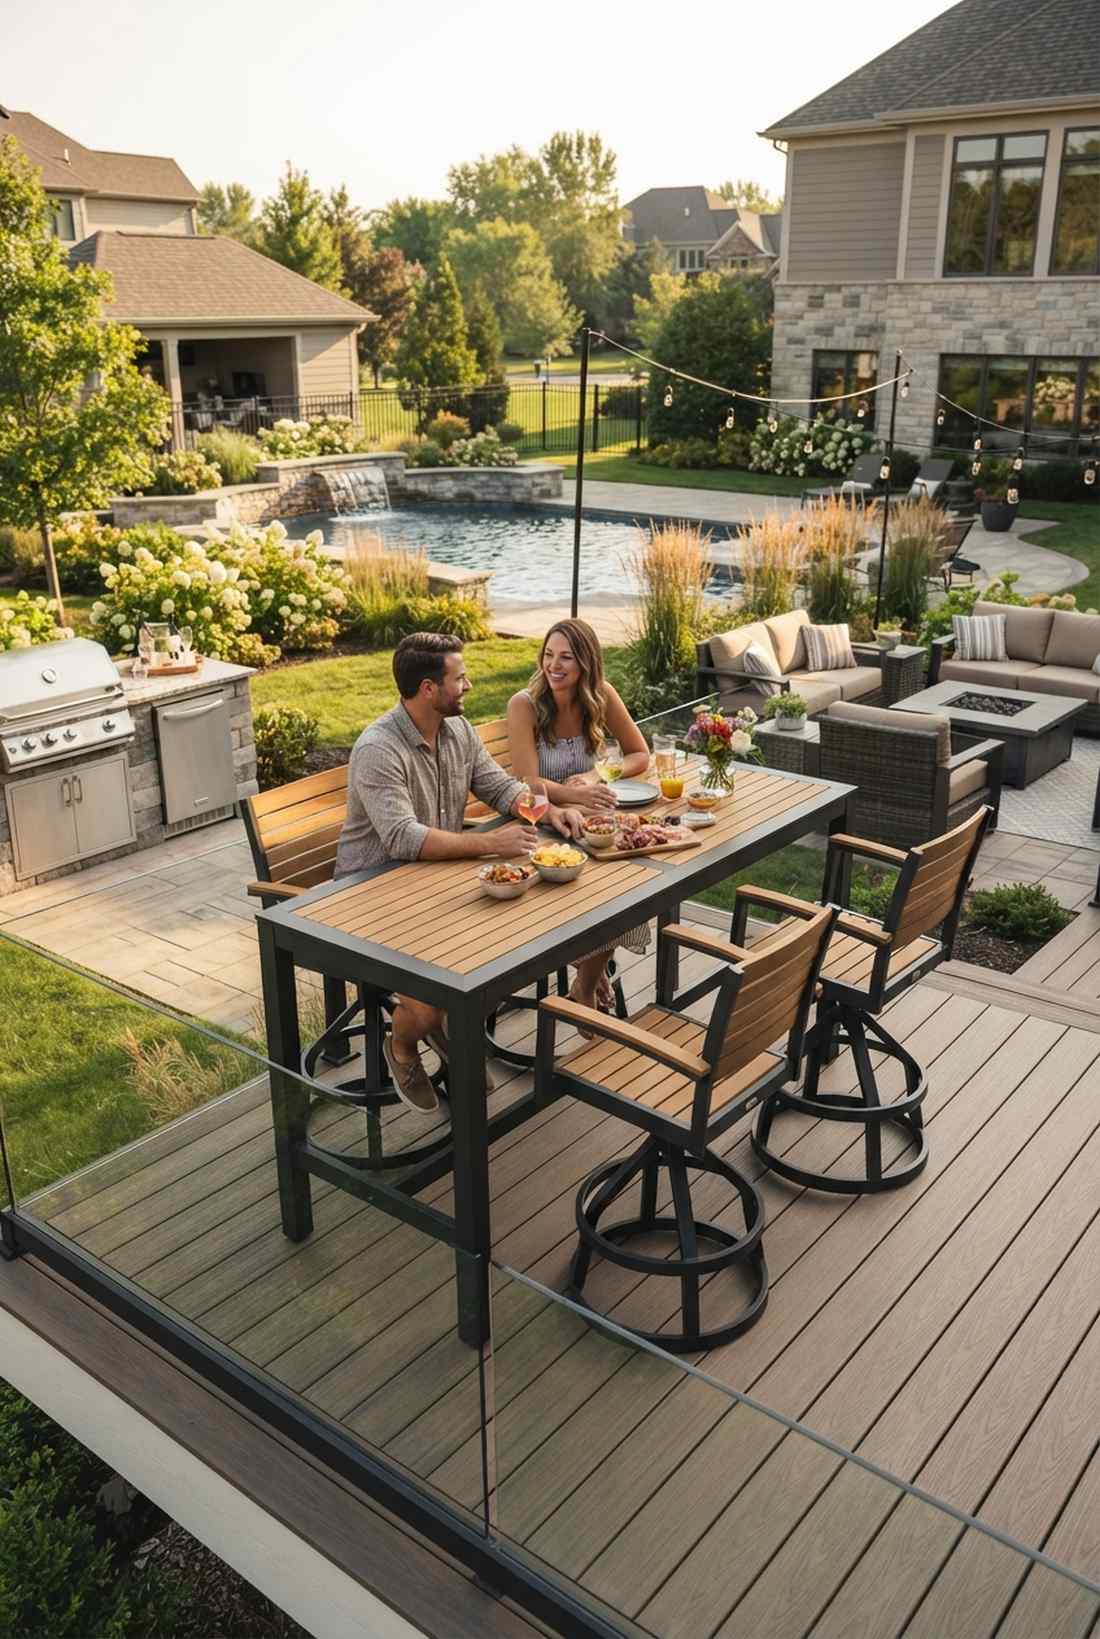
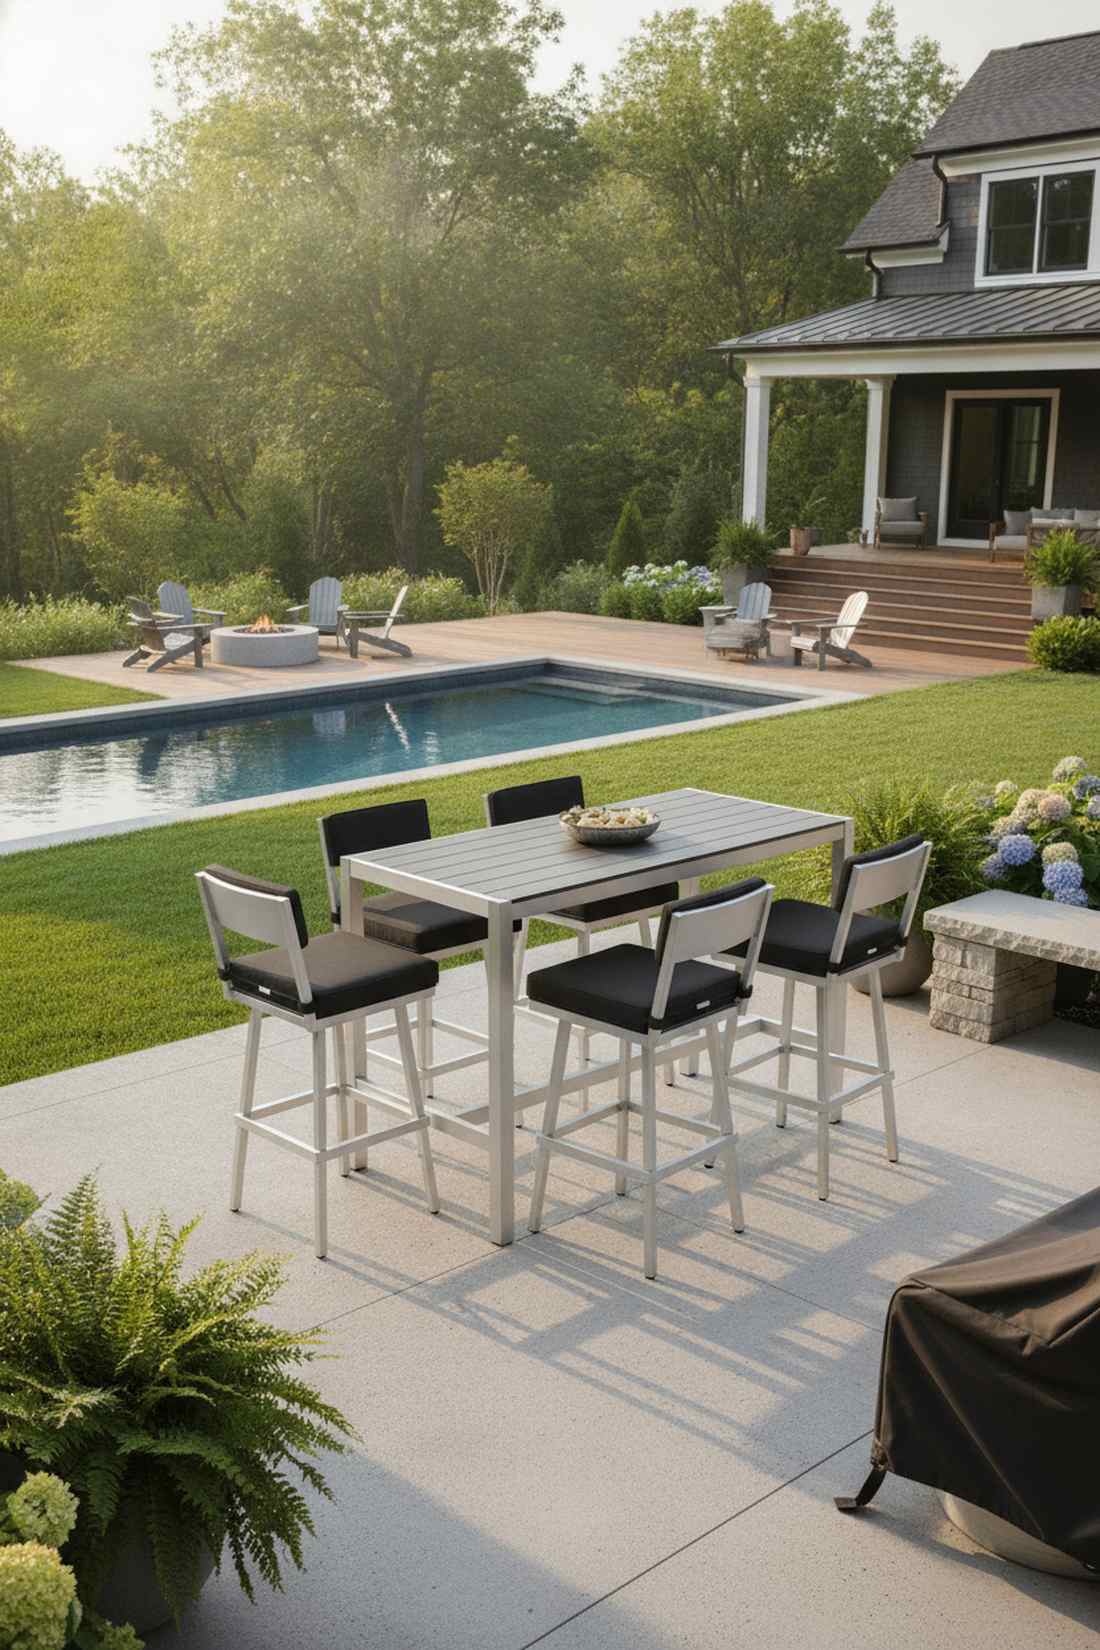
Radiates the sleek, high-energy vibe of a rooftop cocktail lounge. This elevated patio bar setup is the perfect transition piece between outdoor kitchens and pool decks.
Standard dining heights kill sightlines; lifting the table to 42 inches gives a commanding view of the entire yard. Pairing it with heavy base swivel stools ensures guests remain comfortable and engaged during appetizers.
A solid bar-height set runs anywhere from $600–$1,300. Pin this for your ultimate summer hosting setup!
- Key Materials: 42-inch high bar table, weather-resistant swivel stools, outdoor footrest rail
- Vibe / Style: Modern entertaining hub
- Difficulty: Easy assembly
- Budget Breakdown: Bar Table: $400 | Stools (x4): $600 | Cover: $80
- Creator’s Tip: Position the bar table right at the edge of the patio so diners can overlook the lower lawn.
- Smart Sourcing: Powder-coated aluminum bar stools (set of 2) and heavy-duty outdoor bar covers.
12. L-Shaped Dining Bench with Table
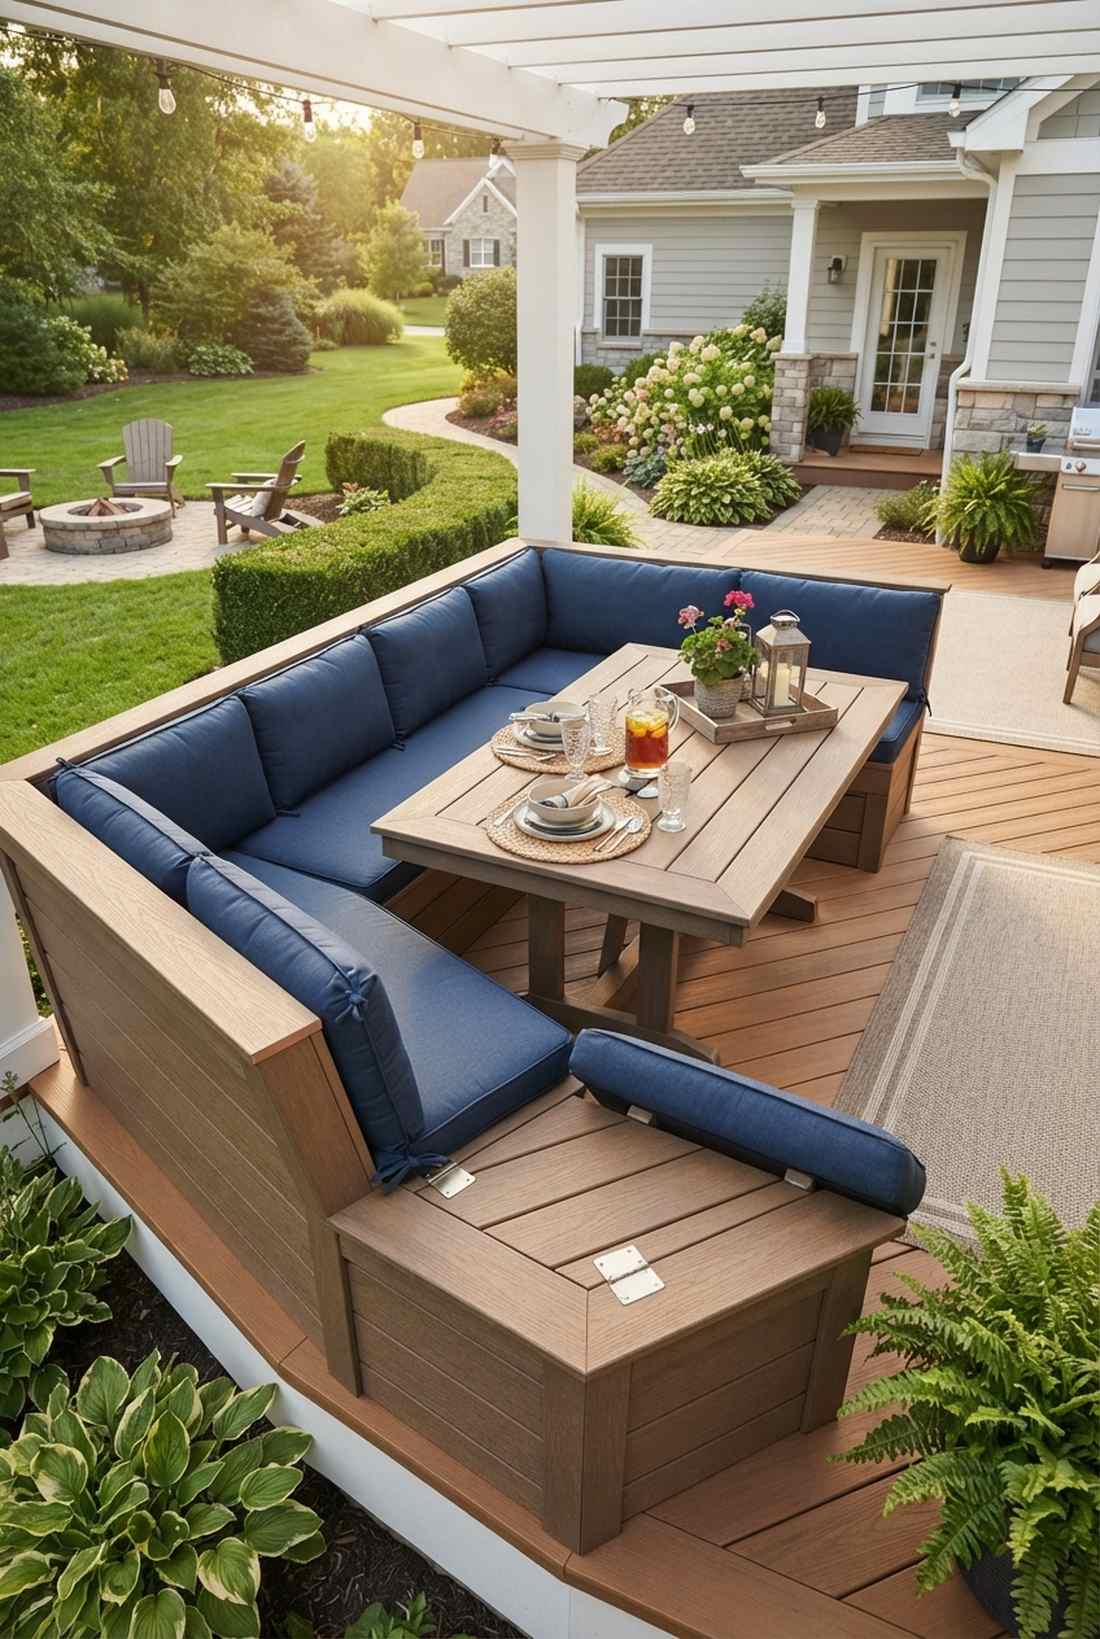
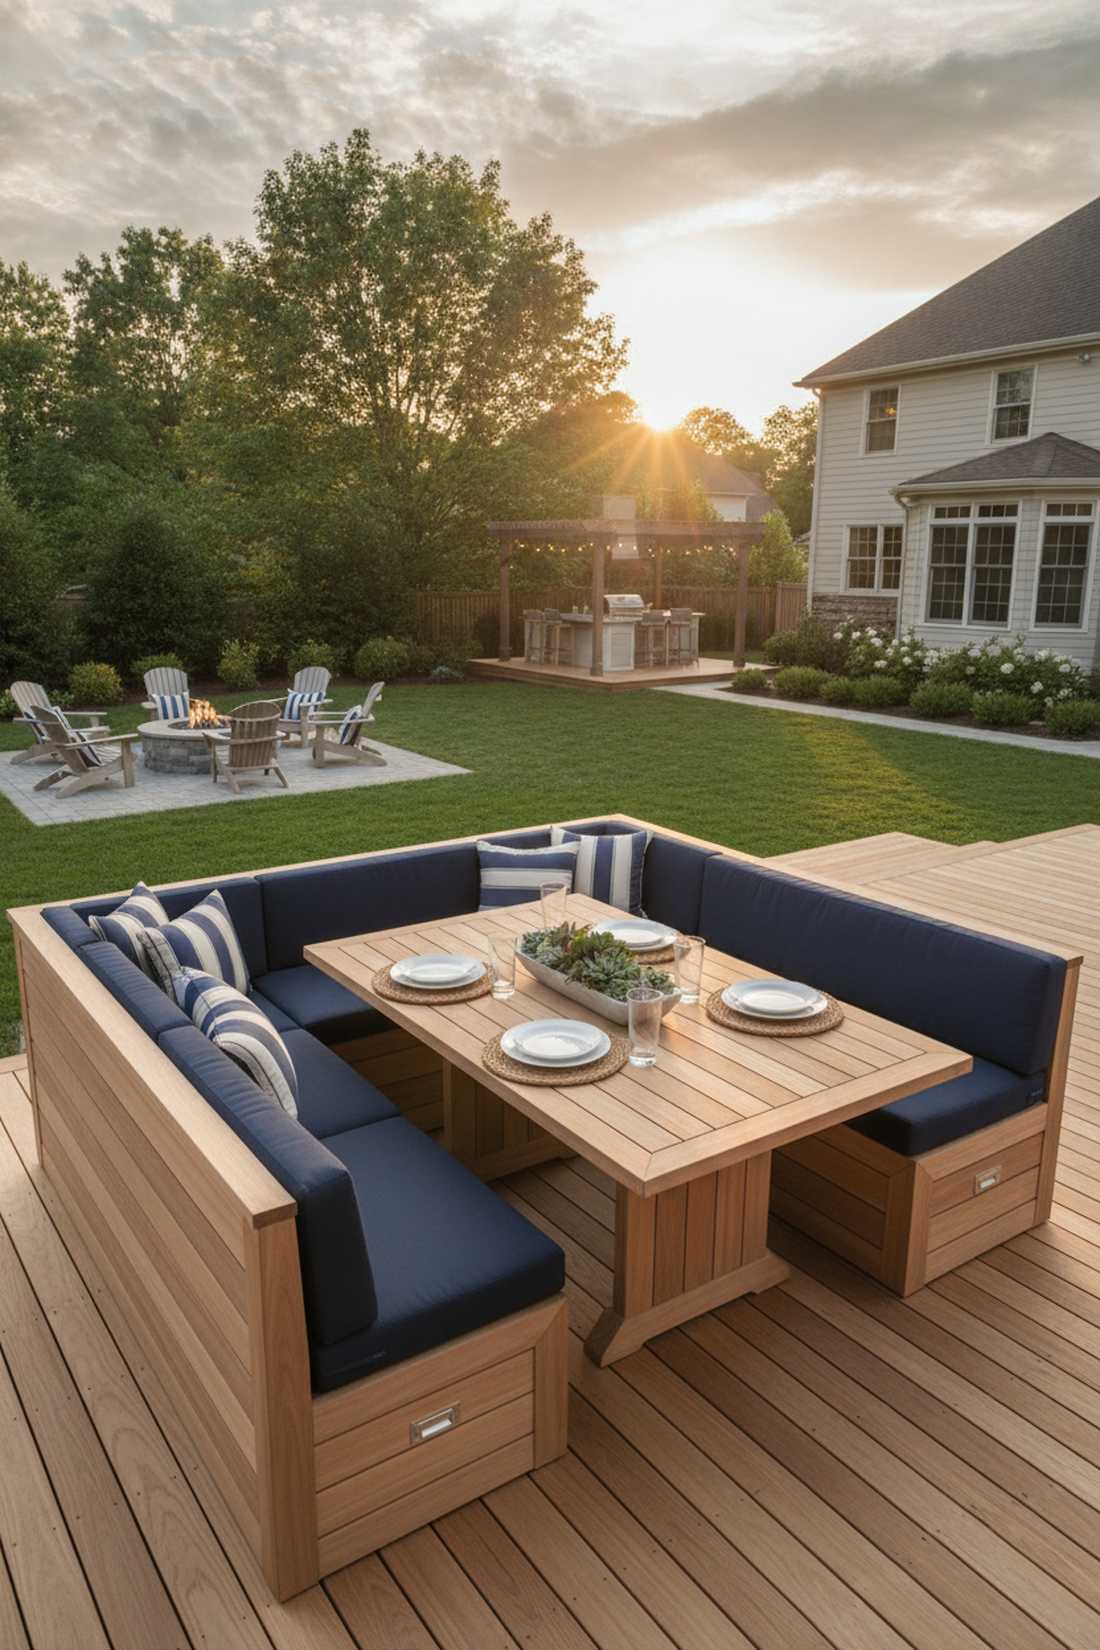
Feels like a custom luxury yacht deck optimized for seamless living. This space-saving outdoor seating area garden design dominates tight corners by eliminating wasted chair space.
Traditional chairs demand 3 feet of pull-out clearance, but an anchored corner bench reclaims all that dead real estate. Adding hidden hinges turns the bench seat into massive storage for off-season cushions.
Building this custom arrangement will cost about $500–$1,100. It’s a weekend project that pays off endlessly.
- Key Materials: Composite decking boards, exterior hinges, rectangular dining table
- Vibe / Style: Nautical space-efficiency
- Difficulty: Intermediate DIY
- Budget Breakdown: Bench Build: $400 | Table: $400 | Hardware: $100
- Creator’s Tip: Match the wood tone of the built-in bench exactly to the table surface for a seamless, built-in look.
- Smart Sourcing: Stainless steel rust-proof hinges (bulk pack) and fade-resistant outdoor bench cushions.
13. Farmhouse Table with Cross-Back Chairs
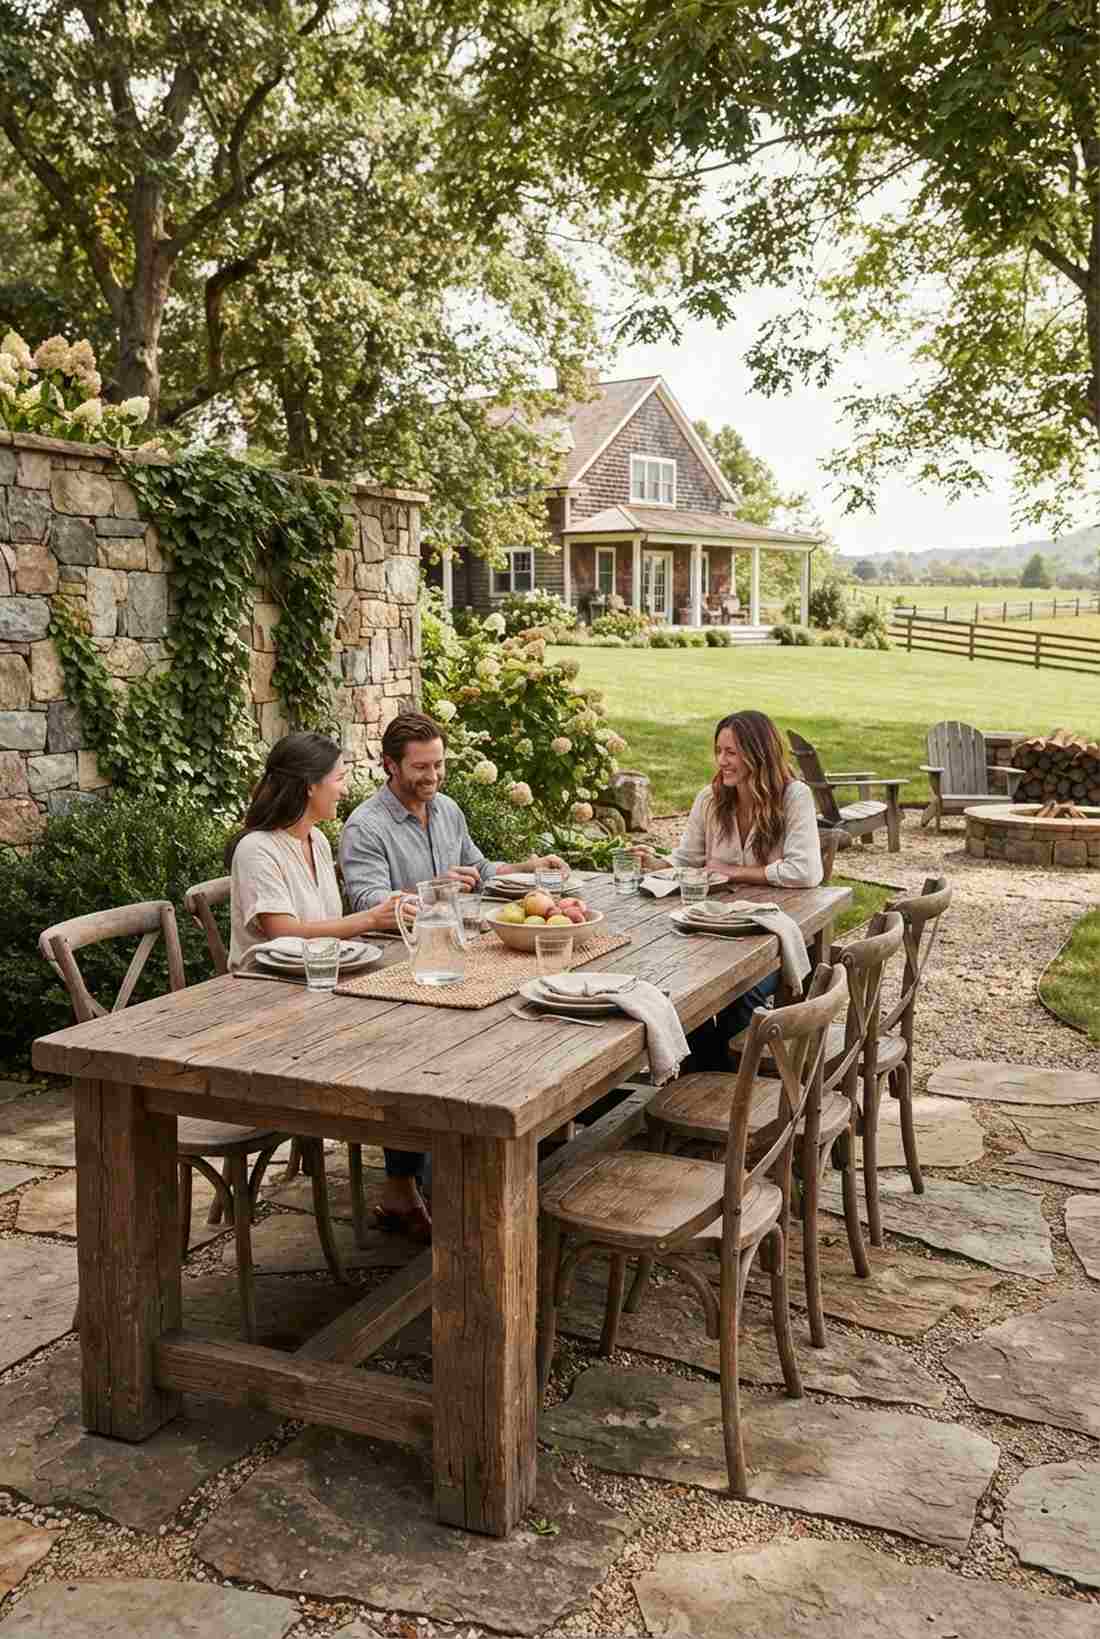
Delivers the rugged, welcoming charm of an old countryside estate. This rustic outdoor dining layout is stunning when set against natural stone or heavy greenery.
Flimsy glass tables shatter the vibe; dropping a massive reclaimed teak table grounds the space with authentic texture. Protect the raw wood with tung oil so it gracefully weathers without rotting.
Sourcing quality reclaimed wood tables ranges from $900–$2,500. Save this if you love pastoral outdoor living!
- Key Materials: Reclaimed wood farmhouse table, wooden cross-back chairs, marine polyurethane
- Vibe / Style: Rustic agricultural elegance
- Difficulty: Heavy lifting required
- Budget Breakdown: Table: $1,200 | Chairs (x6): $900 | Sealant: $50
- Creator’s Tip: Place the table in partial shade to prevent the sun from rapidly baking and splitting the thick timber.
- Smart Sourcing: Premium tung oil wood finish (gallon) and weather-treated cross-back patio chairs.
14. Square Table for Four with Umbrella
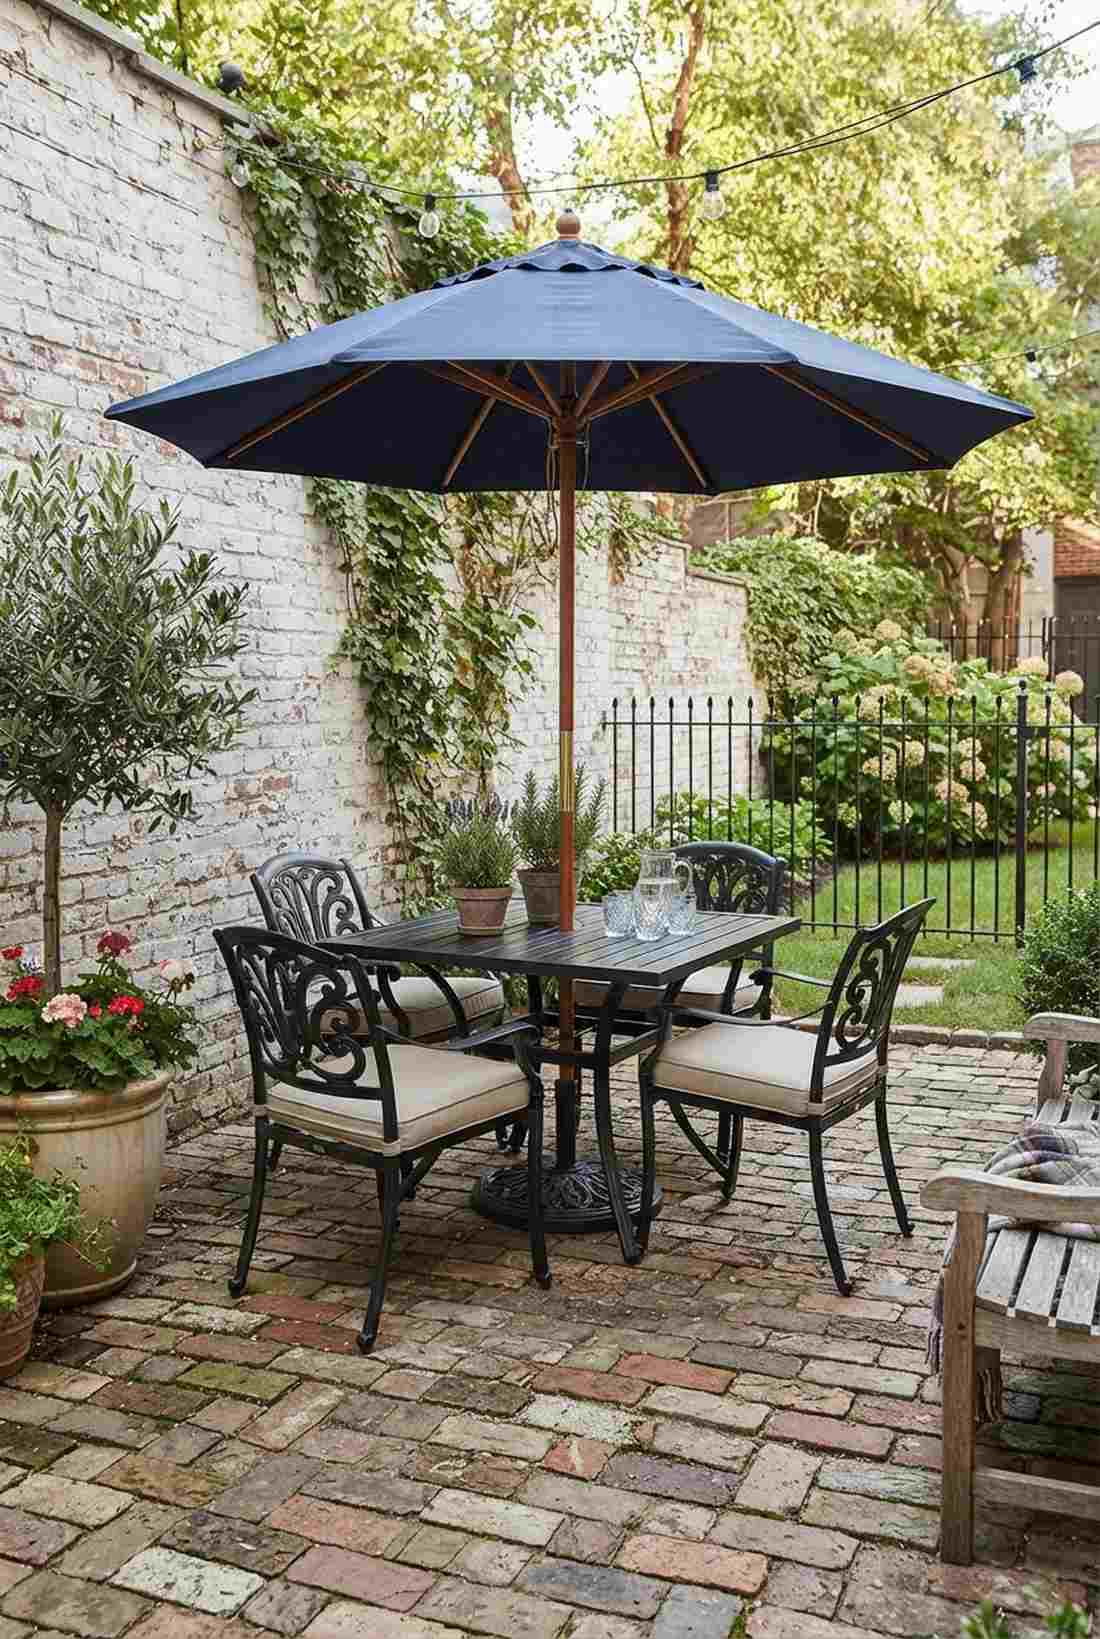
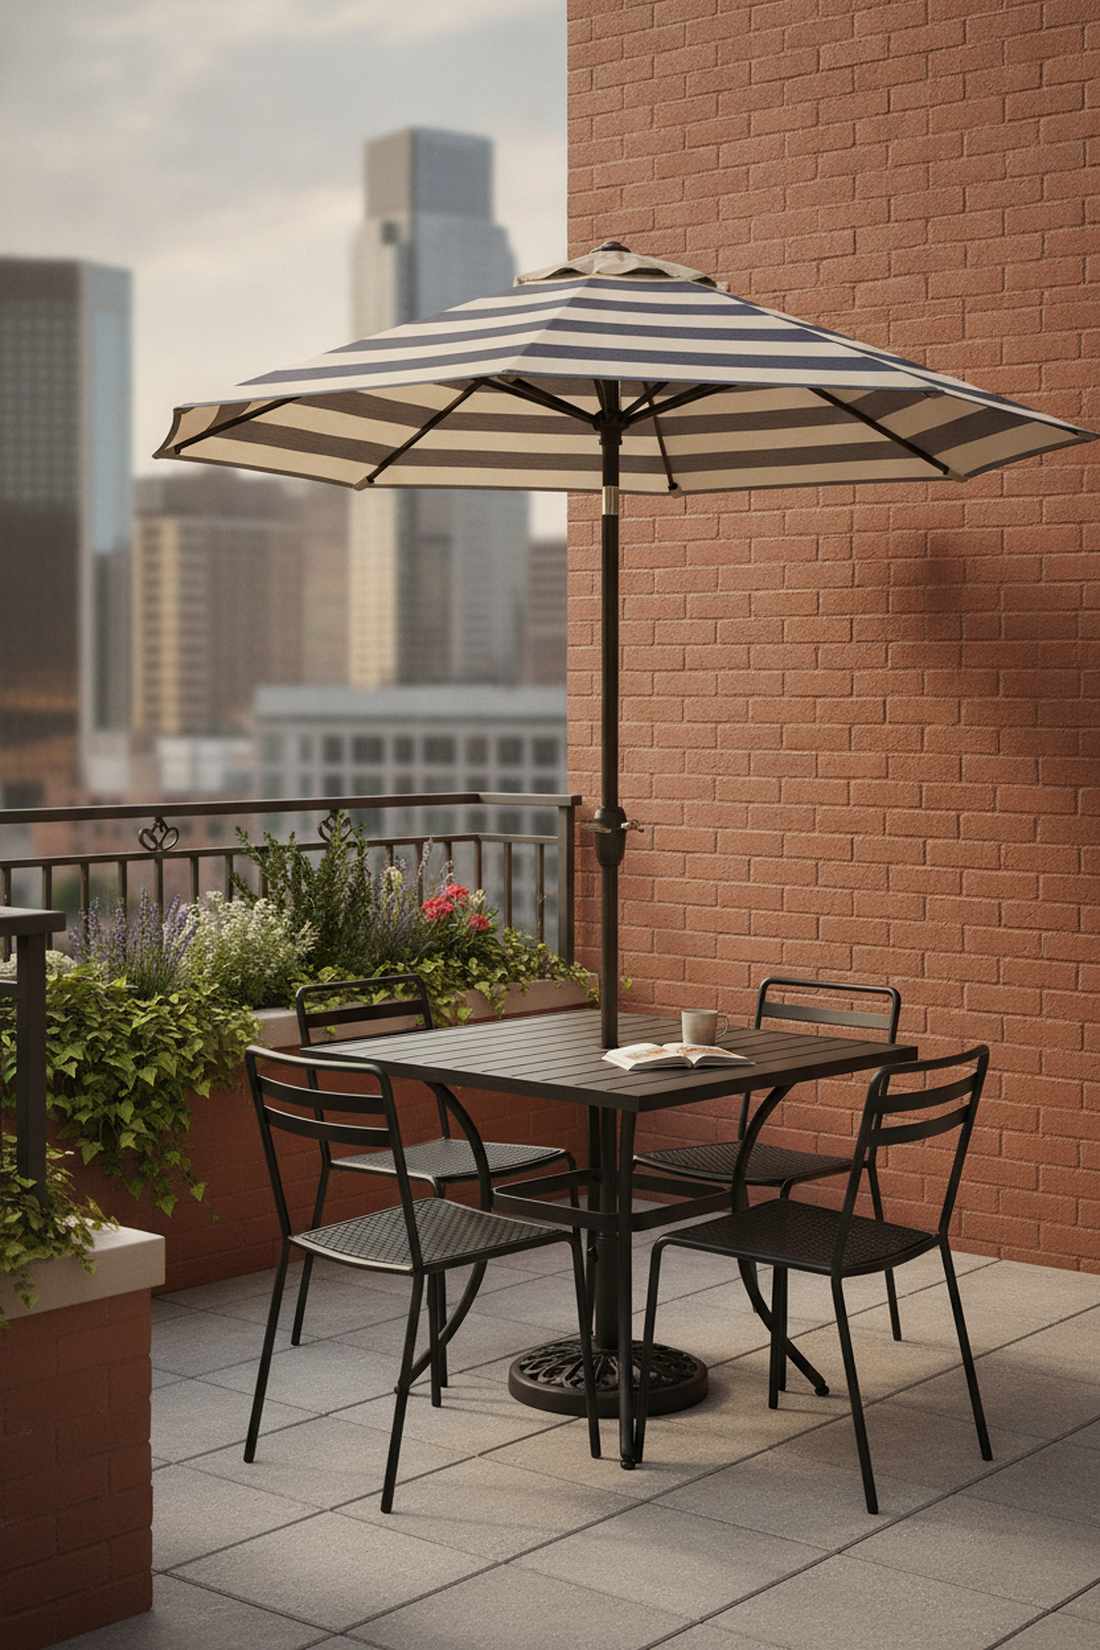
Has the crisp, practical appeal of an upscale sidewalk cafe. This compact shaded patio design is the undisputed champion for small apartment balconies or tight courtyards.
Round tables leave awkward gaps in corners, but a square profile pushes flush against walls when not in use. Utilizing a built-in umbrella slot guarantees localized shade without tripping over heavy cantilever bases.
You can establish this classic setup for roughly $300–$700.
- Key Materials: 36-inch square table, 9-foot market umbrella, cast iron umbrella base
- Vibe / Style: Classic bistro practicality
- Difficulty: Setup in 20 minutes
- Budget Breakdown: Table Set: $350 | Umbrella: $150 | Heavy Base: $80
- Creator’s Tip: Always buy an umbrella base that weighs at least 50 lbs to prevent the whole table from lifting in high winds.
- Smart Sourcing: Vented canopy patio umbrellas and 50lb cast iron umbrella weights.
Stop scrolling if you have a dead, unused corner in your yard. The next blueprint solves it instantly…
15. Trestle Table on Gravel Courtyard
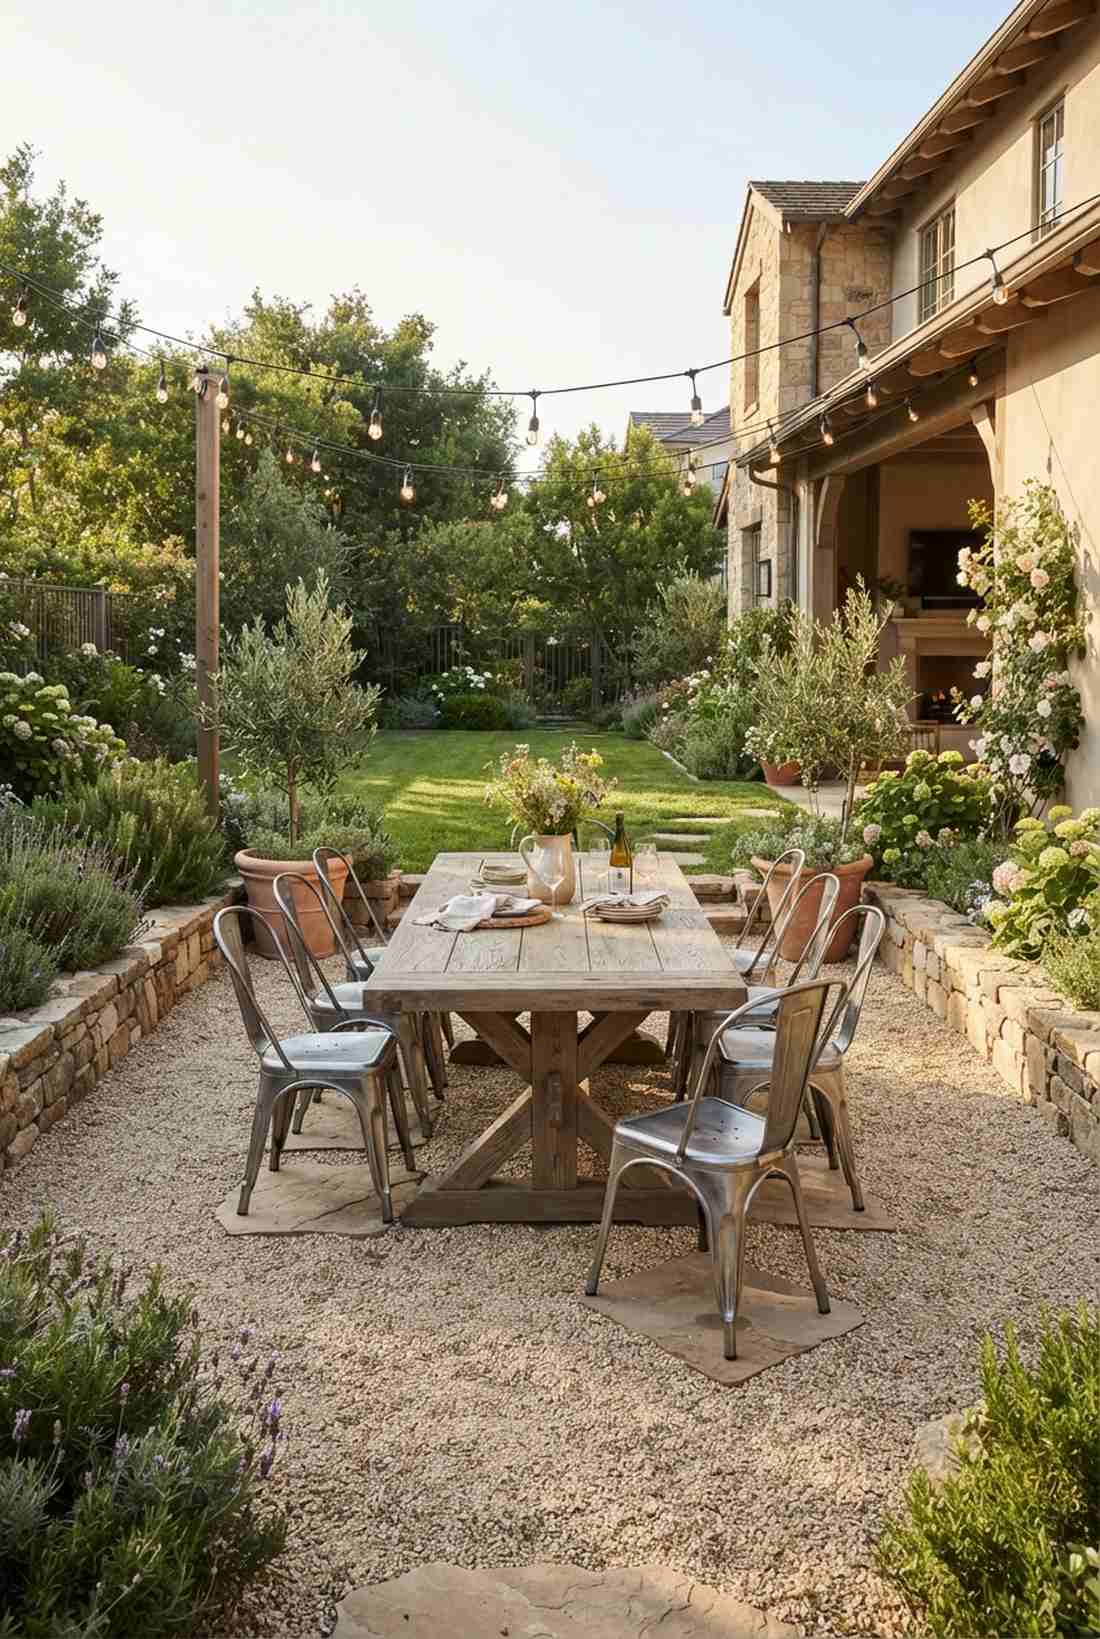
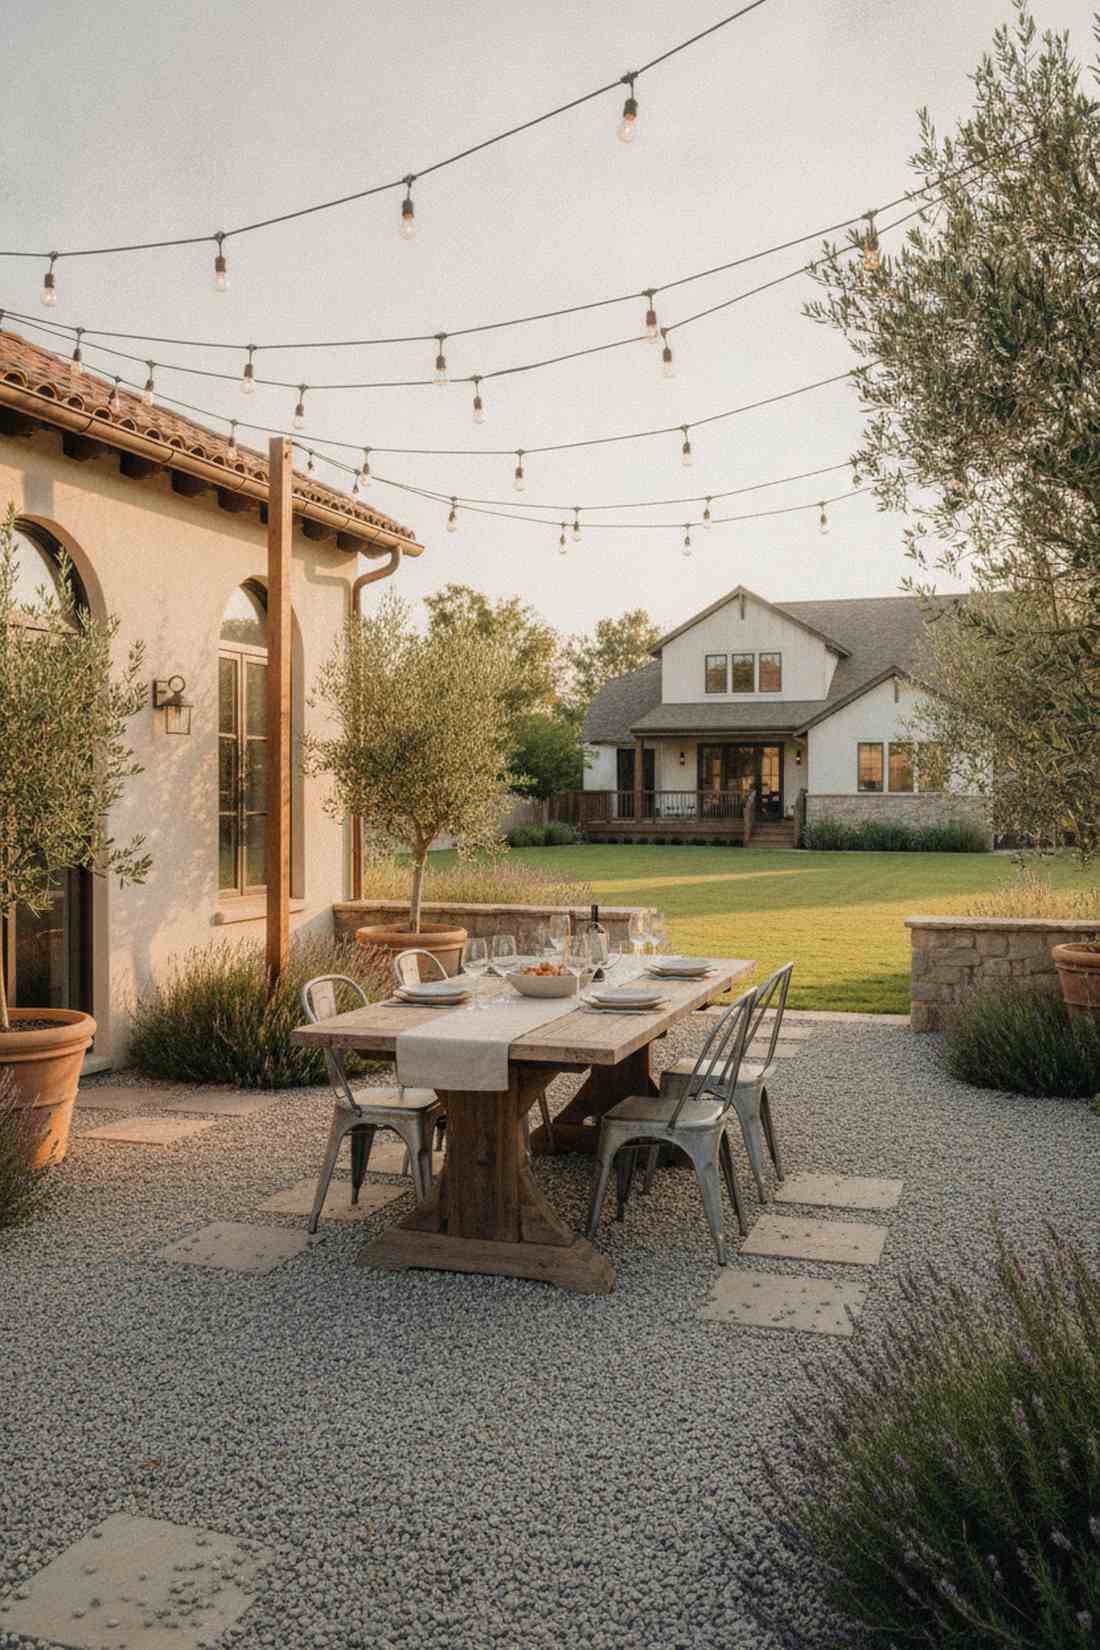
Instantly transports you to a sun-drenched villa in Provence. This gravel courtyard dining layout is perfect for uneven yards where pouring concrete is too expensive.
Standard four-leg tables wobble endlessly on stone, but a heavy trestle base distributes weight for rock-solid stability. Stringing cafe lights overhead defines the “room” visually without needing any walls.
Crushed stone and a solid table will run about $800–$1,600. Pin this for an ultra-romantic yard makeover!
- Key Materials: Heavy timber trestle table, compacted gravel, metal cafe chairs
- Vibe / Style: European villa rustic
- Difficulty: Moderate (requires gravel hauling)
- Budget Breakdown: Gravel/Edging: $300 | Trestle Table: $800 | Chairs: $300
- Creator’s Tip: Place flat, discreet stone pavers exactly where the chair legs rest so they don’t sink into the gravel.
- Smart Sourcing: Commercial-grade LED outdoor string lights and galvanized metal bistro chairs (4-pack).
Multi-Zone Outdoor Garden Seating Areas
Large patios accommodate multiple concurrent activities—lounging, dining, cooking—by dividing the space into distinct functional zones. Landscape architects use material changes, level variations, and furniture groupings to create outdoor rooms with clear purposes. Circulation paths between zones maintain 42-48 inch clearances for comfortable movement and ADA accessibility.
16. Three-Zone Layout with Kitchen, Dining, Lounge
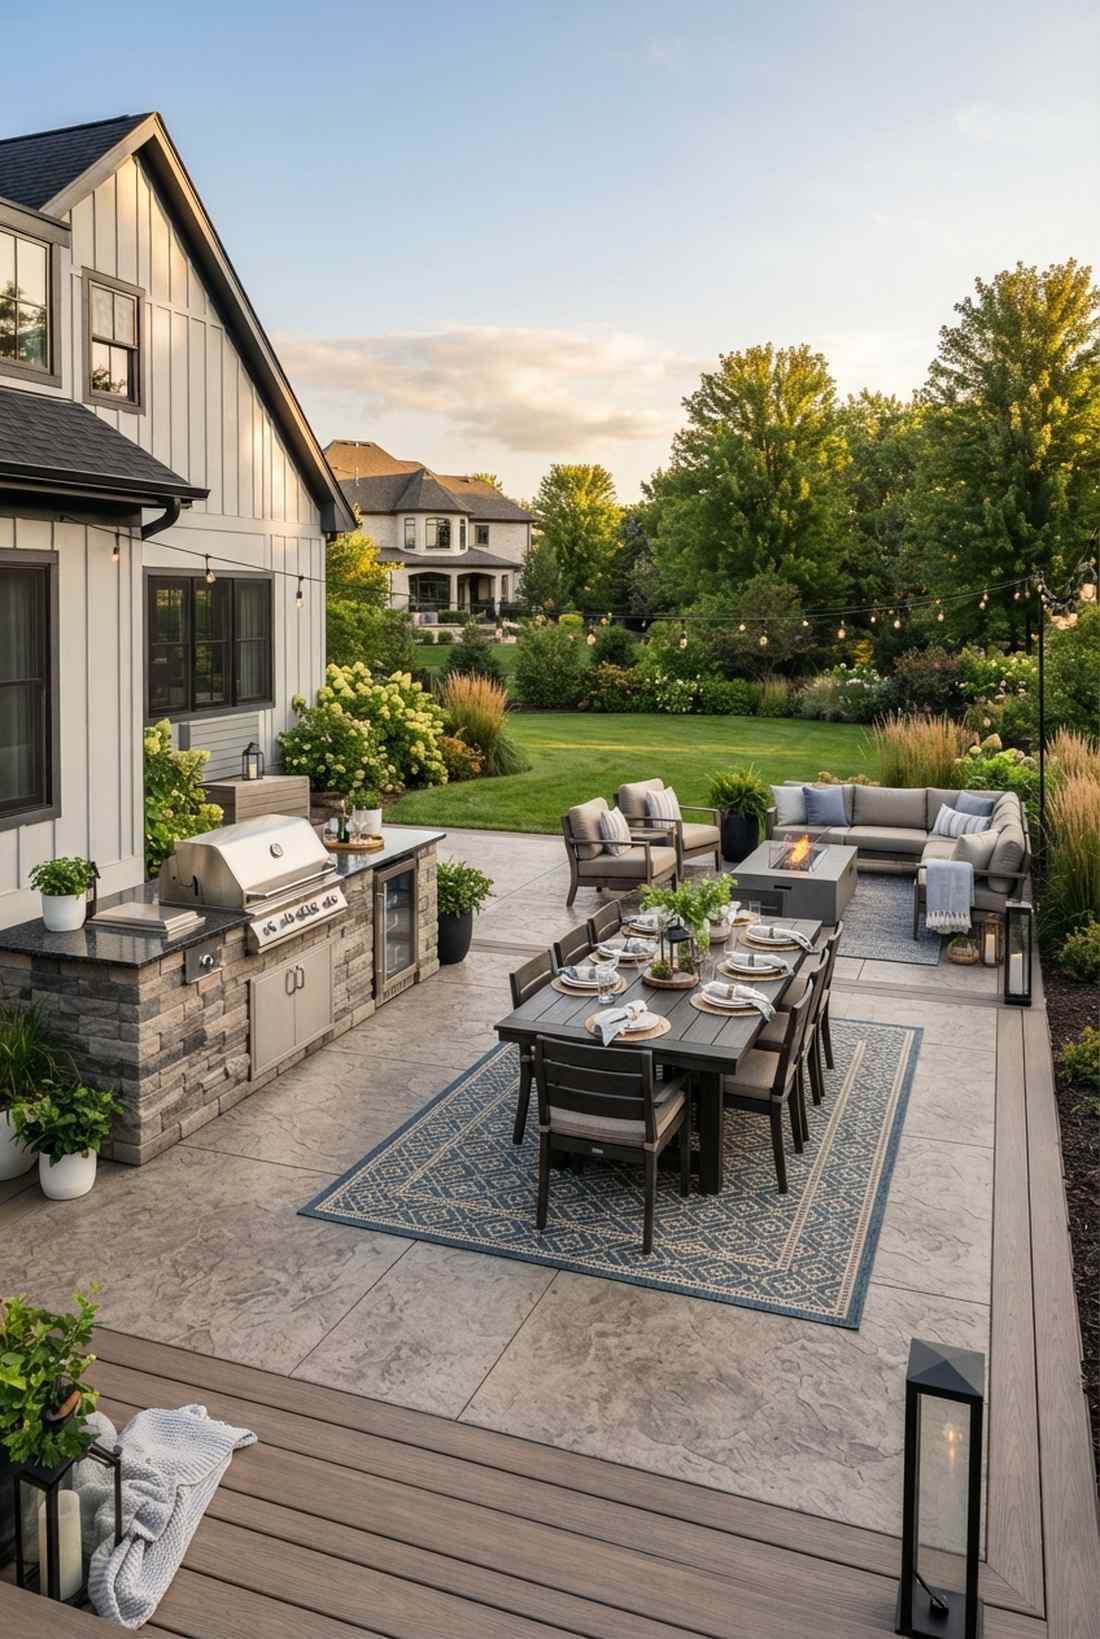
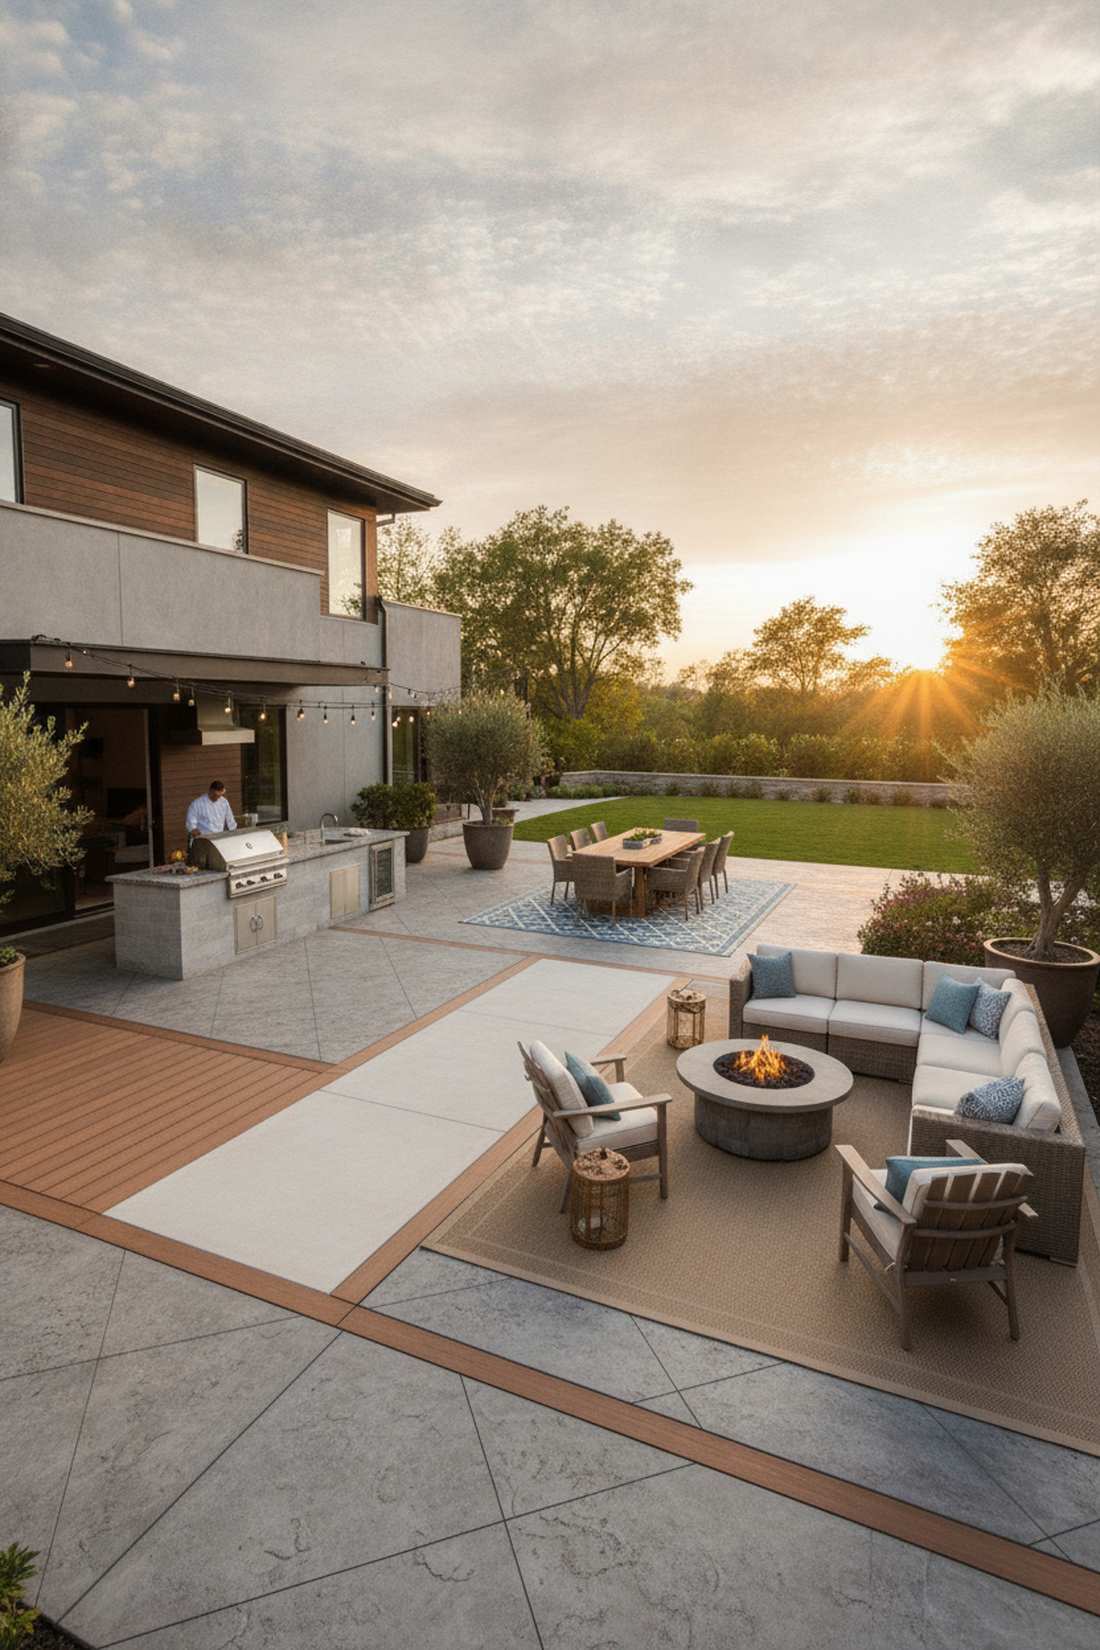
Feels like walking into a luxury celebrity estate open-house. This comprehensive multi-zone outdoor layout transforms massive blank concrete slabs into highly functional living areas.
Leaving a large patio open creates a messy visual; defining strict zones with alternating paving textures forces architectural order. Keep the grill near the house for utility access, and push the lounge to the perimeter for sunset views.
Building this master layout ranges from $5,000–$15,000+ depending on kitchen appliances.
- Key Materials: Textured concrete, composite decking borders, modular outdoor kitchen islands
- Vibe / Style: Ultimate entertainer’s estate
- Difficulty: Professional contracting usually required
- Budget Breakdown: Hardscape: $4,000 | Kitchen: $3,000 | Furniture: $3,500
- Creator’s Tip: Maintain exactly 48 inches of pathway space between each zone so guests can pass comfortably holding drinks.
- Smart Sourcing: Pre-fabricated outdoor BBQ islands and high-traffic outdoor runner rugs.
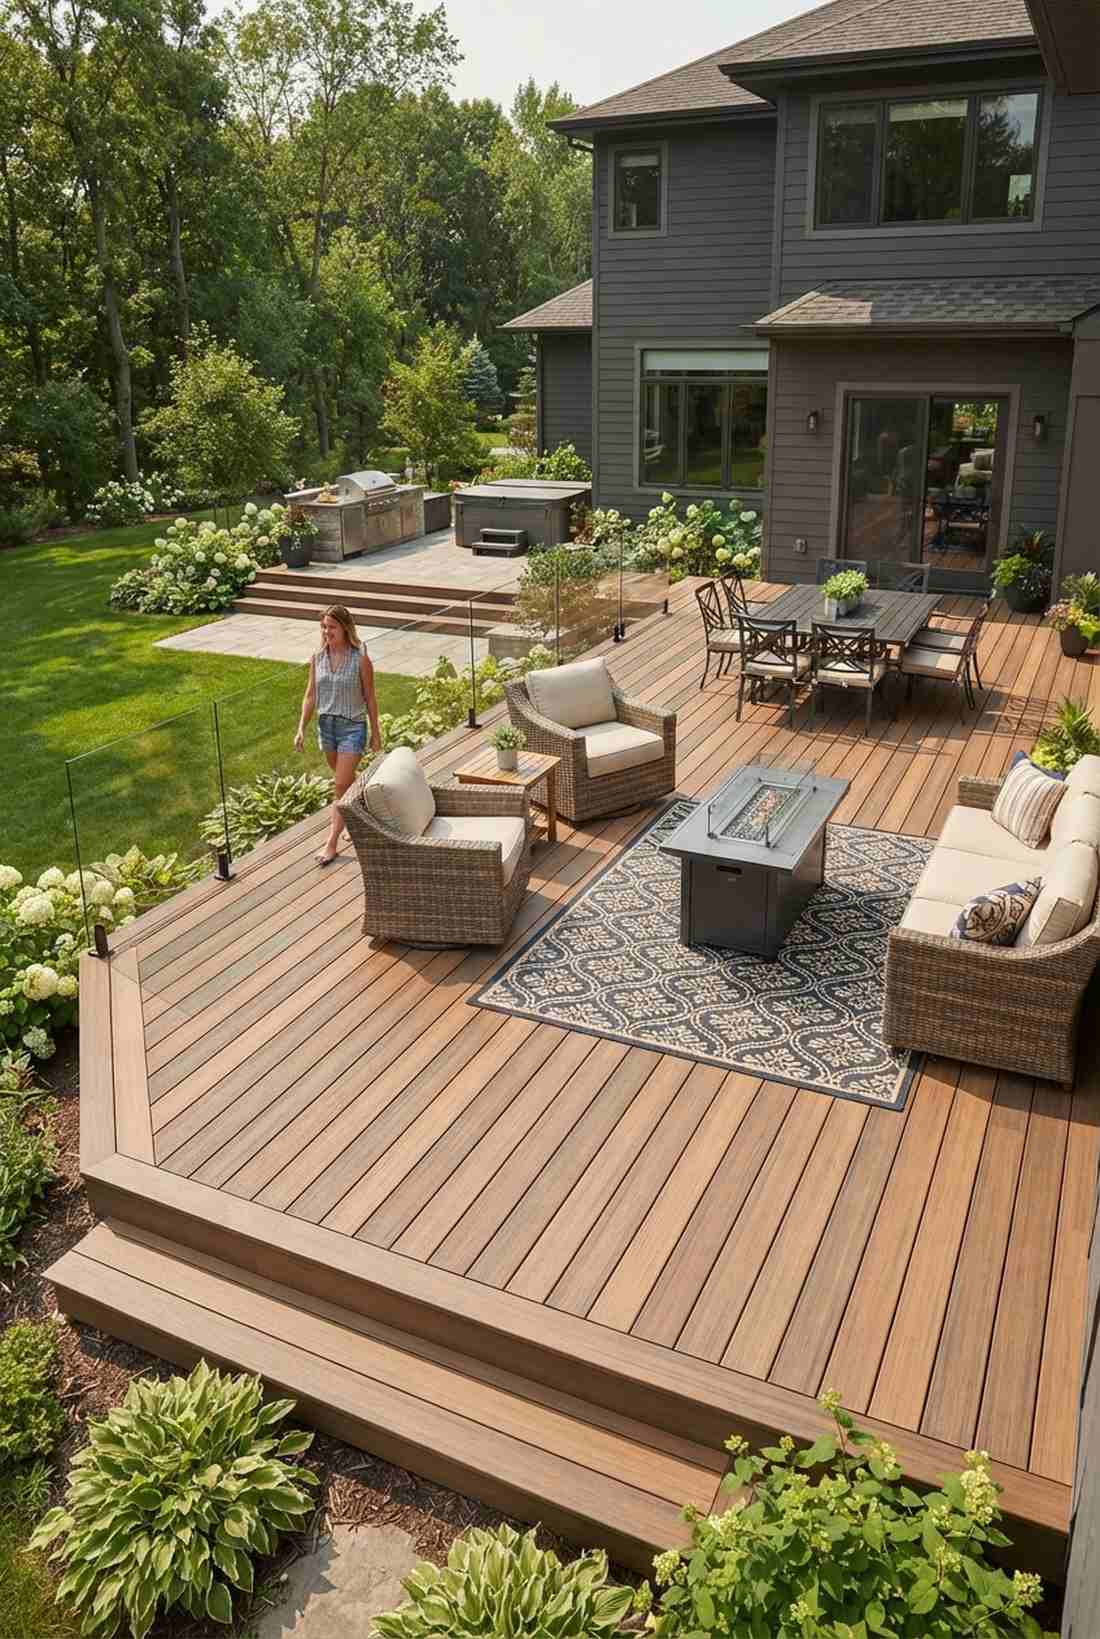
17. Dual-Level Deck with Dining Above, Lounge Below
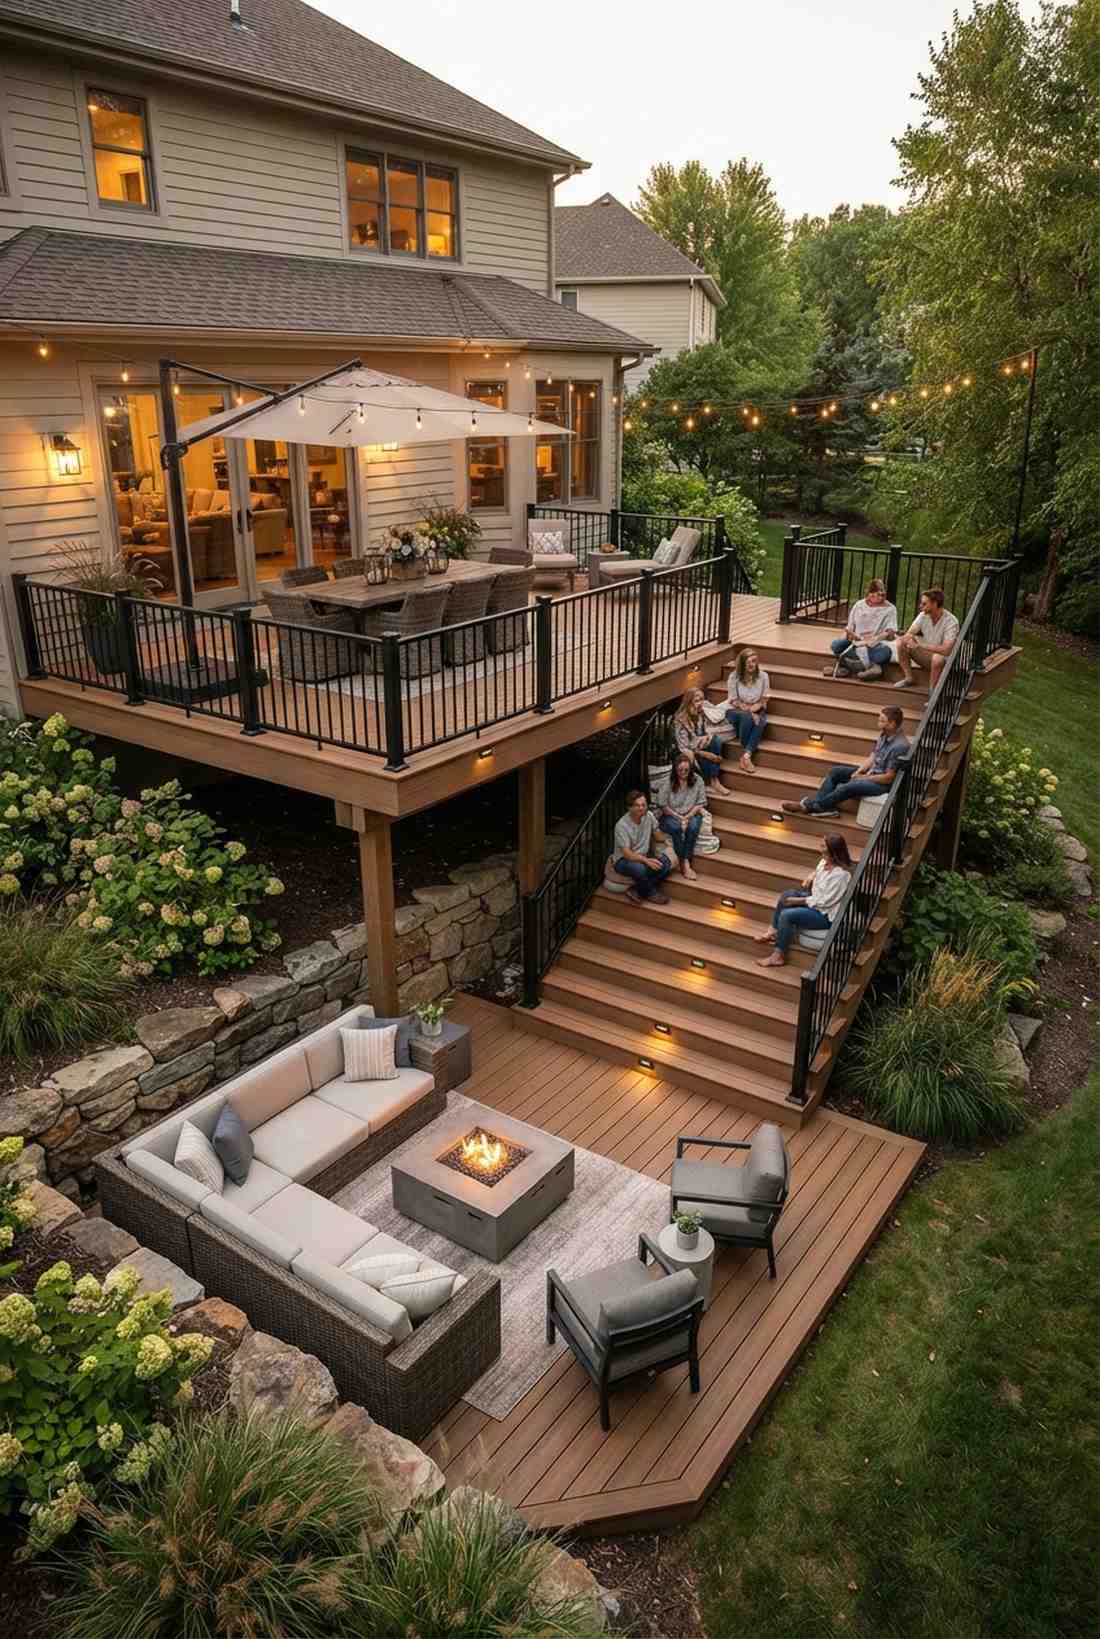
Creates the thrilling dynamic of VIP tiered seating at an exclusive club. This stepped deck patio configuration brilliantly utilizes yards that naturally slope away from the house.
Fighting a slope with massive retaining walls is expensive; stepping the deck down creates psychological zone separation for free. The elevation shift inherently protects the lower lounge area from chilly crosswinds.
Adding a secondary tier to a deck costs roughly $2,000–$5,000. Save this if your yard isn’t perfectly flat!
- Key Materials: Pressure-treated framing, composite fascia boards, wide step treads
- Vibe / Style: Dynamic tiered luxury
- Difficulty: Advanced deck building
- Budget Breakdown: Framing/Footings: $1,500 | Decking: $2,000 | Railings: $800
- Creator’s Tip: Build the connecting stairs unusually wide (minimum 48 inches) so they double as casual overflow seating.
- Smart Sourcing: Hidden deck fastener starter kits and low-voltage LED stair riser lights.
18. Linear Patio with Sequential Activity Zones
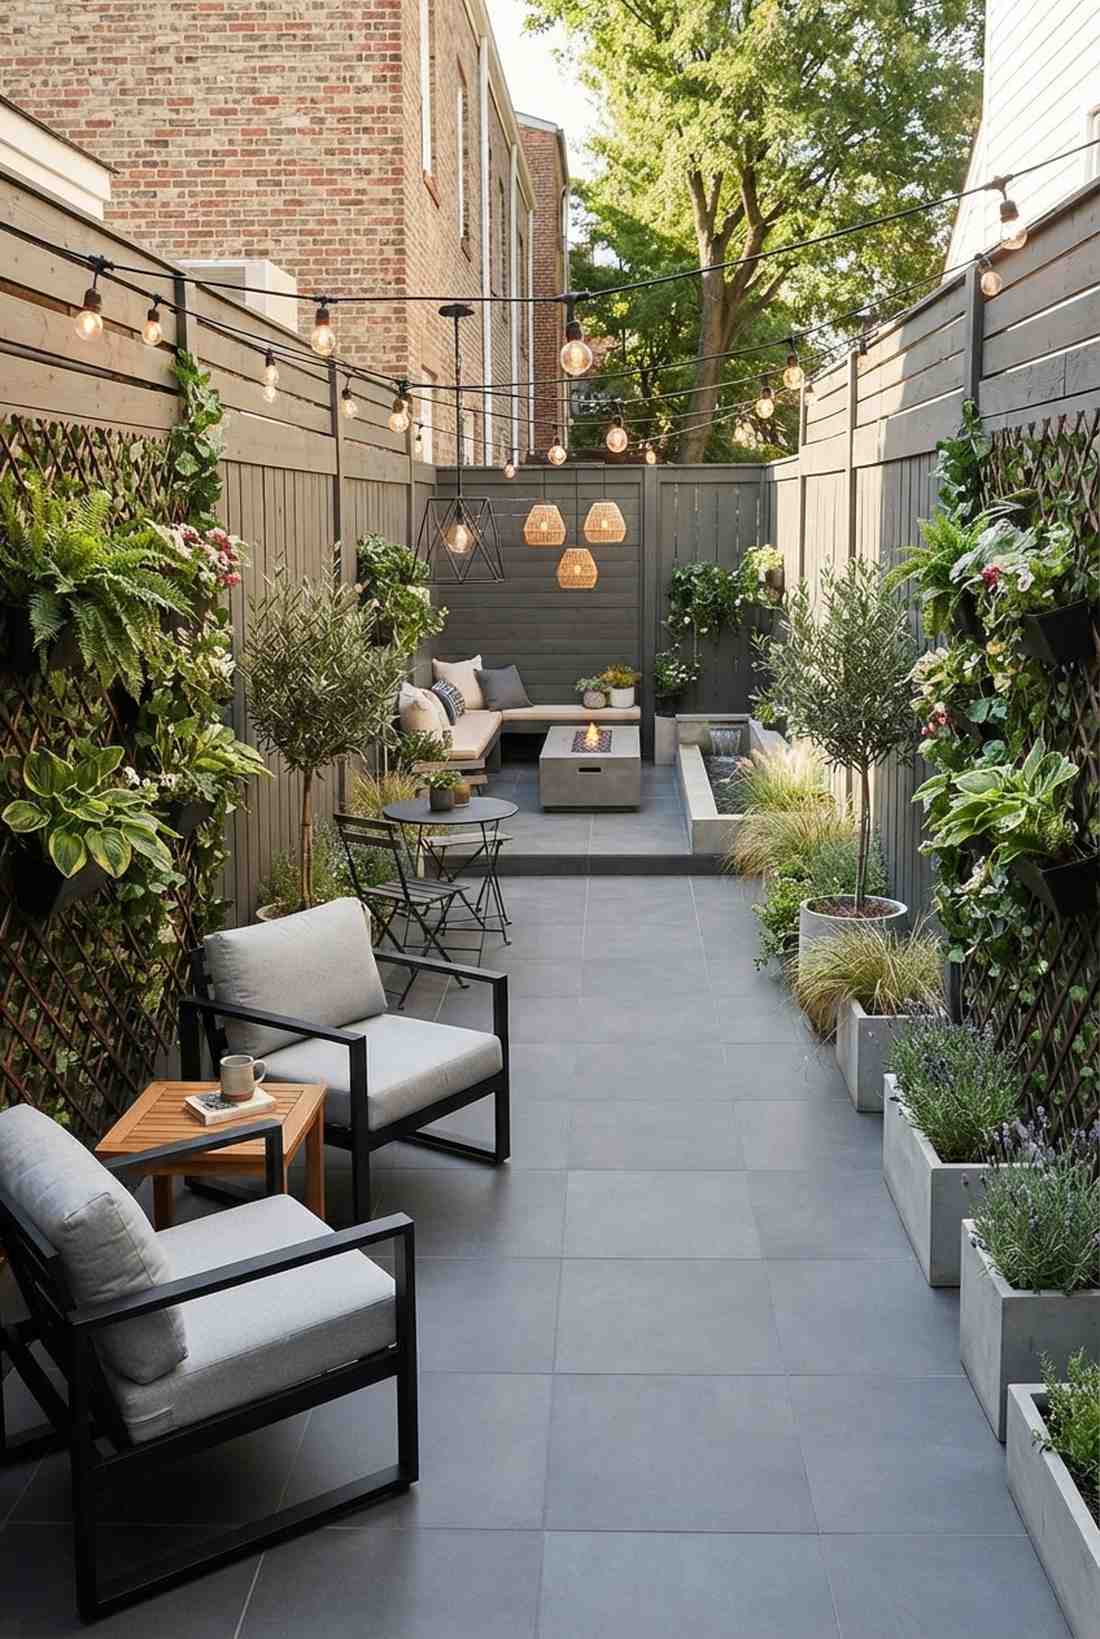
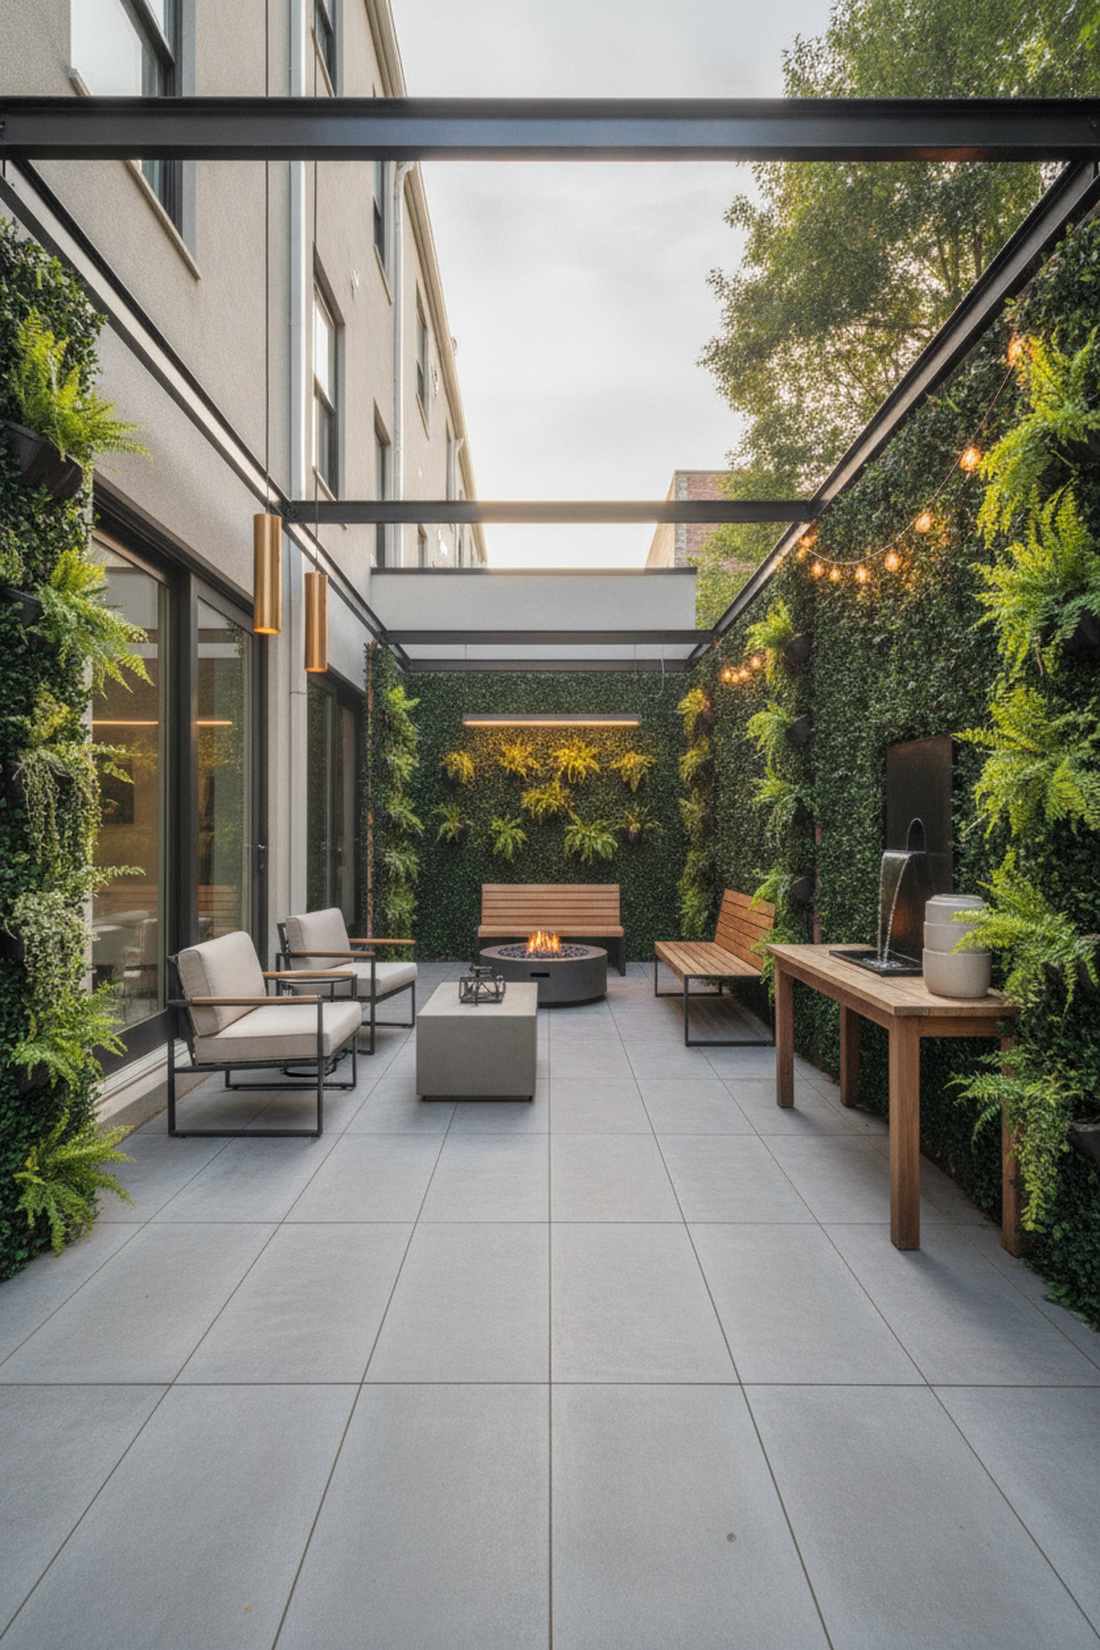
Feels like a sleek, modern gallery walk through your own backyard. This narrow outdoor garden seating area layout is the absolute savior for restricted side yards or urban row homes.
Chopping up a narrow space with fences makes it claustrophobic; running zones sequentially visually stretches the property lines. Use identical paving end-to-end, but change the overhead lighting to signal different functional spaces.
A linear upgrade like this typically costs $1,500–$4,000.
- Key Materials: Continuous large-format pavers, privacy trellises, distinct lighting fixtures
- Vibe / Style: Urban gallery minimalism
- Difficulty: Moderate hardscaping
- Budget Breakdown: Pavers: $1,200 | Trellises: $400 | Furniture: $1,500
- Creator’s Tip: Mount vertical planters on the side fences to add lushness without stealing a single inch of floor space.
- Smart Sourcing: Large-format porcelain patio tiles and expandable faux ivy privacy screens.
19. Corner Lounge with Adjacent Dining
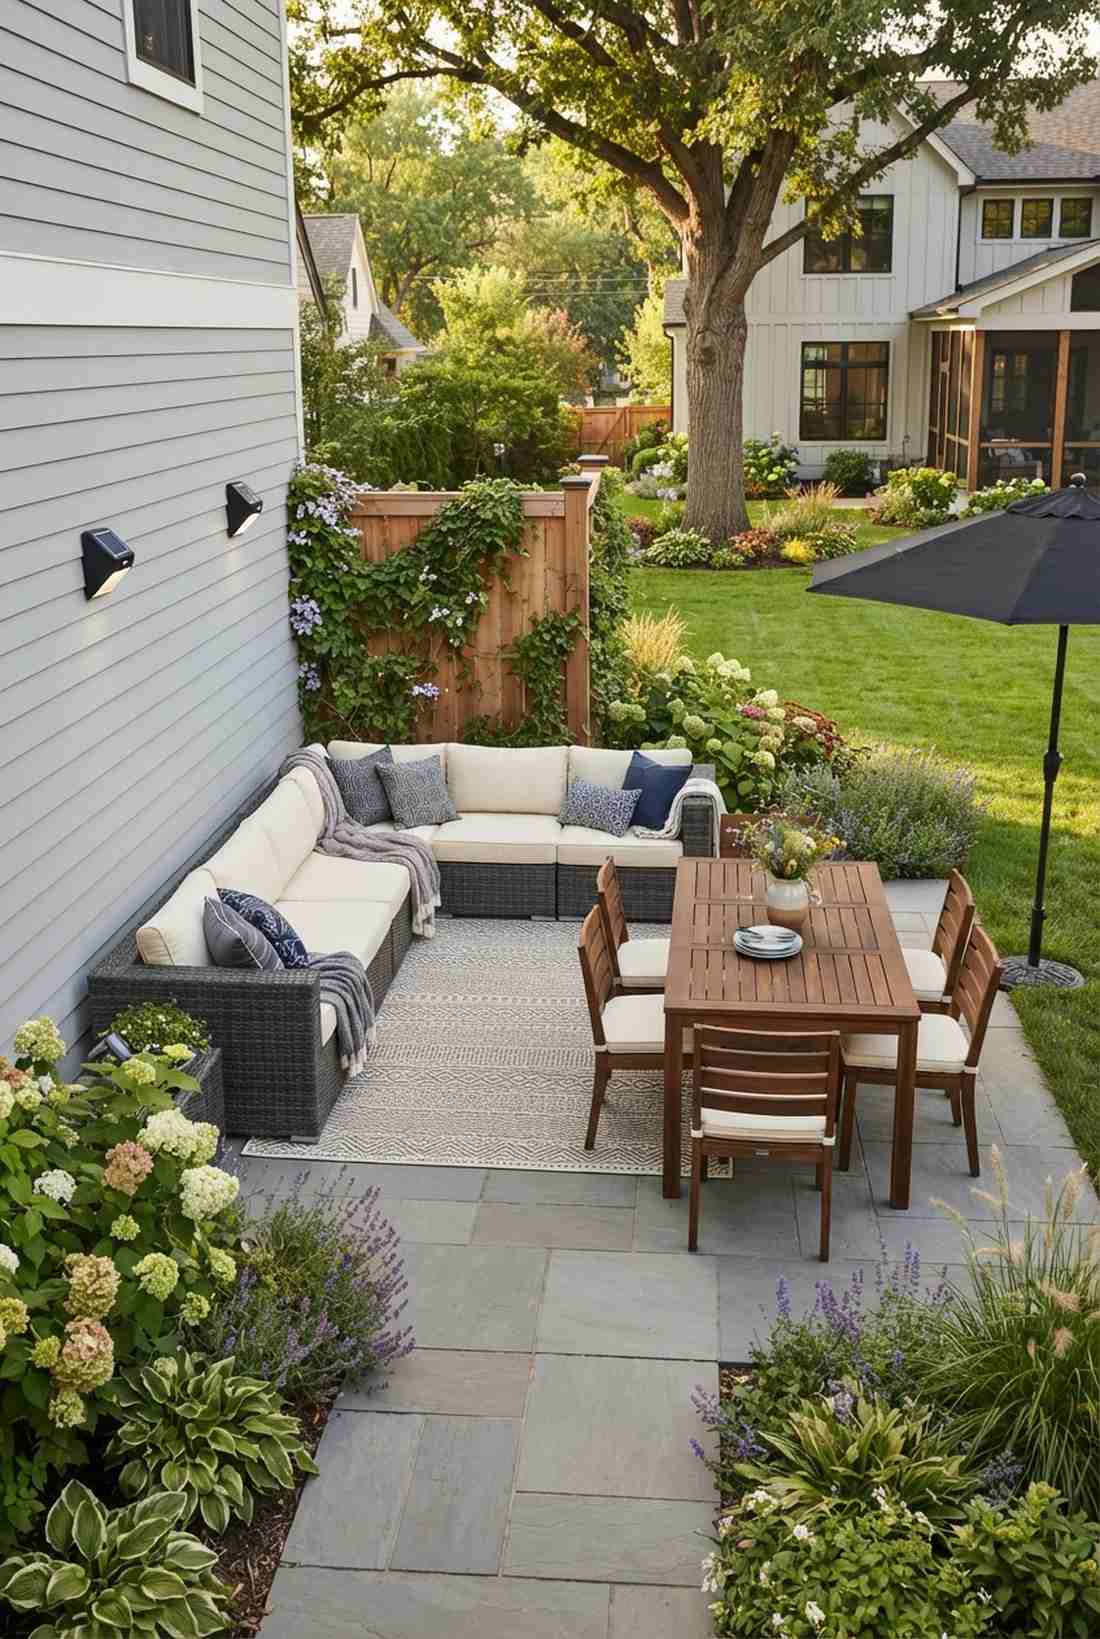

Wraps around you like a cozy, protective architectural hug. This L-shaped patio zone strategy leverages the natural pocket where your house walls meet the property line.
Centering furniture leaves awkward dead zones; pushing the deep-seated sectional deep into the corner maximizes security and wind block. The open perpendicular leg perfectly houses a dining table with unobstructed lawn access.
You can easily pull off this smart configuration for $1,200–$3,000. Pin this to your space-optimization board!
- Key Materials: Deep-seated corner sectional, rectangular dining set, corner lighting sconces
- Vibe / Style: Sheltered modern comfort
- Difficulty: Simple furniture mapping
- Budget Breakdown: Sectional: $1,400 | Dining Set: $800 | Lighting: $150
- Creator’s Tip: Point all dining chairs toward the most attractive landscape feature, turning their backs to the neighbor’s fence.
- Smart Sourcing: Modular L-shaped outdoor sectionals and solar-powered outdoor wall sconces.
Before you pour another concrete slab, look at how this next layout handles water boundaries…
20. Poolside Zones for Wet and Dry Activities
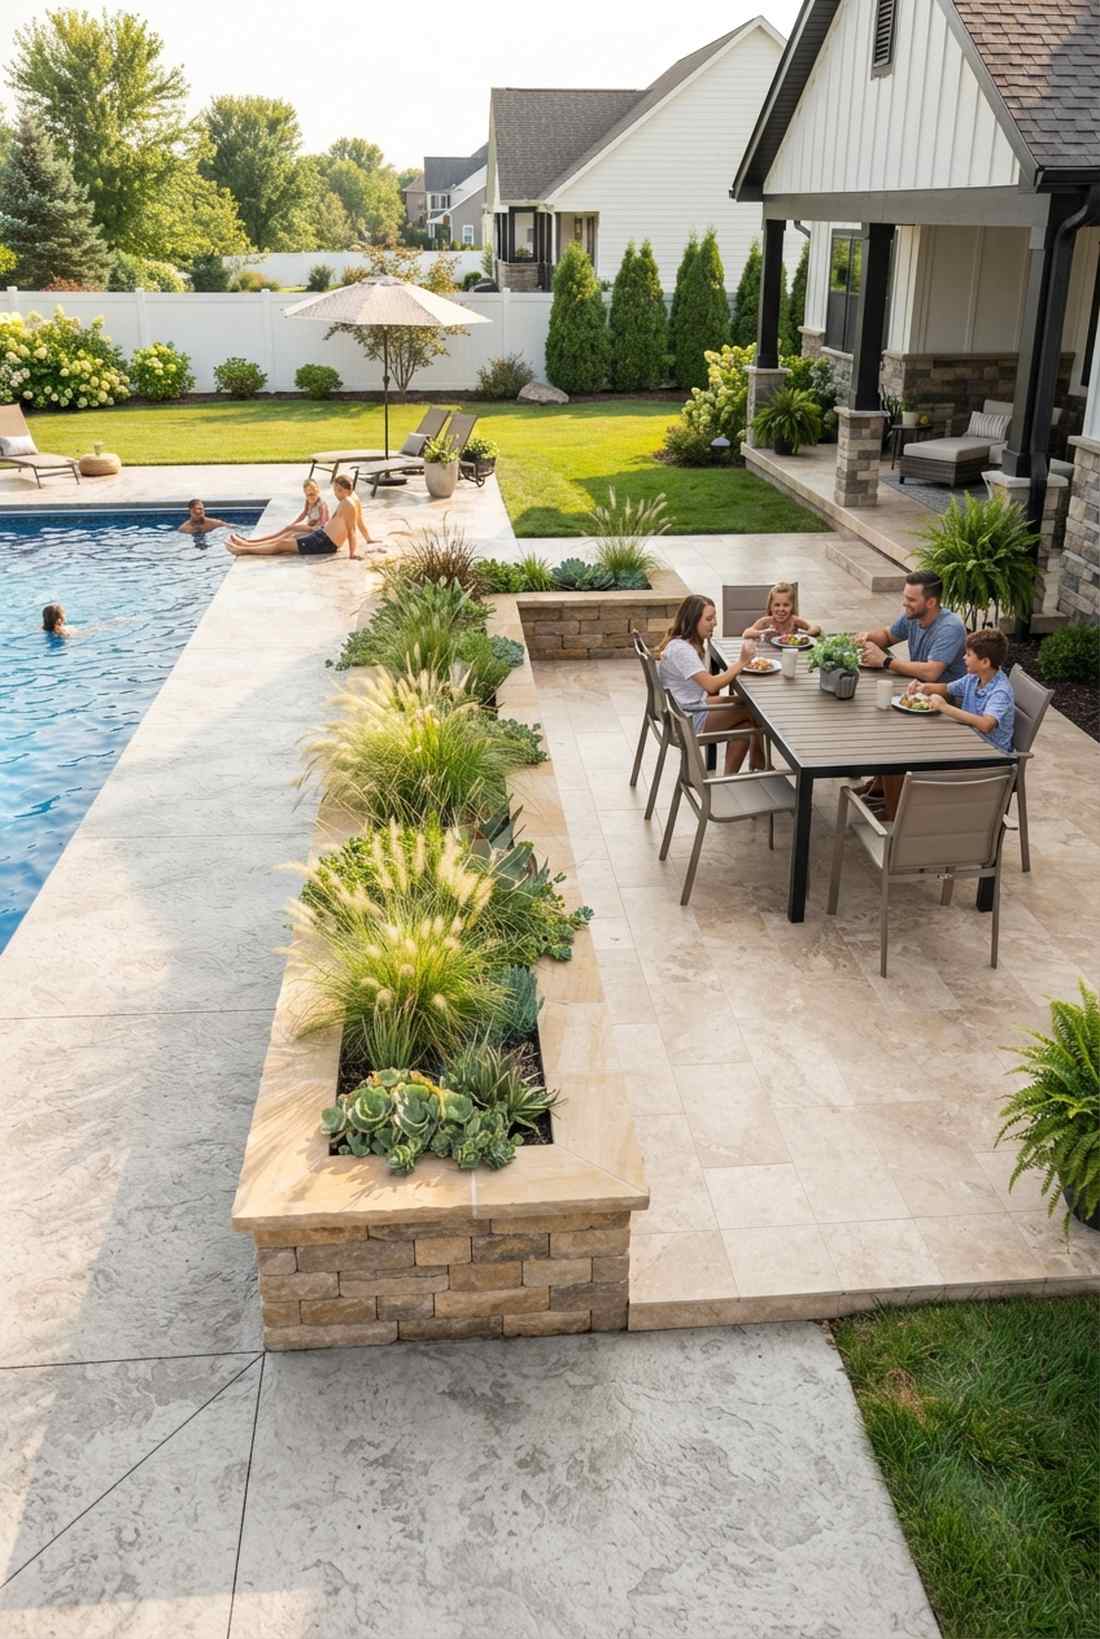
Exudes the flawless planning of a five-star resort pool deck. This split-material poolside layout prevents the nightmare of soggy dining chairs and slippery accidents.
Mixing water play and eating areas is a disaster; enforcing a 10-foot visual barrier with low planter walls solves the splash zone issue completely. Use brushed concrete near the water for grip, and smooth tile for the dining space.
Establishing proper wet/dry zoning costs around $2,000–$5,000 in hardscaping.
- Key Materials: Brushed concrete, non-slip tile, low masonry planter walls
- Vibe / Style: Luxury resort safety
- Difficulty: Professional masonry required
- Budget Breakdown: Planter Walls: $1,200 | Dry Zone Tile: $1,500 | Waterproof Furniture: $1,000
- Creator’s Tip: Plant ornamental grasses in the dividing wall to catch rogue splashes without blocking the view of swimmers.
- Smart Sourcing: Non-slip outdoor porcelain tiles and quick-dry marine-grade sling chairs.
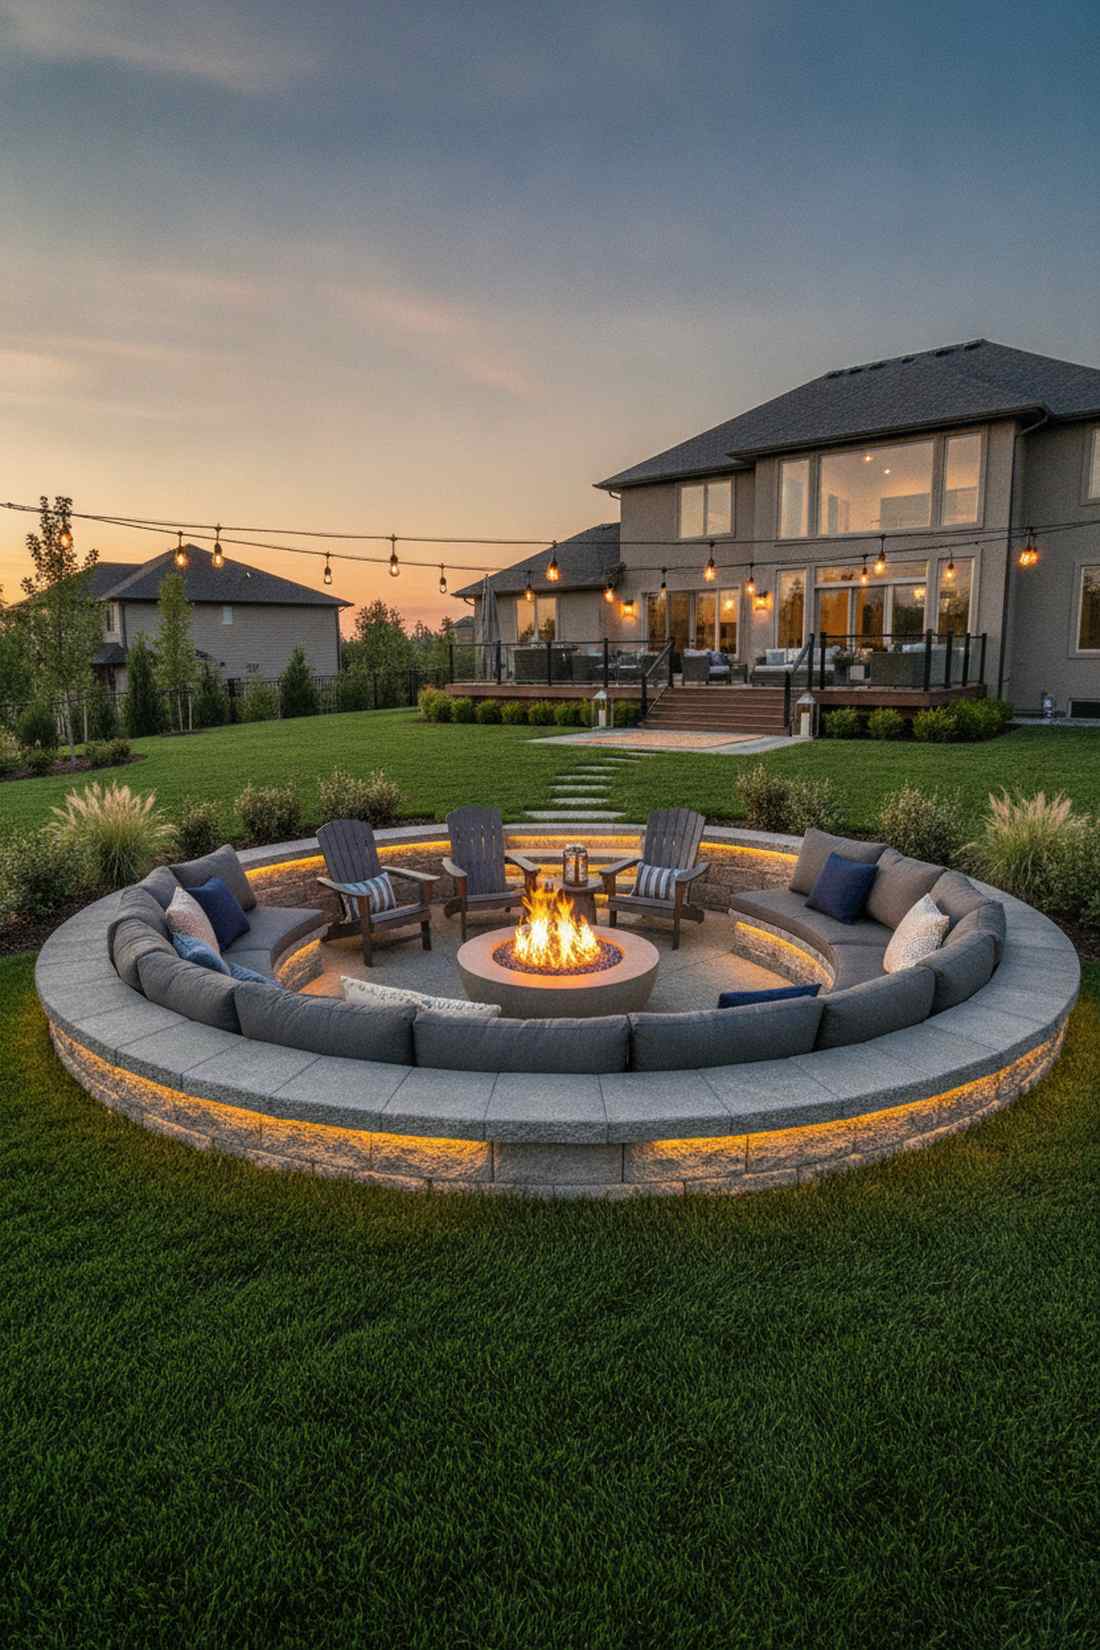
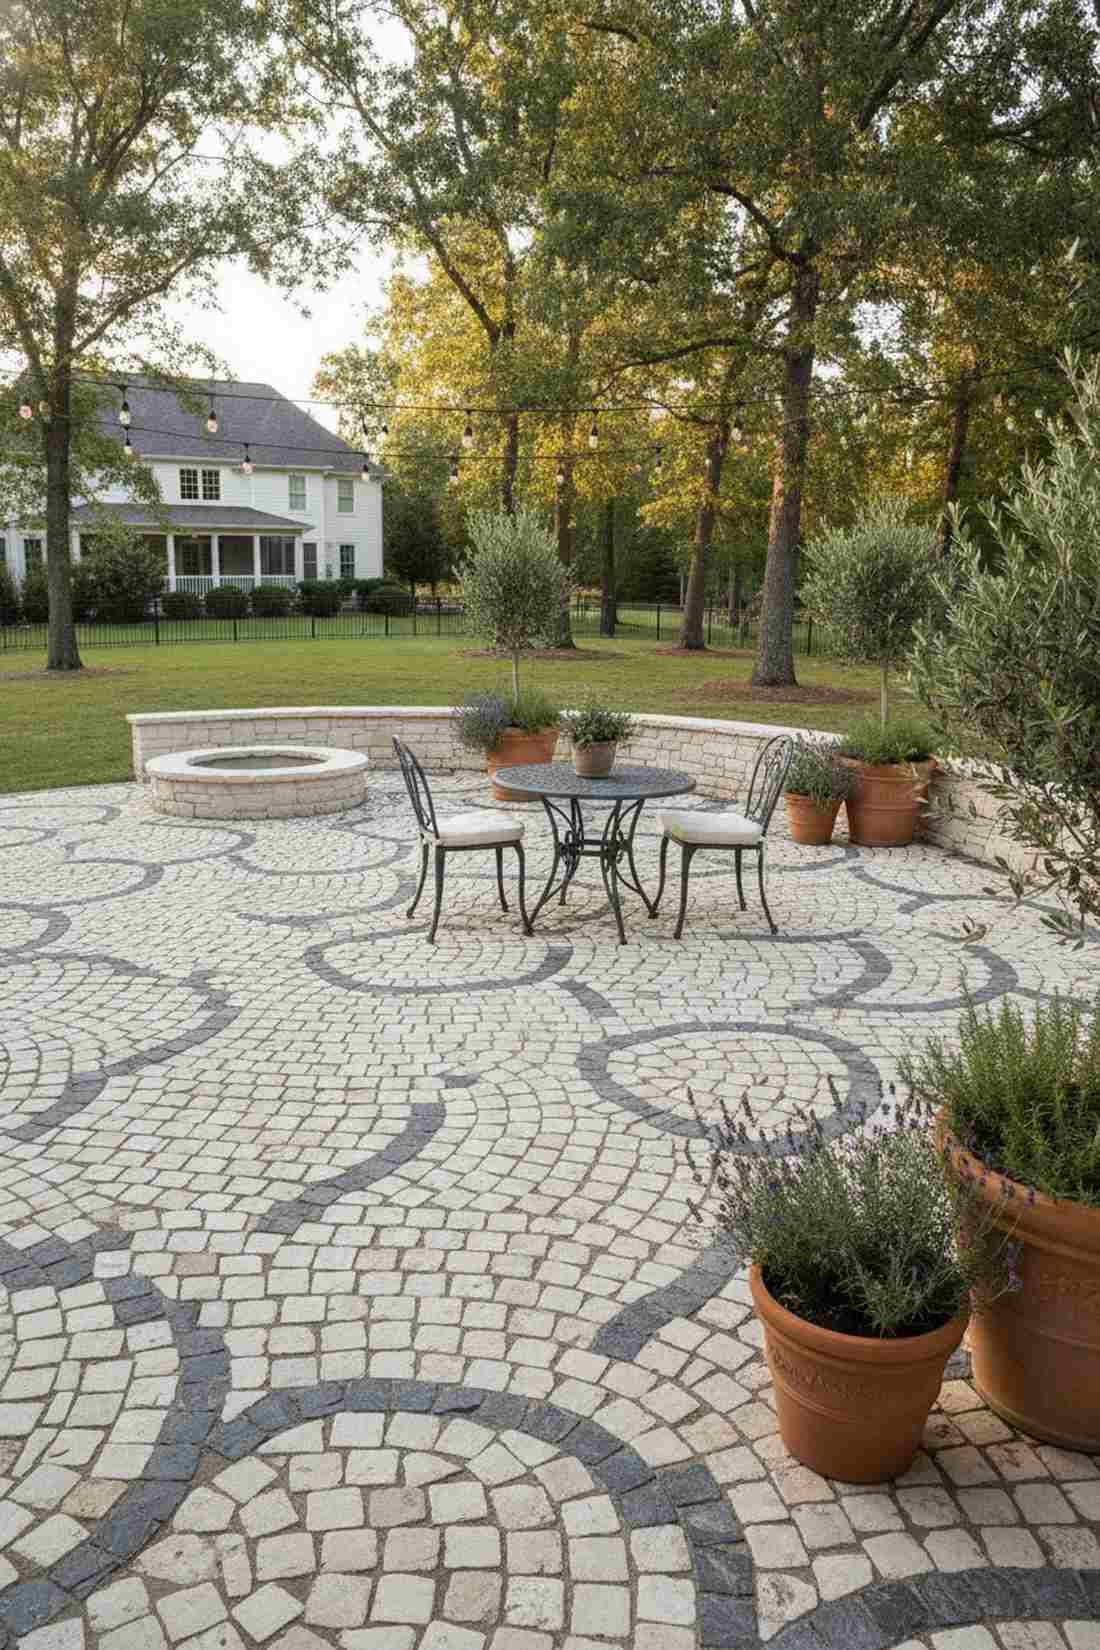
21. Circular Patio with Radial Furniture Arrangement
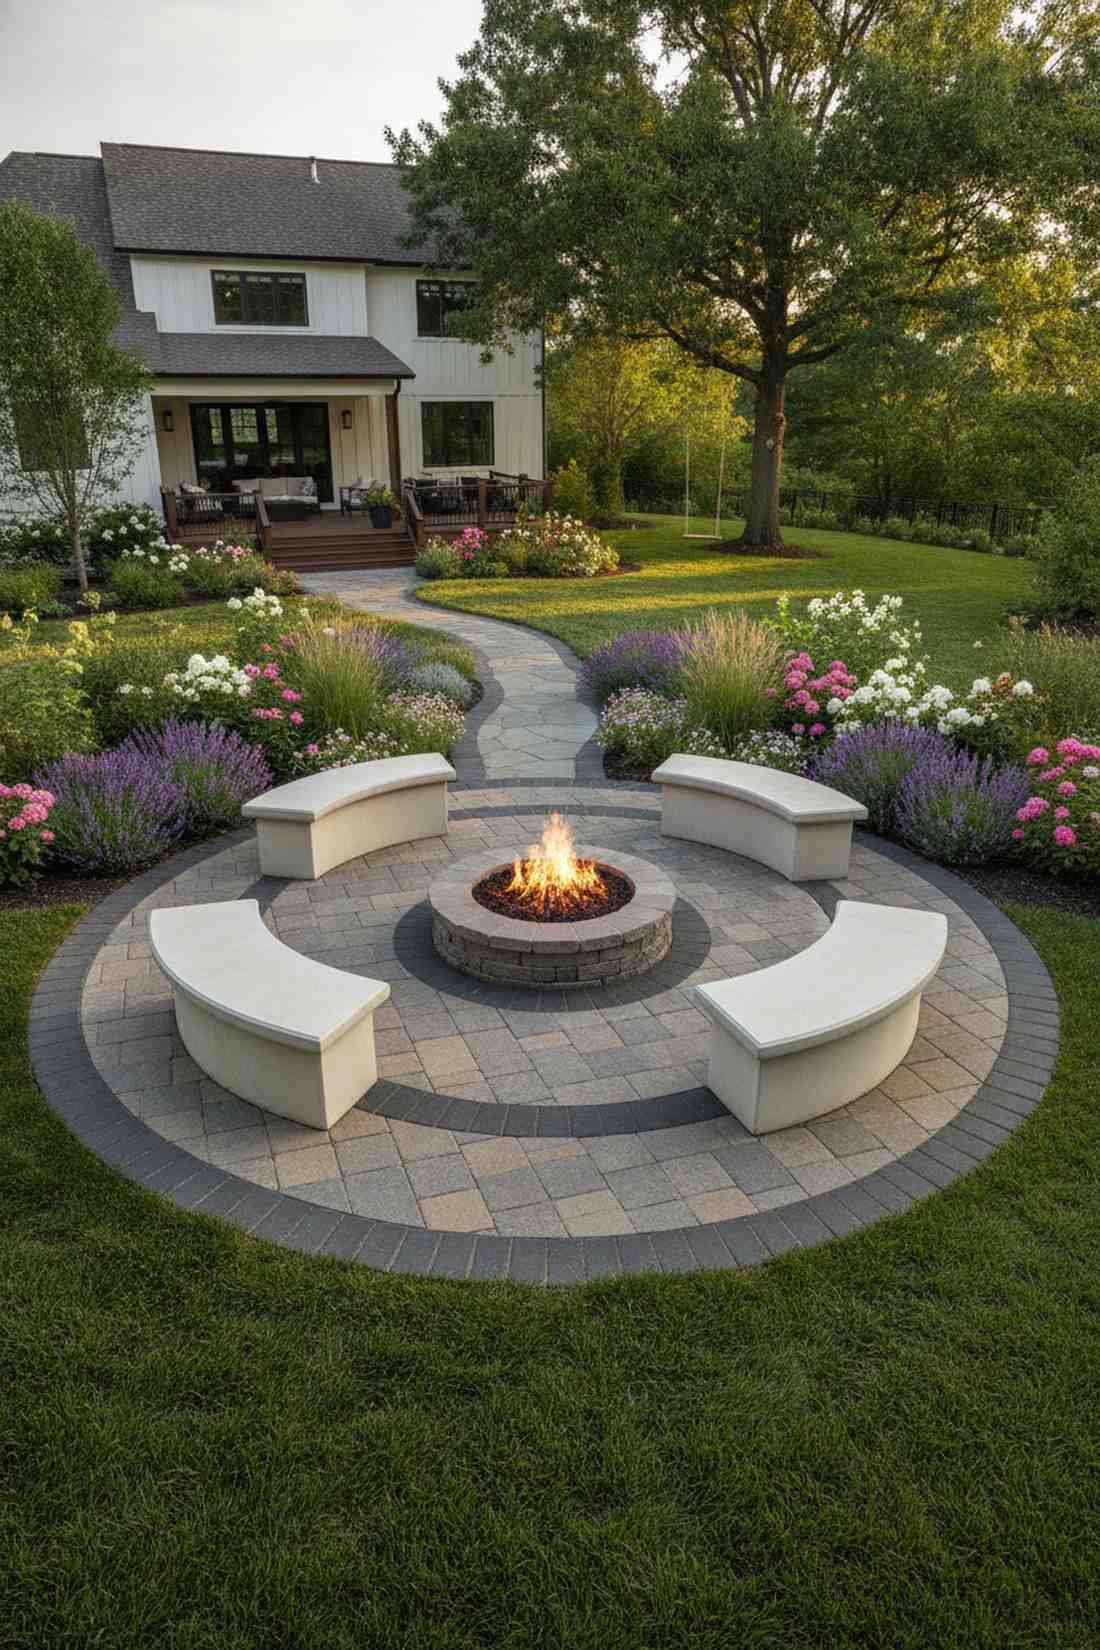
Feels like the magnetic center of a stunning botanical garden. This radial outdoor seating patio design is a show-stopper for standalone fire pits or fountain anchors.
Square layouts fight the natural flow of a central fire feature; pointing furniture inward like clock hands creates a flawless, inclusive circle. Using wedge-shaped paving stones naturally reinforces this powerful geometry.
You can execute this landscape masterpiece for roughly $1,500–$3,500. Save this for a massive backyard centerpiece idea!
- Key Materials: Wedge-shaped concrete pavers, central focal point (fire/water), curved benches
- Vibe / Style: Dynamic garden epicenter
- Difficulty: Intermediate hardscaping
- Budget Breakdown: Radial Pavers: $1,200 | Centerpiece: $800 | Seating: $1,000
- Creator’s Tip: Use a darker colored stone for the outermost ring to visually lock the circular design in place.
- Smart Sourcing: Curved outdoor stone bench kits and circular patio paver pattern templates.
Architectural Shade Structure Integrations
Permanent shade structures extend outdoor seating season by moderating temperature and protecting furniture from weather exposure. Designers select structure types based on desired shade density, architectural style compatibility, and budget parameters. Pergolas provide 30-50% shade through open rafters, while solid-roof structures offer 100% coverage at higher construction costs.
22. Cedar Pergola with Retractable Canopy
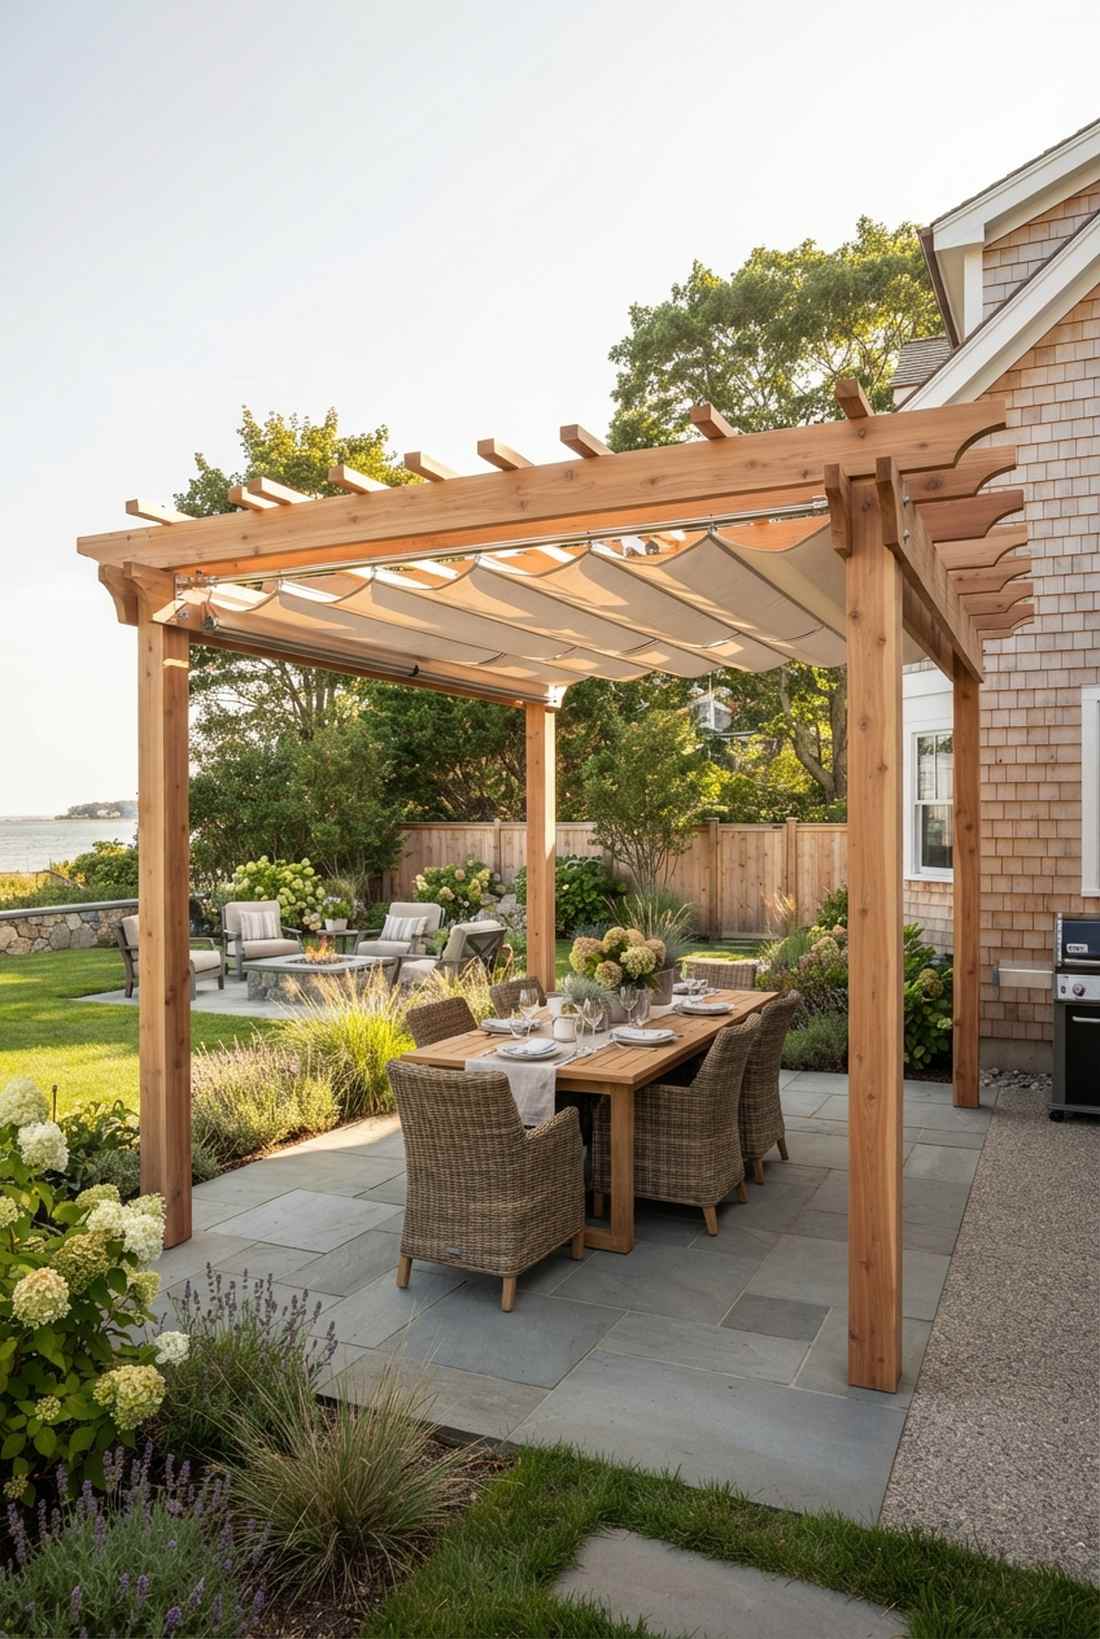
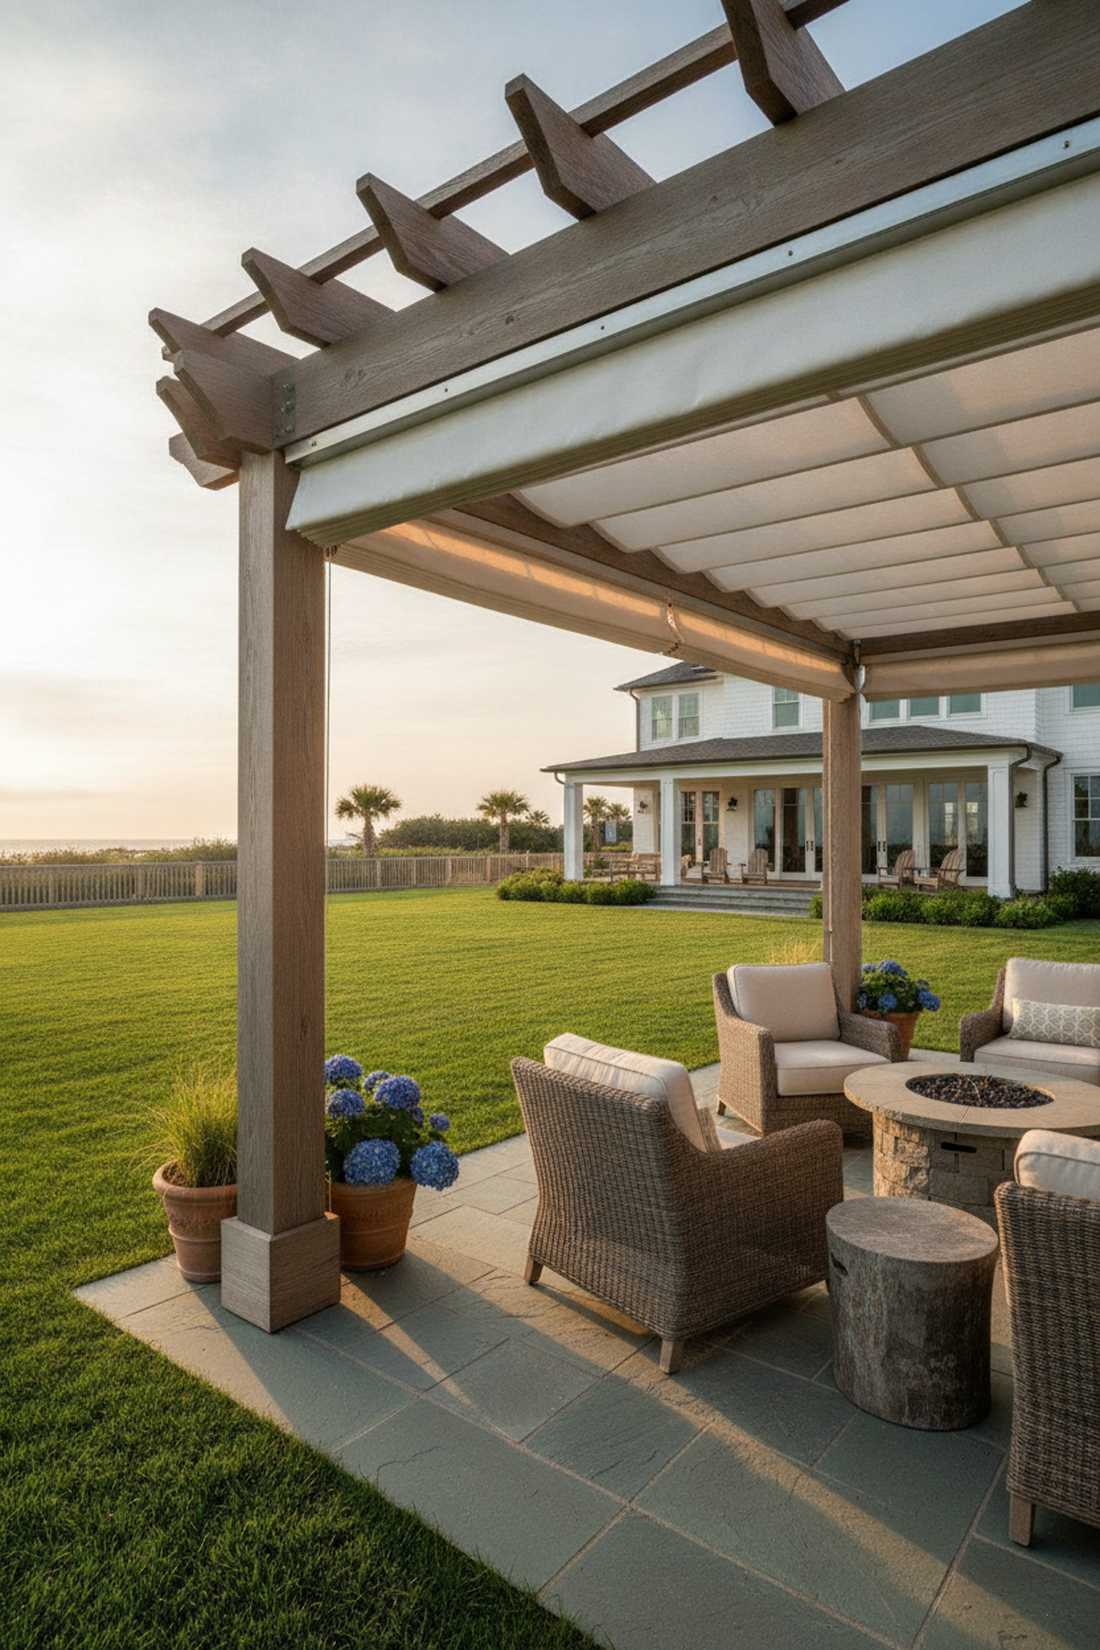
Delivers the breezy, high-end shelter of a coastal cabana. This adjustable pergola shade layout is perfect for patios that need both full sun mornings and protected afternoons.
A static roof traps heat, but installing sliding fabric canopies on a cedar frame gives you ultimate microclimate control. The raw wood naturally silvers over time, blending seamlessly into traditional or transitional homes.
A premium cedar and canopy setup ranges from $2,500–$6,000.
- Key Materials: Western red cedar posts, marine-grade stainless tracks, UV-resistant fabric canopy
- Vibe / Style: Coastal transitional luxury
- Difficulty: Advanced DIY or contractor
- Budget Breakdown: Cedar Lumber: $1,500 | Canopy Track System: $800 | Hardware: $200
- Creator’s Tip: Stain all cedar pieces on the ground *before* assembly so you don’t miss the inaccessible top joints.
- Smart Sourcing: Retractable wave shade canopies (custom fit) and marine-grade stainless steel pergola hardware.
23. Powder-Coated Aluminum Pergola with Louvers
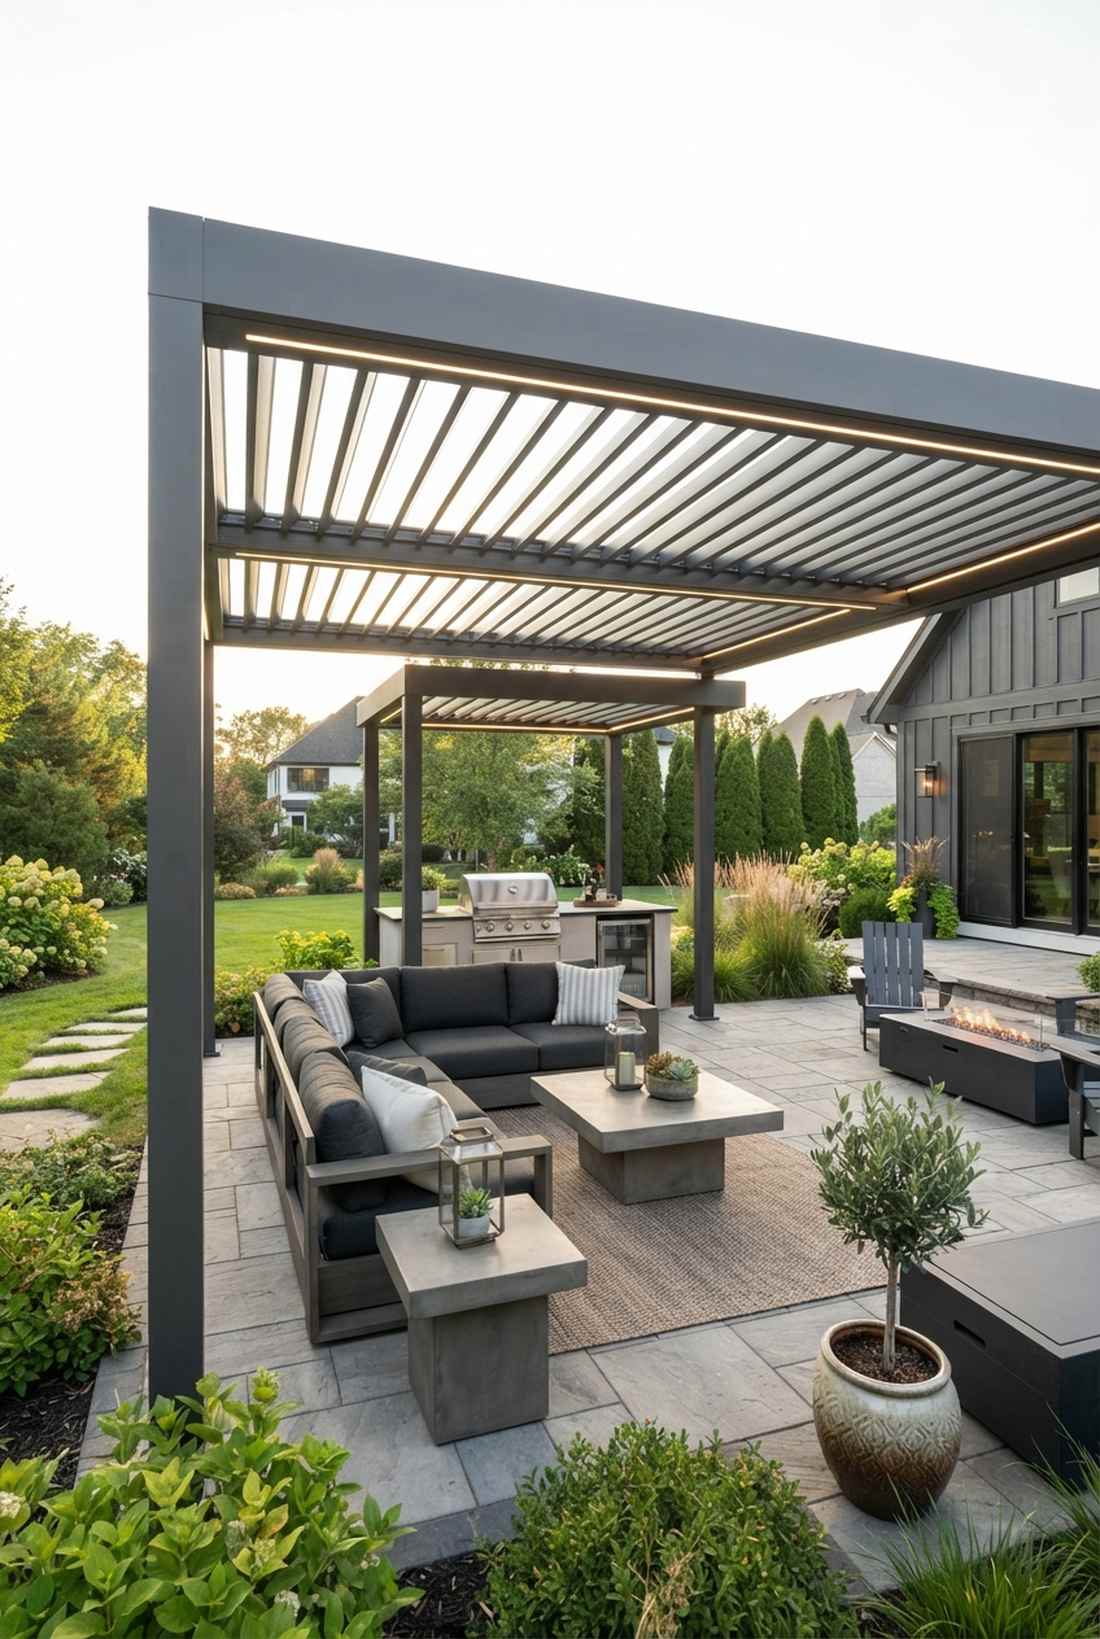
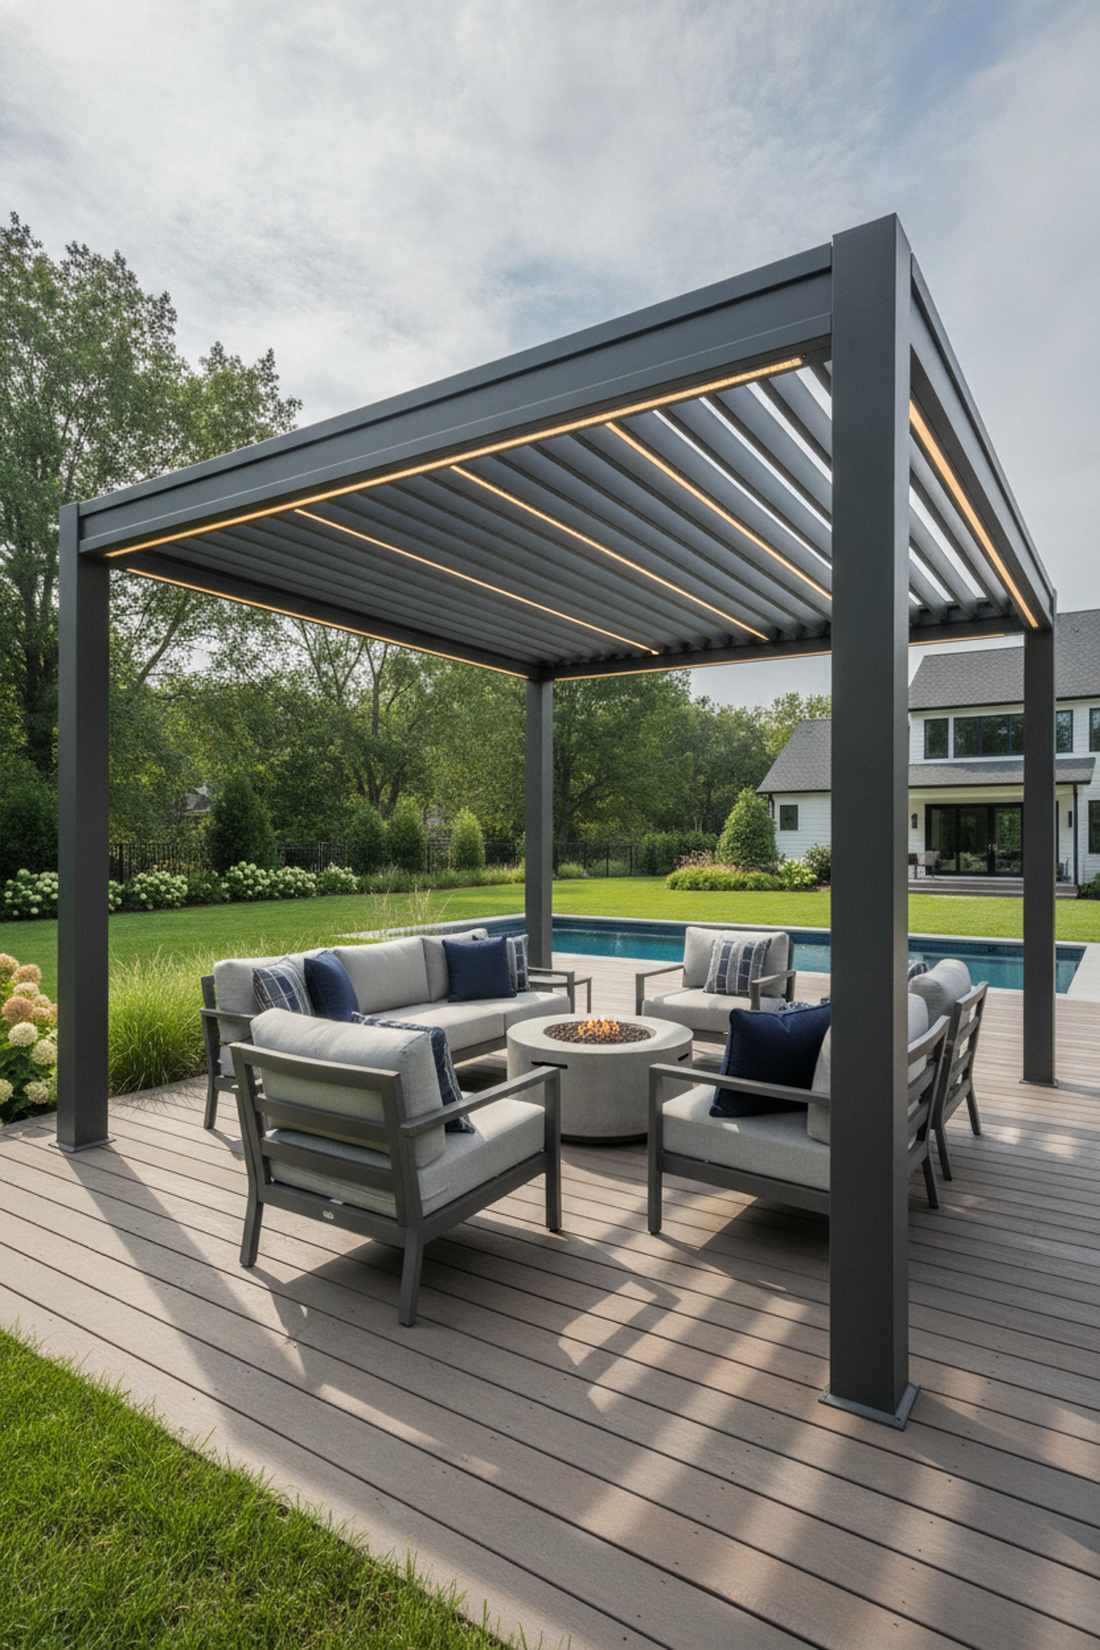
Looks like a cutting-edge smart home feature dropped into your yard. This motorized louver patio cover dominates harsh climates where rain and blazing sun change by the hour.
Wood rots and warps; extruded aluminum guarantees zero maintenance while offering remote-control light tracking. The built-in gutters stealthily divert rainwater so your plush furniture never takes a hit.
This high-tech architectural investment costs $5,000–$12,000. Pin this if you want absolute weather dominance!
- Key Materials: Extruded aluminum framing, motorized louver blades, integrated LED channels
- Vibe / Style: Ultra-modern smart luxury
- Difficulty: Professional installation
- Budget Breakdown: Louvered Kit: $6,000 | Motor System: $1,000 | Install: $2,000
- Creator’s Tip: Orient the louver blades north-to-south so they can precisely track the sun from sunrise to sunset.
- Smart Sourcing: Motorized aluminum louvered pergola kits and waterproof LED channel lighting strips.
24. Sail Shade Canopies in Overlapping Triangles
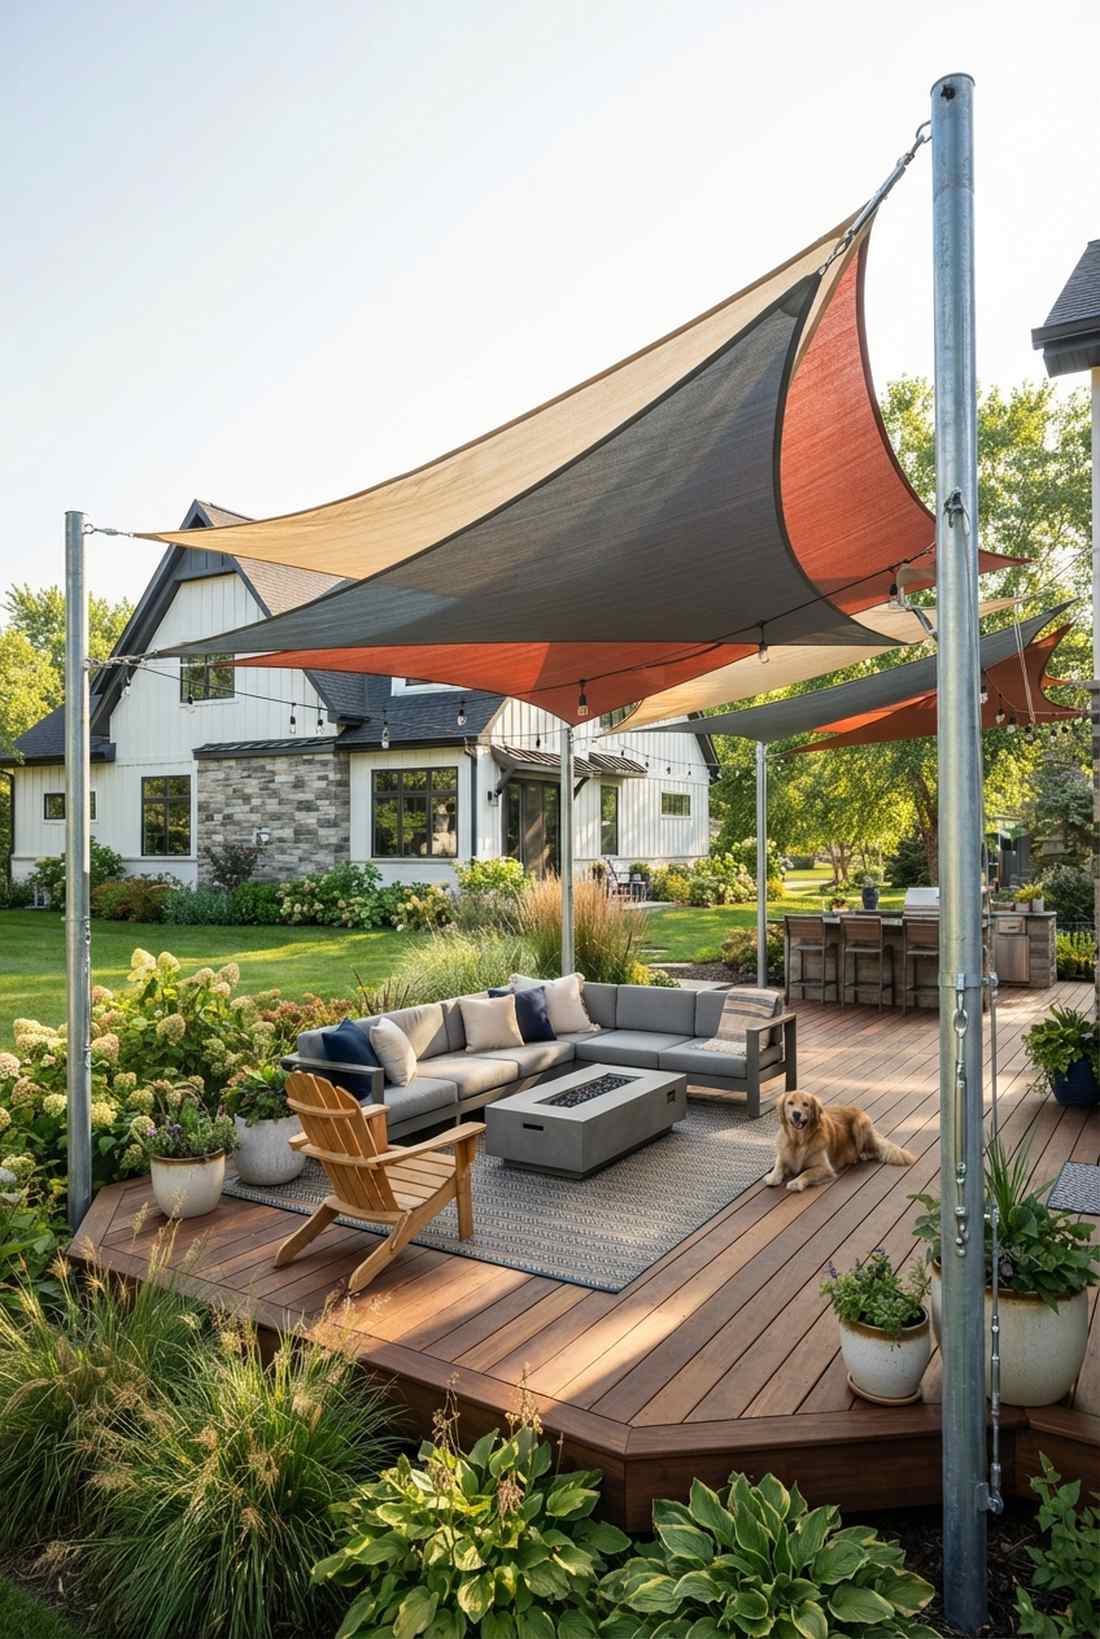
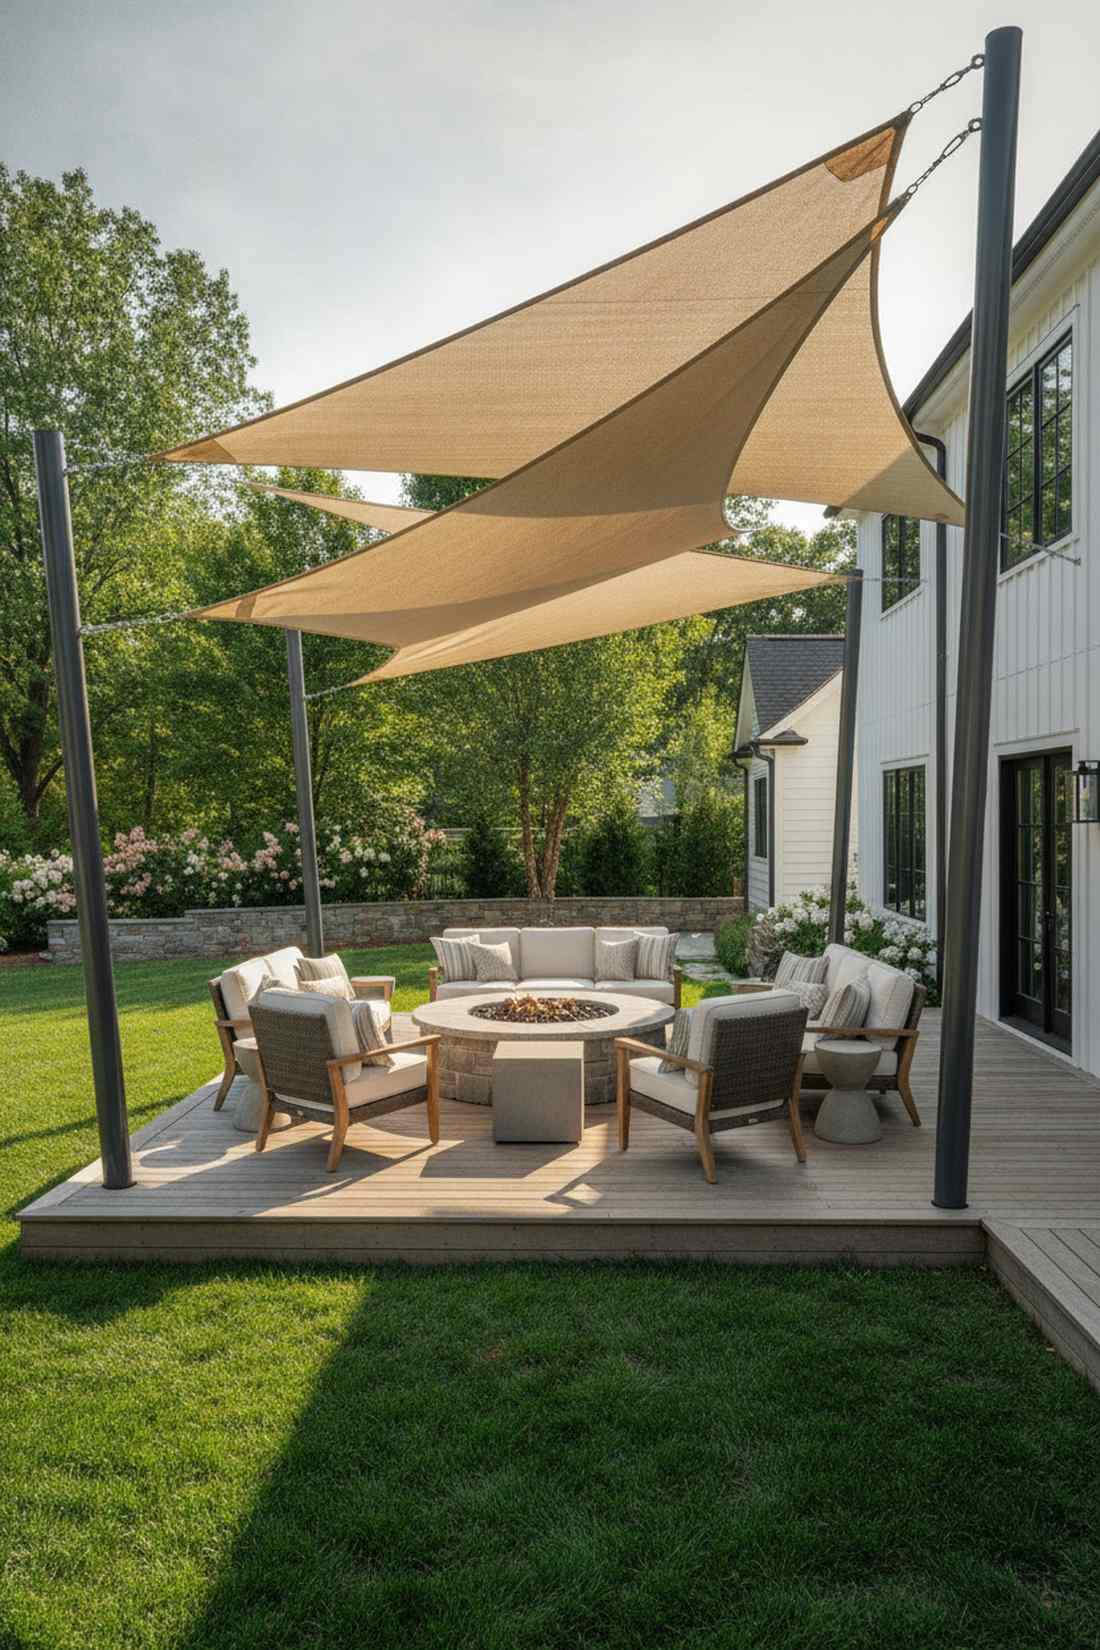
Injects the striking, sculptural tension of modern art into the sky. This tensioned fabric outdoor seating patio structure is an incredibly cost-effective way to shade massive, oddly shaped decks.
Building massive roofs is insanely expensive; suspending overlapping HDPE sails delivers a dramatic designer look for a fraction of the cost. The gaps allow trapped heat to escape, keeping the lounge area noticeably cooler.
You can easily pull off this dynamic canopy for around $300–$800.
- Key Materials: High-density polyethylene (HDPE) sails, steel tension poles, heavy-duty turnbuckles
- Vibe / Style: Sculptural contemporary
- Difficulty: Moderate (requires deep post footings)
- Budget Breakdown: Sails (x3): $200 | Steel Poles: $300 | Tension Hardware: $100
- Creator’s Tip: Always install the sails with a severe 20-degree pitch to ensure heavy rain sheets off instead of pooling and tearing the fabric.
- Smart Sourcing: UV-blocking triangular shade sails (commercial grade) and stainless steel heavy-duty turnbuckle kits.
If you think building an outdoor room is too expensive, the trick in this next layout changes everything…
25. Gabled Roof Pavilion with Ceiling Fans
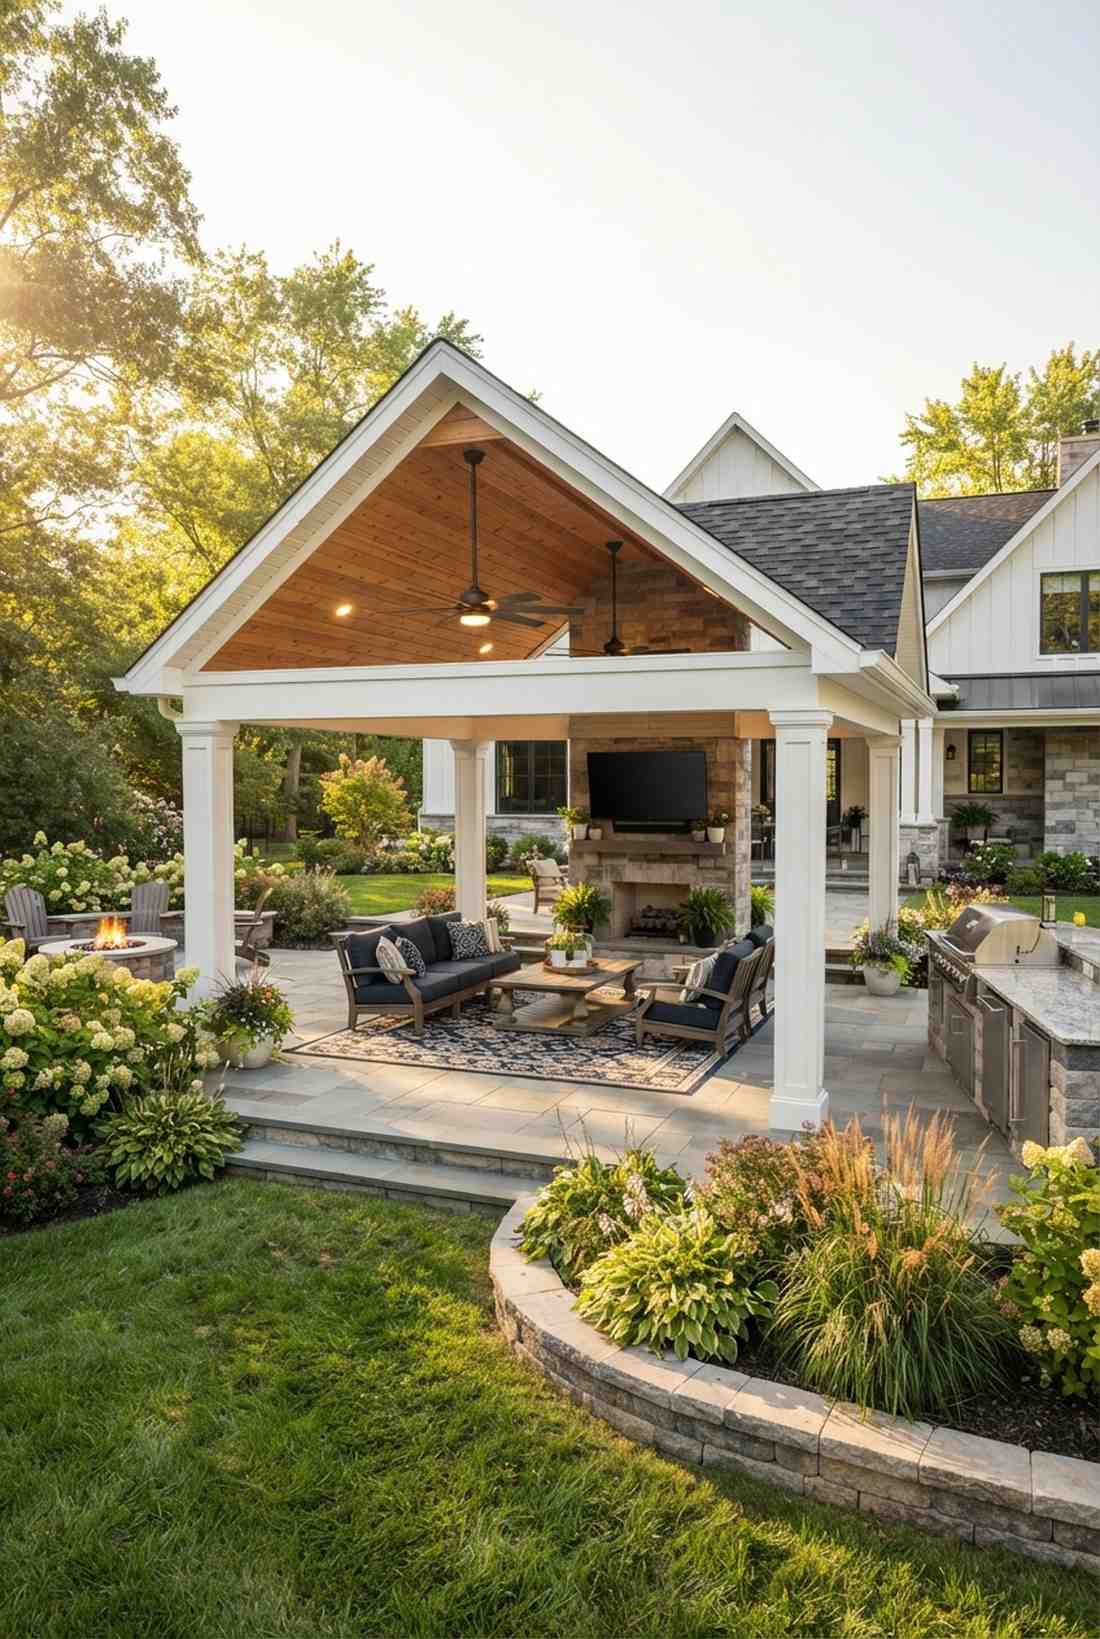
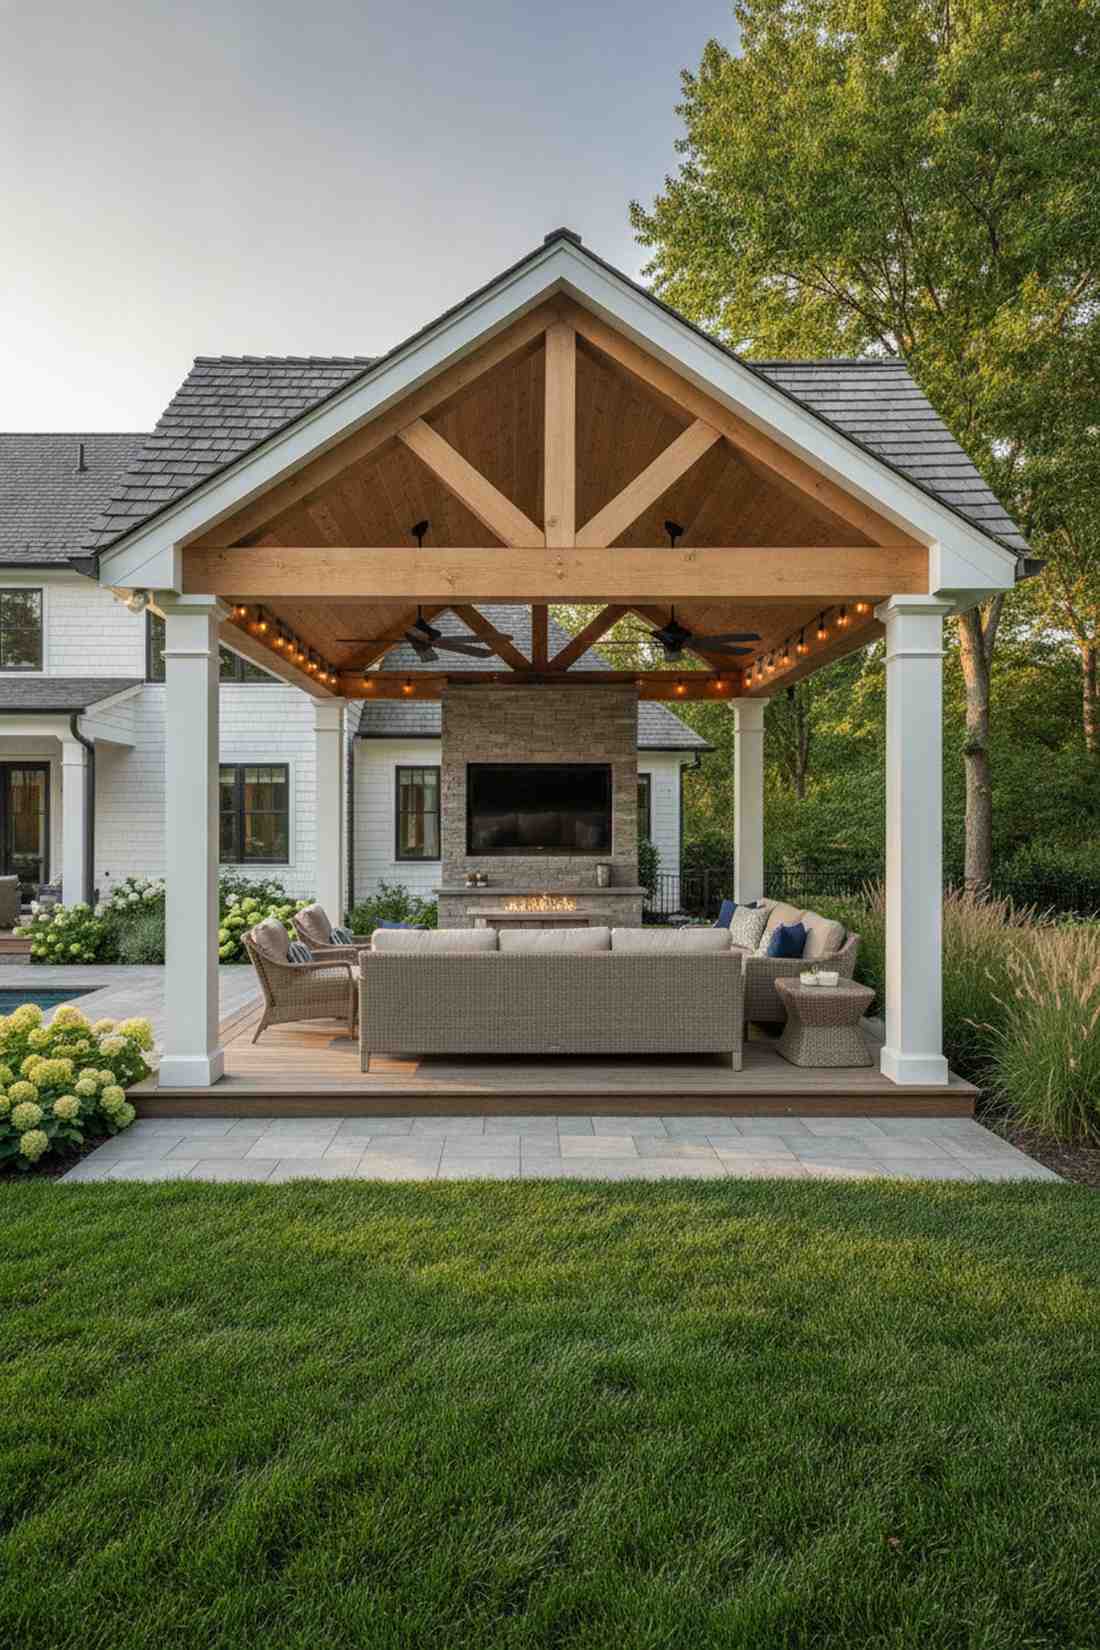
Feels exactly like a luxurious outdoor living room extension of your home. This permanent solid-roof pavilion is the ultimate outdoor seating for garden setups requiring true all-weather protection.
Pergolas look nice but fail in the rain; a shingled gable roof gives you the green light to install outdoor TVs and premium electronics. Vaulting the ceiling creates massive spatial volume while flushing out trapped grill smoke.
Building a fully wired pavilion usually runs $8,000–$20,000. Save this for your forever-home upgrade board!
- Key Materials: Structural lumber framing, architectural shingles, exterior-rated ceiling fans
- Vibe / Style: True architectural extension
- Difficulty: Contractor-level build
- Budget Breakdown: Roofing/Lumber: $5,000 | Electrical: $1,500 | Finish Carpentry: $2,500
- Creator’s Tip: Wrap the raw structural posts in decorative PVC columns to instantly elevate the finish to match your home’s trim.
- Smart Sourcing: Wet-rated outdoor ceiling fans and PVC column wrap kits.
26. Cantilever Umbrella Cluster Over Lounge
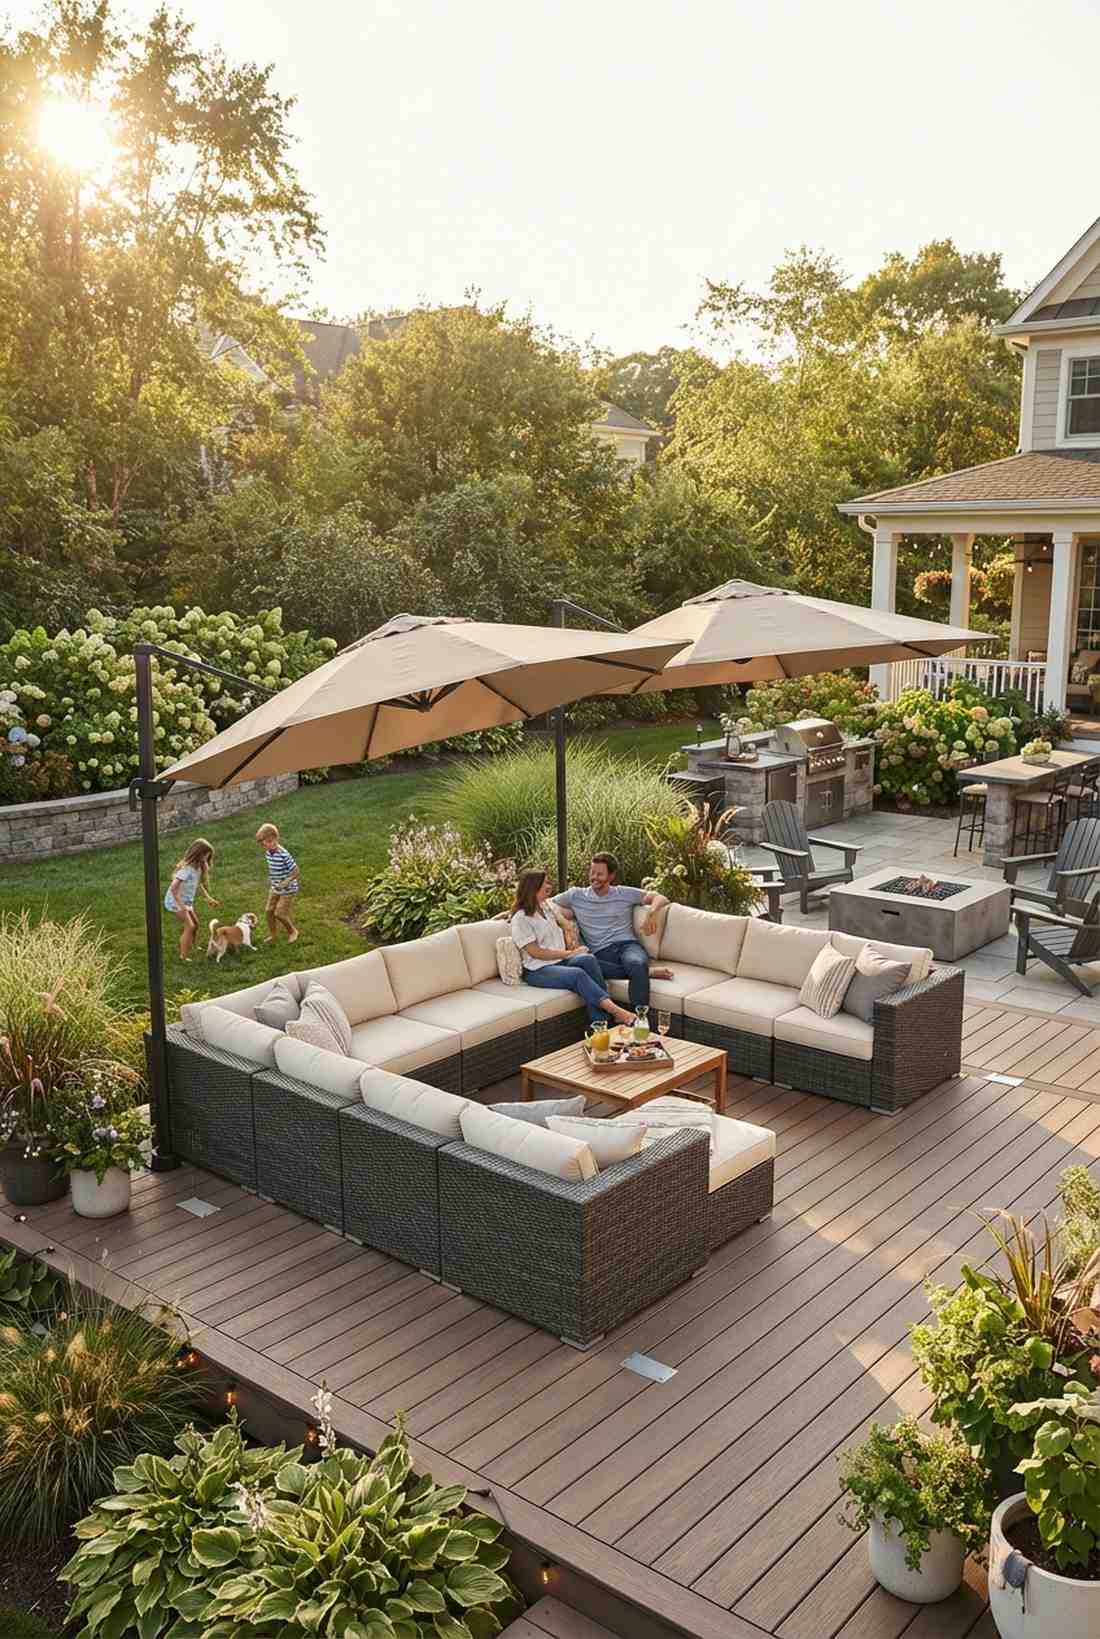
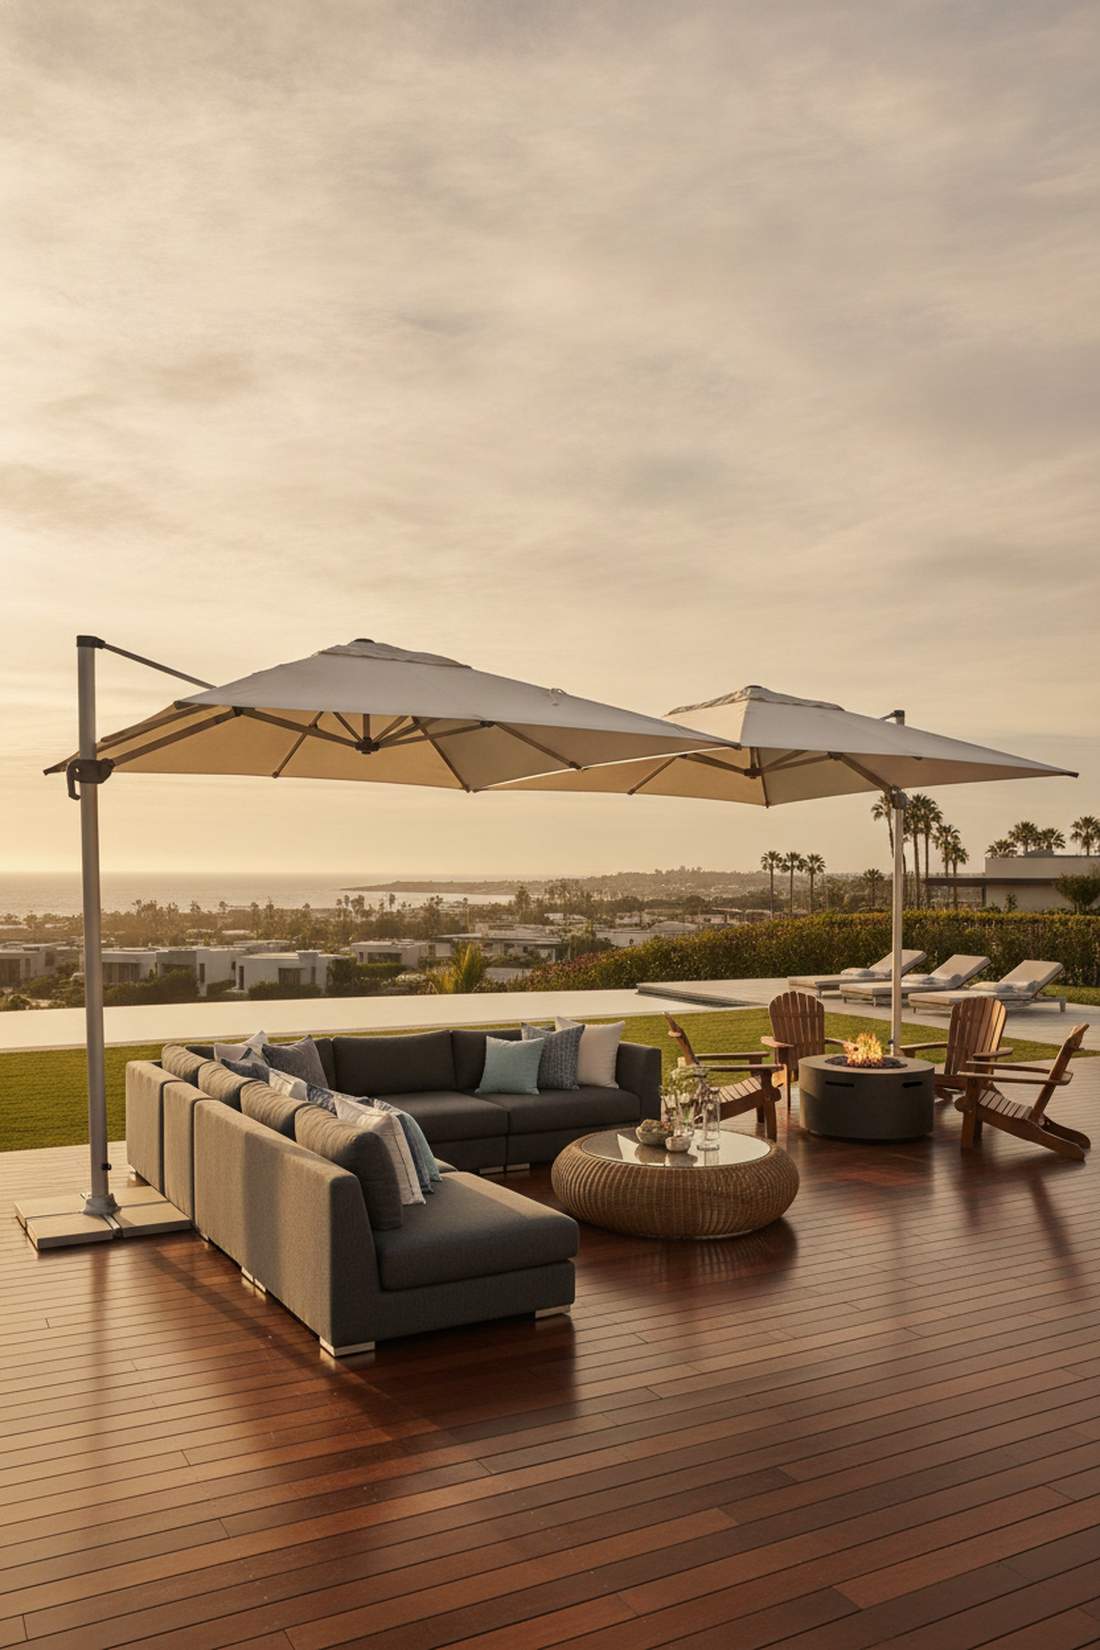
Offers the flexible, sweeping shade of a luxury beach club. This offset umbrella grouping strategy brilliantly shades massive modular sectionals without center-pole obstructions.
Standard table umbrellas ruin conversation lines; grouping 11-foot cantilevers creates a massive, adjustable floating roof. When the sun dips low, just tilt the canopy to block the glare instantly.
A cluster of premium cantilever umbrellas will cost $800–$2,000. Highly recommended for renters or zero-build setups.
- Key Materials: 11-foot cantilever umbrellas, wheeled heavy-duty bases, solution-dyed acrylic fabric
- Vibe / Style: Resort-style flexibility
- Difficulty: Plug and play
- Budget Breakdown: Umbrellas (x2): $1,000 | Heavy Bases: $300
- Creator’s Tip: Skip the bulky plastic bases and install in-ground concrete sleeves for a completely flush, invisible umbrella mount.
- Smart Sourcing: 360-degree rotation cantilever umbrellas and in-ground umbrella base sleeves.
27. Living Roof Pergola with Climbing Vines
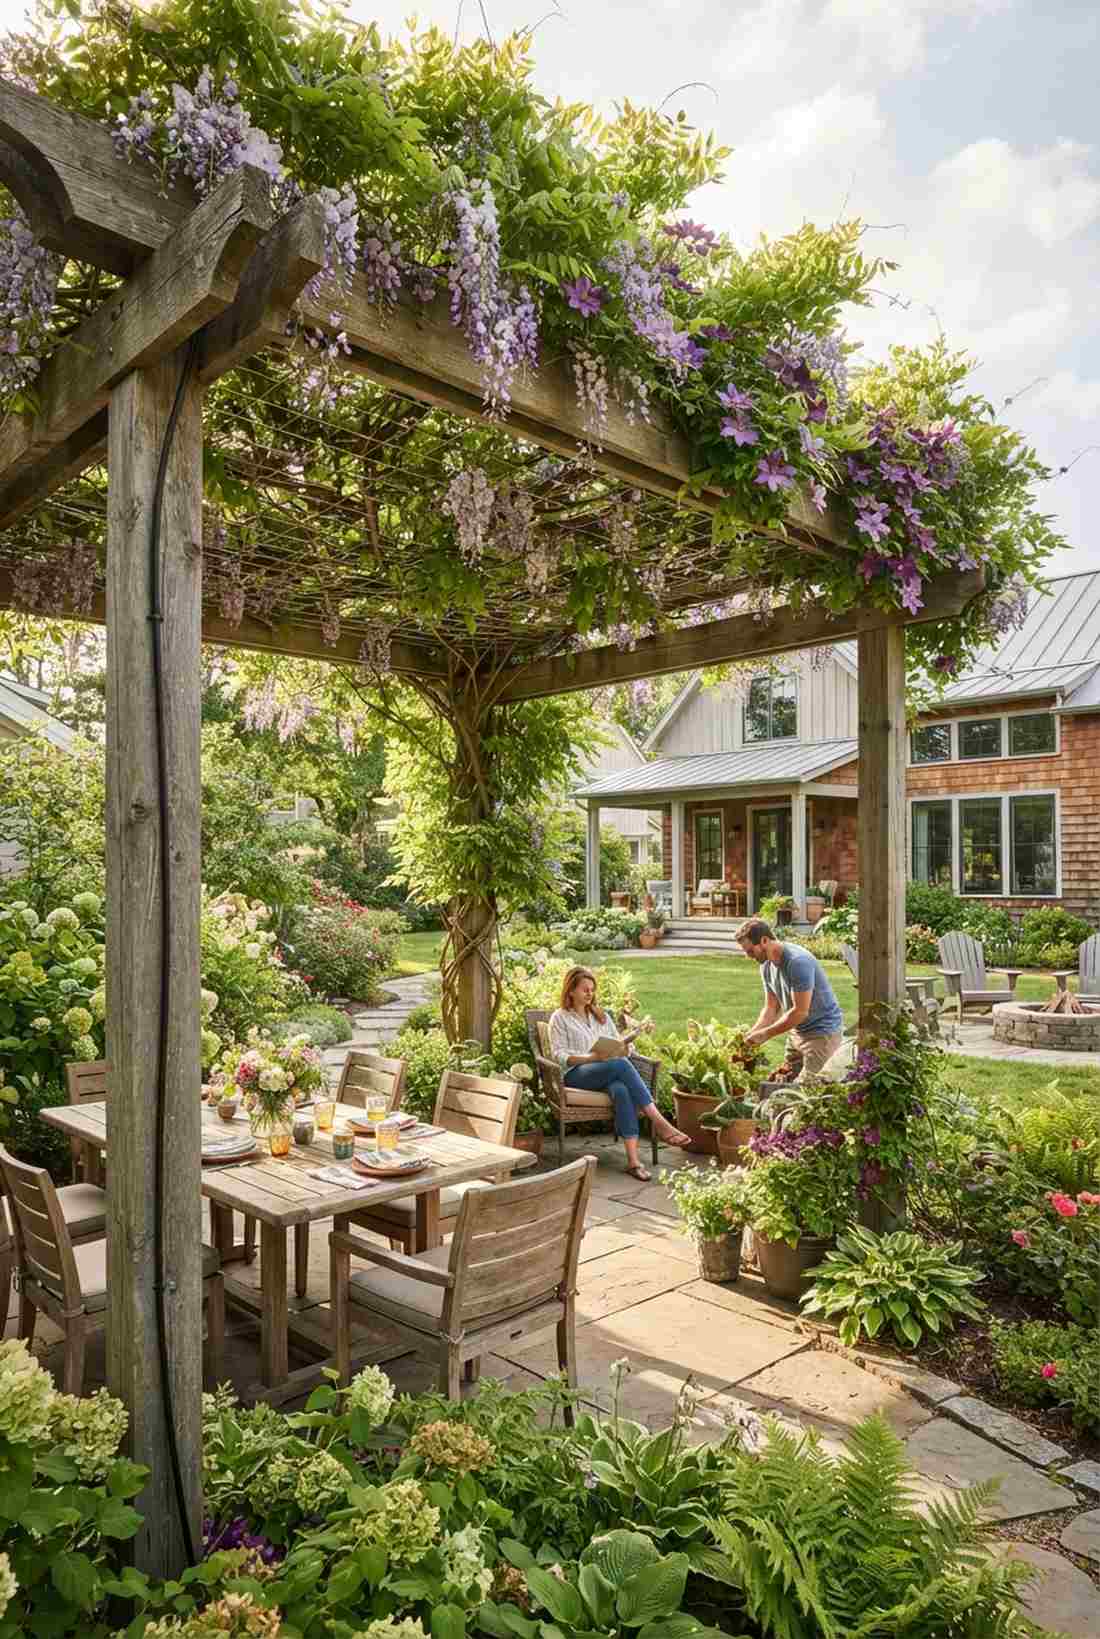

Transports you into the heart of a lush, romantic secret garden. This botanical canopy layout turns basic timber into a living, breathing architectural masterpiece.
Canvas fades, but training wisteria or clematis over a wire grid delivers a designer-level finish that gets thicker and better every year. The transpiration from the leaves physically cools the air underneath by up to 10 degrees.
You can execute this organic upgrade for the cost of a basic pergola plus $150 in plants.
- Key Materials: Standard wood pergola, stainless steel wire trellising, aggressive climbing vines
- Vibe / Style: Organic romanticism
- Difficulty: Easy build, requires gardening patience
- Budget Breakdown: Pergola: $1,000 | Wire Grid: $100 | Mature Vines: $150
- Creator’s Tip: Run an invisible drip-line irrigation tube straight up the corner post to water the canopy automatically.
- Smart Sourcing: Stainless steel cross-wire trellis kits and automatic micro-drip irrigation starters.
28. Modern Steel Frame with Polycarbonate Roof
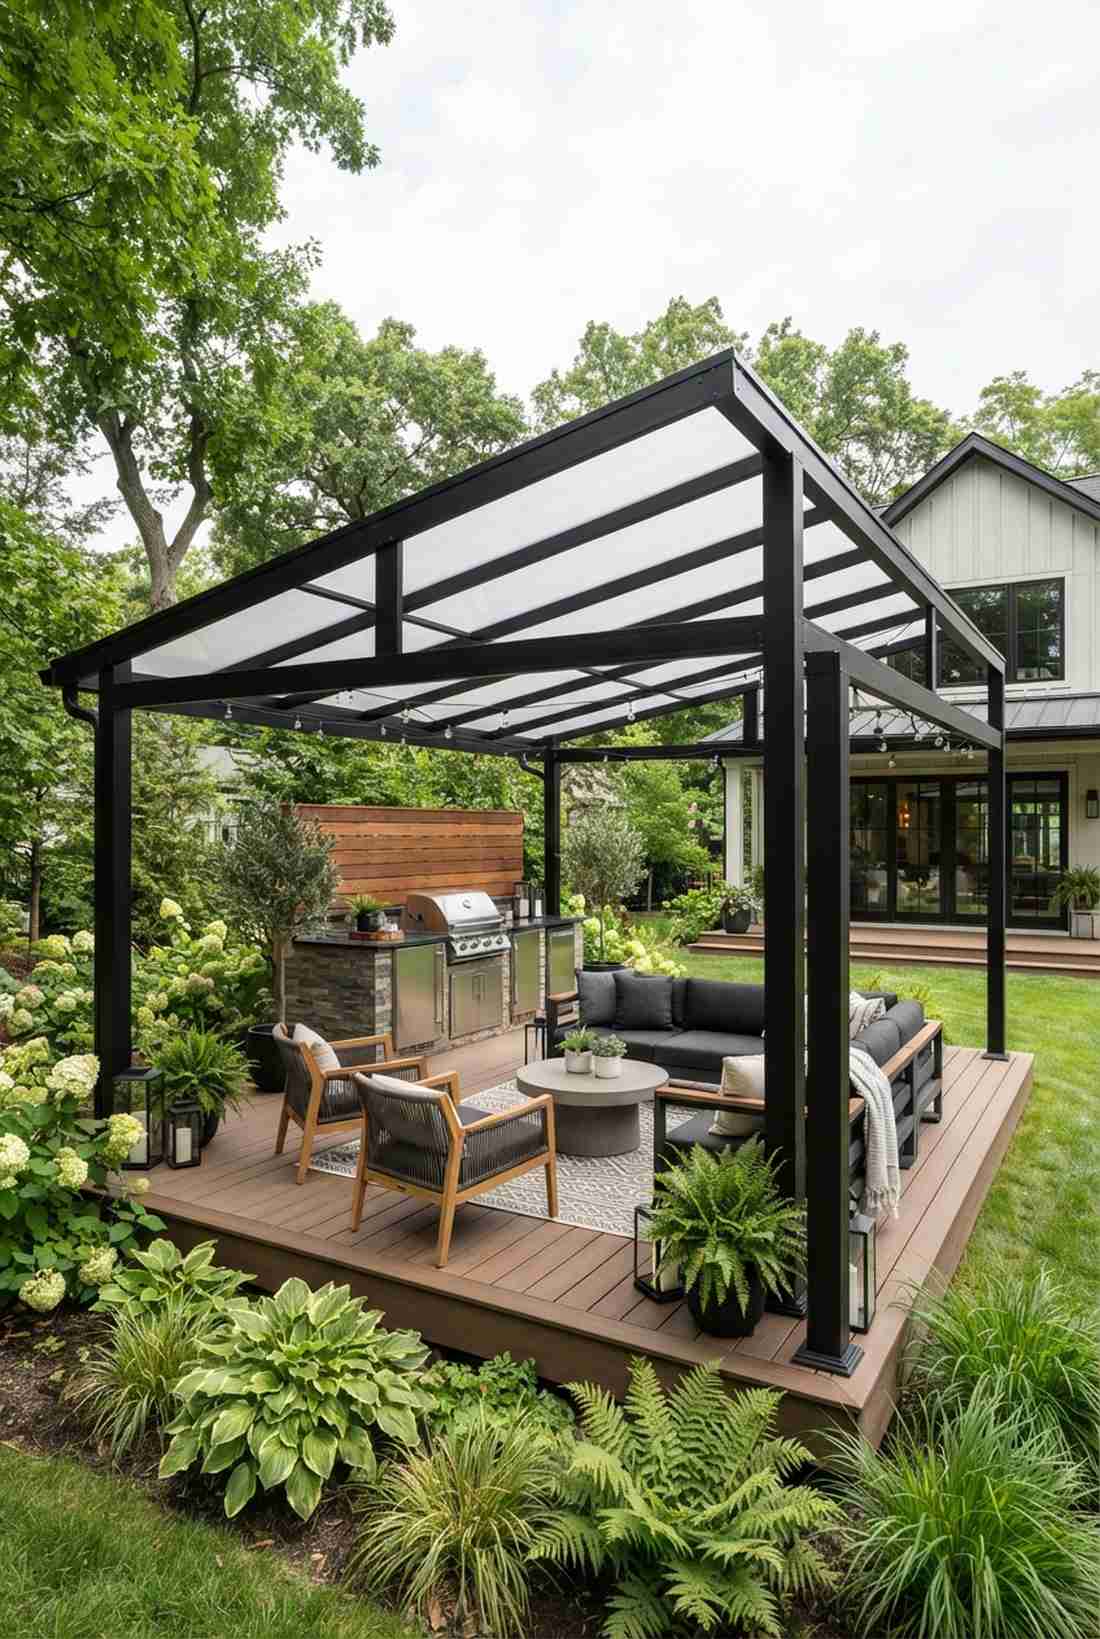
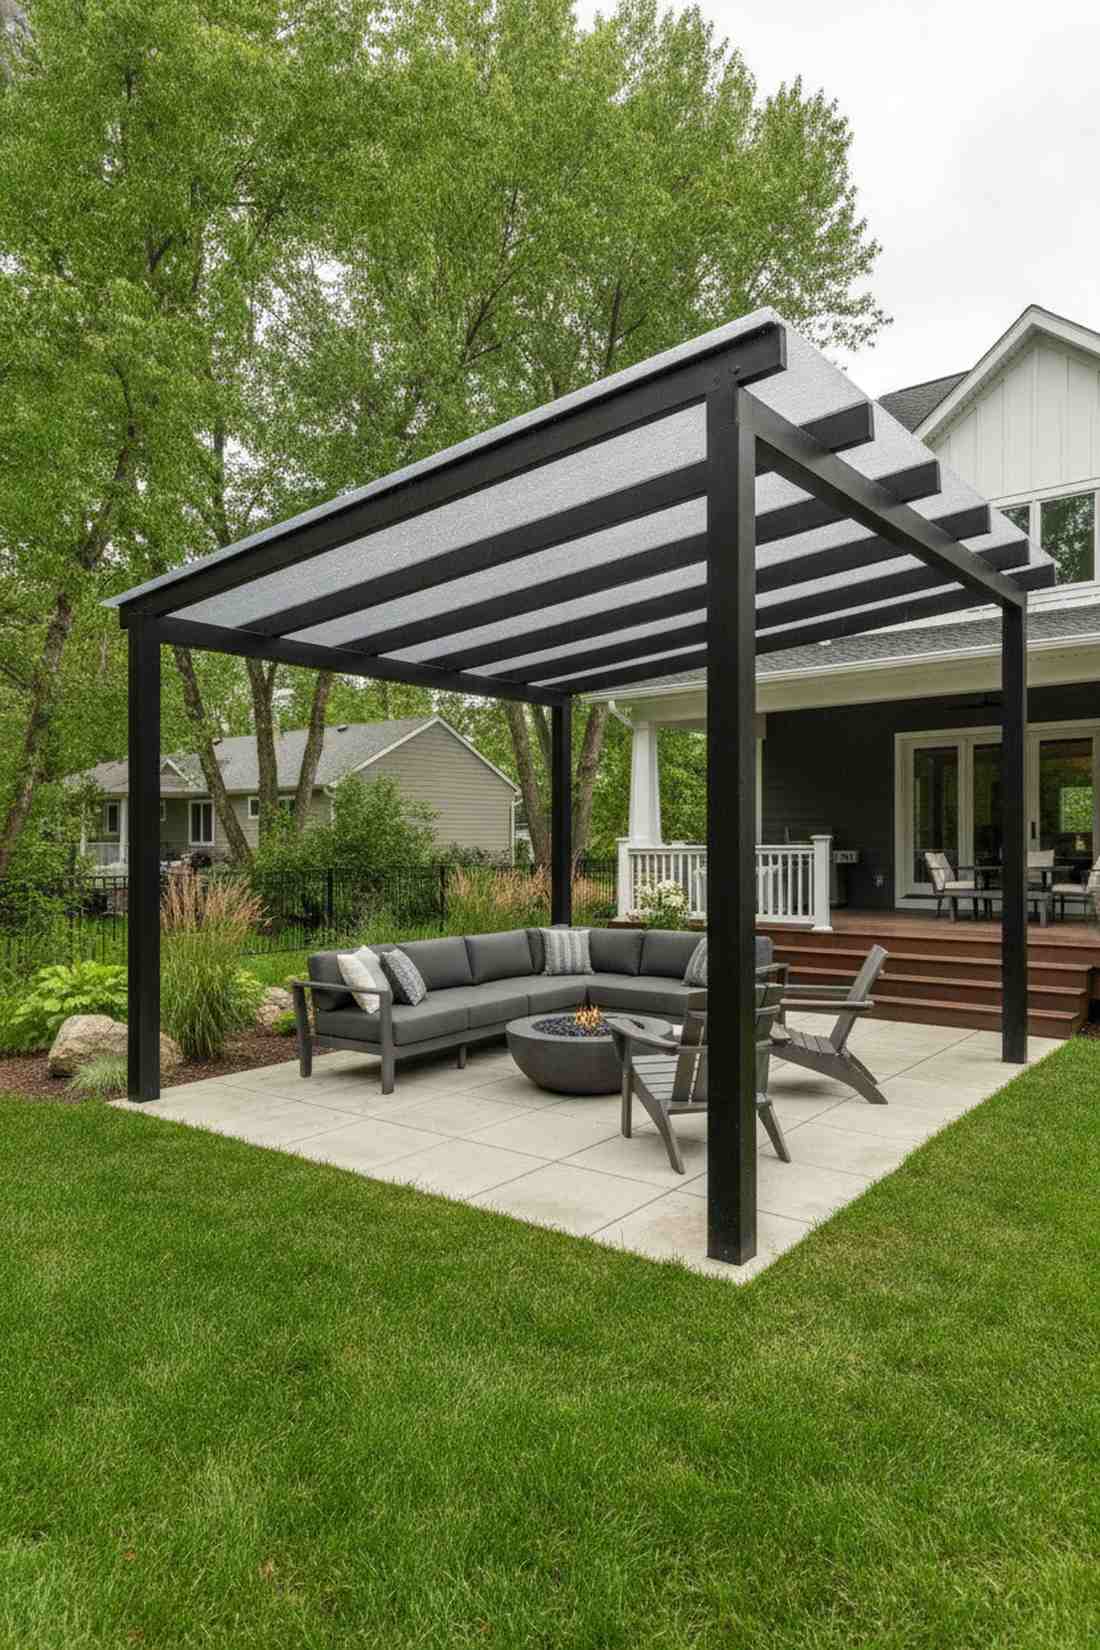
Strikes with the clean, razor-sharp edge of contemporary industrial design. This translucent outdoor seating area garden cover is flawless for rainy climates that still crave natural light.
Solid roofs make adjacent interior rooms depressingly dark; utilizing UV-blocking polycarbonate panels keeps things bright while stopping rain completely. The matte black steel frame provides insane contrast against green landscaping.
A modern steel and poly setup runs around $3,000–$7,000. Pin this if you love minimalist industrial vibes!
- Key Materials: Powder-coated steel beams, multiwall polycarbonate sheets, thermal seal gaskets
- Vibe / Style: Bright industrial minimalism
- Difficulty: Advanced (welding or custom bolting)
- Budget Breakdown: Steel Frame: $2,500 | Poly Panels: $1,200 | Hardware/Seals: $400
- Creator’s Tip: Always use thermally broken aluminum joining strips between the plastic panels to prevent annoying condensation drips.
- Smart Sourcing: UV-coated multiwall polycarbonate panels (bulk pack) and aluminum glazing profile kits.
Material-Driven Patio Expressions
Surface material selection establishes patio character, performance parameters, and maintenance requirements. Designers evaluate porosity for drainage, coefficient of friction for slip resistance, and thermal mass for heat retention. Budget allocations typically assign 40-50% of hardscape costs to material selection, with labor consuming the remainder.
Before buying cheap big-box store stones, look at how this next material completely changes the aesthetic…
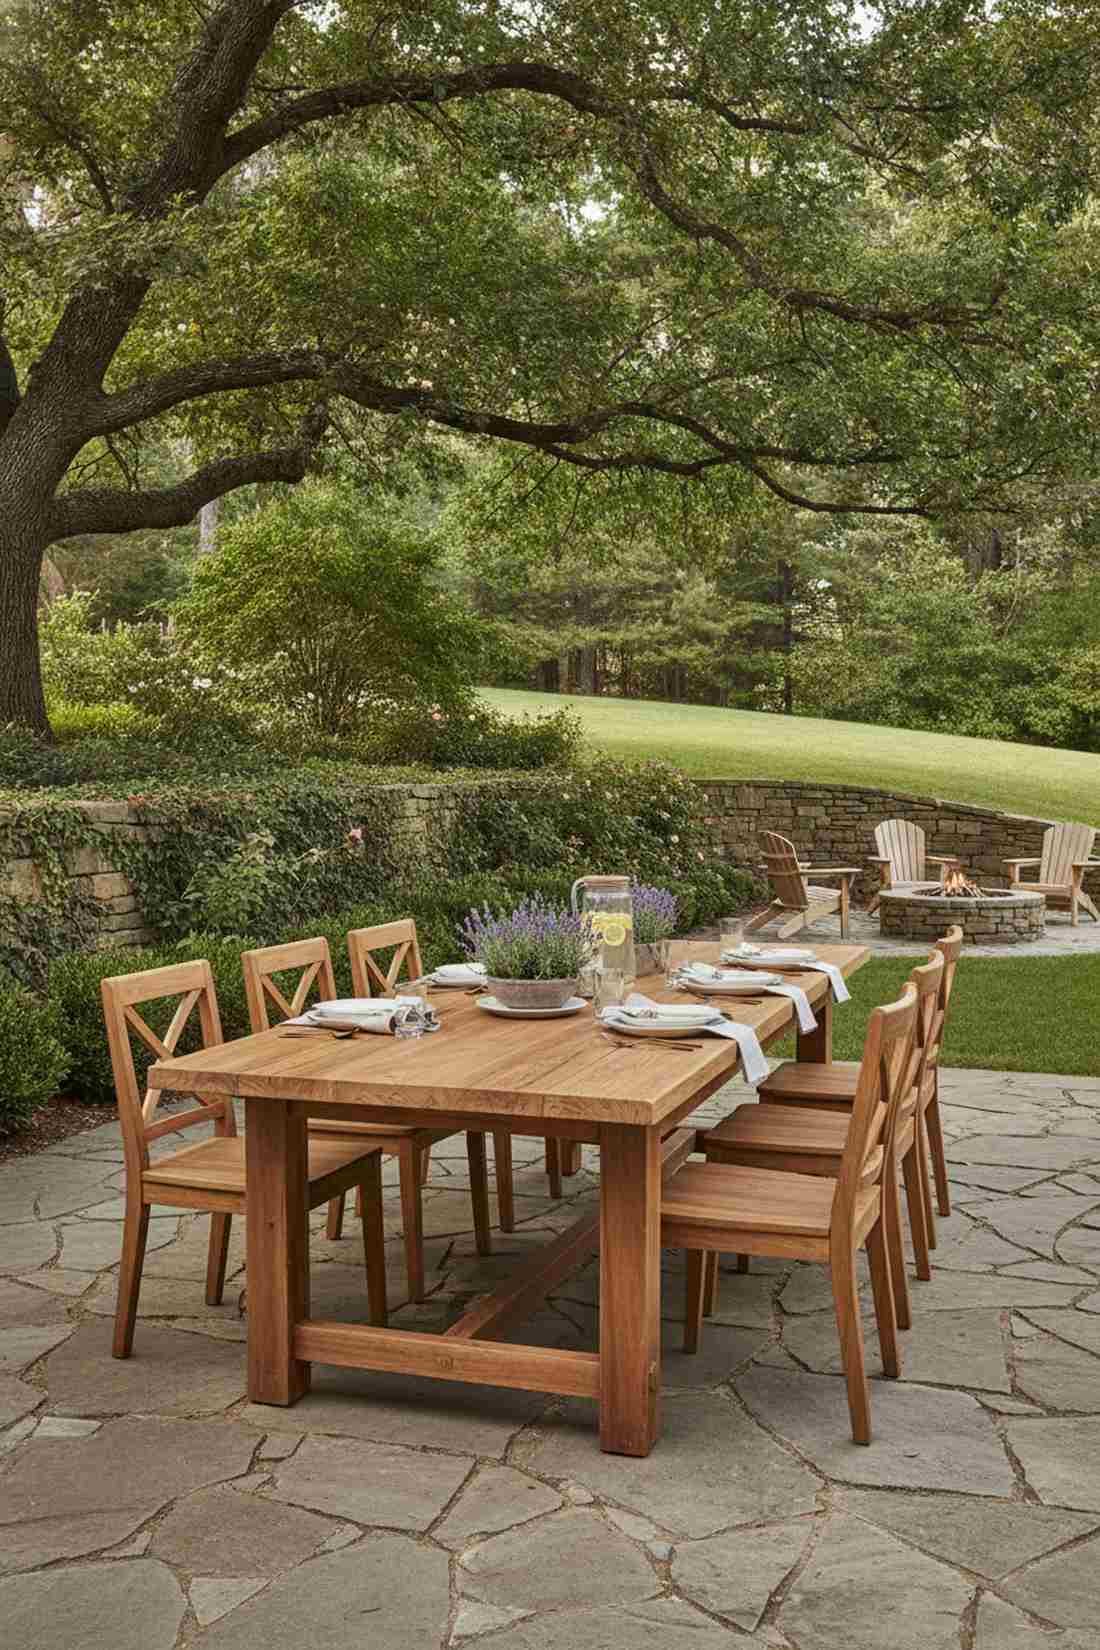
29. Bluestone Pavers with Teak Furniture
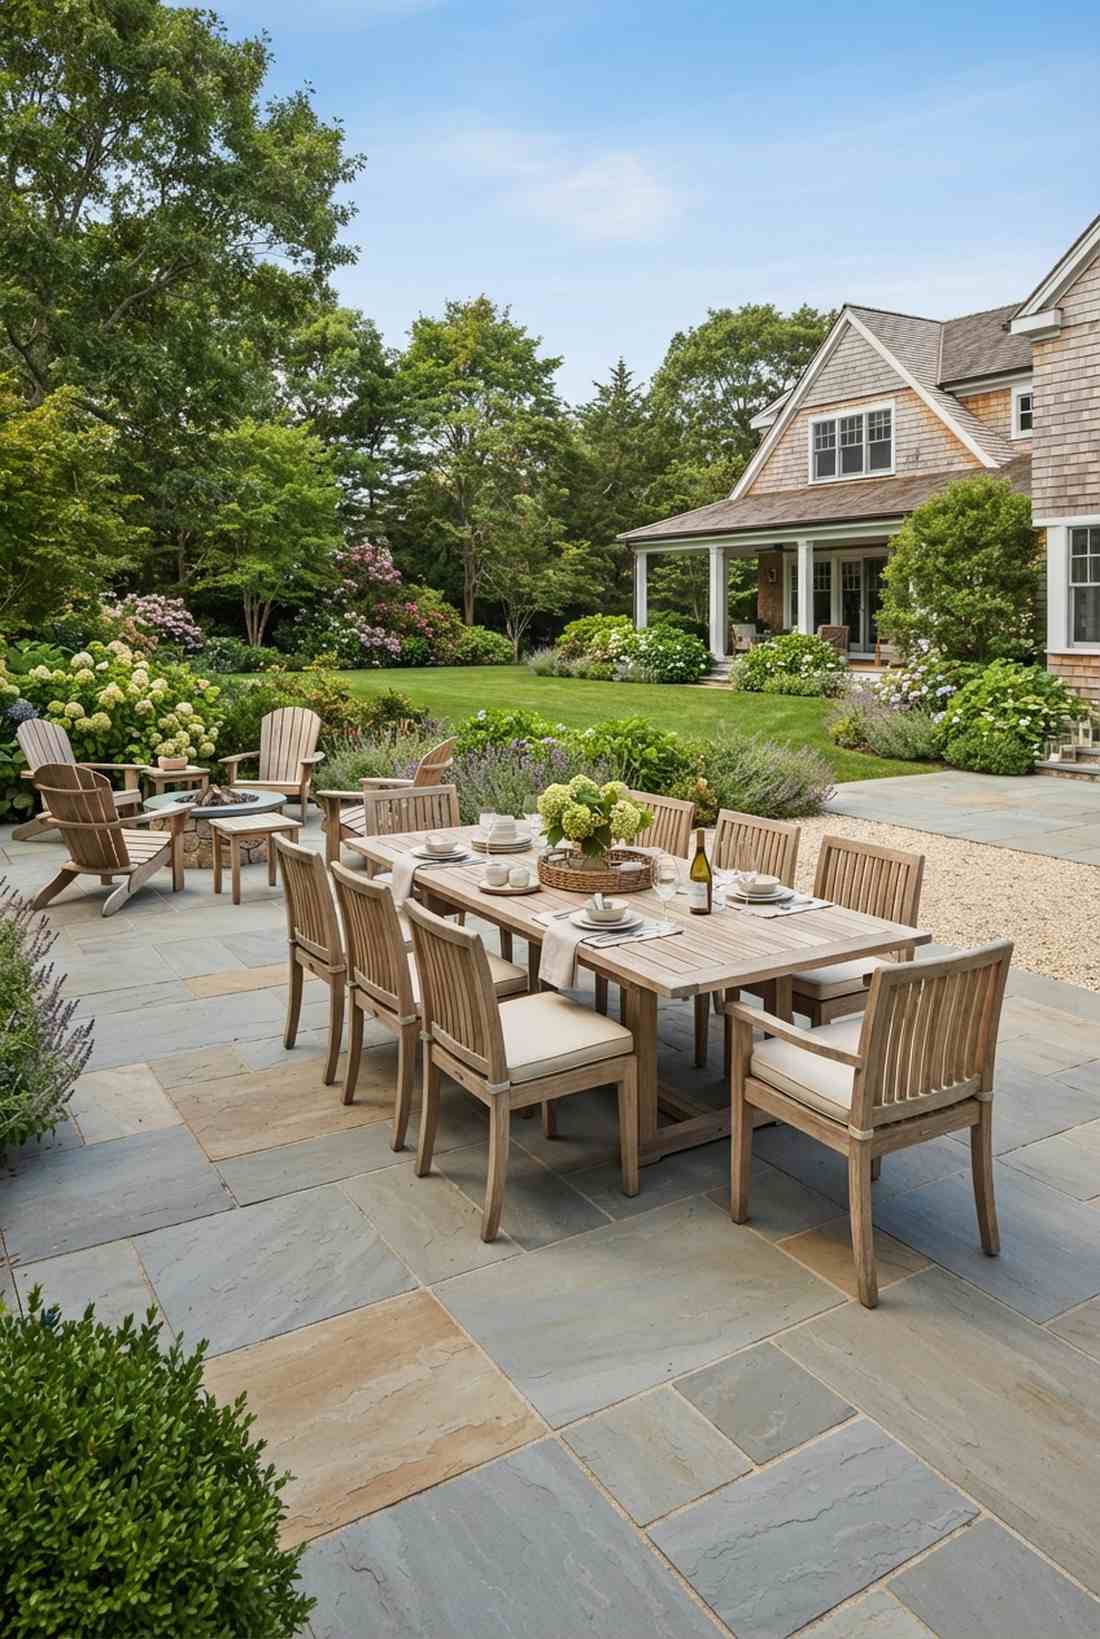
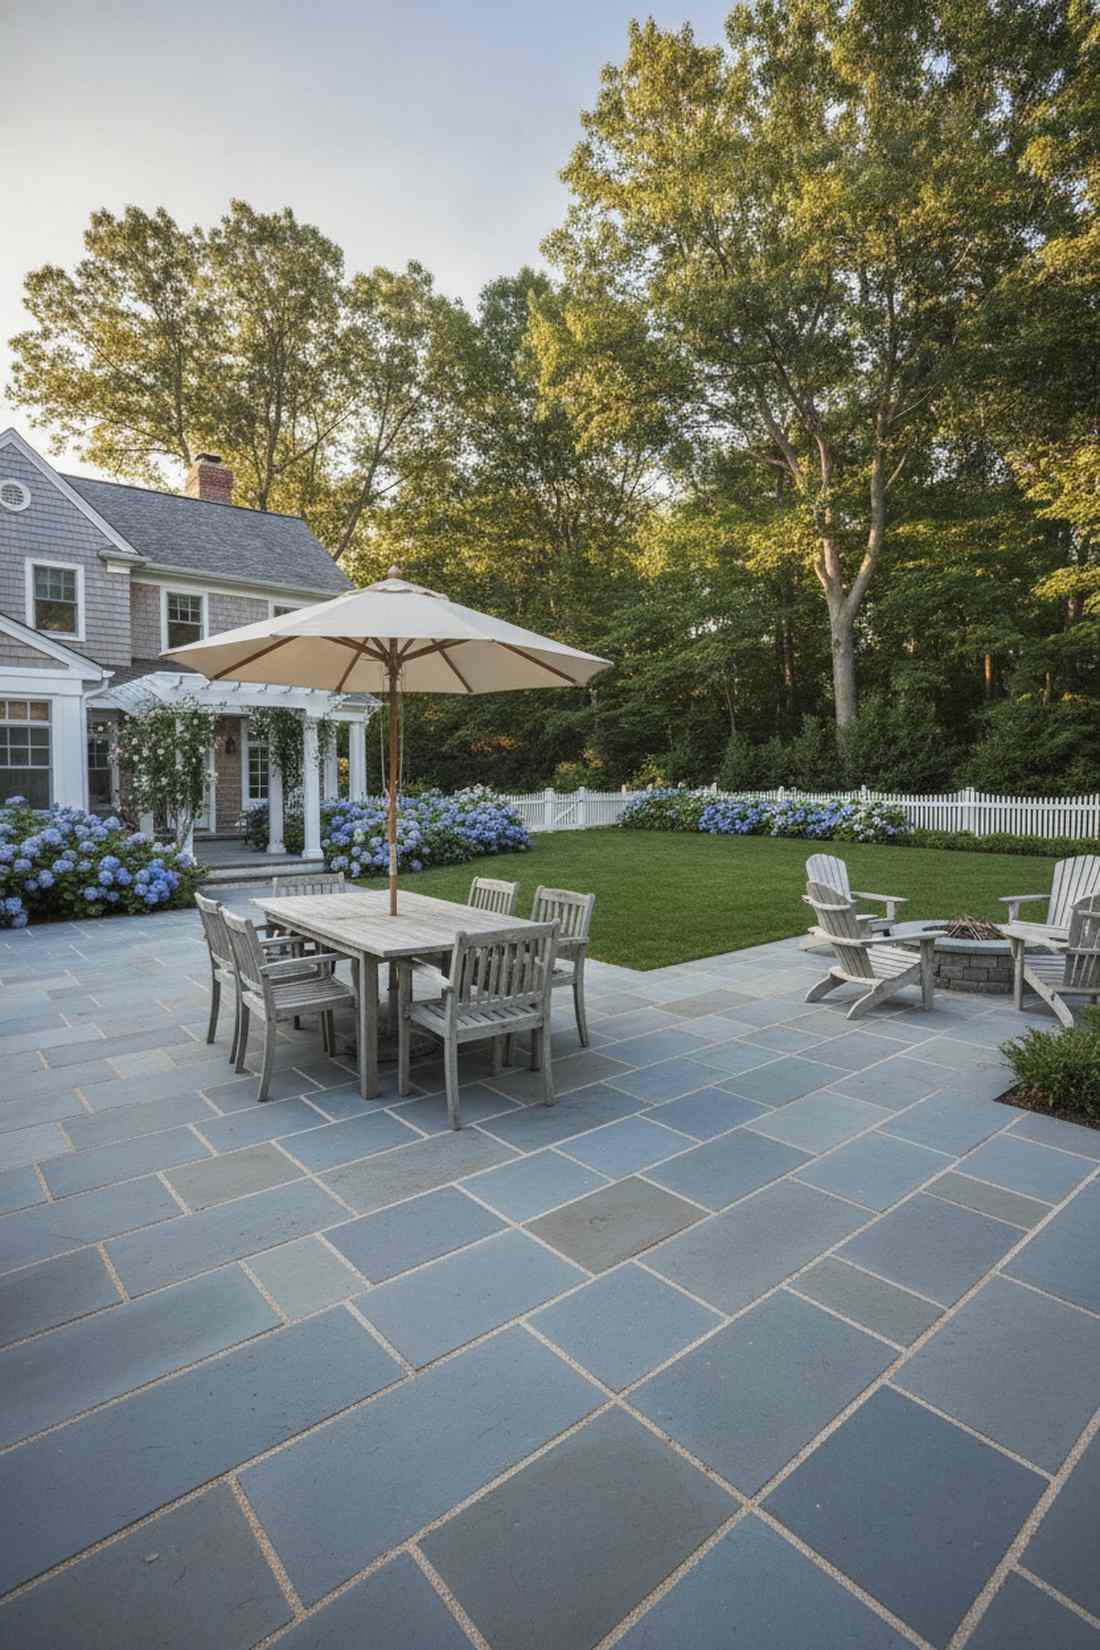
Emanates the quiet, old-money luxury of a Hamptons estate. This natural stone patio combination works effortlessly to elevate standard suburban backyards into premium living spaces.
Concrete cracks and looks cheap; dry-laying thermal bluestone delivers a surprisingly premium look that handles freeze-thaw cycles like a champion. Pairing it with raw teak creates a visual masterpiece as both materials age into a beautiful silver-grey.
Premium stone and wood setups require an investment of $4,000–$9,000.
- Key Materials: Thermal bluestone rectangles, Grade-A teak furniture, compacted gravel base
- Vibe / Style: Timeless coastal heritage
- Difficulty: Heavy lifting hardscaping
- Budget Breakdown: Bluestone: $2,500 | Base Prep: $500 | Teak Set: $3,000
- Creator’s Tip: Sweep polymeric sand into the bluestone joints to permanently lock them in place and completely block weed growth.
- Smart Sourcing: Grade-A solid teak outdoor dining sets and commercial polymeric jointing sand.
30. Poured Concrete with Integral Color
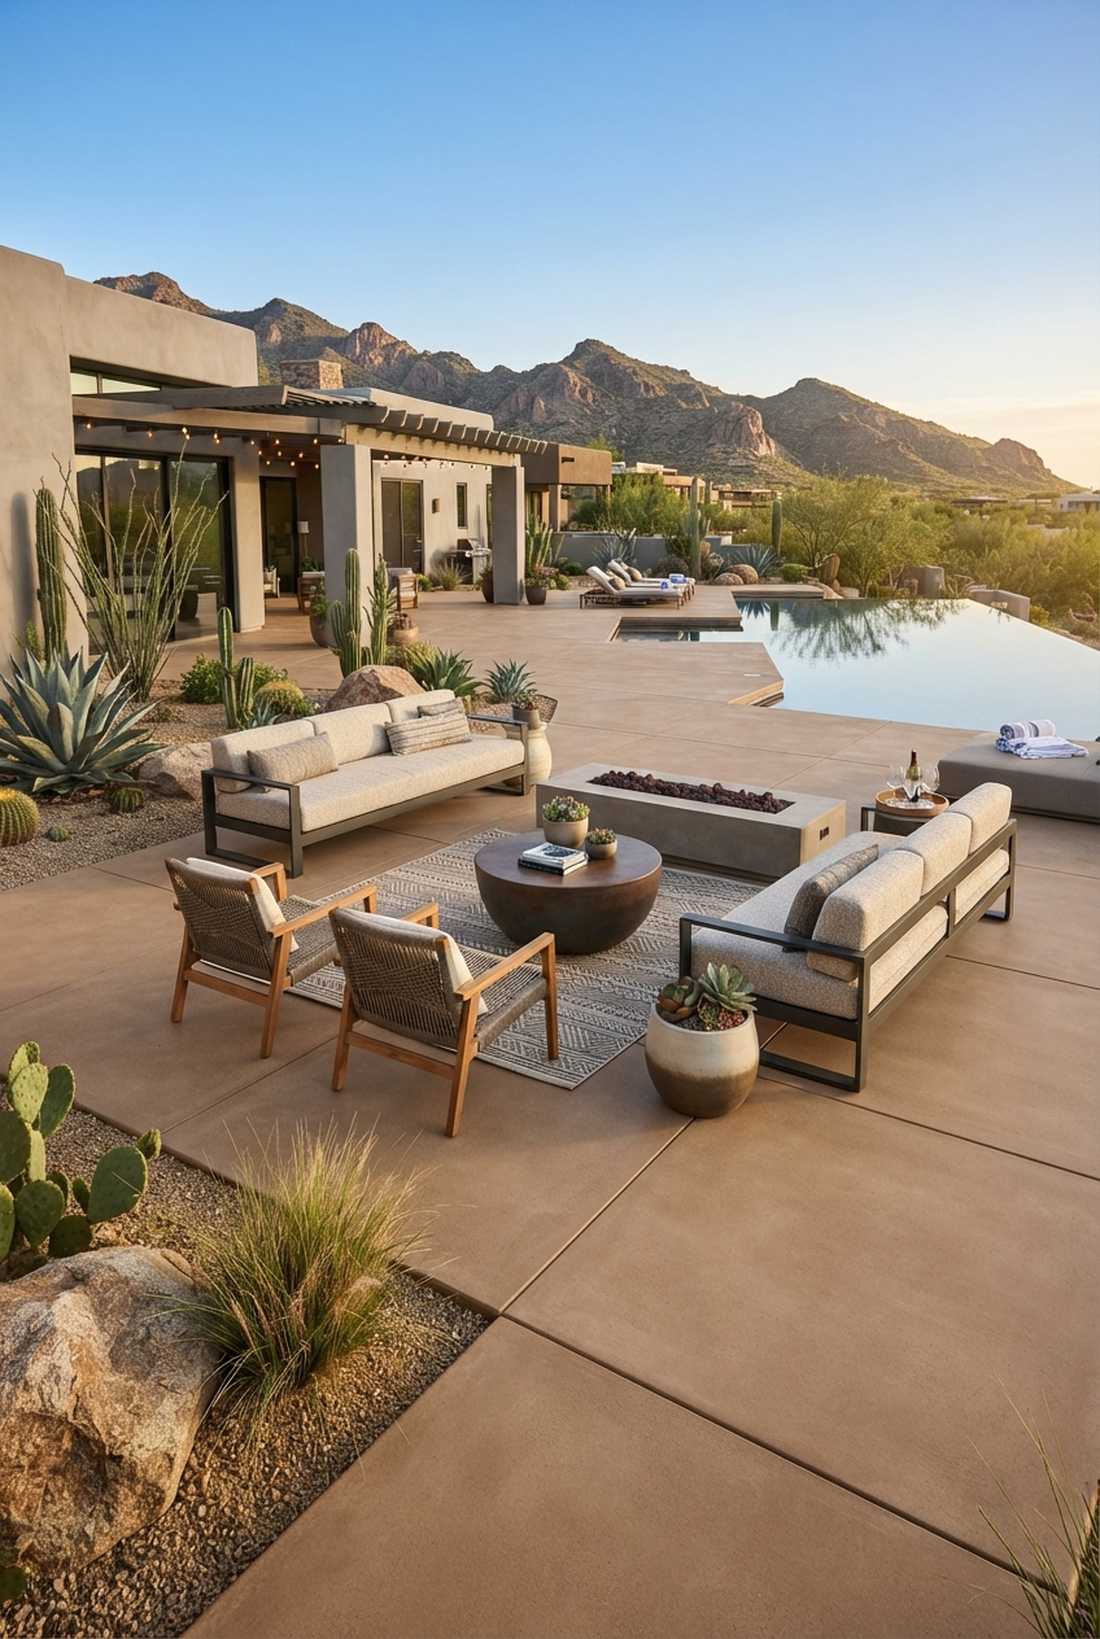
Delivers the ultra-smooth, seamless aesthetic of a modern desert compound. This monolithic outdoor garden seating areas layout is the ultimate hack for achieving high-end minimalism on a budget.
Individual pavers create tripping hazards and weed issues; a continuous colored concrete slab gives a designer-level finish that requires zero maintenance. Using earth-tone integral pigments stops the color from chipping away over time.
Professional colored concrete pours cost around $8–$15 per square foot. Pin this for a sleek, weed-free yard!
- Key Materials: Ready-mix concrete, integral liquid color pigment, expansion joint materials
- Vibe / Style: Desert modern seamless
- Difficulty: Requires a professional concrete crew
- Budget Breakdown: Concrete/Labor: $3,000 | Pigment Additive: $300 | Sealer: $100
- Creator’s Tip: Request a light “broom finish” from your contractor to ensure the surface isn’t violently slippery when wet.
- Smart Sourcing: Integral concrete color pigments and high-gloss wet-look concrete sealers.
31. Reclaimed Brick in Herringbone Pattern

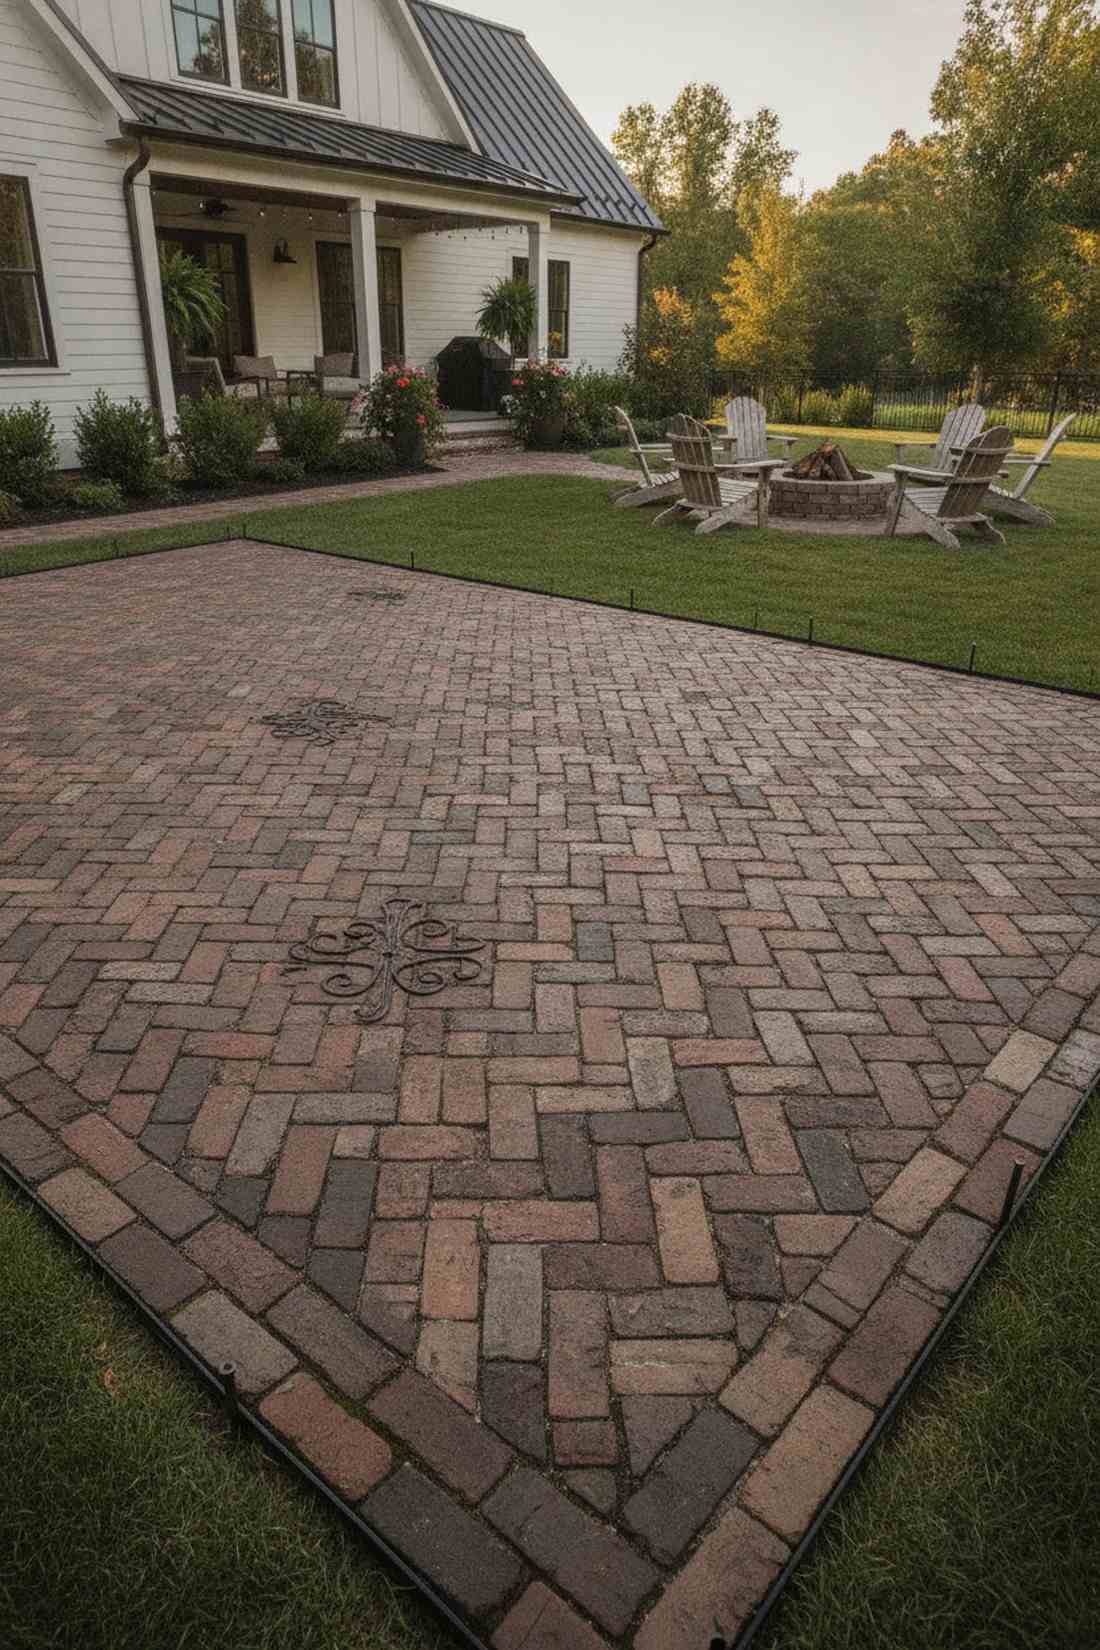
Carries the deep, historic soul of a centuries-old London courtyard. This historic brick paving design injects instant character and warmth into sterile, new-build properties.
New stamped concrete looks incredibly fake; sourcing demolished building bricks creates an interlocking geometry that is visually intoxicating. The herringbone pattern isn’t just pretty—it actually locks the bricks together tighter than any other layout.
You can easily pull this off for $1,500–$3,500 depending on your local salvage yard.
- Key Materials: Salvaged historic street brick, coarse bedding sand, wrought iron accents
- Vibe / Style: Historic courtyard rich
- Difficulty: Tedious but highly DIY-able
- Budget Breakdown: Salvaged Brick: $1,200 | Sand/Gravel Base: $400 | Edge Restraints: $150
- Creator’s Tip: Use rigid plastic edge restraints spiked into the dirt perimeter; otherwise, the whole herringbone pattern will slowly spread outward.
- Smart Sourcing: Flexible paver edging kits (bulk roll) and 10-inch landscaping spikes.
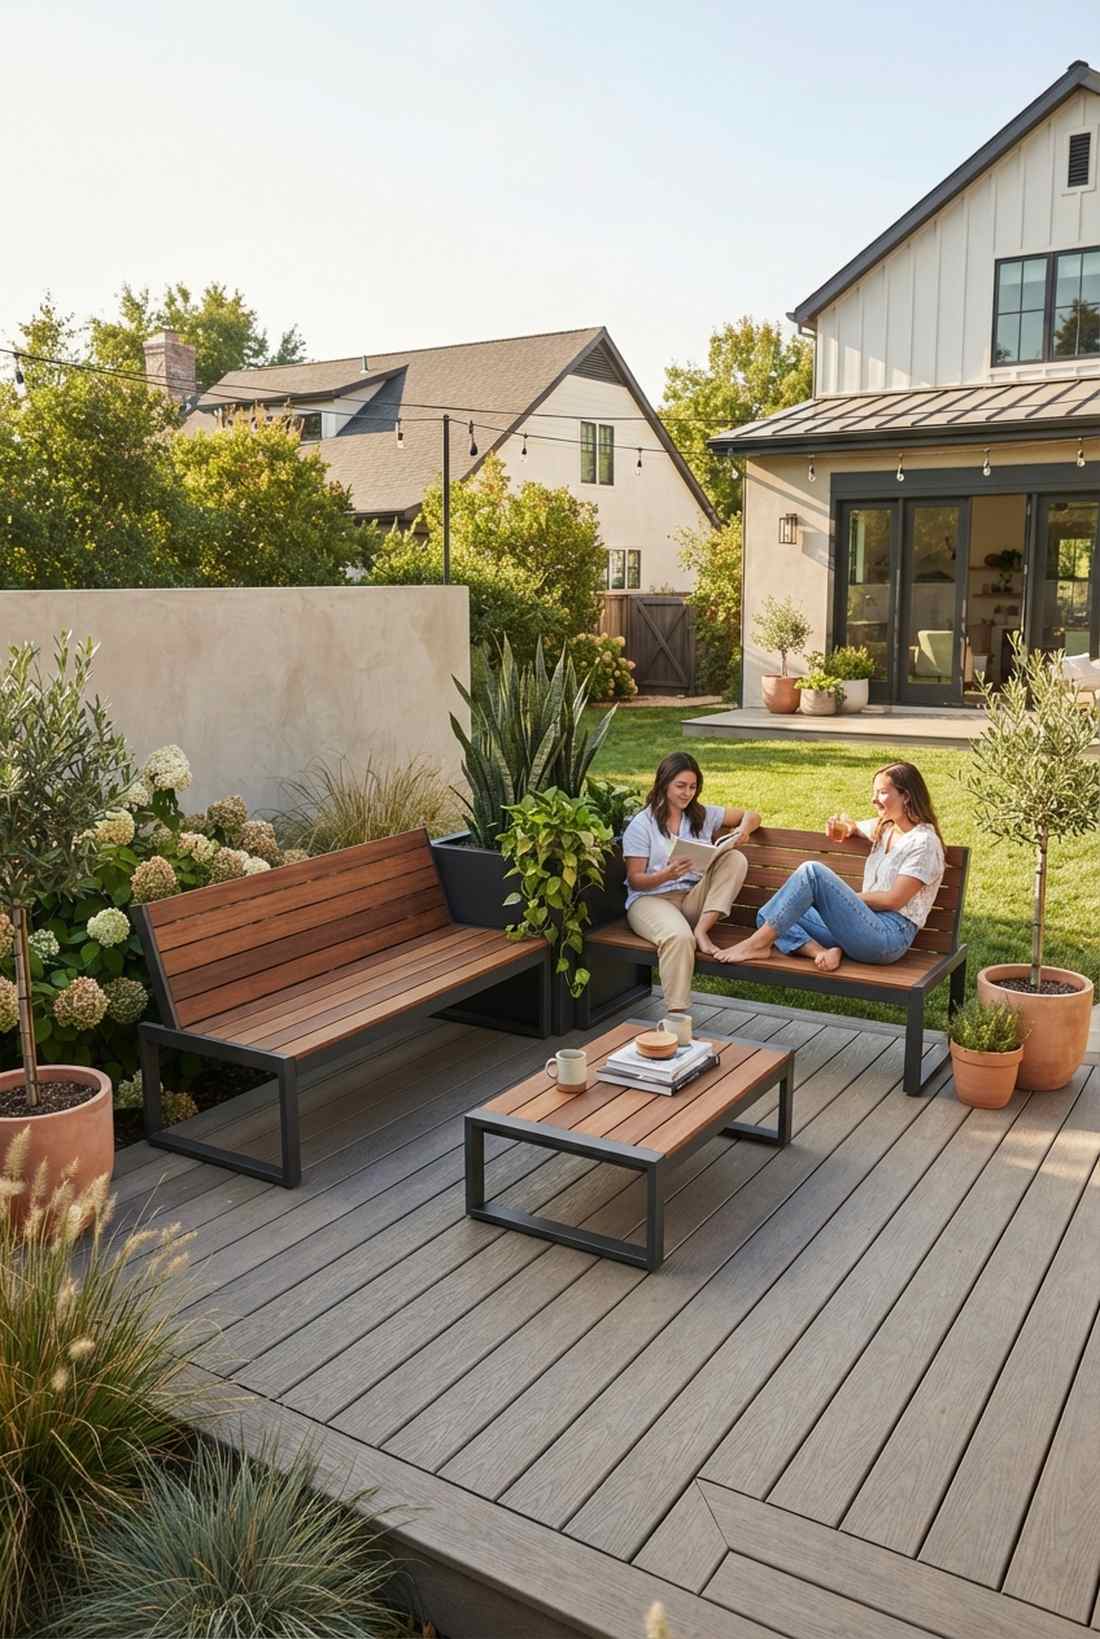
32. Composite Decking in Multi-Tone Blend
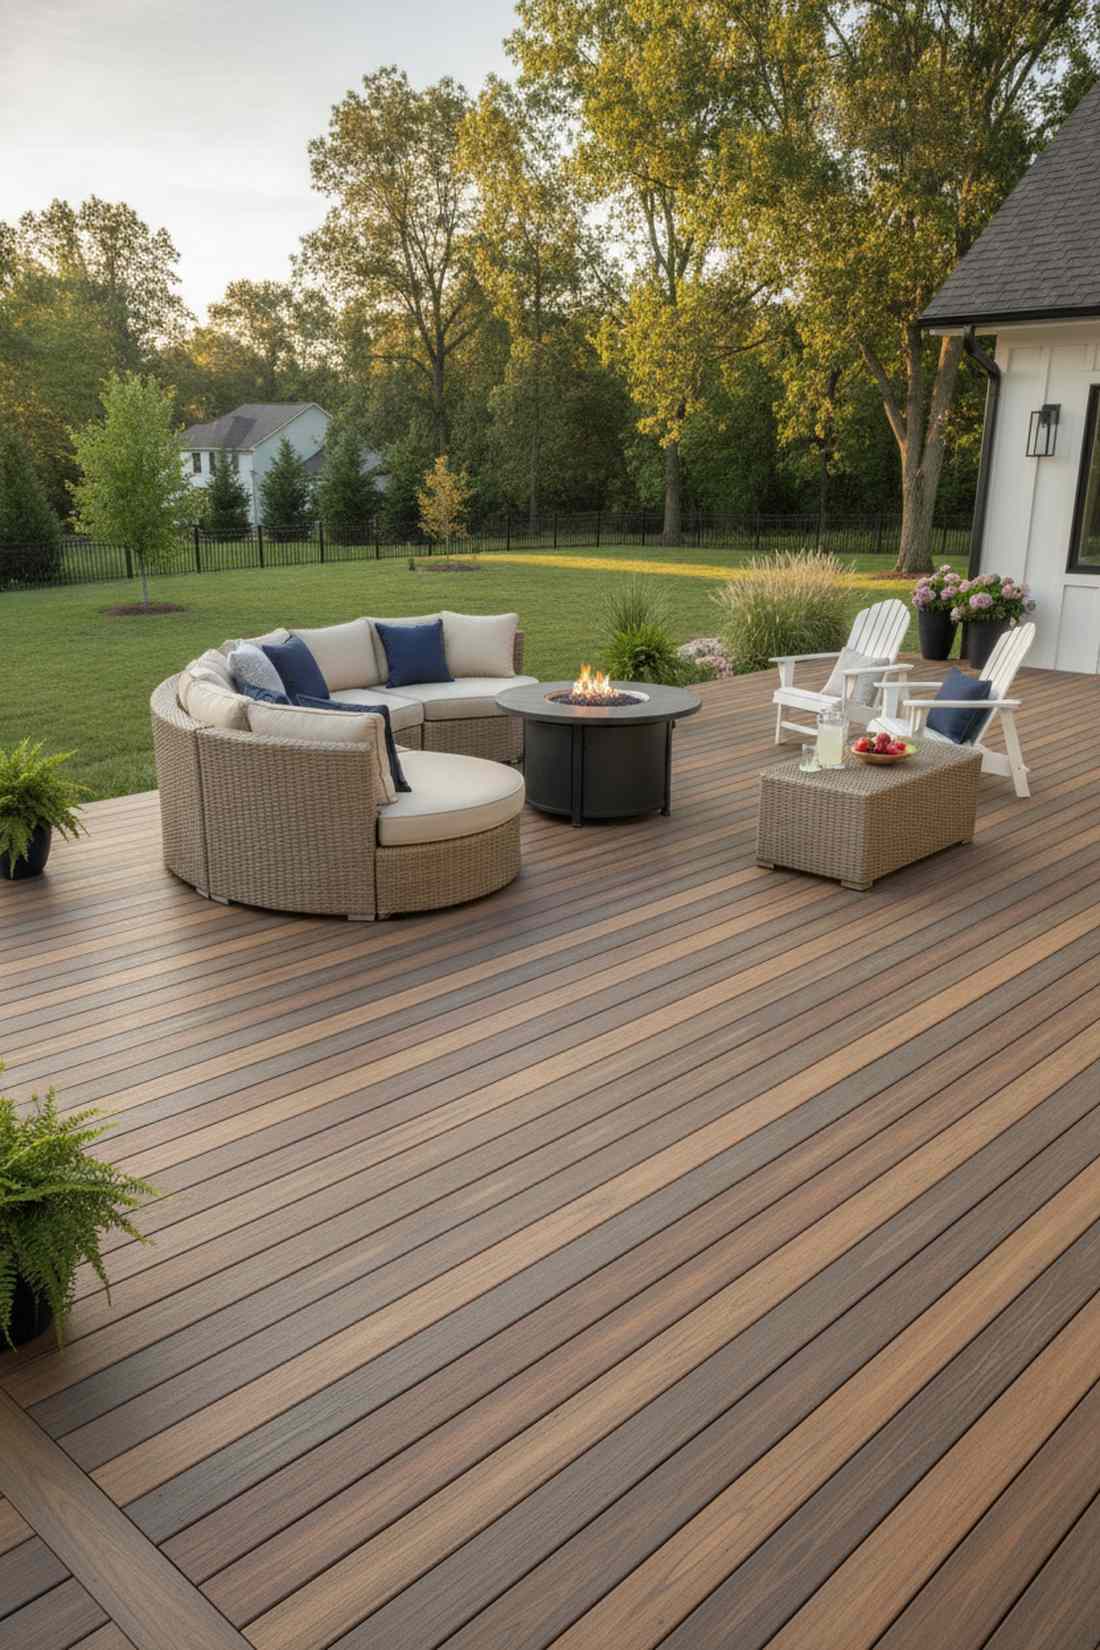
Projects the flawless, clean lines of a luxury resort boardwalk. This maintenance-free outdoor decking solution is the holy grail for homeowners sick of power washing and staining.
Natural wood demands constant labor, but utilizing polymer-capped composite boards looks far more expensive than it is while surviving decades of abuse. The hidden fastener systems eliminate ugly screw heads, creating a perfectly smooth barefoot surface.
Premium composite materials run $2,000–$6,000 for an average patio. Save this to your low-maintenance home board!
- Key Materials: Capped composite decking boards, hidden clip fasteners, synthetic wicker furniture
- Vibe / Style: Pristine barefoot luxury
- Difficulty: Standard deck carpentry
- Budget Breakdown: Composite Boards: $3,500 | Hidden Fasteners: $400 | Framing: $1,000
- Creator’s Tip: Order a “multi-tone blend” box where boards have slight color variations to perfectly mimic the organic look of exotic hardwoods.
- Smart Sourcing: Pre-grooved composite decking boards (bulk pack) and universal hidden deck fastener clips.
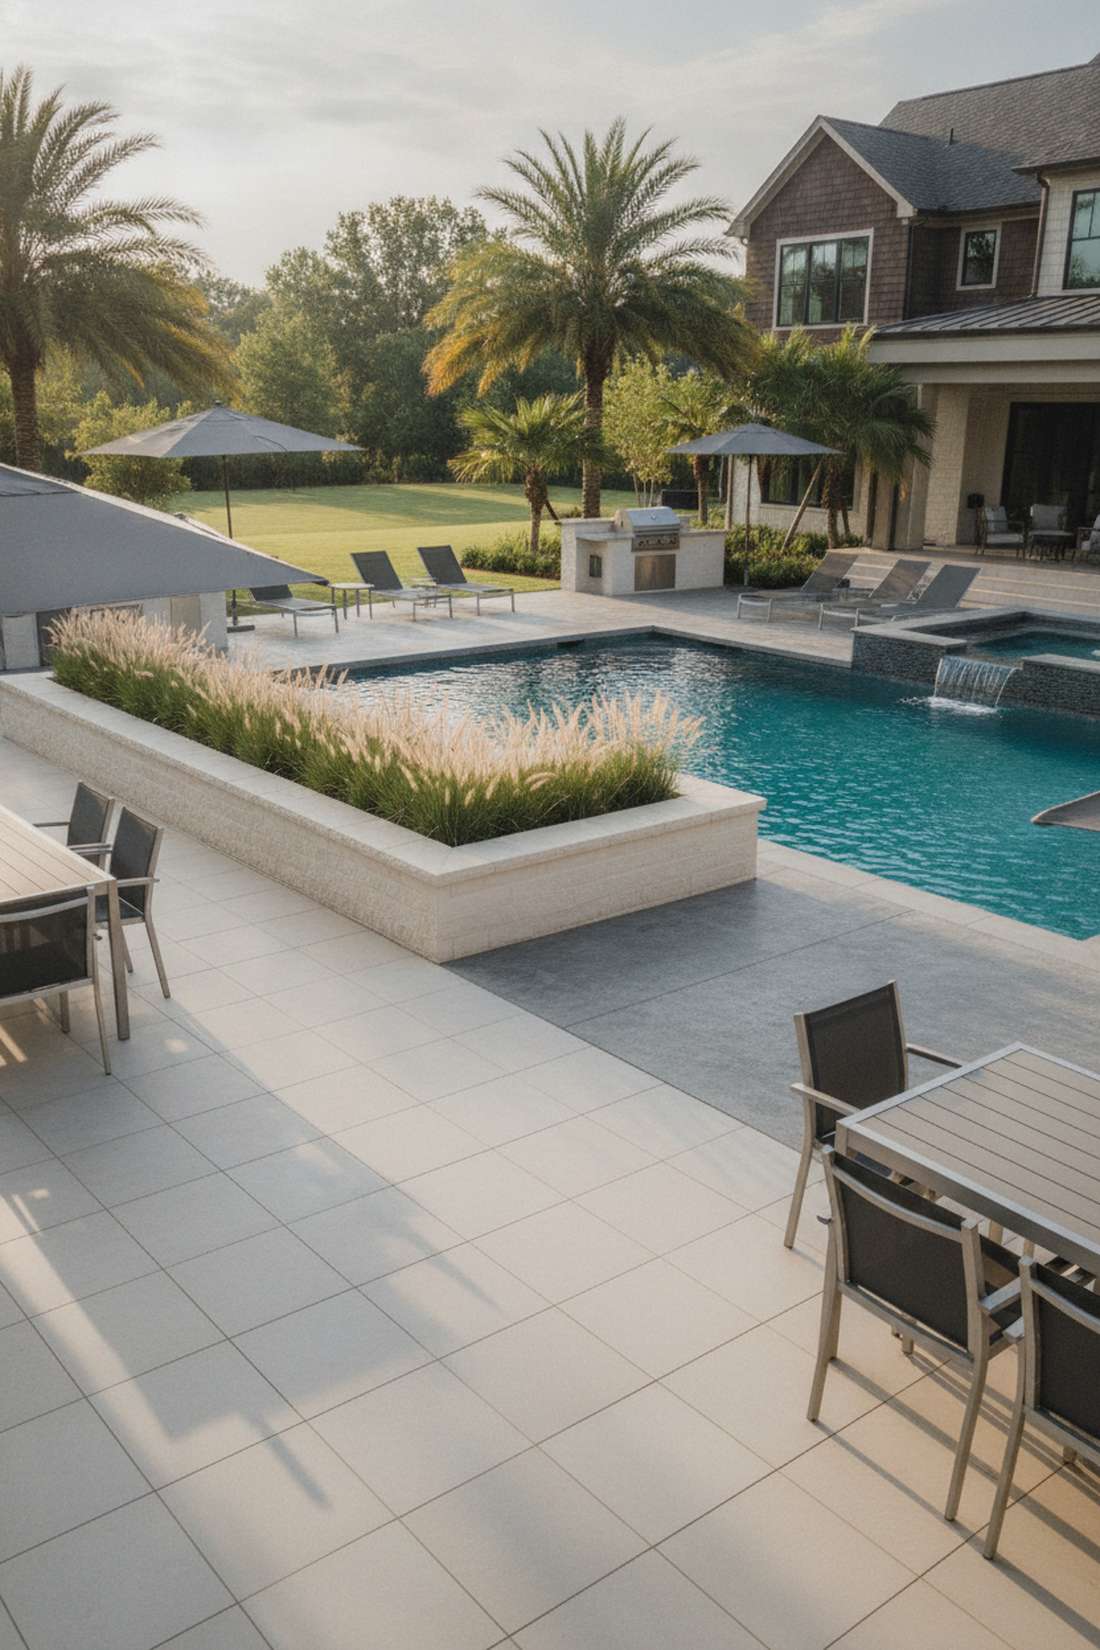
33. Porcelain Tile in Wood Plank Format
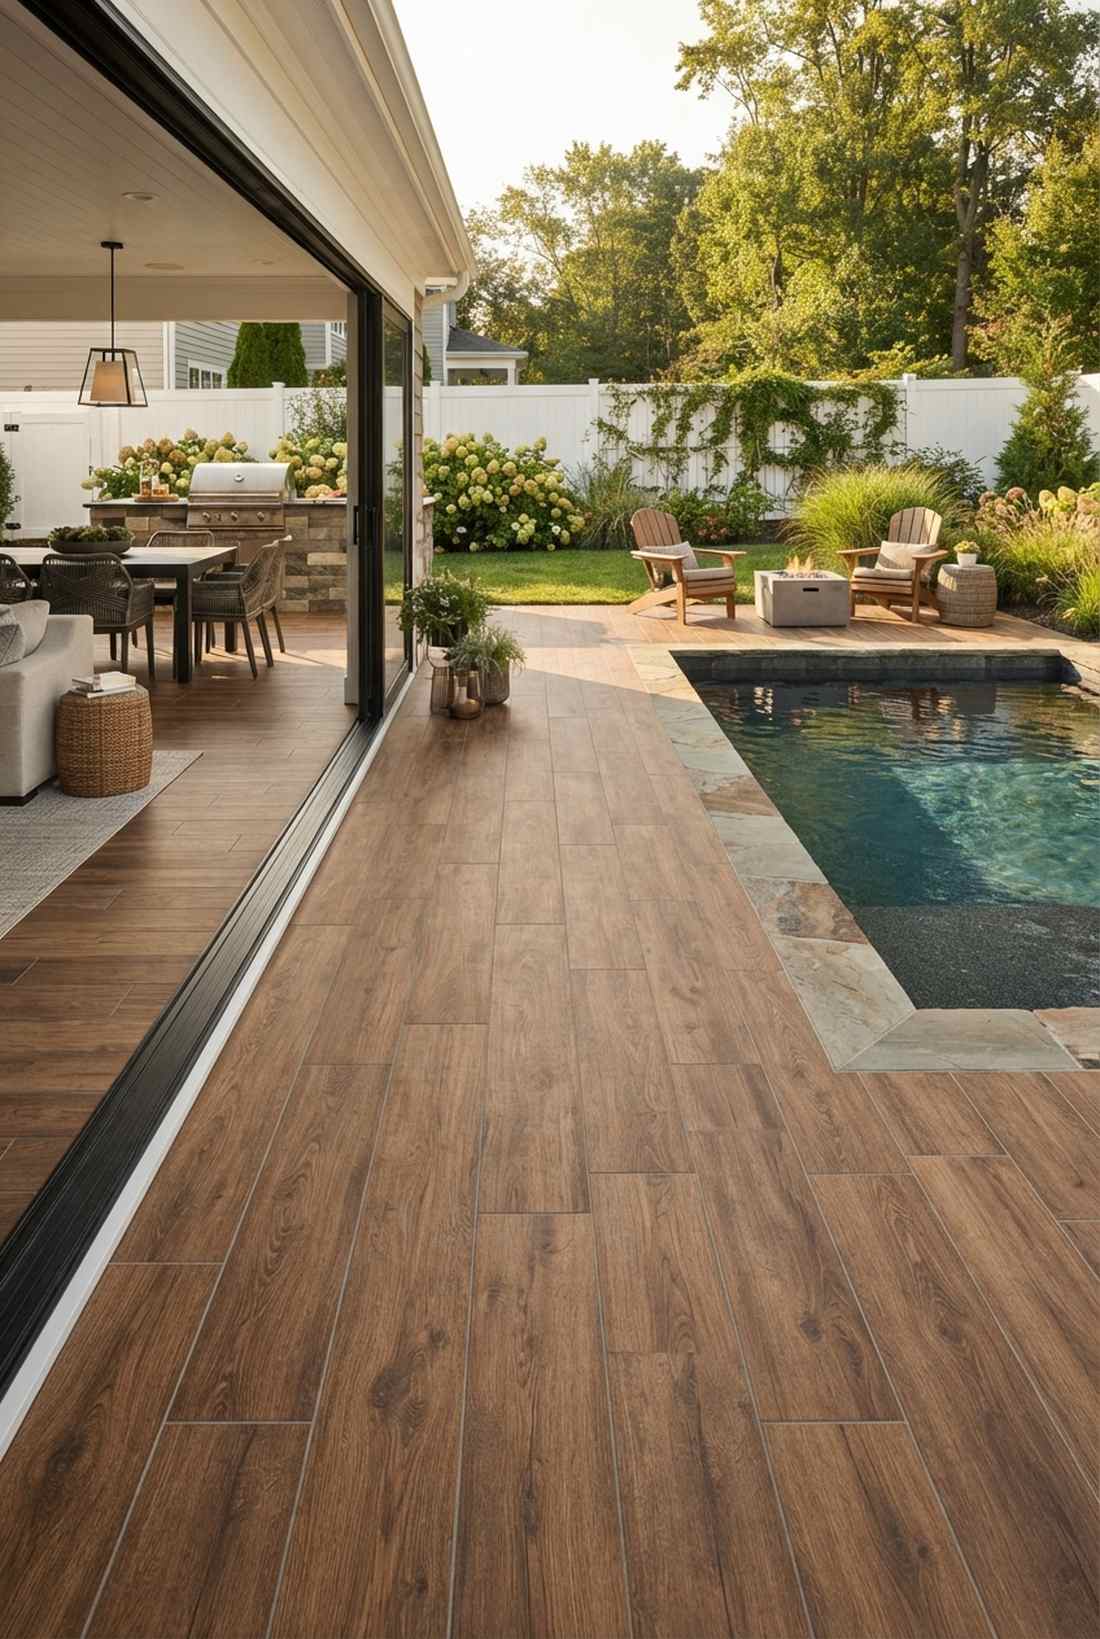
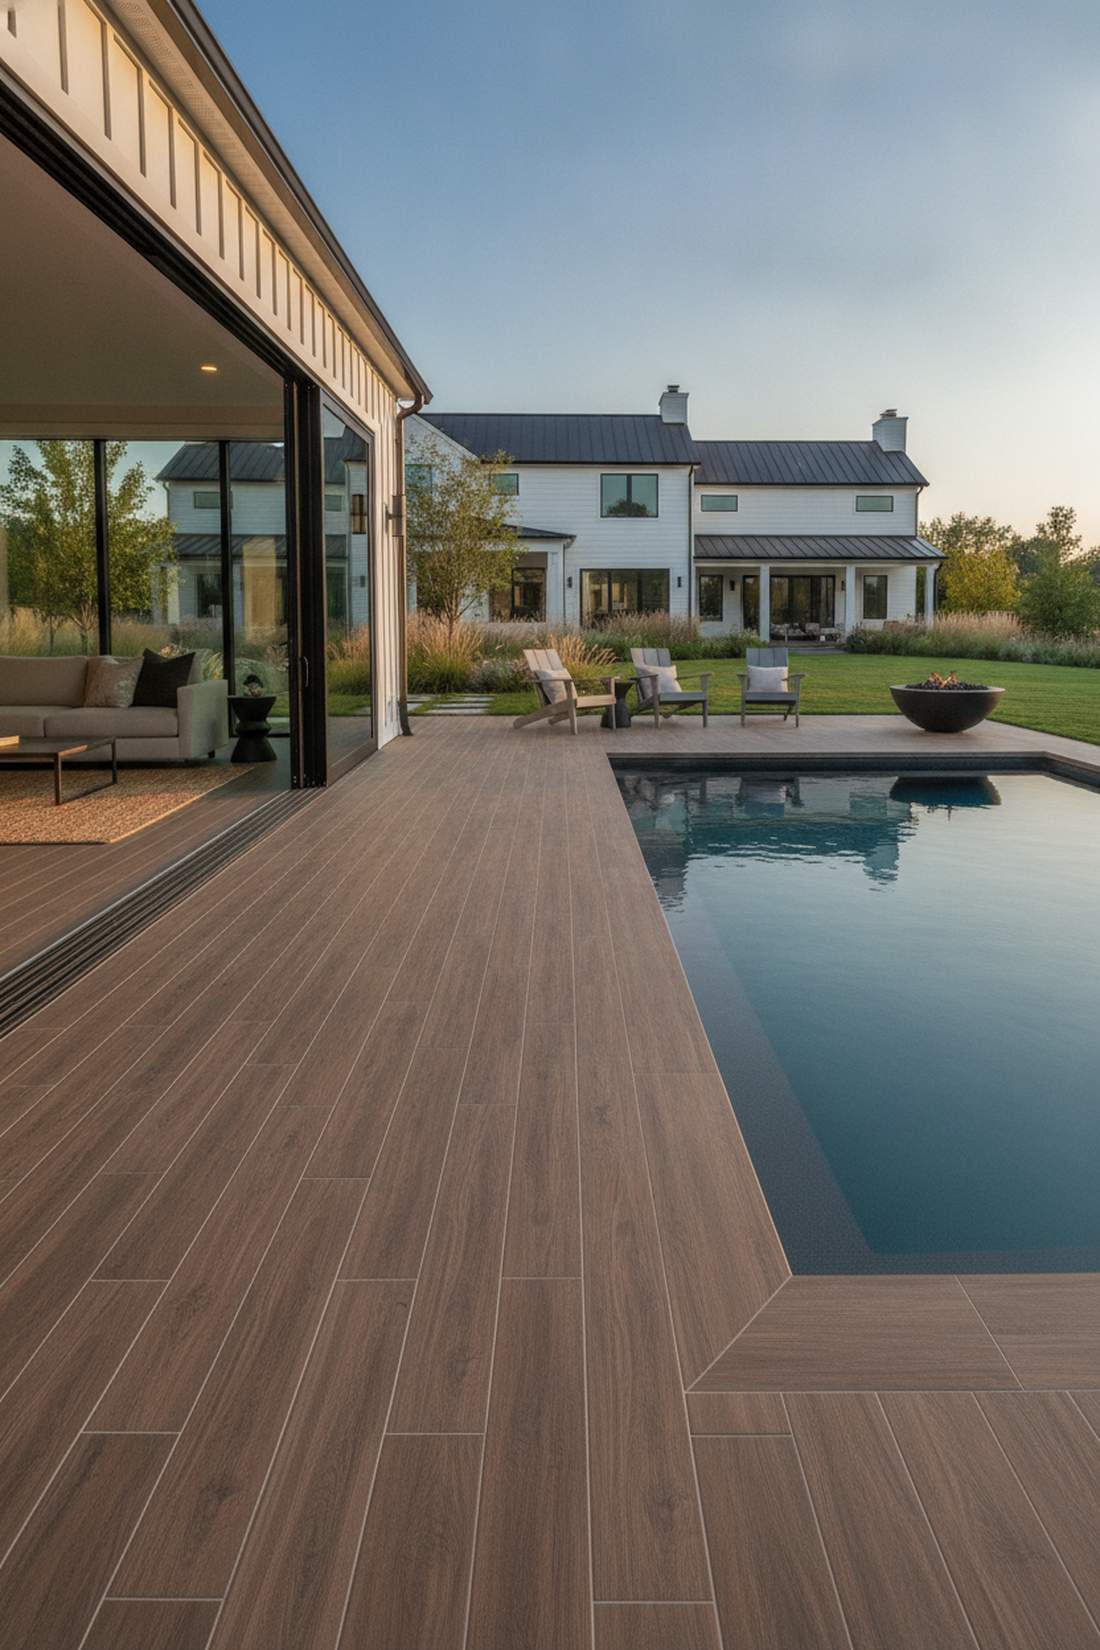
Brings the warmth of hardwood right up to the edge of your swimming pool. This wood-look outdoor tile layout flawlessly bridges the gap between cozy interior flooring and rugged exterior hardscapes.
Putting actual wood on a concrete slab guarantees rot; thick exterior-grade porcelain delivers a surprisingly premium look with absolute zero moisture damage. The massive format planks make the patio look visually endless.
Expect to invest $1,800–$4,500 for the tile and specialized exterior mortar.
- Key Materials: 2cm thick exterior porcelain planks, flexible thin-set mortar, exterior grout
- Vibe / Style: Seamless indoor-outdoor flow
- Difficulty: Advanced tile setting
- Budget Breakdown: Porcelain Tile: $2,000 | Exterior Mortar: $300 | Grout/Prep: $200
- Creator’s Tip: Ensure you use “rectified” tiles so you can make the grout lines razor-thin (1/16th inch), making it look like real wood flooring.
- Smart Sourcing: Exterior-grade wood-look porcelain planks and highly-flexible exterior polymer grout.
34. Decomposed Granite with Metal Edging


Embodies the effortless, earthy charm of a French wine country estate. This permeable granular patio surface is a massive budget hack for creating enormous outdoor living areas.
Paving massive yards bankrupts projects; compacting decomposed granite with a stabilizer gives a designer-level finish for pennies on the dollar. The crisp steel bender-board edging keeps the rustic material looking intentionally architectural.
You can easily pull this off for $400–$900. Pin this if you have a massive yard and a tight budget!
- Key Materials: Decomposed granite (DG), organic binding stabilizer, Corten steel edging
- Vibe / Style: Earthy architectural rustic
- Difficulty: Easy but labor-heavy (tamping)
- Budget Breakdown: DG Material: $300 | Steel Edging: $250 | Stabilizer: $150
- Creator’s Tip: You must mix a liquid stabilizer into the DG before compacting it, otherwise it will just turn into messy mud during the first rainstorm.
- Smart Sourcing: Decomposed granite liquid stabilizer (gallon) and flexible Corten steel landscape edging.
Most DIYers ruin their yard with cheap plastic pavers. The next technique offers historical luxury for the same price…
35. Natural Stone Mosaic with Wrought Iron
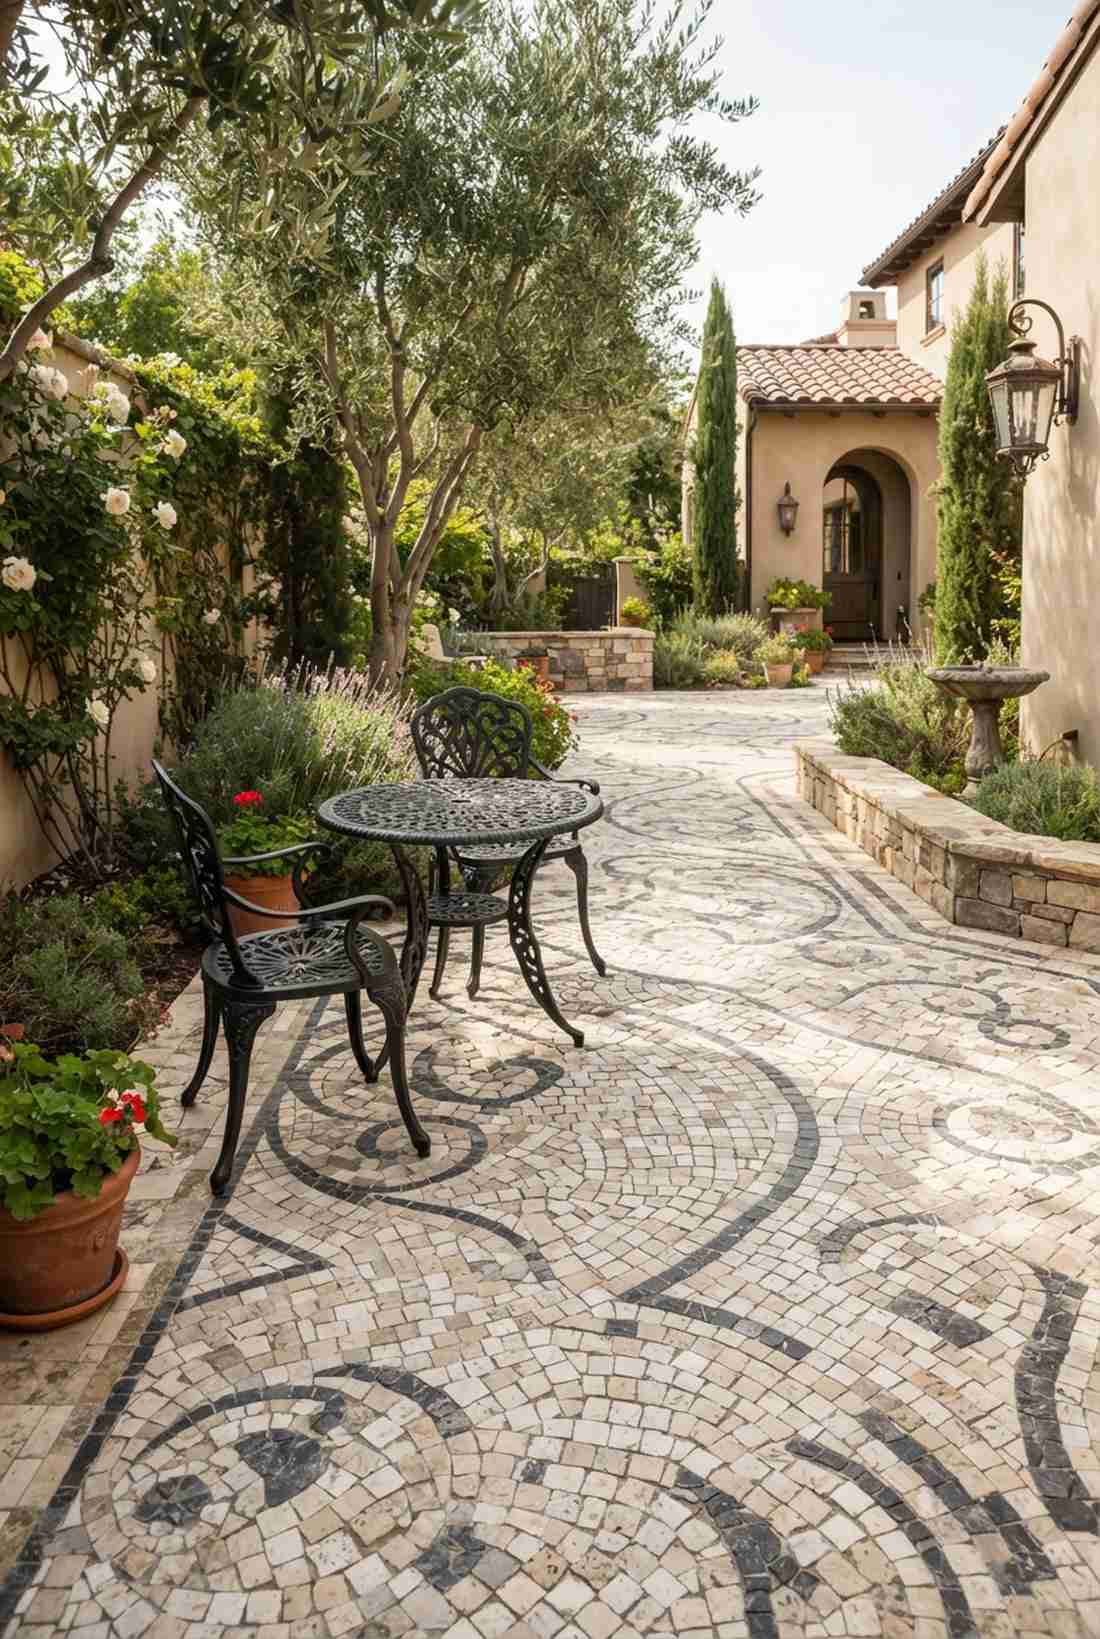
Radiates the rich, textured mystique of an ancient Mediterranean villa courtyard. This cobblestone mosaic patio technique turns boring square concrete pads into literal works of art.
Standard grids are visually exhausting; piecing together tumbled stones hides dirt flawlessly and looks far more expensive than it is. Dropping heavy cast-iron furniture on top completes the bulletproof, historic aesthetic.
Sourcing tumbled stone and mortar runs about $1,200–$2,800.
- Key Materials: Tumbled natural stone pieces, Type-S mortar, cast iron bistro furniture
- Vibe / Style: Old-world artisan
- Difficulty: Tedious artistic masonry
- Budget Breakdown: Tumbled Stone: $1,000 | Mortar/Prep: $300 | Iron Furniture: $500
- Creator’s Tip: Stick to just two color families (like cream and charcoal) to keep the mosaic looking sophisticated rather than chaotic.
- Smart Sourcing: Tumbled marble mosaic paving stones (bulk crate) and rust-proof cast aluminum vintage bistro sets.
Material Guide: Cheap vs. Premium Aesthetic
Knowing exactly where to save and where to spend makes all the difference in achieving that “looks expensive but isn’t” vibe.
- Standard vs. UV-Resistant/Premium: Cheap plastic wicker cracks in one season. Upgrading to high-density polyethylene (HDPE) wicker stops snapping and fading, saving you thousands in replacement costs.
- Pre-made Kits vs. Sourcing Locally: While hauling loose gravel is cheap, utilizing pre-cut pergola kits or interlocking base tiles guarantees precise, architectural-grade alignment without paying a $100/hr carpenter.
Compact Space Solutions
Urban and suburban patios with limited square footage require strategic furniture scaling and space-efficient layouts. Designers specify apartment-scale furniture with reduced depth profiles—sectionals at 32 inches deep rather than standard 38 inches. Wall-mounted and folding elements maximize flexibility while minimizing permanent footprint consumption.
36. Bistro Set in Corner Pocket

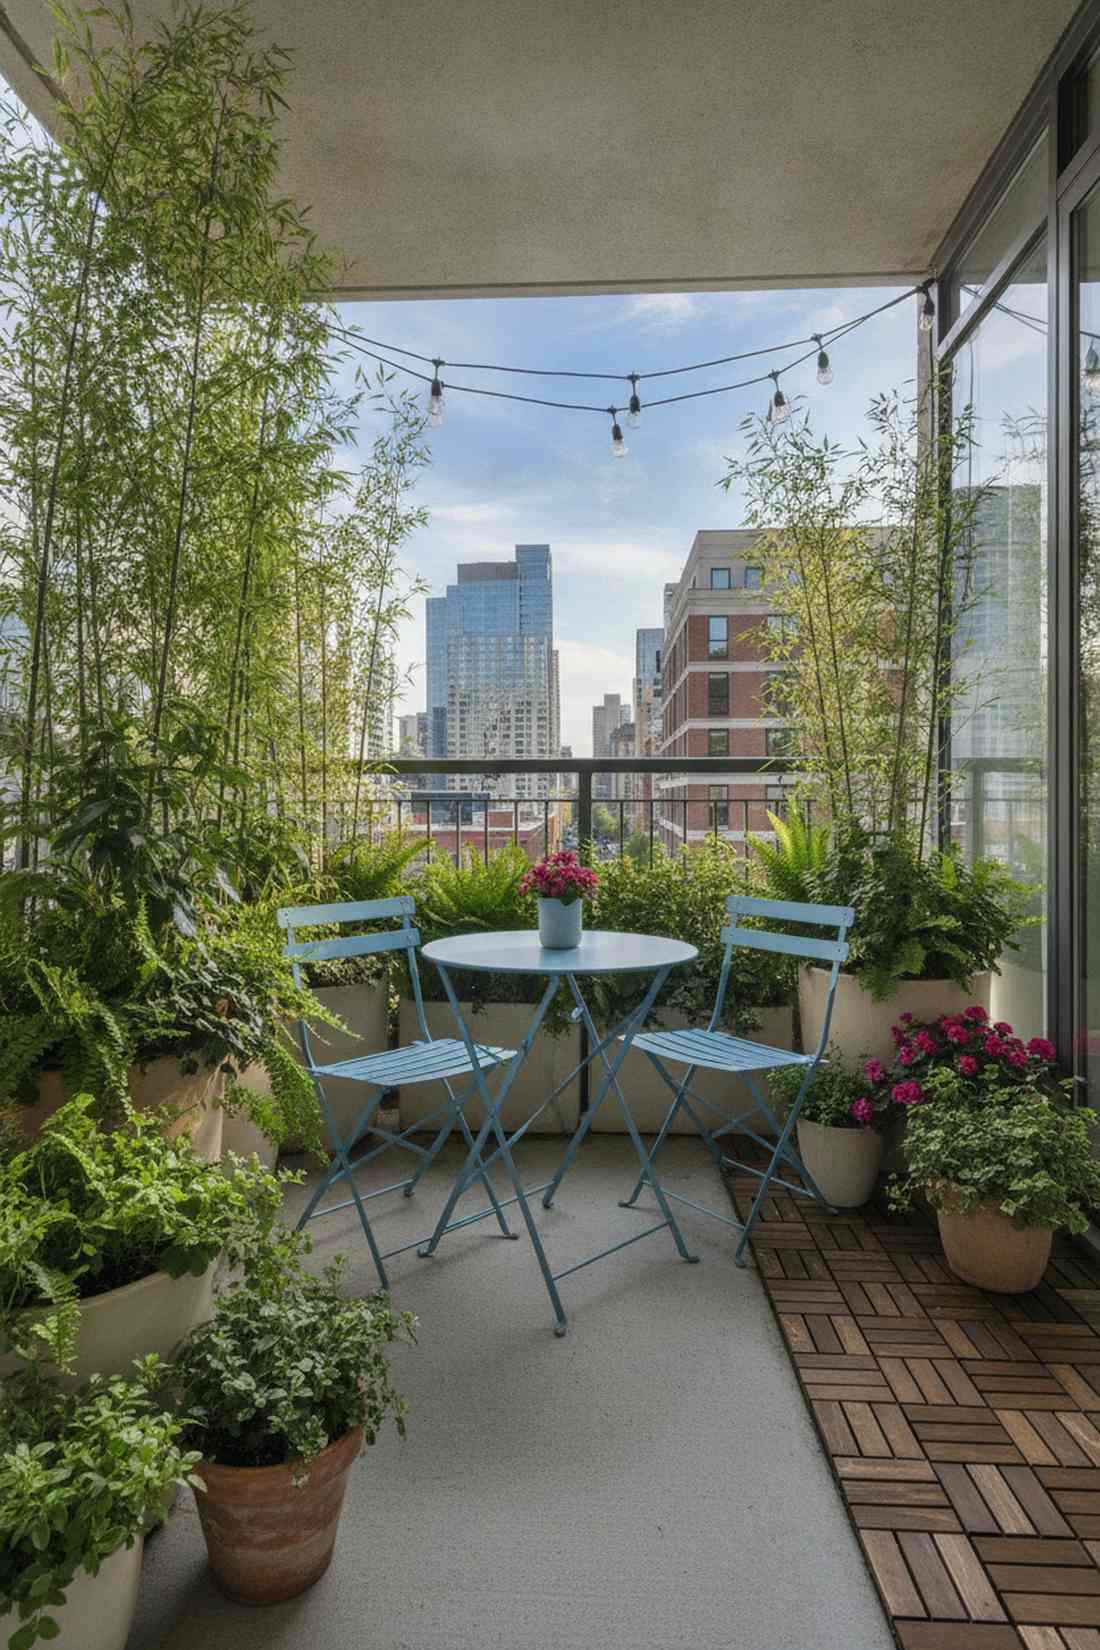
Carries the chic, secretive energy of a tiny European alleyway cafe. This micro outdoor seating for garden setup is the ultimate weapon for tiny 6×6 apartment balconies.
Giant chairs suffocate small spaces; deploying a high-quality folding steel bistro set completely opens up the floorplan. It delivers a surprisingly premium look while allowing you to pack the perimeter with massive, lush planters.
You can easily pull this off for just $150–$300. Save this for your urban balcony makeover!
- Key Materials: 24-inch folding steel table, two folding steel chairs, terracotta planters
- Vibe / Style: Urban botanical chic
- Difficulty: Takes 5 seconds
- Budget Breakdown: Bistro Set: $150 | Planters: $80 | Soil/Plants: $50
- Creator’s Tip: Choose a bright, saturated color for the furniture (like powder blue or yellow) to make the tiny area pop against dull concrete.
- Smart Sourcing: Powder-coated folding steel bistro sets and lightweight fiberglass outdoor planters.
37. Wall-Mounted Fold-Down Table with Stools
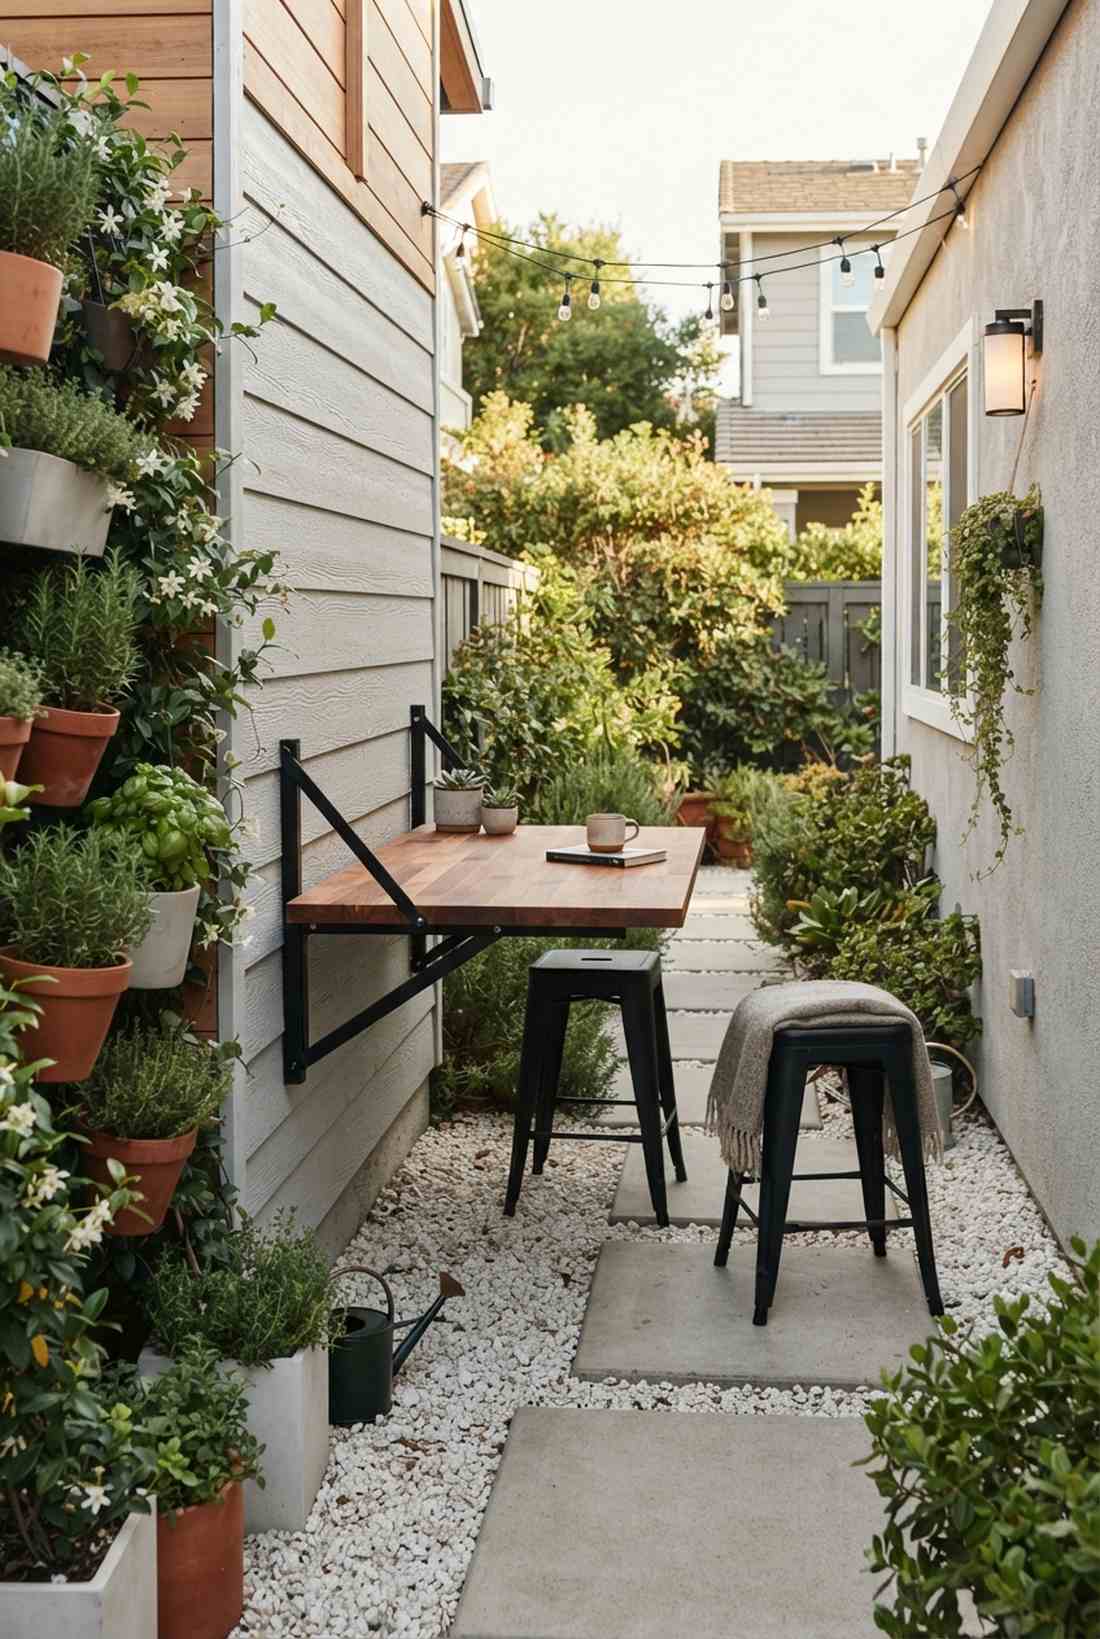
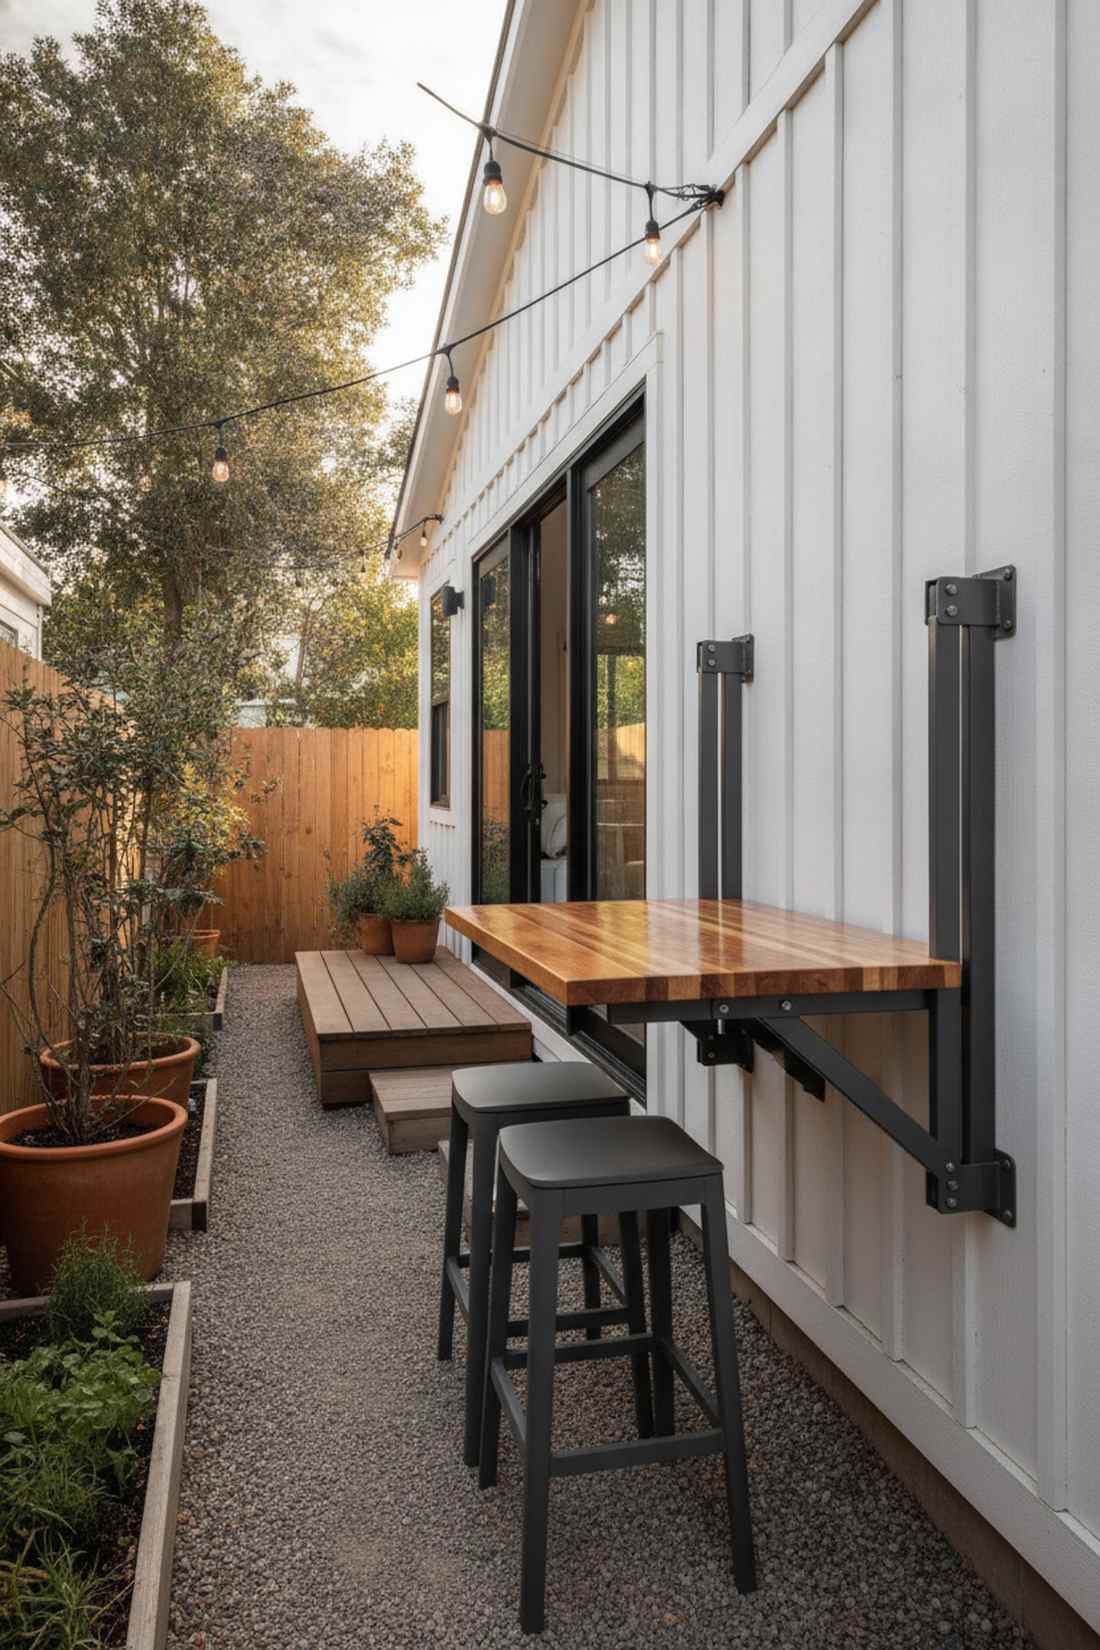
Feels like a clever, bespoke feature in a luxury tiny home. This zero-footprint folding dining trick is an absolute lifesaver for impossibly narrow side yards or Juliet balconies.
Fixed tables trap you; mounting a heavy-duty drop-leaf table to the exterior wall gives a designer-level finish that vanishes when not in use. Pair it with stackable stools to reclaim 100% of your circulation space.
Building this custom wall feature costs a mere $100–$250.
- Key Materials: Exterior-grade butcher block, heavy-duty folding shelf brackets, stackable stools
- Vibe / Style: Minimalist utility
- Difficulty: Simple drill mounting
- Budget Breakdown: Wood Top: $80 | Folding Brackets: $40 | Stools: $80
- Creator’s Tip: Seal the wood heavily with marine varnish and ensure the brackets are rated for at least 300 lbs so leaning on it feels rock-solid.
- Smart Sourcing: Heavy-duty folding wall brackets (500lb rating) and UV-resistant stackable patio stools.
38. Built-In Bench with Lift-Top Storage
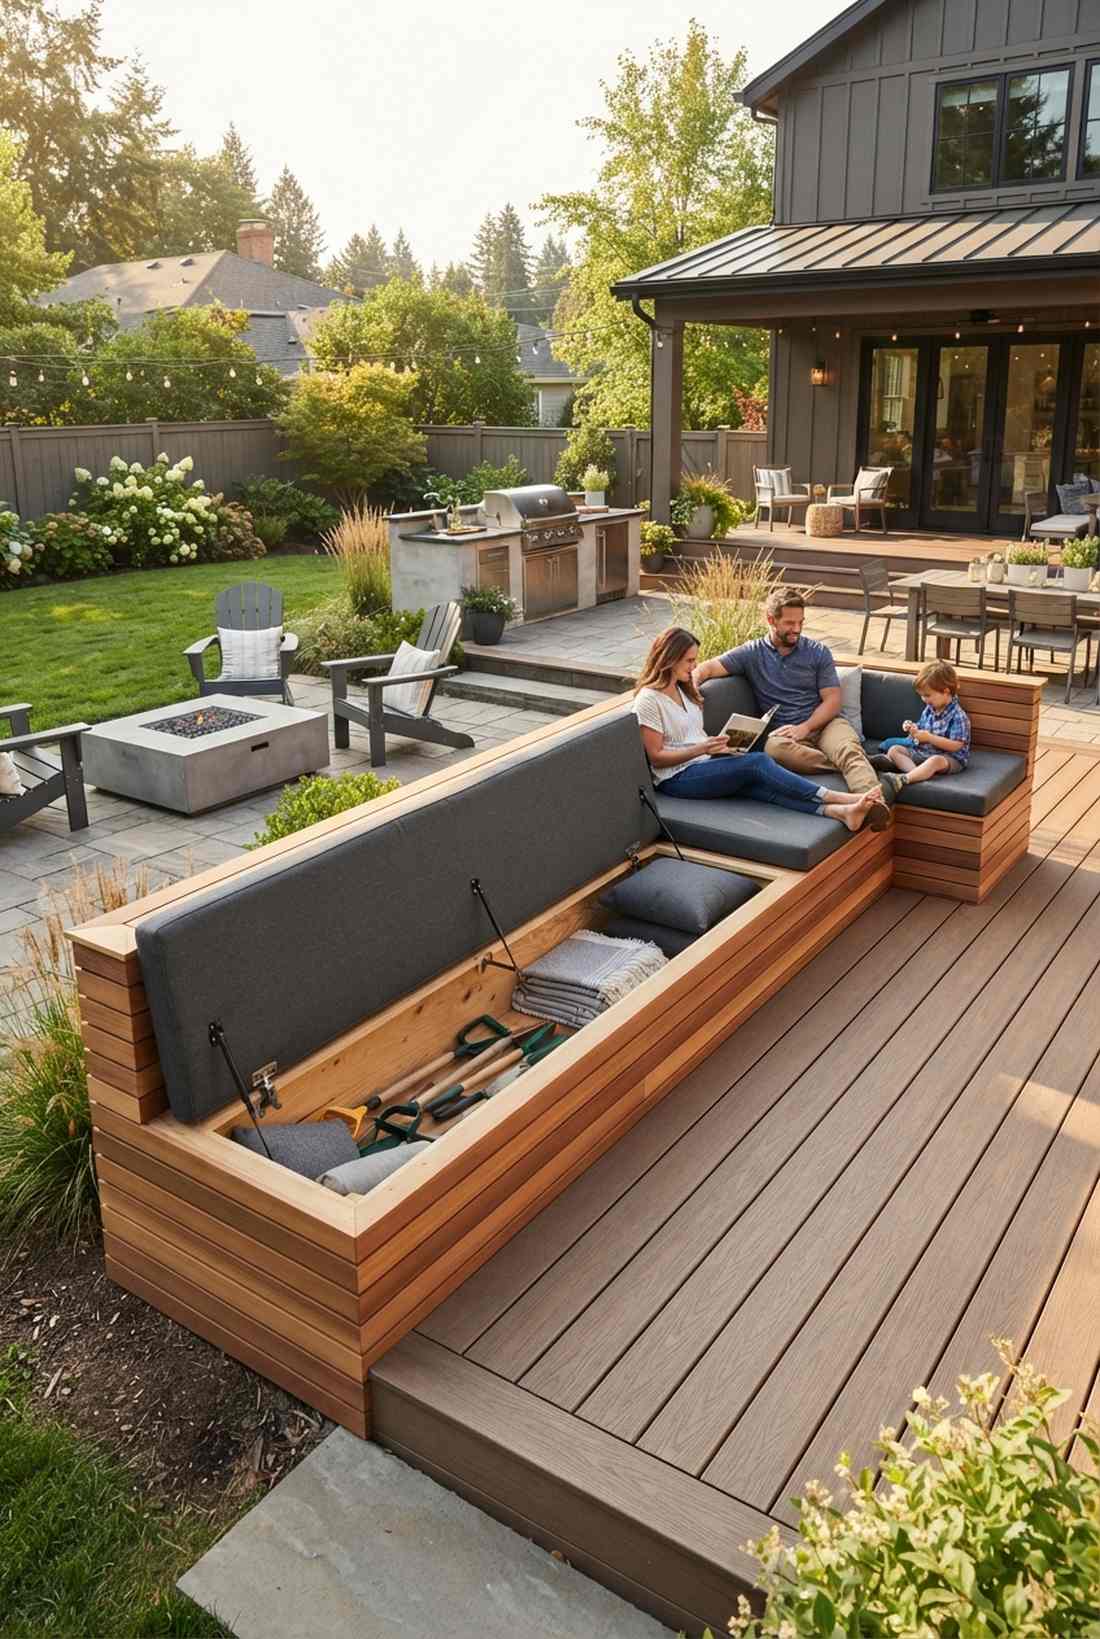
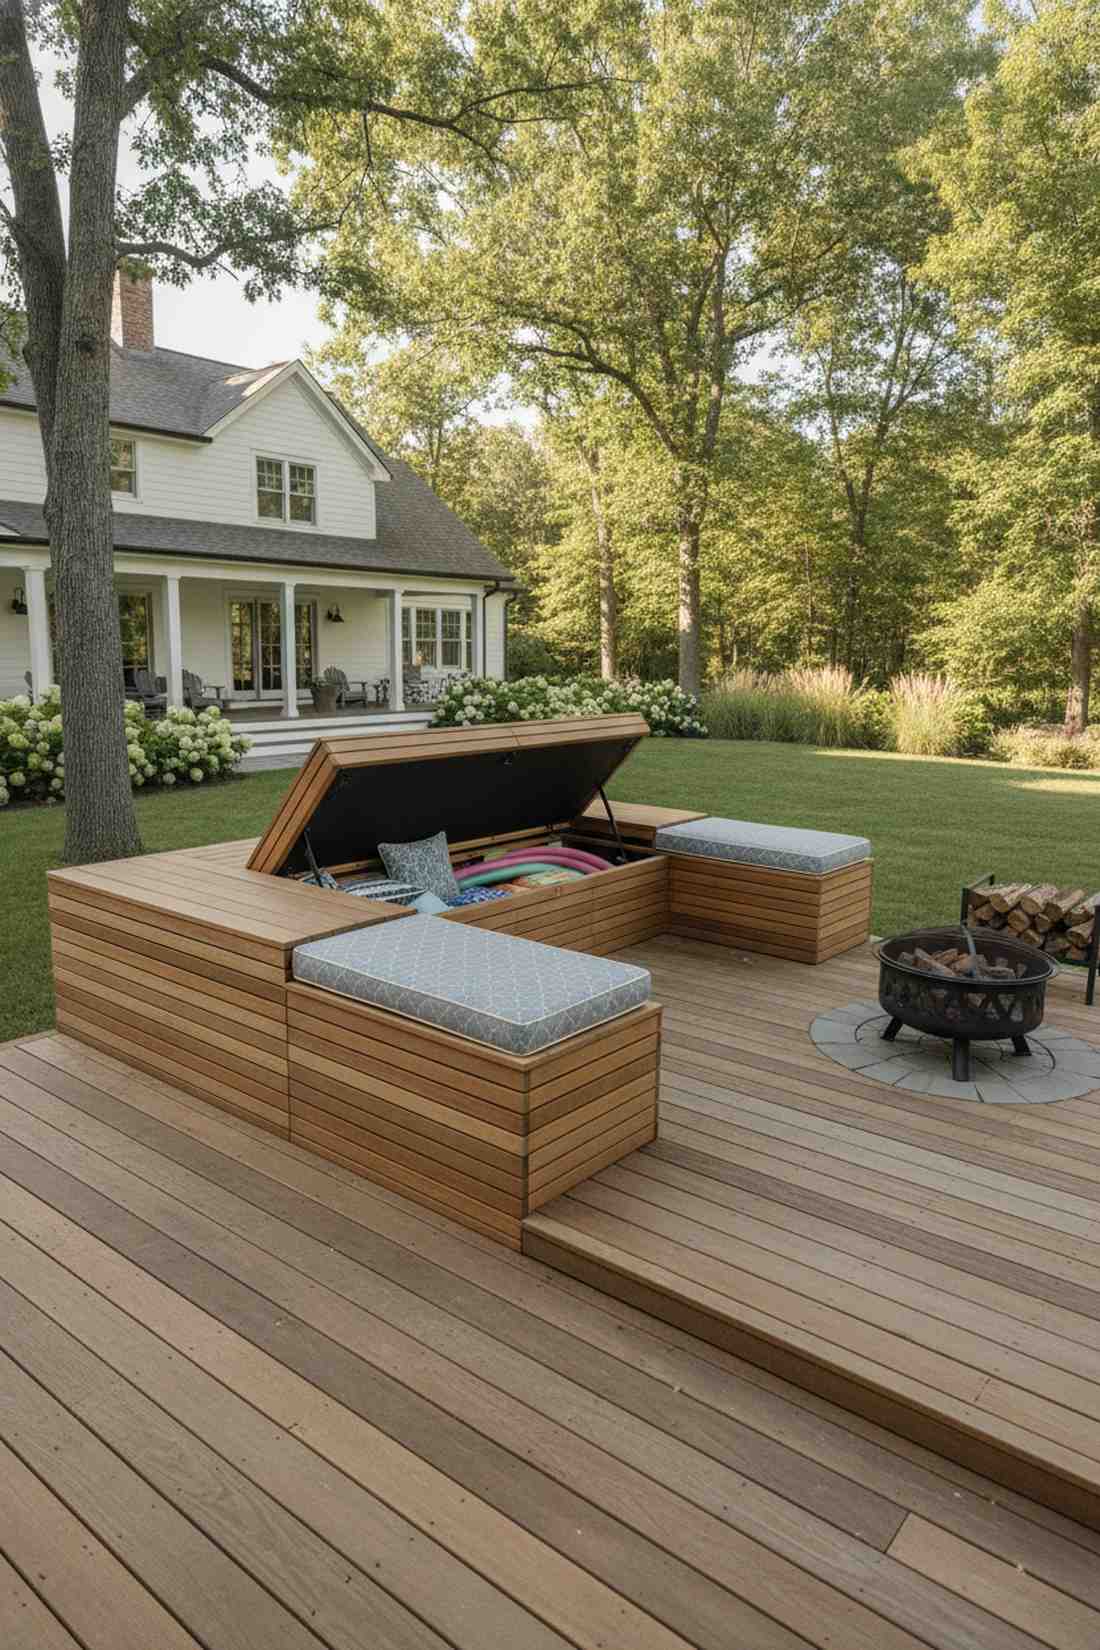
Offers the clean, flush utility of custom cabinetry brought into the sunlight. This dual-purpose patio perimeter seating hides massive amounts of clutter while seating a crowd.
Ugly plastic deck boxes ruin aesthetics; building the storage directly into the seating frame looks far more expensive than it is. Wrapping the exterior in horizontal slat-wood gives it a sleek, modern architectural face.
Lumber and hinges for this project run about $250–$500. Pin this if you desperately need outdoor storage!
- Key Materials: Plywood base, cedar facing slats, heavy-duty lid stays, custom cushions
- Vibe / Style: Integrated modern utility
- Difficulty: Intermediate woodworking
- Budget Breakdown: Wood/Materials: $200 | Lid Hardware: $50 | Cushion: $150
- Creator’s Tip: Drill several 1-inch ventilation holes in the bottom panel to ensure damp cushions don’t grow mildew while locked inside.
- Smart Sourcing: Soft-close heavy-duty lid support hinges and custom-sized waterproof bench cushions.
39. Vertical Wall Garden with Slim Seating
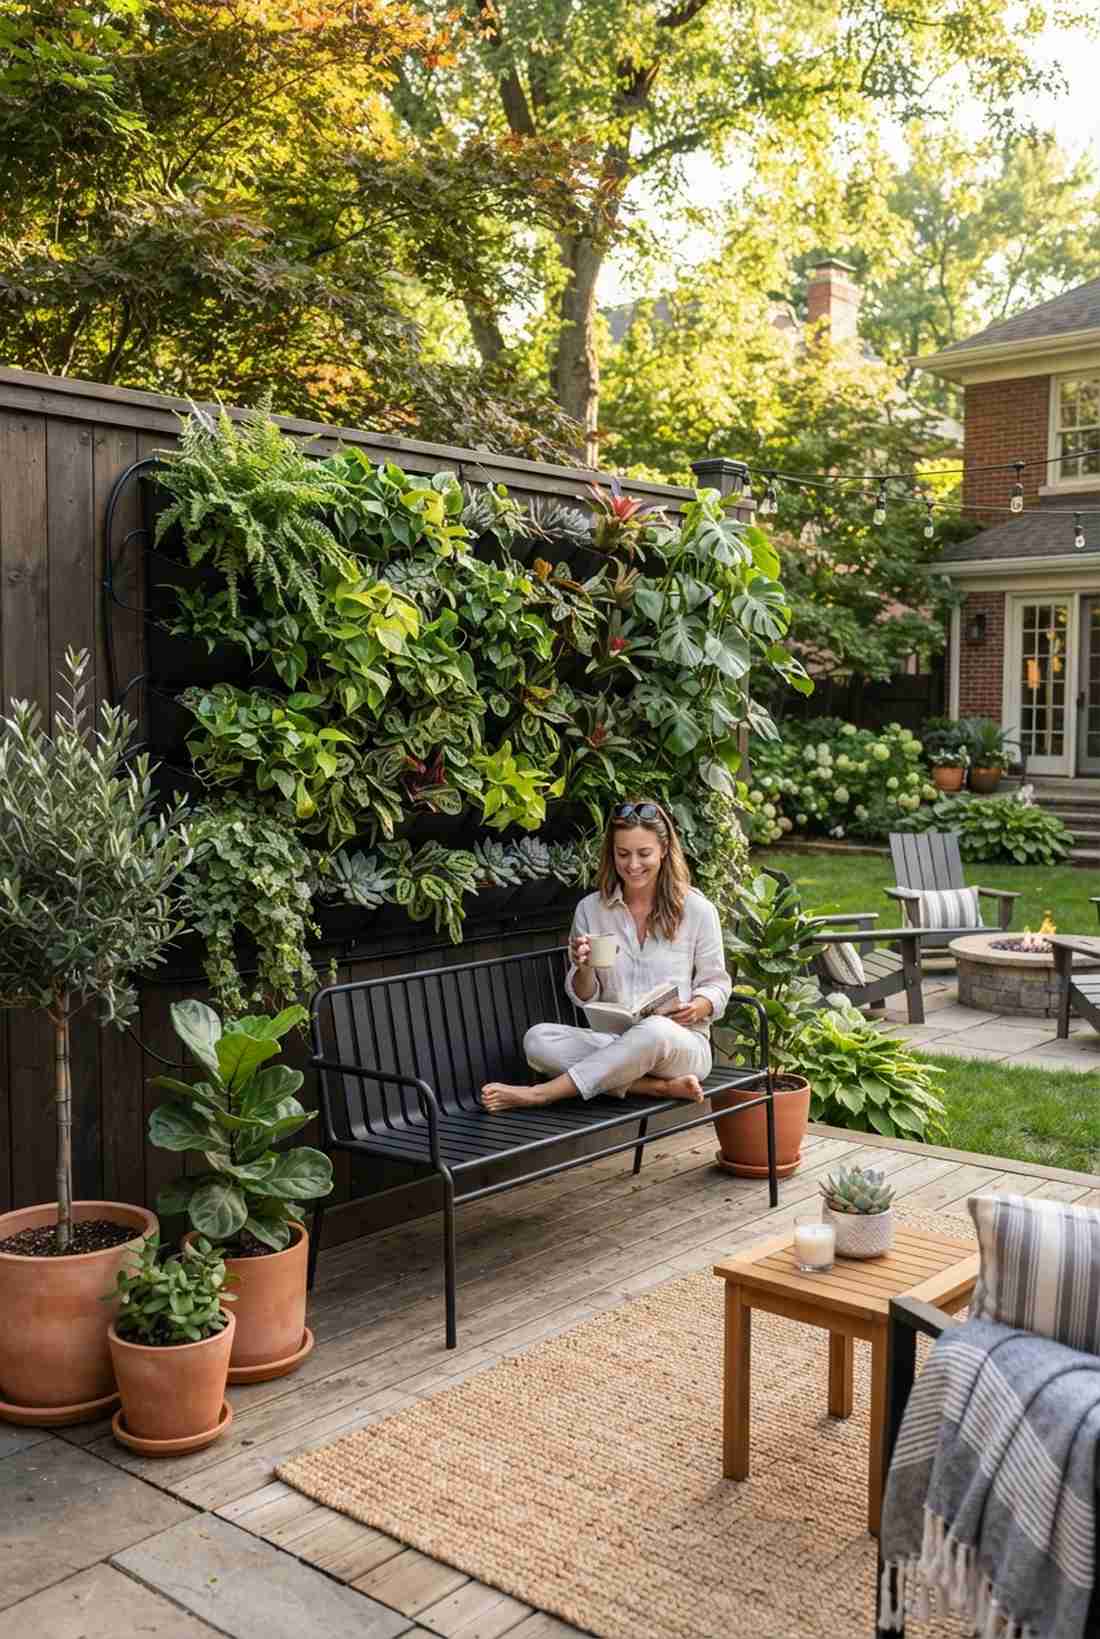
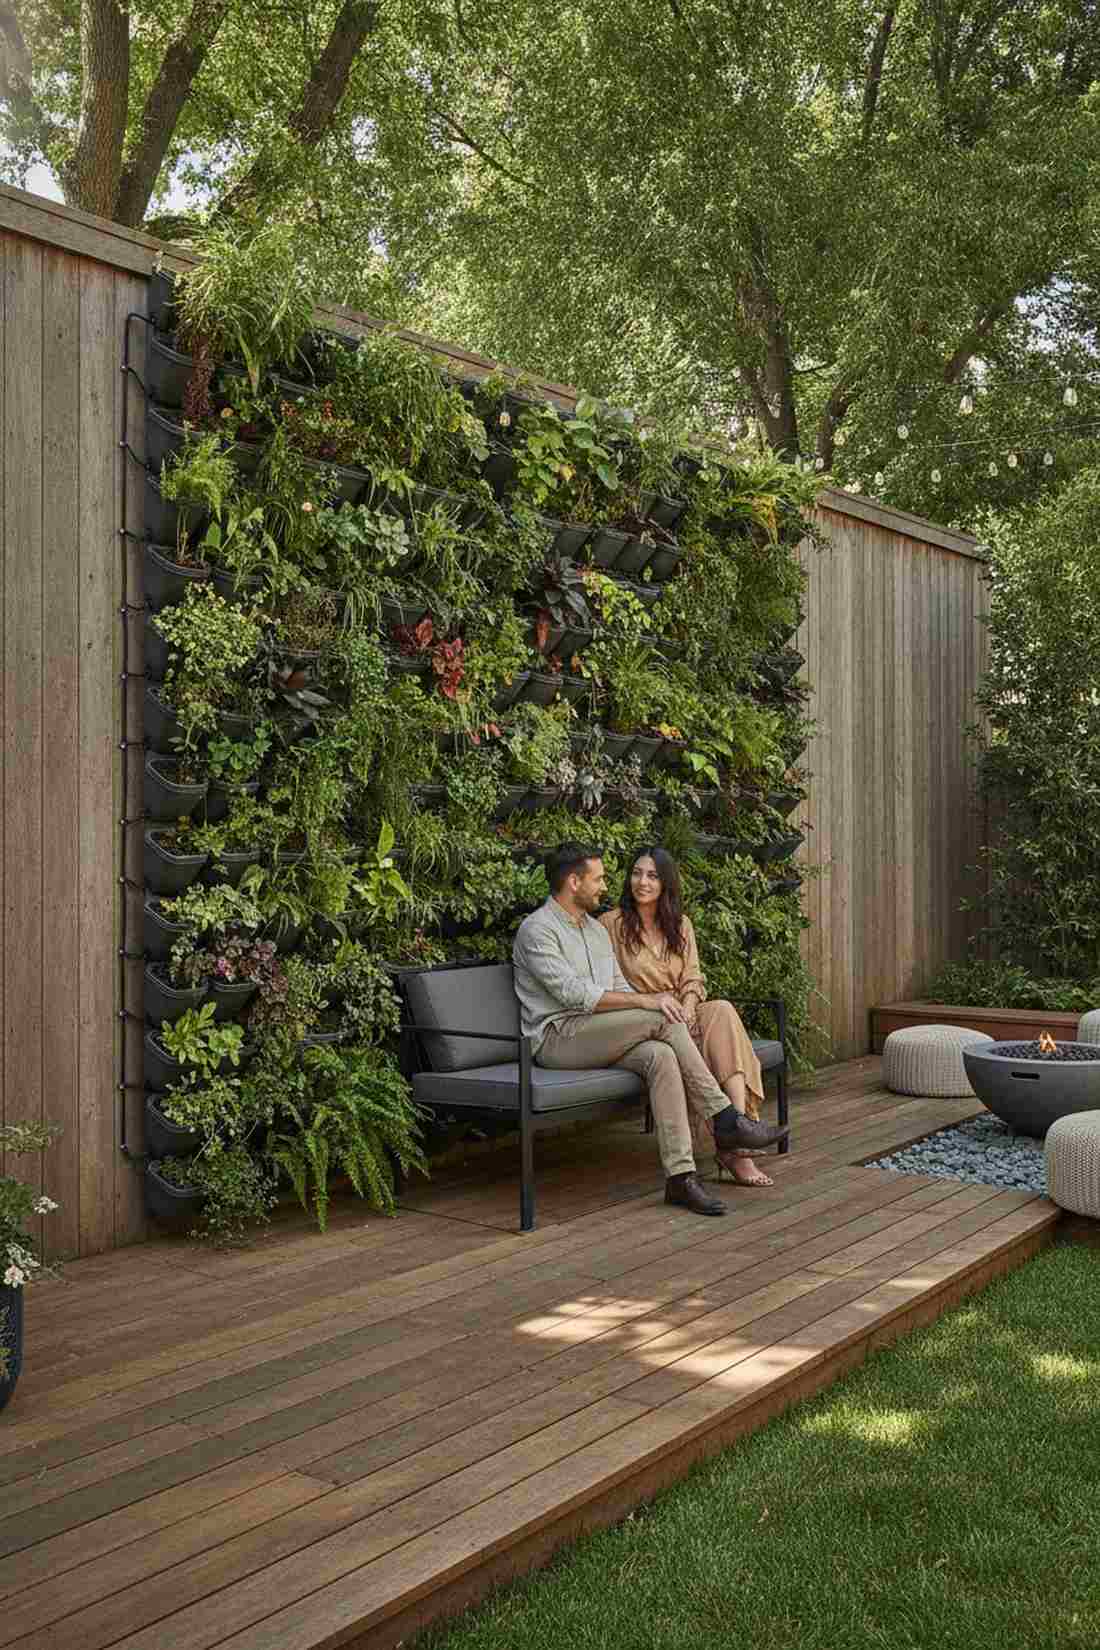
Creates the immersive feeling of sitting deep inside a private jungle ravine. This vertical botanical patio arrangement dominates bare, ugly privacy fences by pulling the landscape directly upward.
Pots eat up valuable deck space; mounting modular planters vertically delivers a surprisingly premium look that makes small patios feel massively tall. Tuck a sleek, 14-inch deep bench underneath so guests are enveloped in greenery.
A full vertical garden and slim bench combo costs $300–$800.
- Key Materials: Modular vertical wall planters, slim-profile metal bench, drip irrigation tubing
- Vibe / Style: Immersive urban oasis
- Difficulty: Moderate (requires irrigation planning)
- Budget Breakdown: Wall Planters: $150 | Bench: $250 | Plants/Irrigation: $200
- Creator’s Tip: You must install an automatic drip line; hand-watering vertical walls is messy and guarantees the top plants die of thirst.
- Smart Sourcing: Self-watering vertical garden wall planter kits and slim-profile modern outdoor benches.
Most small-patio owners completely ignore the sky… this next hanging trick doubles your usable space.
40. Hanging Chair Cluster Without Floor Furniture
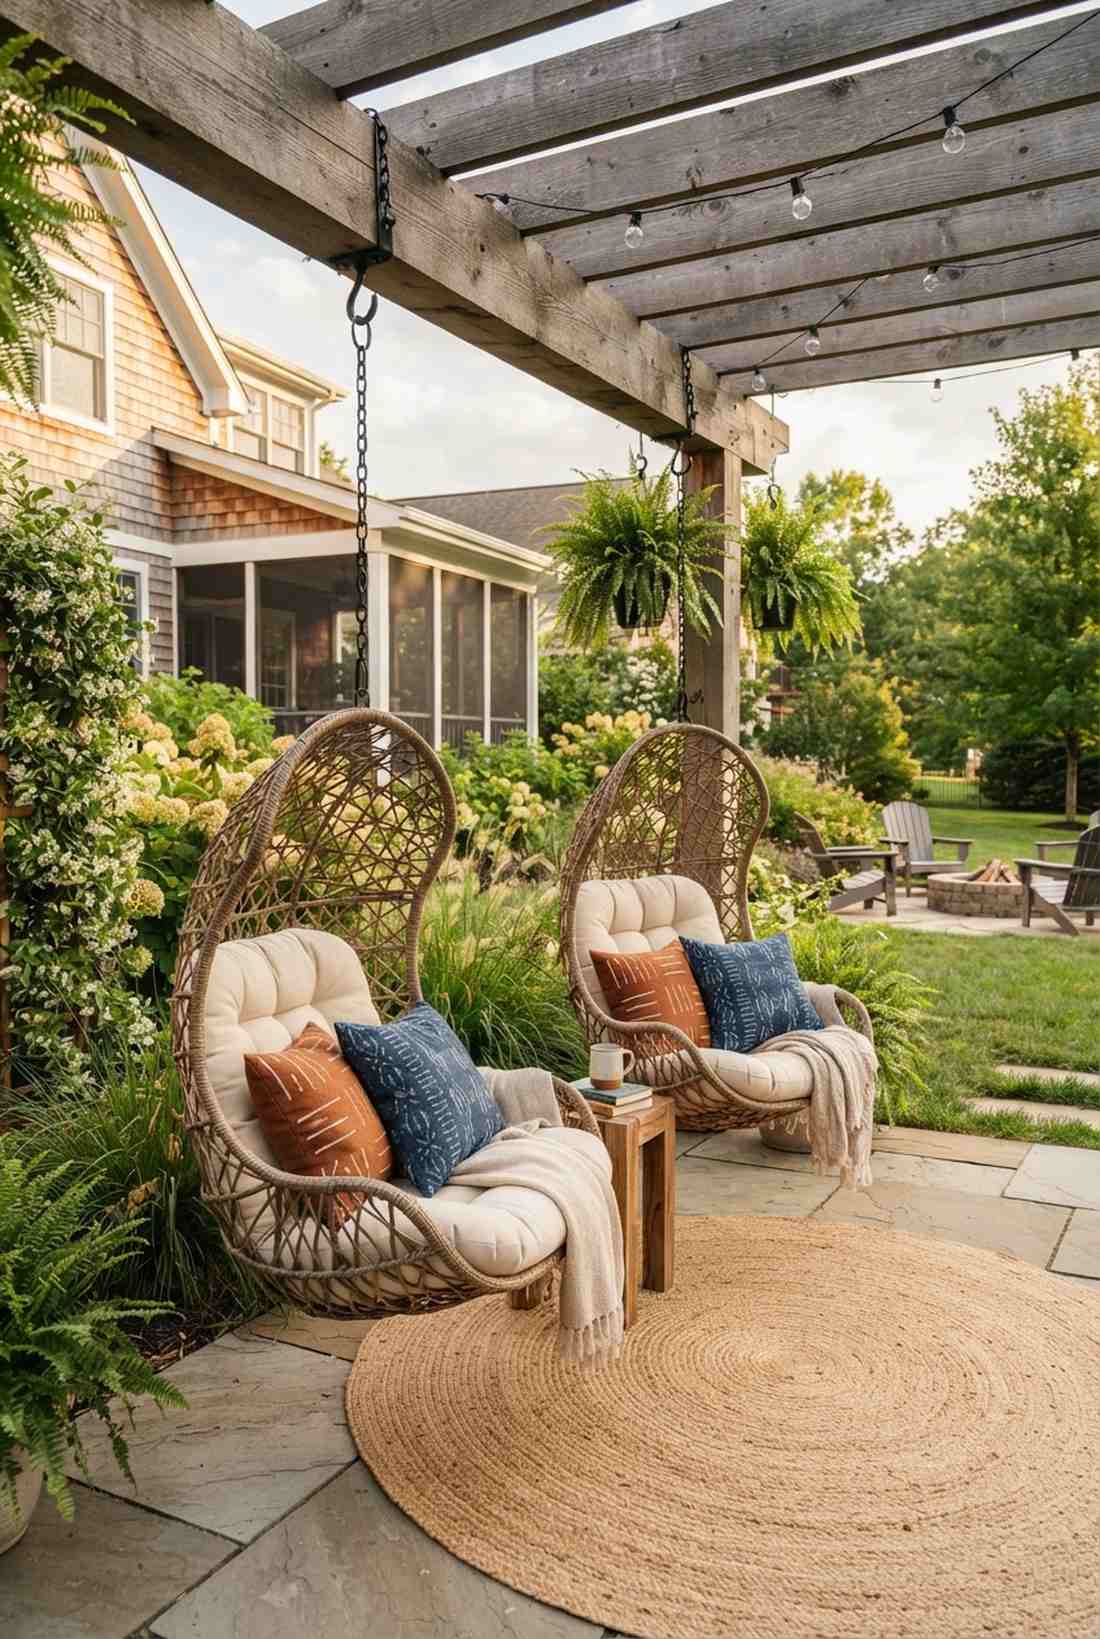
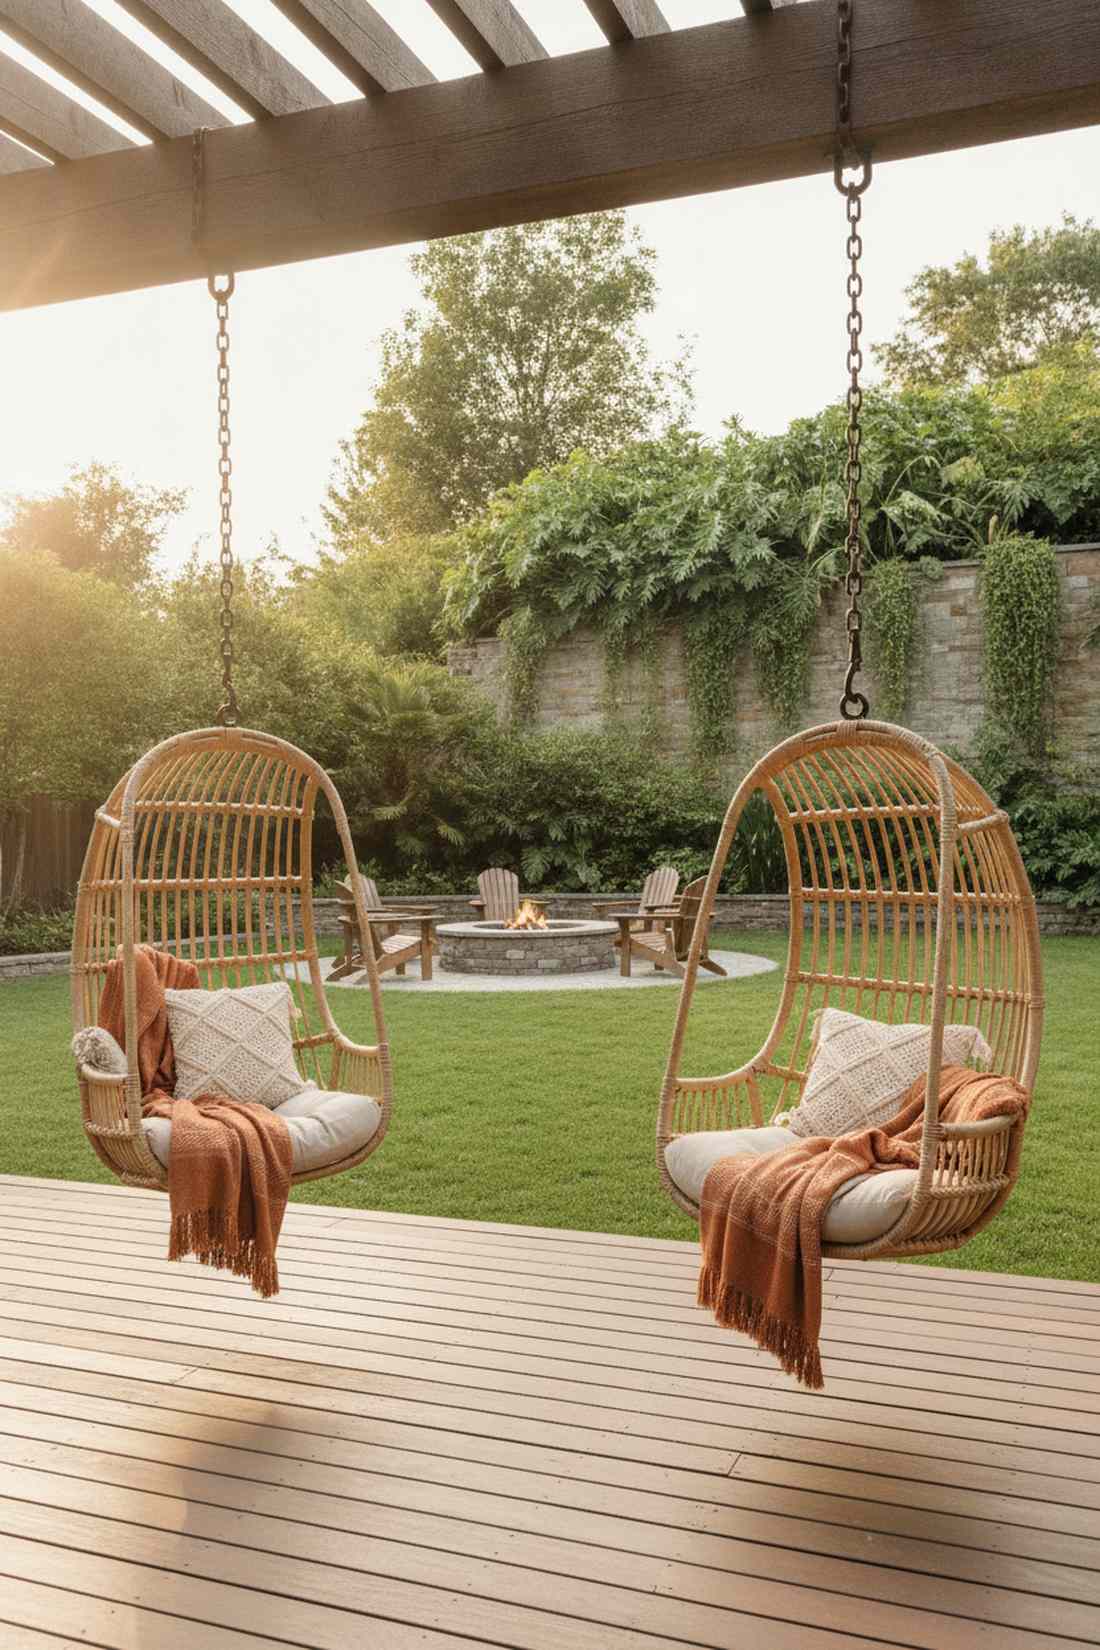
Exudes the weightless, bohemian luxury of a cliffside Tulum eco-resort. This suspended outdoor seating for garden setup is a genius way to leave the ground completely uncluttered.
Bulky chair legs trip up small spaces; floating the furniture from structural beams gives a designer-level finish that visually expands the floor. The gentle swinging motion instantly forces guests into a relaxed, vacation mindset.
Two premium hanging chairs and hardware run around $400–$900. Save this to your relaxing sanctuary board!
- Key Materials: Woven egg chairs, heavy-gauge steel chains, overhead structural beam
- Vibe / Style: Floating bohemian retreat
- Difficulty: Needs heavy structural overhead support
- Budget Breakdown: Hanging Chairs (x2): $500 | Hardware: $100 | Accent Pillows: $50
- Creator’s Tip: If you don’t have a pergola beam, buy hanging chairs that come with their own heavy C-stands to get the exact same look.
- Smart Sourcing: All-weather wicker teardrop hanging chairs and heavy-duty hammock chair swivel hooks.
41. Stackable Stools Around Bar Ledge
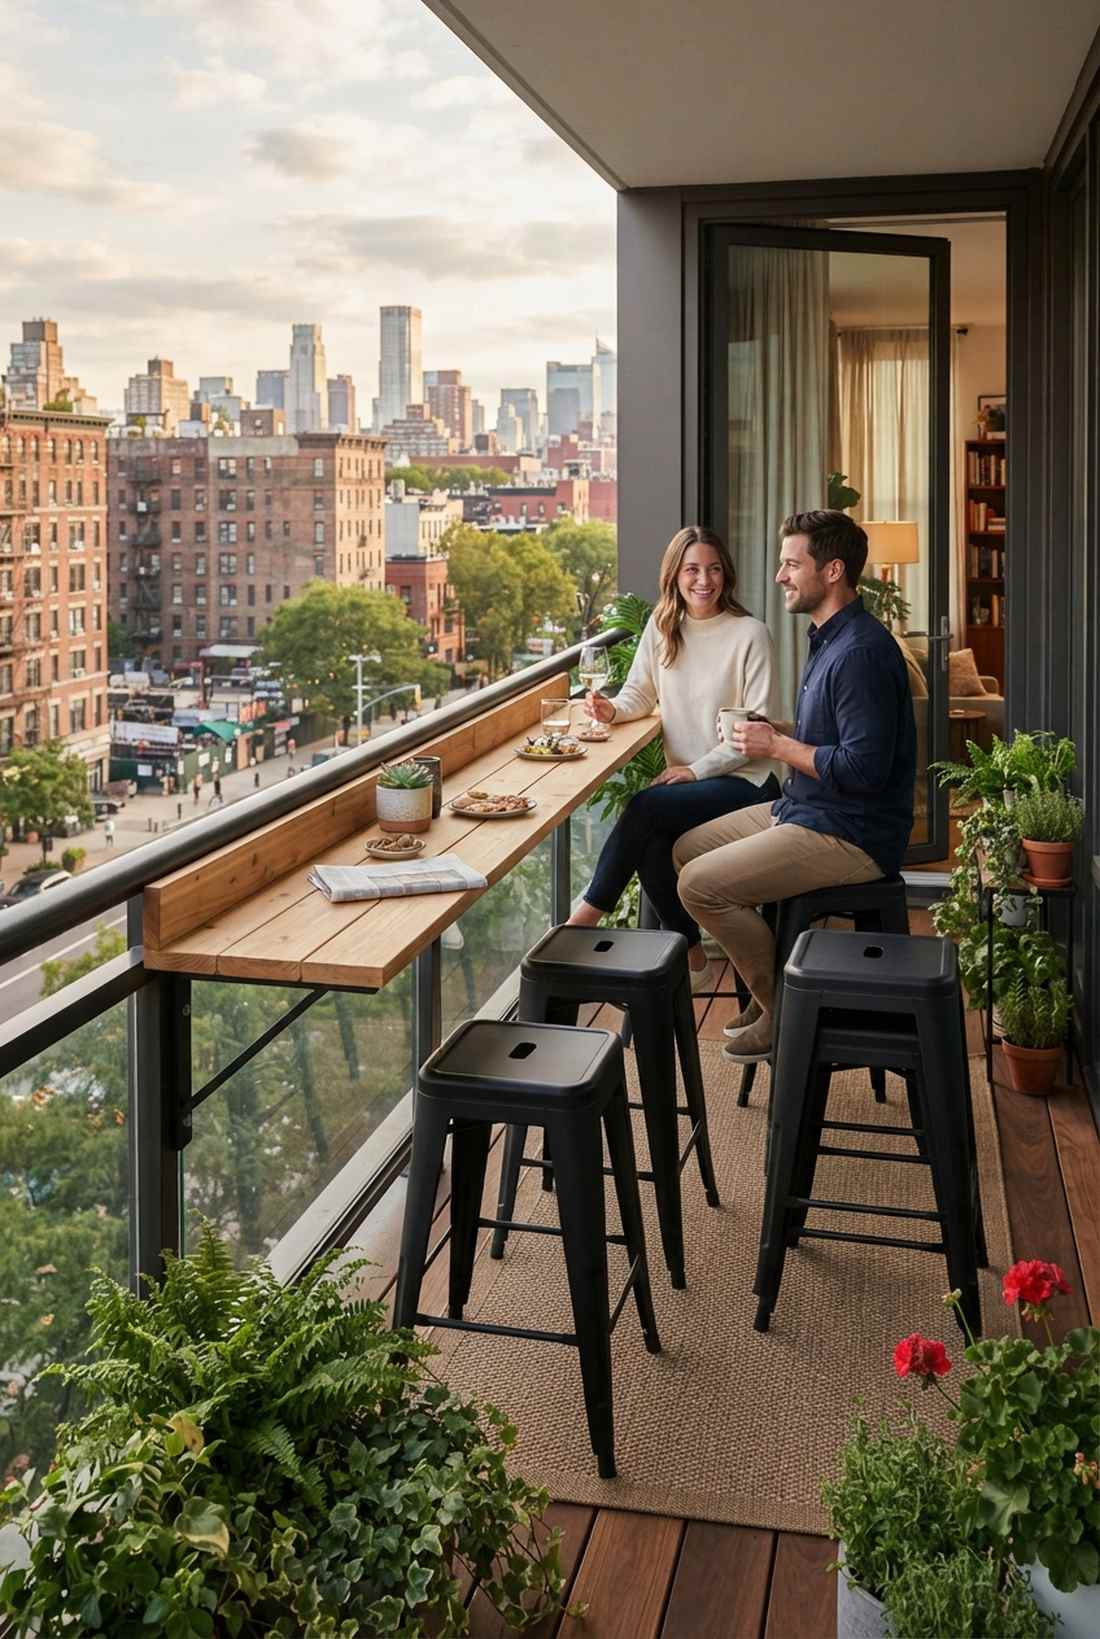
Mimics the slick, hyper-efficient layout of a high-end sushi bar. This cantilevered dining ledge design works absolute miracles on narrow balconies measuring less than 4 feet deep.
Standard tables block the balcony door entirely; bolting a 12-inch floating ledge to the railing looks far more expensive than it is. Using stackable stools means you can clear the entire deck in 10 seconds flat.
You can execute this ultra-slim dining hack for $150–$350.
- Key Materials: Sealed wood plank, heavy-duty railing brackets, stackable metal stools
- Vibe / Style: Ultra-slim urban viewing
- Difficulty: Simple bolting
- Budget Breakdown: Ledge Material: $80 | Brackets: $50 | Stools (x2): $100
- Creator’s Tip: Ensure the ledge height is exactly 42 inches from the deck floor to match standard bar stools perfectly.
- Smart Sourcing: Balcony railing hanging folding tables and stackable powder-coated bar stools (set of 4).
Level Change Strategies
Sloped sites present challenges that skilled landscape architects transform into design assets through level manipulation. Terraced patios create multiple outdoor rooms at different elevations, each with distinct exposure and view angles. Retaining wall systems in natural stone, segmental block, or poured concrete hold grade changes while providing integrated seating opportunities.
42. Terraced Patios with Connecting Stairs
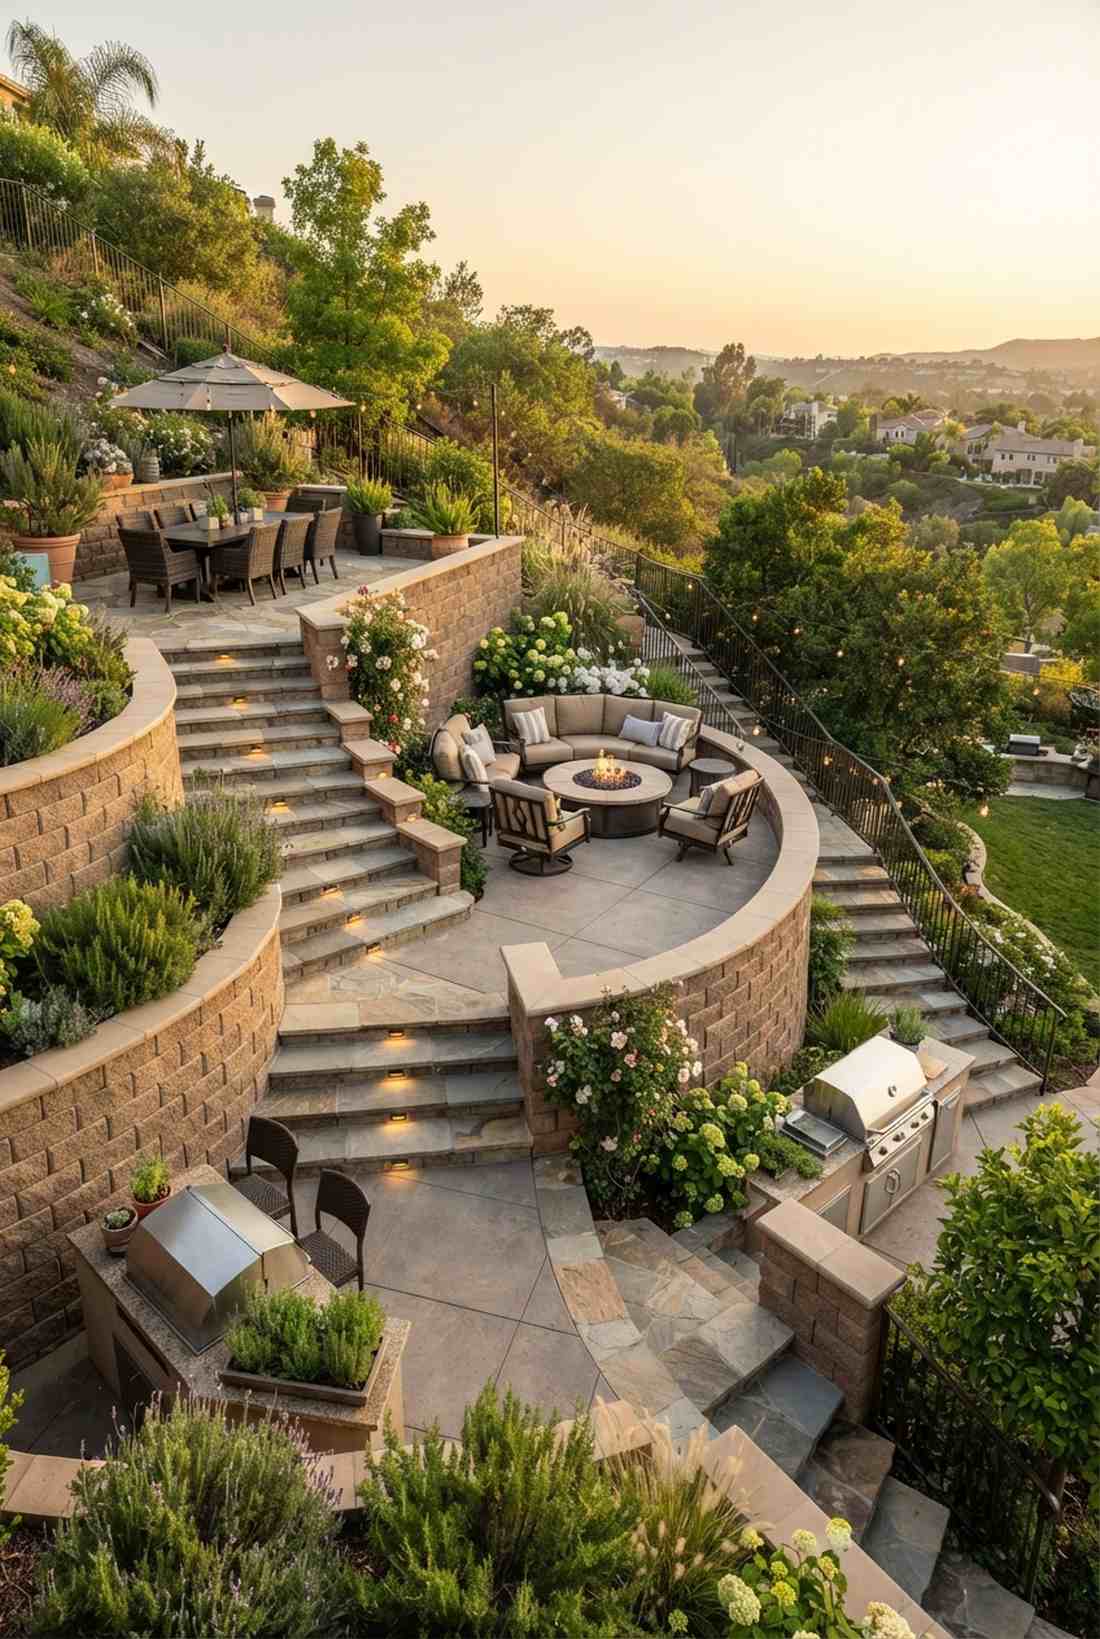
Feels like a sprawling Mediterranean hillside vineyard. This multi-level terraced patio configuration completely neutralizes the nightmare of unusable, steeply sloped backyards.
Trying to flatten a hill costs a fortune; carving out 3 distinct stepped zones delivers a surprisingly premium look with far less soil removal. Each level becomes an exclusive, dedicated room—dining up top, firepit down below.
Major retaining walls and terracing usually cost $6,000–$15,000+. Pin this if your yard feels like a ski slope!
- Key Materials: Segmental retaining blocks, wide stone steps, varied paving materials
- Vibe / Style: Grand hillside architecture
- Difficulty: Heavy machinery contractor needed
- Budget Breakdown: Retaining Walls: $5,000 | Grading: $2,000 | Pavers/Steps: $4,000
- Creator’s Tip: Cap the retaining walls with smooth, 14-inch wide stones so they double as massive amphitheater-style seating for large parties.
- Smart Sourcing: Interlocking segmental retaining wall blocks (pallet) and pre-cut stone wall caps.
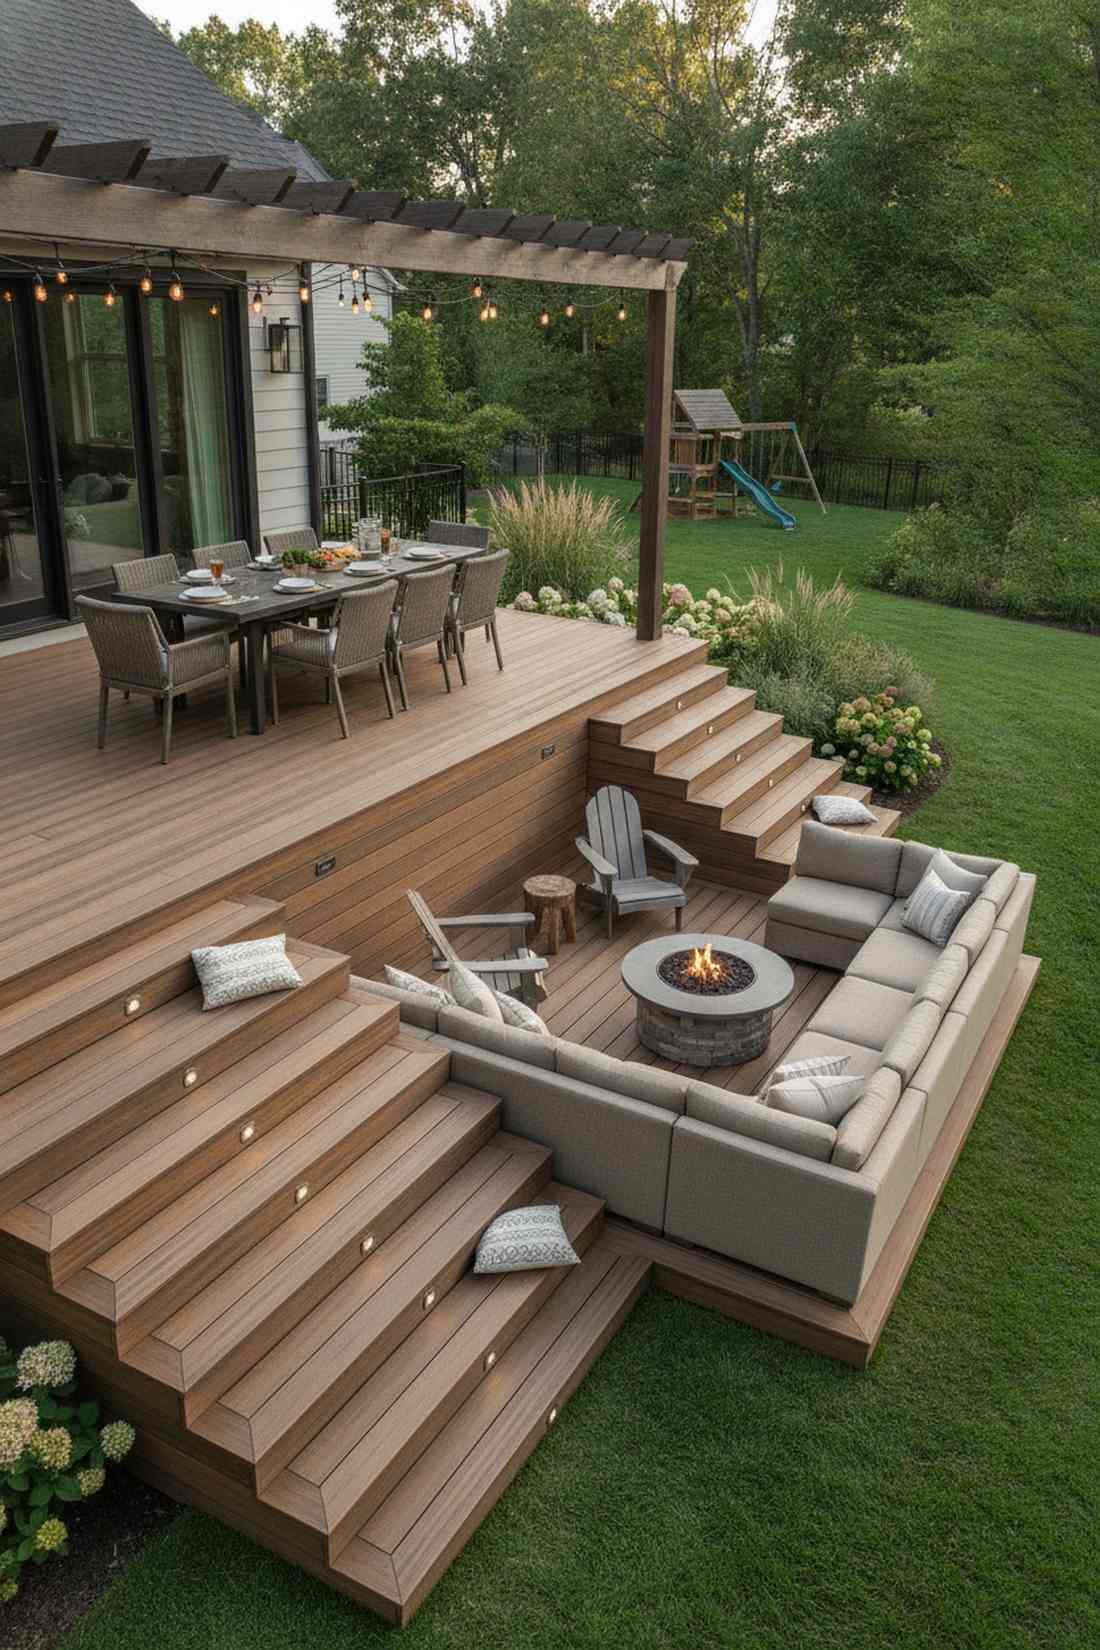
43. Raised Deck Overlooking Sunken Patio
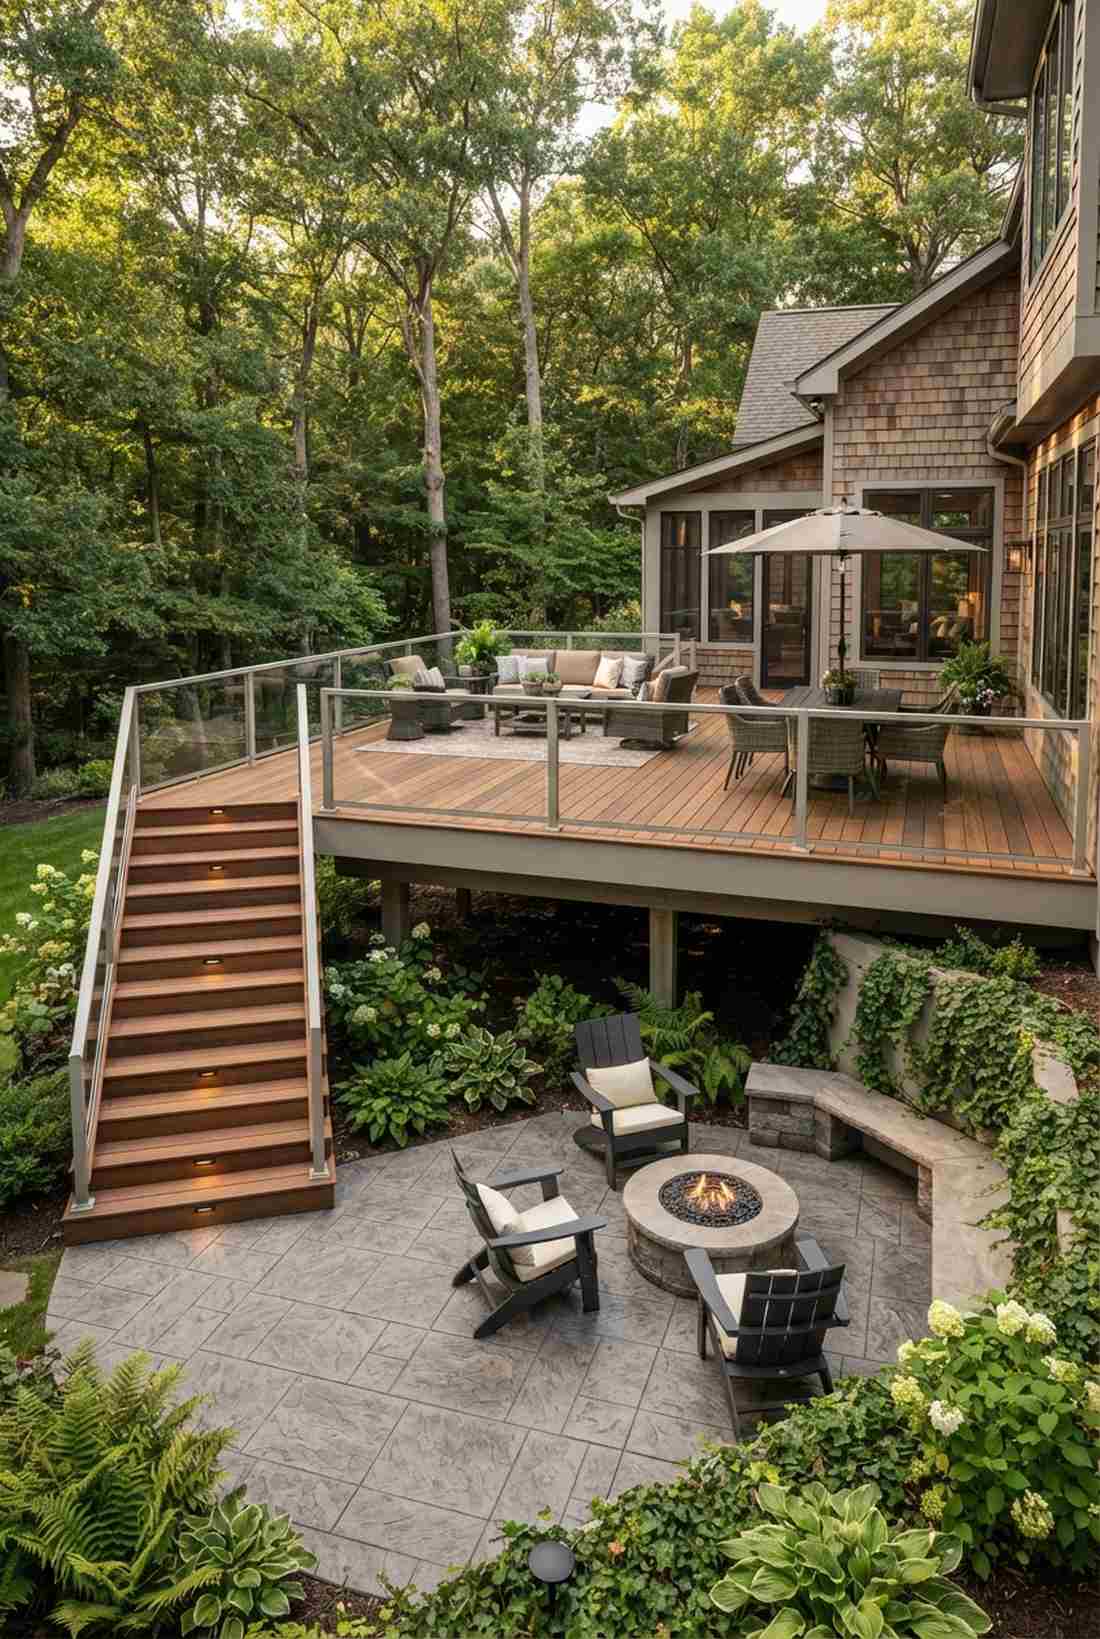
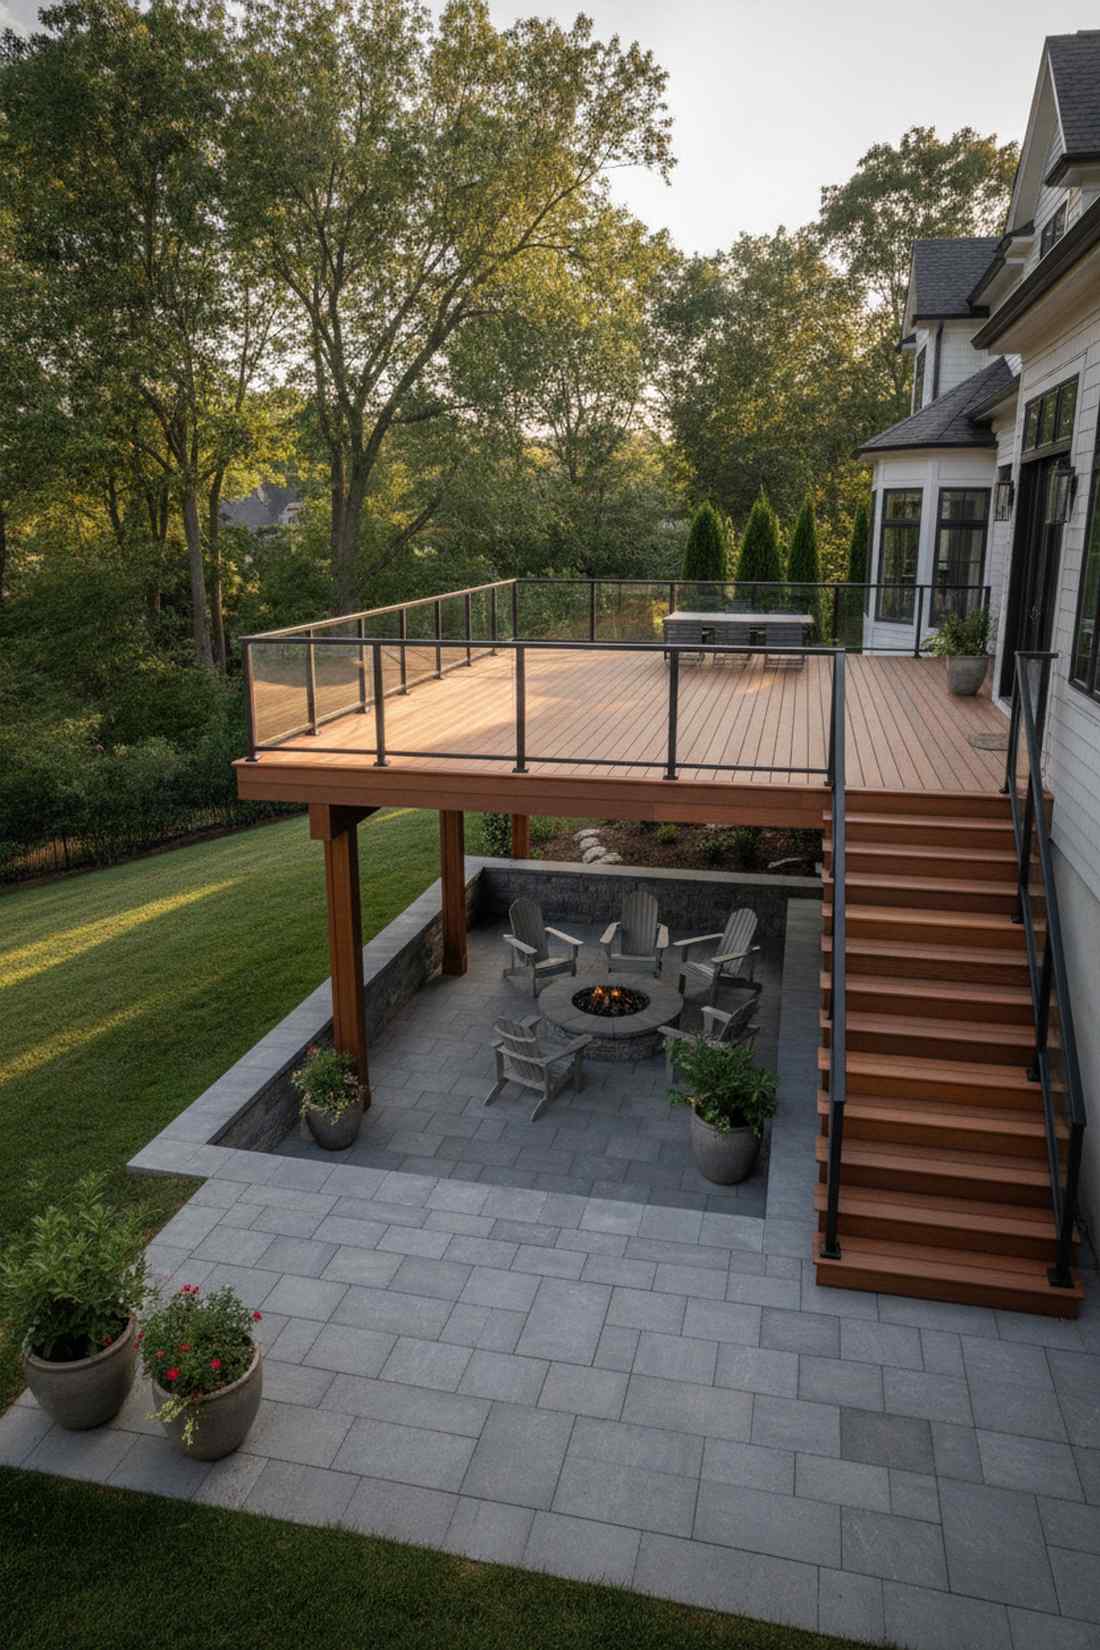
Radiates the dramatic visual impact of a luxury treehouse overlooking a private grotto. This split-elevation outdoor layout creates brilliant contrast between soaring views and sheltered intimacy.
A single massive deck feels completely exposed; transitioning from a raised wooden platform down into a stone patio gives a designer-level finish. The lower level inherently blocks nosy neighbors and harsh winds.
A combo deck and stone patio build ranges from $5,000–$12,000.
- Key Materials: Elevated composite deck, transitional stair system, ground-level stone pavers
- Vibe / Style: Dynamic split-level luxury
- Difficulty: Advanced multi-trade build
- Budget Breakdown: Upper Deck: $4,000 | Stairs: $1,000 | Lower Patio: $3,000
- Creator’s Tip: Use vastly different materials for each zone—warm wood up top and cool grey stone below—to emphasize the architectural separation.
- Smart Sourcing: Aluminum glass deck railing kits and large-format concrete patio pavers.
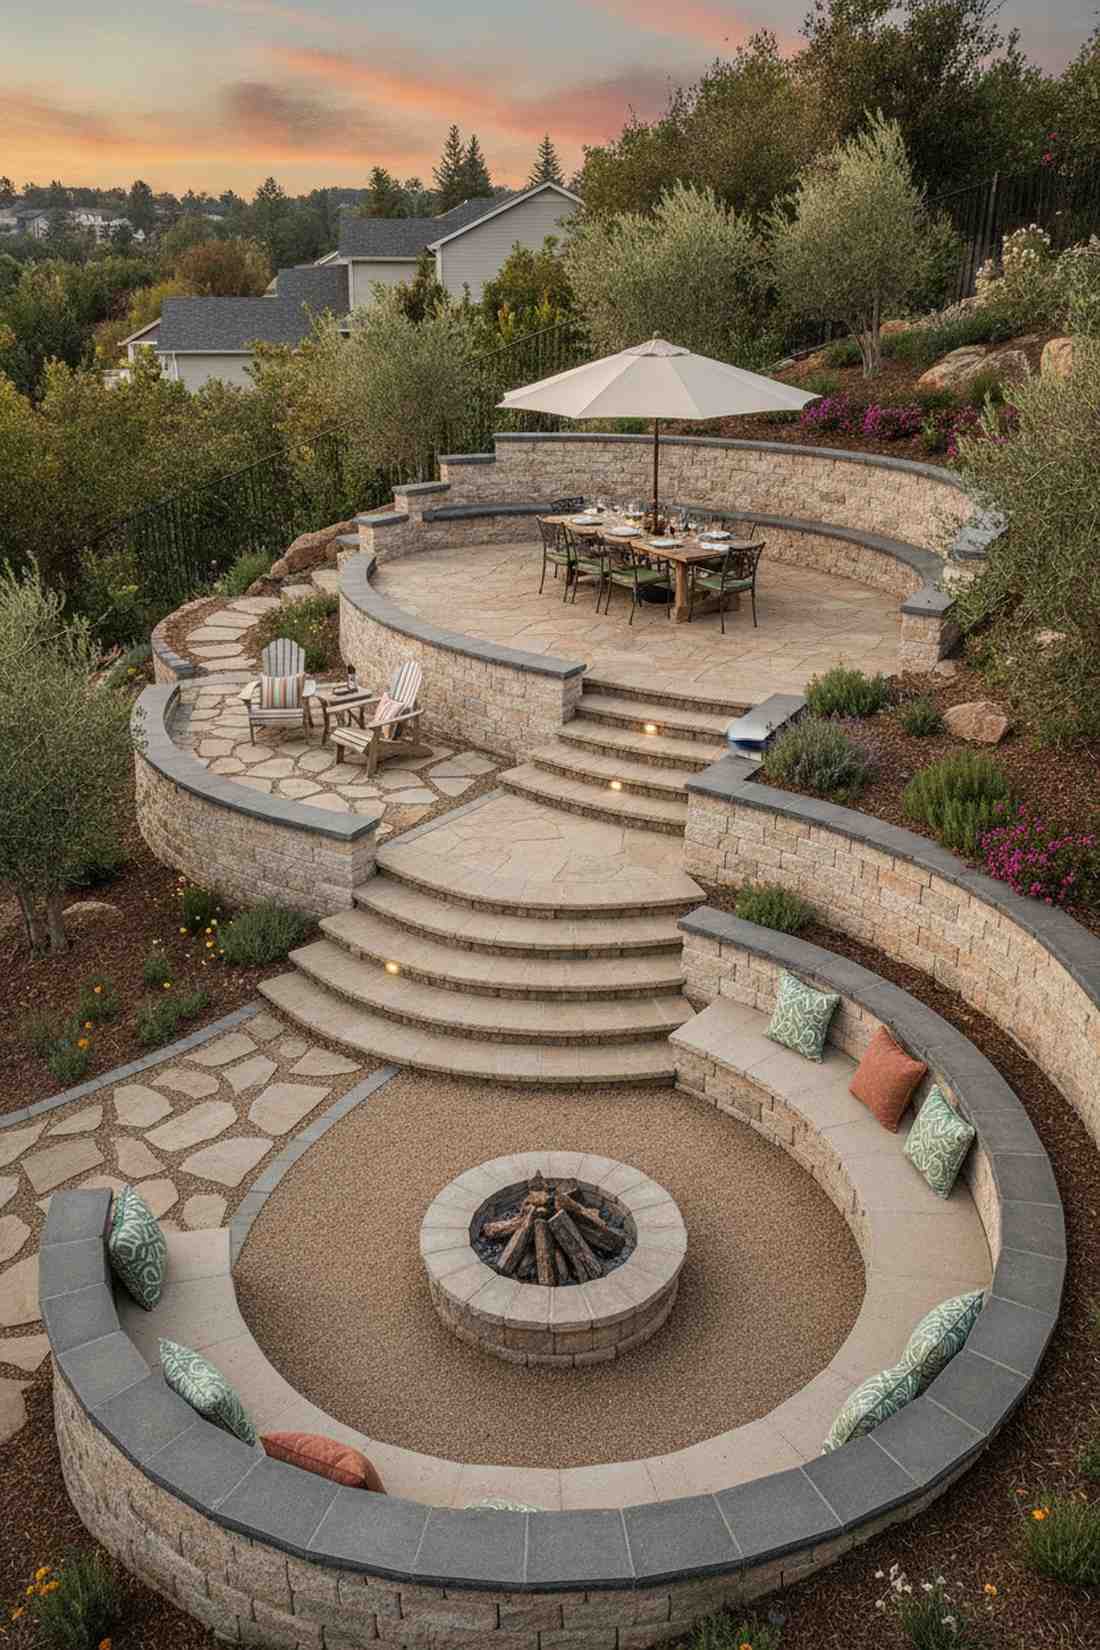
44. Stepped Seating Amphitheater Style
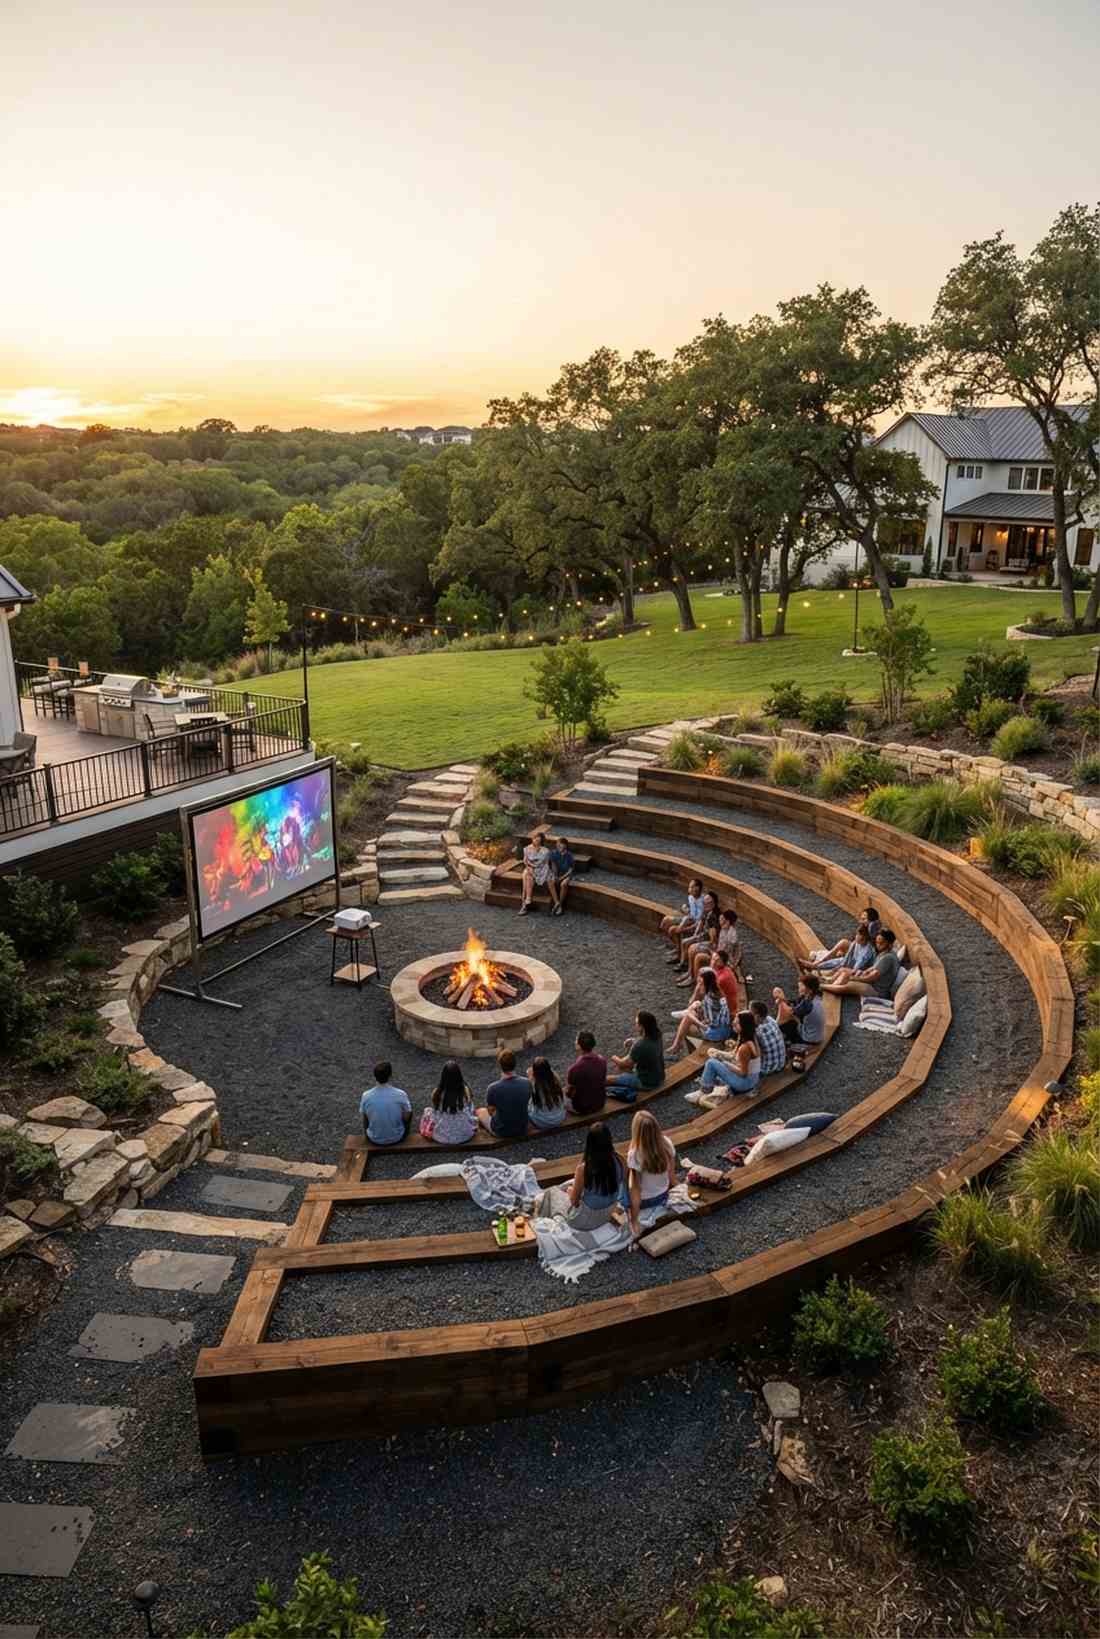
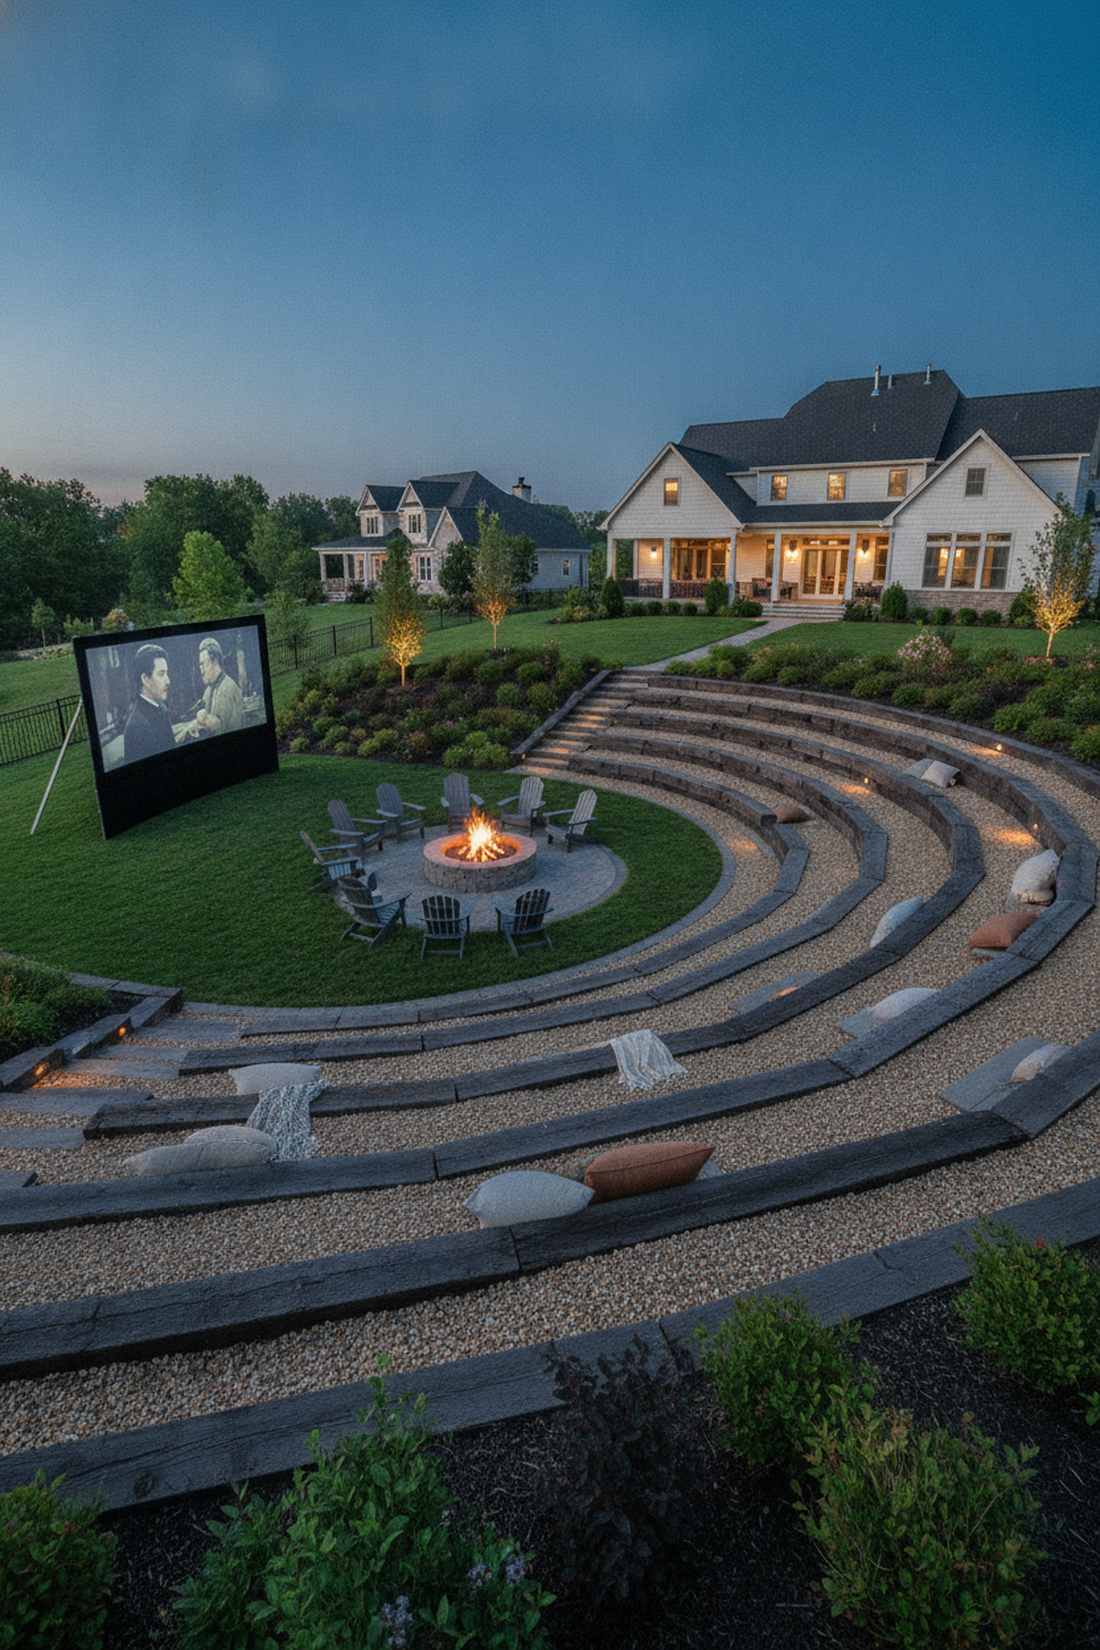
Brings the epic, communal energy of an ancient Greek theater into your backyard. This built-in hillside seating layout is the absolute pinnacle of large-scale outdoor entertaining.
Scattering 30 chairs looks like a messy yard sale; carving wide seating directly into the slope looks far more expensive than it is. Focus the entire sweeping curve onto a central fire pit or a massive outdoor movie screen.
Carving and framing this setup runs $3,000–$8,000. Save this for your ultimate outdoor cinema board!
- Key Materials: Heavy landscape timbers or concrete blocks, gravel treads, central focal point
- Vibe / Style: Epic event hosting
- Difficulty: Heavy earth-moving required
- Budget Breakdown: Materials/Timbers: $2,500 | Gravel: $500 | Labor: $3,000
- Creator’s Tip: Make the step treads exactly 18 inches deep—this is the ergonomic sweet spot for seating without needing actual chairs.
- Smart Sourcing: Pressure-treated landscape timbers (bulk bundle) and outdoor projector screen kits.
If you’re dealing with a massive drop-off in your yard, do NOT build a massive staircase until you see this structural trick…
45. Bridge Deck Spanning Between Levels
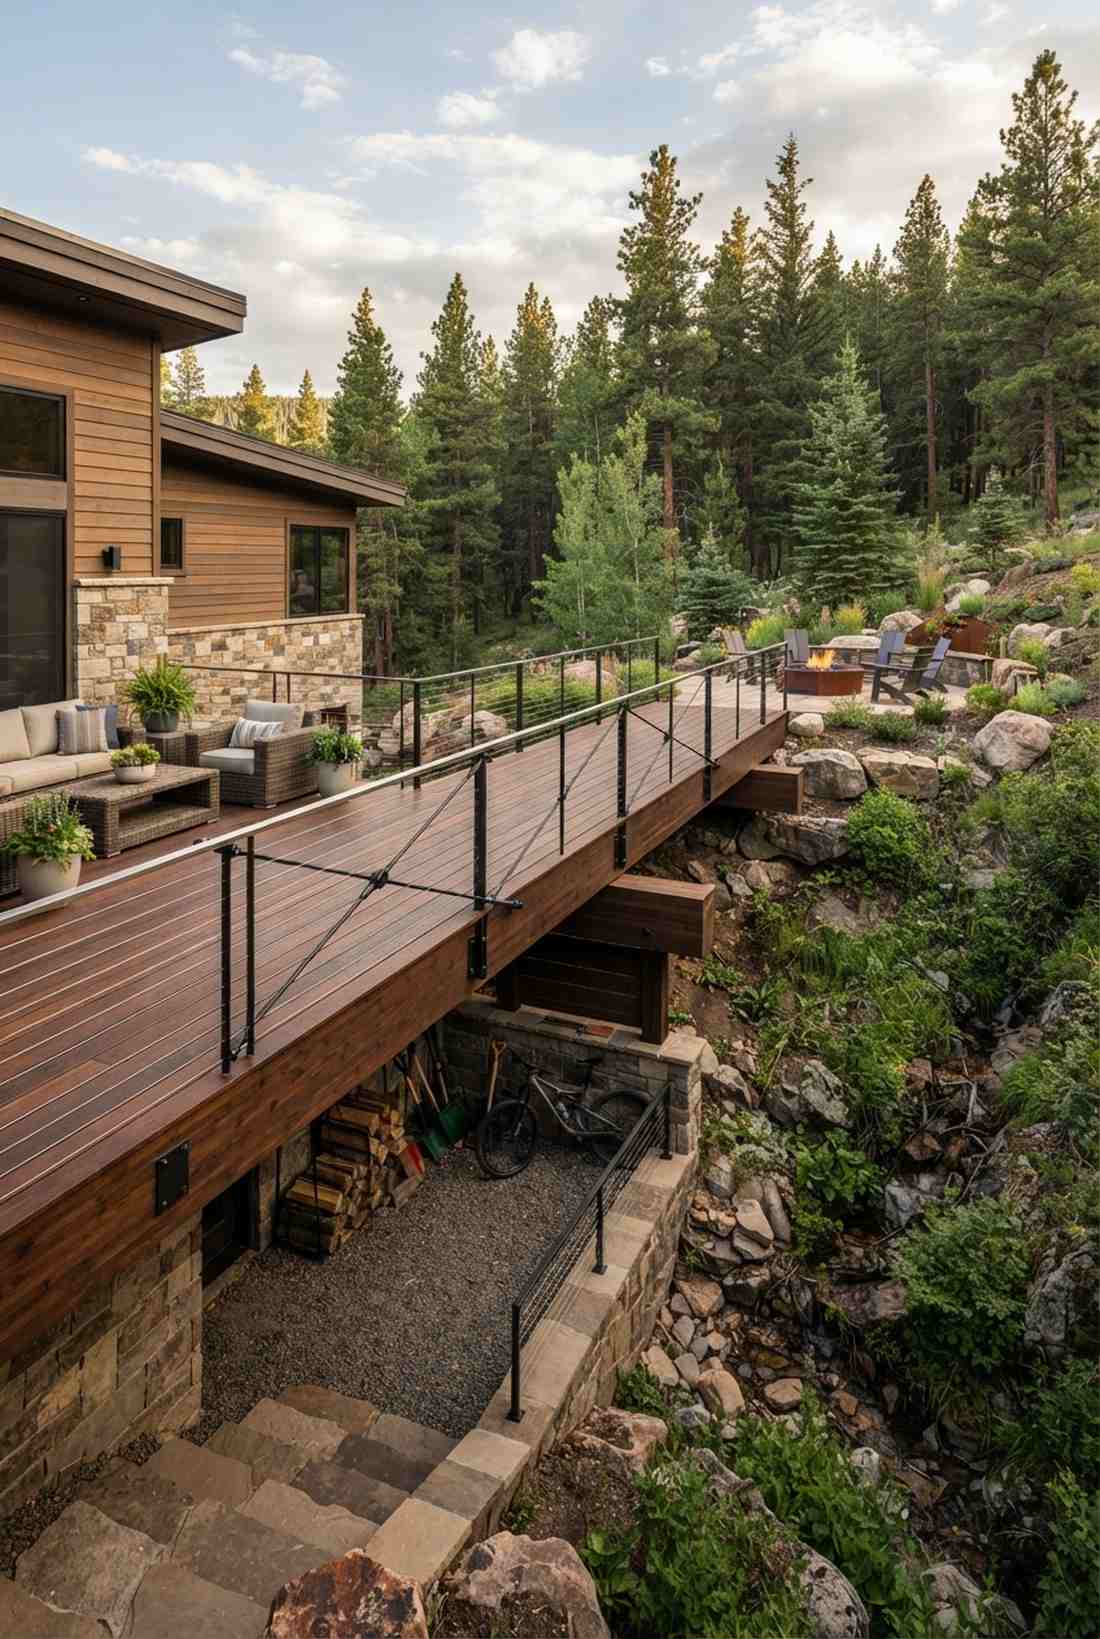
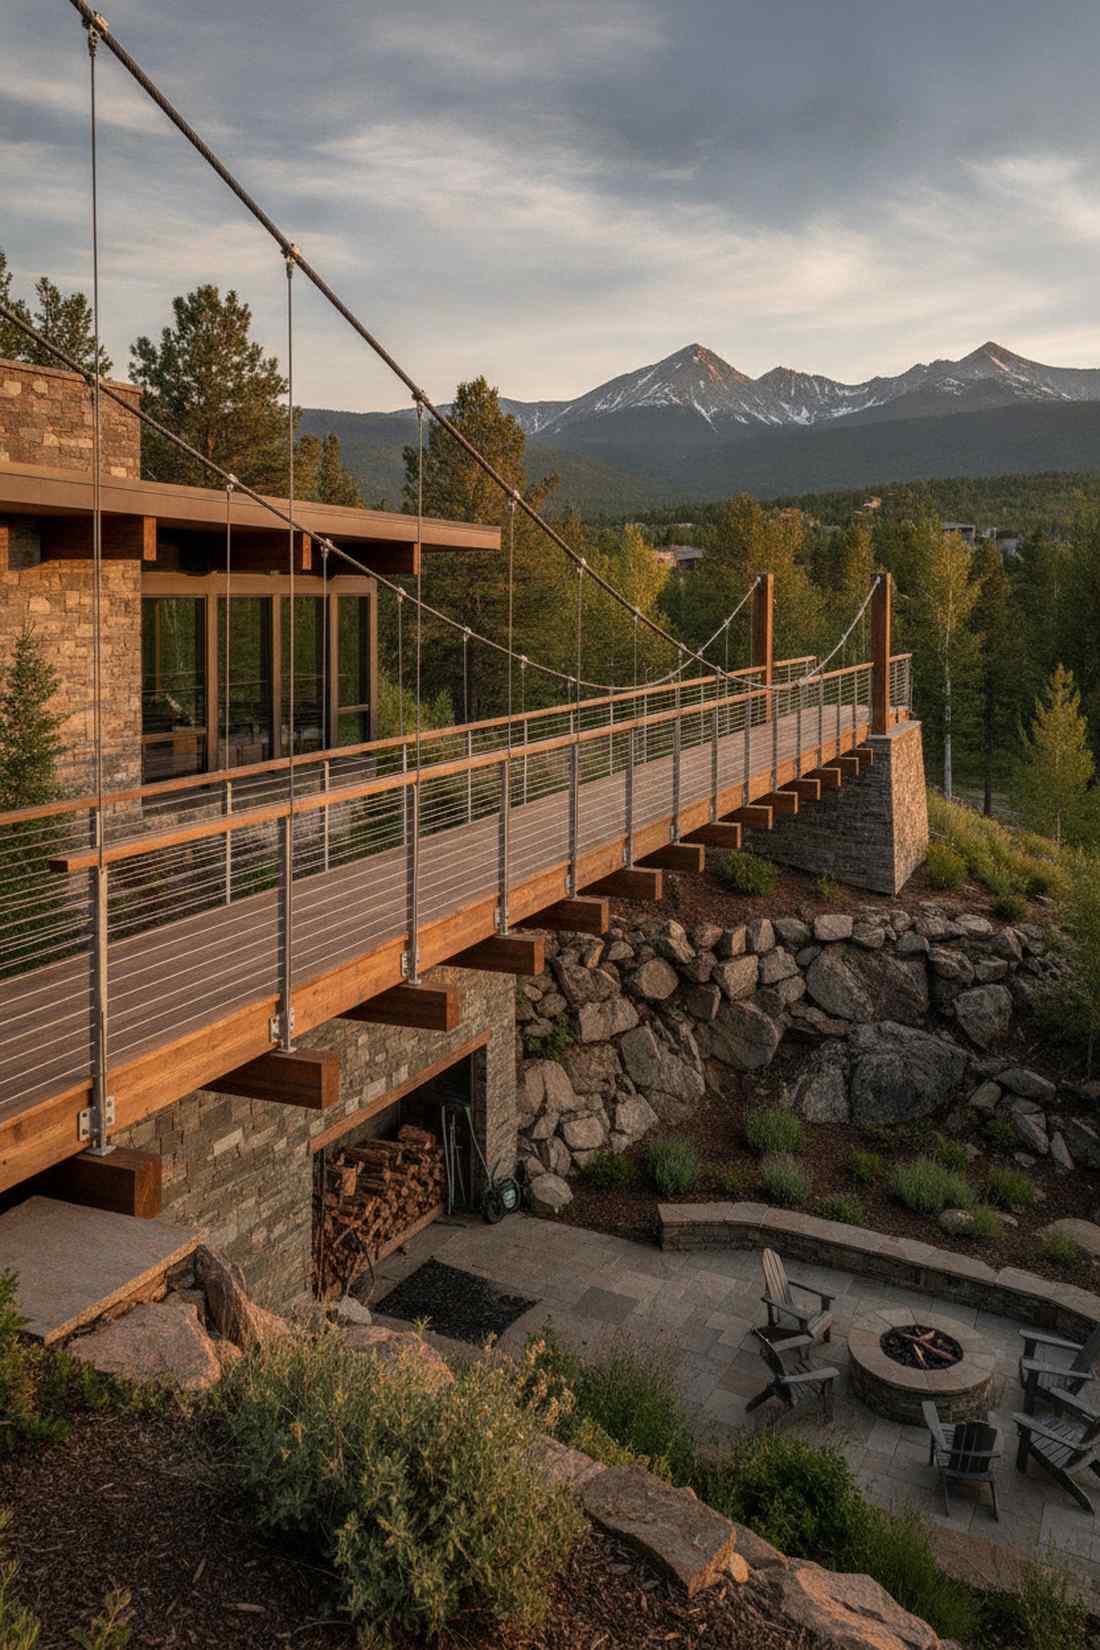
Emanates the high-end architectural tension of a modern mountain retreat. This suspended bridge deck design solves extreme yard drop-offs by flying completely over them.
Massive staircases eat up too much yard; throwing a structural bridge delivers a surprisingly premium look while providing a dramatic walkway. Best of all, the space underneath becomes a bone-dry, shaded storage bunker.
Engineering and building a bridge spans $4,000–$10,000.
- Key Materials: Heavy timber glulam beams, steel tension rods, cable railing system
- Vibe / Style: Daring architectural span
- Difficulty: Requires structural engineering
- Budget Breakdown: Structural Beams: $2,000 | Decking: $1,500 | Cable Rails: $2,500
- Creator’s Tip: Use an invisible stainless steel cable railing system so the bridge feels like it’s floating without obstructing the landscape view.
- Smart Sourcing: Stainless steel wire cable railing kits and marine-grade structural post anchors.
Fire and Water Feature Anchors
Sensory elements—crackling flames, flowing water—transform outdoor seating patio areas into immersive experiences that engage multiple senses. Designers position features as room centers or boundary markers that organize furniture arrangements. Local codes regulate setbacks from property lines and combustible materials, typically requiring 10-15 feet clearance for open flames.
46. Linear Fire Feature Dividing Zones
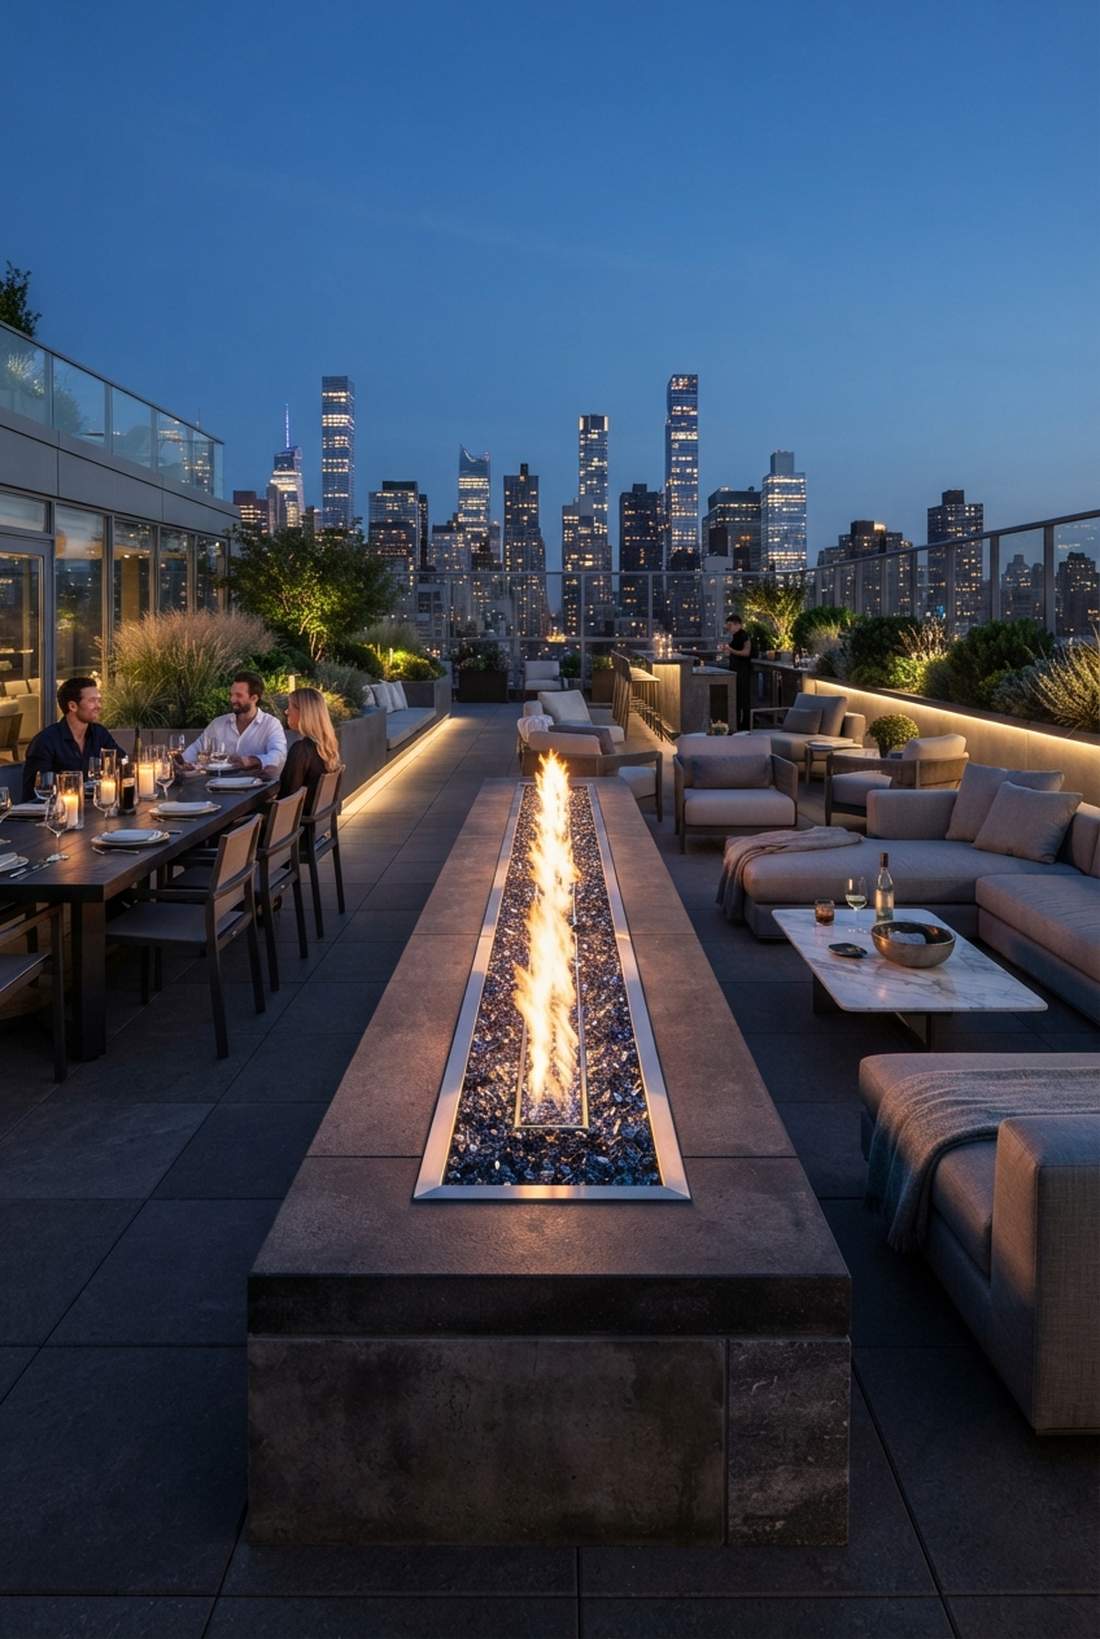
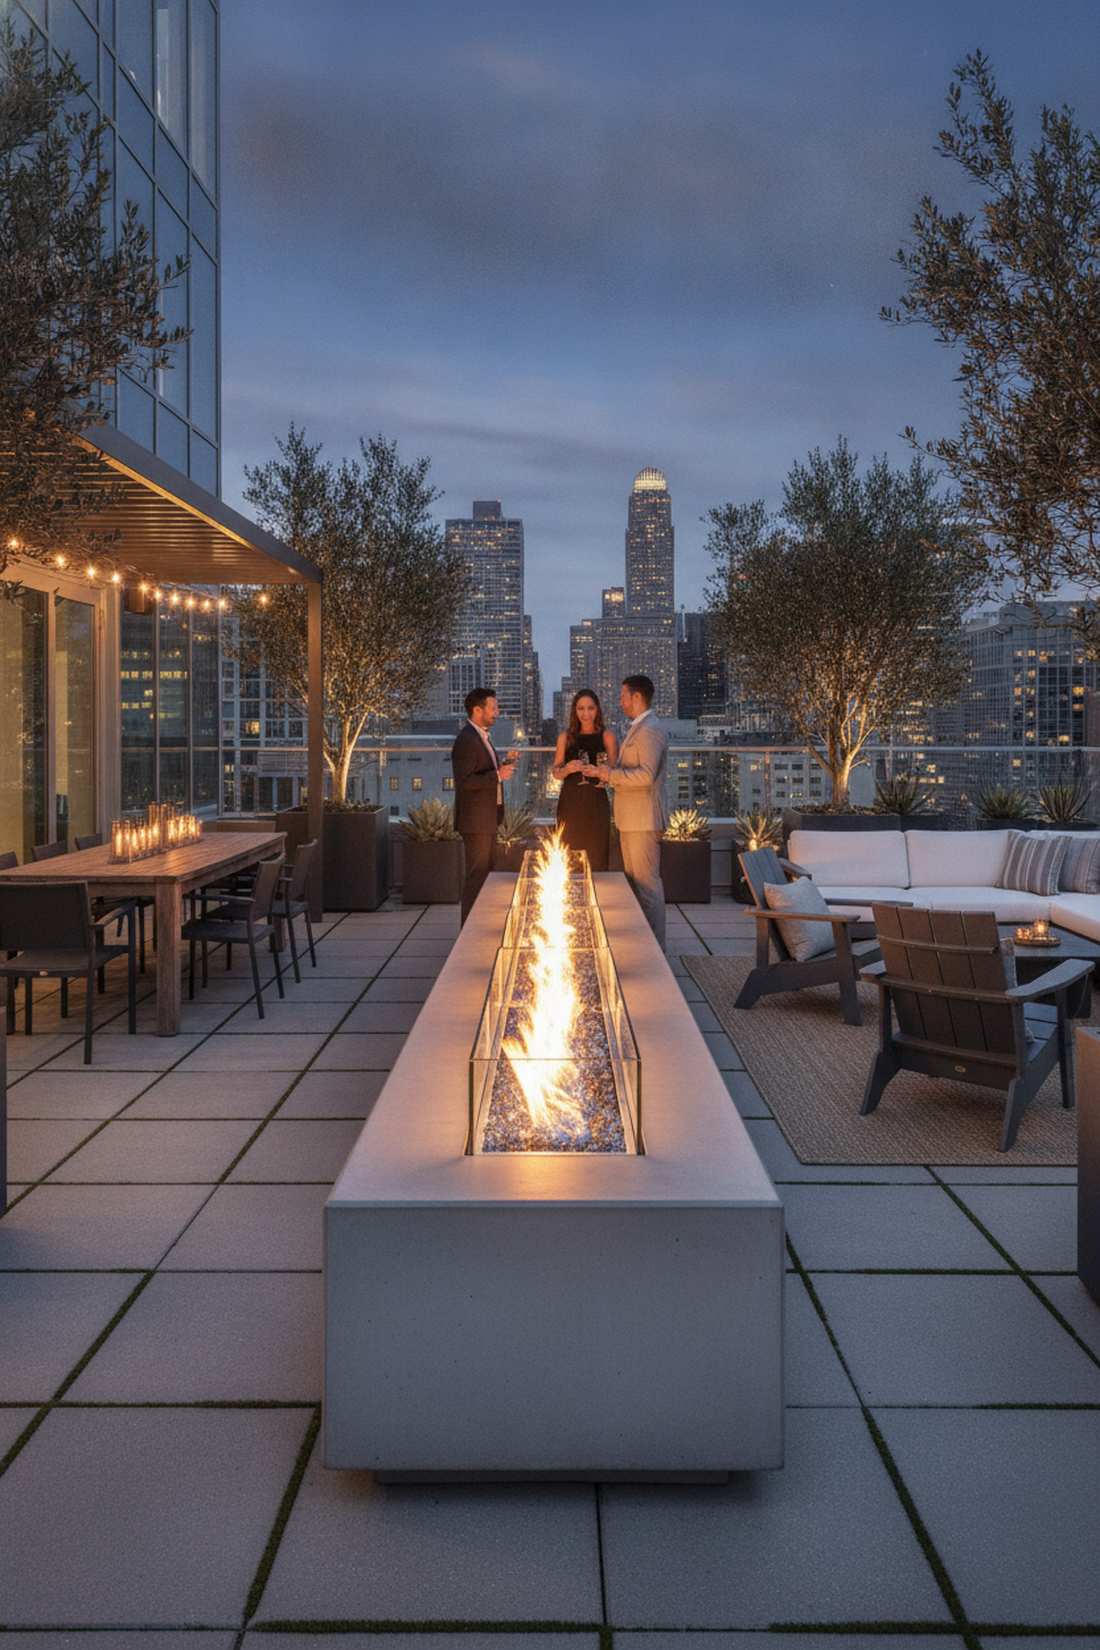
Looks like a fiery glowing boundary at an ultra-exclusive rooftop lounge. This elongated gas fire trough is the ultimate designer trick for splitting massive patios into cozy rooms.
Solid walls block the view; dropping a 6-foot line of fire gives a designer-level finish while visually cutting the dining and lounging areas in half. The transparent flames allow guests to talk through the fire seamlessly.
A custom linear burner setup ranges from $2,000–$5,000. Pin this to your modern luxury board!
- Key Materials: Stainless steel linear gas burner, custom concrete or stone housing, fire glass
- Vibe / Style: Ultra-modern transparency
- Difficulty: Requires a licensed gas plumber
- Budget Breakdown: Burner Kit: $1,200 | Concrete Housing: $800 | Gas Line Run: $600
- Creator’s Tip: Use crushed reflective fire glass instead of fake logs to maximize the modern, glittering aesthetic.
- Smart Sourcing: Drop-in stainless steel linear fire pit pans and tempered reflective fire glass (bulk bag).
47. Boulder Waterfall with Seating Surround
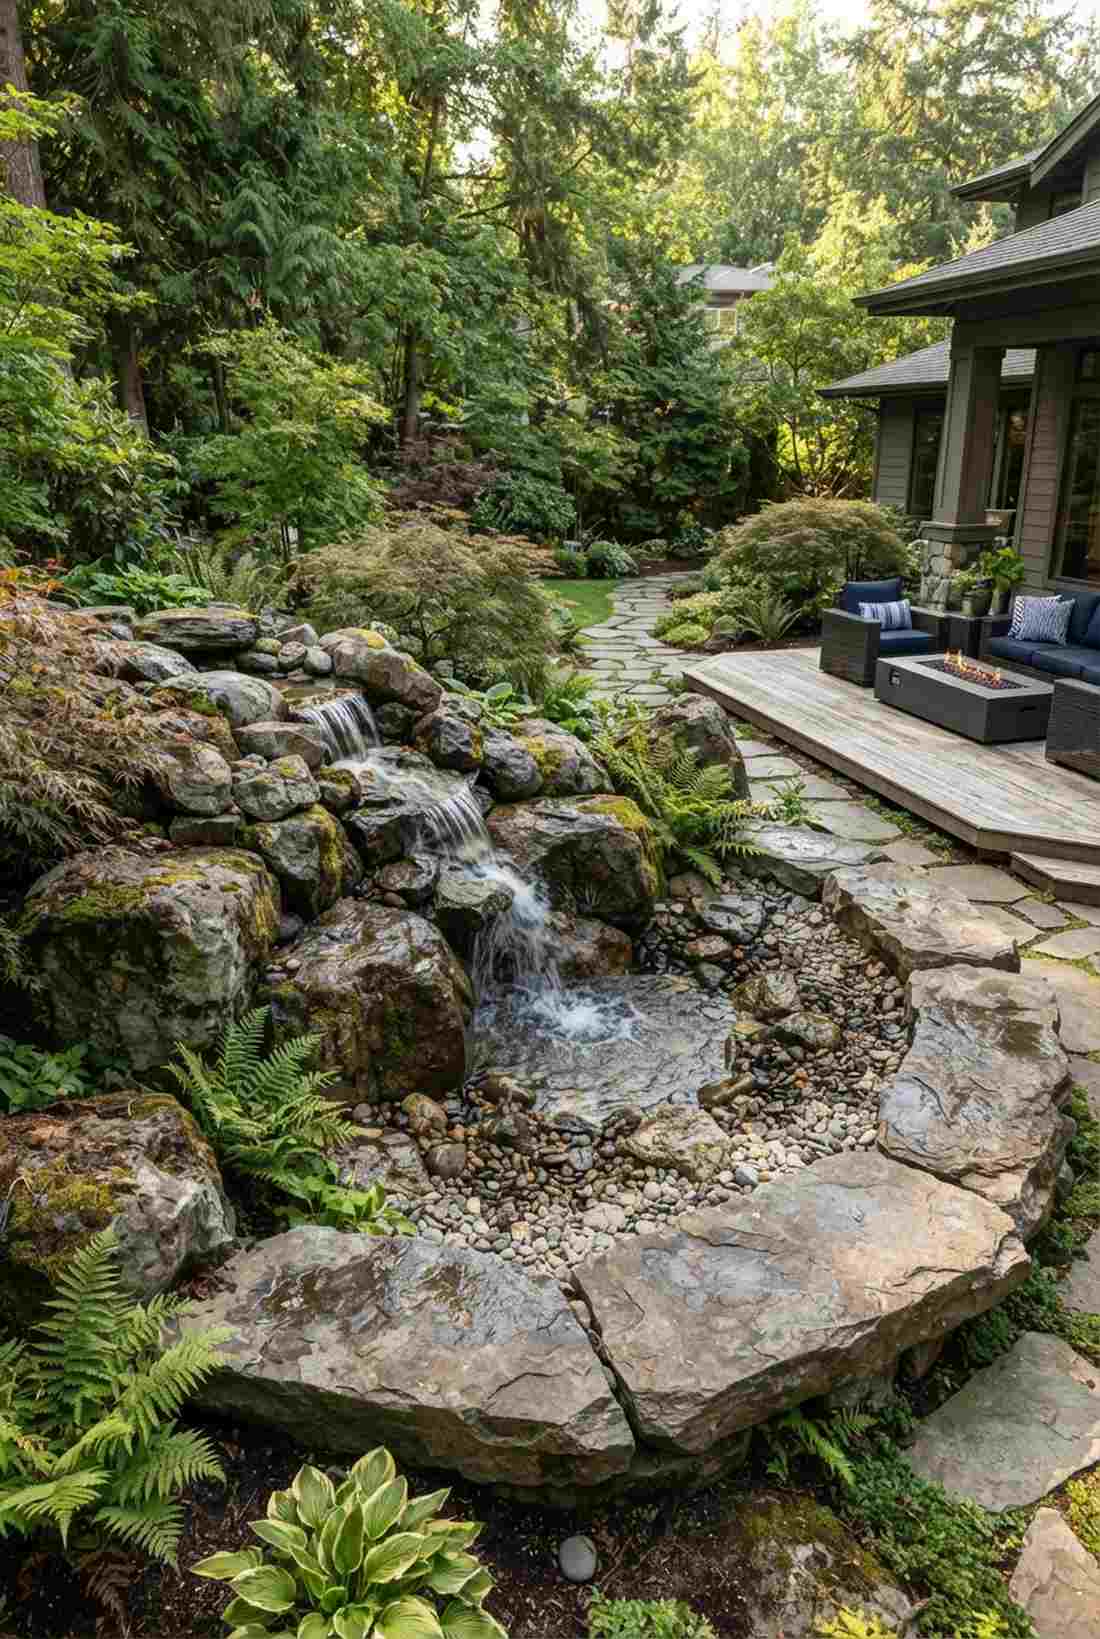
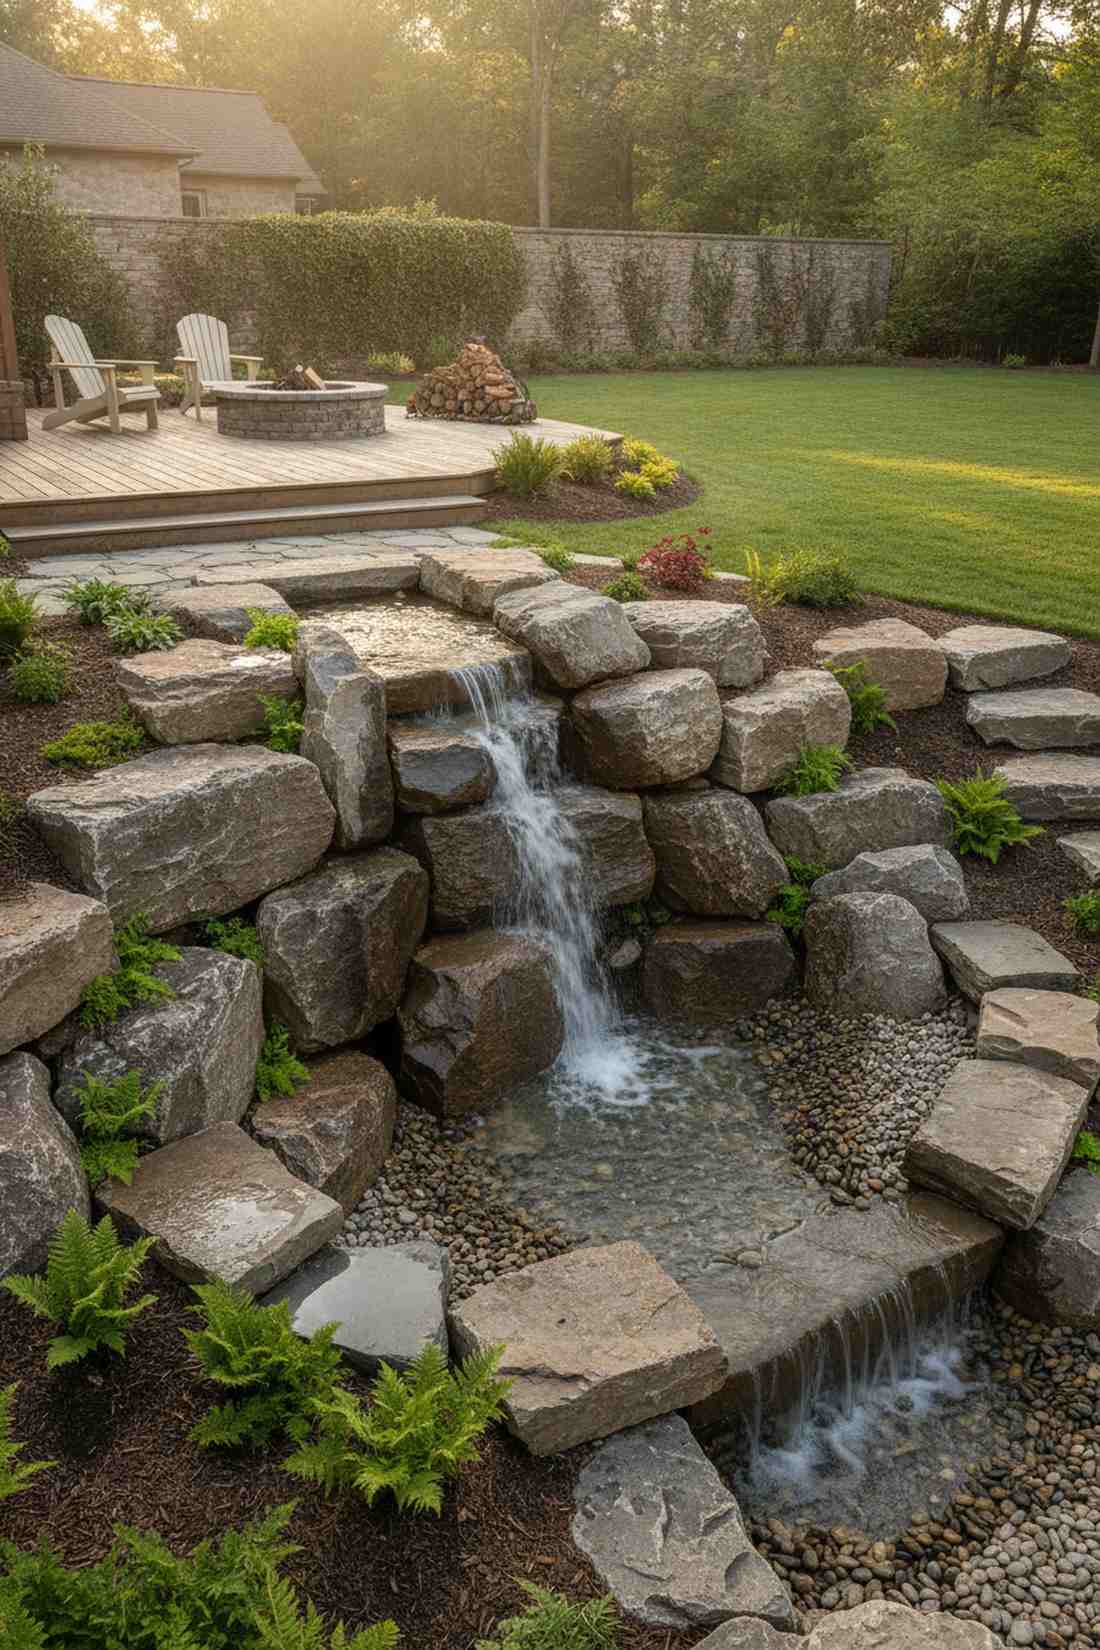
Immerses you in the echoing, tranquil sounds of a deep forest stream. This naturalistic water feature layout brilliantly masks obnoxious traffic noise while providing casual perimeter seating.
Flimsy plastic fountains look cheap; stacking massive boulders delivers a surprisingly premium look that feels like it’s been there for centuries. Position flat ledge-rocks precisely 18 inches high so guests naturally gravitate to sit on them.
A heavy boulder installation costs about $2,500–$6,000.
- Key Materials: Massive landscape boulders, heavy-duty pond liner, recirculating submersible pump
- Vibe / Style: Rugged organic tranquility
- Difficulty: Requires heavy machinery
- Budget Breakdown: Boulders/Delivery: $1,500 | Pump/Plumbing: $400 | Labor: $1,500
- Creator’s Tip: Hide the water catch-basin completely underground beneath heavy gravel so it looks like a natural, “pondless” spring.
- Smart Sourcing: Pondless waterfall pump and liner kits and high-flow submersible water pumps.
48. Reflecting Pool with Deck Cantilever
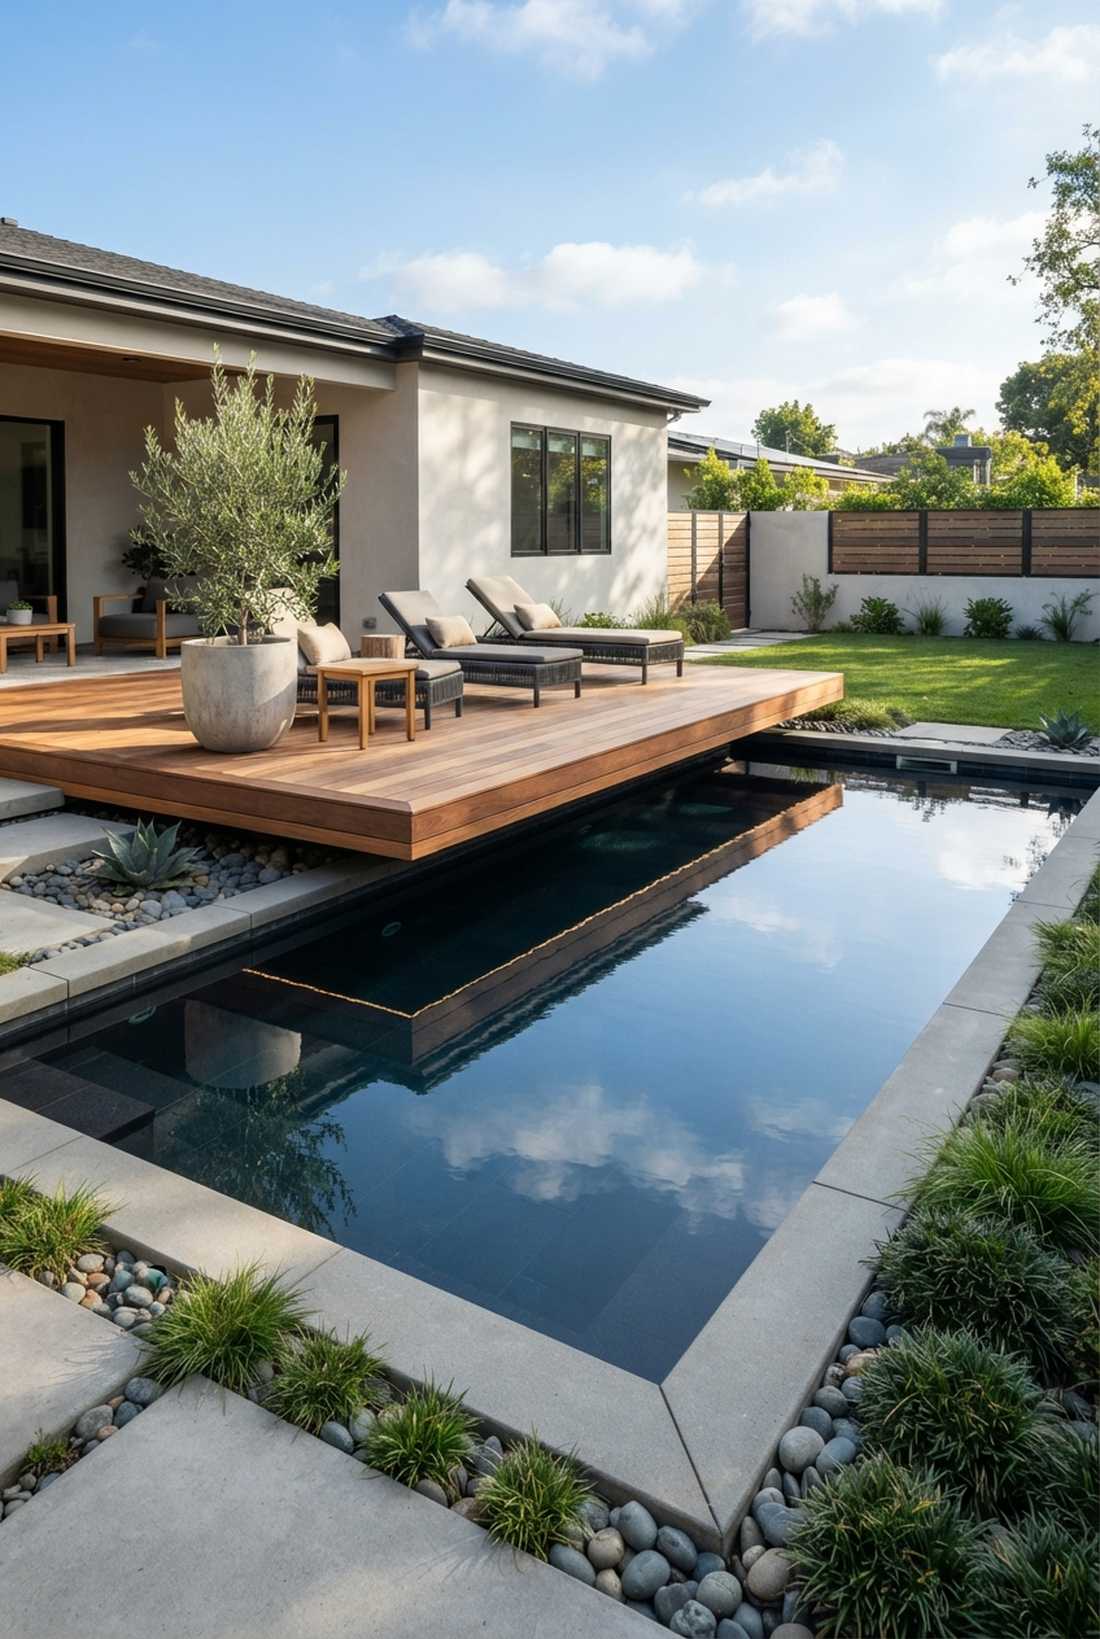
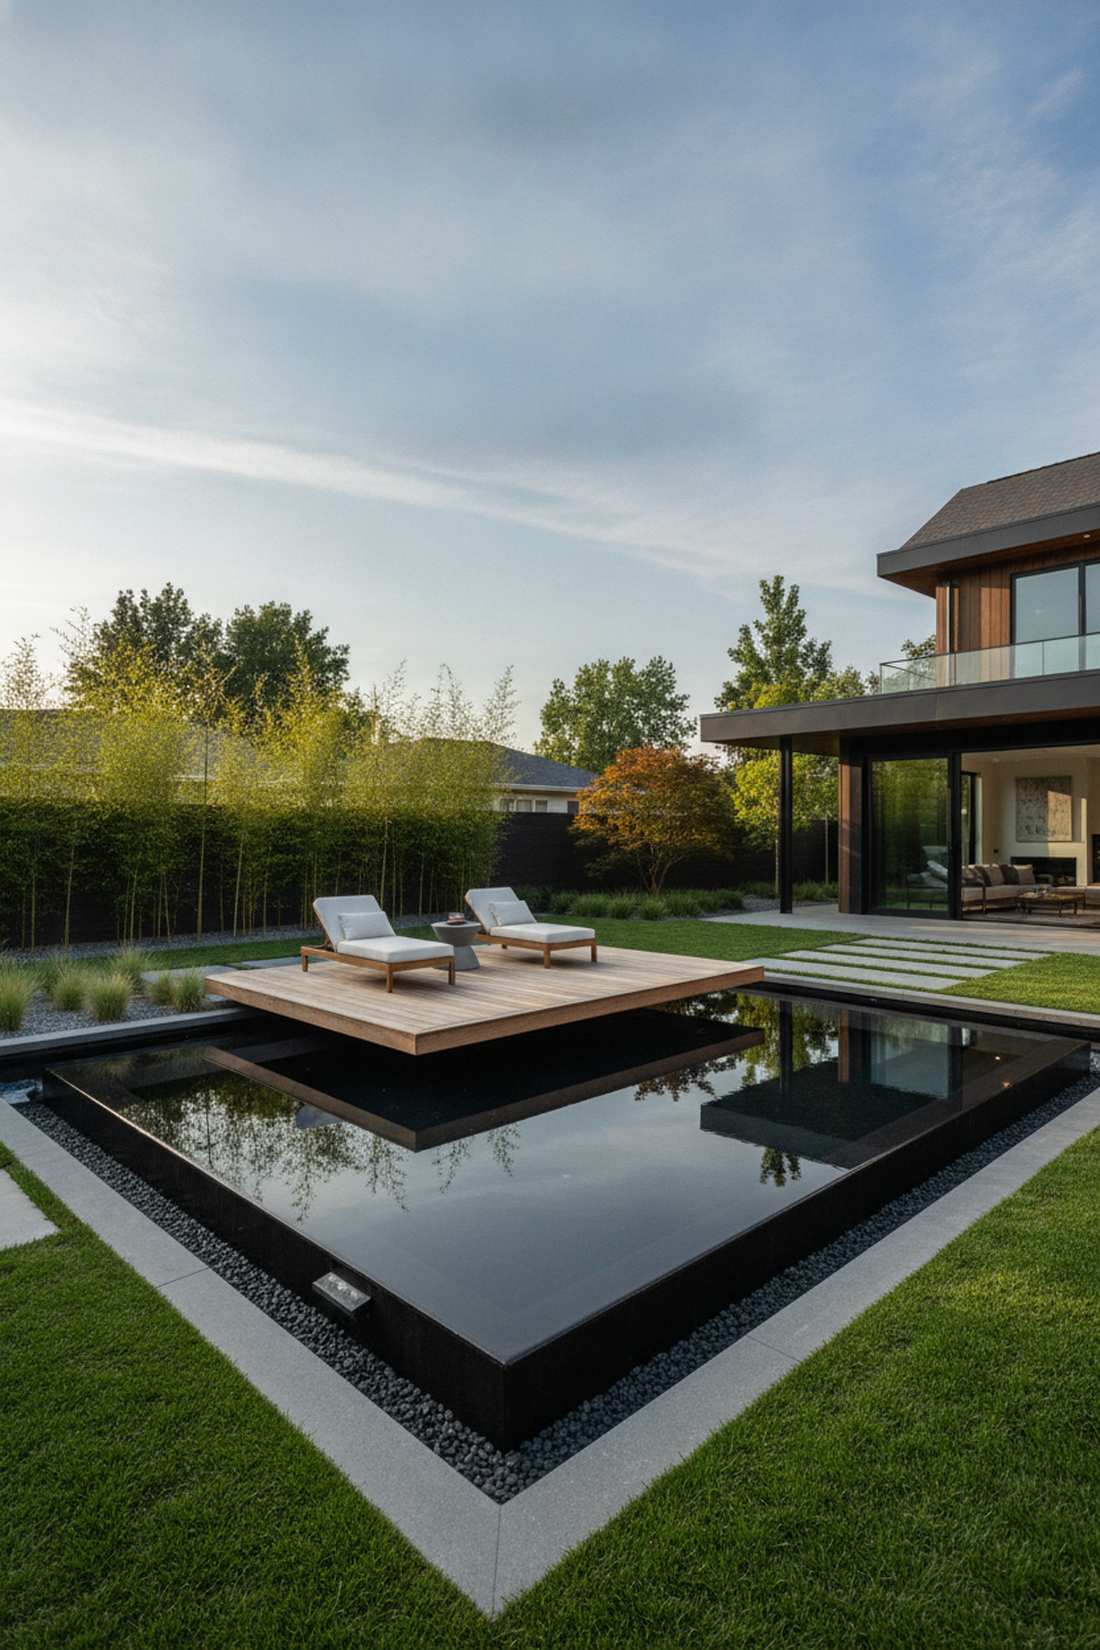
Projects the razor-sharp, mirror-like elegance of a high-end architectural museum. This modern water patio feature makes tight spaces look massive by doubling the sky in the reflection.
Deep ponds are a maintenance nightmare; pouring a 4-inch deep basin looks far more expensive than it is and requires minimal water. Floating the edge of the wood deck directly over the water creates a stunning illusion of suspension.
You can execute this minimalist masterpiece for $1,500–$4,000.
- Key Materials: Poured concrete basin, black pond dye or dark tile, cantilevered deck joists
- Vibe / Style: Zen minimalist illusion
- Difficulty: Advanced concrete forming
- Budget Breakdown: Concrete Basin: $1,200 | Waterproofing: $400 | Deck Overhang: $600
- Creator’s Tip: Paint or tile the inside of the pool completely black. Dark bottoms create the perfect, unbroken mirror reflection of the sky.
- Smart Sourcing: Marine-grade black pond paint sealers and surface pond skimmer kits.
49. Fire Bowl on Water Platform
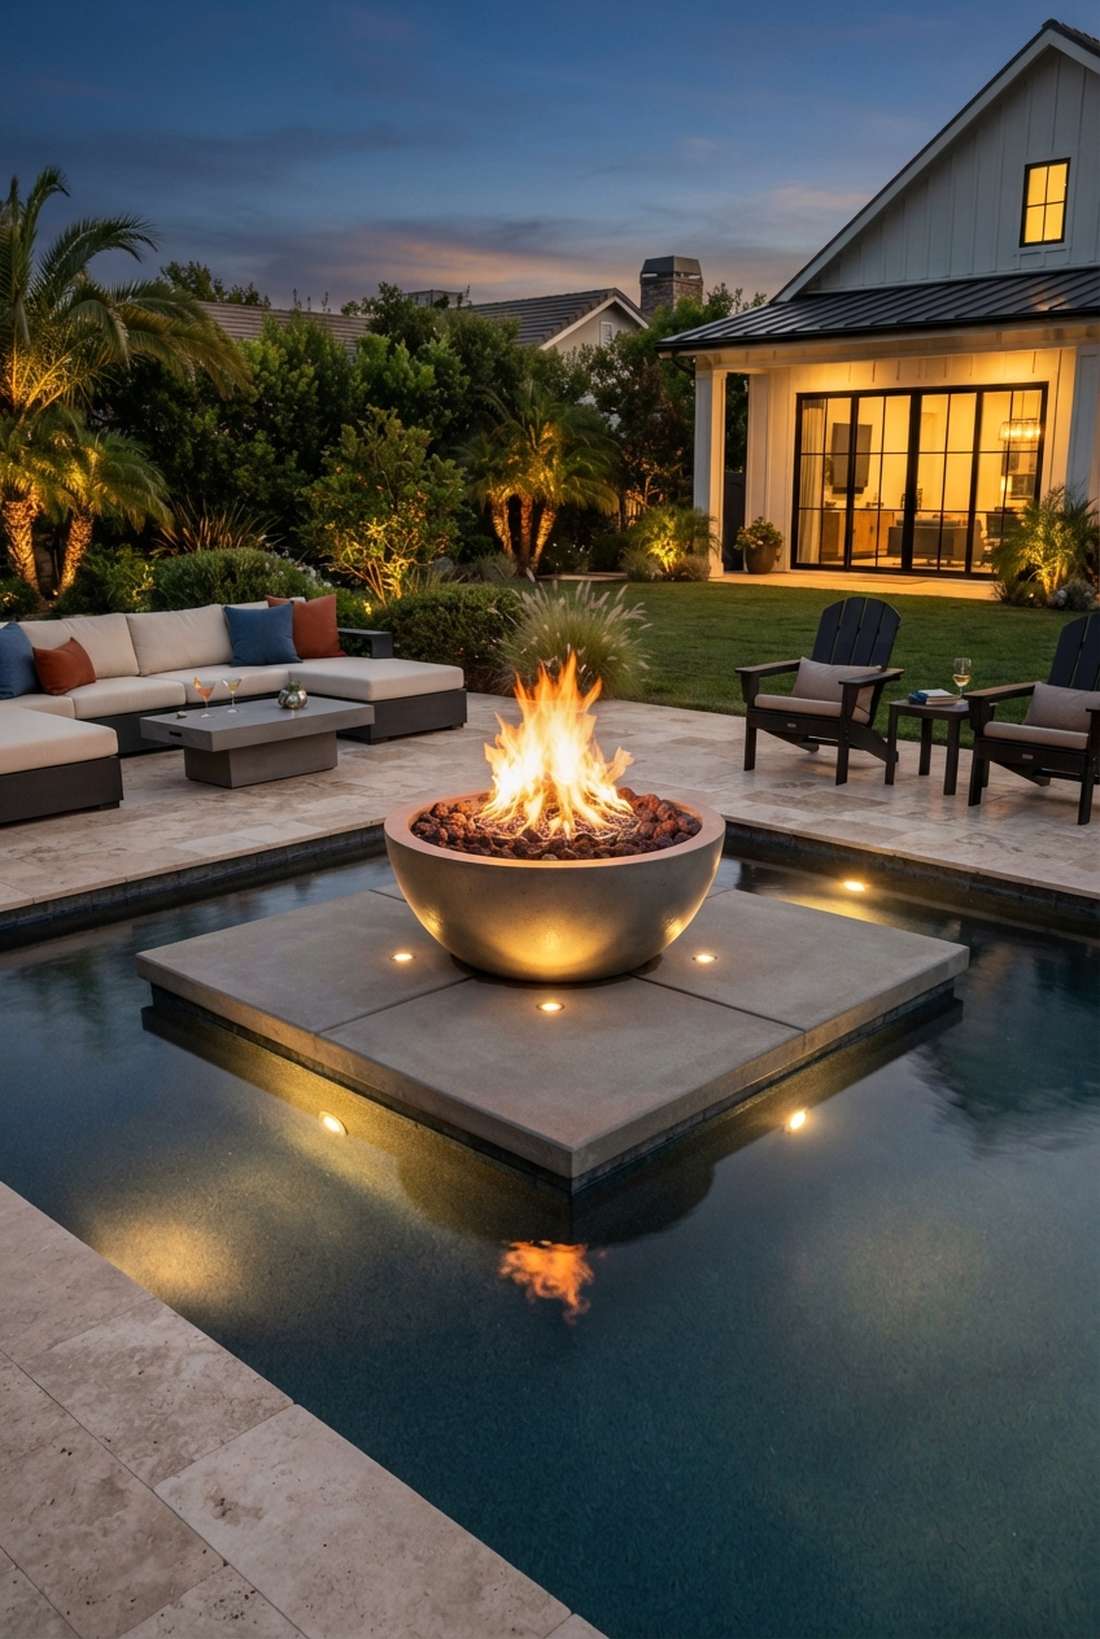
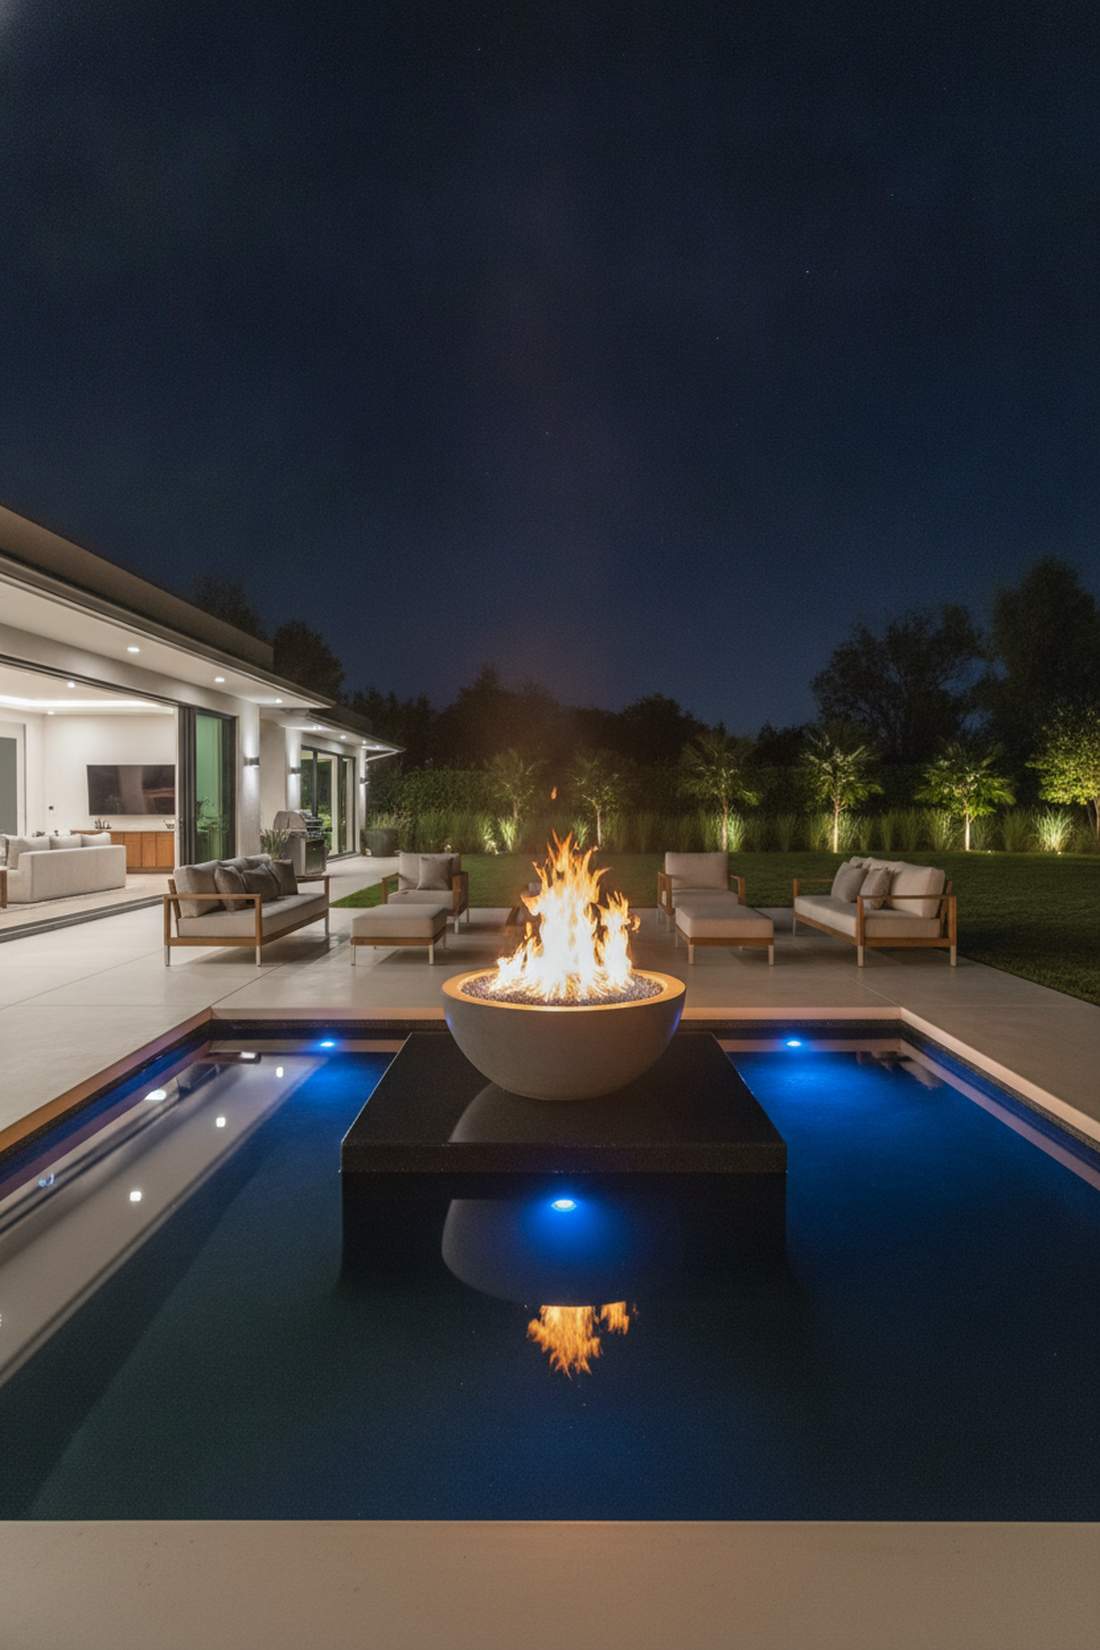
Unleashes the breathtaking, elemental clash of a five-star Vegas resort entry. This fire-and-water hybrid design instantly becomes the undisputed focal point of any modern outdoor seating patio.
A standard pool is boring; mounting a blazing gas bowl right in the center of the water gives a designer-level finish that drops jaws. The flames reflecting off the water’s surface double the ambient lighting at night.
This premium dual-utility feature runs $3,000–$8,000. Pin this if you want ultimate backyard drama!
- Key Materials: Concrete fire bowl, underwater gas lines, submersible LED up-lighting
- Vibe / Style: High-drama elemental luxury
- Difficulty: Professional plumbing/electrical required
- Budget Breakdown: Custom Bowl: $1,500 | Gas/Plumbing: $1,200 | Pump/Lights: $600
- Creator’s Tip: Install an electronic auto-ignition system so you can turn the fire on with a remote control from inside the house.
- Smart Sourcing: Electronic ignition concrete fire bowls and waterproof submersible LED uplights.
You don’t need a massive yard for a water feature. This next vertical trick fits anywhere and costs under $500…
50. Wall Fountain with Bench Facing
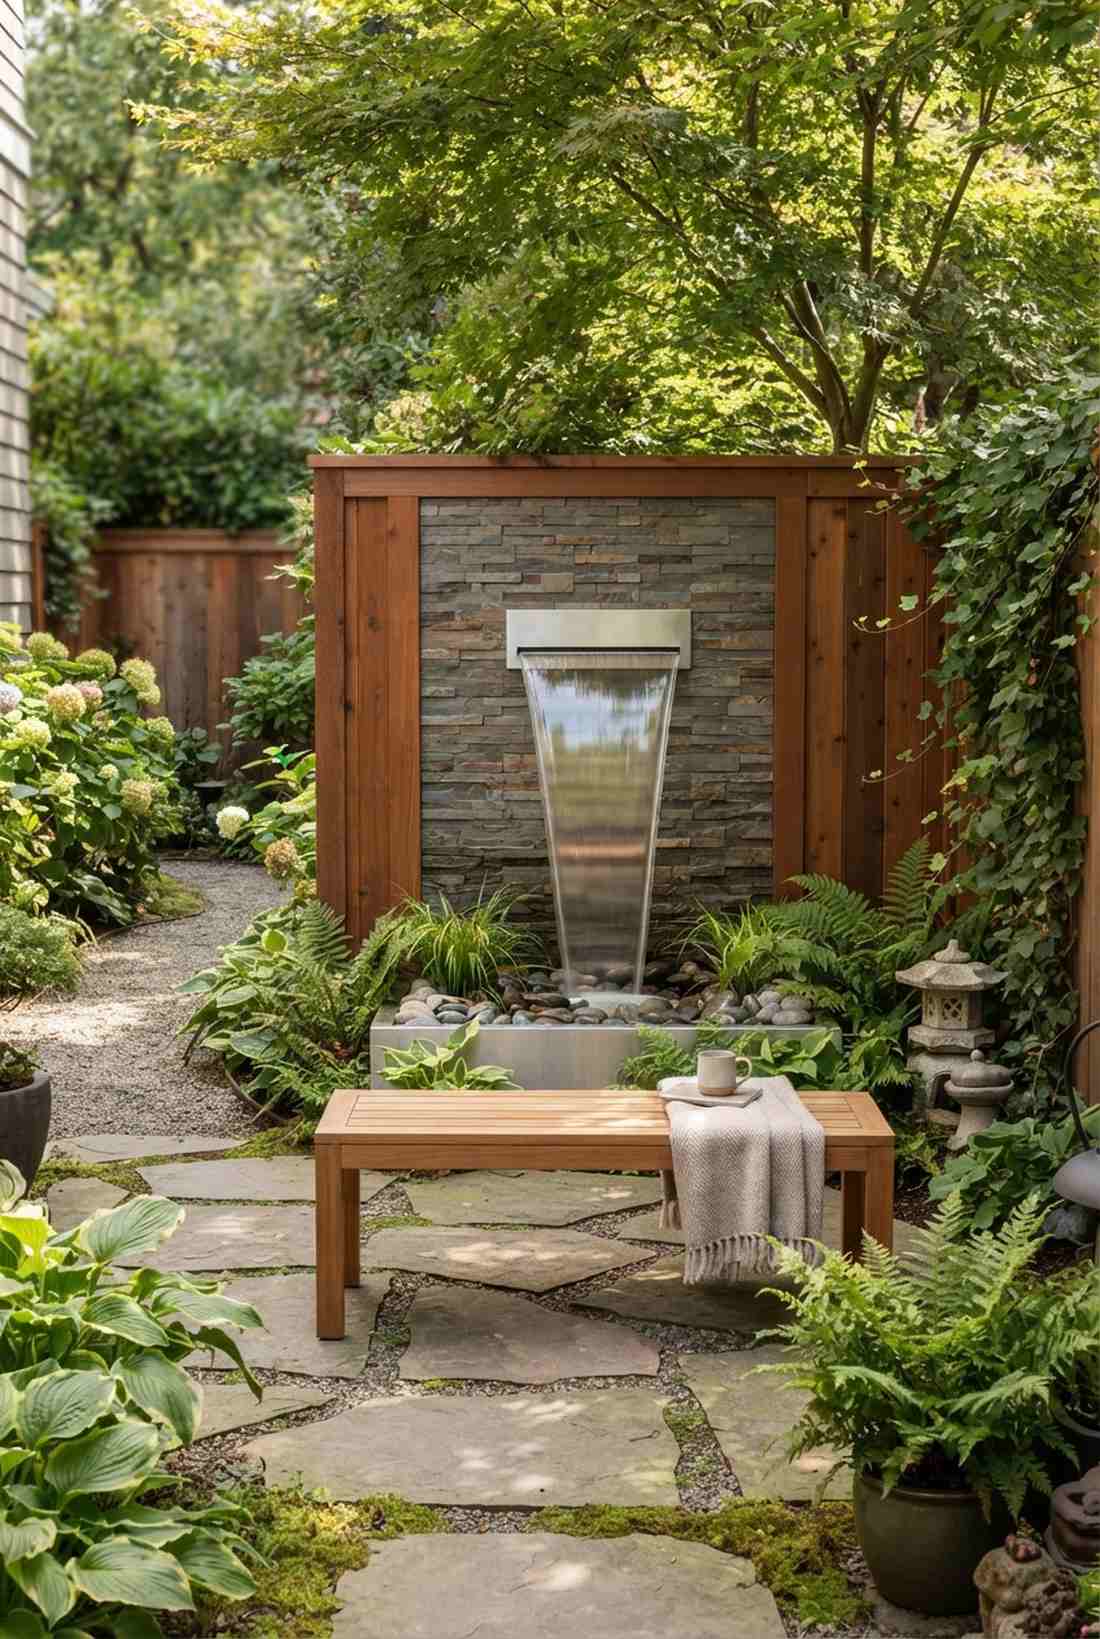
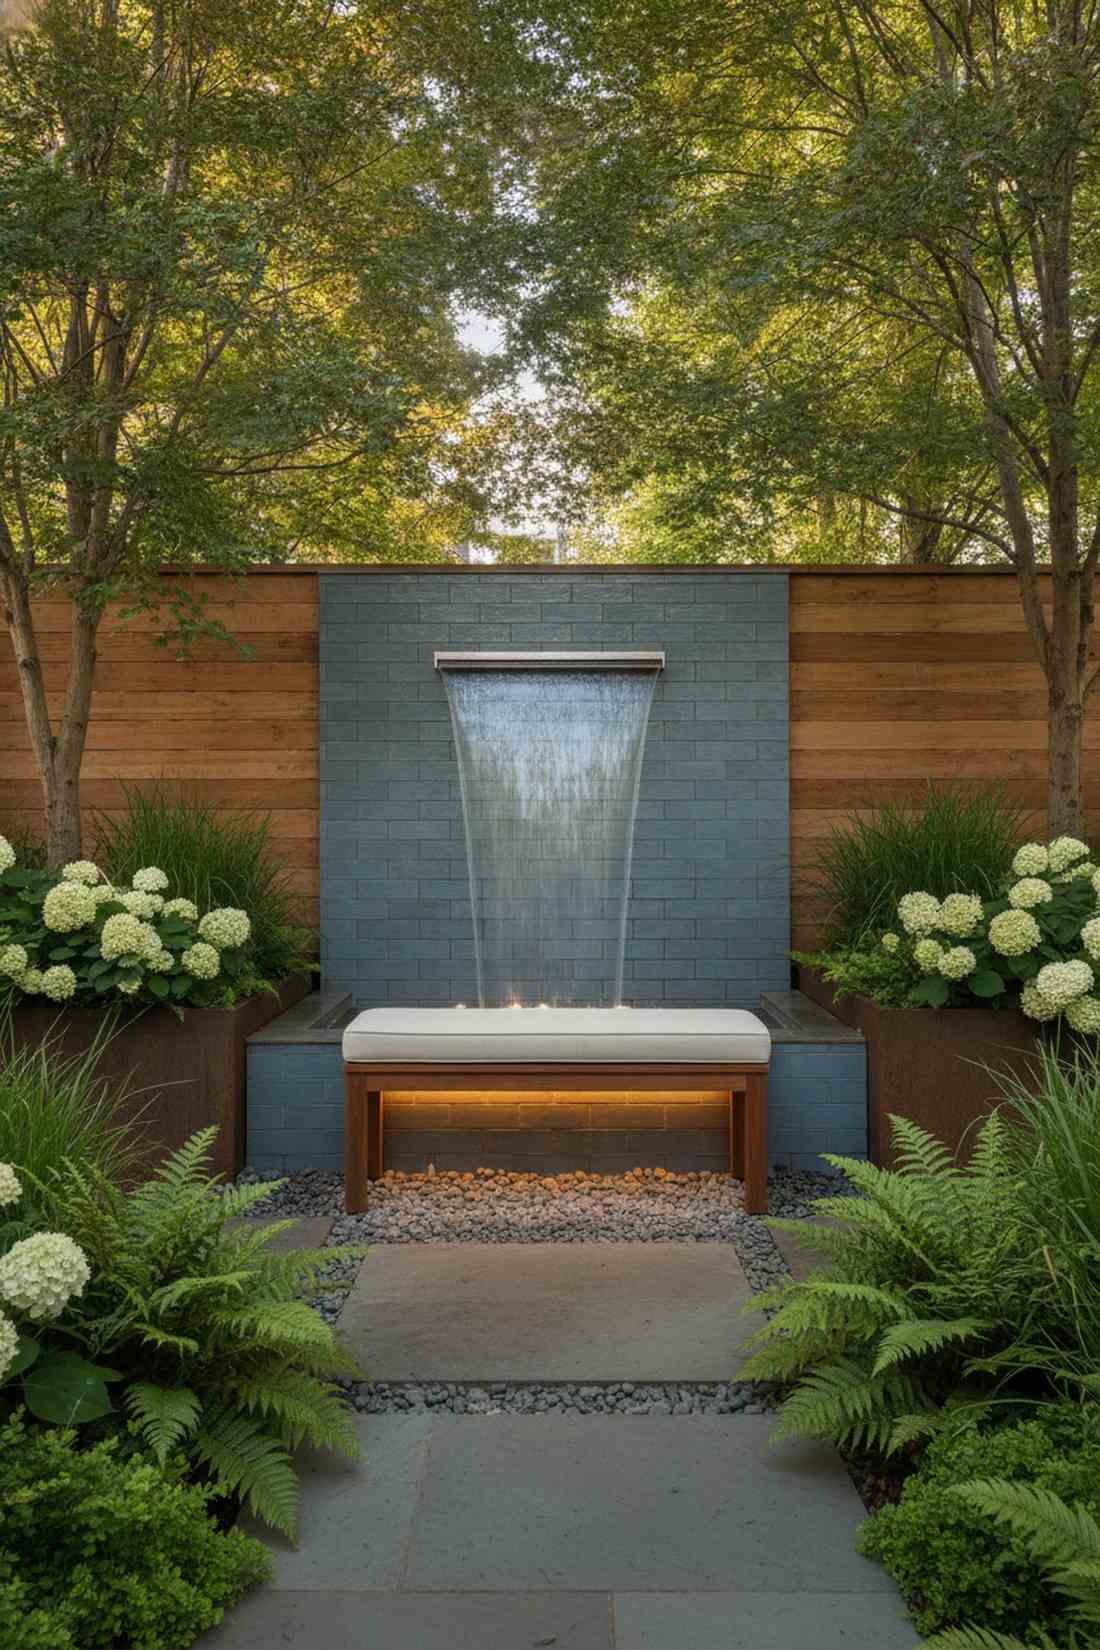
Brings the soothing, restorative acoustics of a hidden courtyard to the tightest spaces. This vertical water feature setup is the ultimate solution for compact side yards craving sensory impact.
Sprawling ponds consume floor space; mounting a sleek water sheer to the fence looks far more expensive than it is and requires zero square footage. Facing a simple bench toward it creates an instant meditation zone.
You can install a beautiful wall sheer for around $400–$1,000.
- Key Materials: Stainless steel sheer descent spillway, hidden reservoir basin, tiled backing wall
- Vibe / Style: Compact architectural zen
- Difficulty: Intermediate DIY
- Budget Breakdown: Spillway: $200 | Pump/Basin: $150 | Wall Finish/Tile: $300
- Creator’s Tip: Space the bench exactly 6 feet away—close enough to hear the water crisp and clear, but far enough to avoid wind-blown mist.
- Smart Sourcing: Stainless steel sheer descent waterfall spillways and hidden underground water reservoir basins.
51. Portable Fire Table with Flexible Arrangement
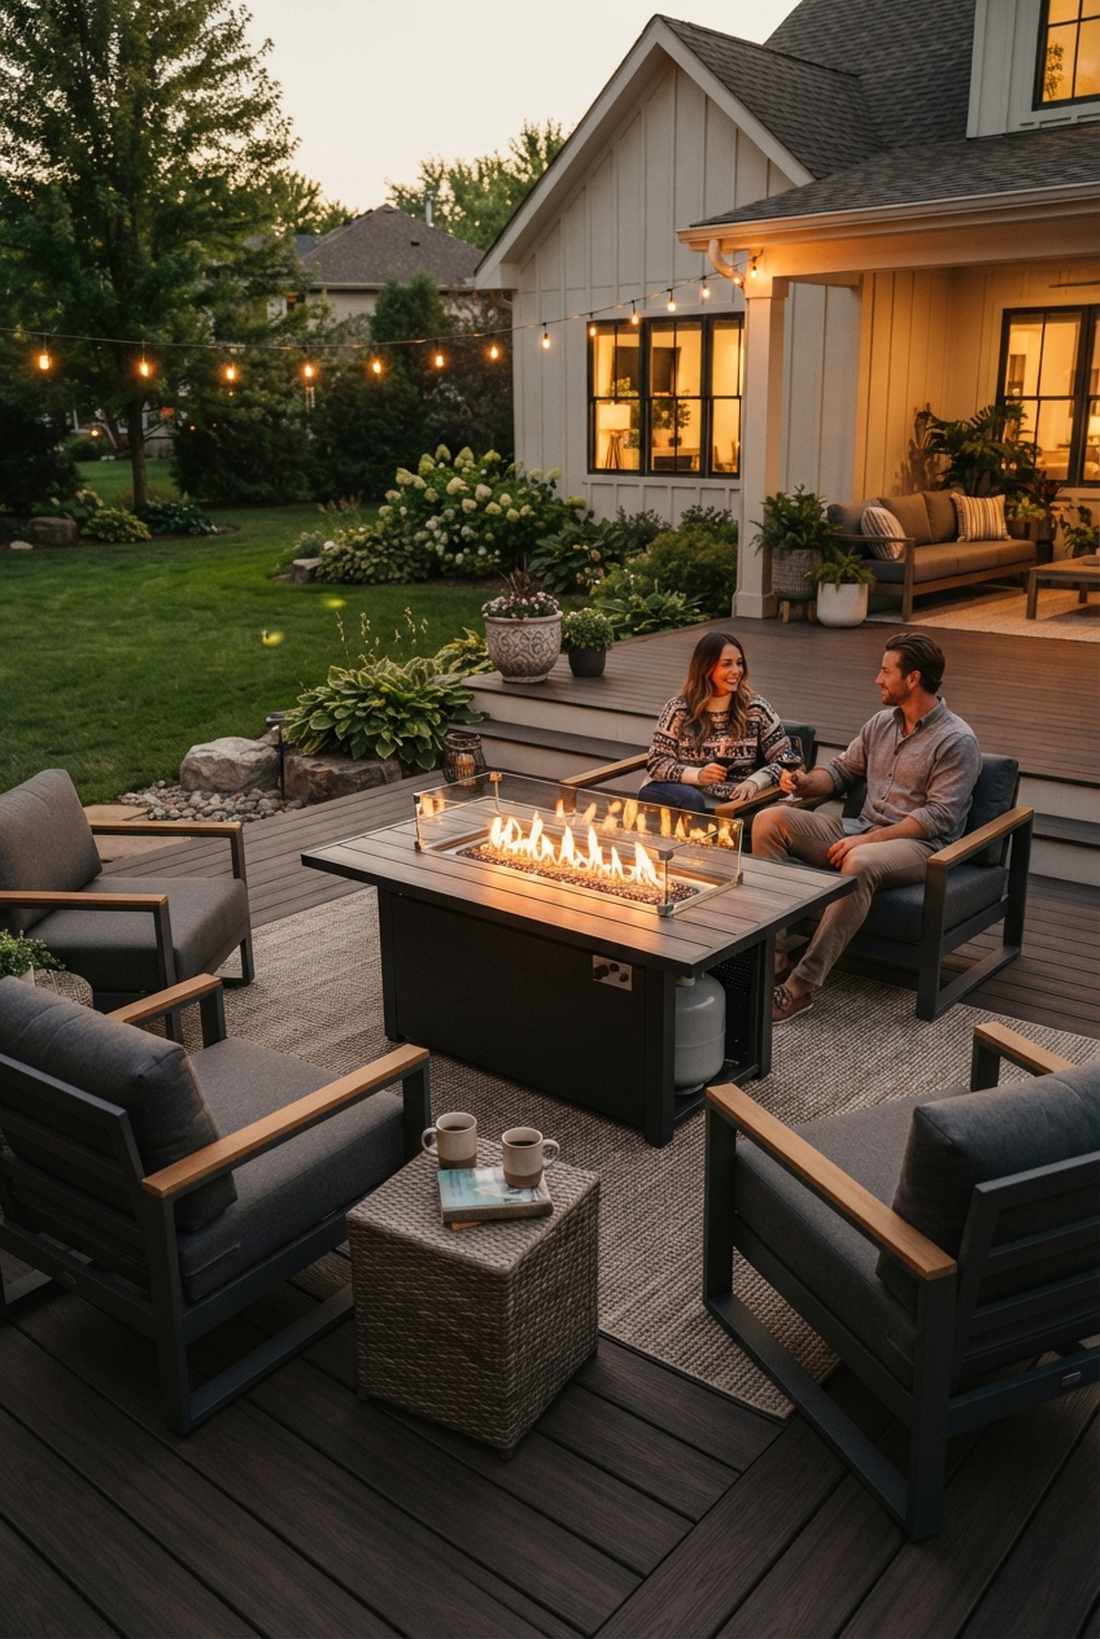

Delivers the cozy heat of a firepit with the adaptable utility of a coffee table. This freestanding fire feature layout is perfect for renters or those who frequently rearrange their patio.
Permanent masonry locks you in; utilizing a propane-fueled table gives a designer-level finish while letting you wheel the heat wherever the party moves. Hiding the tank directly in the base eliminates ugly tripping hazards.
A high-quality aluminum fire table costs between $300–$900. Save this for effortless evening hosting!
- Key Materials: Aluminum frame fire table, tempered glass wind guard, hidden propane storage
- Vibe / Style: Adaptable contemporary warmth
- Difficulty: Zero setup (just attach propane)
- Budget Breakdown: Fire Table: $450 | Glass Guard: $80 | Weather Cover: $40
- Creator’s Tip: Always buy a unit with a thick tempered glass wind guard. It stops the flames from blowing sideways into your drinks or guests.
- Smart Sourcing: Propane outdoor fire pit tables (with hidden tank) and tempered glass flame wind guards.
52. Stream Feature Parallel to Patio
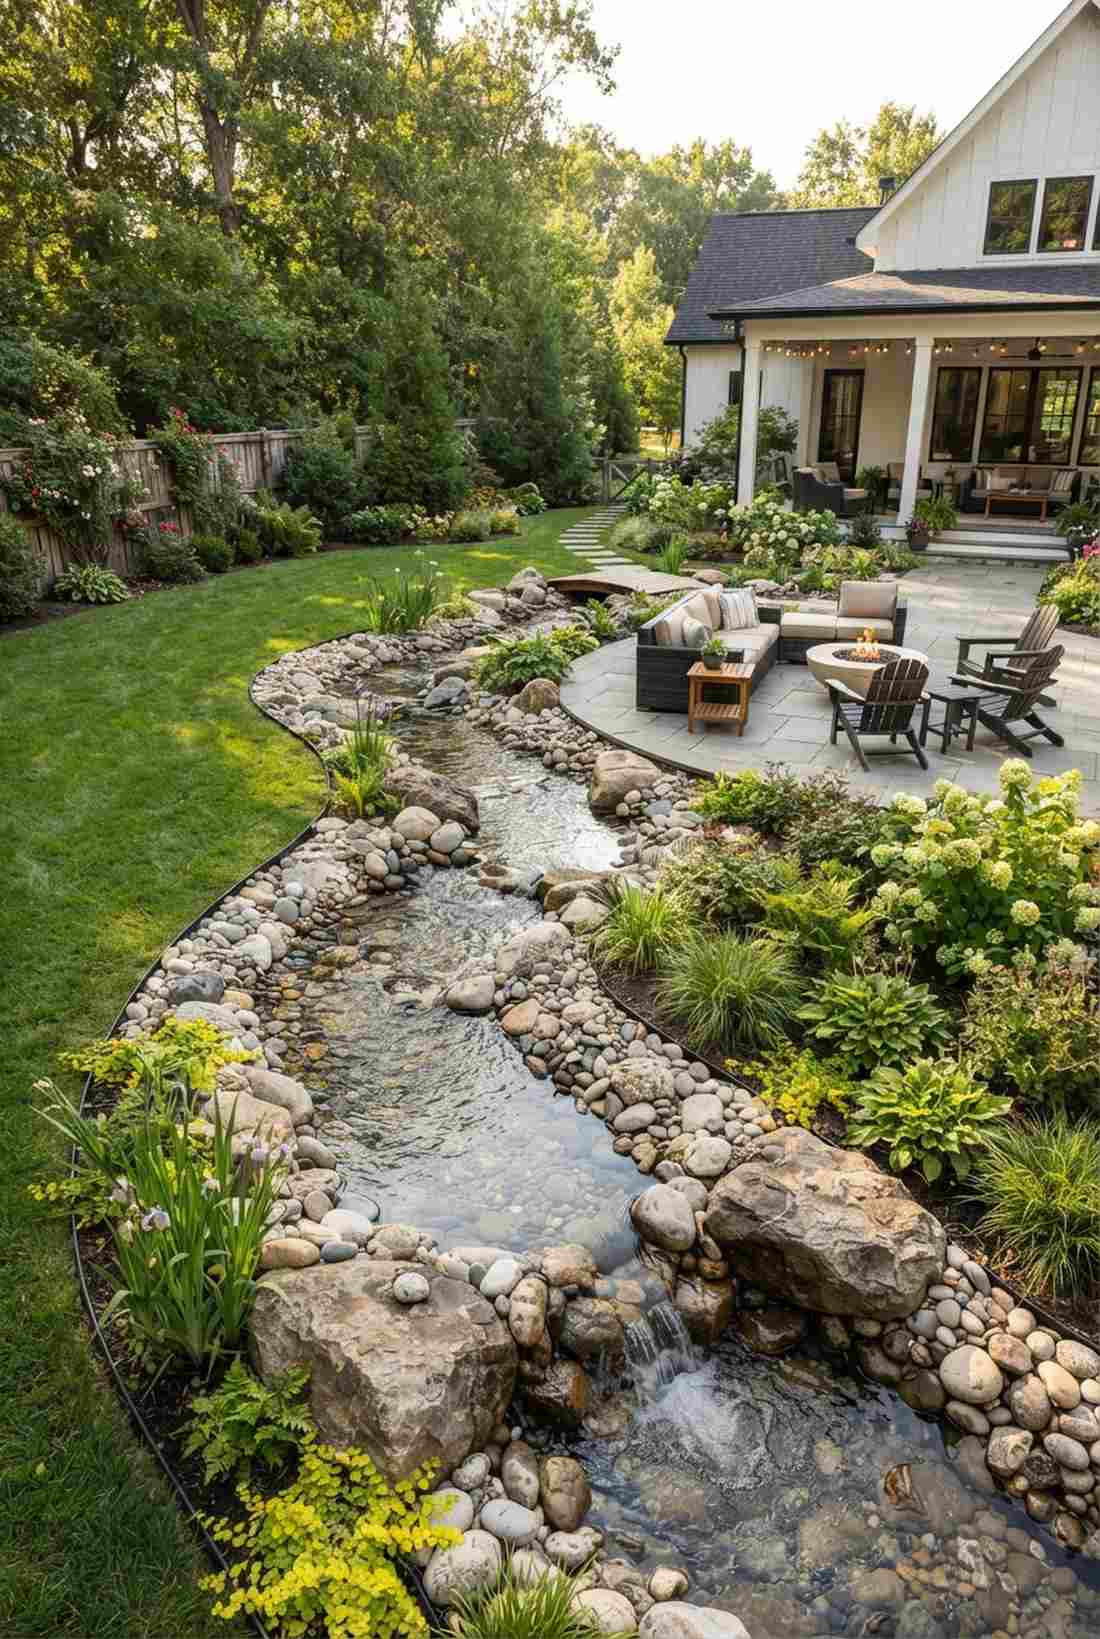

Mimics the idyllic, lazy flow of a countryside creek cutting through your property. This linear water boundary design replaces boring fences with dynamic, flowing movement.
Hard concrete edges feel sterile; running a shallow, recirculating stream parallel to the patio edge delivers a surprisingly premium look that softens the whole yard. The constant babbling water completely transforms the acoustic environment.
Digging and lining a 20-foot stream ranges from $1,500–$4,000.
- Key Materials: EPDM rubber liner, river rock/gravel, high-efficiency recirculating pump
- Vibe / Style: Dynamic organic boundary
- Difficulty: Labor intensive digging
- Budget Breakdown: Liner/Underlay: $400 | River Rock: $500 | Pump System: $400
- Creator’s Tip: Grade the stream with a gentle 2% slope and add a few larger boulders in the middle to create natural splashing sounds.
- Smart Sourcing: Heavy-duty EPDM pond liners (bulk roll) and smooth polished river rocks (bulk bags).
Conclusion
Successful outdoor seating patio design synthesizes site analysis, material performance, and lifestyle requirements into cohesive spatial solutions. These 52 curated blueprints demonstrate exact, proven strategies for conversation zones, dining areas, multi-function spaces, and premium feature-anchored arrangements across varied scales and budgets. Begin your design process by evaluating sun exposure, circulation patterns, and primary activities your outdoor space will support. Take advantage of pre-cut pergola kits or bulk pack composite decking to balance aesthetic preferences with smart budget sourcing. Experiment with these layout variations—test furniture arrangements before finalizing hardscape commitments, and prioritize flexibility for your evolving premium outdoor living needs.