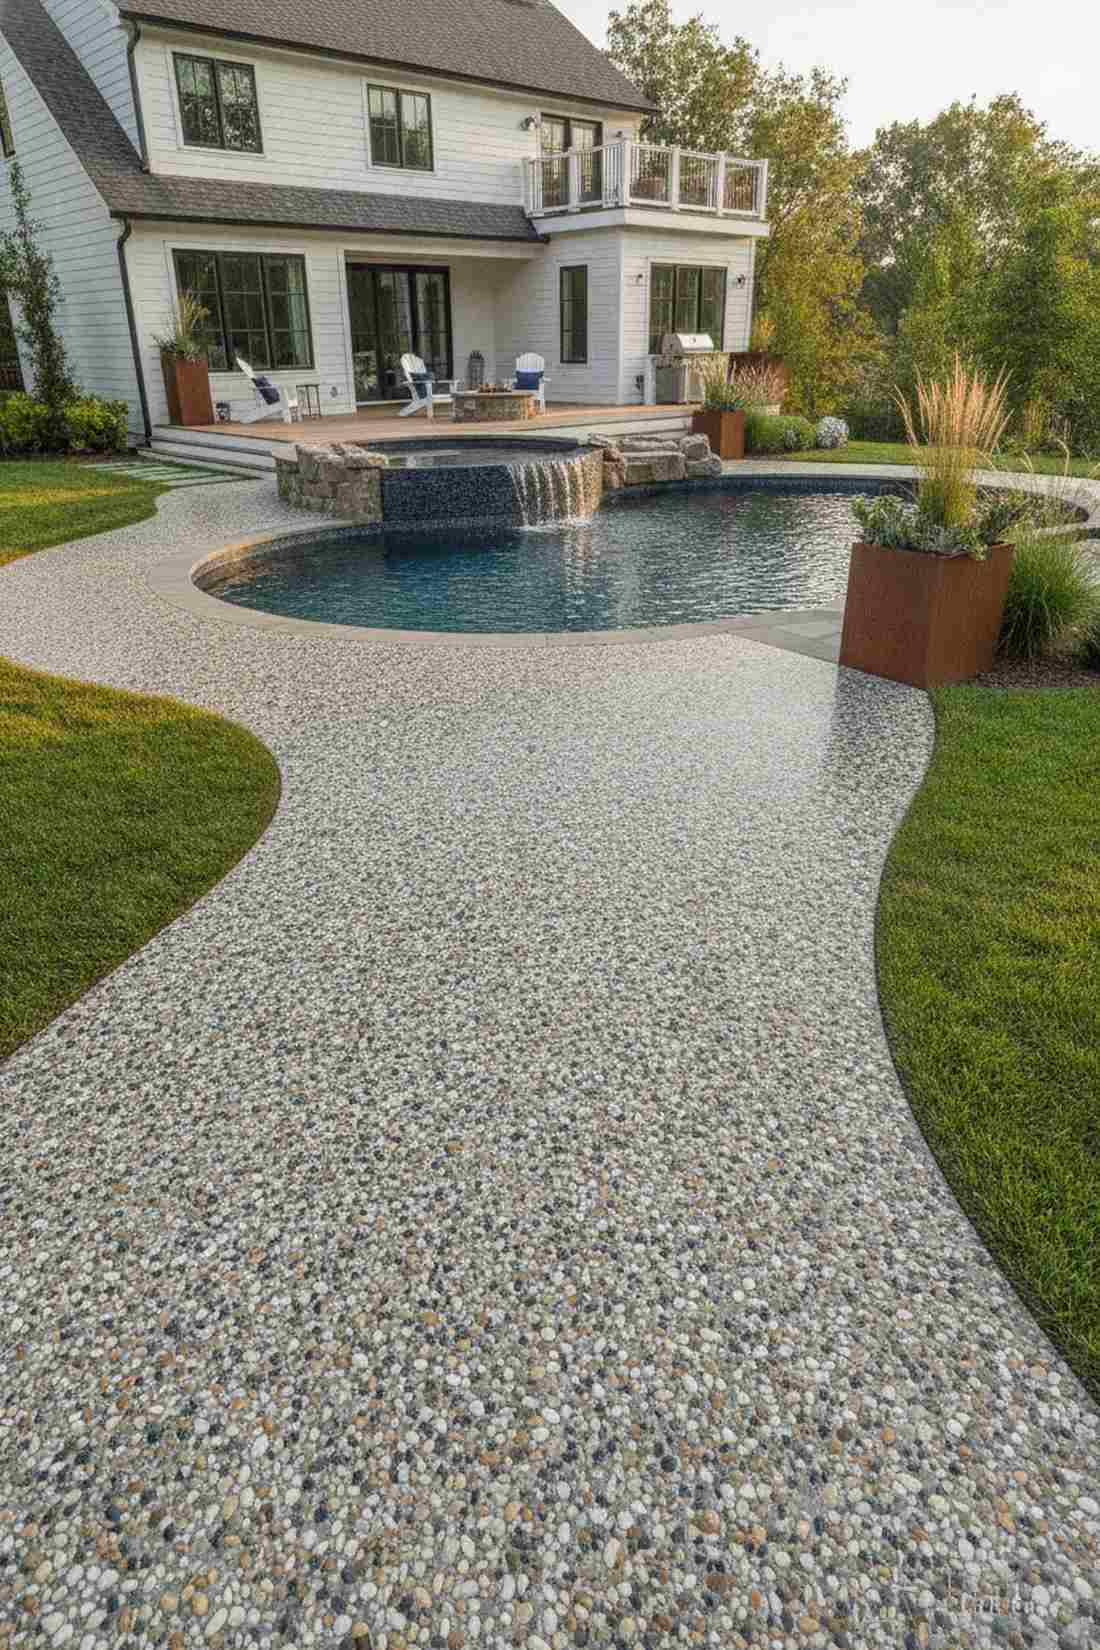
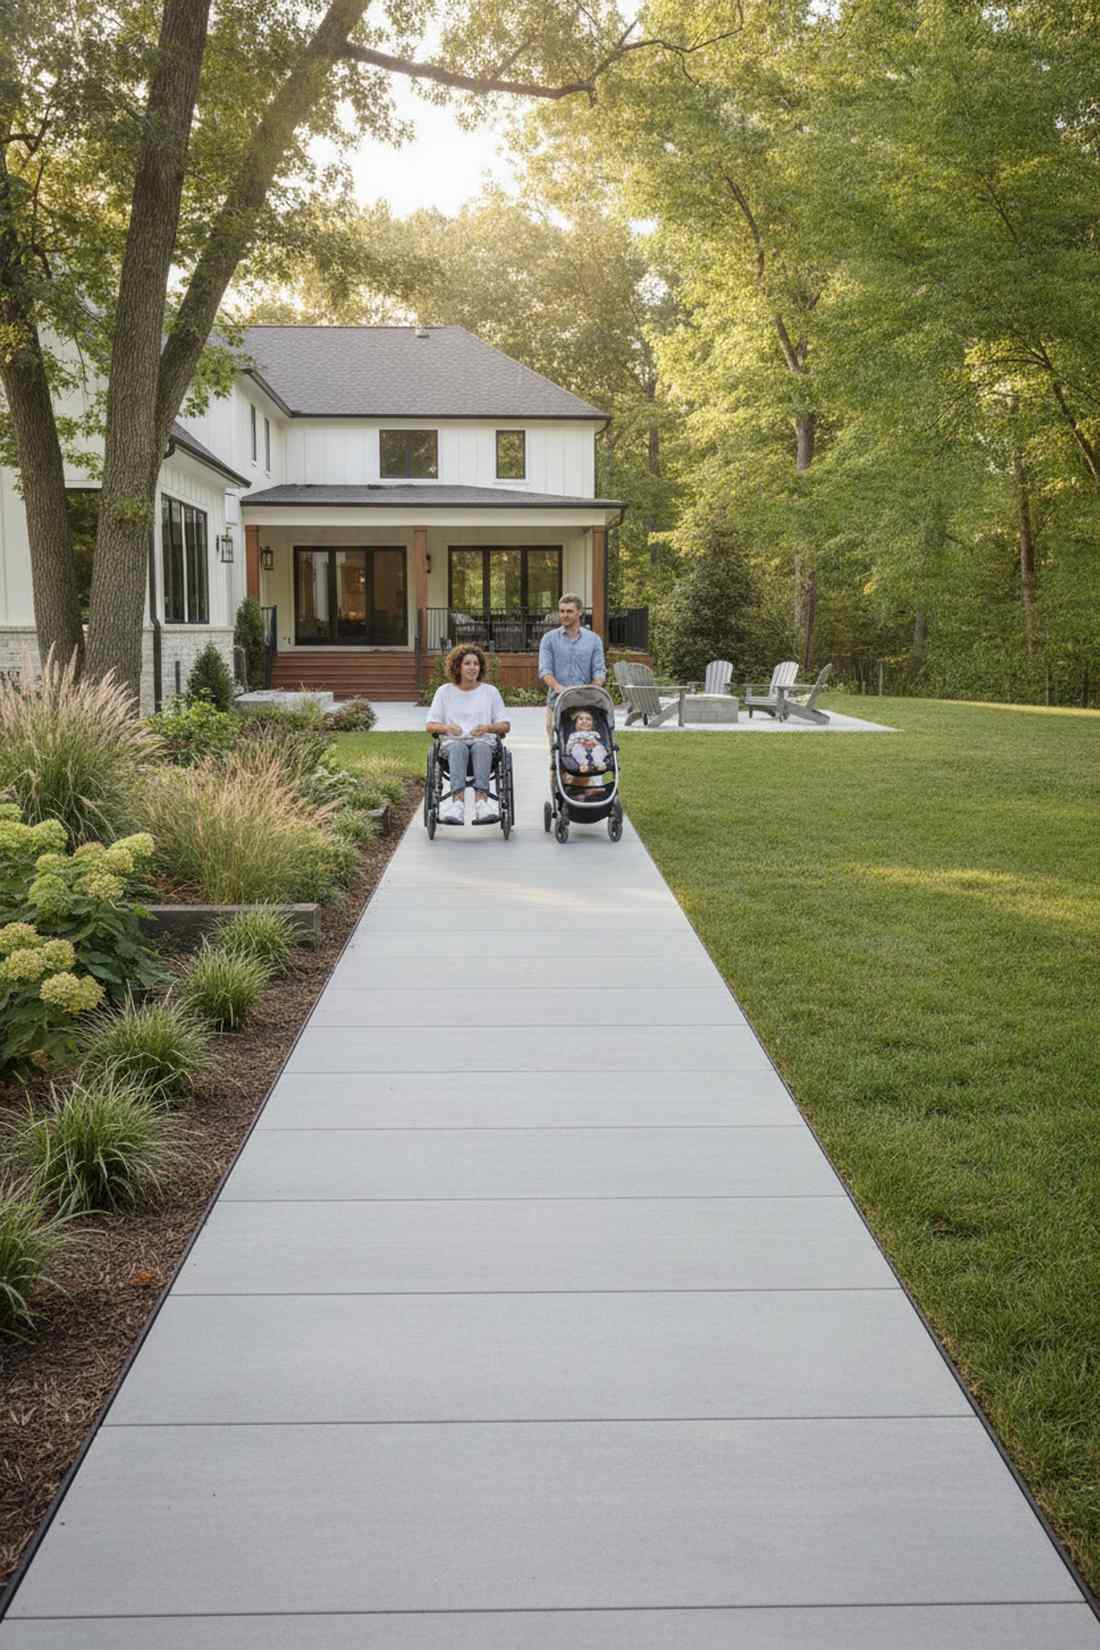
These premium stepping stones instantly elevate mundane pathways into high-end landscape features. Uncover budget-friendly blueprints and smart material sourcing for a designer finish. Upgrade your yard today without massive contractor fees.
Design Snapshot Key Principles
- Stride Calibration: Position stones 24 inches apart to match natural human gait and ensure comfortable movement
- Spatial Definition: Use pathway width and alignment to define garden zones and control circulation flow
- Material Hierarchy: Select stone types based on traffic intensity, climate exposure, and maintenance capacity
- Visual Weight: Balance stone size, pattern density, and void percentage to achieve appropriate pathway presence
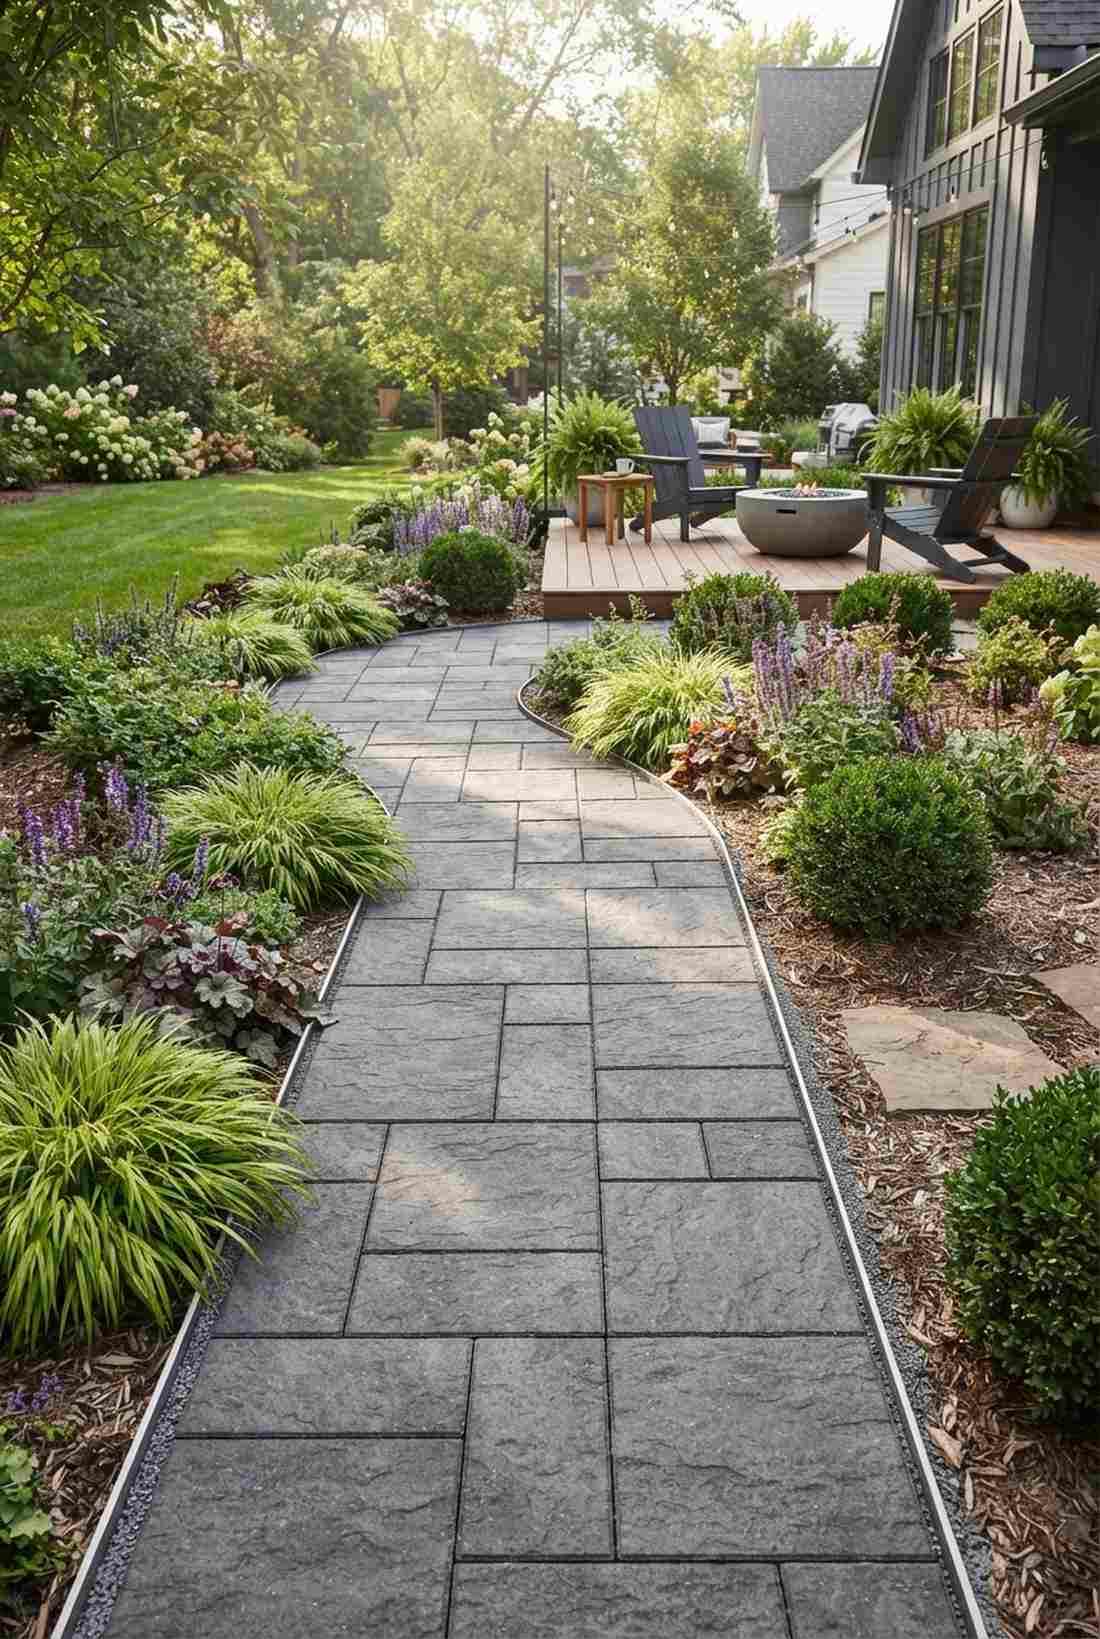
Geometric Precision Pathways
Contemporary landscape architecture relies on geometric rigor to establish visual order and spatial clarity. These stepping stones design concepts employ precise shapes and disciplined spacing to create pathways with strong formal presence.
1. Square Grid Alignment
Feels like a structured sanctuary right out of an architectural magazine. Modern square grid layout is absolutely perfect for flanking a sleek, minimalist property entrance.
This layout delivers a surprisingly premium look by leveraging strict orthogonal repetition. Set your 18-inch high-density concrete units perfectly flush with the ground, maintaining a razor-sharp 4-inch gap for filler. Utilizing heavy-duty paver molds ensures the geometry stays locked in regardless of foot traffic.
You can execute this crisp setup for around $45–$65 per section. Save this to your ultra-modern landscaping Pinterest board.
- Key Materials: 18-inch pre-cast square pavers
- Vibe / Style: Modern architectural luxury
- Difficulty: Moderate DIY precision required
- Budget Breakdown: Pavers: $30 | Base Sand: $15
- Creator’s Tip: Use a laser level to ensure perfectly flat horizontal alignment before placing stones.
- Smart Sourcing: Heavy-duty square paver molds (reusable) and bulk pack polymeric jointing sand.
2. Hexagonal Honeycomb Network
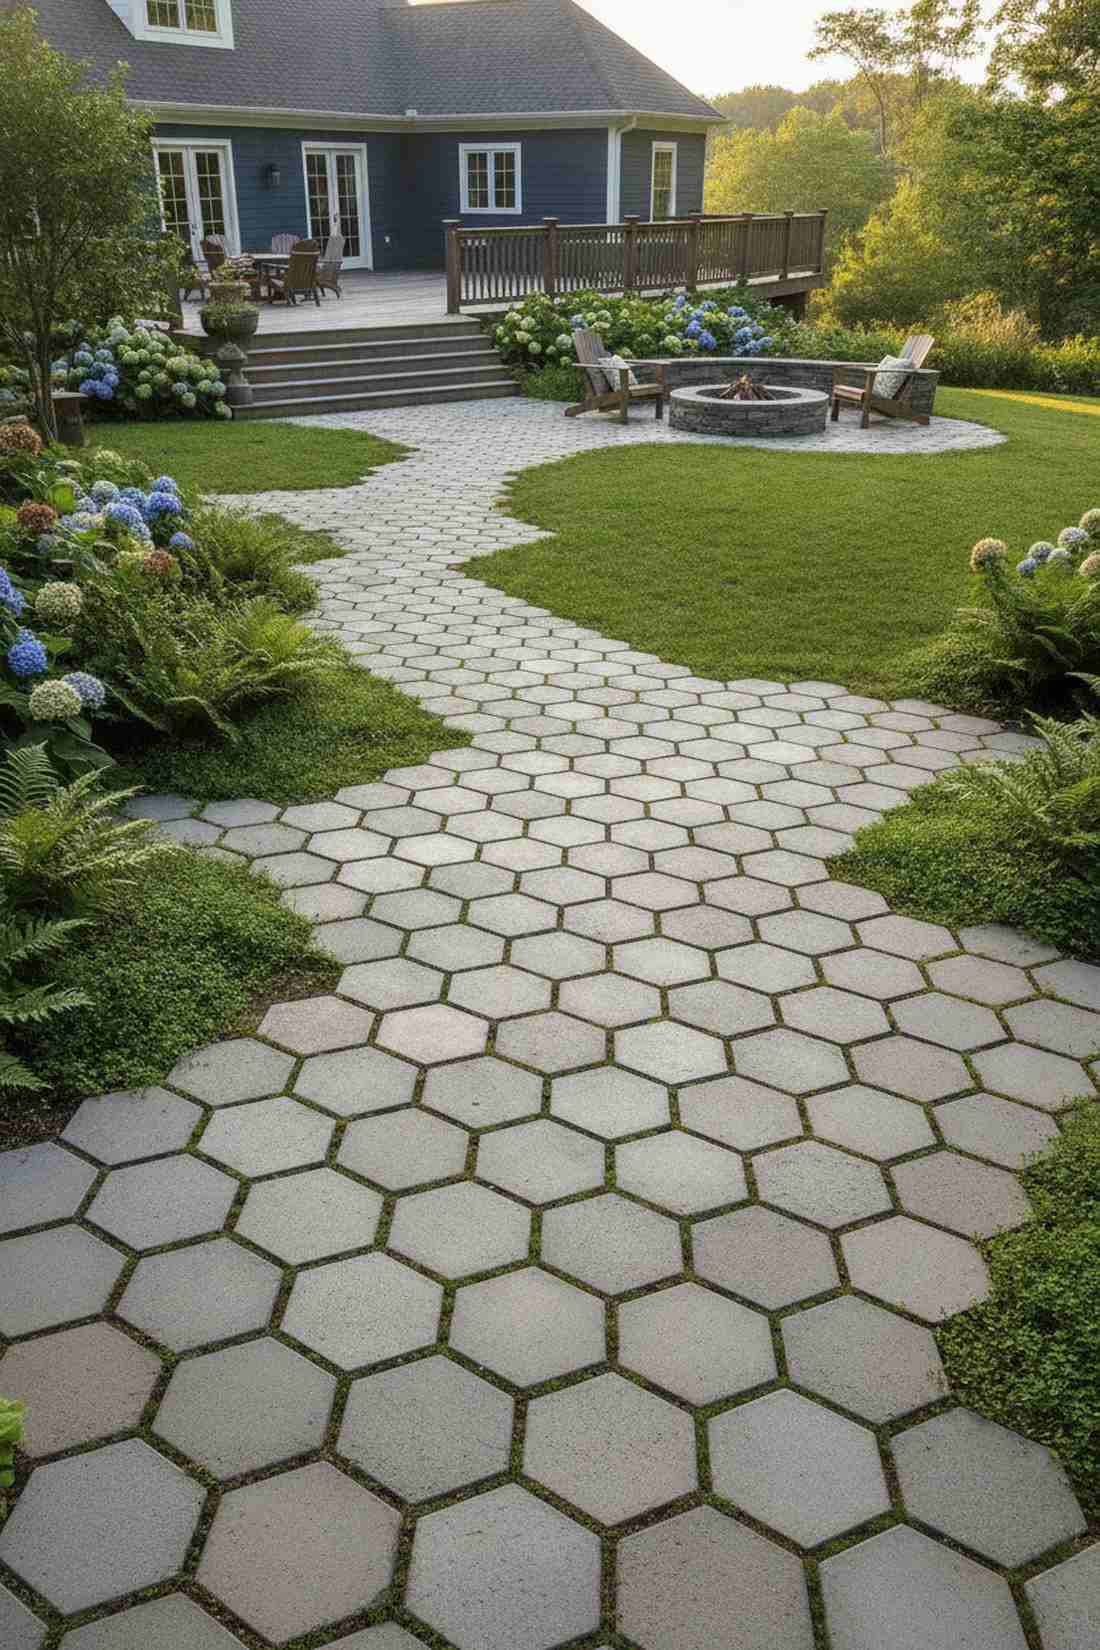
Radiates a futuristic yet strangely organic energy. Interlocking honeycomb pathway works brilliantly for branching routes in a lush backyard patio.
Most homeowners assume complex shapes require a masonry expert, but this modular stepping stones in garden approach is completely approachable. The six-sided pavers distribute weight beautifully while naturally forcing circulation into elegant diagonal strides. Adding UV-resistant sealant keeps the color popping for years.
Expect to spend roughly $35–$50 to establish this eye-catching path. It’s a fast upgrade that completely changes the yard’s vibe.
- Key Materials: Concrete hexagonal tiles
- Vibe / Style: Organic geometric fusion
- Difficulty: Easy beginner setup
- Budget Breakdown: Hex Tiles: $25 | Sub-base: $10
- Creator’s Tip: Space them 8 inches apart if you want creeping thyme to fill the gaps.
- Smart Sourcing: Pre-cut hexagonal concrete templates and high-grade UV paver sealant.
3. Rectangular Running Bond
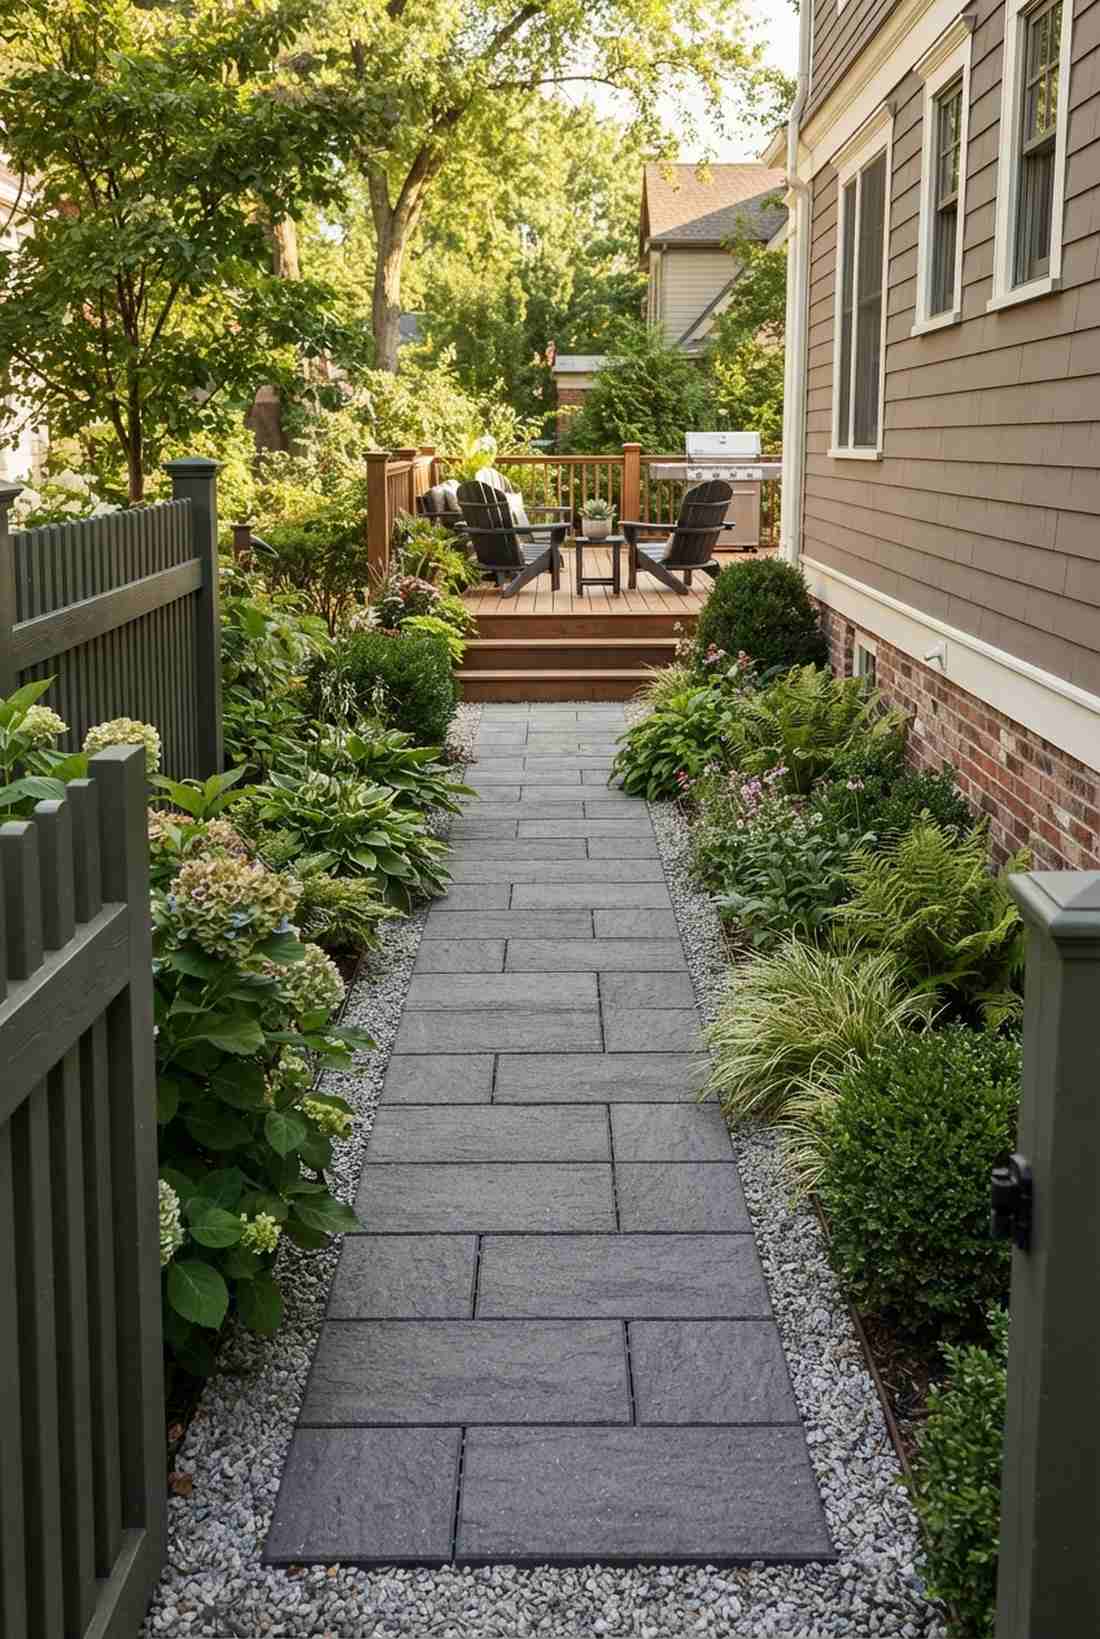
Evokes the timeless charm of an old English estate. Staggered masonry style pathway fits exceptionally well connecting a side gate to a rear deck.
A clever hack to elongate small spaces is utilizing this offset rectangular stepping stones design. By aligning the long 12×24 axis with the primary walking direction, you instantly extend the visual sight line. Sourcing granite-look composite stones gives you the aesthetic without the back-breaking weight.
Materials for this elongated trick will run about $50–$80 per linear segment. Pin this if you’re trying to make a narrow side yard look massive.
- Key Materials: Elongated 12×24 faux-granite slabs
- Vibe / Style: Transitional elegance
- Difficulty: Intermediate leveling needed
- Budget Breakdown: Slabs: $50 | Gravel base: $20
- Creator’s Tip: Offset the joints perfectly at 50% to prevent the visual line from wavering.
- Smart Sourcing: Lightweight composite bluestone rectangles (bulk pack) and heavy-duty weed barrier fabric.
4. Diamond Diagonal Orientation
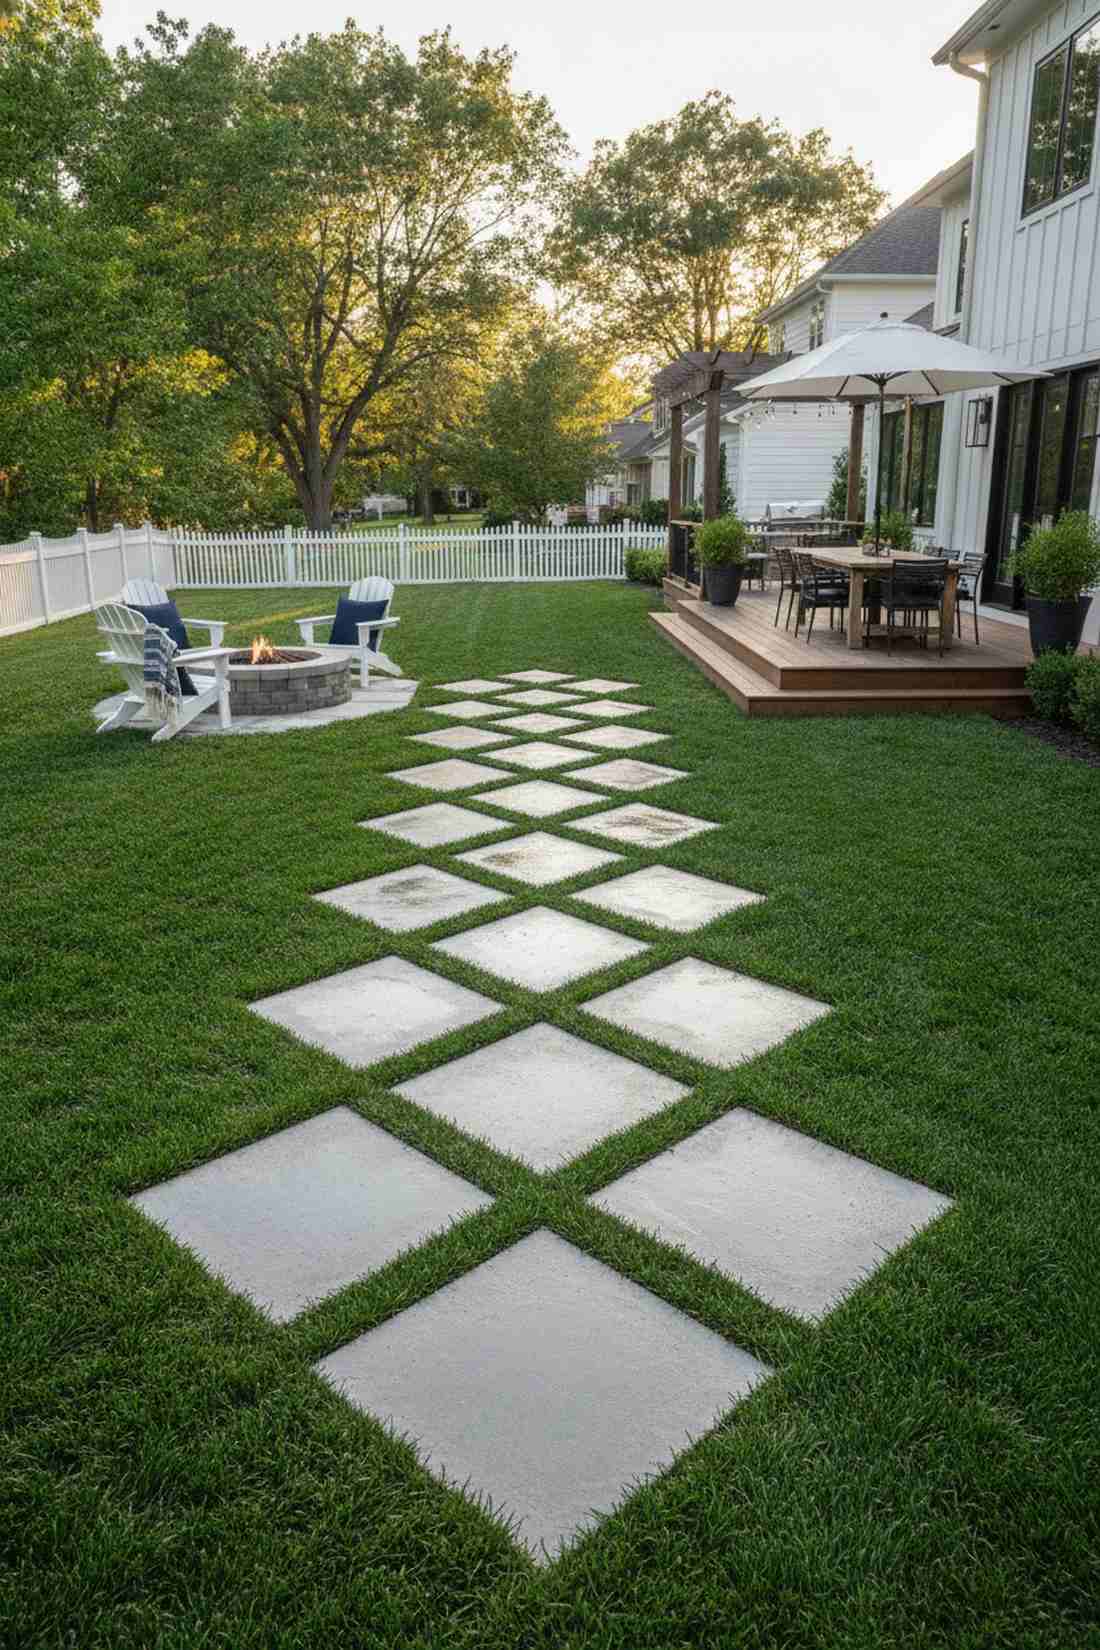
Feels like stepping onto a high-end designer chessboard. Rotated diamond stone configuration is a stunning choice for slicing through wide-open lawn expanses.
This layout looks far more expensive than it actually is simply by rotating basic squares 45 degrees. The angular tension of these stepping stones outdoor pieces instantly slows walking speed and demands attention. Applying a quick-dry acrylic glaze to the stones amplifies the contrast against green turf.
A smart shopper can assemble this layout for just $20–$40 per block area.
- Key Materials: Basic 16-inch concrete squares
- Vibe / Style: Playful contemporary
- Difficulty: Very easy DIY
- Budget Breakdown: Square pavers: $20 | Edge restraints: $15
- Creator’s Tip: Cut the turf exactly to the diamond shape for a flawless sunken look.
- Smart Sourcing: Pre-cast concrete squares (builder’s pack) and acrylic wet-look stone sealer.
This next setup is ridiculously cheap but looks like a $1,500 custom landscape installation…
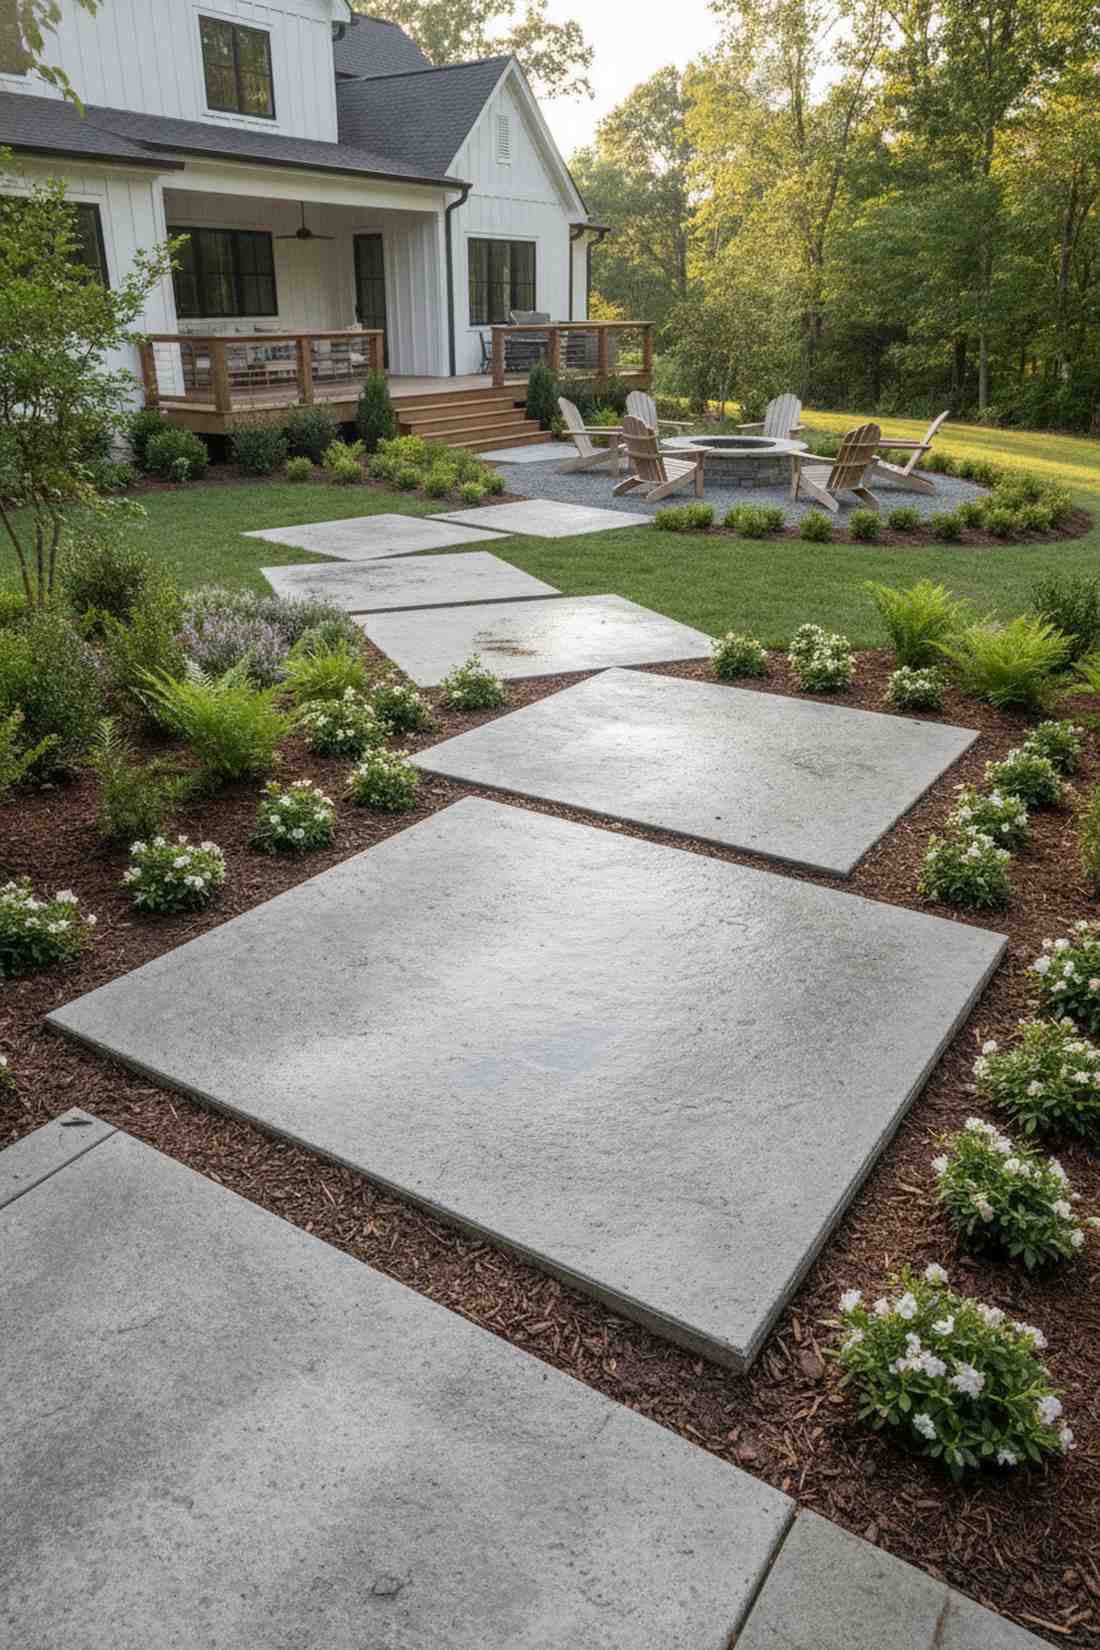
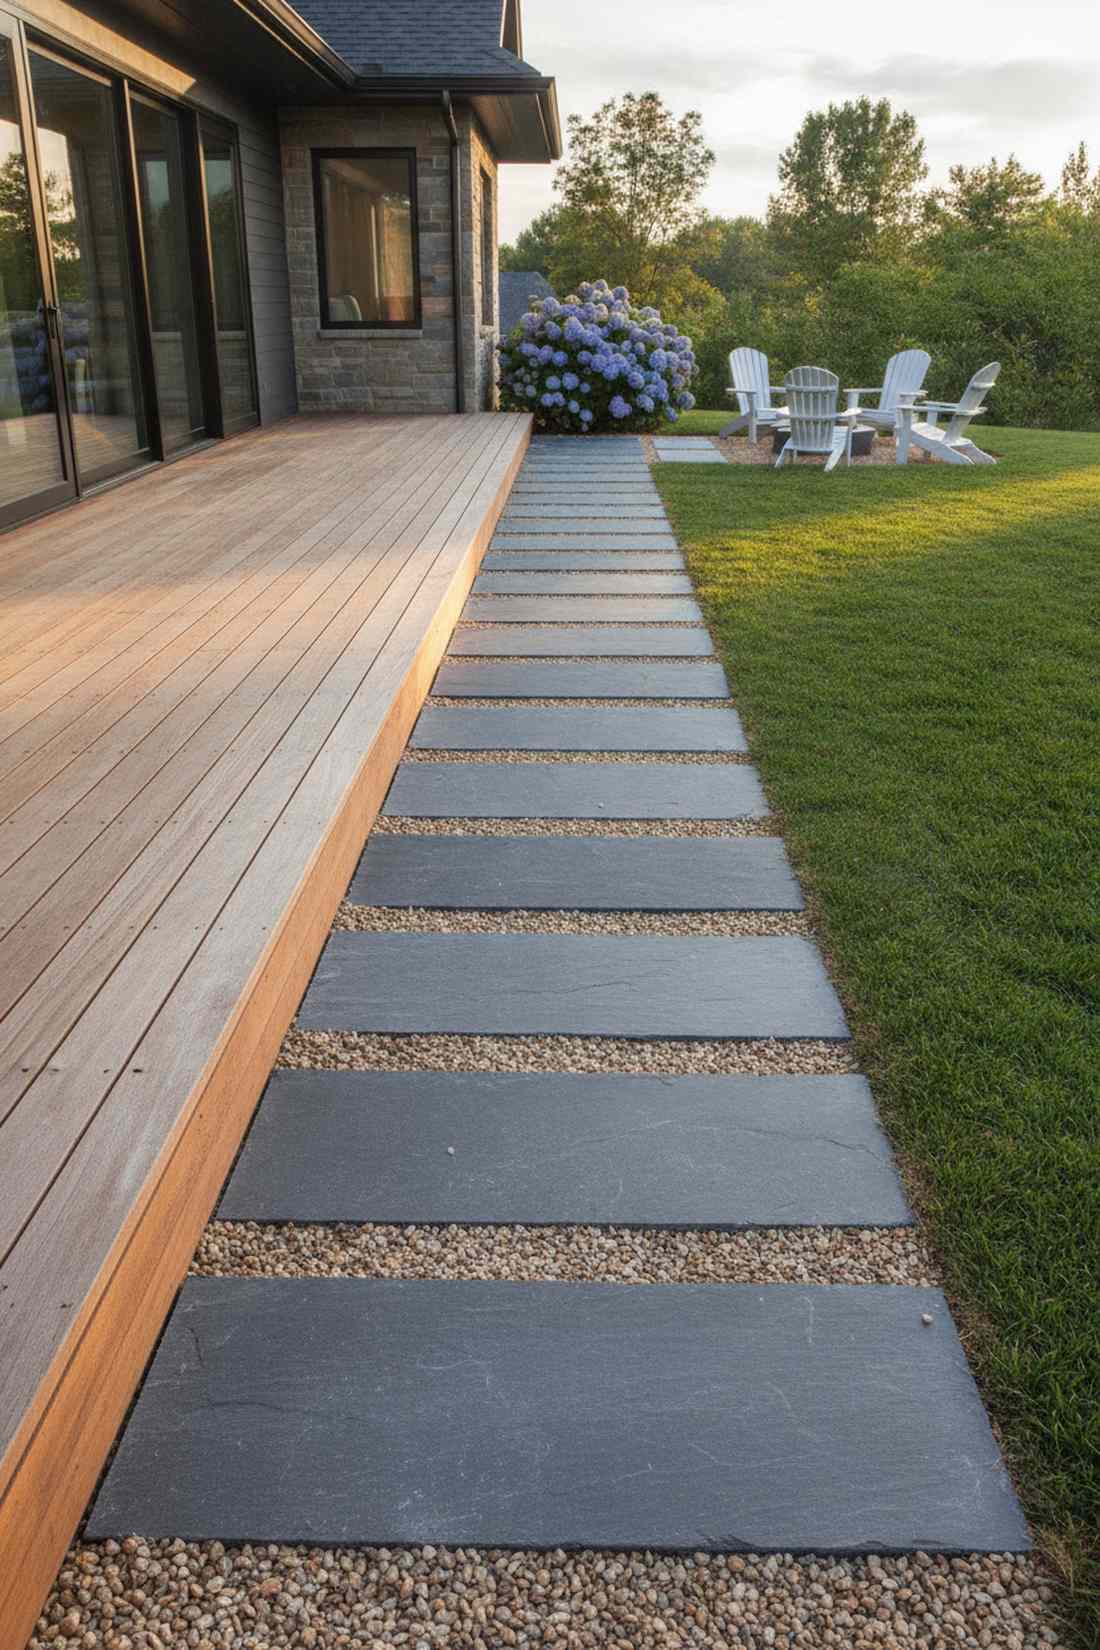
5. Linear Slab Progression
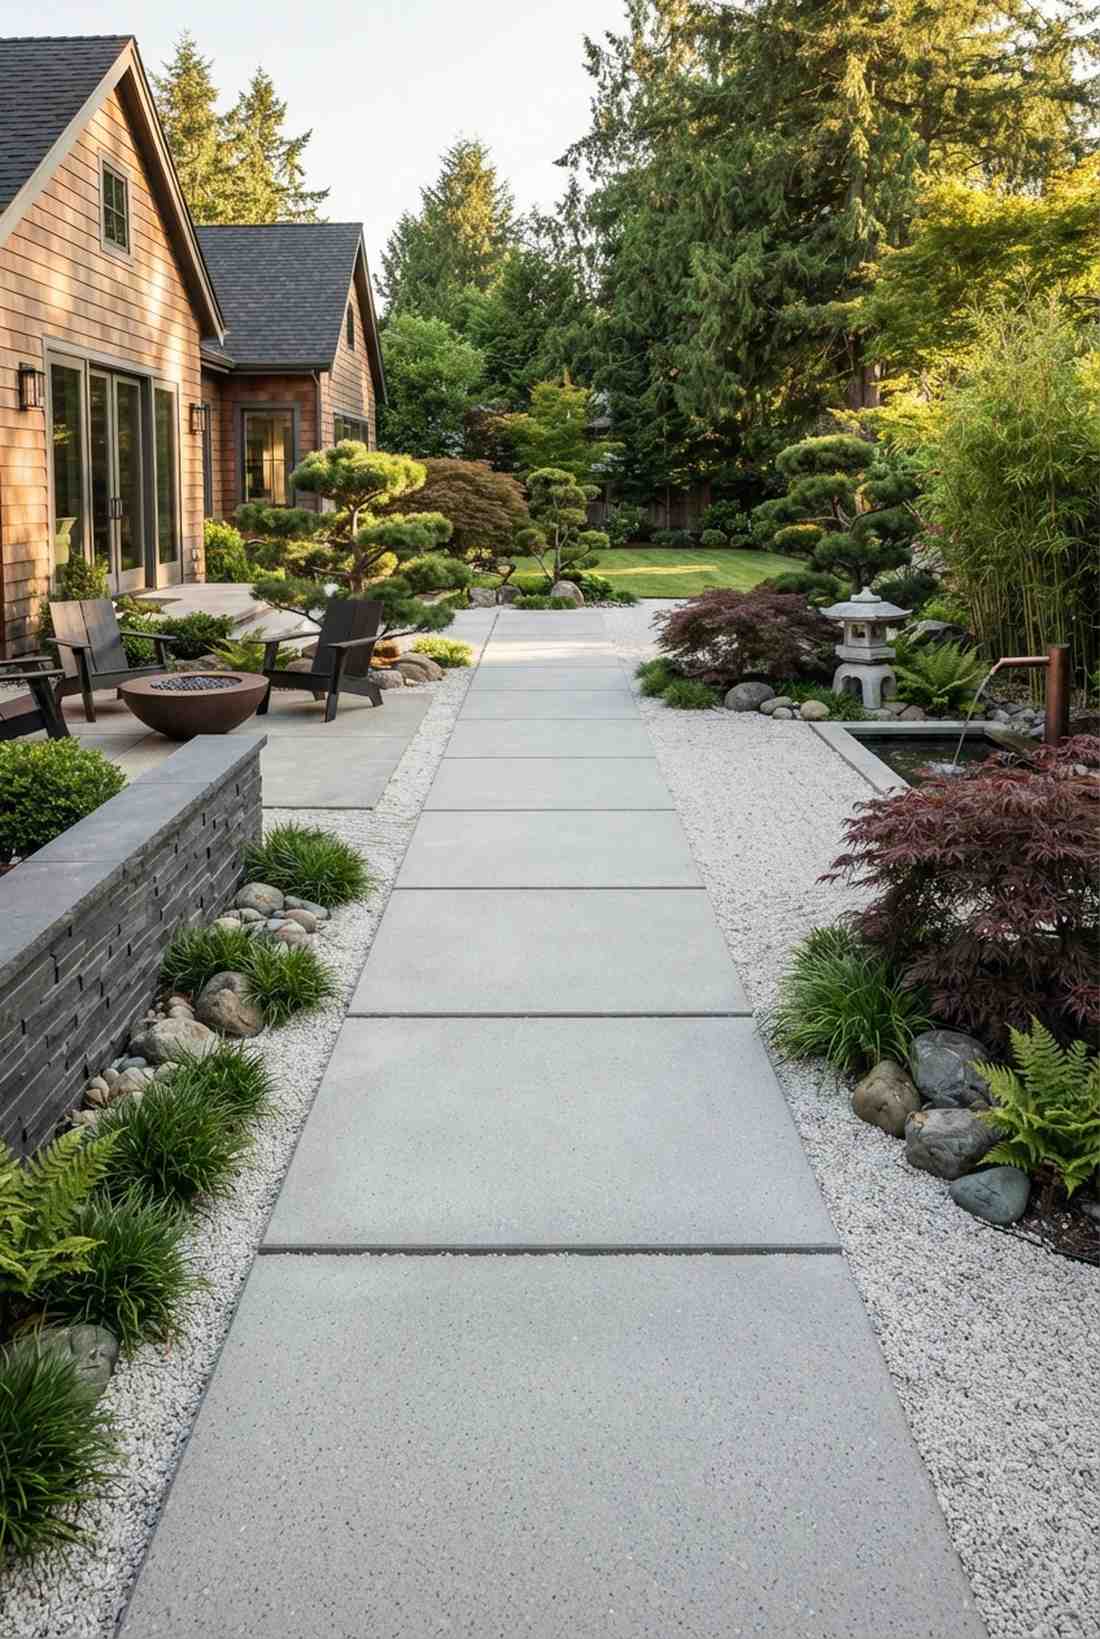
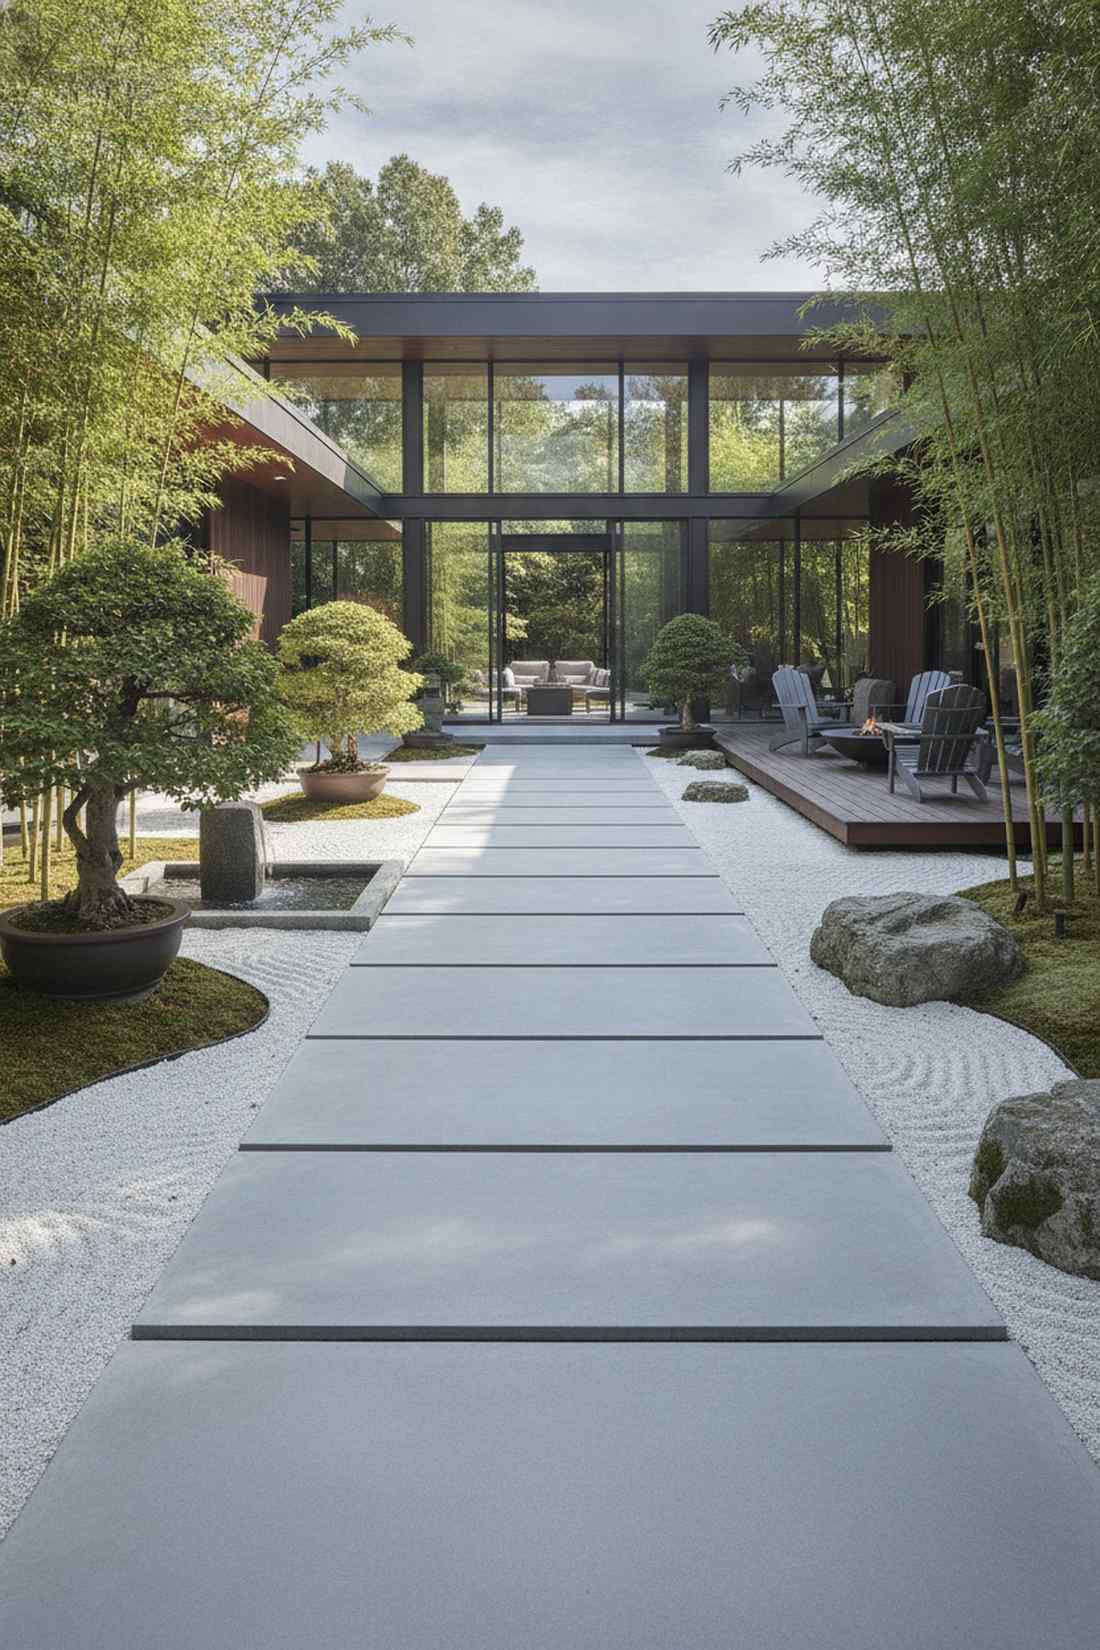
Strikes you immediately as a tranquil minimalist gallery walkway. Continuous stone slab path serves as the ultimate transitional artery for a Japanese-inspired courtyard.
Many contractors overcomplicate modern paths, but dropping 48-inch slabs end-to-end yields a sleek, zero-clutter aesthetic. Minimizing the joint frequency not only speeds up the stride but dramatically slashes weed maintenance. Opt for reinforced fiberglass concrete composites to get the massive slab look without needing a crane.
This high-end gallery aesthetic usually costs around $60–$90 per slab. Save this to your minimalist landscape board right now.
- Key Materials: 48-inch linear composite slabs
- Vibe / Style: Zen minimalist
- Difficulty: Heavy lifting required
- Budget Breakdown: Slabs: $70 | Leveling sand: $10
- Creator’s Tip: Keep the gap under 2 inches to maintain the illusion of one unbroken runway.
- Smart Sourcing: Reinforced fiberglass concrete slabs (oversized) and professional grade leveling sand.
6. Modular Square Clusters
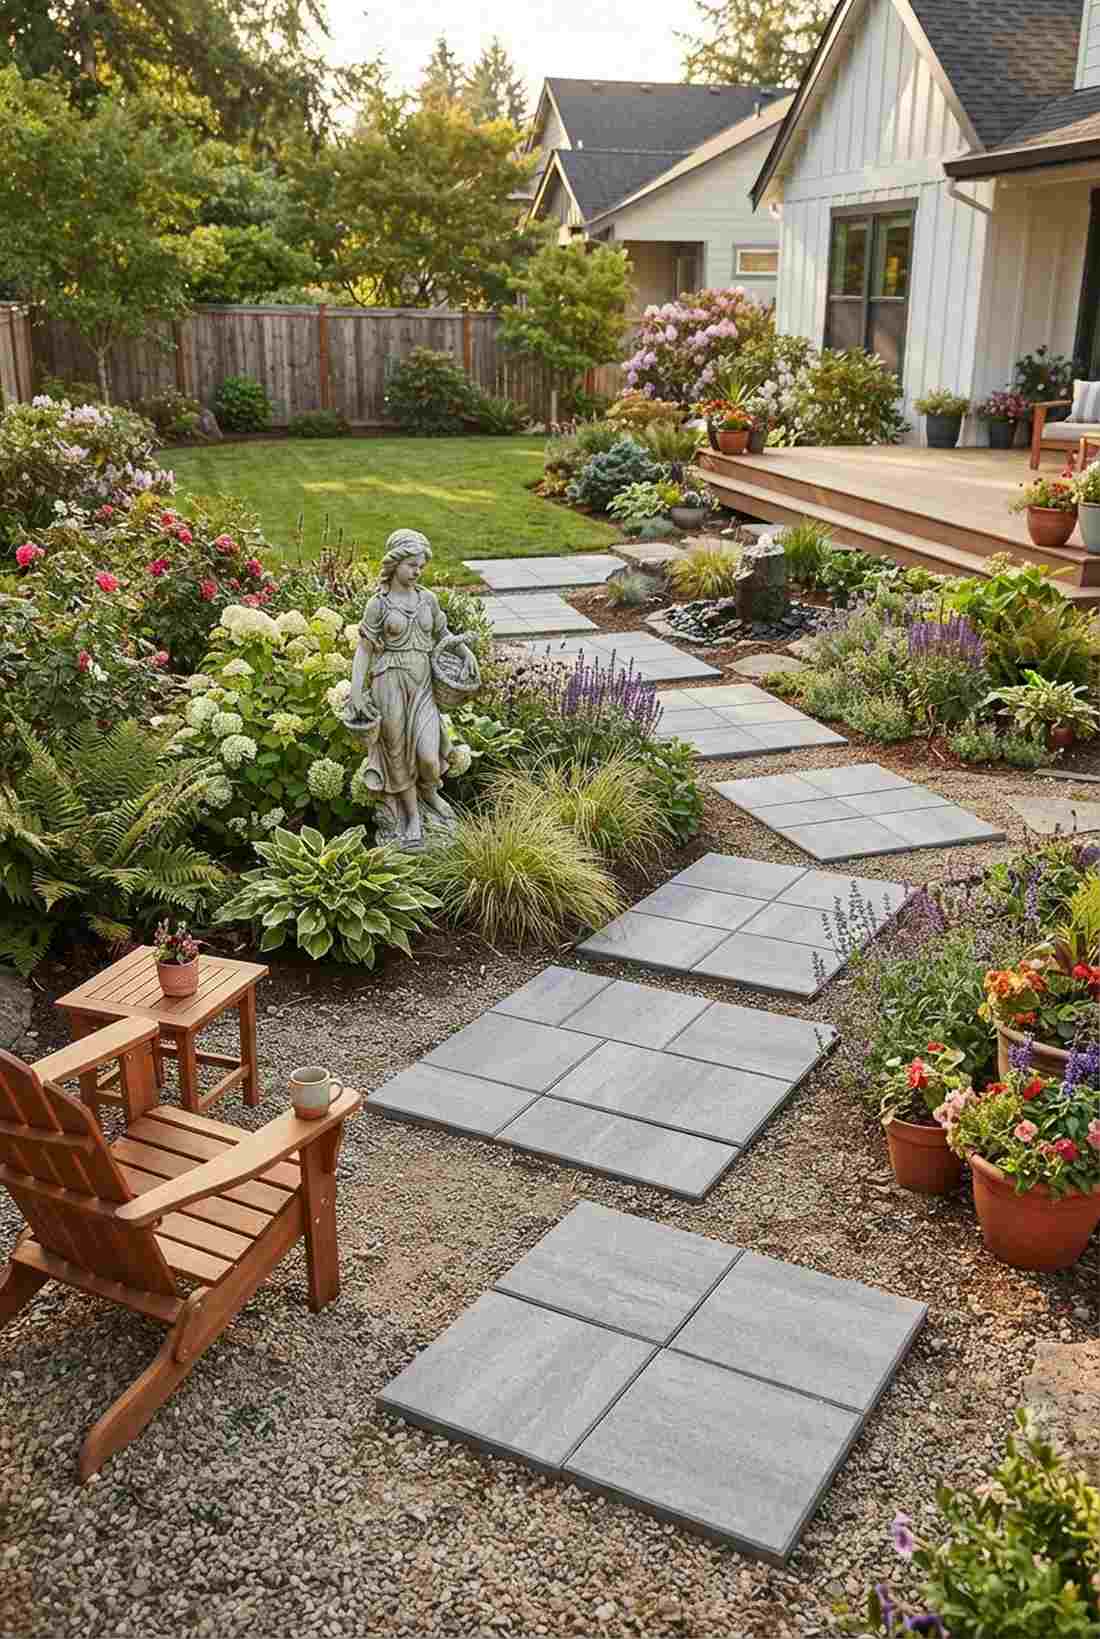
Gives off the vibe of scattered pixel art in a botanical wonderland. Clustered paver landing zones are ideal for creating natural pause points near garden statues or water features.
Instead of a boring single-file line, this layout clusters stepping stones yard units into striking sets of four or nine. Grouping them breaks up visual monotony and signals guests to slow down at key viewpoints. Utilize pre-sealed patio block kits to snap these clusters together rapidly.
You can create each stunning cluster node for roughly $25–$35. Highly recommended for injecting rhythm into long pathways.
- Key Materials: 10-inch square patio blocks
- Vibe / Style: Structured rhythm
- Difficulty: Easy weekend project
- Budget Breakdown: Blocks: $20 | Jointing sand: $5
- Creator’s Tip: Space clusters 36 inches apart to create distinct “islands” of hardscape.
- Smart Sourcing: Pre-sealed patio block kits and weather-resistant paver adhesive.
7. Triangular Directional Markers
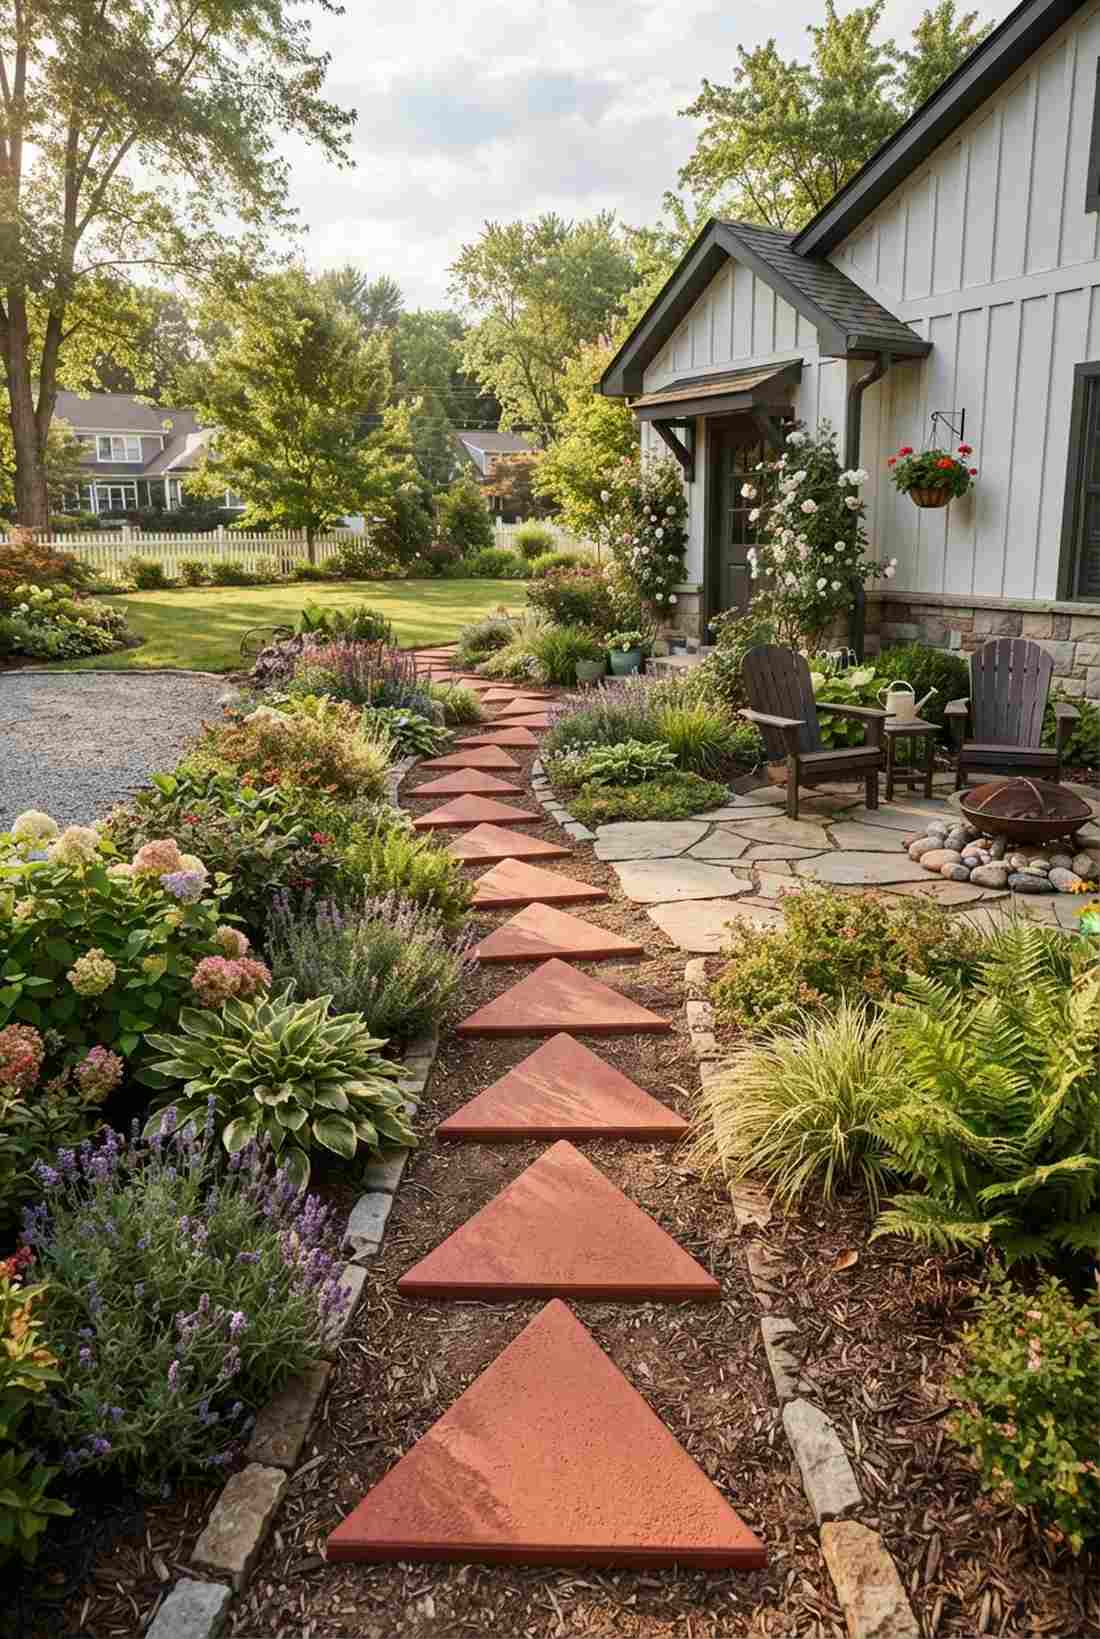
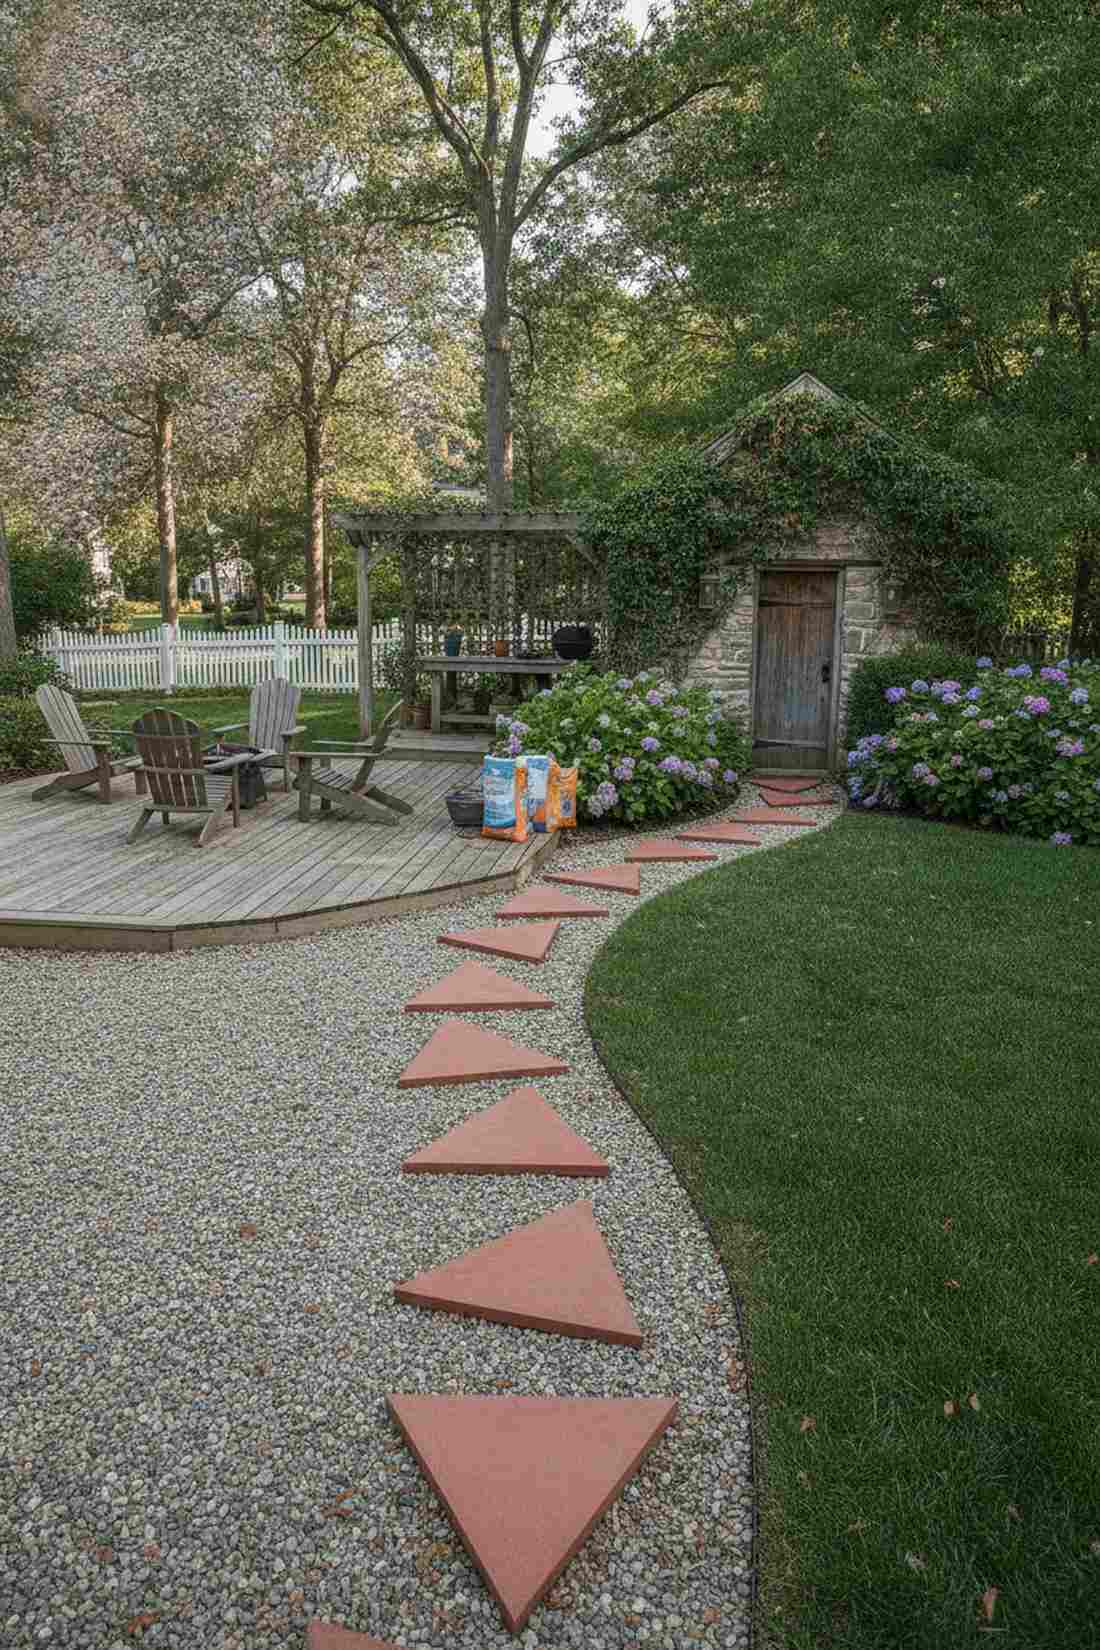
Feels like following an ancient, enchanted compass. Arrow-shaped stone path functions beautifully to guide visitors from a main driveway to a hidden side door.
The secret to this layout is the inherent psychological push of the triangle shape directing your eyes forward. Pointing these stepping stones ideas uniformly creates a dynamic thrust, while alternating them creates a cool jagged rhythm. Cast your own using silicone geometric molds to save a fortune.
Pulling off this directional trick runs about $15–$30 if you pour them yourself. Pin this to your quirky outdoor DIY board!
- Key Materials: Triangular concrete molds
- Vibe / Style: Dynamic & directional
- Difficulty: Moderate casting effort
- Budget Breakdown: Concrete mix: $15 | Molds: $10
- Creator’s Tip: Add a dash of iron oxide pigment to the wet mix to tint the arrows a striking terracotta red.
- Smart Sourcing: Reusable silicone triangle molds and rapid-set concrete mix (bulk).
8. Octagonal Transition Units
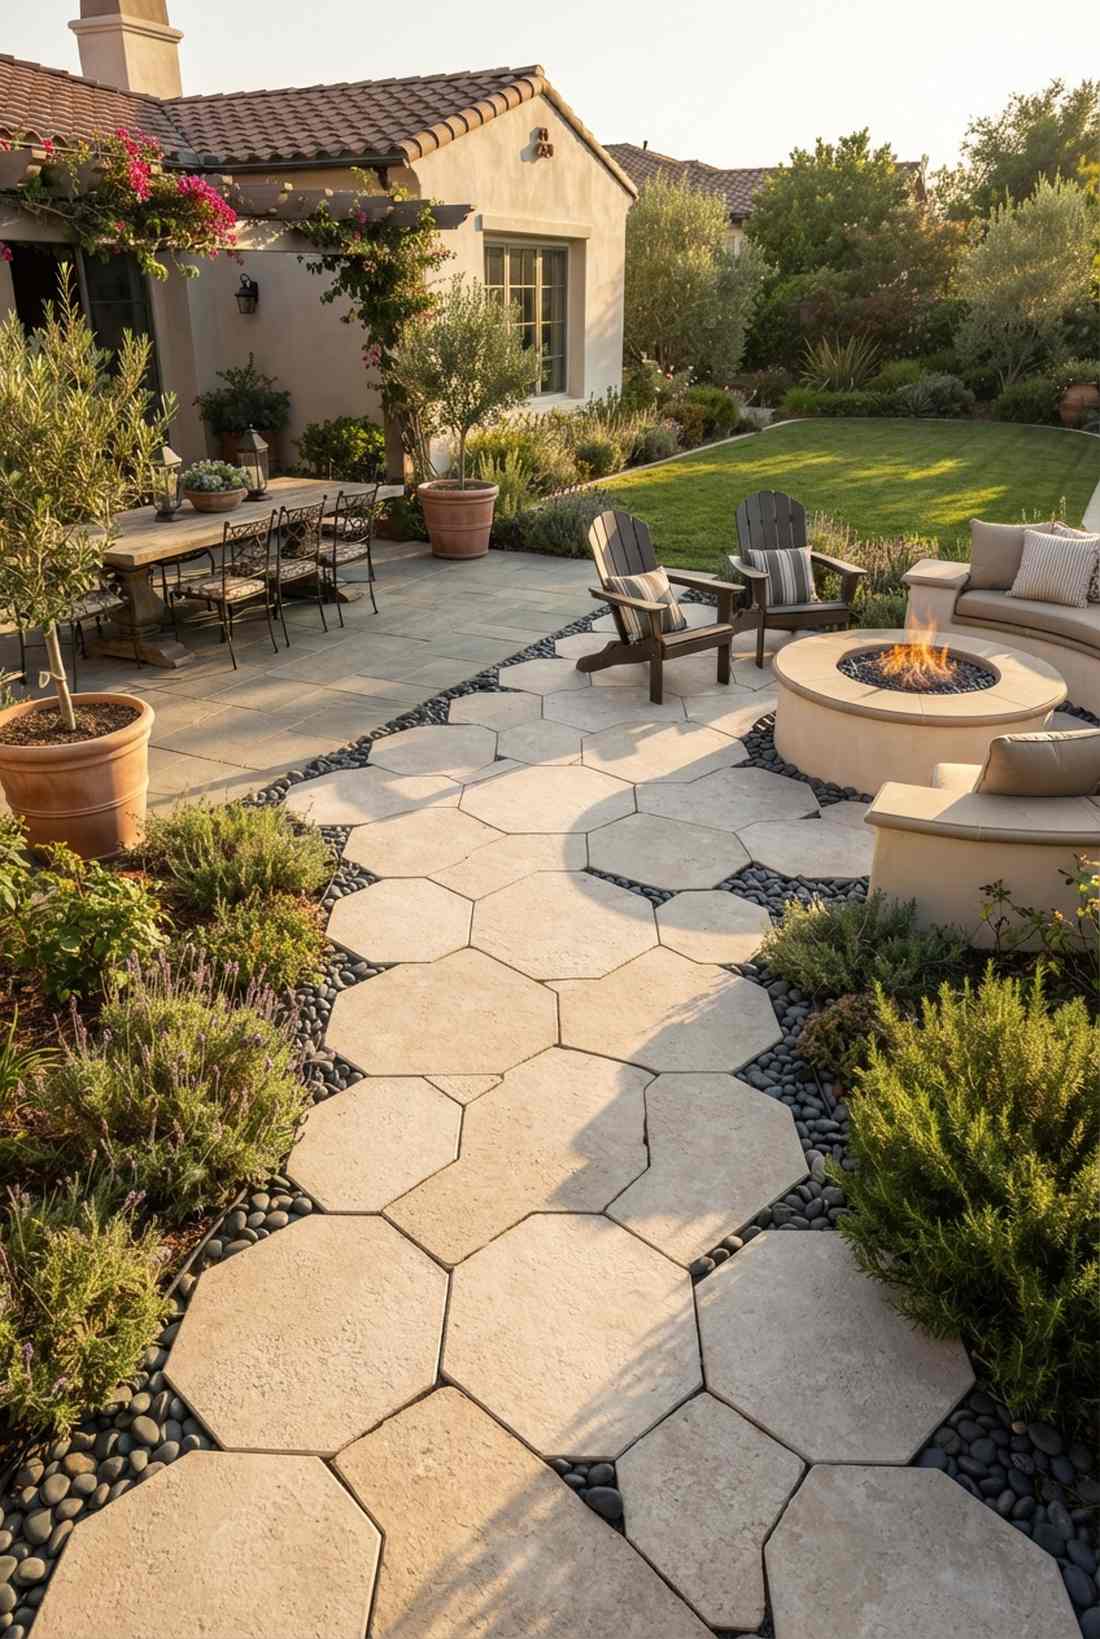
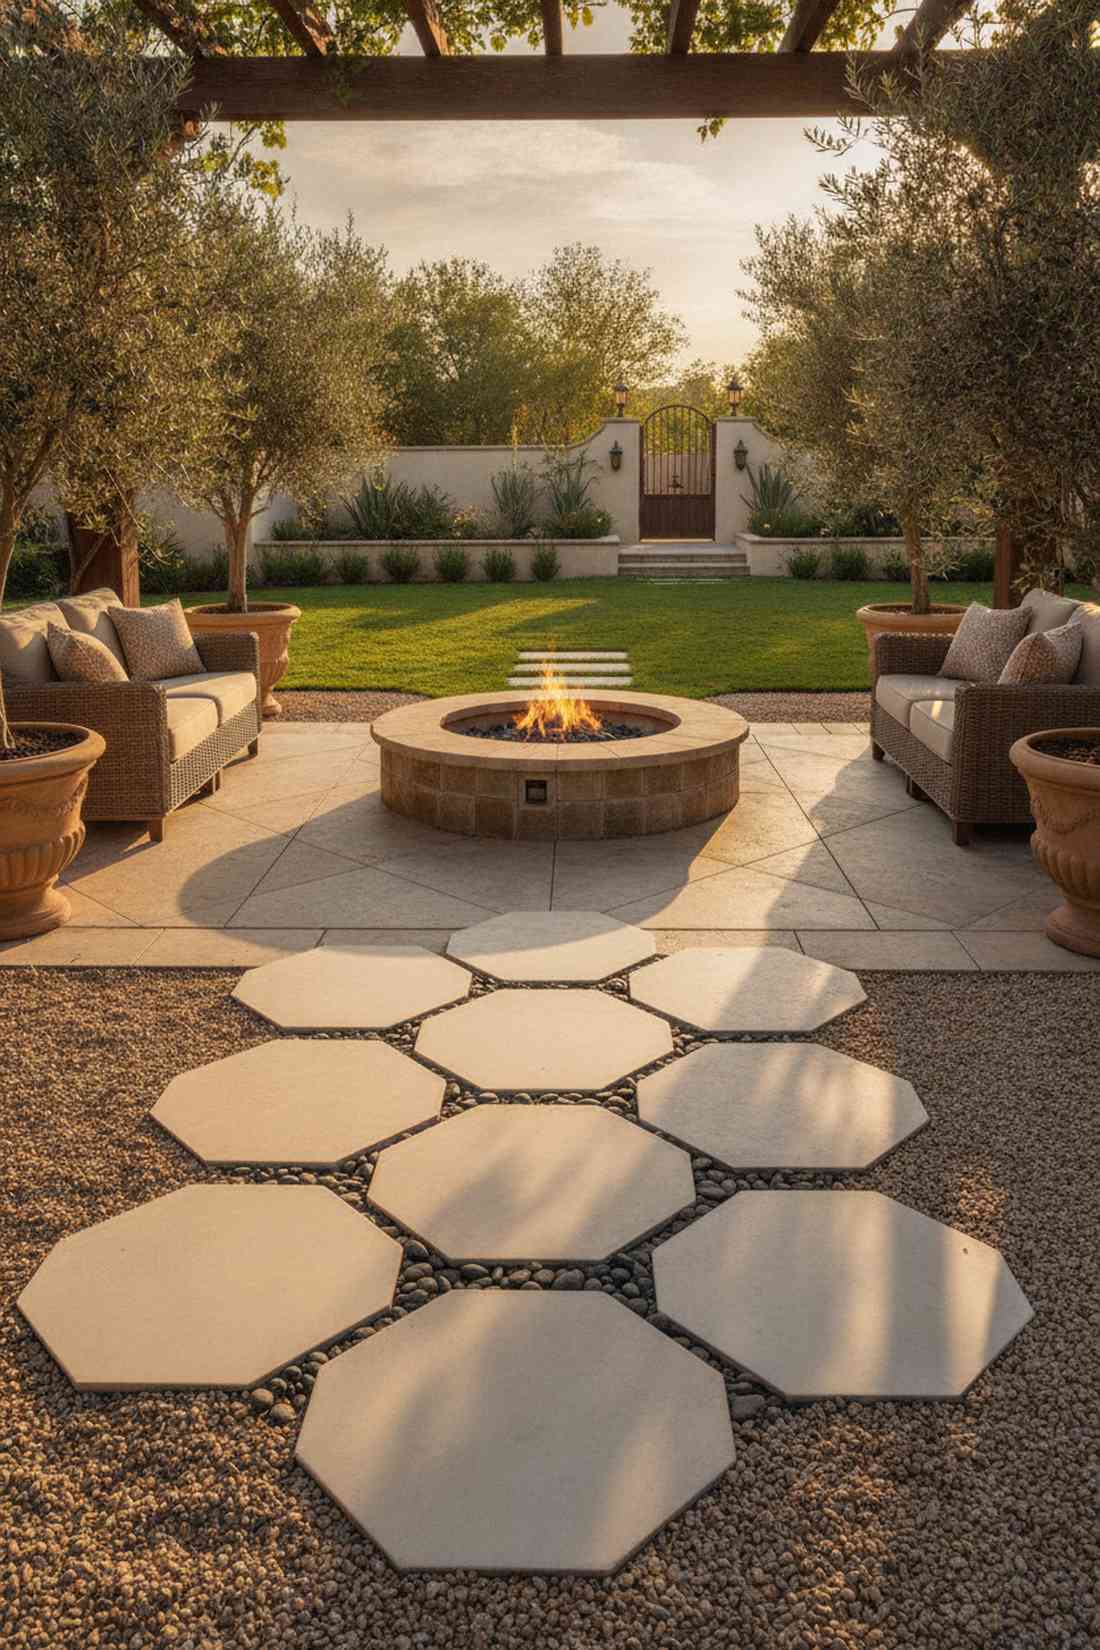
Brings to mind the refined courtyards of a Mediterranean villa. Eight-sided transition stones are a flawless fit for bridging the gap between a square patio and a circular fire pit.
Blending aggressive squares with soft circles often fails, but the chamfered edges of the octagon solve this perfectly. The multi-faceted cuts throw incredible shadows during the golden hour, providing a massive aesthetic boost. Choosing high-density pressed porcelain octagons ensures zero winter cracking.
These specialized units generally cost $30–$45 per stepping zone.
- Key Materials: Thick porcelain octagonal tiles
- Vibe / Style: Mediterranean transition
- Difficulty: Simple drop-and-level
- Budget Breakdown: Octagon units: $35 | Crushed stone base: $10
- Creator’s Tip: Surround the flat edges with dark river rock to make the pale octagon shape pop.
- Smart Sourcing: Outdoor-rated porcelain octagons (anti-slip) and premium crushed gravel base.
Most homeowners completely overlook this next organic layout, missing out on the easiest natural landscape trick available…
Organic Natural Stone Layouts
Natural stone materials with irregular forms create pathways that integrate seamlessly into planted landscapes, honoring topographic contours and ecological character. These stepping stones in garden applications prioritize site responsiveness over imposed geometry.
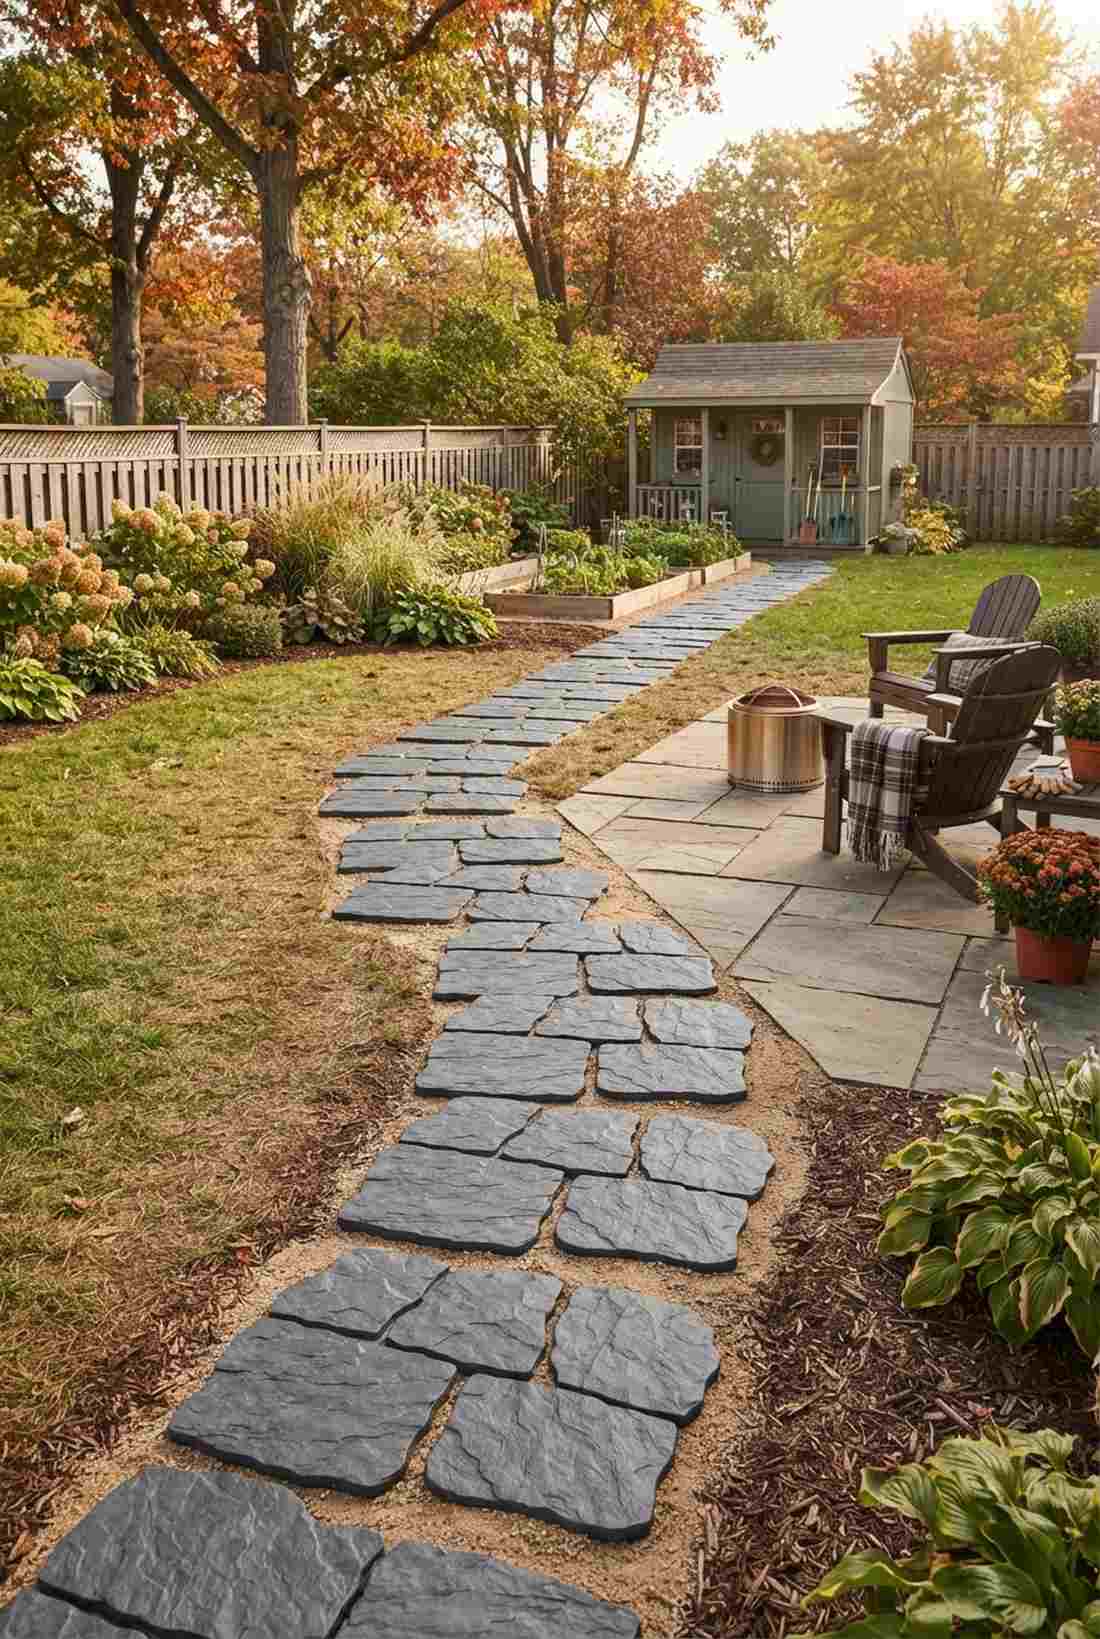
9. Fieldstone Meandering Path
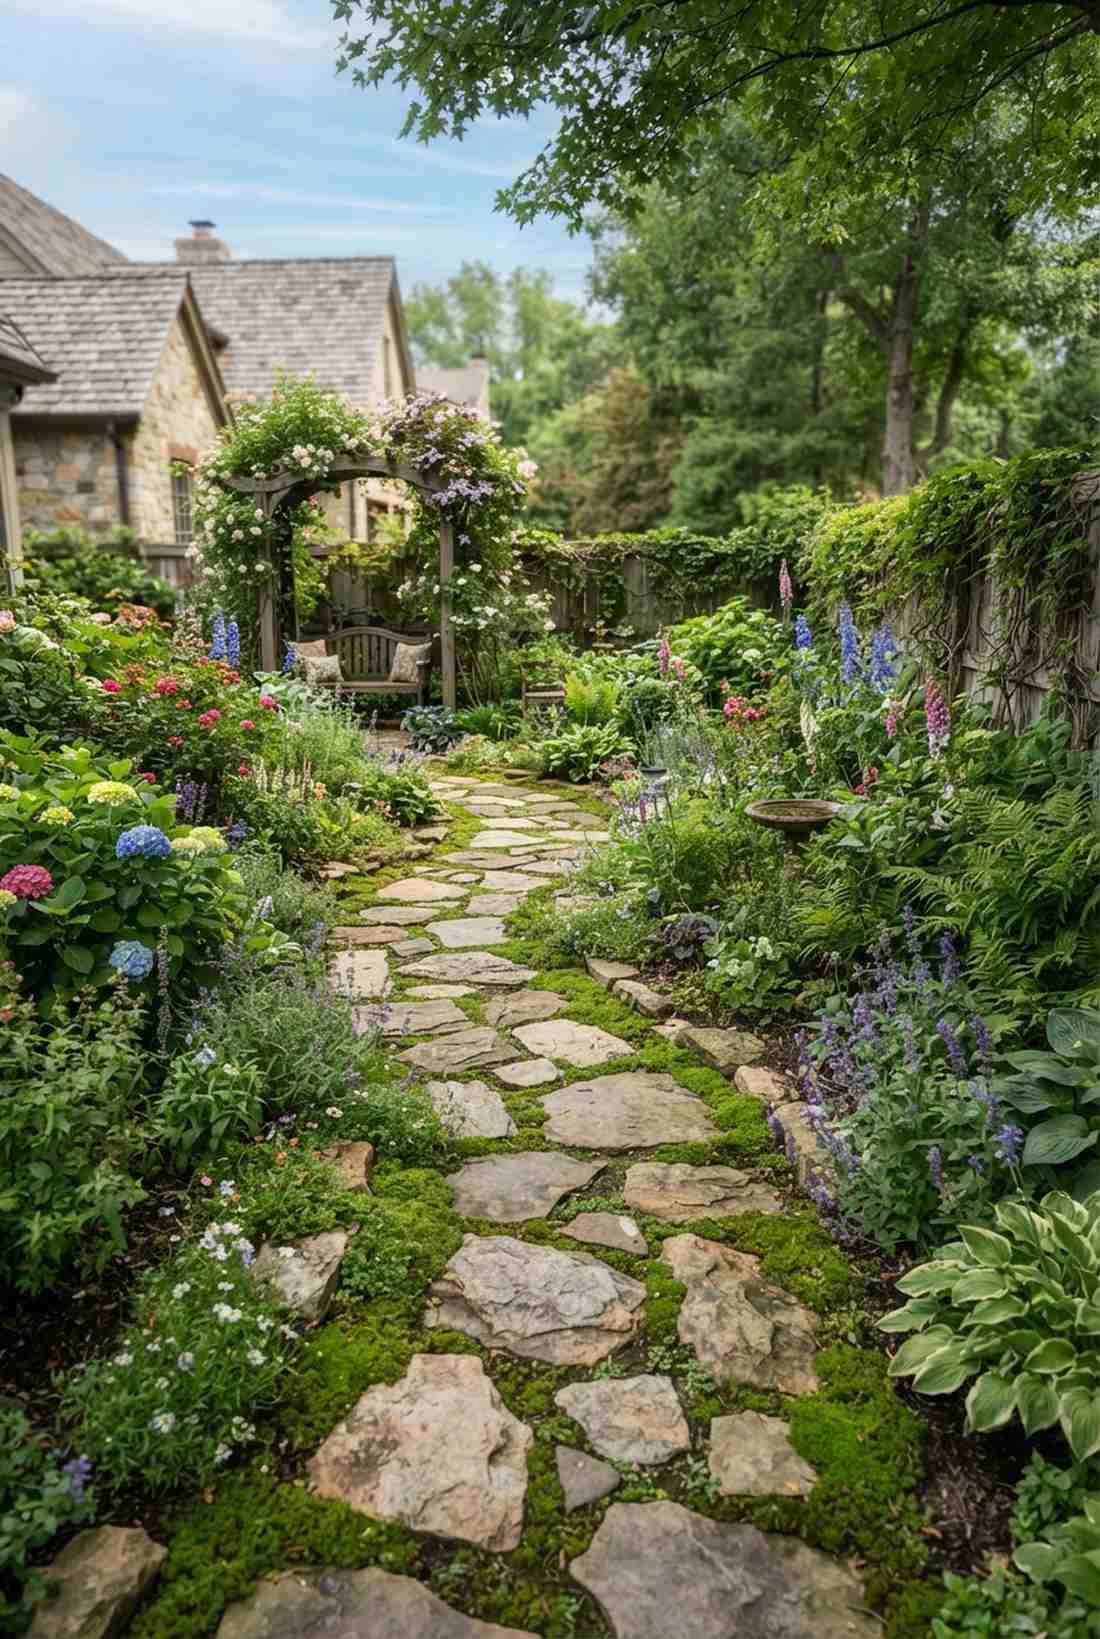
Feels like a hidden fairy forest you accidentally discovered. Wandering natural fieldstone route is the absolute best way to weave through a dense cottage garden.
Skipping rigid geometry for this stepping stones in garden layout effortlessly mimics mother nature. Hunting for stones with relatively flat tops ensures safety, while letting them drift naturally around planting beds creates an authentic, age-old vibe. Snagging bulk miniature garden supplies like moss spores to wedge between them elevates the look immensely.
Sourcing local fieldstone usually keeps this project at a highly affordable $20–$40 per yard. Save this to your cottagecore landscape board.
- Key Materials: Natural irregular fieldstone
- Vibe / Style: Enchanted woodland
- Difficulty: Physically demanding
- Budget Breakdown: Fieldstone pallet: $30 | Topsoil filler: $10
- Creator’s Tip: Dig out the exact shape of the rock so it sits flush with the dirt, preventing mower damage.
- Smart Sourcing: Live Irish moss starter kits and bulk natural fieldstone flats.
💡 Must-Have Supplies for High-End Setups
To build these setups faster and ensure they last, skip the generic craft aisles and invest in the right foundational kits.
- Base & Support: Commercial-grade non-woven weed barrier (heavy duty roll)
- Setup Tools: High-impact rubber mallet & paver leveling starter kits
- Weather/Durability Protection: UV-resistant penetrating stone sealer (matte finish)
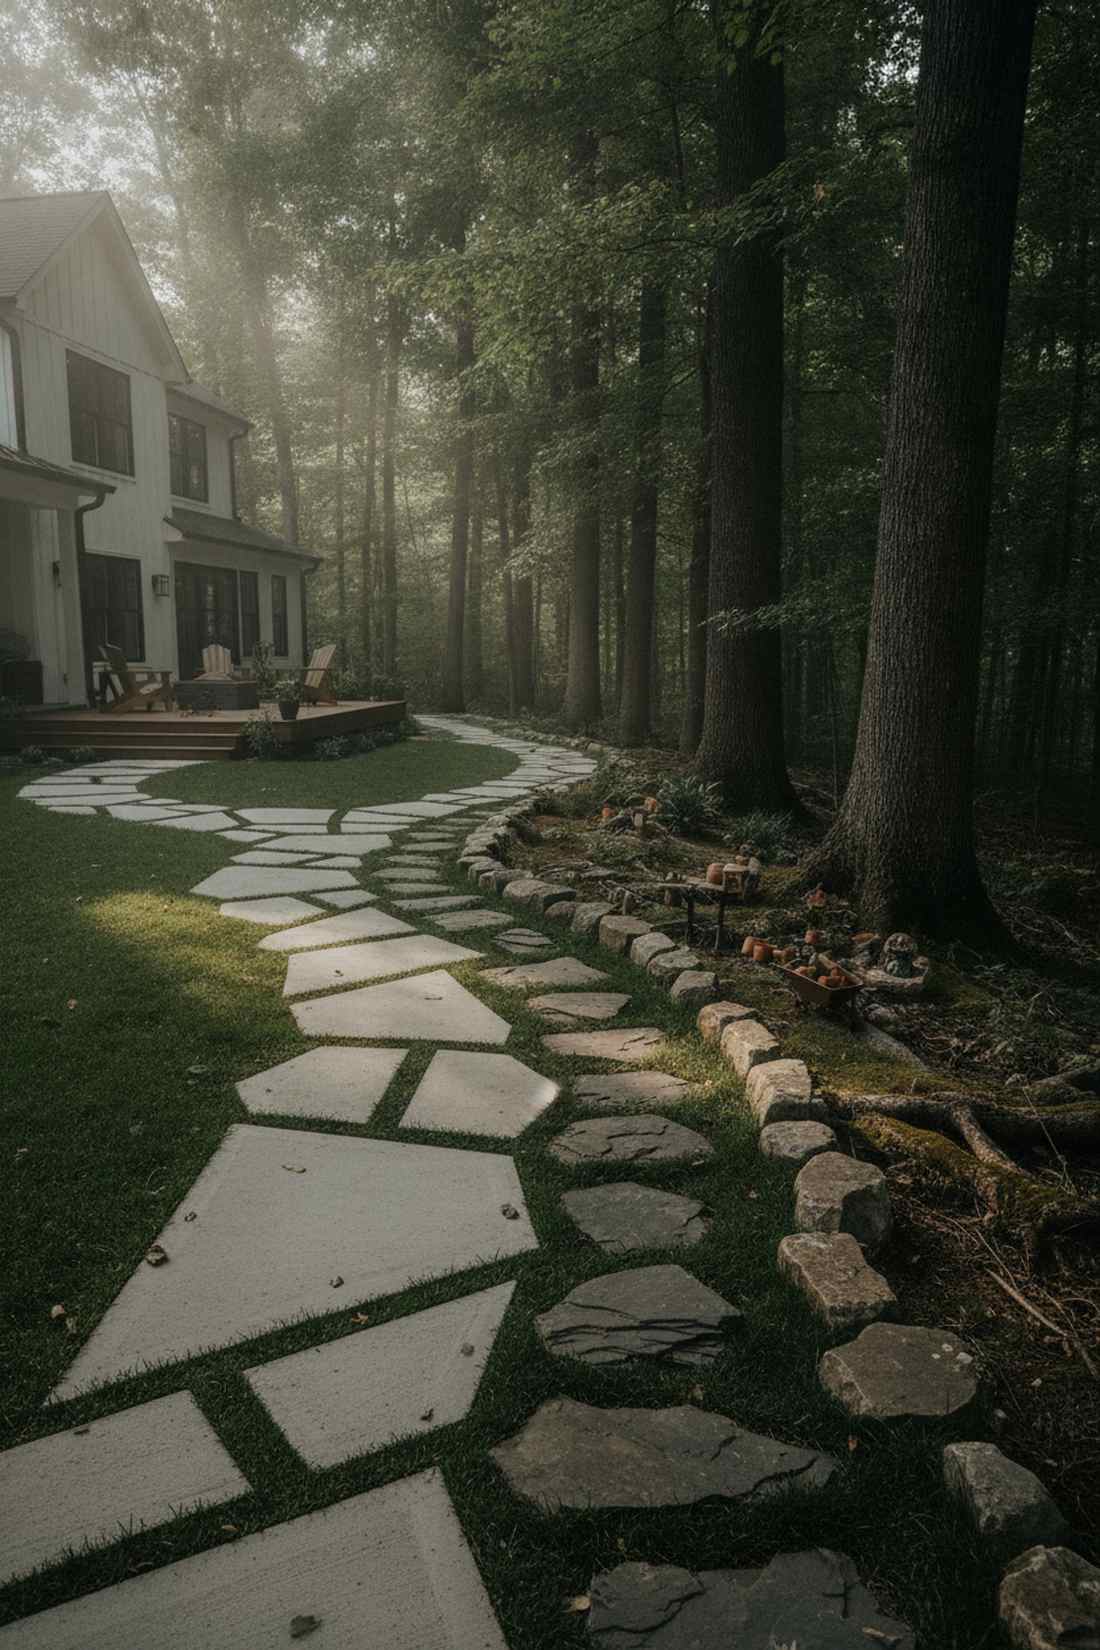
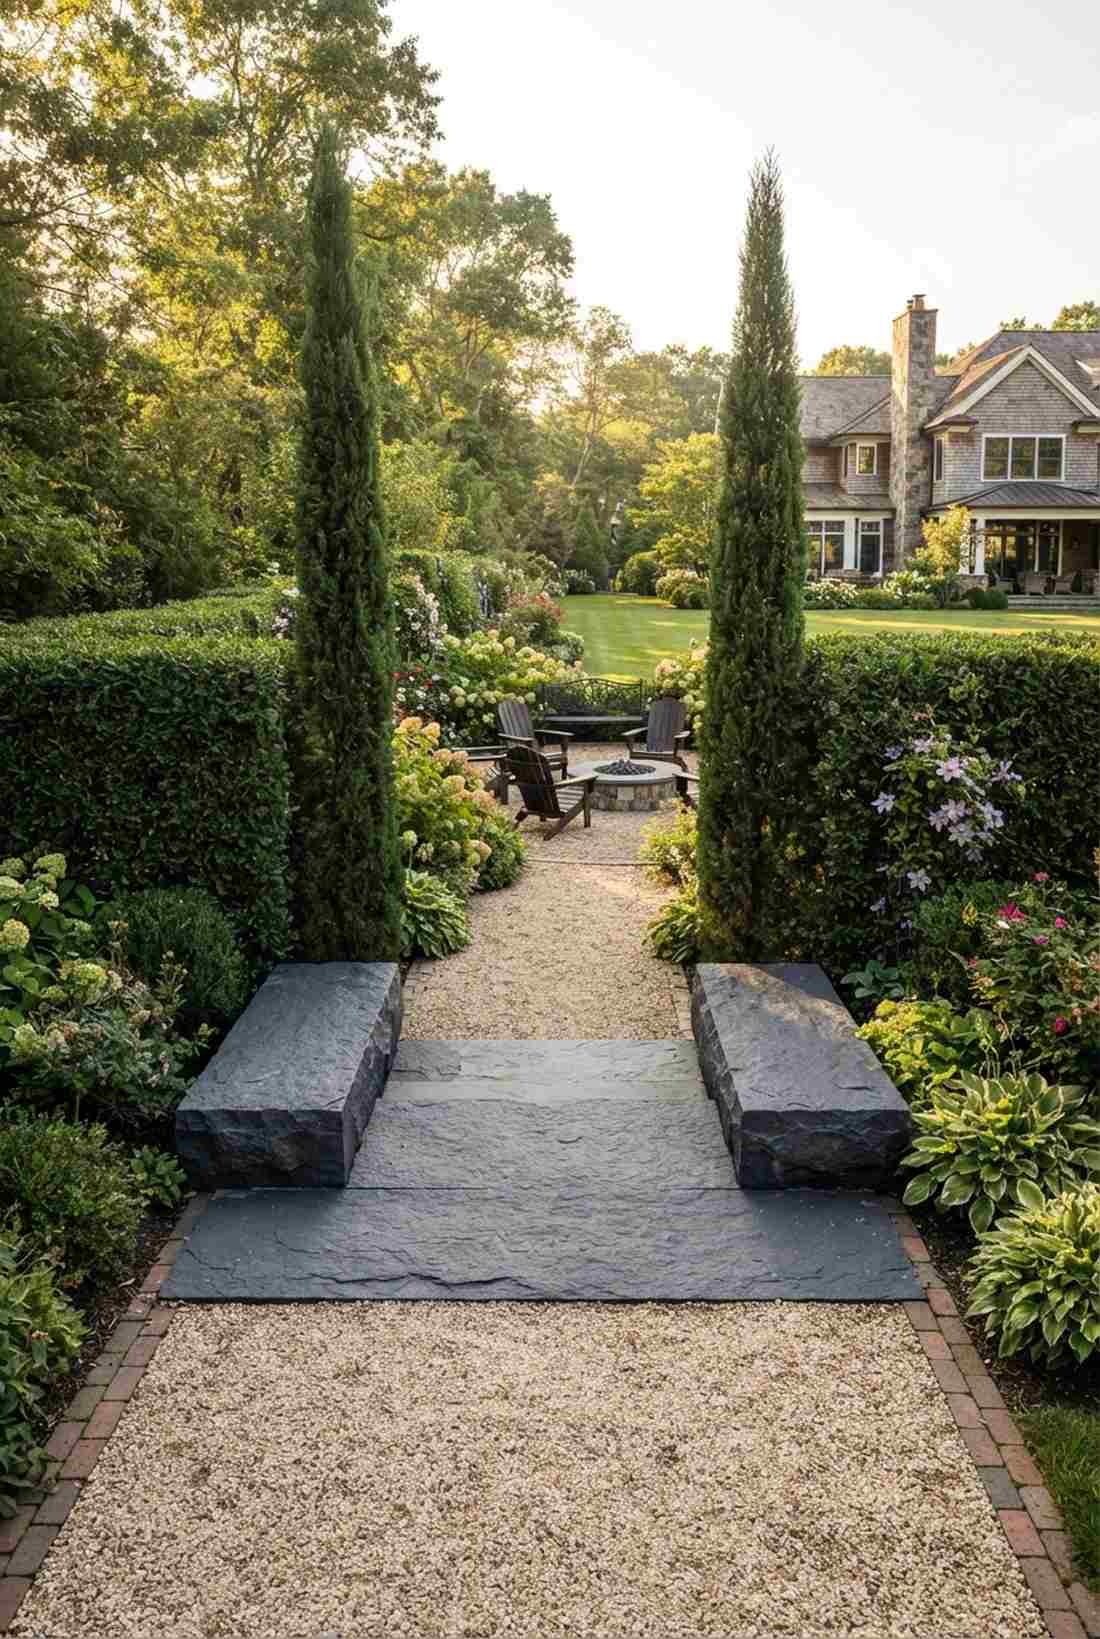
10. Flagstone Irregular Placement
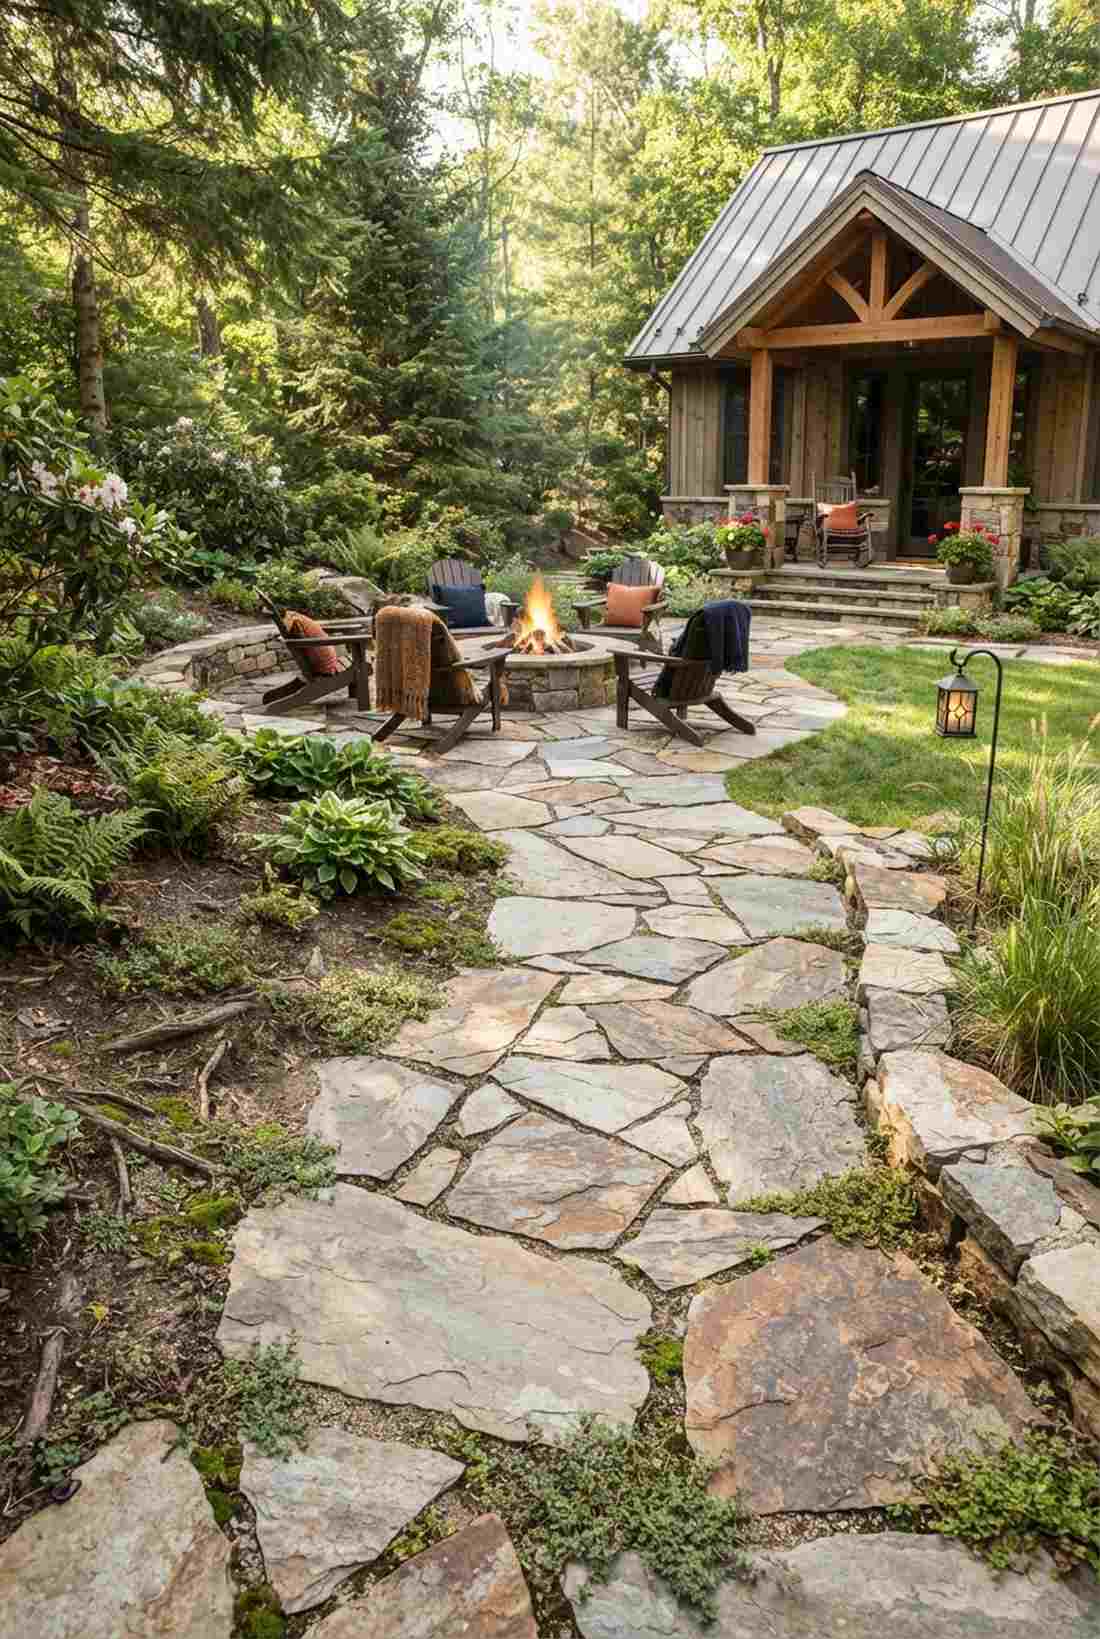
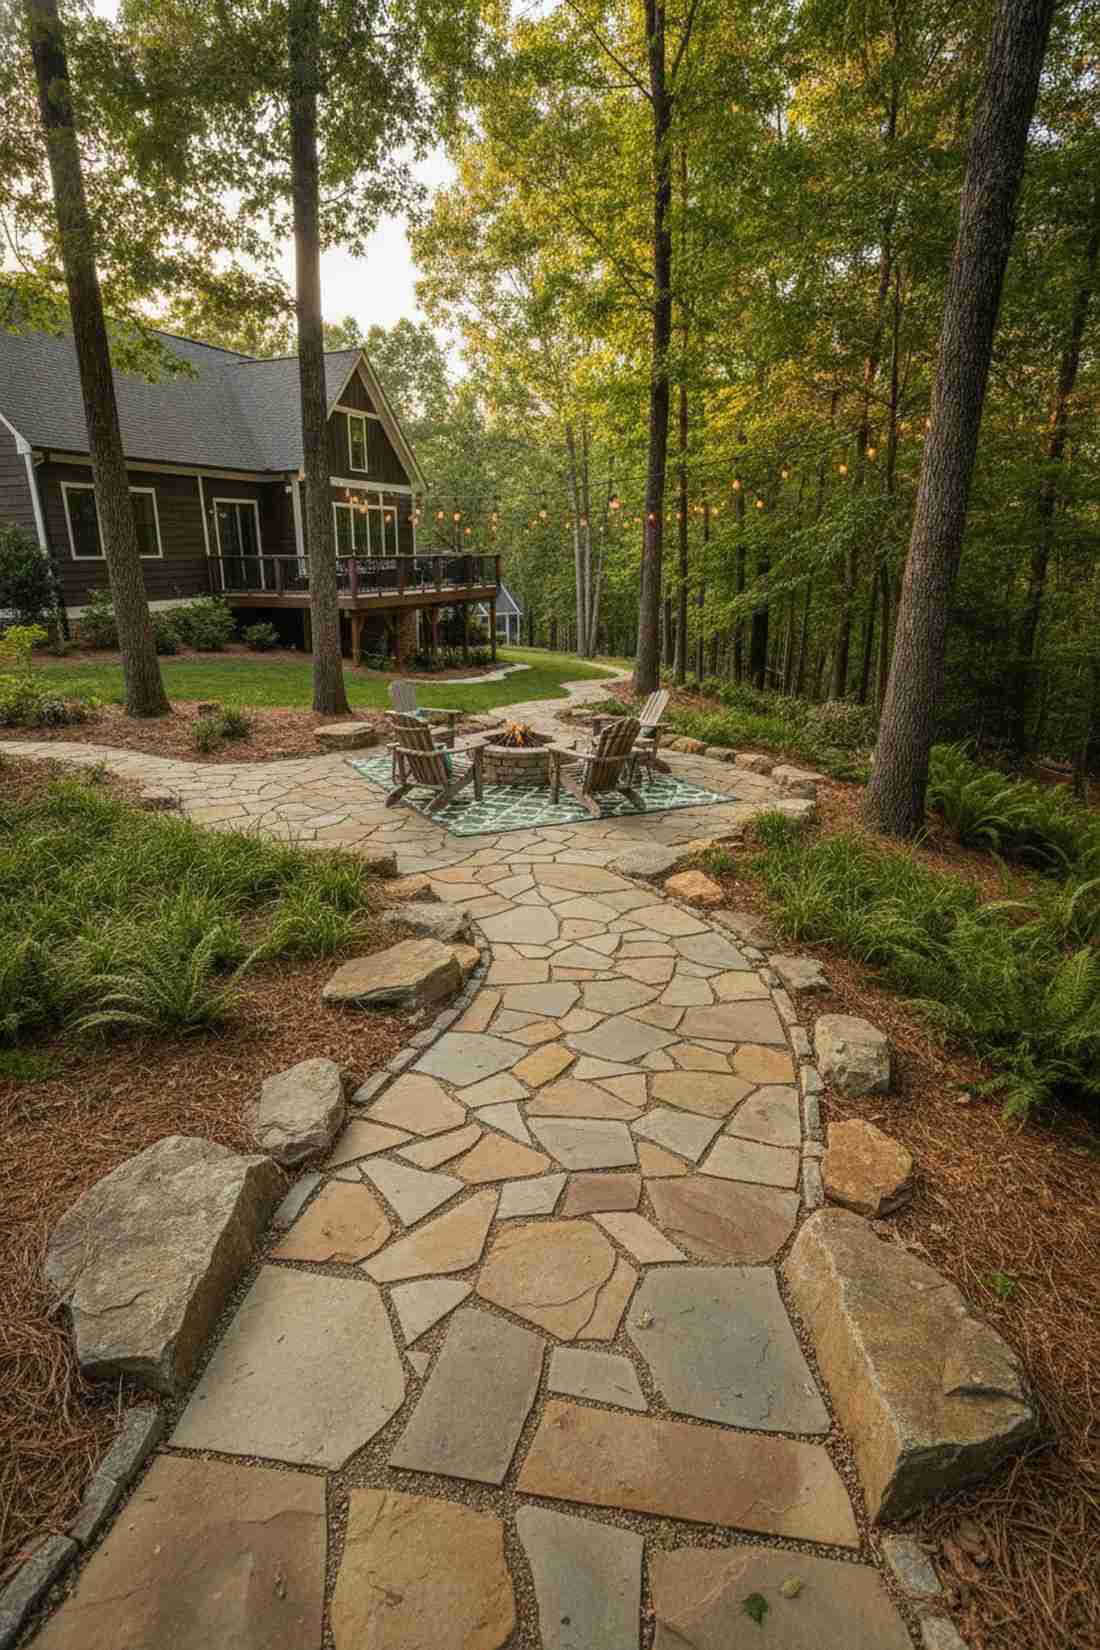
Evokes the rustic luxury of a mountain retreat patio. Fractured flagstone mosaic layout is a brilliant solution for navigating tricky, root-filled backyard slopes.
Using cleaved flagstone guarantees a perfectly flat walking surface despite the wildly irregular perimeters. Nestling huge anchor stones at main turning points and scattering smaller shards in between gives a designer-level finish that naturally absorbs awkward terrain. Grab pre-sealed sedimentary rock to avoid flaking.
You can execute this rugged, beautiful layout for around $50–$75. Pin this if you have trees blocking your ideal pathway route.
- Key Materials: Cleaved natural flagstone
- Vibe / Style: Rustic mountain lodge
- Difficulty: Jigsaw puzzle placement
- Budget Breakdown: Flagstone pieces: $60 | Base grit: $15
- Creator’s Tip: Lay everything out on the lawn first to find the perfect puzzle-piece fit before digging.
- Smart Sourcing: Pre-cut sedimentary flagstone pallets and stone-dust leveling grit (bulk).
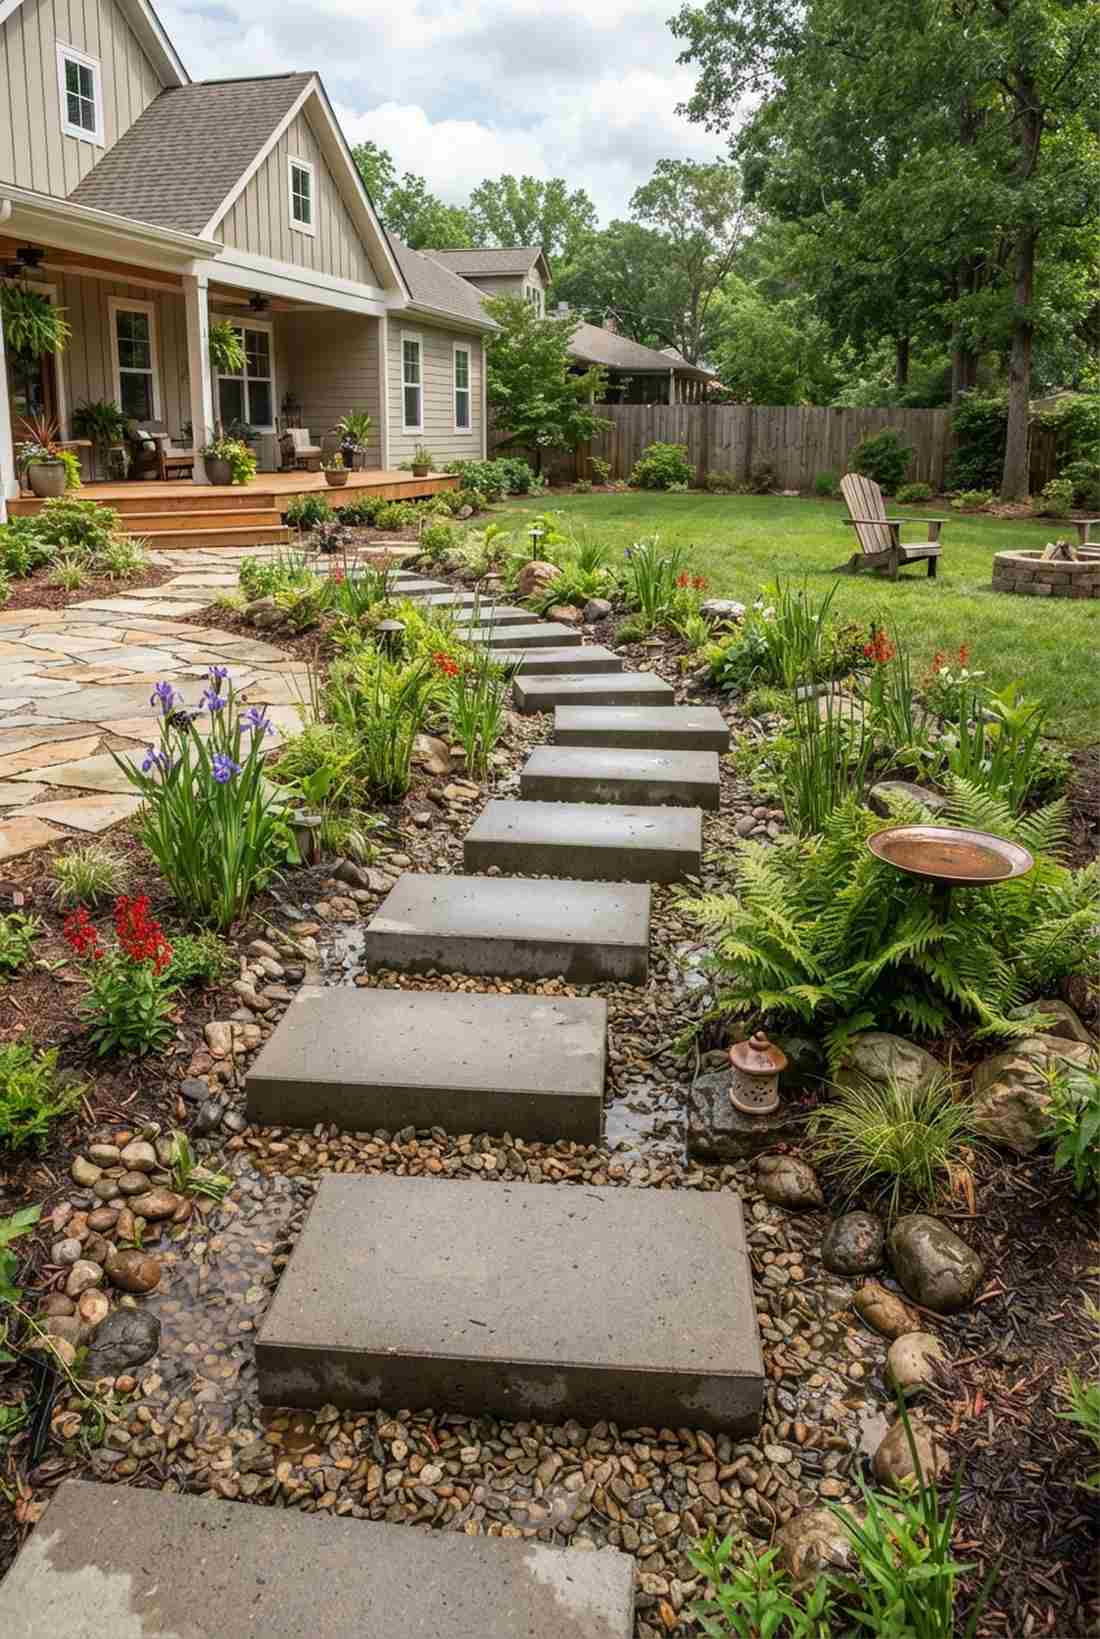
11. River Rock Stepping Sequence
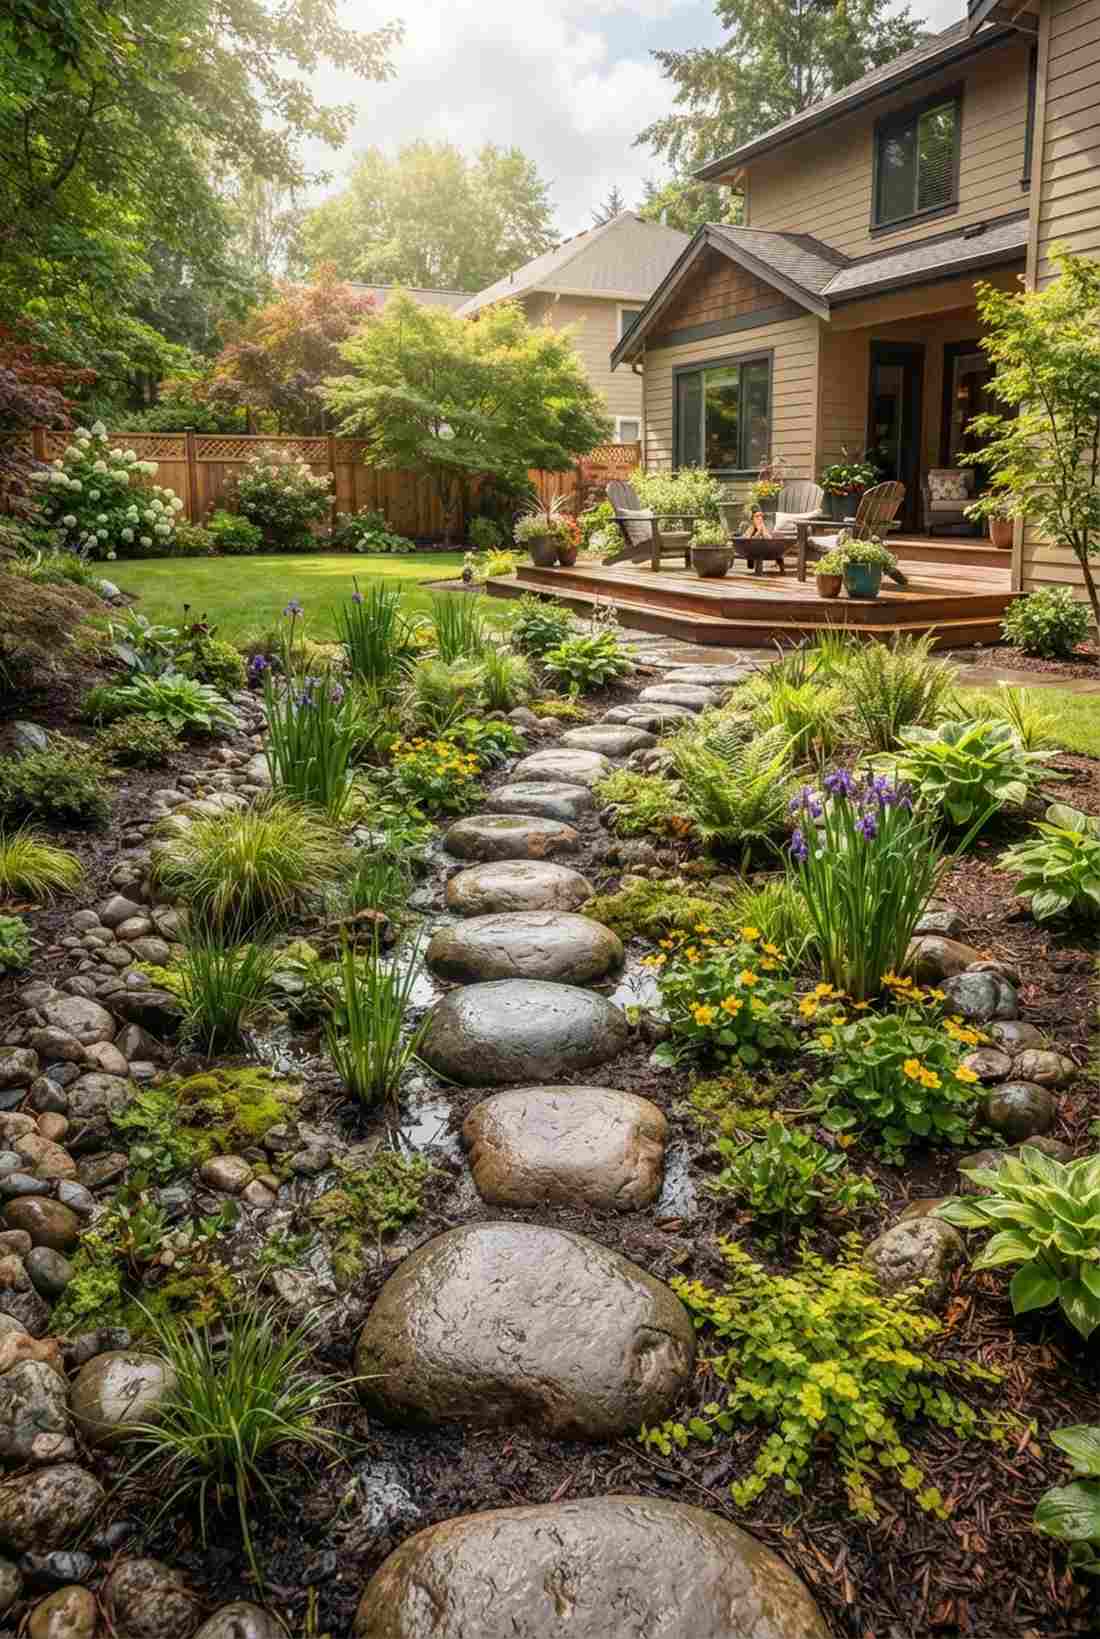
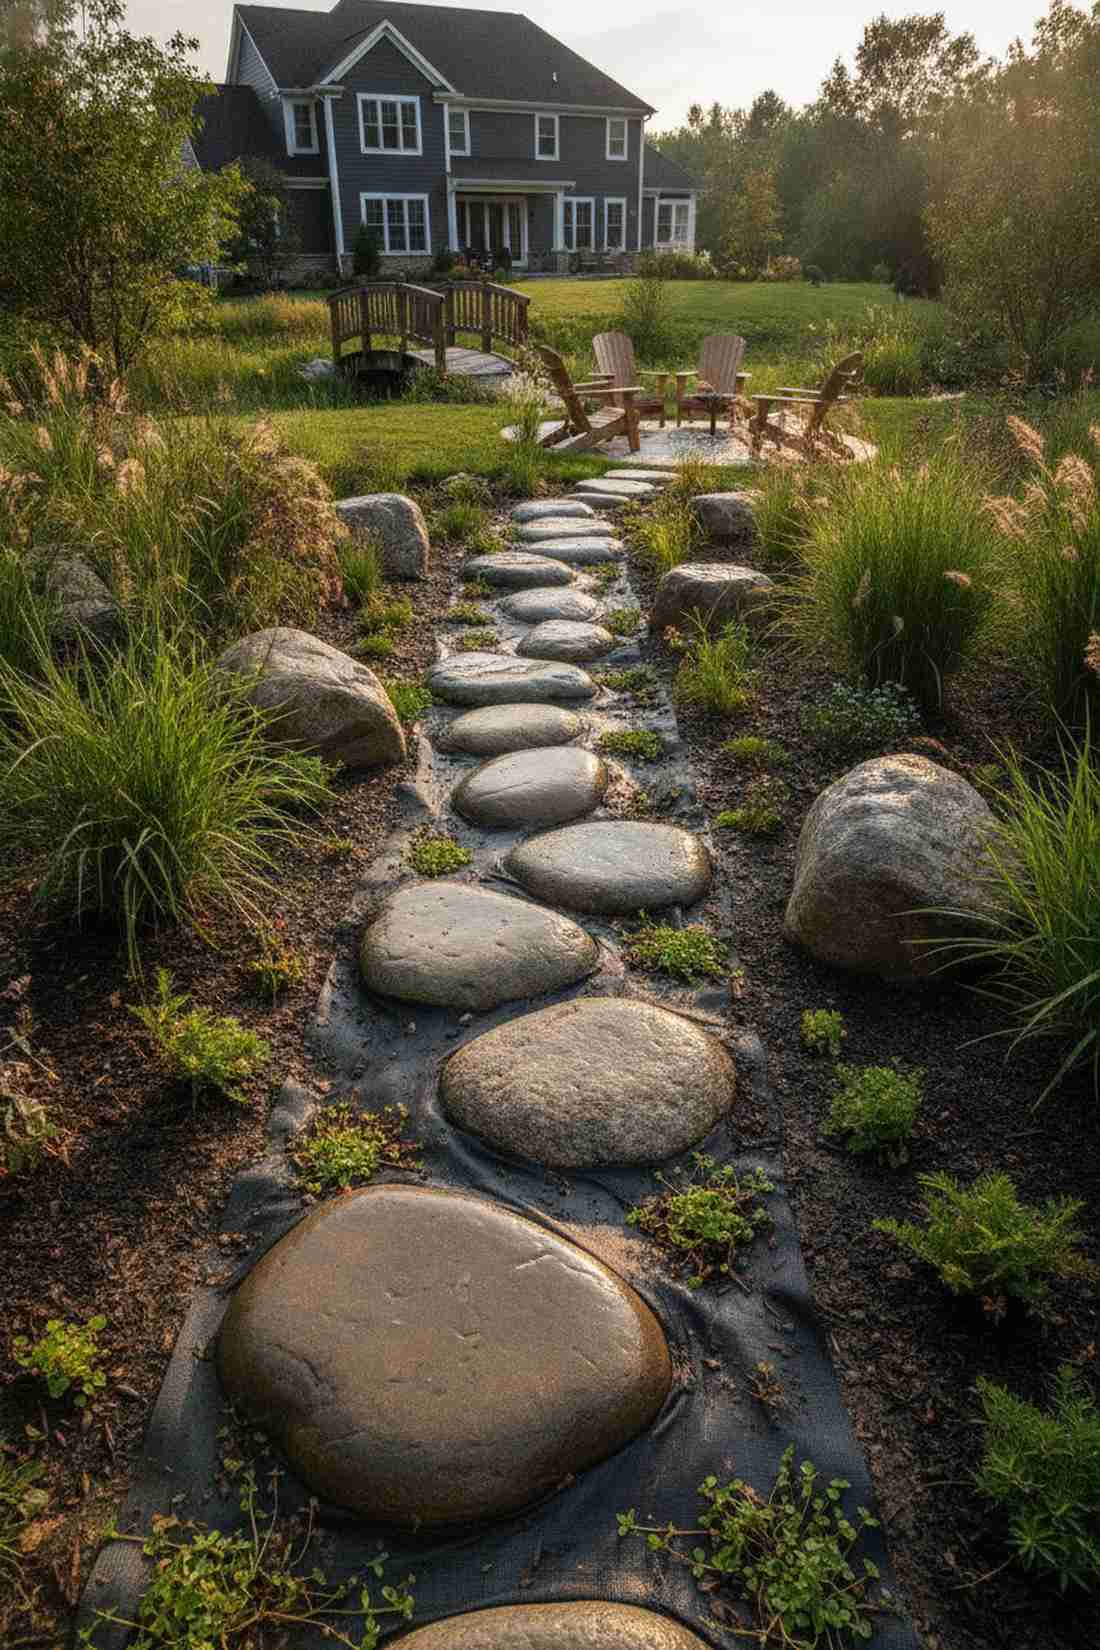
Feels like tiptoeing across a shallow, peaceful creek bed. Oversized river cobble path shines when placed right through the center of a backyard rain garden.
This layout specifically thrives where most stepping stones backyard plans fail: wet, soggy zones. Selecting massive 18-inch rounded cobbles and sinking them deep into the mud guarantees they won’t float away during a storm. Incorporating terrarium accessories or tiny water-loving plants nearby really sells the aquatic illusion.
Expect to spend $30–$45 for these heavy-duty smooth stones. It’s an incredibly unique solution for flood-prone areas.
- Key Materials: 18-inch flat river cobbles
- Vibe / Style: Zen water feature
- Difficulty: Deep excavation required
- Budget Breakdown: Jumbo cobbles: $35 | Aquatic soil: $10
- Creator’s Tip: Bury the rocks at least 40% into the ground so they never wobble under weight.
- Smart Sourcing: Oversized polished river rocks (bulk pack) and water-permeable landscape fabric.
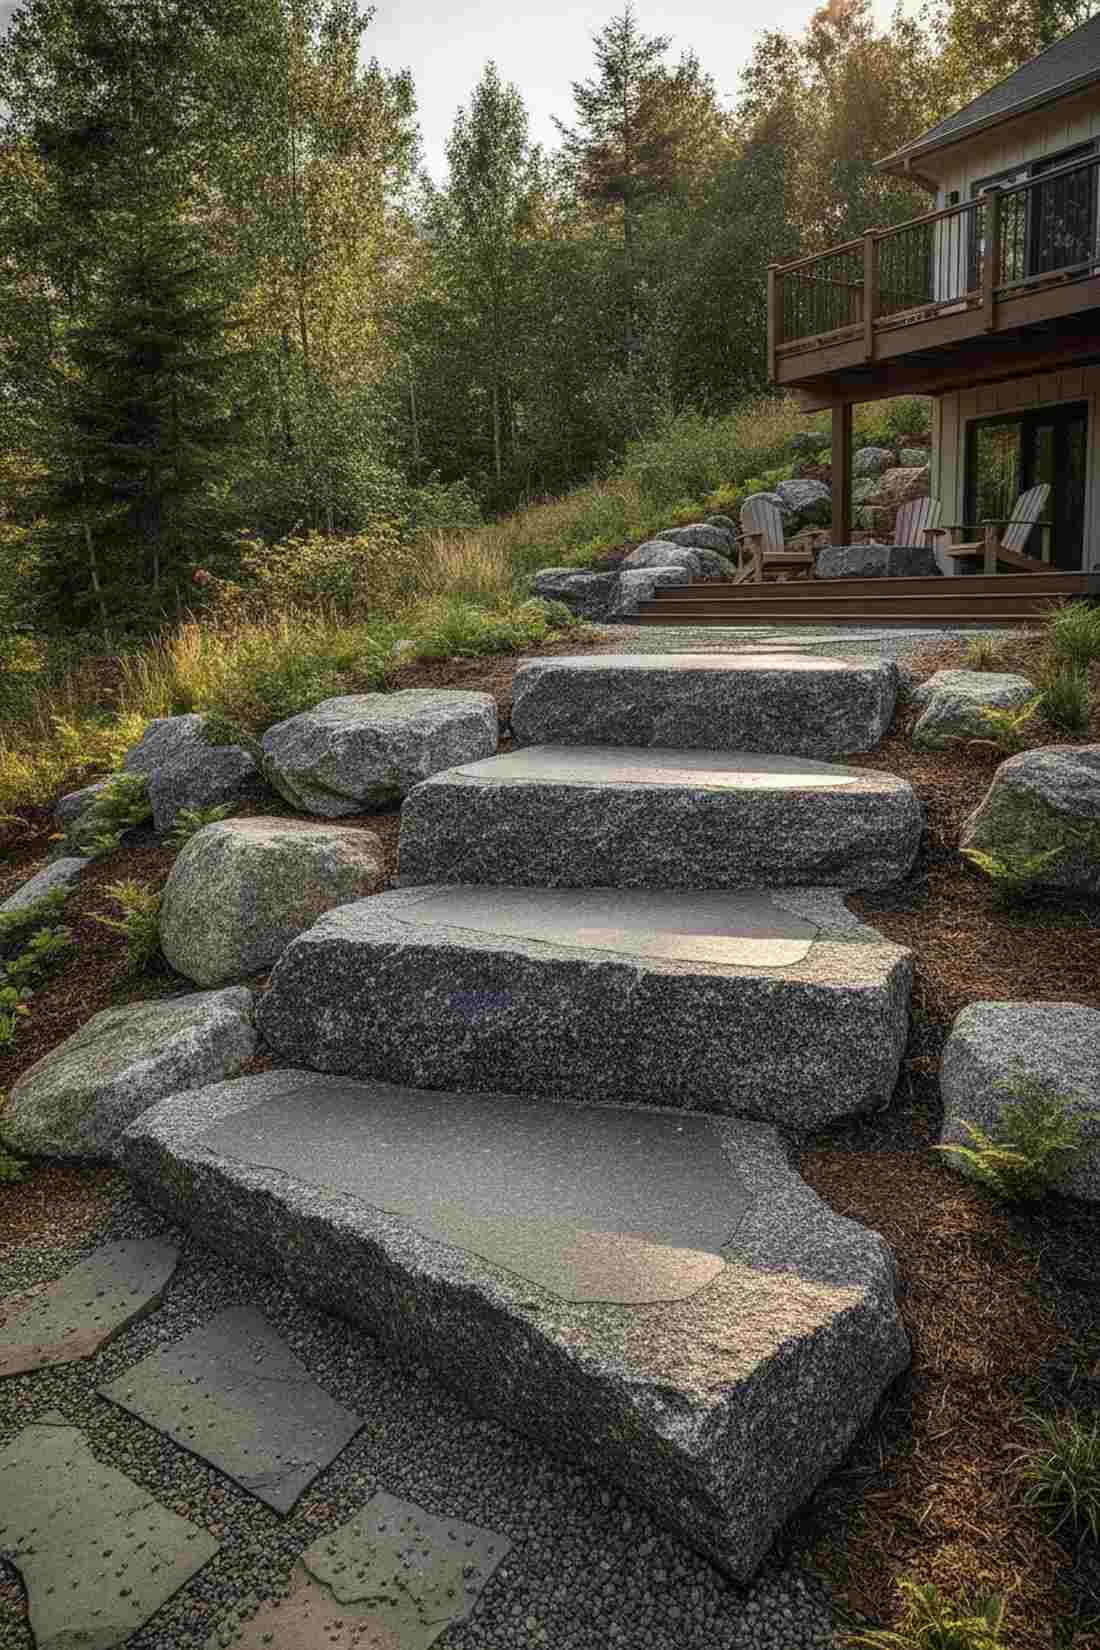
12. Slate Stacked Landings
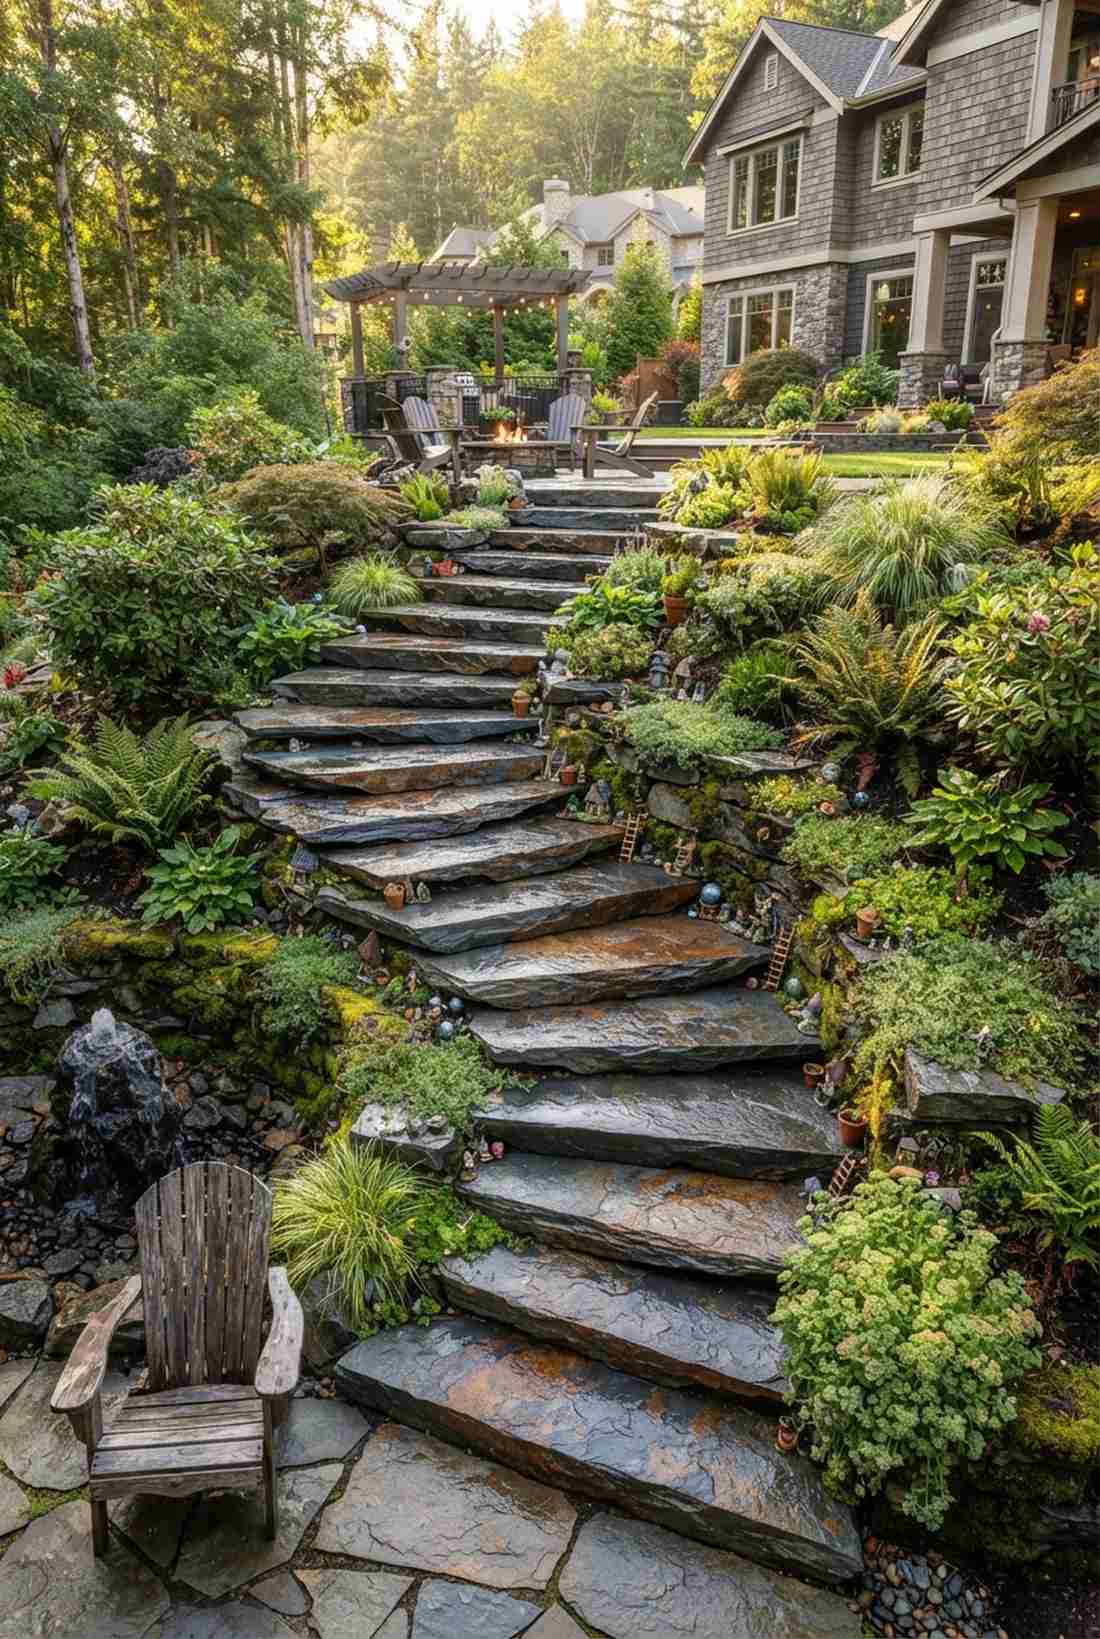
Looks like a natural staircase carved out of an ancient cliffside. Tiered slate cantilever steps are a breathtaking way to conquer a steep garden elevation.
Most basic pavers look cheap on a hill, but overlapping raw slate slabs delivers a surprisingly premium look that acts as both a stair and a retaining wall. The beautiful rust and charcoal tones emerge vividly when wet. Picking up UV-coated fairy garden kits to nestle in the crevices turns this into a masterpiece.
Building these sturdy layered platforms costs roughly $60–$90 per step. Save this to your hillside landscaping board.
- Key Materials: Thick architectural slate slabs
- Vibe / Style: Dramatic cliffside
- Difficulty: Advanced structural stacking
- Budget Breakdown: Slate slabs: $75 | Construction adhesive: $15
- Creator’s Tip: Overlap each slab by at least 4 inches to ensure structural stability against gravity.
- Smart Sourcing: Architectural-grade raw slate (bulk crate) and exterior-grade masonry adhesive.
13. Limestone Weathered Fragments

Captures the essence of a centuries-old European estate ruin. Pitted limestone fragment path adds incredible character winding through a lush herb or vegetable garden.
The neutral, aged beige of weathered limestone integrates so quietly that it looks like it’s been there for decades. Choosing chunks at least 3 inches thick ensures zero cracking, giving you granite-like durability at half the weight. Using high-grade stone sealers prevents green algae from consuming the soft rock over winter.
This timeless European aesthetic is super affordable at $25–$40 per yard.
- Key Materials: Tumbled limestone chunks
- Vibe / Style: Antique cottage ruin
- Difficulty: Easy placement
- Budget Breakdown: Limestone fragments: $30 | Peat moss filler: $10
- Creator’s Tip: Let thyme or oregano spill over the edges to enhance the overgrown, antique vibe.
- Smart Sourcing: Tumbled limestone stepping stones (pre-sealed) and algae-resistant stone clear-coat.
Stop wasting money on generic square pavers. The incredible texture of the next layout instantly boosts your home’s curb appeal…
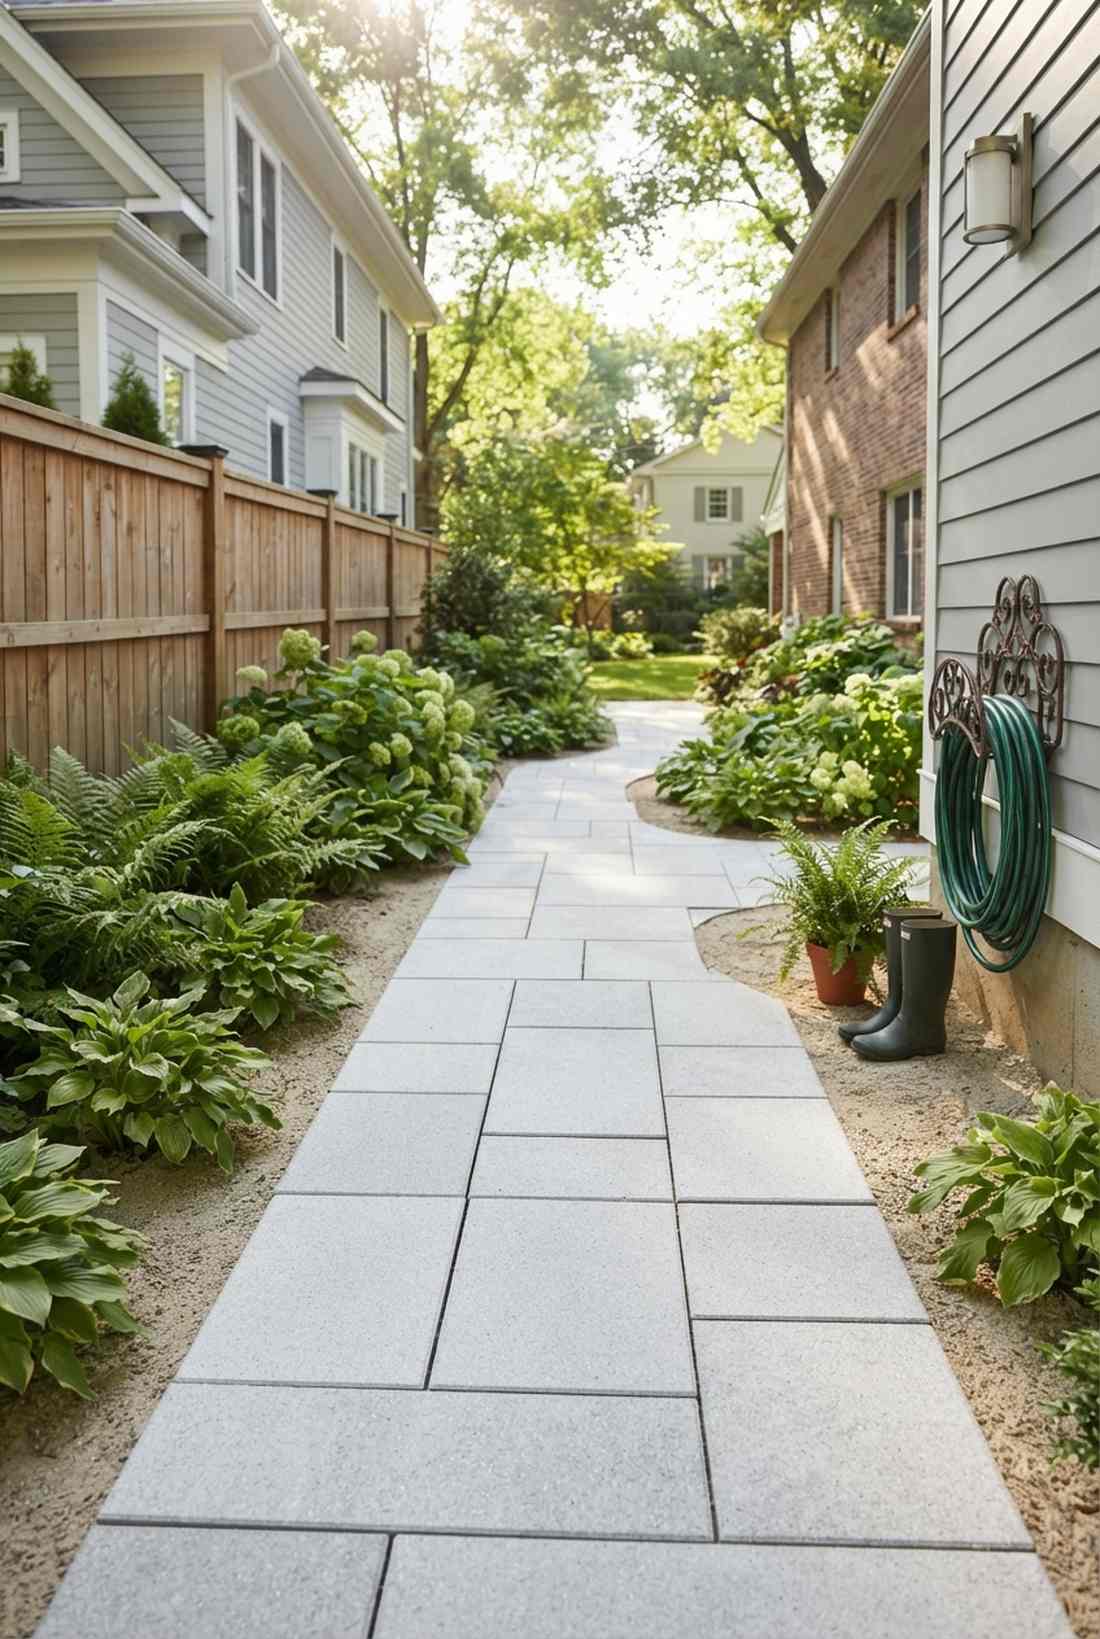
14. Sandstone Irregular Slabs
Brings the warmth of an Arizona desert sunset straight to your yard. Ochre sandstone organic steps pop brilliantly against dark green Mediterranean or xeriscape plantings.
If you want color richness without using artificial dyes, this stepping stones design relies entirely on natural sedimentary layers. The reds and tans create wild visual interest through material diversity alone. Sourcing pre-cut sandstone blocks guarantees flat walking surfaces while preserving the rugged edges.
You can infuse your yard with this desert warmth for about $45–$65. Pin this if you love vibrant, earthy outdoor tones.
- Key Materials: Warm-toned sandstone slabs
- Vibe / Style: Southwestern desert oasis
- Difficulty: Moderate leveling
- Budget Breakdown: Sandstone pieces: $50 | Sand base: $15
- Creator’s Tip: Sweep fine polymeric sand into the joints to lock the irregular shapes in tight.
- Smart Sourcing: Pre-cut desert sandstone slabs (bulk pack) and tan polymeric locking sand.
15. Granite Boulder Steps
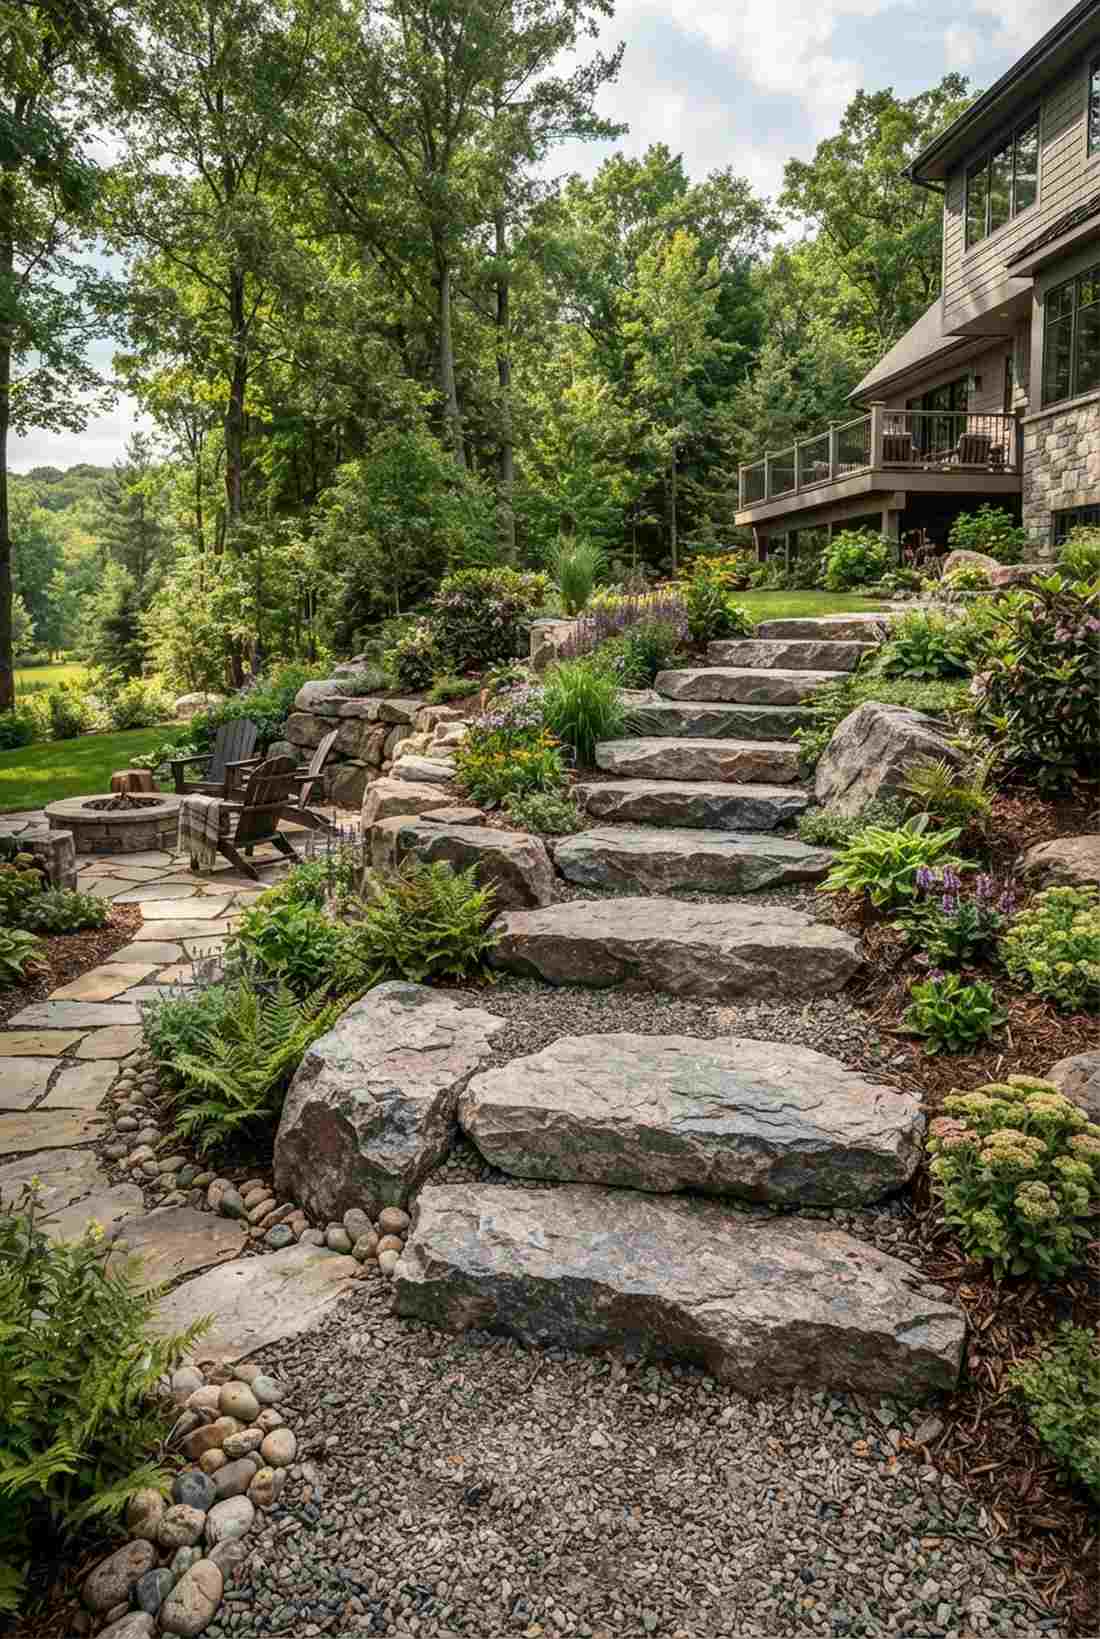
Radiates raw, untouchable geological power. Massive flat-top granite boulders create a jaw-dropping focal point in large, rugged naturalistic landscapes.
This layout laughs at delicate backyard designs and gives a designer-level finish rooted in sheer monumental mass. You only need a few strategically placed boulders to completely dominate a pathway. Because of the extreme weight, investing in a heavy-duty dolly or renting a machine is absolutely mandatory.
Procuring these massive focal pieces will set you back $80–$150 per boulder. Save this to your luxury rugged landscape board.
- Key Materials: Flat-top granite boulders
- Vibe / Style: Monumental wilderness
- Difficulty: Extreme weight lifting
- Budget Breakdown: Boulders: $100 | Machinery rental: $50
- Creator’s Tip: Dig a deep basin and backfill with crushed rock to ensure the boulder never settles unevenly.
- Smart Sourcing: Cored flat-top granite landscape boulders and heavy-duty crushed aggregate base.
16. Bluestone Natural Cleft
Exudes the refined elegance of a high-end country club walkway. Cleft-surface bluestone pieces are the ultimate premium touch for an upscale garden path.
The subtle blue-gray coloration is often replicated, but true bluestone stepping stones outdoor installations are unmatched in wet-weather traction. The natural sedimentary splitting creates a slightly textured surface that is practically slip-proof. Snagging premium miniature garden supplies to line the edges pushes the look into magazine-cover territory.
This premium investment runs around $70–$100 per yard. Highly recommended for a permanent, luxury upgrade.
- Key Materials: Authentic natural cleft bluestone
- Vibe / Style: Upscale traditional
- Difficulty: Intermediate leveling
- Budget Breakdown: Bluestone slabs: $80 | Base prep: $20
- Creator’s Tip: Seal bluestone immediately; it is highly porous and will absorb organic stains from fallen leaves.
- Smart Sourcing: Authentic cleft bluestone (pre-sealed packs) and premium penetrating stone sealer.
Material Innovation Concepts
Emerging materials and fabrication techniques expand design possibilities beyond traditional stone and concrete, introducing sustainability, customization, and performance characteristics. These innovative stepping stones ideas address contemporary design challenges through material intelligence.
17. Permeable Paver Systems
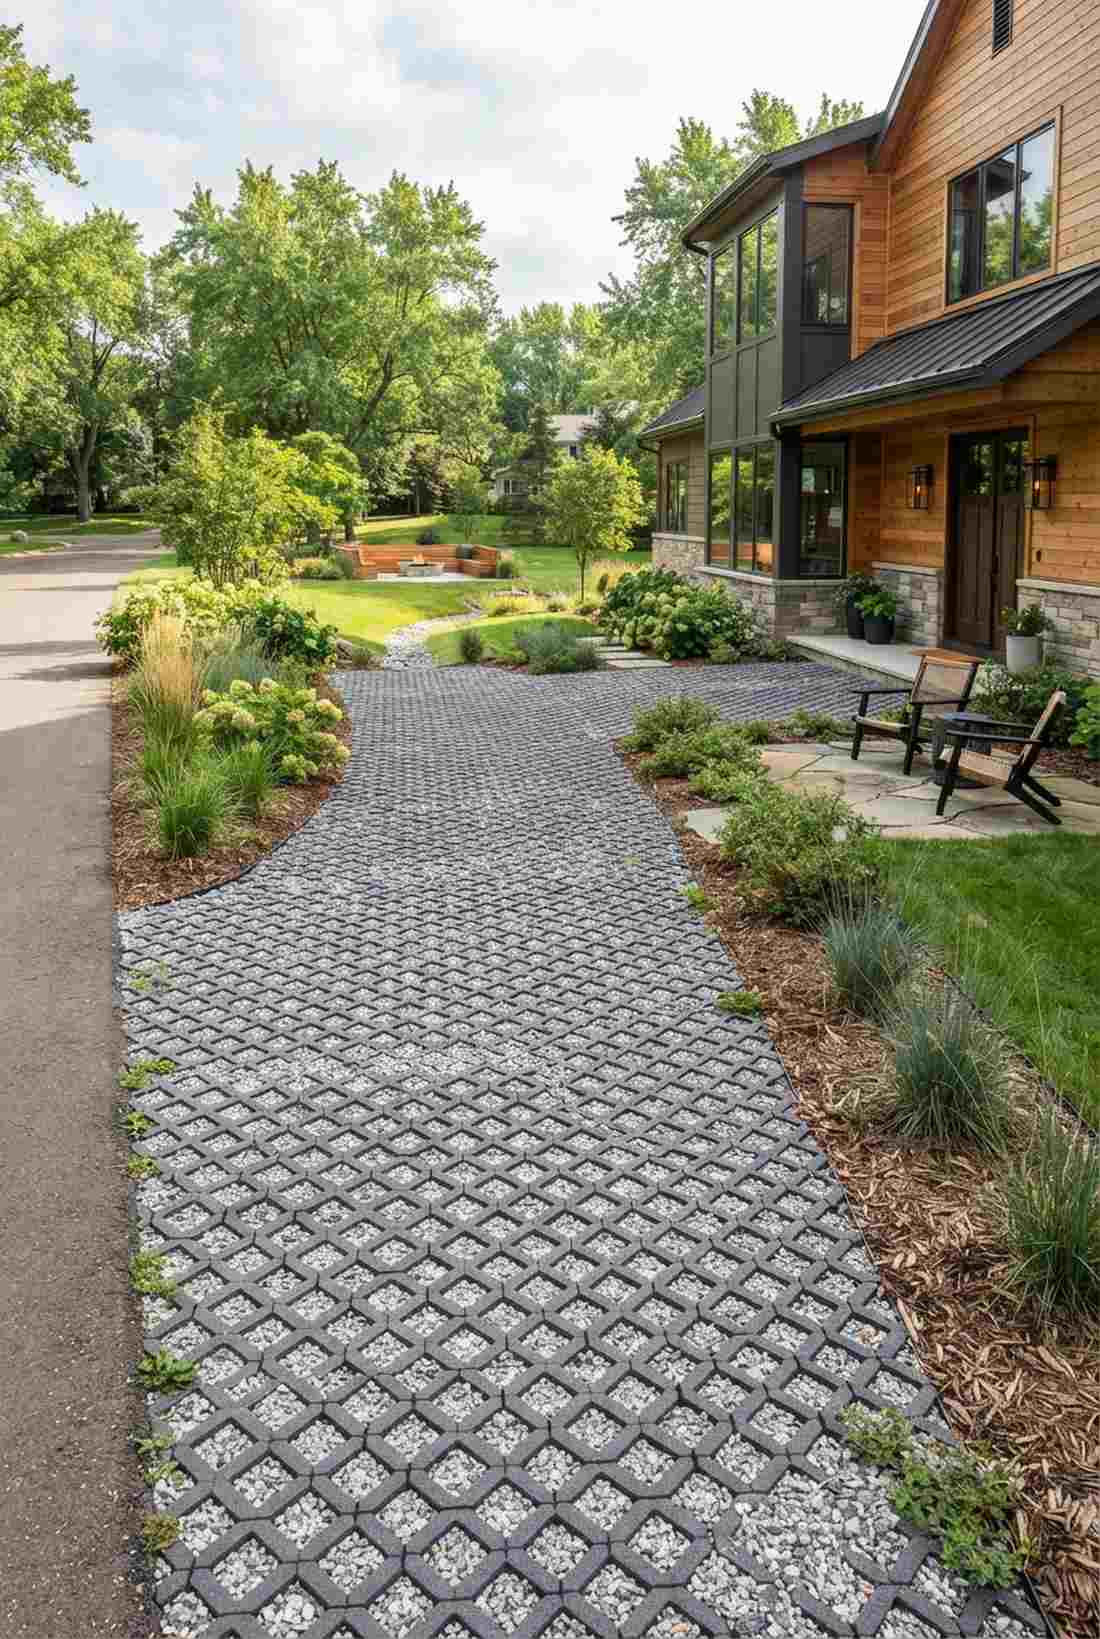
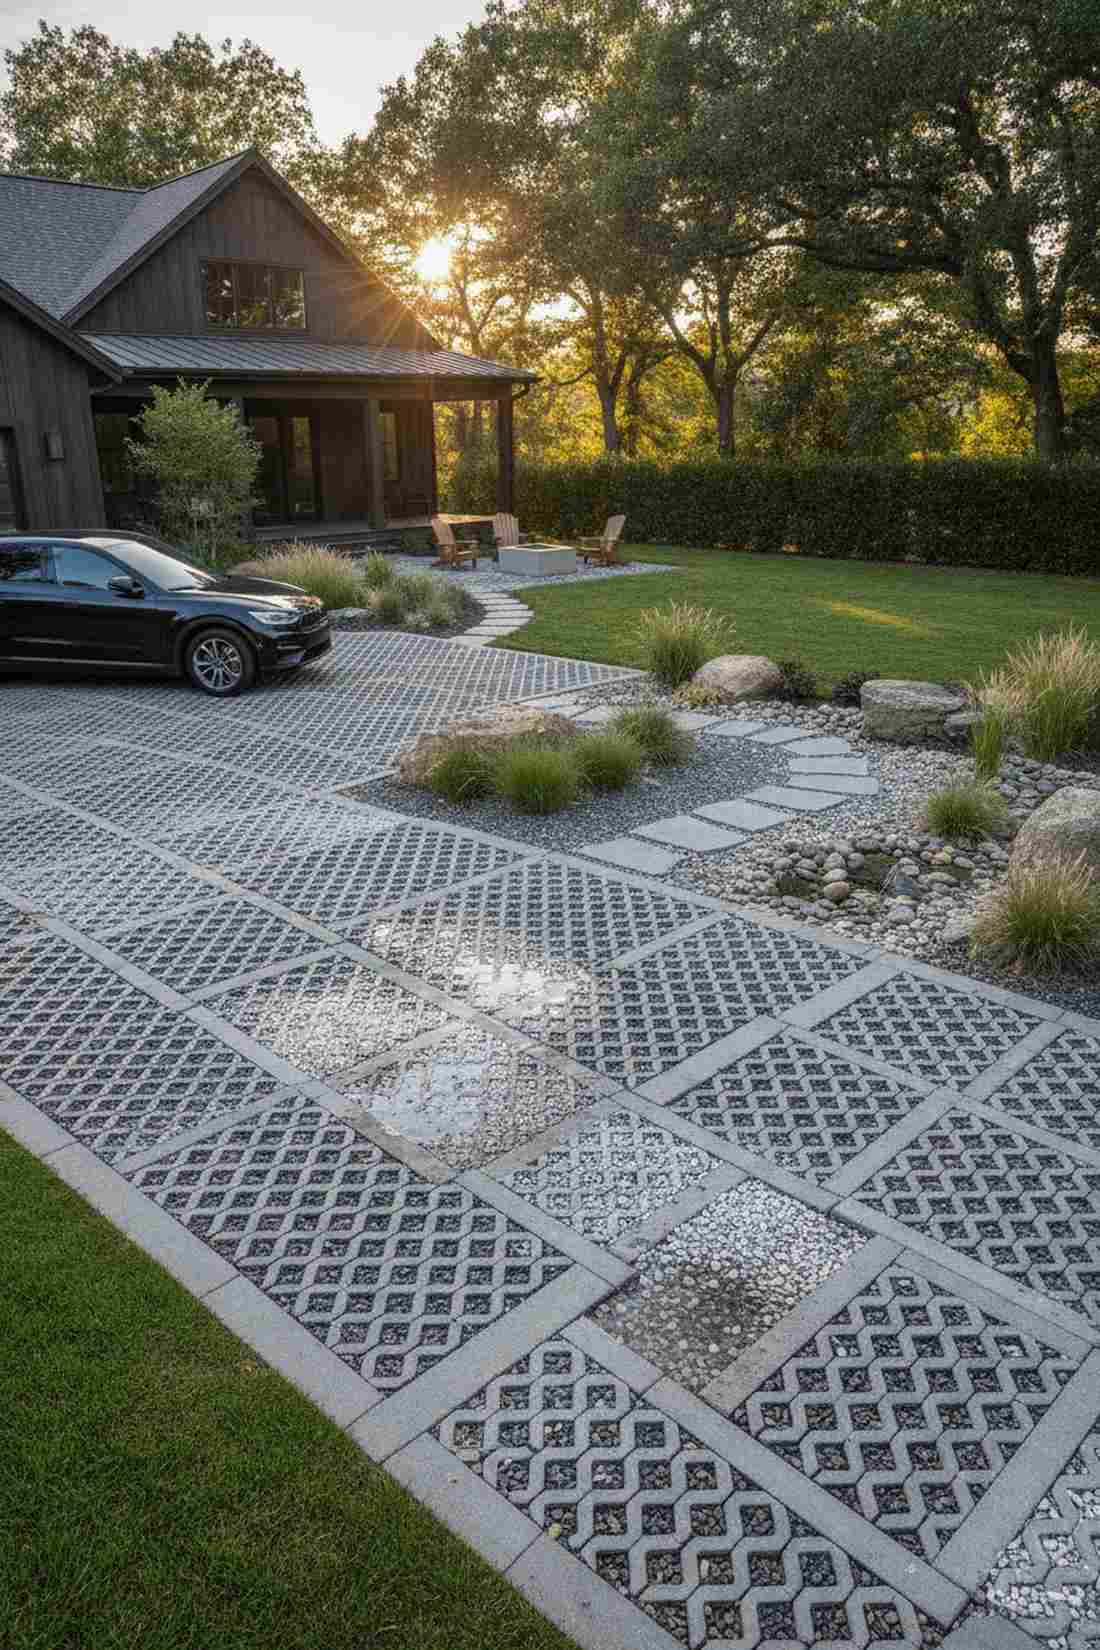
Feels like an eco-warrior’s modern architectural dream. Open-cell permeable grid blocks are highly effective for eco-conscious driveways and rainy garden transitions.
Most hardscapes create nightmare water runoff, but this system absorbs water directly through its engineered voids. You achieve 40% permeability while maintaining the rigid structure needed for heavy foot traffic. Fill the grid holes with crushed quartz or gravel to get a hyper-modern aesthetic.
You can implement this smart water-management path for $35–$55 per section. Pin this to your sustainable home improvement board.
- Key Materials: Open-cell concrete grids
- Vibe / Style: Eco-industrial modern
- Difficulty: Gravel base prep required
- Budget Breakdown: Permeable grids: $35 | Drainage rock: $20
- Creator’s Tip: Never use fine sand underneath; always use clear crushed gravel to ensure water actually drains.
- Smart Sourcing: Heavy-duty permeable paver grids (bulk pack) and high-drainage base gravel.
18. Recycled Composite Pavers
Delivers a flawless, clean finish that never seems to age. Lightweight composite garden blocks are a lifesaver for rooftop gardens or damp, rot-prone side yards.
If hauling heavy stone makes your back ache, this stepping stones yard hack is a total game-changer. Blending recycled plastics with rubber creates a completely rot-proof, uniform paver that weighs a fraction of natural rock. They click together rapidly, making installation ridiculously fast.
Expect to pay roughly $25–$45 for a bundle of these modern marvels. It’s an ultra-fast weekend win.
- Key Materials: Eco-composite plastic/rubber pavers
- Vibe / Style: Clean & consistent
- Difficulty: Effortless DIY
- Budget Breakdown: Composite blocks: $30 | Edge pins: $10
- Creator’s Tip: These expand slightly in extreme heat, so leave a tiny 1/4 inch gap between them.
- Smart Sourcing: Recycled composite stepping stones (UV-coated) and heavy-duty landscape pins.
Wait until you see how glowing glass completely transforms a boring backyard into a twilight wonderland…
19. Glass Aggregate Concrete
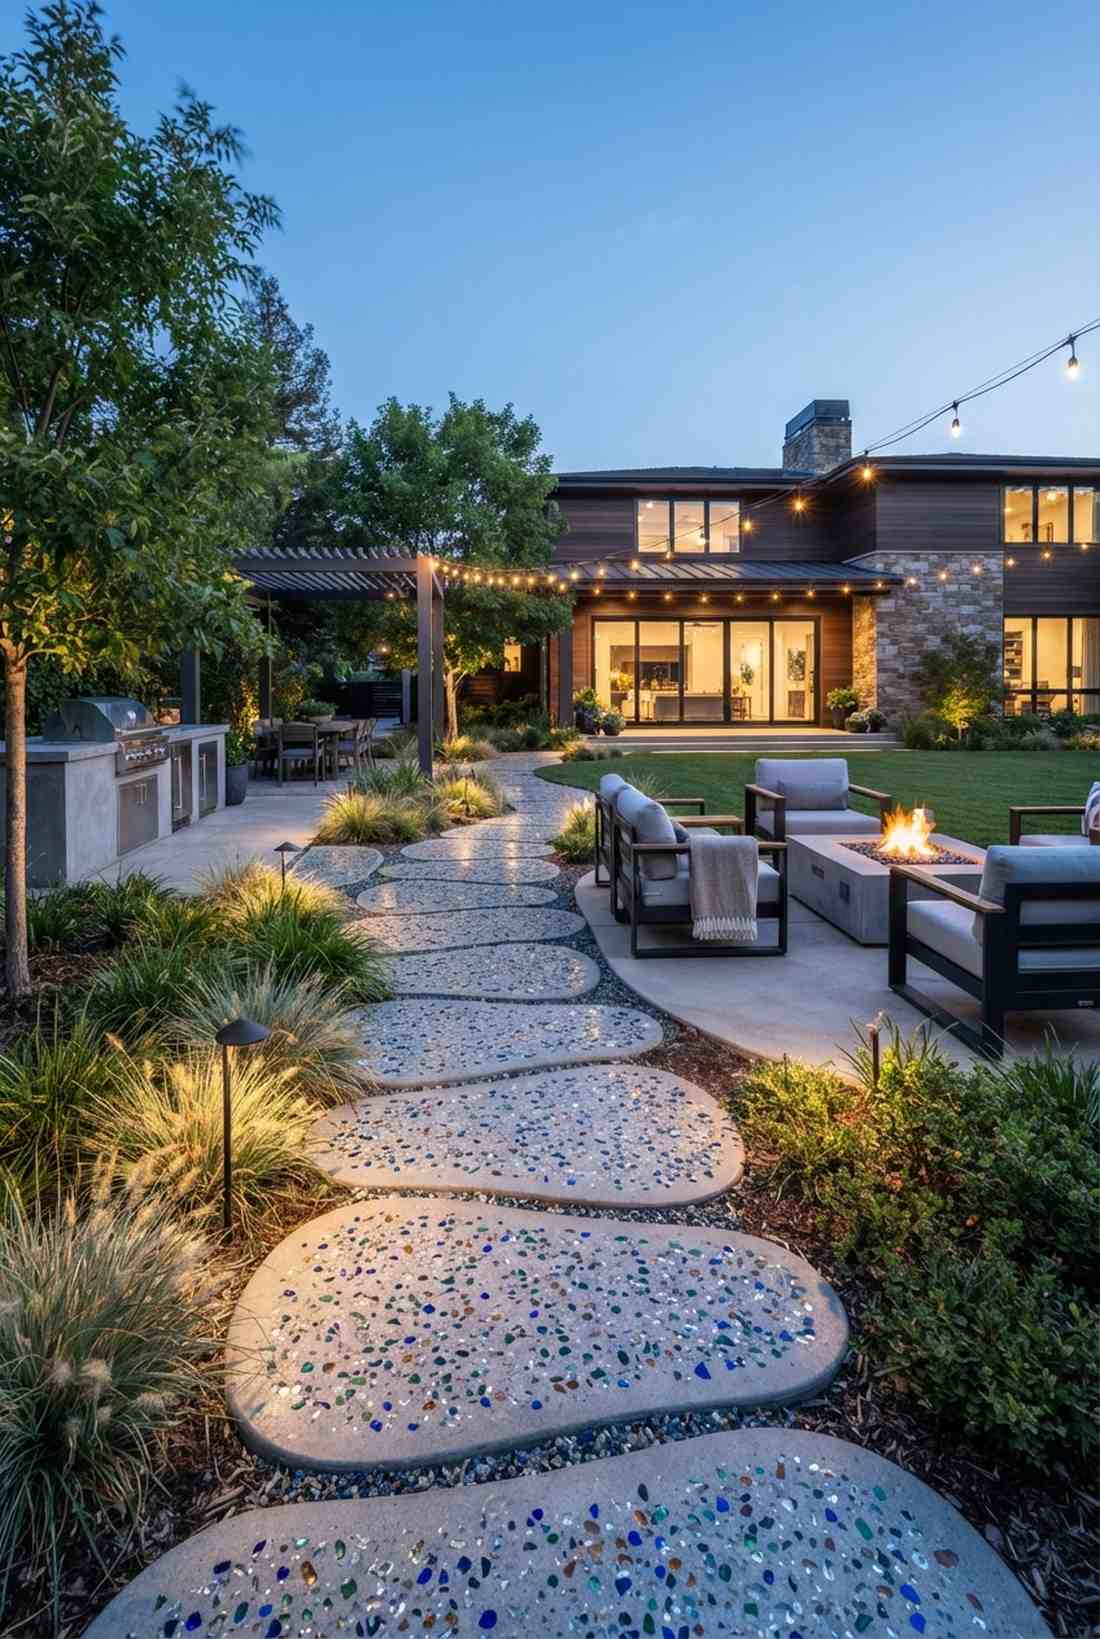
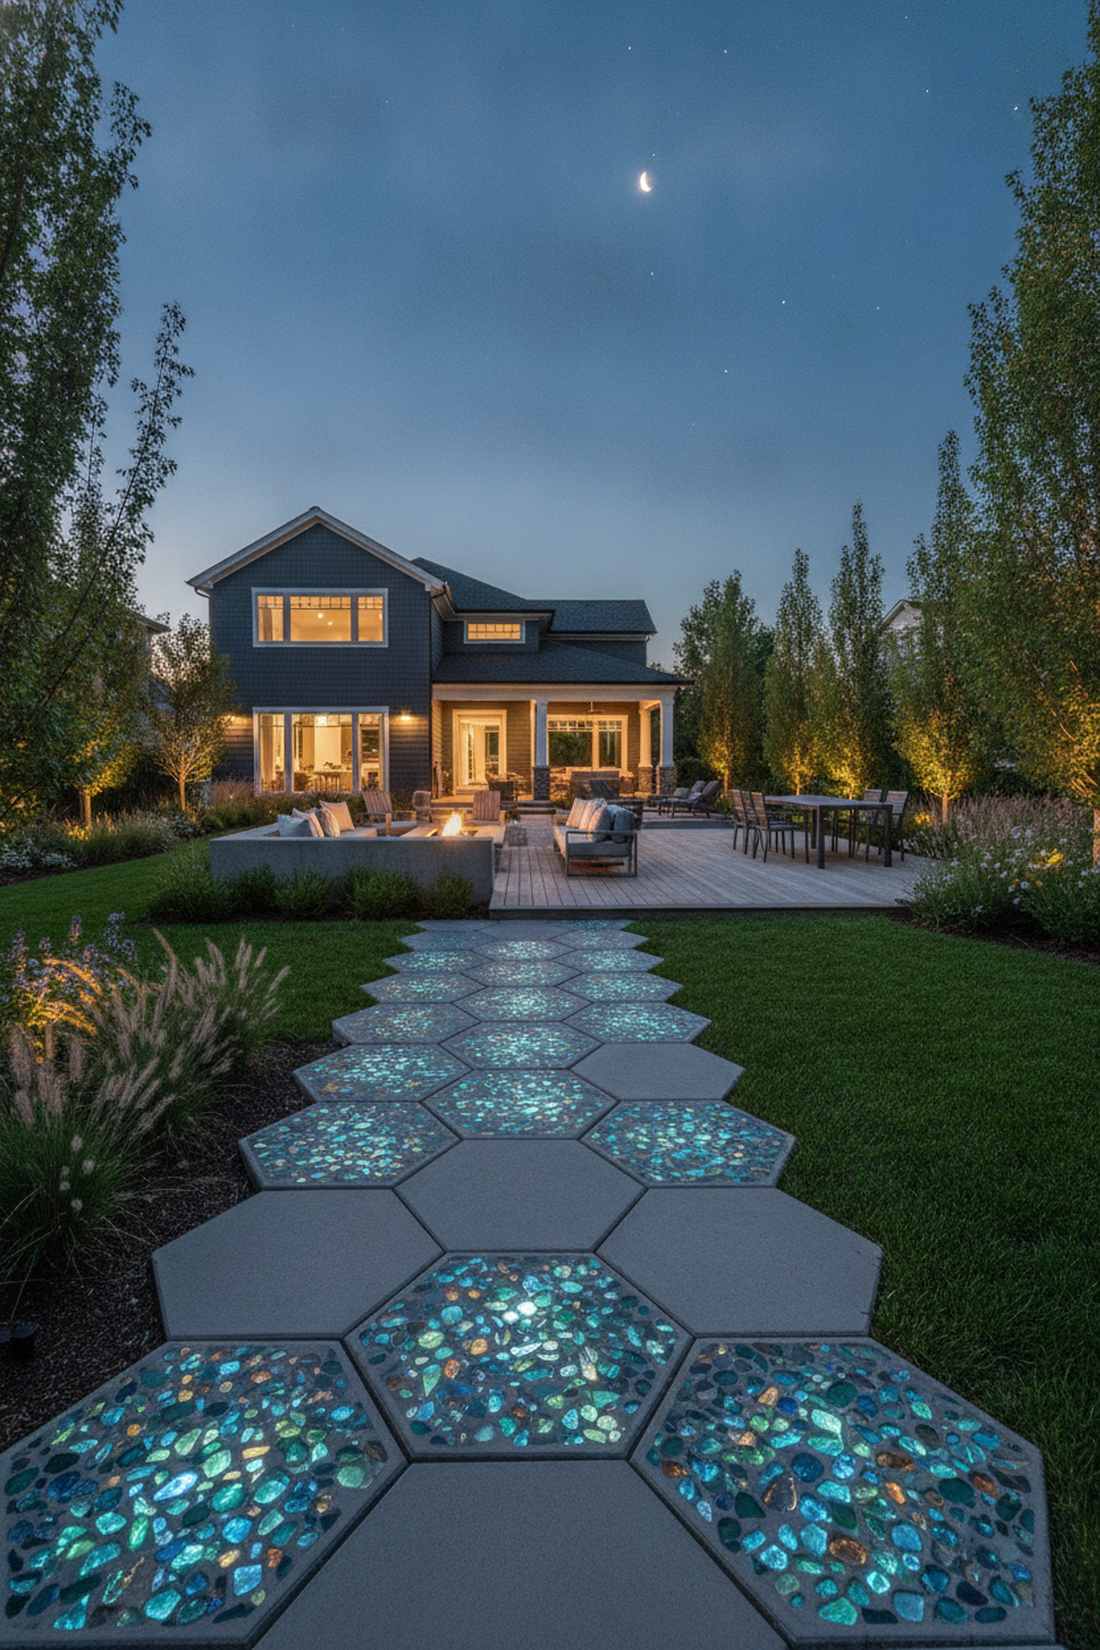
Looks like glowing gemstones frozen inside smooth concrete. Recycled glass terrazzo-style stepping stones create an incredible, sparkling walkway for modern outdoor entertainment spaces.
This layout looks far more expensive than it is by simply mixing tumbled glass shards into a standard concrete matrix. The reflective glass catches the moonlight, illuminating the path naturally without running a single electrical wire. Using pre-mixed glass aggregate kits eliminates the guesswork.
Creating these luminous custom stones costs about $40–$60 per batch. Pin this for your next magical backyard party setup.
- Key Materials: Concrete mixed with tumbled glass
- Vibe / Style: Luminous modern chic
- Difficulty: Moderate concrete mixing
- Budget Breakdown: Concrete: $15 | Tumbled glass: $35
- Creator’s Tip: After pouring, lightly brush the top with a wet sponge to expose the beautiful glass fragments.
- Smart Sourcing: Pre-mixed glass aggregate concrete kits and tumbled recycled landscape glass (bulk).
20. Cast Iron Grate Stepping
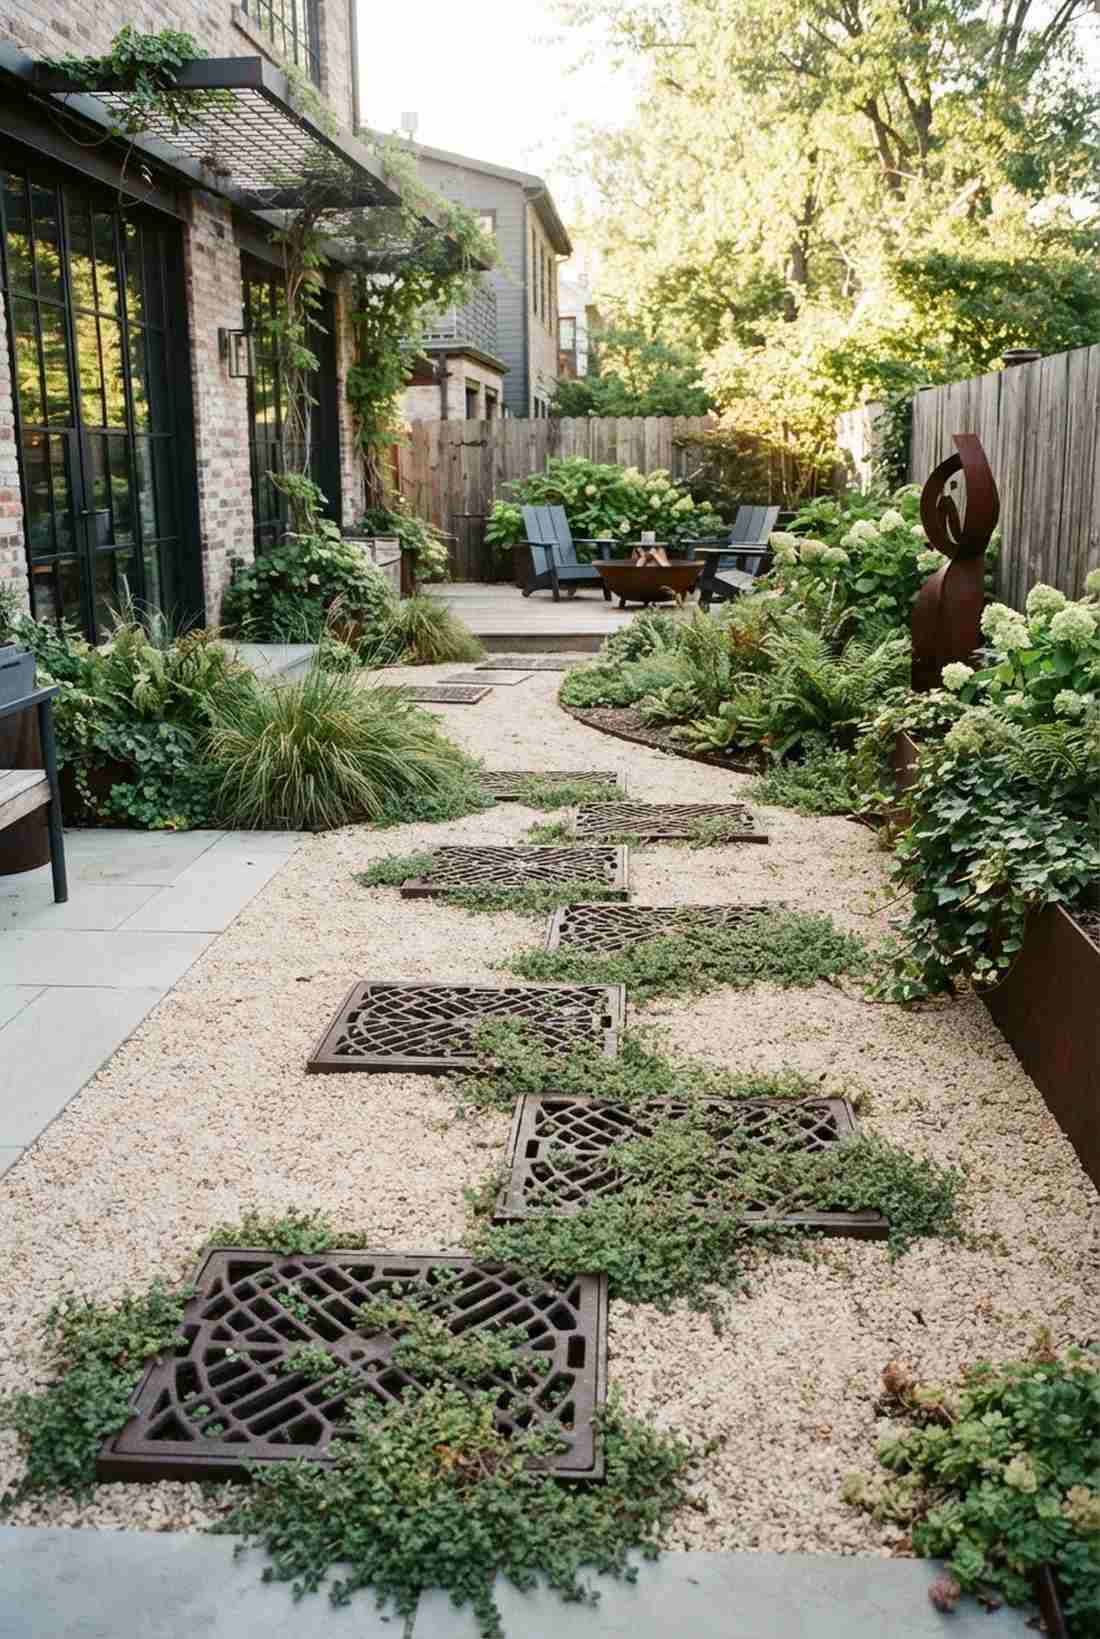
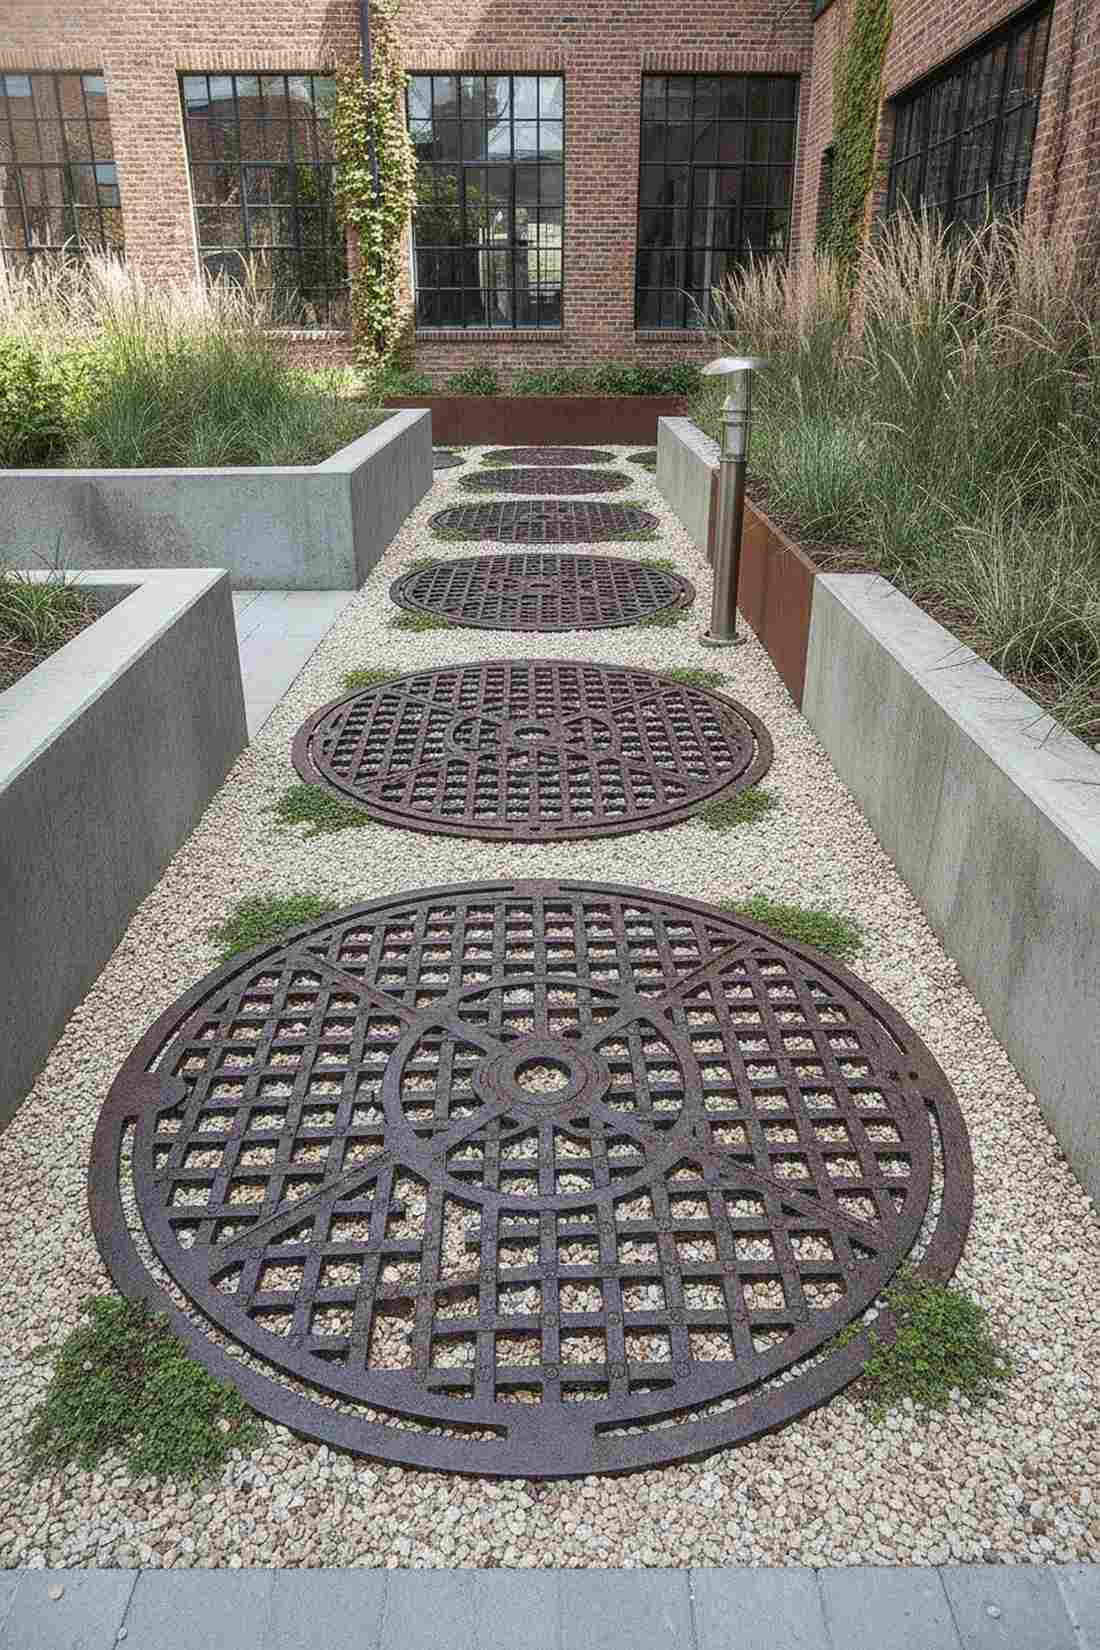
Brings massive steampunk energy to an urban landscape. Salvaged vintage iron grates work brilliantly as rugged, open-lattice pathway steps in a modern industrial garden.
Repurposing old tree-well covers delivers a bespoke finish that no big-box store paver can match. The dark iron contrasting against pale gravel creates an aggressive, beautiful aesthetic while solving drainage issues instantly. Spraying them with a matte rust-converter spray keeps the vintage look without deteriorating the metal.
Finding these authentic pieces usually runs $50–$80 per grate.
- Key Materials: Heavy cast iron drainage grates
- Vibe / Style: Urban industrial vintage
- Difficulty: Heavy lifting
- Budget Breakdown: Iron grates: $60 | Clear sealant: $15
- Creator’s Tip: Plant creeping thyme underneath so it slowly grows up through the metal lattice.
- Smart Sourcing: Reproduction cast iron landscape grates and matte rust-converter spray.
21. Resin-Bound Aggregates

Looks like a seamless carpet of perfectly manicured stones. Pour-in-place resin bound pathways are the ultimate custom hack for wrapping around weirdly shaped swimming pools.
A clever hack to bypass rigid geometry is pouring your stepping stones directly. The clear resin binds the gravel into a rock-solid, yet permeable surface that conforms to literally any curve you design. Investing in a commercial-grade UV resin ensures the stones never turn cloudy or yellow in the sun.
This highly customizable liquid-stone system costs around $70–$100 per setup. Save this if you want a zero-maintenance, weed-free path.
- Key Materials: Decorative gravel and clear epoxy resin
- Vibe / Style: Ultra-smooth contemporary
- Difficulty: Fast-paced chemical mixing
- Budget Breakdown: UV Resin: $50 | Washed gravel: $30
- Creator’s Tip: Work in very small batches; landscape resin cures rapidly once exposed to summer heat.
- Smart Sourcing: UV-resistant landscape binder resin kits and pre-washed decorative micro-gravel (bulk pack).
22. Porcelain Paver Technology
Brings the sterile, gorgeous perfection of an indoor luxury bathroom outside. Large-format outdoor porcelain tiles instantly elevate a plain grass yard into a VIP lounge area.
Most people get this wrong by using indoor tiles outside, but choosing 20mm thick exterior-grade porcelain gives a designer-level finish that is virtually indestructible. They never stain, they never fade, and they easily shrug off deep winter freezes. Using adjustable pedestal kits lets you float them perfectly level over any ugly concrete slab.
This ultra-premium aesthetic generally runs $80–$120 per tile.
- Key Materials: 20mm thick exterior porcelain
- Vibe / Style: Luxury minimalist resort
- Difficulty: High precision required
- Budget Breakdown: Porcelain slab: $85 | Pedestal mounts: $20
- Creator’s Tip: Because they are non-porous, ensure your pathway has a slight 1-degree slope to shed rain.
- Smart Sourcing: 20mm exterior porcelain slabs (anti-slip) and adjustable paver pedestal starter kits.
23. Rubber Safety Pavers
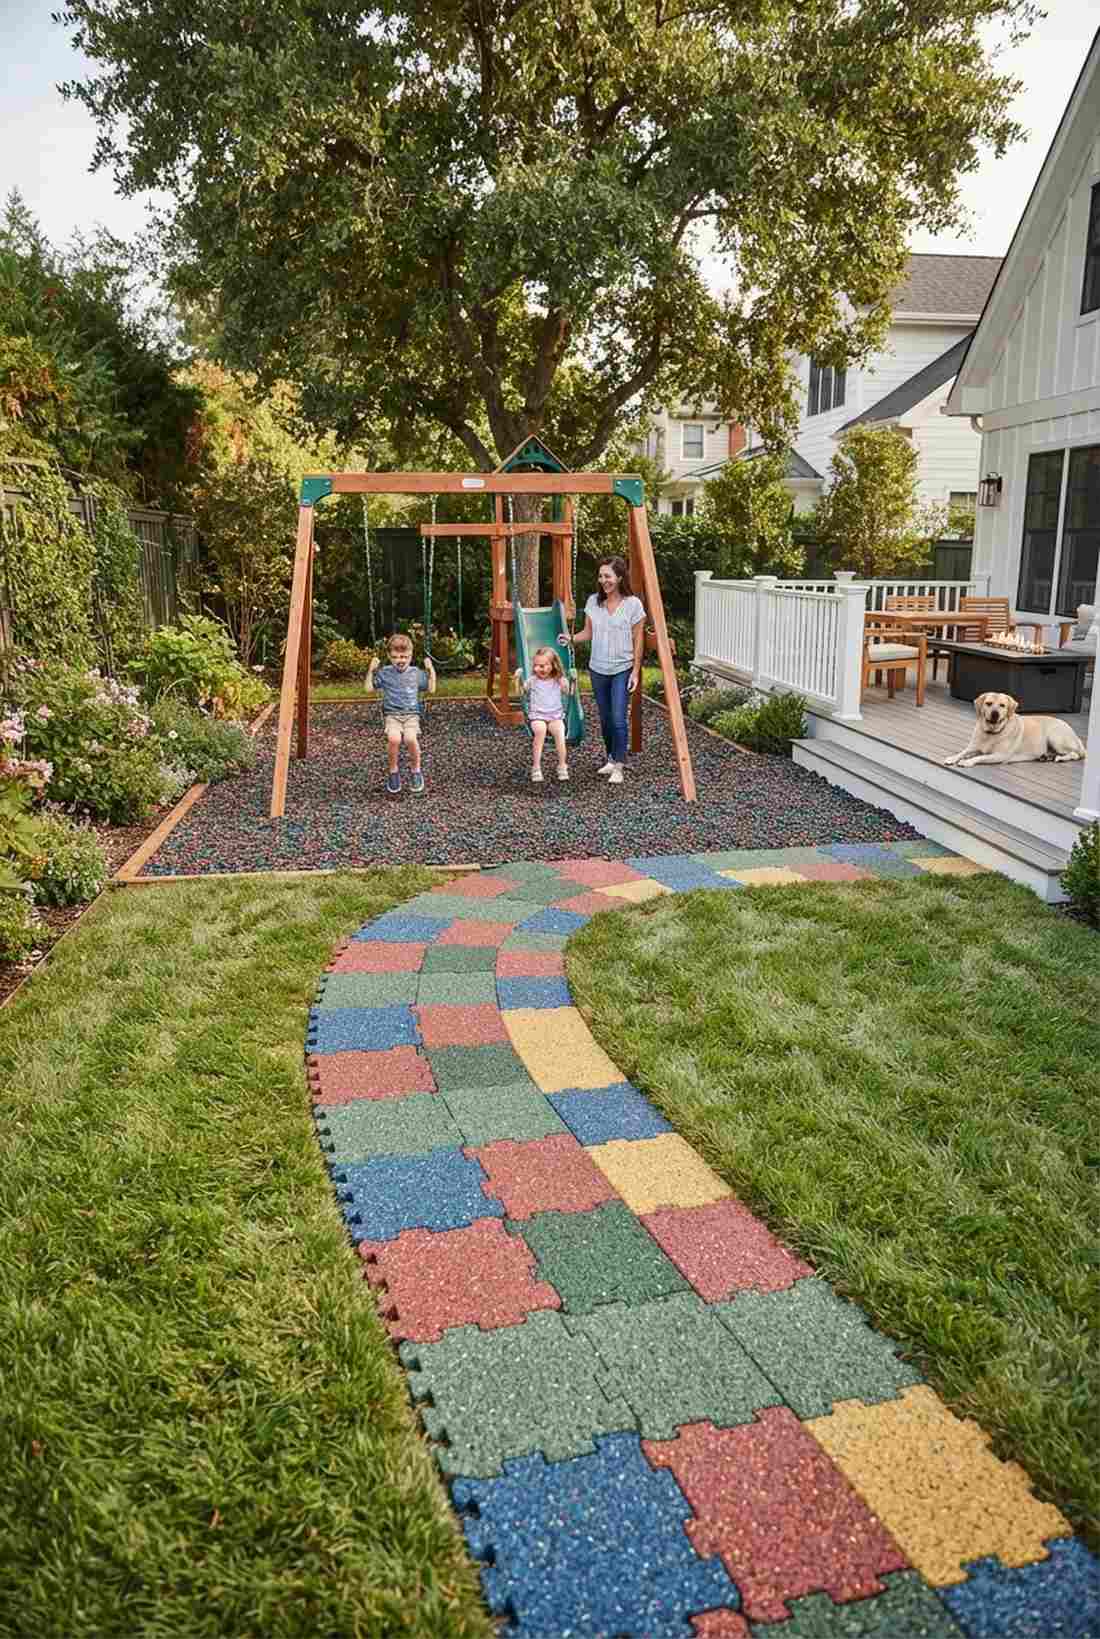
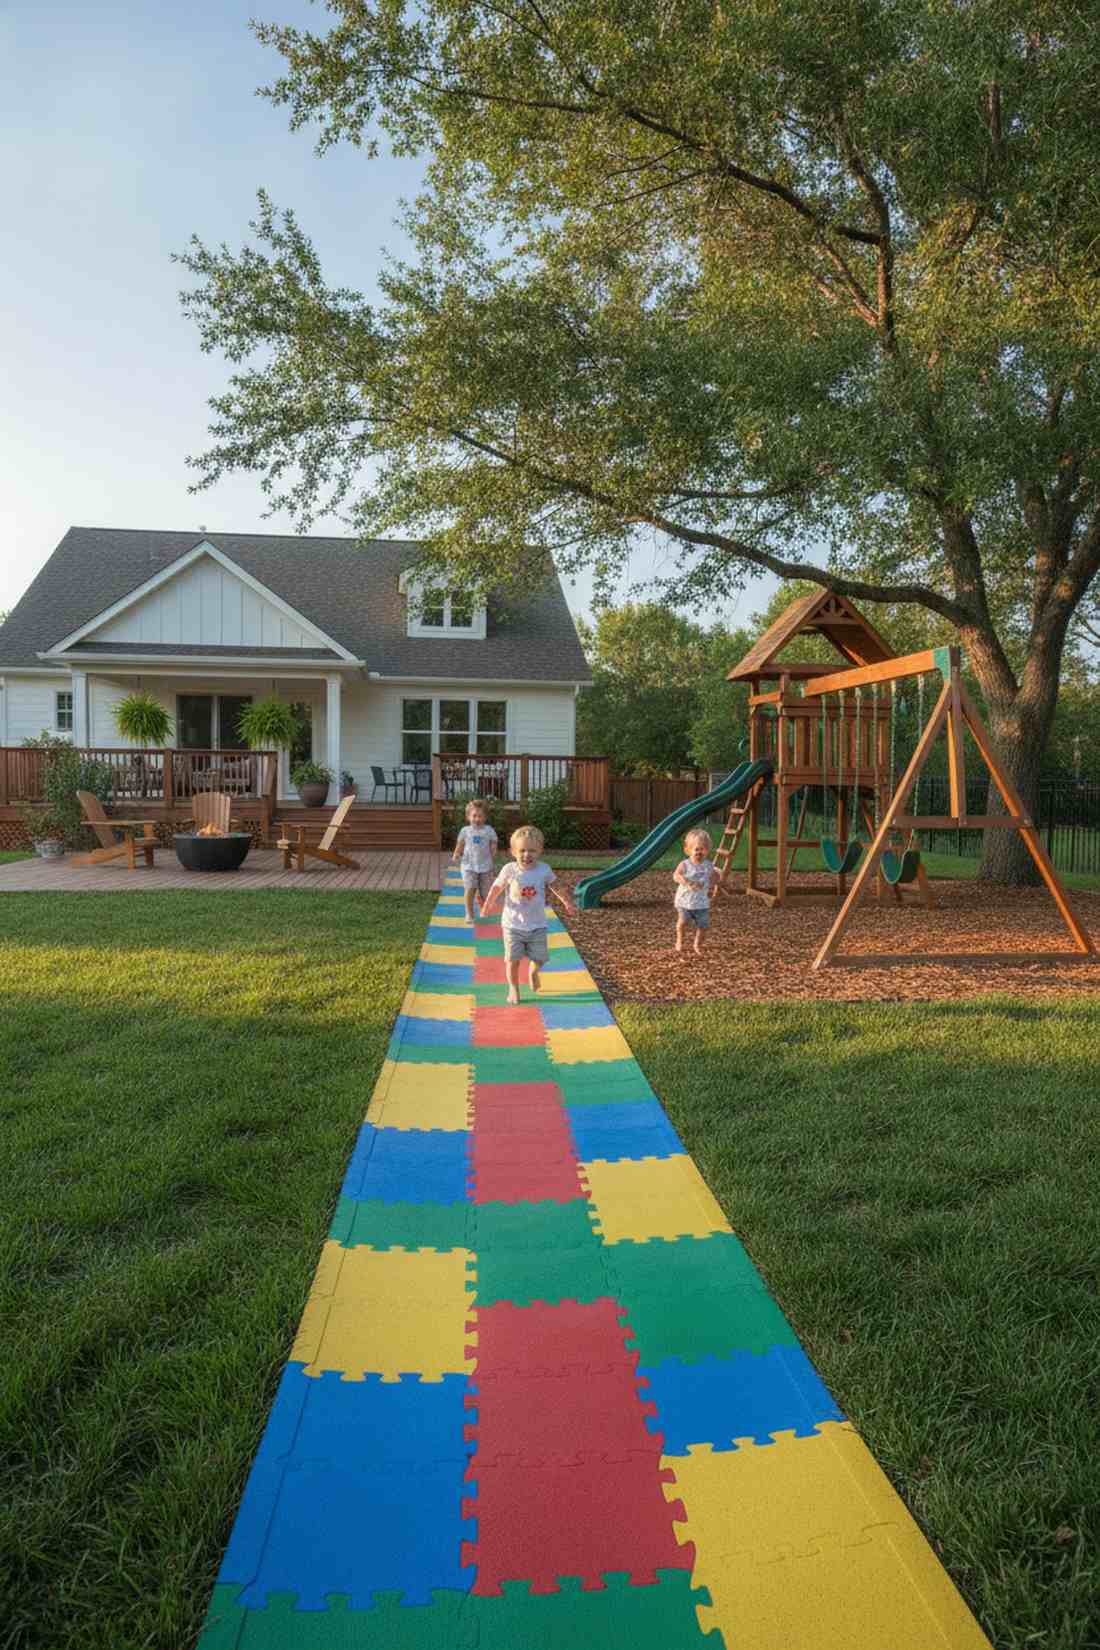
Feels like a bouncy, colorful playground runway. Recycled compressed rubber tiles are the absolute smartest choice for a pathway leading to a backyard swing set.
When safety is the priority, this stepping stones design swaps hard rock for impact-absorbing tech. They provide massive slip resistance even when soaking wet, making them foolproof for toddler play zones. Grabbing pre-cut puzzle-edge rubber pavers allows you to click the entire path together in minutes.
Building this ultra-safe walkway costs about $20–$35 per tile section. Pin this to your family-friendly backyard board.
- Key Materials: Compressed recycled rubber tiles
- Vibe / Style: Playful & protective
- Difficulty: Incredibly simple
- Budget Breakdown: Rubber tiles: $25 | Plastic stakes: $5
- Creator’s Tip: Keep them out of direct, blazing afternoon sun if possible, as dark rubber retains heat.
- Smart Sourcing: Interlocking rubber playground pavers (bulk pack) and heavy-duty rubber landscape adhesive.
24. Photocatalytic Concrete
Sounds like sci-fi but functions beautifully as a self-cleaning marvel. Titanium dioxide infused concrete blocks work magic in shady, algae-prone side alleys.
The secret to this layout is the chemistry: the concrete actively eats air pollutants and destroys organic stains when hit by UV light. This stepping stones in garden technology means zero pressure washing, ever. Purchasing pre-treated smog-eating pavers keeps your path looking brand new without lifting a finger.
These advanced self-cleaning blocks run about $40–$60 per unit.
- Key Materials: Photocatalytic treated concrete
- Vibe / Style: High-tech eco-clean
- Difficulty: Standard paver setup
- Budget Breakdown: Smart concrete units: $50 | Base material: $10
- Creator’s Tip: Do not coat these with standard stone sealers, as it will block the self-cleaning chemical reaction.
- Smart Sourcing: Photocatalytic concrete paver kits and standard leveling sand.
If you’ve been laying pavers in a straight, boring line, this next mind-bending pattern will completely change how you view your yard…
Pattern Composition Strategies
Strategic pattern deployment controls visual rhythm, movement speed, and spatial definition throughout garden circulation systems. These stepping stones outdoor compositions demonstrate how arrangement geometry shapes user experience and landscape character.
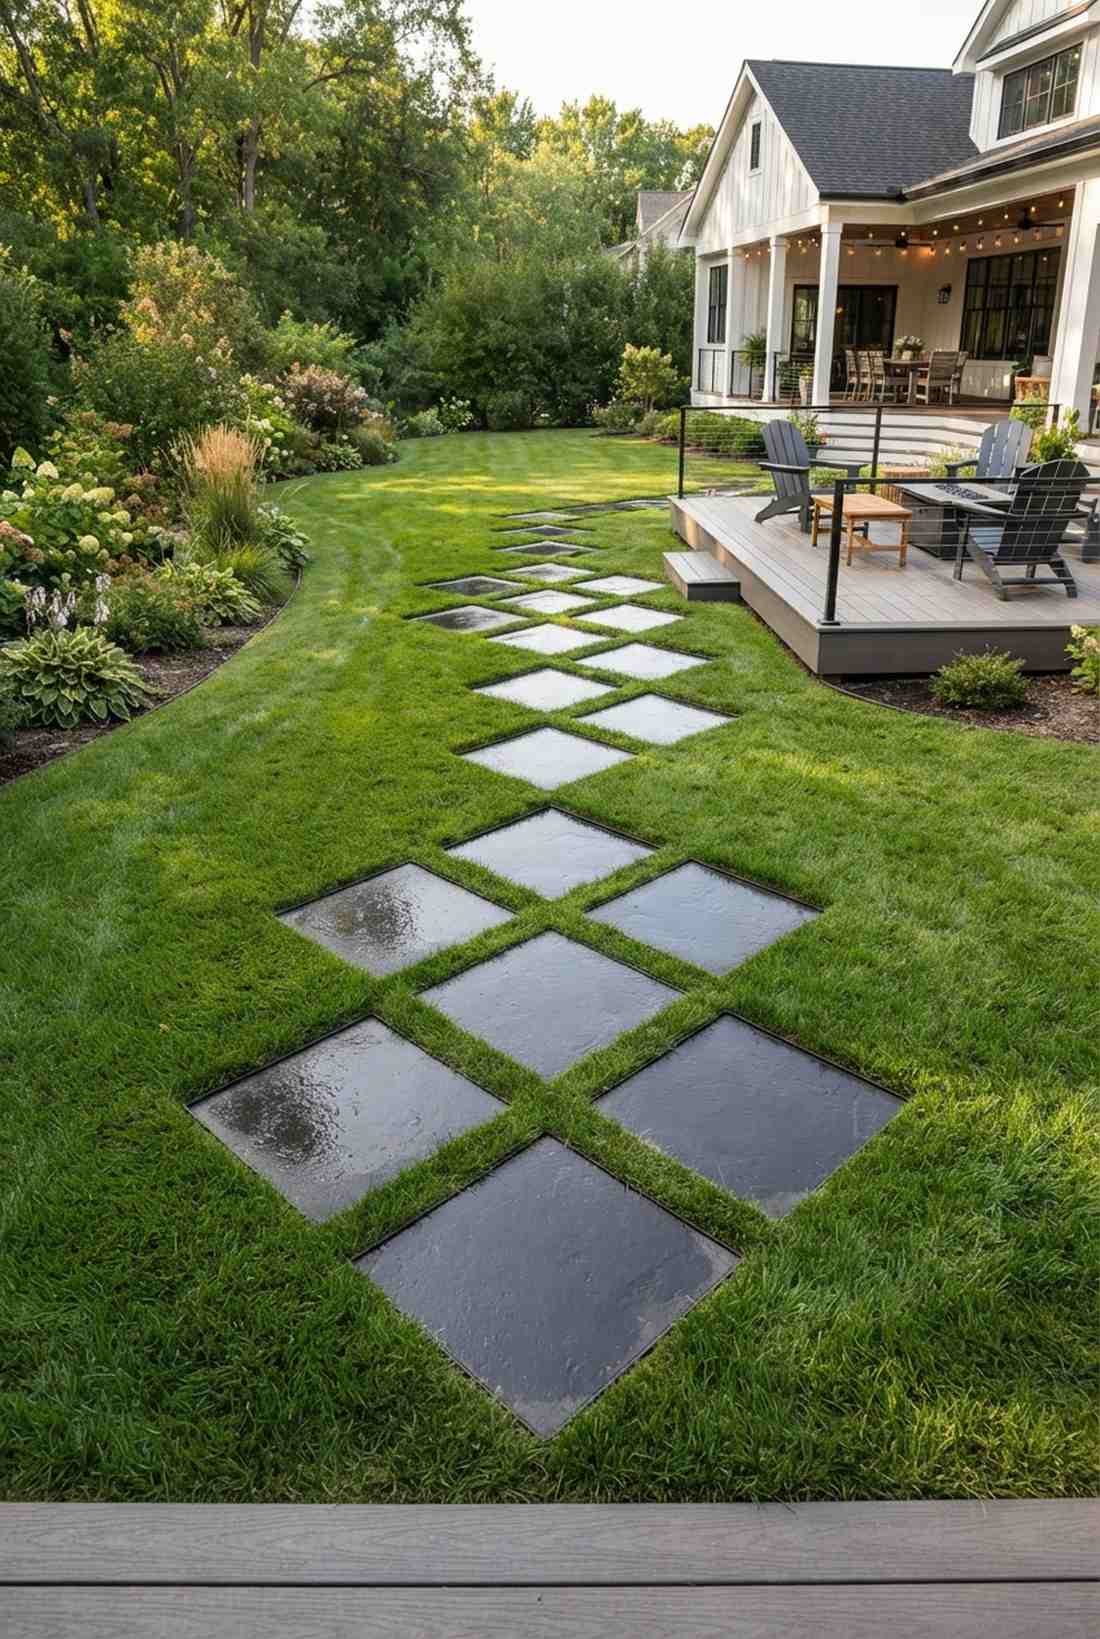
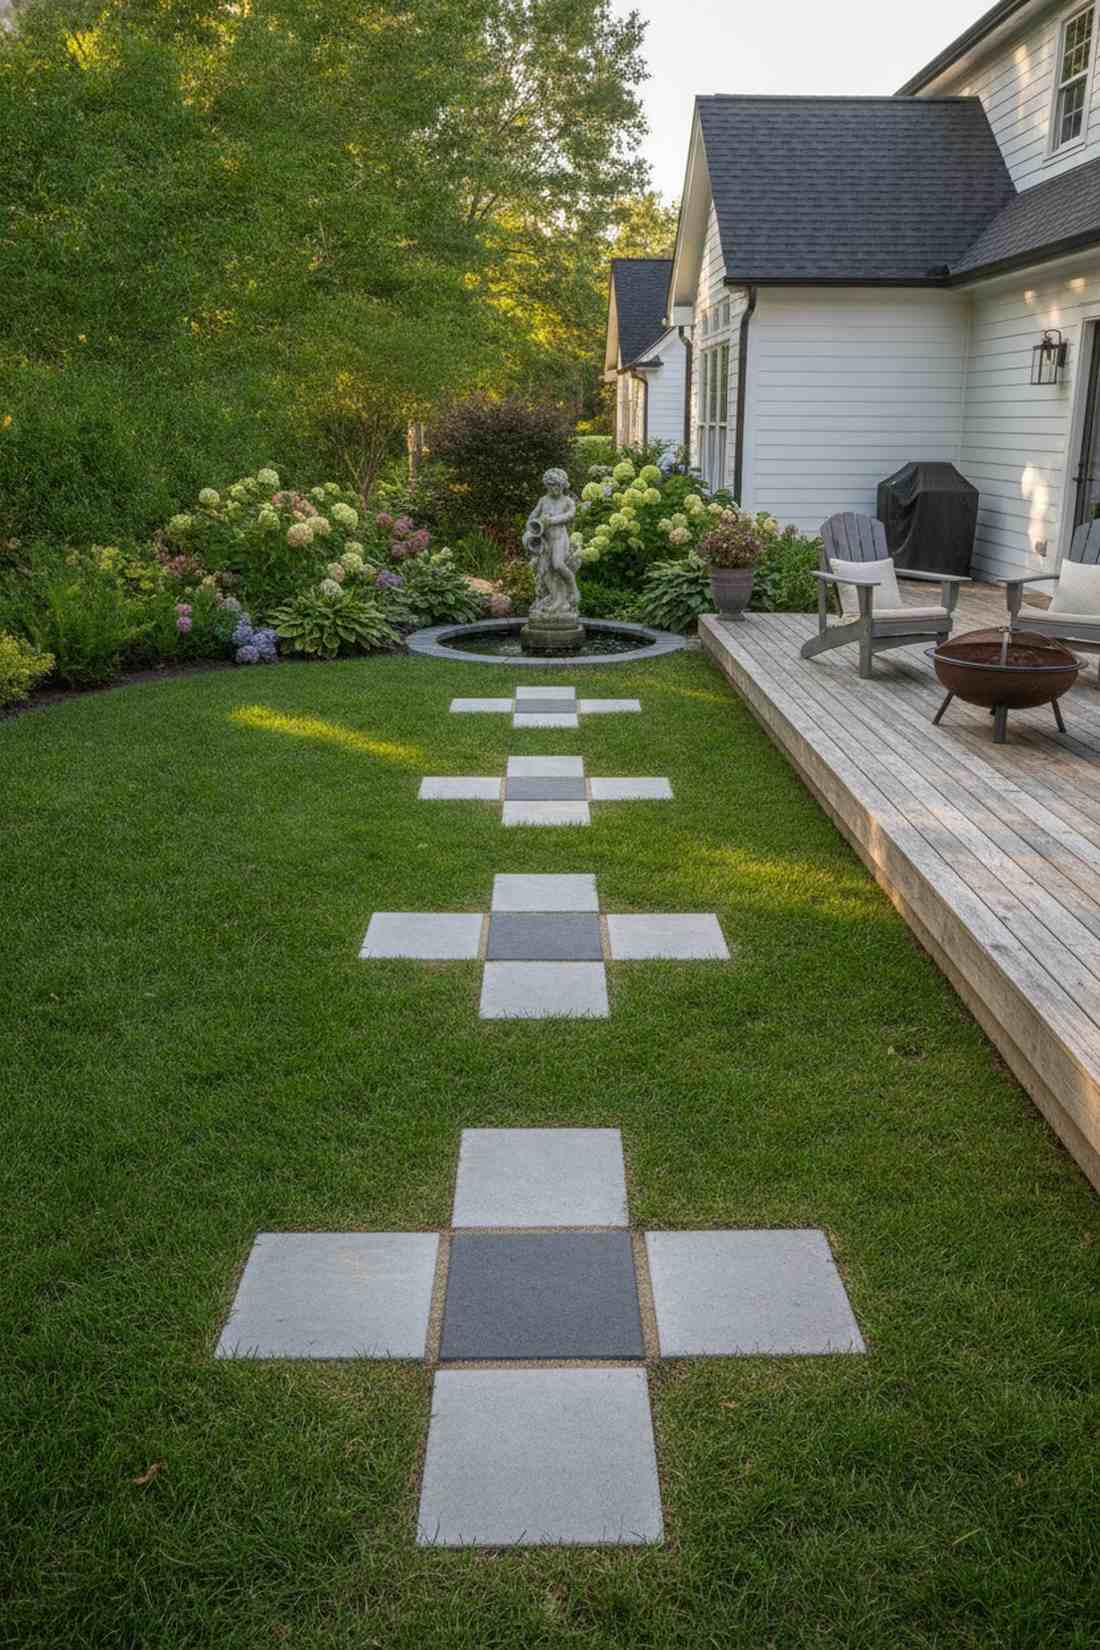
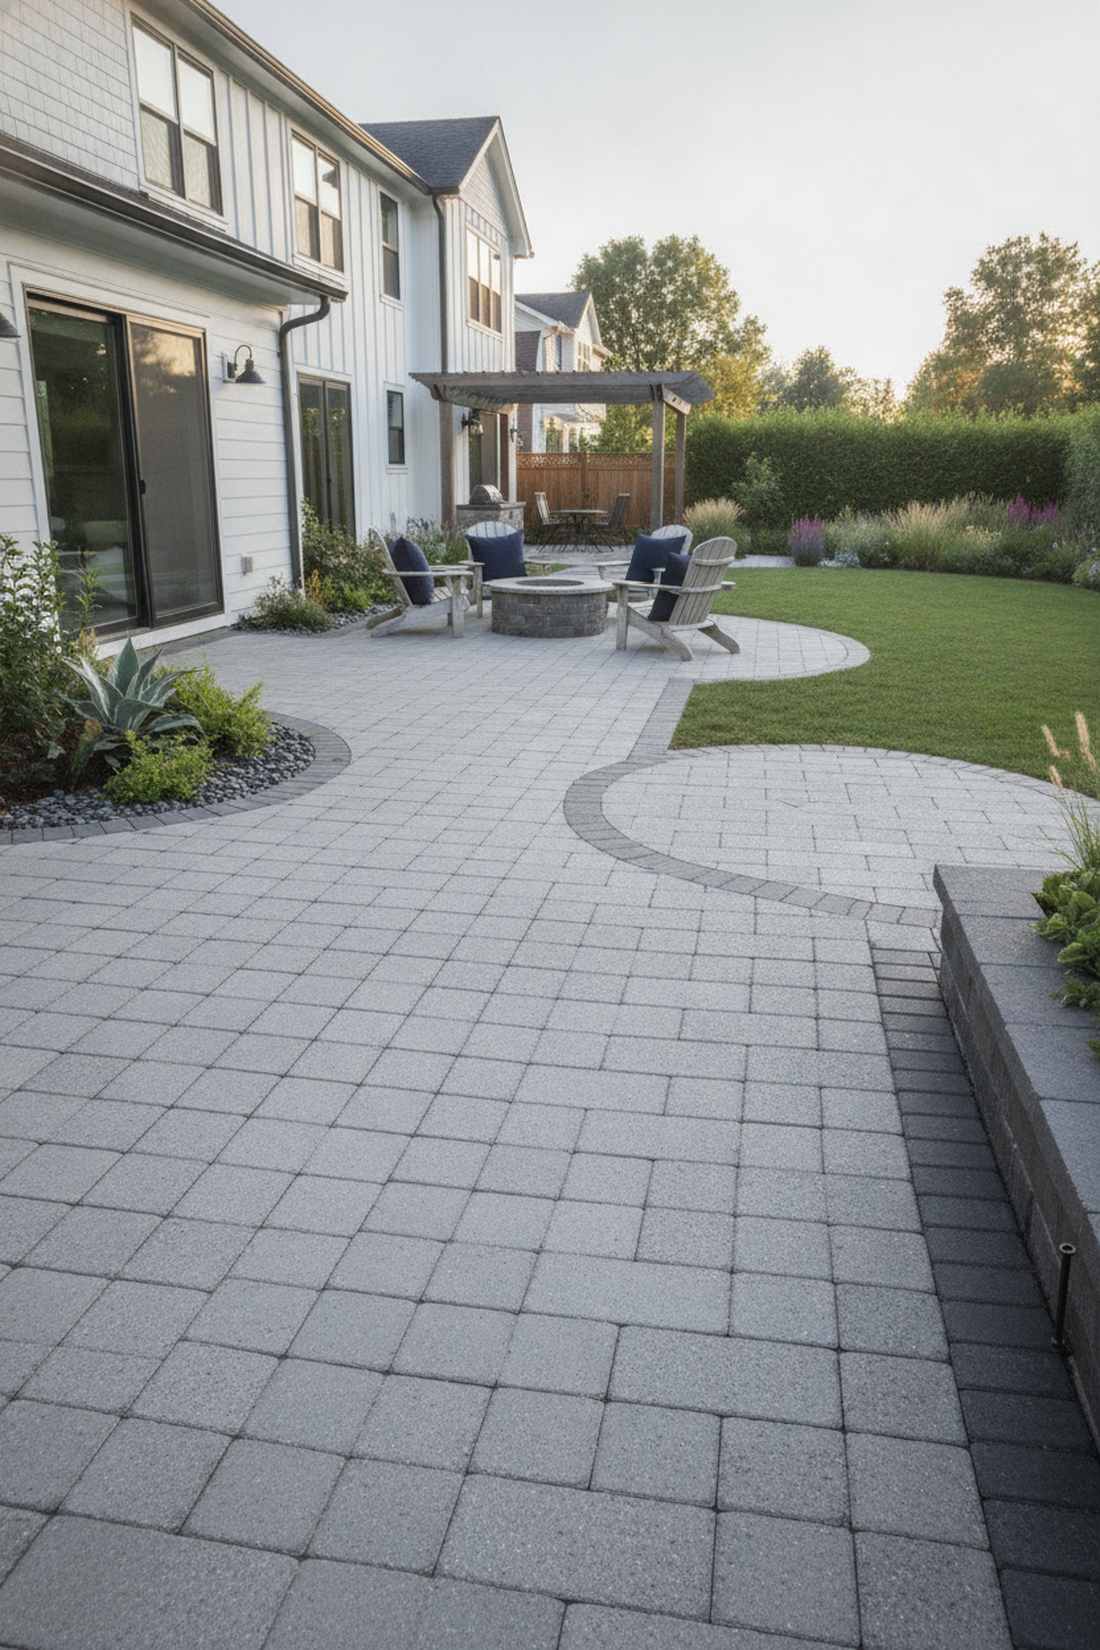
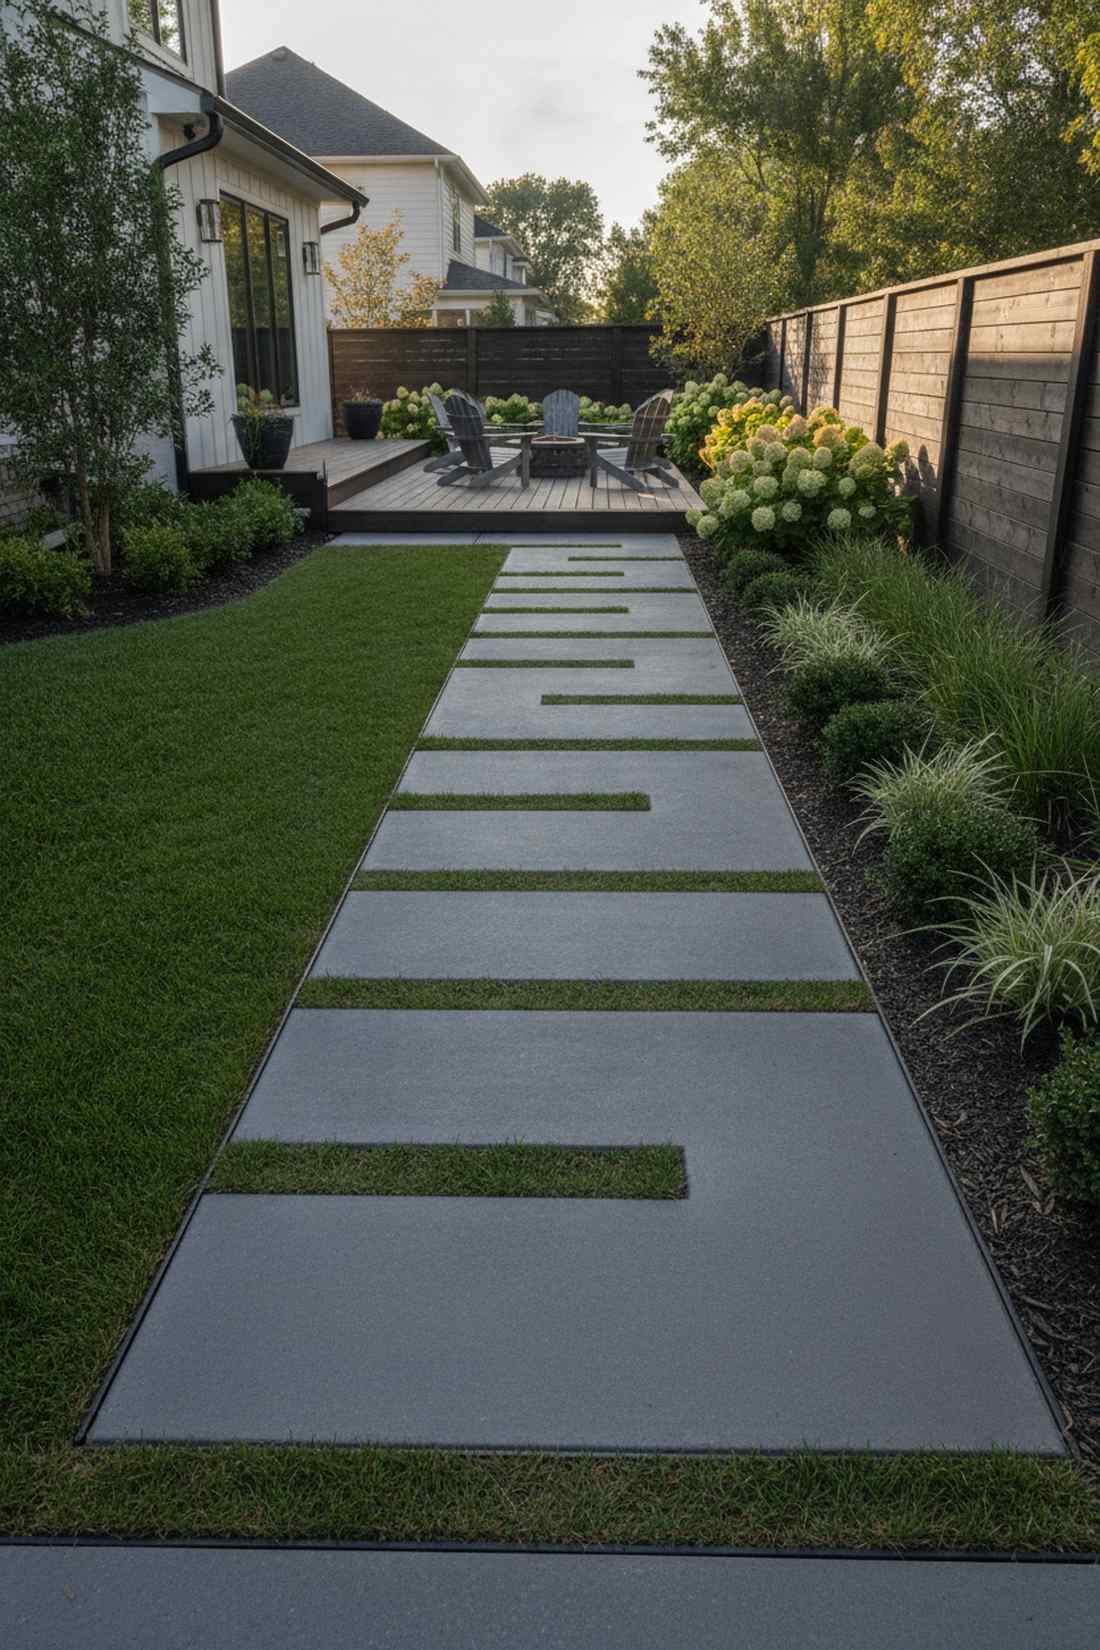
25. Checkerboard Turf Integration
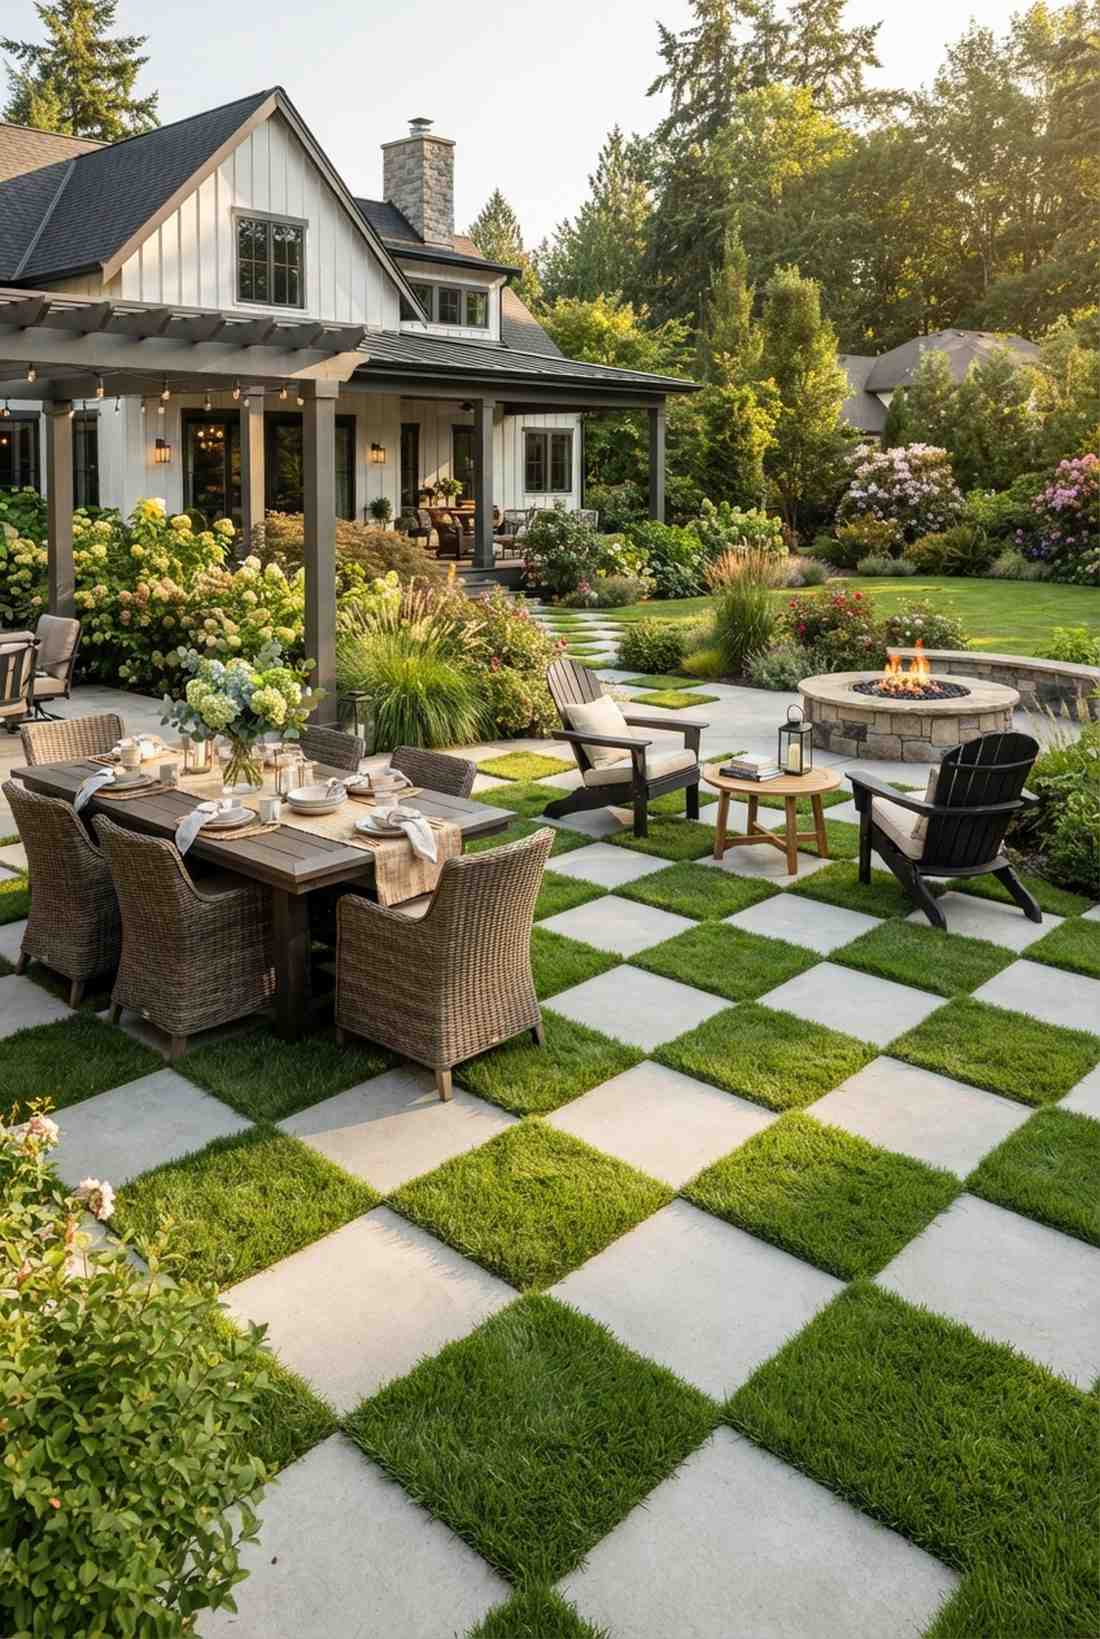
Exudes the manicured perfection of a grand botanical estate. Alternating square paver and turf pattern is an incredibly luxurious way to cover a wide outdoor dining space.
This layout surprisingly creates a high-end estate vibe while actually using 50% less hardscape material. By alternating precise 24-inch squares of stone and lush grass, the eye is tricked into seeing a massive, unified field. Mixing in durable fairy garden kits or dwarf clovers in the green squares adds an enchanting touch.
You can execute this optical illusion for roughly $30–$45 per square meter. Save this to your luxury landscape ideas board.
- Key Materials: 24-inch square concrete slabs and turf
- Vibe / Style: Classic botanical grandeur
- Difficulty: High precision spacing
- Budget Breakdown: Pavers: $25 | Premium grass seed: $10
- Creator’s Tip: Set the stone exactly half an inch below the turf line so you can mow right over it without hitting rock.
- Smart Sourcing: 24×24 architectural paver slabs (bulk) and high-traffic dwarf turf grass seed.
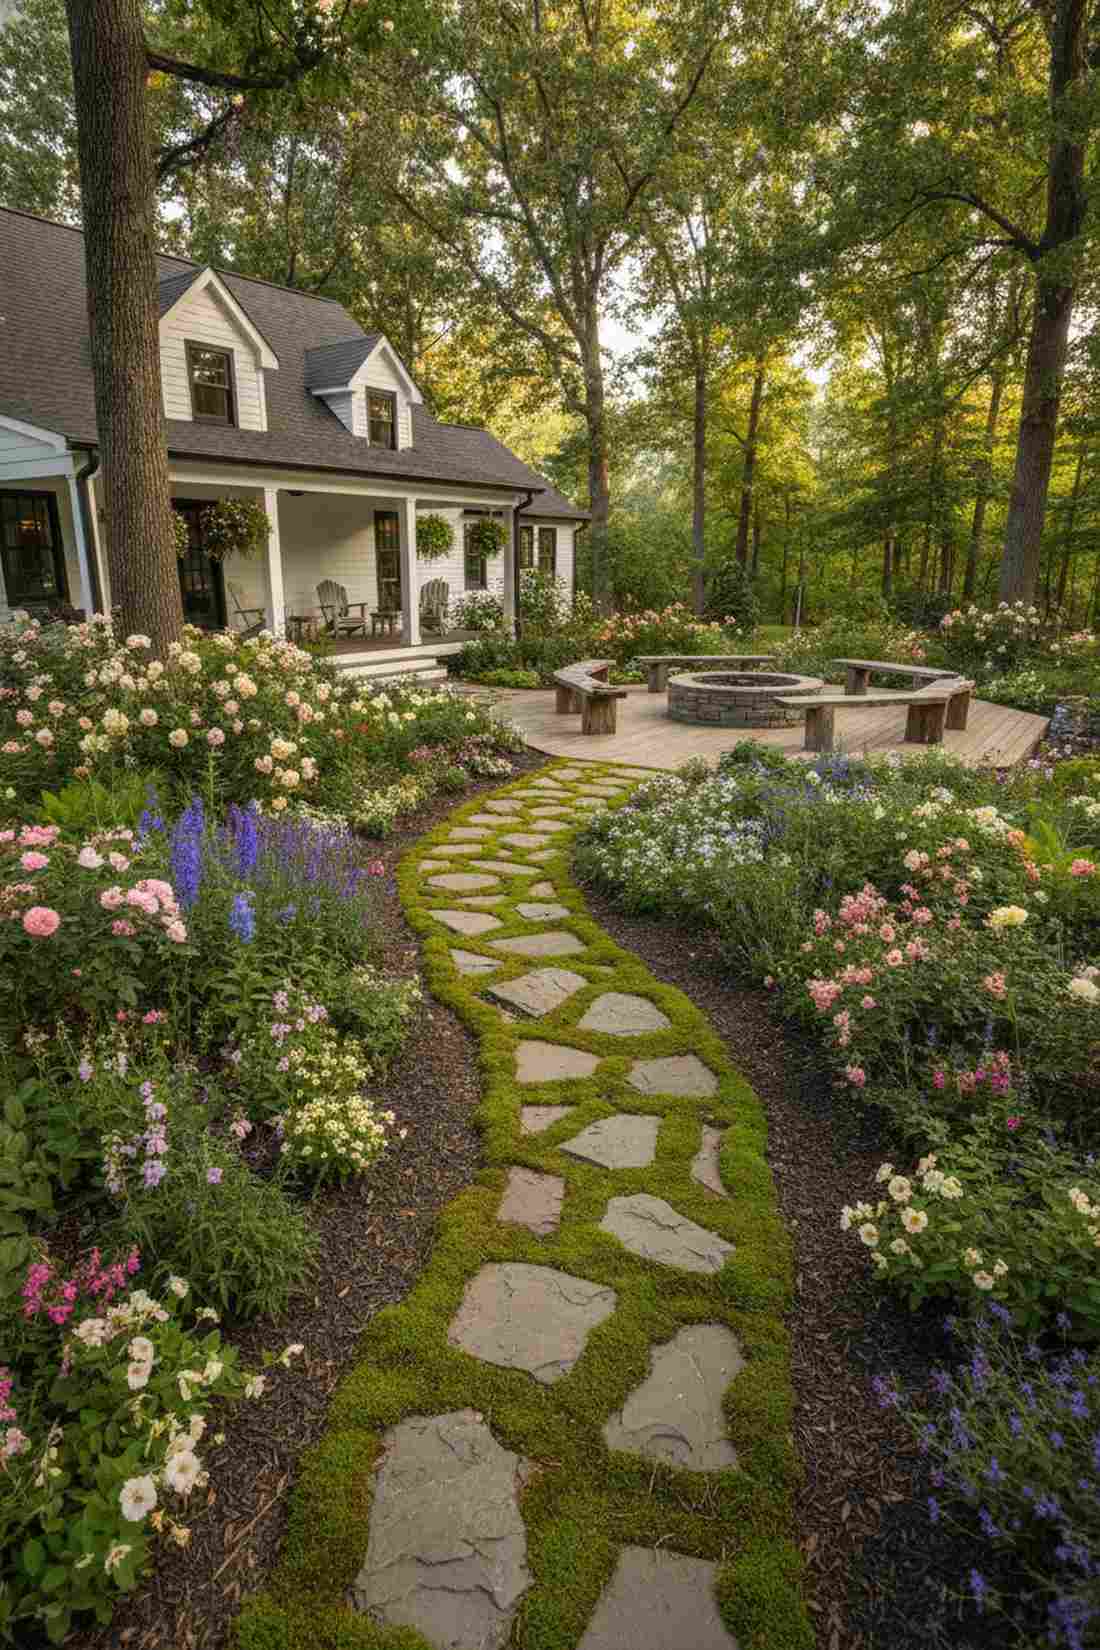
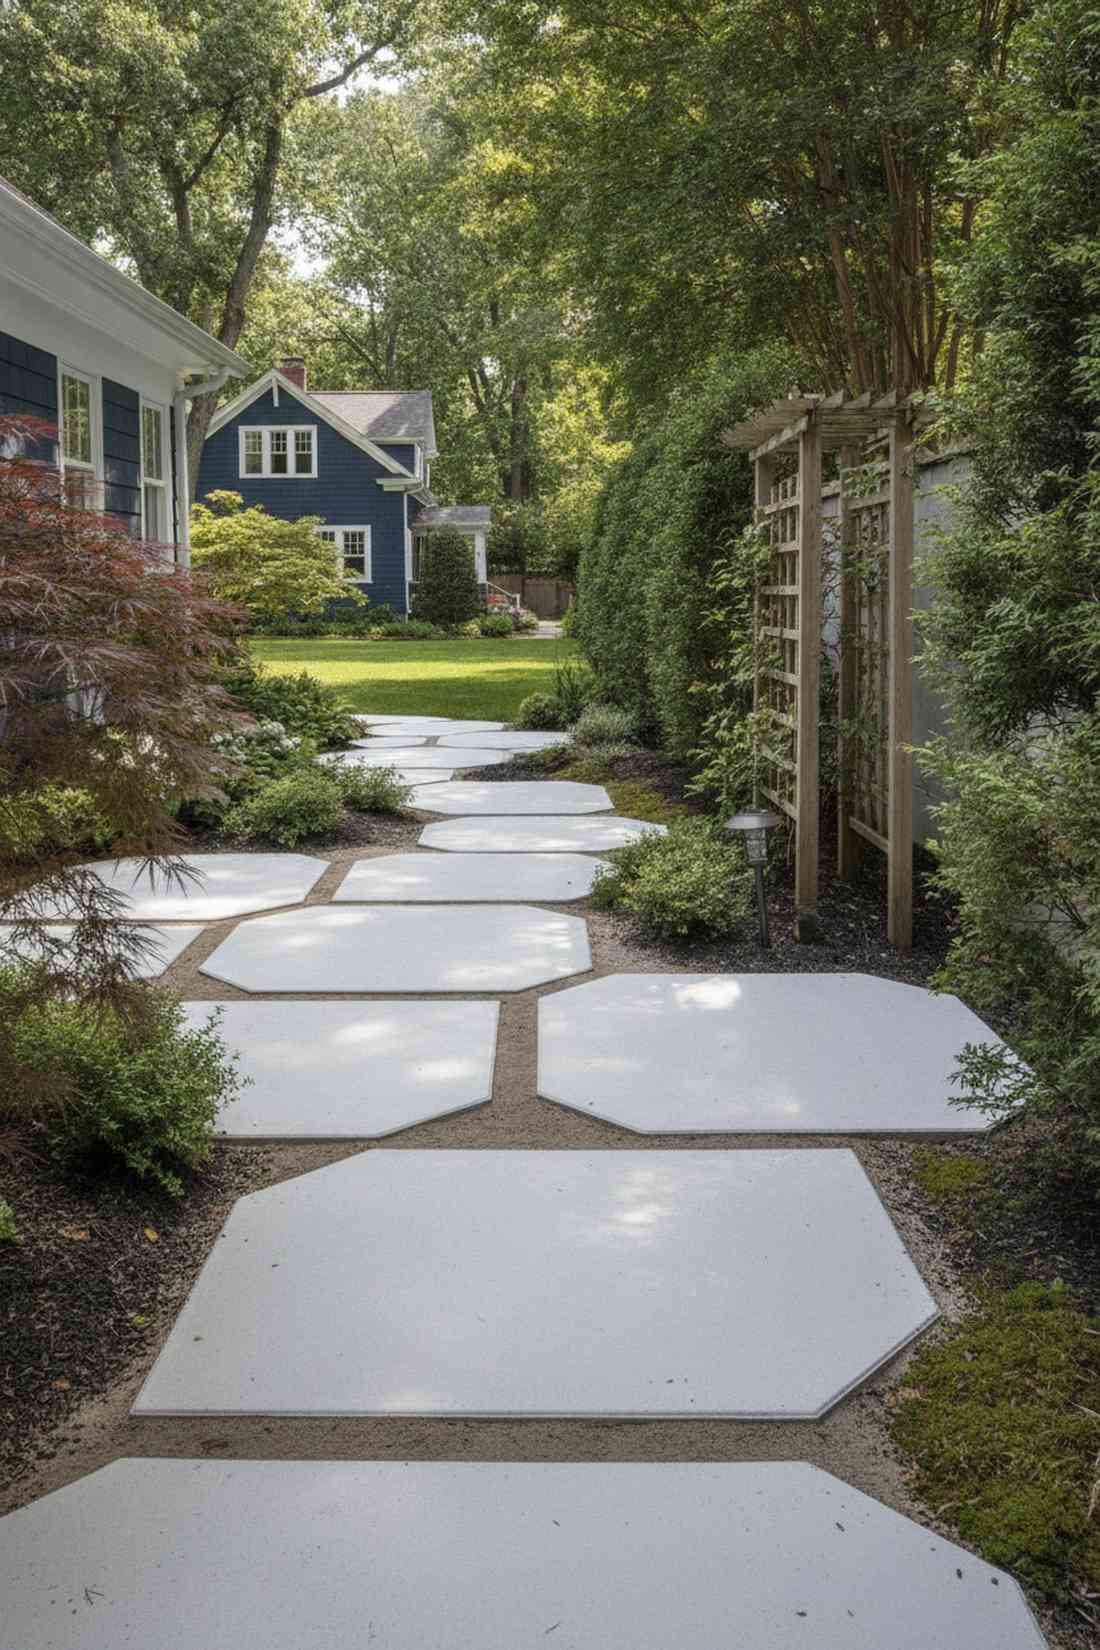
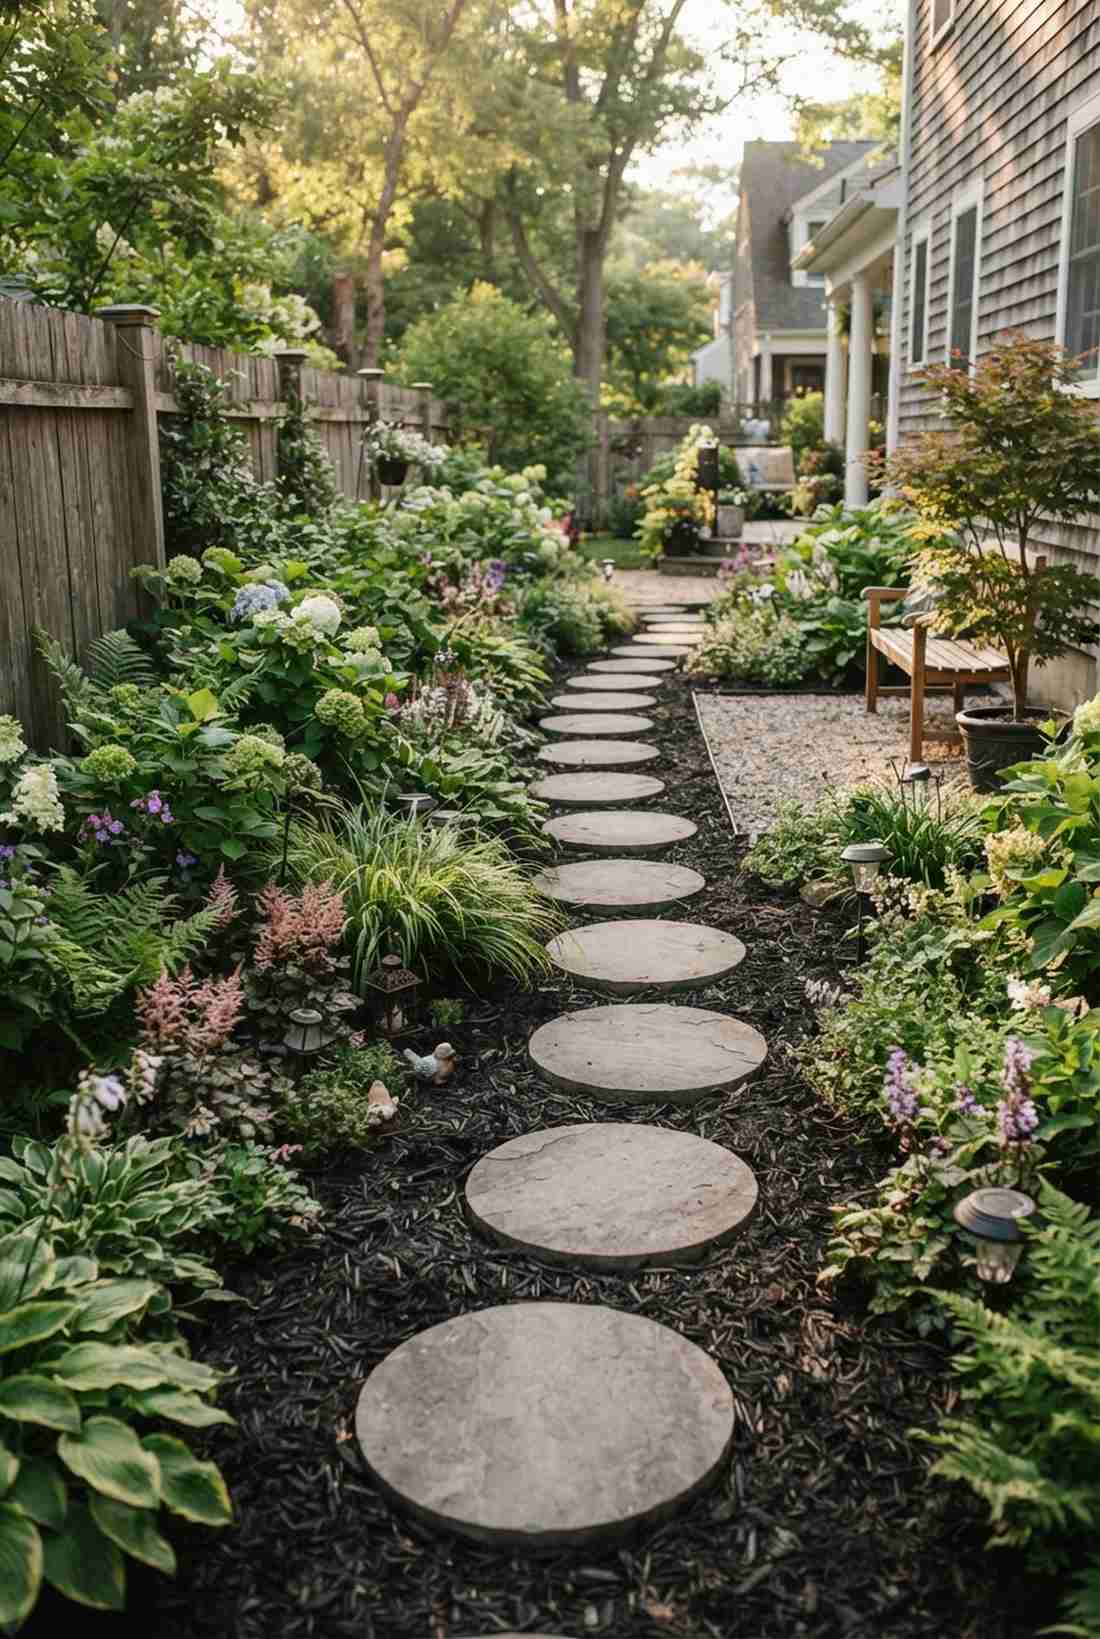
26. Scattered Random Placement
Feels like a whimsical path formed naturally over centuries. Irregular scattered stone distribution is the ultimate laid-back approach for a sprawling, natural groundcover backyard.
Abandoning strict measuring tape rules gives a designer-level finish that feels discovered rather than built. Varying the spacing between 18 and 36 inches accommodates natural walking strides and forces visitors to look down and appreciate the surrounding plants. Picking up pre-cut irregular slate packs makes the “random” look effortless to achieve.
This highly forgiving DIY layout costs about $20–$35 per stepping point.
- Key Materials: Mixed-size natural flagstones
- Vibe / Style: Whimsical & untamed
- Difficulty: Very easy beginner DIY
- Budget Breakdown: Mixed stones: $25 | Soil prep: $5
- Creator’s Tip: Walk the path in the dirt naturally several times, then place the stones exactly where your feet landed.
- Smart Sourcing: Pre-cut irregular slate stepping stones (mixed pack) and heavy-duty garden trowel kits.
27. Herringbone Angled Pattern
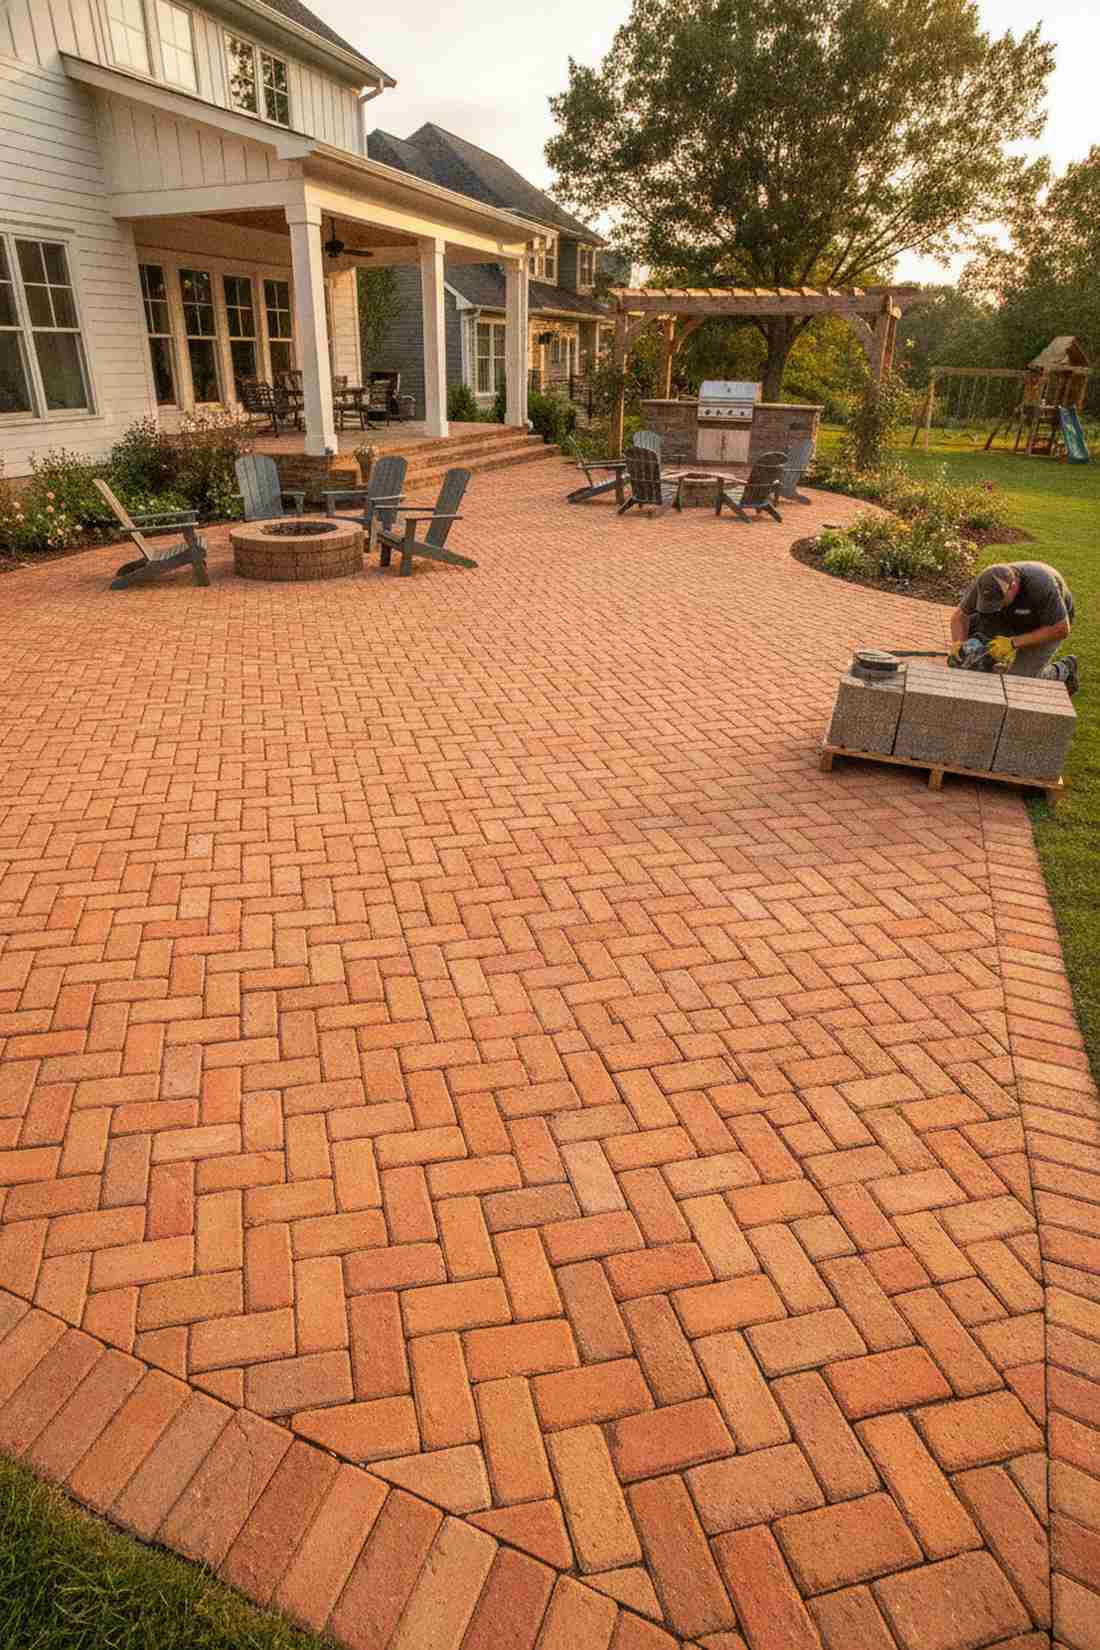
Brings to mind a centuries-old European brick plaza. 45-degree zig-zag herringbone layout is an incredibly sturdy, high-traffic solution for main patio entrances.
This specific layout delivers a bespoke finish while structurally locking the pavers together tighter than any other pattern. The aggressive diagonal lines push energy forward, making static outdoor spaces feel alive. Utilizing UV-coated brick-style concrete pavers ensures the intricate pattern stays vibrant.
Building this structurally superior path runs about $55–$75 per segment. Pin this to your advanced masonry board.
- Key Materials: 4×8 rectangular brick pavers
- Vibe / Style: European plaza elegance
- Difficulty: Advanced angle cutting
- Budget Breakdown: Brick pavers: $45 | Edge restraints: $20
- Creator’s Tip: You will absolutely need an angle grinder with a diamond blade to cleanly cut the border pieces.
- Smart Sourcing: UV-coated concrete brick pavers (bulk pallet) and snap-edge paver restraints.
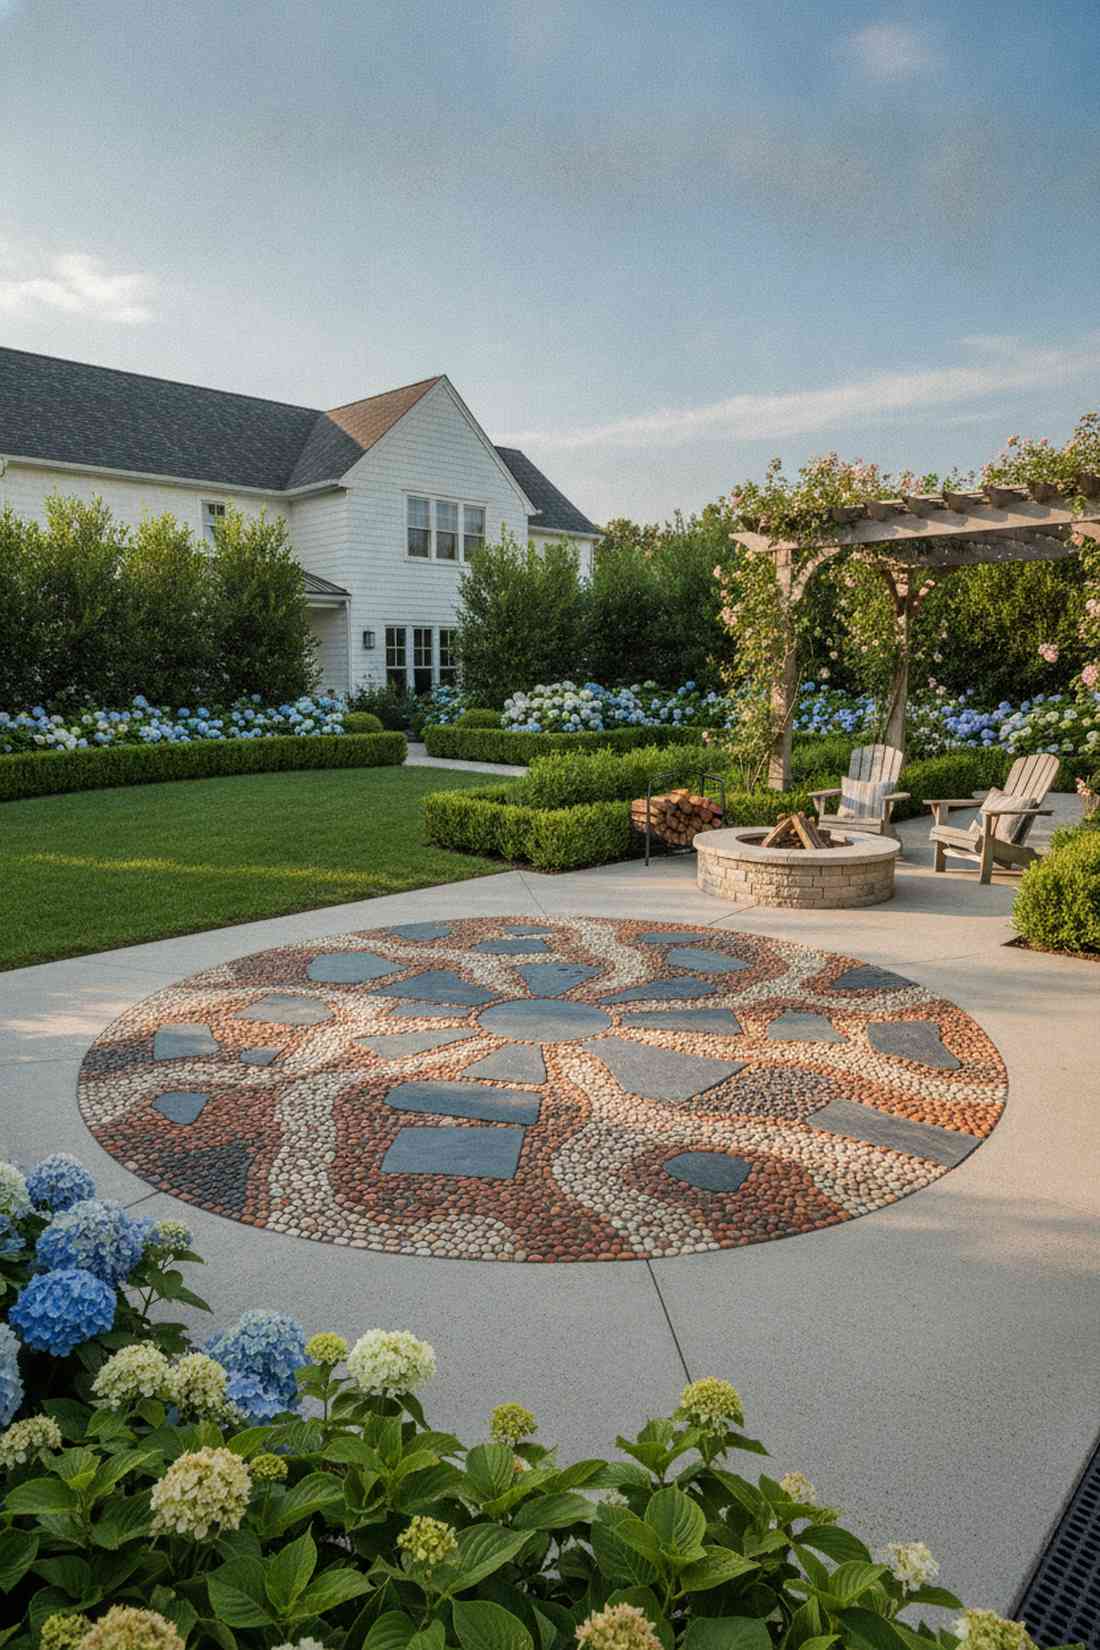
28. Radial Concentric Circles
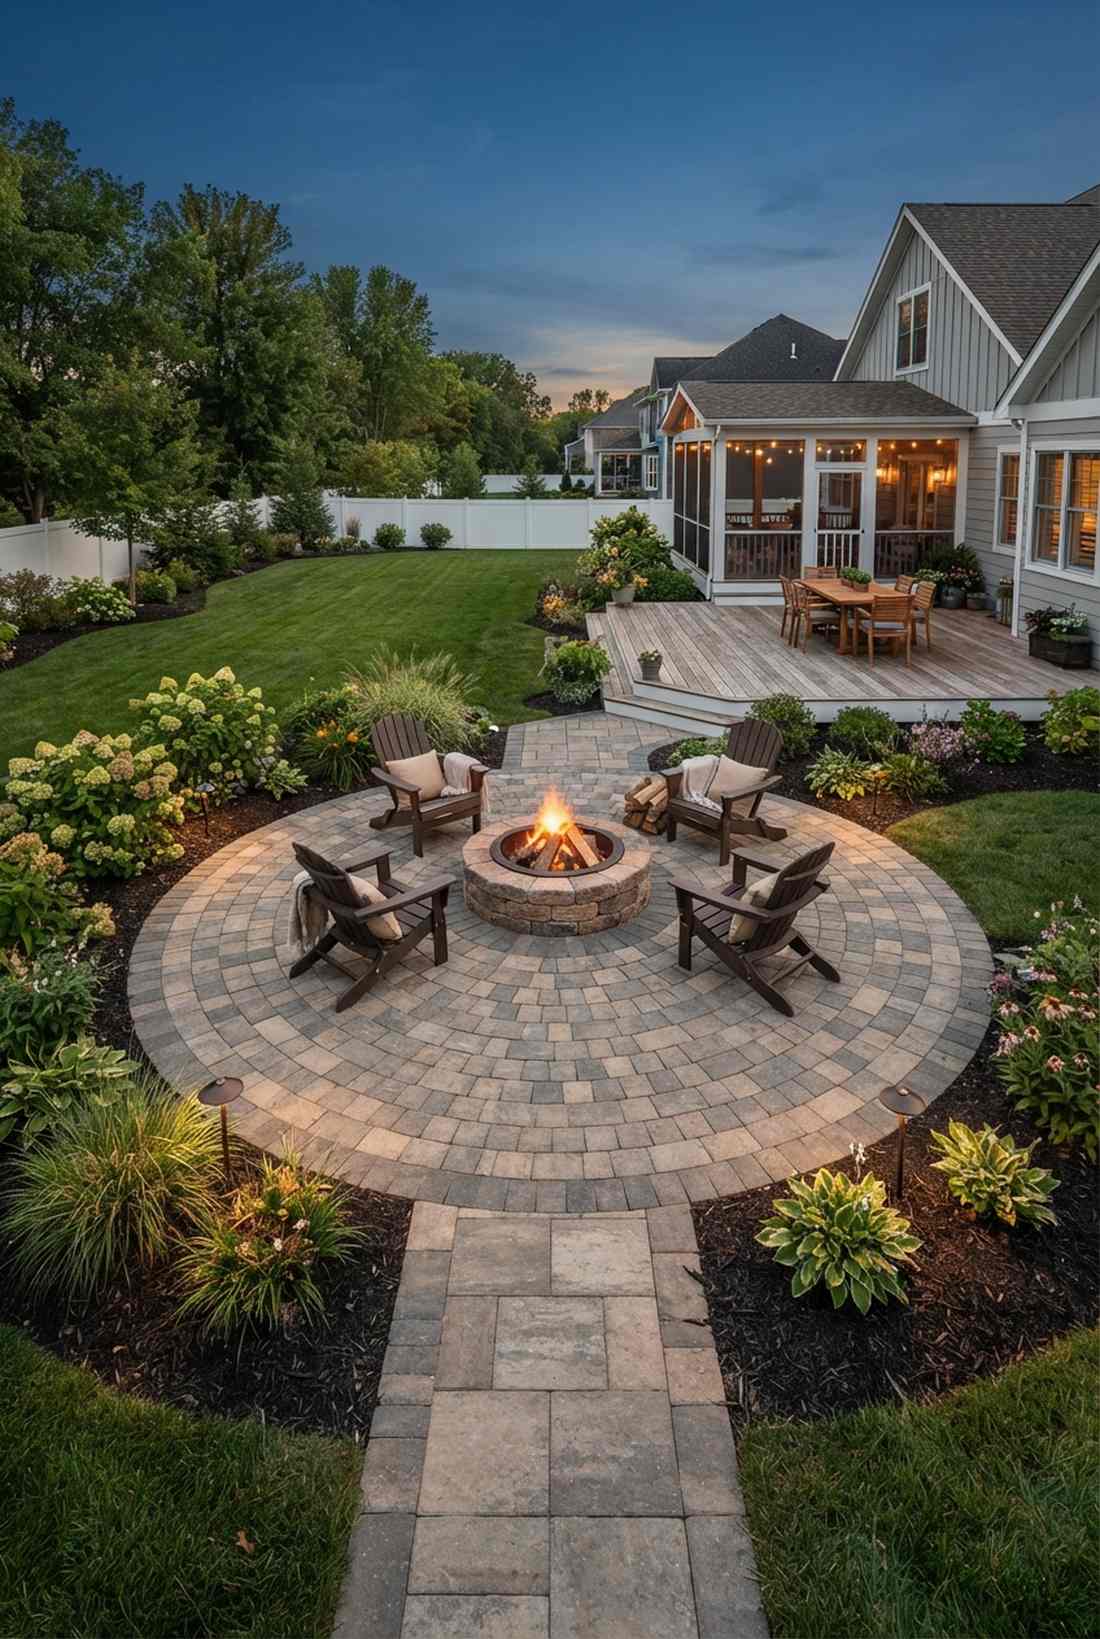
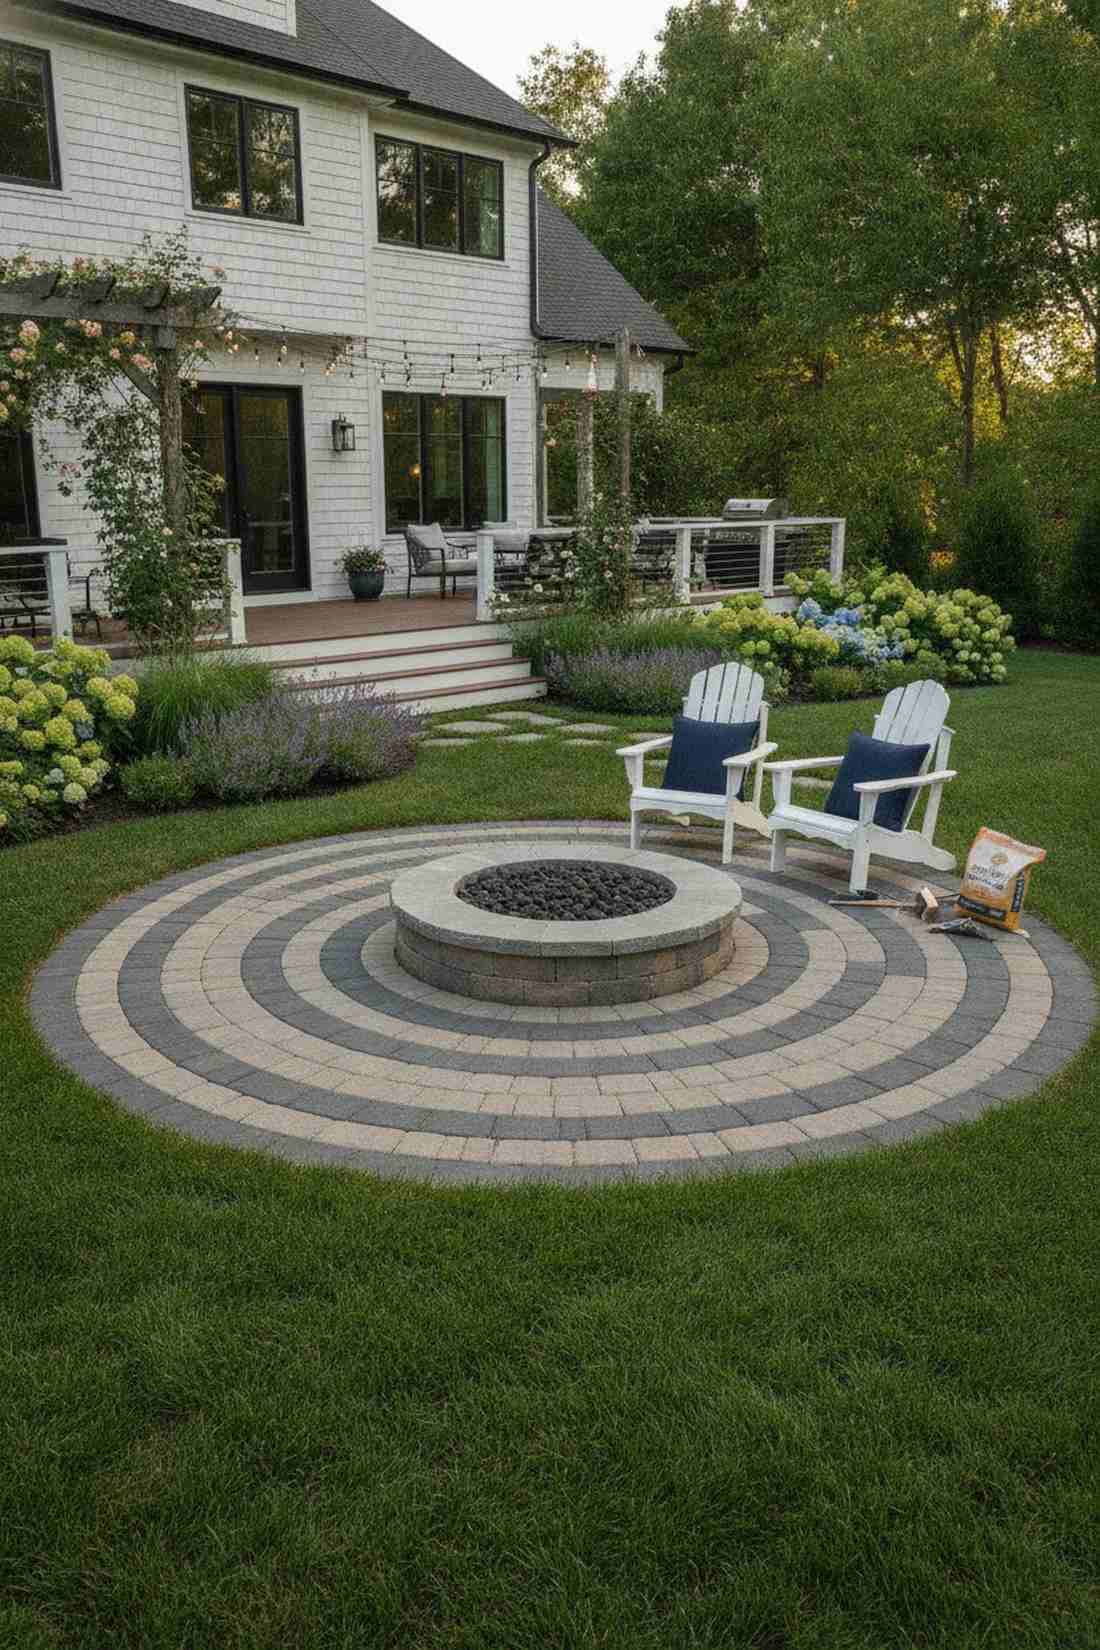
Feels like the epicenter of a magical garden maze. Expanding circular stone rings serve perfectly to anchor a central fire pit or a gorgeous water fountain.
Most backyard designs ignore focal point geometry, but this stepping stones design forces all attention squarely onto the center feature. The expanding rings accommodate movement from all directions without a strict linear path. Buying pre-cut circle paver kits eliminates the nightmare of calculating the expanding wedge angles.
You can create this mesmerizing focal zone for roughly $100–$150 total.
- Key Materials: Tapered wedge circle pavers
- Vibe / Style: Hypnotic focal point
- Difficulty: Intermediate geometry
- Budget Breakdown: Circle paver kit: $120 | Sand: $20
- Creator’s Tip: Always start laying from the absolute center point and work your way outward to maintain the perfect circle.
- Smart Sourcing: Pre-calculated circular paver kits and polymeric jointing sand (bulk).
29. Stepping Stone Stream
Evokes the feeling of balancing on a narrow bridge across a rushing river. Single-file linear rock progression is brilliant for tight, densely packed flower beds.
A clever hack for extremely narrow side yards is avoiding wide paths altogether. Spacing identical 20-inch stones in a tight, disciplined single-file line forces a hyper-focused, zen-like walk through the foliage. Incorporating miniature garden supplies around the bases transforms it into a magical little journey.
This space-saving layout is highly affordable at $15–$25 per linear foot. Save this if you have zero room for a full patio!
- Key Materials: Uniform round or square medium stones
- Vibe / Style: Zen focused crossing
- Difficulty: Very easy placement
- Budget Breakdown: Uniform stones: $20 | Mulch: $5
- Creator’s Tip: Keep the spacing tight (under 18 inches) to avoid forcing an unnatural, uncomfortable stretch.
- Smart Sourcing: Pre-cut round garden stepping stones and premium organic dark mulch.
Stop defaulting to boring concrete pours. The material mix coming up next will make your neighbors think you hired a luxury design firm…
30. Offset Brick Bond
Brings a comforting, traditional warmth to any outdoor space. Classic staggered running bond works flawlessly as a robust, welcoming pathway to a front porch.
This layout looks far more expensive than it is by simply shifting every second row by half a brick length. The staggered lines completely eliminate weak continuous seams, providing massive structural integrity. Picking up bulk packs of tumbled vintage-style pavers gives you that instant historical aesthetic.
Achieving this classic look runs roughly $40–$60 per square meter.
- Key Materials: Standard rectangular brick blocks
- Vibe / Style: Traditional & robust
- Difficulty: Moderate DIY measuring
- Budget Breakdown: Brick blocks: $35 | Base sand: $15
- Creator’s Tip: Use a string line pulled incredibly tight to keep your rows from bowing horizontally over long distances.
- Smart Sourcing: Tumbled vintage-style concrete bricks (bulk pack) and masonry string line level kits.
31. Mosaic Mixed Materials
Feels like an artisanal masterpiece crafted by a master stonemason. Blended mixed-material stone mosaic is an incredible showstopper for a high-end garden courtyard.
Most people get this wrong by using only one stone type, but mixing premium bluestone with cheap terracotta creates immense visual depth. Surrounding large feature stones with hundreds of tiny contrasting pebbles acts as a natural frame. Utilizing pre-meshed mosaic pebble sheets saves you days of tedious hand-placing.
This highly artistic setup costs about $50–$80 depending on your feature stones. Pin this to your luxury artisanal DIY board.
- Key Materials: Large feature stones and micro pebbles
- Vibe / Style: Artisanal handcrafted luxury
- Difficulty: Time-consuming & creative
- Budget Breakdown: Feature stones: $40 | Pebble mesh: $30
- Creator’s Tip: Dry-fit the entire mosaic pattern before mixing any mortar to ensure the color balance is perfect.
- Smart Sourcing: Pre-meshed river pebble mosaic sheets and assorted premium bluestone offcuts.
32. Alternating Size Rhythm
Creates a musical, bouncing energy as you walk down the path. Large-small alternating paver sequence is fantastic for breaking up the monotony of a long, straight side yard.
The secret to this layout is injecting visual cadence through extreme scale shifts. Repeating a large-small-small-large pattern keeps the brain engaged and completely eliminates the boring “runway” effect. Sourcing pre-cut multi-size paver project packs guarantees the geometry will align flawlessly.
You can establish this rhythmic layout for roughly $35–$55 per segment.
- Key Materials: Multiple sizes of identical paver material
- Vibe / Style: Rhythmic contemporary
- Difficulty: Easy if using kits
- Budget Breakdown: Multi-size kit: $45 | Base grit: $10
- Creator’s Tip: Ensure the center point of every stone stays on the same imaginary line so the path doesn’t visually snake.
- Smart Sourcing: Multi-size project paver kits (pre-measured) and commercial grade edge restraints.
Integrated Landscape Systems
Contemporary landscape design integrates circulation with ecological functions, stormwater management, and habitat creation. These stepping stones yard concepts demonstrate multifunctional design where pathways serve purposes beyond simple movement.
33. Rain Garden Stepping Path
Feels like exploring an elevated marshland boardwalk. Raised stones through a bioretention area are perfect for accessing hard-to-reach plants in a soggy backyard drainage zone.
This layout specifically solves the nightmare of navigating flooded yards. Setting thick stones on deep gravel pads rather than solid mortar allows water to flow underneath while keeping your shoes completely dry. Incorporating water-resistant terrarium accessories nearby turns a drainage problem into an aquatic feature.
Building this functional, dry-shoe pathway costs about $40–$65. Save this if your yard turns into a lake every spring.
- Key Materials: Extra-thick concrete or stone blocks
- Vibe / Style: Functional eco-marsh
- Difficulty: Deep gravel prep needed
- Budget Breakdown: Thick blocks: $45 | Drainage stone: $20
- Creator’s Tip: Never use dirt under these stones; use 3/4 inch clean crushed rock so water passes right through.
- Smart Sourcing: Extra-thick heavy duty landscape blocks and clean washed drainage gravel (bulk).
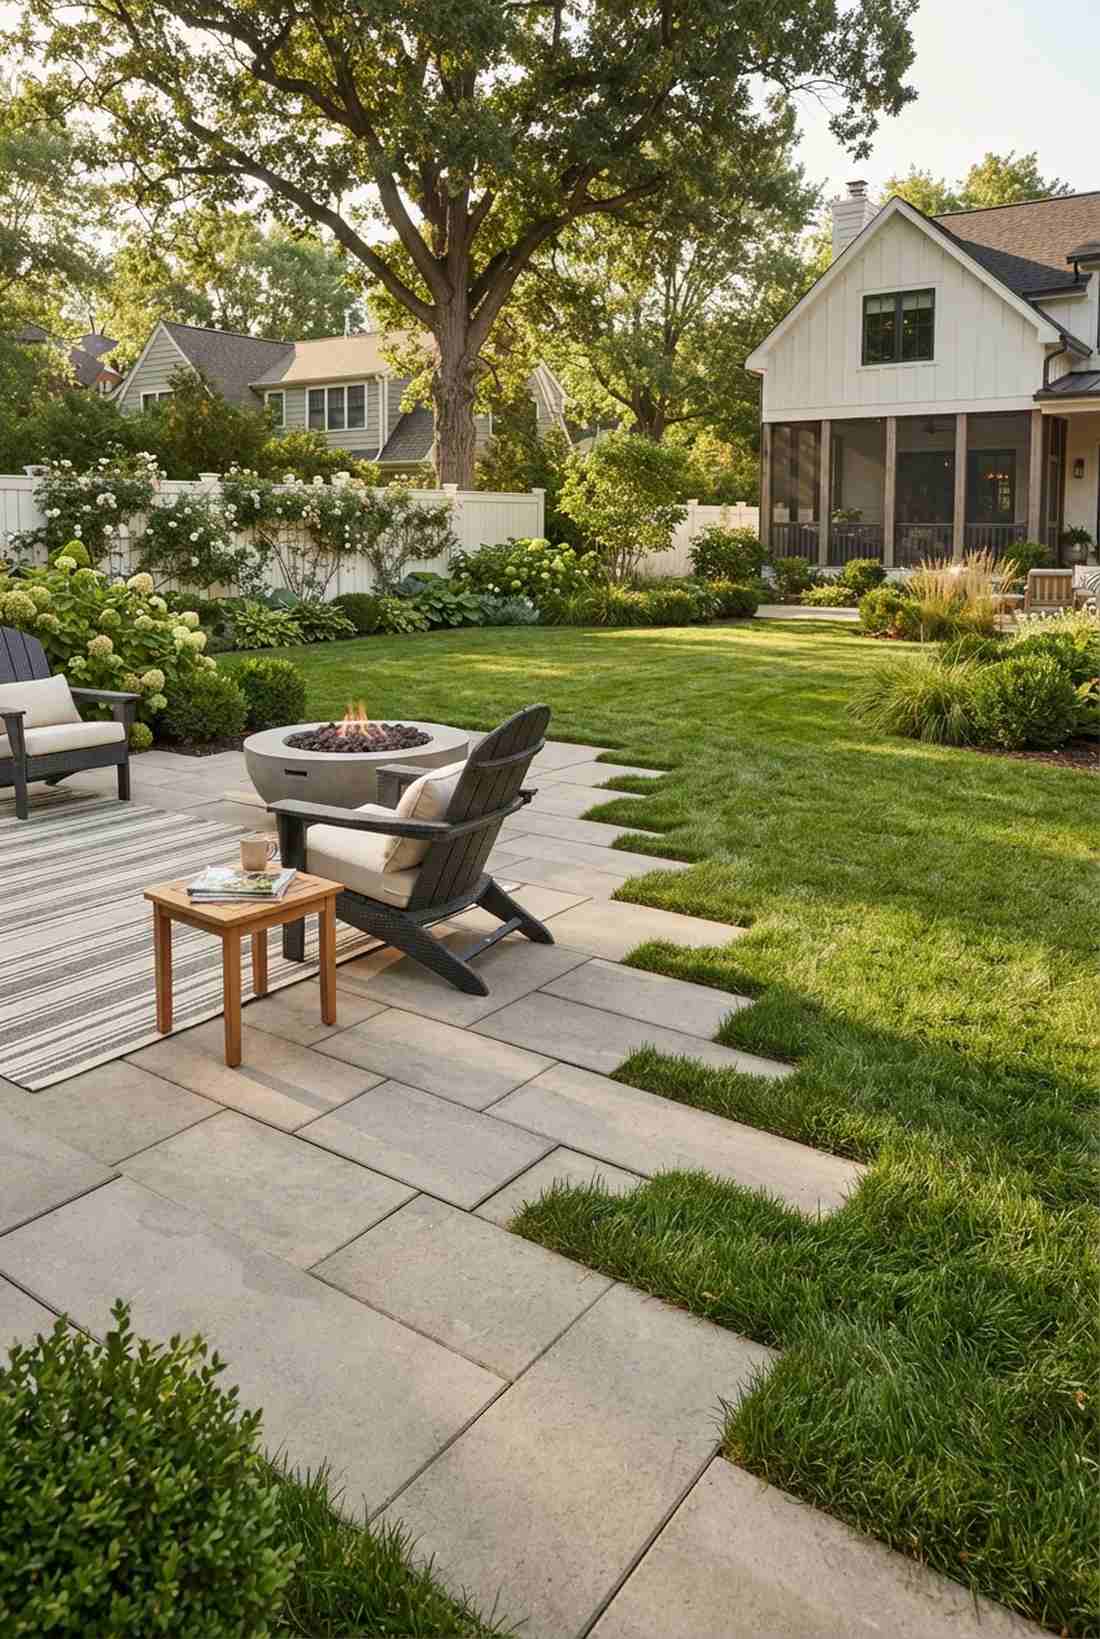
34. Groundcover Planting Gaps
Exudes the lush, overgrown romance of a secret garden. Wide-gapped stones with living green filler instantly soften the harsh edges of a brand new backyard renovation.
This stepping stones outdoor setup gives a designer-level finish by utilizing plants instead of boring sand as mortar. Spacing the units 12-18 inches apart provides a massive canvas for drought-tolerant creeping thyme or dwarf mondo grass to thrive. Buying bulk starter plugs creates that dense, green look in just a few weeks.
This living pathway is incredibly cost-effective at around $25–$40 per yard.
- Key Materials: Standard pavers and live groundcover plugs
- Vibe / Style: Lush romantic cottage
- Difficulty: Patient gardening required
- Budget Breakdown: Pavers: $20 | Live plants: $15
- Creator’s Tip: Mix a handful of compost into the gaps before planting to give the roots an explosive head start.
- Smart Sourcing: Live creeping thyme starter plug trays (bulk pack) and organic compost booster.
Forget pulling weeds between your pavers. The next gravel-locking trick saves you hours of back-breaking weekend labor…
35. Gravel Mulch Surround
Creates a shockingly clean, zero-maintenance modern gallery vibe. Stepping stones sunk into a pristine gravel sea works wonders for arid, water-restricted climates.
A clever hack to avoid constant mowing is wrapping your stepping stones design in contrasting aggregate. The sharp, dark stone popping against bright white crushed gravel gives off an ultra-expensive museum aesthetic. Laying down a commercial weed barrier beneath the gravel ensures it stays flawless forever.
You can execute this hyper-clean look for roughly $35–$55. Pin this if you want an upscale yard with zero weekend maintenance.
- Key Materials: Dark pavers and contrasting bright gravel
- Vibe / Style: Minimalist xeriscape
- Difficulty: Easy shoveling
- Budget Breakdown: Pavers: $30 | White gravel: $20
- Creator’s Tip: Frame the entire pathway with steel edging to prevent the gravel from spilling into the grass.
- Smart Sourcing: Pre-cut dark slate squares and commercial grade weed barrier roll (heavy duty).
Material Guide: Cheap vs. Premium Aesthetic
Knowing exactly where to save and where to spend makes all the difference in achieving that “looks expensive but isn’t” vibe.
- Standard vs. UV-Resistant/Premium: Upgrading to UV-coated stones or applying a penetrating sealer stops the sun from bleaching your path gray in just one summer.
- Pre-made Kits vs. Sourcing Locally: While local rocks seem cheap, buying pre-cut paver starter kits saves you hours of leveling frustration and guarantees perfectly flat walking surfaces.
36. Moss-Filled Joints
Feels like stepping into an ancient, tranquil Kyoto temple. Tight-gapped stones packed with vibrant green moss are the ultimate solution for heavily shaded, damp side yards.
Most grass dies in deep shade, but this stepping stones in garden layout turns darkness into an advantage. By keeping the gaps extremely tight (under 2 inches) and amending the soil to be highly acidic, moss will explode into a velvet carpet. Sourcing live moss slurries accelerates the growth tenfold.
Creating this ancient Japanese aesthetic costs about $25–$45.
- Key Materials: Weathered stones and live moss
- Vibe / Style: Ancient Kyoto temple
- Difficulty: Requires acidic soil prep
- Budget Breakdown: Stones: $25 | Moss starter: $15
- Creator’s Tip: Blend buttermilk with moss fragments in a blender and paint it into the cracks for rapid colonization.
- Smart Sourcing: Live terrarium/garden moss spore slurry kits and soil acidifier (sulfur base).
37. Crushed Shell Pathways
Brings the breezy, salt-air magic of a Cape Cod beach house to your door. Dark stones bedded in bright crushed oyster shells create a stunning maritime vibe.
This specific layout delivers a bespoke finish that sounds incredible when you walk on it. The bright white calcium-rich shells compact over time, creating a rock-solid, reflective surface that drains instantly. Opting for bulk crushed clam shells naturally neutralizes acidic soils, benefiting surrounding plants.
This coastal dream setup runs roughly $30–$50 per yard. Save this to your coastal home inspiration board!
- Key Materials: Dark pavers and crushed oyster/clam shells
- Vibe / Style: Breezy coastal maritime
- Difficulty: Simple spreading
- Budget Breakdown: Pavers: $25 | Crushed shell: $20
- Creator’s Tip: Hose down the crushed shells immediately after spreading to wash off the dust and reveal the bright white color.
- Smart Sourcing: Washed crushed oyster shells (bulk landscape bags) and dark concrete stepping stones.
38. Sedge Meadow Crossing
Looks like a floating bridge through a sea of tall, swaying grass. Elevated stepping stones over tall native sedge are perfect for integrating access without destroying natural habitats.
A clever hack for wild yards is elevating the stones 4-6 inches above the dirt level. This stepping stones yard technique ensures the path stays visible and dry even when the meadow grasses peak in mid-summer. Using heavy-duty concrete risers beneath the stones keeps them permanently elevated.
Building this raised meadow path costs about $40–$60 per stepping node.
- Key Materials: Thick stone slabs and concrete risers
- Vibe / Style: Wild prairie boardwalk
- Difficulty: Moderate base building
- Budget Breakdown: Slabs: $35 | Concrete risers: $20
- Creator’s Tip: Bury the concrete riser block halfway into the dirt, then glue the pretty stone on top for extreme stability.
- Smart Sourcing: Heavy-duty pre-cast concrete risers and premium natural slab stones.
39. Living Roof Pavers

Feels like walking across a futuristic floating eco-city. Cellular pavers planted with succulents are an ingenious way to create a walkable green roof or balcony.
If you have weight limits on a deck, this stepping stones design solves everything. The plastic cellular matrices provide immense crush-resistance for walking while holding lightweight soil and sedums perfectly in place. Sourcing pre-planted sedum tiles cuts the installation time down to minutes.
This high-tech green flooring runs roughly $60–$90 per square meter. Pin this if you are upgrading a bland apartment balcony.
- Key Materials: Plastic paver grids and sedums
- Vibe / Style: Urban eco-balcony
- Difficulty: Lightweight snap-together
- Budget Breakdown: Grid system: $45 | Sedum plants: $35
- Creator’s Tip: Use ultra-lightweight perlite soil mixes to keep the structural weight on the roof as low as possible.
- Smart Sourcing: Interlocking cellular paver grids (bulk pack) and live sedum/succulent starter trays.
Stop struggling with steep, dangerous backyard hills. The terraced trick up next is the safest, most beautiful way to conquer a slope…
40. Wildlife Corridor Bridges
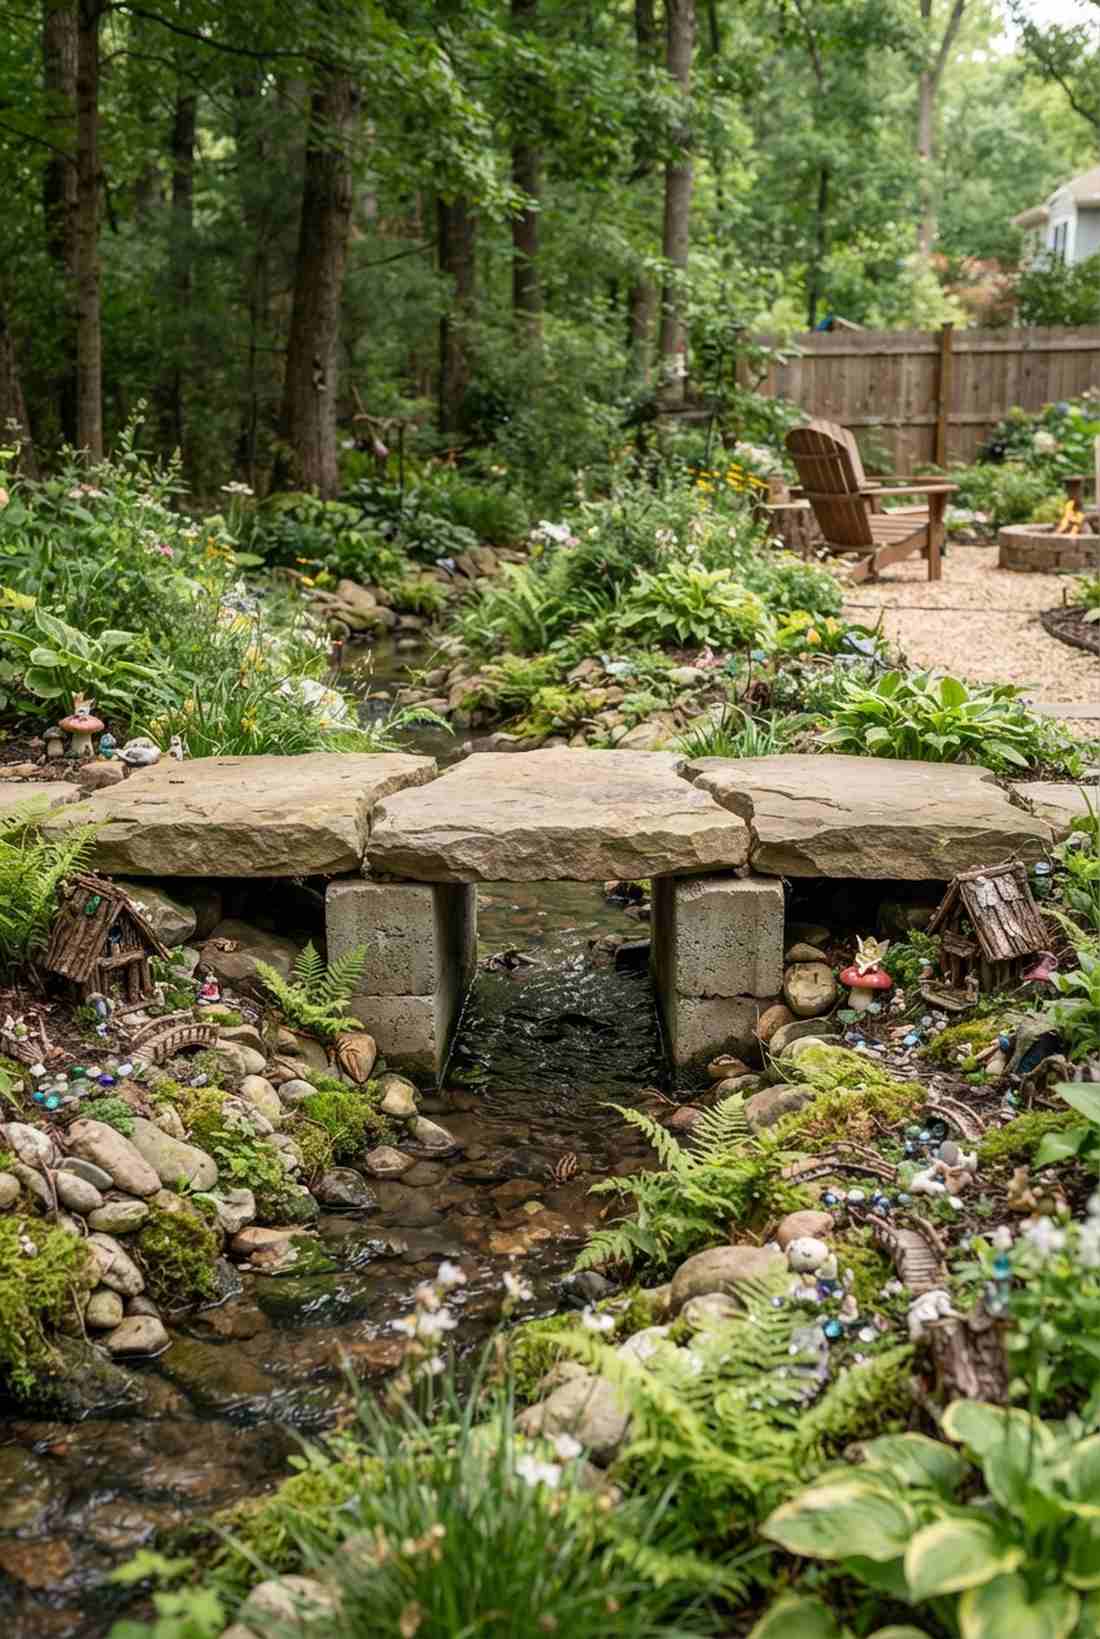
Radiates the pure harmony of a protected nature preserve. Elevated gap stones with built-in animal passages are incredible for crossing small backyard creeks without disrupting local wildlife.
Most backyard builds destroy habitats, but raising these stepping stones outdoor pieces onto small piers creates a literal tunnel for frogs and small mammals. Using heavy natural stone top plates gives a designer-level finish while preserving the ecological flow. Sneaking in UV-coated fairy garden kits alongside the creek makes it magical.
Executing this eco-friendly bridge costs roughly $50–$75.
- Key Materials: Wide flat stones and pier blocks
- Vibe / Style: Eco-harmonious preserve
- Difficulty: Bridge balancing
- Budget Breakdown: Bridge stones: $50 | Support piers: $20
- Creator’s Tip: Ensure the support piers rest on packed gravel, not soft mud, or the bridge will sink under human weight.
- Smart Sourcing: Oversized natural flat bridge stones and concrete pier support blocks.
Spatial Transition Designs
Pathways mediate spatial transitions between garden rooms, grade changes, and architectural thresholds. These designs employ stepping stones in garden transitions to manage elevation, spatial definition, and experiential sequence.
41. Terraced Slope Navigation
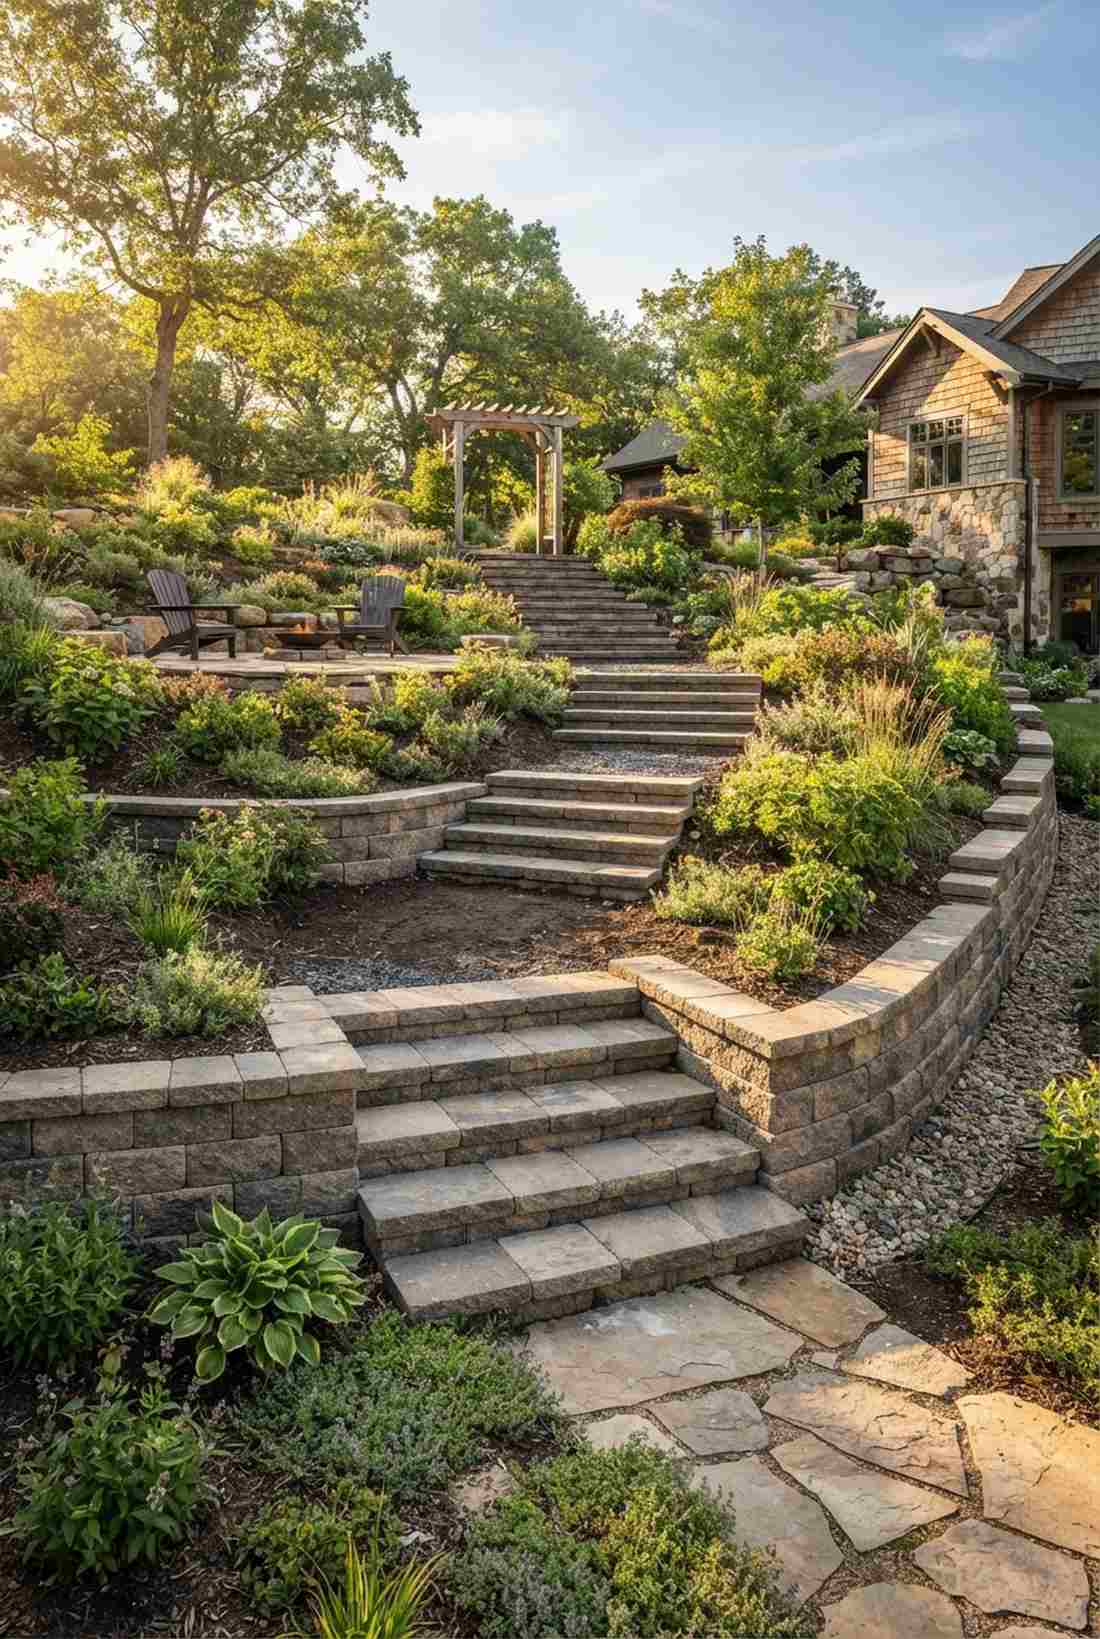

Looks like an ancient, tiered vineyard pathway climbing a hillside. Retaining wall stepped landings are the absolute best way to make a steep yard safely walkable.
This specific layout delivers a surprisingly premium look by breaking a terrifying slope into gentle, 6-inch stair increments. Each stone acts as both a footpad and a mini retaining wall, locking the dirt into place permanently. Utilizing heavy-duty interlocking landscape blocks ensures the hillside won’t wash away in a storm.
Building these structural stairs costs about $60–$90 per tier. Pin this if your backyard is currently an unusable hill.
- Key Materials: Interlocking retaining wall blocks
- Vibe / Style: Tiered vineyard climb
- Difficulty: Advanced leveling & digging
- Budget Breakdown: Retaining blocks: $50 | Base gravel: $25
- Creator’s Tip: Always backfill behind the step with crushed gravel, not dirt, to prevent water pressure from blowing the step out.
- Smart Sourcing: Interlocking retaining wall block kits and heavy-duty landscape construction adhesive.
42. Grade Transition Landings
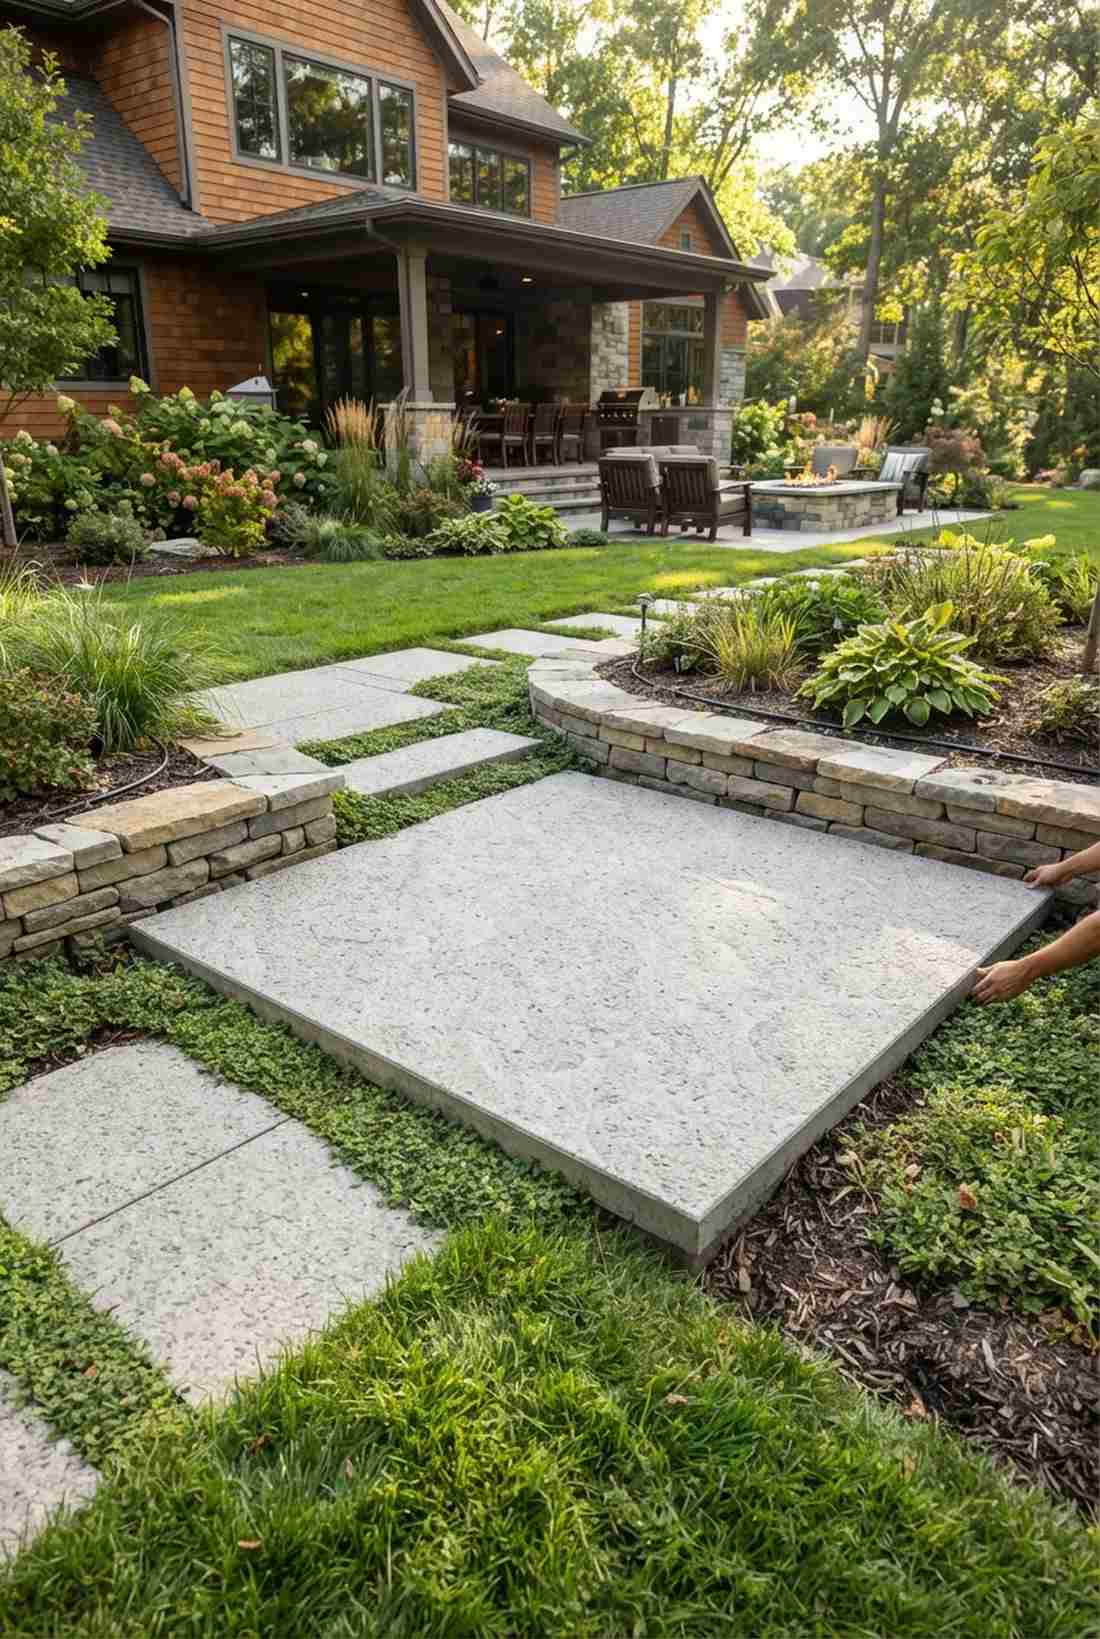
Exudes the thoughtful, sprawling luxury of a custom architectural build. Oversized landing platform stones are crucial for signaling a change in direction or elevation on a long path.
A clever hack to make a pathway feel grand is dropping a massive 36-inch slab right where the path turns. This stepping stones design gives the brain a physical cue to pause, naturally breaking up the journey. Opting for pre-cast concrete patio slabs mimics the look of expensive custom cut stone.
These majestic landing zones run roughly $50–$80 per slab.
- Key Materials: Oversized 36×36 inch concrete slabs
- Vibe / Style: Architecturally paced
- Difficulty: Requires a helper to lift
- Budget Breakdown: Jumbo slab: $60 | Leveling sand: $15
- Creator’s Tip: Pitch the massive landing slab downward by exactly 1% so rainwater easily sheets off the surface.
- Smart Sourcing: Oversized pre-cast patio slabs (heavy duty) and professional paver leveling sand.
43. Threshold Entry Sequence
Feels like the dramatic, welcoming build-up to a grand estate door. Progressively shrinking stone spacing is a brilliant psychological trick to slow down guests as they approach your front porch.
This layout looks far more expensive than it is by simply playing with scale. Expanding the final stone to match the width of your door creates an unmistakable “arrival” platform. Securing UV-resistant fairy garden kits near the final landing adds an unforgettable touch of charm.
Crafting this psychological entry sequence costs around $70–$110. Save this for your front yard curb-appeal board.
- Key Materials: Graduating sizes of matching pavers
- Vibe / Style: Grand welcoming sequence
- Difficulty: Moderate DIY measuring
- Budget Breakdown: Paver set: $80 | Edge lock: $20
- Creator’s Tip: Start with a 36-inch gap at the sidewalk and slowly compress the gaps down to 4 inches at the front door.
- Smart Sourcing: Multi-size paver project kits (pre-cut) and heavy-duty polymer edge restraints.
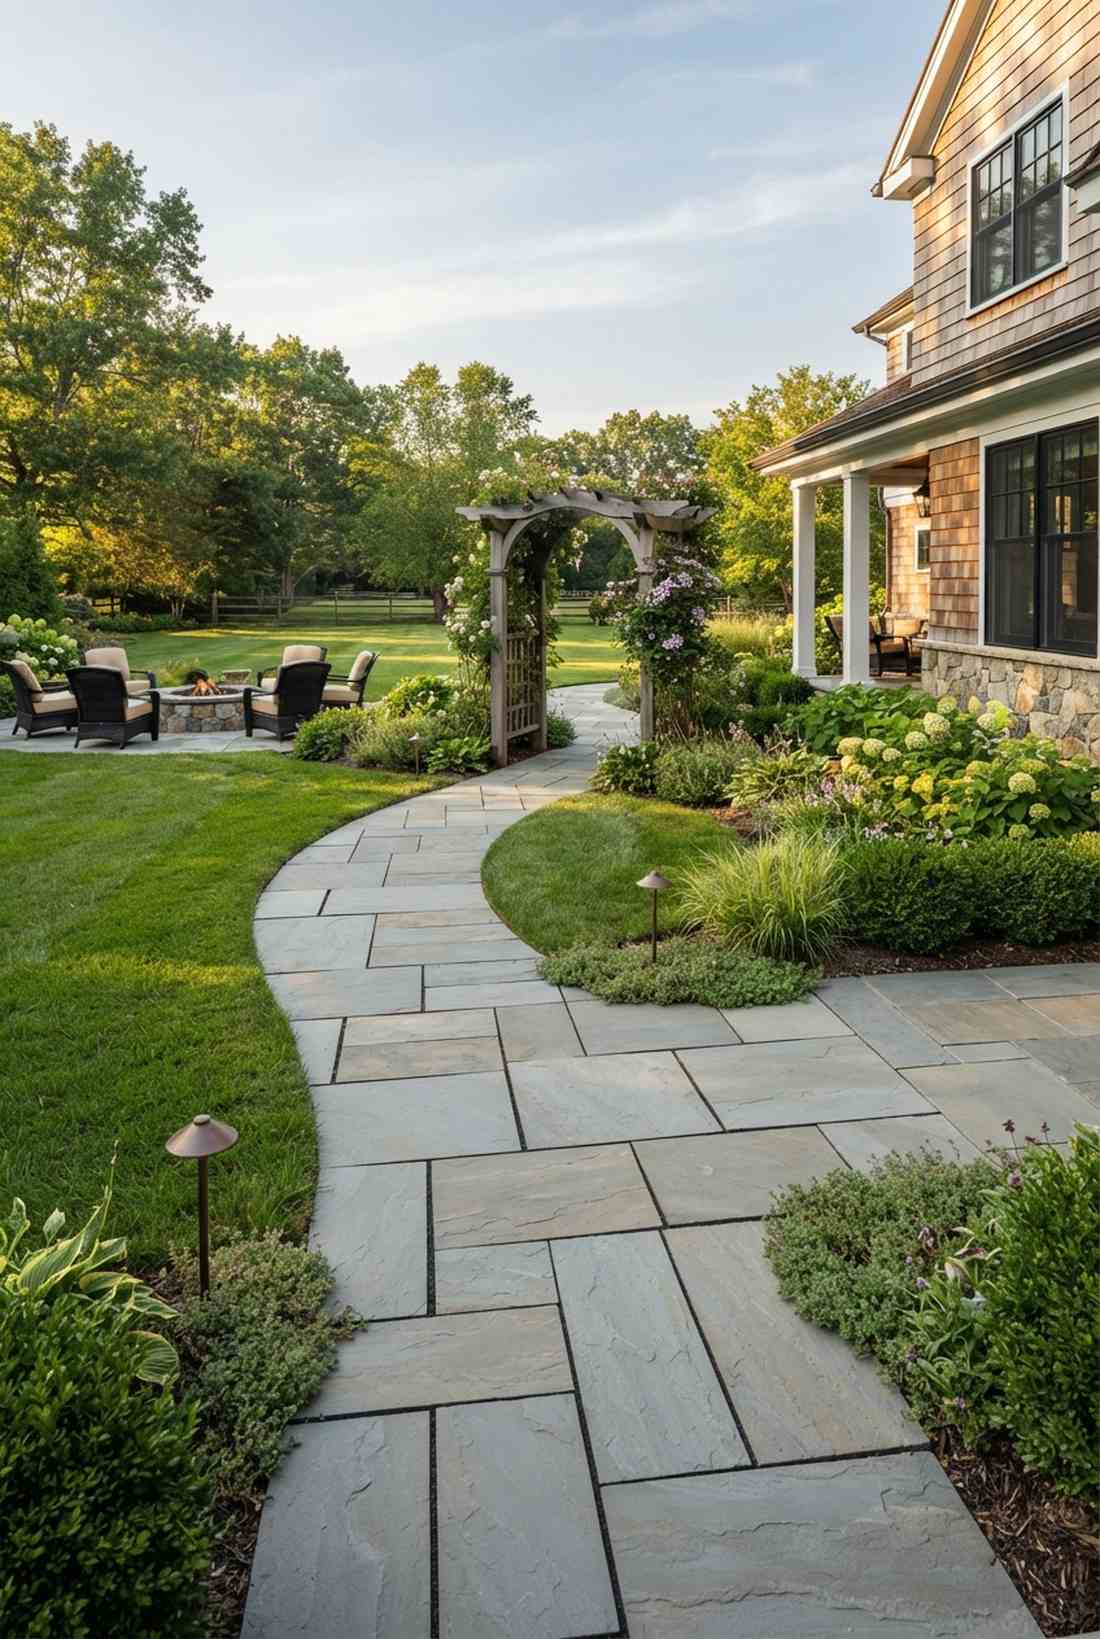
44. Patio-Lawn Edge Detail
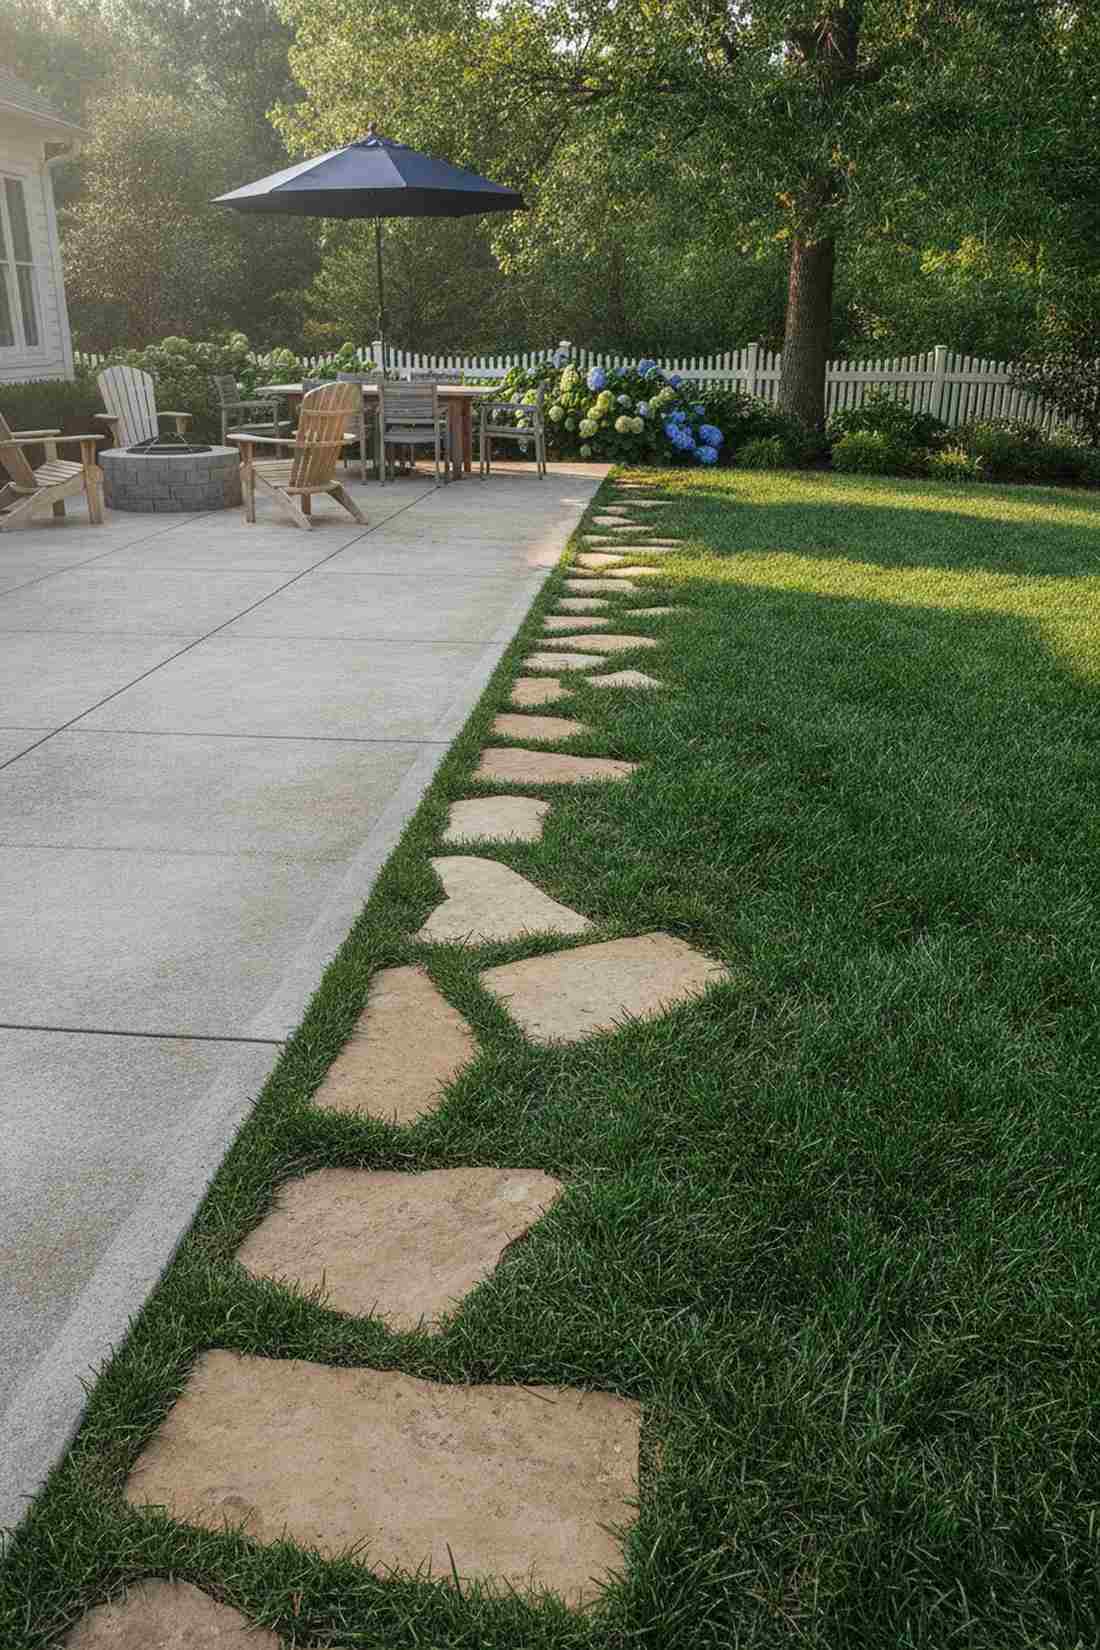
Creates a gorgeously soft, dissolving boundary line between hardscape and nature. Half-embedded transition stones are the perfect way to blend a harsh concrete patio into a lush green lawn.
Most backyard designs stop abruptly with a harsh edge, but staggering stones into the grass gives a designer-level finish that feels organic. By spacing the units progressively wider as they move into the yard, the patio visually bleeds into the landscape. Sourcing bulk packs of matching patio stone makes this seamless.
This beautiful edge-softening trick costs only $30–$50 per linear foot.
- Key Materials: Pavers matching your existing patio
- Vibe / Style: Seamless organic transition
- Difficulty: Easy turf cutting
- Budget Breakdown: Matching pavers: $30 | Sand: $10
- Creator’s Tip: Trace the stone onto the grass with spray paint, then cut exactly on the line for a flawless, tight fit.
- Smart Sourcing: Pre-cut matching transition pavers (bulk pack) and precision turf cutting knives.
If you’re trying to build a path through dense trees, DO NOT use standard square pavers. The approach below saves your tree roots and looks 10x better…
45. Woodland Clearing Approach
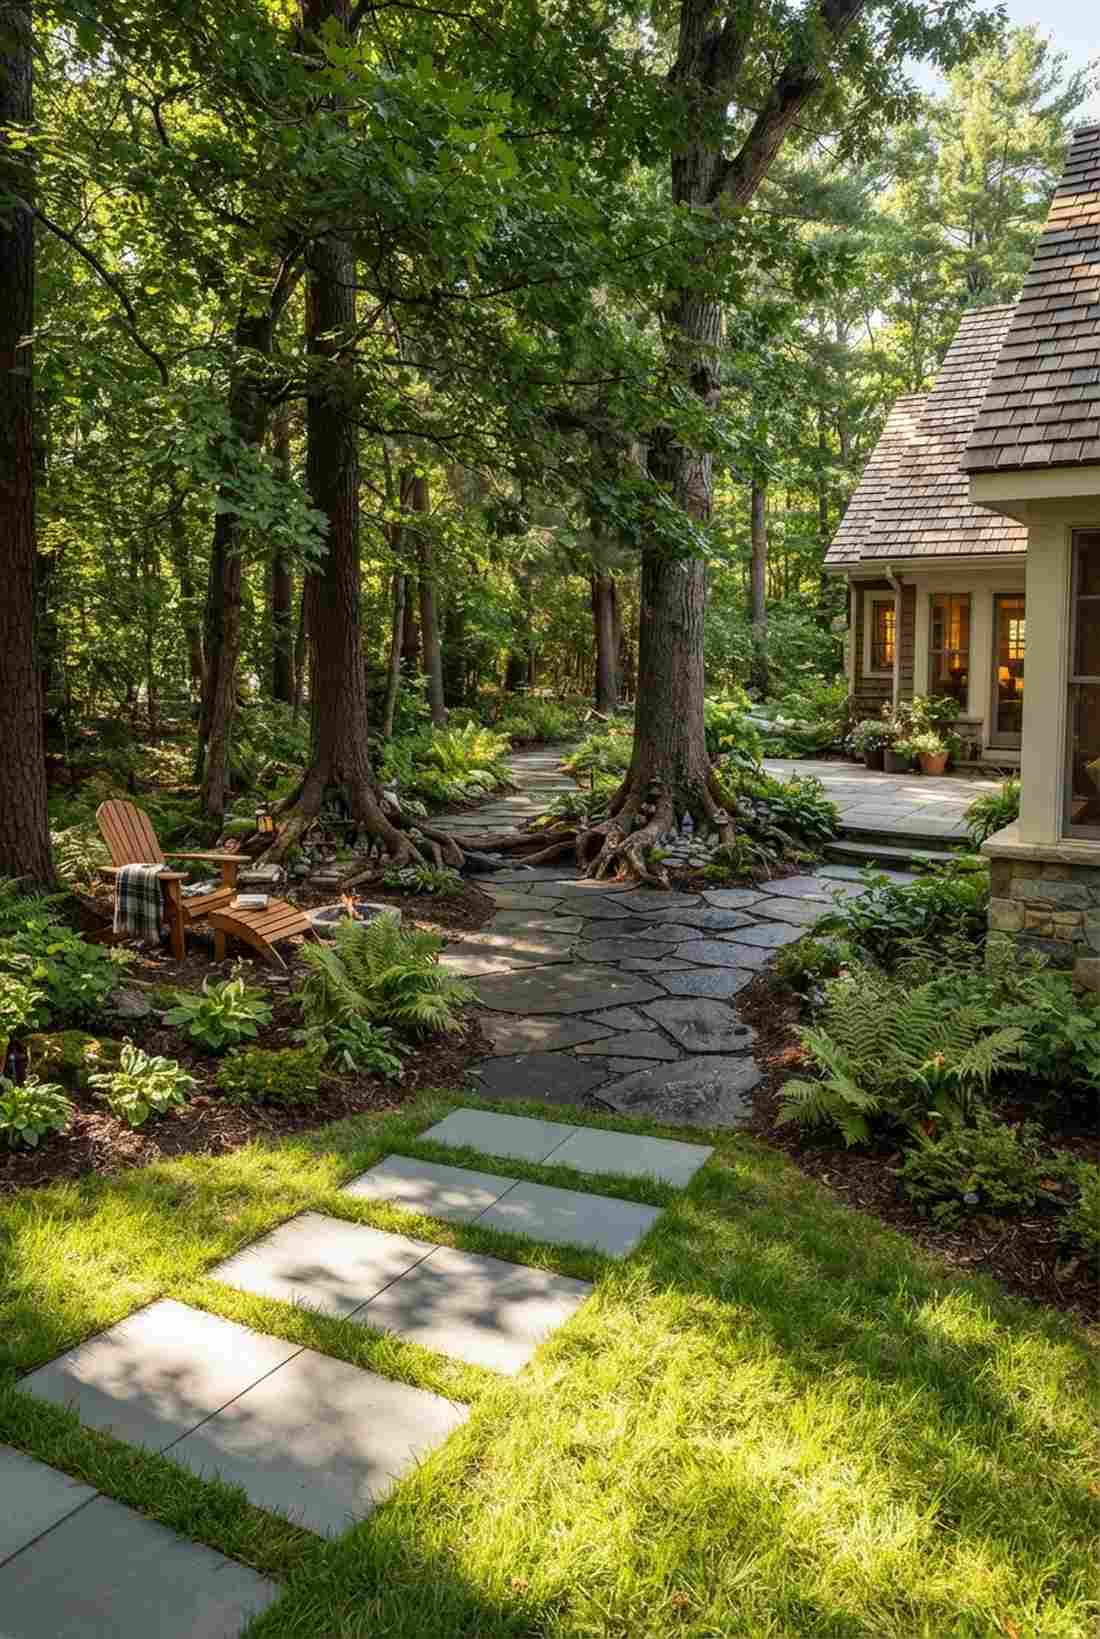
Feels like crossing the magical threshold from civilization into a wild forest. Transitioning from geometric pavers to wild irregular stones perfectly captures a woodland mood.
The secret to this layout is matching the hardscape to the lighting: sharp geometric stones in the bright sun, morphing into dark, wild shapes under the tree canopy. This stepping stones yard trick accommodates giant tree roots seamlessly without needing to hack them up. Snagging miniature garden supplies to hide in the shady roots completes the vibe.
Fusing these two styles costs about $45–$70. Pin this to your woodland garden board.
- Key Materials: Mix of formal pavers and wild flagstone
- Vibe / Style: Magical forest threshold
- Difficulty: Creative visual blending
- Budget Breakdown: Mixed stones: $55 | Shade grass seed: $10
- Creator’s Tip: Never cut major tree roots to lay a stone flat; build the path up over the roots using extra sand instead.
- Smart Sourcing: Irregular woodland flagstone packs (dark tone) and deep-shade tolerant grass seed.
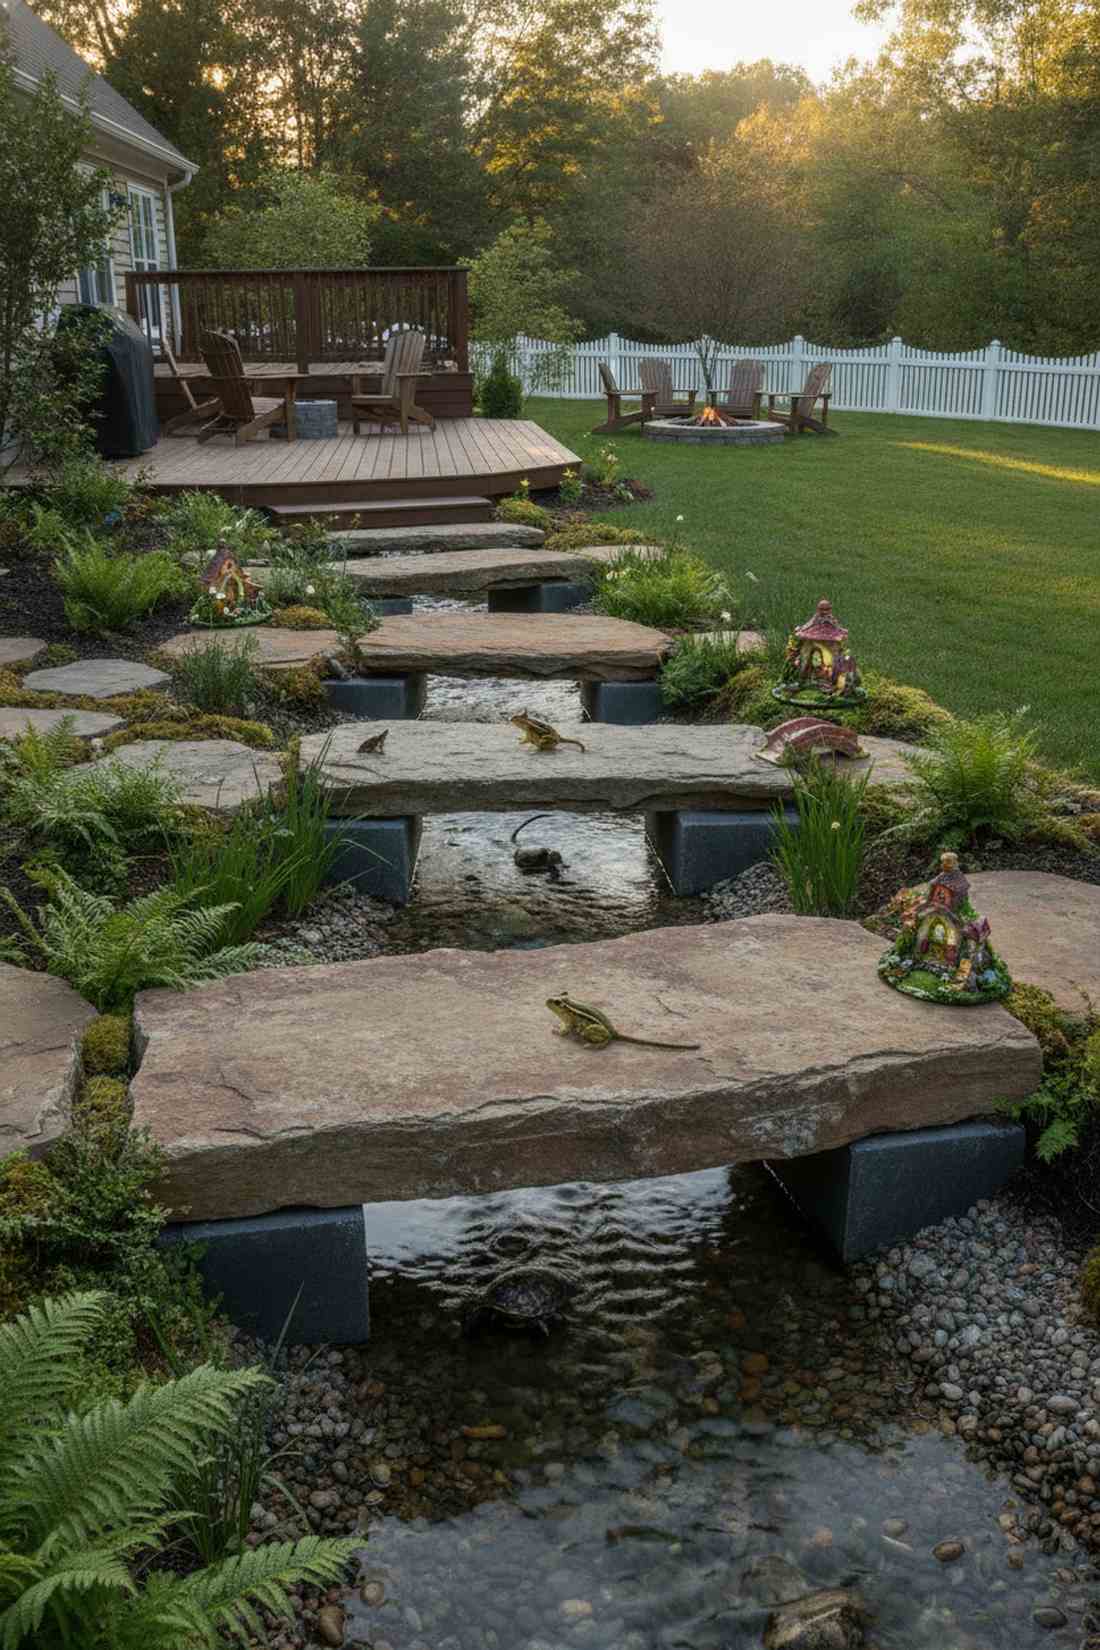
46. Water Feature Crossing
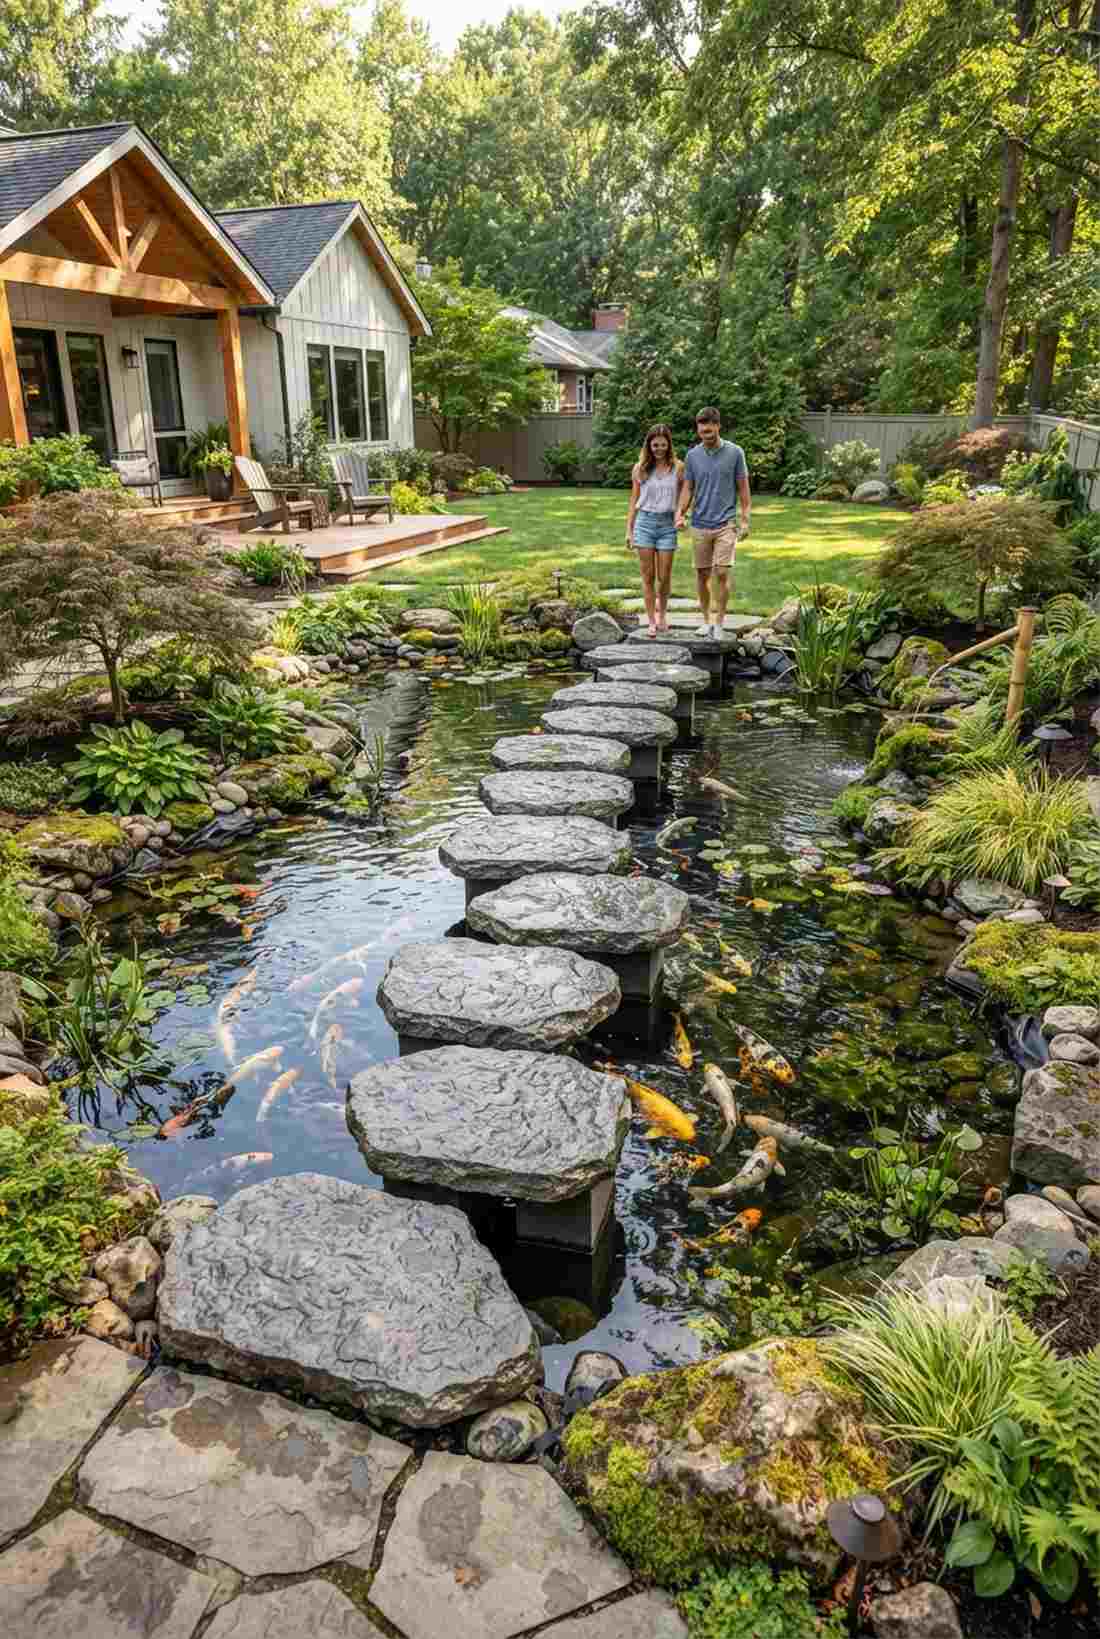
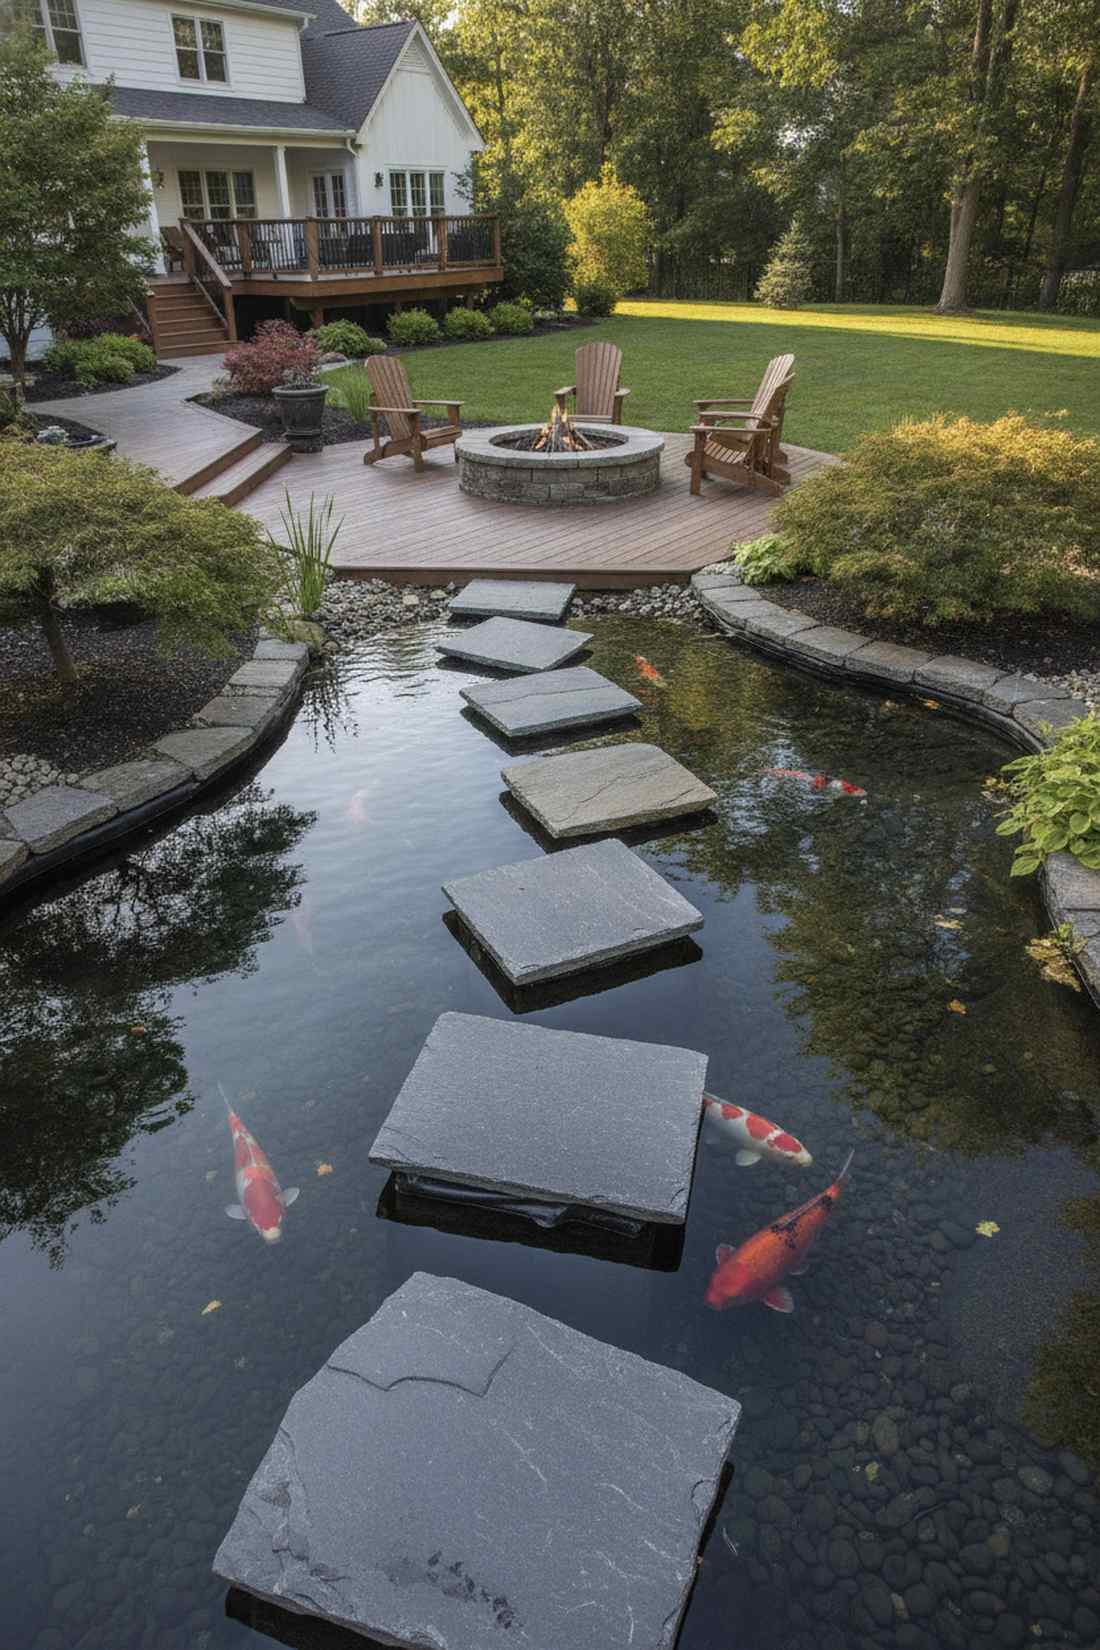
Brings the thrilling, interactive joy of a Japanese koi pond to your backyard. Slightly elevated stones traversing shallow water create a breathtaking sensory experience.
This layout specifically demands respect and forces visitors to engage directly with the landscape. Setting heavy, non-slip stones just 2 inches above the water line creates the illusion of walking on water while minimizing the risk of slipping. Using pre-sealed terrarium accessories to anchor the underwater bases looks phenomenal.
Building this aquatic crossing runs about $60–$90 per stone.
- Key Materials: High-grip flat stones and underwater pedestals
- Vibe / Style: Interactive Zen aquatic
- Difficulty: Advanced waterproofing
- Budget Breakdown: Grip stones: $60 | Concrete pedestals: $25
- Creator’s Tip: Use cinder blocks hidden underwater to support the stepping stone, then cover the blocks with black pond liner.
- Smart Sourcing: High-traction textured water crossing stones and heavy-duty EPDM pond liner rolls.
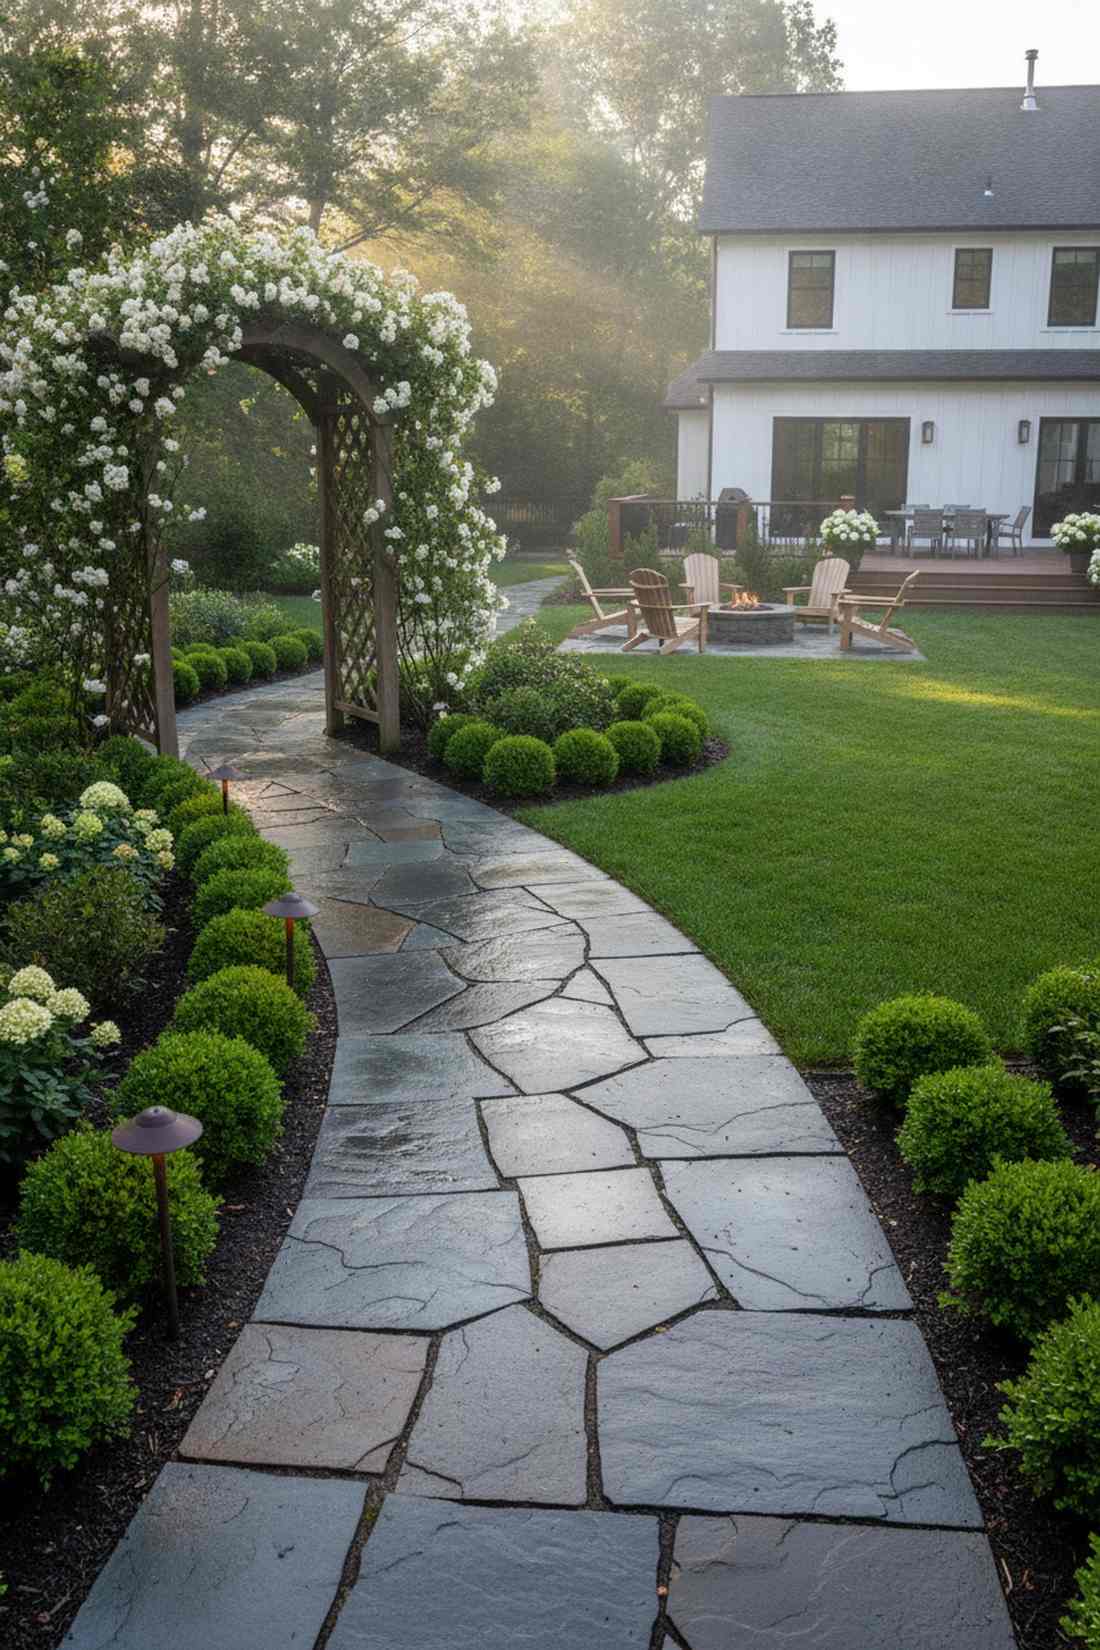
47. Garden Room Gateway

Feels like unlocking a hidden aristocratic sanctuary. Flanking oversized gateway stones are the ultimate way to emphasize a break in a tall hedge or privacy fence.
This layout looks far more expensive than it is by dramatically swelling the pathway width exactly at the threshold. Placing two massive stones side-by-side naturally signals a transition between outdoor “rooms.” Choosing a contrasting color for the gateway stones demands immediate visual attention.
Creating this grand entryway pause costs roughly $40–$60. Save this if you are dividing your yard into different zones.
- Key Materials: Oversized contrasting threshold slabs
- Vibe / Style: Aristocratic room division
- Difficulty: Simple placement
- Budget Breakdown: Jumbo slabs: $45 | Base sand: $10
- Creator’s Tip: Plant two tall, structural plants (like Italian Cypress) directly next to the gateway stones to frame the sky.
- Smart Sourcing: Contrasting oversized threshold pavers and fast-setting base sand.
48. Deck-Grade Transition

Flows with the effortless grace of a high-end architectural extension. Stepping stones descending directly from a wooden deck perfectly bridge the gap between carpentry and landscaping.
Most homeowners build clunky wooden stairs, but integrating stepping stones outdoor blocks right up to the deck gives a designer-level finish. Aligning the first stone perfectly parallel with the deck fascia board anchors the whole yard to the house structure. Utilizing heavy slate ensures the transition feels permanent.
This seamless deck-to-yard transition runs about $50–$75 per step.
- Key Materials: Heavy architectural slate or concrete slabs
- Vibe / Style: Seamless indoor-outdoor flow
- Difficulty: Moderate height measuring
- Budget Breakdown: Transition slabs: $60 | Gravel base: $15
- Creator’s Tip: Keep the first stone exactly 7 inches below the deck surface to mimic a standard, safe stair step.
- Smart Sourcing: Heavy architectural transition slabs (pre-cut) and premium crushed gravel leveling base.
Specialty Application Solutions
Unique site conditions and programmatic requirements demand specialized pathway solutions beyond standard installations. These advanced concepts address specific challenges through innovative stepping stone applications.
49. Accessible Pathway Sequence
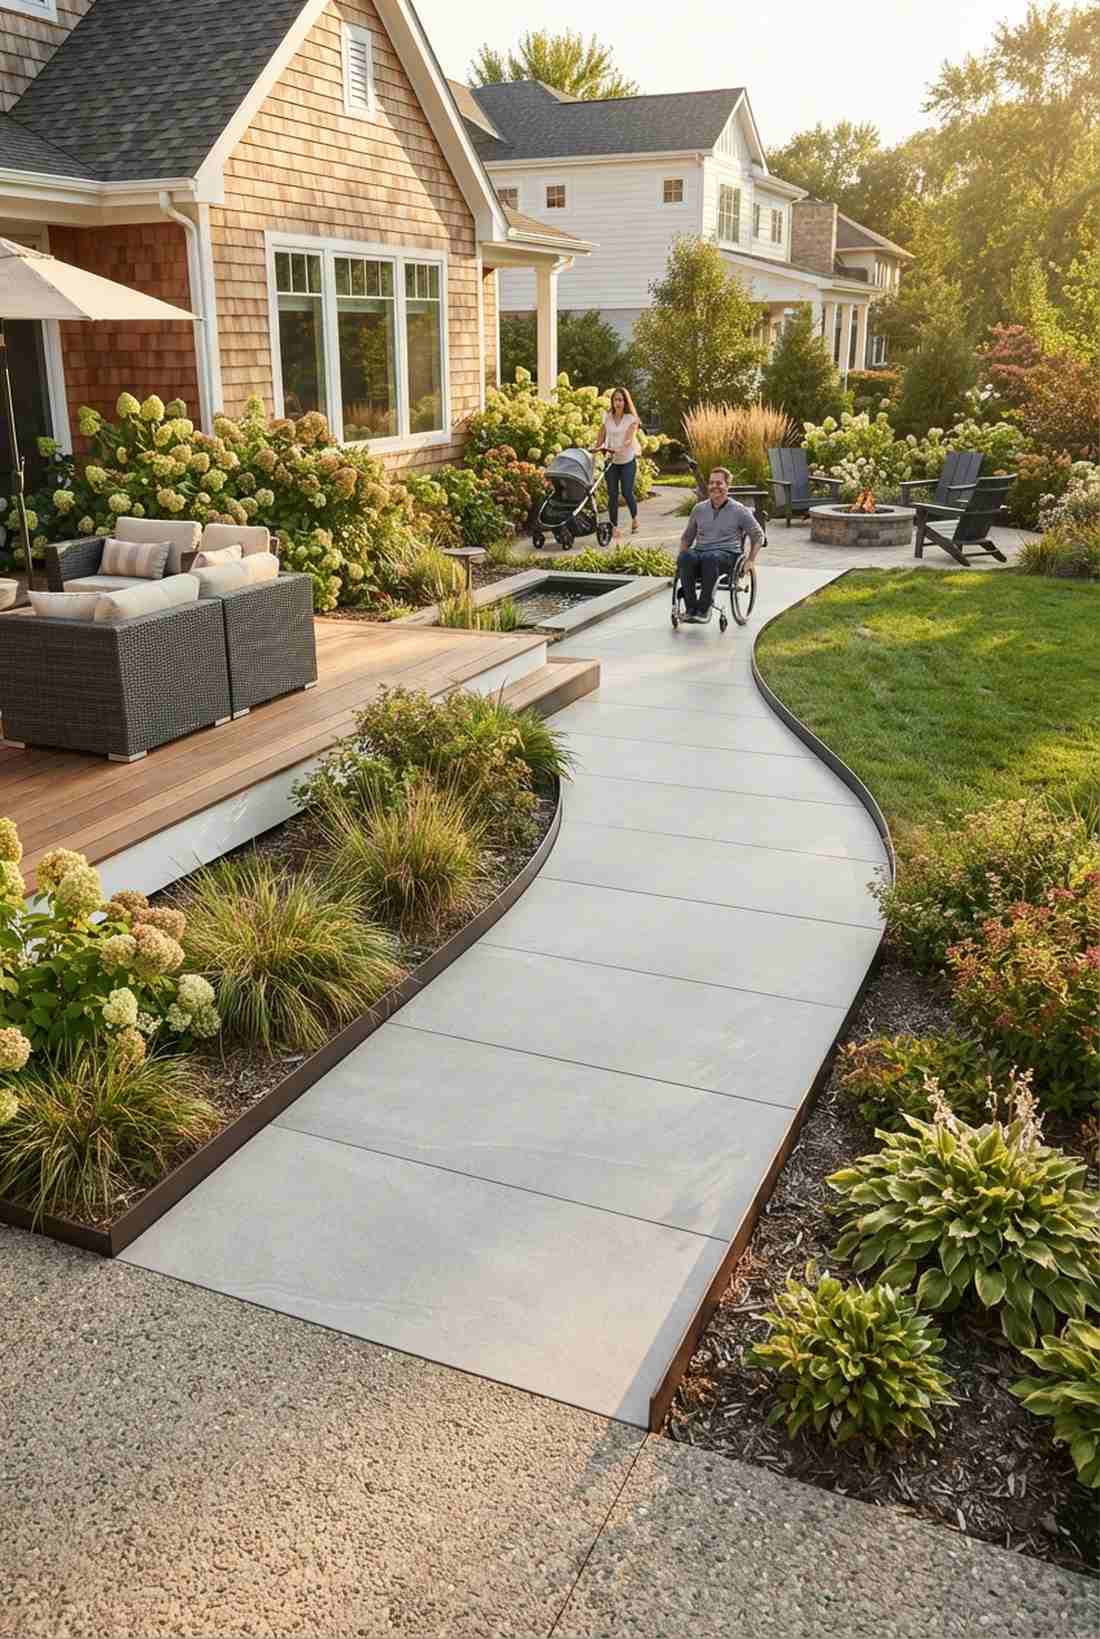
Radiates thoughtful, inclusive, and smooth modern design. Zero-gap level stepping stones are the perfect premium solution for accommodating wheelchairs or strollers without sacrificing yard aesthetics.
This specific layout delivers a bespoke finish while strictly adhering to mobility guidelines. By eliminating the gaps to under half an inch and using ultra-smooth, non-slip porcelain blocks, the path becomes a breeze for any wheels. Grabbing bulk packs of high-contrast edging helps visually impaired guests navigate effortlessly.
You can build this beautifully inclusive pathway for around $60–$85 per meter. Pin this to your accessible home design board.
- Key Materials: Large format non-slip porcelain slabs
- Vibe / Style: Smooth inclusive modern
- Difficulty: High precision leveling
- Budget Breakdown: Smooth slabs: $65 | Edge contrast: $15
- Creator’s Tip: Use polymeric sand in the tiny joints to lock the stones together into one massive, immovable surface.
- Smart Sourcing: Large format ADA-compliant outdoor porcelain (anti-slip) and high-contrast landscape edging kits.
Why build a boring walk path when you can secretly build a glowing arcade game into your backyard grass? See how below…
50. Interactive Play Pathway
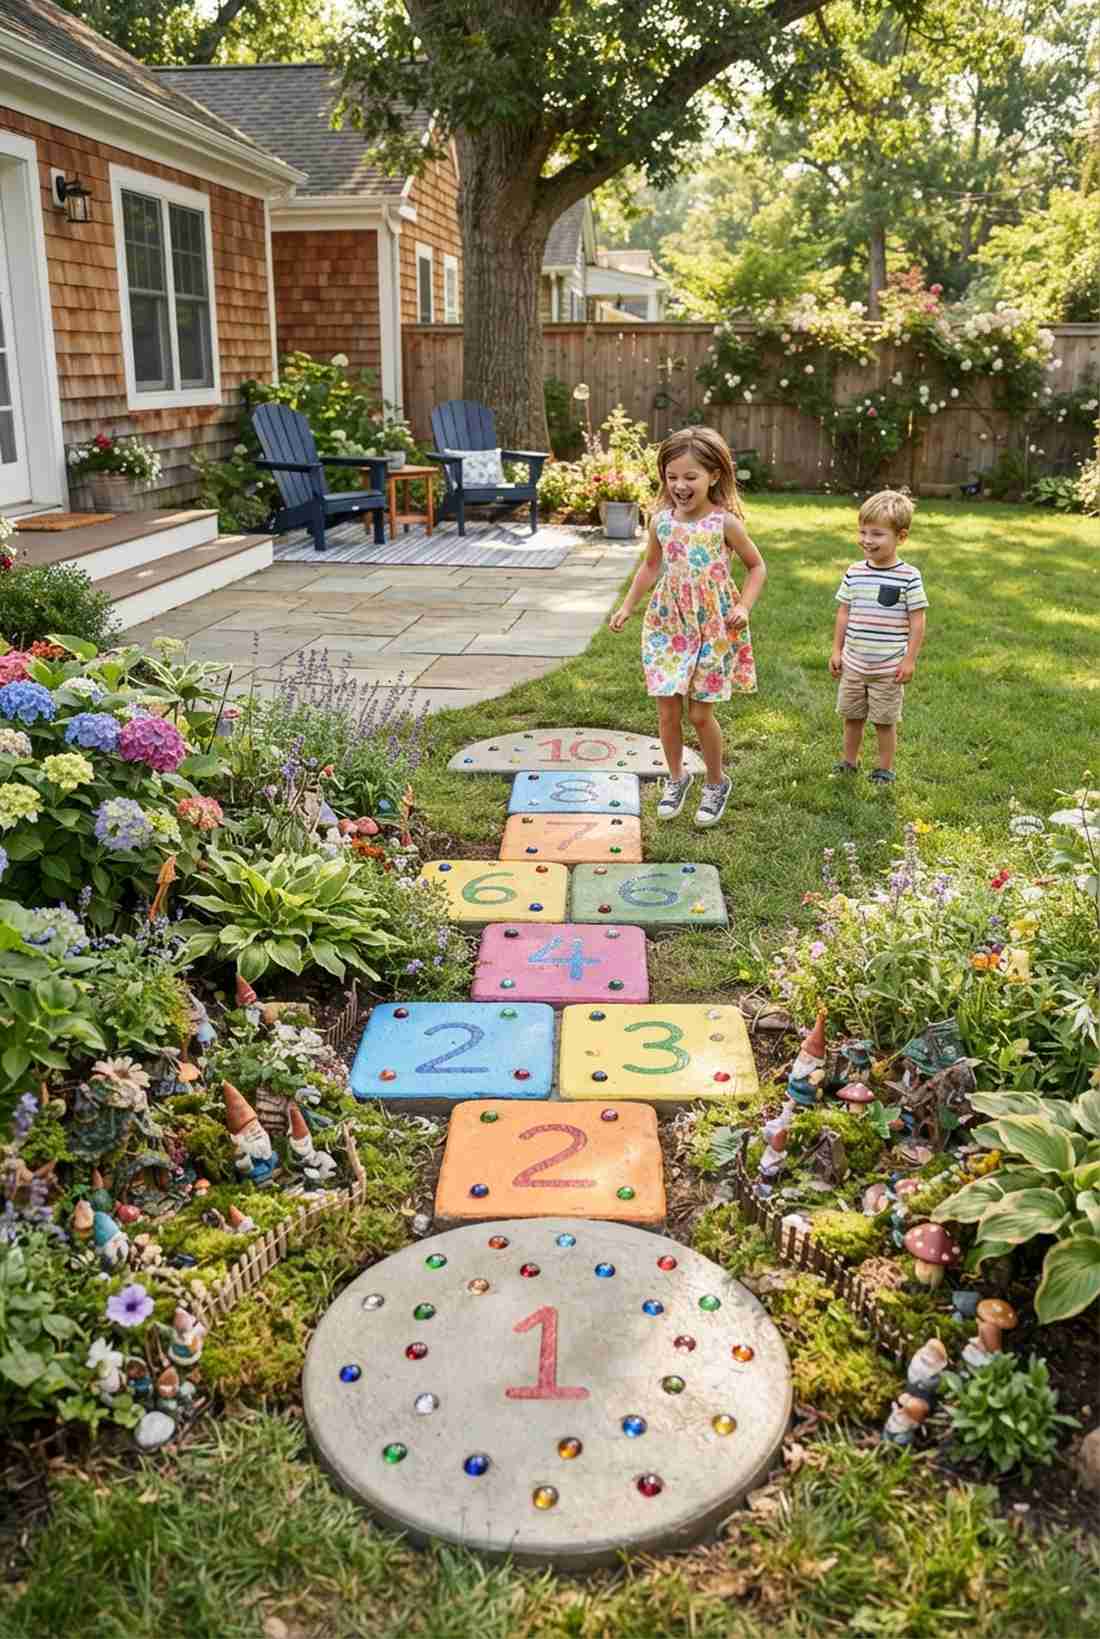
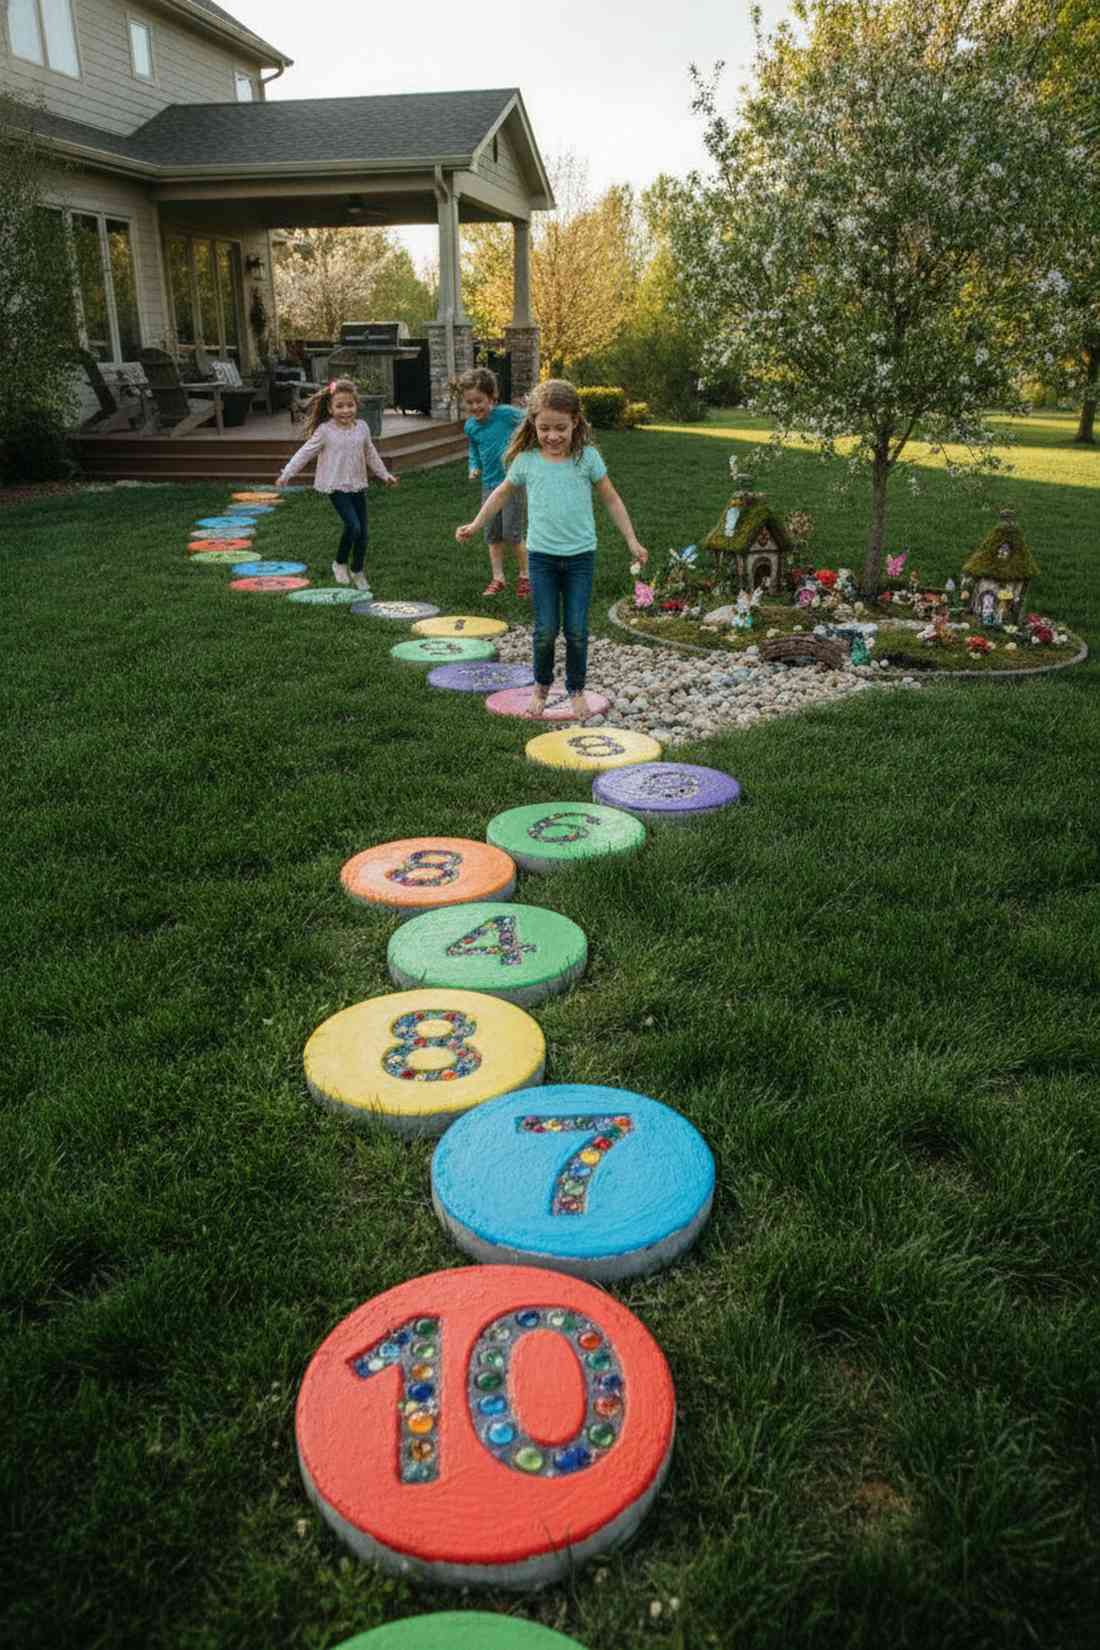
Feels like a magical hopscotch board straight out of a storybook. Brightly colored numbered stepping stones turn a boring side yard into an absolute playground for kids.
A clever hack to get kids playing outside is integrating games directly into the stepping stones design. Casting your own concrete units with bright acrylic paints or embedding marbles into the wet mix creates a permanent activity zone. Throwing in UV-coated fairy garden kits nearby turns the whole area into a fantasy land.
Creating this interactive play zone costs a highly affordable $20–$40.
- Key Materials: Concrete blocks, acrylic paint, and marbles
- Vibe / Style: Vibrant interactive playground
- Difficulty: Fun family DIY project
- Budget Breakdown: Concrete mix: $15 | Acrylic outdoor paint: $15
- Creator’s Tip: Seal the painted stones with three thick coats of marine-grade clear epoxy so the colors never chip off from jumping.
- Smart Sourcing: Fast-setting concrete mix (bulk) and marine-grade clear epoxy sealer.
51. Illuminated Night Pathway
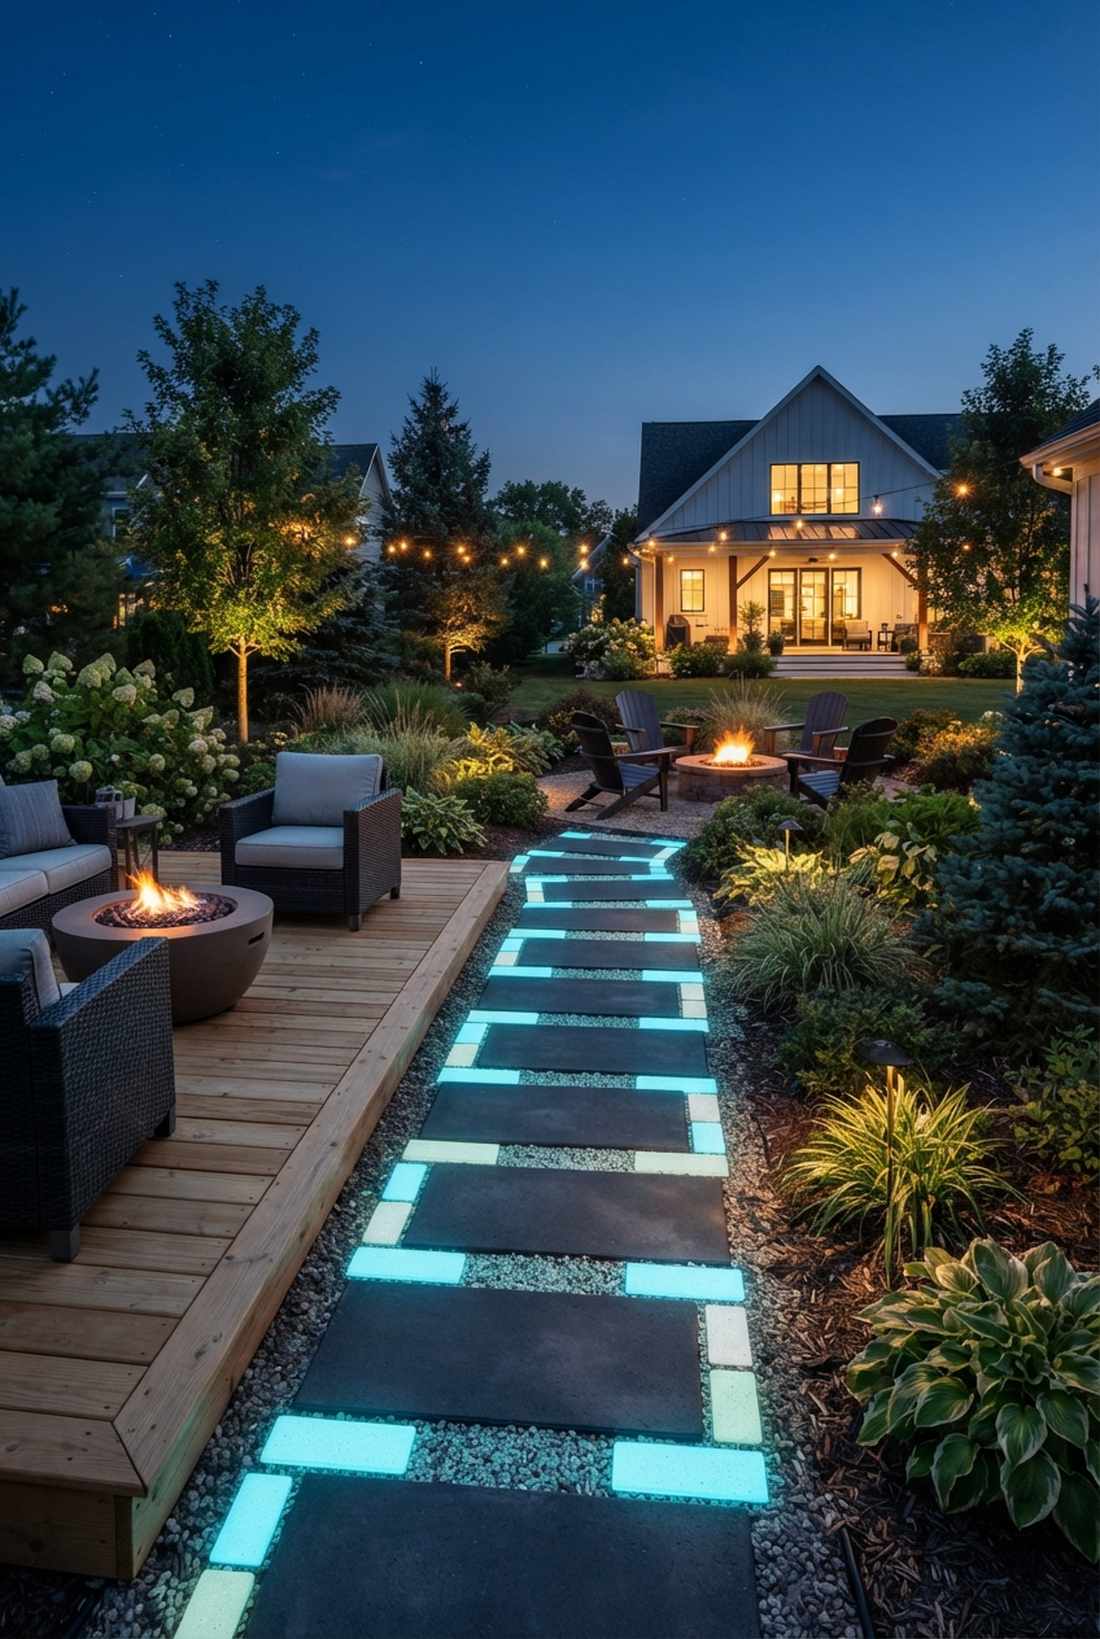
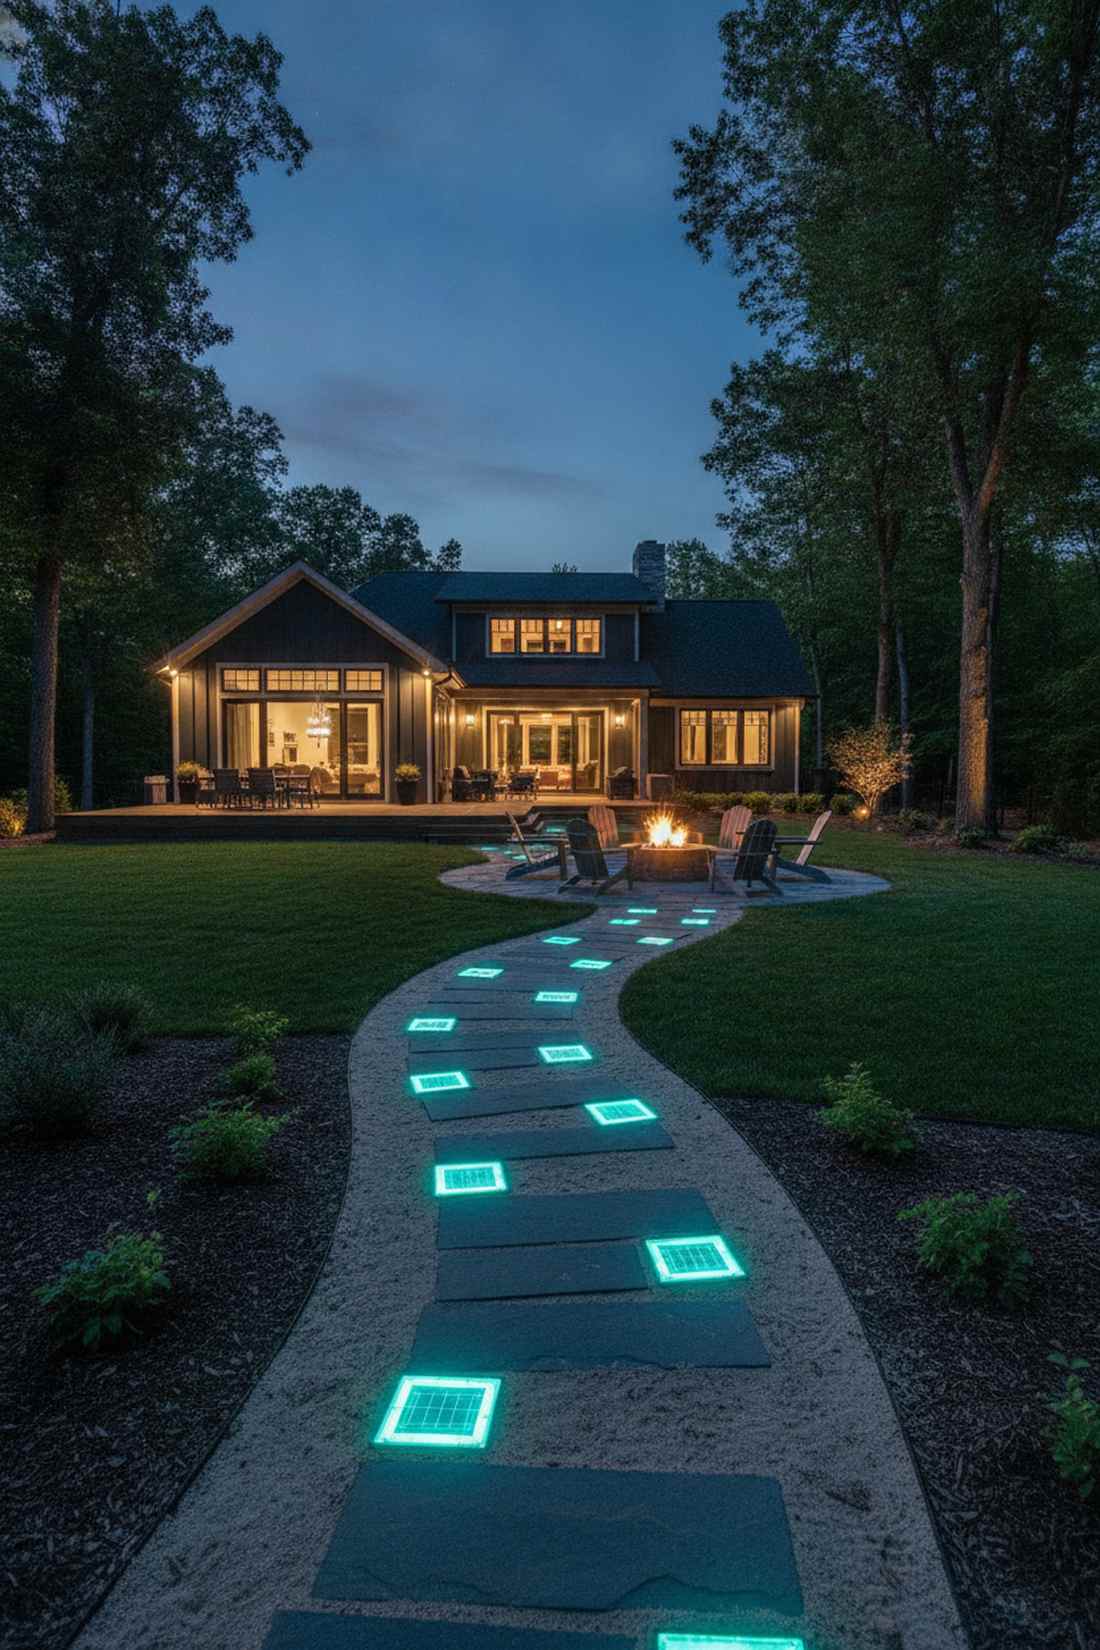
Evokes the breathtaking glow of a futuristic neon forest. Solar LED integrated stepping stones are a mind-blowing way to guide guests to a nighttime fire pit.
This layout looks far more expensive than it is by ditching messy wiring for self-contained lighting. Simply drop these heavy-duty photoluminescent or solar-powered blocks at key decision points rather than lighting the whole path. Purchasing pre-sealed waterproof glowing stones guarantees they survive the rainy season.
These ultra-modern glowing blocks run roughly $35–$55 per unit. Save this to your outdoor nightlife inspiration board.
- Key Materials: Solar LED paver blocks or glow-in-the-dark concrete
- Vibe / Style: Luminescent futuristic nightscape
- Difficulty: Incredibly easy drop-in
- Budget Breakdown: LED stones: $45 | Base sand: $5
- Creator’s Tip: Ensure the glowing stones are placed where they receive at least 6 hours of direct daytime sun to charge fully.
- Smart Sourcing: Heavy-duty solar LED paver blocks (waterproof) and photoluminescent glow-in-the-dark aggregate (bulk).
52. Educational Interpretive Path
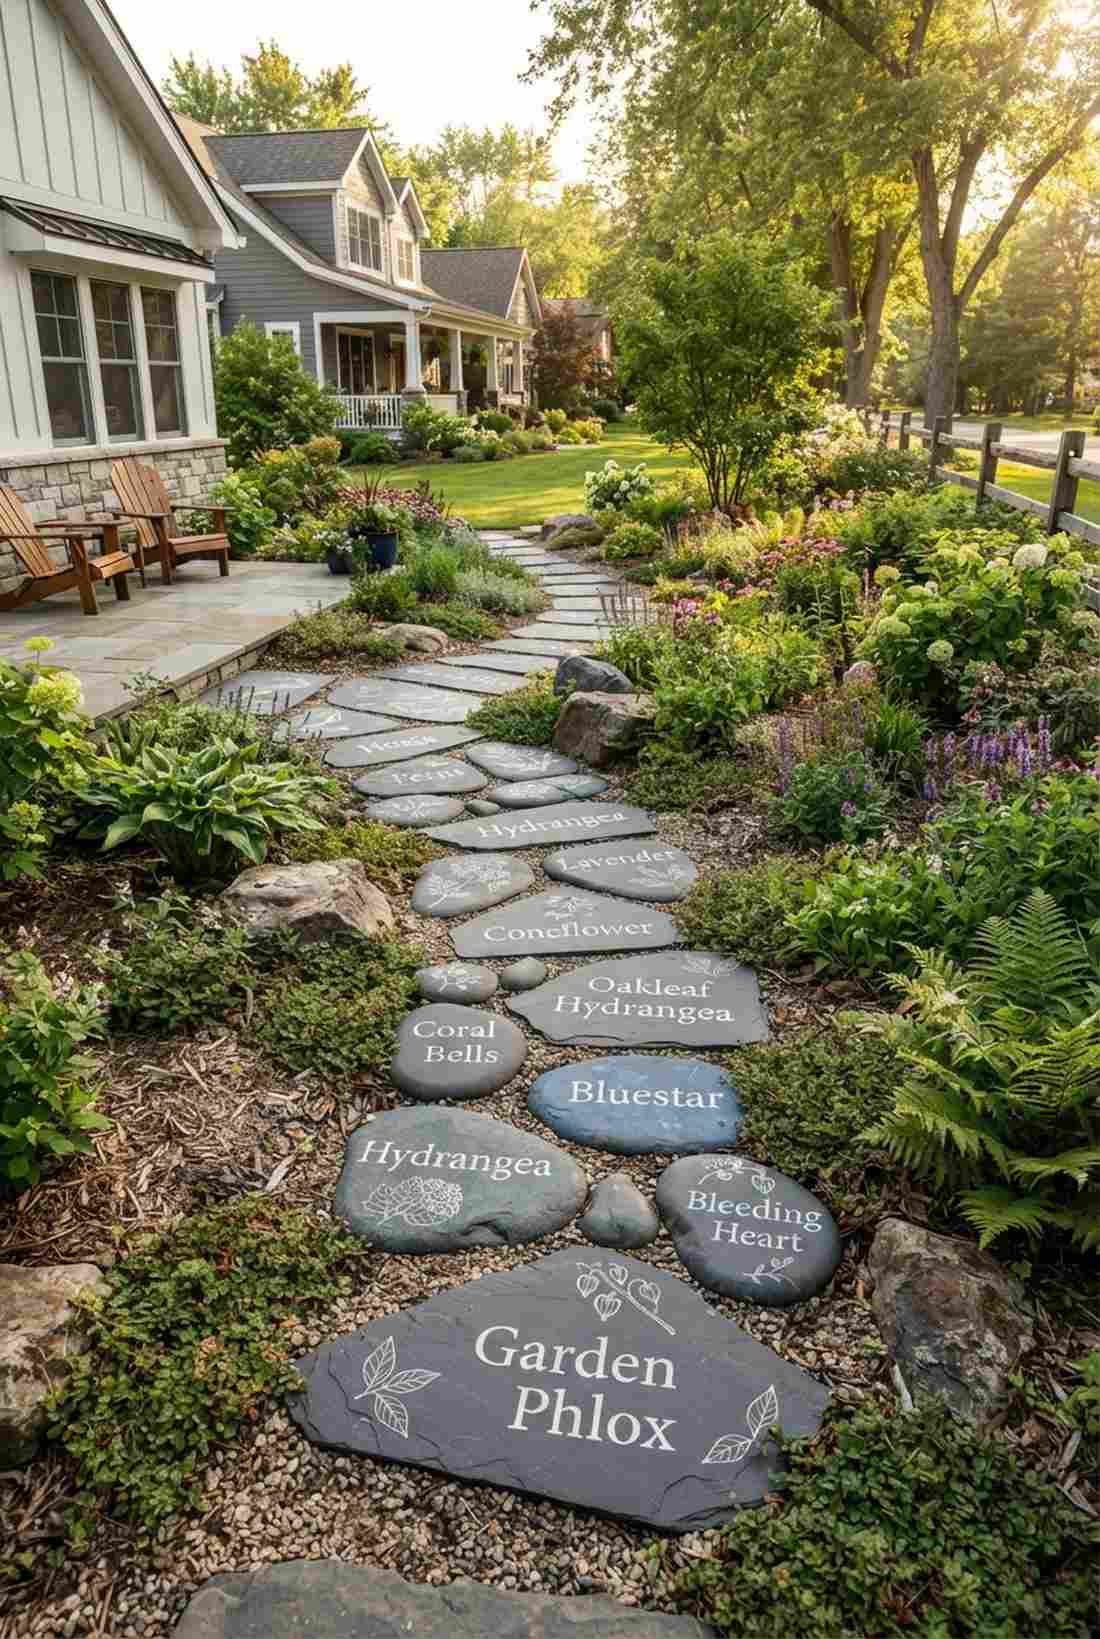
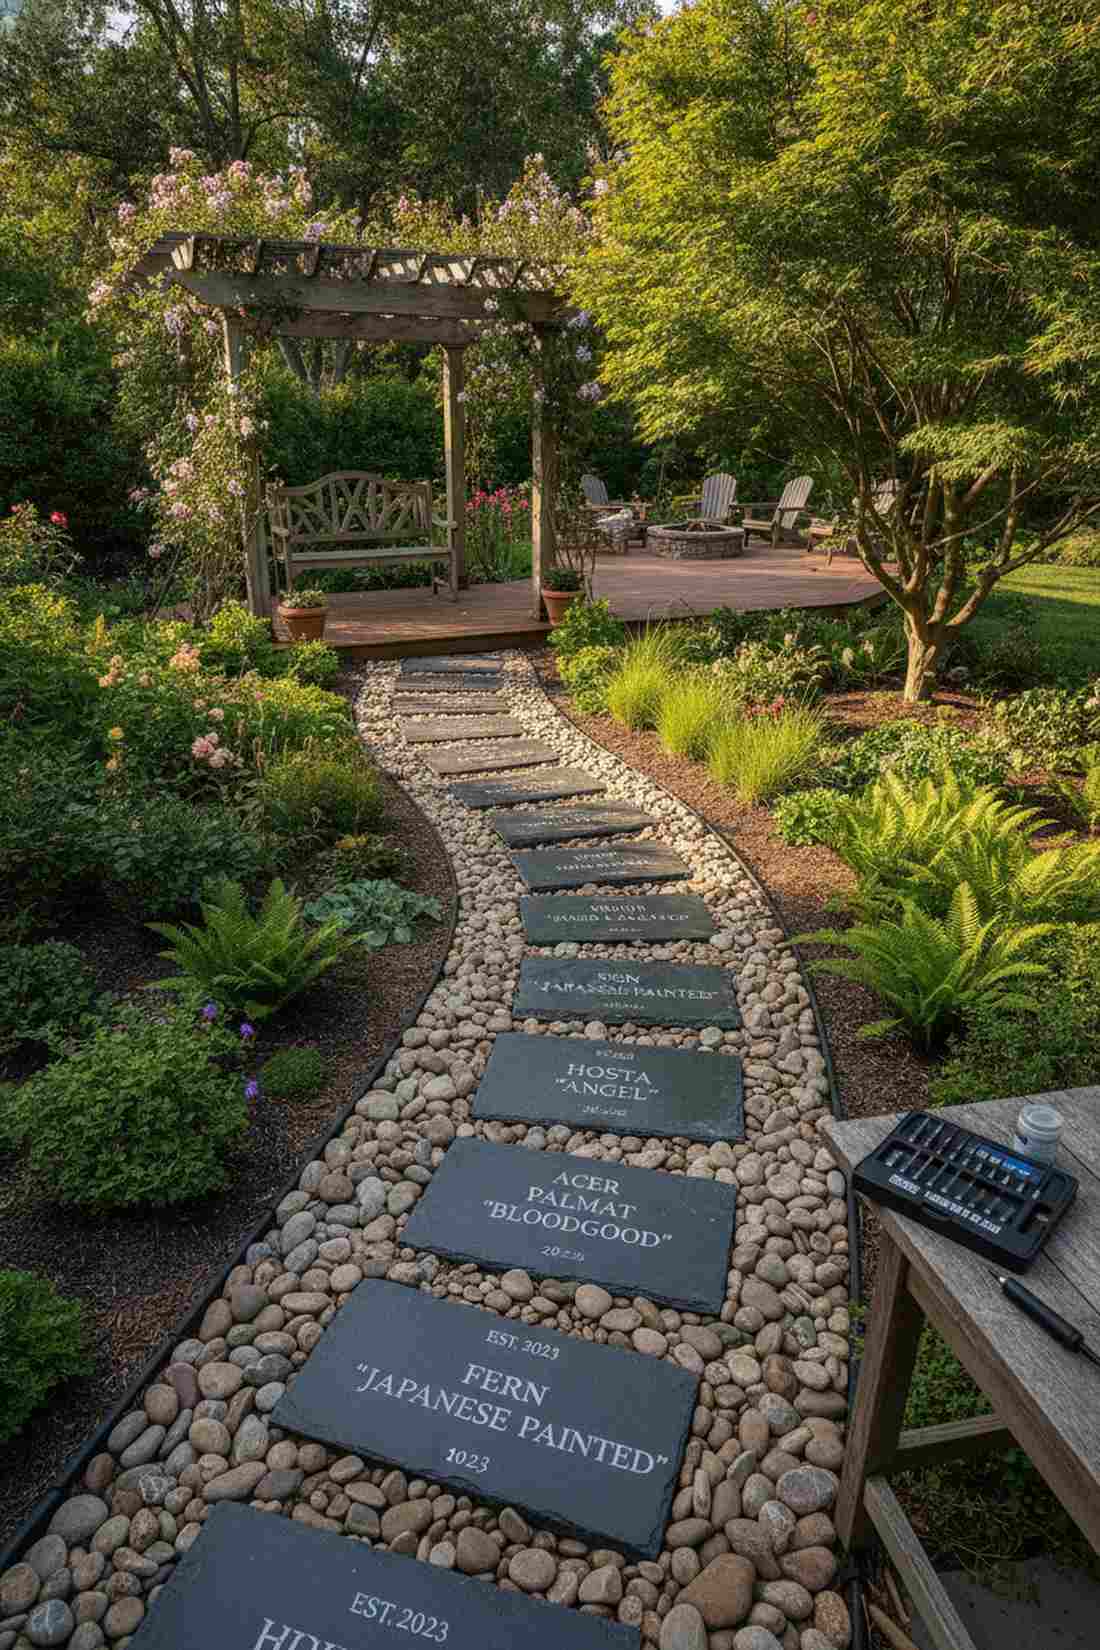
Brings the prestigious, thoughtful atmosphere of a botanical garden walk to your home. Custom engraved botanical stepping stones are a stunning touch for a dedicated garden enthusiast.
Most backyard designs lack personal narrative, but this stepping stones in garden approach turns the ground into an educational tour. By using a Dremel tool to carve plant names or dates into smooth river stones, you elevate the space immensely. Buying pre-cut blank slate slabs gives you a massive canvas for engraving.
Personalizing your yard this way costs only $25–$40.
- Key Materials: Smooth engraving stones or blank slate
- Vibe / Style: Prestigious botanical tour
- Difficulty: Artistic engraving skills needed
- Budget Breakdown: Blank slate: $20 | Engraving bits: $15
- Creator’s Tip: Rub white acrylic paint into the carved letters, then wipe the surface clean so the text pops beautifully.
- Smart Sourcing: Pre-cut blank slate garden slabs (bulk pack) and diamond-tipped stone engraving tool kits.
53. Rooftop Weight Distribution
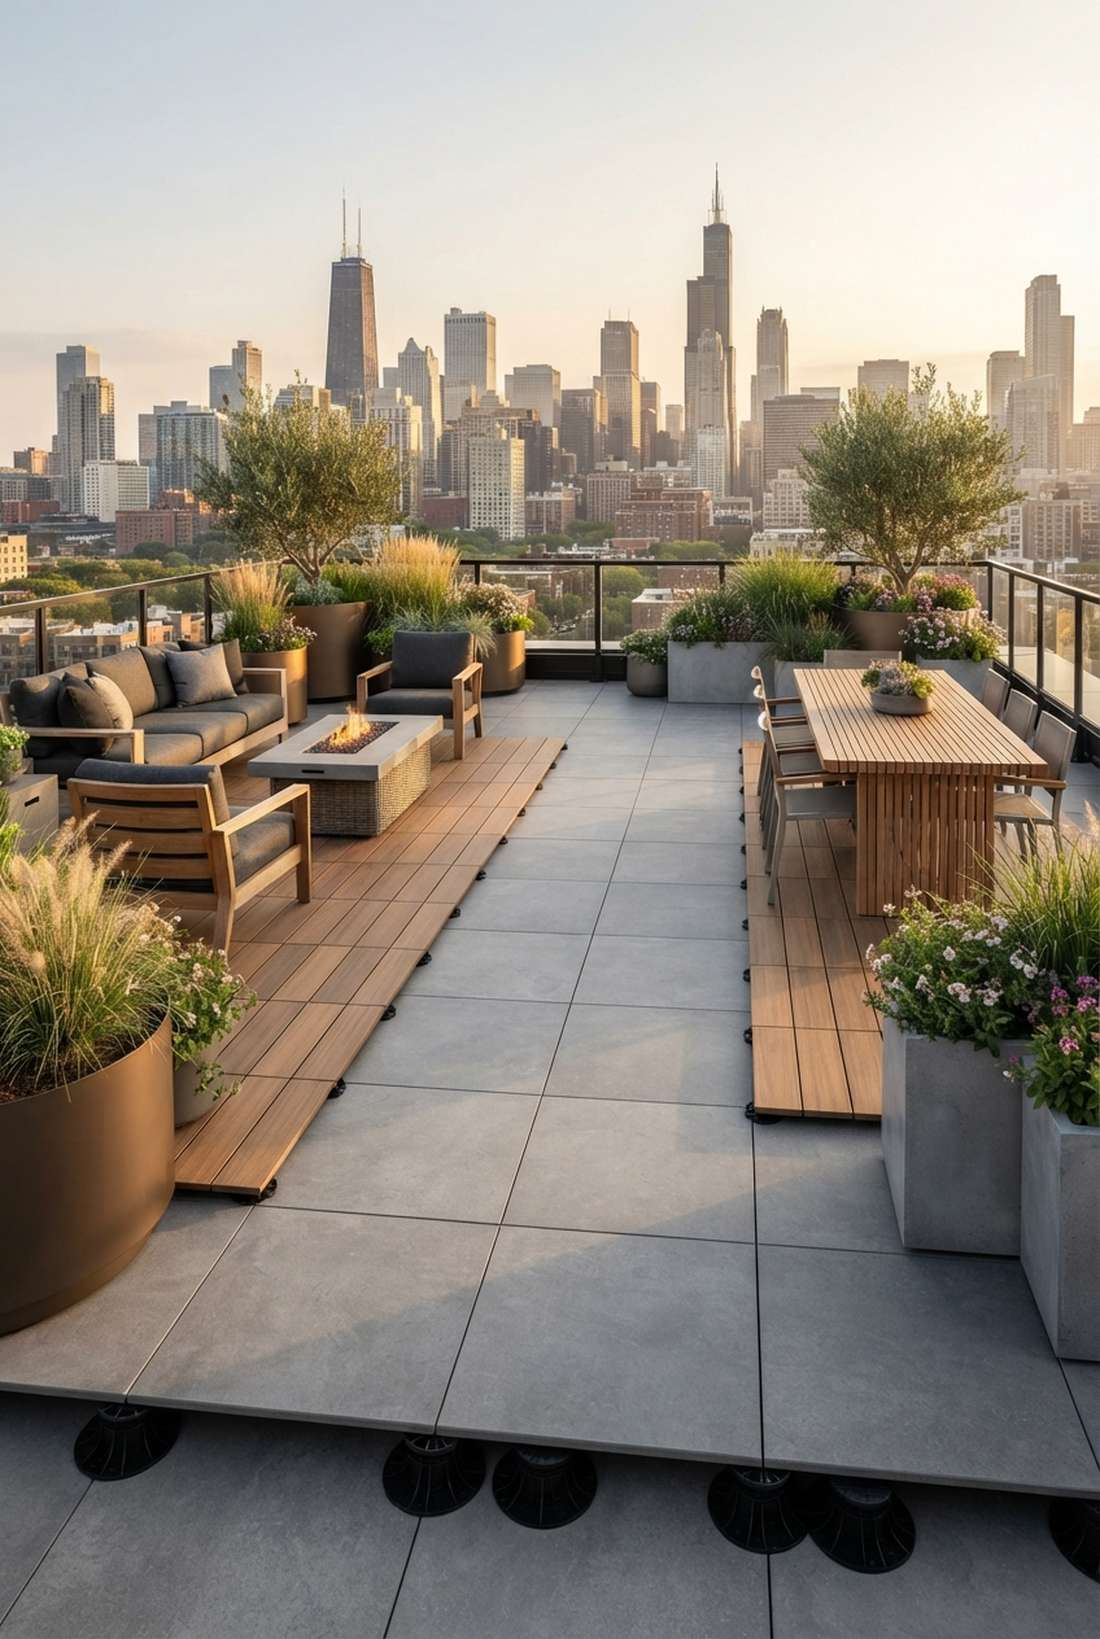
Feels like an exclusive, sky-high penthouse lounge. Lightweight tiles on adjustable pedestal grids are the only safe way to build a hardscape on a fragile apartment roof.
The secret to this layout is keeping heavy loads off the delicate waterproofing membrane. The pedestal system distributes weight evenly while creating a gap underneath for heavy rain to drain instantly. Using UV-coated composite boards or thin porcelain ensures the weight limit is never breached.
This highly specialized rooftop hack runs about $70–$100 per square meter. Pin this if you have a bare apartment balcony!
- Key Materials: Thin porcelain tiles and plastic pedestals
- Vibe / Style: Urban penthouse luxury
- Difficulty: Advanced grid planning
- Budget Breakdown: Pedestal kit: $40 | Lightweight tiles: $45
- Creator’s Tip: Use the adjustable dials on the pedestals to create a perfectly flat floor over a heavily sloped drainage roof.
- Smart Sourcing: Adjustable heavy-duty paver pedestal kits and ultra-lightweight exterior composite tiles (UV-coated).
If you rent your home or hate permanent decisions, this next brilliant hack lets you have a gorgeous path you can literally pack up in an hour…
54. Seasonal Removable Pathway
Captures the brilliant flexibility of nomadic, modular design. Temporary lightweight stepping stones on sand pads are a genius solution for winter access to an unused garden.
This layout specifically caters to renters or four-season climates where needs change rapidly. By skipping mortar and resting high-density composite blocks on small gravel pads, you get a solid path you can lift and store in five minutes. Sourcing bulk packs of faux-stone rubber pavers makes lifting them feather-light.
This temporary seasonal solution is highly budget-friendly at $20–$35 per yard.
- Key Materials: Lightweight rubber or composite faux-stones
- Vibe / Style: Highly adaptable & temporary
- Difficulty: Extremely simple drop-and-go
- Budget Breakdown: Faux-stones: $25 | Base sand: $5
- Creator’s Tip: Lay down a small square of weed fabric under each stone to stop it from sinking into the winter mud.
- Smart Sourcing: Lightweight faux-stone rubber pavers (bulk pack) and pre-cut weed fabric squares.
55. Memorial Commemorative Stones
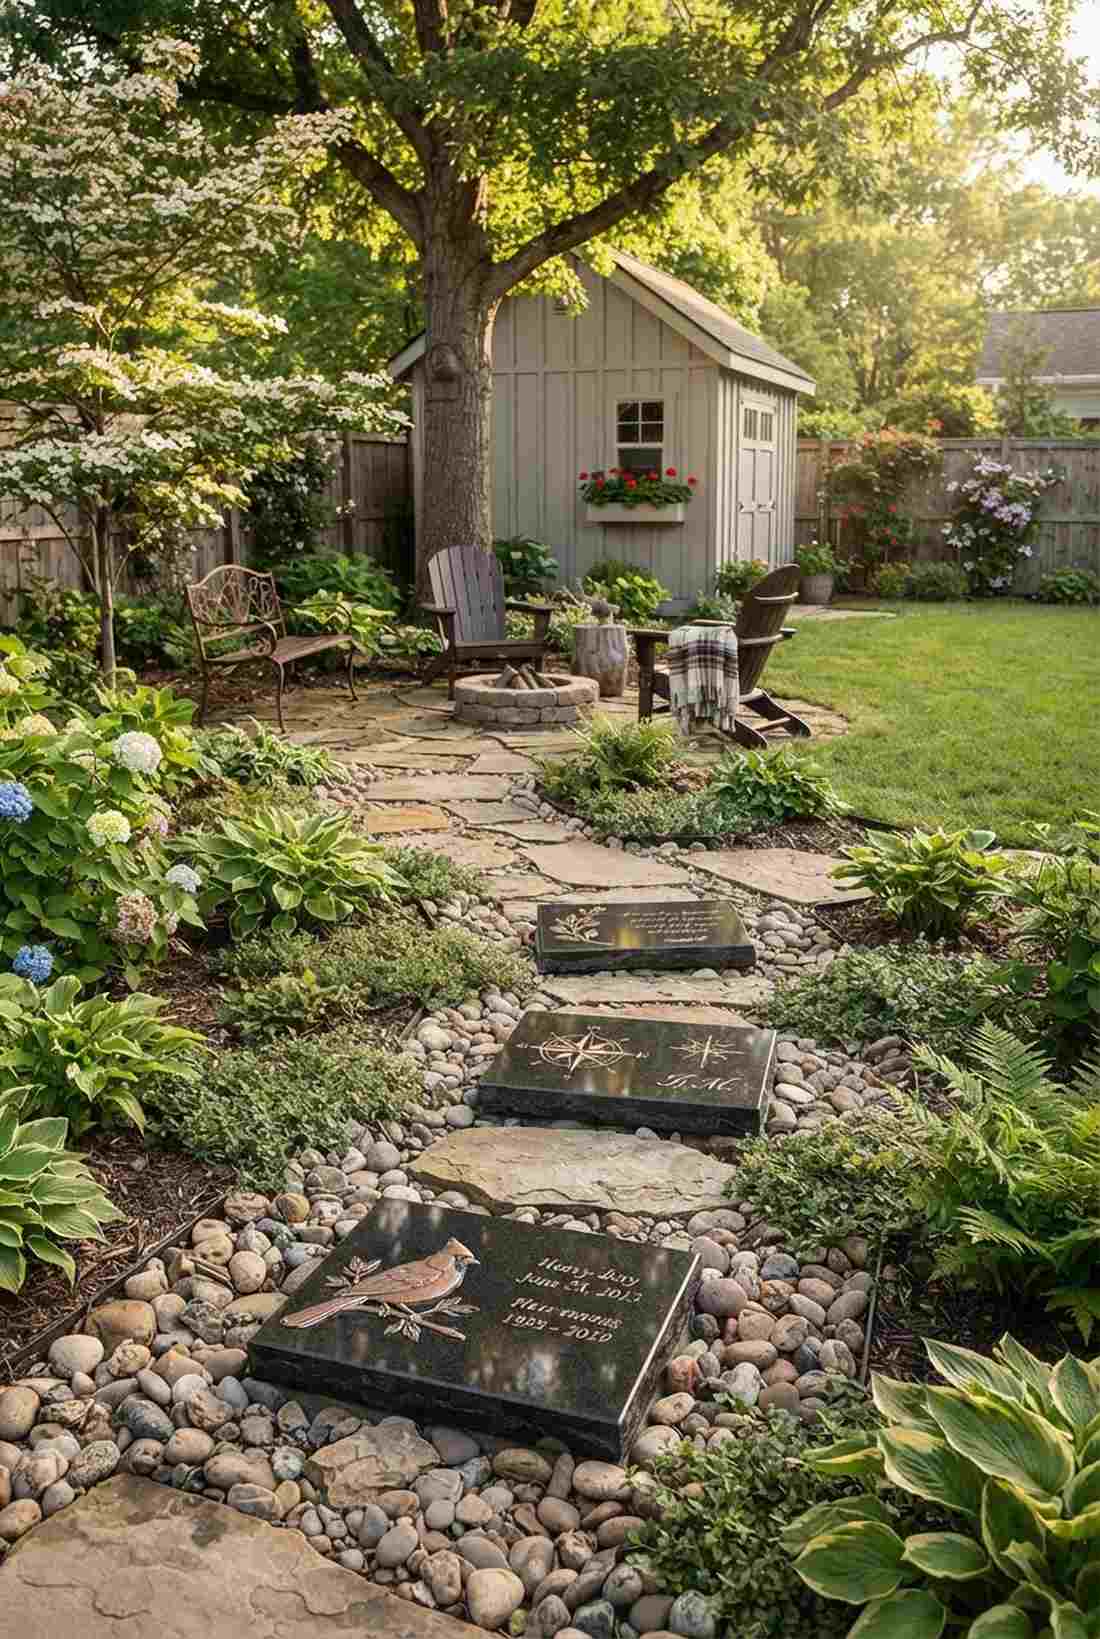
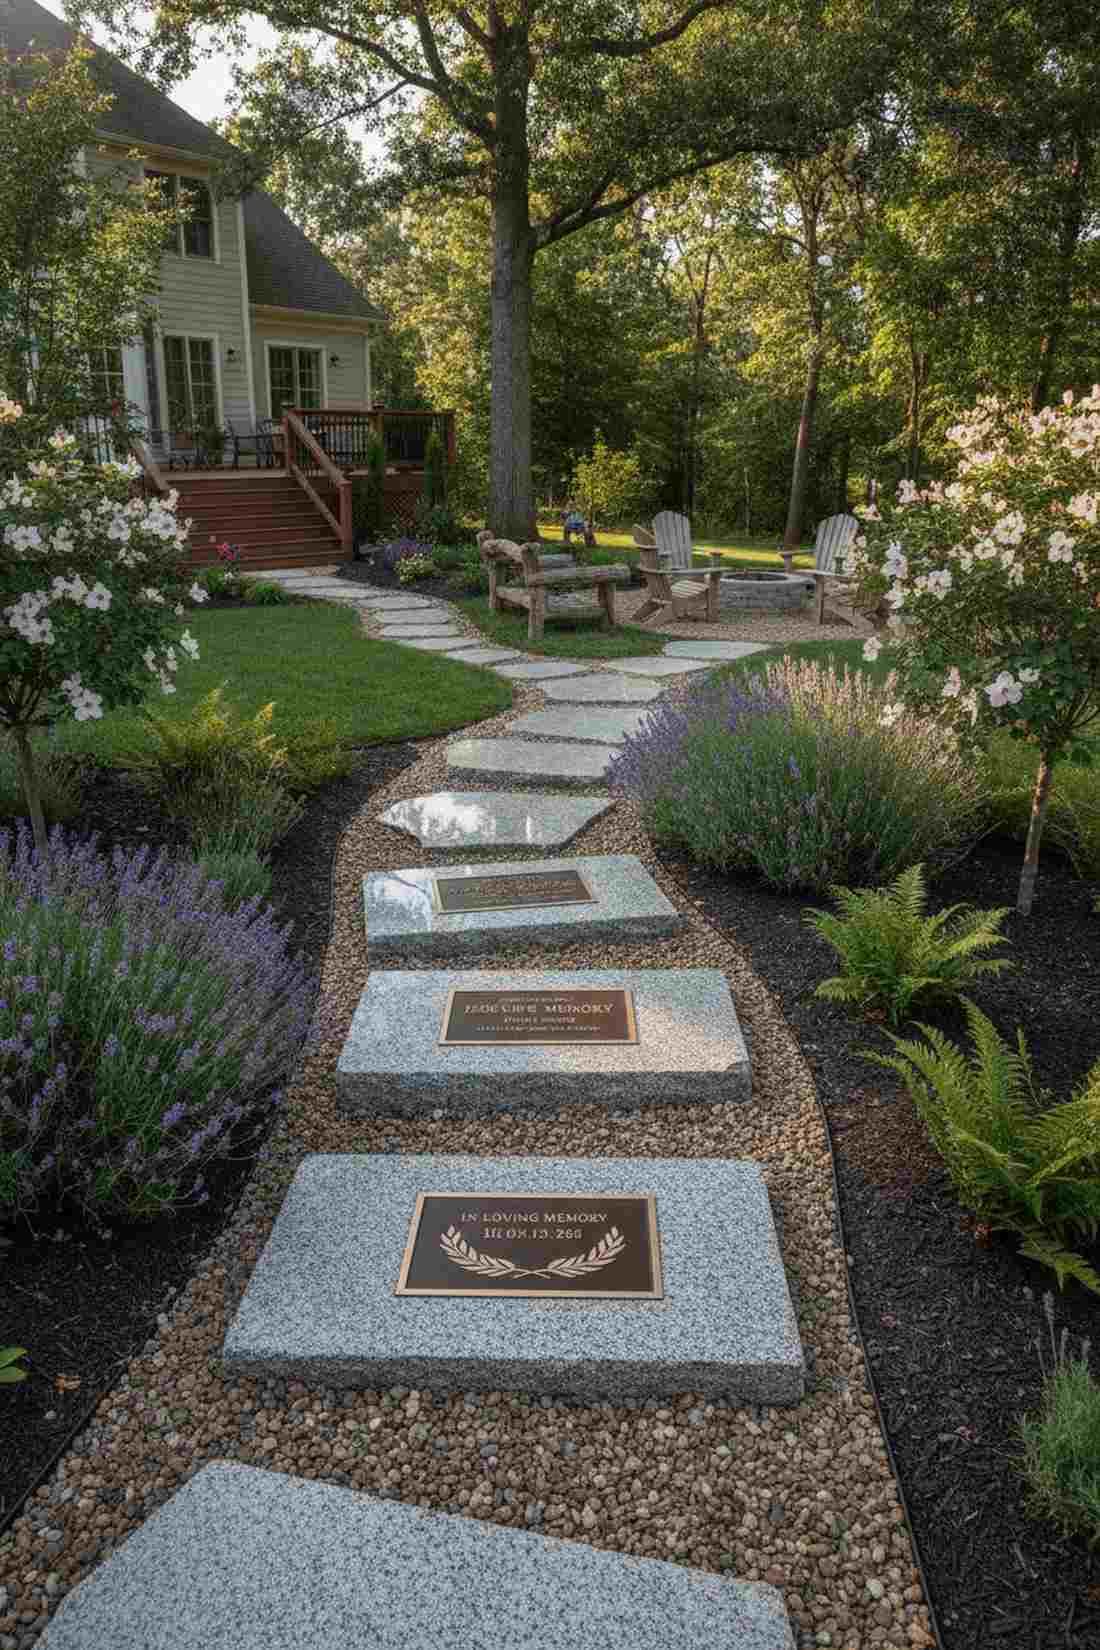
Radiates a deeply moving, timeless reverence. Custom bronze-inlay or engraved memorial path stones create an incredibly touching tribute space in a quiet corner of the yard.
This stepping stones outdoor setup gives a bespoke finish that holds immense emotional weight. Dedicating individual stones along a quiet path adds layers of personal meaning to functional infrastructure. Procuring heavy-duty granite blanks ensures the tribute lasts for generations without weathering away.
Creating these permanent tributes costs roughly $80–$150 per custom stone. Save this beautiful idea to your family garden board.
- Key Materials: High-density granite blanks or bronze plaques
- Vibe / Style: Reverent & timeless tribute
- Difficulty: Professional engraving often required
- Budget Breakdown: Granite blank: $50 | Custom engraving: $70
- Creator’s Tip: Set these specific stones slightly higher than the surrounding path so dirt and water never pool over the text.
- Smart Sourcing: Polished granite memorial blanks (pre-cut) and heavy-duty bronze garden plaque kits.
56. Vegetable Garden Access
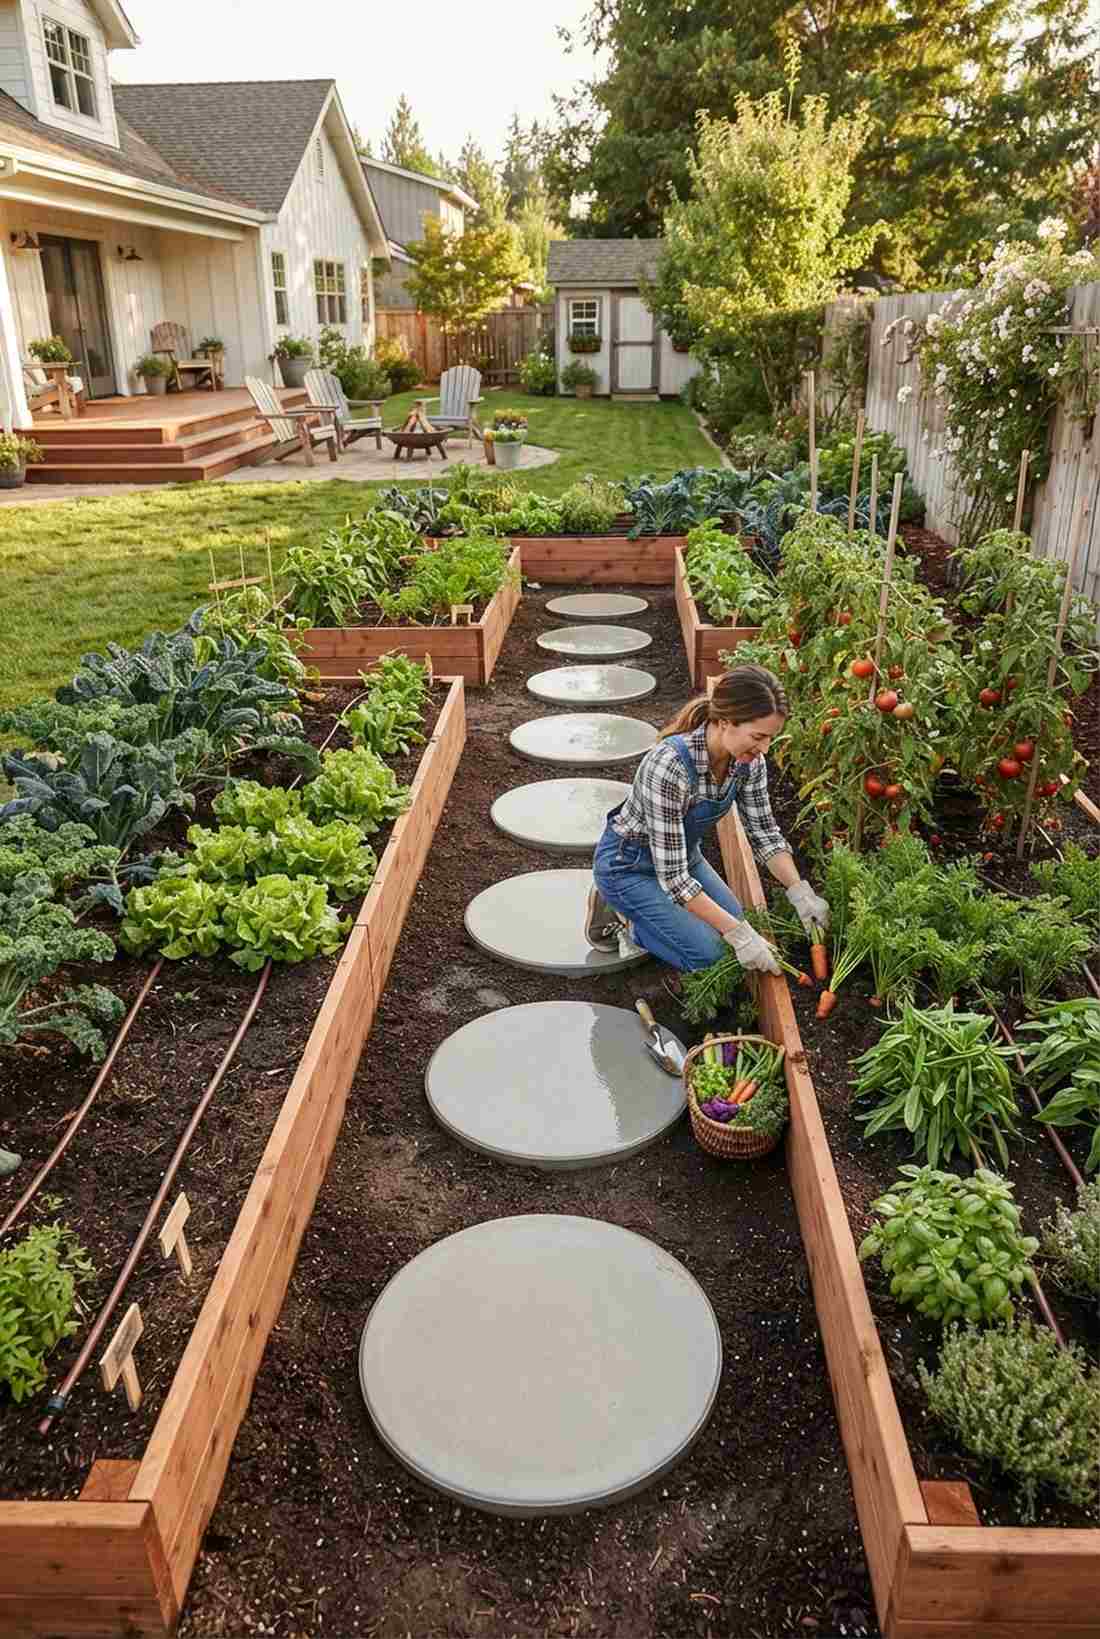
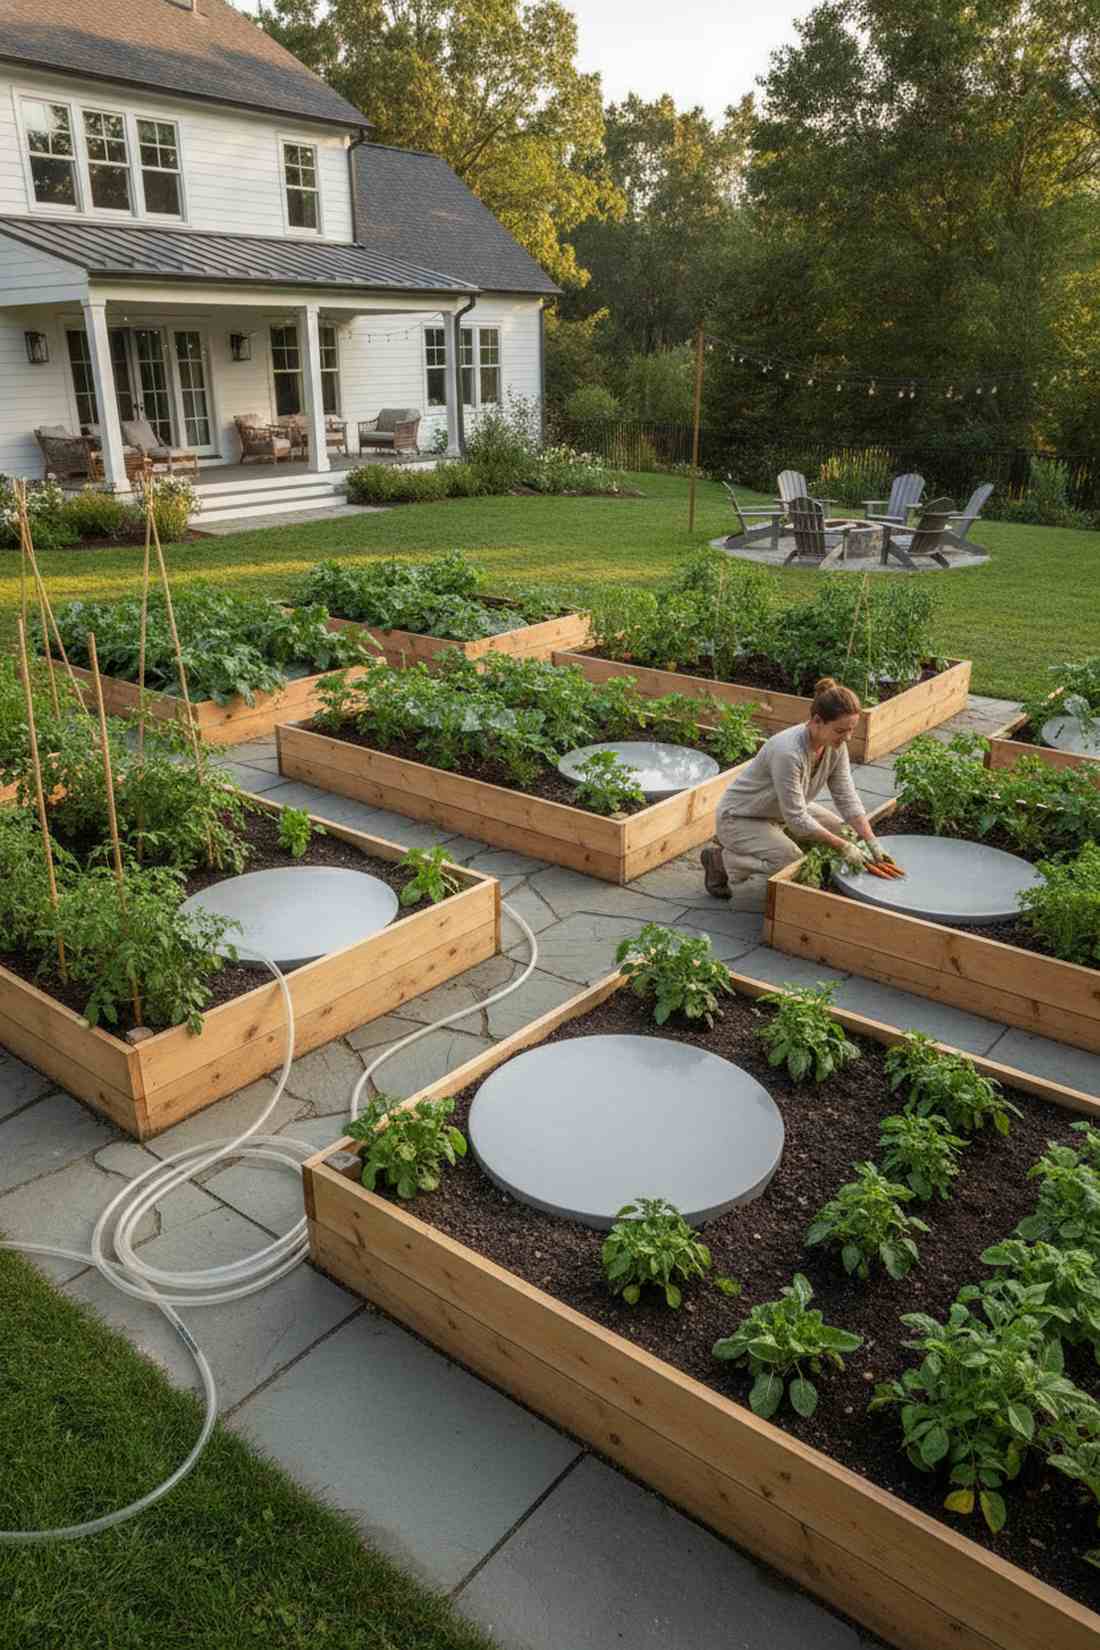
Feels like the ultimate organized, productive homesteader’s paradise. Smooth, cleanable harvest stones are the absolute best way to access deep raised beds without crushing the soil.
Most backyard designs ruin soil aeration by stomping all over the vegetable roots, but this layout solves that completely. Sourcing perfectly smooth, non-porous concrete circles ensures you can rinse the mud off instantly after pulling carrots. Placing them 24 inches into the bed puts everything within arm’s reach.
This highly productive farming layout costs just $15–$25 per access point.
- Key Materials: Smooth sealed concrete rounds
- Vibe / Style: Organized homesteader efficiency
- Difficulty: Very easy placement
- Budget Breakdown: Concrete rounds: $15 | Sealer spray: $5
- Creator’s Tip: Paint the tops with a high-gloss concrete sealer so sticky clay mud hoses off effortlessly.
- Smart Sourcing: Smooth pre-cast concrete garden rounds (bulk) and high-gloss waterproof concrete sealer.
Designing Your Pathway Forward
These 56 premium stepping stones concepts prove that outdoor circulation doesn’t have to be a boring, overpriced contractor nightmare. From massive geometric slabs to highly efficient, budget-friendly ecological setups, achieving that high-end designer look is entirely within reach. By sourcing the smartest kits, leveraging heavy-duty materials, and picking the exact DIY blueprint that matches your yard’s unique challenges, you can completely transform your landscape’s aesthetic. Grab your supplies, map out your route, and start building a yard that looks incredibly expensive but was crafted on your own terms.
FAQ
What is the proper distance between stepping stones?
To avoid awkward stretching and achieve a seamless designer-level finish, you should center your stepping stones 24 inches apart. If you are using premium miniature garden supplies or live moss between them, you can adjust slightly, but always walk the path naturally first to lock in your exact stride length.
What should I put under stepping stones?
Never place them directly on topsoil unless you want a sunken, uneven mess. For a high-end, long-lasting path, excavate a shallow trench and lay down a commercial-grade weed barrier roll, followed by 1-2 inches of professional paver leveling sand or crushed aggregate starter kits to guarantee perfect drainage.
How do you keep stepping stones from sinking?
Sinking ruins the luxury aesthetic instantly. You must dig out the base and compress a thick layer of crushed gravel, followed by a thin layer of sand. For extreme wet zones, upgrading to heavy-duty concrete risers or utilizing permeable paver grids will permanently stop the stones from disappearing into the mud.
What is the best material for stepping stones?
The smartest investment depends on your climate. Authentic cleft bluestone packs offer incredible premium slip-resistance, while UV-coated composite pavers provide an ultra-lightweight, rot-proof alternative. For massive budget wins, sourcing pre-cast concrete block kits gives you maximum durability for the lowest price point.