The scent of damp earth hitting fresh Irish moss instantly grounds a miniature landscape, but it’s the hyper-specific architectural details—like UV-coated resin cottages and precisely placed LED path lights—that actually make the illusion believable. Tossing random plastic figures into a terracotta pot rarely yields that authentic, immersive scale everyone craves. Instead, constructing a high-end micro-world requires strategic layering, durable materials, and clever spatial planning that tricks the eye into seeing a sprawling estate. From affordable terrarium accessories to premium outdoor-rated hardscapes, these foundational blueprints reveal exactly how to engineer tiny sanctuaries that captivate without constantly falling apart.
Design SnapshotKey Principles
- Scale Consistency: Maintain proportional relationships between structures, accessories, and plants to preserve visual believability
- Layered Textures: Combine moss varieties, miniature foliage, and hardscape materials for dimensional depth
- Focal Anchoring: Position one primary structure as the visual centerpiece before adding supporting elements
- Natural Integration: Use living plants as functional elements rather than decorative afterthoughts
Moss Foundation Displays That Establish Living Carpets
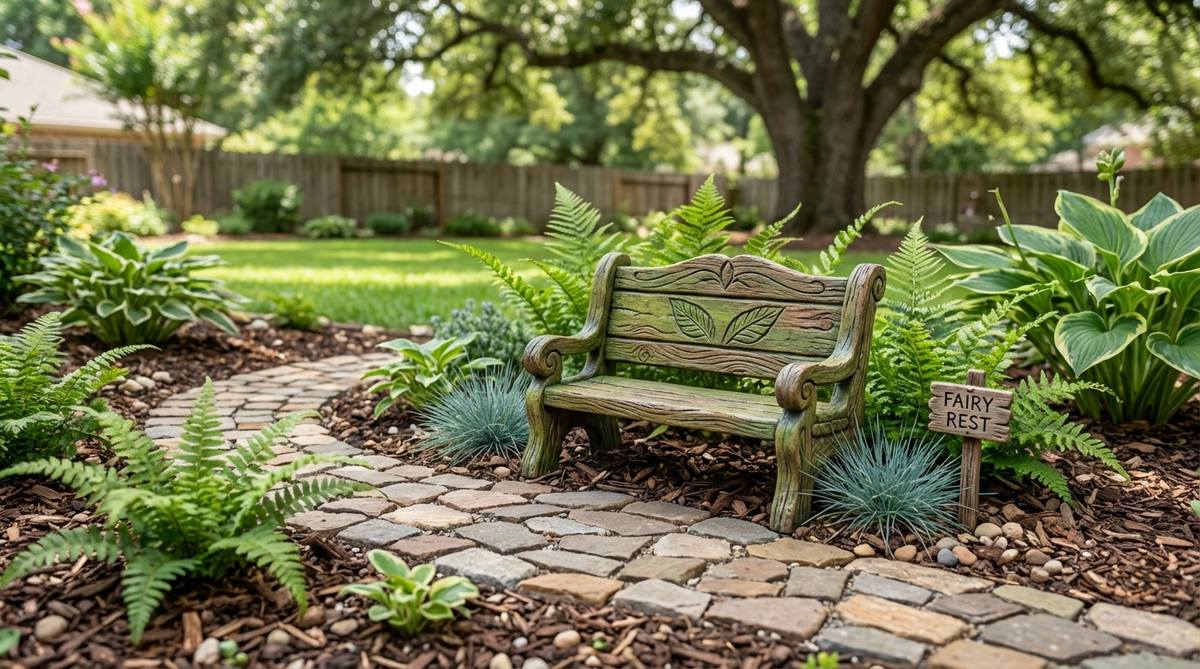
1. Irish Moss Cottage Courtyard
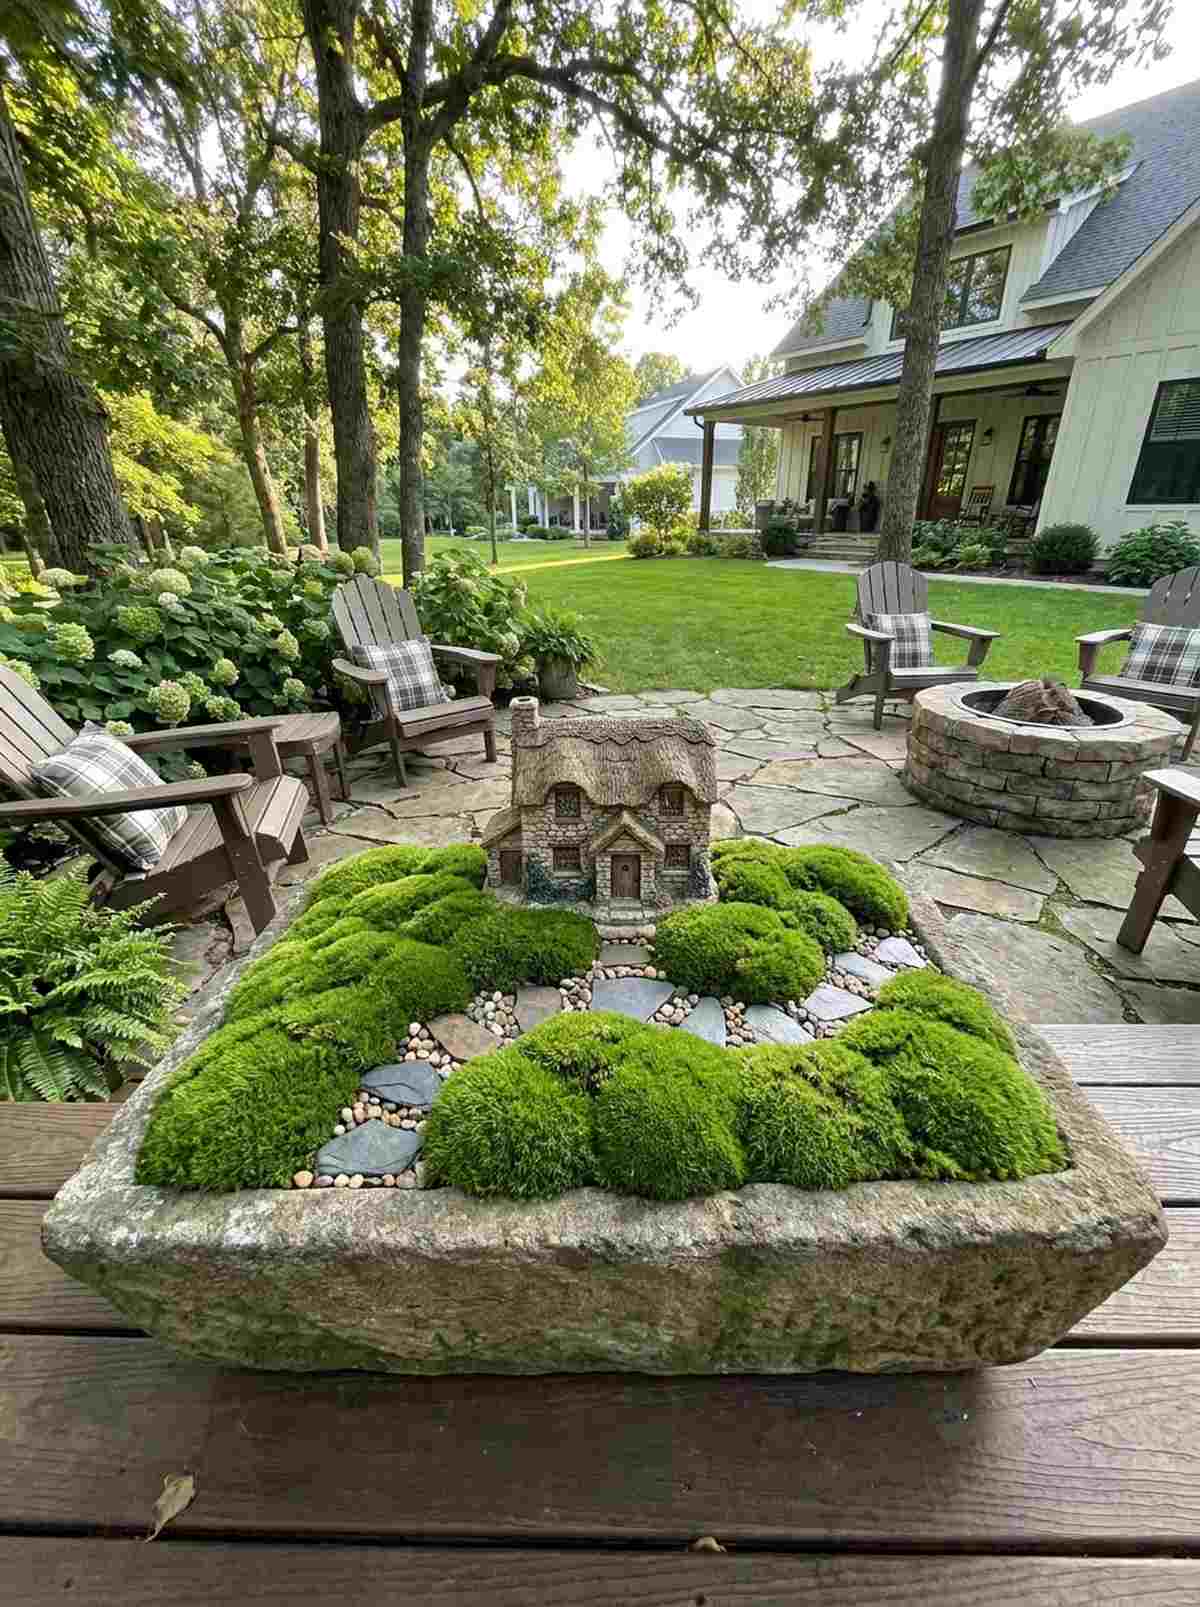
There is an undeniable charm in a lush green miniature landscape that feels like a tiny hidden forest tucked away from the real world. Wrapping emerald-green living carpets around a central focal piece works exceptionally well for a shaded patio or balcony container display.
Skipping proper drainage is a fatal error many beginners make when establishing these damp environments. By incorporating professional-grade fairy garden kits alongside your living foliage, the result delivers a surprisingly premium look that won’t rot within a week. Anchor the soft textures against weather-treated hardscapes to prevent boundaries from blurring.
You can easily pull this off for around $25–$40 depending on your vessel. Save this to your DIY weekend garden board so you have the layout mapped out!
- Key Materials: Live Irish moss plugs, well-draining potting mix, focal cottage figurine
- Vibe / Style: Classic English countryside
- Difficulty: Easy beginner setup
- Budget Breakdown: Materials: $20 | Base Vessel: $15
- Creator’s Tip: Trim the edges bi-weekly with bonsai scissors to keep the scale looking intentional rather than overgrown.
- Smart Sourcing: Pre-cut Irish moss plugs (nursery flat) or UV-coated resin fairy cottage kits
2. Scotch Moss Woodland Glade
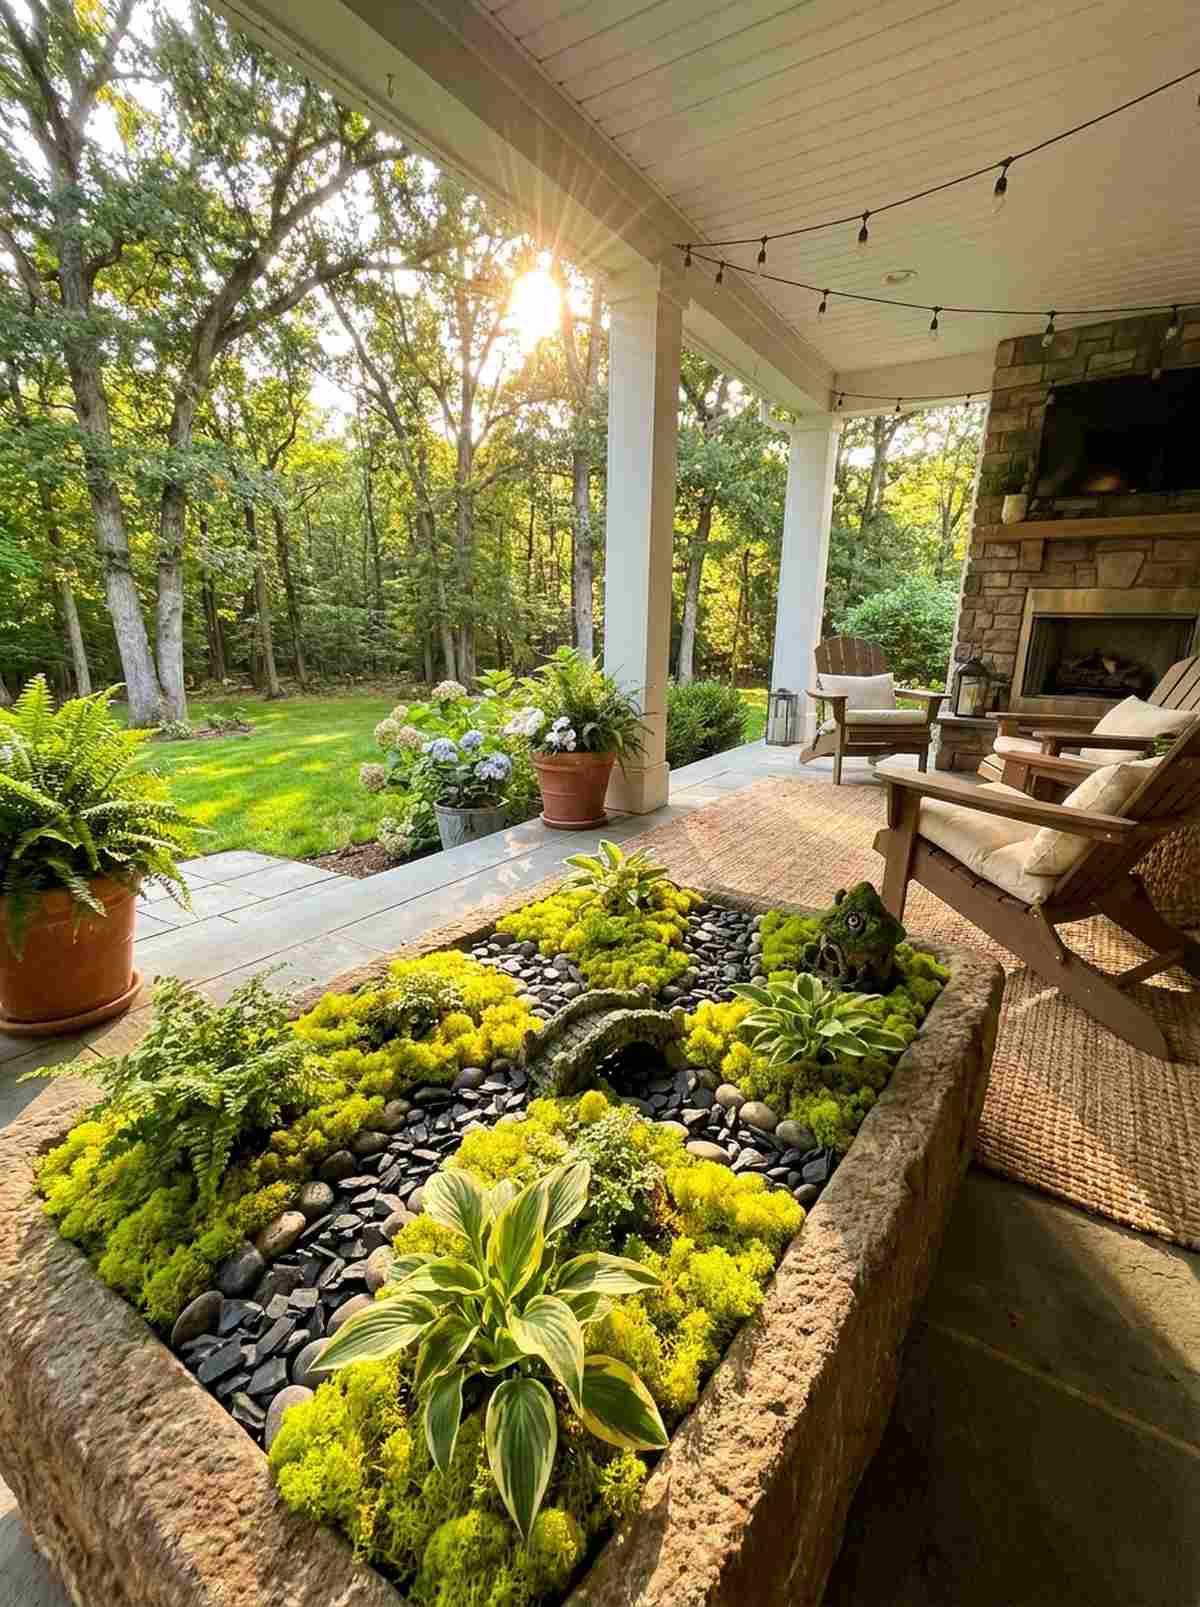
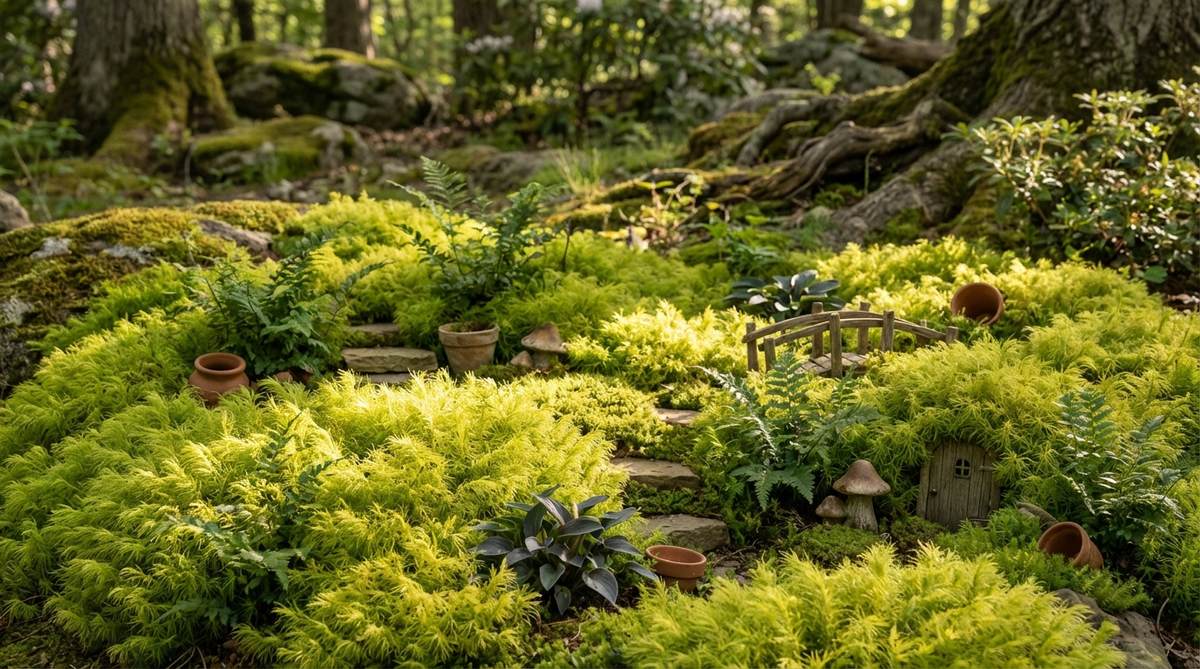
A bright chartreuse carpet dripping in golden sunlight gives off a radiant, enchanting energy straight out of a storybook. This shaded container greenery concept is the ultimate solution for brightening up dim, covered porches where traditional blooms fail.
Dumping dark accessories onto dark soil creates a muddy, chaotic mess that ruins the miniature illusion. Introducing golden Scotch foliage as a base instantly highlights darker terrarium accessories, giving a designer-level finish without extra effort. Pair it with dwarf hostas to manipulate depth perception.
Setting this up requires an initial investment of roughly $15–$30. It’s a fast upgrade that completely changes the vibe of a forgotten corner.
- Key Materials: Scotch moss starter plants, dwarf ferns, dark stone gravel
- Vibe / Style: Enchanted mystical glade
- Difficulty: Intermediate moisture management
- Budget Breakdown: Greenery: $15 | Stone accents: $10
- Creator’s Tip: Keep this variety out of harsh afternoon sun to prevent the delicate fronds from crisping.
- Smart Sourcing: Bulk dark slate chips (miniature size) or dwarf fern starter packs
3. Sheet Moss Terrarium Base
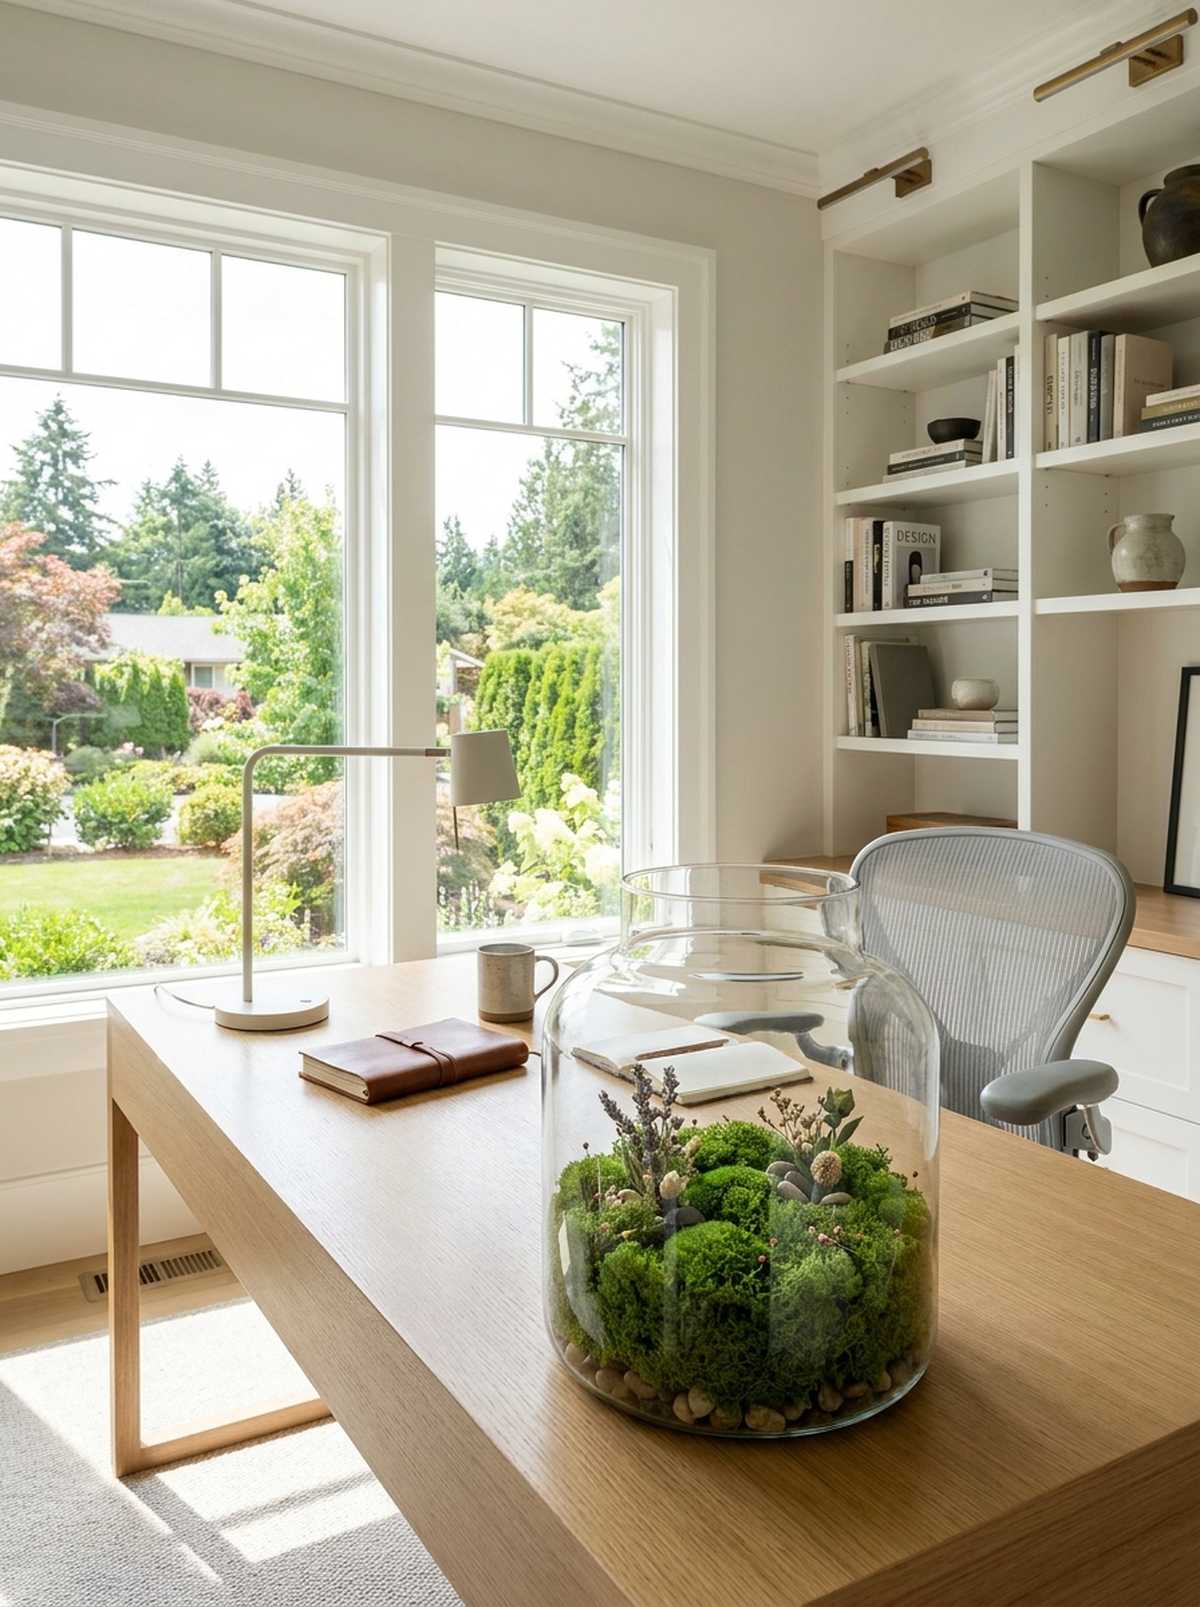
Crafting a zero-maintenance indoor ecosystem feels like capturing a slice of nature inside a pristine glass bubble. Using preserved indoor greenery is perfect for styling a cozy desk decor setup or bringing life to a windowless office.
Relying on living plants in low-light indoor spaces often leads to a heartbreaking, wilted display after just a month. Switching to high-quality miniature garden supplies like treated, dried materials ensures the landscape looks far more expensive than it is, maintaining vibrant color indefinitely. Pinning the edges down prevents the illusion from shifting.
Expect to spend about $20–$35 for a high-quality glass setup. Pin this if you’re planning a small space upgrade for your work desk.
- Key Materials: Glass vessel, floral pins, dried base materials
- Vibe / Style: Clean botanical modernism
- Difficulty: Very low maintenance
- Budget Breakdown: Preserved materials: $12 | Glass Terrarium: $20
- Creator’s Tip: Never water this setup; a light dusting with a dry paintbrush keeps it looking vibrant.
- Smart Sourcing: Pre-cut preserved moss sheets (bulk pack) or rust-proof floral pinning kits
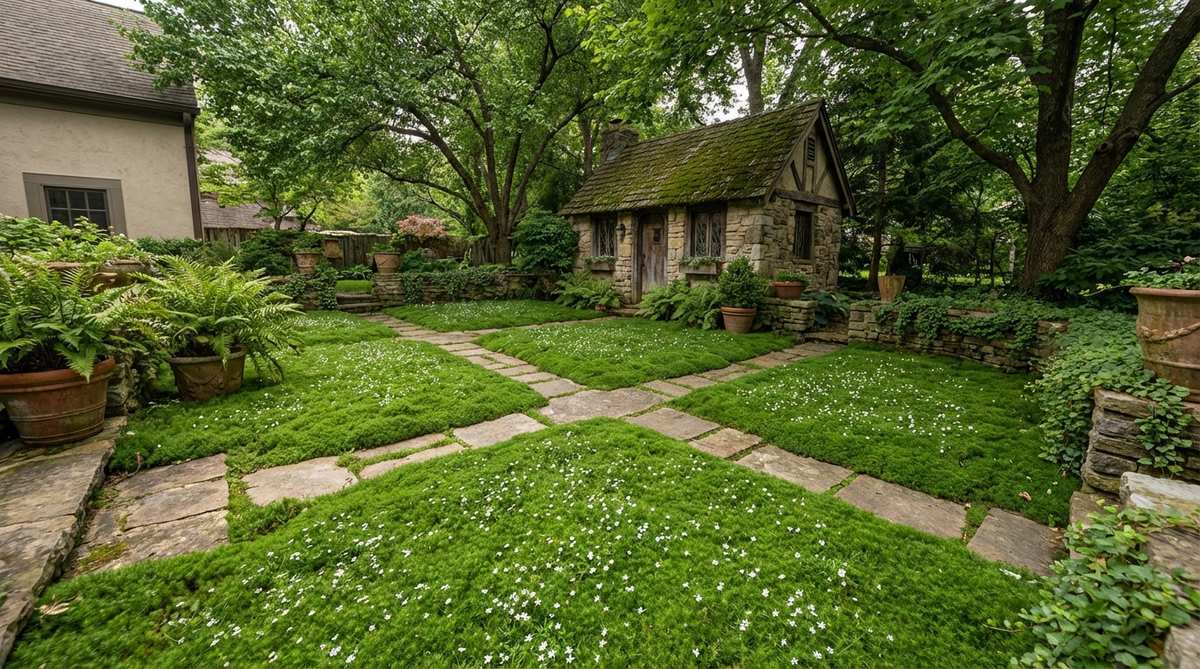
4. Creeping Thyme Fragrant Meadow
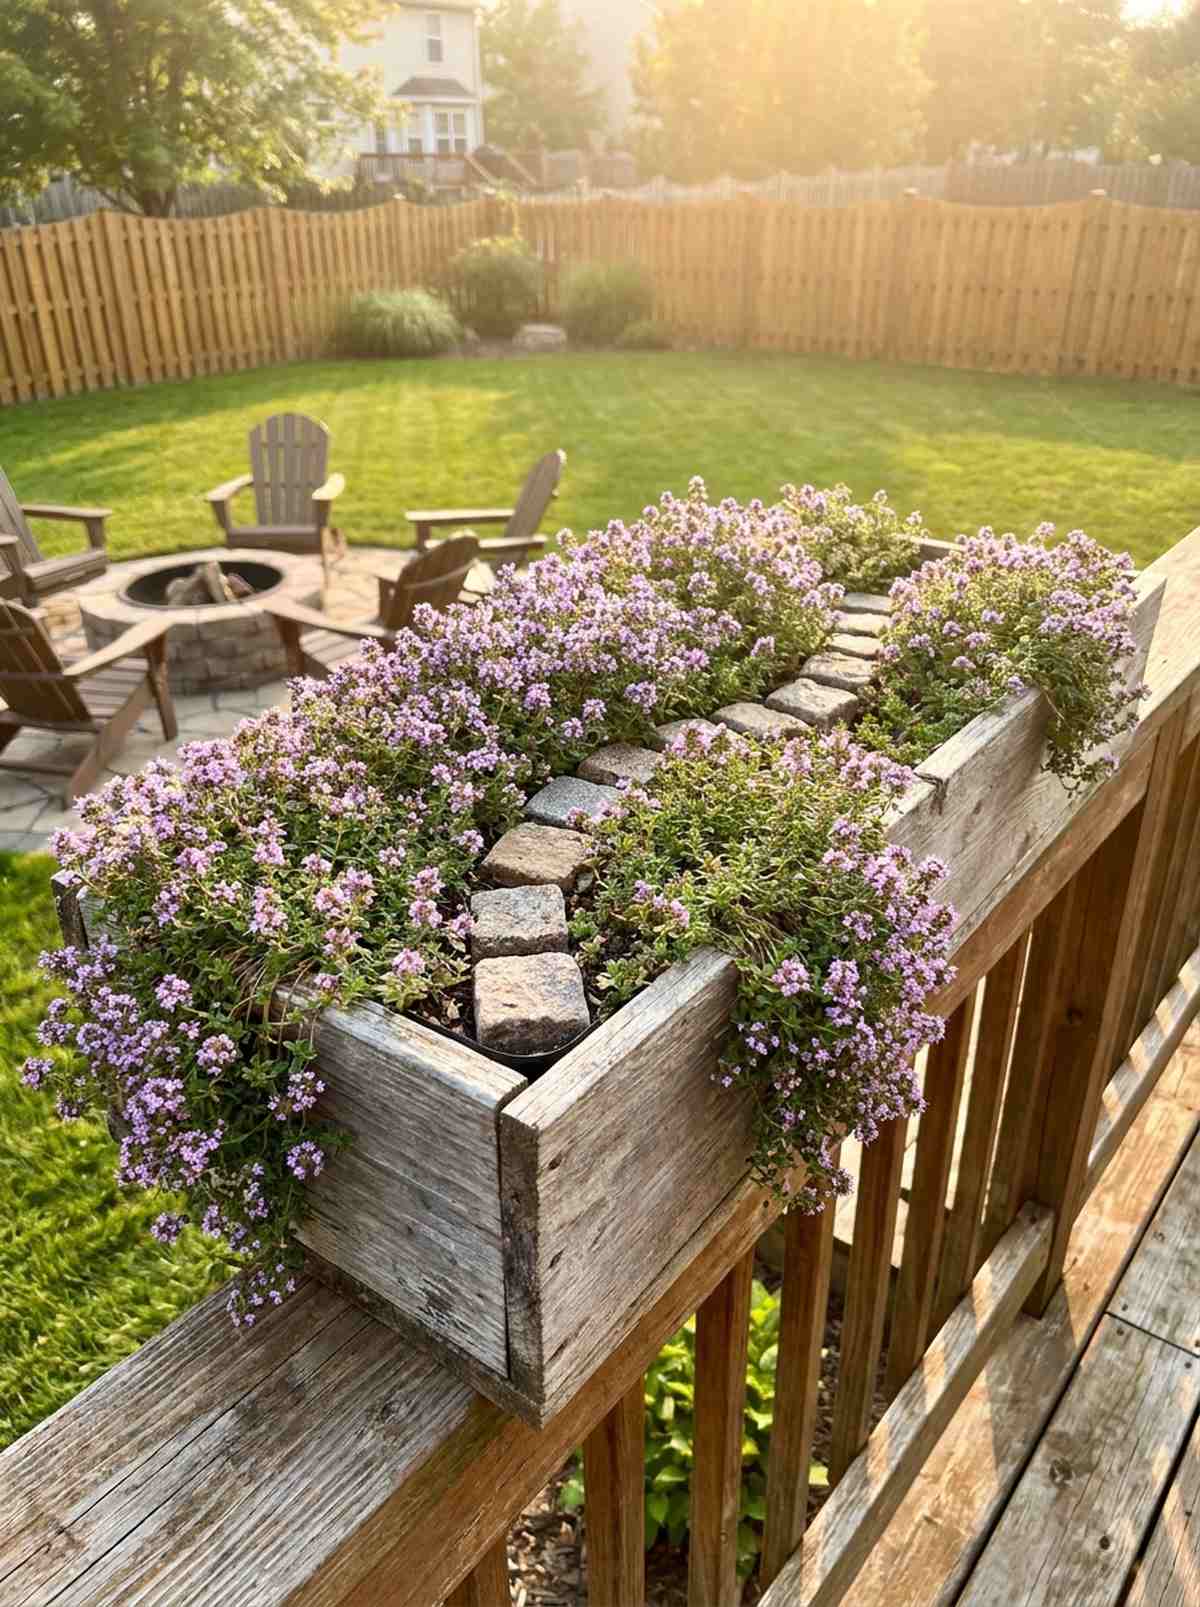
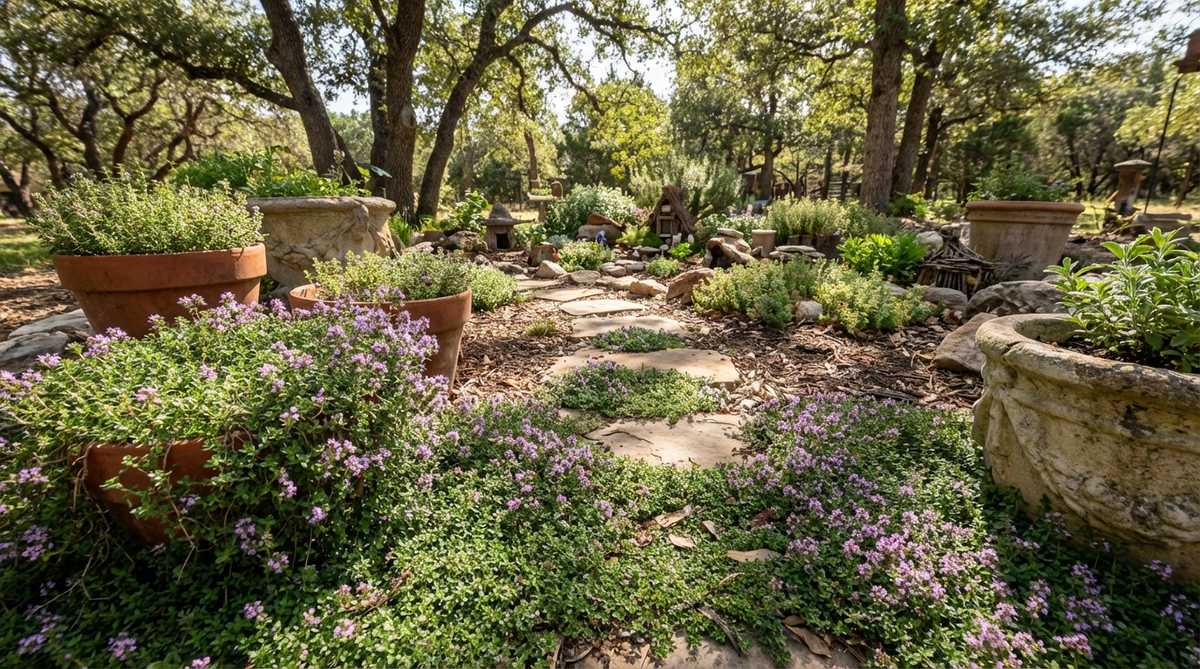
Running your hands over a sun-drenched, aromatic miniature lawn evokes the intoxicating feeling of a late summer afternoon. This scented outdoor micro-landscape thrives brilliantly when used in full-sun window boxes or large patio planters.
Forcing shade-loving moss into brutal sunlight is a guaranteed path to a brown, crispy disaster. Utilizing creeping thyme alongside premium fairy garden aesthetic accessories creates an incredibly resilient, high-end display that naturally flowers in purple hues. It drapes over the container edges for a lush, overgrown appeal.
You can establish this fragrant base for roughly $15–$25. Highly recommended for a quick weekend win that smells amazing.
- Key Materials: Elfin thyme plugs, sandy soil mix, miniature stepping stones
- Vibe / Style: Mediterranean miniature vineyard
- Difficulty: Beginner friendly
- Budget Breakdown: Thyme plugs: $15 | Soil: $8
- Creator’s Tip: Let the soil dry out completely between waterings to mimic its natural Mediterranean environment.
- Smart Sourcing: Drought-tolerant creeping thyme plugs (6-pack) or sealed miniature cobblestone paths
This next setup is ridiculously cheap but looks like a $150 custom landscape display straight from a boutique nursery…
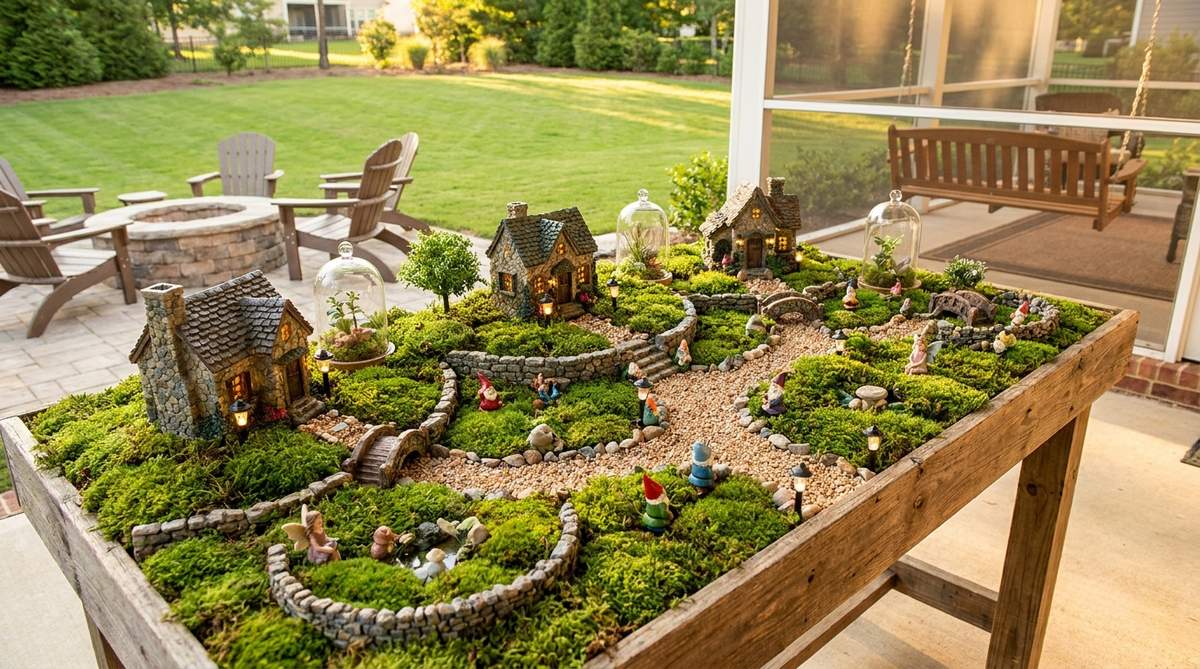
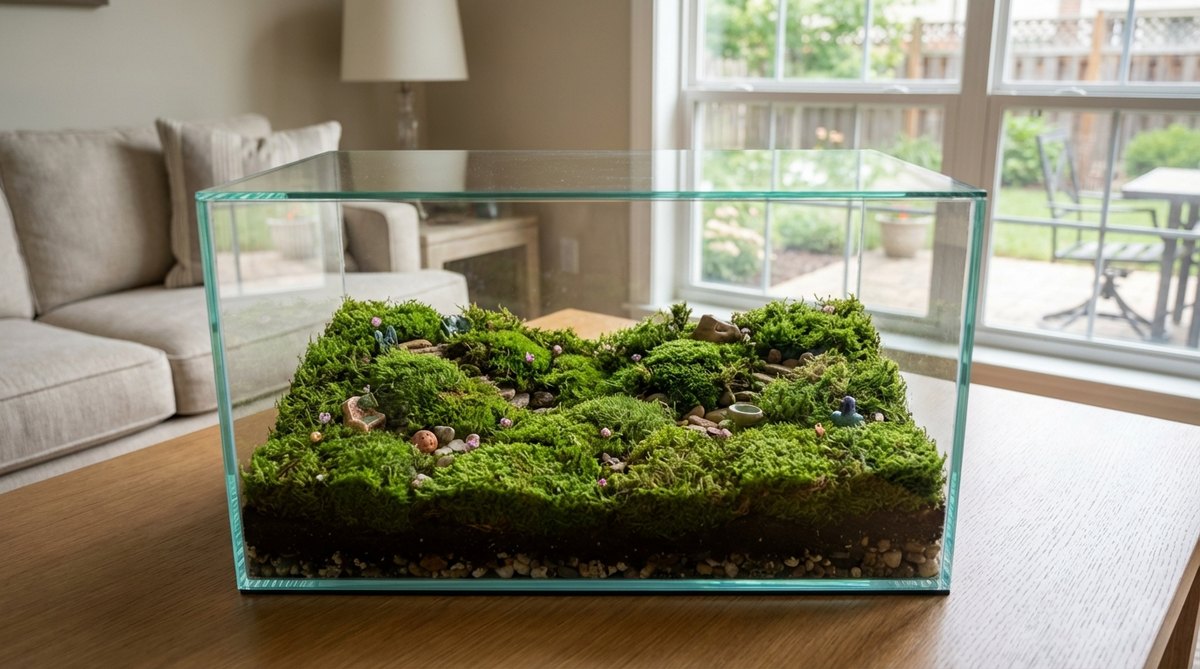
5. Mixed Moss Tapestry Ground
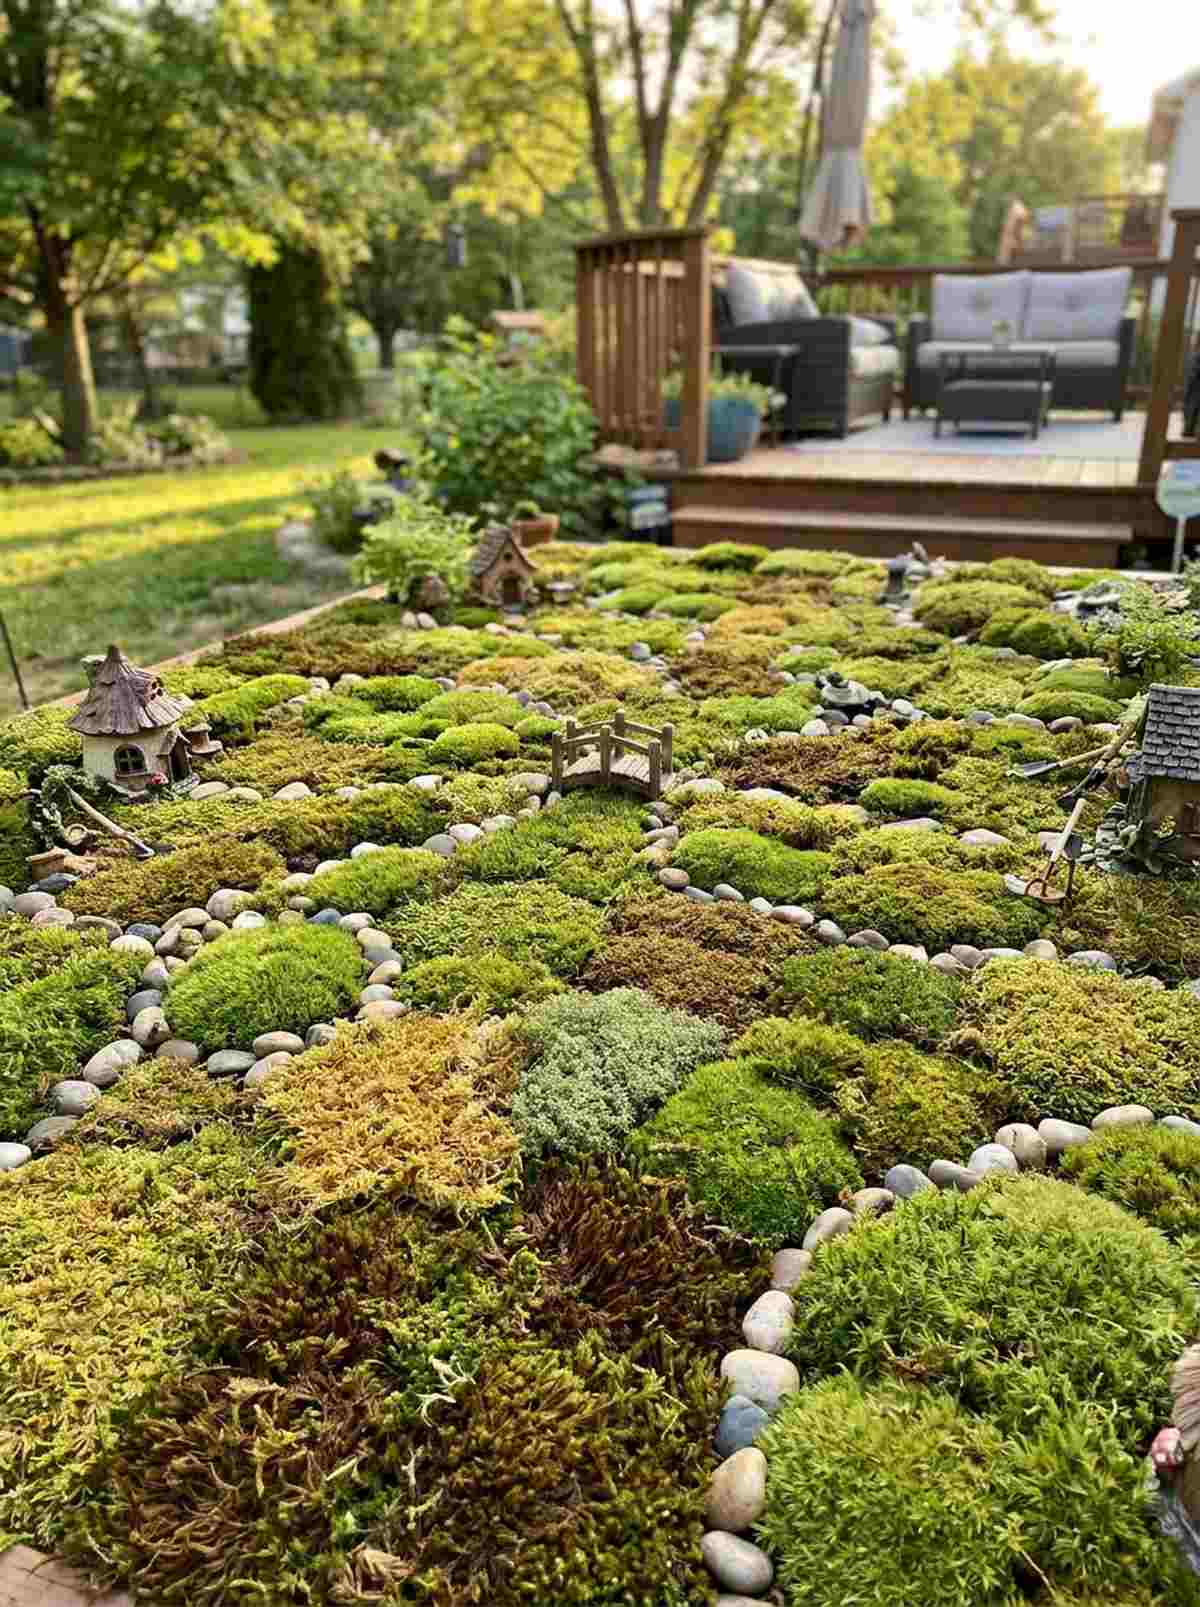
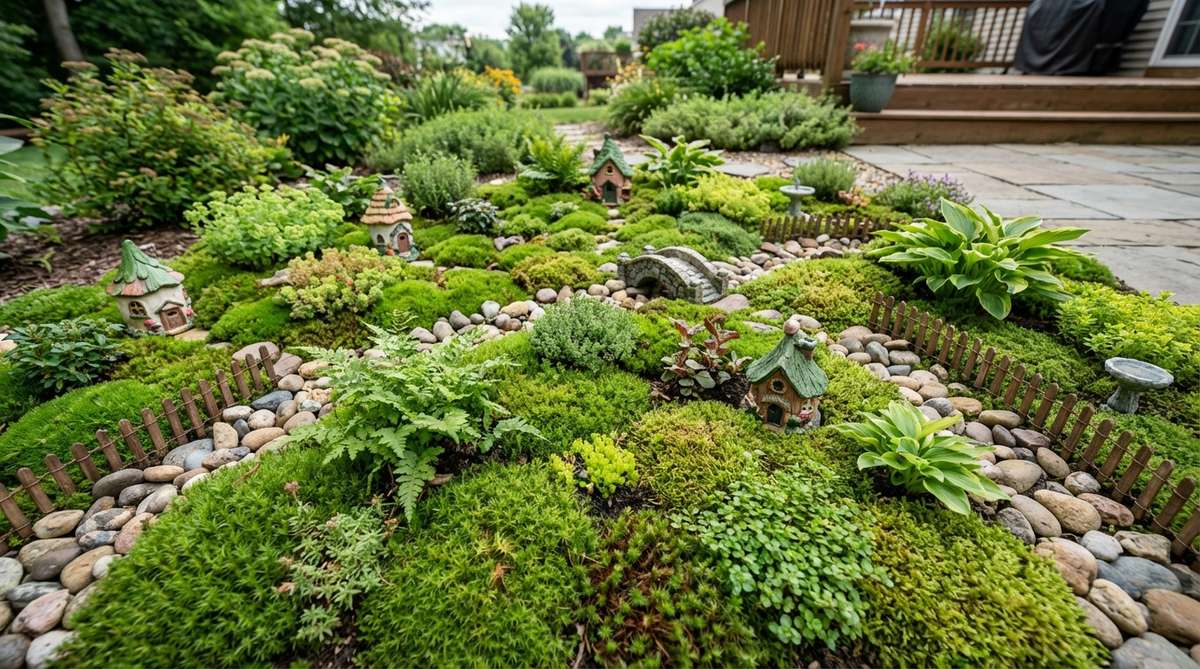
Weaving contrasting textures into a seamless patchwork creates an awe-inspiring, dimensional floor that feels rich and ancient. Building a multi-textured garden carpet works wonders for defining specific “rooms” within a massive outdoor fairy village.
A monochromatic base can quickly look flat and uninspired, ruining the immersive scale of the architecture. Blending different terrarium accessories and foliage types gives a designer-level finish, creating distinct borders without needing physical fences. Use small river rocks to organically separate competing moisture zones.
Creating this tapestry effect will run you about $30–$45 depending on the variety count. Save this concept to your outdoor landscaping board for future reference.
- Key Materials: Assorted living patches, boundary stones, varied soil types
- Vibe / Style: Grand estate landscaping
- Difficulty: Advanced moisture balancing
- Budget Breakdown: Assorted Greens: $25 | Boundary rocks: $10
- Creator’s Tip: Map out the zones on paper first so you don’t accidentally plant high-moisture and low-moisture varieties together.
- Smart Sourcing: Mixed live moss sampler boxes (bulk) or polished mini river stones (5lb bag)
Miniature Furniture Scenes For Inhabited Spaces
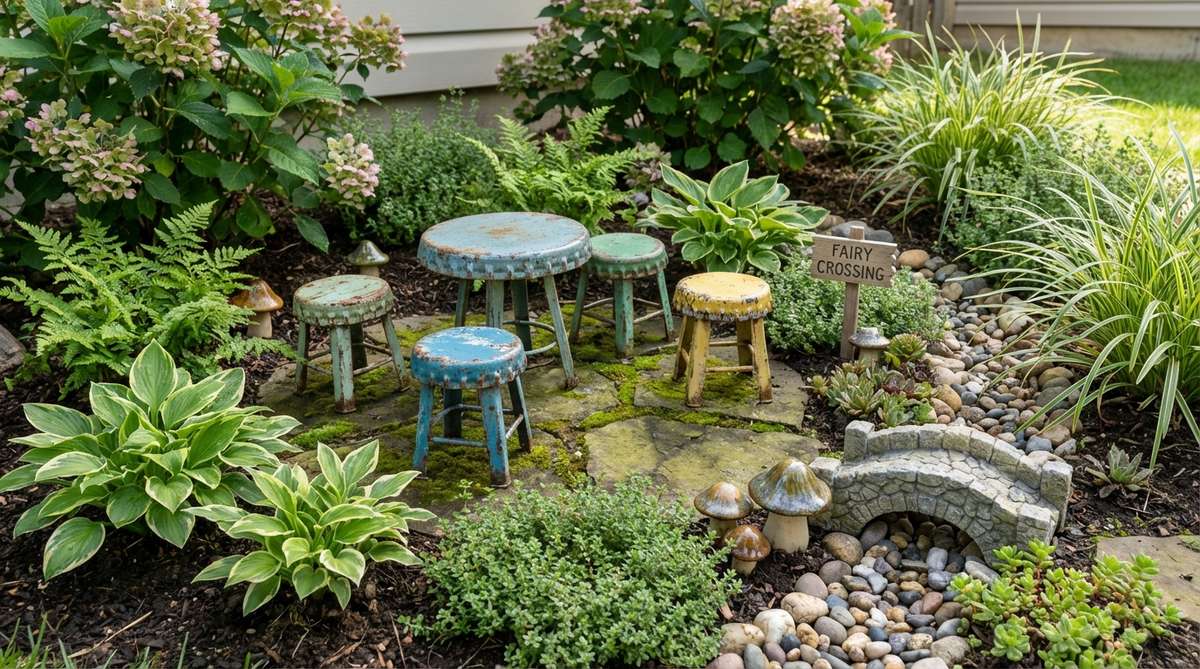
6. Twig Bistro Set
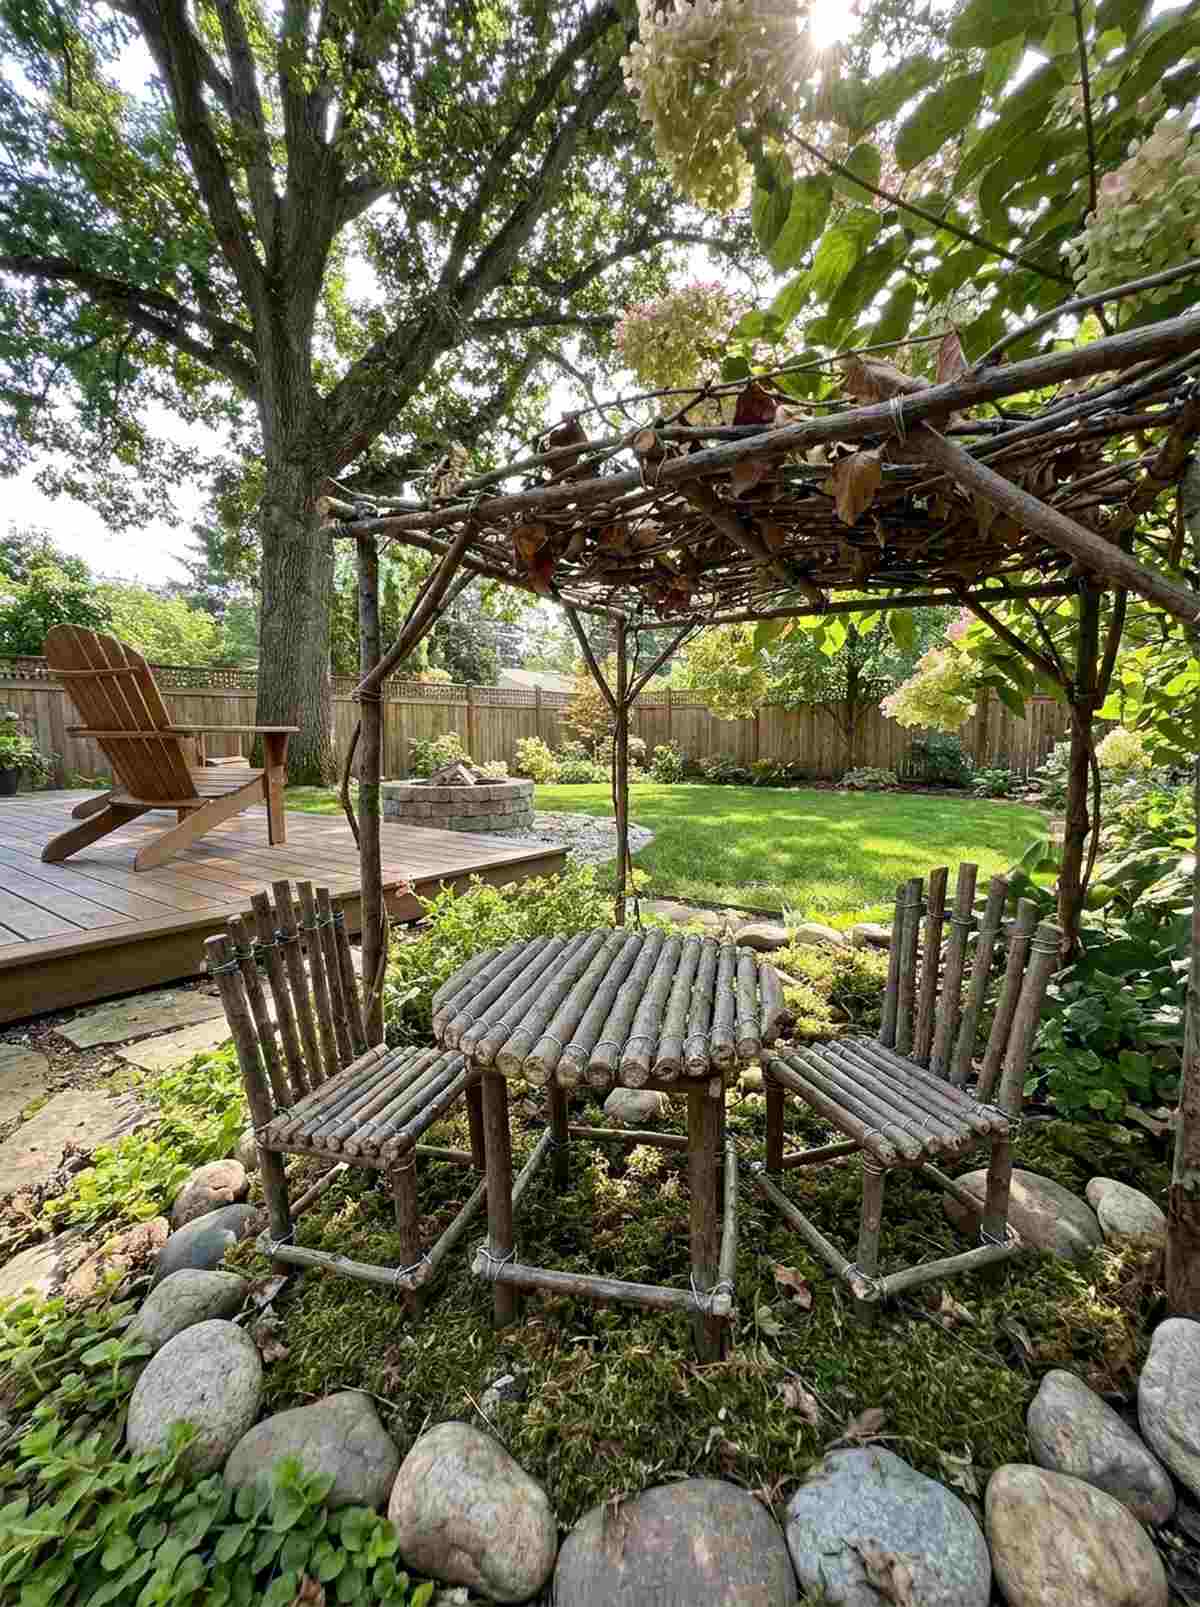
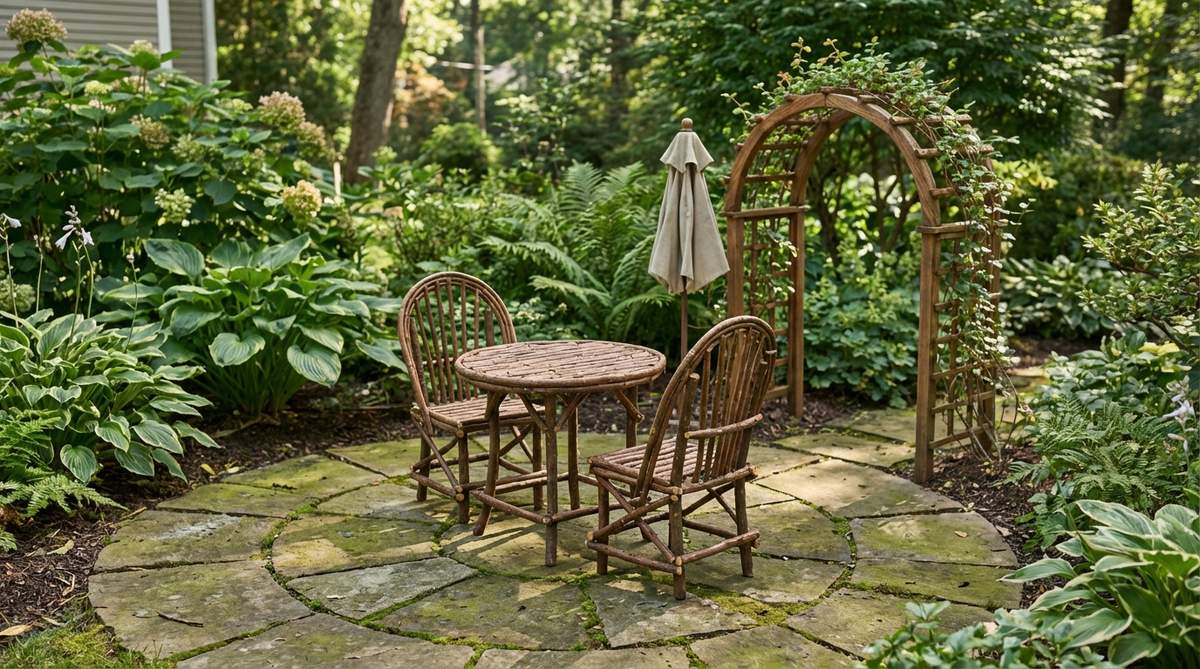
A rustic little dining setup sitting quietly beneath a tiny canopy feels like you’ve caught a secret gathering just after the guests left. This rustic miniature seating idea is phenomenal for adding lived-in charm to a garden corner.
Purchasing cheap plastic furniture often destroys the organic illusion of a natural micro-world. Fabricating or sourcing wood-based miniature garden supplies delivers a far more authentic, expensive aesthetic that weathers beautifully outdoors. Sealing the joints properly is the secret to surviving heavy rainstorms.
This handmade approach costs almost nothing—maybe $5 for glue and sealant. It’s an incredibly satisfying, low-cost project.
- Key Materials: Uniform yard twigs, waterproof wood glue, fine wire
- Vibe / Style: Organic woodland cafe
- Difficulty: Intermediate crafting
- Budget Breakdown: Sealant/Glue: $5 | Twigs: Free
- Creator’s Tip: Sand the twig ends completely flat before gluing to ensure the chairs don’t wobble on uneven ground.
- Smart Sourcing: Marine-grade waterproof wood glue or clear UV-resistant polyurethane spray
7. Acorn Cap Tea Service
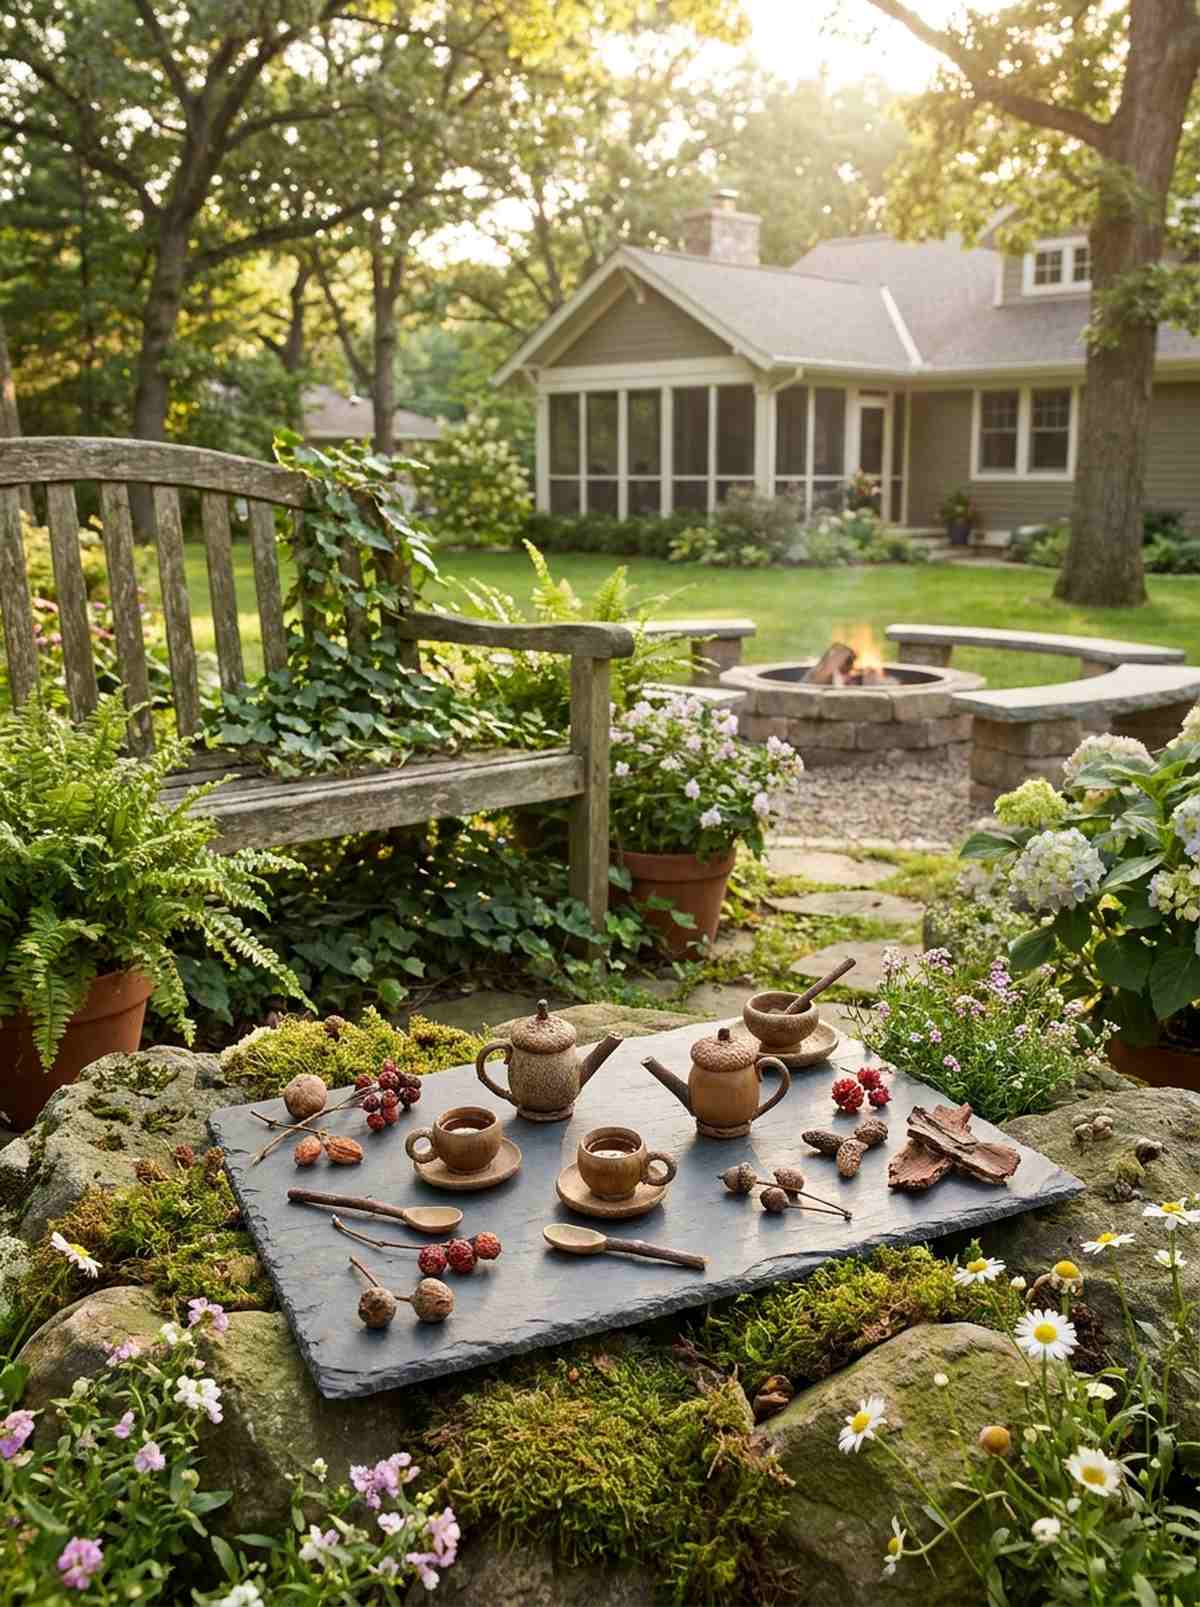
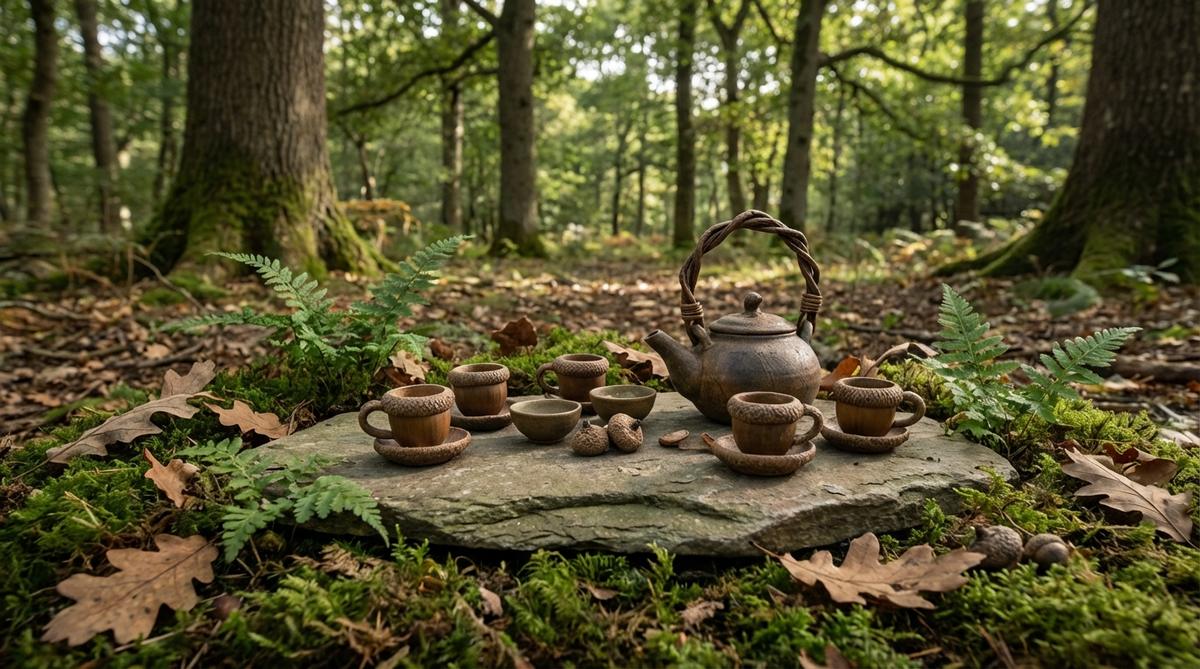
Tiny natural vessels resting on a stone slab invoke pure nostalgia, looking like a whimsical feast prepared by woodland creatures. Implementing foraged garden accents is the absolute best way to decorate a secret garden aesthetic without spending a dime.
Oversized, clunky resin dishes completely shatter the delicate scale of an authentic display. Utilizing real botanical elements looks far more expensive than it is, seamlessly blending the artificial elements with the living ones. A quick dab of adhesive transforms a simple seed pod into a functional-looking prop.
This costs absolutely $0 if you forage your own materials. Pin this if you love utilizing nature’s free craft supplies.
- Key Materials: Oak acorn caps, flat slate chip, tiny twigs
- Vibe / Style: Foraged fairy feast
- Difficulty: Easy precision gluing
- Budget Breakdown: Materials: Free | Craft Adhesive: $5
- Creator’s Tip: Bake the foraged acorns at 200°F for 20 minutes to eliminate any hitchhiking insects before adding them to your display.
- Smart Sourcing: Precision tip cyanoacrylate glue or miniature crafting tweezers
8. Polymer Clay Garden Bench
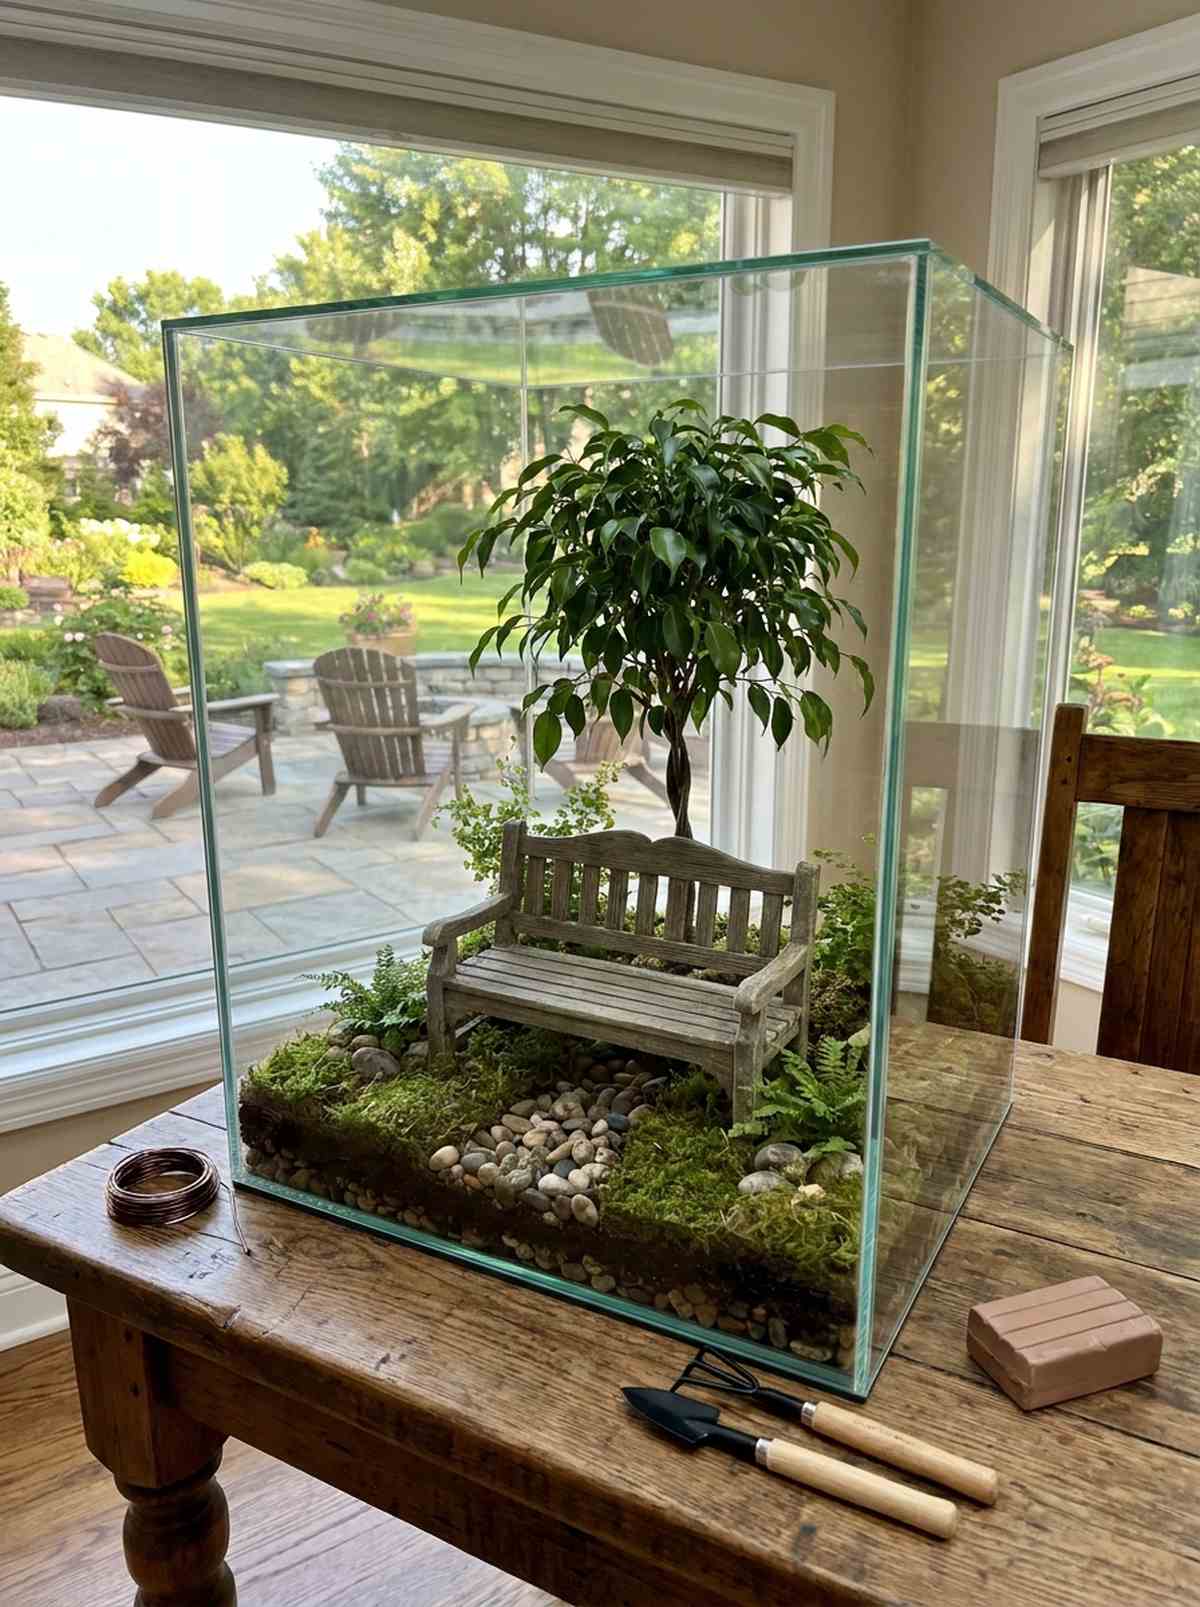
A custom-sculpted resting spot tucked beneath a miniature weeping fig feels like an intimate, quiet sanctuary. Crafting custom weather-proof seating allows you to perfectly match the color palette of any indoor or outdoor terrarium.
Relying solely on pre-made options severely limits your creative control over the scene’s layout. Sculpting your own pieces and baking them alongside specialized terrarium accessories creates a uniquely tailored environment that holds up against humidity. Using an internal wire armature ensures the bench won’t snap under pressure.
You can sculpt multiple pieces from a $15 block of high-quality clay. A fantastic weekend project for creative minds.
- Key Materials: Oven-bake polymer clay, armature wire, outdoor acrylics
- Vibe / Style: Tailored park landscaping
- Difficulty: Intermediate sculpting
- Budget Breakdown: Clay blocks: $15 | Wire/Paint: $10
- Creator’s Tip: Add texture to the unbaked clay using a stiff toothbrush to simulate realistic aged concrete or weathered wood.
- Smart Sourcing: Professional firm polymer clay (bulk brick) or flexible aluminum armature wire
9. Bottle Cap Patio Furniture
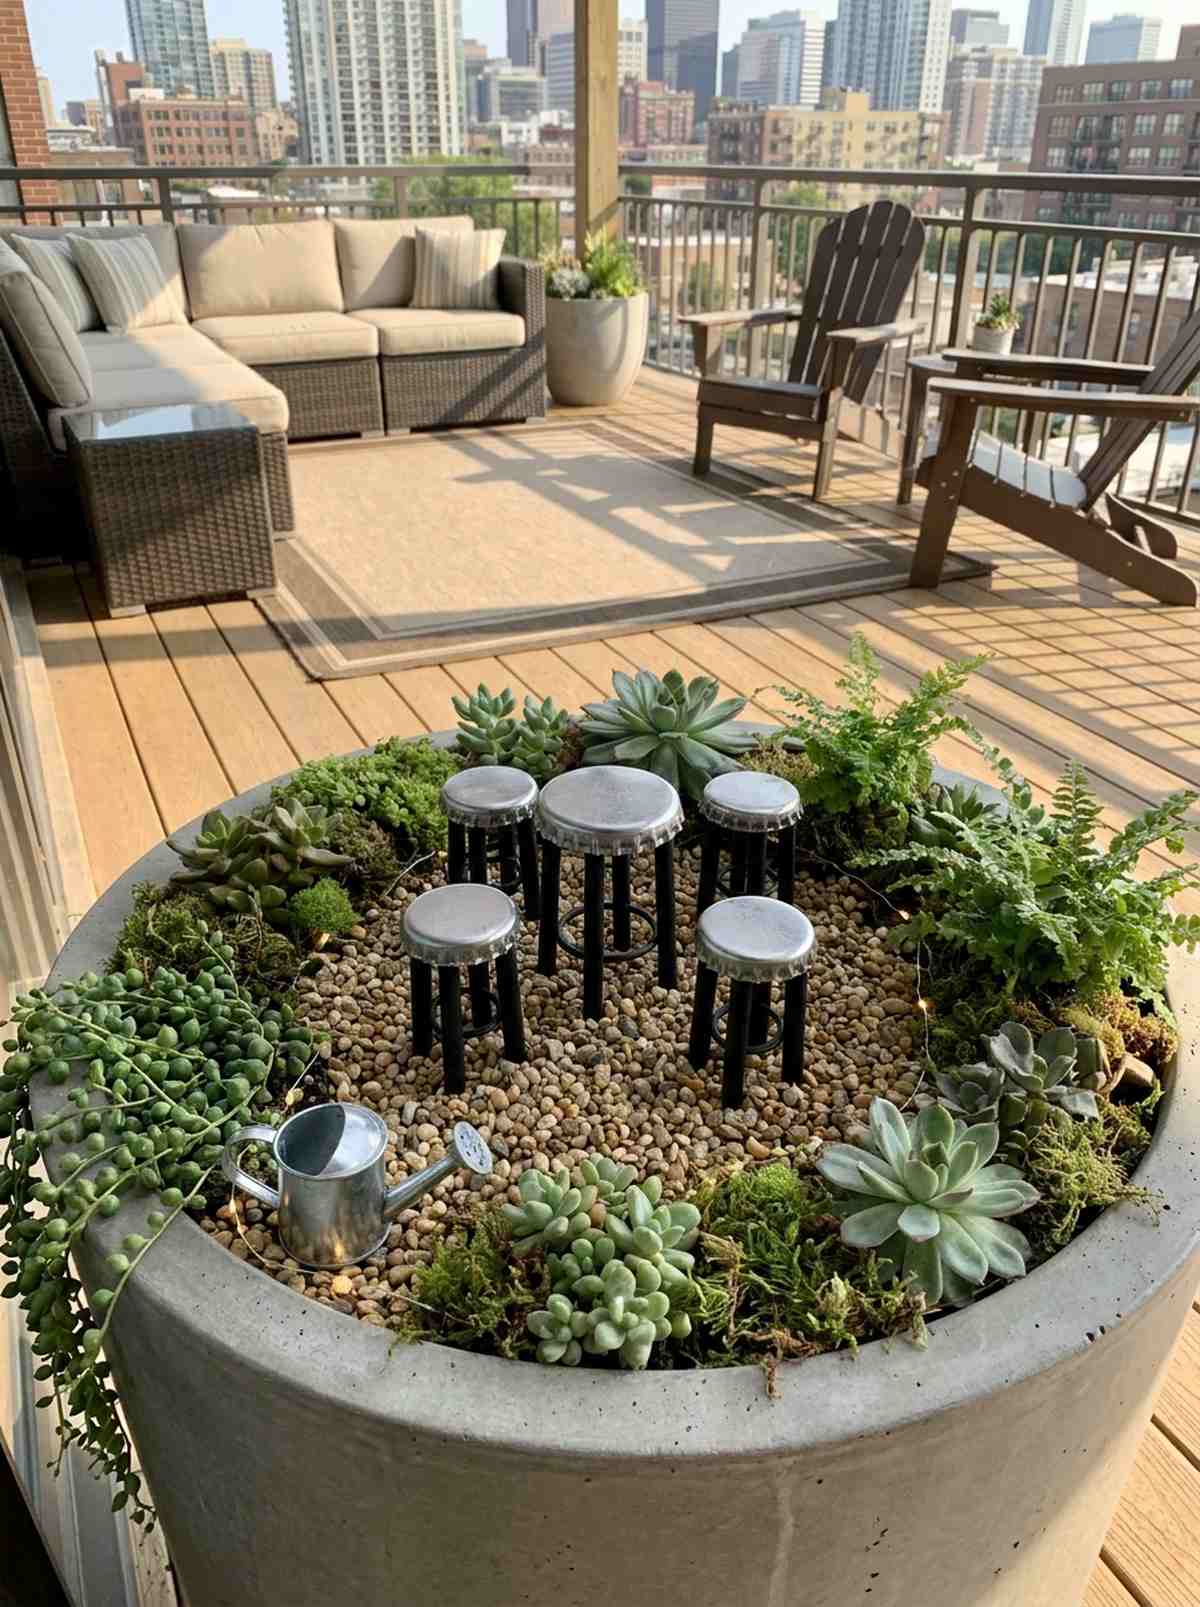
A cluster of metallic, industrial-chic stools sitting on a gravel patio gives off an unexpectedly modern, edgy energy. This upcycled miniature decor technique is brilliant for creating a funky, contemporary vibe in urban balcony planters.
Standard woodland themes aren’t the only way to build a captivating micro-world. Repurposing everyday waste into high-end fairy garden kits accessories delivers a surprisingly premium look that sparks immediate conversation. Leaving the raw metal exposed contrasts beautifully against soft, living greenery.
This project is essentially free, utilizing household recycling. Save this idea if you want a break from the traditional rustic look.
- Key Materials: Metal bottle caps, wooden dowels, strong adhesive
- Vibe / Style: Industrial modern patio
- Difficulty: Easy assembly
- Budget Breakdown: Dowels: $4 | Caps: Recycled
- Creator’s Tip: Paint the dowel “legs” matte black to mimic wrought iron and elevate the industrial aesthetic.
- Smart Sourcing: Pre-cut wooden craft dowels (multi-size pack) or industrial-strength epoxy resin
💡 Must-Have Supplies for High-End Setups
To build these setups faster and ensure they last, skip the generic craft aisles and invest in the right foundational kits.
- Base & Support: Pre-cut drainage mesh and activated charcoal bulk bags
- Setup Tools: Stainless steel long-handle terrarium tool starter kits
- Weather/Durability Protection: Matte finish UV-resistant clear acrylic sealant
Most people get their structural layout completely wrong… until they try the exact pathway technique coming up next.
10. Wire Swing With Bead Seat
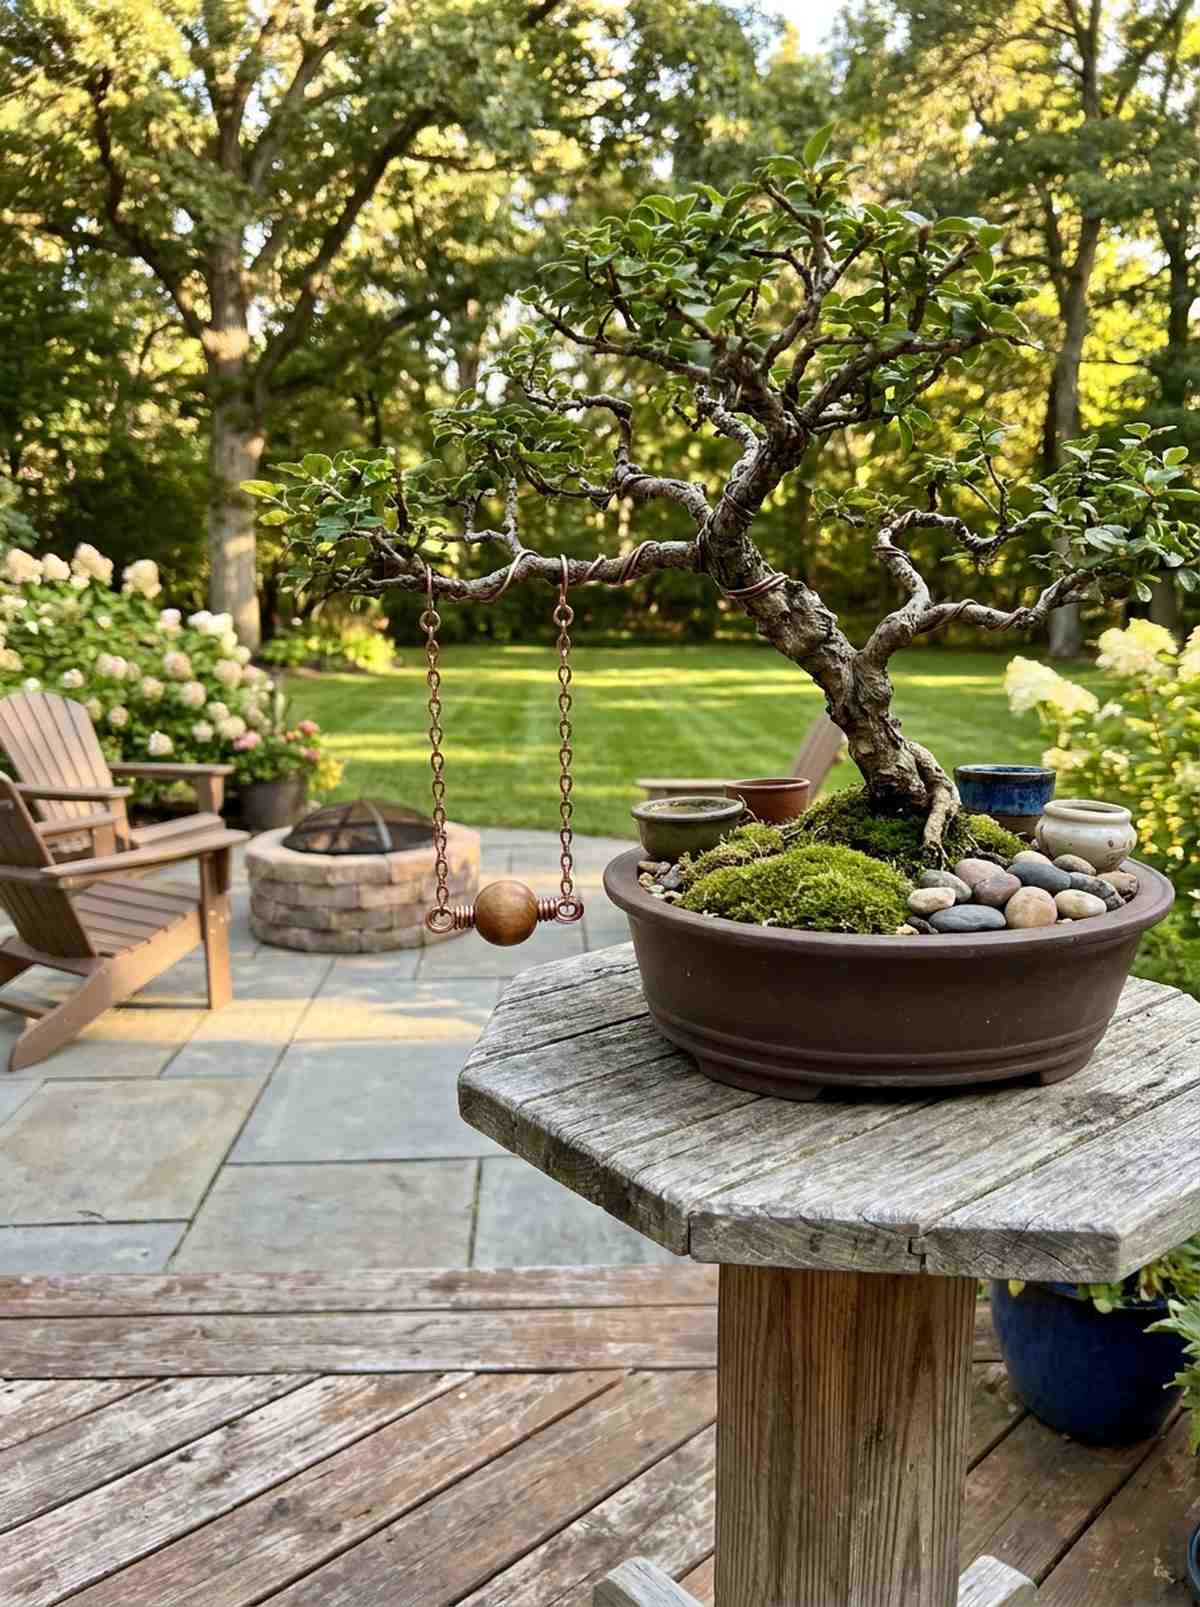
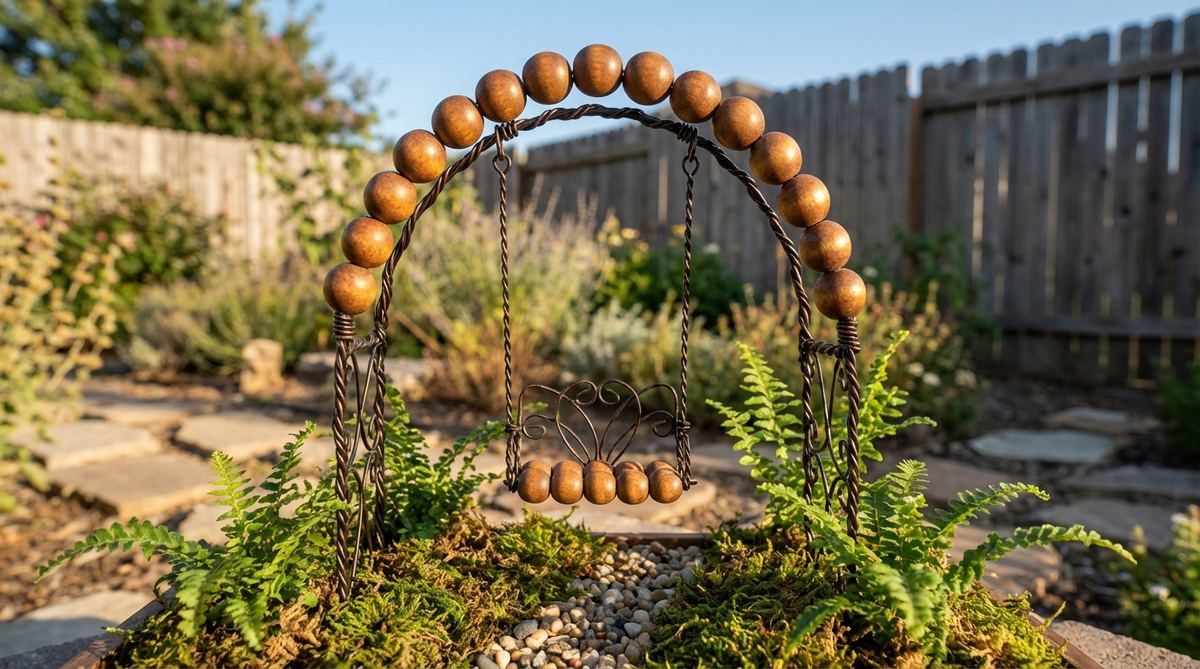
A delicate swing swaying gently in the breeze adds an undeniable sense of life and motion to a static scene. Rigging up interactive micro-architecture is the perfect secret garden aesthetic addition to hang from the branches of a dwarf bonsai.
Displays that lack vertical integration often feel flat and uninspired to the naked eye. Suspending handcrafted elements introduces dynamic energy, and when paired with premium miniature garden supplies, it elevates the entire visual narrative. It acts as a brilliant focal point that draws the eye upward.
You can wire this together for less than $10 using basic jewelry supplies. It completely transforms the atmosphere of the space.
- Key Materials: Craft wire, large wooden bead, hanging chain
- Vibe / Style: Playful hidden sanctuary
- Difficulty: Easy wire wrapping
- Budget Breakdown: Wire/Chain: $6 | Beads: $4
- Creator’s Tip: Use a spot of superglue where the wire loops through the bead to prevent the seat from tilting unevenly.
- Smart Sourcing: Tarnish-resistant copper craft wire (spool) or miniature jewelry chain links
Architectural Accessories That Define Structure
11. Pebble Stepping Stone Path
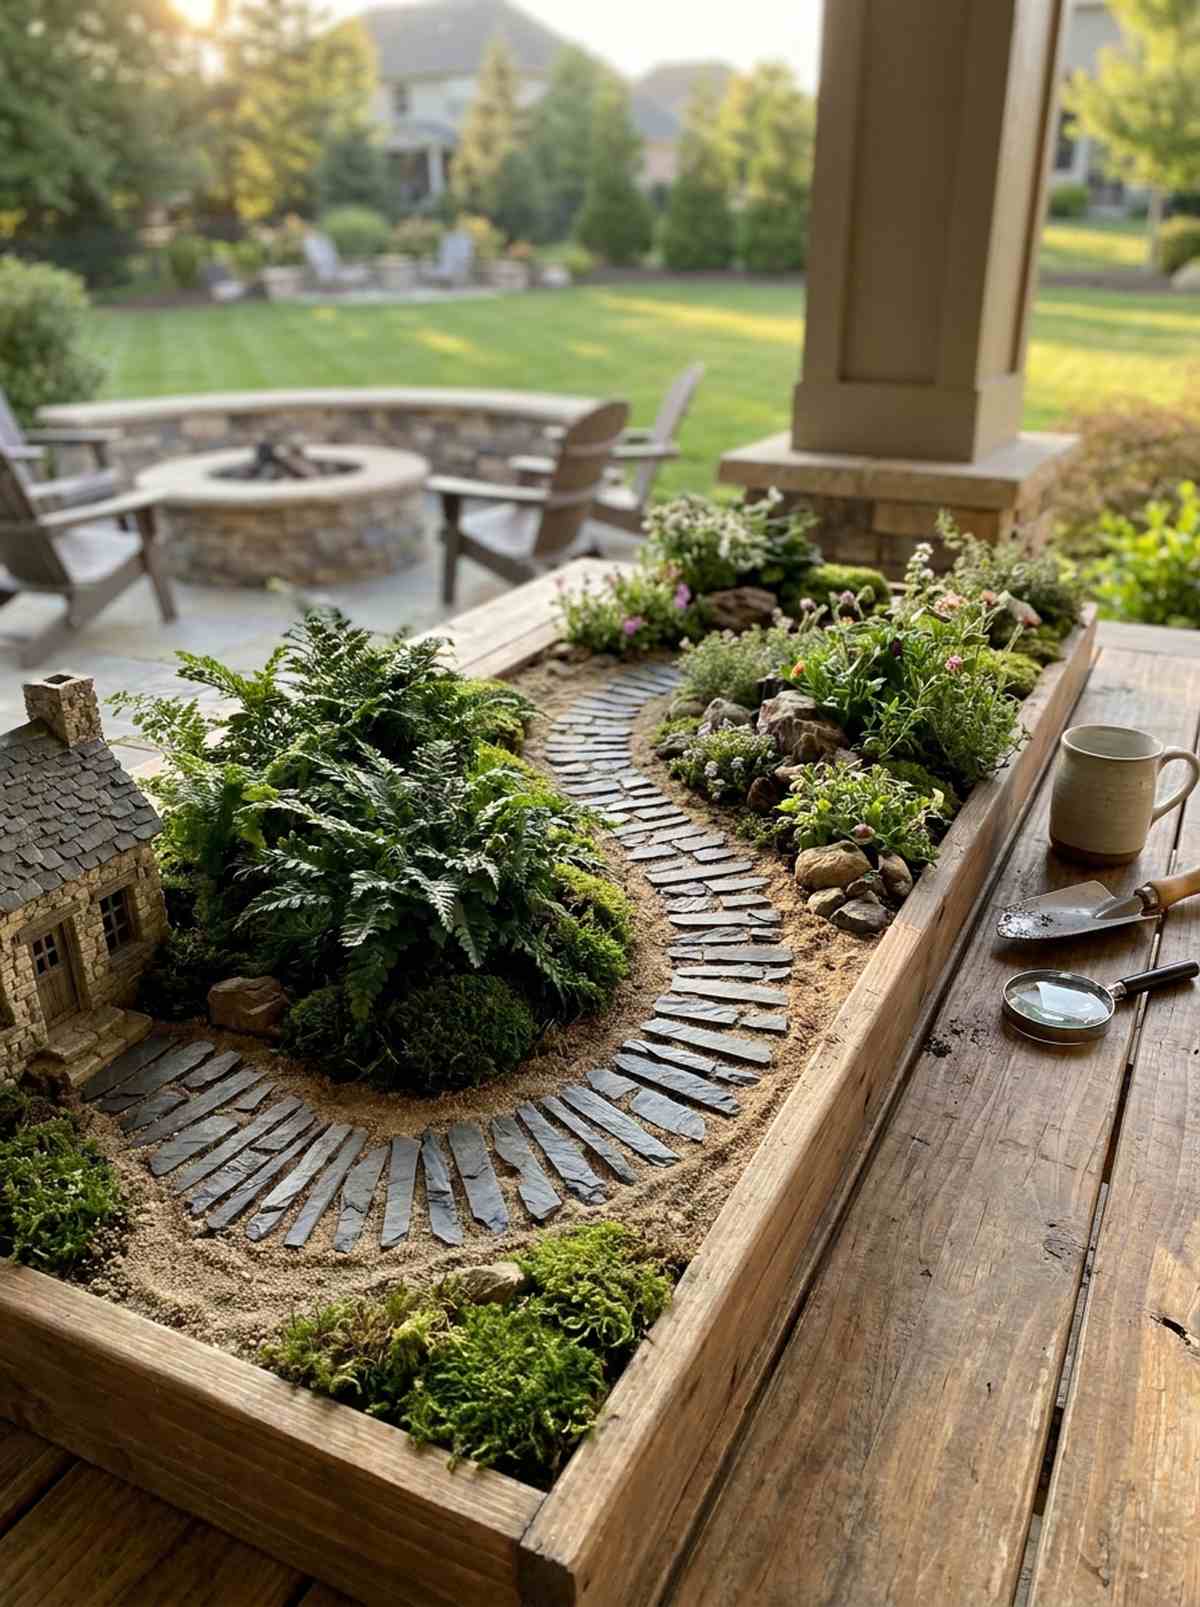
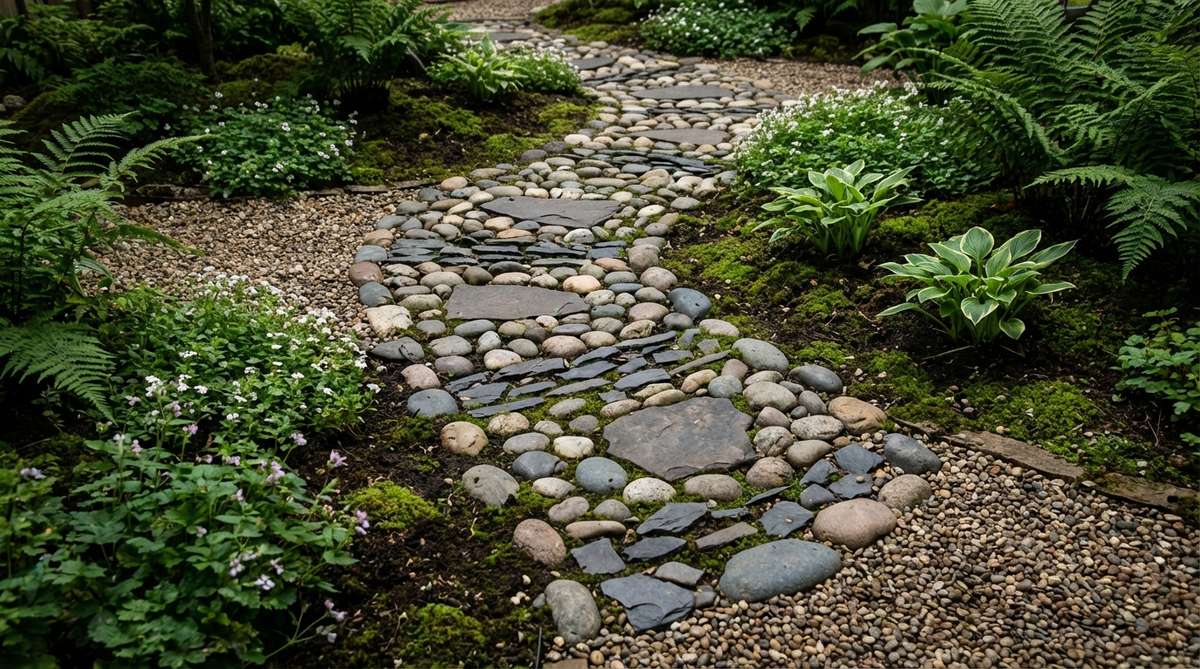
A winding stone walkway disappearing behind a lush plant creates intense visual curiosity and a sense of destination. Installing a meandering miniature pathway is an absolute must-have feature for guiding the viewer’s eye through a large tabletop display.
Simply tossing rocks onto the dirt looks chaotic and destroys the illusion of human-like intent. Embedding flat slate pieces purposefully gives a designer-level finish, making the landscape feel established and historically grounded. Tamping them down slightly into the soil ensures they look like a permanent fixture rather than an afterthought.
A bag of premium stones will cost you roughly $10–$15. Pin this layout trick to instantly upgrade your garden’s flow.
- Key Materials: Flat slate chips, fine boundary sand, leveling tool
- Vibe / Style: Classic cottage walkway
- Difficulty: Easy placement
- Budget Breakdown: Slate chips: $10 | Border sand: $5
- Creator’s Tip: Place the stones closer together near the “house” and space them further apart as the path wanders into the “wild” areas.
- Smart Sourcing: Uniform flat slate mini chips (bulk pack) or fine-grain decorative terrarium sand
12. Miniature Picket Fence Boundary
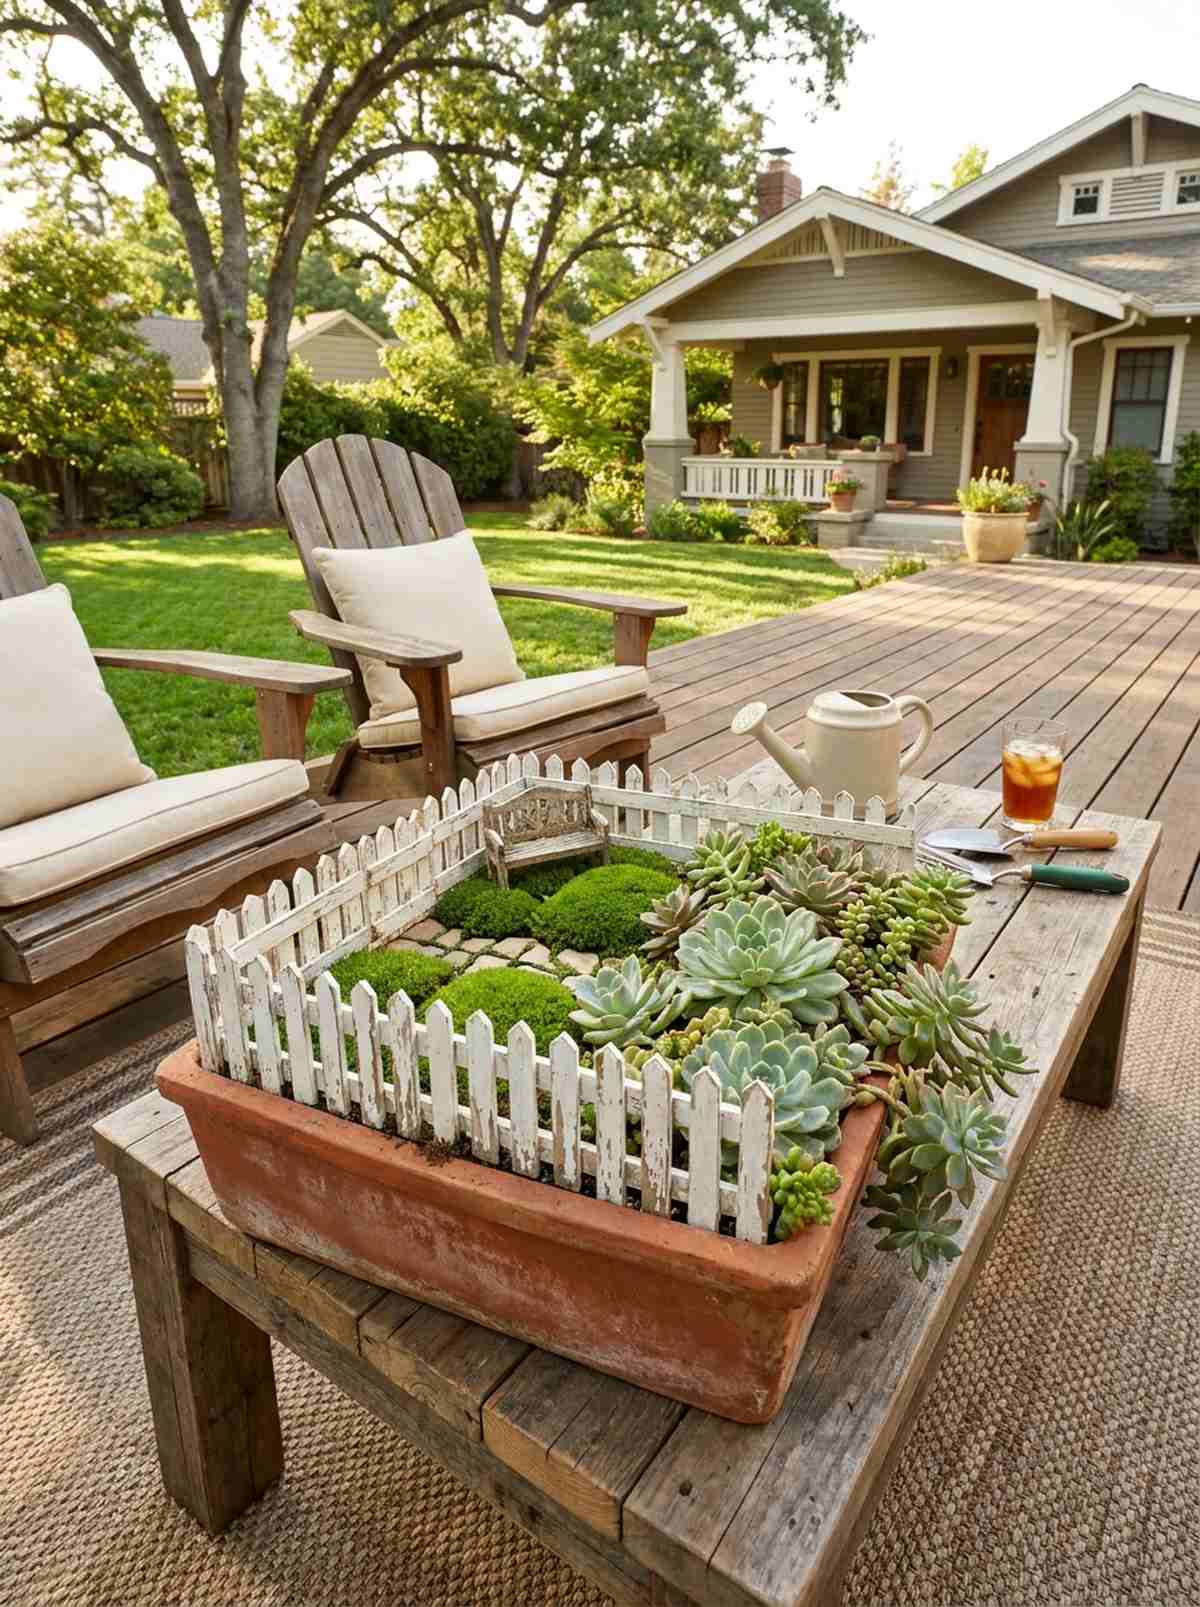
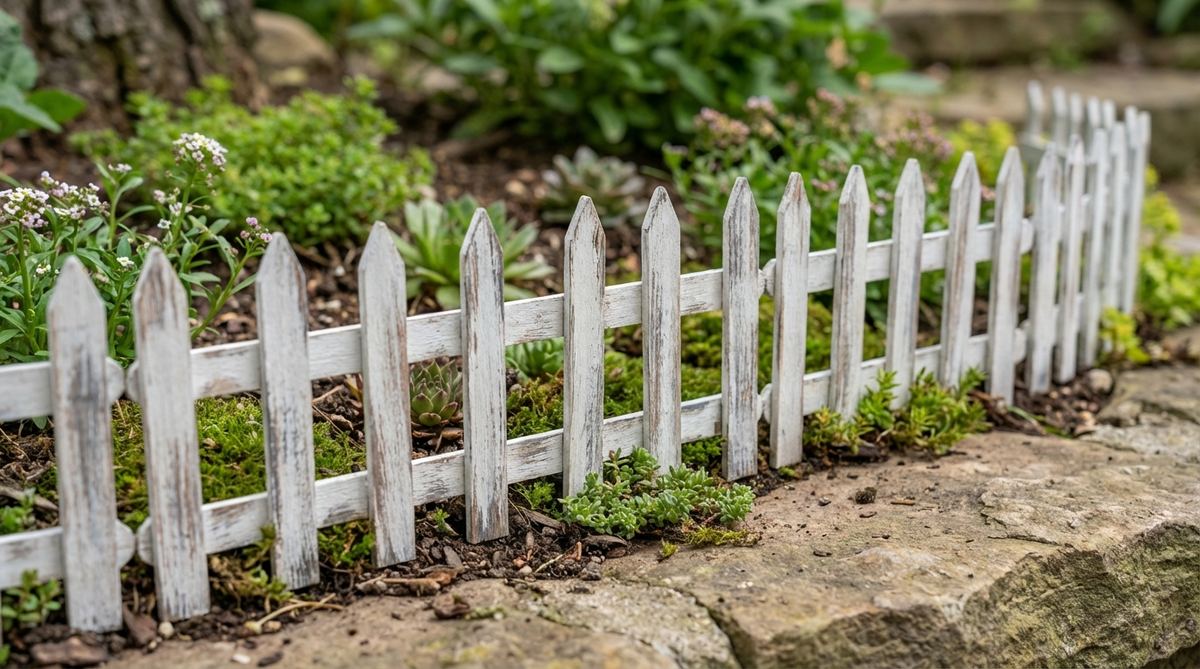
A classic, weathered white fence framing a tiny yard brings an overwhelming sense of cozy domesticity to the wild greenery. Utilizing structured garden borders works brilliantly to protect delicate moss patches from aggressive sprawling succulents in a shared container.
Without hard boundaries, fast-growing plants will swiftly swallow your expensive architectural accessories. Constructing your own barriers out of craft sticks looks far more expensive than it is when detailed with a dry-brush weathering technique. It neatly compartmentalizes the visual chaos into digestible, charming zones.
This barrier build costs around $8 in basic wood supplies. A phenomenal trick for maintaining long-term container organization.
- Key Materials: Wooden craft sticks, outdoor white acrylic, wood glue
- Vibe / Style: Rustic suburban miniature
- Difficulty: Intermediate repetitive crafting
- Budget Breakdown: Craft sticks: $5 | Paint: $3
- Creator’s Tip: Lightly sand the edges of the painted fence with fine-grit sandpaper to reveal the wood underneath for an authentic weathered look.
- Smart Sourcing: Pre-cut wooden craft sticks (bulk box) or weatherproof outdoor acrylic paint set
13. Stone Bridge Over Dry Creek
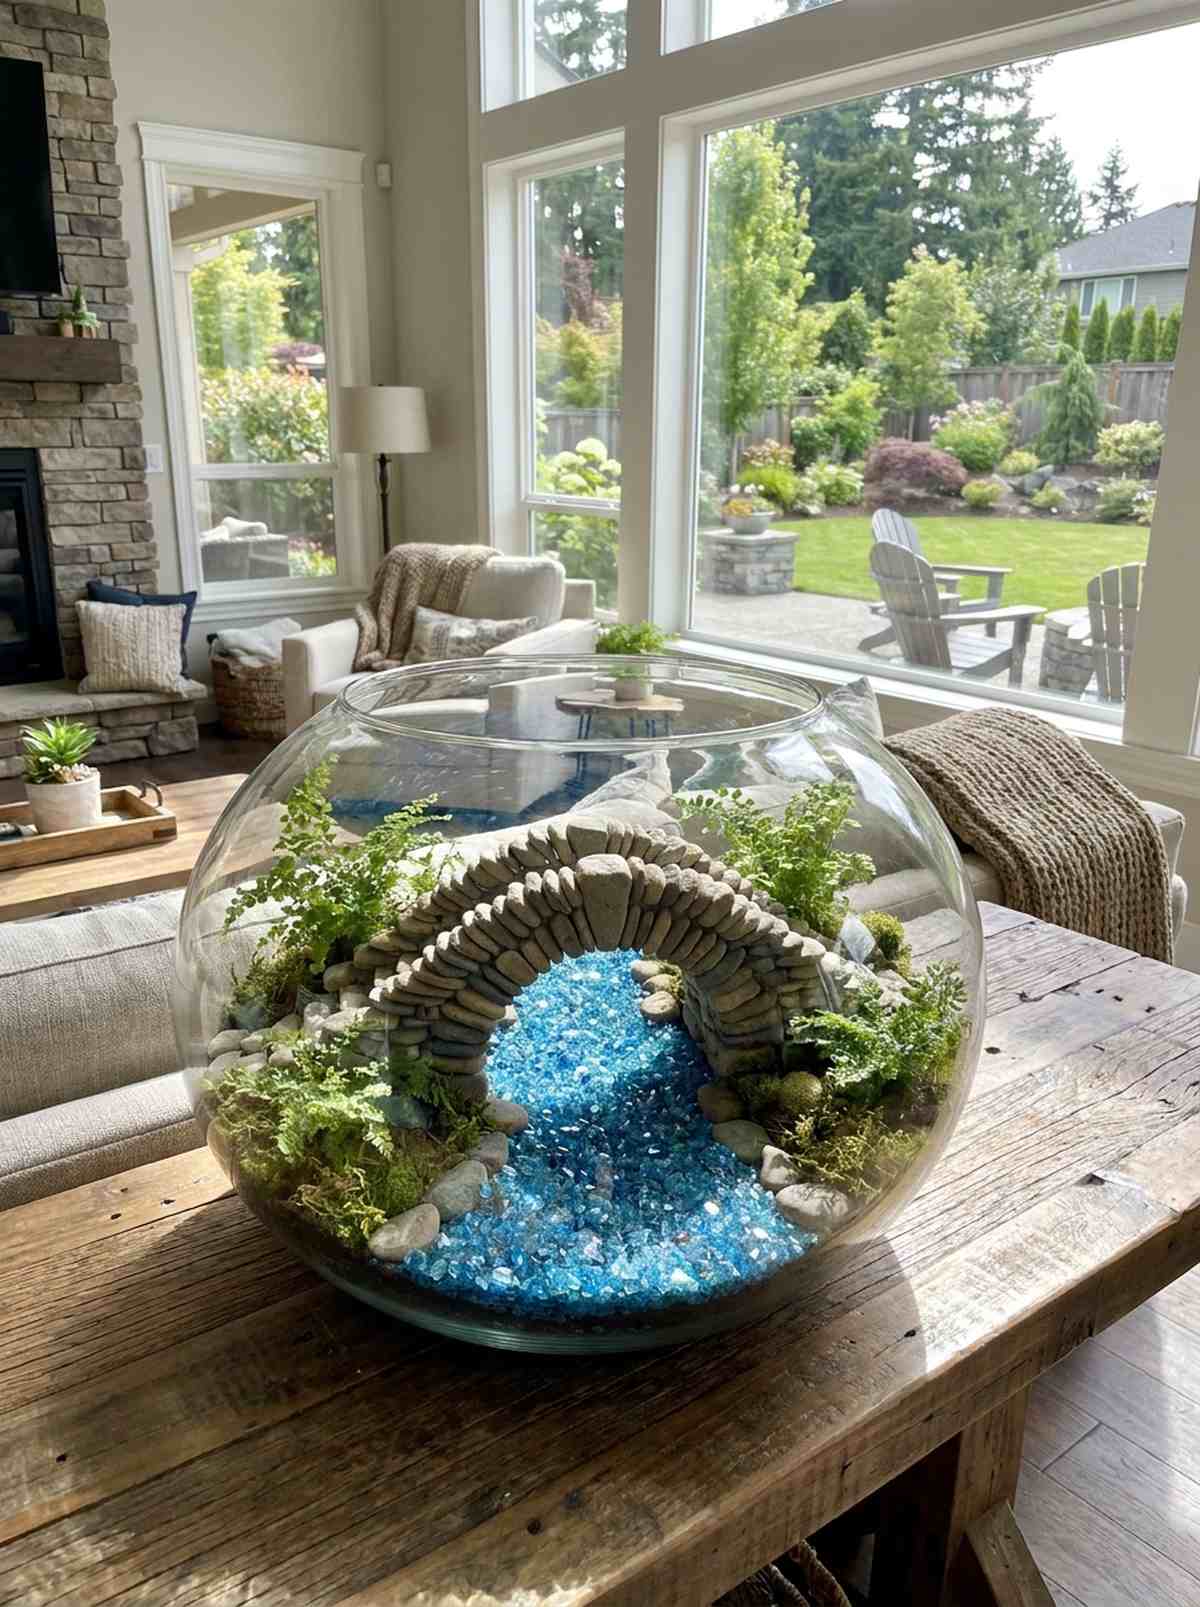
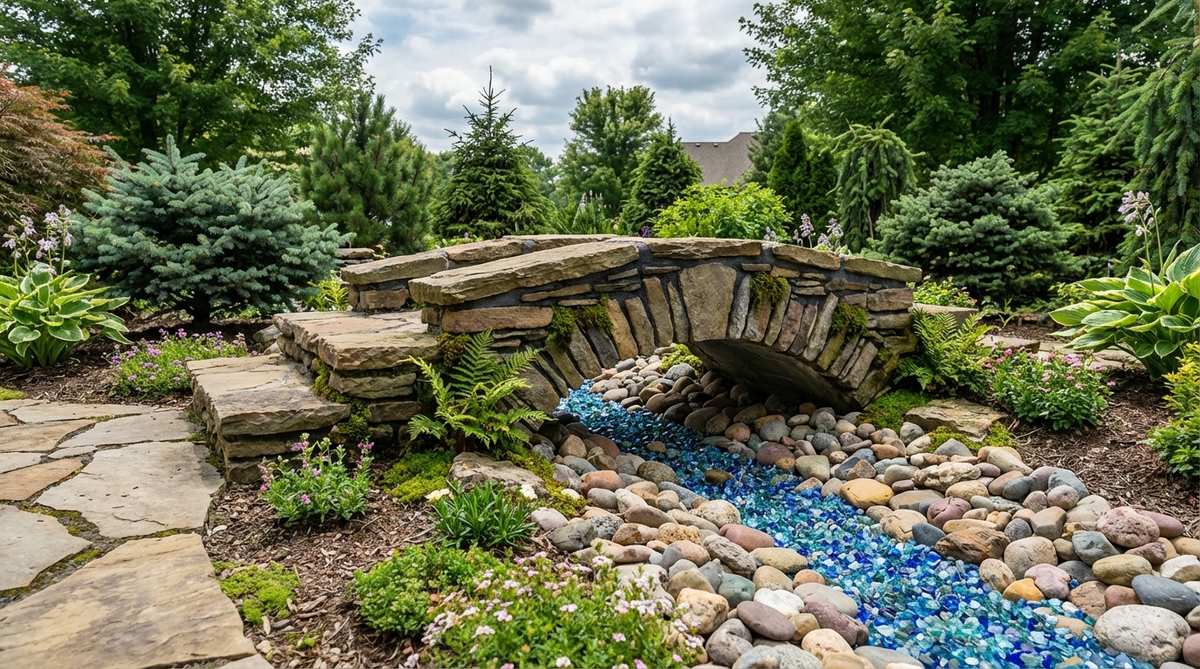
An arched stone crossing spanning a shimmering blue glass river creates a breathtaking, dramatic focal point. Building a dry faux water feature is the ultimate solution for adding aquatic aesthetics to an indoor space without dealing with algae or pumps.
Real water features in small pots inevitably turn into stagnant mosquito breeding grounds. Faking the flow with crushed glass and premium fairy garden kits accessories delivers a surprisingly premium look that requires zero maintenance. The mortared bridge anchors the entire scene with undeniable gravity.
You can execute this dramatic landscape feature for roughly $20–$35. Save this to your high-end terrarium inspiration board.
- Key Materials: Blue glass gravel, flat stacking stones, aquarium-safe adhesive
- Vibe / Style: Tranquil botanical park
- Difficulty: Advanced mortaring
- Budget Breakdown: Glass gravel: $12 | Stones/Adhesive: $15
- Creator’s Tip: Build the bridge over a cardboard arch form covered in wax paper, let it dry completely, and then remove the form.
- Smart Sourcing: Crushed blue faux-water glass (bulk bag) or clear aquarium-safe silicone sealant
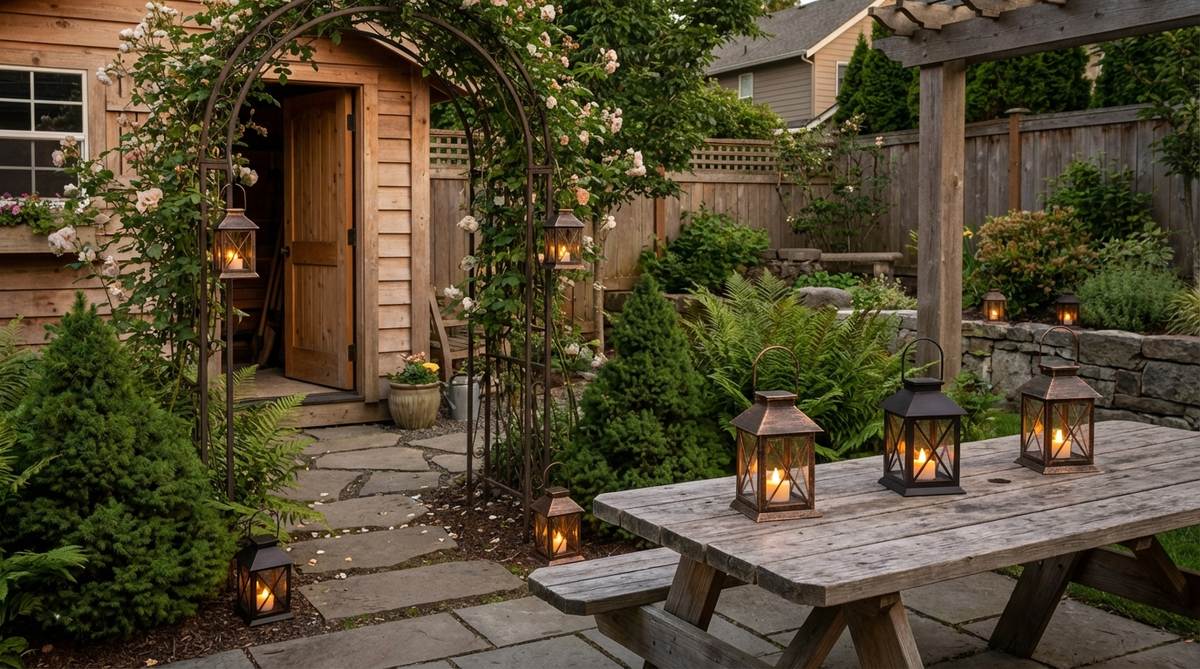
14. Twig Arbor With Flowering Vine
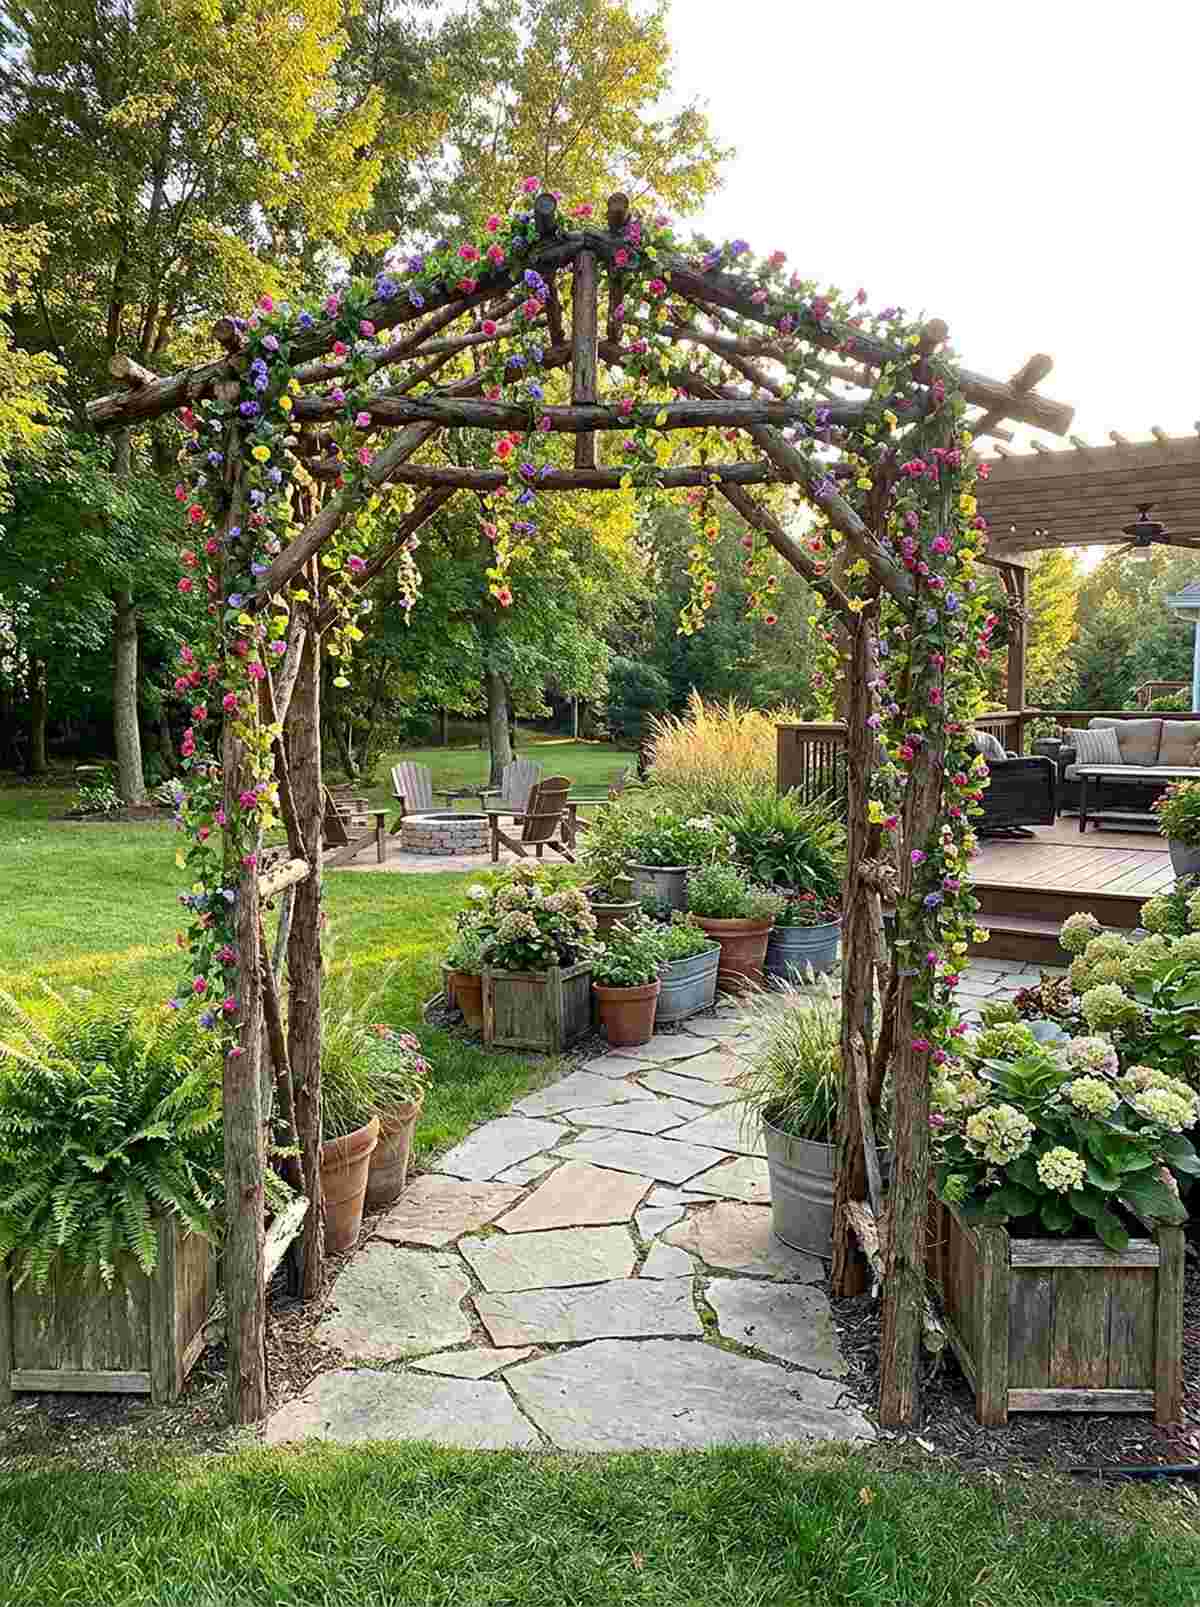
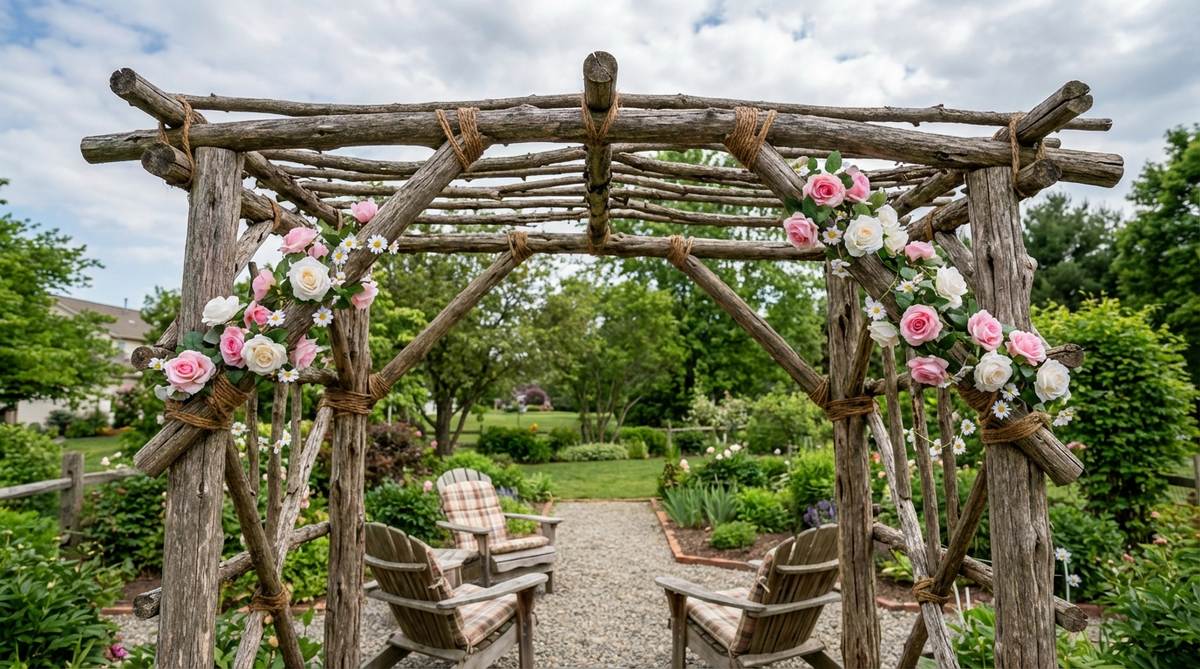
A rustic wooden archway dripping with tiny, vibrant blooms serves as a majestic gateway into a hidden realm. Erecting a vertical floral entryway is perfect for framing the entrance of a large, sprawling outdoor container garden.
Leaving the vertical airspace empty makes a display feel flat and two-dimensional. Wrapping artificial vines around a handmade structure looks incredibly high-end and pulls the eye upward, maximizing the perceived volume of the piece. It bridges the gap between the soil and the upper foliage.
This stunning focal piece requires an investment of about $10–$15. It completely transforms the structural height of the layout.
- Key Materials: Sturdy yard twigs, micro silk flowers, thin binding wire
- Vibe / Style: Romantic enchanted entrance
- Difficulty: Intermediate structural assembly
- Budget Breakdown: Silk vines: $10 | Wire: $4
- Creator’s Tip: Sink the base twigs at least two inches deep into packed soil so the arbor doesn’t blow over in the wind.
- Smart Sourcing: Miniature artificial flowering ivy vines or green floral binding wire (spool)
This next terracing hack is the secret to making a $20 garden center pot look like a luxury multi-level estate…
15. Stacked Stone Garden Wall
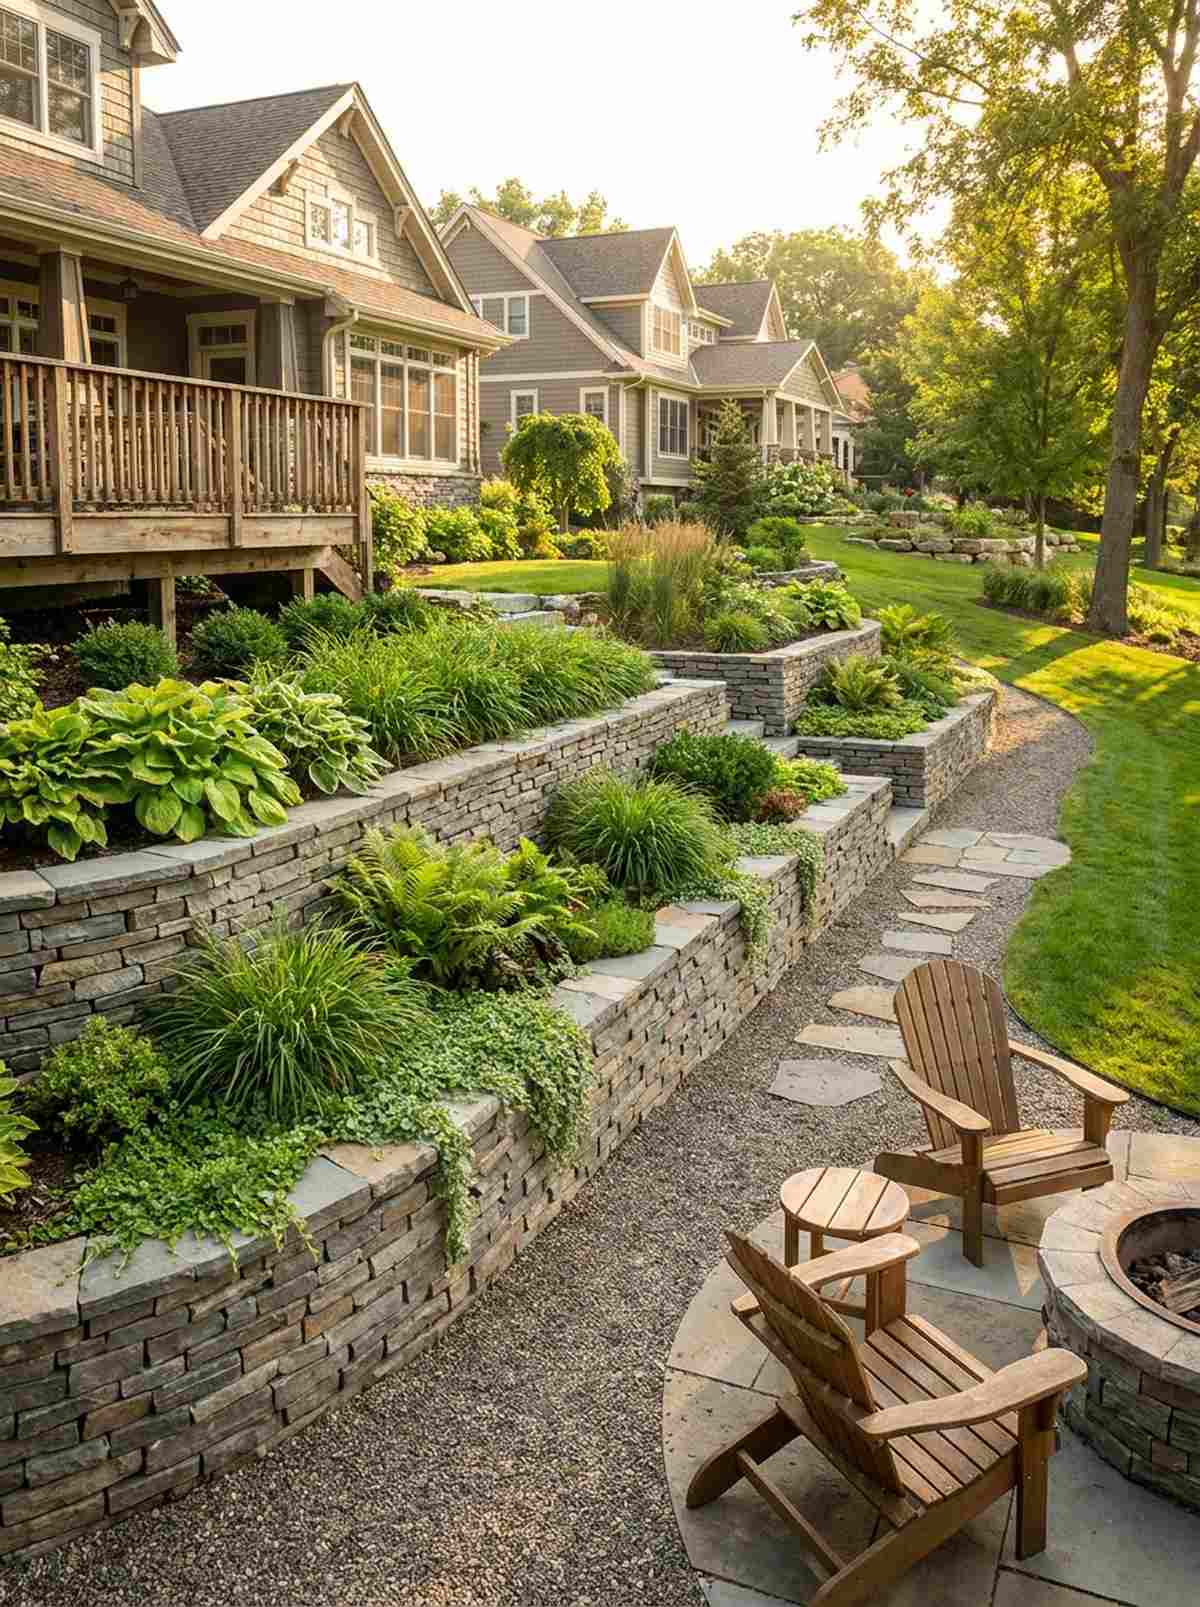

A meticulously layered stone retaining wall holding back a raised bed of lush greens gives an aura of ancient, meticulous craftsmanship. Constructing miniature terraced landscaping solves the frustrating problem of planting on a sloped dirt mound.
Letting soil casually slope down a hill inevitably leads to massive erosion during the first rainstorm. Using proper masonry techniques with high-grade terrarium accessories completely stops soil runoff while adding incredible architectural depth. The resulting multi-level display feels incredibly sophisticated and permanent.
A bag of premium flat stacking stones will run you about $15. Pin this layout if you want to create dramatic height variations.
- Key Materials: Flat face stones, outdoor construction adhesive, backfill gravel
- Vibe / Style: Historic manor grounds
- Difficulty: Advanced masonry
- Budget Breakdown: Stacking stones: $15 | Adhesive: $8
- Creator’s Tip: Slightly tilt each course of stones backward into the hill to significantly increase the wall’s retaining strength.
- Smart Sourcing: Uniform miniature slate stacking stones or heavy-duty clear landscape adhesive
16. Fairy Door Against Tree Base
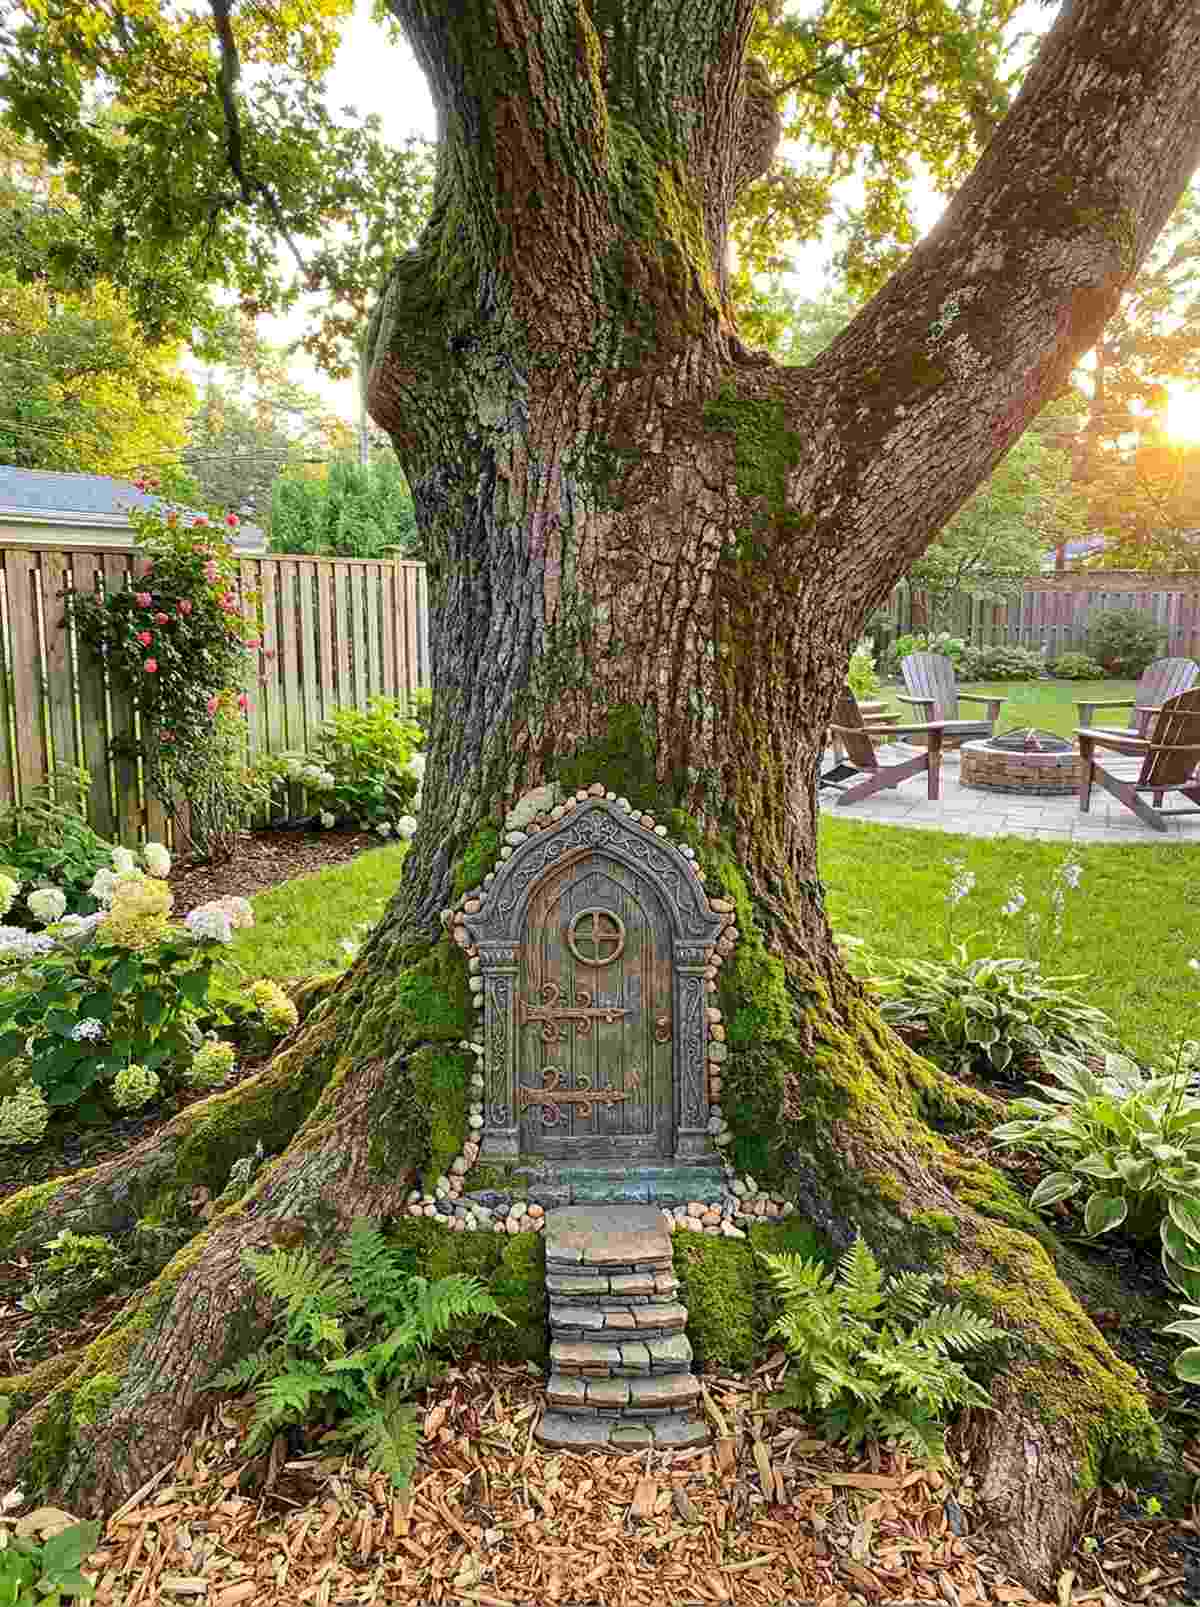
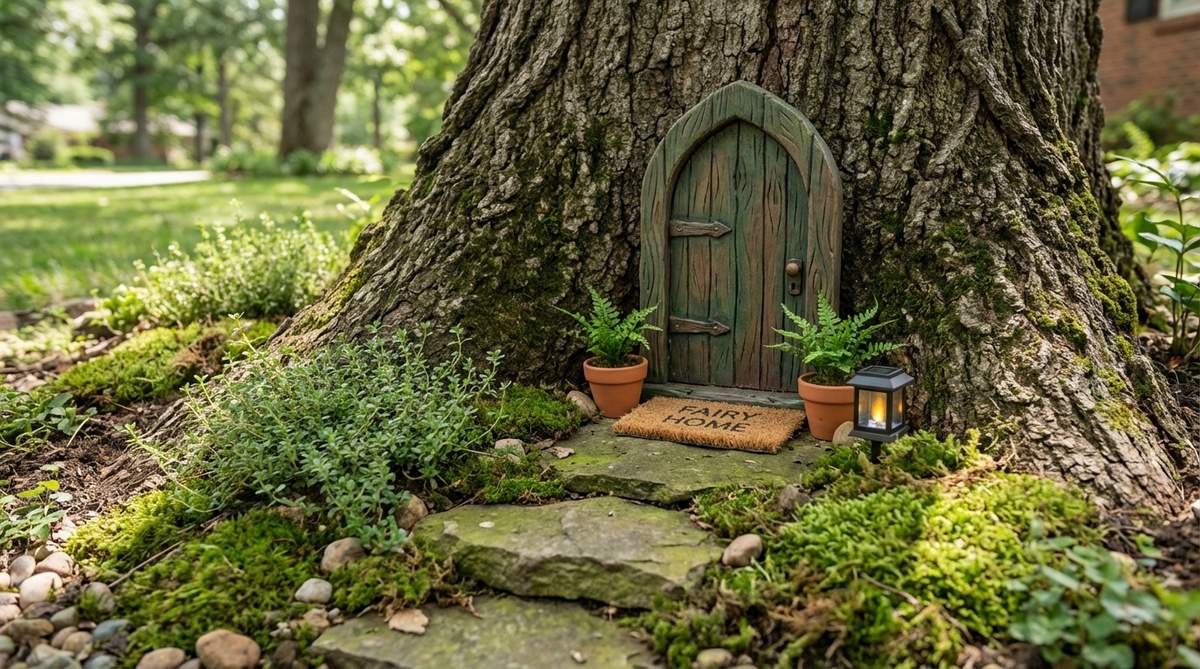
A mysterious, ornate portal nestled seamlessly into the roots of an old oak tree triggers pure childhood wonder. Installing a hidden botanical entryway is the quintessential secret garden aesthetic that works beautifully at the base of mature patio trees.
Just slapping a plastic door against bark shatters the illusion instantly. Blending the edges with live moss and utilizing UV-coated fairy garden kits gives a designer-level finish that looks like it naturally grew there over decades. Adding tiny stone steps leading up to it finalizes the realistic integration.
A high-quality resin door setup costs between $15–$25. Highly recommended for adding magic to an existing potted tree.
- Key Materials: Resin miniature door, live moss patches, tiny accent stones
- Vibe / Style: Classic woodland fantasy
- Difficulty: Easy installation
- Budget Breakdown: Resin Door: $18 | Moss/Stones: $5
- Creator’s Tip: Use outdoor mounting putty instead of permanent glue if you want to swap the door out for different seasonal styles.
- Smart Sourcing: UV-resistant resin fairy door kits or weatherproof outdoor mounting putty
Natural Material Elements From Found Objects
17. Bark Chip Roof Tiles
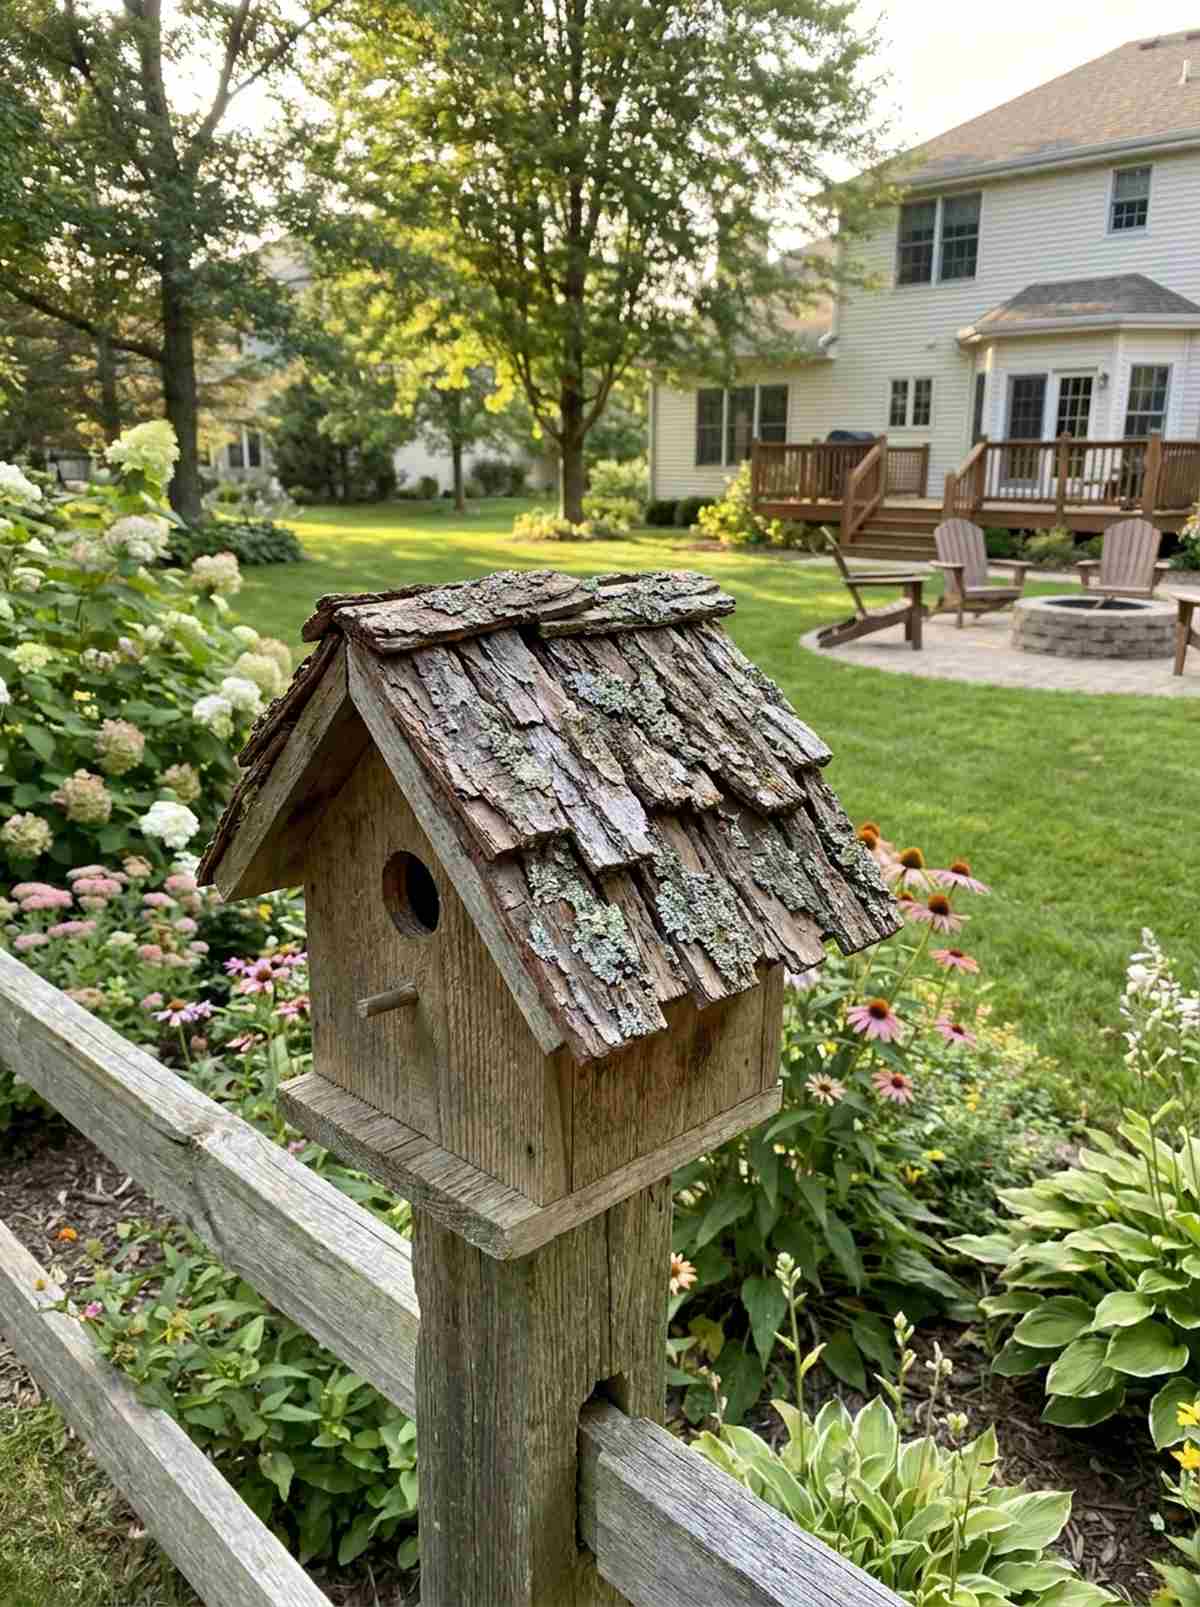
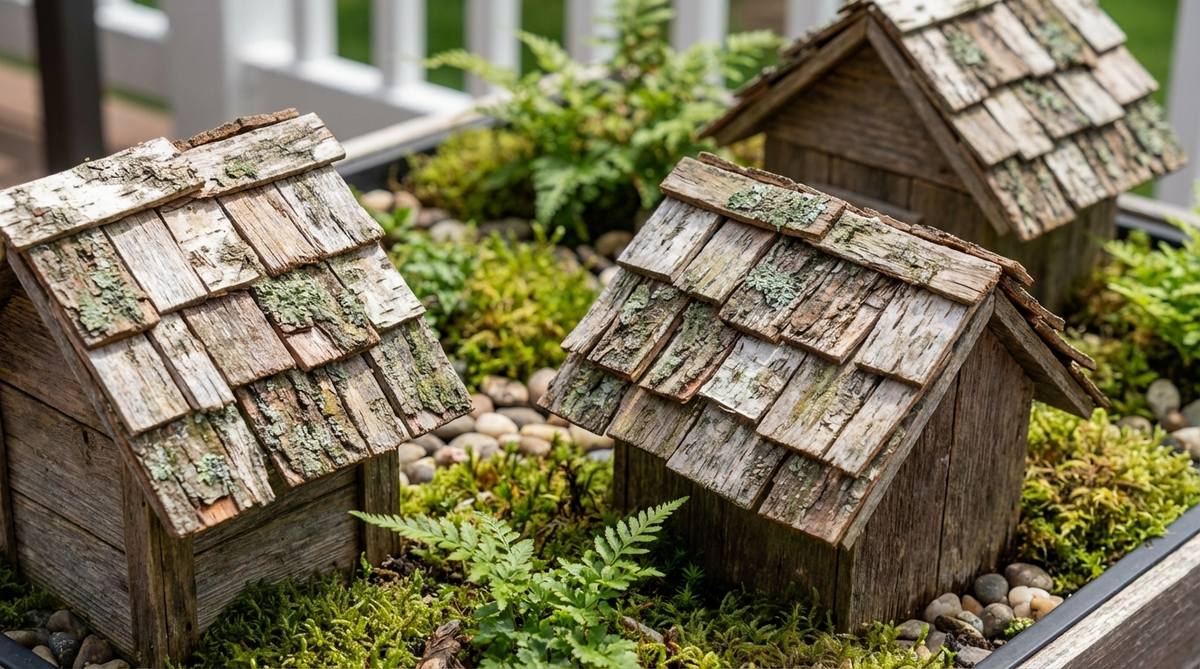
A quaint cottage topped with perfectly overlapping wooden shingles brings an immense amount of rugged, organic texture to the scene. Creating foraged architectural roofing is an incredible way to upgrade cheap plastic birdhouses into premium focal points.
Shiny, mass-produced roofs immediately cheapen the look of an organic landscape. Hand-layering natural bark gives a surprisingly premium look that actually gets better as it weathers and develops real lichen outdoors. It firmly roots the fantasy structure in tangible, natural reality.
This upgrade costs around $5 for the waterproof glue. Save this hack to completely transform budget craft store birdhouses.
- Key Materials: Thin pine bark chips, waterproof wood glue, base roof structure
- Vibe / Style: Rustic forest cabin
- Difficulty: Intermediate layering
- Budget Breakdown: Base house: $5 | Glue: $5
- Creator’s Tip: Start gluing from the bottom edge and work upwards, overlapping each row by a third to ensure rain runs completely off.
- Smart Sourcing: Exterior-grade wood adhesive or pre-cut mini wood shingles (bulk pack)
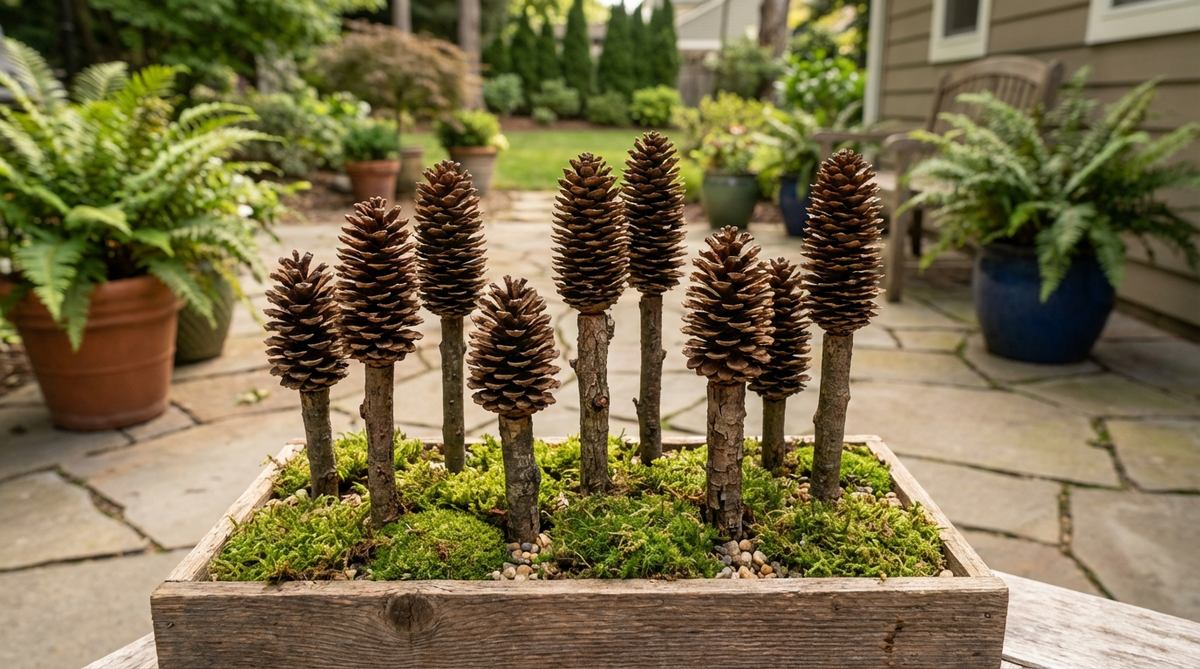
18. Pinecone Miniature Trees
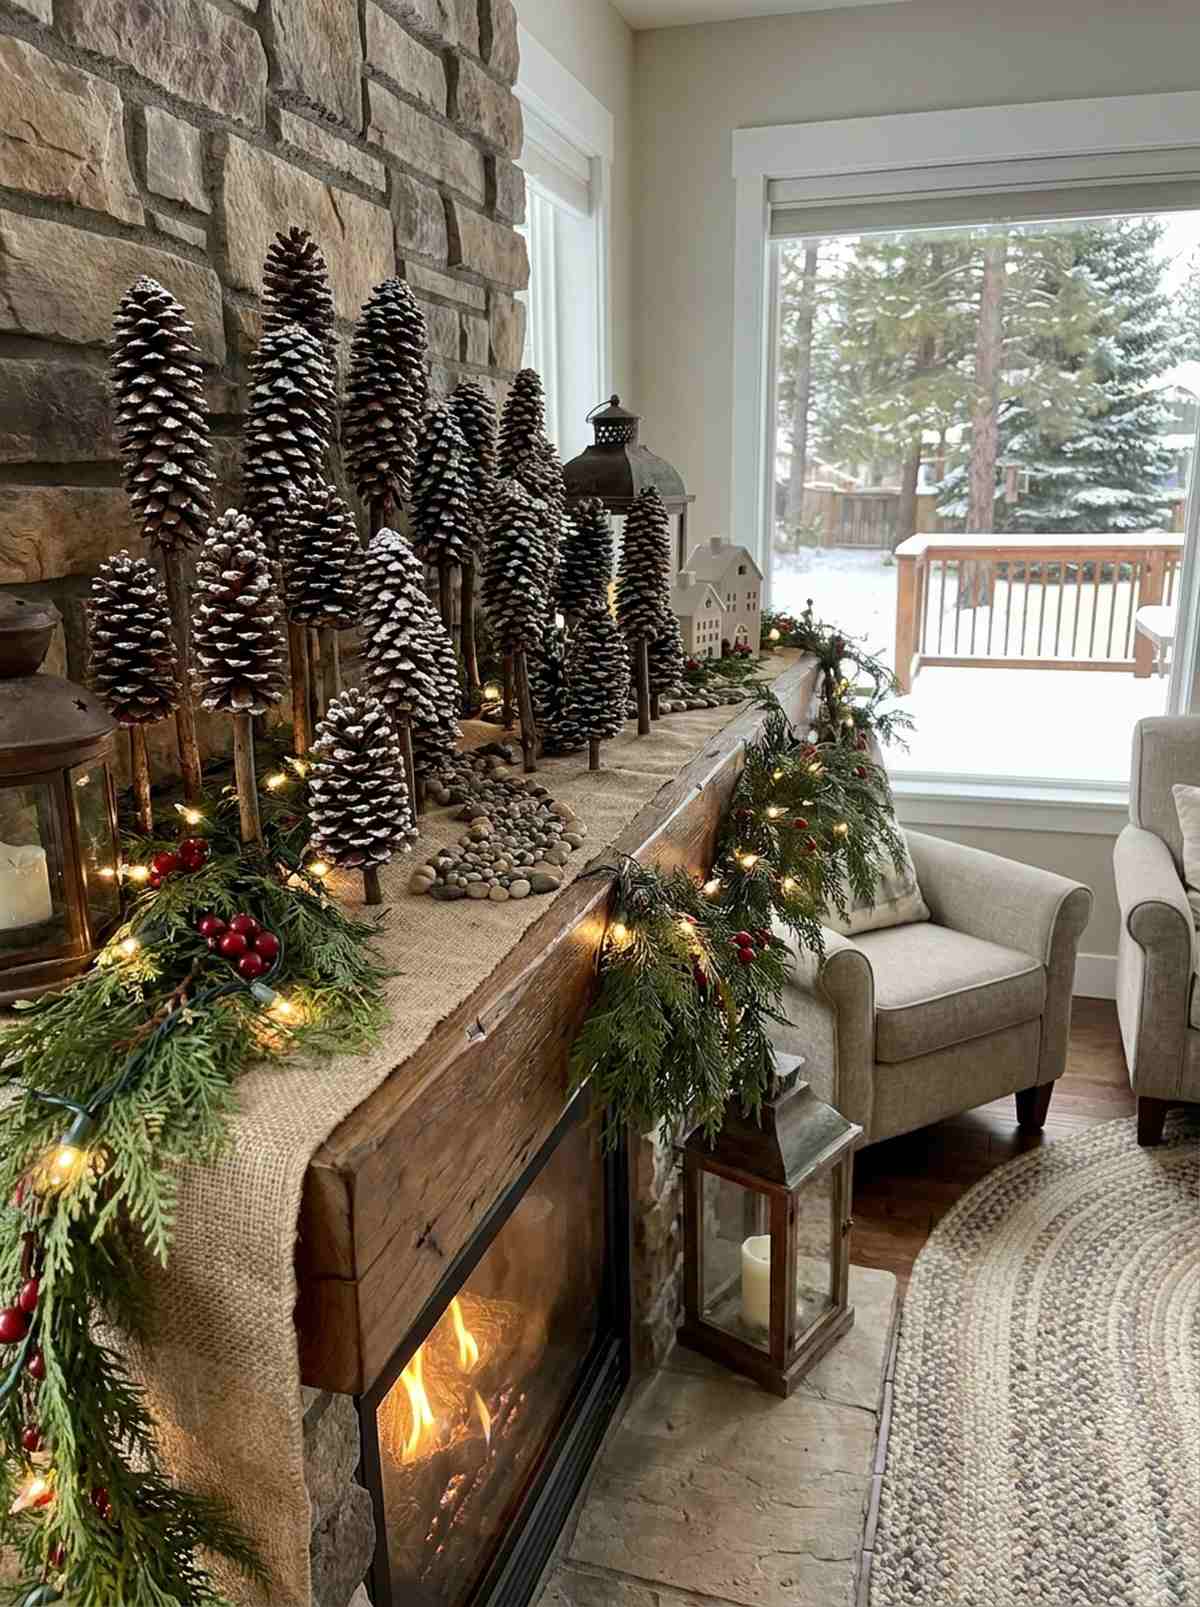
A cluster of tiny, perfectly proportioned evergreen trees standing guard over a pathway evokes the feeling of a dense alpine forest. Utilizing scaled natural evergreens is a brilliant solution for adding wintery aesthetics to an indoor mantelpiece display.
Buying dozens of artificial plastic trees adds up quickly and often looks incredibly tacky. Repurposing natural hemlock cones with premium miniature garden supplies looks far more expensive than it is while maintaining strict scale consistency. Mounting them on real twig trunks sells the illusion completely.
You can create a whole forest of these for under $10. A fantastic, low-cost way to fill out large, empty background spaces.
- Key Materials: Small hemlock cones, thin twig trunks, mounting drill
- Vibe / Style: Alpine winter forest
- Difficulty: Easy drilling/gluing
- Budget Breakdown: Twigs/Cones: Free | Tools: Own
- Creator’s Tip: Lightly dab the edges of the pinecone scales with white acrylic paint to create a permanent, realistic snow-dusted effect.
- Smart Sourcing: Assorted miniature craft pinecones (bulk bag) or micro hand-drill pin vise set
19. Acorn Cap Planters
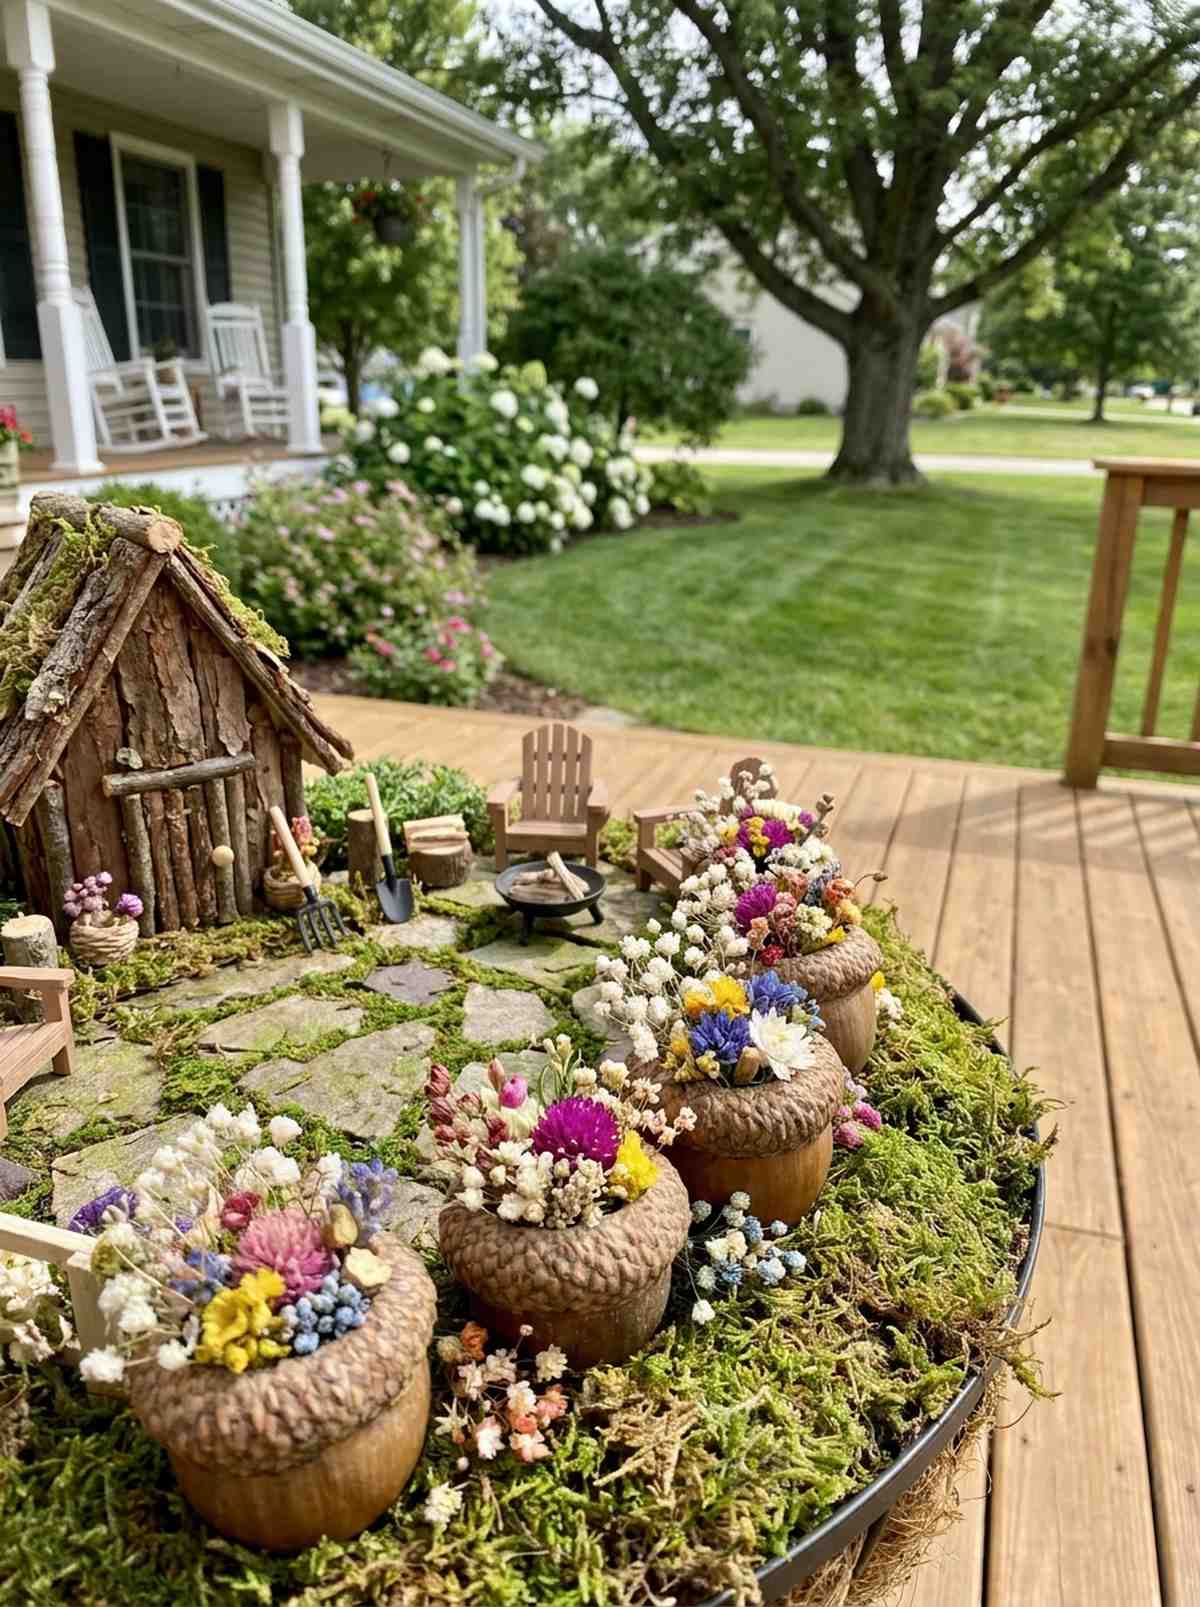

Tiny rustic bowls overflowing with microscopic, colorful blooms look exactly like the meticulous gardening efforts of a tiny homeowner. These micro floral vessels are absolute perfection for decorating the outdoor patios of your miniature fairy houses.
Leaving the hardscapes completely barren of their own “decor” breaks the immersive loop of the diorama. Stuffing natural pods with preserved flora and terrarium accessories creates a uniquely meta “garden within a garden” that hyper-fixates the eye on the details. It adds an intense layer of believability to the scene.
This micro-craft costs maybe $5 in dried floral snippets. Pin this if you obsess over ultra-fine details in your displays.
- Key Materials: Large oak caps, floral foam bits, dried baby’s breath
- Vibe / Style: Quaint floral patio
- Difficulty: Precision arrangement
- Budget Breakdown: Dried flowers: $5 | Caps: Free
- Creator’s Tip: Use a tiny speck of clay at the bottom of the acorn cap to act as a weighted base so they don’t tip over.
- Smart Sourcing: Miniature dried floral arrangement variety packs or soft floral foam bricks
If you think building a cohesive outdoor display is expensive, this next vertical trick uses completely free backyard materials…
20. Twig Ladder Climber
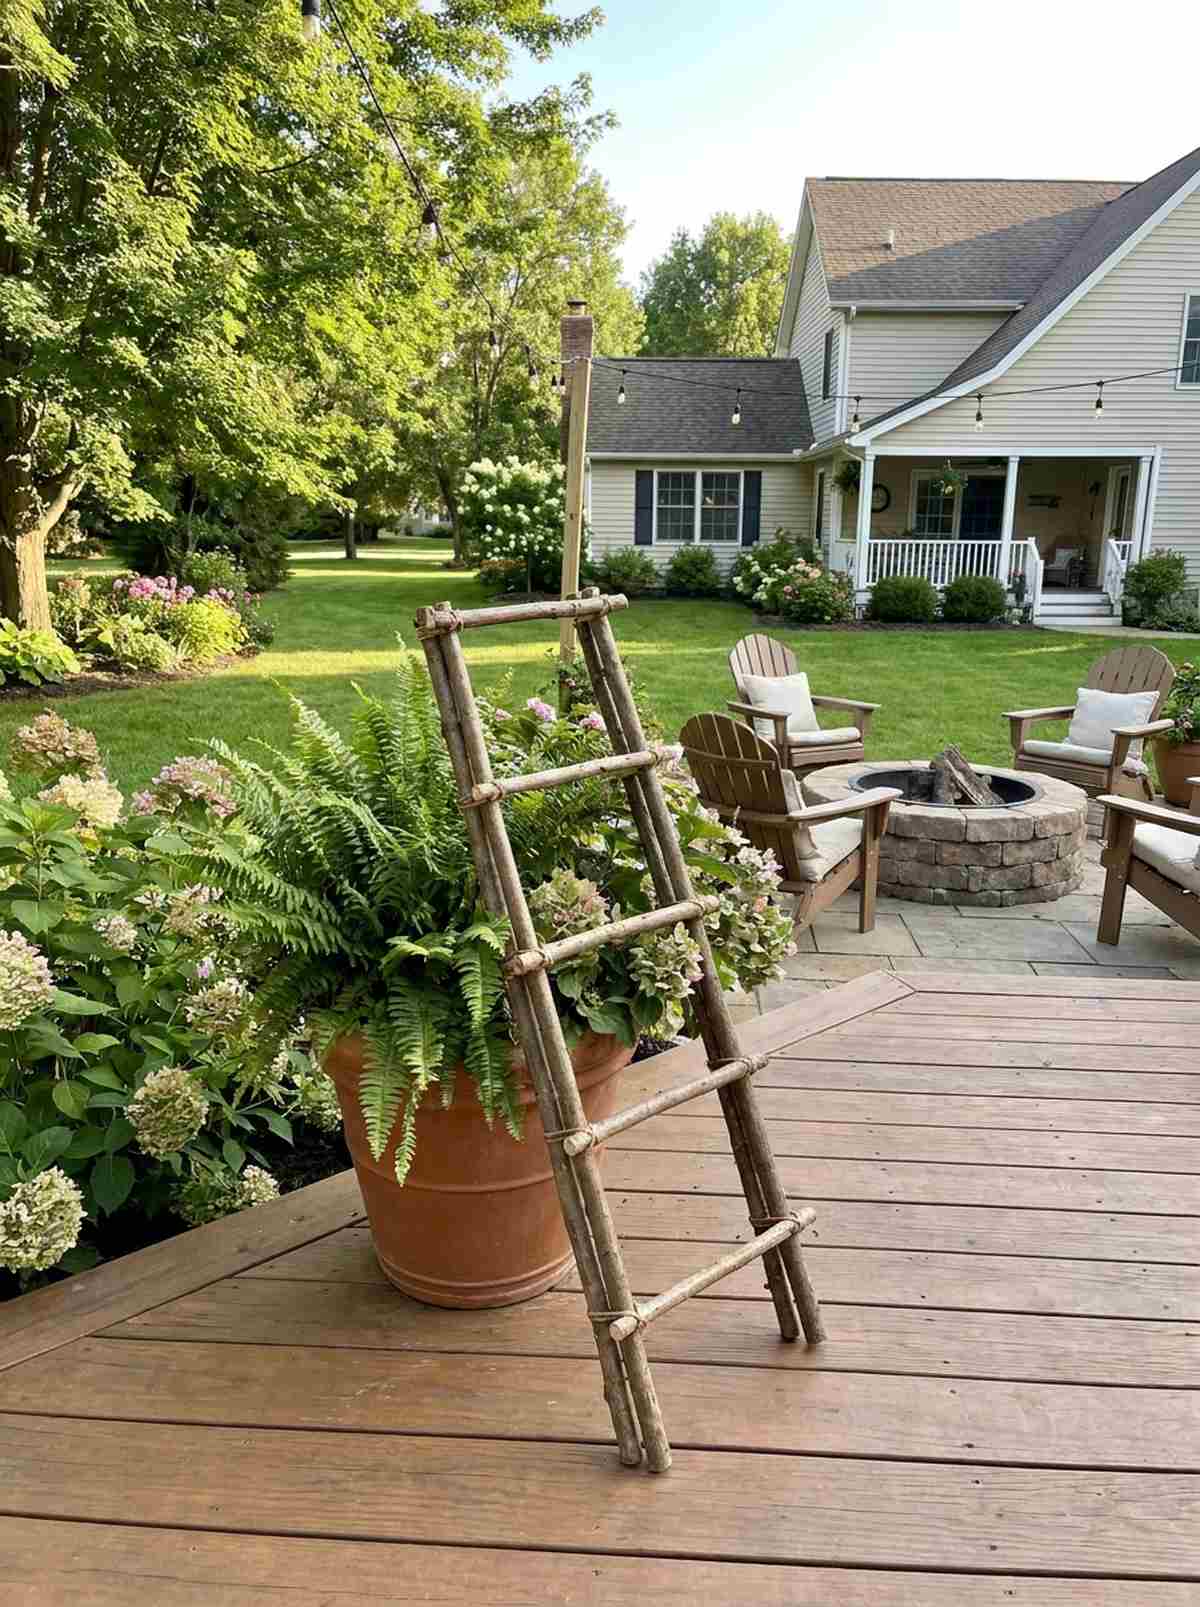
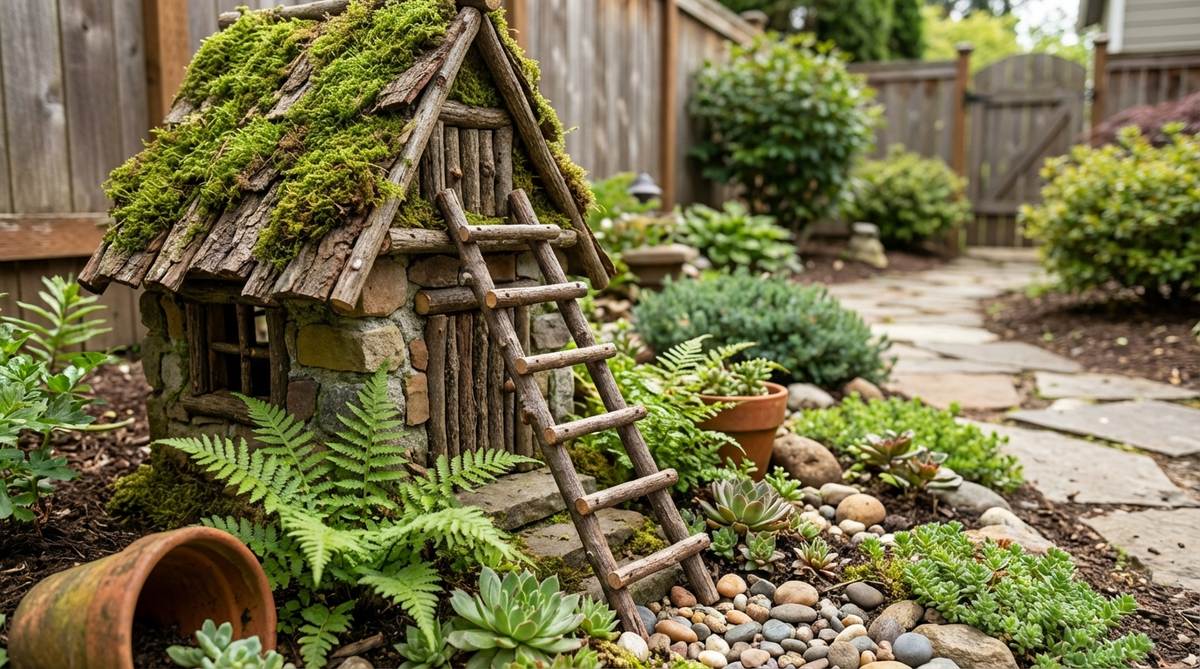
A rugged little ladder leaning casually against an upper-story window suggests a world of unseen, mischievous activity. Adding functional narrative props is the best secret garden aesthetic to make a static display feel like it is currently inhabited.
Displays without interactive props feel like abandoned ghost towns. Taking five minutes to glue uniform sticks together delivers a surprisingly premium look that instantly sparks the imagination of anyone who walks by. Leaning it against a large potted plant bridges the gap between the decor and the living flora.
This costs pennies to create with leftover yard debris. It’s an incredibly fast detail that pays off massively in visual charm.
- Key Materials: Straight yard twigs, rapid-set wood glue
- Vibe / Style: Active woodland village
- Difficulty: Easy assembly
- Budget Breakdown: Twigs: Free | Glue: $5
- Creator’s Tip: Use a heavy book to press the ladder flat while the glue dries so the rungs don’t warp unevenly.
- Smart Sourcing: Rapid-setting gel super glue or pre-cut miniature birch twigs
21. Stone Staircase Ascending
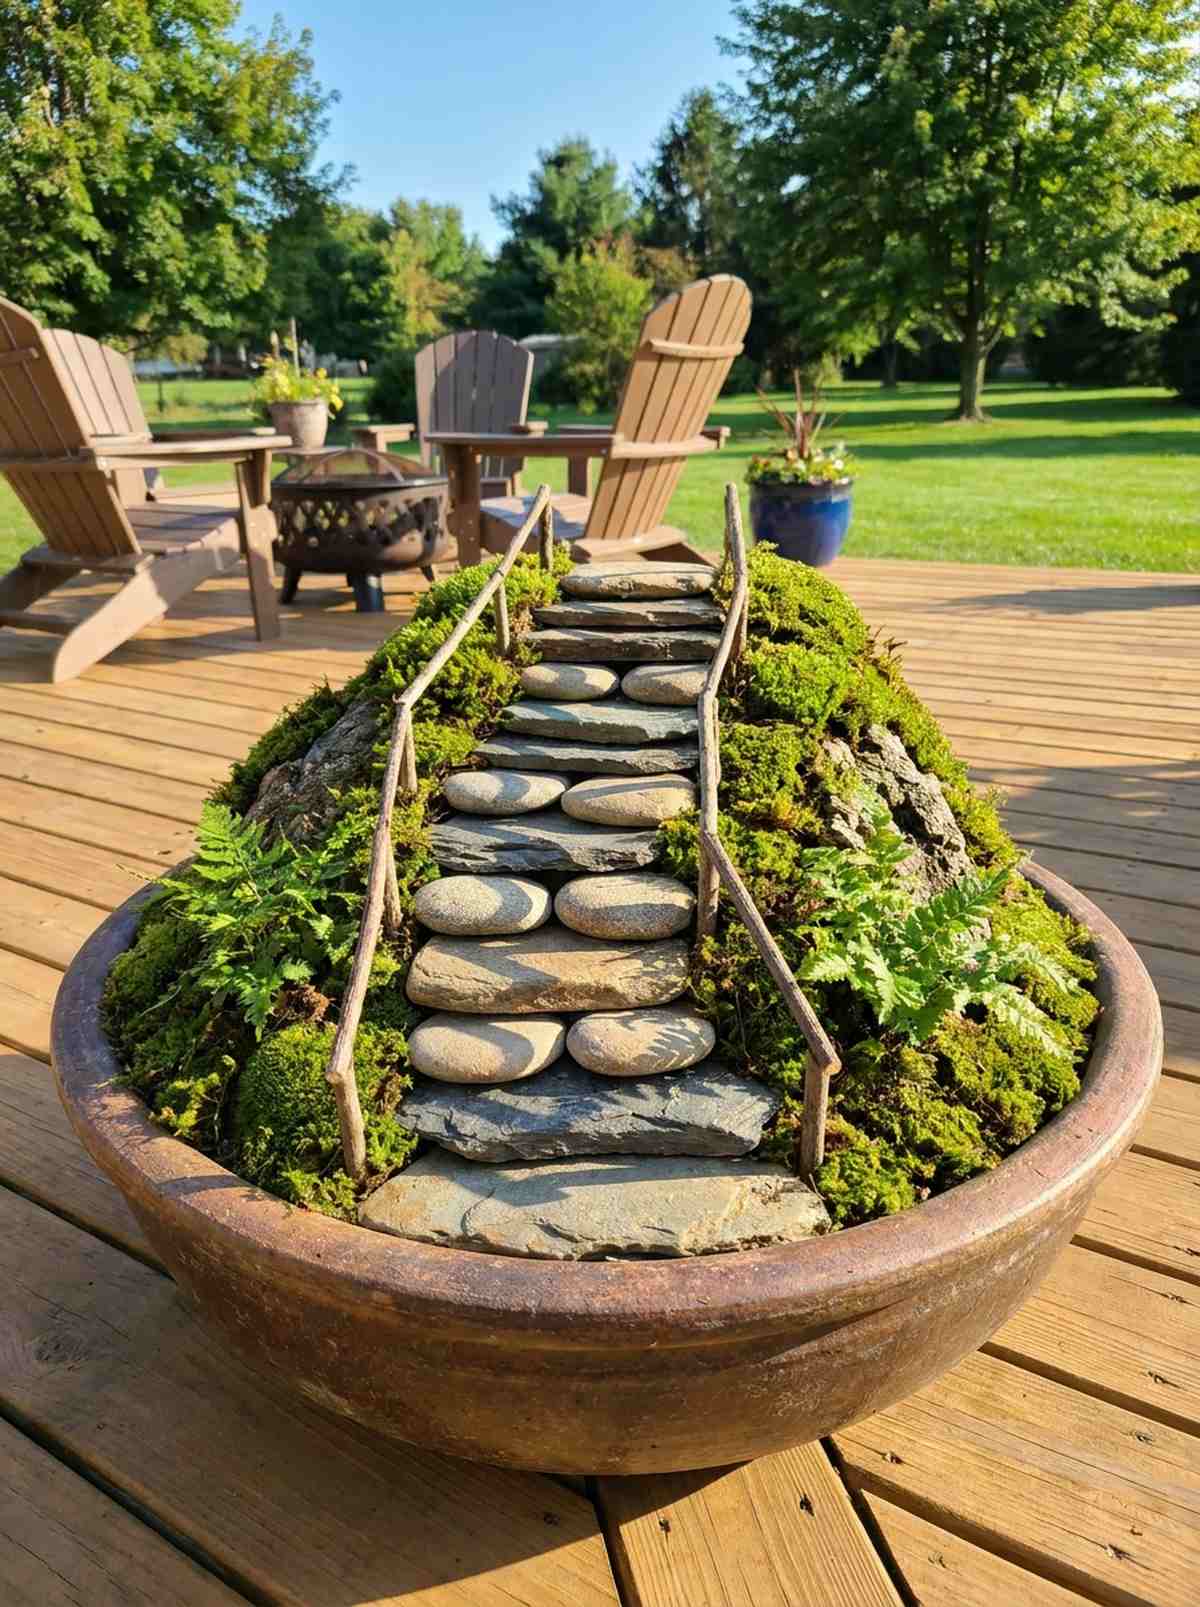
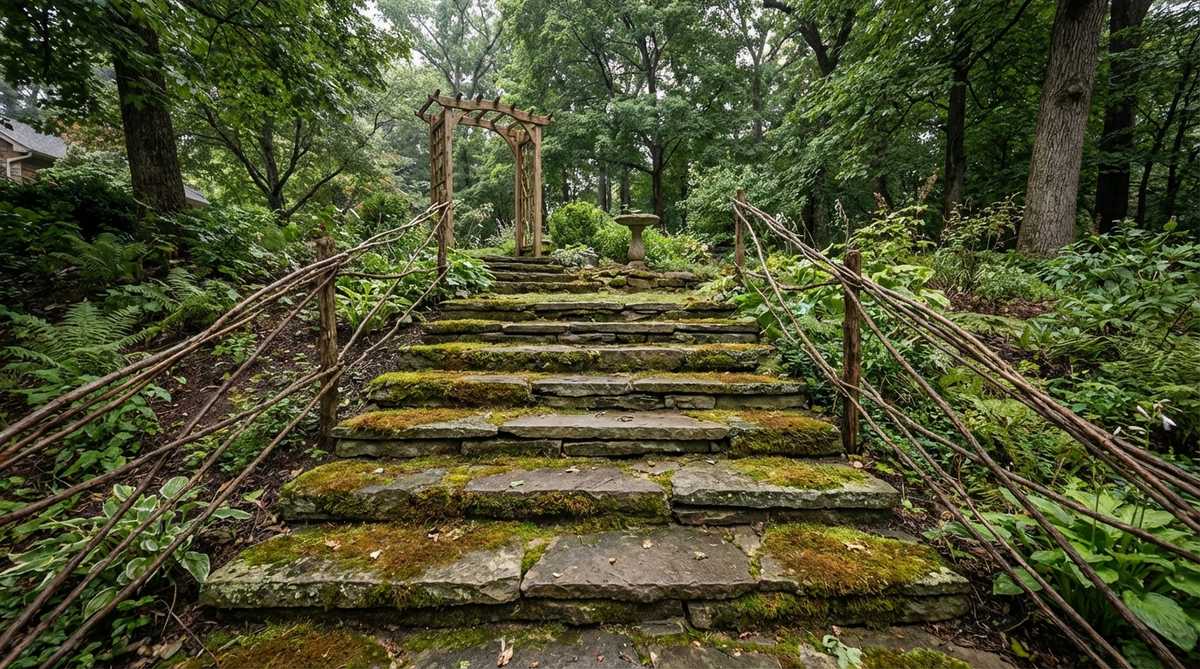
A naturalistic stone flight of stairs climbing up a steep, mossy hill demands to be explored by the eyes. Installing elevated landscape transitions completely solves the issue of navigating steep elevation changes in a deep container garden.
Ignoring elevation completely flattens a landscape, making it visually boring from a distance. Stacking graded slate with professional fairy garden kits gives a designer-level finish that naturally invites real moss to colonize the crevices. Handrail additions make the perilous climb look intentionally engineered.
A bag of varied flat stones costs around $15–$20. Save this architectural technique to completely revolutionize your vertical spaces.
- Key Materials: Graduated flat stones, construction adhesive, soil packing
- Vibe / Style: Ancient mountain temple
- Difficulty: Intermediate grading
- Budget Breakdown: Stone pack: $15 | Adhesive: $8
- Creator’s Tip: Bury the back half of every single step deeply into the soil; if they just sit on top, the staircase will slide down the hill when watered.
- Smart Sourcing: Mixed size flat river stones (bulk) or weather-resistant landscape putty
Lighting & Illumination Features For Evening Magic
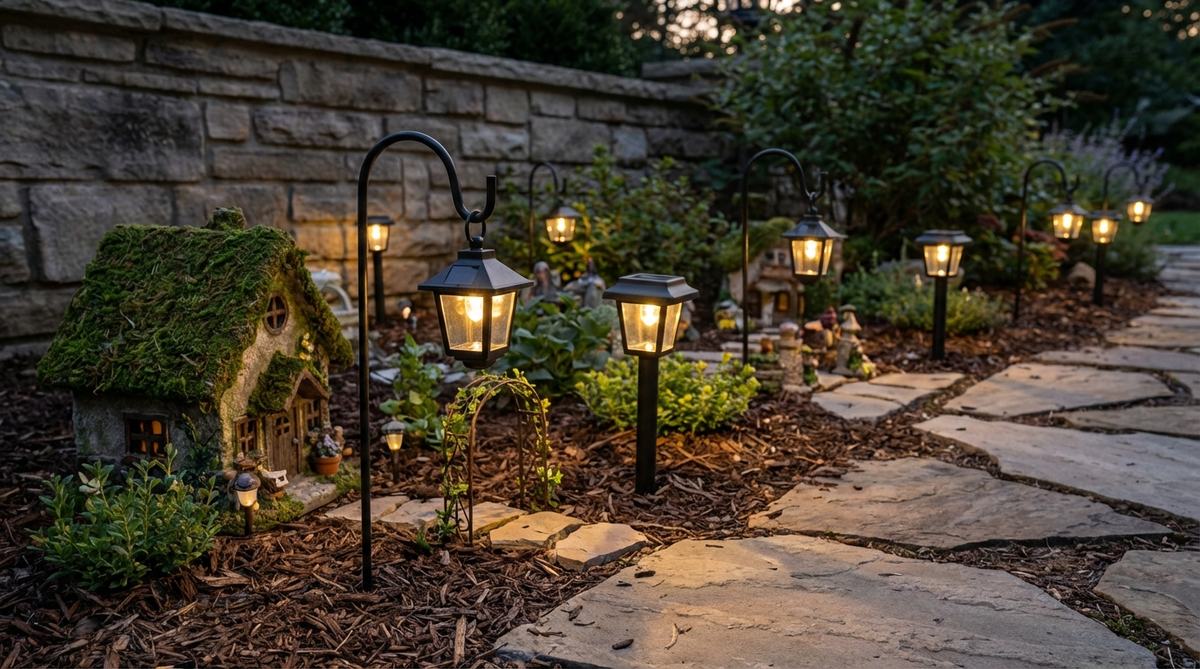
22. Solar Pathway Mushroom Lights
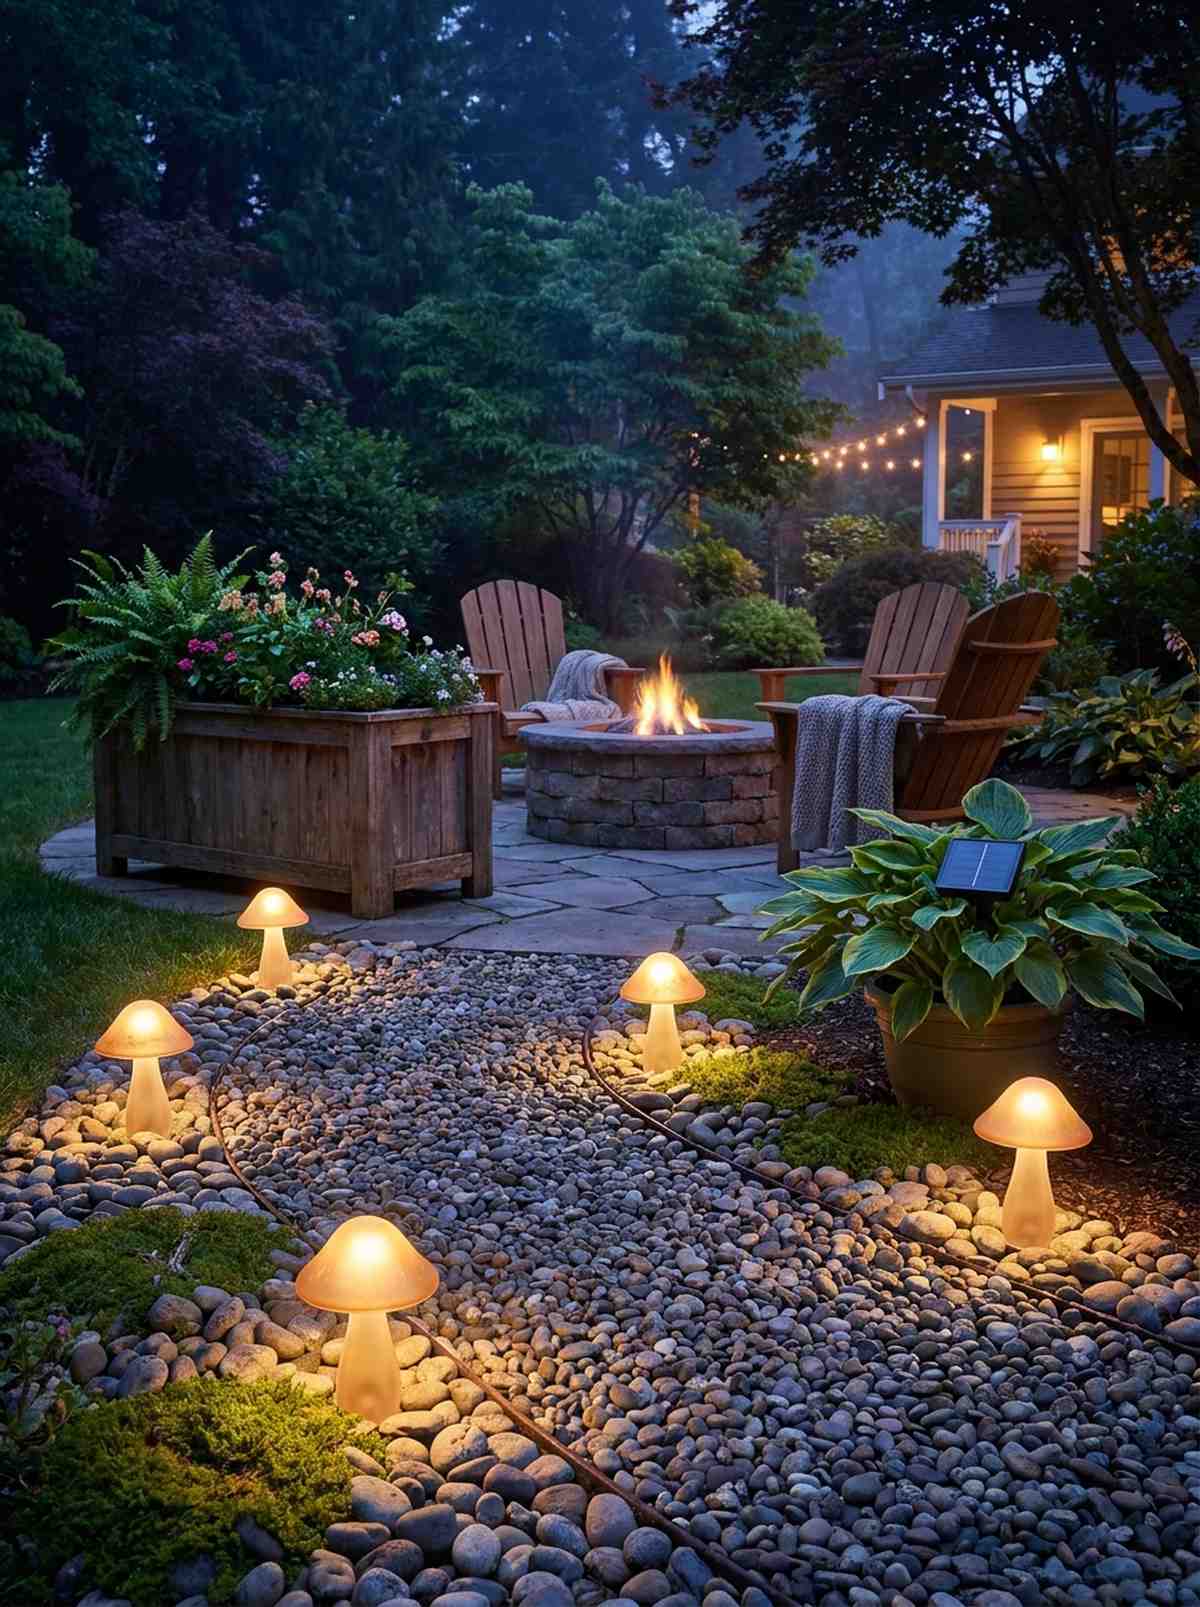
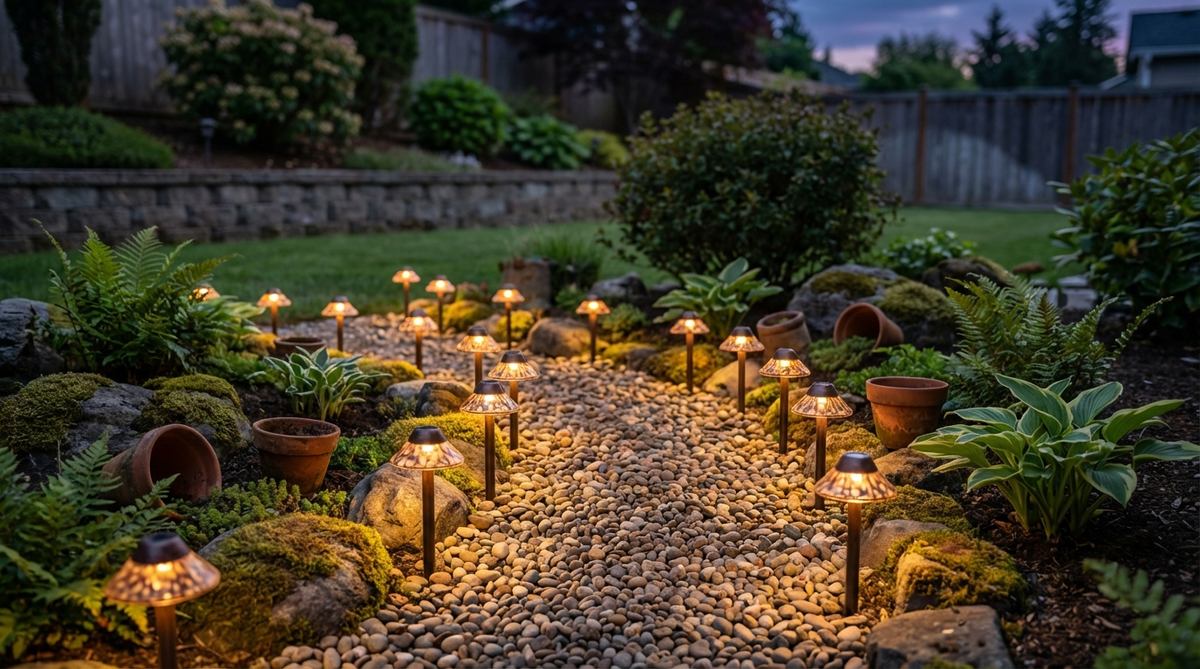
The soft, magical glow of tiny luminous caps lining a darkened pebble path creates a mesmerizing, otherworldly evening atmosphere. Incorporating ambient micro-lighting is absolutely essential for large patio containers that you want to enjoy after sunset.
Relying on harsh overhead porch lights totally washes out the delicate textures of a miniature world. Sourcing premium solar-powered terrarium accessories looks far more expensive than it is and automatically triggers at dusk without messy wiring. It highlights the intricate pathway curves while leaving the background in mysterious shadow.
You can grab a set of reliable micro-solar stakes for $20–$35. Pin this if you want your garden to come alive at night.
- Key Materials: Micro solar mushroom stakes, clear pathway edges
- Vibe / Style: Bioluminescent enchanted forest
- Difficulty: Easy plug-and-play
- Budget Breakdown: Solar Stakes: $25
- Creator’s Tip: Ensure the main solar charging panel is hidden behind a larger background plant, but still receives 6 hours of direct sunlight.
- Smart Sourcing: Waterproof miniature solar mushroom lights (set of 6)
23. LED Fairy String Lights
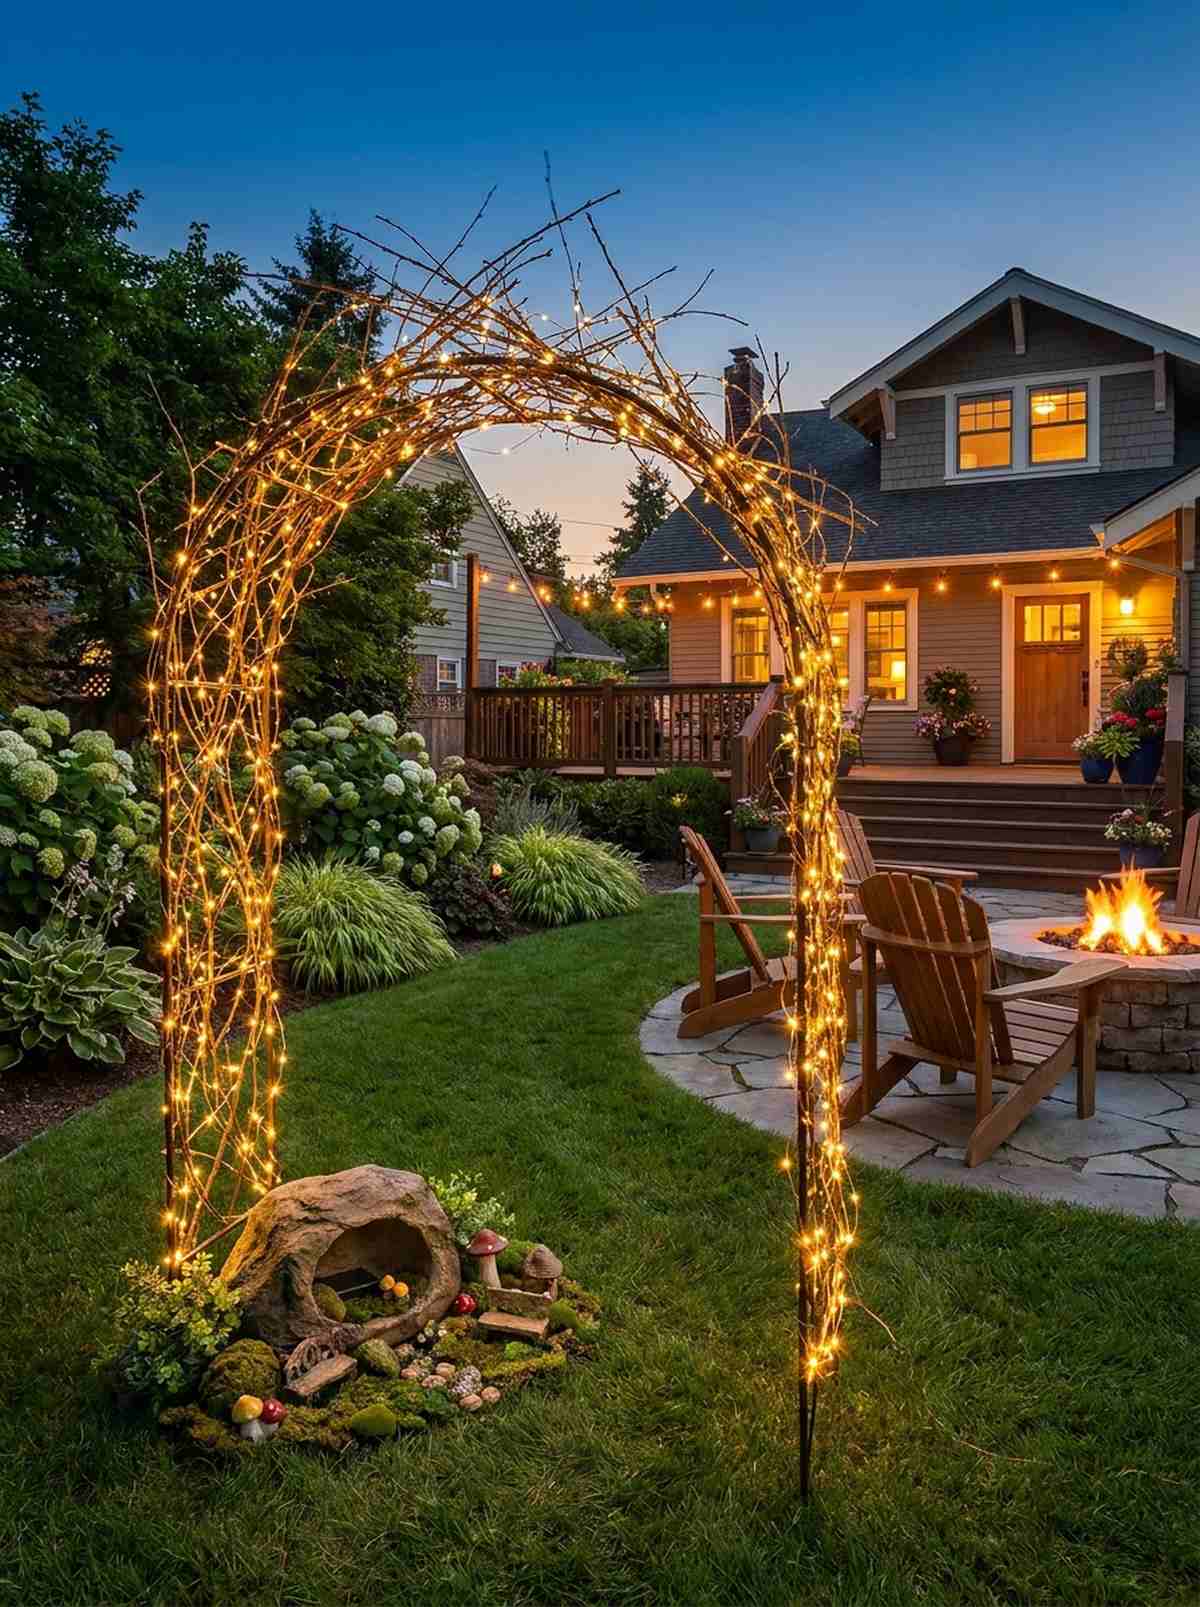
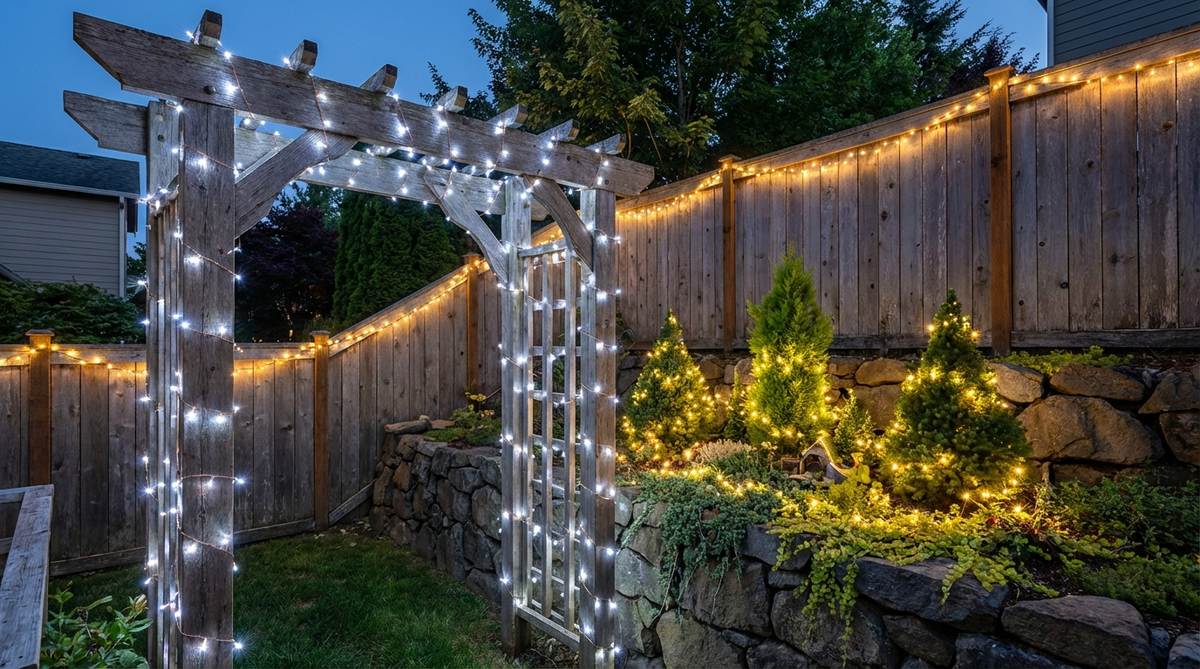
A delicate web of warm golden light woven through an intricate twig arbor feels like a miniature festival is in full swing. Weaving invisible wire illumination is the ultimate hack for wrapping complex architectural structures in indoor displays.
Thick, clunky green wire completely destroys the fragile scale of a small setup during the daytime. Utilizing ultra-thin copper wire with high-end fairy garden aesthetic supplies delivers a surprisingly premium look that virtually disappears when turned off. Hiding the battery pack beneath a hollow resin rock keeps the magic intact.
A multi-pack of copper wire LEDs costs roughly $10–$15. Highly recommended for injecting instant warmth into any space.
- Key Materials: Copper wire micro LEDs, hollow hiding rock, watch batteries
- Vibe / Style: Twilight garden party
- Difficulty: Intermediate wire wrapping
- Budget Breakdown: LED Pack: $12 | Hiding Rock: $8
- Creator’s Tip: Opt for “warm white” over “cool white” bulbs; warm white mimics cozy firelight, while cool white can look like harsh hospital lighting.
- Smart Sourcing: Micro LED copper string lights (battery operated pack) or hollow resin landscape hiding rocks
24. Miniature Lamp Post Stakes
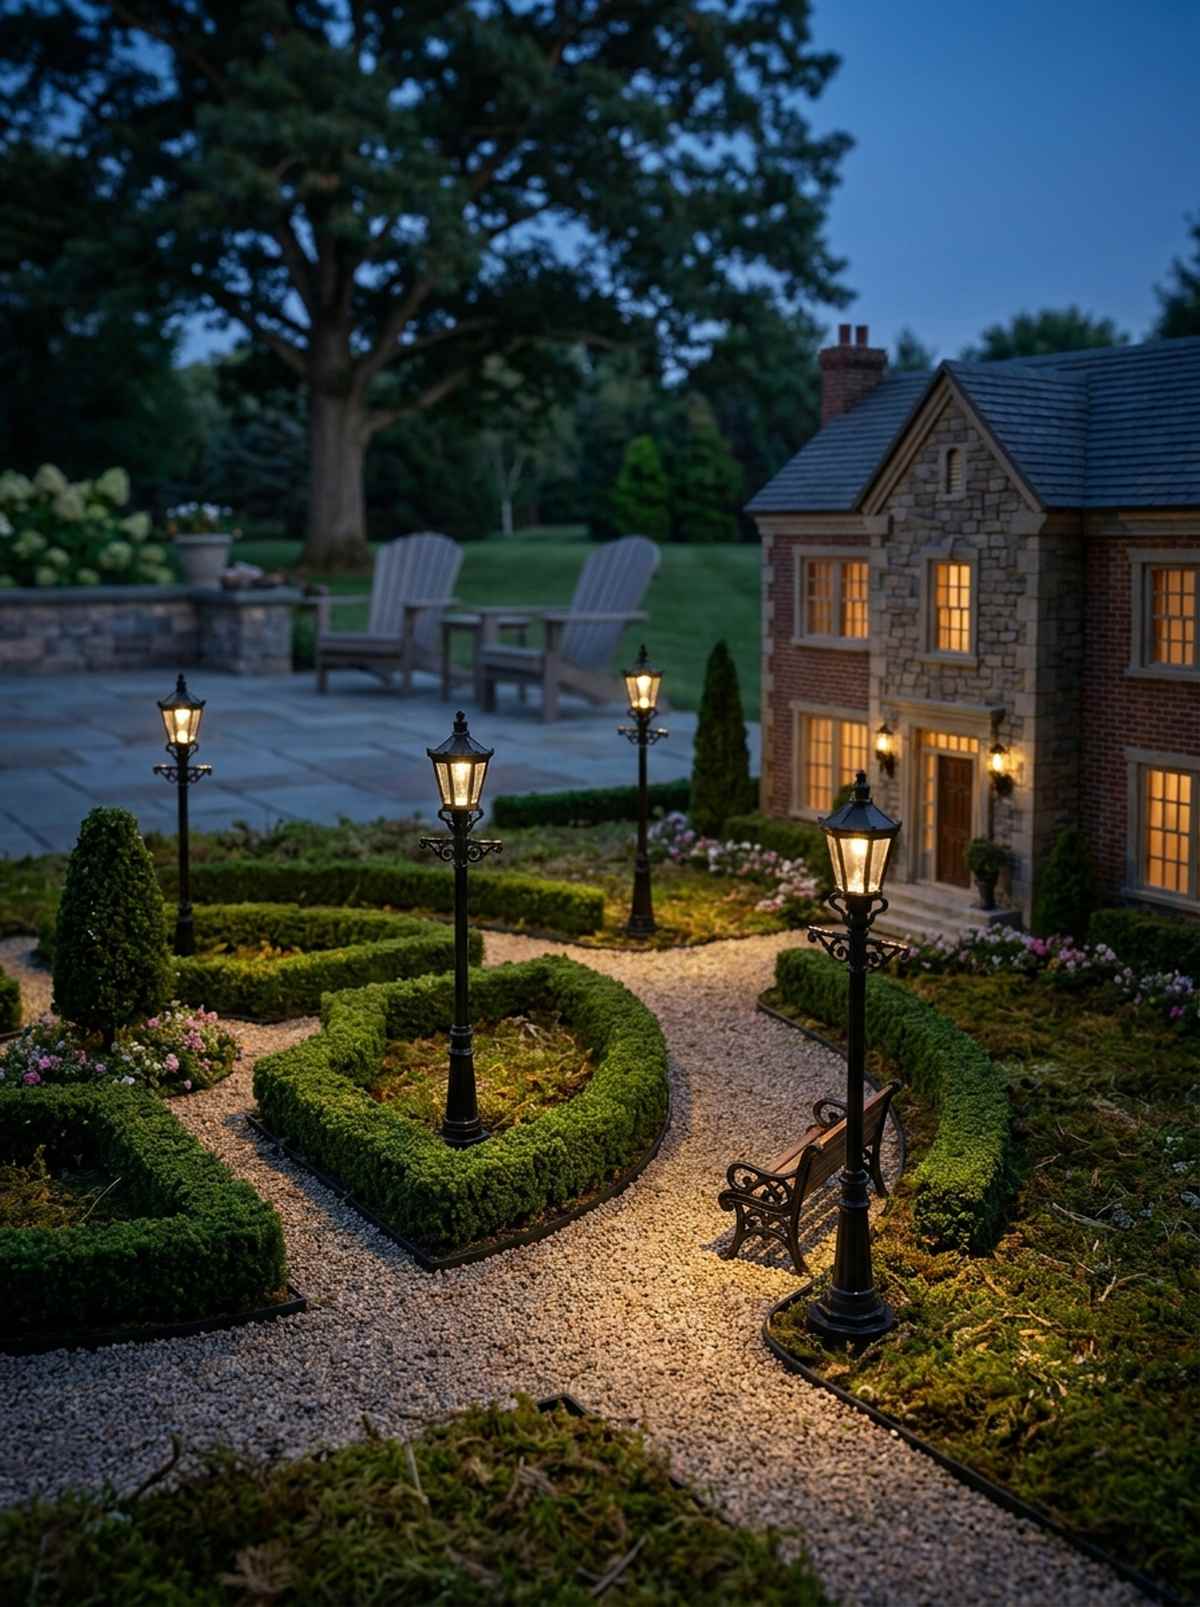
An elegant, Victorian-style streetlamp casting a targeted beam over a tiny garden bench creates an intensely dramatic, moody focal point. Adding structured architectural lighting works exceptionally well for framing the entrance of a formal miniature estate.
String lights can sometimes look too messy or chaotic for a highly structured, manicured layout. Staking specialized miniature garden supplies gives a designer-level finish that suggests a highly civilized, industrialized micro-society. They serve as brilliant vertical anchors that draw the eye immediately.
A high-quality set of scaled streetlamps costs about $15–$25. Save this to your formal landscaping inspiration board.
- Key Materials: LED lamp post stakes, battery pack hub, pathway focal points
- Vibe / Style: Gaslight Victorian park
- Difficulty: Easy placement
- Budget Breakdown: Lamp posts: $20
- Creator’s Tip: Place the lamp post precisely on the outside curve of a pathway to naturally highlight the bend in the road.
- Smart Sourcing: Miniature Victorian LED lamp posts (set of 4)
Most people give up on lighting their terrariums because of ugly wires, but this next glow-in-the-dark trick requires zero electricity…
25. Glow-In-The-Dark Pebbles
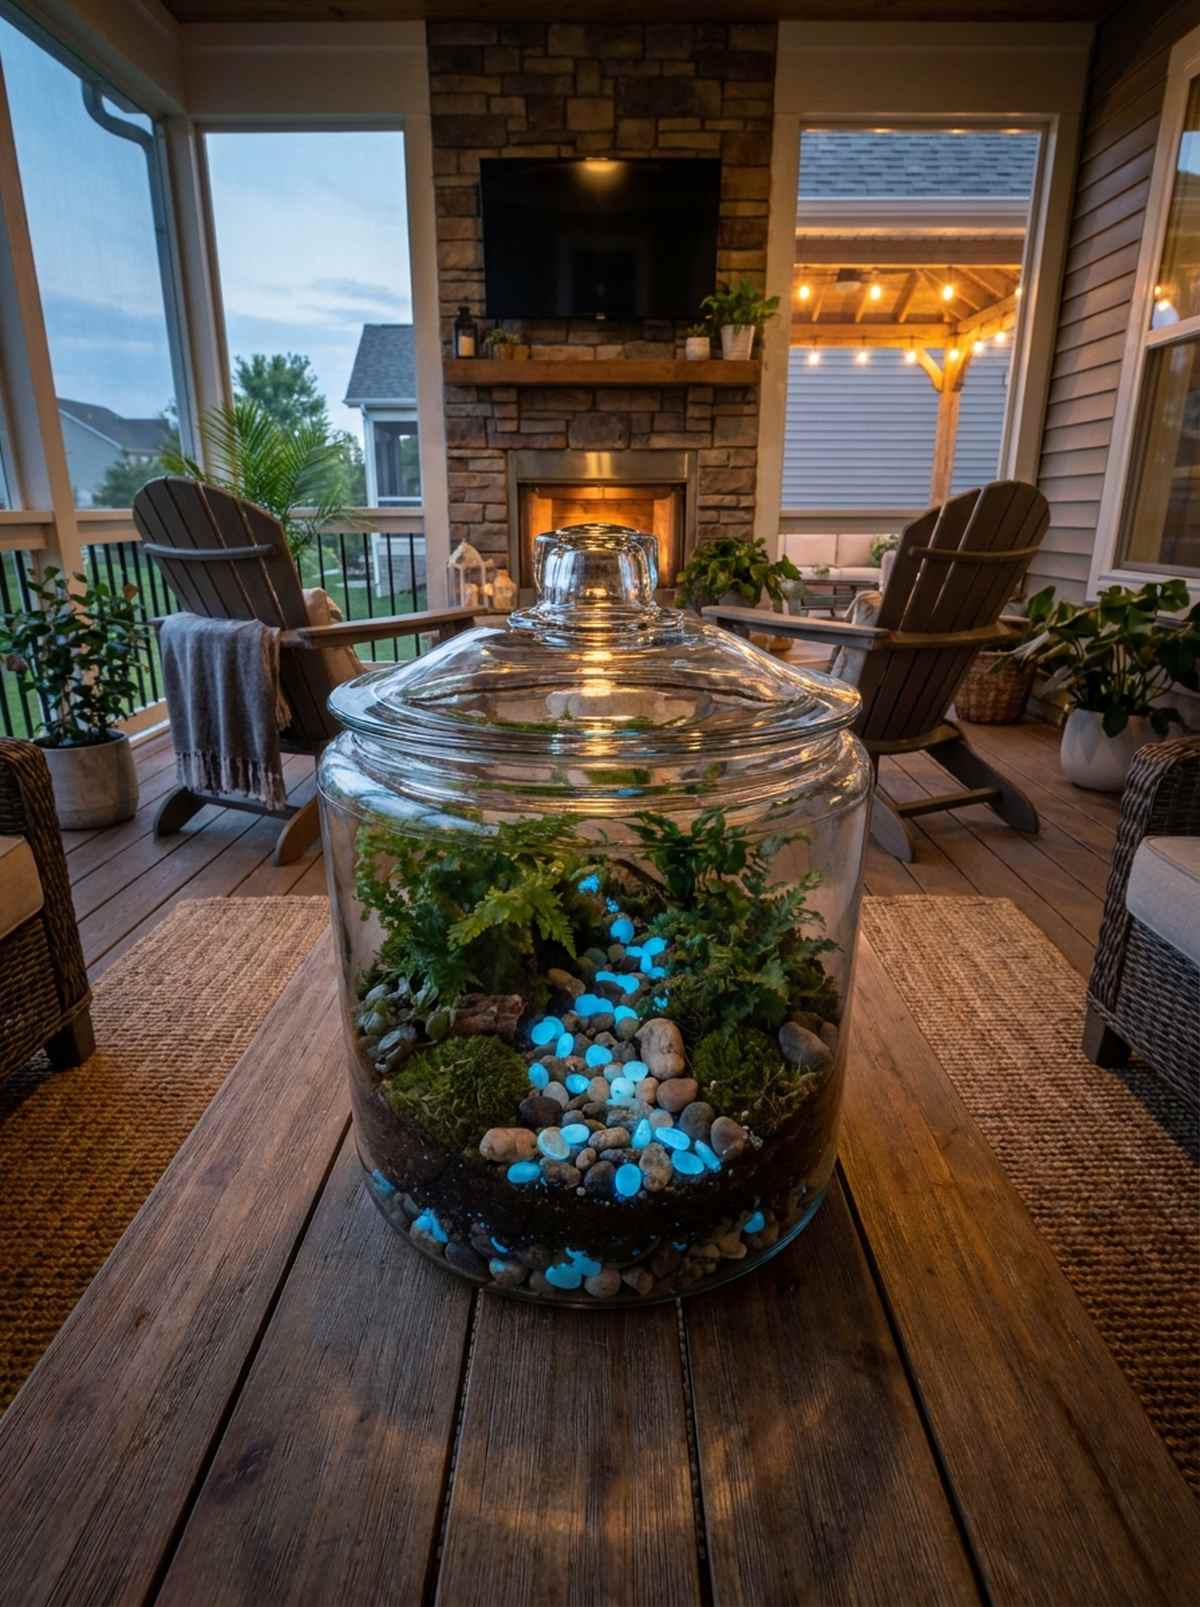
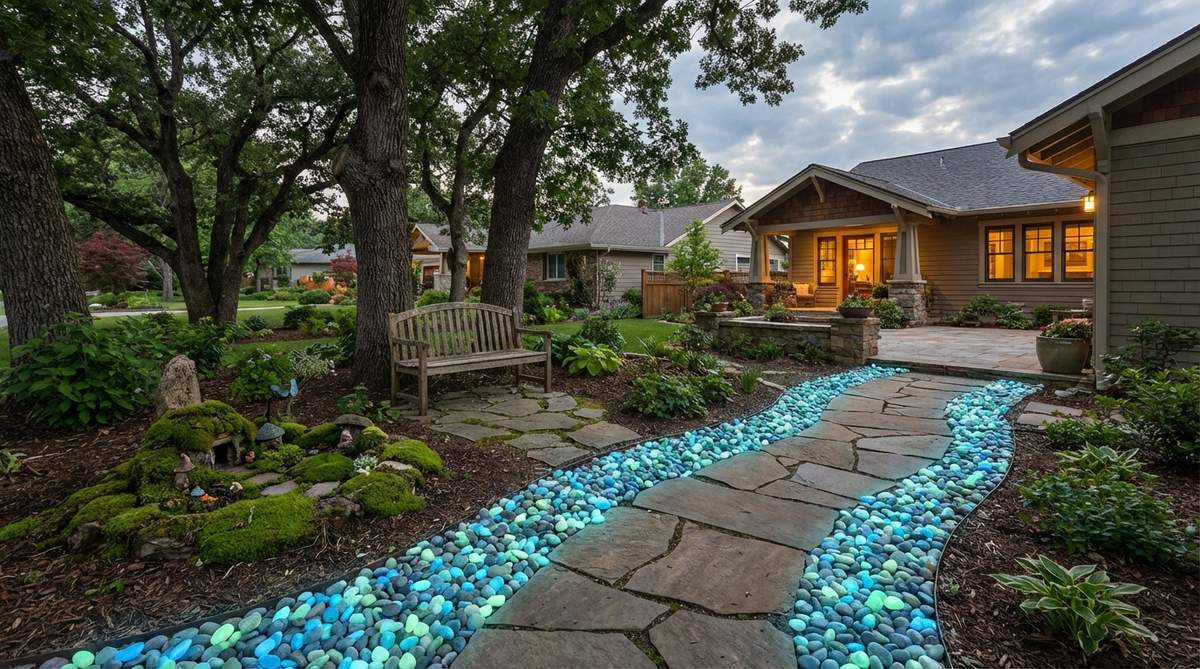
A scattered trail of soft blue luminescence radiating from the soil looks like fragments of fallen stars resting in the moss. Embedding photoluminescent garden accents is a brilliant, zero-maintenance secret garden aesthetic for terrariums that get plenty of daytime sun.
Replacing an entire path with glowing rocks looks overwhelmingly radioactive and ruins the natural daytime aesthetic. Mixing them sparingly with standard terrarium accessories looks far more expensive than it is, creating a subtle, magical surprise that activates naturally. It’s an effortless way to bridge the gap between day and night visuals.
A bag of high-glow resin pebbles costs roughly $10–$15. Pin this hack for a completely wire-free evening glow.
- Key Materials: High-grade photoluminescent pebbles, standard river rocks
- Vibe / Style: Ethereal twilight magic
- Difficulty: Very easy mixing
- Budget Breakdown: Glow Pebbles: $12 | River Rocks: $5
- Creator’s Tip: Stick to blue or green glow colors; they blend naturally with foliage, whereas pink or orange glow pebbles look highly artificial.
- Smart Sourcing: Premium blue glow-in-the-dark resin pebbles (bulk bag)
26. Tea Light Lantern Holders
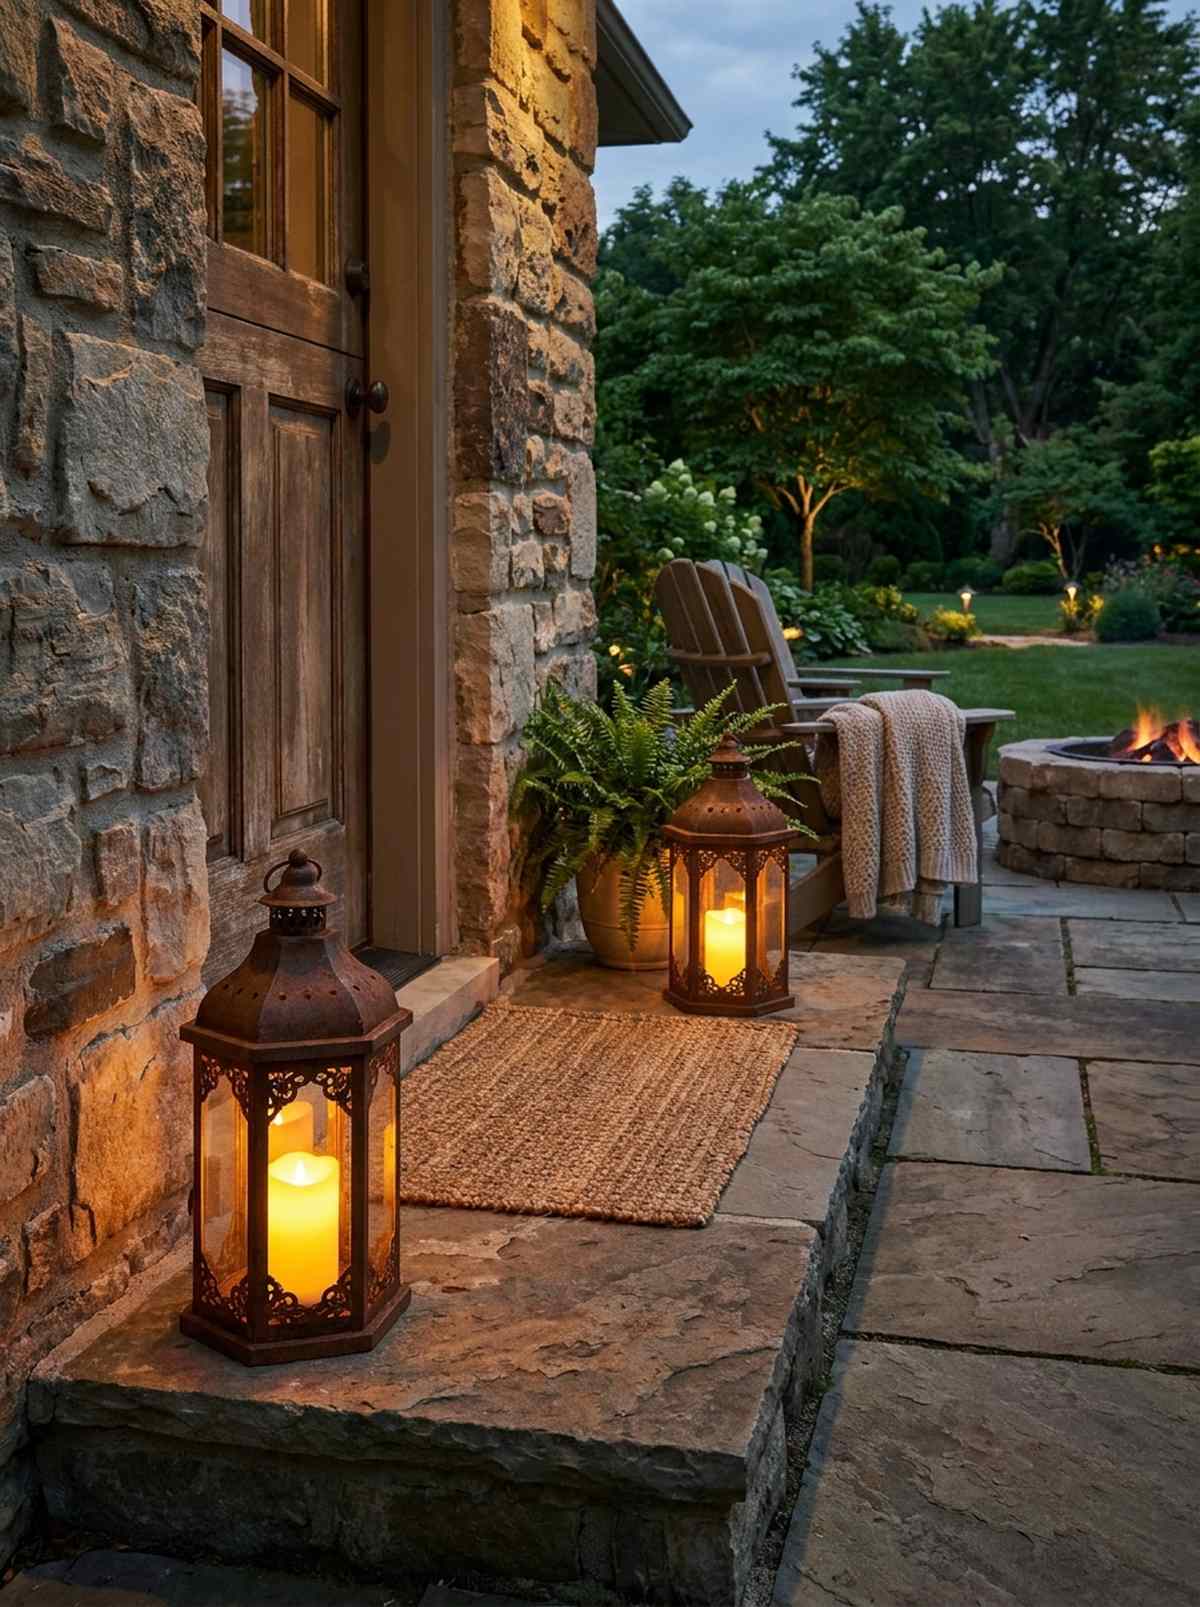
A heavy, ornate iron-style lantern flickering warmly beside a doorway brings a profound sense of cozy, rustic security. Incorporating scaled functional firelight is a stunning way to highlight the intricate textures of a stone cottage or grotto.
Using actual flame candles near dried moss and wooden accessories is an absolute fire hazard waiting to happen. Swapping in flickering LED tea lights alongside premium fairy garden kits delivers a surprisingly premium look that flawlessly mimics real wind-blown flames. The metal housings add incredible architectural weight to the scene.
You can source a heavy metal miniature lantern for around $15. Highly recommended for creating ultra-realistic hearth vibes.
- Key Materials: Miniature metal lantern housing, flickering LED tea light
- Vibe / Style: Rustic nighttime harbor
- Difficulty: Very easy
- Budget Breakdown: Lantern housing: $12 | LED lights: $5
- Creator’s Tip: Lightly brush the metal lantern with a mix of cinnamon and matte Mod Podge to create a highly realistic faux-rust texture.
- Smart Sourcing: Miniature heavy-metal lantern holders or flickering warm-white LED tea lights (bulk pack)
Secret Garden Aesthetic Hideaways With Hidden Spaces
27. Moss-Covered Stone Grotto
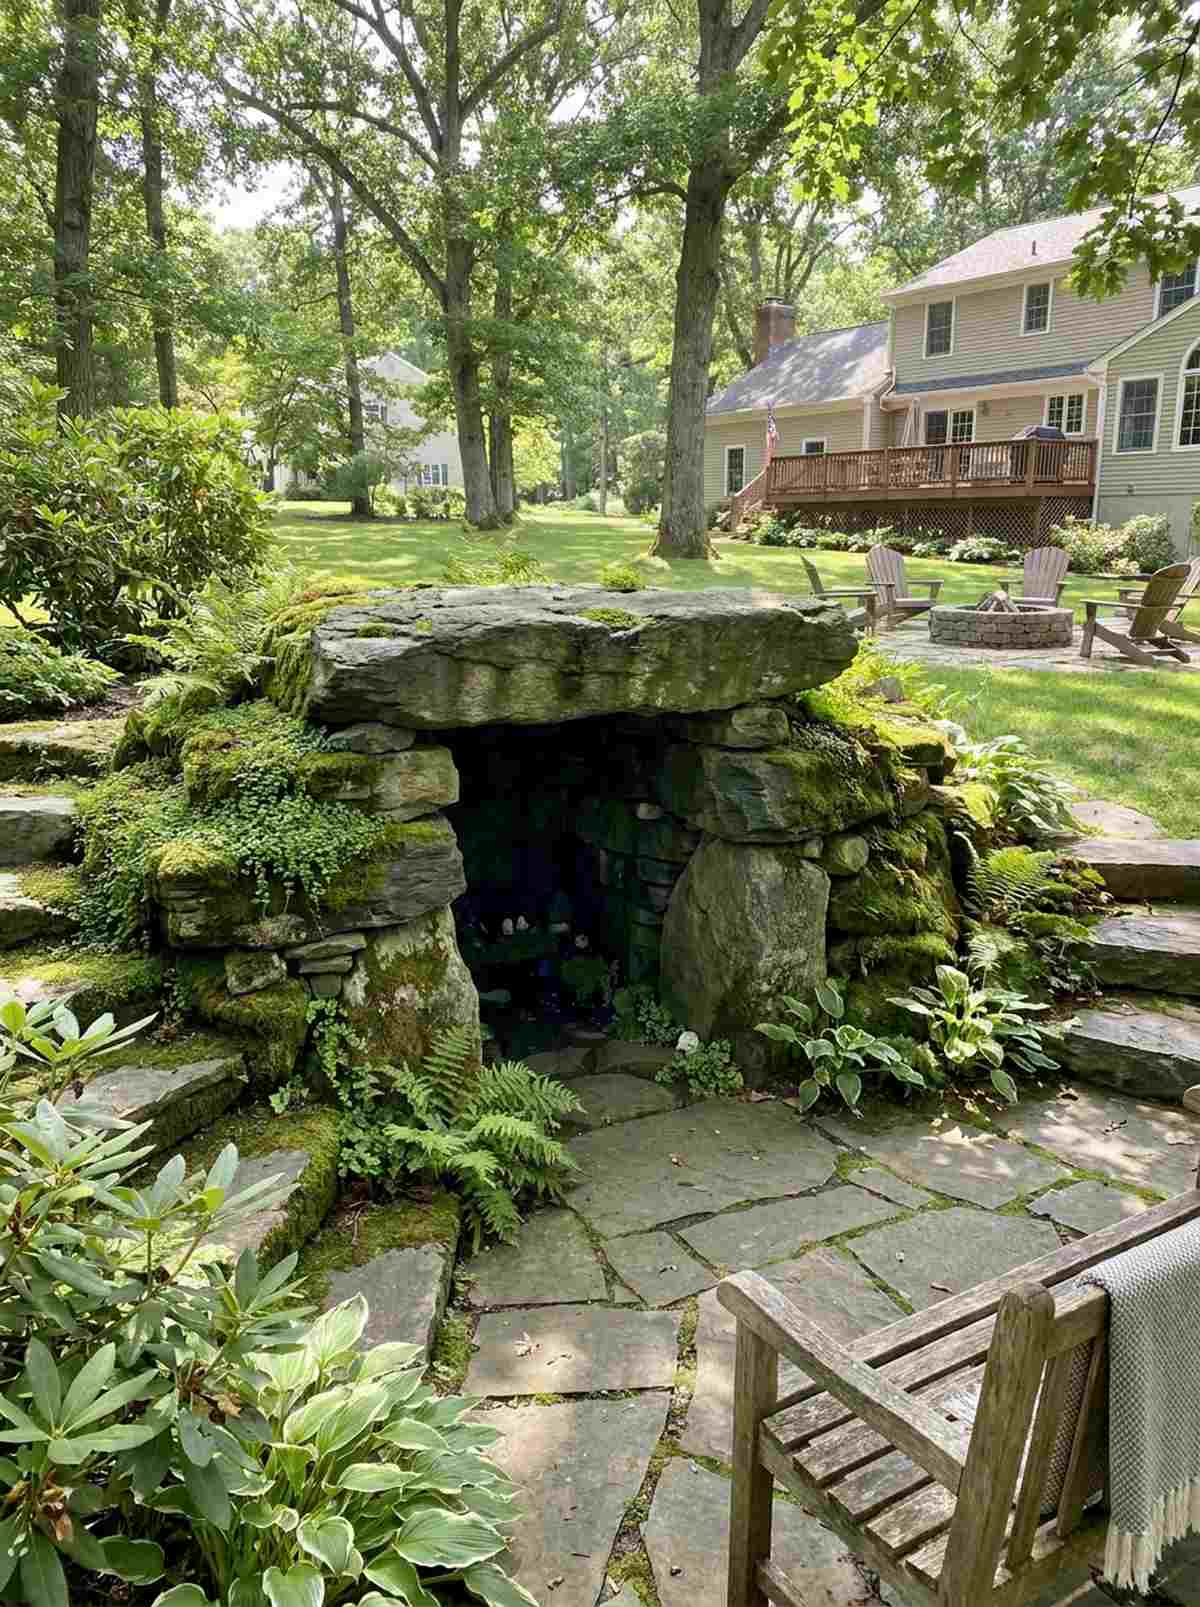
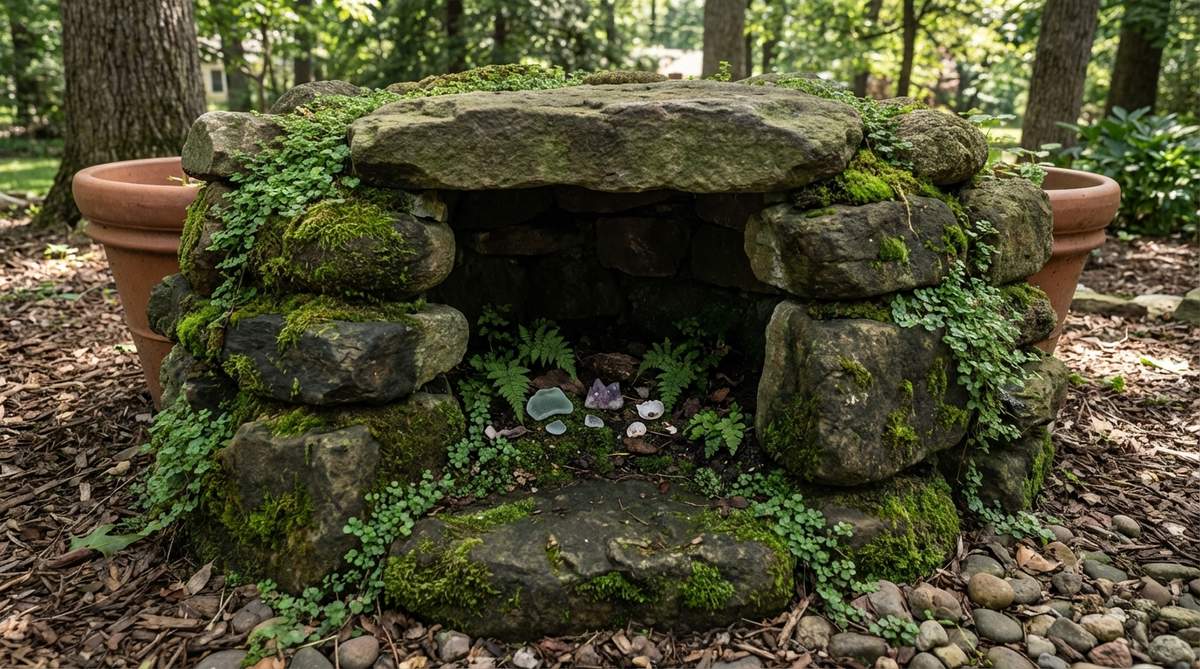
A dark, brooding cave entrance heavily draped in lush, creeping greens feels like a dangerous but thrilling discovery. Building a shaded stone sanctuary is the perfect secret garden aesthetic for cultivating high-humidity plants like baby tears in an arid home.
Exposing delicate humidity-loving plants to dry air conditioning spells immediate disaster for a terrarium. Constructing an enclosed stone cavern gives a designer-level finish while creating a functional micro-climate that traps essential moisture. Tucking tiny treasure elements deep inside forces viewers to actively hunt for hidden details.
Stacking a solid grotto requires about $20 in materials. Pin this layout if you want to create deep, mysterious shadows in your display.
- Key Materials: Heavy stacking stones, flat capstone, live moss plugs
- Vibe / Style: Ancient hidden cave
- Difficulty: Intermediate structural balance
- Budget Breakdown: Stone pack: $15 | Moss: $8
- Creator’s Tip: Ensure the massive capstone is fully supported on three sides so it doesn’t accidentally crush the delicate plants below.
- Smart Sourcing: Large flat aquarium slate rocks (multi-pack) or live baby tears starter plants
28. Living Willow Screen Divider
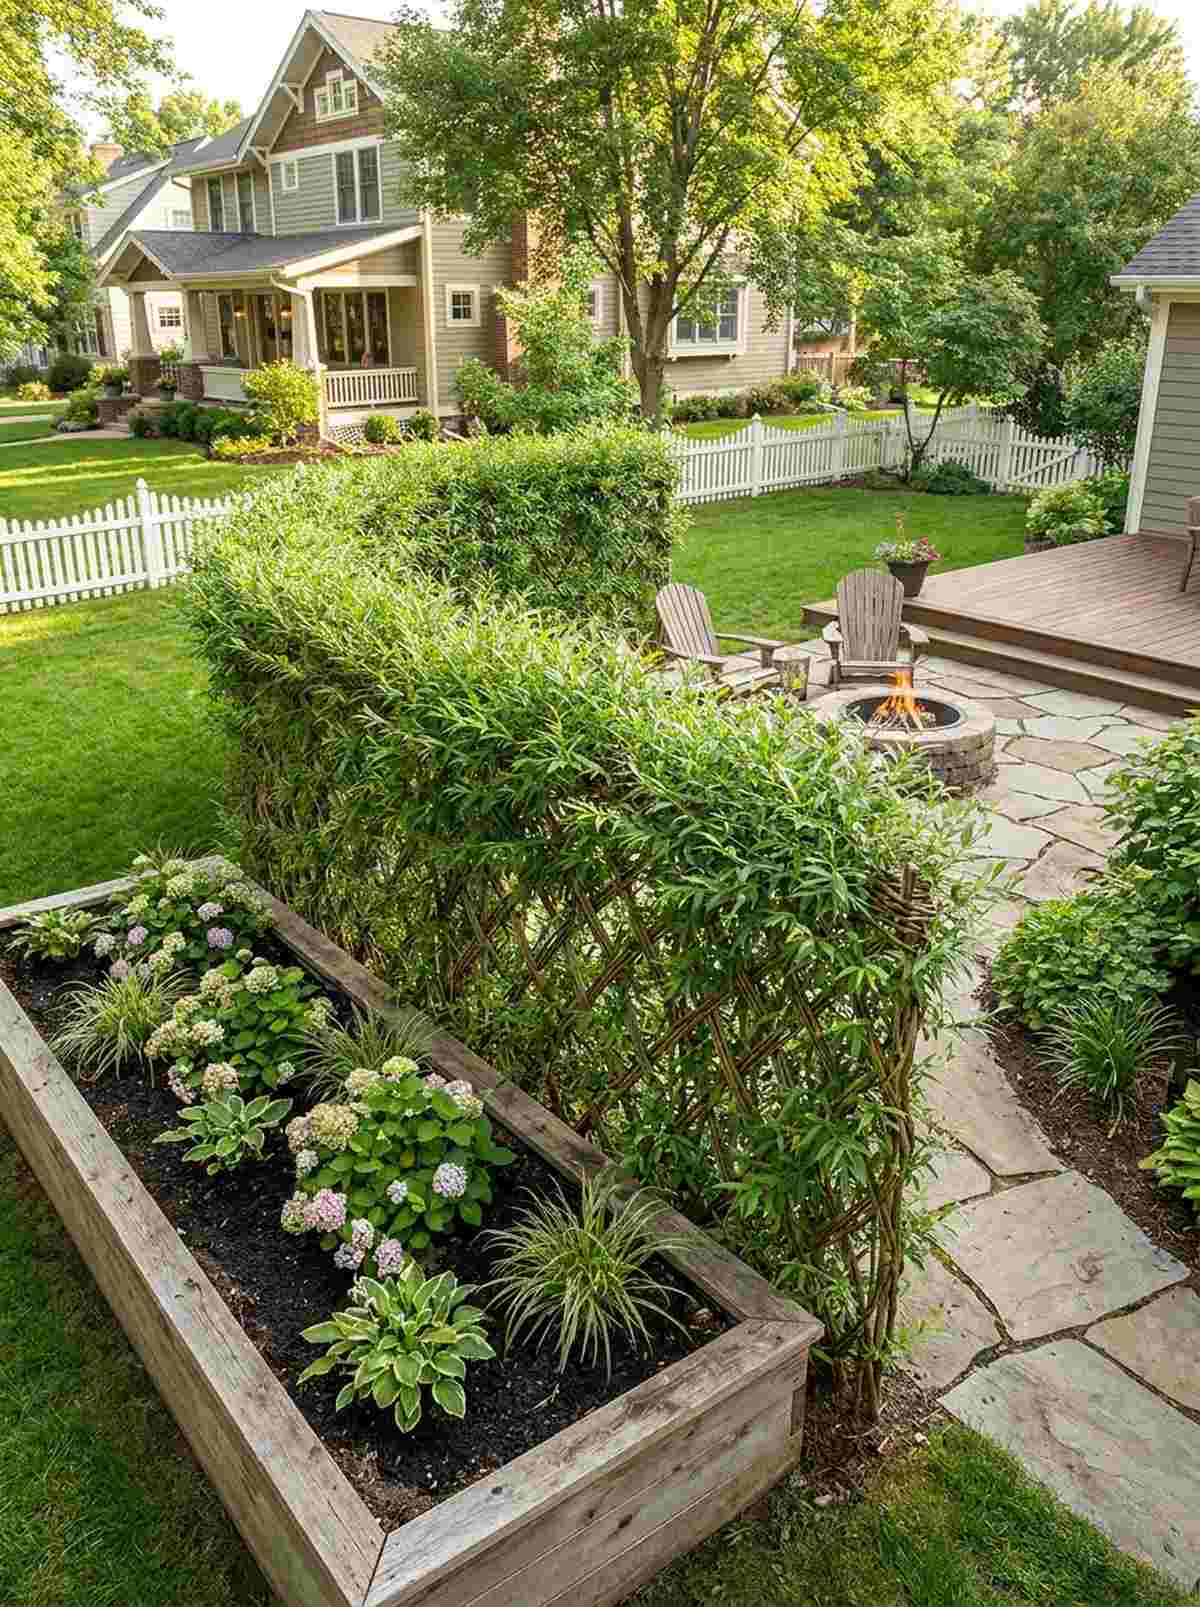
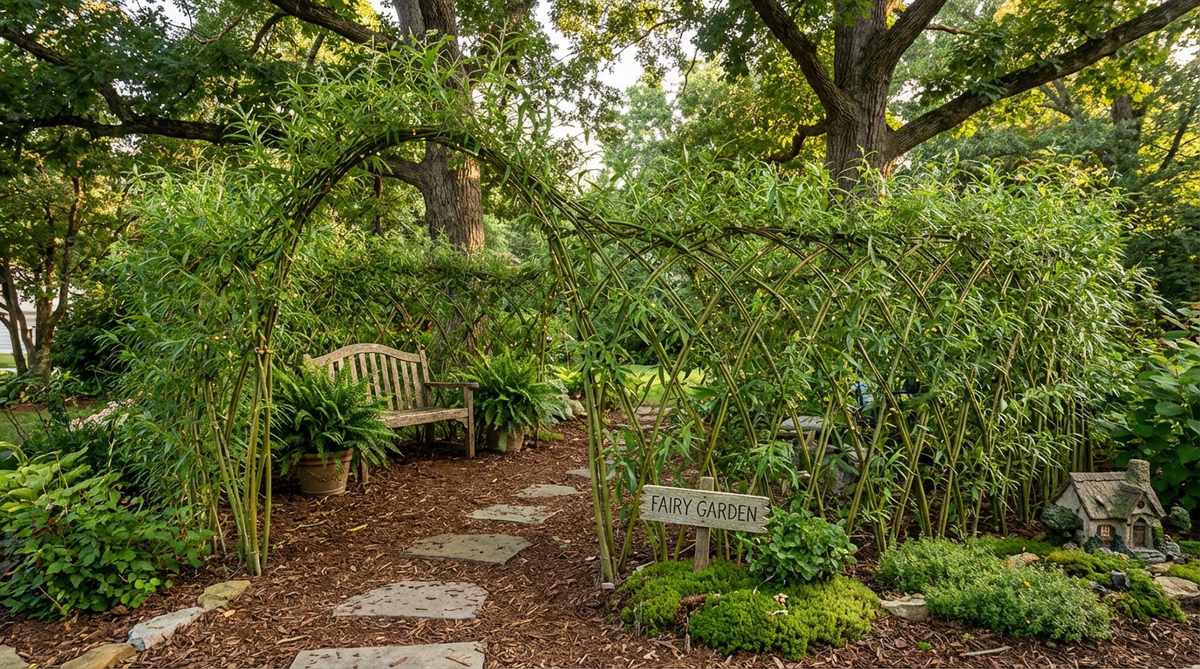
A tightly woven wall of living branches sprouting fresh green leaves creates a stunning, organic privacy fence. Propagating a woven botanical barrier works exceptionally well for hiding ugly plastic container edges or dividing a massive planter box.
Using rigid plastic fencing in a highly organic display completely shatters the naturalistic illusion. Weaving fresh willow whips with premium miniature garden supplies looks far more expensive than it is, and as it roots, the structure actually becomes stronger. It’s a dynamic piece of architecture that changes with the seasons.
Sourcing fresh cuttings costs roughly $15–$25. A phenomenal, advanced technique for blending hardscaping with live botany.
- Key Materials: Fresh willow whips, deep moist soil, rooting hormone
- Vibe / Style: English garden maze
- Difficulty: Advanced horticulture
- Budget Breakdown: Willow cuttings: $20 | Rooting powder: $5
- Creator’s Tip: Keep the soil aggressively moist for the first three weeks; if the willow cuttings dry out once during the rooting phase, the fence will die.
- Smart Sourcing: Fresh live willow cuttings (bundle) or rapid root growth hormone powder
29. Hidden Pond Beneath Ferns
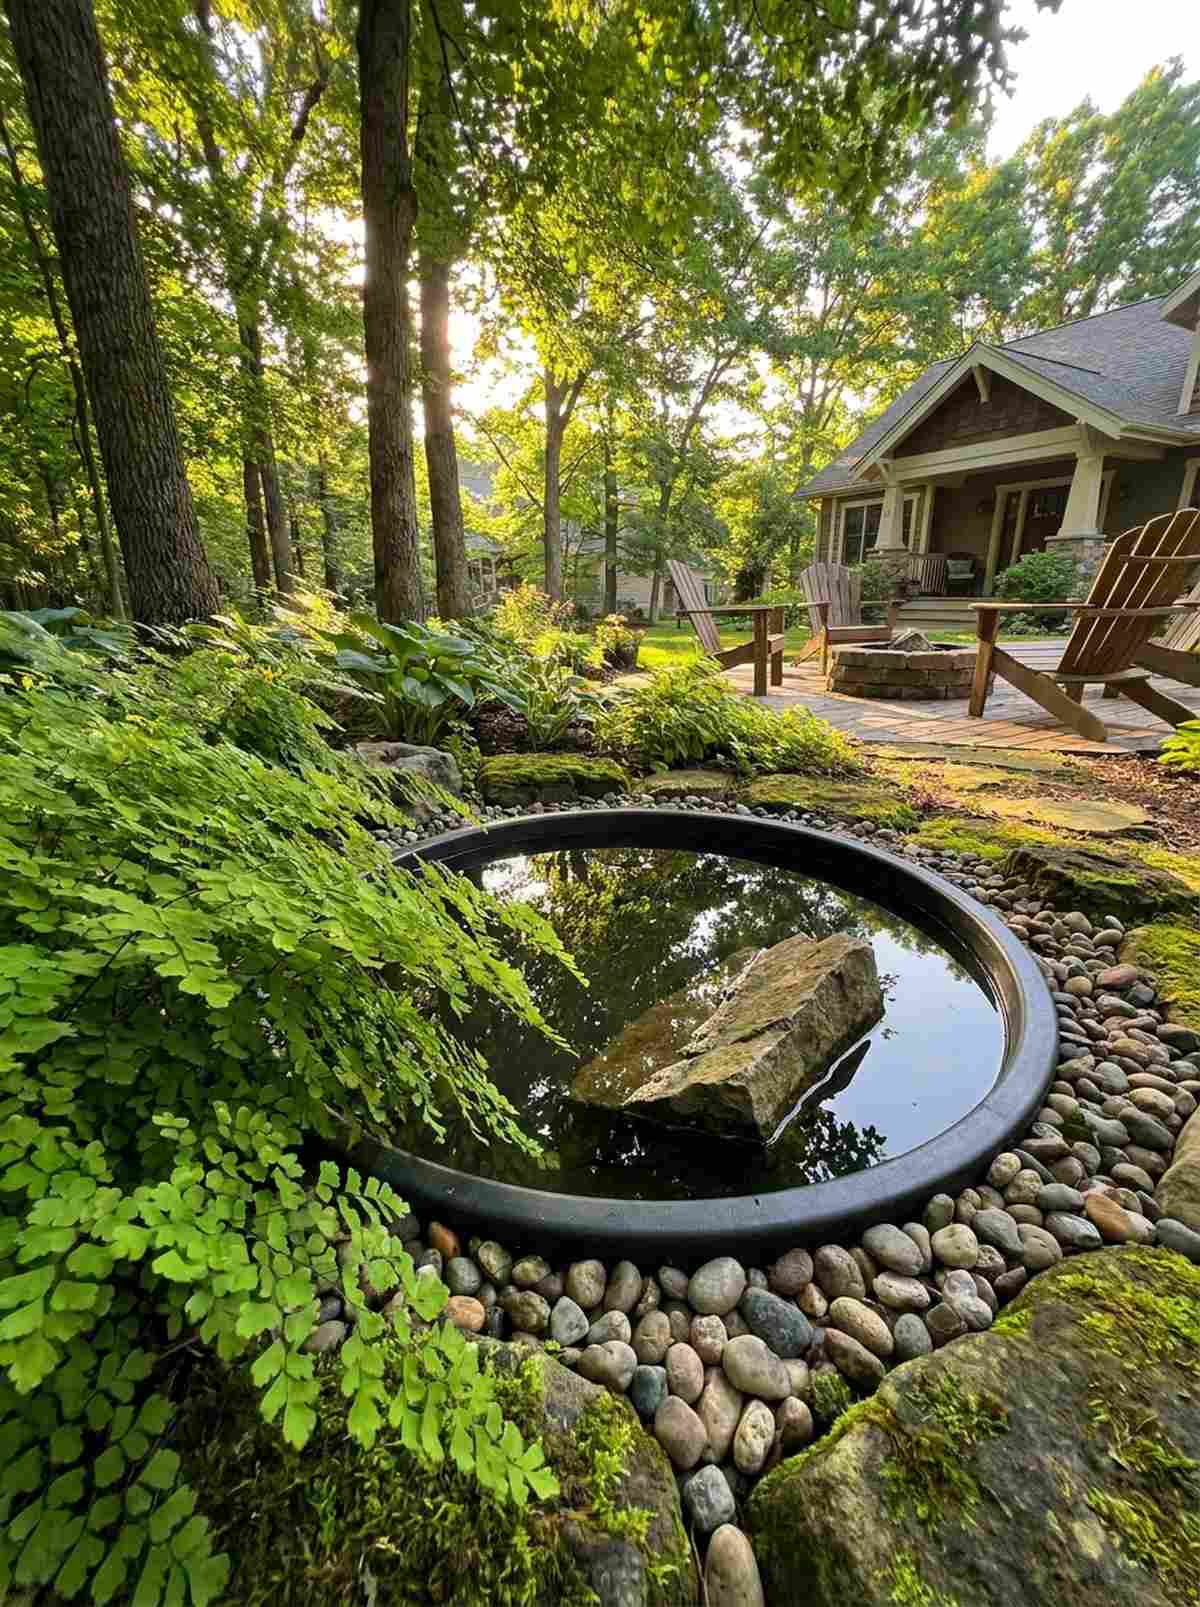
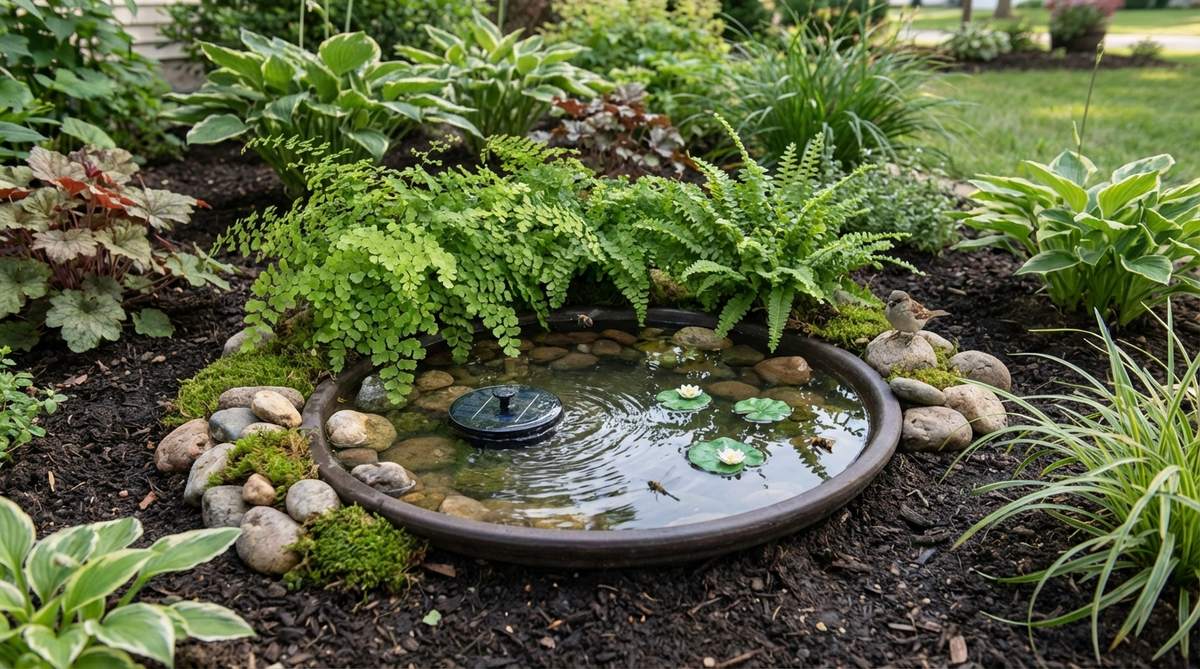
A tranquil pool of still water half-swallowed by the arching fronds of a maidenhair fern creates an intensely peaceful, isolated vibe. Integrating a concealed water feature is the ultimate trick for attracting real beneficial insects to an outdoor patio setup.
Just dropping a plastic blue bowl into the dirt looks incredibly tacky and amateur. Sinking a shallow dish seamlessly and surrounding it with high-end terrarium accessories delivers a surprisingly premium look that mimics a real woodland spring. The overhanging ferns provide crucial shade to stop the water from evaporating instantly.
You can execute this serene oasis for about $15–$20. Save this idea to your ultimate outdoor landscaping board.
- Key Materials: Shallow water dish, maidenhair fern, marginal pebbles
- Vibe / Style: Serene forest spring
- Difficulty: Intermediate moisture management
- Budget Breakdown: Fern: $12 | Base dish/Pebbles: $8
- Creator’s Tip: Place a slightly angled rock inside the pond that breaches the surface; this allows any small trapped insects or frogs to easily climb out.
- Smart Sourcing: Shallow matte black resin water dishes or live maidenhair fern starters
Most people struggle to seamlessly connect two different garden themes, but this archway transition solves the problem for under $10…
30. Vine-Covered Archway Entrance
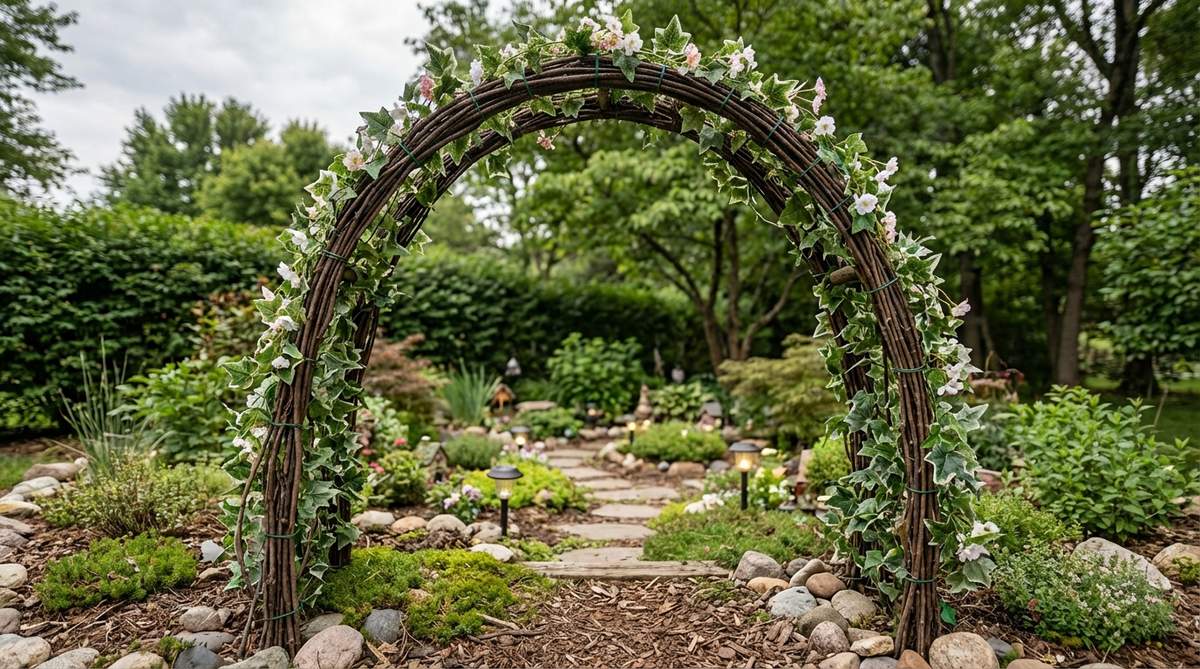
A dense, heavy archway totally consumed by clinging ivy forces the viewer to peer through a literal keyhole of foliage to see what lies beyond. Erecting a camouflaged transition portal is the smartest way to separate a sunny beach theme from a dark woodland theme in a single container.
Abruptly changing aesthetics without a physical barrier makes a garden look like a disorganized junk drawer. Wrapping a wire frame with specialized fairy garden kits completely visually blocks the immediate transition, making the space feel far larger. It builds intense anticipation for the “reveal” on the other side.
This structural transition costs about $10 in materials. Highly recommended for large, multi-theme wheelbarrow setups.
- Key Materials: Flexible wire arch frame, micro artificial ivy, green floral tape
- Vibe / Style: Overgrown forgotten estate
- Difficulty: Easy wrapping
- Budget Breakdown: Arch frame: $5 | Ivy vines: $6
- Creator’s Tip: Wrap the arch structure in green floral tape before adding the ivy; it grips the vines better and hides any shiny metal glares.
- Smart Sourcing: Miniature artificial ivy garlands (micro leaf) or flexible metal garden arch structures
31. Hollow Log Tunnel Passage
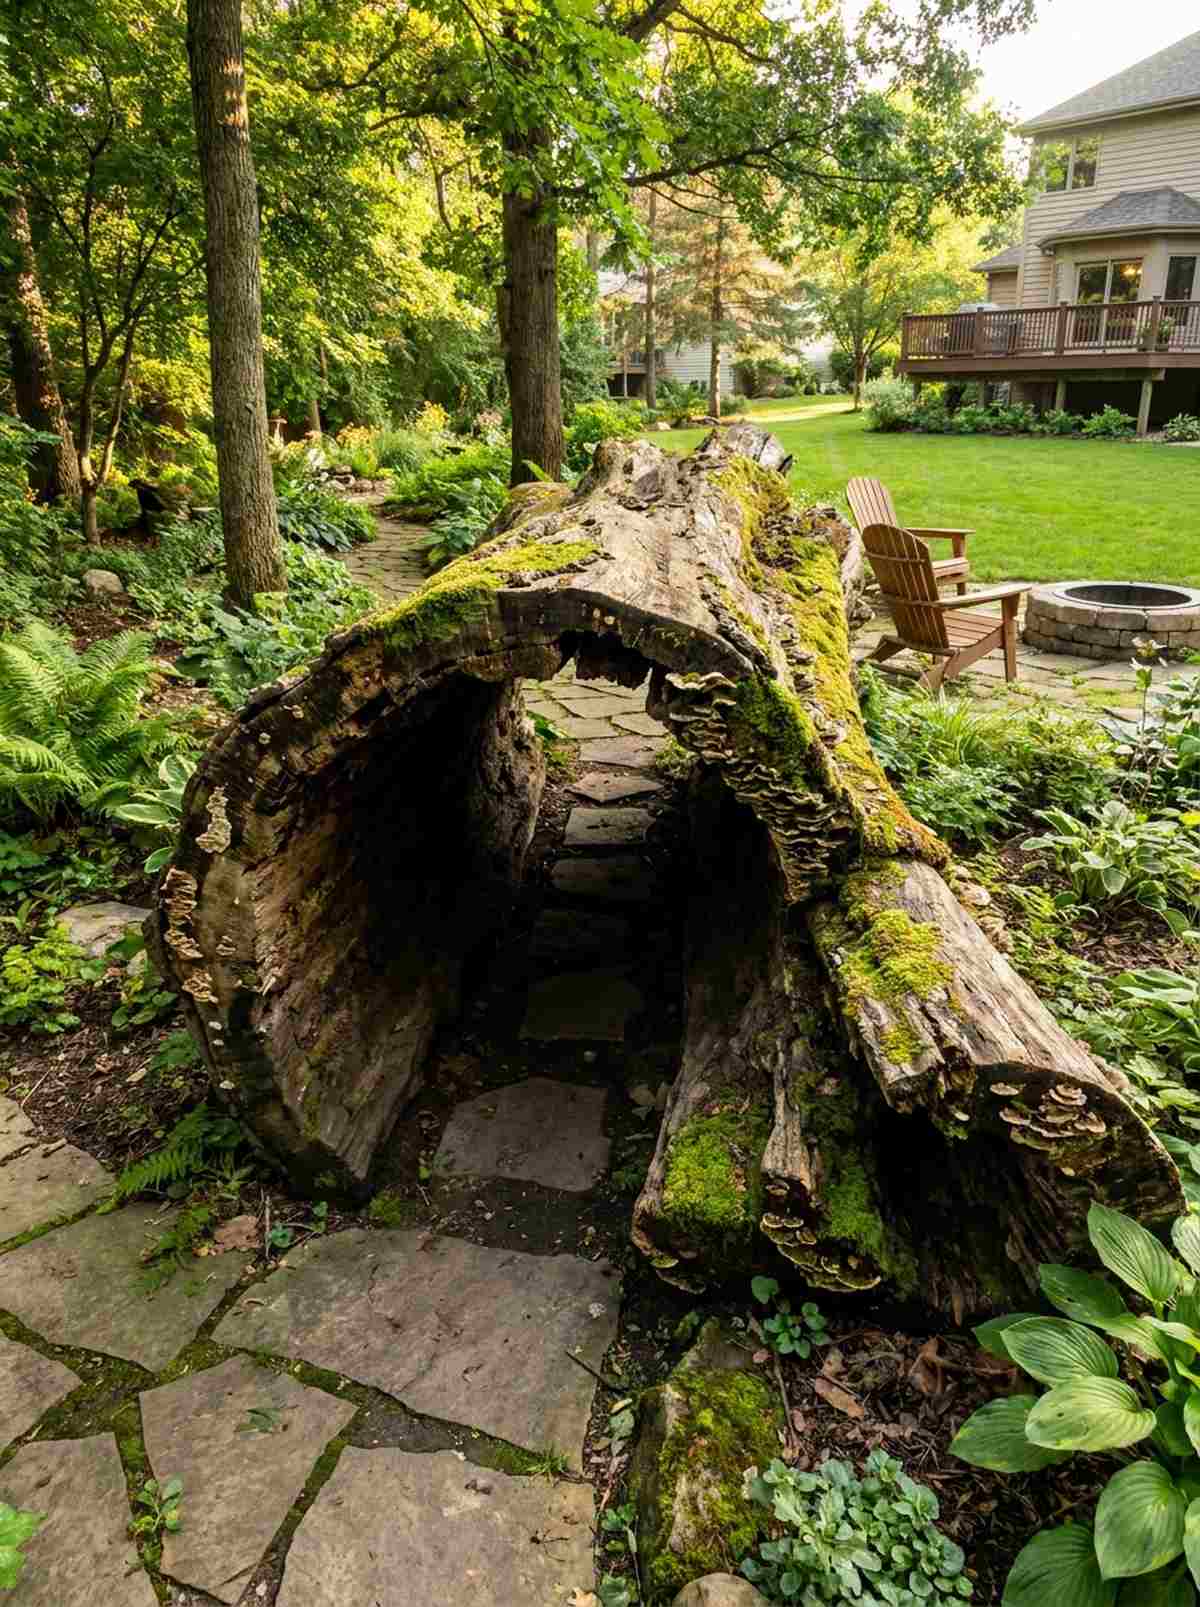
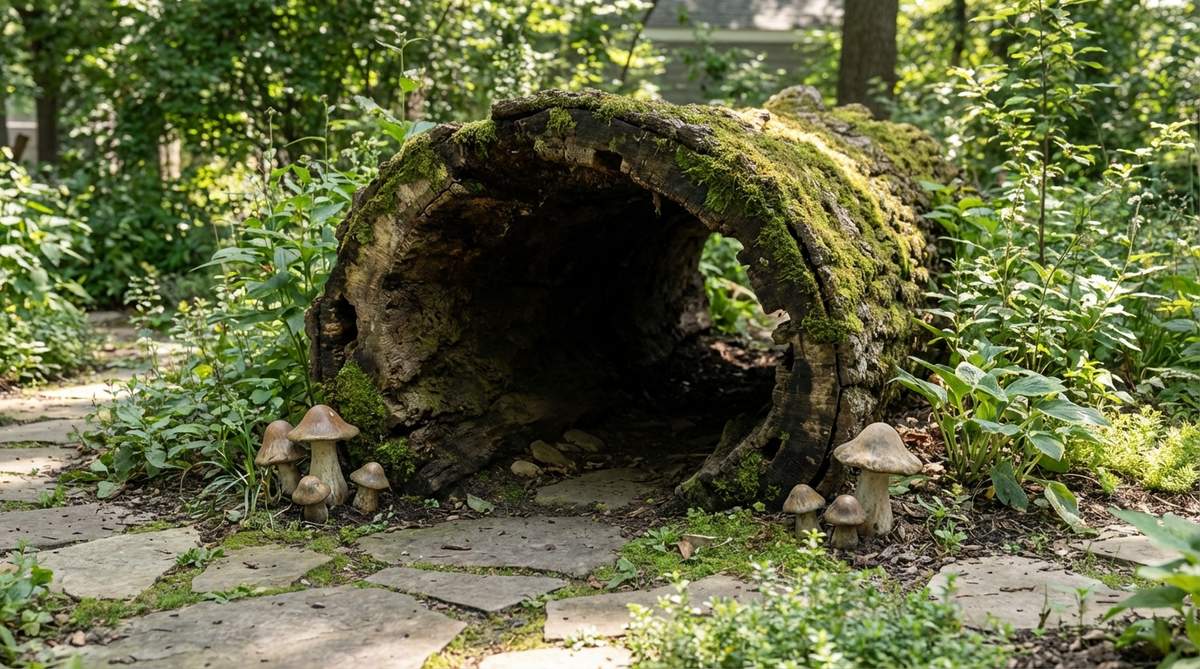
A decaying, hollowed-out tree trunk acting as a natural tunnel creates an intensely moody, dramatic passage for a stone pathway. Repurposing decaying natural wood structures is an incredible secret garden aesthetic for adding massive organic volume without spending money.
Purchasing giant resin log replicas often looks plastic and quickly drains your budget. Sourcing real, partially rotted wood looks far more expensive than it is, and naturally hosts fascinating fungal growth when kept outdoors. The dark interior of the tunnel creates a stark, beautiful contrast against bright green moss.
This adds massive scale to your project for $0 if foraged correctly. Pin this if you love utilizing raw, natural decay in your art.
- Key Materials: Hollowed natural log segment, exterior path stones
- Vibe / Style: Wild forest floor
- Difficulty: Easy placement
- Budget Breakdown: Log: Free | Path stones: $5
- Creator’s Tip: Ensure the tunnel’s interior is wide enough that you can easily reach inside with tweezers to clear out fallen debris over time.
- Smart Sourcing: Pre-treated hollow cork bark tubes (if you cannot forage safely)
Material Guide: Cheap vs. Premium Aesthetic
Knowing exactly where to save and where to spend makes all the difference in achieving that “looks expensive but isn’t” vibe.
- Standard vs. UV-Resistant/Premium: Cheap plastic figures crack and bleach white within weeks outdoors. Upgrading to UV-coated resin cottages prevents fading, ensuring your structural anchors survive multiple harsh seasons.
- Pre-made Kits vs. Sourcing Locally: While foraging twigs is free, buying pre-cut preserved moss sheets (bulk pack) saves hours of frustrating cleaning and prevents massive bug infestations inside your home terrariums.
Seasonal & Thematic Displays That Rotate Year-Round
32. Autumn Harvest Pumpkin Patch
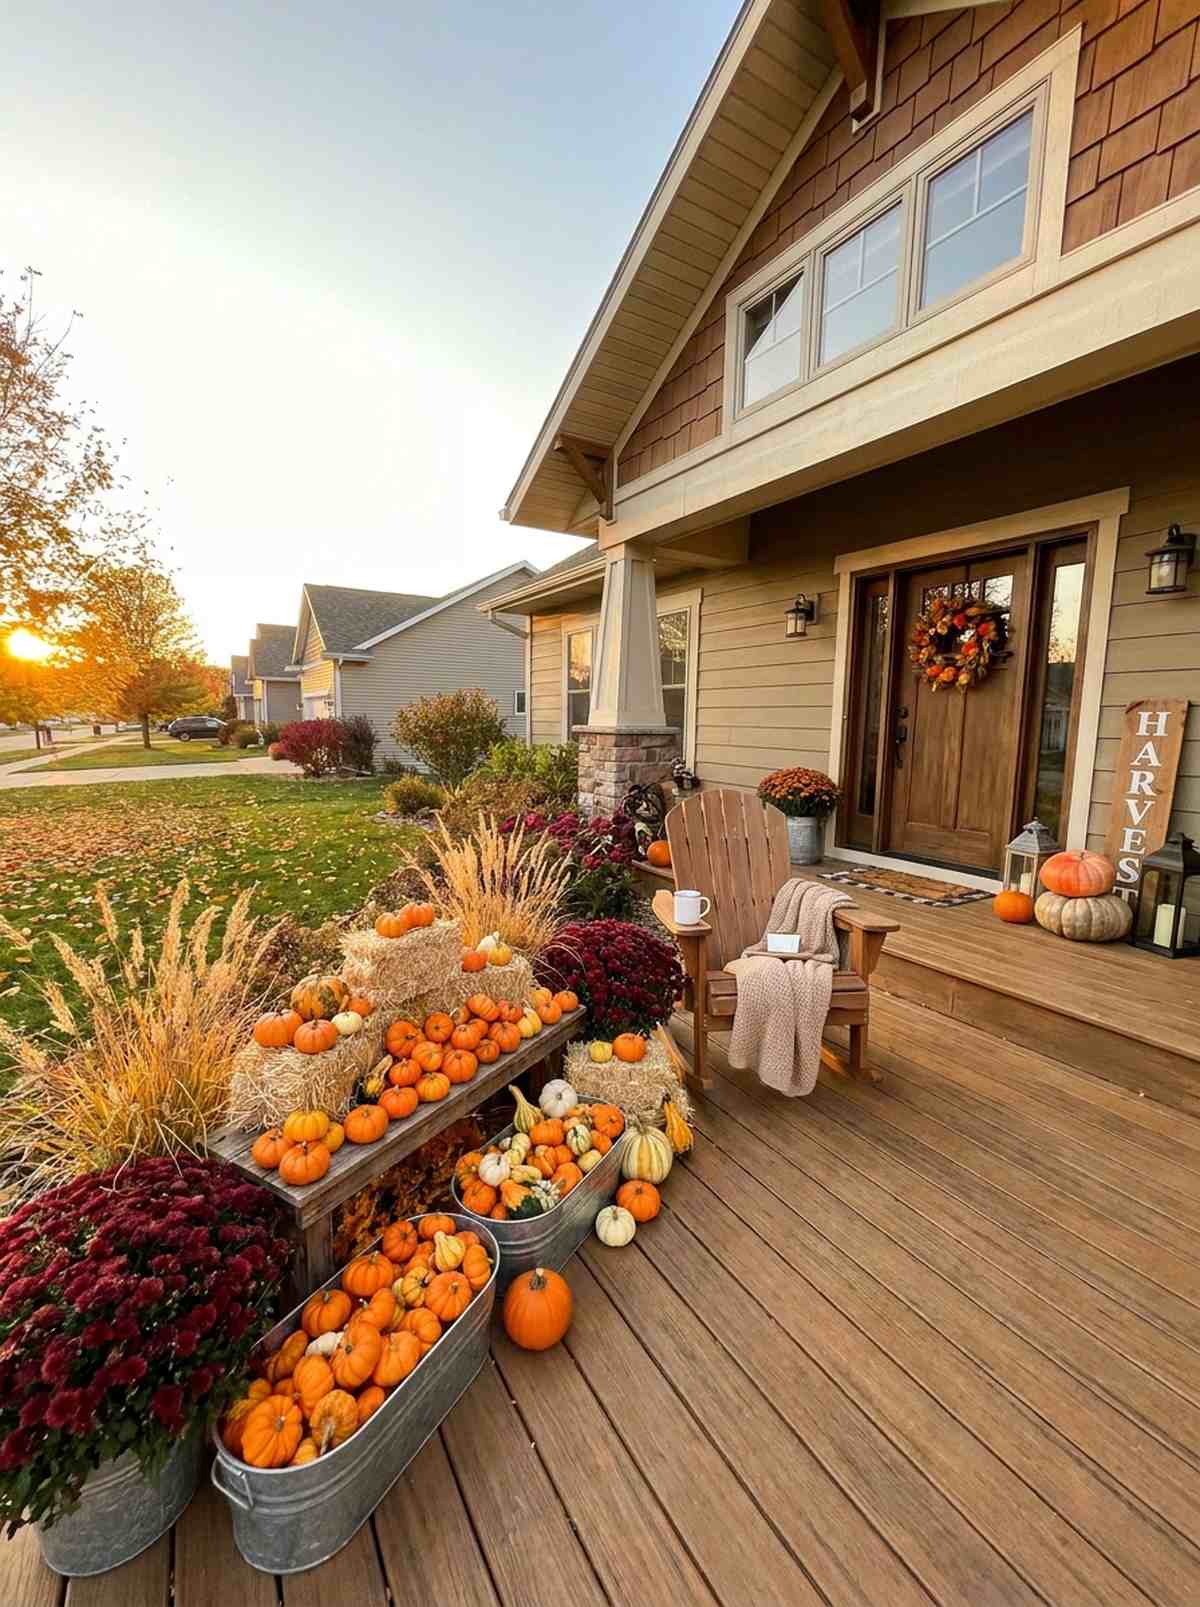

A vibrant spread of tiny orange gourds nestled among dried golden grasses perfectly captures the crisp, cozy essence of fall. Swapping in seasonal miniature agriculture is the easiest way to keep a porch display feeling fresh and relevant from September through November.
Leaving bright spring pastels out during October visually clashes with the surrounding real-world environment. Integrating rich burgundy foliage and premium miniature garden supplies delivers a surprisingly premium look that coordinates flawlessly with autumn aesthetics. Utilizing tiny hay bales adds immense textural warmth.
A complete seasonal swap costs about $15–$25 for new accessories. Save this layout to prep for your autumn porch decor.
- Key Materials: Resin pumpkins, miniature hay bales, dried ornamental grass
- Vibe / Style: Cozy harvest festival
- Difficulty: Easy seasonal swapping
- Budget Breakdown: Pumpkin pack: $10 | Hay/Grass: $8
- Creator’s Tip: Swap out high-water summer plants for drought-tolerant sedums that naturally turn beautiful shades of red and bronze in cooler weather.
- Smart Sourcing: Miniature resin pumpkin assortments (bulk pack) or authentic miniature straw bales
33. Winter Snow Village Scene
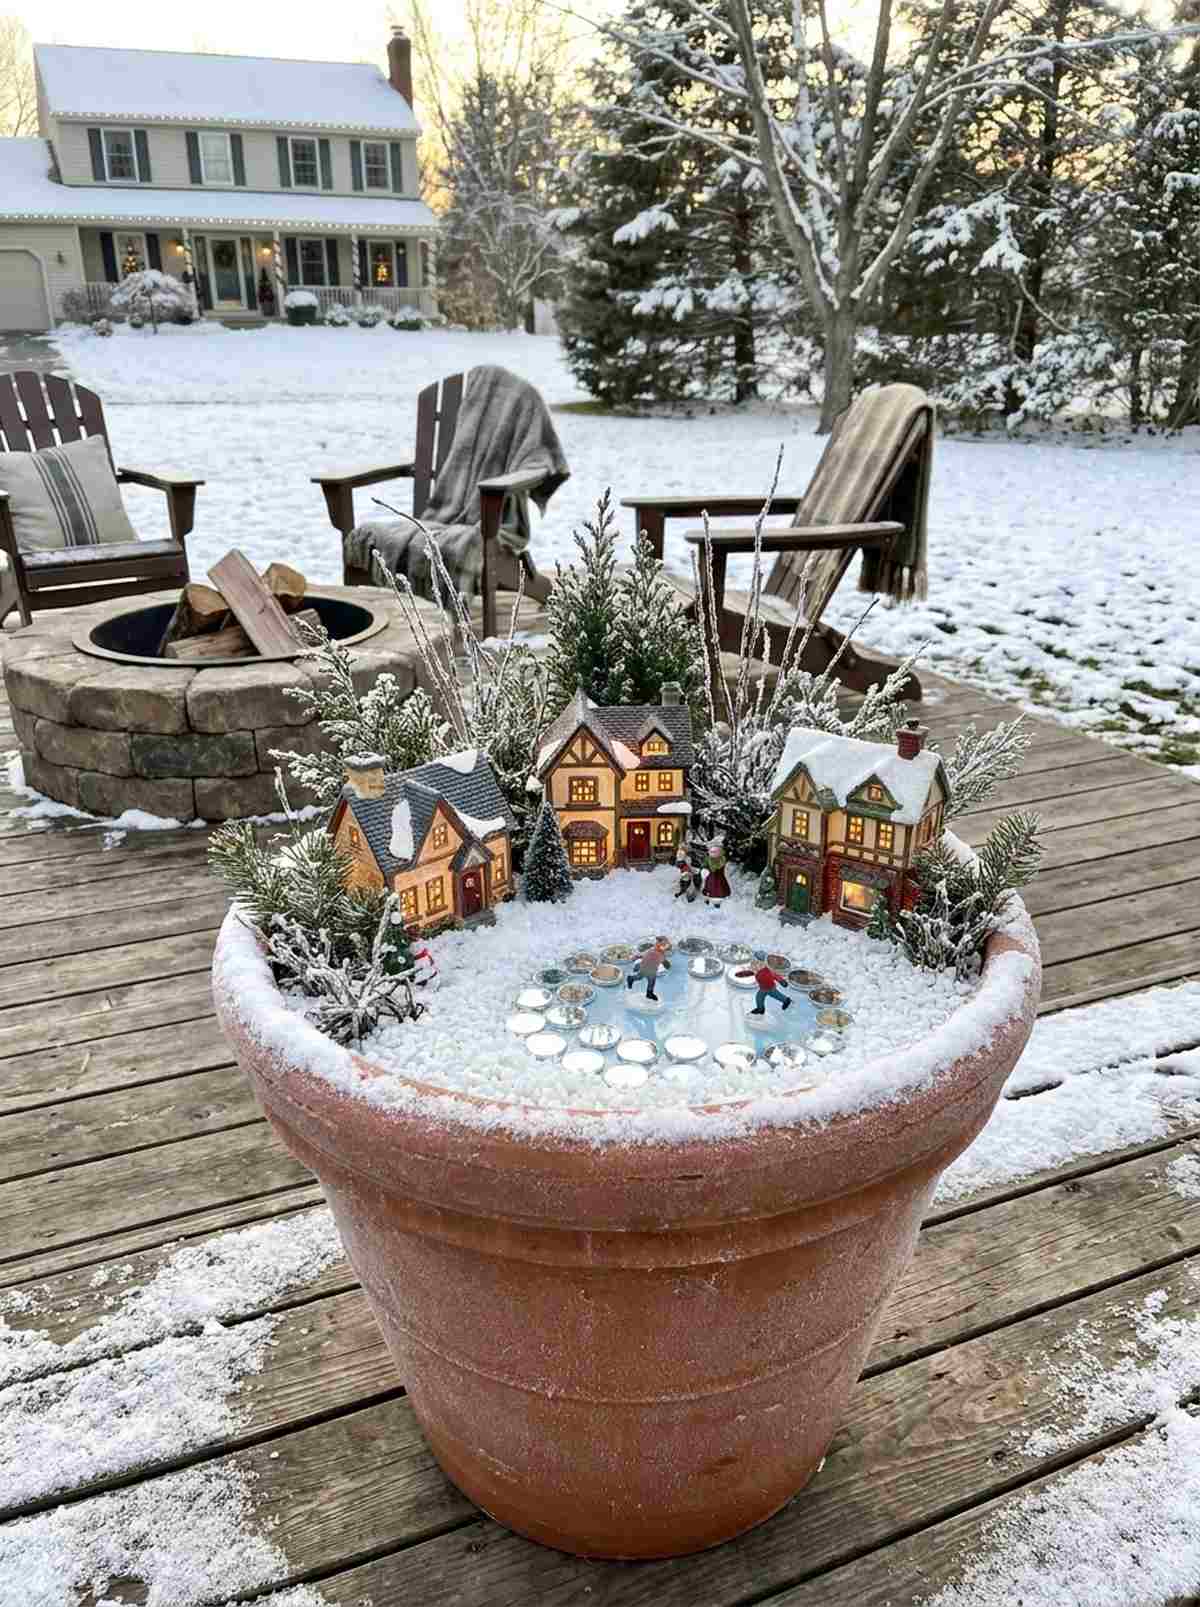
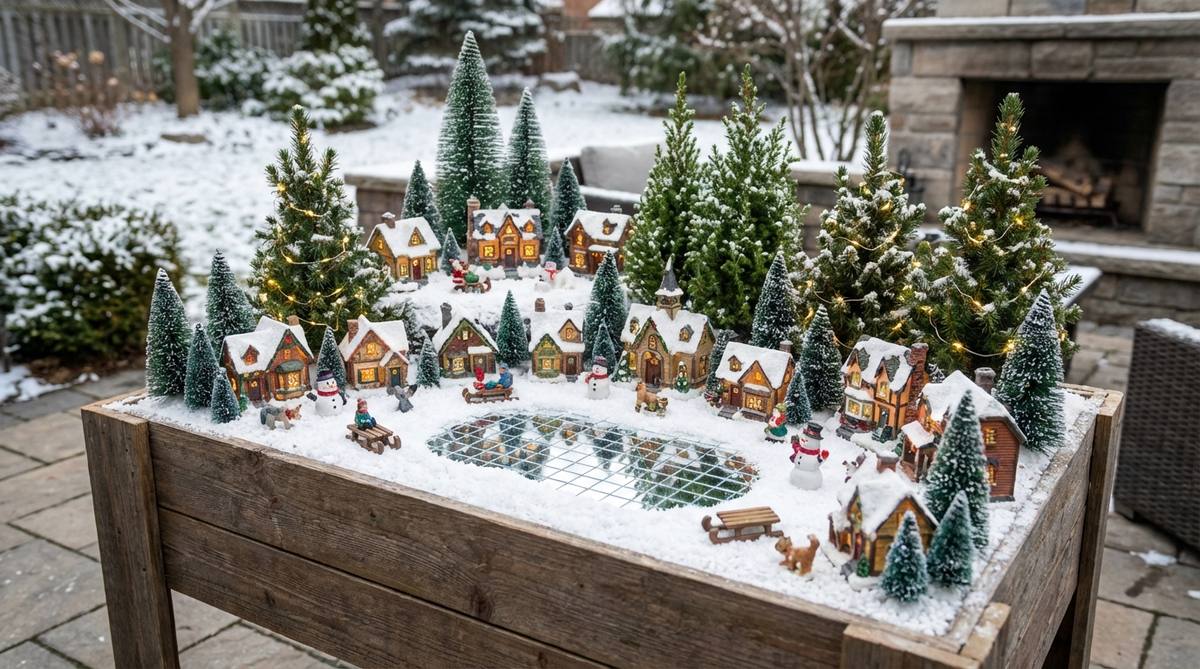
A thick blanket of sparkling white snow surrounding glowing cottage windows transforms a pot into a breathtaking winter wonderland. Designing a dormant frosted landscape is the absolute best way to utilize outdoor fairy garden kits when your real plants die back in December.
Looking at a pot of dead, frozen dirt for four months is incredibly depressing. Blanketing the soil in white aquarium gravel looks far more expensive than it is and creates a highly durable, faux-snow effect that won’t melt indoors or out. Adding mirror tiles instantly creates ultra-realistic frozen skating ponds.
You can winterize your layout for around $20. Pin this to keep your outdoor containers visually stunning all winter long.
- Key Materials: White aquarium gravel, mirror tiles, dormant dwarf evergreens
- Vibe / Style: Frozen alpine village
- Difficulty: Intermediate surface covering
- Budget Breakdown: White gravel: $12 | Mirror tiles: $5
- Creator’s Tip: Never use actual artificial craft snow outdoors; it turns into a slimy, chemical paste when it rains. Always use white stone or glass.
- Smart Sourcing: Fine white aquarium gravel (bulk bag) or small round craft mirror tiles
34. Spring Bulb Garden Awakening

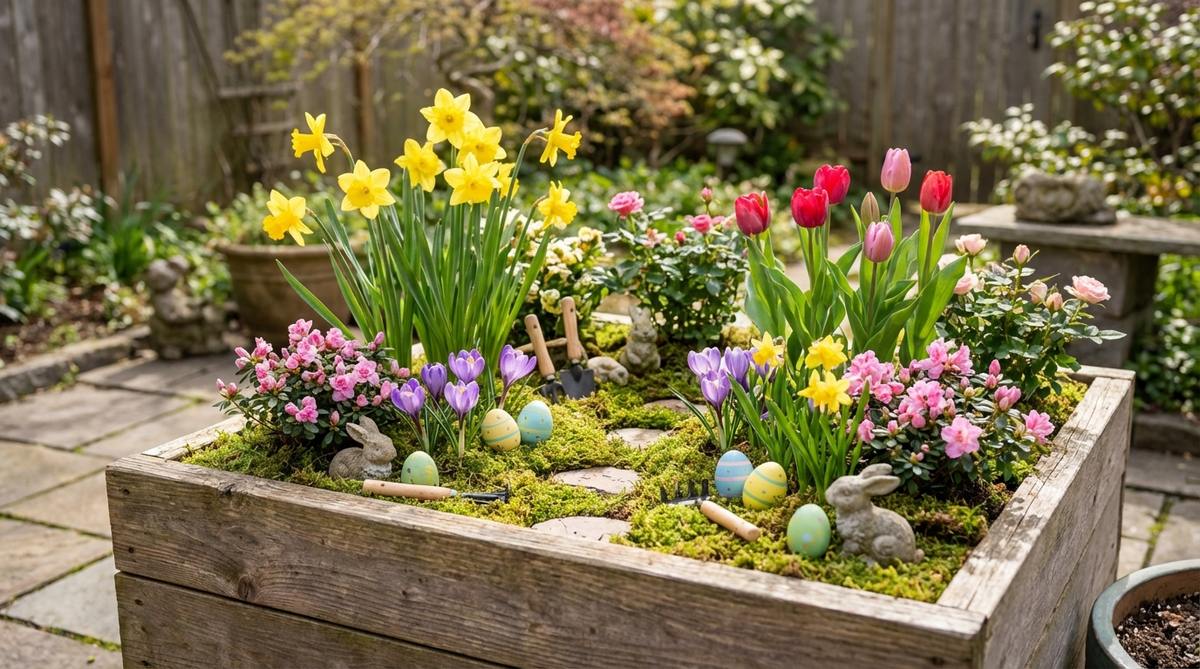
Tiny green shoots exploding through the moss alongside delicate pastel accessories signifies the triumphant return of life. Engineering a miniature blooming revival works exceptionally well for celebrating Easter and the spring thaw on a sunny windowsill.
Relying purely on artificial flowers feels incredibly hollow when the rest of the world is blooming. Burying real miniature crocus bulbs beneath your terrarium accessories gives a designer-level finish that provides authentic, explosive color as the weather warms. The dynamic growth makes checking the garden a daily joy.
A bag of miniature spring bulbs costs about $10–$15. A highly rewarding project for patient gardeners.
- Key Materials: Miniature crocus/daffodil bulbs, pastel resin accents, fresh moss
- Vibe / Style: Joyful spring rebirth
- Difficulty: Intermediate timing/planting
- Budget Breakdown: Bulbs: $12 | Pastel Accents: $8
- Creator’s Tip: Plant the bulbs in the fall before the first freeze, burying them directly beneath the moss layer so they erupt right through the green carpet in spring.
- Smart Sourcing: Miniature crocus bulb variety packs or pastel UV-resistant fairy furniture
Most beginners throw away their wide, shallow pots, not realizing they are the absolute best vessel for this next summer layout…
35. Summer Beach Cottage Retreat
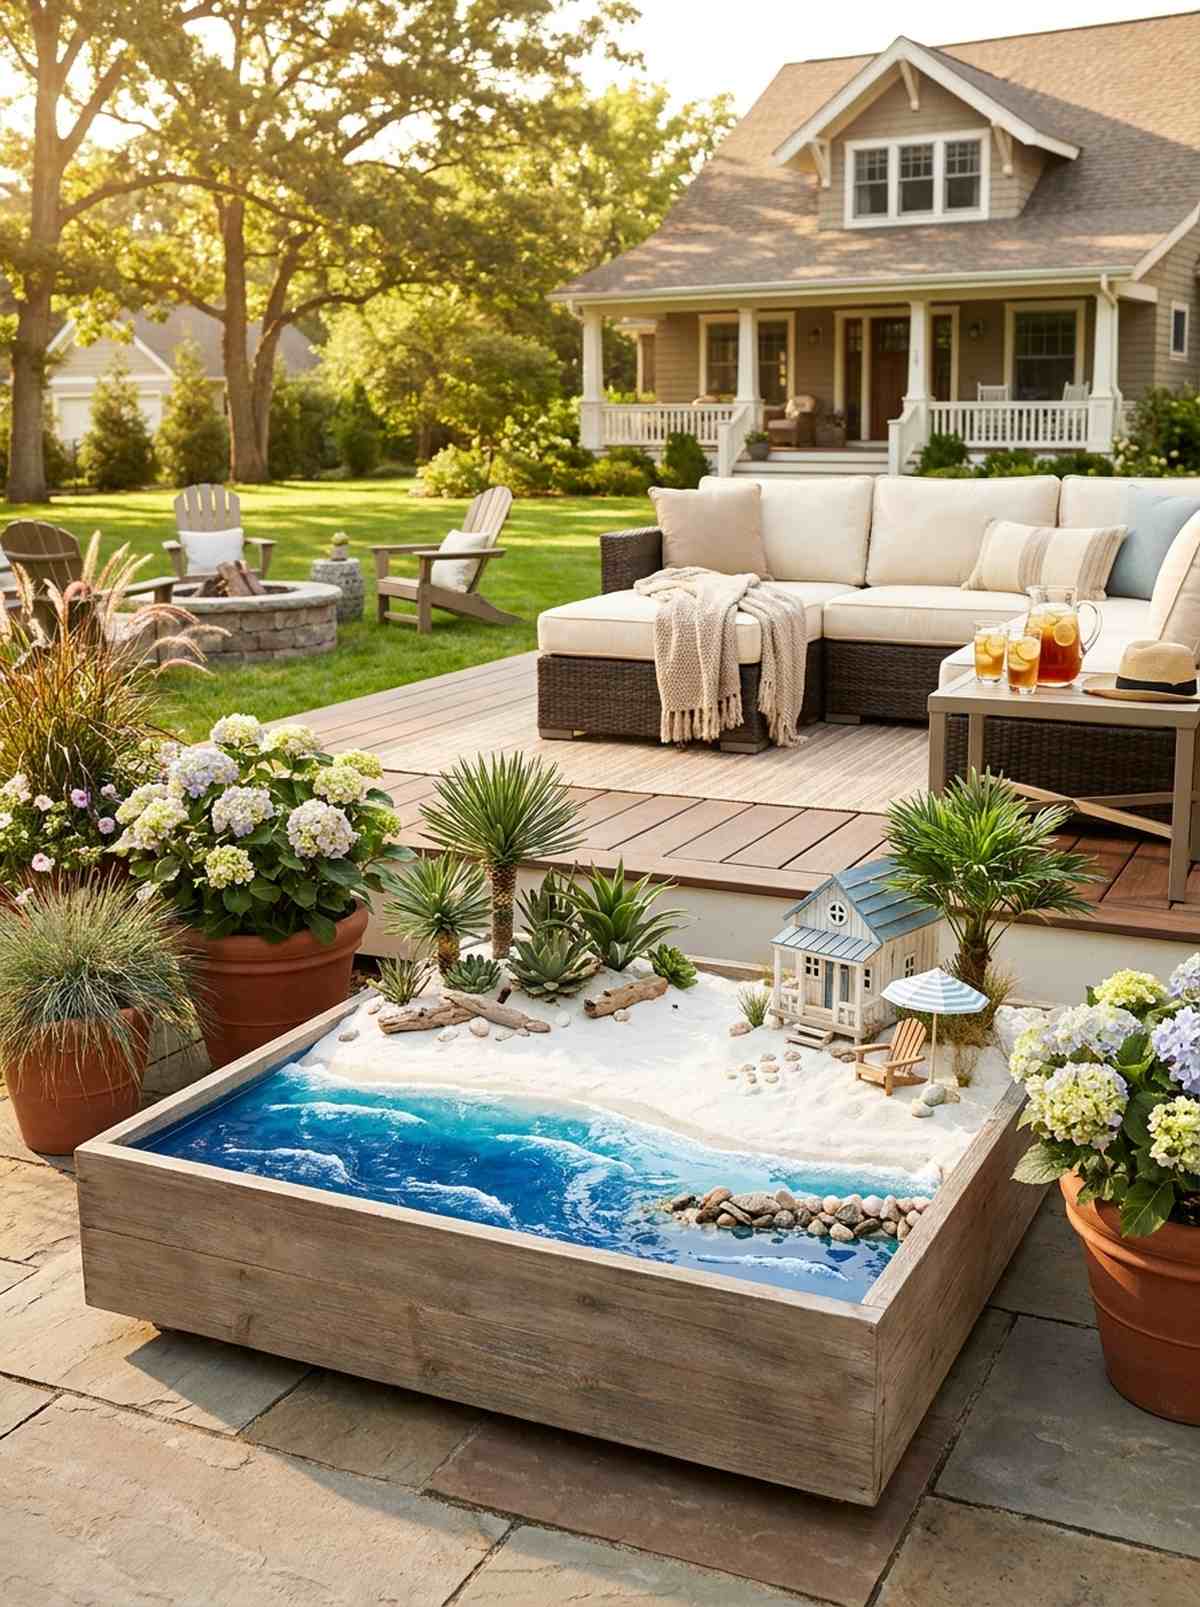
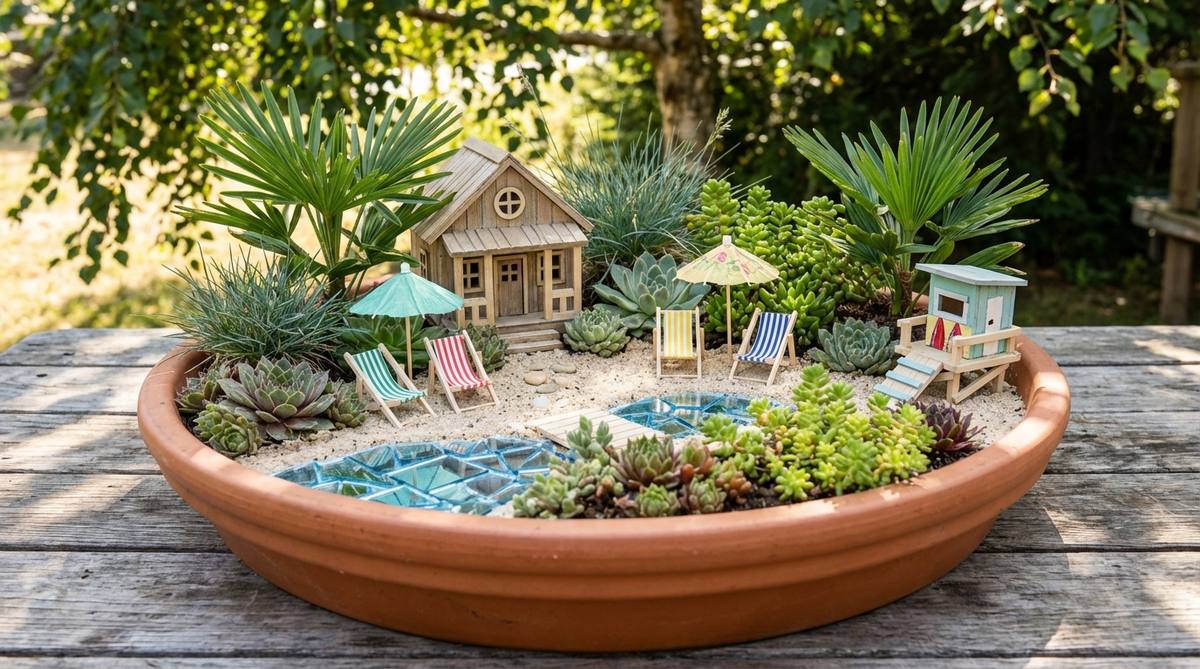
A pristine stretch of white sand meeting a deep blue resin ocean creates an irresistible, sun-drenched vacation vibe. Constructing a coastal miniature oasis is the perfect high-heat, low-water solution for scorching summer patios.
Trying to keep delicate moss alive during a 100-degree heatwave is an exercise in futility. Swapping to a sand-based layout with premium fairy garden kits completely eliminates watering stress while delivering a radically different aesthetic. Succulents easily mimic tropical palm bushes in this arid environment.
Transforming your setup into a beach scene costs roughly $20–$30. Pin this if you want a totally drought-proof summer display.
- Key Materials: Fine white play sand, blue resin water feature, coastal succulents
- Vibe / Style: Tropical island getaway
- Difficulty: Easy sand shaping
- Budget Breakdown: Sand: $5 | Resin water: $15 | Succulents: $10
- Creator’s Tip: Create a hard barrier of rocks just beneath the surface to prevent the soil moisture from seeping into the white sand and turning it brown.
- Smart Sourcing: Fine-grain white terrarium sand (bulk) or drought-tolerant miniature succulent packs
36. Halloween Haunted Fairy Hollow

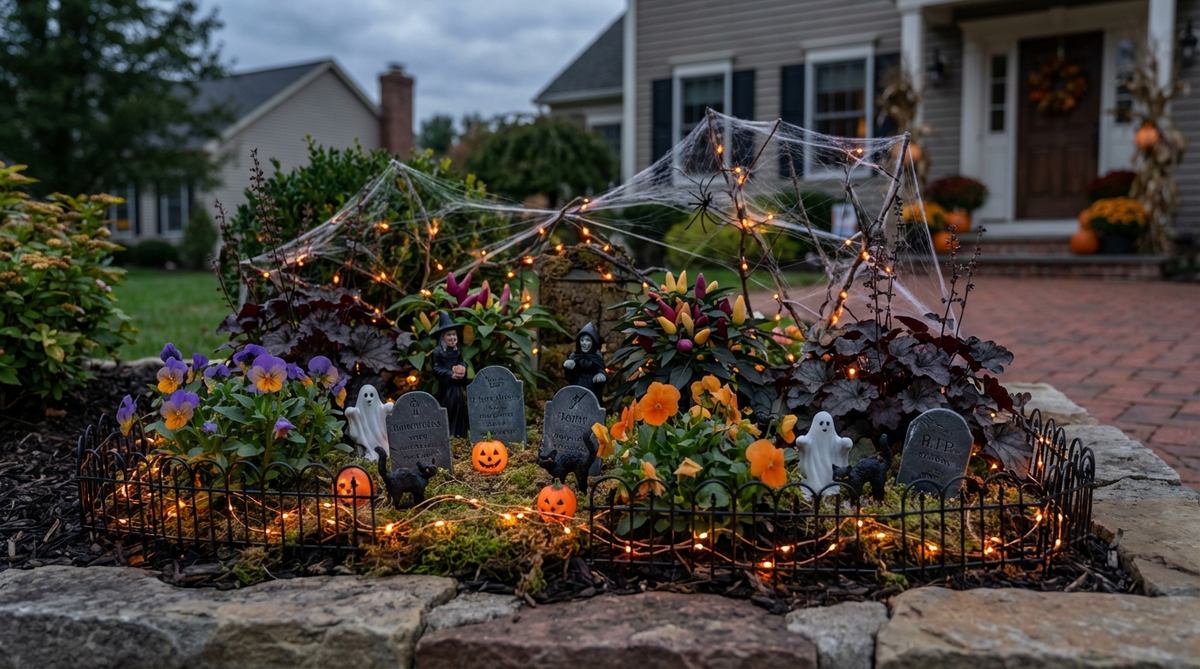
Crooked black fences, tiny tombstones, and creeping fog instantly mutate a cheerful garden into a delightfully spooky diorama. Executing a macabre miniature transformation is a wildly fun secret garden aesthetic for decorating your front porch in October.
Leaving a bright pink fairy house out during spooky season totally ruins the Halloween curb appeal. Introducing dark, distressed terrarium accessories looks far more expensive than it is, seamlessly turning overgrown ivy into a creepy, abandoned estate. Orange LED lights complete the eerie, flickering atmosphere.
A spooky accessory kit will run you about $15–$25. Highly recommended for a massive impact holiday decoration.
- Key Materials: Miniature tombstones, black wire fencing, orange micro LEDs
- Vibe / Style: Abandoned haunted graveyard
- Difficulty: Easy thematic swapping
- Budget Breakdown: Spooky accessories: $20 | Orange LEDs: $8
- Creator’s Tip: Stretch apart standard cotton balls to create ultra-realistic, scale-appropriate spider webs that drape beautifully over your miniature architecture.
- Smart Sourcing: Miniature resin tombstone sets (bulk pack) or orange battery-operated micro LED strings
Container & Vessel Concepts Beyond Standard Pots
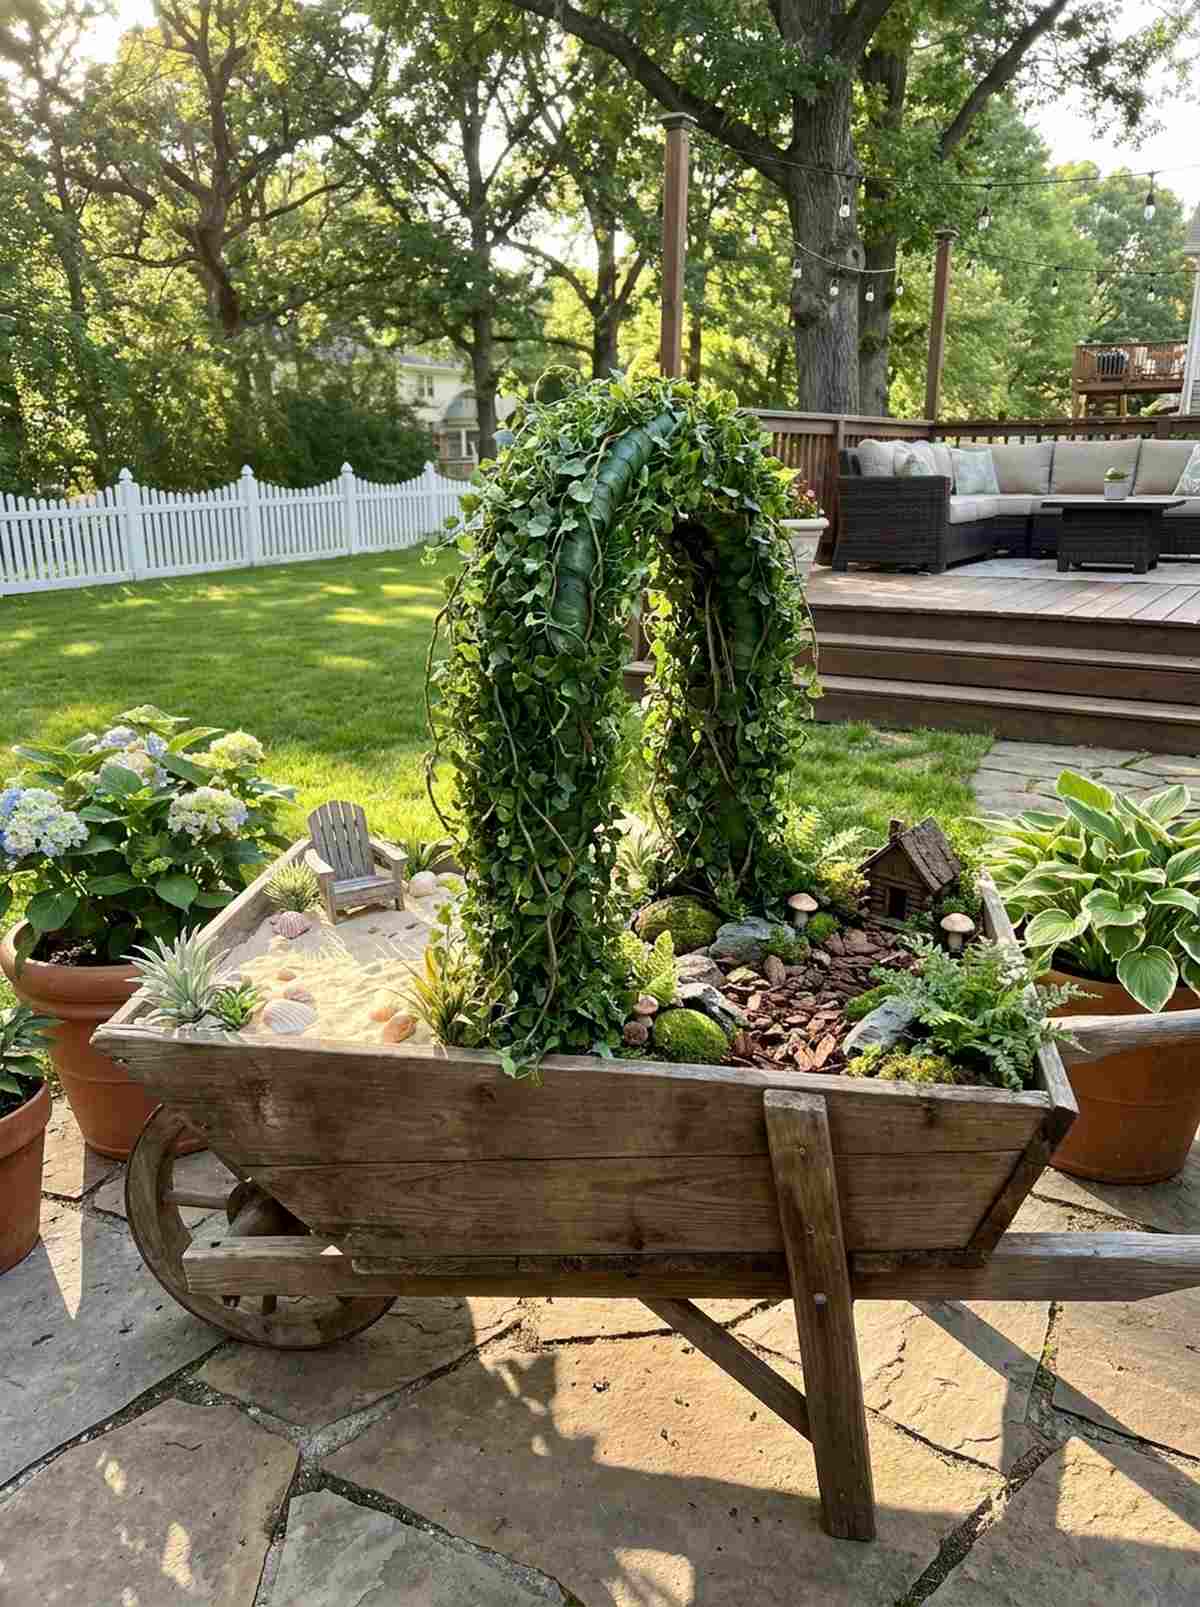
37. Vintage Wheelbarrow Mobile Garden
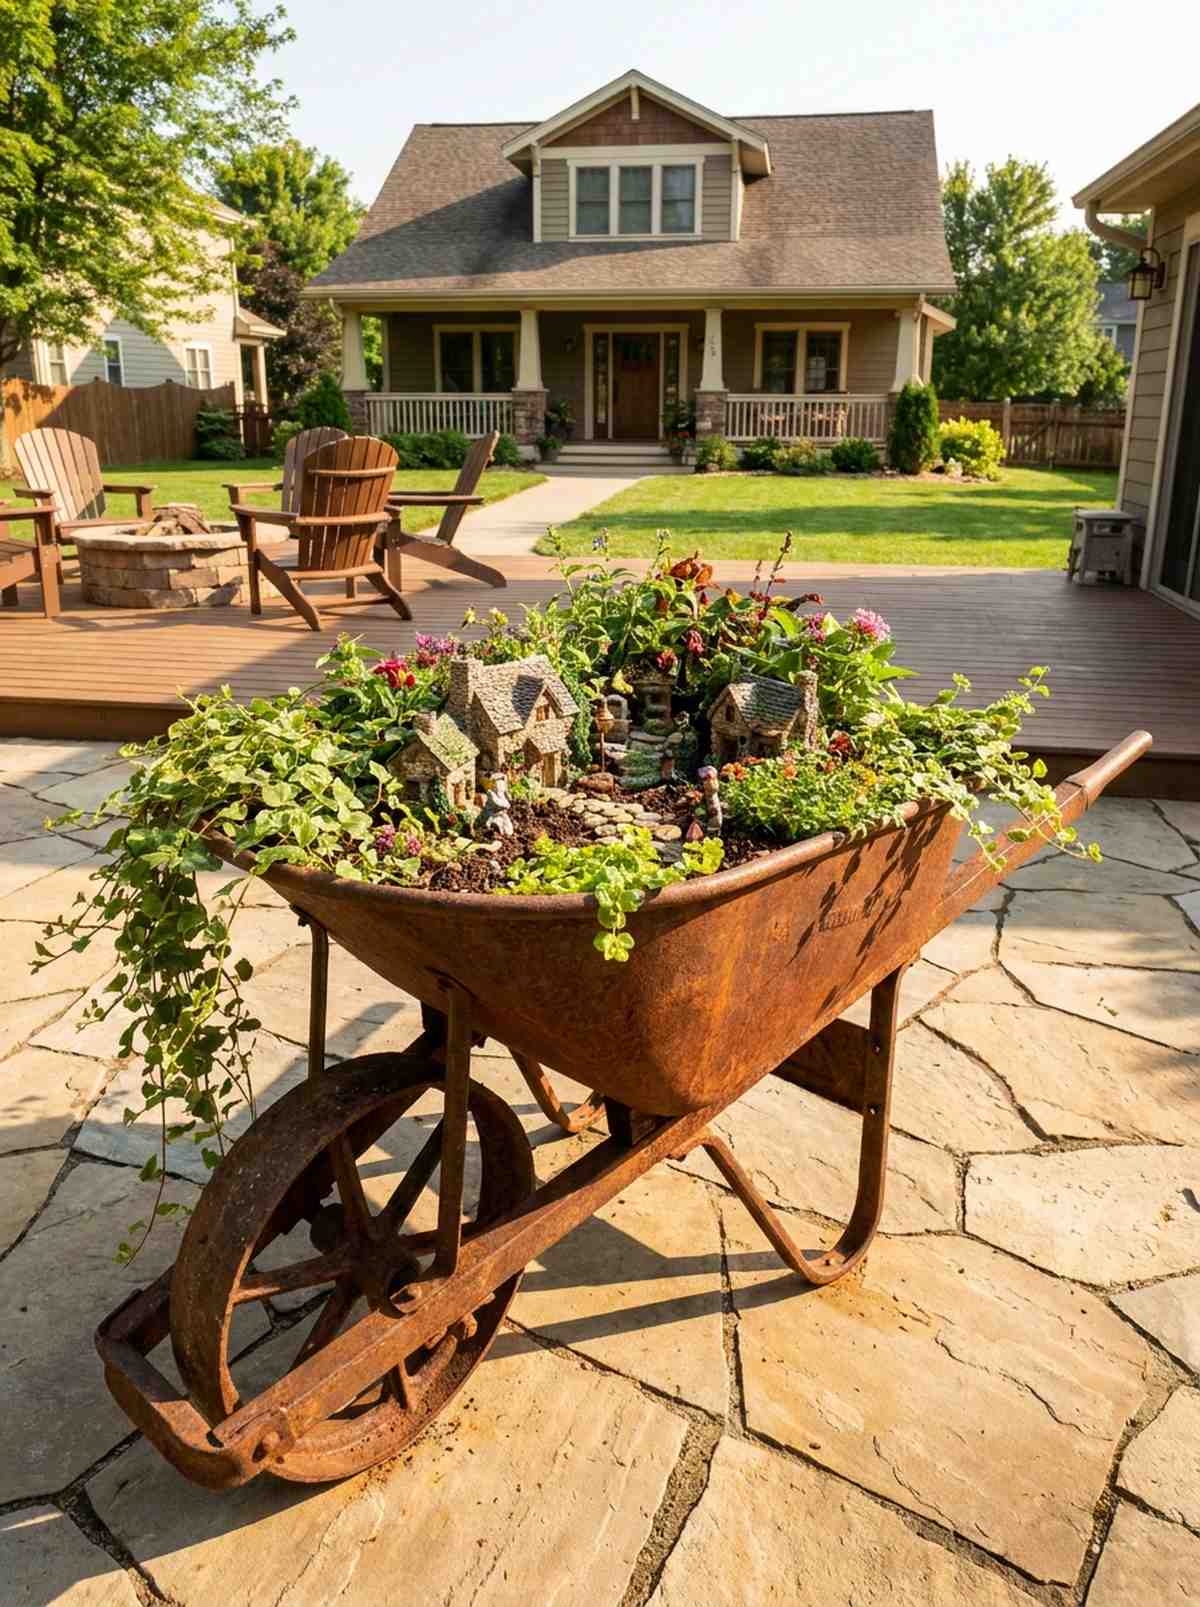

A rusted, massive metal wheelbarrow overflowing with sprawling vines and tiny villages acts as a breathtaking, mobile landscaping centerpiece. Utilizing upcycled utilitarian vessels is the ultimate life-hack for chasing the optimal sunlight across a large patio.
Building a massive, heavy diorama in a static pot means you are permanently stuck with that placement. Repurposing wheeled antiques alongside premium miniature garden supplies gives a designer-level finish that is highly functional and deeply rustic. The natural rust patina adds an immense amount of historical gravity to the display.
You can find vintage vessels at flea markets for $30–$50. Pin this to your large-scale patio project board.
- Key Materials: Rusted metal wheelbarrow, massive soil volume, drainage rocks
- Vibe / Style: Mobile rustic countryside
- Difficulty: Advanced weight management
- Budget Breakdown: Wheelbarrow: $40 | Soil/Rocks: $25
- Creator’s Tip: Drill at least 10 half-inch holes in the bottom pan of the wheelbarrow; otherwise, it will turn into a stagnant swamp after the first heavy rain.
- Smart Sourcing: Heavy-duty metal drilling bits or bulk drainage gravel bags
38. Broken Pot Terraced Levels
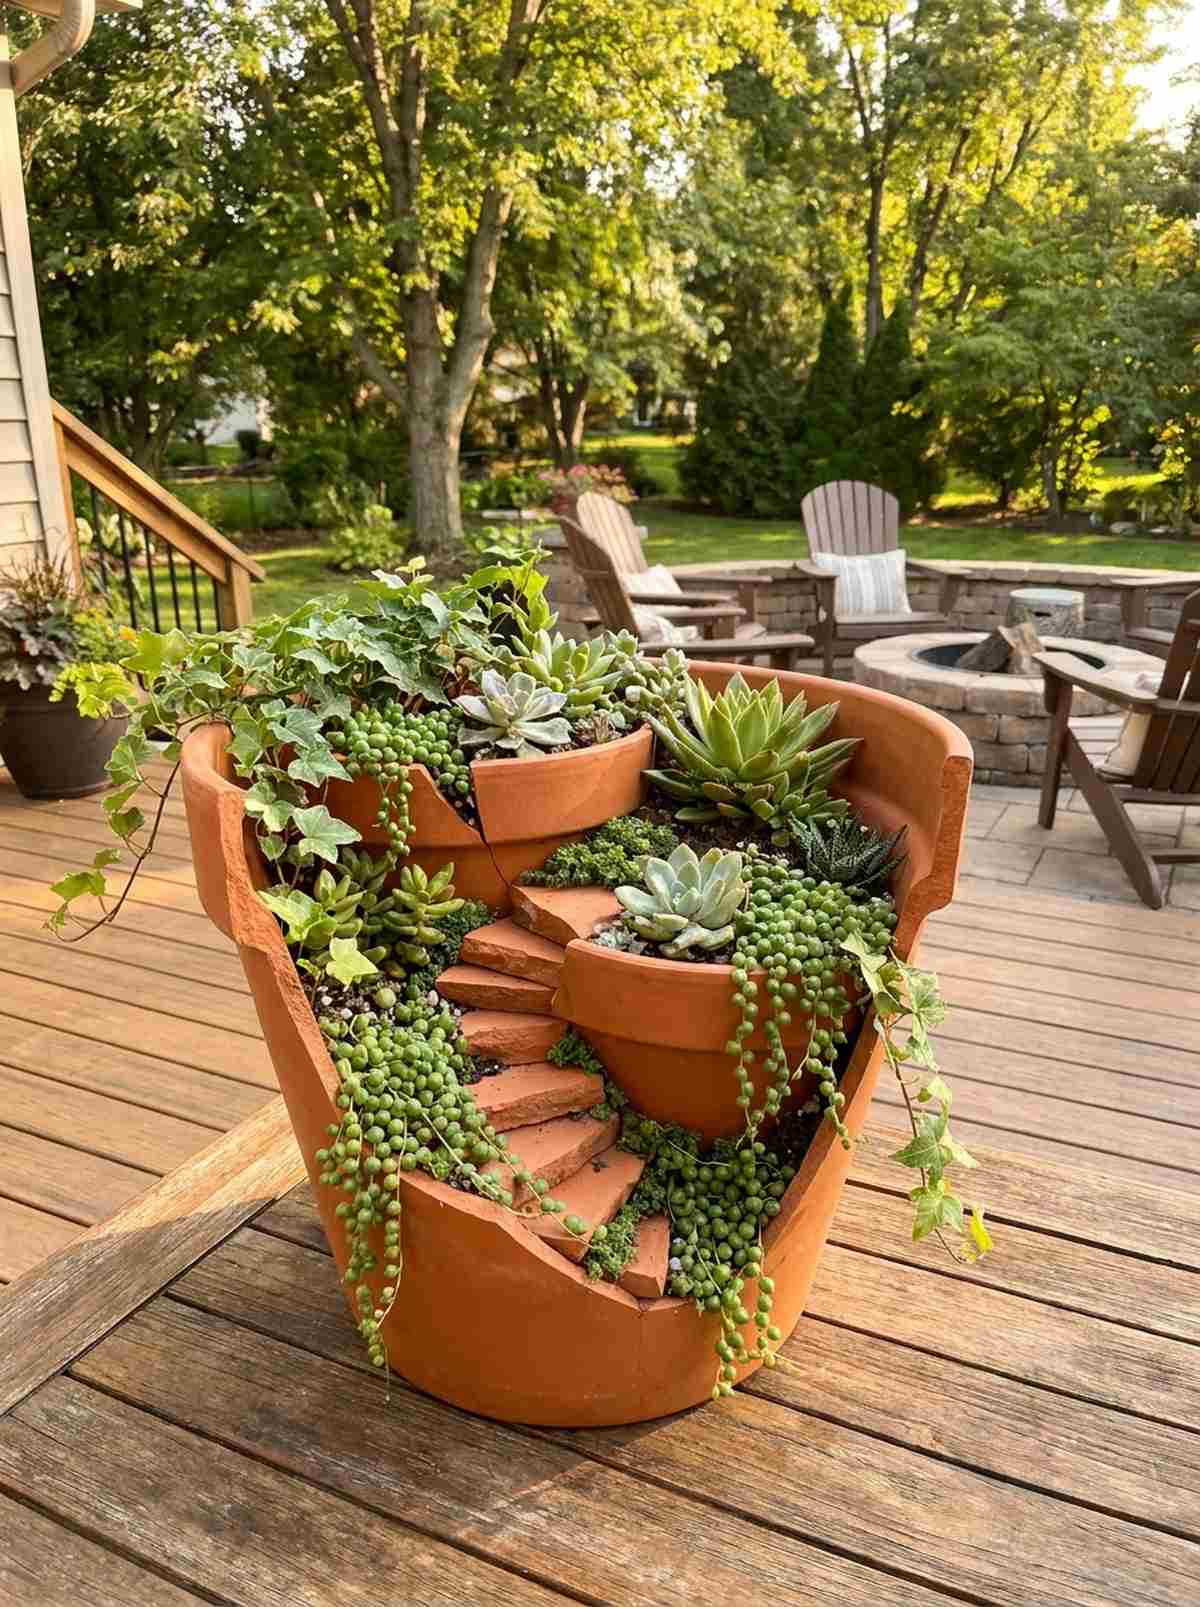
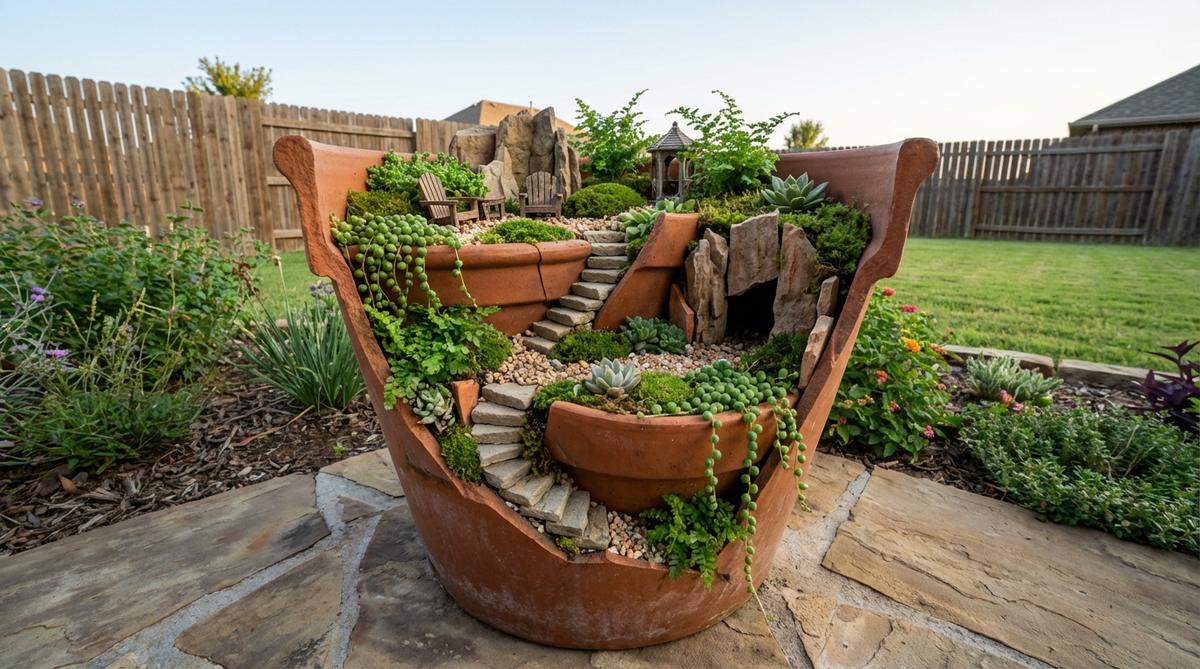
Shattered terracotta shards meticulously arranged to form descending staircases create a mesmerizing, multi-level architectural ruin. Engineering a repurposed fractured container layout is a brilliant way to salvage pots that were destroyed by winter freezing.
Throwing away broken ceramic is a massive waste of incredible structural material. Stacking the shards back into the dirt with high-end fairy garden kits delivers a surprisingly premium look that feels like an archaeological excavation site. Cascading plants draping over the jagged edges softens the harsh ceramic lines.
This structural masterpiece is completely free if you use a broken pot. A phenomenal way to turn a gardening disaster into art.
- Key Materials: Broken terracotta pot, varied succulents, trailing ivy
- Vibe / Style: Ancient excavated ruins
- Difficulty: Advanced structural stacking
- Budget Breakdown: Broken pot: Free | Trailing plants: $15
- Creator’s Tip: Wear heavy leather gloves when arranging the shards, and use a coarse sanding block to slightly dull the sharpest edges to prevent future injuries.
- Smart Sourcing: Live string of pearls trailing succulents or heavy-duty gardening leather gloves
39. Teacup & Saucer Miniature Garden
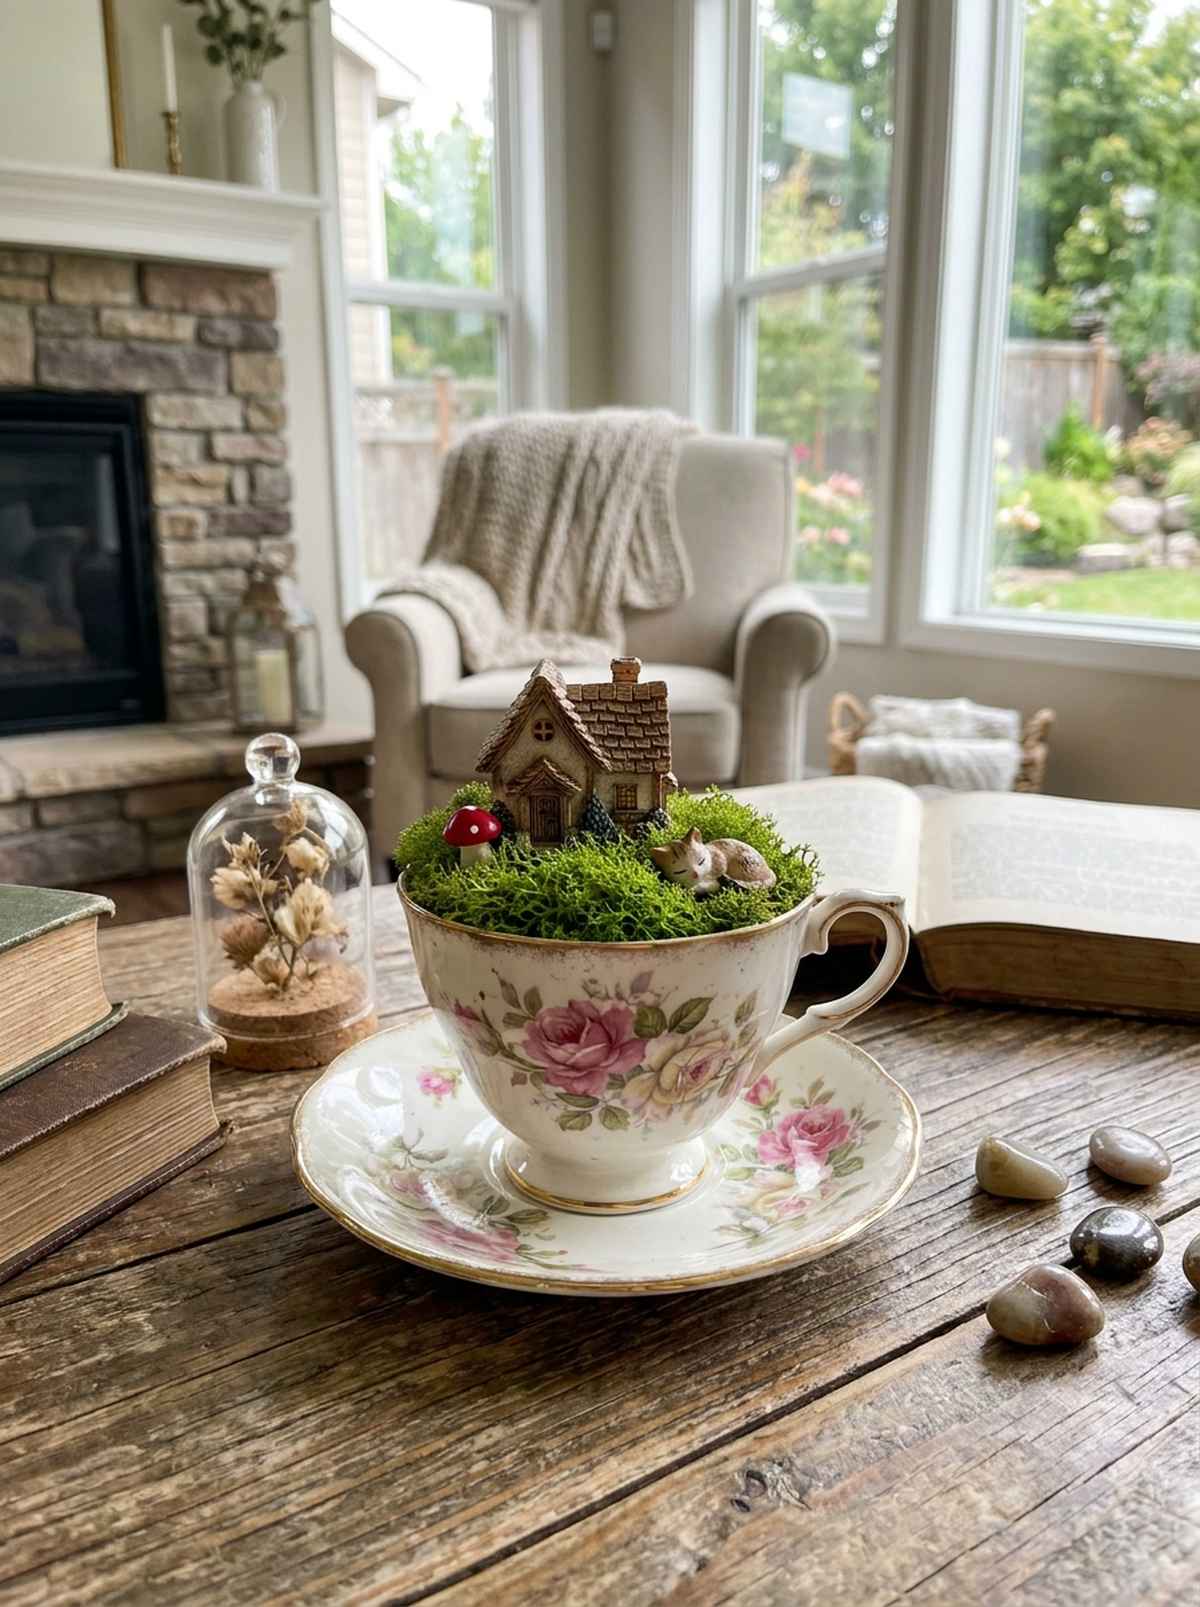
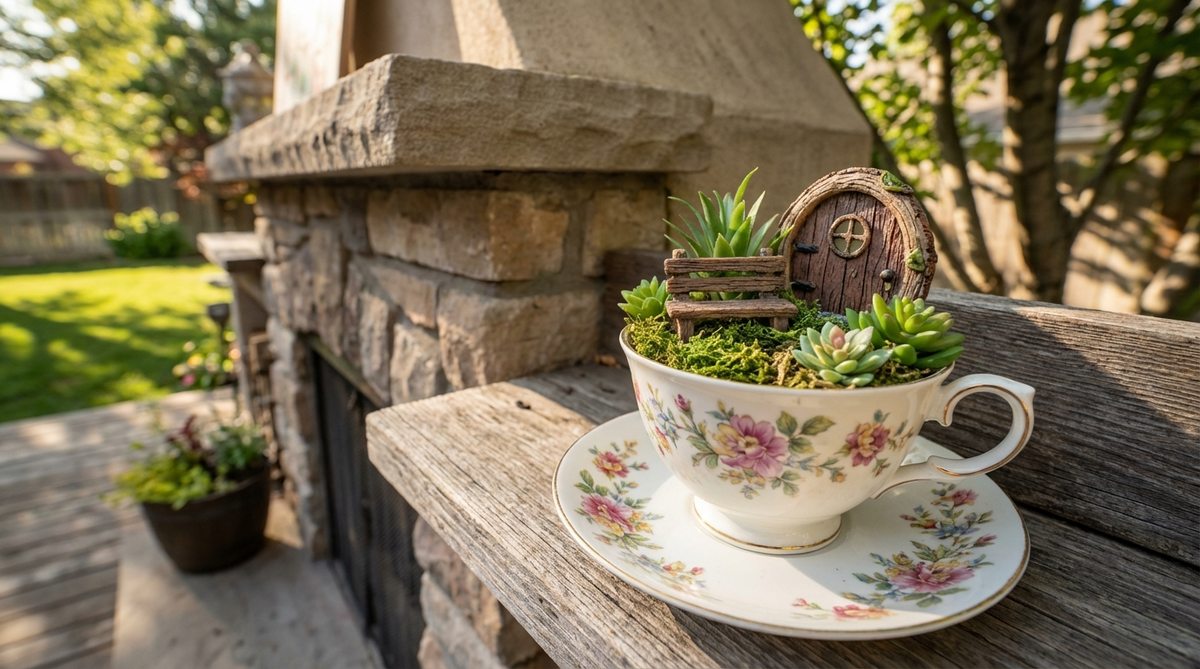
A single, highly detailed tiny house sitting on a bed of soft moss inside a vintage floral teacup is the peak of delicate, feminine charm. Crafting micro-vessel tabletop displays works exceptionally well for creating whimsical wedding centerpieces or delicate desk decor.
Trying to put live, water-heavy plants into a vessel with zero drainage is a guaranteed recipe for foul-smelling root rot. Utilizing preserved moss bases and premium terrarium accessories looks far more expensive than it is while guaranteeing the piece lasts forever indoors. It hyper-focuses the viewer’s attention onto one perfect focal point.
A thrifted teacup setup costs maybe $10–$15 total. Pin this idea for cheap but stunning DIY gift ideas.
- Key Materials: Vintage teacup, dry floral foam, preserved sheet moss
- Vibe / Style: Delicate Victorian whimsy
- Difficulty: Very easy assembly
- Budget Breakdown: Teacup: $4 | Preserved moss: $8
- Creator’s Tip: Glue a single, vibrant focal piece—like a tiny red mushroom or a sleeping cat—dead center to anchor the massive visual contrast against the green moss.
- Smart Sourcing: Dry floral foam base blocks (bulk) or premium preserved sheet moss
Before you invest in a massive, expensive ceramic planter, check your garage for this rugged, high-volume alternative…
40. Wooden Crate Rustic Village
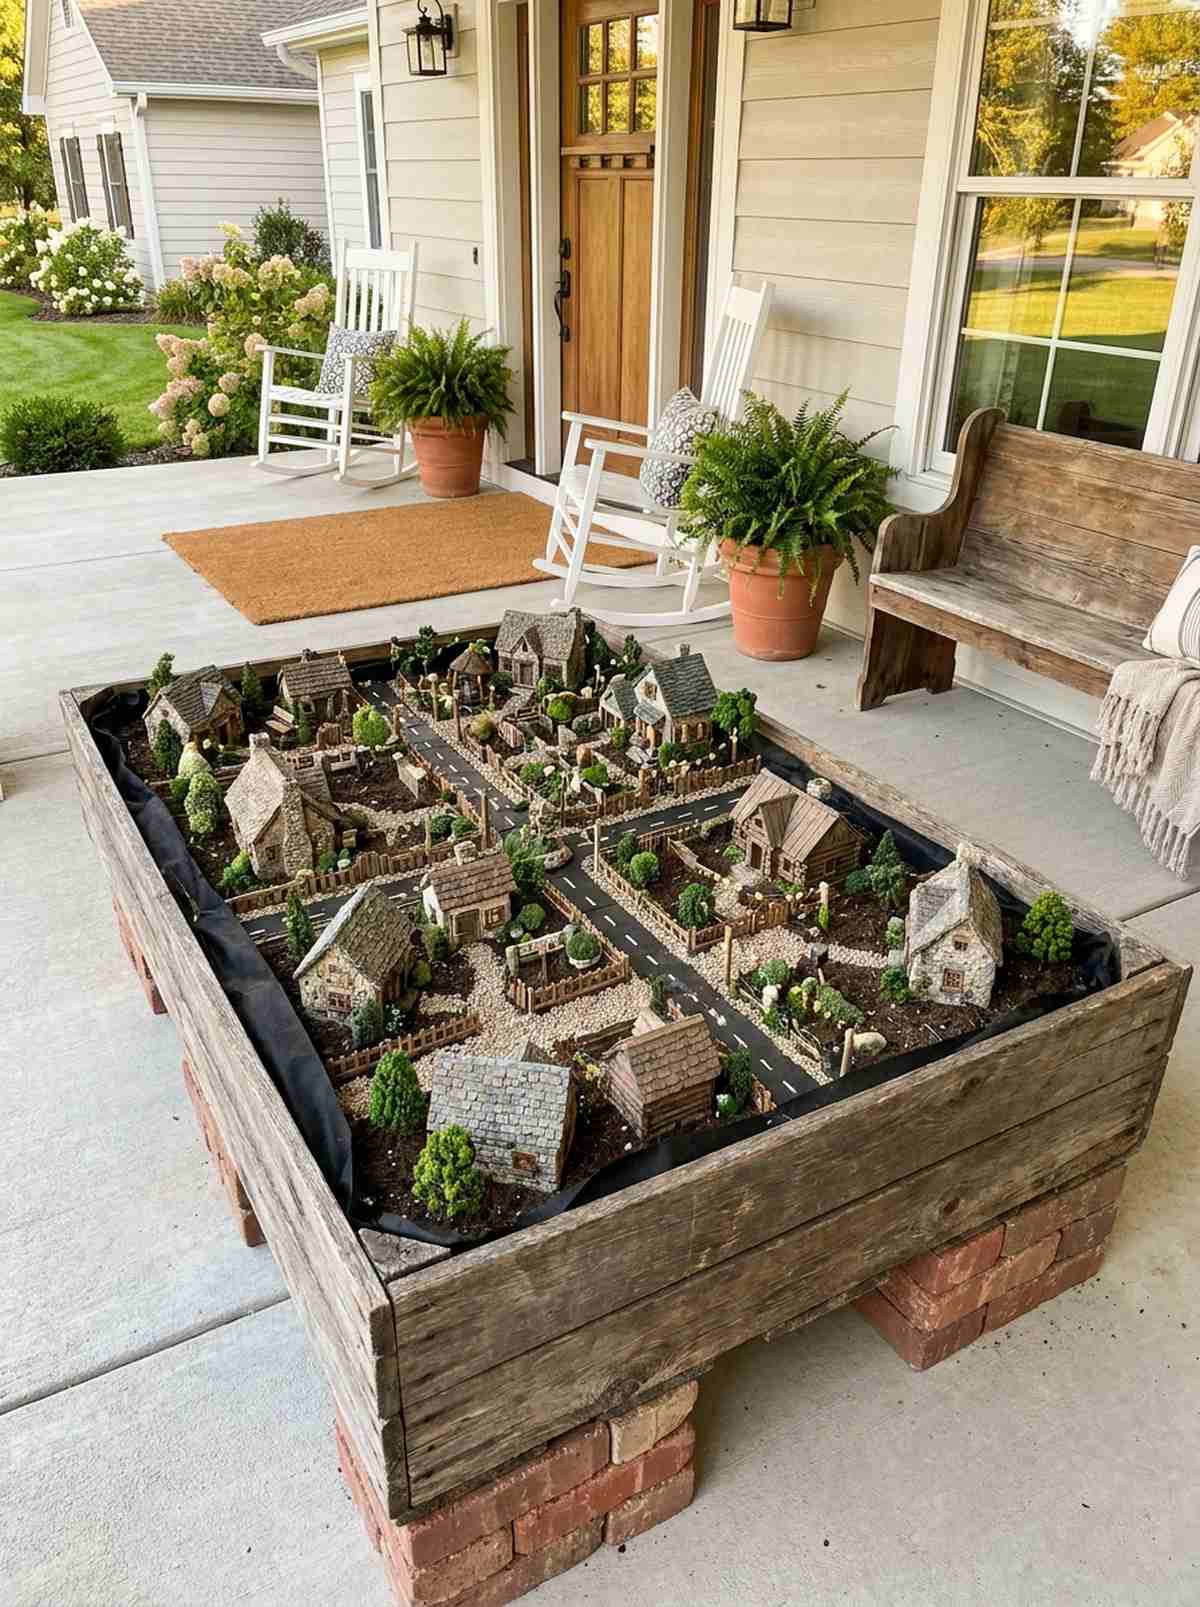
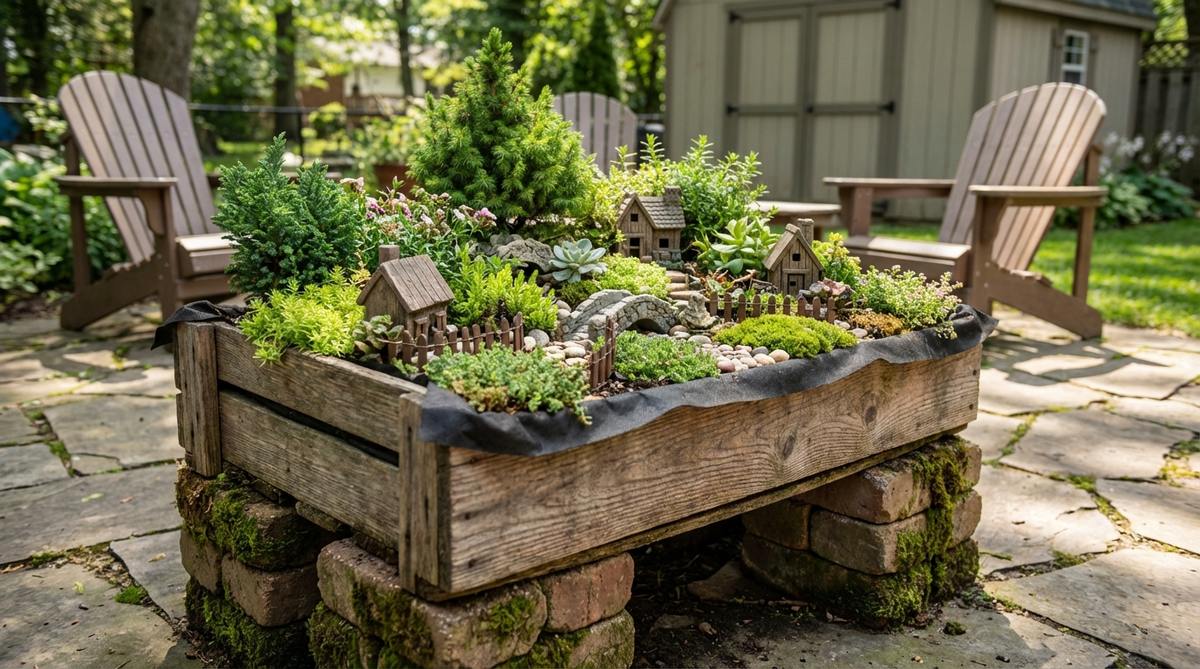
A deep, weathered wine box acting as the sturdy foundation for a sprawling, multi-house village brings a rugged, farmhouse aesthetic to any porch. Utilizing wooden crate architecture is the ultimate solution for building wide, sprawling estates that need massive surface area.
Standard round pots awkwardly pinch the edges of a sprawling village, making square houses look out of place. Lining a rectangular wooden box and populating it with fairy garden kits gives a designer-level finish that accommodates perfectly straight roads and realistic property lines. Elevating it on bricks makes it a commanding focal point.
You can usually source these crates from local wine shops for $10–$20. Save this if you want to build a massive, complex town layout.
- Key Materials: Heavy wooden crate, thick landscape fabric liner, staple gun
- Vibe / Style: Sprawling rustic township
- Difficulty: Intermediate volume management
- Budget Breakdown: Crate: $15 | Liner/Soil: $20
- Creator’s Tip: You absolutely must line the inside with heavy-duty landscape fabric before adding soil; otherwise, wet dirt will rot the wood crate out in a single season.
- Smart Sourcing: Heavy-duty woven landscape fabric (roll) or stainless steel staple gun kits
41. Bird Bath Water Feature Garden
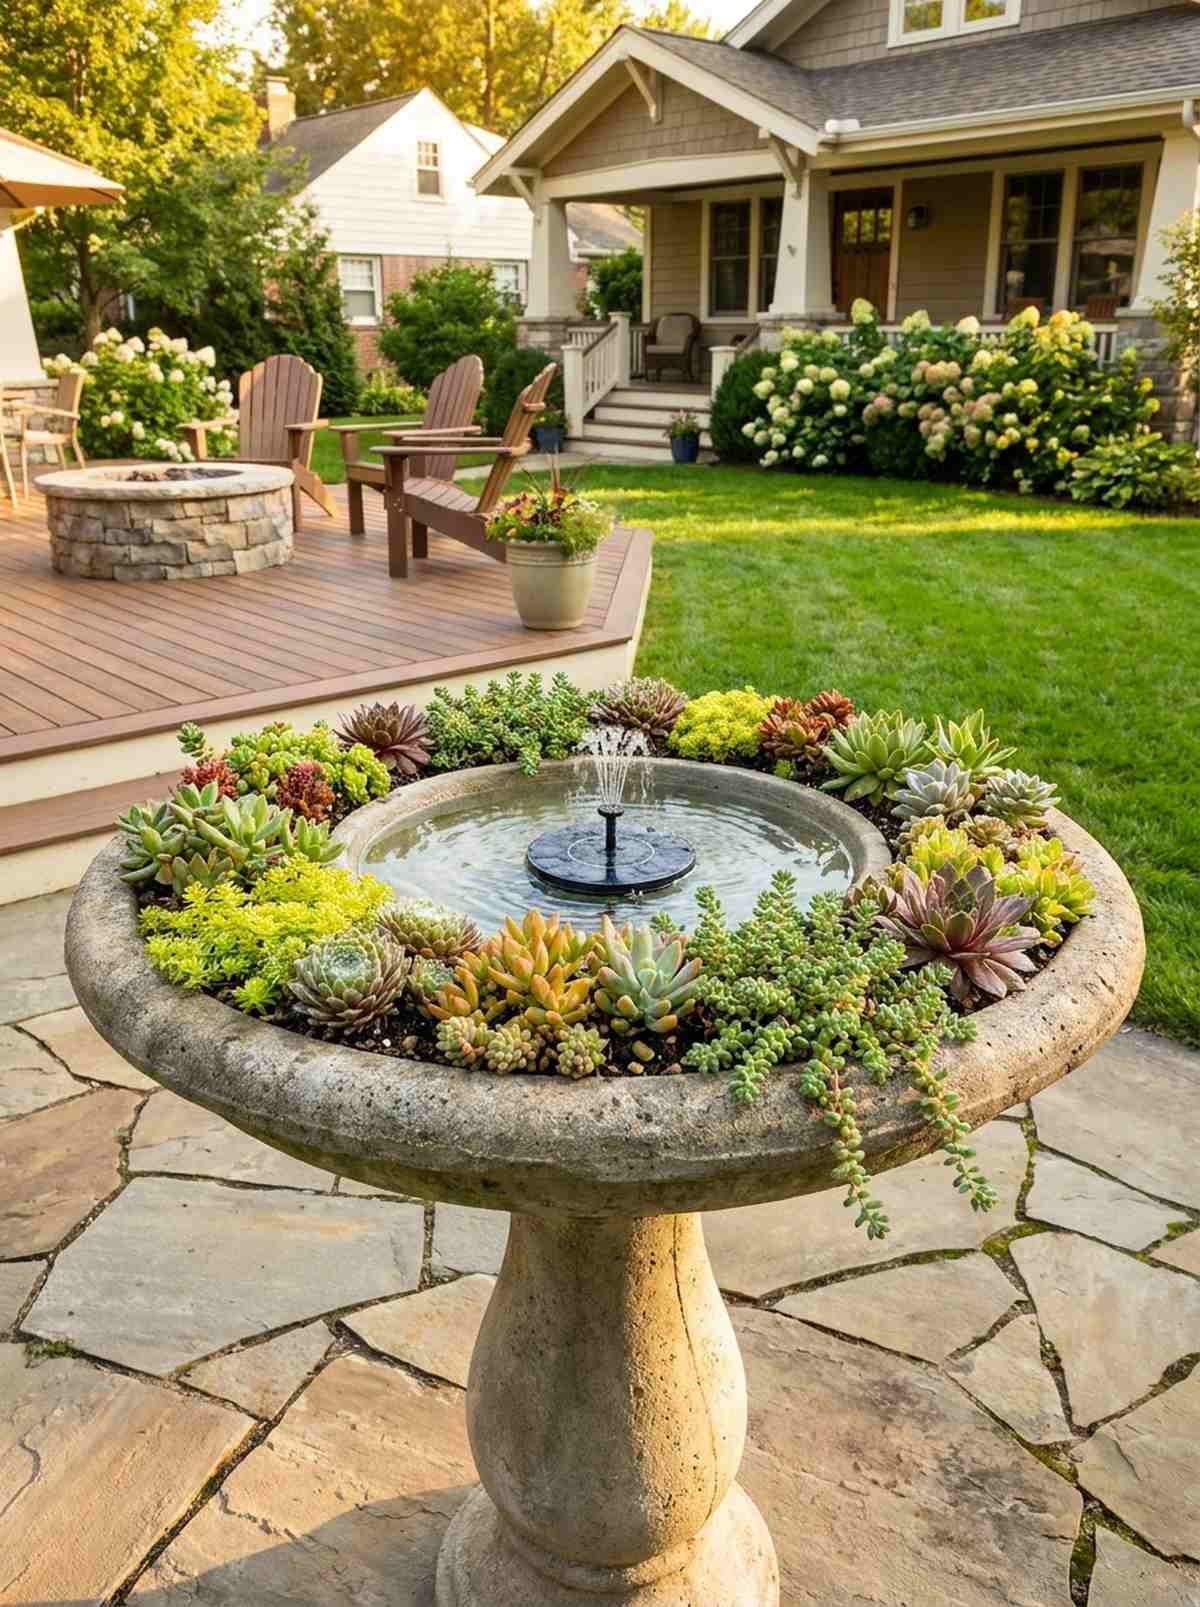
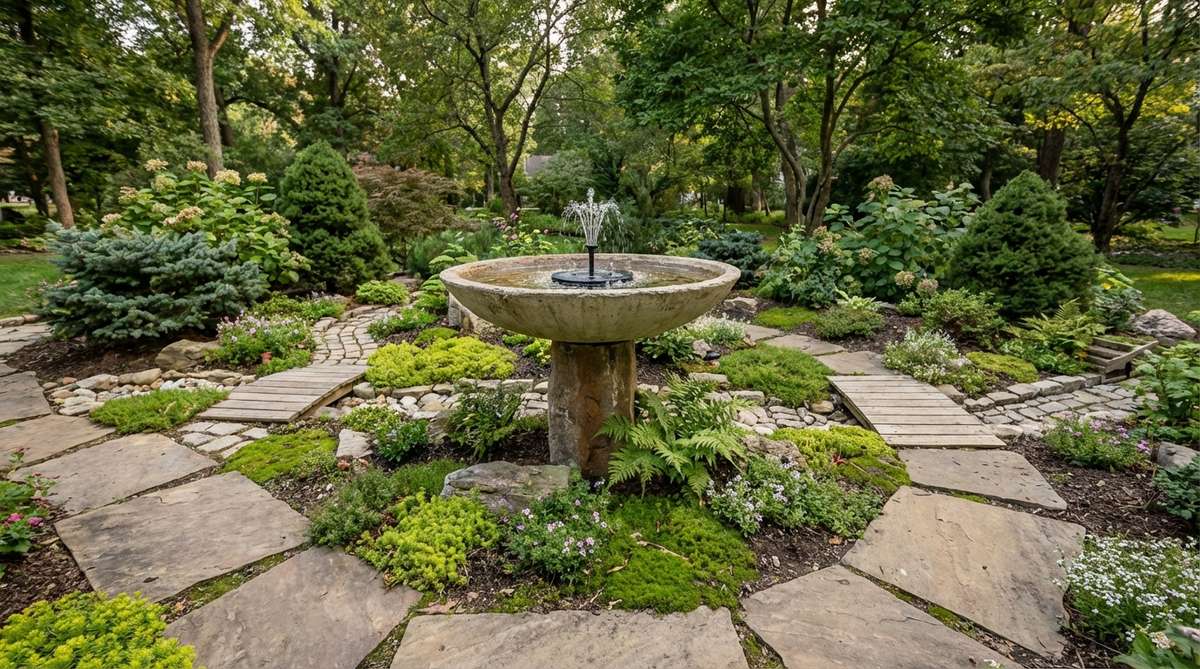
An elevated stone basin offering a perfect, waist-high viewing angle completely changes how you interact with the miniature landscape. Repurposing elevated concrete basins works brilliantly as a secret garden aesthetic that saves your knees and back from constant bending.
Forcing people to crouch on the ground to see your expensive details means most guests will completely ignore your hard work. Planting inside a sturdy bird bath with premium miniature garden supplies delivers a surprisingly premium look that puts the intricate details right at eye level. Leaving the center open as a functional pool adds dynamic wildlife action.
A sturdy concrete base requires an investment of about $40–$60. Highly recommended for elderly gardeners or accessible patio designs.
- Key Materials: Sturdy bird bath, shallow-rooted succulents, central water pool
- Vibe / Style: Elevated manor courtyard
- Difficulty: Easy accessibility planting
- Budget Breakdown: Basin: $50 | Succulents: $20
- Creator’s Tip: Because bird baths are incredibly shallow, only use highly drought-tolerant succulents that thrive in thin, fast-drying soil layers.
- Smart Sourcing: Miniature trailing succulent starter packs or solar-powered floating micro-fountains
42. Hanging Grapevine Sphere Garden
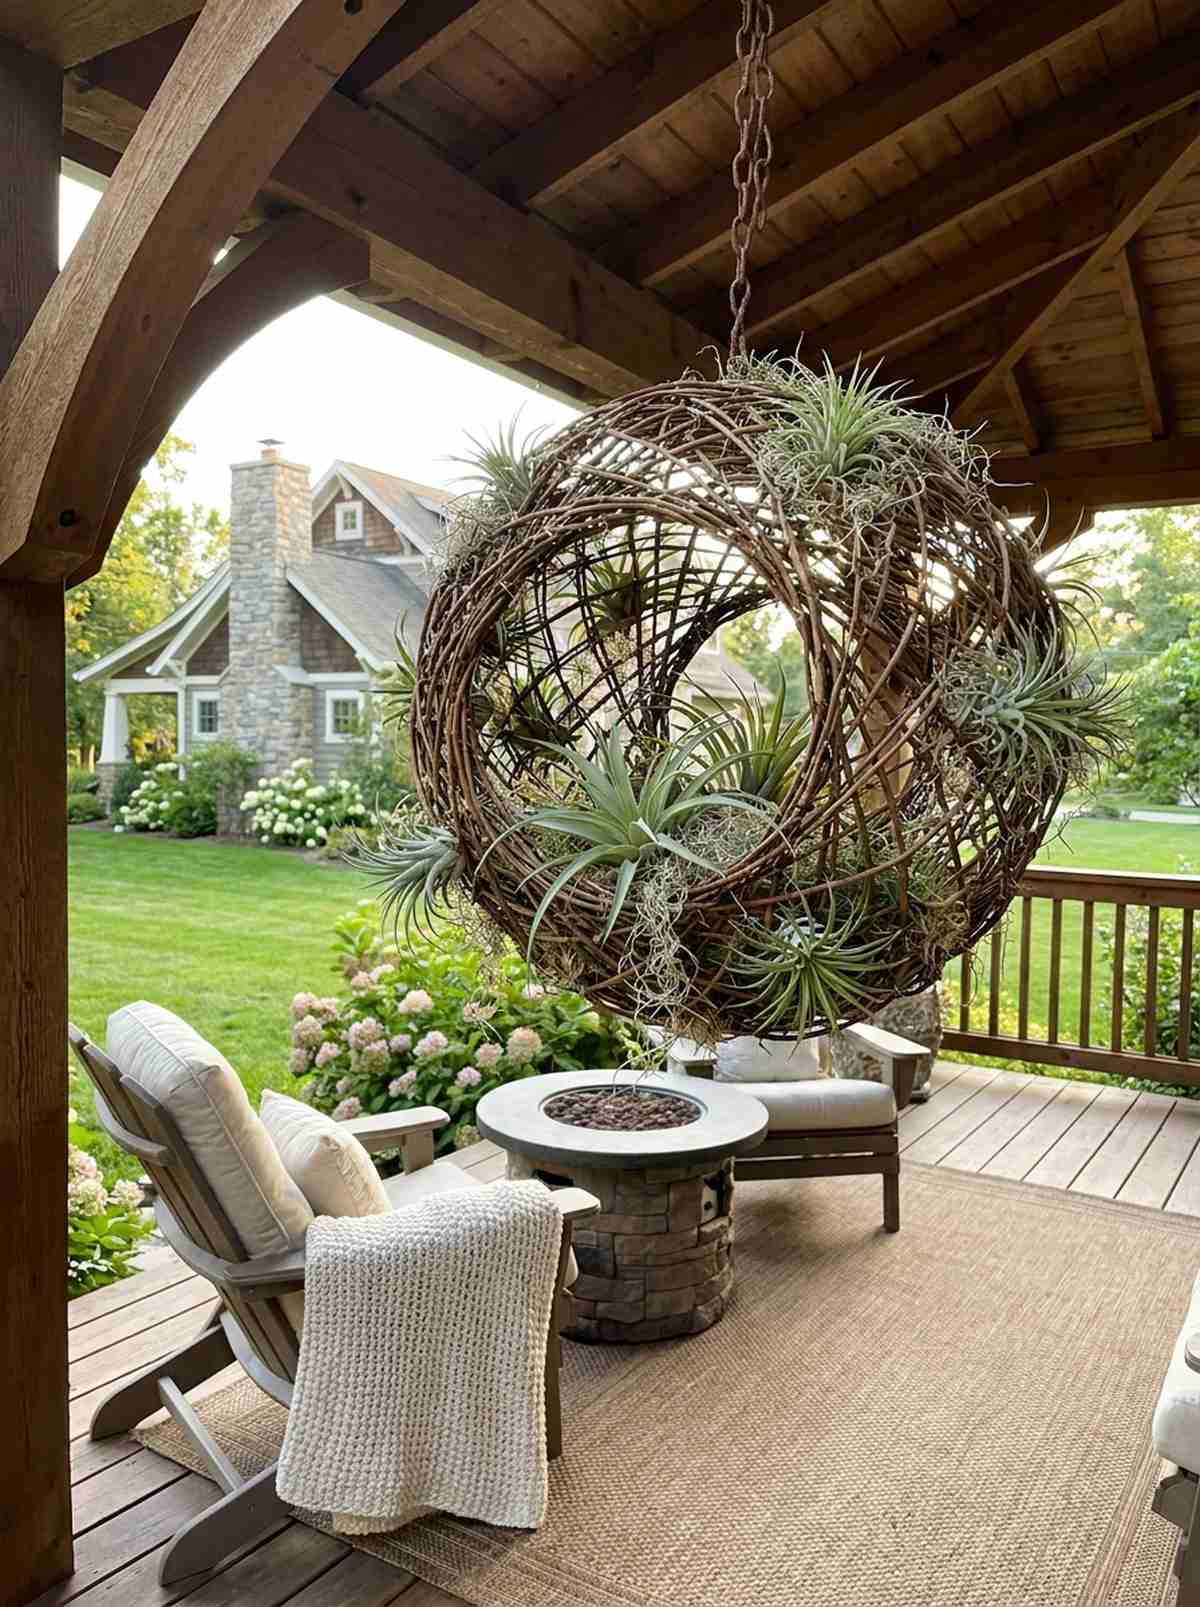
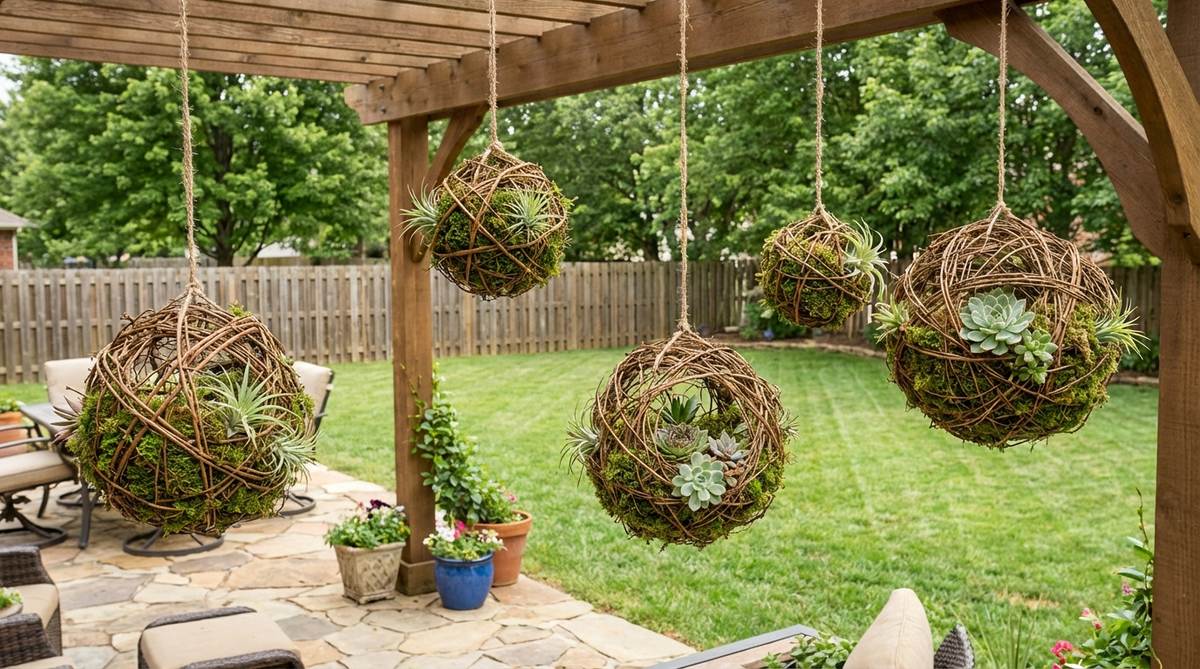
A hollow, woven wooden orb dangling gracefully from a porch rafter feels like an impossible, floating alien biosphere. Engineering a suspended botanical sphere is the absolute pinnacle of utilizing vertical airspace in a cramped urban balcony.
When you run out of floor space, the only direction to go is up, but standard hanging plastic pots look incredibly cheap. Shoving moss into a natural grapevine ball and adding specialized terrarium accessories looks far more expensive than it is, creating a 360-degree viewing experience. The extreme drainage makes it perfect for air plants.
You can craft these magical floating orbs for roughly $15–$25 each. Pin this layout to completely revolutionize your vertical gardening game.
- Key Materials: Hollow grapevine sphere, air plants (Tillandsia), hanging hardware
- Vibe / Style: Floating magical biosphere
- Difficulty: Intermediate suspension
- Budget Breakdown: Vine sphere: $12 | Air plants: $15
- Creator’s Tip: Do not use traditional soil in these spheres; pack the bottom half with sphagnum moss and tuck air plants inside so the sphere remains lightweight.
- Smart Sourcing: Woven grapevine spheres (bulk pack) or assorted live Tillandsia air plant kits
Conclusion
These exactly 42 fairy garden aesthetic layouts prove that creating a breathtaking micro-world isn’t about tossing cheap plastic into dirt; it’s about strategic material sourcing and high-end architectural planning. By prioritizing UV-coated resins, premium preserved mosses, and dedicated terrarium accessories, you elevate a simple craft project into a highly durable, mesmerizing landscape. Whether you are building an affordable teacup setup or investing in a massive wheelbarrow estate, remembering the core principles of scale and boundary definitions will ensure your display looks expensive and cohesive. Skip the chaotic toy aisles, invest in the proper foundational kits, and start engineering a secret garden aesthetic that demands a closer look.
Frequently Asked Questions
What type of moss works best for outdoor fairy gardens?
For high-end outdoor displays, living Irish moss and Scotch moss are the absolute top-tier choices. Irish moss thrives in partial shade with consistent moisture, delivering that highly sought-after emerald-green mounded growth. Scotch moss offers a vibrant chartreuse-gold alternative for incredible visual contrast. If you want to avoid the headache of strict moisture management or are dealing with a full-sun patio, buying bulk creeping thyme plugs is a far superior, drought-tolerant alternative that provides a similar premium carpet look without the constant watering stress.
How do you weatherproof handmade fairy garden accessories?
Relying on raw wood or basic craft paint outdoors guarantees your pieces will rot or bleach white within a month. To achieve a durable, expensive look, you must aggressively seal all handmade items. Investing in a premium marine varnish or a UV-resistant clear acrylic spray is mandatory. Apply 2-3 coats to your polymer clay or wooden miniature garden supplies to completely lock out moisture and prevent sun-fading. For the longest lifespan, swap out delicate handmade items for pre-made UV-coated resin fairy kits during the harsh winter months.
What plants maintain appropriate scale in fairy gardens?
Scale is the single most critical factor in a believable display; using plants with massive leaves instantly ruins the miniature illusion. You need to source dedicated dwarf varieties or terrarium accessories like baby tears, miniature ivy, and dwarf mondo grass. For trees, investing in a miniature Alberta spruce provides an incredibly realistic, scaled evergreen look that grows very slowly. Starting with naturally compact starter kits is vastly cheaper and less frustrating than constantly fighting to prune back aggressive, standard-sized landscaping plants.
Can fairy gardens survive winter in cold climates?
Yes, but survival requires strict preparation and the right foundational materials. Cheap vs premium aesthetics become glaringly obvious in winter. High-quality resin structures can survive freezing, but delicate plastics will shatter. You must choose cold-hardy living bases like Irish moss or dwarf conifers, and heavily mulch their root zones. The smartest strategy for cold climates is building your secret garden aesthetic in mobile containers; utilizing a vintage wheelbarrow or sturdy crate allows you to simply wheel the entire premium setup into an unheated garage to safely go dormant without lethal freezing exposure.
How often should fairy gardens be watered?
Watering frequency dictates whether your expensive setup thrives or rots. Moss-heavy gardens demand high moisture, often needing daily misting in peak summer. However, if you designed a budget-friendly succulent or beach-themed layout, watering more than once a week will instantly drown the root systems. Always check the soil one inch deep before adding water. To make maintenance foolproof, many advanced creators are now shifting toward preserved sheet moss starter kits for their indoor tabletop displays, completely eliminating the need for water while maintaining a flawless, vibrant green aesthetic year-round.