Elevate your outdoor sanctuary into a breathtaking architectural masterpiece with strategic garden design rock installations. By mastering the art of combining affordable base aggregates with statement boulders, you can easily replicate a high-end designer finish without the exorbitant contractor fees. This comprehensive guide reveals the exact materials, smart bulk-sourcing hacks, and layout formulas needed to transform basic stones into a permanent, low-maintenance luxury landscape.
Design Snapshot: Key Principles
- Scale Balance: Match rock size to garden proportions—large boulders anchor expansive spaces while smaller stones define intimate areas.
- Natural Placement: Bury one-third of each boulder below ground and tilt backward to mimic geological formations.
- Textural Contrast: Pair smooth gravel beds with rough boulder surfaces to create visual rhythm and tactile interest.
- Strategic Focal Points: Position statement rocks at garden intersections and sightlines to guide movement through the landscape.
Boulder Focal Point Compositions That Command Attention
Strategic boulder placement creates instant visual hierarchy in garden design with rocks. These permanent installations serve as anchor points that organize surrounding plantings and hardscape elements into cohesive compositions.
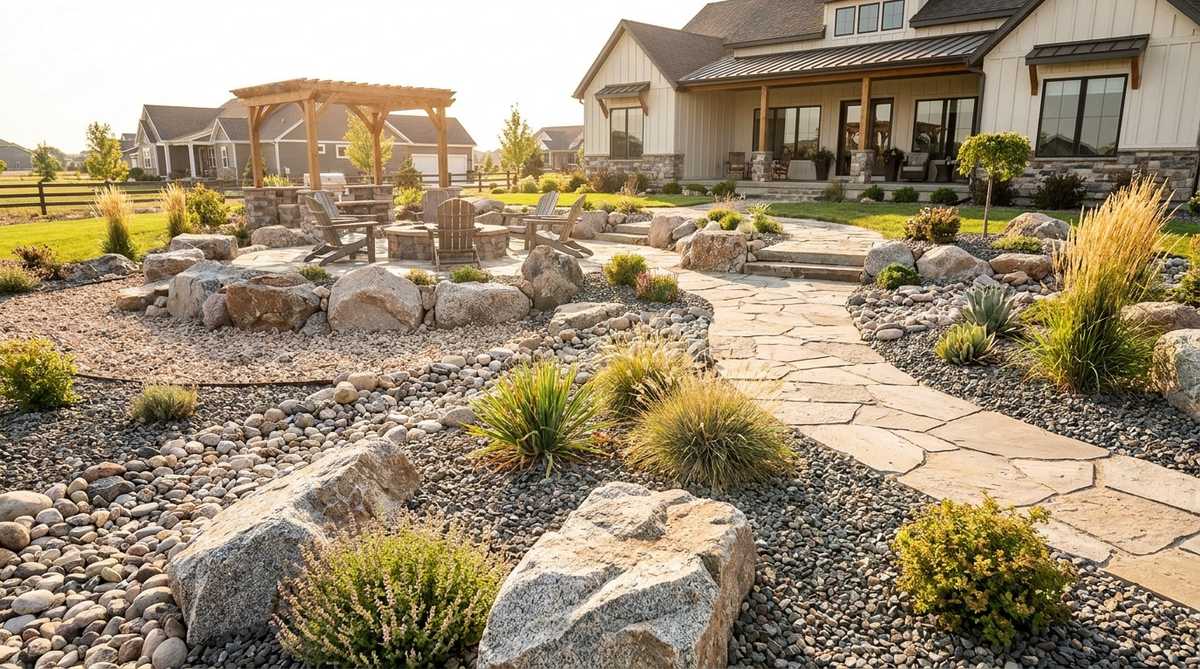
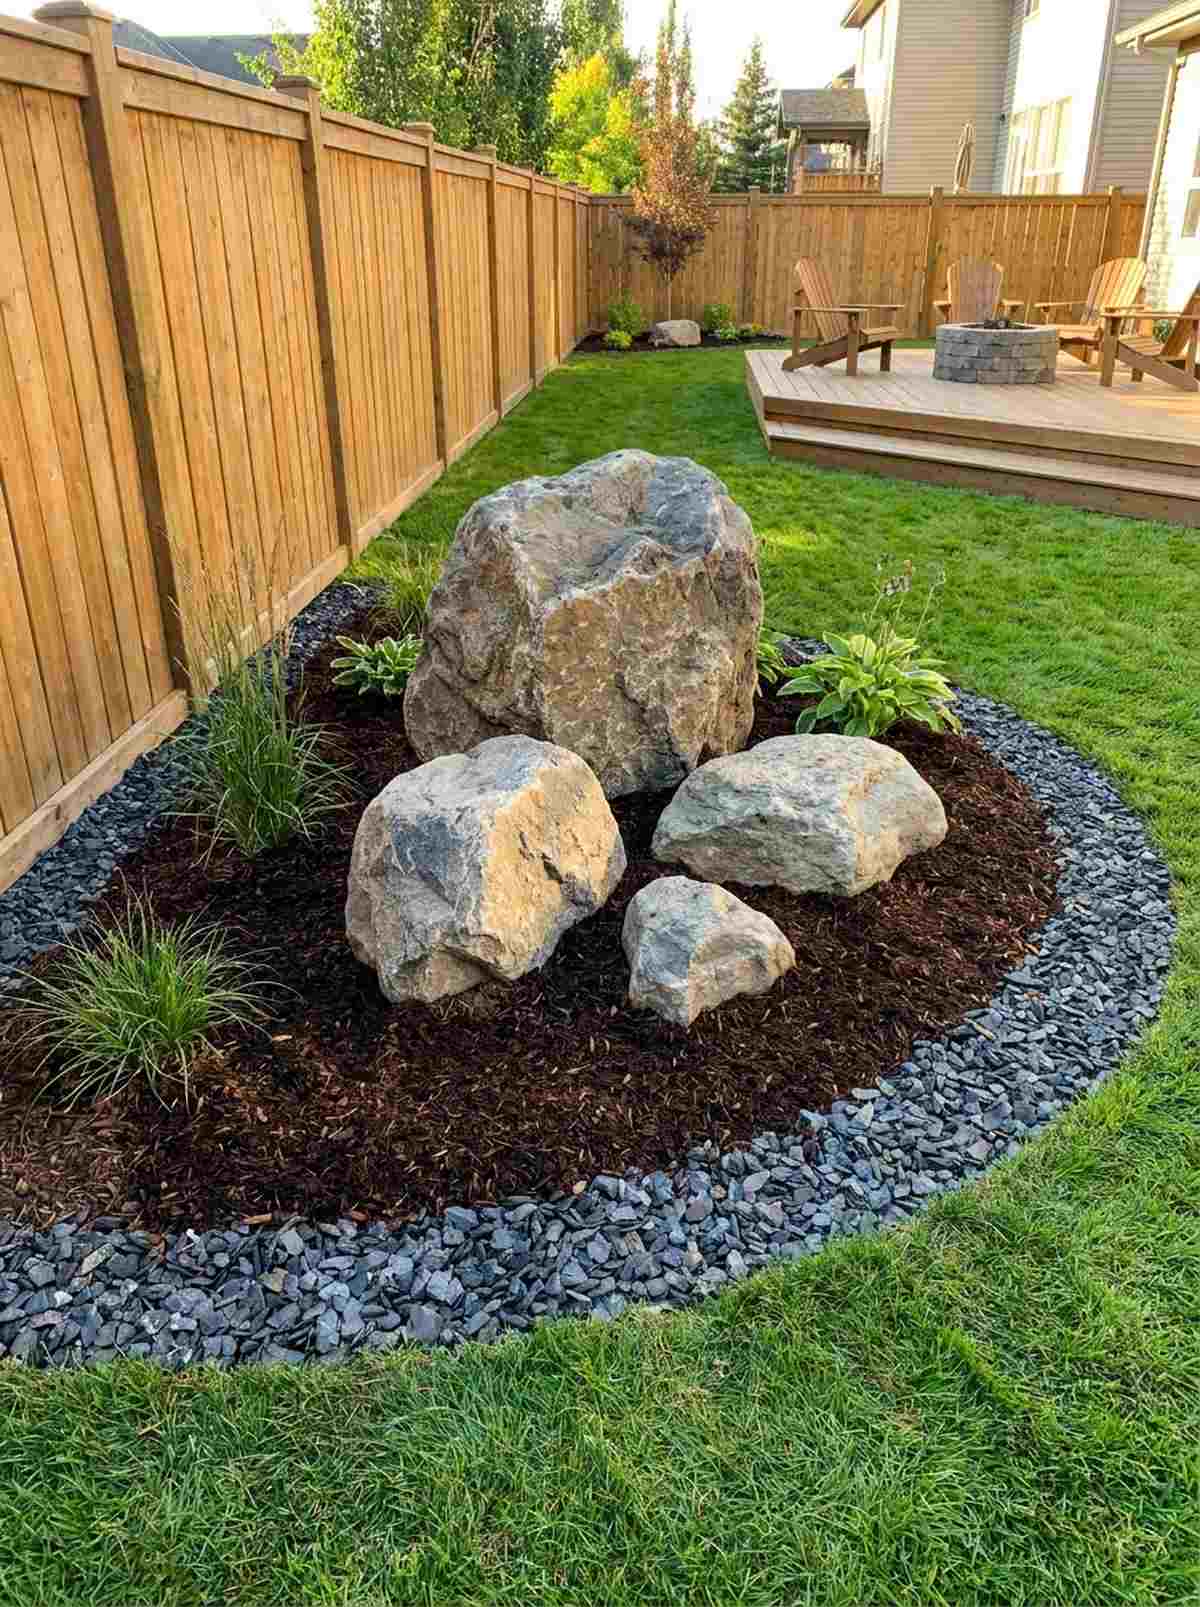
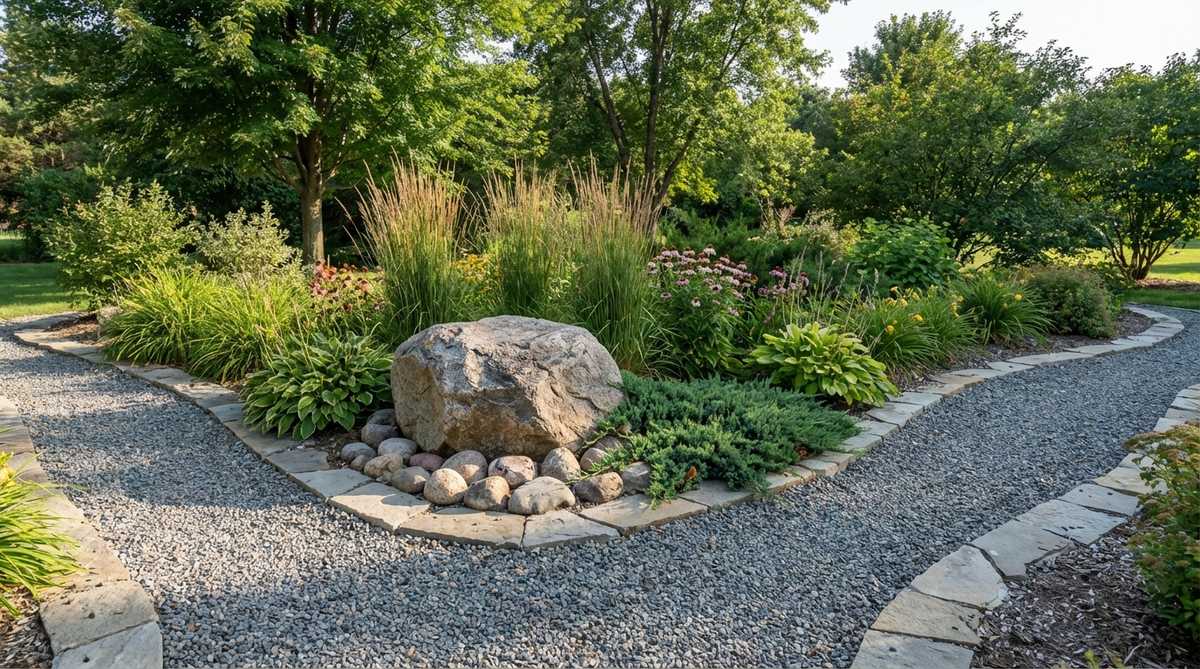
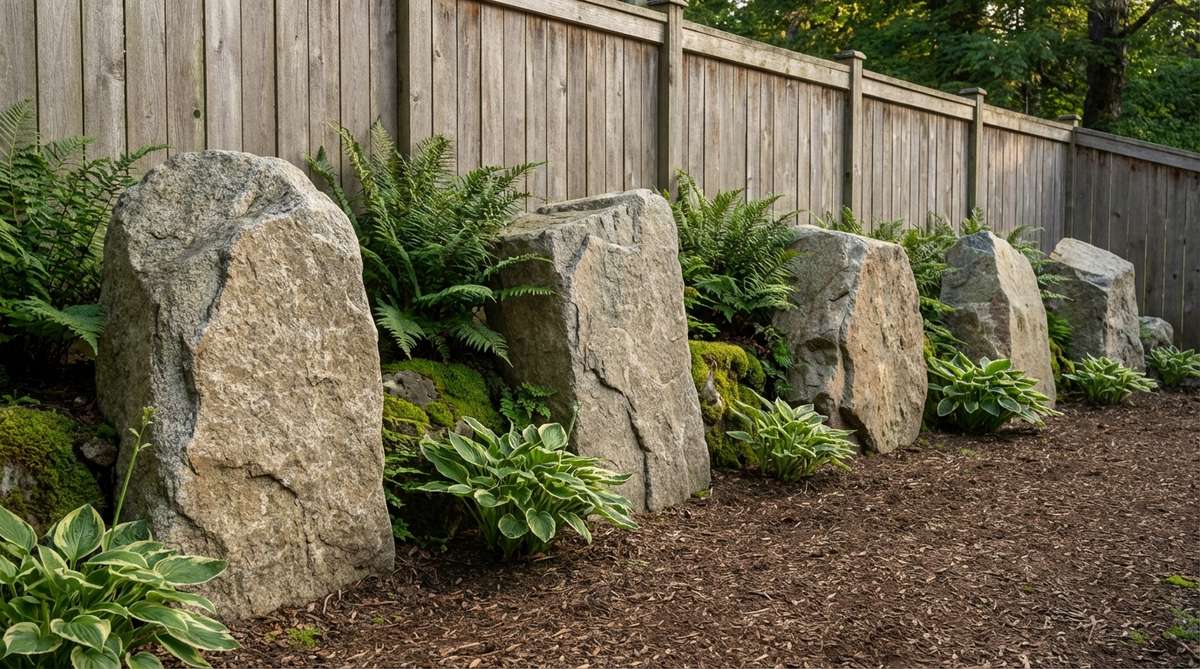
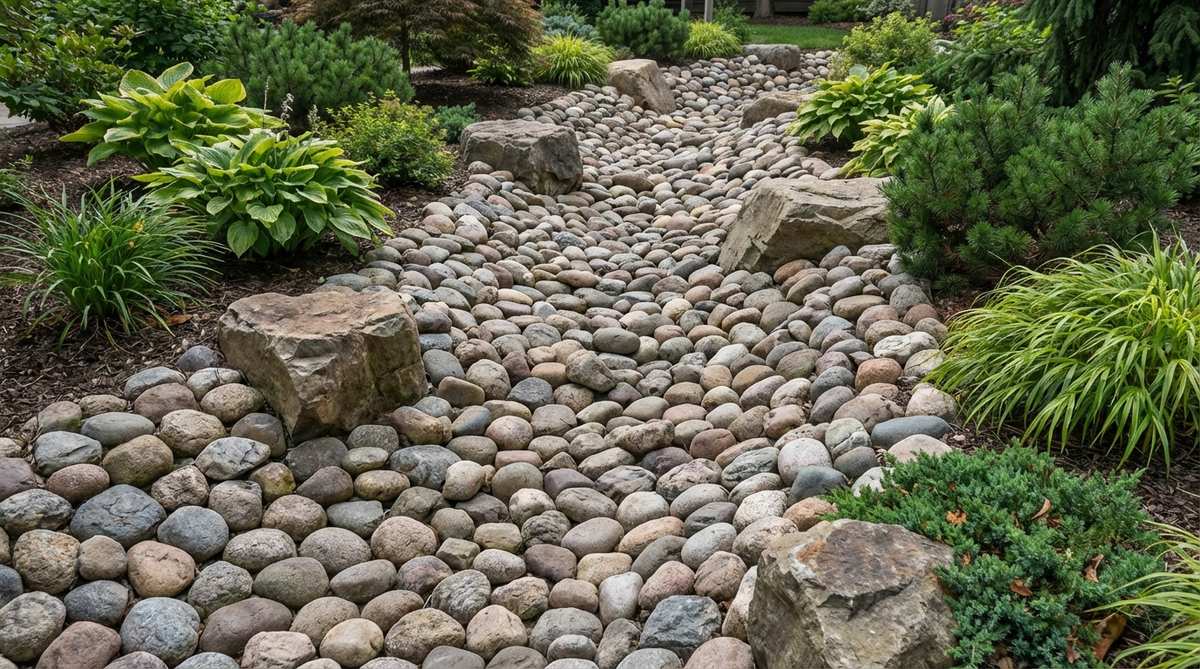
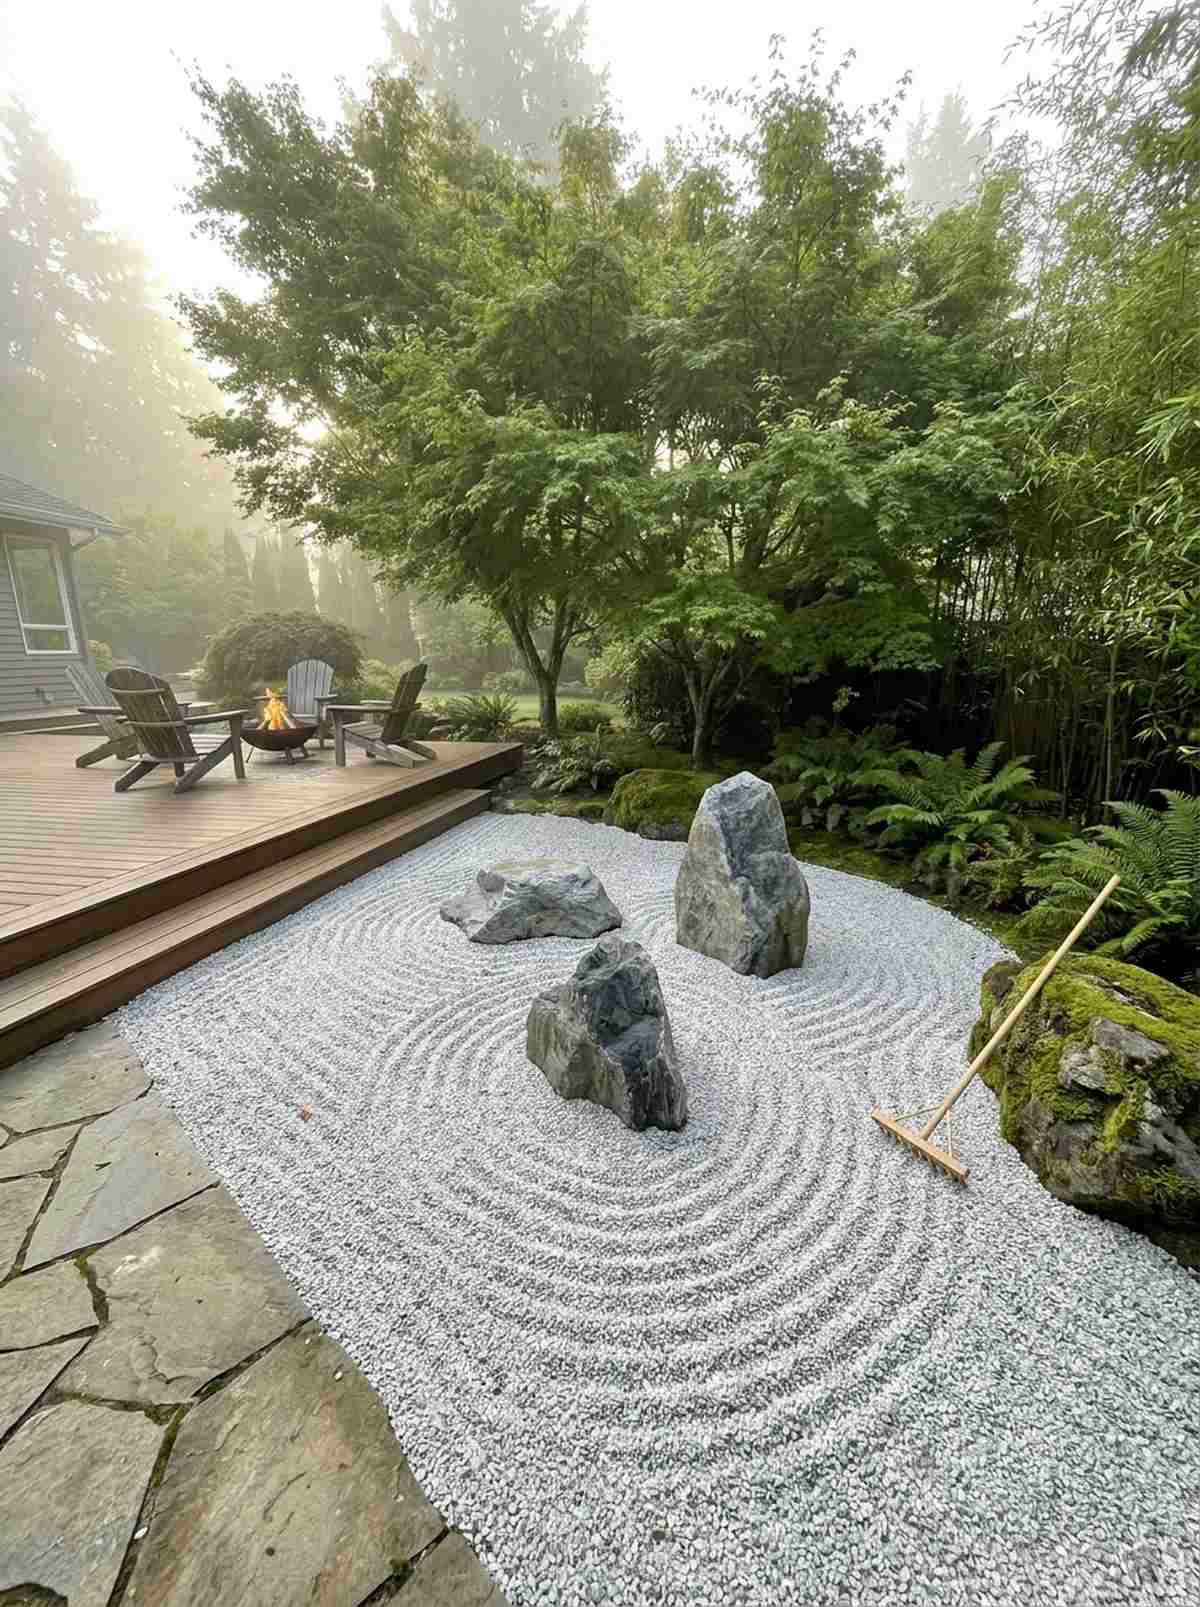
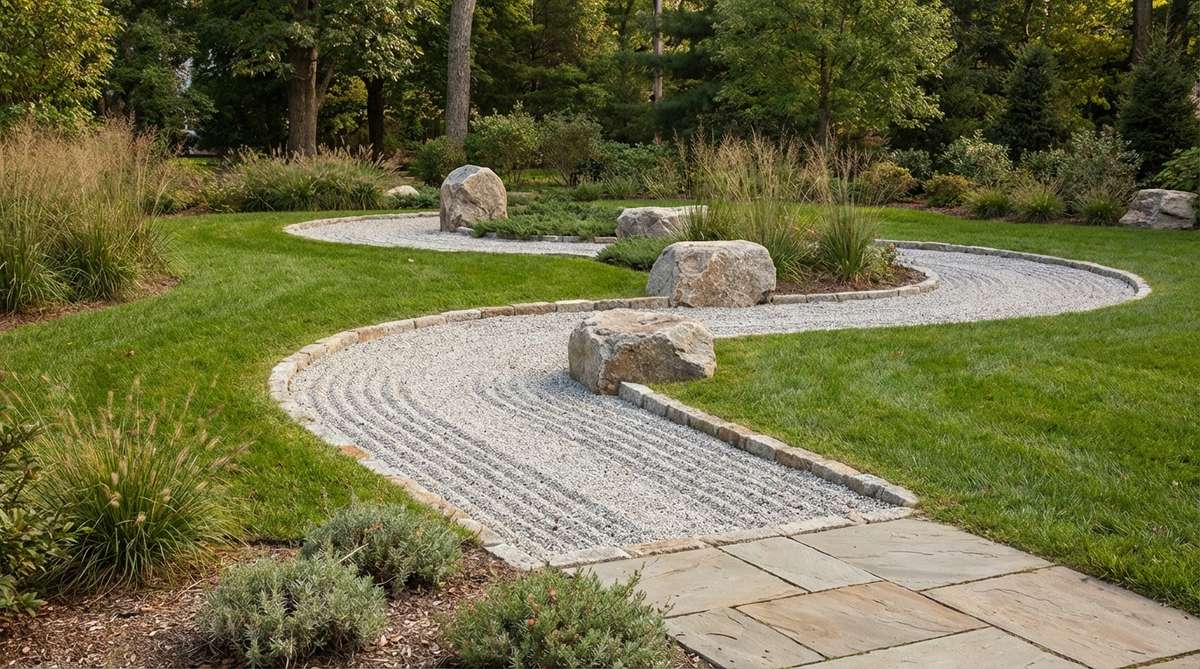
1. Asymmetric Triplet Boulder Cluster
Creates a grounding, organic vibe that feels like a natural mountain clearing accidentally discovered in your own backyard. This asymmetrical garden design with rocks works perfectly as a focal point in a sloping corner bed.
Most beginners mistakenly place stones symmetrically, but burying these progressively sized boulders at varying depths delivers a surprisingly premium look. Using high-grade commercial landscape adhesive to secure surrounding accent pebbles guarantees it stays immaculate through heavy rain.
You can easily pull this off for around $150–$300 depending on boulder weight. Save this to your DIY weekend garden board!
- Key Materials: 3 graduated fieldstone boulders, 2-inch river rock border.
- Vibe / Style: Organic woodland retreat.
- Difficulty: Moderate (requires heavy lifting).
- Budget Breakdown: Boulders: $120 | Accent Rock: $30.
- Creator’s Tip: Always bury the widest part of the boulder facing forward to simulate natural settling.
- Smart Sourcing: Invest in heavy-duty woven landscape fabric (bulk roll) and pre-washed premium river rock for a polished finish.
2. Sentinel Boulder with Halo Gravel
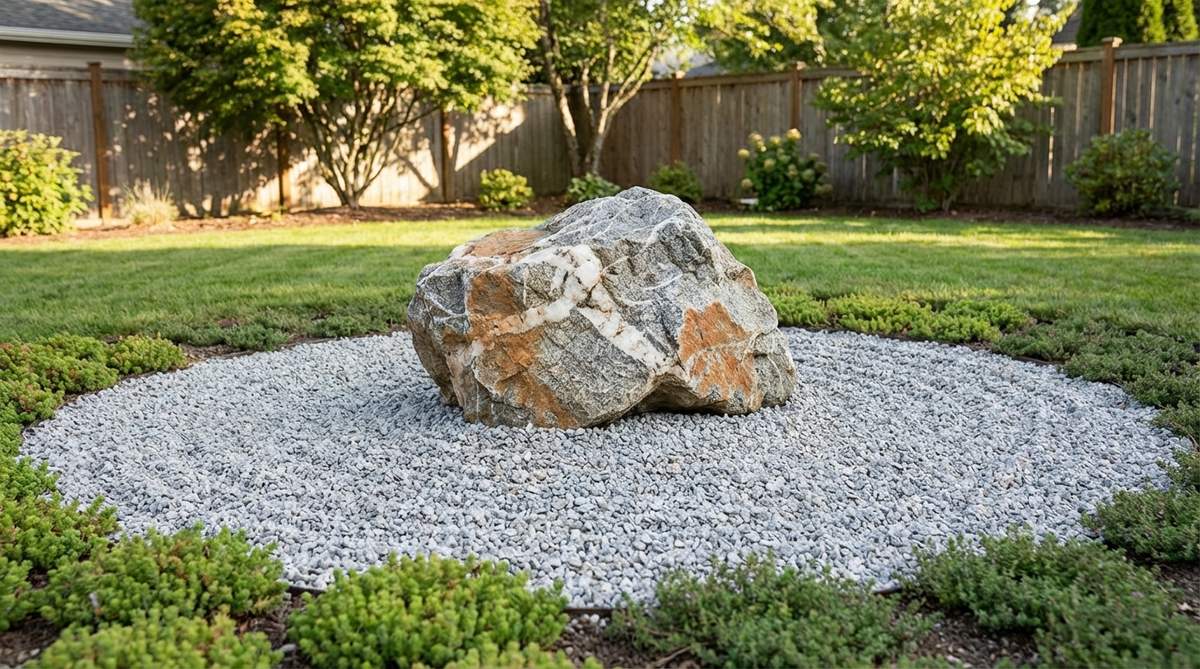
Radiates pure modern tranquility, giving the sensation of stepping into a high-end luxury spa courtyard. This minimalist stone centerpiece is an absolute game-changer for neglected, dry patches where grass refuses to grow.
A single statement stone surrounded by raked ripples looks far more expensive than it actually is. Integrate UV-resistant crushed quartz to achieve that striking, stark contrast against natural foliage that won’t yellow over time.
Expect to spend around $50–$100 for the entire setup. It’s a fast upgrade that completely changes the vibe.
- Key Materials: 1 striking granite boulder, fine crushed quartz.
- Vibe / Style: Contemporary Zen minimalism.
- Difficulty: Easy beginner setup.
- Budget Breakdown: Specimen Stone: $40 | Gravel Base: $25.
- Creator’s Tip: Use a rigid edging hidden beneath the top layer of gravel to keep the circular halo perfect.
- Smart Sourcing: Use a flexible steel garden edging kit and high-contrast bright white gravel bags.
3. Tiered Hillside Boulder Cascade
Injects dramatic vertical energy that feels like a rugged alpine trail ascending your property. This terraced garden design with stones is exceptional for managing steep front yard slopes while adding immense curb appeal.
Instead of battling soil erosion with expensive retaining walls, this staggered setup gives a designer-level finish at a fraction of the cost. Sneak in creeping thyme plug trays between the rocks to soften the harsh geological lines.
You can construct a basic cascade for roughly $200–$450. Pin this if you’re battling a difficult sloped yard!
- Key Materials: Large angular boulders, specialized planting soil.
- Vibe / Style: Rugged mountain terrain.
- Difficulty: Advanced (requires grading).
- Budget Breakdown: Boulders: $250 | Soil & Plants: $100.
- Creator’s Tip: Angle every stone slightly backward into the hill to let gravity do the retaining work.
- Smart Sourcing: Order drought-tolerant groundcover starter packs and professional erosion control netting.
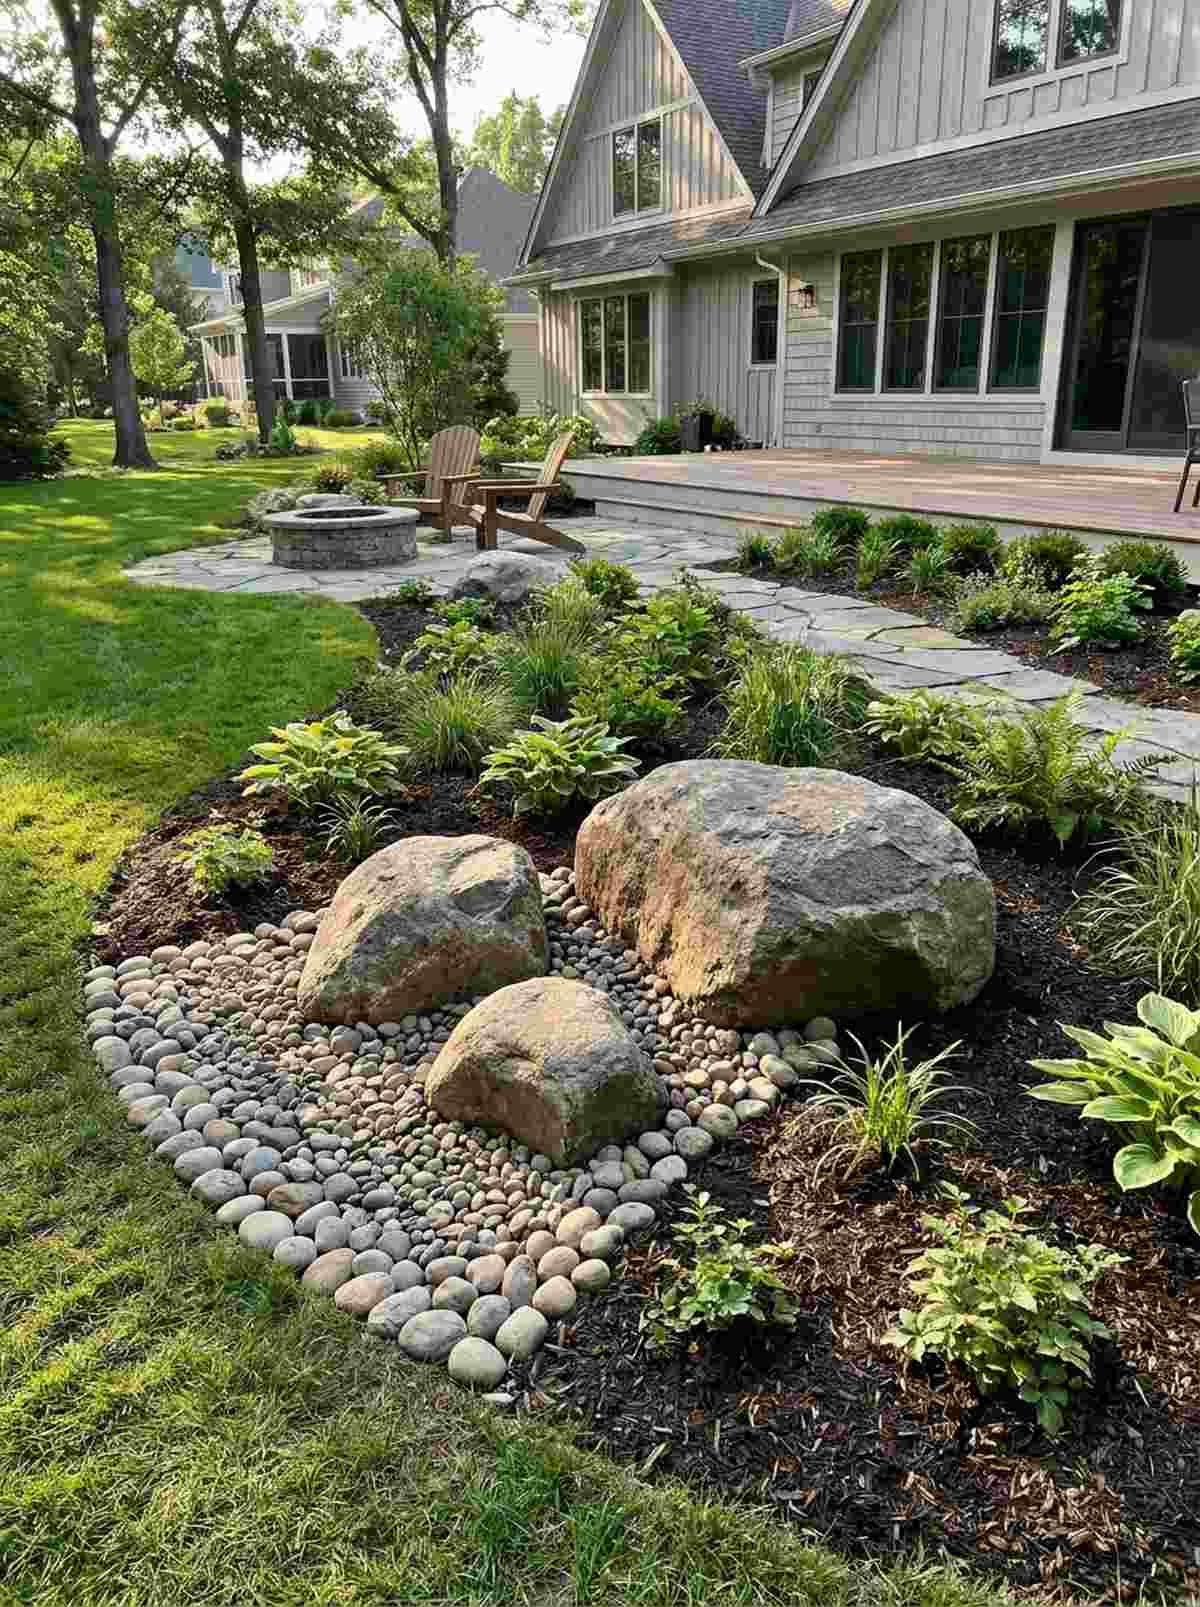
4. Corner Anchor Boulder Formation
Brings a sense of grounded permanence that feels like a historic estate boundary. This corner stone landscape design effectively softens harsh 90-degree property lines and transitions dead space into a deliberate feature.
Leaving corners empty is a missed opportunity, but grouping companion stones here visually expands the yard. Pairing the boulders with premium dark mulch bark creates a rich backdrop that makes lighter rocks pop.
You can execute this weekend project for about $80–$150. Highly recommended for a quick boundary face-lift.
- Key Materials: 1 primary boulder, 2-3 medium companion stones.
- Vibe / Style: Classic transitional border.
- Difficulty: Easy to moderate.
- Budget Breakdown: Stones: $70 | Base Mulch/Gravel: $30.
- Creator’s Tip: Extend the gravel or mulch bed at least 2 feet beyond the rocks to prevent lawnmower damage.
- Smart Sourcing: Pick up commercial grade weed mat pins and bulk decorative slate chips.
This next setup is ridiculously cheap but looks like a custom $1,000 entrance display… Keep scrolling!
5. Pathway Guardian Boulder Pair
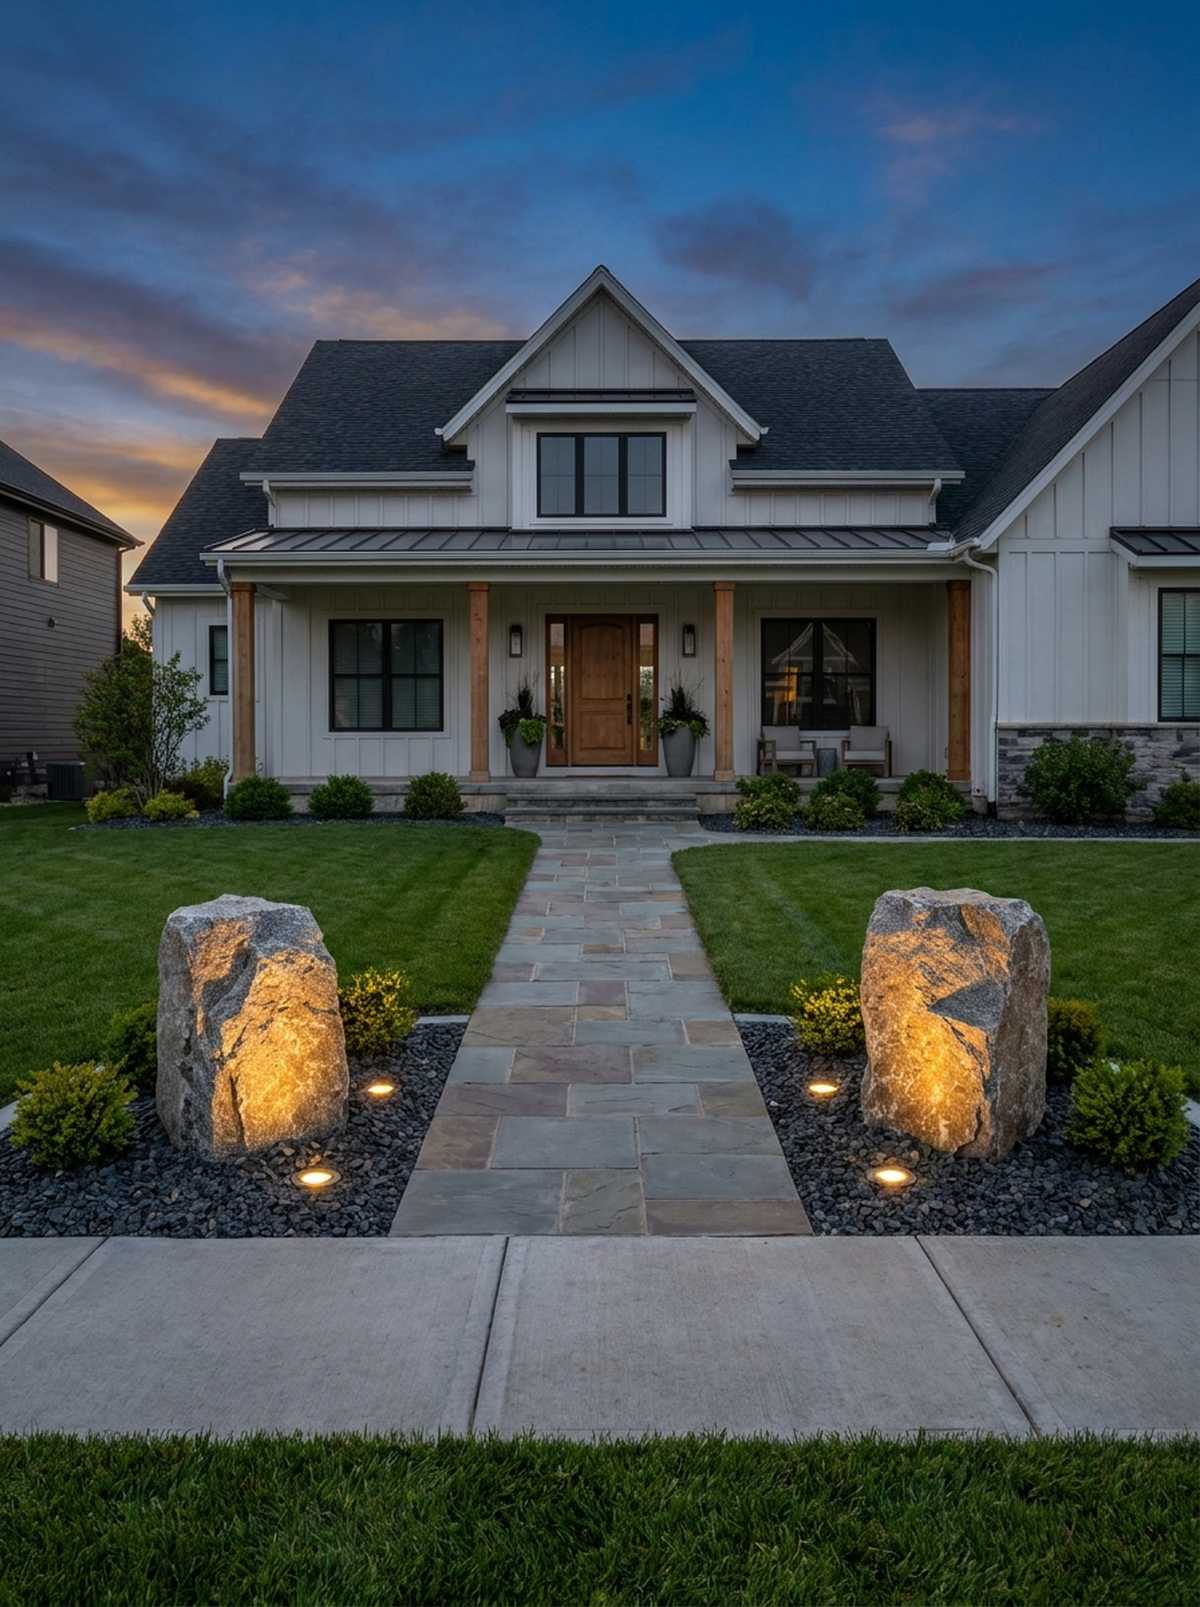
Establishes an authoritative, welcoming gateway that feels straight out of an upscale botanical garden. This symmetrical pathway framing idea acts as a psychological transition from public sidewalk to private sanctuary.
Using matched stones flanking an entrance elevates the space instantly and looks far more intentional than simple potted plants. By embedding low-voltage solar spotlights flush with the gravel, the boulders glow beautifully at night.
Set this up for around $100–$180. Save this to your exterior home styling board!
- Key Materials: Twin matching boulders, contrast gravel.
- Vibe / Style: Formal modern entrance.
- Difficulty: Moderate (focus on leveling).
- Budget Breakdown: Matched Boulders: $120 | Lighting/Base: $40.
- Creator’s Tip: Use a string line level across the path to ensure both boulders sit at the exact same visual height.
- Smart Sourcing: Use heavy-duty recessed solar ground lights and premium basalt pathway gravel.
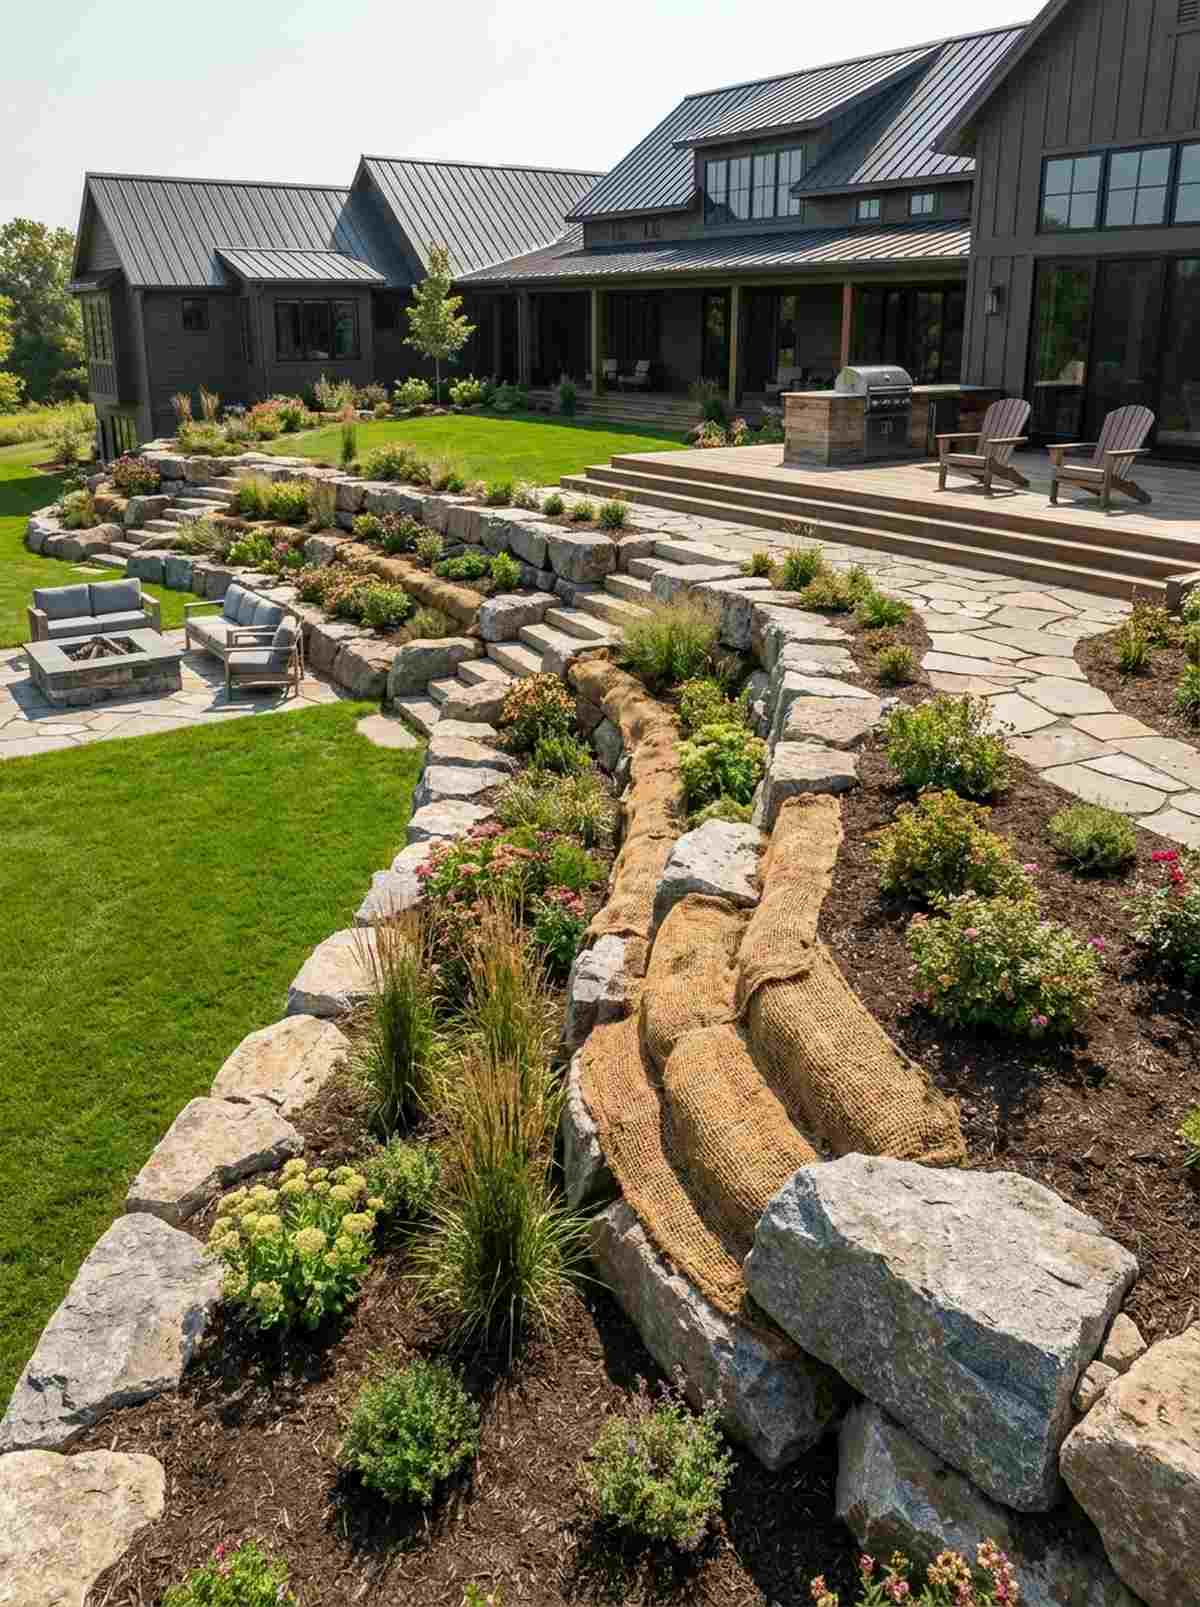
6. Layered Backdrop Boulder Wall
Provides a dramatic, textural canvas that feels like exposed natural bedrock anchoring your property. This vertical garden design rock feature works incredibly well against bland fences or flat property lines.
Standard flat beds lack dimension, but stacking linear stones delivers a surprisingly premium look with minimal digging. Tucking shade-loving outdoor fern bulbs behind the protective rocks creates a lush microclimate.
Materials will run approximately $300–$600 depending on the wall’s length. It’s an investment that never needs repainting.
- Key Materials: Flat-faced boulders, shade plants.
- Vibe / Style: Deep woodland aesthetic.
- Difficulty: Advanced (requires strategic stacking).
- Budget Breakdown: Stone: $400 | Plants/Soil: $100.
- Creator’s Tip: Build the wall with a slight backward batter (tilt) to ensure stability during freeze-thaw cycles.
- Smart Sourcing: Grab bulk woodland fern starter kits and polyurethane stone construction adhesive.
Gravel Bed Foundation Designs for Low-Maintenance Elegance
Properly designed gravel beds eliminate weeding while providing excellent drainage for drought-tolerant plantings. These garden design with stones foundations work across diverse climate zones and soil conditions.
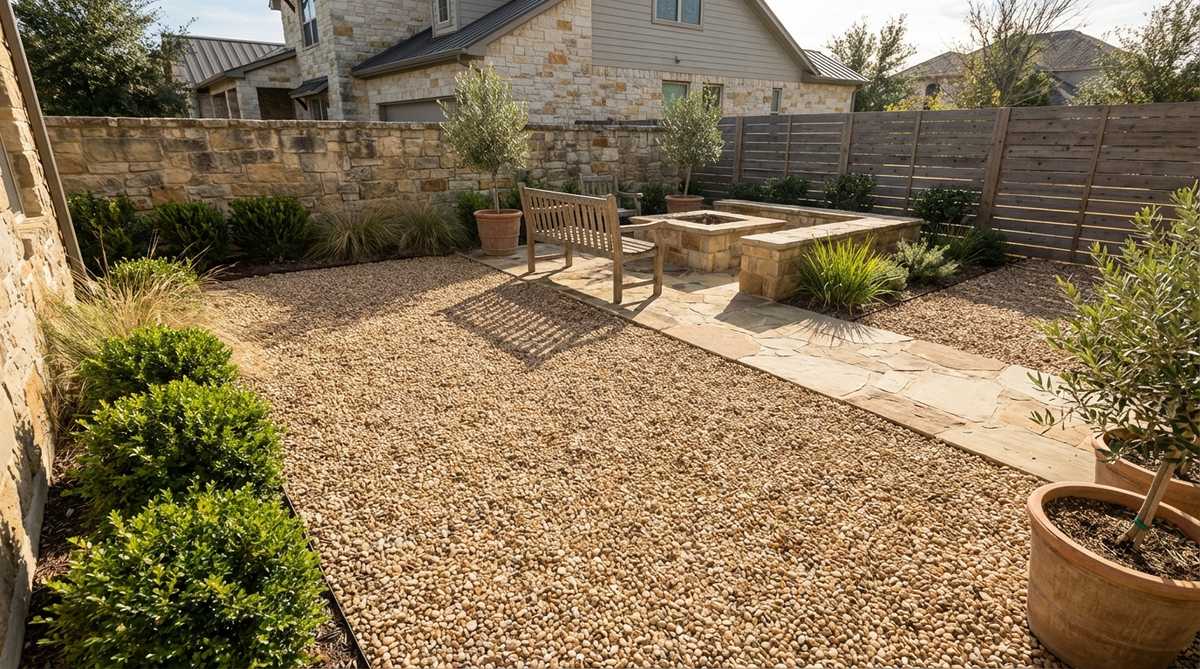
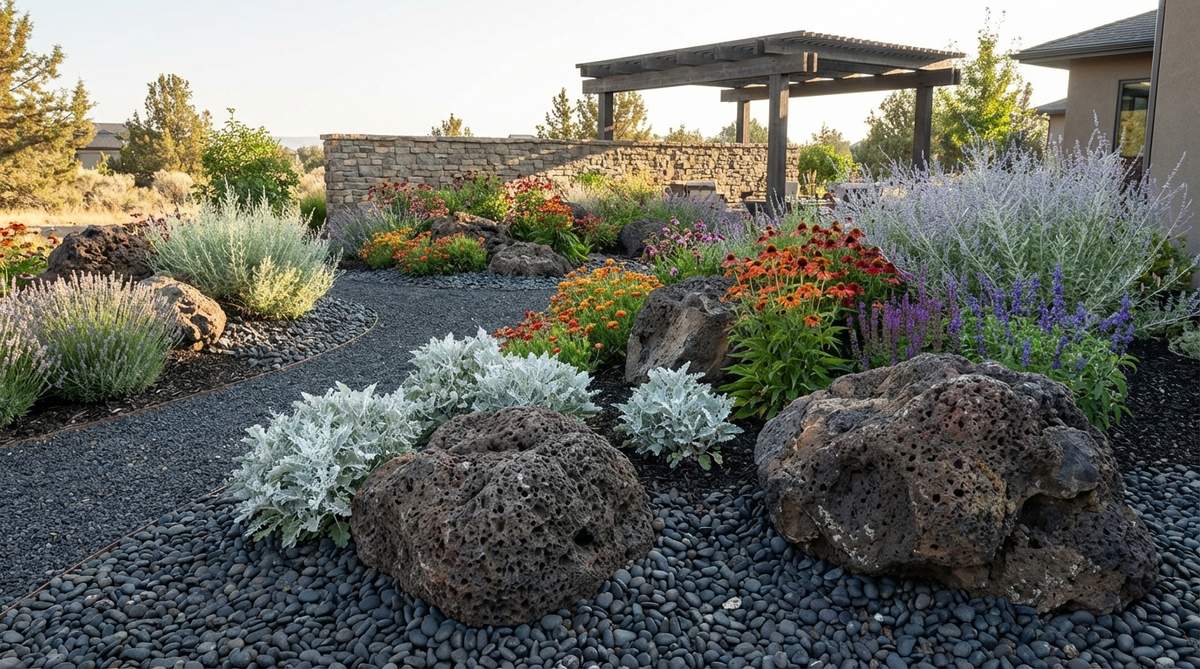
7. Mediterranean Olive Grove Gravel Base
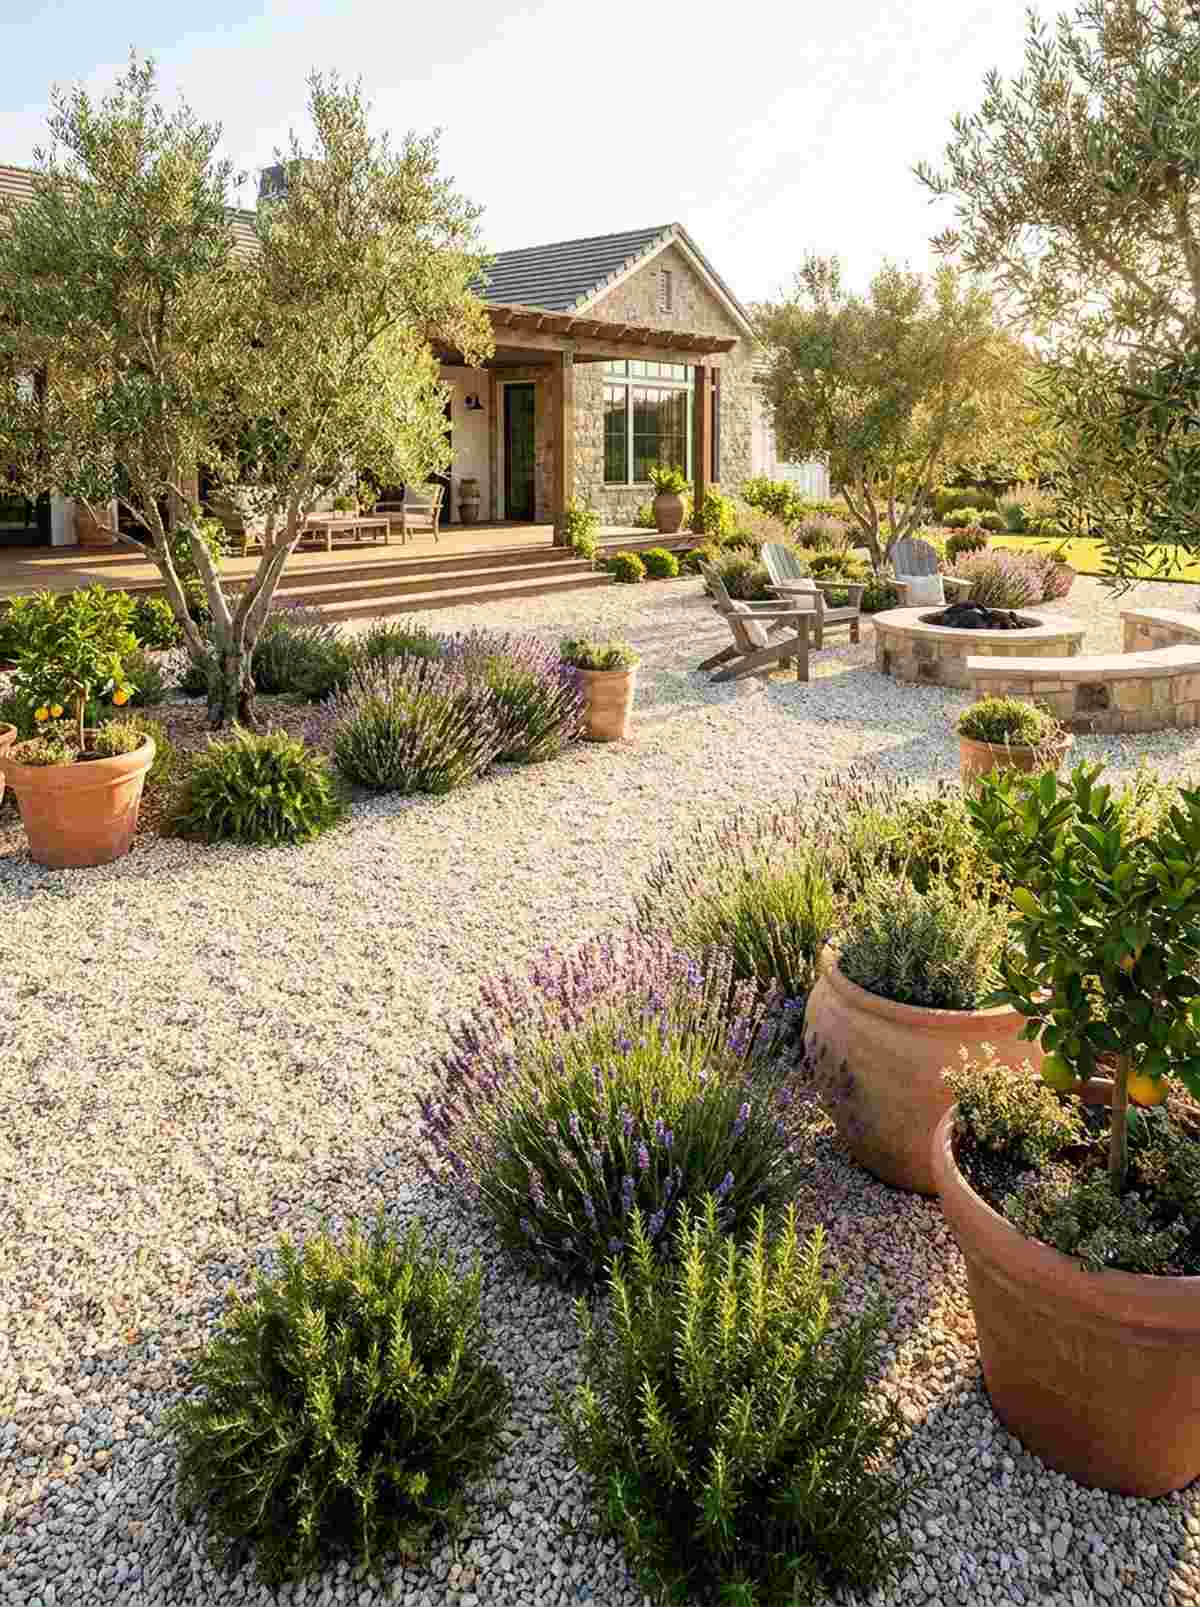
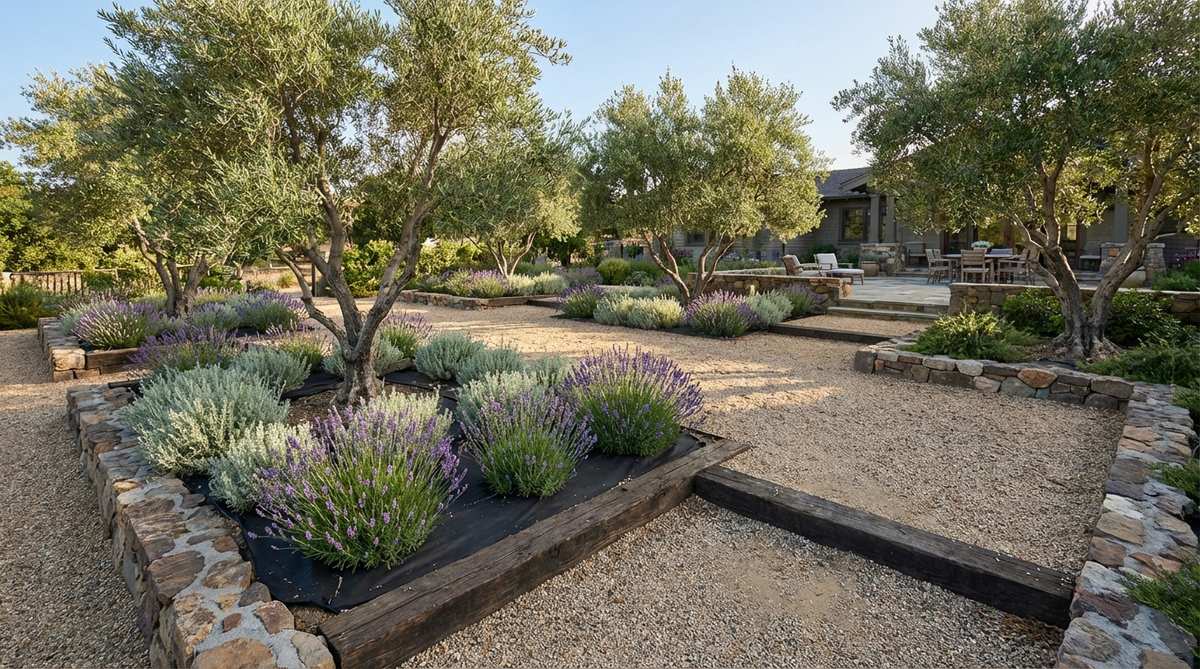
Evokes the sun-drenched, breezy atmosphere of a coastal Italian villa right in your yard. This drought-tolerant gravel layout is the ultimate solution for sunny expanses where traditional turf requires too much water.
Replacing thirsty grass with crushed limestone guarantees a luxurious, water-wise finish. Installing commercial grade landscape staples to hold down the heavy-duty barrier ensures weeds never break the illusion.
You can cover a medium patio area for $150–$350. Pin this if you want to ditch your lawnmower forever!
- Key Materials: Decomposed granite or crushed limestone, Mediterranean herbs.
- Vibe / Style: Rustic Tuscan countryside.
- Difficulty: Moderate (labor intensive spreading).
- Budget Breakdown: Bulk Gravel: $200 | Barrier & Plants: $80.
- Creator’s Tip: Wash the limestone after installation to remove dust and reveal the true, bright color.
- Smart Sourcing: Source extra-thick 5oz weed barrier rolls and lavender plant starter plugs.
8. Monochrome Slate Chip Carpet
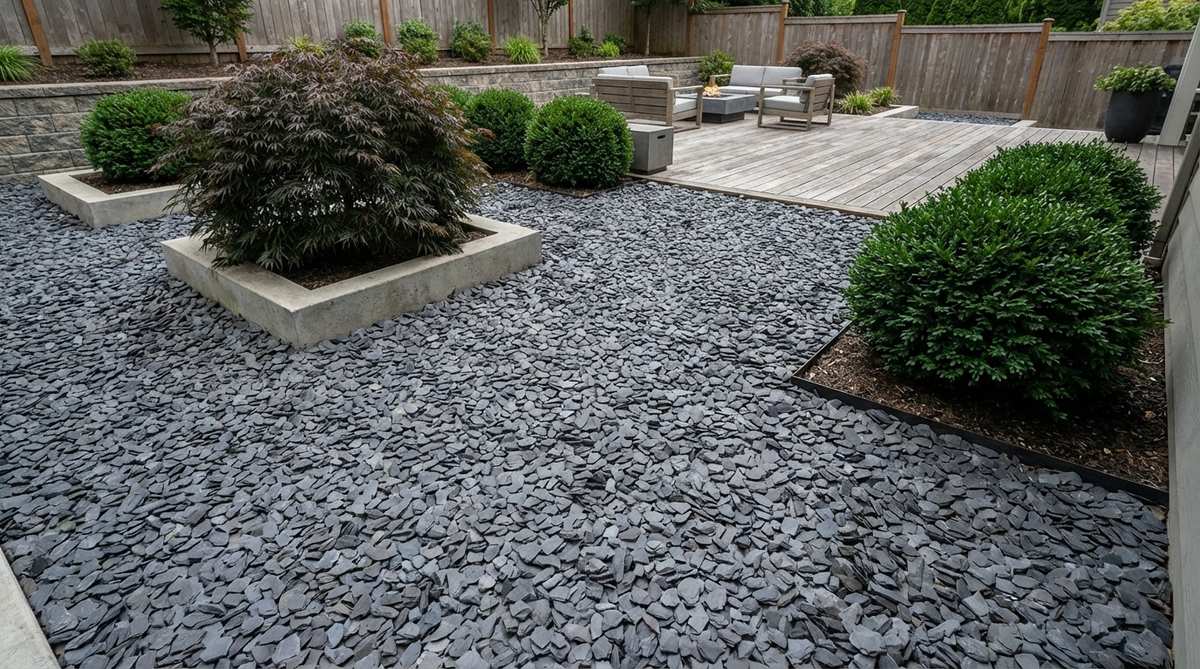
Delivers a sleek, moody aesthetic that feels like an exclusive modern art gallery courtyard. This contemporary dark stone hardscaping perfectly highlights structural plants with bold, architectural foliage.
Many default to cheap pea gravel, but flat slate chips interlock to prevent messy scatter, offering a designer-level finish. Utilizing UV-protected aluminum landscape edging keeps the dark borders crisp and sharp.
Expect to invest $200–$400 for premium slate. It’s a high-impact texture upgrade.
- Key Materials: Uniform grey slate chips, metal edging.
- Vibe / Style: Ultra-modern chic.
- Difficulty: Easy beginner friendly.
- Budget Breakdown: Slate Bags/Pallet: $250 | Edging: $50.
- Creator’s Tip: Slate absorbs heat, so only plant heat-tolerant architectural succulents or grasses in this bed.
- Smart Sourcing: Use heavy-duty aluminum border edging and premium polished slate chips.
9. River Pebble Mosaic Sections
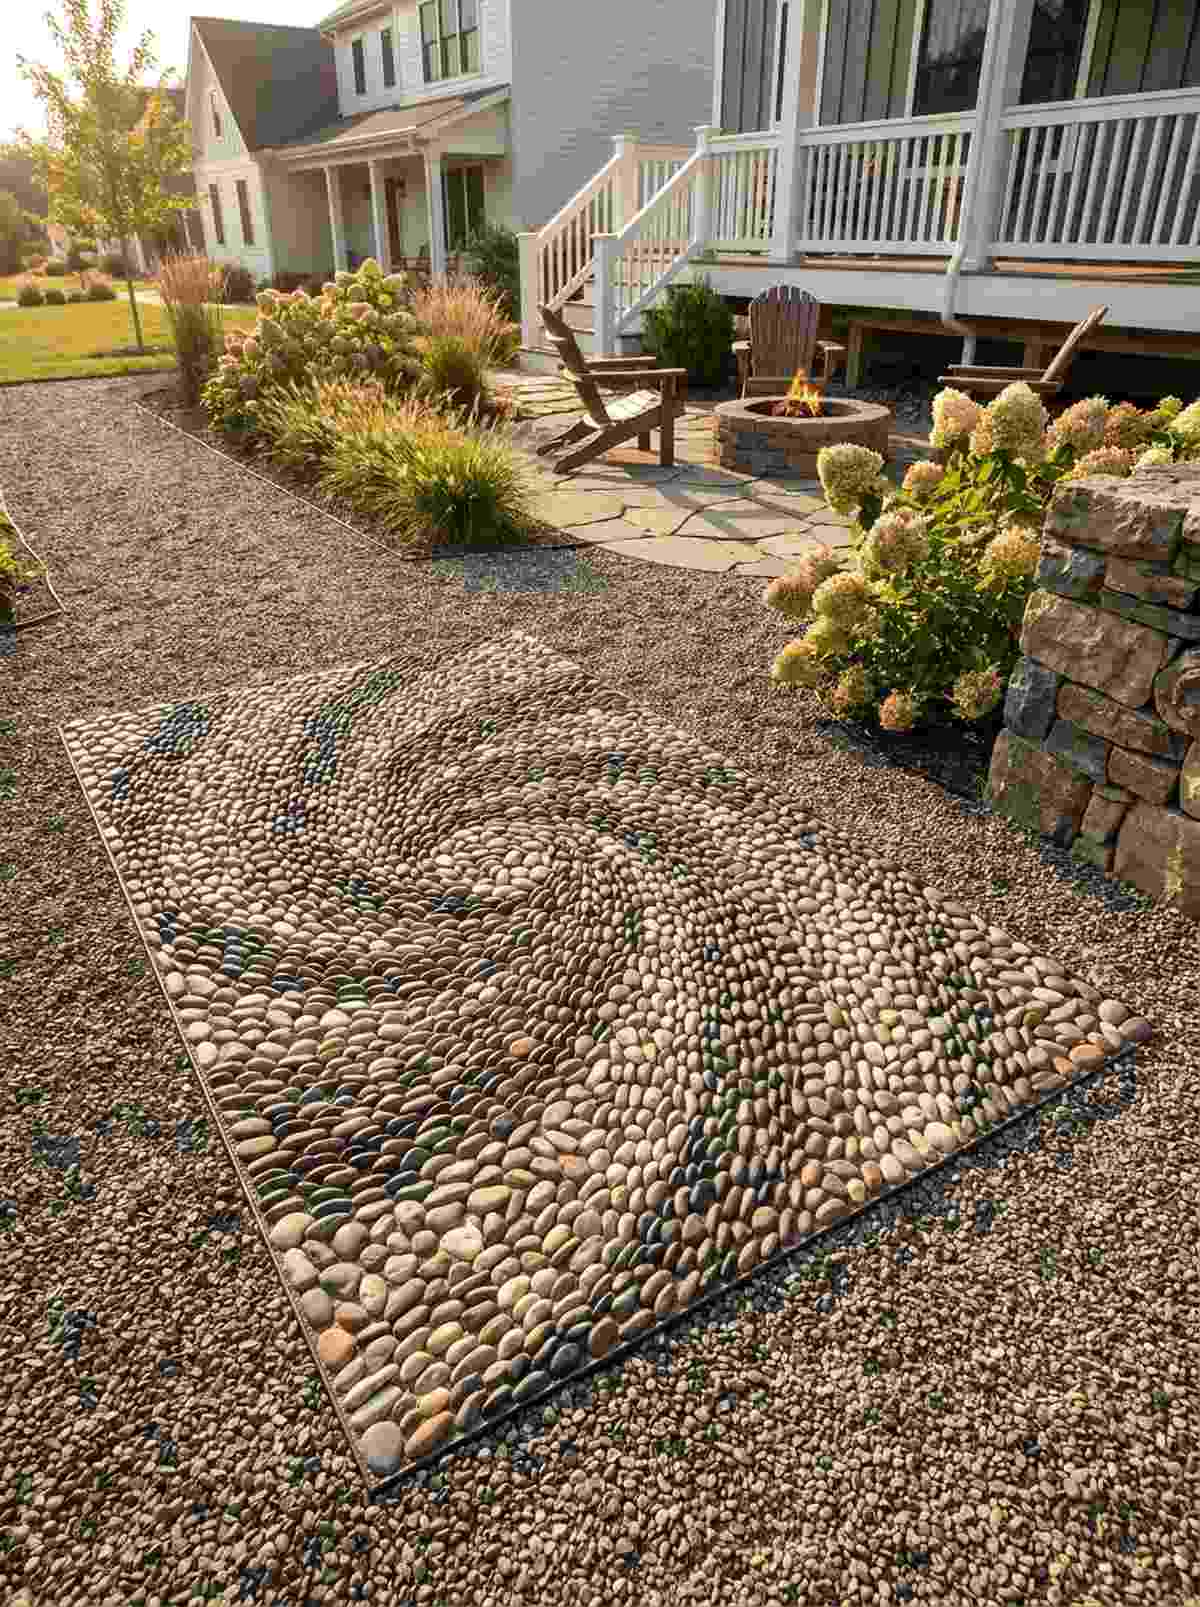
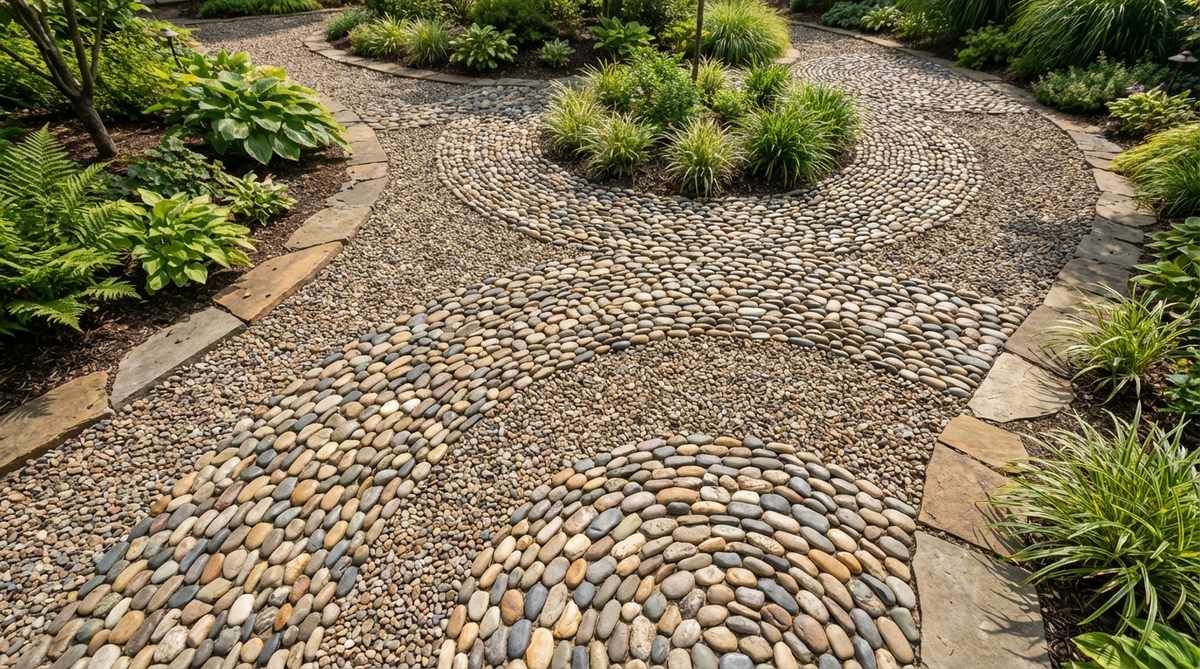
Brings a highly tactile, artistic charm that feels like a bespoke European cobblestone street. This decorative stone mosaic pattern serves as a stunning visual break within larger, monotonous gravel driveways or patios.
Sorting pebbles by color to create bands takes patience but looks completely custom and high-end. Setting them in a semi-dry polymeric sand base locks the intricate design firmly into place.
You can craft a small 3×3 mosaic for under $60. Save this for your next creative outdoor craft day!
- Key Materials: Multi-colored river pebbles, setting sand.
- Vibe / Style: Artisanal cottagecore.
- Difficulty: High (requires patience and design eye).
- Budget Breakdown: Sorted Pebbles: $40 | Polymeric Sand: $20.
- Creator’s Tip: Lay your pattern out dry on a piece of cardboard first to perfect the color gradients.
- Smart Sourcing: Buy pre-sorted multi-color river rock bags and weather-resistant polymeric jointing sand.
💡 Must-Have Supplies for High-End Setups
To build these setups faster and ensure they last, skip the generic craft aisles and invest in the right foundational kits.
- Base & Support: Commercial-grade 5oz non-woven weed barrier
- Setup Tools: Heavy-duty steel tamper and leveling rake kit
- Weather/Durability Protection: High-gloss UV protective stone sealant spray
Most people get their yard drainage completely wrong… until they try the exact layout coming up next.
10. Crushed Granite Xeriscape Field
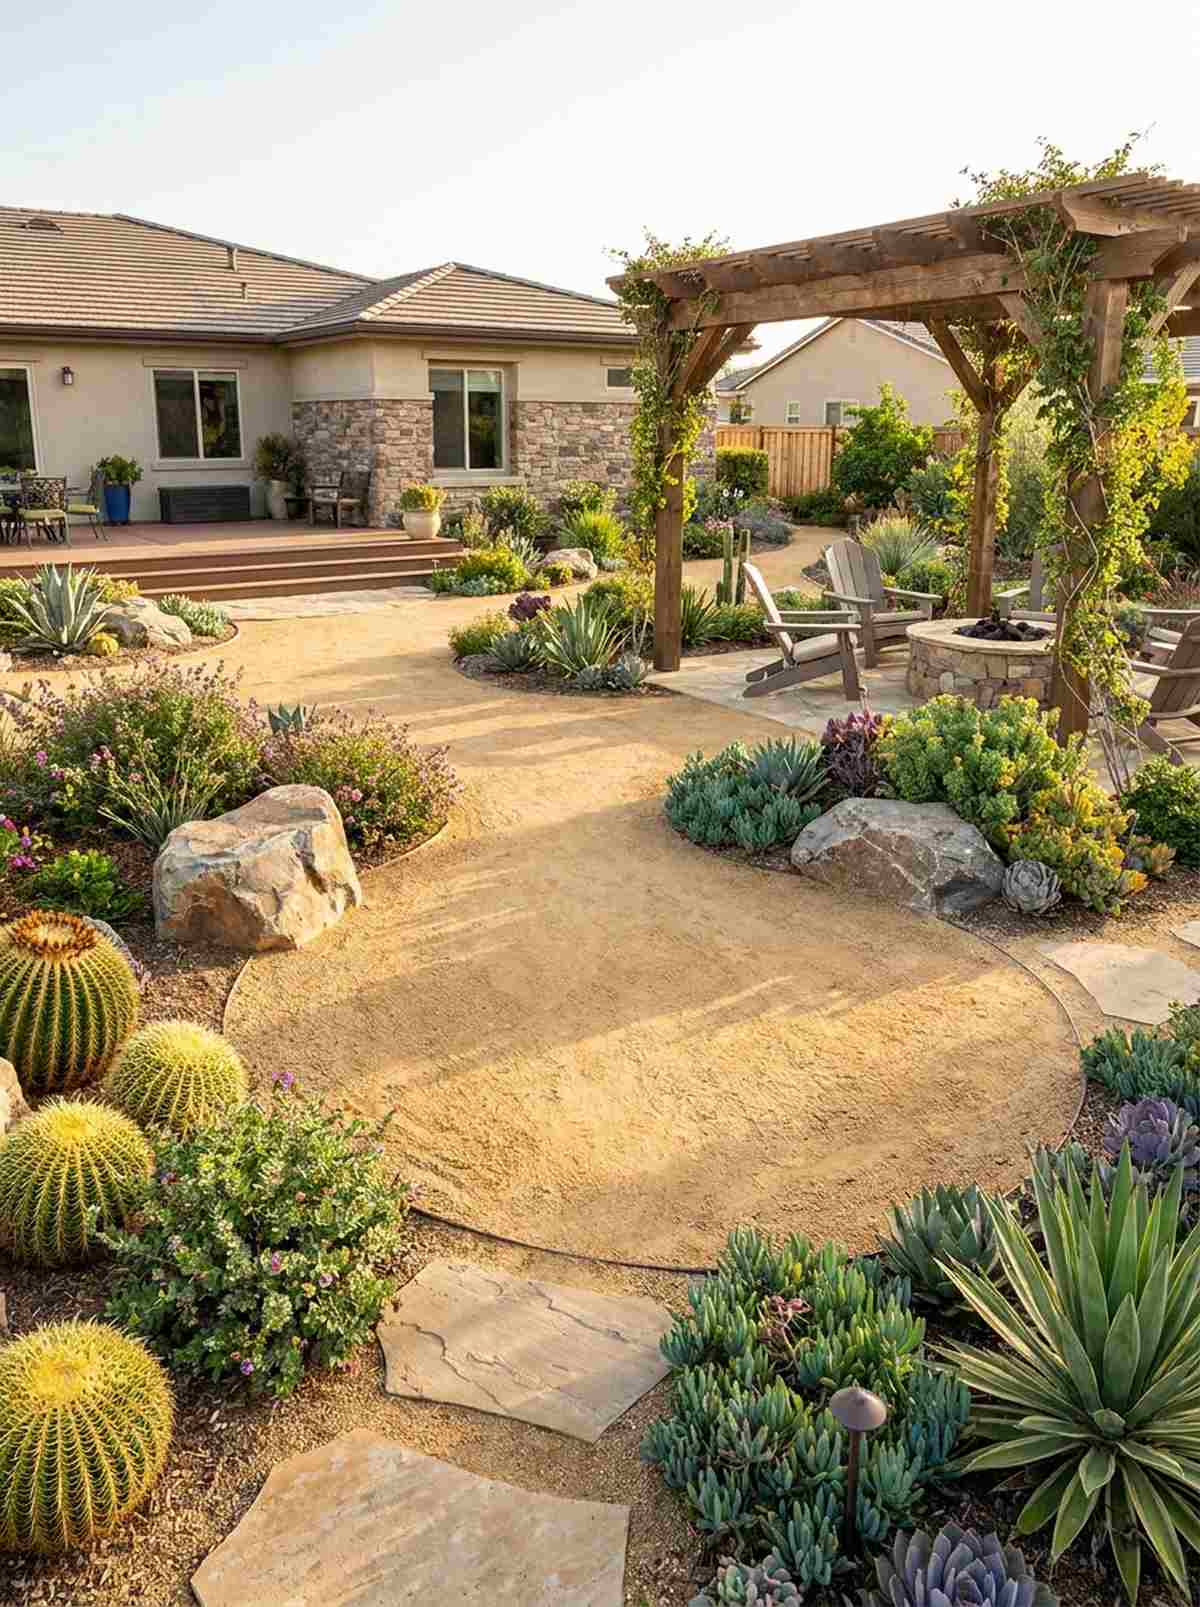
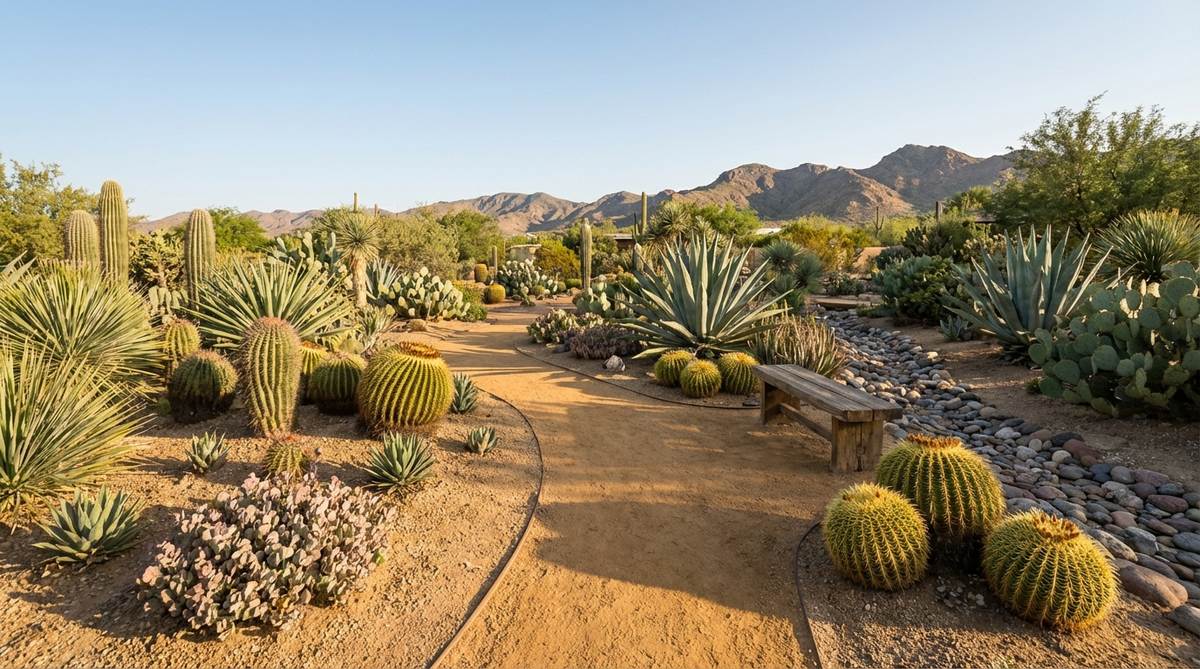
Embraces rugged desert beauty, feeling like a high-end botanical garden in the Southwest. This xeriscape rock garden design is brilliant for creating expansive, walkable spaces that require zero irrigation.
While mulch blows away and decays, compacted granite creates a permanent, walkable crust that looks effortlessly expensive. Mixing in a specialized granite stabilizing binder stops footprints and rutting completely.
Pricing runs about $100–$250 for a standard yard section. A phenomenal choice for eco-conscious landscaping.
- Key Materials: Decomposed granite, cactus/succulent varieties.
- Vibe / Style: Southwest desert oasis.
- Difficulty: Moderate (requires heavy compacting).
- Budget Breakdown: Bulk Granite: $150 | Binder Liquid: $60.
- Creator’s Tip: Water the granite lightly before running a plate compactor over it for a concrete-like finish.
- Smart Sourcing: Use a liquid permeable gravel binder kit and assorted cold-hardy succulent packs.
11. Variegated Gravel Stream Pattern
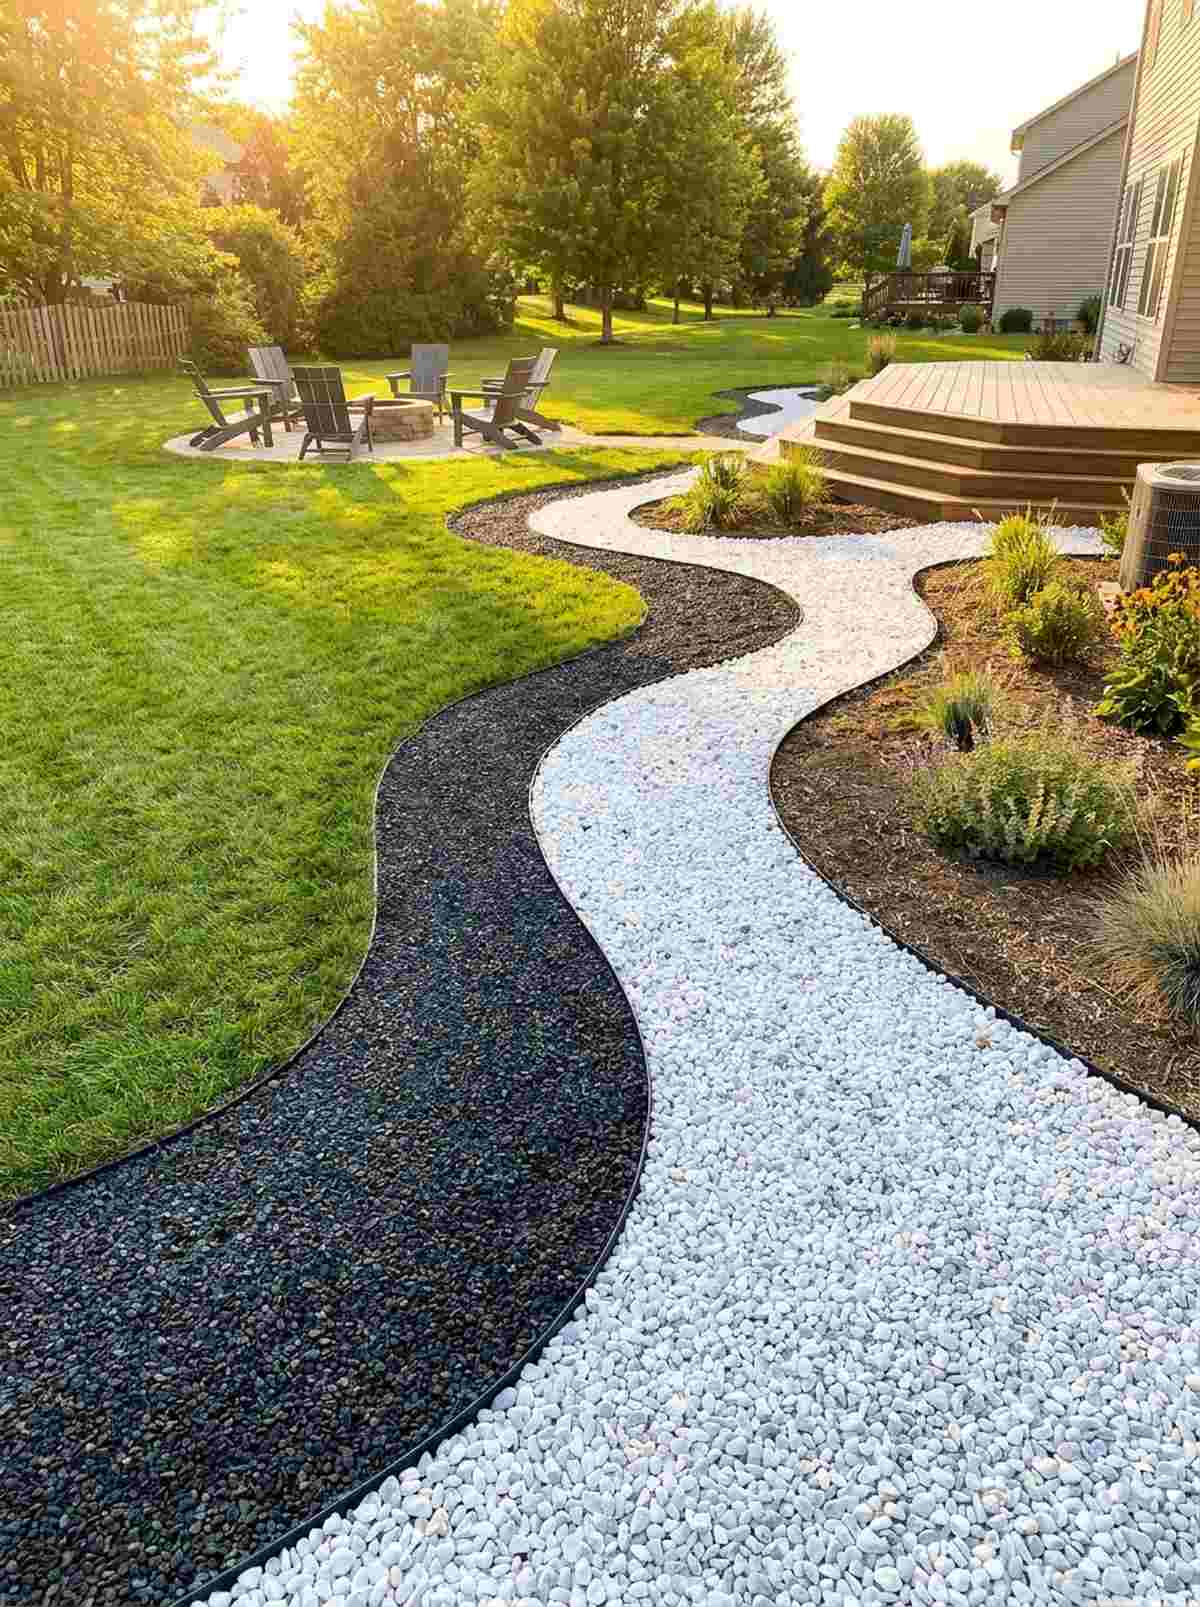
Introduces a hypnotic sense of movement that feels like a Zen painting brought to life. This two-tone gravel pathway design visually elongates small yards by drawing the eye along sweeping curves.
Instead of a boring flat path, weaving distinct light and dark aggregate ribbons delivers a surprisingly premium look. Employing flexible hidden plastic bender board below the surface keeps the two colors from ever mixing.
You can create this dynamic flow for about $150–$250. Pin this if you want to make a tiny yard feel huge!
- Key Materials: Contrasting fine gravels (e.g., black basalt and white marble).
- Vibe / Style: Whimsical modern flow.
- Difficulty: Moderate.
- Budget Breakdown: Two Gravel Types: $120 | Hidden Edging: $50.
- Creator’s Tip: Dig the channel slightly deeper in the center so the gravel naturally slopes inward, preventing overspill.
- Smart Sourcing: Use heavy-duty flexible landscape bender board and premium bright white marble chips.
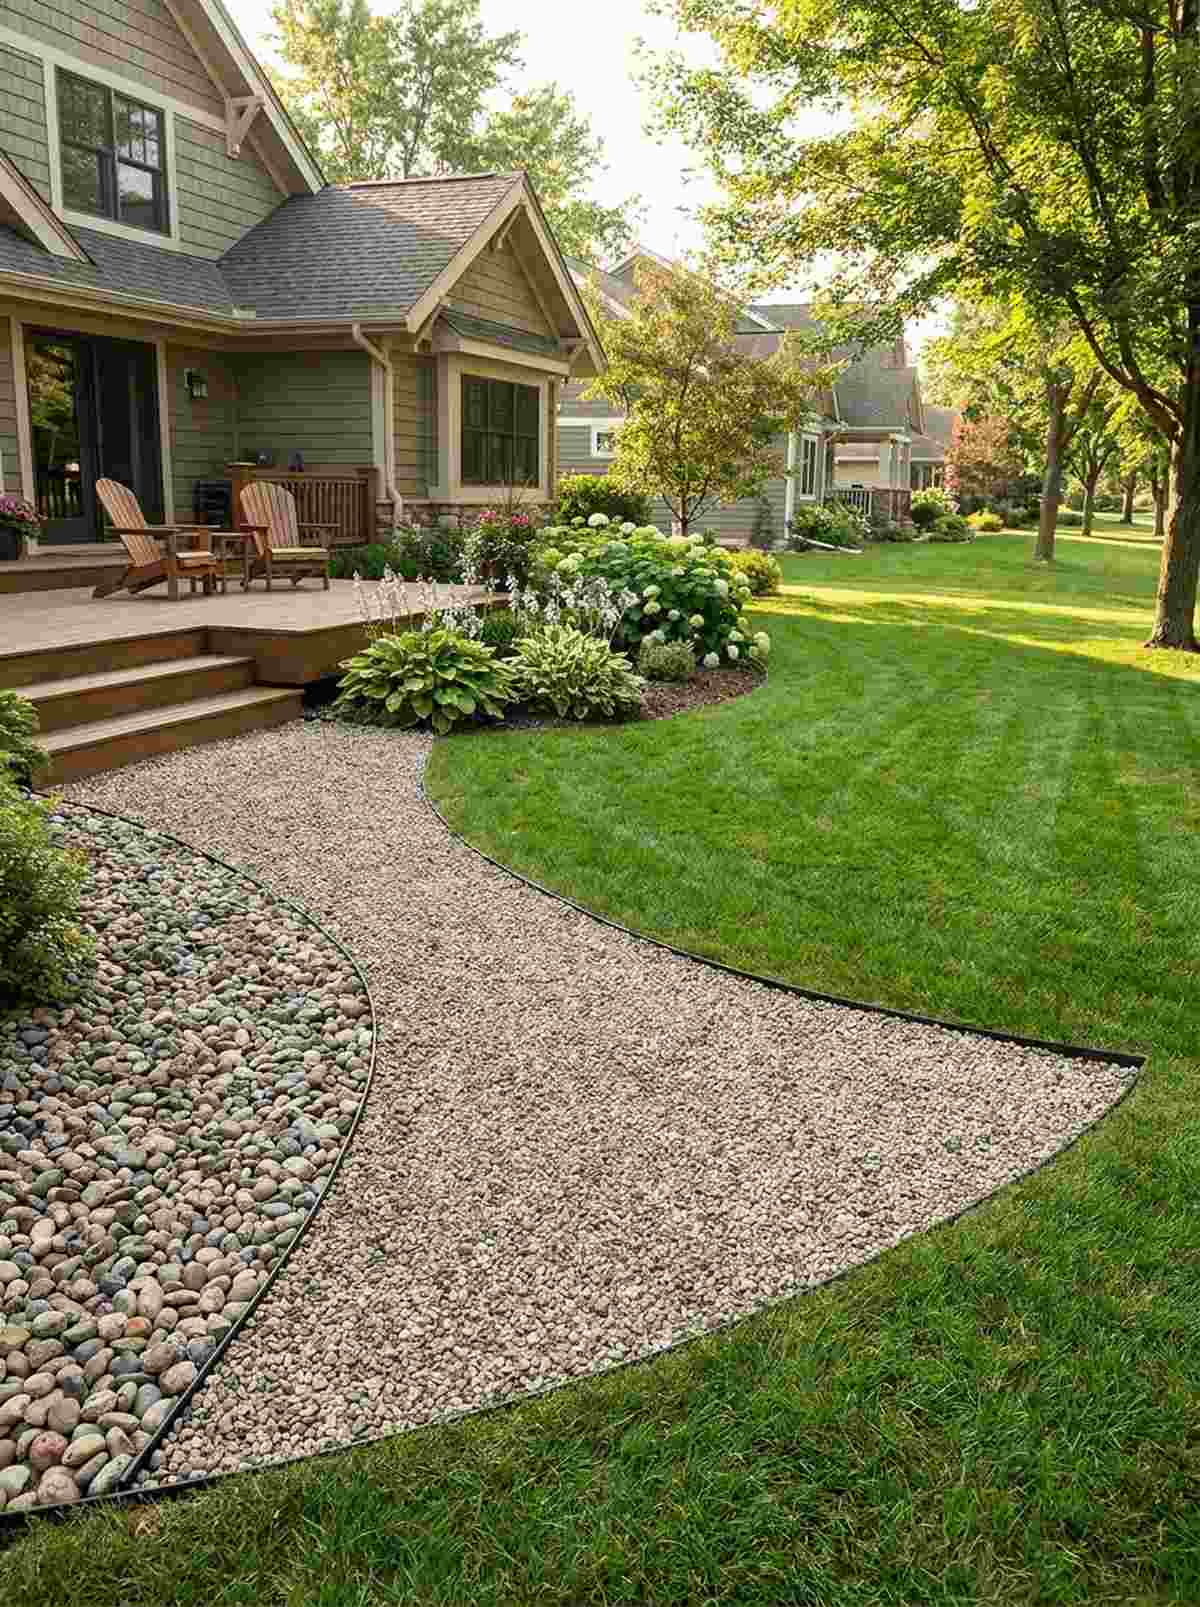
12. Pea Gravel Courtyard Foundation
Creates a soft, inviting crunch underfoot that feels like a romantic Parisian outdoor cafe. This affordable pea gravel patio is the ultimate budget-friendly alternative to expensive poured concrete or pavers.
Poured concrete can crack and look sterile, but warm-toned pebbles offer a designer-level finish with incredible natural drainage. Installing a heavy-duty cellular paving grid beneath the pebbles stops them from sinking into the mud.
Easily achievable for $100–$300 depending on square footage. Highly recommended for cozy fire pit areas.
- Key Materials: Rounded pea gravel, containment edge.
- Vibe / Style: Casual European courtyard.
- Difficulty: Easy DIY project.
- Budget Breakdown: Pea Gravel: $90 | Base Grid: $120.
- Creator’s Tip: Never lay pea gravel thicker than 2.5 inches; anything deeper makes walking feel like trudging through deep sand.
- Smart Sourcing: Order a permeable gravel stabilizing grid system and steel landscape edging stakes.
Dry Creek Bed Installations for Drainage and Drama
Functional dry creek beds manage stormwater runoff while introducing naturalistic garden design with stones elements. These features mimic seasonal waterways that remain visually compelling during dry periods.
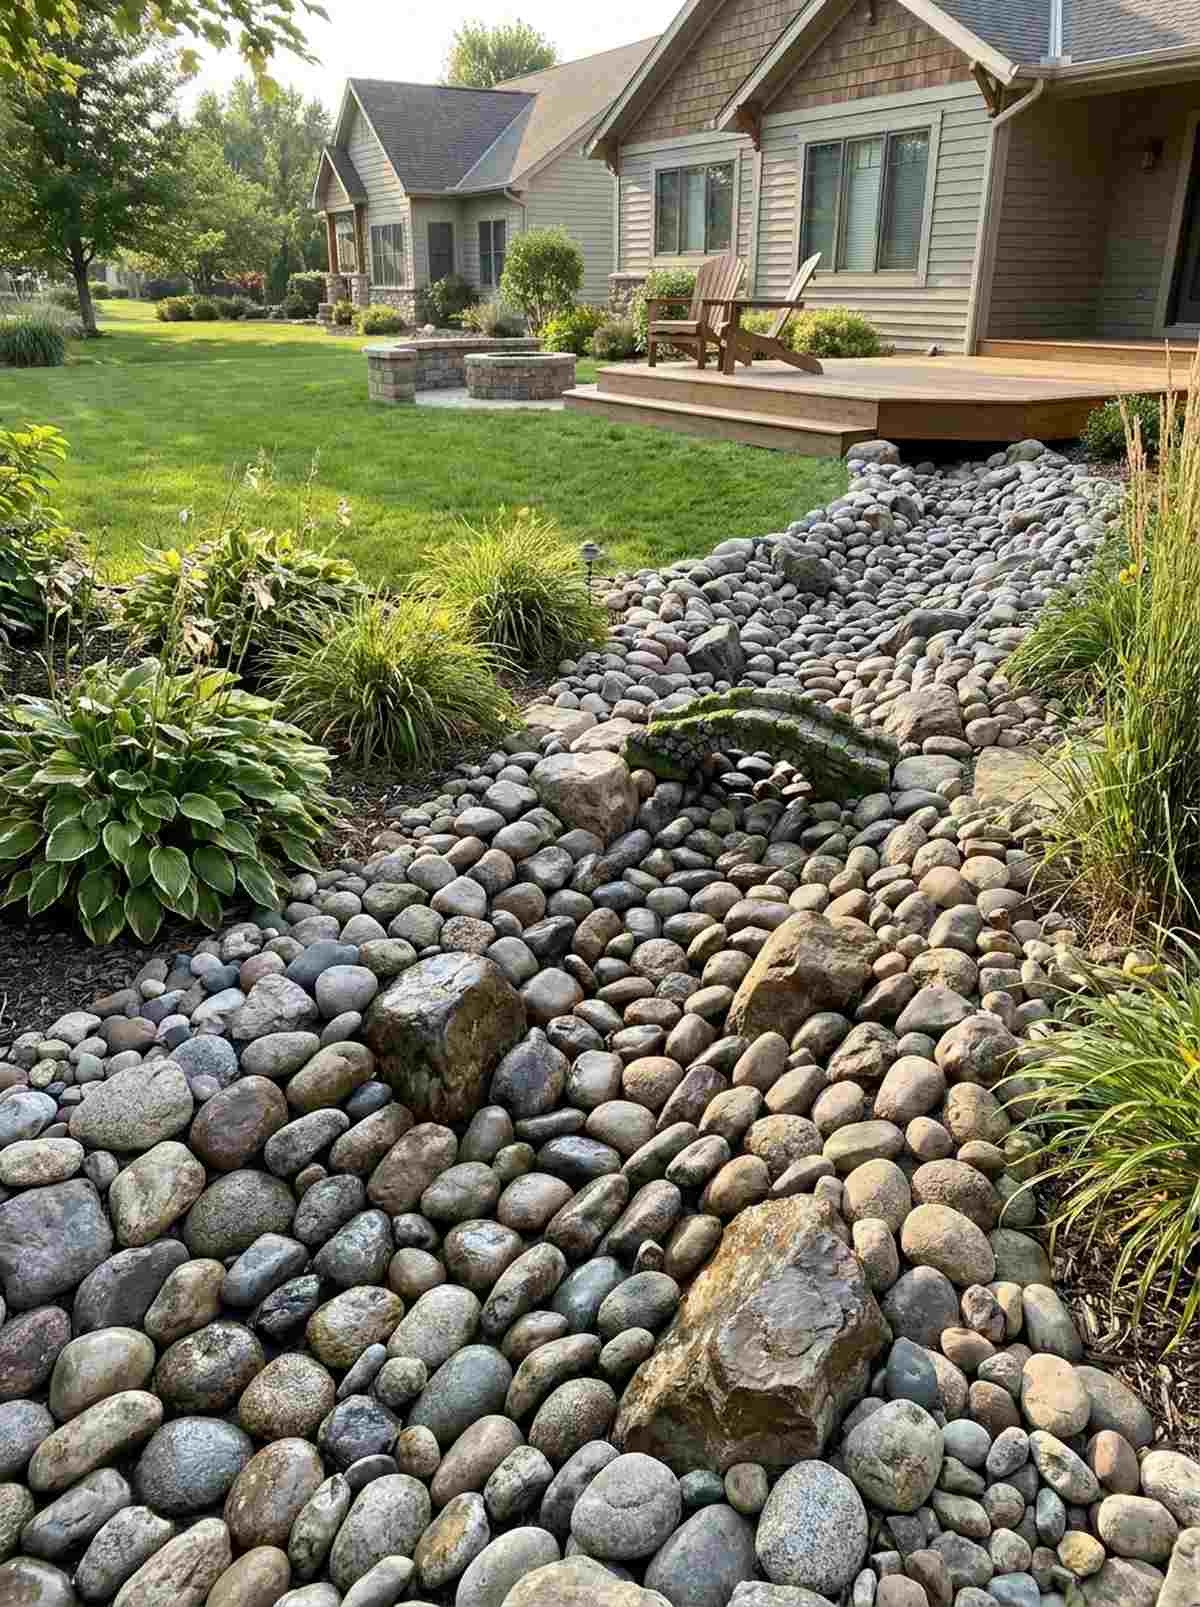
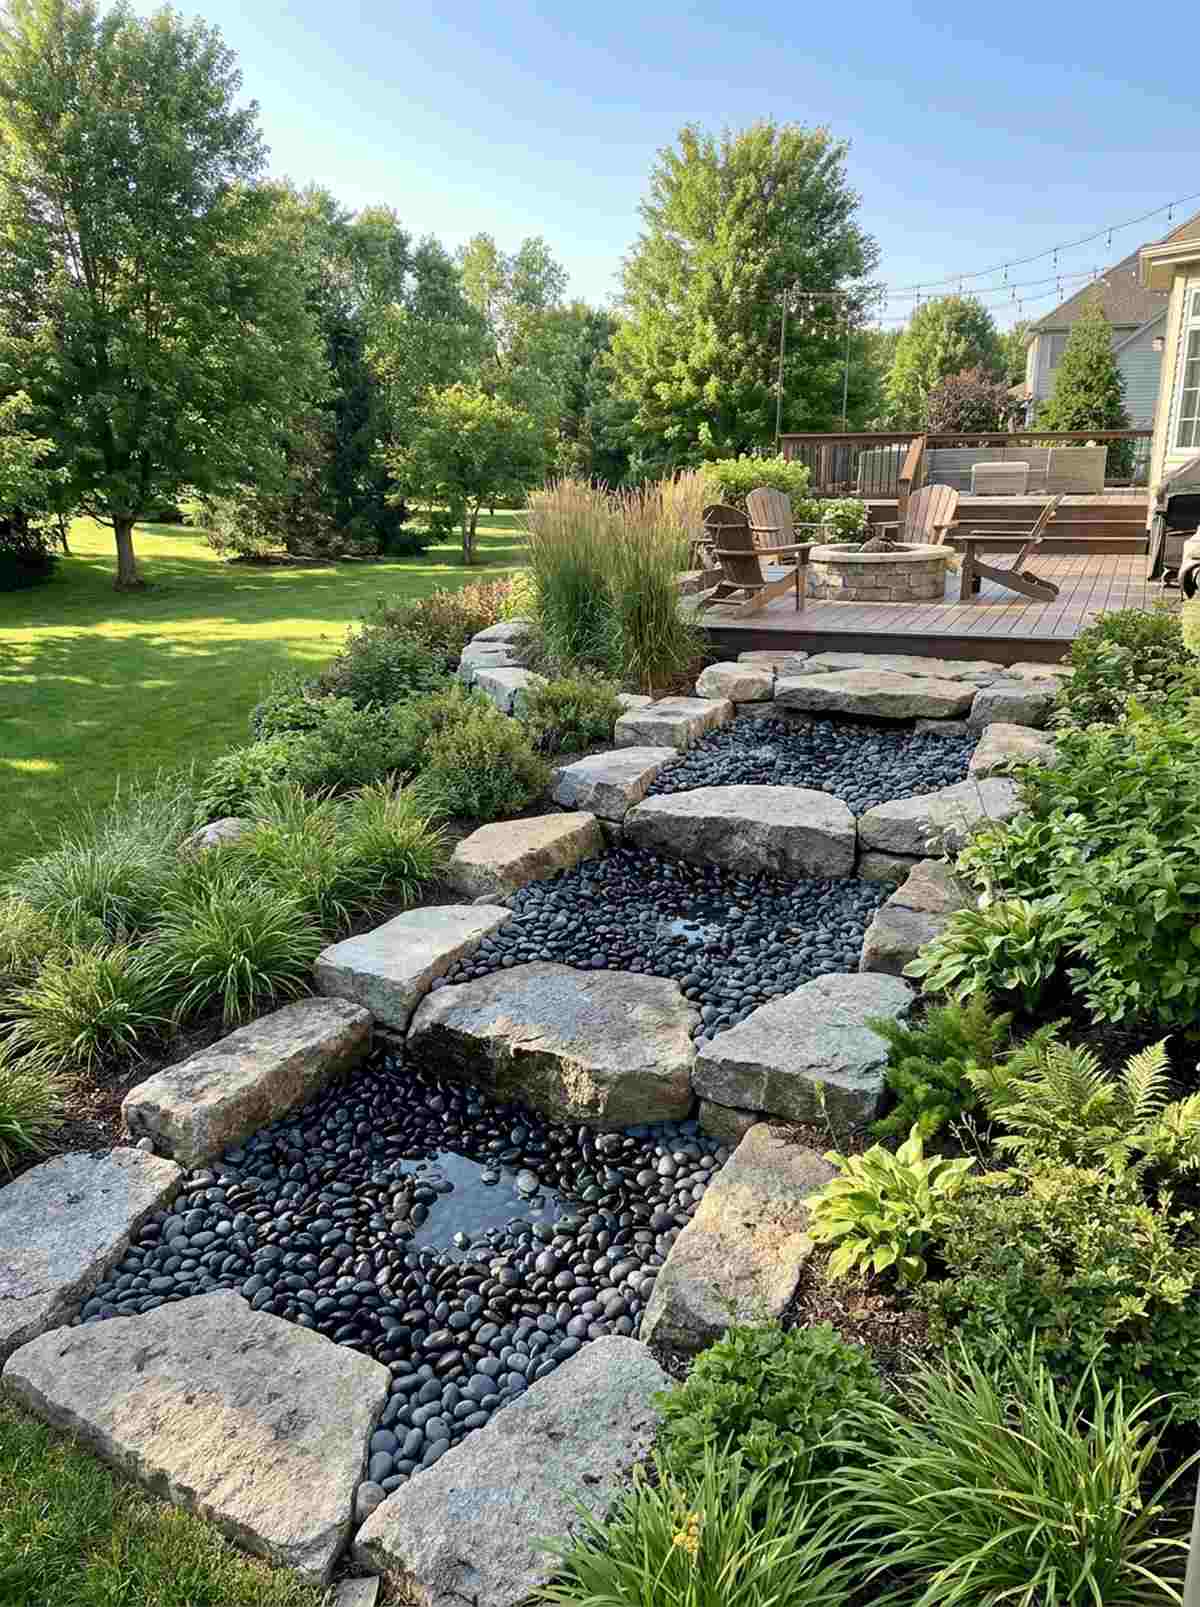
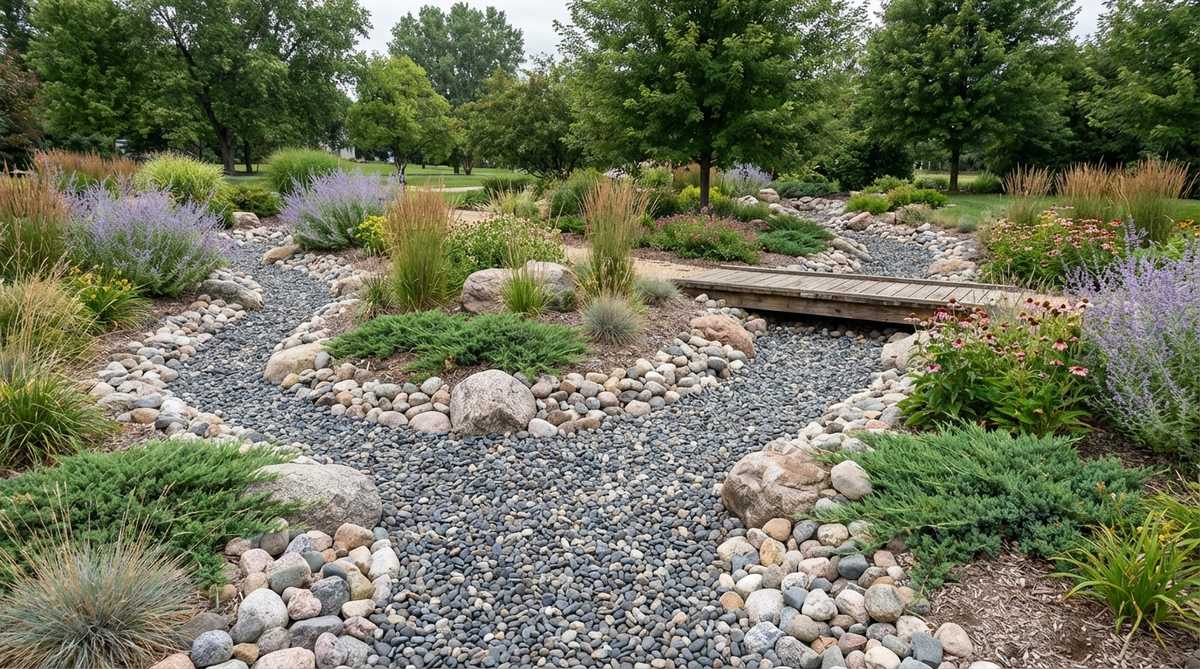
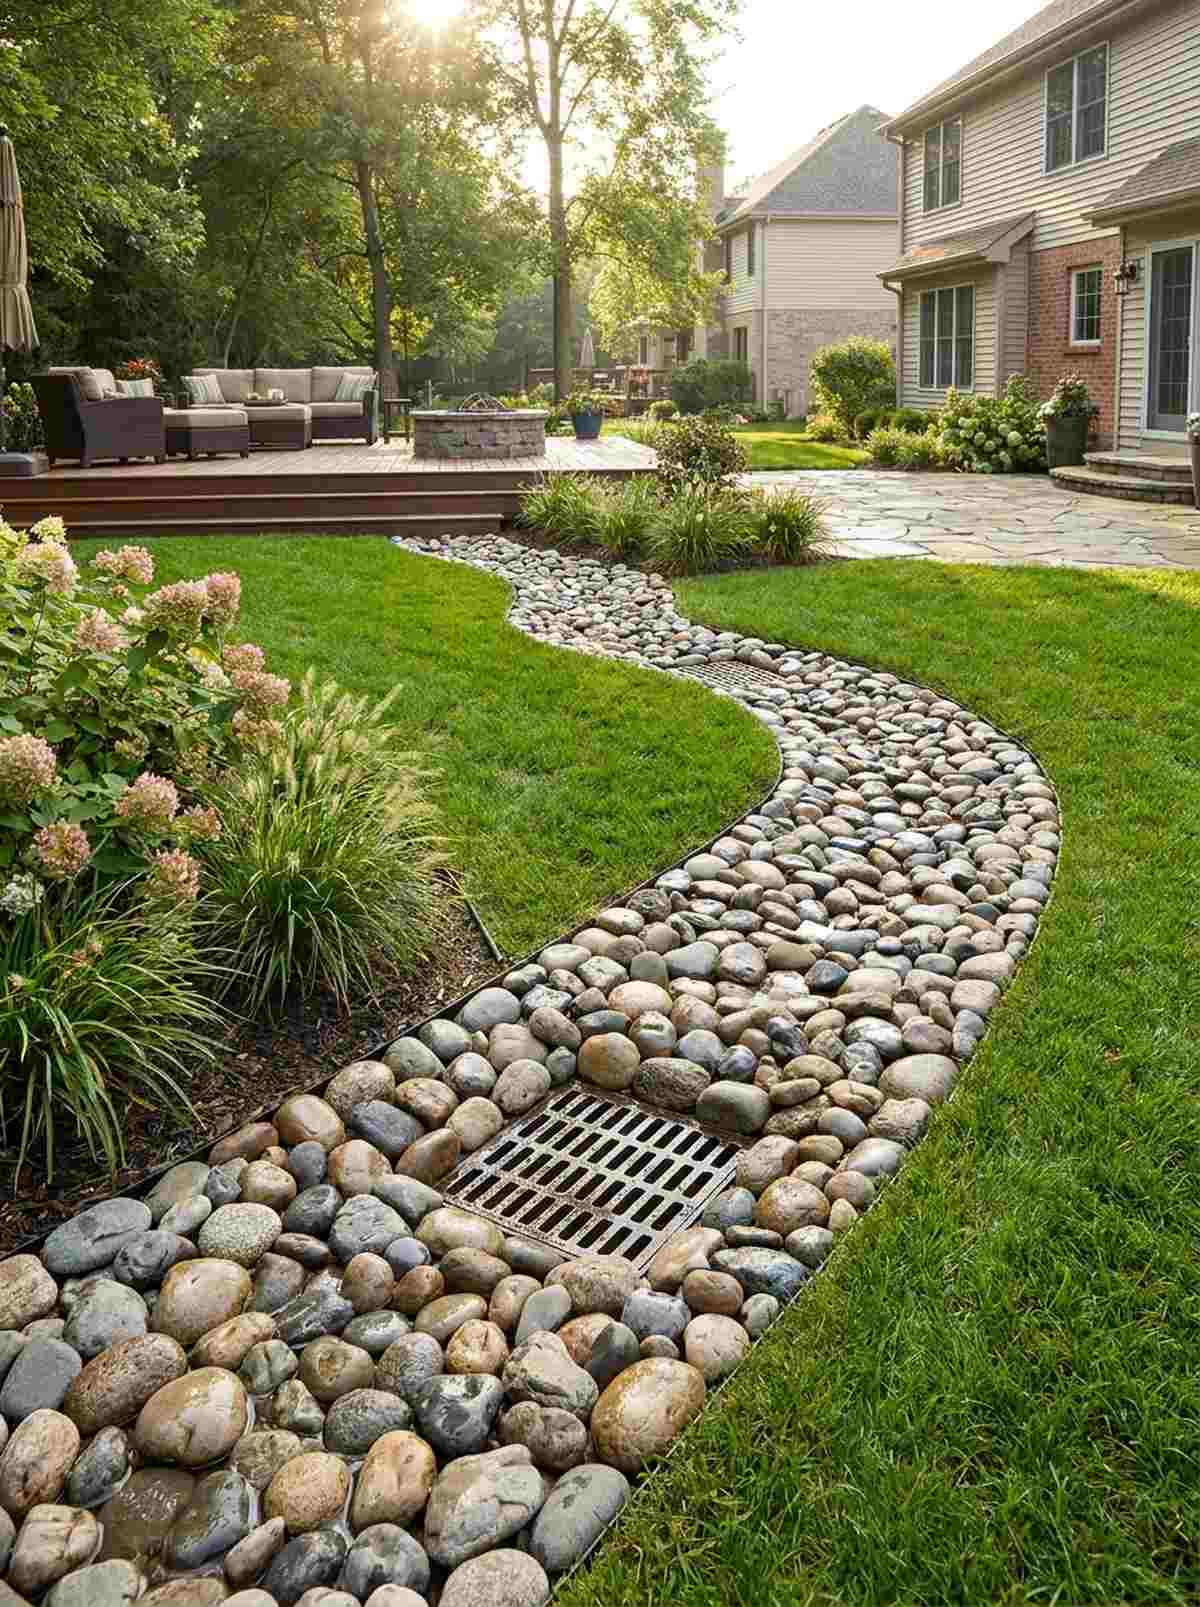
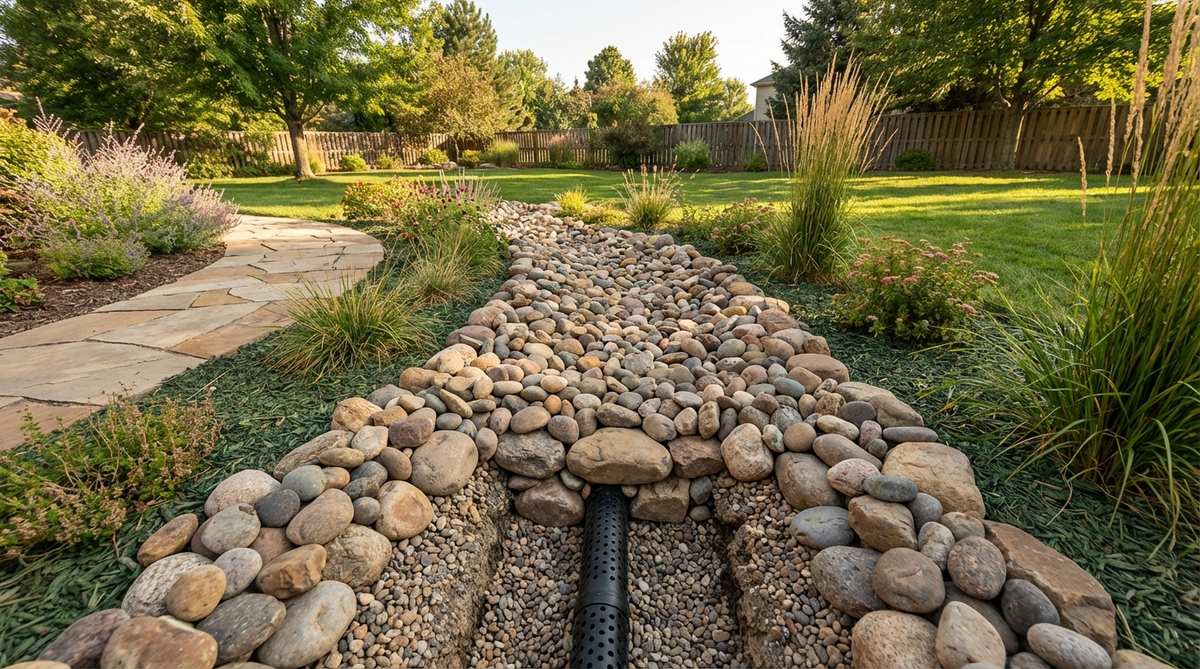
13. Meandering River Rock Channel
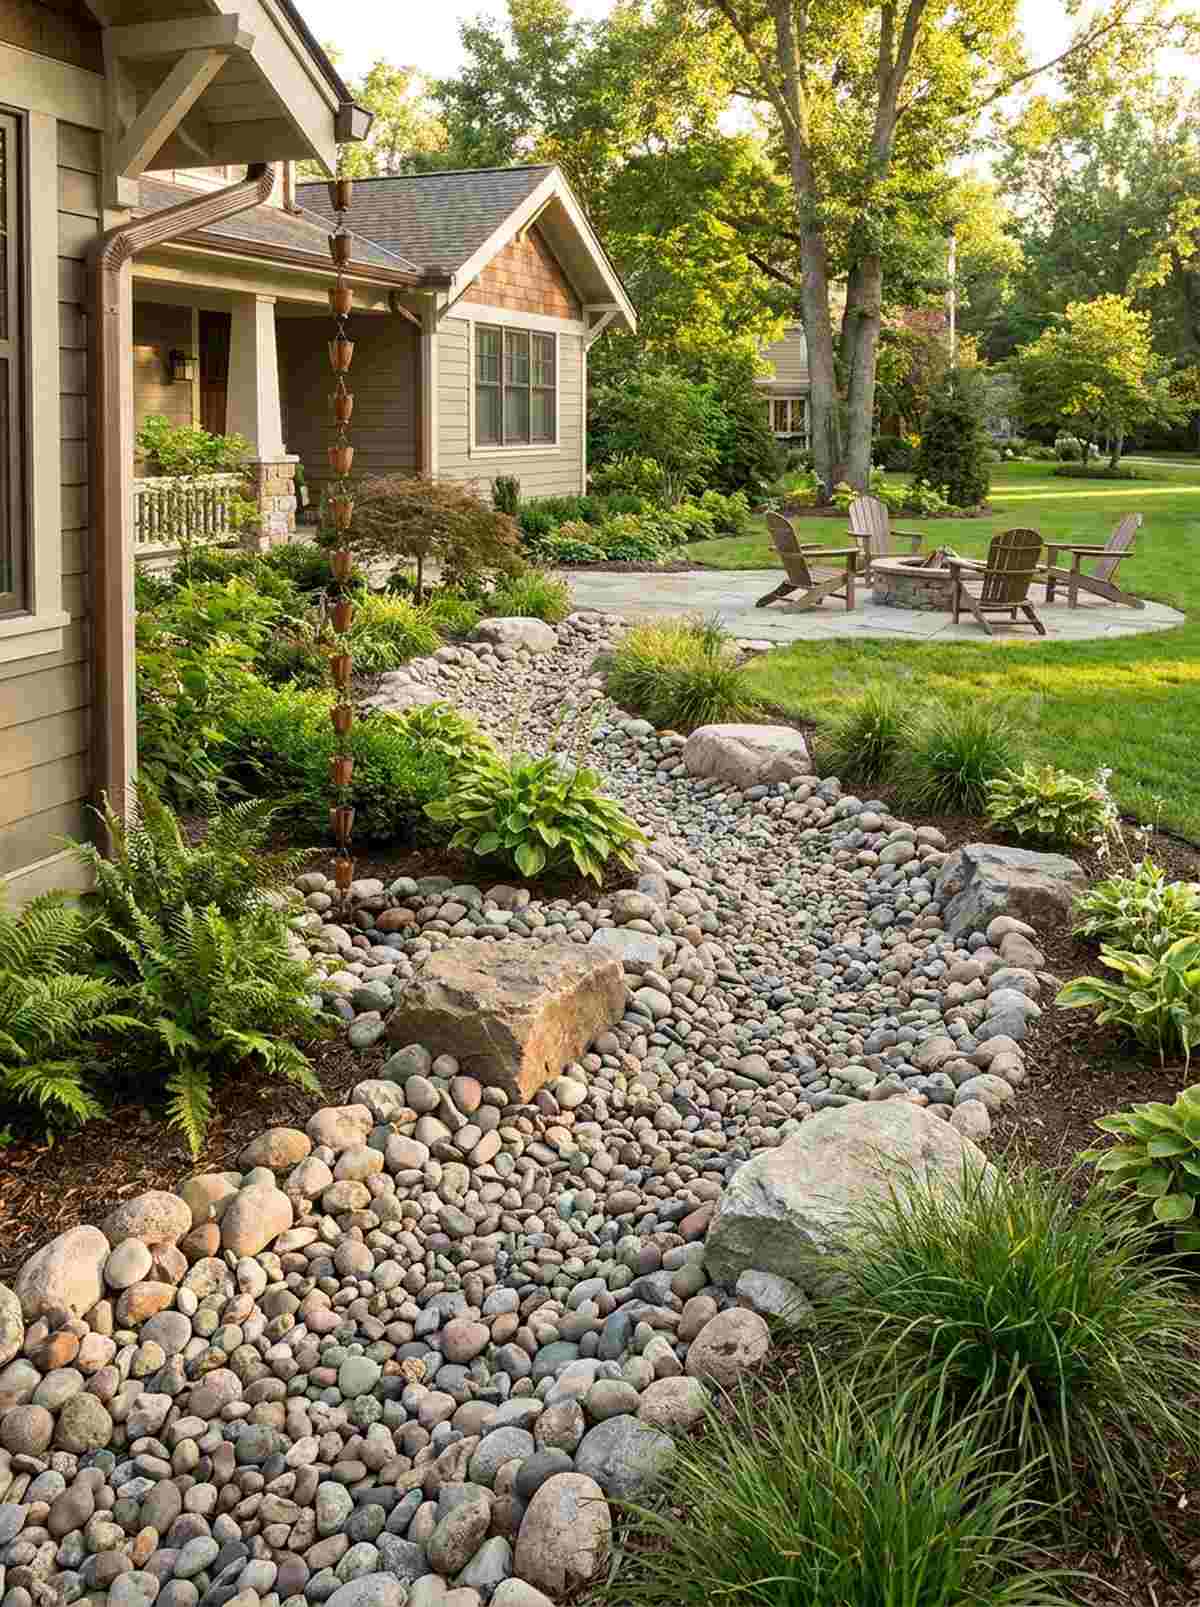
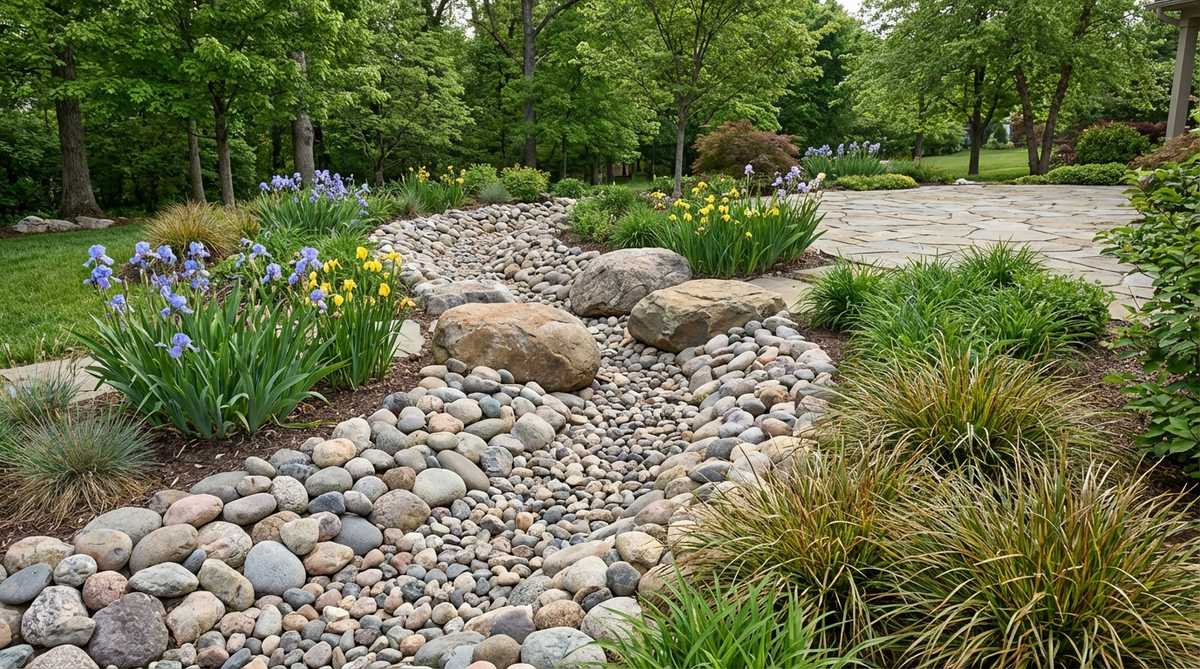
Transform your yard’s soggy problem area into a feature that feels like a wild forest stream cutting through the landscape. This dry creek bed layout brilliantly handles heavy gutter downpour while looking hyper-realistic.
A straight drainage ditch looks industrial, but adding S-curves with graduated stones gives a designer-level finish. Using non-woven geotextile drainage fabric ensures water flows quickly while silt stays out.
Constructing this functional beauty costs roughly $200–$400. Save this if your yard floods during heavy storms!
- Key Materials: Mixed river rock sizes, accent boulders.
- Vibe / Style: Natural woodland creek.
- Difficulty: Moderate (requires trenching).
- Budget Breakdown: River Rock: $180 | Fabric & Boulders: $80.
- Creator’s Tip: Place the largest rocks on the outside edges of the curves to mimic where rushing water would push heavy debris.
- Smart Sourcing: Use heavy-duty French drain geotextile fabric and assorted river cobble bulk bags.
14. Cobblestone Rapids Section
Injects high-texture visual turbulence that feels like a rushing mountain rapid frozen in time. This textured stone arrangement creates a stunning focal point in the steepest section of your dry creek.
Tightly packing vertical stones instead of laying them flat looks far more expensive than standard rock dumping. Sneaking in broad miniature garden supplies like tiny faux-moss covered bridge accents can add hidden whimsy.
You can upgrade a creek section for around $80–$150. It’s an incredible weekend texture boost.
- Key Materials: 3-6 inch cobblestones, protruding accent rocks.
- Vibe / Style: Dynamic rugged rapids.
- Difficulty: Moderate (requires precise stone angling).
- Budget Breakdown: Cobblestones: $100 | Accent Rocks: $30.
- Creator’s Tip: Angle the flat cobblestones diagonally facing “upstream” to realistically mimic rushing water resistance.
- Smart Sourcing: Grab premium polished cobblestone packs and waterproof clear stone sealant.
Think you know how to place boulders? The next waterfall trick will literally blow your mind…
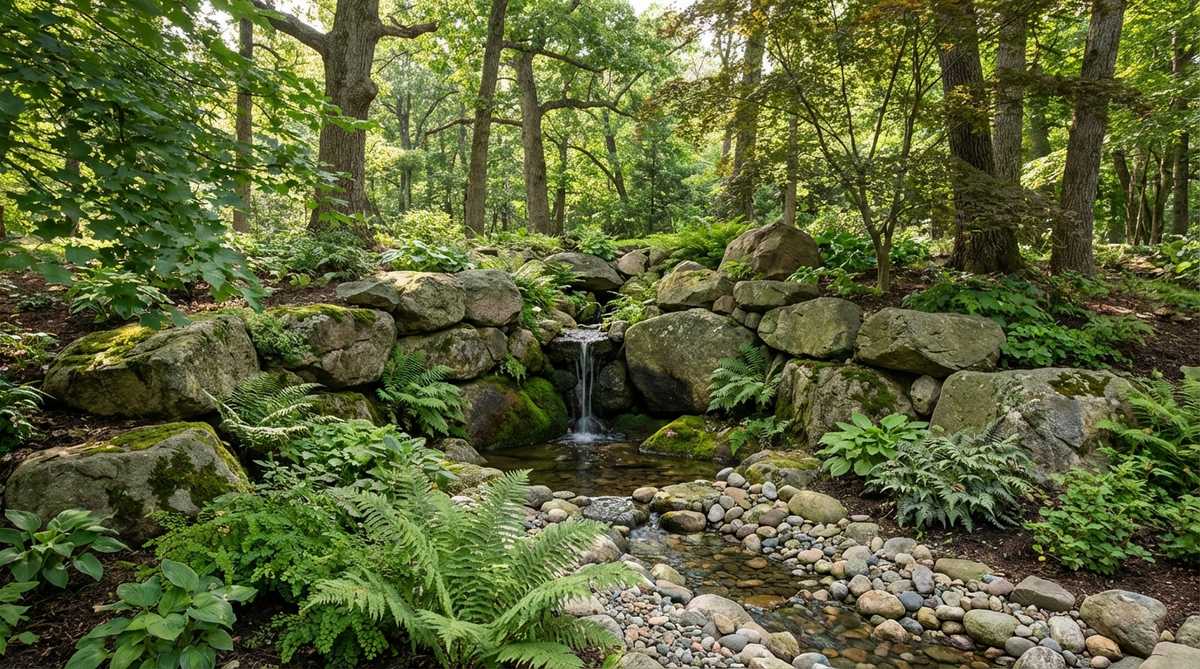
15. Boulder Cascade Drop Pools
Creates mesmerizing elevation changes that give the illusion of a tranquil waterfall, even when bone dry. This stepped garden design rock feature is perfect for transforming an awkward, steep slope into a terraced masterpiece.
Instead of a plain rock slide, excavating small “pools” below heavy boulders delivers a surprisingly premium look. Filling the drop zones with glossy black river stones creates the permanent illusion of deep, pooling water.
Expect to spend around $250–$500 due to the larger anchor rocks. Pin this to your dream backyard board!
- Key Materials: Flat-topped boulders, dark contrasting gravel.
- Vibe / Style: Dramatic dry waterfall.
- Difficulty: Advanced (heavy rock positioning).
- Budget Breakdown: Step Boulders: $300 | Pool Gravel: $80.
- Creator’s Tip: Ensure the top of each “waterfall” boulder is perfectly level laterally so real water spills evenly during a storm.
- Smart Sourcing: Source high-gloss polished black river rocks and a heavy-duty steel digging bar.
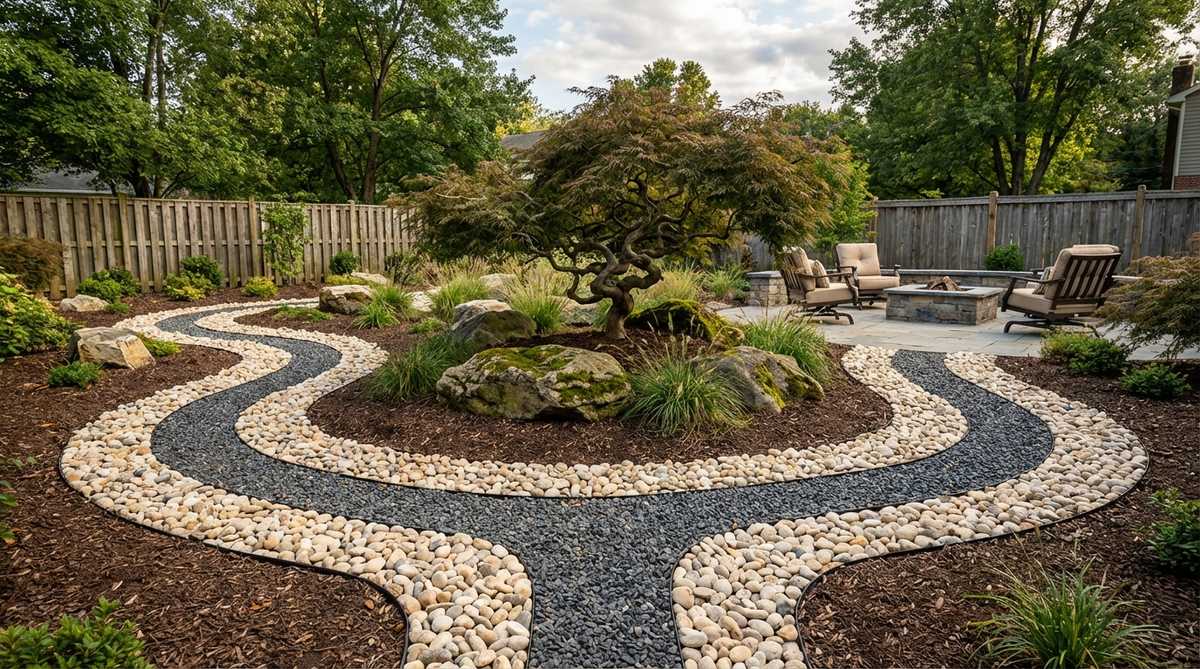
16. Braided Stream Gravel Pattern
Delivers an intricate, sweeping visual that feels like an aerial view of an ancient river delta. This complex dry stream design acts as a brilliant centerpiece for wide, flat yard areas that lack architectural interest.
Splitting a single rock path into multiple winding channels looks far more expensive than a standard straight path. Using sturdy pre-cut faux moss mats on the “islands” between channels instantly adds aged, natural character.
This layout runs about $150–$300 depending on width. A fantastic way to break up a boring flat lawn.
- Key Materials: Fine gravel for channels, larger cobbles for islands.
- Vibe / Style: Expansive natural delta.
- Difficulty: Moderate (design planning crucial).
- Budget Breakdown: Channel Gravel: $100 | Island Stones/Moss: $90.
- Creator’s Tip: Map out the diverging and converging channels with spray paint before laying any fabric or stone.
- Smart Sourcing: Invest in UV-resistant artificial moss panels (bulk pack) and bright landscape marking paint.
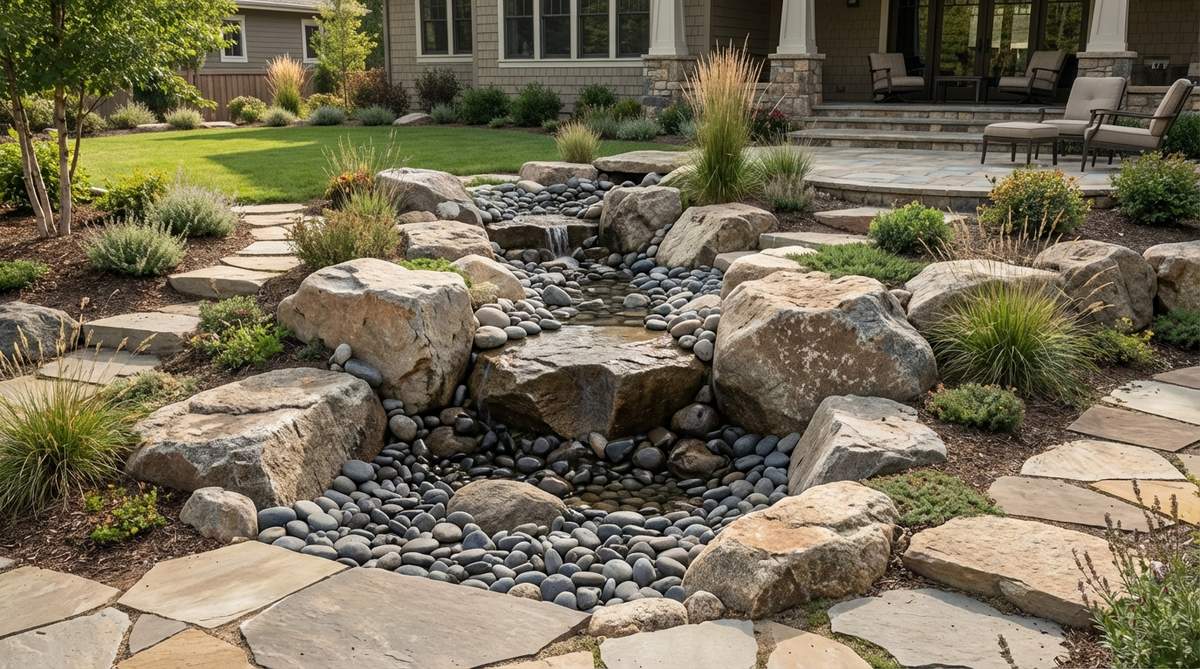
17. Spring Source Boulder Grotto
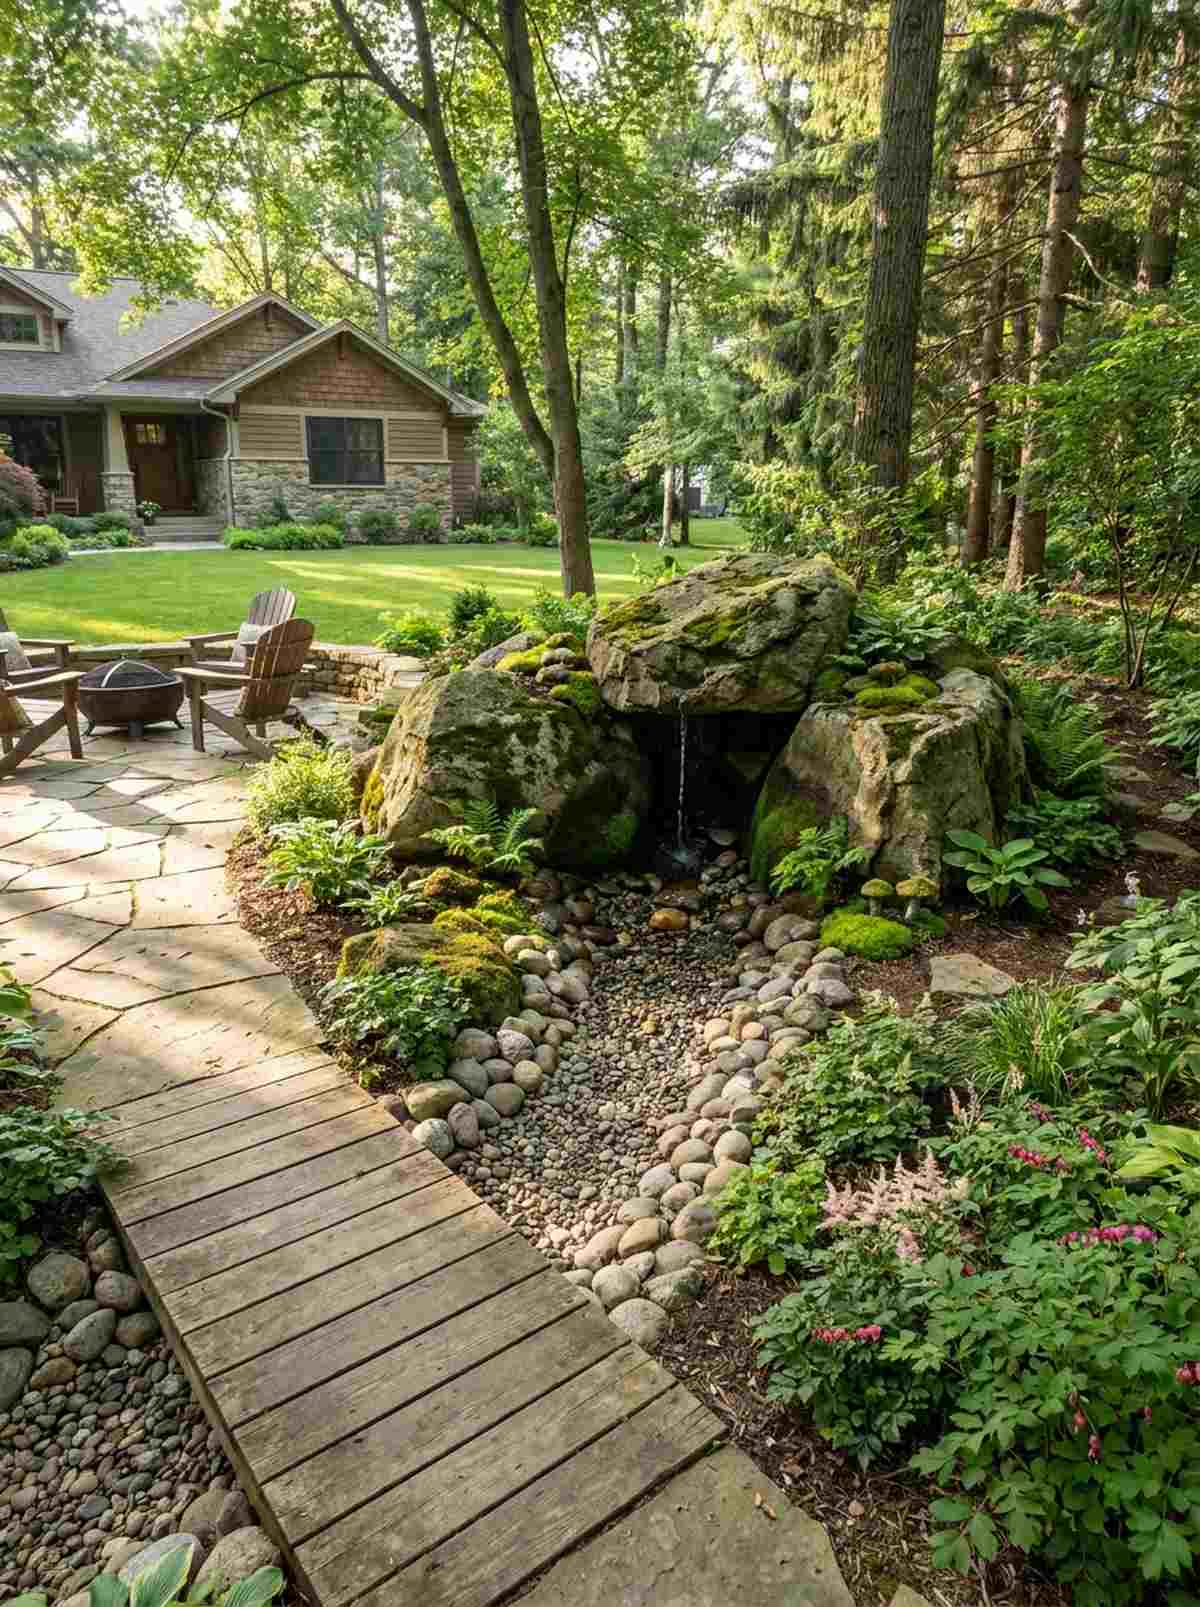
Crafts a mysterious, shaded cove that feels like the birthplace of a hidden woodland spring. This rock garden focal point perfectly caps off the beginning (top end) of any dry creek bed installation.
Starting a creek out of nowhere looks fake, but clustering boulders to form a cave-like emergence gives a designer-level finish. Integrating terrarium accessories or small shade-loving ferns into the rock crevices completes the natural illusion.
You can build this grotto headwaters for $100–$250. Save this to make your dry creek look 100% authentic!
- Key Materials: 3-4 large rugged boulders, small accent stones.
- Vibe / Style: Hidden magical headwaters.
- Difficulty: Moderate.
- Budget Breakdown: Grotto Boulders: $150 | Crevice Plants: $40.
- Creator’s Tip: Pack moisture-retaining sphagnum moss into the gaps between the boulders to support fern growth.
- Smart Sourcing: Use premium compressed sphagnum moss bricks and live shade fern starter packs.
18. Delta Fan Gravel Terminus

Provides a soft, organic fade-out that feels like a river gently emptying into a serene lake. This graduated gravel garden design elegantly solves the problem of how to seamlessly end a rock path into a grass lawn.
Abrupt stone borders can look harsh, but fanning the gravel outward and decreasing stone size looks far more expensive and natural. Installing an invisible heavy-duty plastic lawn edging barrier prevents the tiny fan stones from entering the mower zone.
Cost is roughly $60–$120 for the finishing touch. Essential for a professional, blended landscape look.
- Key Materials: Fine pea gravel fading from medium river rocks.
- Vibe / Style: Smooth transitional landscape.
- Difficulty: Easy.
- Budget Breakdown: Fading Gravels: $60 | Invisible Edging: $40.
- Creator’s Tip: Rake the edges of the fan incredibly thin so the transition from stone to soil is almost imperceptible.
- Smart Sourcing: Pick up a no-dig low profile landscape edging kit and fine grade crushed pea gravel.
Warning: Do not attempt a Zen rock garden without understanding this crucial asymmetrical rule coming up…
Zen-Inspired Rock Gardens for Contemplative Spaces
Japanese garden principles applied to garden design rock create meditative environments emphasizing simplicity and balance. These arrangements use negative space as deliberately as solid elements.
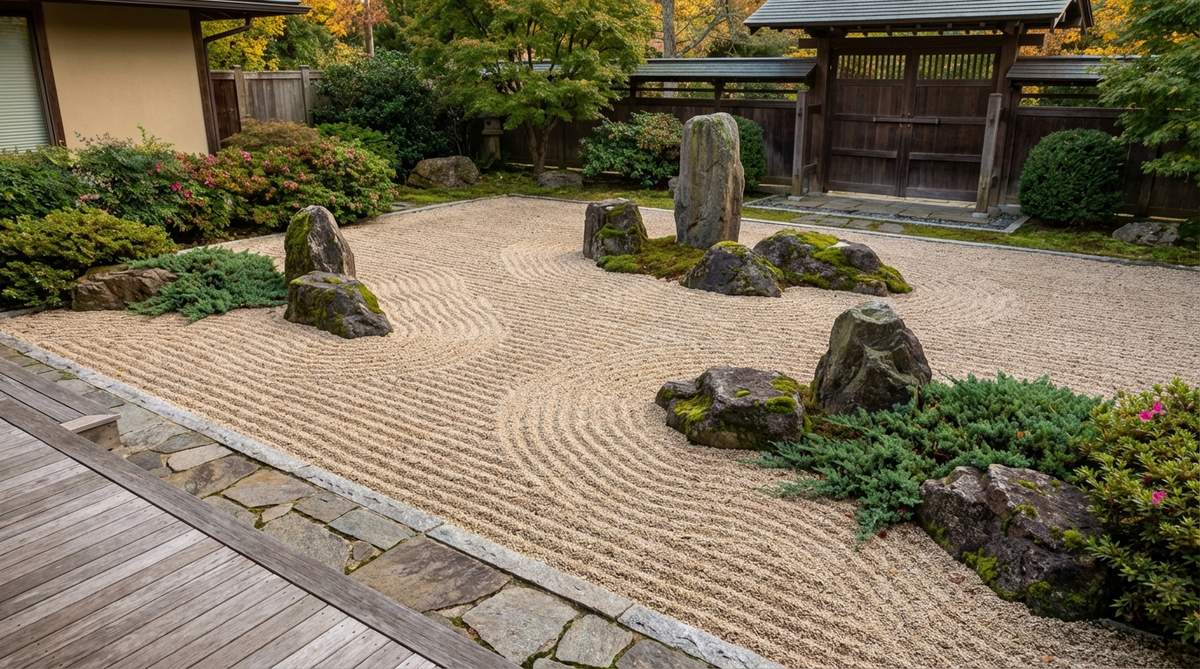
19. Raked Gravel Island Composition
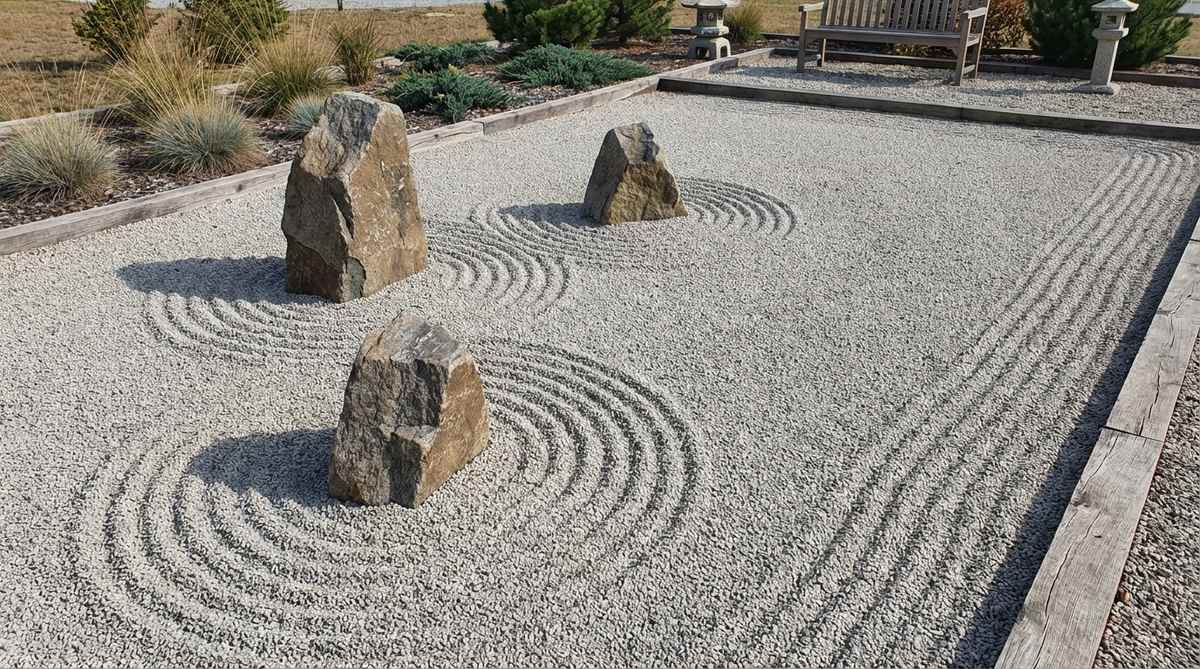
Instills profound peace, creating a space that feels like a dedicated meditation retreat on a misty morning. This Japanese garden design with rocks transforms an unused, shady corner into a powerful minimalist statement.
Cluttering a yard with junk is easy, but mastering the “Buddhist triad” stone placement delivers a surprisingly premium look with zero maintenance. Use angular crushed granite screening instead of round pebbles so the rake patterns actually hold their shape.
You can achieve this Zen mastery for around $80–$150. Pin this if you crave a quiet outdoor escape!
- Key Materials: 3 feature stones, fine angular granite chips.
- Vibe / Style: Traditional Kyoto Zen garden.
- Difficulty: Moderate (focus on spacing rules).
- Budget Breakdown: Feature Stones: $60 | Granite Sand: $50.
- Creator’s Tip: Never place the three stones in a straight line or an equilateral triangle; scalene triangles create the necessary visual tension.
- Smart Sourcing: Purchase a traditional wooden Zen garden rake and premium white granite fines.
20. Moss-Boulder Cluster with Gravel Sea
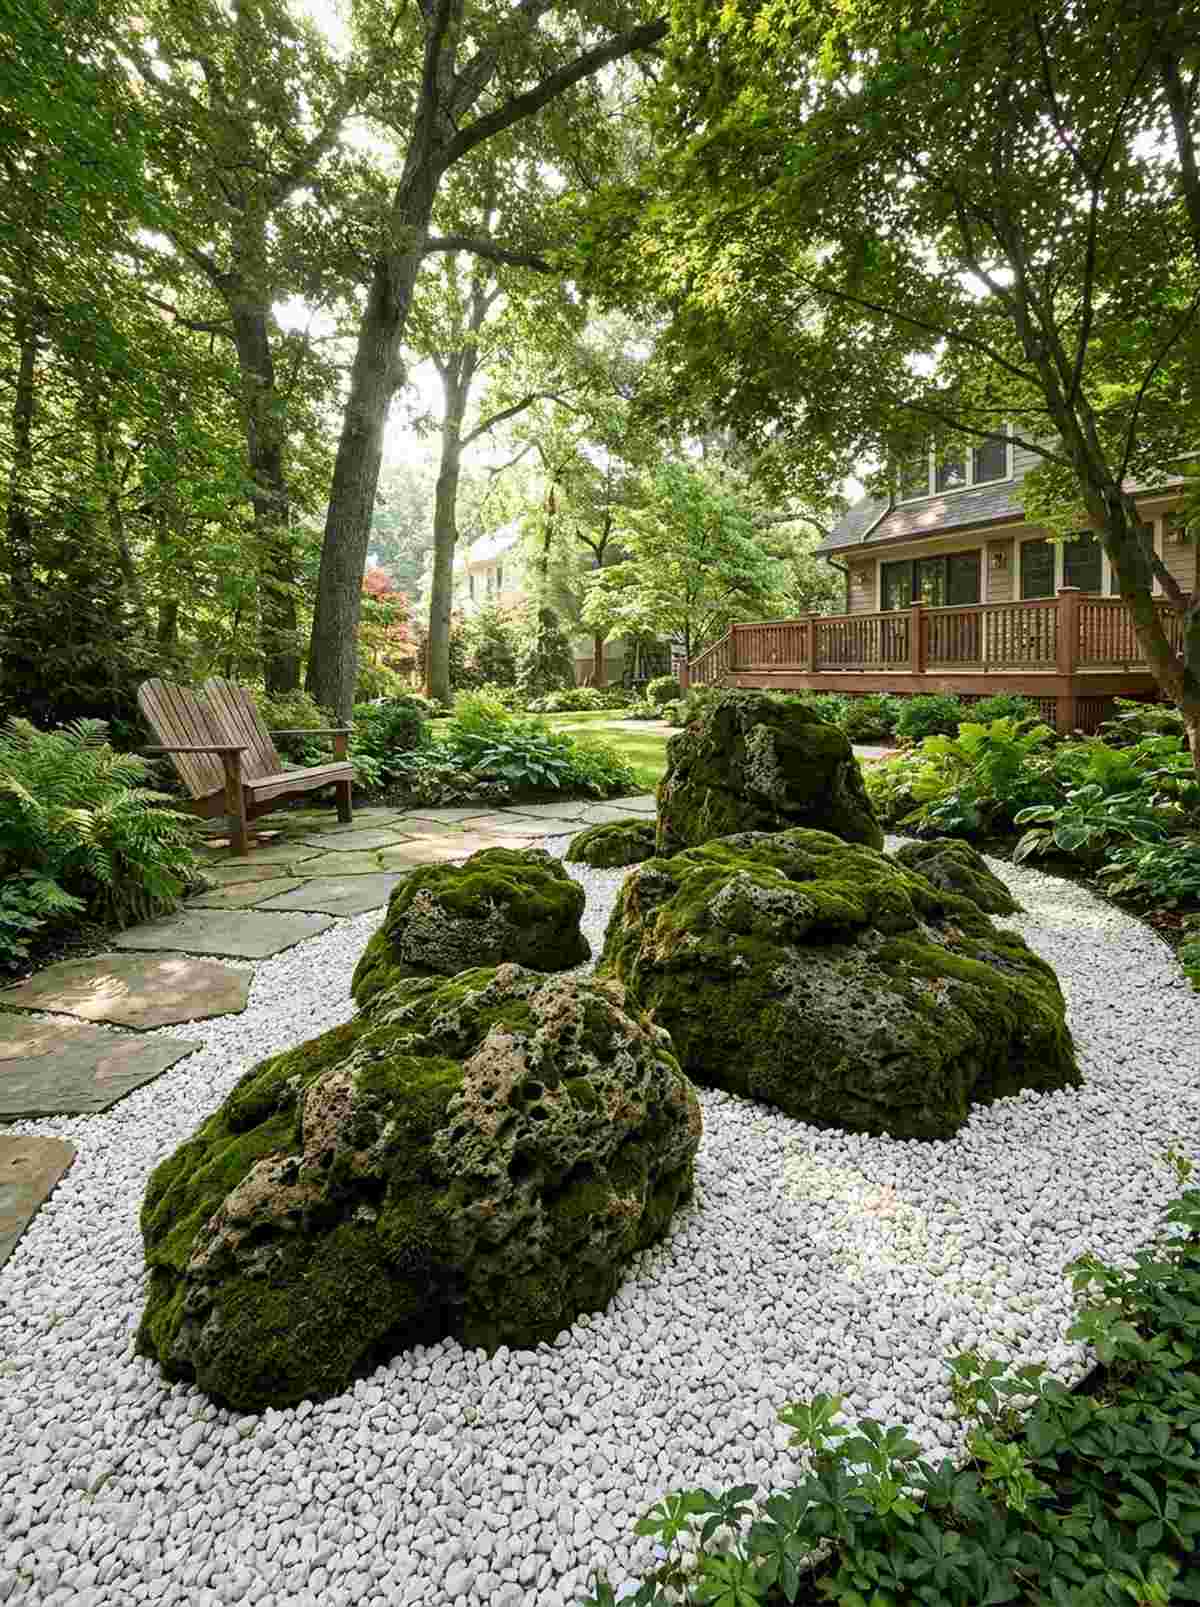

Offers an ancient, weathered aesthetic that feels like a prehistoric island rising from a tranquil silver ocean. This high-contrast stone landscaping brilliantly plays dark, textured greens against bright, smooth gravel floors.
Most rocks look barren, but actively cultivating moss on boulders looks far more expensive than it is. Applying a cultured live moss slurry mix to the porous rock faces accelerates that beautiful, aged patina.
Expect to spend $150–$300 for the boulders and base. A stunning choice for humid, shaded yard zones.
- Key Materials: Aged porous boulders, light limestone chips.
- Vibe / Style: Ancient coastal islands.
- Difficulty: Moderate (requires moisture maintenance).
- Budget Breakdown: Boulders: $120 | Limestone Base: $80 | Moss: $30.
- Creator’s Tip: Moss only thrives on the north-facing sides of boulders; place them accordingly to avoid burning the spores.
- Smart Sourcing: Buy a live moss fragment starter kit and bright white limestone aggregate.
21. Linear Rake Pattern Meditation Path
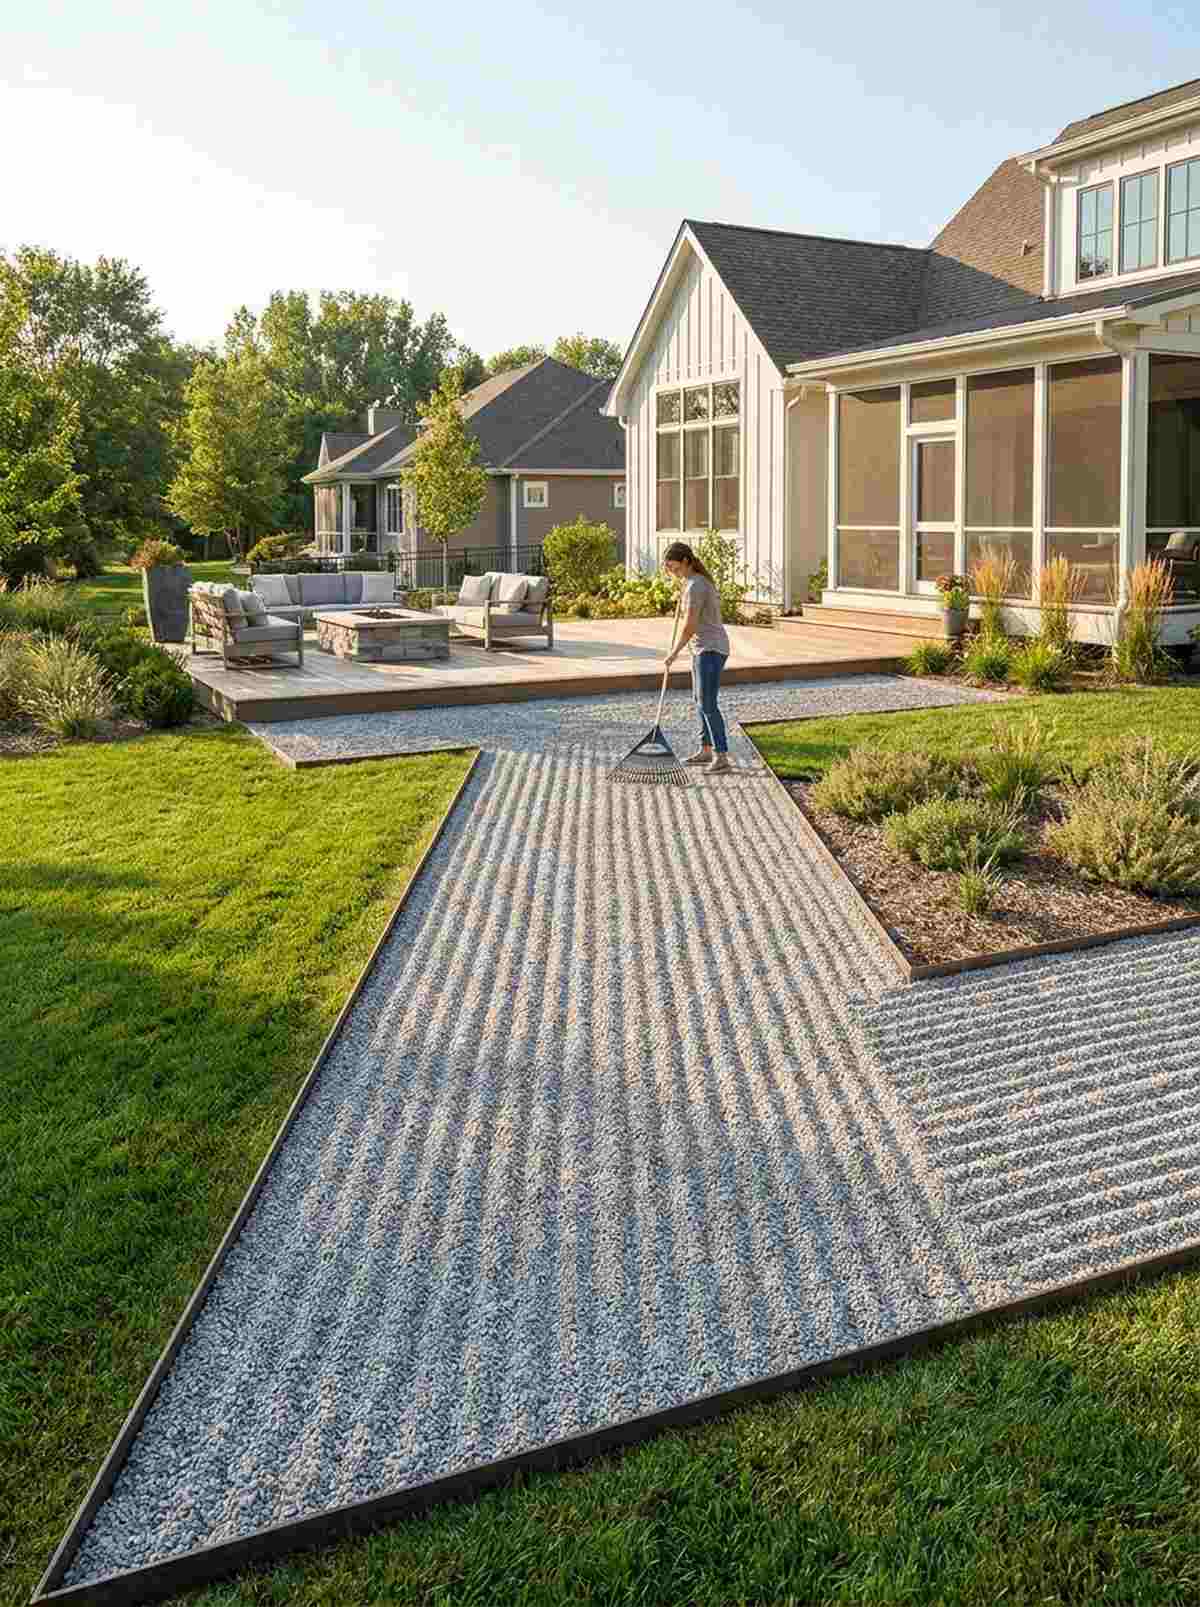
Generates an incredibly crisp, disciplined geometry that feels like a modern museum installation. This interactive gravel path idea doubles as a walking meditation tool and a striking visual border.
Plain gravel walkways get messy, but carving deep parallel lines into fine aggregate gives a designer-level finish. Upgrading to a specialized stabilizing path grid layer beneath ensures the gravel never thins out when walked on.
Materials cost roughly $100–$200 for a standard walkway. Save this to add intentional mindfulness to your daily routine.
- Key Materials: Fine crushed stone, rigid edge restraints.
- Vibe / Style: Strict modern geometry.
- Difficulty: Easy to install, requires weekly raking.
- Budget Breakdown: Path Gravel: $80 | Rigid Edging: $60.
- Creator’s Tip: Dampen the gravel slightly with a misting hose before raking; the water helps the sharp peaks hold their form for weeks.
- Smart Sourcing: Invest in rigid steel path edging (bulk pack) and fine-tooth landscape rakes.
22. Karesansui Dry Landscape Garden
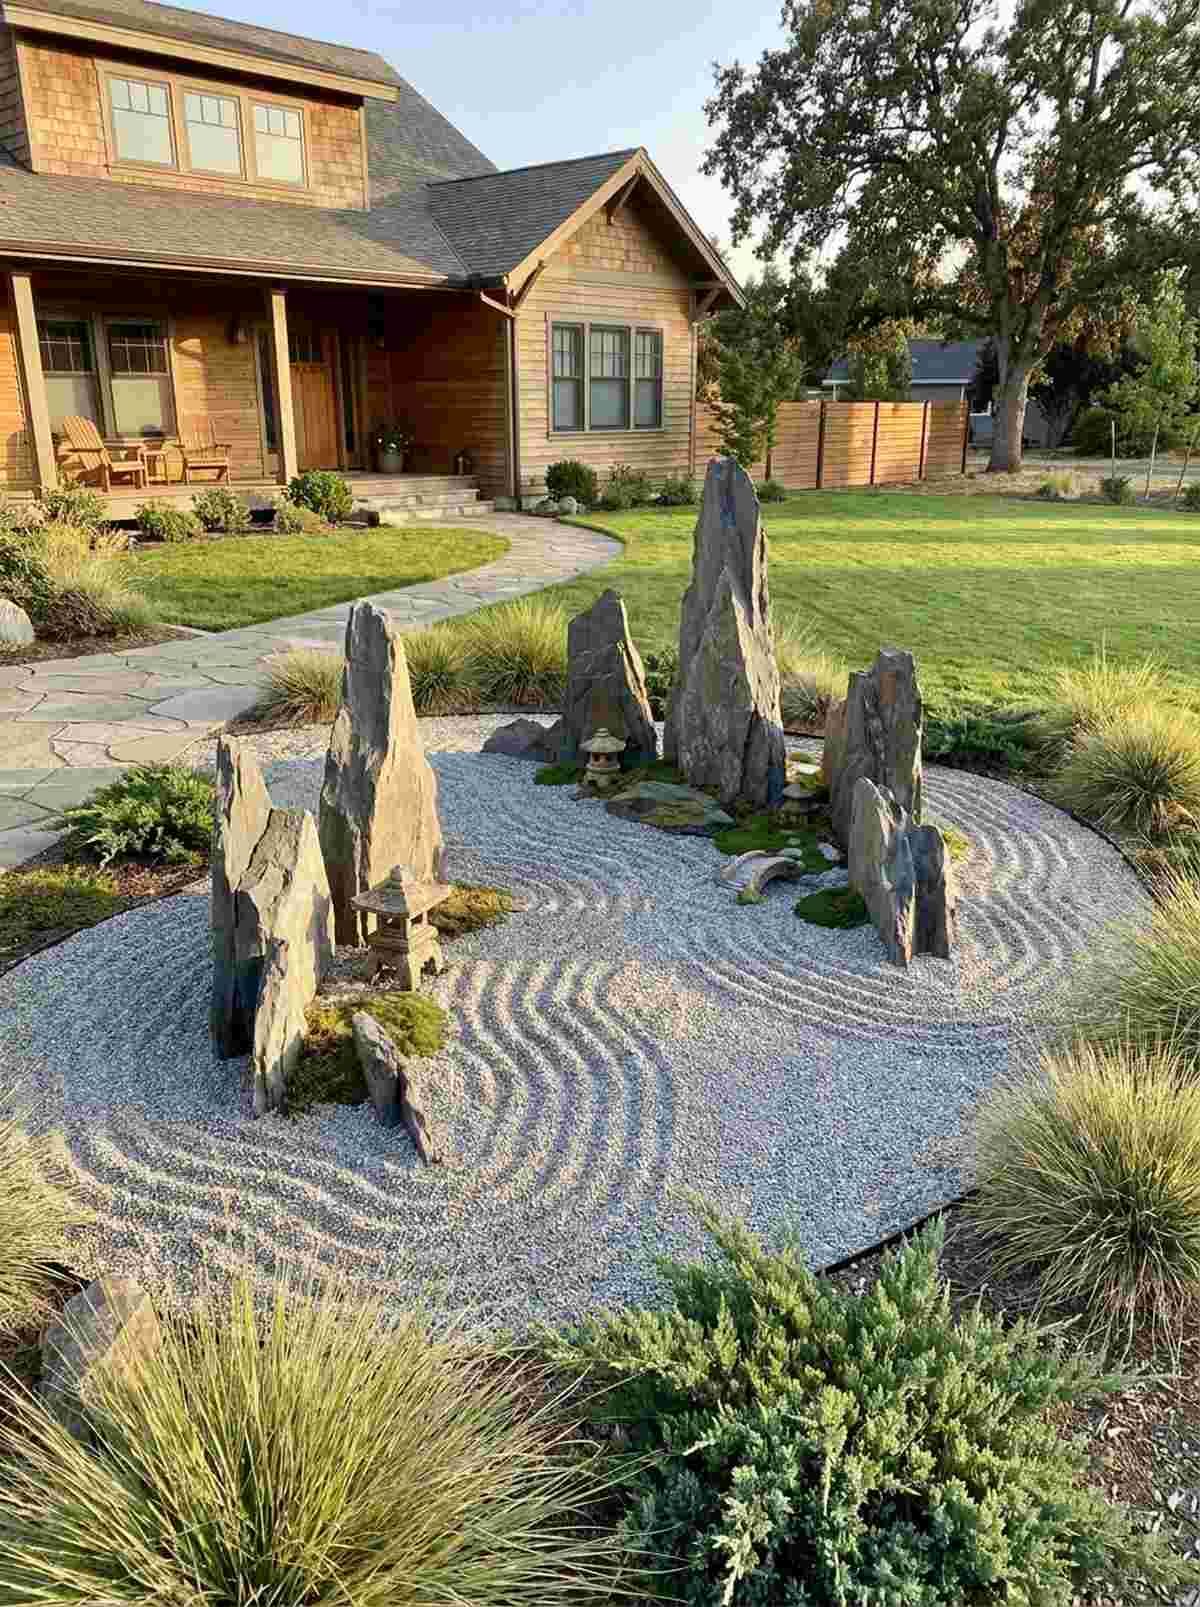
Captures the magnificent essence of a sweeping mountain range condensed into a flat, raked canvas. This dry landscape rock design is the ultimate sophisticated solution for barren, rectangular courtyard spaces.
Using ordinary round rocks looks cheap, but selecting jagged, vertically oriented stones to represent peaks looks far more expensive. Incorporating subtle fairy garden kits or miniature pagodas hidden among the “mountains” creates a delightful sense of scale.
You can execute this grand illusion for about $200–$400. Highly recommended for a low-water, high-impact front yard.
- Key Materials: Vertical jagged stones, sweeping gravel base.
- Vibe / Style: Grand miniature landscape.
- Difficulty: High (requires artistic eye for scale).
- Budget Breakdown: Specimen Stones: $250 | Base Gravel: $80.
- Creator’s Tip: Bury the bottom third of the vertical stones to make them look like massive mountains erupting from the earth, not just rocks resting on top.
- Smart Sourcing: Find miniature resin pagoda lantern kits and premium jagged slate monoliths.
23. Wave Pattern Gravel Surrounding
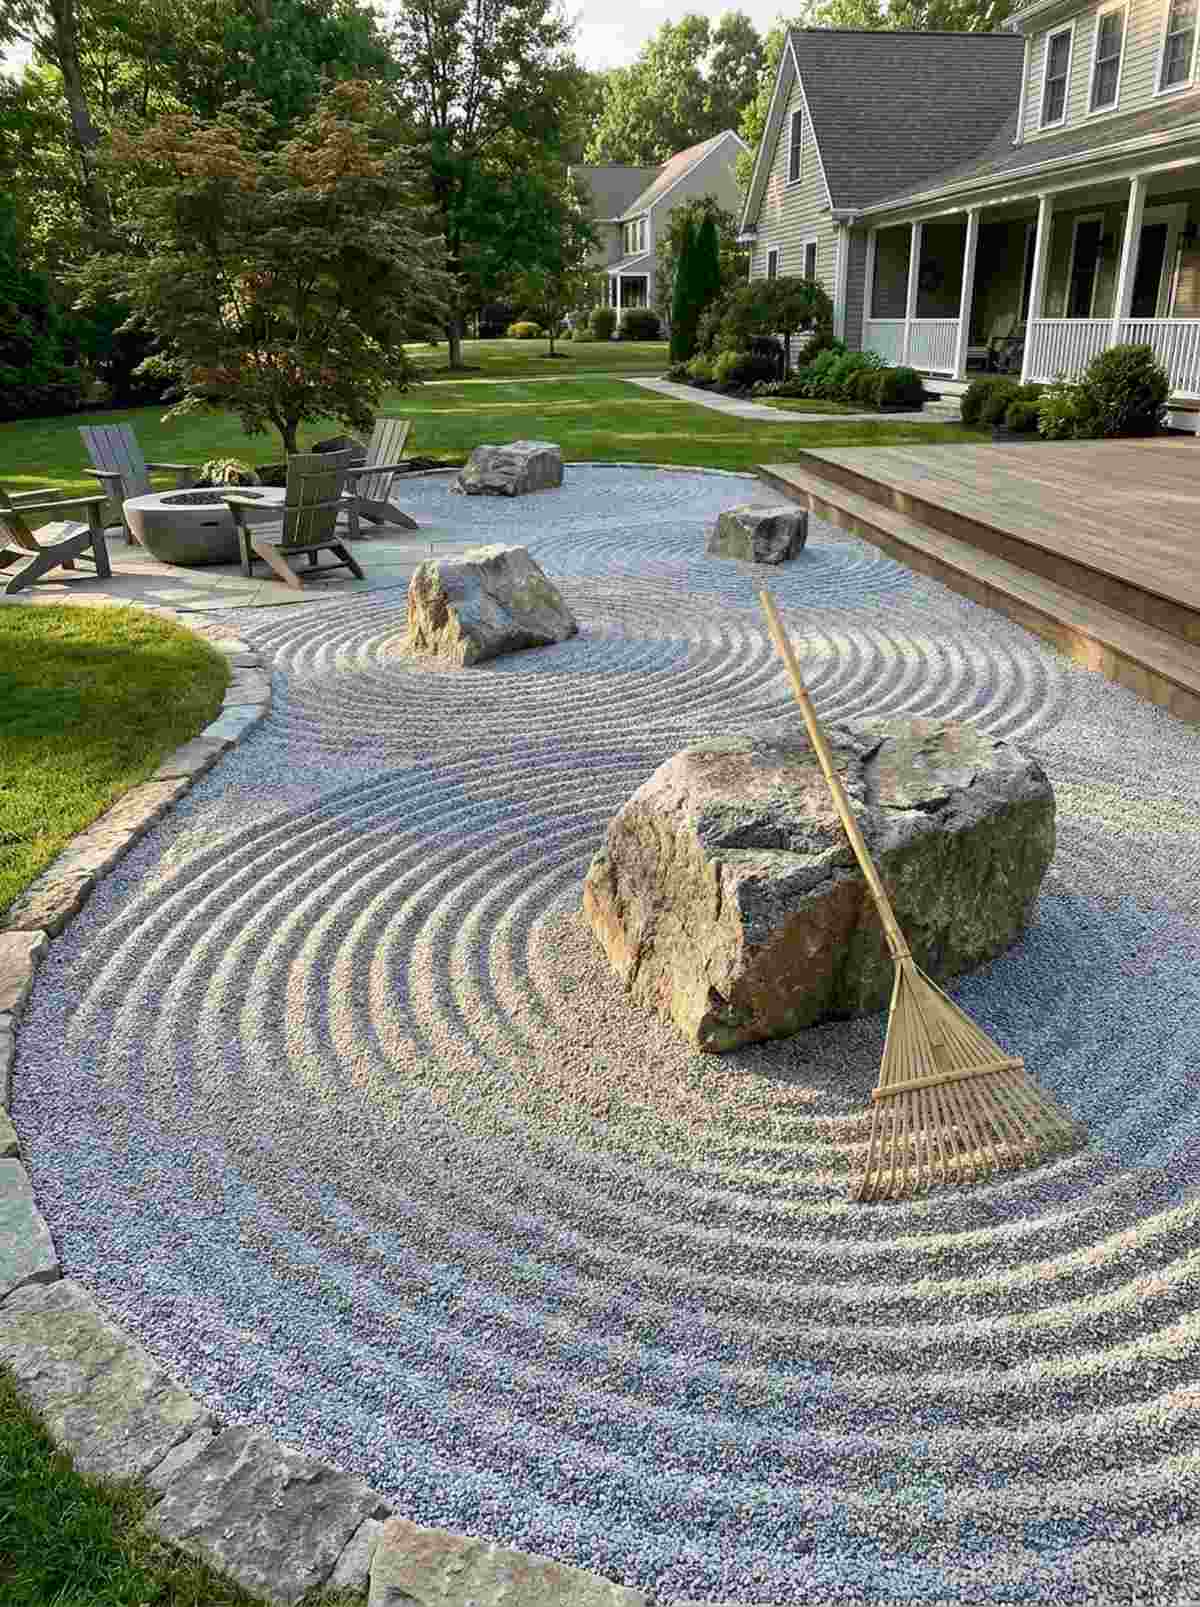
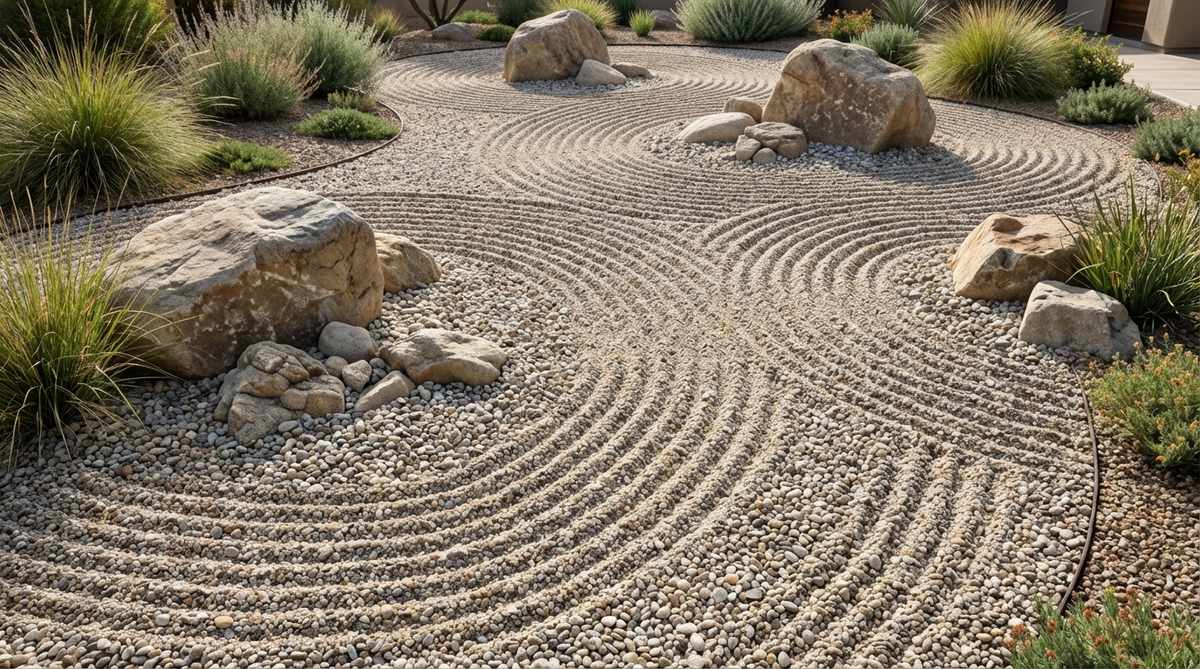
Brings a dynamic, swirling energy that feels like ocean currents crashing against rocky shores. This patterned gravel garden design breathes incredible life into what would otherwise be a static stone display.
Straight lines are boring, but dragging concentric, widening circles around your feature boulders delivers a surprisingly premium look. Using an authentic wide-tine bamboo rake guarantees those perfect, thick, undulating ocean wave shadows.
The gravel and tools will run you about $80–$150. Pin this for the ultimate satisfying weekend yard therapy!
- Key Materials: Deep fine gravel layer, feature boulders.
- Vibe / Style: Flowing oceanic movement.
- Difficulty: Easy (but requires consistent maintenance).
- Budget Breakdown: Fine Gravel: $90 | Specialized Rake: $40.
- Creator’s Tip: Ensure your gravel bed is at least 3 to 4 inches deep, or the rake tines will scrape the ugly landscape fabric below.
- Smart Sourcing: Purchase a professional Japanese bamboo landscape rake and extra-thick weed barrier fabric.
Material Guide: Cheap vs. Premium Aesthetic
Knowing exactly where to save and where to spend makes all the difference in achieving that “looks expensive but isn’t” vibe.
- Standard vs. UV-Resistant/Premium: Cheap white marble chips often turn yellow or green with algae. Upgrading to UV-coated or natural quartz ensures your bright contrast stays brilliant year-round.
- Pre-made Kits vs. Sourcing Locally: While buying local rocks in bulk saves money on base layers, using pre-made starter kits for specific features (like moss slurries, resin sealants, or lighting) saves hours of frustrating trial and error.
If you have a boring, flat lawn, this next structural trick will instantly make it look professionally terraced…
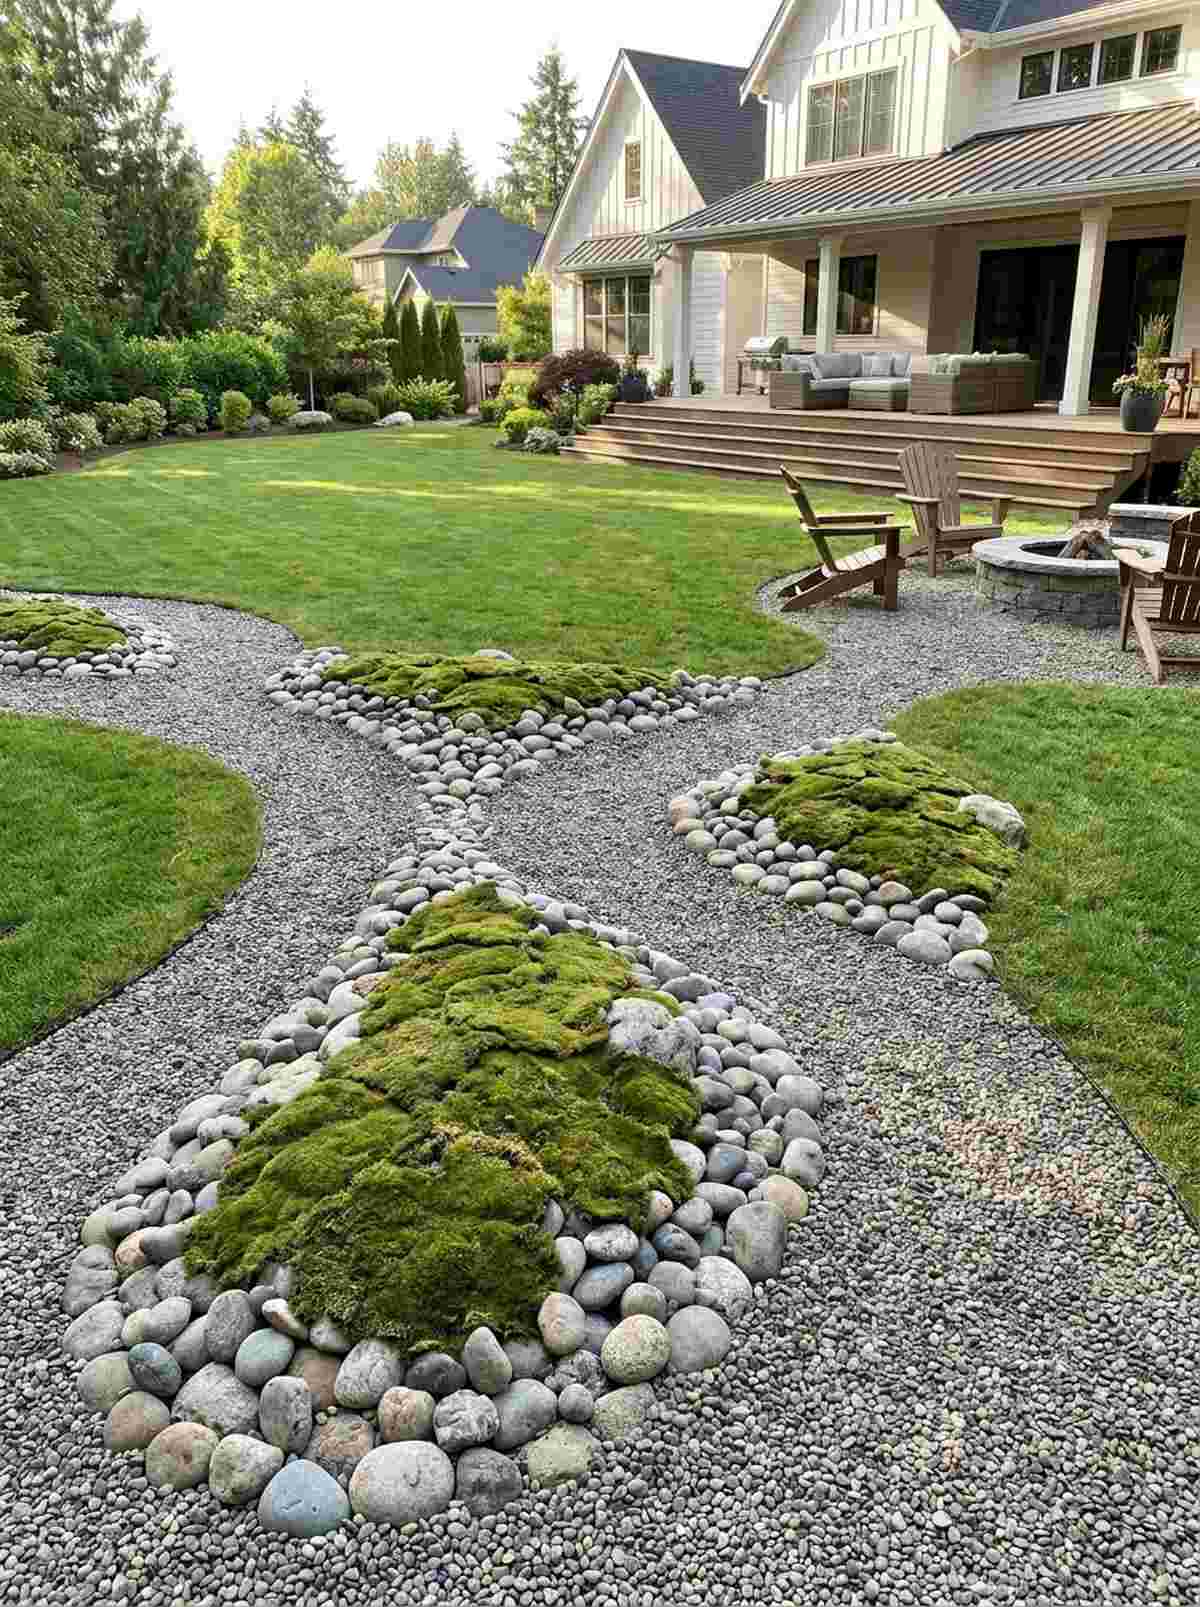
Mixed Stone Arrangements Combining Size and Texture
Layering different rock sizes and types within single compositions adds complexity to garden design with rocks. The interplay between contrasting materials generates visual richness that monolithic designs lack.
24. Alpine Scree Slope Recreation
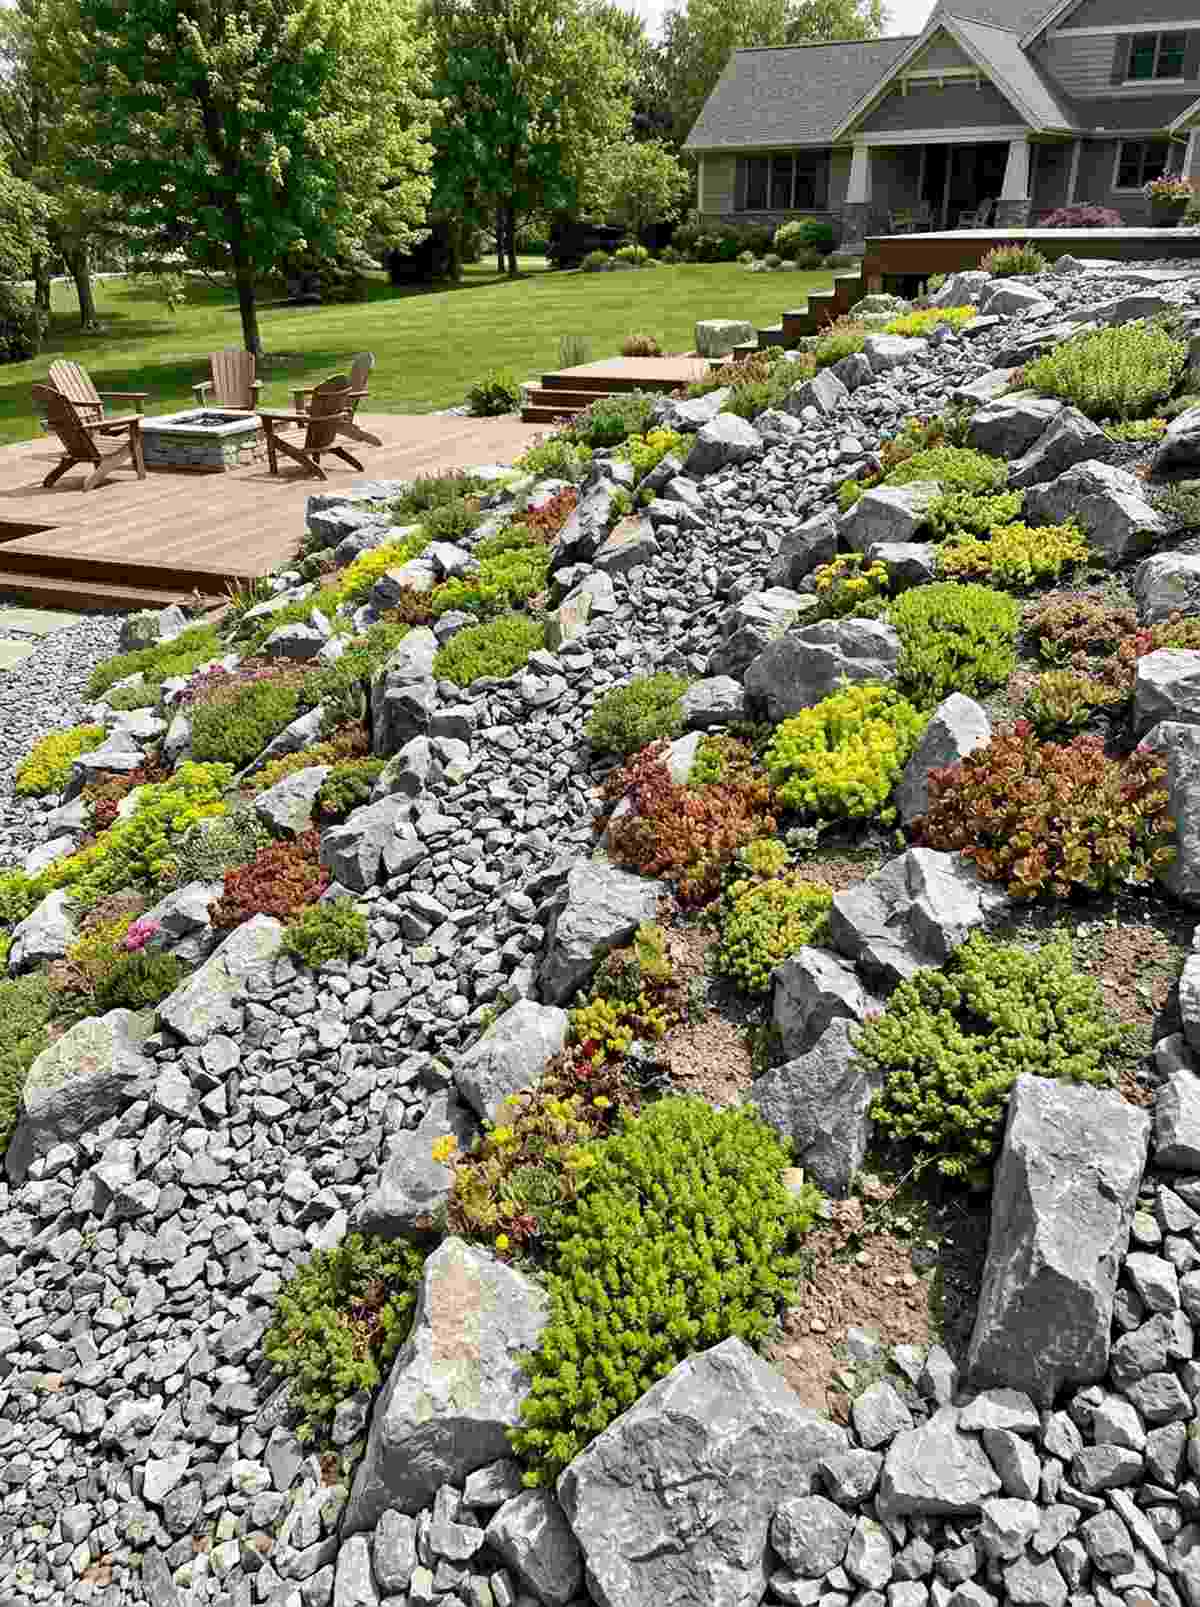
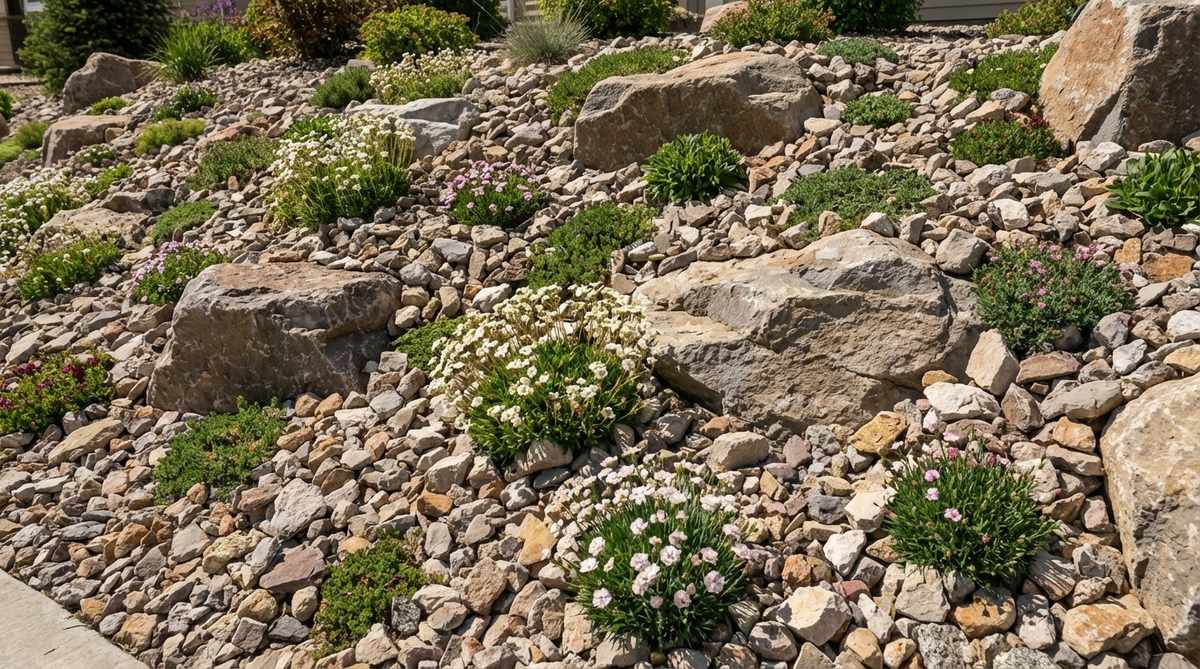
Replicates the harsh, breathtaking beauty of a high-altitude mountain pass right on your property. This mixed alpine rock garden thrives in tough, sunny slopes where traditional garden soil simply washes away.
Uniform gravel is plain, but mixing jagged fragments from 1/4 inch to 4 inches creates a designer-level finish that naturally locks together. Seeding the rocky crevices with drought-hardy alpine succulents creates brilliant pops of green against the grey stone.
You can build a stunning scree pocket for about $100–$200. Save this for those difficult-to-mow hill sections!
- Key Materials: Mixed crushed limestone, random accent stones.
- Vibe / Style: Rugged high-elevation terrain.
- Difficulty: Moderate.
- Budget Breakdown: Mixed Crushed Stone: $80 | Alpine Plants: $50.
- Creator’s Tip: Do not use rich potting soil here; mix heavy sand with local dirt to mimic the lean, fast-draining soil of the mountains.
- Smart Sourcing: Use coarse horticultural sand/grit bulk bags and live creeping sedum tray packs.
25. Cobble and Boulder Beach Edge
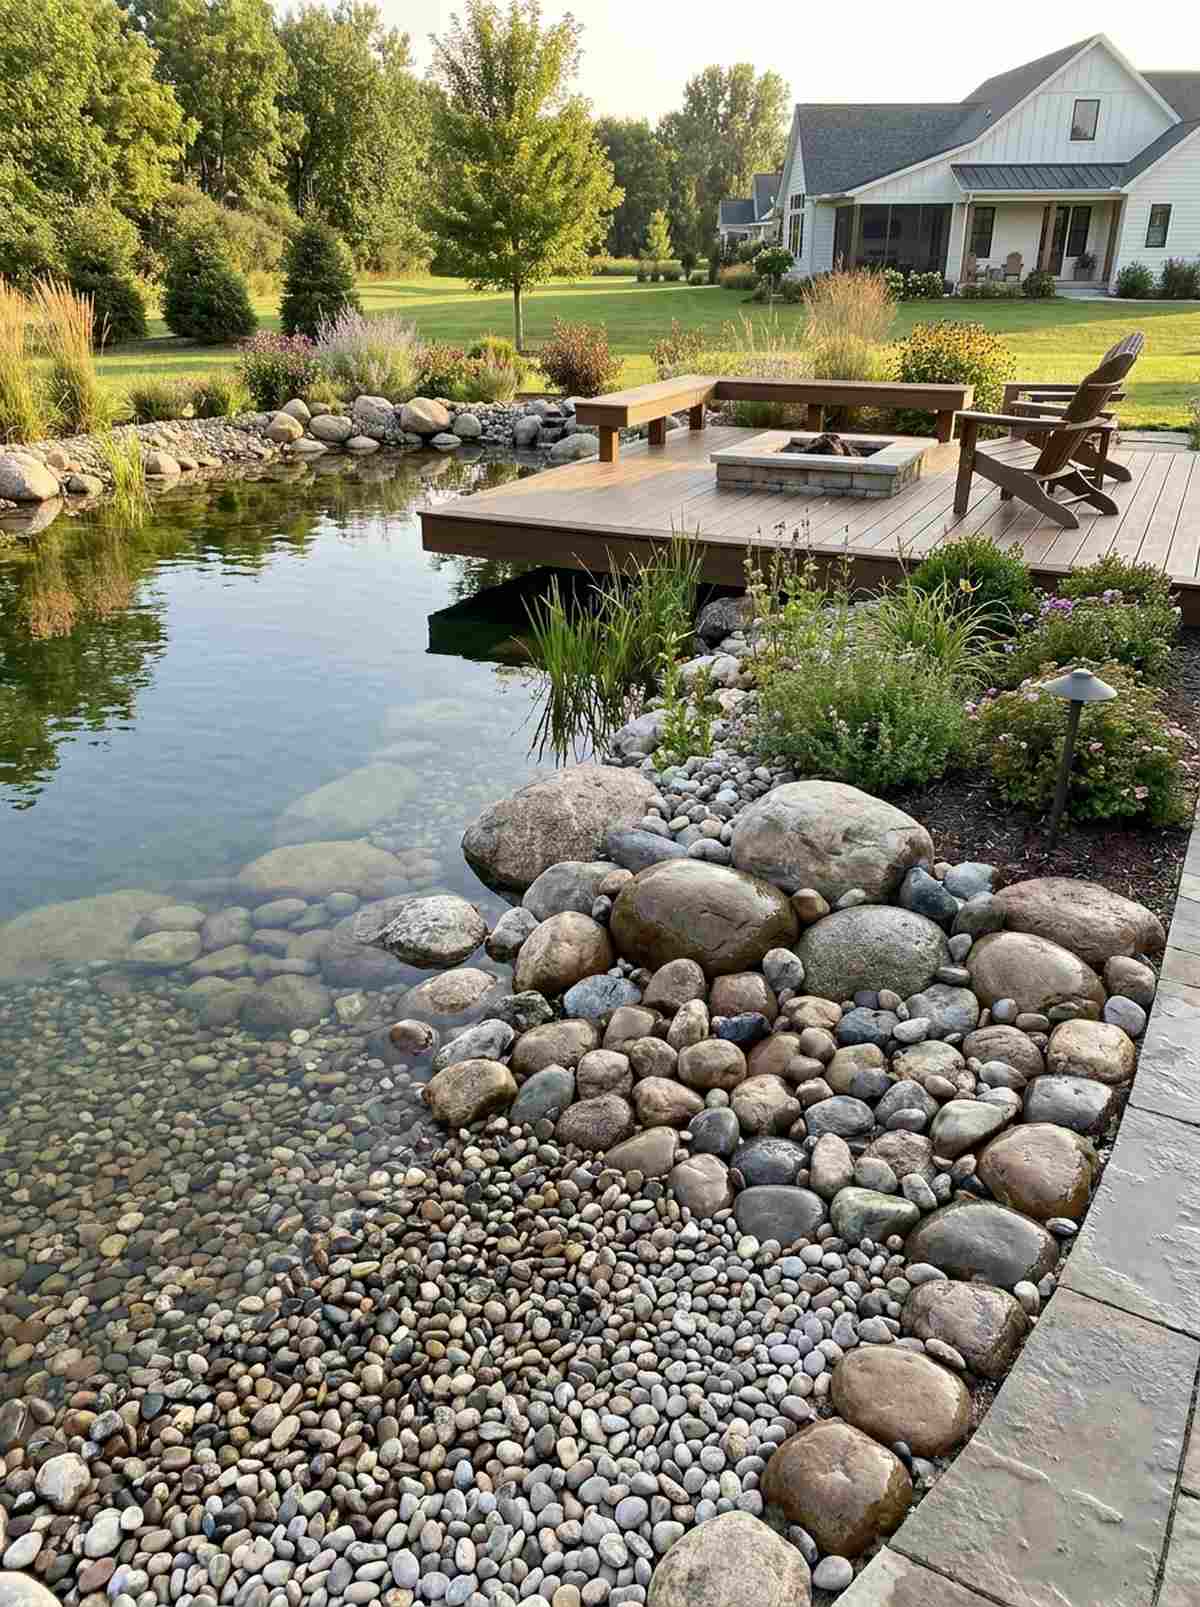

Creates a remarkably soothing transition that feels like a private lakeside retreat. This shoreline garden design with stones is the ultimate way to blend a water feature or pond seamlessly into the surrounding patio.
Harsh pond liners look tacky, but graduating from massive boulders down to tiny, smooth pebbles looks far more expensive and completely natural. Adding a layer of water-safe clear pond sealant to the edge stones keeps them looking perpetually wet and glossy.
Transforming a pond edge costs around $150–$300. It’s a must-do upgrade for any backyard water feature.
- Key Materials: Rounded river stones in 4 distinct sizes.
- Vibe / Style: Natural lakeside beach.
- Difficulty: Easy (just requires sorting).
- Budget Breakdown: Assorted River Rock: $150 | Edge Barrier: $40.
- Creator’s Tip: Only use completely rounded stones for this layout to reinforce the visual that water has been tumbling them for centuries.
- Smart Sourcing: Pick up high-gloss natural stone wet-look sealer and assorted polished river cobbles.
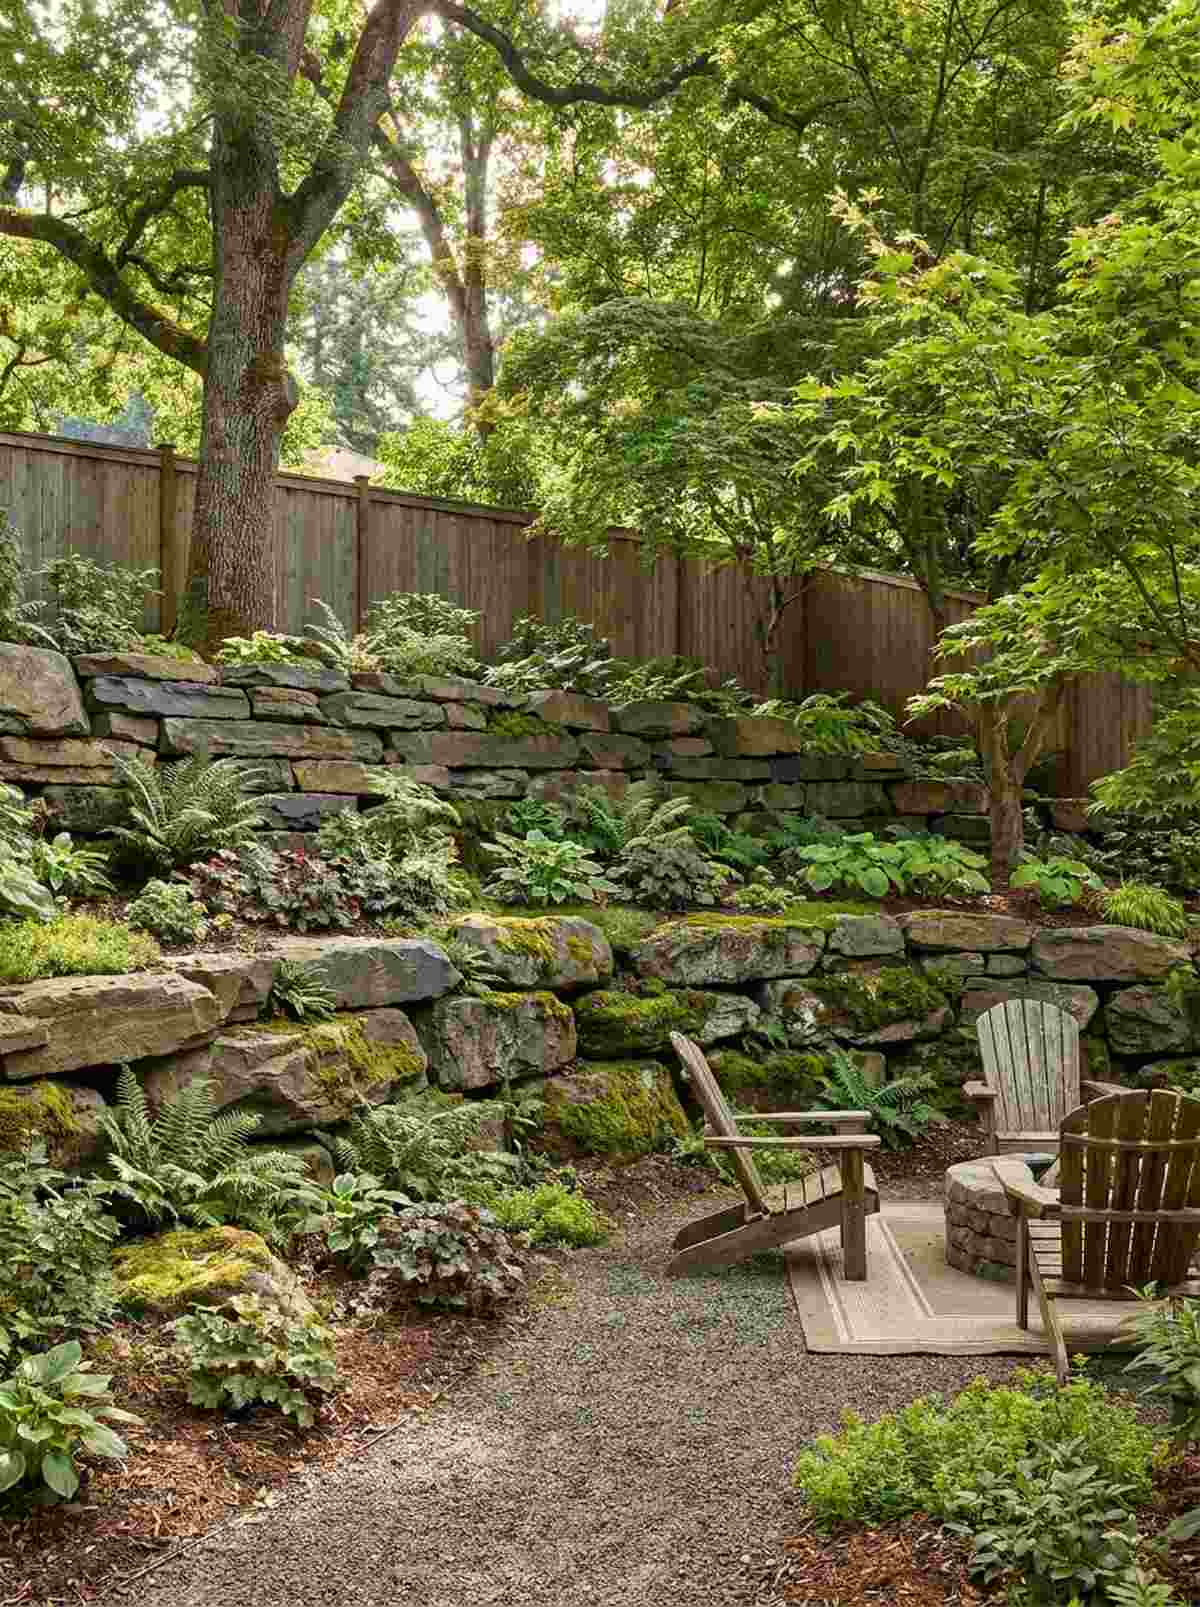
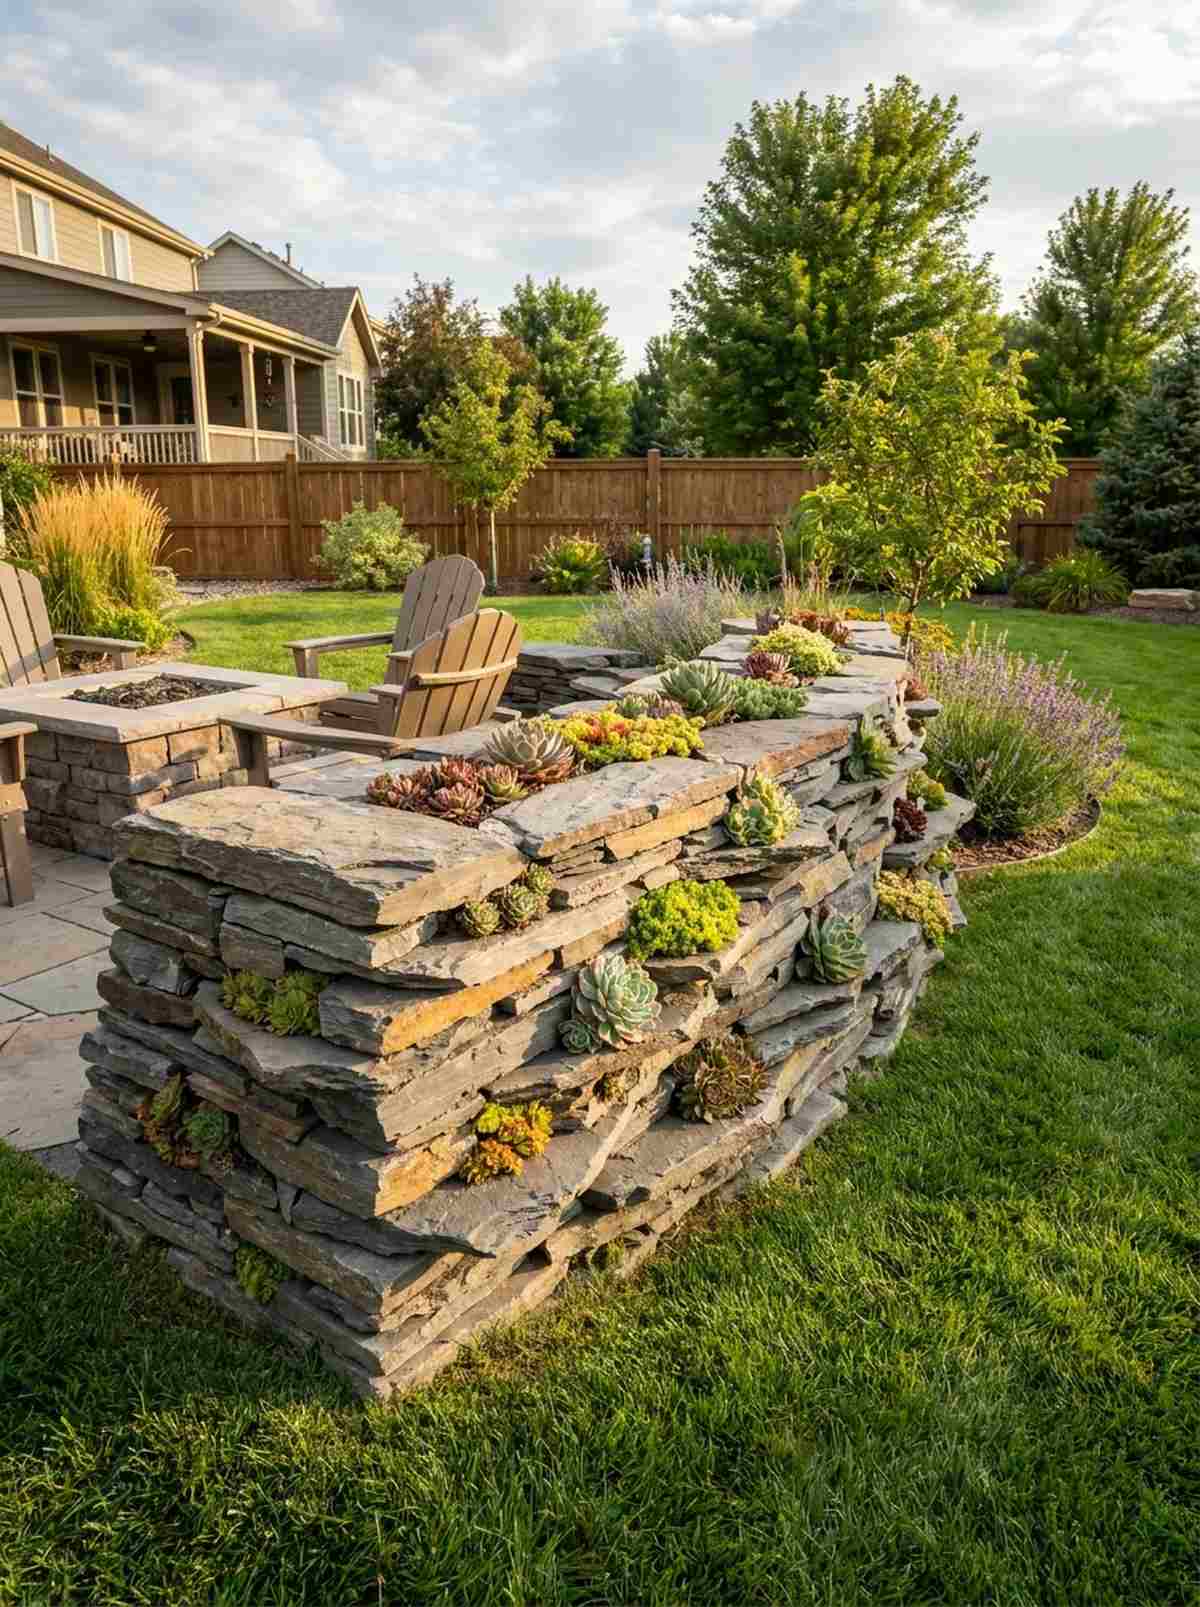
26. Fieldstone Wall with Gravel Base
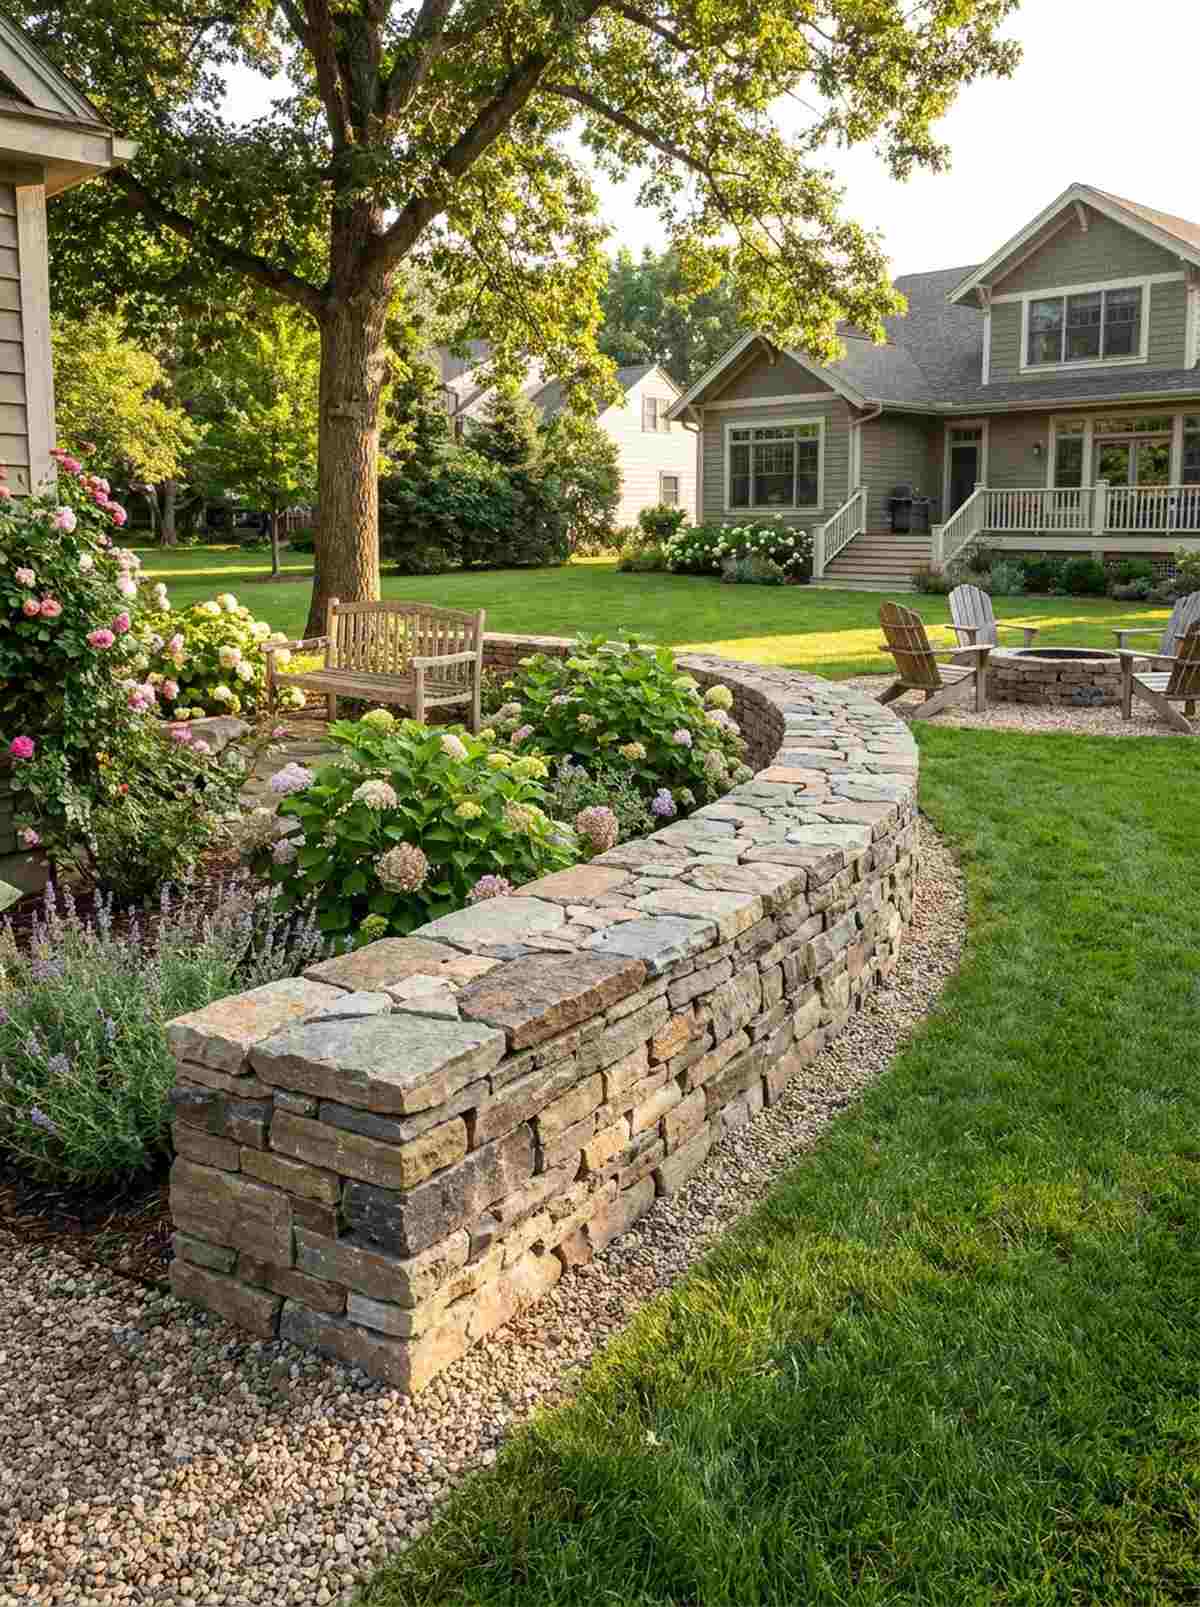
Instills a rich, historical charm that feels like wandering through an old English countryside estate. This dry-stacked stone garden feature adds vital vertical structure to otherwise flat, boring yards.
Flimsy plastic borders crack, but stacking natural fieldstone over a crushed gravel base gives a designer-level finish that lasts generations. Using a hidden polyurethane construction adhesive between the back of the stones ensures it never tumbles over.
Building a low 10-foot wall costs roughly $200–$400. Pin this to add permanent architectural value to your home!
- Key Materials: Flat-faced fieldstone, base gravel.
- Vibe / Style: Traditional English cottage.
- Difficulty: Moderate to Advanced (like a heavy puzzle).
- Budget Breakdown: Pallet of Fieldstone: $300 | Base Gravel: $40.
- Creator’s Tip: Always lay a 4-inch deep trench of compacted gravel beneath the first layer of wall stones to prevent winter frost heaving.
- Smart Sourcing: Grab exterior grade landscape block adhesive and a heavy-duty hand tamper.
27. Quarried Block and Pebble Contrast
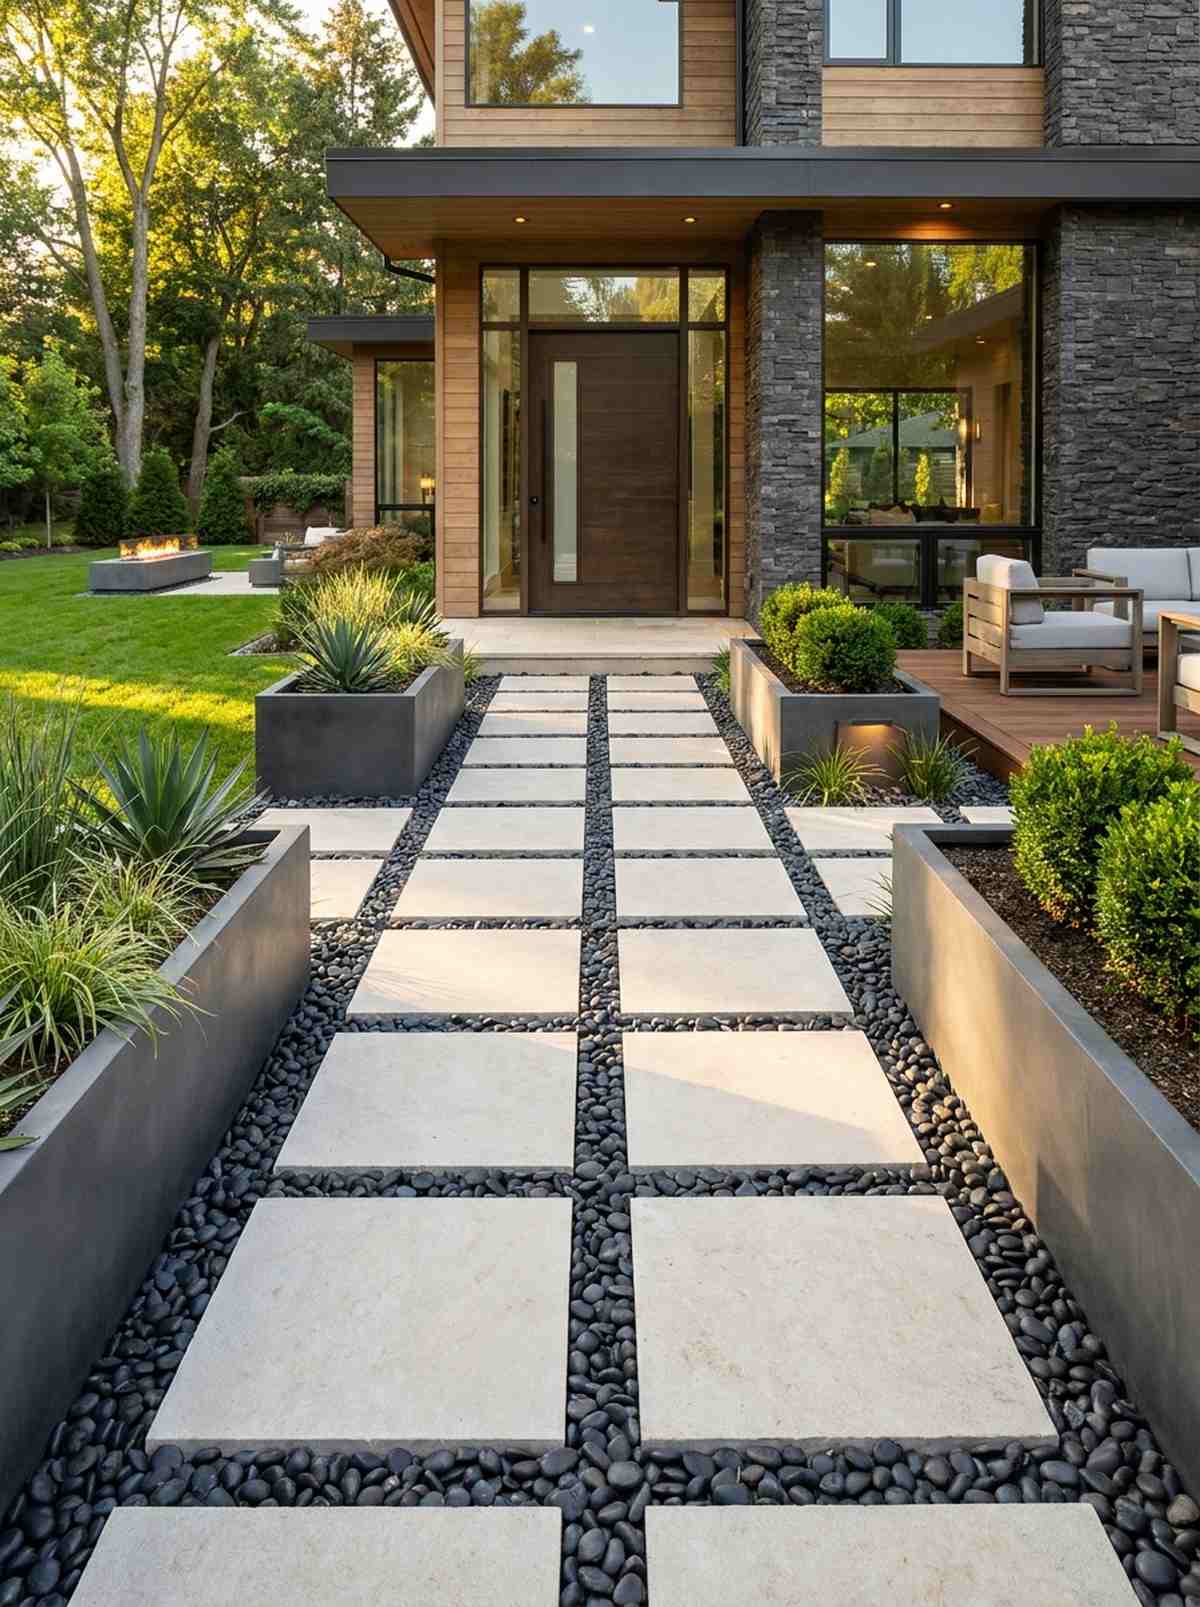
Generates an ultra-crisp, satisfying juxtaposition that feels like a multi-million dollar luxury hotel entrance. This contemporary stone contrast layout relies on the tension between perfect geometry and organic textures.
Mixing similar stones looks messy, but surrounding perfectly square-cut limestone blocks with tiny dark river pebbles delivers a surprisingly premium look. Utilizing robust miniature garden supplies like sleek modern planters amplifies the architectural vibe.
You can execute this modern contrast for about $180–$350. A spectacular upgrade for modern home facades.
- Key Materials: Cut geometric stone blocks, contrasting round pebbles.
- Vibe / Style: Sharp modern luxury.
- Difficulty: Moderate (requires perfect leveling).
- Budget Breakdown: Cut Stone Blocks: $200 | Contrast Pebble: $70.
- Creator’s Tip: The cut blocks must be perfectly level with each other, or the rigid geometric illusion completely falls apart.
- Smart Sourcing: Source precision-cut limestone pavers and premium black polished river stones.
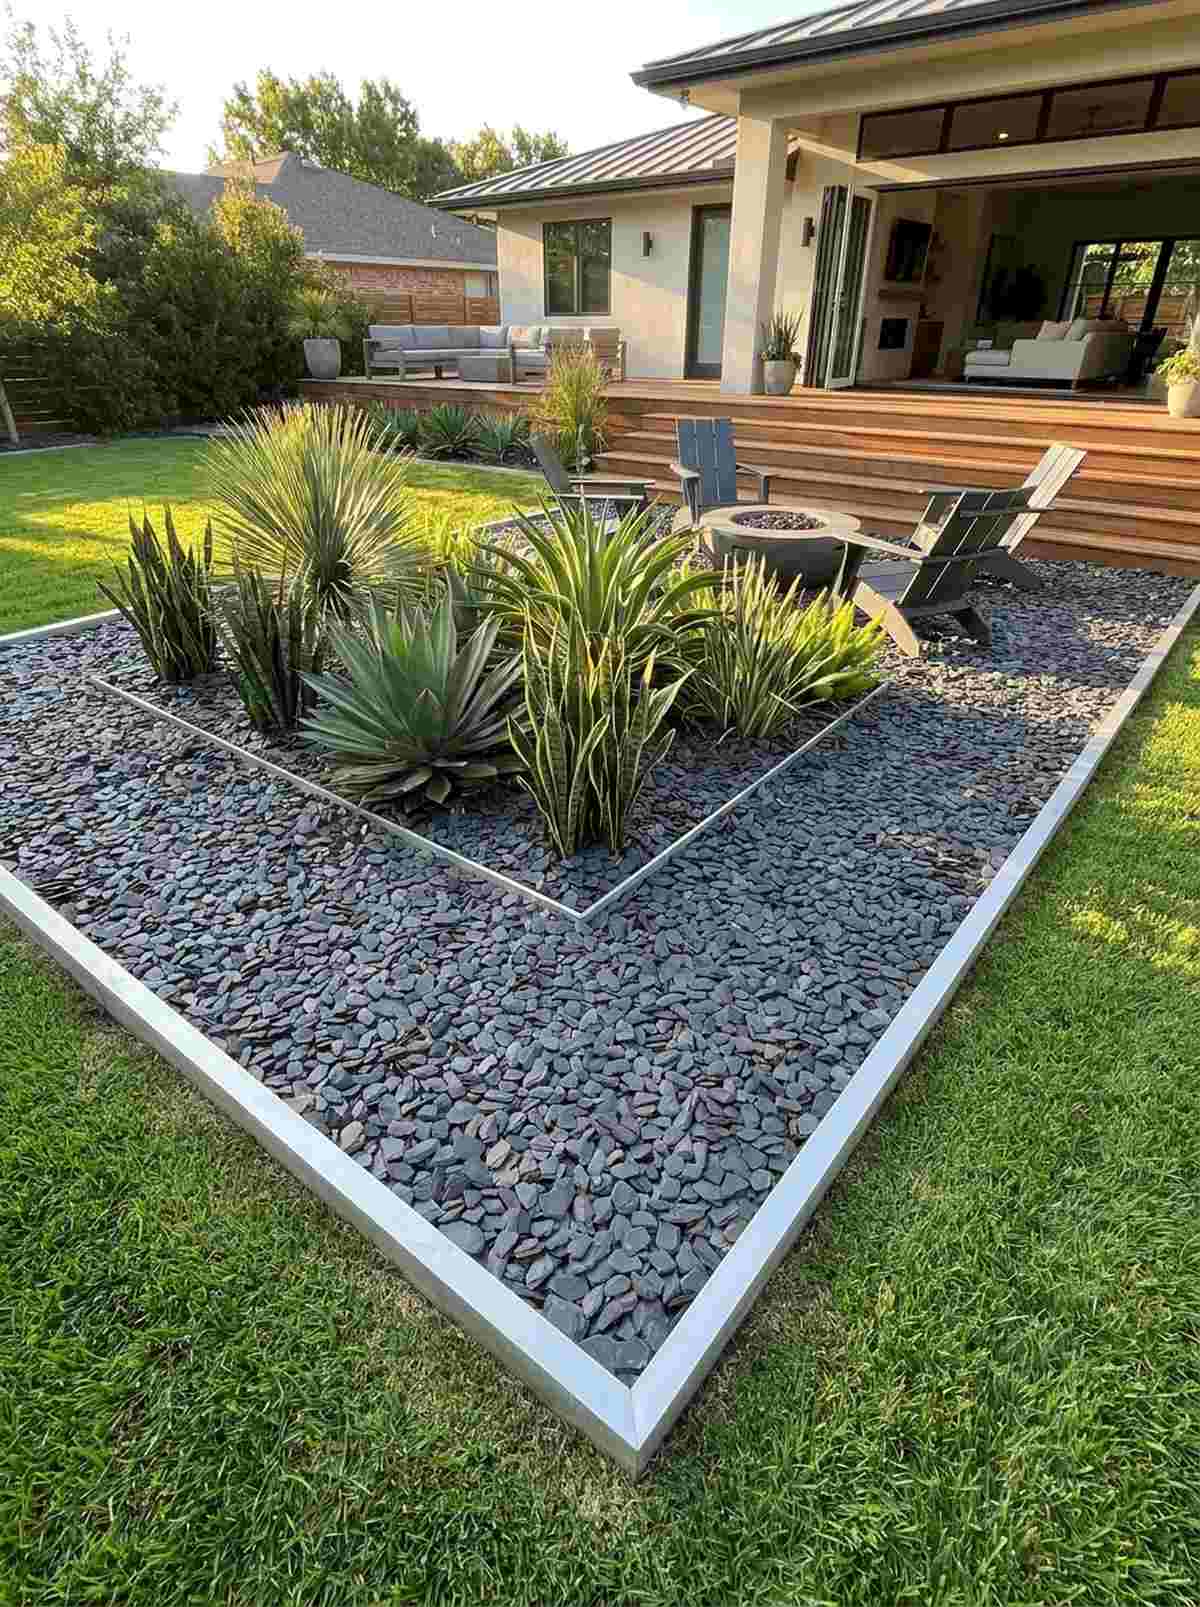
28. Lava Rock and Basalt Gravel Bed
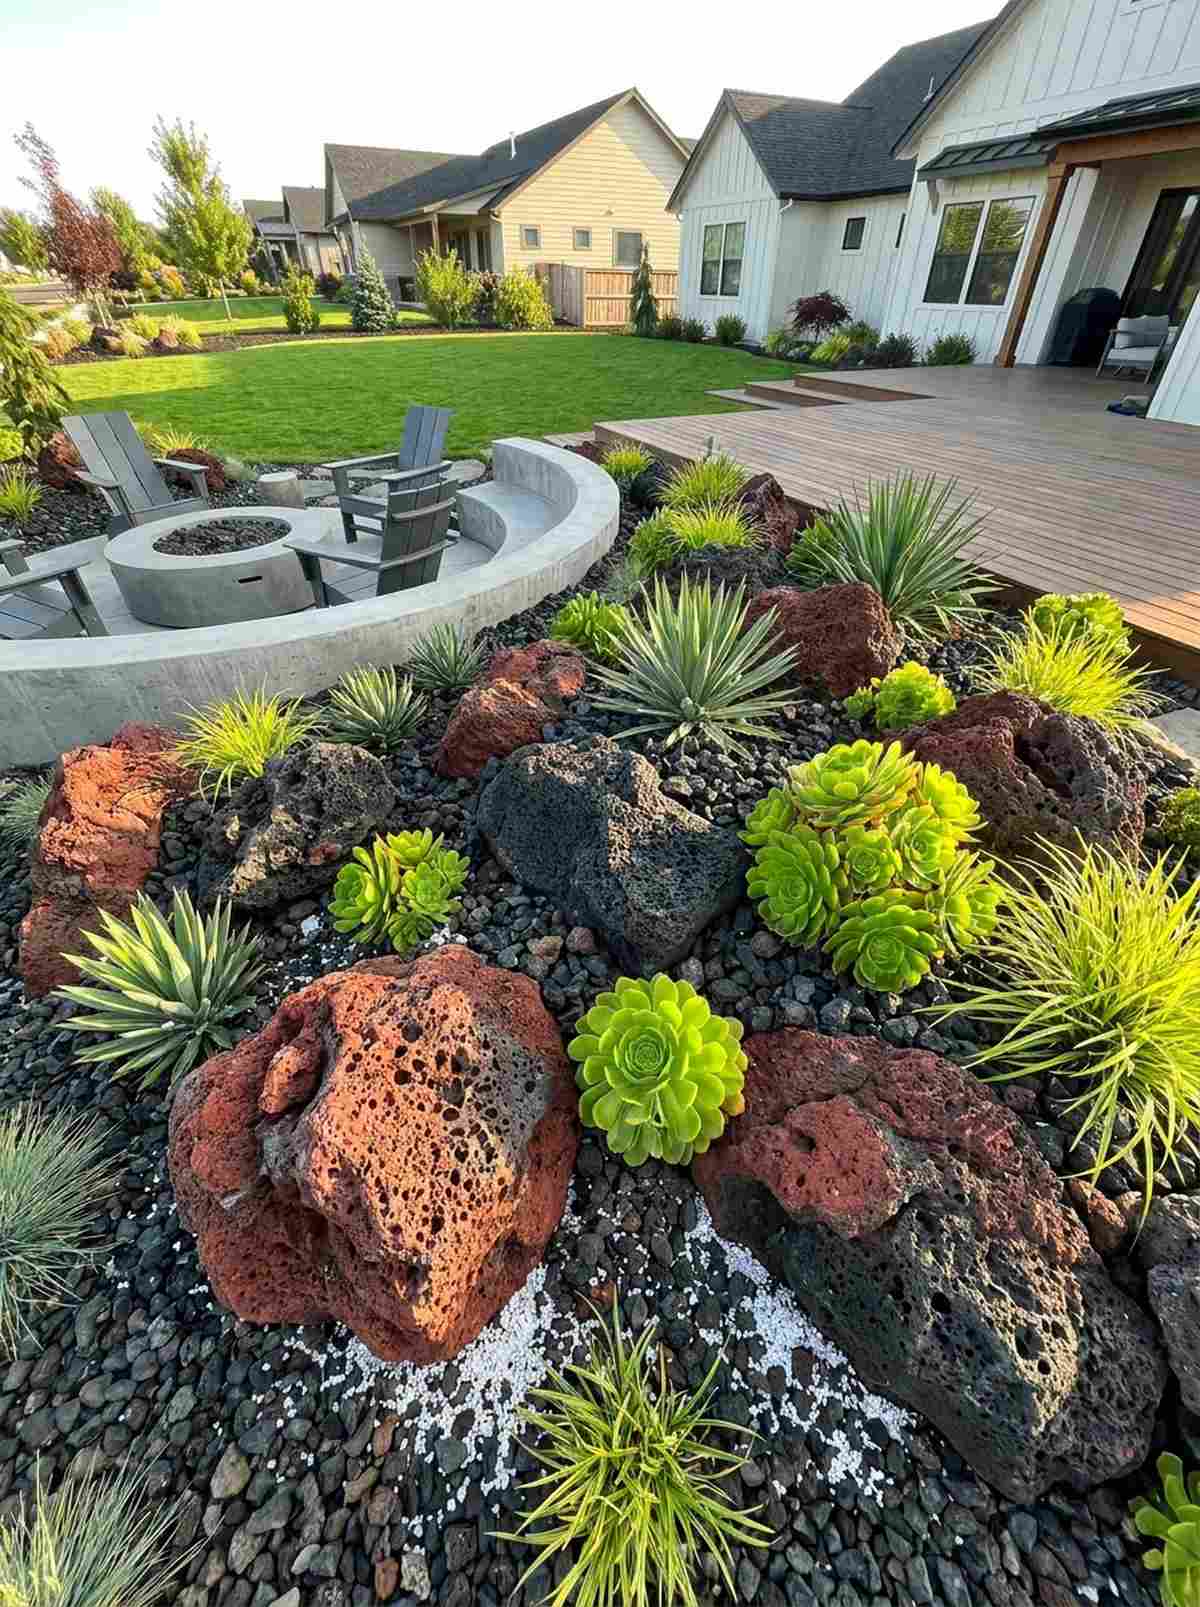
Produces an incredibly striking, dramatic moody vibe that feels like a chic, modern volcanic island. This monochromatic dark rock garden creates the ultimate high-contrast backdrop that makes bright green plants visually explode.
Standard brown mulch fades fast, but deep black basalt and porous red lava rock look far more expensive and literally never lose their color. Adding a dusting of pre-mixed horticultural perlite beneath the lava rocks ensures impeccable drainage for sensitive roots.
Pricing sits around $150–$250 for a standard bed. Save this for a bold, zero-maintenance landscaping move!
- Key Materials: Red/black lava boulders, dark basalt gravel.
- Vibe / Style: Moody contemporary volcanic.
- Difficulty: Easy beginner setup.
- Budget Breakdown: Lava Boulders: $80 | Basalt Gravel: $100.
- Creator’s Tip: Lava rock is incredibly lightweight, making it the perfect choice for rooftop gardens or balcony planters where weight is a concern.
- Smart Sourcing: Find bulk dark basalt pathway gravel and premium horticultural grade perlite.
Tired of expensive retaining walls? The stacked slate trick below is incredibly cheap and looks like a natural cliff face…
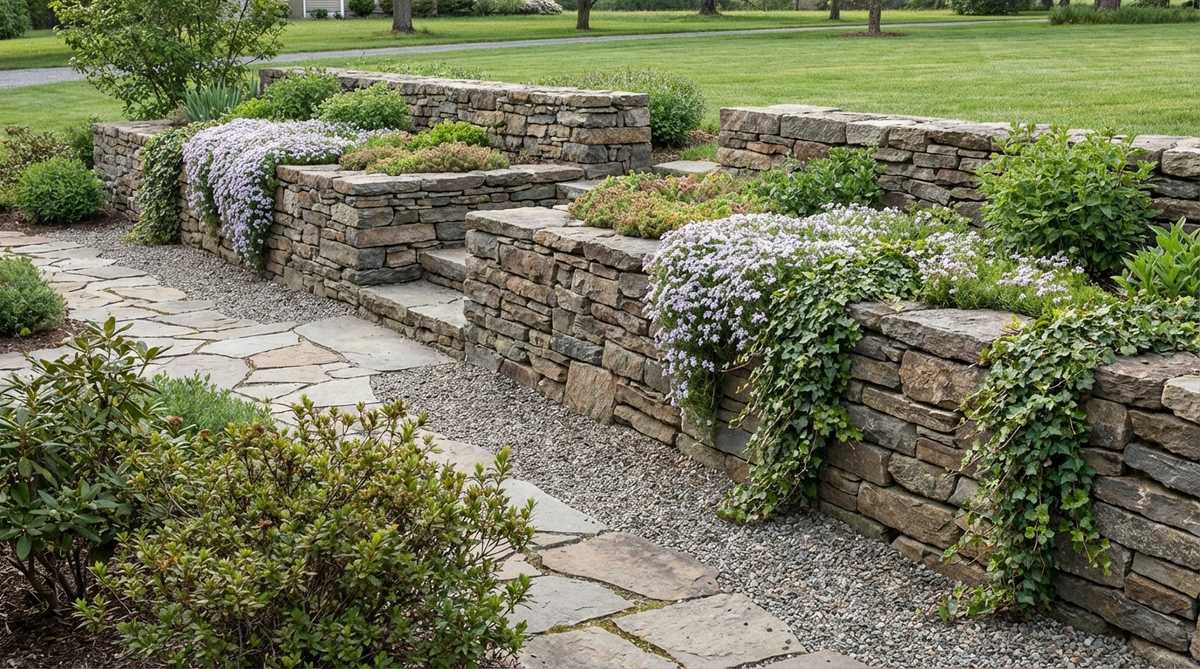
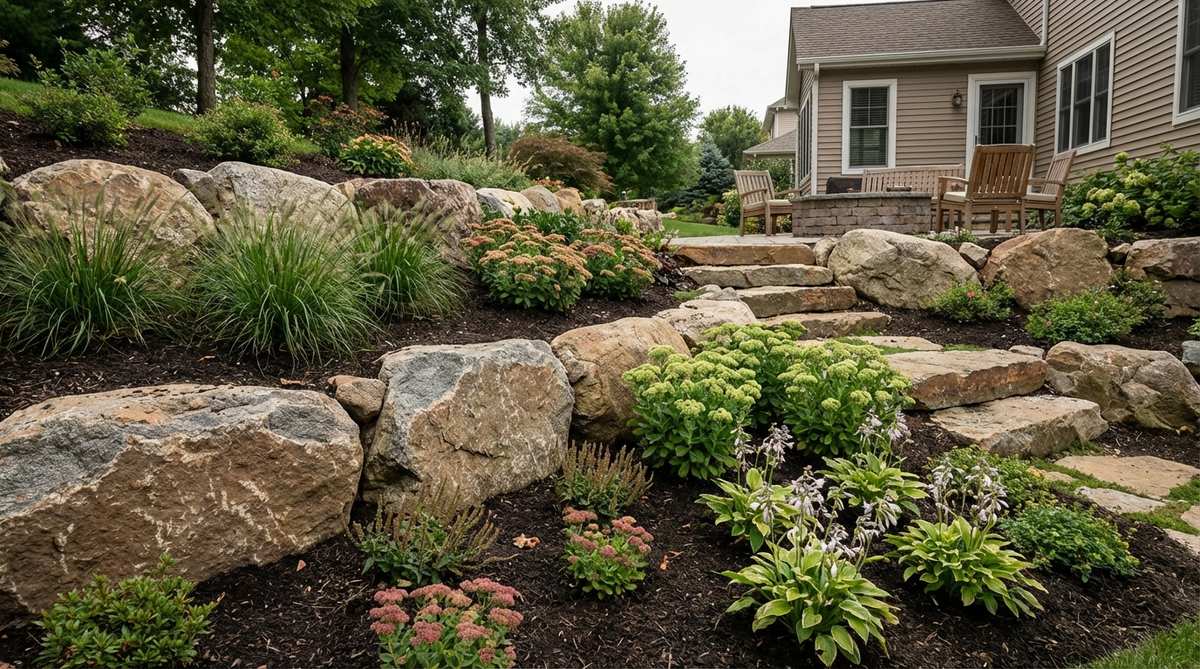
29. Stacked Slate Outcropping
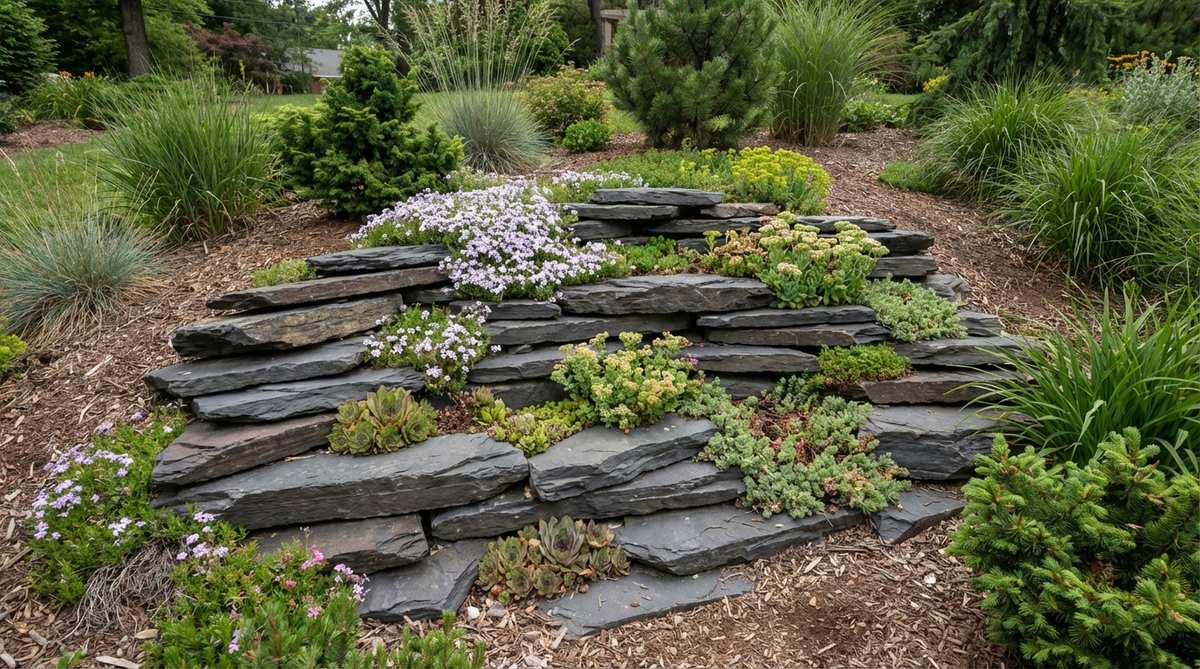
Evokes the raw, ancient beauty of water-carved canyons right in your backyard. This horizontal stone stacking design is an ingenious way to create raised planting beds without using ugly wooden planter boxes.
Vertical walls are common, but horizontally laying irregular slate slabs mimics natural sedimentary rock for a designer-level finish. Jamming succulent cutting starter packs into the tight horizontal crevices transforms it into a living cliff face.
You can build a stunning outcropping for $200–$400 depending on the slate thickness. Pin this for a completely unique raised bed idea!
- Key Materials: Flat slate or flagstone pieces, crevice soil.
- Vibe / Style: Natural sedimentary cliff.
- Difficulty: Moderate (heavy lifting, fun puzzle).
- Budget Breakdown: Slate Pallet: $250 | Succulents: $60.
- Creator’s Tip: Slightly stagger the slate pieces inward as you build up to create tiny natural “shelves” that catch rain for the plants.
- Smart Sourcing: Use assorted live succulent cuttings packs and flat natural slate stepping stones.
Functional Rock Features That Solve Landscape Challenges
Strategic garden design rock placement addresses practical issues while enhancing aesthetic appeal. These arrangements prevent erosion, define borders, and create usable outdoor spaces.
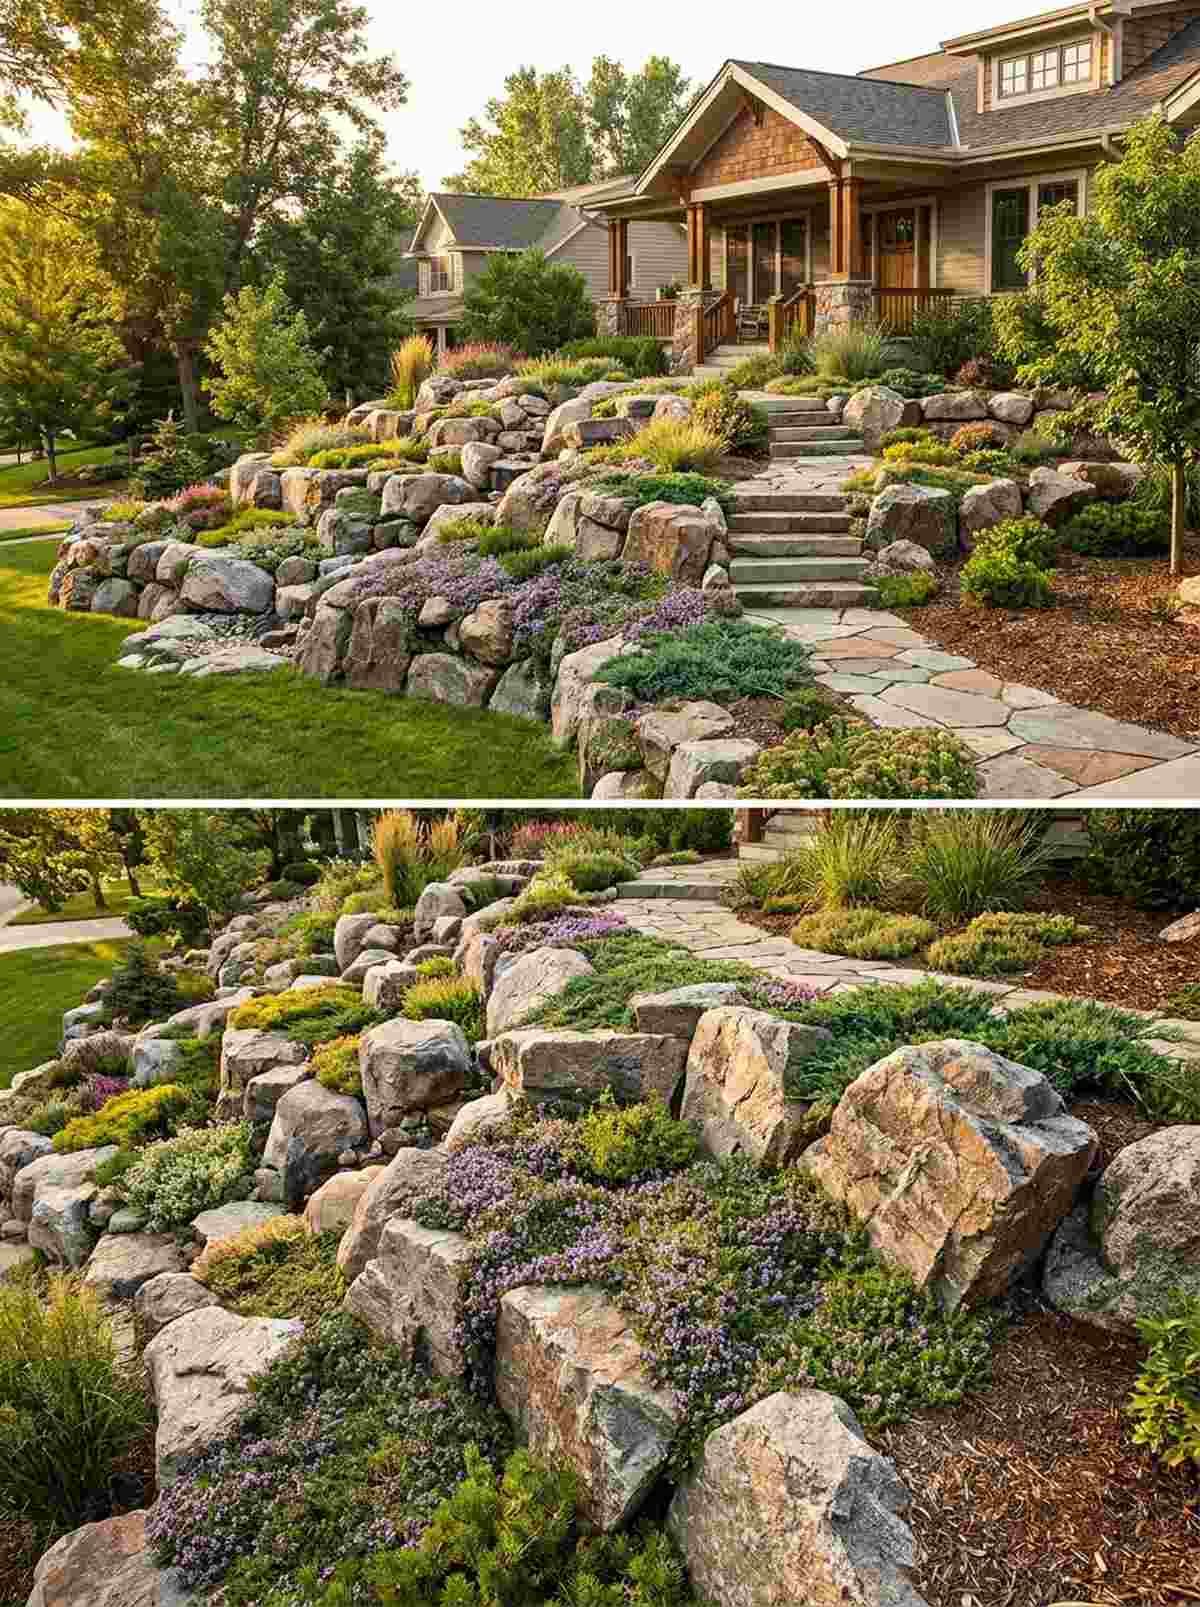
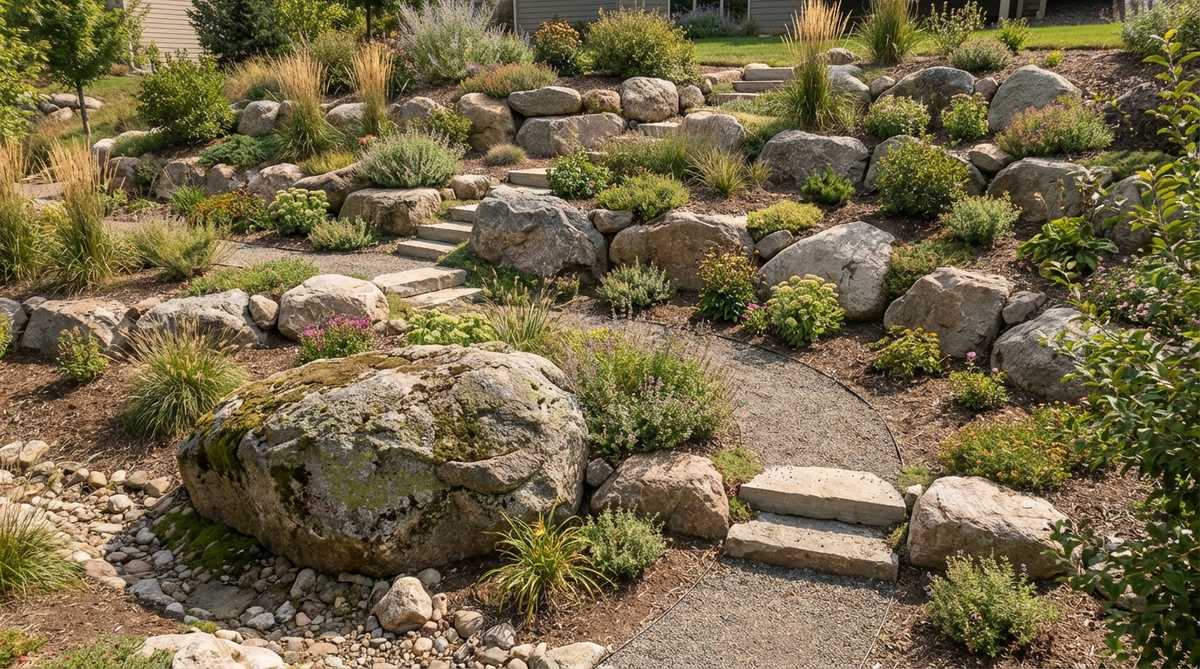
30. Erosion Control Boulder Terracing
Provides robust structural integrity while looking like a naturally formed, idyllic mountainside. This functional boulder terracing layout is an absolute lifesaver for properties where heavy rains wash the soil away every year.
Expensive concrete retaining walls look harsh, but burying large rocks to create step-downs delivers a surprisingly premium look that actually gets stronger as plant roots take hold. Using heavy-duty jute erosion netting behind the stones guarantees the dirt won’t slip while the plants grow.
A functional terraced slope costs roughly $300–$600 in materials. An essential save for anyone with a steep, muddy yard.
- Key Materials: Large heavy boulders, deep-rooted perennials.
- Vibe / Style: Functional natural stability.
- Difficulty: Advanced (requires heavy machinery/levers).
- Budget Breakdown: Boulders: $350 | Erosion Netting: $80.
- Creator’s Tip: Bury at least 1/3 of the bottom boulders in the ground to create an immovable anchor for the rest of the hillside.
- Smart Sourcing: Order biodegradable jute erosion control netting and a heavy-duty forged digging spade.
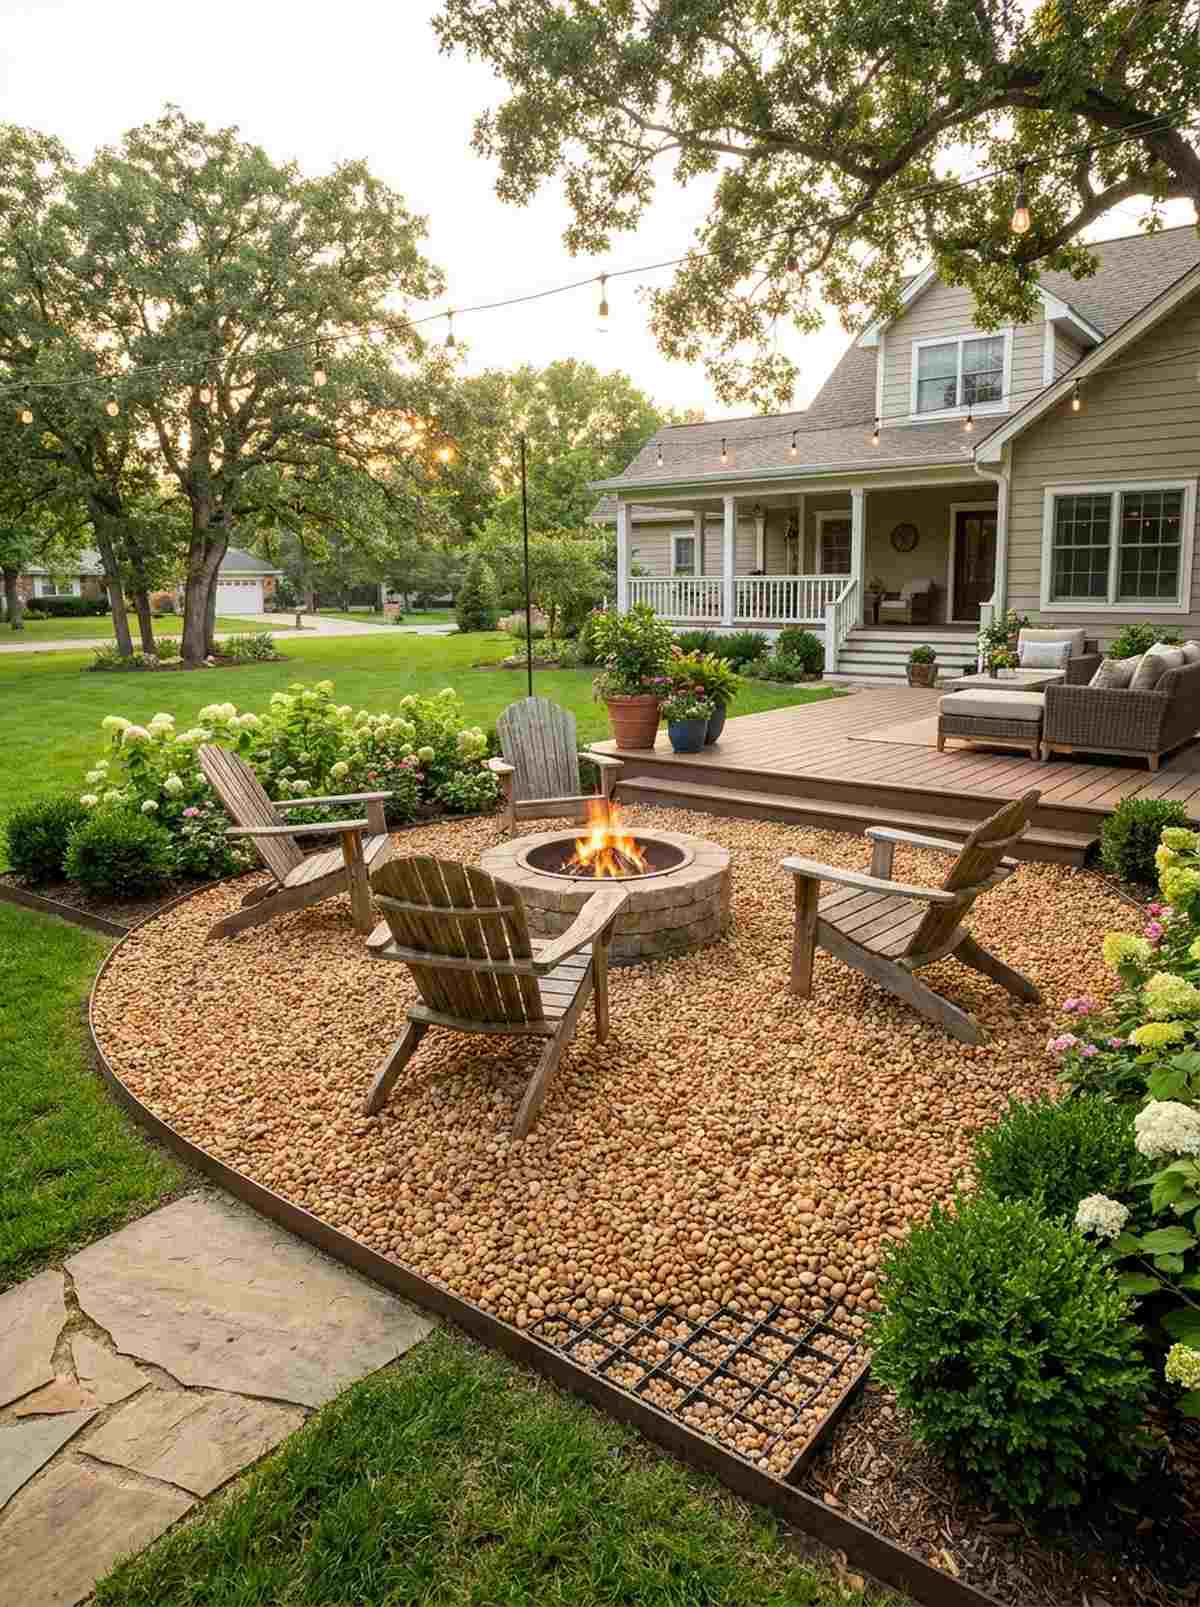
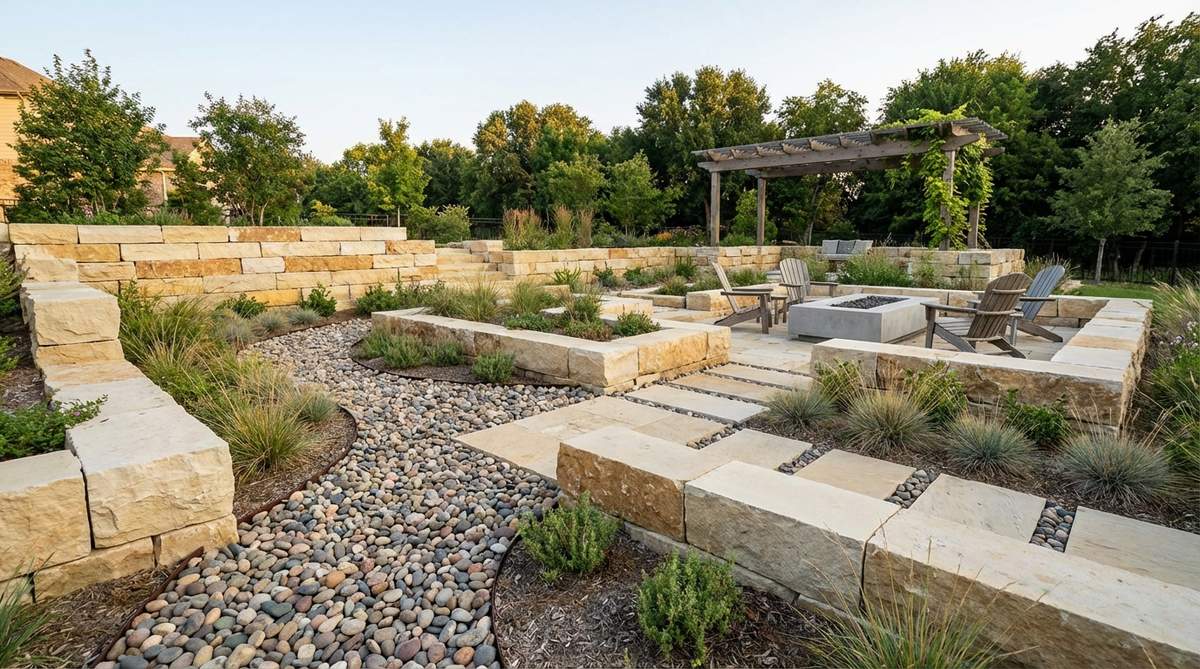
31. Gravel Patio with Boulder Seating
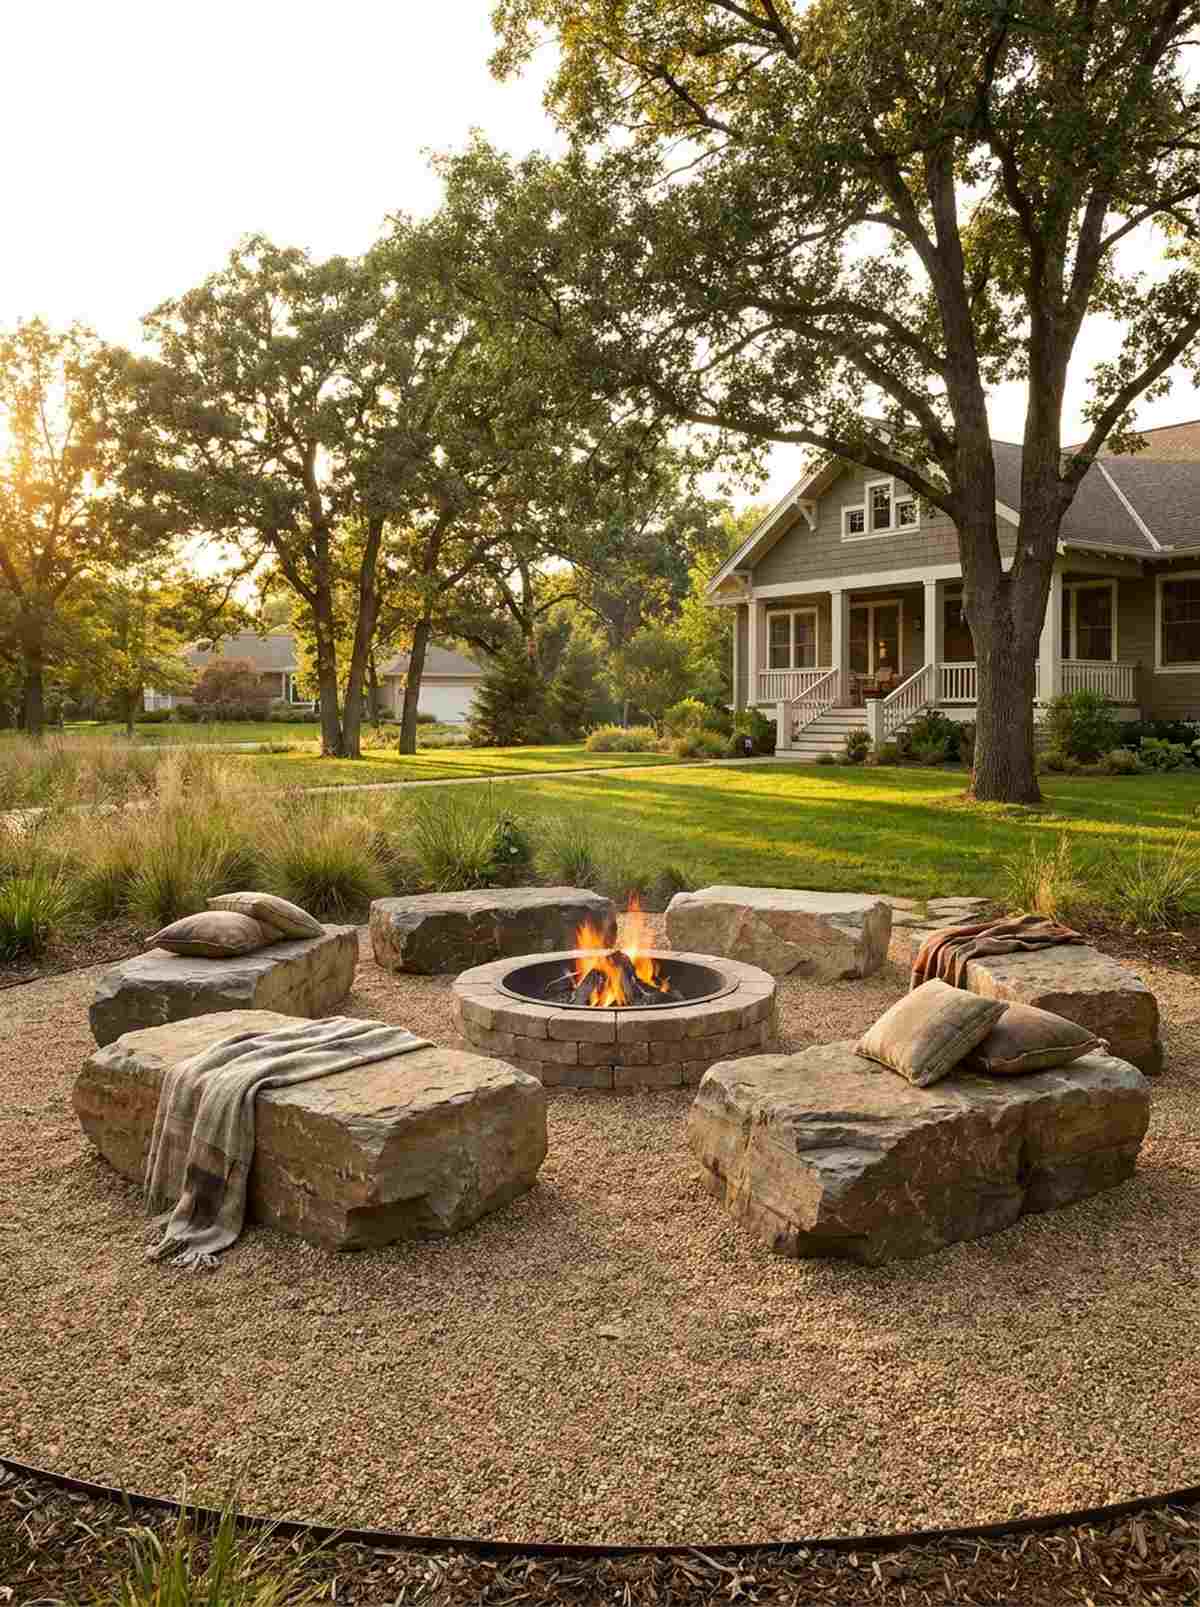
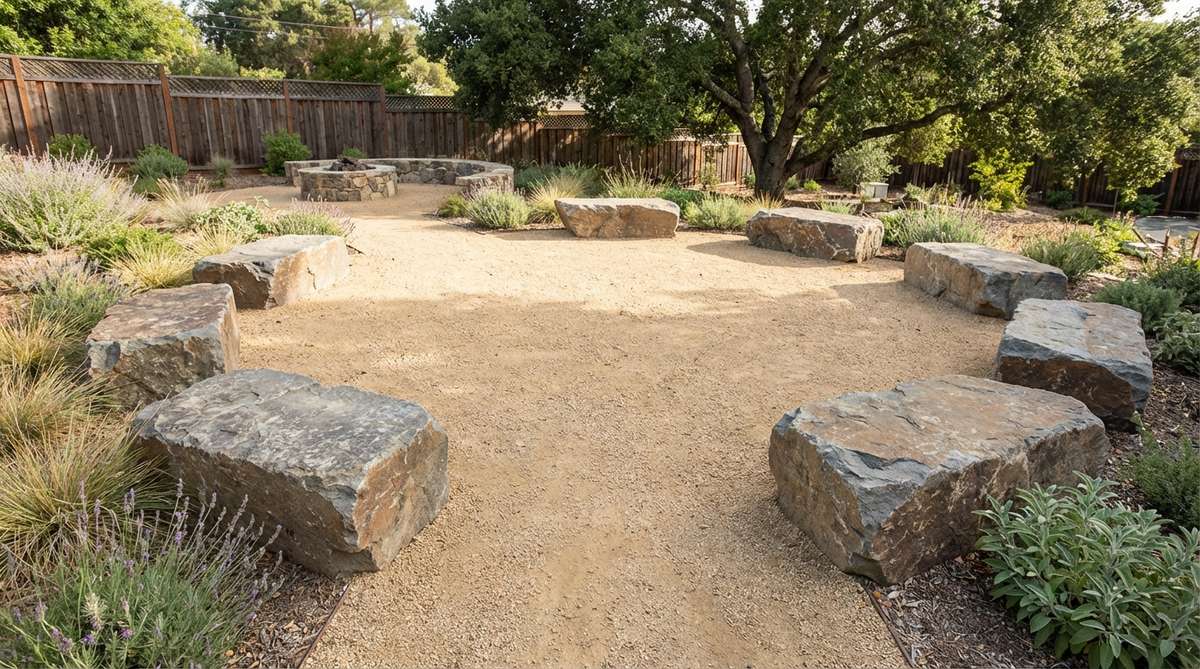
Creates a primitive, cozy gathering space that feels like a luxury campsite in a national park. This natural stone seating area completely replaces the need for buying expensive, fragile outdoor furniture.
Patio sets break and rust, but flat-topped boulders encircling a fire pit look far more expensive and literally last forever. Laying down a thick commercial grade weed barrier under the gravel ensures your seating area doesn’t turn into a weed jungle.
You can construct this indestructible patio for about $300–$500. Save this for your ultimate backyard fire pit setup!
- Key Materials: Flat-topped seating boulders, compacted pea gravel.
- Vibe / Style: Upscale rustic campsite.
- Difficulty: Moderate (moving heavy seating stones).
- Budget Breakdown: Seating Stones: $250 | Gravel Base: $150.
- Creator’s Tip: Select seating boulders that are roughly 16 to 18 inches high, which is standard chair height for maximum knee comfort.
- Smart Sourcing: Pick up heavy-duty 5oz landscape fabric rolls and bulk rounded pea gravel.
32. Rock Garden Retaining System
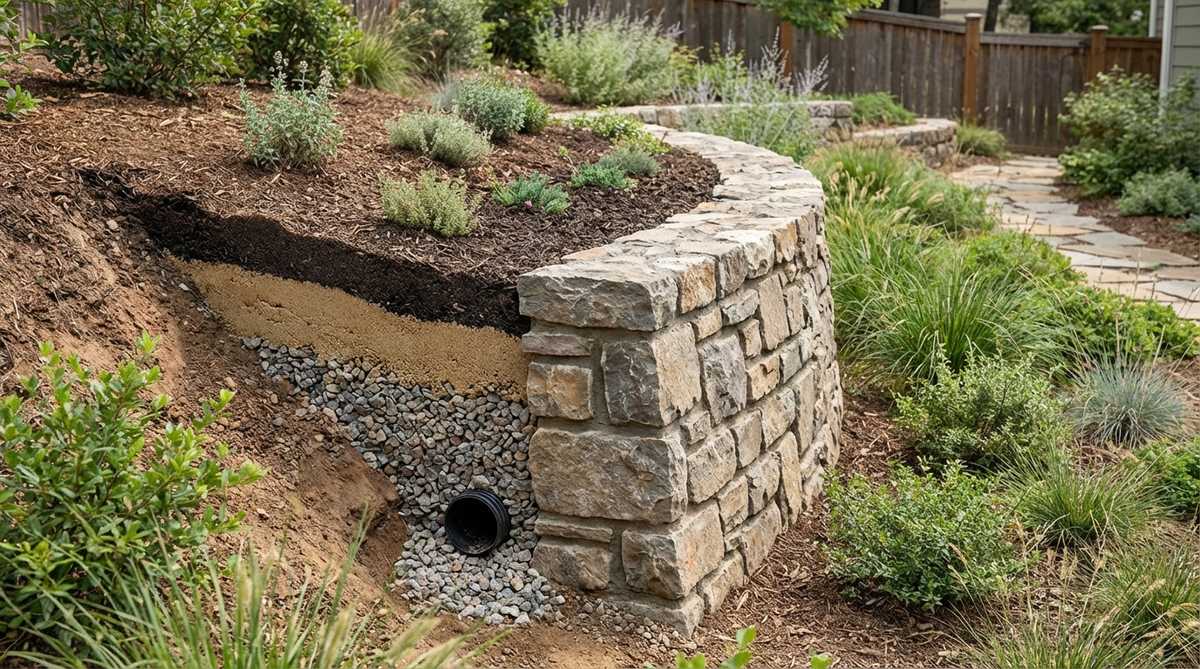
Merges hardcore civil engineering with lush beauty, feeling like an ancient castle wall reclaimed by nature. This stone retaining design allows you to flatten out sloped yards into highly usable, tiered living spaces.
Cinderblocks are ugly, but mortared fieldstone combined with proper gravel backfill gives a designer-level finish that prevents blowout. Wrapping a corrugated perforated drainage pipe in the gravel behind the wall ensures hydrostatic pressure never cracks your hard work.
Materials for a sturdy retaining system run $400–$800. A critical investment for maximizing usable lawn space.
- Key Materials: Stacking stones, drainage gravel, weep pipes.
- Vibe / Style: Heritage structural beauty.
- Difficulty: Advanced (structural integrity required).
- Budget Breakdown: Wall Stone: $400 | Drain Pipe/Gravel: $150.
- Creator’s Tip: Never skip the gravel backfill directly behind the wall; trapped wet dirt expands in winter and will push your wall over.
- Smart Sourcing: Source corrugated French drain pipe with sleeve and high-strength landscape mortar.
33. Stepping Stone Path Through Gravel
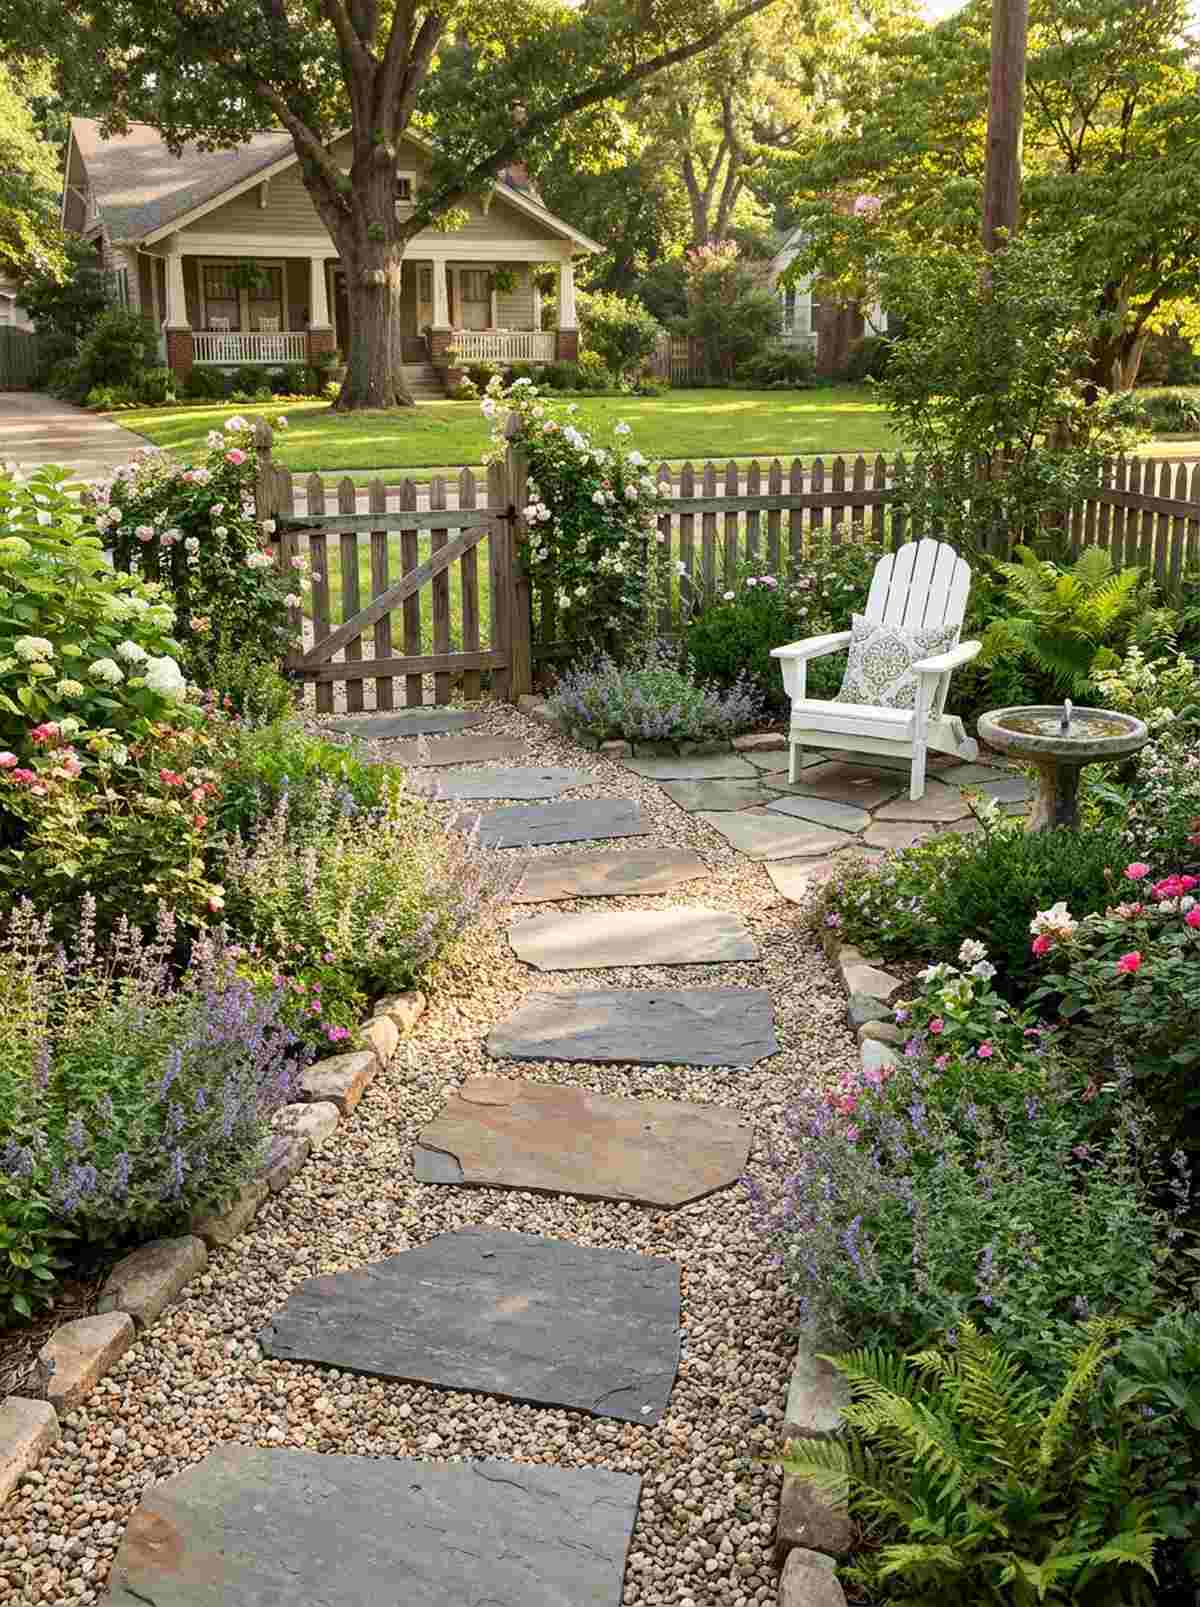
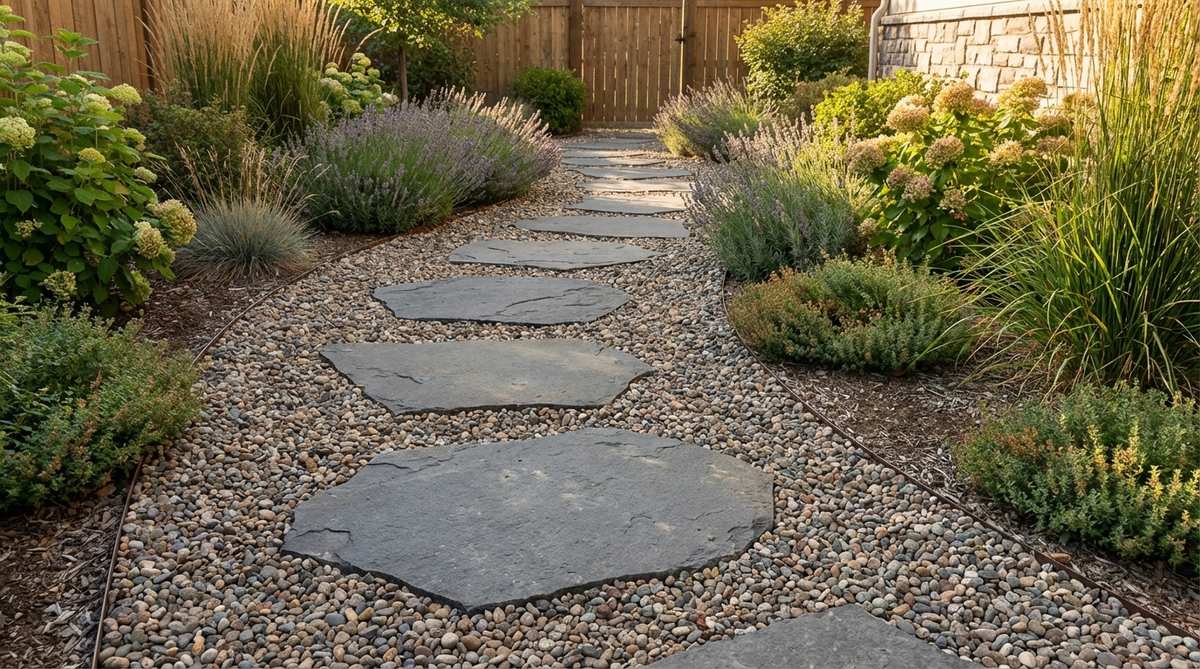
Offers a whimsical, inviting journey that feels like a secret pathway to a hidden cottage garden. This functional garden stone pathway provides clean, mud-free access through soft gravel beds or messy garden plots.
Plain gravel is tough to walk on in heels or bare feet, but embedding massive flat stones delivers a surprisingly premium look and solid footing. Bedding the steps in professional leveling sand stops them from wobbling when you step on the edges.
This charming path costs about $150–$250 to lay down. Pin this for a charming weekend walkway project!
- Key Materials: Large flat flagstones, contrasting gravel.
- Vibe / Style: Classic cottage garden stroll.
- Difficulty: Easy to Moderate.
- Budget Breakdown: Flagstones: $120 | Leveling Sand: $40.
- Creator’s Tip: Space the center of each stepping stone exactly 24 inches apart to match a natural, comfortable walking stride.
- Smart Sourcing: Use paver base leveling sand bags and large natural slate stepping stones.
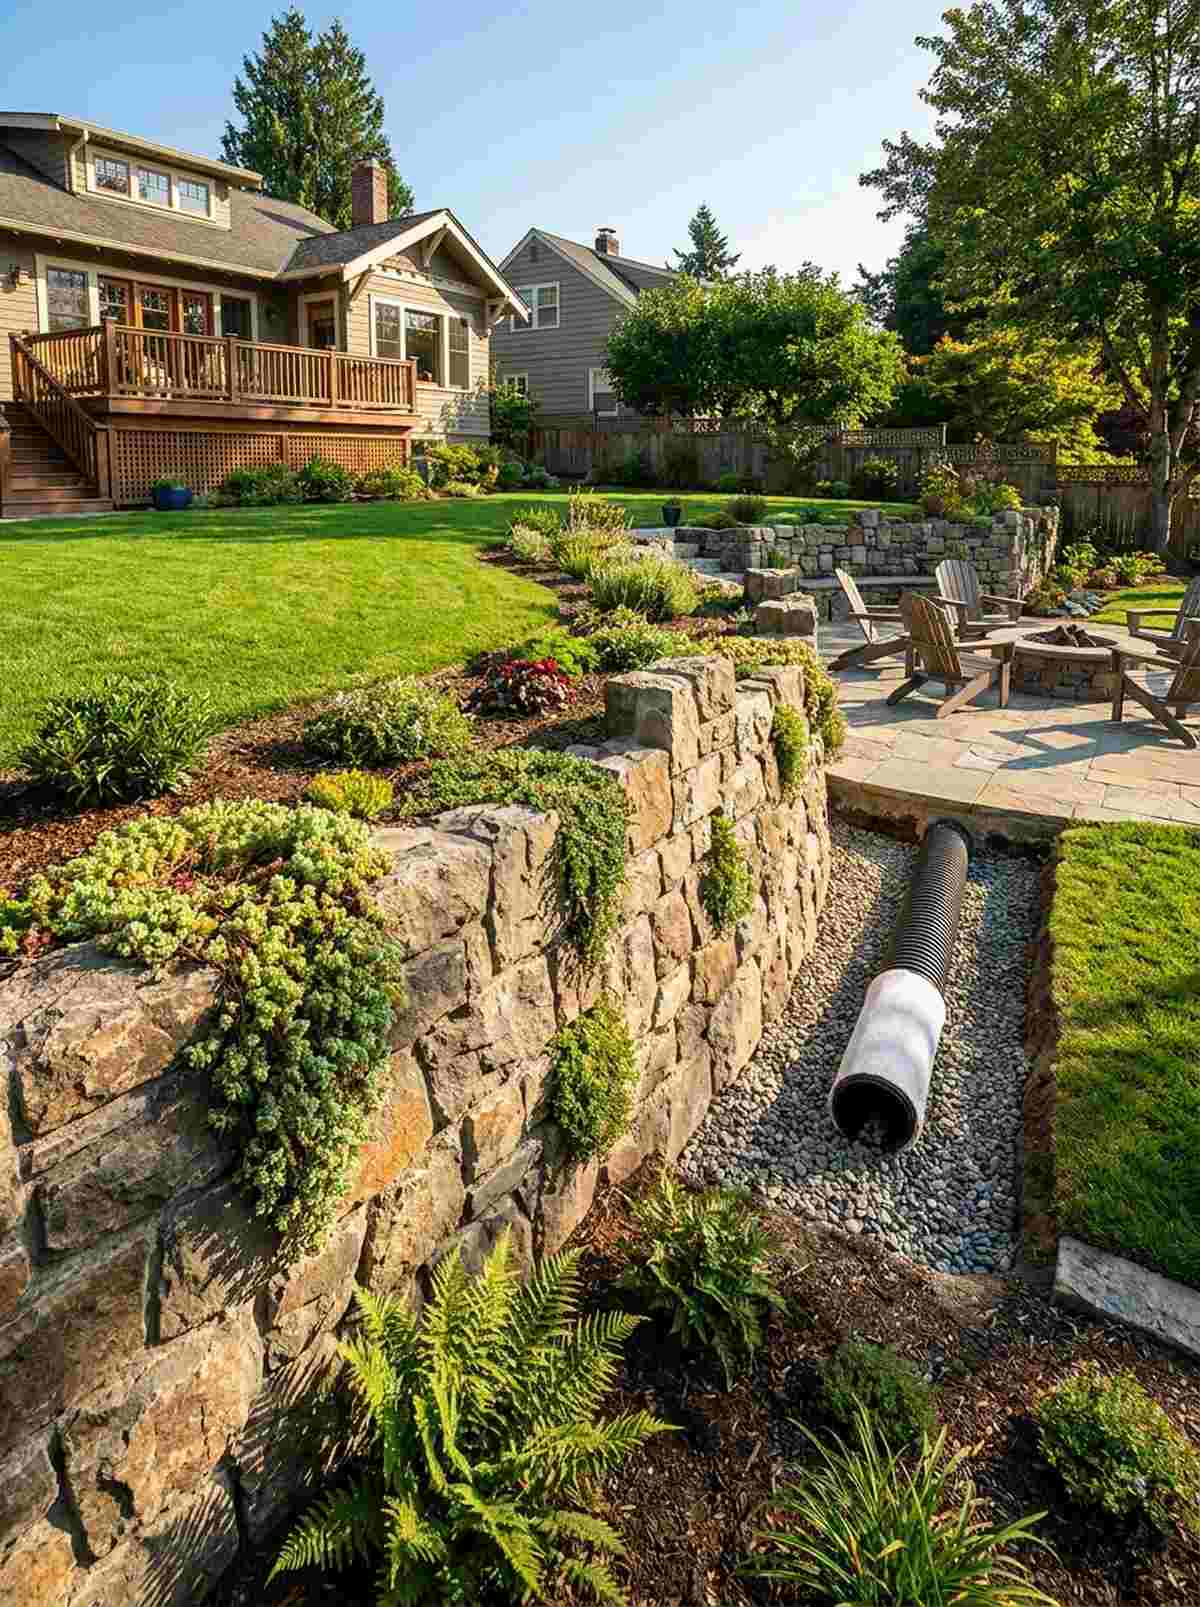
34. French Drain Decorative Rock Cover
Transforms a muddy, water-logged trench into a stunning landscape feature that looks like a high-end architectural border. This functional rock drainage cover proves that utility doesn’t have to be ugly.
Leaving black plastic drain pipes exposed ruins yard aesthetics, but capping the trench with smooth river cobbles looks far more expensive while allowing maximum water flow. Adding heavy-duty catch basin grates along the path ensures leaves don’t clog the underground system.
You can camouflage a drainage system for roughly $80–$150. Essential knowledge for anyone dealing with standing water.
- Key Materials: Large decorative river cobbles, drain pipe.
- Vibe / Style: Polished functional utility.
- Difficulty: Moderate (requires trench digging).
- Budget Breakdown: Decorative Rock: $70 | Pipe/Fabric: $50.
- Creator’s Tip: Wash the decorative rock thoroughly before placing it over the drain so you don’t instantly flush mud into your new pipe system.
- Smart Sourcing: Grab a yard drainage catch basin kit and large polished river cobbles.
This final section features ultra-modern designs that minimalist architects charge thousands to install…
Architectural Stone Groupings for Contemporary Landscapes
Modern garden design with stones emphasizes clean lines and intentional placement. These arrangements complement contemporary architecture with geometric precision and restrained material palettes.
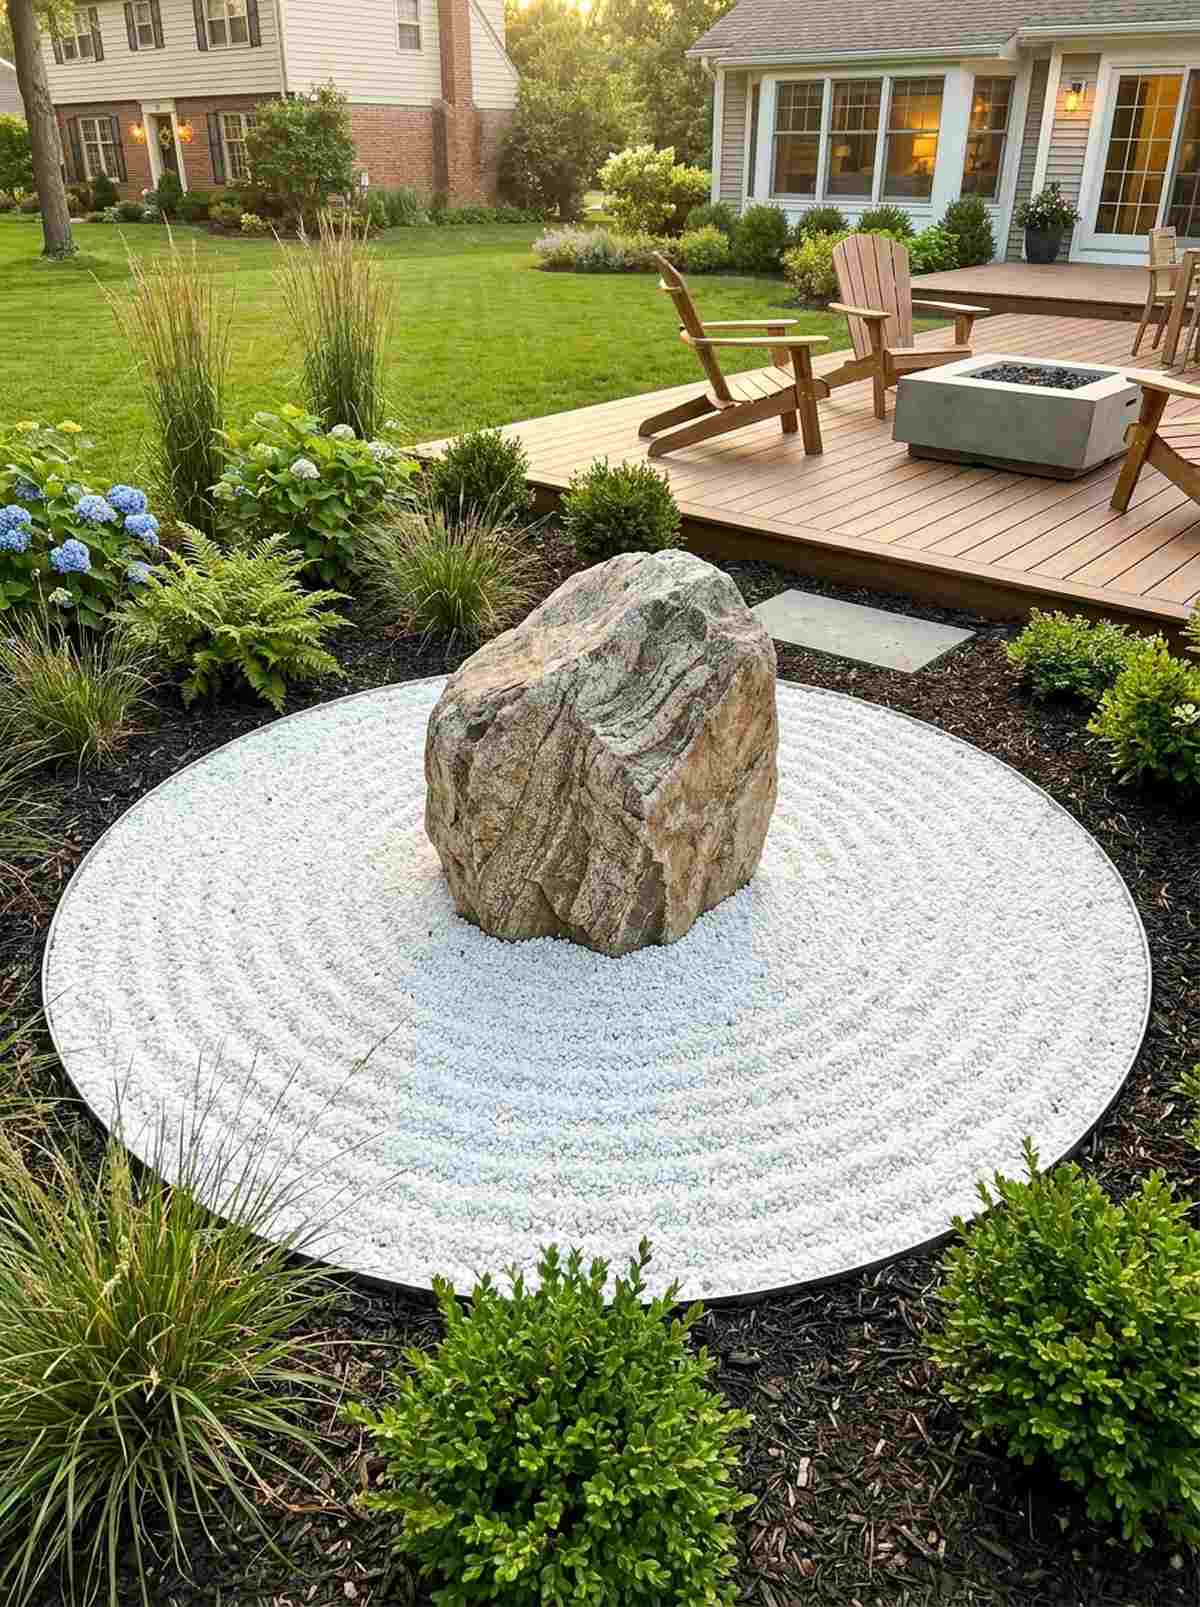
35. Monolith Sculpture Installation
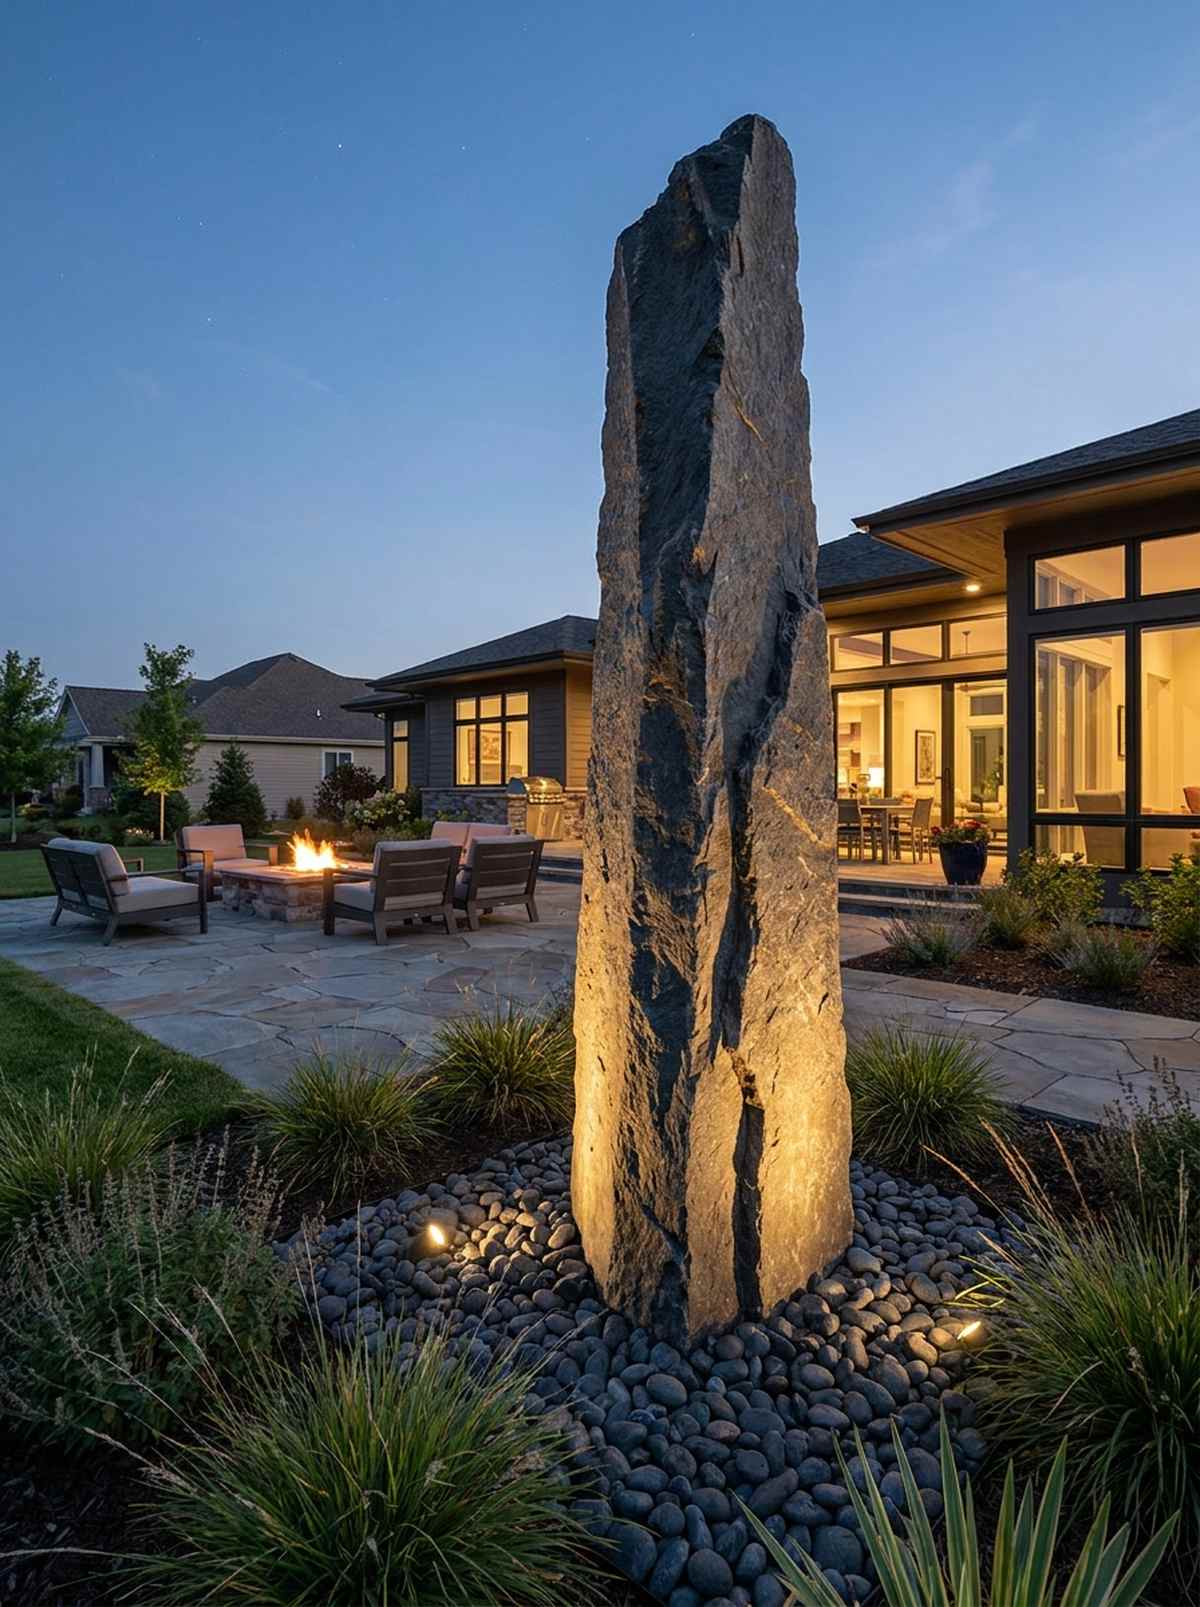
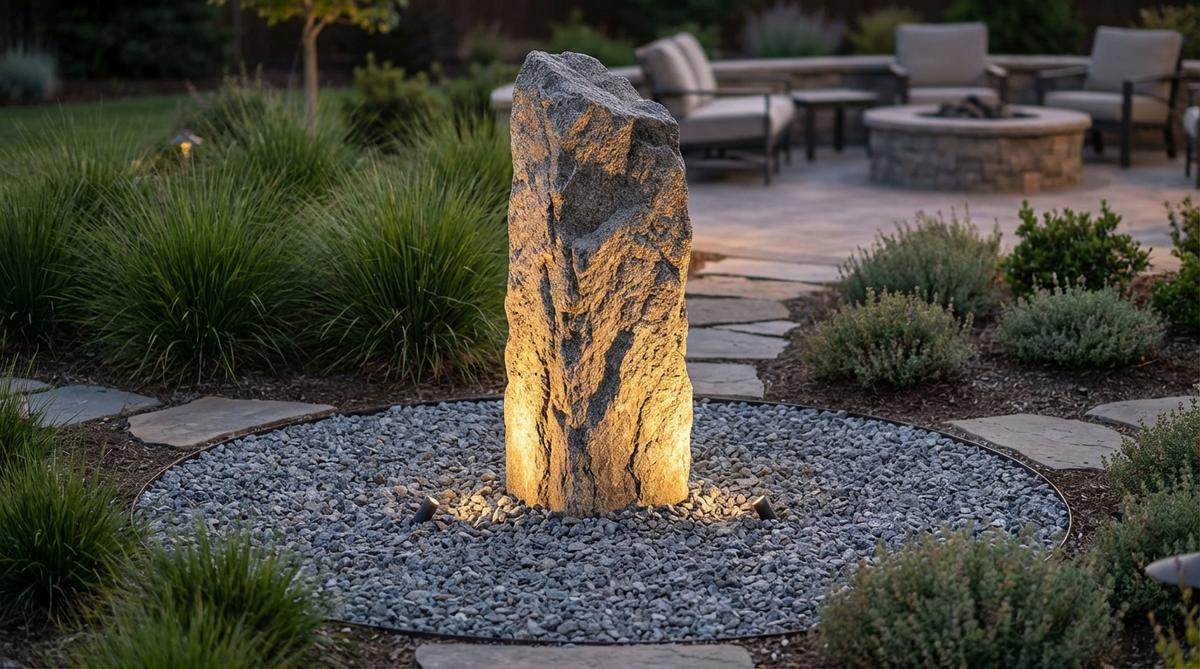
Commands total attention, standing like an ancient, powerful obelisk anchoring your modern yard. This vertical garden design rock setup serves as a breathtaking, zero-maintenance outdoor art piece.
Buying massive outdoor metal sculptures costs thousands, but a single jagged vertical stone gives a designer-level finish for a fraction of the price. Installing a concealed low-voltage landscape uplight at the base transforms it into a dramatic, glowing focal point at night.
A striking monolith setup runs around $200–$400. Pin this to instantly elevate your home’s modern curb appeal!
- Key Materials: One tall striking monolith boulder, accent lighting.
- Vibe / Style: Dramatic modern art.
- Difficulty: Advanced (requires deep, secure burial).
- Budget Breakdown: Monolith Stone: $250 | Lighting Kit: $60.
- Creator’s Tip: You must bury at least 1/3 to 1/2 of a tall monolith stone, packed tightly with gravel, to prevent it from tipping in high winds.
- Smart Sourcing: Use a low-voltage LED landscape brass uplight and a quick-setting post hole concrete mix for the base.
36. Geometric Stone Grid Pattern
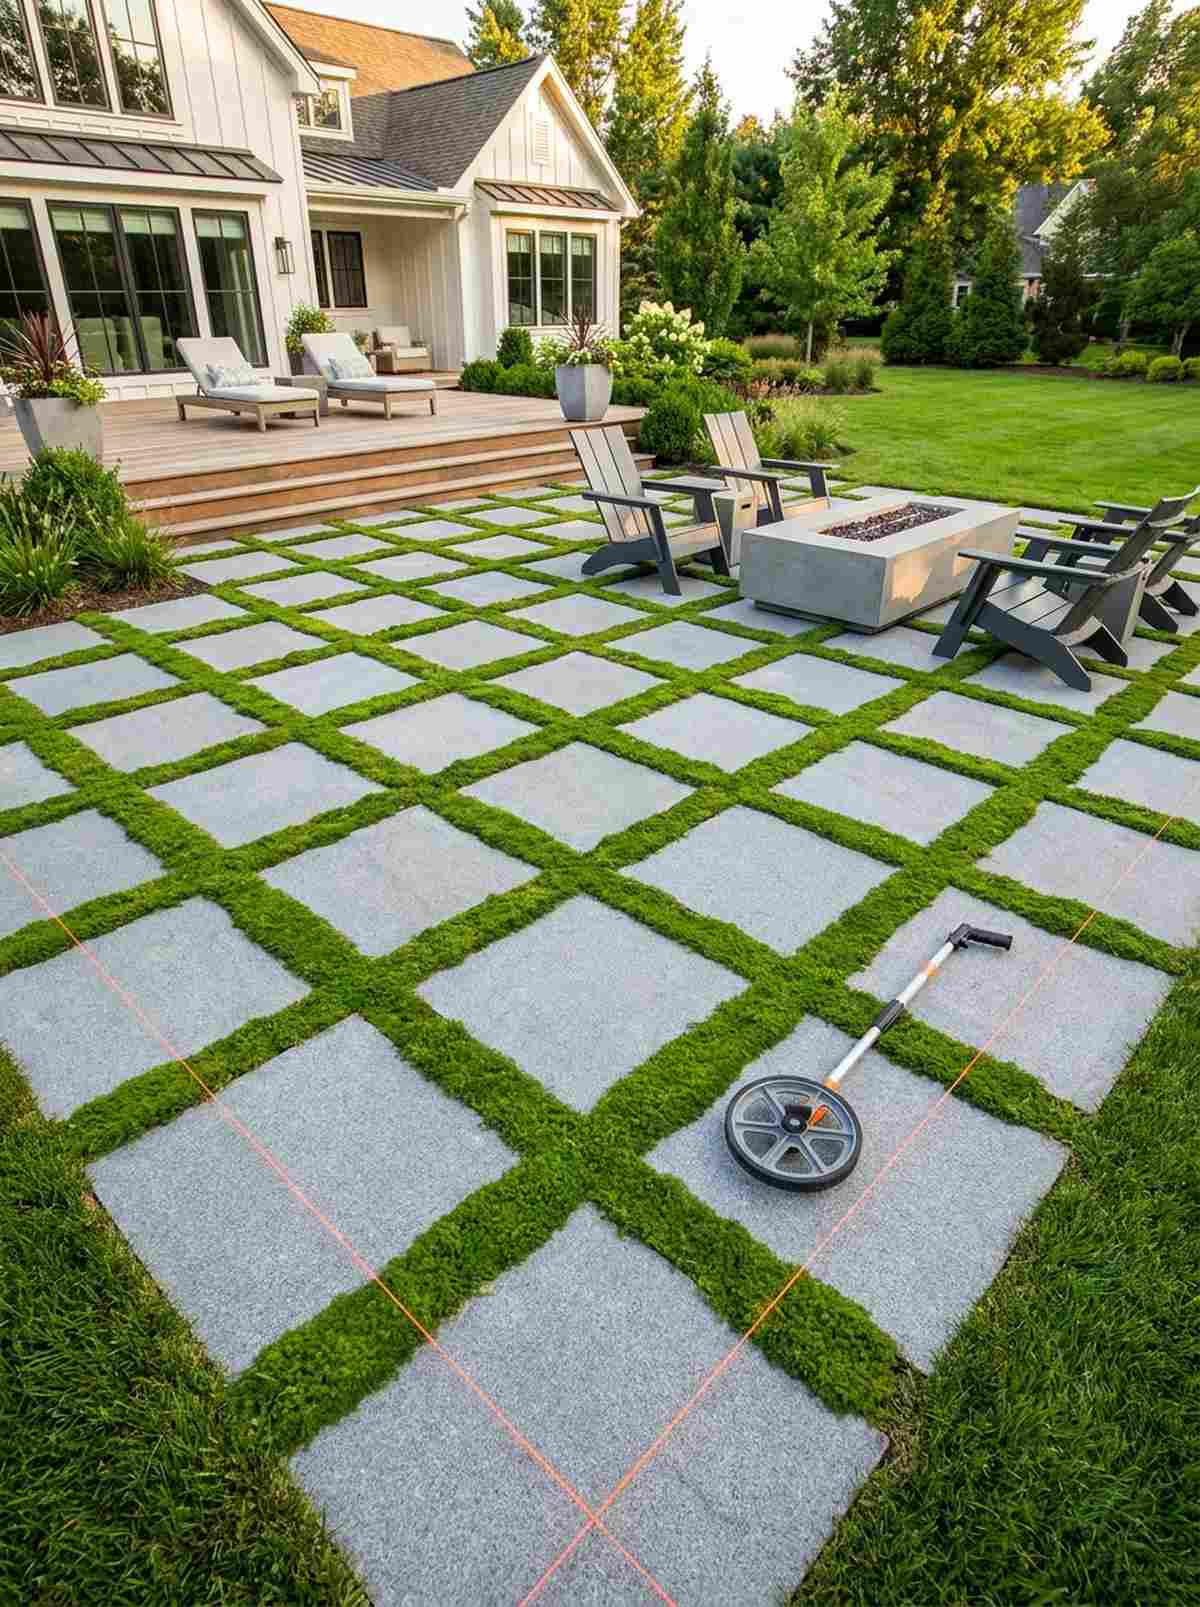
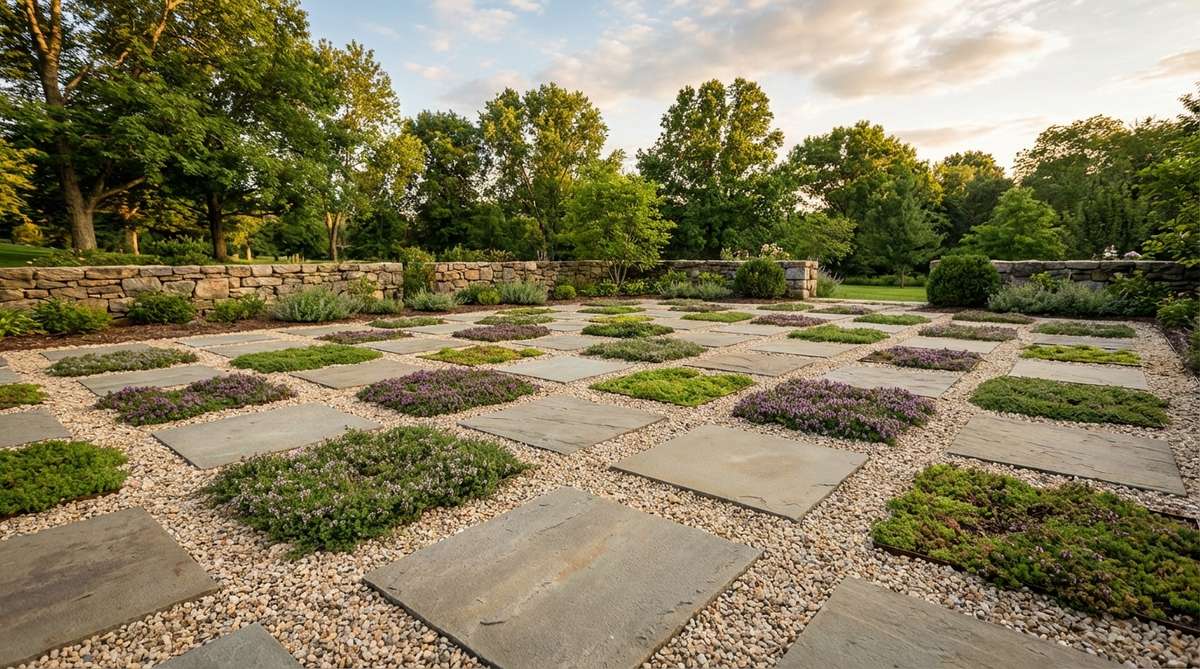
Radiates hyper-organized perfection that feels like an avant-garde urban park space. This structured stone grid layout replaces messy lawns with pristine, low-maintenance architectural geometry.
Randomly scattered stones look chaotic, but measuring a flawless grid of uniform pavers separated by contrasting groundcover looks incredibly expensive. Utilizing a heavy-duty landscaping measuring wheel ensures your grid spacing is mathematically perfect.
Executing this flawless grid costs roughly $250–$500. Save this if you crave absolute symmetry and order.
- Key Materials: Uniform square pavers, creeping groundcover (like Irish moss).
- Vibe / Style: Ultra-crisp architectural grid.
- Difficulty: High (precision measurement is mandatory).
- Budget Breakdown: Square Pavers: $300 | Groundcover/Soil: $80.
- Creator’s Tip: Use tightly pulled mason line strings across the entire yard to keep the pavers perfectly aligned in both directions.
- Smart Sourcing: Order fluorescent nylon mason line rolls and live Irish moss flat trays.
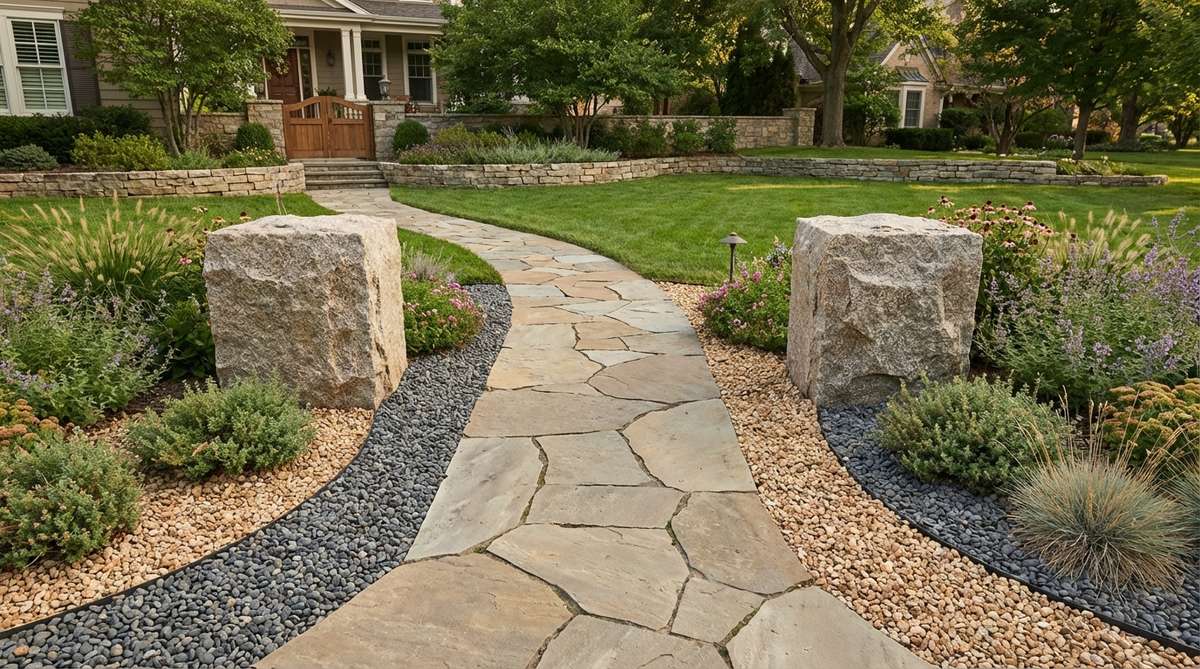
37. Linear Boulder Alignment
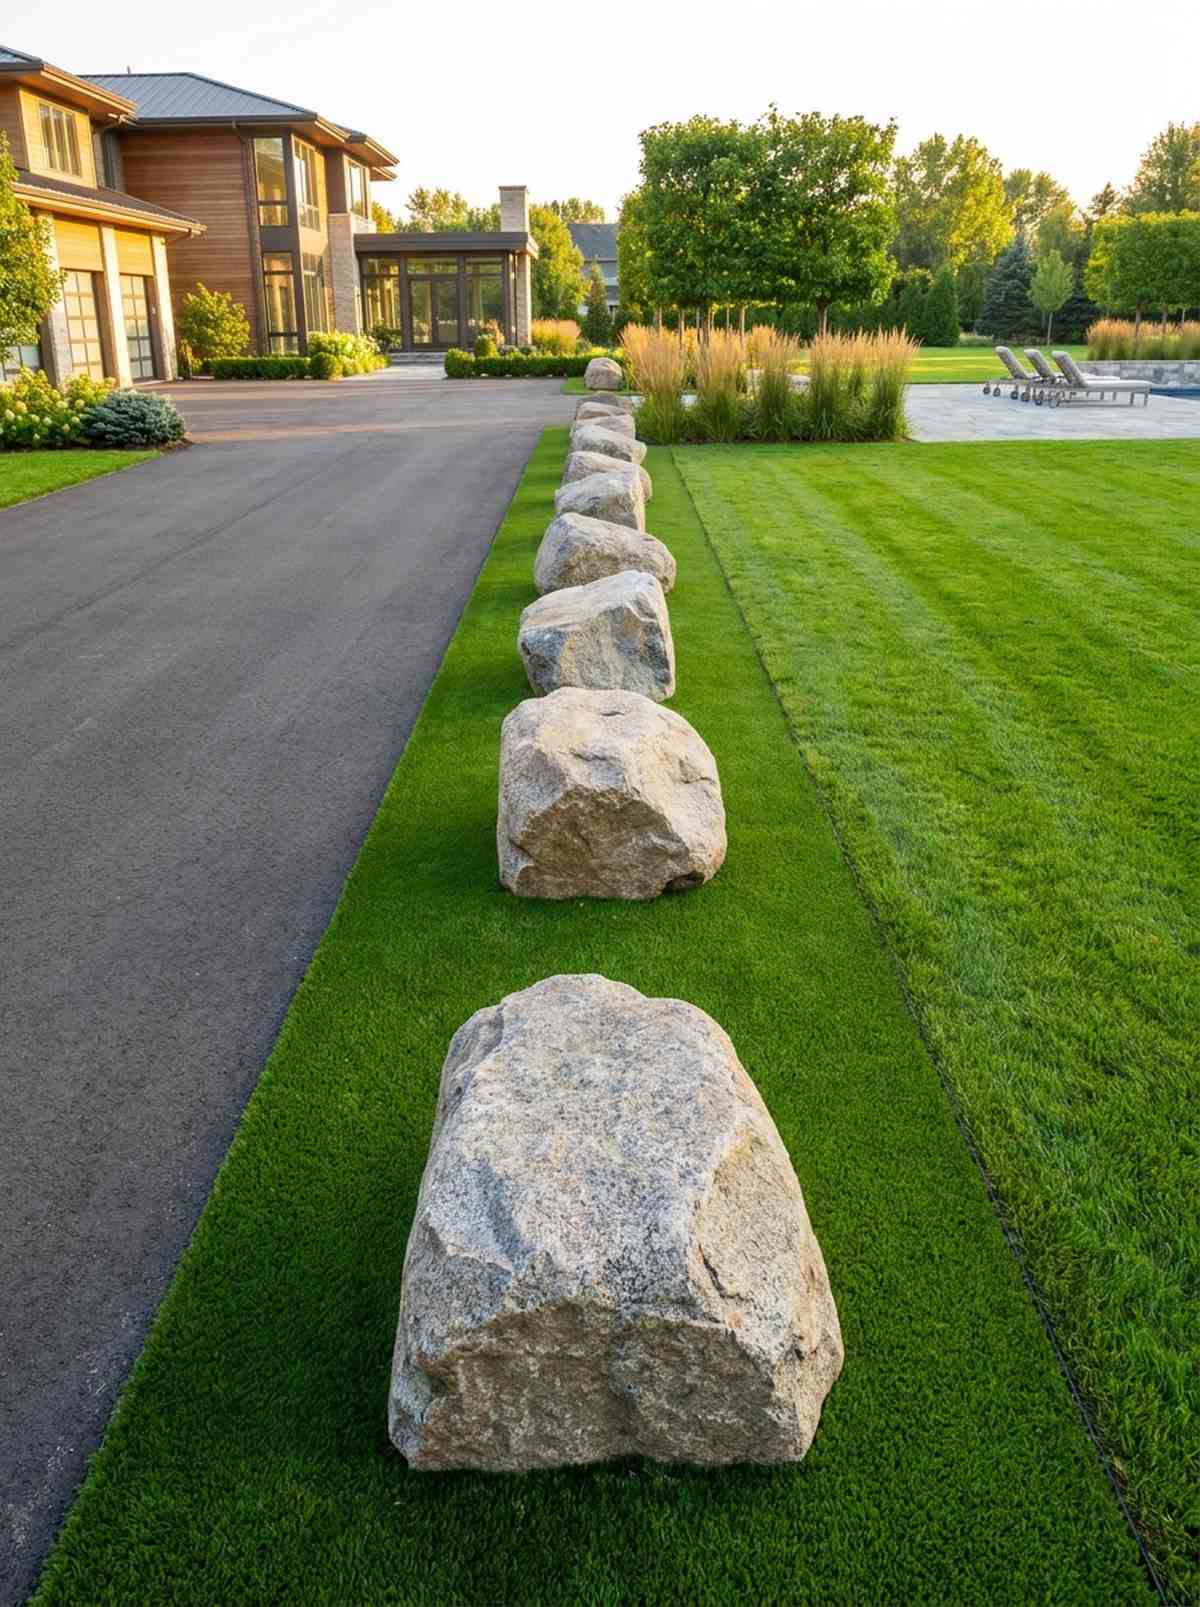
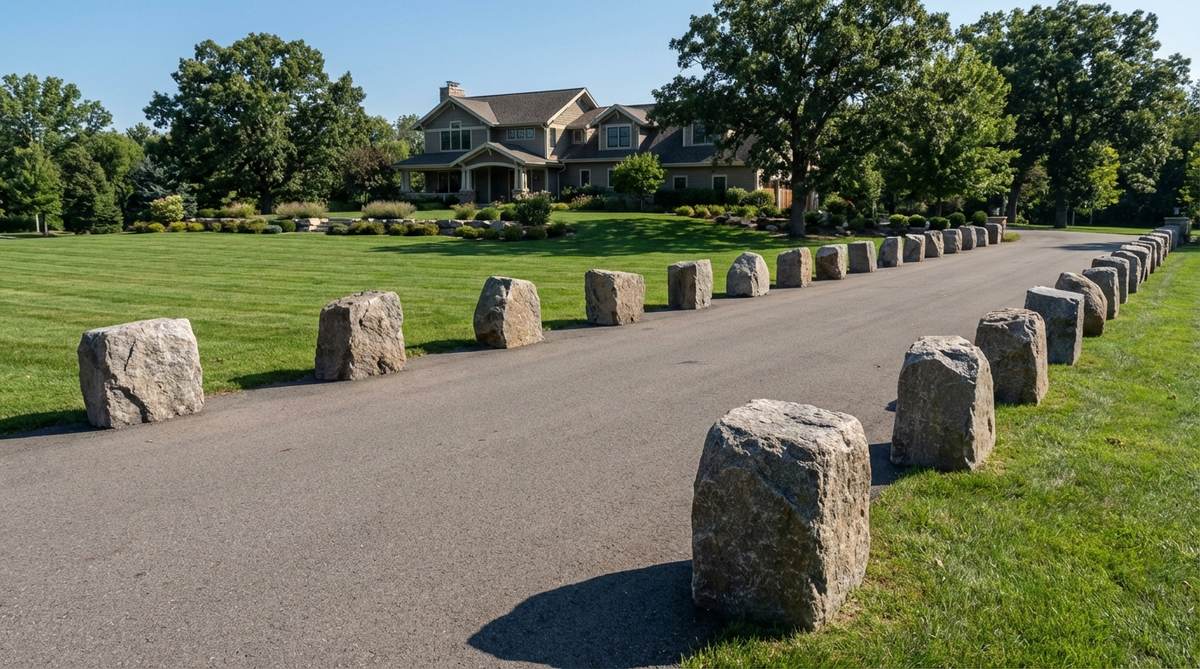
Draws a powerful visual boundary that feels like a contemporary art installation dividing your property. This linear stone border design boldly highlights property lines or long driveways without the need for an ugly fence.
Fences close a yard in, but a spaced line of similarly sized boulders delivers a surprisingly premium look while maintaining open sightlines. Surrounding the base of the stones with a crisp line of pre-cut artificial turf strips creates a shocking, gorgeous texture contrast.
You can line a driveway for about $300–$600 depending on length. A massive upgrade for upscale modern estates.
- Key Materials: Similar sized boulders, linear base material.
- Vibe / Style: High-end estate boundary.
- Difficulty: Moderate.
- Budget Breakdown: Boulders: $400 | Base Contrast: $100.
- Creator’s Tip: Don’t make the rocks identical in shape; it’s the identical spacing and roughly similar mass that creates the architectural rhythm.
- Smart Sourcing: Invest in a heavy-duty landscape boulder dolly and premium synthetic turf border strips.
Transforming Your Landscape with Strategic Rock Design
Implementing these 37 effective garden design rock arrangements requires an understanding of both striking aesthetic principles and practical functionality. Whether you are installing heavy-duty erosion control solutions, building dramatic monolith focal points, or layering premium gravel beds, stones provide an architectural foundation that actually appreciates in beauty over time. By bypassing the cheap generic craft aisles and investing in commercial-grade weed barriers, heavy-duty sealants, and smart bulk sourcing, you can lock in a designer-level finish that outlasts any plant or wooden structure. Your investment in these precise stone layouts will reward you with an ultra-premium, low-maintenance sanctuary that shines brilliantly through every season.
Frequently Asked Questions
How deep should gravel beds be for garden design?
For a flawless, premium aesthetic, install gravel beds at a strict 3-4 inches of depth. Anything less looks sparse and invites weeds, while deeper installations up to 6 inches are perfect for high-traffic fire pit zones or thick raked Zen patterns. To ensure your investment doesn’t sink into the mud, absolutely always install a commercial-grade woven weed barrier beneath the aggregate.
What size boulders work best for residential gardens?
Residential landscapes achieve that “designer-level finish” when using focal boulders ranging from 18-36 inches in diameter. Massive properties can scale up to 48-inch statement stones, while tight courtyard spaces need smaller, 12-inch accent rocks. When buying from bulk delivery suppliers, aim for stones that are heavy enough to look deeply anchored but manageable with standard levering tools.
How do I prevent gravel from spreading into lawn areas?
The secret to keeping gravel looking expensive is rigid containment. Ditch the cheap plastic and install permanent edging like heavy-duty aluminum border strips, thick treated timbers, or polymeric sand-locked cobbles. The barrier must sit at least 2 inches above the gravel line, creating an immovable wall that stops mower kick-back and rain washouts completely.
Should I use landscape fabric under rock arrangements?
Yes, but skip the cheap big-box store stuff. Using a professional-grade, 5oz non-woven landscape fabric completely stops weed emergence while allowing massive amounts of water to drain through. If planting, cut tight “X” slits rather than huge holes to maintain the weed shield. For giant, multi-ton boulders, you can skip the fabric underneath since the sheer weight prevents any growth.
What rocks complement contemporary versus traditional architecture?
Contemporary, high-end homes pair perfectly with stark, monochromatic stones like crushed black basalt, bright white quartz, or uniform slate chips. Traditional, cottage-style landscapes demand organic warmth, which is achieved perfectly by sourcing bulk multi-color river rock packs, weathered limestone fieldstones, and warm-toned sandstone outcroppings.
How many boulders create an effective focal point?
Always follow the asymmetric rule: use odd-numbered groupings of 1, 3, or 5 boulders. A single giant monolith looks highly modern, while a graduated triplet creates stunning natural complexity. Never use even numbers or symmetrical spacing (unless flanking a formal gateway), and always use a premium stone landscape adhesive to lock smaller supporting accent stones around the base.