This exact blueprint totally transforms your standard outdoor decor patio into a luxury retreat. Get the precise material lists and setup secrets that deliver a premium aesthetic without the designer price tag.
Design Snapshot Key Principles
- Zone Definition: Establish clear functional areas using planters, level changes, or furniture orientation while maintaining visual connectivity
- Traffic Flow: Design pathways 36-48 inches wide between zones to prevent bottlenecks during gatherings
- Scale Balance: Position largest furniture pieces first along longest edges to anchor the space and create proportion
- Focal Integration: Orient seating toward natural or created focal points like fire features, water elements, or view corridors
Dual-Zone Patio Configurations
Creating separate but connected dining and lounging areas maximizes patio functionality without requiring physical walls. Designers achieve this through strategic furniture placement, level transitions, or soft partitioning elements that maintain sightlines while signaling distinct purposes.
1. Parallel Axis Layout with Planter Divider
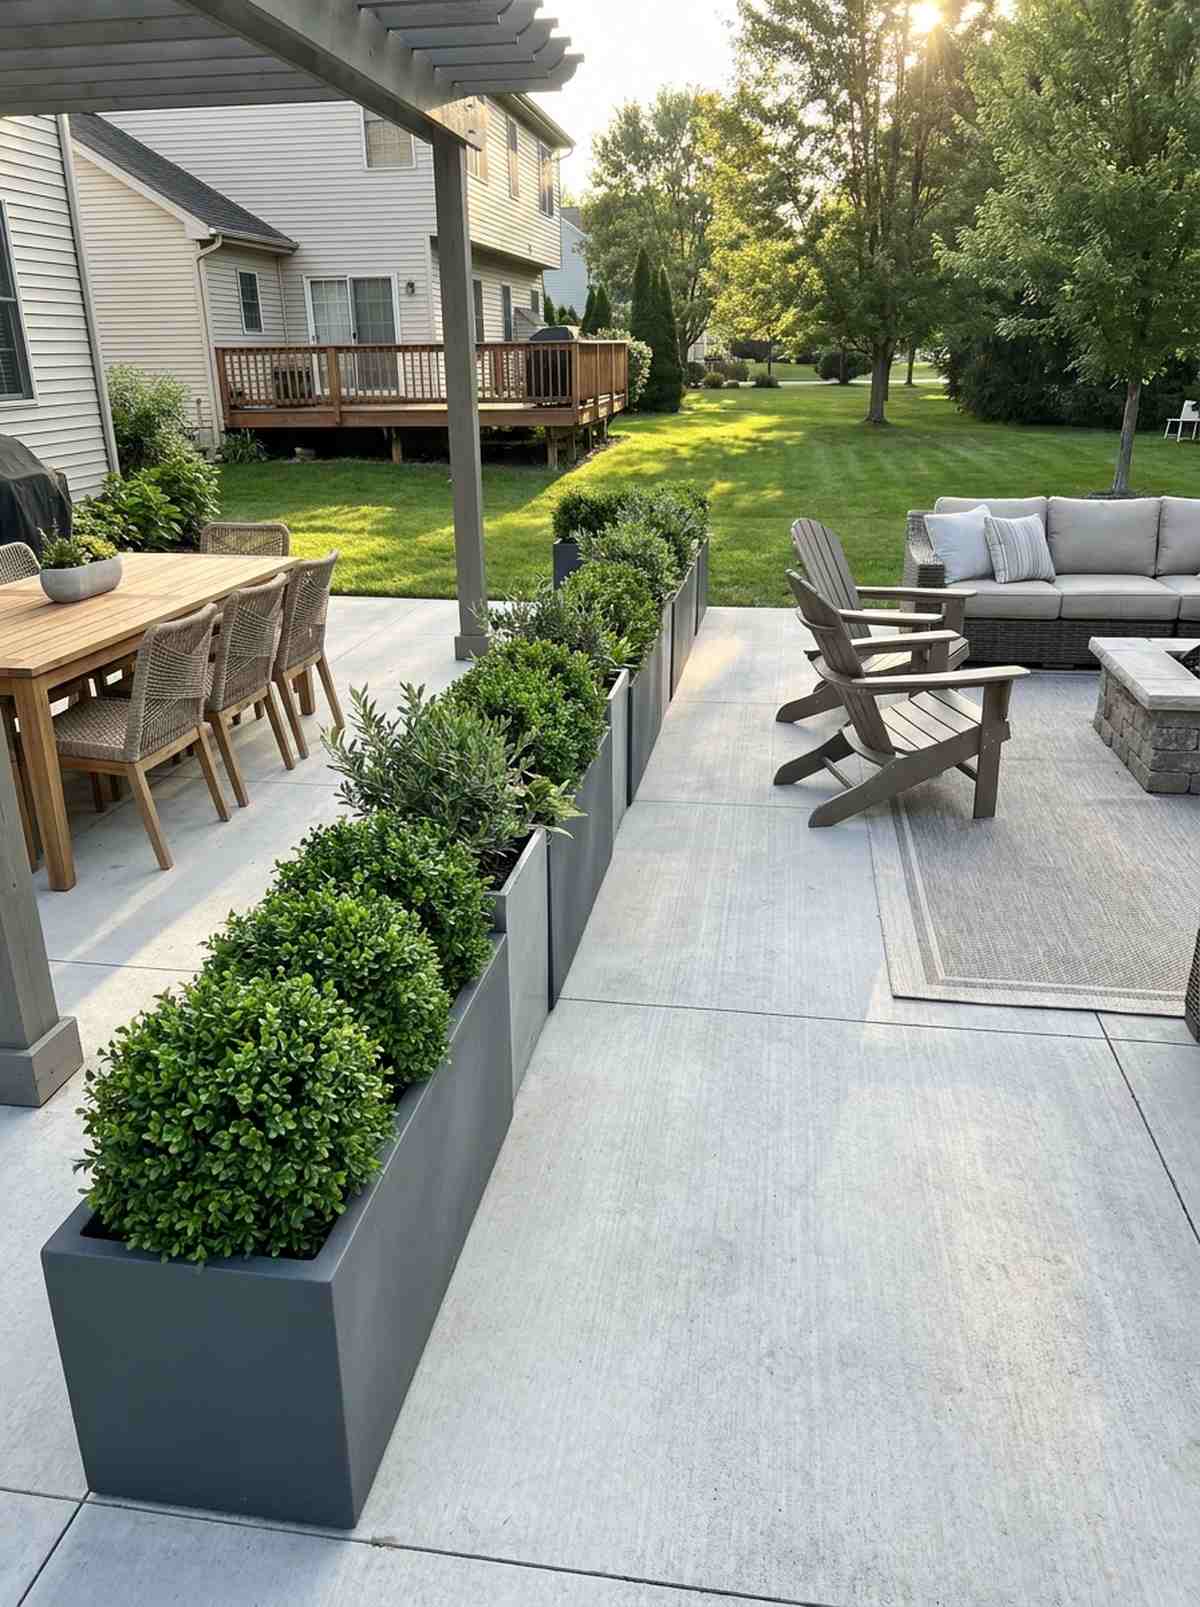
Feels like a secret Mediterranean courtyard you stumbled into. A linear garden planter divider creates a stunning natural wall, making it exceptionally perfect for long, undefined backyard spaces.
Instead of pouring concrete for permanent walls, using waist-high planters delivers a surprisingly premium look. Stocking up on commercial-grade weather-resistant planters allows you to separate the dining and lounging areas flawlessly.
You can execute this division strategy for around $150–$300 depending on the foliage. Pin this if you need to break up a massive concrete slab!
- Key Materials: UV-coated rectangular fiberglass planters
- Vibe / Style: Modern coastal retreat
- Difficulty: Easy weekend project
- Budget Breakdown: Planters: $200 | Soil/Greenery: $80
- Creator’s Tip: Use fake UV-protected boxwood inserts if you don’t want to water them.
- Smart Sourcing: Pre-drilled metal planter troughs and bulk pack artificial boxwood panels.
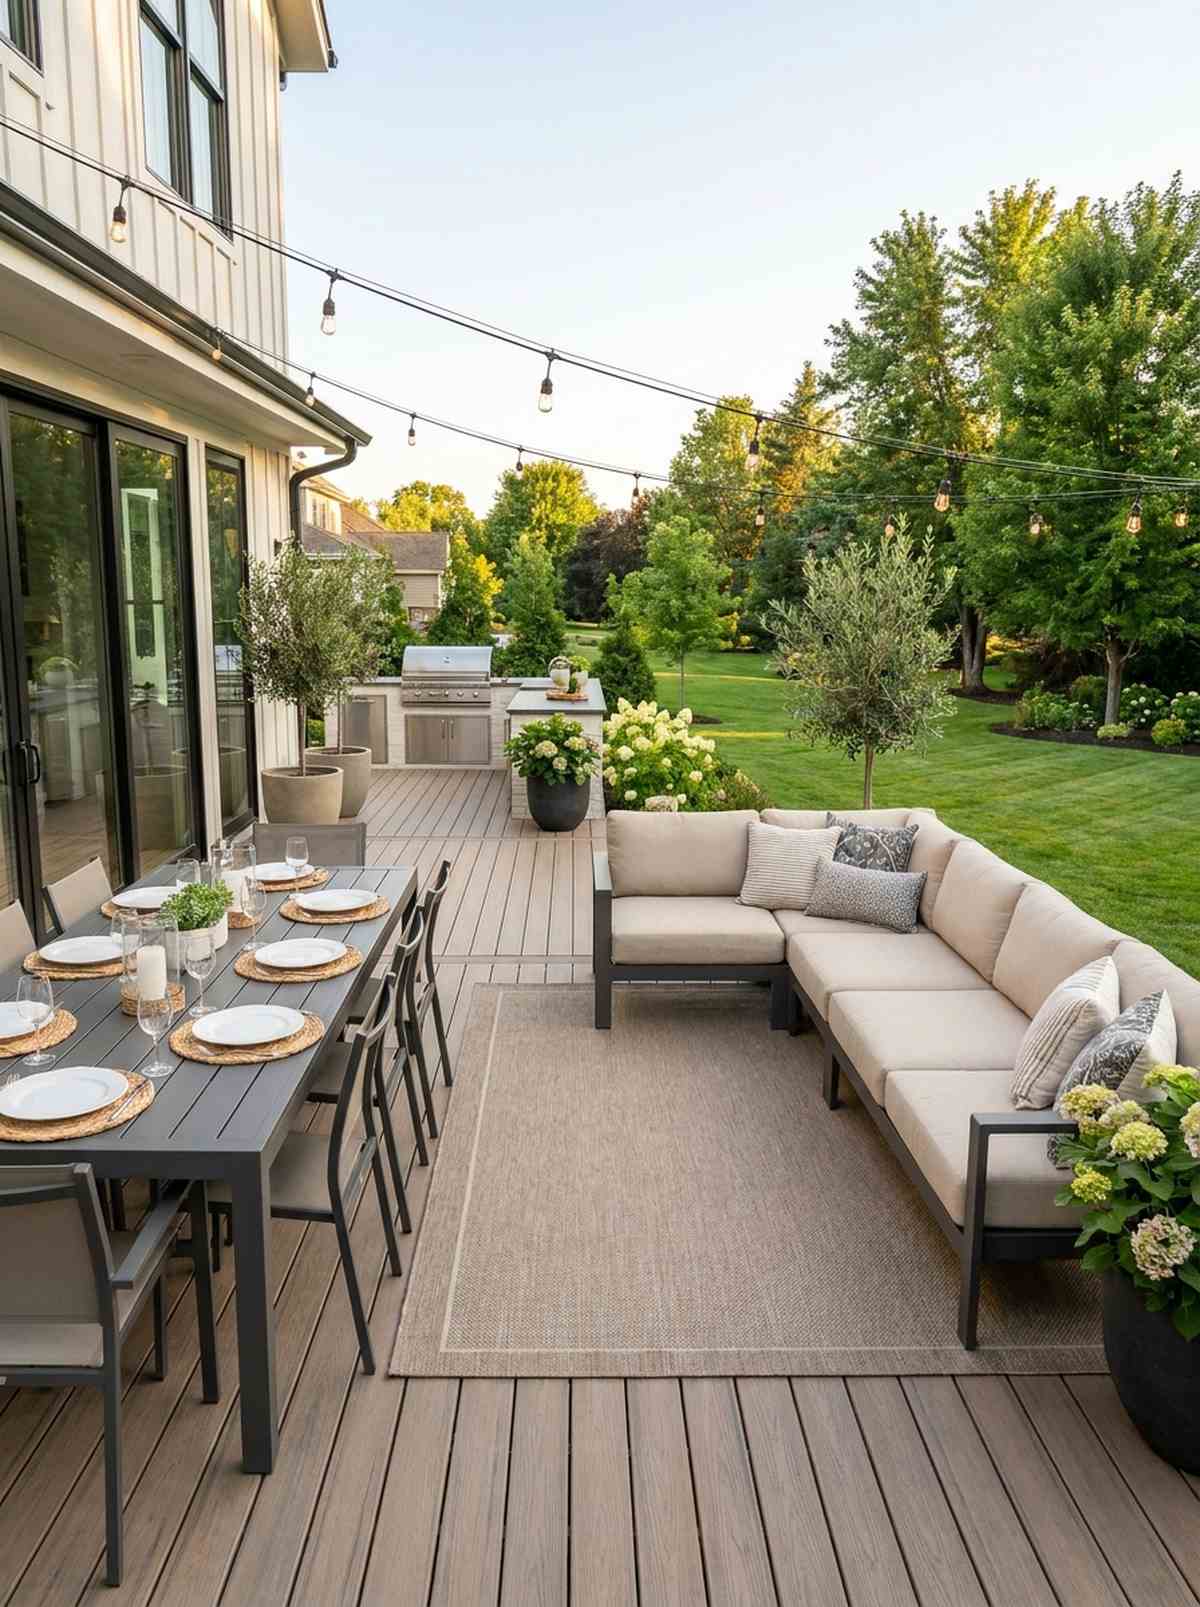
2. L-Shaped Corner Segregation
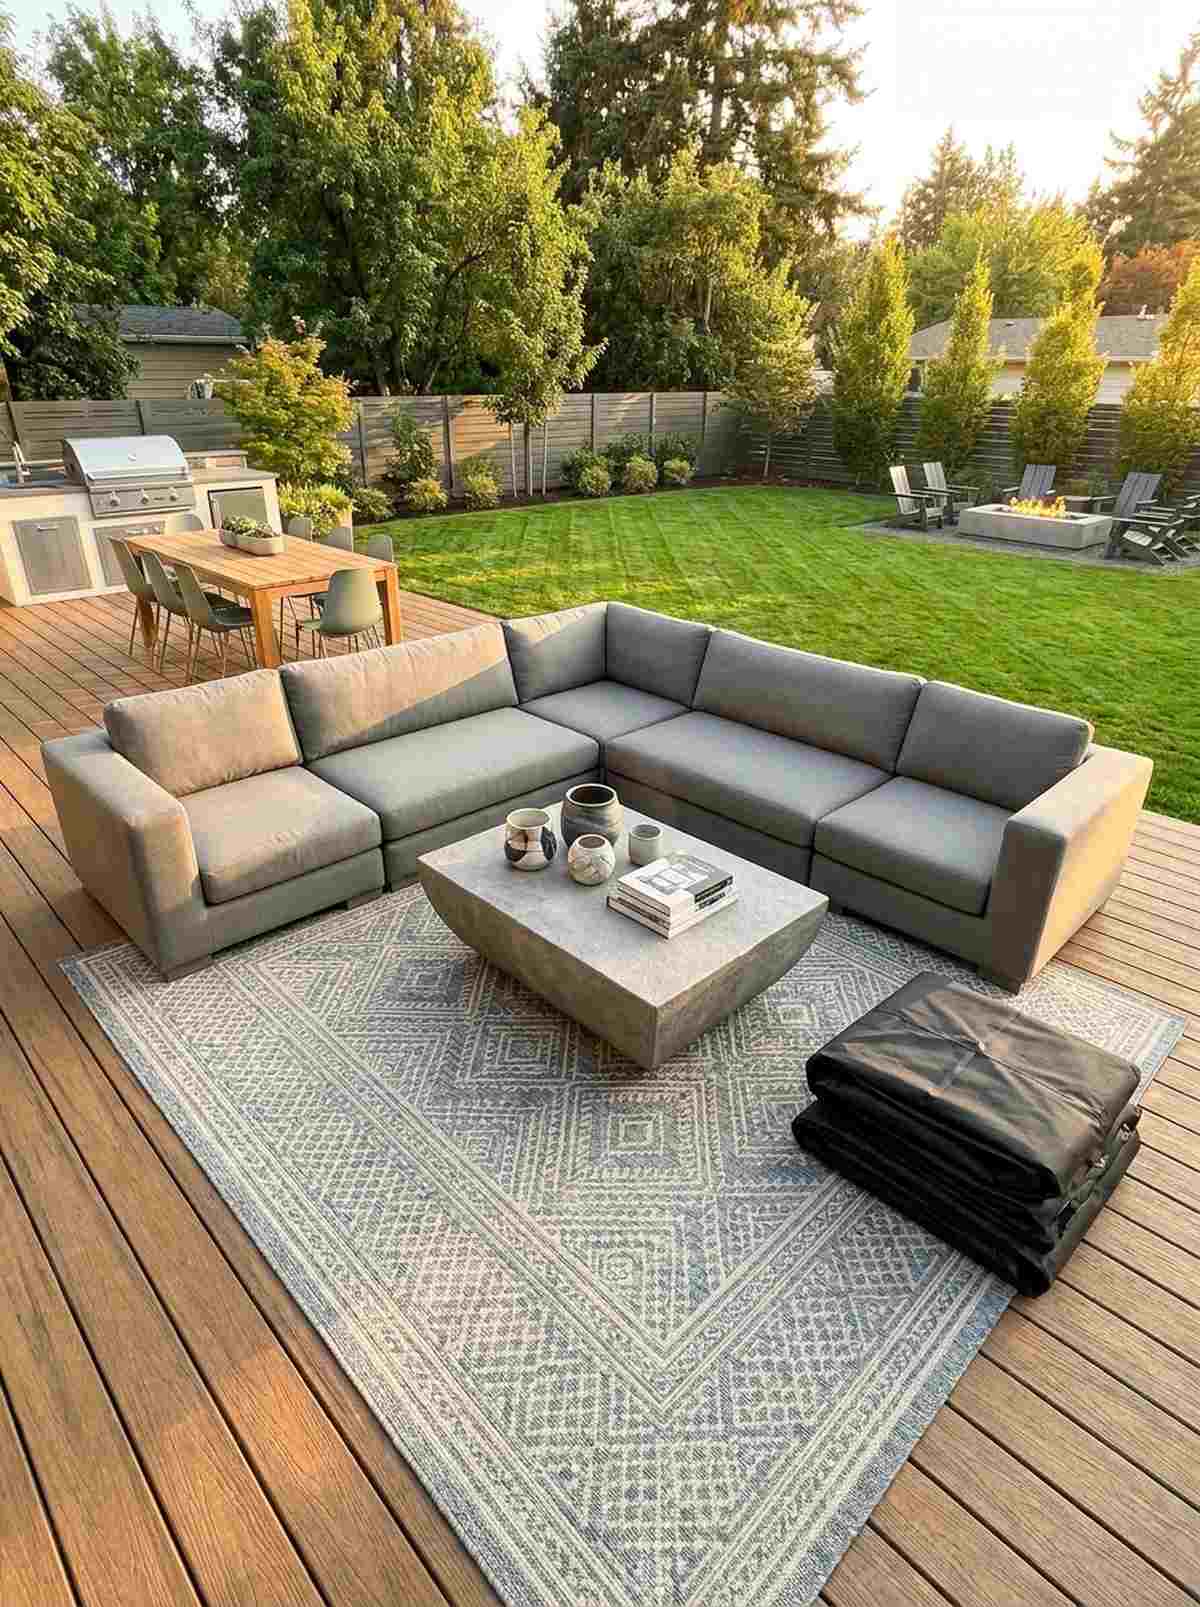
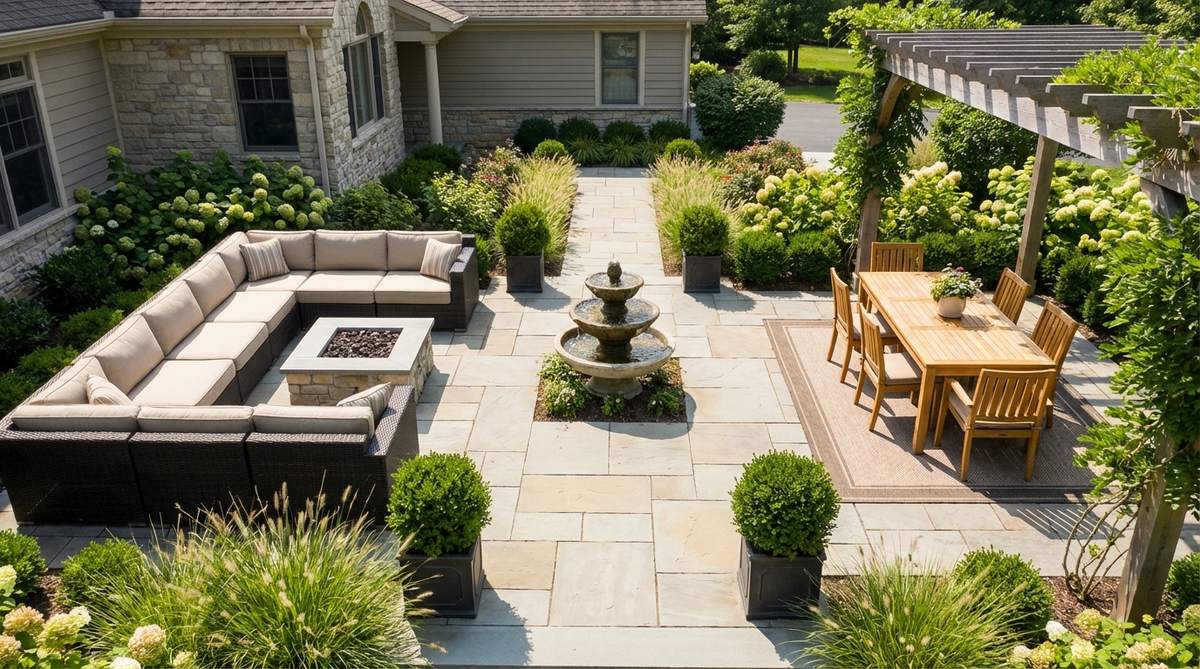
Gives off an immediate private boutique hotel energy. The L-shaped sectional corner setup anchors the relaxation zone, working beautifully for square footprints that lack structure.
Arranging your furniture perpendicular to the dining table looks far more expensive than scattering chairs aimlessly. By adding top-rated modular sectional covers, you protect the investment while keeping a pristine visual flow.
The layout shift costs literally zero dollars, just muscle power. It’s a fast upgrade that completely changes the vibe of the yard.
- Key Materials: Modular sectional couch, oversized outdoor rug
- Vibe / Style: Sleek urban terrace
- Difficulty: Zero-skill required
- Budget Breakdown: Rugs: $120 | Accent decor: $40
- Creator’s Tip: Place a heavy stone focal piece exactly where the two imaginary lines meet.
- Smart Sourcing: Heavy-duty waterproof sectional covers and UV-stabilized outdoor corner rugs.
3. Elevated Dining Platform
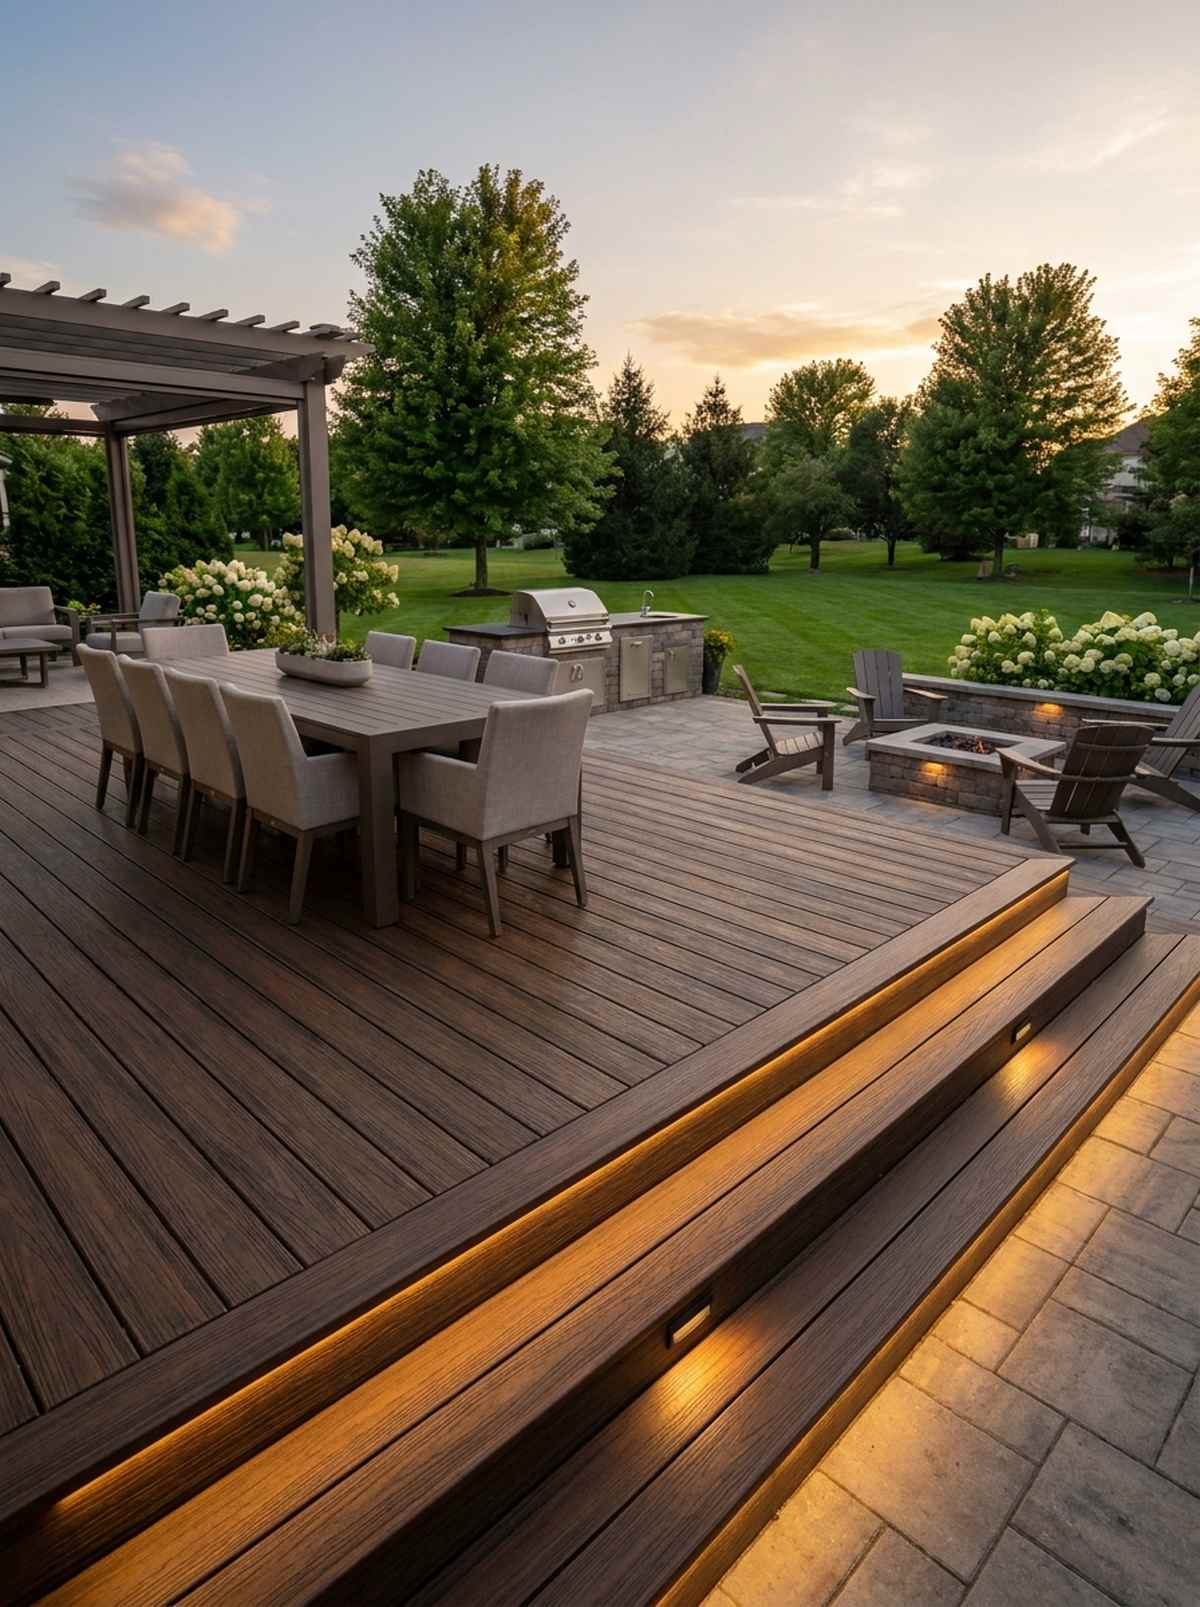
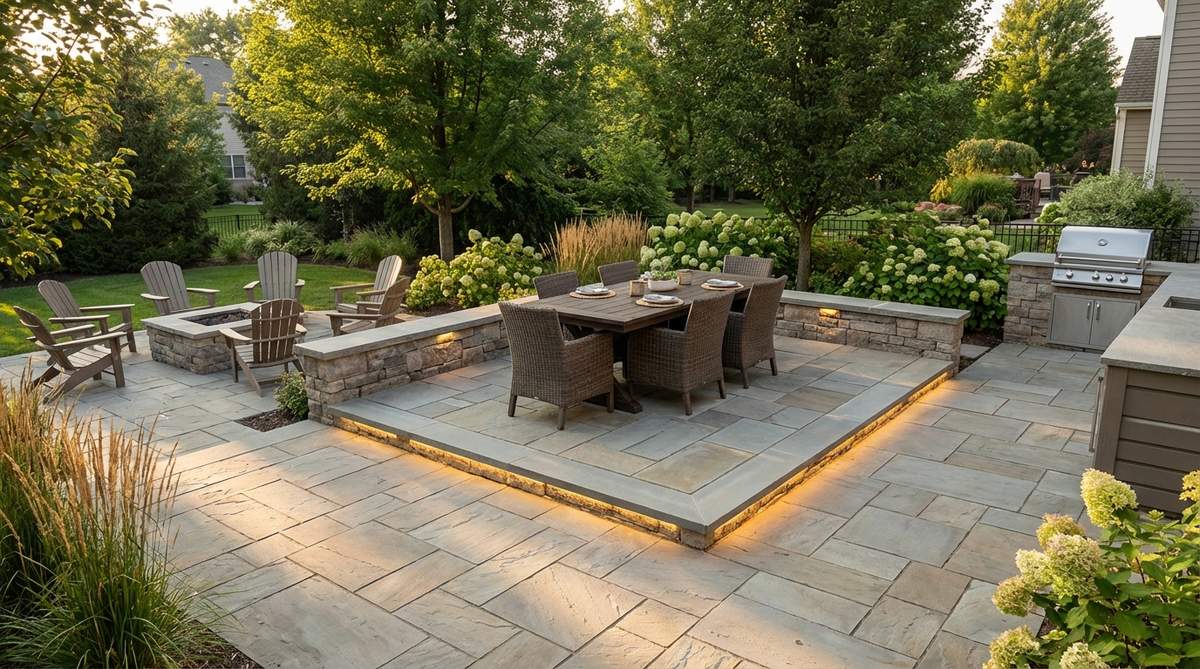
Straight out of a luxury real estate magazine. An elevated wooden dining deck forces a psychological shift between eating and relaxing, ideal for yards with slight natural slopes.
Adding a 10-inch step-up gives a designer-level finish that blows basic flat layouts out of the water. Utilizing high-end composite decking kits ensures this separation handles heavy foot traffic without rotting.
Expect to spend roughly $400–$800 for the platform materials. Save this to your DIY weekend backyard board!
- Key Materials: Composite decking boards, LED stair risers
- Vibe / Style: Architectural modernism
- Difficulty: Intermediate woodworking
- Budget Breakdown: Lumber/Composite: $600 | Lighting: $150
- Creator’s Tip: Run waterproof LED strips under the lip of the platform for an insane nighttime glow.
- Smart Sourcing: Pre-grooved composite deck boards (bulk pack) and marine-grade LED strip lighting kits.
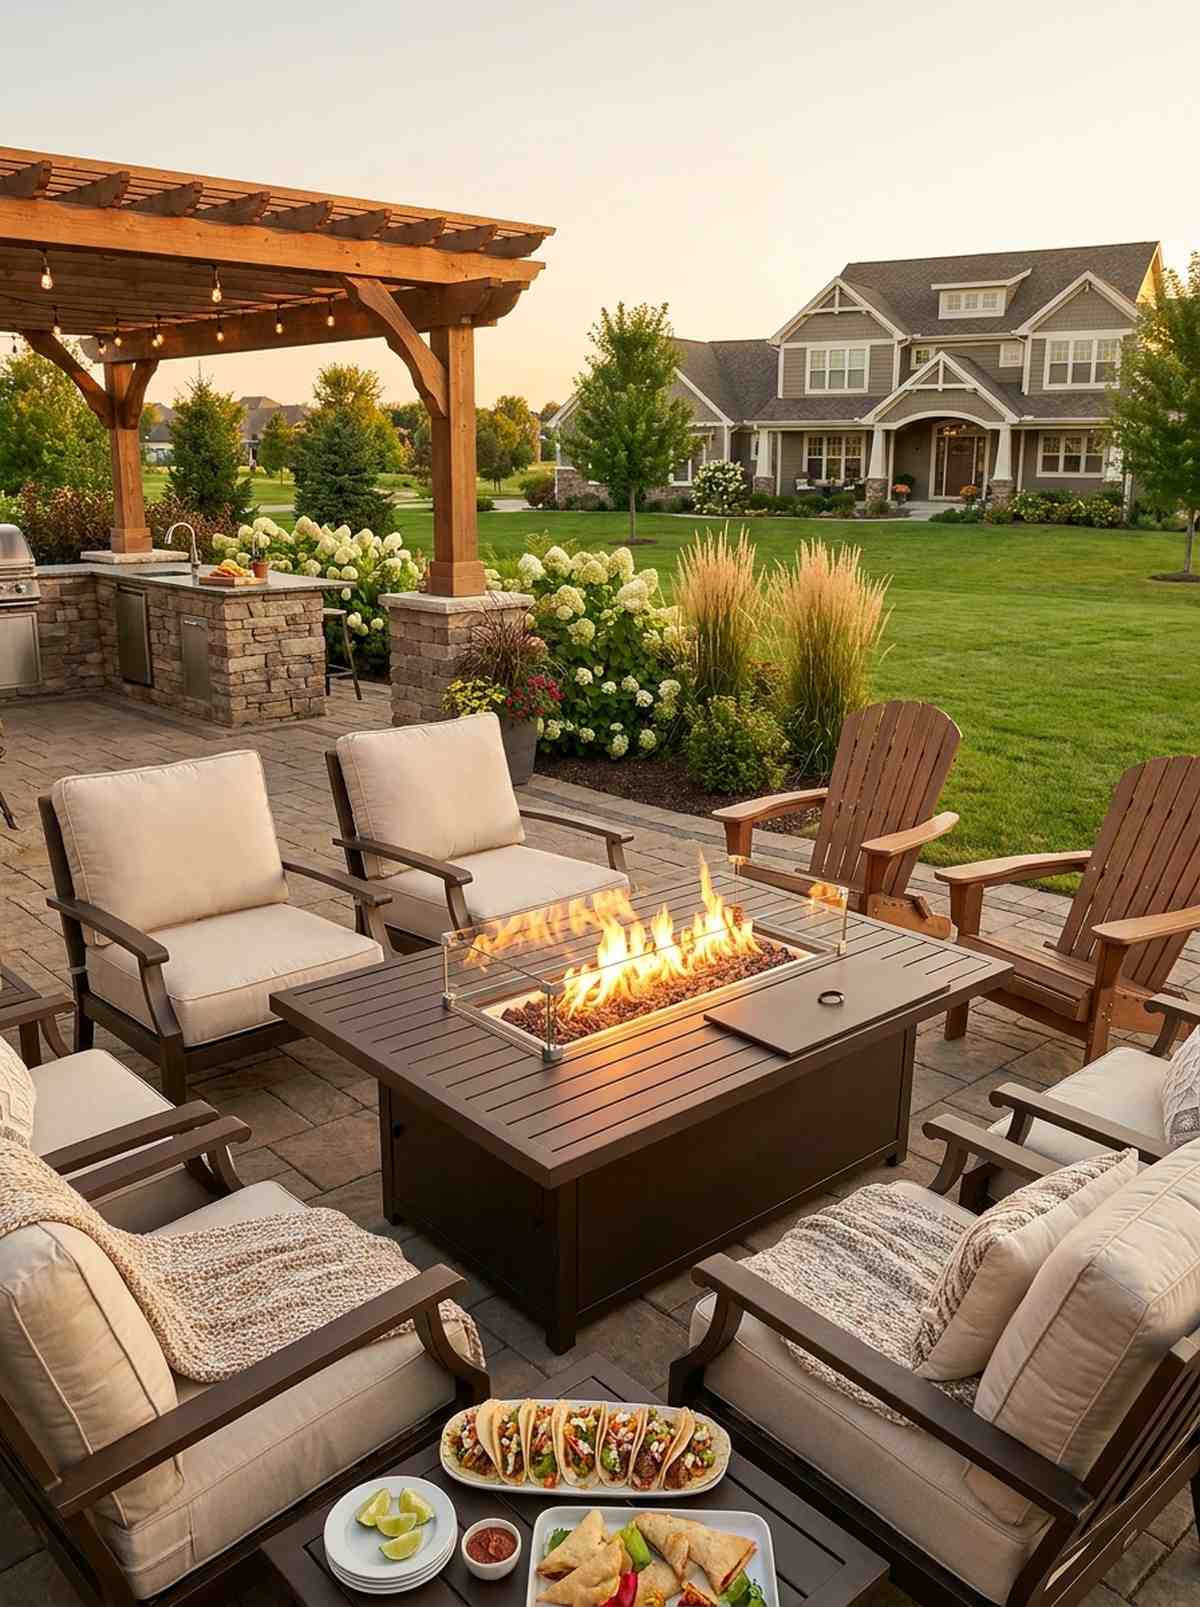
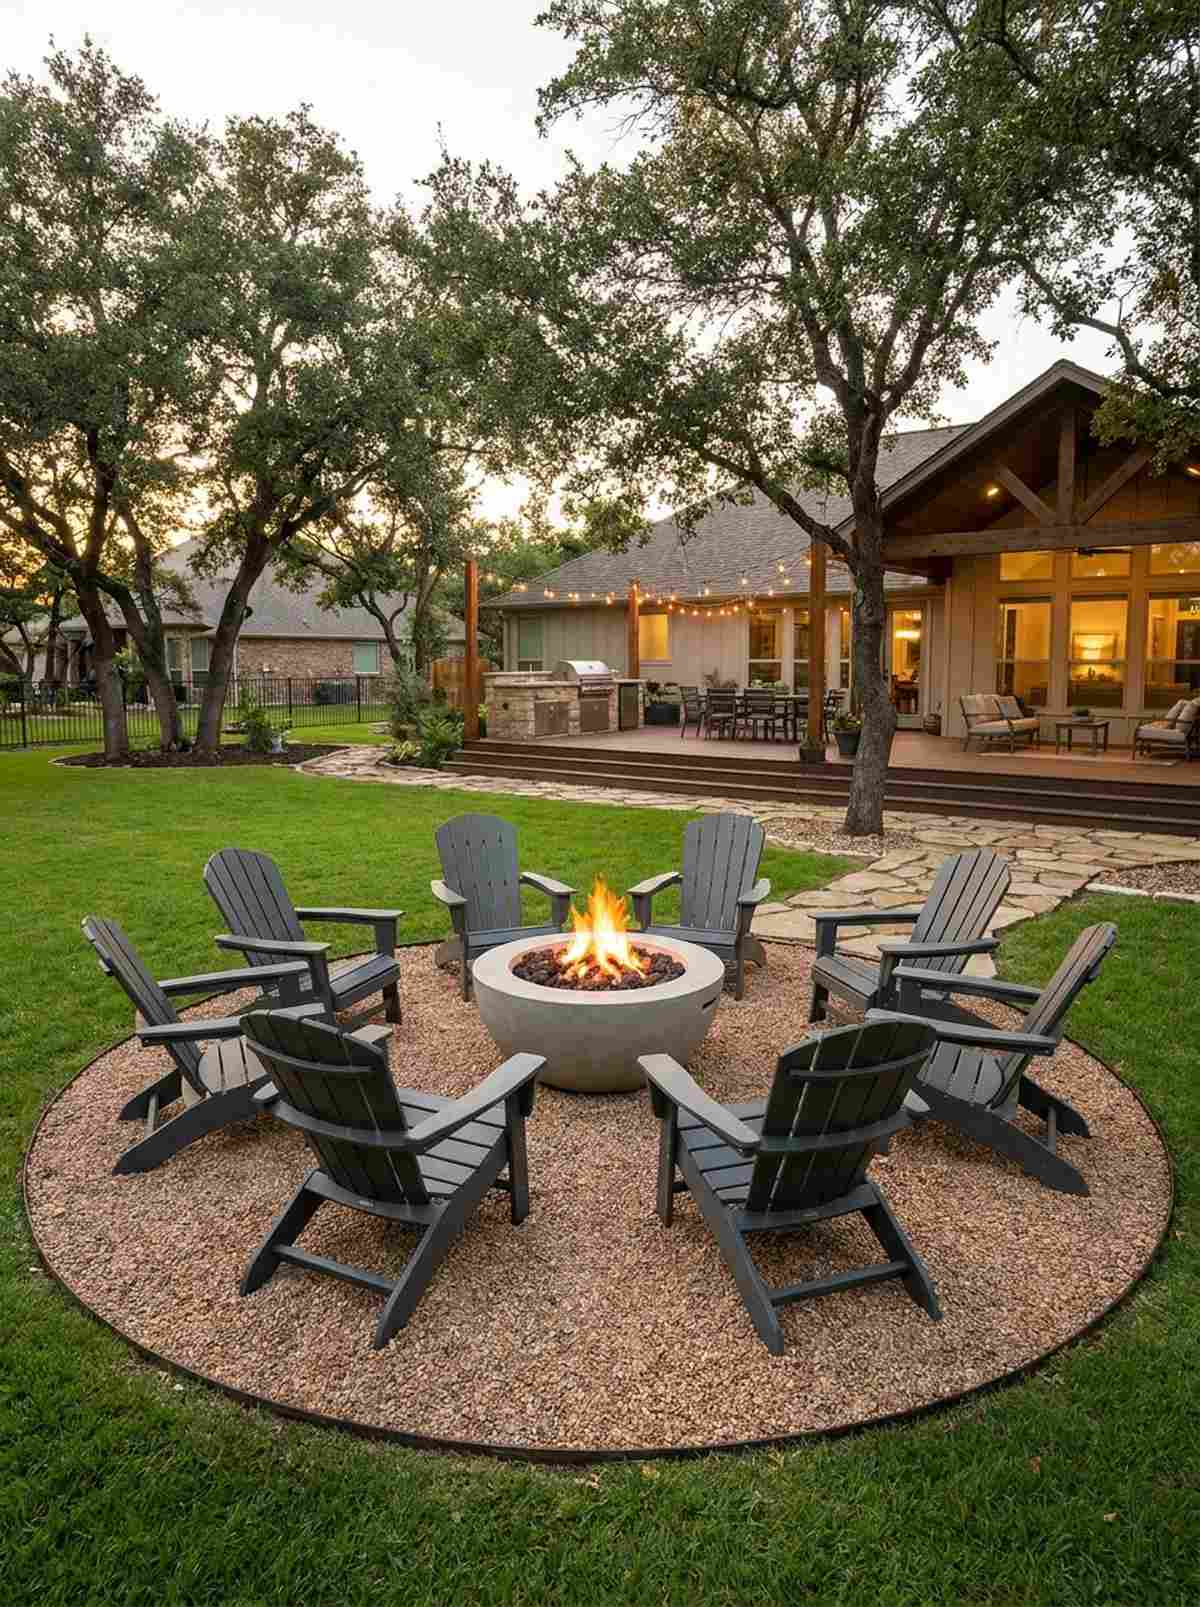
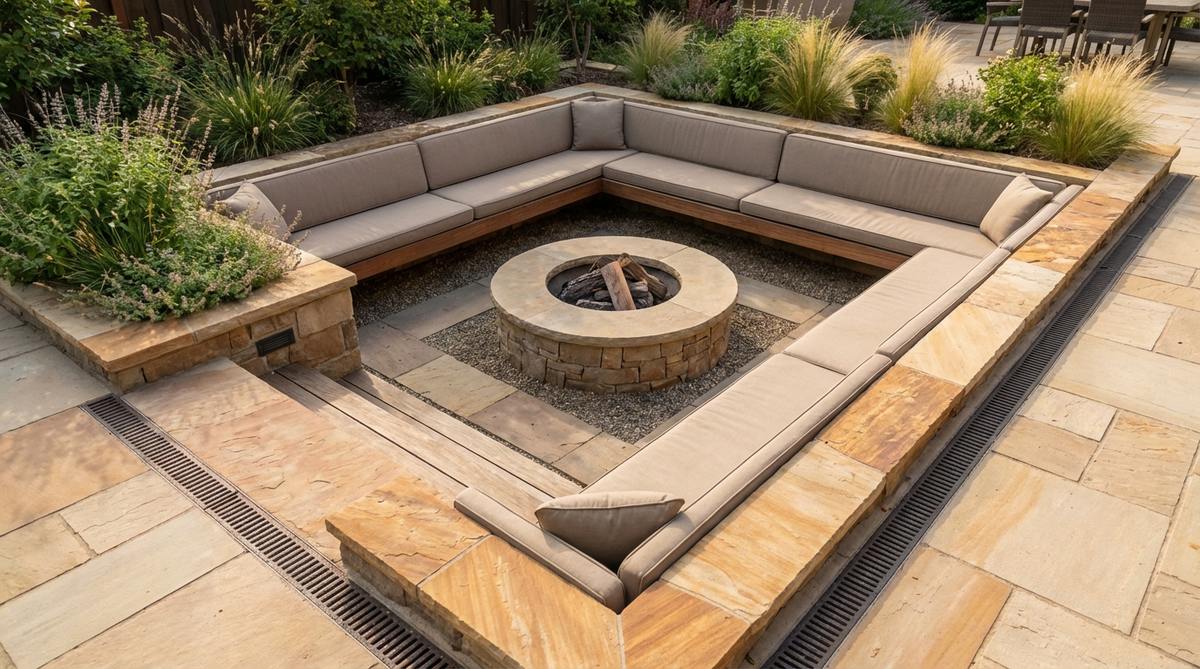
4. Circular Fire Pit Hub with Radiating Zones
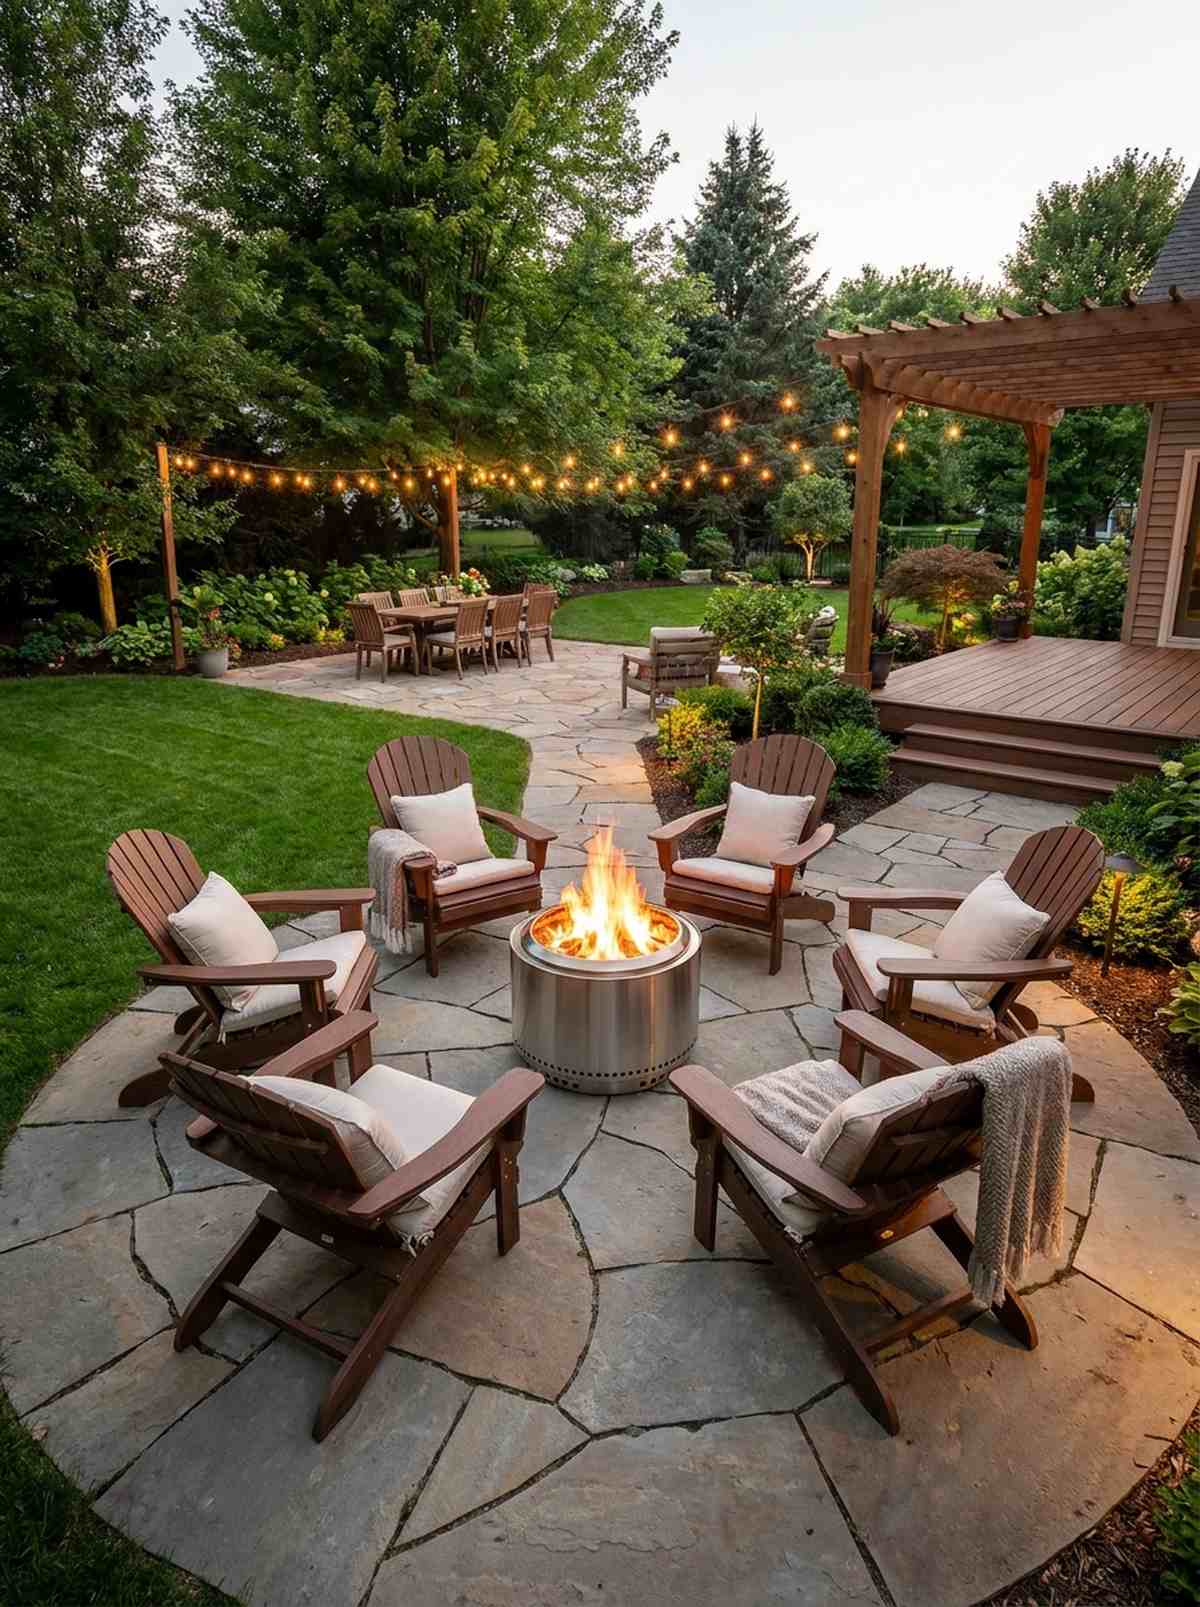
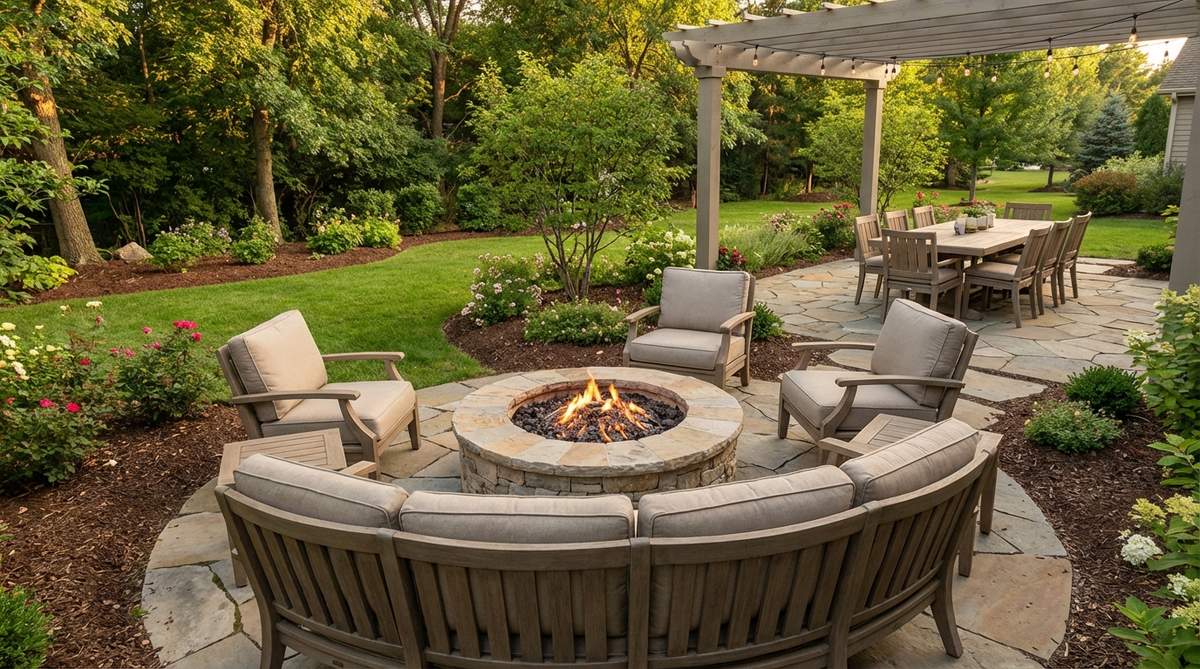
Feels like a cozy wilderness lodge gathering. The centralized fire pit lounge pulls everyone together naturally, making it the ultimate setup for round or irregular patios.
Placing fire elements as the core anchor completely alters how guests interact with the space. Upgrading to a smokeless stainless steel fire bowl ensures nobody gets choked out while eating dinner nearby.
You can easily pull this off for $250–$500 with a portable pit. Highly recommended for a quick weekend win.
- Key Materials: Smokeless fire pit, curved adirondack chairs
- Vibe / Style: Elevated campfire chic
- Difficulty: Setup in under an hour
- Budget Breakdown: Fire feature: $300 | Seating: $400
- Creator’s Tip: Maintain exactly 8 feet of clearance between the flame and the dining table.
- Smart Sourcing: Pre-assembled smokeless fire pit kits and heat-deflector base shields.
Most people get their patio layout completely wrong… until they try the exact high-efficiency orientation coming up next.
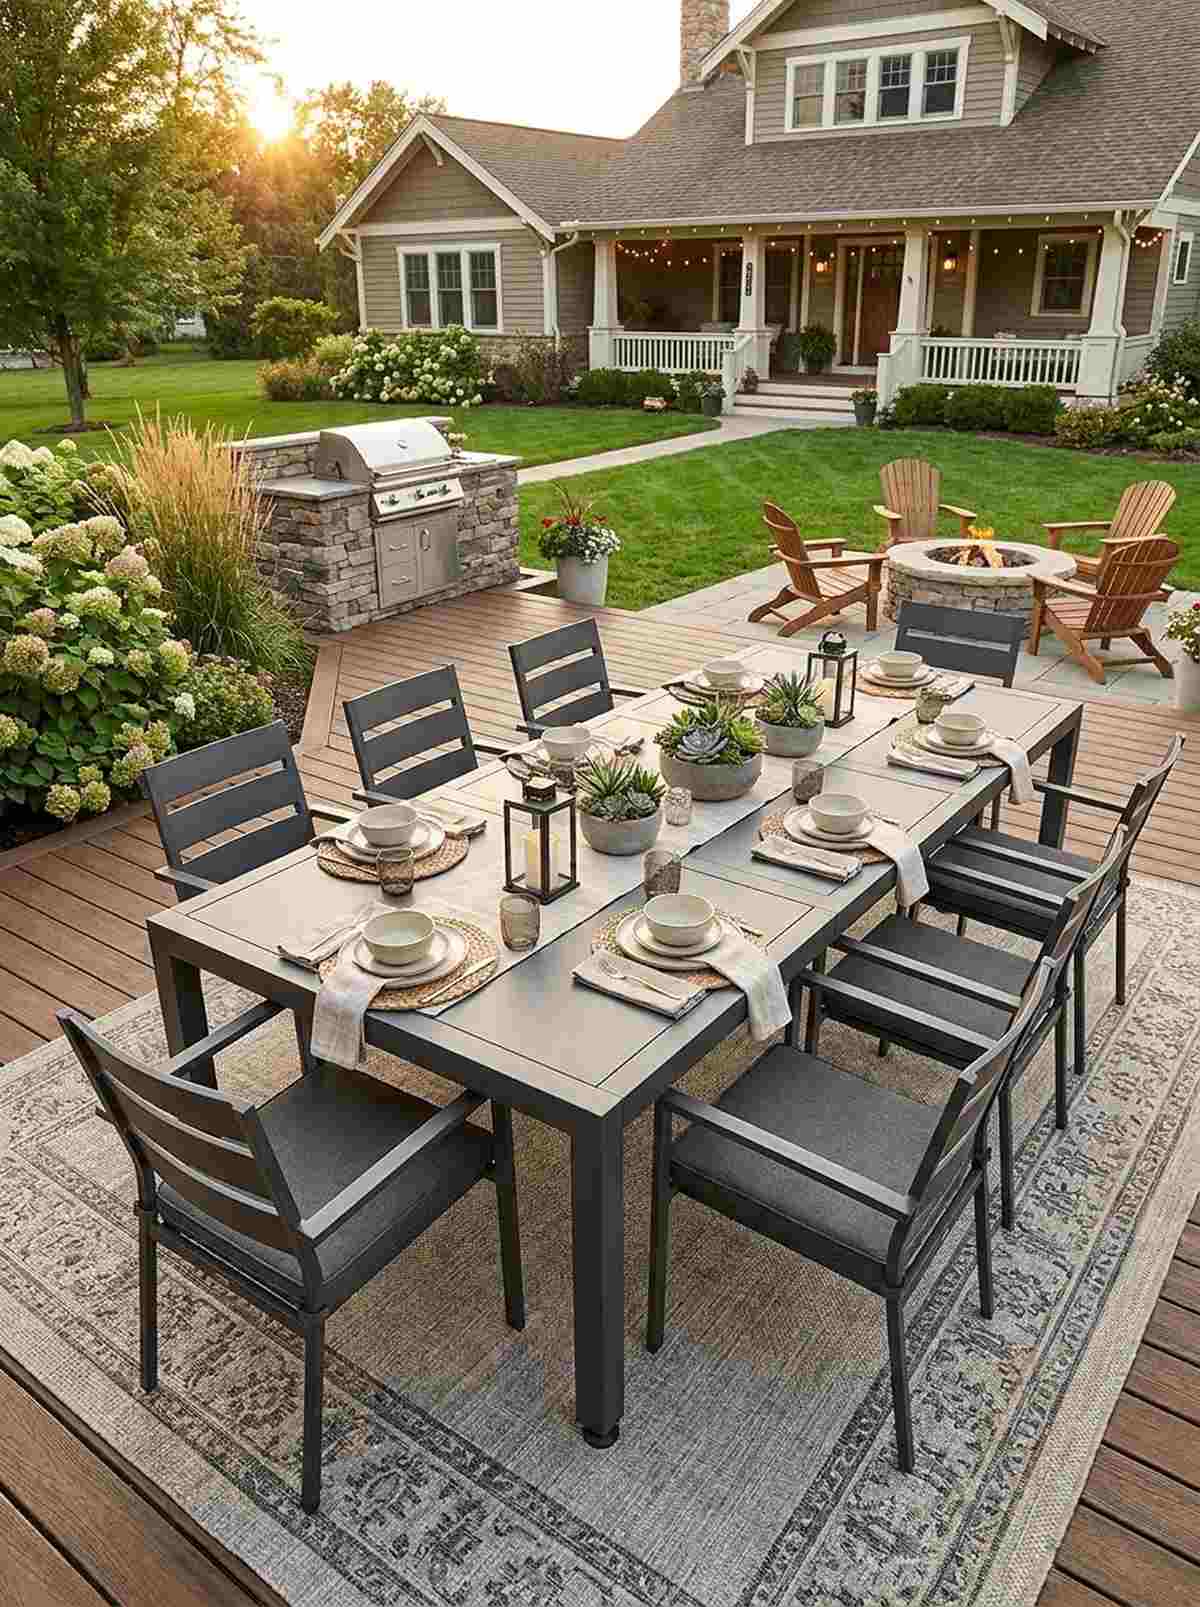
5. Parallel Dining Table with Perpendicular Lounge

Brings a high-efficiency restaurant vibe right to your back door. The T-shaped patio dining layout cuts serving time in half, perfect for hosts who run back and forth to the kitchen.
This stark perpendicular geometry instantly modernizes a boring slab. Snagging an oversized outdoor decor table keeps the dining action flowing parallel to the house while loungers face the garden.
Repositioning your current furniture costs nothing but delivers maximum impact. Pin this if you host frequent summer cookouts!
- Key Materials: Rectangular dining table, low-profile lounge set
- Vibe / Style: Functional host haven
- Difficulty: Beginner friendly
- Budget Breakdown: Table upgrade: $500 | Layout shift: Free
- Creator’s Tip: Leave a minimum 48-inch walkway between the table chairs and the couch back.
- Smart Sourcing: Rust-proof aluminum patio table kits and heavy-weight furniture slider packs.
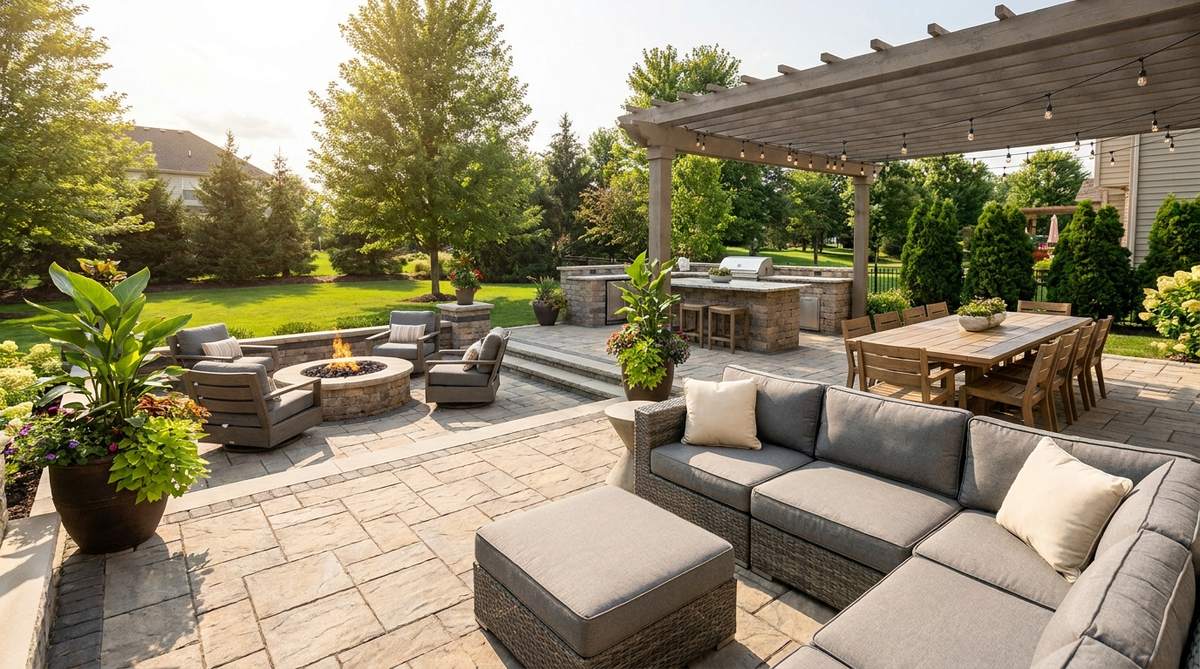
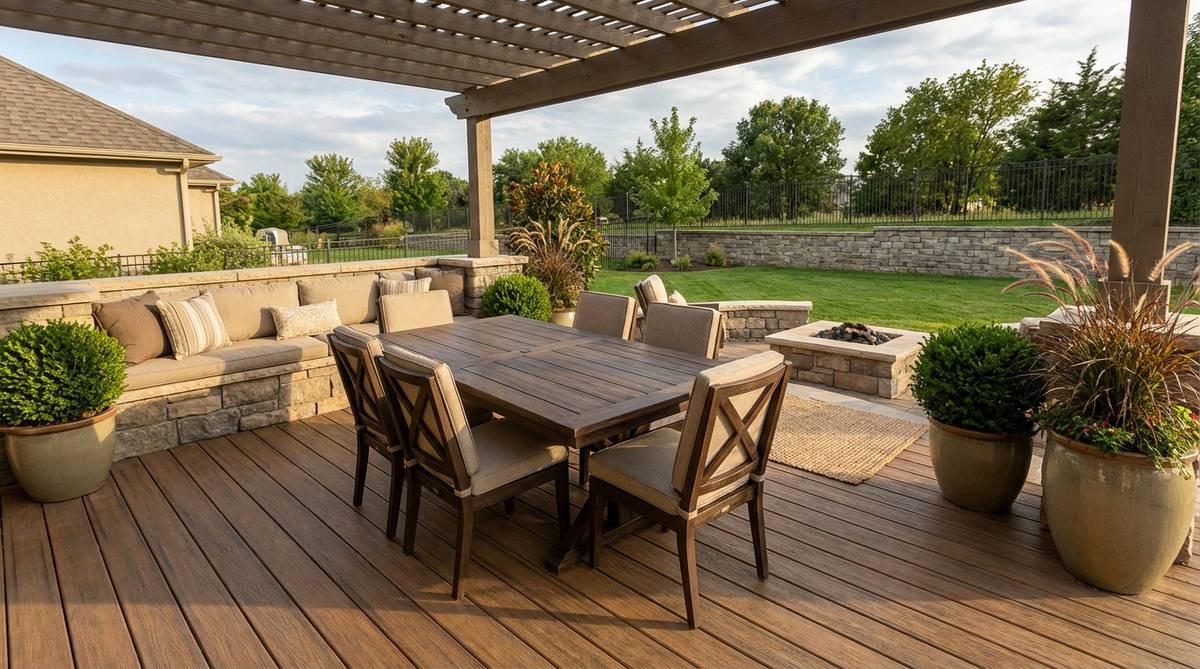
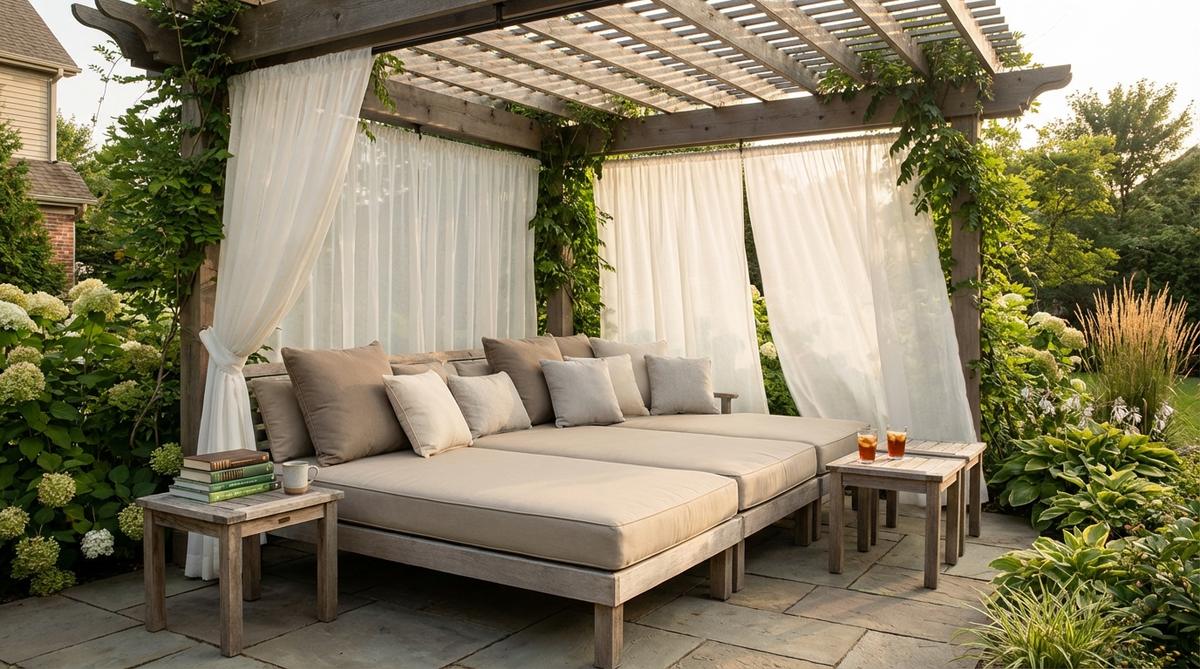
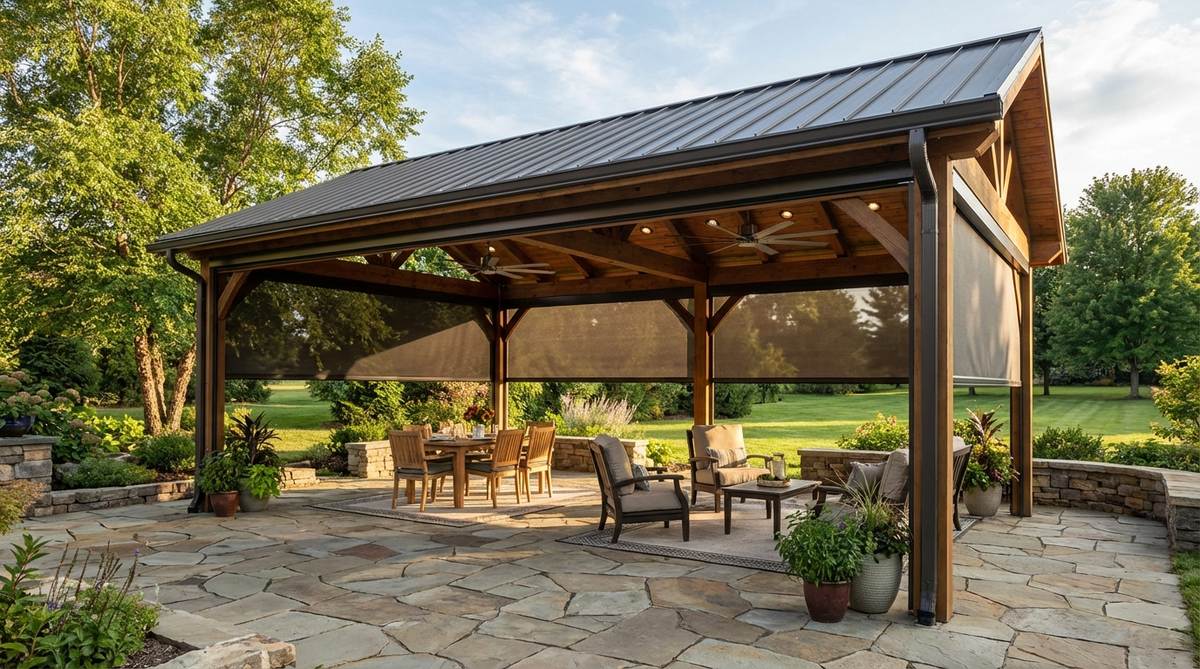
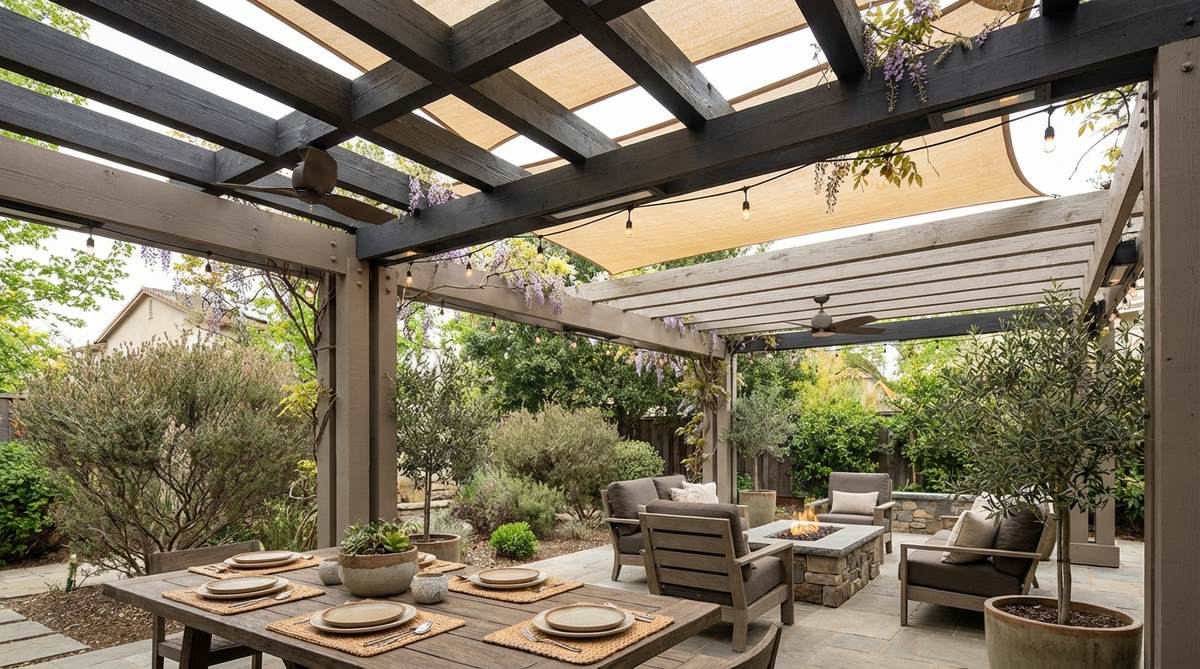
6. Pergola-Defined Dining with Open Lounge
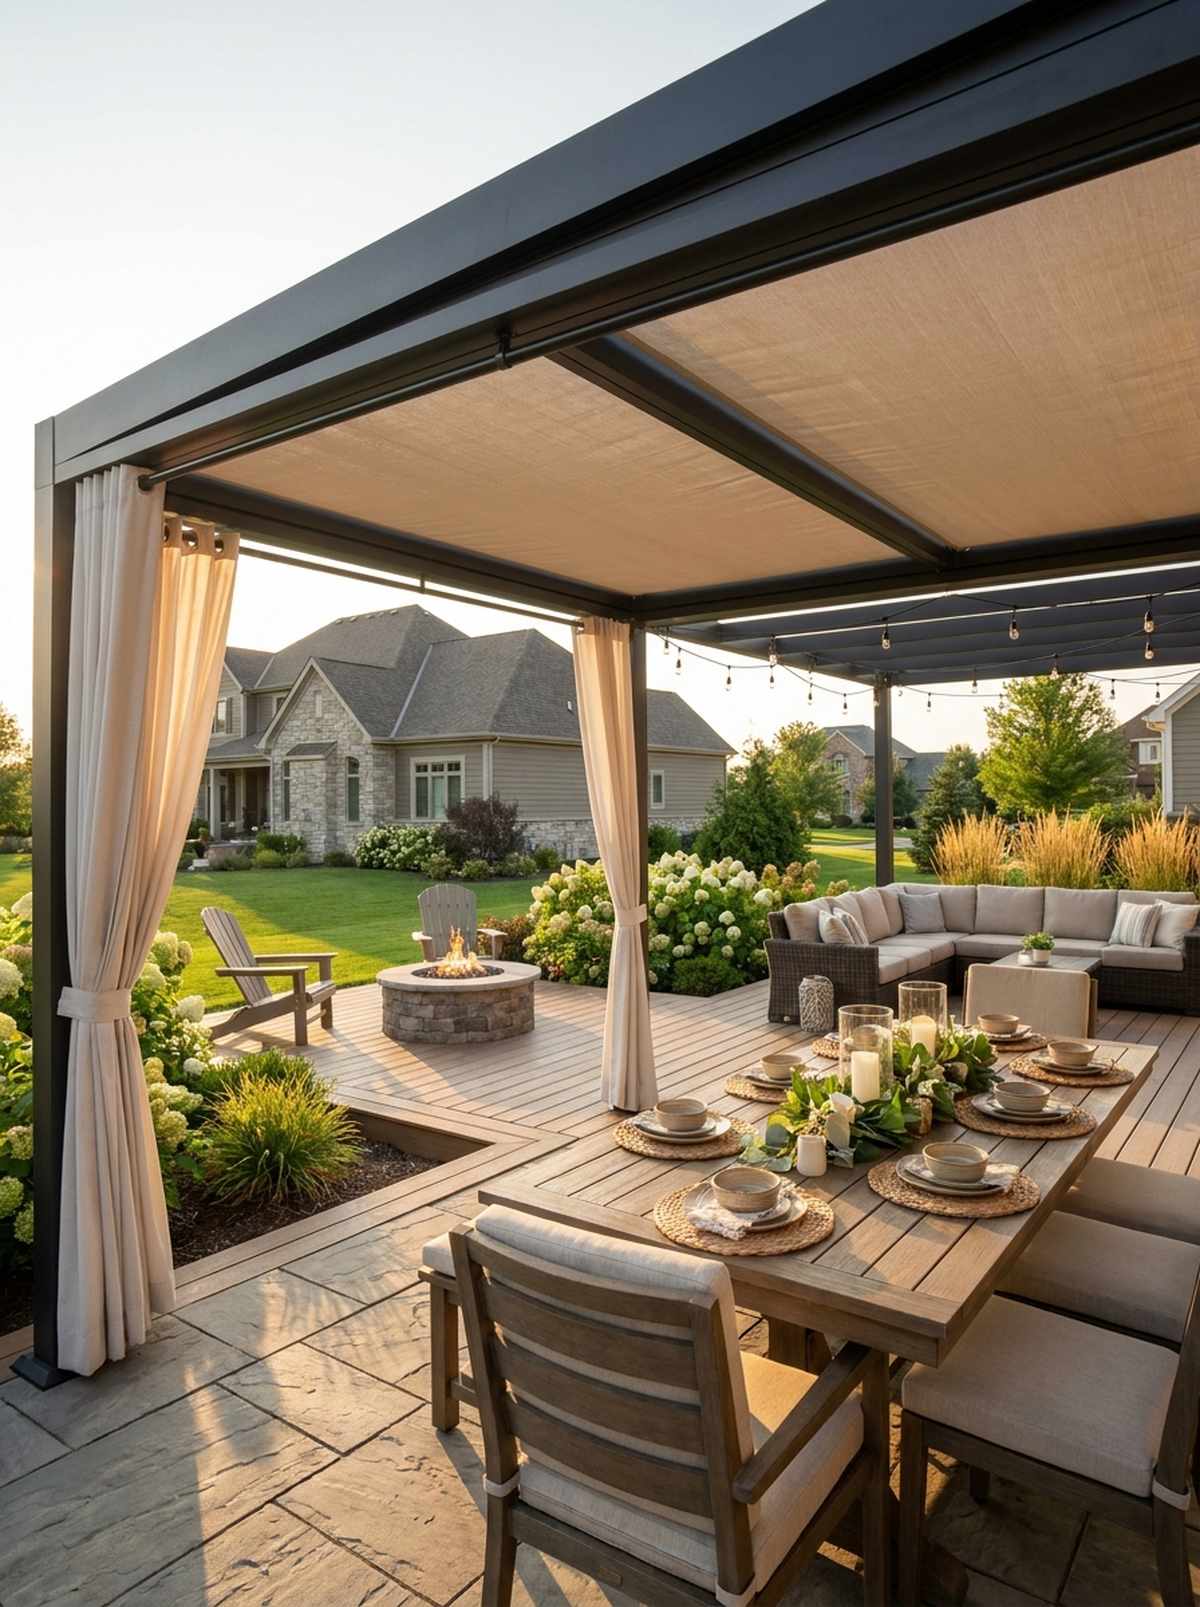
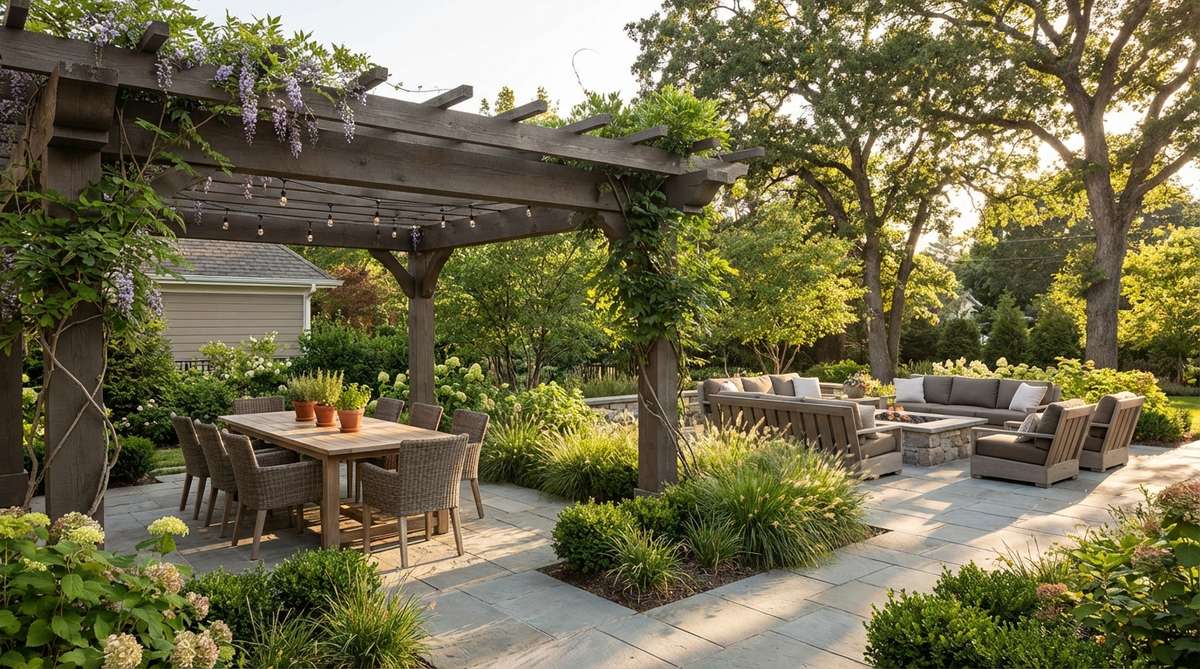
Feels like a high-end vineyard tasting room. A partially covered pergola canopy frames the dining space beautifully, serving as a brilliant solution for massive sun-baked backyards.
Leaving the lounge area exposed while covering the table creates a striking architectural contrast. Installing UV-blocking shade sail hardware under the pergola beams protects diners from harsh midday rays.
A basic aluminum or vinyl structure will run about $600–$1,200. It’s a permanent upgrade that drastically boosts home value.
- Key Materials: Aluminum pergola kit, outdoor dining set
- Vibe / Style: Resort-style luxury
- Difficulty: Advanced weekend assembly
- Budget Breakdown: Pergola kit: $850 | Shade curtains: $120
- Creator’s Tip: Hang outdoor curtains on the western-facing side to block harsh sunset glare.
- Smart Sourcing: Pre-drilled aluminum pergola kits and UV-coated retractable shade canopies.
7. Diagonal Table Placement for Spatial Expansion
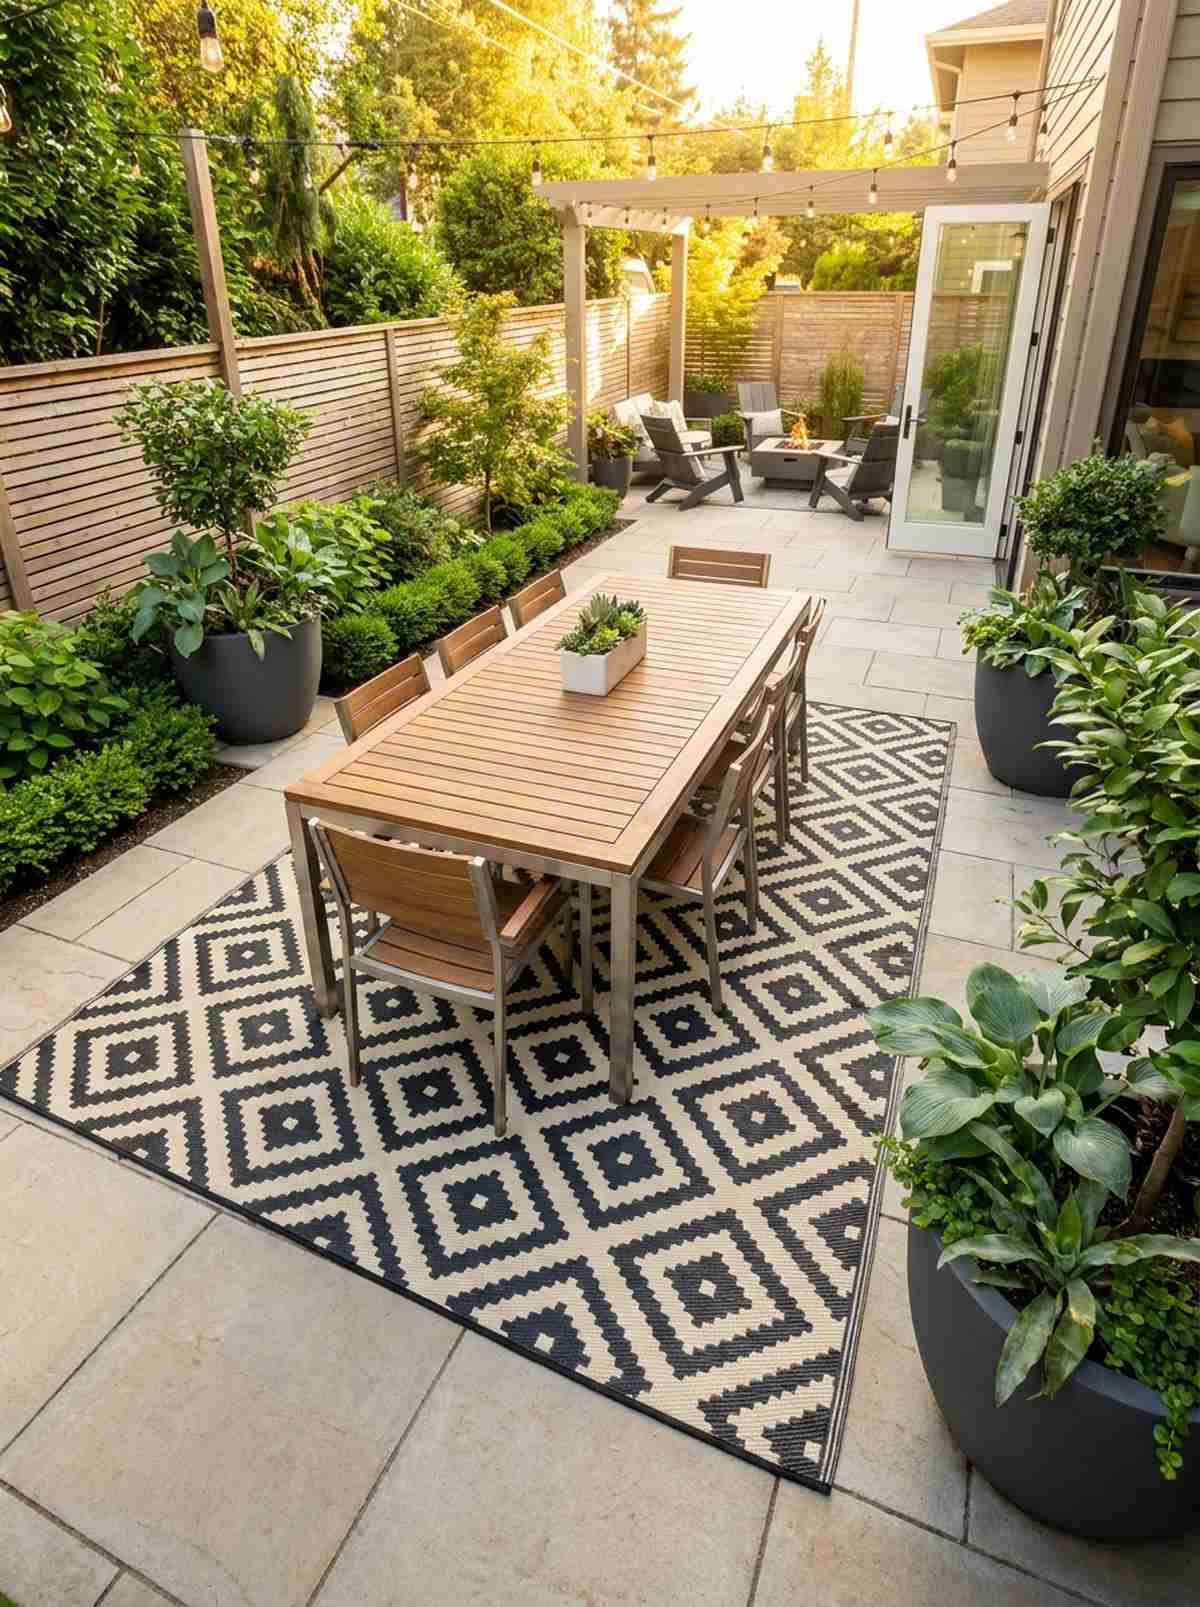
Creates an optical illusion that makes your yard feel twice as big. The angled dining table orientation shatters boring grid lines, perfectly suited for awkwardly narrow patios.
Most homeowners shove furniture against the wall, but rotating it 45 degrees yields a stunning, dynamic effect. Throwing down a geometric outdoor rug underneath anchors the new angle flawlessly.
This layout trick is completely free to test out this afternoon. Save this layout hack before buying new furniture!
- Key Materials: Rectangular table, oversized geometric rug
- Vibe / Style: Edgy contemporary
- Difficulty: Just takes some muscle
- Budget Breakdown: Rug anchor: $150 | Greenery accents: $60
- Creator’s Tip: Use the awkward leftover corner triangles for oversized sculptural plant pots.
- Smart Sourcing: Weather-proof low-pile outdoor rugs and extra-large resin corner planters.
Dining-Focused Outdoor Decor Table Arrangements
When dining takes priority, the outdoor decor table becomes the spatial anchor around which all other elements orbit. Professional designs balance table size, seating capacity, and clearance requirements while incorporating shade, lighting, and serving logistics.
8. Extended Farmhouse Table with Bench Seating
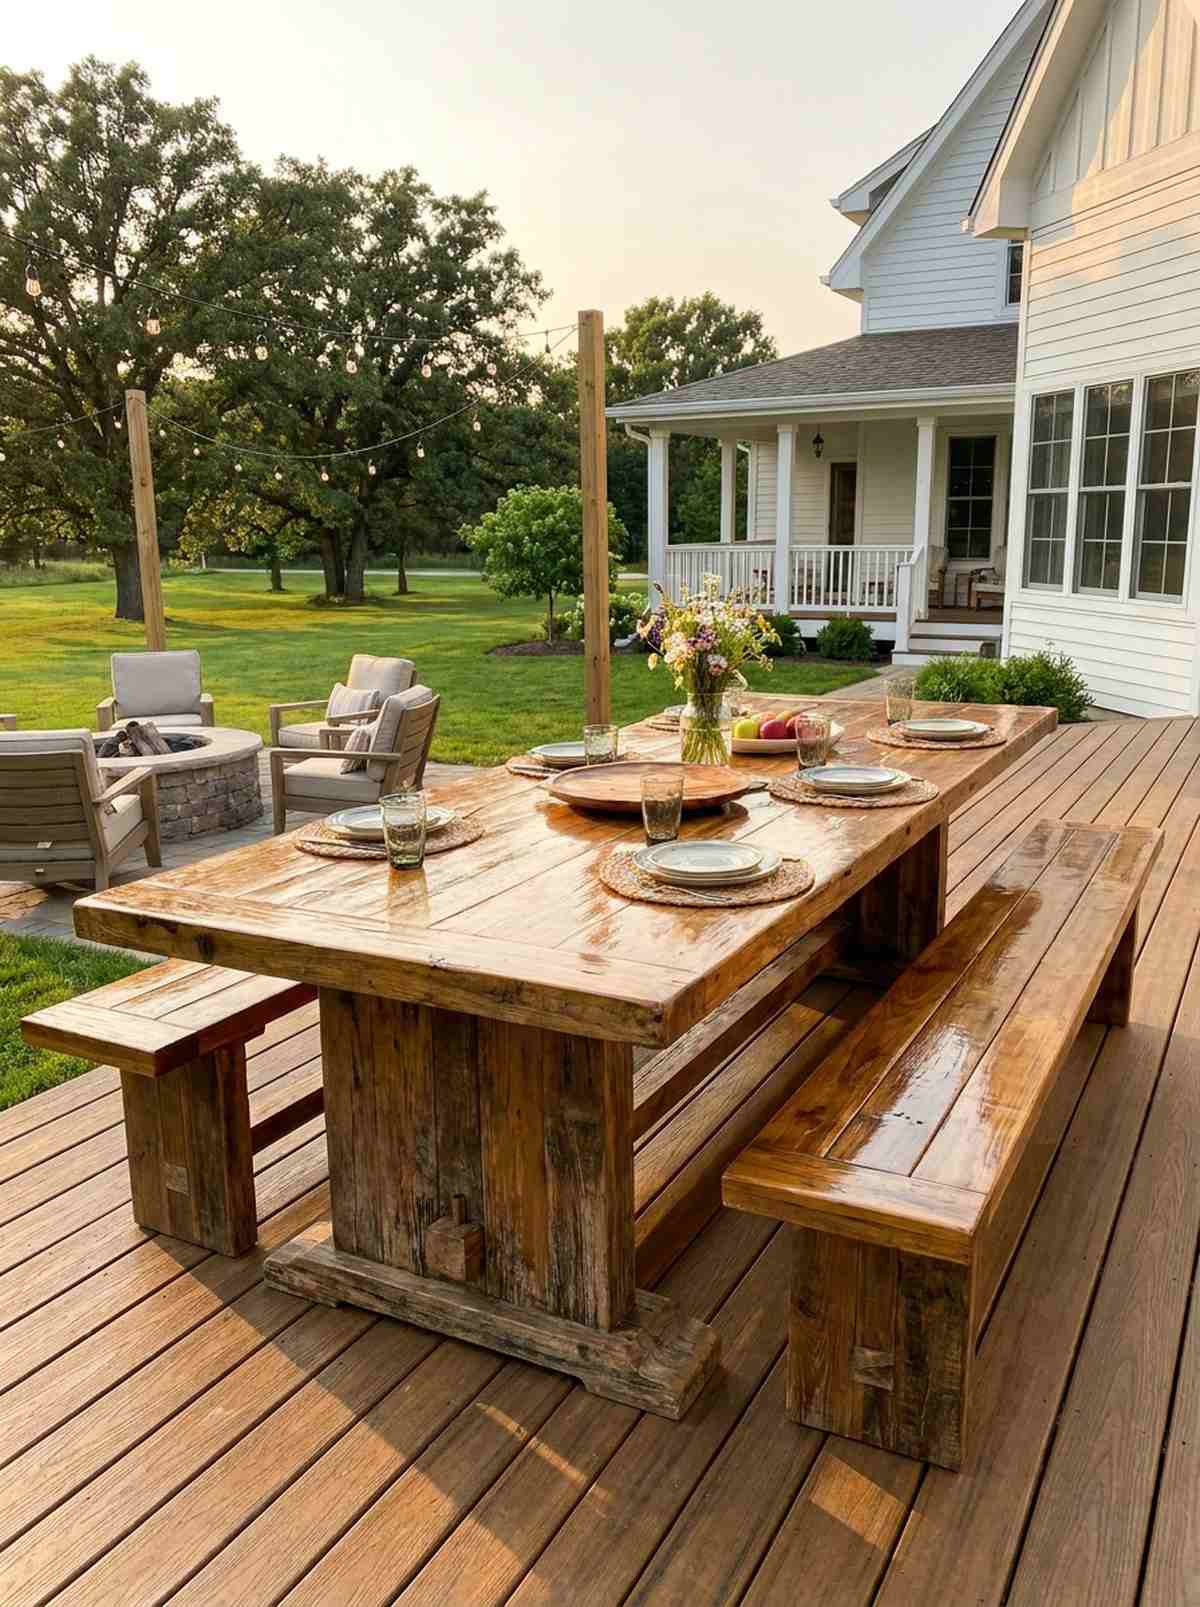
Radiates massive family-style vineyard energy. An oversized rustic outdoor decor table paired with long benches is the ultimate setup for massive holiday gatherings and summer feasts.
Skipping individual chairs for heavy wooden benches looks far more custom and invites closer conversations. Sealing the wood with a marine-grade waterproof topcoat guarantees it survives harsh winters without splintering.
Building or buying this setup typically lands around $500–$900. Pin this to your farmhouse exterior mood board!
- Key Materials: Teak or cedar lumber, thick farmhouse table base
- Vibe / Style: Rustic countryside gathering
- Difficulty: Moderate DIY build
- Budget Breakdown: Wood materials: $400 | Premium sealant: $80
- Creator’s Tip: Always push benches completely under the table when not in use to extend their lifespan.
- Smart Sourcing: Marine-grade clear wood sealant (gallon size) and pre-cut heavy-duty steel table legs.
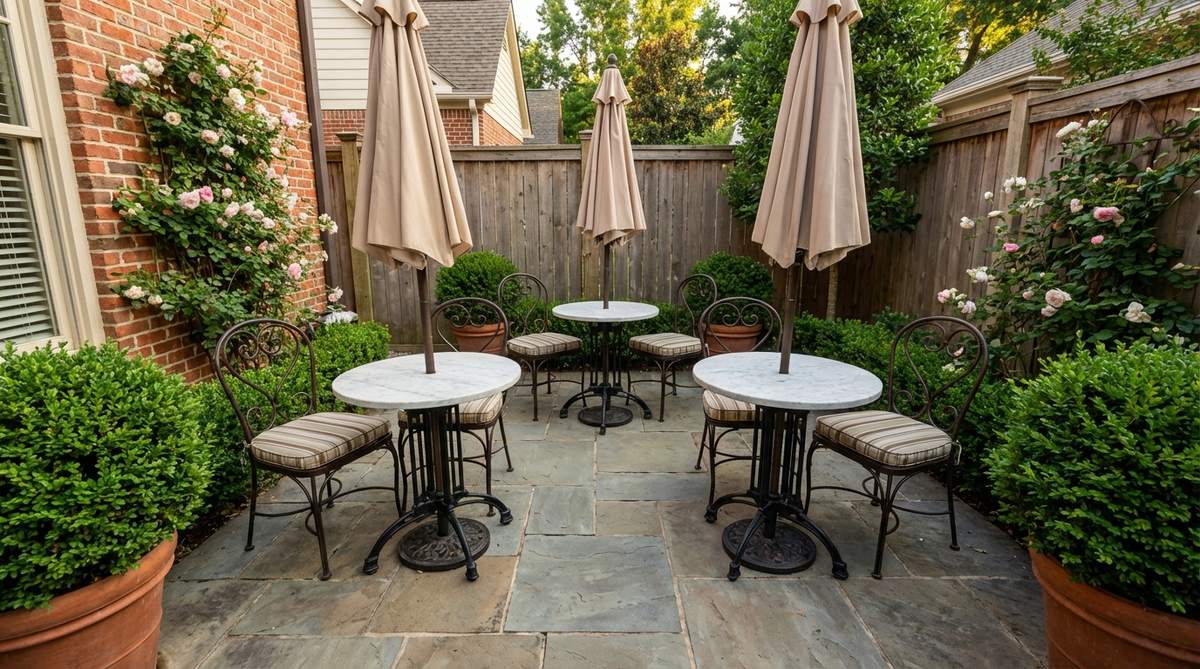
9. Round Pedestal Table for Conversation Flow
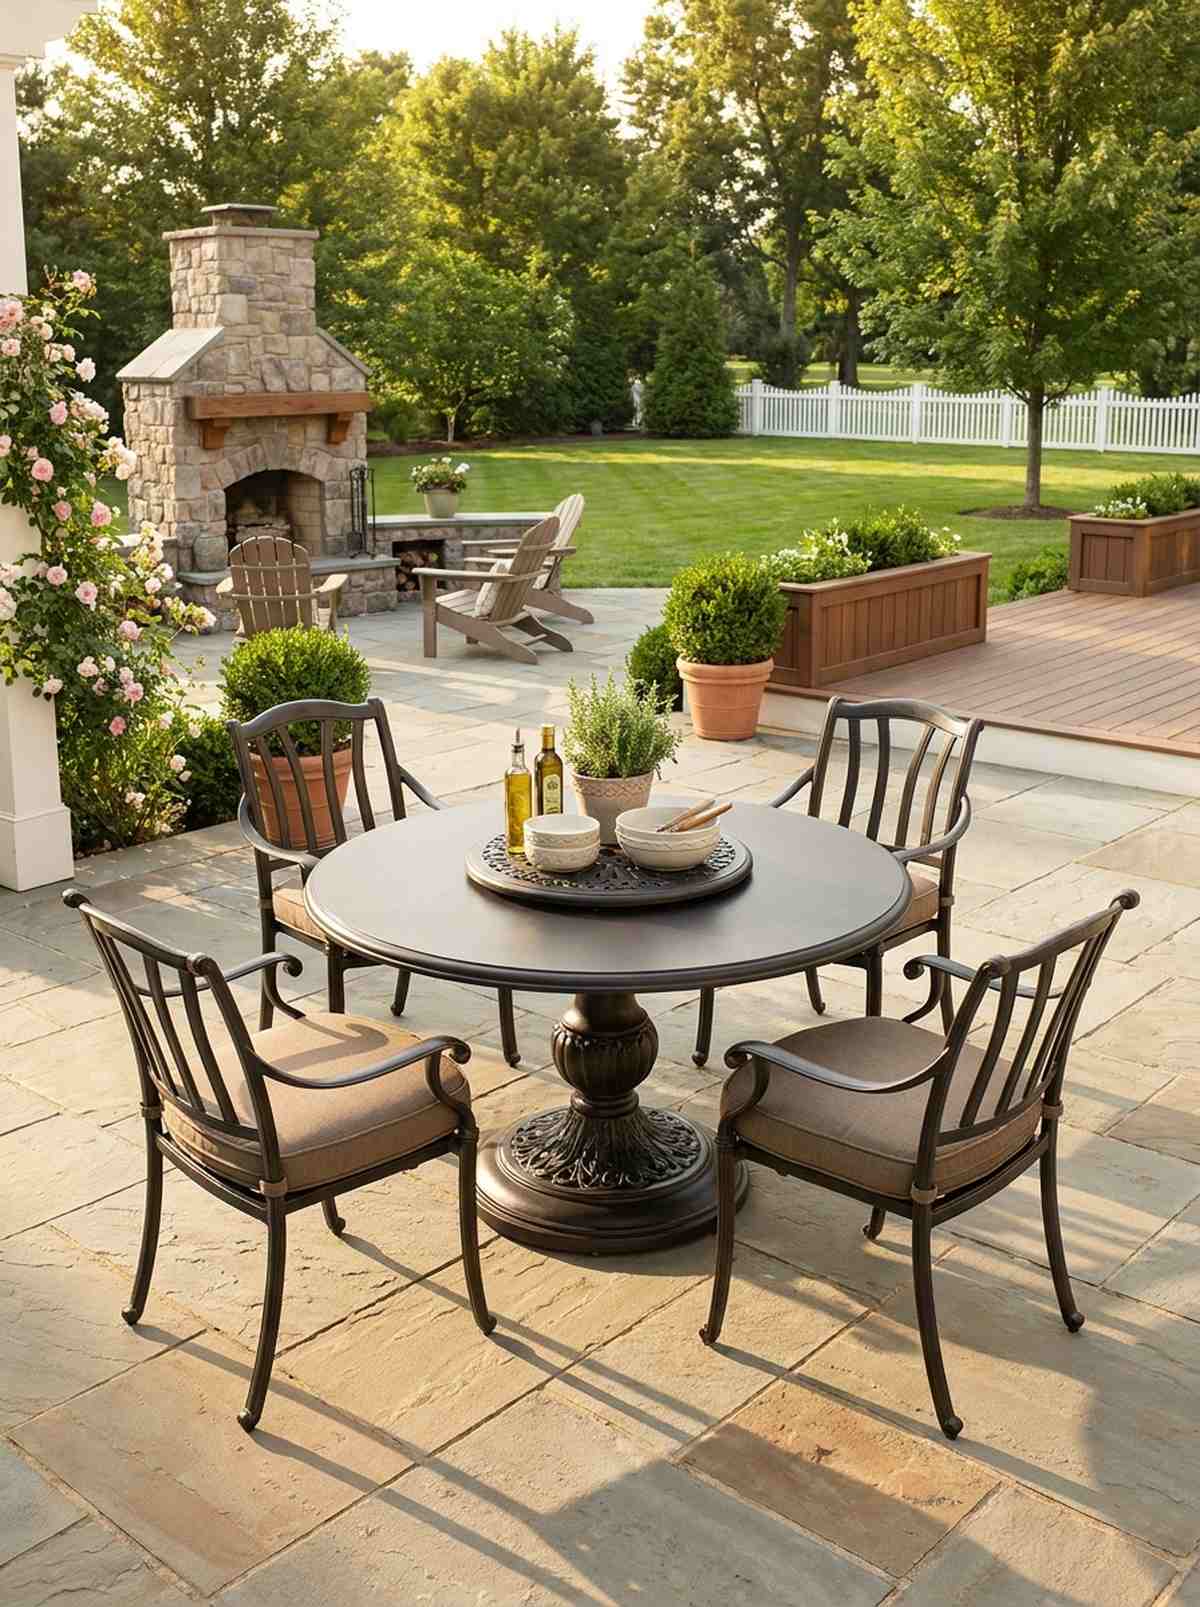
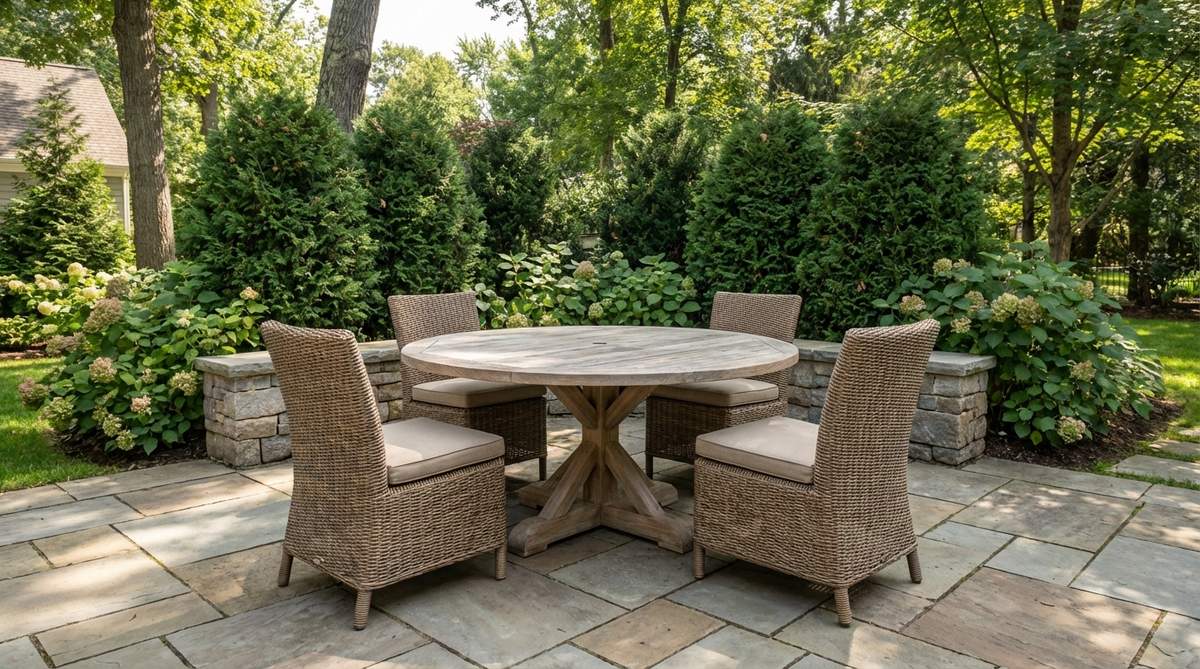
Feels like a charming Parisian sidewalk café. A circular pedestal dining setup eliminates harsh corners, working absolute magic for tight, boxy corner spaces.
Choosing a pedestal base instead of four legs delivers a significantly cleaner, high-end look while maximizing legroom. Integrating outdoor dining supplies directly onto the center turntable makes hosting wildly efficient.
You can find stunning composite round tables for $300–$600 online. It’s a chic upgrade that forces better dinner conversations.
- Key Materials: Cast aluminum round table, curved back chairs
- Vibe / Style: Classic European terrace
- Difficulty: Quick assembly
- Budget Breakdown: Table kit: $450 | Cushions: $100
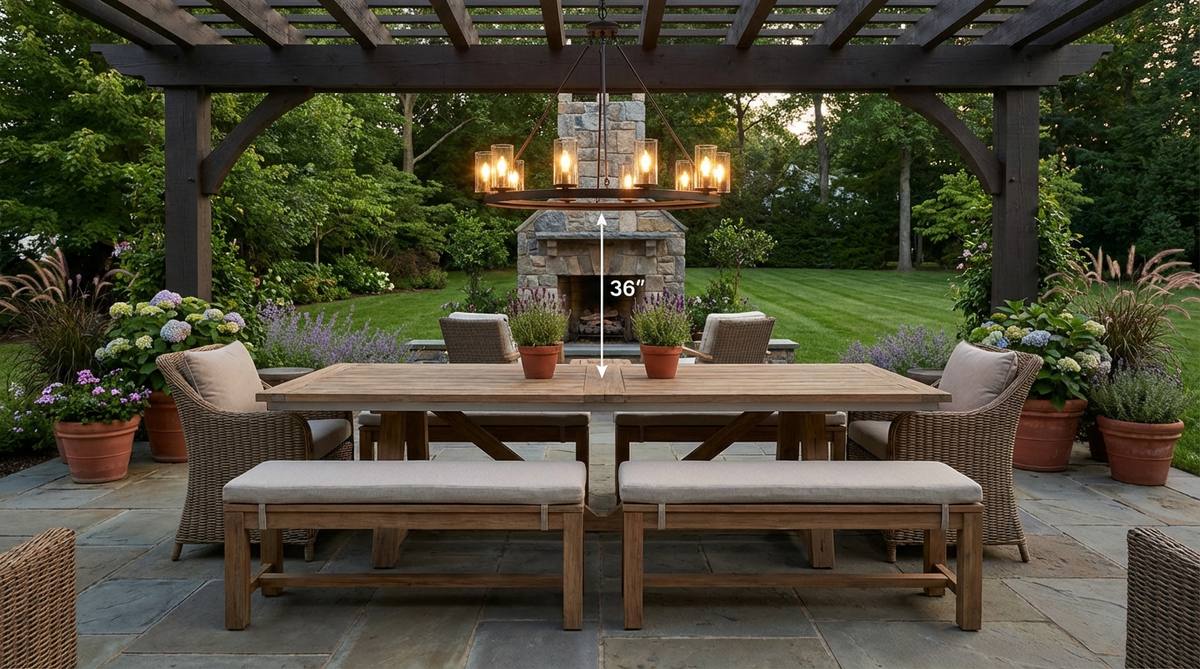
- Creator’s Tip: Ensure a 36-inch clearance buffer around the entire table for easy chair push-back.
- Smart Sourcing: Cast aluminum pedestal table kits and UV-resistant round outdoor cushions.
If you think a standard patio is enough, this next elevated trick will completely change how you use your space every single morning.
10. Bar Height Counter with Swivel Stools
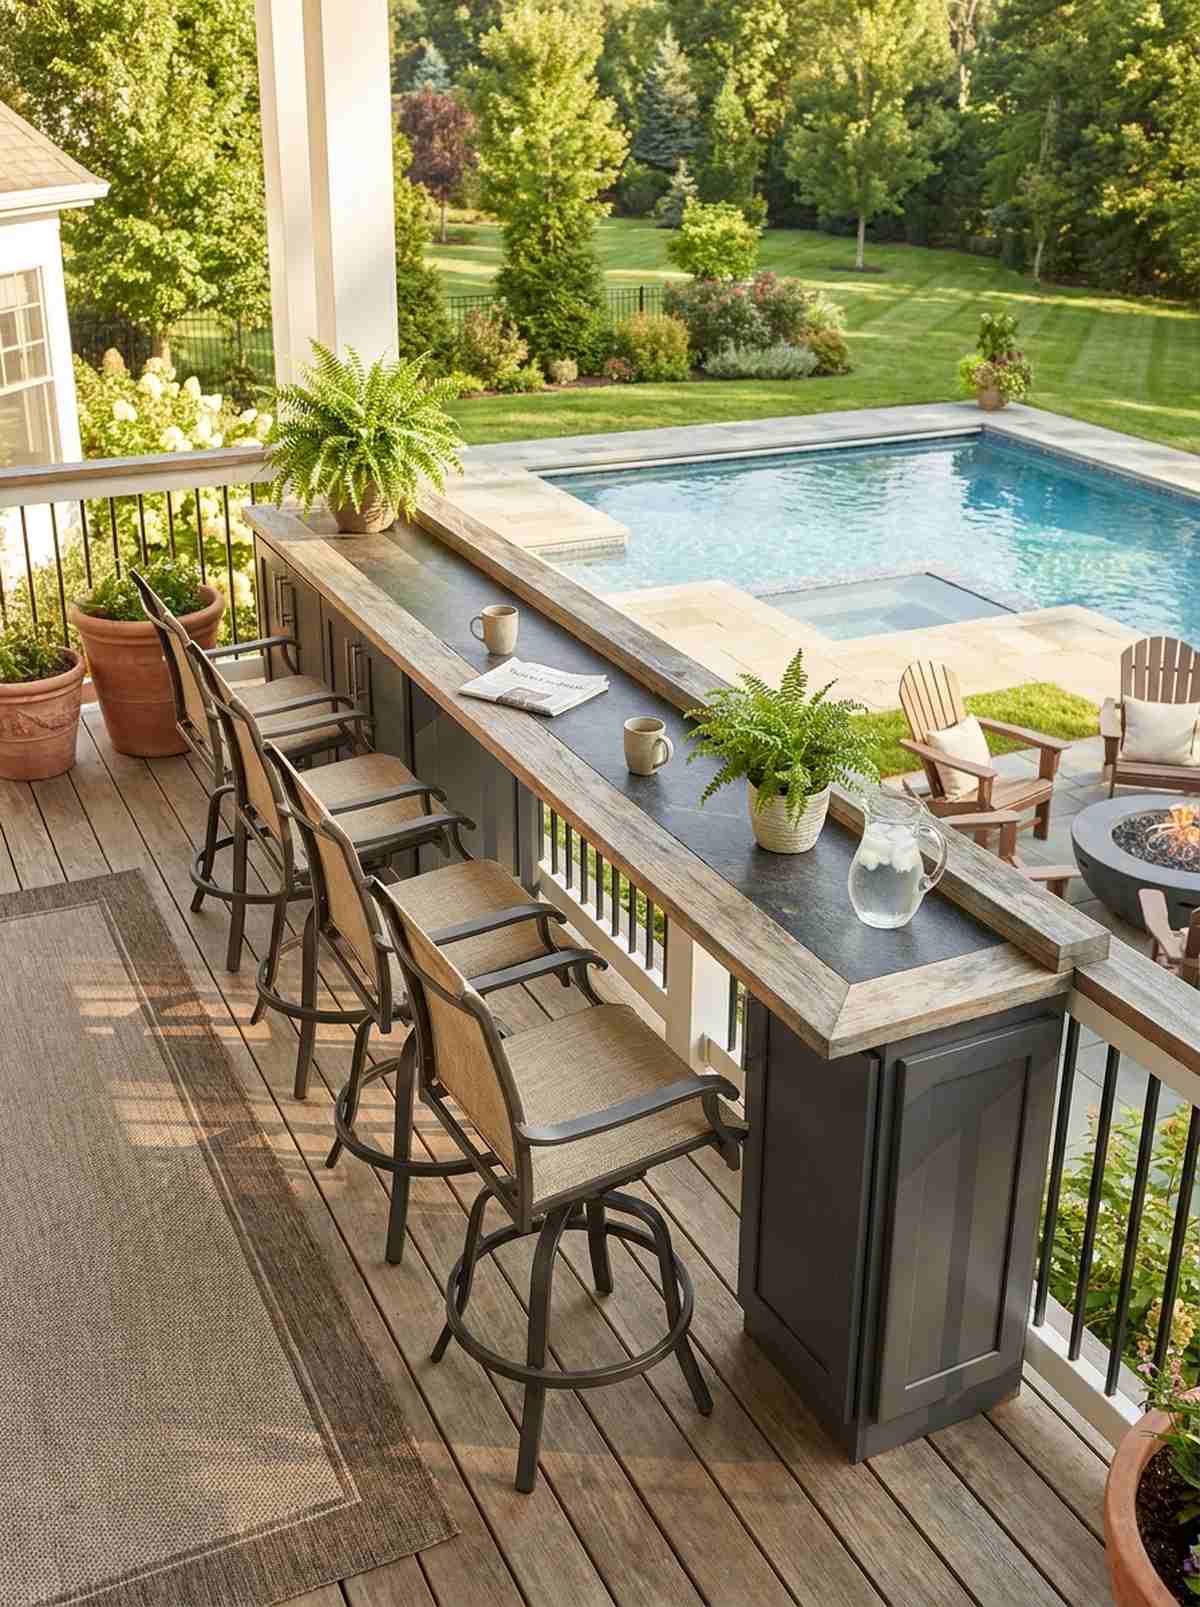
Instantly brings a luxury resort swim-up bar feel to dry land. A raised balcony bar ledge with tall seating is a breathtaking idea for patios overlooking a pool or a lush garden.
Elevating the sightlines completely transforms the perspective of the yard, feeling incredibly premium. Installing waterproof bar cabinetry underneath turns a simple counter into an entire entertainment station.
Expect to invest about $400–$700 for a solid, weatherproof bar ledge setup. Pin this if you love morning coffee with a view!
- Key Materials: Bar-height console, rust-proof swivel stools
- Vibe / Style: Luxury hotel deck
- Difficulty: Easy to moderate
- Budget Breakdown: Counter table: $350 | Swivel stools: $200
- Creator’s Tip: Make sure the stools have a built-in footrest to prevent back strain during long chats.
- Smart Sourcing: Pre-assembled weather-resistant bar consoles and powder-coated steel swivel barstools.
💡 Must-Have Supplies for High-End Setups
To build these setups faster and ensure they last, skip the generic craft aisles and invest in the right foundational kits.
- Base & Support: heavy-duty modular furniture connector clips
- Setup Tools: laser measurement alignment starter kits
- Weather/Durability Protection: commercial-grade UV fabric waterproofing sprays
11. Modular Table System for Flexible Capacity
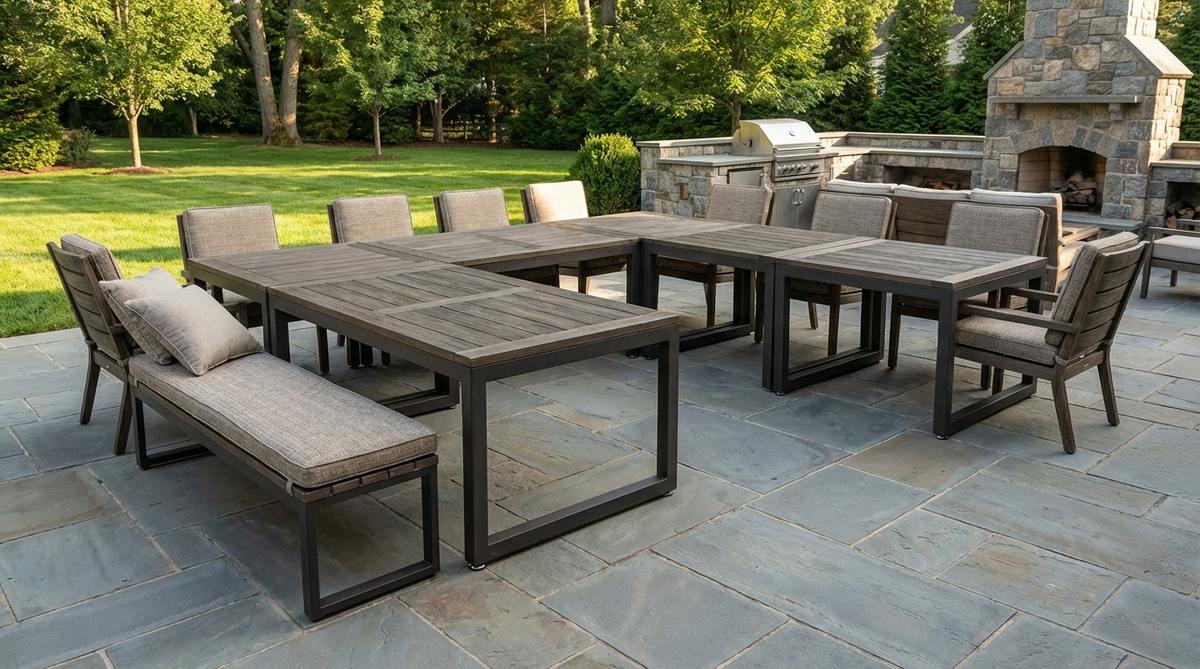
Feels like having a professional event space on standby. A connectable modular dining arrangement adapts instantly, making it the smartest choice for families whose guest list constantly changes.
Instead of committing to a massive piece of furniture, snapping smaller tables together yields a highly versatile, custom result. Snagging lightweight, rust-proof aluminum table squares lets you switch from intimate dinner to massive banquet in minutes.
A starter pack of two modular squares generally runs around $300–$500. Save this idea for ultimate backyard flexibility!
- Key Materials: Matching square patio tables, self-leveling feet
- Vibe / Style: Modern utilitarian
- Difficulty: Extremely simple
- Budget Breakdown: Table modules: $400 | Connector brackets: $30
- Creator’s Tip: Buy tables with built-in adjustable foot glides so they align perfectly on uneven concrete.
- Smart Sourcing: Interlocking aluminum patio table kits and heavy-duty self-leveling table feet.
12. Bistro Cluster for Intimate Dining
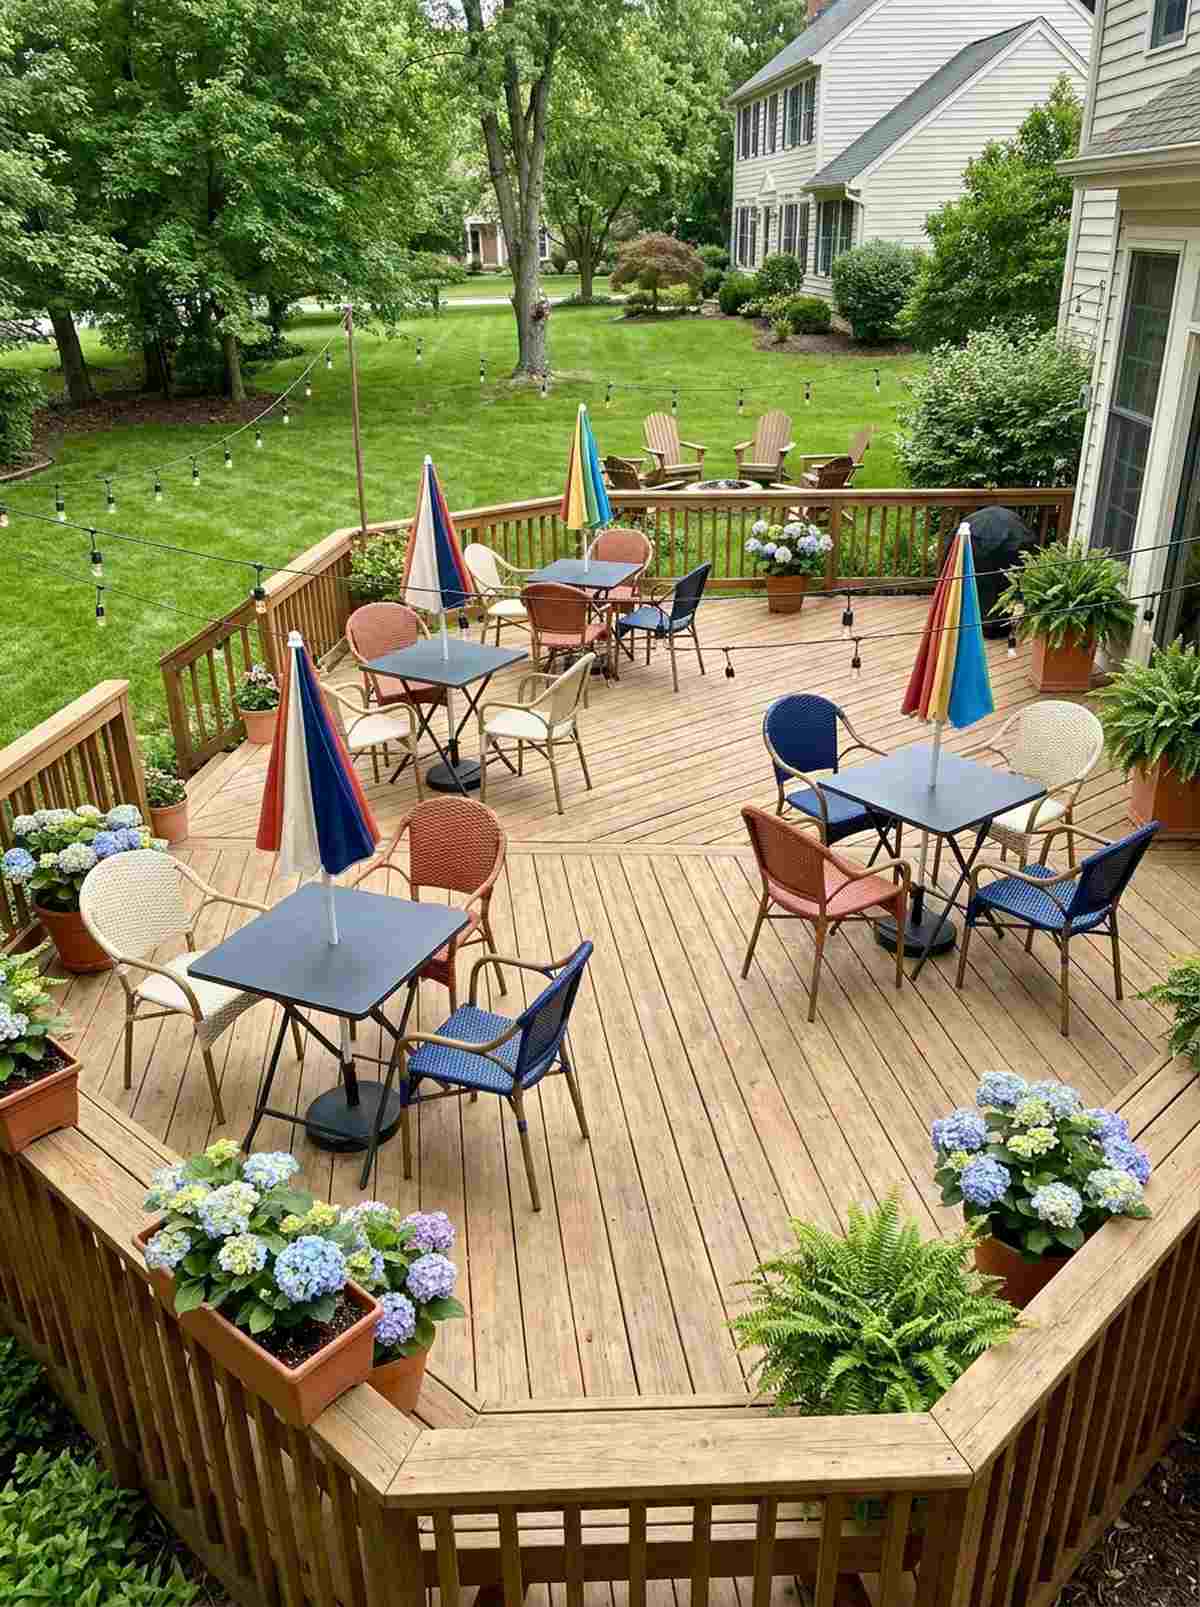
Gives off an incredibly charming French street market aura. A multi-table bistro seating zone scatters the seating perfectly, a brilliant tactic for oddly shaped or multi-level decks.
Using three tiny tables rather than one big one completely re-energizes a dull corner. Adding UV-coated folding chairs ensures the setup handles rain easily while allowing you to pack them away fast.
You can buy three complete bistro sets for under $350 total. Highly recommended if you want that scattered, organic garden look.
- Key Materials: 24-inch metal folding tables, woven cafe chairs
- Vibe / Style: Bohemian garden party
- Difficulty: No assembly required
- Budget Breakdown: 3 Bistro Sets: $300 | Mini umbrellas: $150
- Creator’s Tip: Keep the tables exactly the same color but mix up the chair colors for a curated eclectic vibe.
- Smart Sourcing: Powder-coated steel foldable bistro sets and UV-resistant woven cafe chair packs.
13. Convertible Fire Table for Year-Round Use
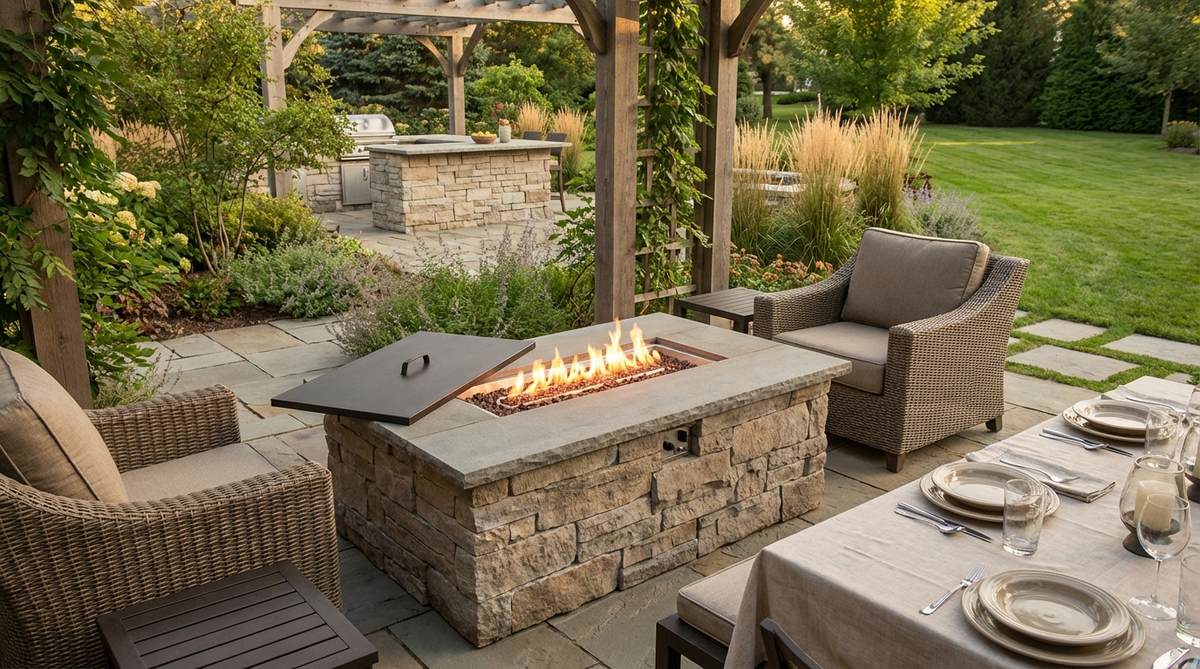
Feels like an exclusive ski resort patio in your backyard. The dual-purpose dining fire pit seamlessly transitions your yard through every season, excelling in cold-weather climates.
A table that turns into a roaring fire delivers an undeniably premium aesthetic. Investing in top-tier heavy-duty outdoor decor table covers protects the burner mechanism when it’s just being used for tacos.
A solid convertible fire table starts at $400 and goes up. Pin this if you want to use your patio into November!
- Key Materials: Propane fire table with lid, wind guard glass
- Vibe / Style: Luxe all-season lounge
- Difficulty: Propane tank connection needed
- Budget Breakdown: Fire Table: $600 | Glass guard: $90
- Creator’s Tip: Only buy a model with an integrated tank hideaway so you don’t trip over ugly gas hoses.
- Smart Sourcing: Aluminum convertible fire pit table kits and tempered glass wind guard surrounds.
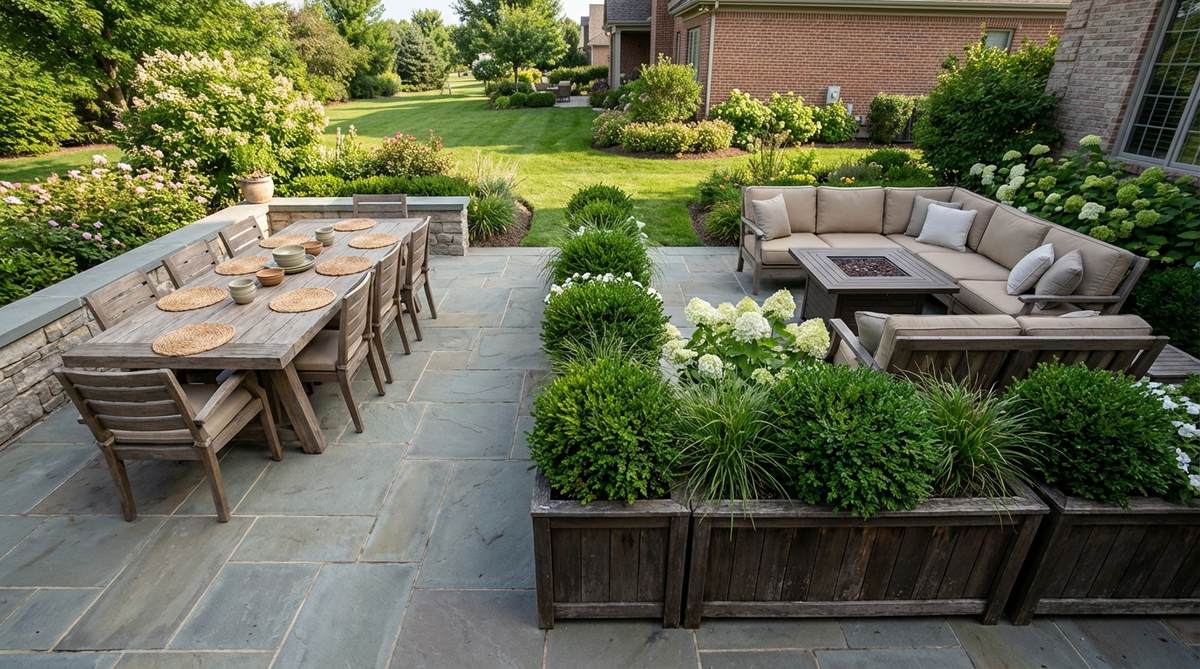
14. Trestle Table with Built-In Planters
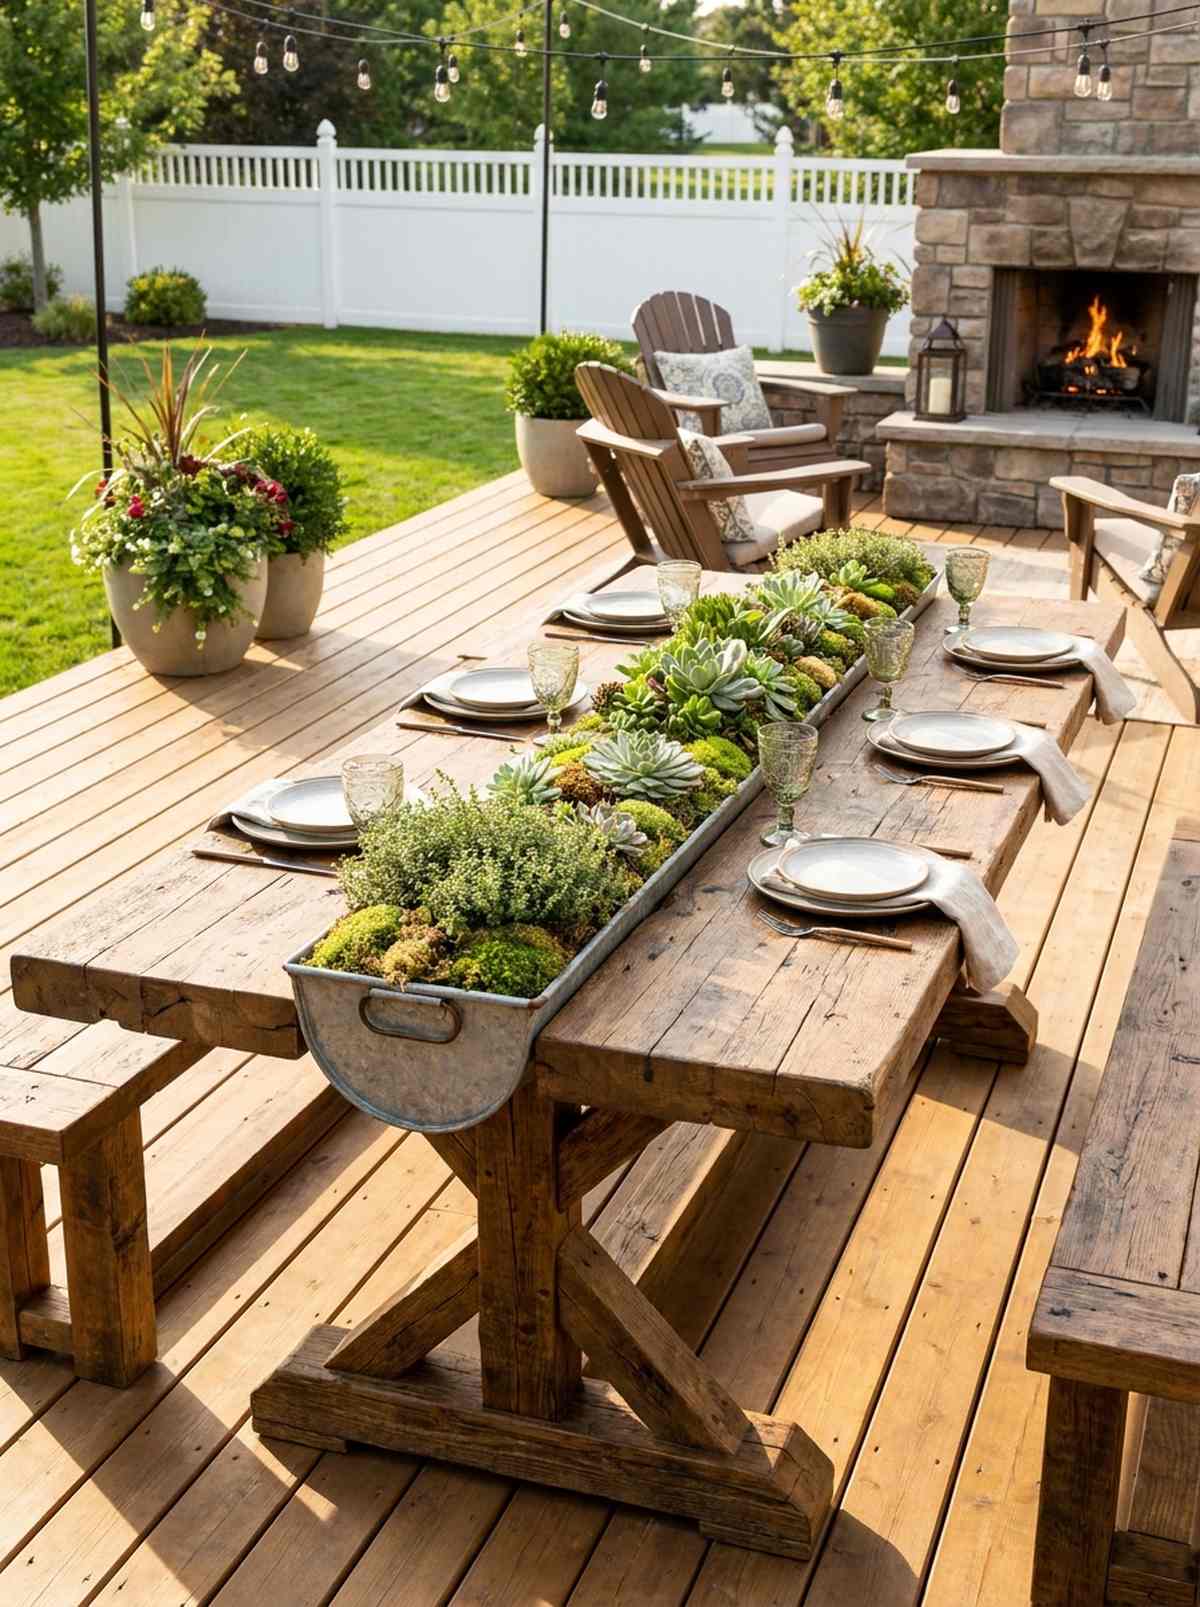
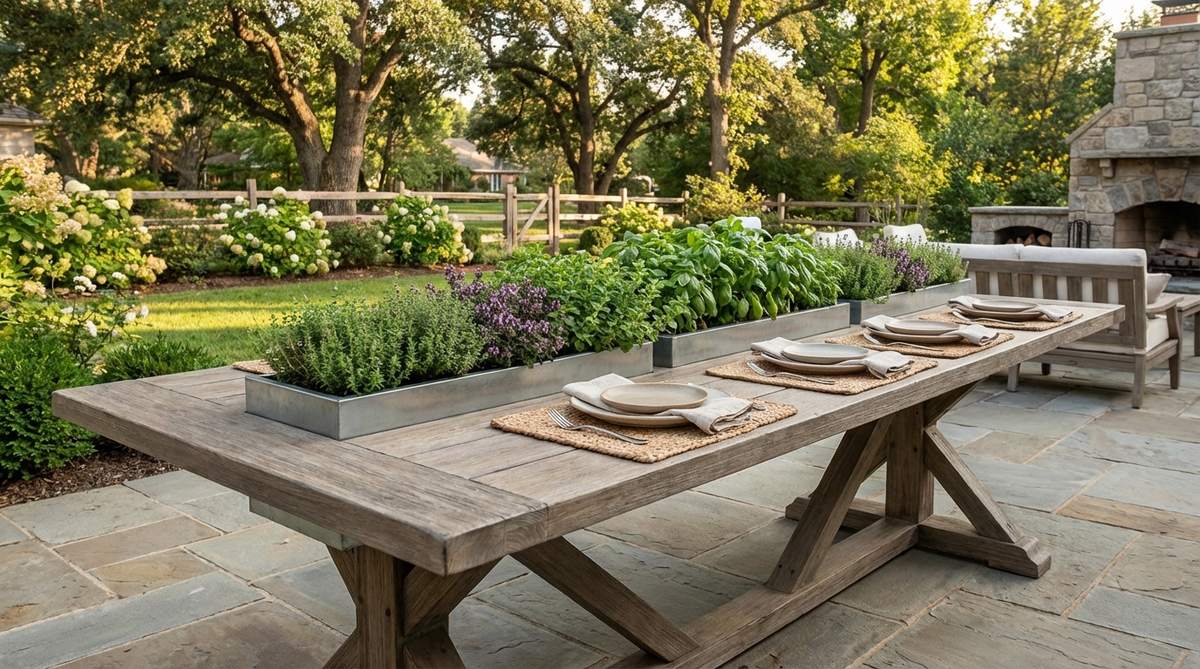
Straight out of a high-end botanical garden showcase. An integrated living centerpiece table blends dining with nature, making it the perfect showstopper for organic, green-heavy yards.
Sinking a trough into the wood looks phenomenally more expensive than a basic glass top. Grabbing pre-lined metal planter trays ensures the wood never rots when you water the succulents down the middle.
Custom building this costs roughly $300–$500 in materials. It’s a breathtaking project that commands attention.
- Key Materials: Thick lumber planks, waterproof metal trough insert
- Vibe / Style: Earthy designer chic
- Difficulty: Advanced DIY router skills
- Budget Breakdown: Table materials: $350 | Planter insert: $60
- Creator’s Tip: Plant creeping thyme or moss; it smells amazing when guests brush their hands across it.
- Smart Sourcing: Rust-proof galvanized trough table inserts and marine-grade wood sealant spray.
Before you just buy a normal table, wait until you see this insane gravity-defying dining trick that goes viral every single summer.
15. Nautical Rope-Suspended Table
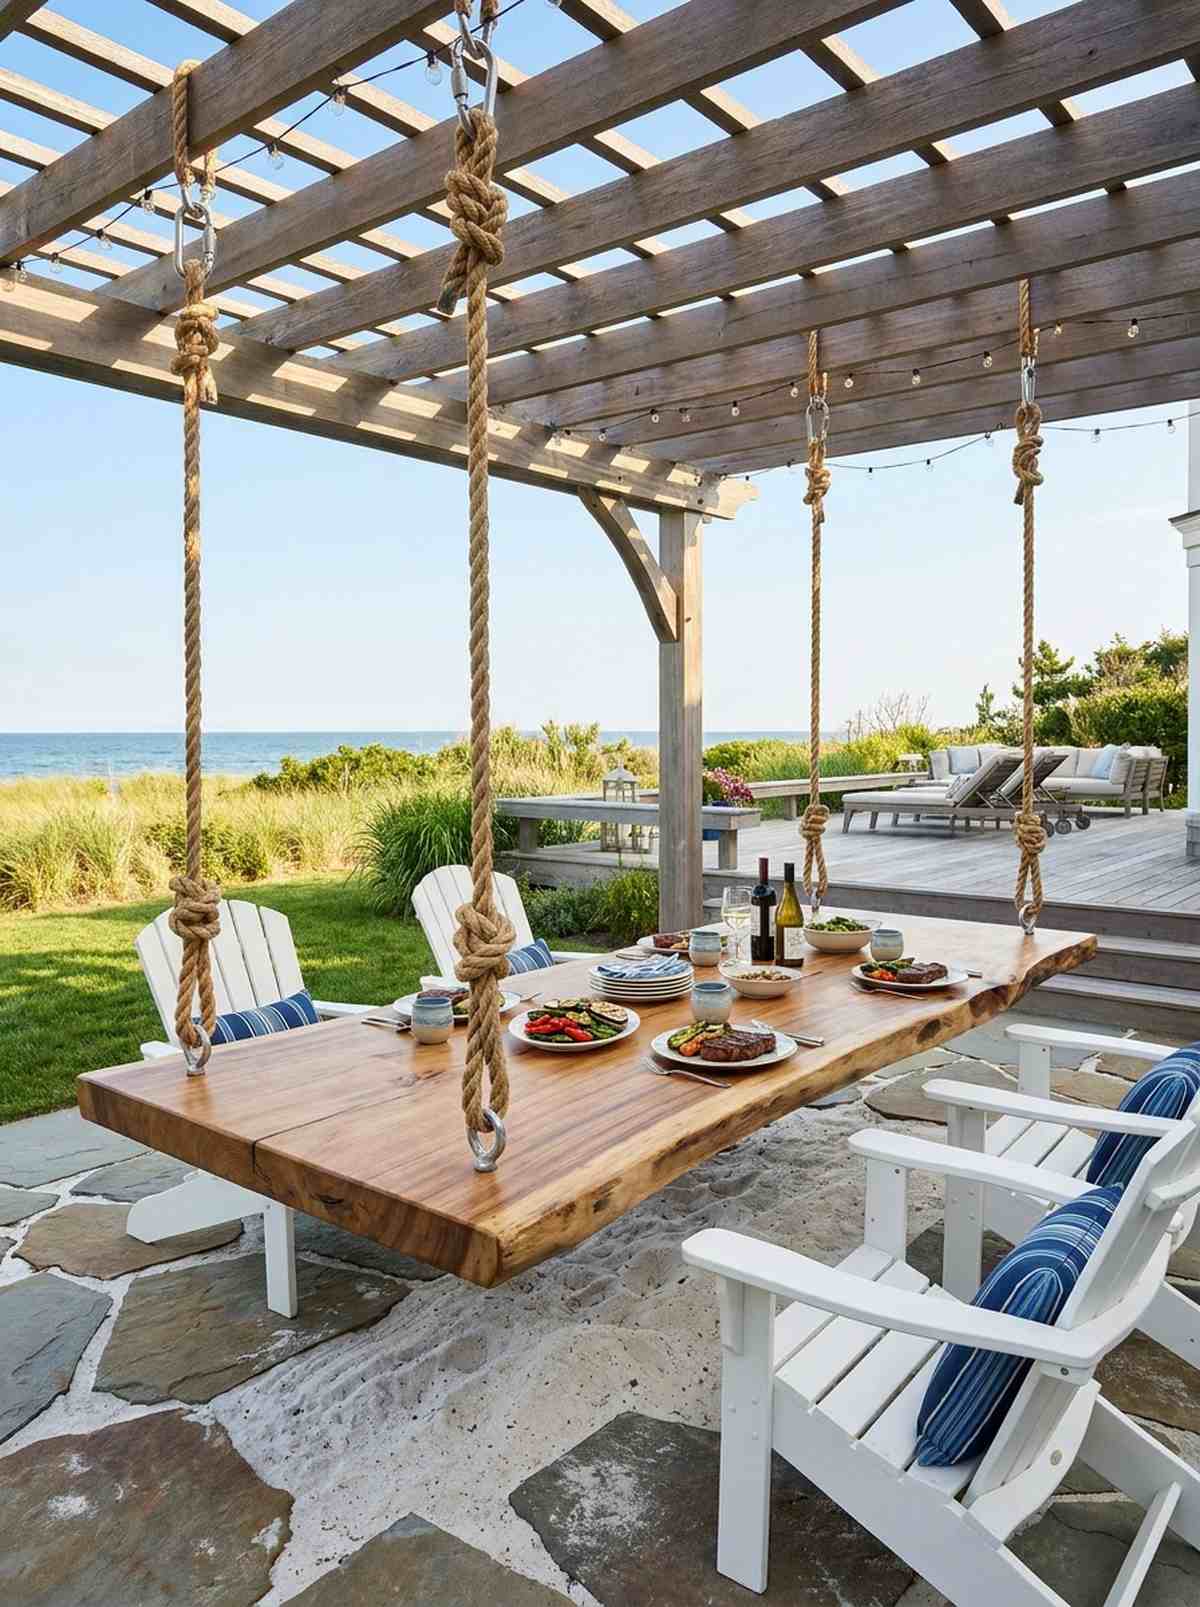
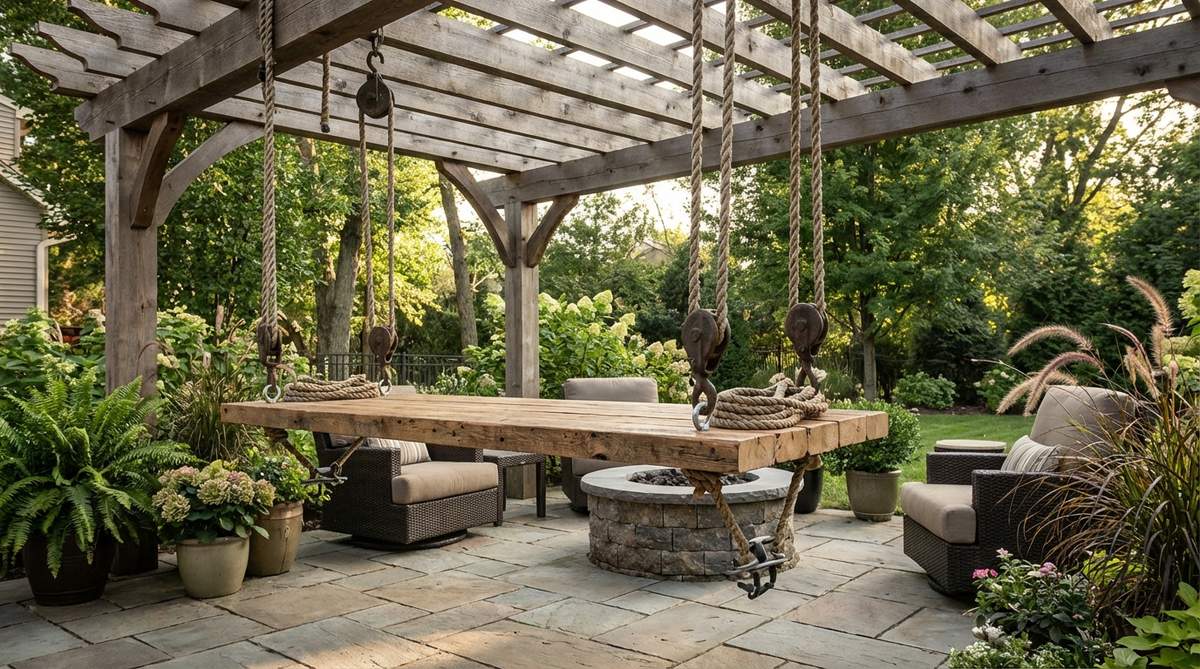
Gives off an incredibly breezy, seaside cottage illusion. A floating hanging dining surface removes floor clutter entirely, an absolute game-changer for under-pergola setups.
Hanging a massive wooden slab from ropes delivers a shocking, custom-built impression. Using thick marine-grade hardware prevents any dangerous swinging while you are trying to cut a steak.
The entire hanging rig and wood slab costs about $200–$350 to construct. Save this to your extreme DIY backyard board!
- Key Materials: Solid wood slab, 1-inch thick manila rope, steel carabiners
- Vibe / Style: Coastal floating oasis
- Difficulty: Heavy lifting and drilling
- Budget Breakdown: Wood slab: $200 | Rigging hardware: $120
- Creator’s Tip: Anchor the table to the ground with discreet tension wires if you live in a windy area.
- Smart Sourcing: Marine-grade thick manila rope (bulk) and heavy-duty steel ceiling anchor brackets.
Lounge-Centric Layouts
Relaxation-focused patios prioritize comfortable seating, optimal views, and ambient features over formal dining infrastructure. These layouts emphasize low furniture profiles, plush cushioning, and arrangements that facilitate casual conversation or solo unwinding.
16. U-Shaped Sectional Conversation Pit
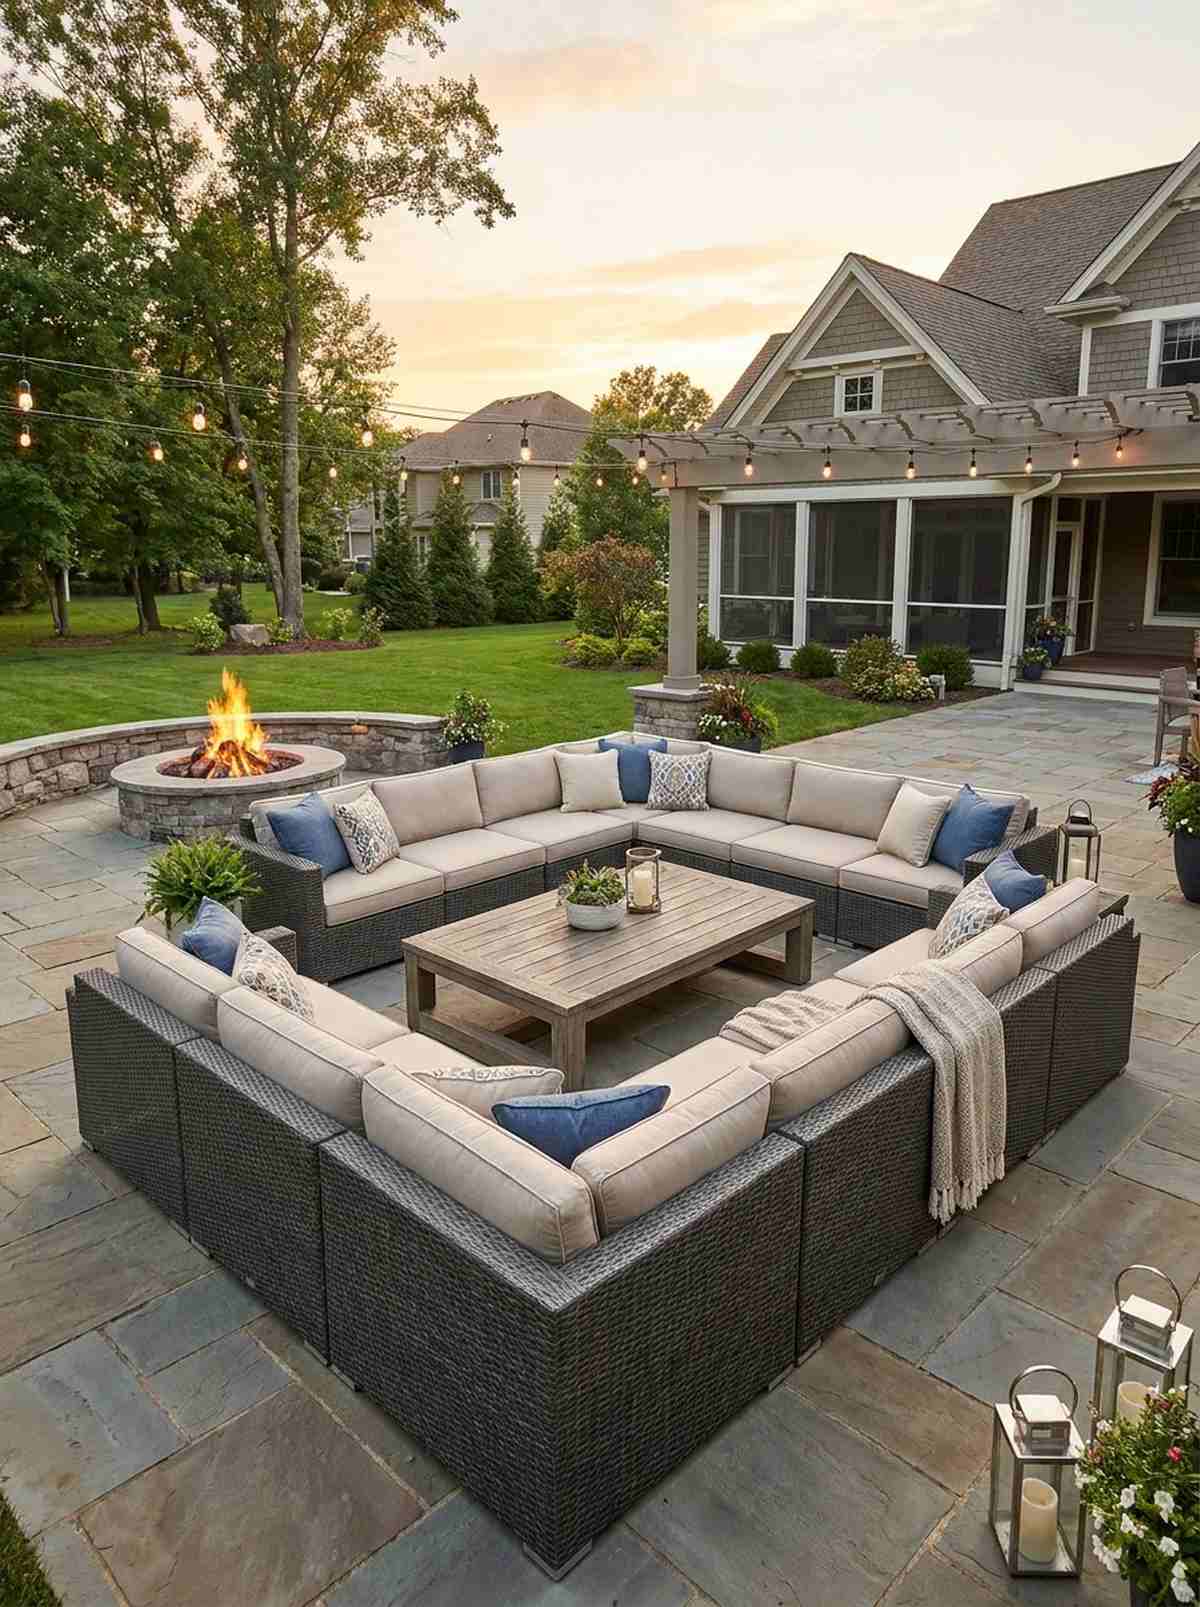
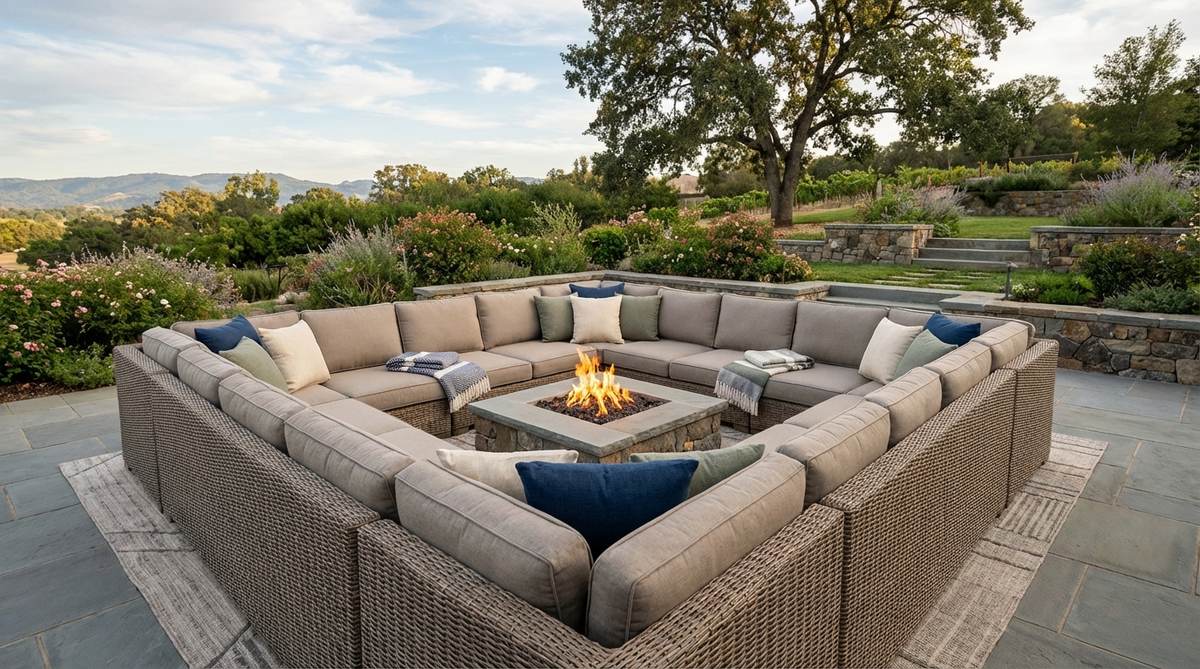
Feels exactly like a VIP club lounge under the stars. The enclosed U-shaped sofa arrangement traps conversation beautifully, making it essential for large, highly social households.
A closed-loop seating layout completely changes the patio dynamic, looking massively expensive. Stocking up on UV-coated outdoor patio cushions ensures the massive couch doesn’t bleach out in the July sun.
A massive U-shape layout will cost between $800–$1,500. It’s an investment that turns your yard into the neighborhood hub.
- Key Materials: 6-piece modular outdoor sofa, oversized coffee table
- Vibe / Style: Modern luxury entertainer
- Difficulty: Very easy setup
- Budget Breakdown: Sectional: $1,200 | Throw pillows: $150
- Creator’s Tip: Tie the cushion modules together underneath with heavy zip ties so they never slide apart.
- Smart Sourcing: All-weather modular resin wicker sectionals and UV-protected outdoor pillow covers (bulk pack).
17. Daybed Pavilion for Ultimate Relaxation
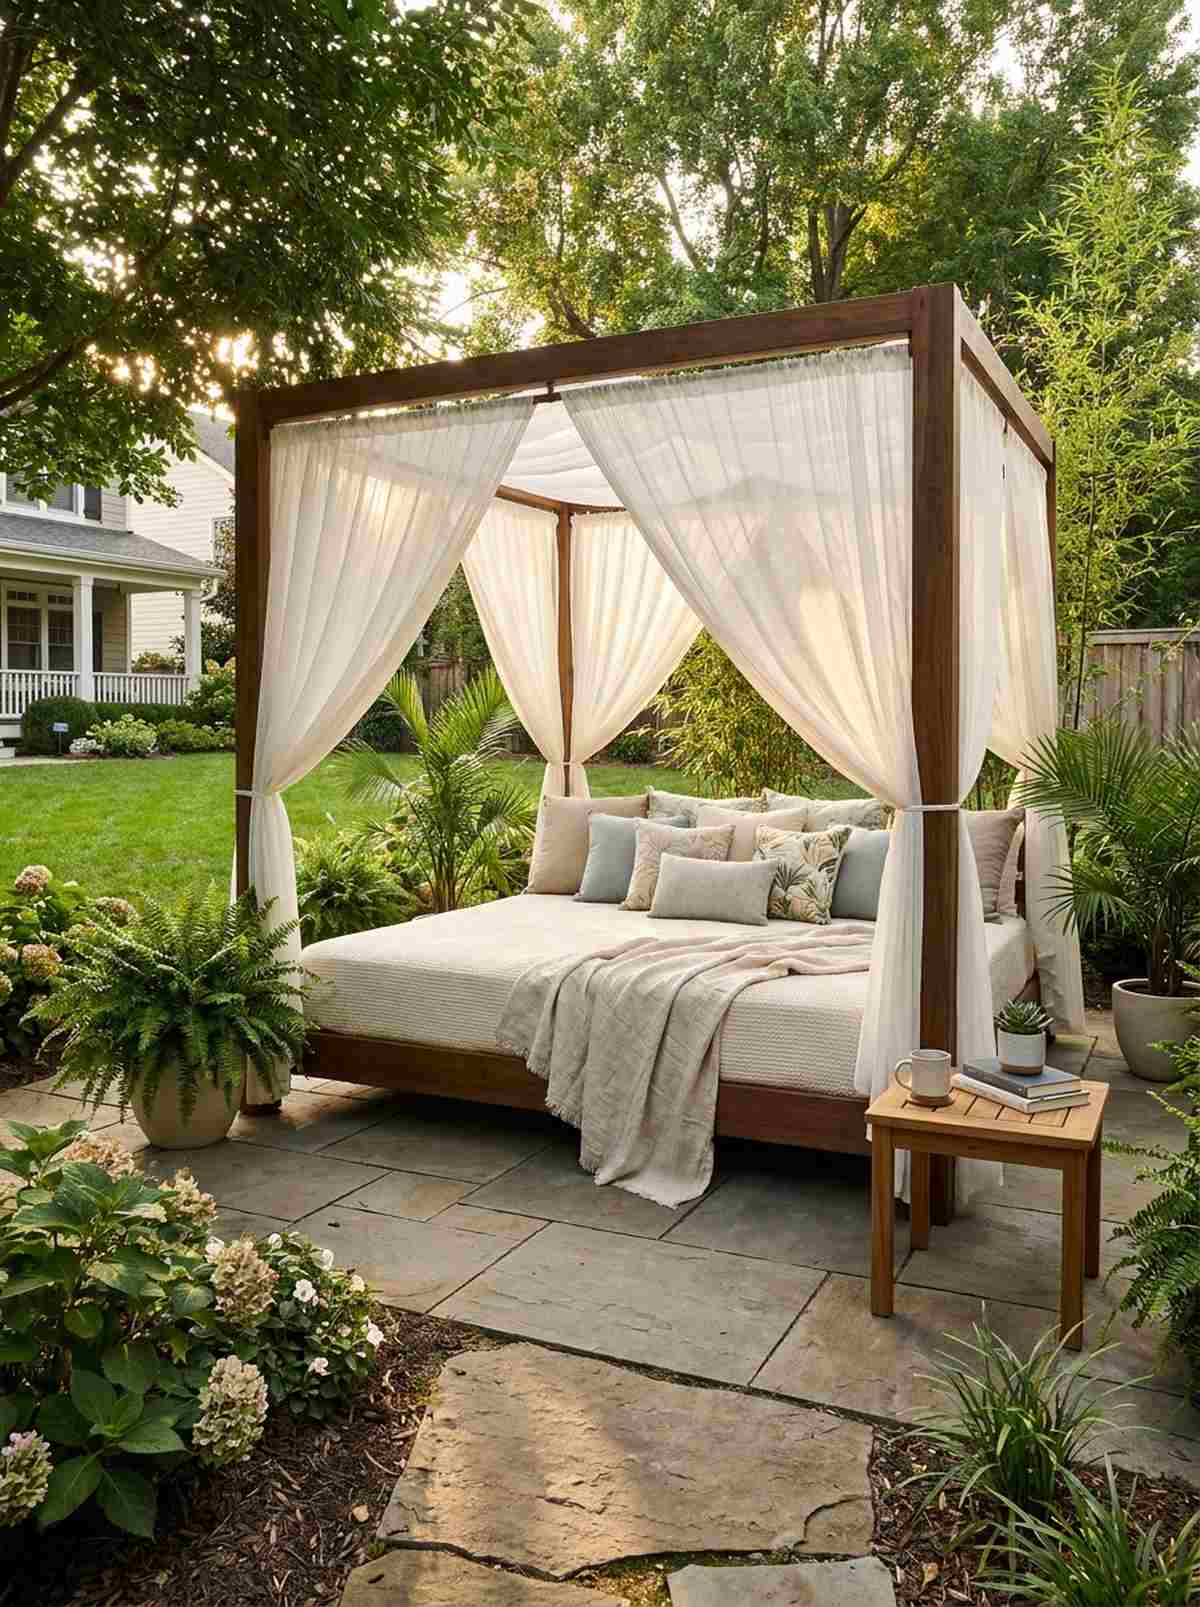
Brings a tropical Bali villa energy straight to the suburbs. An oversized outdoor lounging bed is the ultimate luxurious focal point, perfectly suited for a quiet, shaded corner of the yard.
Putting a literal bed outside provides a shockingly high-end finish that standard chairs can’t touch. Securing a weatherproof canopy over the frame guarantees you won’t wake up from a nap with a sunburn.
A structured daybed frame runs about $500–$1,000 online. Pin this if your ultimate goal is hardcore backyard napping!
- Key Materials: Wood daybed frame, waterproof mattress cover
- Vibe / Style: Zen luxury retreat
- Difficulty: Moderate assembly
- Budget Breakdown: Frame: $600 | Outdoor mattress: $250
- Creator’s Tip: Wrap a standard foam mattress in two layers of heavy duty vinyl before putting the aesthetic cover on.
- Smart Sourcing: Waterproof outdoor mattress encasements and sheer UV-blocking outdoor drapery kits.
18. Paired Chaise Lounges with Shade Sails
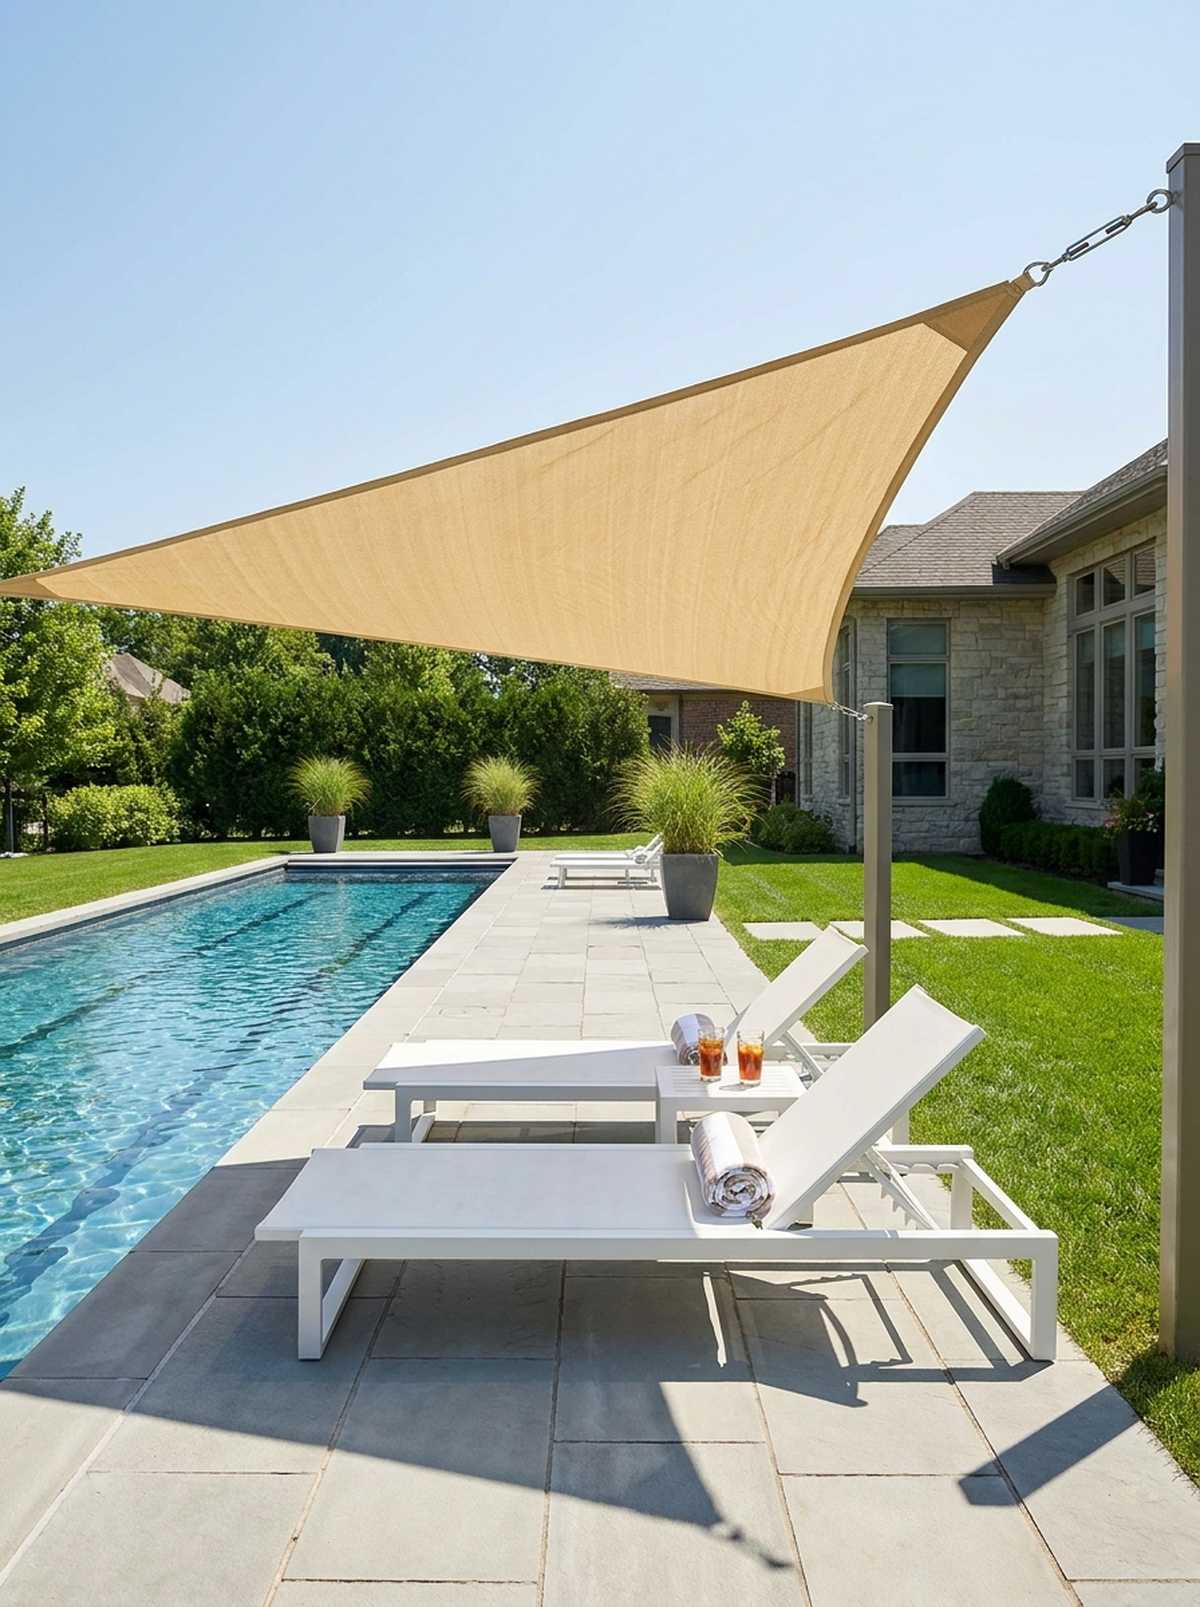
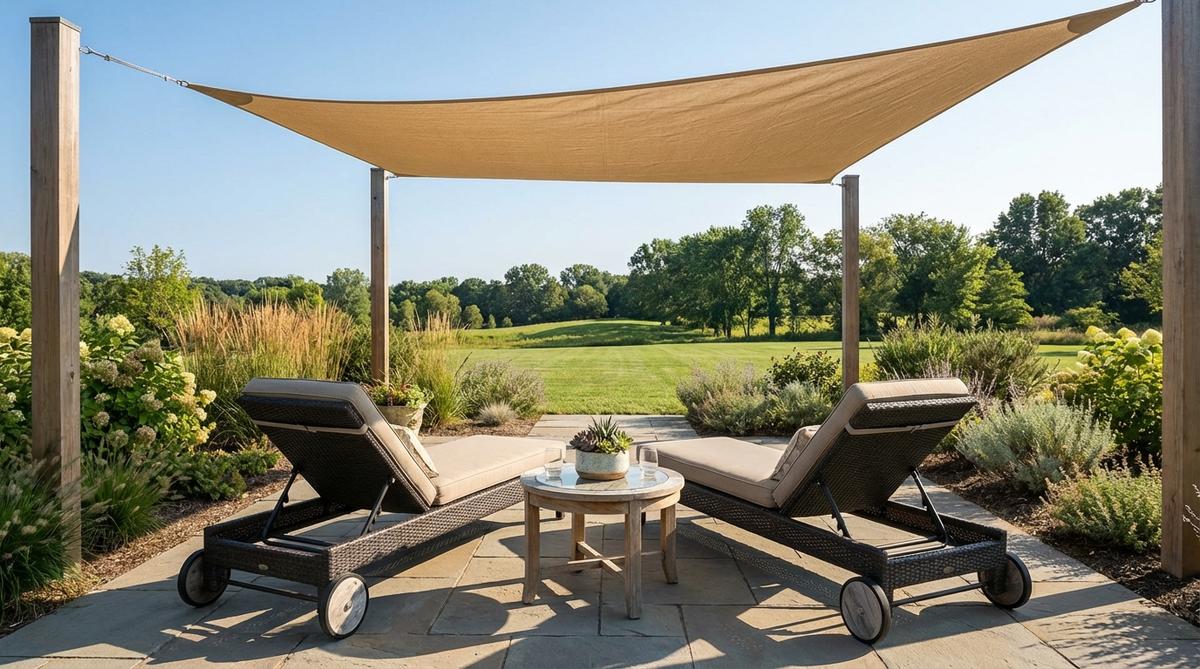
Feels like the deck of a high-end cruise ship. A parallel sun-lounger and shade canopy setup delivers sleek symmetry, working wonders for narrow pool decks or slim patios.
Adding a dramatic overhead architectural shade sail elevates simple chairs into a cohesive visual unit. Picking up a tension-mounted sail kit gives you designer sun protection without building a costly wooden roof.
You can hang a premium sail and set up two chaises for under $400. A highly recommended, fast afternoon upgrade.
- Key Materials: Adjustable resin loungers, triangle sun sail
- Vibe / Style: Minimalist sun deck
- Difficulty: Simple drill mounting
- Budget Breakdown: Chairs: $250 | Shade sail hardware: $90
- Creator’s Tip: Mount one corner of the triangle sail significantly lower to shed rainwater instantly.
- Smart Sourcing: Heavy-duty UV block shade sails and stainless steel tension mounting hardware kits.
19. Circular Seating Around Central Fire Bowl

Gives off an incredibly intimate, storybook gathering vibe. A perfect ring of fireside seating creates seamless equality, making it the top choice for late-night marshmallow roasts.
Ditching the blocky couches for an exact circle yields an organic, custom-built look. Adding low-profile stone or concrete seating blocks ensures the setup withstands blizzards and heavy rain without moving.
Creating the hardscape ring costs roughly $300–$600 in materials. Save this if you love hosting evening bonfires!
- Key Materials: Adirondack chairs, concrete fire bowl
- Vibe / Style: Modern rustic gathering
- Difficulty: Moderate lifting required
- Budget Breakdown: Fire bowl: $250 | Seating circle: $400
- Creator’s Tip: Lay down a circular bed of crushed pea gravel first to define the zone and prevent mud.
- Smart Sourcing: Pre-cast concrete fire bowl kits and weather-resistant resin adirondack chairs (bulk packs).
Most backyard lounges look incredibly cluttered, but this shockingly cheap vertical trick coming up will clear your floor space instantly.
20. Hammock Grove with Palm Planters
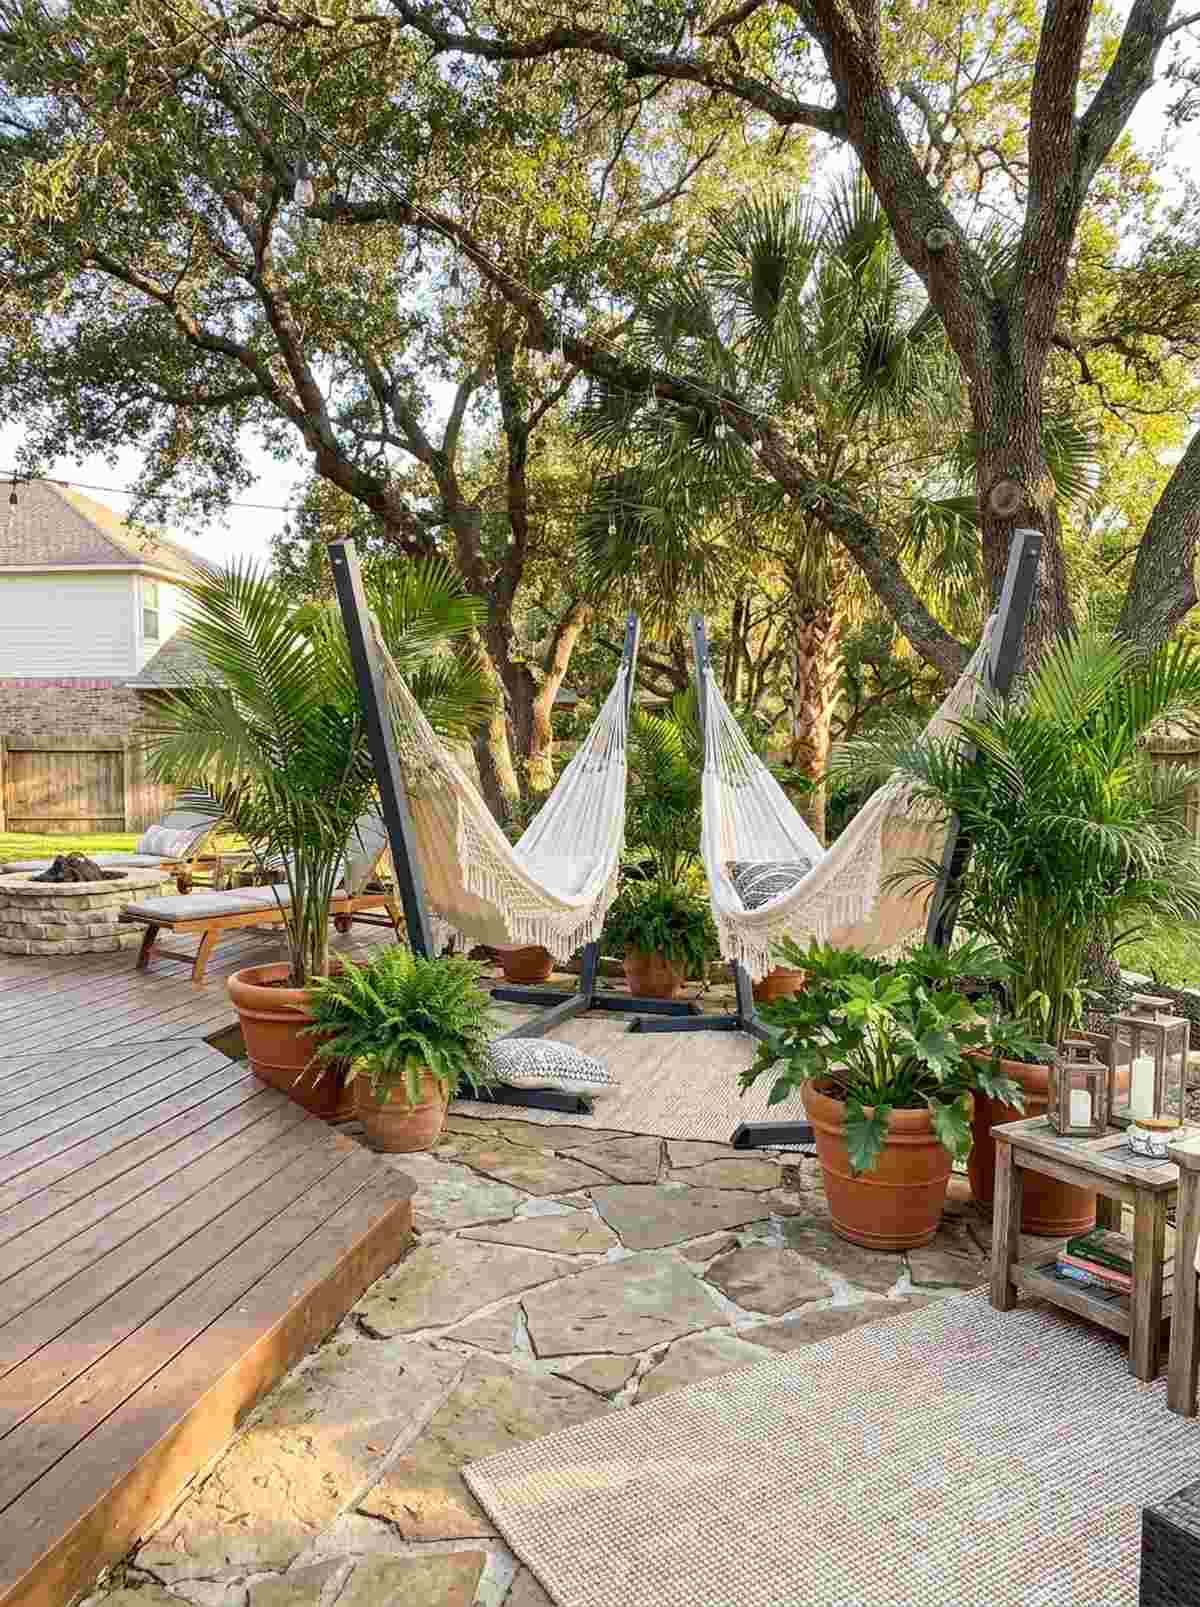
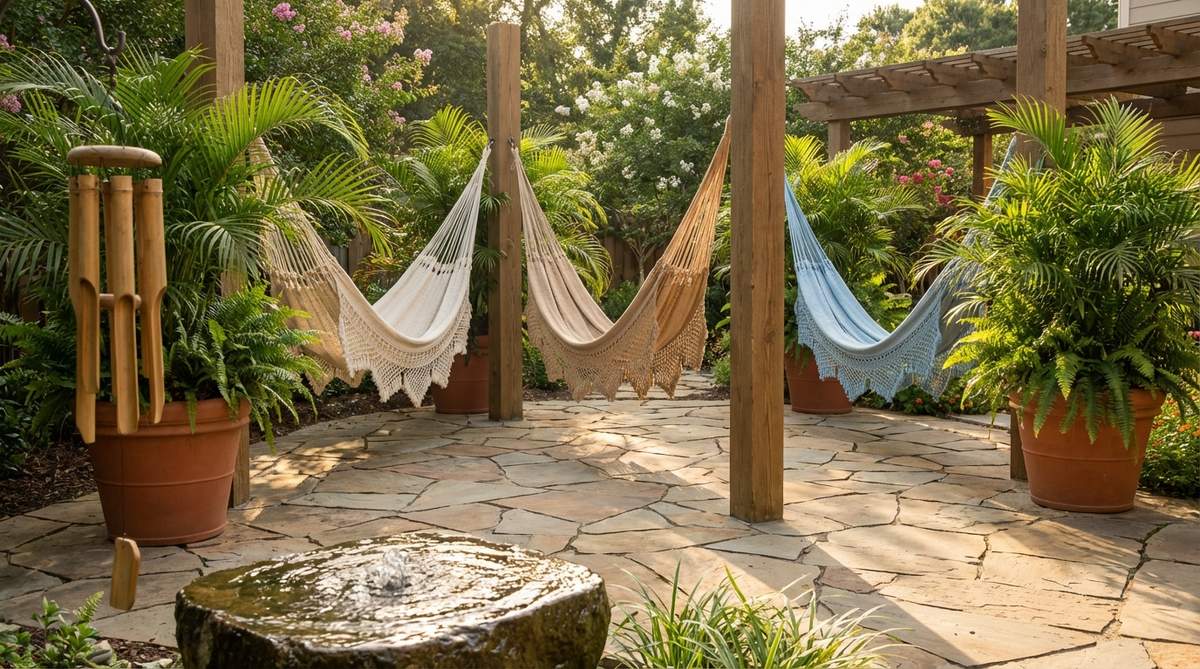
Instantly transports you to a Caribbean island hideaway. A suspended tropical hammock zone requires almost zero square footage, working beautifully for tight side-yards or awkward tree lines.
Stringing up canvas creates a stunning visual without the heavy bulk of patio couches. Sourcing heavy-duty steel hammock stands means you don’t even need perfectly spaced trees to pull this off.
A dual hammock setup runs around $150–$250. It’s a fantastic, low-cost way to add massive relaxation value.
- Key Materials: Canvas hammocks, large tropical potted palms
- Vibe / Style: Bohemian jungle escape
- Difficulty: Very easy
- Budget Breakdown: Hammocks & Stands: $180 | Planters: $100
- Creator’s Tip: Always unclip the canvas during heavy rainstorms to prevent mold buildup in the fabric folds.
- Smart Sourcing: Heavy-duty steel hammock stands and weather-proof brazilian style canvas hammocks.
21. Modular Floor Cushion Arrangement
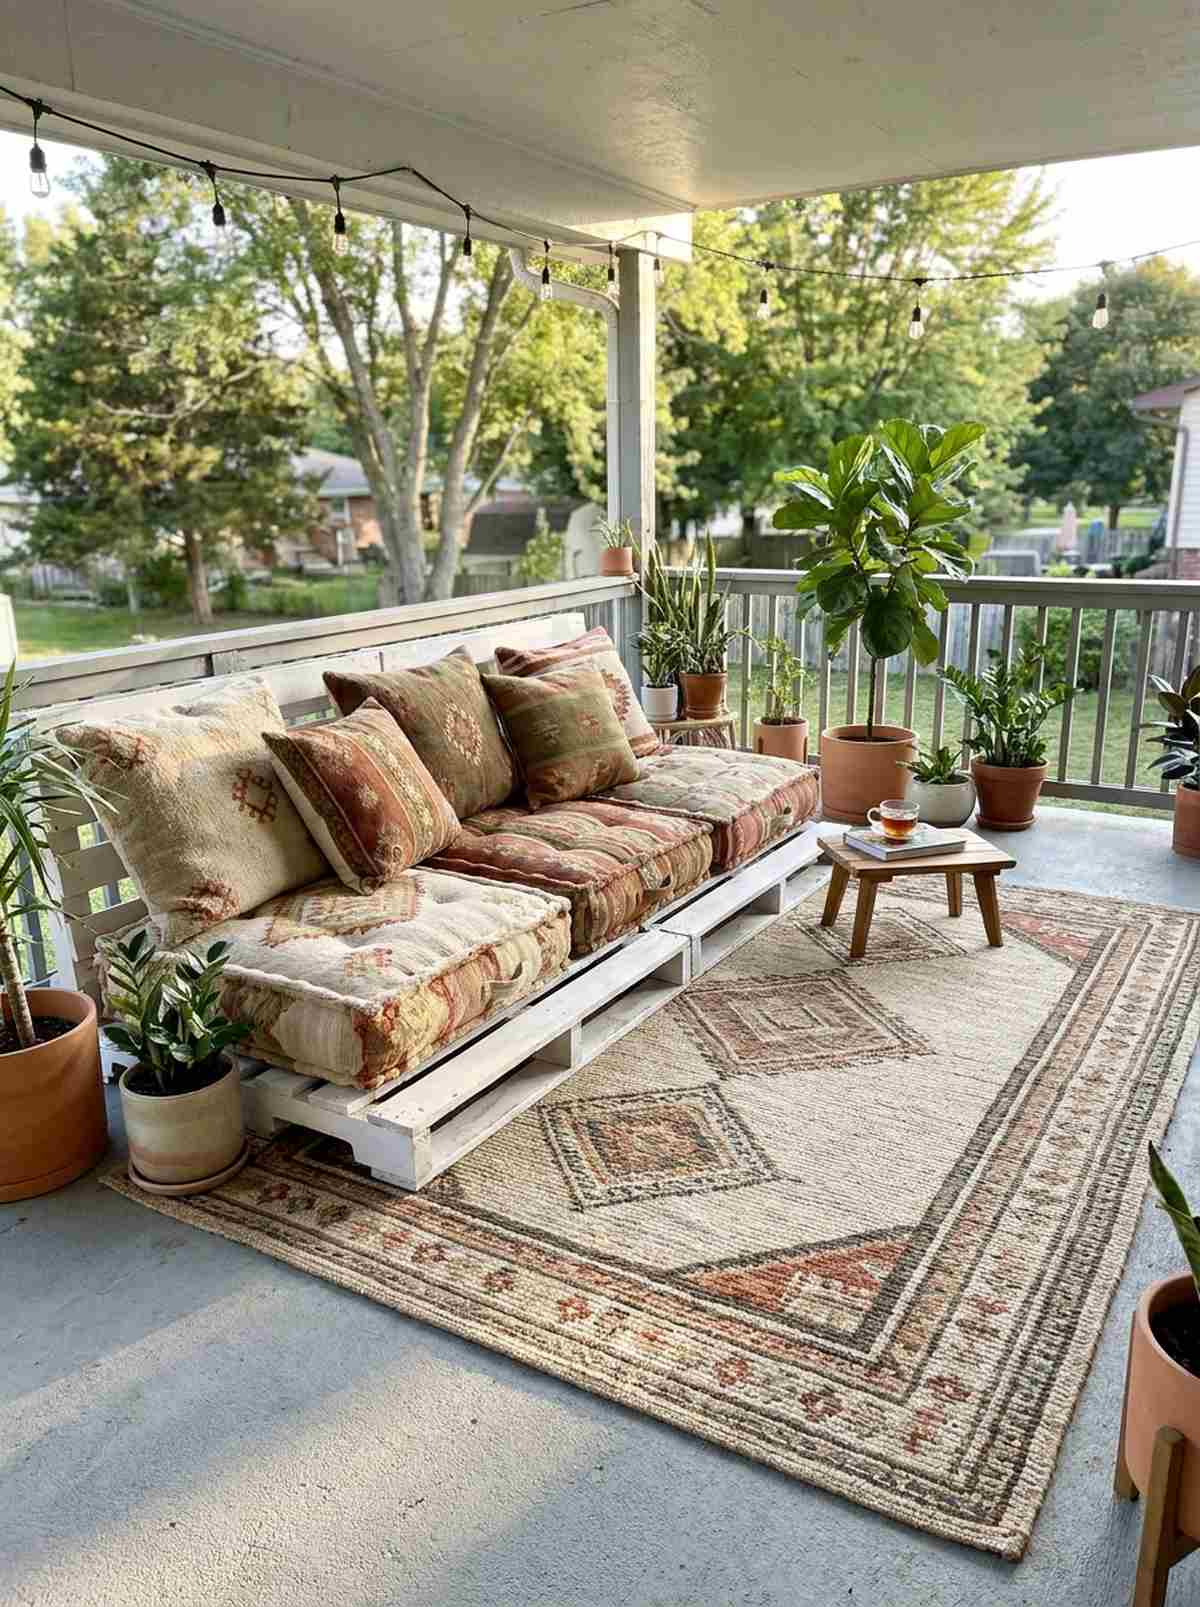
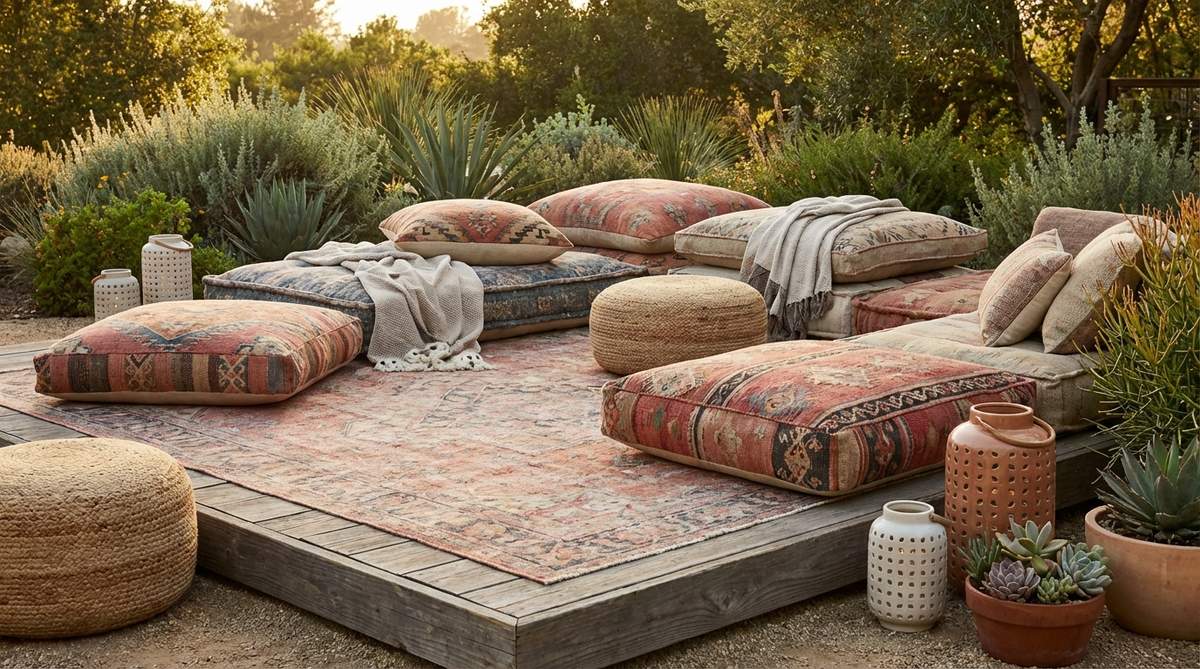
Feels like a cozy, grounded Moroccan tea room. A low-profile outdoor floor seating layout brings an incredibly relaxed vibe, perfect for bohemian renters or small concrete balconies.
Skipping rigid furniture for thick, plush ground pillows delivers an effortlessly cool, expensive look. Throwing down a massive water-resistant outdoor rug underneath keeps the pillows clean and anchors the whole aesthetic.
You can source a stack of thick floor cushions for about $150–$250. Pin this if you hate bulky, heavy outdoor furniture!
- Key Materials: Oversized outdoor floor pillows, thick woven rug
- Vibe / Style: Earthy bohemian
- Difficulty: Literally just tossing pillows
- Budget Breakdown: Rug: $100 | Cushions: $180
- Creator’s Tip: Buy a cheap wooden shipping pallet and paint it white to elevate the pillows slightly off the damp floor.
- Smart Sourcing: Waterproof oversized floor cushions (bulk pack) and mold-resistant outdoor woven rugs.
22. Swing Bench with Canopy Frame
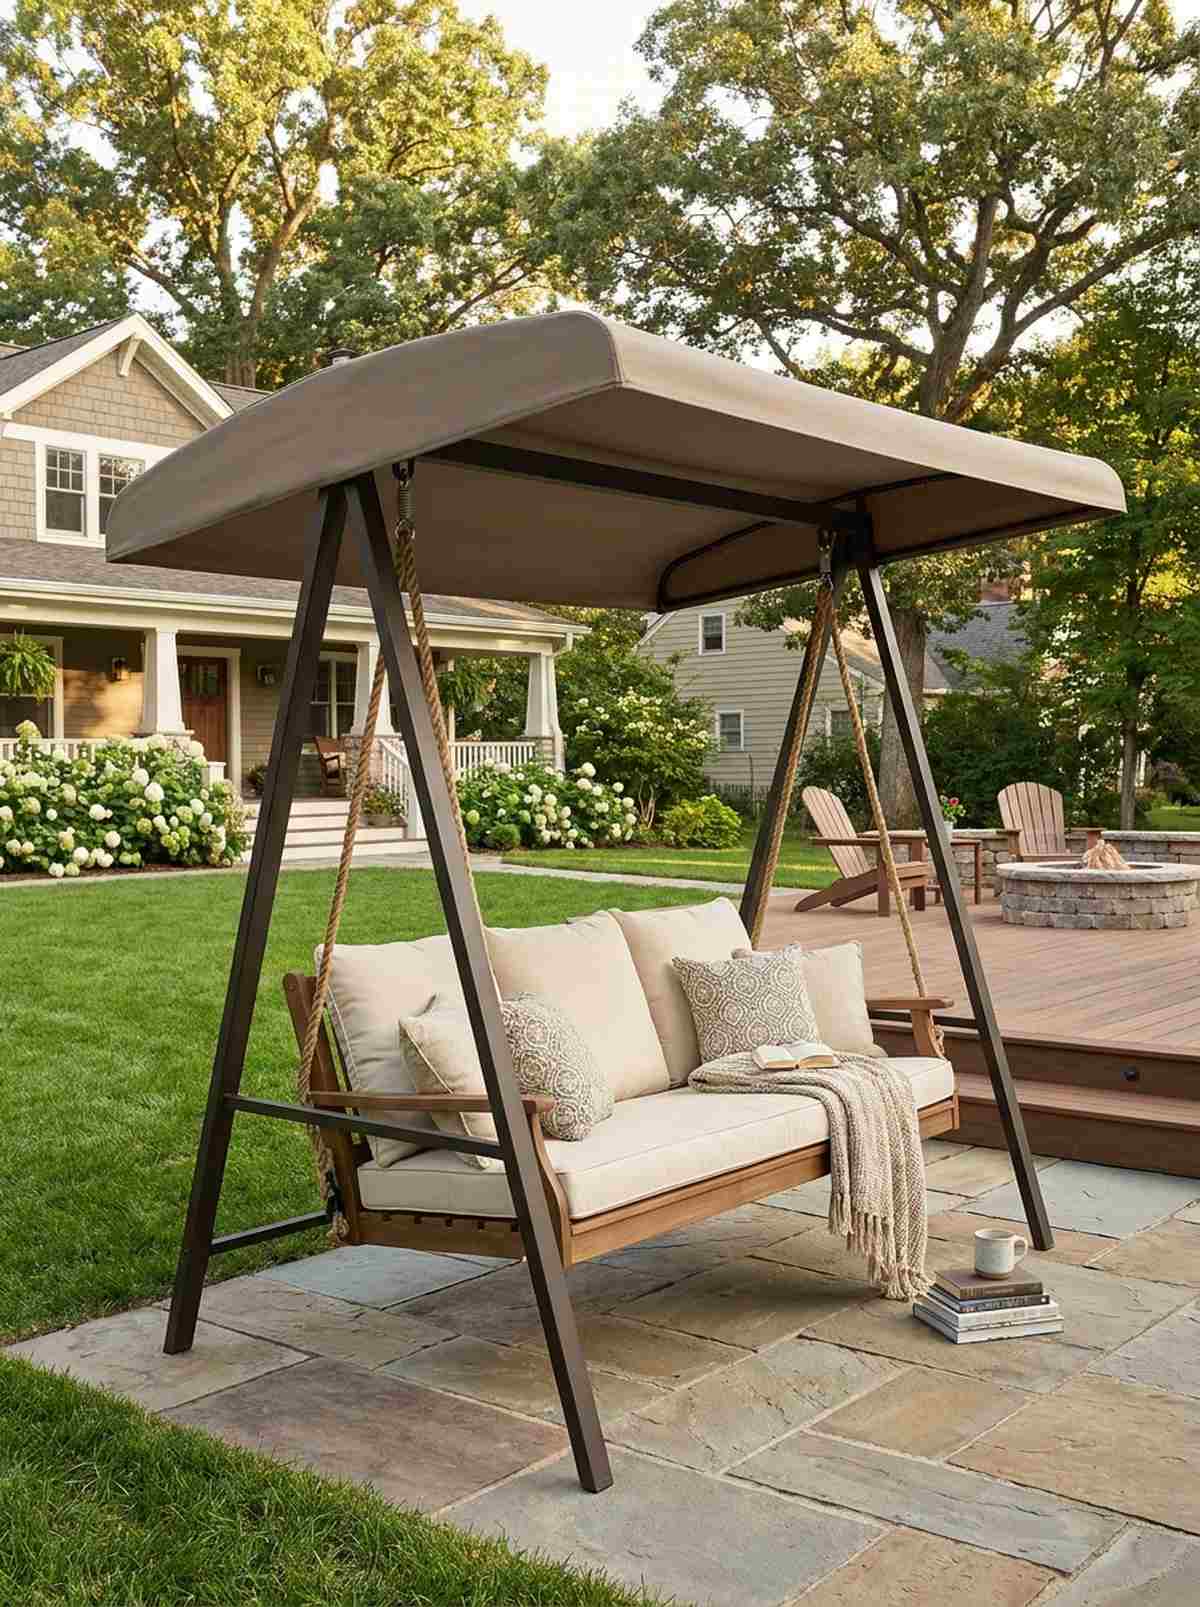

Gives off an incredibly nostalgic, Southern porch aura. A freestanding covered patio swing creates an instant reading nook, an amazing addition to empty lawns or bare concrete corners.
Adding dynamic movement to your seating immediately elevates the entire yard’s appeal. Utilizing a rust-resistant steel A-frame ensures you get smooth, quiet swinging without any terrifying creaks.
A high-quality covered swing costs around $250–$450. Highly recommended for adding a peaceful retreat to a chaotic house.
- Key Materials: Steel swing frame, UV-blocking canopy
- Vibe / Style: Classic comfort
- Difficulty: Intermediate bolt assembly
- Budget Breakdown: Swing kit: $300 | Upgraded cushions: $80
- Creator’s Tip: Replace the factory chain with thick marine rope for a custom, nautical upgrade.
- Smart Sourcing: Rust-resistant freestanding porch swing kits and replacement UV-blocking swing canopies.
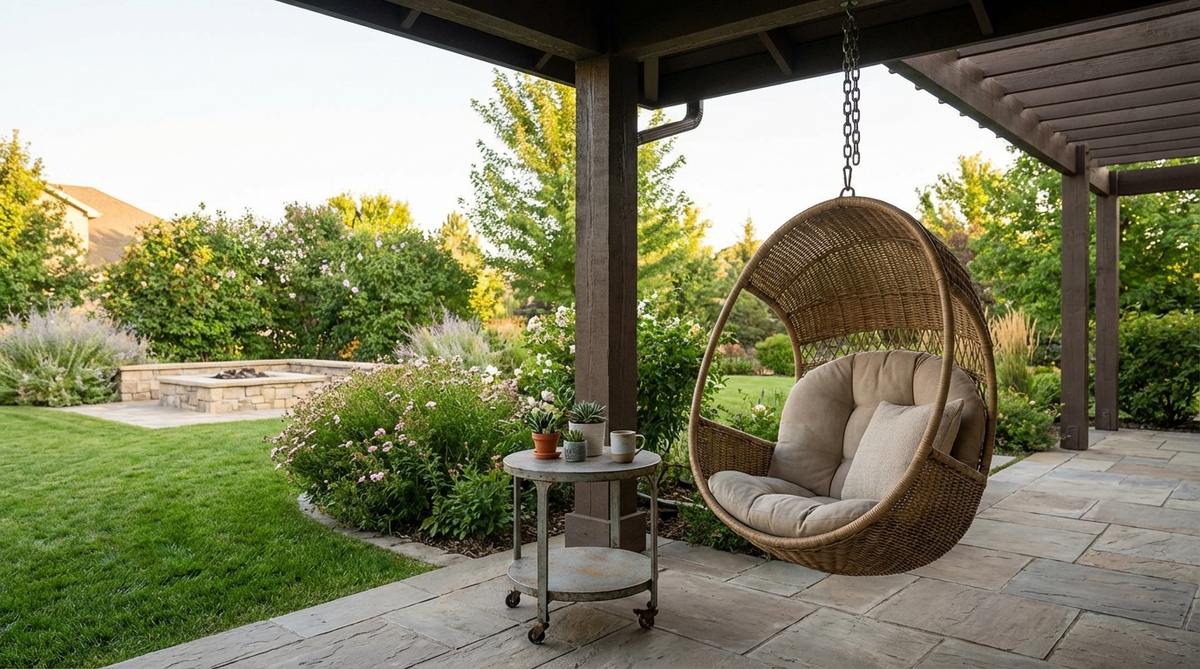
23. Pod Chair Cluster for Individual Retreats
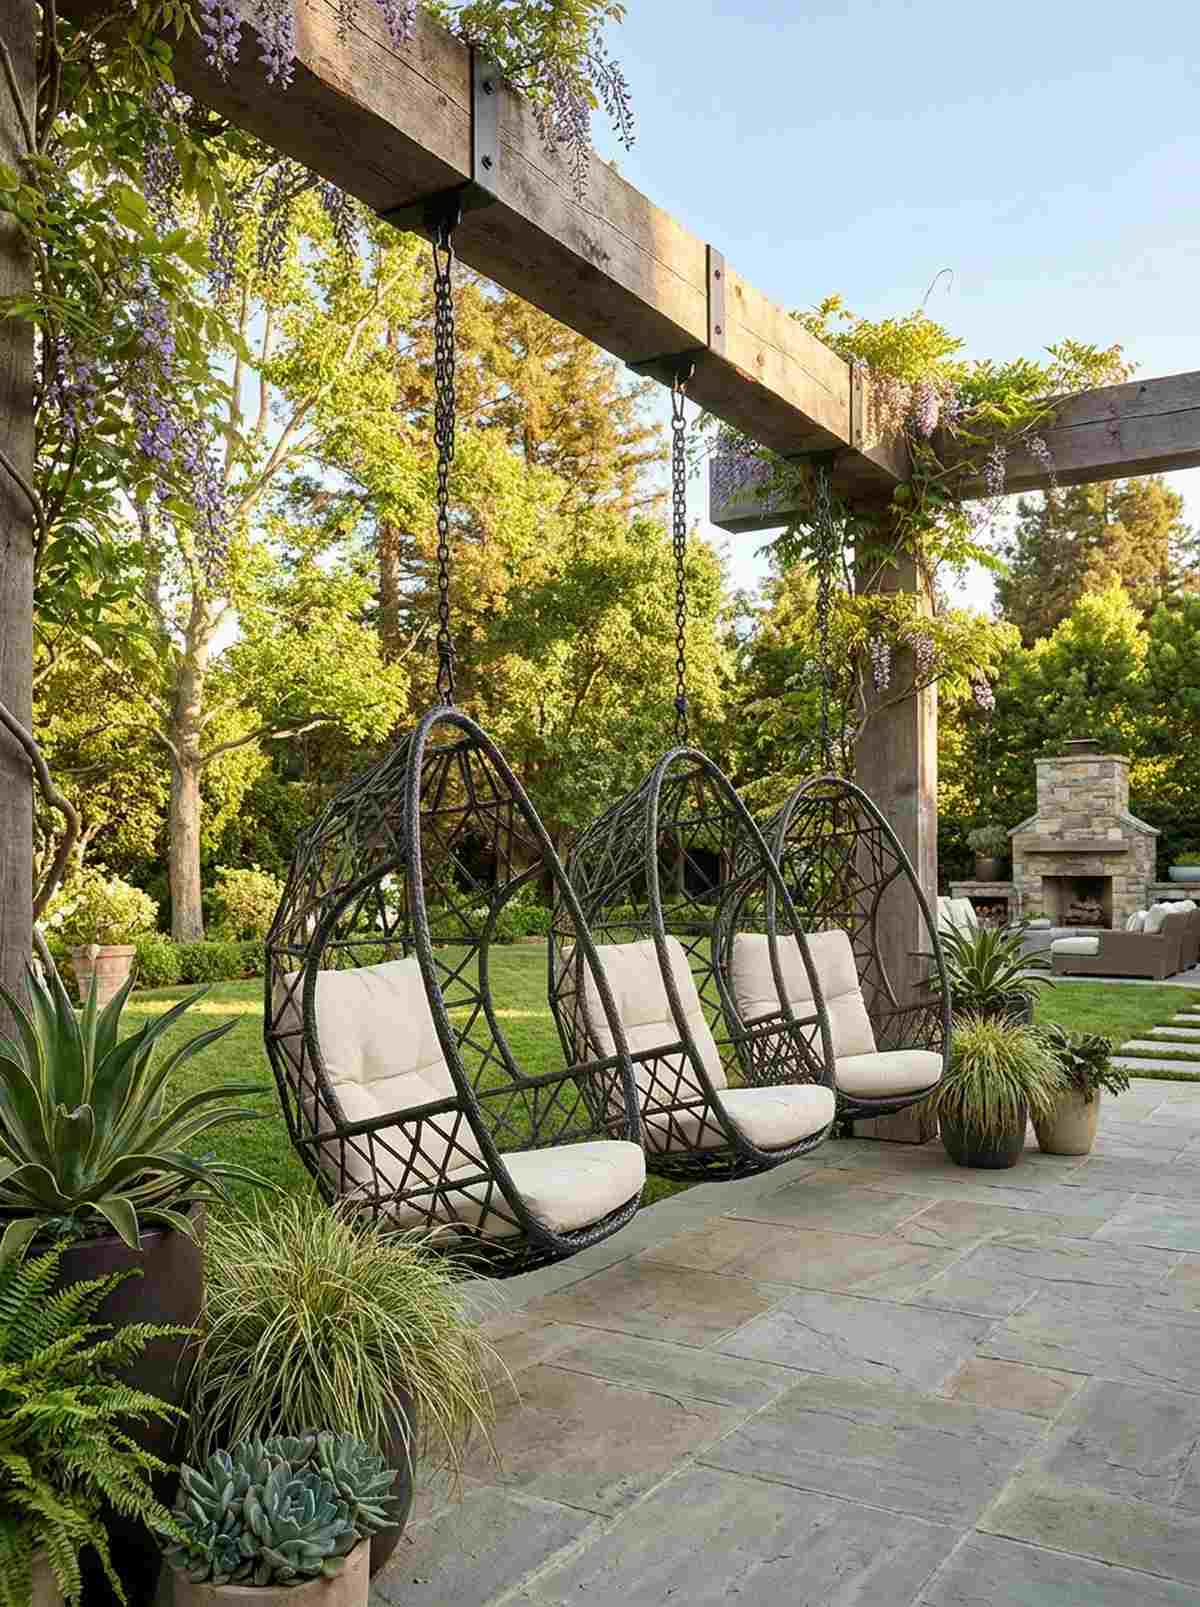
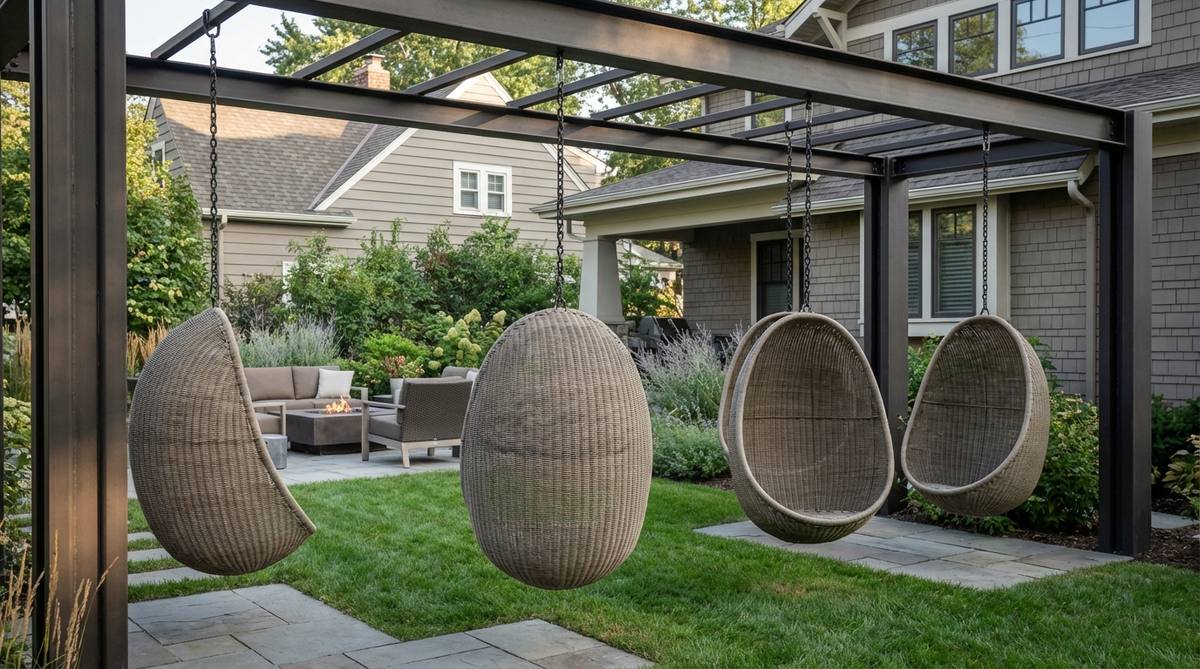
Feels like an artsy, high-end museum sculpture garden. A suspended egg chair collection provides semi-private relaxation, working remarkably well under heavy wooden pergolas.
Swapping a boring bench for hanging geometric pods completely transforms the vertical space. Grabbing heavy-duty resin wicker chairs ensures they survive massive temperature swings without cracking or unraveling.
Hanging three pods will cost about $600–$900 total. Save this layout if you want an ultra-modern aesthetic!
- Key Materials: Resin wicker egg chairs, heavy chain hardware
- Vibe / Style: Sculptural modernism
- Difficulty: Requires strong overhead beams
- Budget Breakdown: 3 Pod Chairs: $750 | Mounting hardware: $60
- Creator’s Tip: Stagger the hanging heights slightly so they look like an organic art installation instead of a rigid line.
- Smart Sourcing: UV-resistant resin wicker hanging egg chairs and heavy-duty steel swing hanging kits.
You probably think you don’t have enough space for dining and lounging… wait until you see this genius 2-in-1 hybrid setup.
Multi-Functional Hybrid Spaces
Patios serving multiple purposes require adaptable furniture and strategic design that supports easy transitions between dining, lounging, entertaining, and activity modes throughout the day and season.
24. Convertible Sectional with Dining-Height Table
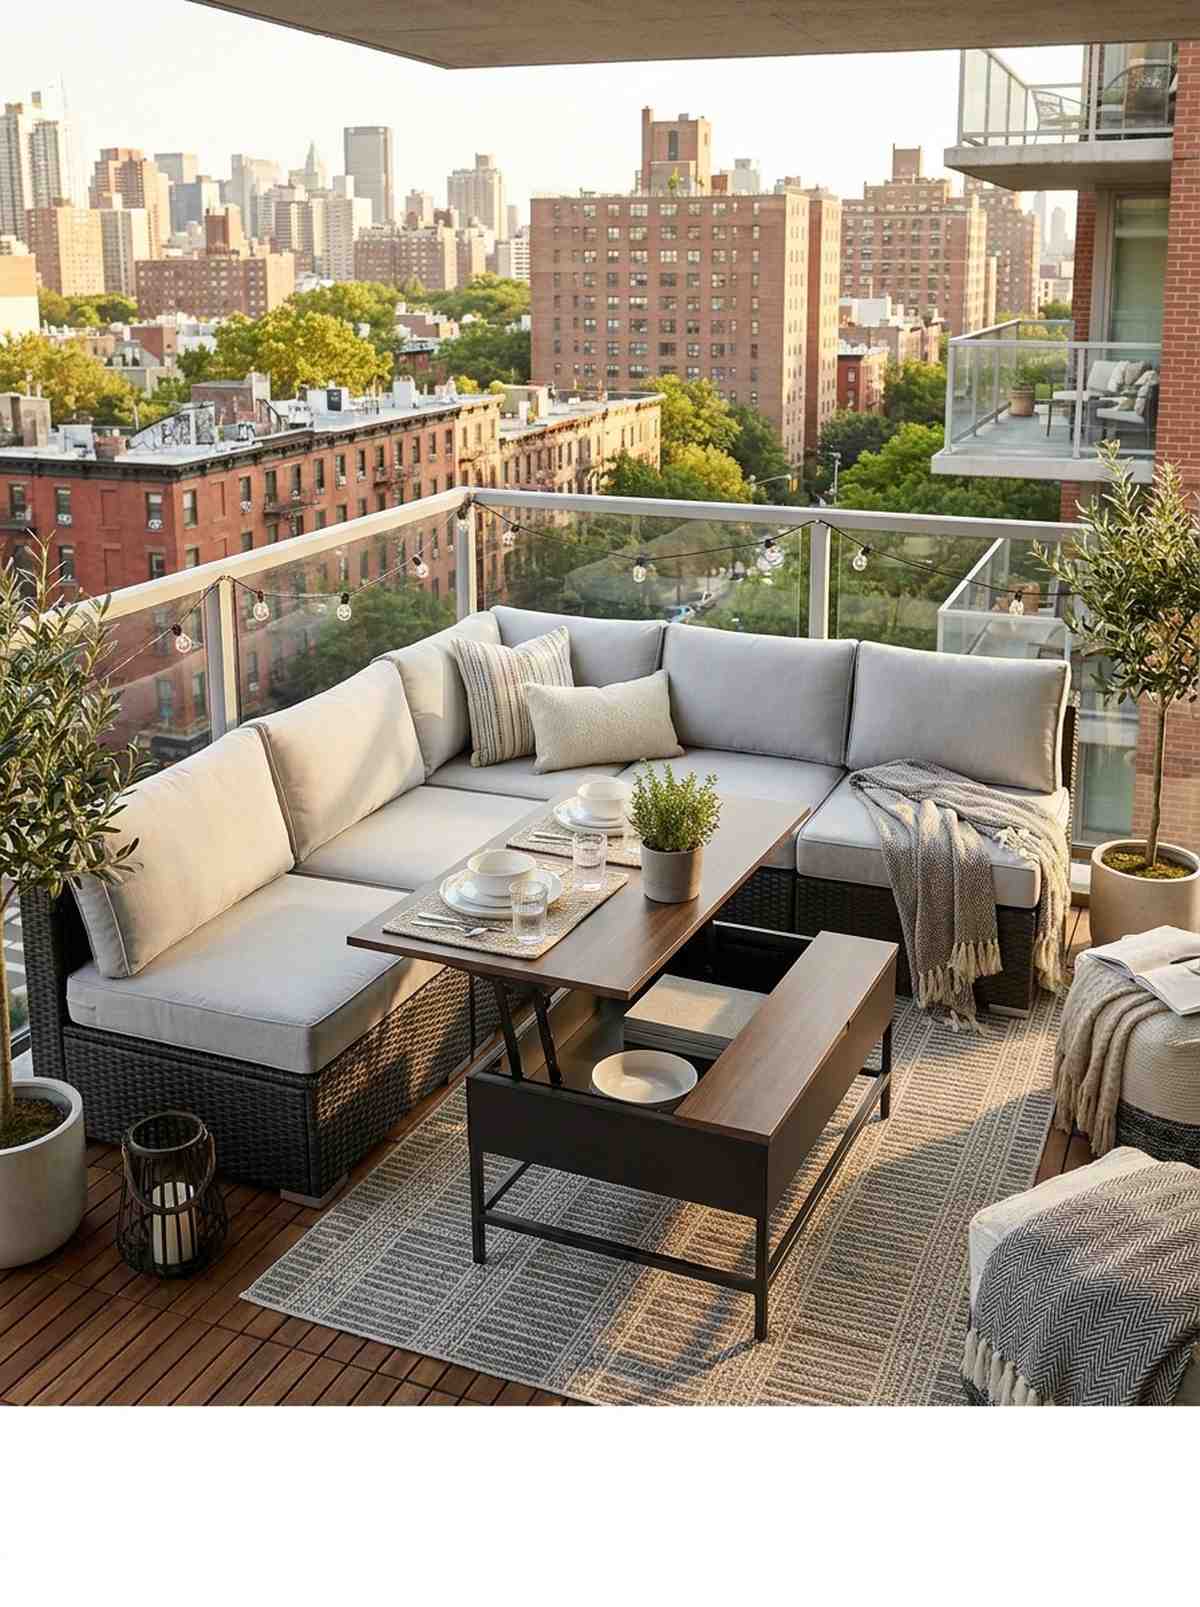
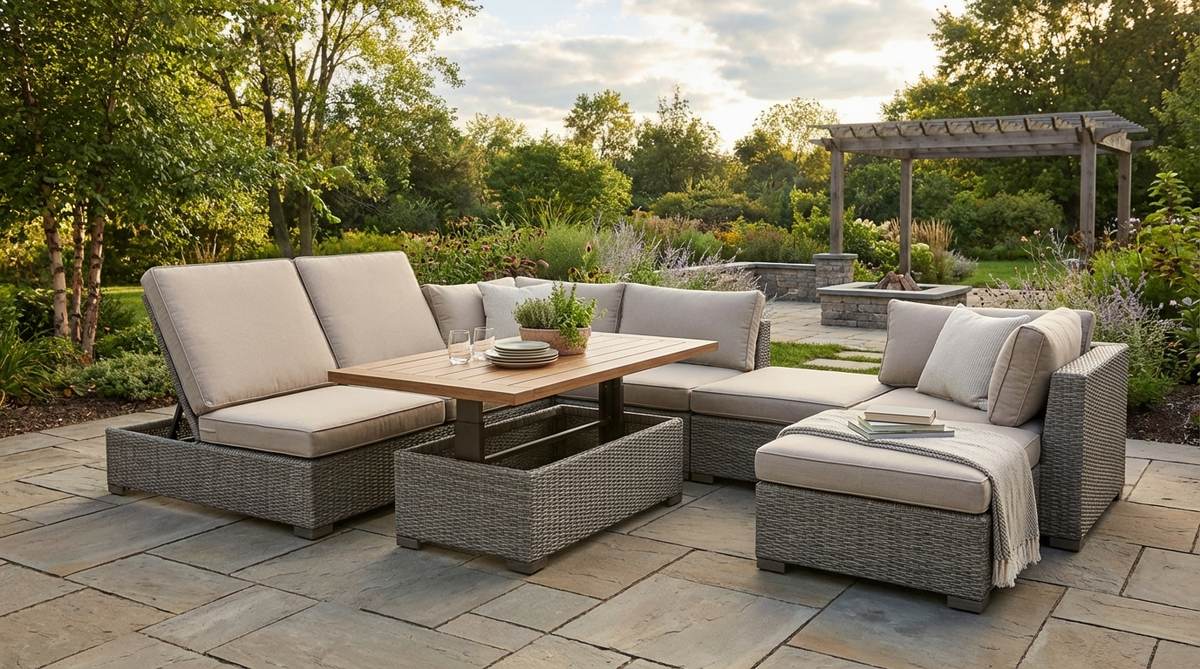
Delivers incredible multi-purpose efficiency in a tiny footprint. The adjustable high-low lounge dining setup allows you to eat a full meal and then instantly recline, perfect for strict HOA balconies.
Fusing a couch with an elevated table provides a shockingly high-end, space-saving finish. Using a hydraulic lift coffee table lets you seamlessly pull the surface up to dinner height in three seconds flat.
This hybrid furniture setup generally runs $600–$1,200. Pin this if you have zero room for separate zones!
- Key Materials: Firm-back sectional couch, adjustable lift-top table
- Vibe / Style: Urban space-saver
- Difficulty: Beginner setup
- Budget Breakdown: Lift table: $300 | Sectional: $600
- Creator’s Tip: Pick a table with hidden storage underneath the lift-top to stash your placemats and napkins.
- Smart Sourcing: Hydraulic lift-top outdoor coffee tables and firm-back modular resin outdoor sectionals.
25. Rolling Bar Cart Service Station
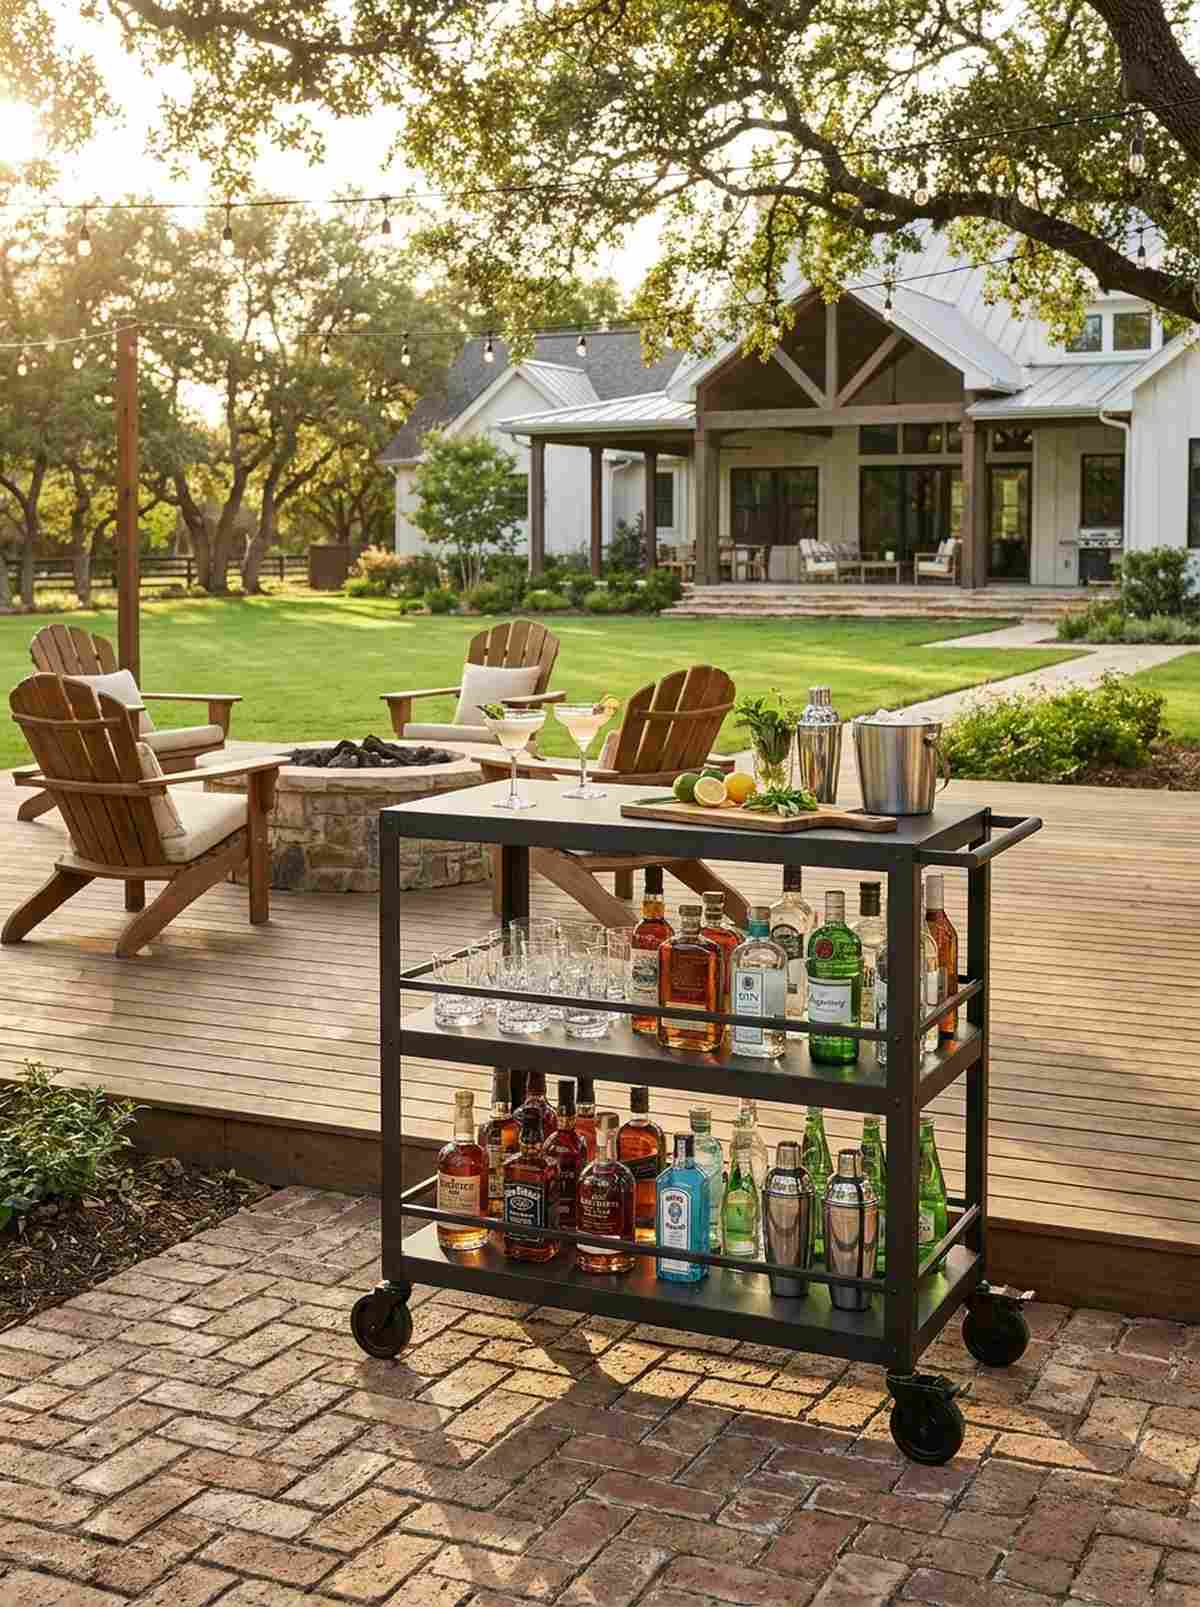
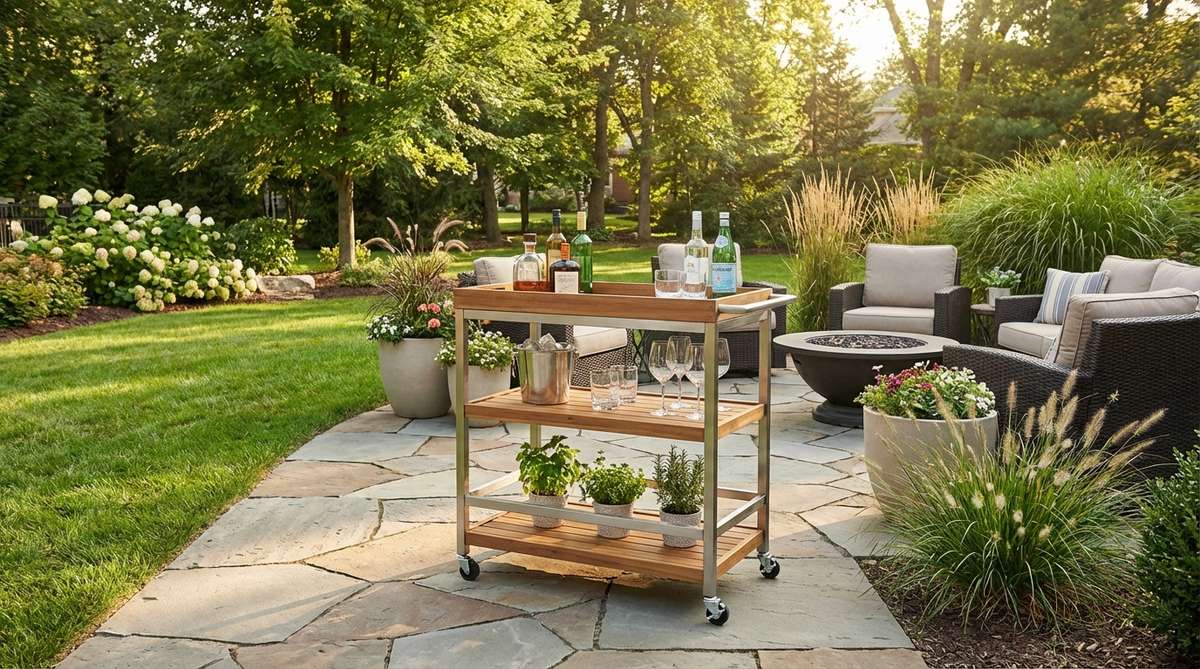
Gives off an instant VIP tableside service vibe. A mobile outdoor beverage and prep cart moves the party anywhere, an absolute must-have for expansive yards where the grill is far away.
A wheeled station looks far more expensive than carrying plates back and forth. Investing in a powder-coated steel utility cart ensures it can hold heavy liquor bottles without bowing or rusting.
A premium weather-proof cart costs about $150–$300. It’s a massive functional upgrade for serious hosts.
- Key Materials: 3-tier metal rolling cart, locking caster wheels
- Vibe / Style: Upscale catering
- Difficulty: Quick bolt-together assembly
- Budget Breakdown: Bar cart: $180 | Weather cover: $30
- Creator’s Tip: Swap out the factory plastic wheels for heavy-duty rubber casters so it rolls smoothly over brick pavers.
- Smart Sourcing: Powder-coated steel outdoor bar carts and heavy-duty rubber locking caster wheel replacement kits.
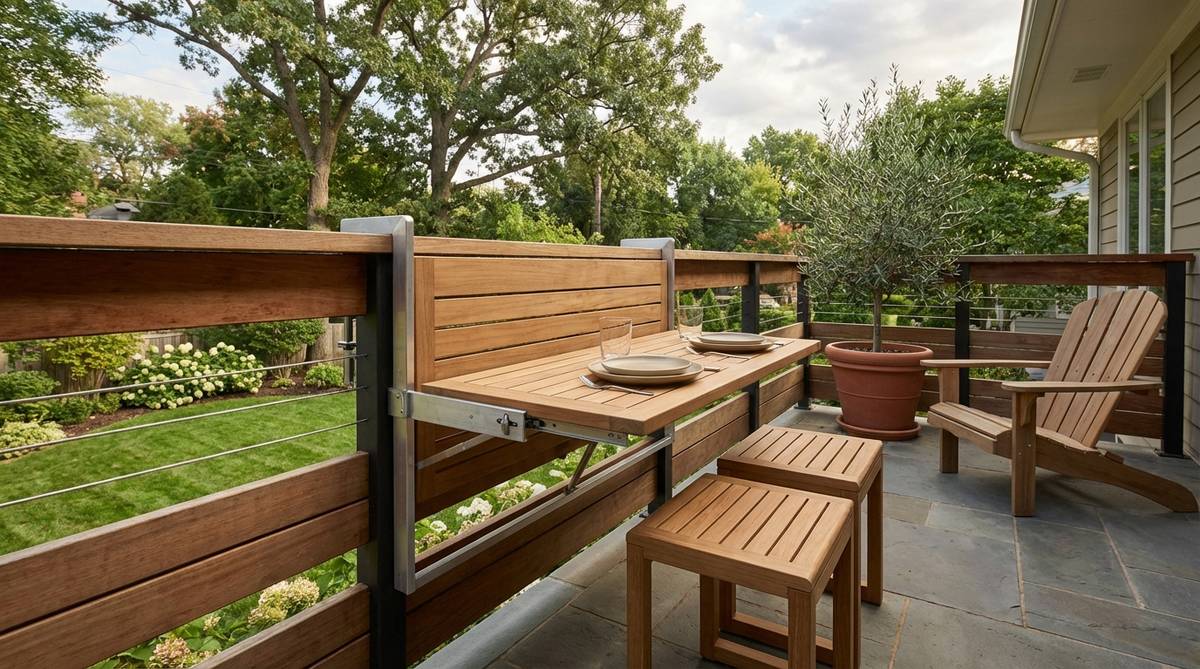
26. Fold-Down Wall-Table System
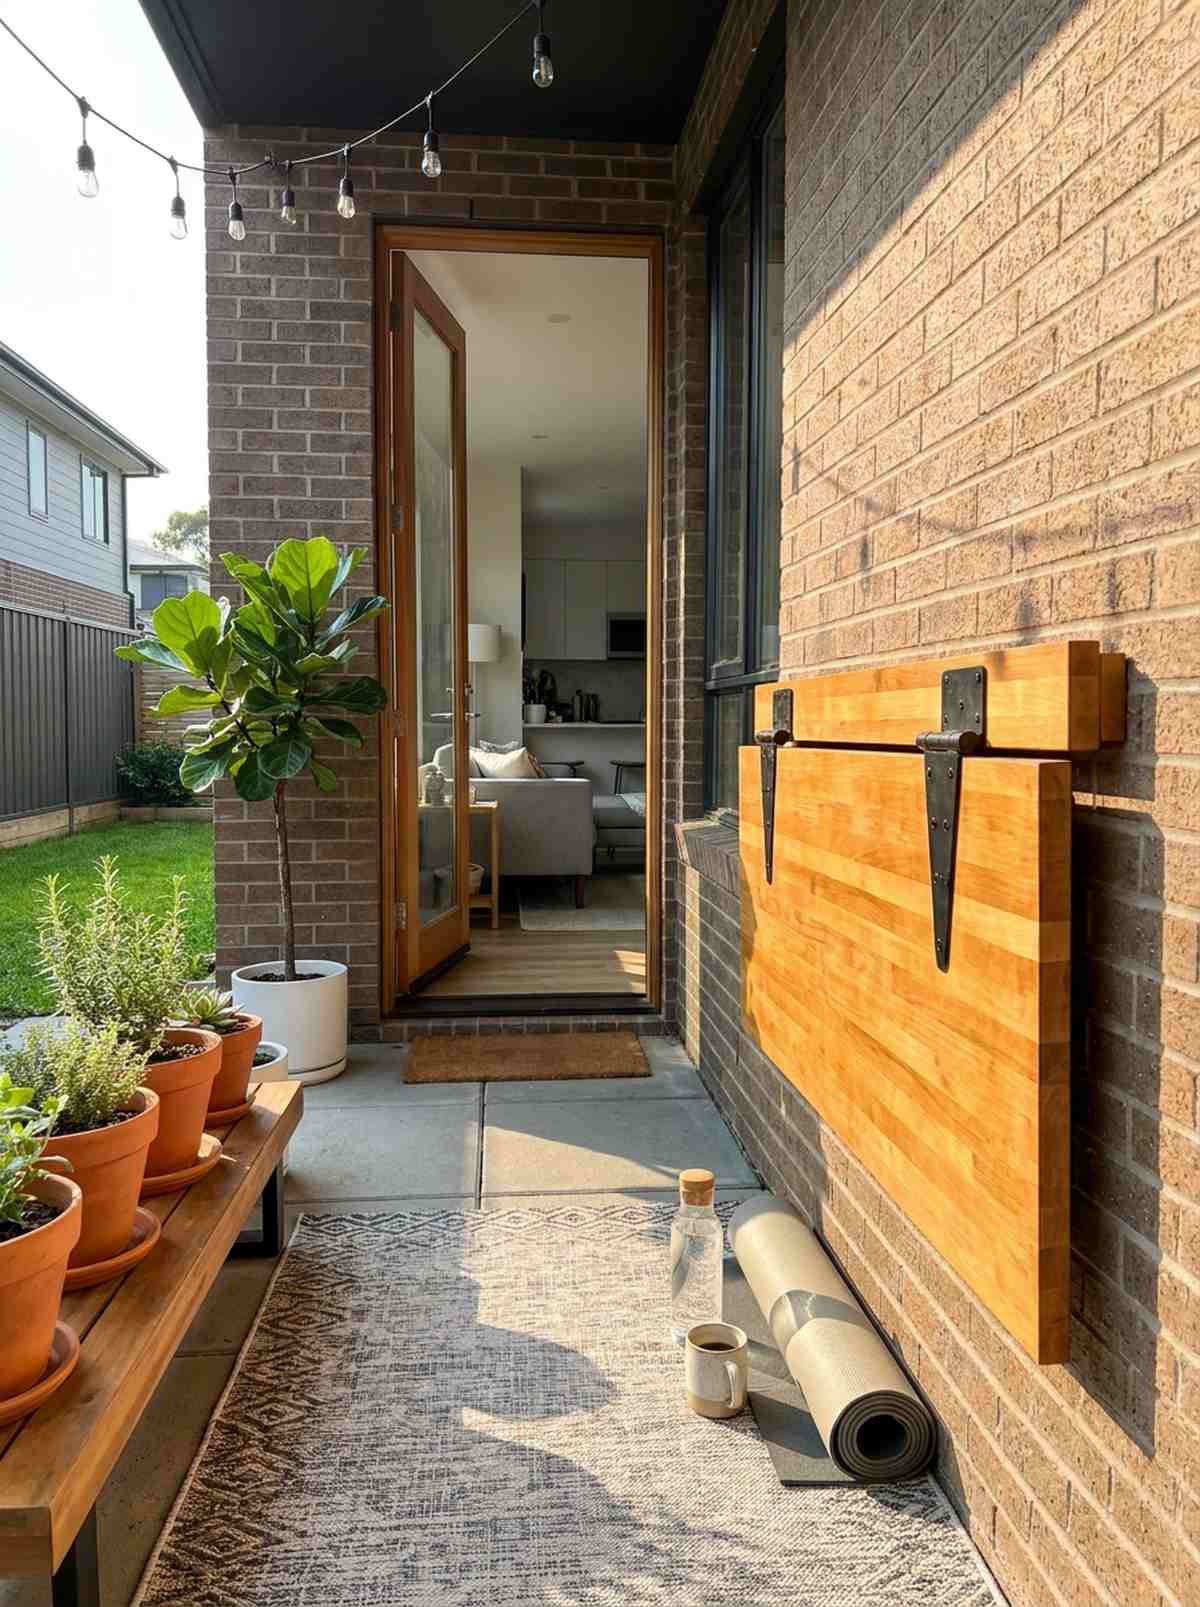
Feels like a genius tiny-home architectural hack. A collapsible wall-mounted dining ledge reclaims your entire floor space instantly, making it the ultimate lifesaver for tiny apartment patios.
Attaching a floating desk to the exterior wall delivers a totally custom, built-in impression. Sourcing marine-grade wood brackets ensures the table won’t snap off the wall during a dinner party.
You can install this fold-away system for roughly $100–$200. Save this if you need room for your yoga mat in the morning!
- Key Materials: Drop-leaf hardware hinges, sealed butcher block
- Vibe / Style: Minimalist urban utility
- Difficulty: Requires masonry drilling
- Budget Breakdown: Heavy brackets: $60 | Wood surface: $80
- Creator’s Tip: Seal the edge that touches the wall with clear silicone caulk to prevent rain from dripping behind it.
- Smart Sourcing: Heavy-duty folding shelf bracket kits and pre-sealed butcher block tops.
27. Nesting Furniture Clusters
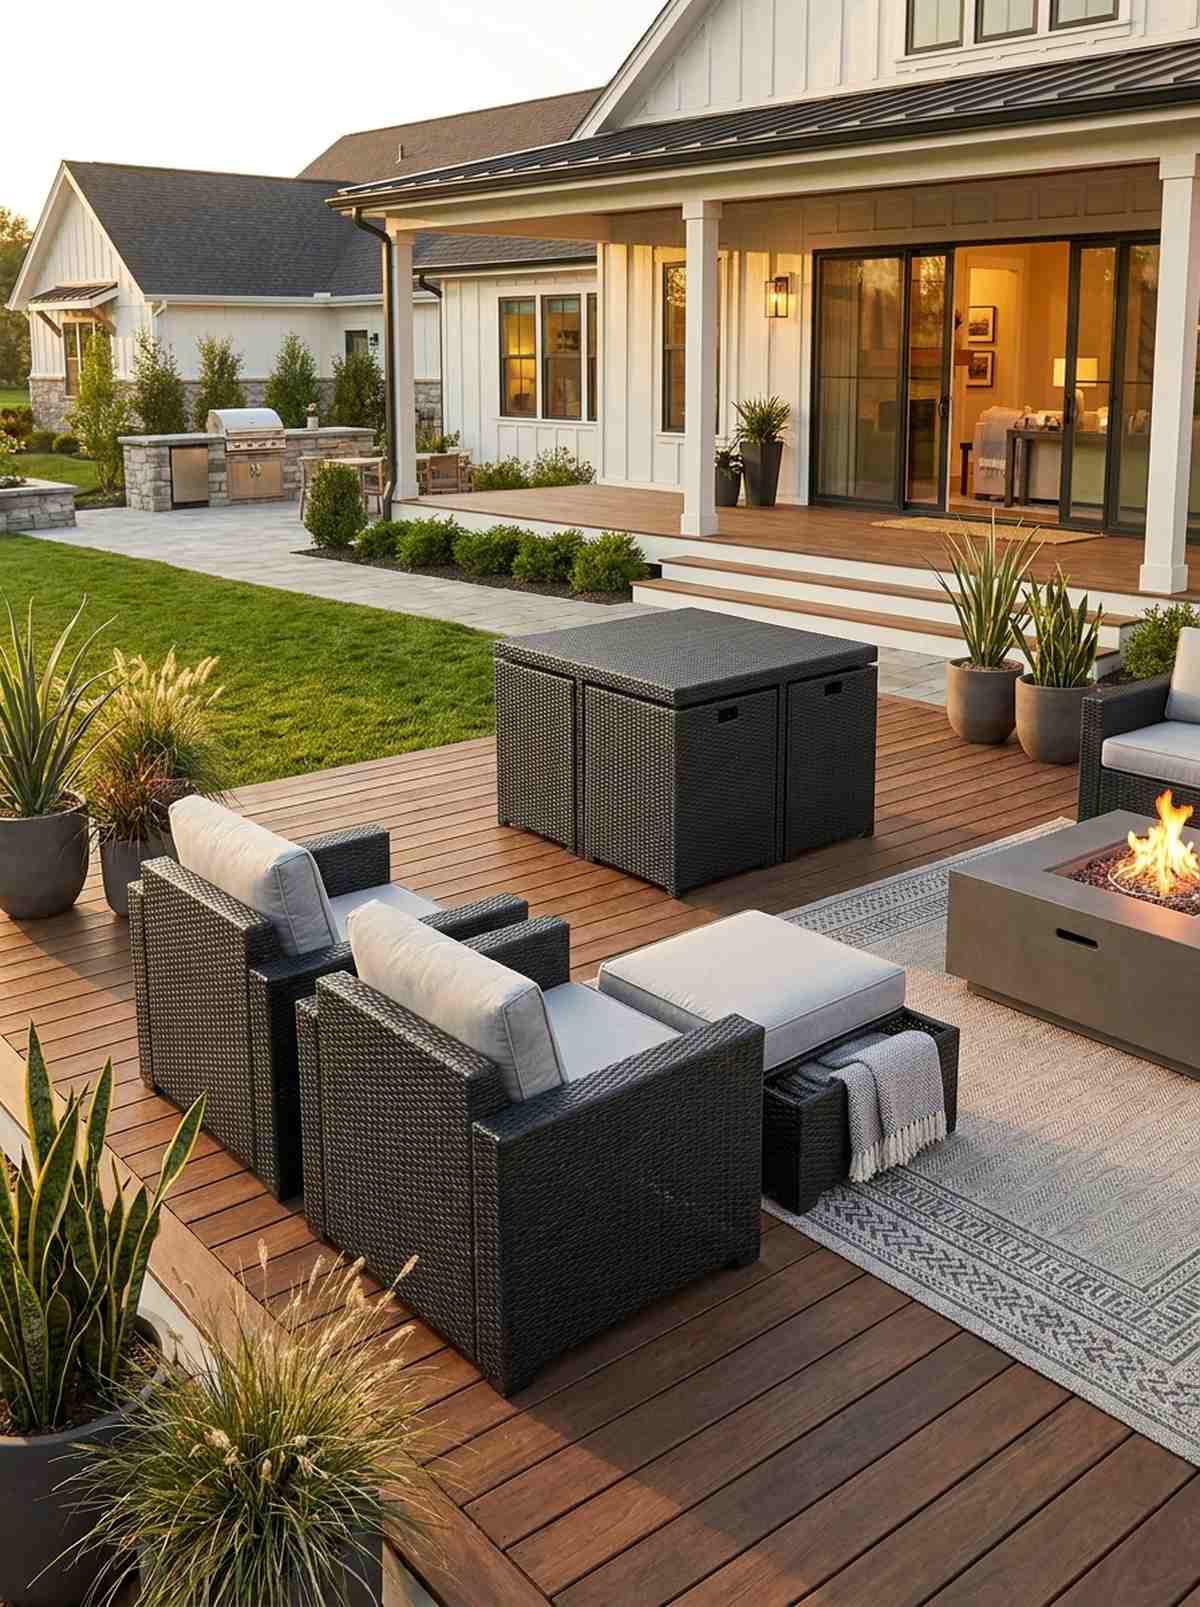
Radiates sleek, modern geometric elegance. A stackable multi-piece lounge configuration stays hidden until you need it, perfectly tailored for minimalists who hate visual clutter.
Furniture that slides perfectly into a single cube yields a shockingly high-end, futuristic look. Buying an all-weather wicker nesting set means you don’t need a massive shed to store twelve chairs in the winter.
A quality 5-piece nesting block runs between $300–$700. It’s an incredibly smart investment for unpredictable guest counts.
- Key Materials: Wicker nesting chairs, hollow ottomans
- Vibe / Style: Ultra-modern compact
- Difficulty: Ready out of the box
- Budget Breakdown: 5-piece nesting kit: $450 | Single cover: $50
- Creator’s Tip: Stash your winter blankets inside the hollow nesting ottomans to save even more space.
- Smart Sourcing: All-weather resin wicker nesting furniture sets and heavy-duty cube furniture covers.
28. Pavilion with Retractable Screens
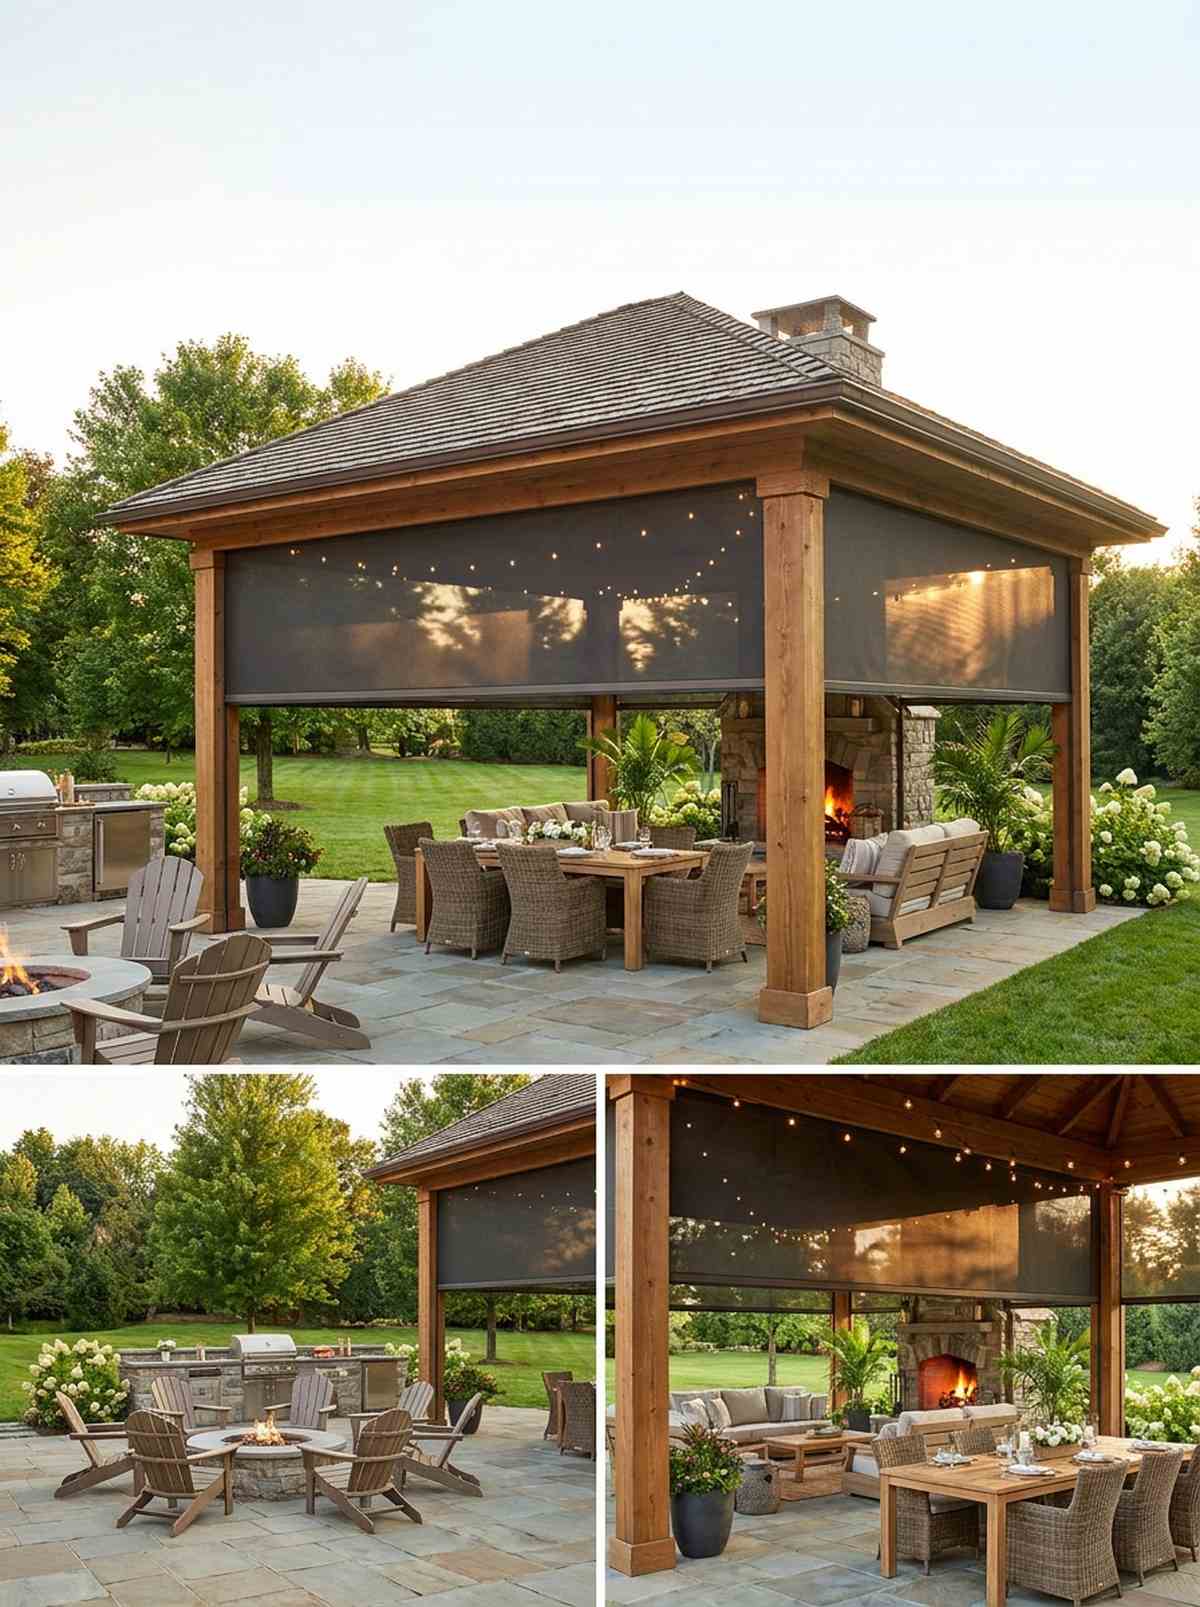
Feels like a luxurious screened-in lanai at a five-star resort. A motorized drop-down bug screen enclosure gives you total climate control, essential for swampy, mosquito-heavy climates.
Adding hidden mesh screens completely redefines the space, looking incredibly custom. Grabbing heavy-duty UV-blocking screen tracks ensures the mesh glides smoothly without snagging on the wooden columns.
Automated screen systems cost around $1,000–$2,500 depending on size. Pin this if you hate getting eaten alive at dinner!
- Key Materials: Track-mounted mesh screens, existing pergola
- Vibe / Style: Protected luxury lanai
- Difficulty: Professional installation recommended
- Budget Breakdown: Screen tracks: $800 | Labor: $400
- Creator’s Tip: Choose a charcoal or black screen mesh rather than white—it makes the screen almost invisible to the eye.
- Smart Sourcing: Manual roll-down outdoor shade screens and heavy-duty magnetic screen door closures.
Building a basic deck is fine, but this layered architectural trick changes the entire depth of your backyard instantly.
29. Multi-Tier Deck with Designated Zones
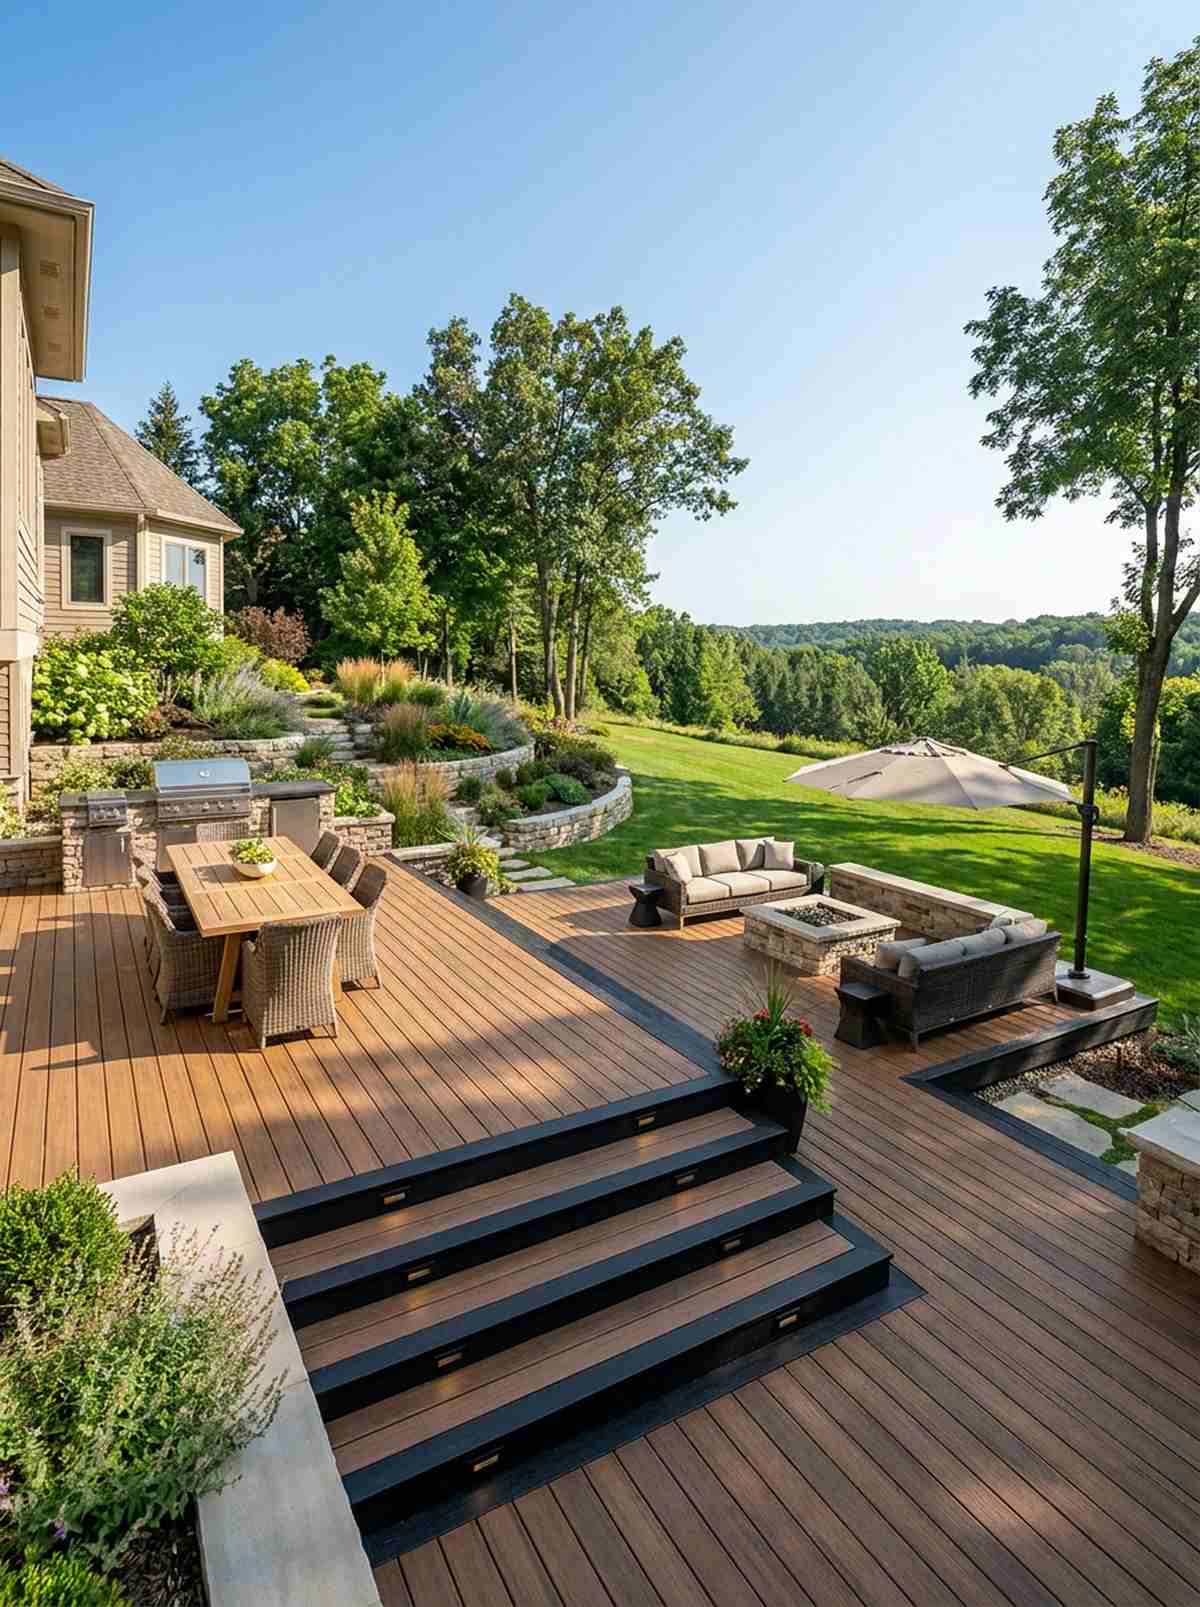
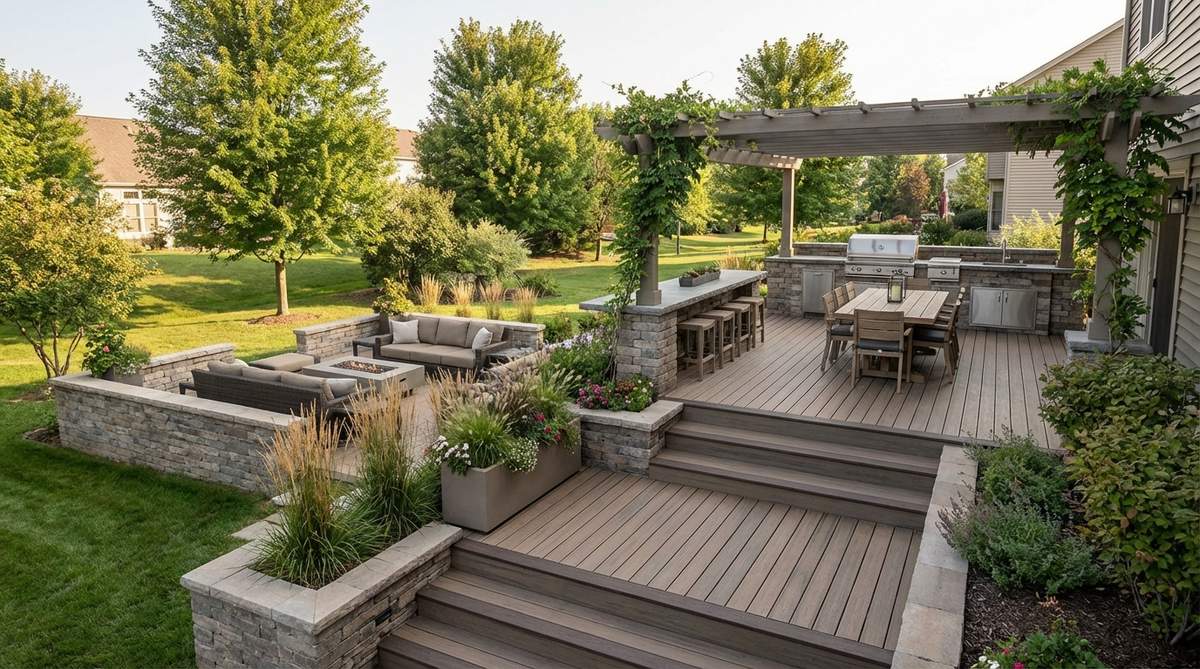
Straight out of a dramatic cliffside architectural digest. The stepped dual-level patio design naturally organizes the party, an absolute masterpiece for yards with harsh, sloping terrain.
Using elevation to split up the yard looks phenomenally more expensive than a flat concrete slab. Utilizing hidden deck fastener kits gives the upper dining tier a flawless, screw-free premium surface.
Building a tiered deck is a major $2,000+ project. It’s a permanent backyard glow-up that massively increases resale value.
- Key Materials: Treated lumber framing, composite top boards
- Vibe / Style: Grand architectural landscape
- Difficulty: Advanced construction
- Budget Breakdown: Framing: $800 | Composite decking: $1,500
- Creator’s Tip: Paint the vertical stair risers black; it makes the top boards look like they are floating.
- Smart Sourcing: Hidden composite deck fastener tool kits and weatherproof framing lumber tape.
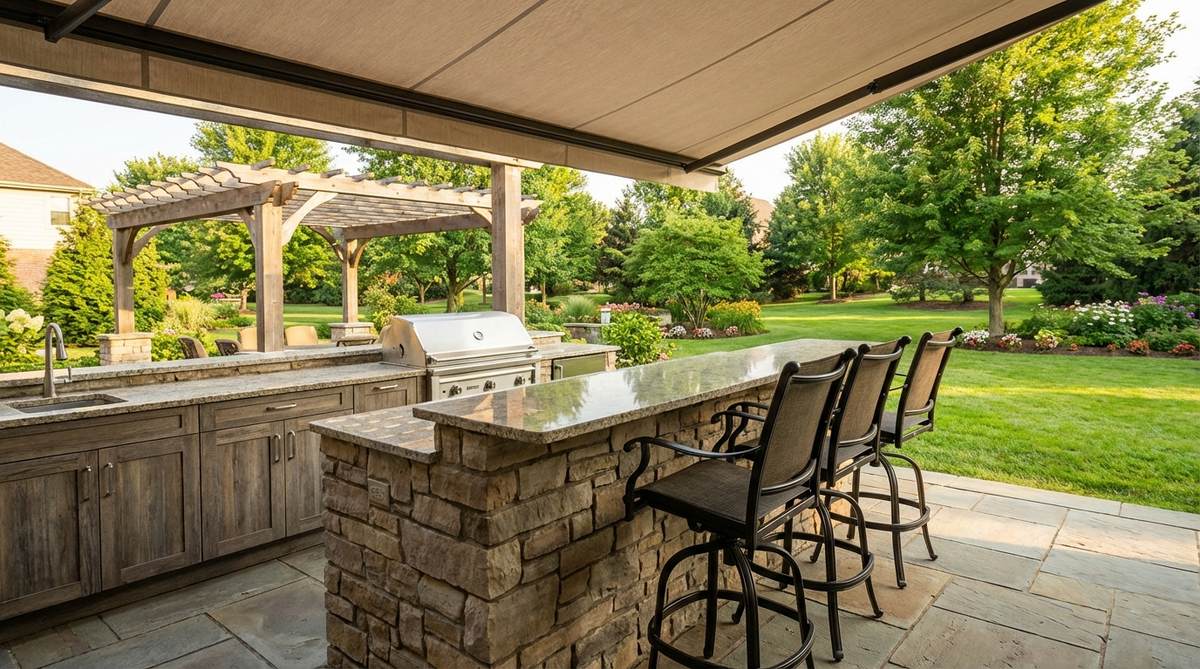
30. Outdoor Kitchen Peninsula with Flip-Up Counter
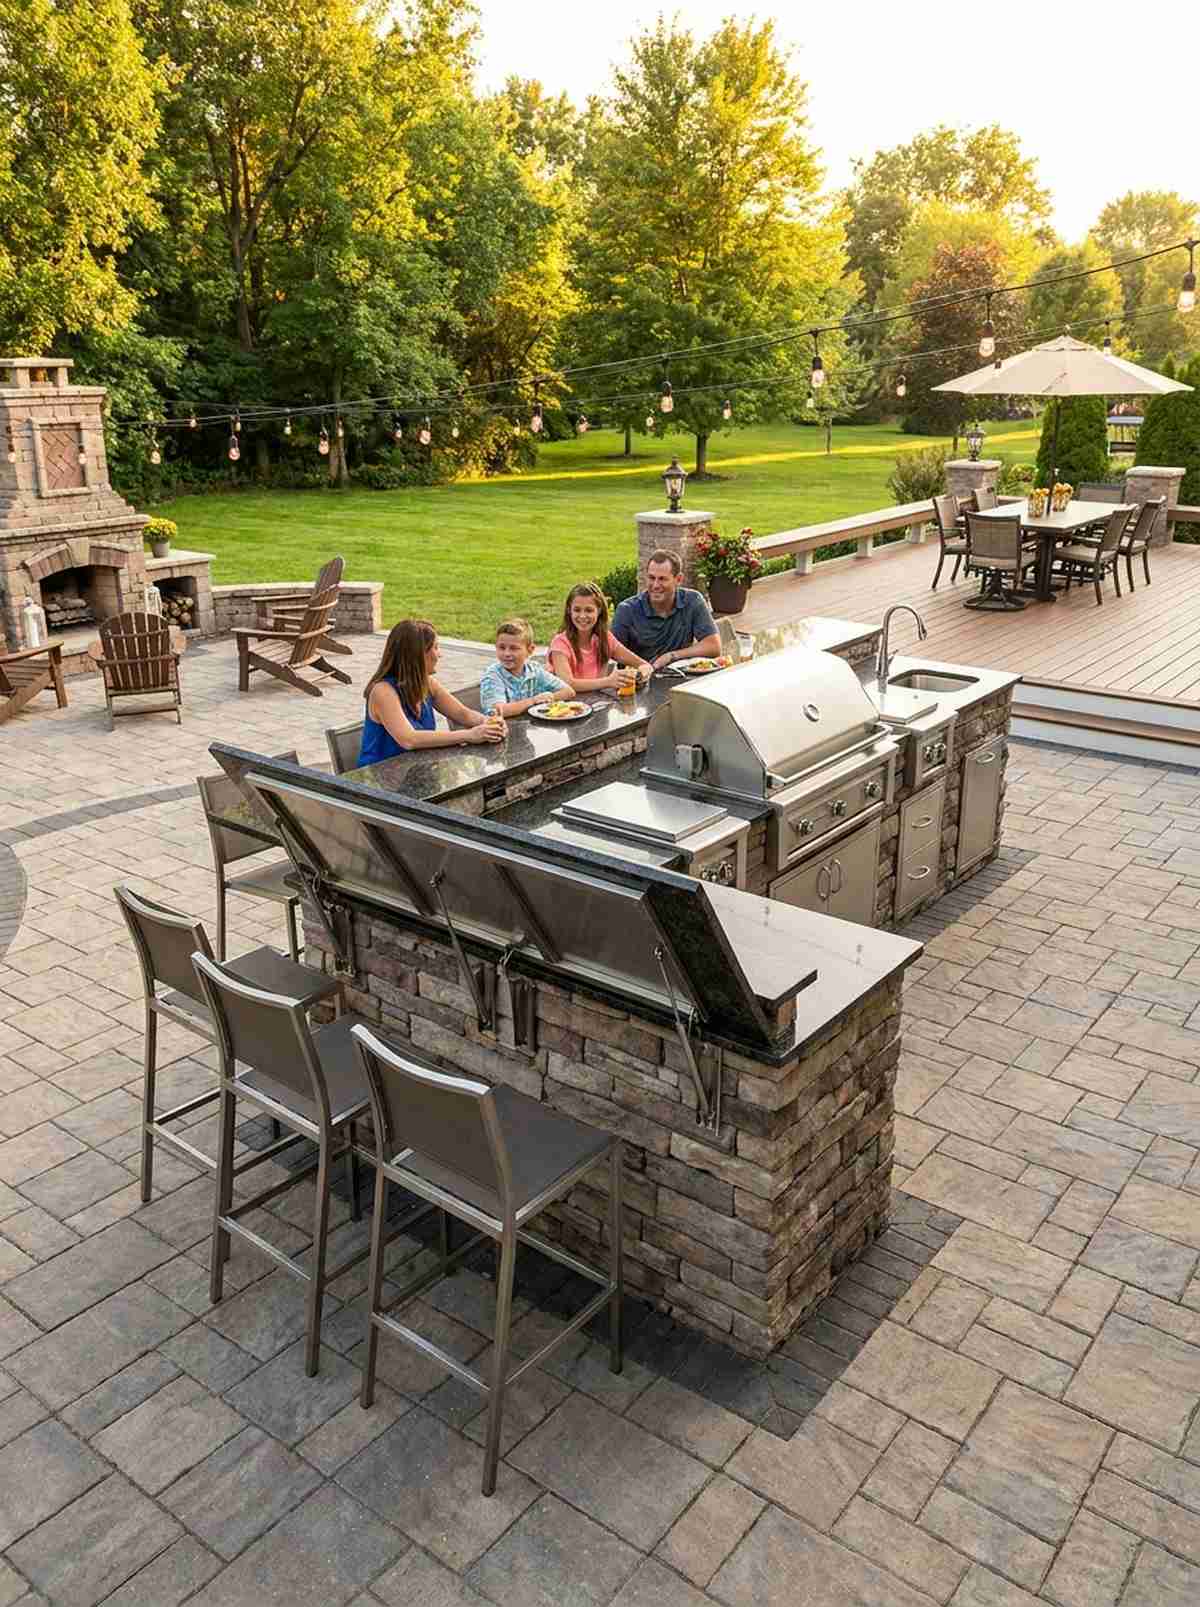
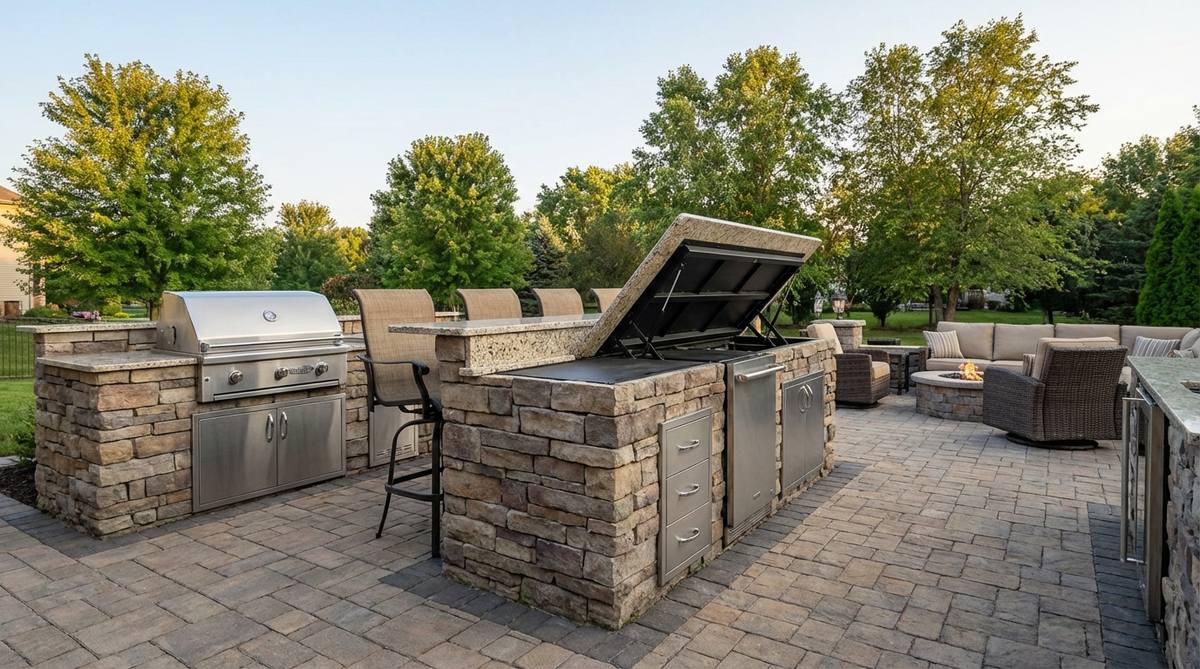
Brings a professional teppanyaki grill aesthetic to your house. A fold-out chef’s dining counter merges cooking and eating seamlessly, brilliant for keeping the host in the middle of the party.
Installing a bar that drops down when not needed delivers a brilliant, space-saving finish. Securing thick stainless steel hinge brackets ensures the flip-up counter won’t crash down onto your guests’ knees.
Upgrading an existing grill island with a flip edge costs about $200–$400. Save this if you want an elite outdoor kitchen!
- Key Materials: Stainless steel piano hinges, granite or tile slab
- Vibe / Style: Professional entertainer kitchen
- Difficulty: Moderate masonry and hardware
- Budget Breakdown: Folding hardware: $120 | Counter material: $200
- Creator’s Tip: Add hydraulic assist shocks underneath the flap so it lifts effortlessly with one finger.
- Smart Sourcing: Heavy-duty folding bracket locks (500lb capacity) and gas spring hydraulic lift struts.
Material Guide: Cheap vs. Premium Aesthetic
Knowing exactly where to save and where to spend makes all the difference in achieving that “looks expensive but isn’t” vibe.
- Standard vs. UV-Resistant/Premium: Cheap fabrics bleach out in one season, making the yard look trashy. Upgrading to UV-coated acrylic threads stops fading entirely.
- Pre-made Kits vs. Sourcing Locally: While building from scratch seems cheaper, commercial modular starter kits often save both time and money by preventing costly measurement errors and weather rot.
Architectural Definition Strategies
Built structures and permanent landscape features create spatial definition more effectively than furniture alone. Architects employ these elements to establish hierarchy, circulation patterns, and functional boundaries within outdoor living spaces.
31. Privacy Wall with Integrated Seating
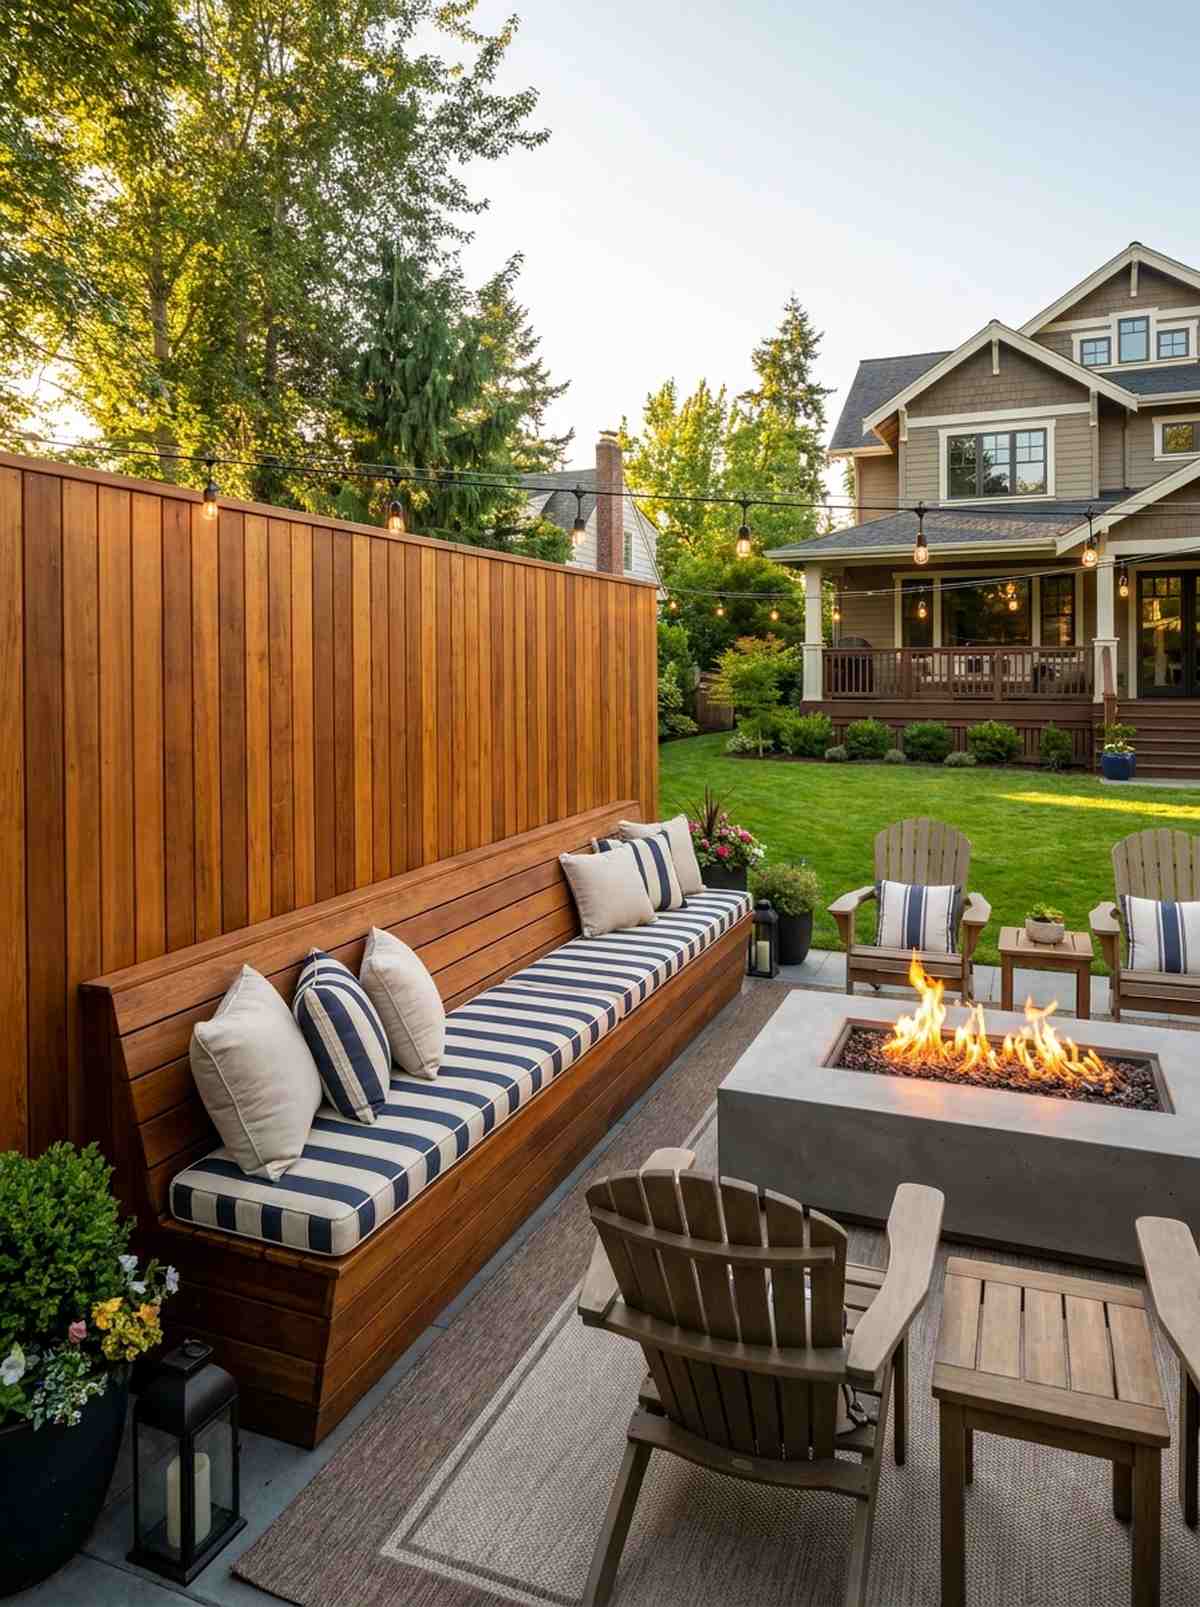
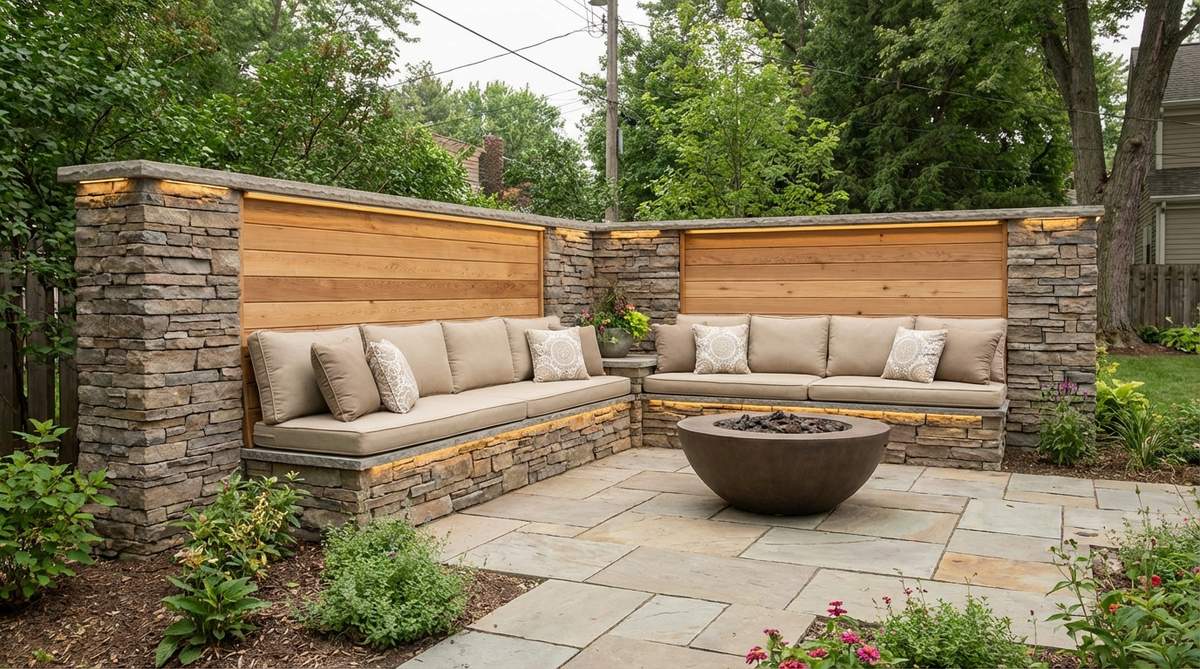
Feels like an upscale private VIP cabana. The built-in wooden bench boundary acts as both a fence and a sofa, solving two massive patio problems with one elegant design.
Fusing the seating directly into the wall completely transforms a basic fence line into custom furniture. Picking up premium marine-grade custom outdoor decor table cushions makes the hard wood feel like a luxury sofa.
Constructing this built-in bench runs roughly $400–$800. Pin this to your ultimate backyard privacy board!
- Key Materials: Cedar planks, concrete footings, thick padding
- Vibe / Style: Built-in modern cabana
- Difficulty: Intermediate woodworking
- Budget Breakdown: Lumber base: $350 | Custom cushions: $250
- Creator’s Tip: Angle the backrest exactly 15 degrees backwards; a perfectly straight 90-degree back is miserable to sit against.
- Smart Sourcing: Custom-size outdoor bench cushion sets and heavy-duty cedar sealing oils.
32. Overhead Beam Grid for Zone Designation
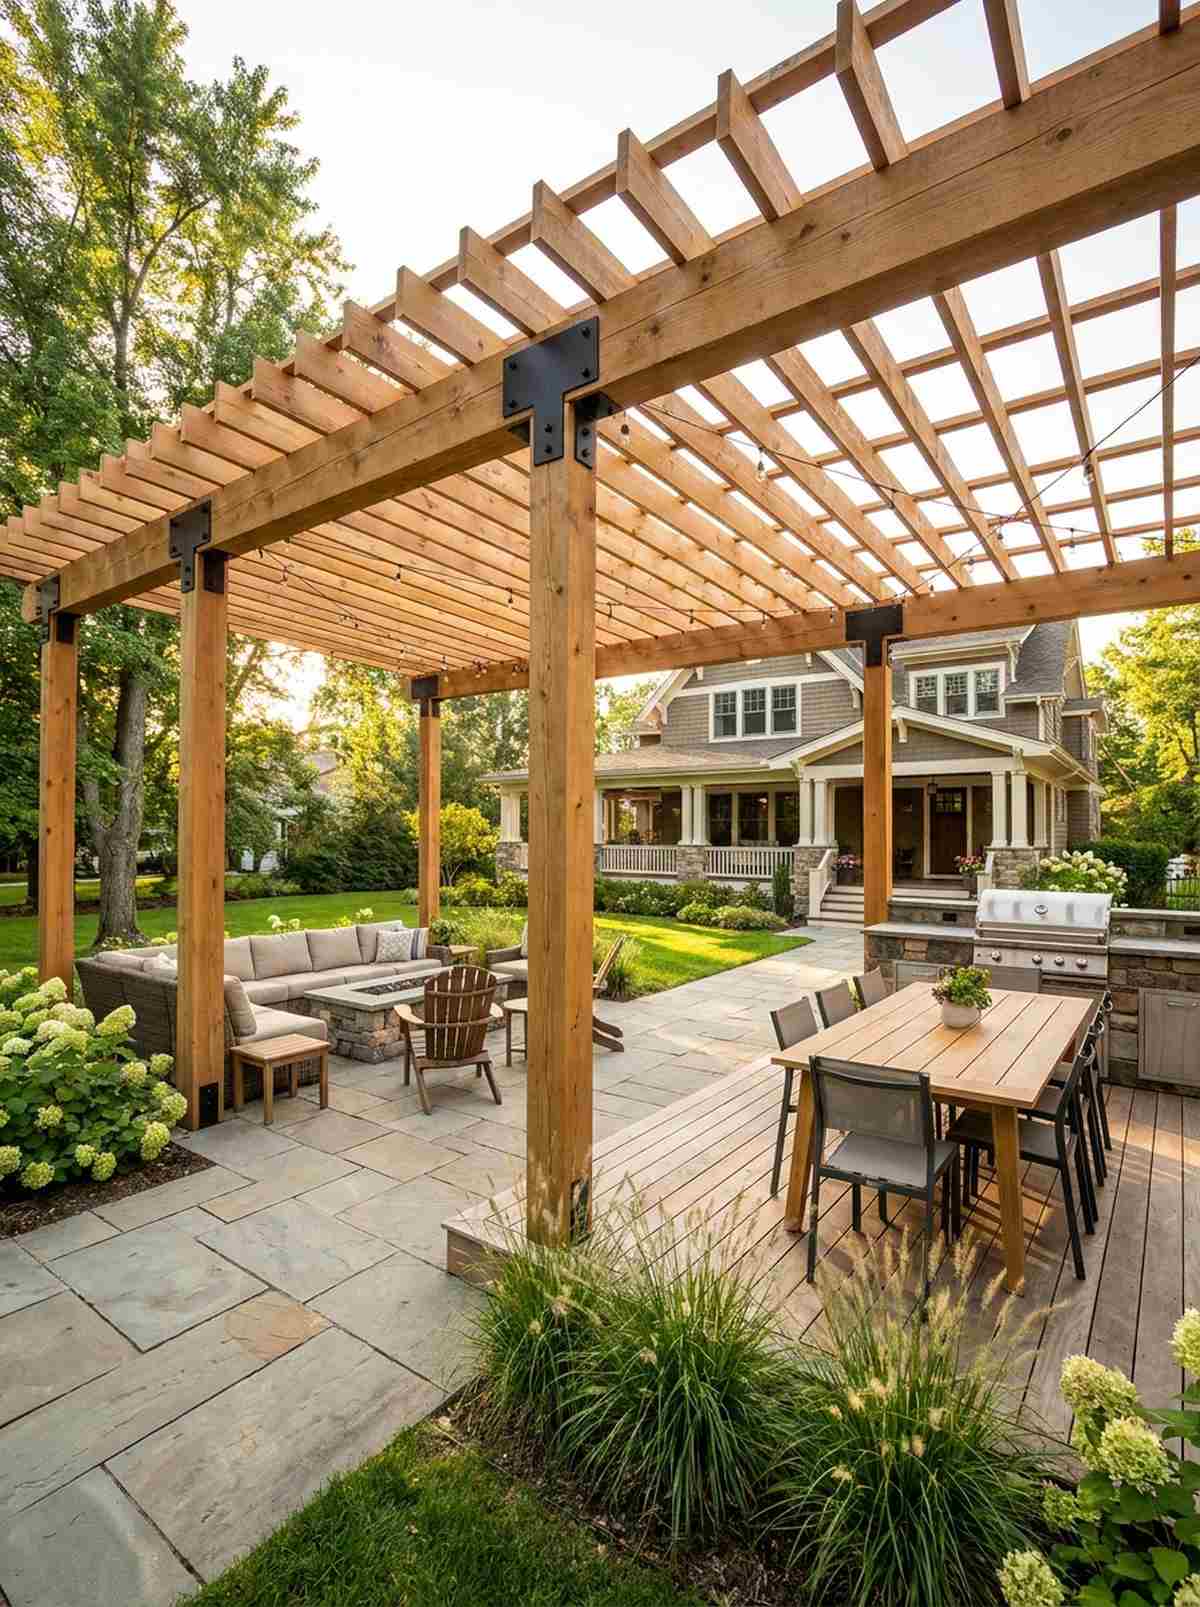
Gives off an incredibly grand, structured estate presence. A slatted ceiling rafter array tricks the eye into seeing separate rooms, excelling in large, flat backyard expanses.
Changing the direction of the overhead wood instantly creates a psychological barrier without a single wall. Utilizing pre-cut commercial pergola bracket kits saves you hours of frustrating math and bad cuts.
An overhead beam grid can range from $800 to $1,500 depending on wood thickness. Highly recommended for adding architectural weight.
- Key Materials: 4×4 posts, 2×6 rafters, black steel brackets
- Vibe / Style: Structured contemporary estate
- Difficulty: Heavy lifting and measuring
- Budget Breakdown: Timber framework: $800 | Steel hardware: $200
- Creator’s Tip: Paint all the connecting steel brackets matte black for a high-end industrial farmhouse contrast.
- Smart Sourcing: Heavy-duty black steel pergola bracket kits and outdoor structural wood screws (bulk box).
33. Living Wall Divider with Vertical Garden
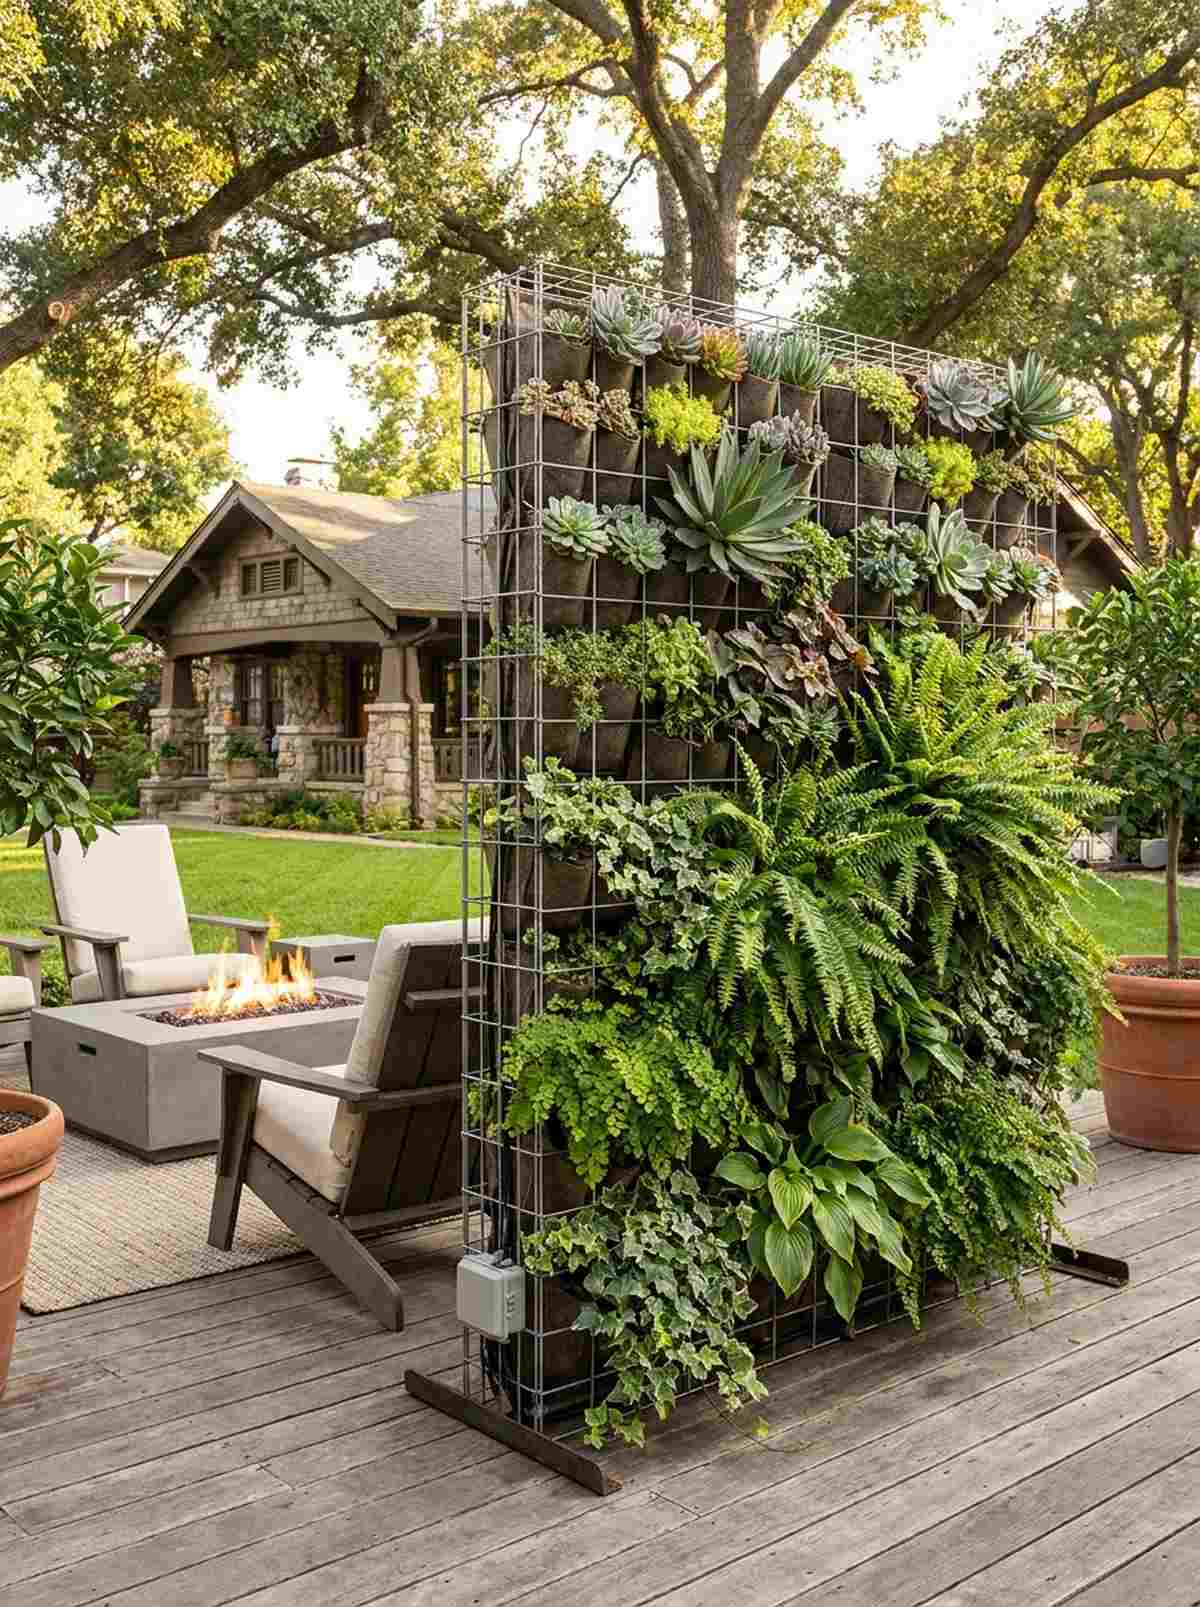
Feels exactly like an ultra-chic eco-resort lobby. A freestanding lush green partition blocks ugly views naturally, the perfect visual block for nosy neighbors.
A towering wall of plants looks phenomenally more expensive than a cheap plastic lattice fence. Adding a hidden drip irrigation tubing kit ensures the wall stays vibrantly green without you hauling a hose out daily.
Building a vertical planter grid costs around $250–$500. Save this if you need privacy but hate solid walls!
- Key Materials: Welded wire grid, felt pocket planters
- Vibe / Style: Lush botanical screen
- Difficulty: Easy assembly, high maintenance
- Budget Breakdown: Frame: $150 | Planter pockets & dirt: $200
- Creator’s Tip: Put drought-resistant succulents at the top and water-loving ferns at the bottom where the water naturally drips.
- Smart Sourcing: Vertical wall planter pocket grids (bulk pack) and micro-drip automatic irrigation kits.
34. Sunken Lounge Pit with Surrounding Grade

Radiates massive 1970s Hollywood Hills luxury. A recessed concrete conversation pit shields you from the wind, standing out as the ultimate centerpiece for modern landscape redesigns.
Dropping the floor level down gives a designer-level finish that traditional surface-level patios cannot replicate. Securing a premium hidden sump pump drainage kit guarantees your luxury lounge doesn’t turn into a swimming pool during a storm.
Excavation and masonry for a sunken pit usually starts at $3,000+. It is an absolute showstopper for high-end homes.
- Key Materials: Concrete blocks, masonry, drainage pipes
- Vibe / Style: Retro modern architectural
- Difficulty: Requires a professional crew
- Budget Breakdown: Excavation: $1,000 | Masonry/Drainage: $2,500
- Creator’s Tip: Install low-voltage step lights into the retaining wall so nobody falls into the pit at night.
- Smart Sourcing: Submersible patio drainage pump kits and recessed waterproof masonry step lights.
Most backyard walkways are just boring concrete lines, but this next setup turns the walk to the grill into an architectural masterpiece.
35. Colonnade Walkway Defining Circulation
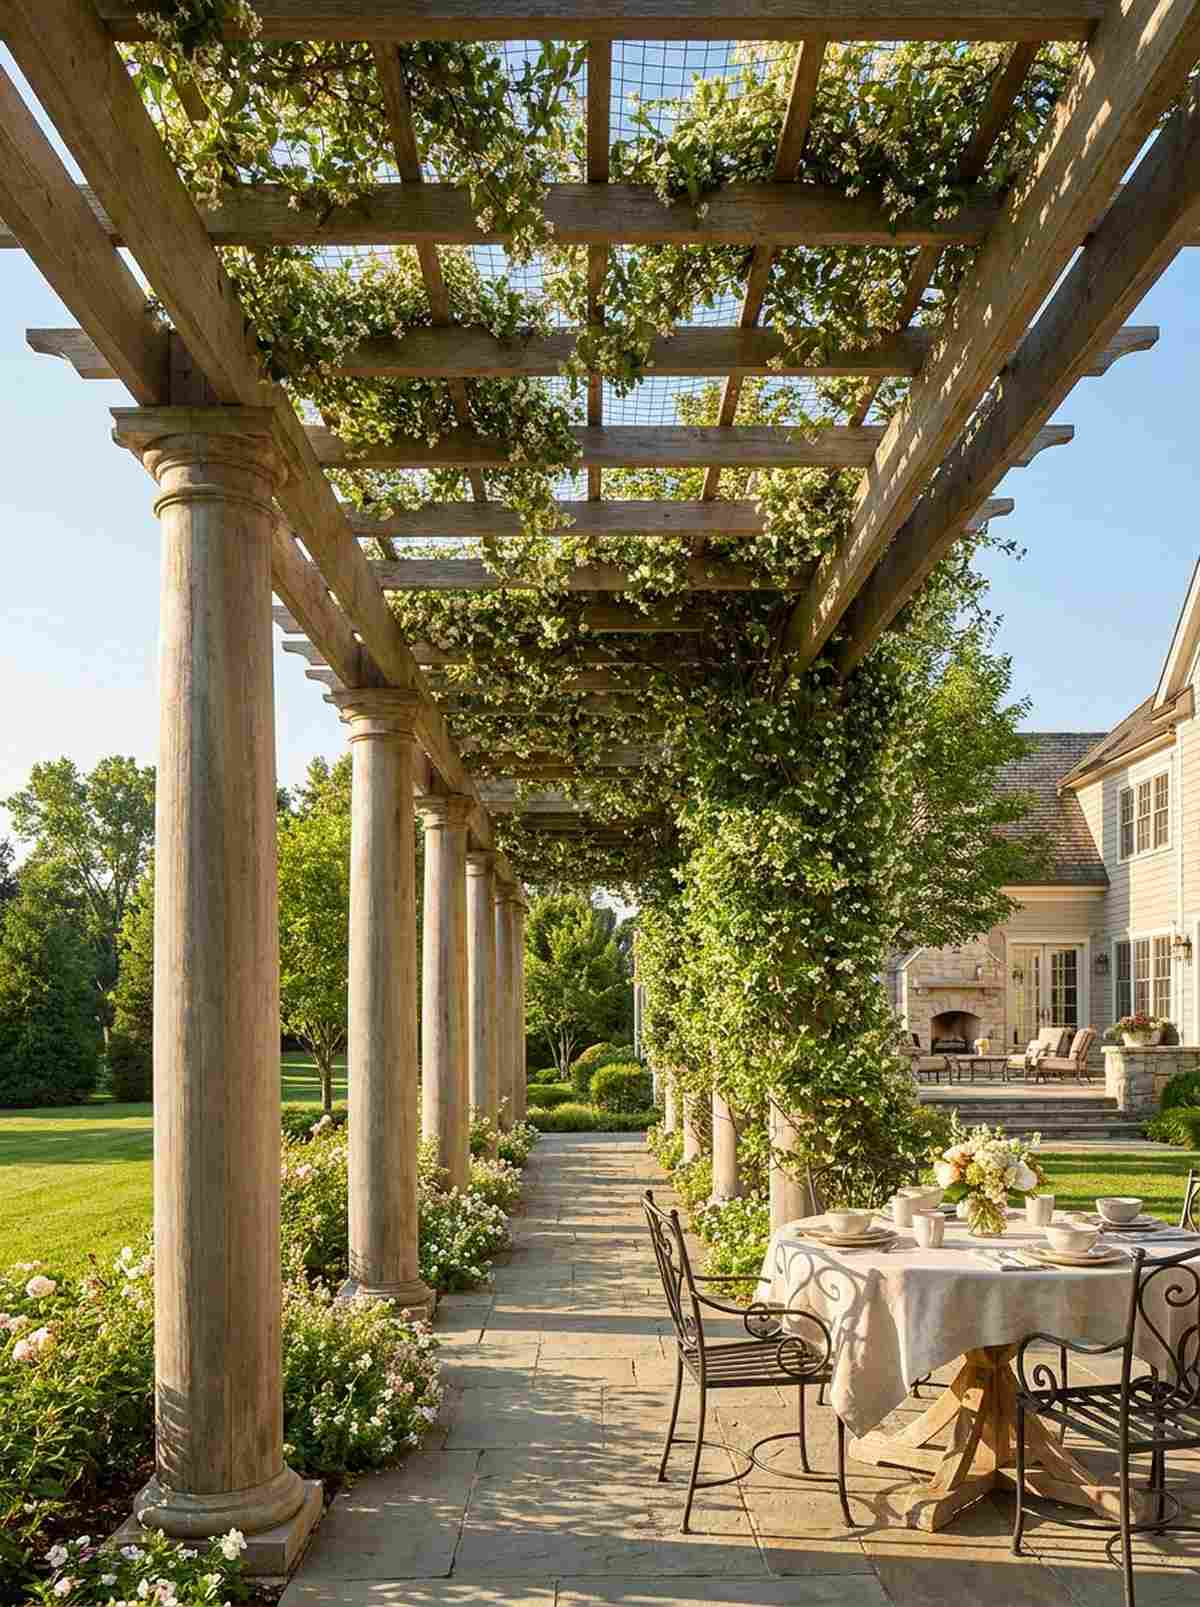
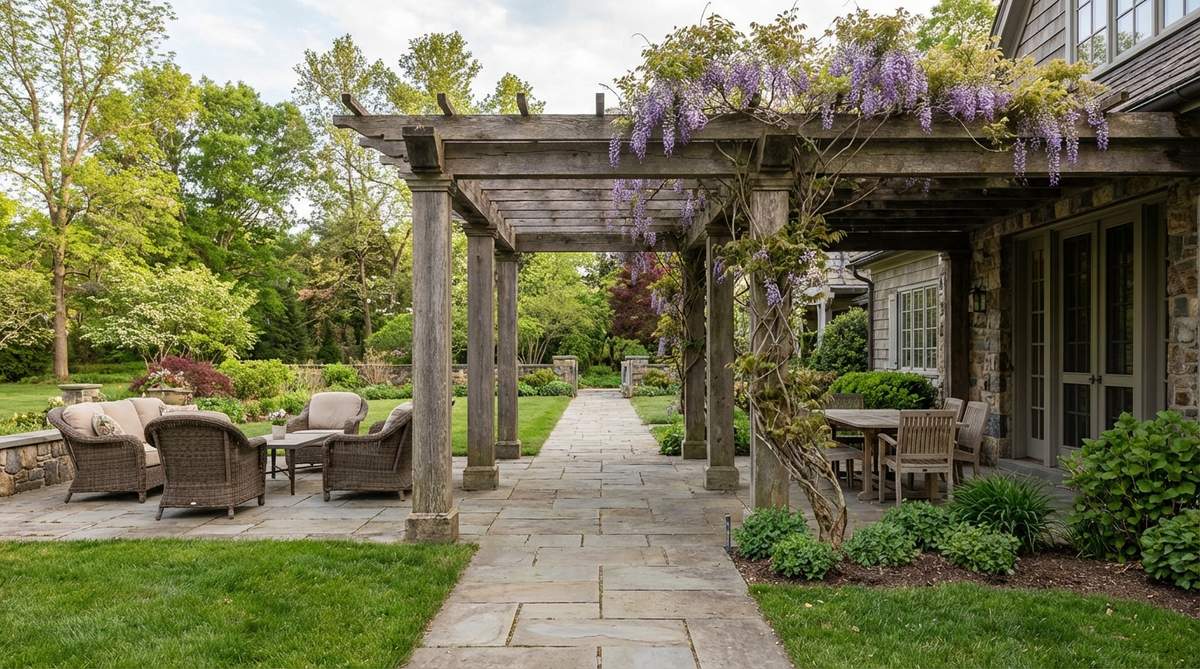
Gives off an incredibly romantic, European villa courtyard feel. A column-lined pathway tunnel acts as a brilliant border, routing traffic away from your delicate dining setup.
Adding vertical pillars completely changes the flow of the yard, looking incredibly custom. Throwing some fast-growing creeping vines onto rust-proof trellis netting quickly turns bare wood into a green, fragrant tunnel.
Building a basic colonnade frame runs roughly $600–$1,000. Pin this to your dream garden pathways board!
- Key Materials: Tall wooden columns, overhead lattice
- Vibe / Style: European romantic garden
- Difficulty: Intermediate carpentry
- Budget Breakdown: Columns/Posts: $500 | Trellis wire: $80
- Creator’s Tip: Plant jasmine at the base of the columns; the smell will fill the walkway during dinner hours.
- Smart Sourcing: Heavy-duty rust-proof trellis netting panels and pre-cut architectural column wraps.
36. Water Feature Boundary with Linear Fountain
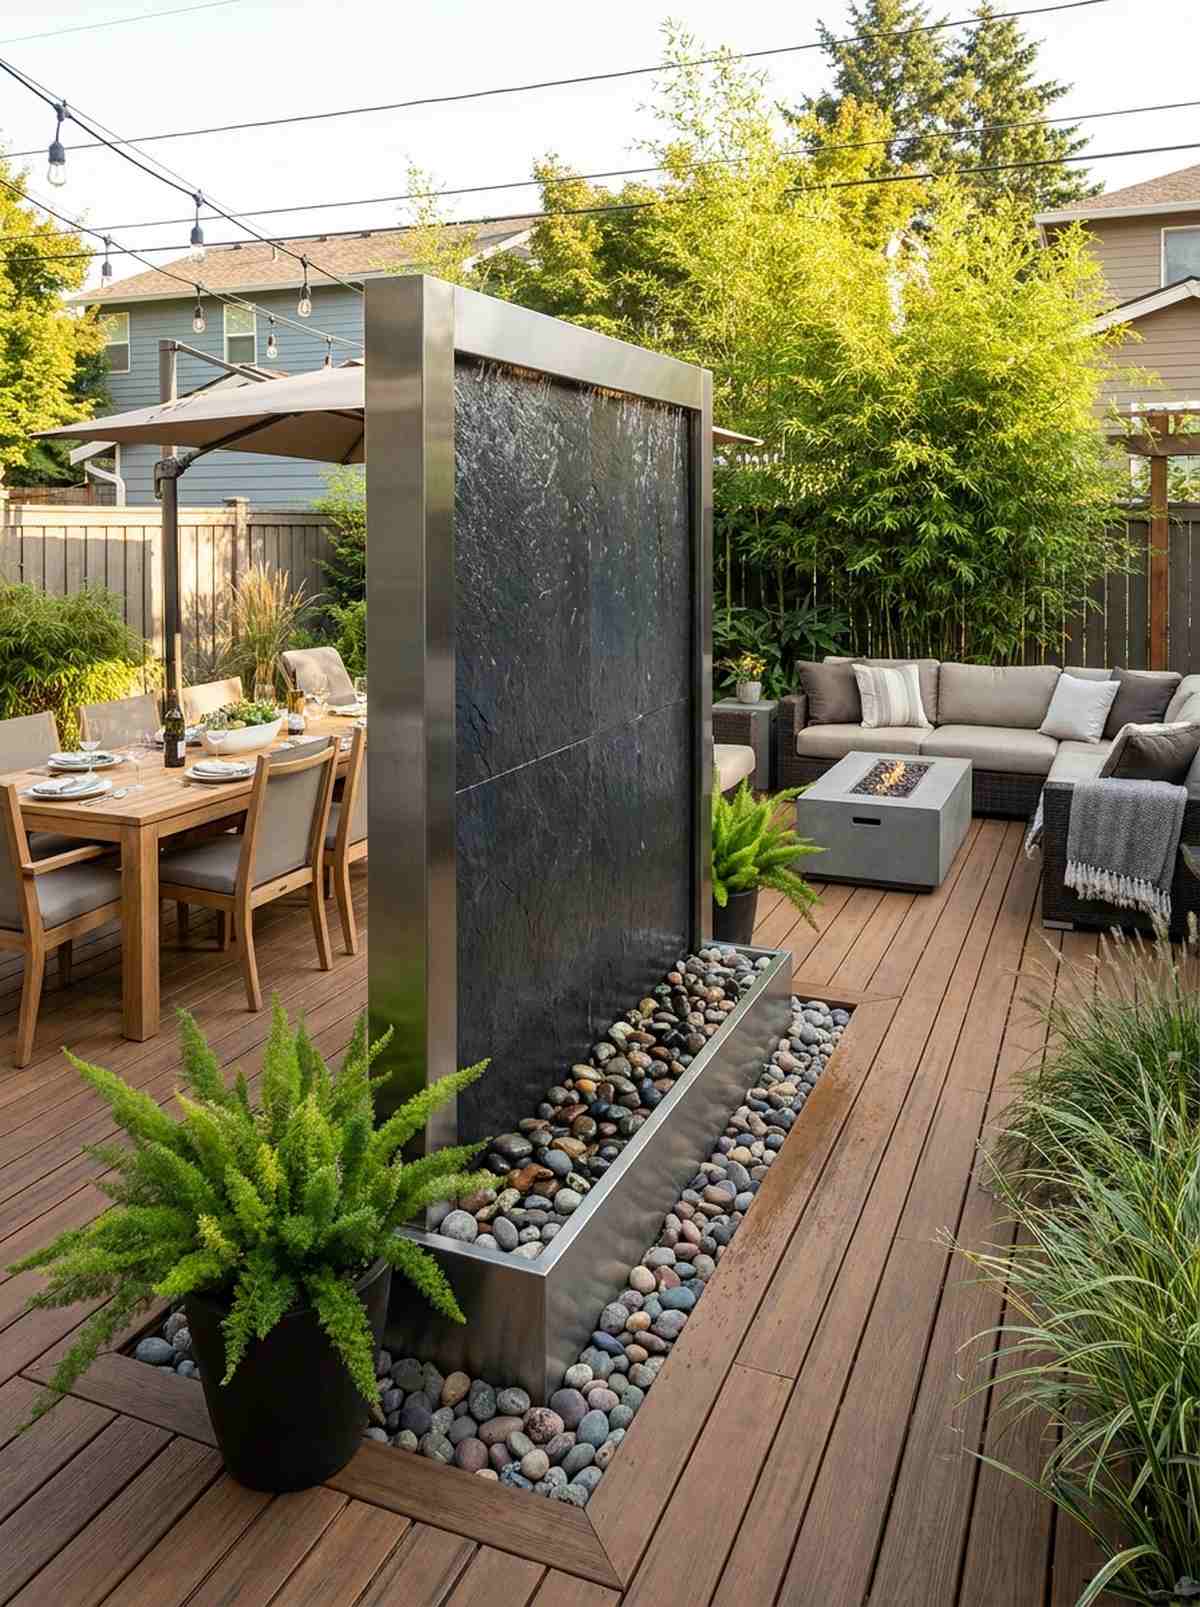
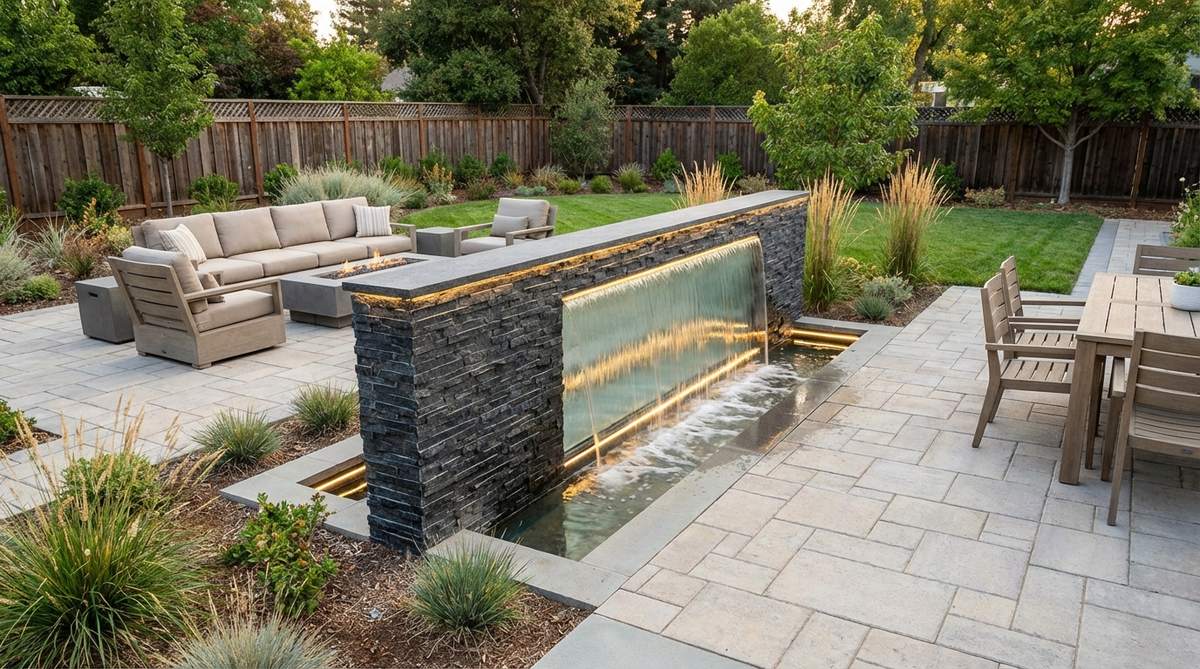
Feels like walking into a luxury day spa sanctuary. A sleek linear water wall drowns out neighborhood traffic noise, making it the supreme choice for noisy urban environments.
Flowing water separating the dining and lounging areas delivers a shockingly high-end, sensory finish. Buying a self-contained recirculating water fountain kit saves you the nightmare of digging complex plumbing trenches.
A solid plug-and-play water wall costs around $400–$800. It’s an upgrade that pays for itself in sheer relaxation.
- Key Materials: Freestanding fountain, river rocks
- Vibe / Style: Zen urban oasis
- Difficulty: Just requires an outdoor outlet
- Budget Breakdown: Water feature: $600 | Base rocks: $40
- Creator’s Tip: Put a few drops of outdoor-safe algae inhibitor in the water weekly to stop it from turning slimy green.
- Smart Sourcing: Self-contained linear waterfall fountain kits and fountain-safe clear algae treatment drops.
37. See-Through Fireplace as Dual Focal Point
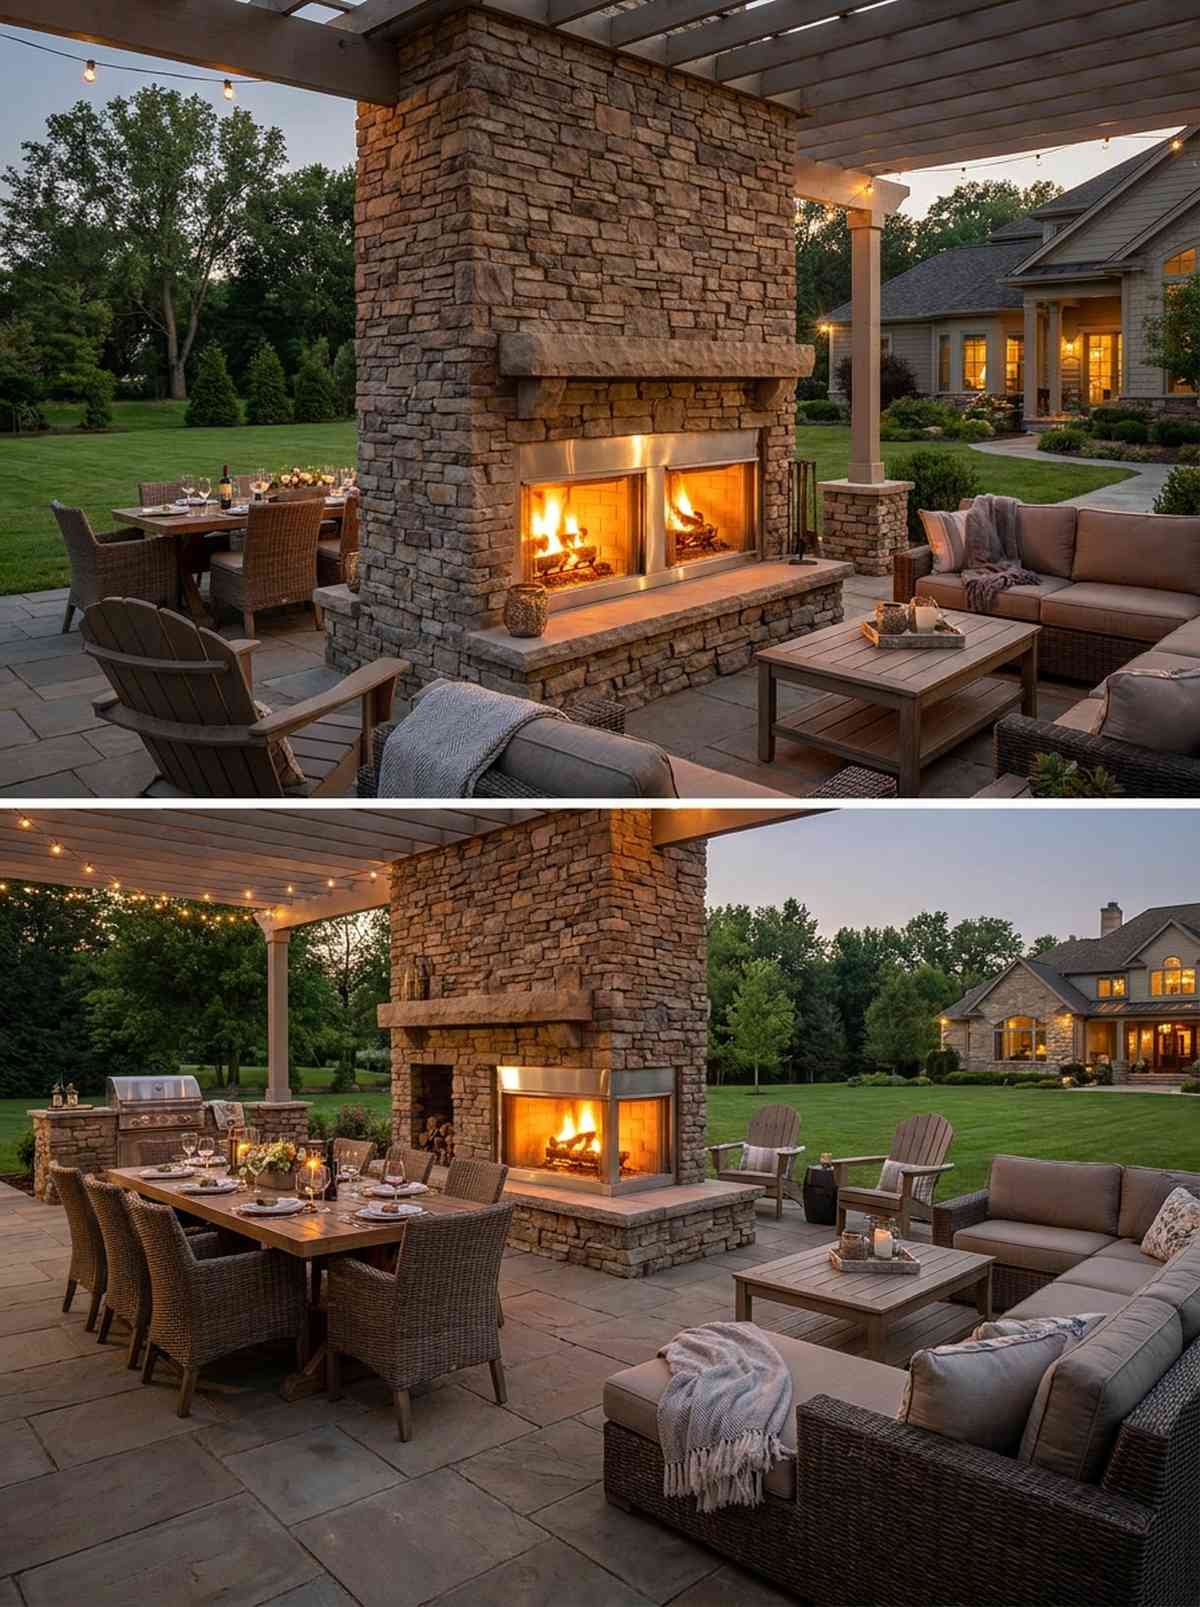
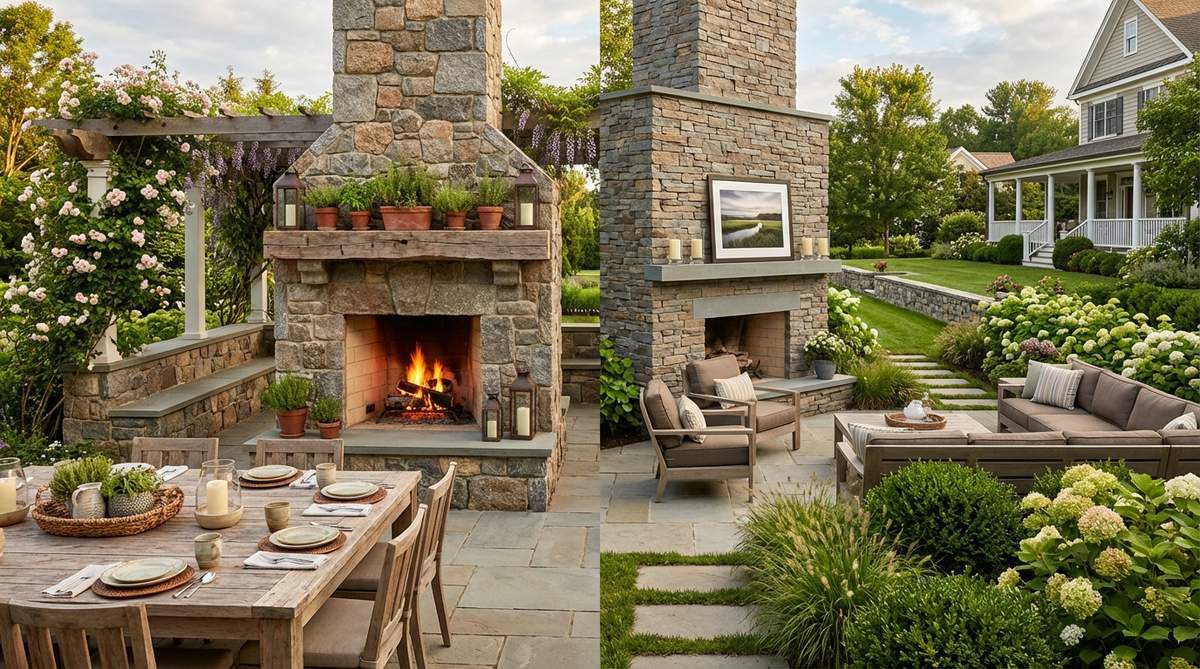
Radiates an ultra-luxurious, custom mansion energy. A double-sided masonry fire wall serves both the dinner table and the couch simultaneously, the ultimate anchor for expansive stone patios.
A massive glowing wall of fire completely transforms a basic slab, looking phenomenally more expensive than a tiny fire bowl. Snagging a pre-fabricated stainless steel firebox insert ensures the flames draft correctly without choking out your guests.
A permanent double-sided fireplace build is a heavy investment, easily hitting $2,500+. Save this for a massive backyard overhaul!
- Key Materials: Cinder blocks, stone veneer, double-sided firebox
- Vibe / Style: Elite luxury estate
- Difficulty: Masonry contractor needed
- Budget Breakdown: Firebox insert: $1,200 | Stone/Labor: $1,500
- Creator’s Tip: Add a thick stone mantel on both sides so guests have a place to rest their wine glasses.
- Smart Sourcing: Pre-fabricated stainless steel dual-sided fireboxes and heat-resistant masonry construction adhesives.
Compact Patio Solutions
Small patios and balconies require strategic space planning where every element serves multiple purposes. Designers maximize functionality through vertical space utilization, furniture scaling, and flexible configurations.
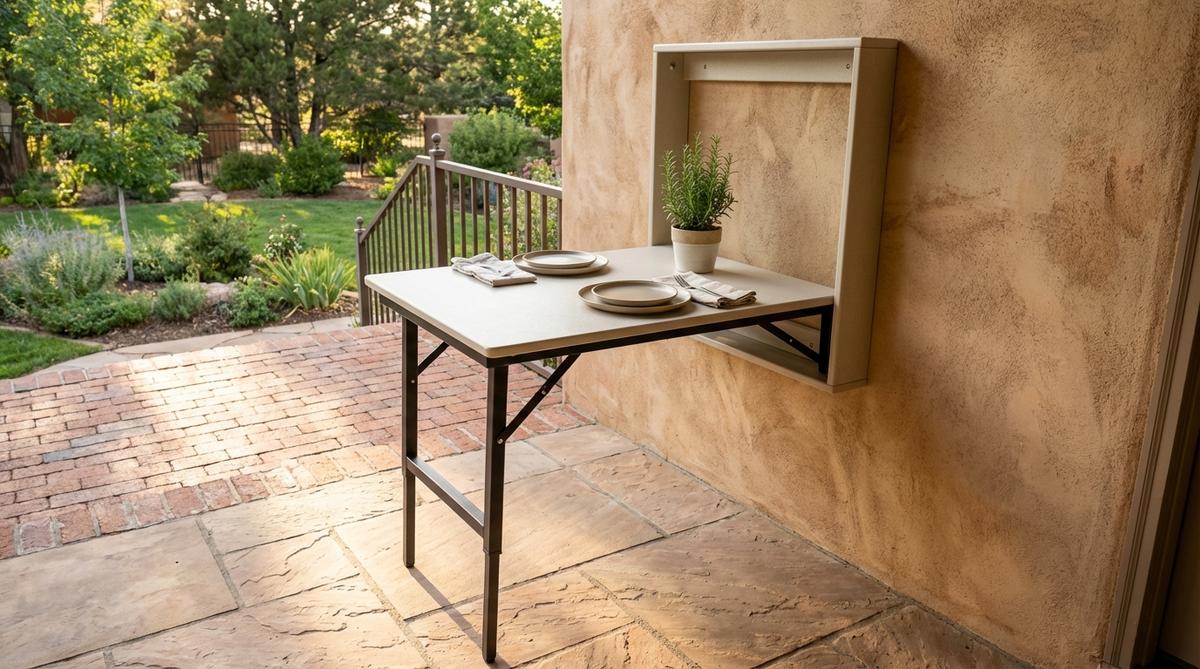
38. Wall-Mounted Fold-Out Dining Ledge
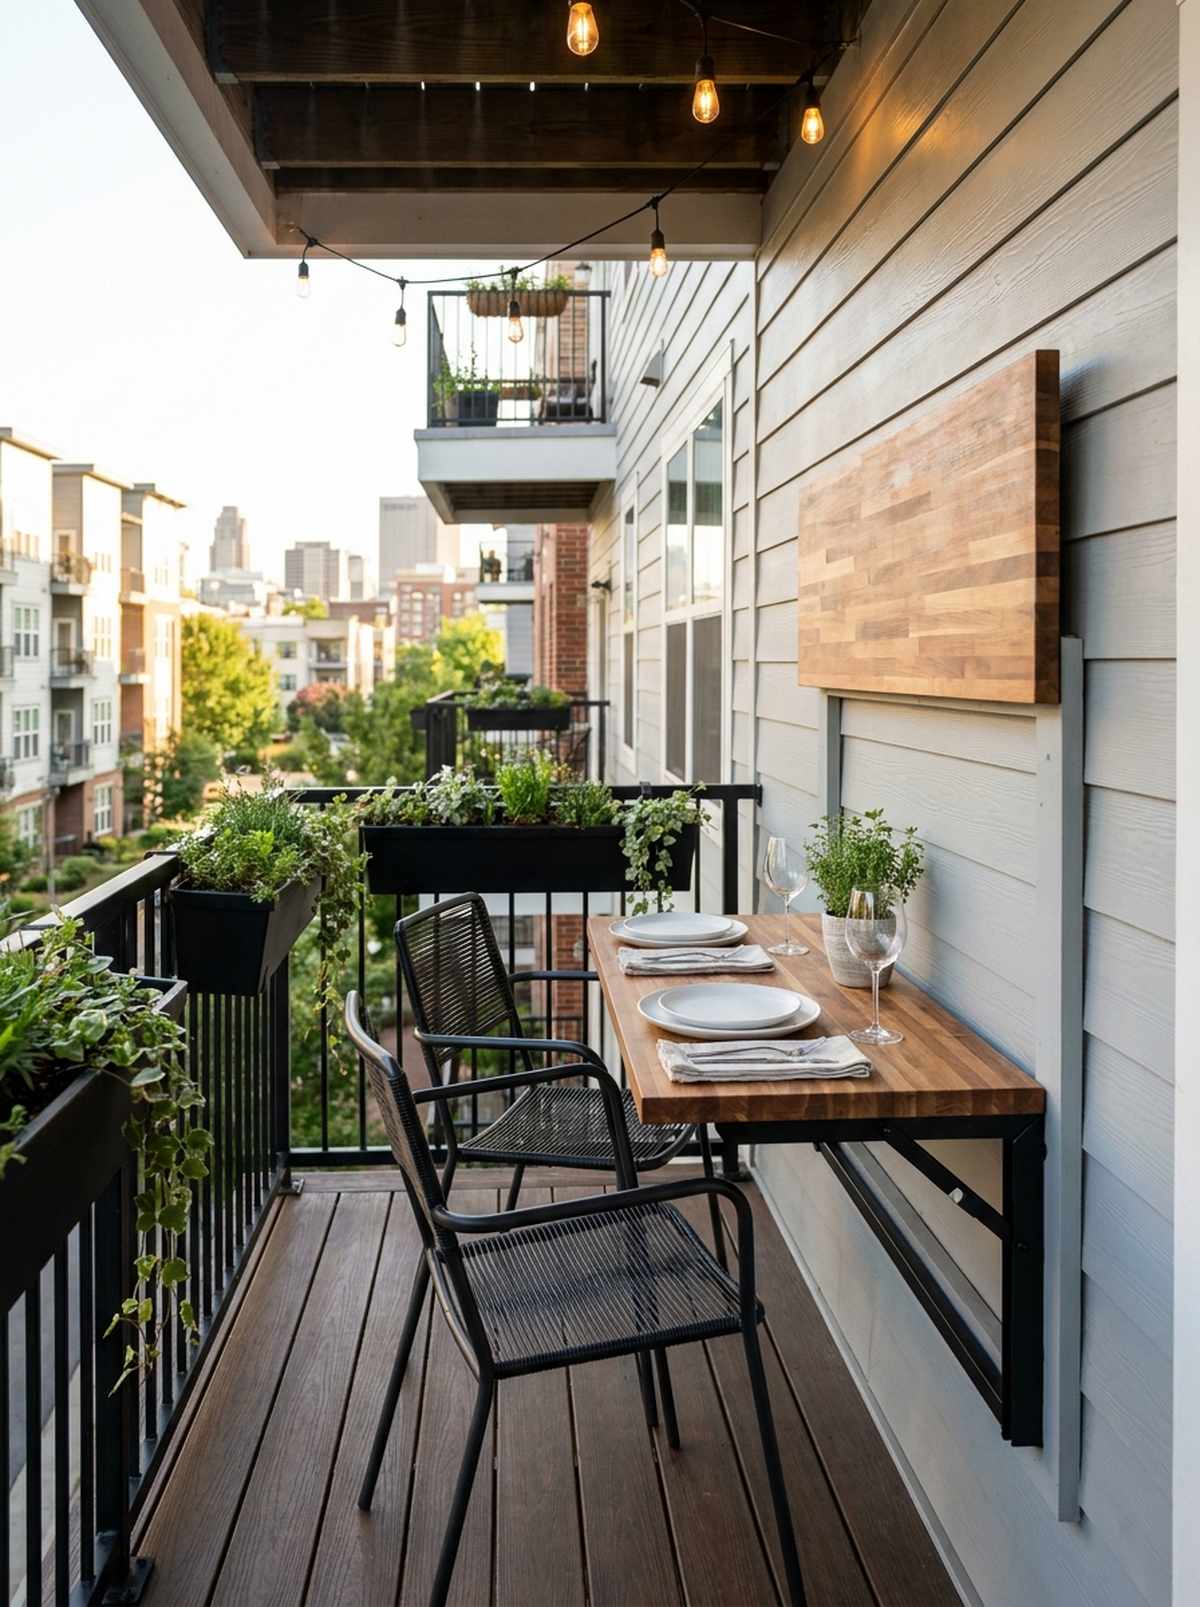
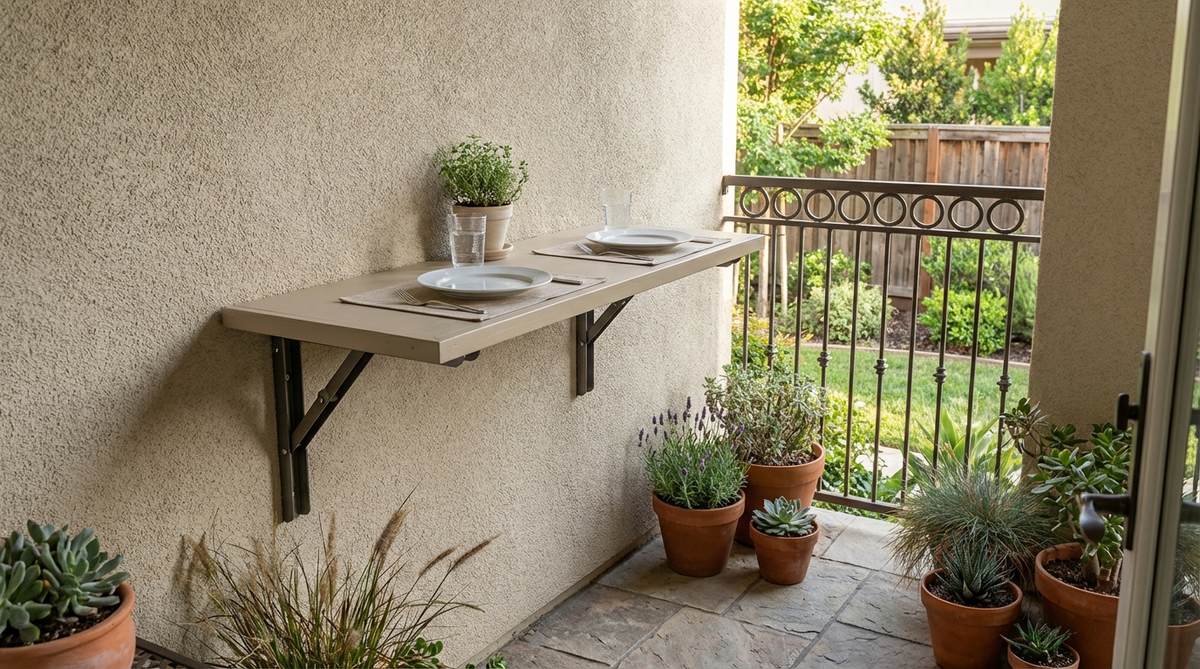
Feels like a hyper-efficient modern studio apartment hack. A drop-down space-saving dining shelf vanishes when you need room to breathe, absolute perfection for 5×5 apartment balconies.
Attaching your eating surface to the wall gives a designer-level finish that clunky tables ruin. Grabbing a pre-finished weatherproof butcher block ensures your outdoor decor table survives sudden rainstorms unharmed.
You can screw this setup together for under $150. Pin this if your patio is basically a glorified closet!
- Key Materials: Heavy-duty folding brackets, sealed wood panel
- Vibe / Style: Smart urban efficiency
- Difficulty: Quick drill installation
- Budget Breakdown: Brackets: $50 | Wood surface: $80
- Creator’s Tip: Paint the underside of the wood the exact same color as your siding so it disappears visually when folded down.
- Smart Sourcing: Heavy-duty locking folding shelf hinges and pre-sealed weatherproof wood desktop slabs.
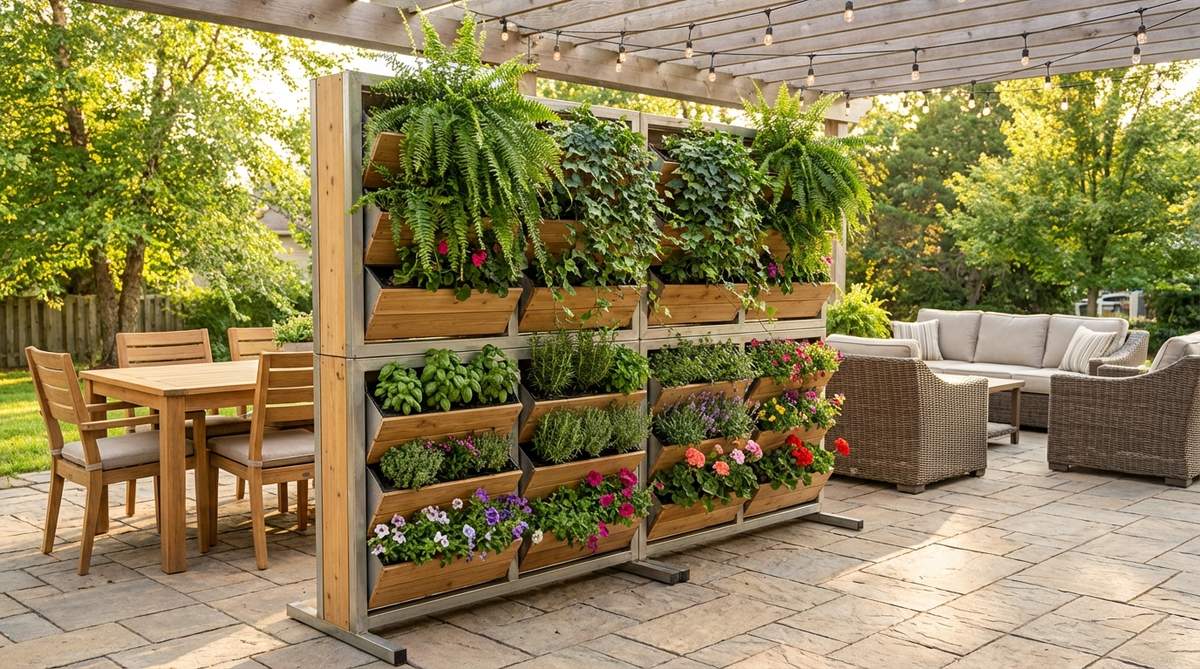
39. Vertical Garden Wall with Bench Base
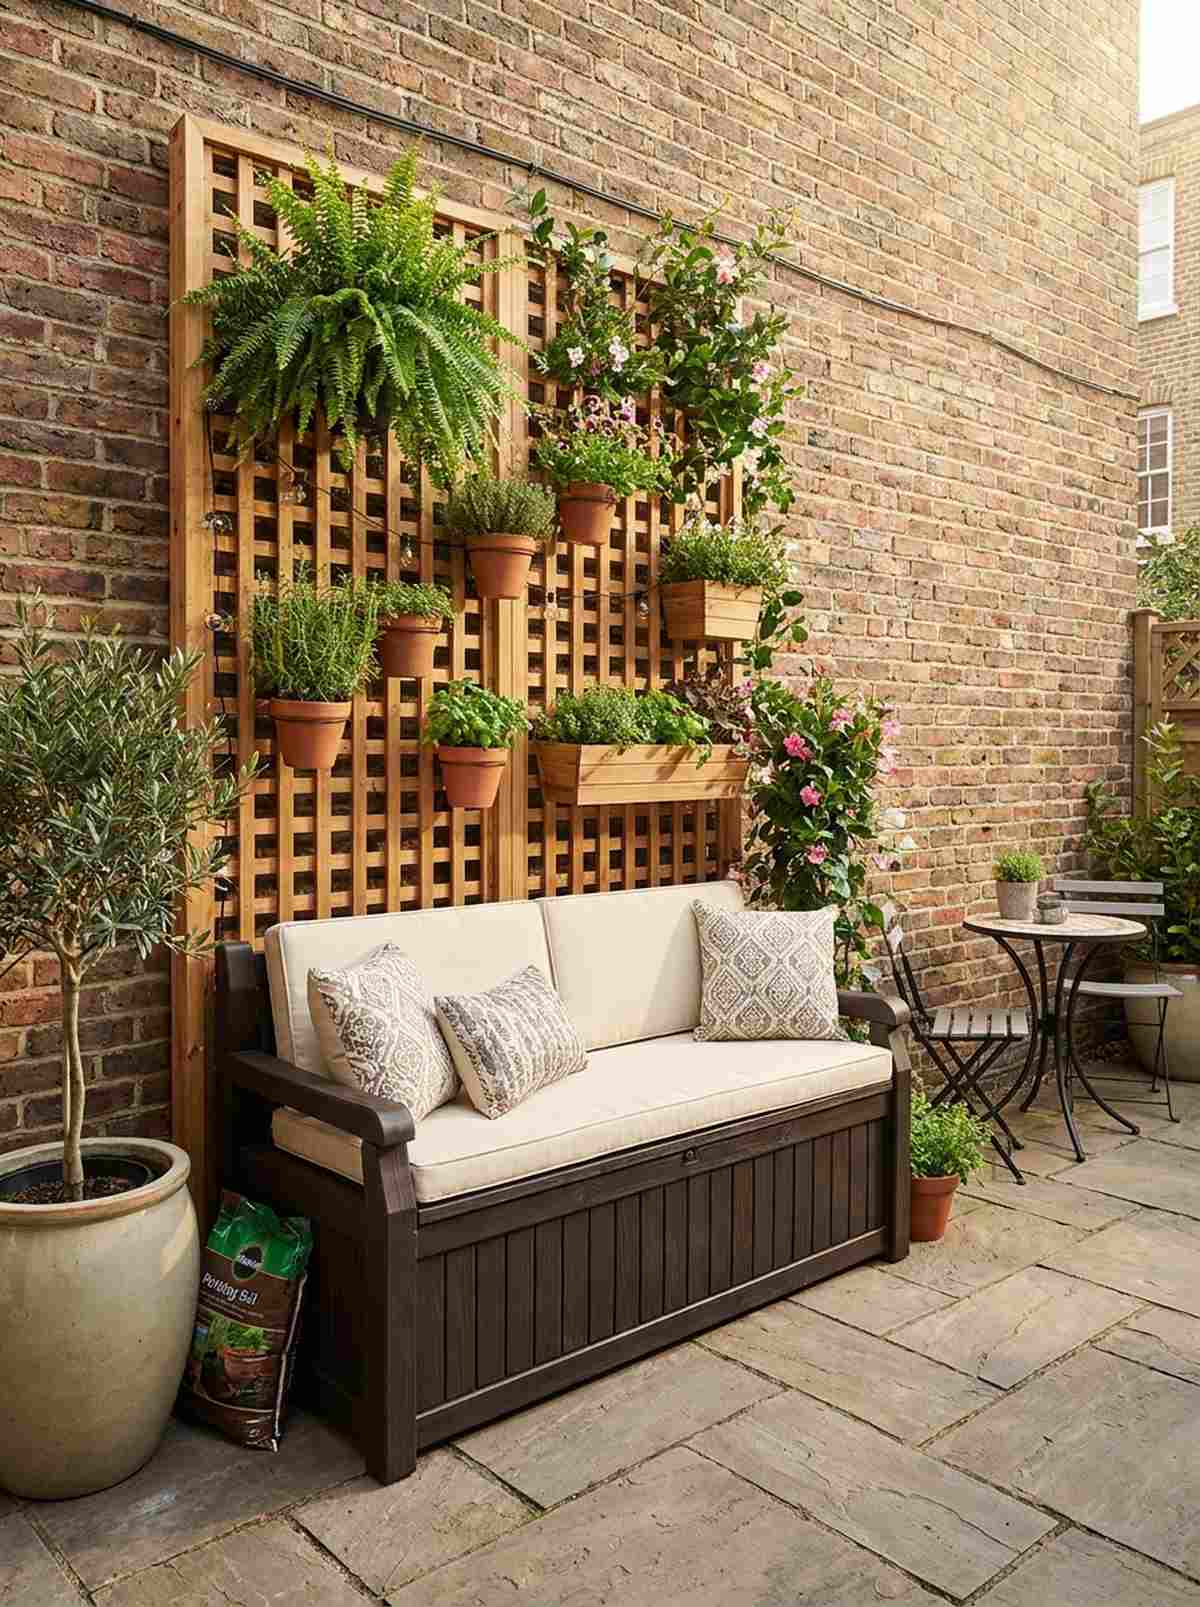
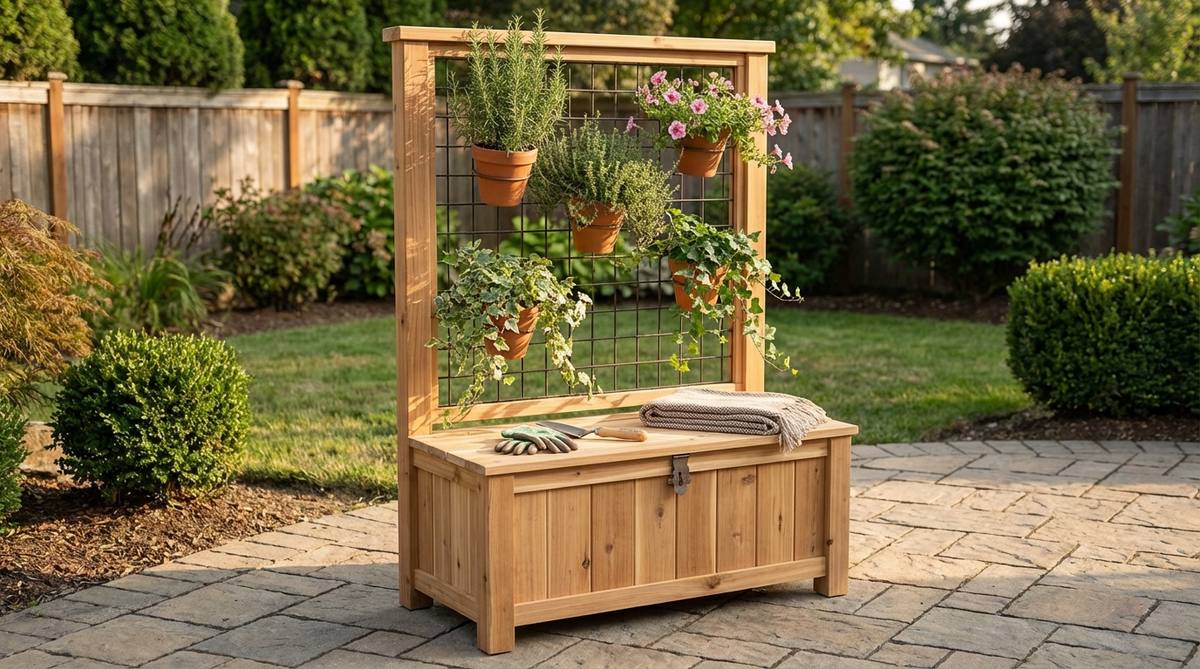
Gives off an incredibly lush, botanical cafe vibe. An all-in-one planter bench unit stacks seating, storage, and greenery into a tiny footprint, ideal for bare townhome courtyards.
Building upward instead of outward completely transforms a tight space, looking incredibly custom. Sourcing a heavy-duty resin storage bench base gives you a waterproof spot to hide ugly potting soil bags.
A solid planter-bench hybrid build runs about $200–$350. Save this hack to maximize your square footage immediately.
- Key Materials: Storage bench, tall wooden trellis backing
- Vibe / Style: Compact secret garden
- Difficulty: Easy weekend screw-together
- Budget Breakdown: Base bench: $150 | Trellis & Pots: $100
- Creator’s Tip: Line the inside of the storage bench with thick plastic sheeting in case a wet cushion gets tossed in.
- Smart Sourcing: Waterproof resin outdoor storage benches and pre-assembled cedar lattice trellis panels.
Don’t let a tiny balcony ruin your summer. This next hidden-storage seating hack is an absolute lifesaver for cramped renters.
40. Corner Sectional with Lift-Top Storage
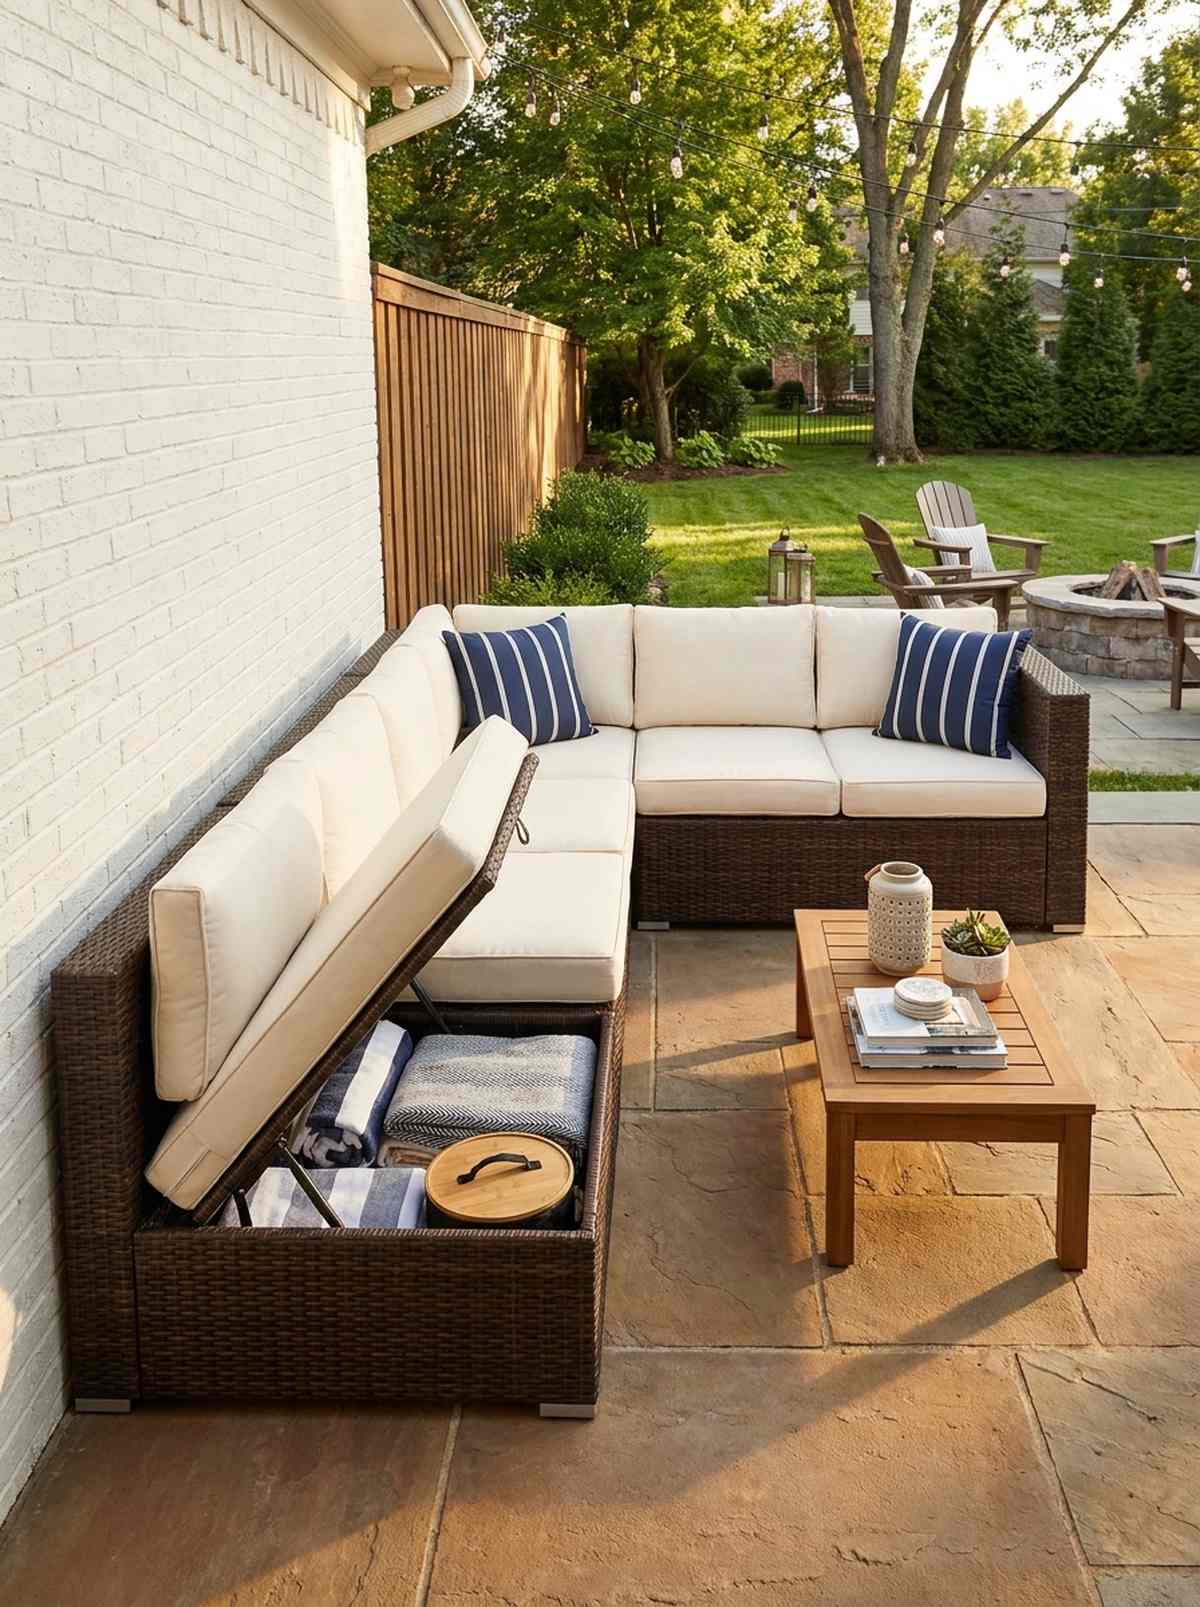
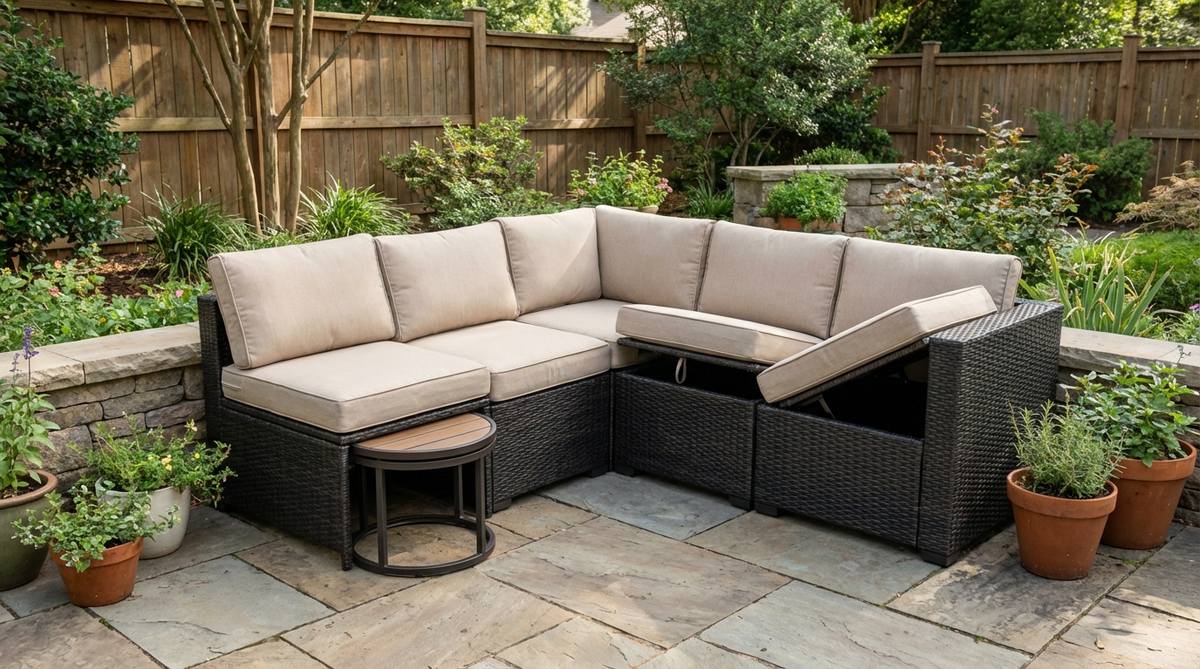
Feels like a perfectly optimized luxury yacht deck. A hidden-storage corner seating block swallows up all your clutter, making it the holy grail setup for narrow, messy patios.
Shoving the seating strictly into the corner yields a shockingly high-end, spacious look. Picking up an all-weather wicker sectional with hydraulic lid lifts ensures you don’t crush your fingers grabbing a blanket.
A premium storage sectional generally costs $400–$800. Highly recommended to keep your small space looking pristine.
- Key Materials: Resin wicker L-shape couch with hinge seats
- Vibe / Style: Clean nautical efficiency
- Difficulty: Ready out of the box
- Budget Breakdown: Storage sectional: $600 | Accessories: $50
- Creator’s Tip: Throw a few moisture-absorbing charcoal bags into the storage bins to stop mildew during humid months.
- Smart Sourcing: Lift-top outdoor resin wicker storage sectionals and bamboo charcoal moisture absorber bag packs.
41. Hanging Chair with Underneath Side Table
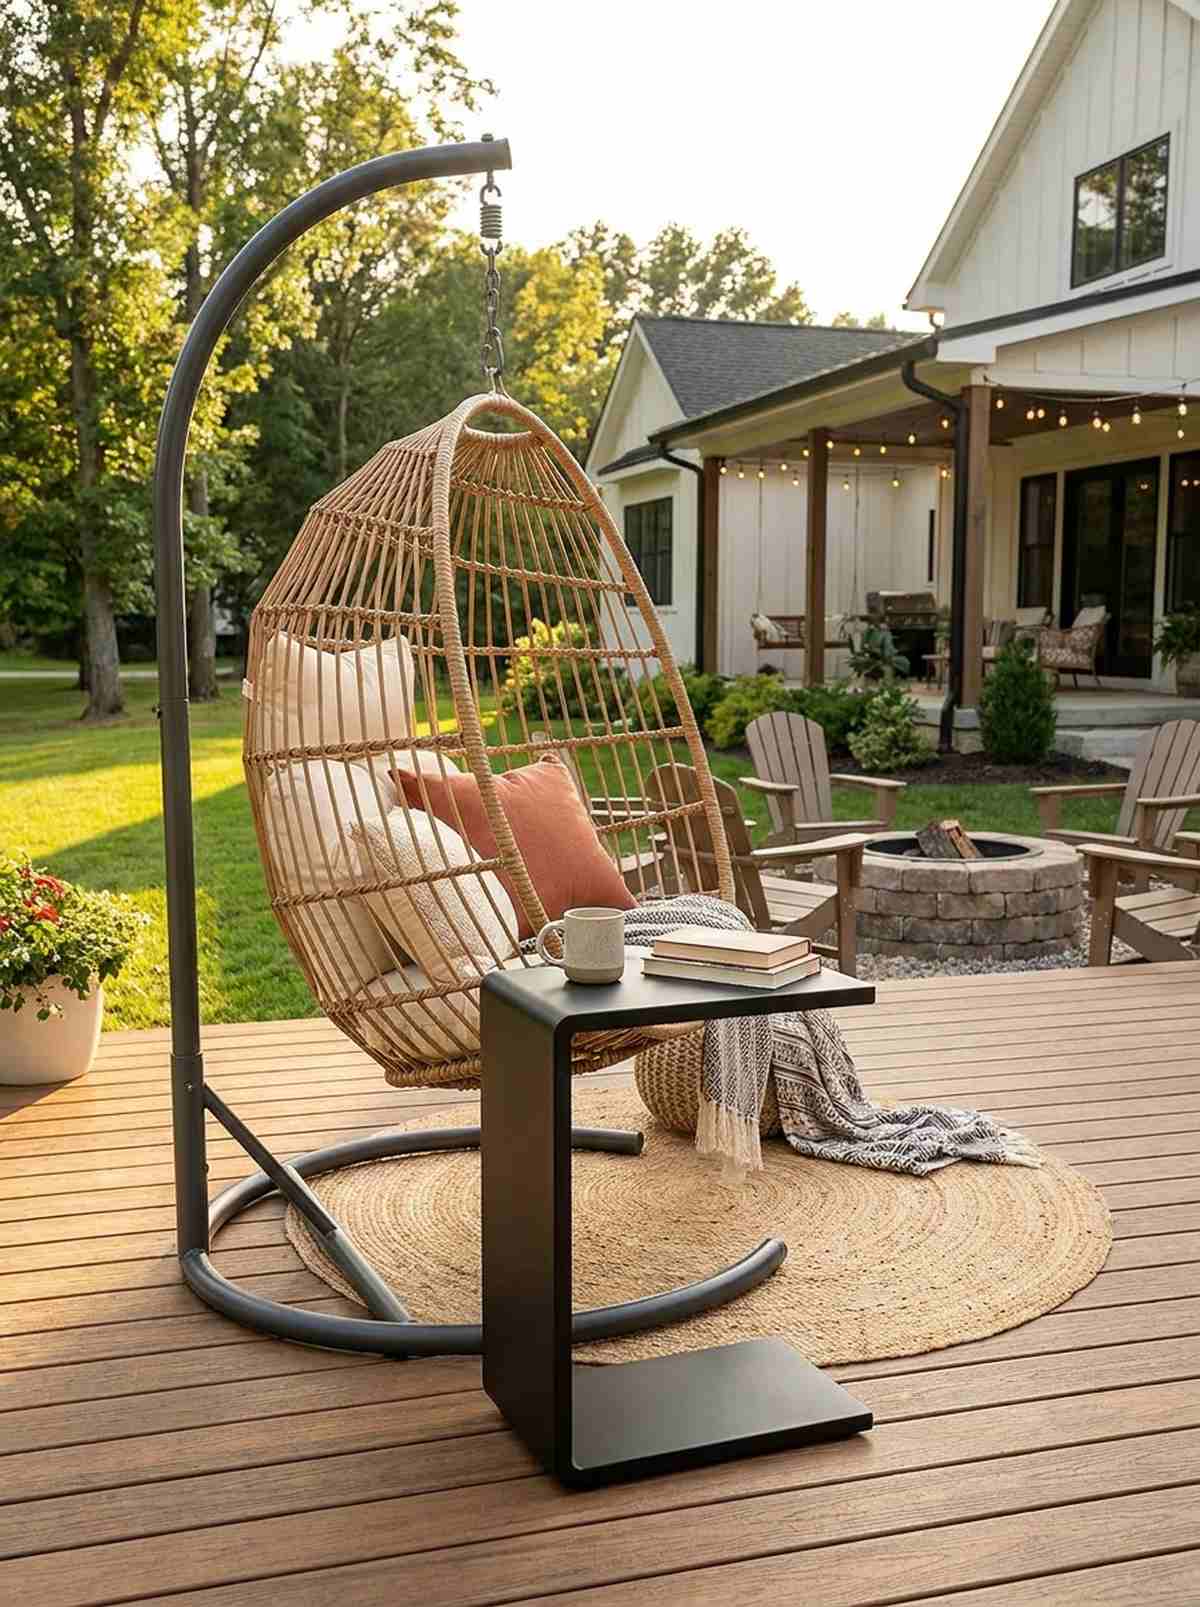
Gives off a chic, floating bohemian reading room aura. A suspended pod and sliding table combo requires exactly zero walking space, brilliant for tight corners that need some visual flair.
Stacking the table under the floating chair completely changes the spatial layout, looking massively expensive. Grabbing a heavy-duty steel C-stand means you can rock gently without tearing a hole in your ceiling.
This entire stacked lounge setup can be done for $300–$500. Save this if you want maximum comfort in a minimal footprint!
- Key Materials: Hanging basket chair, rolling C-table
- Vibe / Style: Modern floating comfort
- Difficulty: Simple bolt assembly
- Budget Breakdown: Hanging chair kit: $280 | Rolling table: $70
- Creator’s Tip: Get a C-shaped side table; it slides perfectly around the heavy steel base of the chair stand.
- Smart Sourcing: Heavy-duty steel stand hanging egg chairs and rust-proof metal outdoor C-tables.
42. Rail-Mounted Folding Table for Balconies
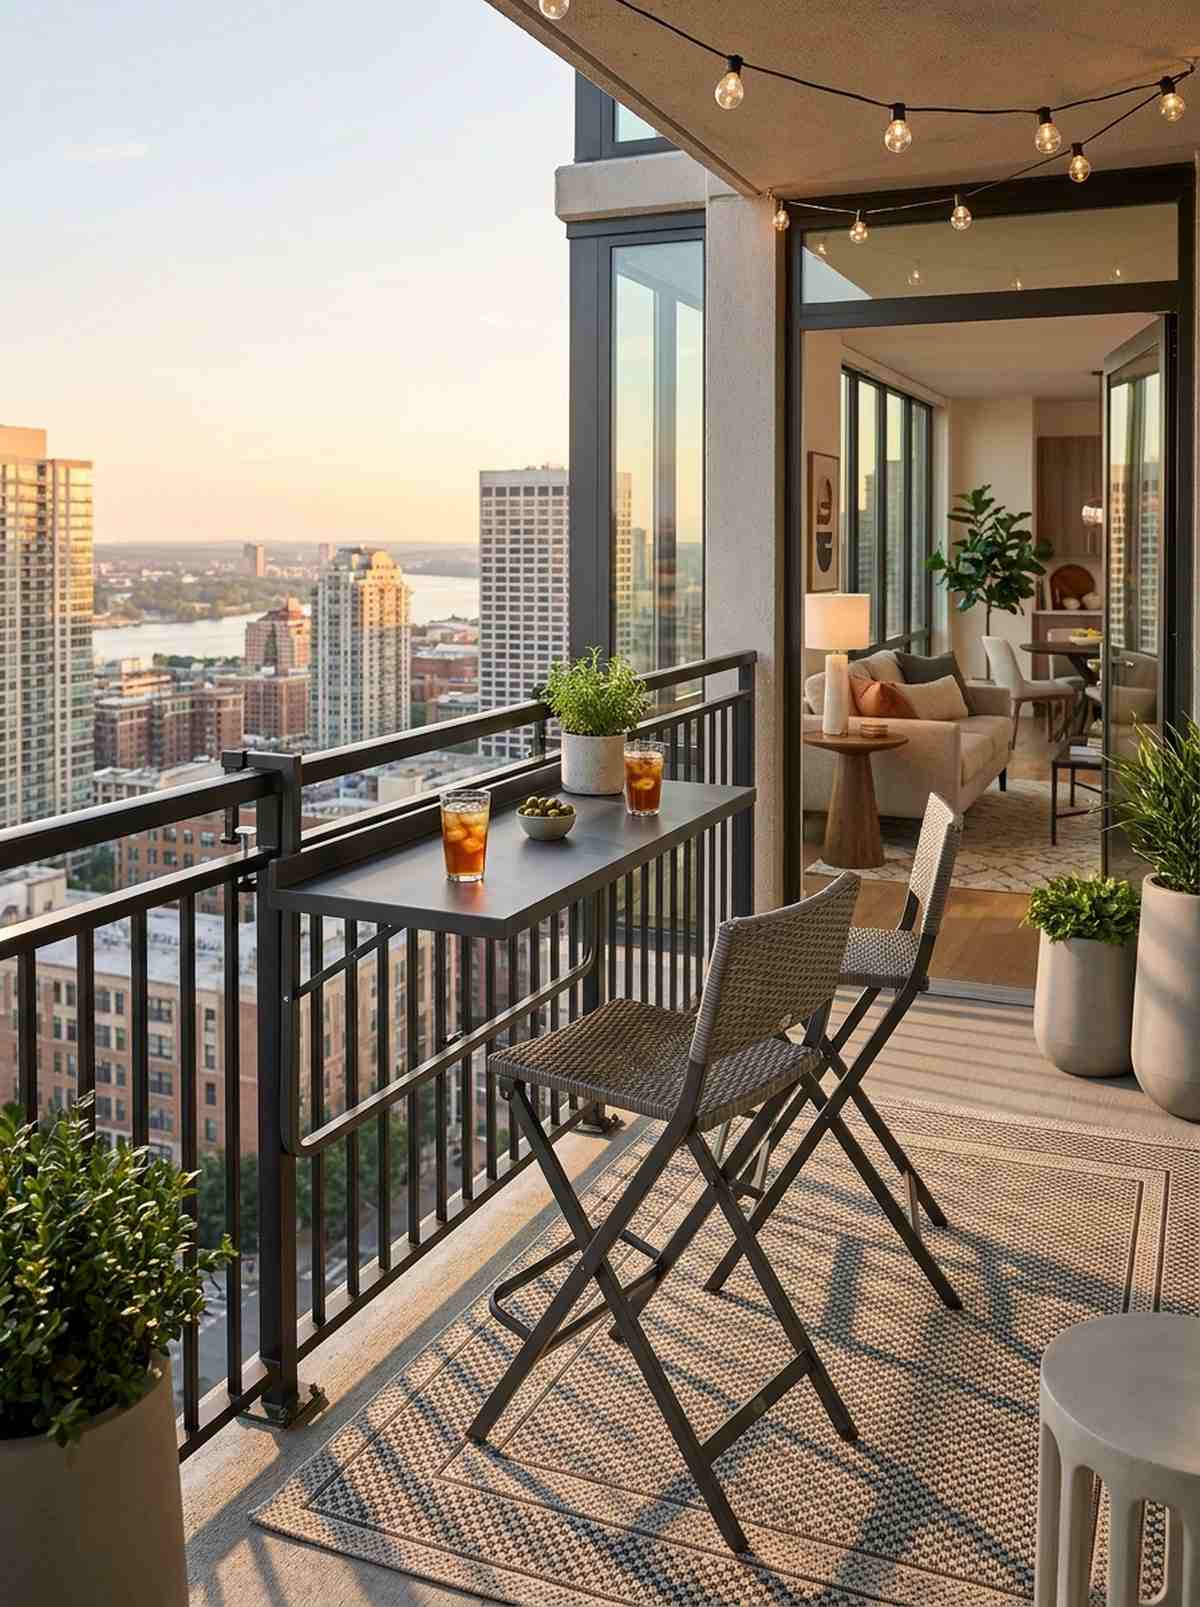
Feels exactly like a high-rise city overlook bar. An over-the-railing hanging bar counter pushes the dining zone off the floor entirely, an absolute game-changer for microscopic high-rise balconies.
Clipping a table directly to the metal railing delivers a brilliant, space-saving finish. Utilizing a powder-coated aluminum balcony desk kit ensures the setup won’t rust and stain the building’s exterior.
You can snag a clamp-on rail desk for $80–$150. Pin this to your apartment balcony upgrade board immediately!
- Key Materials: Clamp-on metal ledge, folding barstools
- Vibe / Style: Urban skyline cafe
- Difficulty: Clamp and tighten
- Budget Breakdown: Rail table: $100 | Two stools: $120
- Creator’s Tip: Double check your railing width with a tape measure; most cheap tables won’t fit on thick concrete balcony walls.
- Smart Sourcing: Adjustable clamp-on balcony folding tables and collapsible weather-proof outdoor barstools.
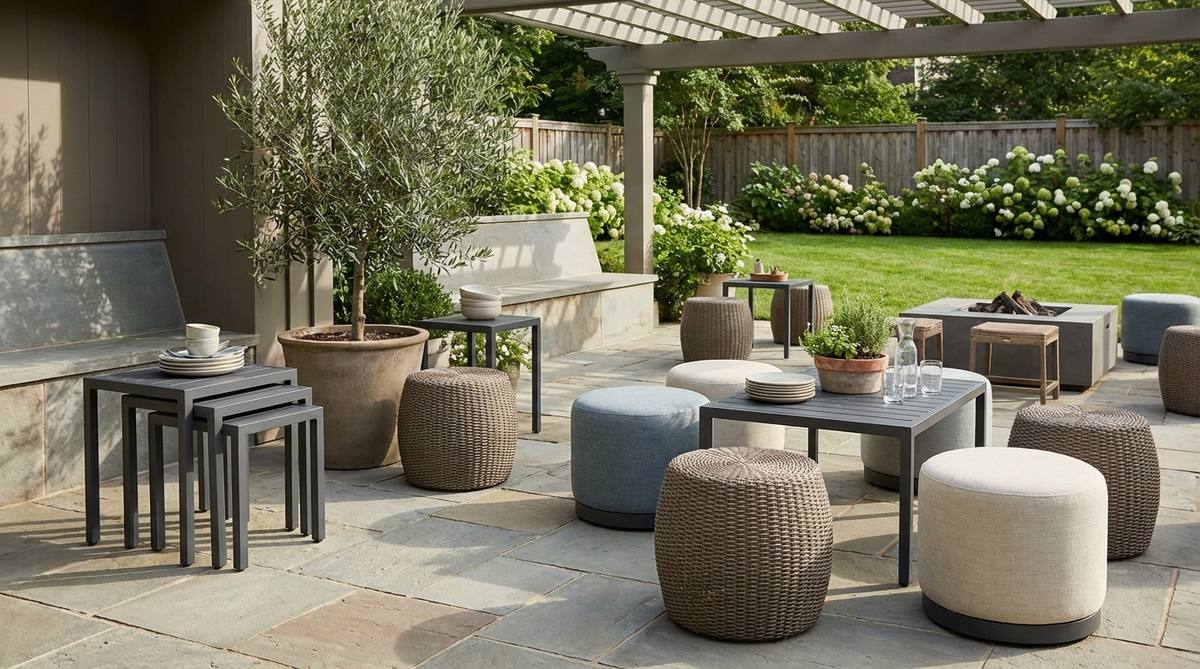
43. Ottoman Cluster as Modular Seating
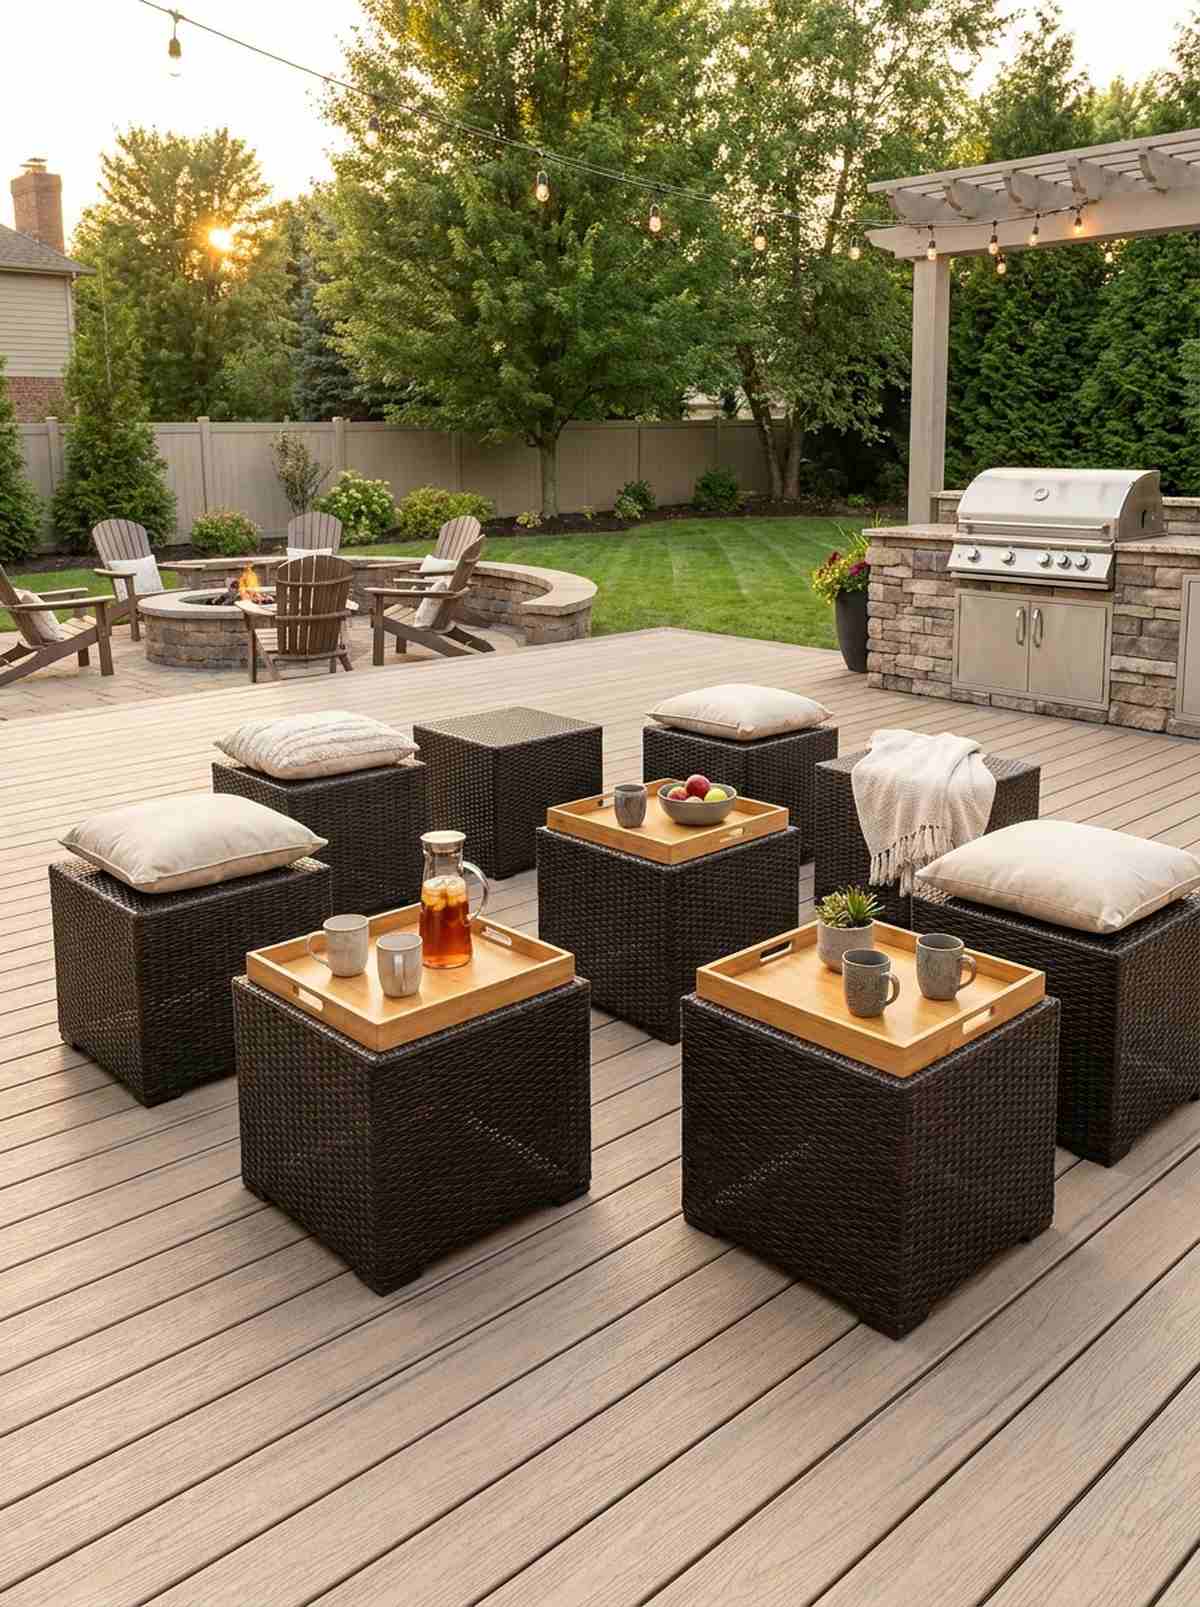
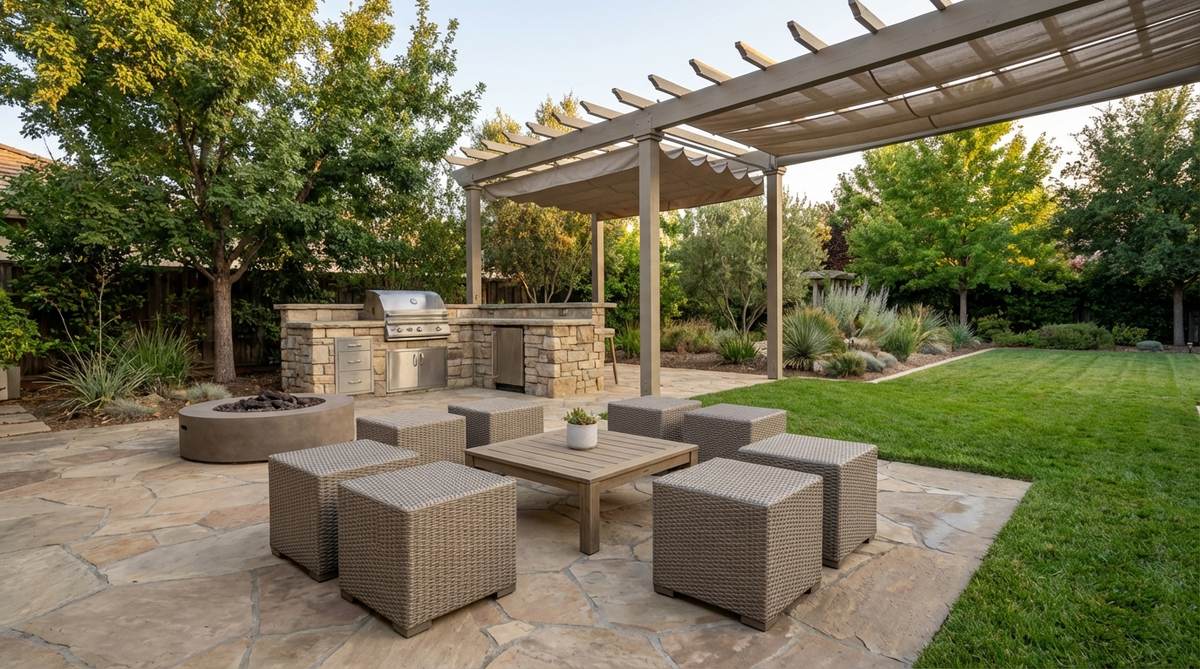
Radiates a chic, adaptable lounge club energy. A scattered cube ottoman arrangement can be shoved together to form a bed or pulled apart for individual seats, perfect for wildly unpredictable deck parties.
Skipping rigid chairs for geometric cubes yields a shockingly high-end, customizable look. Buying outdoor decor table covers to throw over the cubes instantly turns them into waterproof drink stations.
A set of six heavy-duty cube ottomans costs around $300–$500. It’s the ultimate flexible furniture hack for small spaces.
- Key Materials: Uniform square outdoor ottomans, large trays
- Vibe / Style: Fluid modern lounge
- Difficulty: No setup required
- Budget Breakdown: 6 Ottomans: $400 | Serving trays: $60
- Creator’s Tip: Keep two large wooden serving trays handy; placing them on top of any ottoman instantly converts it into a hard coffee table.
- Smart Sourcing: All-weather resin wicker cube ottomans (bulk pack) and oversized bamboo outdoor serving trays.
Conclusion
Successfully planning out these 43 premium outdoor decor patio layouts completely relies on smart spacing and aggressive sourcing. By avoiding basic big-box store furniture and utilizing heavy-duty modular connector clips, UV-resistant fabric upgrades, and smart vertical storage kits, you guarantee a space that feels like a luxury resort. Whether you are dealing with a sprawling sloped backyard or a cramped high-rise balcony, executing these precise blueprints and investing in commercial-grade structural elements will ensure your dual-purpose dining and lounging zones look wildly expensive for years to come.
Frequently Asked Questions
What is the ideal space allocation between dining and lounge zones on a patio?
Professional designers typically divide the yard 40/60, but achieving that “looks expensive but isn’t” vibe requires strict clearance. You must leave at least 36 inches around any outdoor decor table setup. If you are strapped for space, skip buying two separate sets and invest heavily in a premium multi-functional starter kit like a convertible lift-top dining sectional to maximize every single square foot.
How far should dining furniture be positioned from outdoor kitchens or grills?
If you don’t want to choke your guests on burger smoke, mandate an 8-to-10-foot buffer between the cooking station and the seating zone. To make this look seamless, lay down bulk-pack composite floor transition strips to visually separate the chef’s zone from the relaxation area. If your patio is tiny, heavily invest in a commercial-grade directional wind guard for your grill.
What outdoor rug size works best under dining tables?
The biggest mistake homeowners make is buying a rug that is too small, which makes the yard look incredibly cheap. You need a premium UV-coated outdoor woven rug that extends exactly 24 to 30 inches past the back of your pushed-out chairs. Sourcing an oversized 10×12 weather-proof rug immediately anchors the dining zone and gives off a highly curated designer aesthetic.
Can fire pits function effectively between dining and lounge areas?
Absolutely, but only if you use them as the primary visual divider. Positioning a heavy-duty pre-cast concrete fire bowl exactly in the middle acts as a brilliant transitional anchor. To avoid smoke blowing into the dinner spread, always upgrade to a high-end smokeless stainless steel fire pit insert—it’s a massive buyer-intent upgrade that transforms the usability of the yard.
What lighting strategy works best for dual-function patios?
Basic floodlights ruin the mood completely. You must layer your lighting using commercial-grade outdoor lighting setups. Hang heavy-duty shatterproof string light kits over the dining area for visibility, and install low-voltage marine-grade LED strip lighting under the lounge couches for a moody, high-end glow. This contrast makes the space look custom-built for under $200.