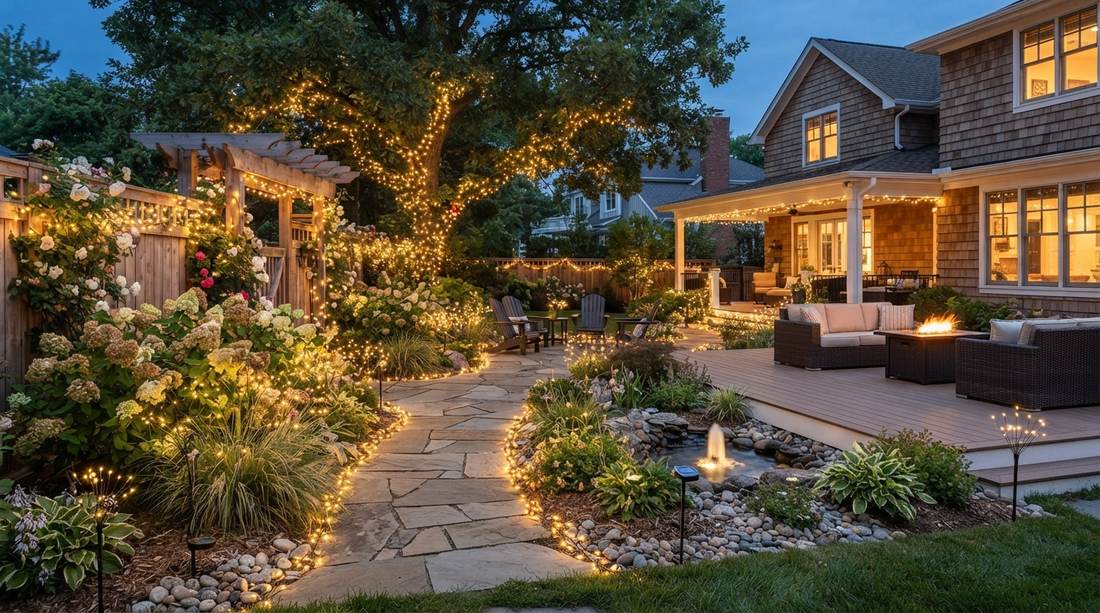
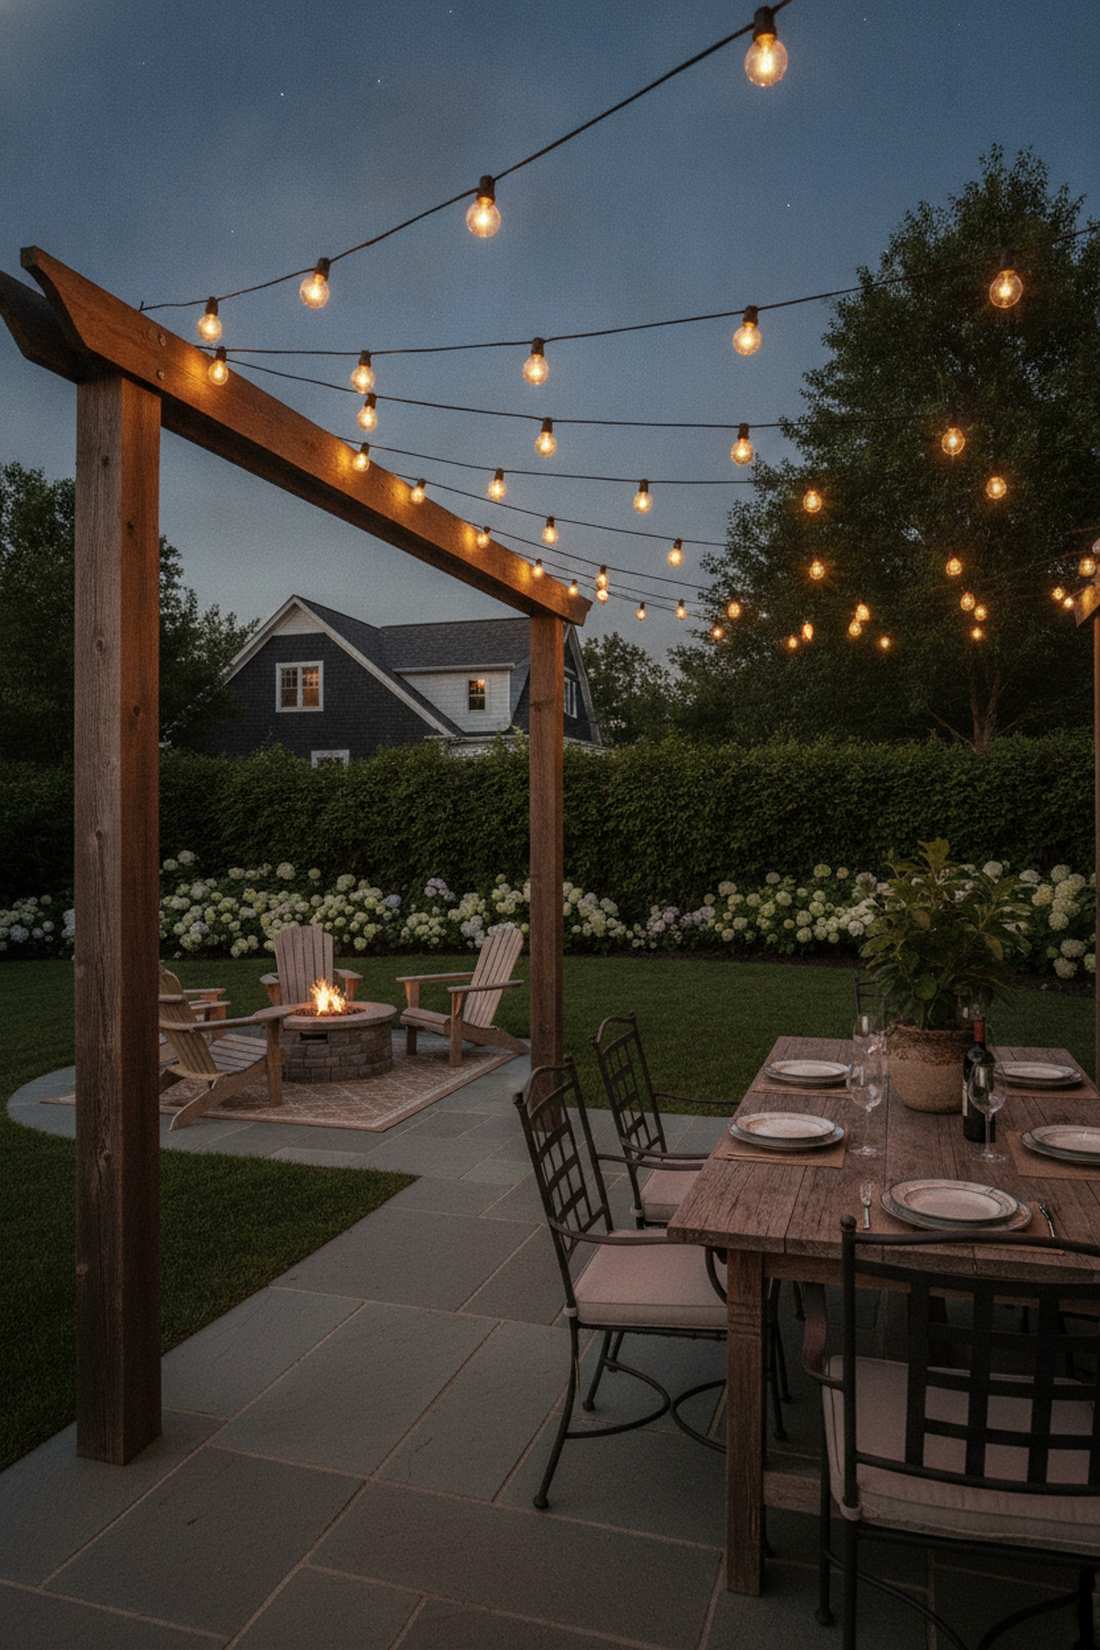
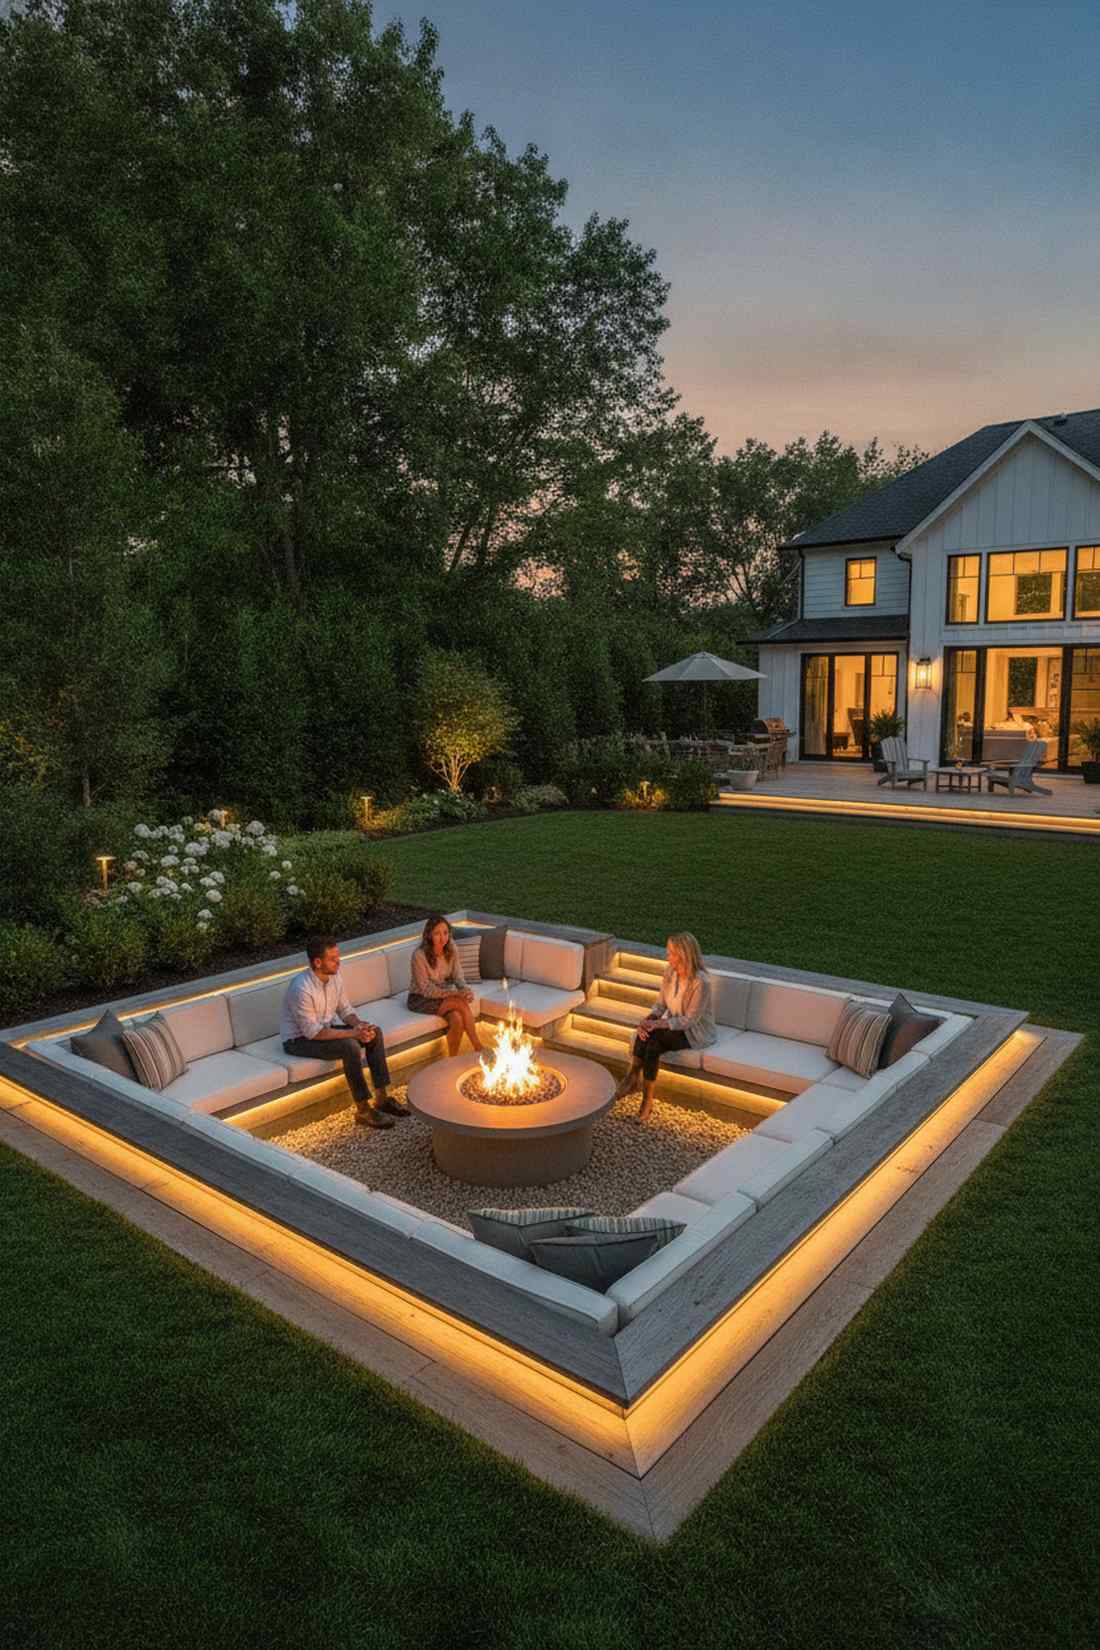
Installing solar fairy lights in garden zones instantly upgrades your home’s nighttime curb appeal. This breakdown reveals exact design blueprints alongside incredibly clever budget material sourcing. Expect a stunning high-end finish using durable outdoor components without electrical wiring.
Design SnapshotKey Principles
- Solar Panel Placement: Position collectors where they receive 6-8 hours of direct sunlight for optimal nighttime performance
- Light Distribution: Space installations 8-12 feet apart for even coverage without creating harsh gaps or over-saturated zones
- Seasonal Adaptation: Select adjustable systems that accommodate changing sun angles and foliage density throughout the year
- Visual Layering: Combine ground-level, mid-height, and overhead placements to create dimensional lighting architecture
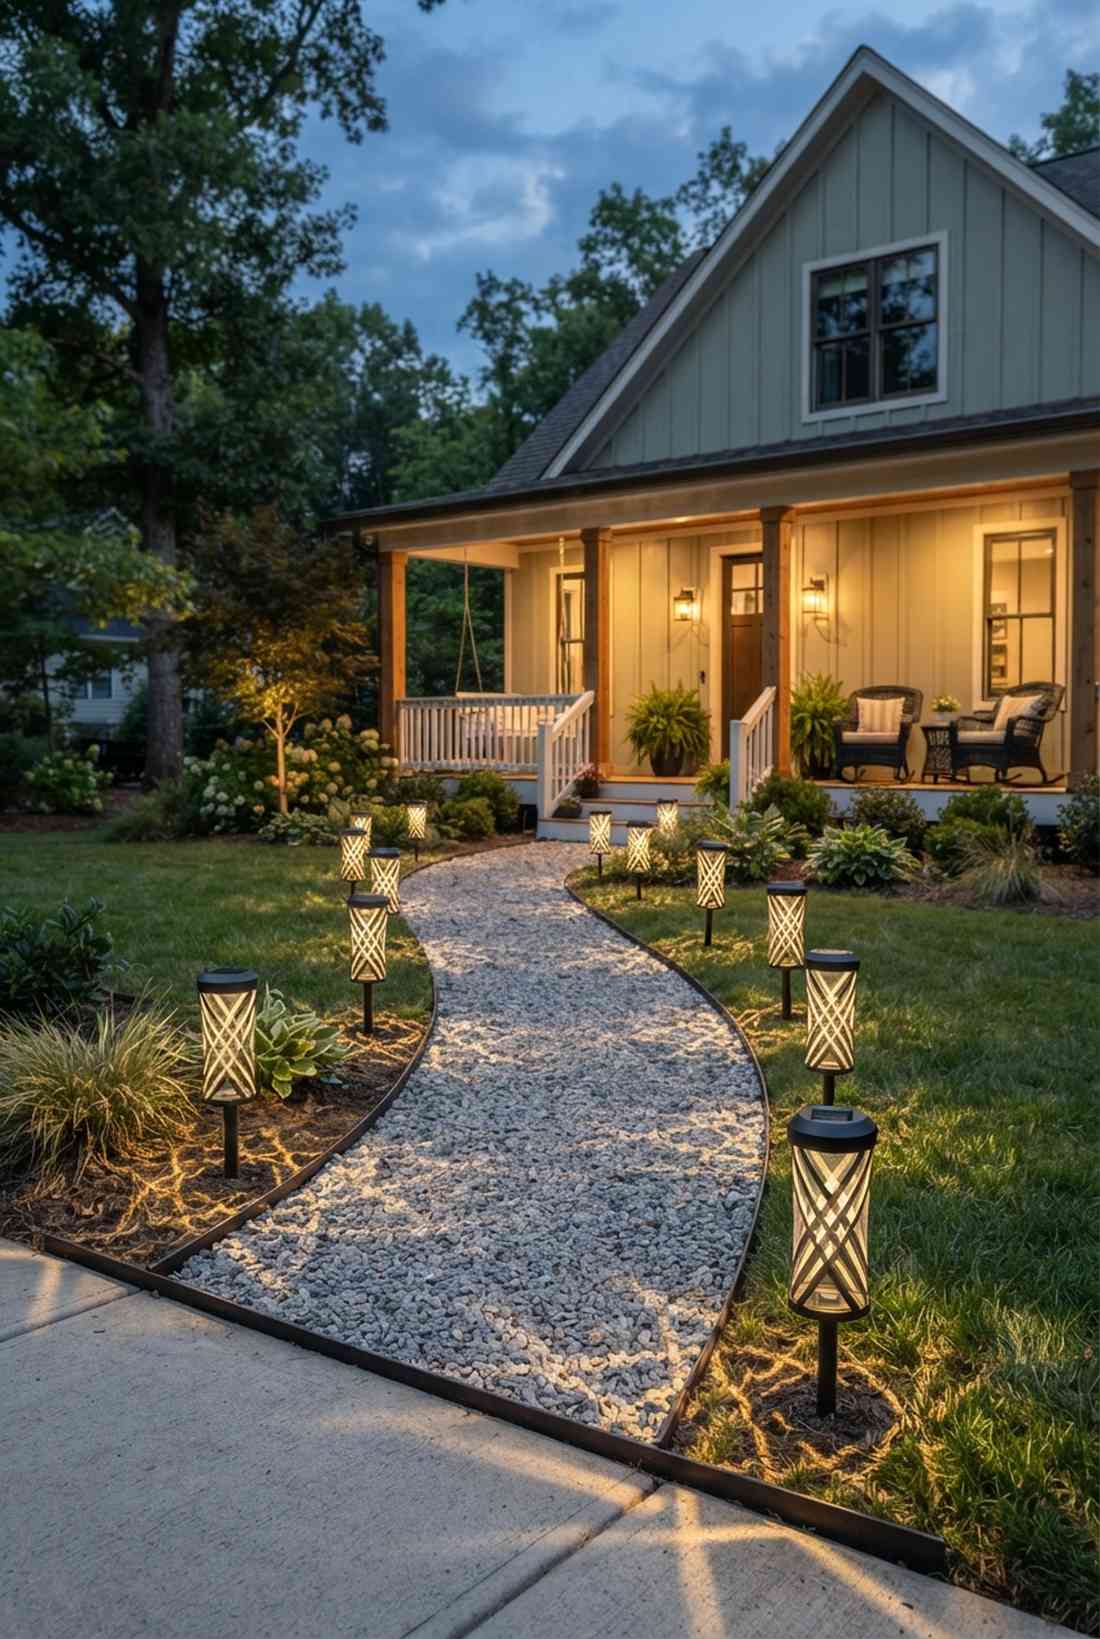
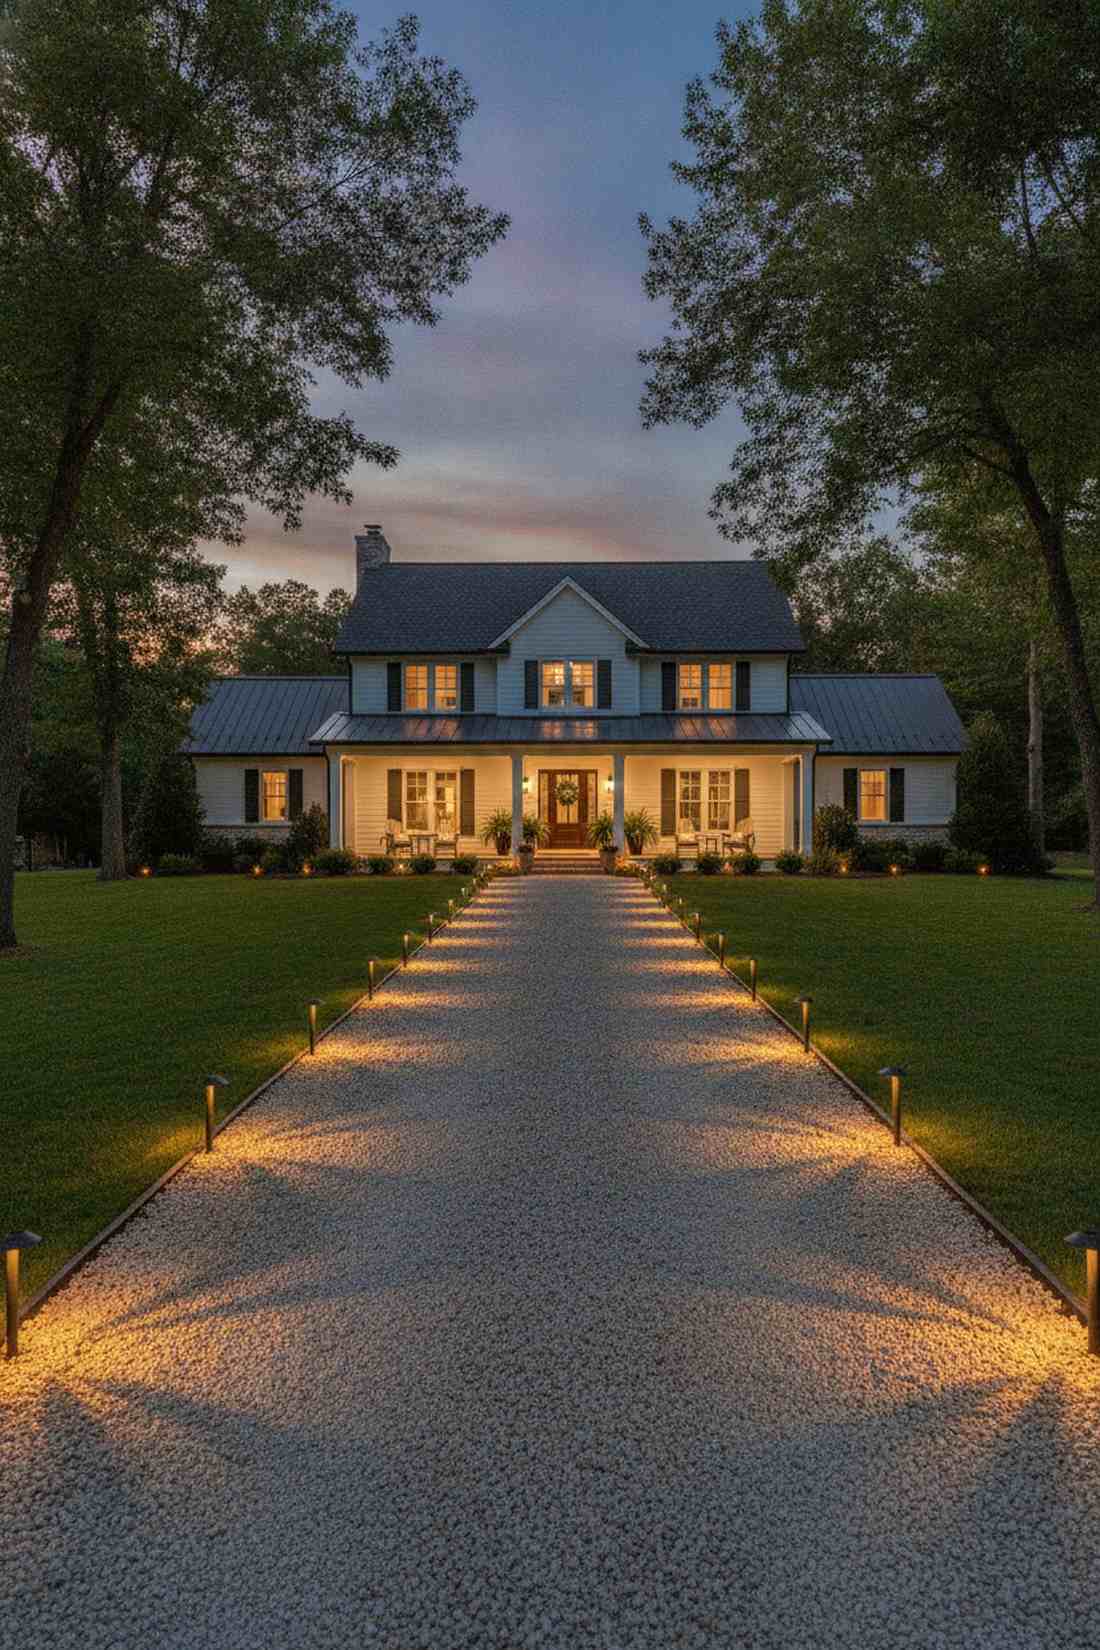
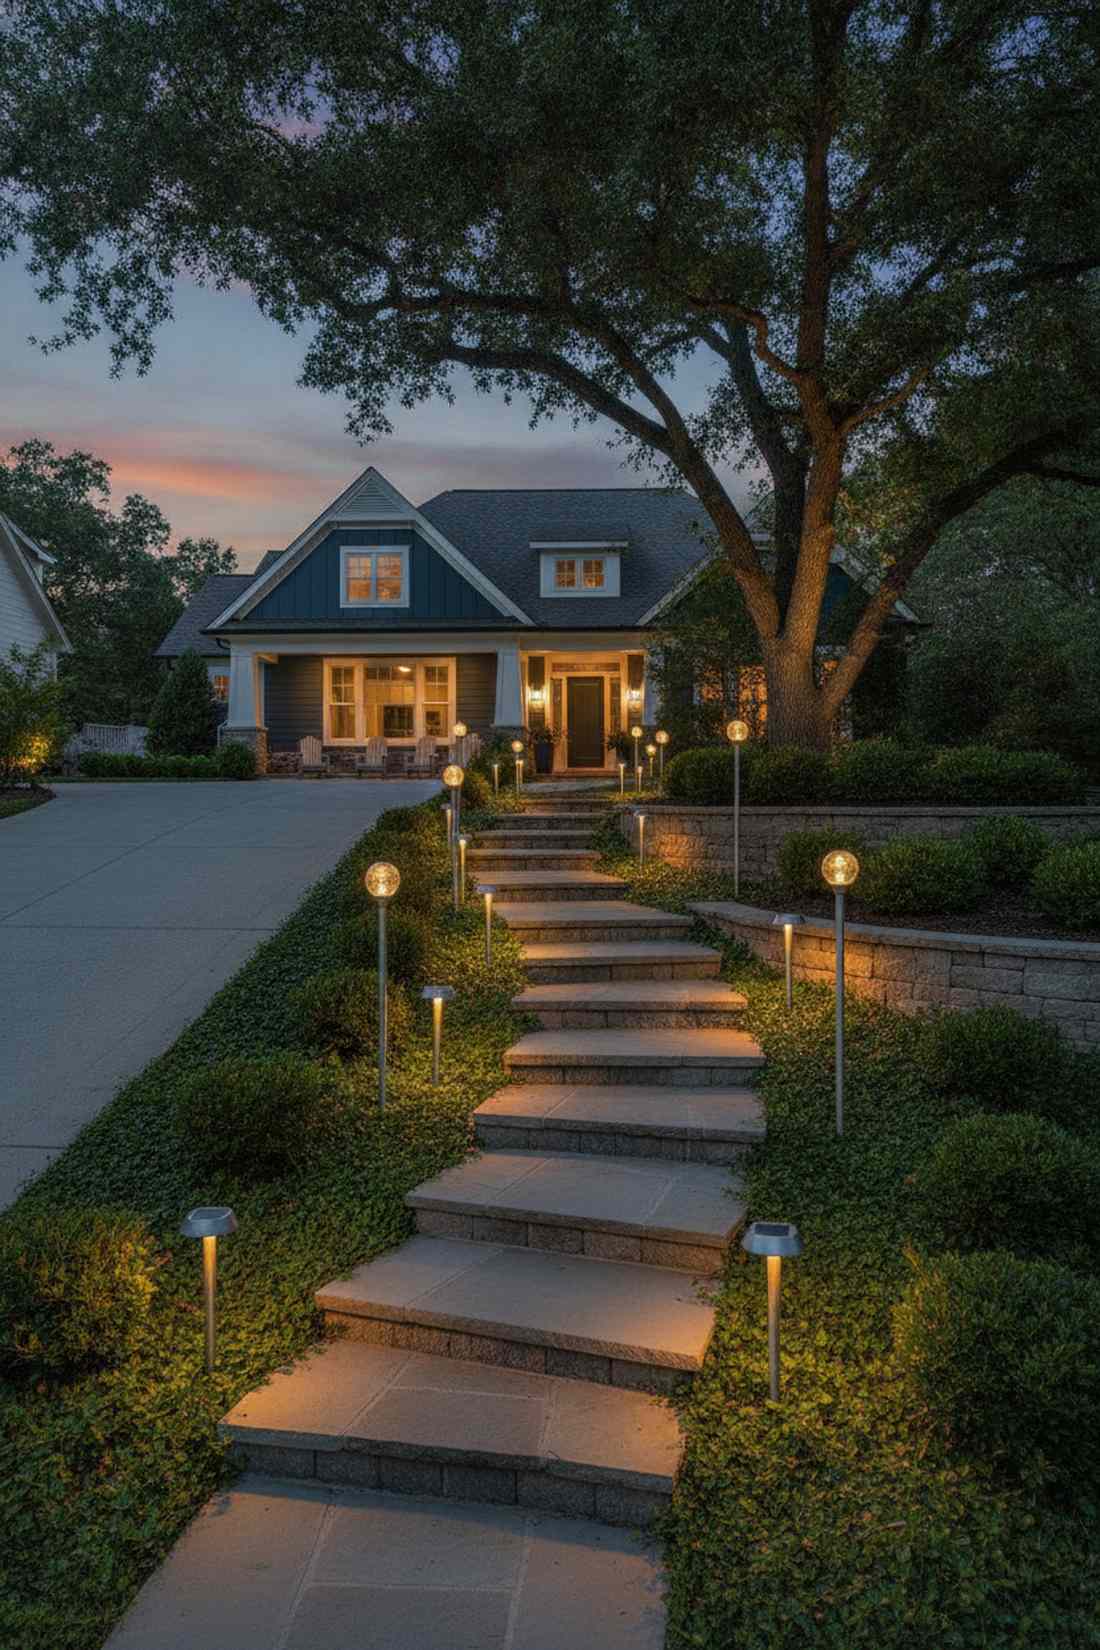
Pathway & Entrance Illumination
Front walkways and garden paths require functional lighting that guides visitors while enhancing curb appeal. Solar fairy lights eliminate trenching for electrical lines and adapt easily to curved or irregular path configurations.
1. Crisscross Pattern Pathway Stakes
This glowing boundary feels like a secret enchanted corridor opening up at dusk. Illuminated front yard walkway ideas thrive on this layered geometry. It works exceptionally well for highlighting a sweeping gravel path leading up to a main porch.
Crossing the directional LED beams creates an upscale matrix effect that bypasses the cheap plastic aesthetic entirely. Utilizing a weatherproof outdoor landscaping bundle ensures the nodes withstand heavy foot traffic and rough lawncare equipment. Most homeowners mistake this layout for an expensive hardwired system.
You can effortlessly lock in this transformation for a budget-friendly $20–$35. Pin this if you’re plotting a major outdoor curb appeal overhaul!
- Key Materials: UV-coated warm white stake fixtures
- Vibe / Style: Modern woodland entrance
- Difficulty: Easy beginner setup
- Budget Breakdown: Materials: $25 | Base Anchors: $5
- Creator’s Tip: Bury the stakes an extra inch deep into the soil to prevent accidental tilting during heavy rain.
- Smart Sourcing: pre-cut reflective gravel (bulk pack) and high-lumen directional solar stakes.
2. Graduated Height Entrance Sequence

The tiered elevation here brings an incredibly welcoming energy that is straight out of a storybook. Implementing a tiered landscape lighting aesthetic instantly adds professional depth. Highly recommended for a sloping driveway or terraced garden steps.
Staggering the pole heights completely alters the visual depth, making a flat yard look like a luxury resort pathway. Many amateur designers ignore vertical layers, but this gives a designer-level finish without breaking the bank. Integrating premium metal extension poles rather than standard factory plastic prevents snapping in high winds.
Expect to invest roughly $40–$60 for a complete and sturdy sequence setup. It’s a fast weekend upgrade that completely elevates your exterior.
- Key Materials: Multi-height metal pole extensions
- Vibe / Style: Architectural terraced glow
- Difficulty: Moderate alignment required
- Budget Breakdown: Poles: $30 | Lighting Kits: $25
- Creator’s Tip: Use a simple string line to ensure your heights step up at a mathematically perfectly even angle.
- Smart Sourcing: rust-proof aluminum garden stakes (starter kit) and shatter-resistant solar globes.
3. Border-Integrated Pathway Lighting
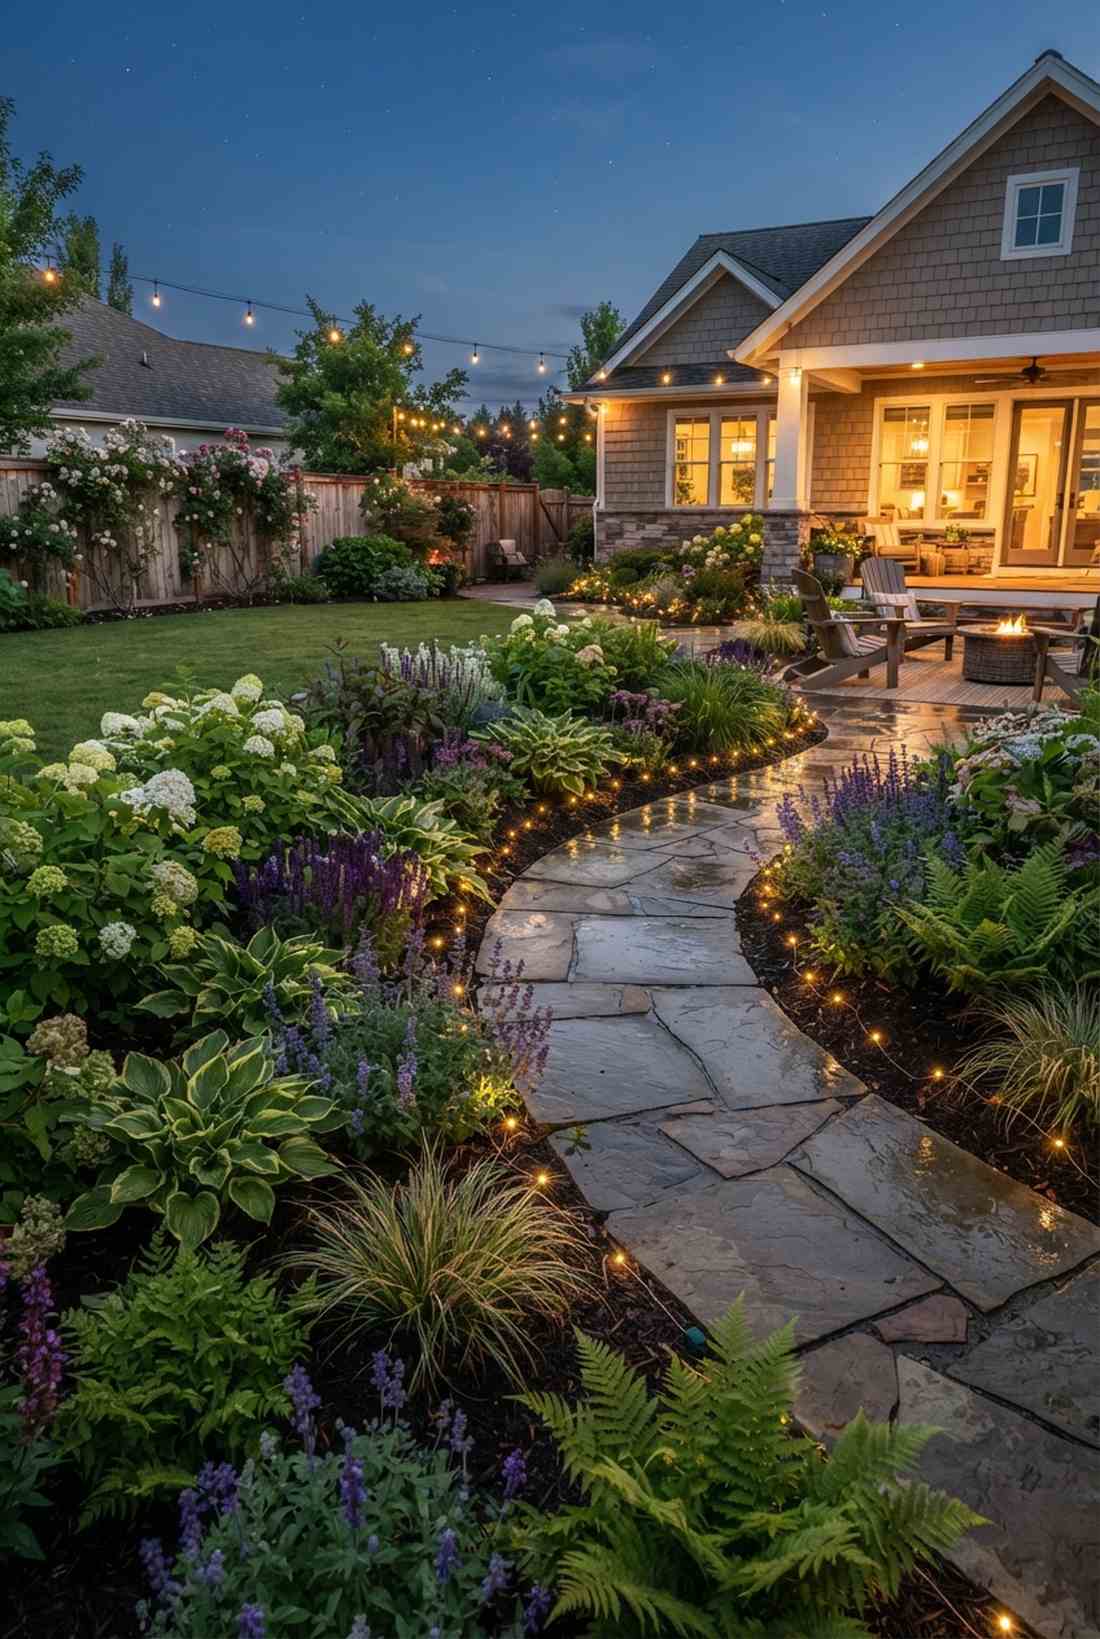
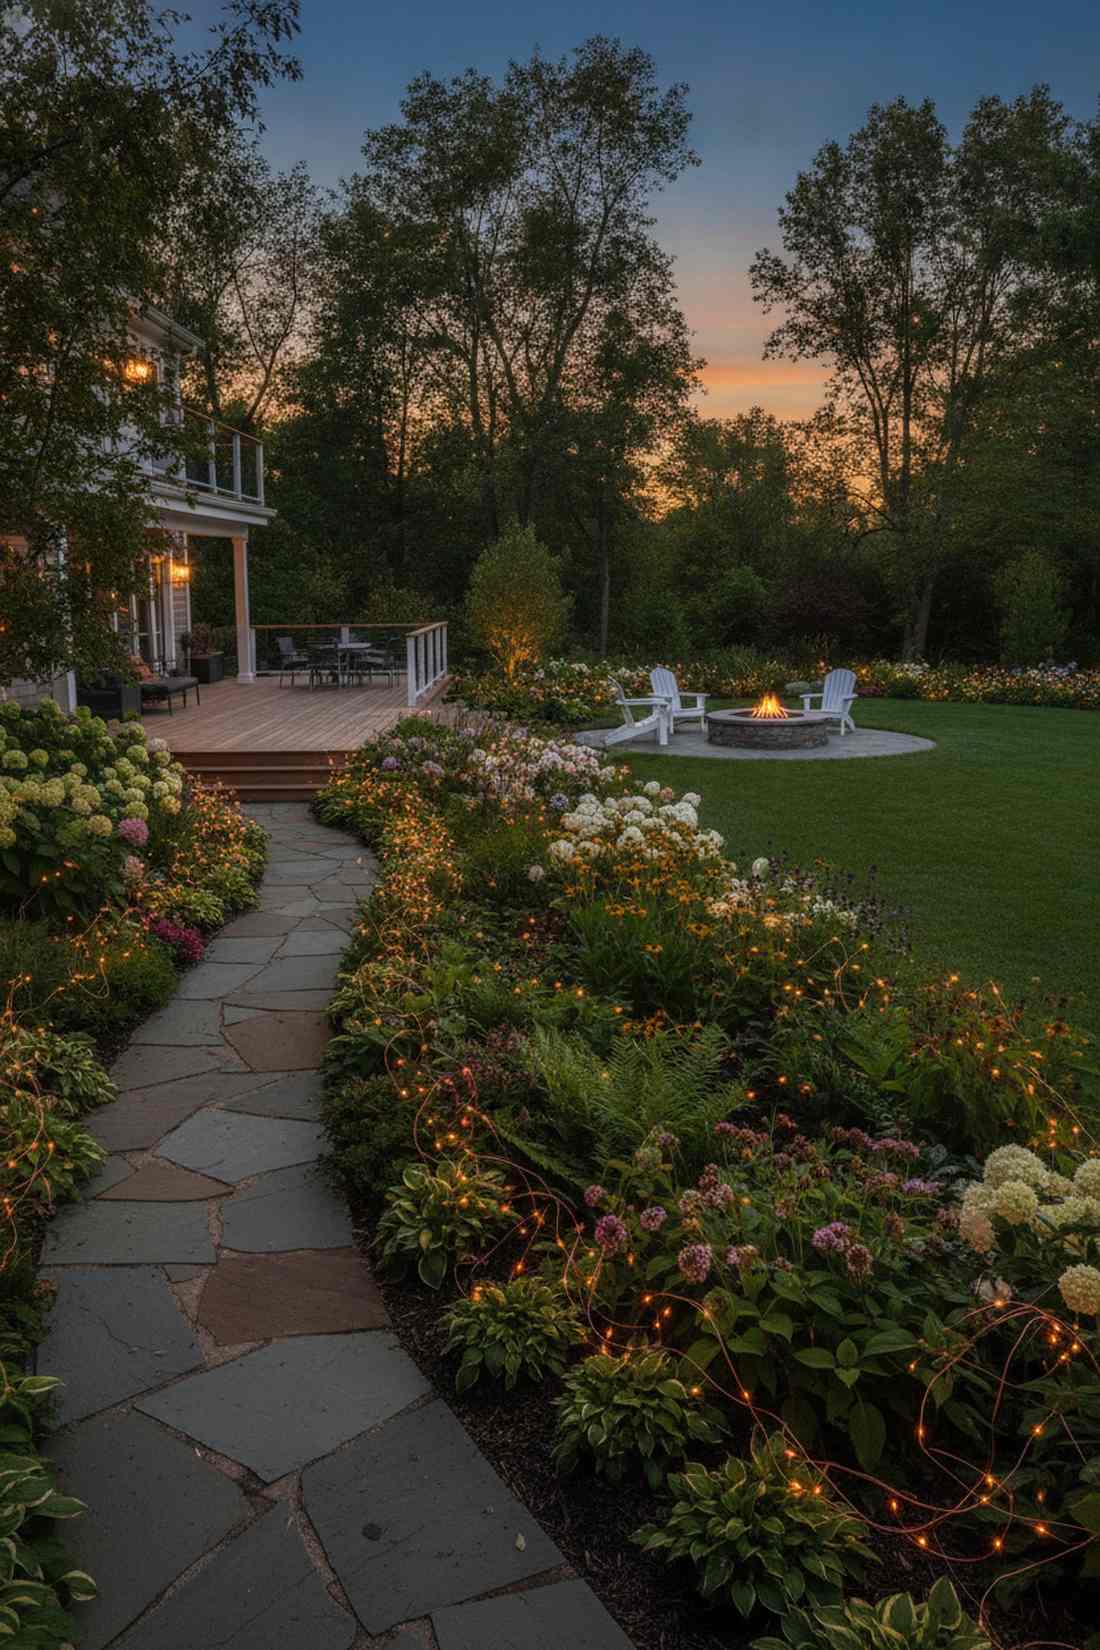
These subtle floral glows feel like tiny grounded stars resting peacefully among your flower beds. Lovers of organic garden border decor are obsessed with this seamless integration. Perfect for lush perennial borders where rigid fixtures would look completely out of place.
Tucking the nodes directly behind first-tier foliage completely obscures the ugly hardware during daylight hours. This trick tricks visitors into thinking the landscape naturally glows, far outperforming standard rigid pathway markers. Grabbing a commercial-grade solar string light set ensures the thin wiring survives constant soil moisture.
This subtle lighting trick costs a highly manageable $15–$25 to accomplish. Save this to your spring garden renovation board immediately!
- Key Materials: Flexible copper-wire outdoor fairy strings
- Vibe / Style: Hidden floral magic
- Difficulty: Simple weaving
- Budget Breakdown: Stringers: $15 | Plant Ties: $4
- Creator’s Tip: Leave a little slack in the wires to allow your bordering plants to grow and expand without ripping the cord.
- Smart Sourcing: UV-coated copper wire bundles and discreet garden cable clips (bulk pack).
4. Gravel Path Sphere Markers
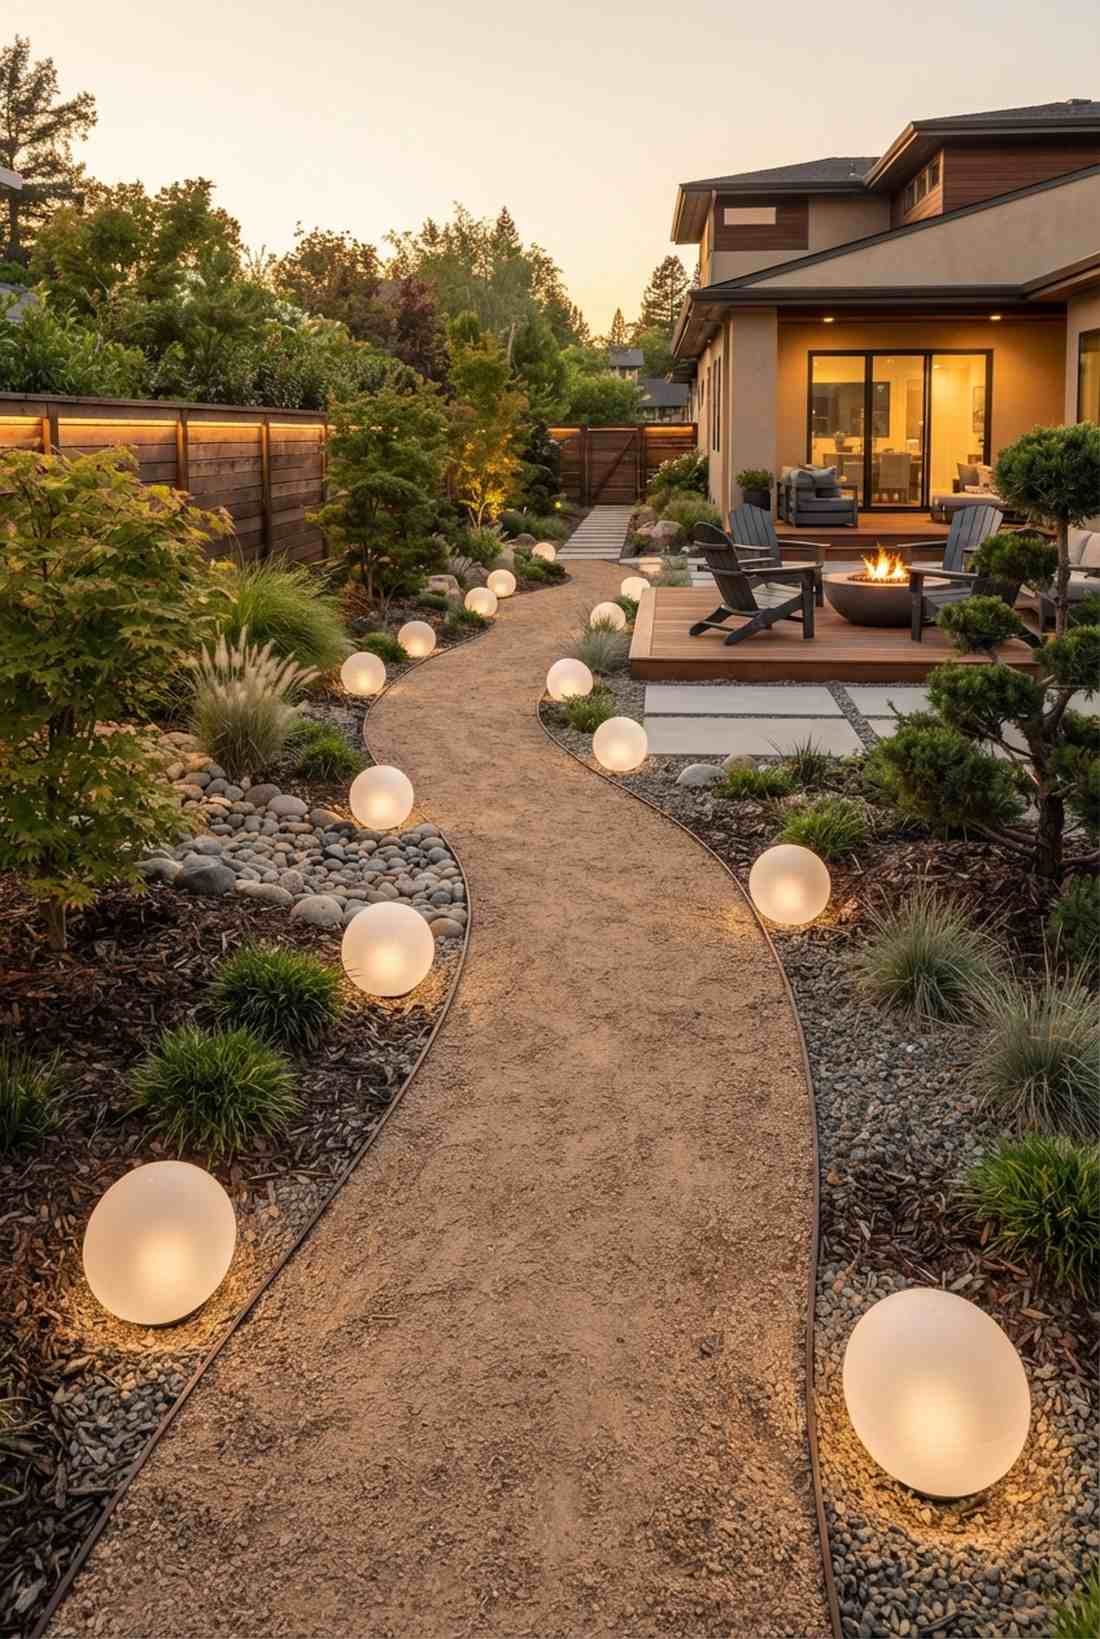
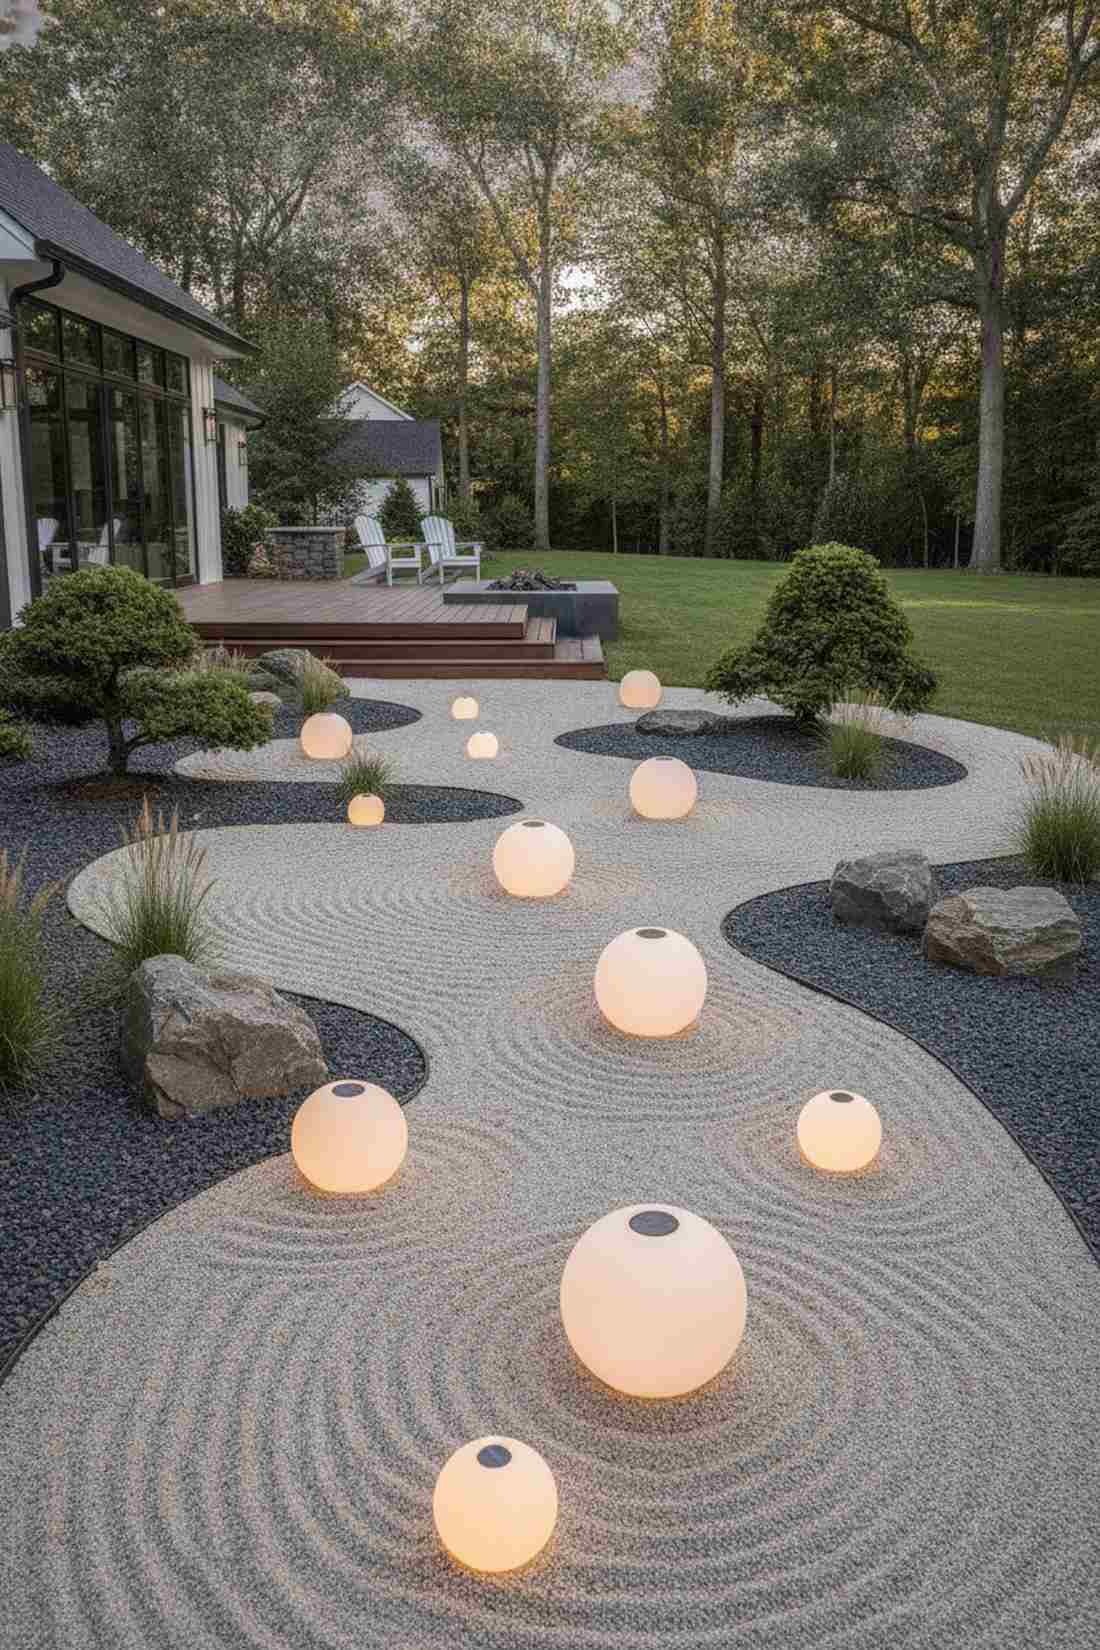
This layout radiates a calming energy that feels like a chic modern art exhibit. Anyone hunting for contemporary zen garden layouts will find this approach flawless. Absolutely ideal for loose decomposed granite pathways where traditional spikes refuse to stay upright.
Resting weighted, frosted globes directly on the ground yields an incredibly upscale resort aesthetic. It completely solves the frustrating issue of wobbly stakes while providing a stunning diffused ambient wash. Ensure you select shatterproof acrylic bulk packs so rogue pebbles from walking don’t crack the casing.
You can execute this modern pathway for roughly $50–$80 depending on globe size. Highly recommended for a zero-dig weekend project.
- Key Materials: Weighted frosted solar spheres
- Vibe / Style: Minimalist zen pathway
- Difficulty: Zero-tool placement
- Budget Breakdown: Spheres: $60 | Base leveling sand: $5
- Creator’s Tip: Dig a tiny one-inch divot for each sphere to rest in so they don’t roll away during severe storms.
- Smart Sourcing: heavy-duty acrylic light orbs (multi-pack) and pre-mixed leveling sand bags.
Most people get their exterior walkway lighting completely wrong… until they try the exact layout coming up next.
5. Step & Edge Safety Lighting
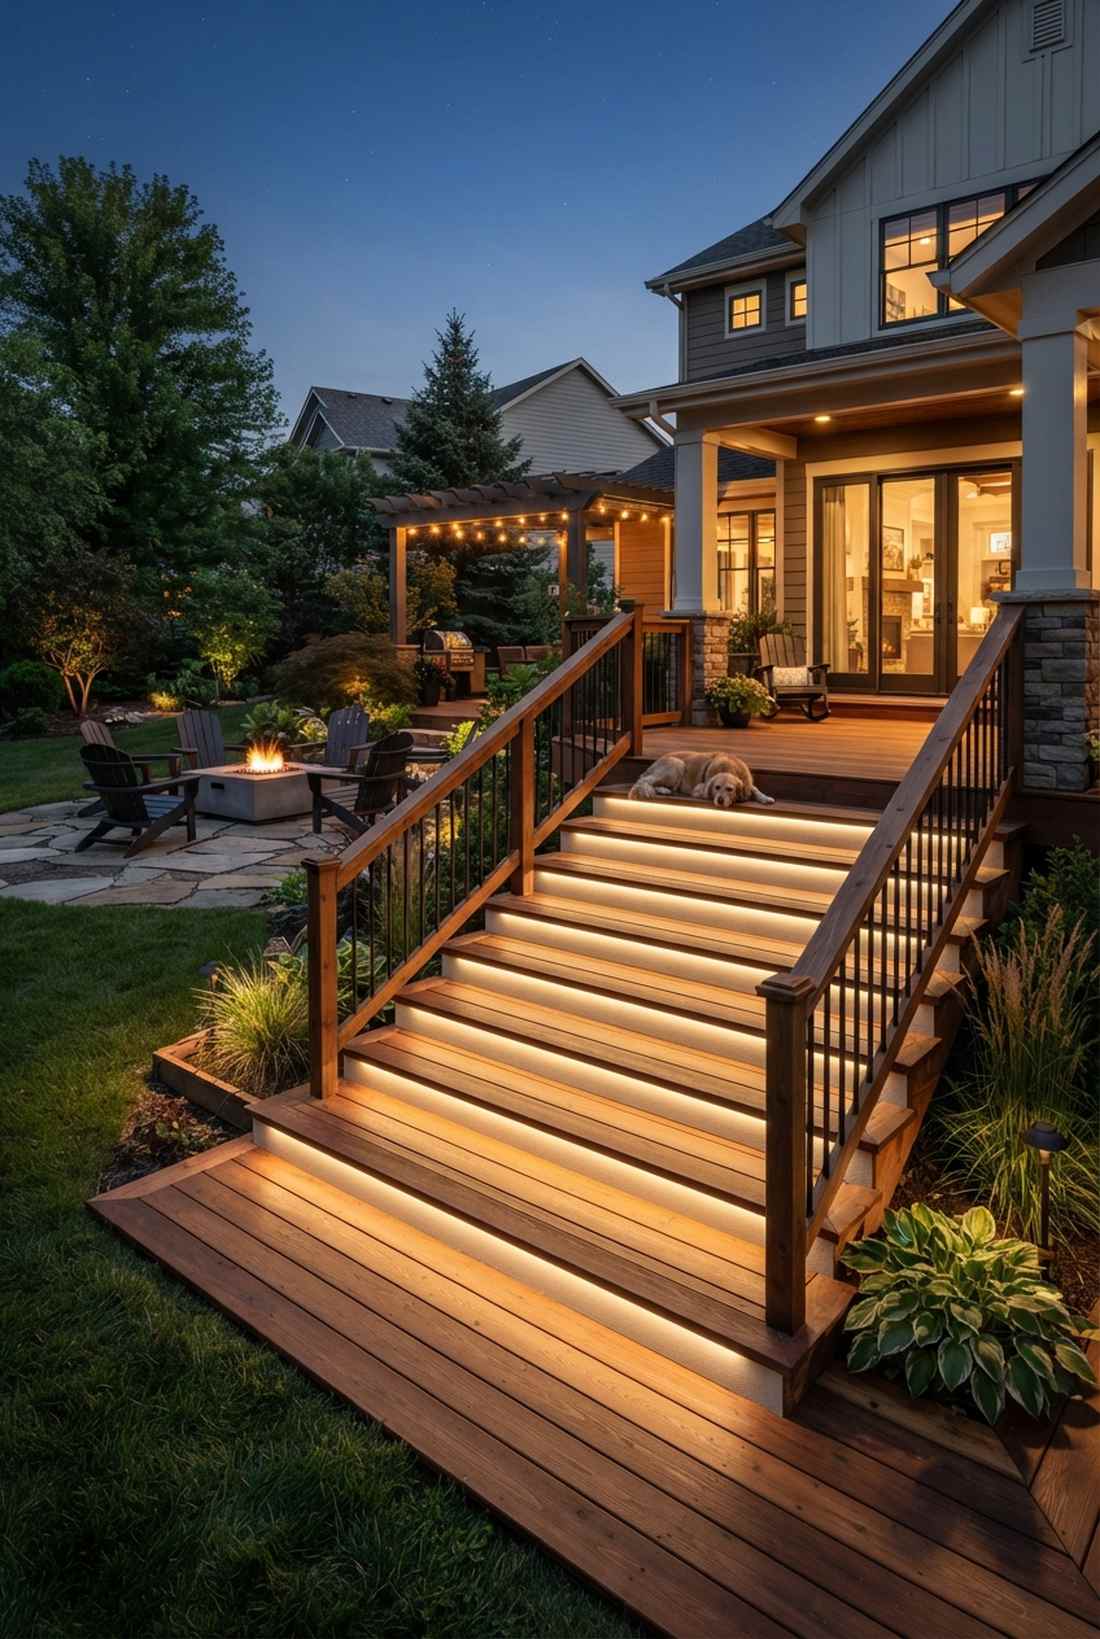
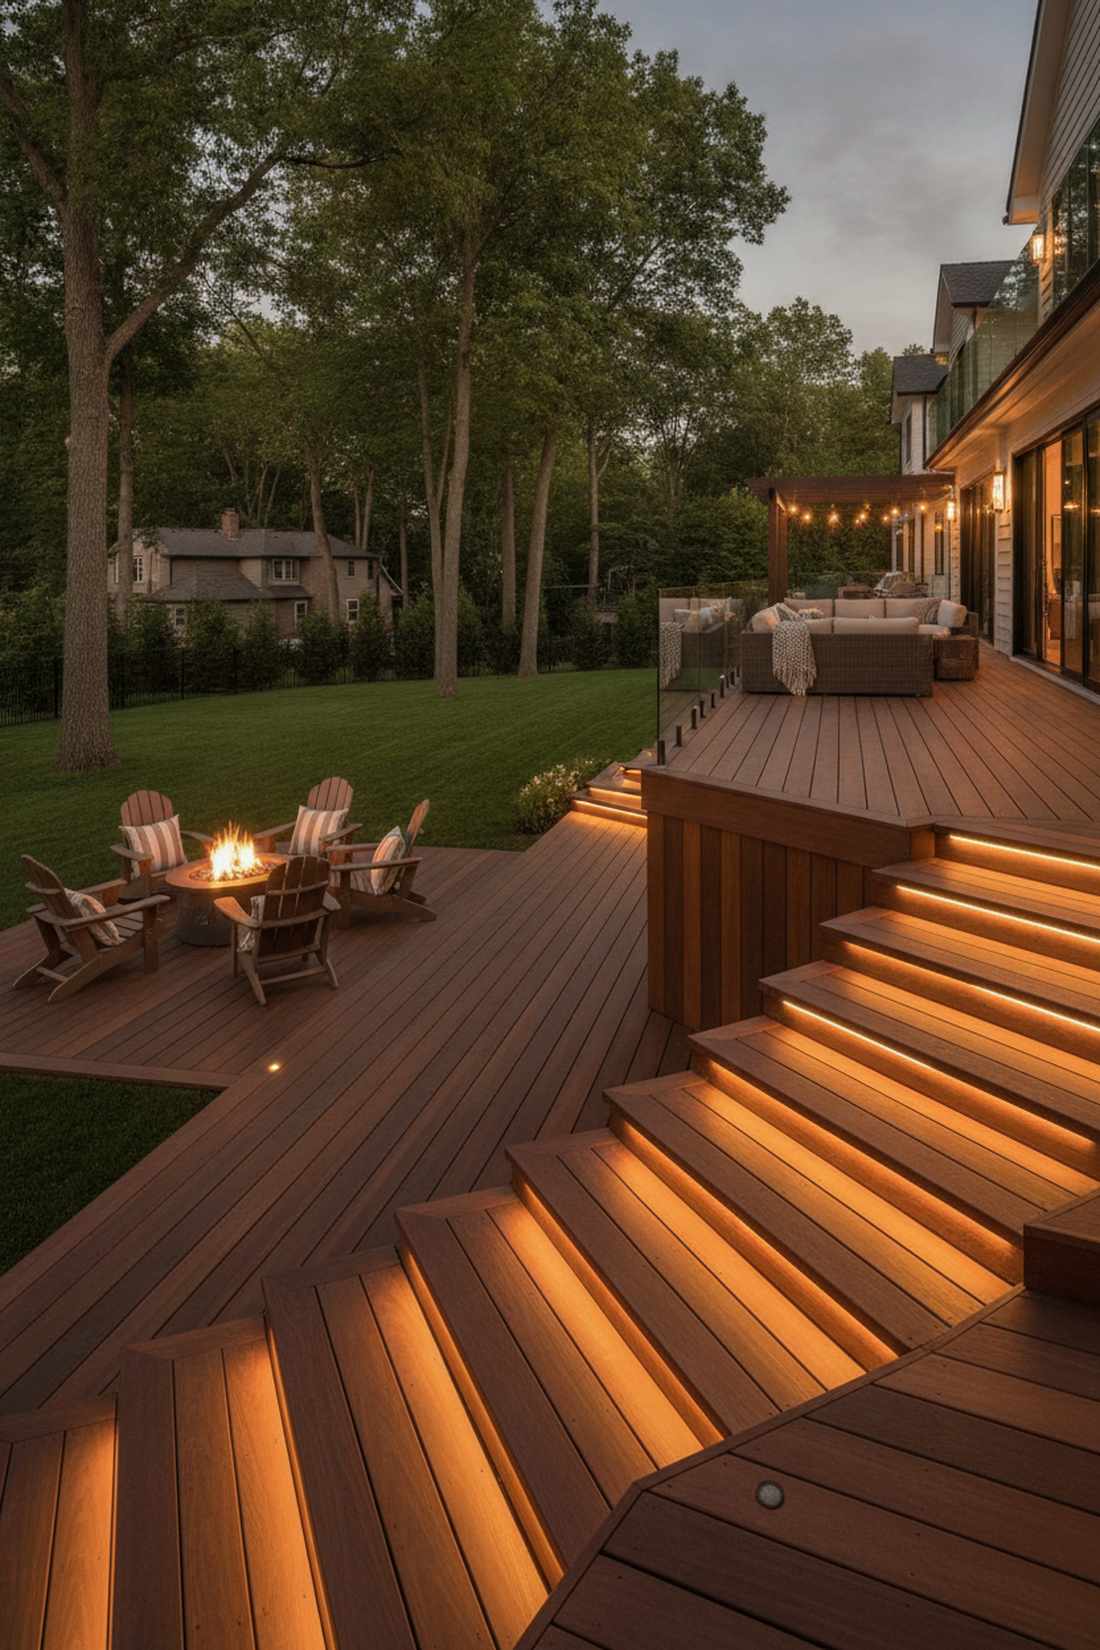
This sleek outline feels like a VIP entrance to an exclusive rooftop lounge. Functional outdoor step illumination merges flawless safety with incredible modern styling. Works wonders for steep deck stairs or sharp concrete patio drop-offs.
Running low-profile adhesive strips under the stair lip completely hides the light source while bathing the tread in a warm glow. This method delivers a surprisingly premium look that mimics thousand-dollar architectural installations. Look for heavy-duty waterproof LED strips to prevent the adhesive from failing in humid climates.
A full flight of stairs can be upgraded for an incredibly reasonable $30–$50. Pin this safety-first upgrade for your upcoming patio revamp!
- Key Materials: Solar-powered IP65 adhesive tape lights
- Vibe / Style: Architectural safety glow
- Difficulty: Needs clean surface prep
- Budget Breakdown: Tape Lights: $35 | Isopropyl alcohol prep: $3
- Creator’s Tip: Scrub the stair lip rigorously with rubbing alcohol before applying the tape to guarantee a permanent bond.
- Smart Sourcing: commercial-grade outdoor adhesive tape (bulk pack) and solar strip light starter kits.
Vertical & Tree Lighting
Tree trunks and vertical garden elements provide natural frameworks for elevated lighting displays. Solar fairy lights wrapped or draped on vertical surfaces create ambient pillars that define garden rooms and add height dimension.
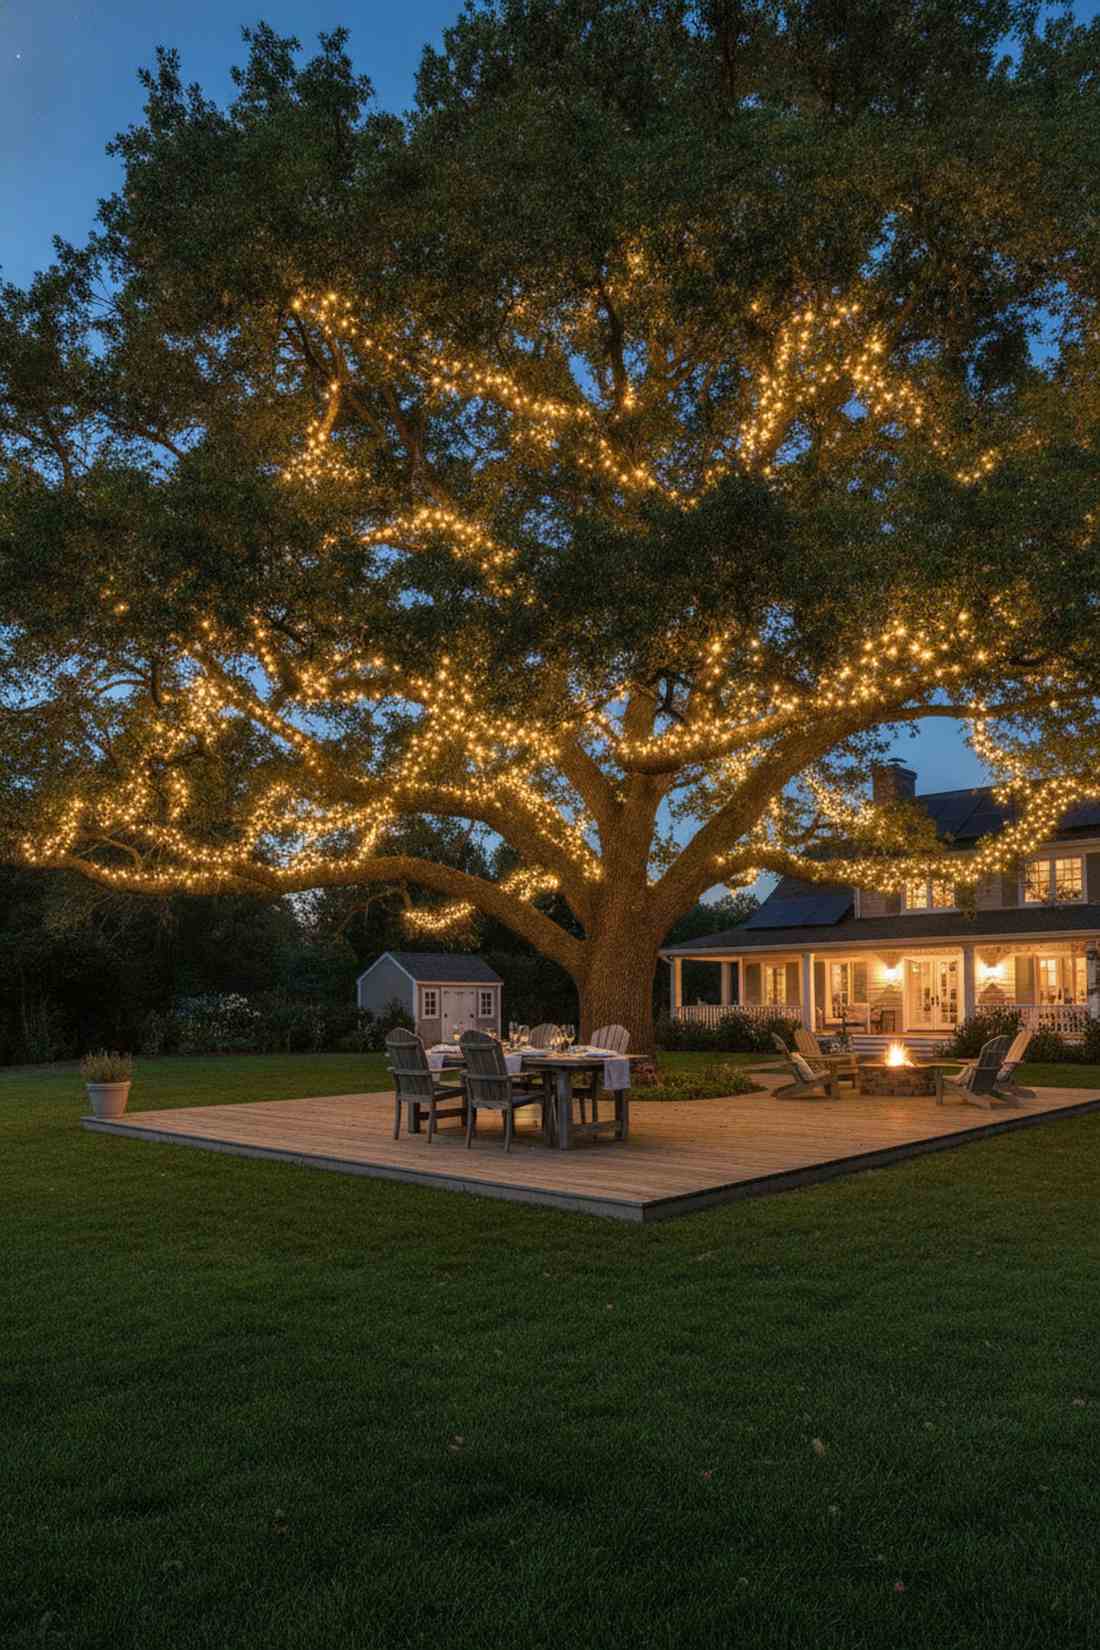
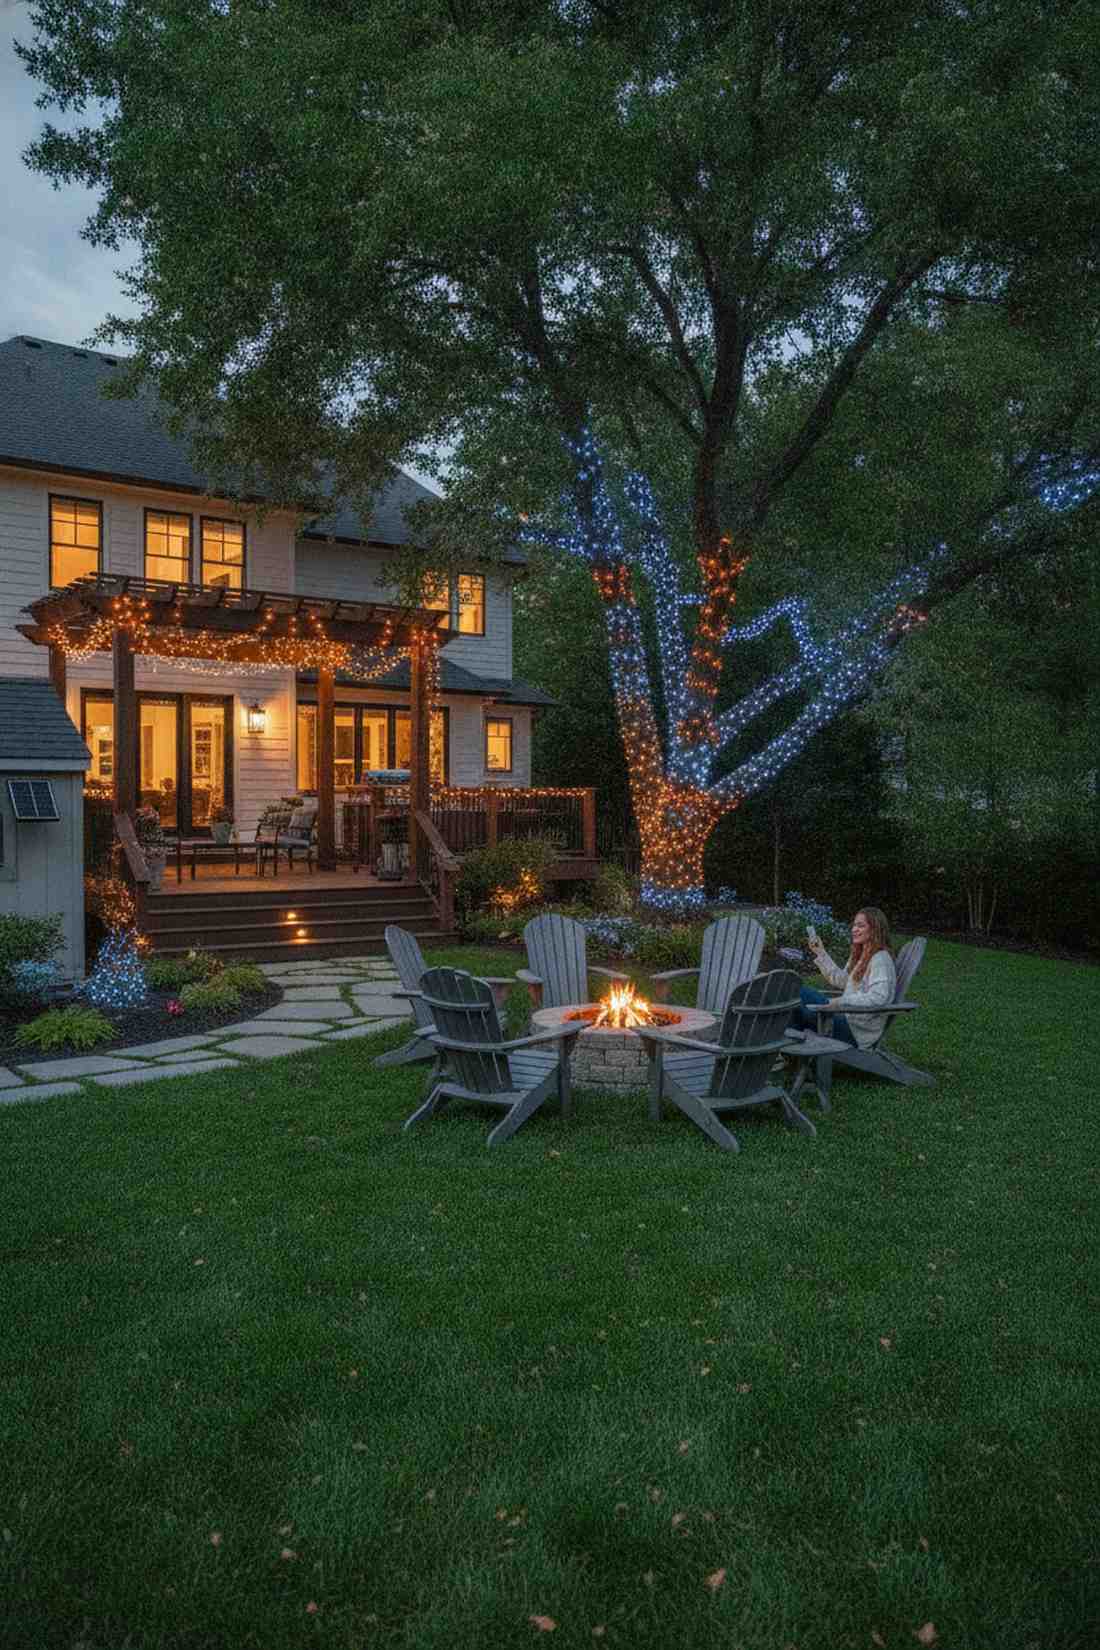
6. Trunk-Wrapped Pillar Lighting
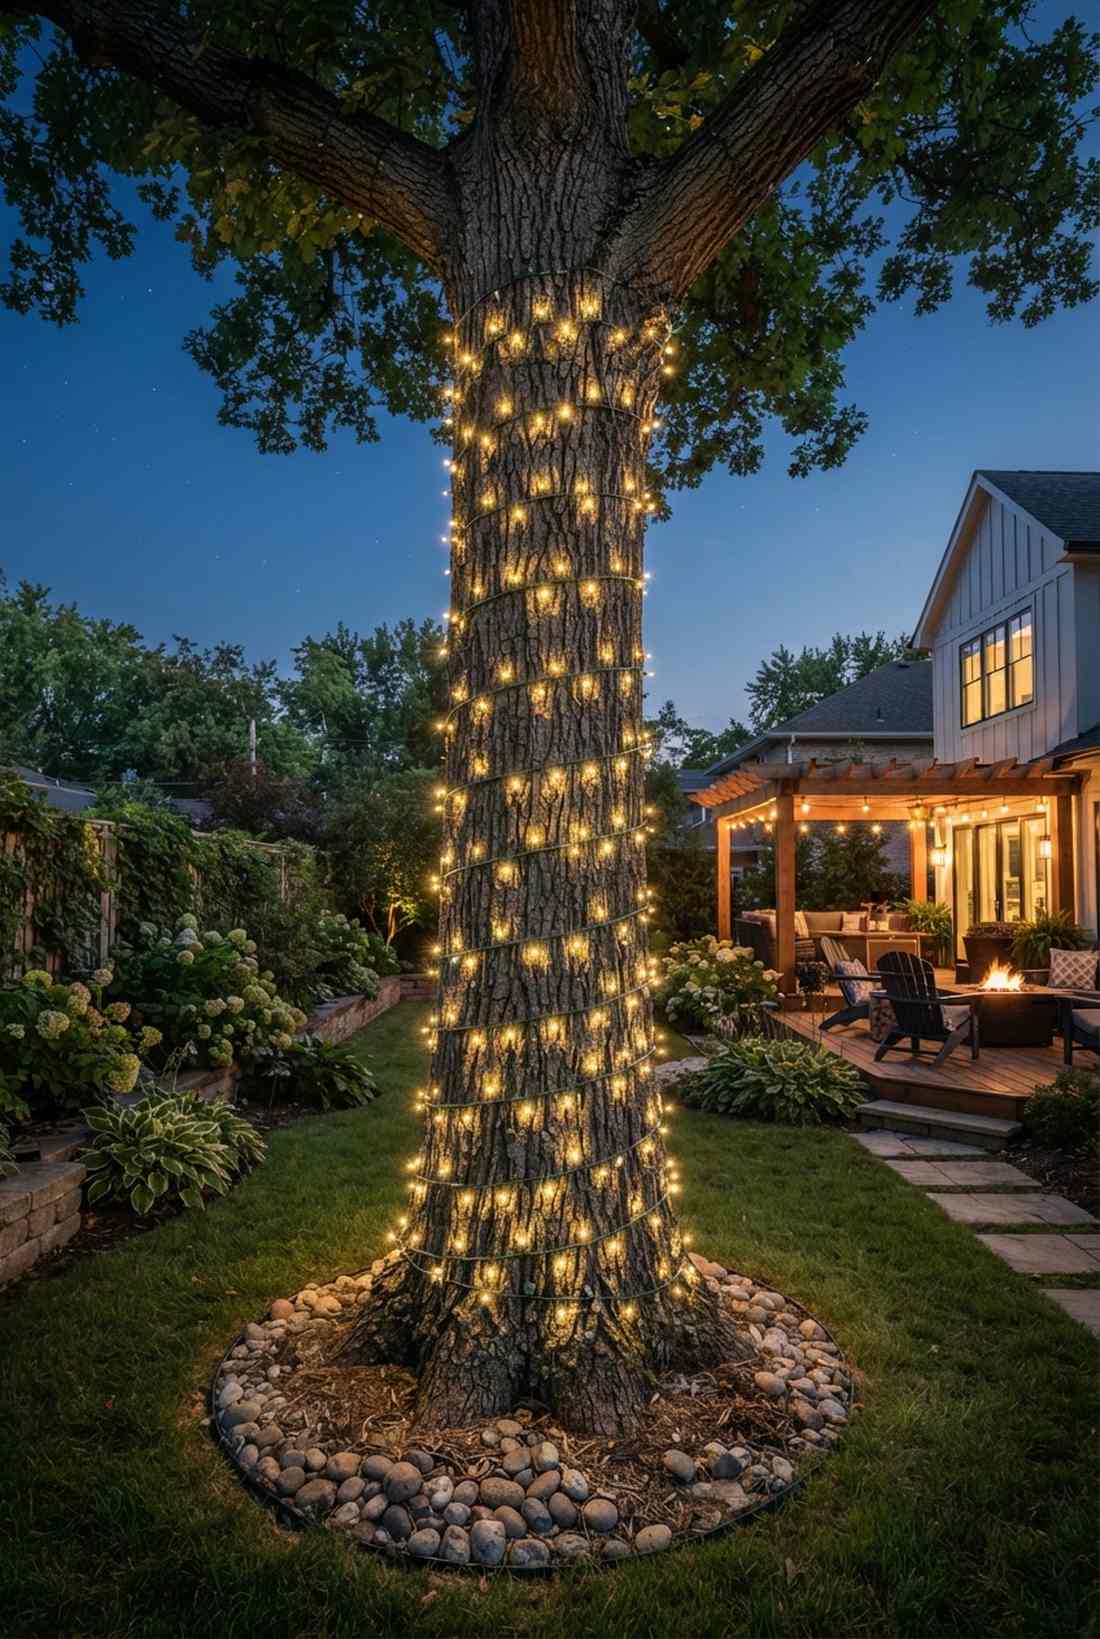
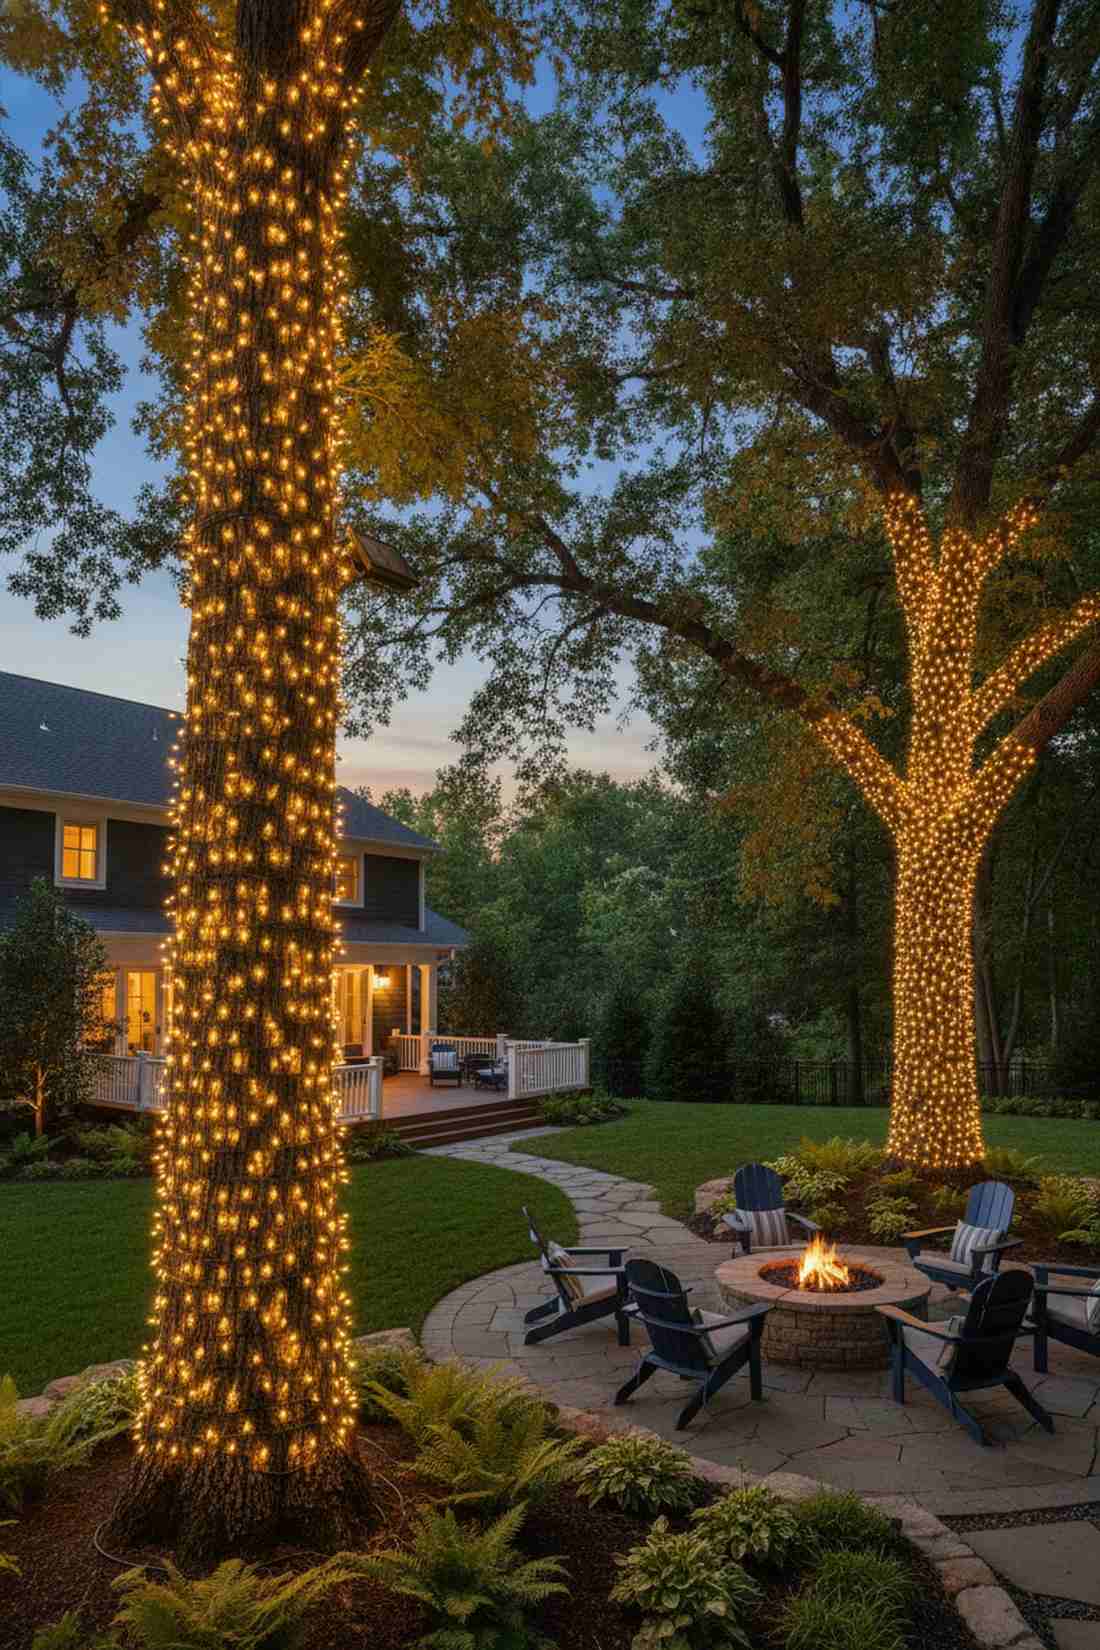
This majestic upward spiral creates the feeling of ancient, glowing sentinels standing guard over your yard. Embracing wrapped backyard tree decor instantly draws the eye upward to expand small spaces. It is flawlessly suited for mature oak or maple tree bases.
Maintaining a strict, uniform spacing between the wire revolutions creates an upscale matrix effect rather than a chaotic holiday mess. This rigid alignment makes generic outdoor areas look custom-built by professional landscapers. Securing the setup with flexible silicone plant ties ensures you never damage the tree’s expanding cambium layer.
You can wrap a massive tree trunk beautifully for just $20–$40 in materials. An absolute must-try technique that changes your yard’s entire scale.
- Key Materials: 100-LED dark-wire solar strands
- Vibe / Style: Majestic glowing pillars
- Difficulty: Requires a step ladder
- Budget Breakdown: Long strands: $25 | Plant ties: $8
- Creator’s Tip: Wrap the tree from the bottom up, keeping the solar panel anchor secured to a sunny lower branch first.
- Smart Sourcing: extra-long dark green wire strands (bulk pack) and expandable rubber tree ties.
7. Canopy Branch Draping
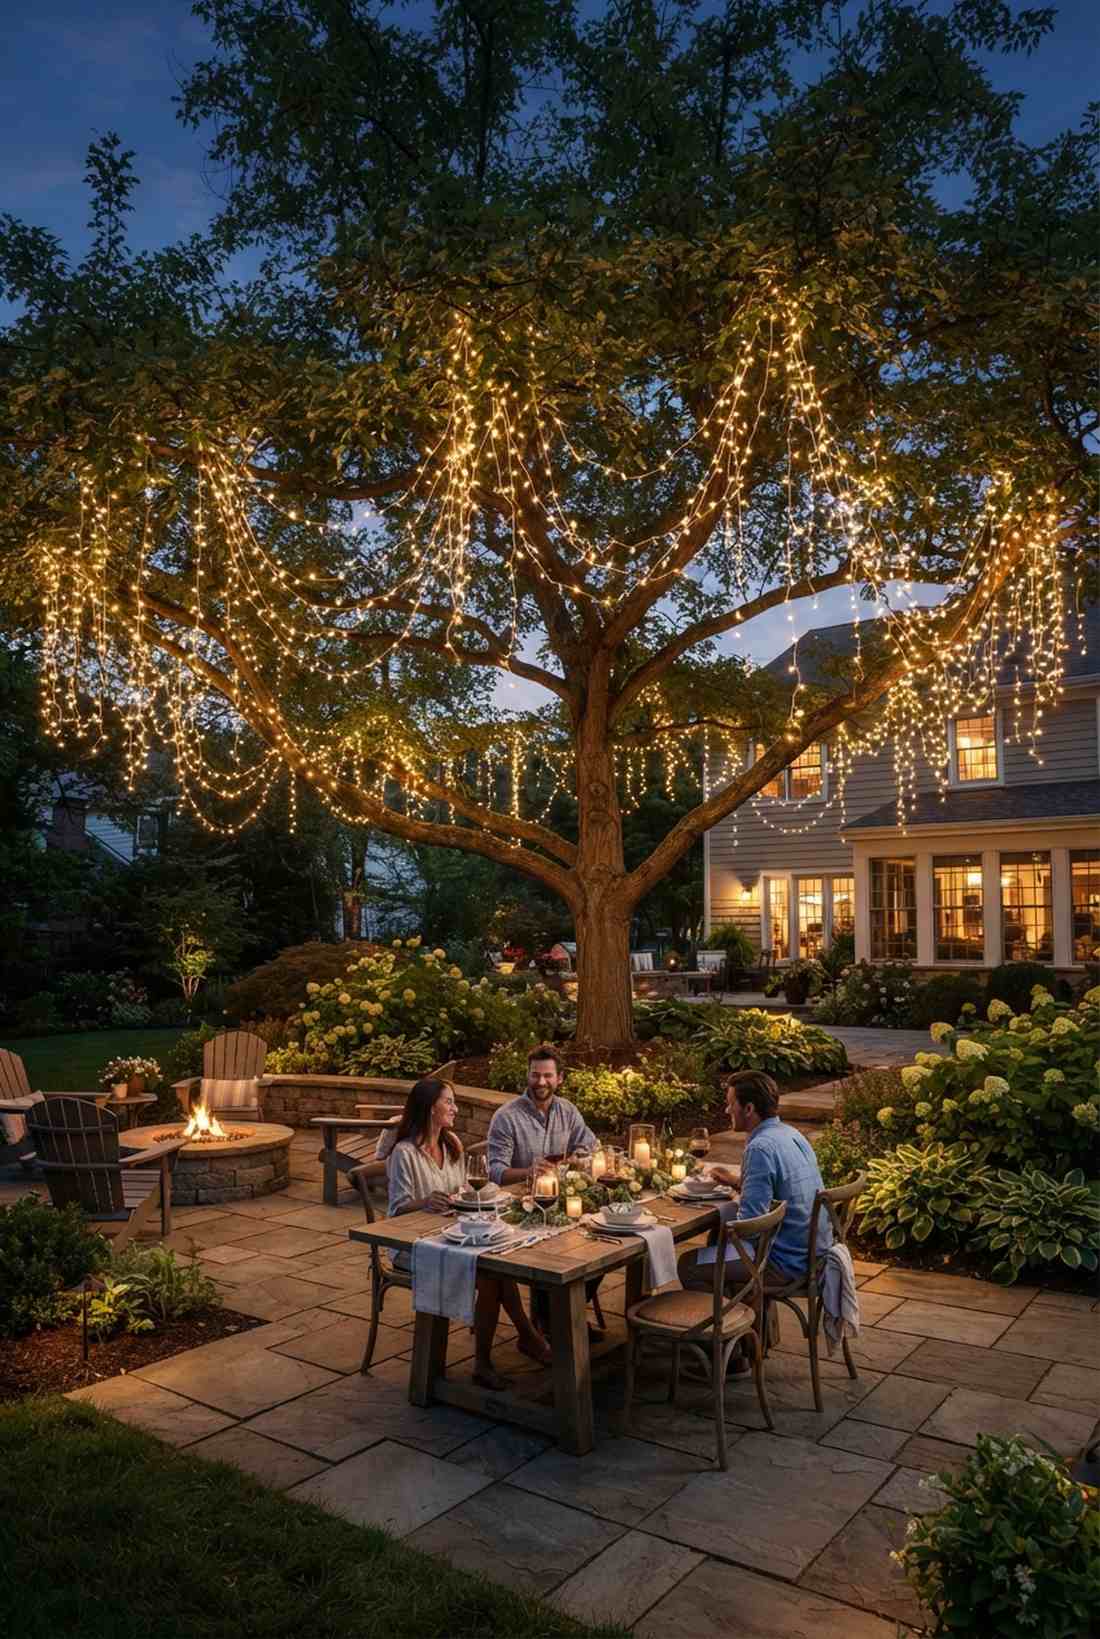
The soft overhead shimmer feels exactly like dining beneath a galaxy of captive fireflies. Overhead patio canopy lights produce an unmatched romantic ambiance for evening gatherings. Perfectly tailored for trees featuring wide, sweeping horizontal branches.
Allowing the wires to droop naturally in catenary curves avoids the rigid, stressful look of overtightened cables. This relaxed suspension tricks visitors into thinking the landscape naturally glows with ethereal energy. Snagging a set of miniature garden supplies and lightweight micro-LEDs prevents delicate branches from sagging under hardware weight.
Achieve this dreamy canopy effect for a modest $30–$45 investment. Save this to your ultimate outdoor dining inspiration board!
- Key Materials: Micro-drop fairy lights
- Vibe / Style: Romantic weeping willow effect
- Difficulty: Moderate reaching required
- Budget Breakdown: Micro-lights: $35 | Extension cables: $10
- Creator’s Tip: Only drape the lower two-thirds of the canopy so the lights reflect warmly off the ground below.
- Smart Sourcing: ultra-lightweight fairy wire bundles and weather-sealed solar panel extensions.
8. Multi-Tree Interconnected Web
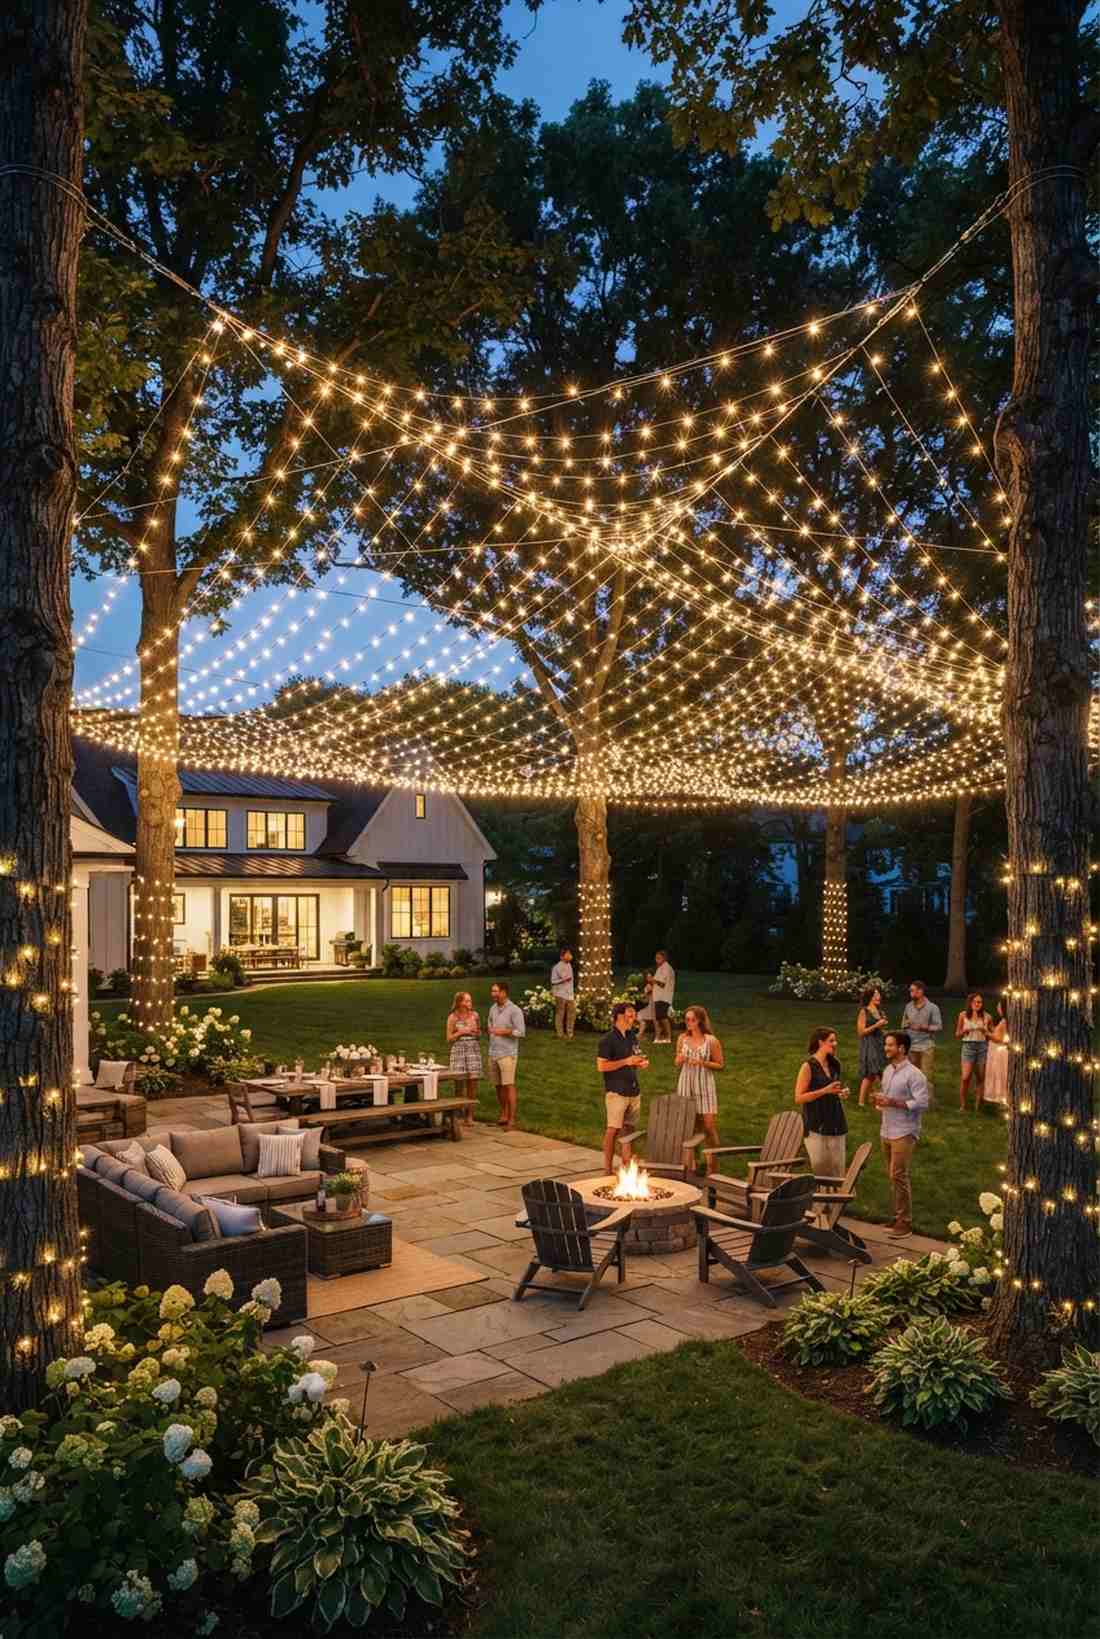
This floating ceiling of illumination feels like a magical festival tent erected right in your backyard. Interconnected string light web layouts command attention and define massive entertainment zones. Brilliant for expansive lawns featuring multiple spaced-out mature trees.
Stringing primary support cables first prevents the delicate fairy wires from snapping under their own tension across wide gaps. This foundational step upgrades the space far beyond its cost, ensuring the display survives violent weather. Investing in a heavy-duty zip tie multi-pack ensures your intersection points never slide out of alignment.
Building this overhead network requires around $60–$100 total. Highly recommended if you frequently host massive summer evening parties.
- Key Materials: Steel support cables, turnbuckles, long light strands
- Vibe / Style: Outdoor festival ceiling
- Difficulty: Advanced installation
- Budget Breakdown: Support wire/hardware: $40 | Lights: $45
- Creator’s Tip: Always install turnbuckles on the main support lines so you can easily tighten the web when it sags over time.
- Smart Sourcing: stainless steel wire rope kits (starter kit) and heavy-duty zip ties (bulk pack).
9. Climbing Plant Integration
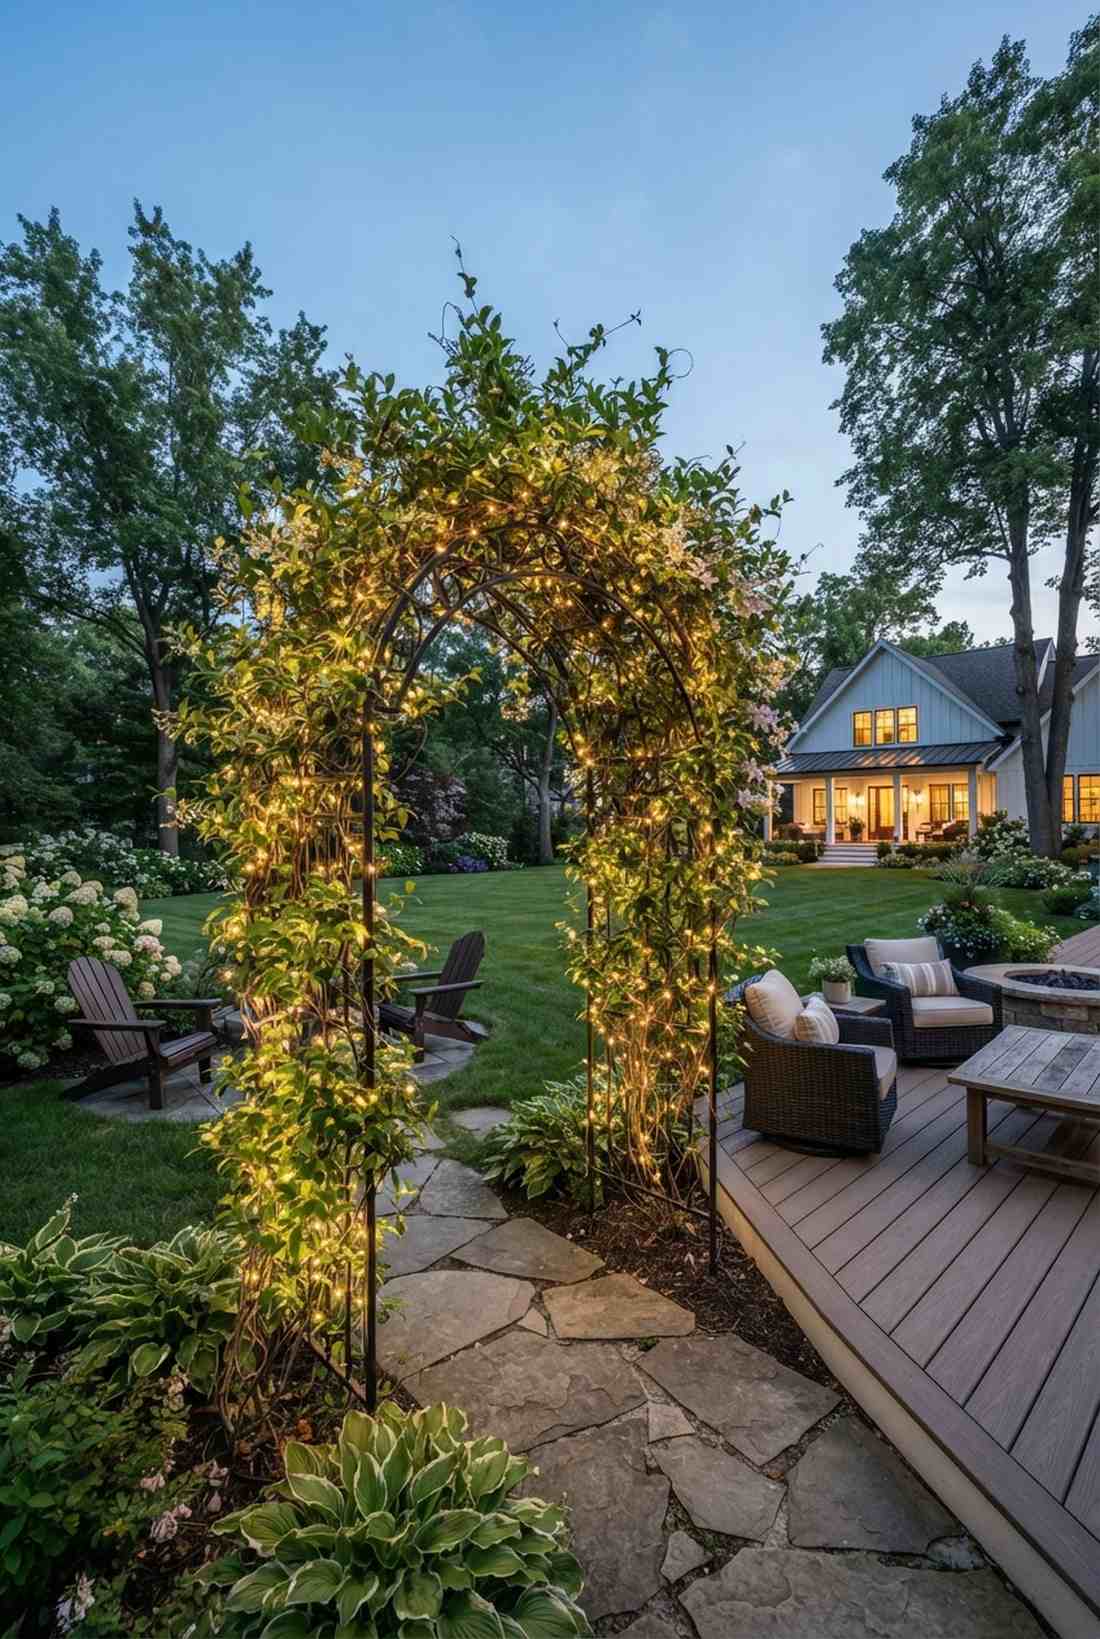
This glowing foliage feels like living, breathing magic woven directly into nature. Fans of illuminated trellis architecture consider this the holy grail of garden aesthetics. Works exceptionally well on establishing clematis, jasmine, or climbing rose arbors.
Training the flexible diodes to grow directly alongside the plant stems forces a dramatic focal point where none existed before. It entirely bypasses the cheap plastic aesthetic, looking like a high-end botanical garden display. By incorporating fairy garden kits and thin wire setups, the stems naturally swallow the hardware as they mature.
This botanical fusion is remarkably cheap, costing only $15–$25 to start. Pin this clever growth hack for your next spring planting session!
- Key Materials: Ultra-thin warm white wire lights
- Vibe / Style: Enchanted living wall
- Difficulty: Requires ongoing plant training
- Budget Breakdown: Micro-wire kit: $18 | Soft twine: $4
- Creator’s Tip: Wind the lights extremely loosely during the spring; the vine stems will thicken drastically by late summer.
- Smart Sourcing: flexible copper vine lights (pre-cut) and biodegradable garden twine spools.
This next setup completely shatters the mold—it’s ridiculously cheap but looks like a $500 custom architectural display…
💡 Must-Have Supplies for High-End Setups
To build these setups faster and ensure they last, skip the generic craft aisles and invest in the right foundational kits.
- Base & Support: commercial-grade outdoor adhesive tape (bulk pack)
- Setup Tools: stainless steel wire rope kits (starter kit)
- Weather/Durability Protection: UV-coated copper wire bundles
10. Vertical Garden Wall Accent
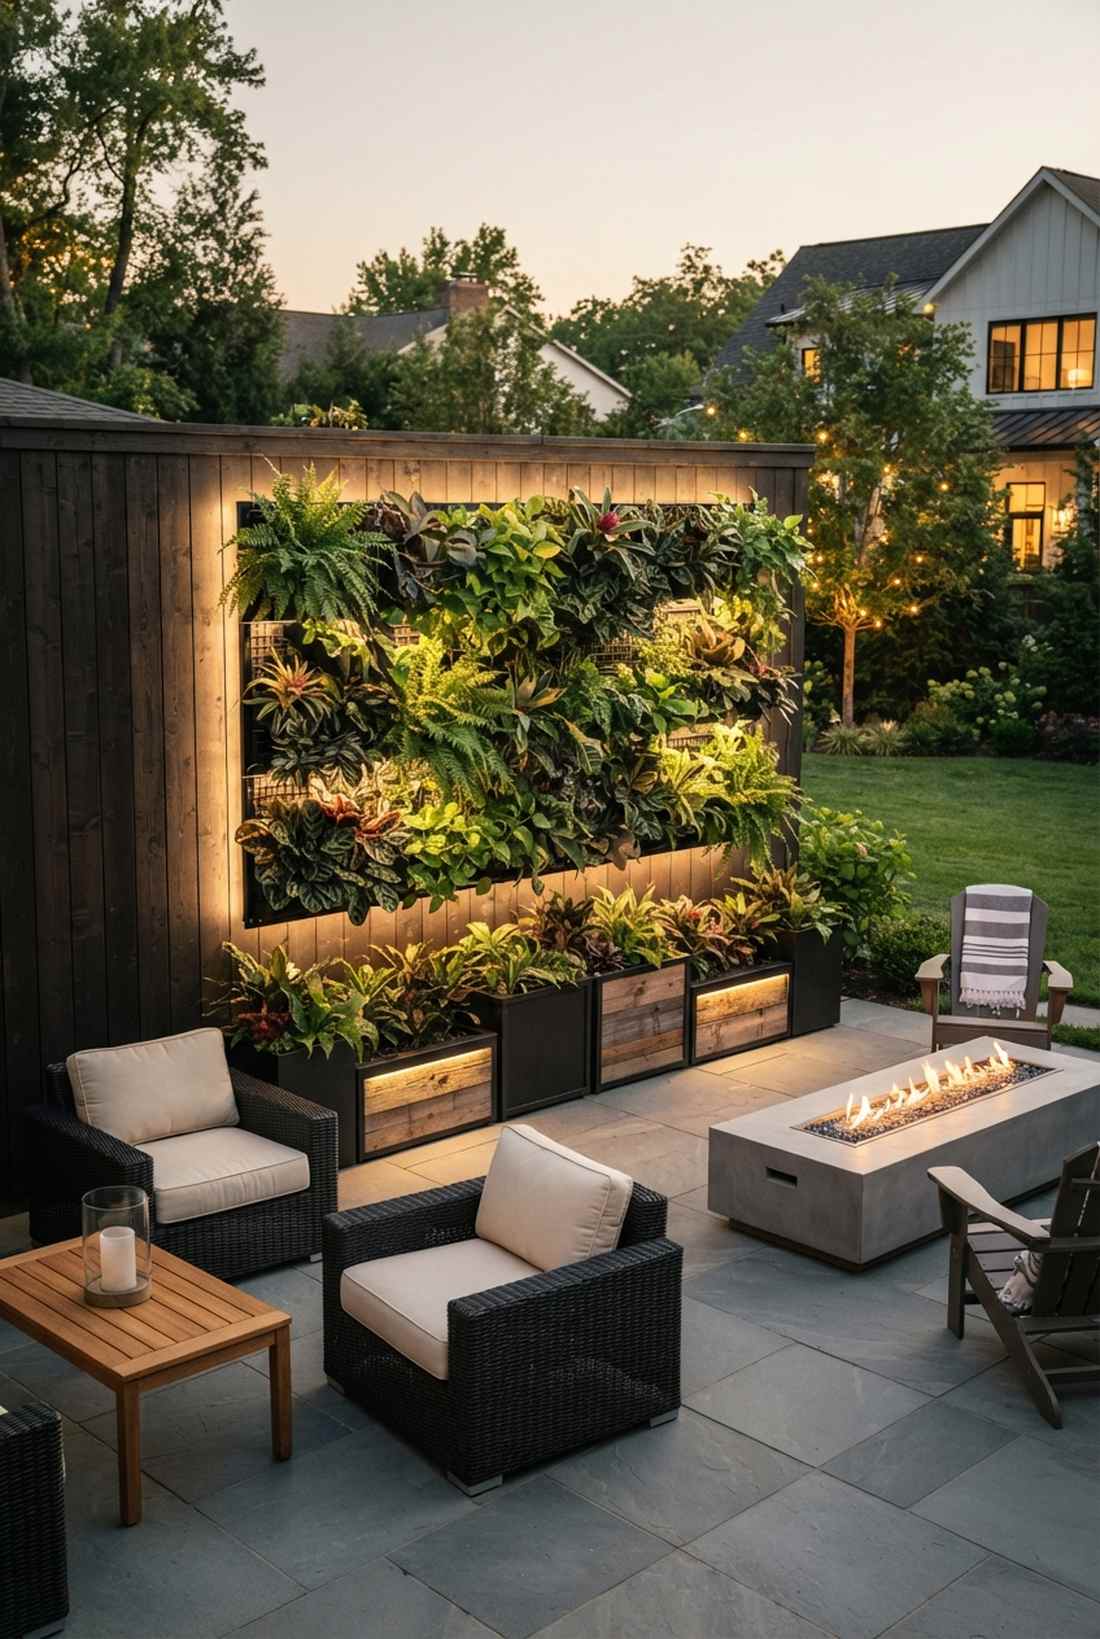
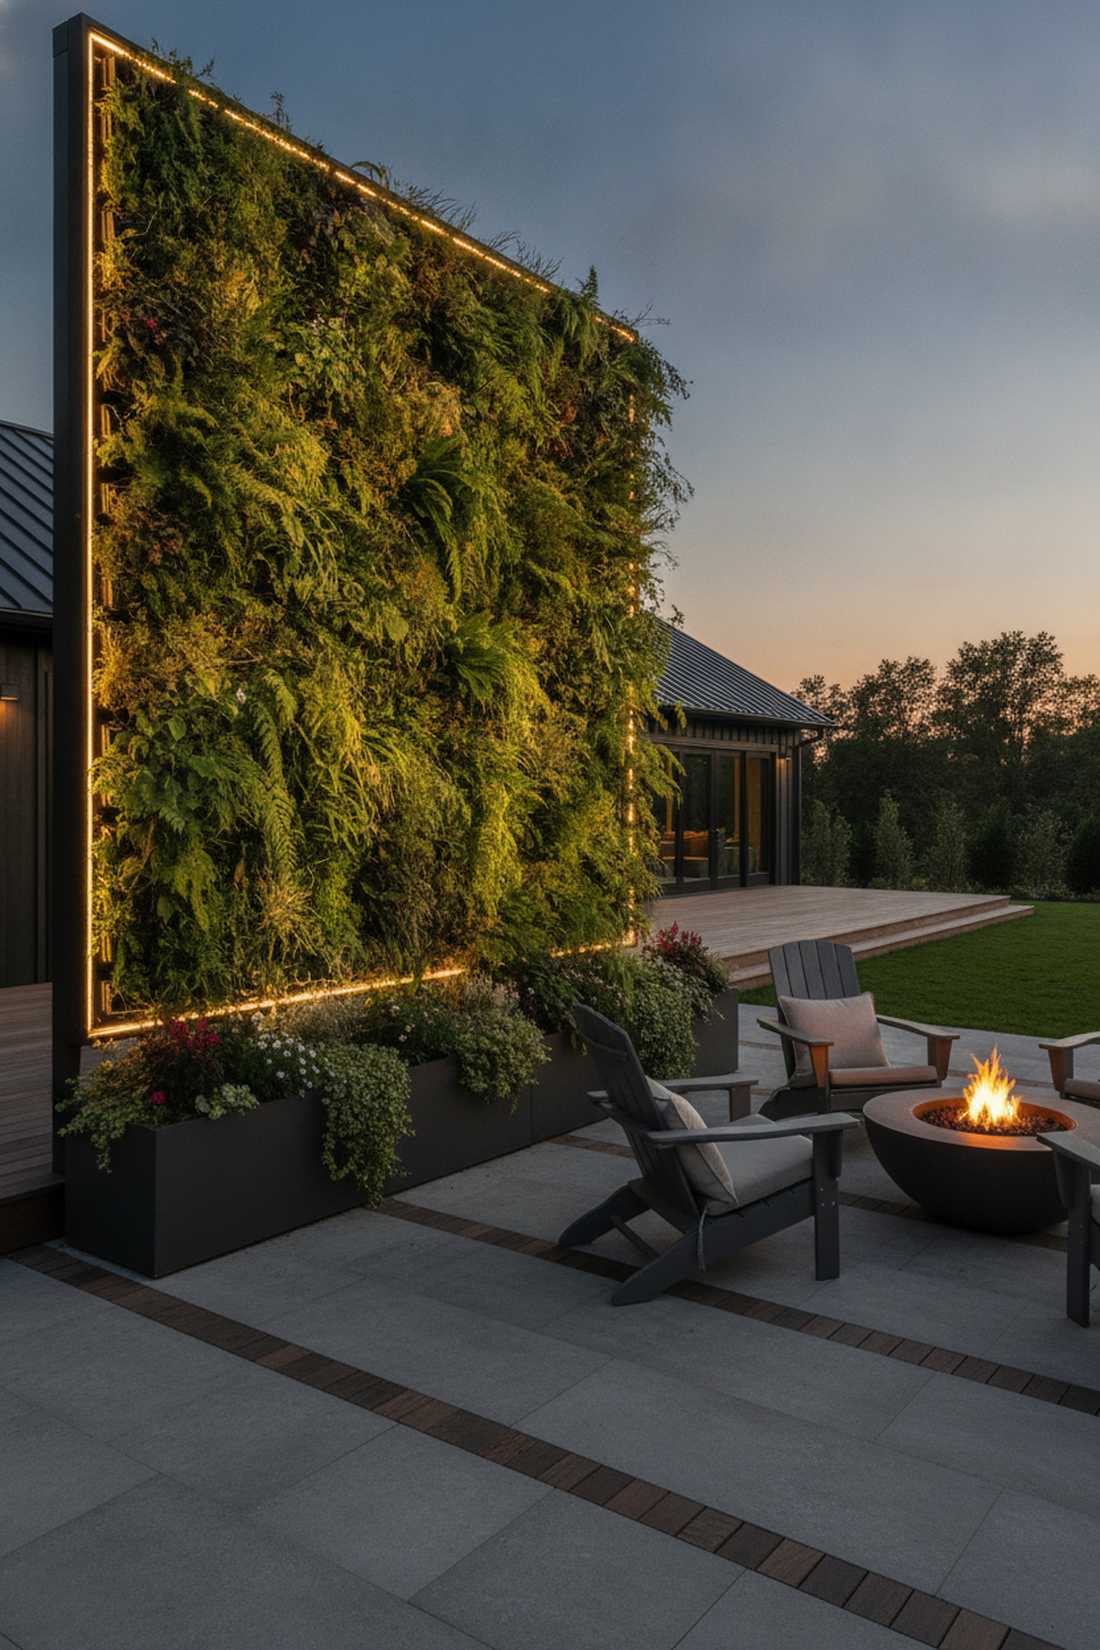
This backlit foliage setup feels incredibly futuristic, like a high-end eco-resort lobby. Living wall backlight ideas instantly bring flat, boring fences to life with aggressive 3D texture. A flawless addition to modular patio planters and dense fern walls.
Shining the diodes from directly behind the greenery highlights the intricate leaf veins rather than just blasting the front with harsh glare. This indirect method yields an incredibly upscale resort aesthetic that looks highly professional. Using waterproof outdoor LED strips guarantees the electronics won’t short out when you water the living wall.
Expect to dedicate about $30–$45 for a fully backlit vertical planter. It’s an instant texture upgrade for any compact balcony space.
- Key Materials: Flat LED strips or panel lights
- Vibe / Style: Luxury eco-lounge
- Difficulty: Easy placement behind grids
- Budget Breakdown: Flat strips: $35 | Mounting clips: $5
- Creator’s Tip: Space the lights at least two inches behind the foliage to prevent hot spots and allow the light to diffuse.
- Smart Sourcing: pre-cut living wall grid panels and waterproof backing panels (bulk pack).
Pergola & Overhead Designs
Pergolas and overhead structures provide ideal frameworks for solar fairy light installations that create intimate outdoor rooms. The geometric grid of beams and rafters enables systematic light distribution patterns.
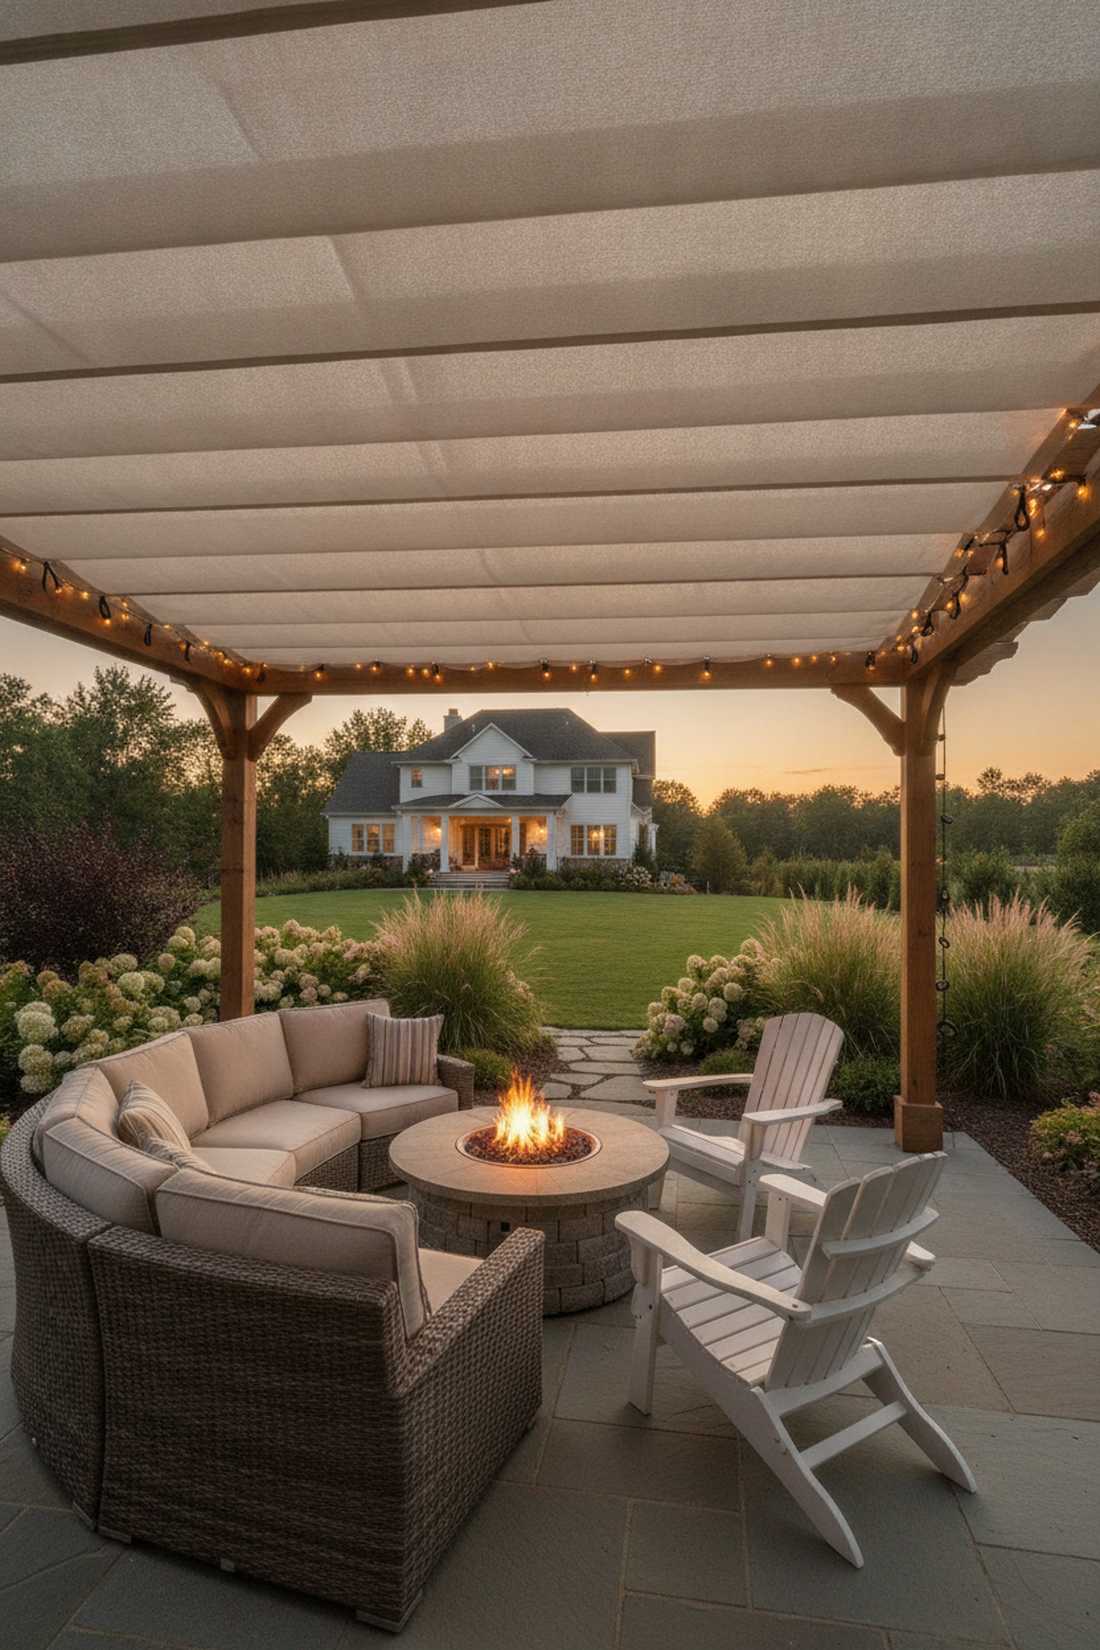
11. Rafter Beam Wrapping

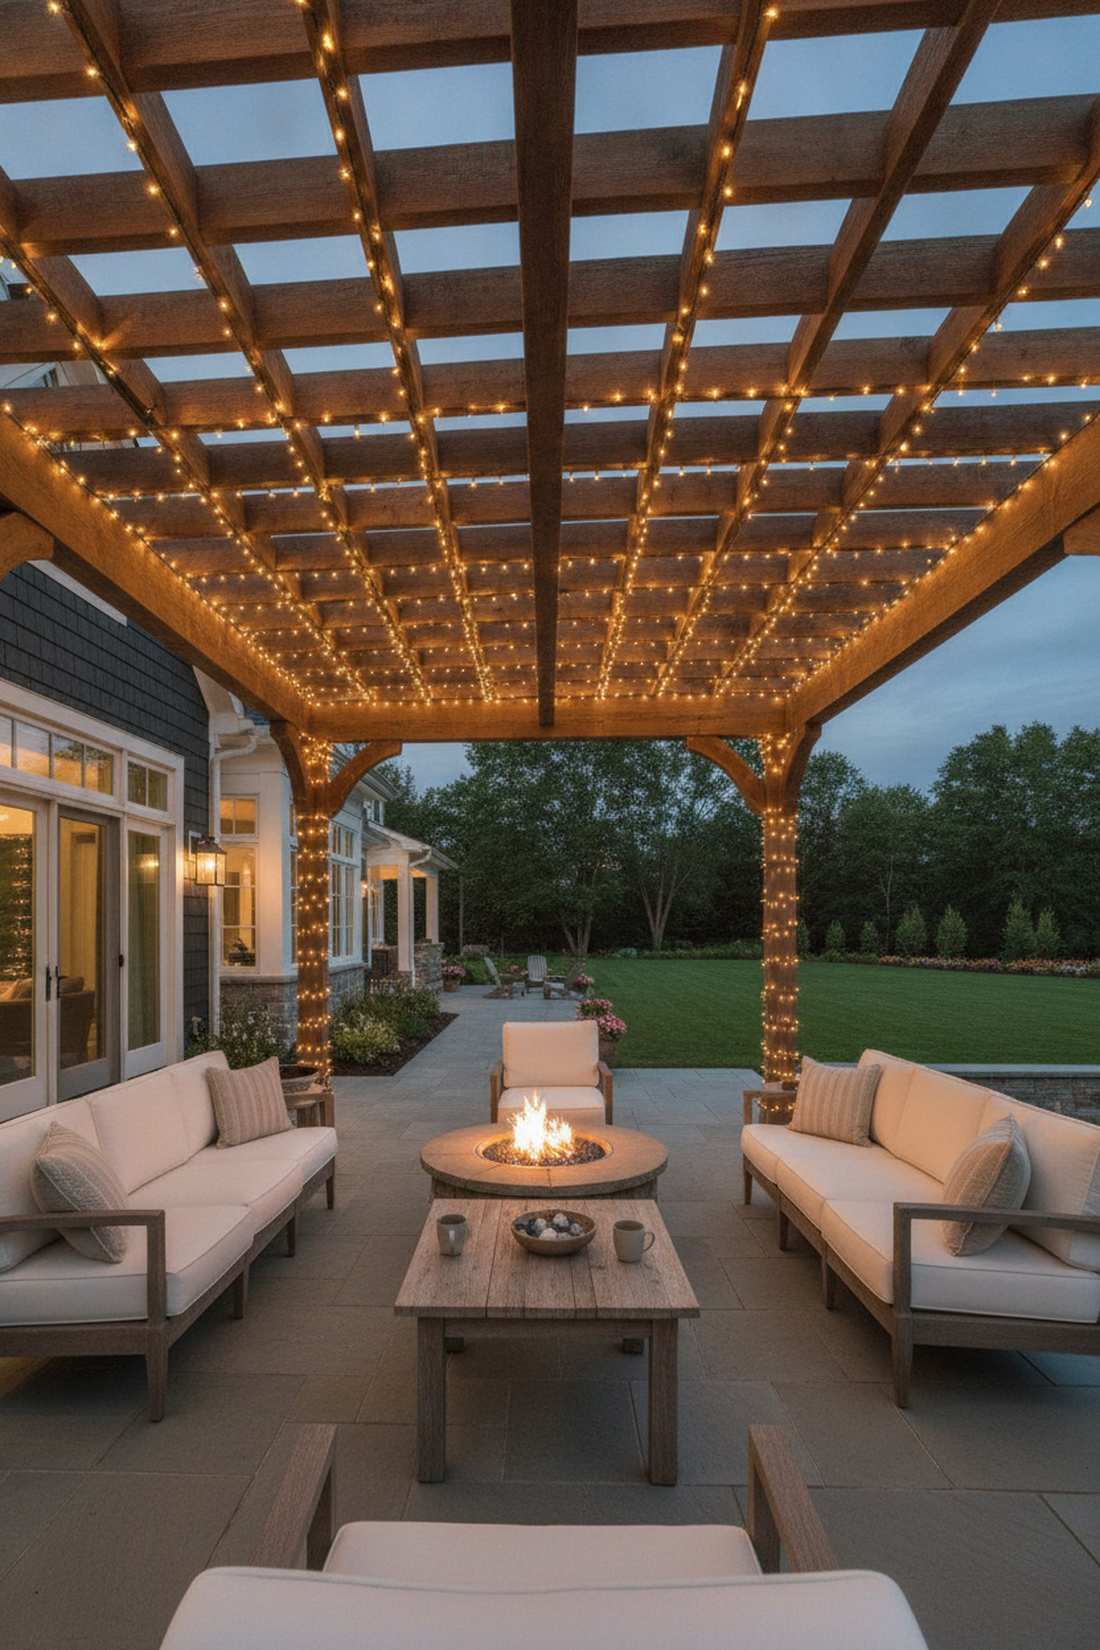
This structured illumination feels like an inviting geometric embrace over your patio. Illuminated pergola roof structures provide the ultimate foundation for late-night outdoor entertaining. Fantastic for heavy wooden structures where the beams need visual softening.
Wrapping each individual rafter tightly and uniformly emphasizes the beautiful architecture rather than just throwing light randomly. This meticulous alignment gives a designer-level finish that rivals expensive hardwired outdoor pavilions. Look into top-rated outdoor garden decor channels for specialized dark-wire strands that vanish against the wood during the day.
You can execute a full pergola wrap for around $40–$75 depending on its size. Save this directly to your dream backyard renovation board!
- Key Materials: Long-length dark-coated fairy wires
- Vibe / Style: Structured architectural glow
- Difficulty: Tedious but simple wrapping
- Budget Breakdown: High-capacity strands: $60 | Cable tacks: $10
- Creator’s Tip: Measure the length of one wrapped beam and multiply by the number of beams before buying your string length.
- Smart Sourcing: dark-wire fairy light bundles (bulk pack) and weather-resistant staple gun kits (starter kit).
12. Cross-Beam Zigzag Pattern
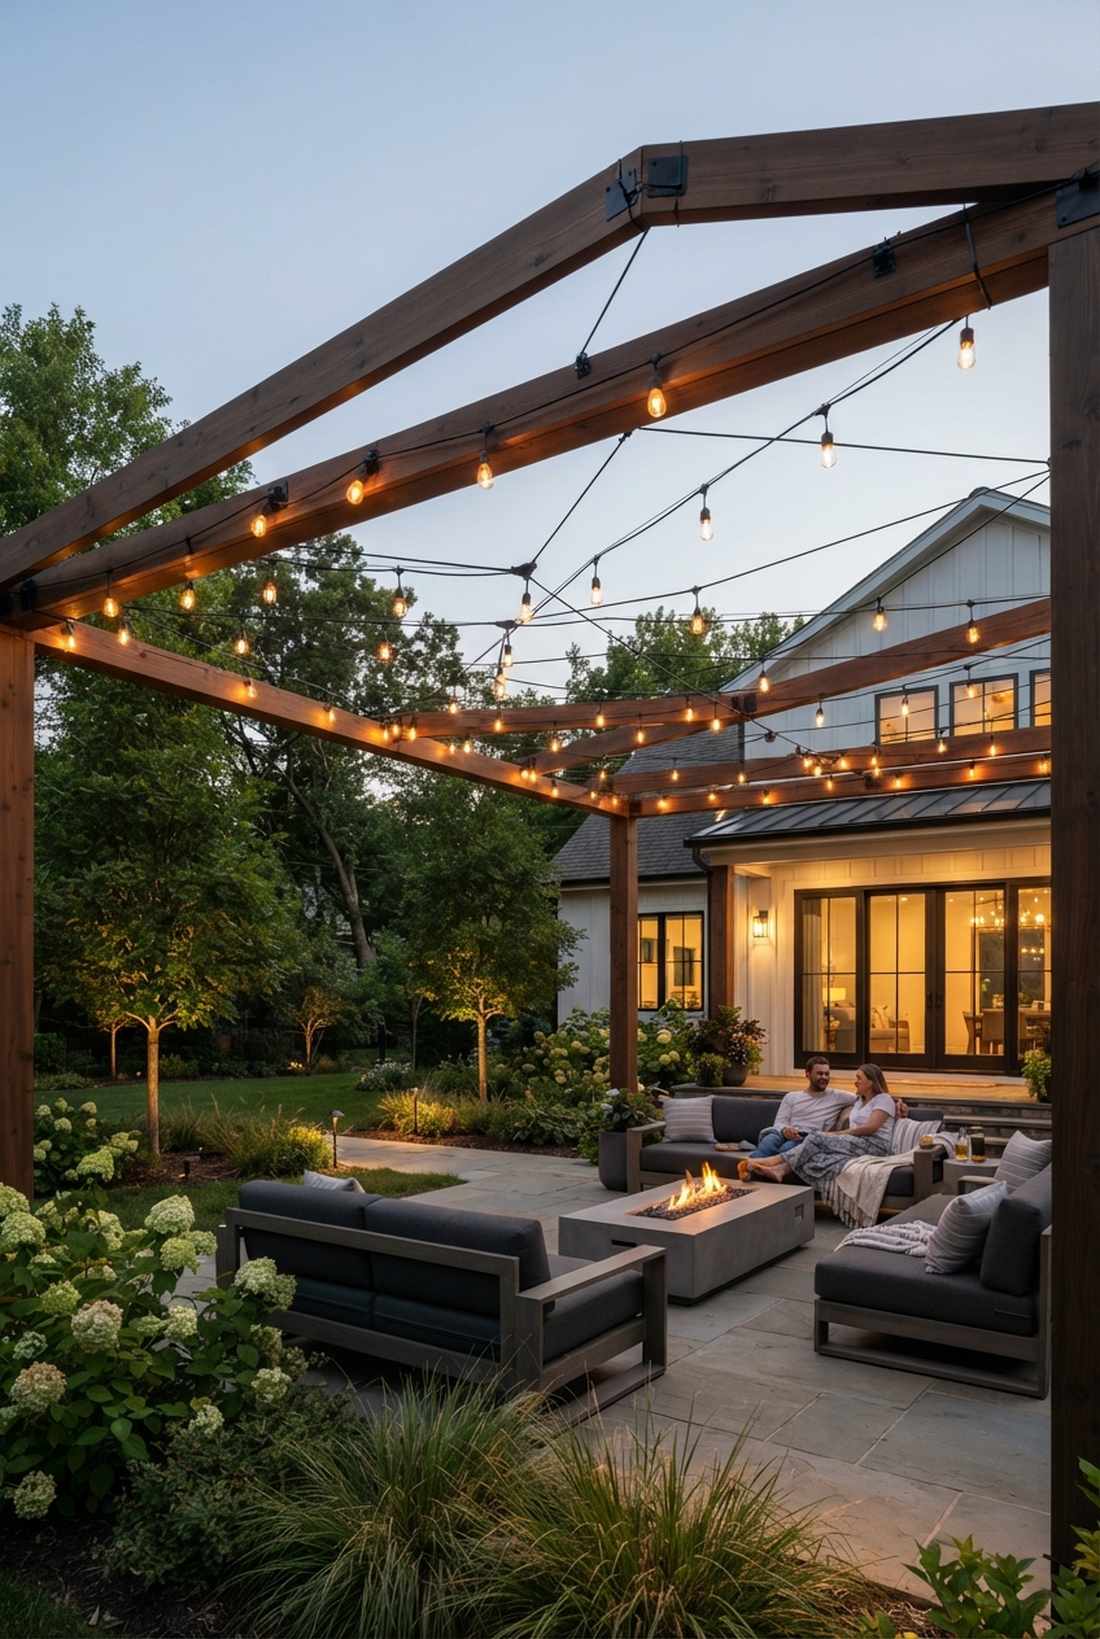
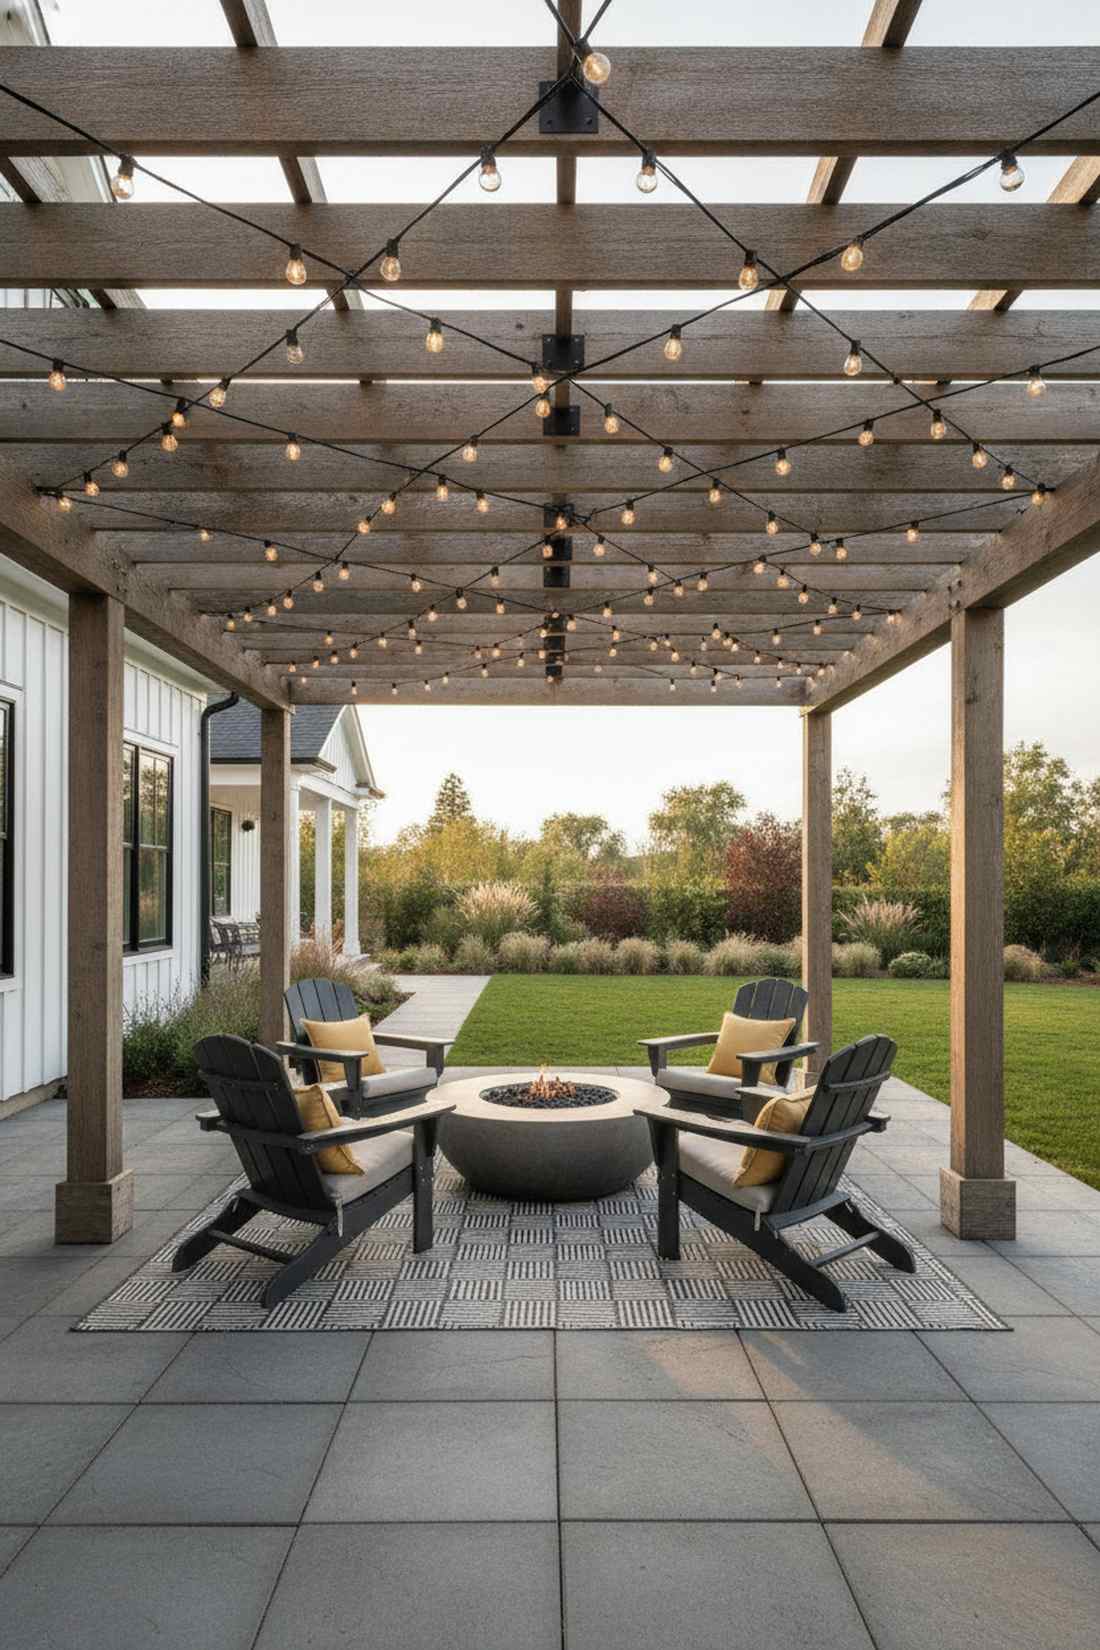
This dynamic overhead matrix feels intensely energetic and modern. Angular patio lighting blueprints shatter the boring parallel lines most people settle for. Perfect for modern, minimalist pergolas needing a sudden injection of visual movement.
Routing the cables diagonally back and forth generates an unexpected visual rhythm that draws eyes straight up. This aggressive geometry tricks visitors into thinking it’s custom wired by an avant-garde designer. Snagging a heavy-duty zip tie multi-pack is critical to keep the sharp angles pulled tightly without sagging.
This sharp layout will run you approximately $25–$40 for a standard patio covering. Highly recommended to modernize an aging wooden structure.
- Key Materials: Straight string lights, heavy-duty anchors
- Vibe / Style: Energetic modern matrix
- Difficulty: Requires precise measuring
- Budget Breakdown: Strings: $25 | UV zip ties: $8
- Creator’s Tip: Map out the zigzag pattern on paper first to ensure the angles are symmetrical before you start stapling.
- Smart Sourcing: UV-resistant mounting squares (bulk pack) and shatterproof string bundles.
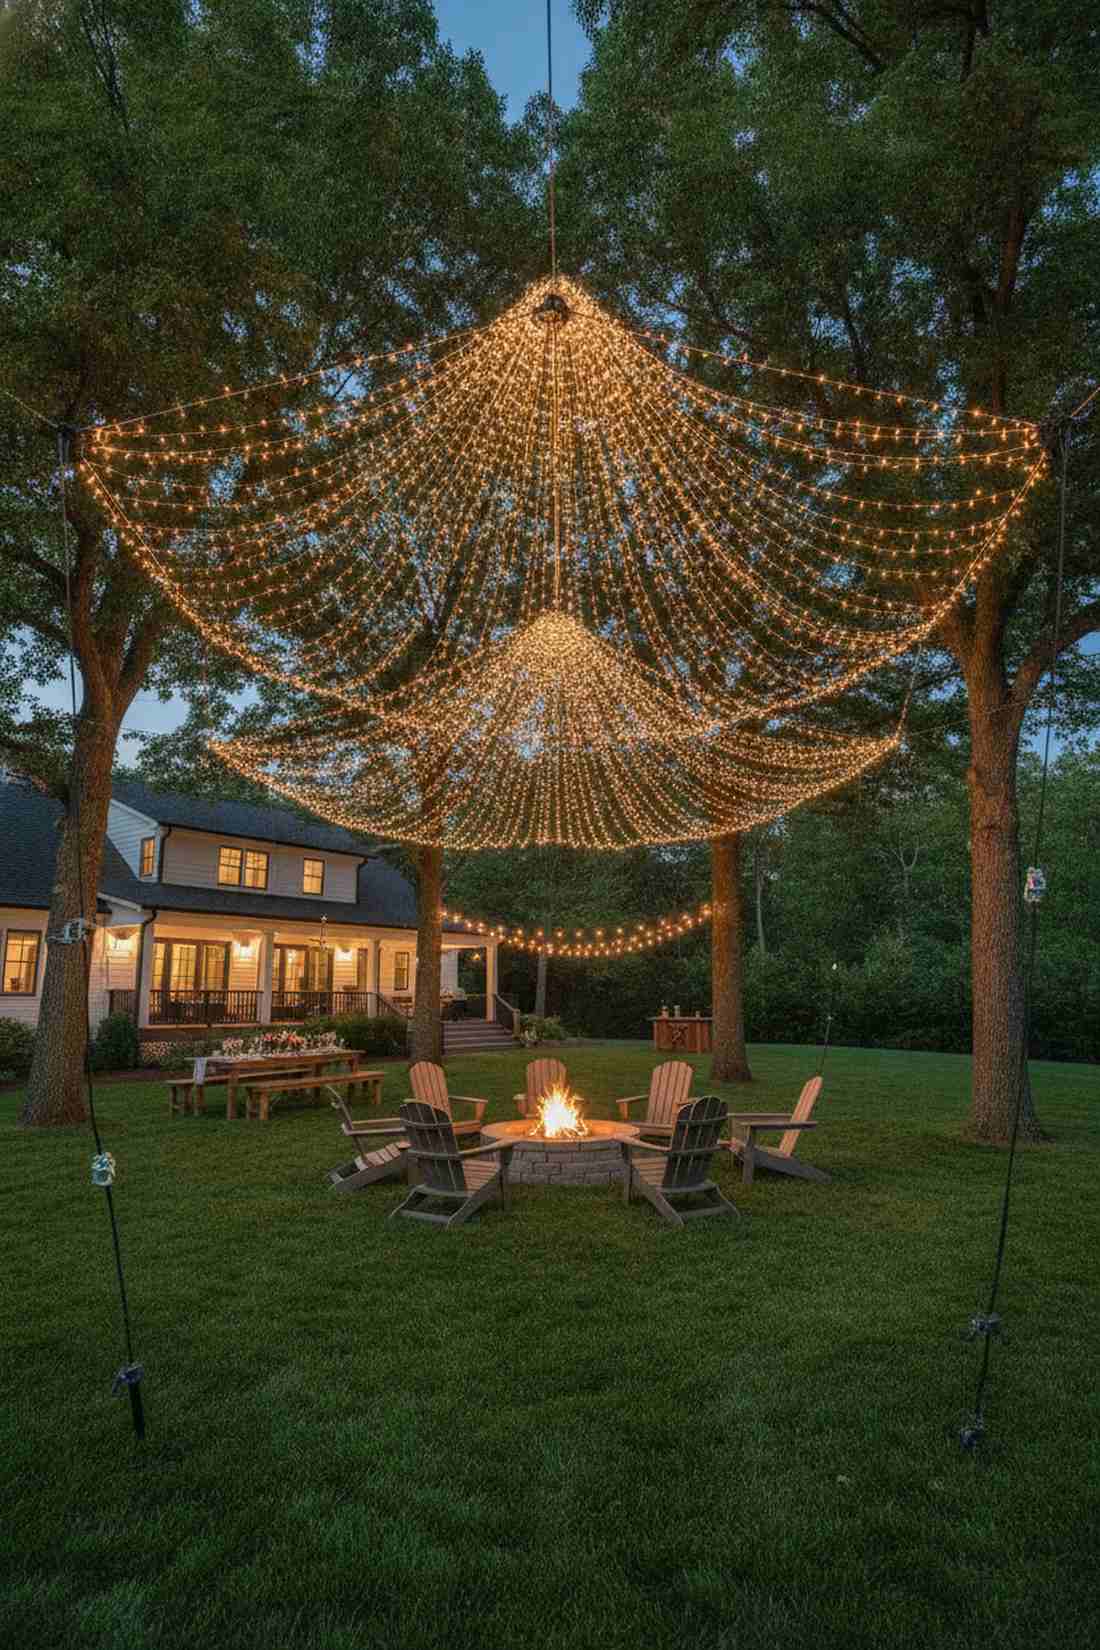
13. Festoon-Style Catenary Draping
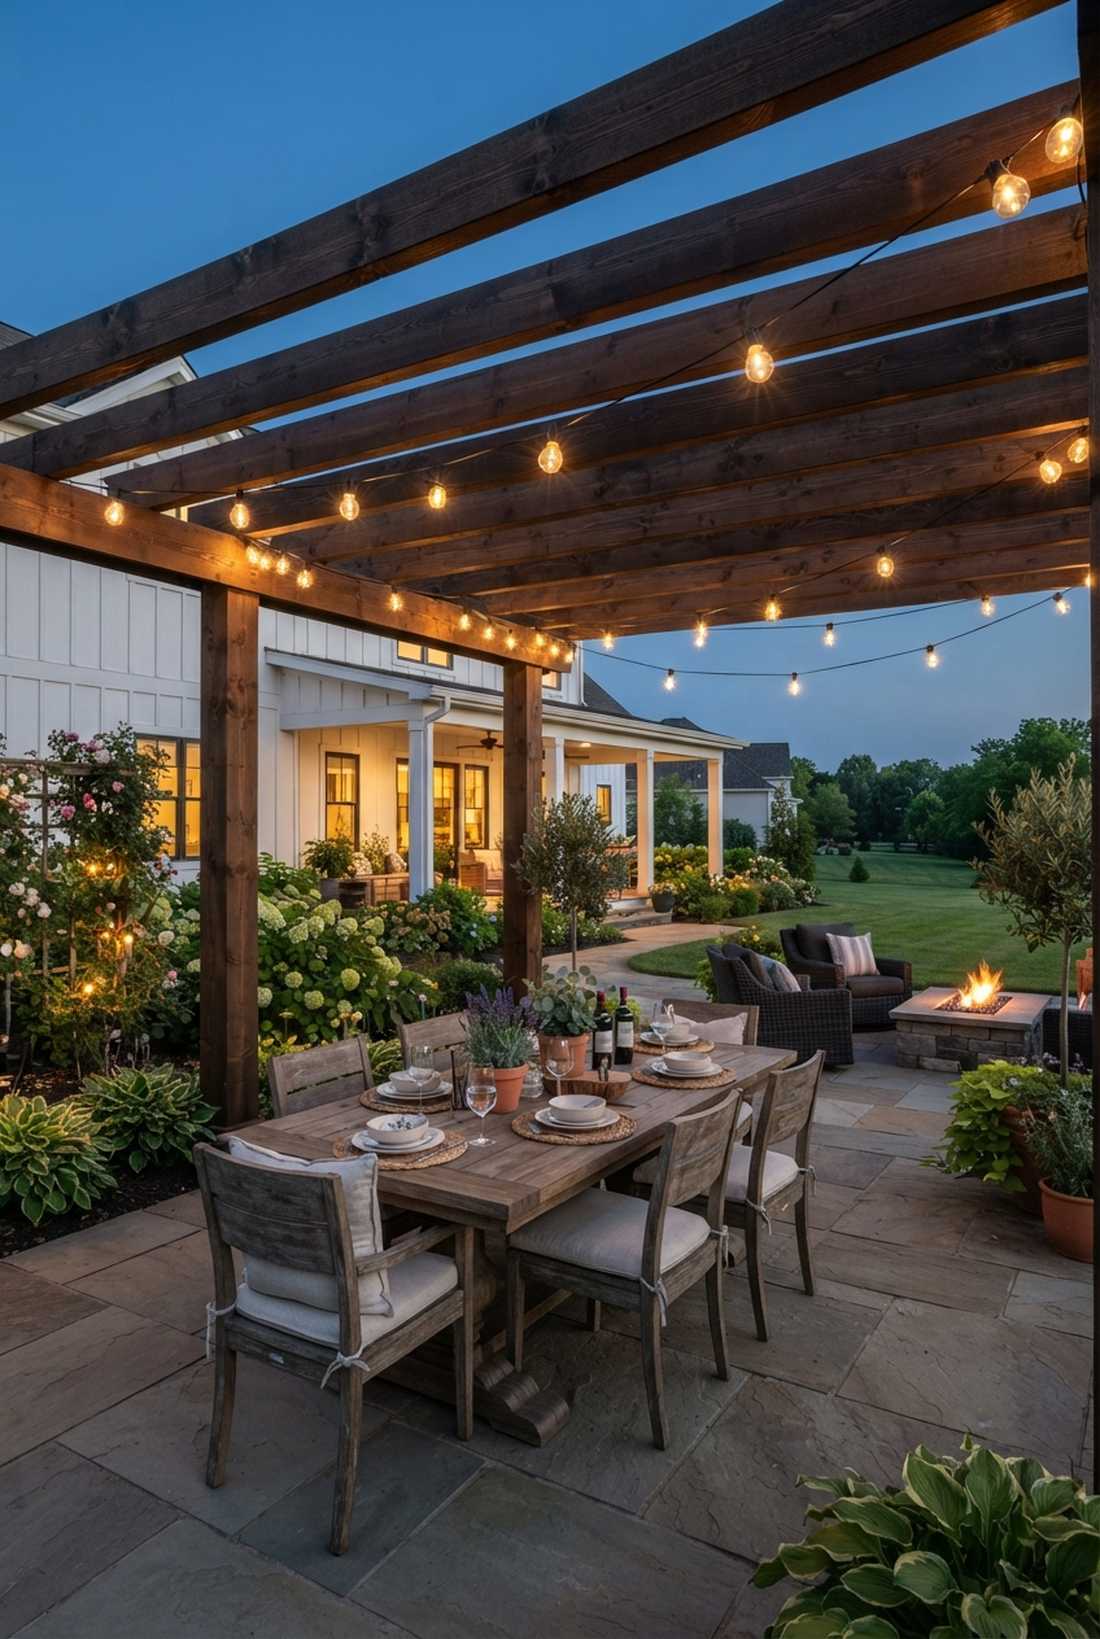
The sweeping curves of this layout feel like a bustling European street cafe at midnight. Classic bistro patio lighting is undeniably the most sought-after outdoor aesthetic right now. Ideal for spanning wide gaps between thick pergola support posts.
Calculating the exact sag ratio for the bulbs prevents the strands from looking like a messy, neglected college dorm setup. This calculated drape delivers a surprisingly premium look that instantly elevates cheap outdoor furniture. Choosing commercial-grade solar string lights ensures the large bulbs survive hail and high winds without shattering.
Expect a slightly higher cost of $50–$90 for durable festoon-style bulbs. Pin this if you want to replicate that perfect alfresco dining vibe!
- Key Materials: Large-bulb solar festoon strands
- Vibe / Style: European cafe elegance
- Difficulty: Easy hanging
- Budget Breakdown: Festoon strings: $75 | Cup hooks: $5
- Creator’s Tip: Aim for exactly 8 inches of droop per 10 feet of horizontal span for the perfect architectural curve.
- Smart Sourcing: shatterproof LED bistro bulbs (bulk pack) and rust-resistant screw hooks (starter kit).
14. Column & Post Uplighting
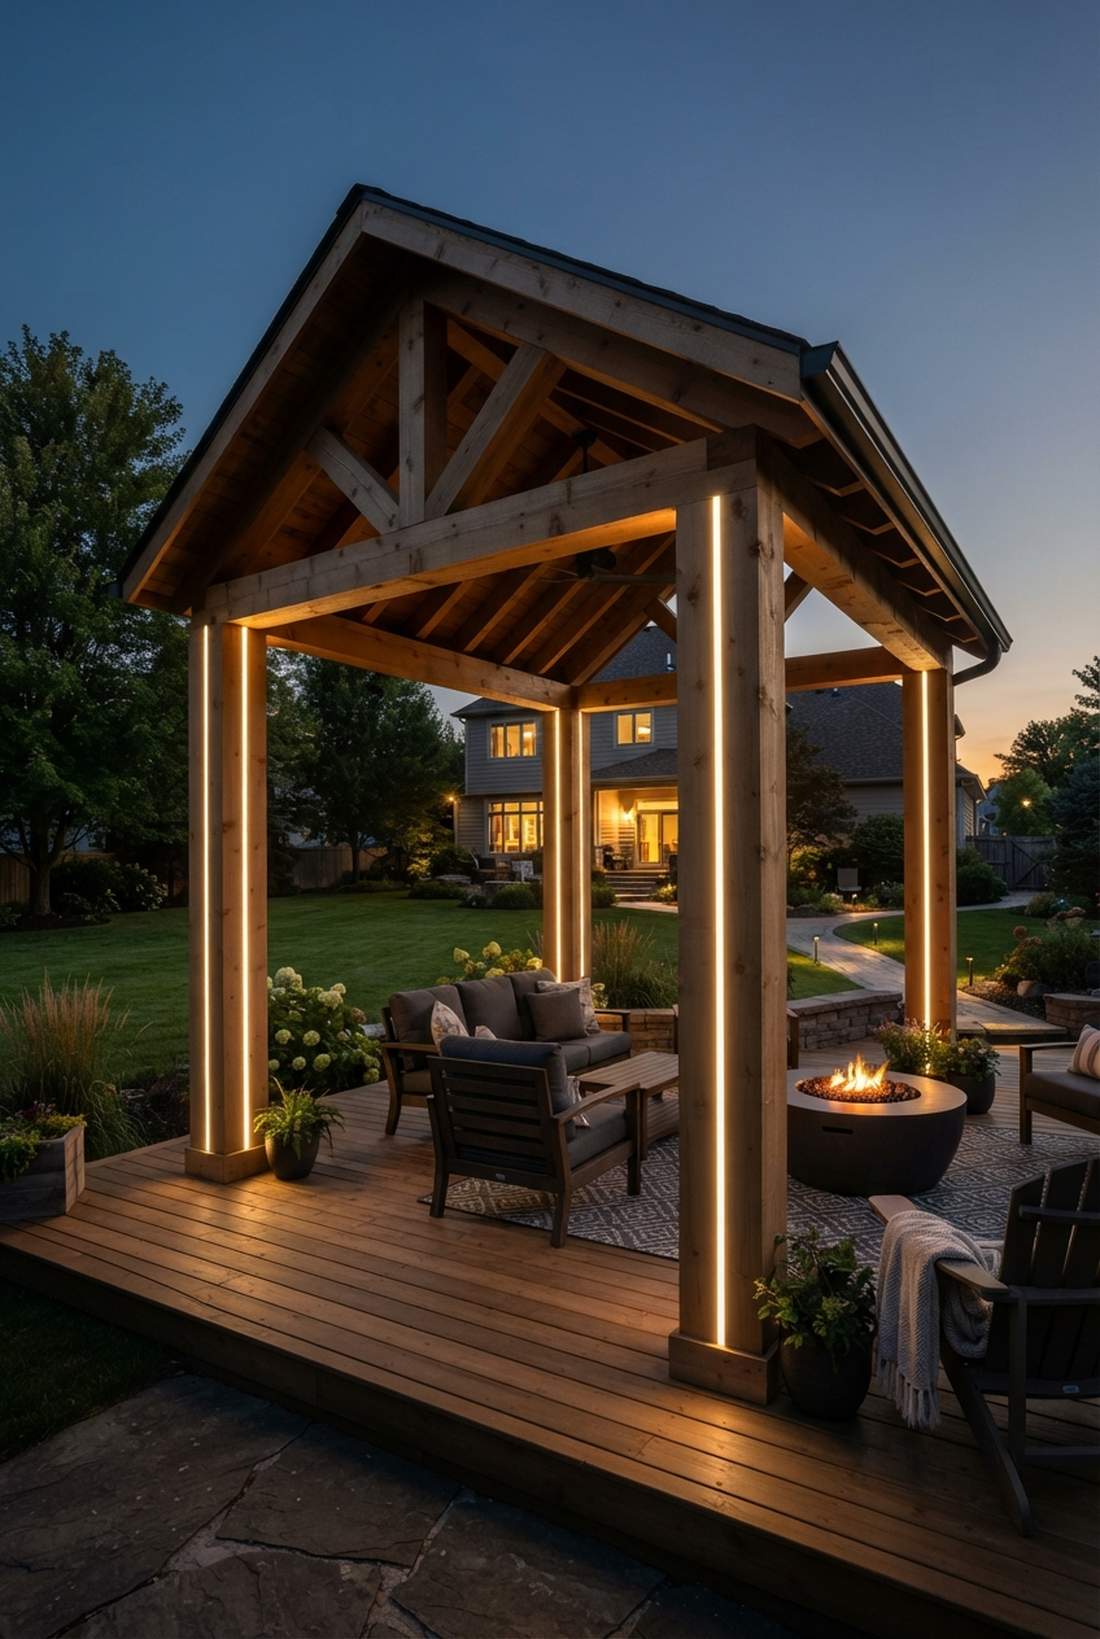
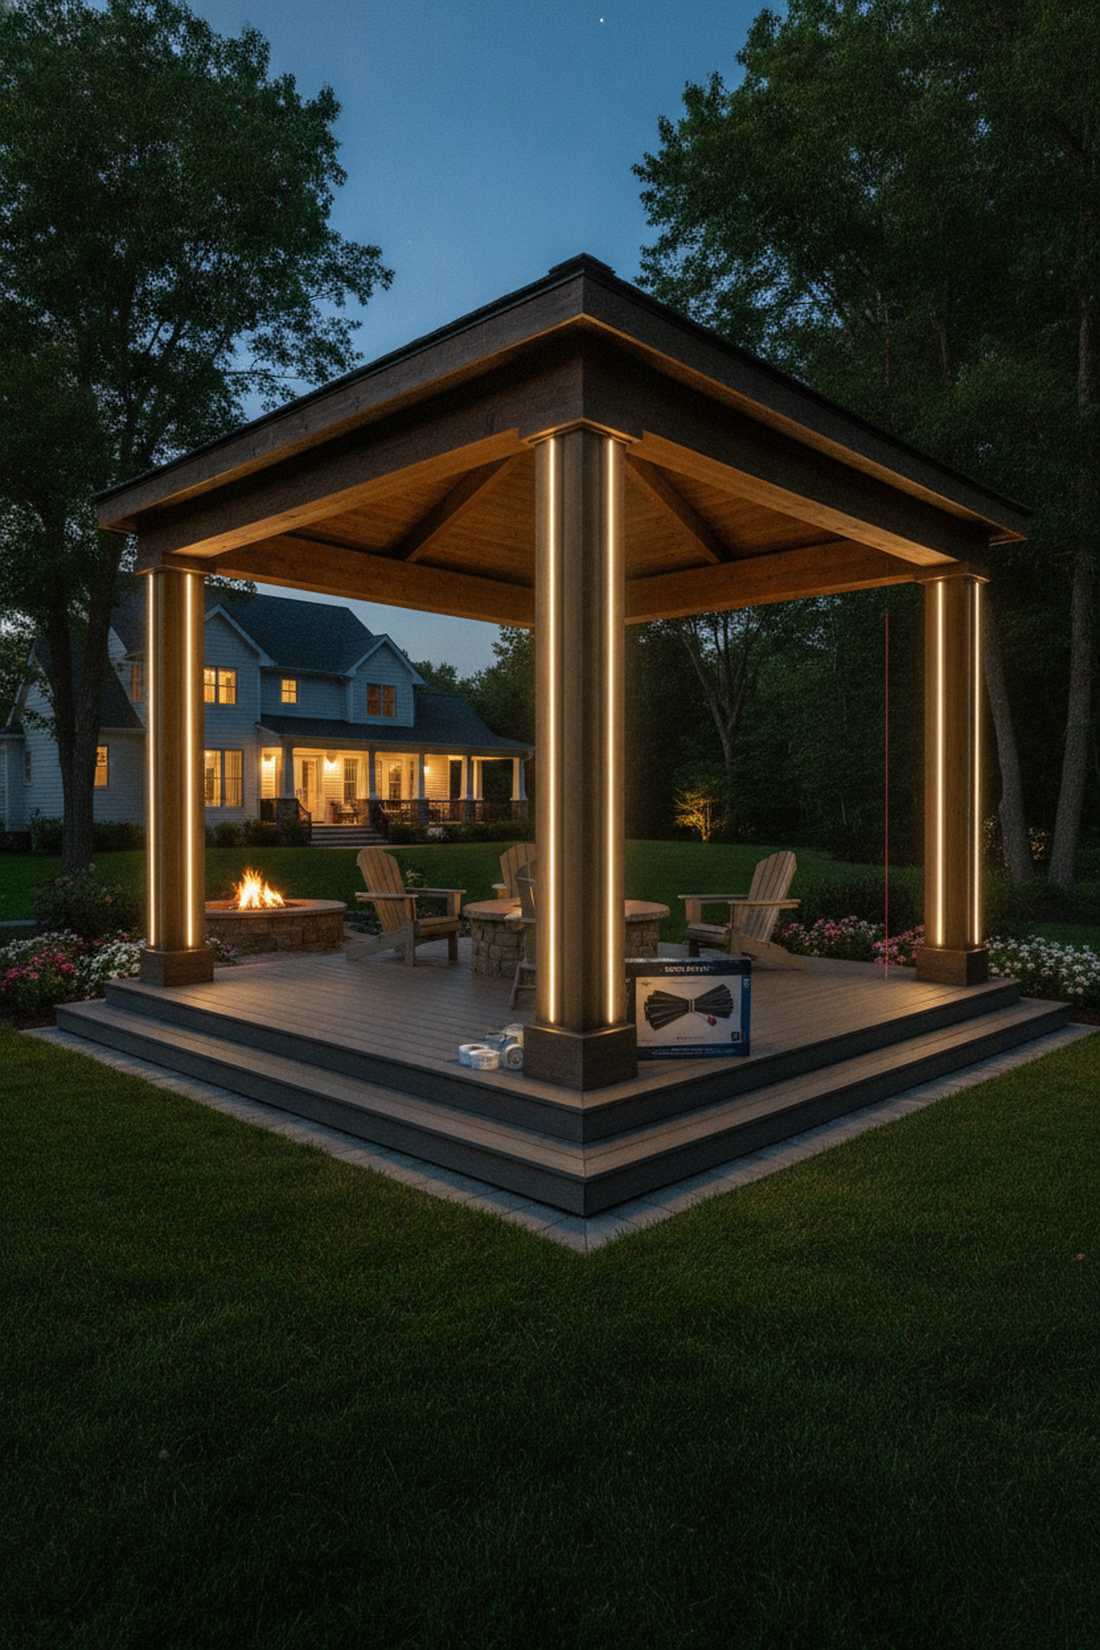
This vertical accent lighting feels like grand pillars supporting a glowing outdoor palace. Vertical deck post illumination creates structural boundaries without putting harsh lights directly in your eyes. Flawlessly applied to chunky pavilion supports or thick gazebo legs.
Running precise vertical lines down the columns anchors the floating roof visually to the deck floor. This strict linearity makes generic outdoor areas look custom-built and highly deliberate. Sourcing prebuilt backyard lighting kits with exact-length vertical drops saves hours of frustrating wire management.
You can frame your entire structure for an easy $30–$50. A fantastic and incredibly fast way to outline your entertainment zone.
- Key Materials: Linear LED strips or rigid light bars
- Vibe / Style: Stately architectural framing
- Difficulty: Clean alignment needed
- Budget Breakdown: Light strips: $35 | Alignment clips: $10
- Creator’s Tip: Use a laser level to ensure the vertical light lines are perfectly straight down the center of the post.
- Smart Sourcing: weather-sealed track channels (pre-cut) and high-adhesion outdoor mounting tape.
Most backyard DIYers completely ignore this next seasonal trick, yet it solves the biggest lighting headache instantly…
15. Retractable Seasonal Canopy
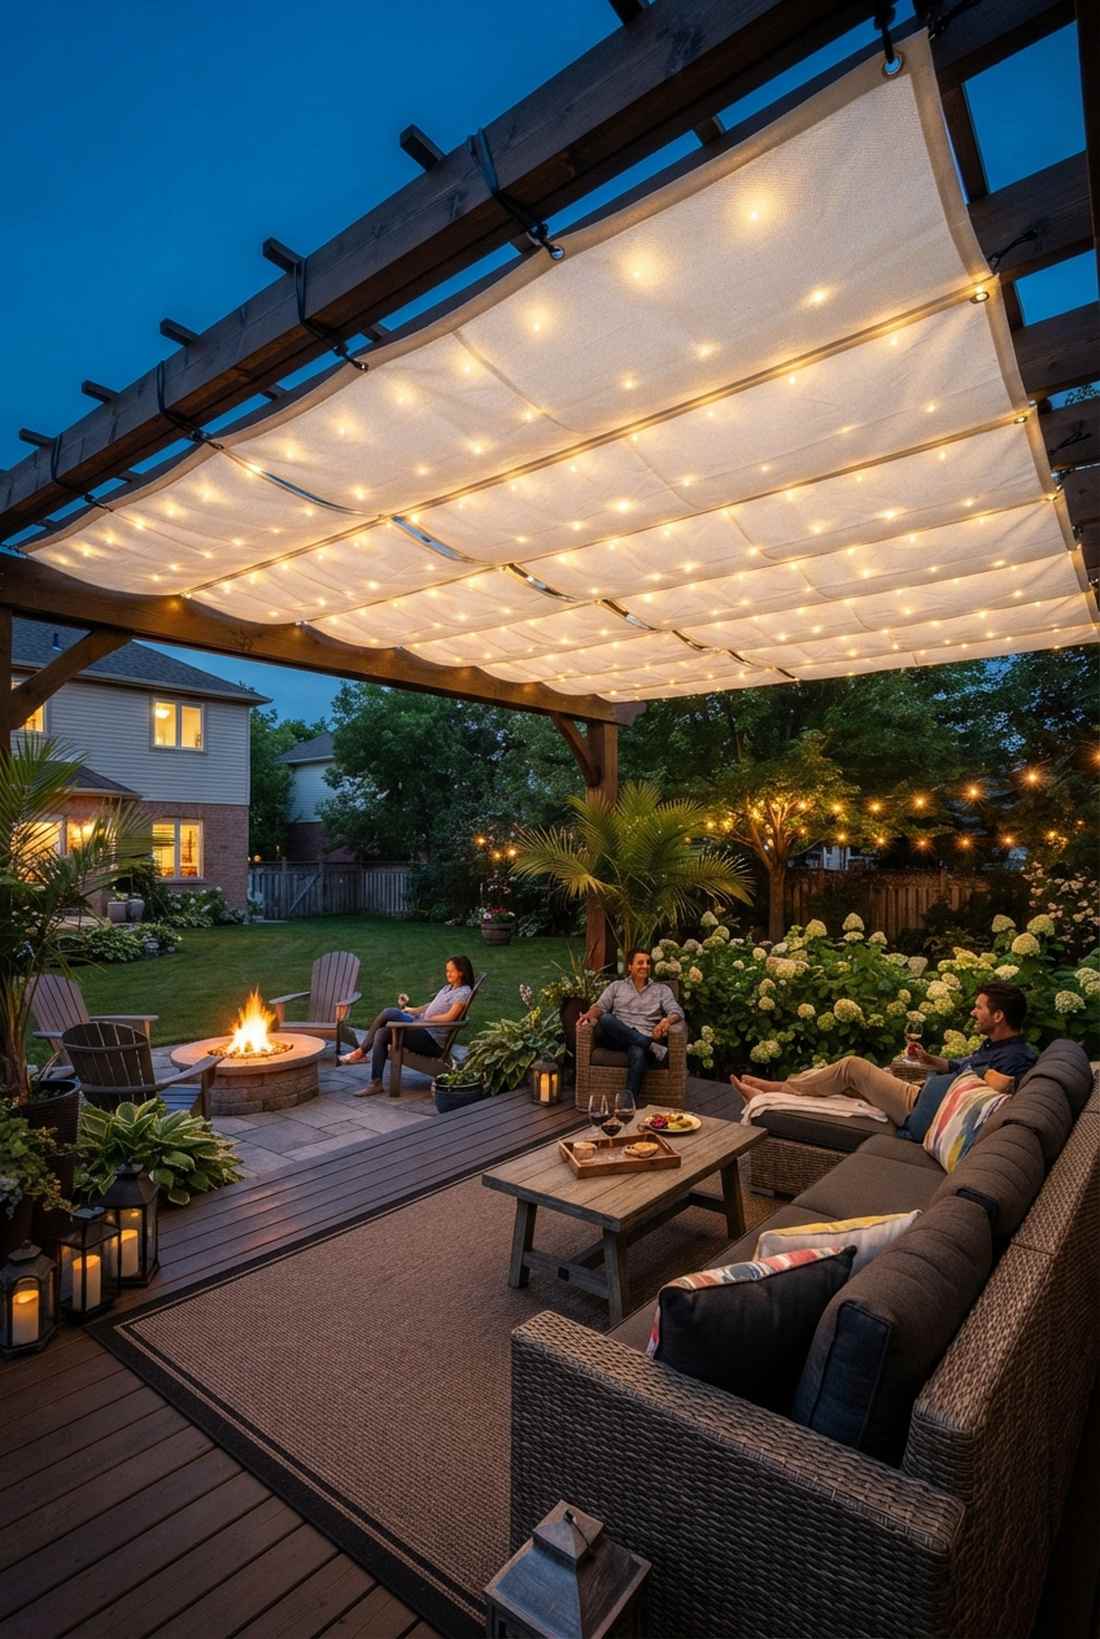
This glowing fabric ceiling feels exactly like an exclusive VIP cabana on a tropical beach. Fabric diffused patio lights soften harsh LEDs into a luxurious, buttery glow. A brilliant solution for areas with brutal winter weather where permanent lights get destroyed.
Mounting the strands onto a removable fabric scrim allows you to take down the entire system in under five minutes before a blizzard. This modular approach yields an incredibly upscale resort aesthetic while extending the lifespan of your electronics by years. Utilizing heavy-duty zip tie multi-packs and grommeted canvas ensures the fabric won’t tear at the anchor points.
Creating this custom canopy runs about $80–$120 for the fabric and lights combined. Save this genius weather-proof hack to your DIY board!
- Key Materials: Grommeted fabric scrim, fairy lights, bungee cords
- Vibe / Style: Soft diffused cabana
- Difficulty: Requires sewing or grommet punching
- Budget Breakdown: Scrim fabric: $50 | Lights: $40 | Bungees: $15
- Creator’s Tip: Sew the fairy light wires directly into a hem on the back of the fabric so they never shift out of place.
- Smart Sourcing: UV-blocking outdoor canvas (pre-cut) and marine-grade bungee toggles (bulk pack).
Solar Lights Fairy Garden Dining & Entertainment
Outdoor dining and entertainment zones benefit from adjustable solar fairy garden lighting that creates ambiance without overwhelming conversation spaces. Strategic placement enhances functionality while maintaining intimate atmosphere.
16. Table Perimeter Ground Ring
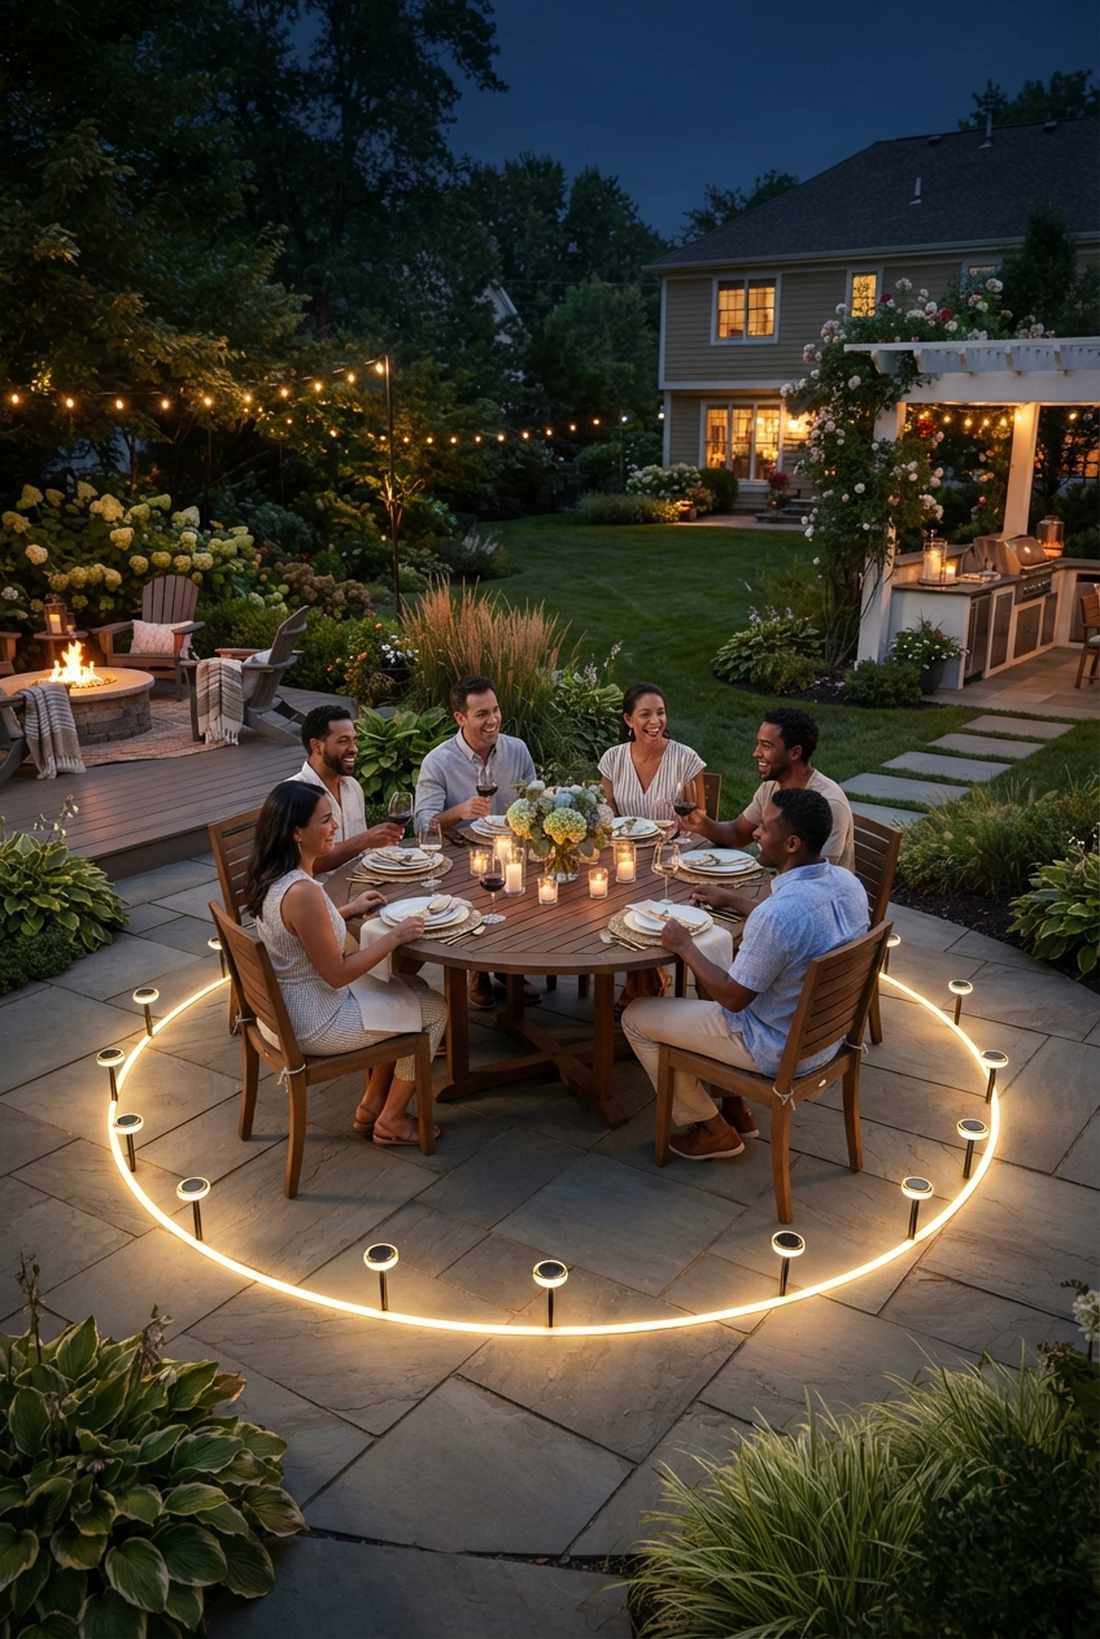
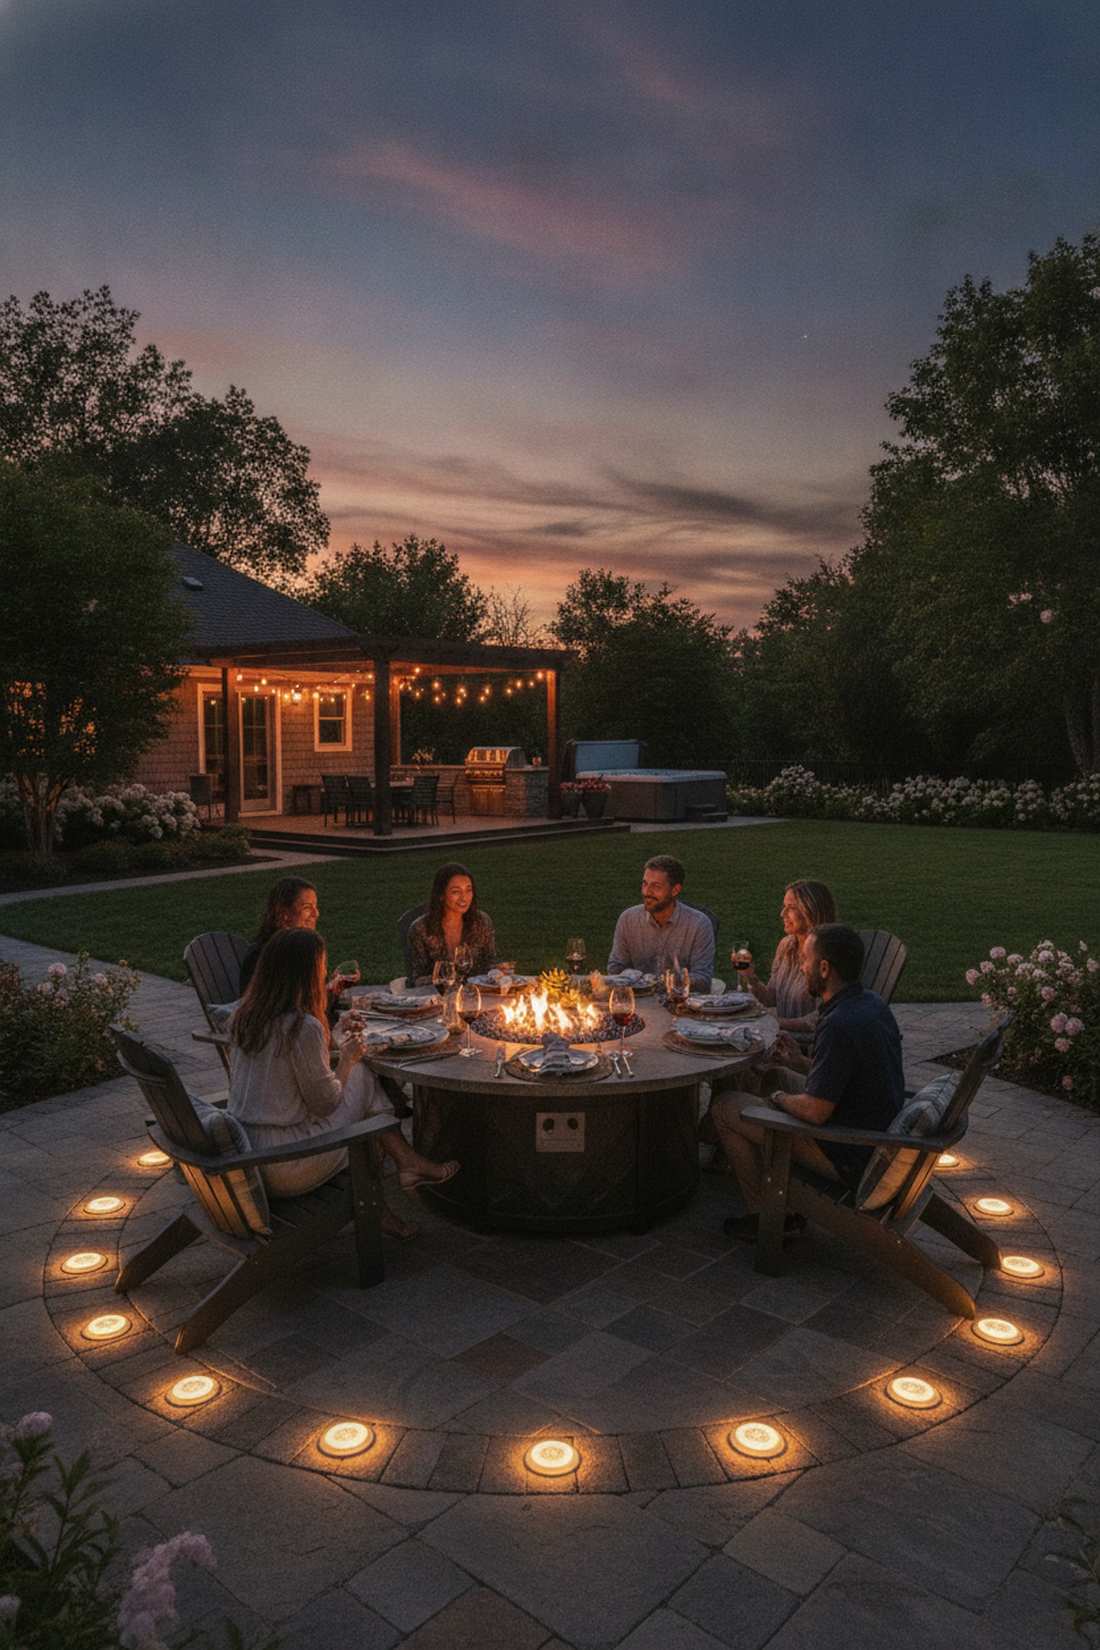
This low-level lighting ring feels like a protective glowing hearth centered around your meal. Ground-level dining zone highlights keep the ambiance high without blinding your guests across the table. It is perfect for large circular patios or freestanding fire pit dining sets.
Positioning the markers in a wide perimeter softly illuminates the feet and table base, naturally drawing people into the circle. This subtle boundary creates an upscale resort aesthetic that defines the space without physical walls. Integrating premium garden stake sets prevents the ring from looking cheap and flimsy.
Establishing this glowing dining boundary costs around $30–$45. Highly recommended for setting a moody, intimate dinner party vibe.
- Key Materials: Warm white solar stakes
- Vibe / Style: Intimate dining hearth
- Difficulty: Very easy staking
- Budget Breakdown: Stake pack: $35 | String measure: $2
- Creator’s Tip: Place the stakes exactly three feet out from the table edge so guests don’t kick them when pulling chairs out.
- Smart Sourcing: low-profile disc lights (bulk pack) and shatter-resistant solar ground markers.
17. Umbrella Canopy Draping
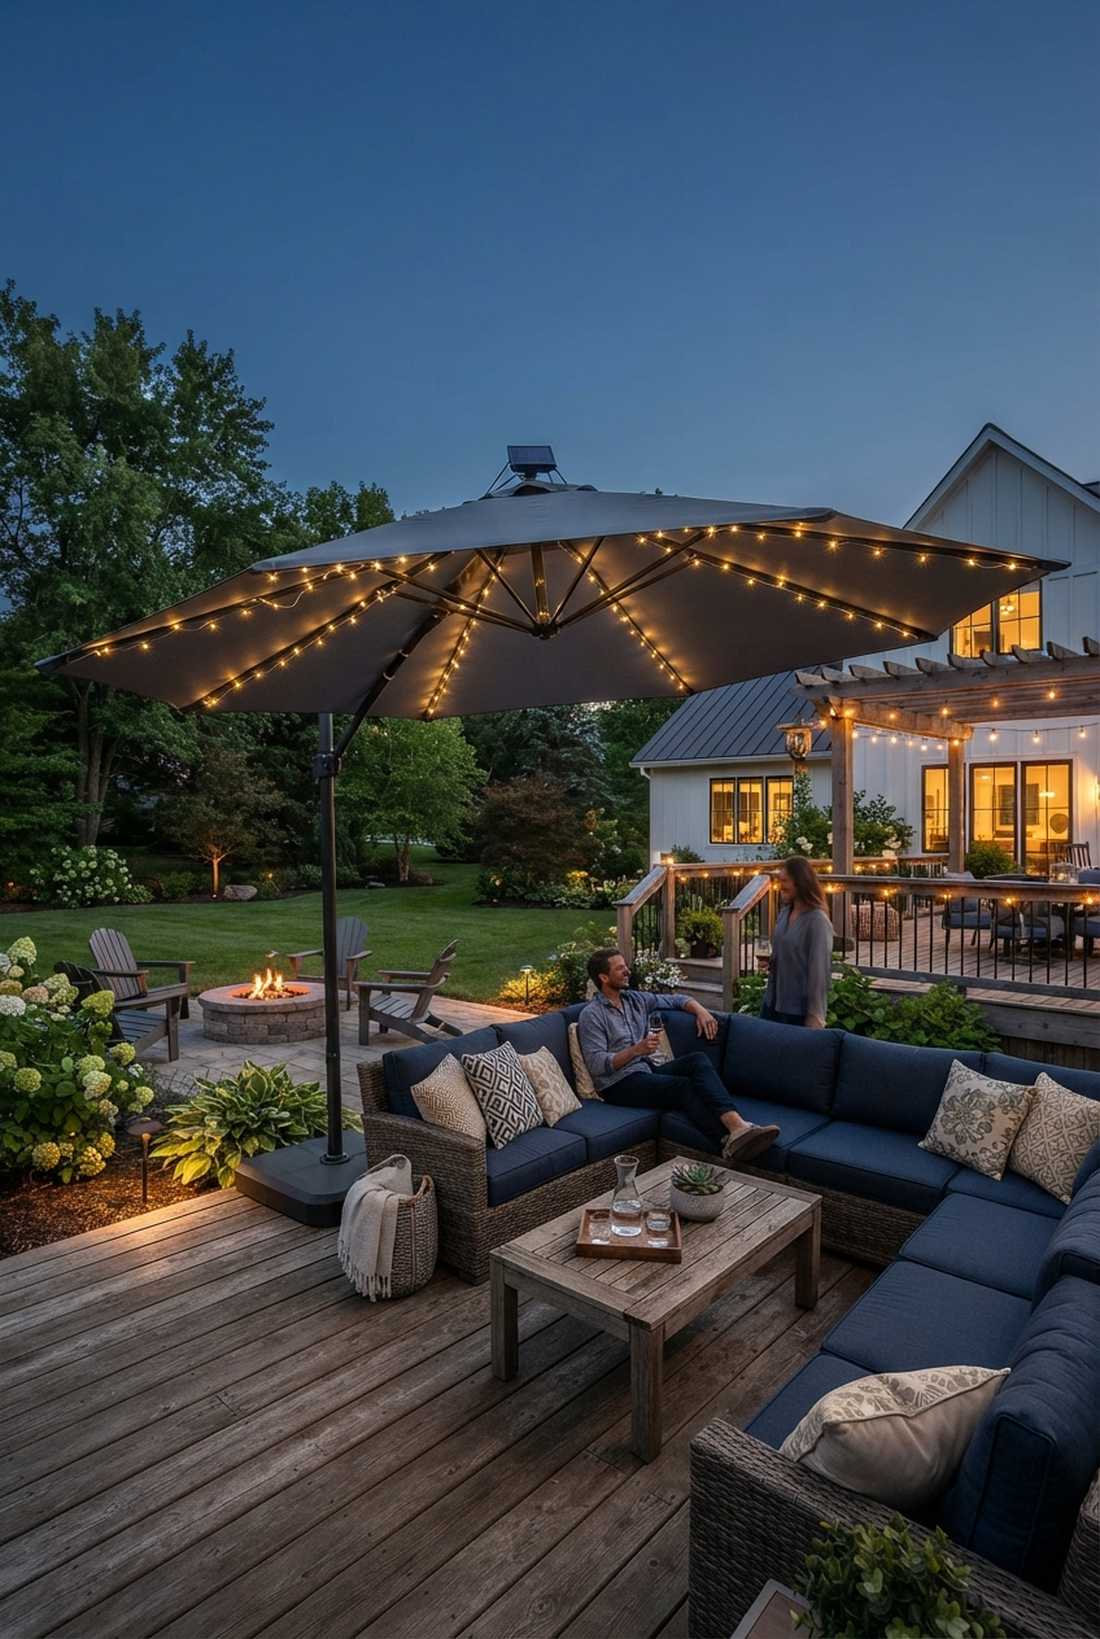
This radiant shelter feels like a private, glowing tent suspended just for your conversation. Patio umbrella string light setups turn boring daytime sunshades into spectacular nighttime centerpieces. An absolute must for cantilever umbrellas over deep seating patio sets.
Running the delicate micro-wires down the internal ribs totally conceals the messy cords while reflecting off the canvas. This hidden setup tricks visitors into thinking it’s custom wired directly from the factory. Securing the nodes with a terrarium accessories micro-clip kit lets the umbrella fold down without snapping any wires.
You can upgrade a standard umbrella into a glowing canopy for just $15–$25. Pin this incredibly easy 10-minute transformation right now!
- Key Materials: Flexible micro-LED strands, binder clips
- Vibe / Style: Private glowing tent
- Difficulty: Fast clip-on setup
- Budget Breakdown: Micro-strings: $15 | Mini clips: $5
- Creator’s Tip: Zip-tie the solar collection panel directly to the very top finial of the umbrella for maximum, unshaded sun exposure.
- Smart Sourcing: ultra-thin umbrella lighting kits (starter kit) and rust-proof mini clips (bulk pack).
18. Bar & Counter Edge Lighting
This sharp under-glow feels like you’ve stepped up to an exclusive high-end outdoor cocktail lounge. Under-counter patio bar lighting adds extreme utility and massive style points simultaneously. Flawless for illuminating outdoor kitchen prep spaces or concrete serving ledges.
Hiding the light strip completely under the lip washes the vertical surface without ever hitting the eye directly. This indirect wash gives a designer-level finish that rivals expensive professional hardscaping features. Be absolutely sure to use heavy-duty waterproof LED strips so drink spills and weather don’t destroy the diodes.
You can outfit an entire outdoor bar edge for a highly affordable $25–$40. A brilliant tweak that makes nighttime hosting infinitely easier.
- Key Materials: IP65 solar strip lights
- Vibe / Style: VIP cocktail lounge
- Difficulty: Simple adhesive application
- Budget Breakdown: Strip lighting: $30 | Cleaning prep: $4
- Creator’s Tip: Mount the lights facing slightly backward toward the base wall, rather than straight down, for a softer, wider diffusion.
- Smart Sourcing: commercial-grade outdoor adhesive tape (bulk pack) and high-density solar tape lights.
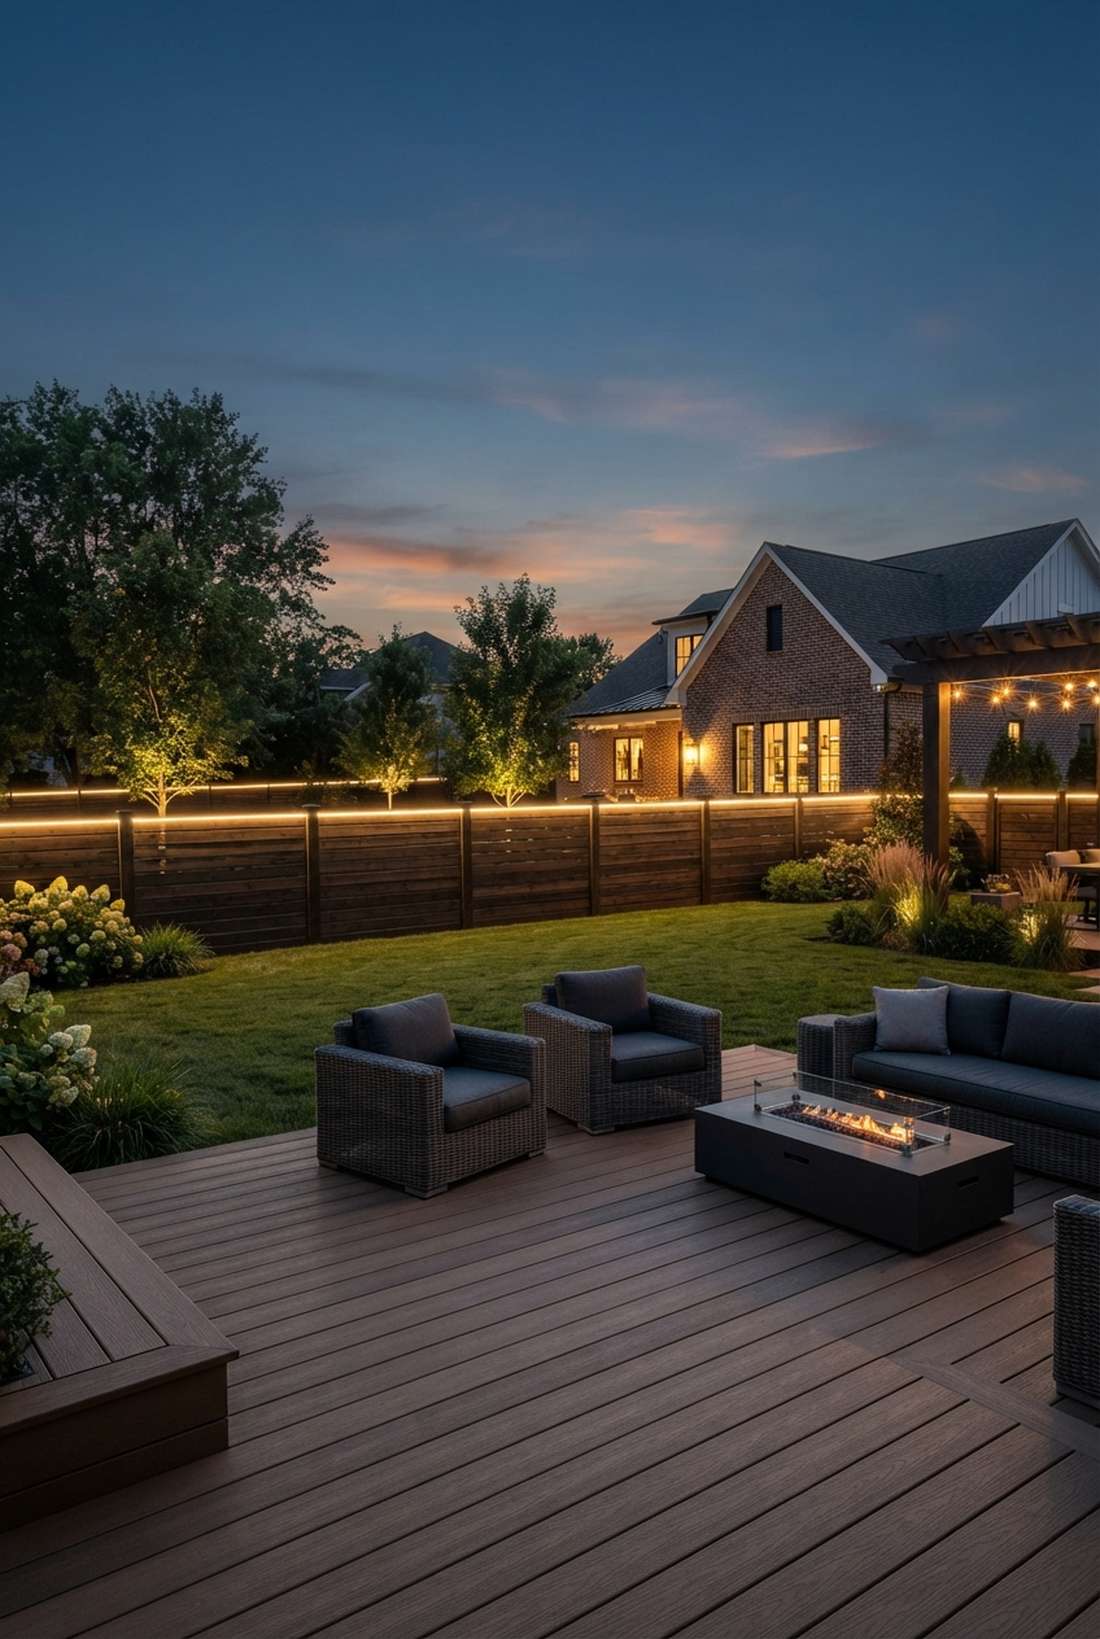
19. Conversation Pit Seating Definition
This glowing perimeter feels like an inviting, warm hug wrapping around your outdoor sofas. Built-in seating outline lights create distinct architectural boundaries in vast, open backyards. Unbeatable for outlining sunken fire pits or long wooden bench retaining walls.
Tucking the soft LEDs behind the backrests softly illuminates faces without creating a harsh, blinding interrogation-room effect. This gentle reflection completely avoids that tacky holiday-light vibe, pushing for a sleek modernism instead. Tapping into a stash of premium garden stake sets and flat-wire setups keeps the install invisible by day.
Defining a large seating zone will usually cost around $35–$55. Save this concept if you want to make your large yard feel cozier!
- Key Materials: Warm white rope lights
- Vibe / Style: Cozy glowing boundary
- Difficulty: Easy bracket mounting
- Budget Breakdown: Rope lights: $40 | Mounting saddles: $10
- Creator’s Tip: Avoid cool white (5000K+) lights here; always use warm white (2700K) so your guests’ skin tones don’t look sickly and blue.
- Smart Sourcing: silicone-encased solar rope tubing (bulk pack) and U-channel mounting clips.
Most beginners ruin their backyard ambiance right here. This next trick balances everything perfectly…
Material Guide: Cheap vs. Premium Aesthetic
Knowing exactly where to save and where to spend makes all the difference in achieving that “looks expensive but isn’t” vibe.
- Standard vs. UV-Resistant/Premium: Upgrading to UV-coated wiring stops the plastic from cracking and turning brittle after one summer, preventing total system failure.
- Pre-made Kits vs. Sourcing Locally: Purchasing waterproof starter kits often saves money over time because the seals on the solar batteries are factory-tested against heavy rain.
20. Fire Feature Complementary Lighting
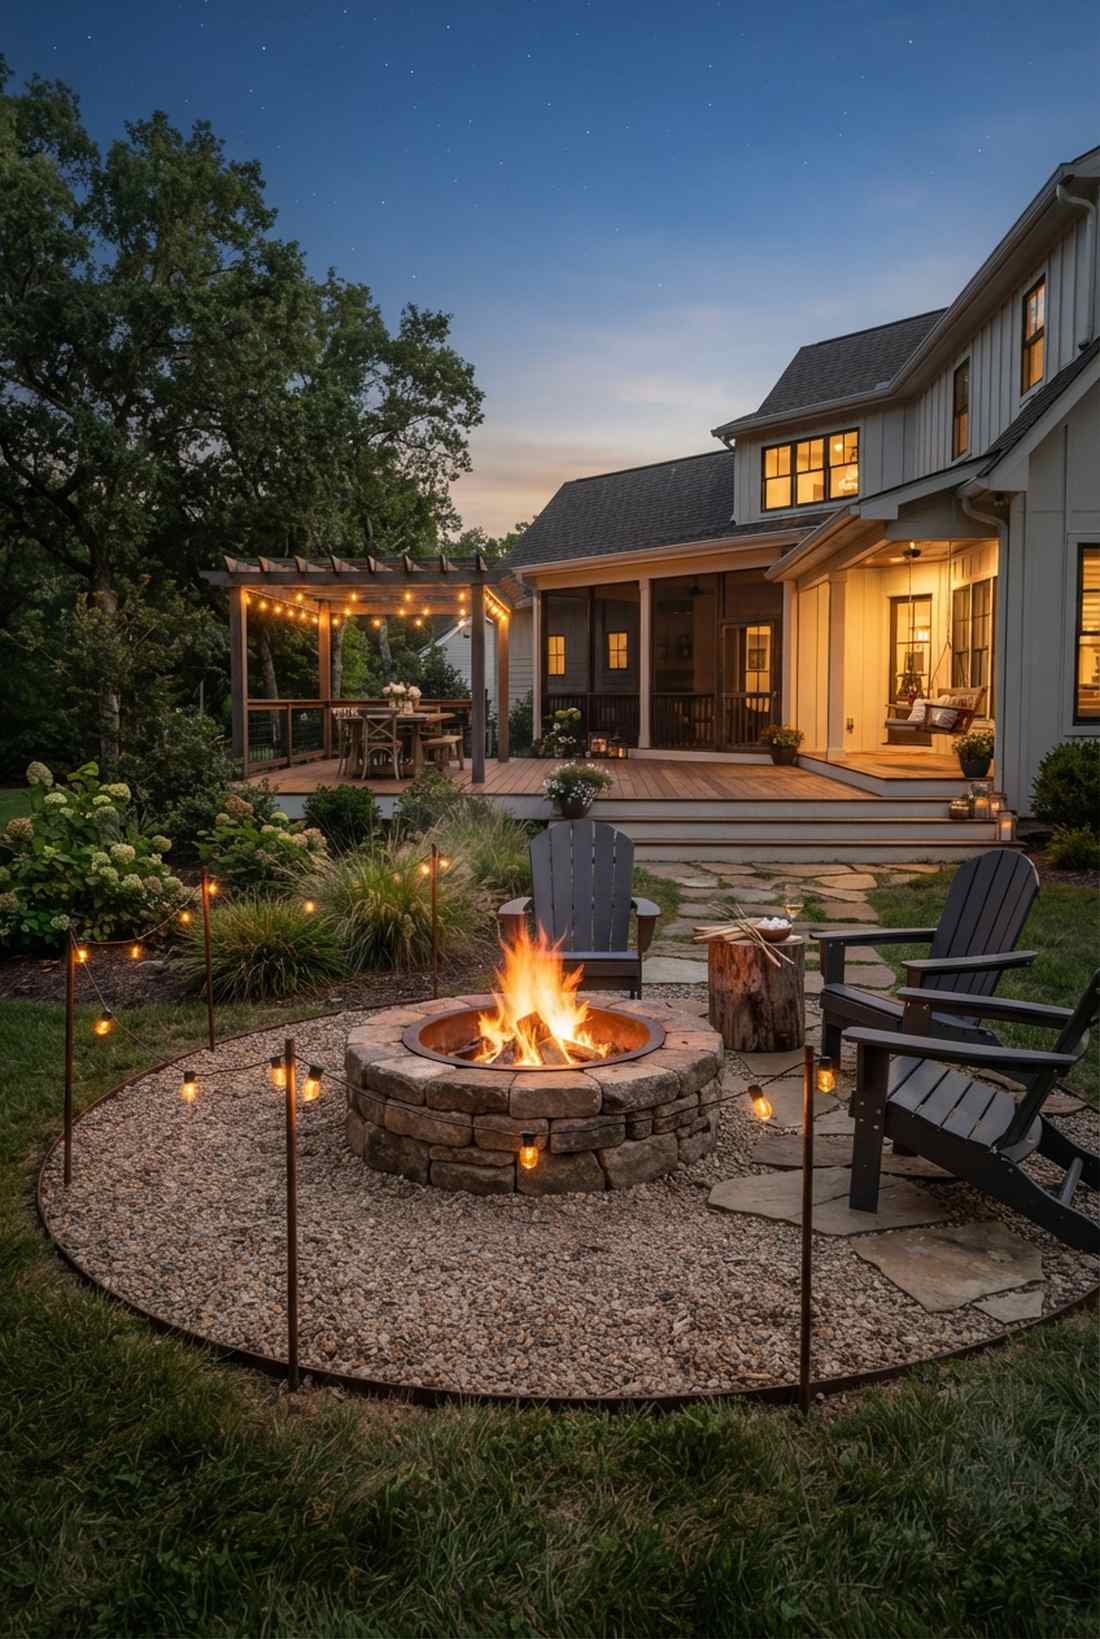
This balanced glow feels like a perfectly orchestrated symphony of natural flame and modern tech. Fire pit accent light setups enhance safety without ever overpowering the dancing flames. Ideal for surrounding gravel campfire circles or heavy stone hearths.
Using severely dimmed amber LEDs mimics the fire’s color temperature, creating a unified, deeply relaxing visual palette. This careful color matching forces a dramatic focal point where none existed, making the fire pop even more. Look out for solar string lights clearance sales to grab high-end dimmable kits on a massive budget.
Balancing this dual-light zone costs an easy $20–$35 for low-lumen setups. Highly recommended for anyone who loves late-night marshmallow roasting.
- Key Materials: Dimmable amber solar nodes
- Vibe / Style: Harmonious campfire glow
- Difficulty: Simple perimeter placing
- Budget Breakdown: Amber lights: $25 | Ground stakes: $8
- Creator’s Tip: Keep all artificial lights at least 4 feet away from the actual fire pit edge so the heat doesn’t melt the plastic wiring.
- Smart Sourcing: amber-tinted micro LEDs (starter kit) and heat-shielding cable wraps.
Decorative Accent Installations
Solar fairy lights function as decorative garden art beyond pure illumination purposes. Creative installations transform lights into sculptural elements that enhance gardens during both day and night hours.
21. Mason Jar Hanging Lanterns
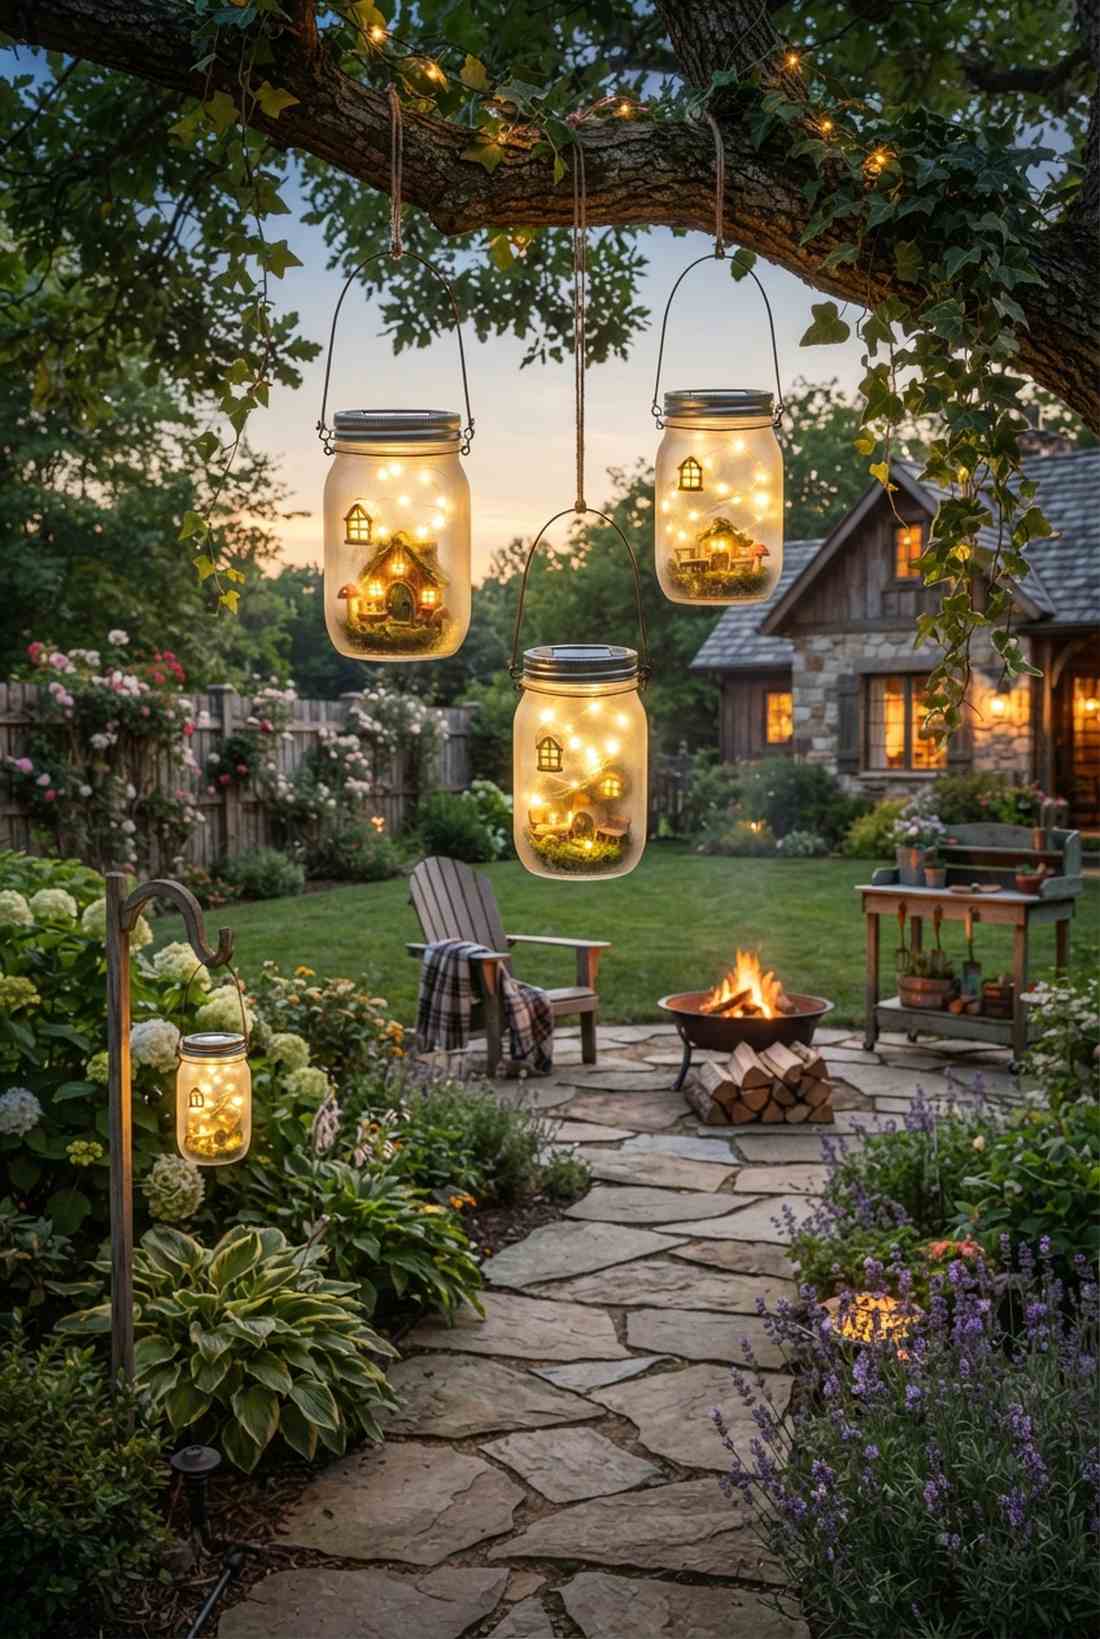
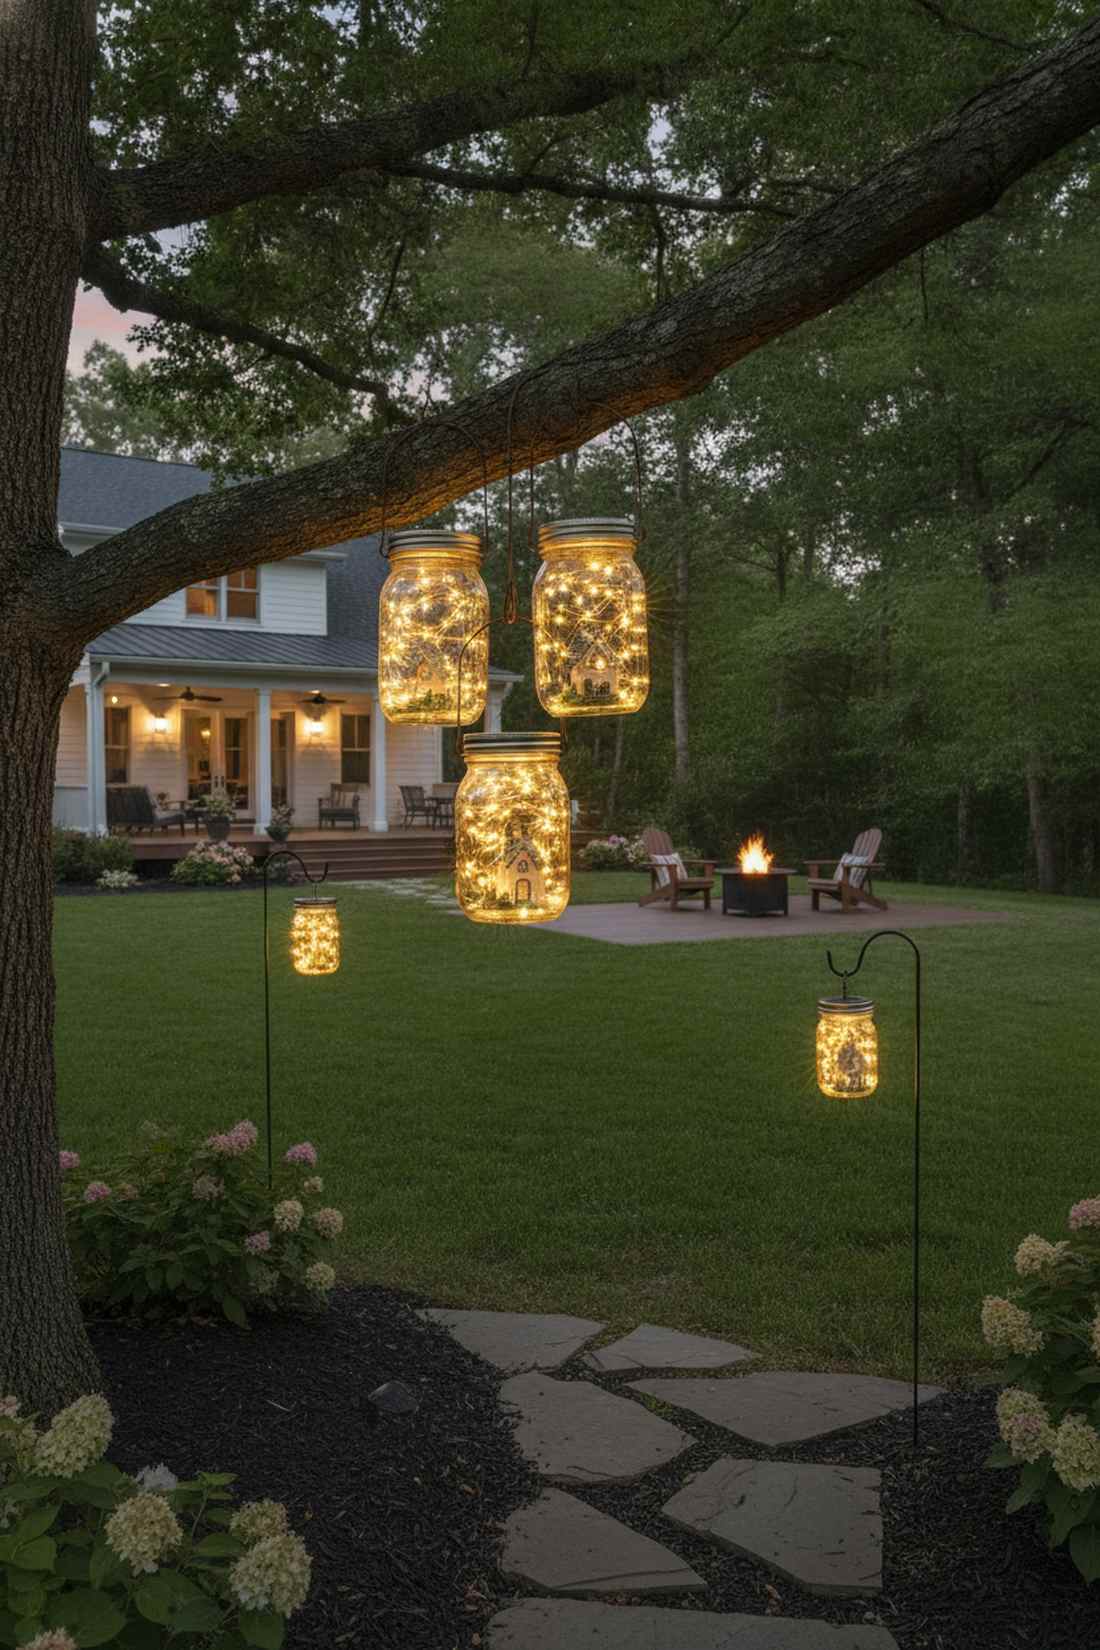
These hanging clusters feel like capturing pure starlight in vintage glass bottles. DIY solar jar lanterns bring an incredibly charming, rustic cottagecore aesthetic to any space. Perfect for dangling from low, sturdy tree branches or classic shepherd hooks along a path.
Coiling short, dense strands inside the glass creates intense, magnified light refractions that scatter beautifully across the yard. This upcycled approach delivers a surprisingly premium look from materials you probably already have in your kitchen. Adding some resin fairy cottage accessories inside the jar creates magical little shadowboxes.
You can build a cluster of three lanterns for under $15 in lighting hardware. Pin this to your ultimate budget-friendly garden crafts board!
- Key Materials: Wide-mouth jars, solar lid inserts, wire handles
- Vibe / Style: Rustic captured starlight
- Difficulty: Fun beginner craft
- Budget Breakdown: Solar lids: $12 | Jars: $0 (recycled)
- Creator’s Tip: Lightly spray the inside of the jar with a frosted glass spray paint to hide the wires and make the jar glow evenly.
- Smart Sourcing: solar mason jar lid inserts (bulk pack) and rust-proof hanging wire handles.
22. Decorative Planter Integration
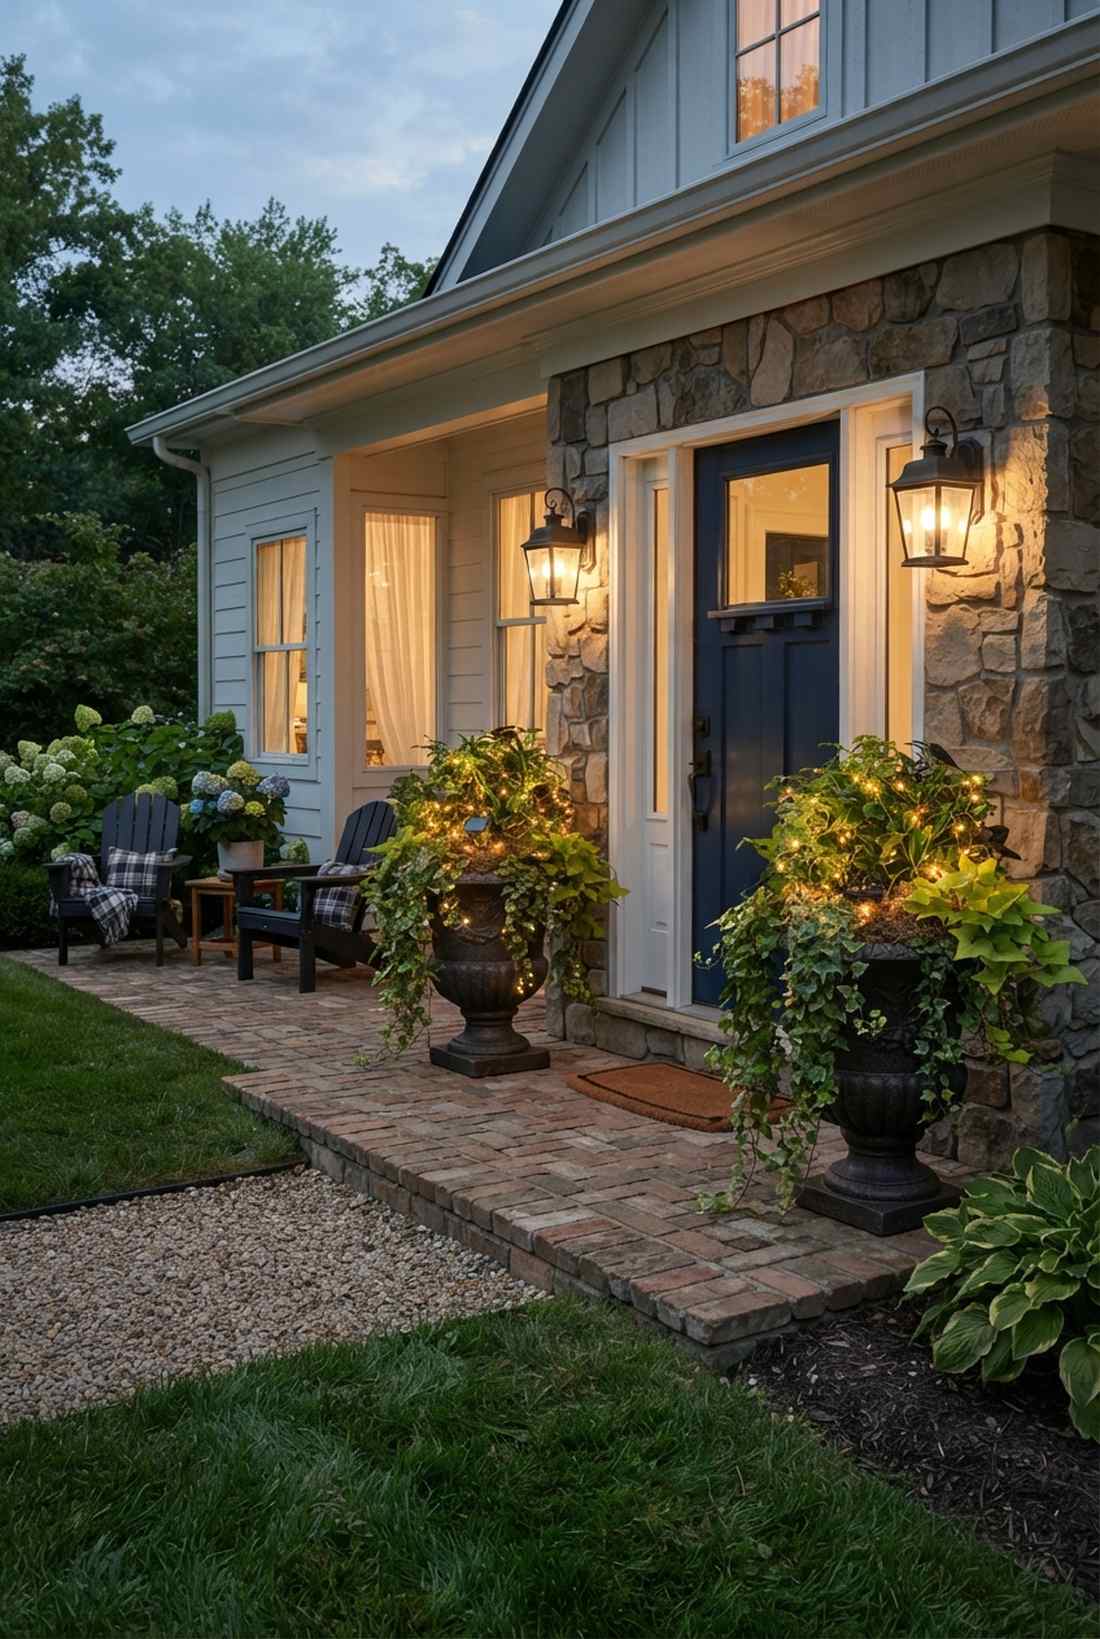
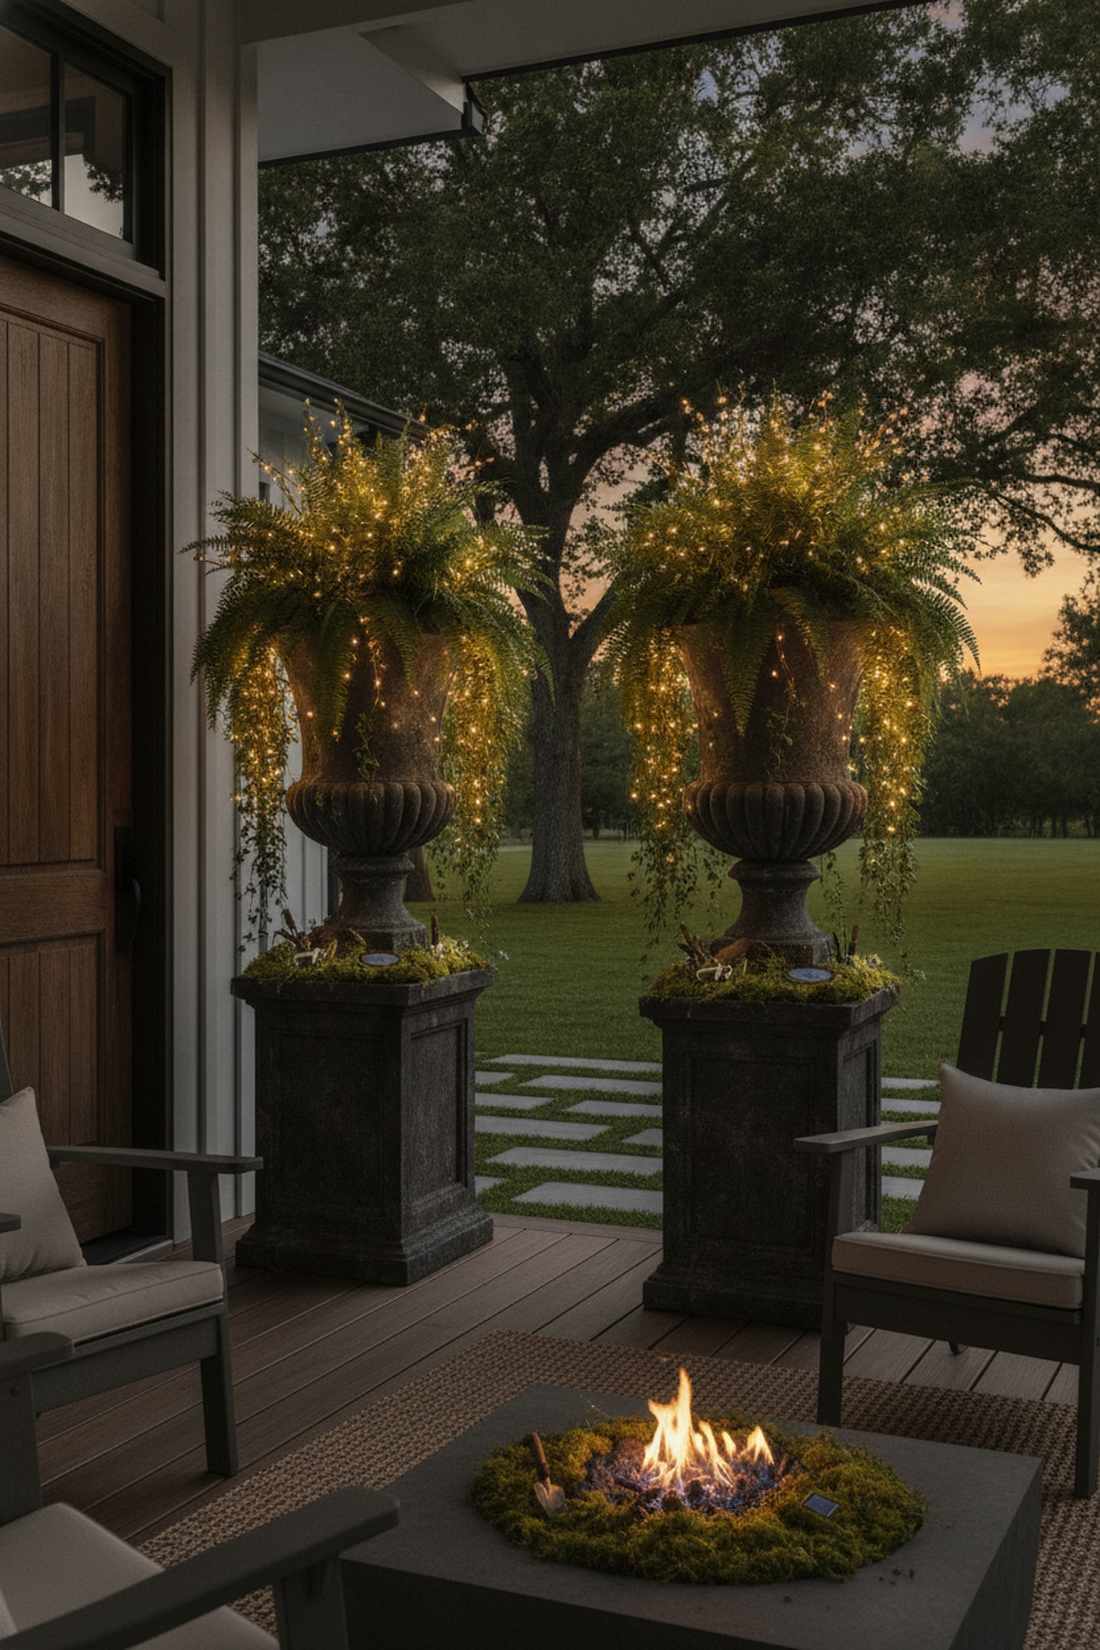
This illuminated greenery feels like a magical, bioluminescent plant straight out of a fantasy movie. Illuminated large patio planters turn dark, heavy pots into stunning floating focal points. It works exceptionally well for massive porch urns filled with trailing vines.
Weaving the micro-wires deep into the soil and up through the stems makes the plant itself appear to be glowing from within. This bypasses the cheap plastic aesthetic entirely, offering a sophisticated, botanical lighting solution. Utilizing miniature garden supplies keeps the hardware completely invisible among the dirt and leaves.
Lighting up a massive statement planter costs a meager $10–$20 per pot. A brilliantly fast tweak that completely elevates your front door styling.
- Key Materials: Waterproof copper wire fairy lights
- Vibe / Style: Bioluminescent botanical art
- Difficulty: Easy threading
- Budget Breakdown: Micro-strings: $15 | Concealing moss: $5
- Creator’s Tip: Cover the solar panel base with a thin layer of loose sphagnum moss so it blends into the dirt but still catches sunlight.
- Smart Sourcing: pre-cut preserved moss sheets (bulk pack) and ultra-thin outdoor copper lights.
23. Garden Art & Sculpture Highlighting
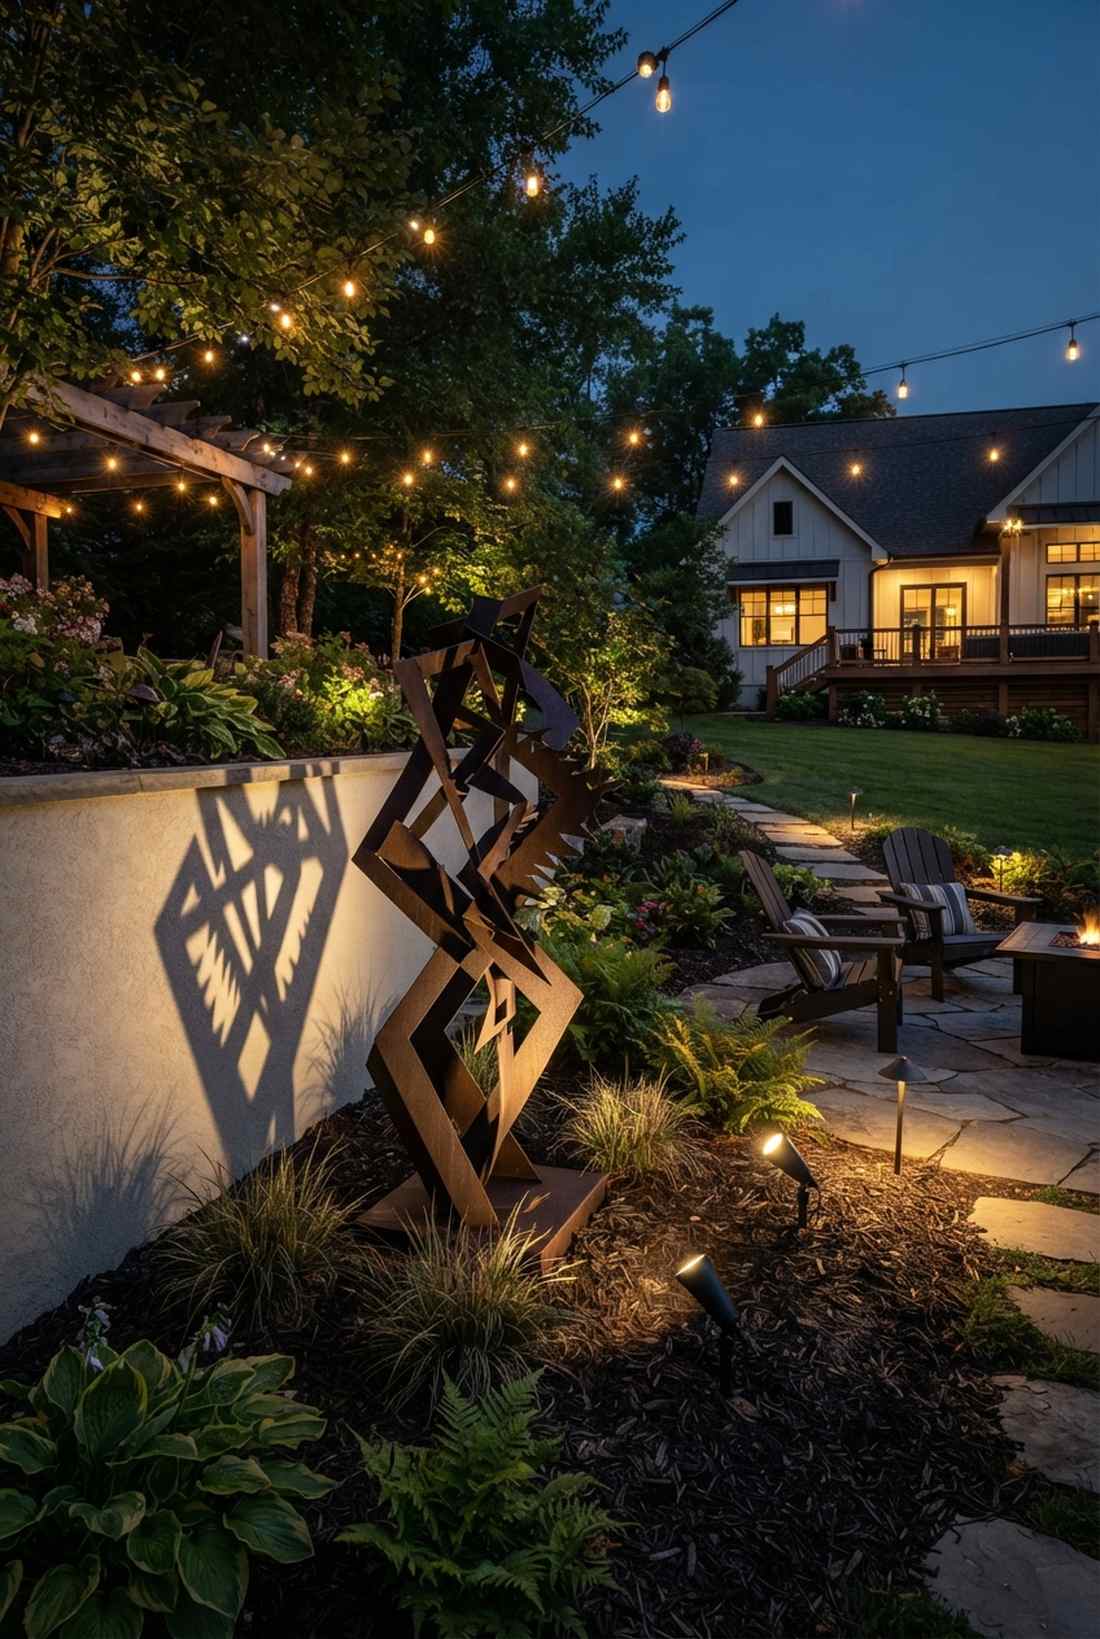
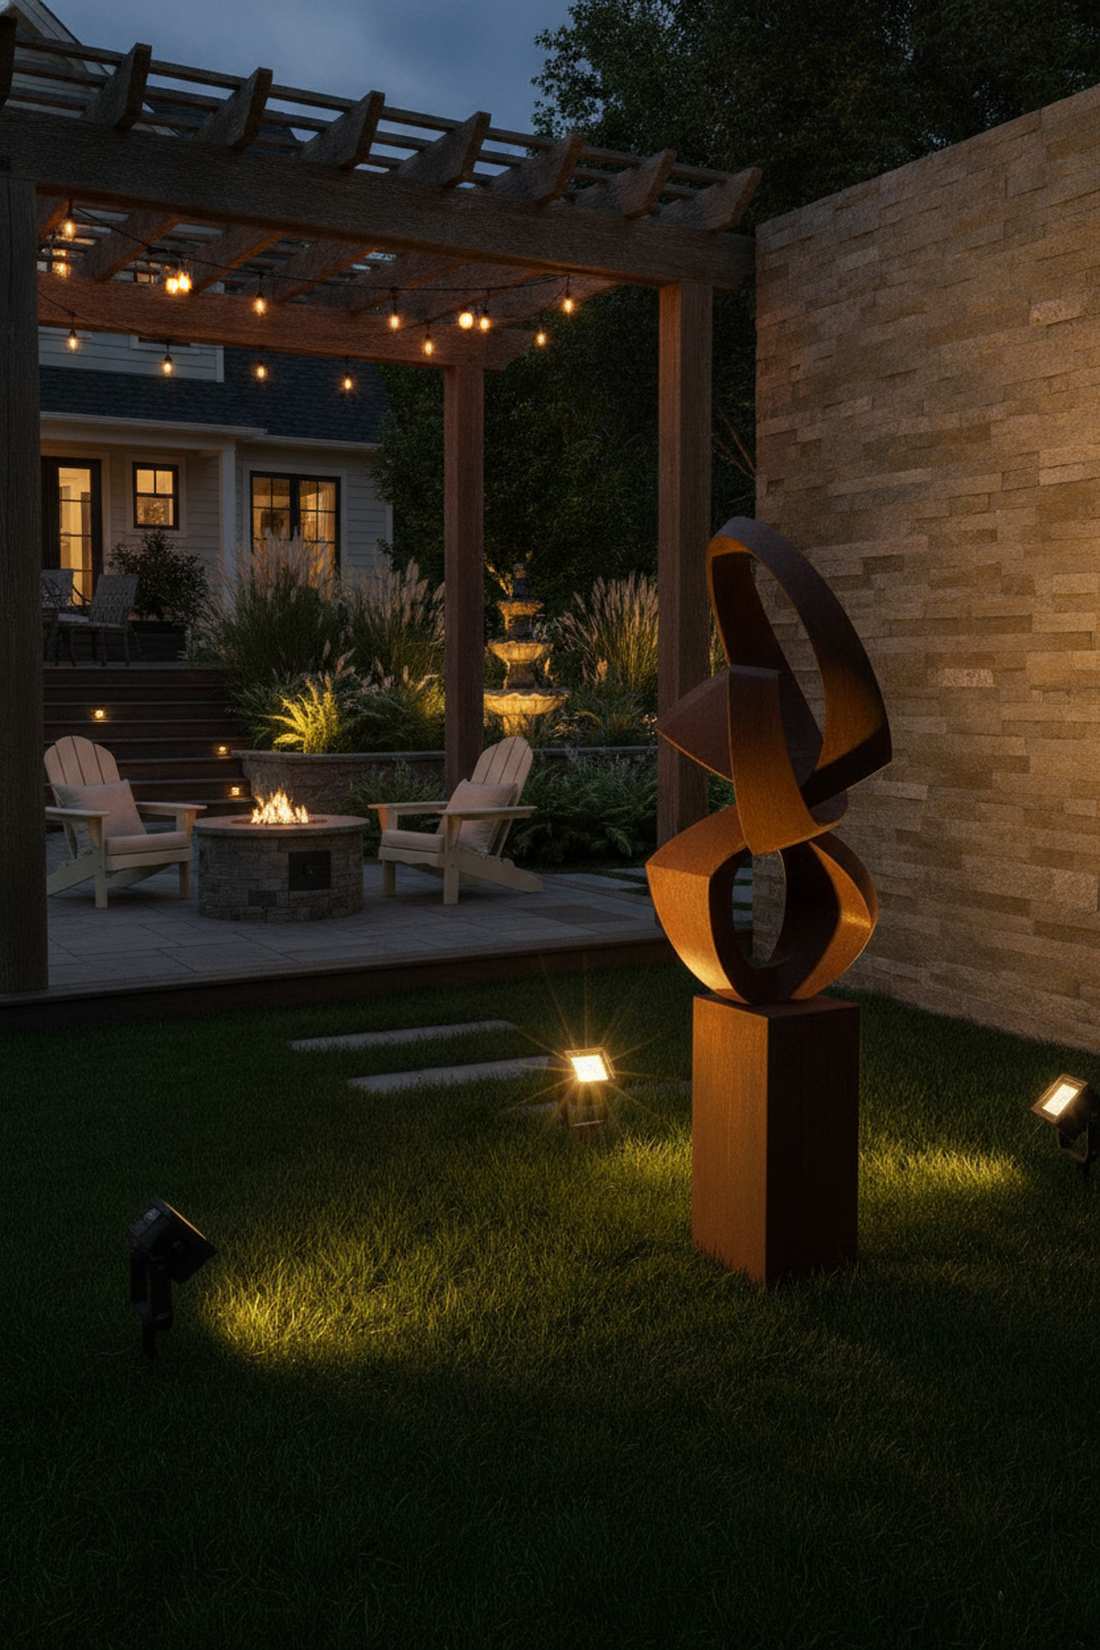
This precision lighting feels like stepping into a curated nighttime museum gallery. Outdoor garden sculpture spotlights command attention and reveal beautiful textures lost in the dark. Absolutely crucial for highlighting metal abstract art, stone fountains, or ornate birdbaths.
Casting a sharp, low-voltage beam from the ground up creates massive, dramatic shadows that emphasize the 3D structure. This theatrical technique makes generic outdoor areas look custom-built by high-end landscape architects. Investing in commercial-grade solar string lights with attachable micro-spotlights guarantees punchy, focused beams.
Properly accenting a major yard sculpture will run about $25–$45. Save this pro-lighting secret for your next backyard overhaul!
- Key Materials: Directional solar spotlights
- Vibe / Style: Dramatic museum gallery
- Difficulty: Requires angle tweaking
- Budget Breakdown: Spotlights: $30 | Mounting spikes: $5
- Creator’s Tip: Place the light at a steep 45-degree angle rather than straight on; the side-lighting creates much deeper, moodier shadows.
- Smart Sourcing: adjustable mini solar spotlights (starter kit) and anti-glare lighting hoods.
24. Birdbath & Water Feature Accent
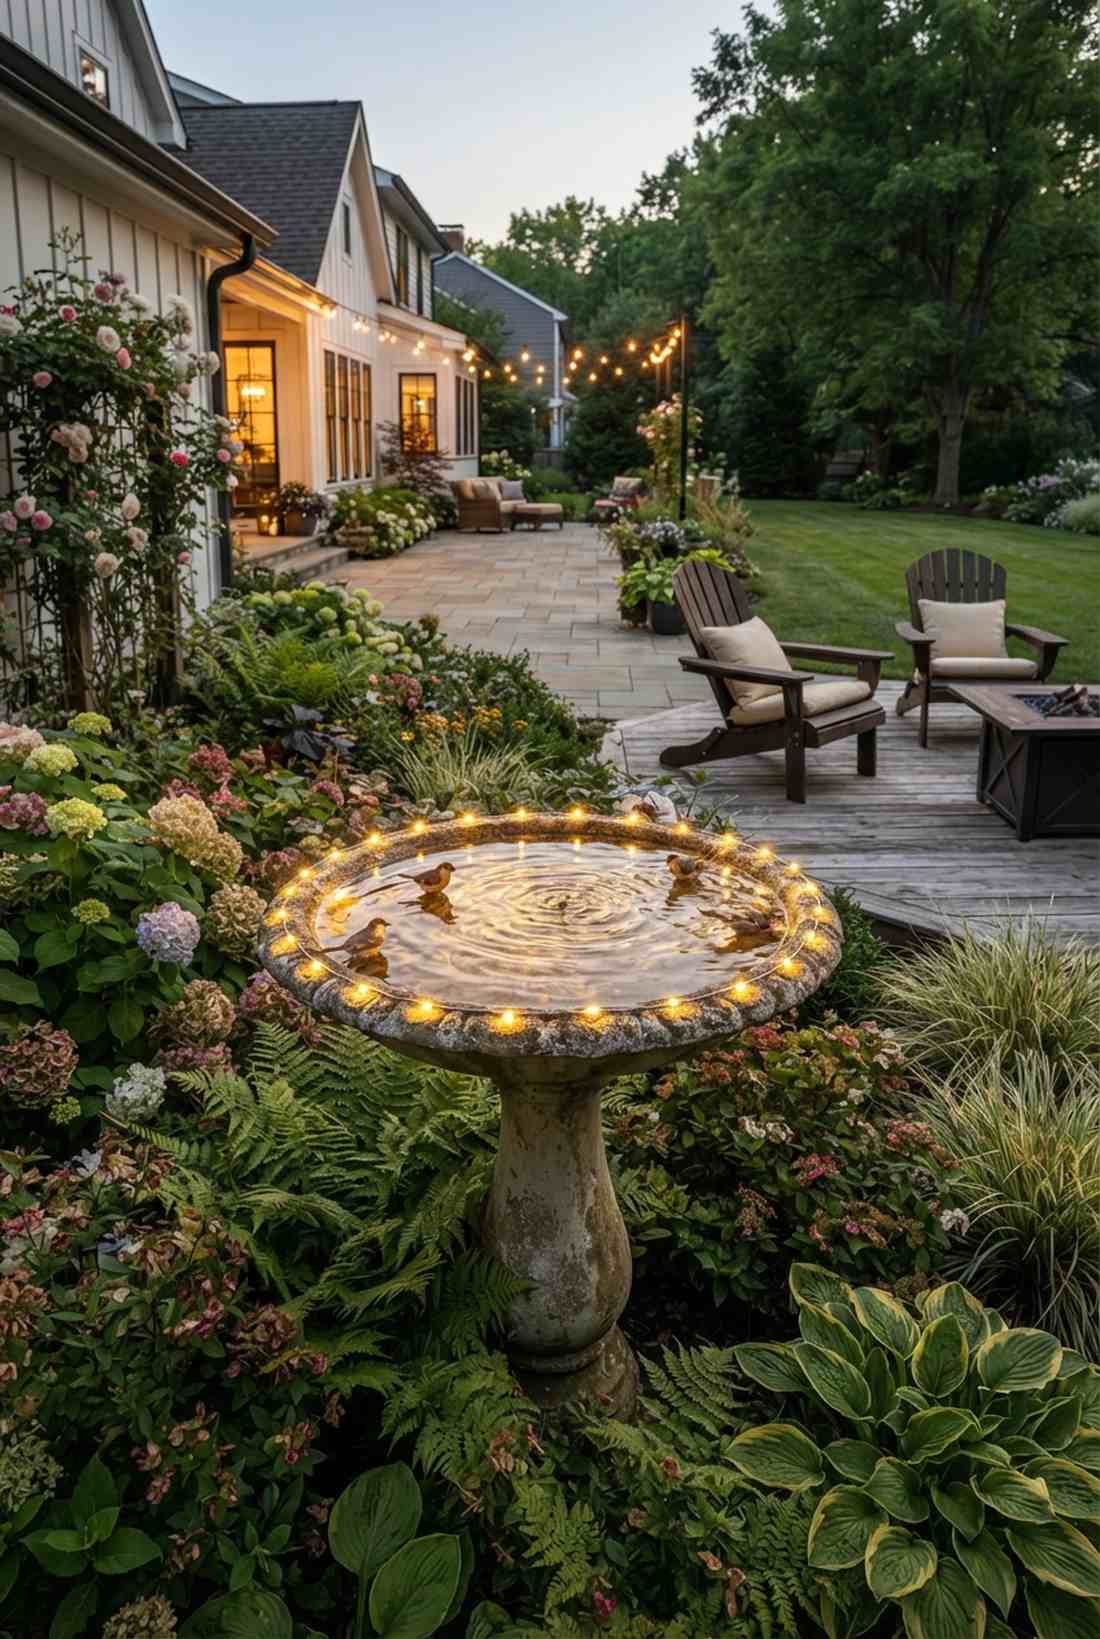
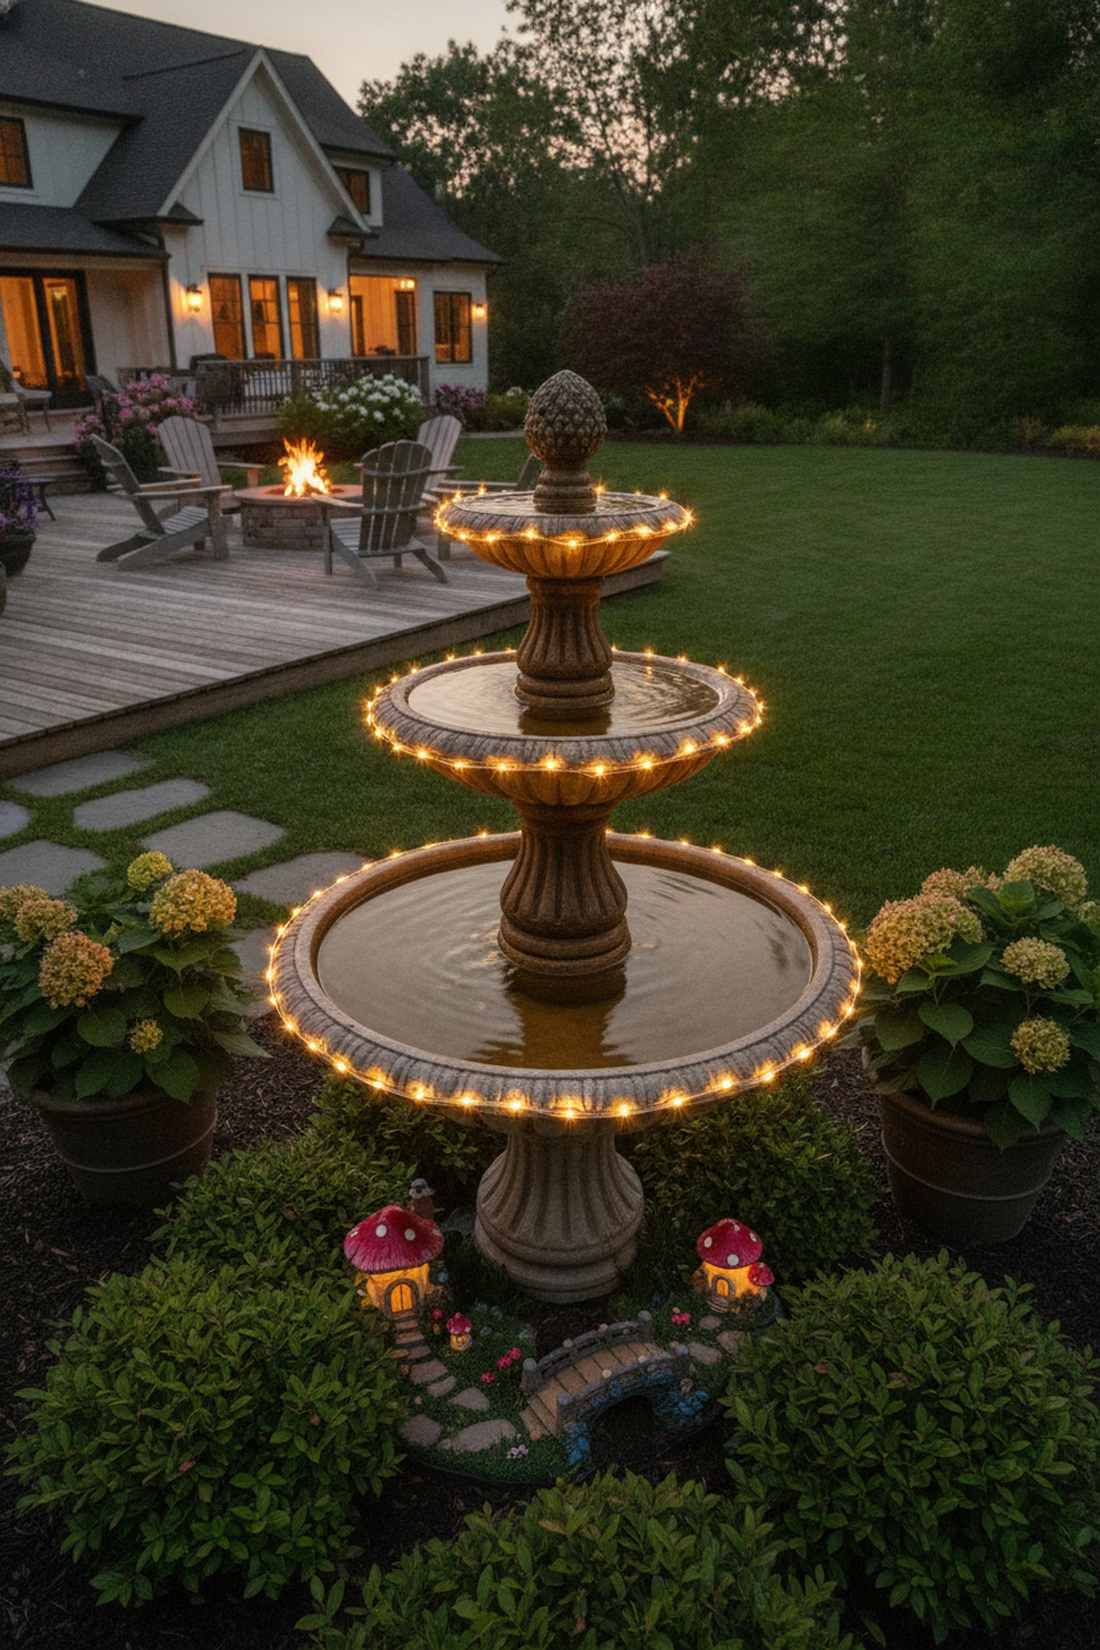
This shimmering reflection feels like a magical, glowing oasis tucked into the foliage. Solar water feature border lights double the visual impact by bouncing light directly off the rippling water. Fantastic for small stone birdbaths or cascading patio fountains.
Ringing the perimeter with warm LEDs makes the water surface act like a massive mirror, magnifying a small light source into a huge glow. This yields an incredibly upscale resort aesthetic without needing to wire dangerous 120v lines near water. Ensure you grab fairy garden kits with strict IP65 waterproof ratings for safety.
Upgrading a small water feature is shockingly cheap, usually under $20. Highly recommended for adding mesmerizing movement to your night garden.
- Key Materials: IP65 fully waterproof LED strings
- Vibe / Style: Shimmering glowing oasis
- Difficulty: Careful edge wrapping
- Budget Breakdown: Waterproof string: $18 | Securing putty: $4
- Creator’s Tip: Keep the lights exactly two inches away from the actual water line; splashing water will eventually corrode even the best seals.
- Smart Sourcing: submersible-rated solar LEDs (bulk pack) and waterproof outdoor mounting putty.
If you think standard garden lighting is boring, this next sculptural hack completely rewrites the rules…
25. Seasonal Topiary Forms
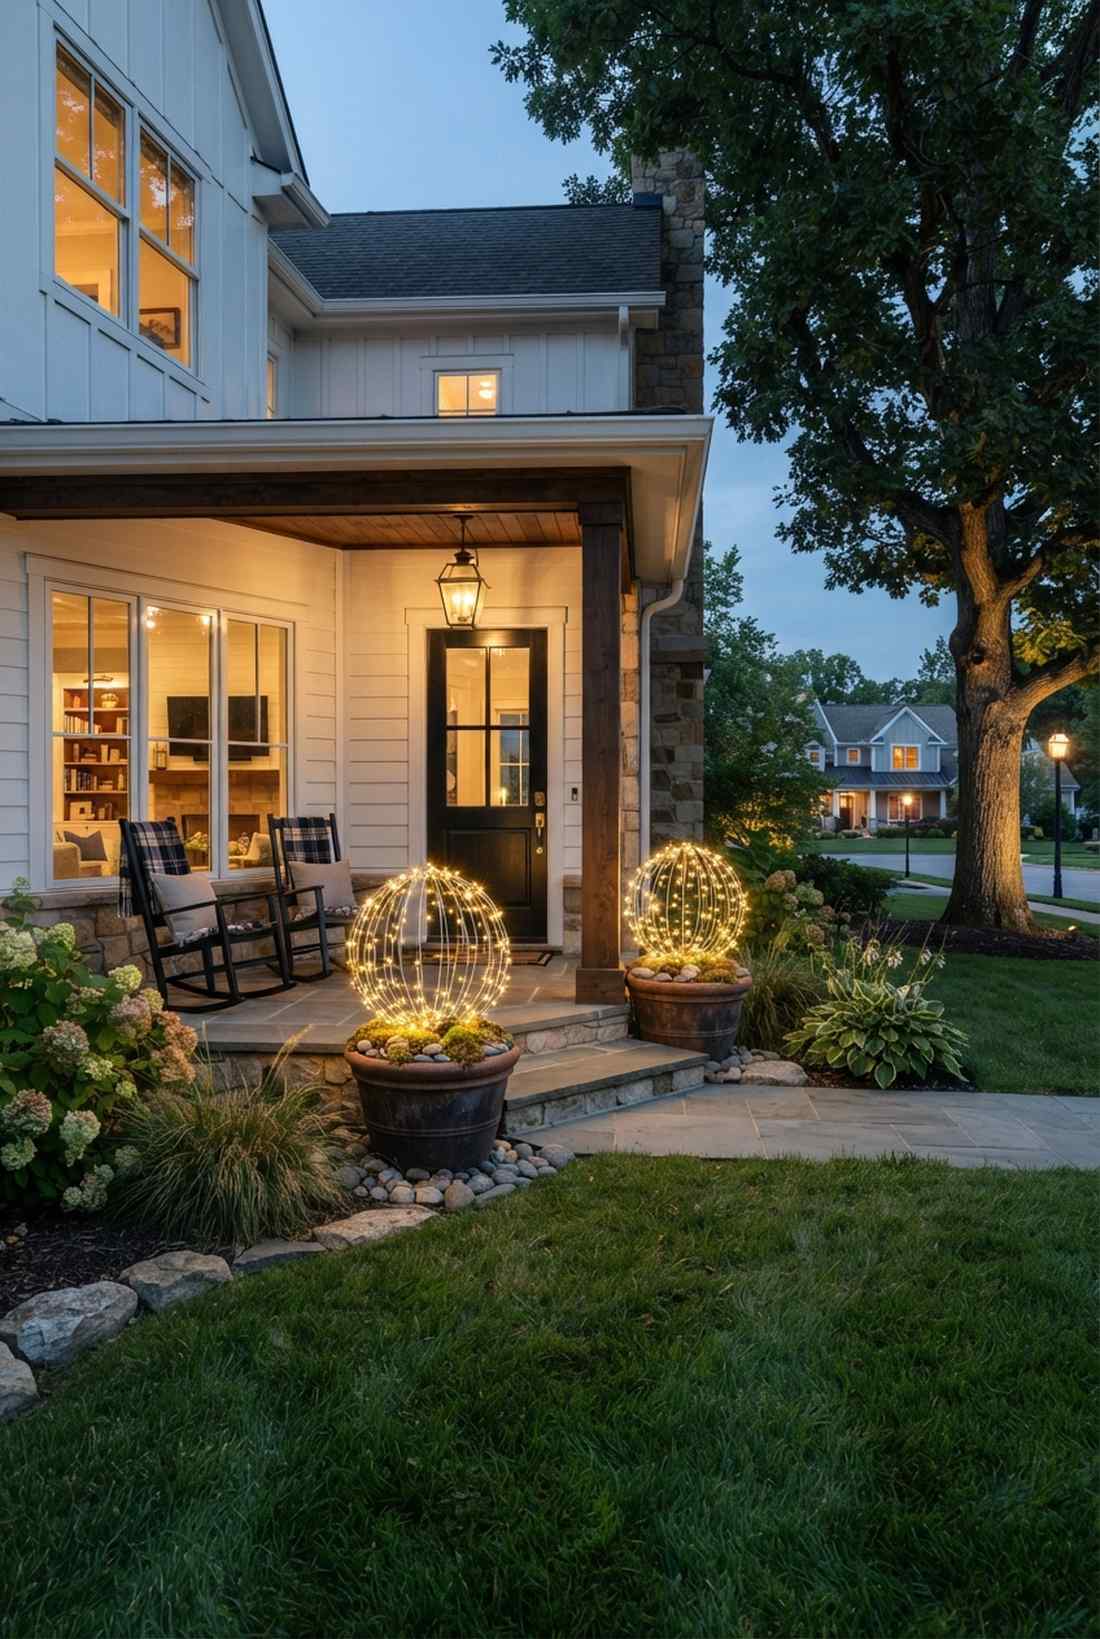
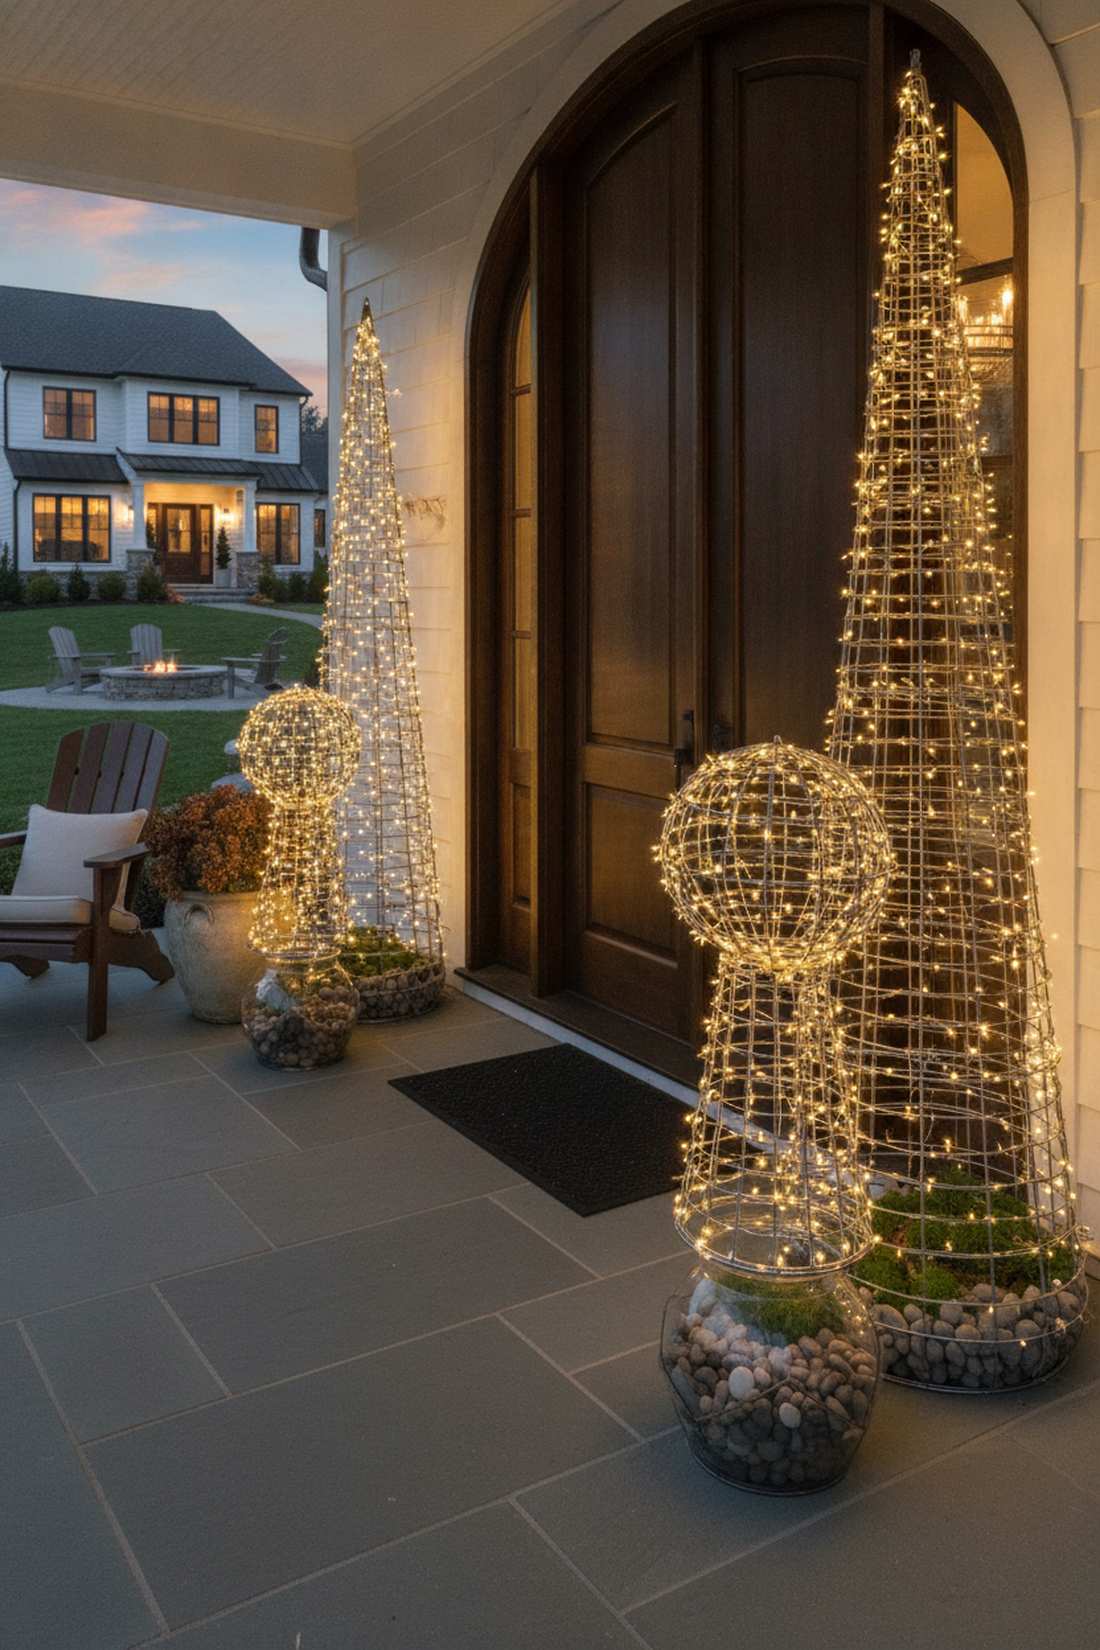
These glowing wire shapes feel like avant-garde illuminated sculptures floating in the dark. Wire topiary frame light wraps provide massive architectural interest with zero plant maintenance required. Ideal for flanking front doors with matching glowing spheres or cones.
Wrapping dense micro-lights tightly around a metal frame creates a solid-looking 3D object from a distance. This geometry completely avoids that tacky holiday-light vibe, pushing instead for high-end modern art. You can integrate terrarium accessories into the base to weigh down the hollow wire frames.
Building a pair of illuminated topiaries costs roughly $40–$70 for the frames and lights. Pin this brilliant zero-maintenance gardening hack!
- Key Materials: Bare wire topiary frames, dense fairy lights
- Vibe / Style: Illuminated modern sculpture
- Difficulty: Tedious wire wrapping
- Budget Breakdown: Wire frames: $35 | Lights: $25
- Creator’s Tip: Use a zip tie every four inches while wrapping the frame; otherwise, the tension will slip and the shape will warp.
- Smart Sourcing: galvanized topiary wire forms (starter kit) and high-density micro LED spools.
Fence & Wall Applications
Vertical boundary surfaces provide extensive mounting opportunities for solar fairy lights that transform perimeter fences from simple barriers into illuminated backdrops. These installations define property edges while adding depth to garden spaces.
26. Horizontal Rail Stringing

This glowing boundary line feels like a crisp, modern frame drawn around your entire property. Linear fence lighting blueprints aggressively widen the perceived size of a small backyard. Flawlessly suited for horizontal slat fences or classic split-rail borders.
Stretching the lights perfectly taut along the top rail emphasizes property lines without cluttering the vertical space. This strict linearity gives a designer-level finish that screams expensive architectural planning. Grabbing a pack of outdoor landscaping light bundles with UV-resistant coatings stops the wire from degrading under brutal summer sun.
Outlining a standard fence line will run about $30–$60 per major section. A phenomenal way to make your backyard feel twice as large.
- Key Materials: Heavy-duty rope lights or thick-wire stringers
- Vibe / Style: Crisp modern boundary
- Difficulty: Requires pulling taut and stapling
- Budget Breakdown: String lights: $45 | Cable tacks: $8
- Creator’s Tip: Never use a standard hammer-stapler directly over the wire; always use dedicated cable clips so you don’t accidentally pierce the jacket.
- Smart Sourcing: screw-in outdoor cable clips (bulk pack) and commercial-grade thick wire solar stringers.
27. Vertical Panel Cascading
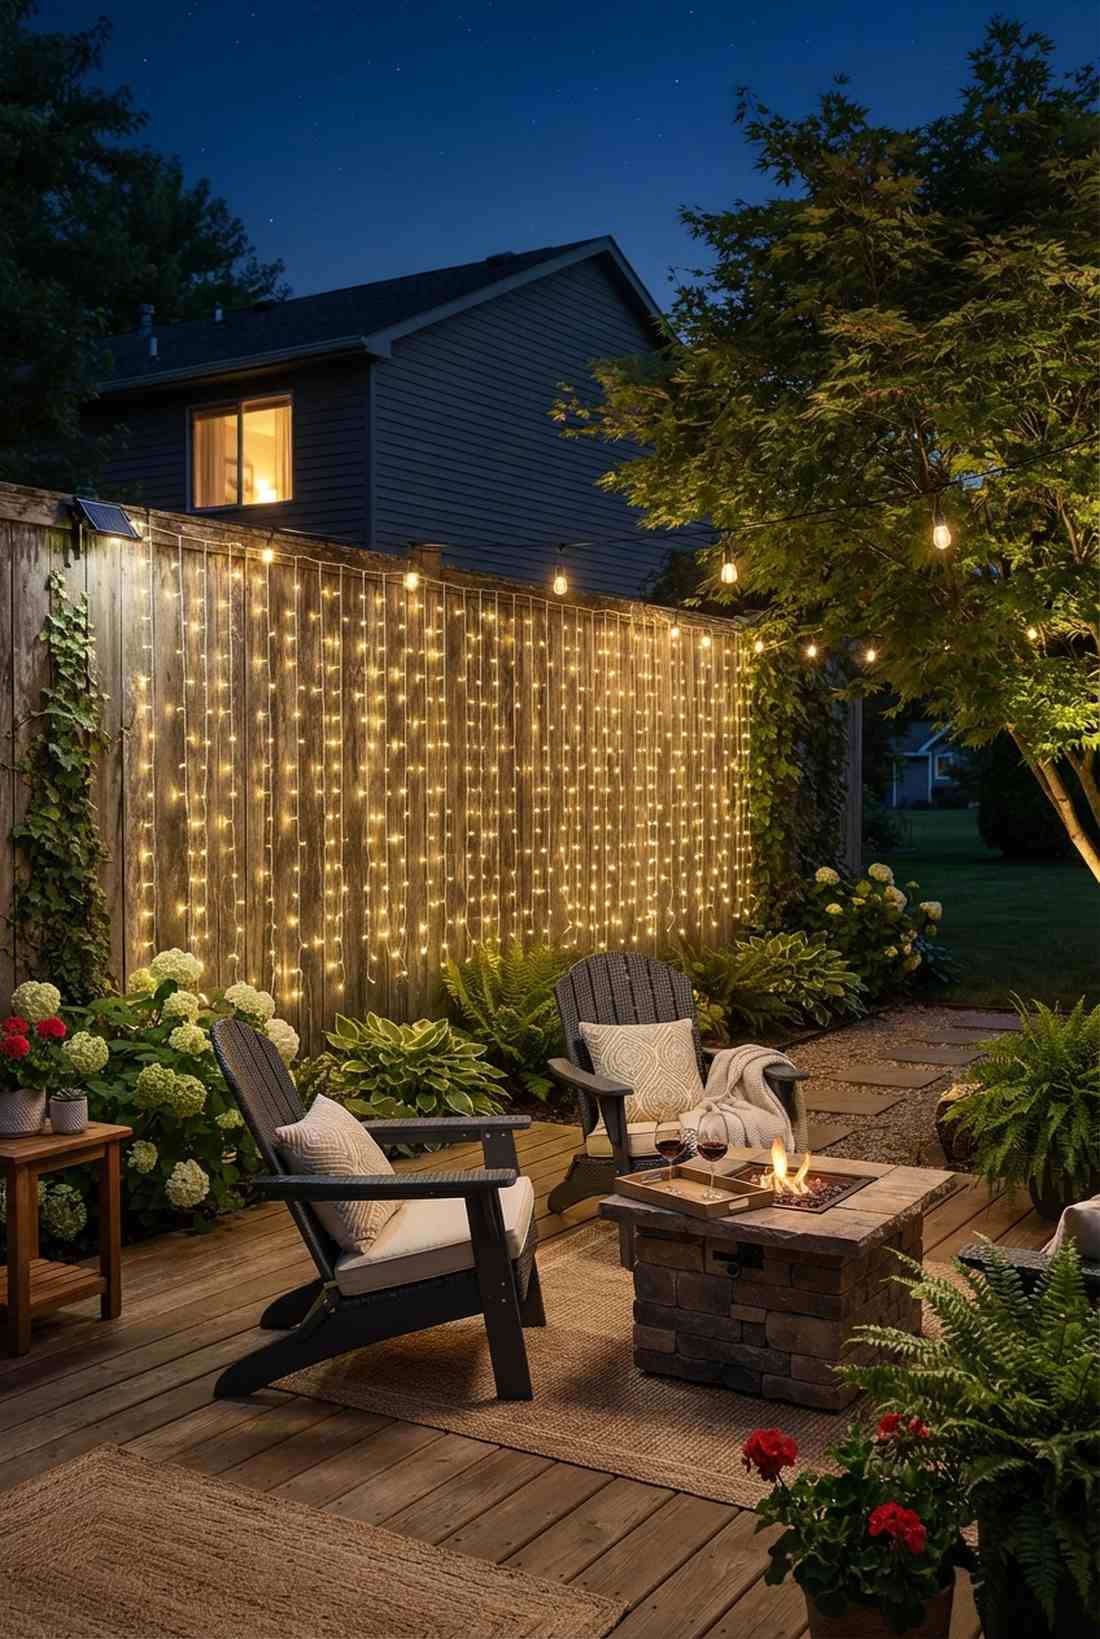
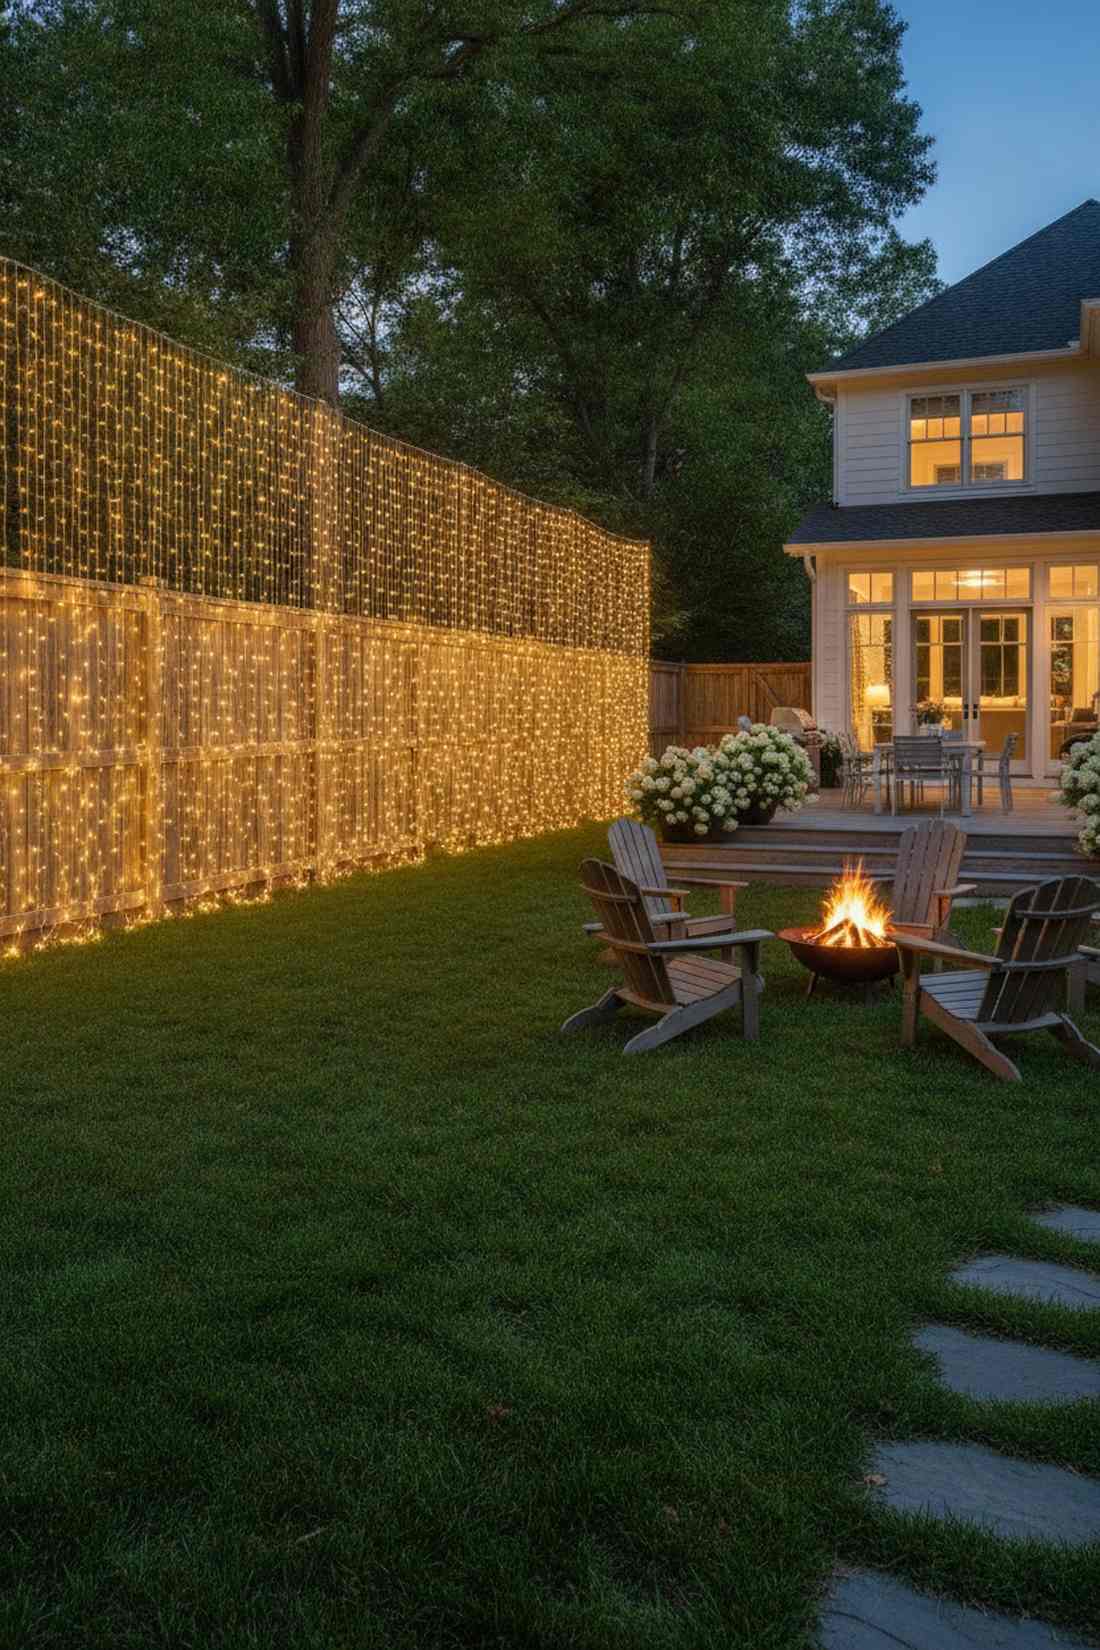
This dripping wall of light feels like a magical, glowing waterfall frozen in time. Cascading fence curtain lights create an overwhelming wall of ambiance that completely masks ugly, aging wood. Perfect for hiding dilapidated privacy fences or creating a massive photo backdrop.
Letting gravity pull the strands straight down creates an incredibly organic, relaxing visual rhythm. This overwhelming coverage tricks visitors into thinking it’s custom wired for a high-end luxury event. Finding solar string lights clearance deals on “curtain” style sets saves you from having to wire 50 individual vertical drops.
Covering a large fence panel costs around $45–$80 using pre-made curtain nets. Save this for your ultimate summer party prep list!
- Key Materials: Pre-wired solar curtain light panels
- Vibe / Style: Magical glowing waterfall
- Difficulty: Very easy top-mounting
- Budget Breakdown: Curtain nets: $60 | Top rail hooks: $10
- Creator’s Tip: Mount the main horizontal support wire an inch behind the top rail so the hardware is completely hidden from the front view.
- Smart Sourcing: pre-built solar curtain nets (starter kit) and heavy-duty cup hooks.
28. Net Light Fence Coverage
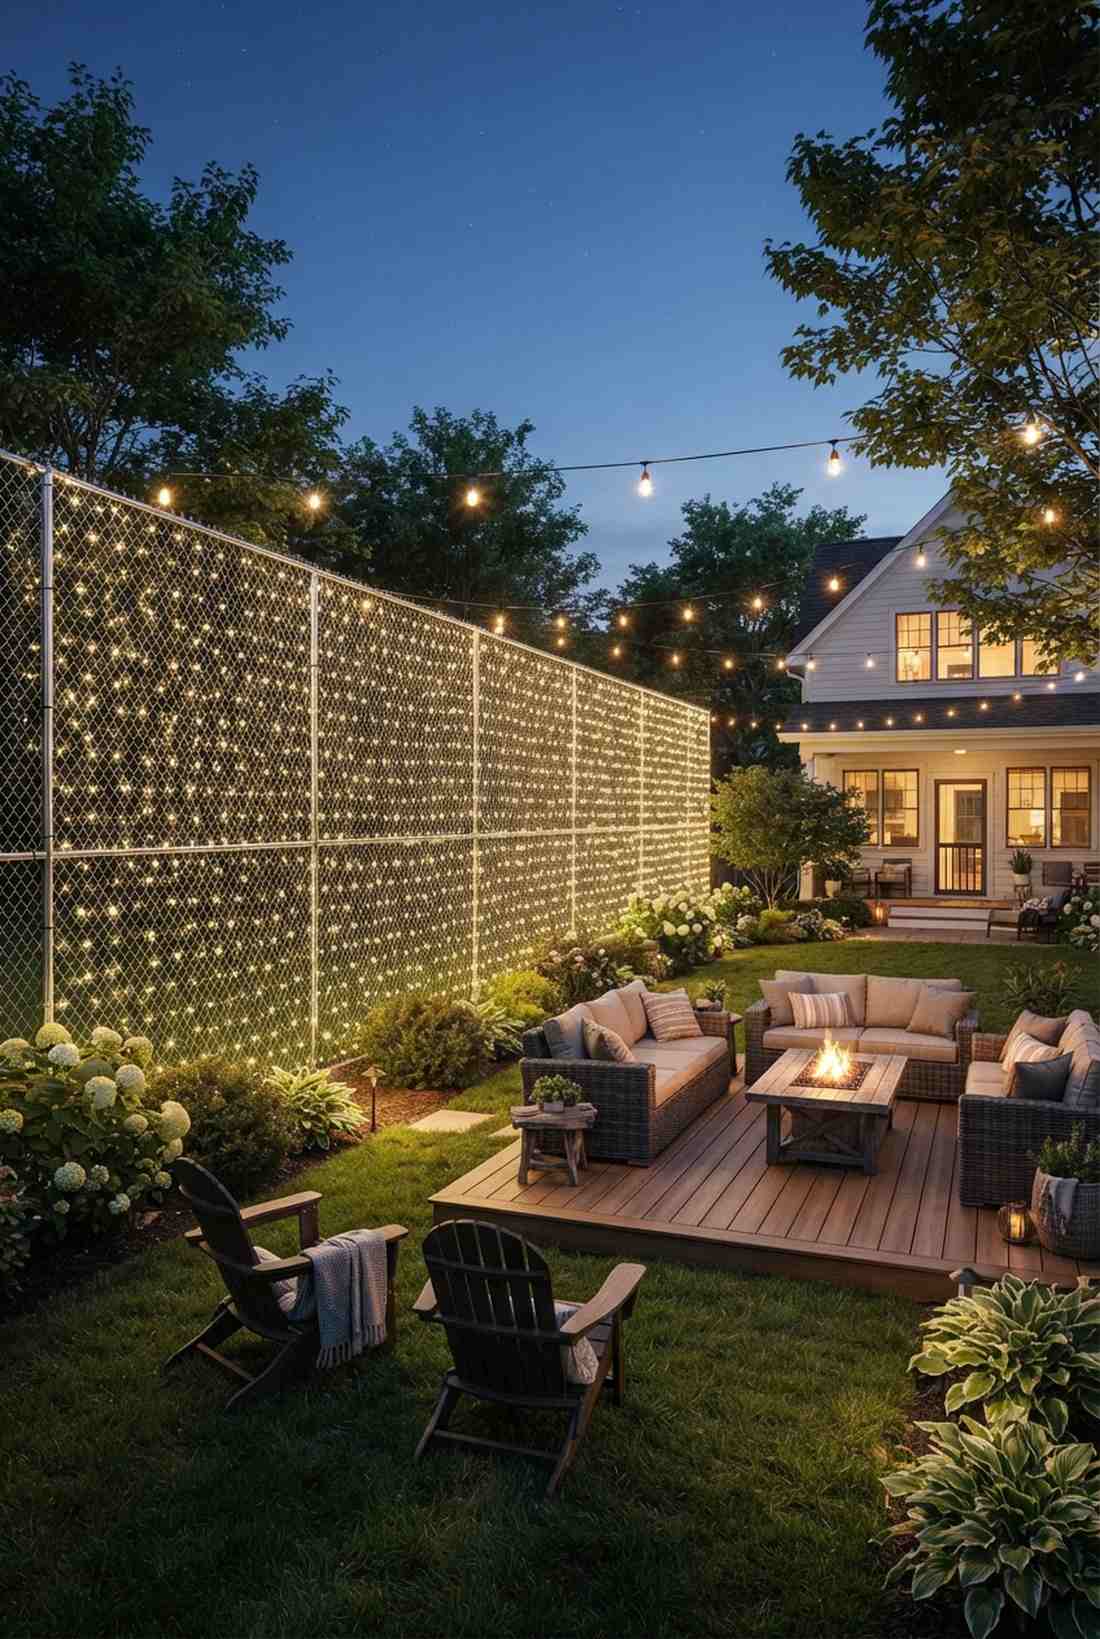
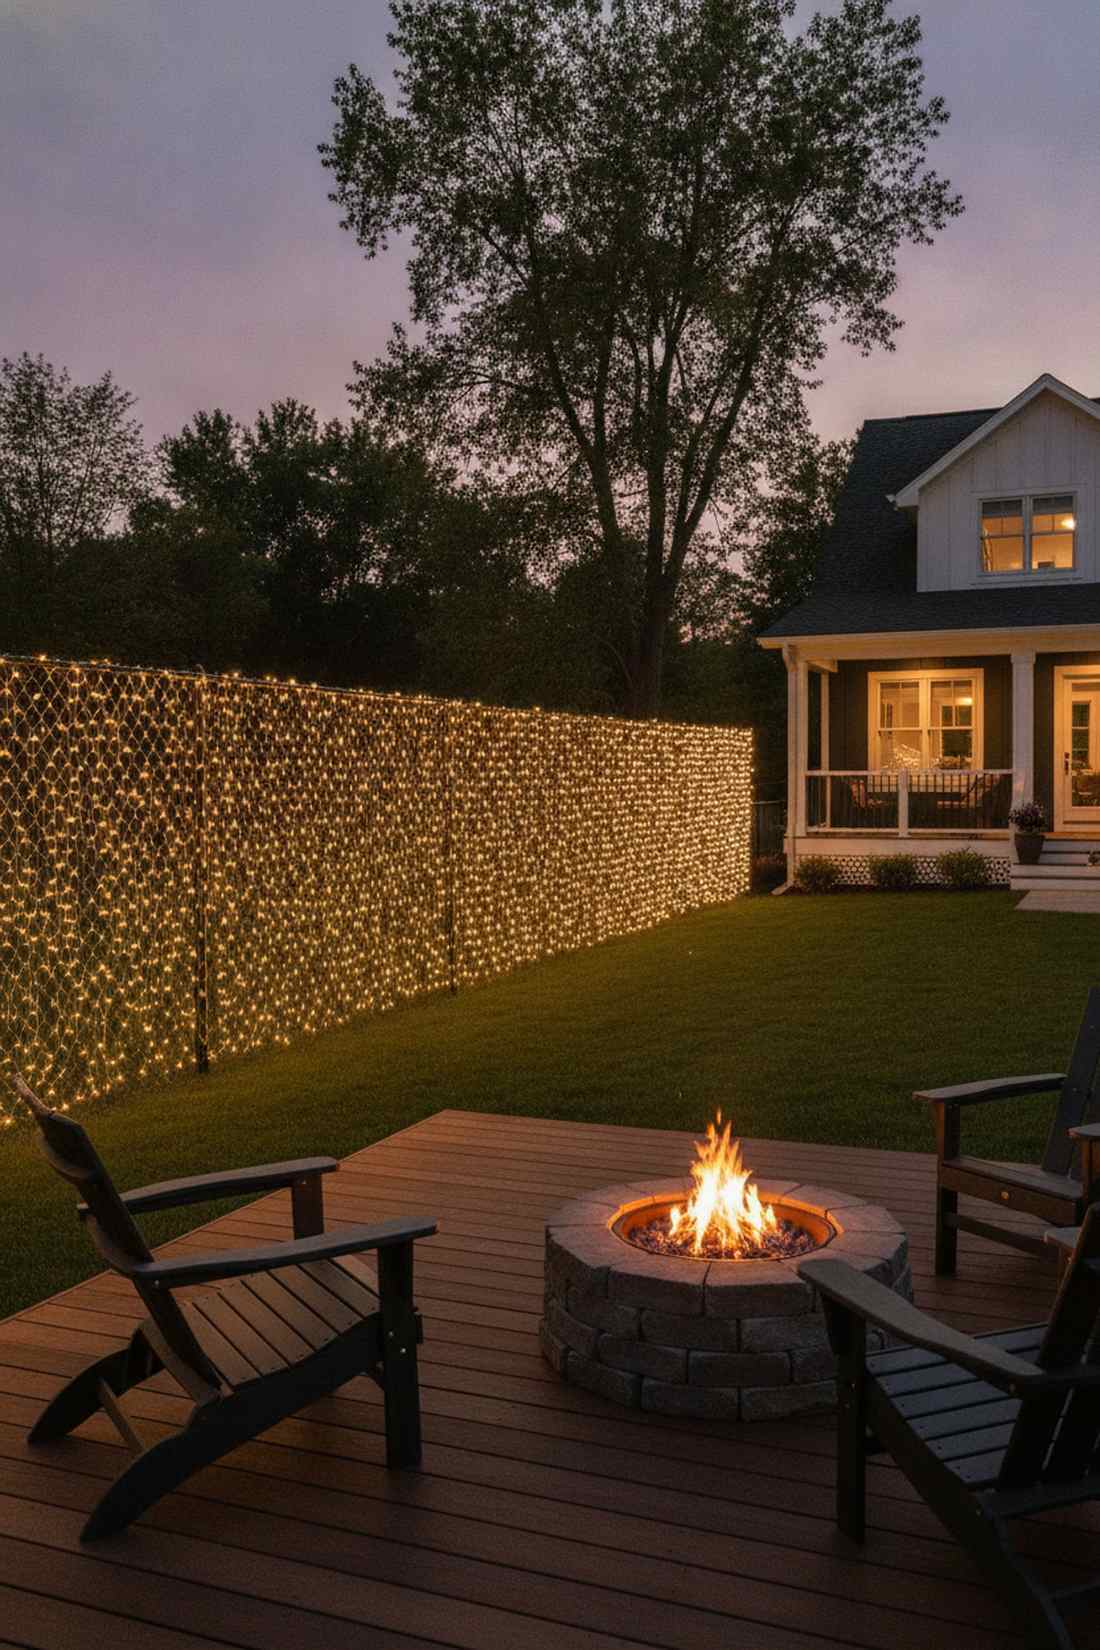
This glowing grid feels like a shimmering screen of stars dropped right onto your property line. Solar net light fence wraps provide the absolute fastest way to cover massive vertical square footage. Excellent for chain-link fences that desperately need a visual upgrade.
Stretching a pre-woven grid across the chain link instantly turns an industrial eyesore into a glowing feature wall. This rapid deployment upgrades the space far beyond its cost, saving hours of tangled frustration. Look for prebuilt backyard lighting kits specifically designed as “shrub nets” for the easiest installation.
You can blanket a large ugly fence for a highly efficient $35–$60. Highly recommended for renters who can’t build a new wood fence.
- Key Materials: 5×5 solar LED net lights
- Vibe / Style: Luminous star screen
- Difficulty: Fast stretch and clip
- Budget Breakdown: Net kits: $40 | Zip ties: $5
- Creator’s Tip: Stretch the net as tightly as physically possible; any loose, sagging areas will look incredibly sloppy and cheap during the day.
- Smart Sourcing: heavy-duty outdoor solar nets (bulk pack) and UV-resistant black zip ties.
29. Post Cap Accent Lighting
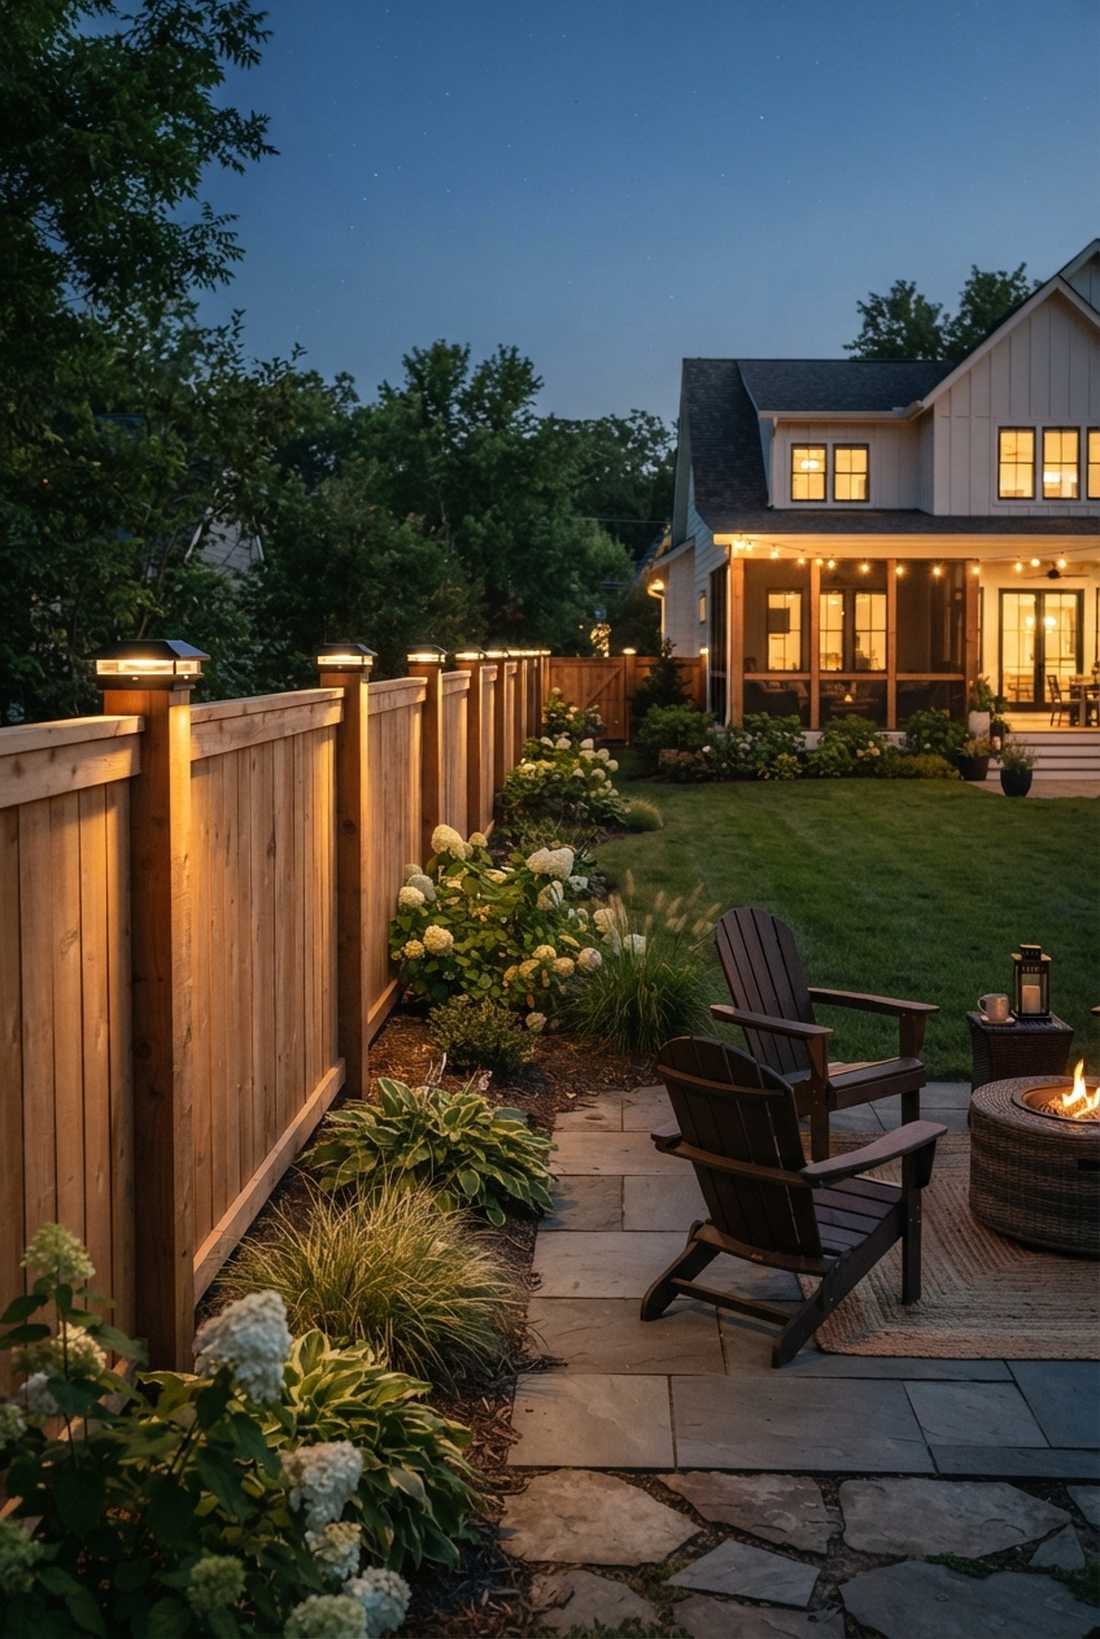
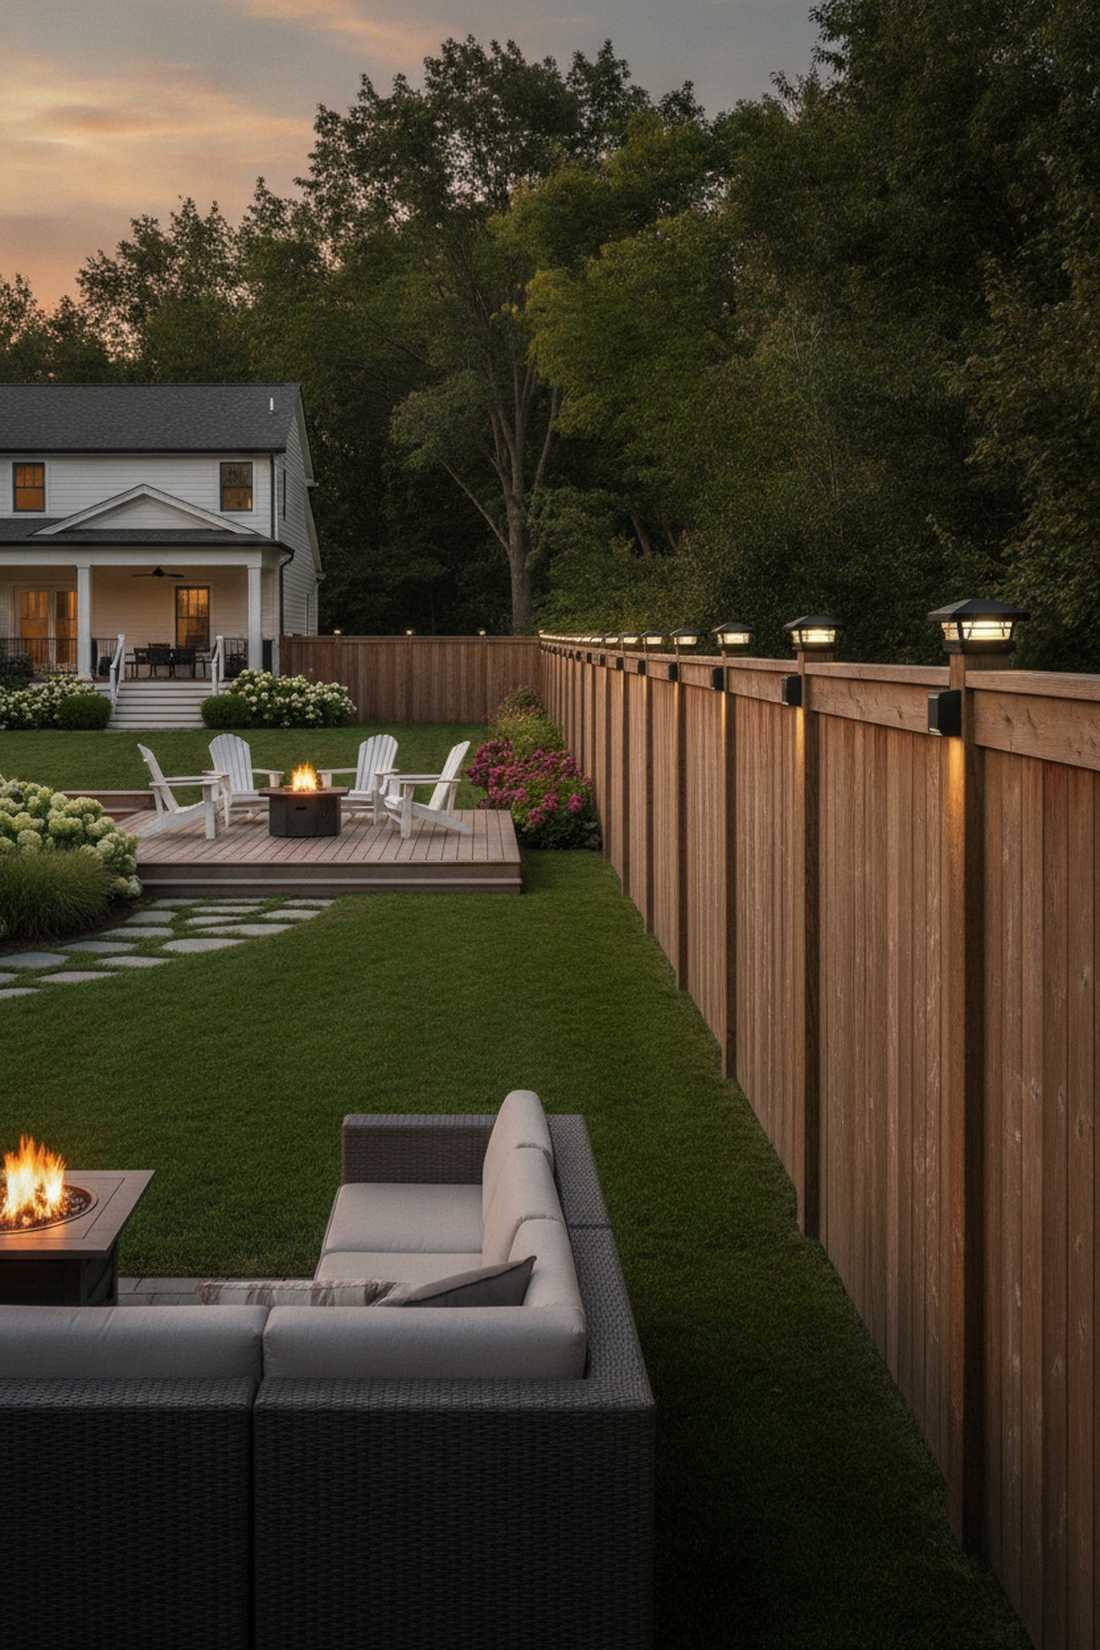
This rhythmic dotting of light feels like a sequence of elegant beacons guiding you home. Solar post cap illuminators offer structured, architectural accents that leave the actual fence boards clean and uncluttered. Best utilized on thick 4×4 wooden privacy fence posts.
Capping the vertical posts finishes the fence’s geometry, pulling the eye down the entire length of the property. This deliberate placement yields an incredibly upscale resort aesthetic that looks like it cost thousands in hardscaping. Upgrading to premium garden stake sets with matching square bases ensures a flush, professional fit.
Outfitting a standard yard will cost roughly $15–$25 per post cap. Pin this to add an instant touch of class to your backyard border!
- Key Materials: 4×4 fitted solar post caps
- Vibe / Style: Elegant architectural beacons
- Difficulty: Simple screw-on capping
- Budget Breakdown: Caps: $20 each | Mounting screws: $2
- Creator’s Tip: Ensure your wooden posts are completely level on top before screwing these in, or the lights will sit at a maddeningly crooked angle.
- Smart Sourcing: weather-sealed 4×4 solar caps (bulk pack) and rust-proof exterior decking screws.
Most privacy screens look incredibly flat at night… until you apply this genius, high-contrast backlighting trick coming up.
30. Privacy Screen Backlighting
This glowing silhouette feels like a high-end designer lounge where shadows become the actual artwork. Backlit slatted privacy panels manipulate negative space to create mind-blowing contrast. Absolutely stunning behind horizontal cedar slats or laser-cut metal garden screens.
Forcing the light to push through the narrow gaps turns the physical screen into a dramatic, glowing silhouette. This technique completely avoids that tacky holiday-light vibe, leaning hard into ultra-modern architectural design. Securing heavy-duty waterproof LED strips to the back frame keeps the diodes perfectly hidden from all frontal angles.
You can backlight an entire privacy wall for a surprisingly low $40–$65. A phenomenal technique to make a small patio feel like a luxury spa.
- Key Materials: Flat LED tape lights, offset spacers
- Vibe / Style: Ultra-modern spa silhouette
- Difficulty: Requires rear access to panel
- Budget Breakdown: Tape lights: $45 | Wood spacers: $10
- Creator’s Tip: Mount the lights exactly 4 inches behind the slats; mounting them too close creates harsh hot spots instead of a smooth glow.
- Smart Sourcing: high-diffusion solar strip lights (starter kit) and waterproof silicone mounting brackets.
Specialty & Creative Solutions
Advanced solar fairy light applications push beyond conventional installation approaches to create signature garden features. These techniques require additional planning but deliver distinctive results unavailable through standard methods.
31. Ground-Level Constellation Patterns

This scattered ground glow feels like you’ve dragged the night sky directly onto your lawn. Scattered constellation garden markers ignore boring straight lines in favor of pure, chaotic magic. Perfect for large, low-traffic grass expanses viewed from a second-story deck.
Plotting actual star maps on your lawn creates a brilliant hidden easter egg for guests to discover. This whimsical layout delivers a surprisingly premium look that feels bespoke and artistic. Adding in some miniature garden supplies and varied lumen bulbs replicates the exact magnitude differences of real stars.
Creating your own galaxy costs a very reasonable $35–$60 in varied stake lights. Pin this incredibly unique idea if you want a yard unlike any other!
- Key Materials: Mixed-brightness flush ground solar disks
- Vibe / Style: Magical terrestrial galaxy
- Difficulty: Requires overhead pattern mapping
- Budget Breakdown: Mixed disks: $45 | Marking paint: $5
- Creator’s Tip: Use landscaping spray paint to mark your exact constellation dots before sinking a single light into the turf.
- Smart Sourcing: flush-mount solar ground disks (bulk pack) and water-based lawn marking spray.
32. Seasonal Color-Changing Displays
This shifting palette feels like a dynamic, living art installation that breathes with the holidays. RGB outdoor solar fairy strings allow you to completely alter your yard’s mood with a single remote click. Excellent for homeowners who love decorating for every single holiday but hate rewiring.
Programming deep oranges for fall or icy blues for winter keeps the landscape feeling fresh year-round. This flexibility upgrades the space far beyond its cost, entirely eliminating the need for separate holiday light boxes. Picking up a top-rated outdoor garden decor RGB kit ensures the colors are deeply saturated, not washed out.
A high-quality color-changing system will run about $40–$75. Highly recommended to future-proof your exterior decorating budget.
- Key Materials: RGB LED solar strings with remote
- Vibe / Style: Dynamic holiday chameleon
- Difficulty: Simple app/remote syncing
- Budget Breakdown: RGB strands: $55 | App controller: included
- Creator’s Tip: Set the default to a warm, static amber for normal days so it doesn’t look like a nightclub on a random Tuesday.
- Smart Sourcing: app-controlled RGB solar kits (starter kit) and UV-coated colored wire bundles.
33. Pathway Edge Linear Trenching
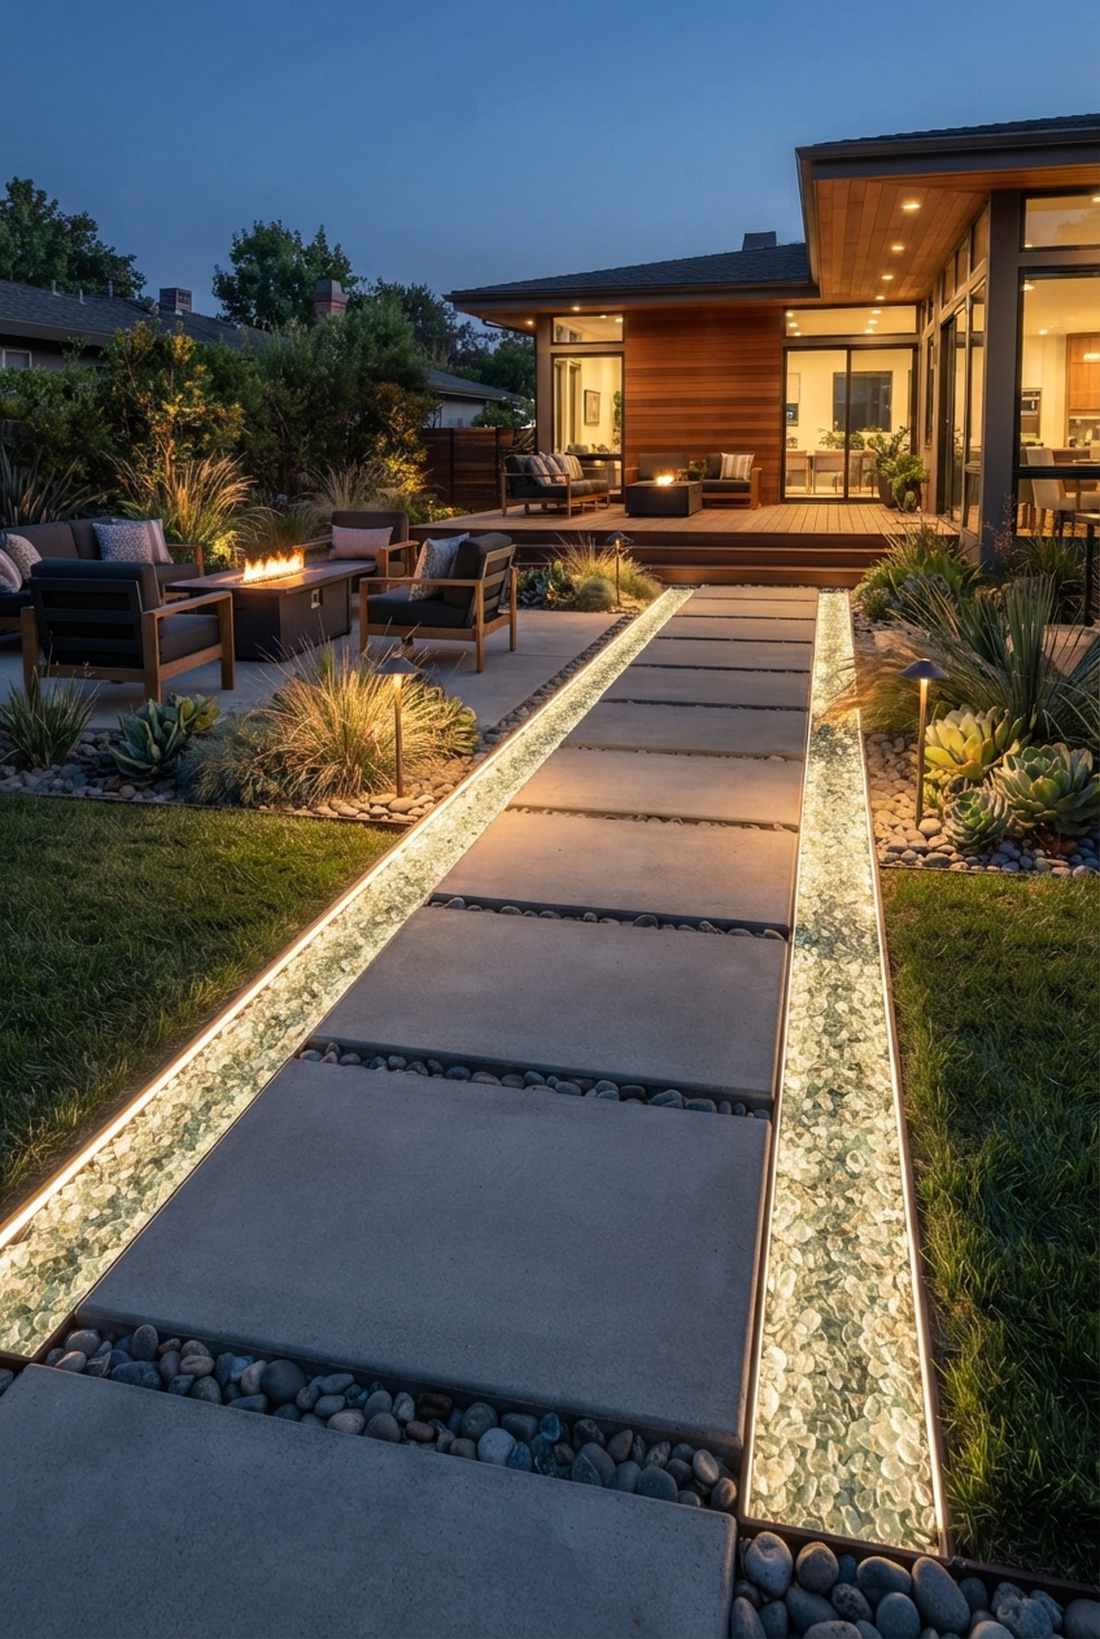
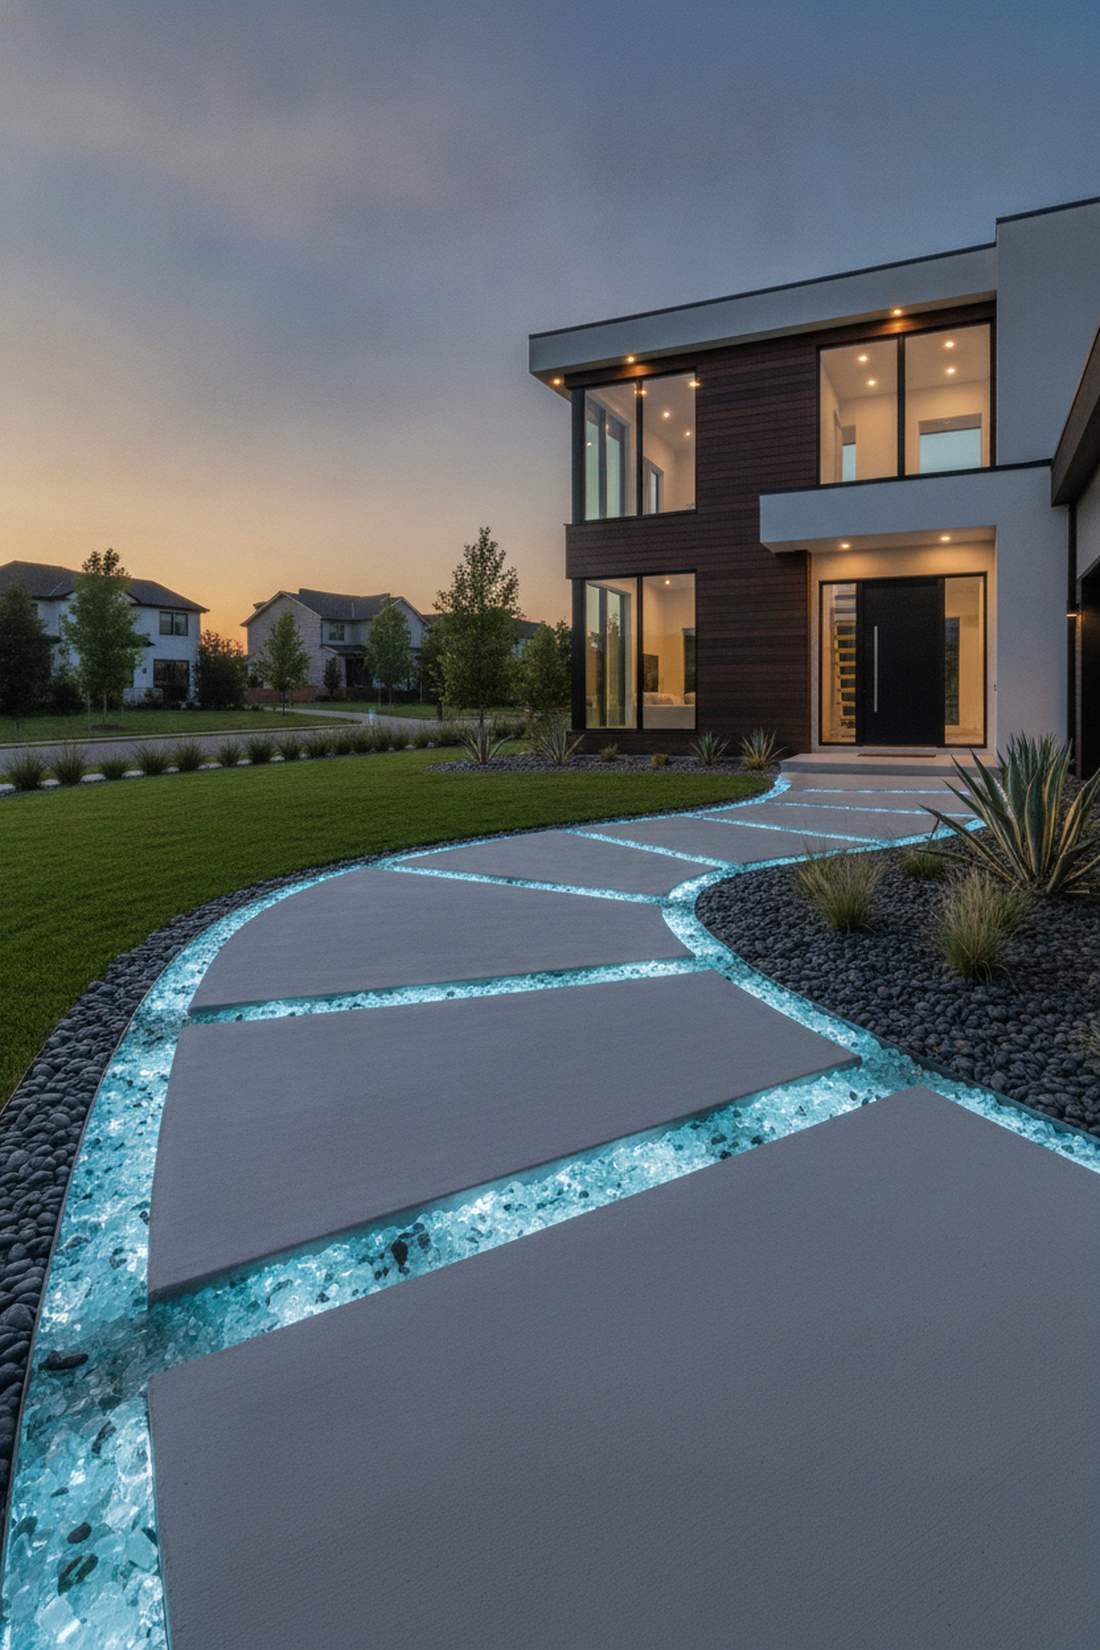
This hidden glowing trench feels like a futuristic sci-fi walkway guiding your steps. Sub-surface glowing gravel trenches completely hide the fixtures while making the actual ground appear to radiate light. Flawlessly applied to modern concrete slab walkways bordered by river rock.
Burying waterproof lines under translucent glass mulch turns the entire border into a solid beam of diffused light. This severe architectural trick makes generic outdoor areas look custom-built by a high-end design firm. Sourcing heavy-duty waterproof LED strips rated for direct soil burial is absolutely critical here.
Digging and lighting this trench costs around $60–$100 due to the specialty glass mulch. Save this for your ultimate modern front yard blueprint!
- Key Materials: Direct-burial LED ropes, recycled glass mulch
- Vibe / Style: Ultra-modern glowing border
- Difficulty: Requires shallow trench digging
- Budget Breakdown: Burial lights: $50 | Glass mulch: $35
- Creator’s Tip: Always lay landscape fabric down inside the trench before the lights to stop mud from burying your diodes after a heavy rain.
- Smart Sourcing: direct-burial silicone light ropes (bulk pack) and tumbled landscape glass chips.
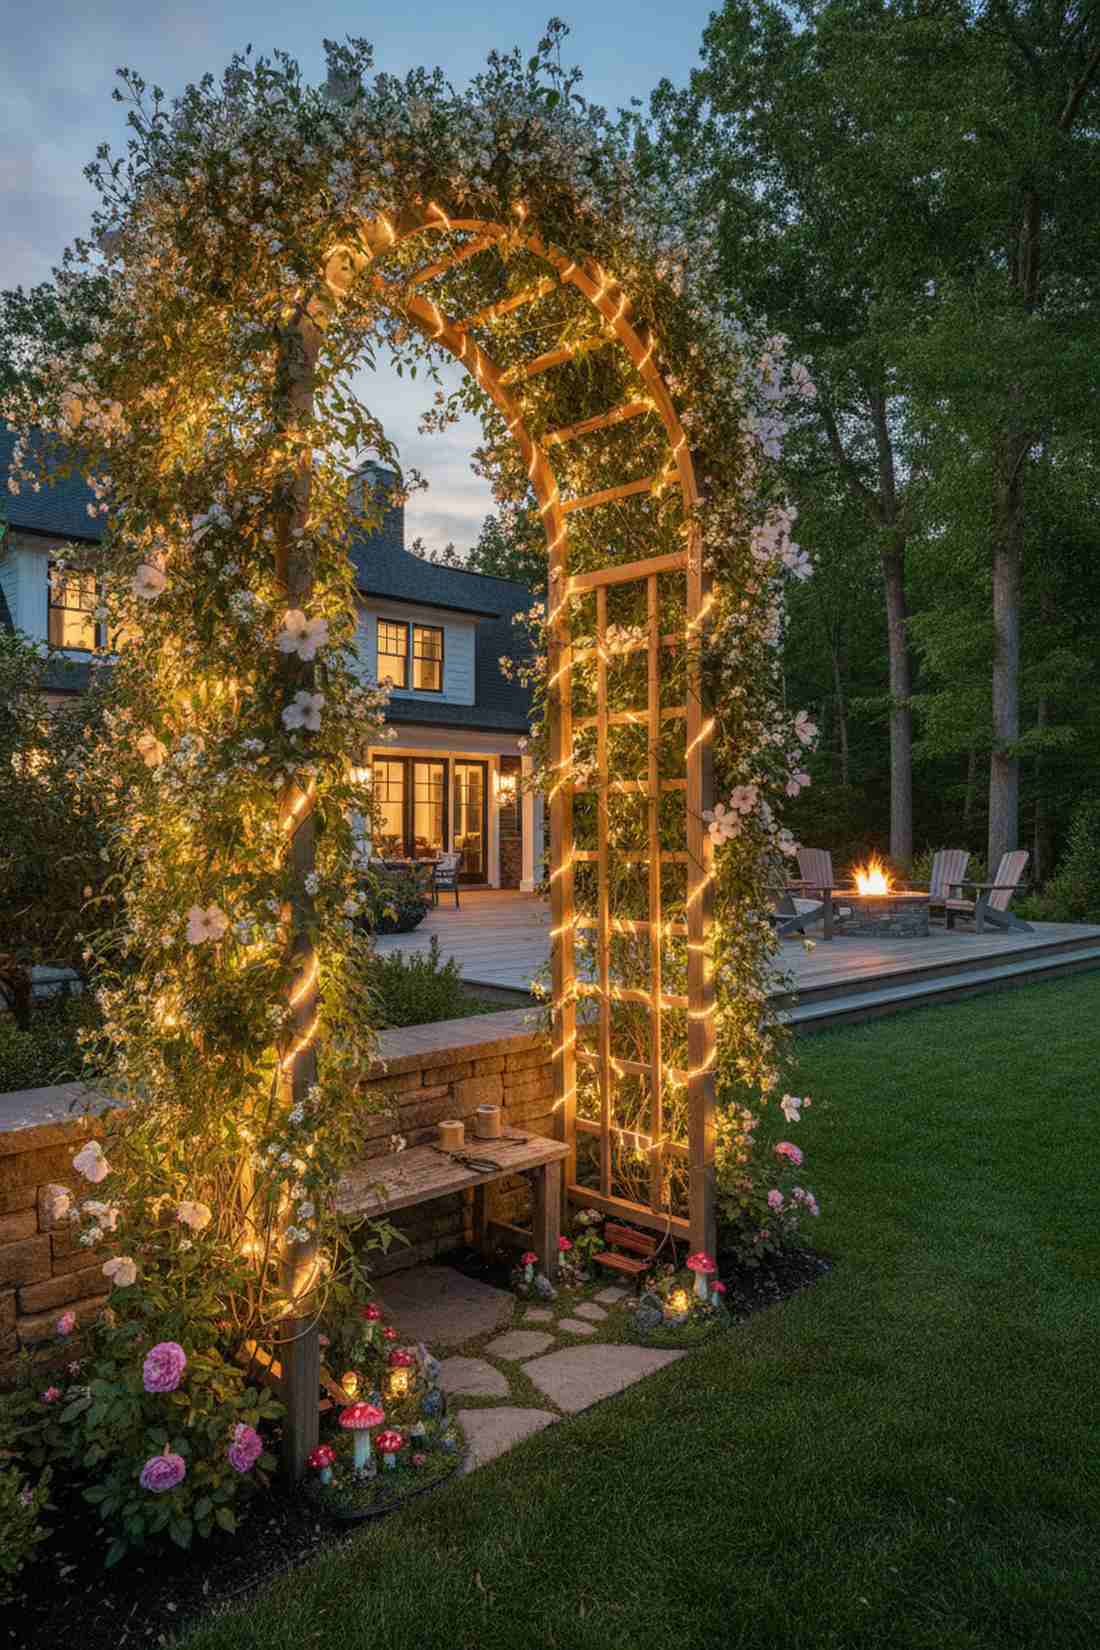
34. Arbor & Entry Gateway Definition
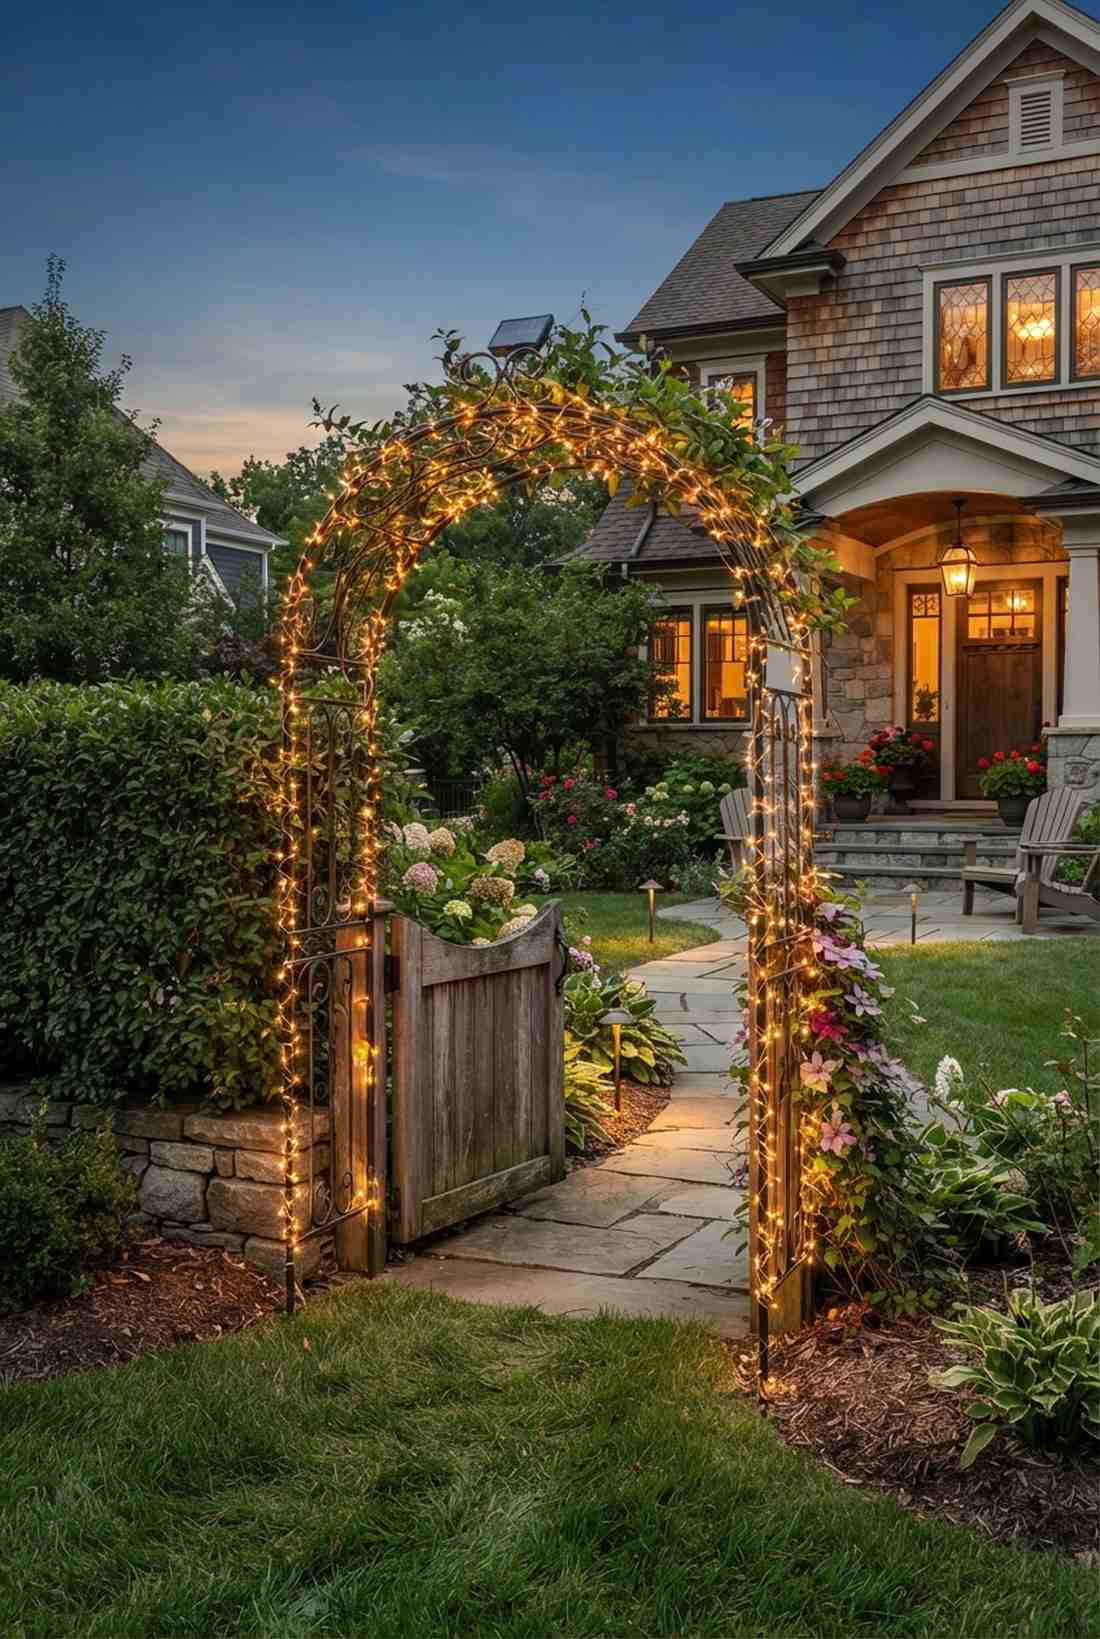
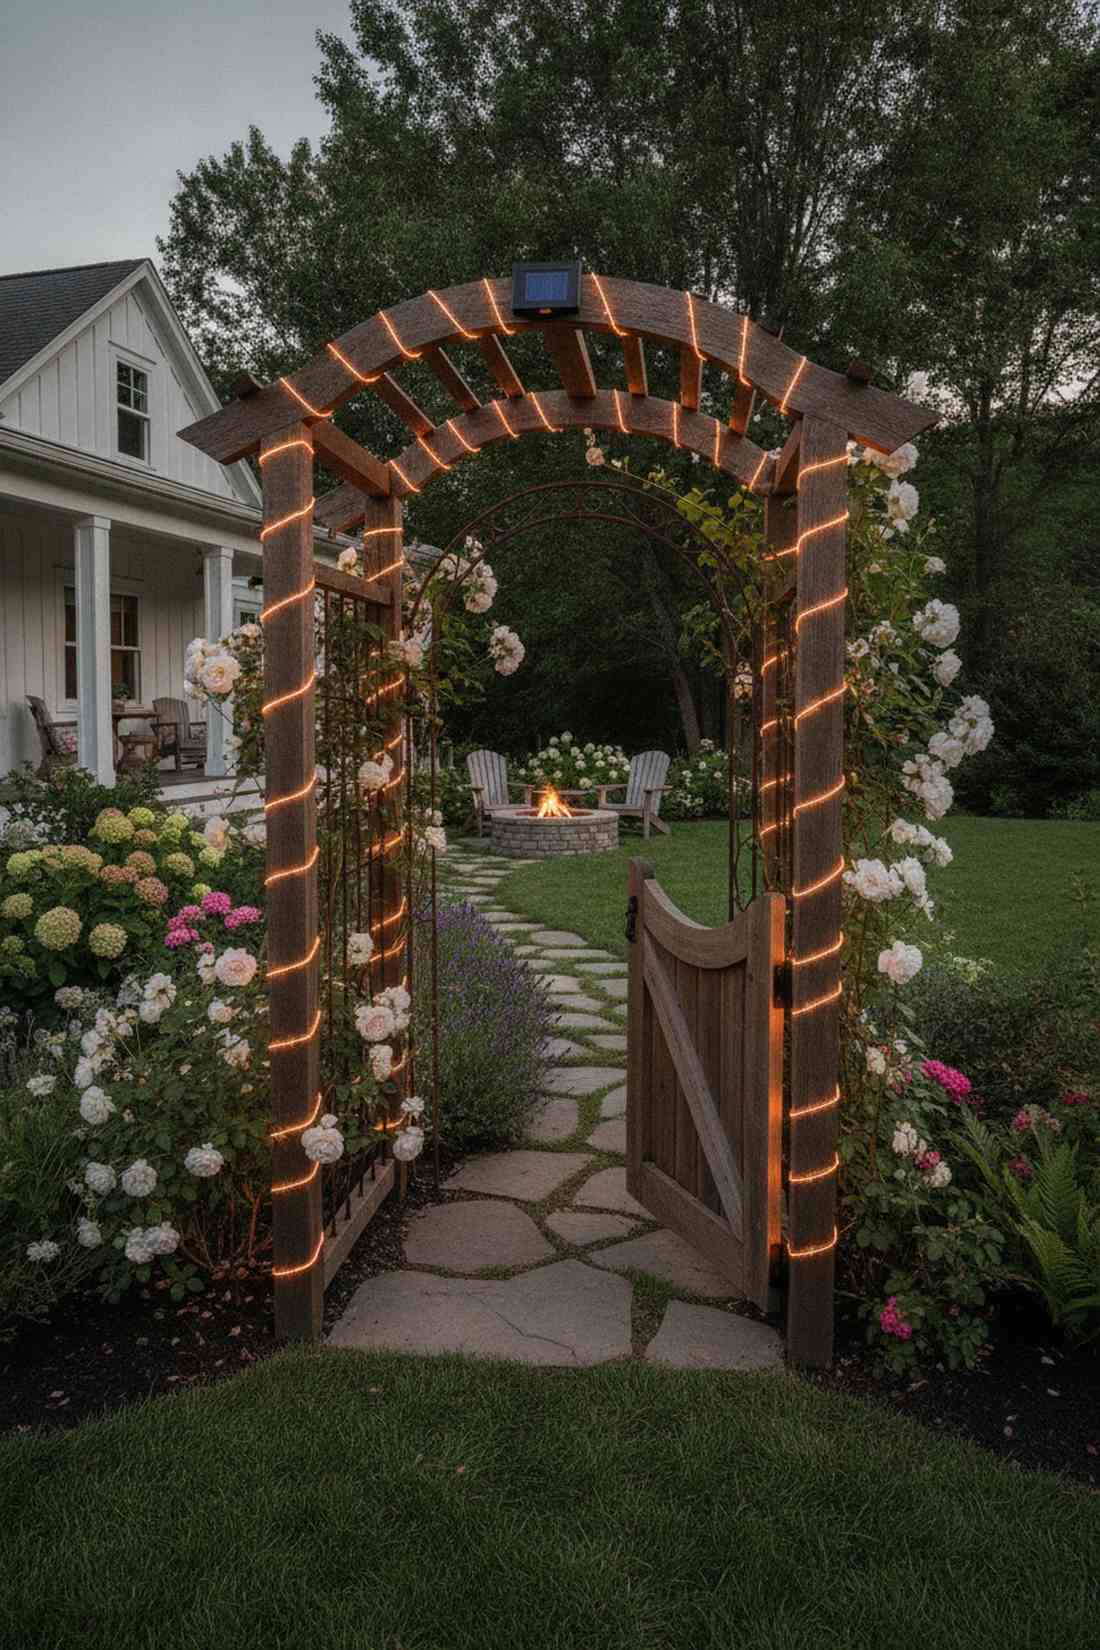
This glowing archway feels like a literal portal transporting you into a secret garden. Illuminated garden arbor frames signal a powerful transition from the chaotic street to your private sanctuary. Unbeatable for framing wooden entrance gates or metal rose arches.
Wrapping the legs and crowning the arch emphasizes the structure’s height and welcomes guests with a warm embrace. This structured framing trick tricks visitors into thinking it’s custom wired into the home’s electrical grid. Using thin fairy garden kits wrapped tightly prevents the lights from interfering with the gate’s hinges.
You can light up a massive entrance gateway for an incredibly cheap $20–$35. A brilliant, low-effort tweak to boost your curb appeal instantly.
- Key Materials: Thin copper fairy lights
- Vibe / Style: Secret garden portal
- Difficulty: Easy wrapping
- Budget Breakdown: Long fairy wires: $25 | Clear zip ties: $5
- Creator’s Tip: Keep the solar panel mounted on the absolute highest peak of the arch so passing guests don’t accidentally knock it down.
- Smart Sourcing: ultra-thin copper fairy bundles (pre-cut) and miniature clear zip ties (bulk pack).
Most DIY deck projects completely ignore this dual-purpose trick, leaving the space dangerously dark and visually flat…
35. Deck Railing Integration
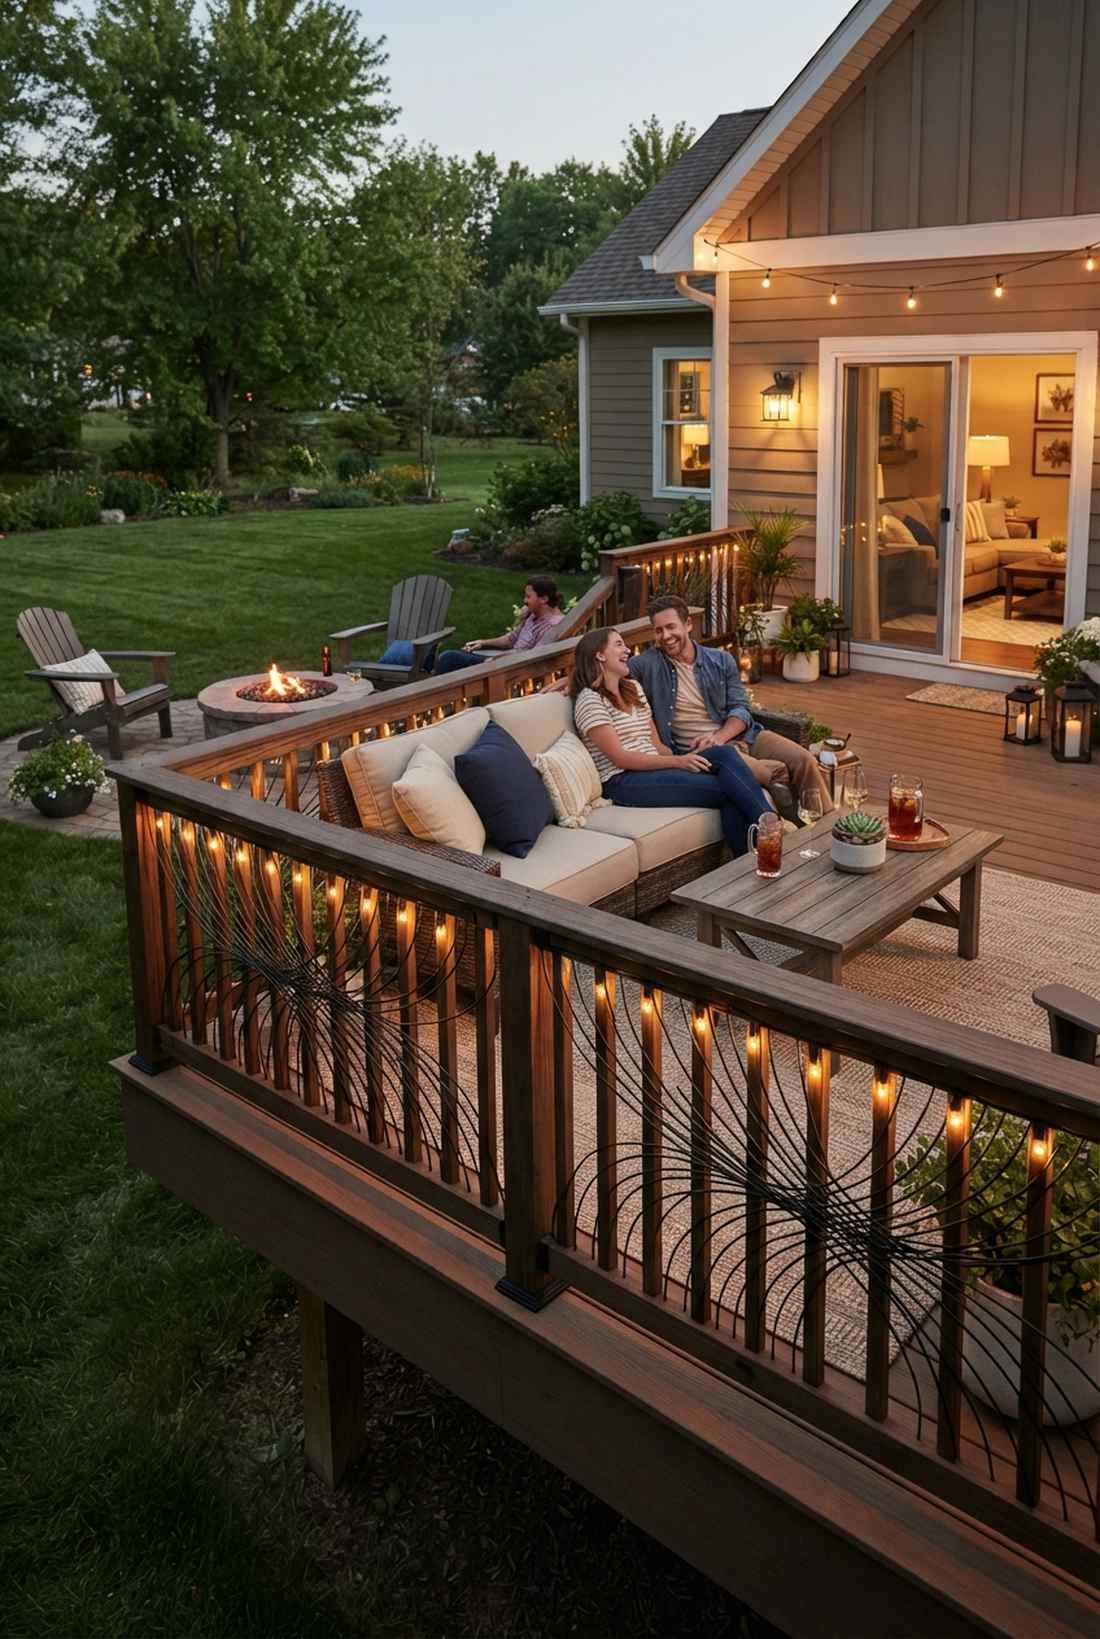
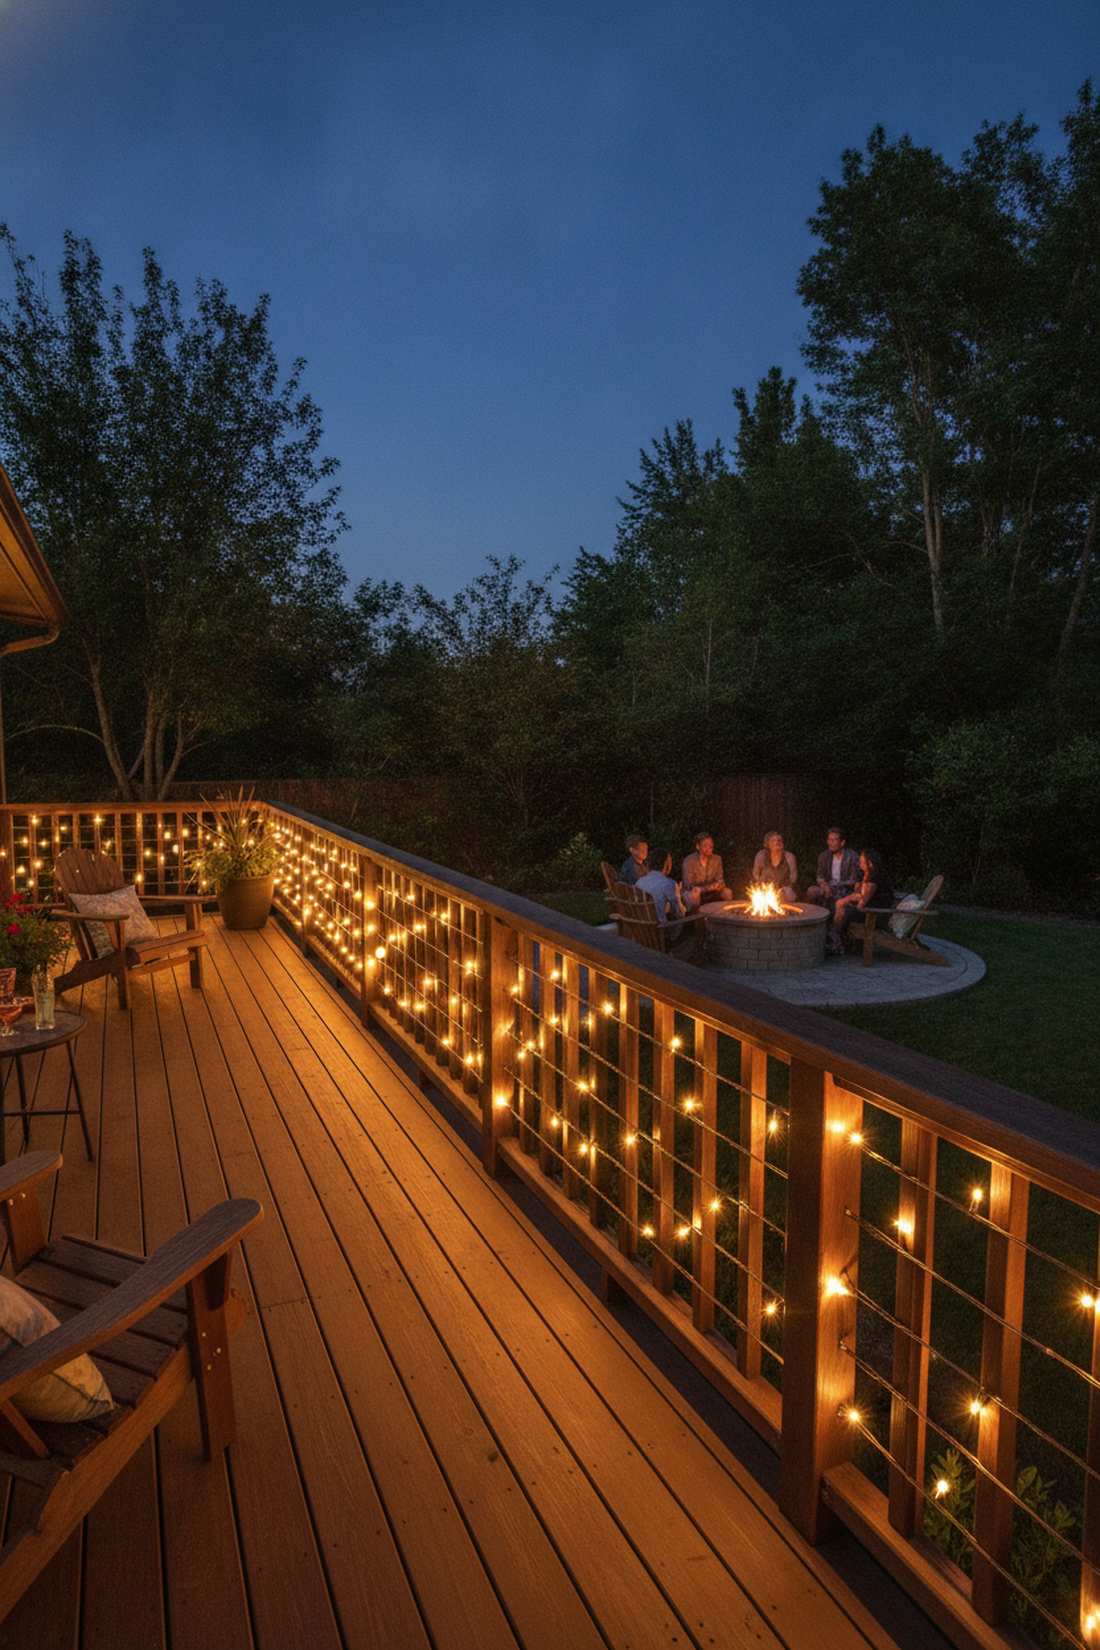
This woven barrier glow feels like a cozy, protective net keeping your evening parties safe and stylish. Integrated deck baluster lighting provides massive ambient light without taking up a single inch of floor space. Perfect for narrow elevated balconies where traditional lanterns would get kicked.
Weaving the wire tightly through the balusters in a wave pattern adds immense visual interest while acting as a safety barrier. This dual-purpose integration gives a designer-level finish that integrates seamlessly into the woodwork. Grabbing commercial-grade solar string lights with dark brown or black wire ensures they vanish completely against the wood during the day.
Upgrading your deck perimeter usually costs a highly affordable $30–$50. Pin this to make your deck the ultimate nighttime hangout spot!
- Key Materials: Dark-wire outdoor string lights
- Vibe / Style: Cozy illuminated barrier
- Difficulty: Simple over-under weaving
- Budget Breakdown: Stringers: $35 | Securing clips: $8
- Creator’s Tip: Pull the wire taut at the top and bottom of each weave; if it sags in the middle, the pattern looks incredibly messy.
- Smart Sourcing: black-wire outdoor fairy strands (bulk pack) and flush-mount cable tacks.
36. Hedge & Topiary Interior Lighting
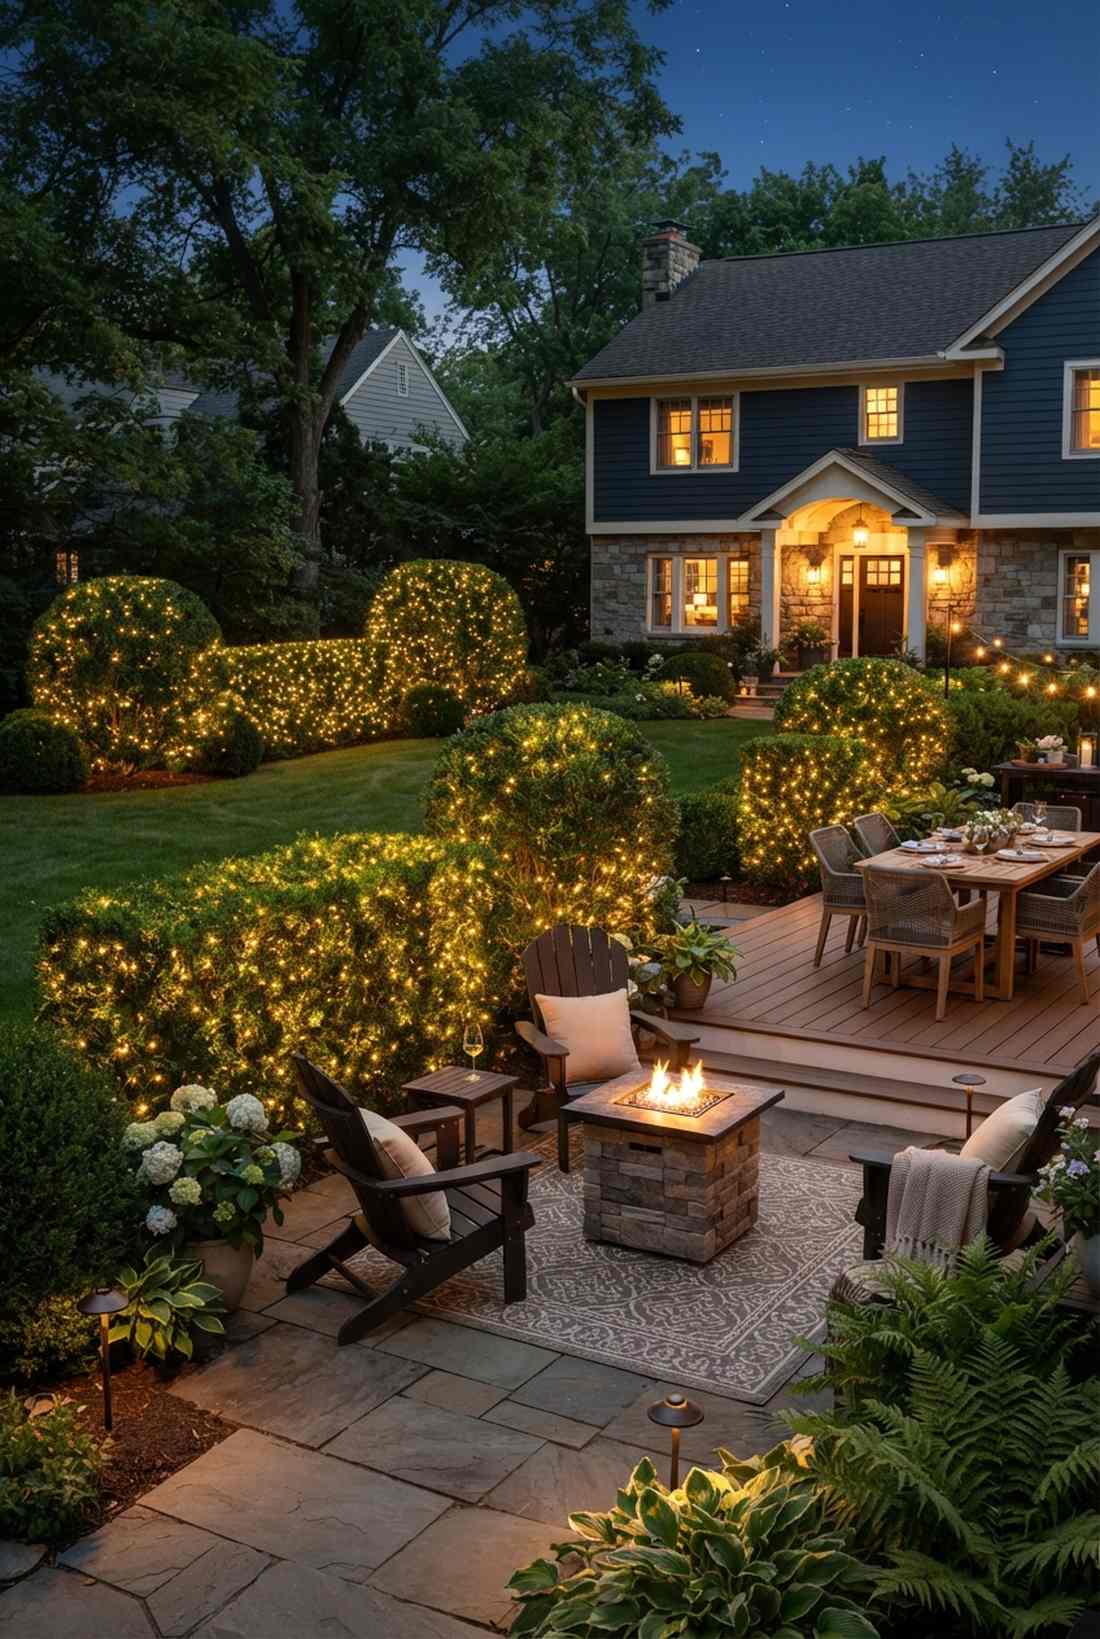
This deep, mysterious glow feels like your landscaping is naturally radiating magical energy from its core. Internal hedge ambient lighting creates an unexplainable, ethereal volume that surface-wrapping just can’t match. Flawlessly applied to dense boxwoods, thick yews, or massive evergreen globes.
Shoving the LEDs deep into the branch framework conceals the hardware entirely, letting the leaves act as a massive, natural light diffuser. This hidden core technique yields an incredibly upscale resort aesthetic that looks highly professional. Using terrarium accessories and micro-wire ensures the thick woody interior doesn’t snap the delicate connections.
You can illuminate a large boxwood from the inside out for just $20–$35. Highly recommended if you want a truly magical, glowing front yard.
- Key Materials: High-density micro fairy wires
- Vibe / Style: Deep glowing botanical core
- Difficulty: Requires deep branch threading
- Budget Breakdown: Micro-wires: $25 | Scratch-resistant sleeves: $5
- Creator’s Tip: Install these during late winter when the interior branches are easiest to reach before the dense spring flush of leaves blocks access.
- Smart Sourcing: heavy-duty copper wire fairy kits (starter kit) and protective gardening sleeves.
37. Greenhouse & Grow Tunnel Accent
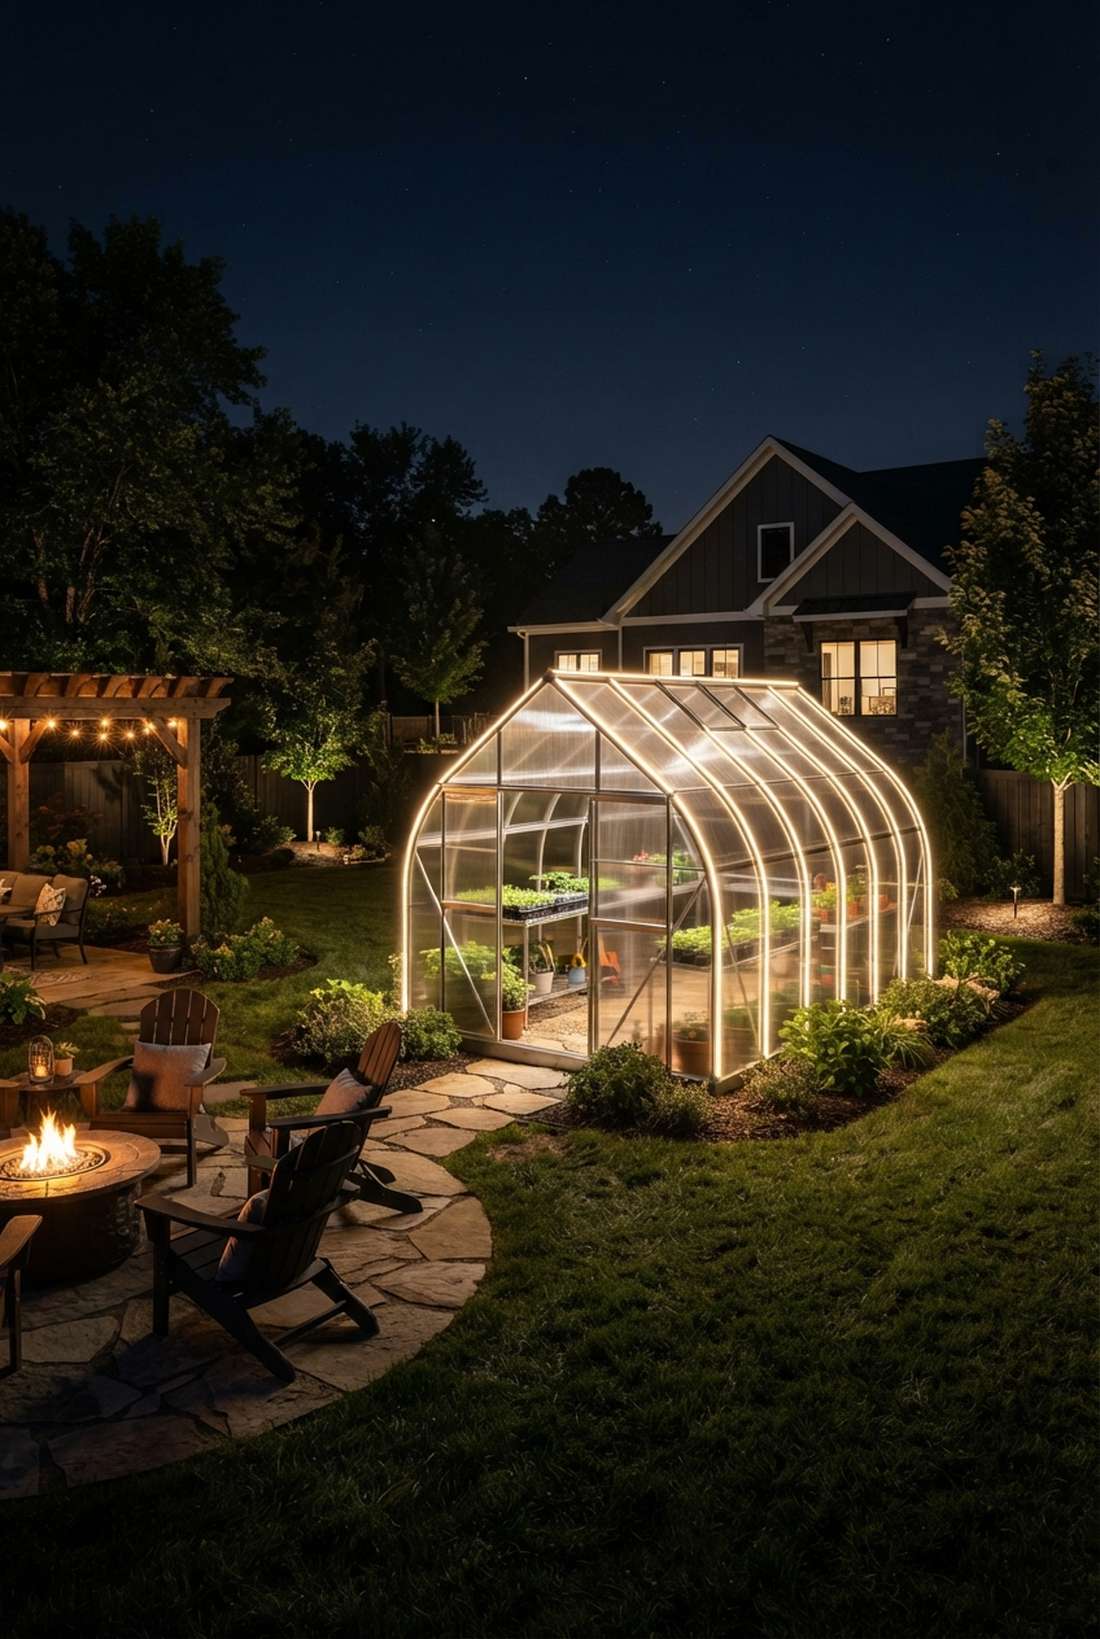
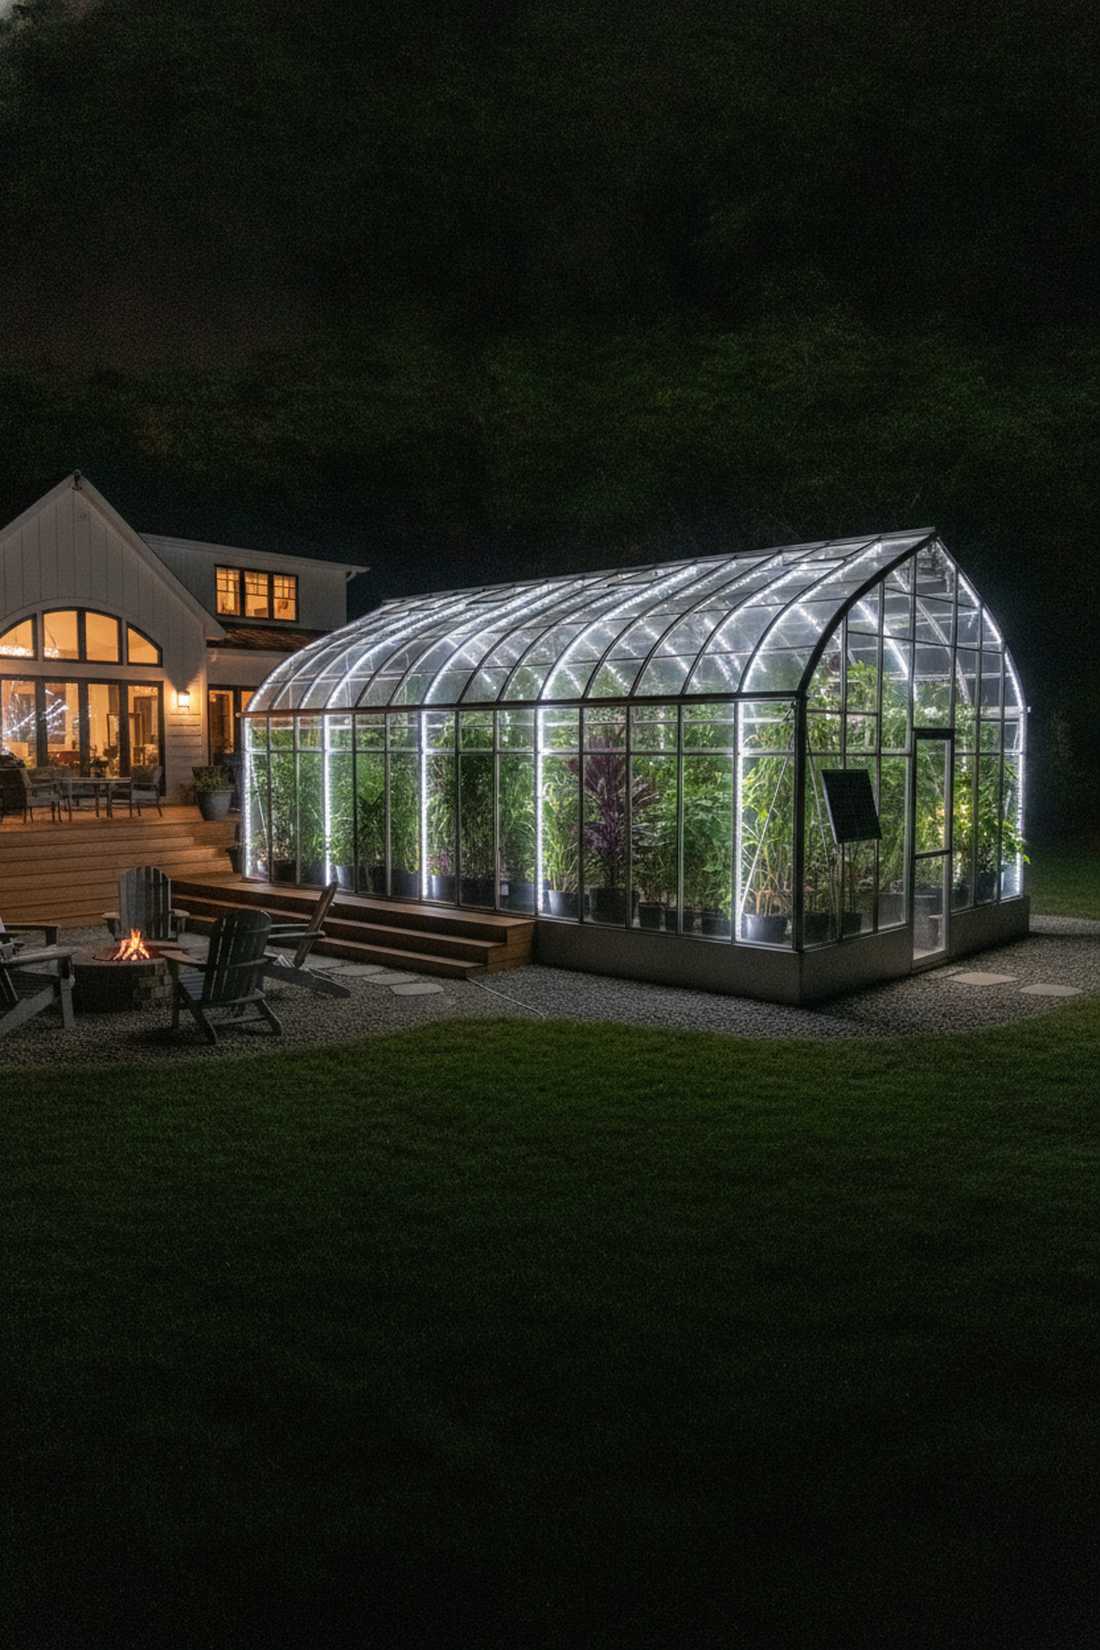
This structural highlight feels like a glowing architectural ribs bracing a high-tech botanical laboratory. Illuminated greenhouse ridge lines turn purely utilitarian farming structures into breathtaking nighttime yard features. A must-do for polycarbonate hoop houses or classic glass conservatories.
Running a solid line of light down the main roof ridge and arches highlights the beautiful utilitarian geometry of the structure. This brilliant tracing upgrades the space far beyond its cost, making midnight harvesting incredibly easy. Sourcing waterproof outdoor LED strips is non-negotiable here due to the extreme internal humidity.
Accenting a standard backyard greenhouse costs roughly $40–$65. Save this idea if you want your veggie garden to look spectacular at 2 AM!
- Key Materials: High-lumen waterproof rope lights
- Vibe / Style: High-tech glowing conservatory
- Difficulty: Easy ridge clipping
- Budget Breakdown: Rope tubing: $45 | Ridge clips: $10
- Creator’s Tip: Always mount the solar collection panel on the exterior south-facing wall; interior mounting cuts charging power by 60% through the plastic.
- Smart Sourcing: silicone-sealed solar tubing (bulk pack) and greenhouse-specific ridge clips.
38. Rain Chain & Water Feature Combination
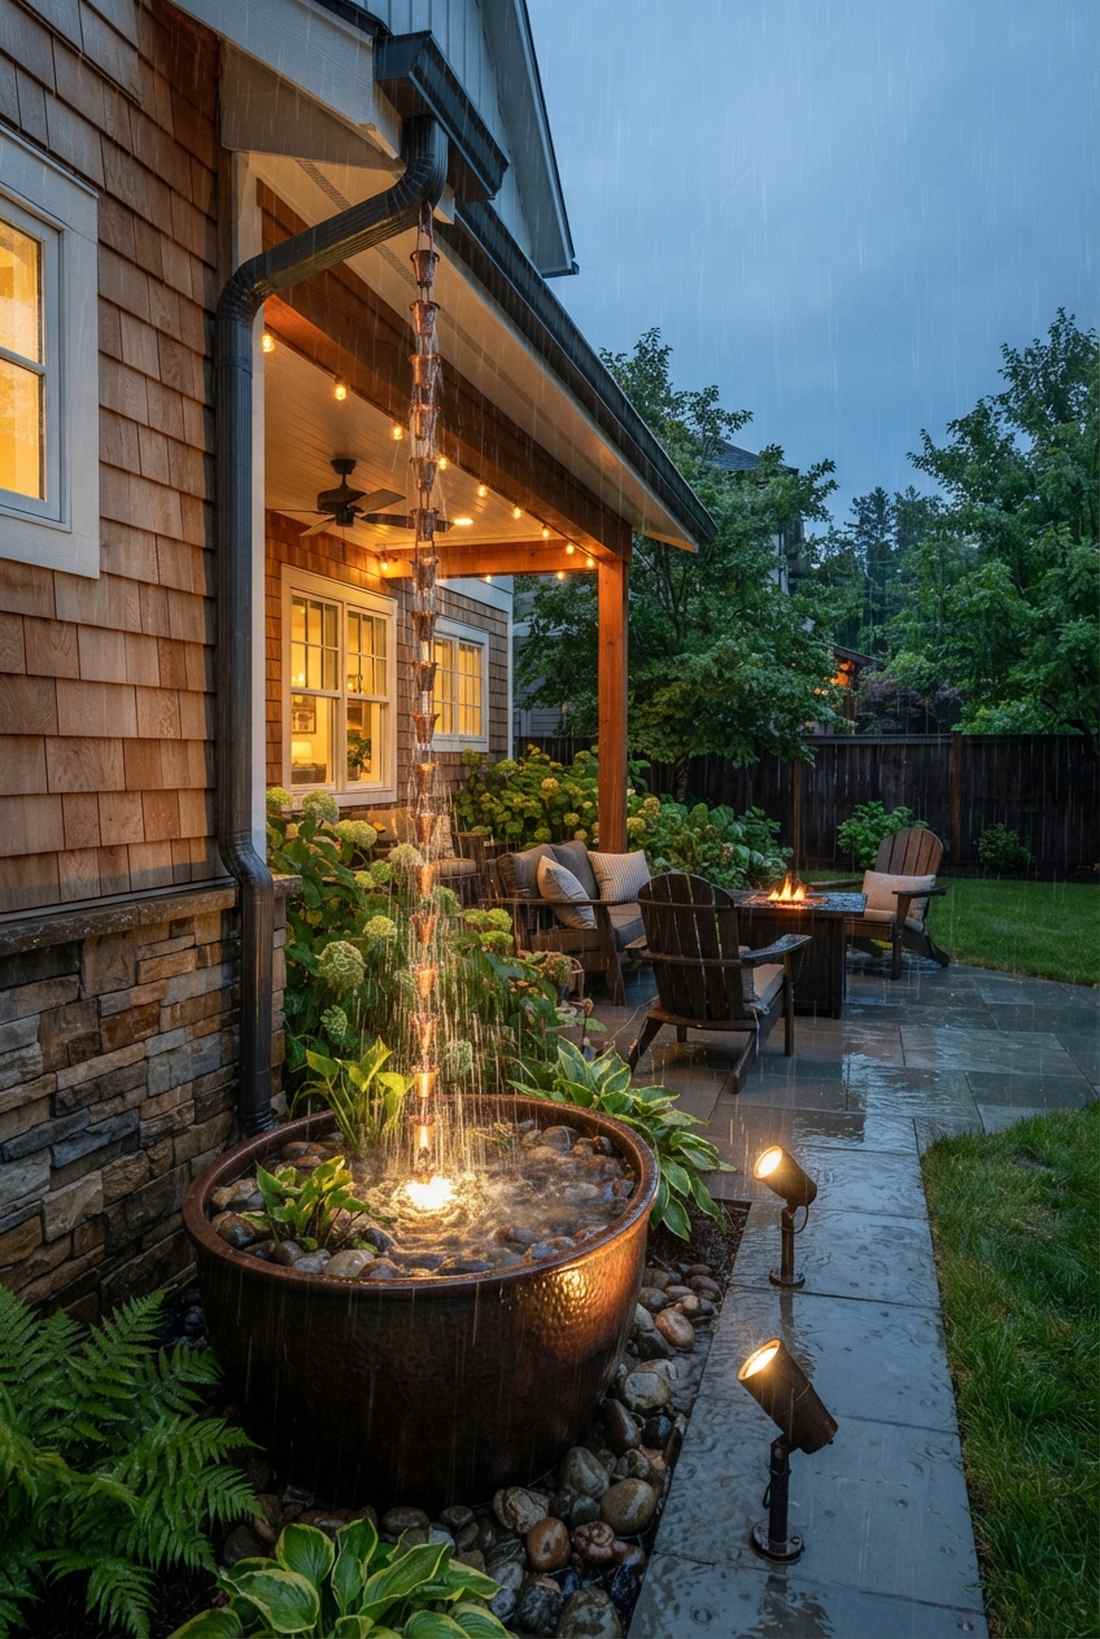

This kinetic light show feels like capturing a glowing, electrical thunderstorm in a controlled vertical drop. Illuminated decorative rain chains merge moving water and light for the ultimate sensory garden experience. Perfect for replacing boring aluminum downspouts near a main patio seating area.
Aiming tight, focused beams at the metallic chain causes the water droplets to sparkle and flash as they cascade downward. This dynamic reflection completely avoids that tacky holiday-light vibe, creating a mesmerizing, high-end water feature. Picking up a pack of outdoor landscaping light bundles with micro-spotlights guarantees you can aim the beam perfectly.
You can upgrade your rain chain for a minimal $20–$40 spotlight investment. Pin this to make your garden absolutely stunning during a heavy downpour!
- Key Materials: Directional mini solar spotlights
- Vibe / Style: Kinetic glowing waterfall
- Difficulty: Simple spotlight aiming
- Budget Breakdown: Spotlights: $25 | Rain chain: $0 (existing)
- Creator’s Tip: Do not wrap the wire directly on the chain! The ice buildup in winter will shred the wires instantly. Just point a spotlight at it.
- Smart Sourcing: directional micro solar spots (starter kit) and weather-sealed cable extensions.
Creating Your Solar Fairy Light Garden Strategy
Executing these 38+ solar fairy lights in garden blueprints bridges the gap between basic yard decor and high-end landscape styling. By prioritizing smart material sourcing—like UV-resistant wiring and commercial-grade solar collectors—you ensure your aesthetic upgrades survive multiple brutal seasons. Start with foundational high-impact zones like your front pathway or dining perimeter, then slowly layer in the sculptural and vertical lighting techniques. Always test your layouts with cheap prototypes before committing to heavy adhesives or permanent wire staples to guarantee that flawless, expensive-looking nighttime glow.
Frequently Asked Questions
How long do solar fairy lights stay illuminated each night?
Premium commercial-grade solar string lights typically run 8-12 hours after a full charge in direct sunlight. Budget-friendly starter kits with 600-800mAh batteries provide a solid 8 hours of continuous illumination, while high-end setups utilizing 1200mAh collectors easily achieve 10-12 hours. Keep in mind that heavy shade dramatically slashes run time—repositioning your collector panel is the cheapest way to boost performance.
Do solar fairy lights work during winter or cloudy weather?
Yes, but you need to invest in a premium alternative setup to get reliable winter performance. Modern high-efficiency panels charge even in overcast conditions, though output drops to about 20-40% compared to full summer sun. If you live in a gloomy climate, look for starter kits that feature USB backup charging ports or oversized collector plates specifically engineered for low-light winter operation.
Can you leave solar fairy lights outside permanently?
Absolutely, provided you source kits with strict IP65 waterproof ratings and UV-resistant coatings. Cheaper kits crack and fade quickly, but investing in heavy-duty waterproof LED strips and weather-sealed housing guarantees multi-year durability through snow and rain. To maximize battery life, wipe the solar panel glass clean every few months to stop mineral buildup from blocking the sun.
What is the best placement for solar panels on fairy lights?
For maximum high-CPC charging efficiency, mount your panels facing true south (in the northern hemisphere) and angle them directly toward the midday sun. Avoiding shadows from overhanging branches is critical, as even a tiny sliver of shade can kill the charge. The smartest layout strategy is sourcing kits with 10-15 foot extension cables, allowing you to hide the lights in the shade while keeping the panel in the blasting sun.
How do you prevent solar fairy lights from tangling during storage?
Never crush them into a box. The best technique is wrapping the delicate copper wires tightly around a dedicated cord reel or a piece of heavy cardboard, securing the ends with velcro. Proper storage prevents the micro-diodes from snapping, extending the life of your fairy garden kits by years. Always store the batteries in a dry, temperature-controlled environment to prevent interior acid corrosion.
Are solar fairy lights bright enough for security lighting?
While standard micro-LEDs create an amazing aesthetic vibe, they are not designed to blind intruders. A massive 100-LED strand only outputs about 500-1000 diffused lumens. However, strategically placing these ambient lights eliminates pitch-black hiding spots in your yard. For real security, layer your fairy lights alongside dedicated, motion-activated top-rated outdoor garden decor spotlights that blast 1000+ lumens when triggered.