Building raised beds against fence boundaries instantly turns wasted yard space into high-yield zones. This layout strategy delivers a custom landscape feel while drastically cutting lumber costs. Grab the premium layout blueprints below.
Design Snapshot: Core Principles
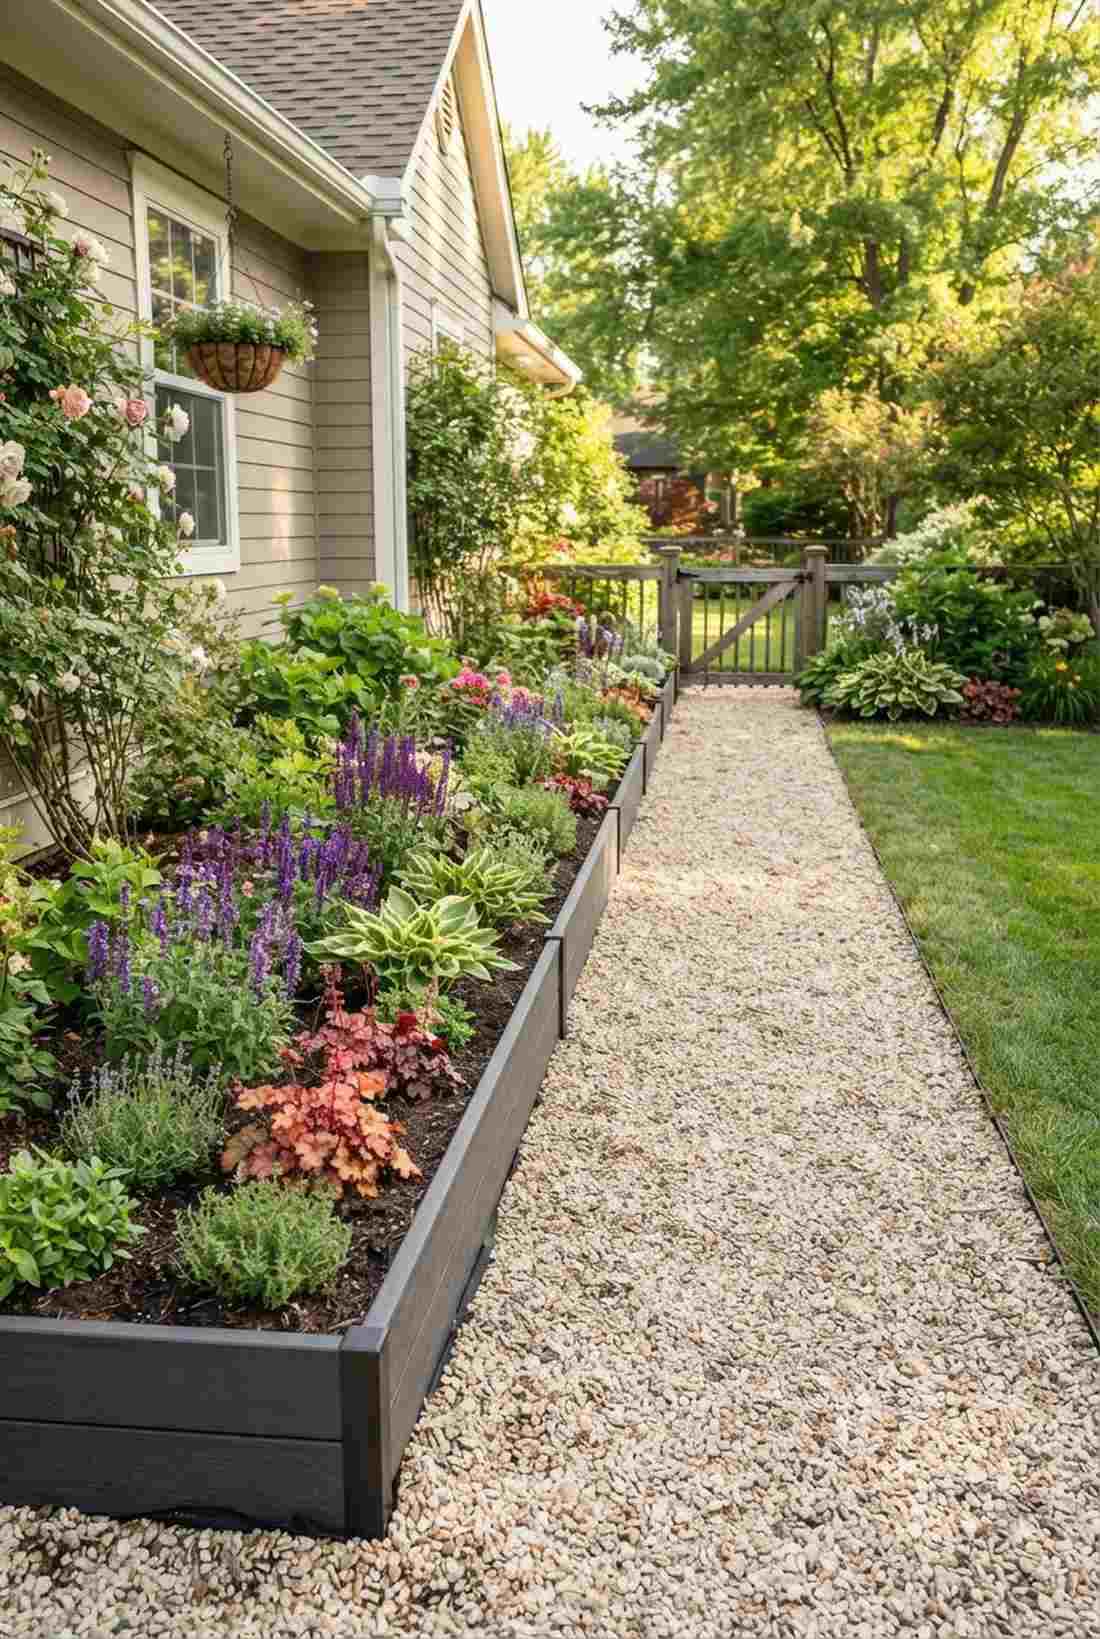
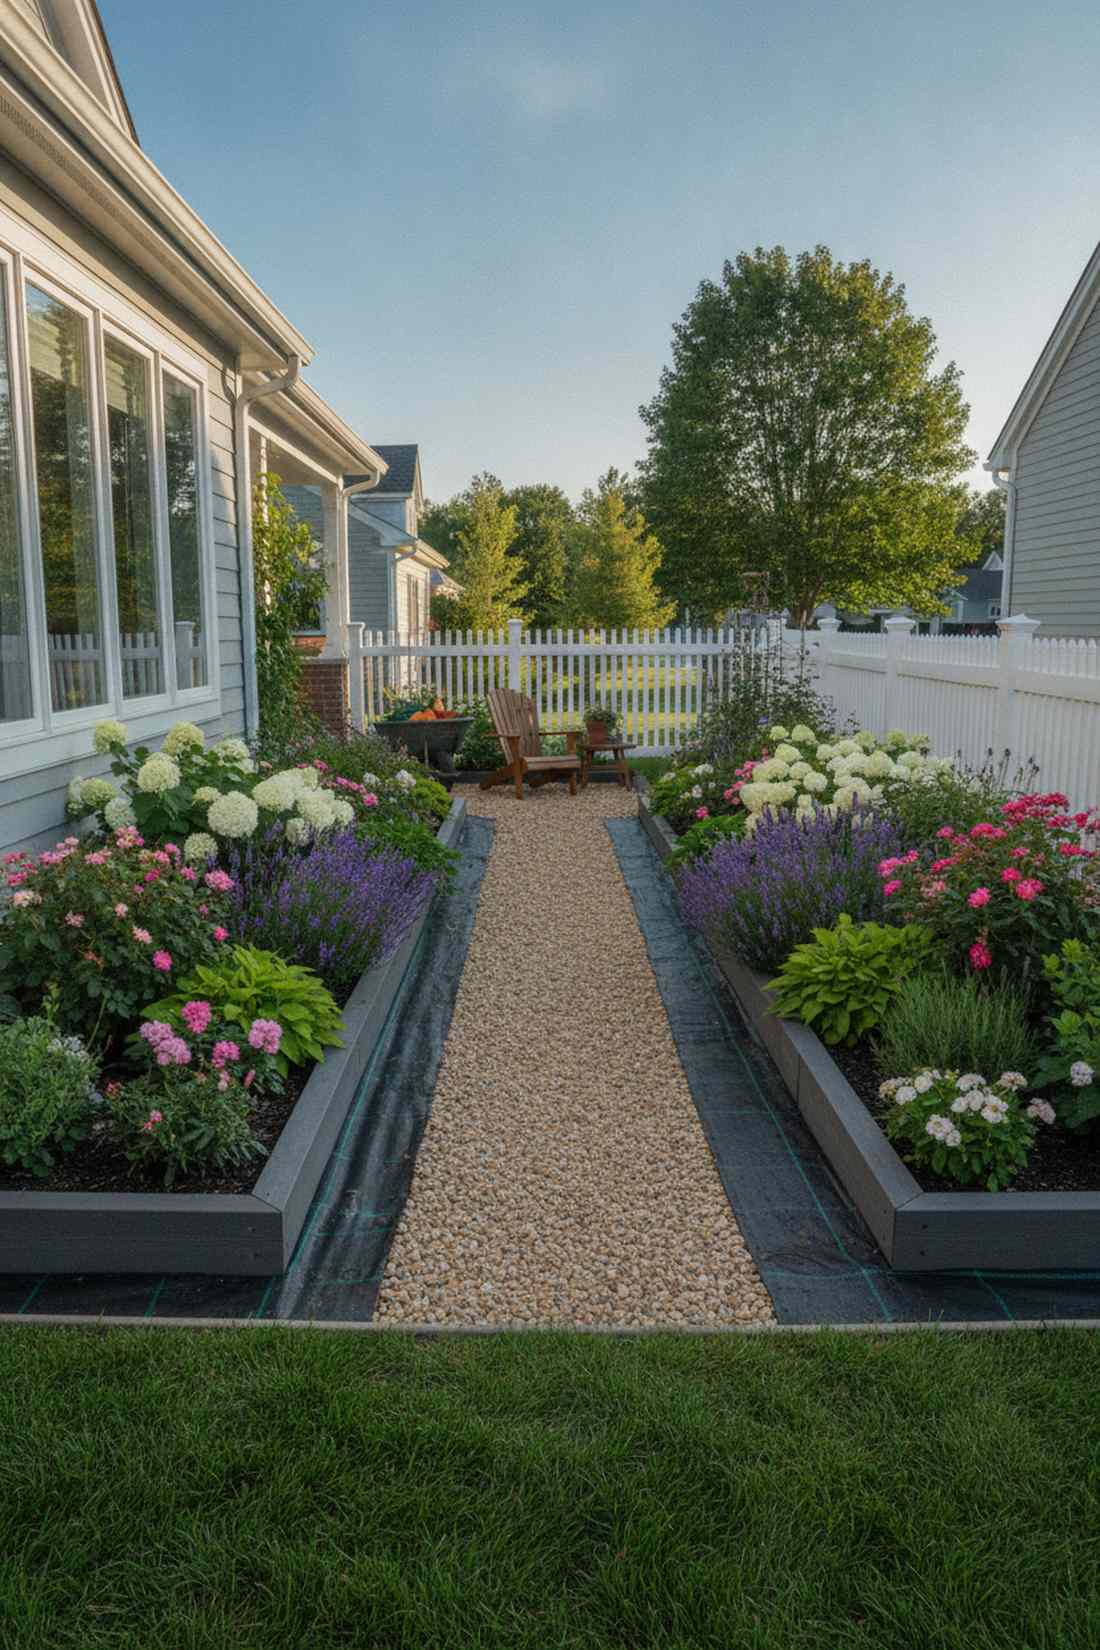
- Depth Management: Position beds 6–12 inches from fence boards to prevent moisture damage and allow air circulation behind plantings.
- Access Planning: Design narrow beds (18–36 inches wide) for easy reach from pathways, eliminating the need to step into planting zones.
- Vertical Integration: Use fence panels as natural trellis support for vining crops, reducing the need for additional structures.
- Material Coordination: Match or complement bed materials with fence finishes to create cohesive perimeter aesthetics that feel intentional.
Space-Efficient Linear Designs for Maximum Fence Line Coverage
Long, narrow configurations along fence perimeters create continuous planting zones that feel organized and maintain consistent growing conditions. These layouts work efficiently in yards where fence lines define property boundaries or separate functional zones.
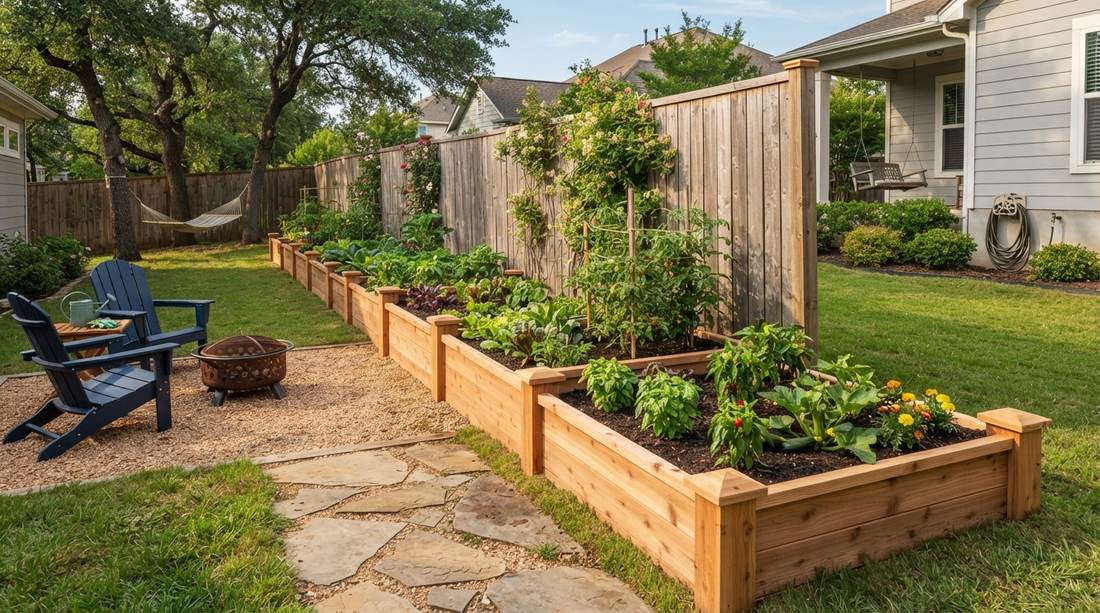
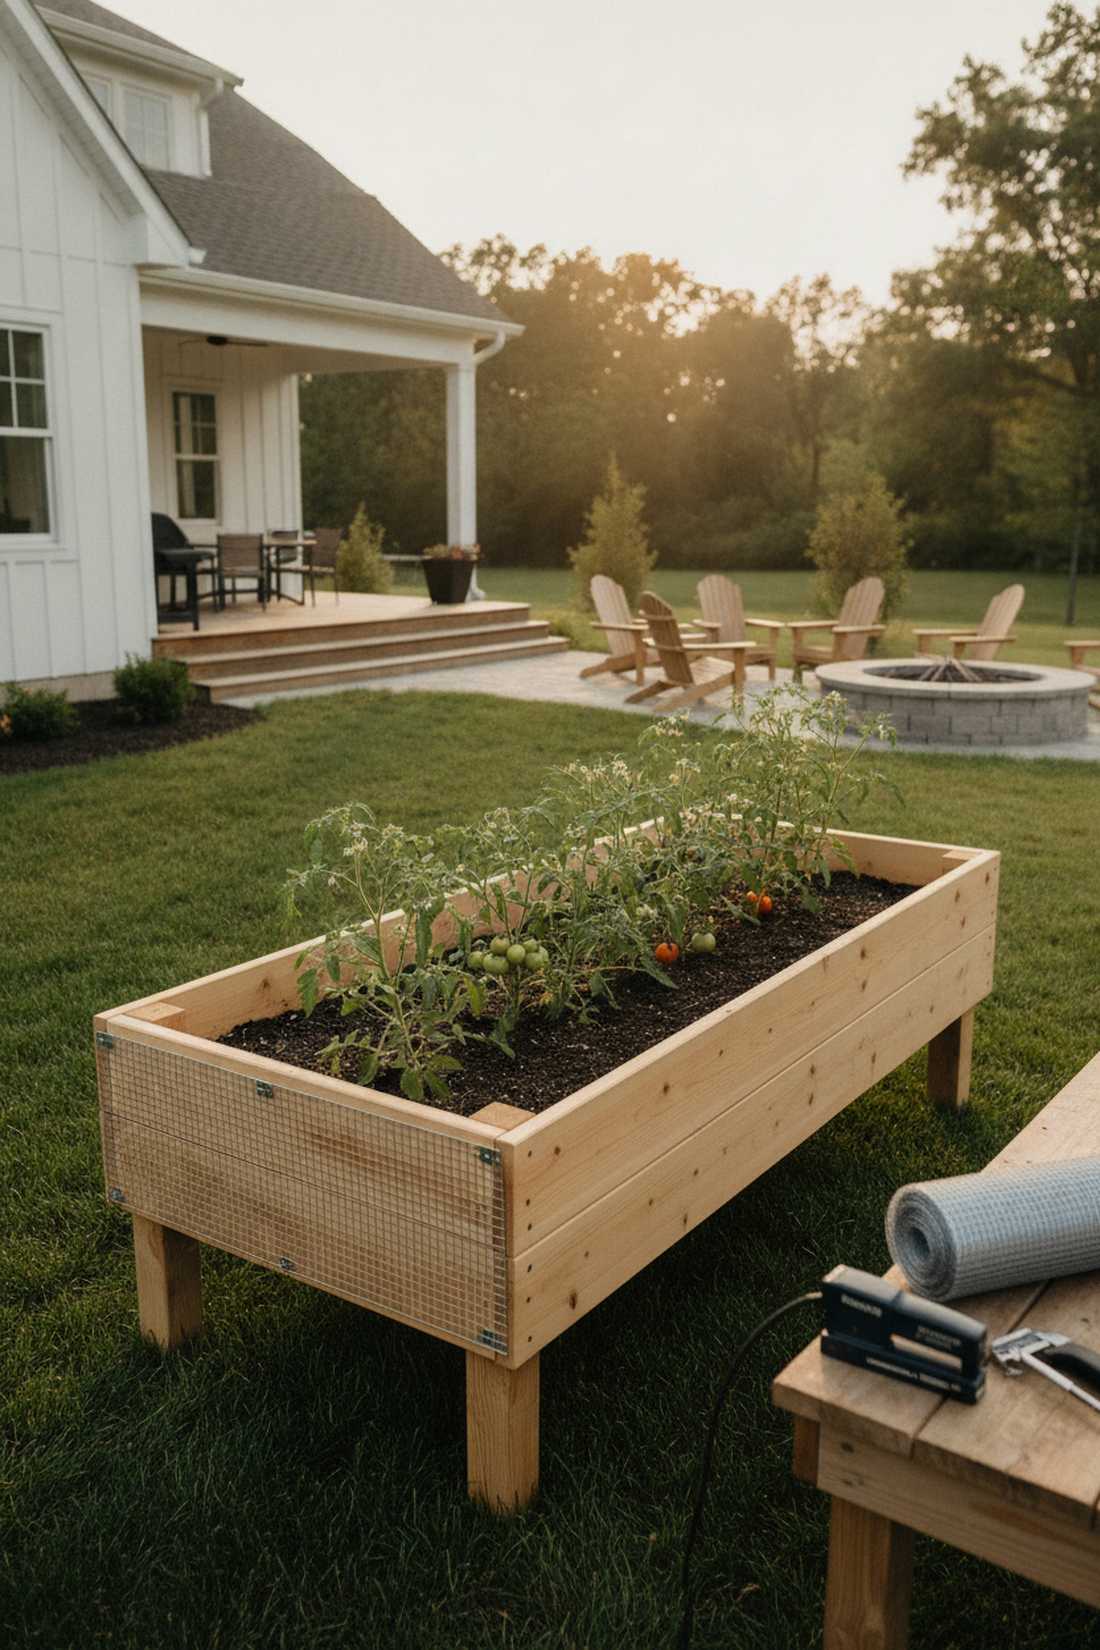
1. Continuous Narrow Bed with Walking Path
Feels like a sprawling English estate border you just stumbled upon. This linear garden pathway decor works exceptionally well for transforming a boring suburban side yard into a lush, vibrant corridor.
Most homeowners waste money on deep, bulky frames when this slim profile gives a surprisingly premium look. Sourcing heavy-duty raised bed kits creates an uninterrupted flow while ensuring your soil stays perfectly aerated.
You can easily pull this off for around $40–$75 per segment. Pin this to your side yard transformation board to save the exact layout.
- Key Materials: UV-coated composite boards, heavy-duty weed barrier.
- Vibe / Style: Structured manicured estate.
- Difficulty: Easy beginner setup.
- Budget Breakdown: Frame: $50 | Soil & Base: $25.
- Creator’s Tip: Leave a solid 4-foot pathway gap so you can easily maneuver a wheelbarrow during harvest season.
- Smart Sourcing: pre-cut composite edging (bulk pack), UV-resistant weed barrier rolls.
2. Double-Tiered Fence Line System
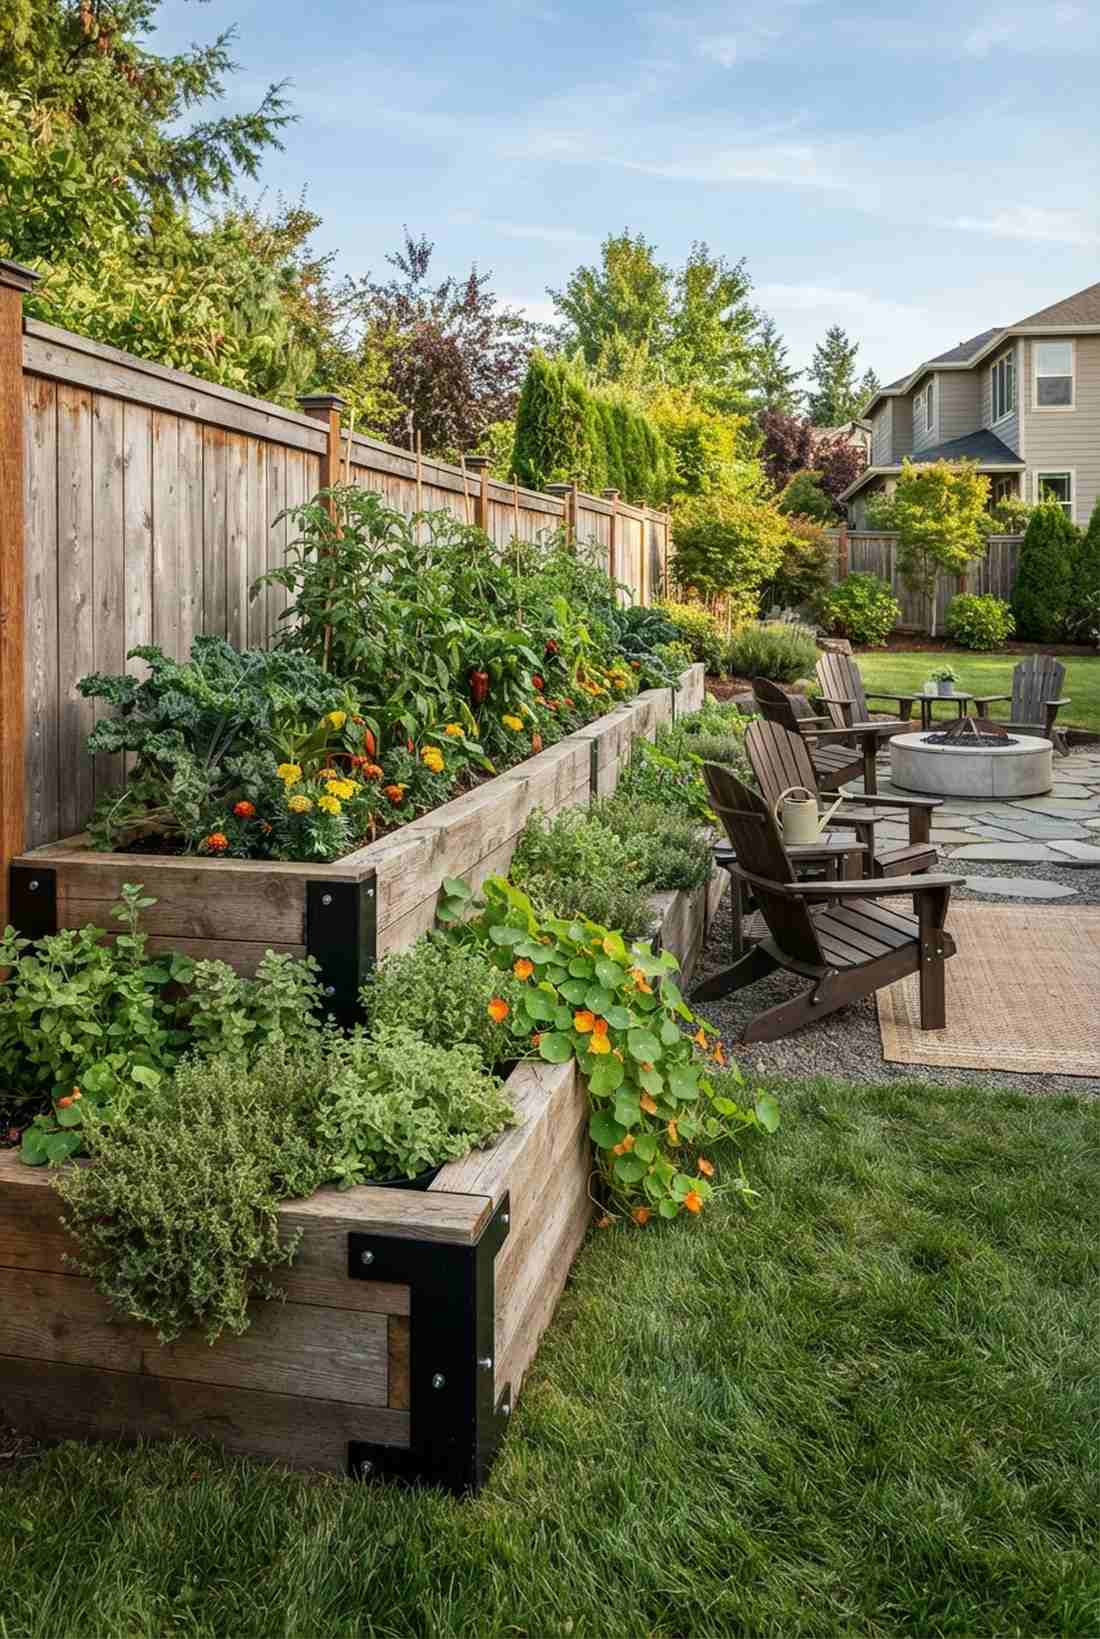
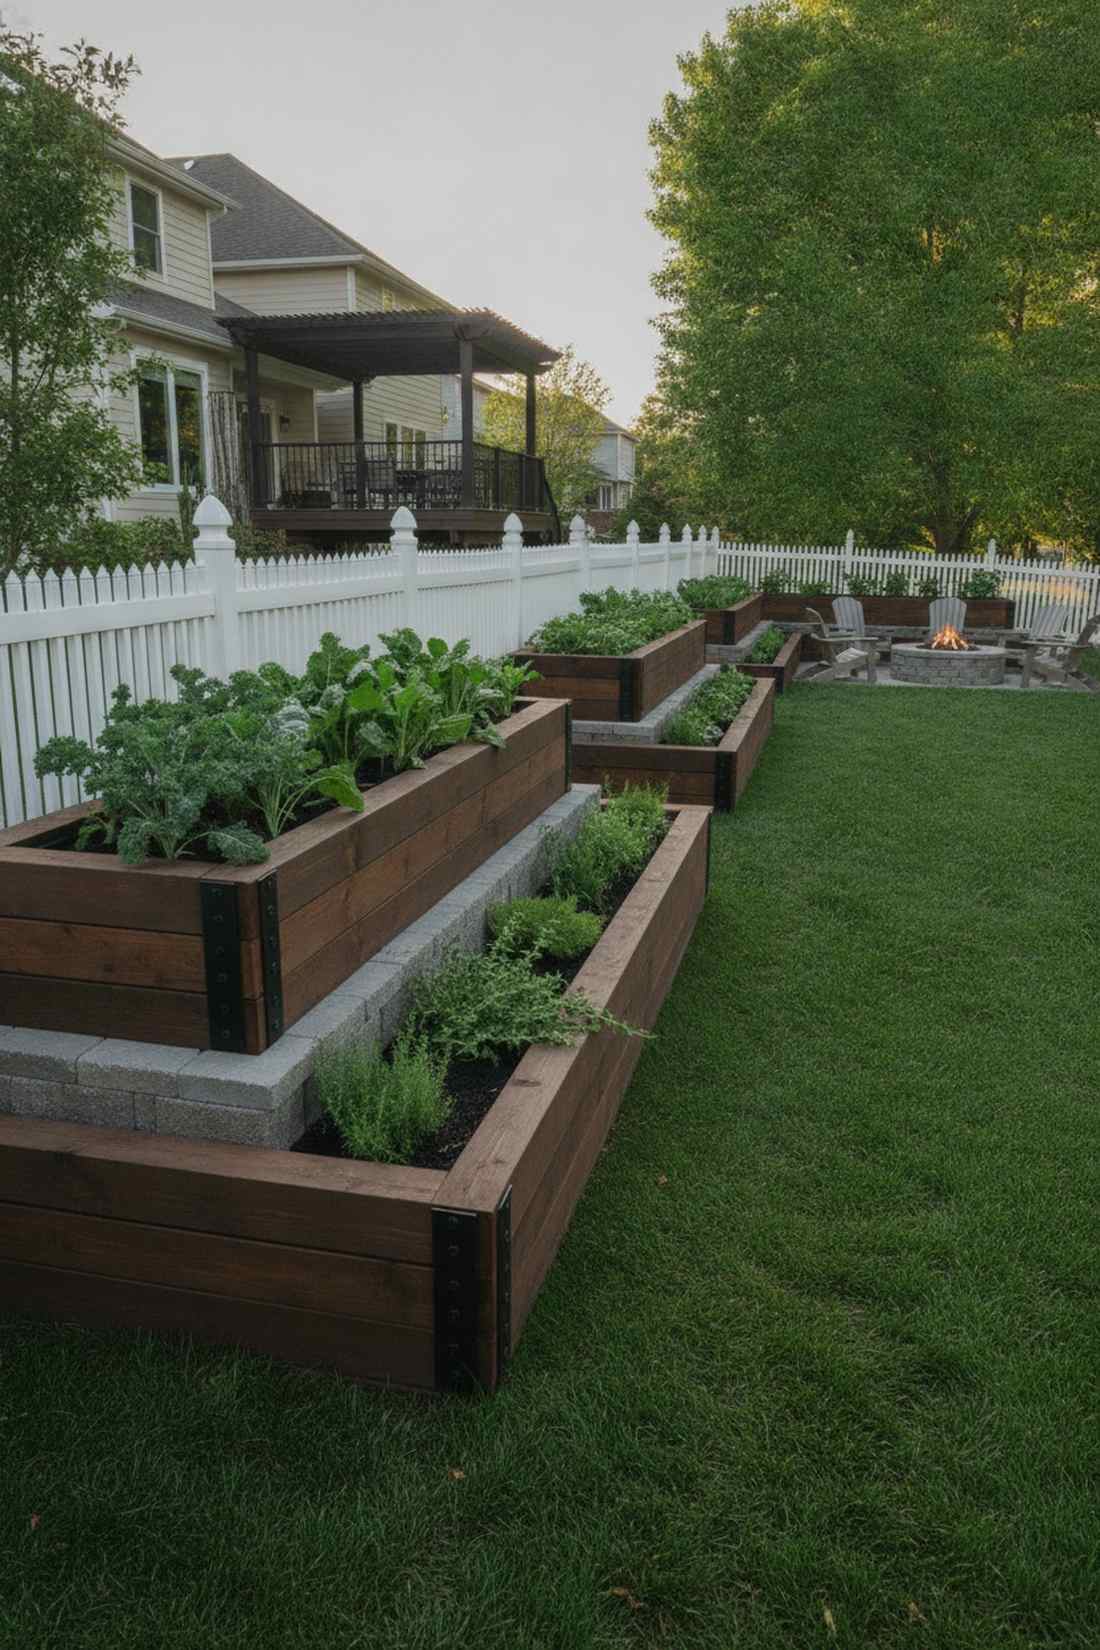
Gives off that high-end terraced resort vibe right in your backyard. A multi-level perimeter planter setup is perfect for adding immense depth to flat, uninspired property boundaries.
Layering heights creates a brilliant optical illusion that makes small yards feel massive, delivering a designer-level finish for pennies. Slipping in some premium terracing block kits ensures the back layer drains perfectly without rotting your wooden divider.
Expect to spend roughly $60–$120 for a durable two-tier setup. It’s a fast weekend upgrade that completely changes your yard’s architecture.
- Key Materials: Stacking timber brackets, waterproof liner.
- Vibe / Style: Dimensional modern yard.
- Difficulty: Moderate weekend build.
- Budget Breakdown: Lumber: $80 | Brackets: $40.
- Creator’s Tip: Put deep-rooted vegetables in the taller back section and trailing herbs cascading over the front edge.
- Smart Sourcing: heavy-duty steel corner brackets, bulk pack galvanized decking screws.
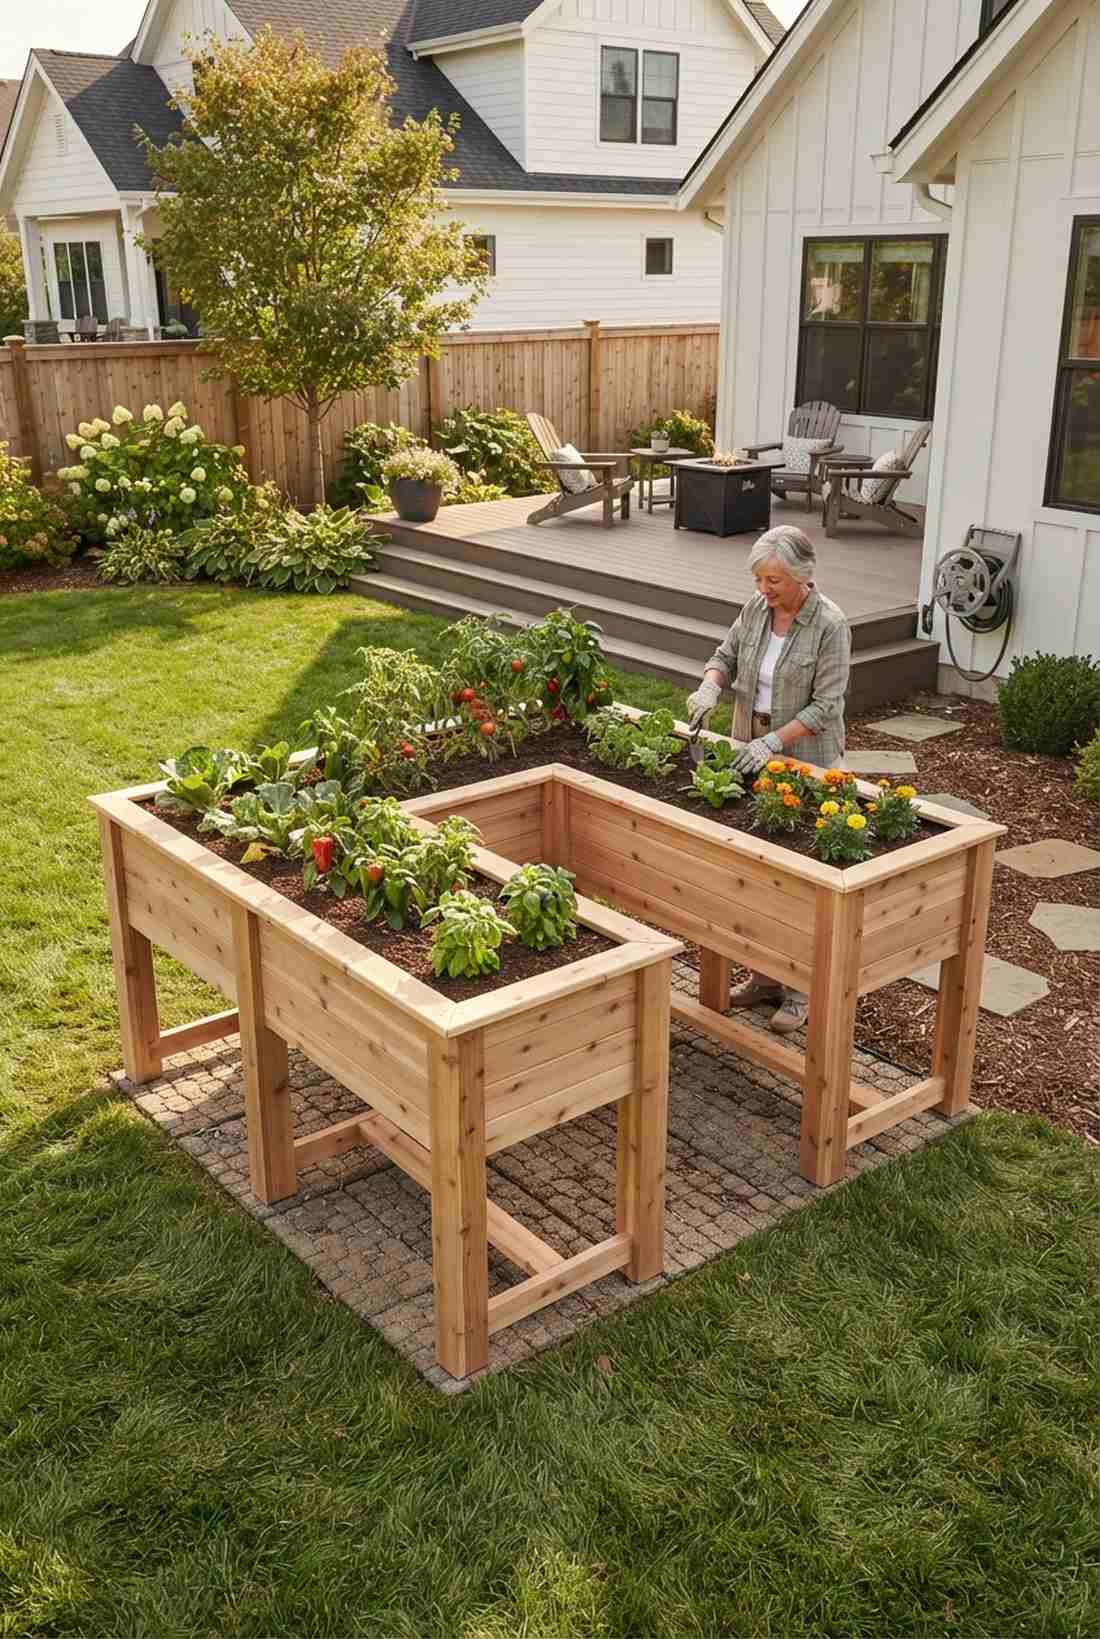
3. Segmented Modular Bed Series
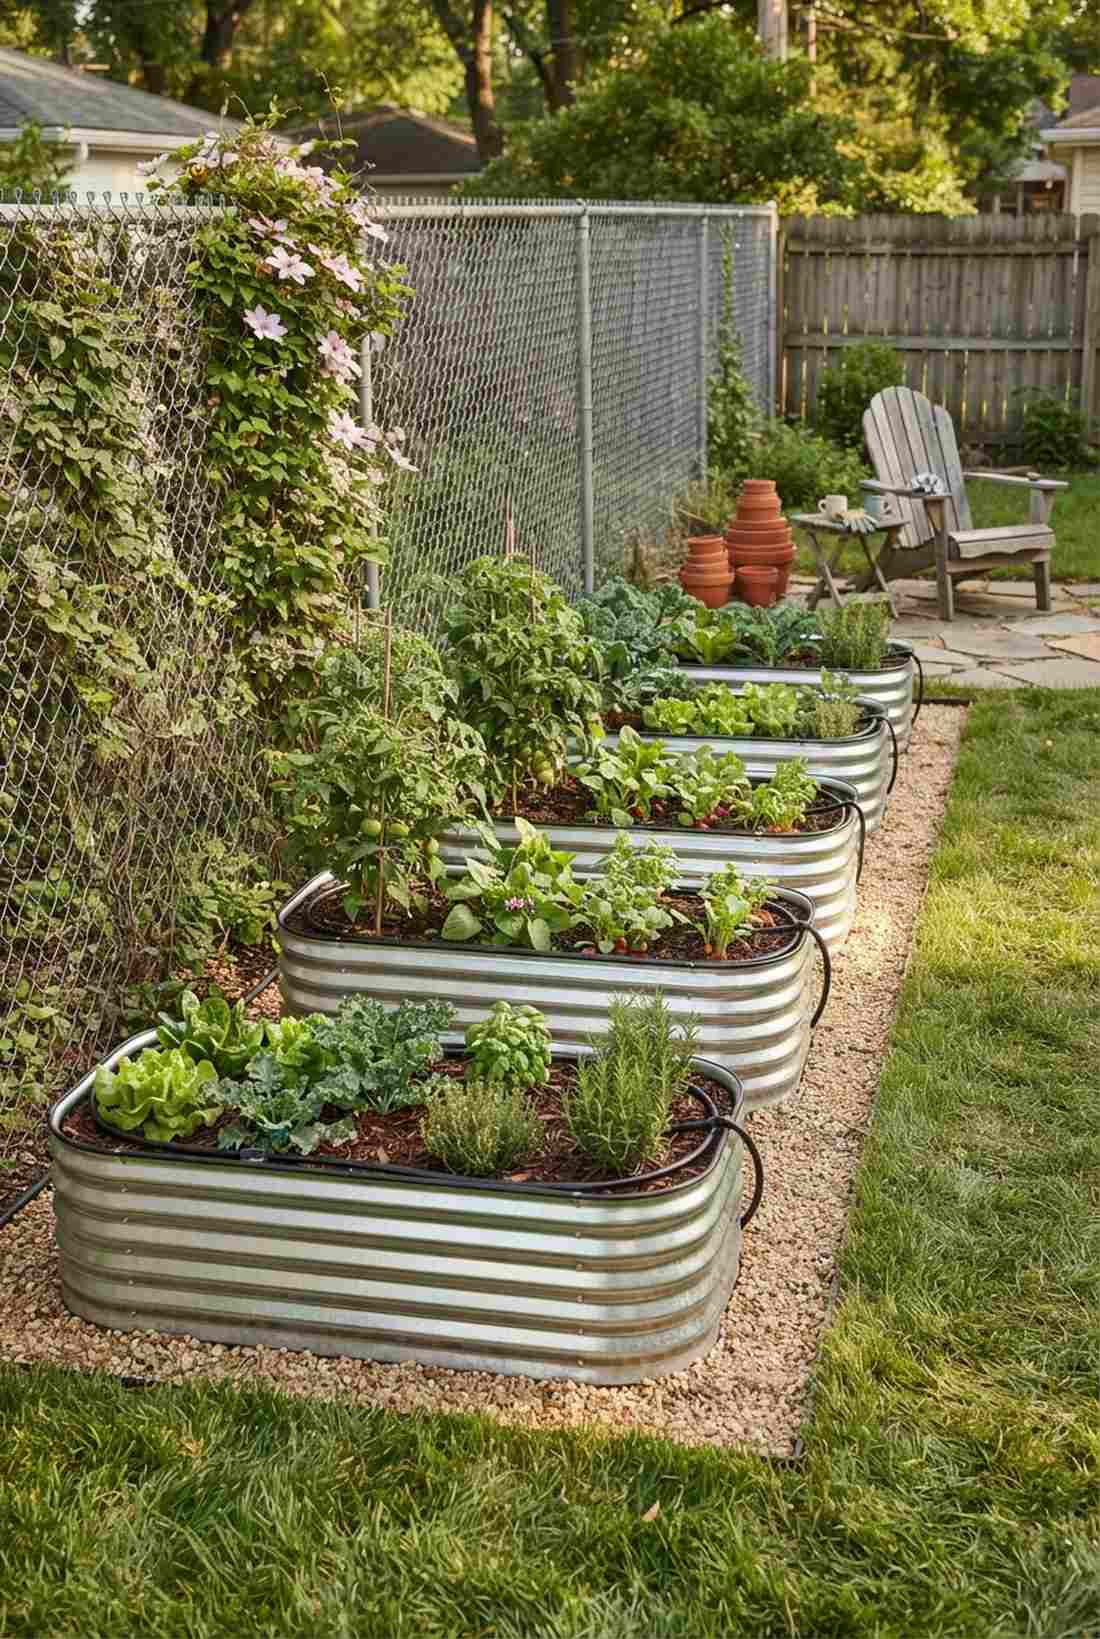
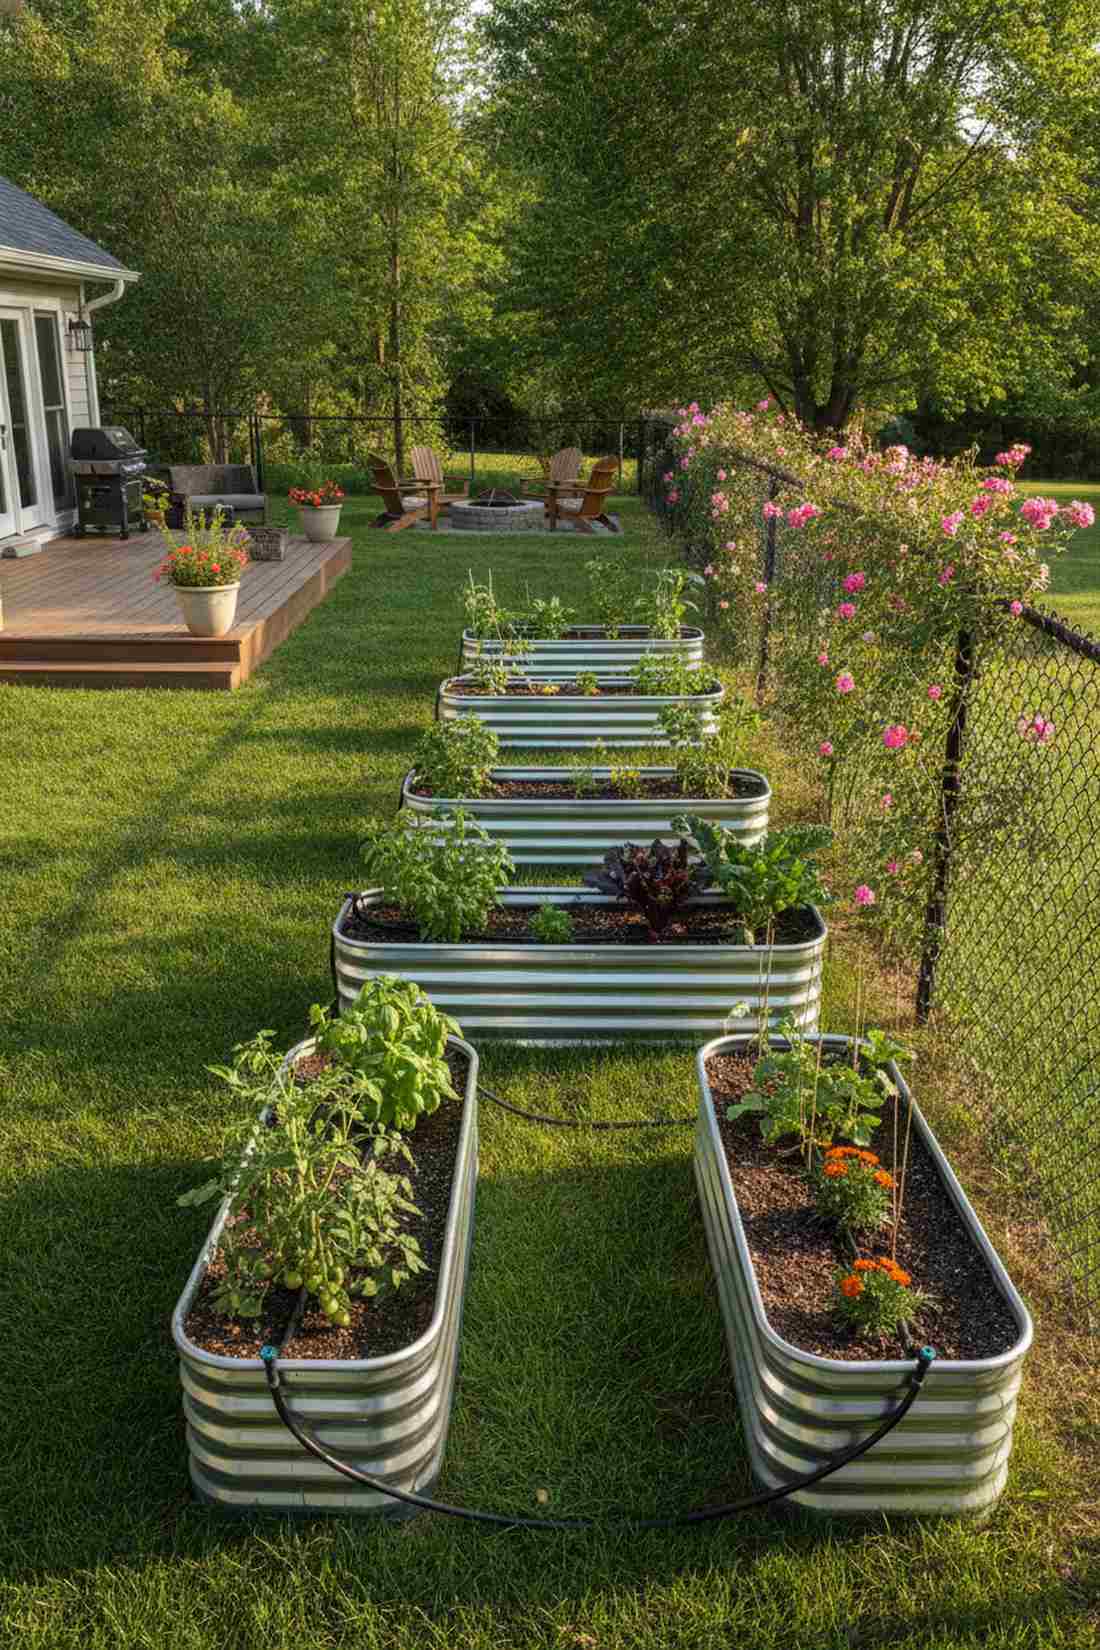
Straight out of a professional urban farm catalog. These spaced garden bed modules are an absolute game-changer for homeowners wanting a clean, organized aesthetic along a chain-link barrier.
Skipping the massive single-trench build in favor of distinct blocks creates an instantly bespoke feel that elevates the whole space. Incorporating commercial-grade elevated planter boxes makes crop rotation foolproof and keeps soil-borne diseases isolated.
Modules usually cost between $30–$50 each depending on the base material. Save this layout if you plan on growing vastly different plant families next season.
- Key Materials: Pre-fab modular boxes, drip irrigation tubing.
- Vibe / Style: Urban agricultural chic.
- Difficulty: Fast snap-together assembly.
- Budget Breakdown: Planters: $45 each | Irrigation: $20.
- Creator’s Tip: Space modules exactly 8 inches apart to comfortably slide a weed trimmer between them.
- Smart Sourcing: pre-fab corrugated galvanized kits, commercial-grade drip irrigation starter kits.
This next vertical setup is ridiculously cheap to build, but it literally looks like a $2,000 custom landscape architect installation…
Vertical Growing Solutions Using Fence Support
Integrating raised beds along fence with trellis systems converts vertical airspace into productive growing zones. Fence panels naturally support climbing plants, reducing material costs and structural complexity.
4. Fence-Mounted Trellis Bed Combination
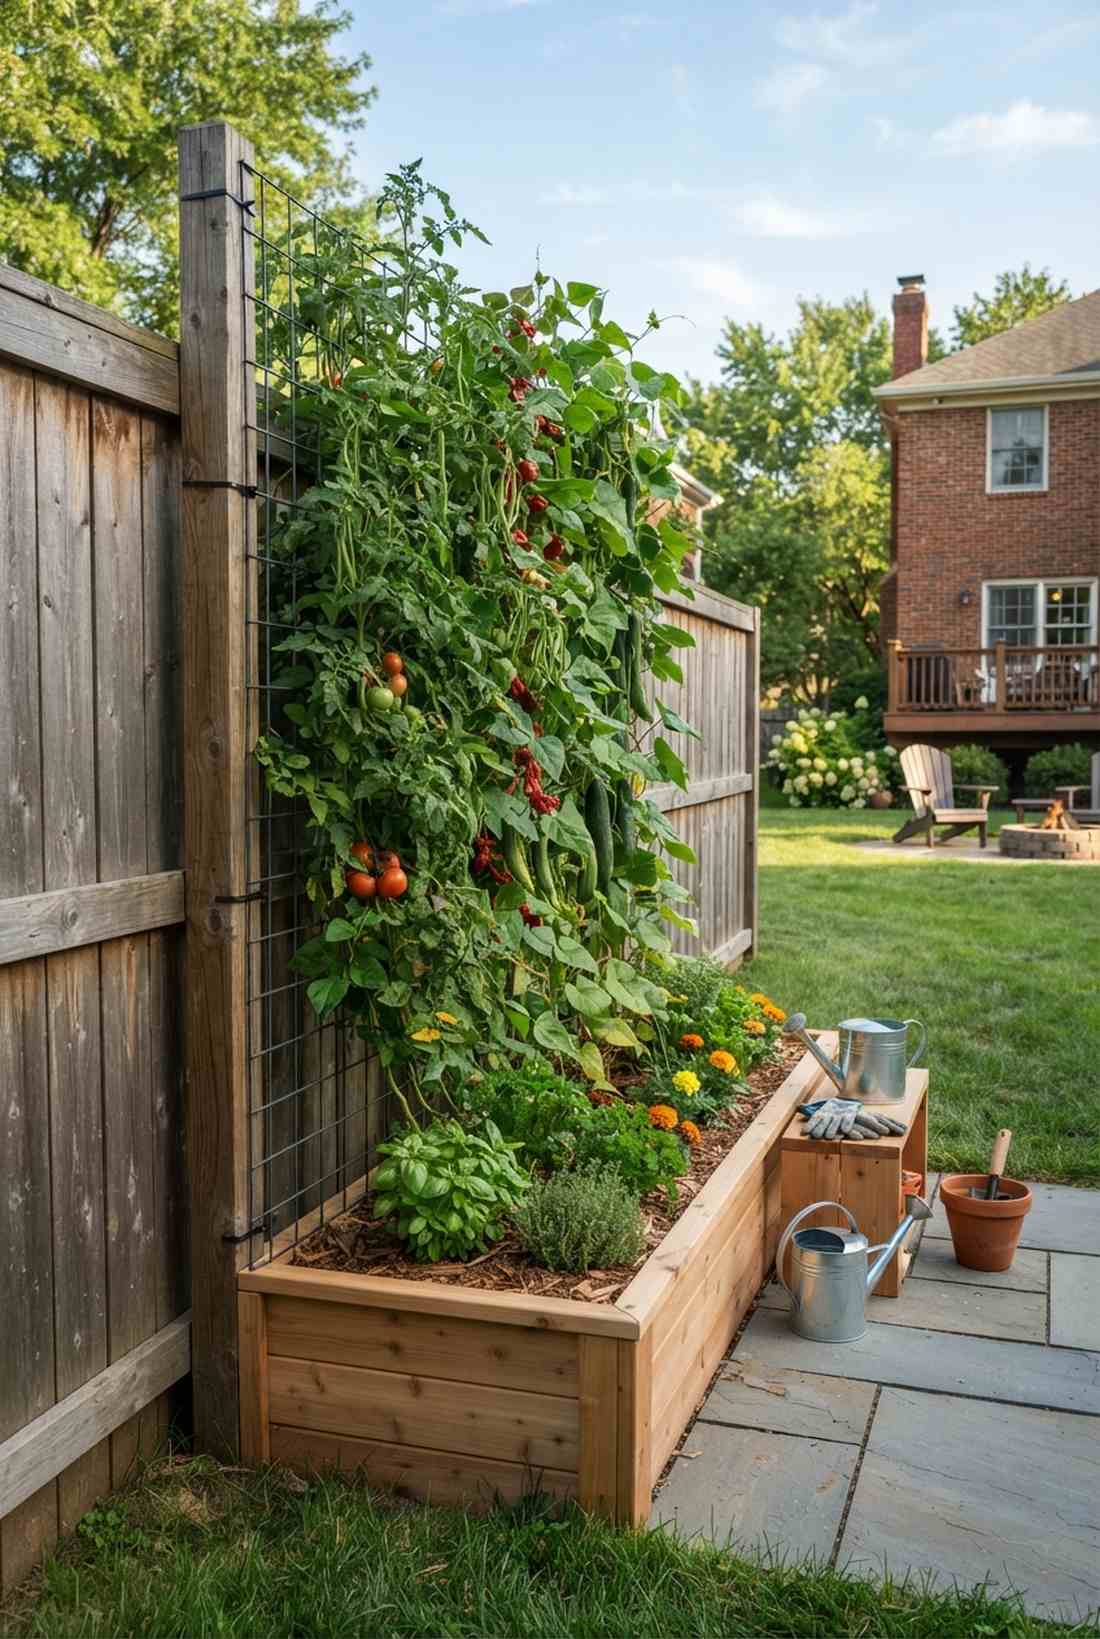
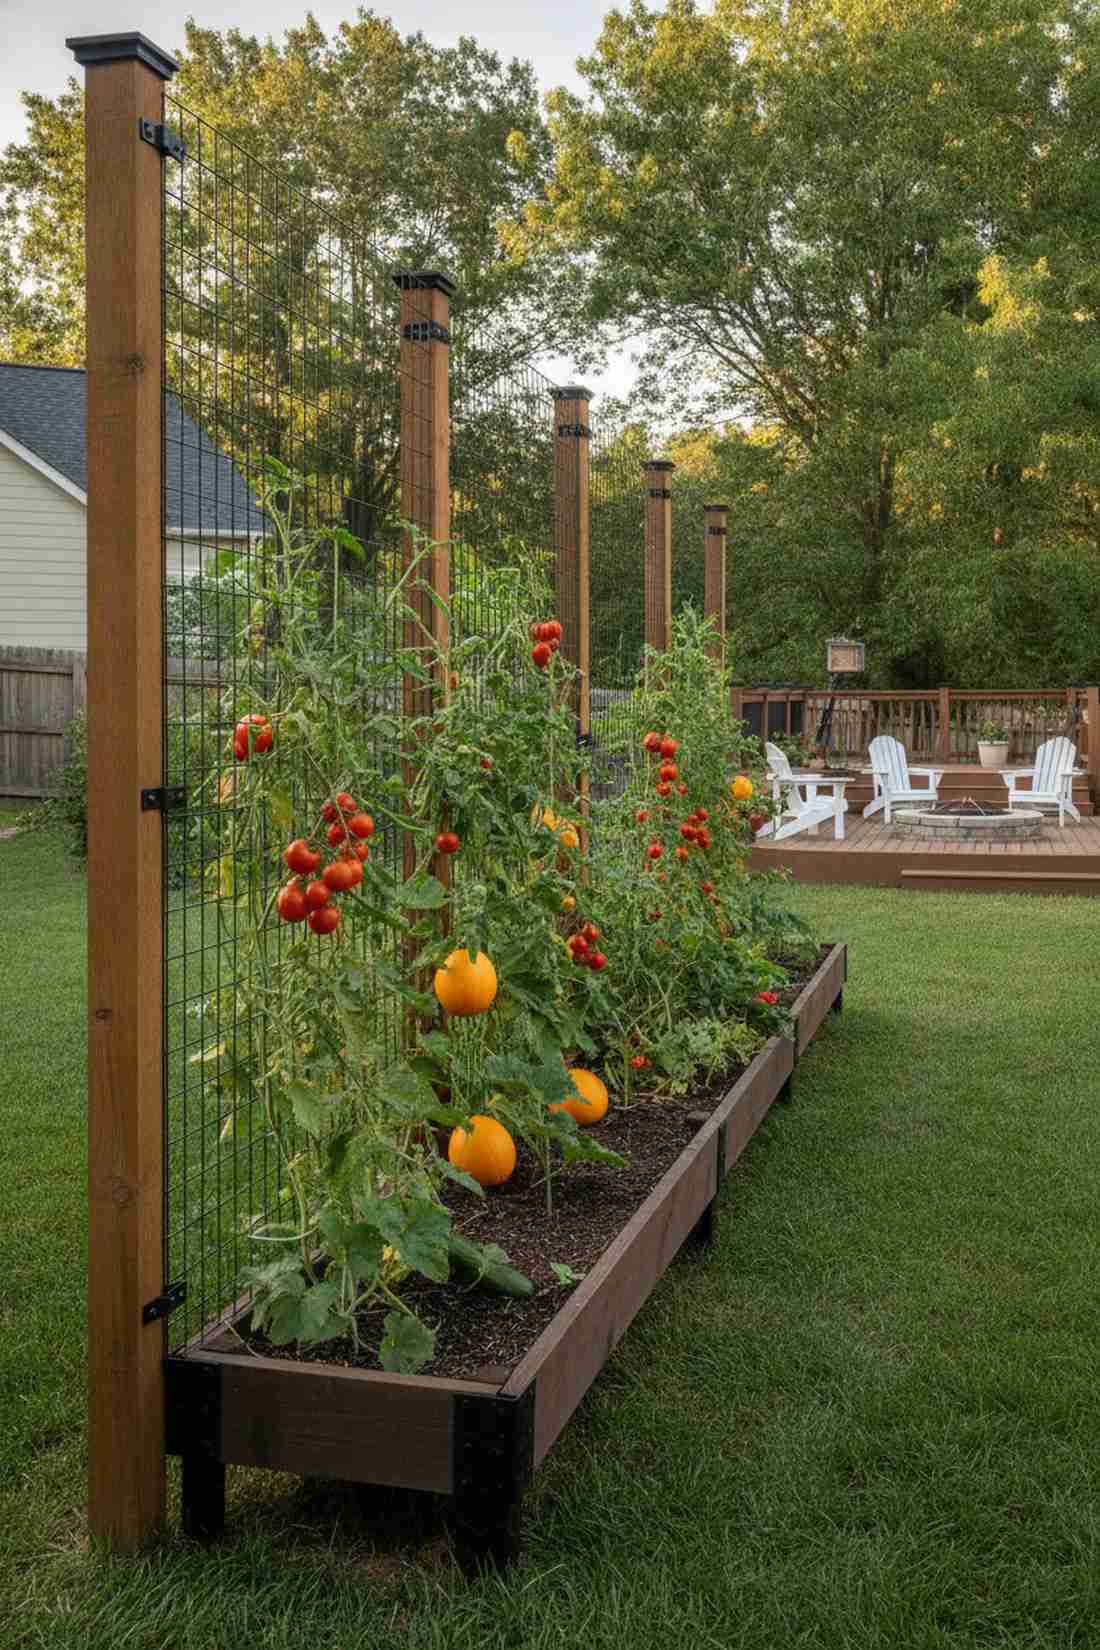
Feels like a lush secret garden wall dripping with fresh produce. A vertical climbing vine trellis system works beautifully for narrow city lots where you need to grow upwards instead of out.
People overcomplicate trellising, but anchoring right into sturdy posts yields an unexpectedly custom architectural finish. Integrating heavy-duty cattle panel sections provides rock-solid support for heavy melons or heirloom tomatoes without bowing in the wind.
Setting this up only costs about $25–$45 in basic hardware. Pin this to your vertical gardening board before spring planting begins.
- Key Materials: Steel mesh grids, mounting brackets.
- Vibe / Style: Lush vertical oasis.
- Difficulty: Beginner friendly.
- Budget Breakdown: Panels: $30 | Mounting Hardware: $15.
- Creator’s Tip: Keep the bed at least 6 inches off the fence base to ensure airflow stops wood rot.
- Smart Sourcing: powder-coated steel mesh grids, UV-resistant heavy-duty zip ties.
5. Arched Trellis with Dual-Side Planting
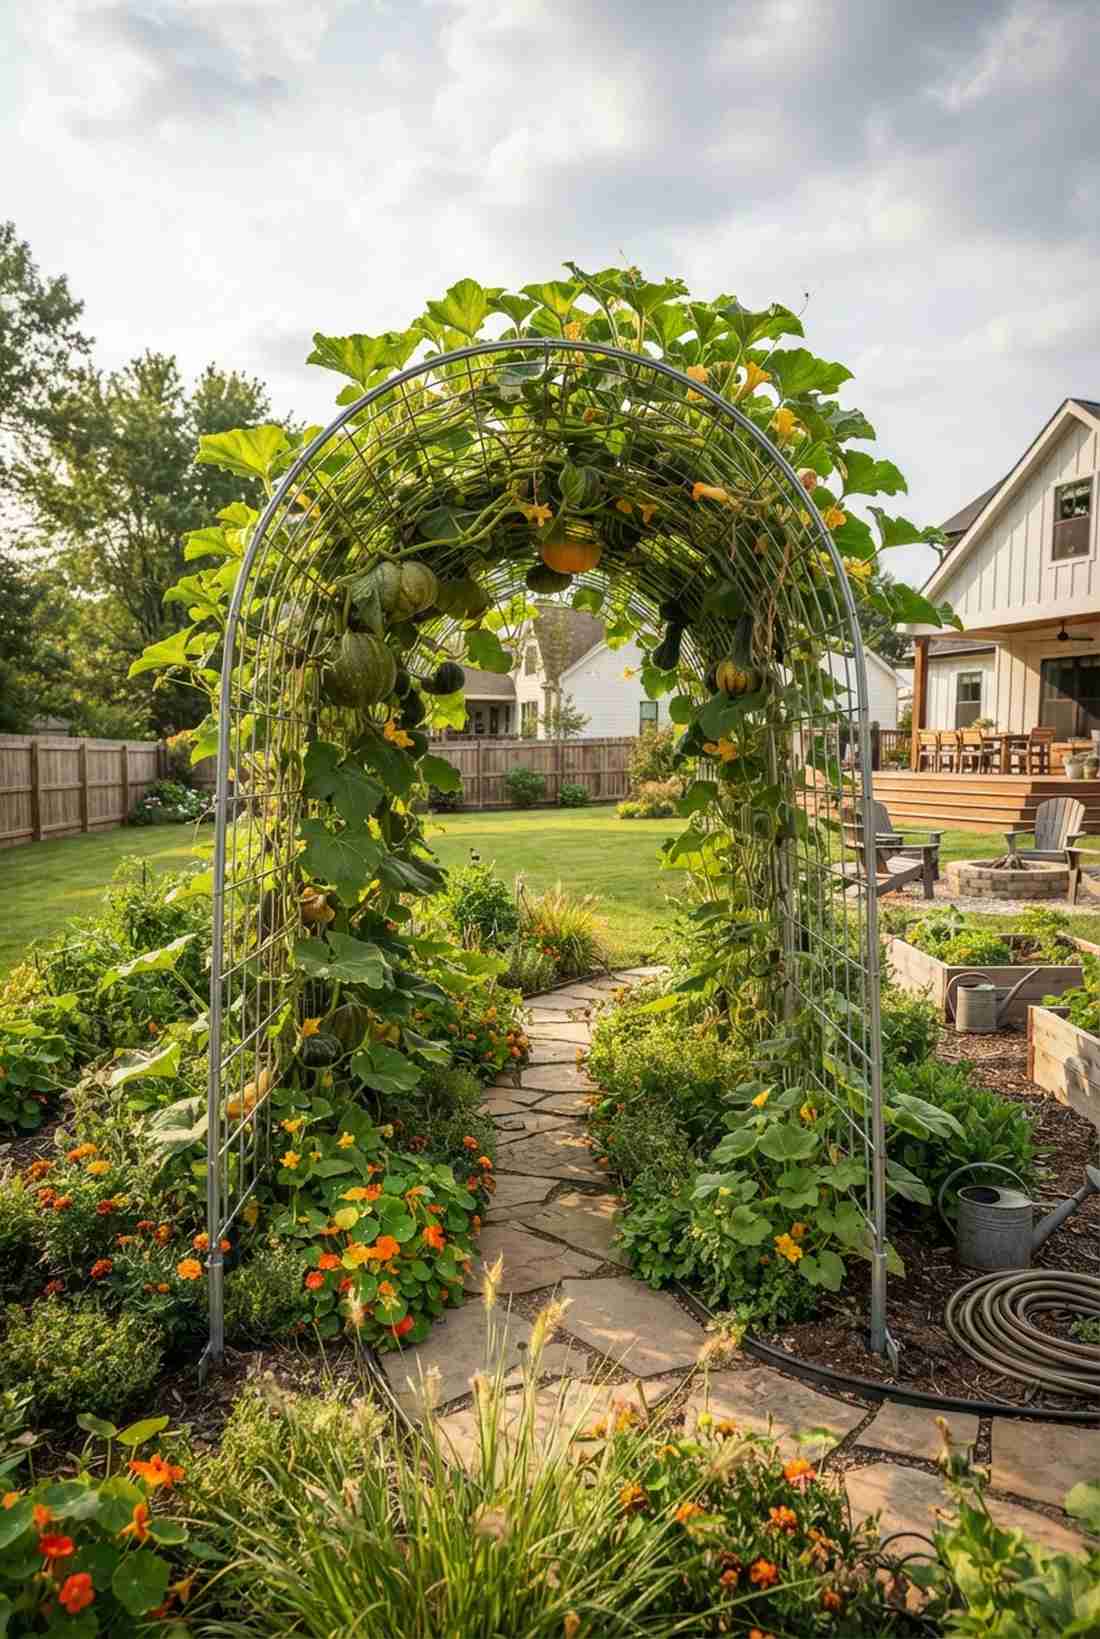
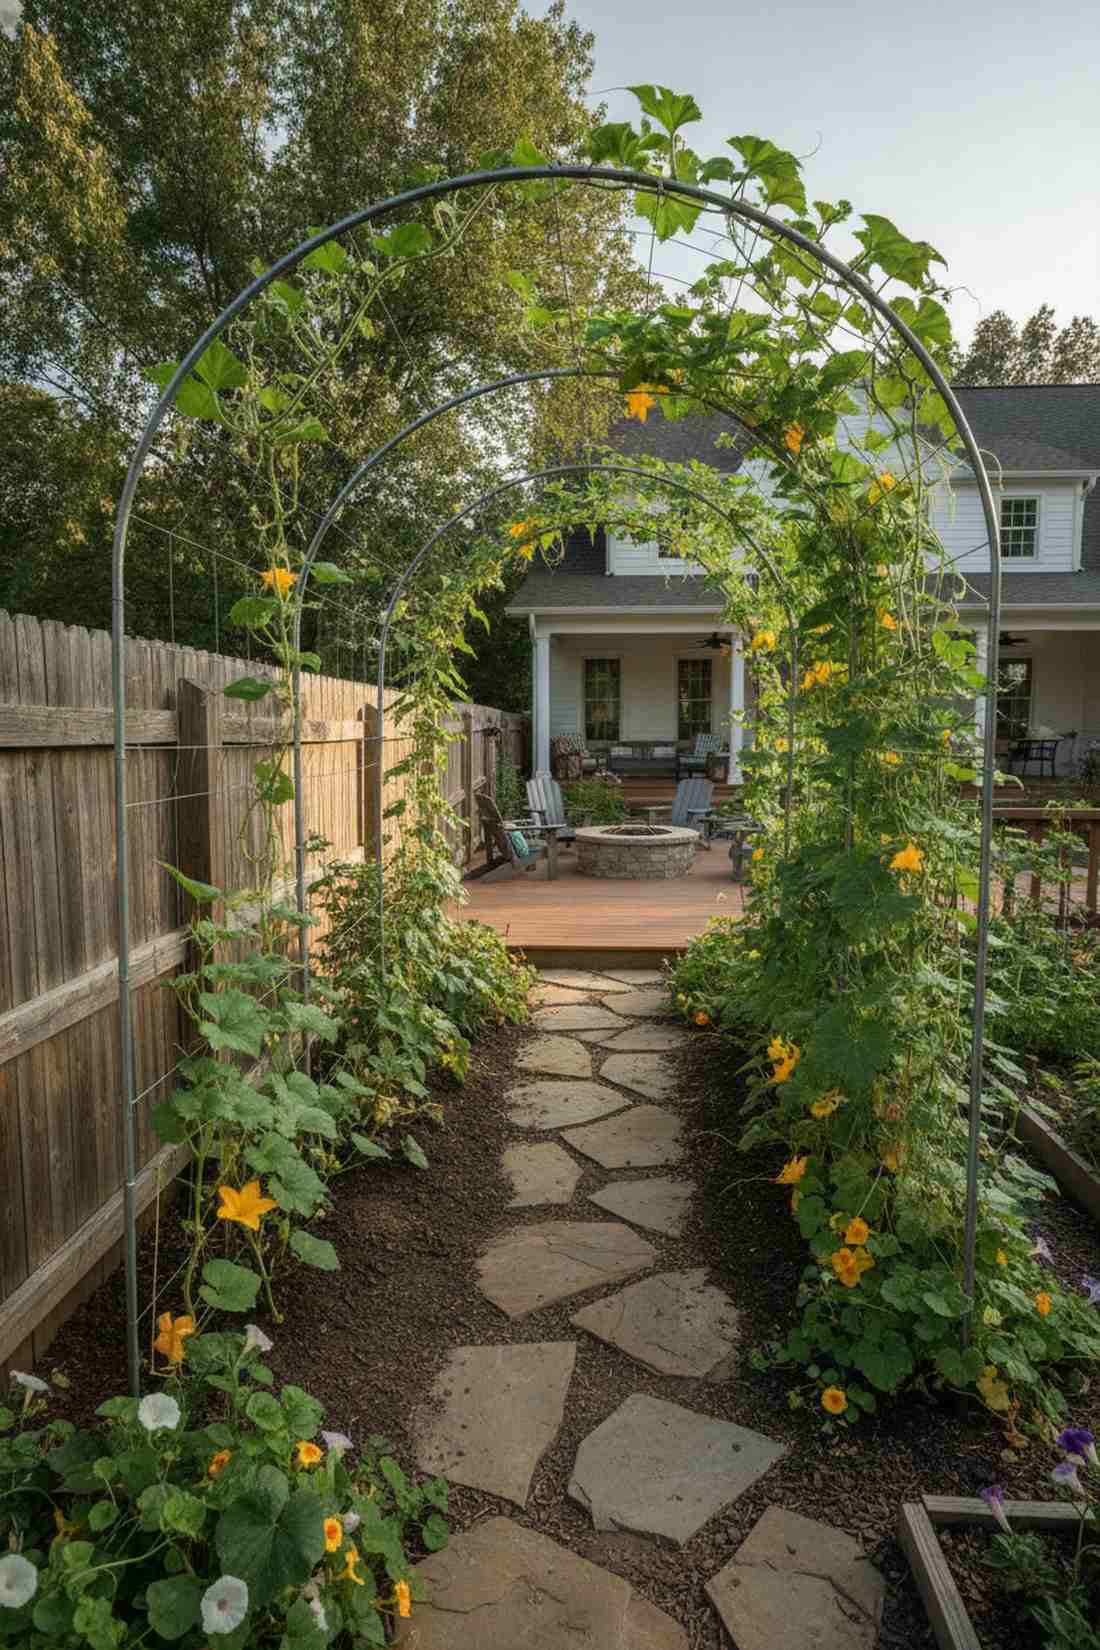
Looks like a magical botanical tunnel straight out of a storybook. This walkthrough garden archway setup is stunningly effective for creating an immersive pathway right next to your boundary line.
Bending industrial metal across a walkway provides a wildly expensive-looking custom canopy on a shoestring budget. By utilizing galvanized livestock panels anchored into deep soil bases, you create immense structural rigidity for massive squashes.
This striking feature runs about $50–$80 total. Highly recommended for a jaw-dropping focal point that doubles your vertical yield.
- Key Materials: Flexible galvanized panels, deep U-nails.
- Vibe / Style: Whimsical productive canopy.
- Difficulty: Requires two people.
- Budget Breakdown: Arch Panel: $40 | Base Support: $20.
- Creator’s Tip: Train your vines early using soft garden twine so they follow the arch naturally.
- Smart Sourcing: galvanized steel trellis arches (starter kit), bulk pack heavy-duty U-nails.
6. Vertical Pocket Wall Above Raised Bed
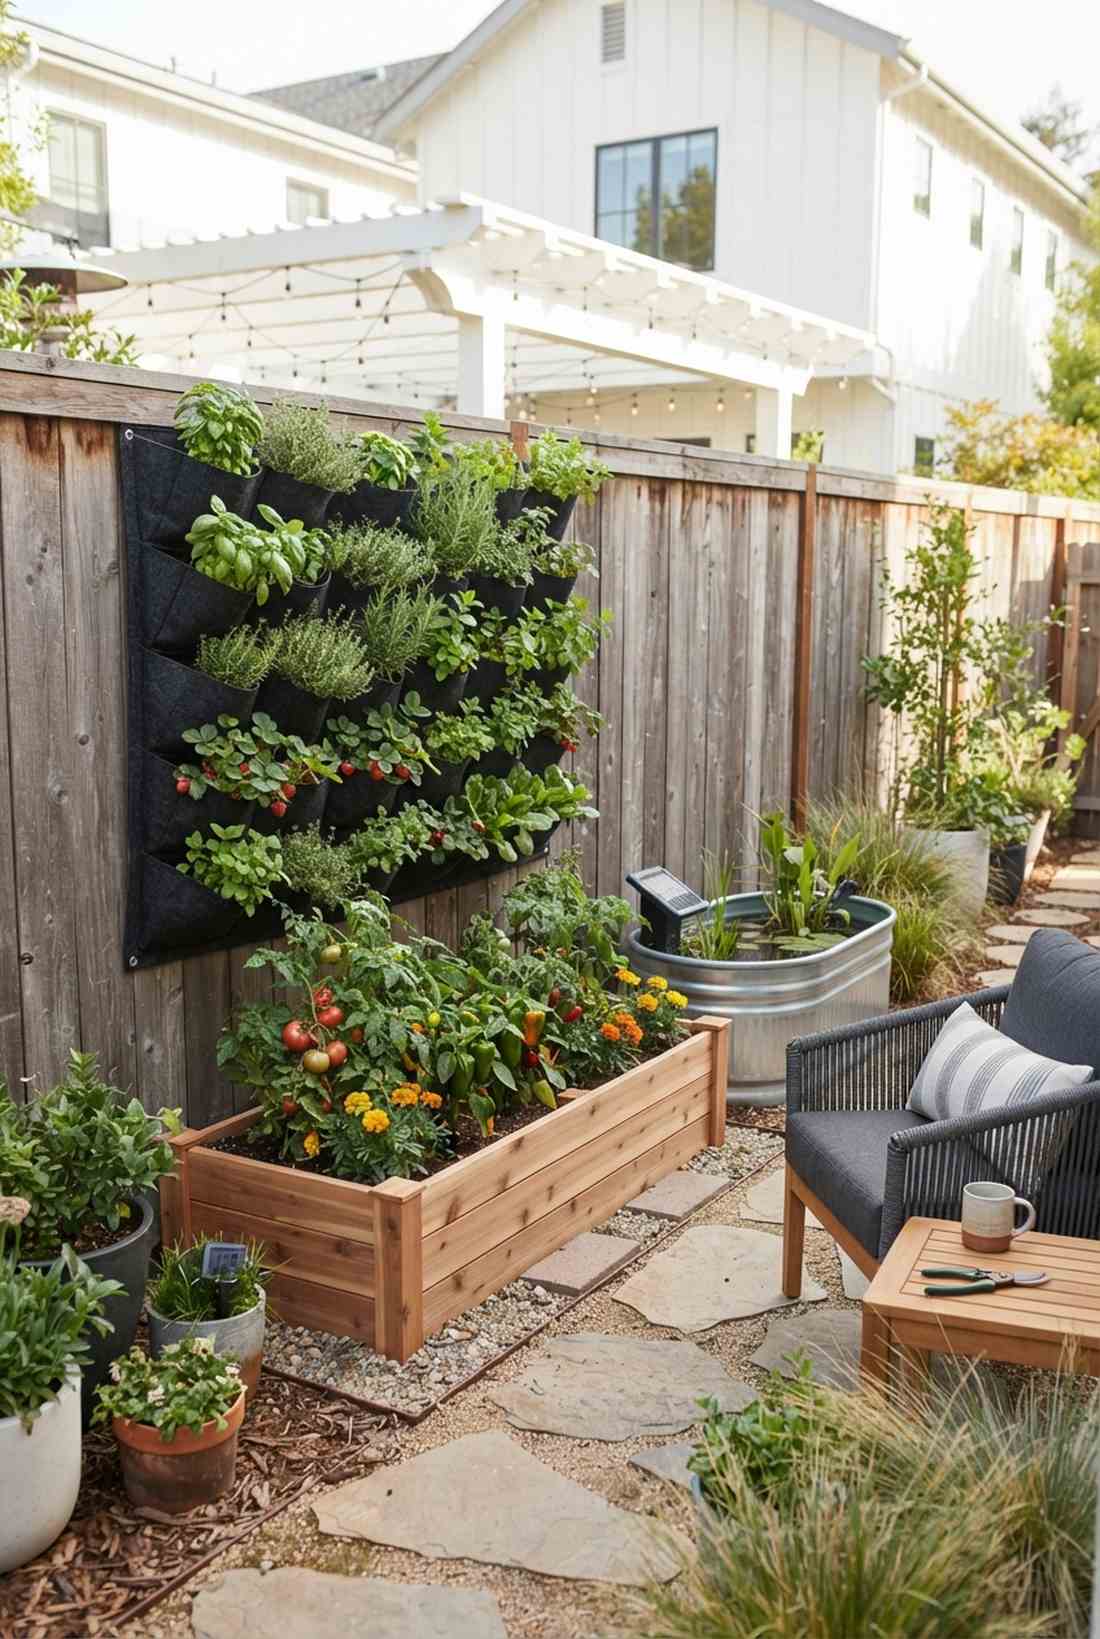
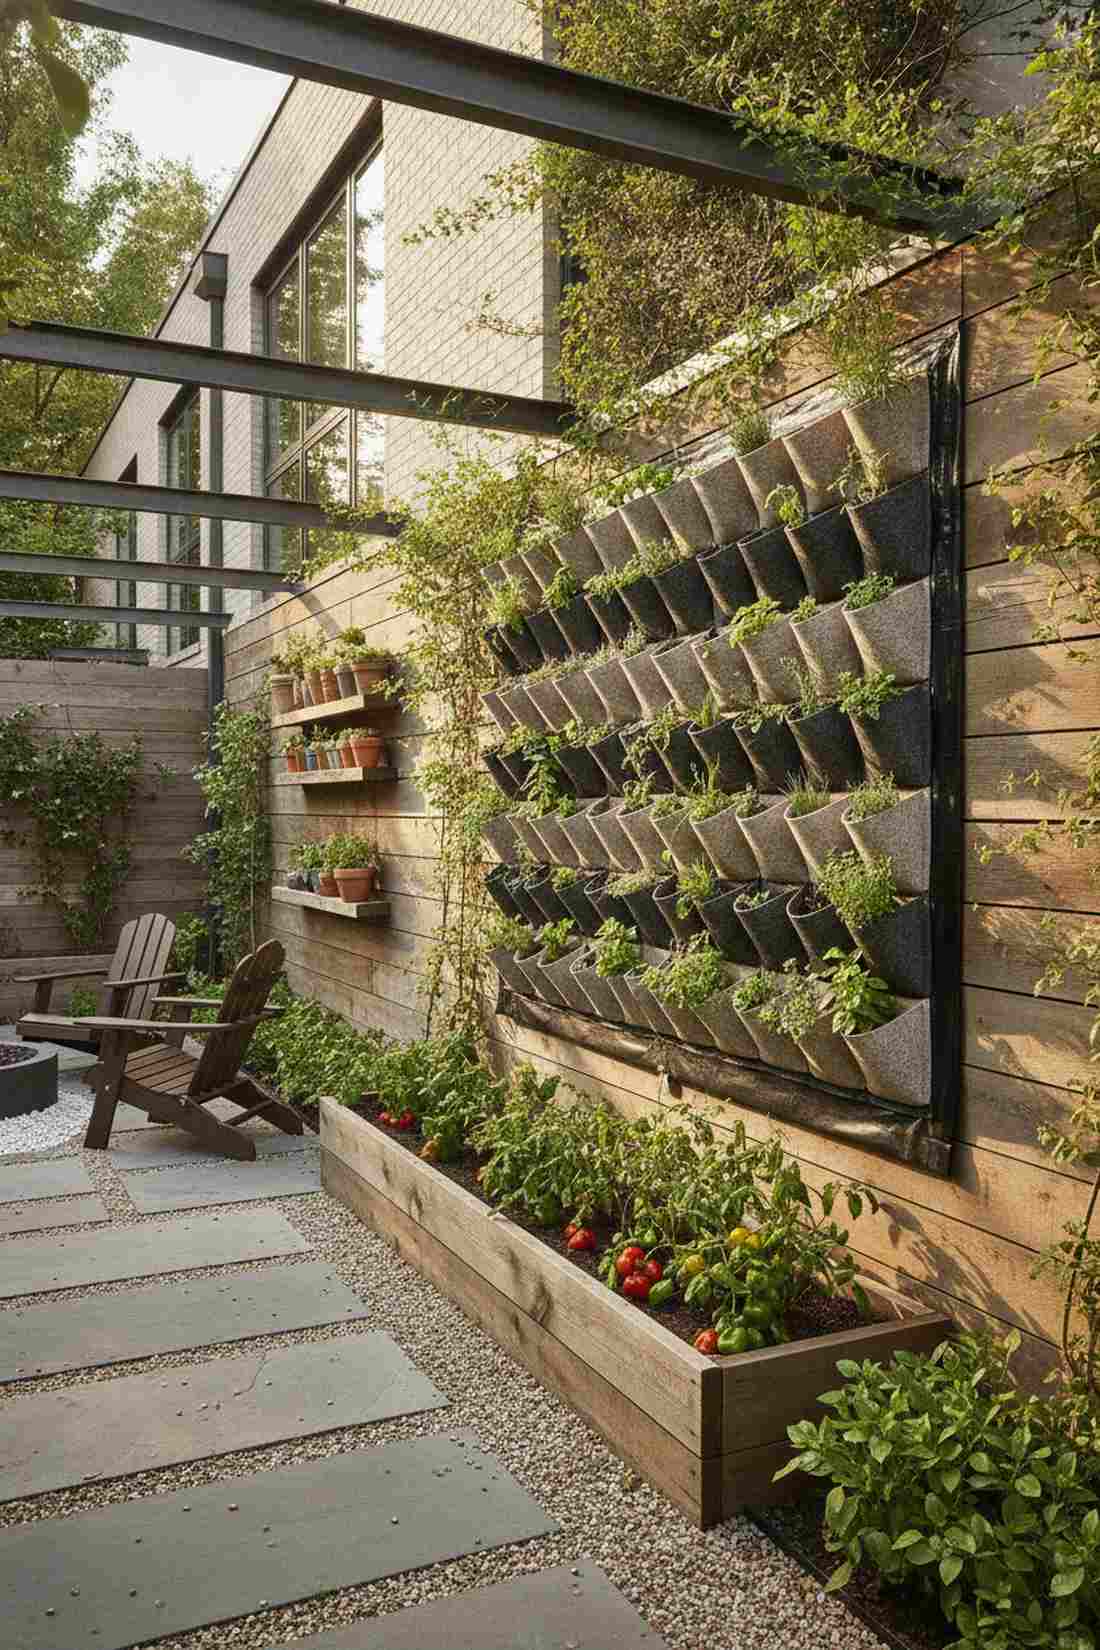
Feels like a modern living wall you would see at an upscale eco-resort. Integrating hanging felt planter pockets is brilliant for maximizing sun exposure in extremely tight urban side yards.
Many beginners ignore the airspace above their crops, but stacking your planting zones completely elevates the yard’s aesthetic. Using breathable fabric vertical garden kits prevents root rot while turning a boring wooden divider into a lush green canvas.
You can easily install this add-on for under $35. Save this idea if you want to quadruple your herb harvest without taking up ground space.
- Key Materials: Multi-pocket planters, waterproof backing.
- Vibe / Style: Sleek eco-modern.
- Difficulty: Very easy.
- Budget Breakdown: Pocket Wall: $25 | Fasteners: $10.
- Creator’s Tip: Mount a waterproof plastic sheet behind the felt to protect your fence from constant moisture.
- Smart Sourcing: breathable fabric pocket planters (bulk pack), heavy-duty waterproof backing rolls.
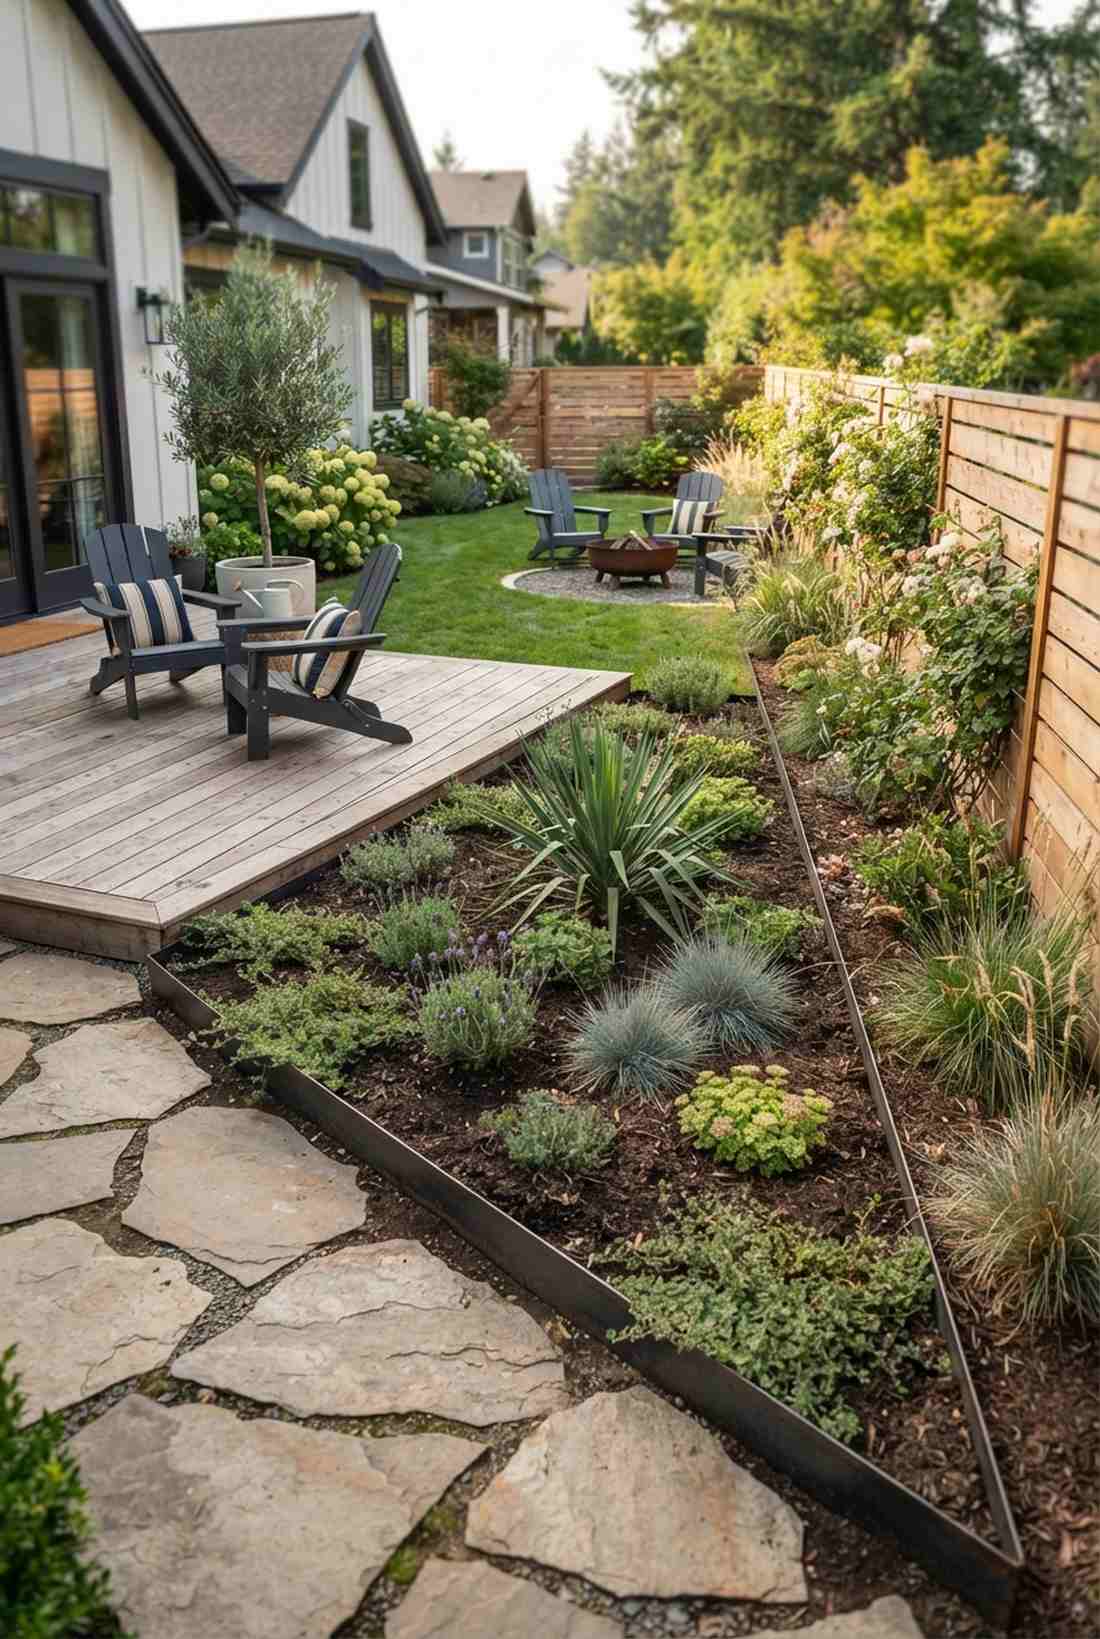
Corner and Angular Configurations for Complex Perimeters
Fence corners and angled boundaries present opportunities for creative bed designs that capture awkward spaces. These configurations turn challenging areas into focal points rather than leaving them empty.
7. L-Shaped Corner Bed with Extended Arms
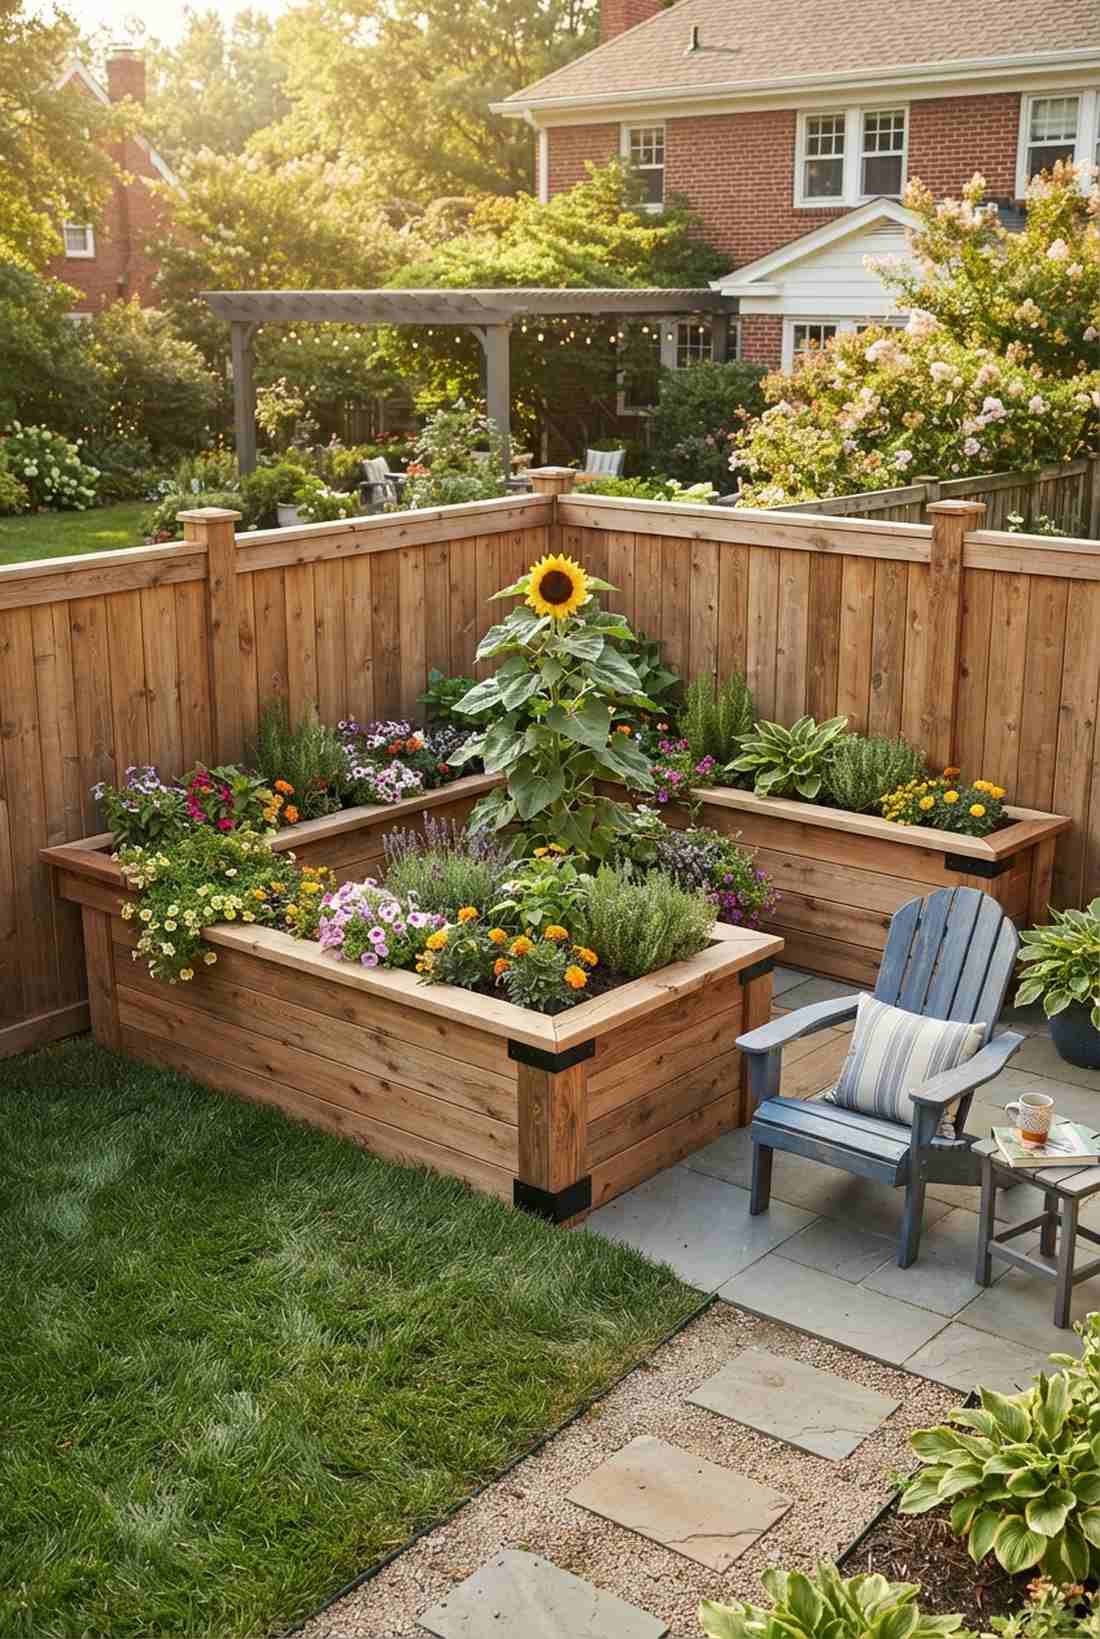
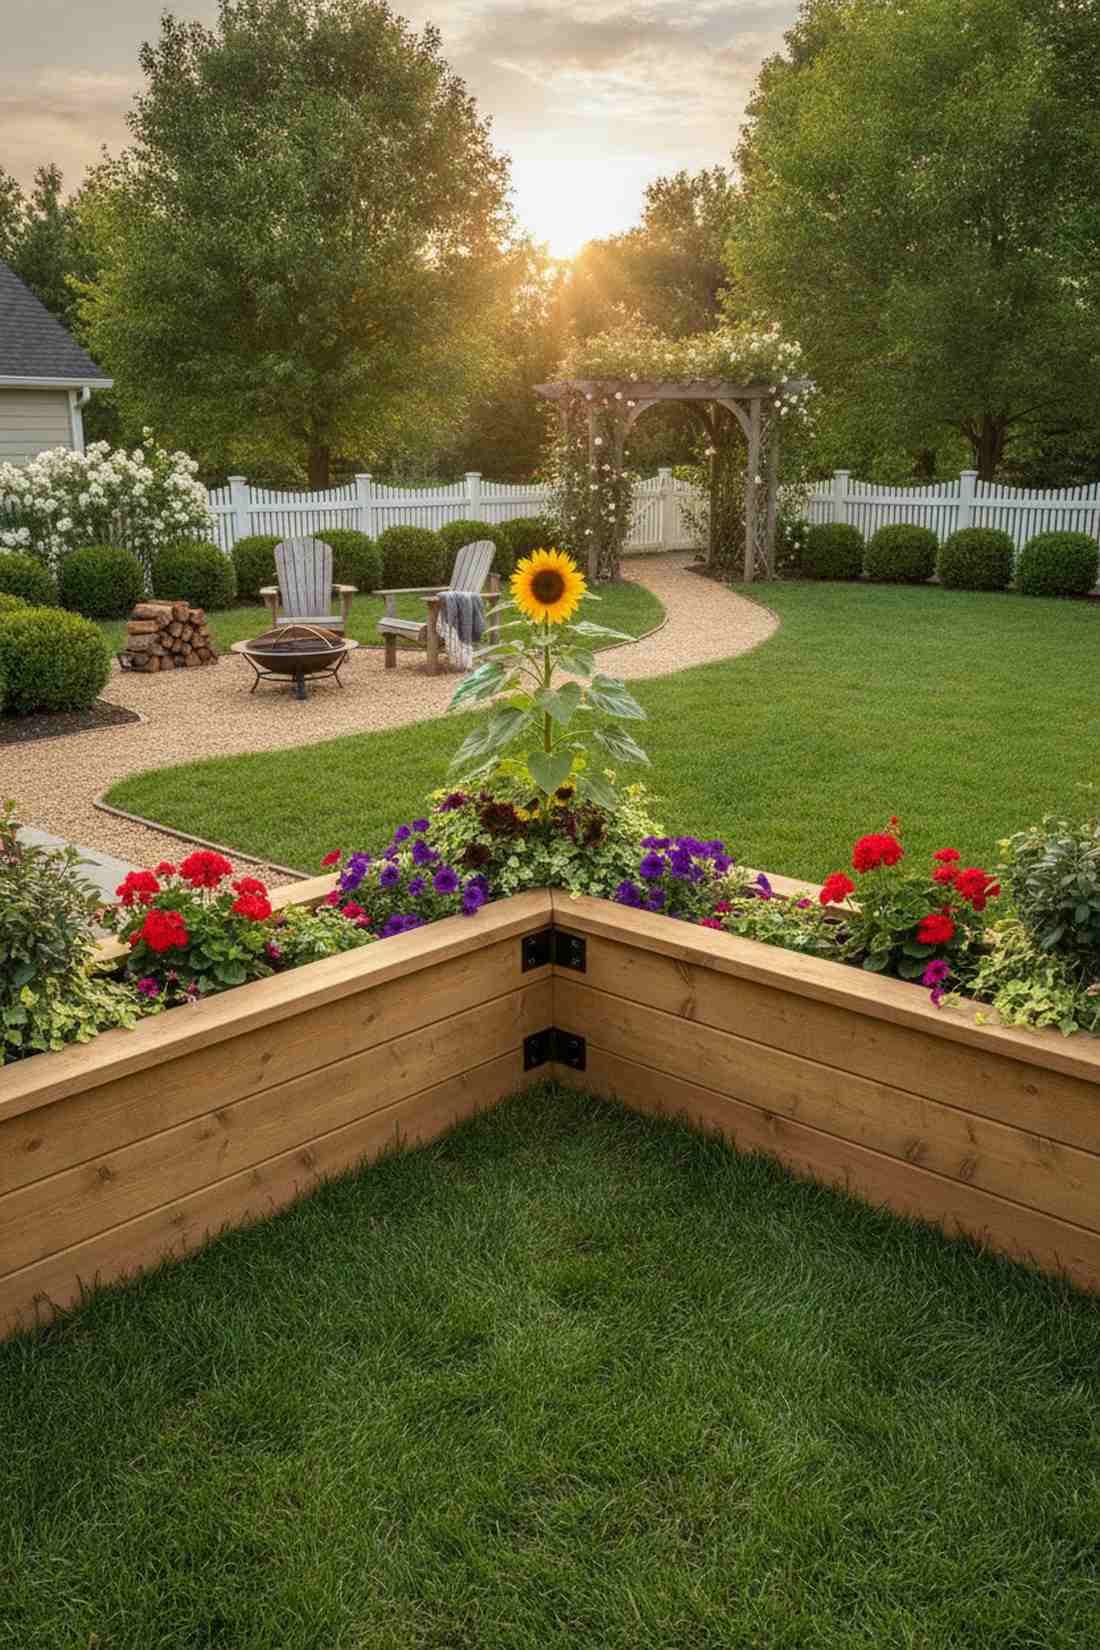
Gives off the ultimate cozy courtyard vibe that begs you to sit and relax. An angled corner planter box works flawlessly to anchor awkward property lines and soften harsh 90-degree turns.
Leaving corners empty is a massive missed opportunity, whereas this wrap-around design looks far more expensive than it is. Using pre-cut corner bracket joints ensures seamless connections and stops soil from spilling out over the years.
A large wrap-around build typically costs $80–$150. Pin this to your backyard renovation board for your next big weekend project.
- Key Materials: Corner joint brackets, structural lumber.
- Vibe / Style: Anchored courtyard.
- Difficulty: Moderate carpentry.
- Budget Breakdown: Brackets: $45 | Lumber: $90.
- Creator’s Tip: Plant a tall focal piece like a dwarf sunflower directly in the center of the L-bend.
- Smart Sourcing: heavy-duty 90-degree planter brackets, pre-cut cedar corner trim.
8. Triangular Corner Infill Bed
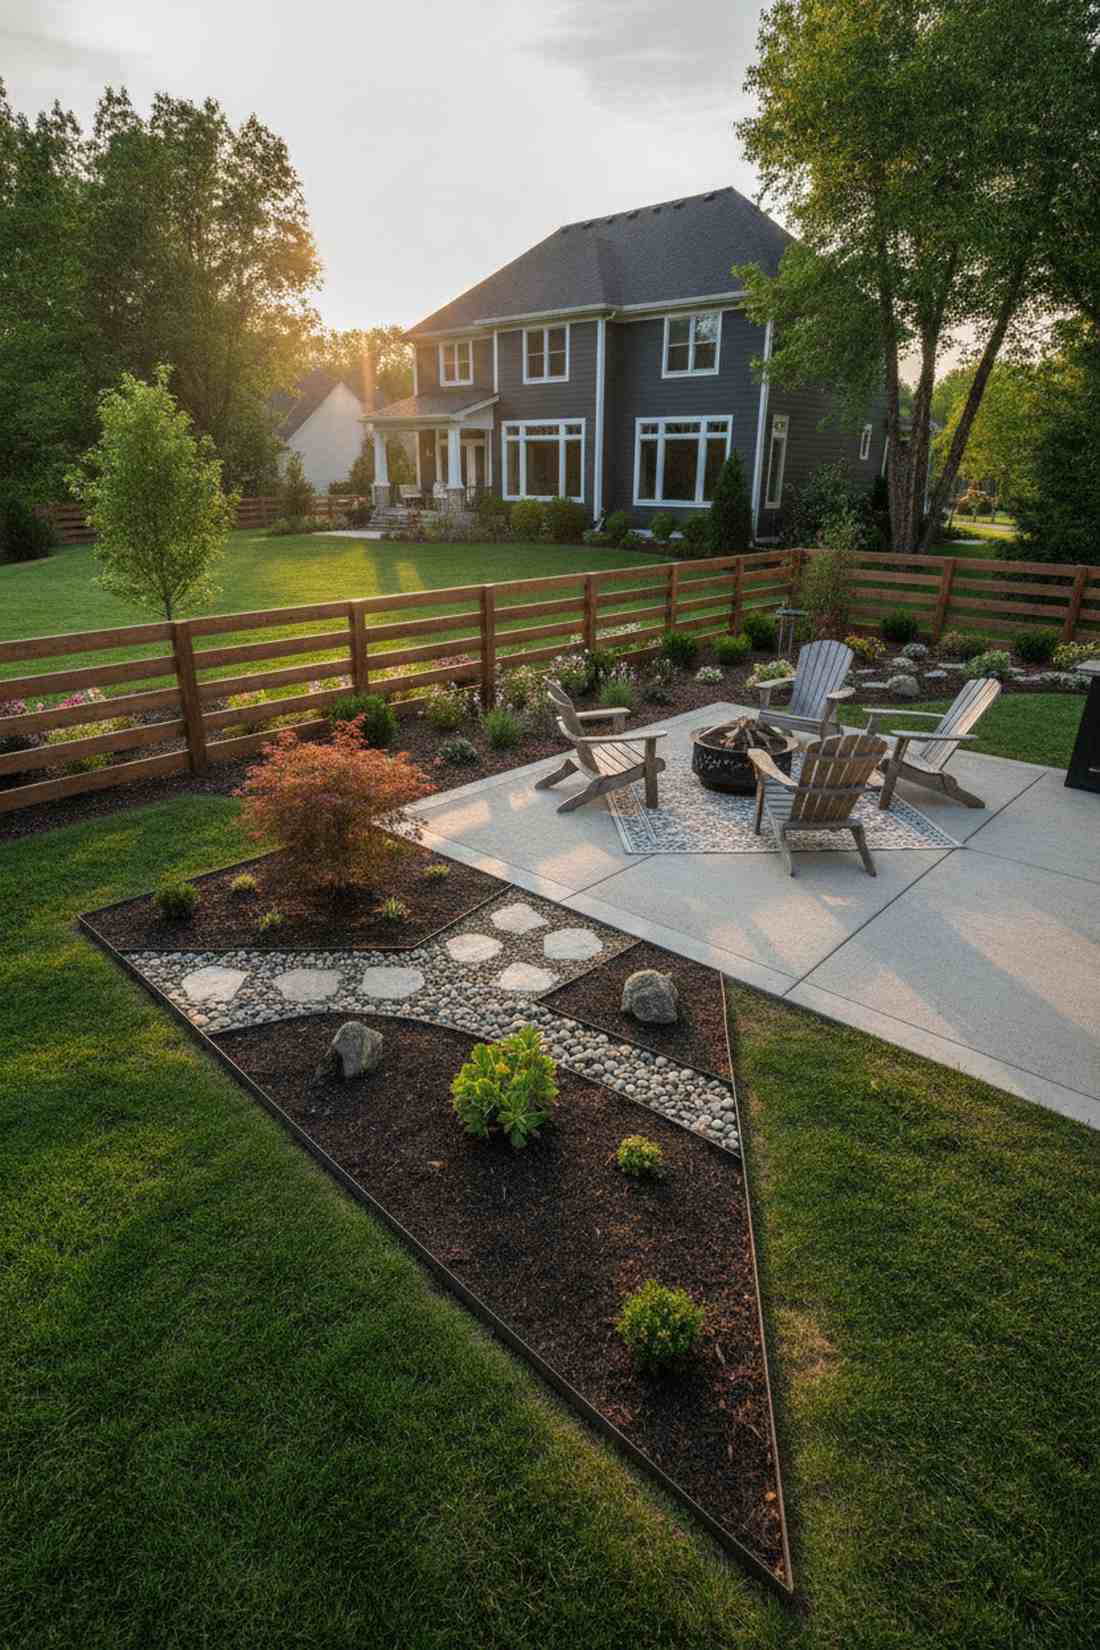
Feels like a custom-built geometric feature from a high-end landscape magazine. A diagonal wedge garden bed is the perfect space-saving hack for irregular or diagonal property boundaries.
Slotted perfectly into tight wedges, this approach transforms wasted dirt patches into a highly intentional focal point. Sourcing custom-fit landscape edging strips makes it incredibly simple to mold the shape perfectly against any weird angles.
Expect to spend around $30–$60 for the lumber and soil base. It’s a remarkably fast way to clean up messy yard corners.
- Key Materials: Flexible edging, soil amendments.
- Vibe / Style: Crisp geometric modernism.
- Difficulty: Quick beginner build.
- Budget Breakdown: Edging: $25 | Fill Dirt: $20.
- Creator’s Tip: Use a speed square to map out the exact angles before making any lumber cuts.
- Smart Sourcing: flexible metal landscape edging (starter kits), premium miniature garden supplies.
Most people get their yard layout completely wrong… until they try the genius staggered arrangement coming up next.
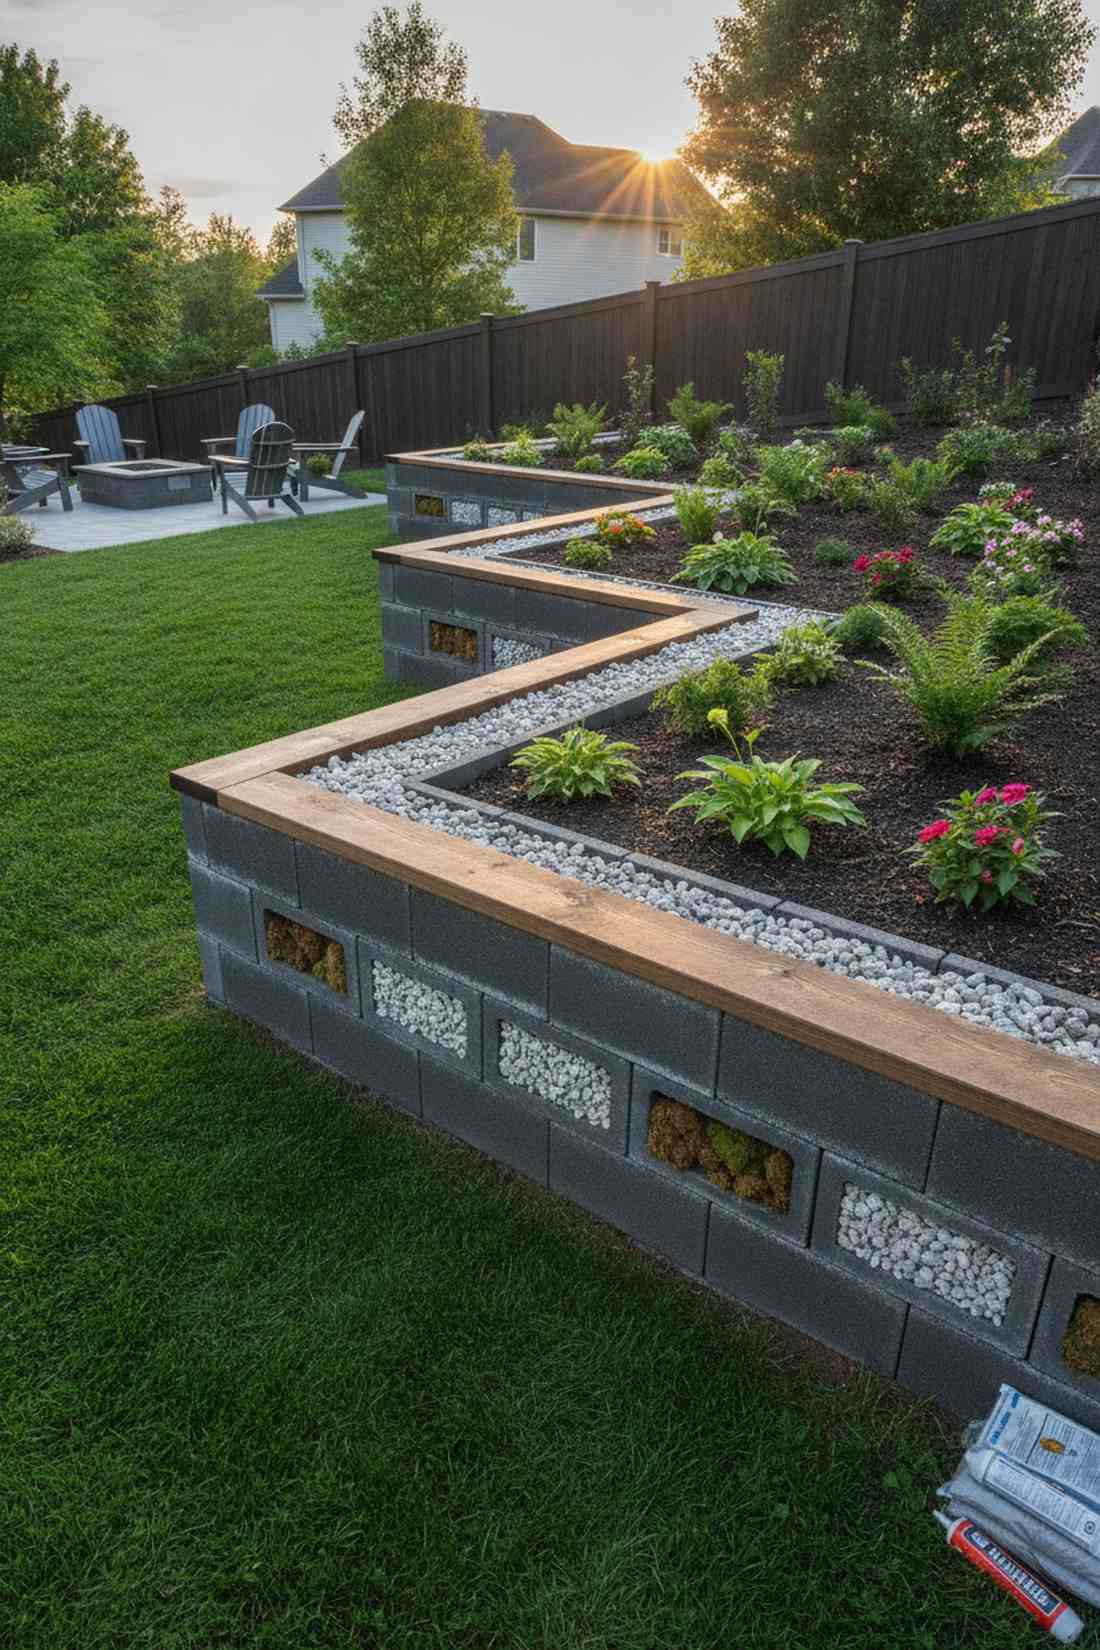
9. Staggered Offset Bed Arrangement
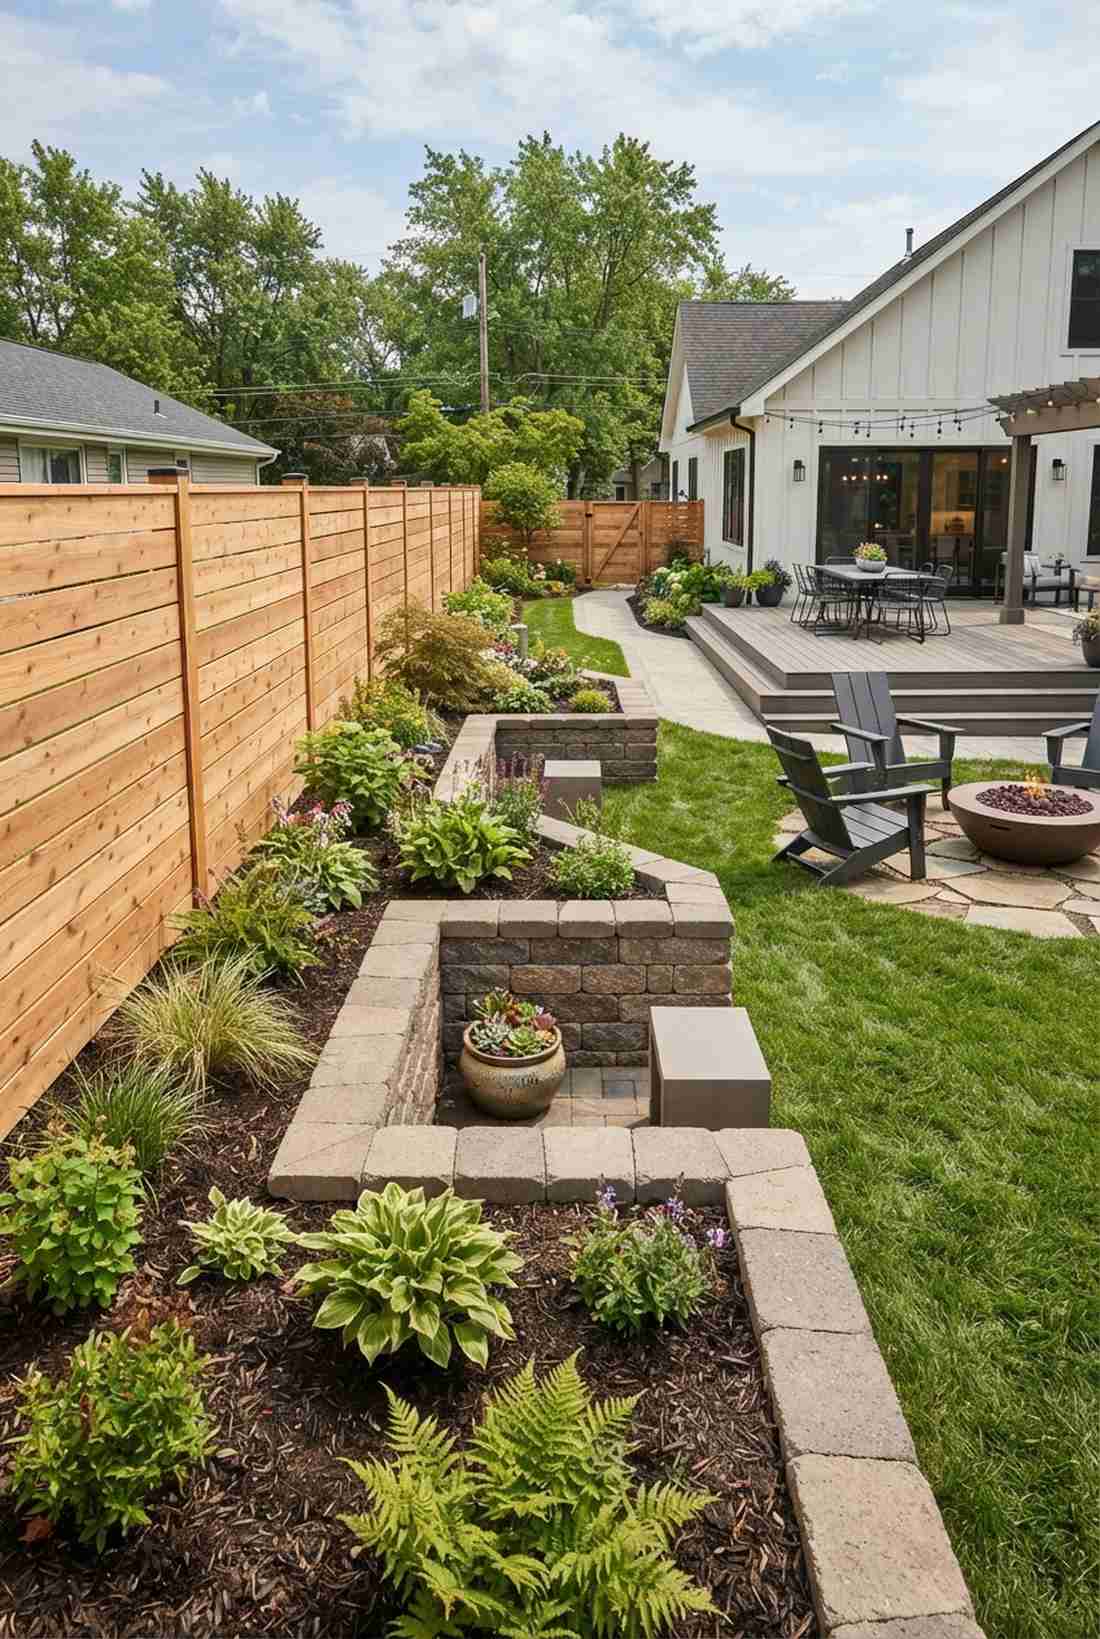
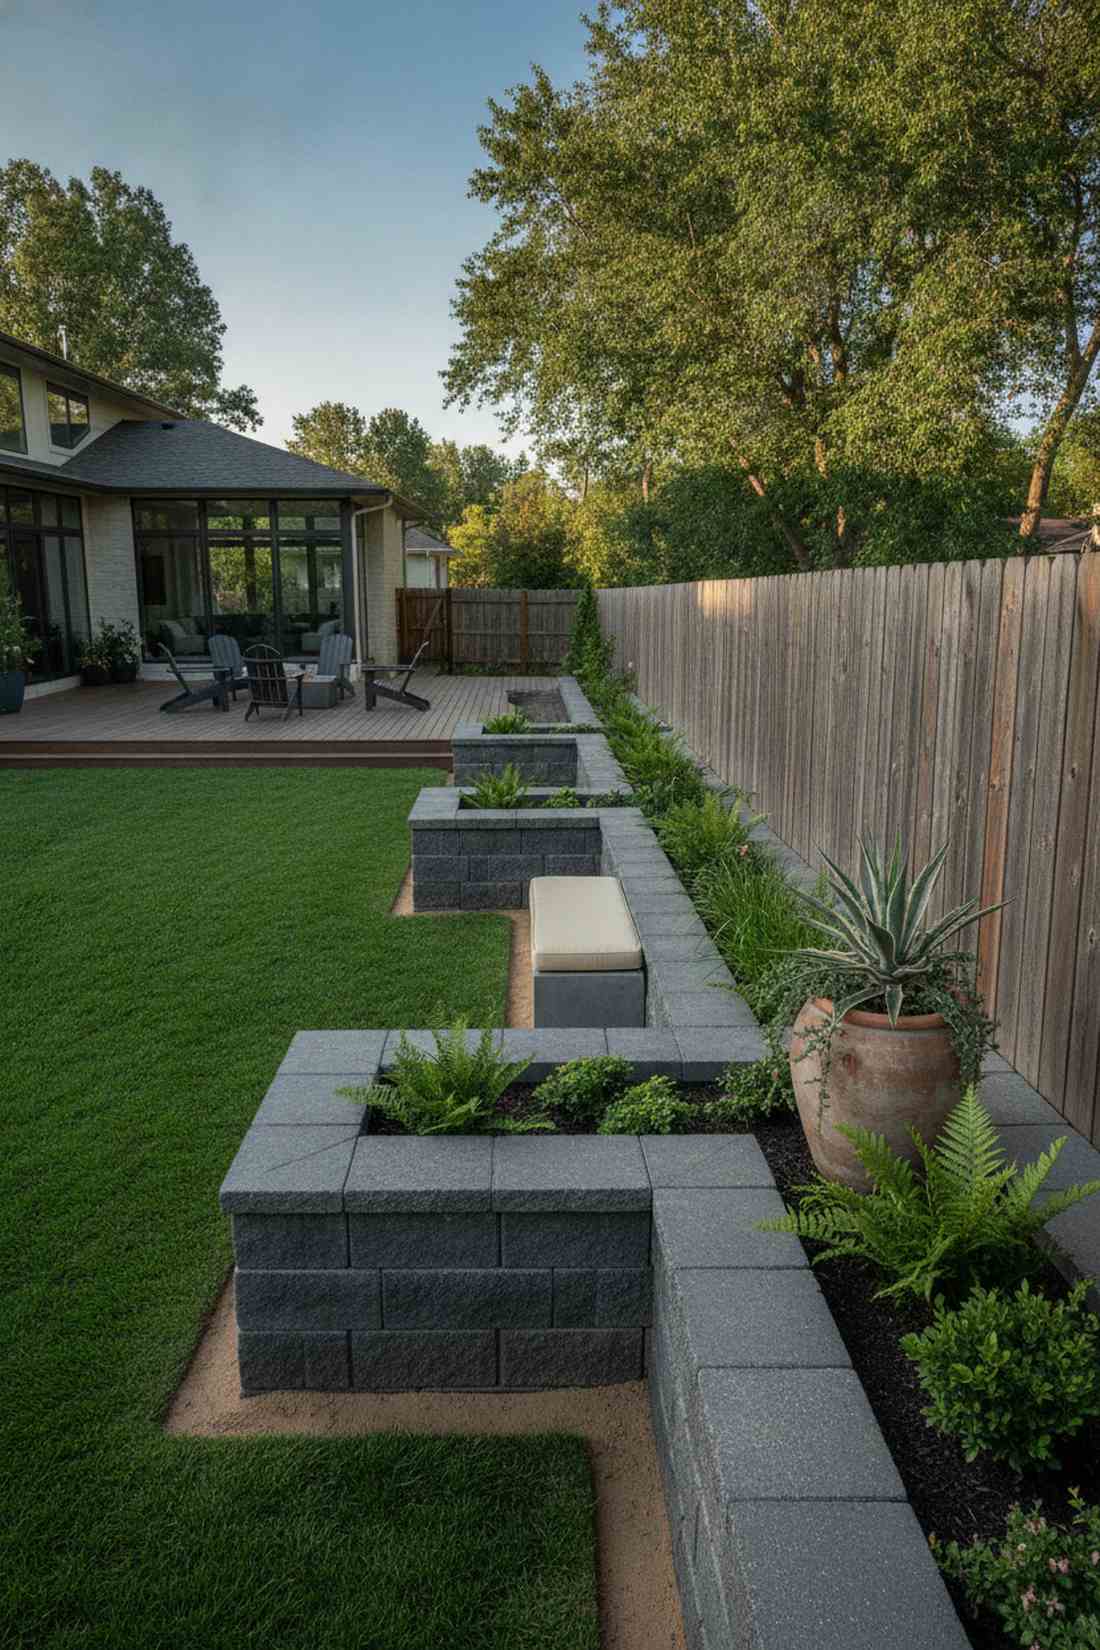
Looks exactly like a modern art museum’s outdoor patio layout. A zigzag perimeter planter design works exceptionally well for breaking up the boring visual monotony of a long, flat fence.
Pushing alternating sections outward delivers a surprisingly premium look by creating dynamic microclimates. Investing in commercial-grade landscaping blocks for the recessed sections turns basic dirt into a high-end architectural triumph.
You can construct this staggered look for roughly $70–$130. Save this idea if you want to completely redefine a boring rectangular backyard.
- Key Materials: Modular wall blocks, leveling sand.
- Vibe / Style: Dynamic architectural flow.
- Difficulty: Intermediate leveling required.
- Budget Breakdown: Blocks: $90 | Sand Base: $25.
- Creator’s Tip: Tuck a small seating block or a decorative pot into the recessed zig-zag areas.
- Smart Sourcing: interlocking retaining wall blocks (bulk pack), premium leveling sand bags.
💡 Must-Have Supplies for High-End Setups
To build these setups faster and ensure they last, skip the generic craft aisles and invest in the right foundational kits.
- Base & Support: pre-cut rot-resistant cedar timber kits
- Setup Tools: heavy-duty corner bracket starter kits
- Weather/Durability Protection: UV-coated protective garden box sealants
Material-Specific Builds for Different Fence Types
Matching bed construction materials and methods to existing fence styles creates cohesive perimeter designs. Material choices affect durability, maintenance requirements, and compatibility with fence structures.
10. Cedar Plank Beds for Wood Fences
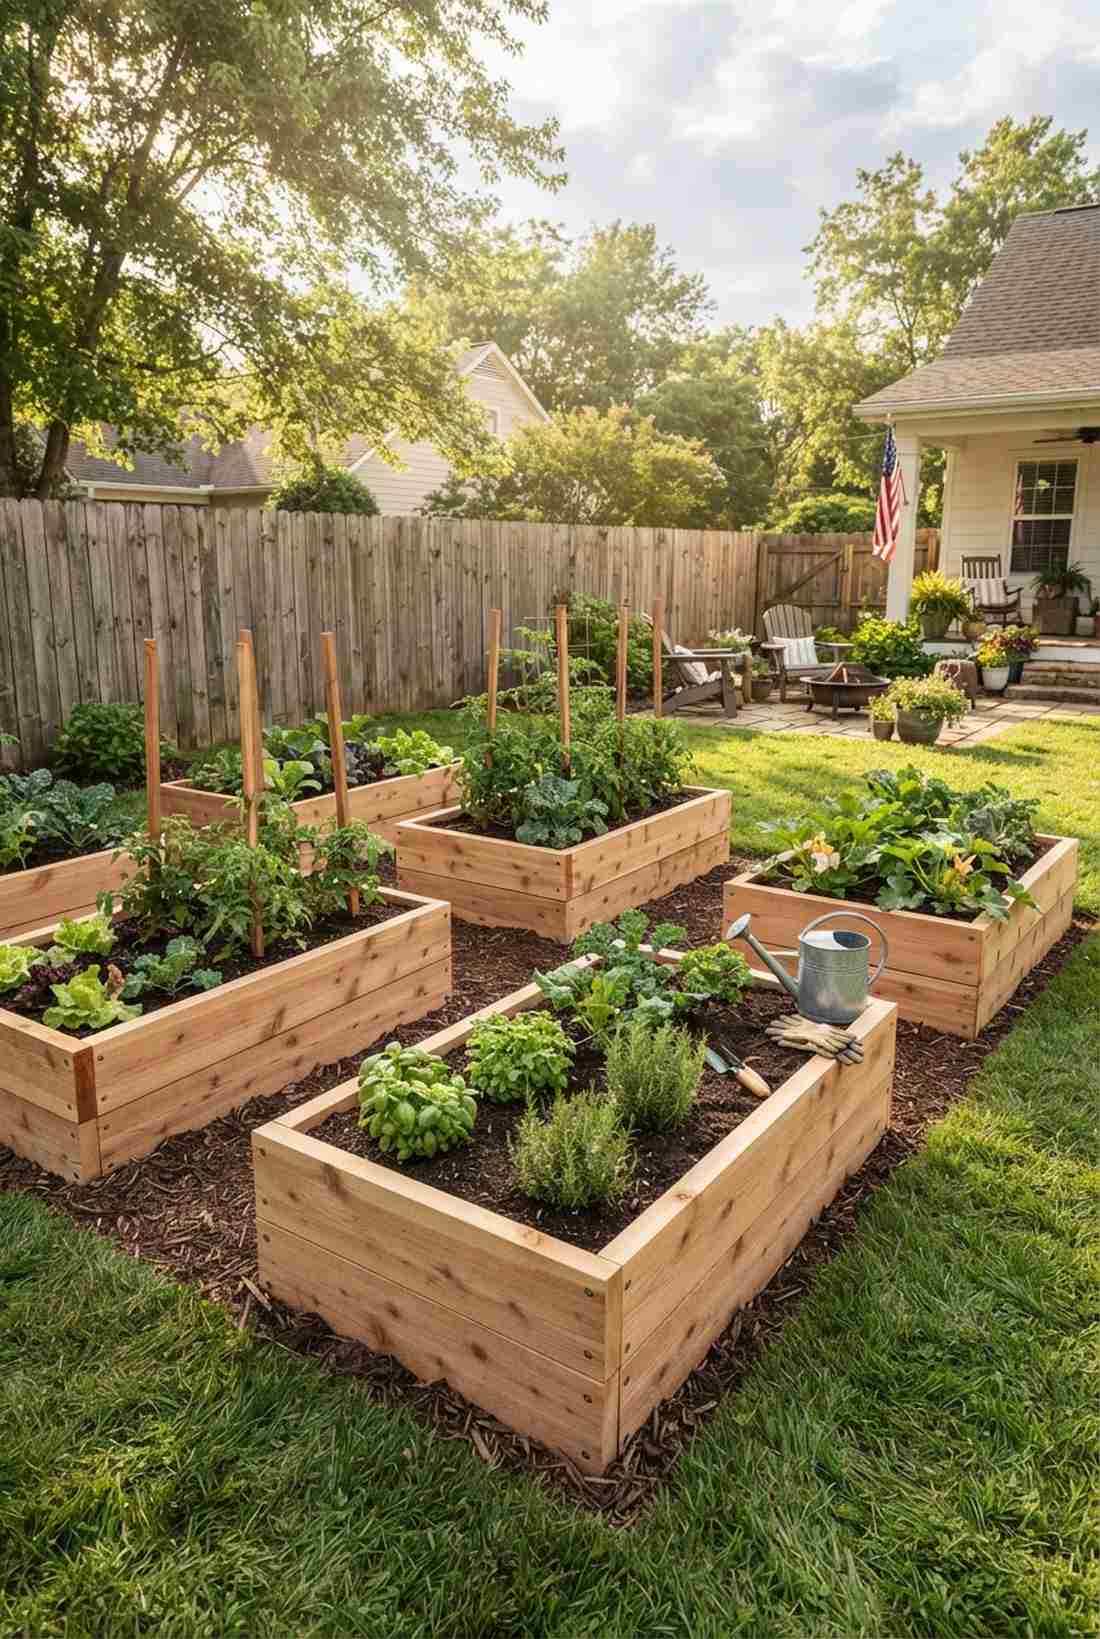
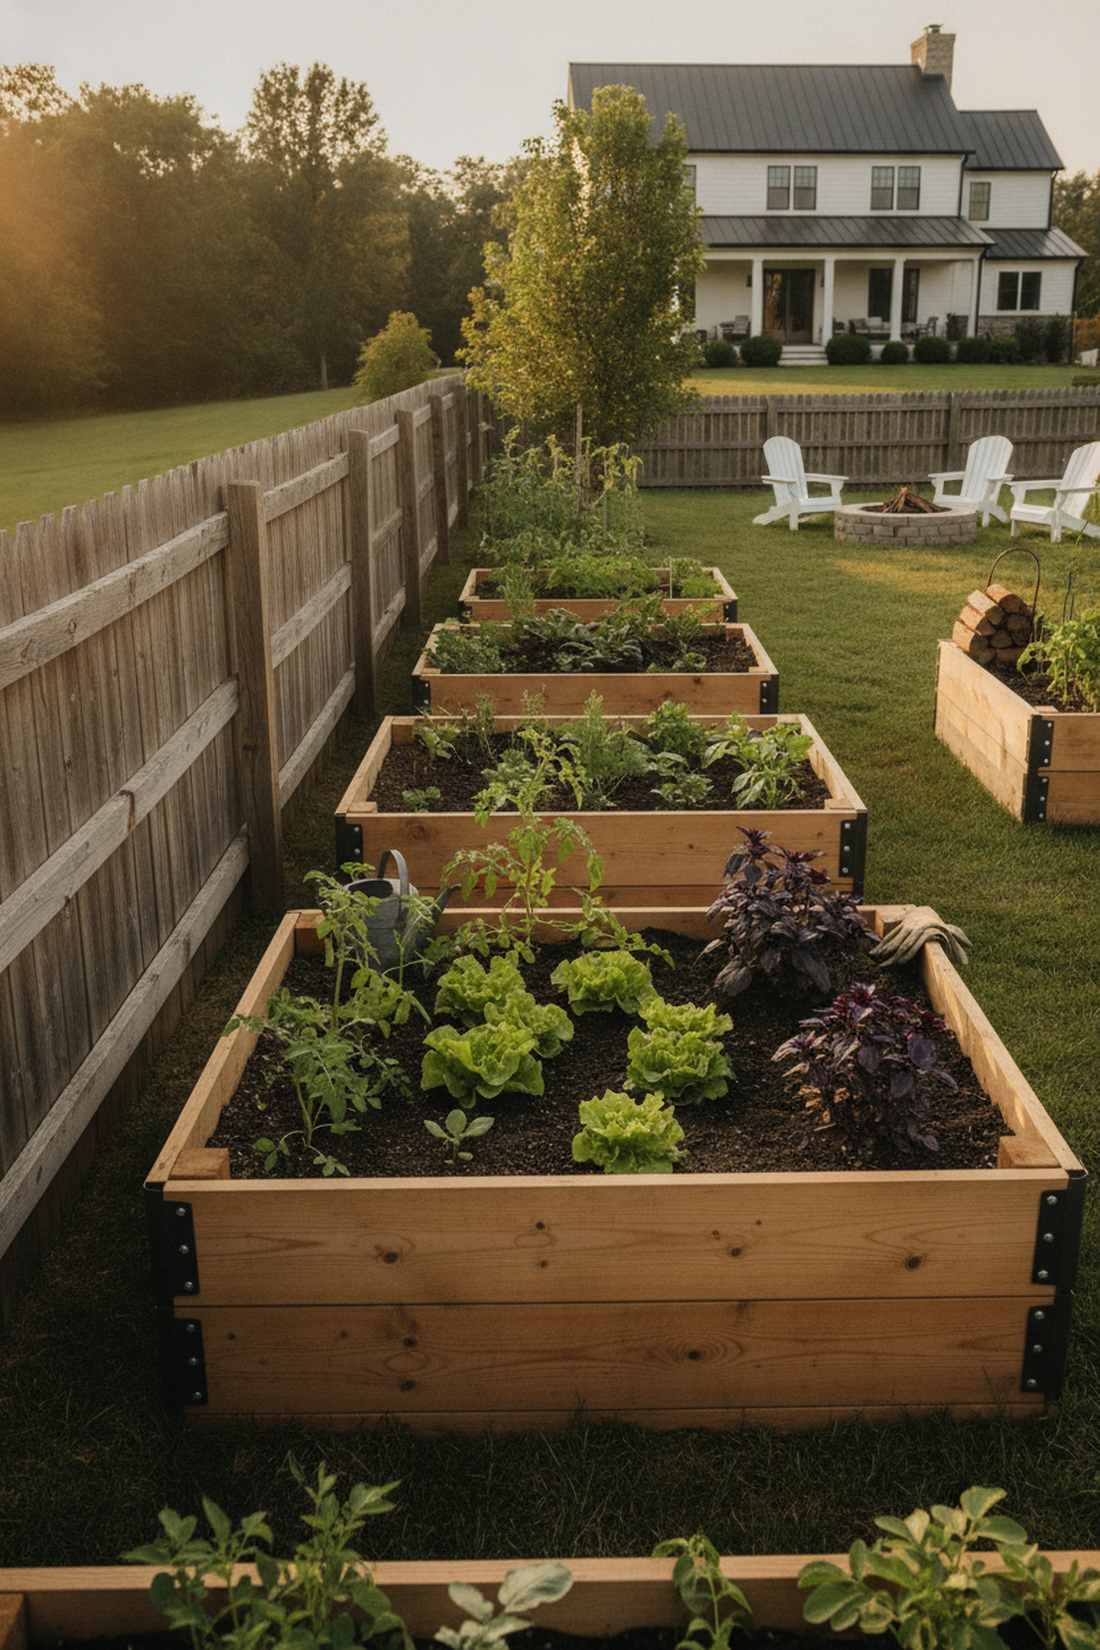
Feels like a rustic farmhouse setup that will age beautifully over time. Using natural wood garden borders is perfect for seamlessly matching existing wooden boundary lines without clashing styles.
Using cheap pine often leads to rotting, but untreated premium wood guarantees a setup that looks far more expensive than it is. Opting for premium cedar garden kits ensures your frame naturally fights off insects and decay without nasty chemicals leaching into your soil.
Cedar setups usually run around $75–$150 depending on thickness. Highly recommended if you want a chemical-free edible vegetable harvest.
- Key Materials: 2×8 Cedar planks, deck screws.
- Vibe / Style: Classic organic farmhouse.
- Difficulty: Easy straight cuts.
- Budget Breakdown: Cedar Planks: $110 | Hardware: $20.
- Creator’s Tip: Double up cheap cedar fence pickets to achieve a thick, chunky look for half the price of dimensional lumber.
- Smart Sourcing: pre-cut cedar garden kits (starter set), weather-resistant outdoor deck screws.
11. Corrugated Metal Beds for Modern Fences
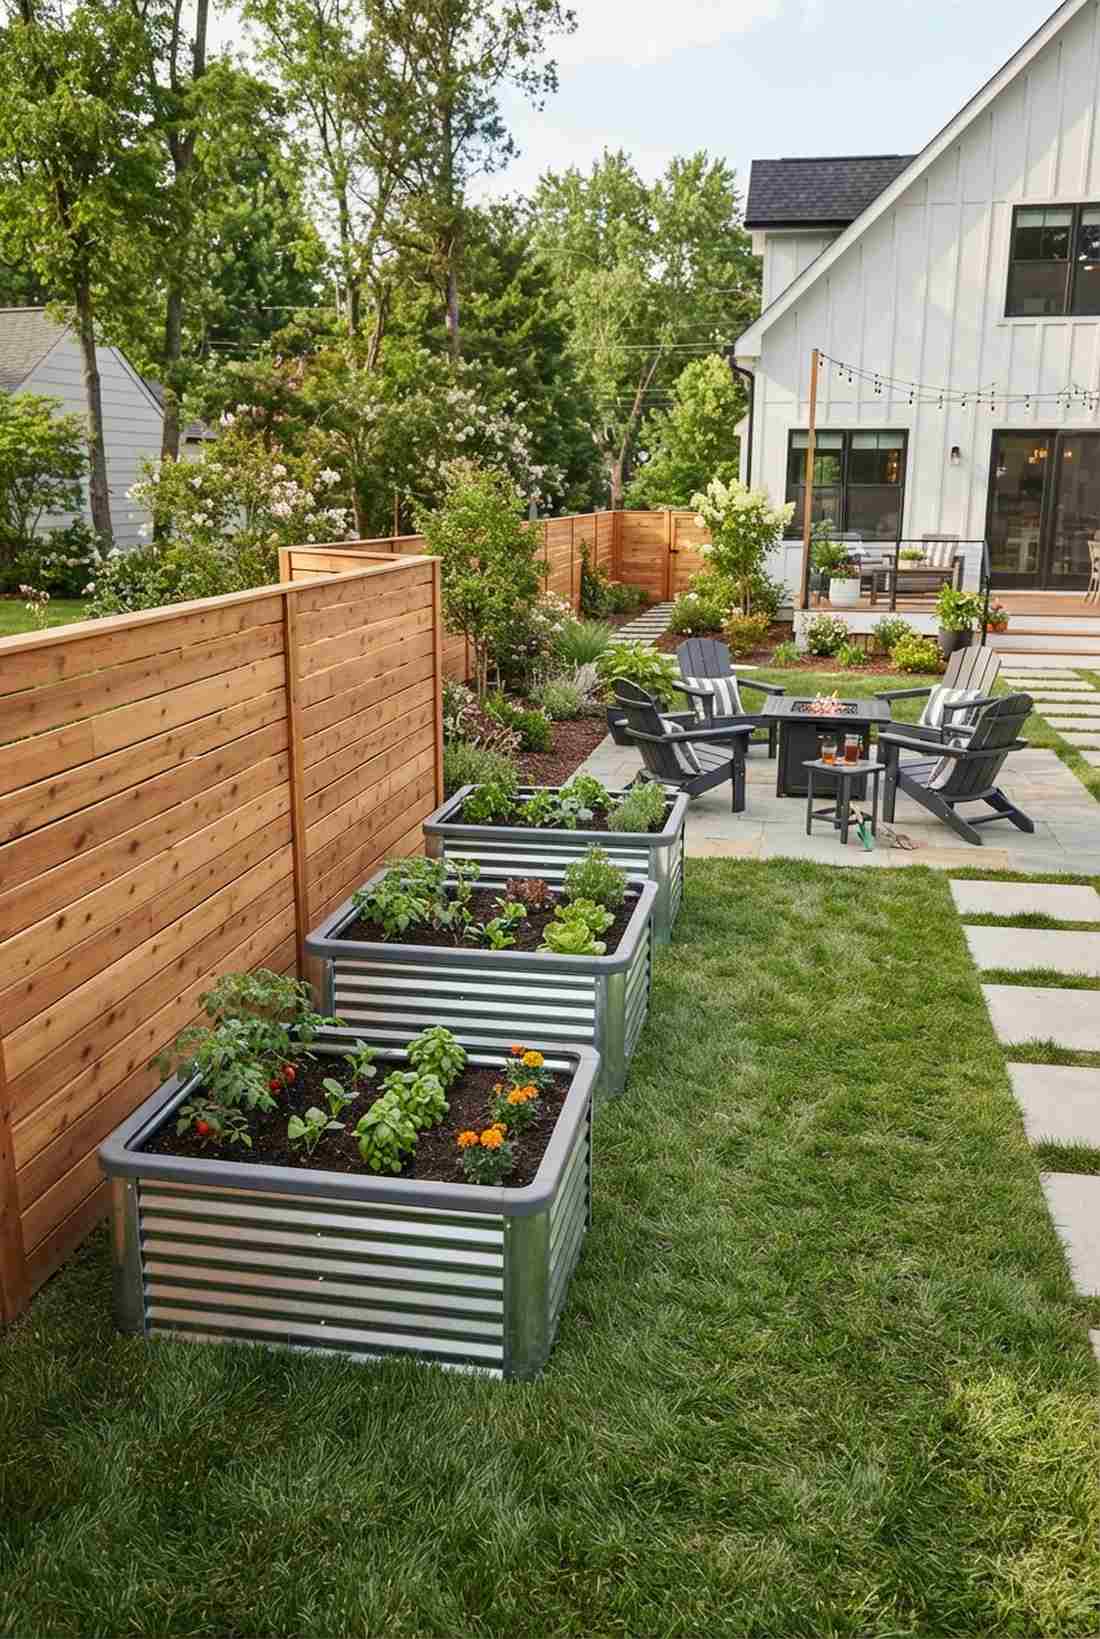
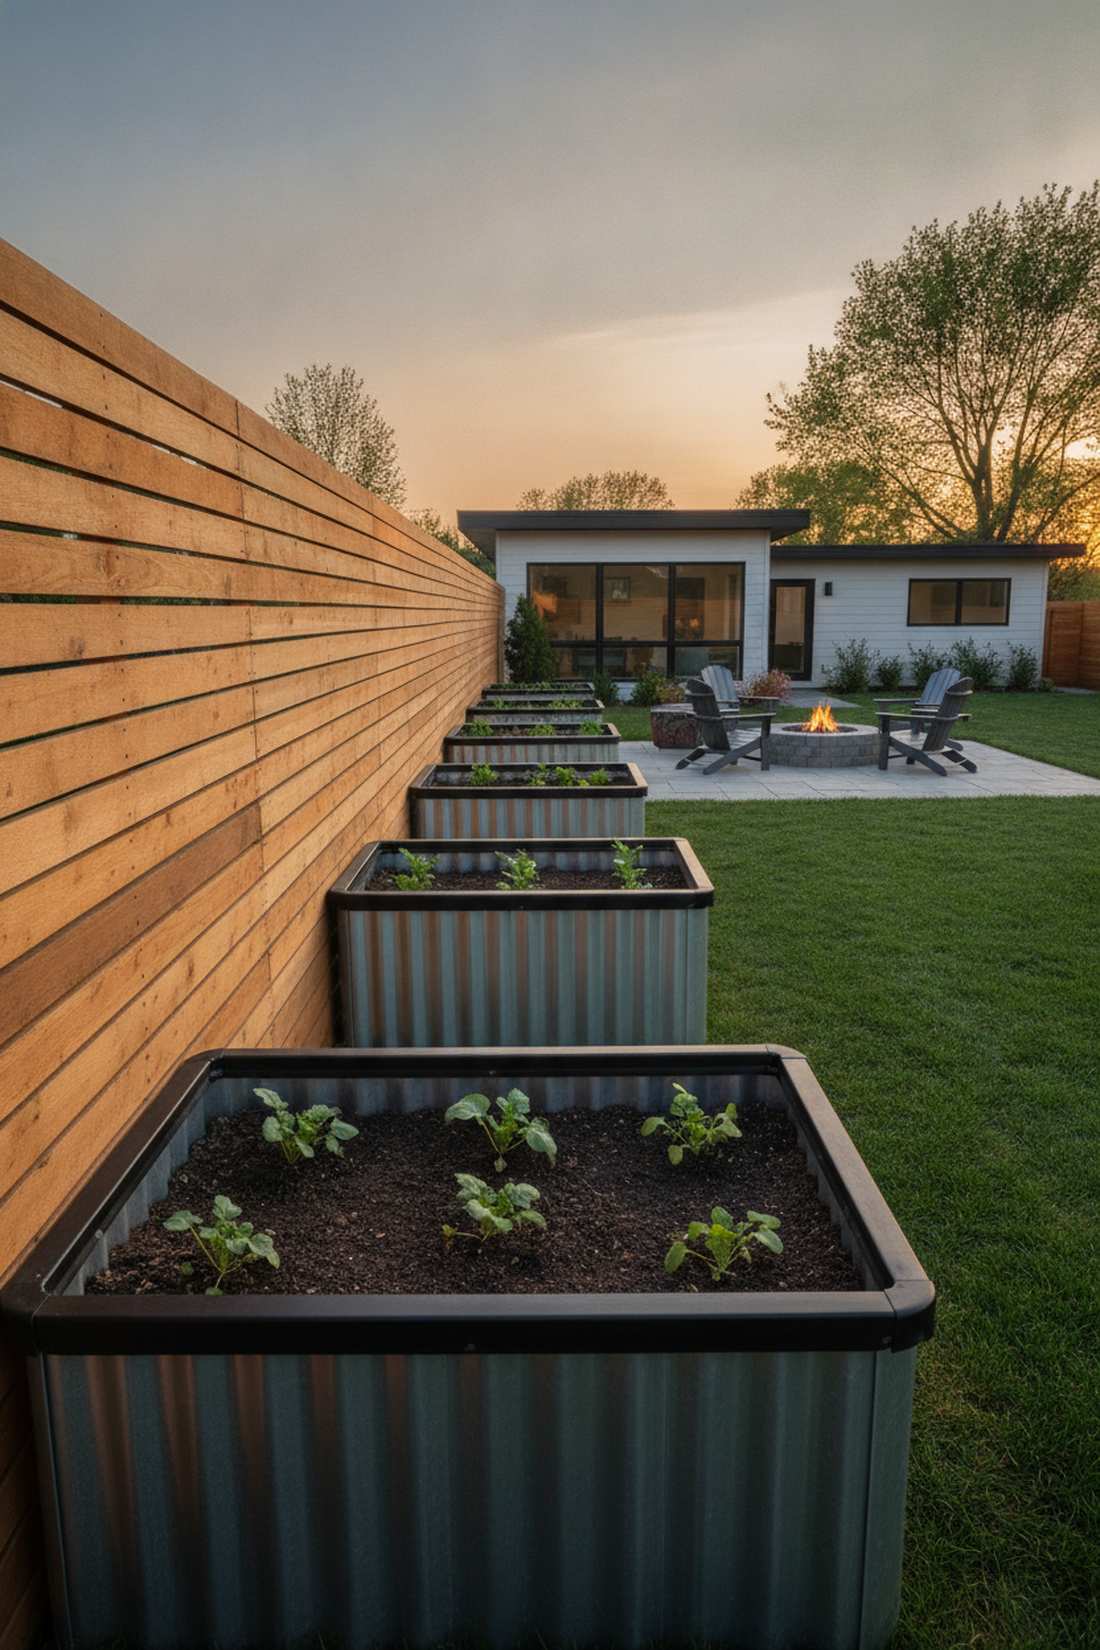
Gives off an incredibly sleek industrial-chic vibe right out of a high-end design blog. A galvanized steel planter barrier works exceptionally well to complement modern horizontal-slat fences.
Flimsy plastic borders fade quickly, but mixing cool metal with warm wood creates a striking contrast that delivers a designer-level finish. Utilizing rust-proof corrugated garden panels also heats up the soil faster in early spring, giving your seedlings a massive head start.
You can assemble a metal-sided bed for about $60–$100. Pin this to your modern landscaping board for a trendy, indestructible layout.
- Key Materials: Corrugated steel sheets, rubber edge trim.
- Vibe / Style: Industrial modern chic.
- Difficulty: Moderate metal handling.
- Budget Breakdown: Metal Panels: $65 | Trim: $15.
- Creator’s Tip: Always install a rubber U-channel trim over the top edge so you don’t cut your hands while weeding.
- Smart Sourcing: corrugated galvanized steel panels (bulk pack), heavy-duty rubber edge guard strips.
12. Cinder Block Buffer Beds
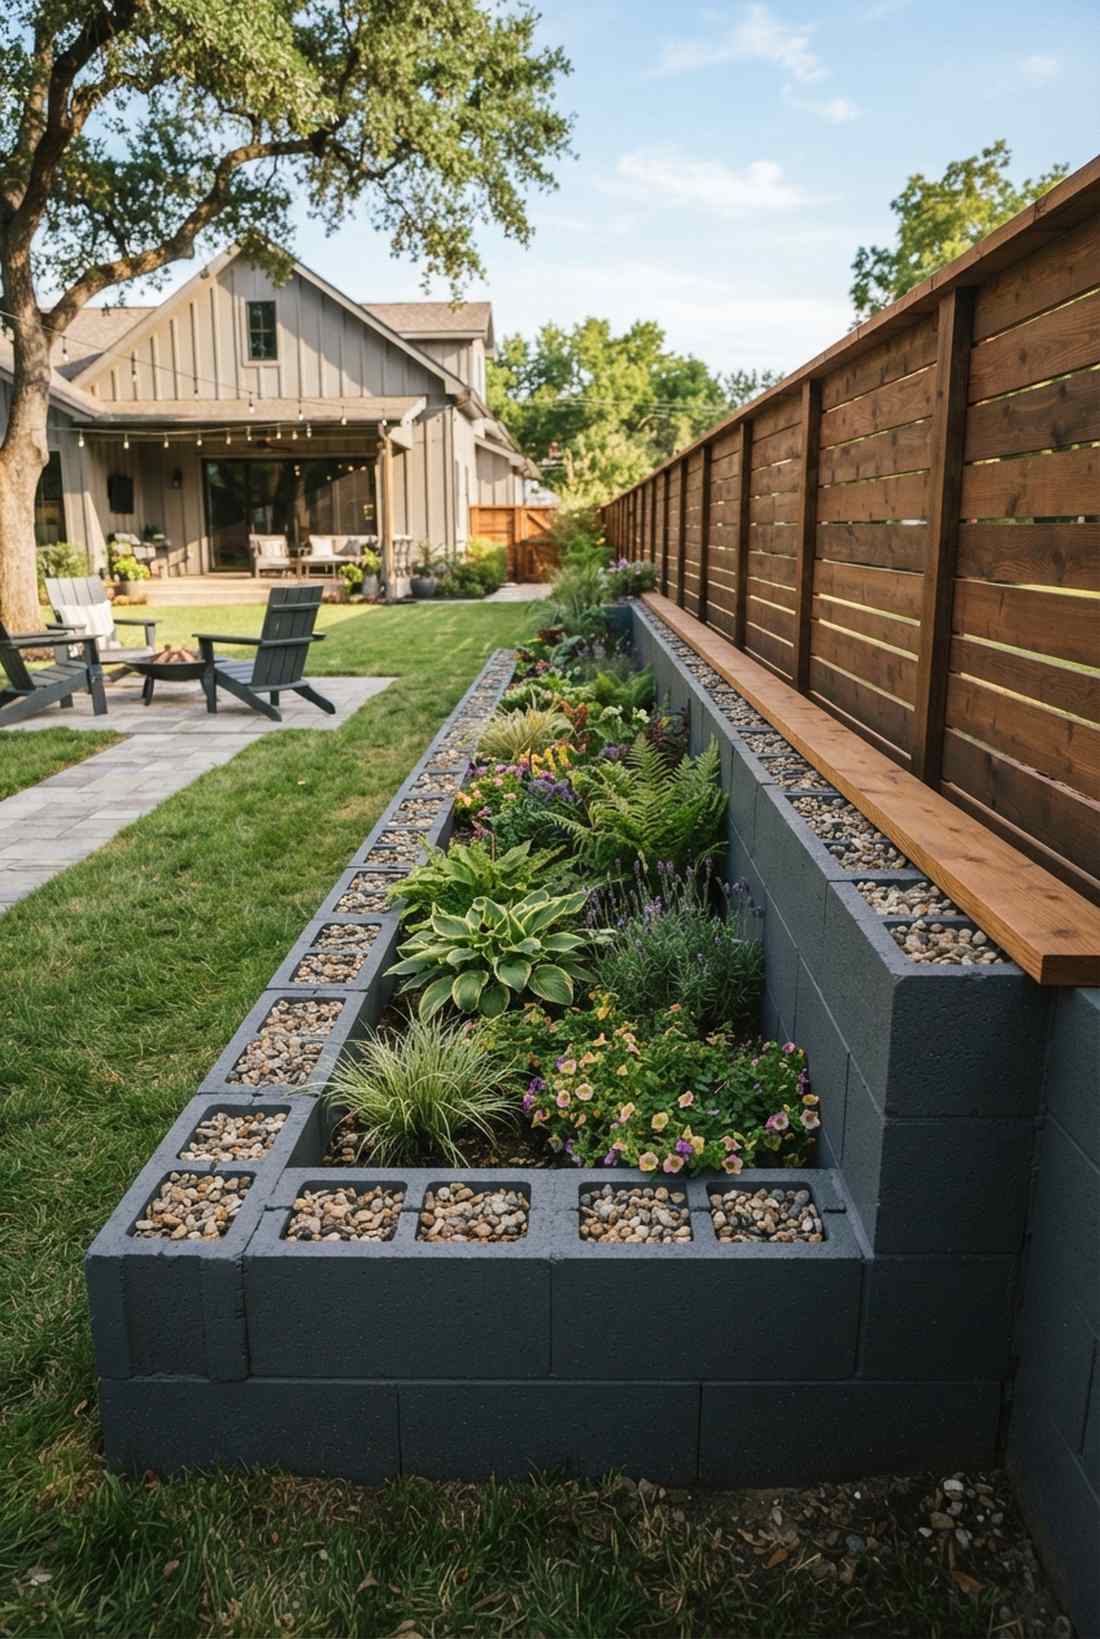
Feels like a rugged, indestructible fortress protecting your delicate plants. A masonry perimeter buffer zone is absolutely perfect for sloped or uneven yards where wood would quickly rot away.
Laying concrete sounds utilitarian, but capping them with wood creates an aesthetic that looks far more expensive than basic blocks. Filling the gaps with high-porosity terrarium accessories or decorative gravel guarantees that moisture never touches your vulnerable wooden fence.
Cinder block layouts are notoriously cheap, costing around $30–$50. It’s an incredibly durable weekend win that will outlast your house.
- Key Materials: Concrete cinder blocks, gravel fill.
- Vibe / Style: Brutalist minimalist hybrid.
- Difficulty: Heavy lifting required.
- Budget Breakdown: Blocks: $35 | Gravel: $15.
- Creator’s Tip: Paint the blocks a matte charcoal gray to instantly upgrade the look from “construction site” to “modern patio.”
- Smart Sourcing: concrete adhesive tubes (bulk pack), premium drainage gravel bags.
Wait until you see how this next design turns a simple dirt box into a high-end patio seating area for almost zero extra cost.
Specialized Functional Designs Beyond Standard Planting
Raised beds along fence lines can serve multiple purposes beyond growing plants. These specialized designs integrate seating, privacy screening, or protective functions into perimeter layouts.
13. Raised Bed with Integrated Seating Cap
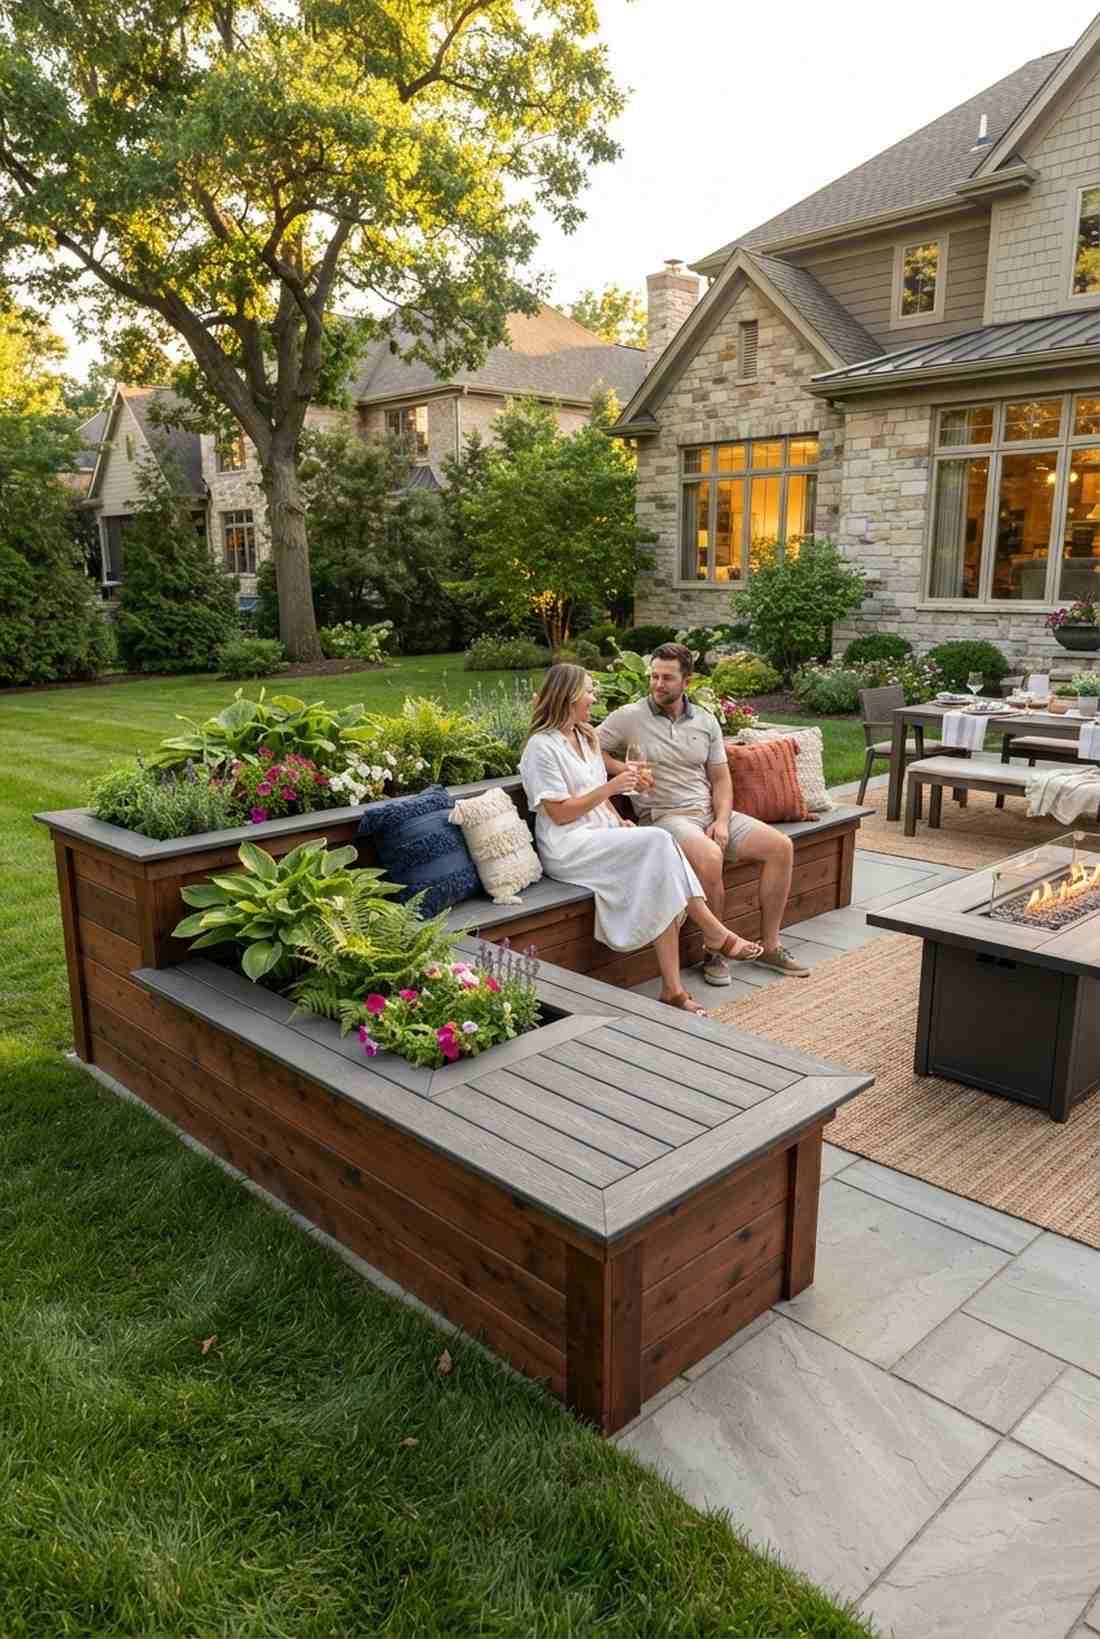
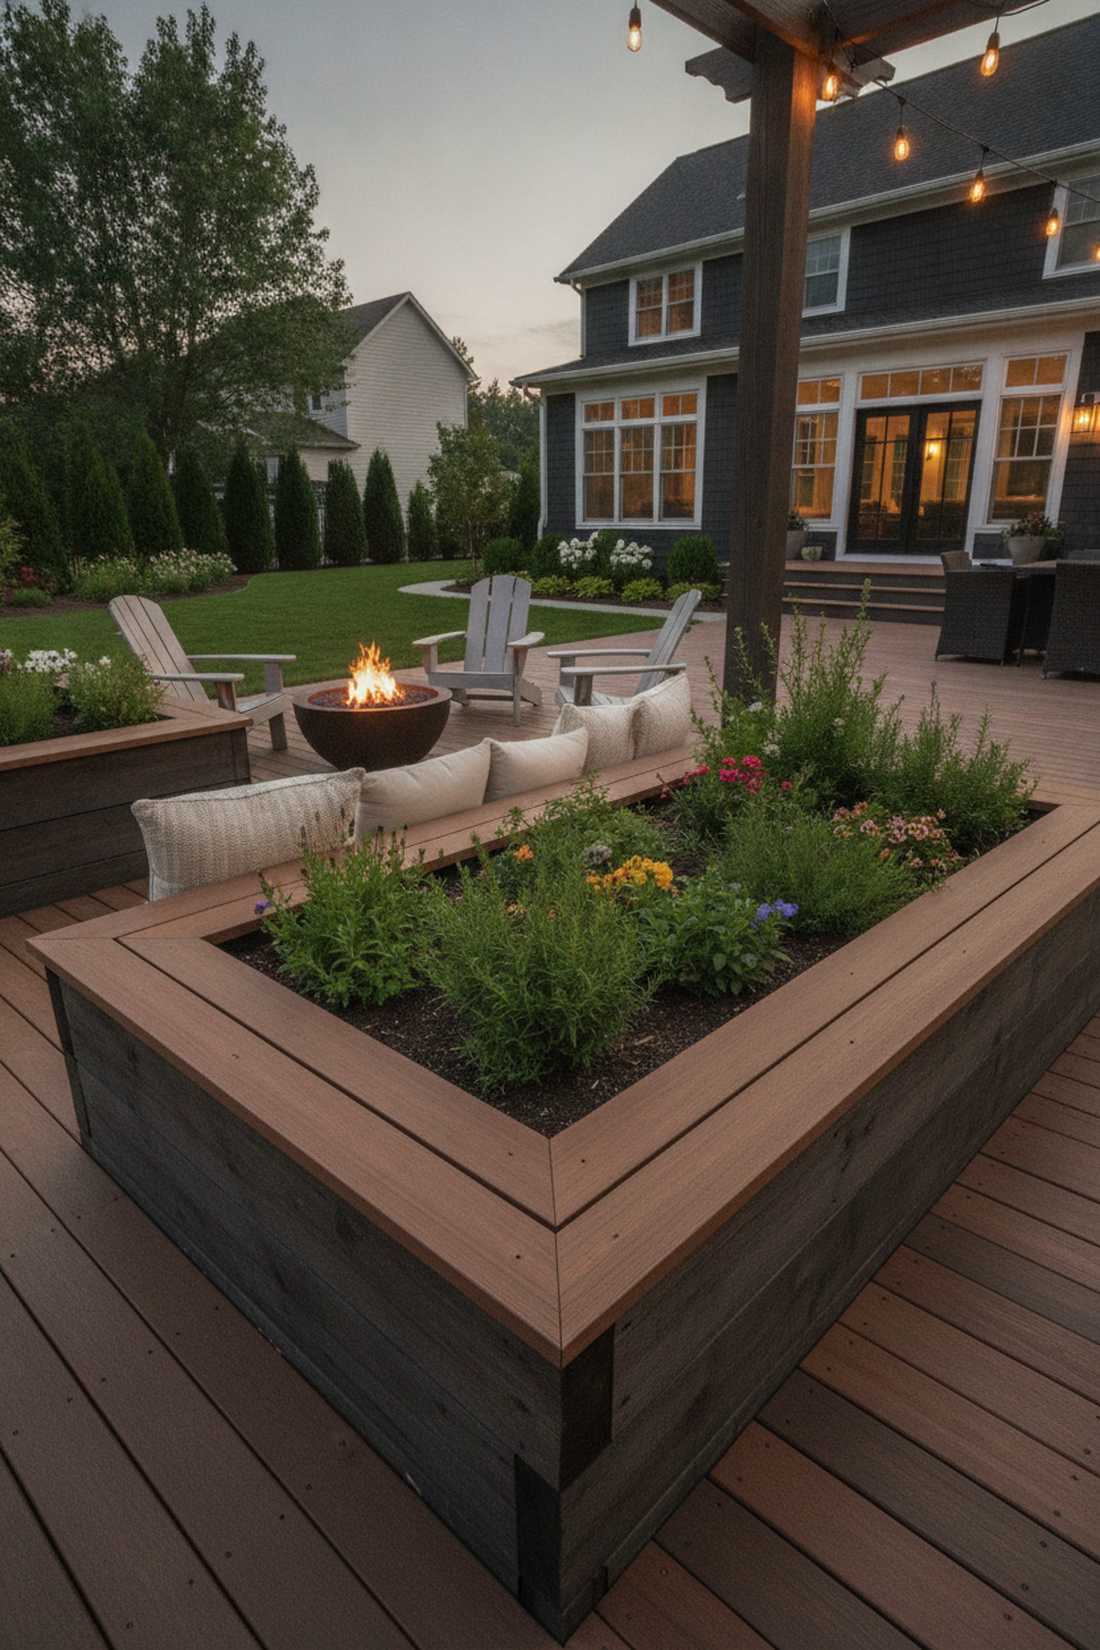
Feels like a luxurious built-in outdoor lounge you’d find at a boutique hotel. A wood-capped bench planter works beautifully for enclosing a patio space while offering hidden functional seating.
Most backyards lack enough chairs, but topping a sturdy frame with smooth boards gives a surprisingly premium look that solves two problems at once. Installing heavy-duty composite capping boards guarantees you won’t get splinters while hosting summer evening parties.
Adding a bench cap usually adds about $40–$70 to your build cost. Save this layout if you love hosting outdoor dinner parties.
- Key Materials: Smooth composite boards, finishing nails.
- Vibe / Style: Integrated luxury lounge.
- Difficulty: Moderate precision cuts.
- Budget Breakdown: Cap Boards: $55 | Fasteners: $10.
- Creator’s Tip: Overhang the capping board by exactly 2 inches on the front edge so it feels like a real bench.
- Smart Sourcing: pre-cut composite capping boards, weatherproof hidden deck fasteners.
14. Privacy Screen Bed with Tall Plantings
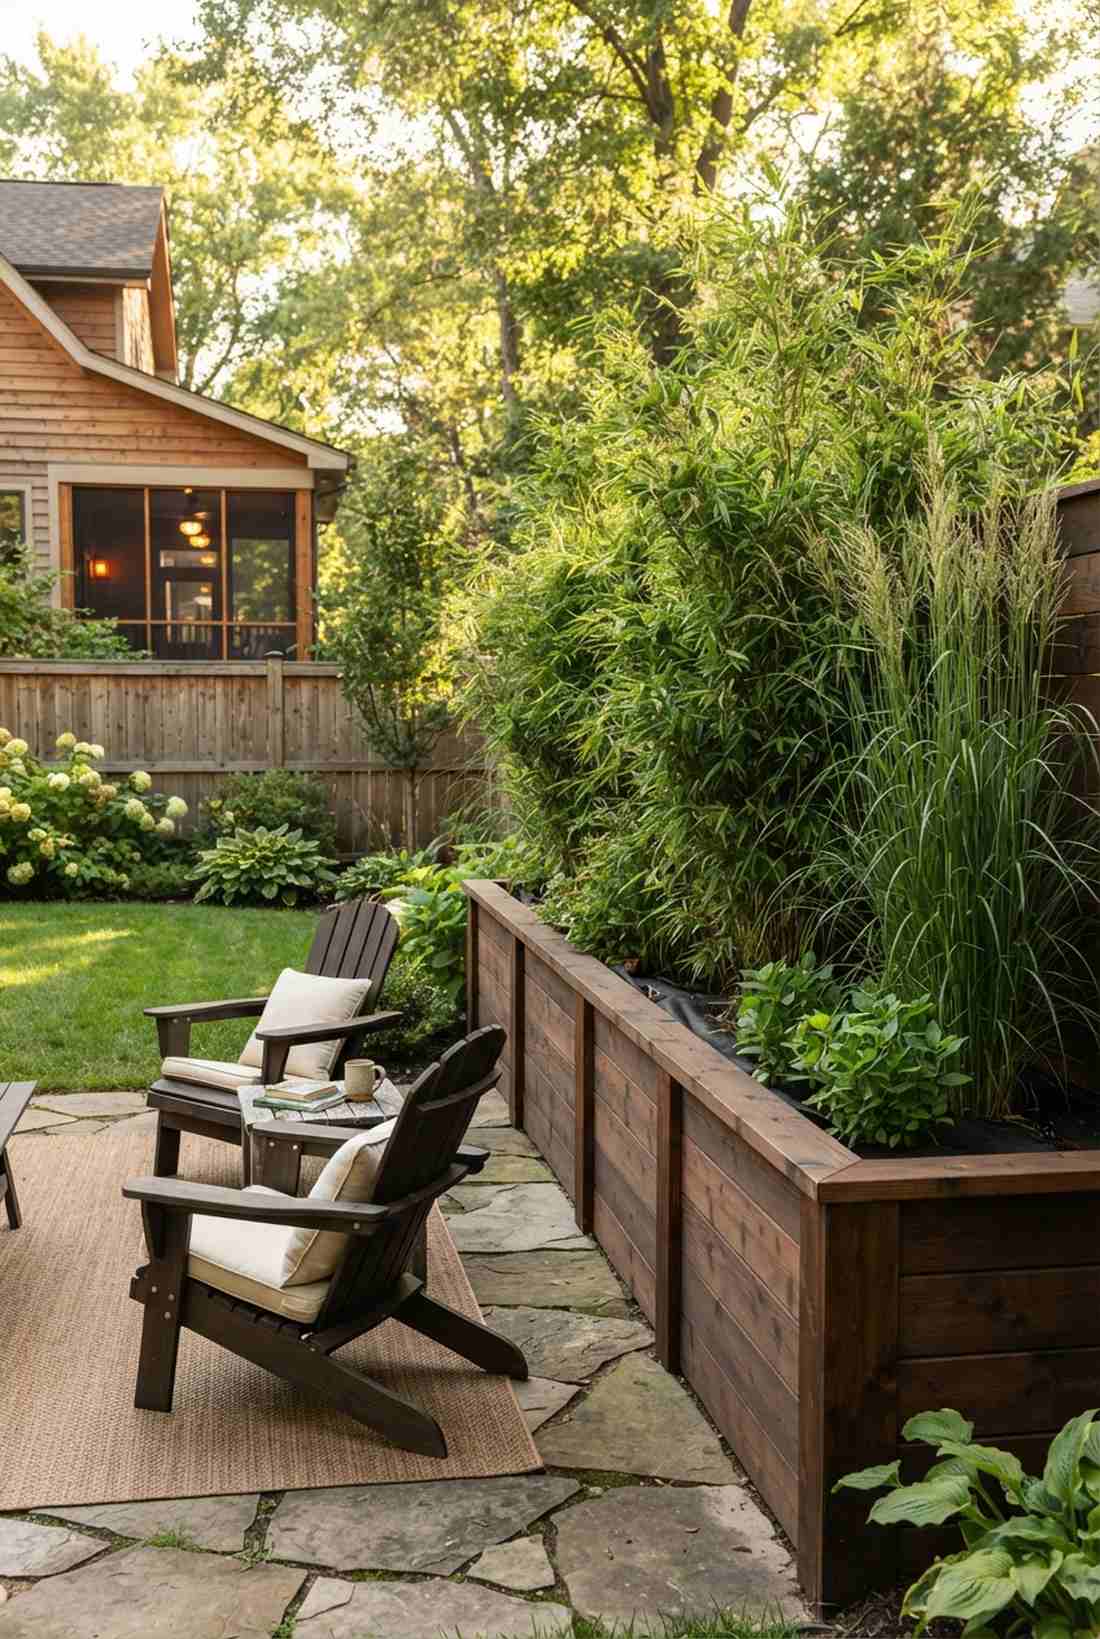
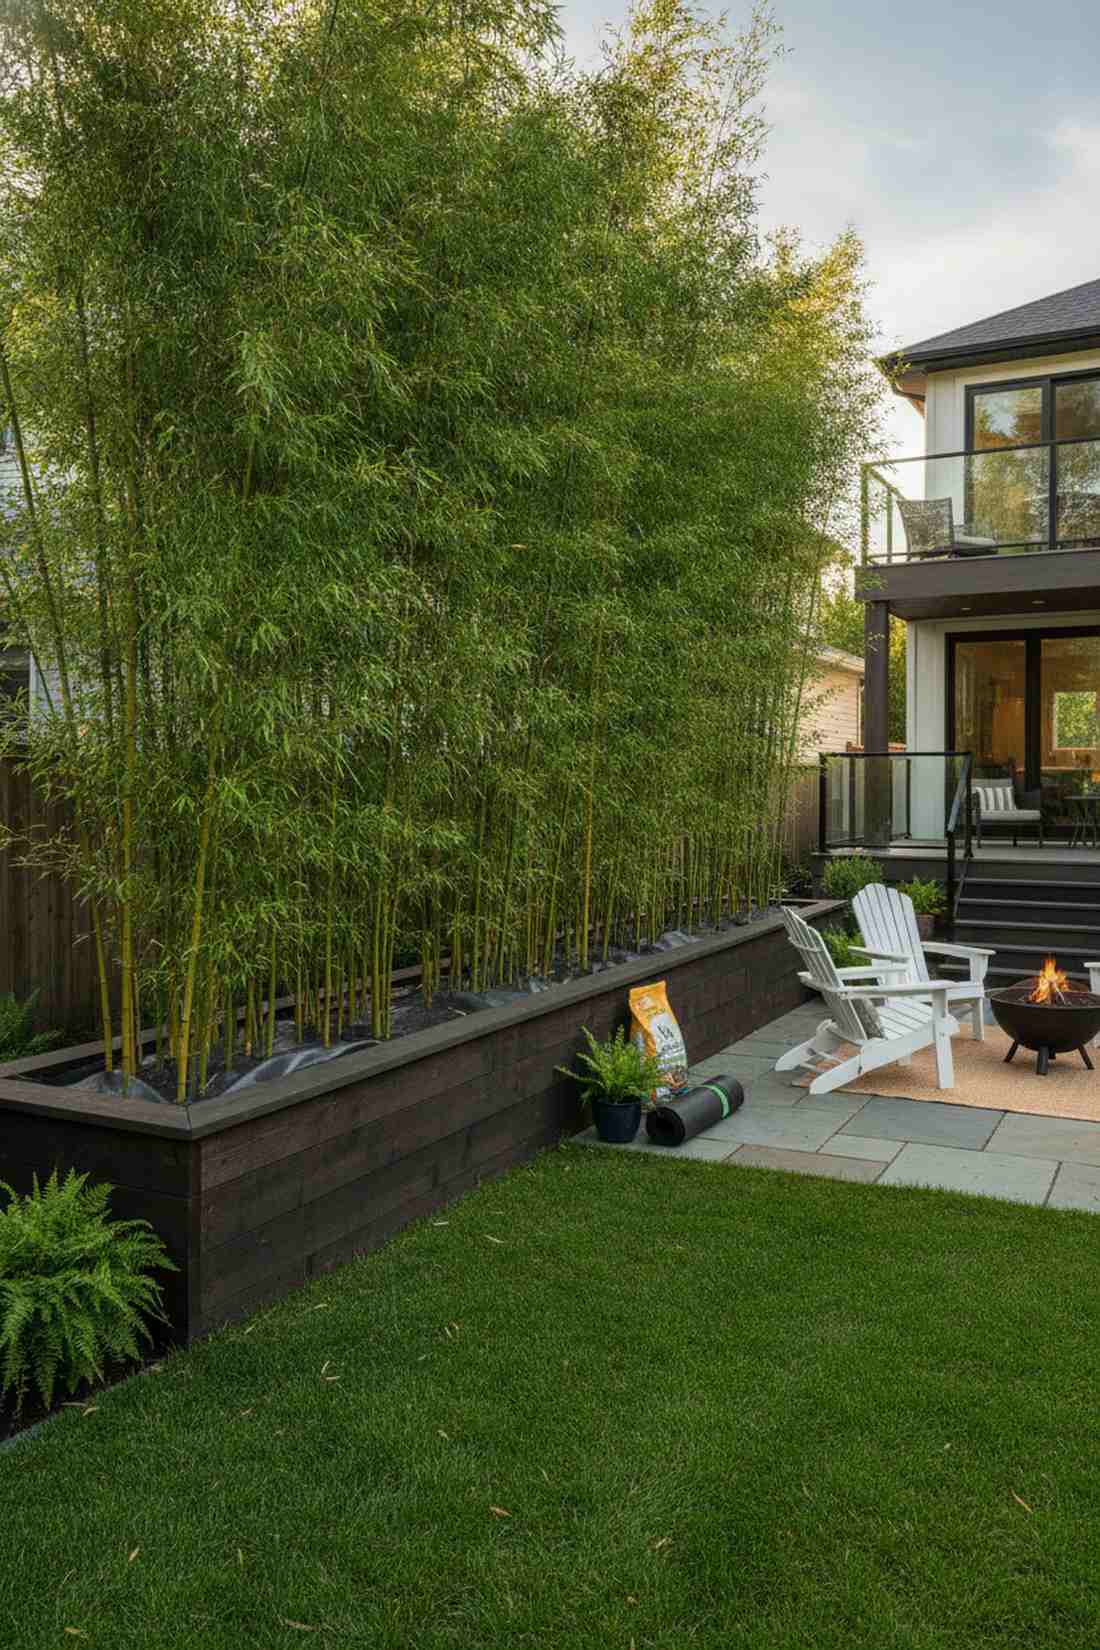
Looks like an impenetrable wall of lush greenery shielding you from the neighbors. A tall perimeter screening planter is ideal for yards where local HOA rules won’t let you build a higher wooden fence.
Rather than battling poor native dirt, elevating the roots ensures massive growth that looks incredibly high-end in record time. Utilizing commercial-grade landscape fabric liners keeps aggressive clumping bamboo or tall grasses strictly contained inside the box.
Deep screening beds run around $80–$140 depending on depth. Highly recommended for instantly reclaiming your backyard privacy.
- Key Materials: Deep lumber frame, root barrier fabric.
- Vibe / Style: Secluded private sanctuary.
- Difficulty: Moderate digging and filling.
- Budget Breakdown: Deep Frame: $95 | Root Barrier: $30.
- Creator’s Tip: Only buy “clumping” bamboo varieties, never “running” varieties, to prevent an invasive nightmare.
- Smart Sourcing: heavy-duty root barrier rolls (bulk pack), premium slow-release fertilizer kits.
Material Guide: Cheap vs. Premium Aesthetic
Knowing exactly where to save and where to spend makes all the difference in achieving that “looks expensive but isn’t” vibe.
- Standard vs. UV-Resistant/Premium: Upgrading to UV-coated components stops your panels from fading or cracking after a single harsh summer, saving you replacement costs.
- Pre-made Kits vs. Sourcing Locally: Pre-cut starter kits often save both time and money because you avoid renting saws, buying bulk hardware you don’t need, and dealing with warped lumber.
15. Insulated Winter Bed with Cold Frame Attachment
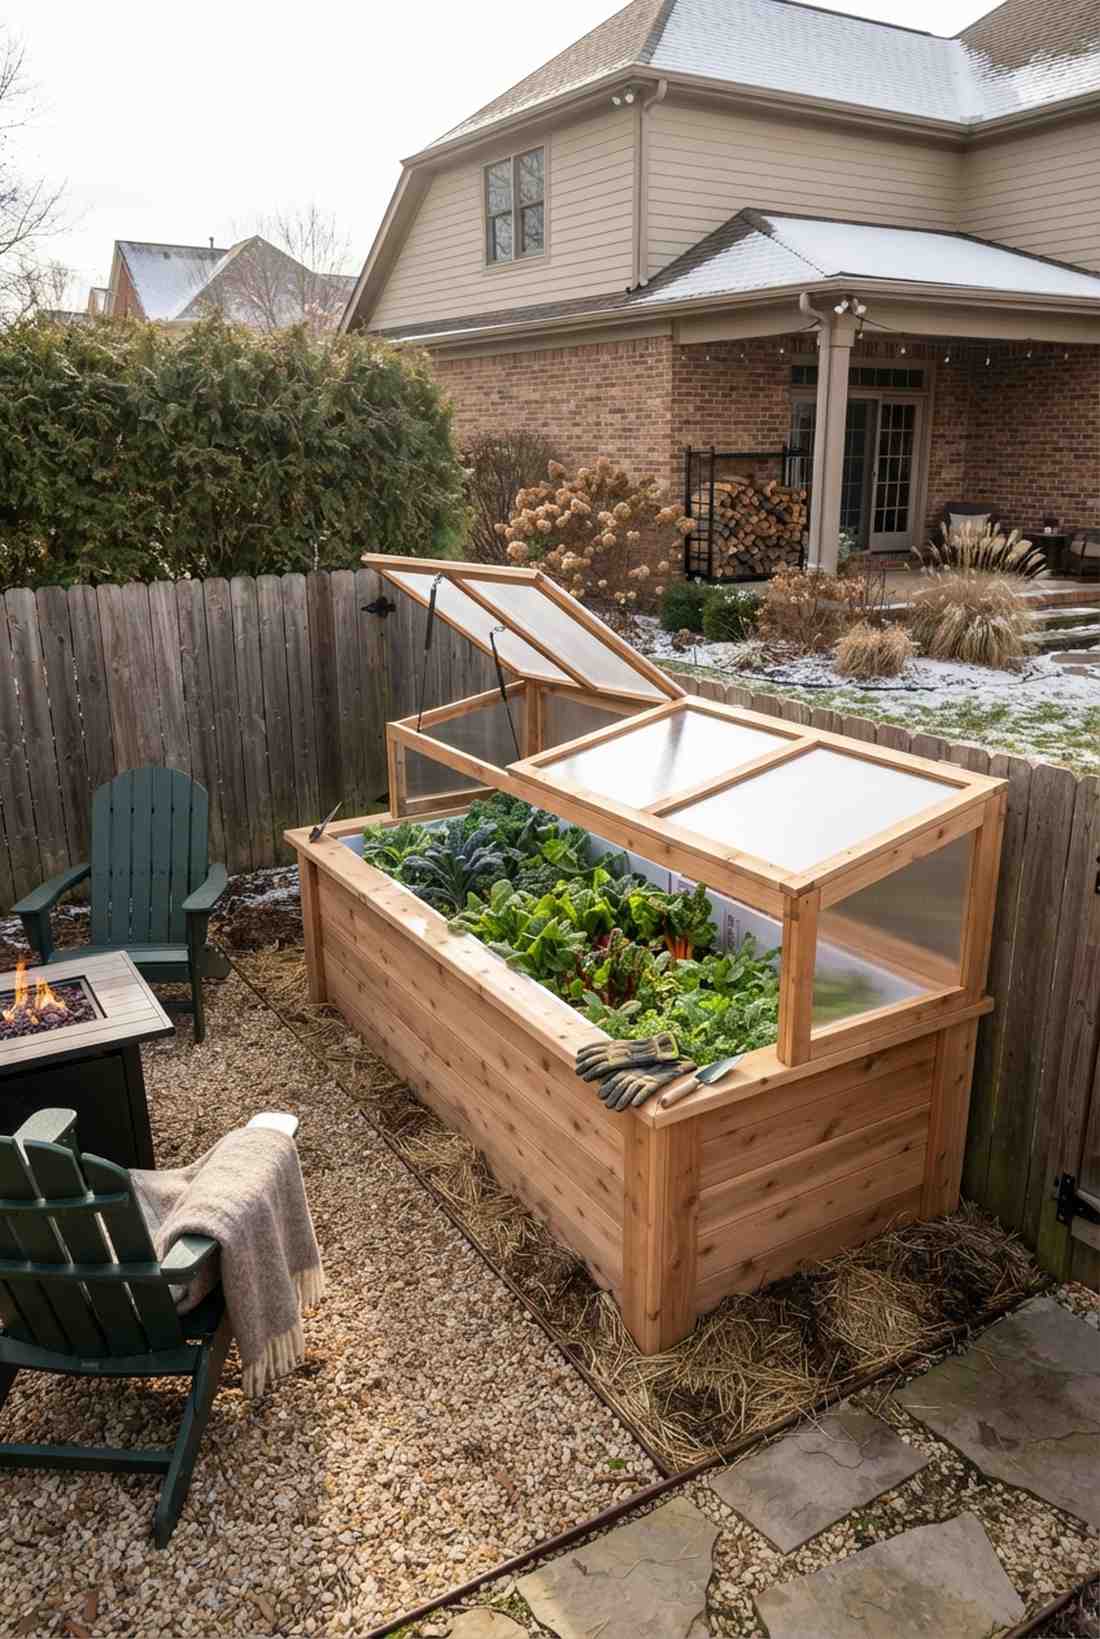
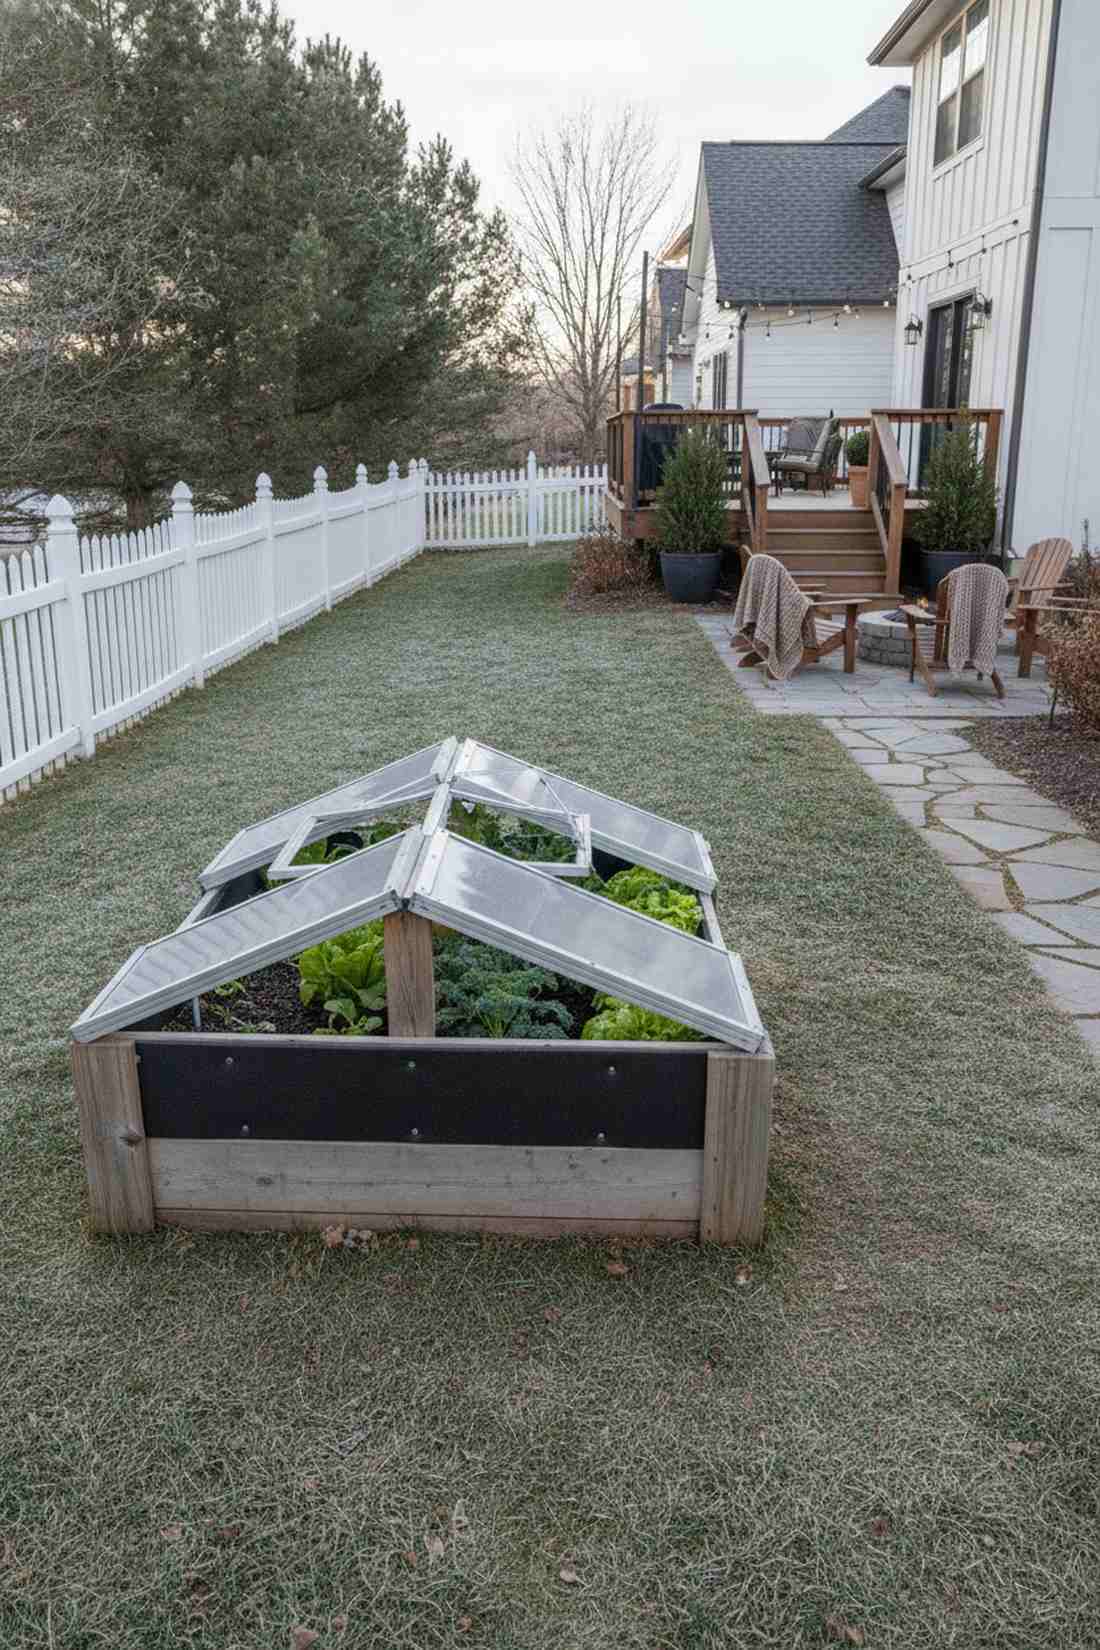
Feels like a brilliant mini-greenhouse tucked right against your property line. An attached winter garden cold frame is an absolute lifesaver for extending your harvest well into the freezing months.
Most people give up gardening in November, but bolting a clear lid to your frame delivers a surprisingly premium look and massive utility. Integrating UV-coated acrylic glazing panels captures winter sunlight perfectly while bouncing harsh northern winds off the back fence.
Adding a cold frame lid costs roughly $45–$85. Pin this to your winter prep board so you can eat fresh greens in January.
- Key Materials: Hinged acrylic lids, foam insulation.
- Vibe / Style: High-yield winter survival.
- Difficulty: Intermediate hardware installation.
- Budget Breakdown: Clear Panels: $50 | Hinges: $15.
- Creator’s Tip: Install an automatic heat-sensitive vent opener so your plants don’t accidentally cook on a sunny winter afternoon.
- Smart Sourcing: UV-coated polycarbonate twin-wall sheets, automatic greenhouse vent openers (starter kit).
16. Pet Barrier Bed with Hardware Cloth Base
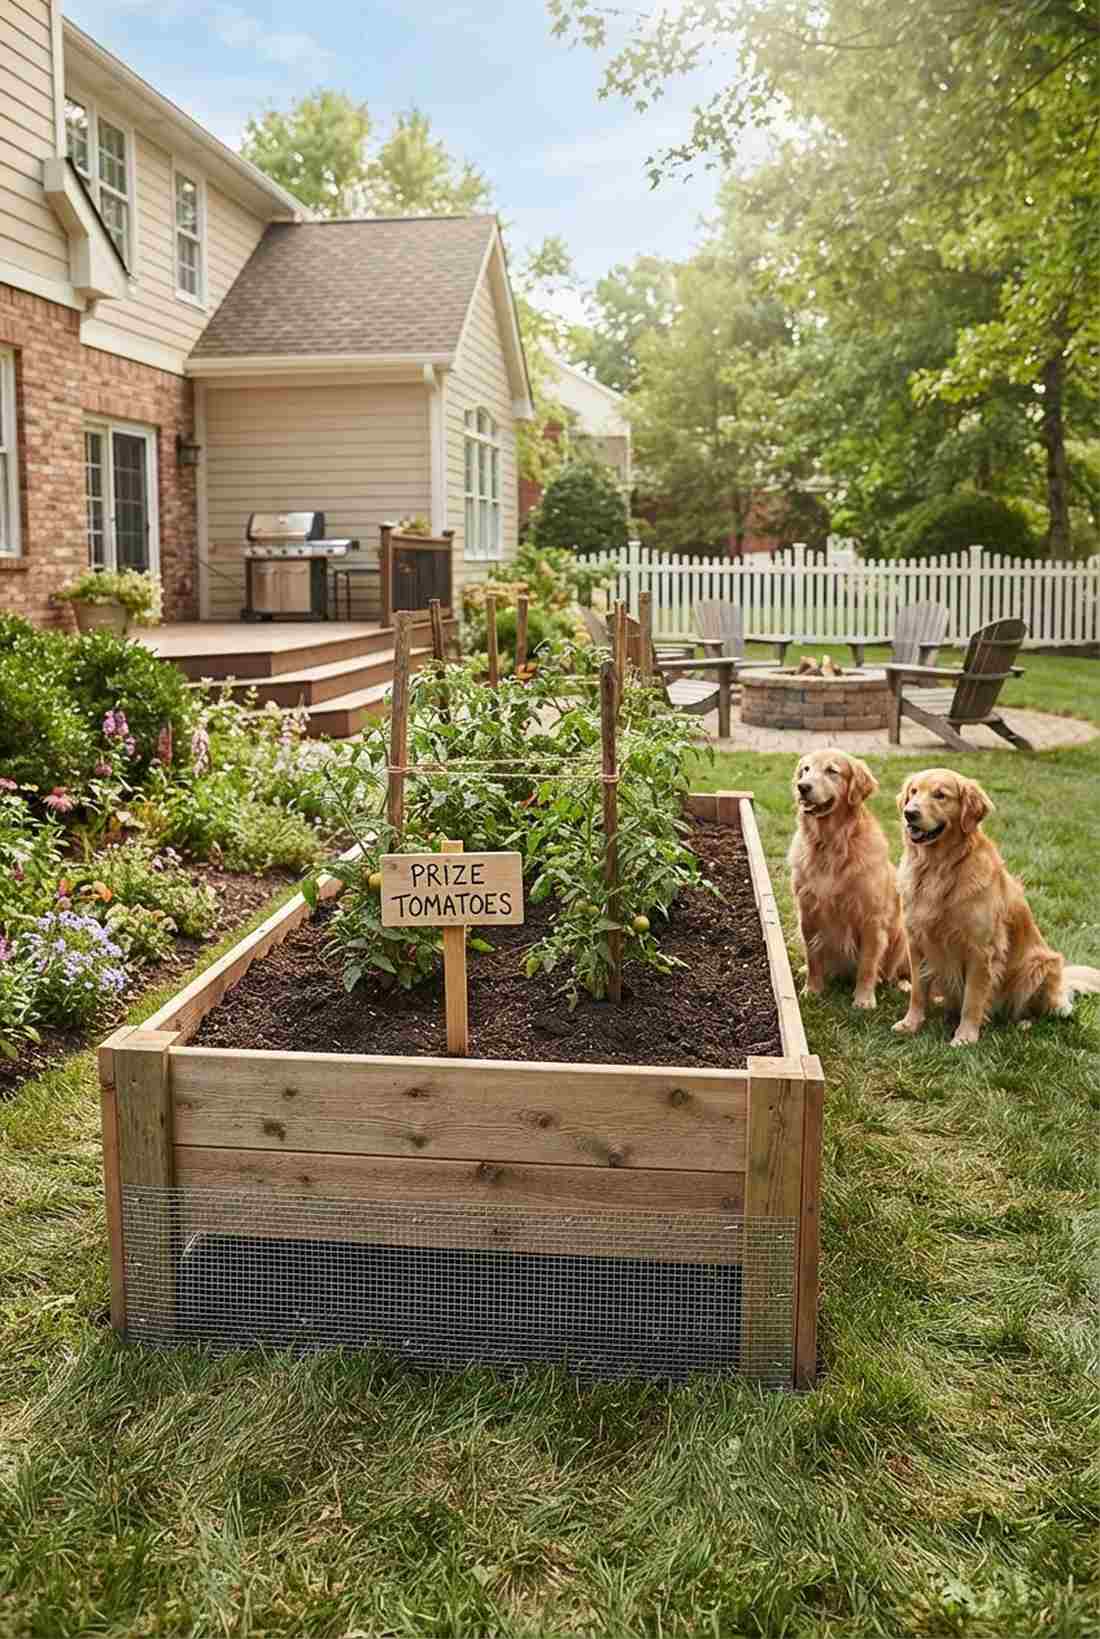
Gives off a totally pristine vibe because your dogs can’t dig it up. A mesh-bottomed protective planter works exceptionally well for keeping destructive pets and burrowing moles out of your prize tomatoes.
Leaving the bottom exposed is a recipe for disaster, whereas wrapping the base looks far more expensive and intentional. Sourcing heavy-duty galvanized hardware cloth completely stops underground pests from treating your fresh soil like a litter box.
Rolling out this protective base only costs about $20–$40. It’s a fast upgrade that completely changes the survival rate of your crops.
- Key Materials: 1/2-inch hardware cloth, heavy staples.
- Vibe / Style: Pristine undisturbed growth.
- Difficulty: Easy unrolling and stapling.
- Budget Breakdown: Mesh Roll: $25 | Staples: $10.
- Creator’s Tip: Bend the mesh up the inside walls by about 6 inches before stapling to stop pests from squeezing through the corners.
- Smart Sourcing: galvanized hardware cloth rolls (bulk pack), heavy-duty staple gun kits.
Most backyard DIYers completely ignore the accessibility trick in this final design, yet it’s the smartest structural upgrade you could possibly make.
17. Accessible Raised Bed at Standing Height
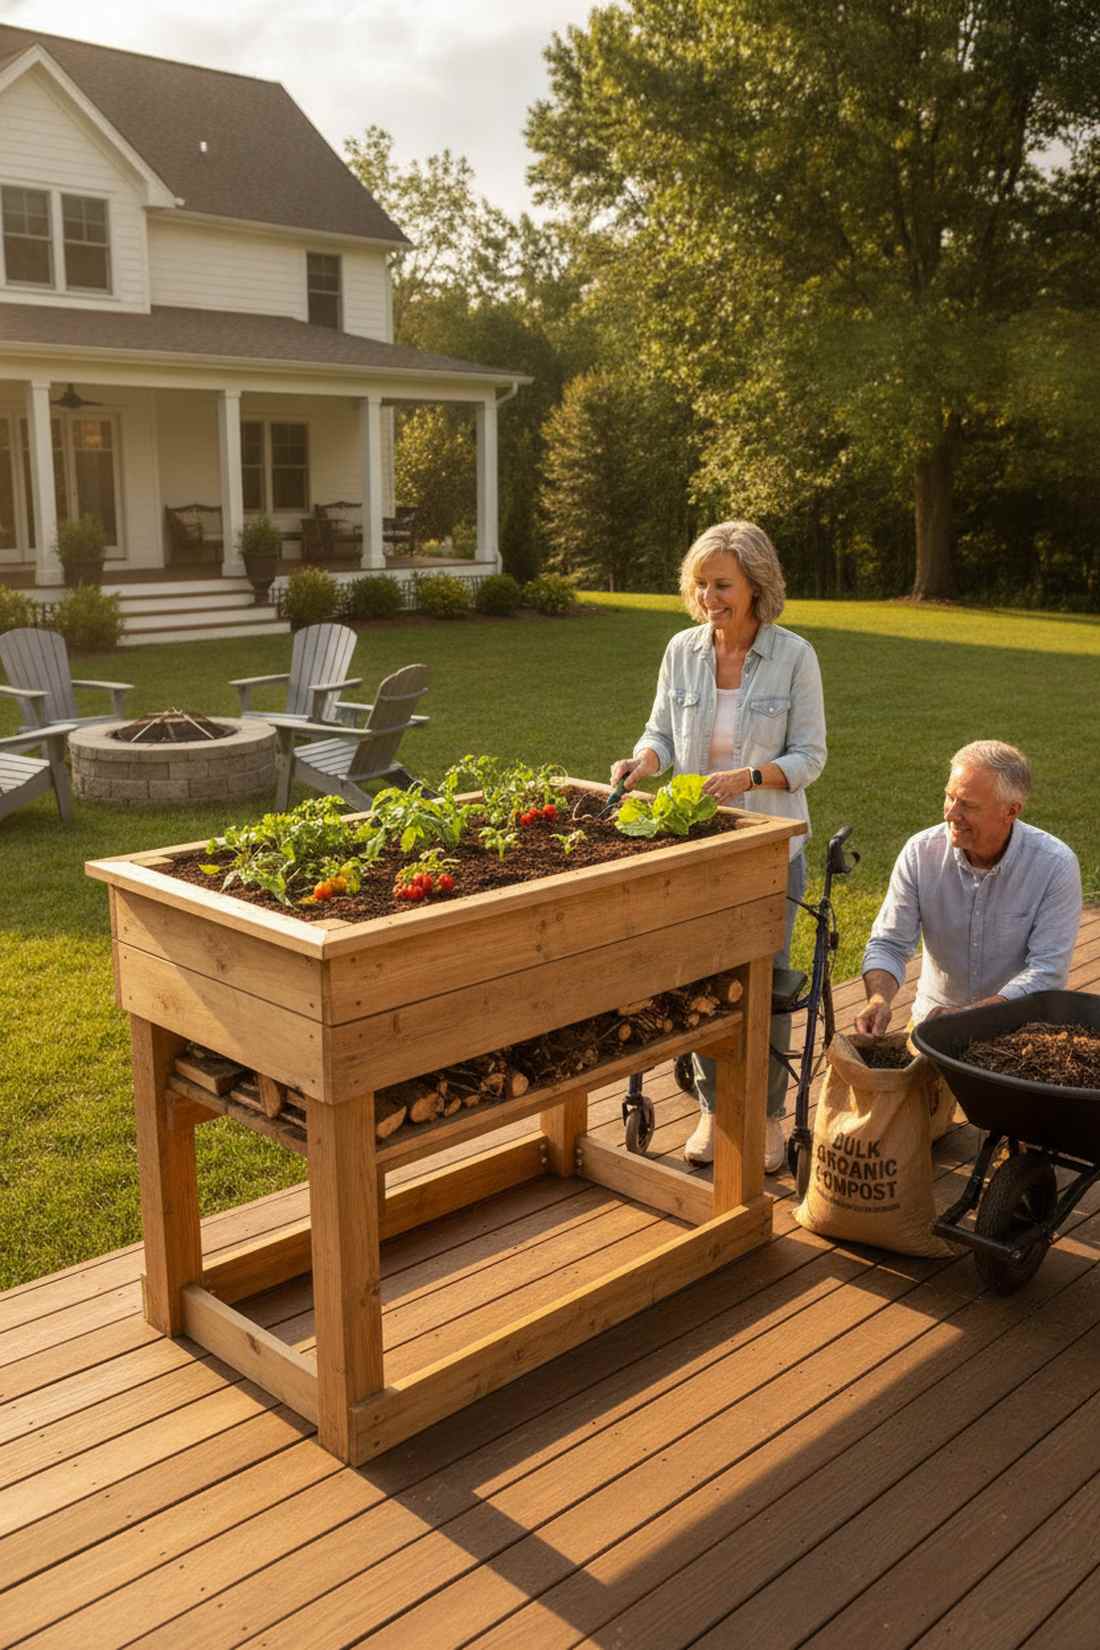
Feels like a custom ergonomic workstation designed specifically for your comfort. A standing-height perimeter garden is absolutely perfect for anyone who wants to ditch the back pain and knee pads.
Forcing yourself to hunch over ruins the experience, but elevating the box to waist level gives a designer-level finish that is fiercely practical. Utilizing pre-cut elevated planter kits allows wheelchairs or walkers to slide right underneath the toe-kick area seamlessly.
Building to this height requires more material, costing $100–$180. Save this if you want to enjoy pain-free gardening for decades.
- Key Materials: Tall structural posts, deep soil mix.
- Vibe / Style: Premium ergonomic utility.
- Difficulty: Moderate structural build.
- Budget Breakdown: Tall Lumber: $120 | Bracing: $30.
- Creator’s Tip: Fill the bottom 50% of the ultra-deep bed with cheap organic matter like logs and twigs (hugelkultur) to save a fortune on potting soil.
- Smart Sourcing: pre-cut elevated cedar planter kits, bulk organic compost delivery.
Transform Your Fence Line into Productive Garden Space
Implementing raised beds against fence perimeters completely revolutionizes your dead boundary space into a premium, high-functioning zone. By utilizing the 17 layouts detailed above, you can upgrade generic lumber into a custom-looking oasis that drastically boosts your property’s visual appeal. Whether you install a space-saving corner wedge, utilize a heavy-duty climbing trellis kit, or build a stunning staggered retaining wall, leveraging smart product sourcing guarantees a high-end result that won’t break the bank. Start with one or two kits to test your preferred dimensions, and watch your perimeter transform into a wildly productive, professionally designed landscape.
Frequently Asked Questions
How far should raised beds be positioned from wooden fence boards?
You must position your raised beds exactly 6–12 inches away from wooden fence boards to maintain critical air circulation. Pinning wet soil directly against the barrier is the #1 reason backyard projects fail, leading to massive rot. If you are using premium pre-fab corrugated galvanized kits or heavy-duty cinder blocks, you can safely move them slightly closer, but always leave a buffer to apply protective wood sealants.
What is the ideal width for raised beds along a fence line?
If you can only access the structure from the front side, stick to a 24–36 inch width so you don’t have to awkwardly step on your high-end soil to reach the back. Narrower 18-inch profiles look incredibly sleek for modern landscape borders, while 36-inch deep commercial-grade elevated planter boxes are best for serious vegetable yields. Never exceed 36 inches unless you’re building a dual-access arched pathway layout.
Can I attach trellis structures directly to my fence for raised bed plants?
You can attach lightweight mesh, but do not anchor massive weight-bearing loads directly into standard panels. Instead, invest in freestanding galvanized steel trellis arches or secure heavy-duty cattle panel sections directly into the planter box posts. This guarantees your heavy melons or heirloom tomatoes have rock-solid support without tearing down your expensive property line boundary during a windstorm.
What materials work best for building raised beds against fences?
Premium rot-resistant cedar and composite lumber are the absolute best choices for a luxurious, chemical-free edible garden. If you want a cheaper alternative that still delivers a designer-level finish, interlocking retaining wall blocks and rust-proof corrugated garden panels provide incredible thermal mass and outlast standard pine by decades. Always source UV-resistant components to ensure your investment survives extreme summer heat.
How do I prevent raised beds from damaging my fence over time?
The smartest hack is to staple a heavy-duty waterproof backing roll or commercial-grade landscape fabric to the backside of your planter to stop moisture transfer. Additionally, utilizing an interior drip irrigation starter kit ensures water targets the plant roots directly rather than aggressively spraying the wood. Treat your boards with a UV-coated protective garden box sealant every few years to keep the perimeter looking flawless.