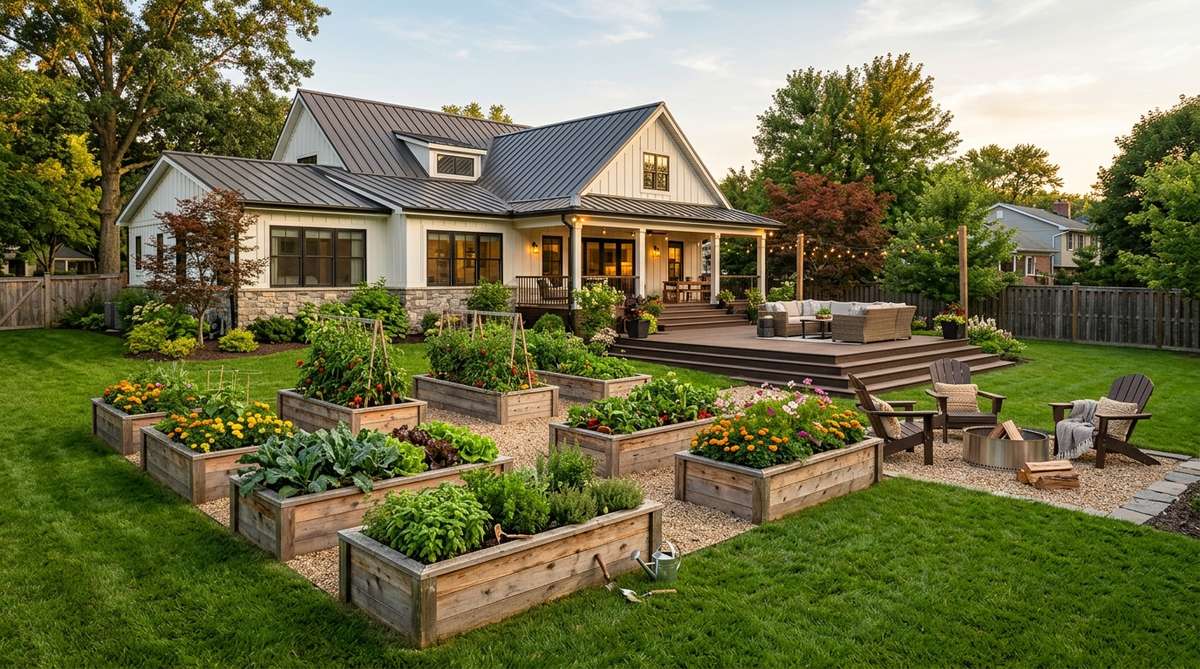
A strategic garden layout for raised beds turns basic yards into stunning, high-yield sanctuaries. You’ll discover exact budget blueprints and premium material hacks. Upgrade your outdoor aesthetic instantly without overspending.
Design Snapshot: Key Principles
- Accessibility First: Keep beds 2-4 feet wide to reach center without stepping on soil
- Strategic Orientation: Position beds north-south for optimal sun exposure throughout growing season
- Companion Integration: Group plants by compatibility and water needs within each zone
- Vertical Efficiency: Add trellises and supports to double productivity per square foot
Space-Efficient Vegetable Garden Layouts
These compact configurations maximize every inch of growing space while maintaining easy access. Each layout focuses on intensive planting techniques that increase yield without expanding your footprint.
1. Classic 4×8 Grid System
This structured backyard vegetable grid feels like a perfectly organized botanical retreat. Works exceptionally well for a standard suburban lawn looking to maximize usable square footage with a clean, defined aesthetic.
Most beginners overcomplicate spacing, but this simple blueprint delivers a surprisingly premium look with minimal effort. Integrating a heavy-duty weed barrier fabric underneath ensures a pristine, low-maintenance finish year-round while keeping pests away.
You can easily pull this off for around $40–$60 per frame. Save this to your weekend DIY vegetable garden board!
- Key Materials: Pre-cut untreated cedar boards, rust-resistant corner brackets
- Vibe / Style: Traditional farmhouse clean
- Difficulty: Easy beginner setup
- Budget Breakdown: Materials: $45 | Base: $15.
- Creator’s Tip: Line the bottom with hardware cloth to stop burrowing rodents immediately.
- Smart Sourcing: pre-cut cedar planks (bulk pack), rust-proof steel corner brackets.
2. Square Foot Intensive Bed
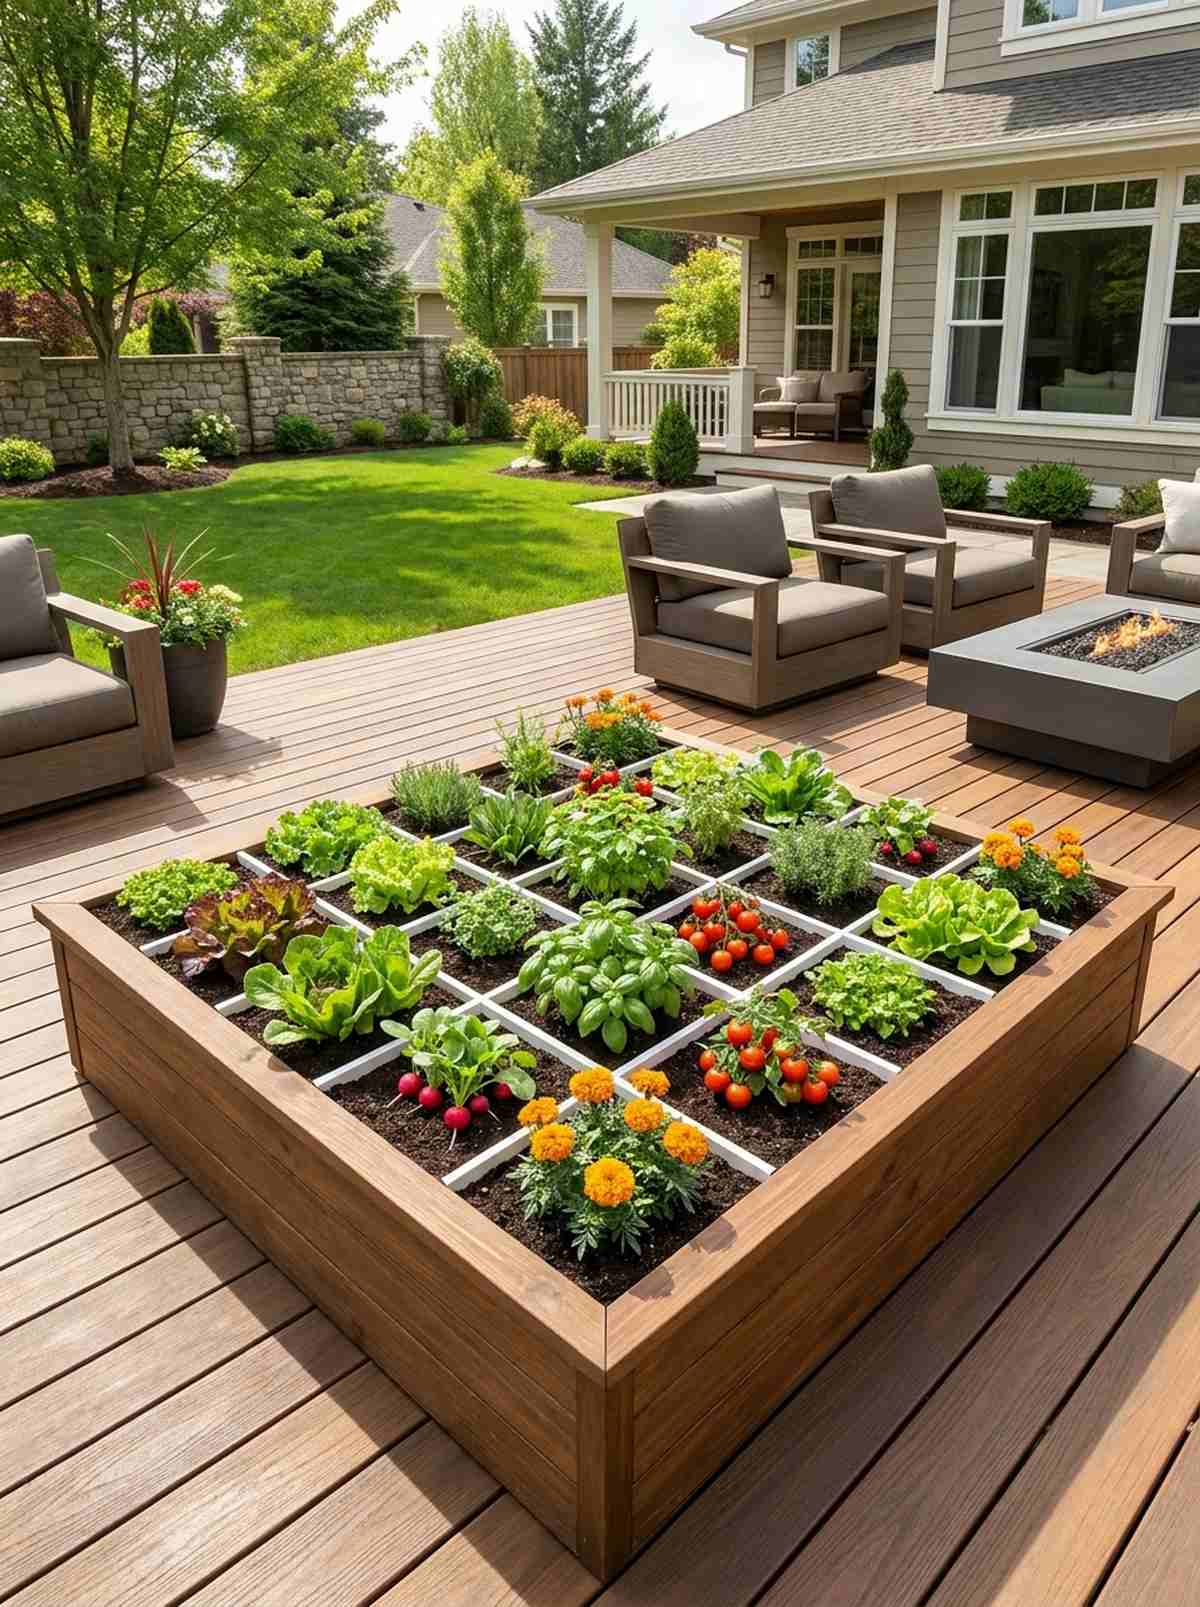
This geometric intensive planter feels like a lush, living mosaic straight out of a high-end gardening magazine. Perfect for a sunny patio corner where every single inch of soil needs to count.
People often waste space with traditional rows, yet this dense configuration looks far more expensive than it is. Dropping in pre-made vinyl planting grids instantly upgrades the organization and creates a designer-level finish.
Expect to spend roughly $30–$50 to establish this highly contained setup. It’s a fast upgrade that completely changes the vibe of your outdoor space.
- Key Materials: Custom square grid dividers, premium potting soil blend
- Vibe / Style: Modern hyper-organized patio
- Difficulty: Very easy
- Budget Breakdown: Frame: $25 | Grid Kit: $15.
- Creator’s Tip: Use durable PVC lattice strips instead of twine for permanent, clean lines.
- Smart Sourcing: UV-coated vinyl grid dividers, nutrient-dense organic compost starter kits.
3. Narrow Production Strips
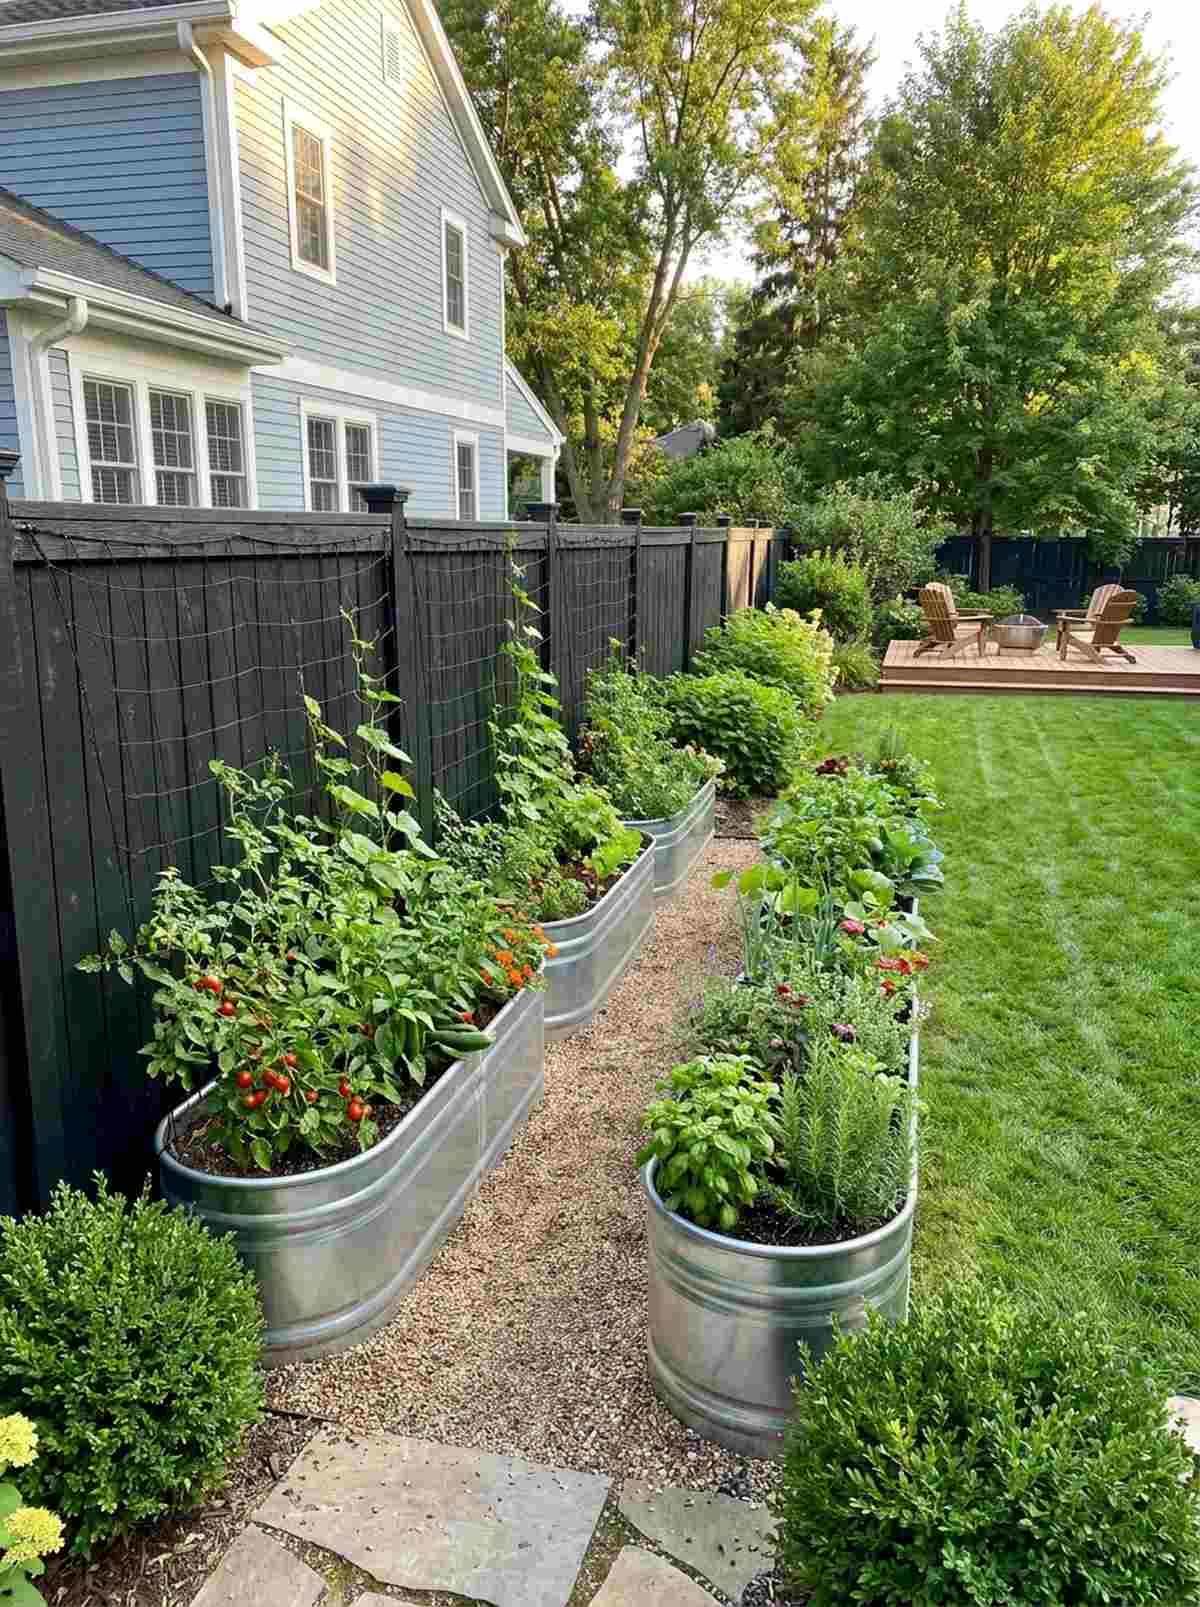
A slimline side-yard planter feels like a hidden, productive alleyway you accidentally stumbled upon. Absolutely ideal for tight property lines or creating a functional green boundary along a boring wooden fence.
Many assume narrow spaces are useless, but this sleek vegetable garden layout backyard hack proves otherwise. Utilizing galvanized steel narrow beds gives an instant industrial-chic aesthetic that will not rot like cheap wood.
You can set up one of these strips for about $50–$75 depending on the material. Pin this if you’re planning a small space upgrade this spring!
- Key Materials: Modular metal planter panels, vertical trellis netting
- Vibe / Style: Urban industrial chic
- Difficulty: Moderate
- Budget Breakdown: Metal Panels: $60 | Soil: $15.
- Creator’s Tip: Paint the fence behind it black to make the green foliage aggressively pop.
- Smart Sourcing: weather-resistant modular metal beds, heavy-duty nylon trellis netting.
4. Tiered Staircase Arrangement
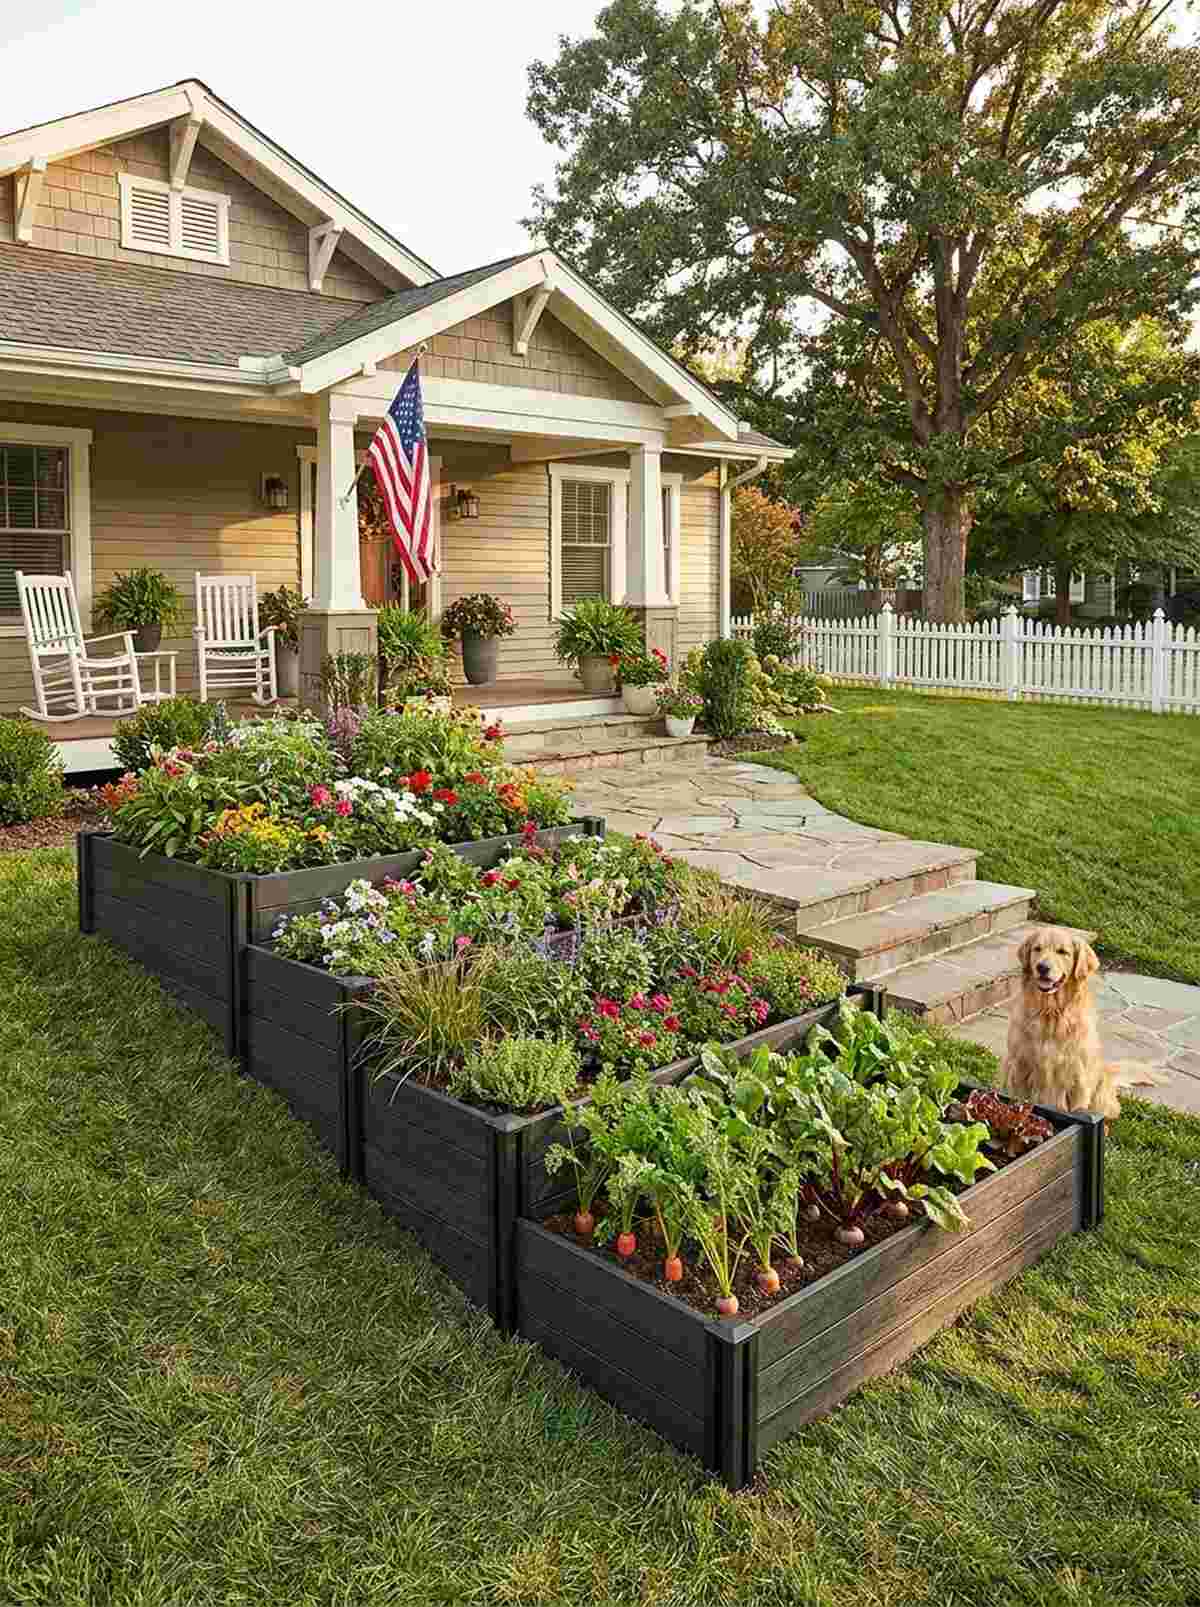
This multi-level stepped garden feels like a cascading green waterfall right on your property. Works beautifully for sloped front yards or acting as a striking living divider on a large patio.
Flat gardens can look incredibly boring, whereas this dimensional approach forces the eye upward and commands attention. Stacking pre-fabricated composite terrace kits ensures perfect leveling without the headache of custom carpentry.
Building a three-tier setup usually runs between $80–$120. Highly recommended for a quick weekend win that adds massive curb appeal.
- Key Materials: Interlocking composite boards, leveling stakes
- Vibe / Style: Architectural cascading landscape
- Difficulty: Intermediate DIY
- Budget Breakdown: Tier Kit: $90 | Anchor Stakes: $20.
- Creator’s Tip: Put your deepest root vegetables on the lowest, thickest soil tier.
- Smart Sourcing: snap-together composite tier kits, UV-resistant leveling corner joints.
This next setup is ridiculously cheap but looks like a $150 custom landscape display…
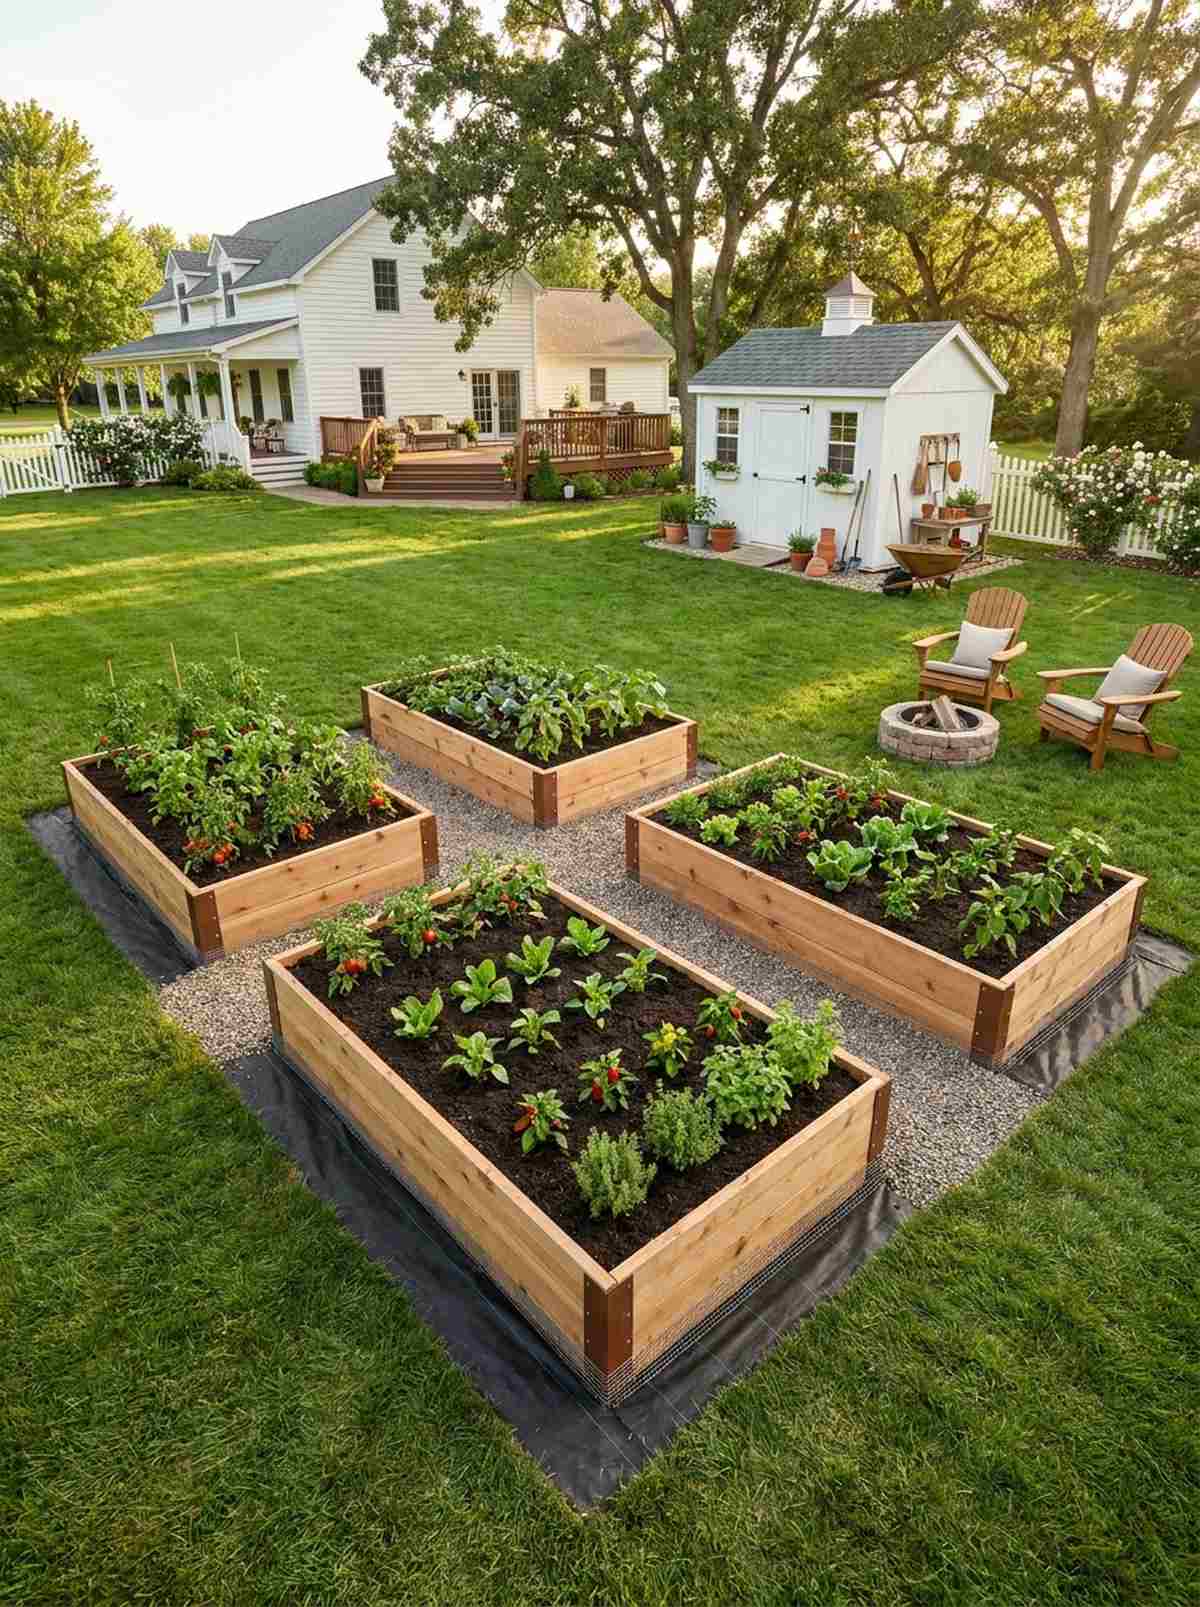
5. Double-Wide Production Bed
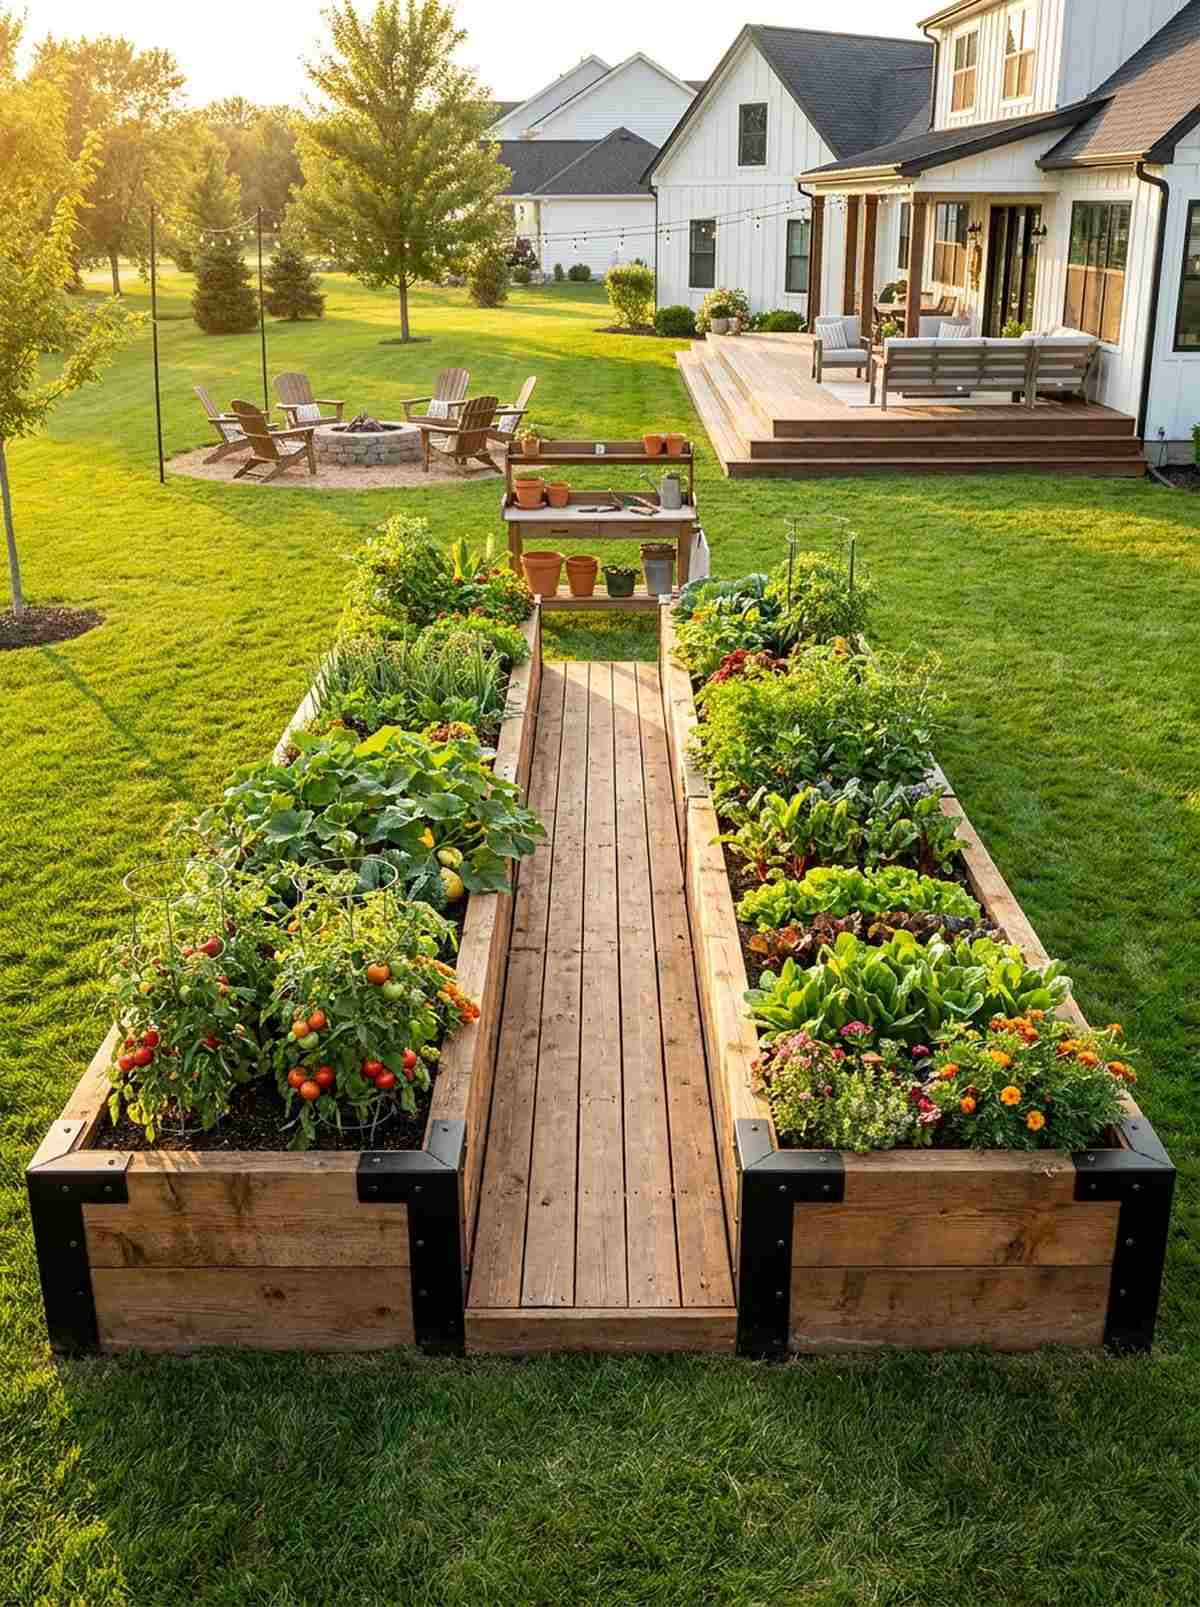
The expansive communal planter feels like a sprawling, abundant farmer’s market display in your own yard. Ideal for wide, open lawns where you want a singular, massive focal point instead of scattered little boxes.
A common mistake is making beds too wide to reach, but adding a simple center walking plank entirely solves this while keeping the luxurious aesthetic. Using reinforced corner bracing on a bed this size prevents bowing and guarantees a long-lasting, sturdy build.
Materials for this oversized layout usually hover around $90–$130. Save this idea for when you’re ready to drastically scale up your harvest!
- Key Materials: Extra-long timber, center stepping stone or plank
- Vibe / Style: Massive homestead abundance
- Difficulty: Moderate (requires an extra set of hands)
- Budget Breakdown: Timber: $100 | Braces: $25.
- Creator’s Tip: Install an automated drip line down the center before filling with soil.
- Smart Sourcing: heavy-duty steel corner brackets (4-pack), drip irrigation starter kits.
6. Offset Zigzag Pattern
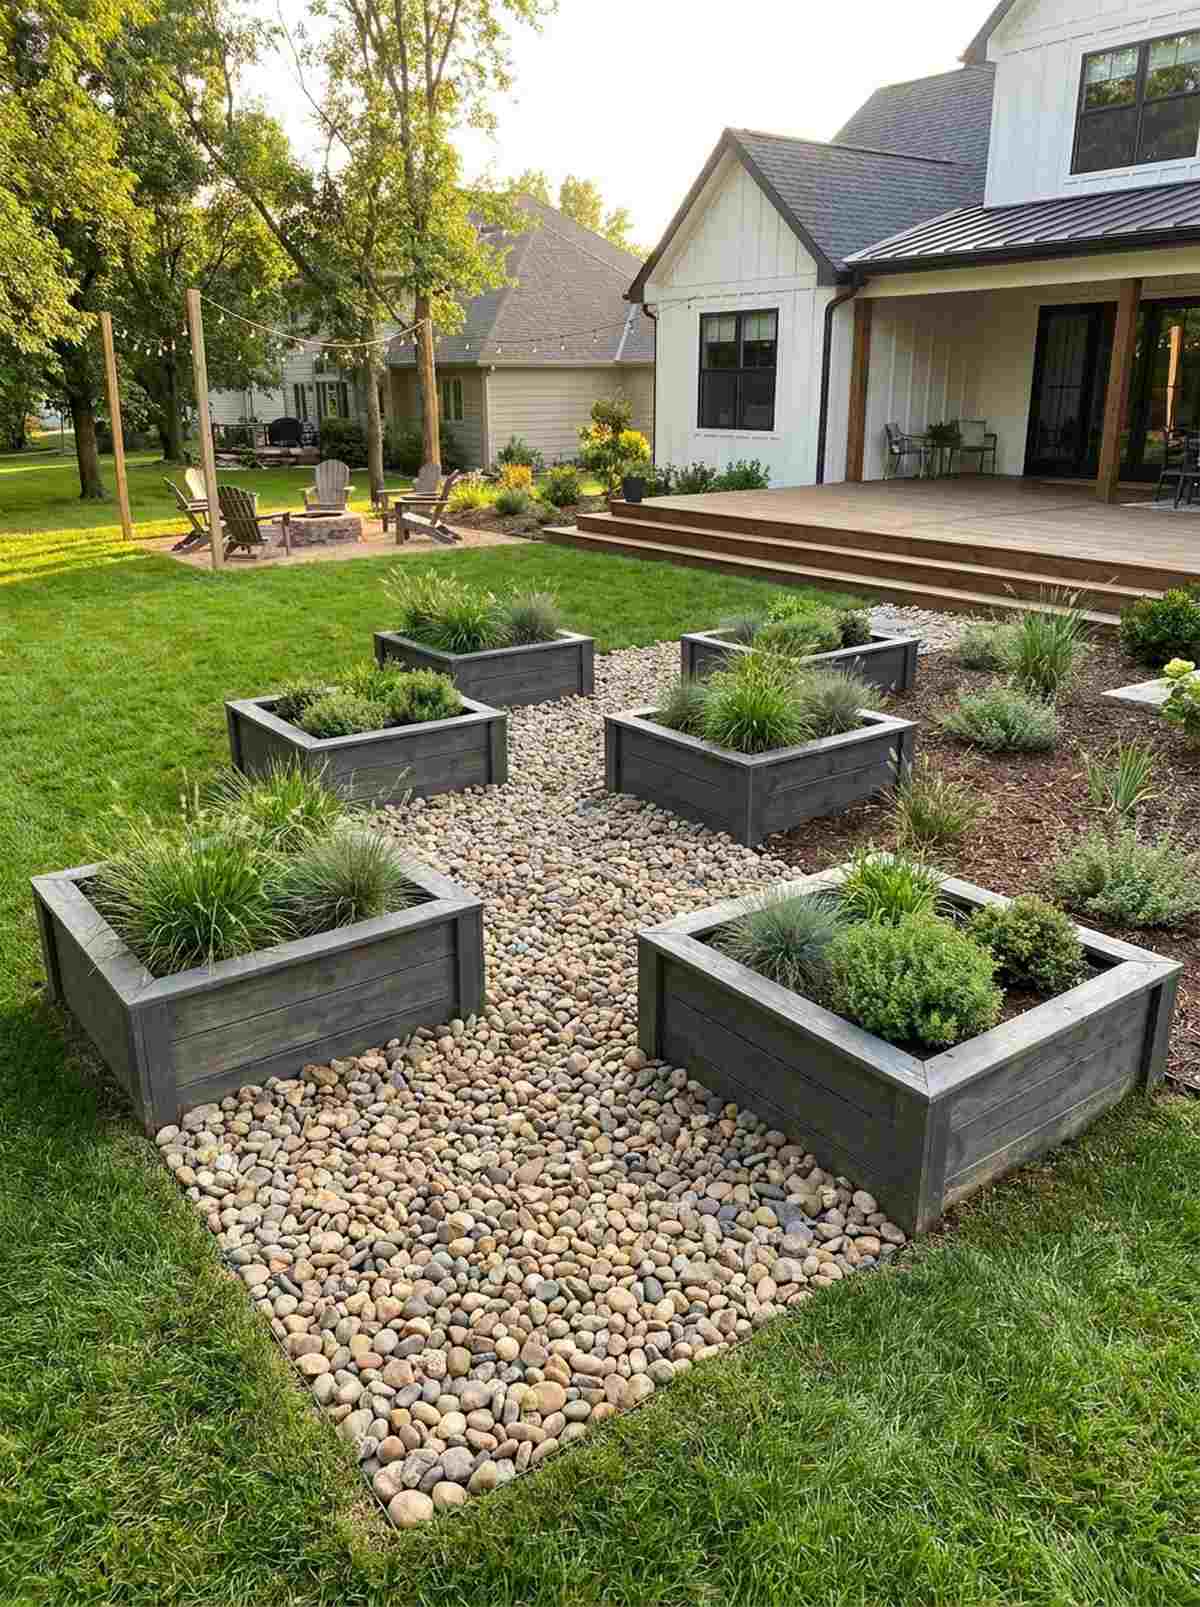
An asymmetrical staggered layout feels like a curated path through a modern botanical garden. Exceptionally perfect for breaking up the monotonous visual of a standard, boxy suburban lawn.
Most default to boring straight lines, yet this dynamic arrangement gives a designer-level finish and vastly improves airflow. Laying down bulk decorative river rock between the staggered boxes elevates the entire area from a dirt patch to a premium walkway.
Creating this custom pathway effect costs roughly $150 total for boxes and path materials. Pin this if you hate boring, predictable yard designs!
- Key Materials: Matching square planters, landscaping stones
- Vibe / Style: Contemporary geometric flow
- Difficulty: Easy layout, heavy lifting
- Budget Breakdown: Planters: $100 | Path Stones: $50.
- Creator’s Tip: Use a string line to ensure your zigzags are perfectly parallel.
- Smart Sourcing: pre-cut raised bed kits, commercial-grade landscaping fabric (bulk roll).
7. Corner Wedge Beds
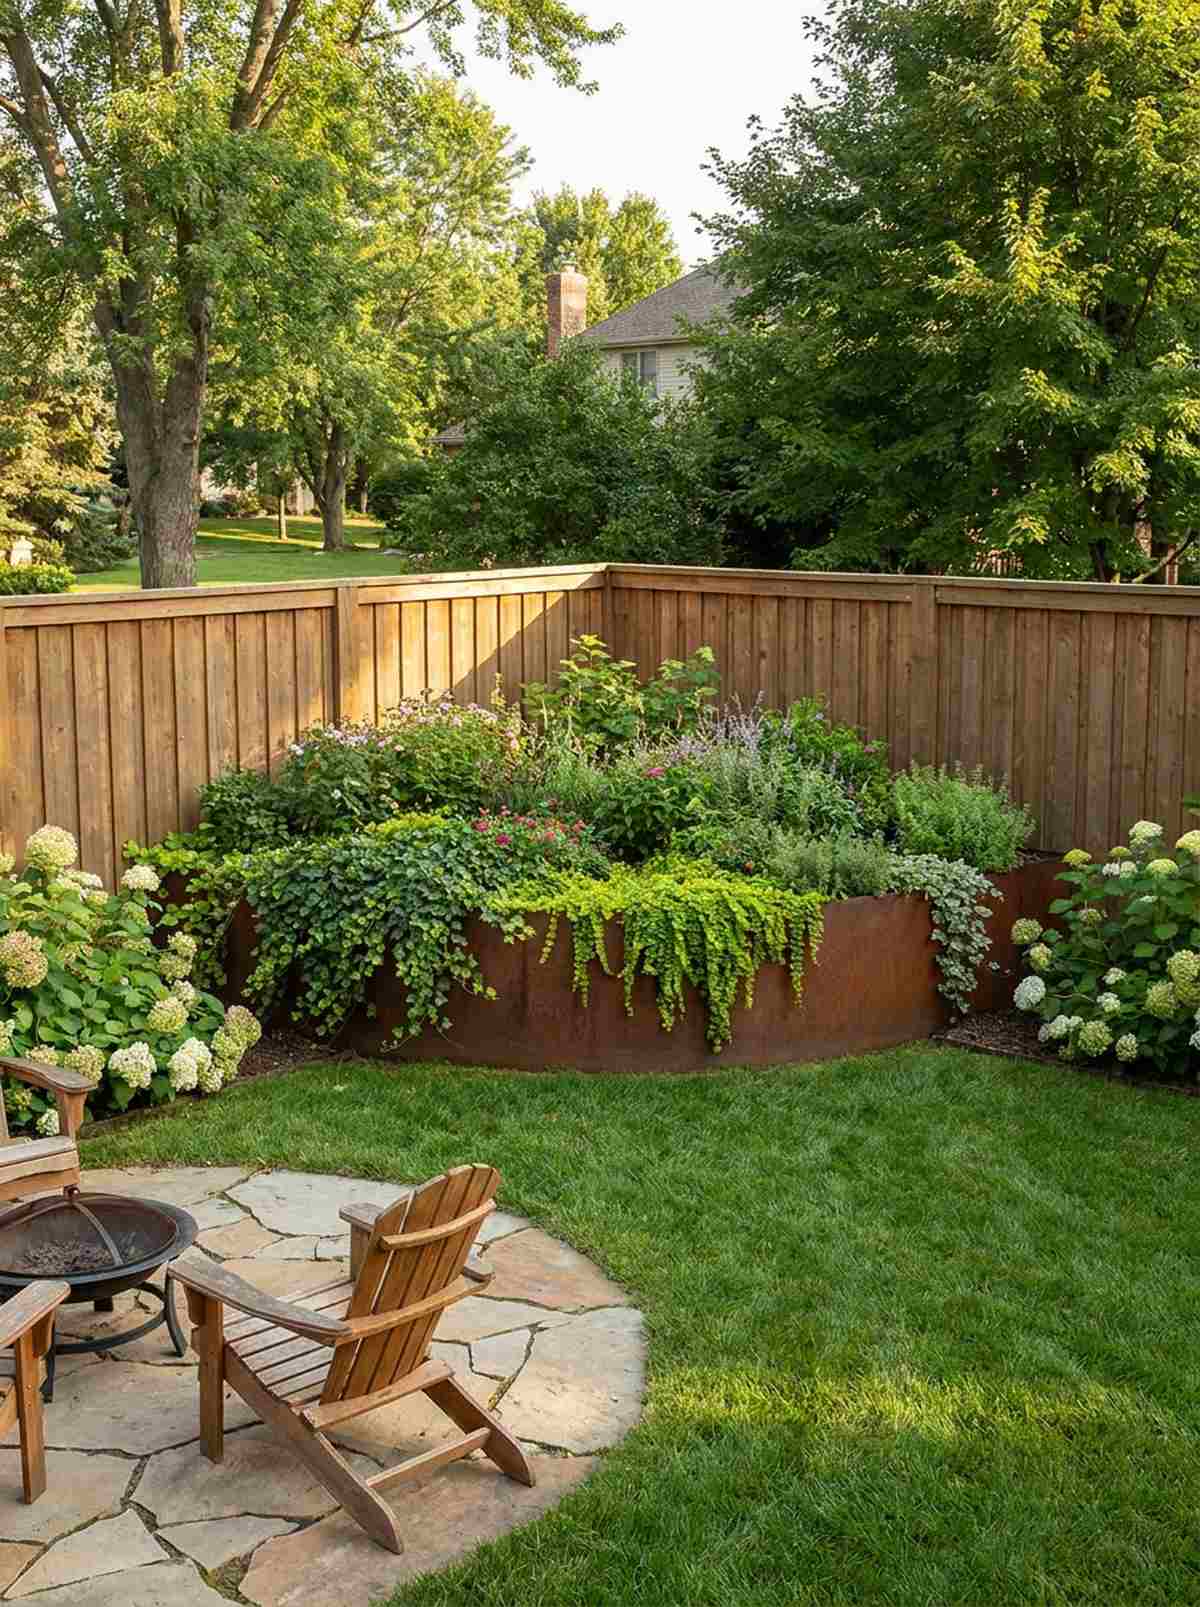
This custom triangular planter feels like a clever architectural hack for wasted space. Works brilliantly for awkward fence corners or tucked neatly into the dead space of a small courtyard.
People constantly leave their yard corners empty, but wrapping a bed perfectly into a 90-degree angle looks custom-built and highly deliberate. Opting for flexible metal edging allows you to curve the front face, adding an unexpected soft, premium touch to rigid fences.
You can easily pull this off for around $40–$60. It’s the ultimate weekend solution for neglected yard spaces.
- Key Materials: Bendable corten steel or custom wood angles
- Vibe / Style: Clever space-saving oasis
- Difficulty: Intermediate
- Budget Breakdown: Edging: $45 | Corner Supports: $15.
- Creator’s Tip: Plant trailing vines at the front edge to spill over and soften the sharp look.
- Smart Sourcing: rust-proof flexible metal edging, adjustable angle corner brackets.
Specialized Productive Growing Zones
Purpose-built zones optimize conditions for specific plant families or growing methods. These layouts address unique requirements like extended harvest periods, companion relationships, or vertical growth habits.
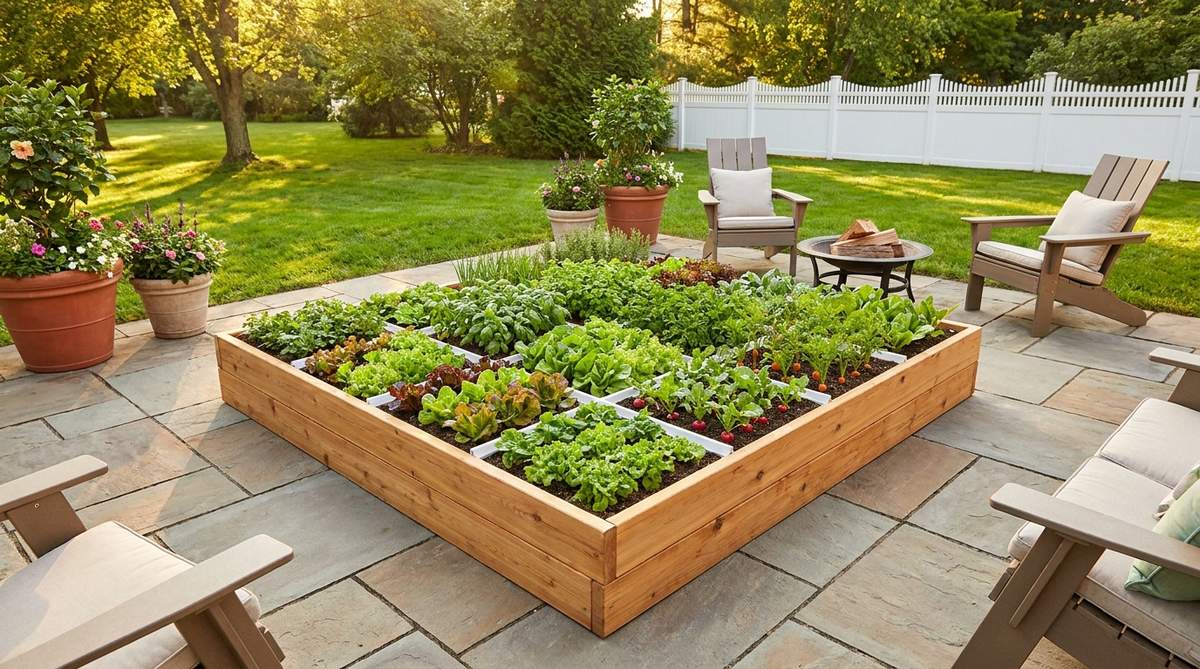
8. Perpetual Salad Bar System
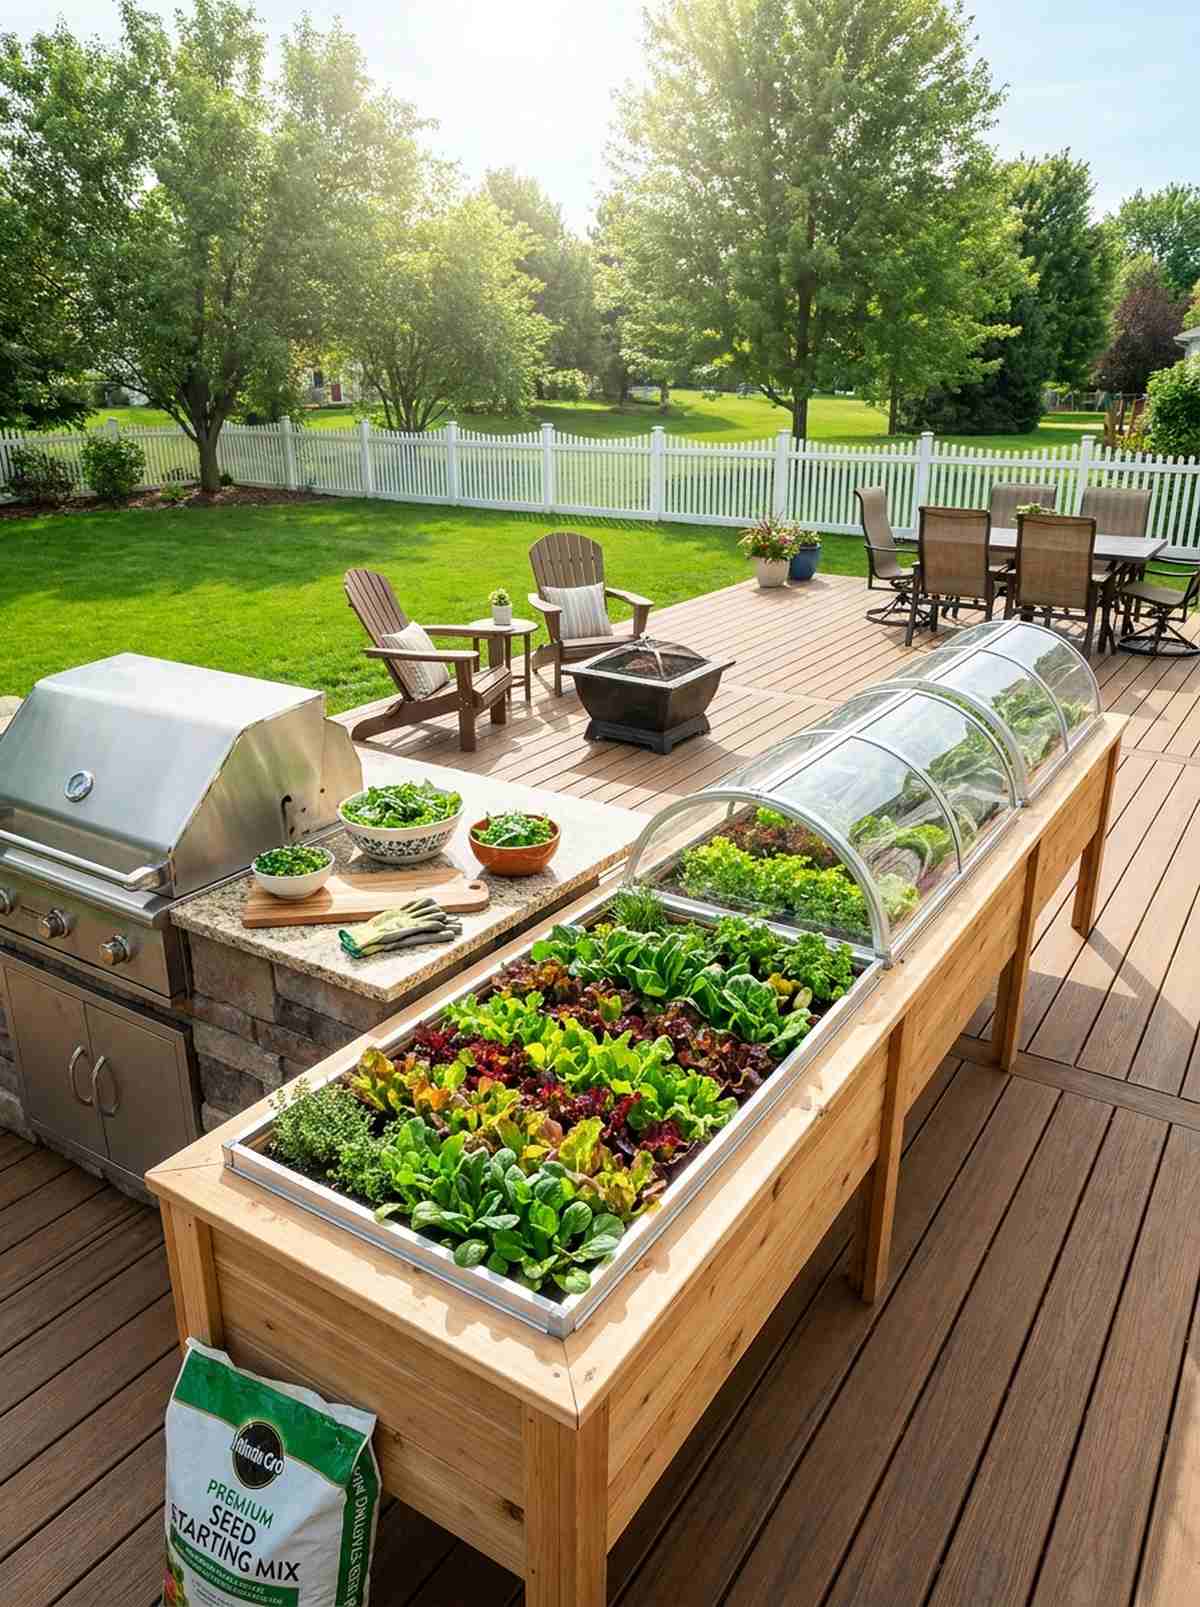
The continuous greens station feels like having a private gourmet market directly outside your kitchen door. A flawless addition for a sunny deck or a location right next to your grilling area.
Many struggle with bolted, bitter lettuce, but rotating slim rows guarantees a fresh, high-end harvest all season. Utilizing acrylic cold frame covers extends the life of this setup, protecting delicate greens from sudden frost and looking incredibly professional.
Setting up the bed and cover system typically costs $60–$90. Pin this to your healthy living or patio garden board!
- Key Materials: Shallow planter box, clear row covers
- Vibe / Style: Fresh culinary station
- Difficulty: Easy beginner setup
- Budget Breakdown: Box: $40 | Covers: $45.
- Creator’s Tip: Use a soil mixture heavy in vermiculite to keep the shallow roots moist.
- Smart Sourcing: UV-coated acrylic mini greenhouses, premium seed starting mix (bulk bag).
9. Tomato Fortress Layout

This heavy-duty vertical trellis bed feels like a lush, towering jungle of production. It works exceptionally well as a windbreak or a privacy screen along the edge of a shared property line.
Flimsy wire cages ruin the aesthetic of a beautiful garden, whereas a rigid, structured fortress setup delivers a surprisingly premium look. Using powder-coated steel plant supports guarantees your heavy vines won’t snap during late-season storms.
You can build an indestructible support system for about $50–$80. Highly recommended if you are tired of collapsed plants mid-summer!
- Key Materials: Heavy wooden base, steel cattle panels or thick stakes
- Vibe / Style: Structural abundance
- Difficulty: Moderate
- Budget Breakdown: Supports: $60 | Base box: $20.
- Creator’s Tip: Plant pest-deterring marigolds thickly around the base of the fortress.
- Smart Sourcing: powder-coated heavy-duty tomato towers, bulk pack organic fertilizer stakes.
💡 Must-Have Supplies for High-End Setups
To build these setups faster and ensure they last, skip the generic craft aisles and invest in the right foundational kits.
- Base & Support: Pre-cut galvanized steel raised bed kits
- Setup Tools: Automated drip irrigation starter kits
- Weather/Durability Protection: UV-resistant heavy-duty weed barrier fabric
Most people get this completely wrong… until they try the exact layout coming up next.
10. Root Cellar Collection Bed
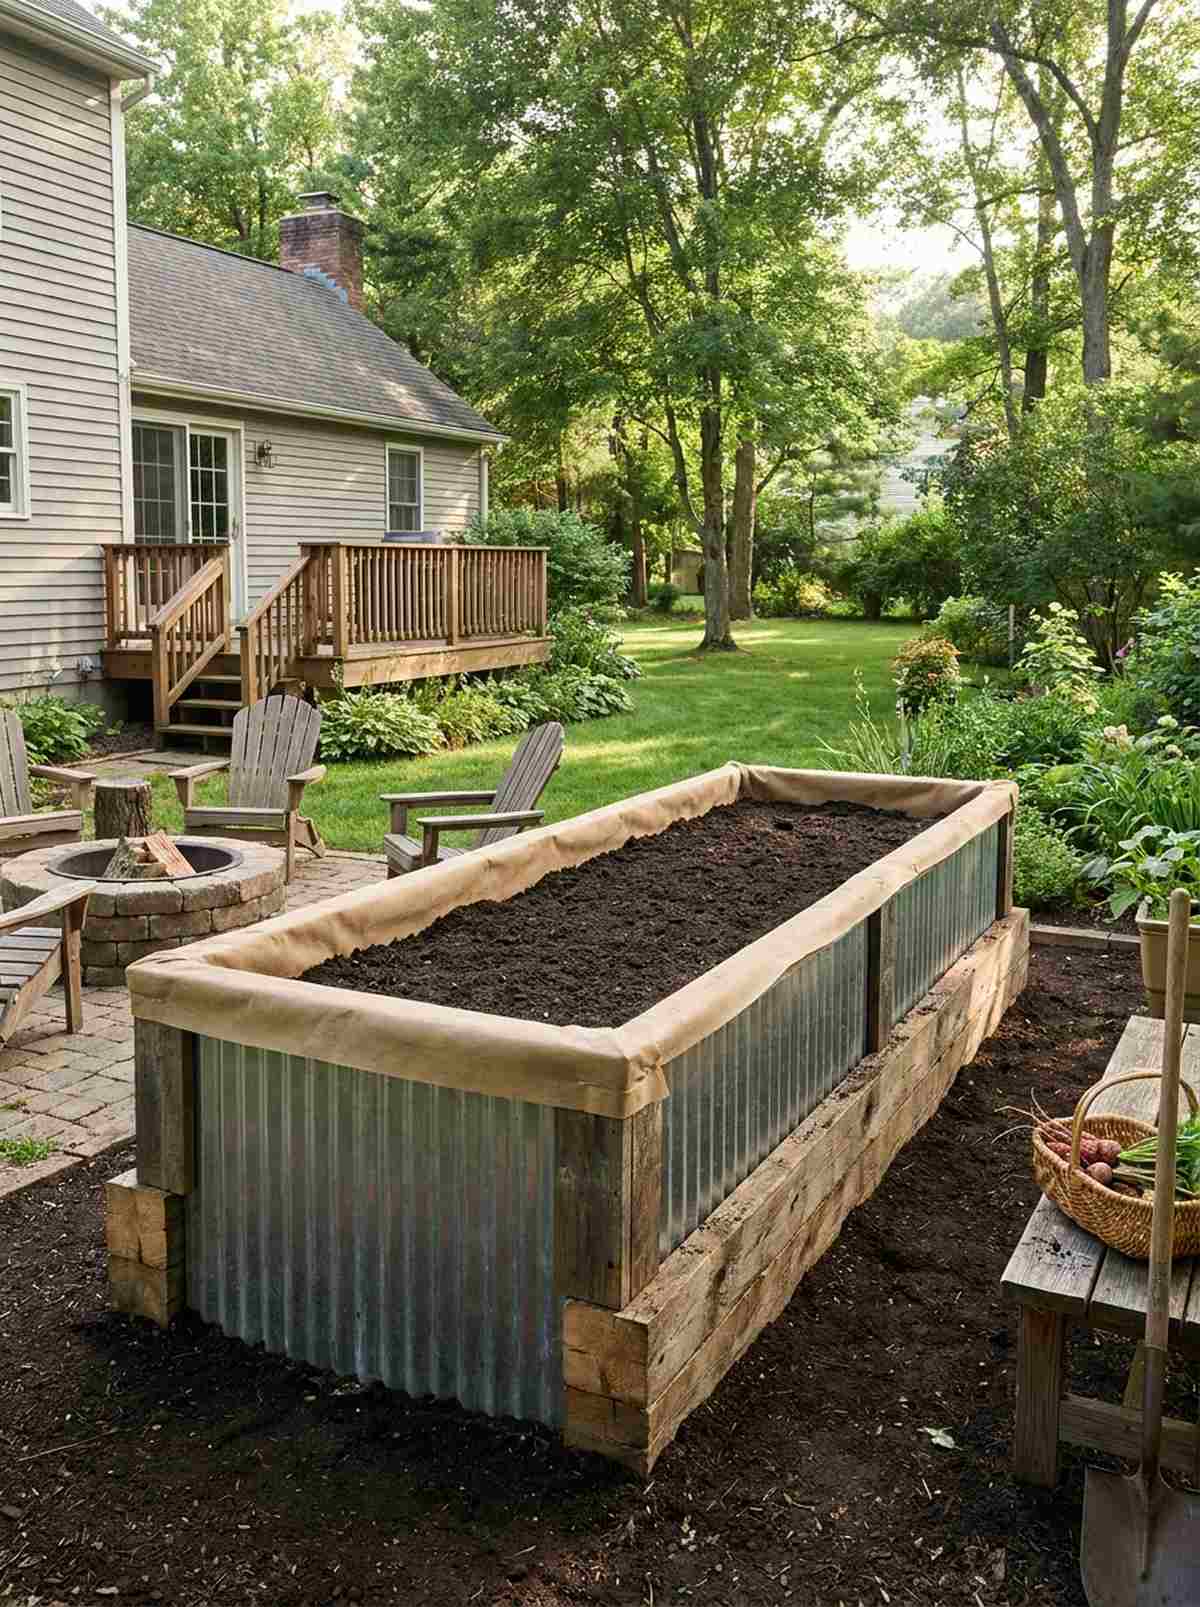
An extra-deep storage crop box feels like a treasure chest hidden right in your backyard. Perfect for a cooler, slightly shaded side of the house where deep soil can maintain consistent temperatures.
Standard shallow beds completely stunt root growth, but upgrading to a high-walled configuration looks far more expensive than it is. Dropping in a breathable geotextile liner keeps the deep soil from seeping out the sides during heavy rainstorms.
Building a 24-inch deep bed runs around $80–$110. Save this to your winter homesteading board to prep for massive harvests.
- Key Materials: Tall corrugated metal or stacked lumber, thick liner
- Vibe / Style: Rustic deep-woods homestead
- Difficulty: Moderate DIY
- Budget Breakdown: Tall Frame: $85 | Liner: $20.
- Creator’s Tip: Mix in a high percentage of sand to ensure carrots grow perfectly straight.
- Smart Sourcing: extra-tall corrugated metal bed kits, heavy-duty breathable geotextile liners.
11. Three Sisters Companion Zone
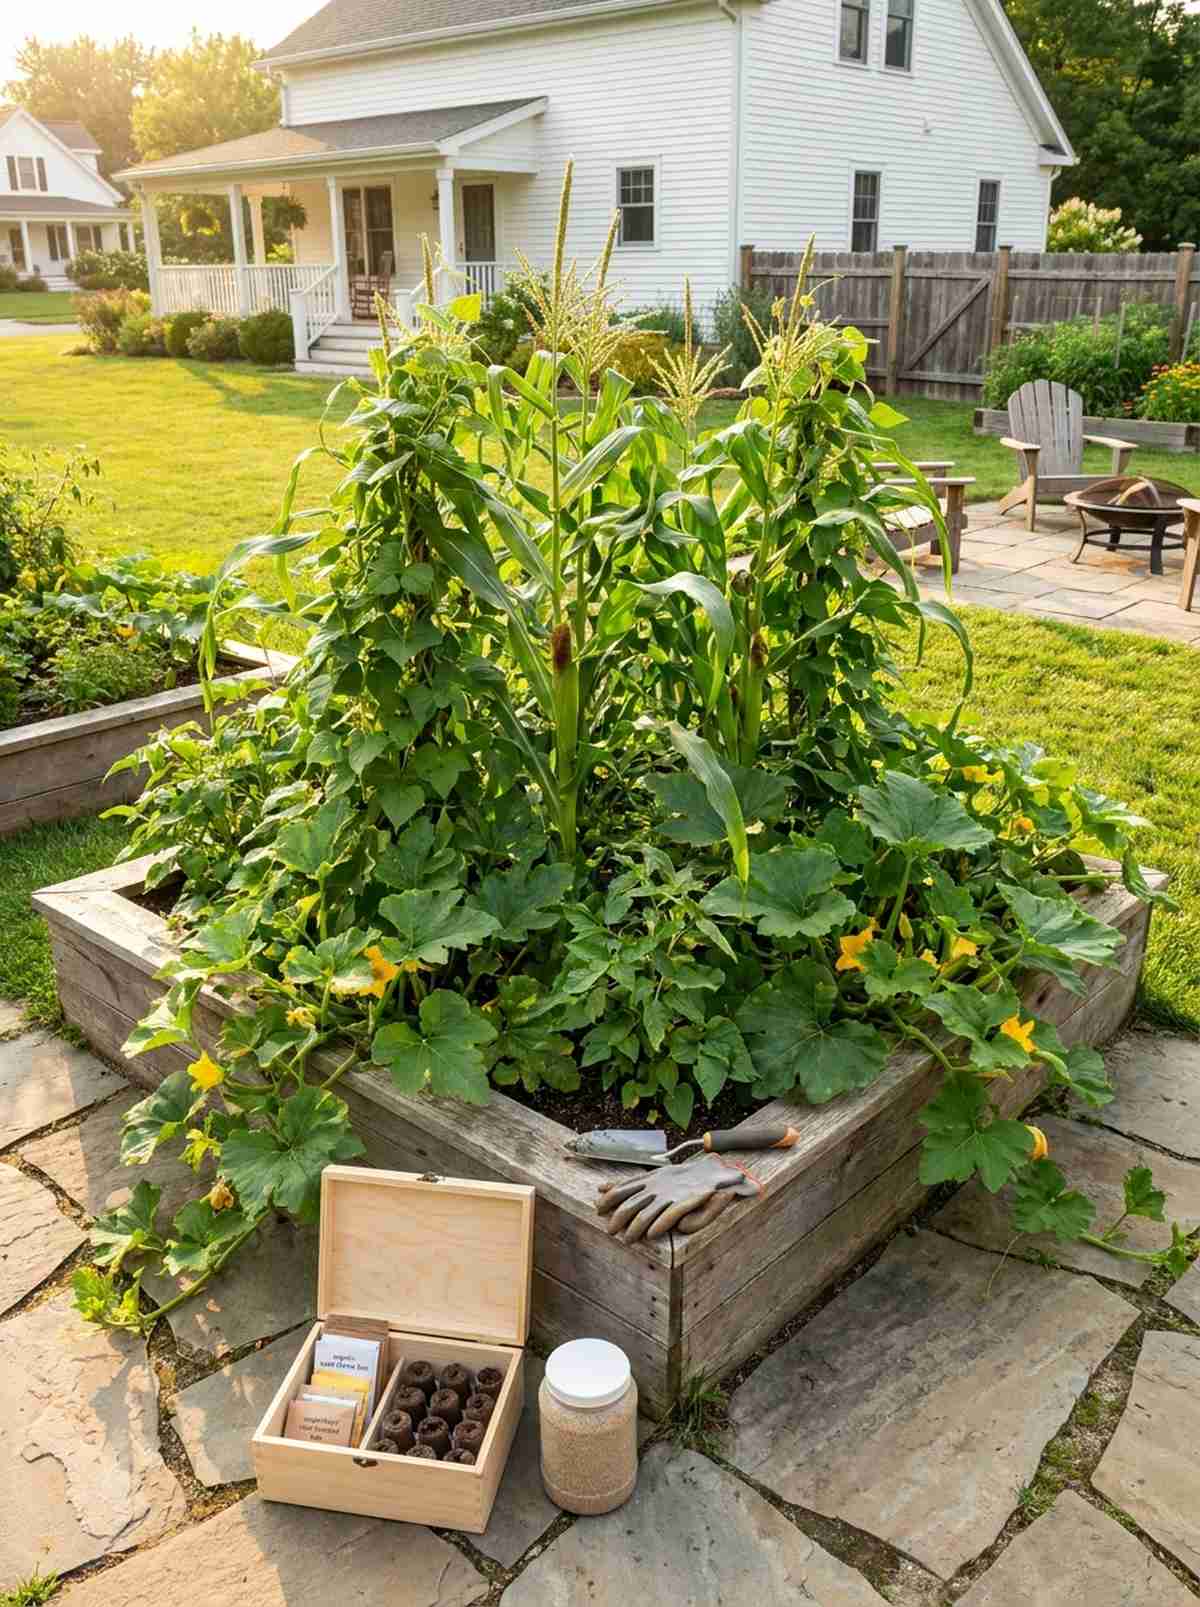
This symbiotic polyculture square feels like a thriving, self-sustaining micro-ecosystem. Works beautifully as a centerpiece in a larger garden layout backyard setup due to its impressive height and density.
Planting crops in isolated rows is a modern mistake, but blending them together creates an interactive, designer-level finish that naturally suppresses weeds. Utilizing organic mycorrhizal inoculant at planting time ensures these companion roots communicate and share nutrients flawlessly.
This entire high-yield system can be set up for just $30–$40. It’s a fast upgrade that completely changes the efficiency of your soil.
- Key Materials: Square frame, targeted companion seeds
- Vibe / Style: Wild and natural abundance
- Difficulty: Easy beginner setup
- Budget Breakdown: Base Box: $25 | Soil Additives: $15.
- Creator’s Tip: Let the corn grow at least six inches before planting the beans to prevent smothering.
- Smart Sourcing: premium organic seed starter kits, bulk pack mycorrhizal root inoculant.
12. Cutting Flower Production Bed
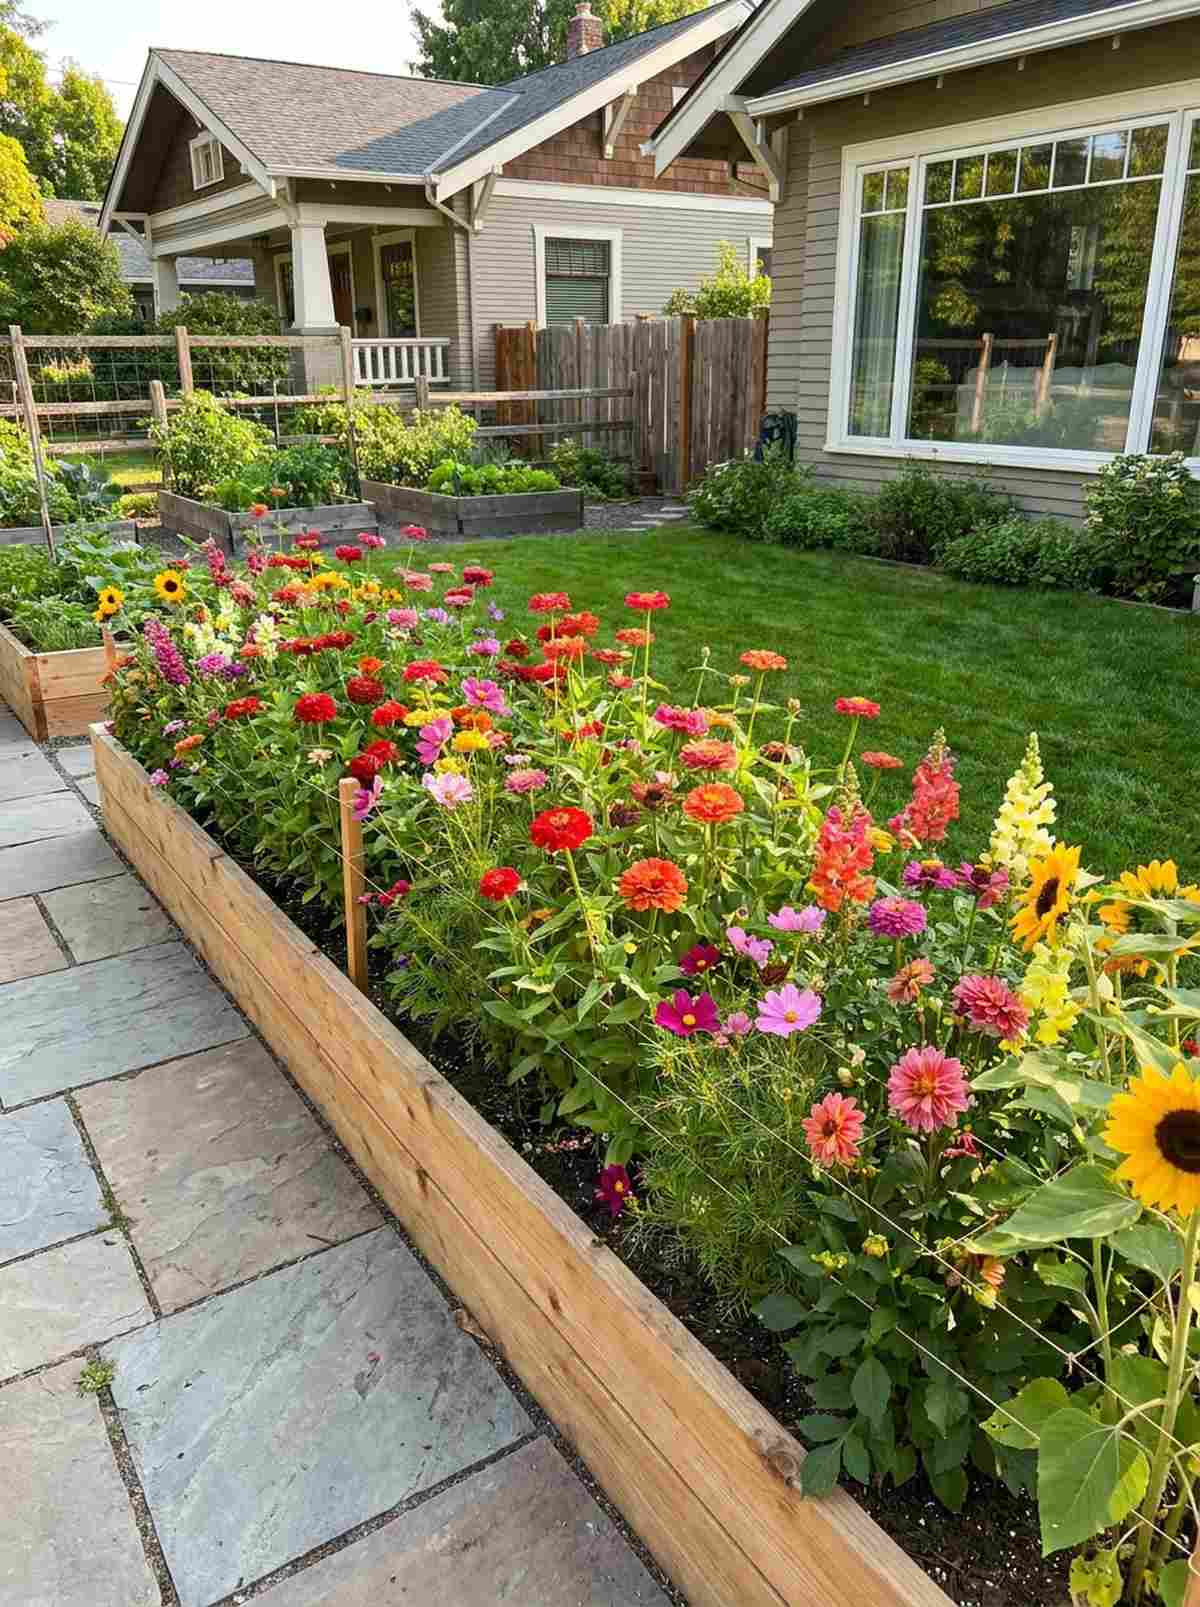
A dedicated floral border box feels like a vibrant painter’s palette exploding with color. Absolutely perfect for placing near a front walkway or right outside a large living room window.
Vegetable gardens often lack visual curb appeal, but bordering them with intense blooms gives a surprisingly premium look that draws in essential pollinators. Installing invisible nylon support grids horizontally keeps tall stems perfectly straight for professional-grade bouquets.
You can easily pull this off for around $40–$55. Pin this if you want to mix stunning aesthetics with practical gardening!
- Key Materials: Narrow bed frame, horizontal floral netting
- Vibe / Style: English cottage garden
- Difficulty: Very easy
- Budget Breakdown: Netting: $15 | Bed: $35.
- Creator’s Tip: Pinch the center of young seedlings to force them into branching outwards.
- Smart Sourcing: pre-cut horizontal flower support netting, pollinator-friendly wildflower seed blends.
13. Berry Production Frame
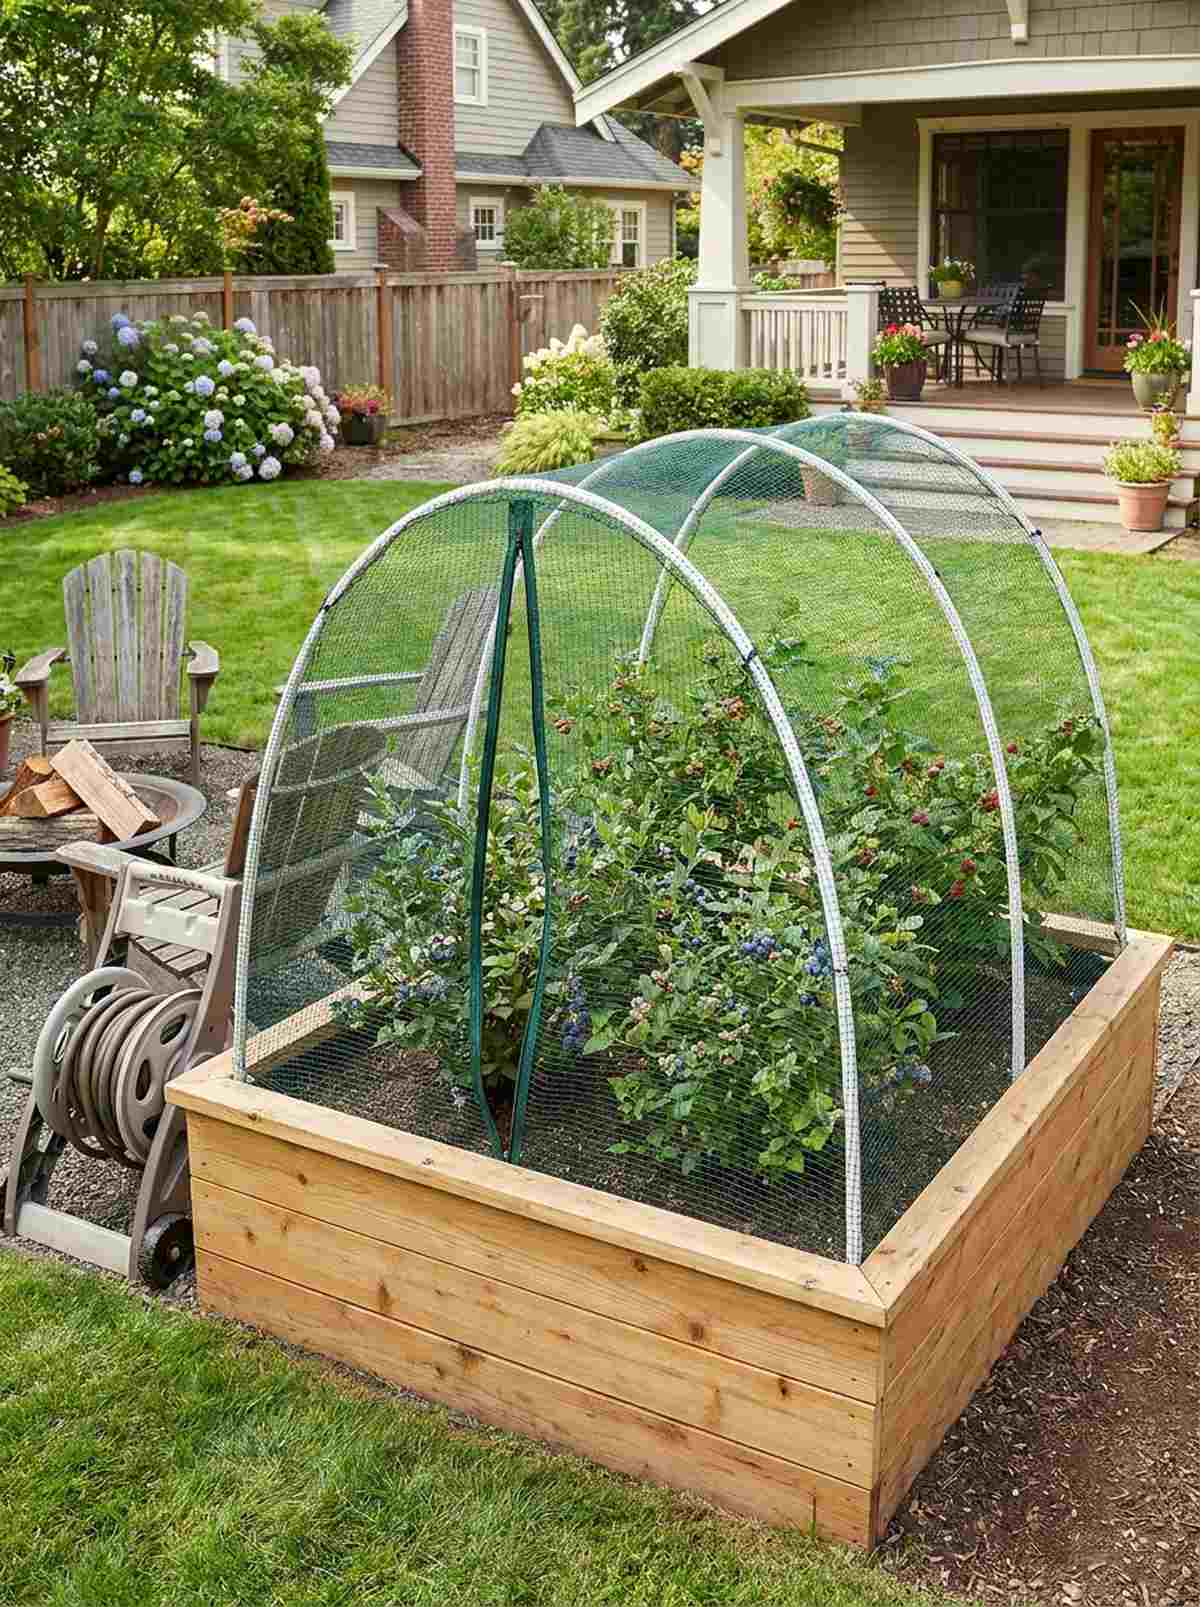
The enclosed sweet fruit habitat feels like a secret, protected vault of summer treats. It is the ultimate addition for a sunny backyard corner where kids or pets frequently play.
Nothing is more frustrating than birds stealing your harvest, but an integrated, structured netting system looks sleek and highly deliberate. Using a zippered mesh crop cage over the bed upgrades the whole setup from a messy DIY to a premium, pest-proof sanctuary.
Expect to spend about $60–$85 for the bed and protective enclosure. Highly recommended to protect your high-value crops!
- Key Materials: Wooden frame, PVC hoops, bird netting
- Vibe / Style: Protected orchard aesthetic
- Difficulty: Intermediate
- Budget Breakdown: Frame: $40 | Mesh Cage: $35.
- Creator’s Tip: Use an acidic soil mix specifically tailored for berries to double your yield.
- Smart Sourcing: custom-fit zippered mesh crop cages, acid-loving plant food (bulk pack).
14. Perennial Herb Sanctuary
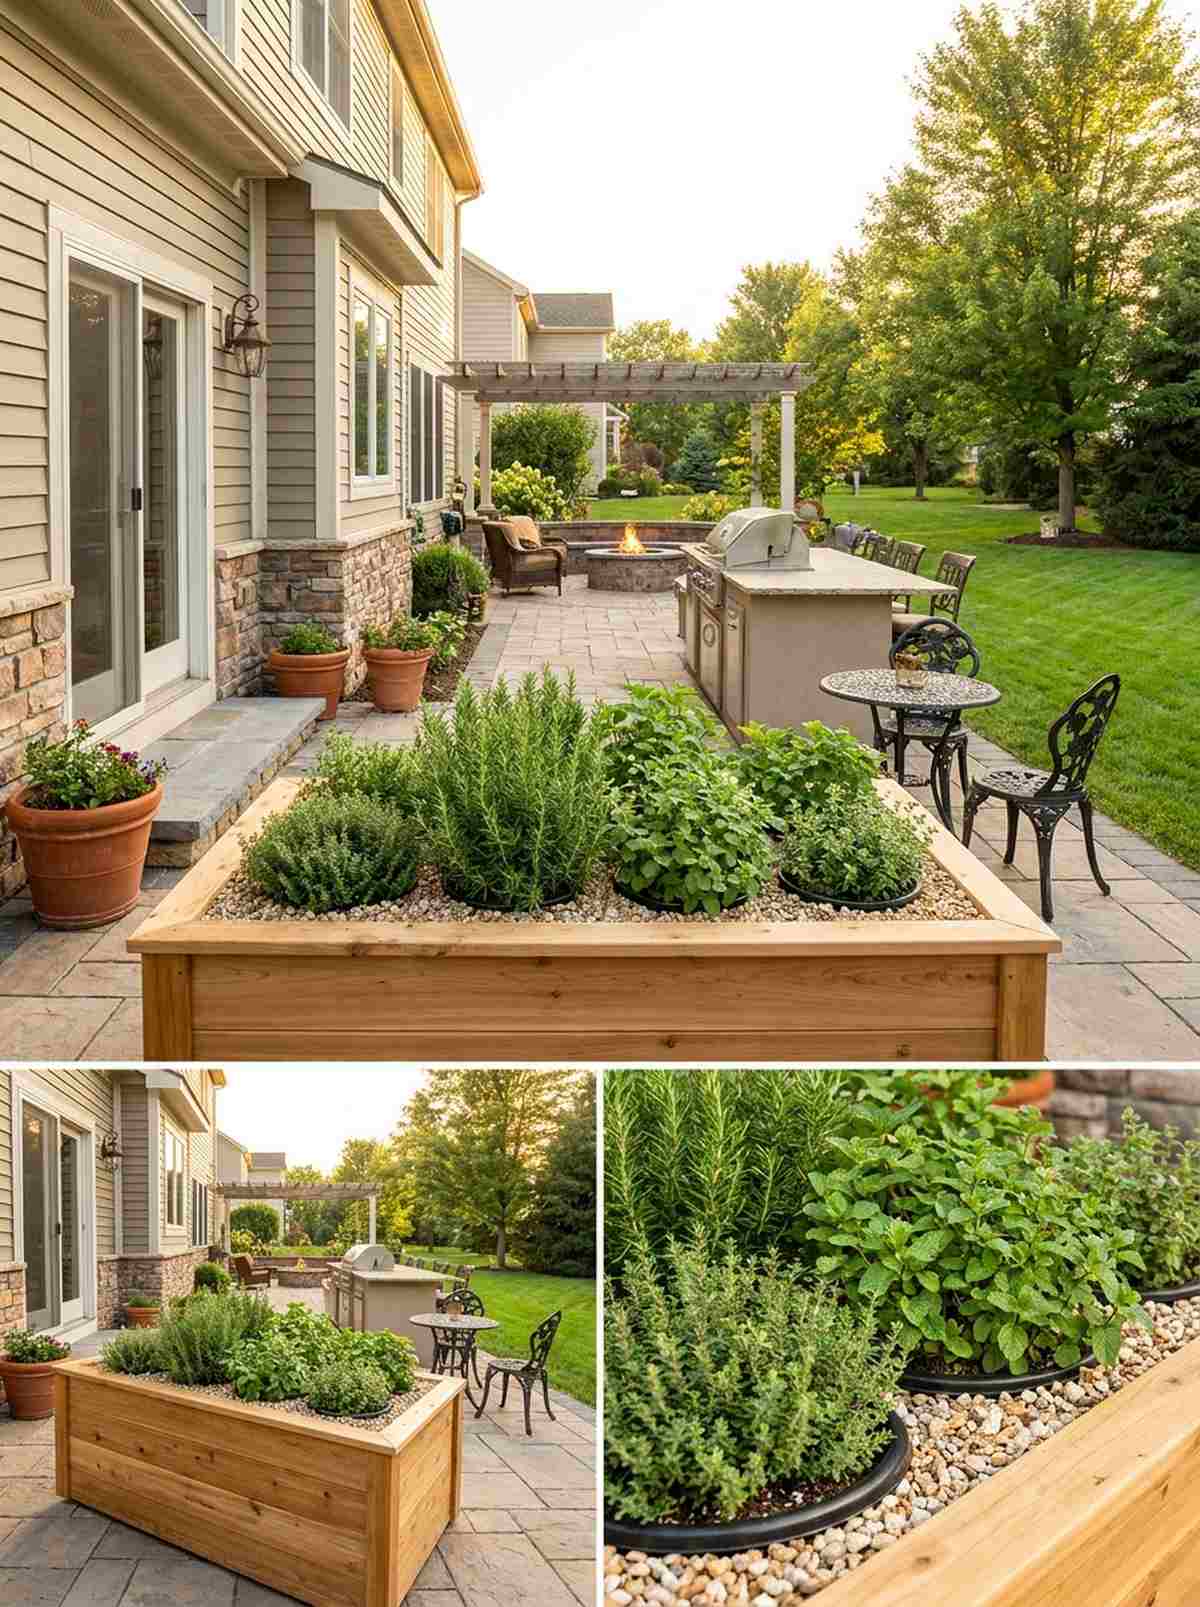
This permanent fragrant raised planter feels like a serene, high-end spa garden. Works exceptionally well placed as close to the kitchen door as possible for instant culinary access.
Mixing aggressive herbs with delicate veggies is a rookie error, but giving them a contained, dedicated zone delivers a surprisingly premium look. Using pre-formed fiberglass planter inserts prevents mint and oregano from aggressively taking over the entire yard.
You can create this aromatic focal point for around $40–$70. Save this to your outdoor kitchen inspiration board!
- Key Materials: Cedar box, root-blocking barrier pots
- Vibe / Style: Mediterranean culinary oasis
- Difficulty: Easy beginner setup
- Budget Breakdown: Planter: $45 | Barrier Inserts: $20.
- Creator’s Tip: Top dress the soil with light-colored gravel to reflect heat up into the thyme and rosemary.
- Smart Sourcing: heavy-duty root barrier pots (bulk pack), premium cedar raised planter boxes.
If you think a basic box is enough, wait until you see the dramatic transformation of this next layout…
Backyard Garden Layout Configurations
These full-scale garden layouts address how multiple beds work together across your entire backyard space. Strategic placement considers sunlight patterns, water access, and traffic flow.
15. U-Shaped Courtyard Garden
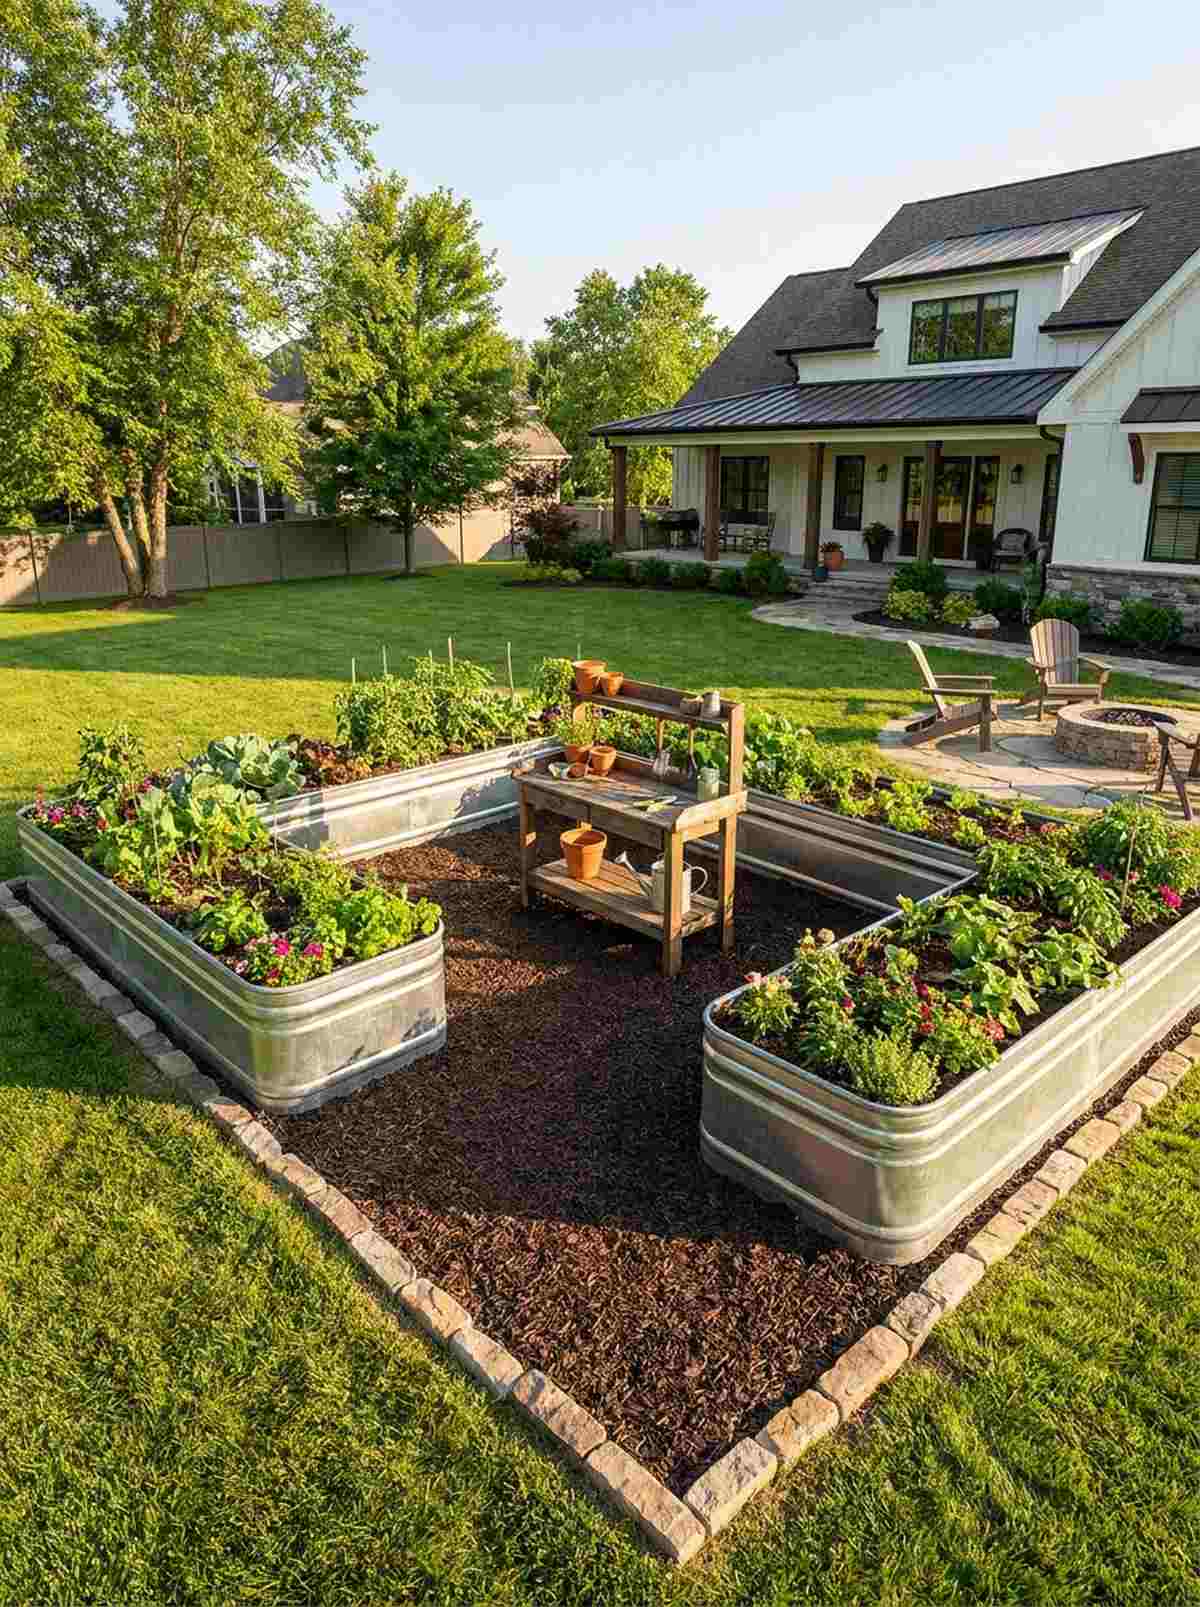
A wraparound modular courtyard feels like an exclusive, immersive outdoor workspace. Perfect for transforming an empty, square patch of lawn into a highly functional, room-like garden retreat.
Standard parallel rows can feel disconnected, but enclosing the space with a U-shape looks far more expensive than it is and minimizes walking fatigue. Laying a premium rubber mulch pathway inside the U instantly elevates the area, keeping it mud-free and incredibly comfortable underfoot.
Building this multi-bed configuration costs roughly $150–$250. Pin this layout if you want maximum harvest with minimum footsteps!
- Key Materials: Three matching bed kits, pathway ground cover
- Vibe / Style: Immersive private workspace
- Difficulty: Moderate (requires leveling multiple beds)
- Budget Breakdown: 3 Beds: $180 | Pathway: $50.
- Creator’s Tip: Place a small potting bench at the dead center of the U for maximum efficiency.
- Smart Sourcing: pre-cut galvanized steel bed kits (3-pack), UV-coated rubber pathway mulch.
16. Parallel Production Rows
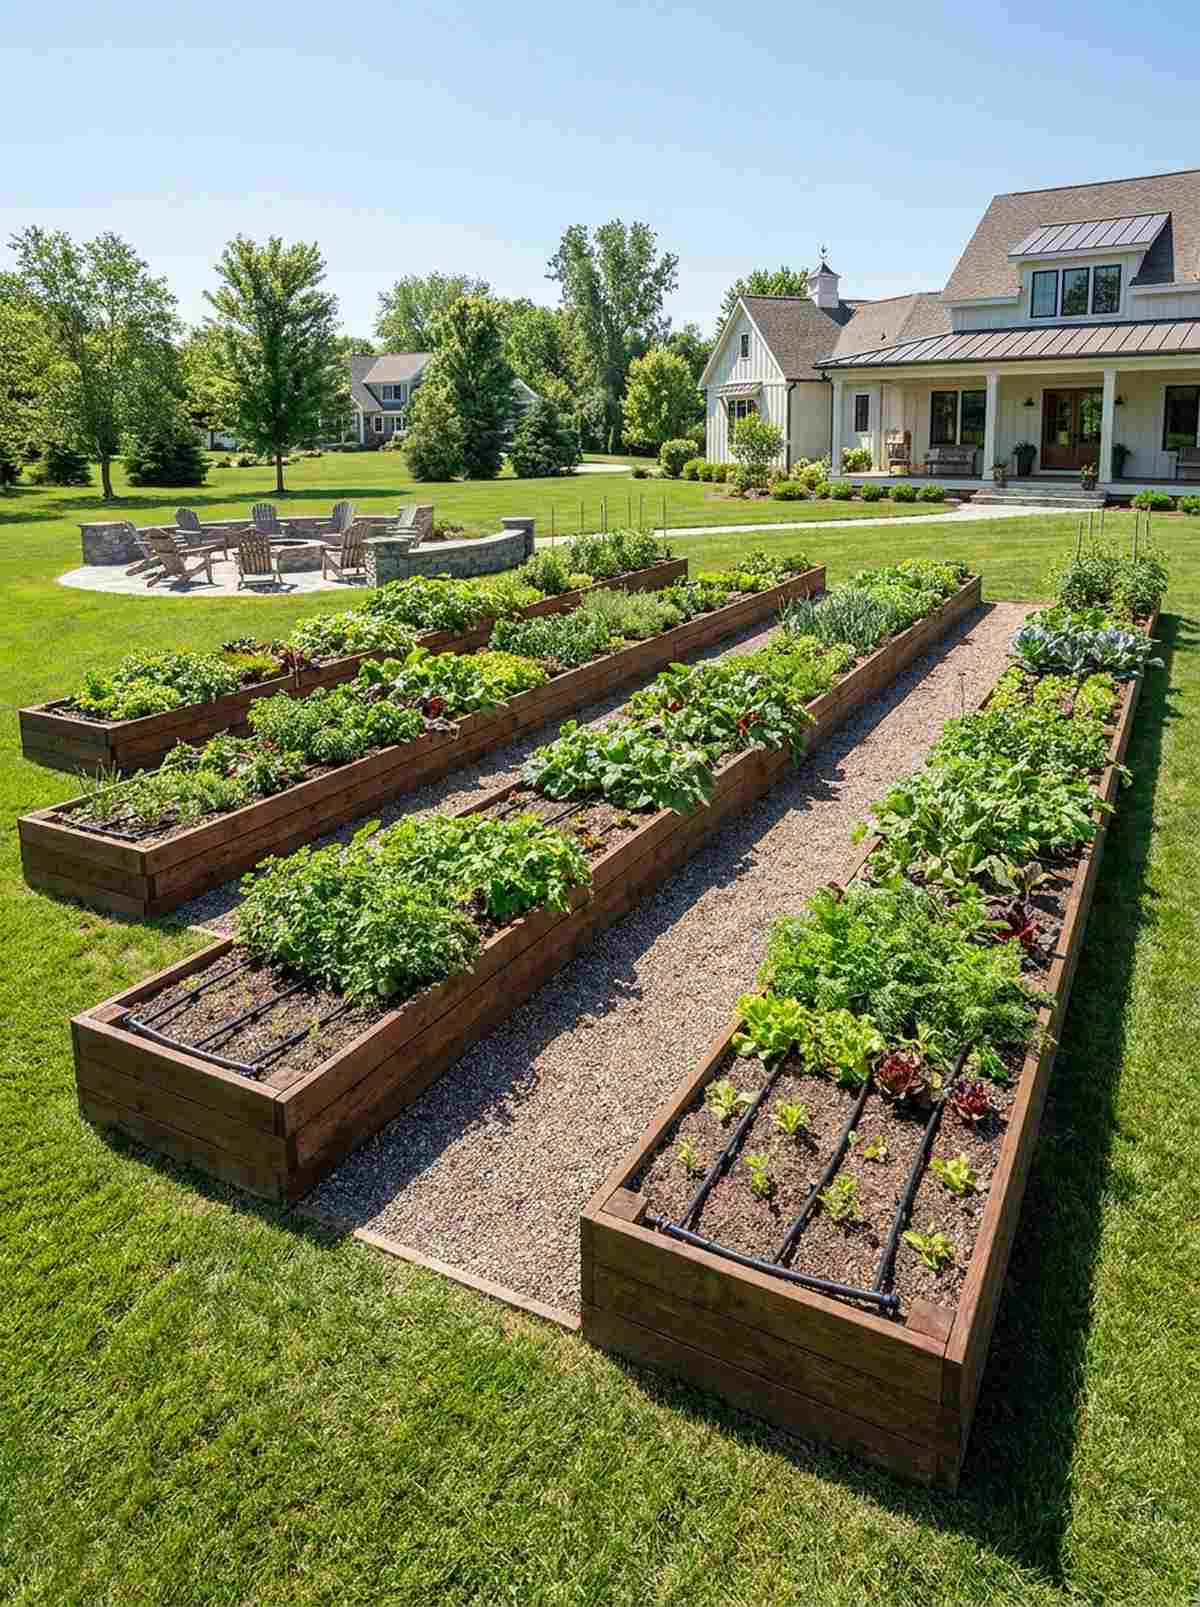
These sleek, uniform linear beds feel like a professional boutique farming operation. Exceptionally well-suited for long, rectangular yards where you want a tidy, symmetrical vegetable garden layout.
Disorganized random boxes look messy, yet this militaristic precision gives a designer-level finish that makes irrigation a breeze. Running an automated multi-zone drip hose system down the straight aisles saves hours of labor and looks incredibly sleek.
You can easily pull this off for around $120–$200 for a set of four. Save this if you value extreme organization!
- Key Materials: Uniform timber rows, straight pathway material
- Vibe / Style: Professional boutique farm
- Difficulty: Intermediate
- Budget Breakdown: Bed Frames: $140 | Irrigation: $45.
- Creator’s Tip: Keep pathways exactly 36 inches wide to easily fit a standard wheelbarrow.
- Smart Sourcing: multi-zone automatic drip irrigation kits, commercial-grade weed barrier rolls.
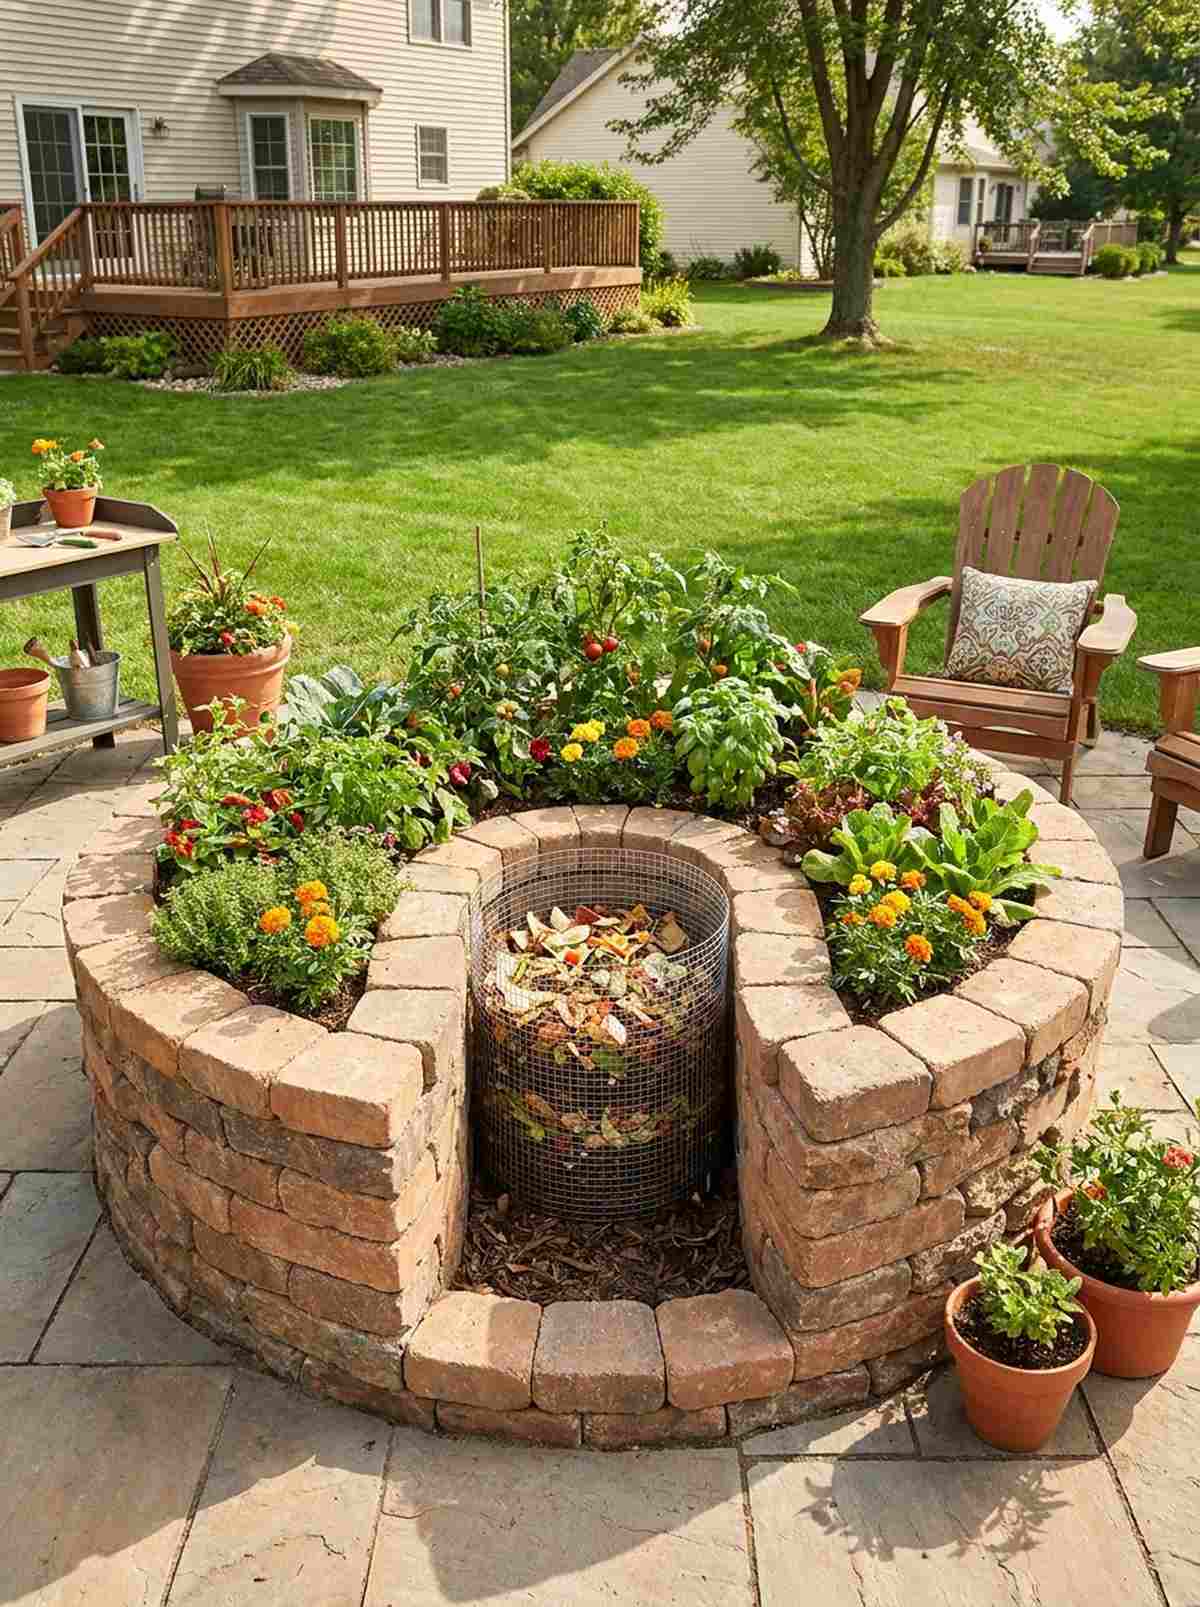
17. Hub and Spoke Design
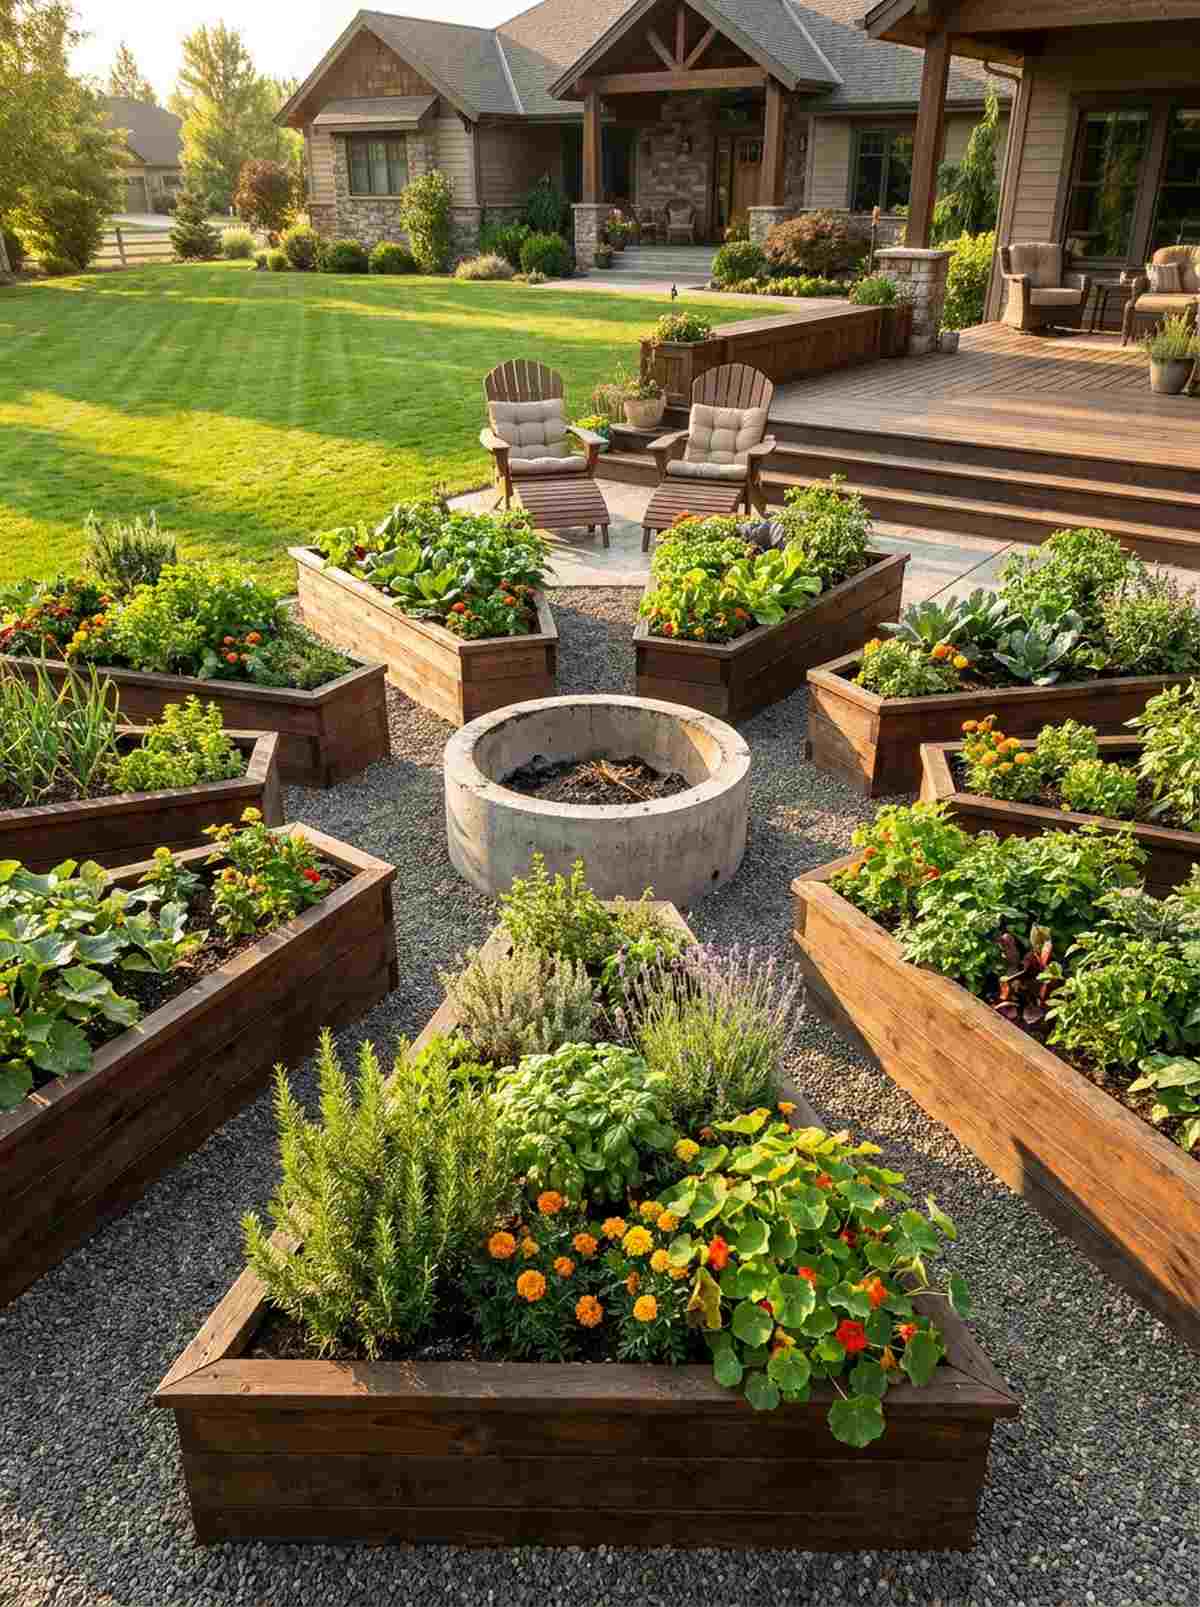
The radiating circular garden feels like a mystical, enchanting sundial embedded in the earth. Absolutely stunning for a central yard focal point where aesthetics are just as important as the yield.
Most layouts ignore visual artistry, but this highly architectural shape delivers a surprisingly premium look that guests will constantly compliment. Utilizing a pre-cast concrete fire pit ring as the center hub anchors the entire design flawlessly.
Constructing this intricate setup usually runs between $200–$350. Pin this if you want a true show-stopping landscape feature!
- Key Materials: Custom-cut wedge beds, central circular focal point
- Vibe / Style: Magical estate garden
- Difficulty: Advanced DIY
- Budget Breakdown: Custom Wood: $180 | Center Hub: $60.
- Creator’s Tip: Use the center hub as a stealthy, contained compost bin to feed the radiating beds.
- Smart Sourcing: adjustable angle corner brackets (bulk pack), heavy-duty metal center rings.
18. Twin Block Formation
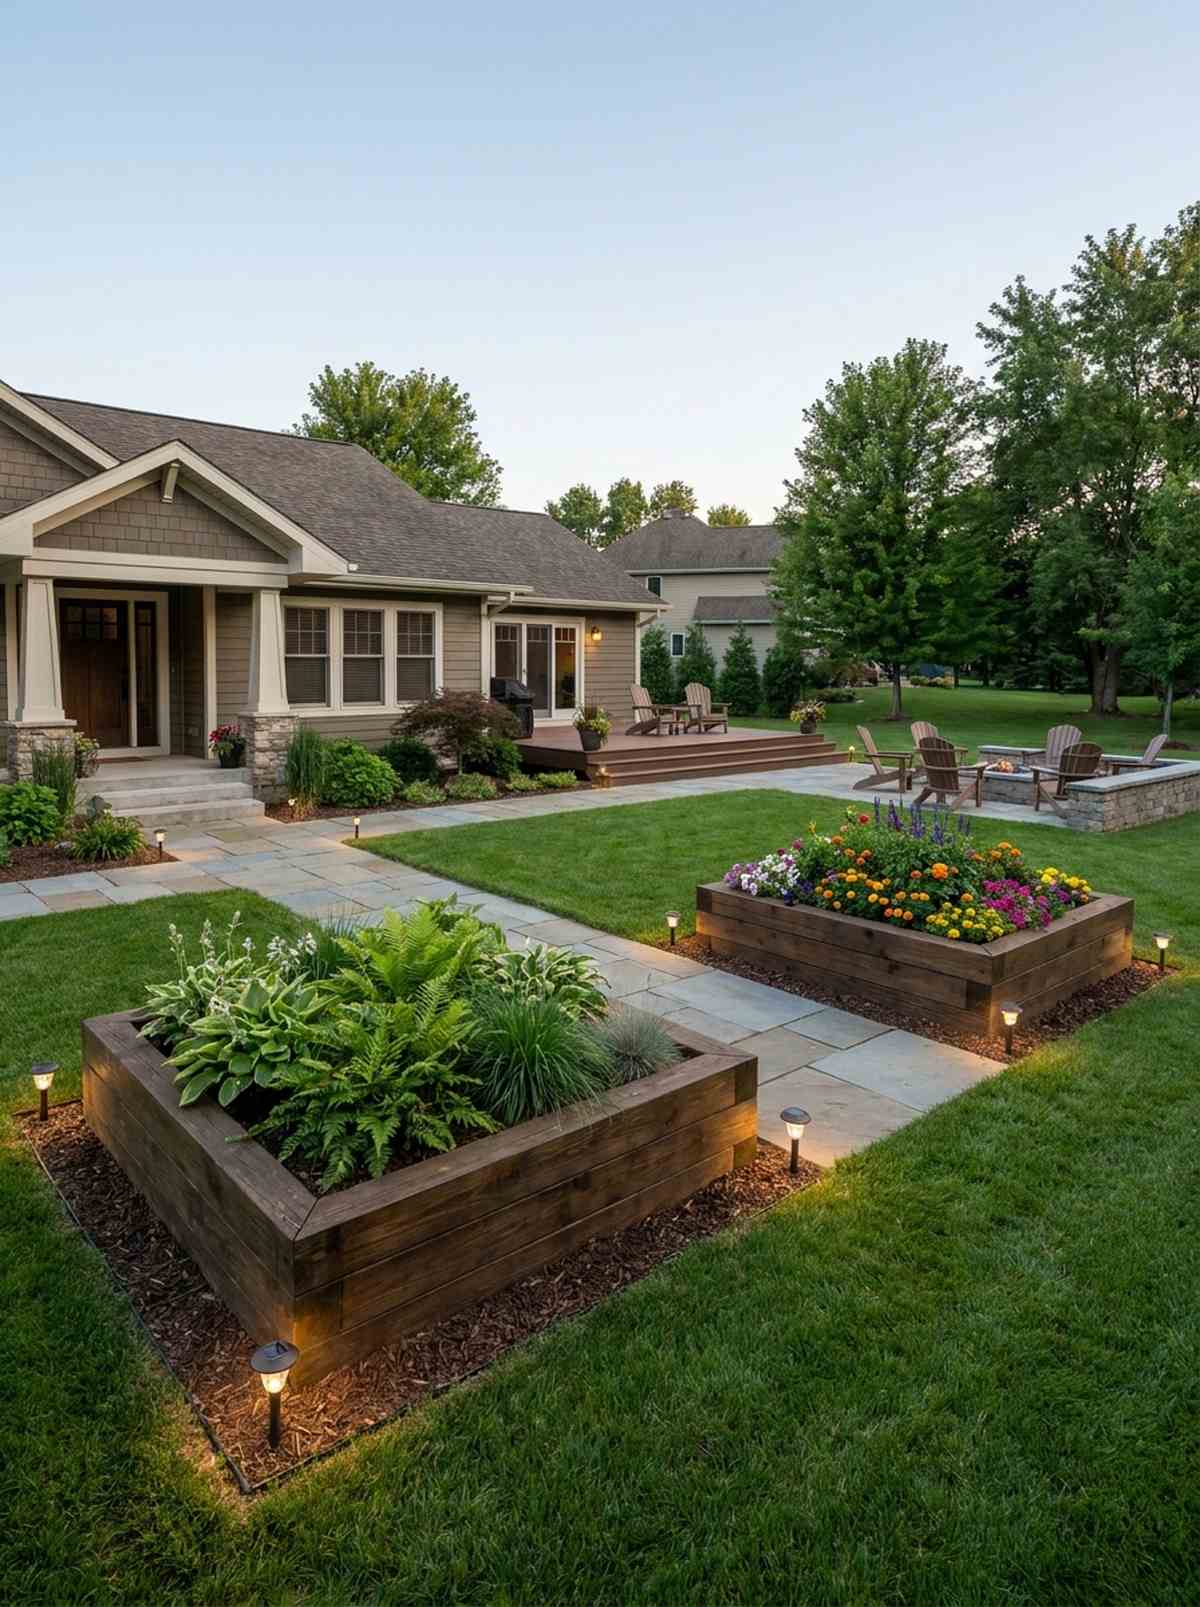
This mirrored symmetrical garden setup feels like a perfectly balanced, manicured courtyard. Ideal for framing a walkway or creating a defined entrance to the rear of your property.
A lopsided yard causes visual anxiety, whereas this twin approach looks far more expensive than it is by forcing strict symmetry. Adding solar-powered pathway edge lights around the perimeter of the blocks elevates the nighttime aesthetic dramatically.
You can establish these mirrored zones for about $100–$160. It’s a fast upgrade that completely changes the vibe of a bland lawn.
- Key Materials: Identical square or rectangular frames, lighting
- Vibe / Style: Symmetrical modern estate
- Difficulty: Easy layout
- Budget Breakdown: Frames: $90 | Lighting: $40.
- Creator’s Tip: Dedicate one block strictly to perennials and the other to rotating seasonal annuals.
- Smart Sourcing: waterproof solar garden edge lights (8-pack), pre-cut square planter kits.
19. Terraced Slope System
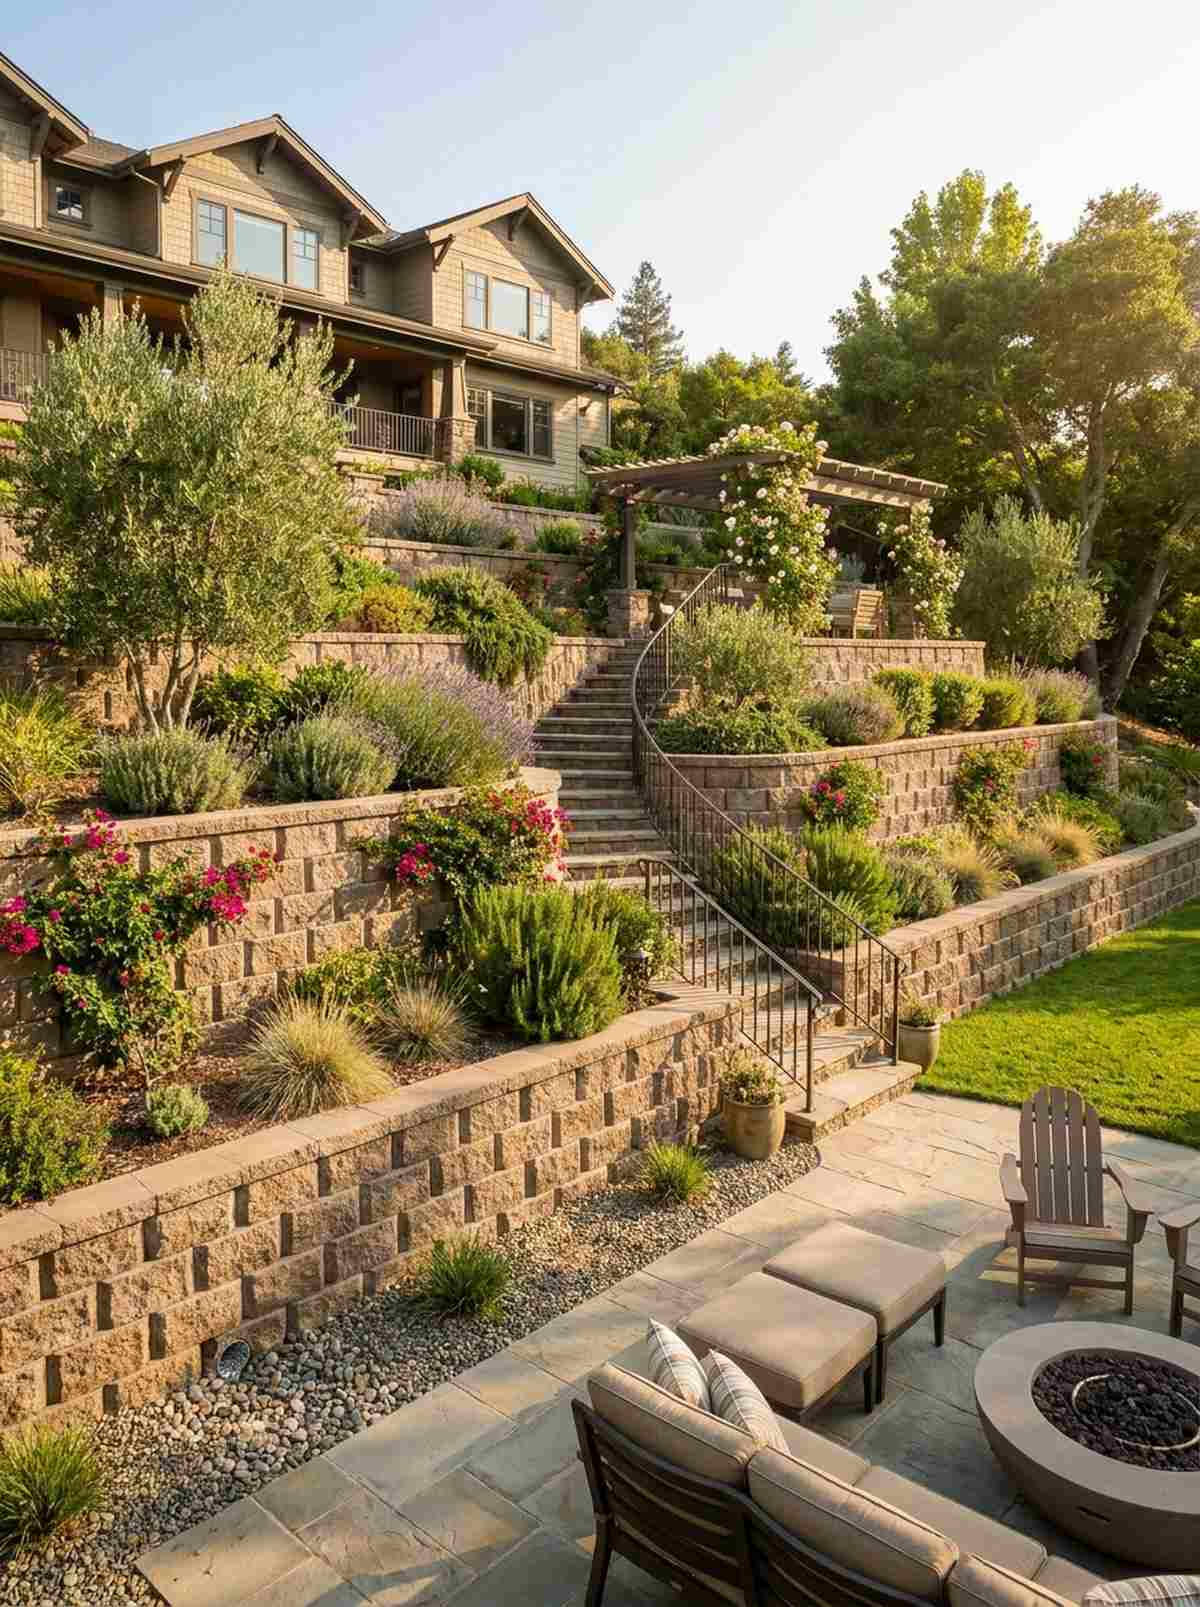
A dramatic hillside retaining garden feels like a luxurious Mediterranean villa landscape. Works exceptionally well to reclaim useless, steep slopes that are impossible to mow.
People often spend thousands leveling yards, but integrating beds right into the slope gives a designer-level finish that stops erosion naturally. Using heavy-duty interlocking retaining blocks for the front edges ensures the beds won’t wash out during a heavy storm.
Depending on the hill, this typically costs $150–$300. Save this to your extreme backyard makeover board!
- Key Materials: Stone retaining blocks, deep soil backfill
- Vibe / Style: Mediterranean hillside villa
- Difficulty: Advanced (heavy lifting required)
- Budget Breakdown: Stone Blocks: $200 | Drainage Pipe: $30.
- Creator’s Tip: Always install a perforated drainage pipe behind the lowest wall to prevent water buildup.
- Smart Sourcing: heavy-duty interlocking landscape blocks, pre-cut corrugated drainage pipes.
Most DIYers ruin their yard’s flow entirely… until they implement this ridiculously simple pathway trick.
20. Central Pathway Garden

The grand central promenade layout feels like walking through an elite, historic botanical estate. Absolutely perfect for dividing a large, overwhelming backyard into manageable, beautiful zones.
Thin, winding paths look messy and confusing, but establishing a wide, dominant central corridor delivers a surprisingly premium look. Laying out a permeable gravel grid stabilizer prevents your premium pathway stones from sinking into the mud over time.
Creating this grand entrance effect costs around $130–$180. Pin this if you love a highly structured, walkable aesthetic!
- Key Materials: Long flanking beds, wide pathway stabilizer grids
- Vibe / Style: Grand historic estate walk
- Difficulty: Intermediate
- Budget Breakdown: Grids: $70 | Gravel/Beds: $90.
- Creator’s Tip: Build an arbor at the start of the pathway to create a stunning visual entrance.
- Smart Sourcing: heavy-duty permeable gravel grid stabilizers, pre-cut galvanized steel beds.
21. Modular Expansion Grid

This scalable geometric block system feels like a high-tech, ever-growing urban farm. Ideal for first-time homeowners who want to start small but plan to conquer the whole yard eventually.
Building massive beds all at once leads to burnout, whereas this snap-together method looks far more expensive than it is and grows with your budget. Investing in modular composite planter brackets allows you to seamlessly attach new boxes next season without tearing anything down.
Start your first core grid for just $60–$80. Highly recommended for a quick weekend win that scales later!
- Key Materials: Uniform starter boxes, modular corner joints
- Vibe / Style: Modern scalable urban farm
- Difficulty: Very easy
- Budget Breakdown: First 2 Beds: $50 | Joints: $20.
- Creator’s Tip: Map out the final grid with landscaping paint before placing your very first box.
- Smart Sourcing: UV-coated modular composite corner joints, pre-cut expansion planter kits.
Material Guide: Cheap vs. Premium Aesthetic
Knowing exactly where to save and where to spend makes all the difference in achieving that “looks expensive but isn’t” vibe in your vegetable garden layout backyard.
- Standard Wood vs. UV-Coated Metal/Composite: Cheap pine rots in two seasons, making your yard look derelict. Upgrading to UV-coated composite or galvanized metal eliminates rotting, warping, and the need for toxic sealants.
- Pre-made Kits vs. Sourcing Locally: Buying loose lumber seems cheaper until you factor in hardware, cutting time, and mistakes. Starter kits often save both time and money while guaranteeing perfectly square, professional corners.
Advanced Intensive Planting Systems
These sophisticated layouts combine multiple techniques to achieve maximum productivity per square foot. Implementation requires more planning but delivers exceptional yields.
22. Vertical Trellis Corridor

A soaring green archway tunnel feels like a magical, hidden gateway straight out of a storybook. Works beautifully spanning across the main walking path between two parallel raised beds.
Leaving the air above your beds empty is a massive waste of real estate, but this vertical arch delivers a surprisingly premium look that provides cooling shade. Using heavy-gauge galvanized cattle panels bent into an arch guarantees it can hold hundreds of pounds of squash or melons without collapsing.
You can easily pull this off for around $40–$60 per arch. Save this to your vertical gardening dream board!
- Key Materials: Flexible steel panels, heavy-duty zip ties, U-nails
- Vibe / Style: Magical cascading tunnel
- Difficulty: Moderate (requires bending steel)
- Budget Breakdown: Panel: $35 | Fasteners: $10.
- Creator’s Tip: Plant shade-loving lettuce directly under the arch to protect it from harsh afternoon sun.
- Smart Sourcing: heavy-duty UV-resistant zip ties (bulk pack), galvanized steel mounting brackets.
23. A-Frame Trellis Integration
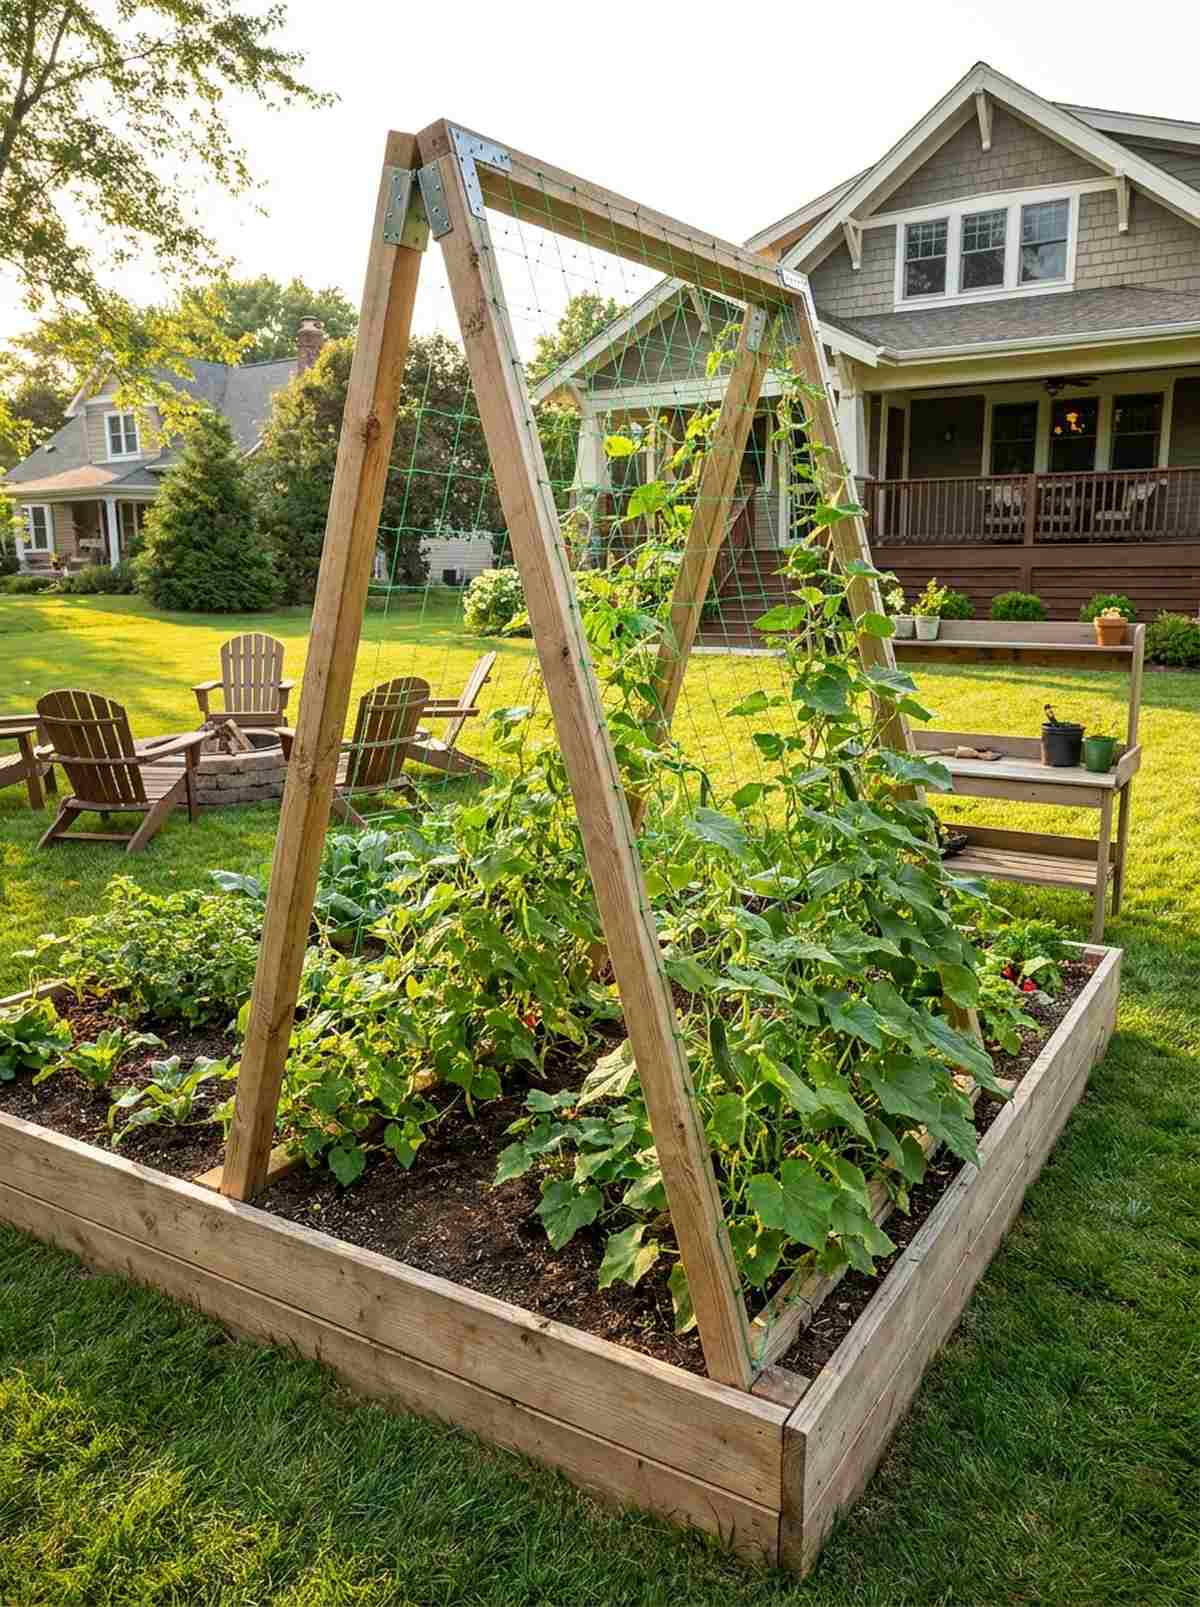
This freestanding climbing tent feels like a rugged, functional piece of homestead architecture. Exceptionally perfect for placing dead center in a wide bed to maximize vertical bean or cucumber yields.
Flimsy bamboo teepees blow over in a light breeze, yet this rigid A-frame design gives a designer-level finish that withstands major storms. Incorporating weather-proof nylon trellis netting draped over the frame ensures vines have perfect climbing tension.
Building a solid A-frame system costs roughly $25–$45. Pin this if you’re planning a high-yield, small space upgrade!
- Key Materials: 2×2 lumber, top hinges, trellis netting
- Vibe / Style: Rustic high-yield farm
- Difficulty: Easy DIY
- Budget Breakdown: Wood: $15 | Netting/Hardware: $15.
- Creator’s Tip: Attach heavy-duty door hinges at the top so the A-frame can fold flat for winter storage.
- Smart Sourcing: weather-proof nylon trellis netting, rust-proof outdoor hinges (bulk pack).
24. Keyhole Accessibility Bed
The notched circular planter feels like an ancient, brilliant piece of off-grid engineering. Absolutely ideal for an accessible patio garden where bending or reaching is physically difficult.
Standard deep boxes make center-weeding a nightmare, but this African-inspired cutout shape looks far more expensive than it is while solving the reach issue entirely. Dropping a wire compost basket insert into the center notch creates a passive, continuous feeding system for the entire bed.
You can build this smart system for about $80–$120. It’s a fast upgrade that completely changes how you interact with your plants.
- Key Materials: Curved bricks or flexible edging, center compost tube
- Vibe / Style: Clever off-grid sustainability
- Difficulty: Intermediate
- Budget Breakdown: Bricks/Frame: $90 | Wire Tube: $20.
- Creator’s Tip: Toss your daily kitchen scraps directly into the center tube and let the worms do the fertilizing.
- Smart Sourcing: heavy-duty galvanized wire mesh rolls, rust-proof flexible metal landscape edging.
Most backyard setups waste 40% of their space… but this next layout forces maximum production every single month.
25. Succession Planting Zones
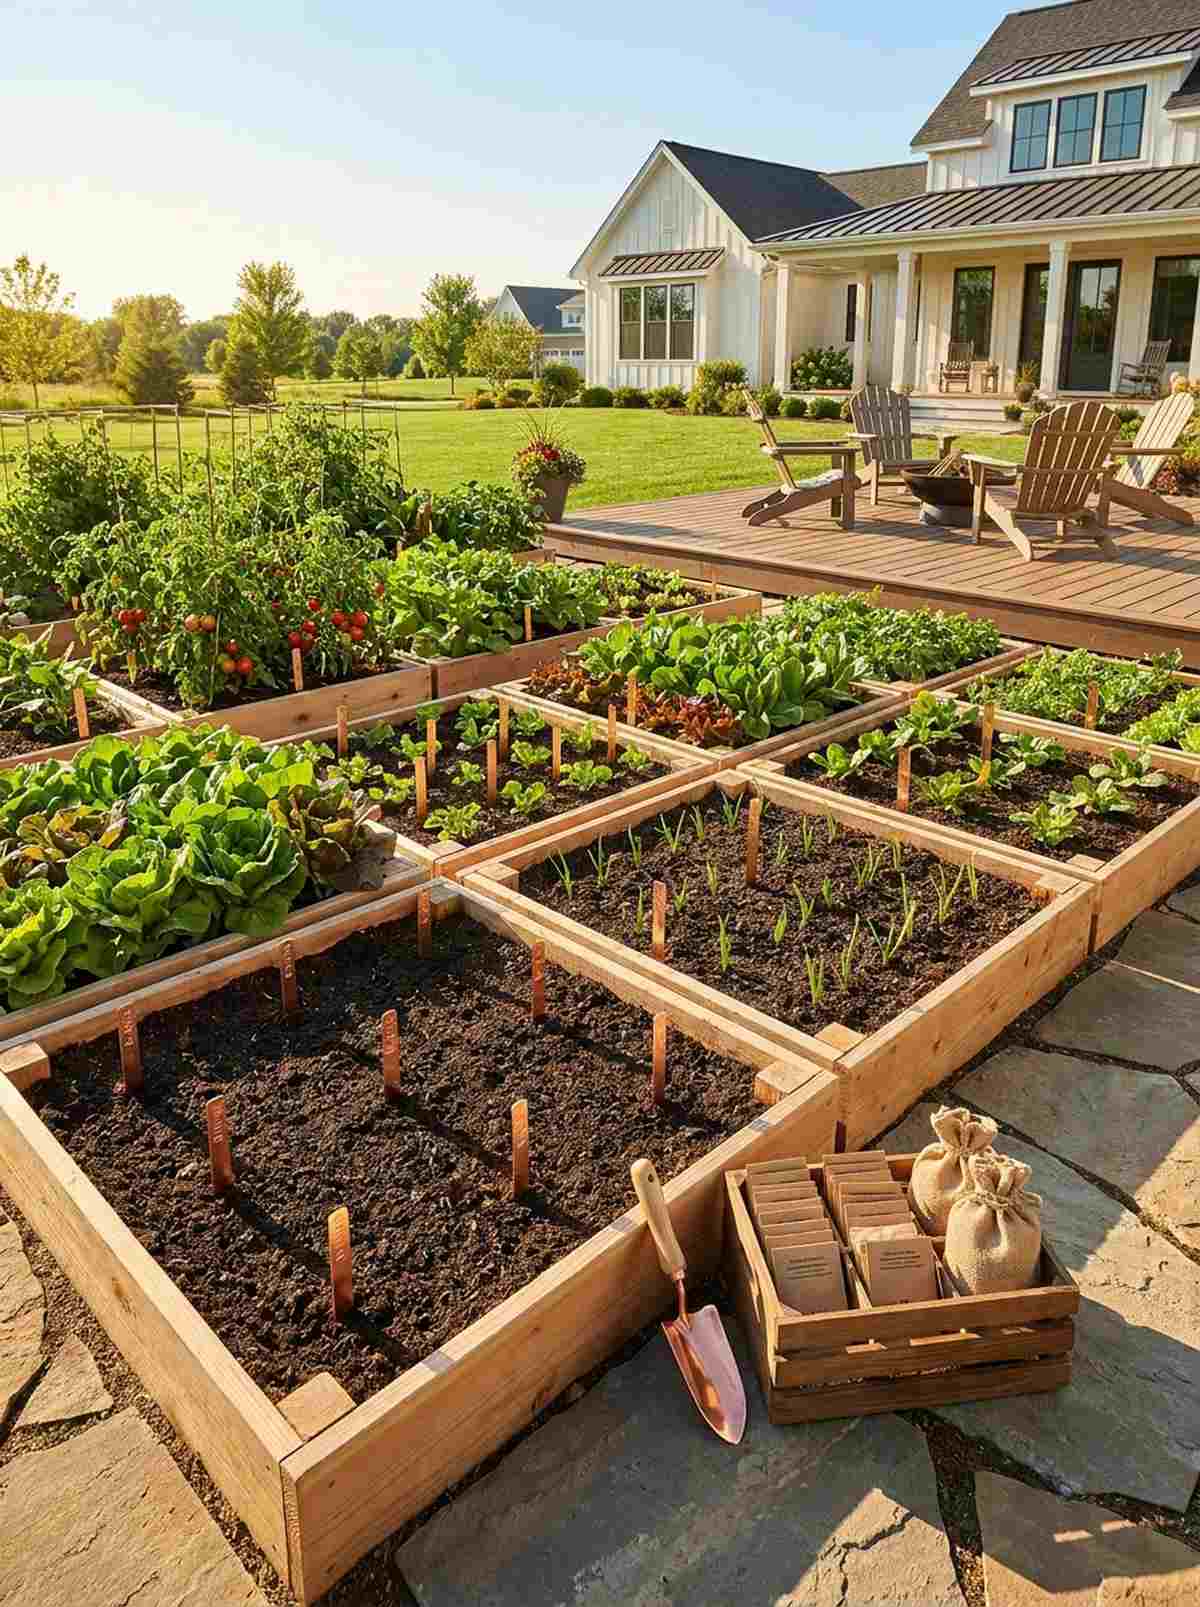
A staggered continuous harvest grid feels like a highly-tuned, professional production line. Perfect for a dedicated backyard vegetable layout where you want fresh food hitting the kitchen table every single week, not all at once.
Planting everything on the same day leads to rotting excess, whereas sectioning your boxes delivers a surprisingly premium look of constant, lush growth. Using copper plant marker stakes to label exact planting dates adds a brilliant, high-end metallic touch to the dirt.
Setting up this zoned system costs practically nothing extra. Save this to your advanced gardening strategies board!
- Key Materials: Zone dividers, premium weatherproof markers
- Vibe / Style: Meticulous market garden
- Difficulty: Easy setup, requires planning
- Budget Breakdown: Dividers: $10 | Markers: $15.
- Creator’s Tip: Leave one-third of the bed completely empty during the initial spring planting to save room for summer crops.
- Smart Sourcing: weatherproof copper plant marker kits, premium organic seed vaults (bulk pack).
26. Bio-Intensive Companion Grid
This hyper-dense ecological matrix feels like a miniature, wildly thriving jungle canopy. Exceptionally well-suited for a compact urban lot where maximizing biodiversity in a 4×4 box is the absolute priority.
Planting in bare dirt leaves roots exposed to scorching heat, but packing the bed with varying heights gives a designer-level finish and acts as a living mulch. Integrating beneficial insect attractant seed blends directly among the vegetables drastically drops your pest control costs.
You can pull this dense planting off for around $30–$45. Pin this if you want to ditch chemical pesticides forever!
- Key Materials: Diverse seed combinations, organic compost top-dressing
- Vibe / Style: Wild permaculture abundance
- Difficulty: Intermediate (requires plant knowledge)
- Budget Breakdown: Seeds: $20 | Compost: $15.
- Creator’s Tip: Plant low-lying creeping thyme around your tall peppers to lock in soil moisture.
- Smart Sourcing: beneficial insect attractant seed blends, nutrient-dense organic compost starter kits.
27. Split-Season Rotation Bed
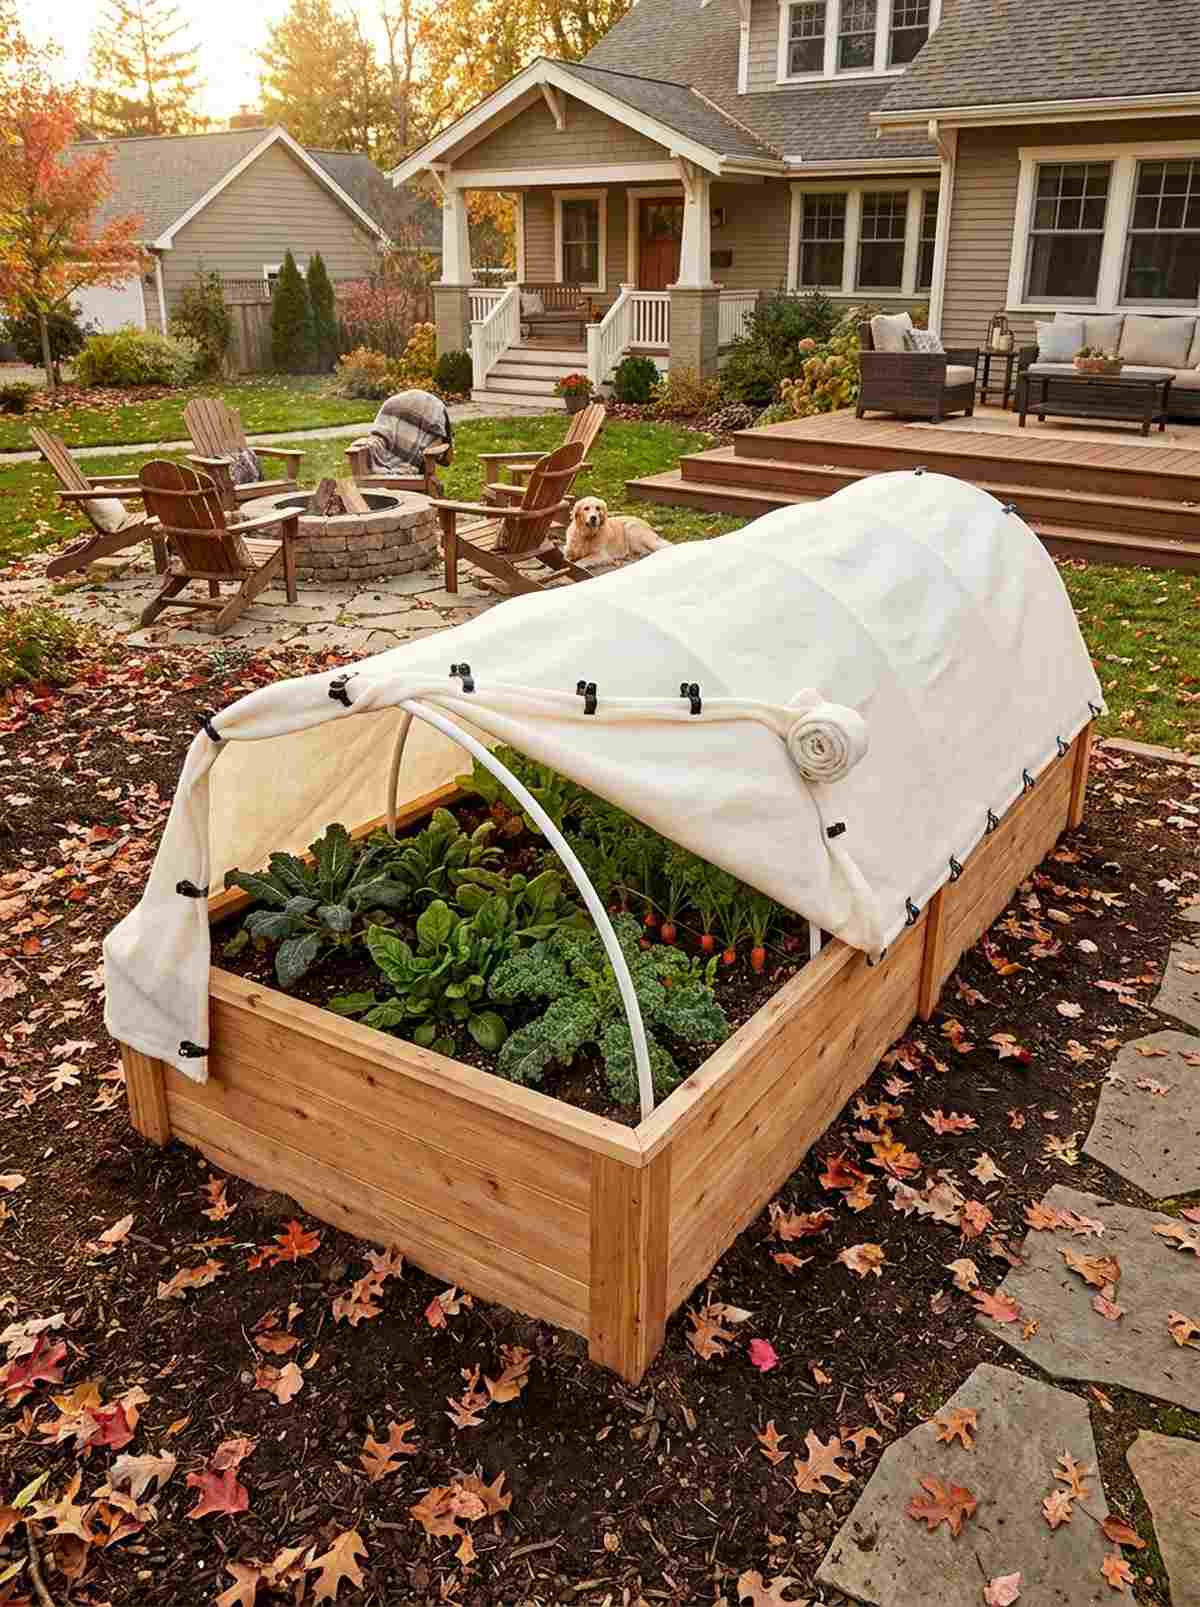
The dual-climate transitional planter feels like cheating the seasons entirely. Works brilliantly for regions with unpredictable springs or harsh, early autumn frosts.
Most gardens look like graveyards by November, but adding a modular cover system looks far more expensive than it is and keeps the space vibrant. Utilizing heavy-weight frost protection fleece over a simple hoop structure extends your growing season by at least two months.
Building this seasonal extension frame runs about $40–$65. Highly recommended for a quick weekend win that yields food into winter!
- Key Materials: PVC hoops, thermal frost blankets, clips
- Vibe / Style: Year-round resilience
- Difficulty: Easy beginner setup
- Budget Breakdown: Hoops/Clips: $20 | Fleece: $30.
- Creator’s Tip: Use snap-on PVC clips to quickly roll up the fleece during unusually warm afternoon spikes.
- Smart Sourcing: heavy-weight frost protection fleece (bulk roll), UV-coated snap-on PVC greenhouse clips.
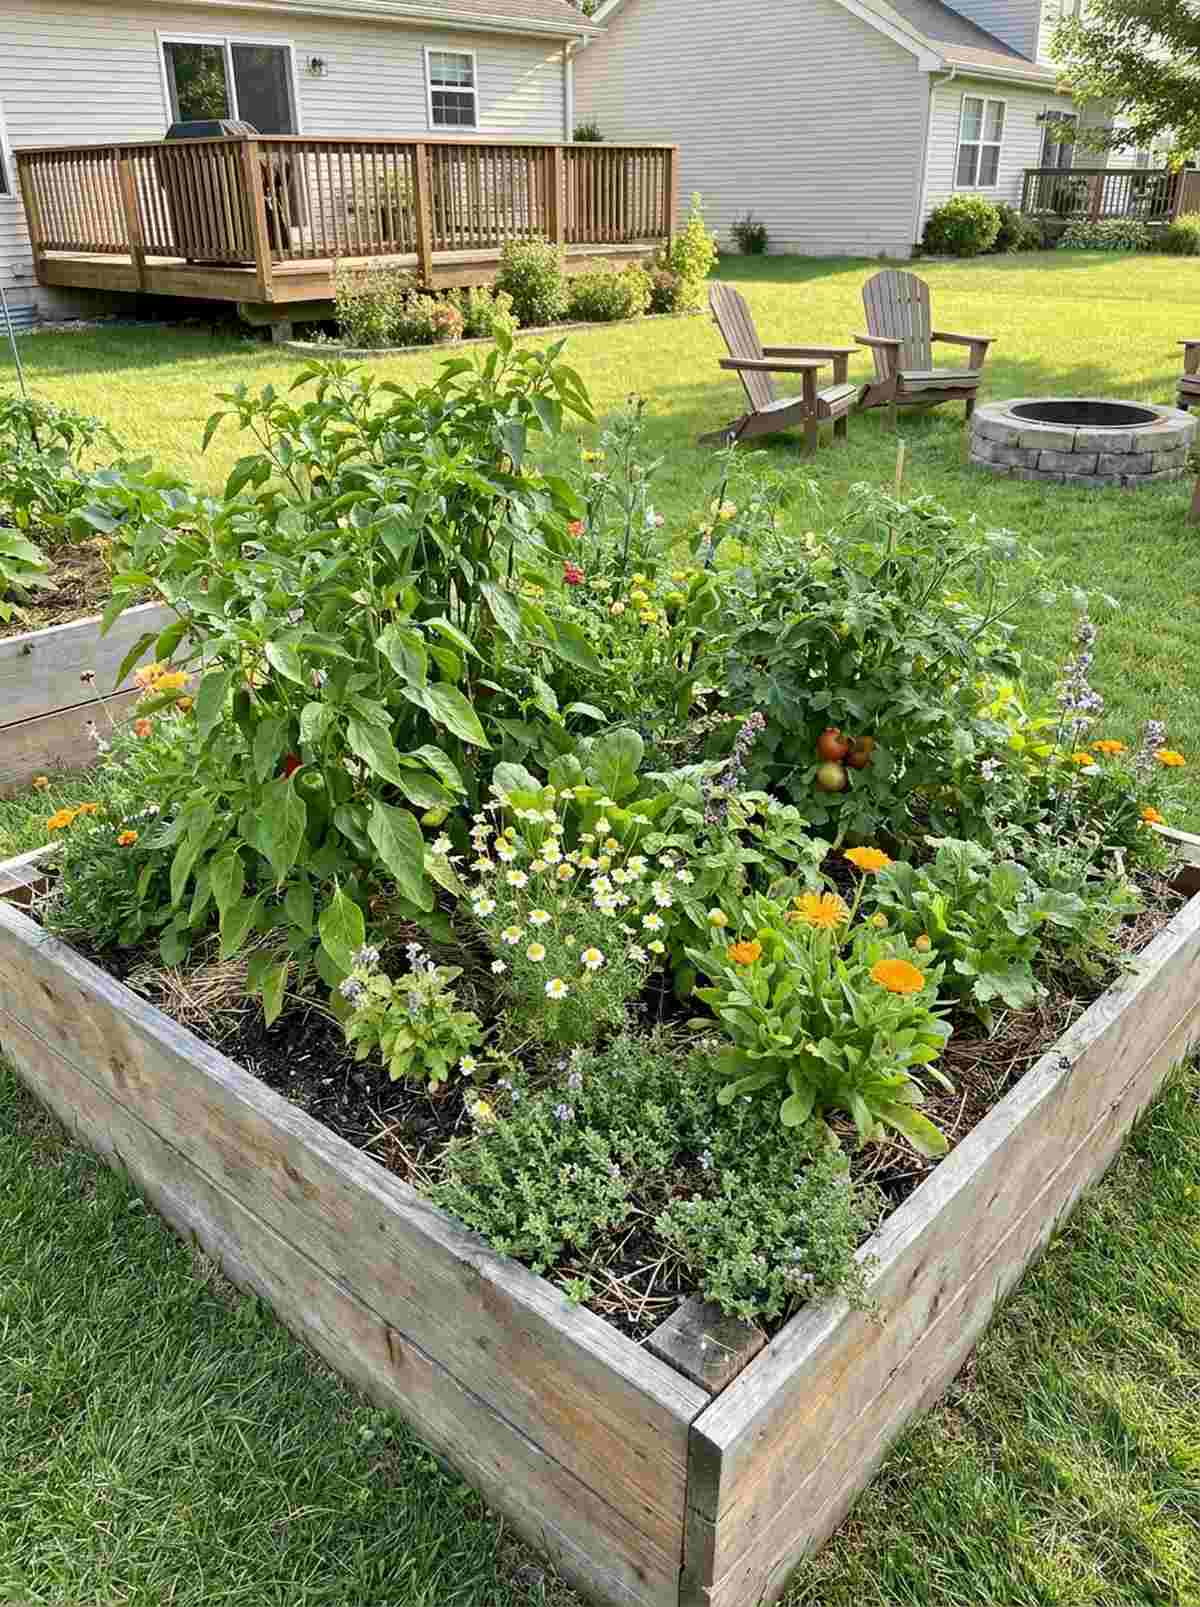
28. Pollinator-Integrated Production
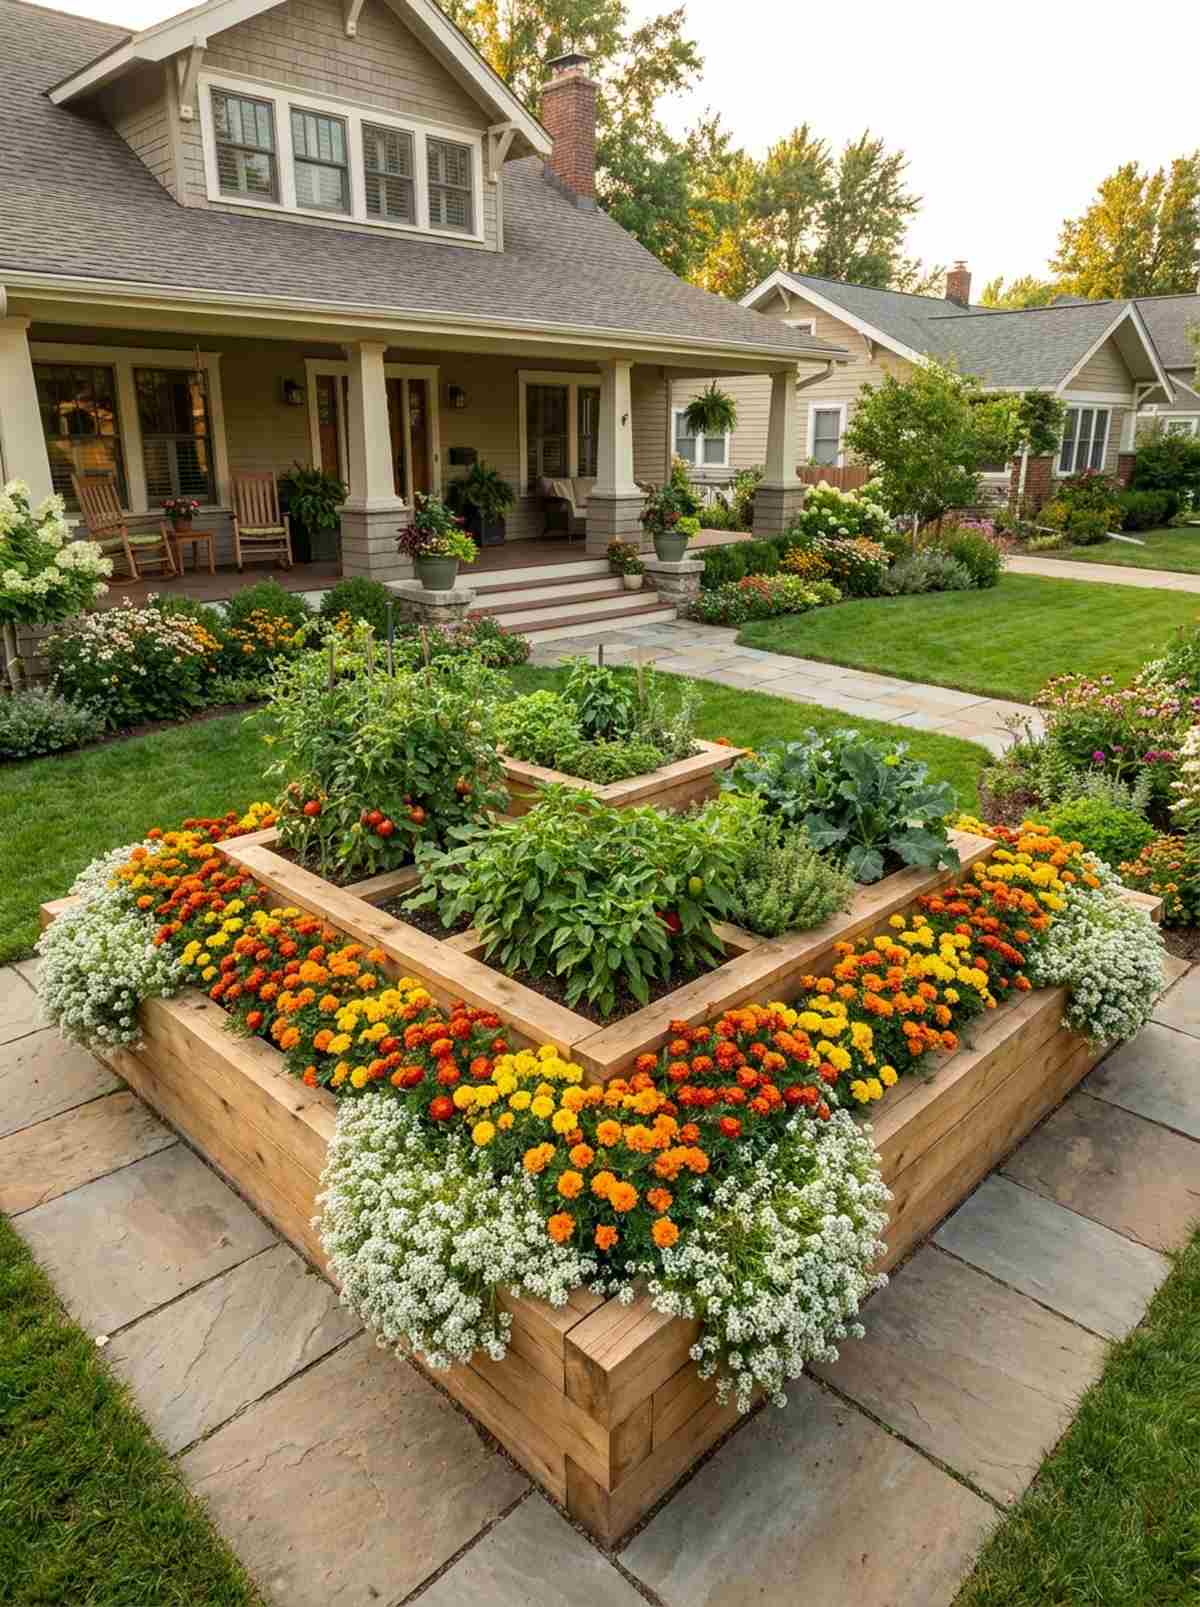
This flower-lined vegetable fortress feels like a lavish, blooming estate border that secretly produces food. Perfect for a front yard raised garden layout where HOA rules demand strict visual aesthetics over bare dirt farming.
Purely green vegetable beds can look utilitarian, but surrounding them with a halo of bright annuals delivers a surprisingly premium look that forces bees to visit. Sowing dwarf marigold border seeds heavily along the wooden edges creates a stunning, pest-repelling fiery ring.
You can easily add this aesthetic upgrade for just $15–$25. Save this to your beautiful front yard landscaping board!
- Key Materials: Low-growing floral borders, vegetable centerpieces
- Vibe / Style: Secret cottage garden
- Difficulty: Very easy
- Budget Breakdown: Flower Seeds: $10 | Extra Soil: $10.
- Creator’s Tip: Plant sweet alyssum—it droops beautifully over the hard wooden edges, softening the entire structure.
- Smart Sourcing: dwarf marigold border seeds (bulk pack), premium potting soil blend (bulk bag).
Transform Your Space with Strategic Garden Layout
Executing the perfect garden layout for raised beds doesn’t require a professional landscaper—it just requires the right blueprint and smart material sourcing. By utilizing these 28 exact layouts, you can transform an empty, boring yard into a premium, high-yield vegetable garden layout backyard oasis. Whether you opt for a cheap starter kit, UV-coated composite boards, or a towering vertical trellis system, investing in these structural upgrades pays off massively in both aesthetics and abundant harvests. Grab your preferred blueprint, order your bulk supplies, and start building your premium outdoor sanctuary today.
Frequently Asked Questions
What is the most productive size for raised bed vegetable gardens?
The standard 4×8 foot footprint remains highly efficient, but upgrading to pre-cut galvanized steel raised bed kits in this size ensures longevity without the rot of cheap wood. This specific dimension allows you to reach the center easily without compressing the soil. Pairing three of these setups with nutrient-dense organic compost starter kits can yield enough premium crops to consistently feed a family.
How far apart should I space raised beds in my backyard layout?
Always leave 3 to 4 feet of clearance, especially if you plan on using a wheelbarrow or garden cart. A tight garden layout backyard setup quickly becomes a nightmare to navigate. To achieve that expensive, manicured look, lay down a commercial-grade weed barrier roll between the boxes and cover it with a thick layer of premium cedar or rubber mulch.
Can I combine different garden layout systems in my backyard?
Absolutely. The most stunning, high-end setups mix uniform vegetable garden layouts with aggressive vertical systems. You can use standard modular boxes for base crops, and install heavy-duty steel cattle panels between them for vertical vining. The key to making it look deliberate rather than messy is using consistent materials, like matching UV-coated composite corner joints across all beds.
Should raised bed layouts run north-south or east-west?
For maximum high-yield production, a north-south alignment is ideal as it allows the sun to hit the canopy evenly as it arcs. However, don’t sacrifice your yard’s natural flow just to meet this rule. If you must plant east-west, place your tallest powder-coated heavy-duty tomato towers on the north side of the box so they don’t cast shadows over your shorter, delicate greens.
How do I plan productive growing zones for year-round harvests?
You must invest in seasonal extension gear rather than relying strictly on the summer months. Upgrading specific zones with heavy-weight frost protection fleece or rigid UV-coated acrylic mini greenhouses allows you to push harvests deep into winter. Pair this with a dedicated cold-hardy vegetable bed, and you create a setup that looks highly professional and produces long after your neighbors’ gardens have died.