Building raised beds on a slope creates an instant architectural masterpiece. This smart terraced landscaping setup stops soil erosion while adding premium curb appeal. Grab the specific structural kits below for a flawless finish.
Design Snapshot: Key Principles
- Level Integration: Each bed must sit level even when ground slopes, using strategic excavation and fill techniques
- Water Management: Terracing slows runoff velocity by 60-70%, allowing soil absorption and preventing erosion
- Structural Anchoring: Beds on slopes require rebar stakes, deep posts, or retaining elements for stability
- Access Planning: Stairway integration and pathway grading ensure safe movement across vertical changes
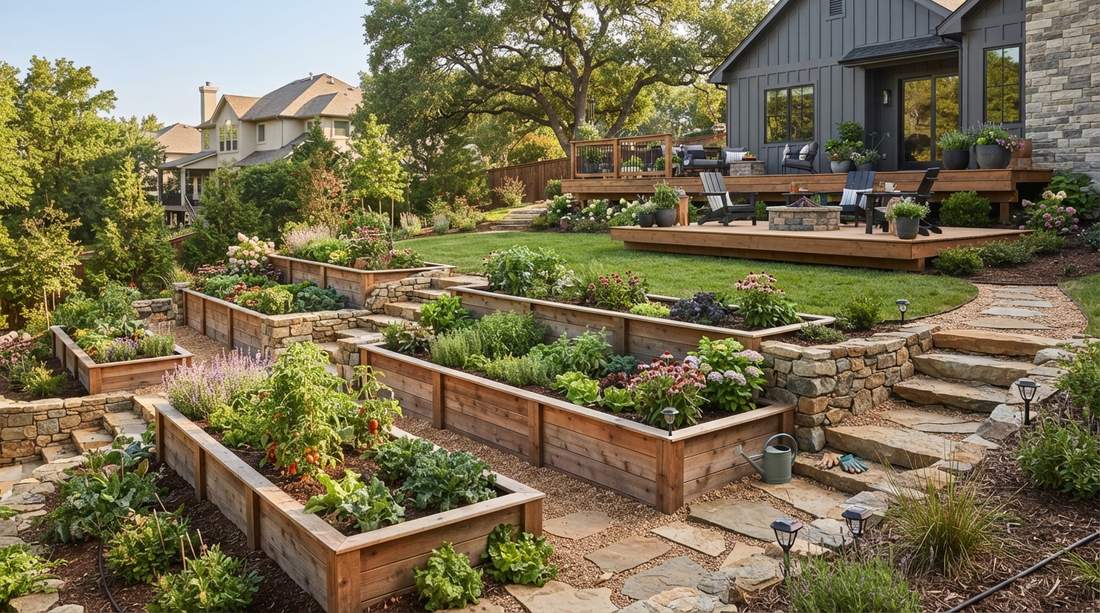
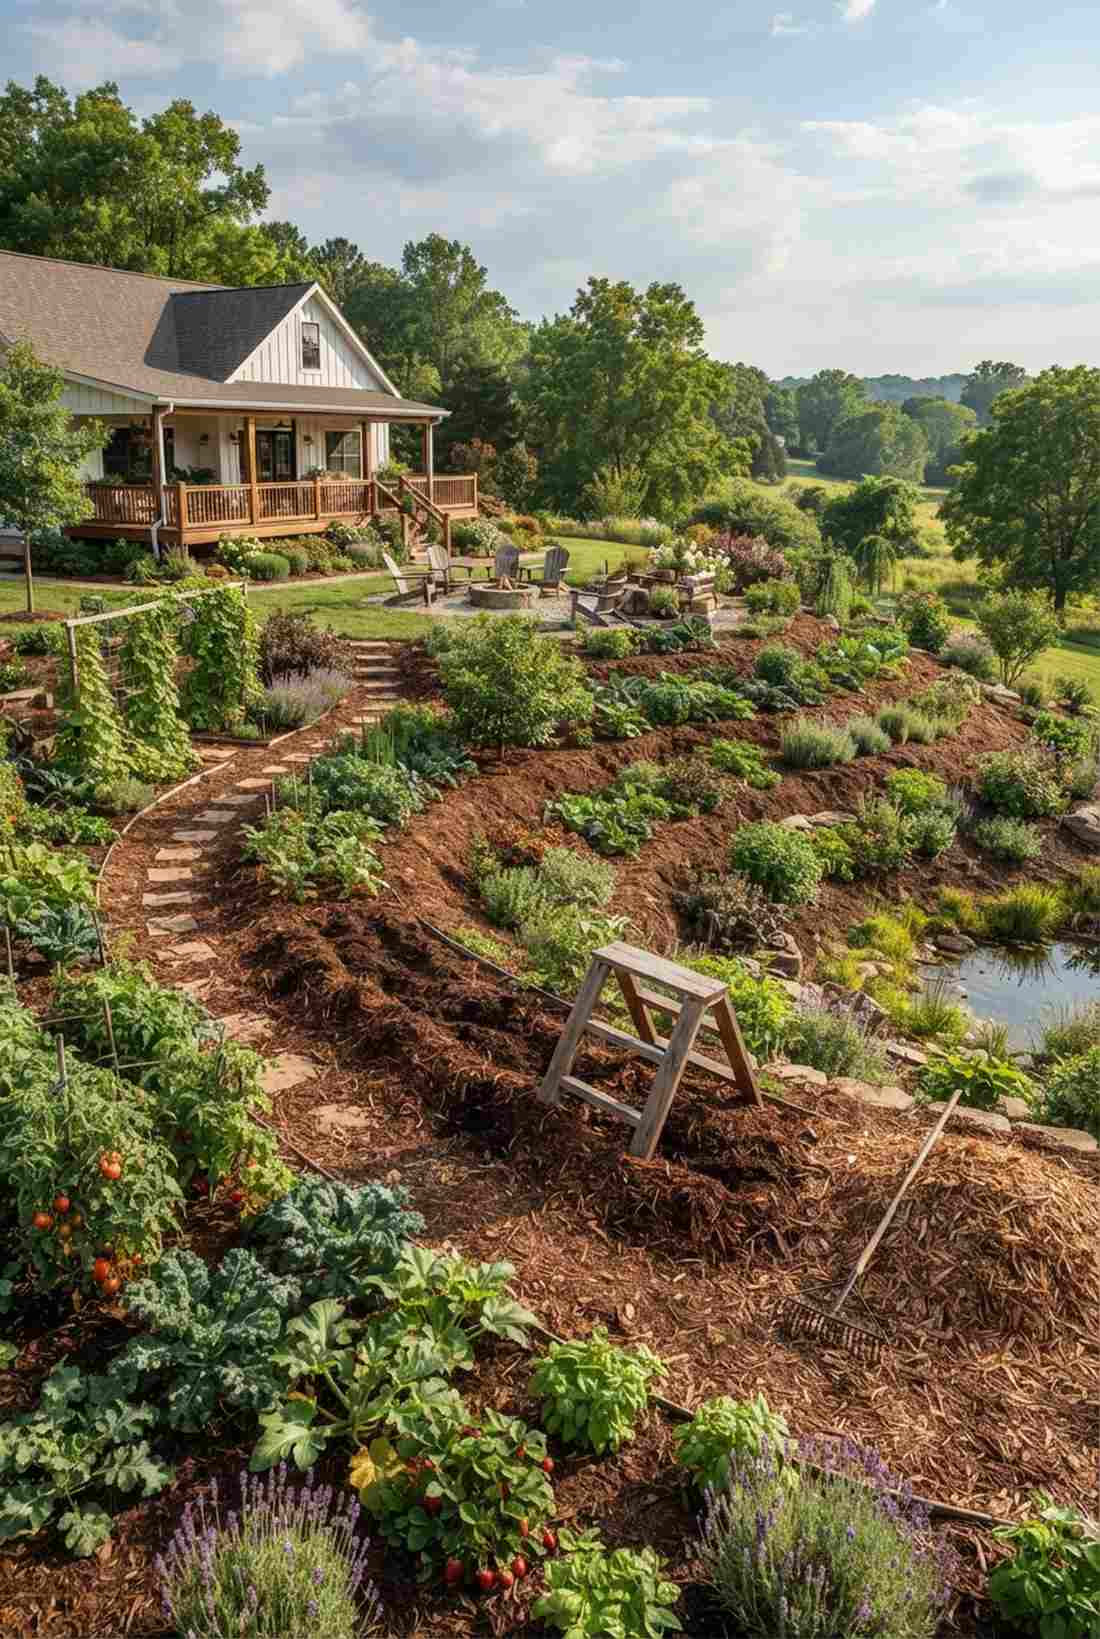
Stepped Terrace Foundations for Hillside Raised Beds
The foundation determines long-term stability on slopes. These designs address grade changes through strategic excavation and structural support systems that anchor beds securely into hillside terrain.
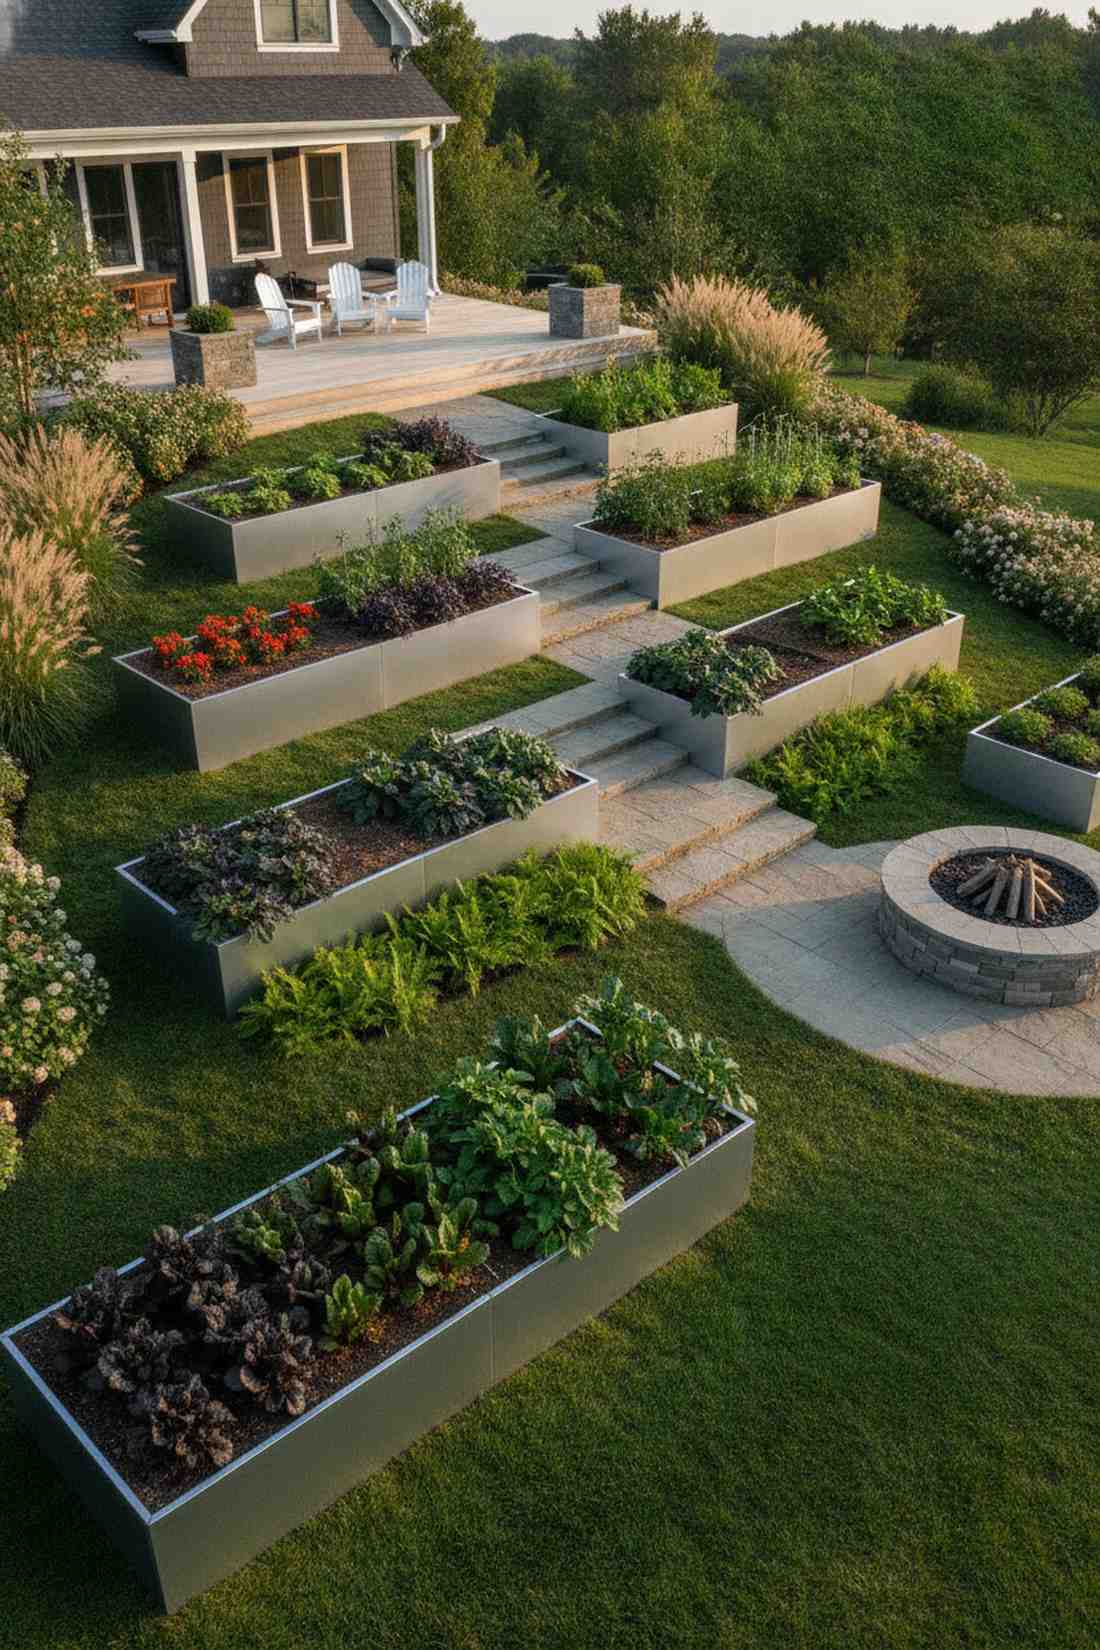
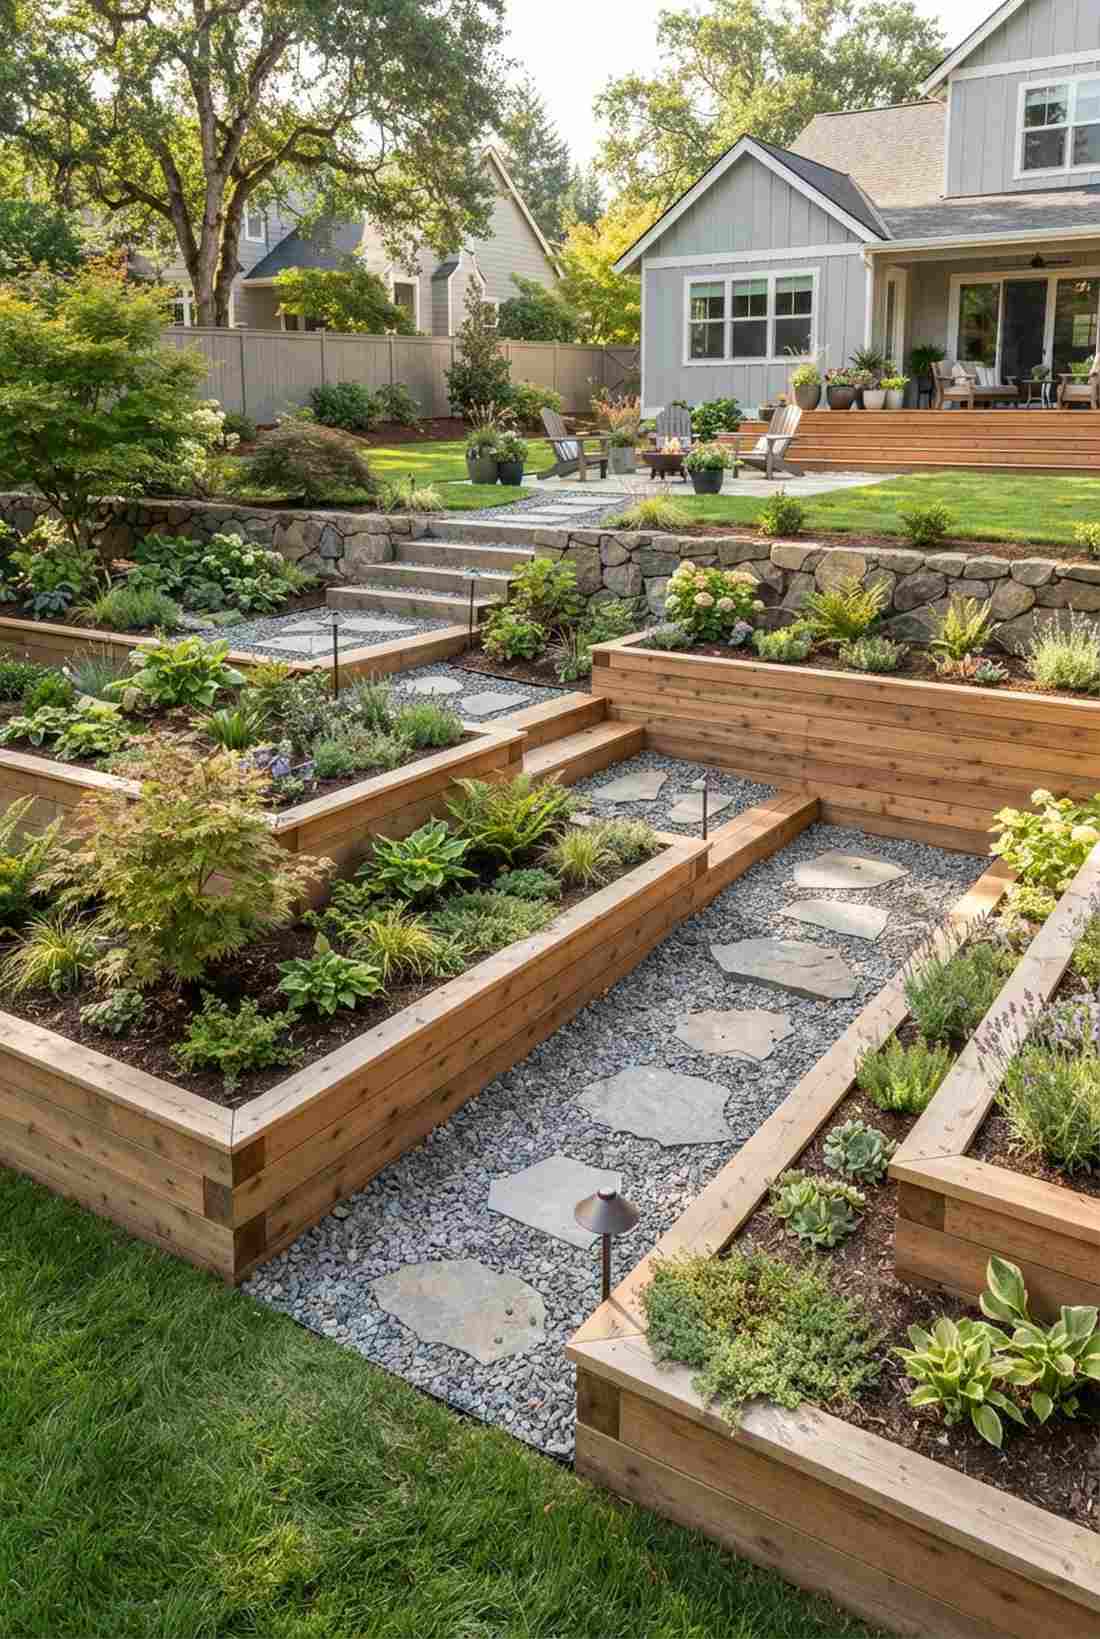
1. Cut-and-Fill Leveling System

Feels like a brilliant feat of backyard engineering. This classic cut-and-fill terraced garden works exceptionally well for a mildly sloped suburban backyard.
Many beginners waste money on imported dirt, but this method perfectly balances the grade using your existing soil. It delivers a surprisingly premium look by matching the upper and lower terrace heights flawlessly without breaking the bank on heavy landscaping.
You can easily pull this off for around $40–$60 just for the border frames. Save this to your DIY weekend garden board to remember the technique!
- Key Materials: Pre-cut cedar timber planks
- Vibe / Style: Structured geometric landscape
- Difficulty: Beginner-friendly weekend project
- Budget Breakdown: Timber: $45 | Base screws: $15.
- Creator’s Tip: Always compact the excavated base layer heavily before laying your first frame to prevent uneven settling.
- Smart Sourcing: Invest in a bulk pack of galvanized wood screws and pre-cut untreated cedar boards.
2. Rebar-Anchored Timber Beds
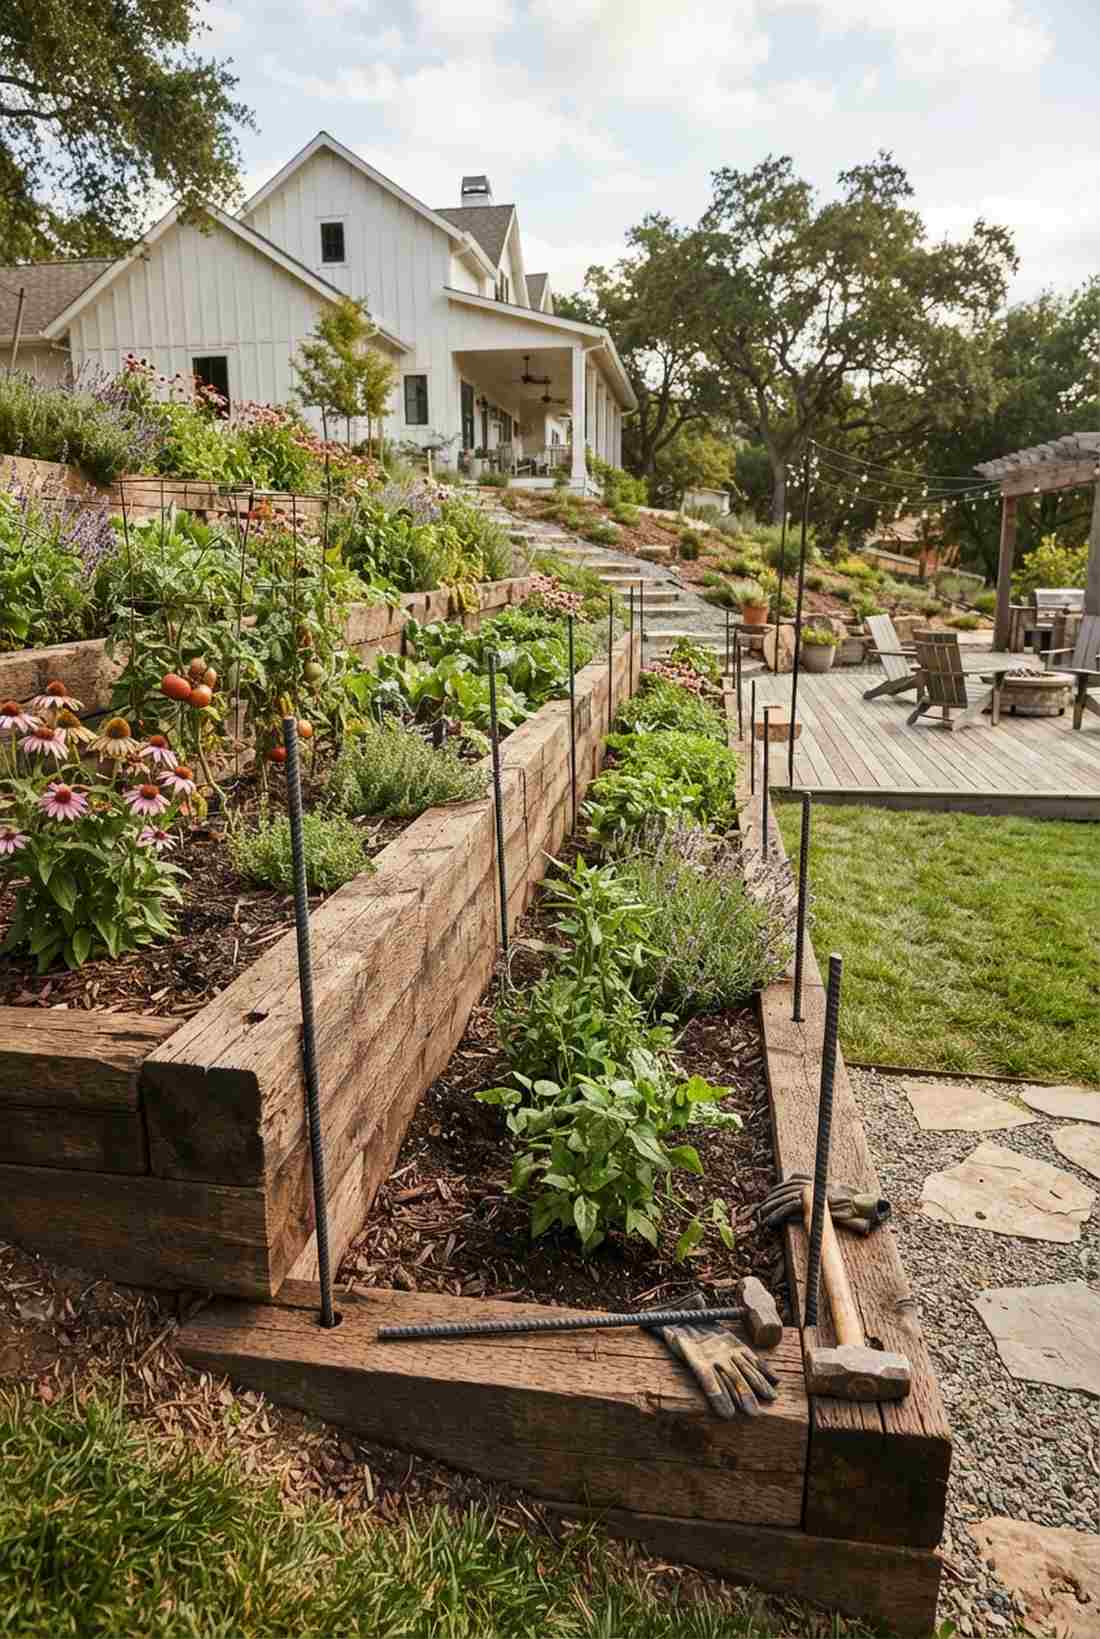
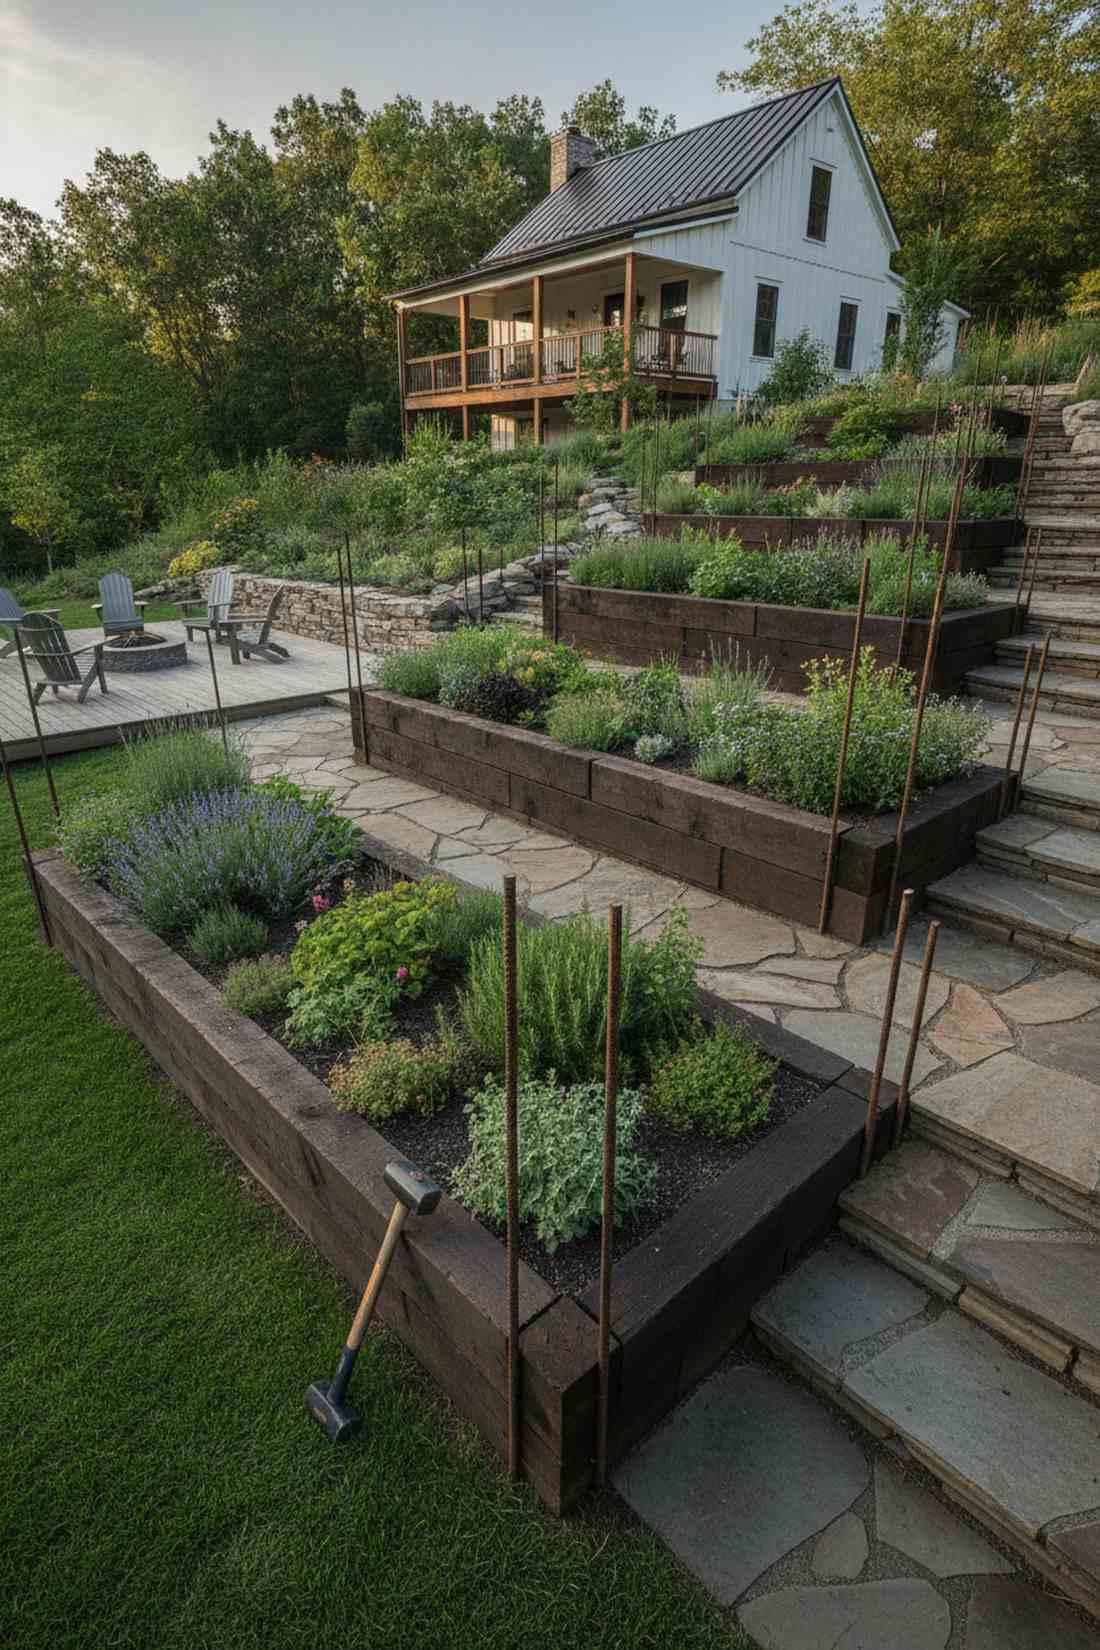
Radiates a rugged, invincible energy that feels satisfyingly permanent. This rebar-secured hillside planter is perfect for steep grades where standard boxes would slide away.
Skipping proper ground anchors is the quickest way to ruin a sloped garden, so driving heavy iron through the corners is a game-changer. This approach gives a designer-level finish while completely eliminating downhill soil creep.
Expect to spend around $75–$100 depending on lumber quality. Highly recommended for a quick weekend win that adds instant property value.
- Key Materials: Heavy-duty steel rebar stakes
- Vibe / Style: Industrial farmhouse garden
- Difficulty: Moderate physical effort
- Budget Breakdown: Rebar: $25 | Heavy Timber: $65.
- Creator’s Tip: Use a long masonry bit to pre-drill your timbers; it stops the wood from splitting when hammering the iron.
- Smart Sourcing: Pick up a bulk pack of 24-inch rebar pins and a heavy-duty sledgehammer kit.
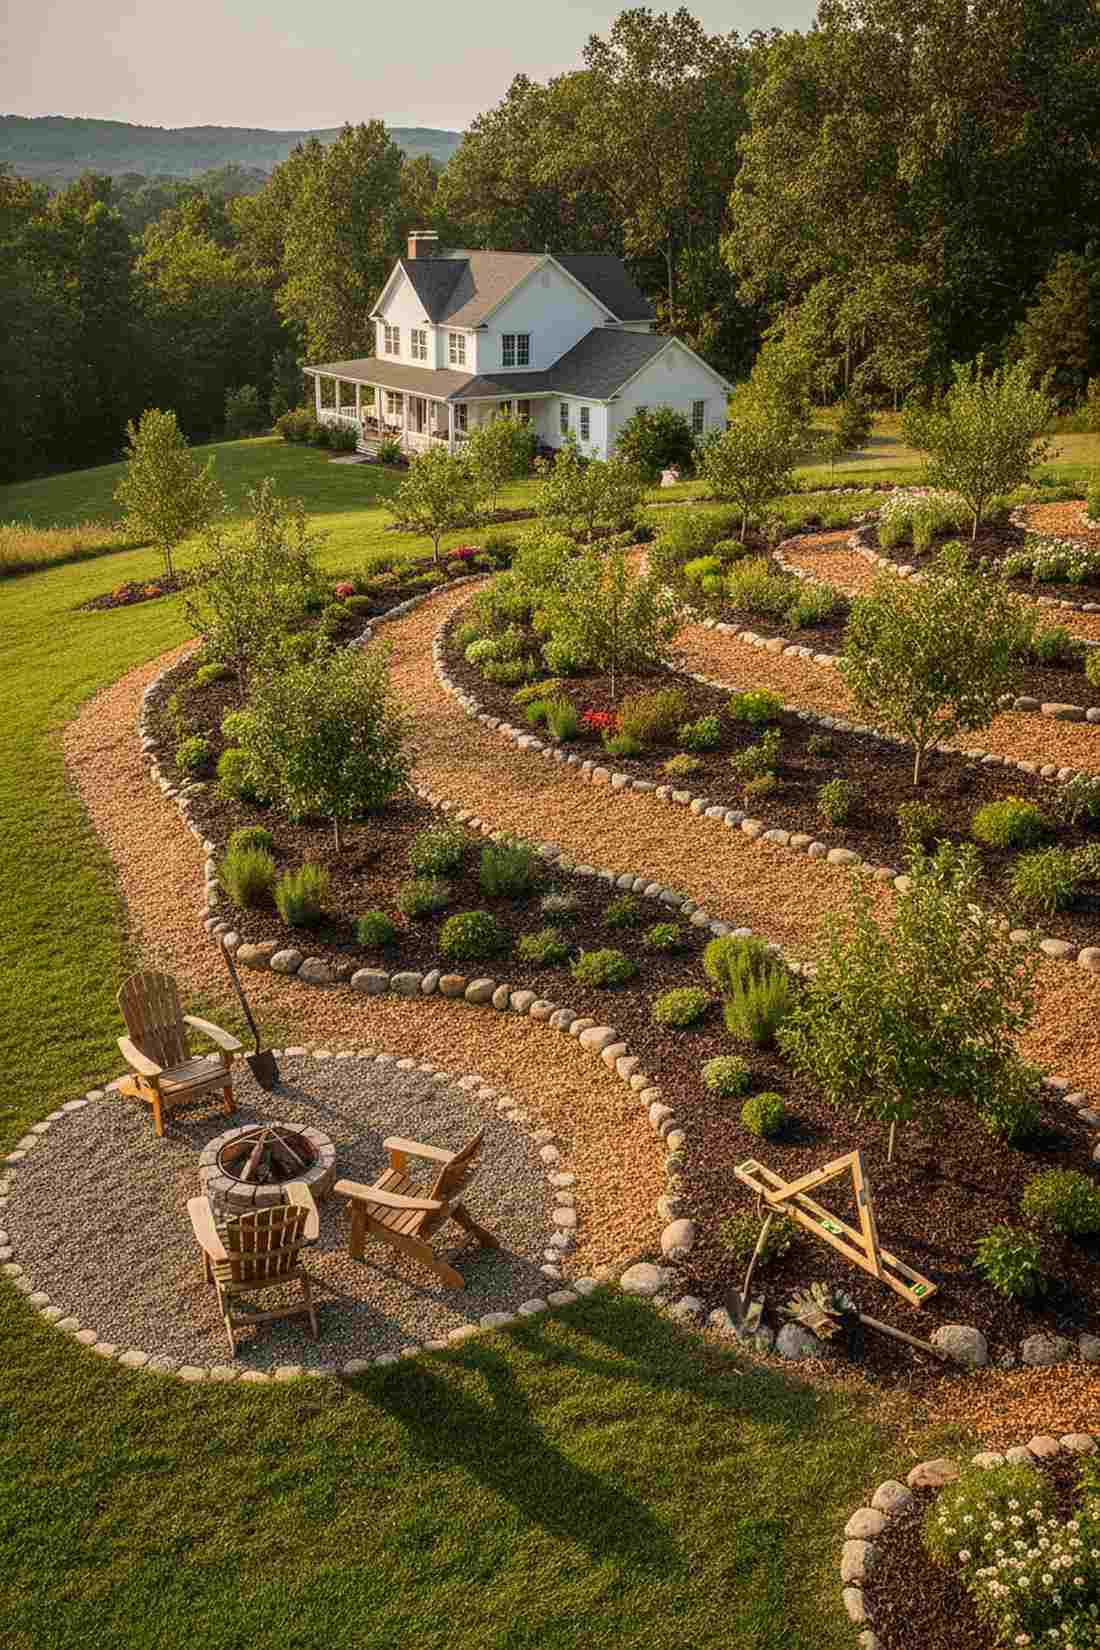
3. Staggered Elevation Cascade
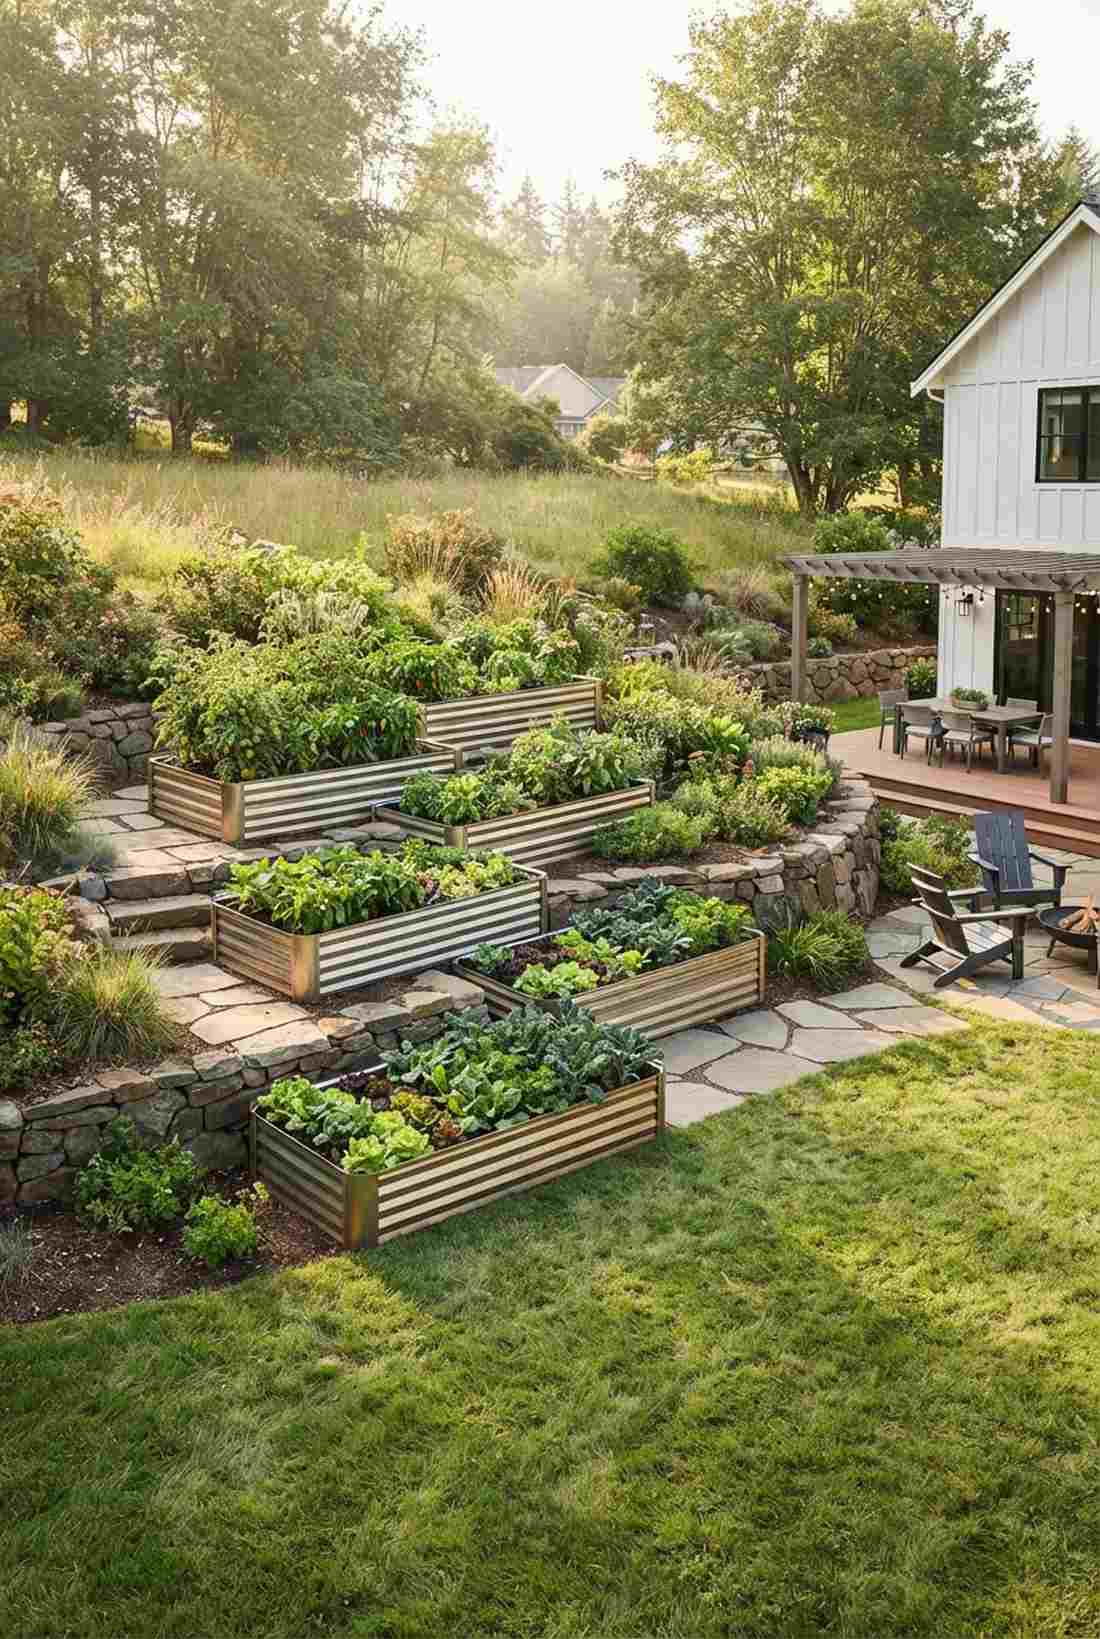
Looks straight out of an upscale botanical magazine spread. A staggered multi-tier raised bed layout is ideal for large, wide-open hillsides needing a dramatic focal point.
Instead of rigid straight lines, offsetting each box creates a cascading visual rhythm that looks far more expensive than it actually is. Integrating broad terraced garden supplies ensures you capture microclimates perfectly for different crop types.
This elaborate setup costs about $150–$250 in total materials. Pin this if you’re planning a massive small-space upgrade this spring!
- Key Materials: Modular metal raised bed kits
- Vibe / Style: Modern architectural oasis
- Difficulty: Intermediate planning required
- Budget Breakdown: Planter kits: $180 | Soil: $50.
- Creator’s Tip: Plant heat-loving crops in the top boxes and shade-tolerant greens in the lower, staggered tiers.
- Smart Sourcing: Grab UV-coated galvanized steel bed kits and bulk premium potting mix.
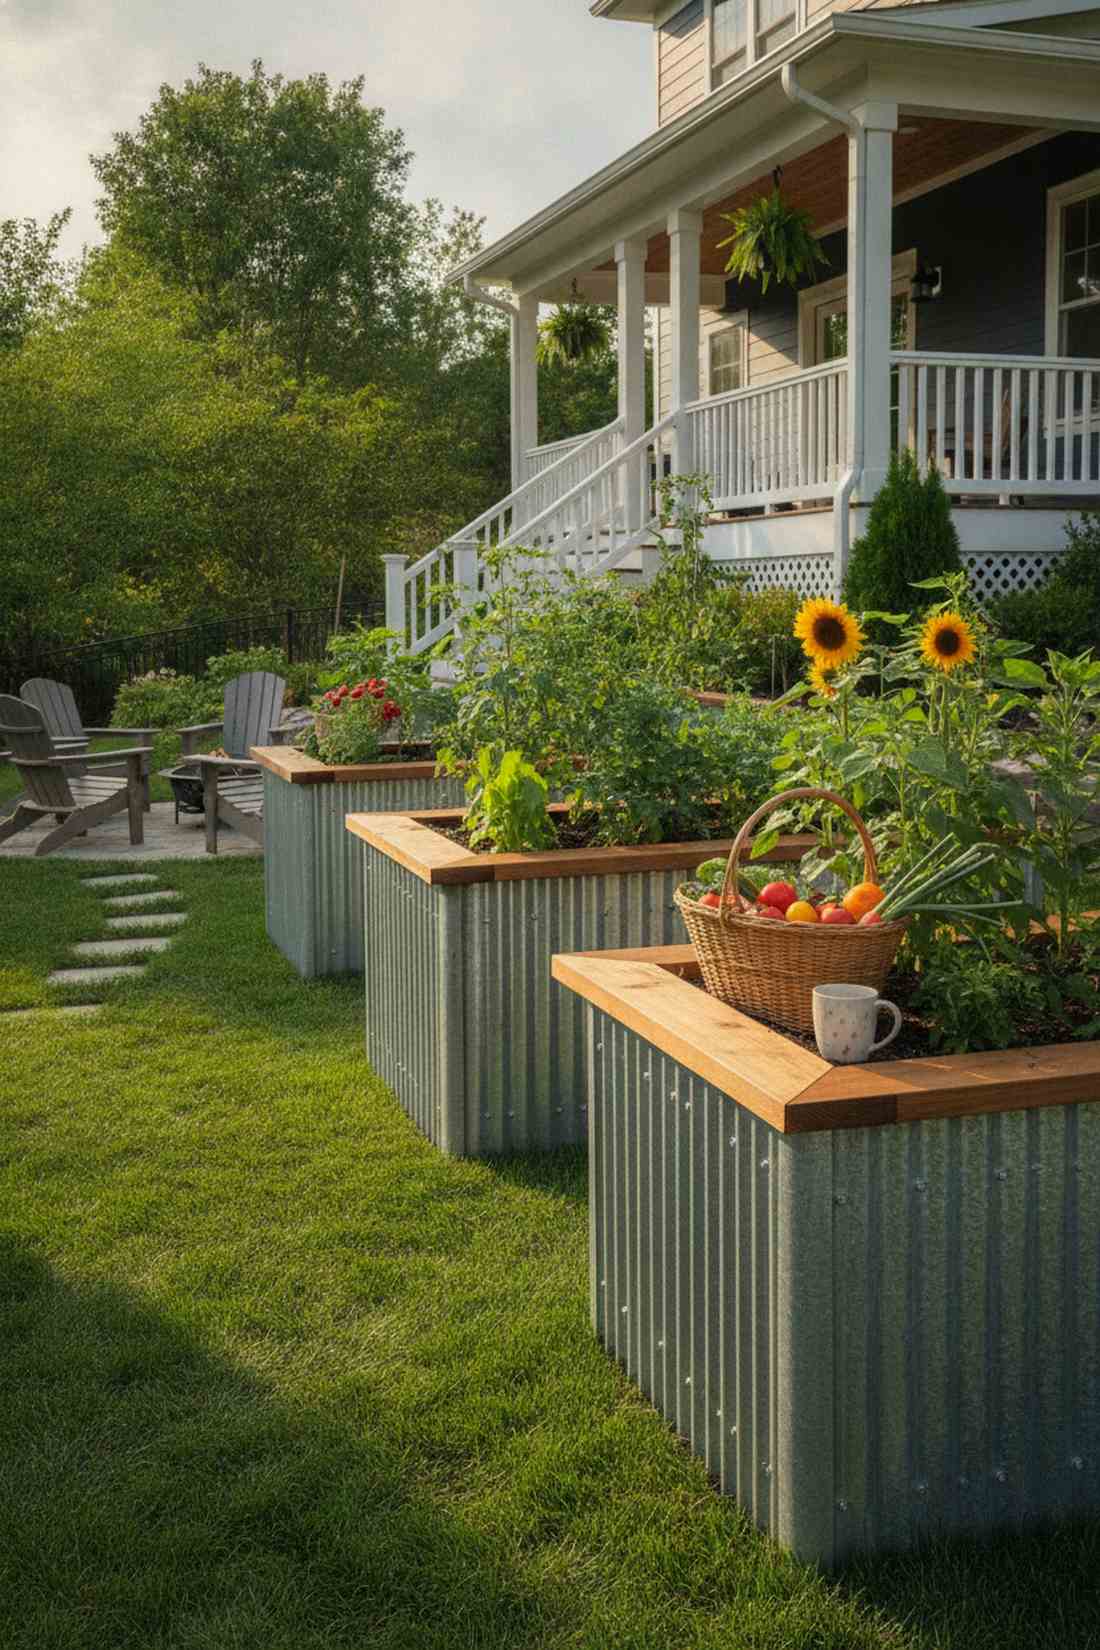
4. Post-Elevated Bench Beds
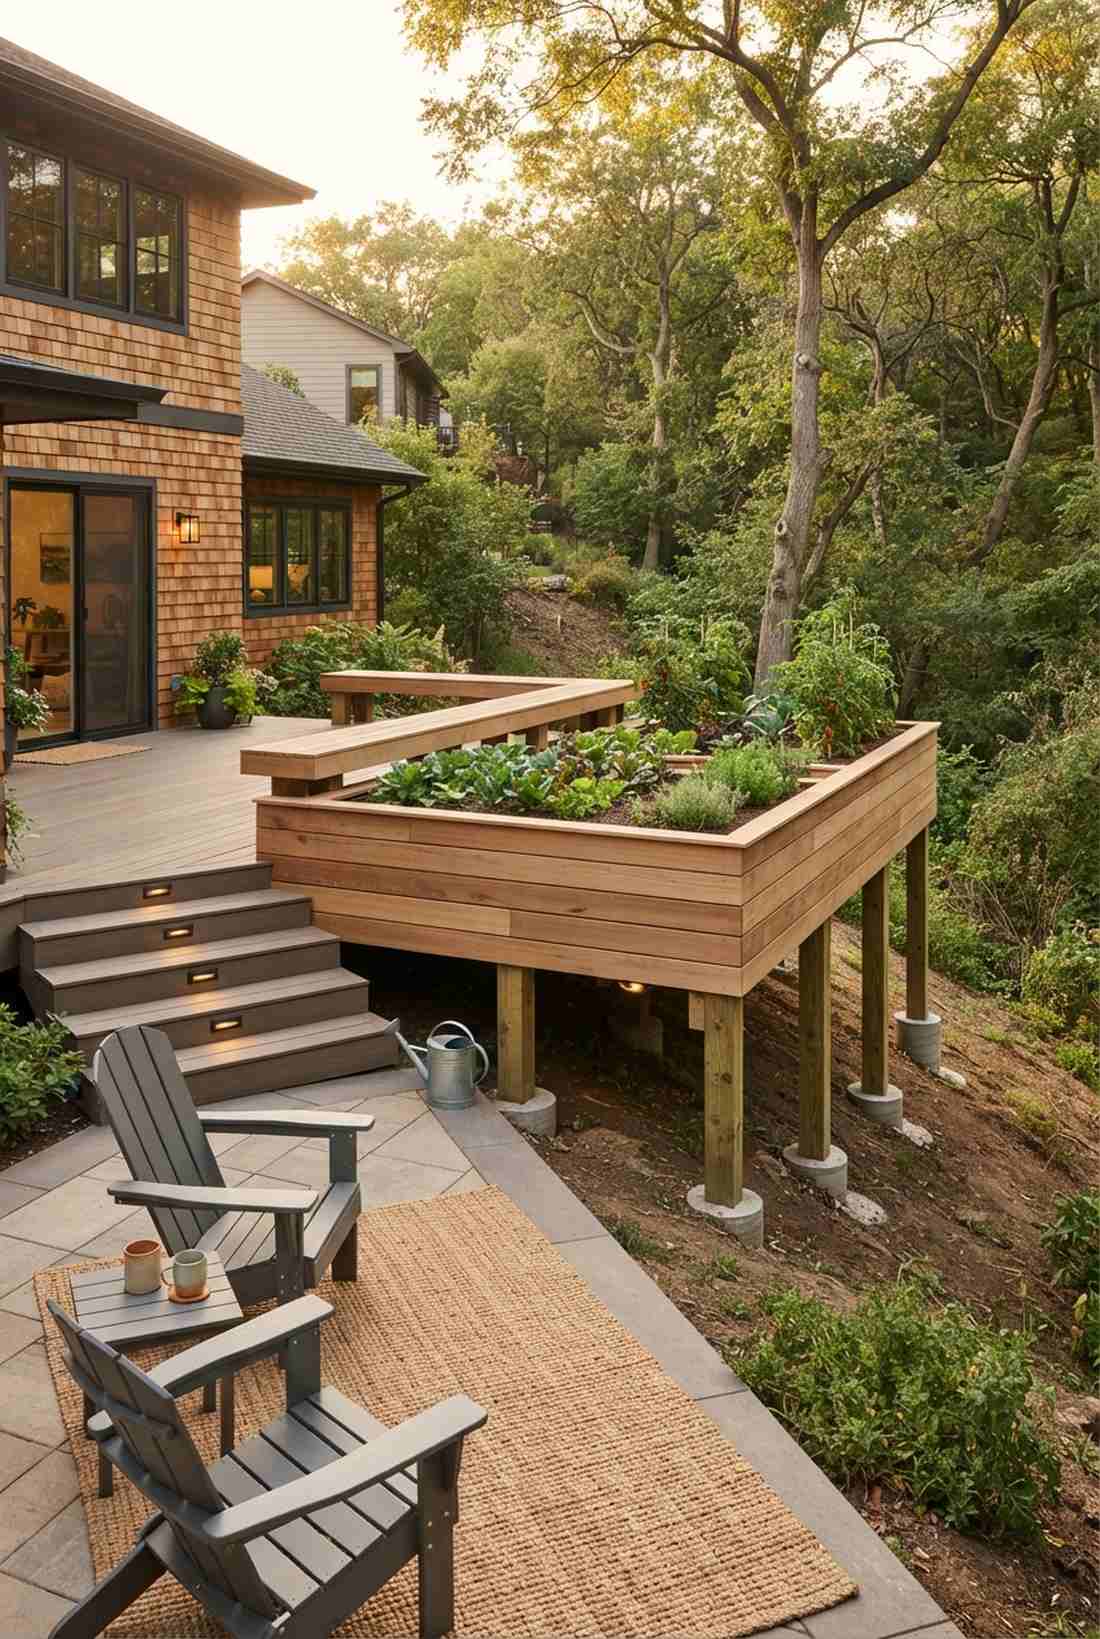

Feels like a floating garden hovering over your yard. An elevated post-supported bench garden works flawlessly for steep ravines or heavily angled property lines.
Building outward instead of digging downward prevents massive soil disruption and delivers an incredibly ergonomic harvesting height. This clever structure completely changes the vibe from a messy hill to a structured deck-like growing zone.
Plan for a budget of around $120–$180 for strong structural posts and hardware. It’s a fantastic investment for saving your back during harvest season.
- Key Materials: Pressure-treated 4×4 support posts
- Vibe / Style: Floating contemporary deck garden
- Difficulty: Advanced carpentry skills
- Budget Breakdown: Structural posts: $80 | Lag bolts: $40.
- Creator’s Tip: Always cement the downhill posts below the frost line to guarantee absolute stability through harsh winters.
- Smart Sourcing: Use heavy-duty structural lag screws (bulk pack) and a fast-setting concrete starter kit.
This next setup is ridiculously cheap but looks like a $100 custom display you’d see in a luxury home catalog…
5. Half-Excavated Terrace Pockets
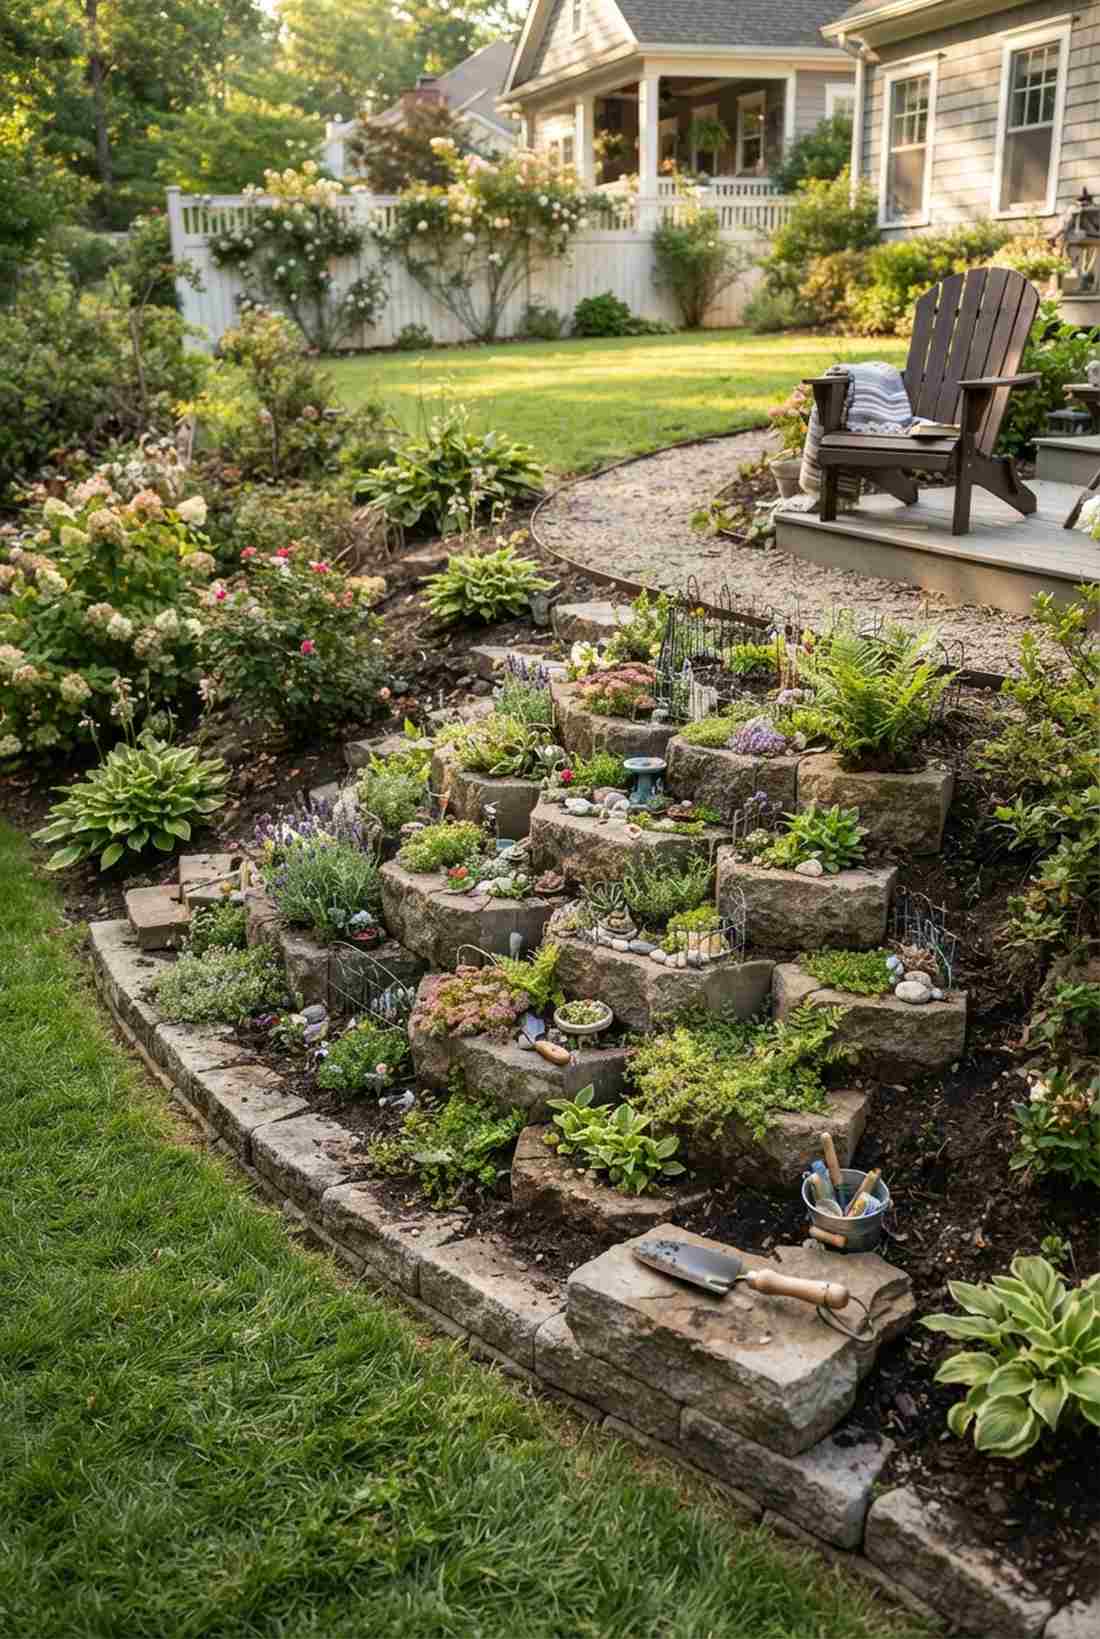

Gives off a cozy, hidden cottagecore vibe tucked right into the earth. The semi-excavated pocket planter is a genius solution for tight, awkward sloped corners.
Rather than building a massive continuous wall, carving out individual notches drops your material costs by half while achieving a bespoke, custom-built aesthetic. Sneaking in high-end miniature garden supplies or decorative stone elevates the look instantly.
You can easily pull this off for just $20–$40 per pocket. Save this to your DIY landscaping board to slash your budget!
- Key Materials: Stackable retaining wall blocks
- Vibe / Style: Secret garden hillside
- Difficulty: Easy but labor-intensive
- Budget Breakdown: Stone blocks: $30 | Hand trowel: $10.
- Creator’s Tip: Leave the downhill edge completely flush with the grass to create a seamless transition into the yard.
- Smart Sourcing: Order pre-cast textured landscaping stones and a heavy-duty ergonomic hand shovel.
Raised Beds on a Hill: Strategic Drainage Systems
Slopes concentrate water flow, creating erosion and saturation challenges. These drainage-integrated designs manage runoff velocity, redirect excess moisture, and prevent soil loss from terraced beds.
6. French Drain Perimeter Beds
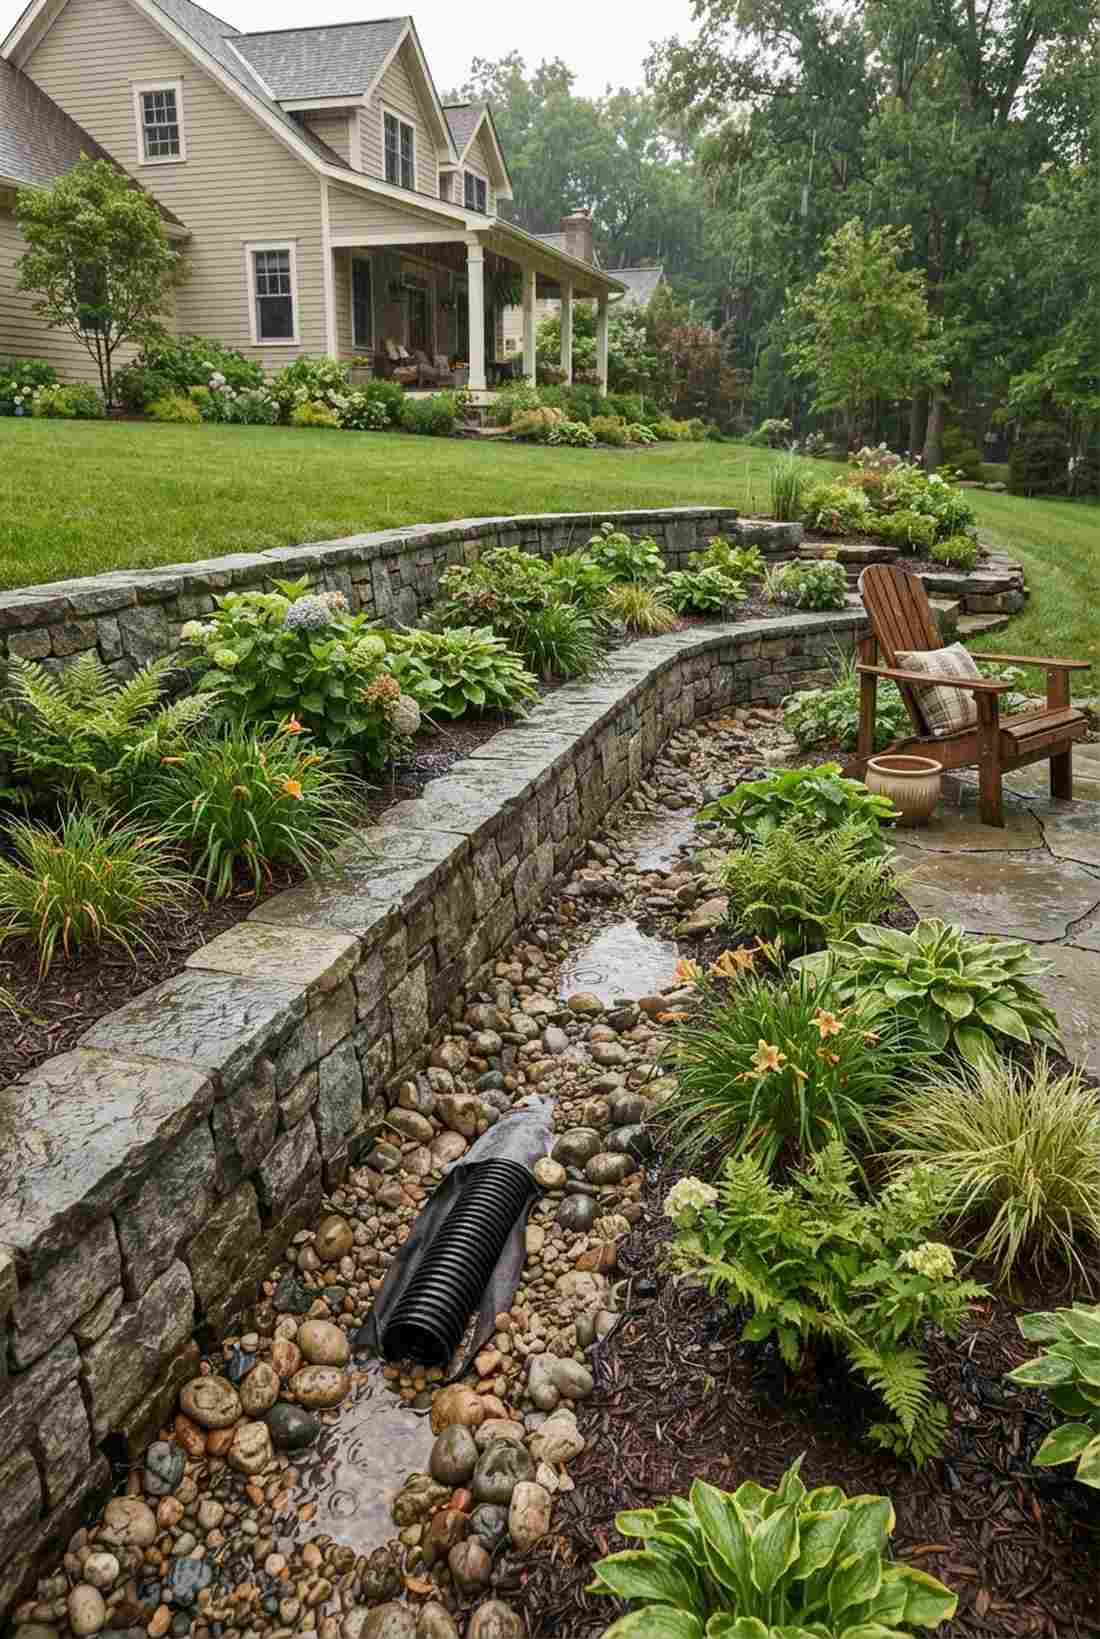
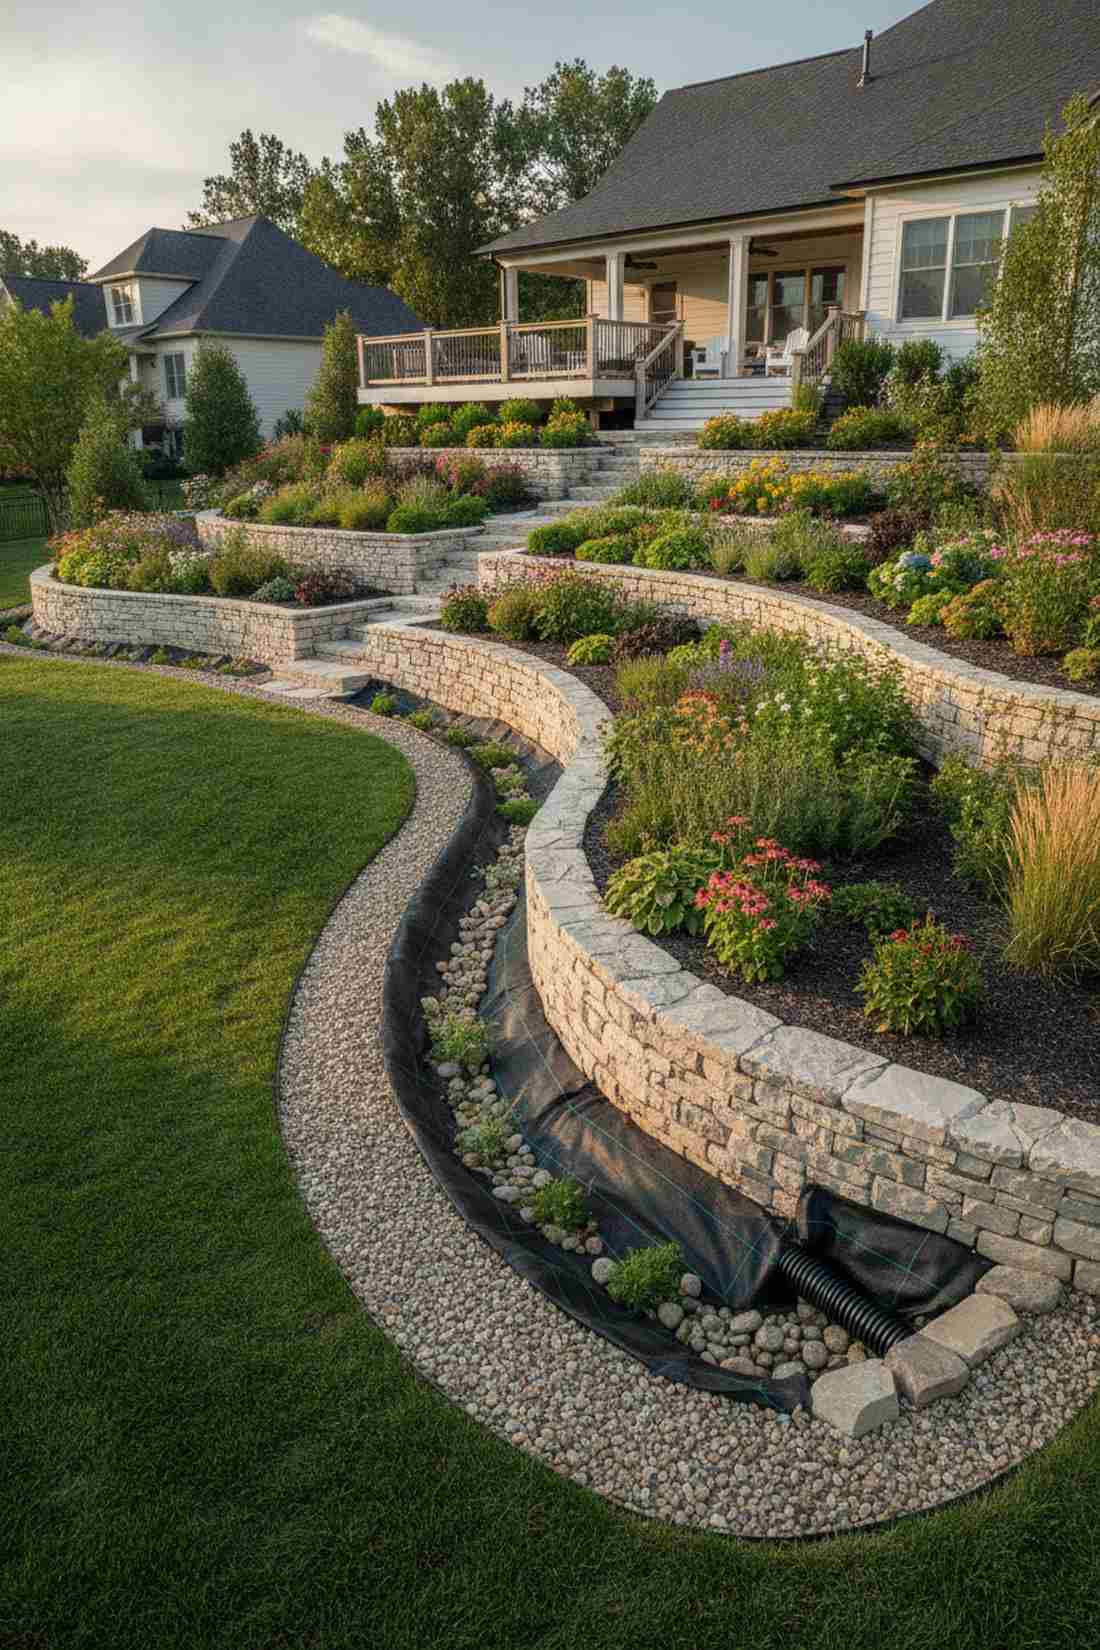
Feels like a professionally engineered storm management system hidden in plain sight. A drainage-integrated hillside garden is an absolute must-have for areas prone to heavy seasonal downpours.
Leaving drainage up to chance is a rookie mistake, but wrapping a hidden coil behind the beds guarantees your soil never turns to sludge. This hidden utility looks completely natural on the surface but performs like a premium commercial installation.
Adding this protection costs roughly $50–$80 per tier. The peace of mind during a rainstorm makes it worth every penny.
- Key Materials: Corrugated perforated drain pipe
- Vibe / Style: Clean, functional landscape
- Difficulty: Intermediate
- Budget Breakdown: Drain coil: $40 | Landscape fabric: $25.
- Creator’s Tip: Always wrap the entire gravel trench in fabric, not just the pipe, to stop silt from clogging the system over time.
- Smart Sourcing: Buy commercial-grade non-woven landscape fabric (bulk roll) and a pre-slotted drainage coil kit.
7. Gravel-Filled Gap Terraces
Emanates a pristine, zen-like serenity that visually breaks up heavy wooden structures. Using crushed stone drainage gaps works perfectly between tightly spaced hillside planter tiers.
Filling the negative space with aggregate provides a ridiculously premium look while acting as a massive vertical water filter. This layout prevents muddy overflow and gives a designer-level finish that rivals luxury outdoor spaces.
You can execute this upgrade for around $30–$50 in local stone. Pin this if you want a weed-free pathway between your growing zones!
- Key Materials: Washed crushed drainage gravel
- Vibe / Style: Modern zen garden pathway
- Difficulty: Easy beginner setup
- Budget Breakdown: Gravel bags: $35 | Weed barrier: $15.
- Creator’s Tip: Use an angular crushed stone rather than smooth river rock so the pieces lock together and don’t slide downhill.
- Smart Sourcing: Grab a bulk pack of heavy-duty ground staples and premium weed-blocking underlayment.
8. Overflow Spillway Beds
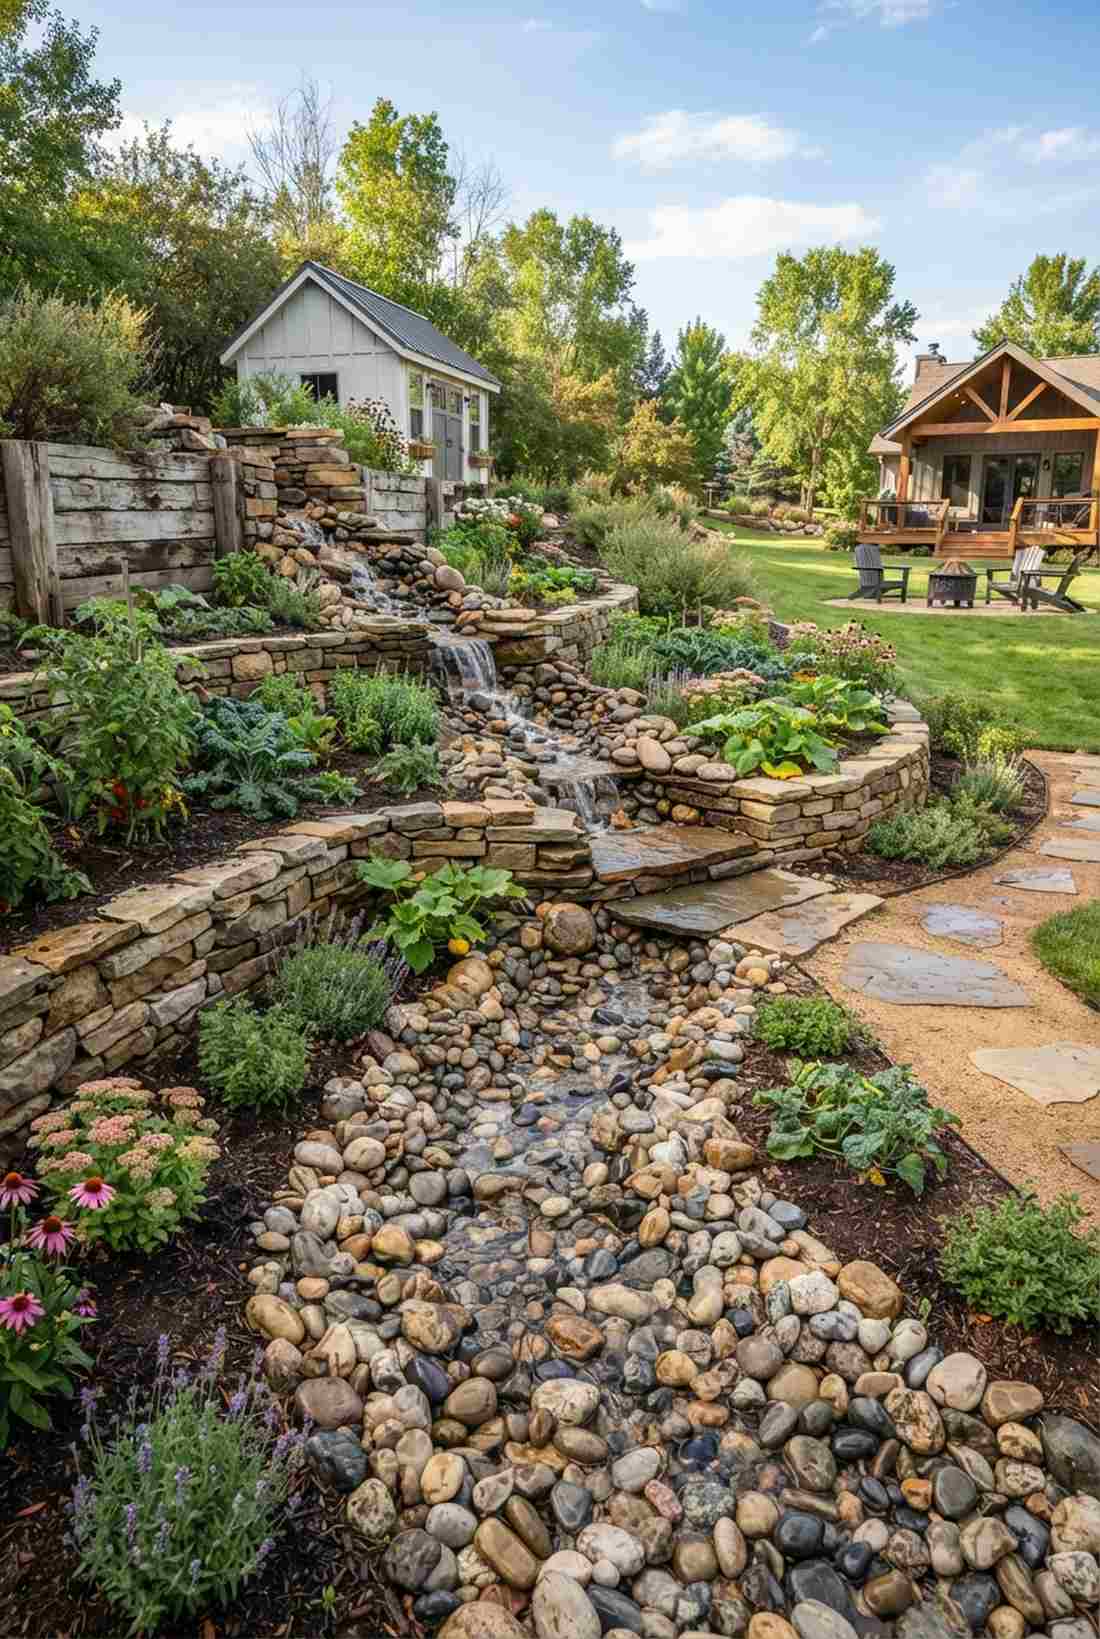
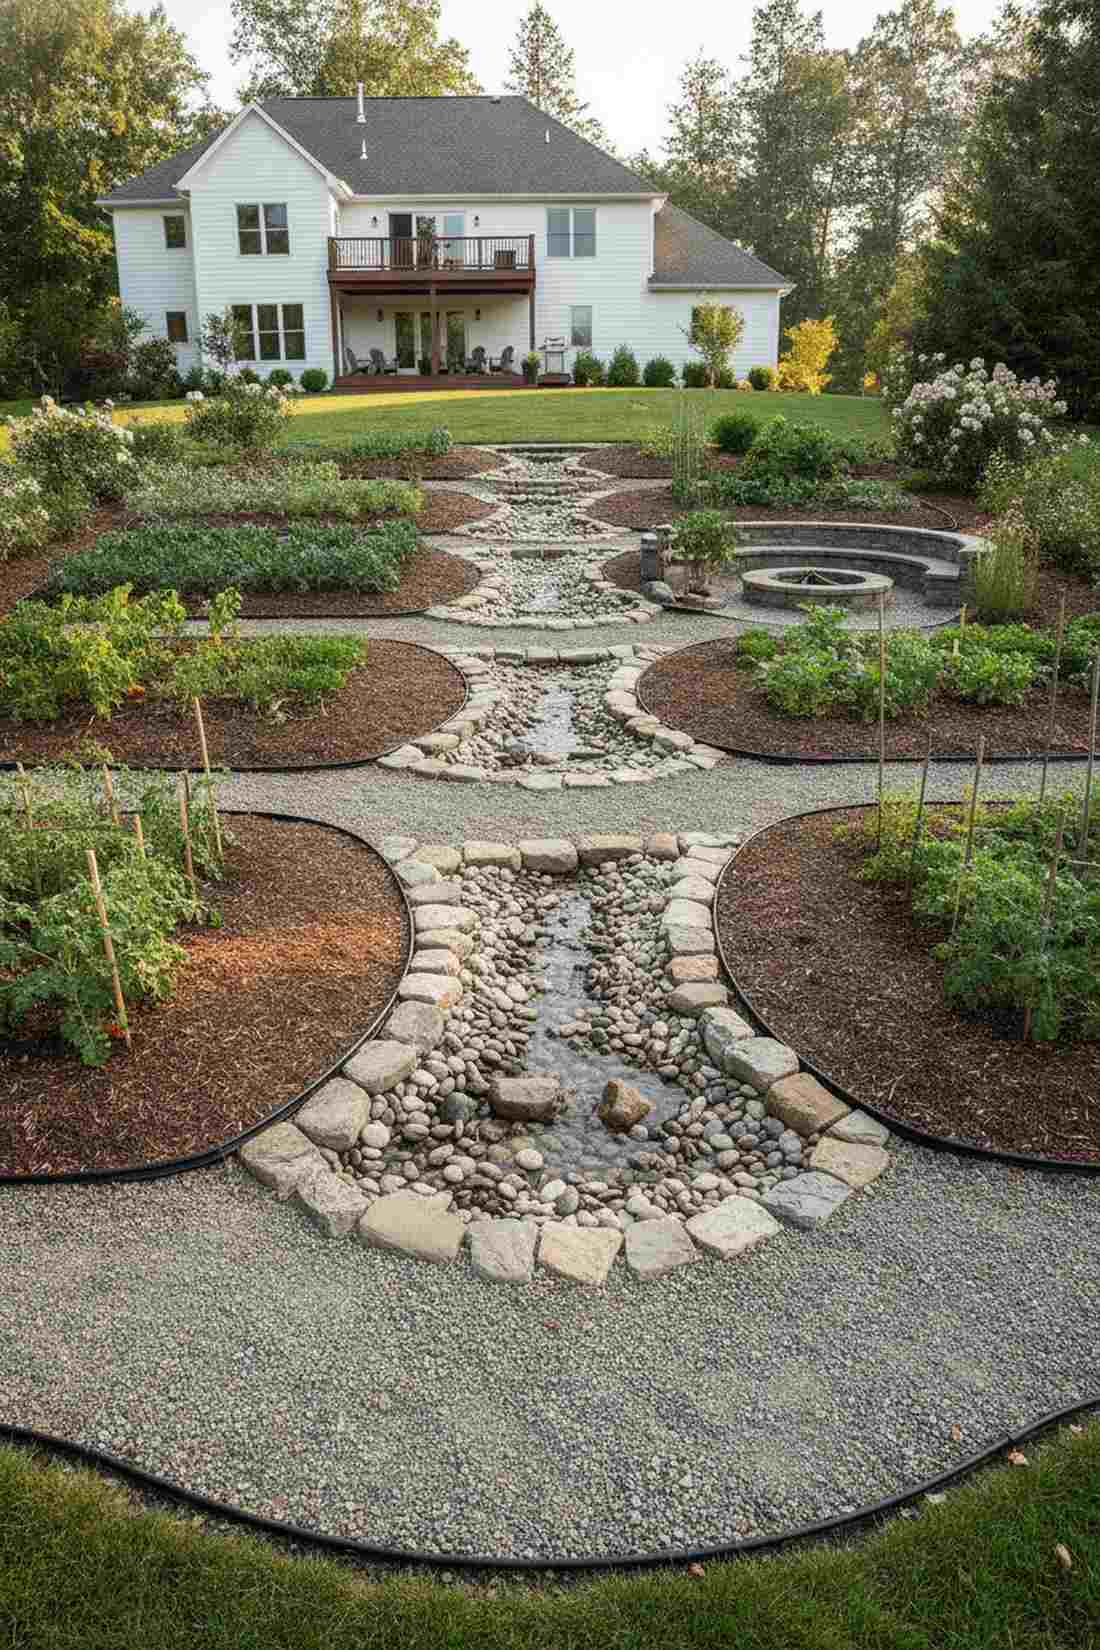
Feels like a natural babbling brook cascading through your veggies. A stone-lined spillway terrace is incredibly effective for managing flash floods on long, sweeping hillsides.
Designing deliberate overflow notches ensures water escapes exactly where you want it to, preventing disastrous retaining wall blowouts. Injecting landscape water management supplies seamlessly into the design turns a potential hazard into a gorgeous focal point.
Expect to invest around $25–$45 in decorative river rocks. It’s a fast upgrade that completely changes the vibe of your runoff paths.
- Key Materials: Polished decorative river stones
- Vibe / Style: Natural alpine landscape
- Difficulty: Easy
- Budget Breakdown: River rock: $30 | Support mesh: $15.
- Creator’s Tip: Angle the spillway slightly away from the bed below it so excess water waters the pathways, not the lower crops.
- Smart Sourcing: Pick up a bulk bag of polished river pebbles and a flexible border edging kit.
Most people get this completely wrong… until they try the exact layout coming up next, which practically waters itself.
9. Wicking Cell Base Layers
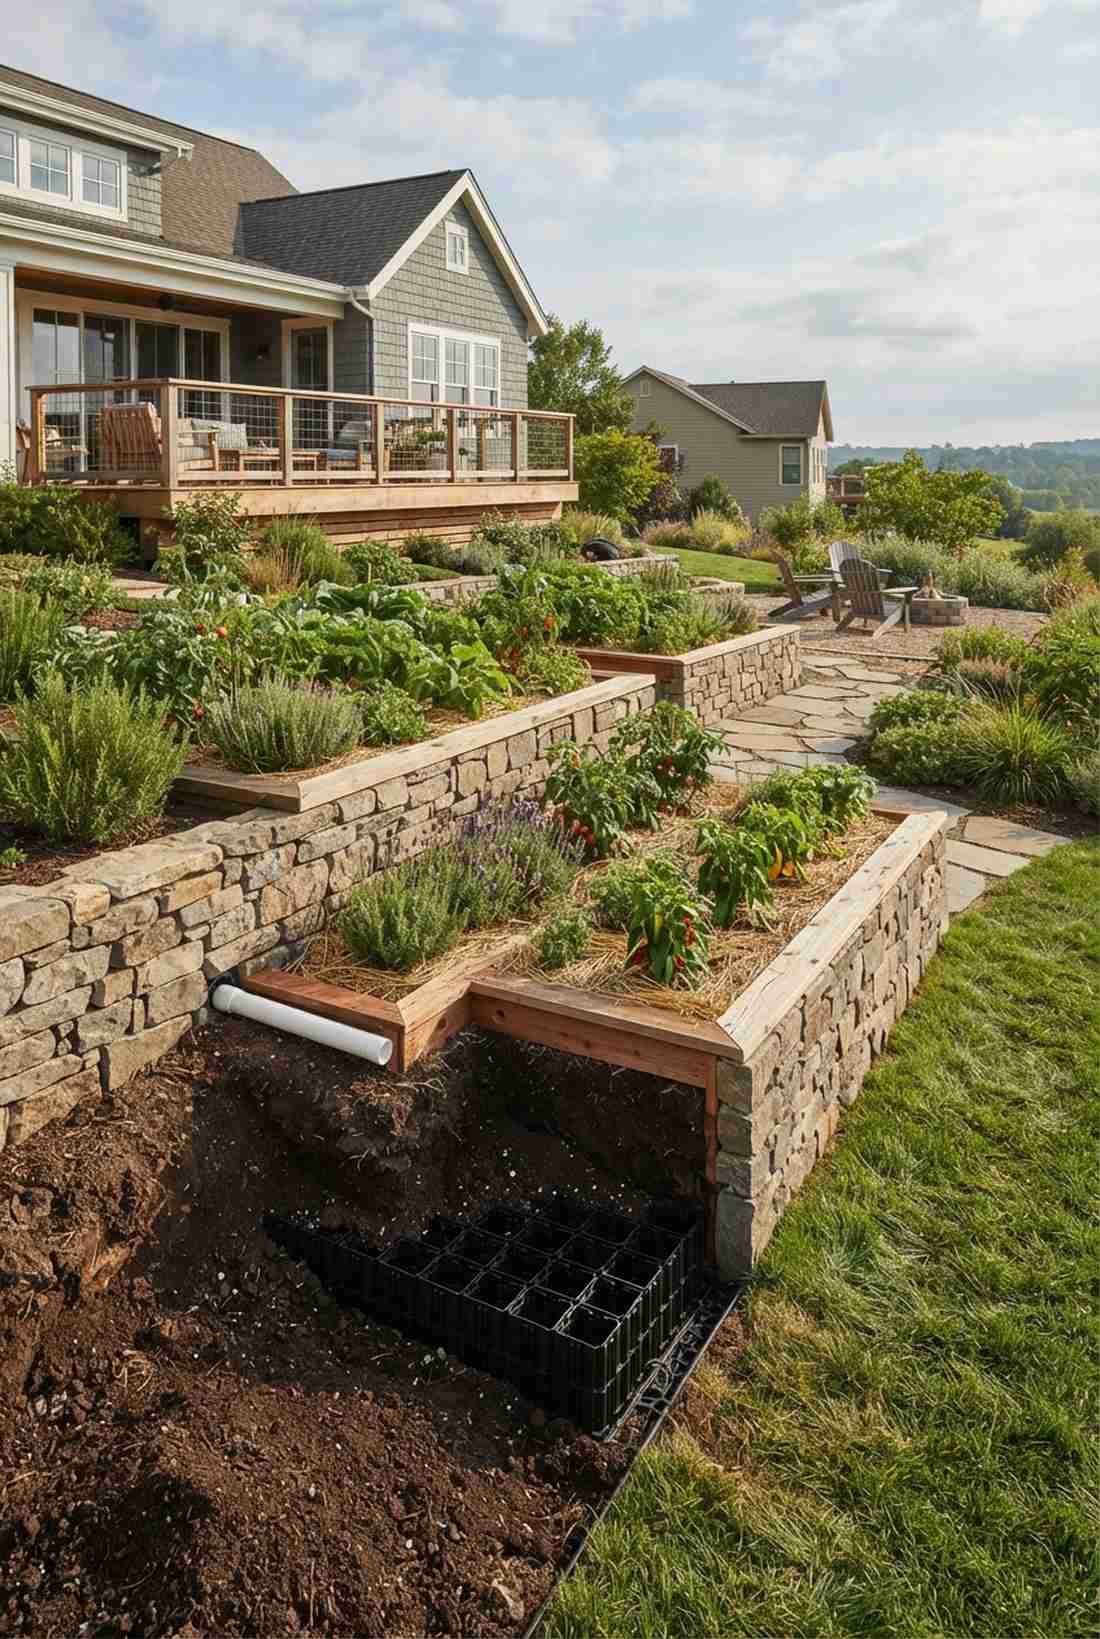
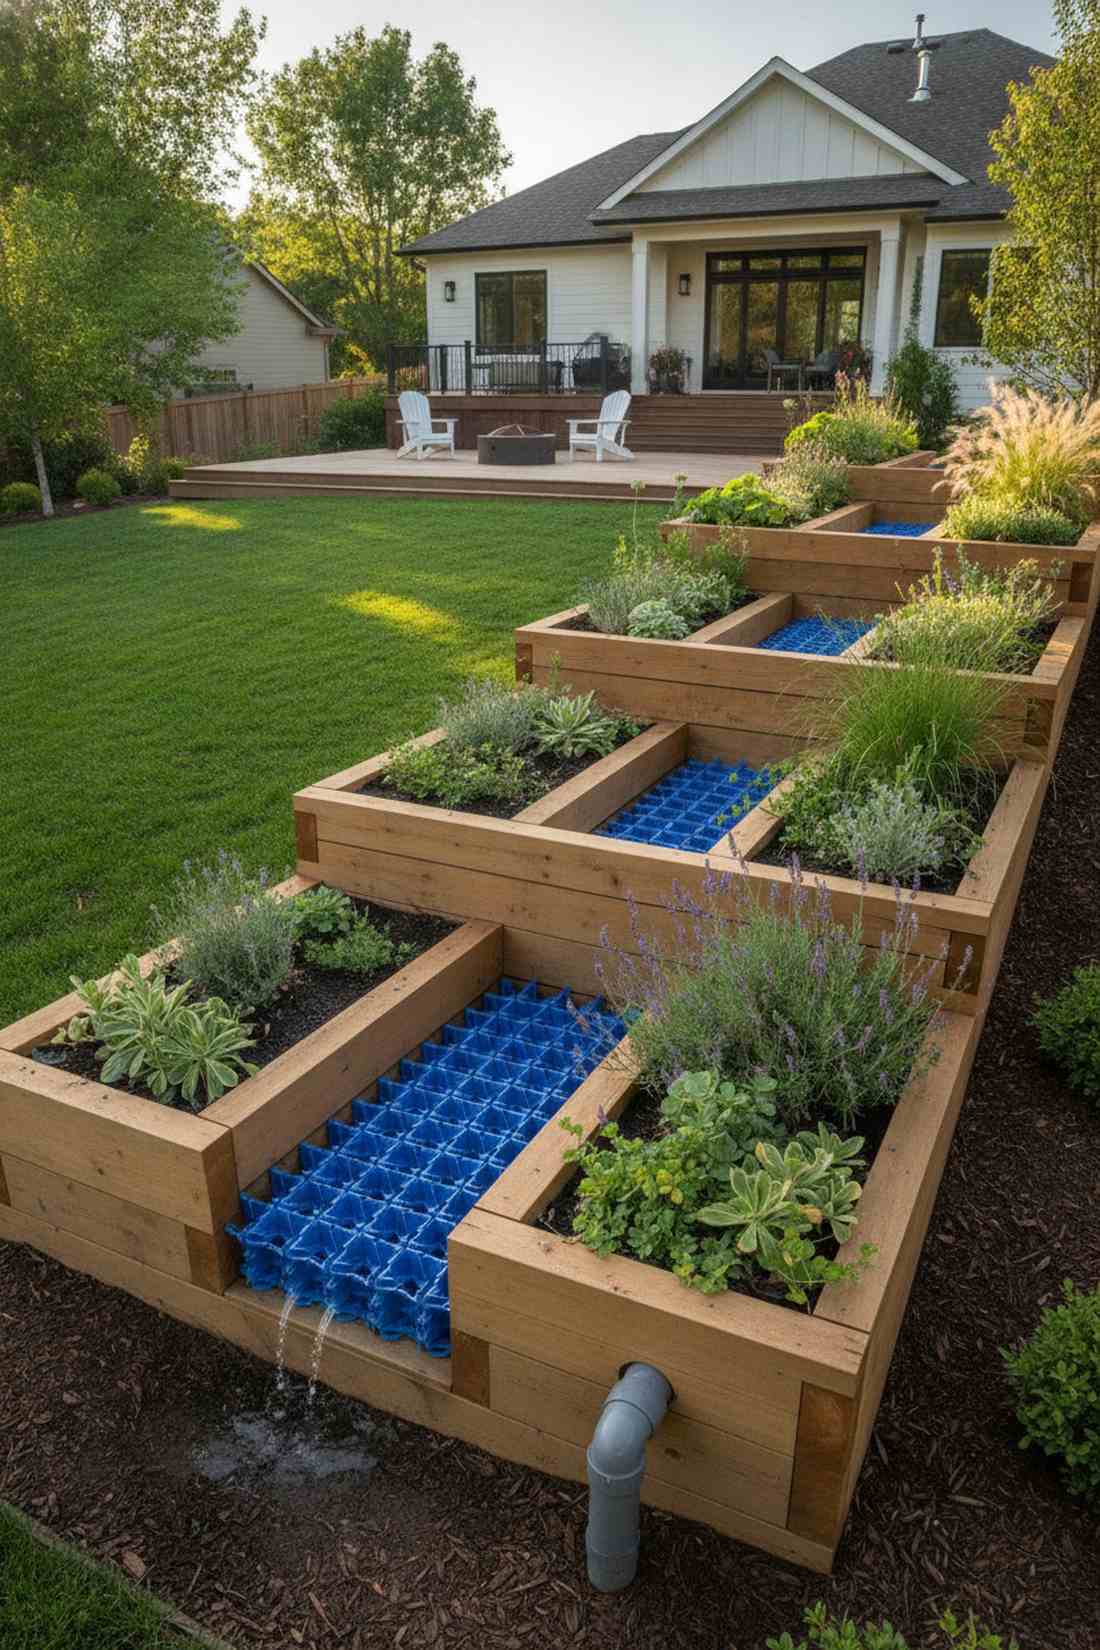
Brings a high-tech, futuristic drought-resistance right into your backyard. The sub-irrigated terraced planter is a lifesaver for south-facing slopes that bake in the afternoon sun.
Standard hillside beds dry out notoriously fast, but laying specialized plastic reservoirs at the base traps moisture perfectly. This hidden upgrade looks completely normal from the outside but delivers a surprisingly premium root-watering system.
This internal tech costs about $60–$90 per bed frame. Save this to your garden hacks board for the ultimate low-water setup!
- Key Materials: Modular plastic wicking cells
- Vibe / Style: High-efficiency smart garden
- Difficulty: Intermediate
- Budget Breakdown: Cell panels: $65 | Overflow tube: $10.
- Creator’s Tip: Ensure your planter frame has a tiny weep hole right at the top level of the wicking cell so it never over-floods.
- Smart Sourcing: Invest in pre-cut sub-irrigation base grids and a heavy-duty PVC overflow pipe kit.
💡 Must-Have Supplies for High-End Setups
To build these setups faster and ensure they last, skip the generic craft aisles and invest in the right foundational kits.
- Base & Support: Premium galvanized steel retaining brackets
- Setup Tools: Heavy-duty hillside terracing starter kits
- Weather/Durability Protection: Commercial-grade UV-coated wood sealant
10. Trellis-Backed Terrace Walls
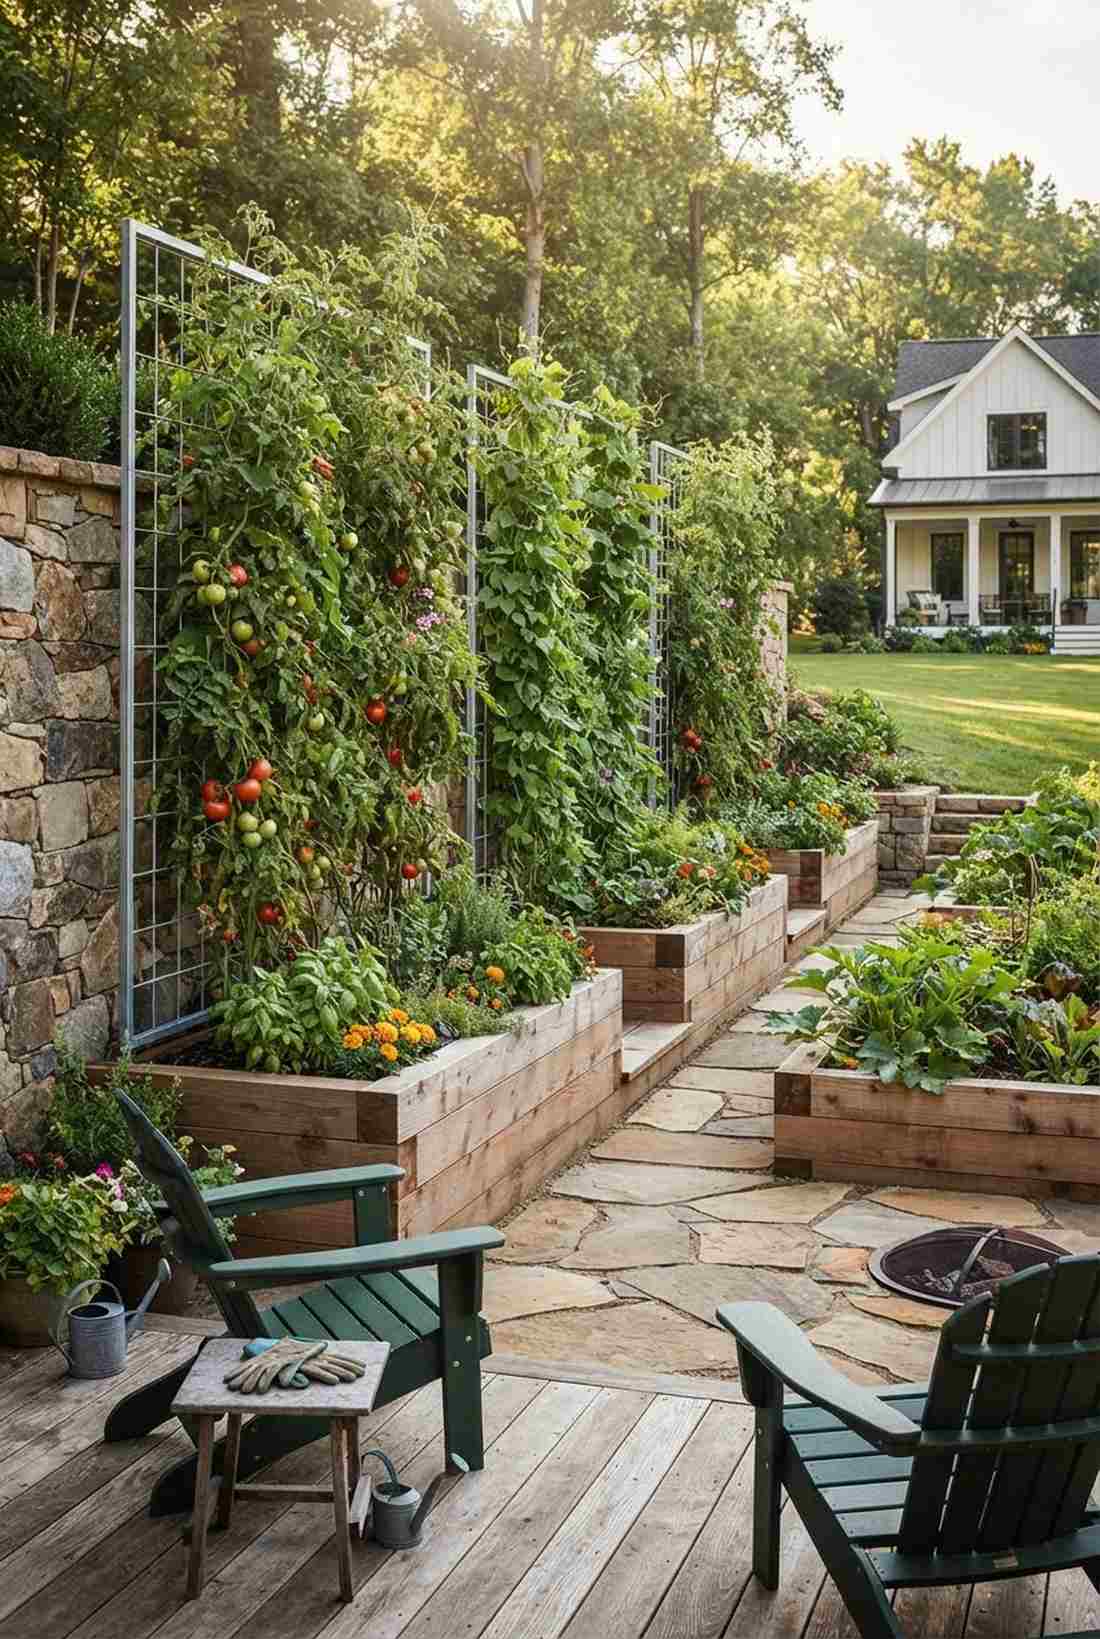
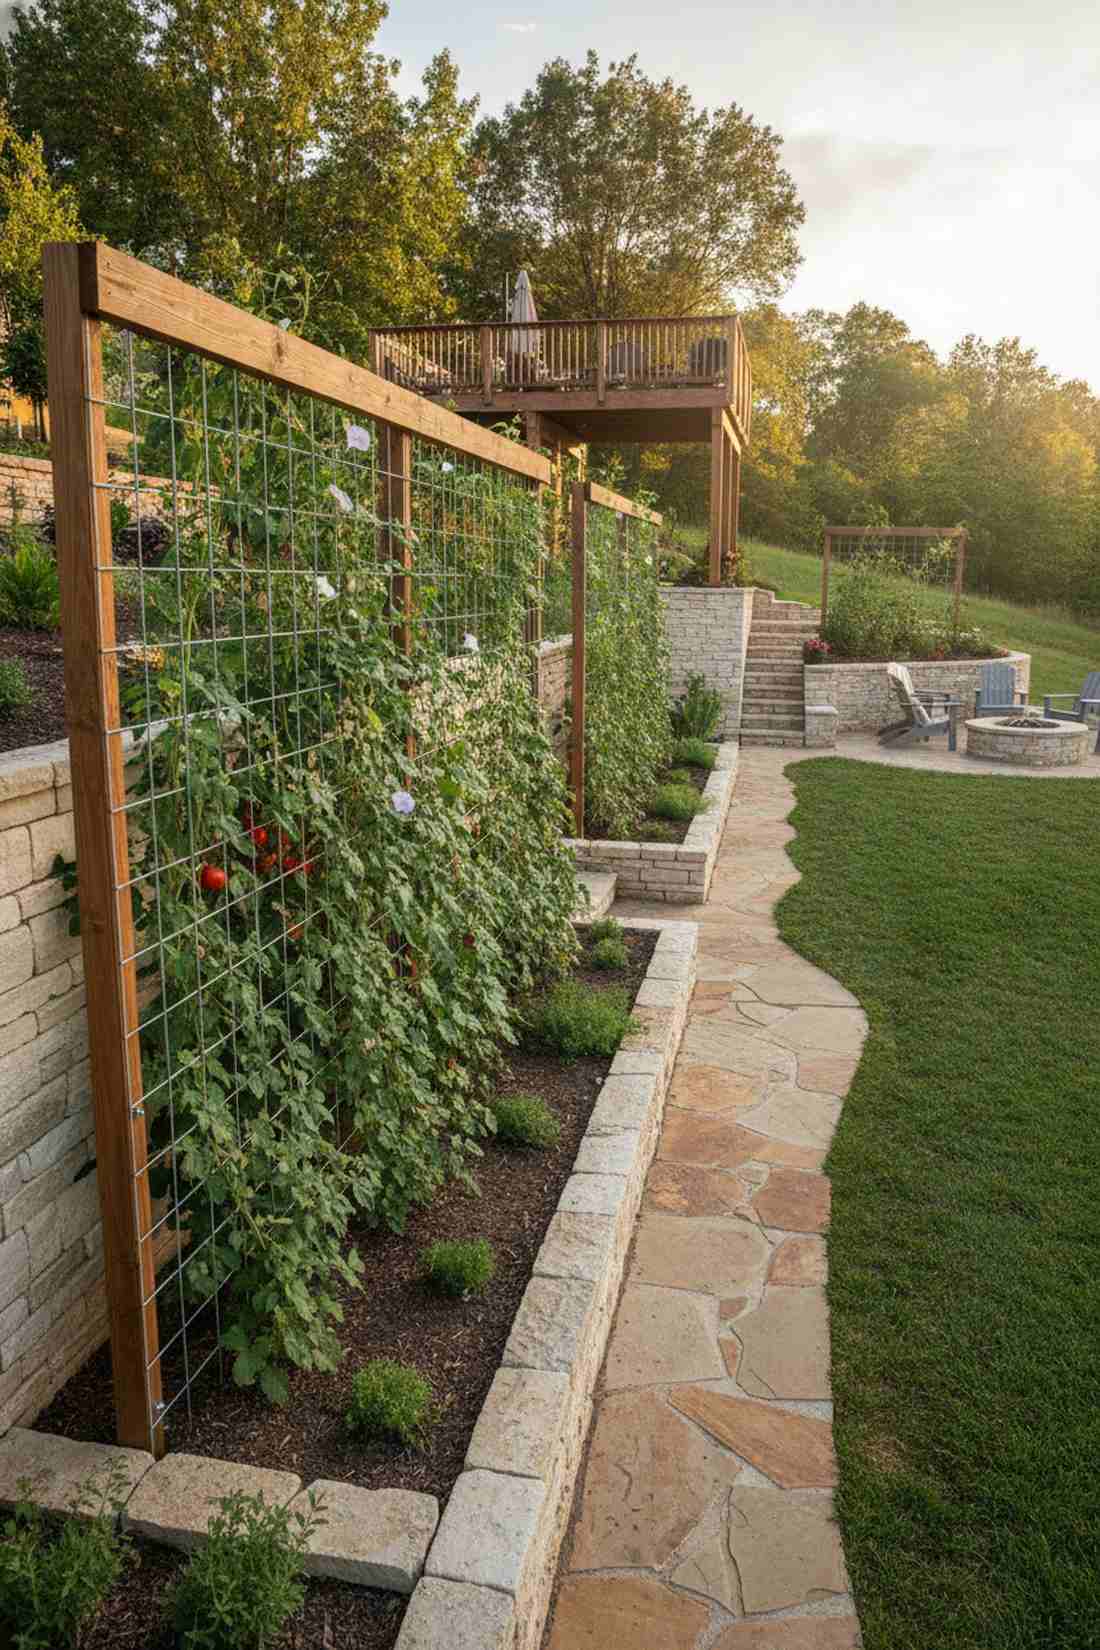
Feels like walking through a lush, green vertical tunnel of foliage. A wire-backed elevated bed layout maximizes yield for tight, narrow hillside properties without shading the yard.
Attaching panels directly to the retaining wall turns a basic barrier into a massive productive climbing wall. It gives a designer-level finish that draws the eye upward, making the slope look intentionally majestic rather than steep.
Setting up a strong climbing grid costs about $40–$60. Pin this if you want to grow massive tomatoes in a small footprint!
- Key Materials: Rigid galvanized cattle panels
- Vibe / Style: Abundant vertical homestead
- Difficulty: Beginner-friendly
- Budget Breakdown: Wire panels: $45 | U-nails: $10.
- Creator’s Tip: Use heavy-duty fencing staples to attach the wire to the wood, ensuring it won’t pop off under the weight of heavy fruit.
- Smart Sourcing: Grab a bulk pack of galvanized U-staples and pre-cut heavy-gauge wire trellis grids.
Vertical Growing Structures on Sloped Raised Beds Landscaping
Slopes provide natural support for vertical growing systems. These designs leverage hillside angles to maximize production density and create stunning three-dimensional garden displays.
11. A-Frame Cascade Supports
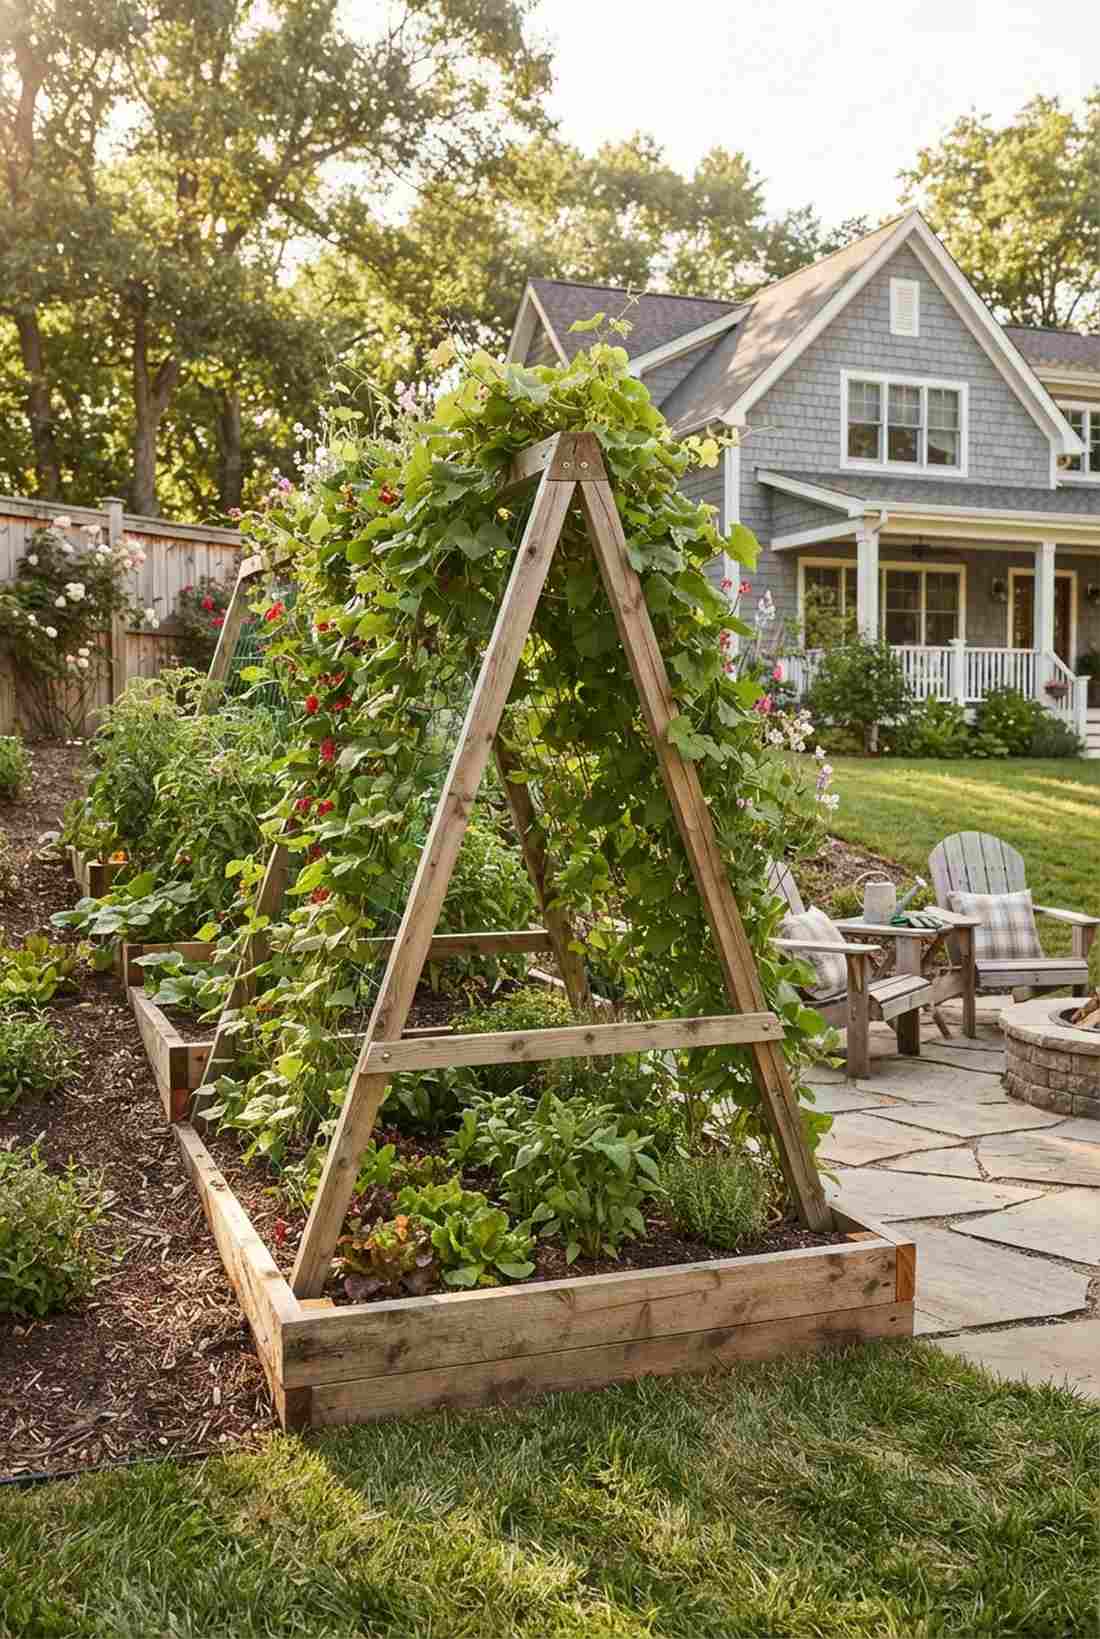

Projects a rustic, charming vineyard aesthetic that completely upgrades the space. An A-frame spanning garden trellis is exceptionally well-suited for connecting upper and lower terraced beds.
Using the natural angle of the hill stabilizes the structure naturally without needing deep concrete footings. Utilizing broad vertical garden accessories seamlessly bridges the gap between levels, creating a spectacular shaded canopy for delicate crops underneath.
You can easily build these frames for around $25–$40 in raw lumber. Highly recommended for adding architectural height to flat slopes.
- Key Materials: Untreated 2×2 cedar lumber
- Vibe / Style: Rustic climbing canopy
- Difficulty: Easy carpentry
- Budget Breakdown: Lumber: $30 | Deck screws: $10.
- Creator’s Tip: Secure the base of the A-frame directly to the inside lip of the wooden bed frame to prevent wind from knocking it over.
- Smart Sourcing: Use heavy-duty exterior wood screws (bulk pack) and a pre-cut trellis netting starter kit.
12. Living Wall Pocket Planters
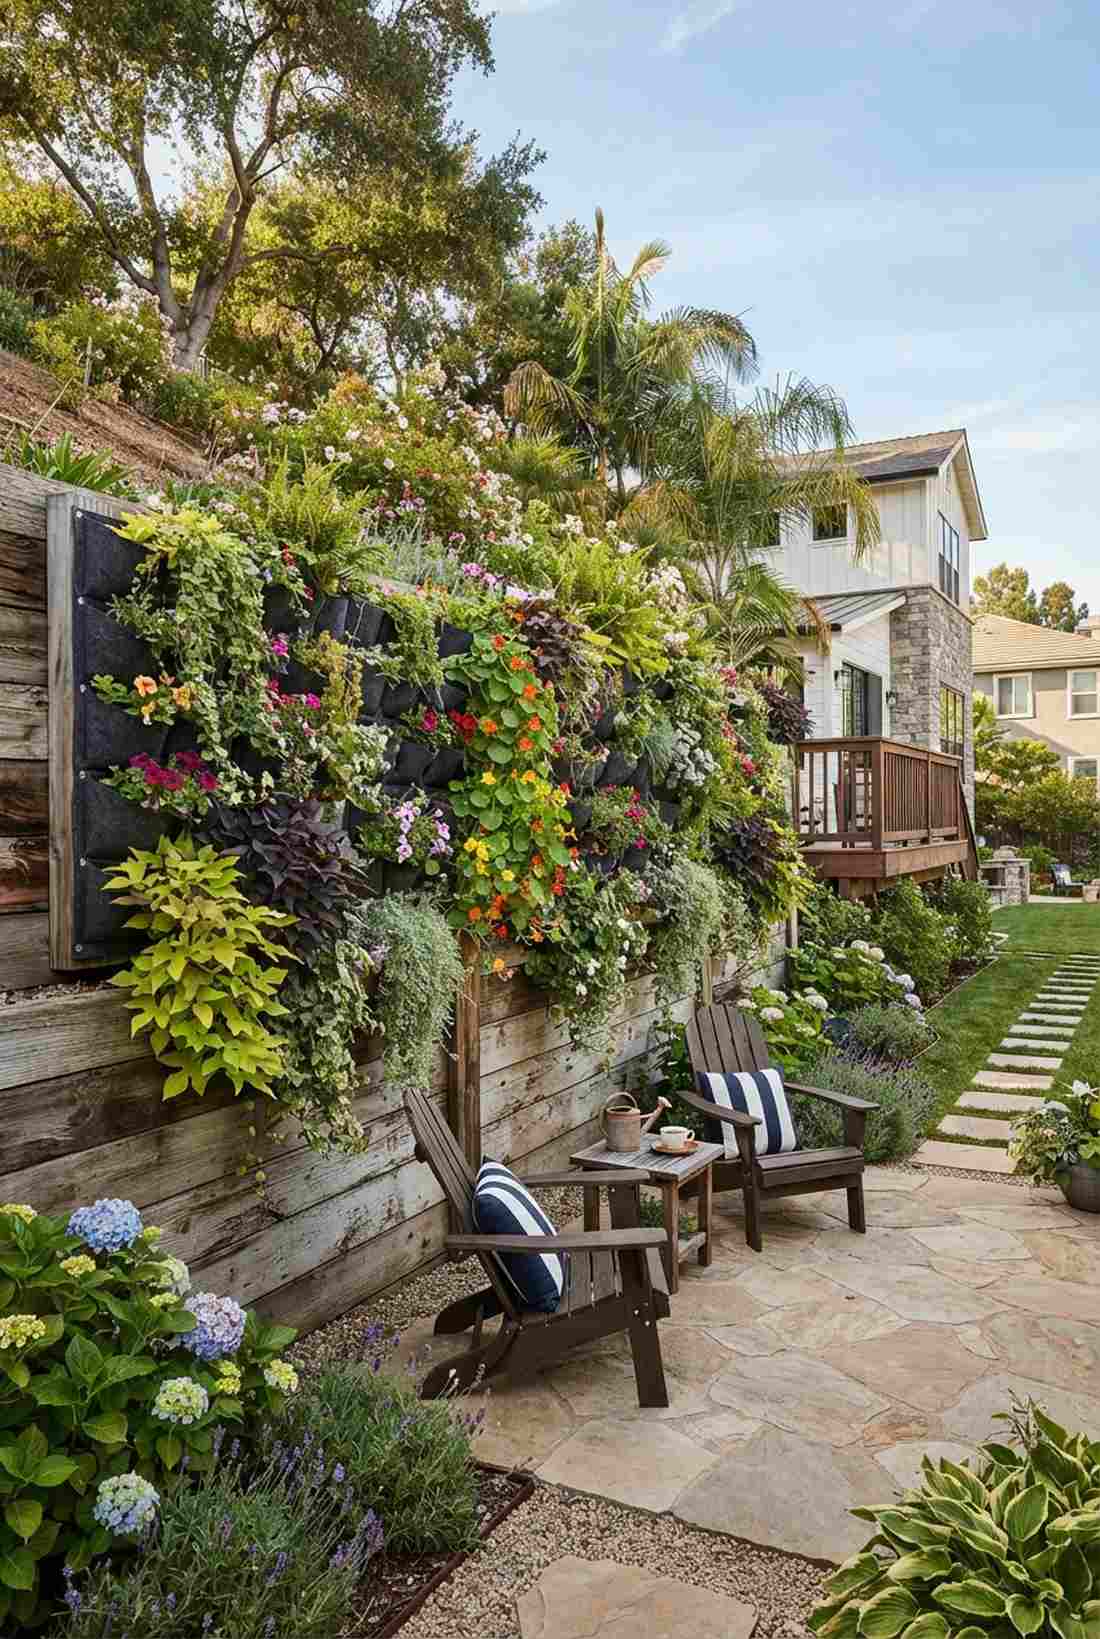
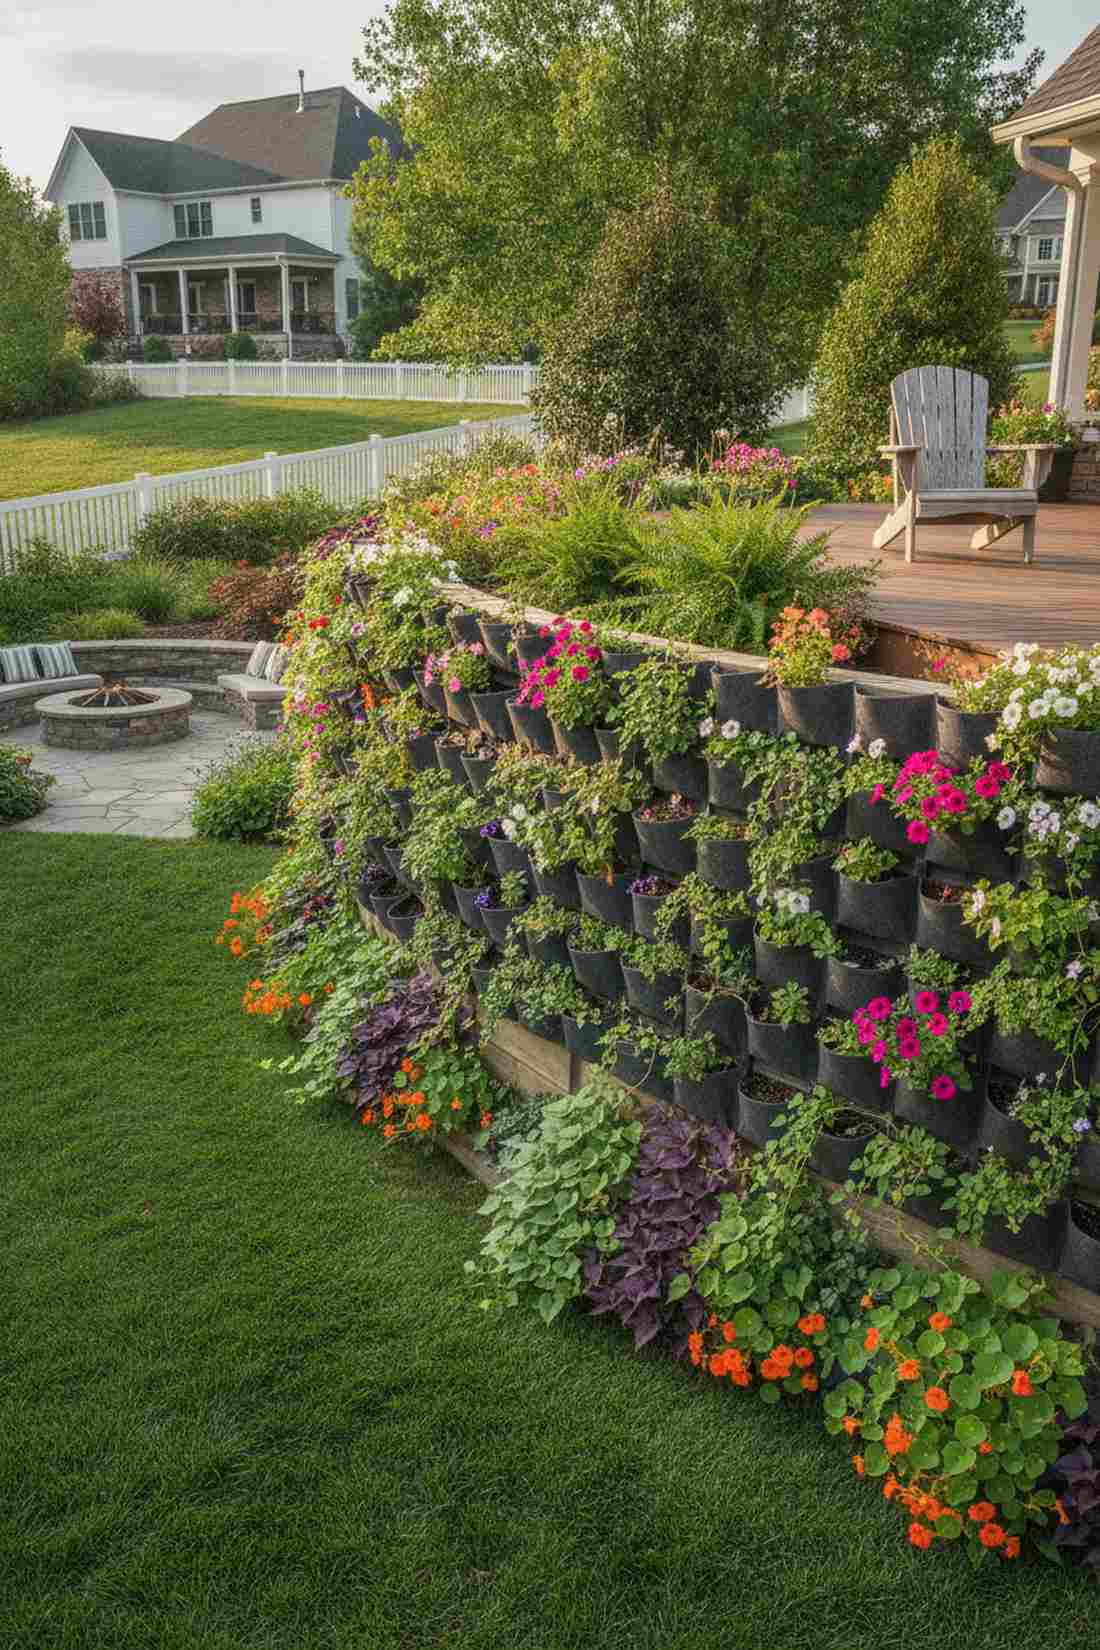
Feels like a tropical resort retaining wall covered in cascading blooms. Fabric wall-mounted pocket gardens are brilliant for hiding ugly, bare wooden retaining walls between terraces.
Leaving vertical faces blank is a missed opportunity, but strapping on soft fabric pouches turns every inch into a growing zone. It delivers a surprisingly premium look that softens the hard edges of your hillside construction.
These hanging systems cost about $20–$35 per panel. Save this to your backyard makeover board for an instant pop of color!
- Key Materials: Breathable felt wall planter bags
- Vibe / Style: Lush botanical living wall
- Difficulty: Very easy
- Budget Breakdown: Planter bags: $25 | Anchors: $5.
- Creator’s Tip: Plant trailing vines like sweet potato or cascading nasturtium in the bottom pockets to completely hide the retaining wall.
- Smart Sourcing: Order UV-coated multi-pocket wall planters and a moisture-retaining potting soil mix.
13. Spiral Tower Terrace Anchors
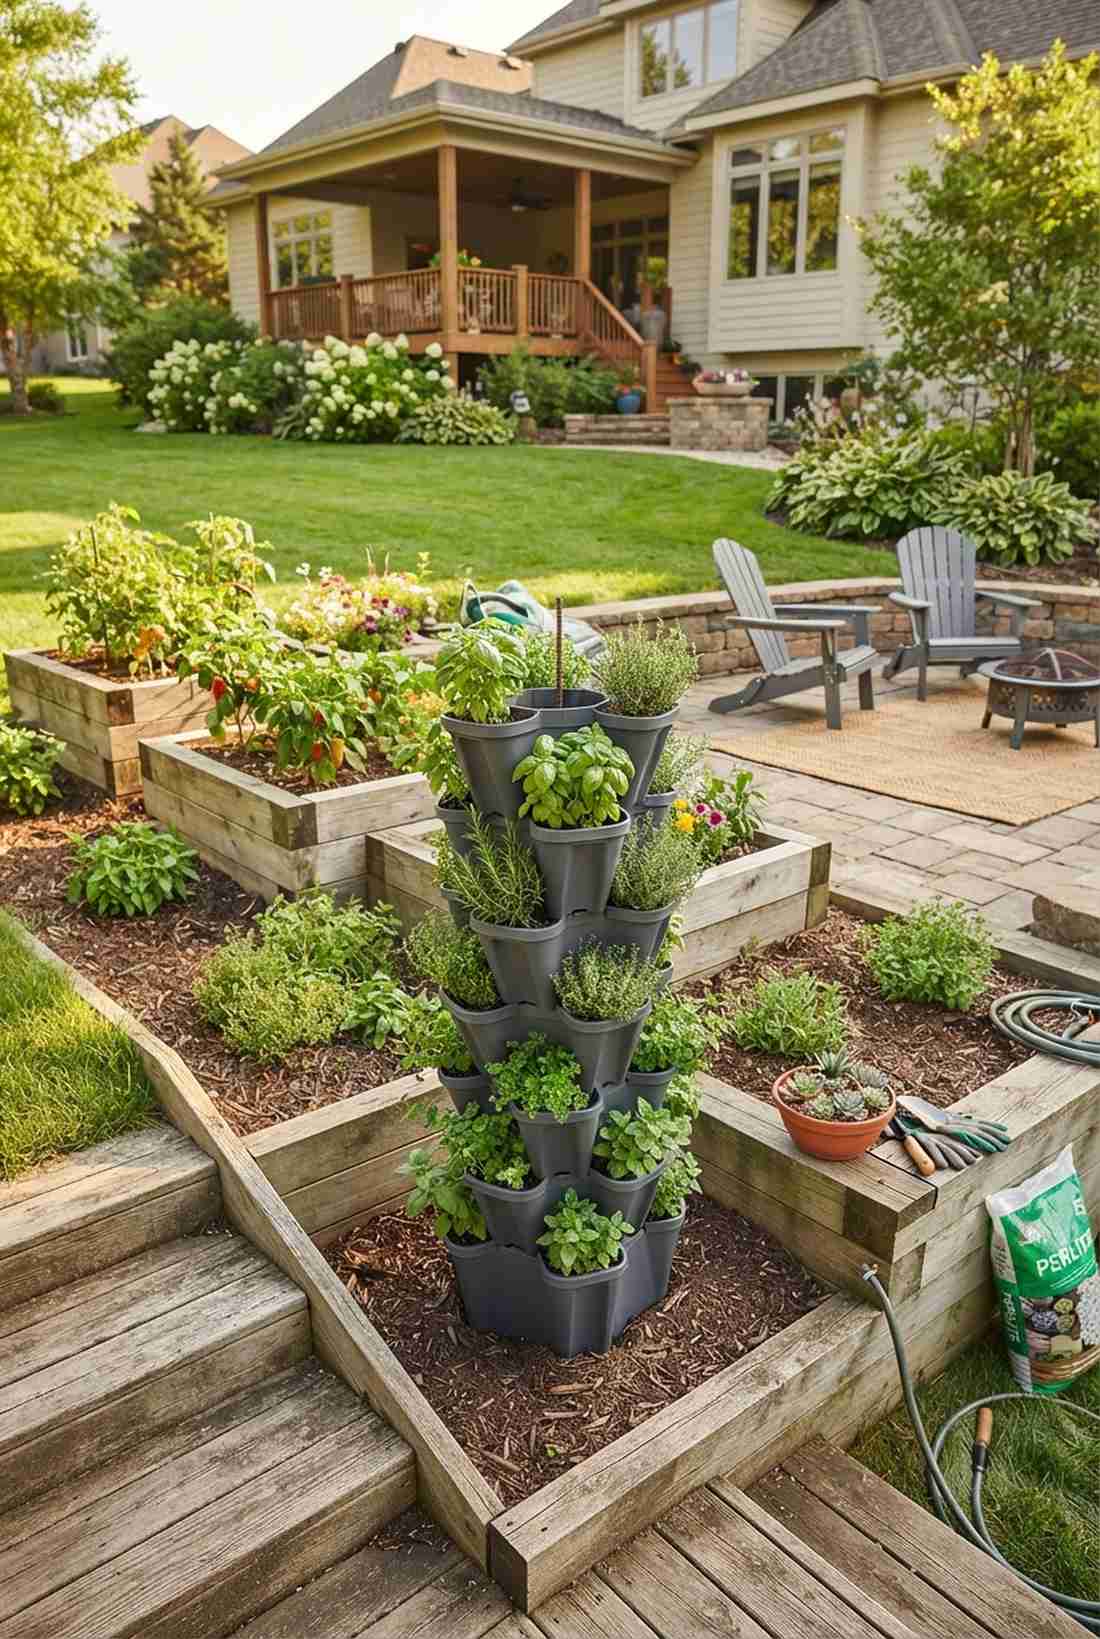
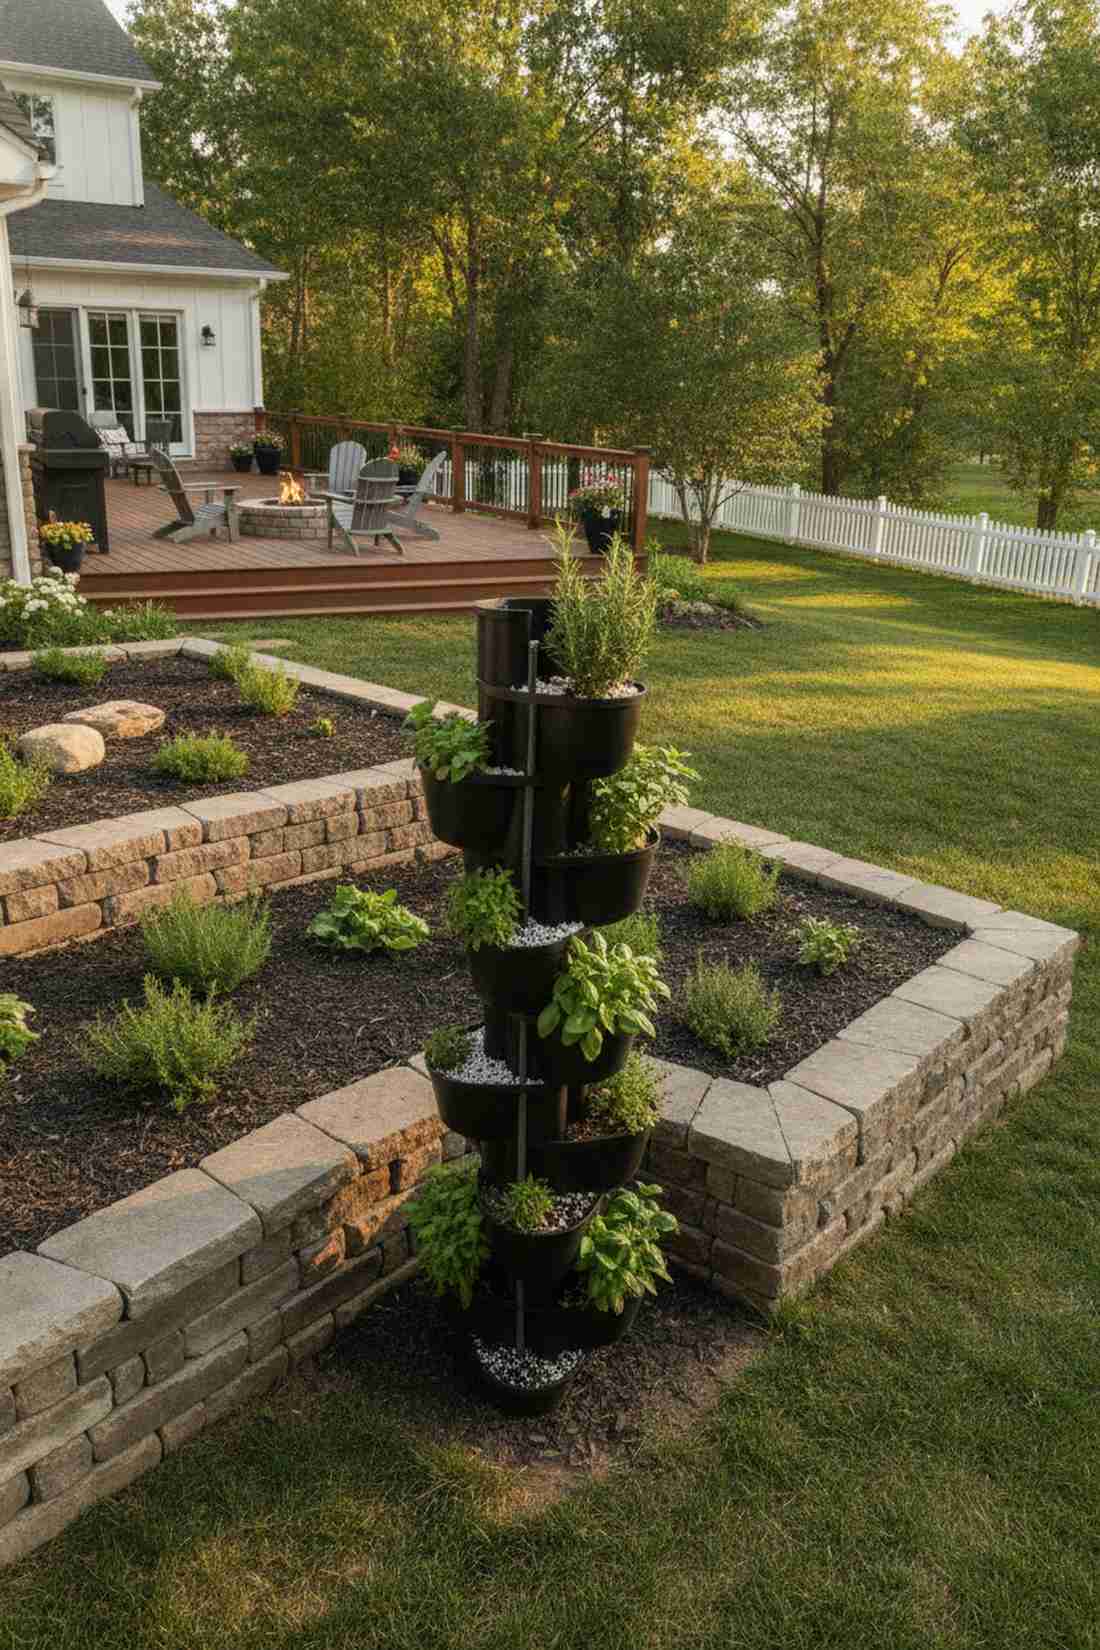
Emanates an enchanting, sculptural energy that breaks up blocky square planters. A vertical corner herb tower is perfect for the downhill edges of your terraced layout.
Most hillside designs feel too linear, but dropping a spiral accent piece at the corners creates stunning geometric contrast. Incorporating modern terrarium accessories or smart towers ensures a massive harvest without blocking sunlight to the beds behind it.
A high-quality tower setup runs about $50–$80. Pin this if you love having fresh herbs accessible at arm’s reach!
- Key Materials: Stackable vertical tower planters
- Vibe / Style: Whimsical geometric accent
- Difficulty: Easy assembly
- Budget Breakdown: Tower kit: $60 | Base stake: $10.
- Creator’s Tip: Drive a piece of rebar through the center hole of the stacked tower to pin it permanently to the sloped earth.
- Smart Sourcing: Buy a UV-resistant stackable planter kit and a bulk pack of perlite for drainage.
Most backyard DIYers stop here, but the next structural trick is the secret to making sure your entire hill doesn’t wash away in a storm…
14. Deep-Rooted Perennial Edges
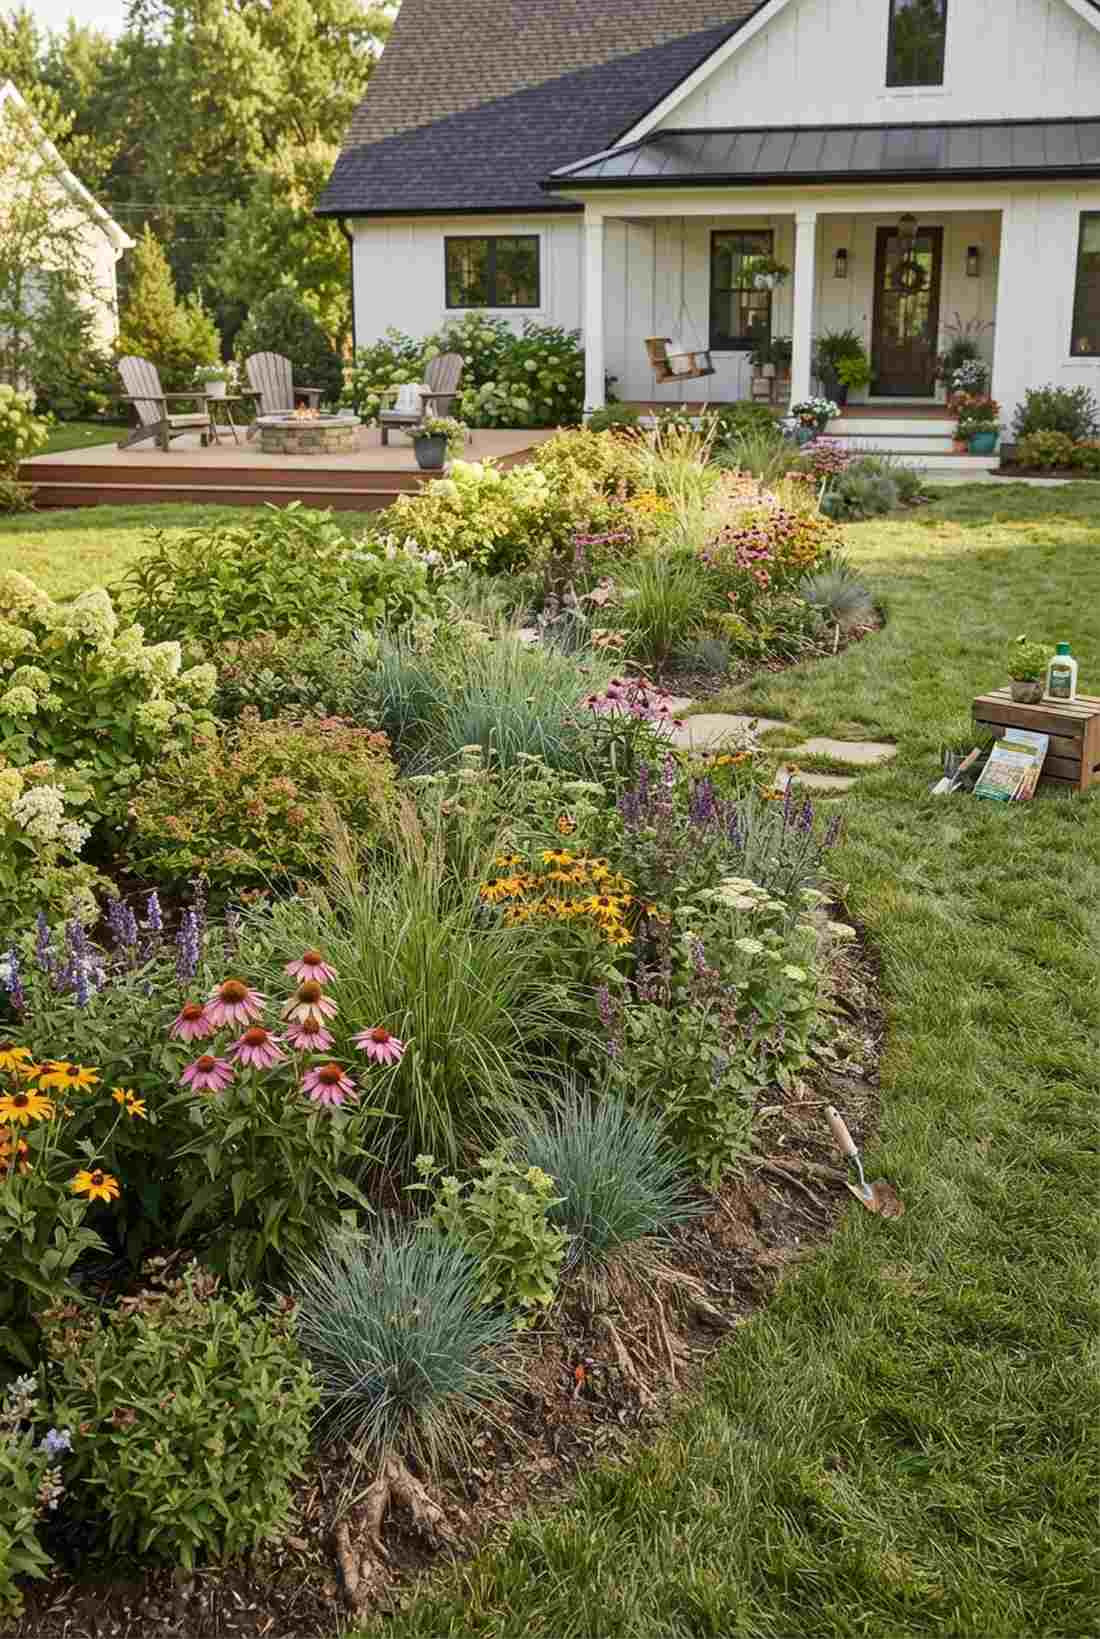

Feels like a wild, untamed meadow that is secretly holding the earth together. Living perennial perimeter borders work exceptionally well for softly terraced slopes without rigid wooden boxes.
Skipping hardscaping altogether can save thousands, provided you use aggressive root systems to bind the soil naturally. This organic layout looks far more expensive than it is, wrapping your functional garden in a blanket of permanent, stabilizing greenery.
You can seed these borders for as little as $15–$30. It’s an eco-friendly upgrade that completely changes the vibe of the yard.
- Key Materials: Deep-rooting ornamental grass seeds
- Vibe / Style: Naturalistic prairie border
- Difficulty: Patient beginner
- Budget Breakdown: Seed packets: $20 | Root stimulator: $10.
- Creator’s Tip: Use a mix of creeping thyme and deep-rooted comfrey to cover the surface quickly while anchoring the deep soil.
- Smart Sourcing: Pick up a bulk pack of erosion-control grass seed and a premium root-boosting fertilizer.
Erosion Control Designs for Raised Beds Landscaping
Preventing soil loss is critical on slopes. These beds integrate erosion-fighting features through material choices, planting strategies, and structural elements that stabilize terrain.
15. Stone-Armored Retaining Walls
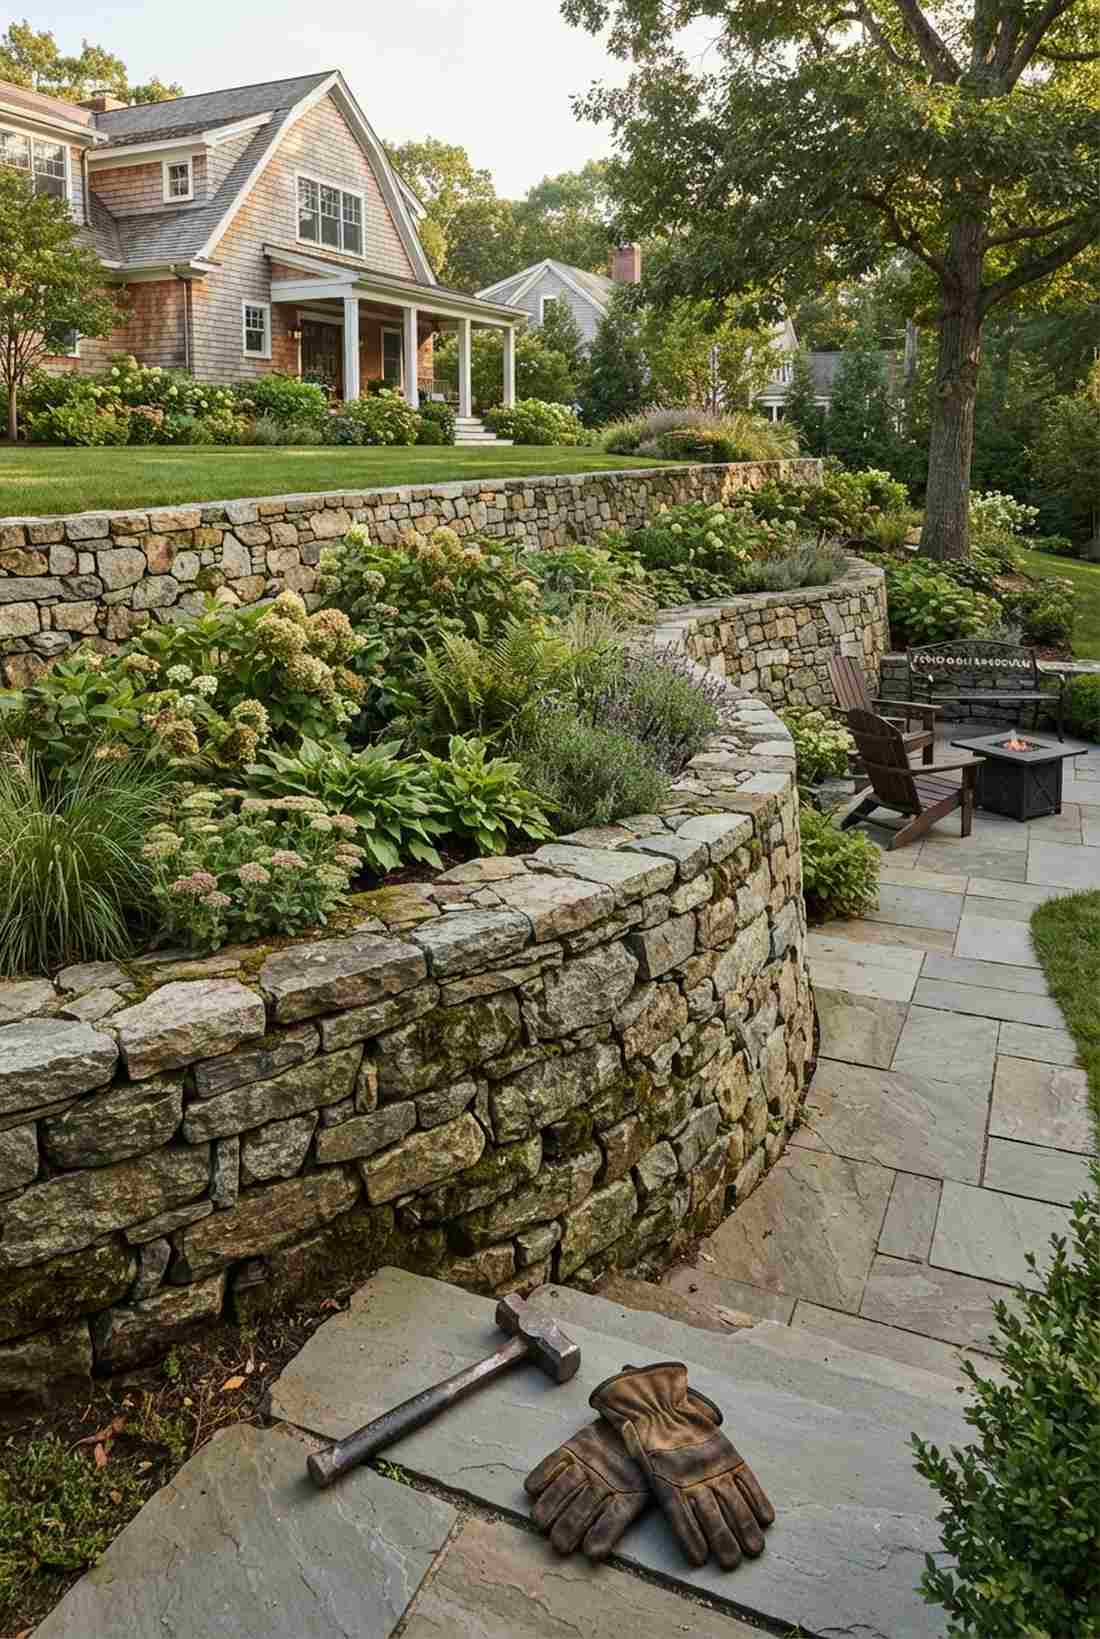
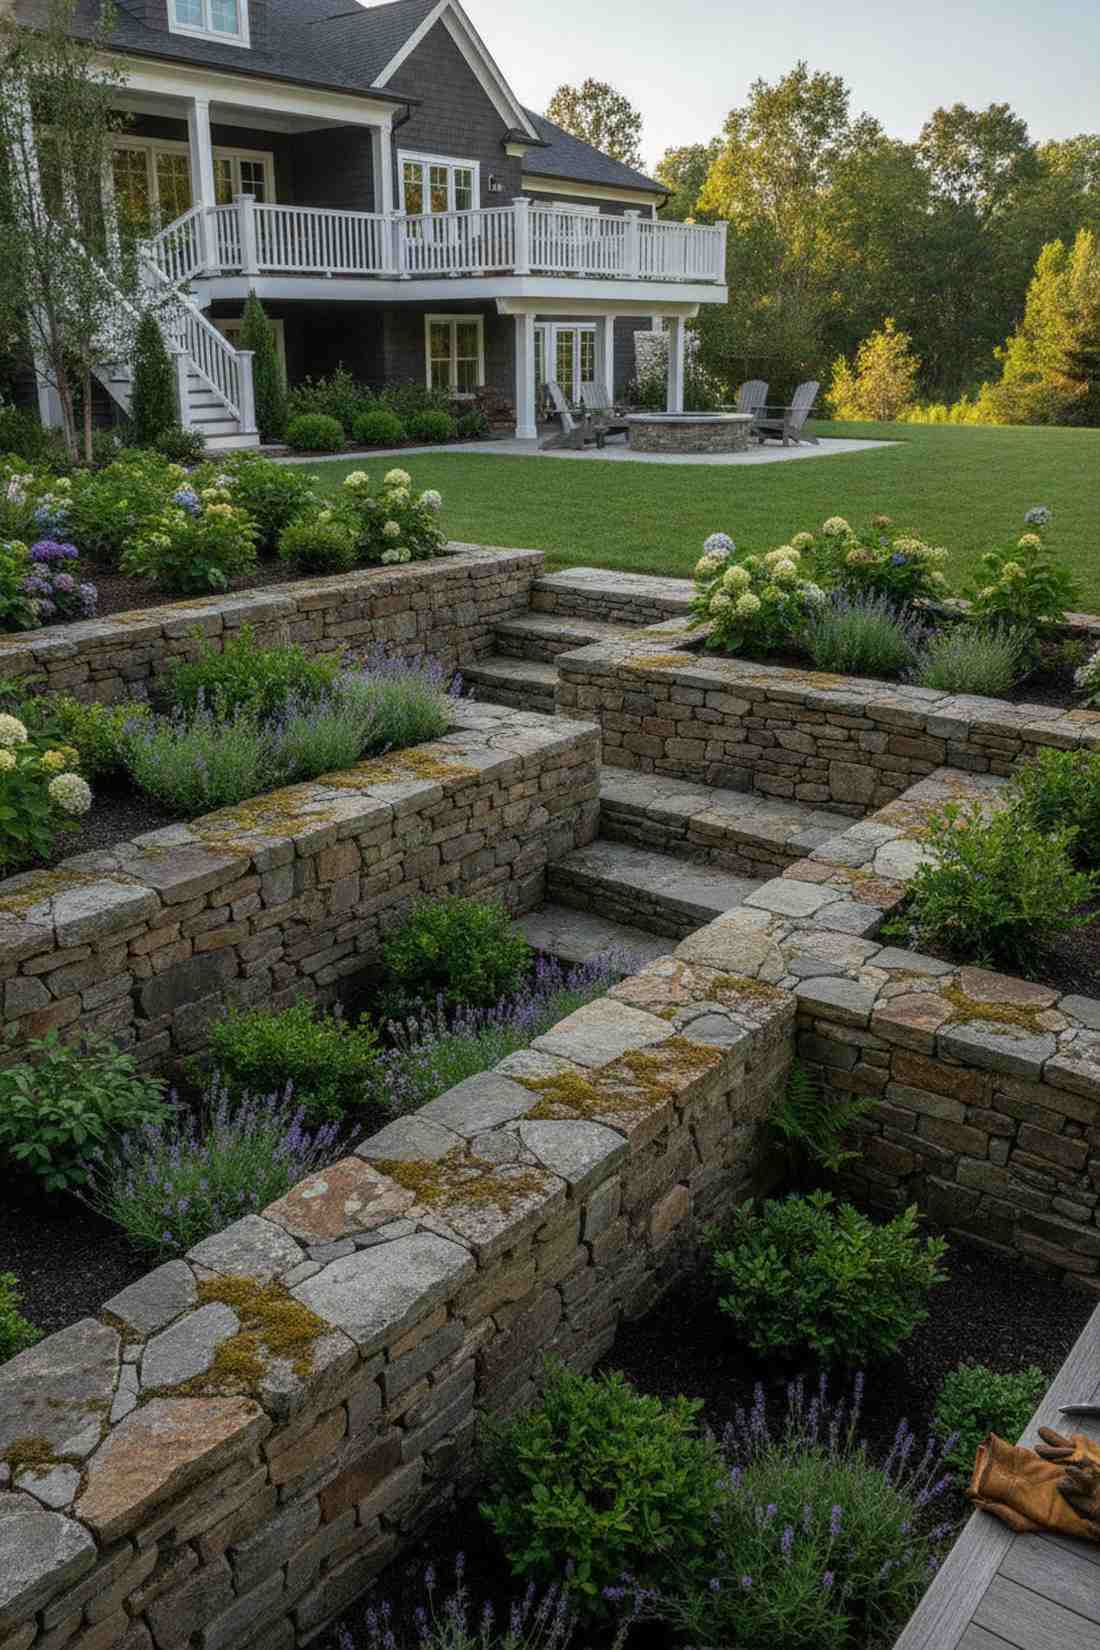
Projects an ancient, timeless strength like a centuries-old castle garden. A dry-stacked stone planter face is the ultimate permanent solution for heavy, clay-heavy hillsides.
Wood eventually rots when pushed against wet soil, but natural rock allows water to seep harmlessly through the gaps. This rugged aesthetic gives a designer-level finish that only looks better as moss naturally colonizes the crevices over the years.
Sourcing local fieldstone can keep this under $100–$150. Save this to your heavy-duty landscaping board for inspiration!
- Key Materials: Irregular landscape fieldstone
- Vibe / Style: Heritage estate garden
- Difficulty: Heavy physical labor
- Budget Breakdown: Stone blocks: $120 | Backfill gravel: $30.
- Creator’s Tip: Always lean the stone wall backward into the hill at a 10-degree angle to counter the massive weight of the wet earth.
- Smart Sourcing: Invest in heavy leather landscaping gloves (bulk pack) and a steel-forged mason’s hammer.
If you don’t have the budget for heavy stone, this next biodegradable trick locks the soil down for pennies on the dollar…
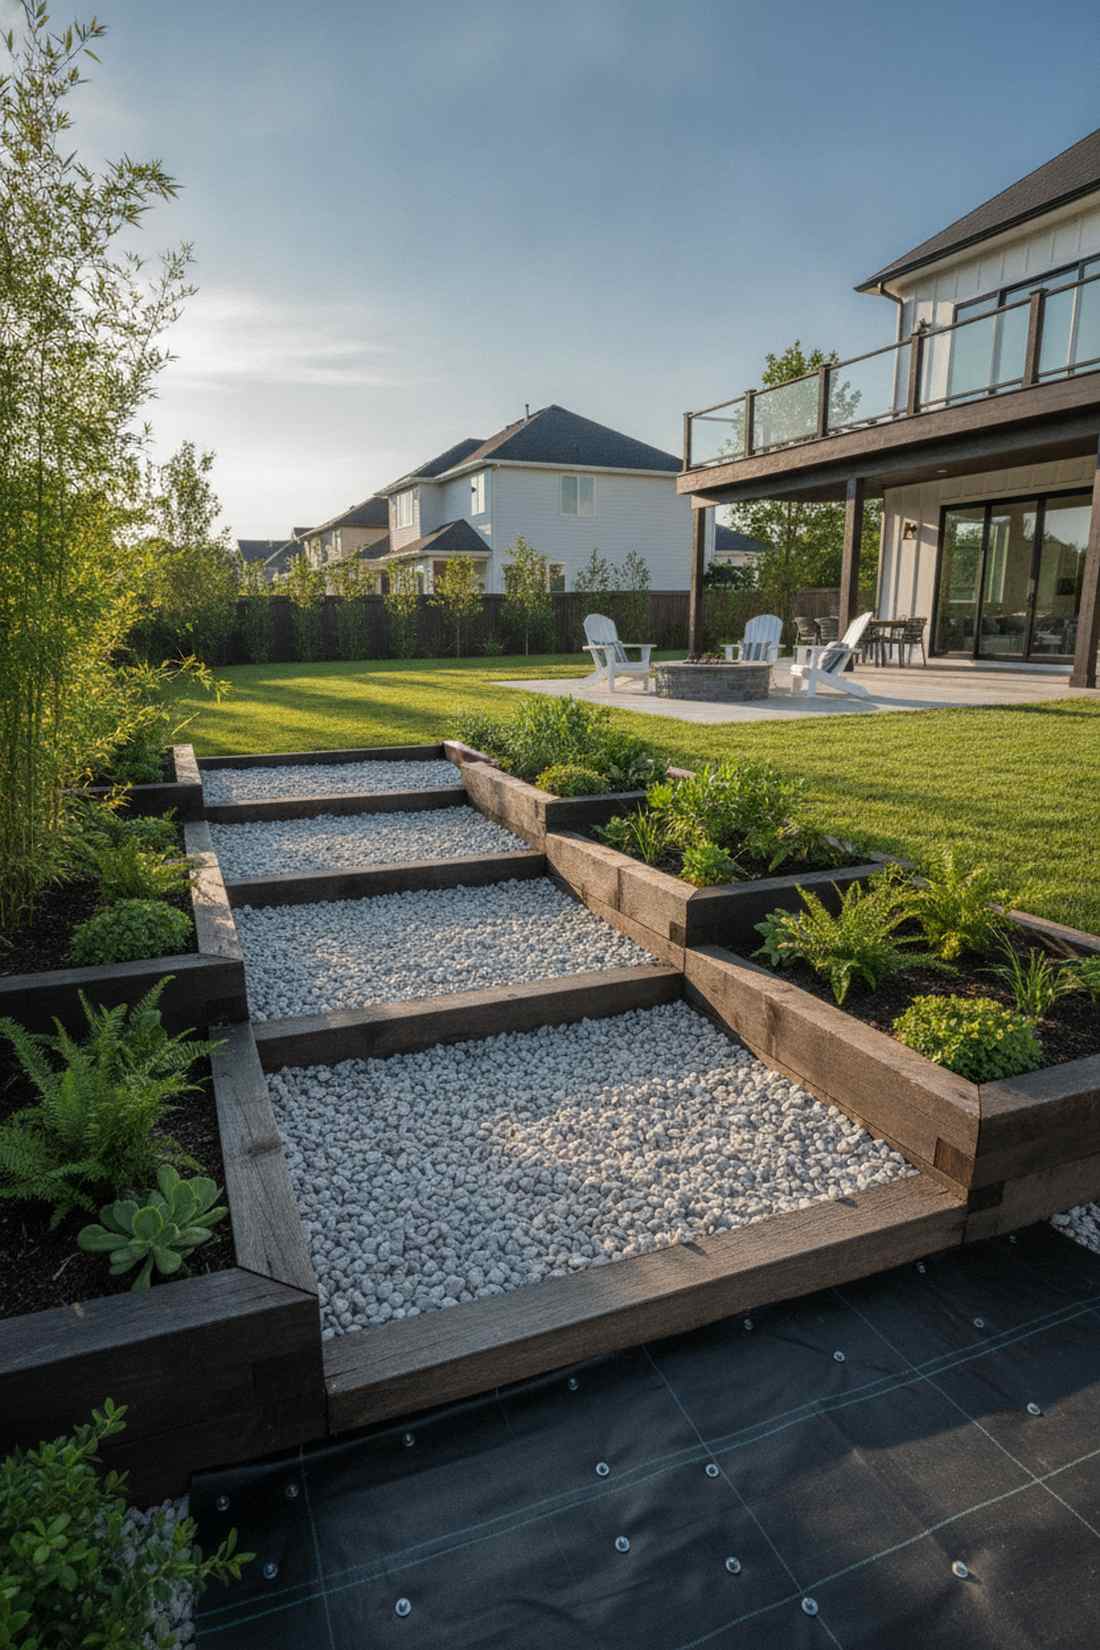
16. Coir Mat Wrapped Berms
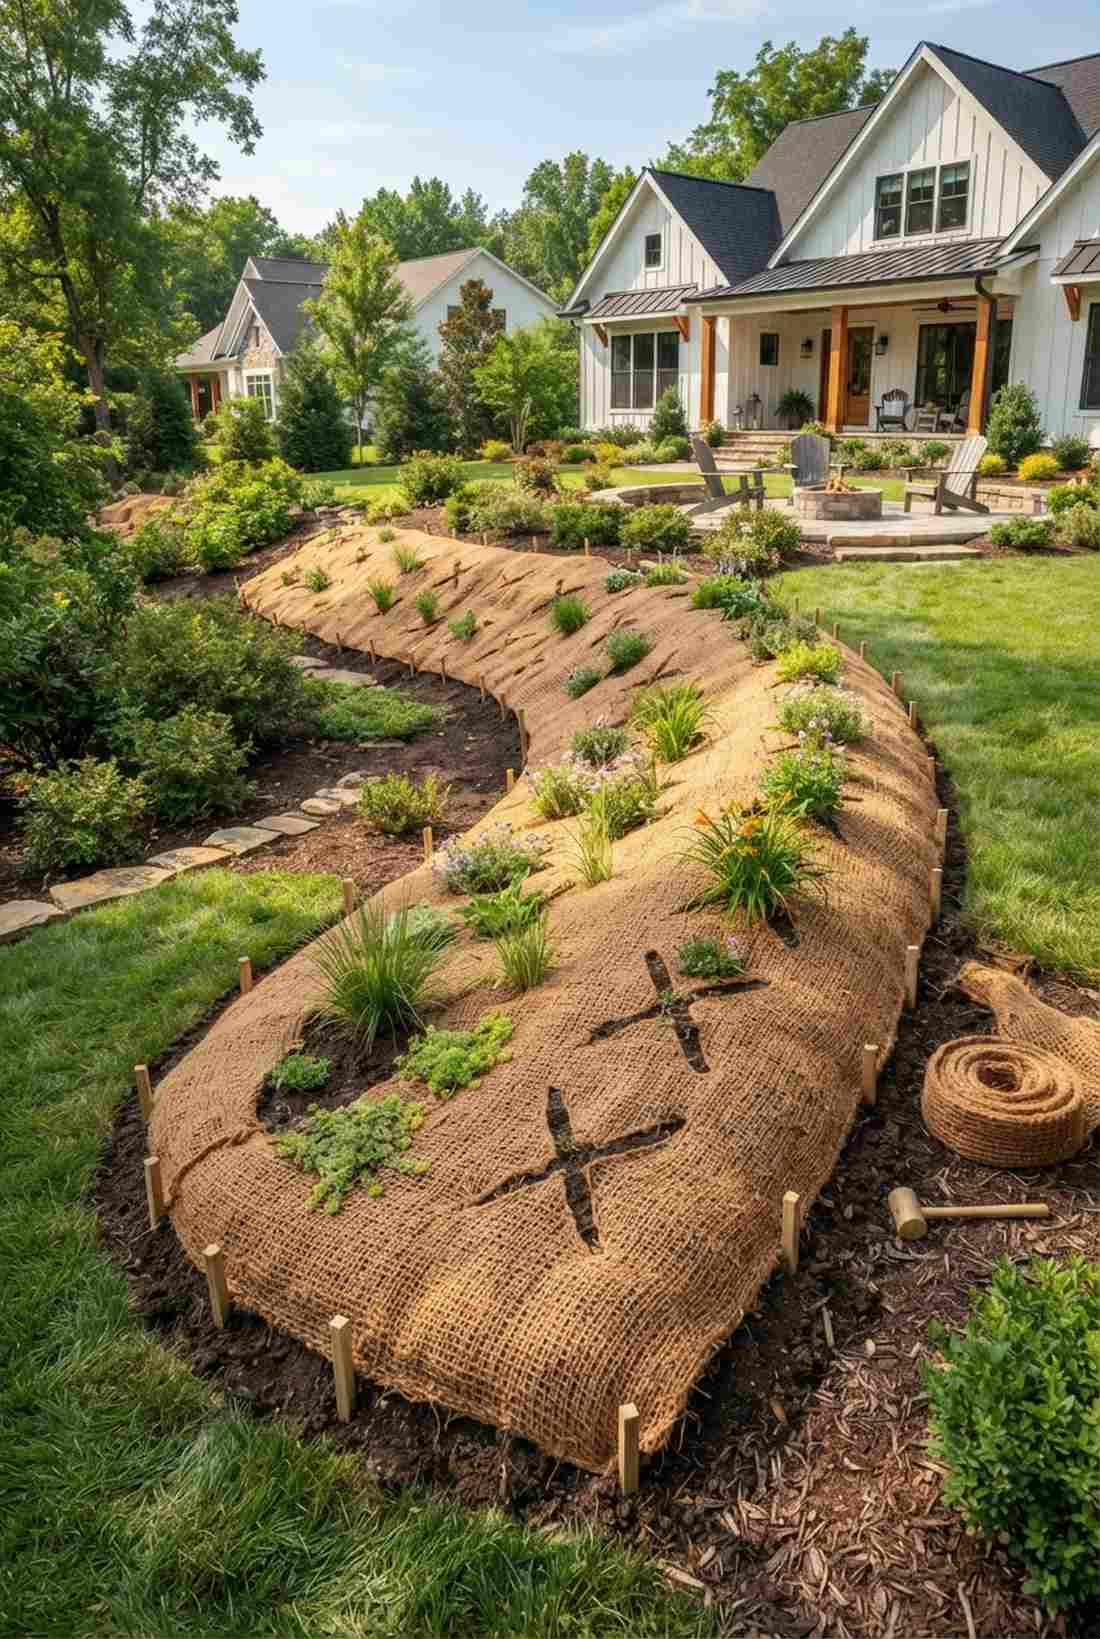
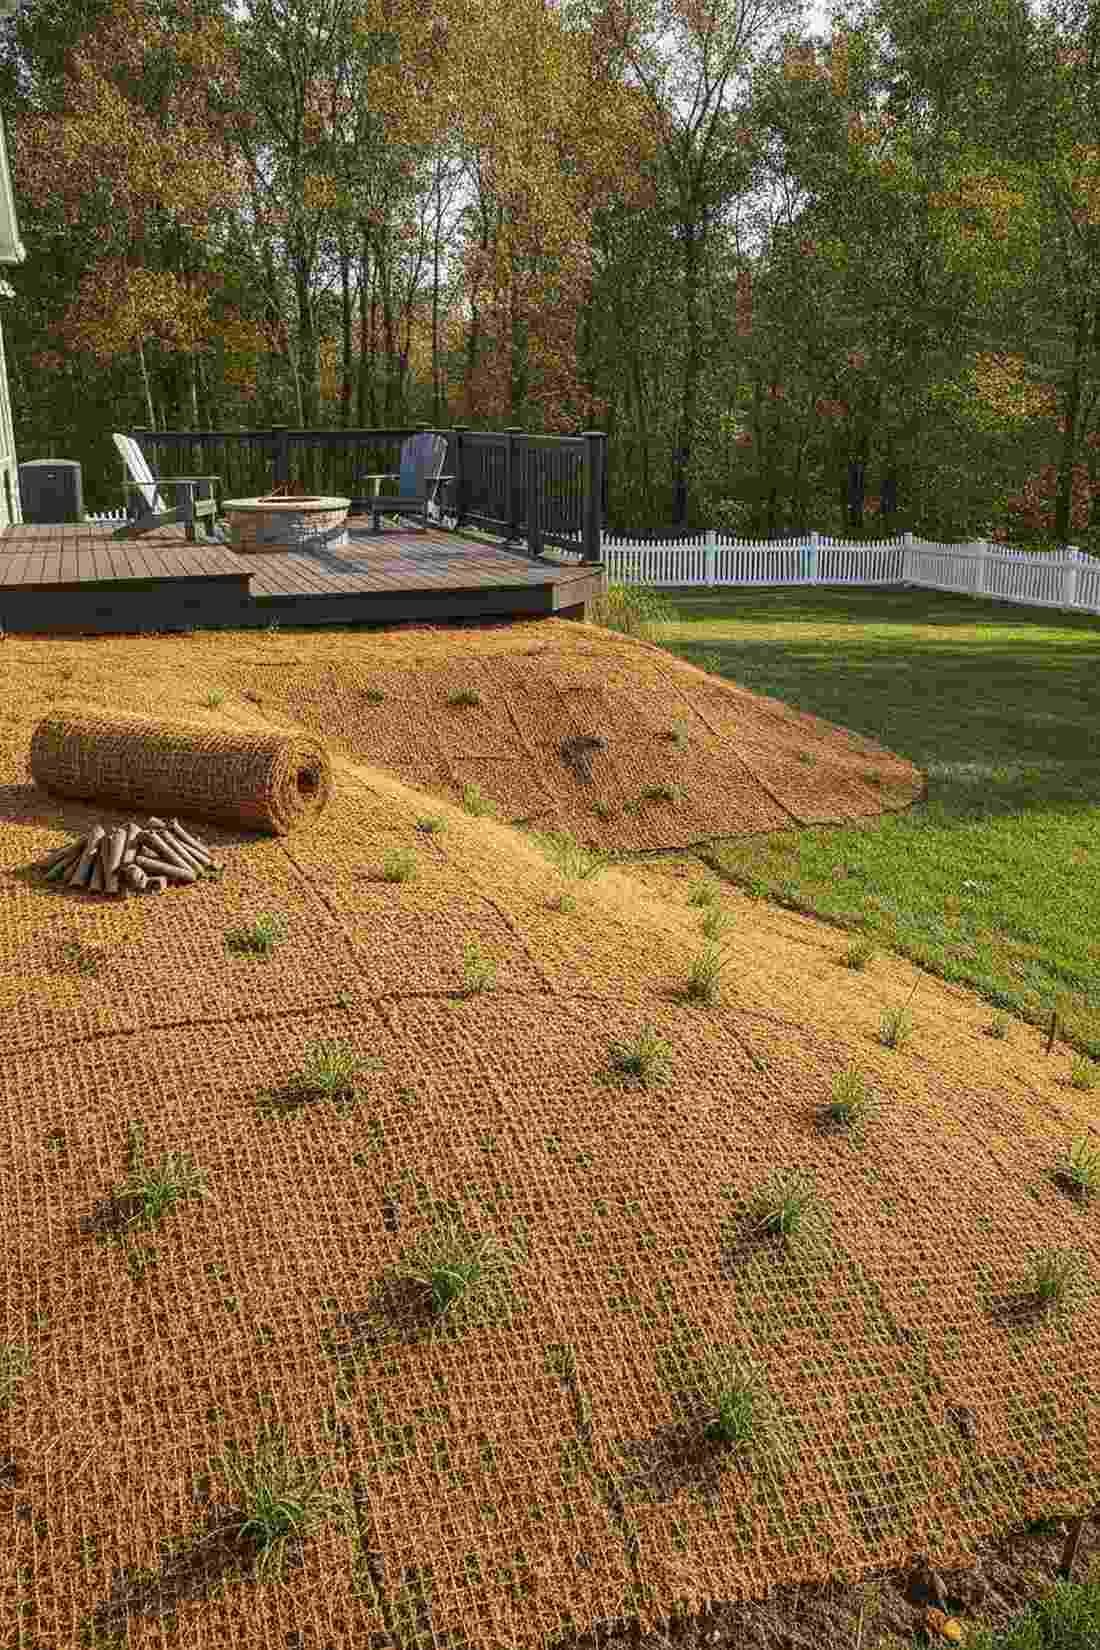
Feels like a brilliant commercial landscaping secret brought home. Biodegradable coir matting wraps are perfectly suited for newly carved earth berms before the roots take hold.
Exposed dirt will wash away in the first rain, but pinning coconut fiber tight against the slope locks everything down instantly. Utilizing these heavy-duty landscape fabric alternatives delivers a surprisingly premium look while the plants underneath grow strong.
A full roll of protection costs around $40–$65. Highly recommended for a quick weekend win against erosion.
- Key Materials: Woven coconut coir erosion netting
- Vibe / Style: Neat, managed earthworks
- Difficulty: Easy installation
- Budget Breakdown: Coir roll: $50 | Anchor pins: $15.
- Creator’s Tip: Cut X-shaped slits into the matting to plant your starter plugs directly through the fabric without removing the protection.
- Smart Sourcing: Grab a bulk pack of biodegradable landscape stakes and a pre-cut coir matting roll.
17. Swale-Integrated Terraces
Creates a lush, self-watering paradise that feels deeply connected to nature. A water-catching permaculture swale is ideal for large, sprawling hills that dry out too quickly.
Rather than fighting runoff, carving a level ditch directly uphill from your bed traps the water and slowly sinks it into the root zone. This genius method completely changes the vibe of your garden, turning a parched slope into an oasis.
This layout costs roughly $0 if you do the digging yourself. Pin this if you want to drastically reduce your summer watering bill!
- Key Materials: Wood chip mulch for filling the trench
- Vibe / Style: Sustainable permaculture food forest
- Difficulty: Moderate digging required
- Budget Breakdown: Mulch delivery: $40 | Digging tools: $0.
- Creator’s Tip: Use an A-frame level to ensure the bottom of your swale is perfectly flat; otherwise, the water will run to one side and break out.
- Smart Sourcing: Order bulk organic wood chips and an easy-read landscape bubble level.
18. Hay Bale Temporary Barriers
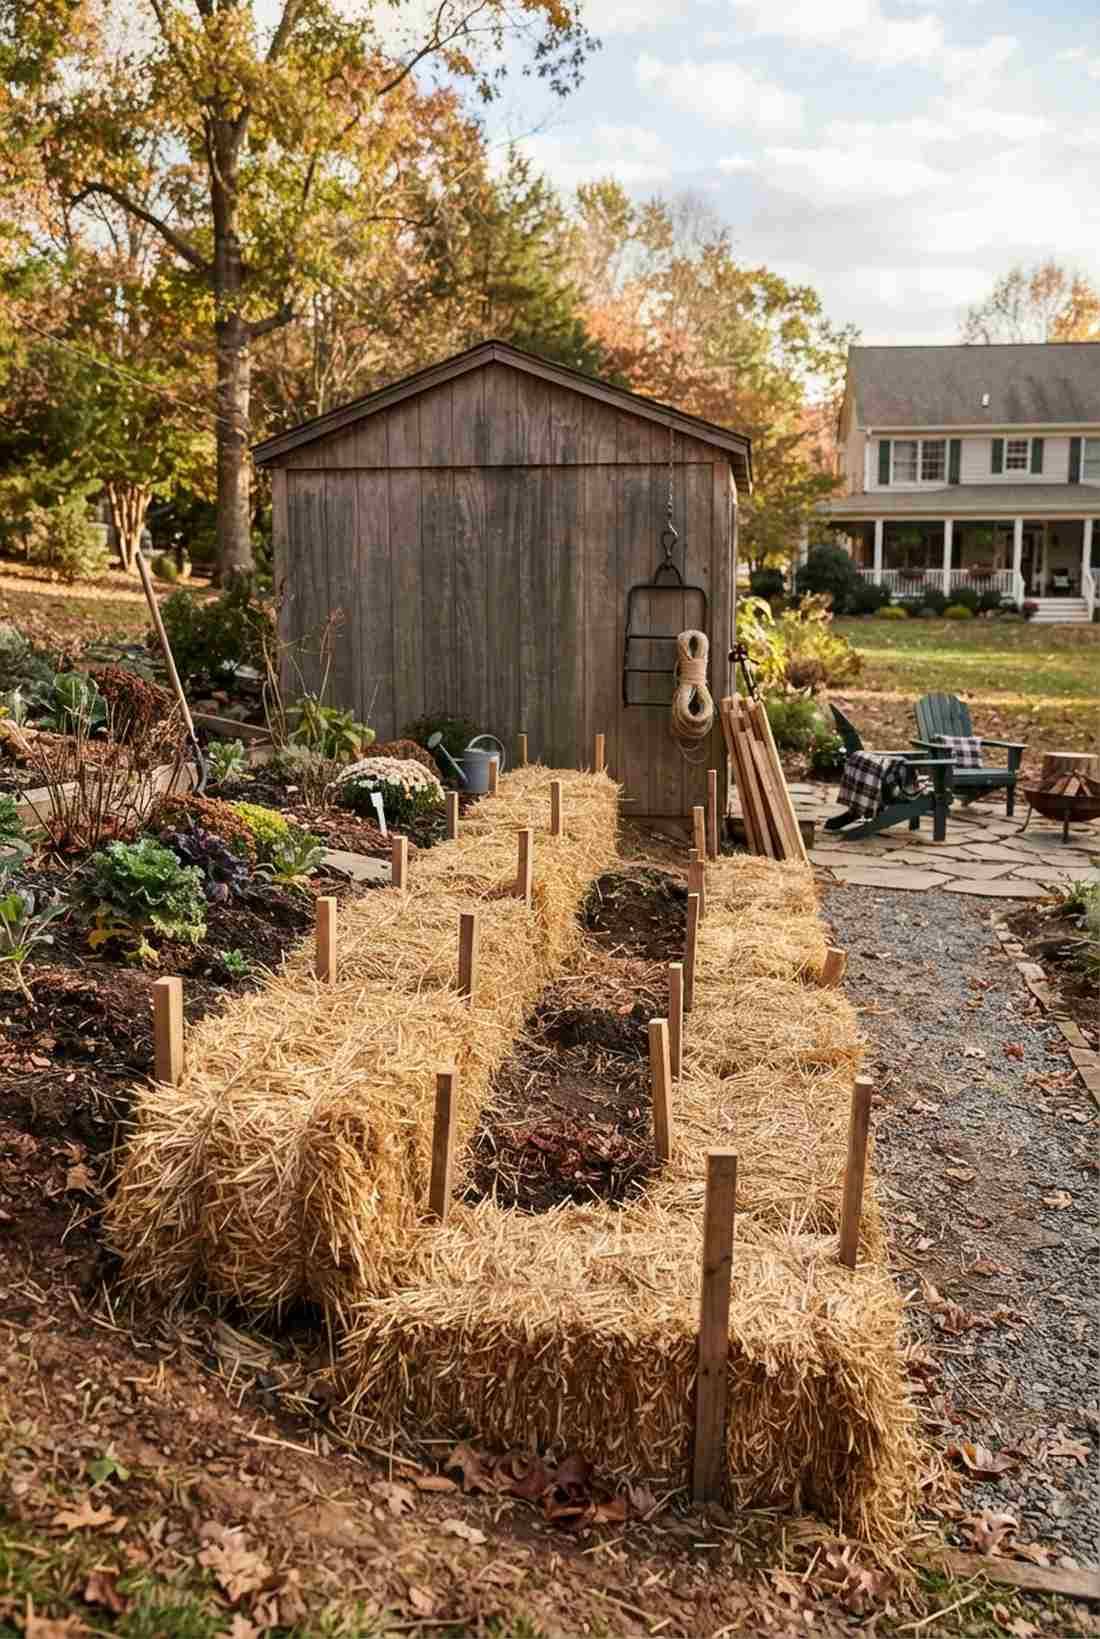
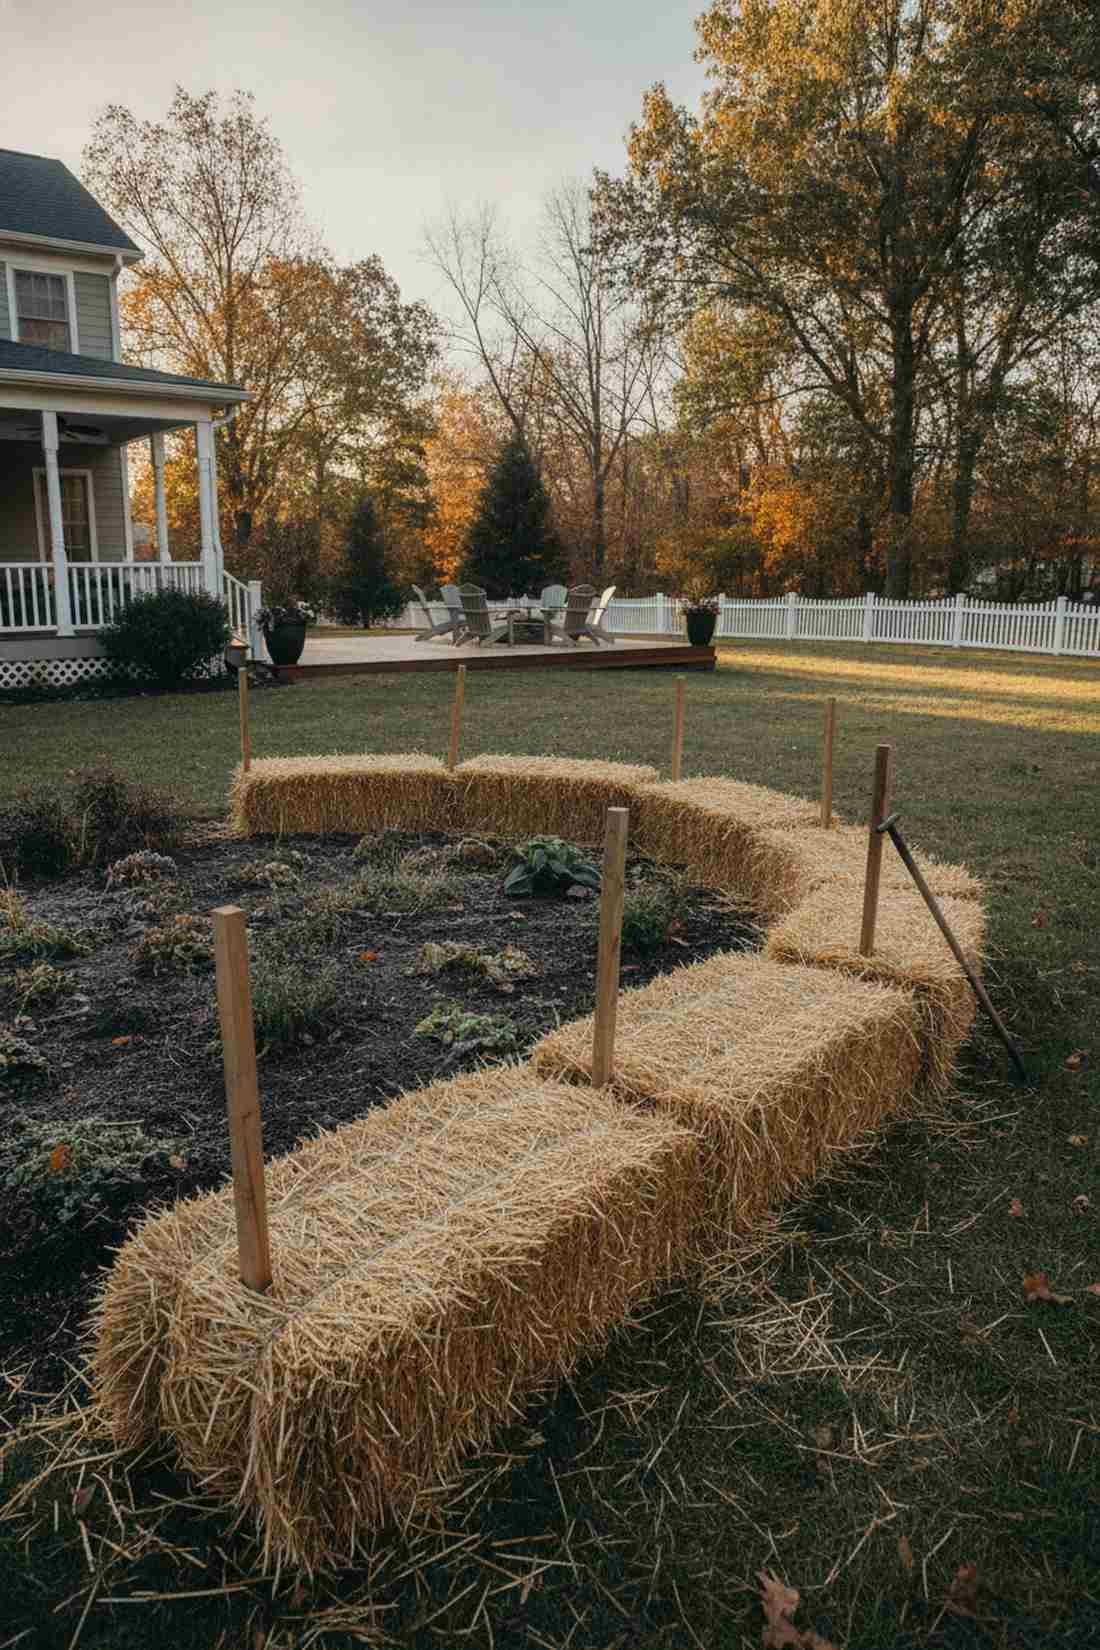
Gives off a charming, rustic farmyard feel that fixes problems instantly. The temporary straw bale retaining wall is a fantastic short-term hack for securing freshly built beds before winter.
Instead of rushing to build expensive wooden walls in the off-season, dropping cheap bales absorbs impact and water immediately. It looks surprisingly intentional and gives you an entire season to plan your permanent hardscaping.
You can secure a whole slope for about $30–$50 in local straw. Save this to your budget garden hacks board!
- Key Materials: Tightly bound straw or hay bales
- Vibe / Style: Rustic seasonal homestead
- Difficulty: Very easy beginner setup
- Budget Breakdown: Bales: $40 | Wooden stakes: $10.
- Creator’s Tip: Drive a wooden garden stake straight down through the center of each bale into the mud so they don’t slide in the rain.
- Smart Sourcing: Pick up a bulk pack of sharpened wooden stakes and a heavy-duty bale moving hook.
Material Guide: Cheap vs. Premium Aesthetic
Knowing exactly where to save and where to spend makes all the difference in achieving that “looks expensive but isn’t” vibe on a hillside.
- Standard Wood vs. UV-Resistant Metal Kits: Untreated wood rots against wet slope soil in 3 years. Upgrading to UV-coated galvanized steel completely stops degradation and offers a sleek, modern finish.
- Pre-made Kits vs. Sourcing Locally: Buying pre-cut terracing starter kits often saves both time and money because the precise angles are already calculated, preventing expensive wasted cuts and failed retaining walls.
Accessibility Solutions for Sloped Terrain Management
Moving across terraced gardens safely requires thoughtful access design. These solutions integrate pathways, steps, and ergonomic features that make hillside beds manageable for all gardeners.
19. Integrated Stairway Planters
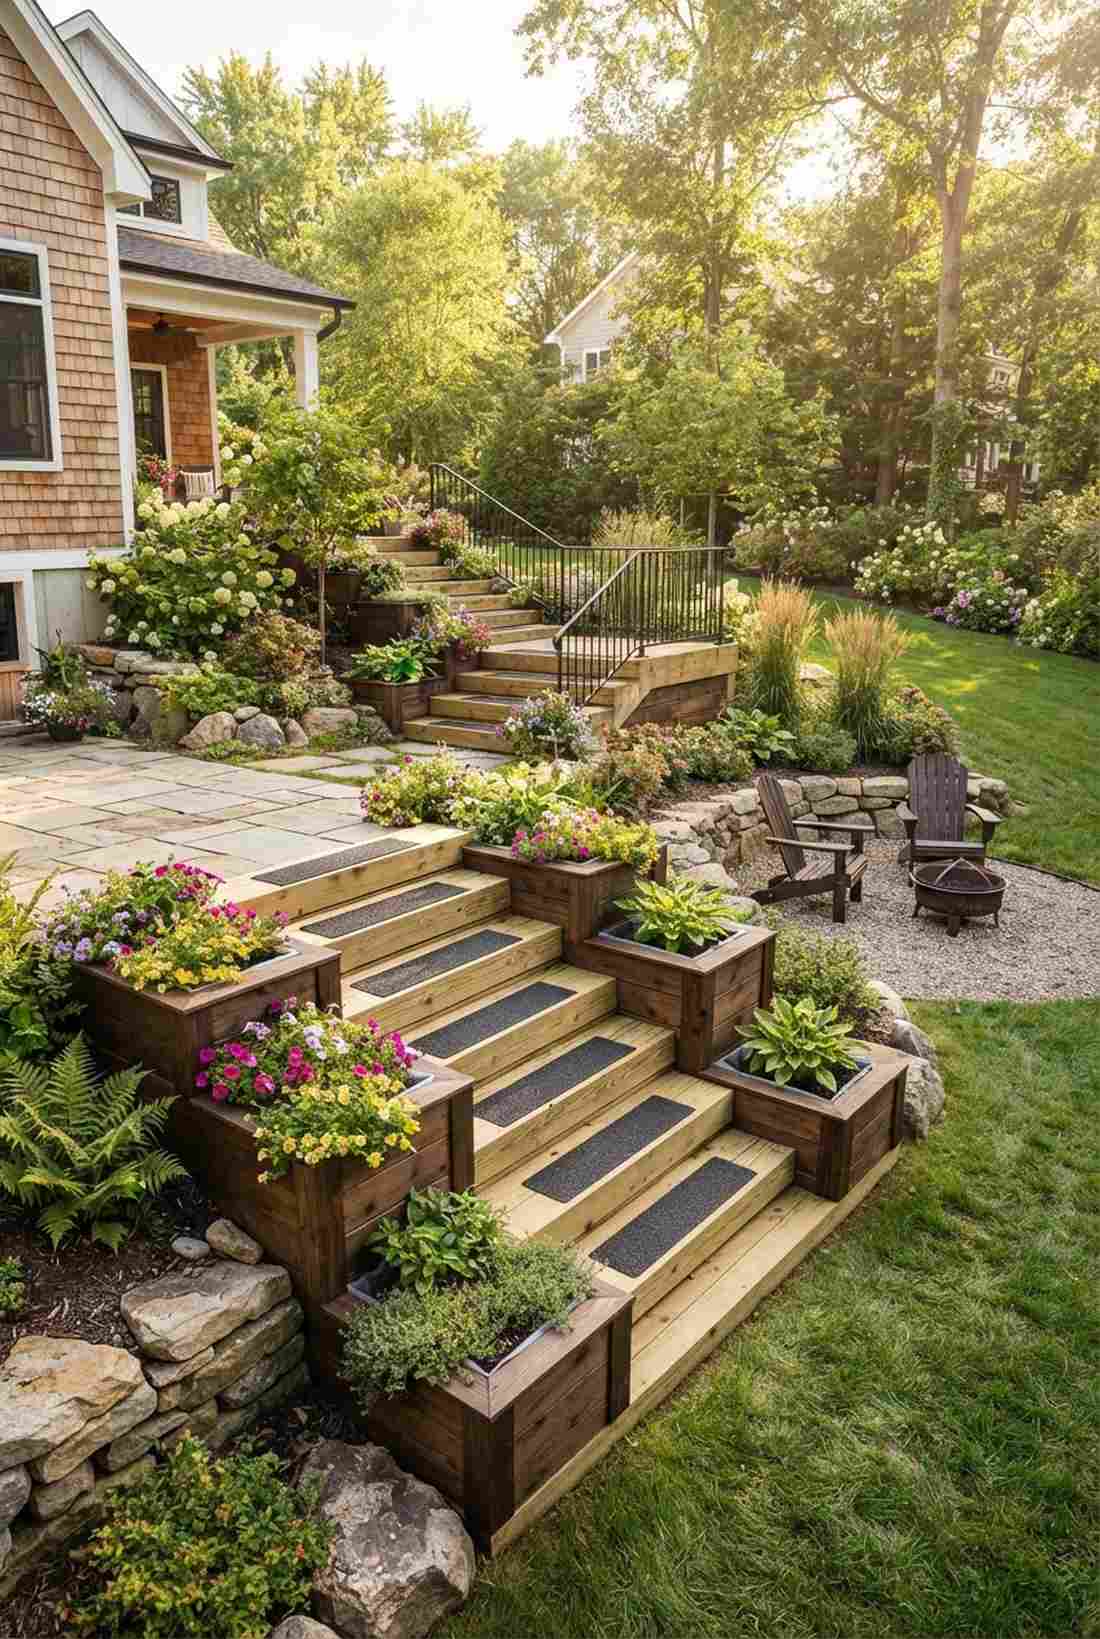
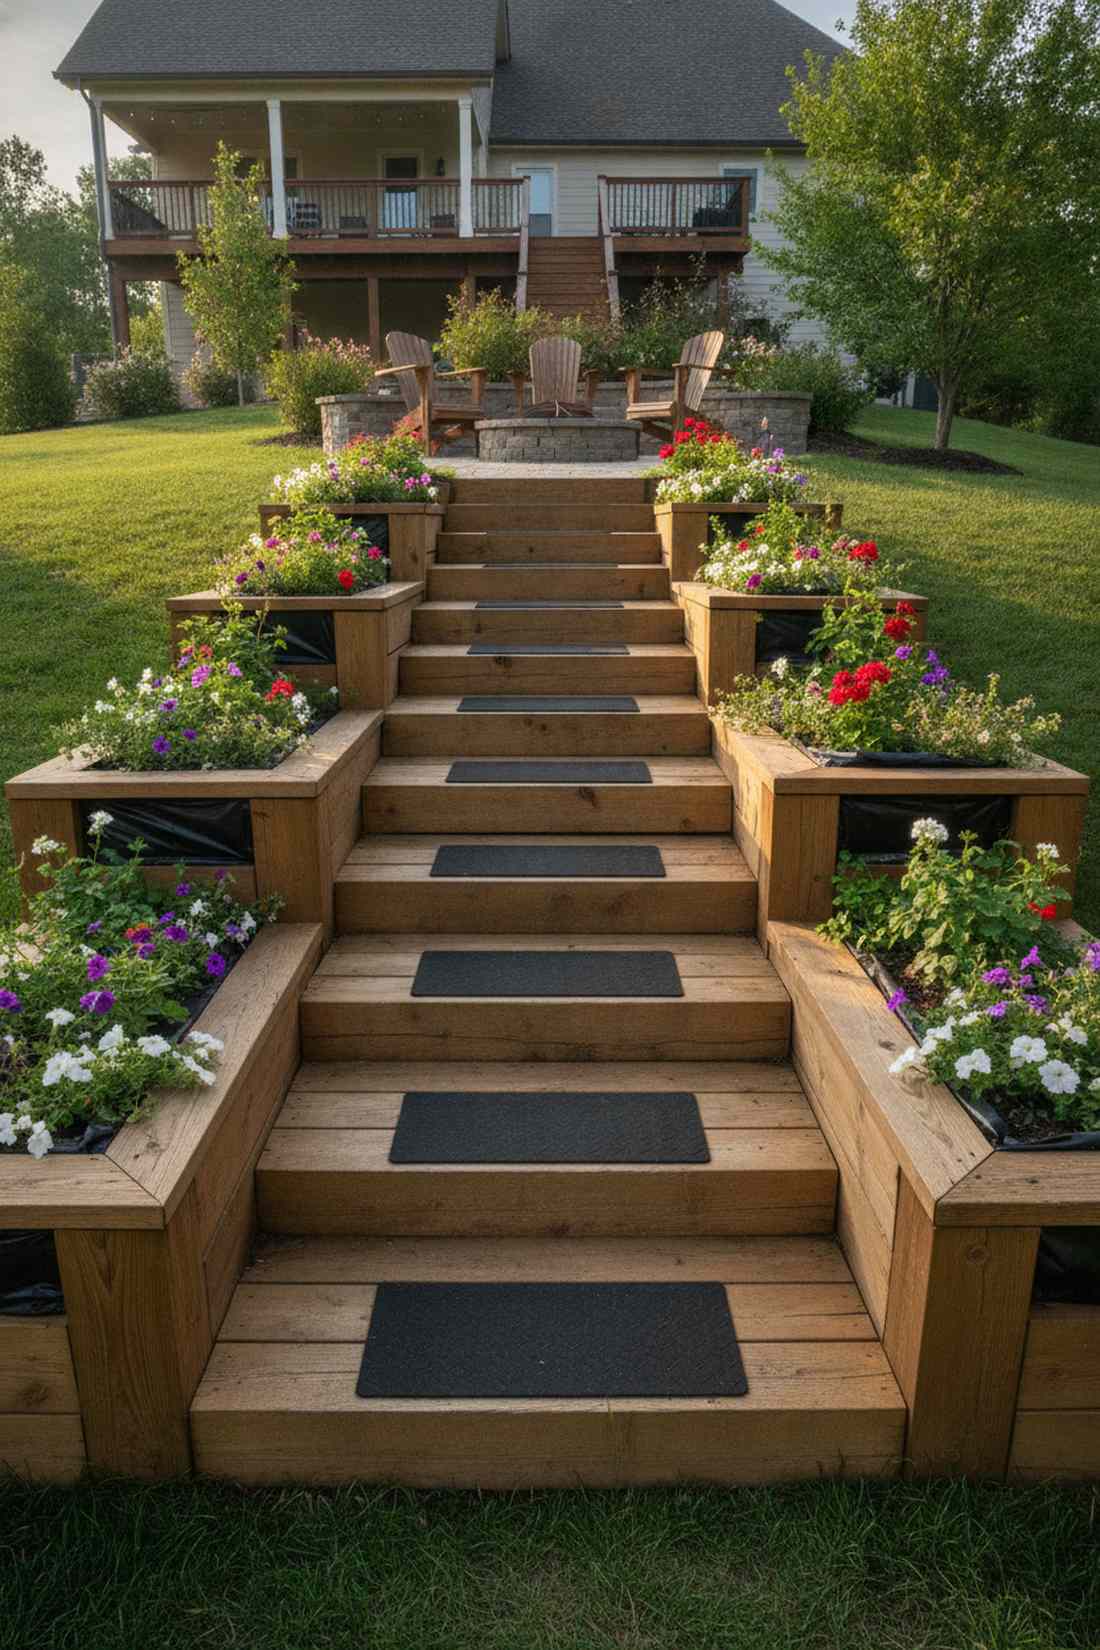
Feels like climbing an ancient, bloom-filled temple staircase. Stepped planter box stairs are a phenomenal use-case for a steep pathway leading down to a lower yard.
Wasting pathway edges is a common error, but extending the stair treads outward to create mini-boxes maximizes every inch of dirt. Integrating these terraced garden supplies natively into the walkway delivers a surprisingly premium look that guests will obsess over.
This dual-purpose build runs about $150–$200 for safe, sturdy lumber. Pin this if you want to turn a boring staircase into a focal point!
- Key Materials: Thick 2×12 pressure-treated stringers
- Vibe / Style: Multi-functional architectural path
- Difficulty: Advanced layout skills
- Budget Breakdown: Step lumber: $120 | Grip tape: $30.
- Creator’s Tip: Line the inside of the planter sections with heavy plastic to prevent wet soil from rotting the structural stair stringers.
- Smart Sourcing: Use heavy-duty thick plastic sheeting (bulk roll) and pre-cut anti-slip stair treads.
20. Contour Path Switchbacks
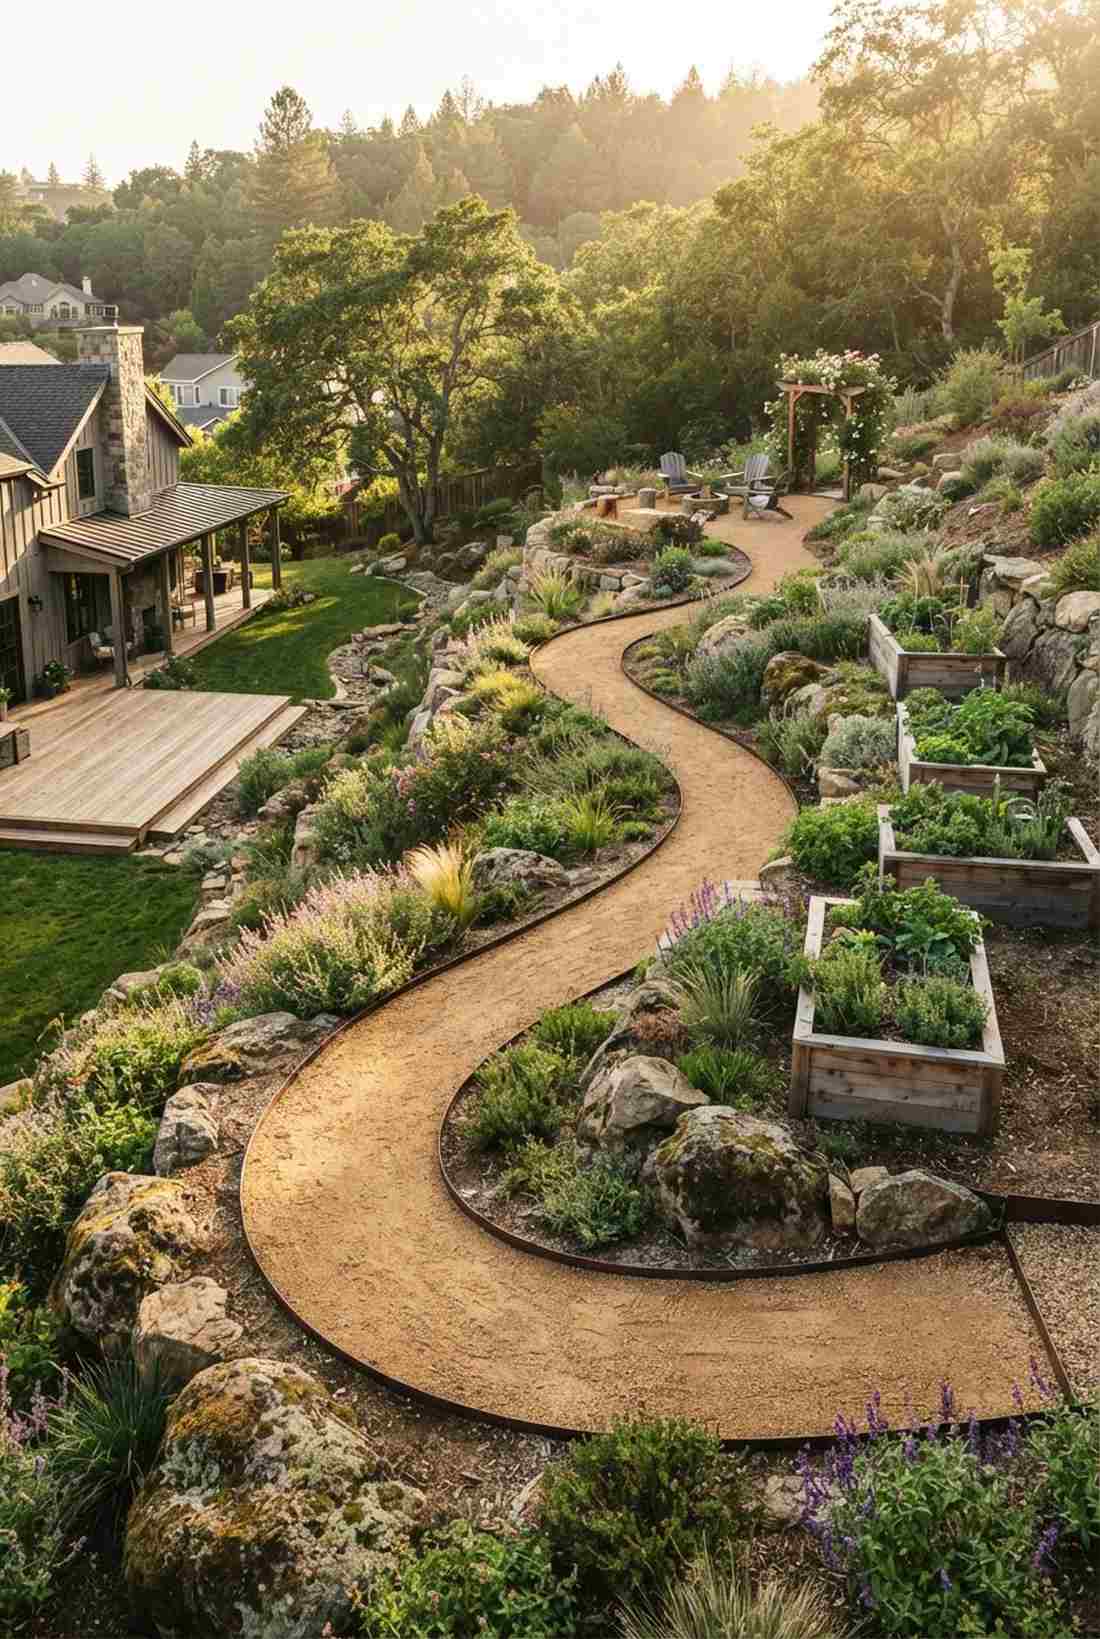
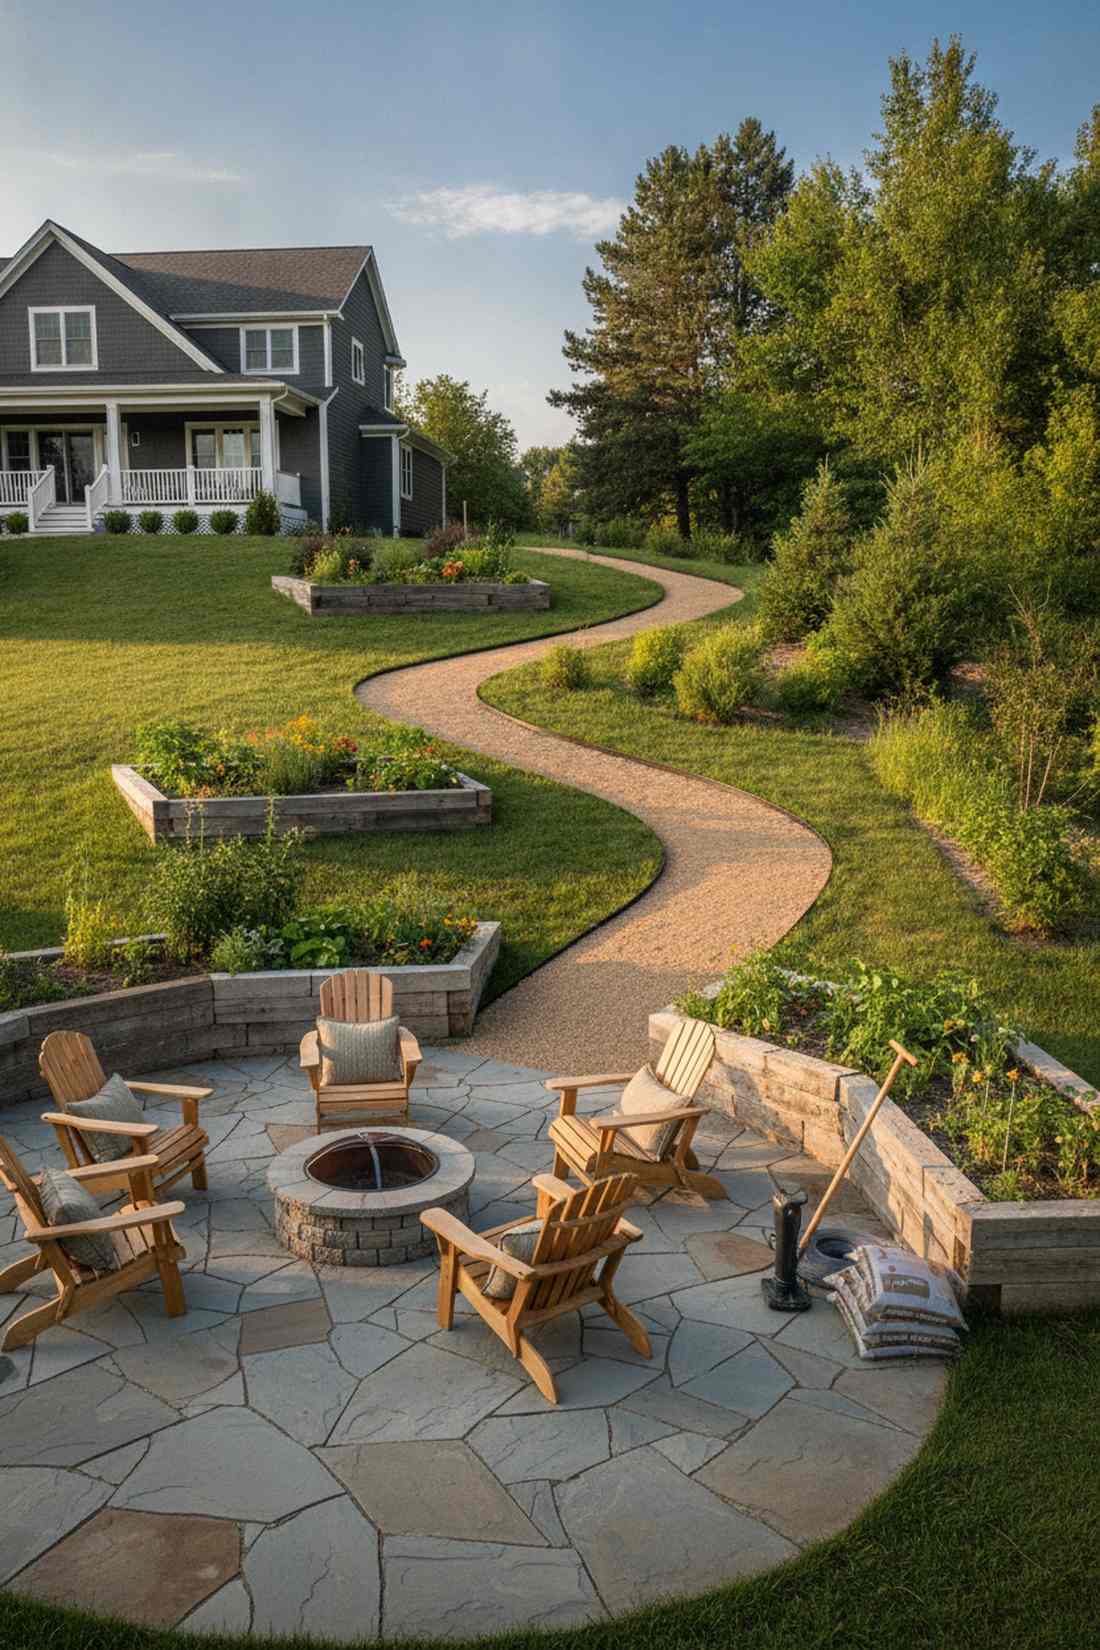
Emanates the adventurous vibe of a high-end mountain hiking trail right at home. A curved switchback gravel pathway works beautifully to navigate massively steep, un-walkable backyards.
Charging straight up a hill causes immediate erosion, but zigzagging gently across the grade cuts the incline dramatically. This layout looks far more expensive than it is, transforming a dangerous hill into a leisurely, accessible stroll between your raised beds.
Carving the path and adding aggregate costs about $80–$120. It’s a fast upgrade that completely changes how you experience your property.
- Key Materials: Compacted decomposed granite or gravel
- Vibe / Style: Meandering mountain retreat
- Difficulty: Moderate excavation
- Budget Breakdown: Gravel delivery: $90 | Edging: $30.
- Creator’s Tip: Tamp the gravel down while it is slightly wet; it will lock together almost like concrete and won’t kick loose on the slope.
- Smart Sourcing: Grab a heavy-duty steel hand tamper and a flexible path edging starter kit.
You probably think harvesting on a hill destroys your back… until you see this genius elevated trick.
21. Waist-Height Elevated Platforms

Feels like a luxurious custom chef’s prep station out in the sunshine. Tall downhill-facing elevated beds are exceptionally perfect for gardeners dealing with knee or back pain.
Instead of fighting the incline, using the natural drop to create a 36-inch high wall on the downhill side creates a perfect standing-height workstation. It gives a designer-level finish while completely eliminating the need to bend over during harvest time.
Planting at chest height costs around $100–$140 due to the taller front wall materials. Save this to your accessible gardening board!
- Key Materials: Corrugated metal roofing panels for tall sides
- Vibe / Style: Ergonomic modern homestead
- Difficulty: Intermediate
- Budget Breakdown: Metal panels: $80 | Top rail: $40.
- Creator’s Tip: Add a wide, flat 2×6 wooden cap along the tall edge to serve as a resting spot for your harvest basket and coffee mug.
- Smart Sourcing: Pick up a bulk pack of self-tapping metal screws and pre-cut corrugated steel sheets.
22. Pulley Bucket Irrigation Systems
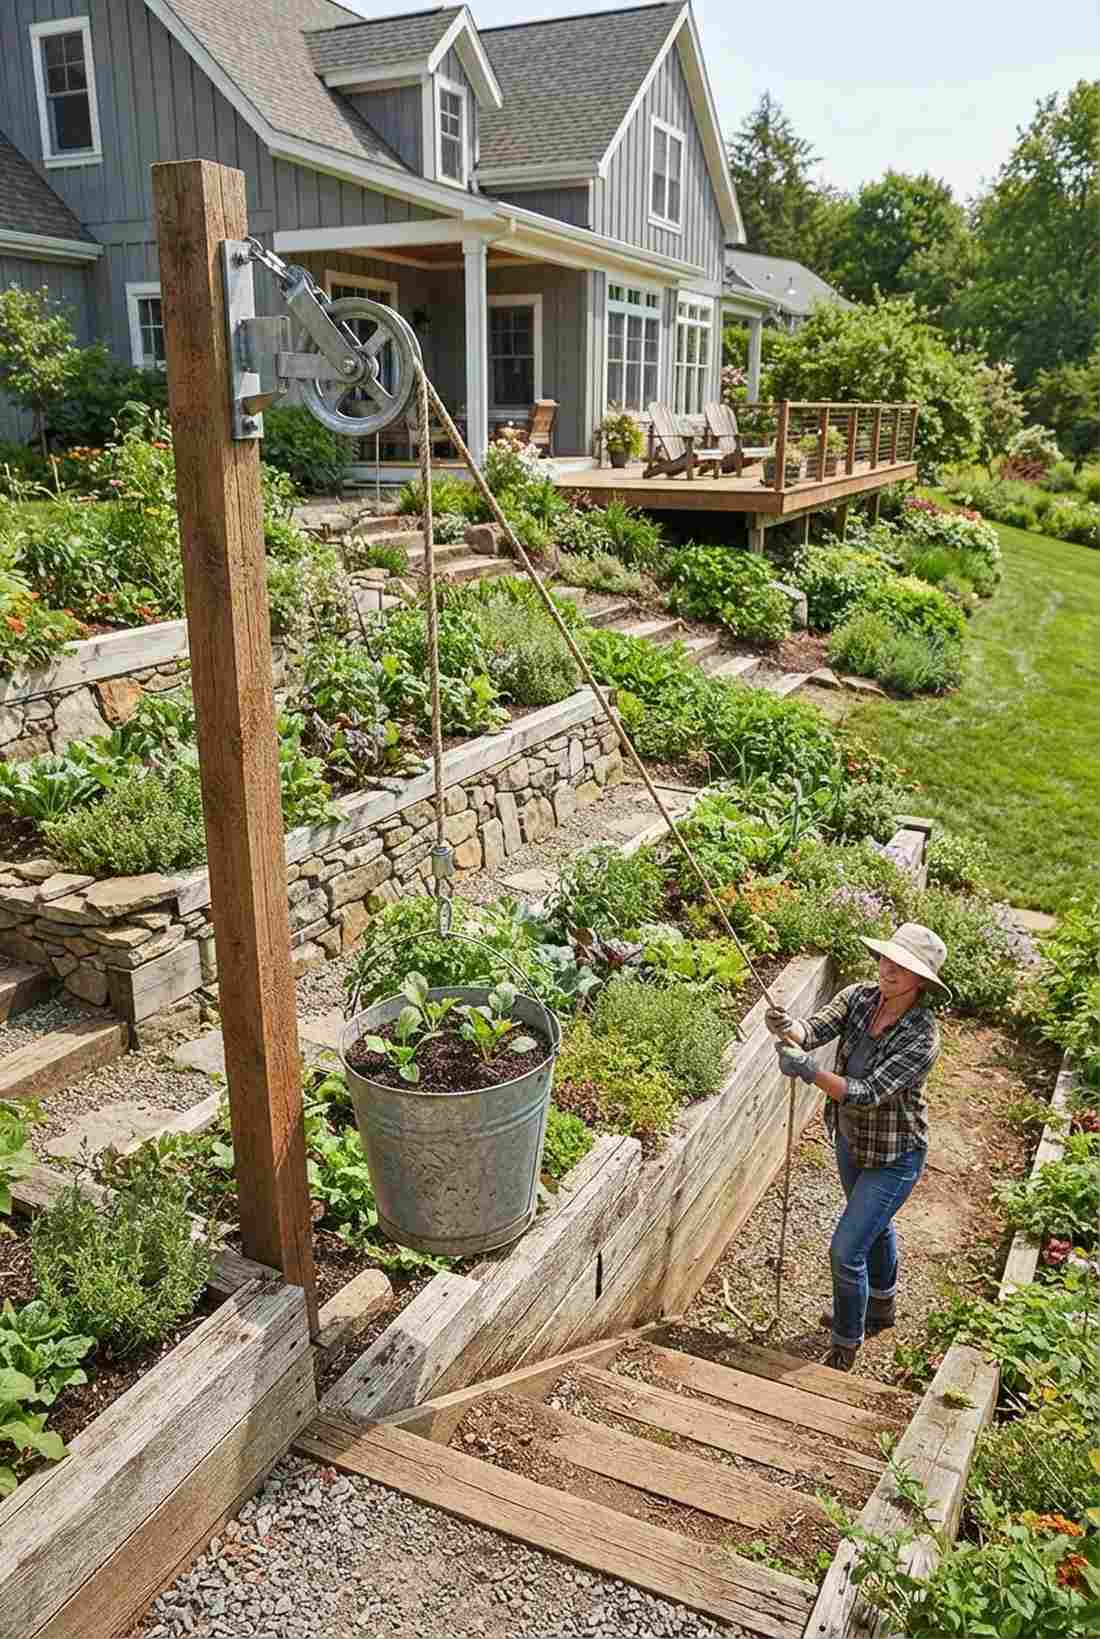
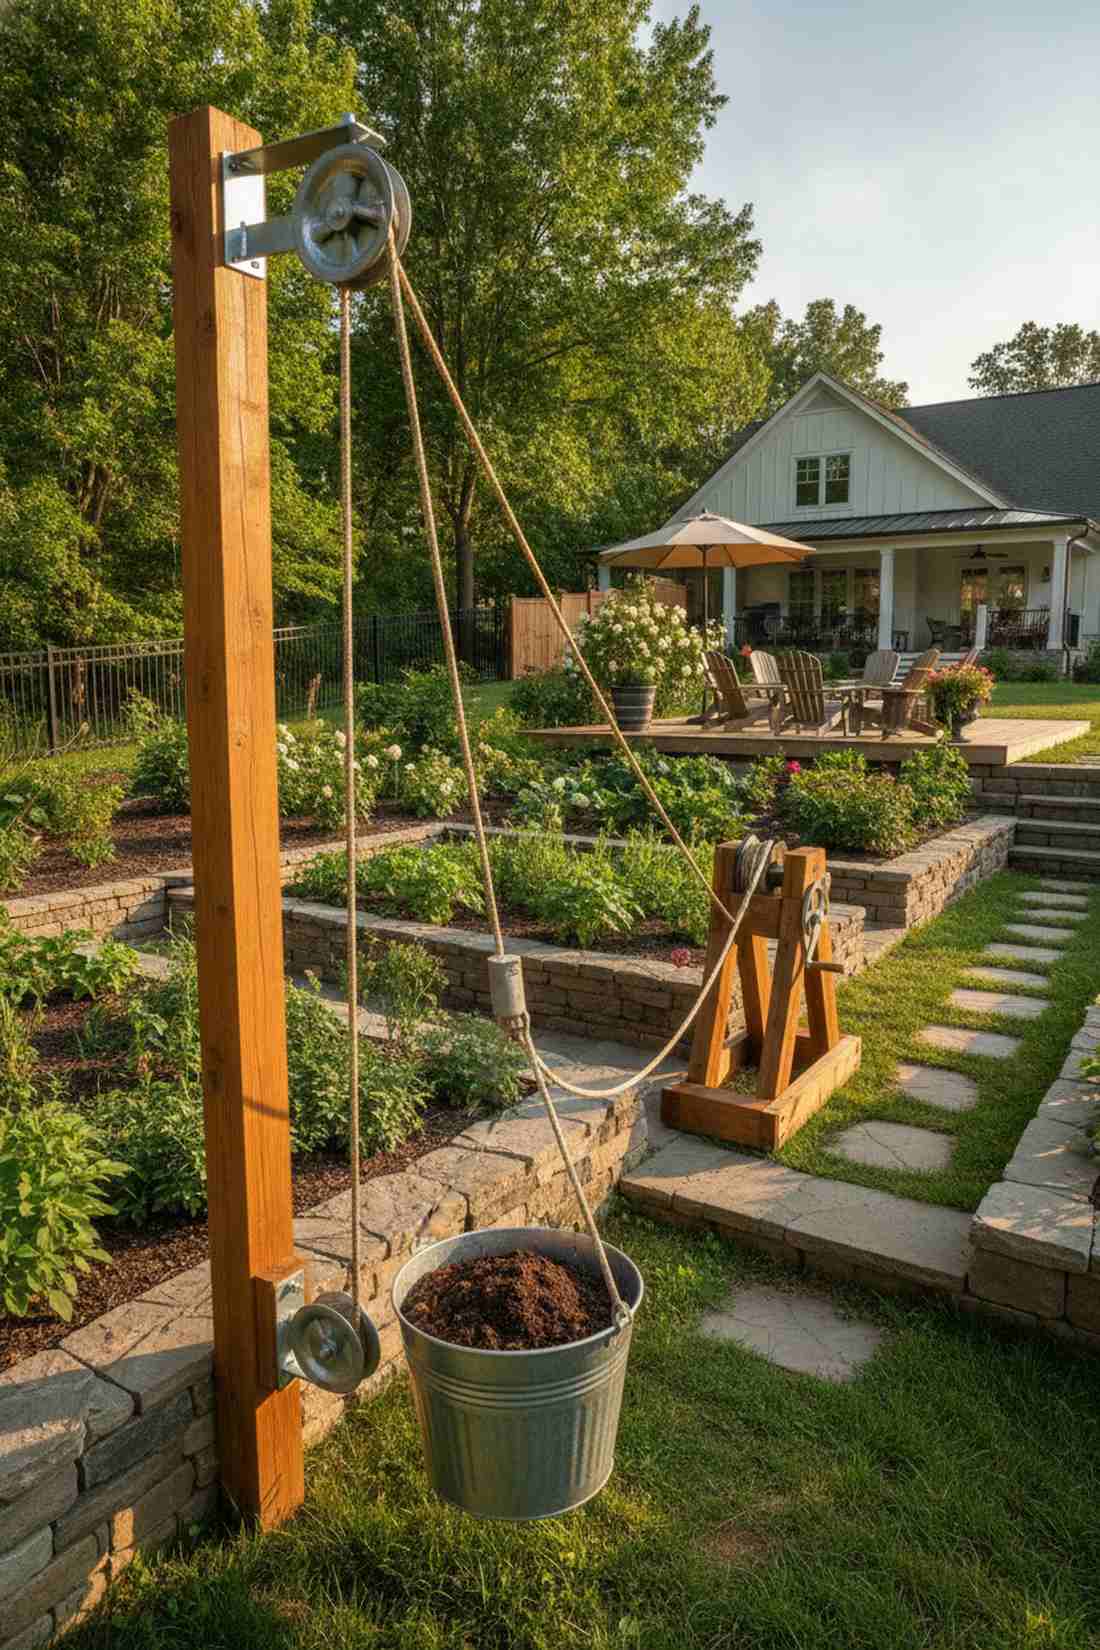
Brings a charming, old-world mechanical ingenuity to your modern yard. A post-mounted bucket pulley setup is an absolute lifesaver for moving water or compost up a steep incline.
Carrying heavy loads up terraced stairs is exhausting, but rigging a simple line to hoist materials changes the game completely. Injecting these clever miniature garden supplies and hardware into your design looks incredibly unique and saves massive physical effort.
This clever rigging system costs a mere $30–$50 to install. Highly recommended for adding functional, rustic charm.
- Key Materials: Heavy-duty steel pulley wheel and marine rope
- Vibe / Style: Clever rustic utility
- Difficulty: Easy
- Budget Breakdown: Pulley hardware: $25 | Nylon rope: $15.
- Creator’s Tip: Anchor the top pulley to a dedicated 4×4 post rather than a fence or tree, ensuring it can handle the weight of wet soil.
- Smart Sourcing: Buy a commercial-grade steel swivel pulley and a bulk spool of weather-resistant nylon rope.
23. Landing Platform Work Zones
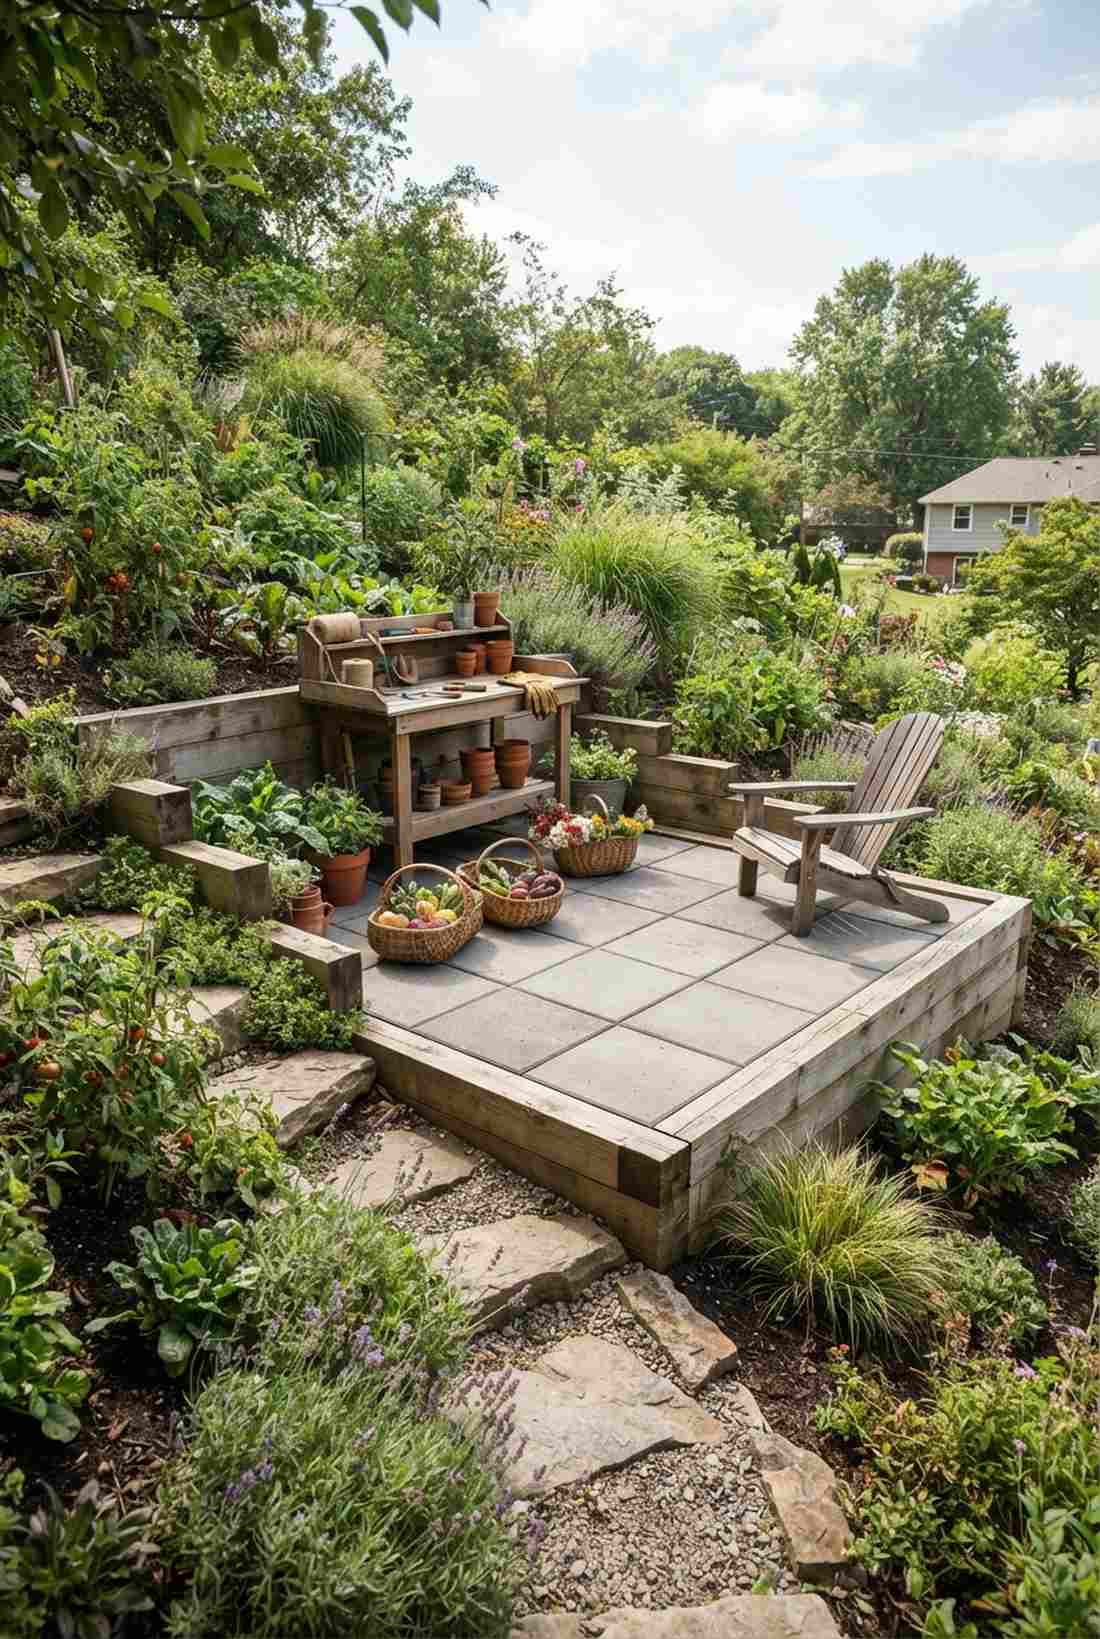

Feels like a private little viewing deck hidden among the foliage. A level gravel staging platform works wonders when placed halfway up a massive hillside garden installation.
Without a flat place to stand, pruning and harvesting on an angle becomes miserable quickly. Building a simple framed square of flat ground delivers a surprisingly premium look, acting as a dedicated patio space right in the middle of your crops.
You can frame out a solid resting pad for just $40–$60. Pin this to ensure you build a comfortable workspace into your design!
- Key Materials: Concrete pavers or stepping stones
- Vibe / Style: Structured hillside patio
- Difficulty: Beginner-friendly
- Budget Breakdown: Pavers: $35 | Sand base: $15.
- Creator’s Tip: Frame the platform box deeply into the hill on the uphill side so it naturally acts as a small retaining wall for the path above it.
- Smart Sourcing: Invest in a bulk pack of heavy concrete patio pavers and a premium leveling sand starter kit.
Conclusion
Mastering these 23 exact raised beds on a slope ideas transforms challenging hillside terrain into highly productive, visually dynamic, high-end garden spaces. The strategic terracing techniques, drainage systems, and accessible layouts presented here guarantee that your investment looks incredibly premium without breaking the bank. By skipping generic dirt and investing in smart, productized kits—like UV-coated metal panels and heavy-duty ground anchors—you secure structural stability and stop erosion permanently. Start with a simple level pocket layout for your first terrace, and systematically expand as you lock down the terrain. Your hillside property will reward smart sourcing with decades of abundant harvests and unmatched curb appeal.
Frequently Asked Questions
What is the maximum slope angle for raised bed installation?
Raised beds can be installed on slopes up to 30-35 degrees with proper terracing and heavy-duty anchoring. Steeper slopes require extensive retaining wall structures or commercial-grade ground anchors. Most DIYers find 8-20 degree slopes ideal, allowing you to use standard pre-cut cedar planks or galvanized raised bed kits without facing excessive construction complexity.
How do I prevent water from pooling behind terraced beds?
Install perforated French drain coils or bulk landscaping gravel trenches at the uphill edge of each bed to intercept runoff seamlessly. Create weep holes or gaps in your retaining wall blocks every 4-6 feet to allow water passage rather than letting hydrostatic pressure build up and crack the wood. Using proper landscape water management supplies prevents catastrophic wall failure.
Should all terraced beds be the same height?
Uniform heights simplify construction, but using staggered elevation cascade kits creates a much more premium, custom visual interest. Varying terrace heights by 6-18 inches accommodates different root depths—deeper corrugated steel planters for root crops, and shallow modular kits for lettuce and herbs. It all depends on your budget and slope gradient.
How far apart should I space terraced beds vertically?
Space terrace levels 18-36 inches apart vertically so you have adequate pathway clearance to lay down UV-resistant weed barrier fabric and gravel. Closer spacing works for intensive small-space setups, while wider spacing accommodates heavy-duty garden carts and prevents tall crops from shading out the lower levels.
What lumber works best for sloped raised beds?
Pre-cut cedar planks and redwood resist rot naturally without chemical treatments, making them perfect for organic setups. For budget-friendly but high-end looking projects, use premium composite decking boards or ground-contact rated timber treated with a commercial-grade UV-coated wood sealant to ensure they survive the harsh hillside moisture.