
Strategic garden layouts instantly maximize crop yields and transform wasted space into designer-level sanctuaries. Discover exact material lists, structural blueprints, and budget-friendly setups to build a premium outdoor oasis. Sourcing the right raised bed kits makes all the difference.
Design SnapshotKey Principles
- Spatial Efficiency: Maximize growing area while maintaining comfortable access pathways of at least 24 inches
- Microclimate Awareness: Position tall plants on the northern edge to prevent shading low-growing crops
- Visual Hierarchy: Use repetition and symmetry to create order; introduce curves to soften rigid boundaries
- Zone Definition: Separate intensive production areas from low-maintenance perennial zones for optimized resource allocation
Raised Bed Configurations for Intensive Production
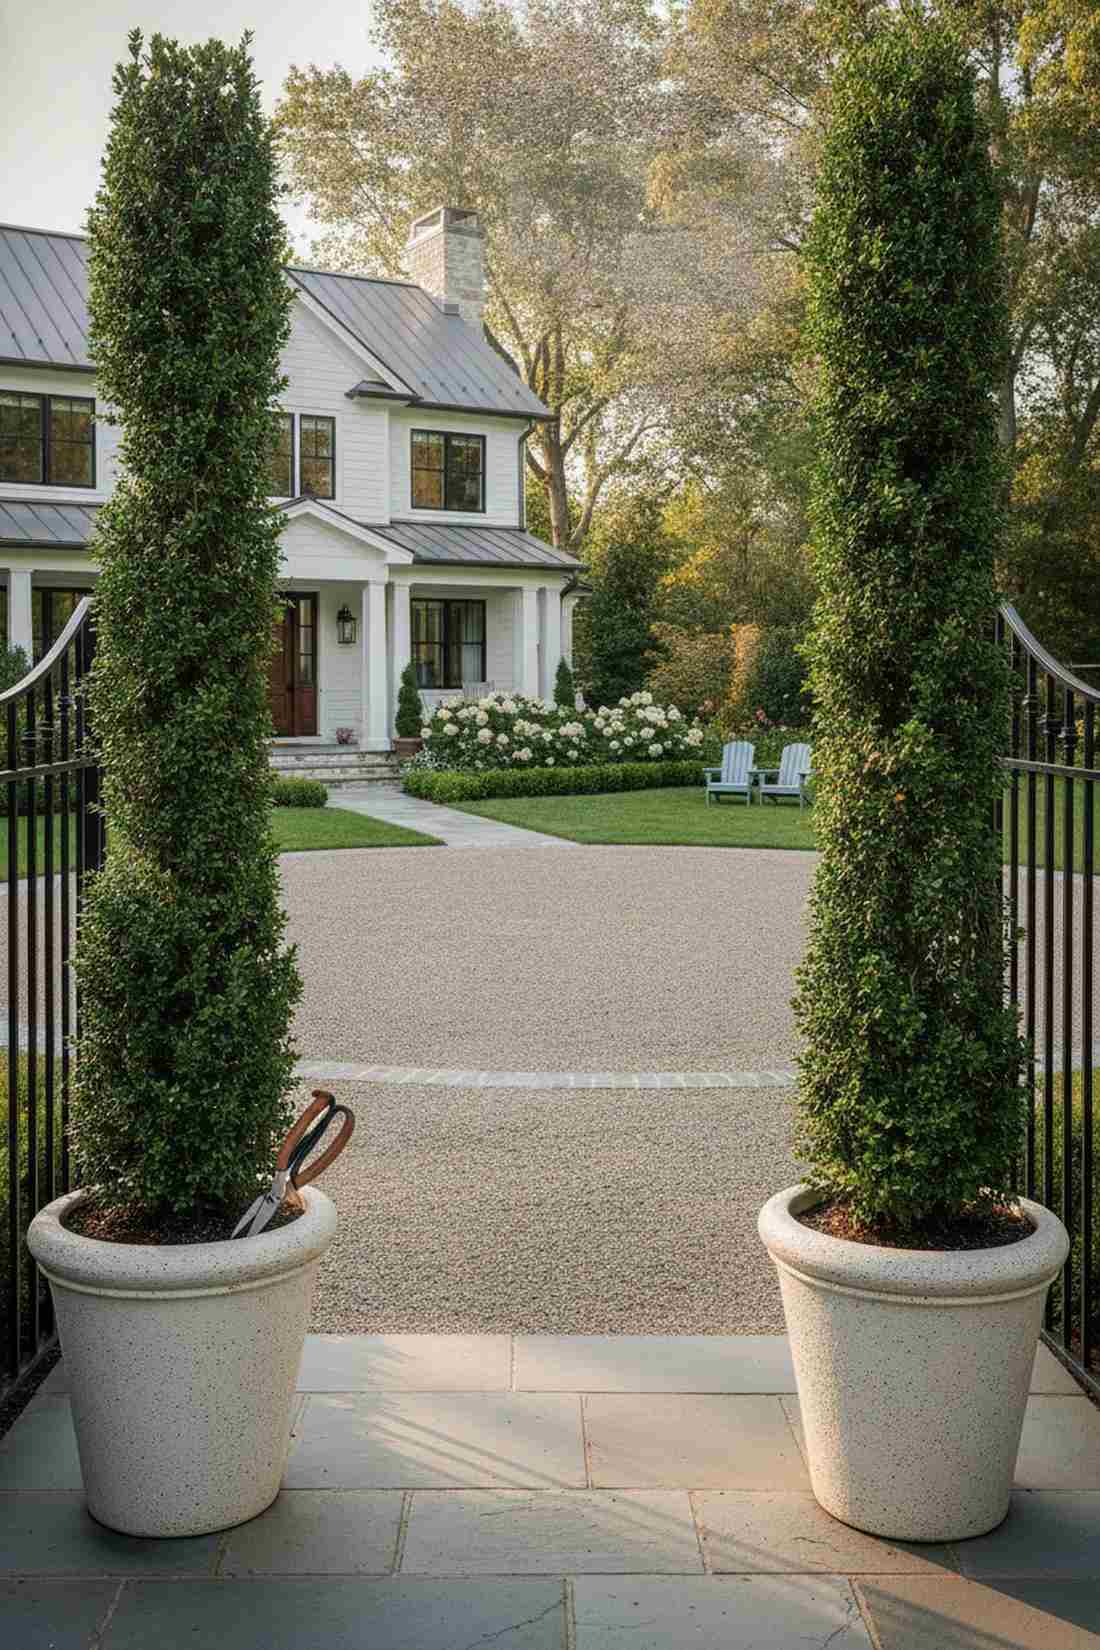
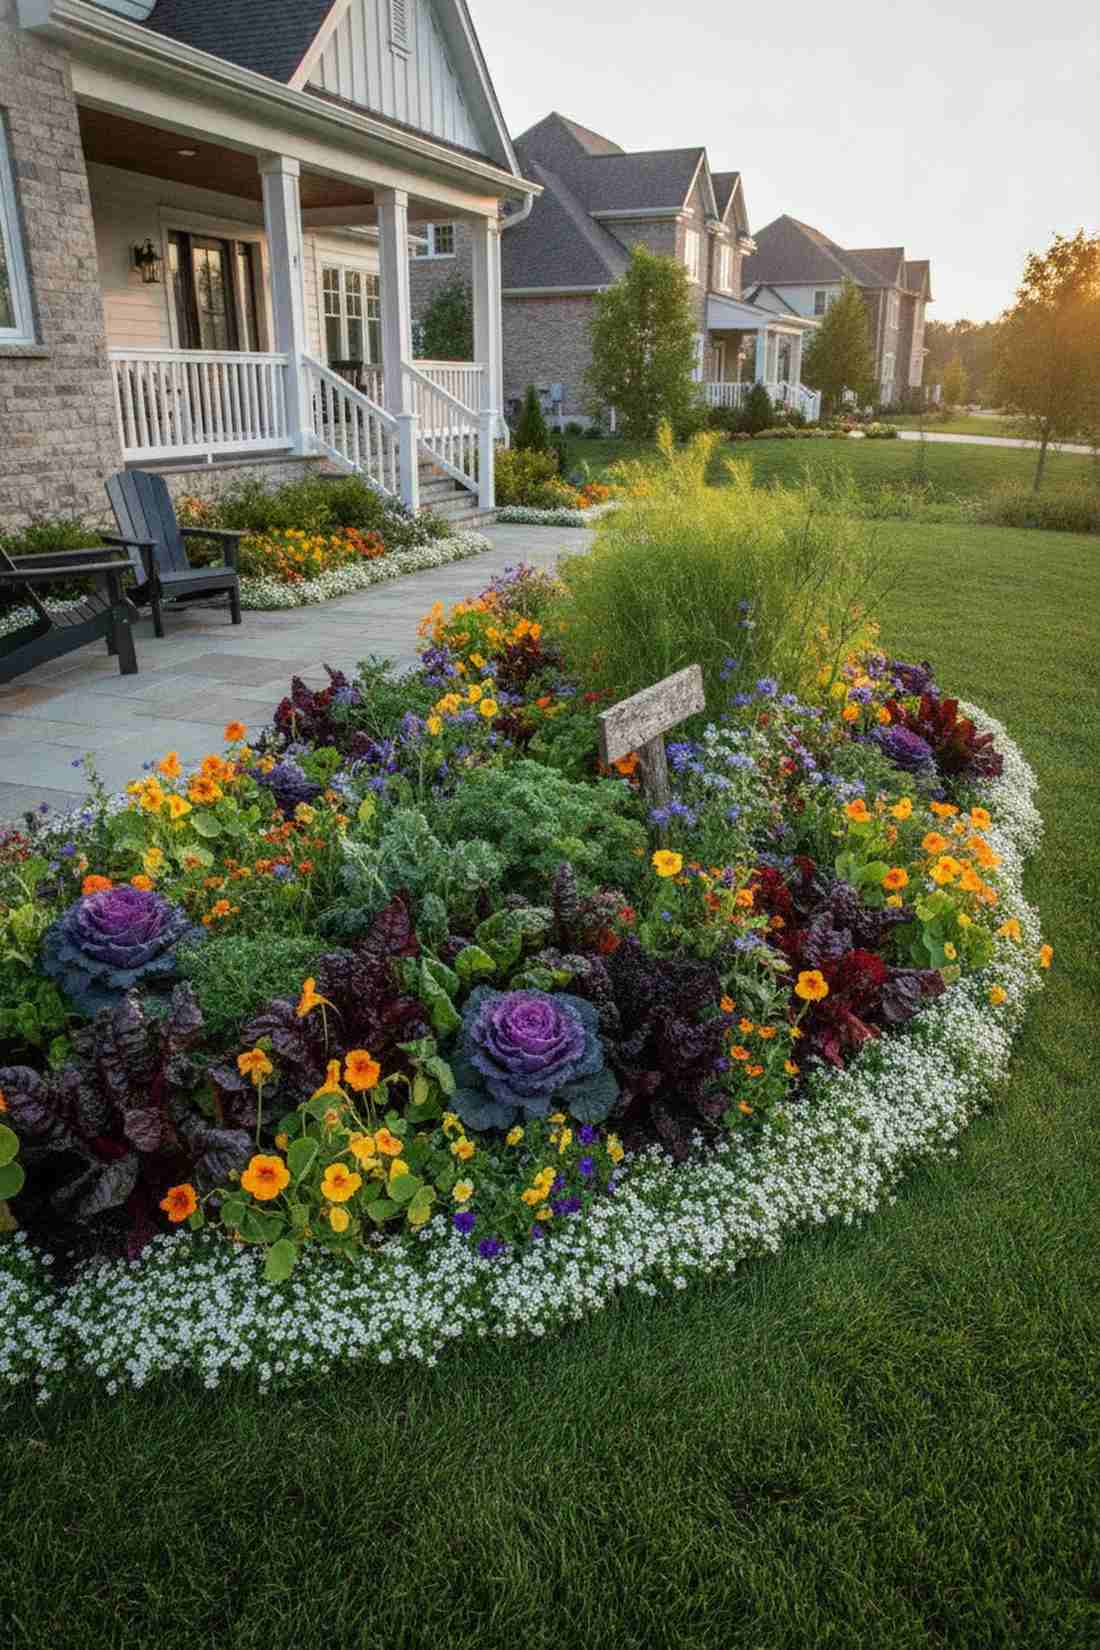
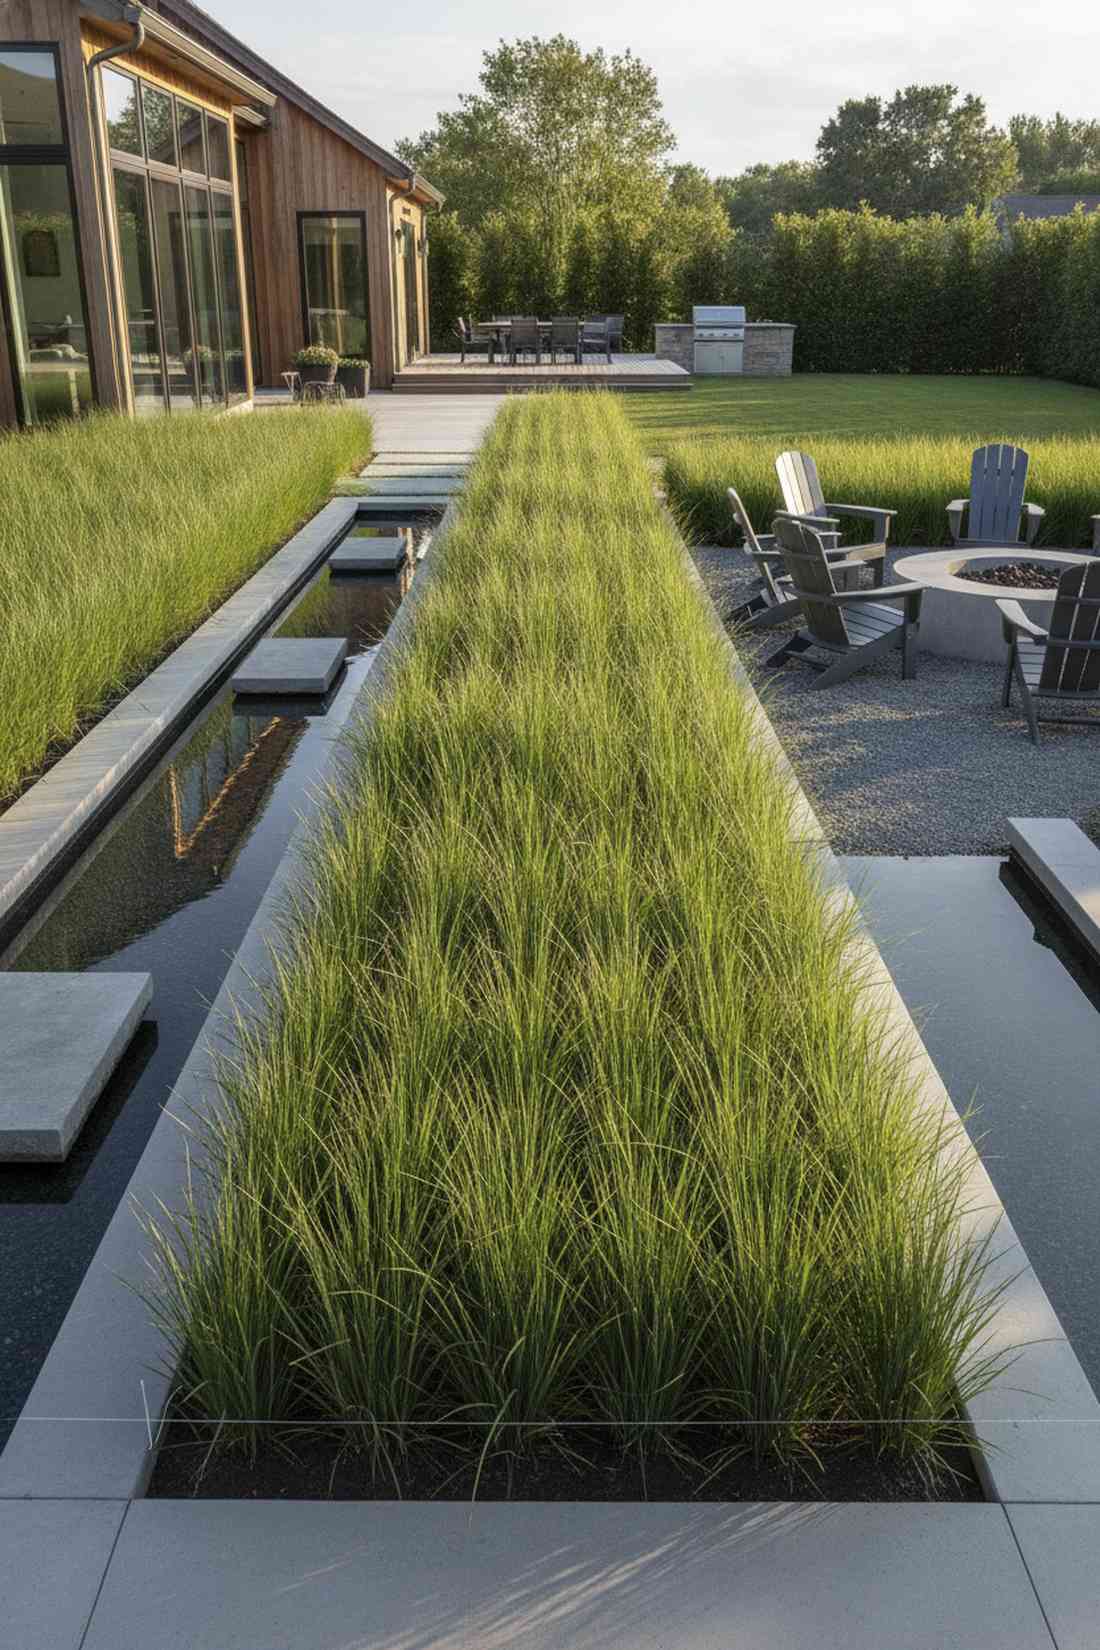
1. Border Garden Alignment
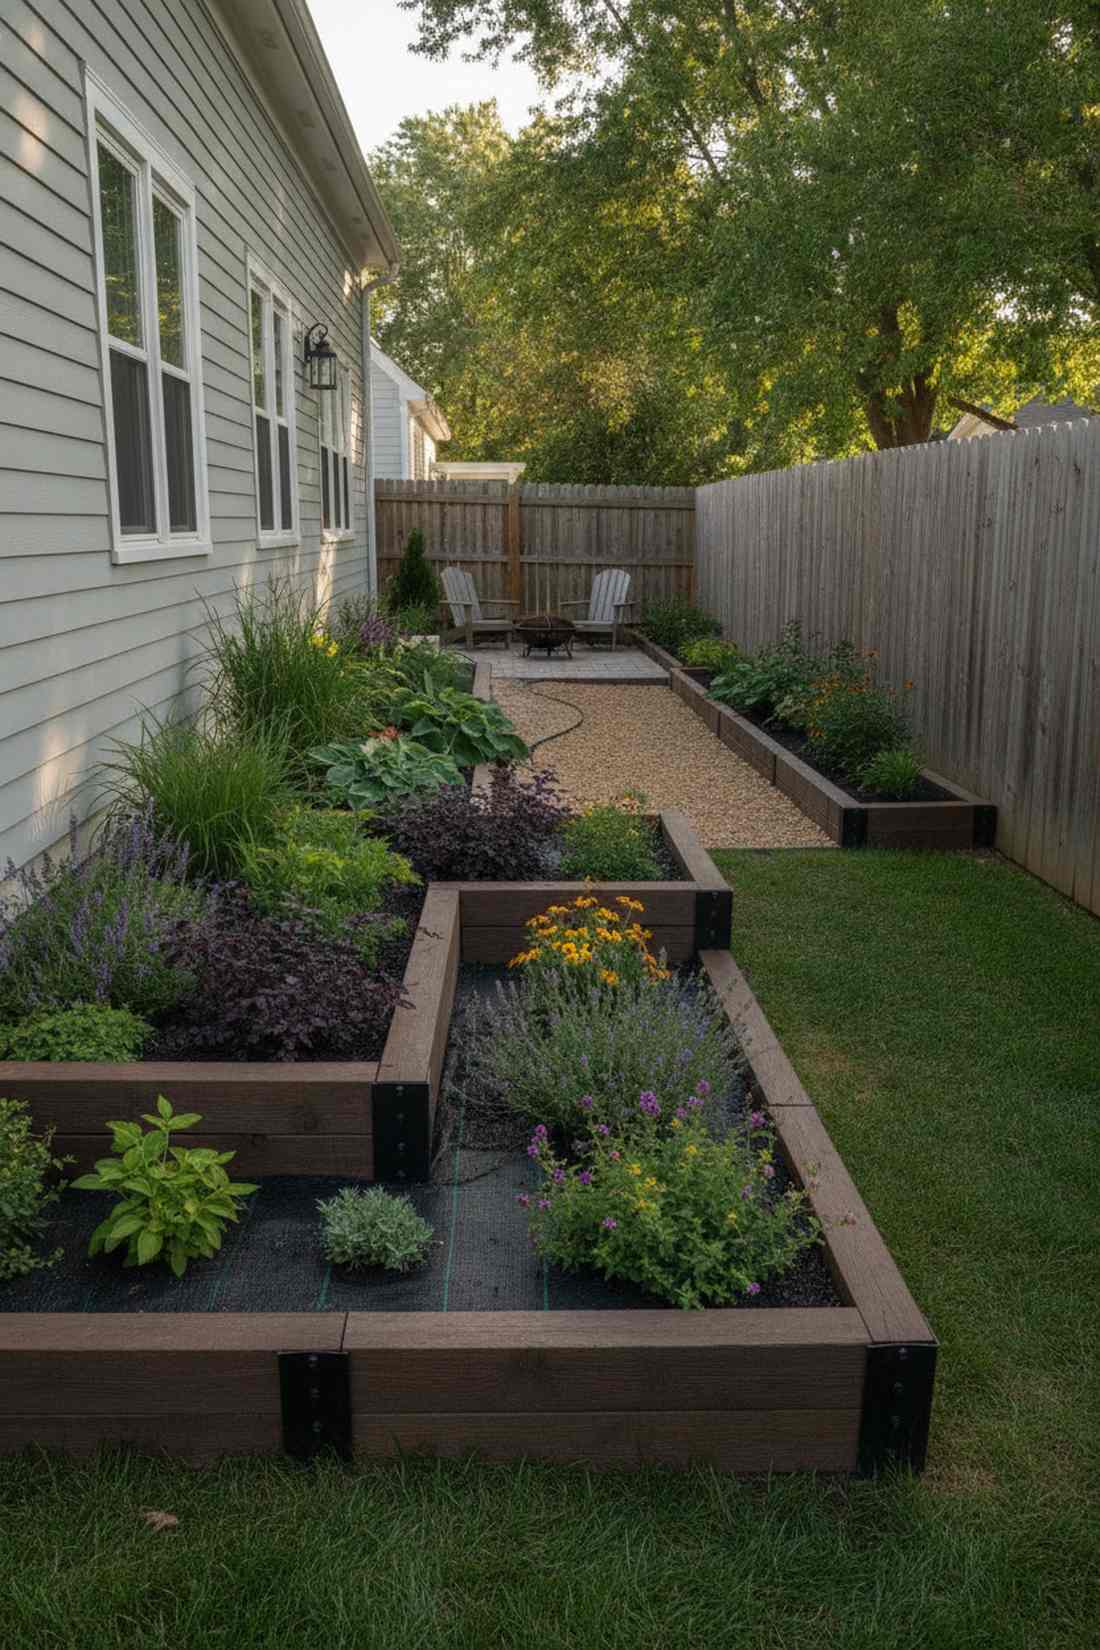
This aesthetic feels like a hidden boundary oasis that perfectly frames your property. It’s a brilliant narrow side yard garden decor concept explicitly designed to salvage tight perimeter spaces.
Reclaiming dead fence space delivers a surprisingly premium look when framed correctly. Utilizing high-quality modular retaining wall kits rather than cheap plastic edging completely modernizes these restrictive corridors.
You can execute this border upgrade for roughly $60–$120 depending on length. Save this to your DIY weekend exterior board for your next curb appeal project.
- Key Materials: Weatherproof timber panels
- Vibe / Style: Structured perimeter elegance
- Difficulty: Easy weekend setup
- Budget Breakdown: Edging: $45 | Base soil: $25
- Creator’s Tip: Line the bottom with a commercial-grade weed barrier to prevent lawn grass invasion.
- Smart Sourcing: pre-cut composite edging panels and heavy-duty steel anchor spikes (bulk pack)
2. Twin Arch Connection
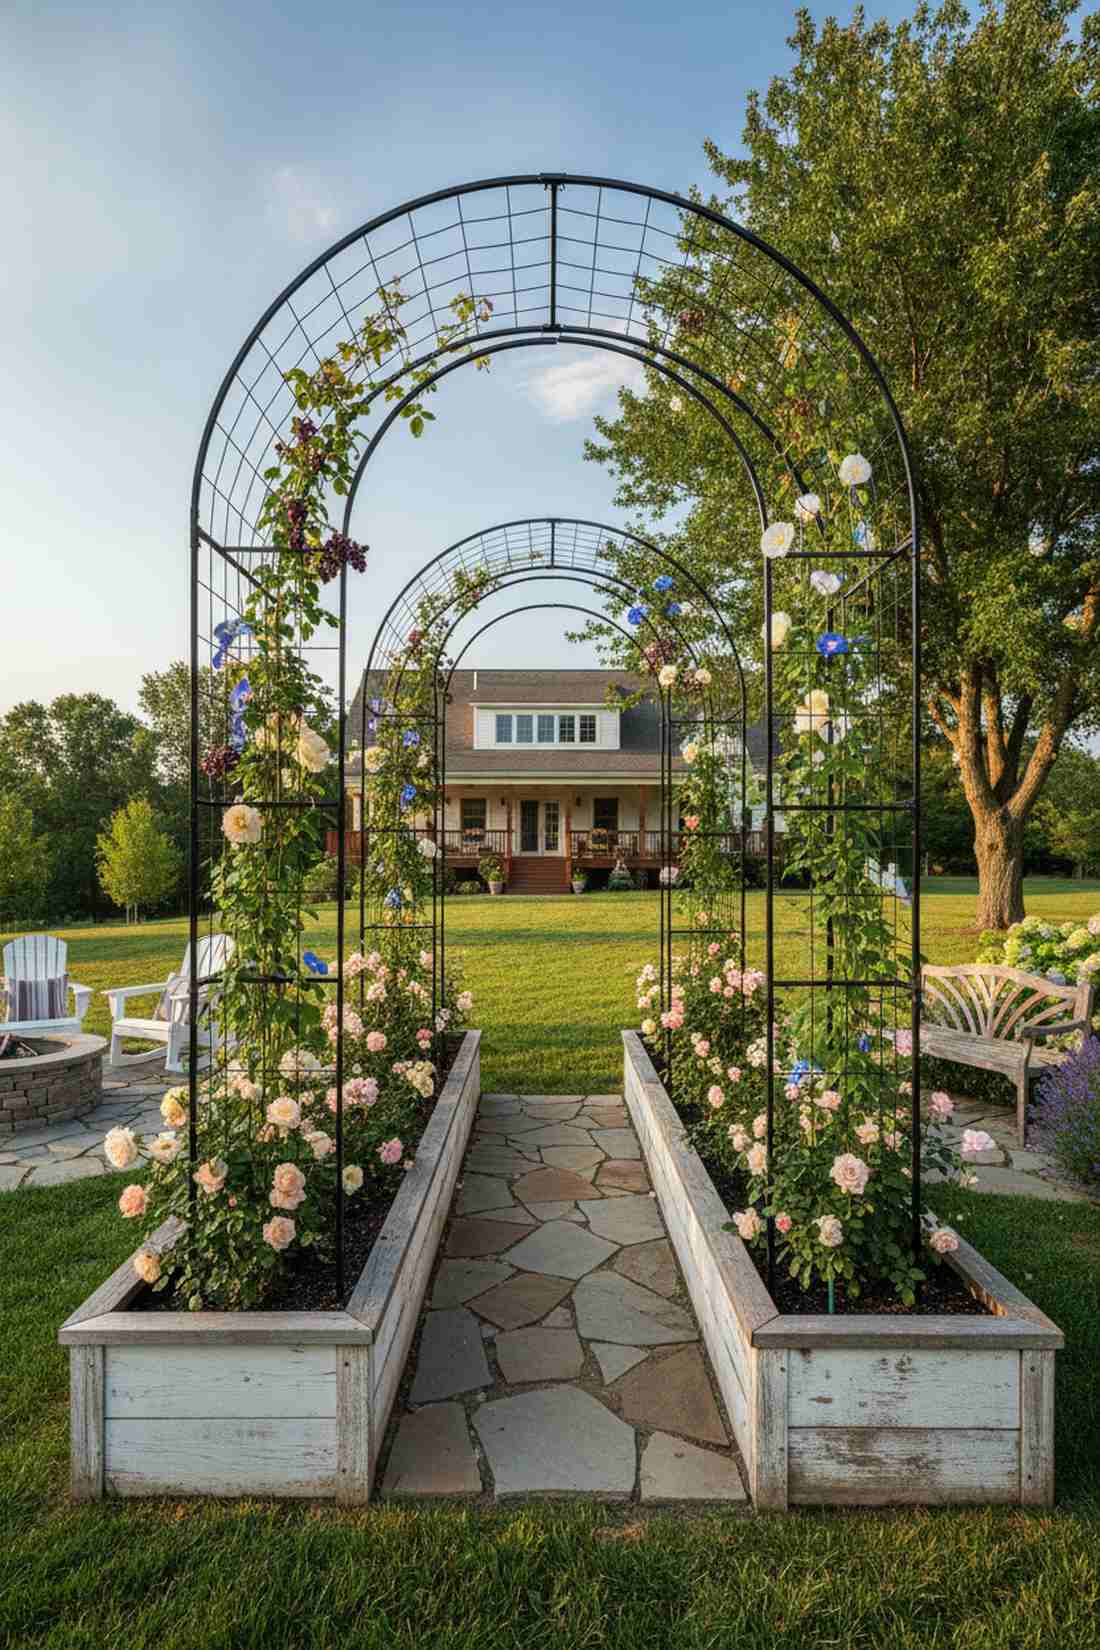
Walking under this setup feels like stepping into a romantic storybook portal. This arched trellis garden feature works exceptionally well for connecting two distinct outdoor seating zones.
Most basic trellises warp, but securing parallel beds with a reinforced metal arch gives a designer-level finish. Integrating sturdy climbing crop support systems ensures the structure handles heavy summer yields effortlessly.
Expect a total investment of around $80–$150 for a stunning vertical canopy. It’s a fast structural upgrade that completely changes your yard’s spatial vibe.
- Key Materials: Powder-coated steel arch
- Vibe / Style: Whimsical farmhouse tunnel
- Difficulty: Moderate two-person job
- Budget Breakdown: Arch: $90 | Bed materials: $40
- Creator’s Tip: Bolt the arch directly to the raised bed framing to prevent wind damage.
- Smart Sourcing: rust-resistant galvanized steel arches and UV-coated climbing plant netting
3. Trio Mirrored Planting
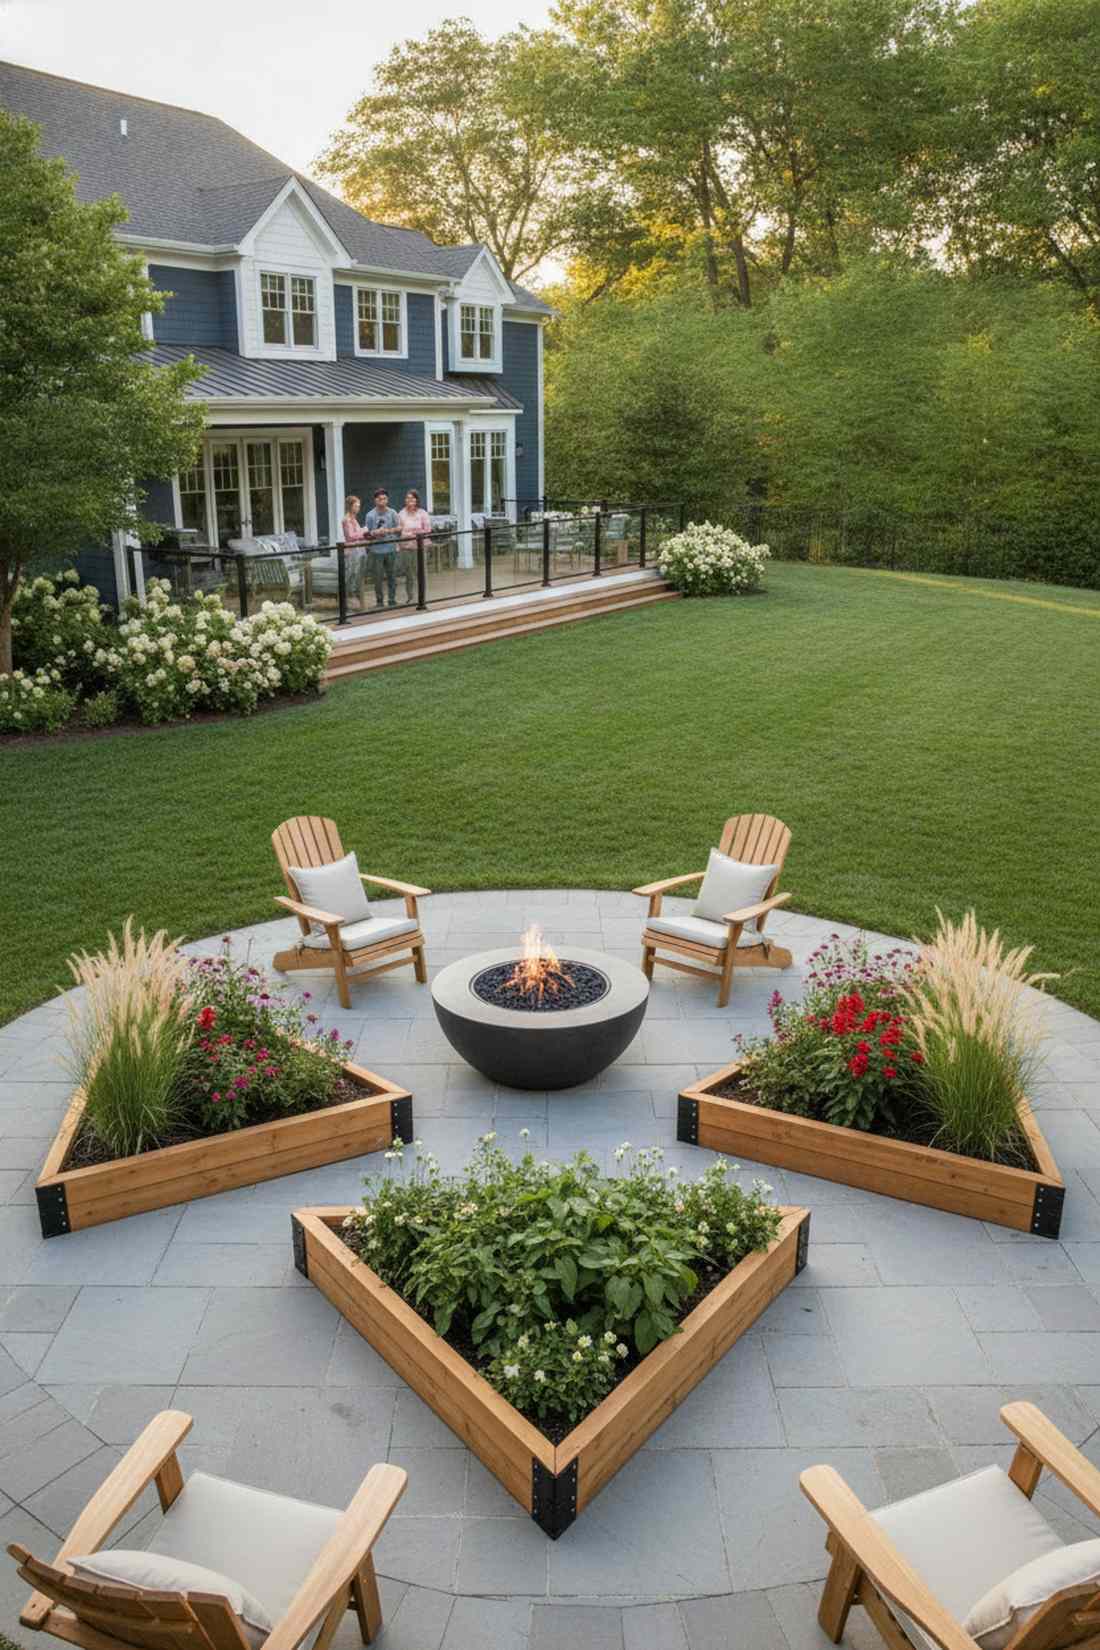
This layout evokes the serene balance of an upscale botanical courtyard. Implementing a symmetrical triad garden setup is perfect for grounding a circular patio or focal fire pit area.
Skipping standard straight rows for angled symmetry looks far more expensive than it is. Utilizing pre-fabricated corner joints makes assembling these intricate triangular shapes completely foolproof for beginners.
You can usually pull this off for $100–$200 total. Pin this if you’re planning a structured yet organic landscape overhaul.
- Key Materials: Cedar planks and corner hinges
- Vibe / Style: Balanced modern organic
- Difficulty: Intermediate measuring required
- Budget Breakdown: Lumber: $80 | Hardware: $35
- Creator’s Tip: Use the center bed strictly for low-maintenance perennials to reduce daily upkeep.
- Smart Sourcing: articulating metal raised bed corners (4-pack) and premium cedar plank starter kits
4. Four-Square Classic
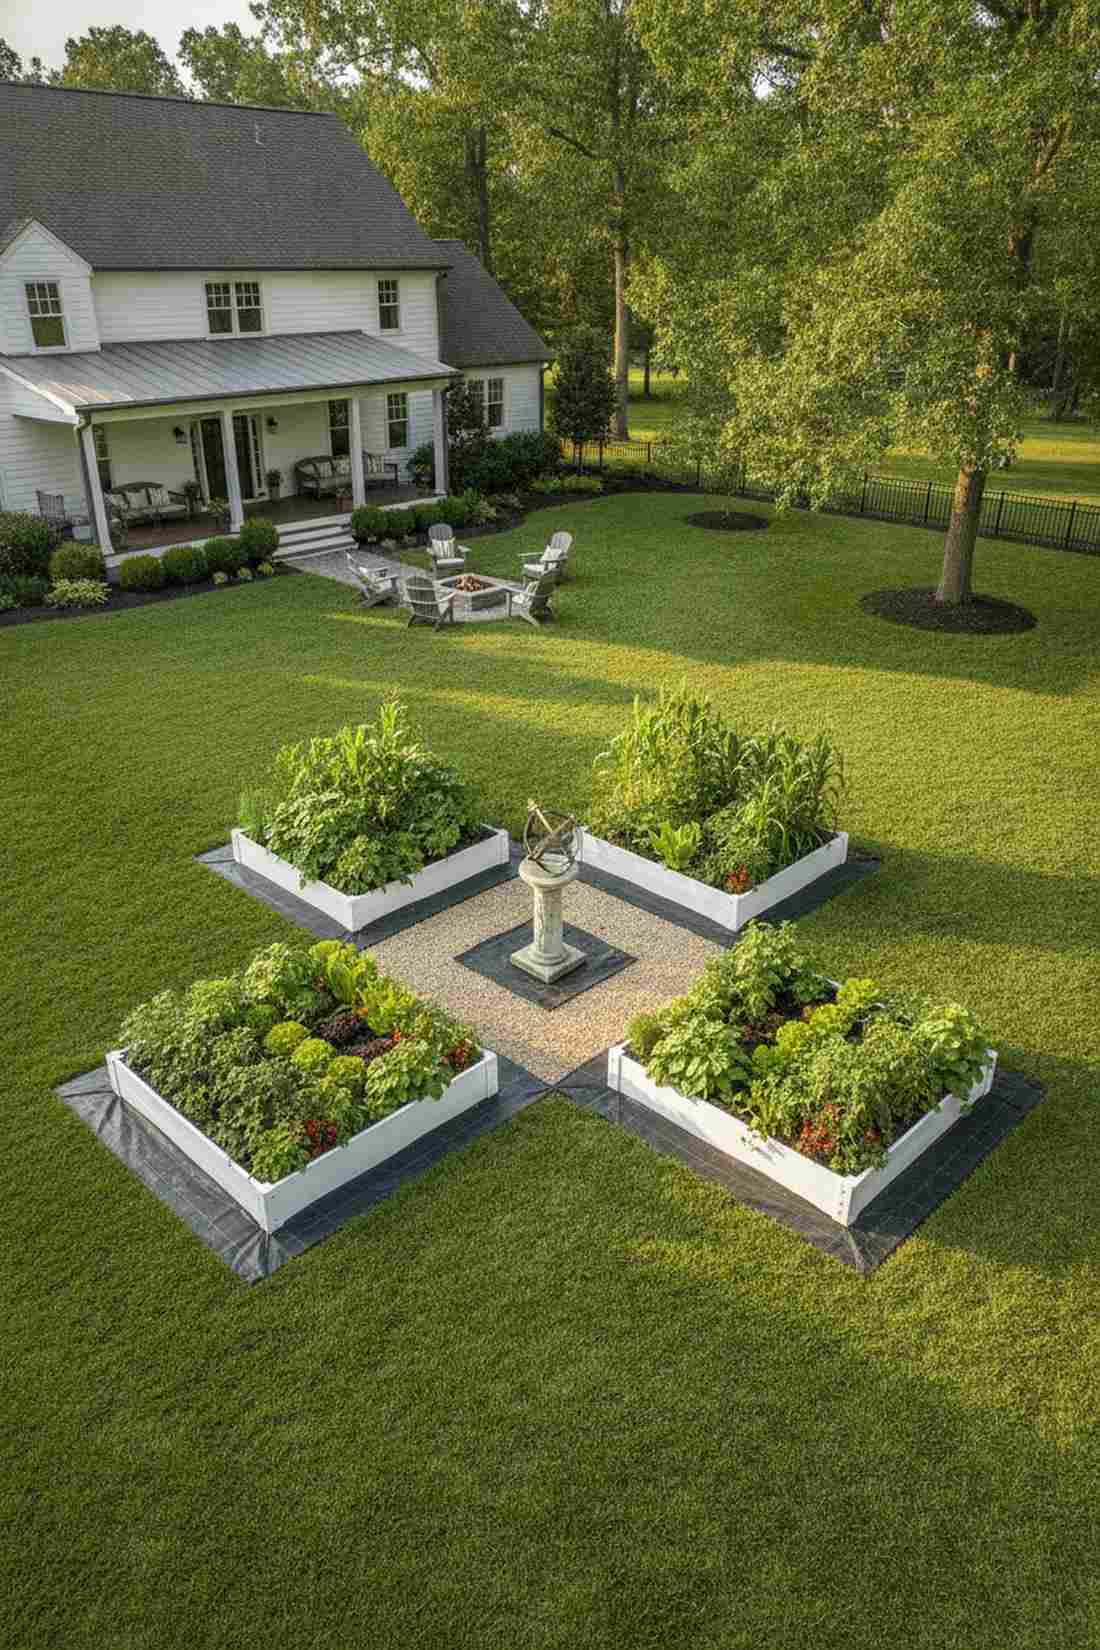
This grid format feels like a historic European kitchen estate brought right to your backyard. The classic four-square potager design acts as the ultimate centerpiece for wide, open suburban lawns.
While standard rows look agricultural, adding crossing central pathways creates a high-end architectural anchor. Elevating the center intersection with top-tier garden layout ideas like a sundial or birdbath guarantees an instant luxury feel.
Materials run approximately $150–$300 depending on your pathway choice. Highly recommended for establishing a permanent, high-yield vegetable zone.
- Key Materials: Square raised bed frames, gravel
- Vibe / Style: Traditional estate courtyard
- Difficulty: Labor intensive but straightforward
- Budget Breakdown: 4 Beds: $160 | Pathway gravel: $50
- Creator’s Tip: Install commercial landscape fabric under the entire grid before placing the beds.
- Smart Sourcing: snap-together vinyl raised bed kits and bulk weed-blocking underlayment rolls
This next setup completely changes how small spaces function without breaking the bank…
5. U-Shaped Efficiency
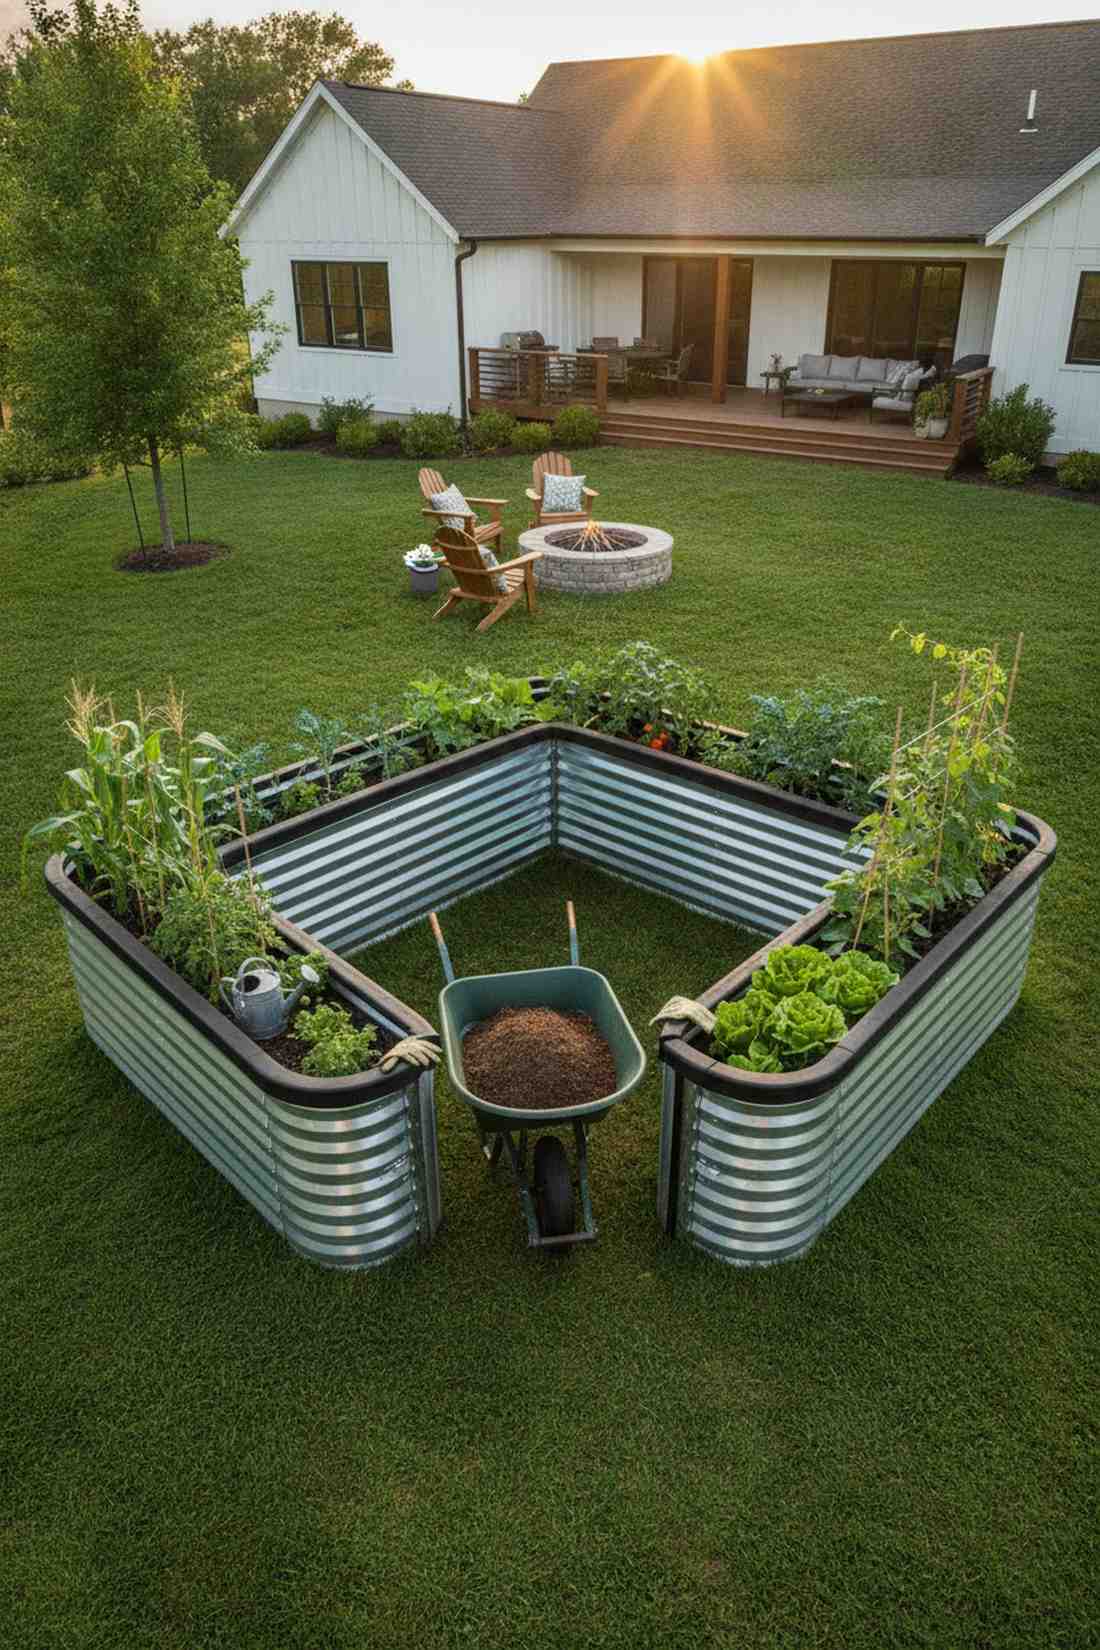
Immersing yourself in this setup feels like commanding a custom culinary cockpit. A wraparound raised garden design is heavily favored for dedicated backyard homesteaders wanting maximum yield per square foot.
Creating enclosed operational zones eliminates wasted stepping space and boosts harvest speed drastically. Opting for modular metal basin configurations avoids the tedious cutting and drilling of traditional lumber builds.
A durable setup typically costs around $200–$350. Save this to your urban farming board for maximum spatial efficiency.
- Key Materials: Corrugated metal panels
- Vibe / Style: Utilitarian modern homestead
- Difficulty: Intermediate assembly
- Budget Breakdown: Metal panels: $200 | Hardware: $30
- Creator’s Tip: Leave the opening exactly wheelbarrow-width for easy compost deliveries.
- Smart Sourcing: corrugated galvanized steel planter kits and heavy-duty rubber edge protectors
6. H-Shaped Dual Access
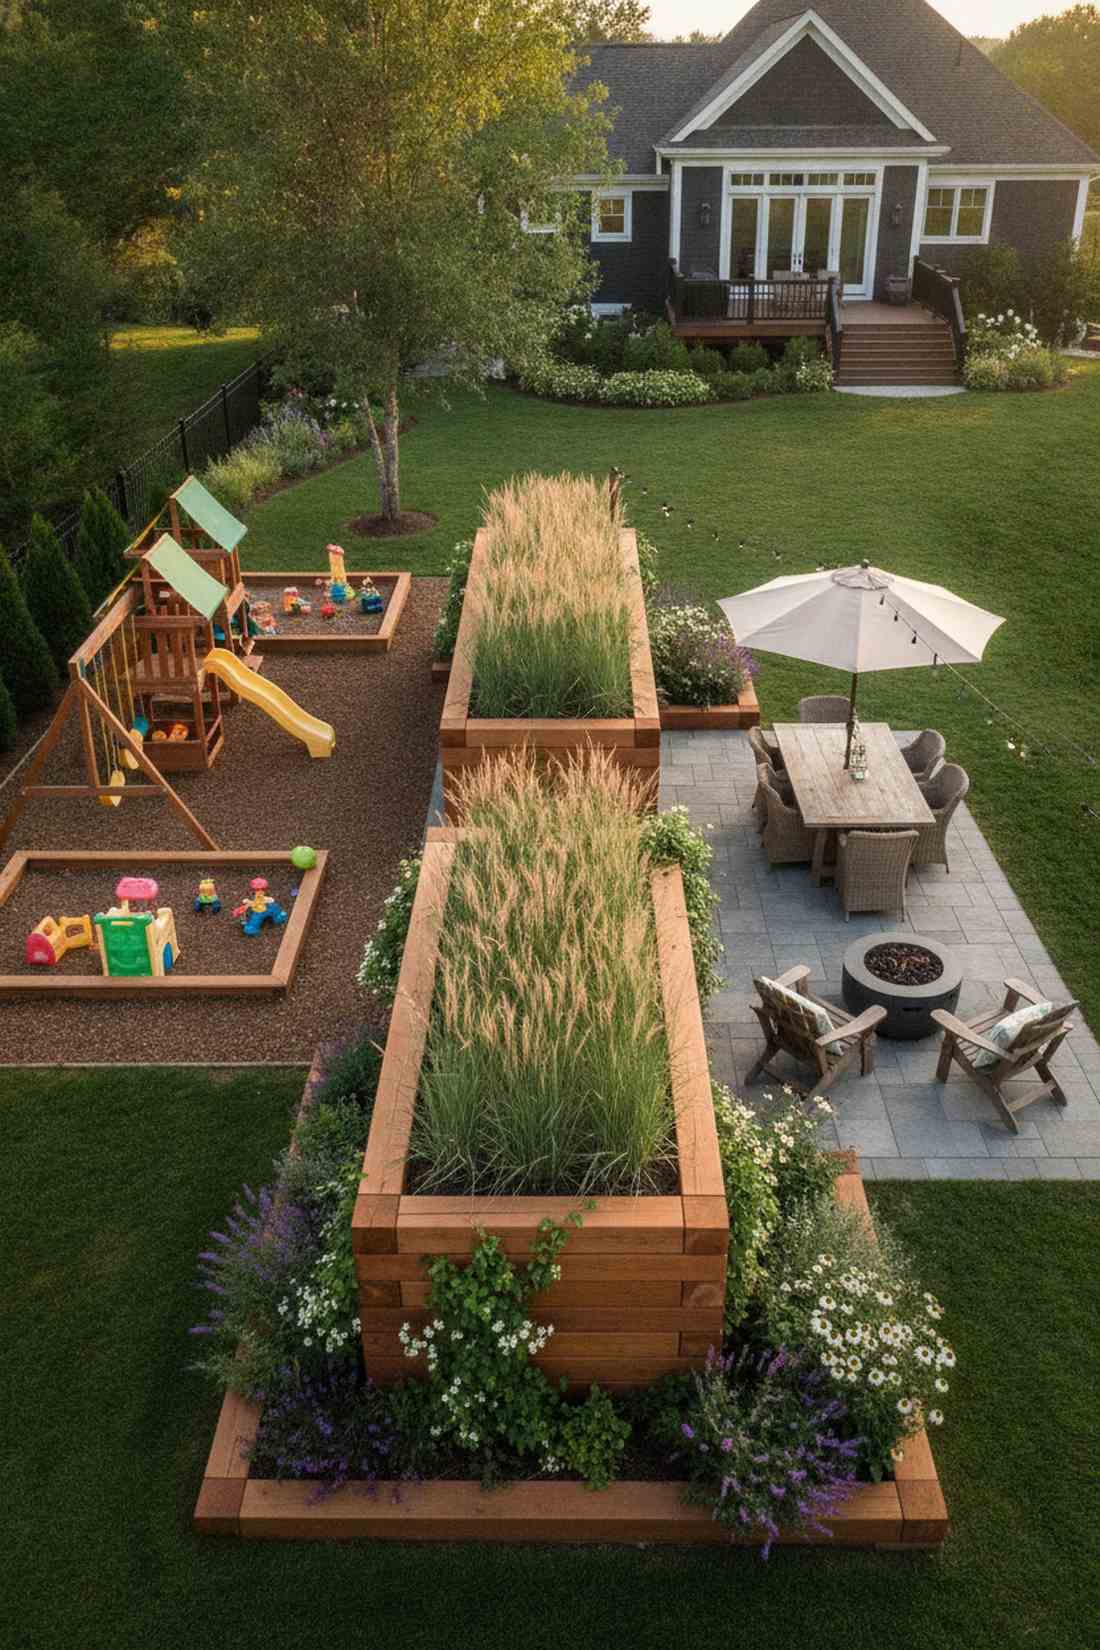
This configuration acts like a natural room divider that feels both open and structured. The dual-zone garden partition is phenomenal for separating a kids’ play area from an adult dining patio.
Using a cross-bed as a physical barrier offers a designer-level finish without building actual fences. Incorporating tall ornamental grasses into excellent garden layout design transforms the center link into a vibrant privacy screen.
Budget around $180–$250 for the complete framework. It’s a highly functional approach to zoning an open-concept yard.
- Key Materials: Interlocking timber logs
- Vibe / Style: Architectural organic flow
- Difficulty: Beginner-friendly
- Budget Breakdown: Wood: $140 | Soil: $60
- Creator’s Tip: Plant trailing vines on the cross-section to soften the rigid geometric lines.
- Smart Sourcing: tool-free interlocking cedar bed kits and pre-mixed organic raised bed soil (bulk bags)
7. Staggered Offset Rows
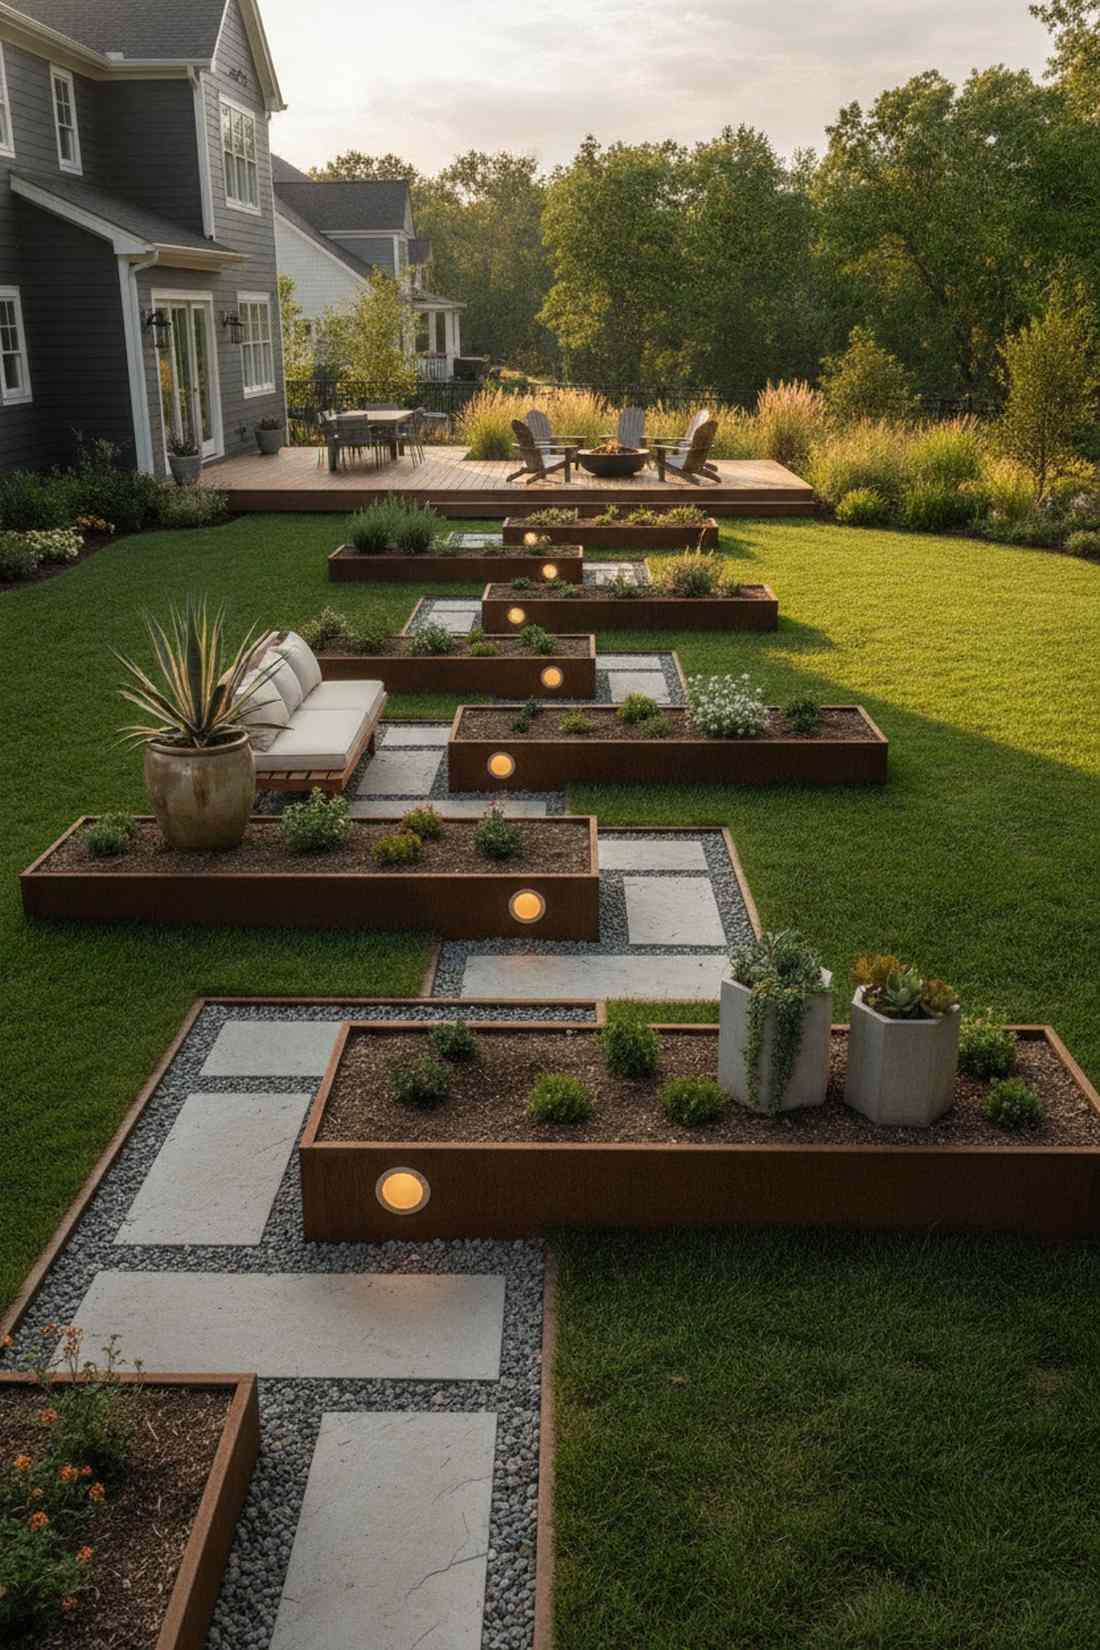
Wandering through these offset paths feels remarkably like exploring a modern art gallery. A staggered garden pathway setup breaks up boring straight lines and is ideal for long, narrow rectangular lots.
Shifting alignment naturally forces the eye to bounce, making the yard appear significantly deeper. To pull high-CPC traffic, many designers recommend embedding sleek solar pathway lighting into the staggered niches for a high-end glow.
Plan for a $100–$220 budget for materials and lights. Pin this if you’re tired of the standard “bowling alley” backyard look.
- Key Materials: Rectangular bed frames, solar lights
- Vibe / Style: Contemporary dynamic flow
- Difficulty: Easy layout planning
- Budget Breakdown: Planters: $120 | Lighting: $45
- Creator’s Tip: Place a small bench or large feature pot in the alcoves created by the offset.
- Smart Sourcing: weatherproof LED pathway light kits and rust-proof aluminum planter borders
8. Diagonal Axis Expansion
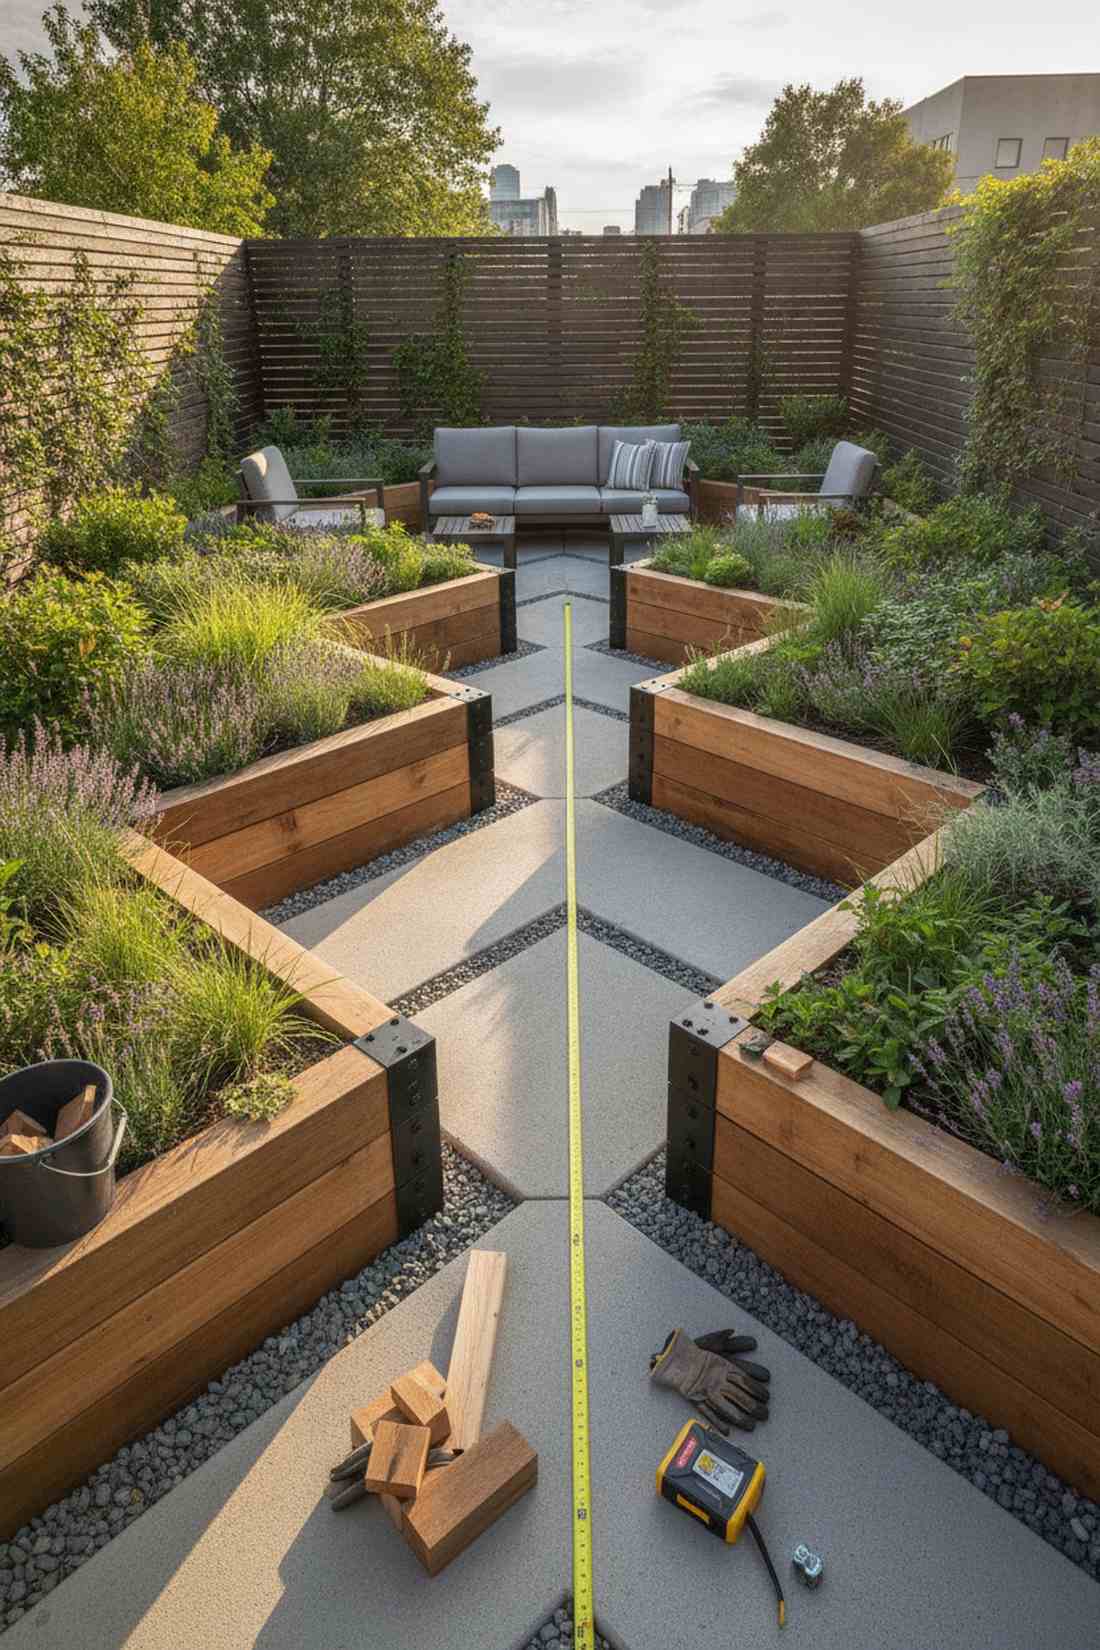
This optical illusion feels like your yard just doubled in square footage instantly. The diagonal axis garden layout is the ultimate cheat code for cramped, boxy urban patios.
Angling your planters at 45 degrees completely disrupts predictable visual boundaries and delivers a surprisingly premium look. Securing angular corner braces allows you to build custom diamond shapes that perfectly fit the newly established grid.
This visual trick costs about $150–$250 to implement properly. A must-try hack for anyone battling a claustrophobic outdoor space.
- Key Materials: Custom-cut lumber, angle brackets
- Vibe / Style: Sleek spatial manipulation
- Difficulty: Advanced measuring required
- Budget Breakdown: Wood: $130 | Custom brackets: $50
- Creator’s Tip: Use a chalk line to ensure your 45-degree angles are dead-on before digging.
- Smart Sourcing: heavy-duty adjustable angle framing brackets and high-visibility pro chalk line kits
9. Terrace Cascade
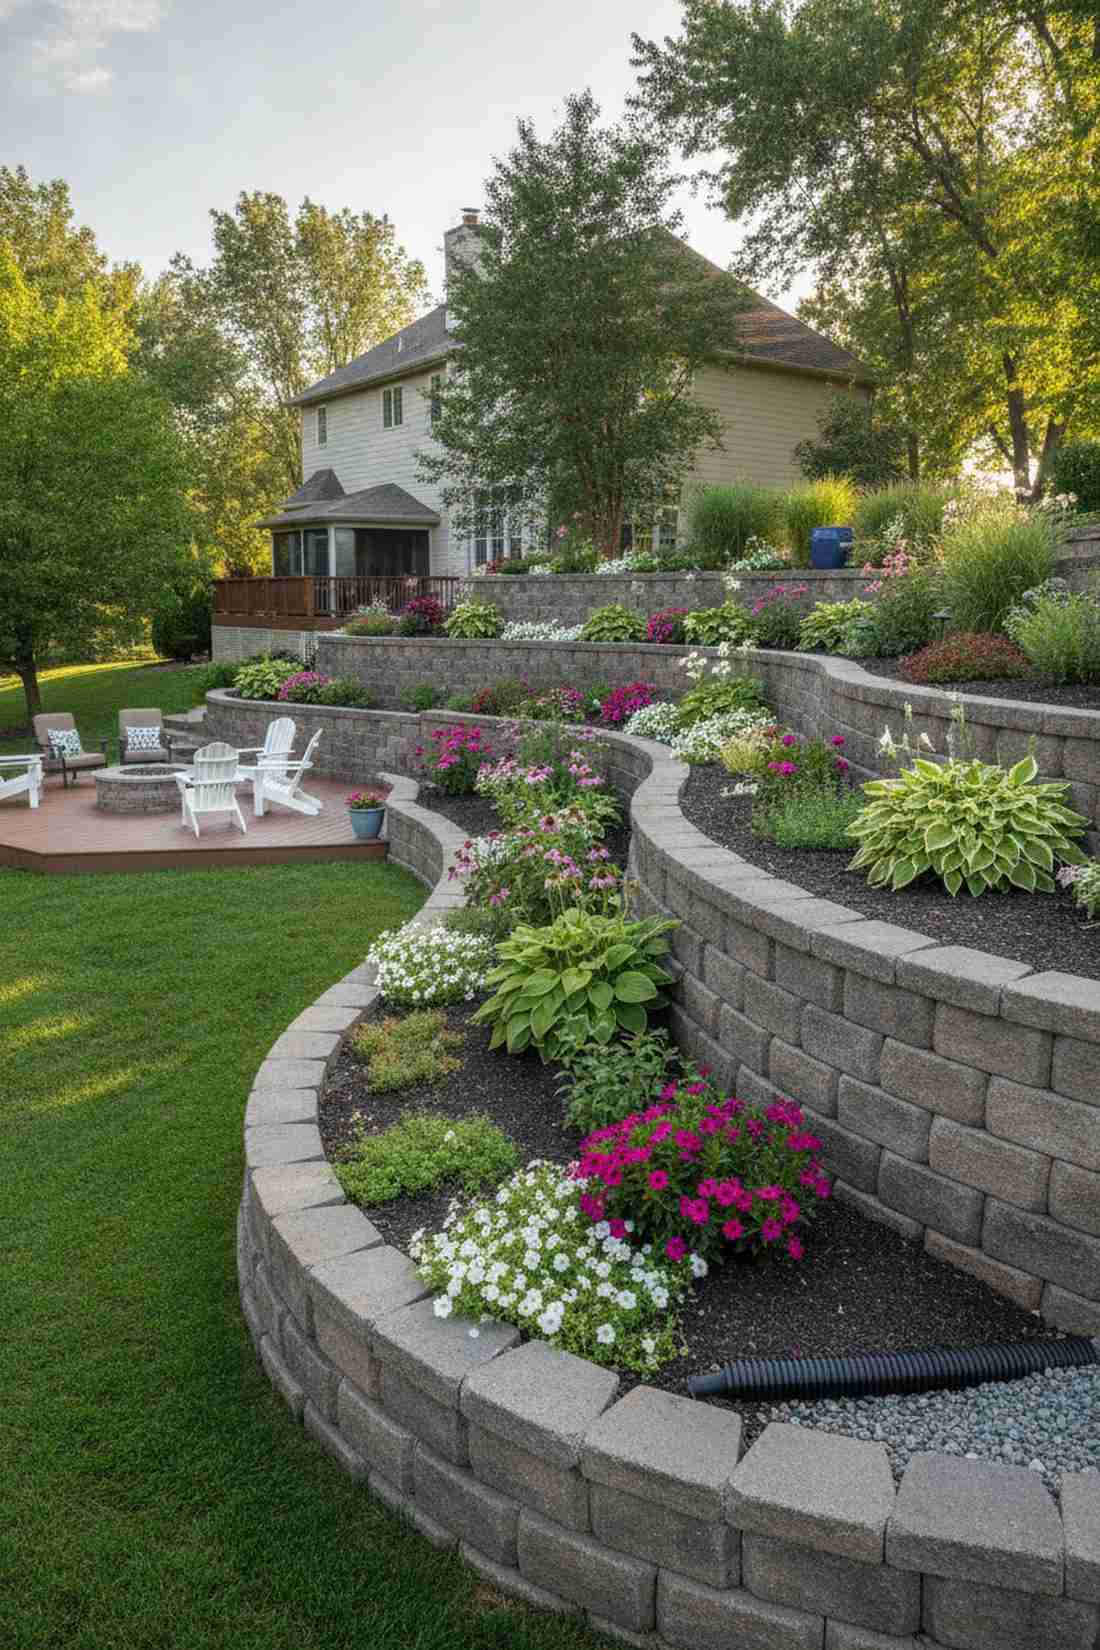
Standing below this layout feels like looking at an ancient hanging garden masterpiece. Implementing a cascading terraced garden system effortlessly solves the nightmare of landscaping a steep, unusable hillside.
Fighting gravity with cheap materials always fails, but utilizing interlocking concrete retaining blocks guarantees a permanent structural victory. Proper garden layout and design here prevents topsoil erosion while creating highly accessible, level planting shelves.
Expect a heavier investment of $300–$600 for quality stone. Save this to your hardscaping board if you need to tame a sloped yard.
- Key Materials: Retaining wall blocks, drainage pipe
- Vibe / Style: Majestic layered hillside
- Difficulty: Physically demanding
- Budget Breakdown: Stone blocks: $250 | Gravel/Pipe: $80
- Creator’s Tip: Always install a perforated corrugated drain pipe behind the bottom tier to prevent water pressure blowouts.
- Smart Sourcing: interlocking textured retaining wall blocks (pallet) and flexible French drain tubing kits
💡 Must-Have Supplies for High-End Setups
To build these setups faster and ensure they last, skip the generic craft aisles and invest in the right foundational kits.
- Base & Support: heavy-duty galvanized steel bed frames (powder-coated)
- Setup Tools: laser leveling toolkit with tripod
- Weather/Durability Protection: commercial-grade UV-resistant landscape fabric
Most people get this completely wrong… until they try the exact layout coming up next.
10. Keyhole Center Access
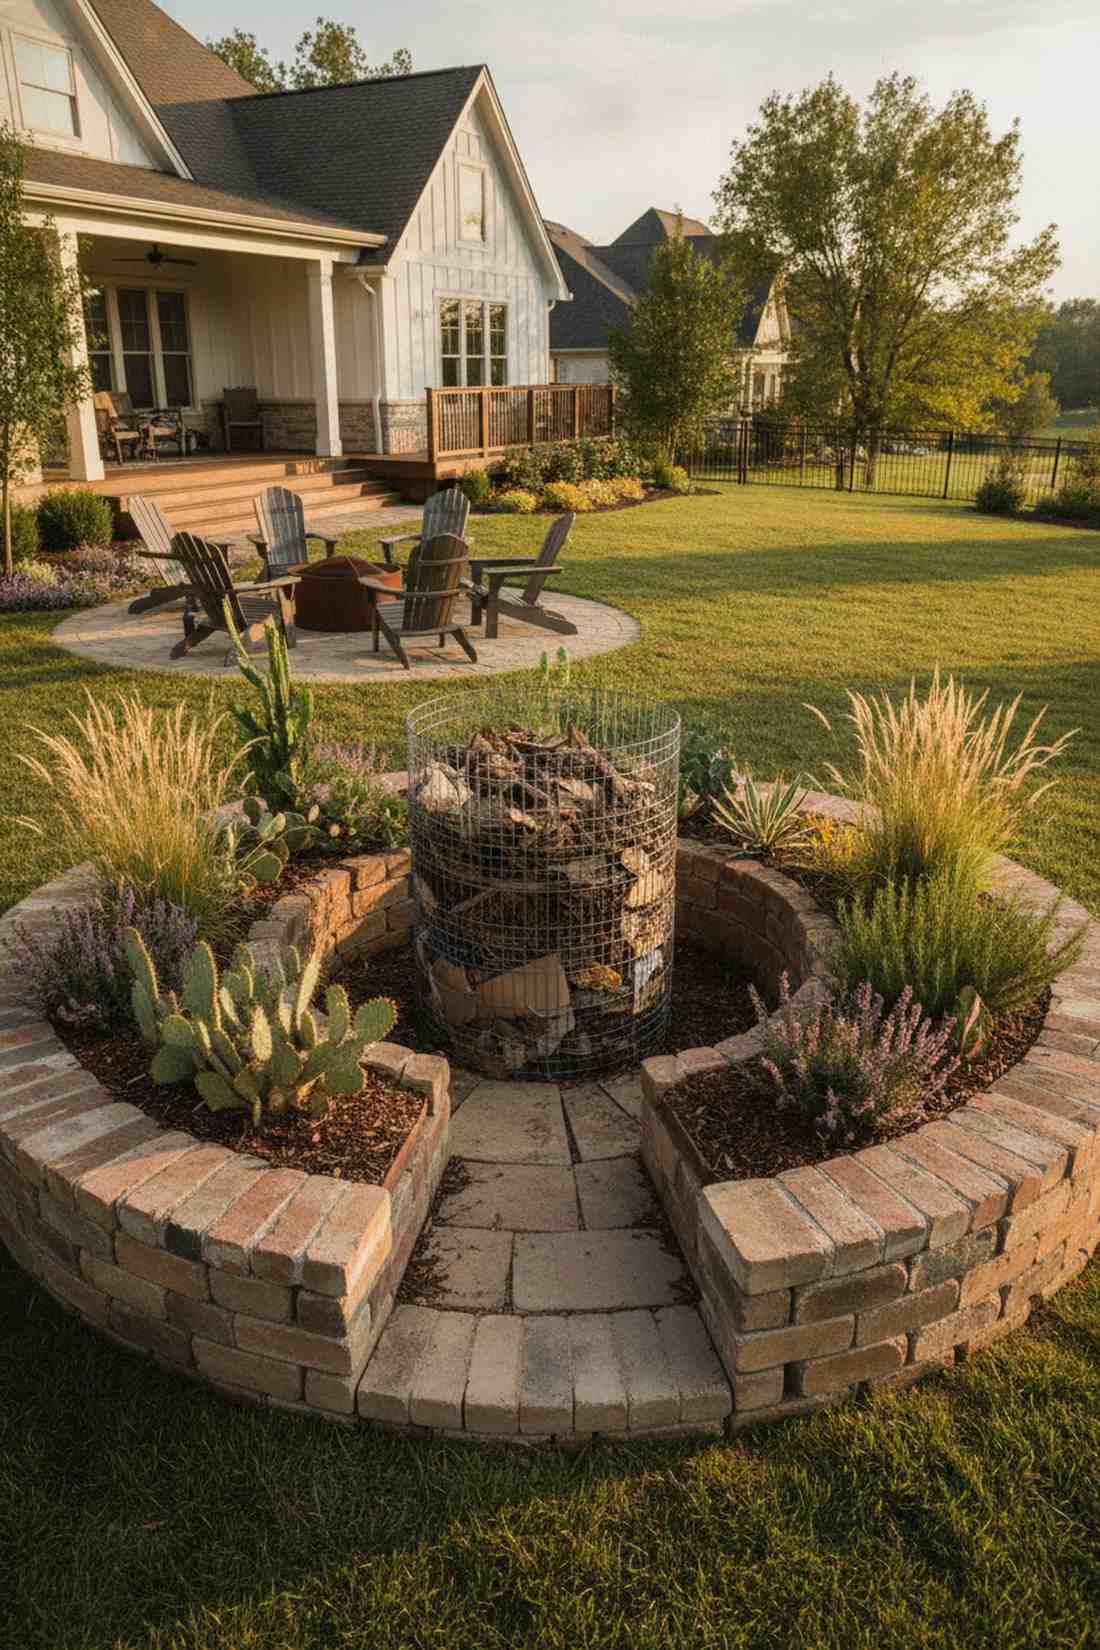
Tending this bed feels like operating from a cozy, self-contained ecological command center. The circular keyhole composting garden is phenomenal for arid climates or zero-waste homesteading setups.
Fusing an active compost tower directly into the bed center looks incredibly unique while automating your soil nutrition. Surrounding the core with drought-tolerant garden layout examples ensures the organic tea seeps perfectly into the root zones.
You can build this brilliant closed-loop system for about $100–$180. Pin this if you want to drastically cut down on your watering and fertilizing chores.
- Key Materials: Stone or brick border, wire mesh
- Vibe / Style: Permaculture desert chic
- Difficulty: Moderate masonry
- Budget Breakdown: Masonry: $100 | Center basket: $20
- Creator’s Tip: Layer the bottom of the bed with thick cardboard and old logs (hugelkultur style) to retain extra moisture.
- Smart Sourcing: galvanized hardware cloth mesh rolls and pre-formed circular raised bed borders
Formal Geometric Patterns for Structured Landscapes
11. Central Axis Bilateral
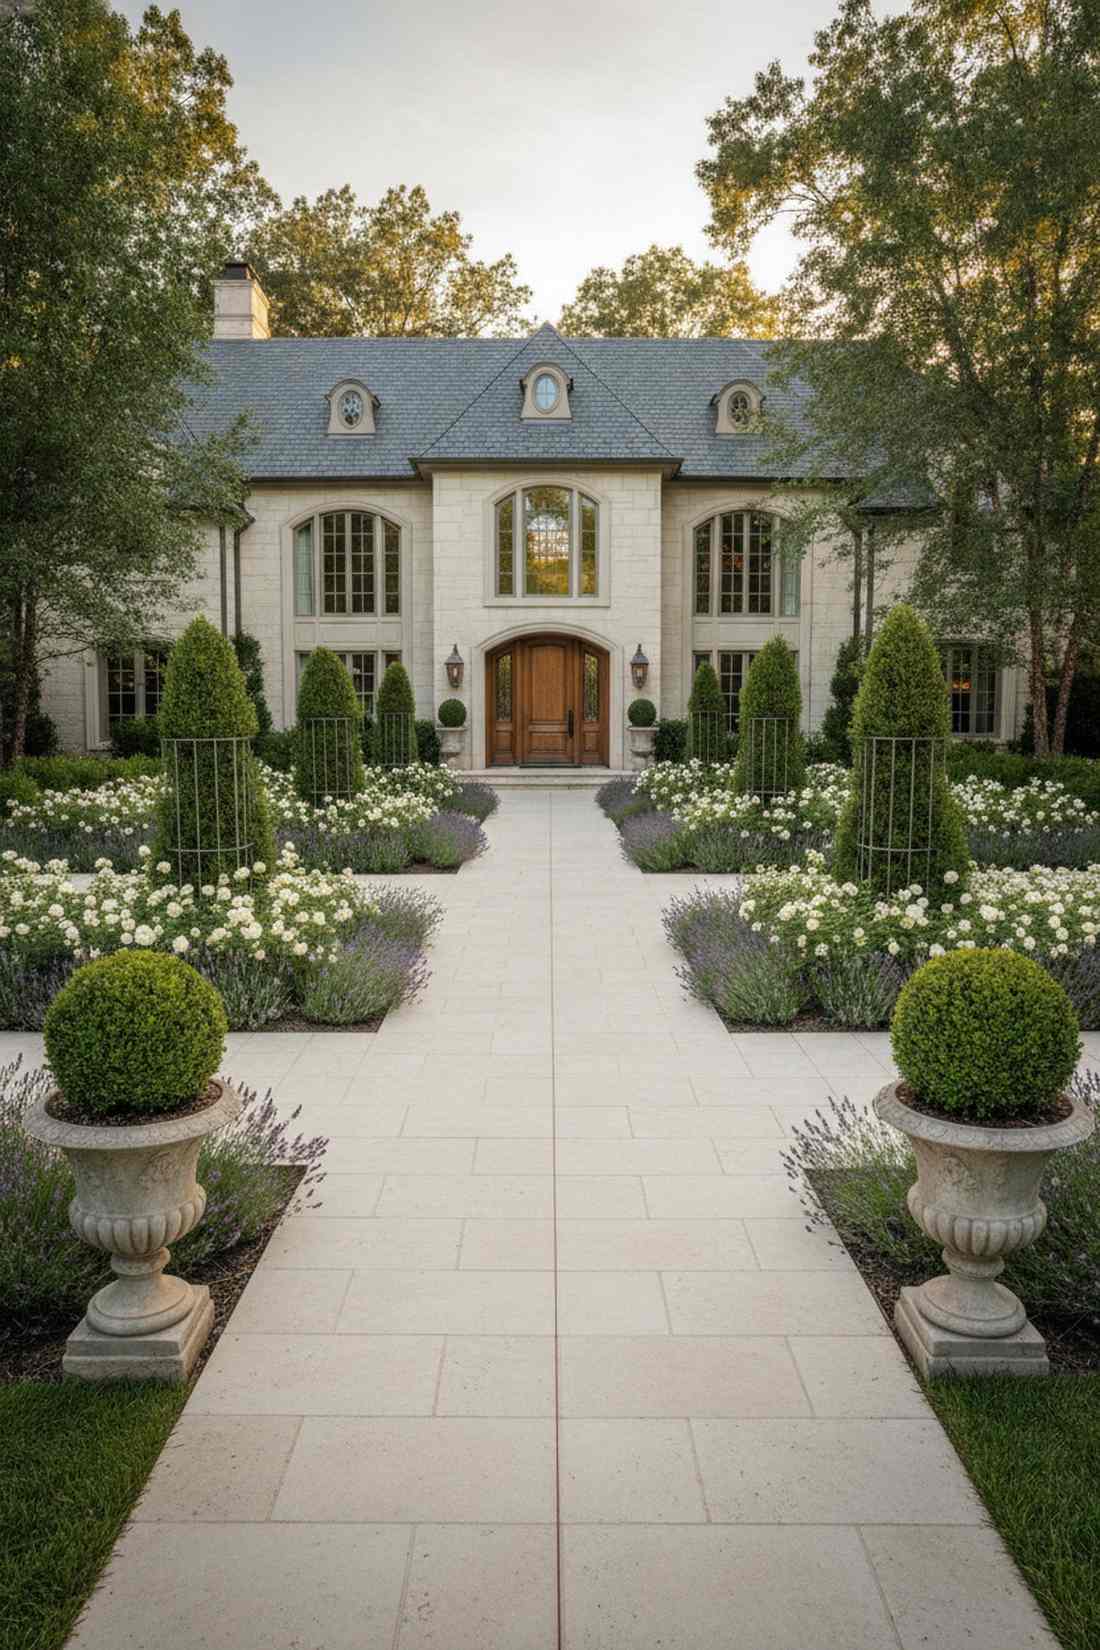
Strolling down this path feels like you’ve entered the grounds of a luxury French chateau. A mirrored bilateral walkway design is the definitive choice for grand front yard entrances seeking maximum curb appeal.
Randomly scattering plants looks messy, but forcing strict symmetry creates an undeniable aura of wealthy curation. Utilizing high-end topiary frames on both sides effortlessly maintains the crisp, aristocratic lines required for this style.
Sourcing symmetrical statement pieces runs roughly $200–$500. It’s a high-impact aesthetic that demands attention and boosts property value.
- Key Materials: Matching urns, formal pavers
- Vibe / Style: Elegant aristocratic promenade
- Difficulty: Precision planting required
- Budget Breakdown: Twin urns: $150 | Hardscaping: $200
- Creator’s Tip: Stretch a masonry string line tight down the center to guarantee flawless mirroring during installation.
- Smart Sourcing: weather-resistant cast stone planter urns (set of 2) and high-tensile masonry string line kits
12. Parterre Embroidery
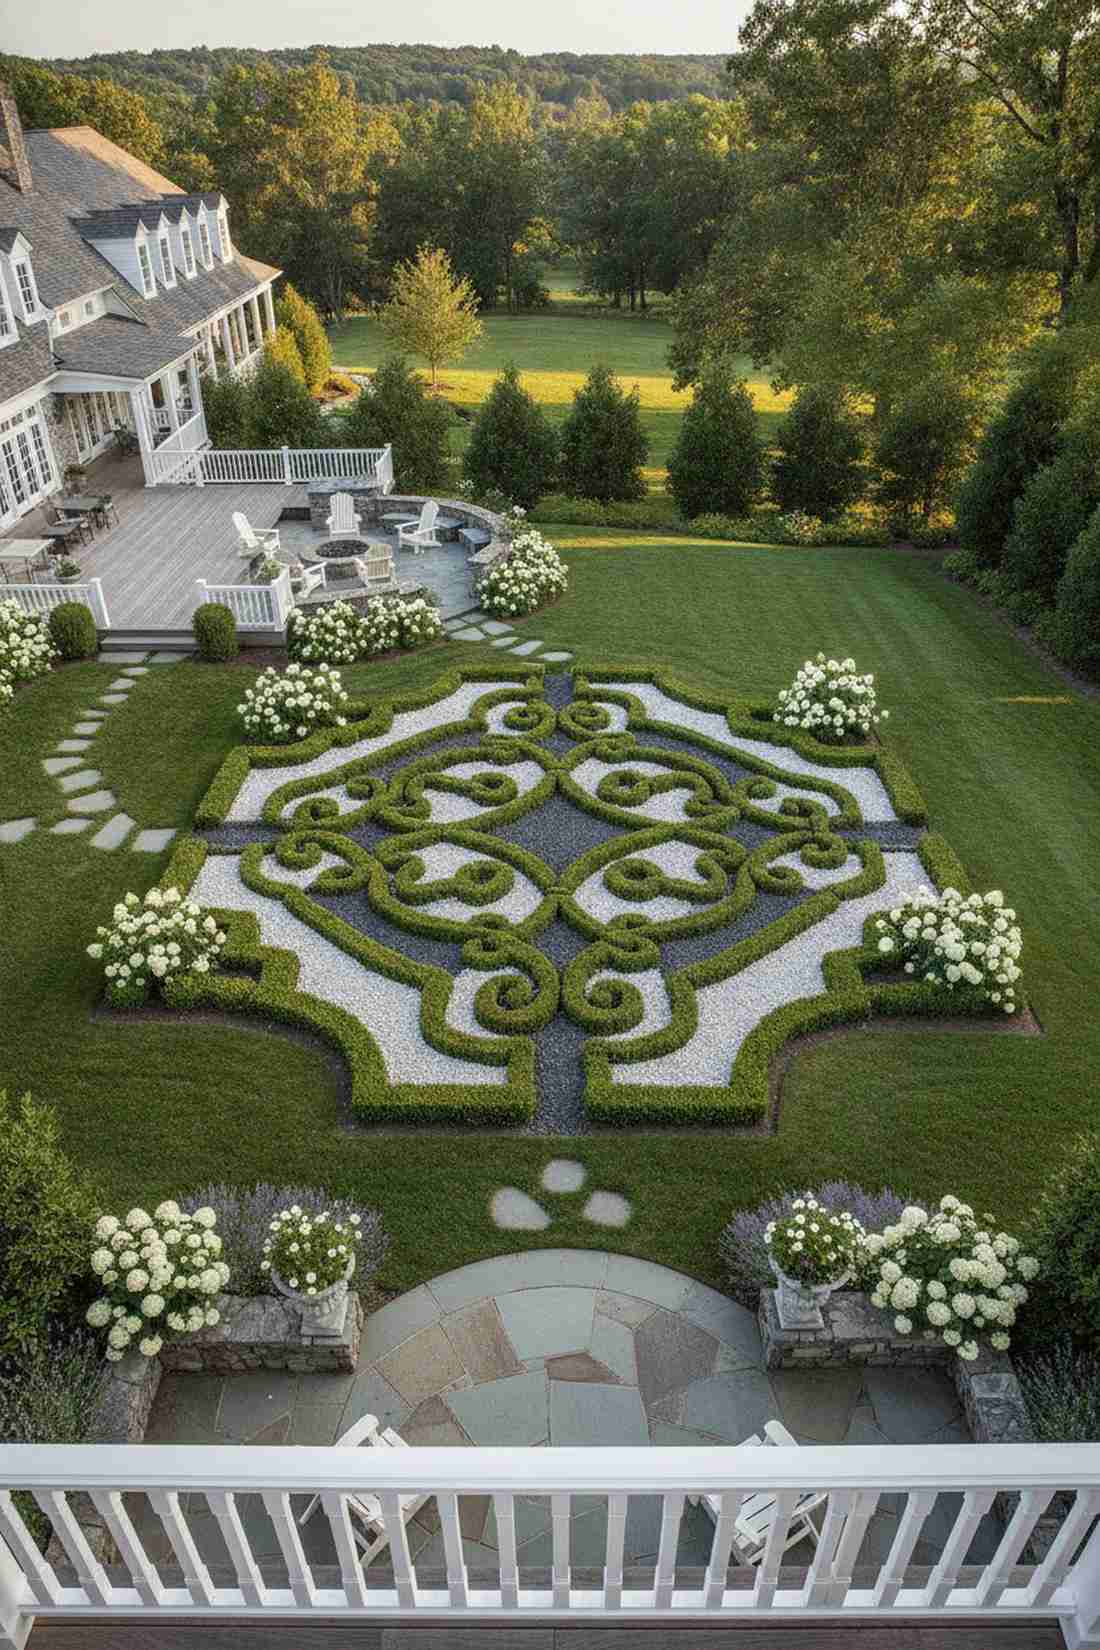
Looking down on this intricate design feels like admiring a living velvet tapestry. The geometric parterre knot garden works best when viewed from elevated terraces or second-story master bedroom windows.
Trying to freehand this complex layout usually ends in disaster, but utilizing flexible garden edging as a hidden guide guarantees flawless shapes. Filling the negative spaces with vibrant contrasting mulches gives a designer-level finish with almost zero weeding.
Creating this botanical art costs around $150–$300 in miniature hedging and mulch. Save this to your luxury garden inspiration board.
- Key Materials: Dwarf boxwood, colored gravel
- Vibe / Style: Intricate royal courtyard
- Difficulty: High-maintenance pruning
- Budget Breakdown: Starter shrubs: $180 | Gravel filler: $60
- Creator’s Tip: Use a customized cardboard template to trim your hedges uniformly every single time.
- Smart Sourcing: premium dwarf boxwood bare root bundles and decorative high-contrast marble chips
13. Radial Symmetry Wheel
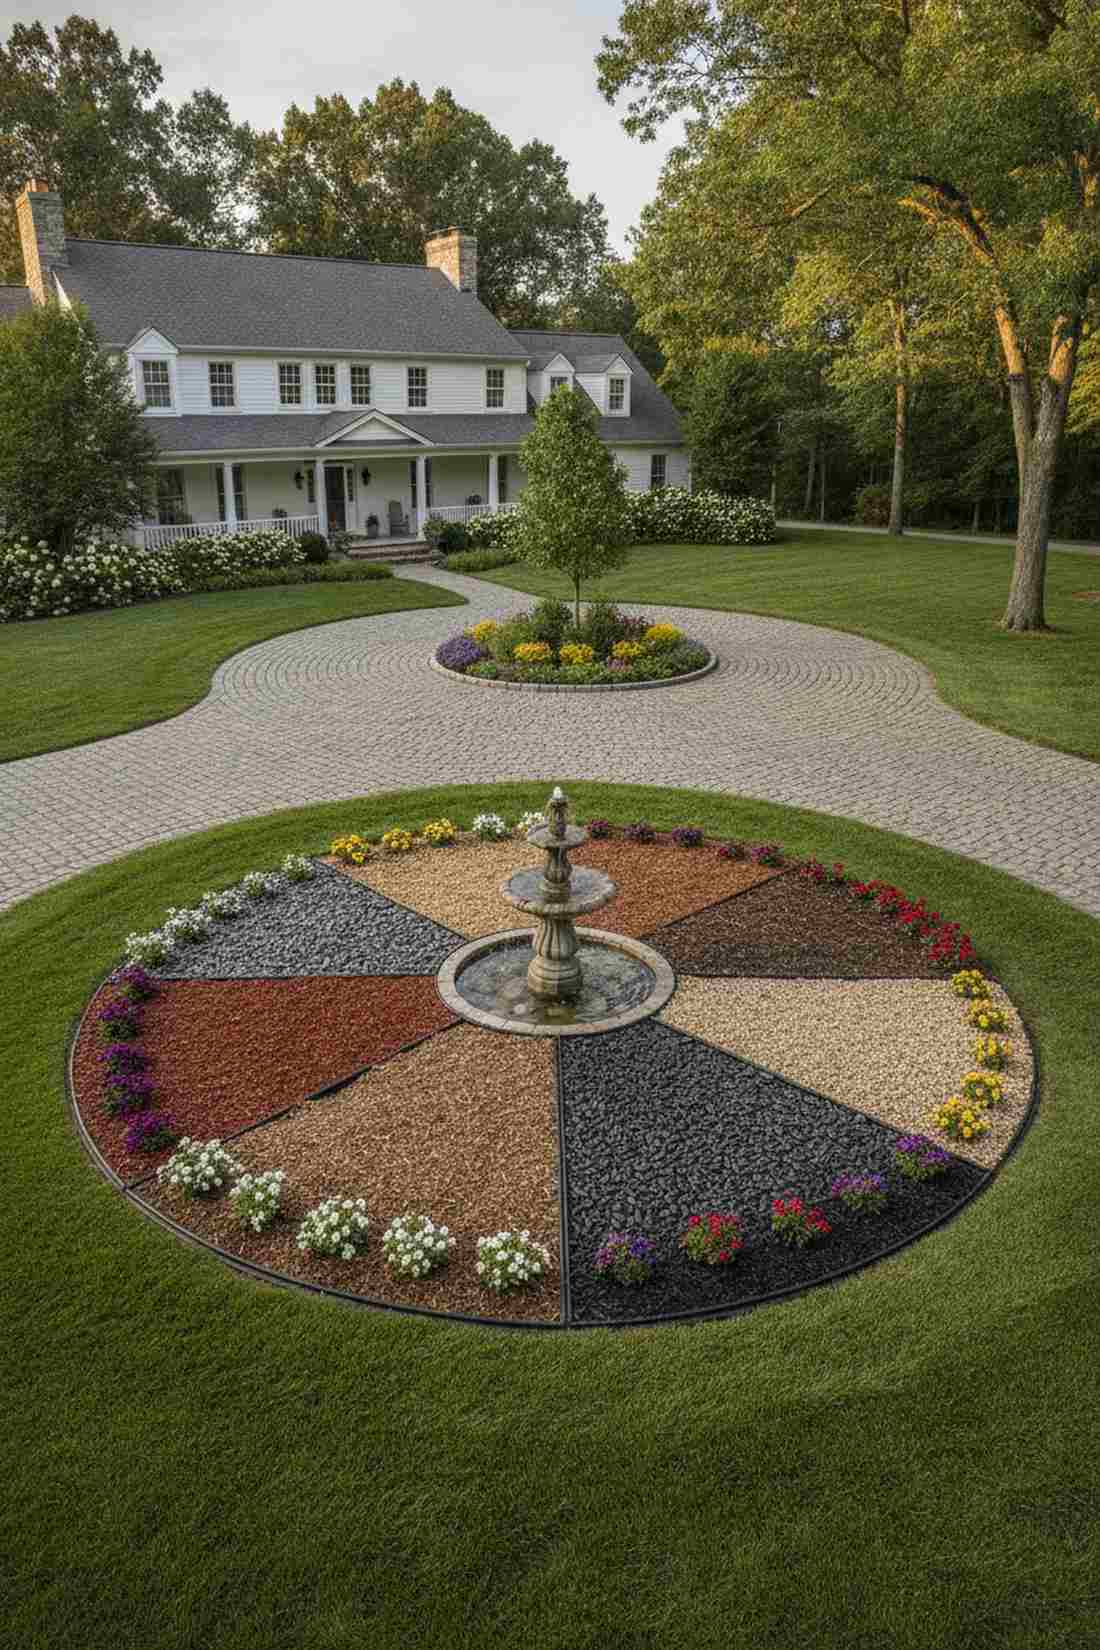
This striking circular focal point feels like a giant compass directing the energy of your yard. A radial spoke garden layout acts as the perfect, attention-grabbing centerpiece for a wide circular driveway.
A massive expanse of plain grass is boring, but segmenting a circle into thematic planting wedges creates mesmerizing order. Installing a heavy-duty focal anchor like a premium birdbath in the center pulls the entire visual web together.
This impressive structural hub typically costs $200–$400. Pin this layout if you need a show-stopping alternative to traditional foundation planting.
- Key Materials: Curved edging, center water feature
- Vibe / Style: Majestic structured hub
- Difficulty: Moderate geometry planning
- Budget Breakdown: Centerpiece: $120 | Edging: $80
- Creator’s Tip: Bury landscape edging along every “spoke” line to keep the different mulch colors from mixing during heavy rain.
- Smart Sourcing: flexible heavy-duty bender board edging and solar-powered tiered birdbath fountains
14. Quadrant Division
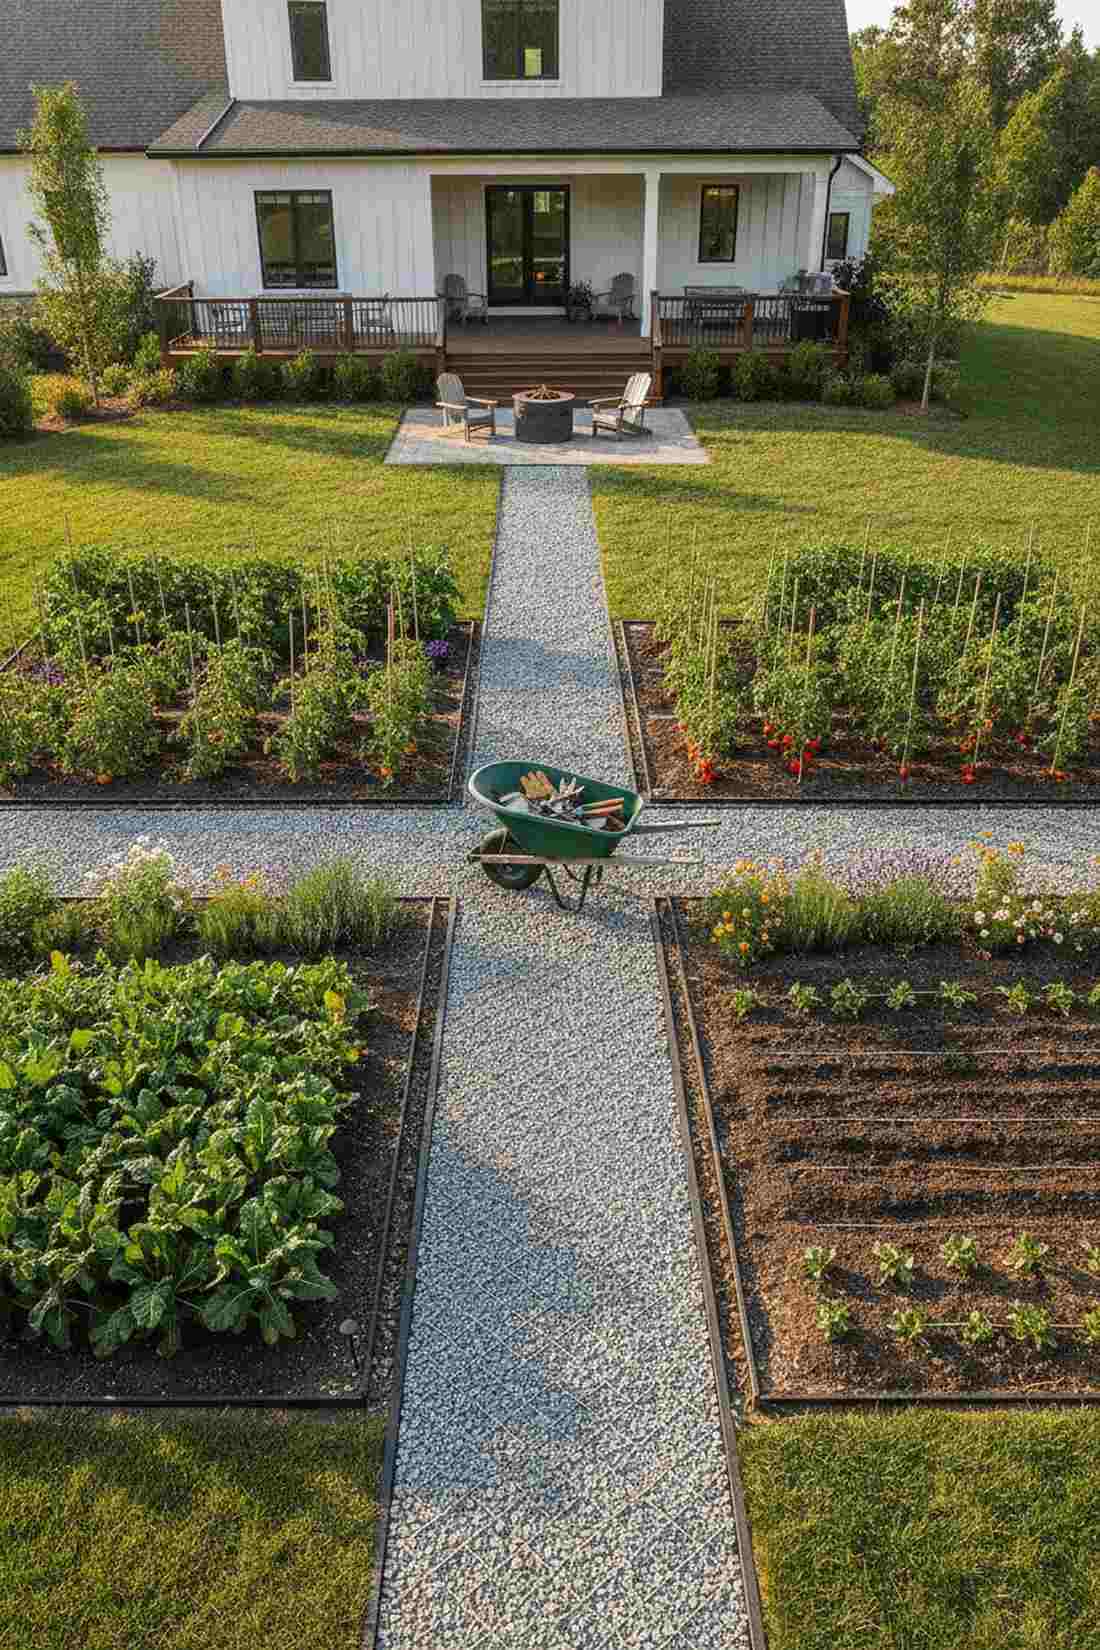
Operating within this organized space feels incredibly therapeutic and mentally decluttering. The four-quadrant segmented yard design is highly practical for homeowners who want to seamlessly mix agriculture with aesthetics.
Blending everything together creates chaos, but establishing rigid perpendicular cross-paths delivers a surprisingly premium look. Assigning specific crop rotations to defined garden layout examples makes seasonal soil management completely effortless.
Establishing the gravel cross-paths generally costs $100–$200. It’s an essential framework for any serious suburban homestead.
- Key Materials: Pathway gravel, rigid border strips
- Vibe / Style: Orderly functional estate
- Difficulty: Easy grid execution
- Budget Breakdown: Borders: $75 | Ground cover: $85
- Creator’s Tip: Make the main intersecting pathways wide enough to easily turn a loaded wheelbarrow.
- Smart Sourcing: permeable pathway stabilizing grids and no-dig rigid landscape borders
Wait until you see how affordable this next high-end structural trick actually is…
15. Allée Corridor
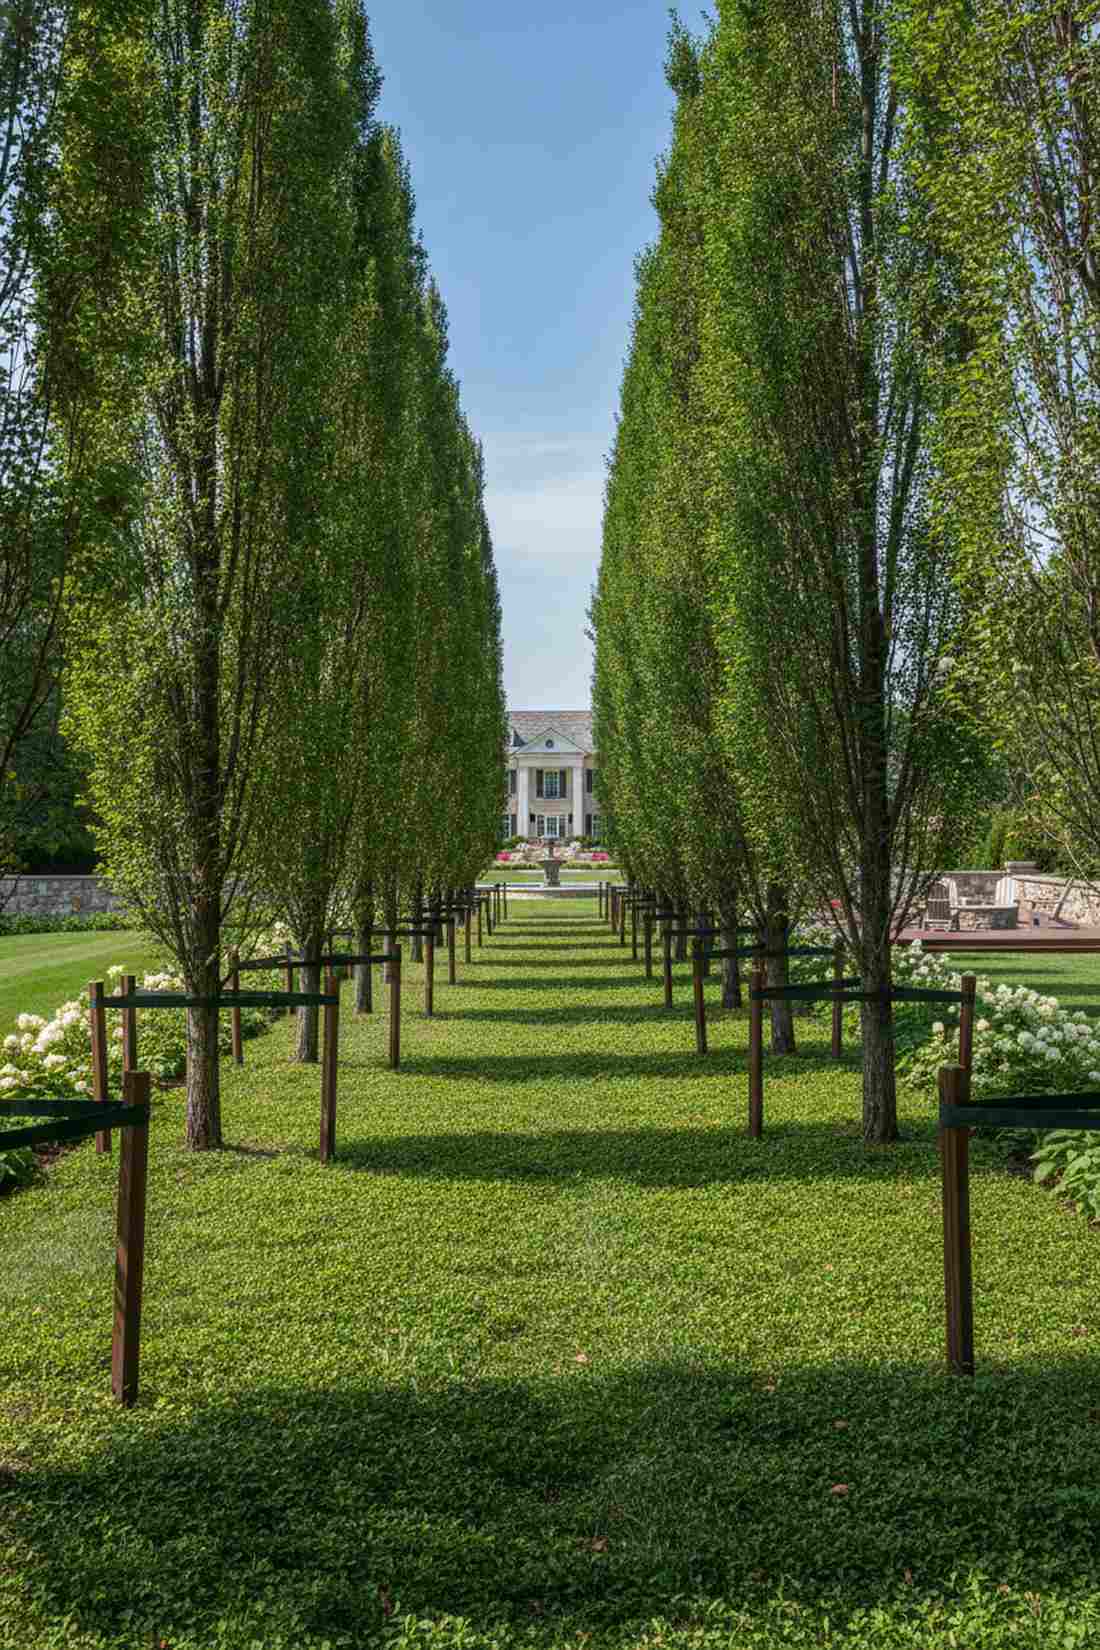
Walking through this shaded tunnel feels like an exclusive VIP entrance to a private sanctuary. An allée tree corridor layout completely transforms long, boring property lines into a majestic journey.
Planting random saplings looks scattered, but enforcing military-strict parallel spacing creates powerful, forced perspective. Investing in robust tree-staking kits guarantees your vertical lines remain perfectly plumb against harsh storm winds.
This living architecture requires a $300–$800 initial tree investment. Save this to your large-scale landscape planning board for maximum future impact.
- Key Materials: Matching columnar trees, support stakes
- Vibe / Style: Grand estate procession
- Difficulty: High precision planting
- Budget Breakdown: Saplings: $400 | Supports: $75
- Creator’s Tip: Underplant the entire corridor with a single, creeping shade-tolerant groundcover to unify the floor.
- Smart Sourcing: heavy-duty tree staking anchor kits (pro-pack) and fast-growing columnar evergreen saplings
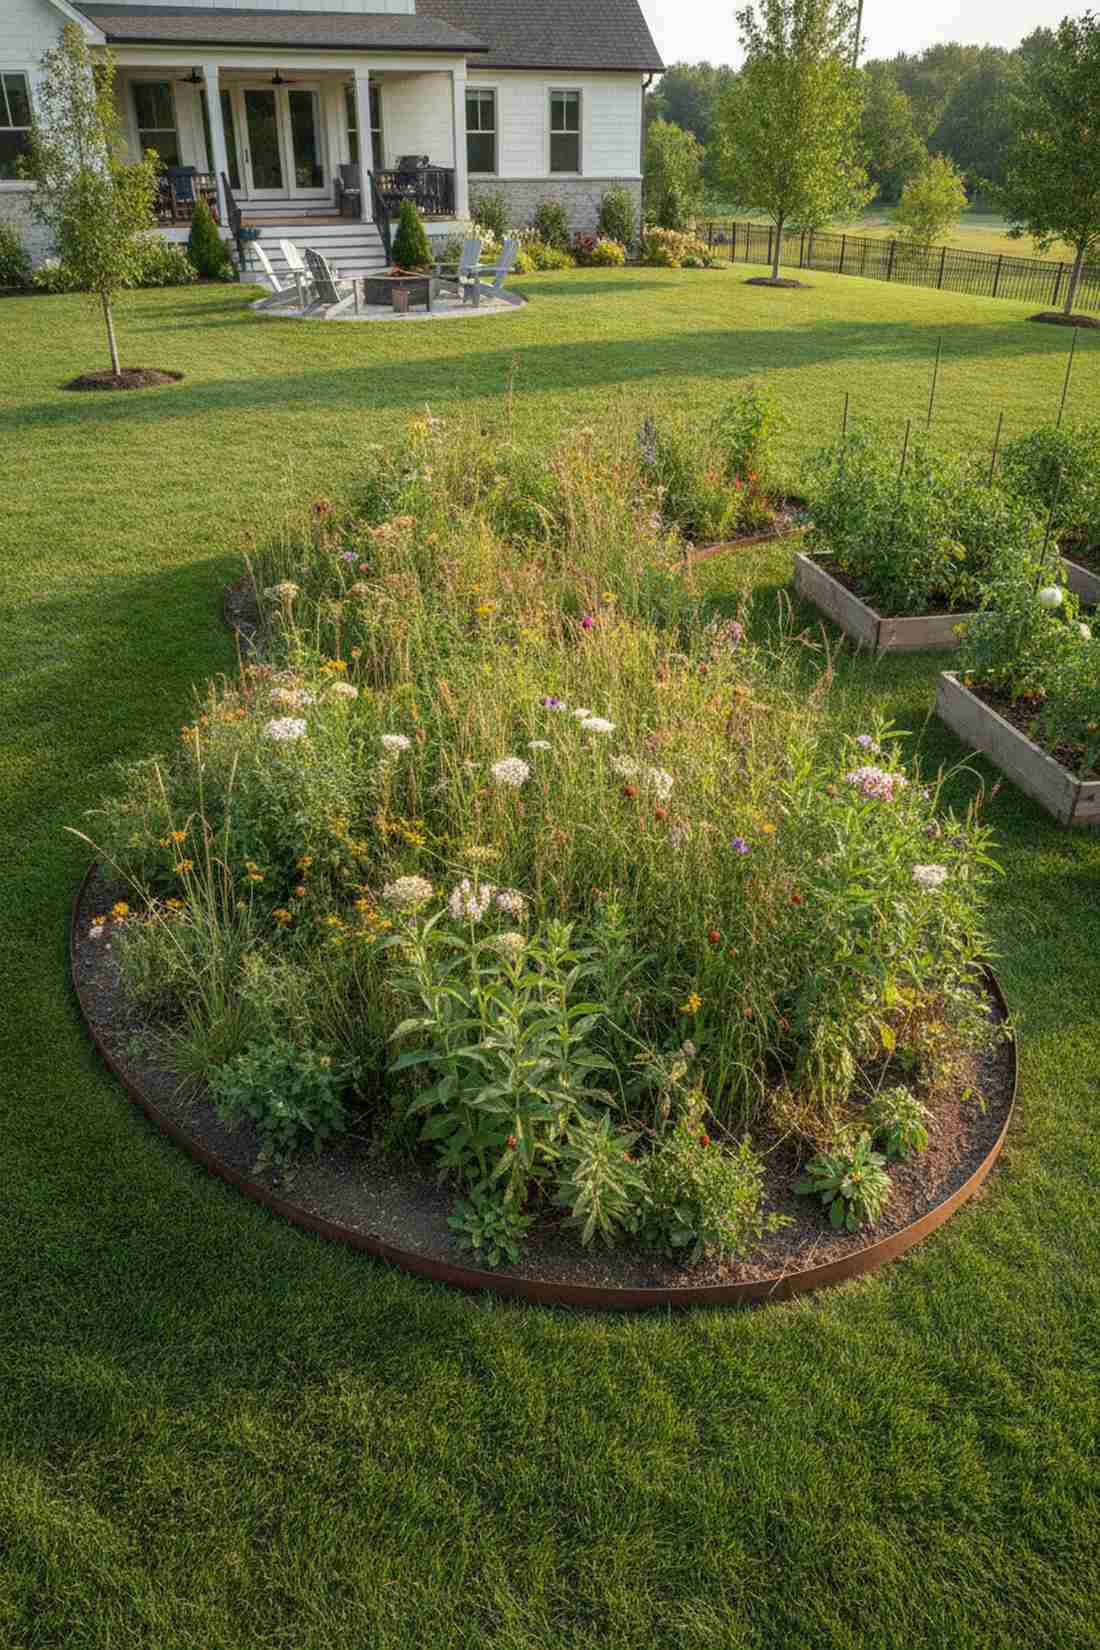
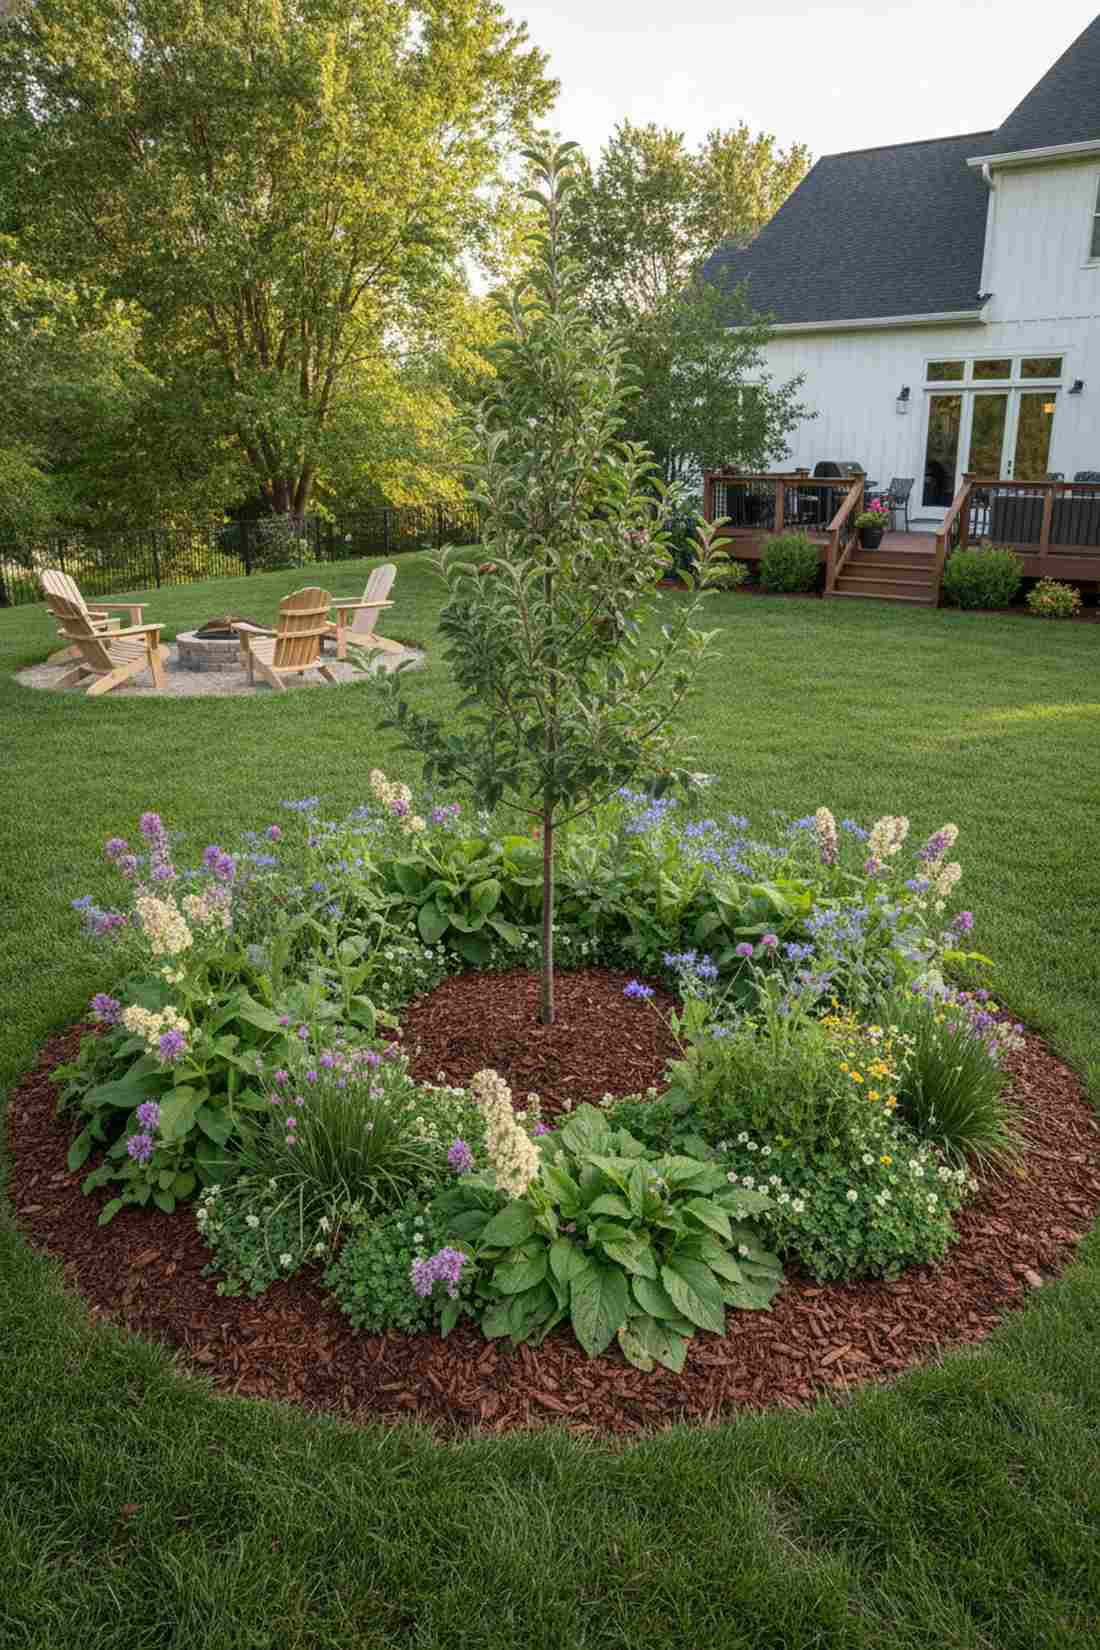
16. Circular Concentric Rings
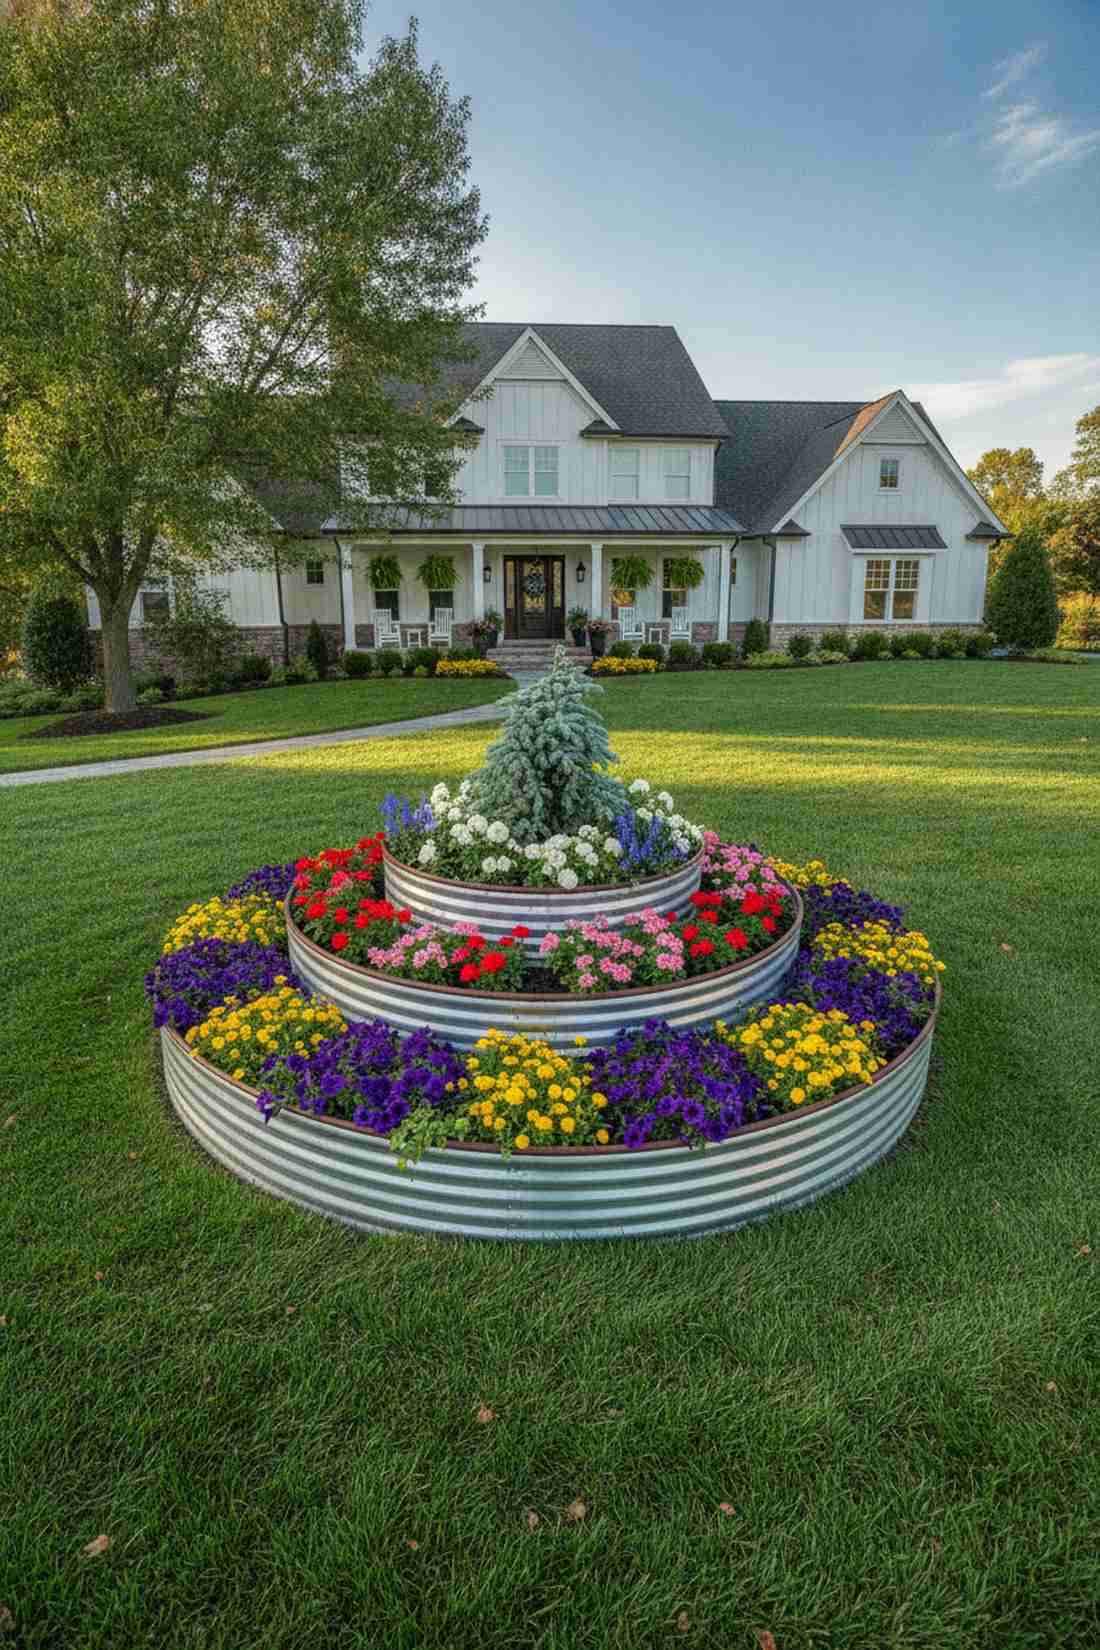
This layered mounding effect feels like a vibrant, pulsating bullseye of blooming color. The concentric ring island bed is the ultimate solution for breaking up a massive, monotonous front lawn.
Flat beds get lost from the street, but stepping height upward toward the center creates a dramatic 3D topographical feature. Integrating high-quality garden layout ideas like tiered corrugated steel rings makes achieving perfect circles completely foolproof.
Building this tiered wedding-cake structure costs around $150–$300. It’s a visually striking way to showcase specimen centerpieces.
- Key Materials: Flexible tiered borders, graded soil
- Vibe / Style: Dynamic blooming island
- Difficulty: Intermediate leveling
- Budget Breakdown: Ring borders: $140 | Soil volume: $90
- Creator’s Tip: Choose an evergreen for the absolute center so the bed retains its anchor during winter dormancy.
- Smart Sourcing: pre-curved galvanized steel border rings and premium slow-release granular fertilizer
17. Topiary Sentinels
Passing between these sculpted green pillars feels like walking through an exclusive gallery. Strategically placing formal topiary sentinel plants is a brilliant tactic to punctuate dull walkway corners and gated entries.
Relying solely on floppy florals looks untidy, but injecting rigid sheared evergreens provides an instant backbone of luxury. Using high-grade fiberglass display pots rather than cheap plastic mimics heavy stone while remaining easy to position.
This instant injection of class runs about $120–$250 per pair. Pin this if you want an evergreen structural aesthetic that never quits.
- Key Materials: Columnar evergreens, heavy planters
- Vibe / Style: Crisp architectural framing
- Difficulty: Routine shearing required
- Budget Breakdown: Shrubs: $100 | Premium pots: $120
- Creator’s Tip: Weigh down the bottom of the planters with heavy bricks to prevent these tall sails from blowing over.
- Smart Sourcing: faux-stone lightweight fiberglass planters and precision topiary trimming shears
Vertical Growing Systems for Limited Footprints
18. Trellis Wall Maximizer
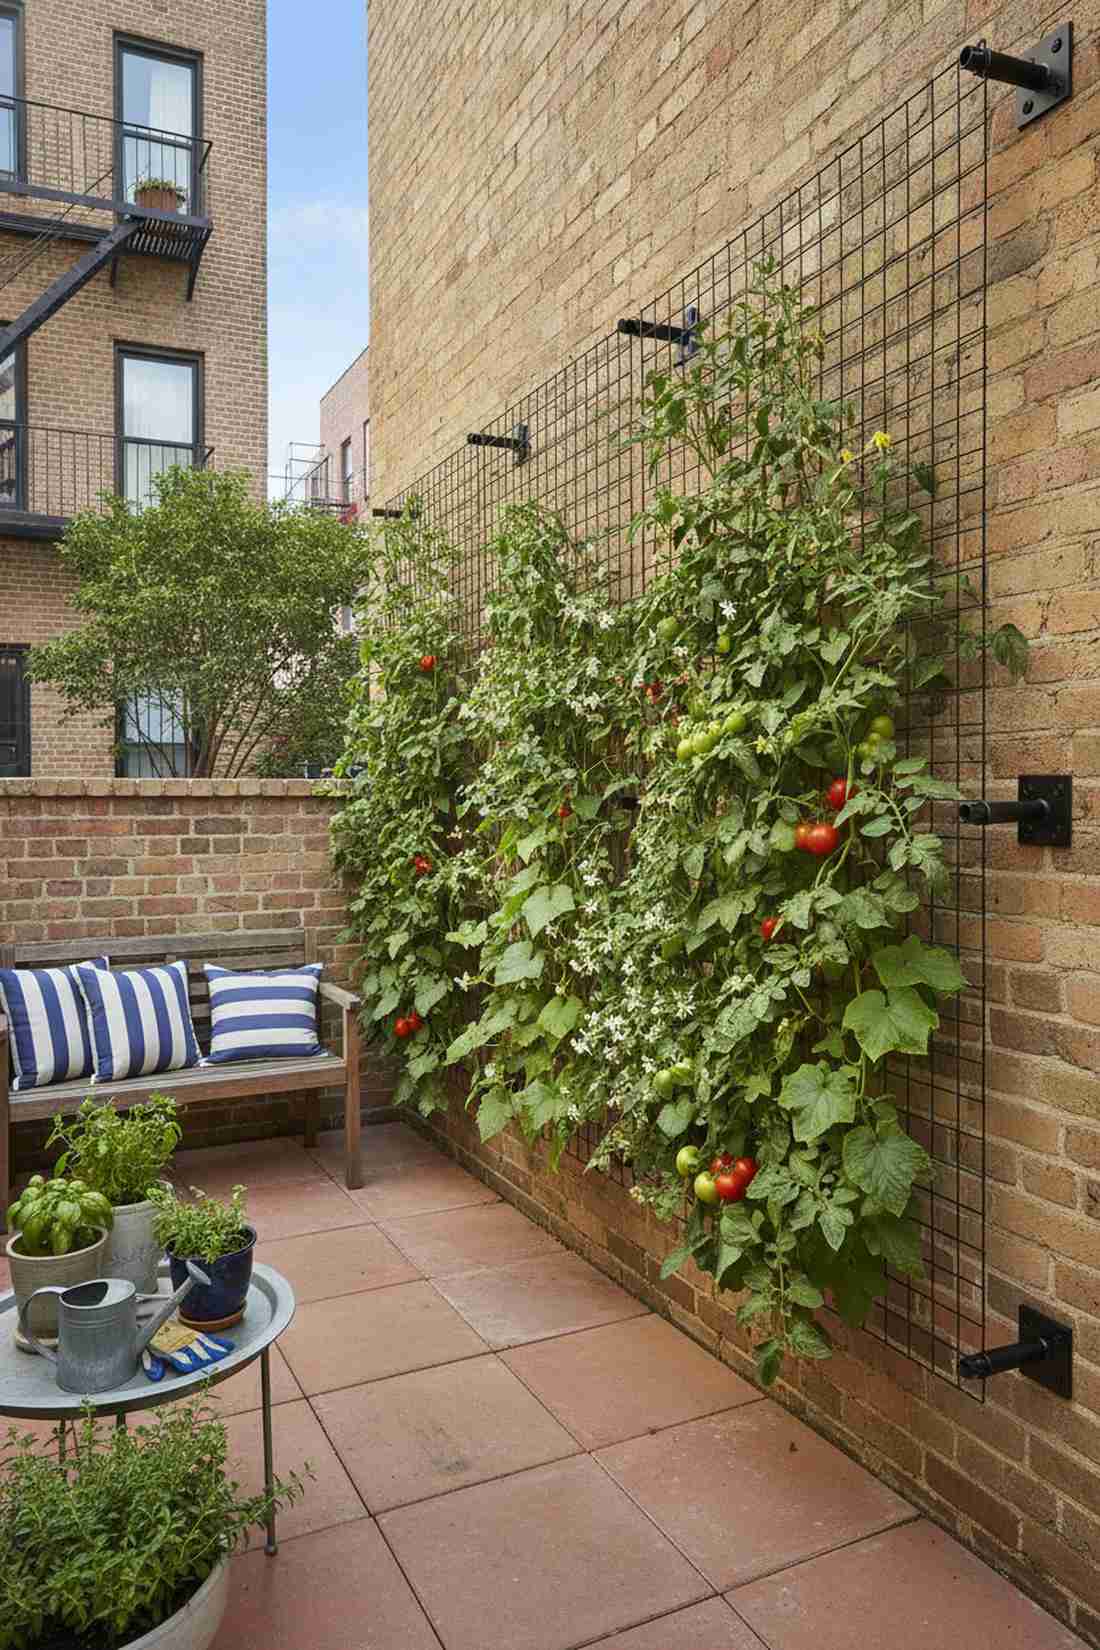
This vertical jungle feels like a lush, productive green wall thriving in mid-air. The heavy-duty wall trellis system is an absolute lifesaver for cramped urban patios craving fresh tomato yields.
Letting vines sprawl wastes precious square footage, but forcing them upward delivers a surprisingly premium look and higher yields. Swapping flimsy bamboo for commercial-grade coated wire mesh ensures the grid won’t snap under the weight of mature fruiting crops.
You can easily pull this vertical trick off for $40–$80. Save this to your small space gardening board for massive harvest gains.
- Key Materials: Welded wire panels, wall standoffs
- Vibe / Style: Productive urban verticality
- Difficulty: Easy wall mounting
- Budget Breakdown: Mesh panels: $35 | Hardware: $15
- Creator’s Tip: Mount the trellis at least 3 inches away from the wall to guarantee proper air circulation and prevent mildew.
- Smart Sourcing: rust-proof welded wire trellis panels and heavy-duty masonry standoff brackets
19. A-Frame Tunnel
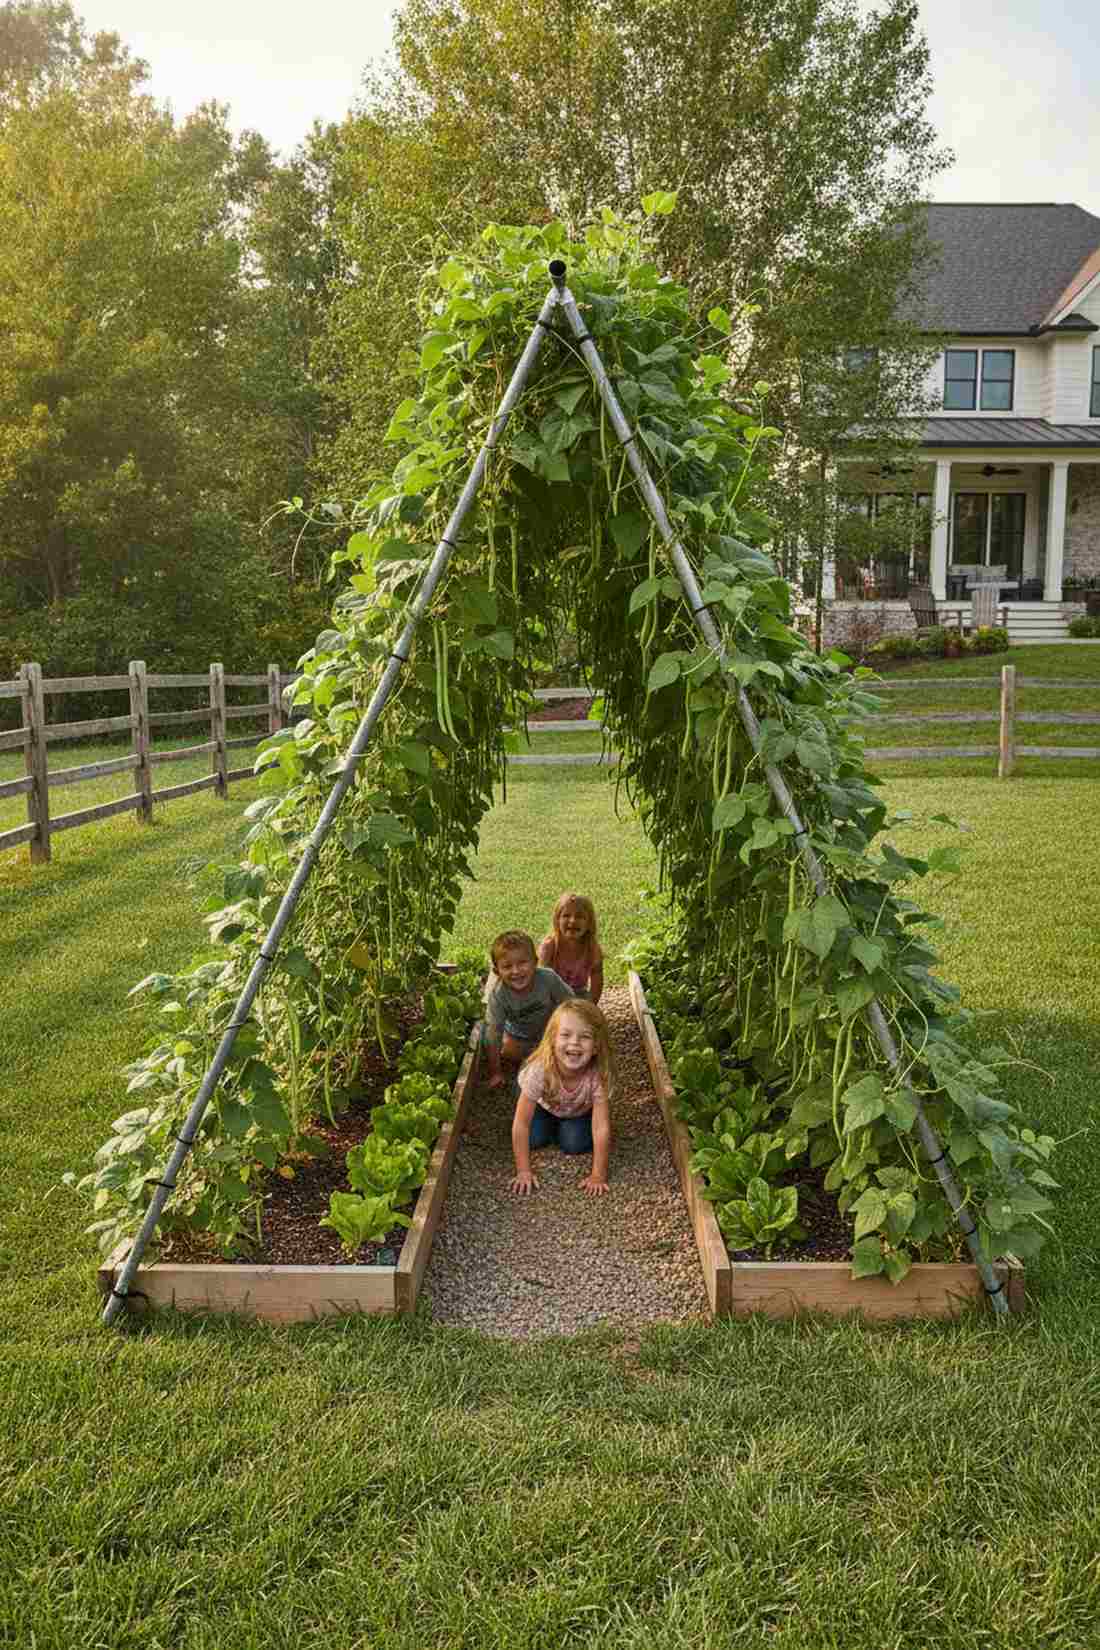
Crawling through this leafy corridor feels like discovering a secret hideout dripping with fresh produce. Building a freestanding A-frame garden tunnel is a magical, space-doubling hack perfect for entertaining kids.
Standard flat trellises are uninspiring, but leaning two panels together creates an incredibly sturdy, self-supporting architectural feature. Incorporating climbing garden layout design strategies like pole beans on the outside creates a cool, shaded pathway underneath.
Constructing this enchanting tunnel costs roughly $70–$130. It’s a fantastic, high-yield structure that takes up minimal ground space.
- Key Materials: Cattle panels, zip ties
- Vibe / Style: Whimsical edible canopy
- Difficulty: Quick two-person build
- Budget Breakdown: Panels: $60 | Fasteners: $15
- Creator’s Tip: Plant shade-tolerant salad greens directly under the tunnel to utilize the newly created microclimate.
- Smart Sourcing: heavy-duty galvanized cattle panels and UV-resistant industrial zip ties (bulk pack)
If you’re dealing with awkward corners, the upcoming design is a total game-changer.
20. Obelisk Vertical Anchors
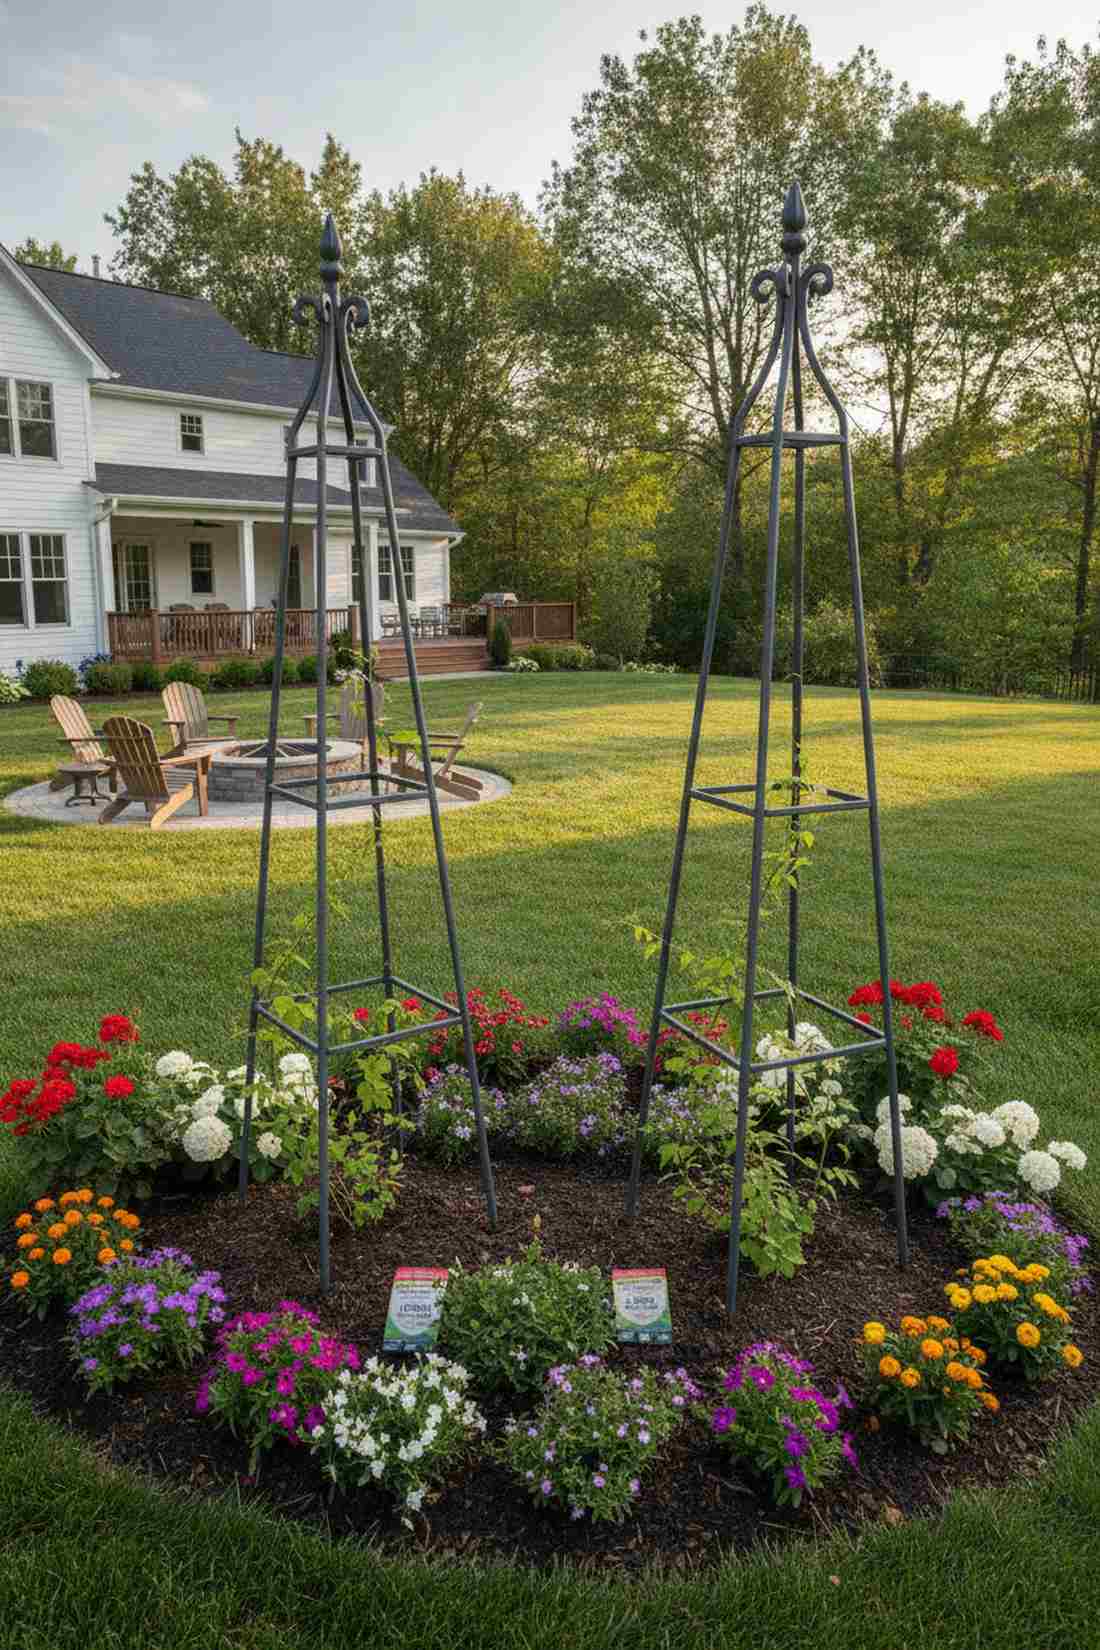
Adding this striking element feels like dropping a piece of fine art right into the dirt. A pyramidal garden obelisk setup serves as the perfect sculptural anchor for flat, uninspired flower beds.
Relying on plants alone for height takes years, but dropping in a pre-built structural spire looks far more expensive than it is. Investing in premium weather-coated steel ensures these striking focal points won’t rot out after one wet season.
Grab a high-quality spire for about $50–$120. Pin this to instantly elevate the architectural height of your backyard.
- Key Materials: Metal or cedar obelisk
- Vibe / Style: Classic English sculptural
- Difficulty: Instant drop-in setup
- Budget Breakdown: Structure: $85 | Climbing seeds: $10
- Creator’s Tip: Sink the legs at least 8 inches deep into the soil so heavy winds don’t uproot your climbing vines.
- Smart Sourcing: powder-coated steel garden obelisks and fast-climbing flowering vine seed kits
21. Tiered Strawberry Tower
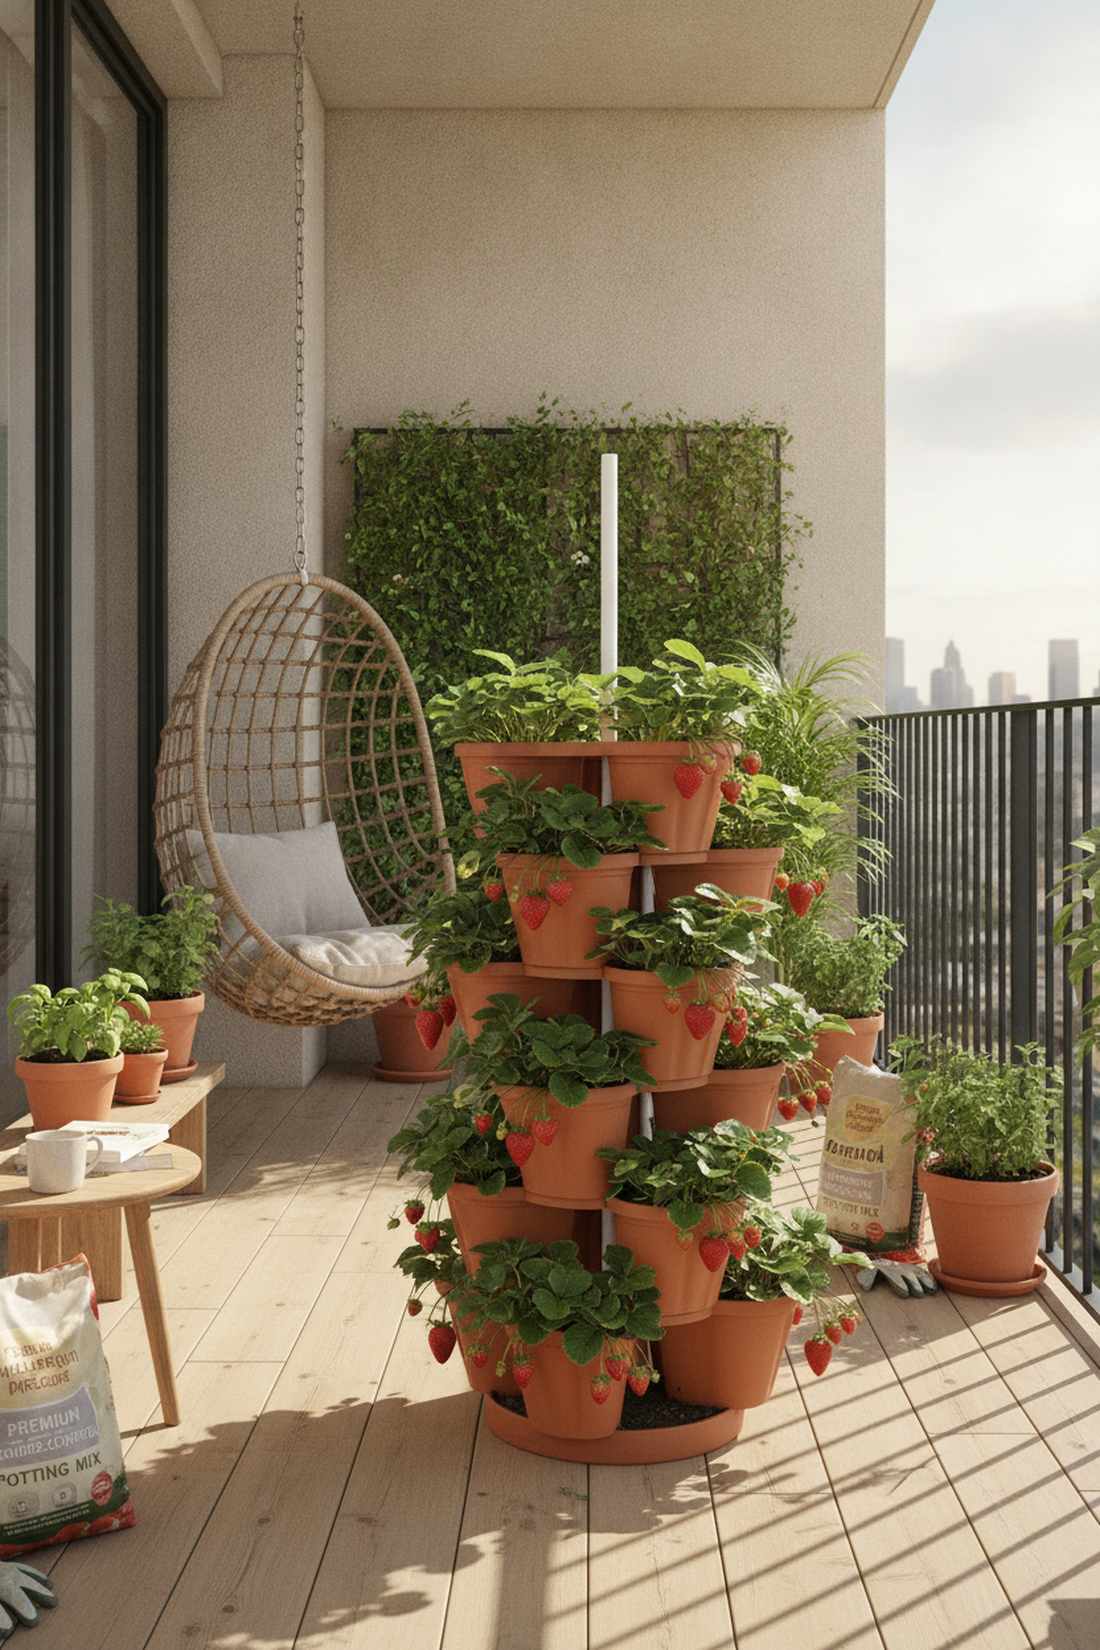
Harvesting from this cascading pillar feels like pulling treats from an overflowing botanical fountain. The stackable tiered planter tower is an absolute necessity for apartment balconies craving fresh berry yields.
Using single pots wastes vertical air space, but stacking specialized interlocking pockets maximizes sun exposure for dozens of plants. Dropping a PVC watering pipe down the center of this garden layout and design completely automates moisture delivery to every tier.
These modular kits usually run $40–$90. Highly recommended for a quick, high-density weekend win.
- Key Materials: Stackable plastic tiers, potting mix
- Vibe / Style: Ultra-compact abundance
- Difficulty: Very easy assembly
- Budget Breakdown: Tower kit: $50 | Soil & Plants: $35
- Creator’s Tip: Mix perlite heavily into your soil to prevent the bottom tiers from becoming compacted and waterlogged.
- Smart Sourcing: 5-tier stackable vertical planter kits and premium lightweight moisture-control potting mix
22. Espalier Fruit Fence

Tending this flat-pressed tree feels like maintaining a living, breathing architectural masterpiece. Developing a 2D espalier fruit tree layout is the ultimate flex for narrow walkways requiring premium horticultural skill.
Bushy trees swallow yard space, but forcing branches to grow completely flat against a masonry wall delivers a designer-level finish. Utilizing heavy-duty tension wire kits keeps the rigid geometric candelabra patterns perfectly aligned as the wood thickens.
The specialized hardware and sapling cost around $100–$250. Save this if you want to produce orchard-level fruit in a 12-inch footprint.
- Key Materials: Tension wire, turnbuckles, bare-root tree
- Vibe / Style: Historic European geometric
- Difficulty: Advanced pruning required
- Budget Breakdown: Hardware kit: $65 | Tree: $80
- Creator’s Tip: Paint your masonry wall a stark white or dark charcoal first to make the tree’s green silhouette pop visually.
- Smart Sourcing: stainless steel espalier wire tension kits and flexible rubber tree training ties
23. Green Wall Pocket System
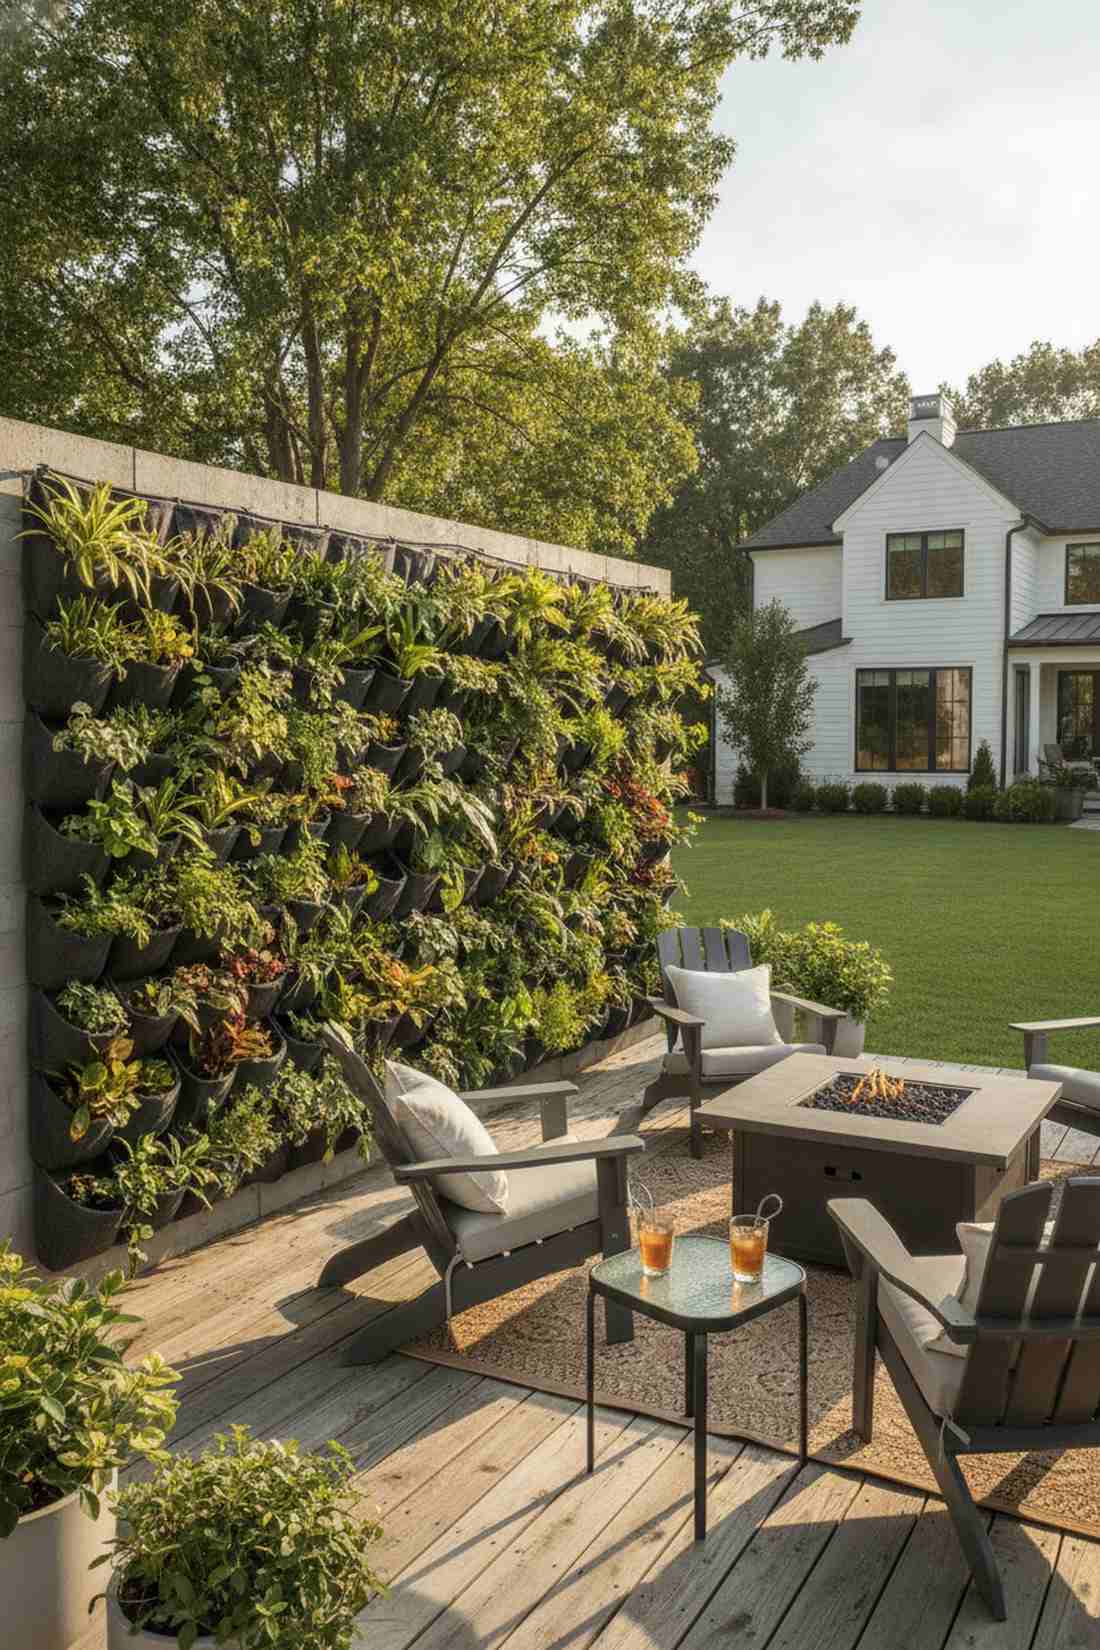
Staring at this vibrant installation feels like bringing a luxury hotel lobby right to your patio. A modular felt pocket green wall completely erases ugly concrete fencing by replacing it with a curtain of foliage.
Traditional hanging baskets dry out rapidly, but utilizing moisture-retaining synthetic felt pouches gives a designer-level finish that practically waters itself. Integrating a micro-drip irrigation line along the top row is the secret to keeping this vertical tapestry alive during heatwaves.
You can cover a large wall section for roughly $80–$160. Pin this to transform barren outdoor walls into lush living art.
- Key Materials: Pocket planters, drip tubing
- Vibe / Style: Lush contemporary oasis
- Difficulty: Moderate plumbing setup
- Budget Breakdown: Pockets: $60 | Irrigation: $35
- Creator’s Tip: Stick to moisture-loving ferns or pothos indoors, but use tough succulents if the wall faces harsh afternoon sun.
- Smart Sourcing: waterproof-backed vertical wall planter pouches and micro-drip irrigation starter kits
24. Pergola Overhead Production
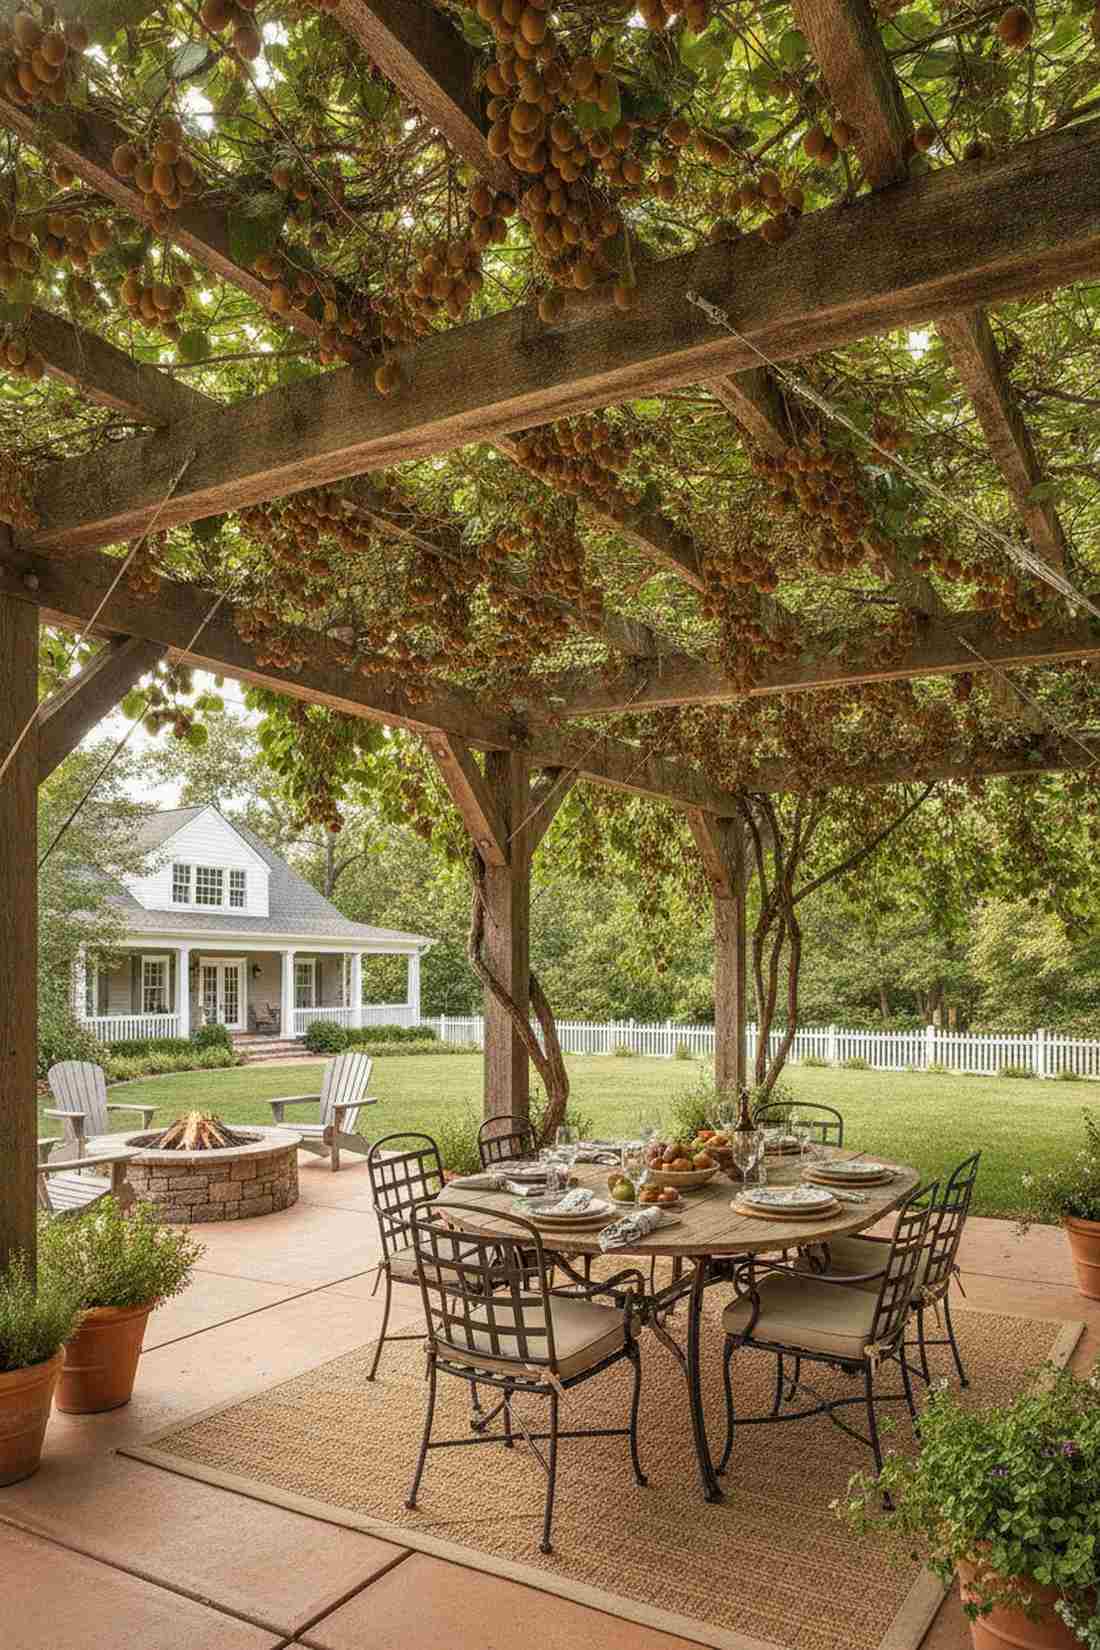
Relaxing under this leafy roof feels like dining in a Mediterranean vineyard. The overhead pergola fruit canopy does double duty by providing deep shade while generating massive clusters of edible grapes or kiwis.
Leaving a pergola bare is a wasted opportunity, and utilizing heavy timber crossbeams ensures the structure handles the intense weight of mature fruiting vines. Implementing garden layout examples like this effortlessly merges outdoor living space with high-volume food production.
Adapting an existing structure costs only $40–$80 in vines and wire. It’s an incredible way to cool down a sweltering concrete patio.
- Key Materials: Support cables, climbing fruit vines
- Vibe / Style: Rustic Tuscan dining
- Difficulty: Patience required for growth
- Budget Breakdown: Vines: $50 | Support cables: $25
- Creator’s Tip: Rig stainless steel cables diagonally across the pergola roof to give the vines extra grab points between the thick wood beams.
- Smart Sourcing: heavy-duty stainless steel cable rigging kits and fast-growing hardy kiwi vine starters
Contractors charge a premium for this next look, but the DIY version is surprisingly cheap…
25. Ladder Shelf Display
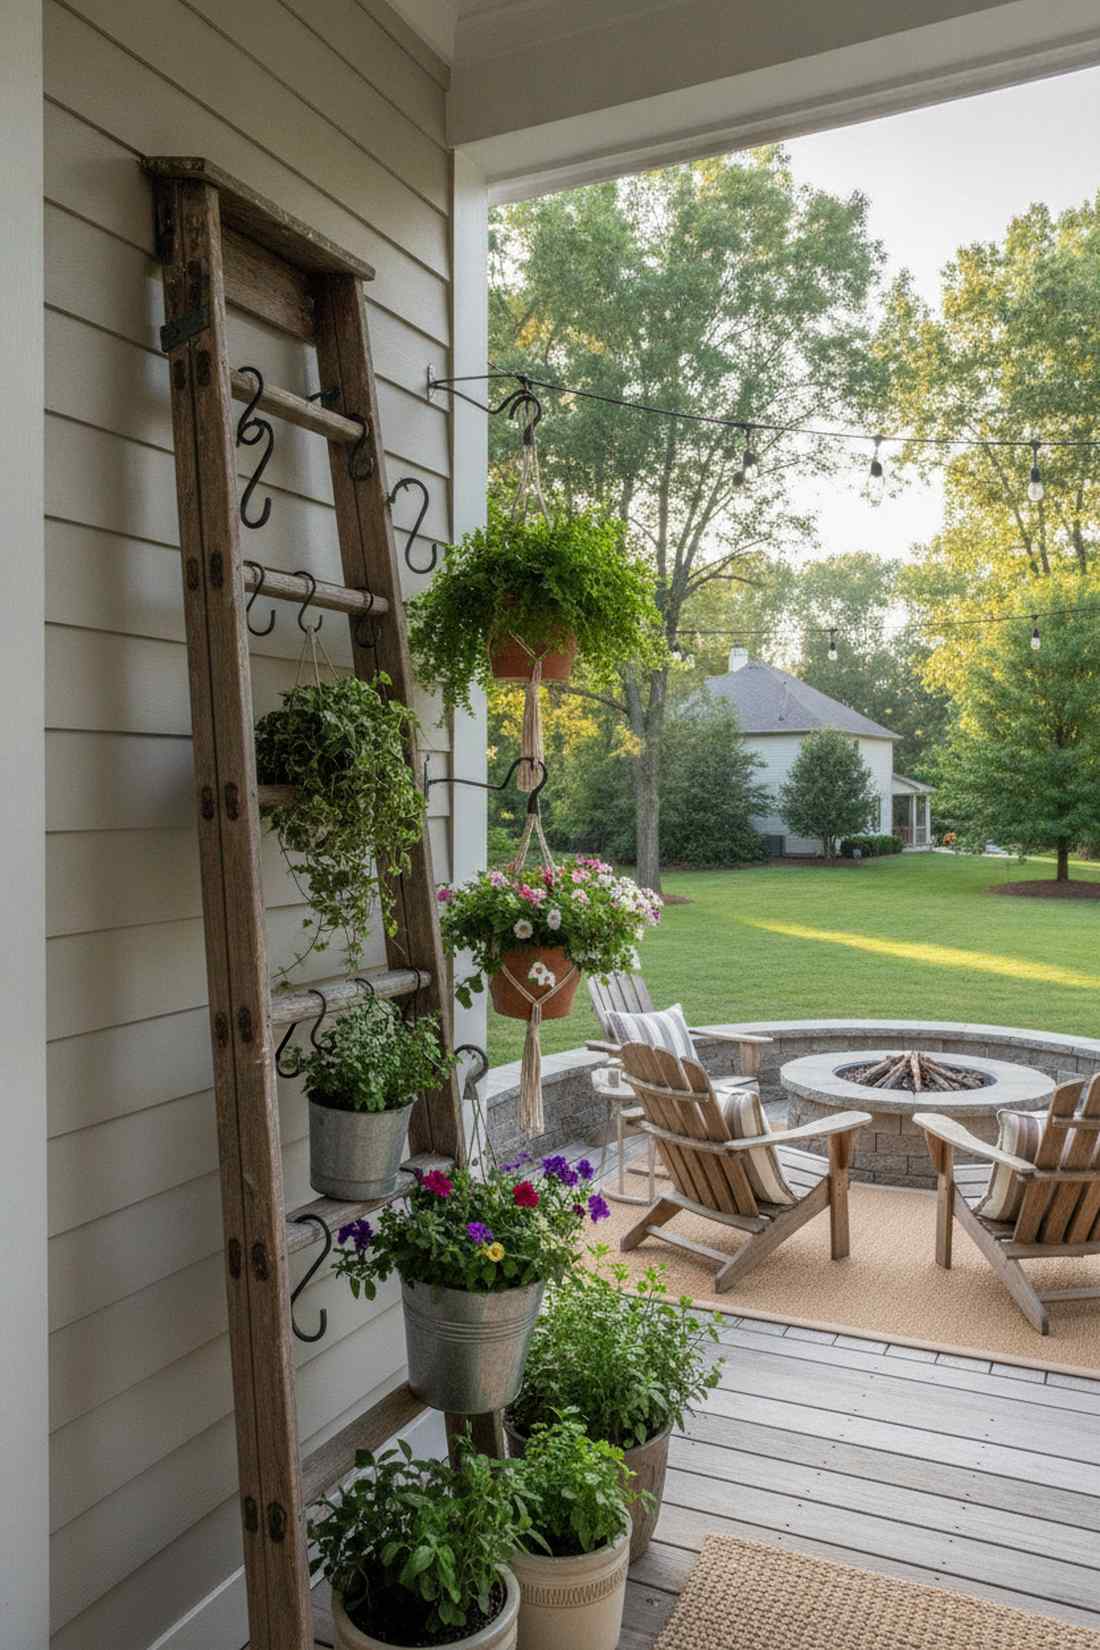
Styling this rustic piece feels like curating a chic boutique plant stand. A tiered leaning ladder garden is the perfect, highly mobile solution for renters wanting to maximize an awkward balcony corner.
A cluster of pots on the ground looks messy, but elevating them on staggered rungs delivers a surprisingly premium look in minutes. Securing weather-treated wooden shelving guarantees this aesthetic piece won’t buckle under the weight of wet terracotta.
You can easily pull this off for $30–$70. Save this to your apartment decor board for an instant vertical upgrade.
- Key Materials: Wooden ladder frame, varied pots
- Vibe / Style: Boho-chic balcony display
- Difficulty: Zero-tool assembly
- Budget Breakdown: Ladder shelf: $45 | Pots: $20
- Creator’s Tip: Place trailing vines like creeping jenny on the top rungs to cascade down and soften the wooden edges.
- Smart Sourcing: foldable wooden tiered plant stands and lightweight faux-terracotta resin pots (multi-pack)
Permaculture Zoning for Sustainable Management
26. Zone One Intensive Hub
Stepping out your back door into this setup feels like having a private chef’s pantry at your fingertips. The Zone One culinary herb layout is meticulously designed to keep daily-use greens within a ten-second walk of the kitchen.
Hiding herbs at the back of the yard guarantees they’ll be forgotten, but placing them in high-traffic entryways completely optimizes your daily cooking routine. Utilizing sleek, elevated planter boxes here ensures these high-maintenance crops receive daily watering without bending over.
Setting up this premium hub costs about $80–$150. A mandatory functional upgrade for anyone who cooks from scratch.
- Key Materials: Elevated waist-high planters
- Vibe / Style: Accessible gourmet utility
- Difficulty: Easy setup
- Budget Breakdown: Planter: $100 | Herbs: $30
- Creator’s Tip: Install a small decorative rain barrel right next to this zone so you never have to drag a hose for daily watering.
- Smart Sourcing: ergonomic waist-high metal planter boxes and culinary herb garden seed starter kits
27. Zone Two Production Core
Operating in this space feels like running a highly efficient micro-farm. A core vegetable production zone design acts as the heavy-lifting engine of your yard, dedicated entirely to high-yield seasonal crops.
Mixing daily herbs with heavy-duty crops wastes effort, but separating your main caloric production into a distinct, manageable grid looks far more expensive than it is. Applying thick layers of premium organic compost specifically to this targeted area slashes your fertilizer budget.
Establishing this engine room costs roughly $150–$300 in soil amendments. Pin this to streamline your heavy gardening chores.
- Key Materials: Bulk compost, sturdy row markers
- Vibe / Style: Organized agricultural power
- Difficulty: Moderate physical labor
- Budget Breakdown: Soil/Compost: $150 | Seed banks: $40
- Creator’s Tip: Map out wide 3-foot pathways here specifically to accommodate heavy wheelbarrow traffic during harvest season.
- Smart Sourcing: bulk organic vegetable fertilizer blends and heavy-duty steel plant row markers
28. Zone Three Orchard Perennials
Walking through this semi-wild area feels like exploring a thriving, self-sustaining woodland edge. The perennial food forest layout requires almost zero daily maintenance once the root systems mature.
Relying purely on annuals is exhausting, but anchoring the background with permanent fruit and nut trees gives a designer-level finish that produces food for decades. Planting nitrogen-fixing shrubs directly under the canopy creates a self-fertilizing loop that eliminates the need for chemical inputs.
This long-term investment usually costs $200–$400 in bare-root stock. Save this if you want to build generational backyard wealth.
- Key Materials: Bare-root trees, groundcover seeds
- Vibe / Style: Abundant woodland transition
- Difficulty: Long-term planning
- Budget Breakdown: Trees: $180 | Companion plants: $60
- Creator’s Tip: Paint the lower trunks with white latex paint to prevent winter sunscald on young, vulnerable saplings.
- Smart Sourcing: dormant bare-root fruit tree bundles and permaculture nitrogen-fixer seed mixes
29. Zone Four Managed Forage
This layout feels incredibly primal, like you’ve successfully tamed a slice of the wilderness. Designing a semi-wild foraging boundary is perfect for expansive properties looking to harvest mushrooms or medicinal roots.
Manicuring every inch of acreage is a waste of money, but lightly managing timber edges with strategic garden layout ideas creates a zero-maintenance perimeter. Inoculating fallen hardwood logs with specialty mushroom spores turns rotting wood into a premium culinary asset.
Spore plugs and basic tools run about $40–$90. It’s an incredibly unique, ultra-low-effort way to yield high-value crops.
- Key Materials: Hardwood logs, mushroom spawn
- Vibe / Style: Rugged natural harvest
- Difficulty: Very low maintenance
- Budget Breakdown: Spawn plugs: $30 | Wax/Drill bits: $20
- Creator’s Tip: Keep the inoculated logs heavily shaded and low to the ground to maintain the strict humidity mushrooms require.
- Smart Sourcing: gourmet shiitake mushroom plug spawn kits and food-grade sealing wax (bulk)
Stop scrolling if you want an ultra-low-maintenance trick that looks meticulously planned.
30. Zone Five Wild Observation
Leaving this corner untouched feels like opening a private sanctuary for local wildlife. A designated wild ecosystem zone provides a crucial, zero-cost genetic reservoir that heavily supports your cultivated beds.
Eradicating native brush destroys predator insect habitats, but intentionally framing a wild patch delivers a surprisingly premium look when given a clean, sharp border edge. This raw area naturally breeds ladybugs and parasitic wasps that will obliterate the aphids attacking your prized tomatoes.
This zone costs $0 to maintain. Pin this to your eco-friendly landscape board for ultimate pest-control synergy.
- Key Materials: Crisp edging boundary
- Vibe / Style: Framed ecological wilderness
- Difficulty: Zero effort
- Budget Breakdown: Edging to frame it: $40 | Plants: $0
- Creator’s Tip: Mow a very sharp, clean curve around the wild patch; the neat border signals that the wildness is intentional, not lazy.
- Smart Sourcing: heavy-duty steel landscape edging strips and predatory beneficial insect attractant lures
31. Guild Polyculture Cluster
Looking at this dense plant community feels like viewing a perfectly balanced, miniature ecosystem. A fruit tree guild planting strategy mimics nature by grouping highly cooperative, mutually beneficial species in tight circles.
Planting trees in isolated grass circles stunts their growth, but surrounding the trunk with dynamic nutrient accumulators looks far more expensive than it is. Utilizing specific high-CPC terms like permaculture companion seeds helps explain how these clusters naturally suppress weeds while drawing deep minerals to the surface.
Seed packets and mulch will cost roughly $30–$60 per tree. It’s a game-changing biological engine for any orchard.
- Key Materials: Diverse seed packets, deep mulch
- Vibe / Style: Lush symbiotic ring
- Difficulty: Easy to seed
- Budget Breakdown: Seeds: $25 | Mulch base: $15
- Creator’s Tip: Include deep-taproot plants like comfrey to mine nutrients from sub-soil and deposit them on the surface when their leaves die back.
- Smart Sourcing: bulk comfrey root cuttings (bocking 14) and beneficial insect wildflower seed mixes
32. Keyline Water Harvesting
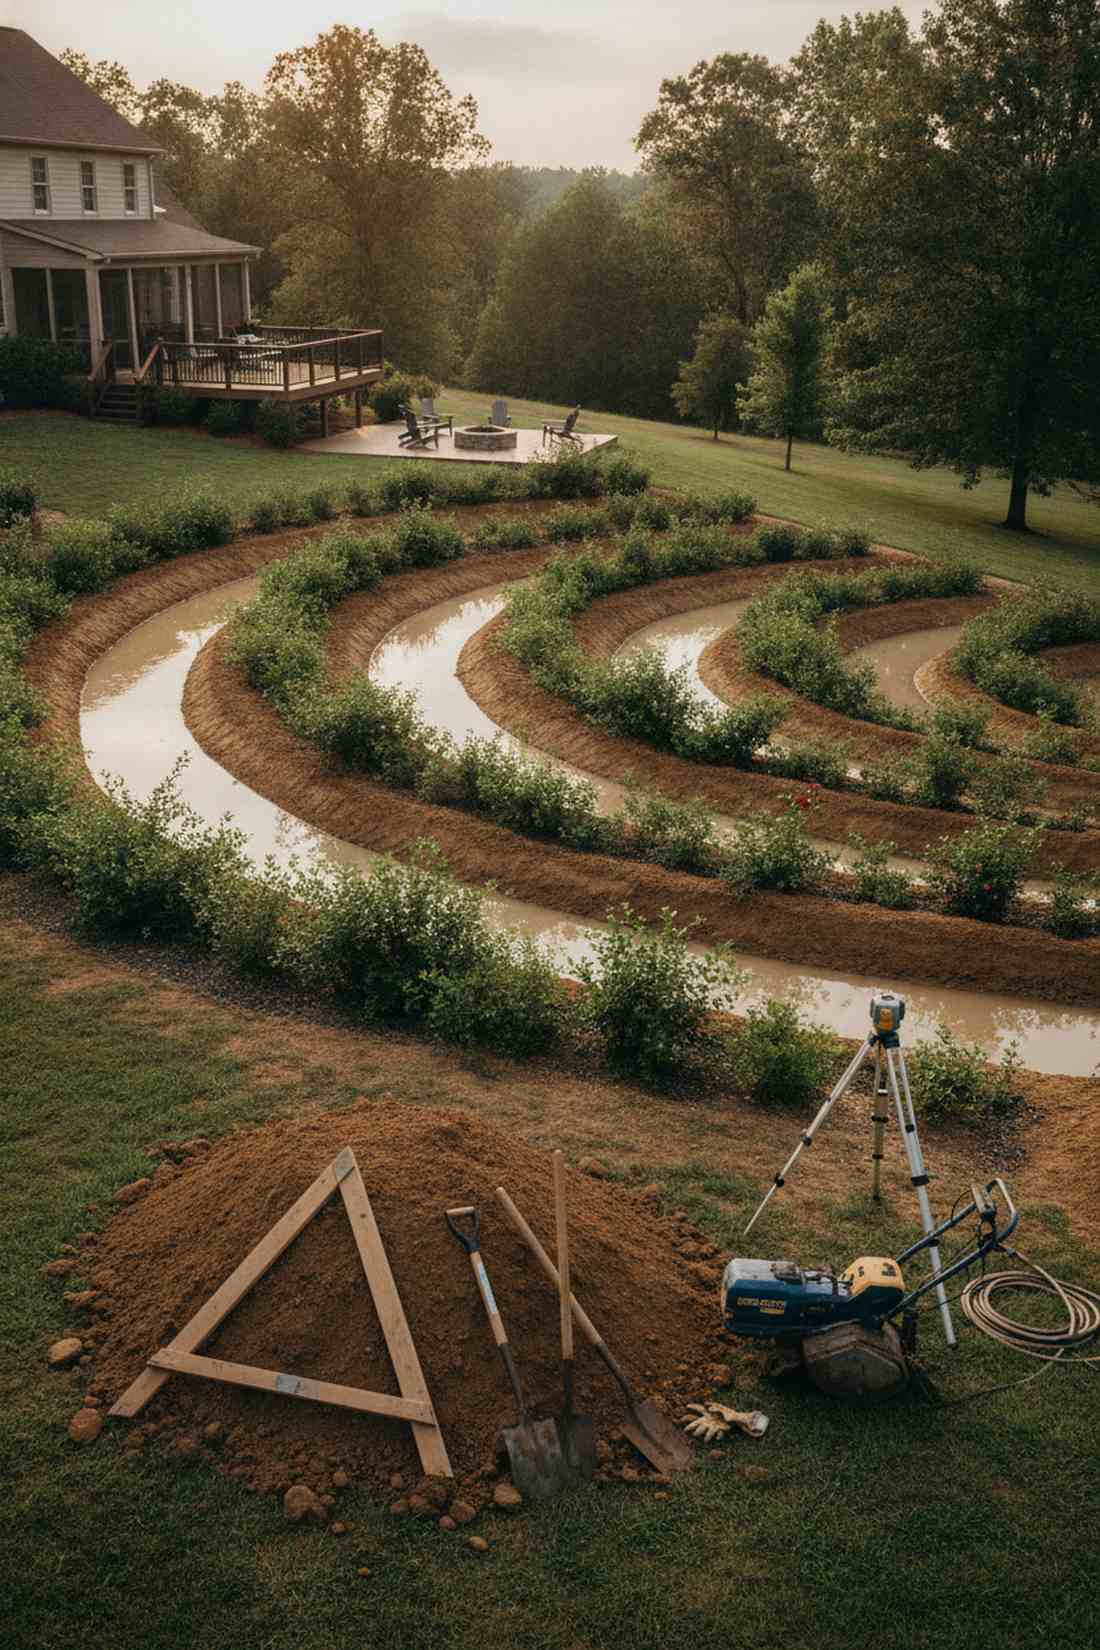
Observing this landscape during a storm feels like watching brilliant engineering come to life. The contour swale water capture design is the absolute holy grail for completely eliminating irrigation bills on sloped properties.
Letting rainwater wash away topsoil is a costly mistake, but digging level trenches across the slope gives a designer-level finish to your water management. Planting thirsty fruit bushes on the downhill berm ensures they drink deeply from the subterranean water lens you’ve created.
This earthwork costs nothing but sweat equity and maybe a rented tiller ($60–$100). Pin this if you want a drought-proof landscape.
- Key Materials: A-frame level, shovels
- Vibe / Style: Engineered ecological resilience
- Difficulty: High physical labor
- Budget Breakdown: Tool rental: $70 | Labor: $0
- Creator’s Tip: Use an A-frame level to ensure the bottom of the swale is perfectly flat; otherwise, water will pool at one end and breach the wall.
- Smart Sourcing: professional laser level transits and heavy-duty trenching spades
Compact Urban Solutions for Small Spaces
33. Botanical Bento Compartments
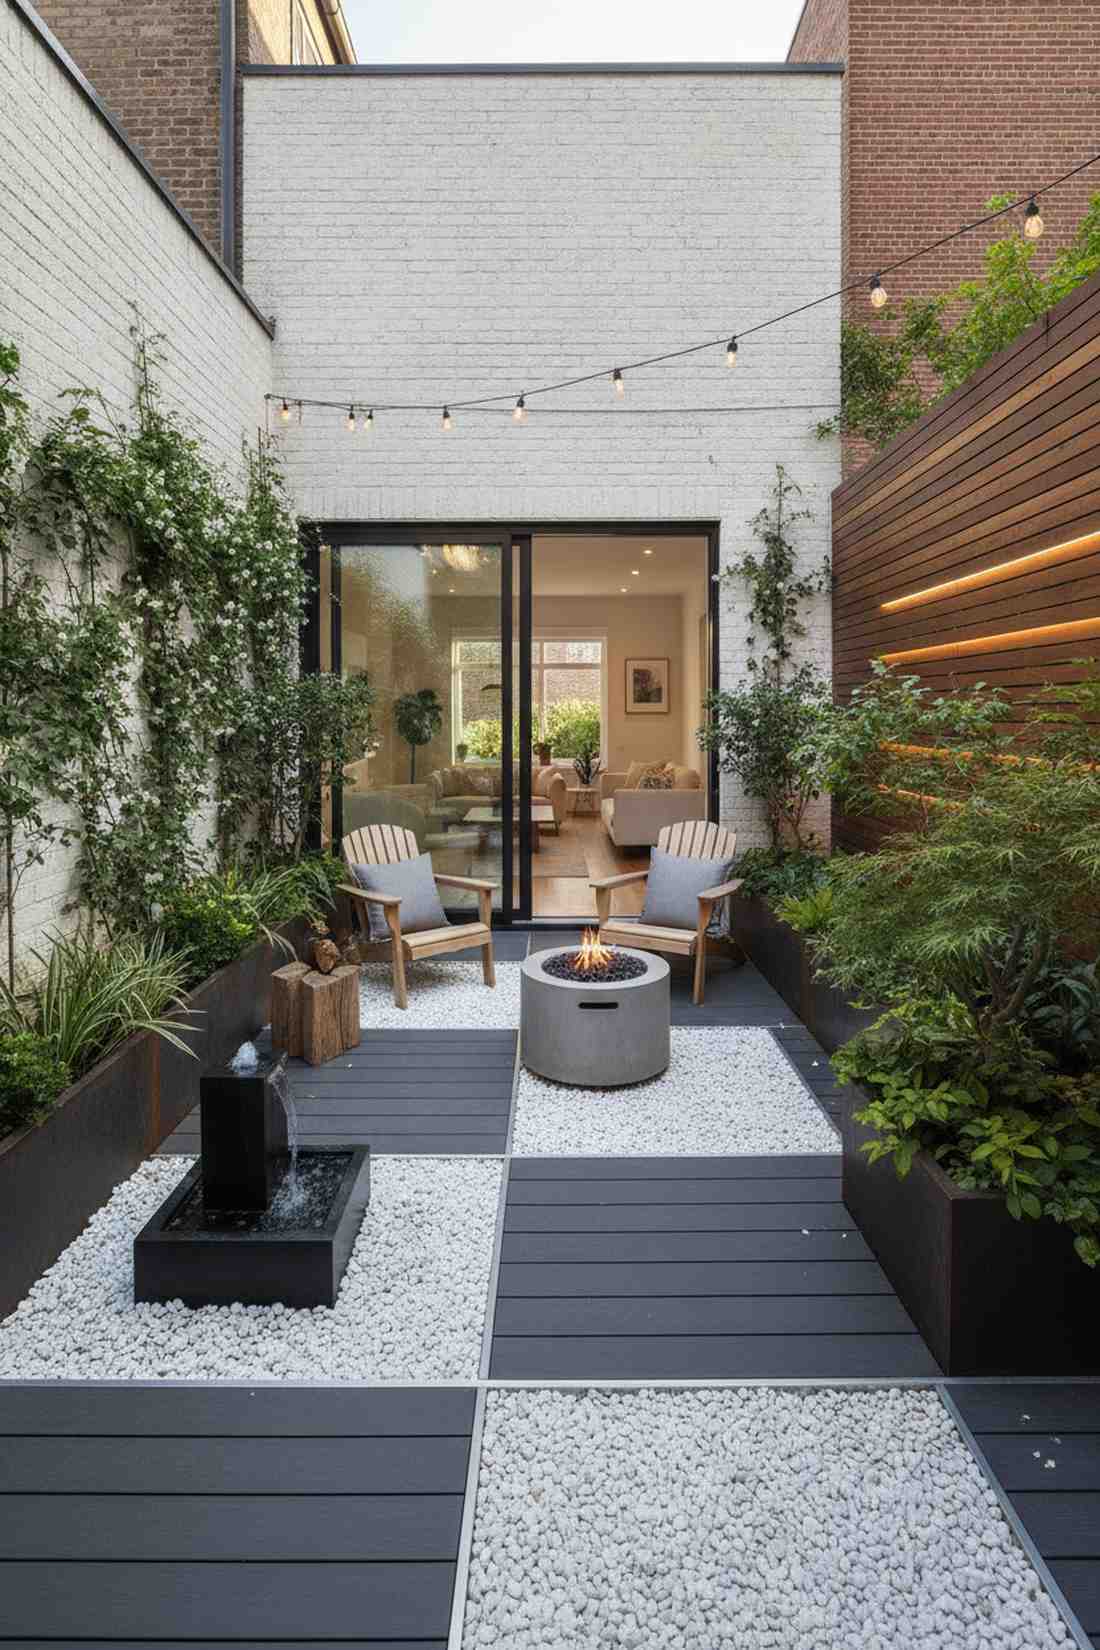
Stepping into this tiny courtyard feels like exploring a series of exquisite, jewel-box rooms. The compartmentalized bento patio design is the genius way to make a 200-square-foot concrete slab feel massive.
Leaving a small space entirely open makes it look smaller, but visually chopping it up with contrasting floor textures delivers a surprisingly premium look. Shifting between sleek composite decking and white marble gravel forces the eye to process multiple distinct “rooms.”
This flooring illusion generally costs $200–$400. Save this to your urban patio makeover board for an instant spatial upgrade.
- Key Materials: Deck tiles, contrasting gravel
- Vibe / Style: Ultra-modern segmented chic
- Difficulty: Easy modular layout
- Budget Breakdown: Decking tiles: $150 | Gravel: $70
- Creator’s Tip: Use rigid metal separator strips between the materials to keep the geometric lines razor-sharp over time.
- Smart Sourcing: snap-together acacia wood deck tiles and aluminum landscape divider strips
34. Balcony Rail Planters
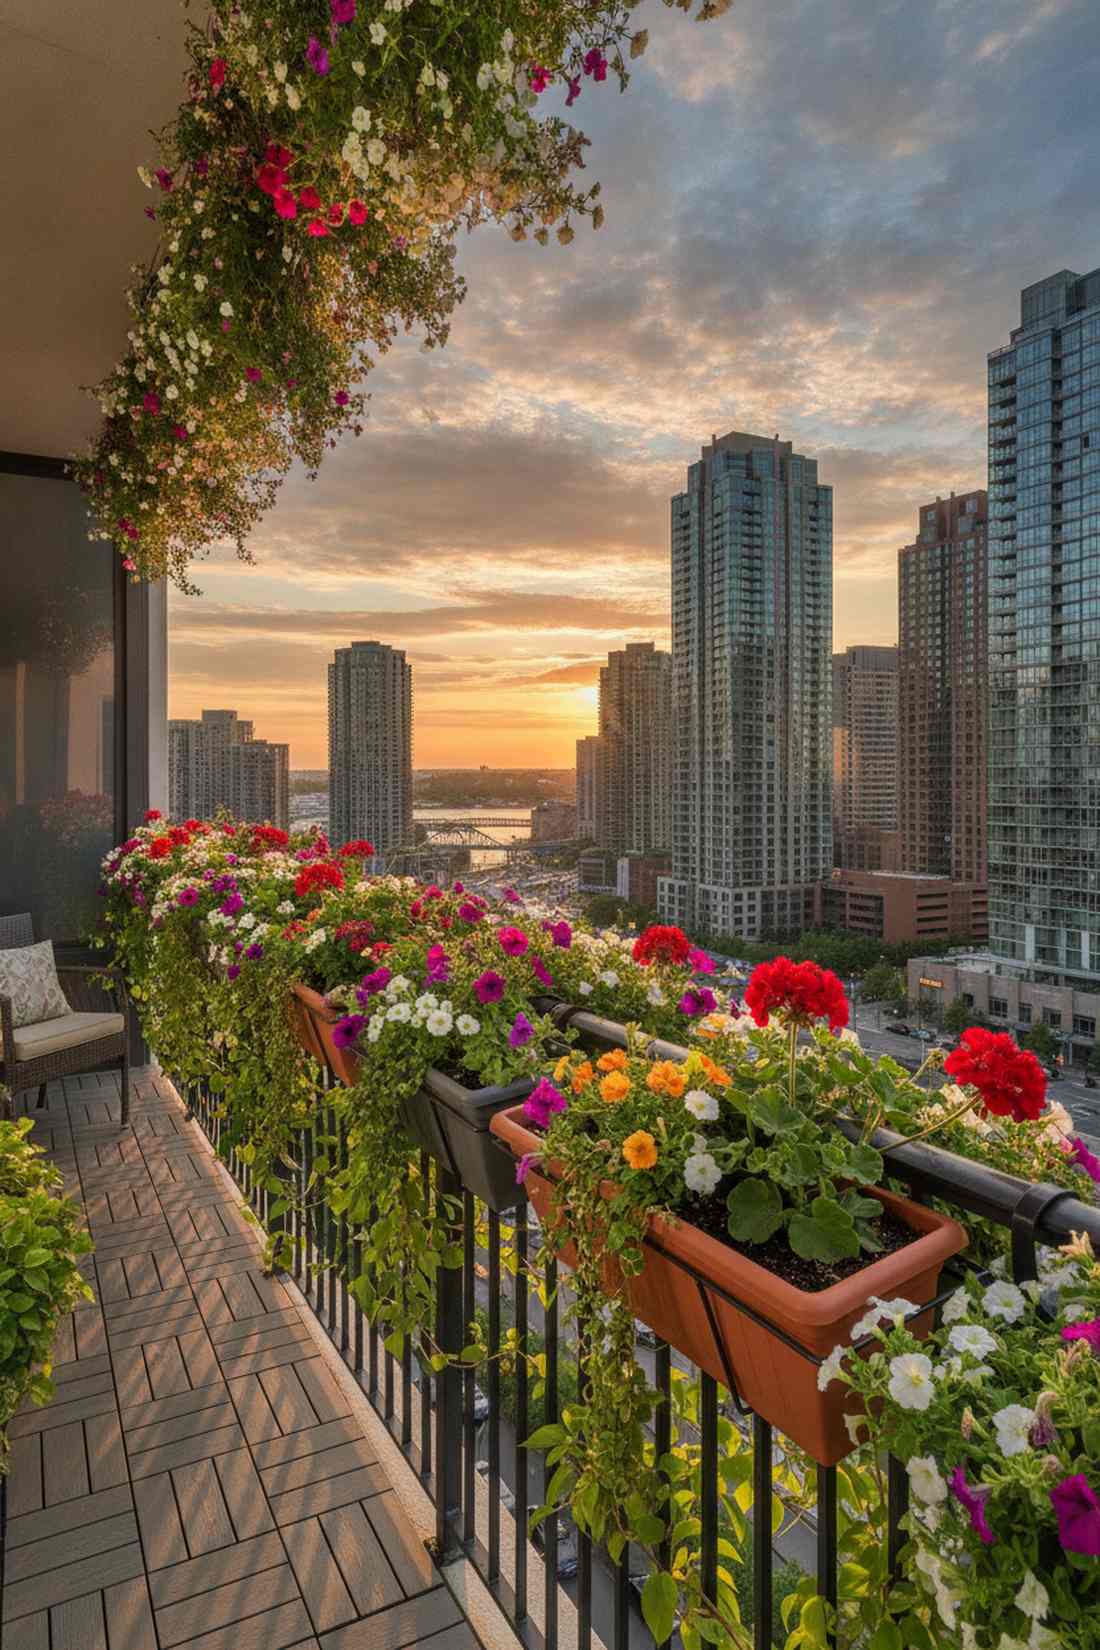
Looking out your window feels like hovering above a floating ribbon of vibrant greenery. A straddling railing planter setup is absolutely essential for maximizing zero-square-foot high-rise apartments.
Balancing loose pots on a ledge is a massive safety hazard, but utilizing secure, dual-sided saddle containers looks far more expensive than it is. Sourcing premium UV-coated resin options ensures they won’t fade or crack under intense, exposed balcony sunlight.
Outfit a standard railing for about $50–$120. Pin this to turn sterile metal rails into an overflowing floral boundary.
- Key Materials: Saddle planters, zip ties
- Vibe / Style: Floating urban floral boundary
- Difficulty: Very easy installation
- Budget Breakdown: Planters: $80 | Potting mix: $20
- Creator’s Tip: Secure the planters to the iron rails with heavy-duty black zip ties hidden under the soil line to prevent wind displacement.
- Smart Sourcing: UV-resistant balcony railing saddle planters and water-retaining gel crystal soil additives
The upcoming layout completely defies traditional spacing rules—and the results are stunning.
35. Rolling Mobile Garden
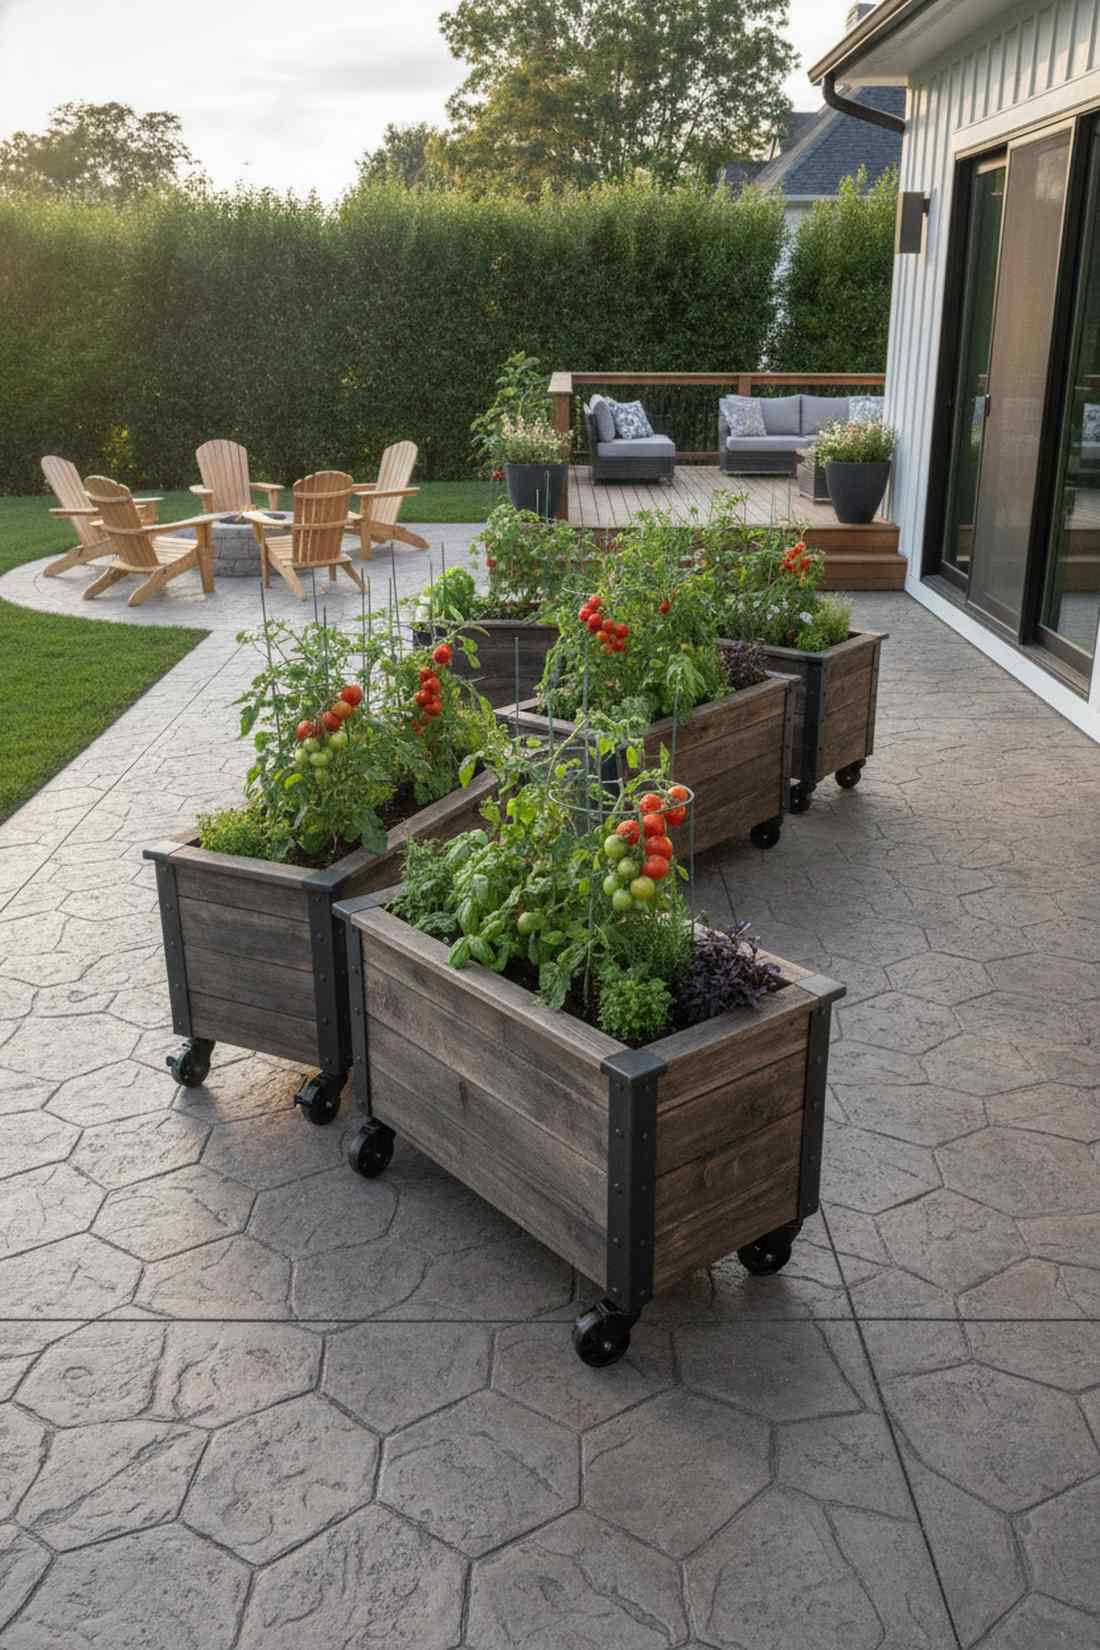
Sliding these planters around feels like effortlessly rearranging the furniture in a chic outdoor living room. Implementing a heavy-duty wheeled planter layout is the ultimate hack for patios with constantly shifting sun patterns.
Static heavy pots trap dirt and stain concrete, but bolting industrial casters to the base gives a designer-level finish that cleans easily. This mobility allows you to physically chase the sun in a shaded urban yard, guaranteeing massive yields from sun-hungry tomatoes.
Adding premium casters costs about $40–$80 per box. Save this trick if you love hosting and need to clear patio space instantly.
- Key Materials: Wooden boxes, locking casters
- Vibe / Style: Industrial adaptable chic
- Difficulty: Basic drill required
- Budget Breakdown: Caster sets: $35 | Base wood: $40
- Creator’s Tip: Always buy locking casters made of polyurethane so they roll smoothly over stamped concrete without scratching.
- Smart Sourcing: heavy-duty locking polyurethane casters (4-pack) and weather-sealed wooden deck box planters
36. Fire Escape Micro Garden
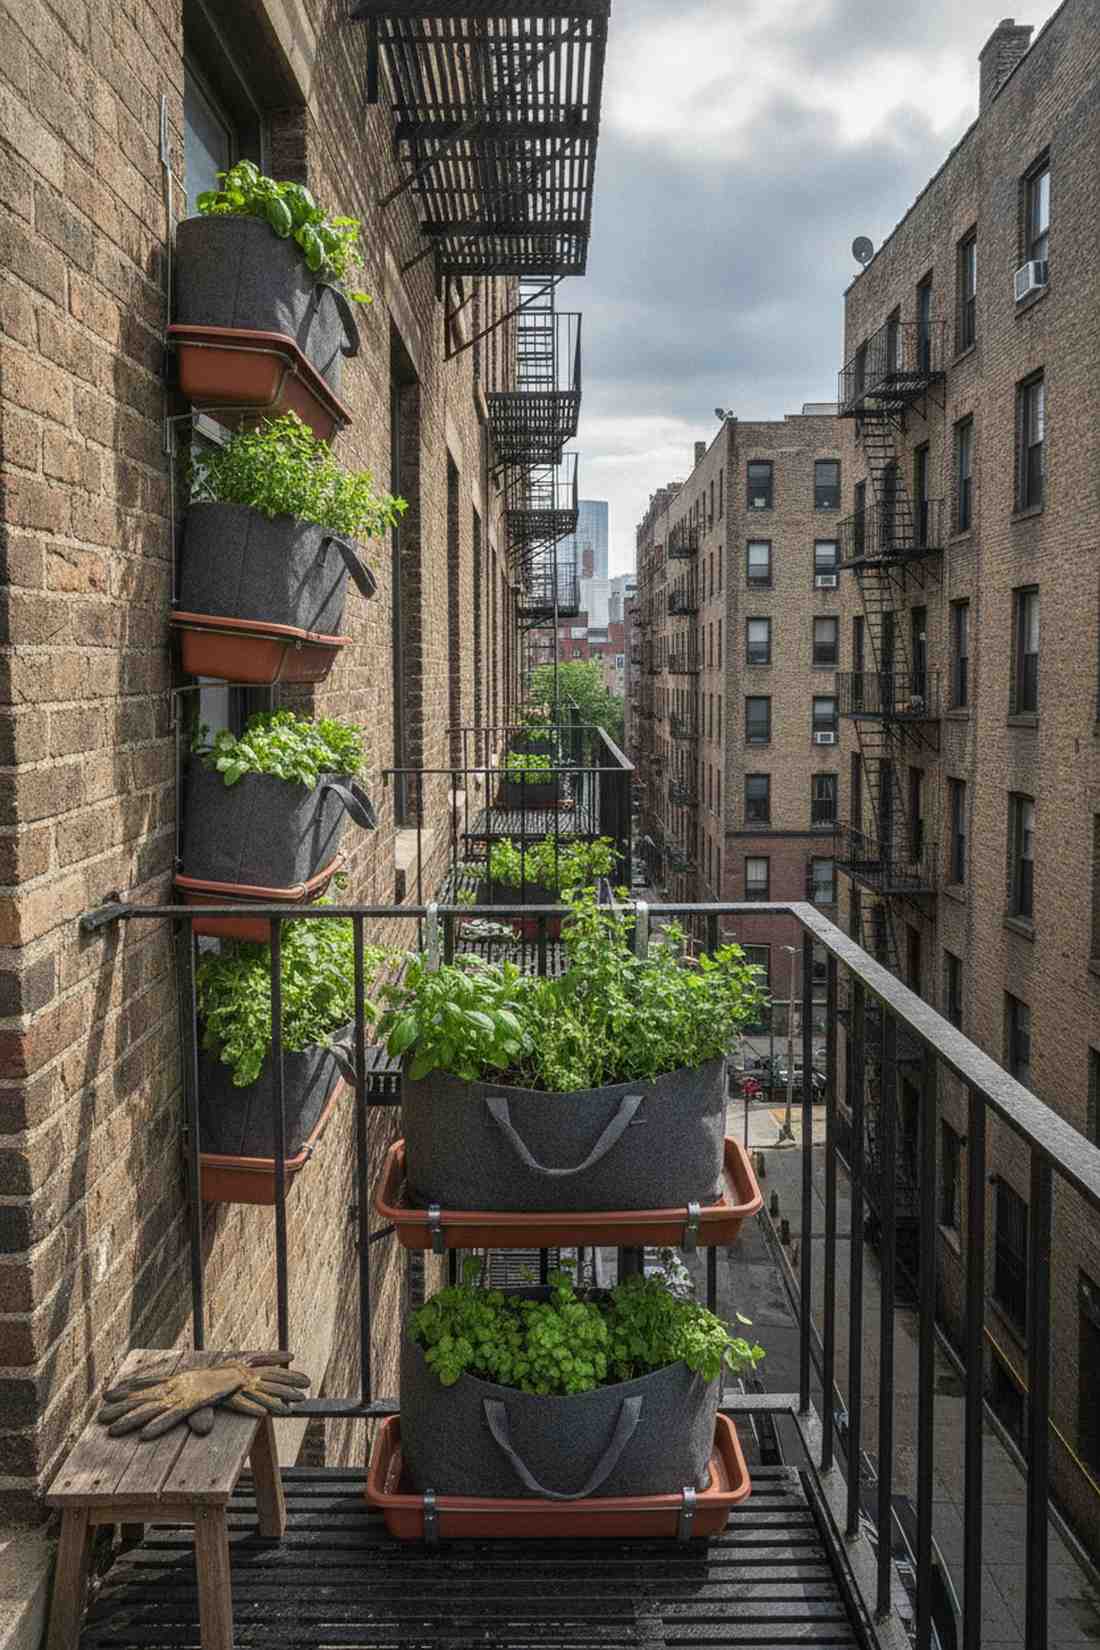
Stepping out onto this landing feels like discovering a defiant pocket of nature thriving against the steel city. A vertical micro-container setup allows city dwellers to exploit every legal inch of their fire escape.
Using heavy terracotta up here is dangerous, but swapping to ultra-lightweight fabric grow bags looks surprisingly premium while protecting weight limits. Strategically hanging shallow-rooted herbs on the vertical rails keeps the mandatory emergency egress pathways completely clear.
You can start this micro-farm for as little as $30–$60. Pin this if you’re desperate for fresh herbs but have absolutely zero ground space.
- Key Materials: Fabric grow bags, rail hooks
- Vibe / Style: Gritty urban green defiance
- Difficulty: Zero-tool setup
- Budget Breakdown: Grow bags: $25 | Hanging hooks: $15
- Creator’s Tip: Place deep drip trays under every single bag to ensure dirty water doesn’t drip onto your downstairs neighbor’s patio.
- Smart Sourcing: heavy-duty fabric grow bags with handles (bulk pack) and adjustable metal rail planter brackets
37. Rooftop Modular System
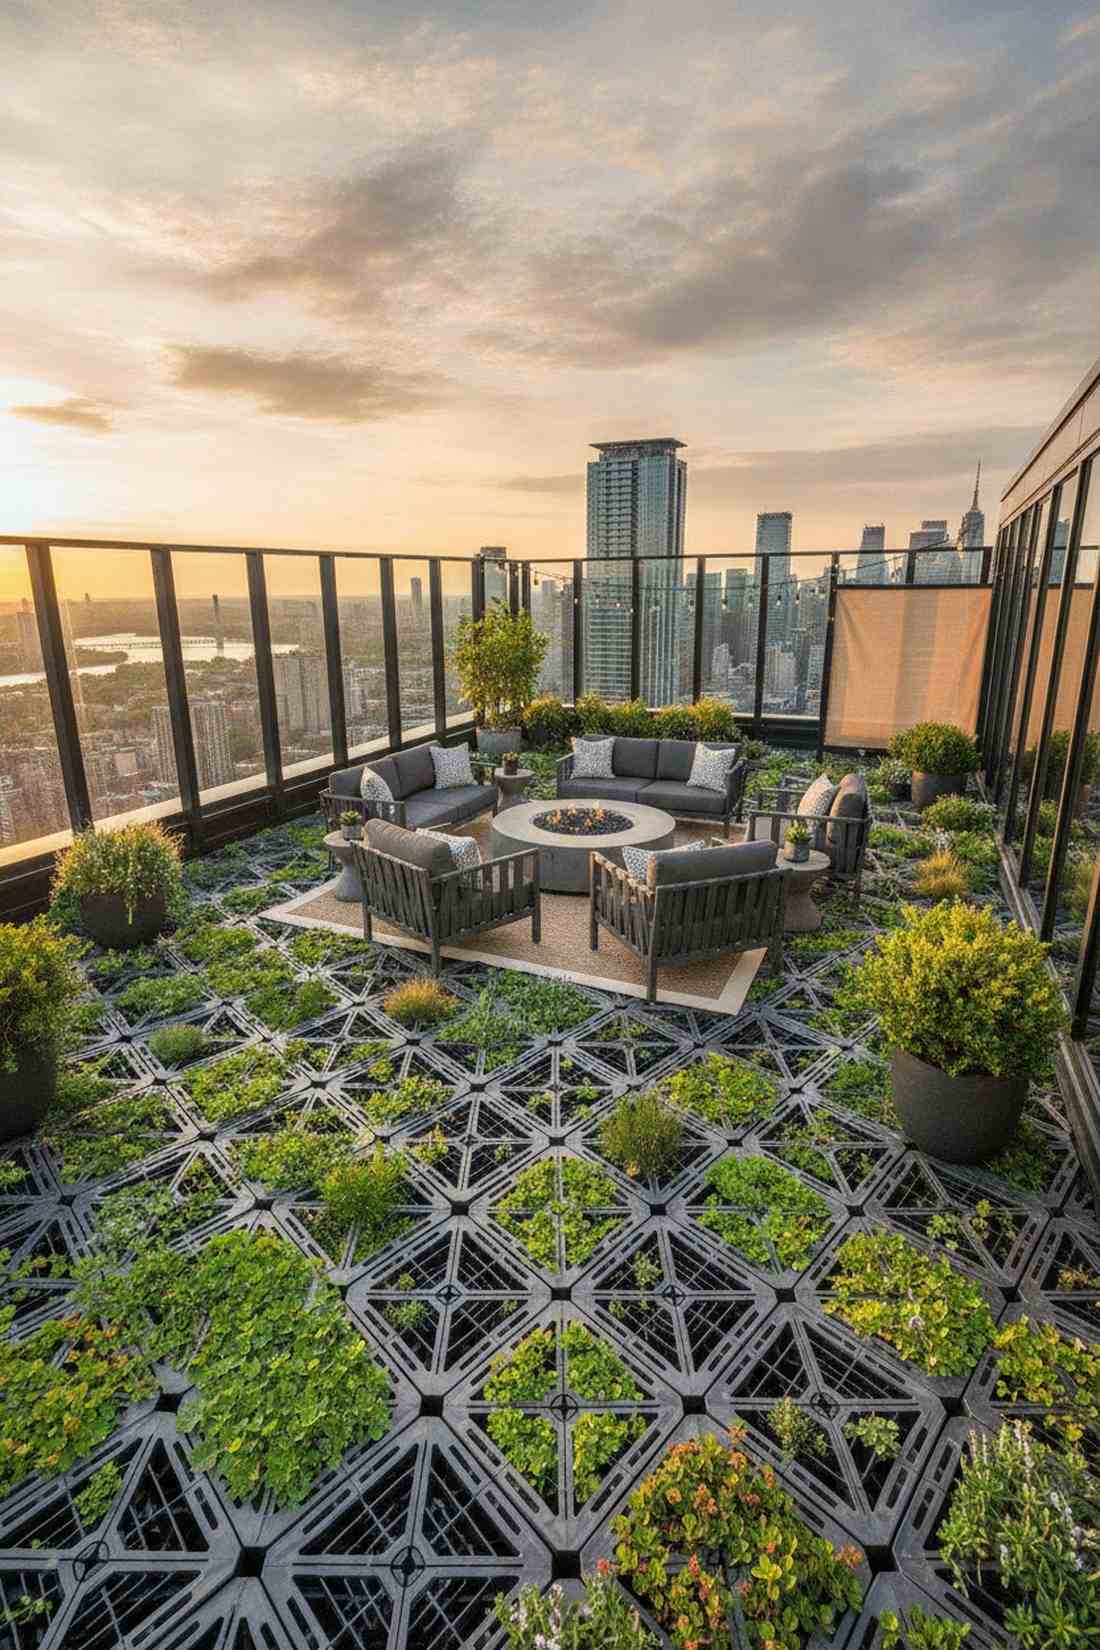
Standing up here feels like presiding over a luxurious, wind-swept sky lounge. The modular rooftop container grid is the safest, most effective way to turn barren tar roofs into high-end entertaining zones.
Dumping soil directly on a roof destroys the membrane, but utilizing interlocking self-draining trays gives a designer-level finish while protecting structural integrity. Pushing heavy planters strictly over the load-bearing outer walls prevents terrifying center-roof sagging.
A starter modular grid runs about $200–$500. Save this if you’re planning a massive skyline aesthetic overhaul.
- Key Materials: Self-draining modular trays
- Vibe / Style: Elevated skyline oasis
- Difficulty: Requires structural awareness
- Budget Breakdown: Trays: $250 | Wind-screens: $100
- Creator’s Tip: Install heavy glass or canvas windbreaks; high-altitude wind sheer will shred delicate leaves in days.
- Smart Sourcing: interlocking green roof drainage cell trays and heavy-duty privacy wind screen fabric
38. Courtyard Focal Point
Walking into this minimalist enclosure feels like entering a high-end spa reception area. A solitary focal planter layout completely elevates tiny, claustrophobic walled courtyards.
Cluttering a small space with dozens of tiny pots causes severe visual anxiety, but placing one massive, dramatic specimen tree in the dead center looks far more expensive than it is. Surrounding the single piece with pristine, sweeping gravel creates a calming, gallery-like emptiness.
Investing in one giant pot and tree usually costs $250–$600. Pin this if you prefer sleek, ultra-low-maintenance luxury.
- Key Materials: Oversized statement pot, specimen tree
- Vibe / Style: Minimalist Zen gallery
- Difficulty: Heavy lifting required once
- Budget Breakdown: Giant pot: $180 | Specimen tree: $150
- Creator’s Tip: Spotlight the tree from below with a hidden solar up-light to cast massive, dramatic shadows on the courtyard walls at night.
- Smart Sourcing: extra-large lightweight resin statement planters and high-lumen solar landscape spotlights
This next configuration is the absolute secret weapon for masking ugly property lines…
39. Hanging Basket Canopy

Sitting beneath this setup feels like lounging under a magical, floating ceiling of flowers. Developing a suspended basket canopy layout capitalizes entirely on unused vertical air space over small seating areas.
Scattering a few baskets looks haphazard, but grouping them in dense, staggered heights delivers a surprisingly premium look resembling a botanical chandelier. Integrating a discrete pulley system allows you to lower these heavy, dripping arrays for easy, mess-free watering.
Creating this floating roof costs about $100–$200 in hardware and baskets. Save this to instantly inject color without losing an inch of floor space.
- Key Materials: Pulley hooks, large wire baskets
- Vibe / Style: Floating floral chandelier
- Difficulty: Needs strong overhead beams
- Budget Breakdown: Baskets: $90 | Pulley system: $40
- Creator’s Tip: Line wire baskets with premium sphagnum moss and hide a water-retaining diaper at the bottom to cut watering chores in half.
- Smart Sourcing: retractable hanging basket pulley hooks (4-pack) and coco coir basket liners (bulk)
40. Window Box Series
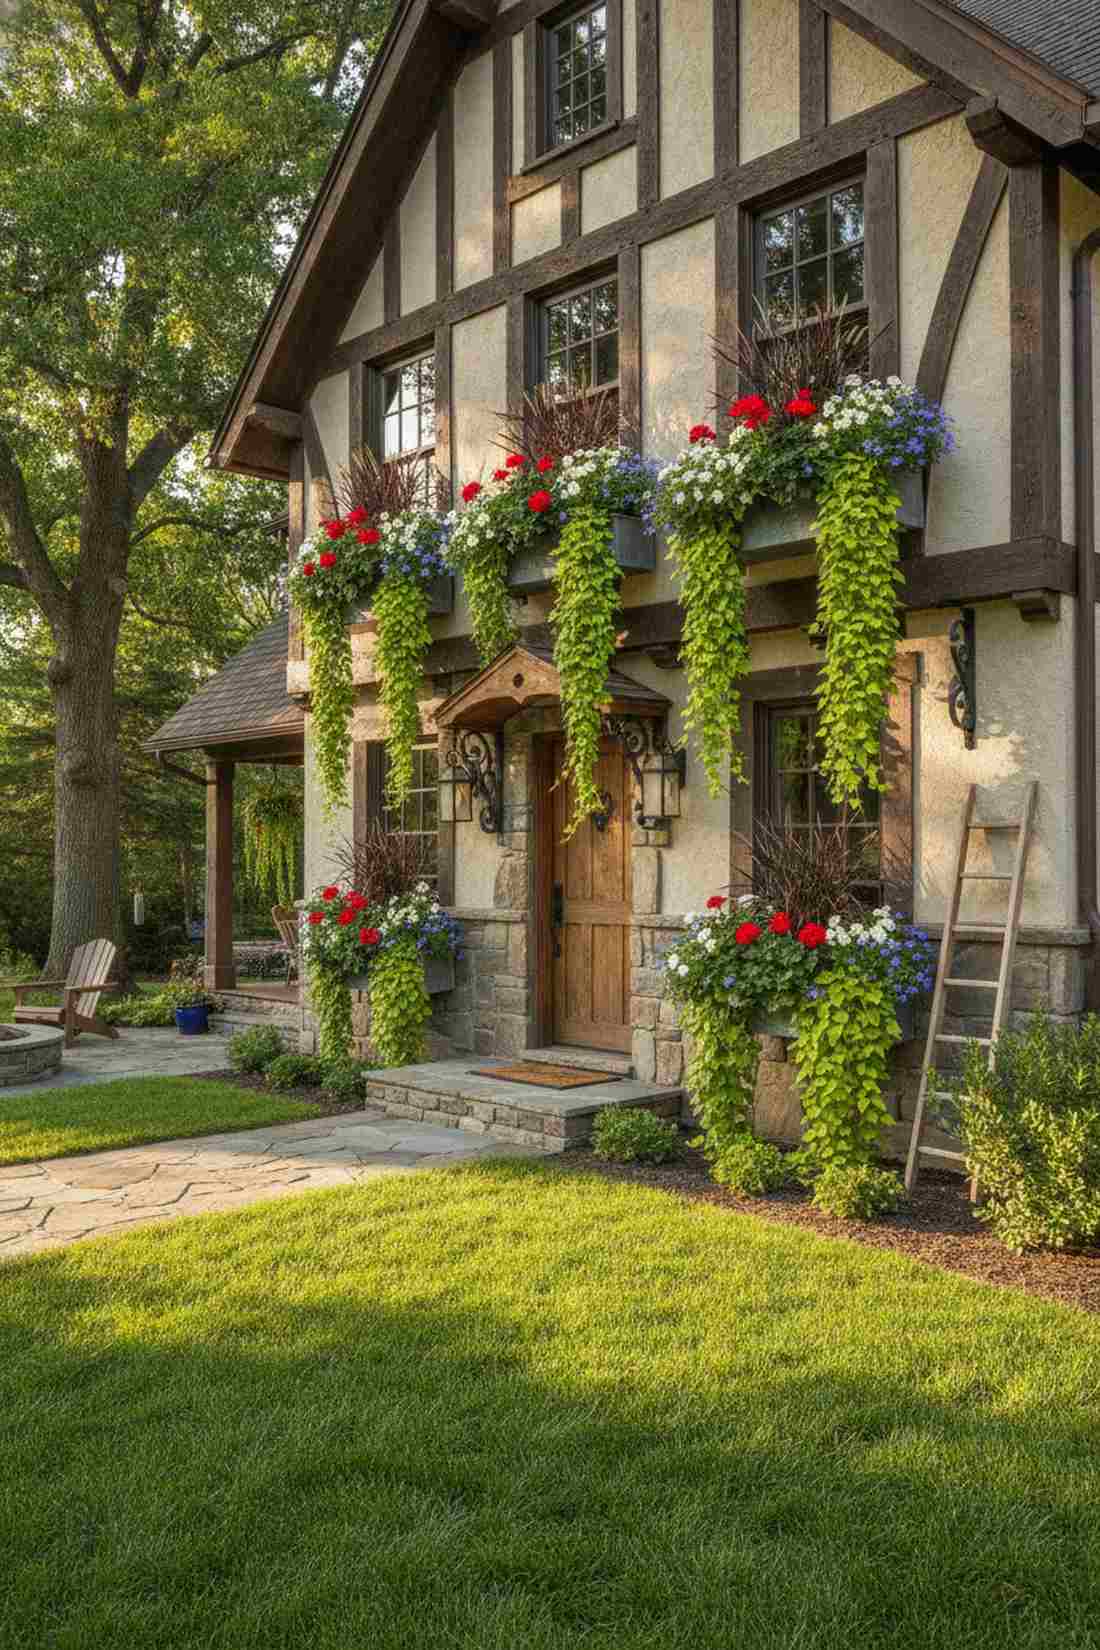
Approaching this home feels like arriving at a picturesque, flower-draped alpine chalet. A coordinated window box facade is the ultimate fast-track to radically boosting a boring house’s street appeal.
Mismatched plastic bins look cheap, but repeating identical, high-quality architectural brackets across every window gives a designer-level finish. Upgrading to self-watering reservoir boxes is critical to keeping these high-exposure arrangements alive during peak summer heat.
Equipping three windows usually runs $150–$300 total. Pin this if you want maximum curb appeal impact for minimum effort.
- Key Materials: Self-watering boxes, heavy brackets
- Vibe / Style: Charming historic facade
- Difficulty: Requires ladder and drill
- Budget Breakdown: Planters: $160 | Brackets: $50
- Creator’s Tip: Use the “thriller, filler, spiller” method—tall grass in back, dense flowers in middle, and ivy trailing down the front.
- Smart Sourcing: premium self-watering window box planters and heavy-duty decorative steel shelf brackets
Cottage Abundance Layouts for Informal Charm
41. Curved Path Reveal

Wandering down this path feels like slipping into a whimsical, overgrown secret garden. A sweeping curved pathway design is a masterful psychological trick to make a small backyard feel twice as large.
Straight concrete walks are brutally boring, but laying down a winding, obscured trail looks far more expensive than it is. Using dense, overflowing garden layout ideas at the curves completely hides the destination, forcing visitors to slow down and explore.
You can carve out this mystery path for $100–$250 using mulch or decomposed granite. Save this to your romantic landscaping board.
- Key Materials: Soft pathway material, flexible edging
- Vibe / Style: Mysterious romantic journey
- Difficulty: Easy turf removal
- Budget Breakdown: Edging: $60 | Granite dust: $120
- Creator’s Tip: Bury the flexible edging completely flush with the soil so the plants appear to spill naturally onto the path.
- Smart Sourcing: no-dig flexible landscape border kits and bulk decomposed granite pathway material
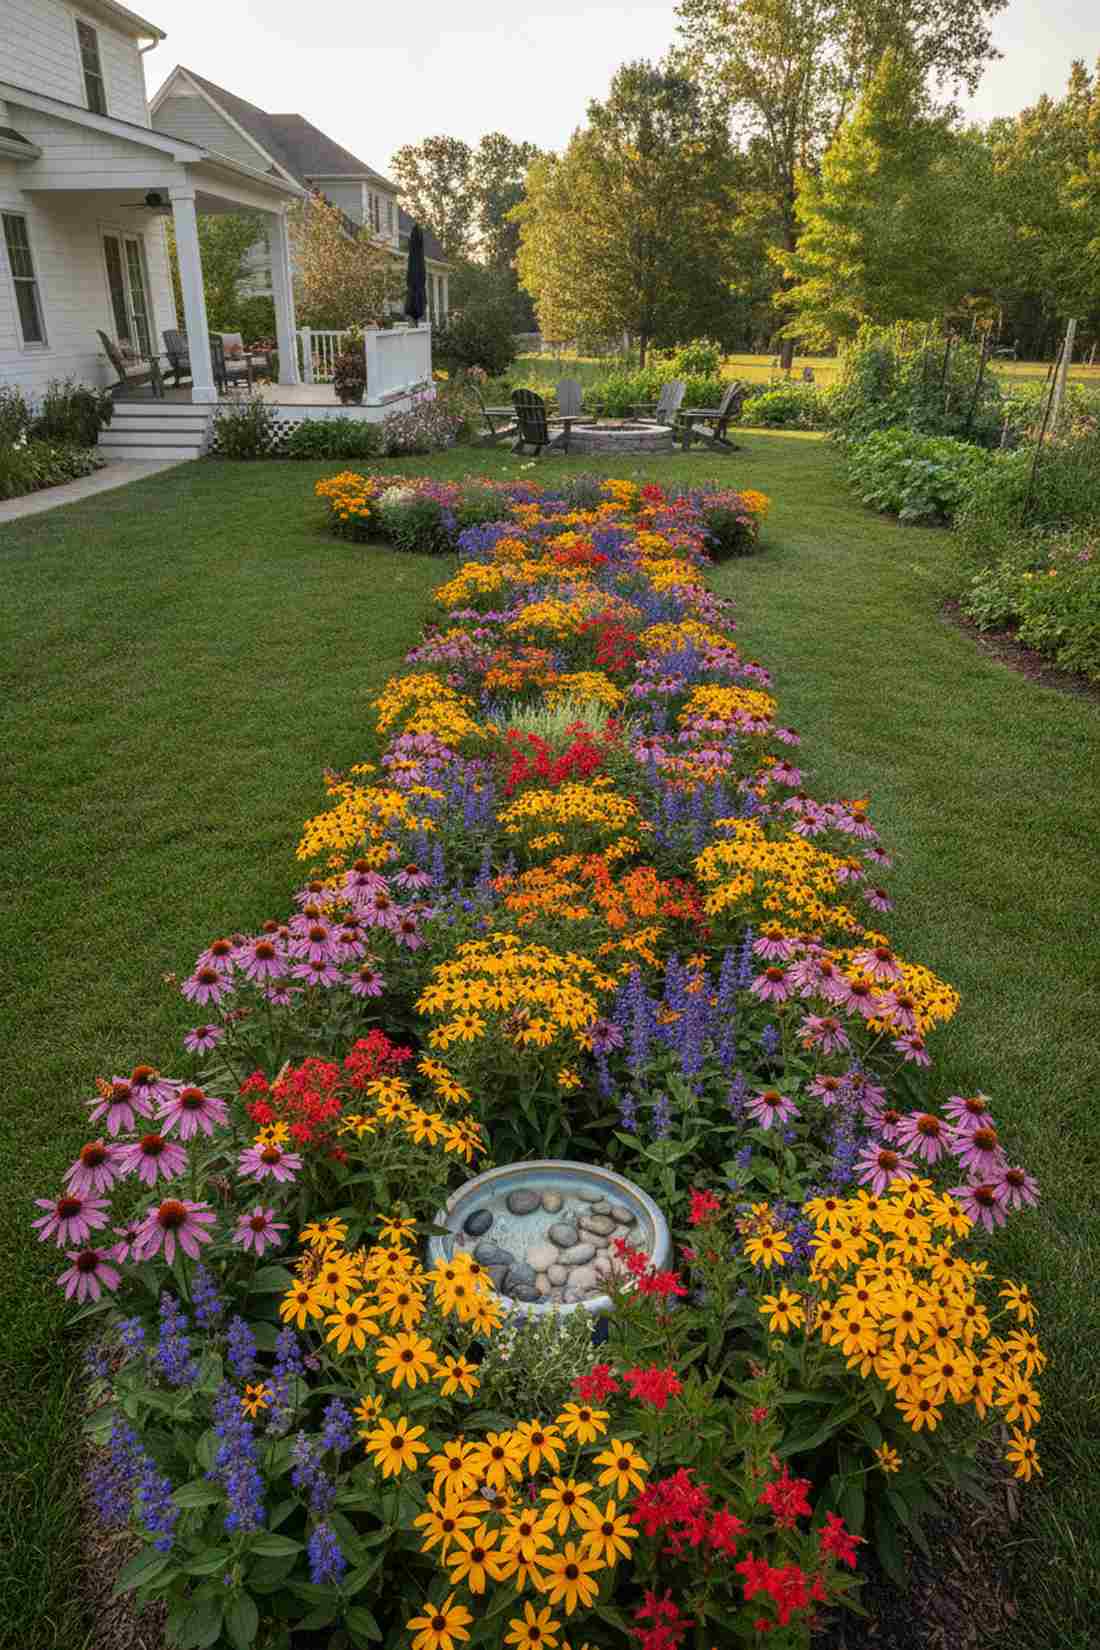
42. Layered Height Succession
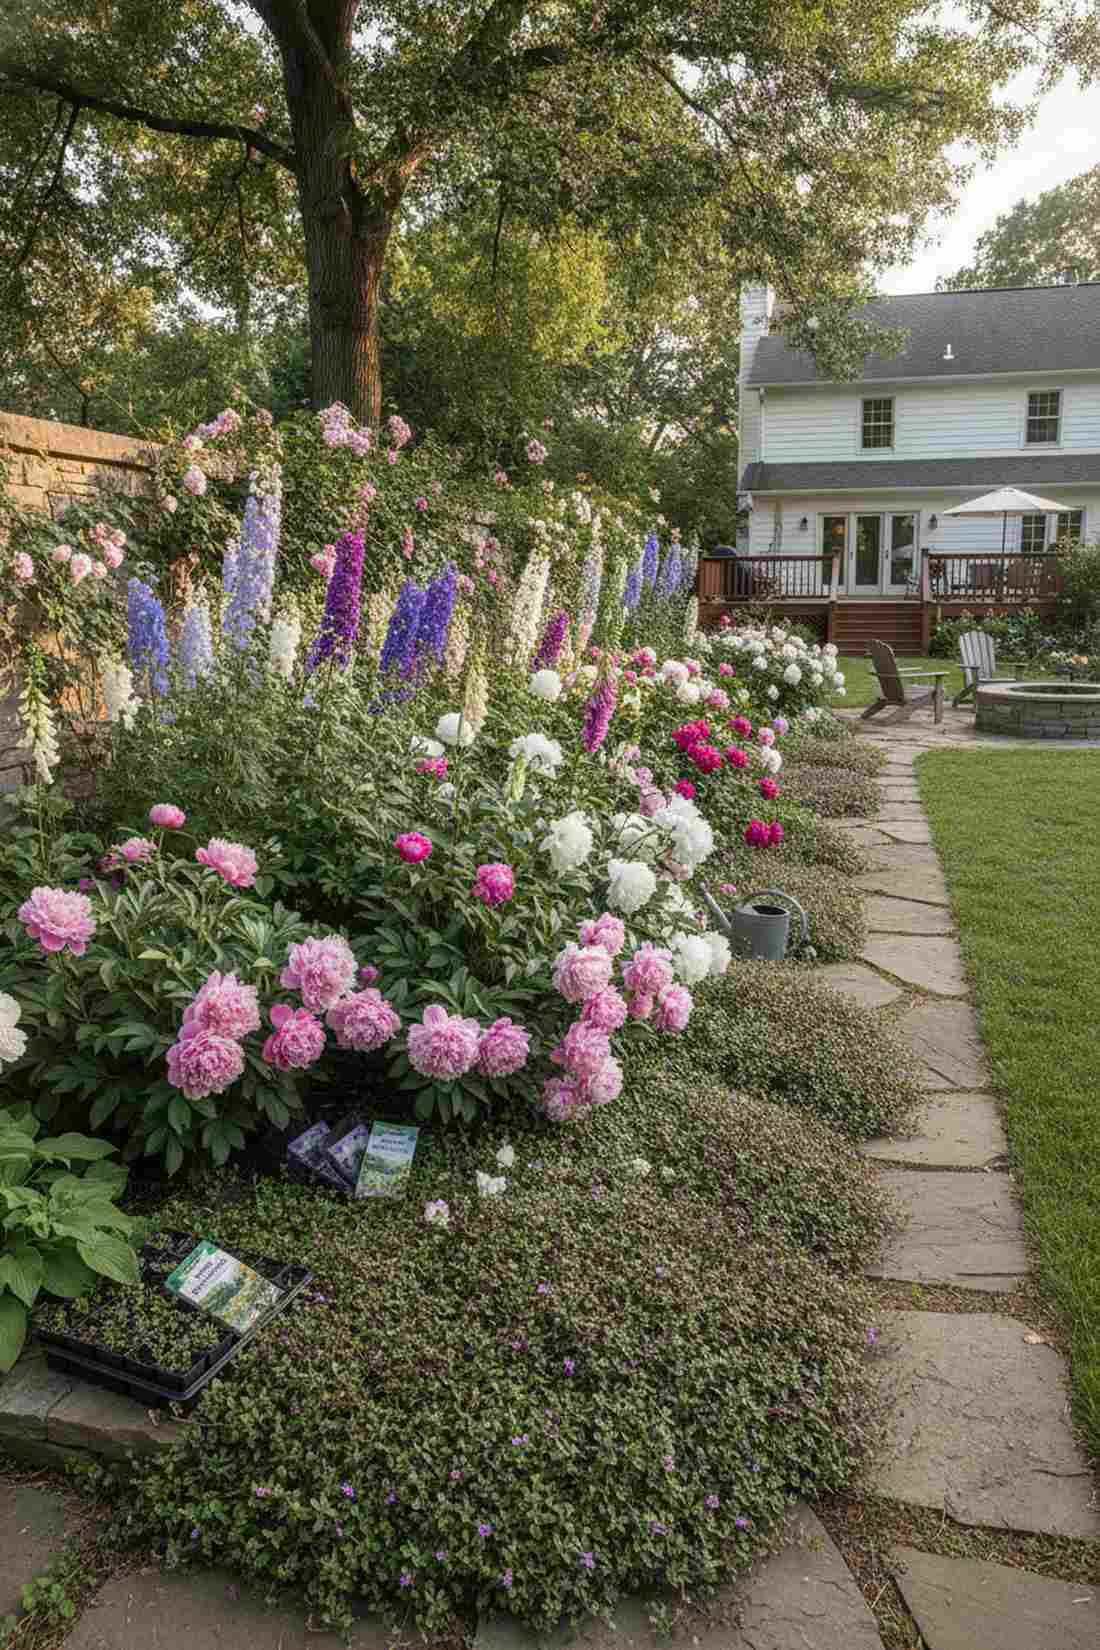
Gazing at this deep border feels like looking at a dense, perfectly painted floral stadium. The stadium-tiered planting arrangement is the cornerstone of achieving that classic, overflowing English cottage aesthetic.
Planting indiscriminately leads to a tangled mess, but strictly enforcing a low-medium-tall height gradient delivers a surprisingly premium look. Putting towering delphiniums in the absolute back ensures the low-hugging creeping thyme in the front receives maximum, unshaded sunlight.
Fleshing out a dense border costs about $200–$400 in perennials. Pin this if you want a riot of color that still feels visually organized.
- Key Materials: Varied height perennials
- Vibe / Style: Explosive classical border
- Difficulty: Requires mature height planning
- Budget Breakdown: Front border: $50 | Tall backdrops: $120
- Creator’s Tip: Group your plants in odd numbers (3, 5, or 7) rather than evens or singles to create a more natural, organic drift.
- Smart Sourcing: tall heirloom delphinium seed packets and creeping thyme groundcover flats
43. Arbor Gateway Threshold
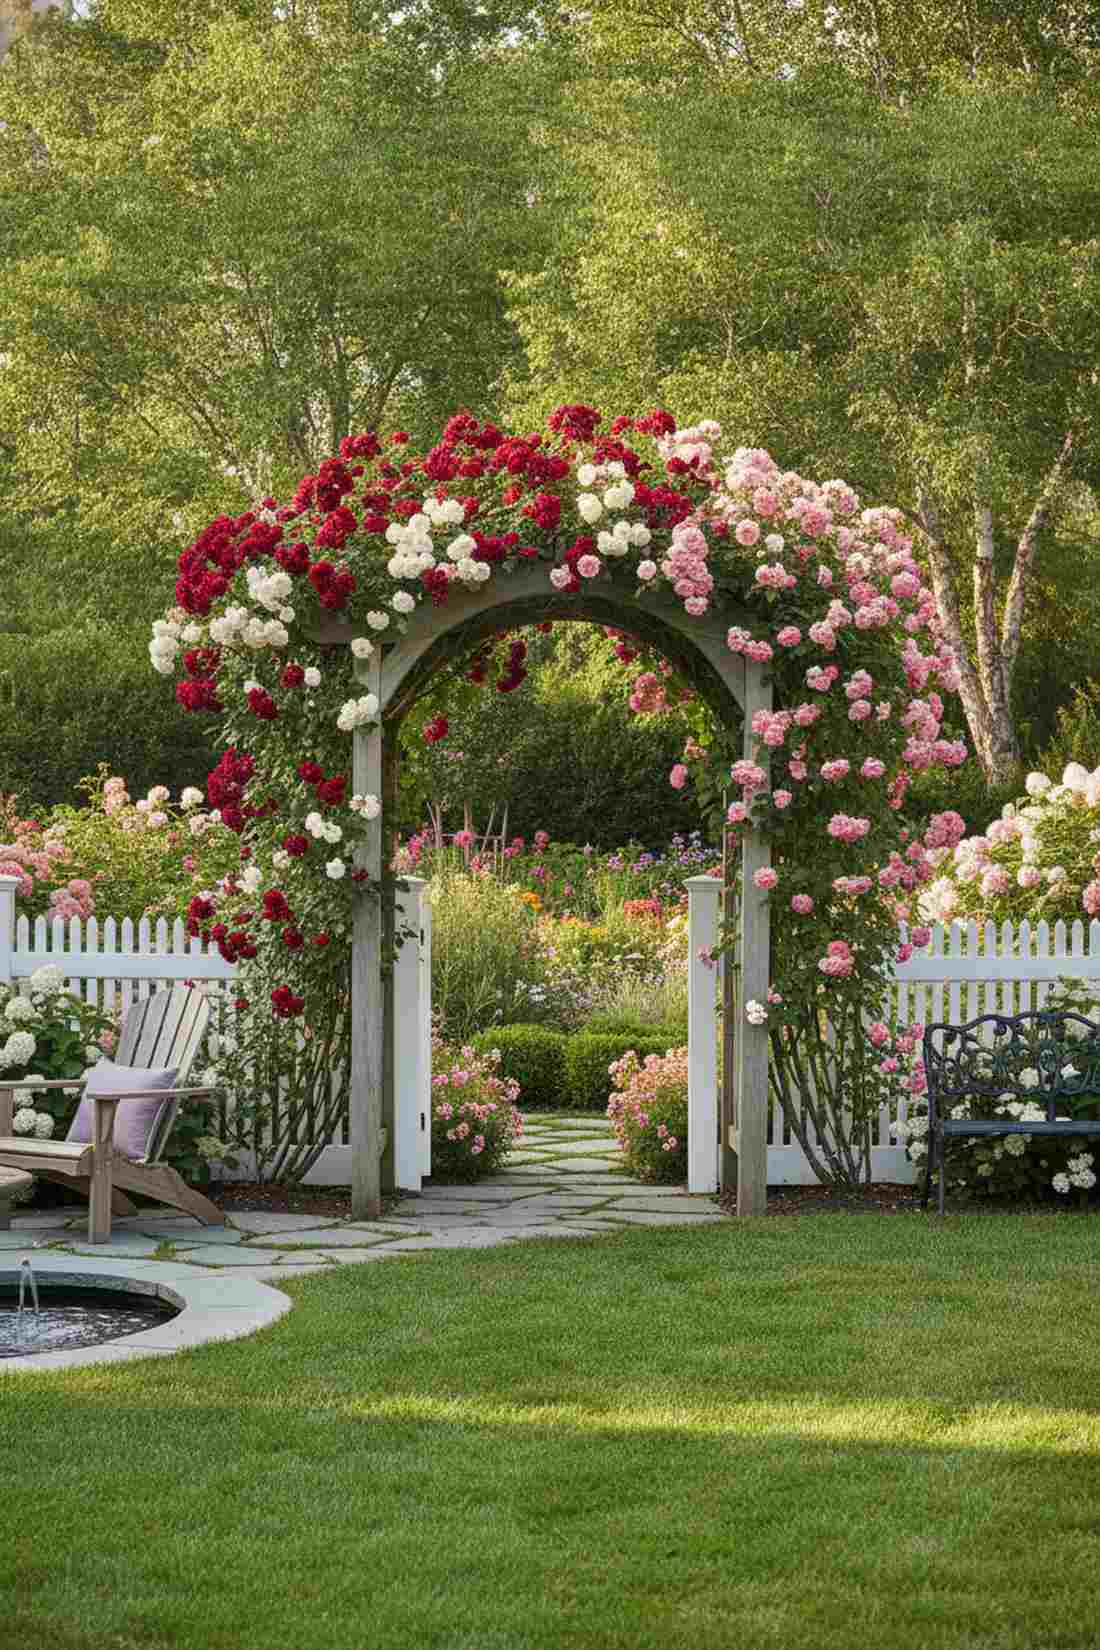
Passing under this flowering archway feels like leaving reality and entering a private sanctuary. A climbing arbor entrance feature creates a powerful psychological threshold between your boring lawn and your lush floral escape.
An open gap in a fence is easily ignored, but framing it with a heavy wooden arch gives a designer-level finish that screams luxury. Wrapping it in aggressive, high-CPC terms like premium climbing roses creates a breathtaking overhead canopy that smells incredible.
This structural gateway runs around $150–$350. Save this to instantly boost the architectural romance of your property.
- Key Materials: Wooden arbor kit, climbing vines
- Vibe / Style: Majestic floral gateway
- Difficulty: Needs deep anchoring
- Budget Breakdown: Arbor structure: $200 | Roses: $60
- Creator’s Tip: Set the arbor posts in quick-setting concrete so the heavy, wind-catching vines don’t topple it during a summer storm.
- Smart Sourcing: weather-resistant cedar arbor kits and fast-setting concrete mix bags
44. Edible Ornamental Blend
Looking at this vibrant mix feels like staring at a beautifully chaotic, edible tapestry. The integrated foodscape layout shatters the old rule that vegetables and flowers must be strictly separated.
Hiding vegetables in the back corner is outdated; weaving ruby chard and purple cabbage directly into your front flower beds looks surprisingly premium. This brilliant disguise prevents HOA complaints while secretly turning your high-visibility front yard into a high-yield grocery store.
This hybrid approach requires zero extra cost, just creative placement. Pin this to your stealth gardening board.
- Key Materials: Colorful vegetable seeds, ornamentals
- Vibe / Style: Lush rebellious foodscape
- Difficulty: Easy mixing
- Budget Breakdown: Veggie seeds: $15 | Flower borders: $40
- Creator’s Tip: Use tall, feathery fennel at the back of the border to mimic the look of expensive ornamental grasses.
- Smart Sourcing: colorful heirloom vegetable seed vaults and organic edible flower seed mixes
Before you buy any expensive planters, check out the genius spacing trick right below…
45. Repeating Drift Rhythm
Scanning this landscape feels like listening to a visually soothing, rhythmic melody. The repetitive drift planting technique is the absolute secret to making a chaotic cottage garden feel unified and intentional.
Planting one of everything creates a stressful “zoo” effect, but splashing massive, repeating waves of the same color looks far more expensive than it is. Repeating familiar garden layout and design elements like silver sage every ten feet acts as a visual anchor that guides the eye effortlessly.
Buying in bulk flats costs about $150–$250. Save this trick to cure your yard of the messy “collector” look.
- Key Materials: Bulk perennial flats
- Vibe / Style: Flowing harmonic landscape
- Difficulty: Requires bulk purchasing
- Budget Breakdown: Bulk flats: $180 | Soil prep: $40
- Creator’s Tip: Choose a tough, silver-foliage plant (like dusty miller) as your repeating element because silver perfectly bridges clashing flower colors.
- Smart Sourcing: bulk flats of drought-tolerant perennials and heavy-duty steel transplanting trowels
46. Cottage Foundation Border
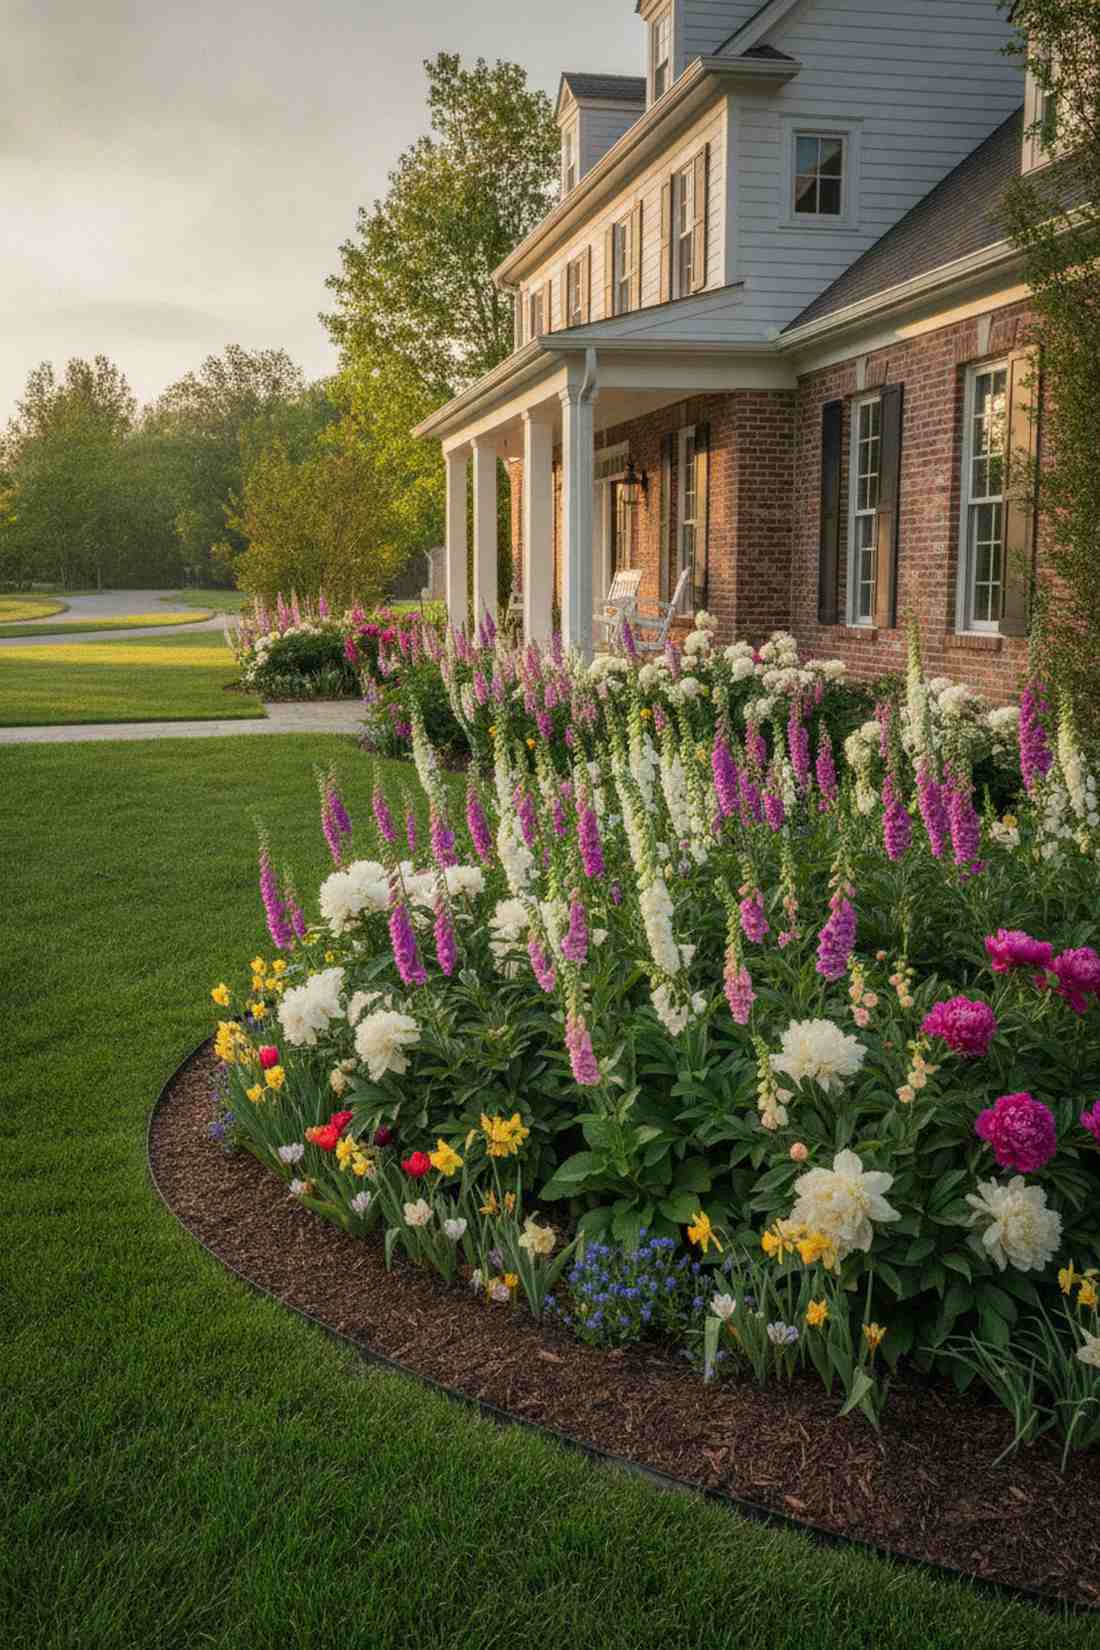
Standing back from the street, this lush setup feels like the house is growing organically right out of the earth. The dense foundation masking layout completely softens harsh concrete footings and brick transitions.
A bare foundation makes a house look sterile, but packing the edge with towering foxgloves and peonies gives a designer-level finish reminiscent of an English manor. Layering early spring bulbs underneath ensures this high-visibility strip explodes with color before the main perennials even wake up.
A thick foundation wrap usually costs $200–$500. Pin this to massively soften your home’s exterior architecture.
- Key Materials: Bulbs, deep-rooted perennials
- Vibe / Style: Rooted architectural romance
- Difficulty: Trenching near concrete
- Budget Breakdown: Spring bulbs: $60 | Base perennials: $200
- Creator’s Tip: Keep the soil and mulch at least 4 inches below the home’s siding to prevent rot and termite bridges.
- Smart Sourcing: bulk packs of mixed spring-blooming bulbs and premium composted foundation soil blends
Material Guide: Cheap vs. Premium Aesthetic
Knowing exactly where to save and where to spend makes all the difference in achieving that “looks expensive but isn’t” vibe.
- Standard vs. UV-Resistant/Premium: Standard plastics crack after one summer, while UV-resistant resin containers maintain their rich color and structural integrity for years.
- Pre-made Kits vs. Sourcing Locally: Scavenging raw lumber often wastes entire weekends, whereas modular starter kits ensure perfect alignment and often end up cheaper when factoring your time.
Modern Minimalist Designs for Clean Aesthetics
47. Geometric Hardscape Grid
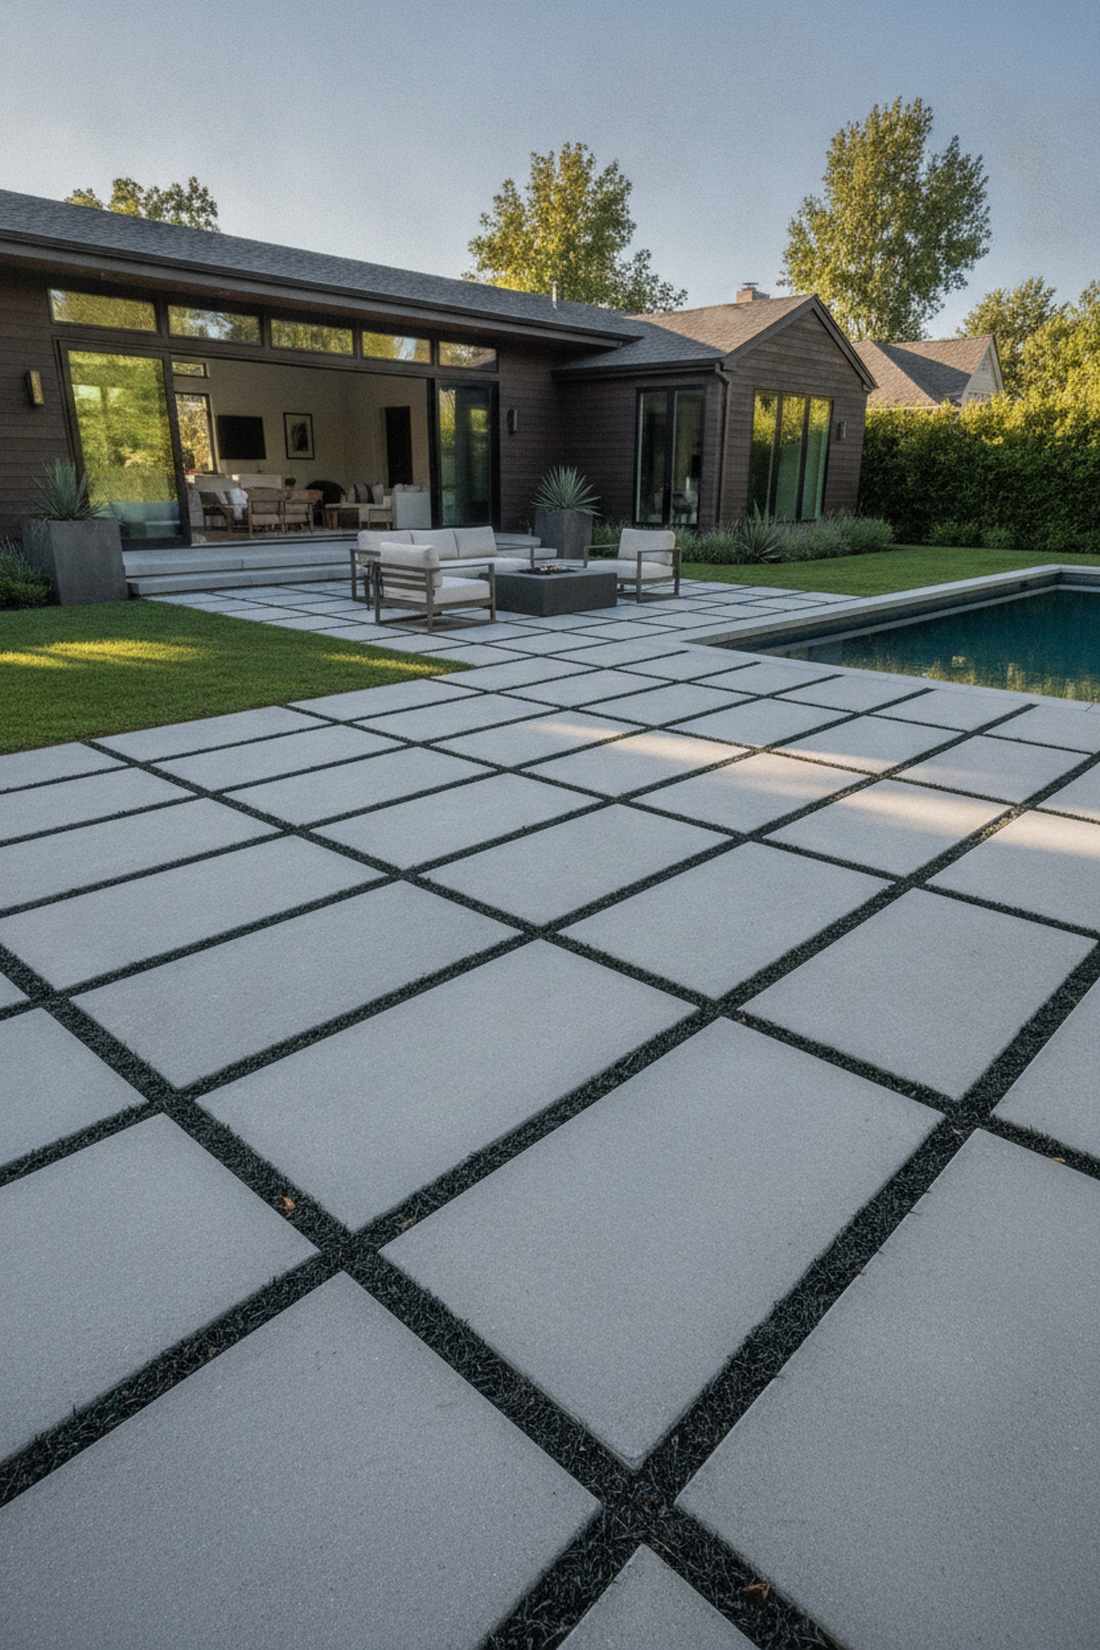
Walking across this precise patio feels like stepping into a sleek, high-end architectural rendering. The sharp geometric paver layout completely flips traditional design by making concrete the star and plants the accessory.
Curved edges look outdated here; enforcing strict 90-degree angles and sharp paver joints delivers a surprisingly premium look. Leaving perfectly square “negative spaces” in the hardscape to plant tufts of pristine black mondo grass creates an ultra-modern, high-contrast grid.
This concrete precision costs roughly $300–$800 for the pavers. Save this to your minimalist backyard makeover board.
- Key Materials: Large format pavers, dark foliage
- Vibe / Style: Ultra-crisp architectural modern
- Difficulty: Exact leveling required
- Budget Breakdown: Pavers: $400 | Leveling sand: $80
- Creator’s Tip: Use polymeric sand in the joints to lock the massive pavers perfectly in place and absolutely prevent weeds.
- Smart Sourcing: large-format modern concrete patio pavers and weed-preventing polymeric joint sand
48. Monochrome Planting Palette

Surveying this pristine yard feels like looking through an elegant, black-and-white fashion editorial. A strict monochromatic planting scheme strips away color chaos to focus entirely on striking textures and forms.
Mixing reds, yellows, and purples often looks like a messy circus, but restricting yourself to only crisp whites and deep greens looks far more expensive than it is. This disciplined garden layout design ensures the space photographs beautifully while maintaining a calming, spa-like coherence.
Curating these specific colors costs about $150–$300. Pin this if you want a highly sophisticated, soothing outdoor aesthetic.
- Key Materials: White-blooming plants, varied green foliage
- Vibe / Style: Sophisticated high-end spa
- Difficulty: Requires strict discipline
- Budget Breakdown: White florals: $120 | Textural greens: $100
- Creator’s Tip: Use plants with massive, architectural leaves (like hostas or elephant ears) to provide visual interest when the white flowers drop.
- Smart Sourcing: premium white-blooming perennial collections and giant-leaf hosta bare roots
49. Linear Hedge Division
Navigating this space feels like walking through the crisp hallways of a modern outdoor museum. The rigid linear hedge partition is the ultimate minimalist hack for creating sharp, living privacy walls.
Wooden fences rot and look bulky, but utilizing tightly sheared evergreen walls gives a designer-level finish that breathes life into the concrete. Swapping traditional boxwoods for tall, razor-straight ornamental grasses offers a stunning contemporary alternative that sways in the wind.
A fast-growing grass barrier runs about $100–$250. Save this to create sleek, modern privacy without building a fortress.
- Key Materials: Ornamental grasses or yews
- Vibe / Style: Razor-sharp living architecture
- Difficulty: Easy planting, straight lines needed
- Budget Breakdown: Grass plugs: $120 | Drip line: $40
- Creator’s Tip: Plant the grass plugs exactly 18 inches apart using a taut string line to ensure the mature “wall” is perfectly straight.
- Smart Sourcing: tall ornamental feather reed grass plugs (Karl Foerster) and straight-line planting masonry string
The following setup is arguably the highest ROI upgrade you can make this weekend.
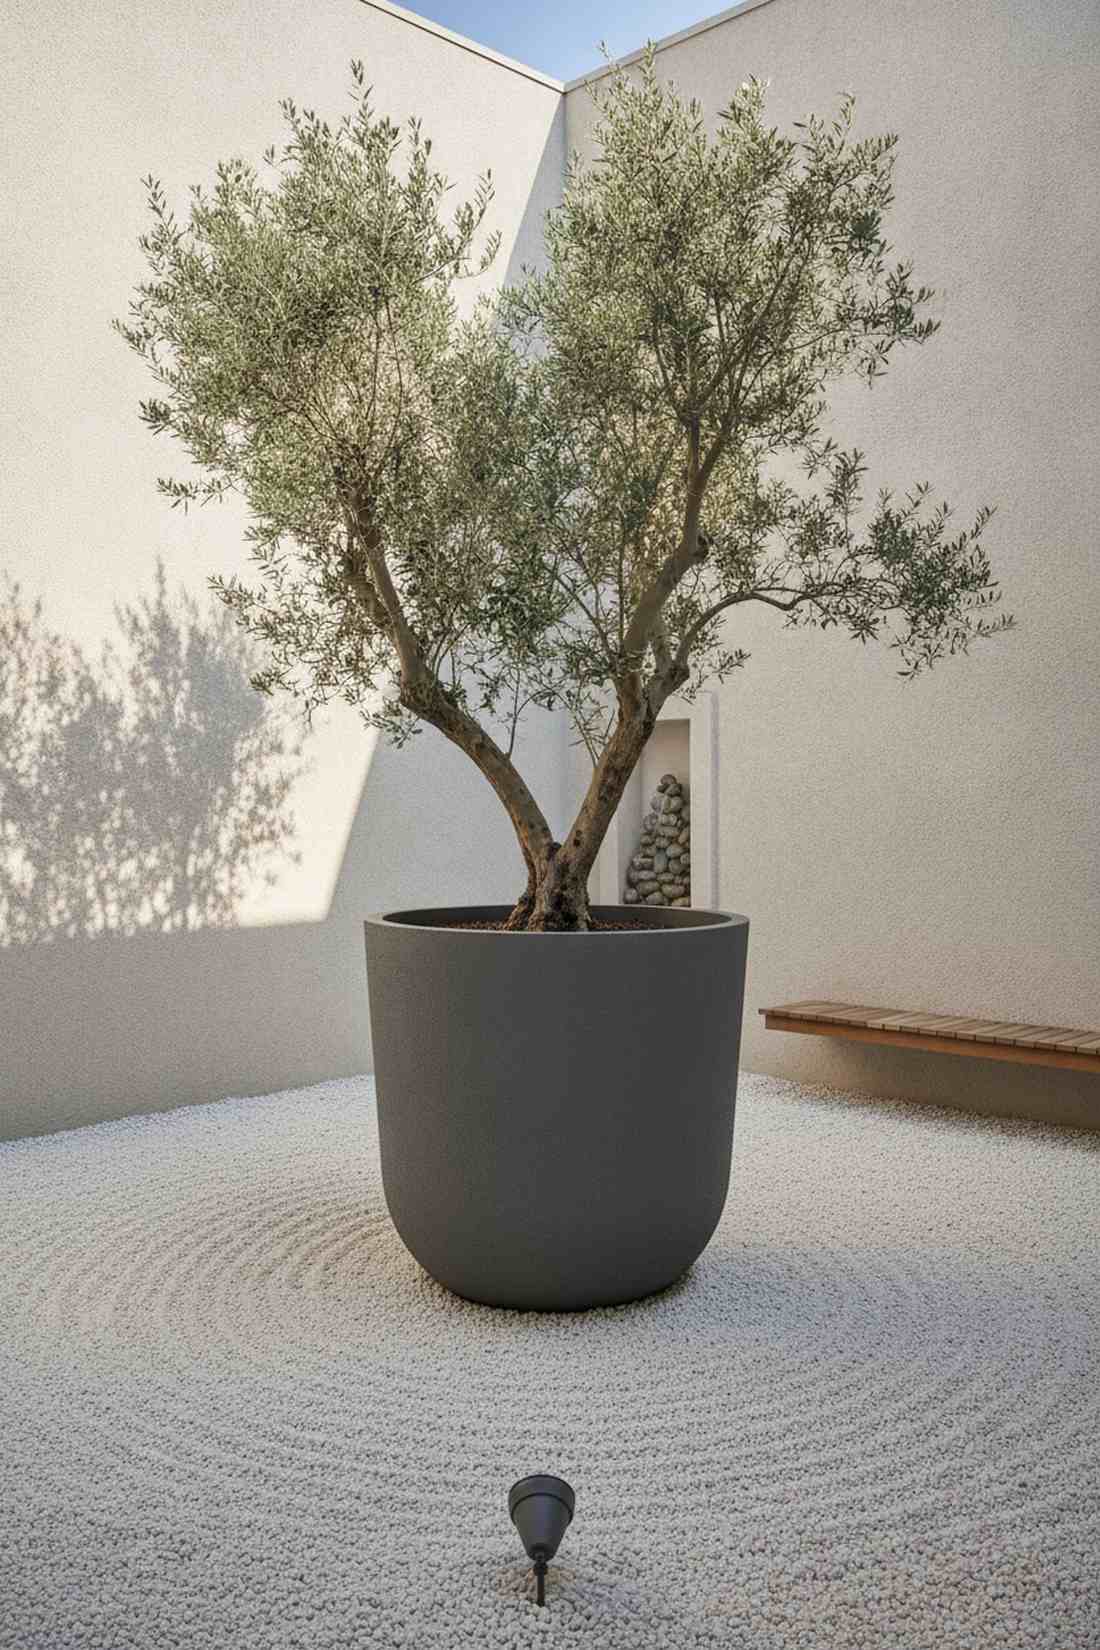
50. Single Specimen Focus
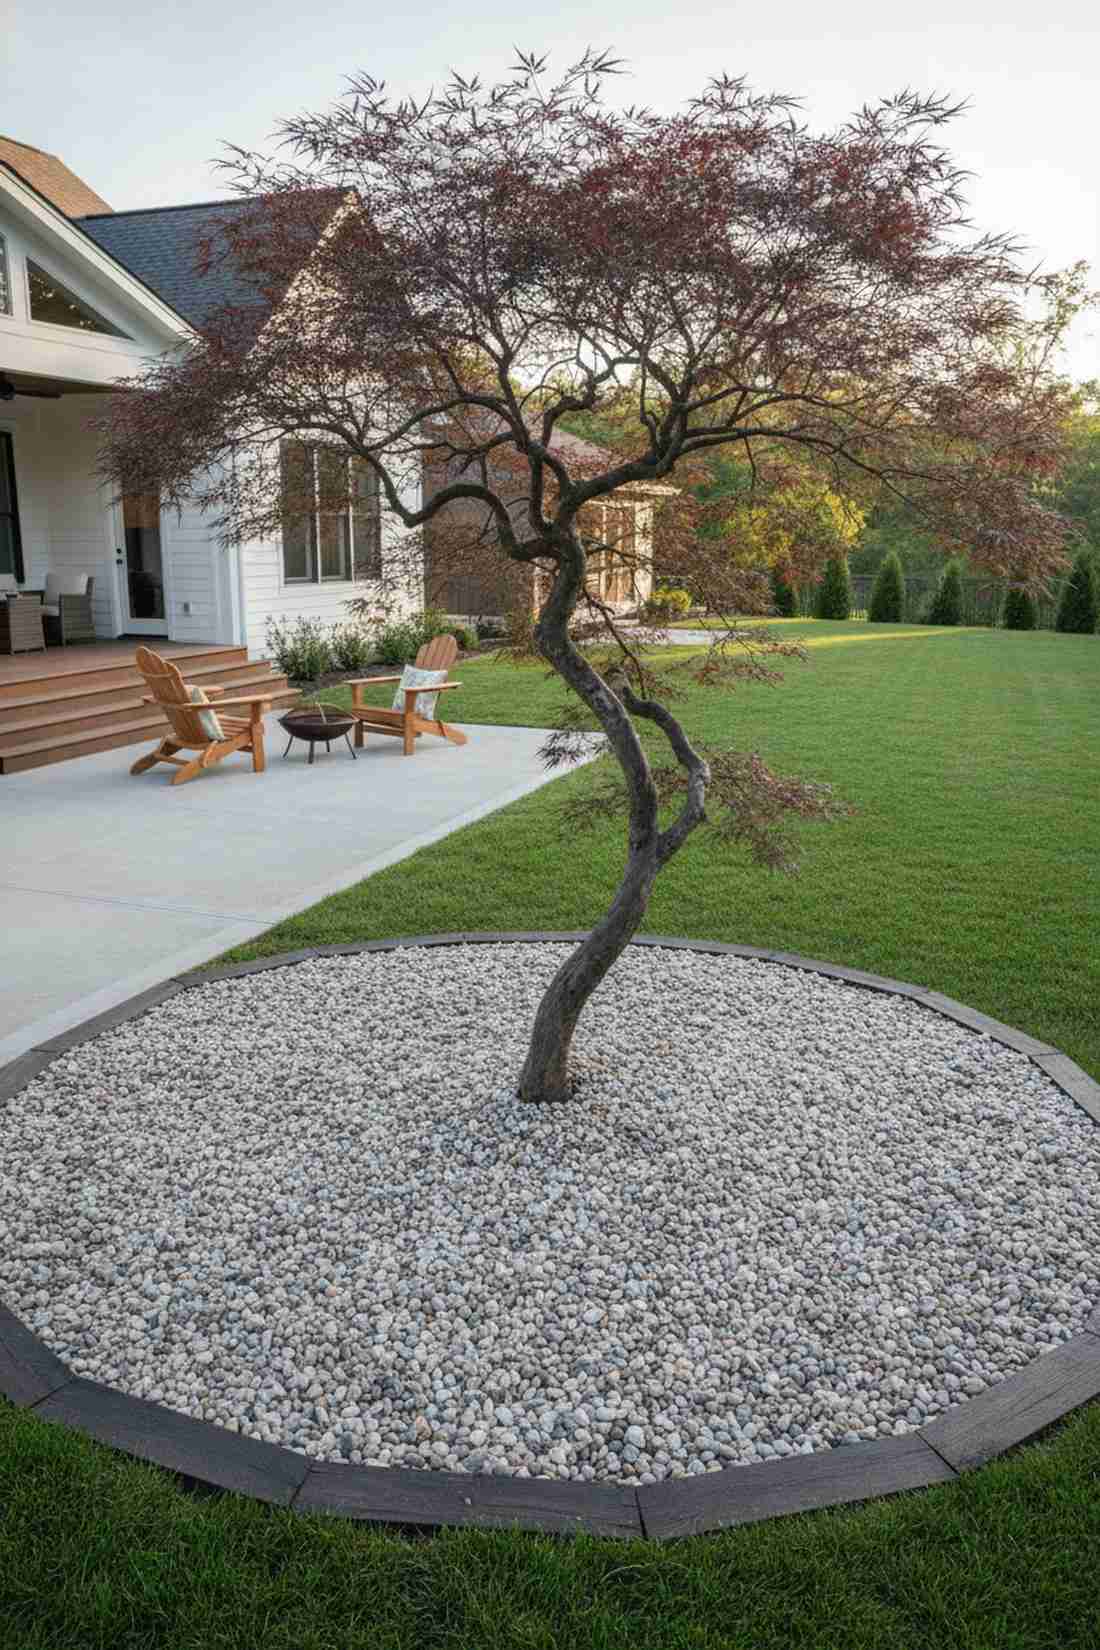
Staring at this layout feels like admiring a priceless sculpture showcased in an empty gallery. The solitary specimen accent design requires incredible restraint but delivers maximum, show-stopping drama.
Crowding a beautiful tree with cheap filler plants ruins its impact, but isolating a twisted Japanese maple in a sea of pristine gravel looks surprisingly premium. This layout completely eliminates weeding chores while forcing all visual attention onto the architectural trunk structure.
This high-impact minimalist trick costs roughly $150–$400 for the tree. Pin this if you want maximum visual drama with zero ongoing maintenance.
- Key Materials: Twisted specimen tree, washed gravel
- Vibe / Style: Dramatic Zen gallery
- Difficulty: Finding the perfect tree
- Budget Breakdown: Specimen tree: $200 | Gravel sea: $80
- Creator’s Tip: Splurge on the most uniquely shaped, crooked, or multi-trunk tree you can find; perfect symmetry is boring here.
- Smart Sourcing: premium grafted Japanese maple saplings and washed decorative river stone (bulk bags)
51. Floating Concrete Platforms

Stepping up onto this terrace feels like entering a sleek, billionaire-style modern lounge. The staggered floating pad layout uses deep shadow lines to make massive concrete slabs appear weightless.
Standard poured patios look cheap and industrial, but pouring individual pads separated by dark river rock gives a designer-level finish. Recessing hidden LED strip lights beneath the overhanging edges turns this hardscape into a glowing architectural masterpiece at night.
Forming these custom pads requires about $300–$700 in concrete and wood. Save this to radically modernize a flat, boring backyard.
- Key Materials: Concrete mix, form boards, LED strips
- Vibe / Style: Billionaire twilight lounge
- Difficulty: Advanced concrete forming
- Budget Breakdown: Concrete: $250 | LED lighting: $90
- Creator’s Tip: Build the wooden forms with a 2-inch overhang so you have a hidden lip to attach the waterproof LED strips.
- Smart Sourcing: waterproof exterior LED strip lighting kits and high-strength crack-resistant concrete mix
52. Mass Planting Simplicity
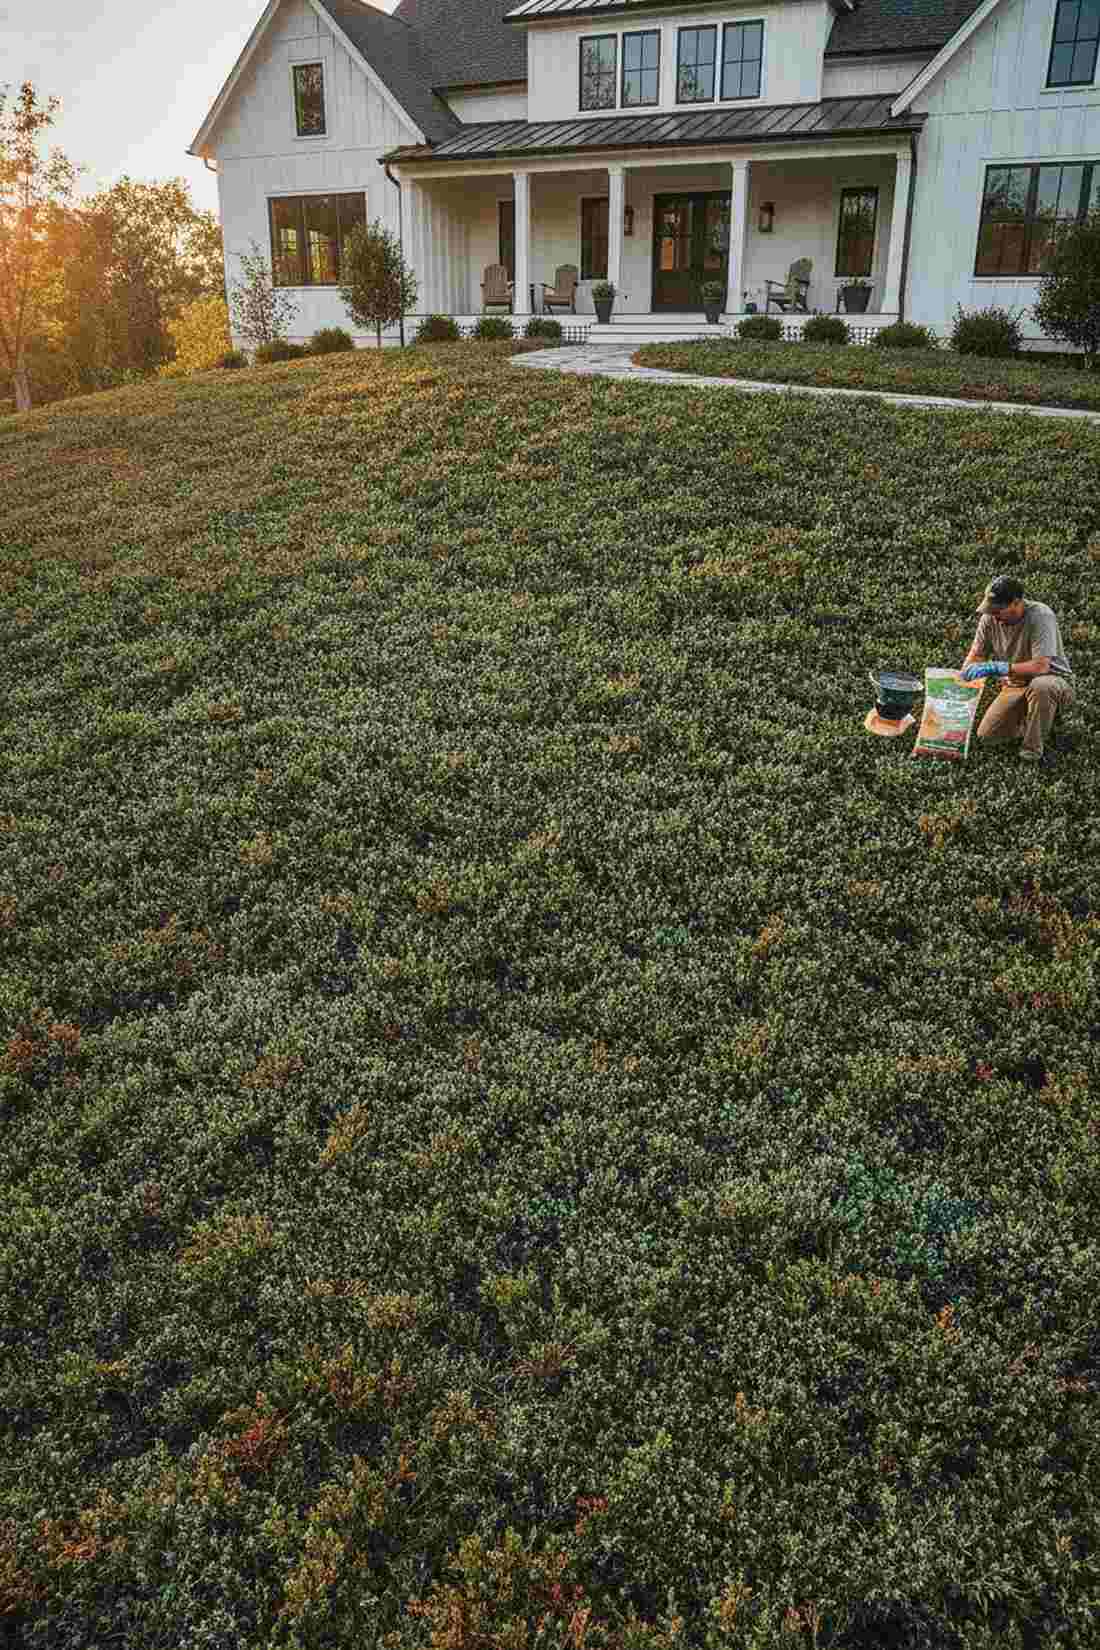
Sweeping your eyes across this yard feels like staring at a thick, rolling ocean of lush texture. The monoculture mass planting strategy is the ultimate minimalist solution for massive, hard-to-mow front yards.
Mixing twenty different plants on a slope looks chaotic, but carpeting the entire hill with a single, aggressive groundcover looks incredibly expensive and intentional. This strategy chokes out 100% of weeds and creates a powerful, unified visual statement that requires zero mowing.
Buying groundcover flats in bulk costs around $150–$350. Pin this to eliminate your lawn care chores permanently.
- Key Materials: Bulk groundcover plugs
- Vibe / Style: Bold sweeping simplicity
- Difficulty: Repetitive planting
- Budget Breakdown: Bulk plugs: $200 | Pre-emergent: $40
- Creator’s Tip: Spray a pre-emergent weed preventer immediately after planting the plugs so weeds don’t compete while the carpet fills in.
- Smart Sourcing: bulk creeping juniper groundcover plugs and safe granular pre-emergent weed preventer
Drought-Resilient Xeriscaping for Water Conservation
53. Hydrozoning Clusters

Looking at this smart layout feels like watching a brilliantly efficient water management system in action. The strategic hydrozone planting map completely stops you from wasting expensive city water on plants that don’t need it.
Spraying a blanket of water everywhere spikes your utility bill, but grouping thirsty plants strictly near the house looks far more expensive than it is while slashing water waste. Placing bulletproof, drought-tolerant garden layout examples on the far property edges completely eliminates the need to drag a hose.
This layout trick is entirely free to plan. Save this to your xeriscape board to massively cut down your summer water bill.
- Key Materials: Smart hose timer, zoned plants
- Vibe / Style: Resourceful eco-logic
- Difficulty: Requires initial planning
- Budget Breakdown: Hose timer: $40 | Drip zones: $30
- Creator’s Tip: Set up a cheap dual-outlet hose timer to automate the thirsty zone while leaving the drought zone entirely manual.
- Smart Sourcing: programmable dual-outlet hose watering timers and drought-tolerant perennial starter kits
54. Gravel Mulch Matrix
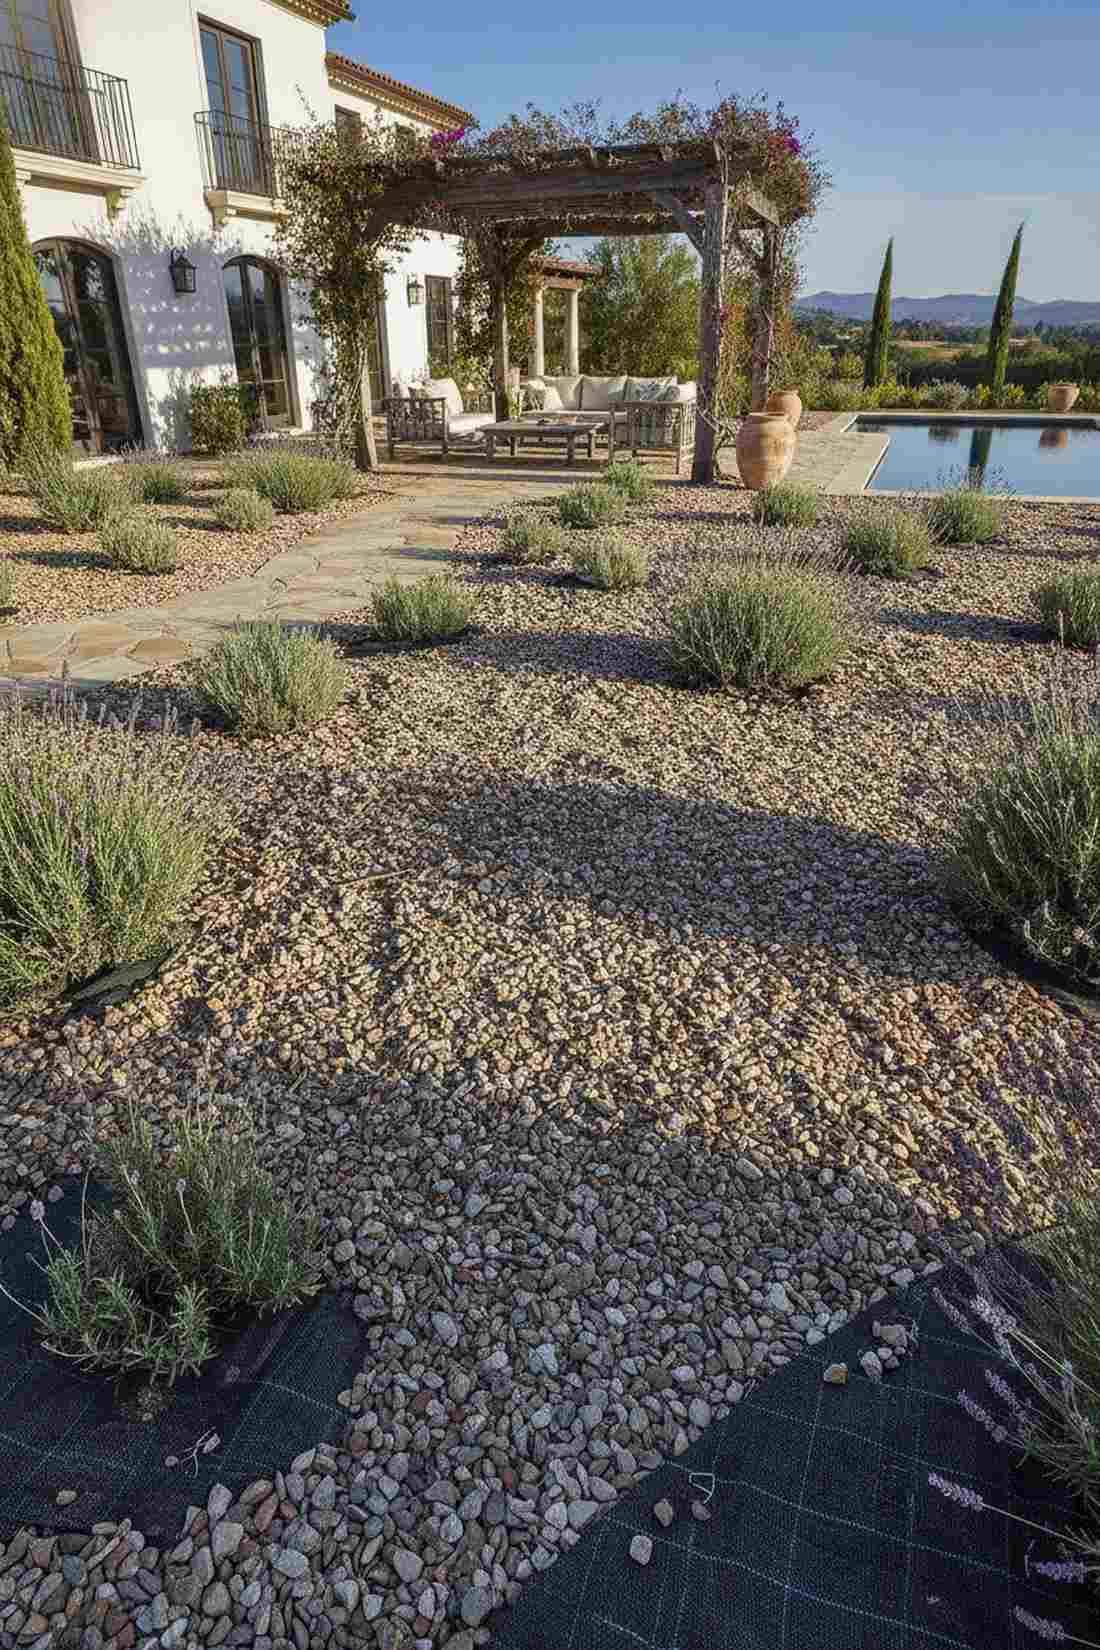
Walking through this arid space feels like exploring a chic, high-end Mediterranean estate. The deep mineral gravel mulch system acts as a permanent, weed-crushing armor for your soil.
Wood mulch blows away and rots, but utilizing sharp, crushed stone gives a designer-level finish that actively reflects heat into sun-loving herbs like lavender. Choosing angular gravel over round pebbles ensures the stones interlock tightly, preventing them from sliding down slopes or washing away.
A bulk delivery of crushed stone runs about $150–$300. Pin this if you are absolutely sick of replacing wood mulch every spring.
- Key Materials: Crushed angular stone, weed fabric
- Vibe / Style: Crisp Mediterranean armor
- Difficulty: Heavy wheelbarrowing
- Budget Breakdown: Stone: $200 | Heavy fabric: $60
- Creator’s Tip: Never use plastic sheeting; use heavy woven permeable fabric so water can still penetrate the gravel layer into the soil.
- Smart Sourcing: commercial-grade woven weed barrier fabric and heavy-duty steel landscape fabric staples
You’ll wonder why you never thought of this next brilliant spatial hack…
55. Rain Garden Depression
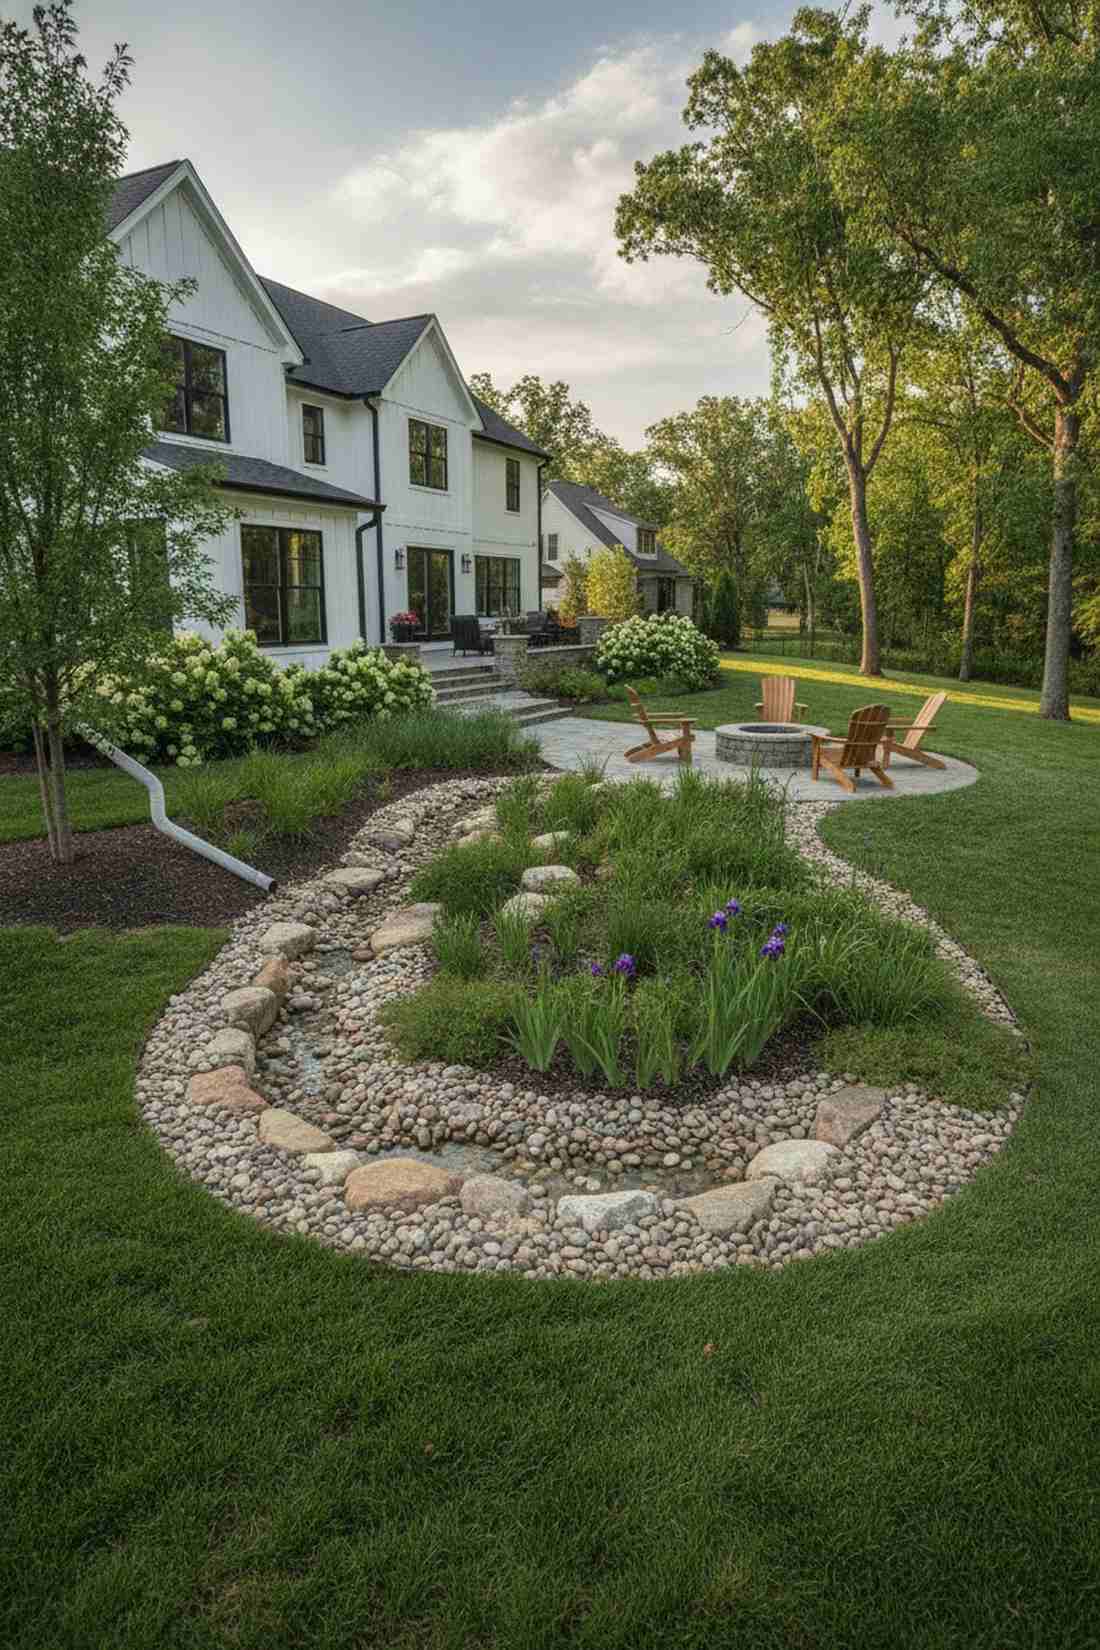
Watching this basin fill during a storm feels like having a private, beautifully engineered oasis. A stormwater rain garden layout is the absolute smartest way to handle annoying gutter runoff without burying ugly plastic pipes.
Letting downspouts flood your lawn creates a muddy nightmare, but digging a shallow, planted basin delivers a surprisingly premium look while solving drainage issues. Loading the depression with deep-rooted native sedges allows the water to percolate into the aquifer within hours.
Building this functional swale costs about $80–$150 in native plants. Save this to turn a flooding problem into a stunning landscape feature.
- Key Materials: River rock, native wetland plugs
- Vibe / Style: Functional eco-basin
- Difficulty: Digging a shallow bowl
- Budget Breakdown: River rock channel: $50 | Plants: $60
- Creator’s Tip: Line the very bottom with fist-sized cobble to prevent the incoming rushing water from eroding the soil away.
- Smart Sourcing: smooth decorative river rock cobbles (bulk) and native moisture-loving iris rhizomes
56. Boulder Accent Grouping
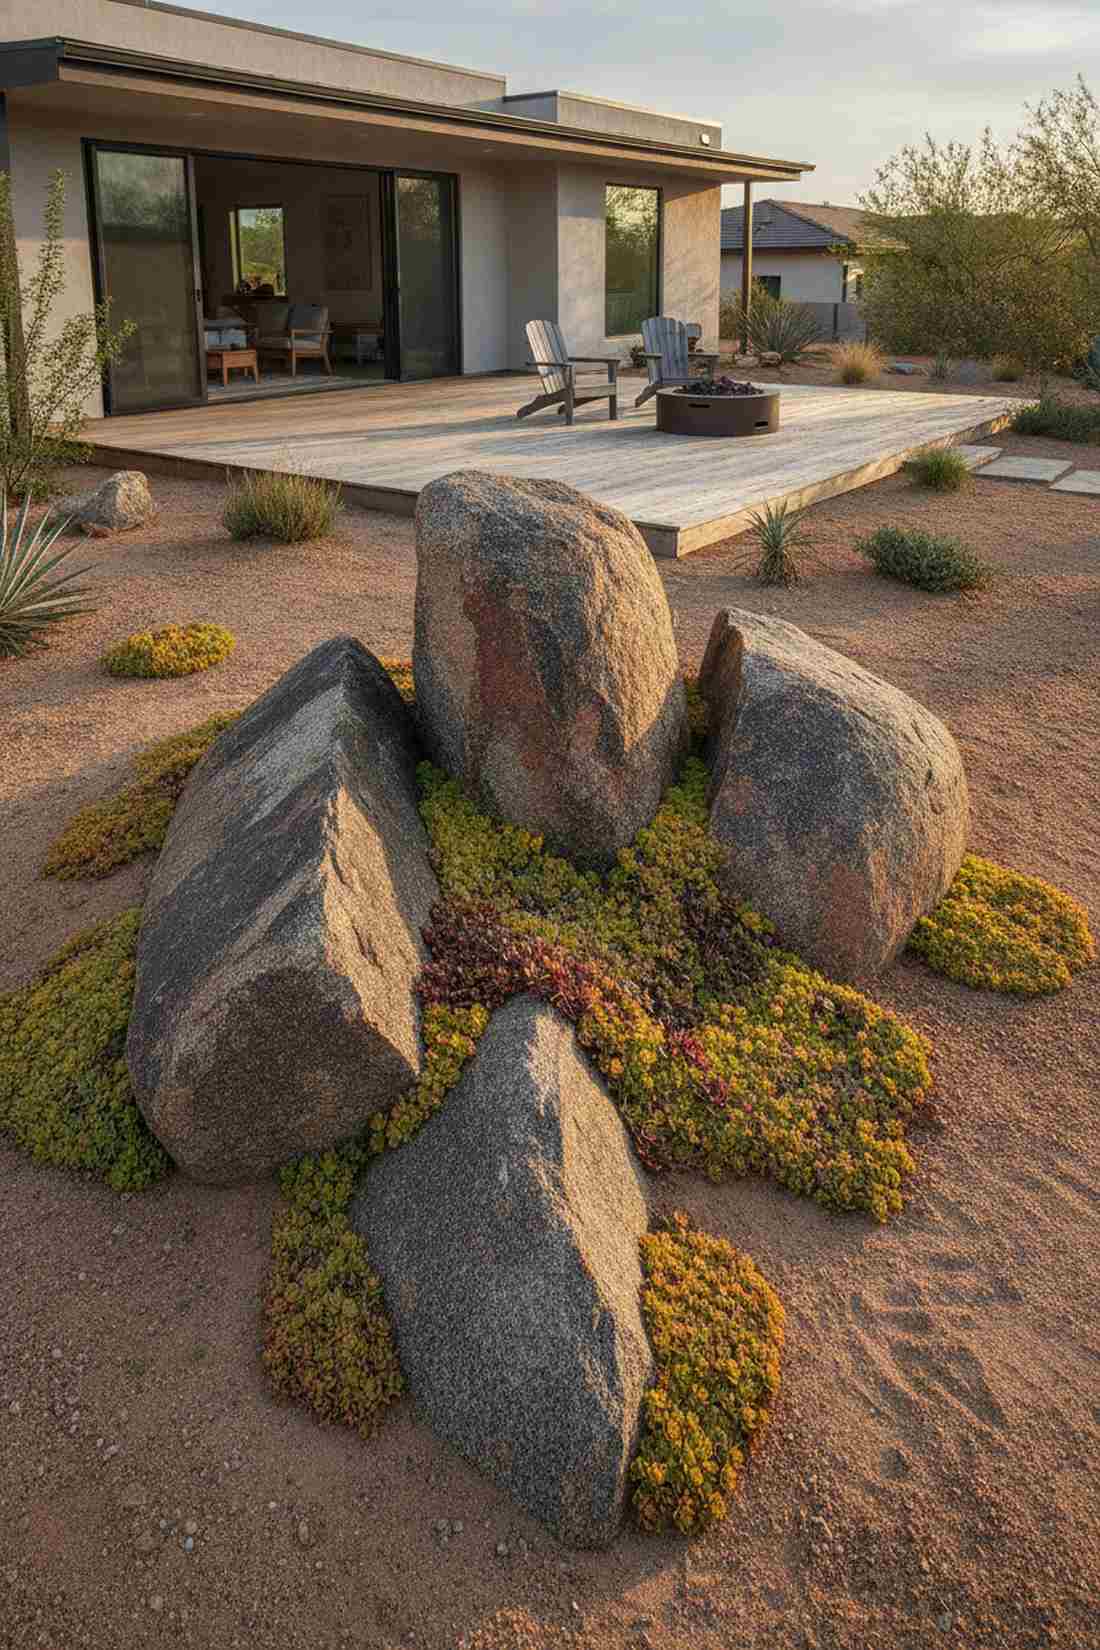
Arranging these massive stones feels like dropping ancient, sculptural anchors right into your yard. A strategic boulder accent layout provides instant, zero-maintenance architectural weight to flat, sandy areas.
Scattering tiny rocks looks like debris, but burying the bottom third of massive boulders gives a designer-level finish that looks like a natural geological outcropping. Stuffing the crevices with creeping sedums creates stunning micro-habitats that require absolutely no irrigation.
Having a few boulders delivered costs roughly $200–$400. Pin this to add permanent, rugged texture to your xeriscape.
- Key Materials: Large boulders, creeping sedums
- Vibe / Style: Rugged desert architecture
- Difficulty: Requires heavy machinery or a pry bar
- Budget Breakdown: Boulders: $250 | Sedum plugs: $40
- Creator’s Tip: Group boulders in odd numbers (3 or 5) and bury them slightly to make them look rooted, not just dropped on the lawn.
- Smart Sourcing: creeping sedum stonecrop plug trays and heavy-duty steel landscaping pry bars
57. Native Meadow Restoration
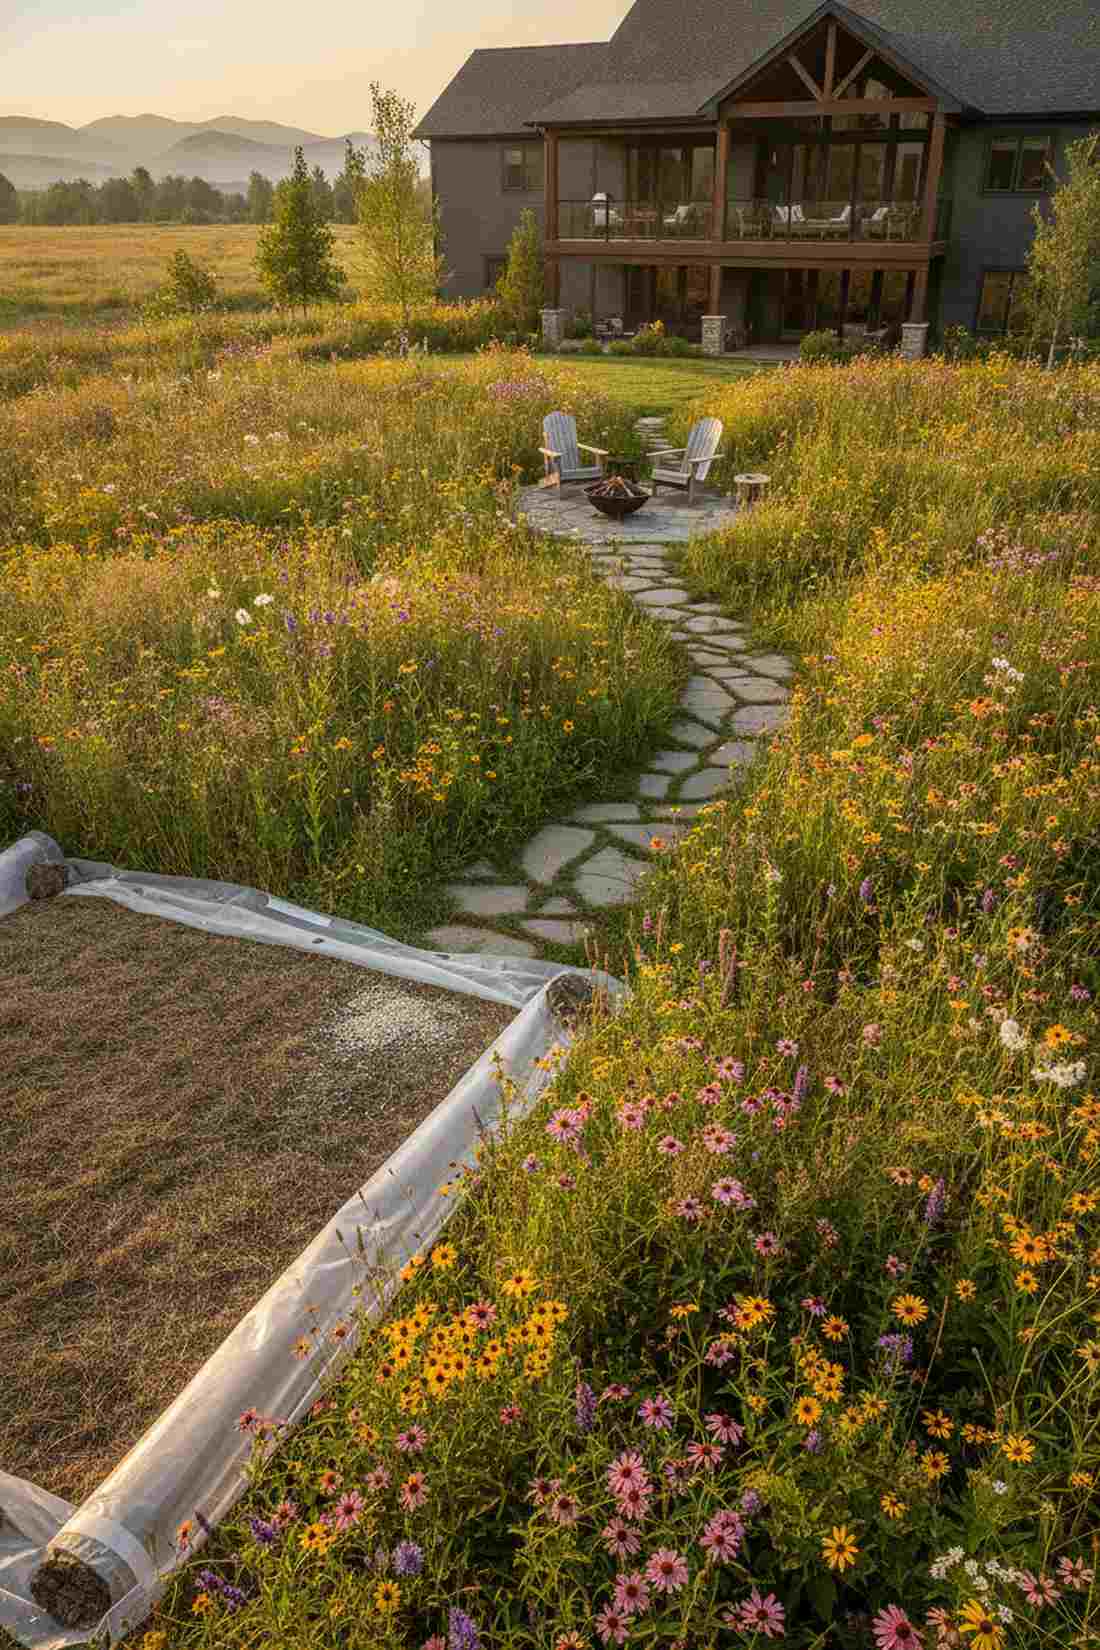
Watching the wind roll through this yard feels like standing in a pristine, untouched prairie. The no-mow native meadow conversion is the ultimate rebellion against expensive, water-guzzling suburban turf lawns.
Fighting to keep grass green in a drought is miserable, but ripping it out for native wildflowers looks incredibly premium and slashes your water bill to zero. High-CPC terms like premium wildflower seed matrices ensure the area explodes with pollinator activity while requiring a mow only once a year.
Seed and prep work will run about $100–$250. Save this if you are ready to sell your lawnmower and embrace ecological freedom.
- Key Materials: Meadow seed mix, soil solarization plastic
- Vibe / Style: Wild expansive freedom
- Difficulty: Requires patience for establishment
- Budget Breakdown: Bulk seeds: $80 | Solarization tarp: $50
- Creator’s Tip: Smother the existing grass with a clear plastic tarp during peak summer to bake and kill the lawn weeds before sowing seeds.
- Smart Sourcing: bulk native pollinator wildflower seed mixes and heavy-duty clear agricultural solarization plastic
58. Succulent Tapestry
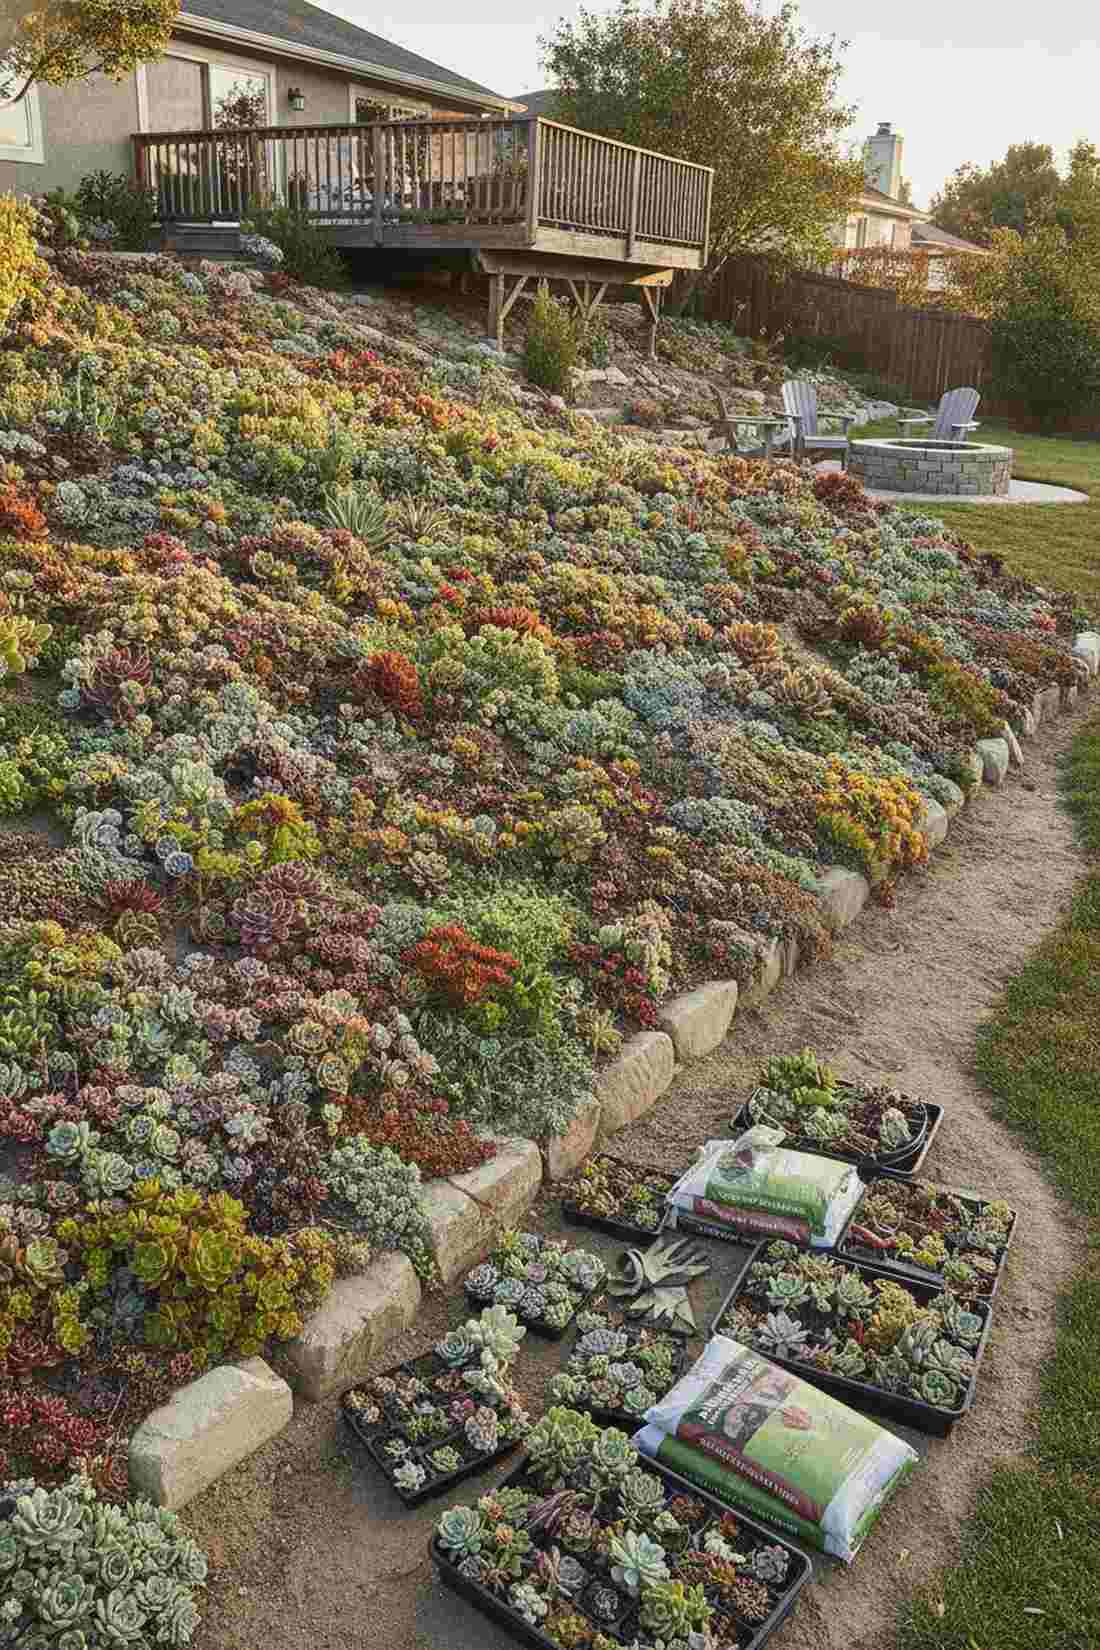
Staring down at this layout feels like examining a vibrant, living coral reef made of stone. A dense succulent mosaic design is absolutely perfect for scorching, rocky slopes where nothing else survives.
Planting sparse succulents looks barren, but packing them shoulder-to-shoulder in a tightly woven carpet delivers a surprisingly premium look with incredible fractal textures. These fleshy plants hoard their own water, meaning this stunning visual display is completely impervious to harsh summer droughts.
A bulk tray of cuttings costs around $50–$100. Pin this to create a bulletproof, high-texture groundcover.
- Key Materials: Assorted succulent cuttings, sandy soil
- Vibe / Style: Desert coral reef
- Difficulty: Very easy planting
- Budget Breakdown: Cutting trays: $60 | Cactus soil: $25
- Creator’s Tip: Don’t buy mature plants; buy unrooted cuttings in bulk. Just stick the stems into sandy soil and they will root themselves in weeks.
- Smart Sourcing: bulk assorted succulent cutting packs and fast-draining cactus and succulent soil mix
Specialty Purpose Layouts for Specific Goals
This final cluster of designs proves you don’t need a massive budget for a magazine-worthy yard.
59. Cutting Garden Rows
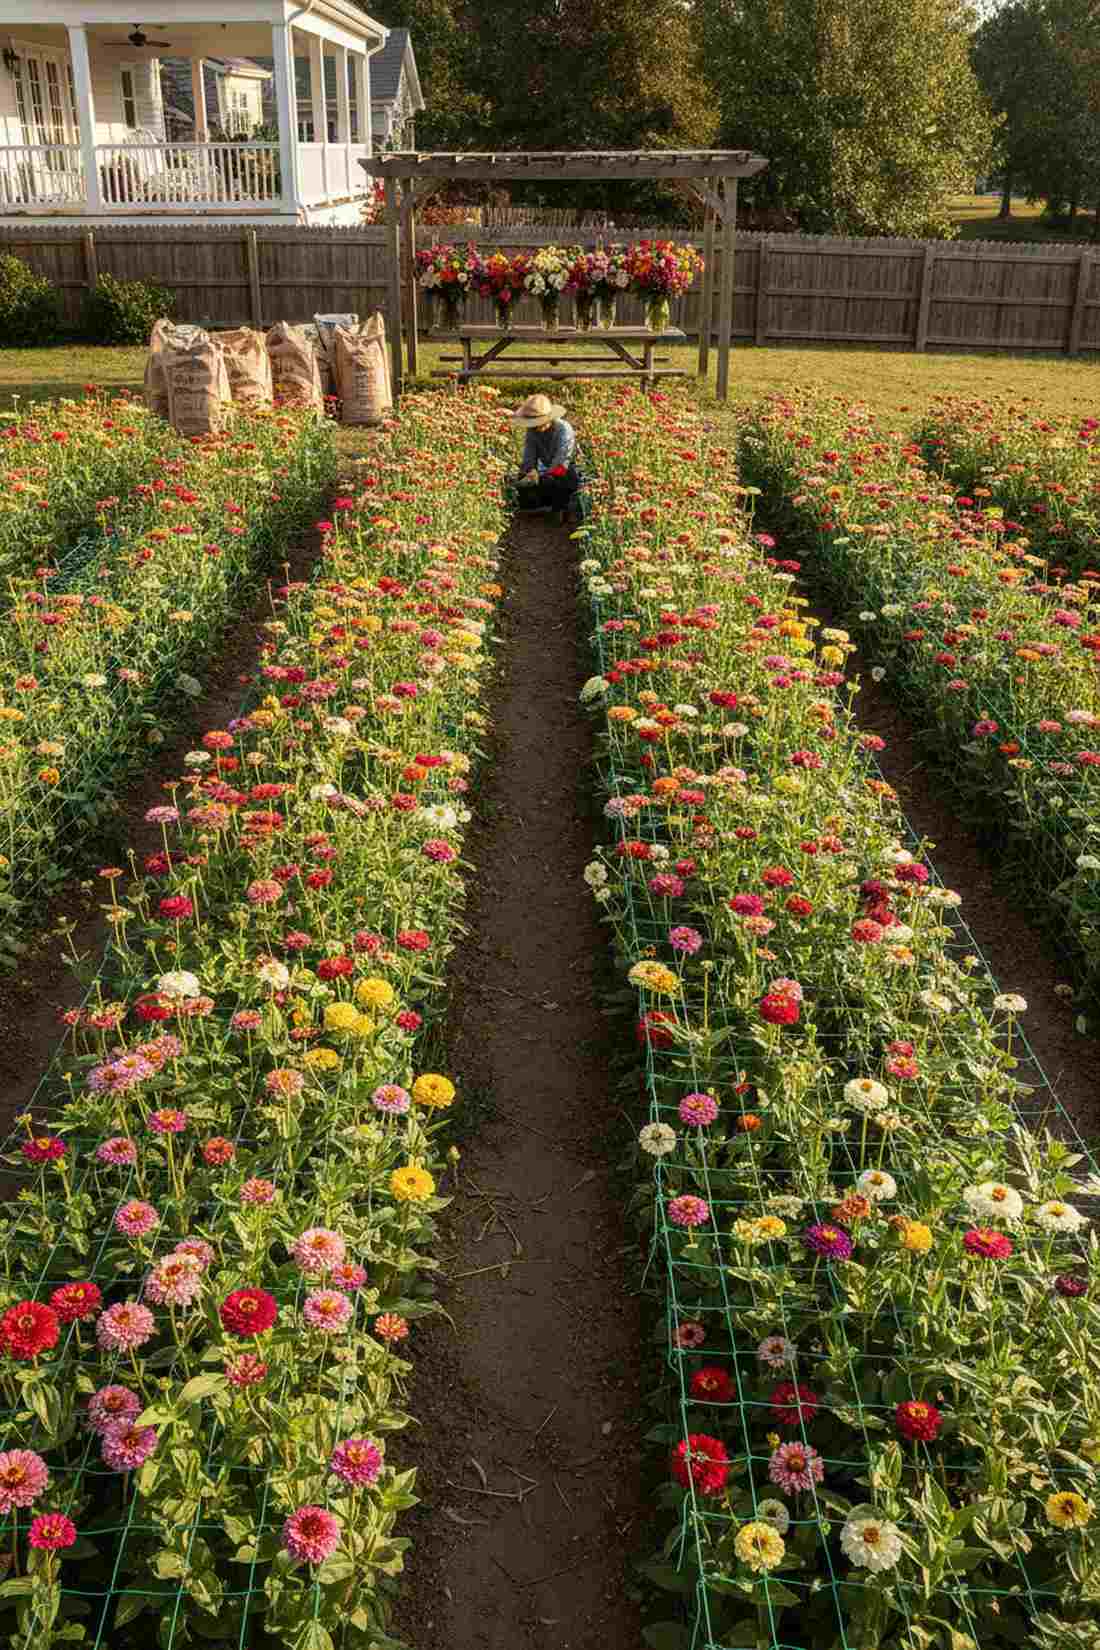
Working in this setup feels like operating your own private, highly productive floral boutique. The utilitarian cut-flower farm layout strips away the aesthetics to focus purely on generating massive volumes of bouquet stems.
Trying to harvest from a mixed landscape ruins your front yard display, but planting zinnias and dahlias in strict, agricultural rows gives a designer-level finish to your harvest speed. Sourcing premium bulk pack seeds ensures you can afford to pack the rows tightly, forcing the stems to grow perfectly straight.
Starting a cutting grid costs about $40–$80 in seeds and support netting. Save this if you want fresh indoor centerpieces all summer long.
- Key Materials: Floral support netting, bulk seeds
- Vibe / Style: High-yield floral utility
- Difficulty: Easy row planting
- Budget Breakdown: Seeds: $30 | Support net: $20
- Creator’s Tip: Stretch horizontal floral netting over the beds while plants are young so they grow through it, preventing heavy blooms from snapping in the wind.
- Smart Sourcing: bulk cut-flower garden seed vaults and horizontal floral support trellis netting
60. Wheelchair Accessible Raised
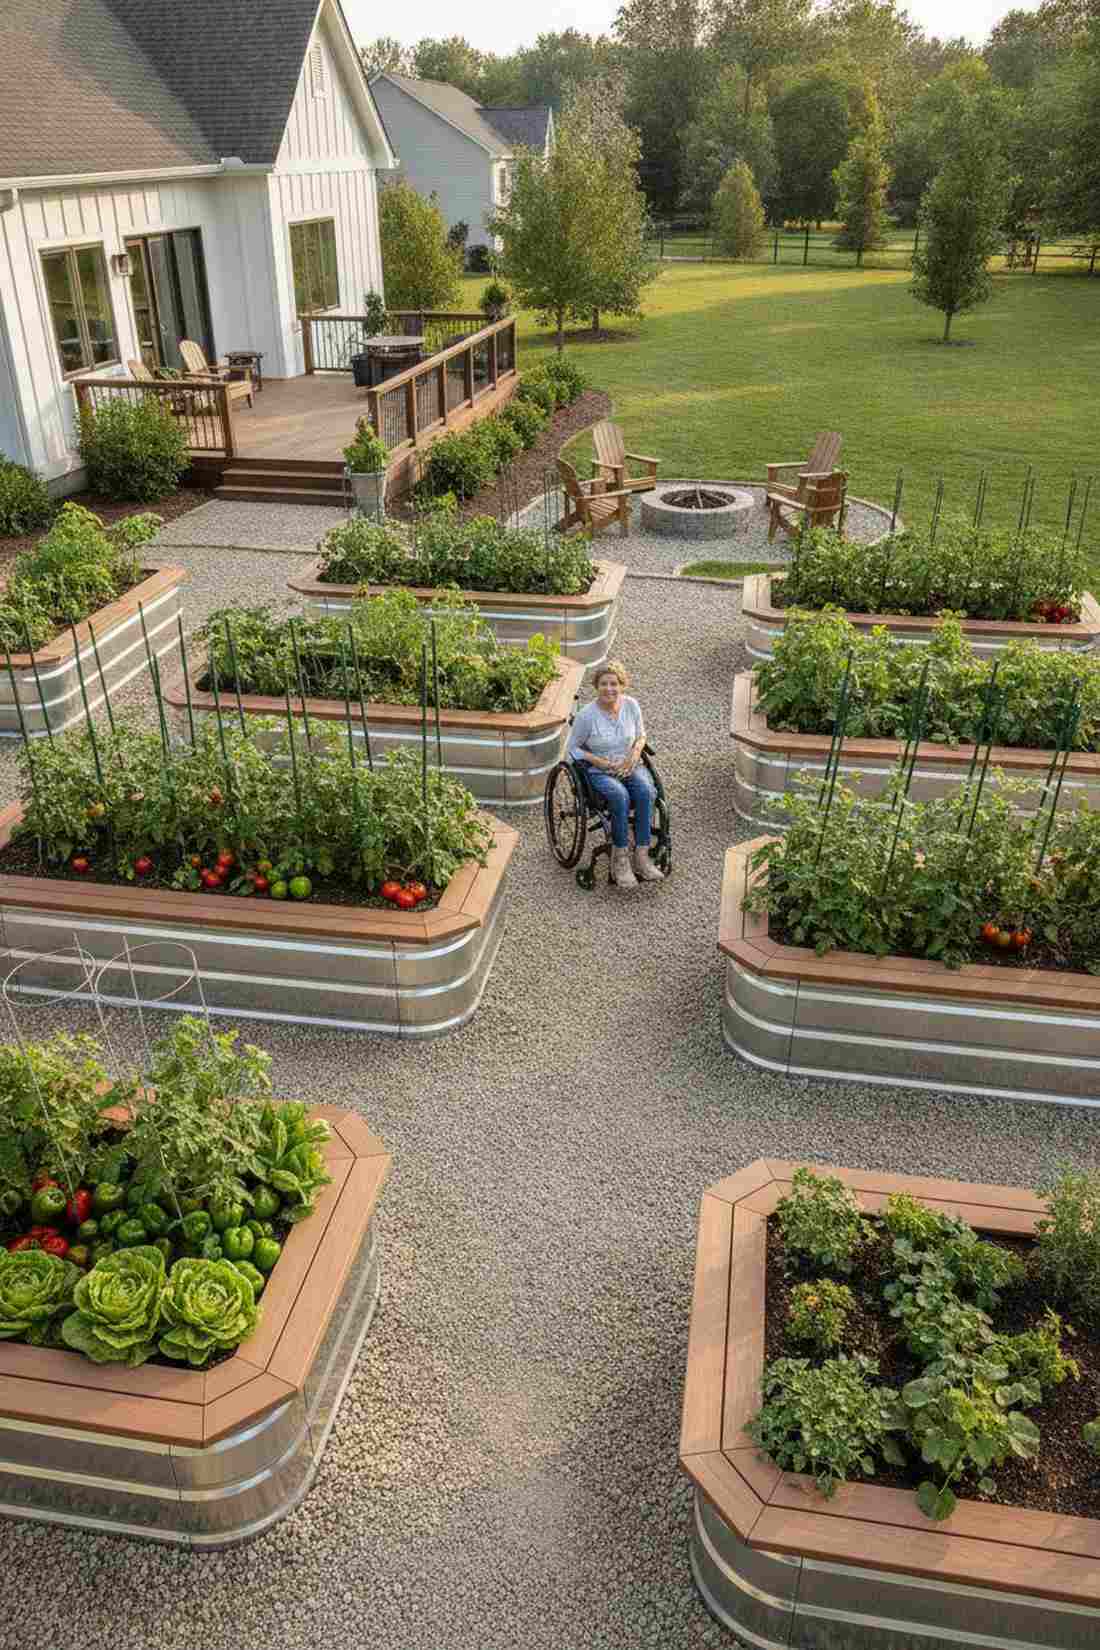
Gliding through these extra-wide paths feels incredibly freeing and flawlessly ergonomic. The ADA-compliant elevated planter layout ensures that mobility challenges never stop you from enjoying a premium harvest.
Standard pathways are dangerously tight, but expanding gravel routes to 36 inches and elevating beds to 30 inches delivers a surprisingly premium look of luxury spacing. Capping the bed edges with wide, flat composite boards creates a comfortable leaning rim that won’t give you splinters.
Building extra-tall beds requires more lumber, running about $250–$500. Pin this to build a completely barrier-free garden experience.
- Key Materials: Tall metal sides, wide decking caps
- Vibe / Style: Ergonomic barrier-free utility
- Difficulty: Moderate building required
- Budget Breakdown: Extra lumber/metal: $300 | Capping boards: $80
- Creator’s Tip: Fill the bottom half of these deep beds with empty plastic jugs or logs so you don’t spend a fortune on unnecessary potting soil.
- Smart Sourcing: extra-tall 32-inch galvanized raised bed kits and smooth composite decking boards (for edge seating)
61. Pollinator Corridor
Standing near this buzzing border feels like you’ve engineered a vibrant superhighway for nature. The continuous pollinator flight path design connects fragmented yards to create a massive buffet for bees and butterflies.
Planting a single butterfly bush isn’t enough, but stringing a massive, unbroken line of nectar-rich native blooms gives a designer-level finish that hums with life. Utilizing garden layout ideas like grouping identical flowers in clusters of five ensures the bees can spot the color targets from high altitudes.
This ecological upgrade runs around $60–$150. Save this to rapidly increase your vegetable yields through hyper-pollination.
- Key Materials: Native nectar plugs, shallow water dish
- Vibe / Style: Vibrant ecological superhighway
- Difficulty: Very easy planting
- Budget Breakdown: Native plugs: $80 | Bee bath: $20
- Creator’s Tip: Place a shallow dish filled with pebbles and water nearby so exhausted bees can land safely and drink without drowning.
- Smart Sourcing: regional native pollinator perennial kits and shallow ceramic bee bath watering dishes
62. Moon Garden Luminescence
Sitting out here at midnight feels like basking in a glowing, silver-drenched ethereal sanctuary. The nocturnal moon garden layout is the ultimate hack for professionals who only get to enjoy their yards after dark.
Dark red and purple flowers completely disappear at night, but packing a border strictly with silver foliage and white blooms looks far more expensive than it is when the moonlight hits. Adding night-blooming jasmine near your seating area ensures the evening air is flooded with an intoxicating perfume.
Curating this glowing aesthetic costs about $80–$160. Pin this to create a magical, glowing patio experience.
- Key Materials: White blooms, silver foliage, dark mulch
- Vibe / Style: Glowing ethereal midnight oasis
- Difficulty: Easy color matching
- Budget Breakdown: White florals: $90 | Silver accents: $50
- Creator’s Tip: Use jet-black dyed mulch as the base; the extreme contrast makes the white flowers look like they are literally floating in the dark.
- Smart Sourcing: night-scented moon flower seed packets and premium black color-retaining landscape mulch
Conclusion
Strategic garden layouts instantly upgrade outdoor spaces from messy backyards to high-end, productive sanctuaries. The 62 blueprints and configurations presented here prove that achieving a premium aesthetic relies entirely on smart spatial planning and quality material sourcing, not necessarily a massive budget. By utilizing raised bed starter kits, UV-resistant hardware, and intelligent zoning, you eliminate wasted effort and maximize your visual ROI. Dive into your site plan, identify your sun patterns, and start executing the layout that perfectly matches your lifestyle and budget.
Frequently Asked Questions
What is the most efficient vegetable garden layout?
The most efficient vegetable garden layout leverages budget-friendly starter kits to build 3-4 foot wide modular raised beds. This layout ensures you maximize your premium alternative growing area without compacting the soil, drastically improving yields. Integrating square-foot gardening templates over these beds allows you to pack high-CPC seeds tightly, eliminating weed growth and creating a highly organized, visually stunning production zone.
How do I design a garden layout for a small yard?
When searching for garden layout ideas in tight spaces, the secret is utilizing vertical air space and top-rated planters. Utilize heavy-duty wall trellises and UV-coated balcony rail planters to pull vegetation upward. Angling your beds diagonally instantly tricks the eye into perceiving a larger area, serving as a brilliant DIY blueprint for cramped urban patios.
What spacing should I use between garden beds?
Proper garden layout design dictates a minimum of 24 inches for standard pathways to accommodate wheelbarrows and comfortable kneeling. If you want a truly premium look, expand your primary central walkways to 36 inches and fill them with heavy-duty commercial landscape fabric topped with crushed angular gravel. This ensures a clean, weed-free zone that handles heavy foot traffic effortlessly.
Should garden beds run north-south or east-west?
For flawless garden layout and design, running your beds north-to-south provides the most even sun exposure across all your crops throughout the day. However, if you are forced to run them east-west, use a smart structural hack: plant your towering crops (like pole beans on a sturdy metal trellis) on the northern edge to prevent them from casting dense shadows over your low-lying, sun-hungry greens.
How many garden beds do I need to feed a family?
While basic garden layout examples suggest 800 square feet, using high-density vertical structures and bulk pack seeds can drastically reduce that footprint. By utilizing continuous succession planting and heavy-duty season extension cold frames, a family of four can pull massive, consistent harvests from just six to eight 4×8 premium raised bed modules.
What is the best layout for a cottage garden?
The best cottage garden layout relies on sweeping, curved pathways and dense, layered height successions rather than rigid straight lines. By sourcing the best wild flower seeds and planting them in massive repeating drifts, you create an intentional, overflowing aesthetic that looks incredibly expensive. Frame the entrance with a heavy-duty cedar arbor to add structural luxury to the informal charm.