Craving an elegant outdoor seating round setup without the designer price tag? Uncover 23 curved layouts prioritizing smart sourcing, exact budgets, and weatherproof builds. Elevate your backyard into a custom, high-end entertainment lounge today.
Design Snapshot: High-End Core Principles
- Radial Symmetry: Circular plans naturally force high-ticket visual symmetry, pulling focus directly to premium fire pits or water features.
- Arc-Based Circulation: Sweeping curved walkways eliminate cheap-looking harsh angles, upgrading the holistic flow of your landscape.
- Nested Radii: Stacking concentric tiers gives an incredibly expensive, architectural weight to otherwise flat, boring yards.
- Directional Flow: Strategic breaks in curved benches invisibly control party traffic without relying on clunky physical barriers.
Classic Circular Configurations
Ditching standard straight lines for these foundational arcs instantly upgrades a basic backyard into a high-value gathering zone. These layouts are designed to maximize both aesthetic dominance and social warmth.
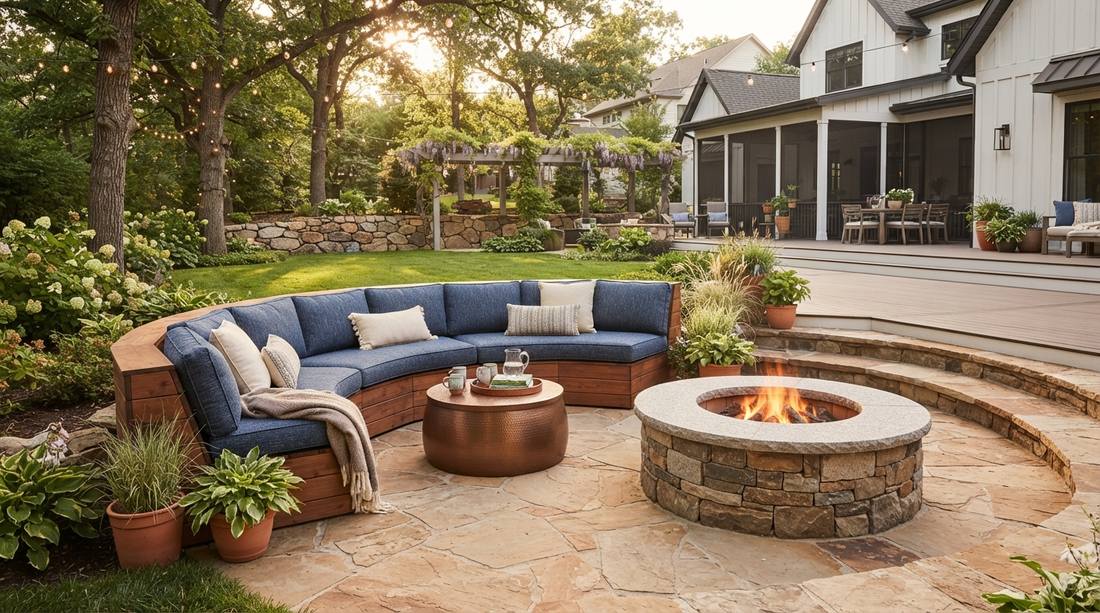
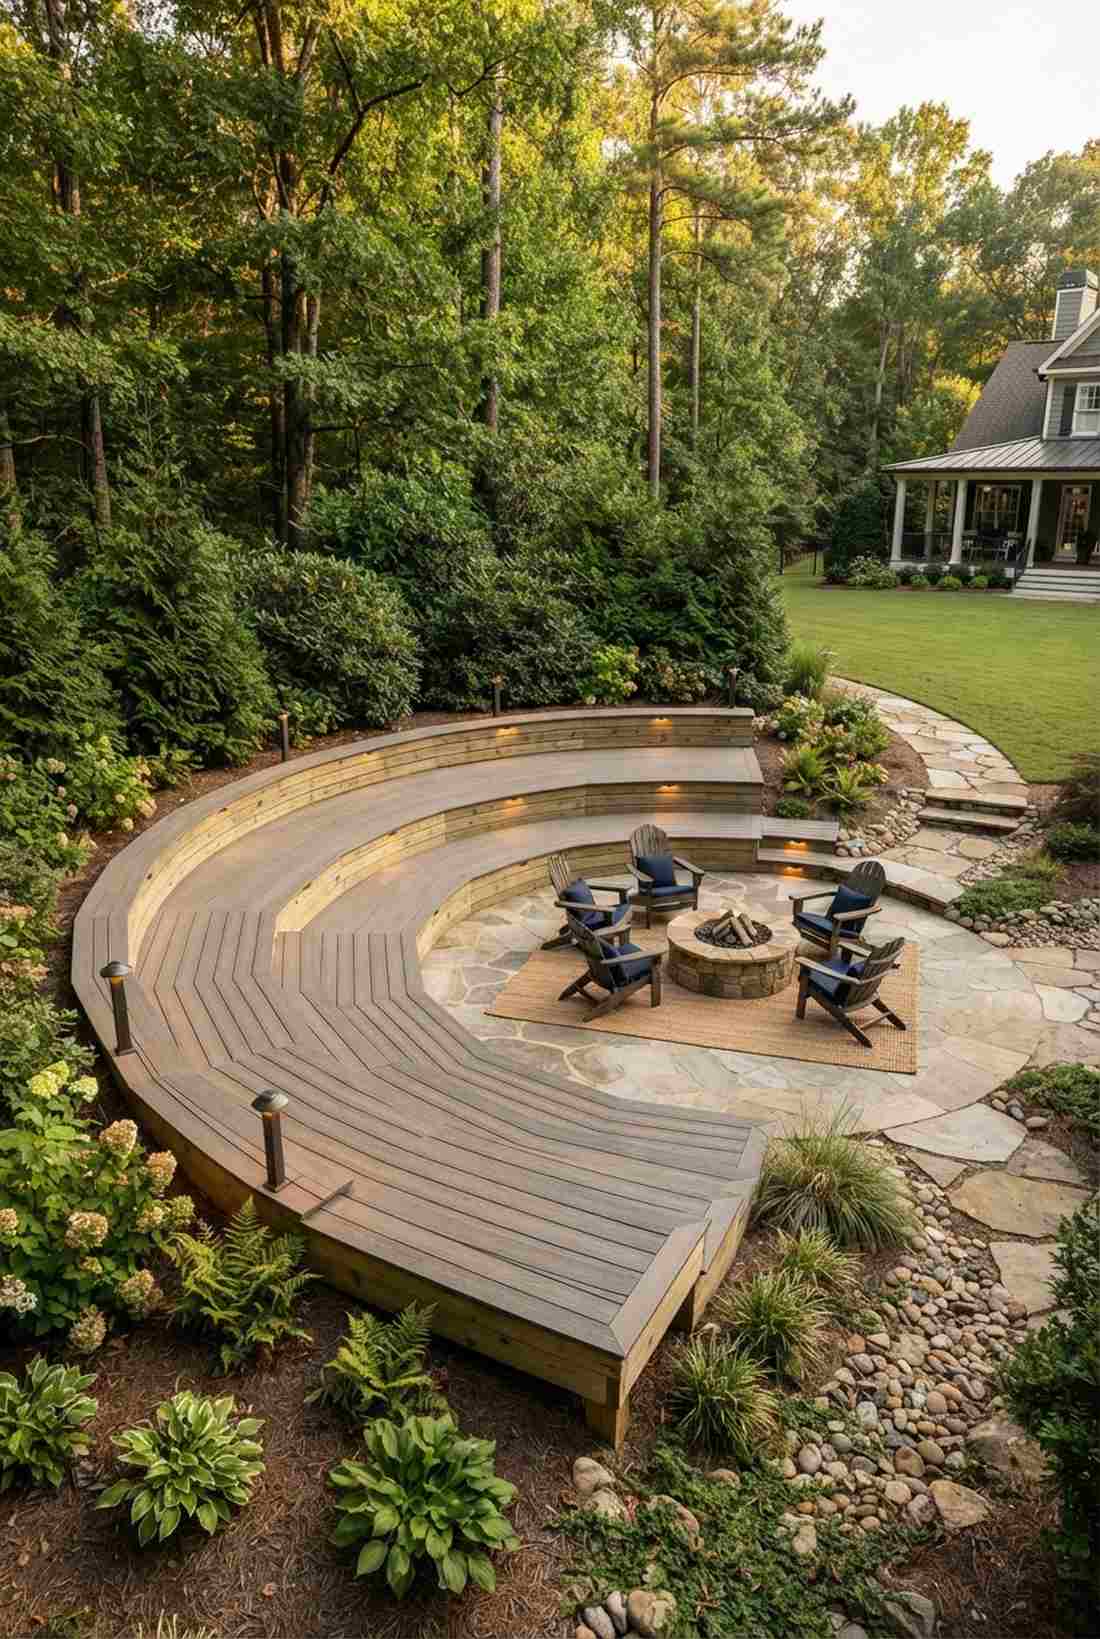
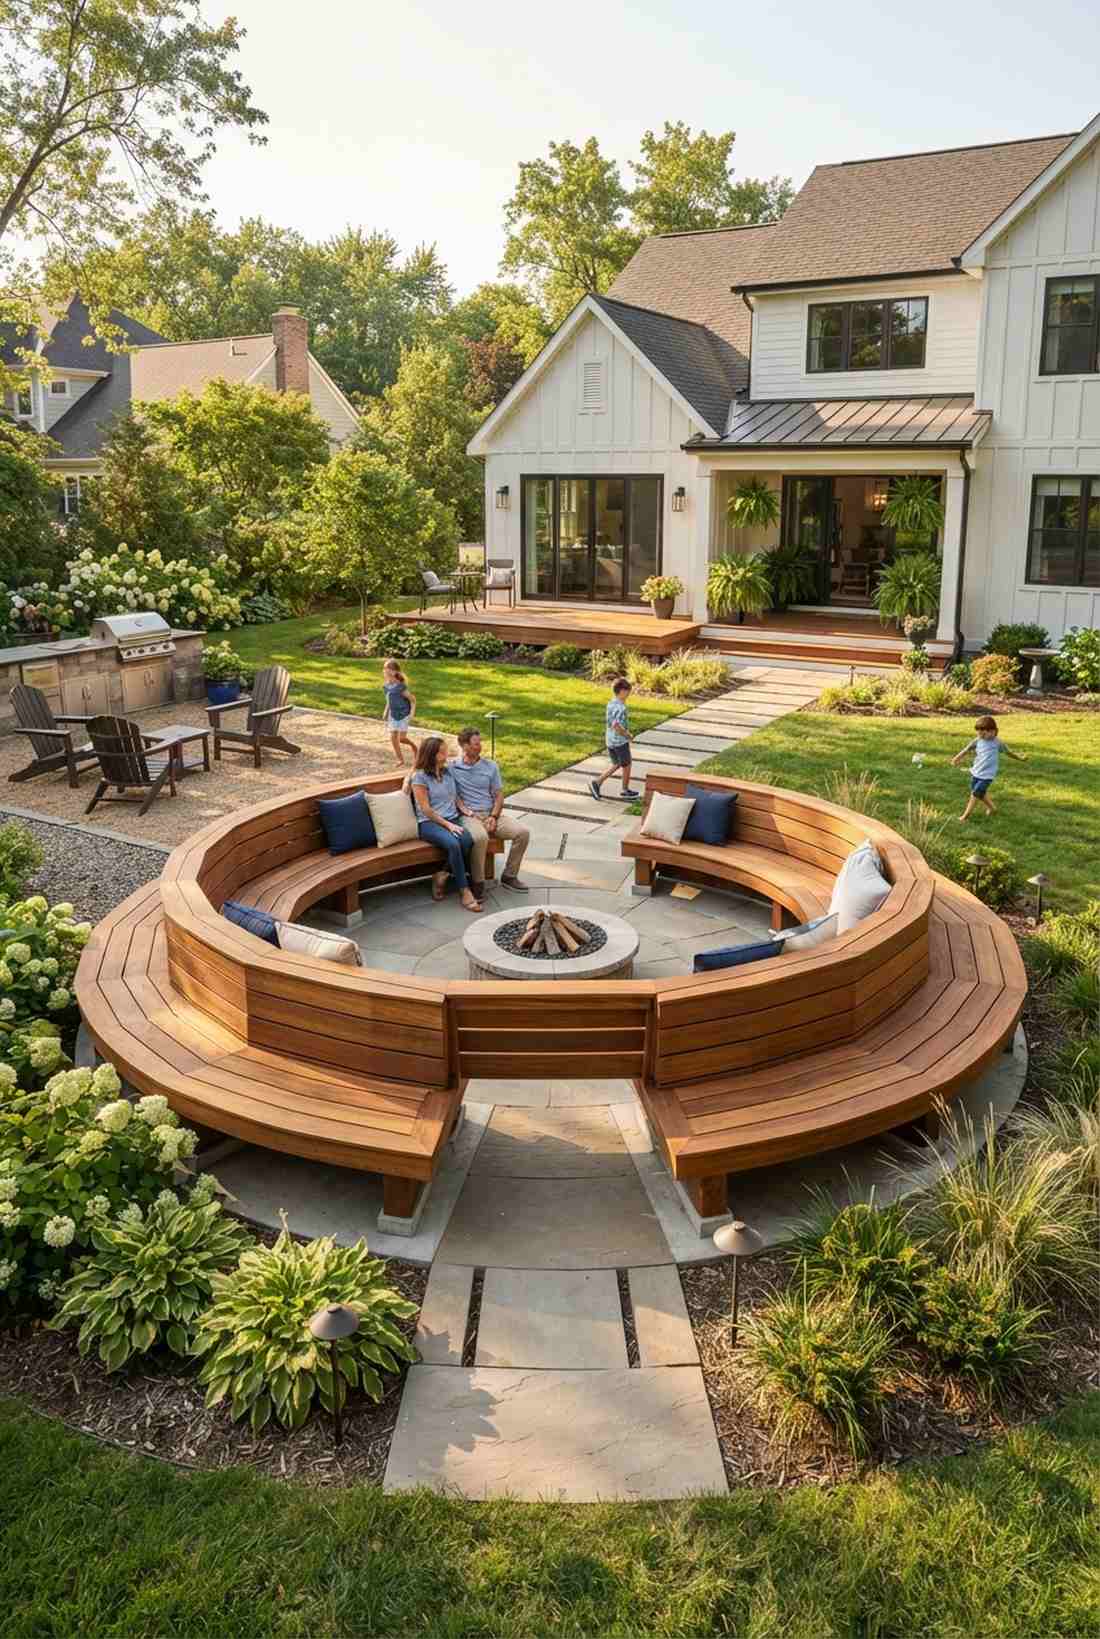
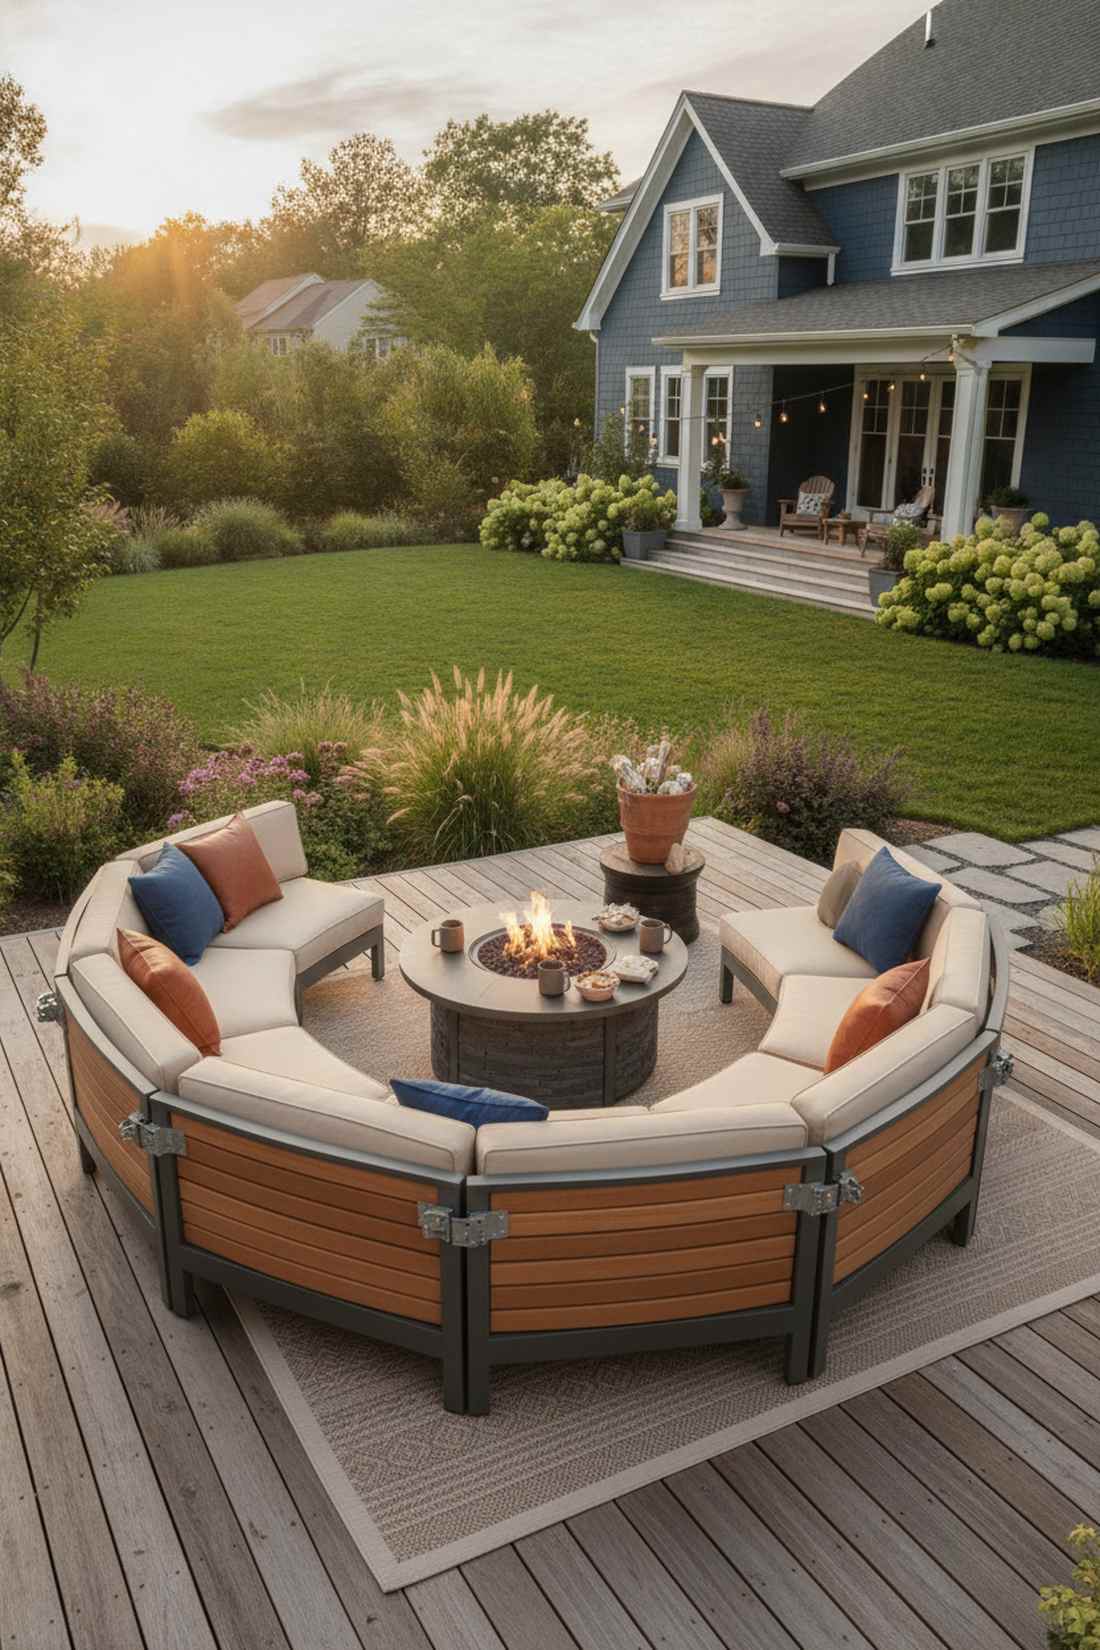
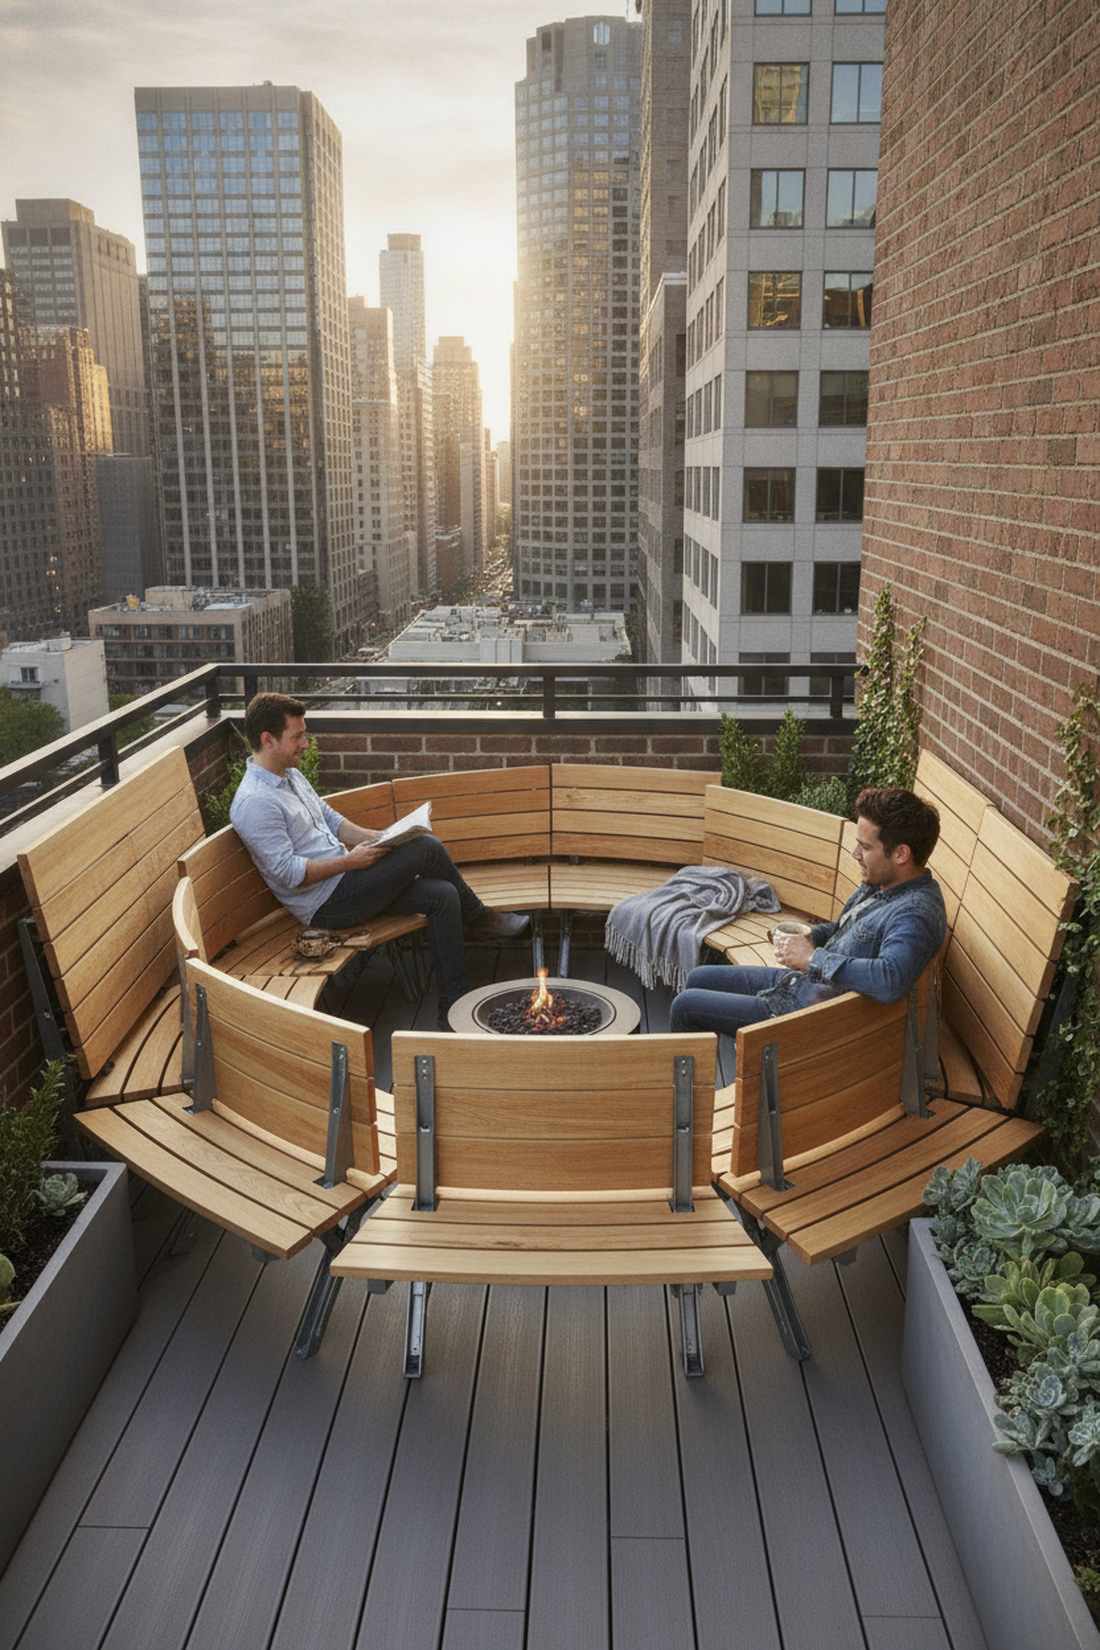
1. Full Circle Fire Pit Ring
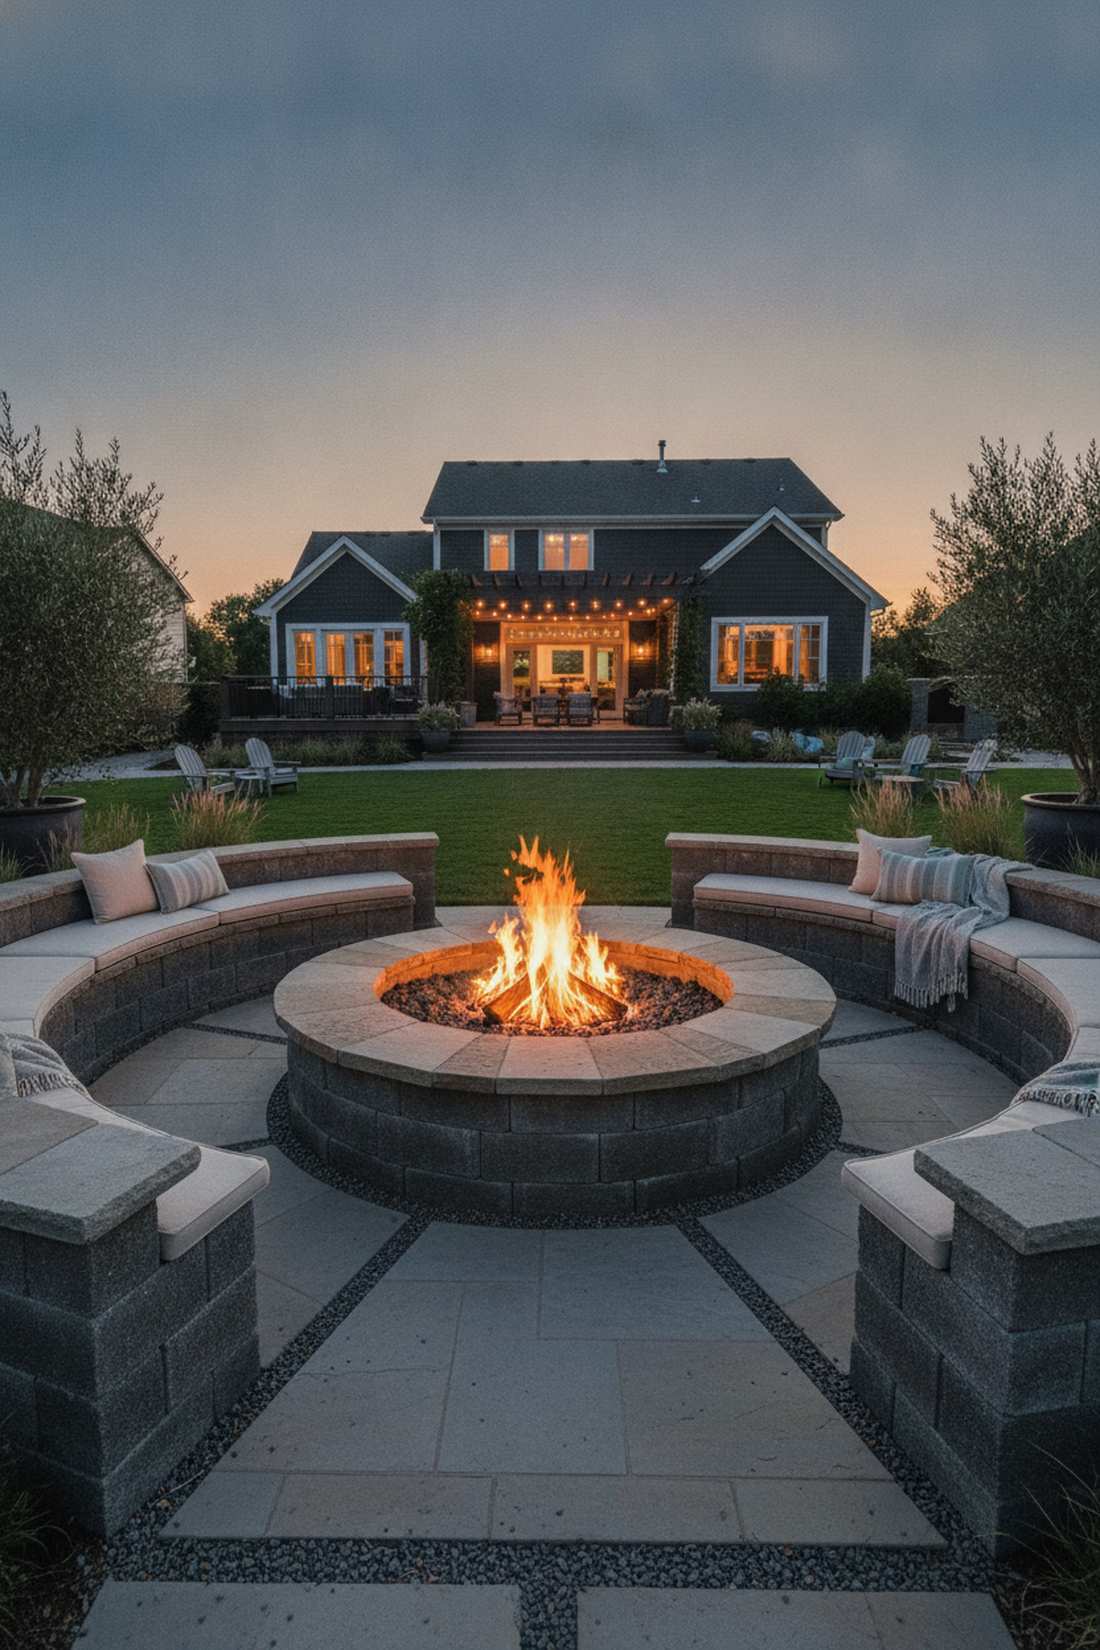
Feels like a hidden luxury resort enclave you’ve accidentally stumbled into. A circular stone fire pit setup works flawlessly for expansive backyard entertainment zones that demand a bold centerpiece.
Most homeowners waste money on flimsy chairs, but a continuous built-in ring delivers a surprisingly premium look with zero maintenance. Integrating heavy-duty masonry adhesive with precision-cut retaining blocks guarantees a weatherproof, indestructible baseline.
You can realistically budget $300–$600 depending on the quality of your hardscape materials. Save this to your ultimate backyard DIY weekend board!
- Key Materials: Concrete retaining blocks, heat-resistant mortar, flagstone caps
- Vibe / Style: High-end rustic resort
- Difficulty: Moderate weekend build
- Budget Breakdown: Stone: $350 | Adhesive & Core: $80 | Caps: $120
- Creator’s Tip: Leave two 24-inch gaps at opposite ends for seamless party traffic flow.
- Smart Sourcing: pre-cut radial stone blocks (pallet) and bulk pack fire-rated mortar.
2. Octagonal Conversation Court
Radiates a structured, geometric warmth perfect for a modern courtyard. This angled patio bench design works exceptionally well for DIYers upgrading a flat, lifeless lawn into a dynamic social hub.
Ditching complex curved cuts saves massive construction time while looking far more expensive than it is. Using premium weather-treated lumber secured with hidden deck fasteners elevates the final finish from an amateur project to architectural art.
Expect to spend roughly $250–$400 for structural timber and commercial-grade hardware.
- Key Materials: Pressure-treated 4×4 posts, composite deck boards, hidden brackets
- Vibe / Style: Modern structured minimalism
- Difficulty: Easy straight-cut carpentry
- Budget Breakdown: Lumber: $200 | Fasteners: $45 | Finish: $35
- Creator’s Tip: Fill the inner open space with low-maintenance sedums instead of grass.
- Smart Sourcing: hidden deck fastener starter kits and UV-coated composite lumber packs.
3. Sunken Circular Lounge

Feels like an exclusive VIP lounge hidden right in your garden. A recessed fire pit bowl transforms a sloped or uneven backyard into an intimate, wind-protected conversation pit.
Many designers charge thousands for this specific aesthetic, yet excavating concentric rings yourself yields a designer-level finish for pennies on the dollar. Reinforce the soil walls using heavy-duty retaining mesh and professional landscape fabric to lock the structure in place.
Excavation is mostly sweat equity, but budget around $500 for quality retaining wall supplies.
- Key Materials: Retaining mesh, poured concrete or stone fascia, French drain pipes
- Vibe / Style: Intimate sunken luxury
- Difficulty: Advanced digging & leveling
- Budget Breakdown: Drainage: $80 | Retaining Wall: $300 | Base Gravel: $90
- Creator’s Tip: Never skip the center drainage trench to prevent your lounge from becoming a pool.
- Smart Sourcing: heavy-duty woven landscape fabric (bulk roll) and corrugated drainage starter kits.
4. Half-Moon Bay Window Seating
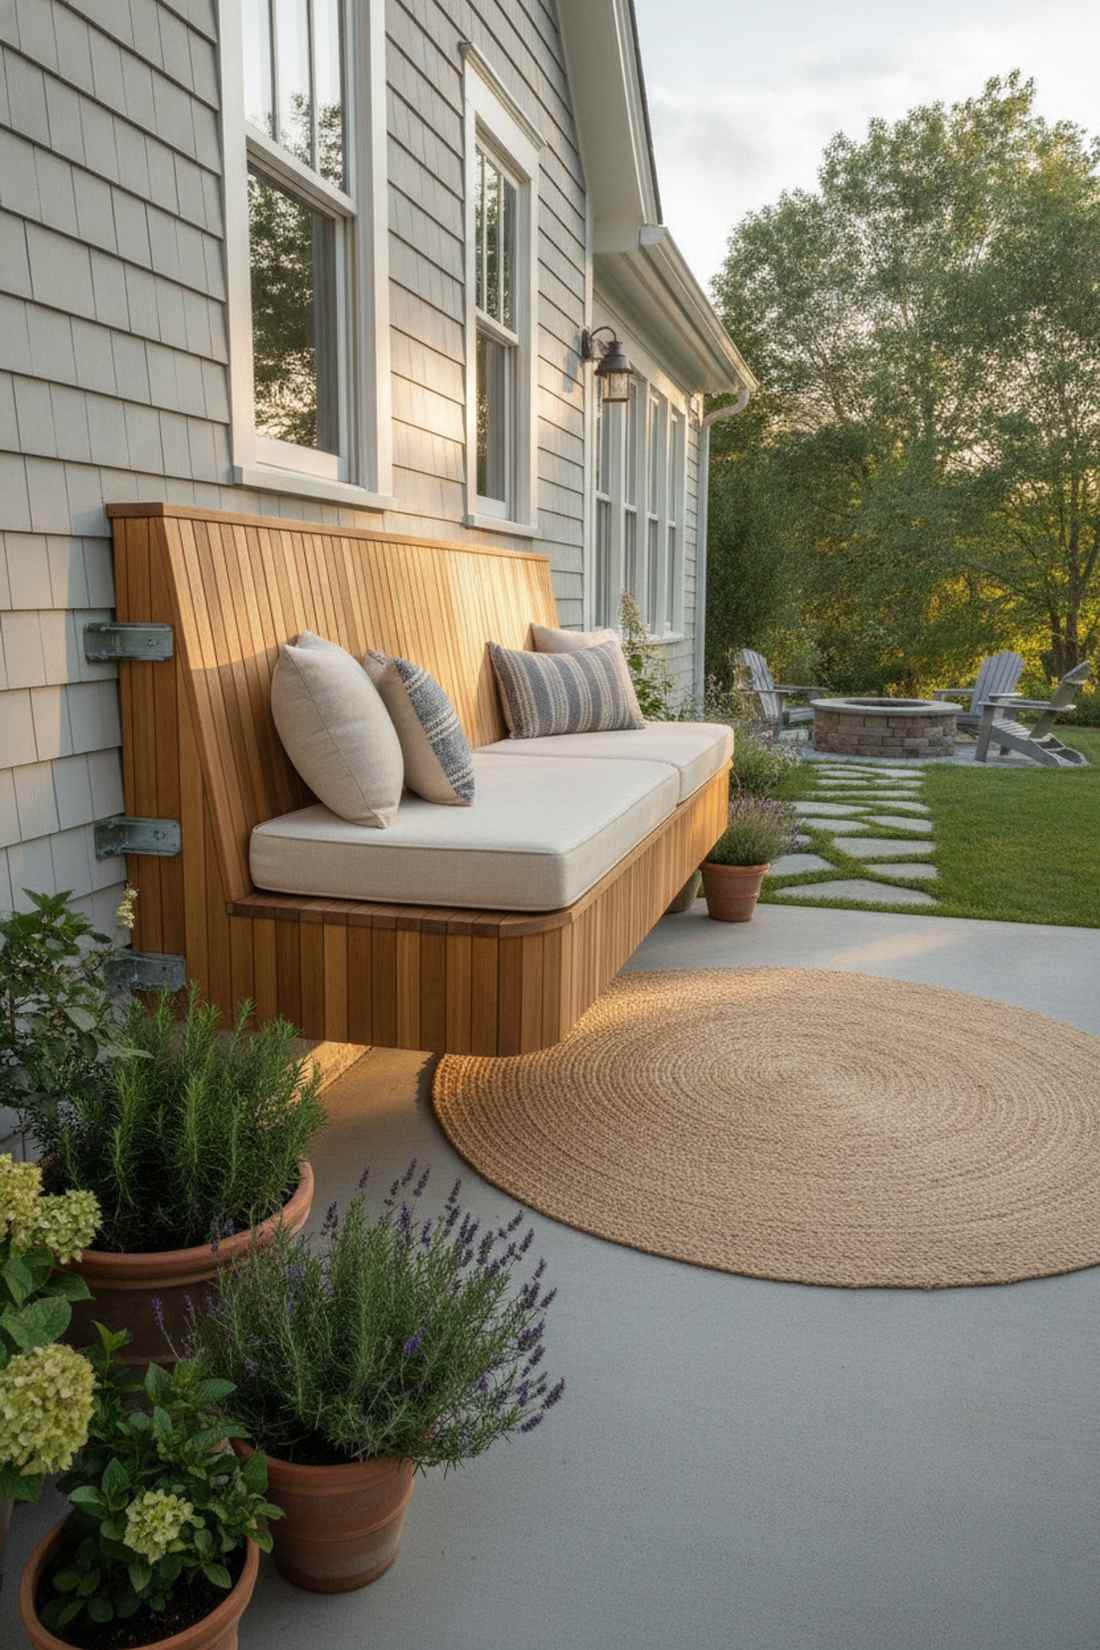
Wraps you in a cozy, sun-drenched embrace straight out of a boutique hotel. This semi-circular wall bench is the ideal space-saving hack for narrow side yards or empty exterior walls.
This layout is highly underrated, instantly turning dead concrete foundations into high-value real estate. Opting for curved laminated rim joists paired with heavy-duty structural brackets guarantees a breathtaking, floating illusion that stops guests in their tracks.
It’s a fast upgrade that completely changes the vibe for about $150–$250 in materials. Pin this if you are maximizing a tiny outdoor footprint!
- Key Materials: Laminated rim joists, masonry ledger bolts, vertical wood slats
- Vibe / Style: Cozy architectural alcove
- Difficulty: Intermediate wall-mounting
- Budget Breakdown: Joists: $90 | Hardware: $40 | Slats: $70
- Creator’s Tip: Anchor the bench to the sunniest south-facing wall to extend seasonal use.
- Smart Sourcing: masonry expansion anchor bolts (bulk pack) and pre-milled vertical cedar slats.
This next setup completely ignores traditional patio rules, but the visual result is absolutely jaw-dropping and changes how you experience your yard…
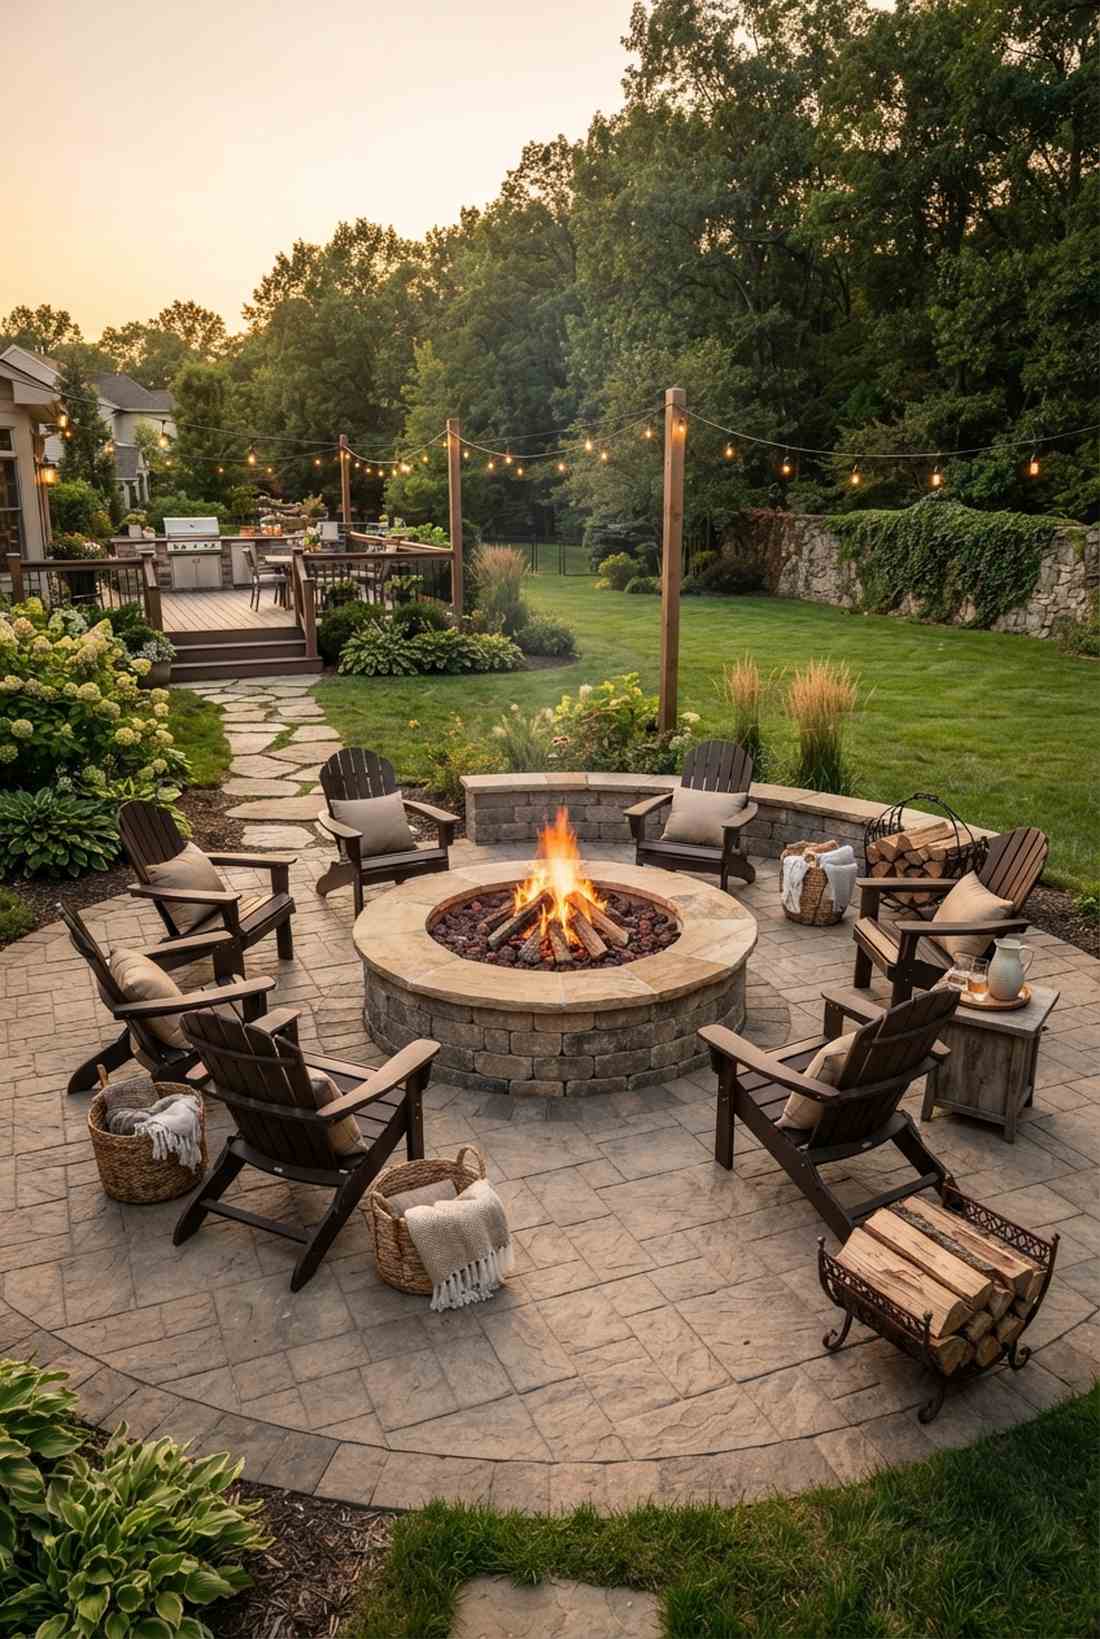
5. Three-Quarter Circular Amphitheater
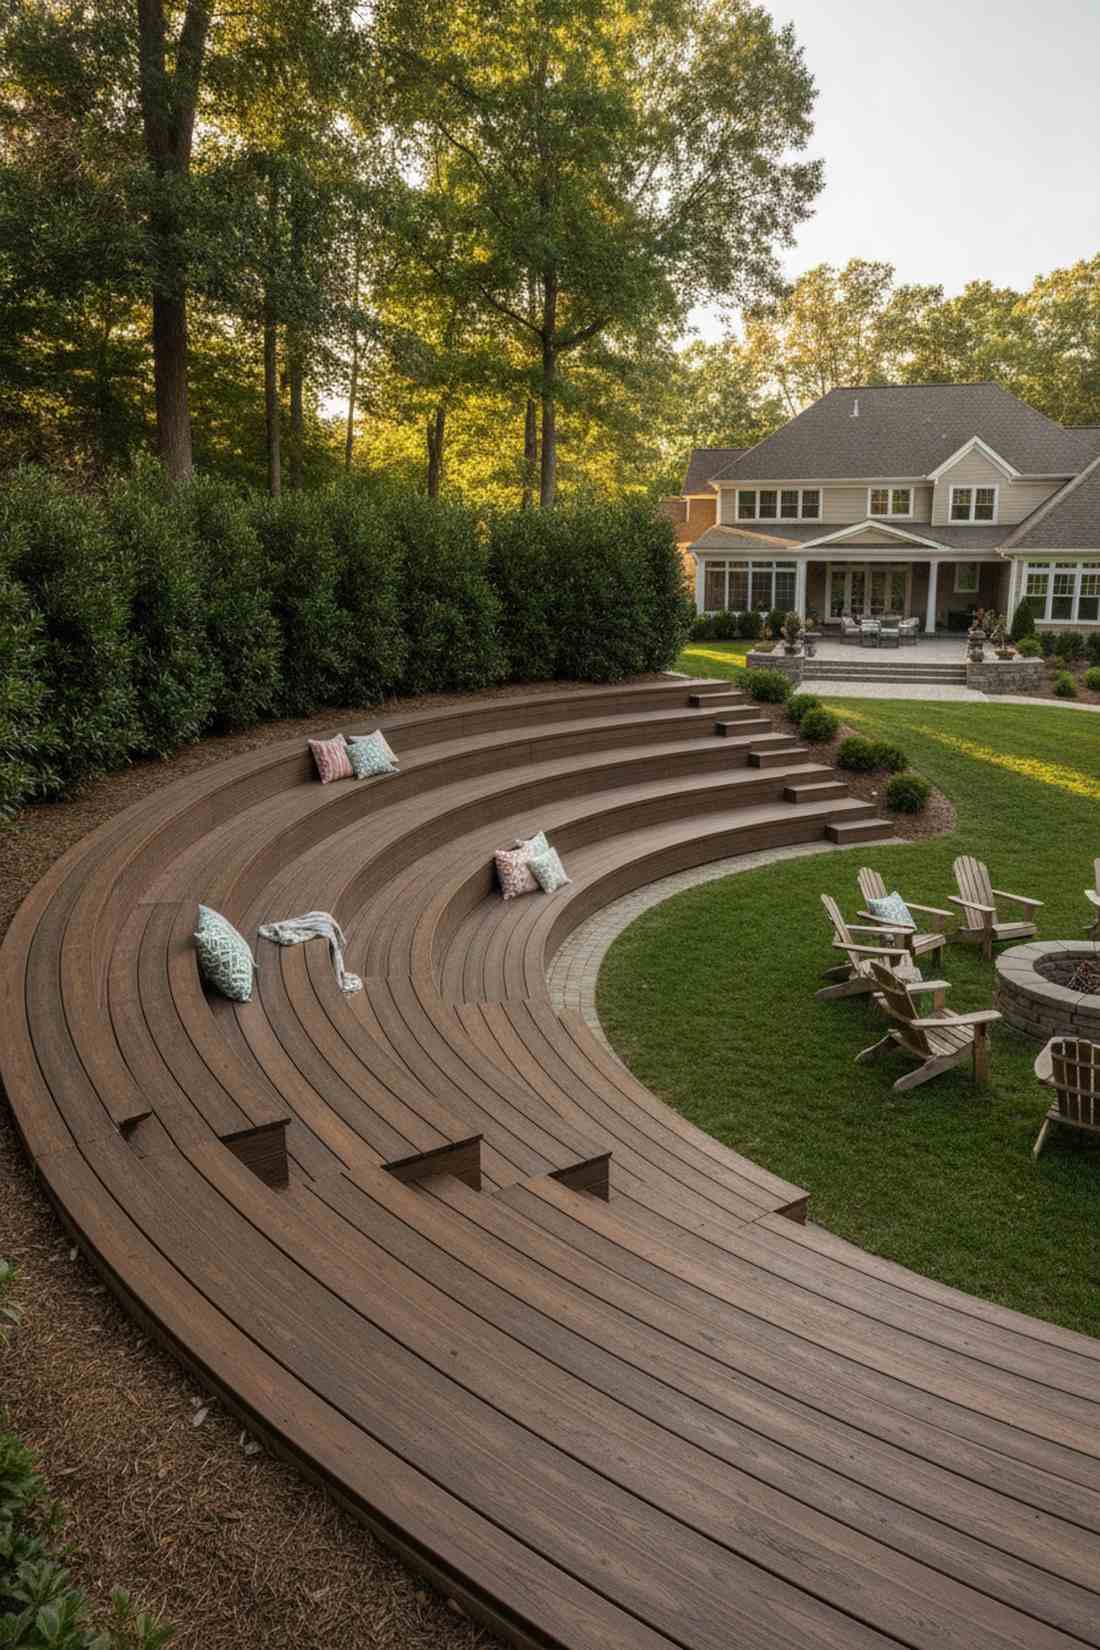
Generates the acoustic intimacy of a private woodland theater. An outdoor tiered seating layout flawlessly accommodates corner plots or hillsides that are traditionally impossible to furnish.
Standard flat patios look incredibly boring next to this multi-level approach, which organically hugs the landscape. Secure the sweeping treads using commercial outdoor construction adhesive to stop any annoying shifting or warping over time.
Material costs average $400–$700 depending on the specific decking brand you choose.
- Key Materials: Ground-contact treated lumber, composite treads, construction adhesive
- Vibe / Style: Grand landscape integration
- Difficulty: Advanced terracing
- Budget Breakdown: Subframe: $250 | Decking: $350 | Adhesive: $50
- Creator’s Tip: Plant thick evergreen bushes behind the top tier to create a natural sound barrier.
- Smart Sourcing: polyurethane outdoor construction adhesive (pro pack) and pre-cut composite stair treads.
Curved Outdoor Seating Innovations
Push past basic circles. These organic, flowing concepts utilize advanced curved outdoor seating mechanics to generate rhythm and motion across your landscape.
6. Serpentine Bench Ribbon
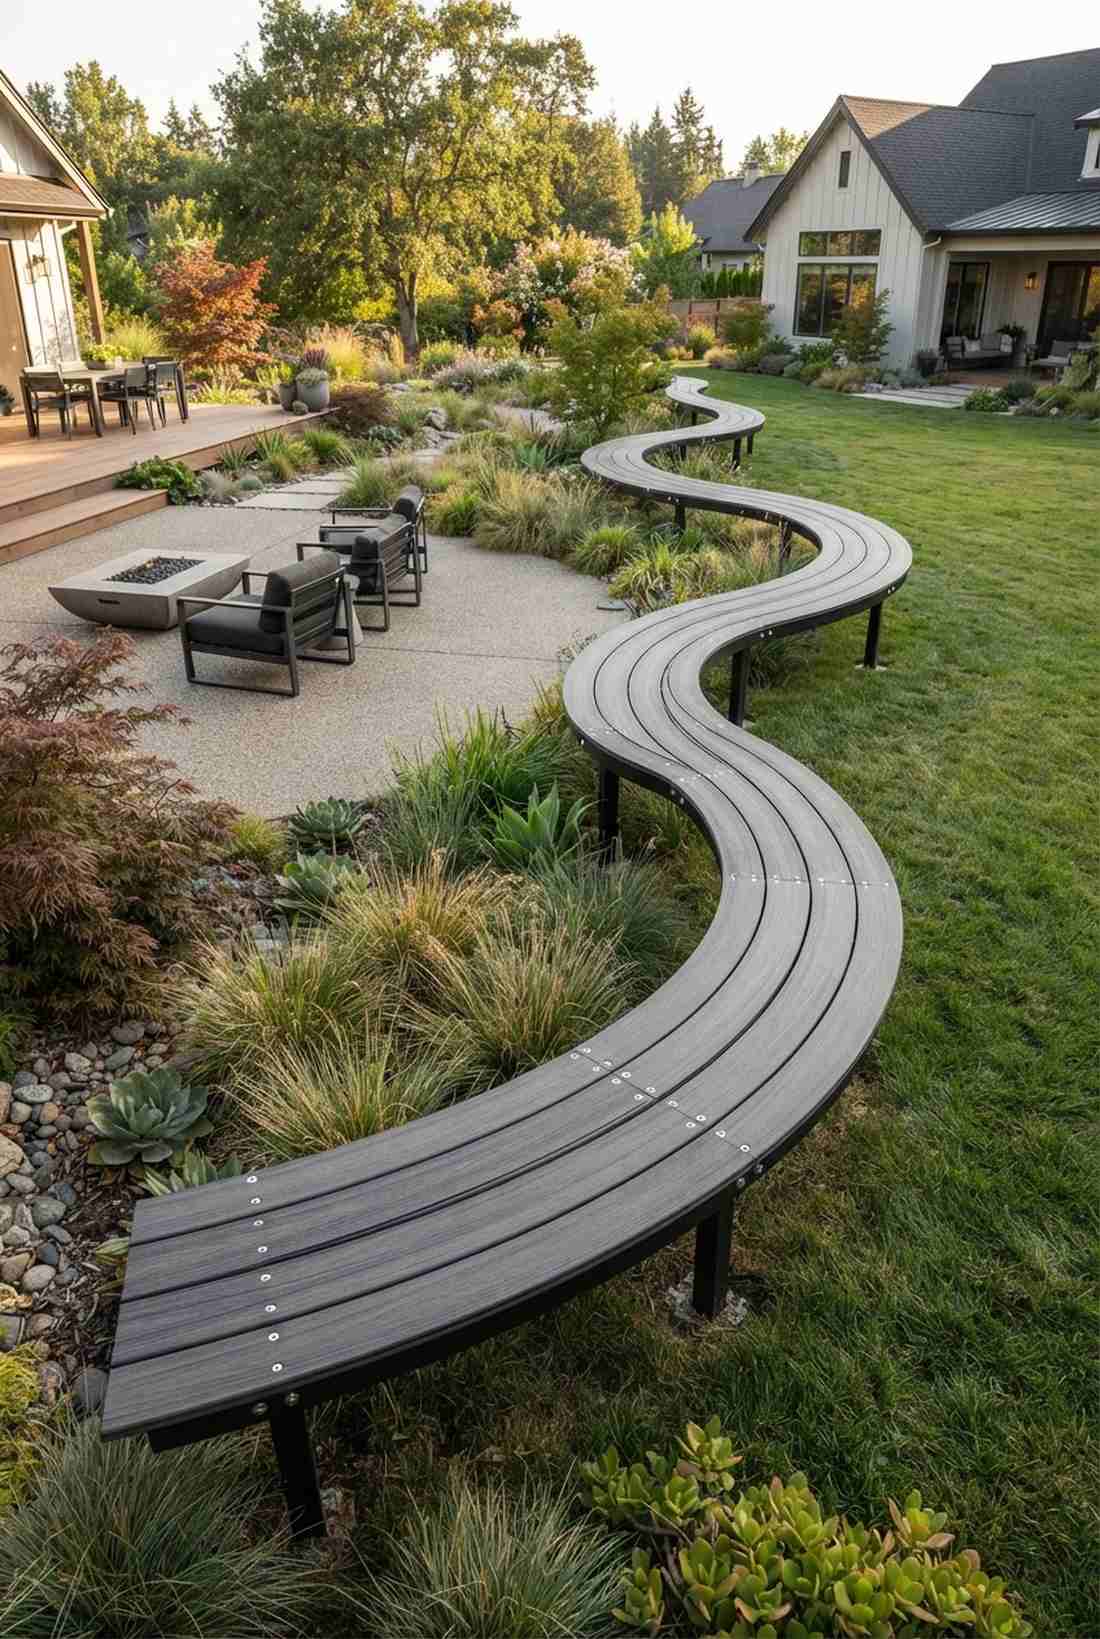

Flows like a living, breathing sculptural art piece across your lawn. This undulating garden bench serves as a brilliant statement piece for minimalist or highly contemporary landscapes.
People assume you need to pay for custom concrete, but steam-bending flexible composite slats delivers an identical luxury aesthetic for a fraction of the cost. Utilizing pre-drilled aluminum posts provides the ultimate rot-free skeleton for those dramatic, sweeping S-curves.
Creating this winding masterpiece costs around $300–$600. Pin this if you love breaking rigid geometric rules!
- Key Materials: Flexible composite fascia boards, aluminum ground posts, stainless bolts
- Vibe / Style: Fluid contemporary art
- Difficulty: Advanced material bending
- Budget Breakdown: Flex Boards: $300 | Posts: $150 | Hardware: $60
- Creator’s Tip: Align the deepest curve directly toward your best garden view for a natural framing effect.
- Smart Sourcing: flexible composite decking boards (multi-pack) and powder-coated aluminum post kits.
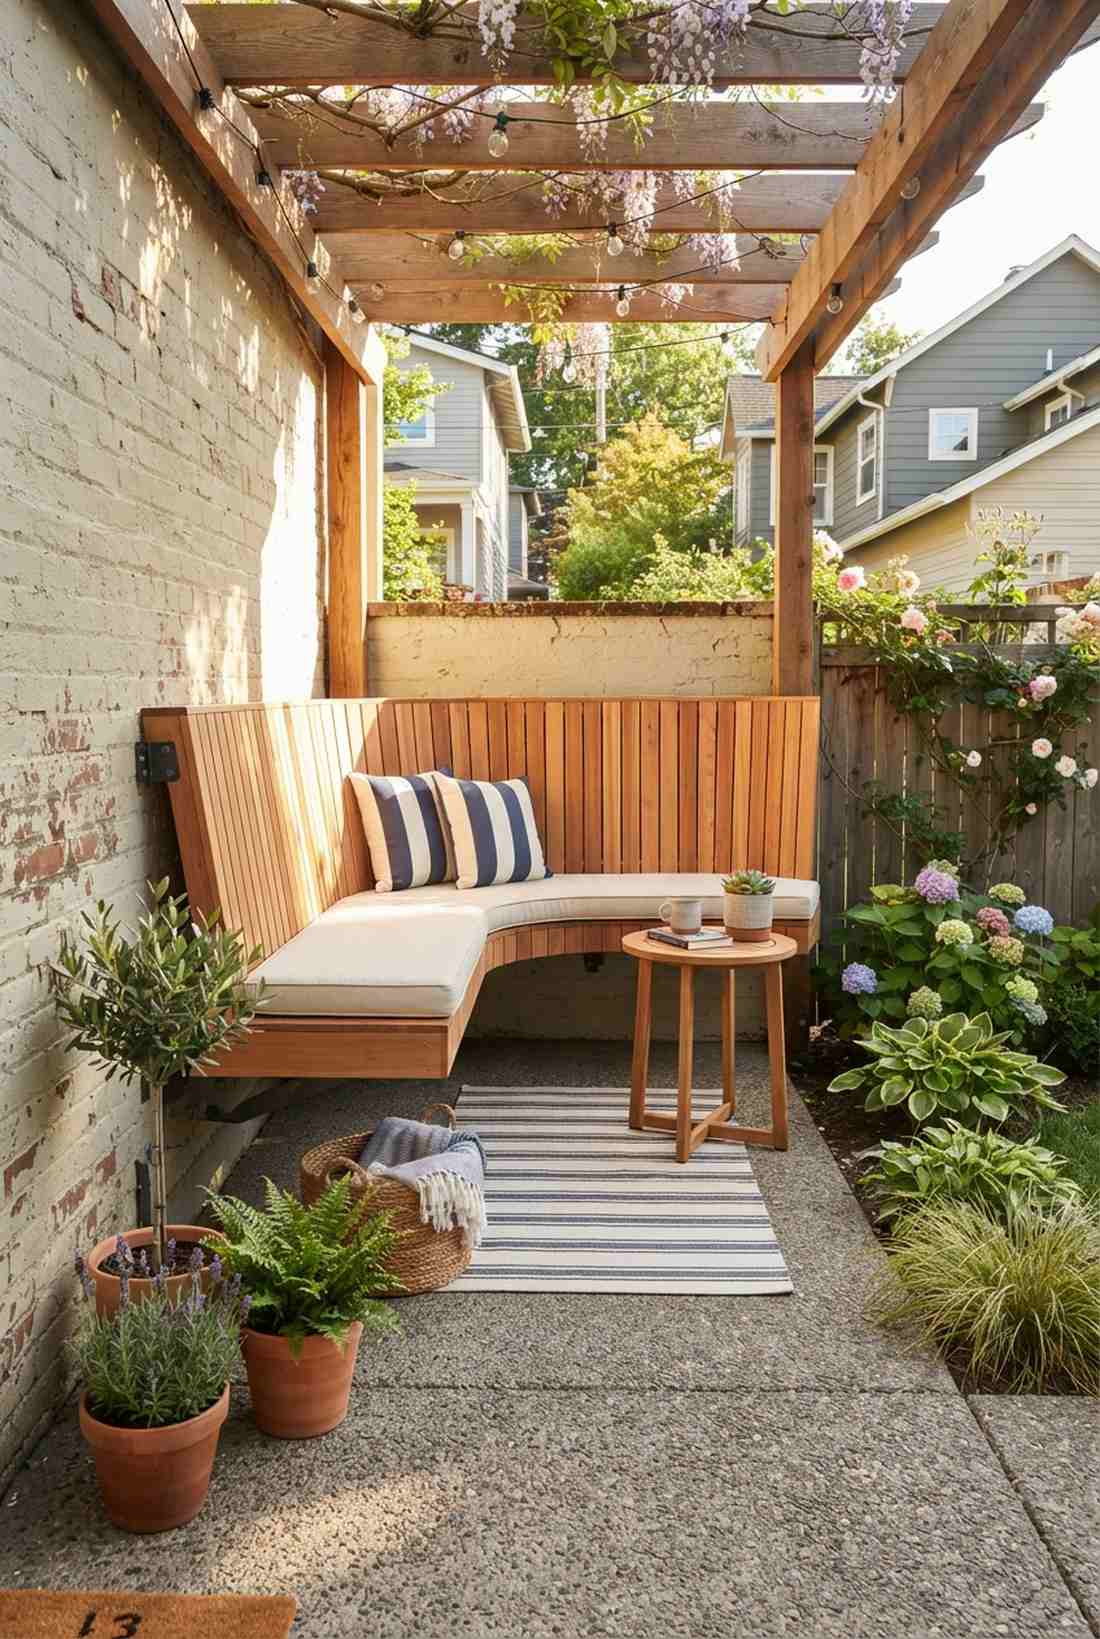
7. Crescent Moon Conversation Nook

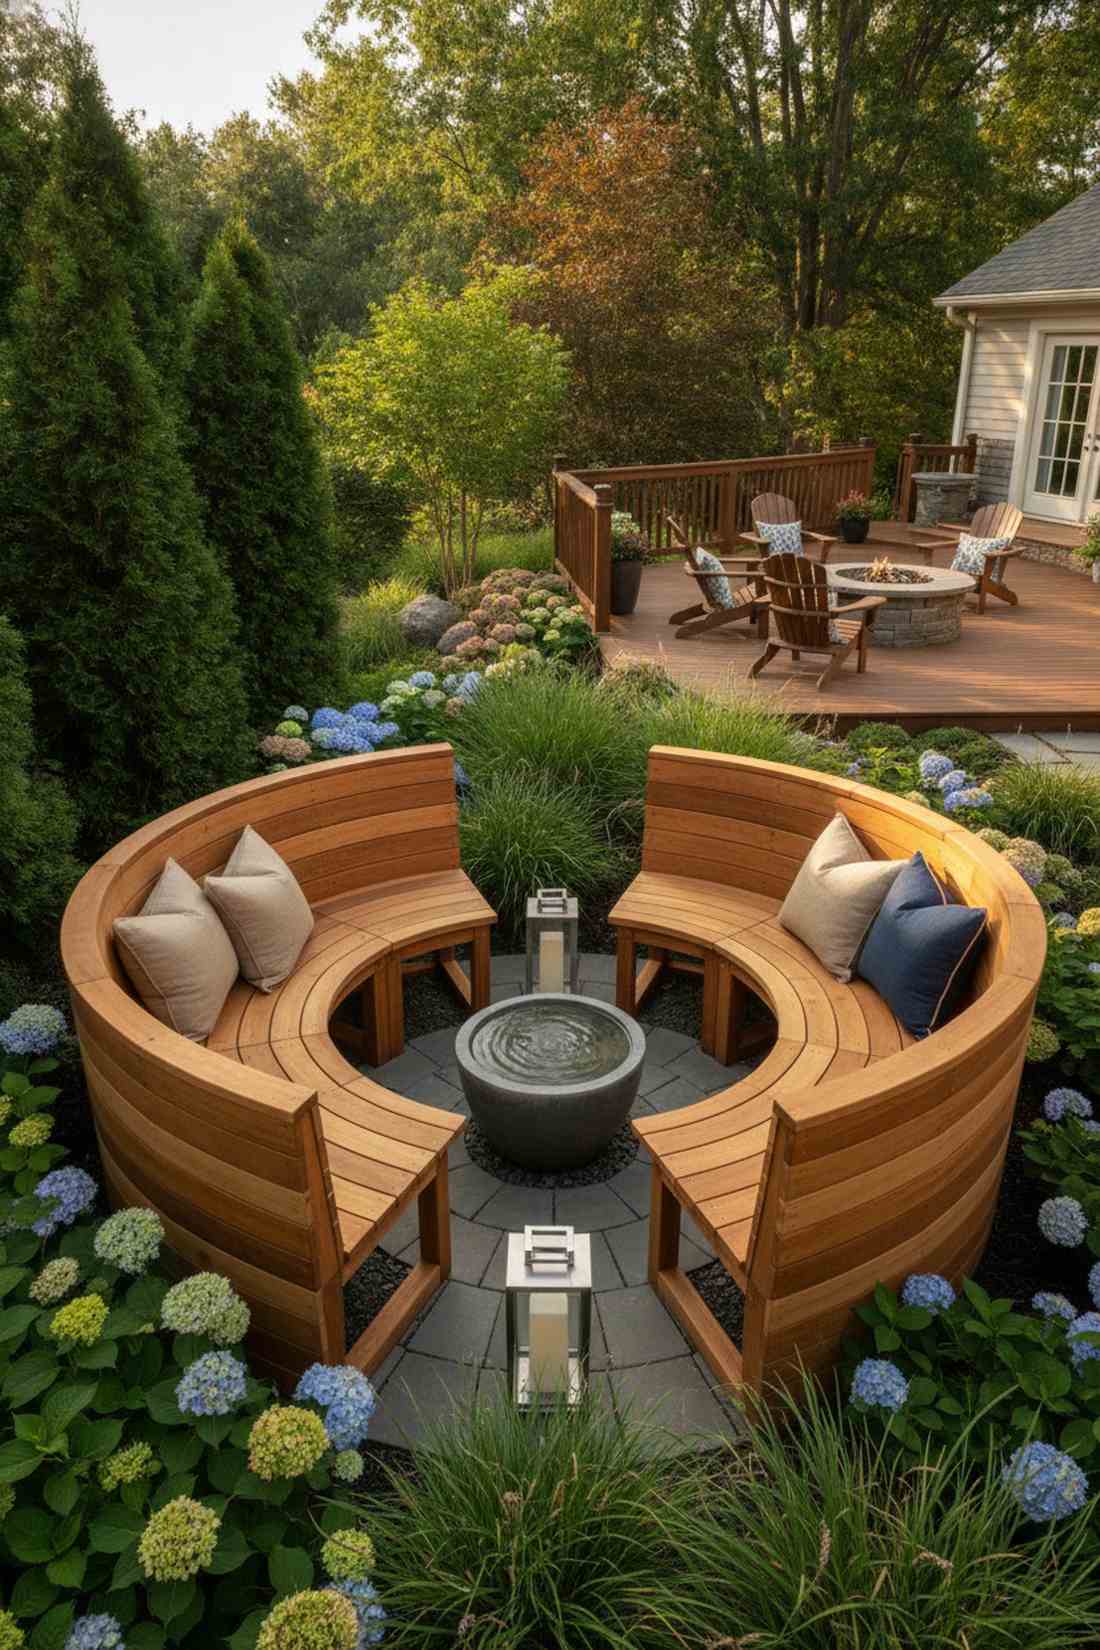
Feels like a secret dialogue bubble tucked away from the rest of the world. A dual curved bench setup perfectly occupies an underutilized garden corner while protecting you from chilly winds.
Instead of a generic single bench, facing two arcs creates intense spatial magnetism that naturally pulls guests together. You can assemble this rapidly using pre-cut modular framing kits wrapped in weather-resistant cedar to ensure it outlasts the harsh winter.
You can easily pull this elegant layout off for around $200–$350.
- Key Materials: Cedar cladding, modular curved frames, outdoor wood sealant
- Vibe / Style: Intimate protective nook
- Difficulty: Moderate framing
- Budget Breakdown: Frames: $100 | Cedar: $150 | Sealant: $40
- Creator’s Tip: Place a tiny trickling water basin exactly in the center to bounce soothing sounds off the concave wood.
- Smart Sourcing: modular curved bench framing kits and UV-resistant clear cedar sealant.
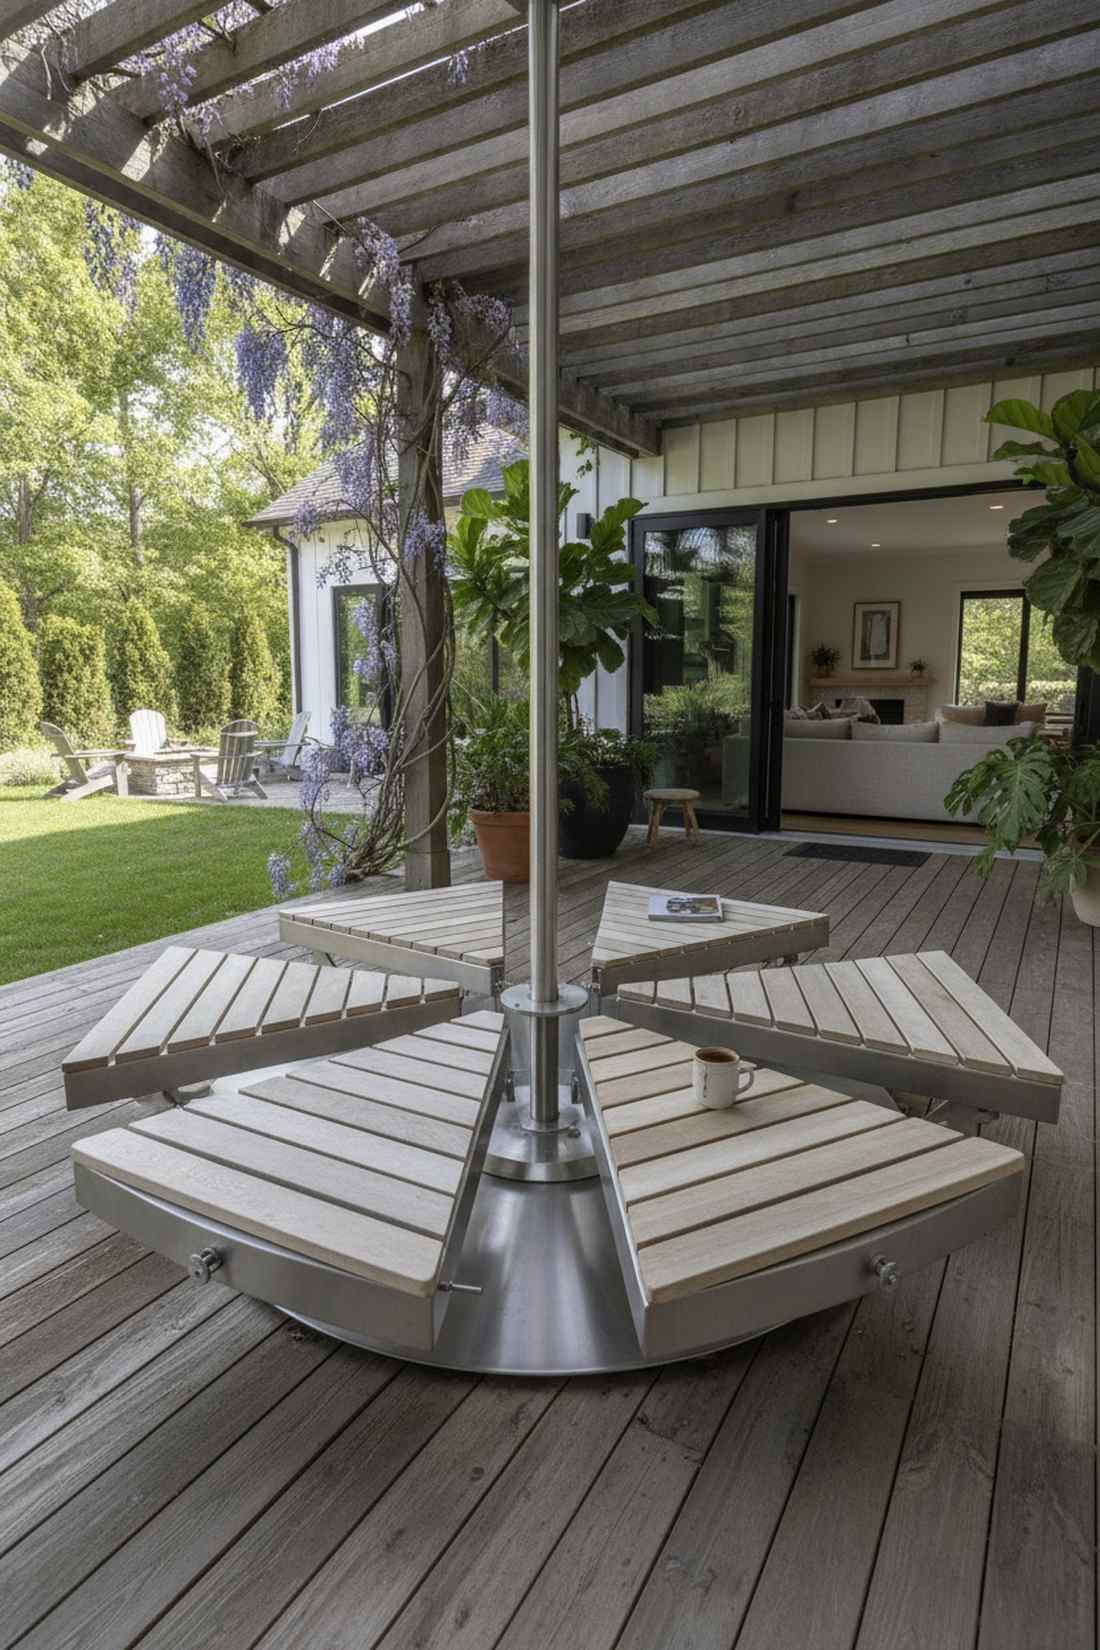
8. Spiral Viewing Deck
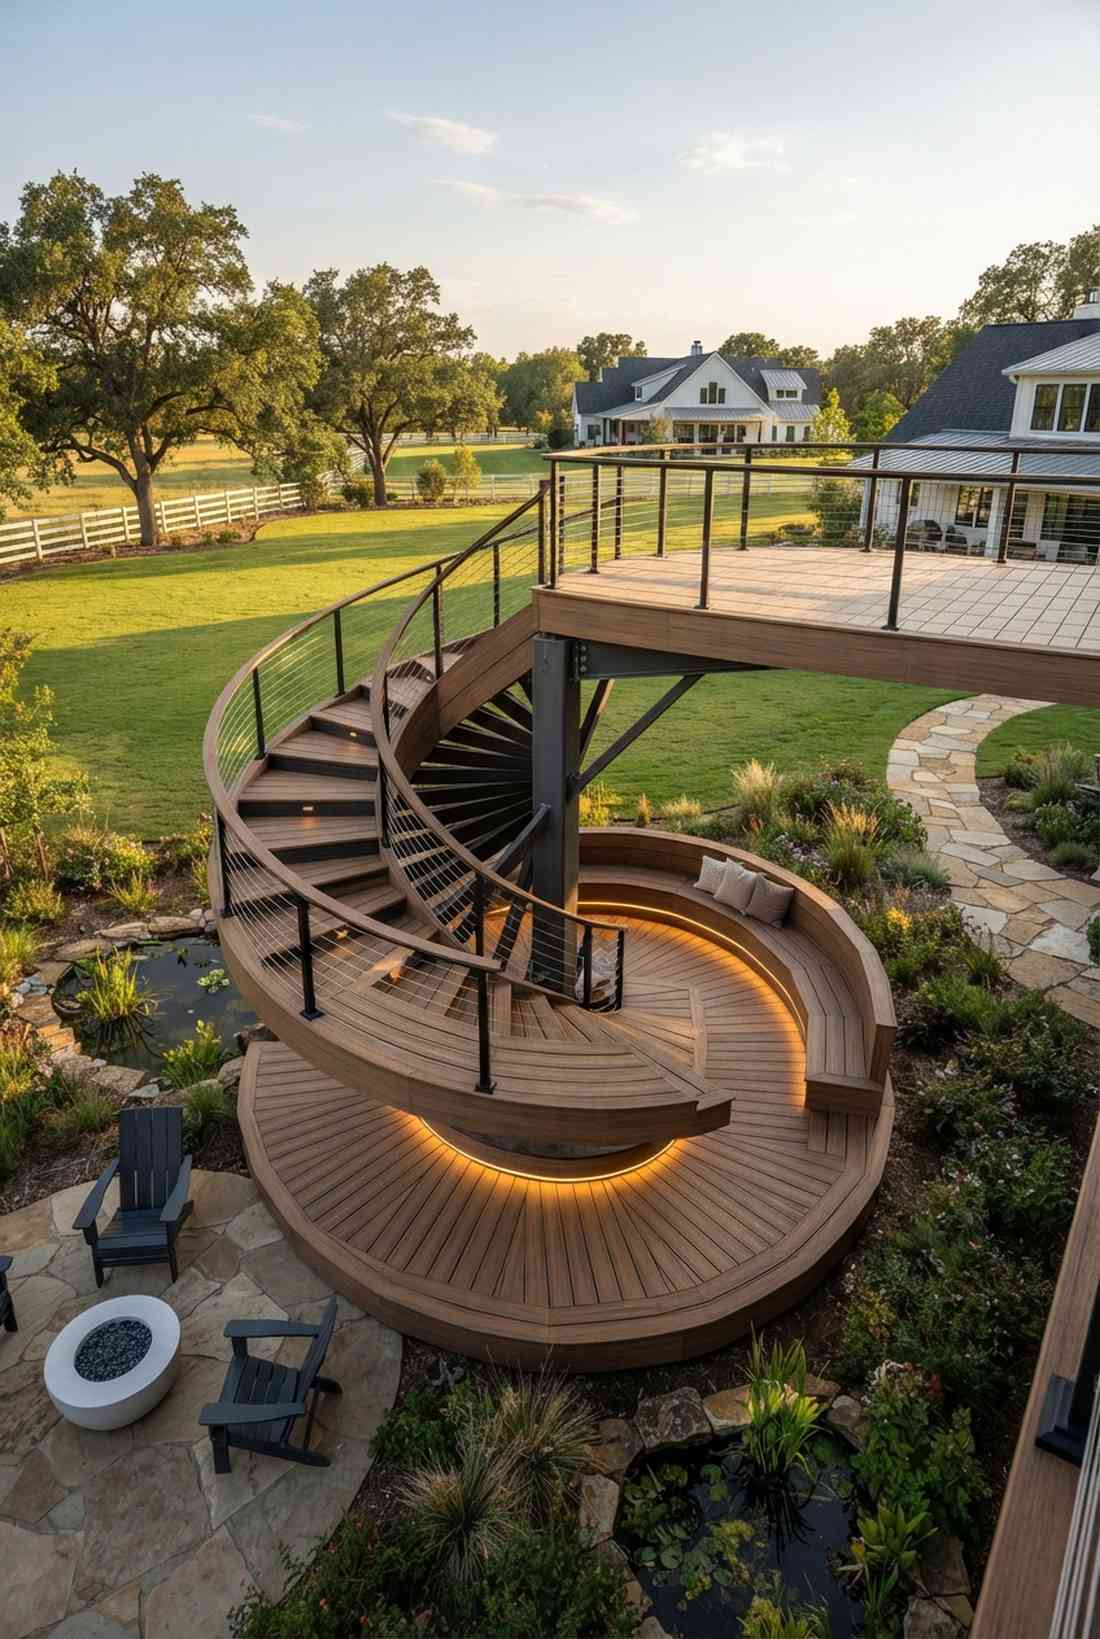
Evokes the enchanting feeling of ascending a beautifully crafted treehouse. The coiled pathway seating acts as an incredible focal point for flat, featureless yards craving vertical dimension.
The genius here is layering height, making a small physical footprint look and feel double its actual size. Invest heavily in marine-grade decking screws and a high-strength center hub bracket to safely lock the sweeping geometry into perfect alignment.
Budget approximately $600–$900 for the premium decking and intense subframe requirements.
- Key Materials: Radial joists, central steel hub, composite decking
- Vibe / Style: Kinetic elevated viewing
- Difficulty: Expert level geometry
- Budget Breakdown: Hub: $150 | Joists: $300 | Decking: $400
- Creator’s Tip: Install low-voltage LED strips beneath the outer coil for a floating spaceship effect at night.
- Smart Sourcing: heavy-duty steel center hub brackets and marine-grade stainless decking screws (bulk box).
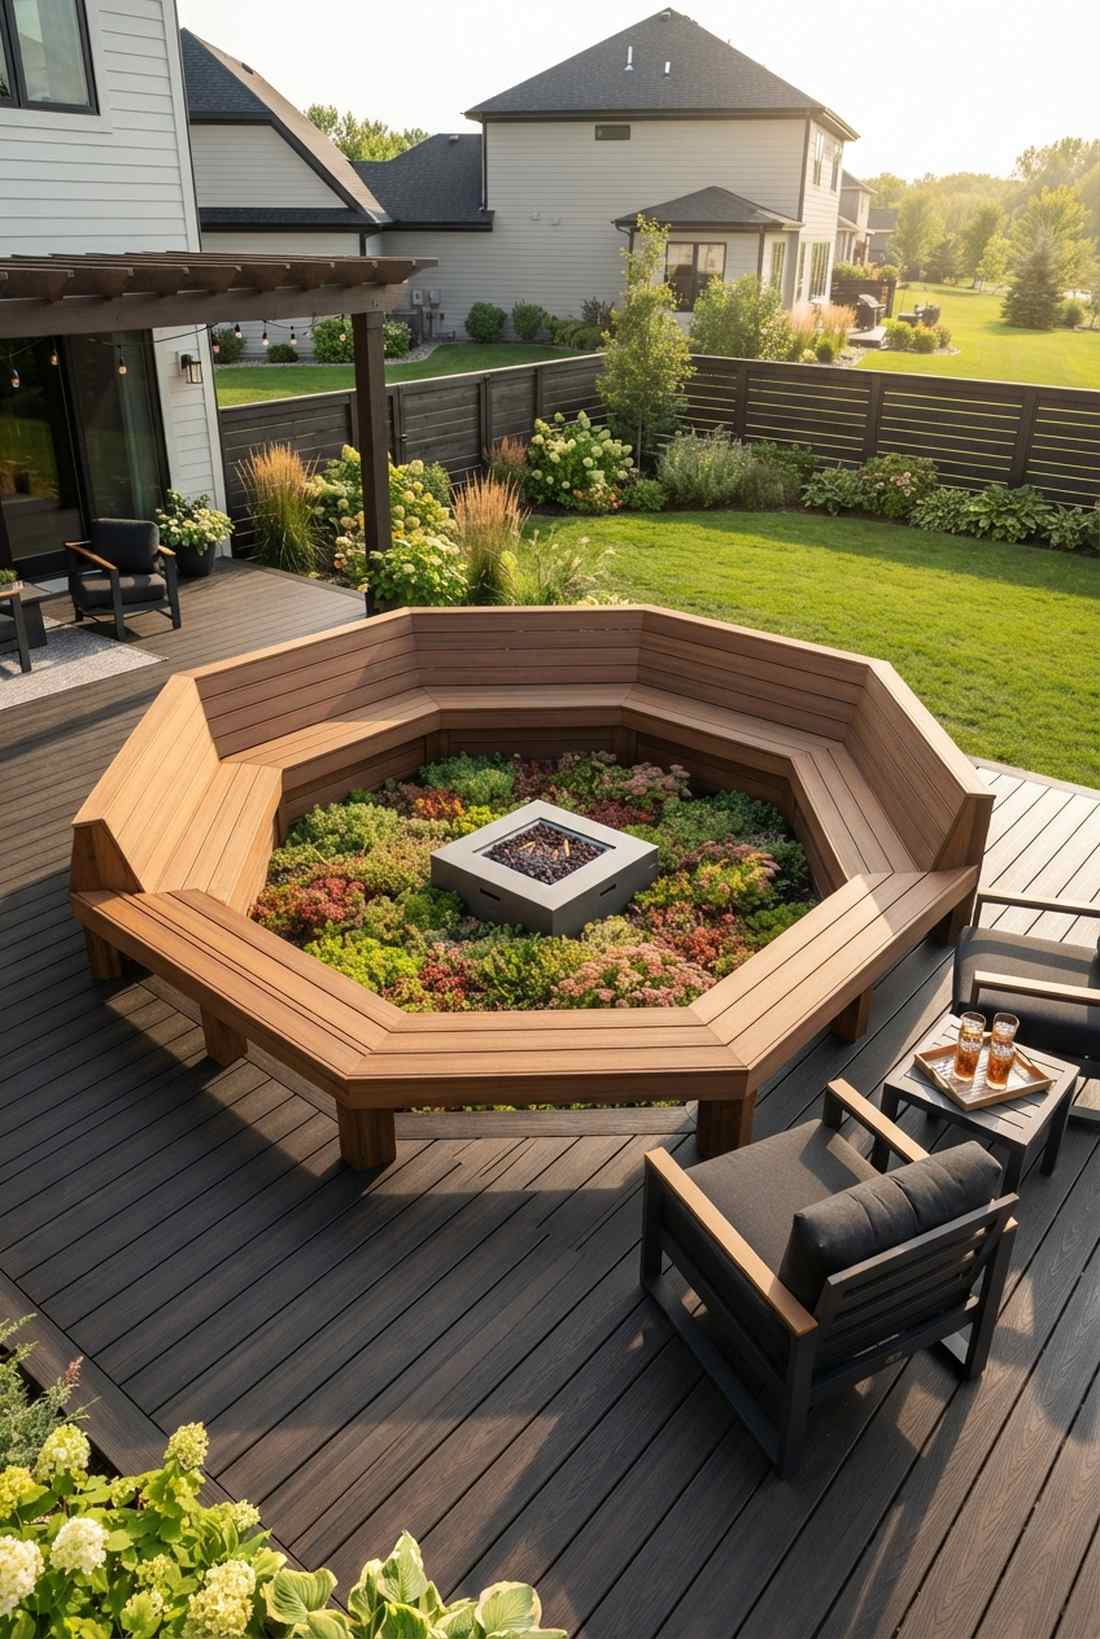
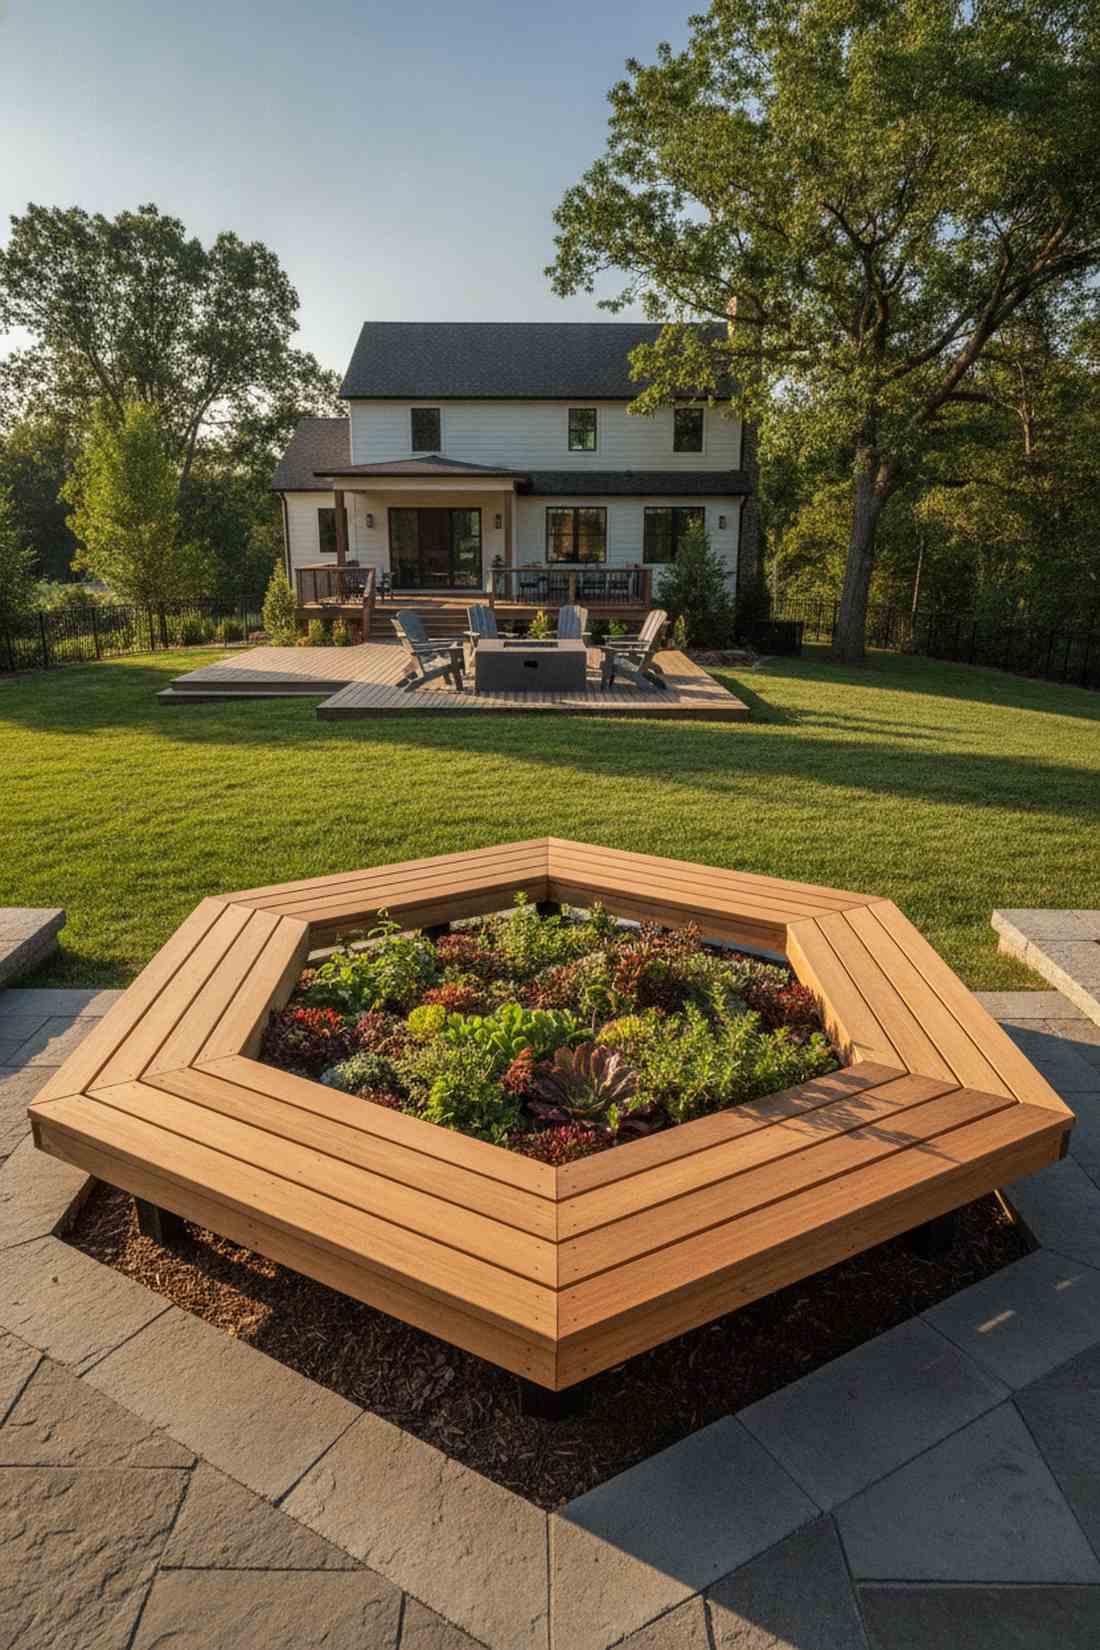
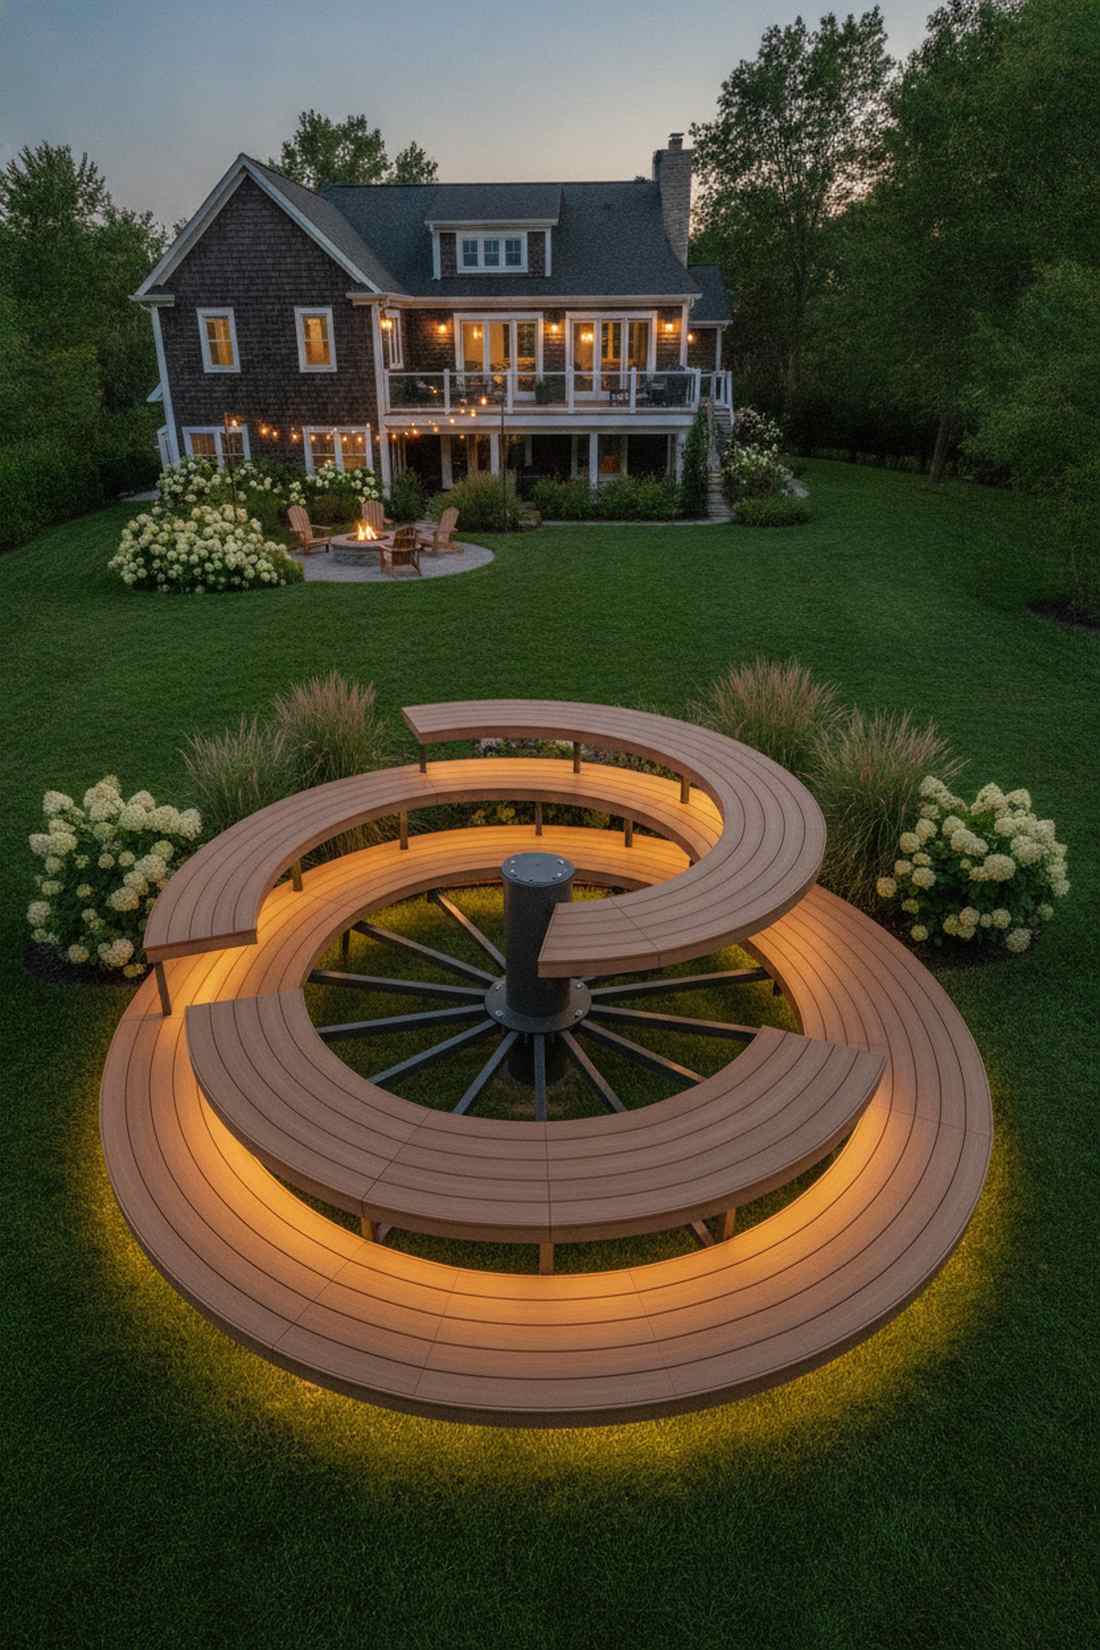
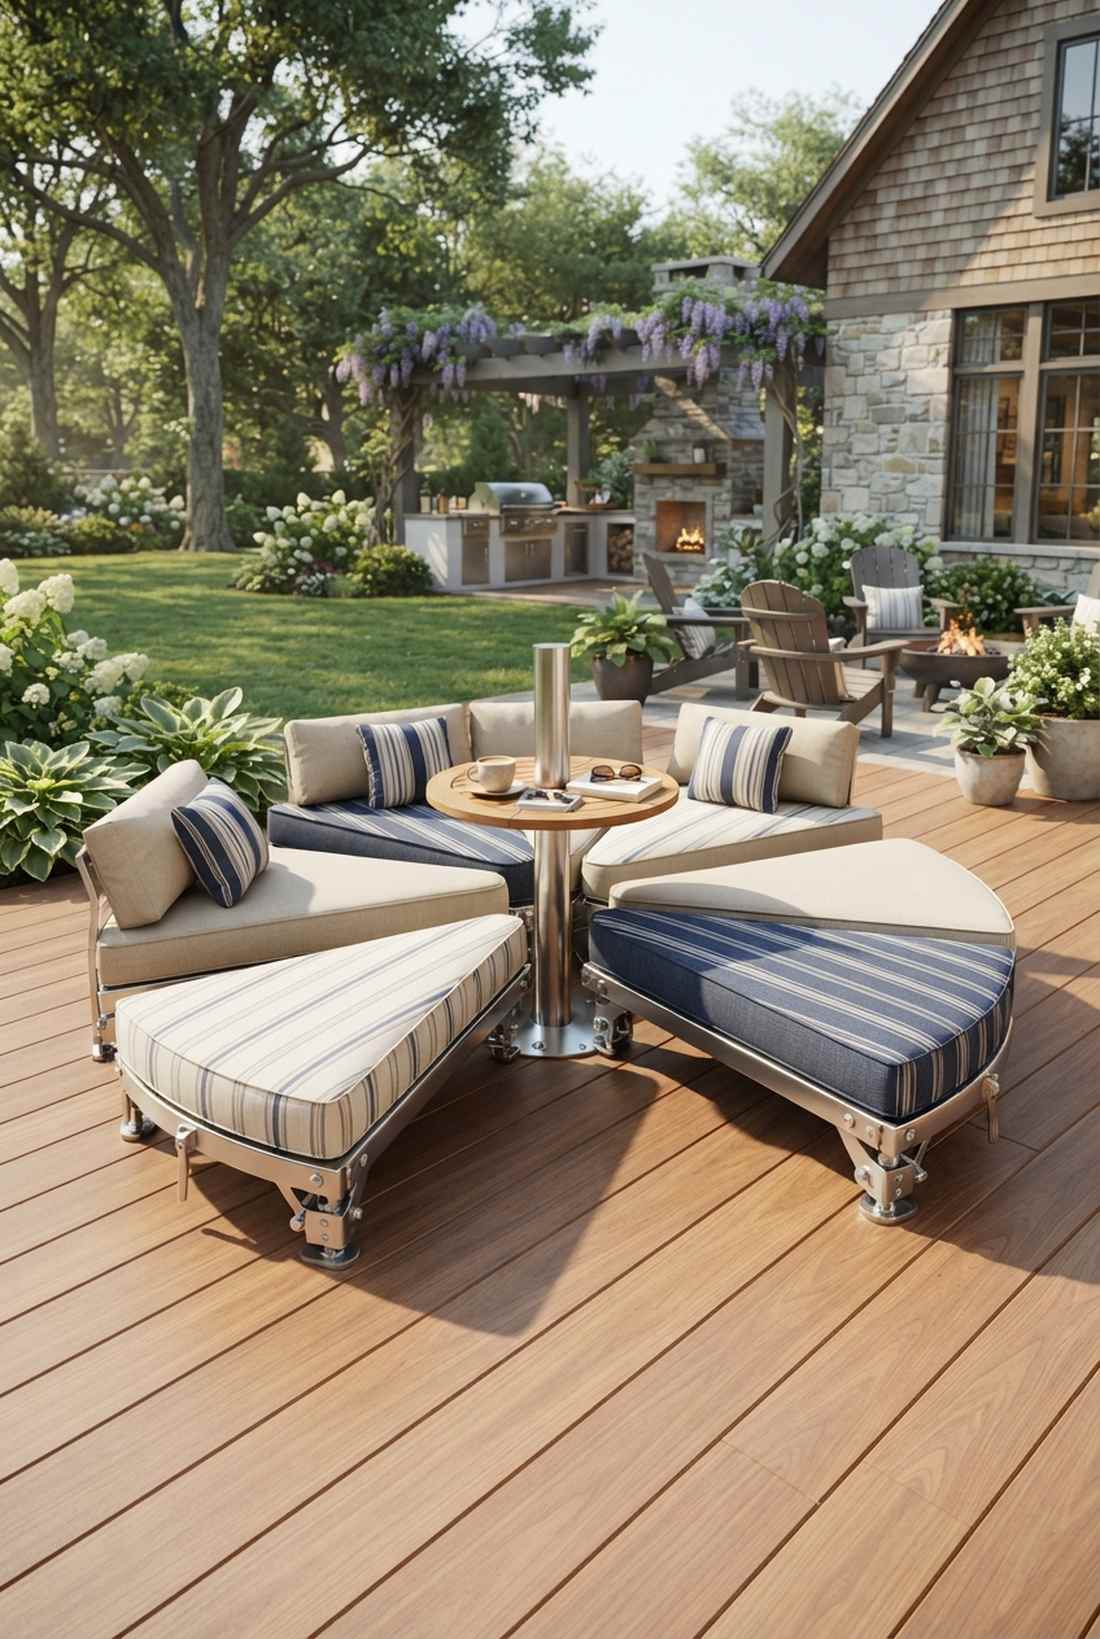
9. Nested Arcs with Pathway Slots

Brings the structured elegance of a premium botanical garden right to your backyard. A multi-tier radial bench system works wonders for large families needing massive seating without creating bottlenecks.
Solid rings block traffic, but carving out directional slots completely revolutionizes the spatial flow and accessibility. Applying UV-resistant clear varnishes over raw hardwood ensures the timber survives extreme sun exposure without turning a cheap, weathered gray.
Expect to invest $500–$800 for top-tier lumber and premium protective coatings. Save this layout for your next major backyard overhaul!
- Key Materials: Hardwood planks, concrete footings, UV varnish
- Vibe / Style: Accessible resort lounge
- Difficulty: Moderate precision cutting
- Budget Breakdown: Hardwood: $450 | Concrete: $80 | Varnish: $60
- Creator’s Tip: Always align the carved pathways to point toward the main house door for natural navigation.
- Smart Sourcing: marine-grade UV clear varnish (gallon) and pre-poured concrete deck footings.
💡 Must-Have Supplies for High-End Setups
To build these curved setups faster and ensure they actually last, skip the generic craft aisles and invest in the exact foundational kits professionals use.
- Base & Support: heavy-duty modular curved deck framing kits
- Setup Tools: precision flexible contour layout gauges
- Weather/Durability Protection: commercial-grade UV deck sealant and structural epoxy
10. Asymmetric Kidney Pool Deck
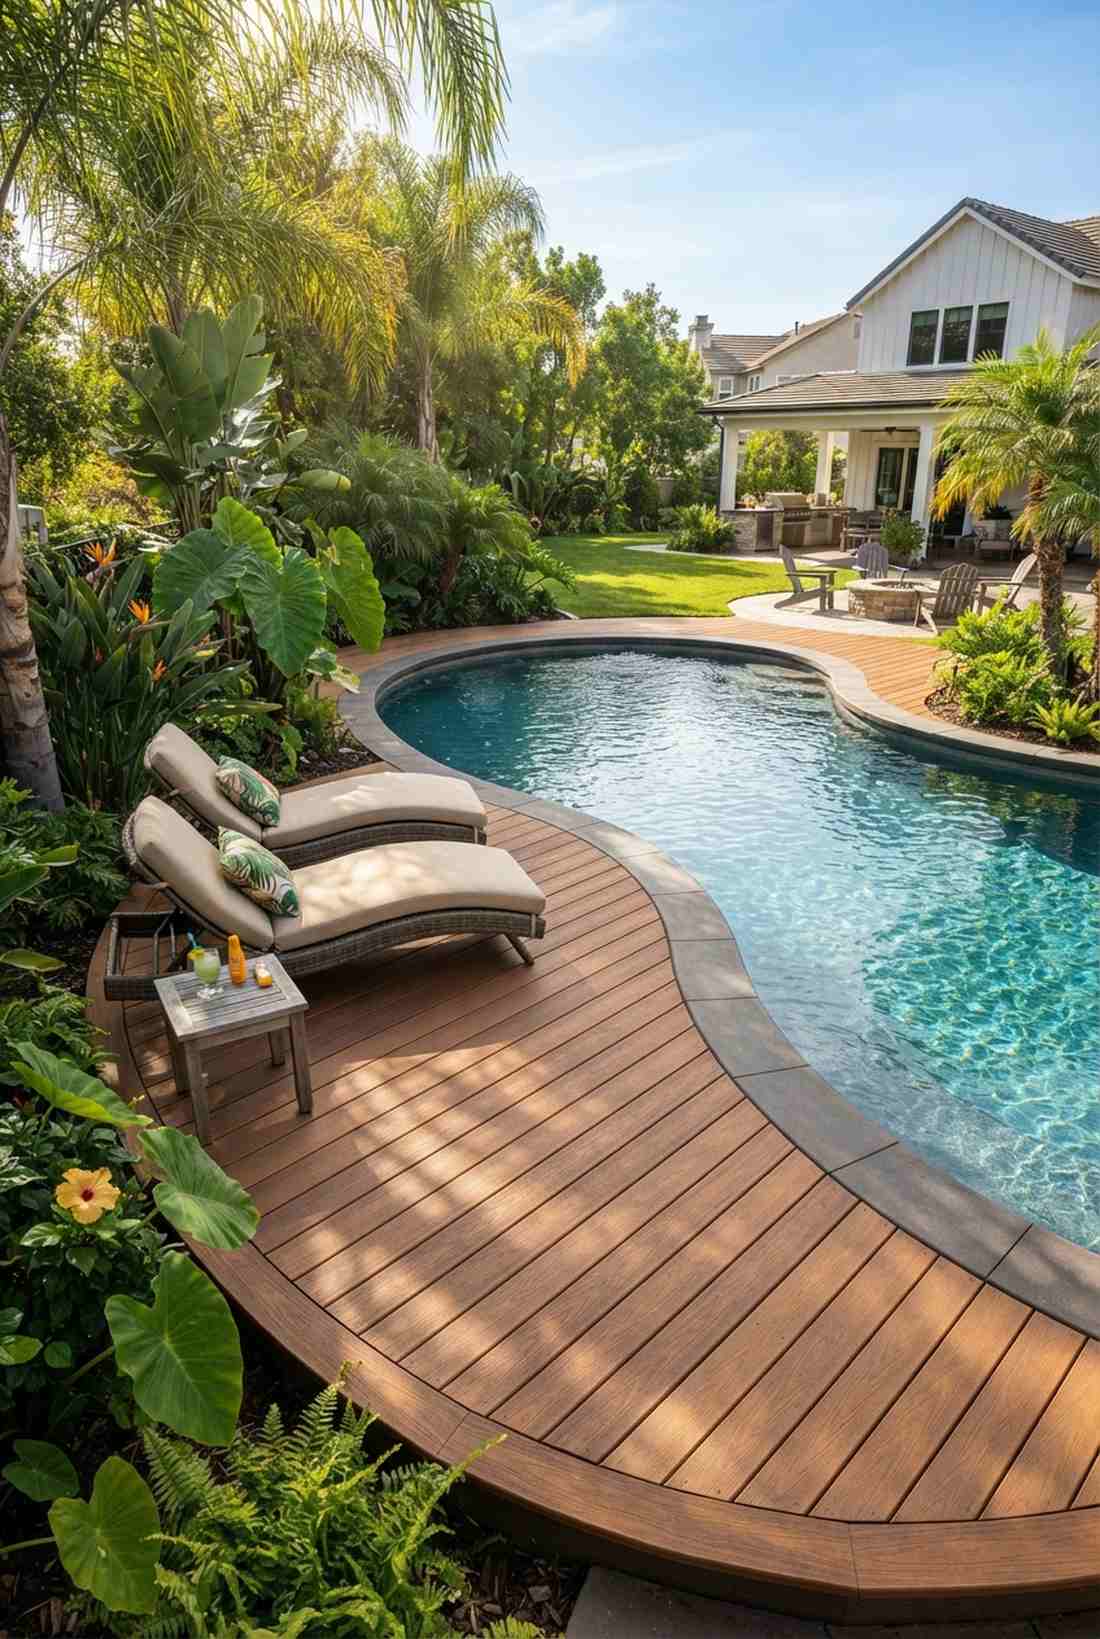
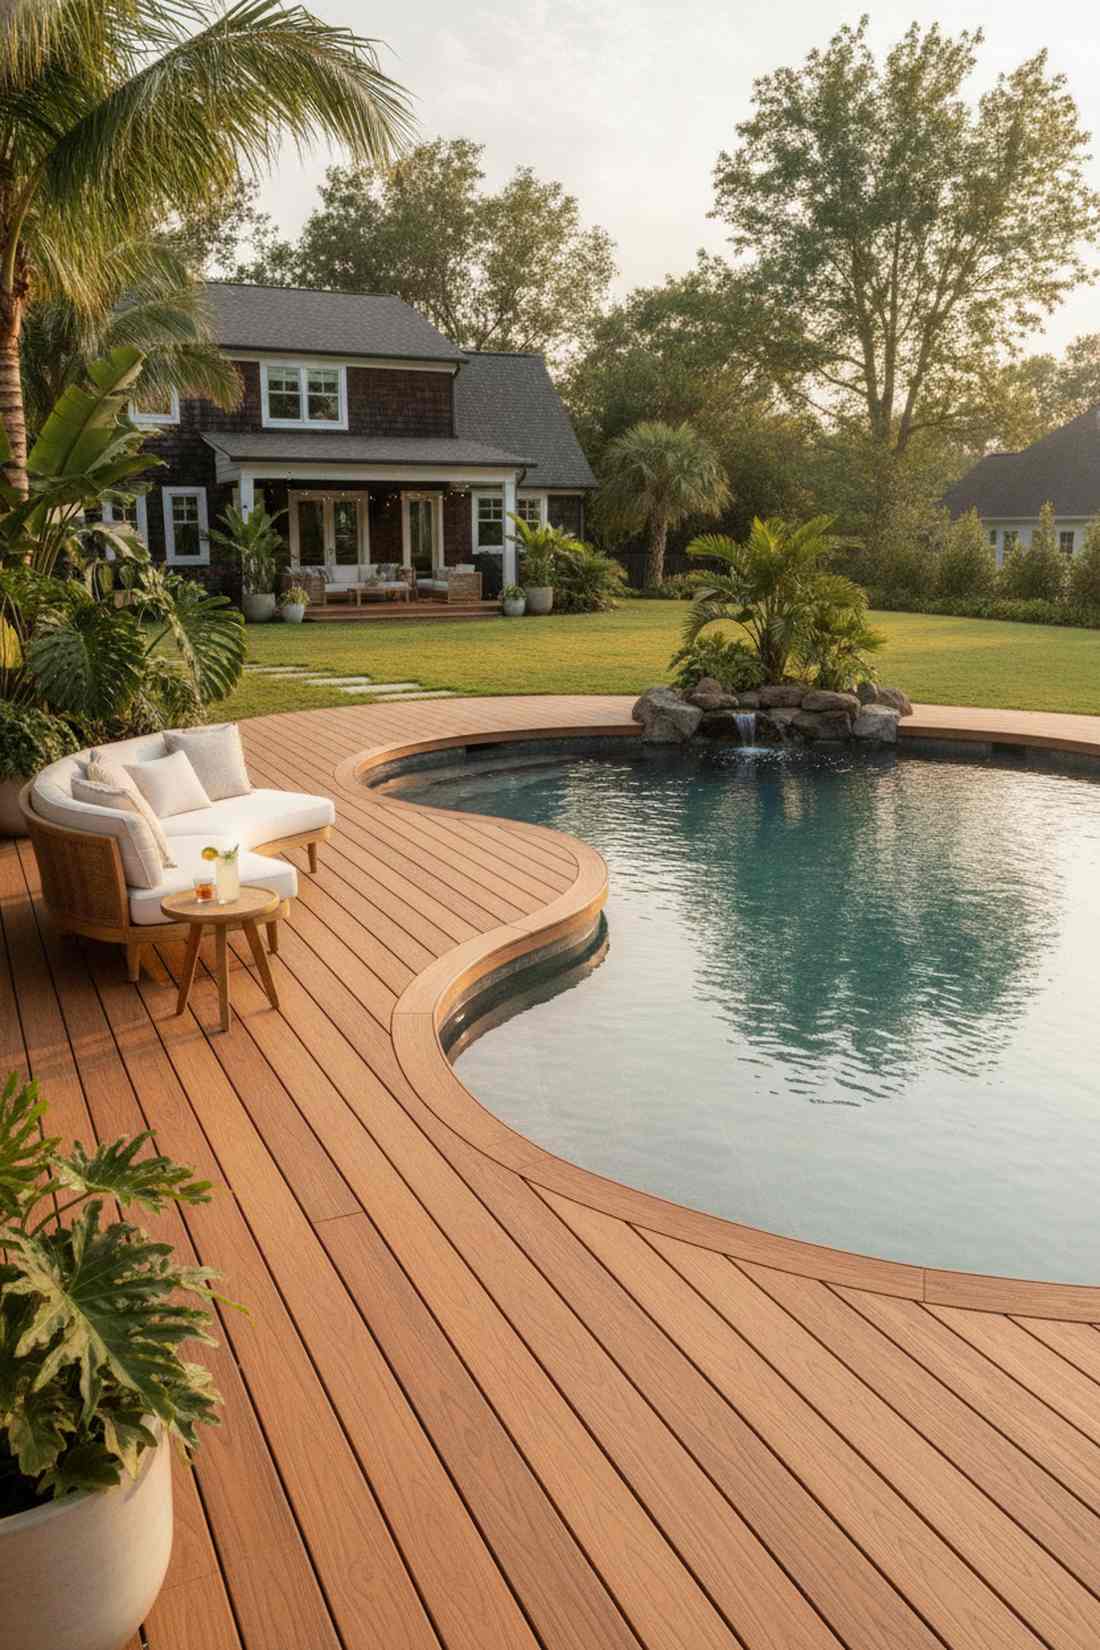
Projects a lush, tropical oasis vibe that instantly softens harsh concrete edges. A curved poolside lounge is the ultimate luxurious upgrade for organically shaped water features.
Aligning the wood grain to follow the pool’s contour creates a visual harmony that most basic square decks completely fail to achieve. Always specify slip-resistant composite boards and stainless steel hidden clips to guarantee a barefoot-safe, premium pool aesthetic.
This custom aesthetic usually costs $400–$800 for the immediate curved edge zone.
- Key Materials: Slip-resistant composite, hidden fasteners, treated subframe
- Vibe / Style: Tropical resort pool
- Difficulty: Intermediate contouring
- Budget Breakdown: Decking: $500 | Fasteners: $100 | Frame: $150
- Creator’s Tip: Overhang the deck board 1-inch past the pool coping to hide ugly concrete transitions.
- Smart Sourcing: slip-resistant composite decking (bundle) and stainless steel hidden deck clips.
Most backyard DIYers get their fire pit seating completely wrong… until they discover the spatial trick coming up next.
Multi-Radius Compound Layouts
Why settle for one circle? Layering multiple arcs creates incredible architectural tension and separates noisy dining zones from relaxing fire pits naturally.
11. Overlapping Circles Venn Seating
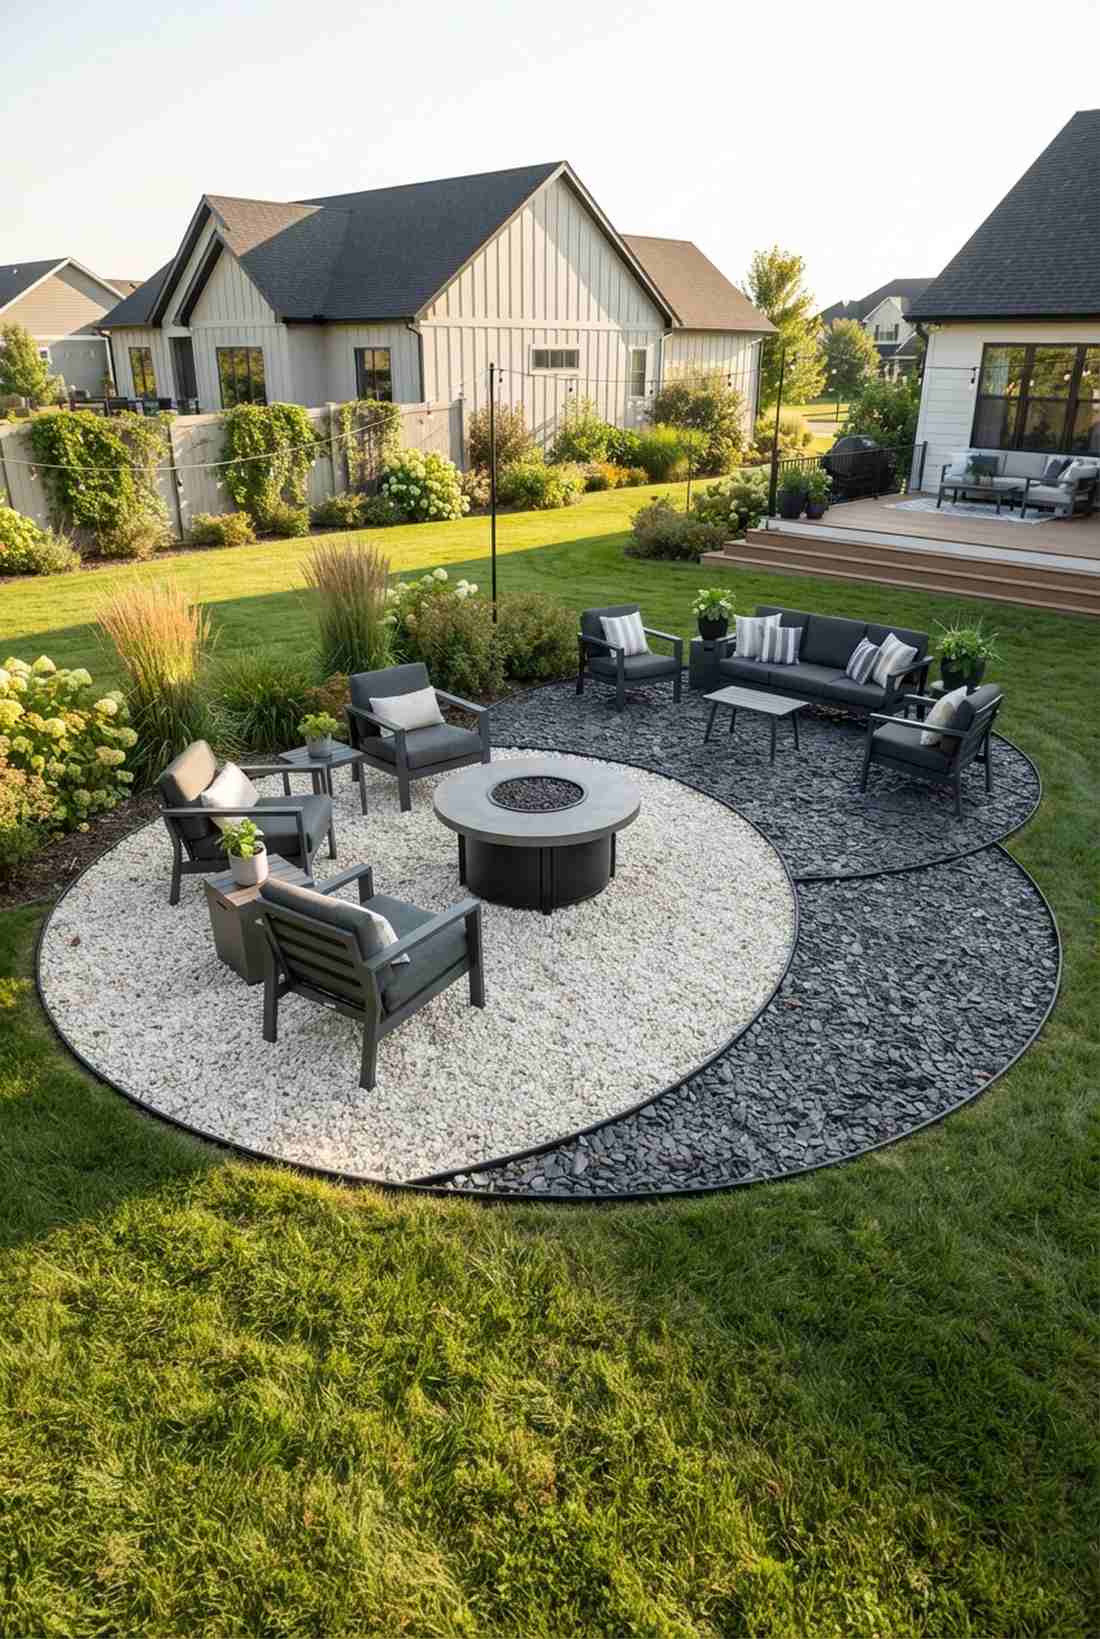
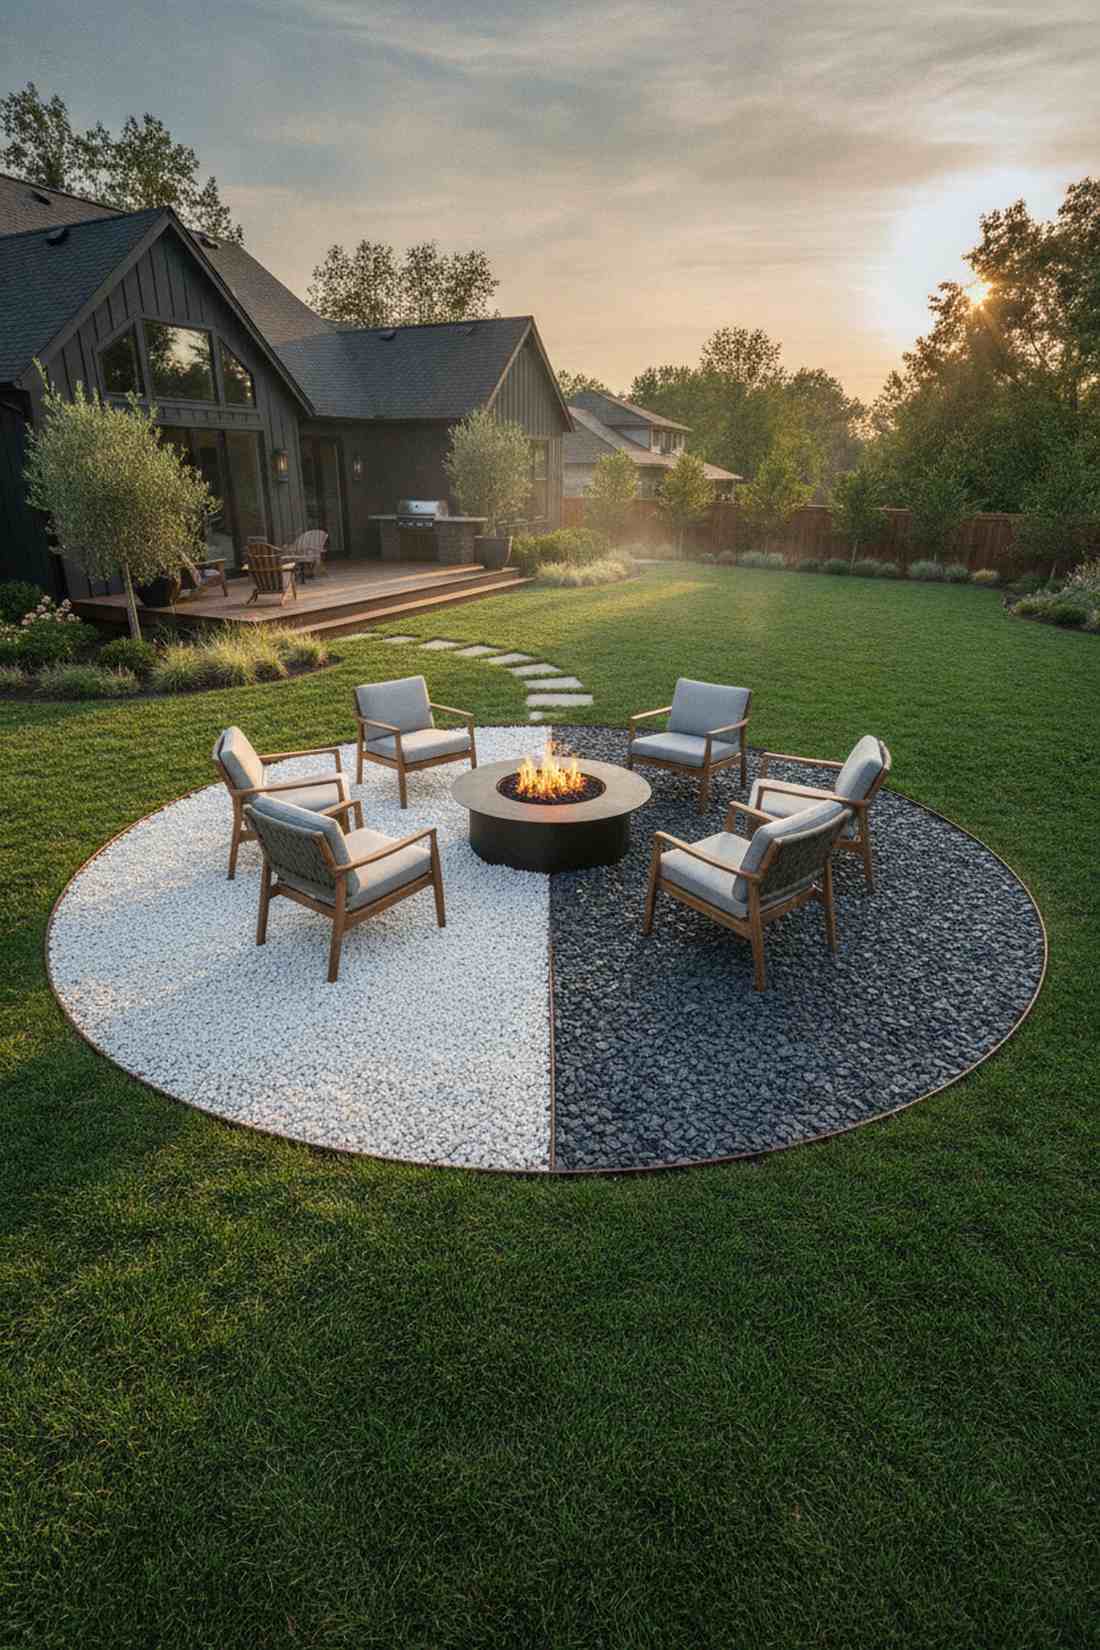
Feels like a modern art installation that you can actually lounge on. This intersecting patio layout dynamically splits an open yard into two flawless, distinct conversation zones.
Sticking to one boring circle is out; colliding two shapes together brings a high-end architectural tension that looks professionally designed. Contrast the two bases using bulk pack crushed marble in one, and dark slate chips in the other, for zero-maintenance visual drama.
Materials for the stone ground cover and basic framing sit nicely around $250–$400.
- Key Materials: Crushed marble, slate chips, flexible bender board
- Vibe / Style: Modern dynamic contrast
- Difficulty: Easy groundscaping
- Budget Breakdown: Stone: $180 | Edging: $50 | Weed Barrier: $40
- Creator’s Tip: Place a communal table exactly where the two circles intersect as the ultimate social anchor.
- Smart Sourcing: flexible composite bender edging (roll) and heavy-duty commercial weed barrier.
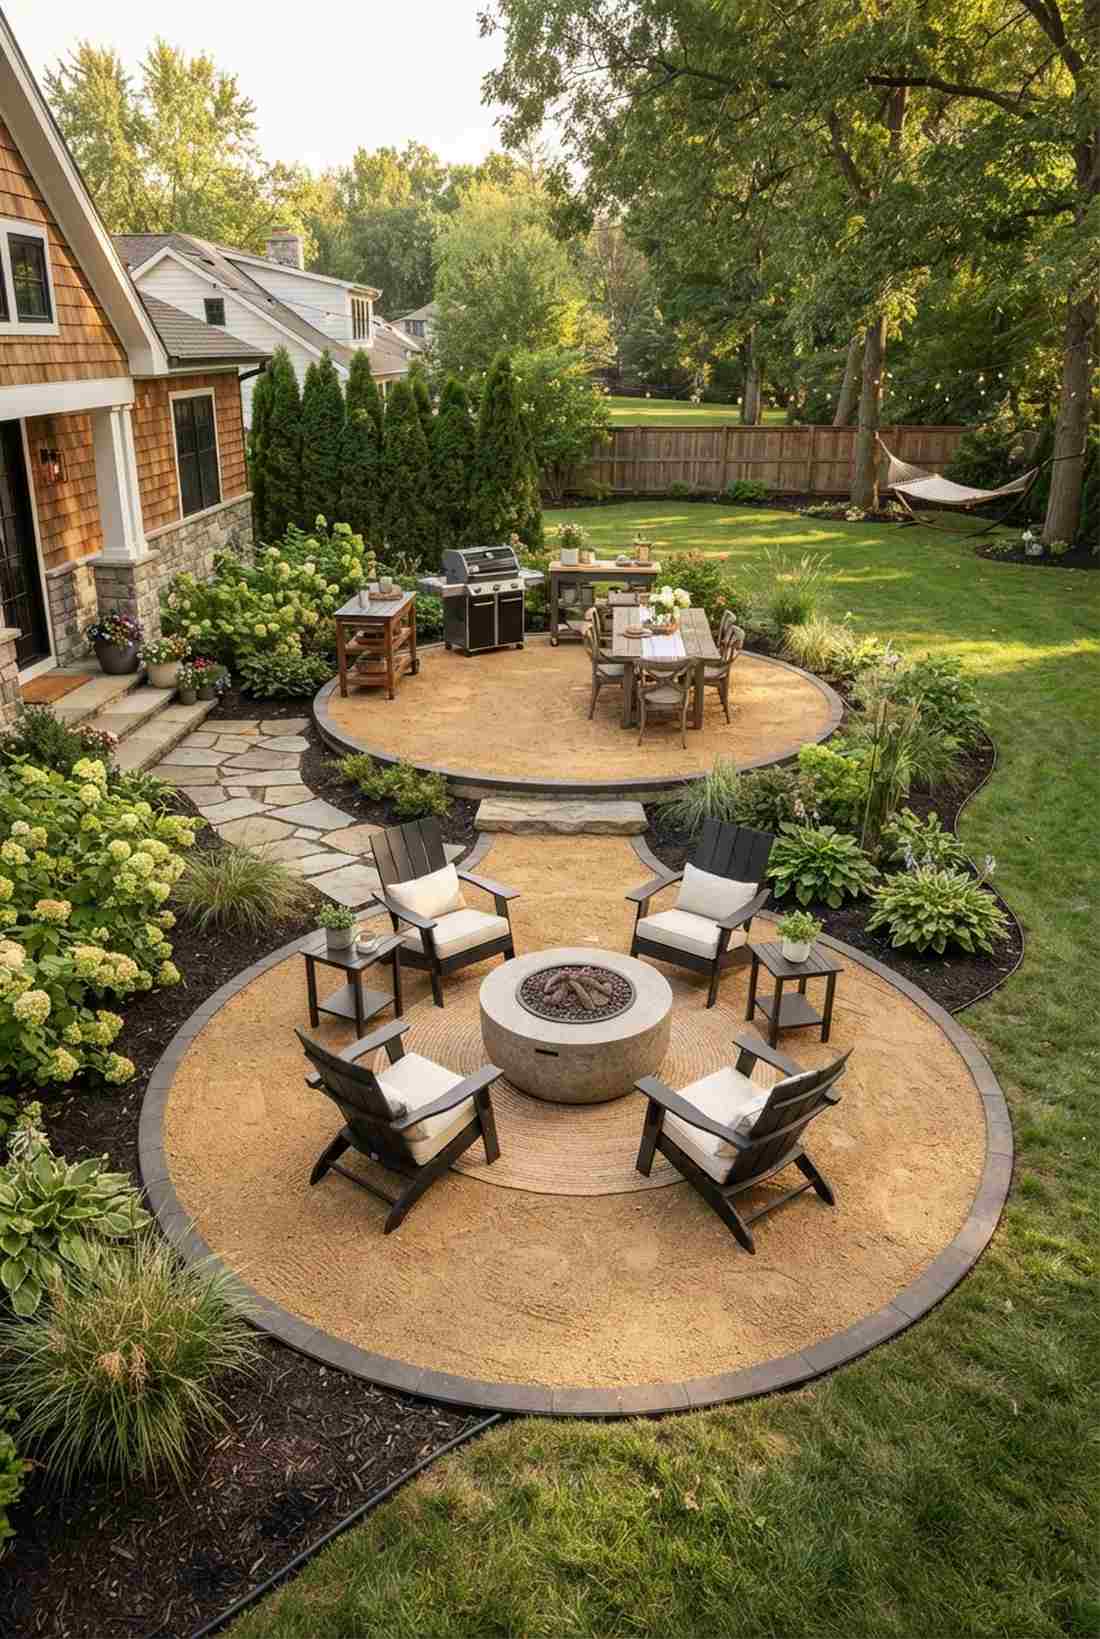
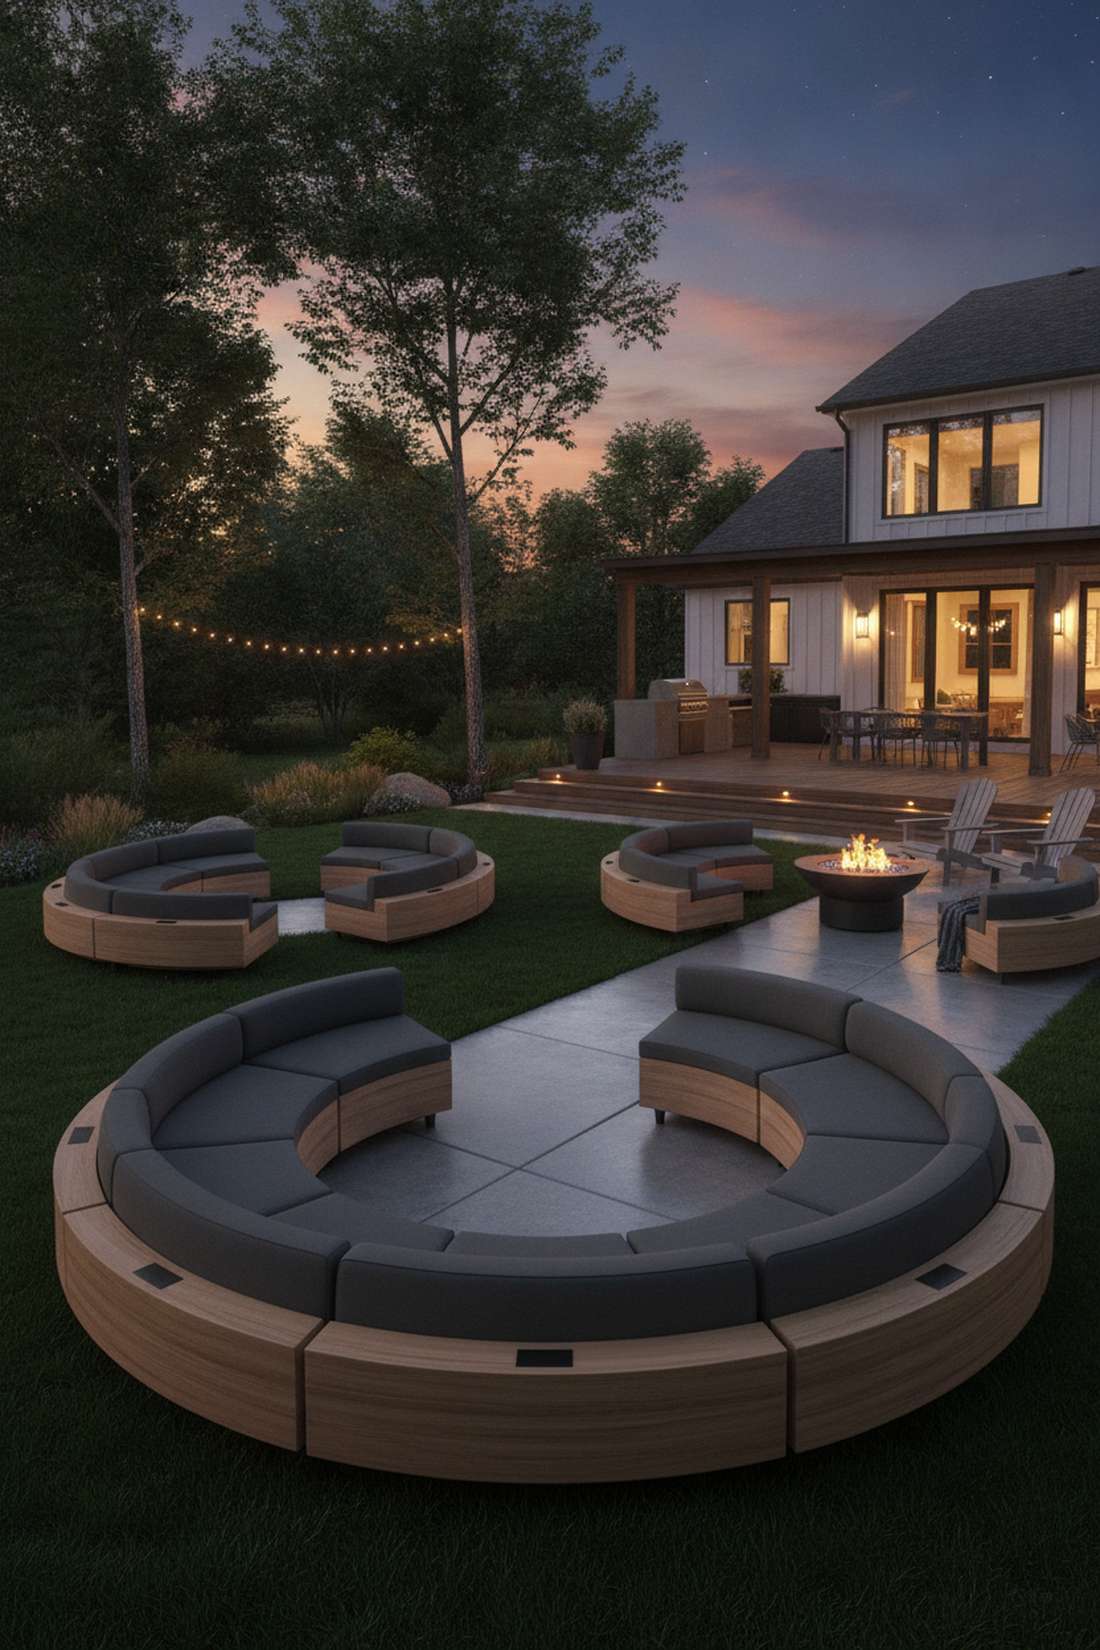
12. Planetary Satellite Seating Cluster
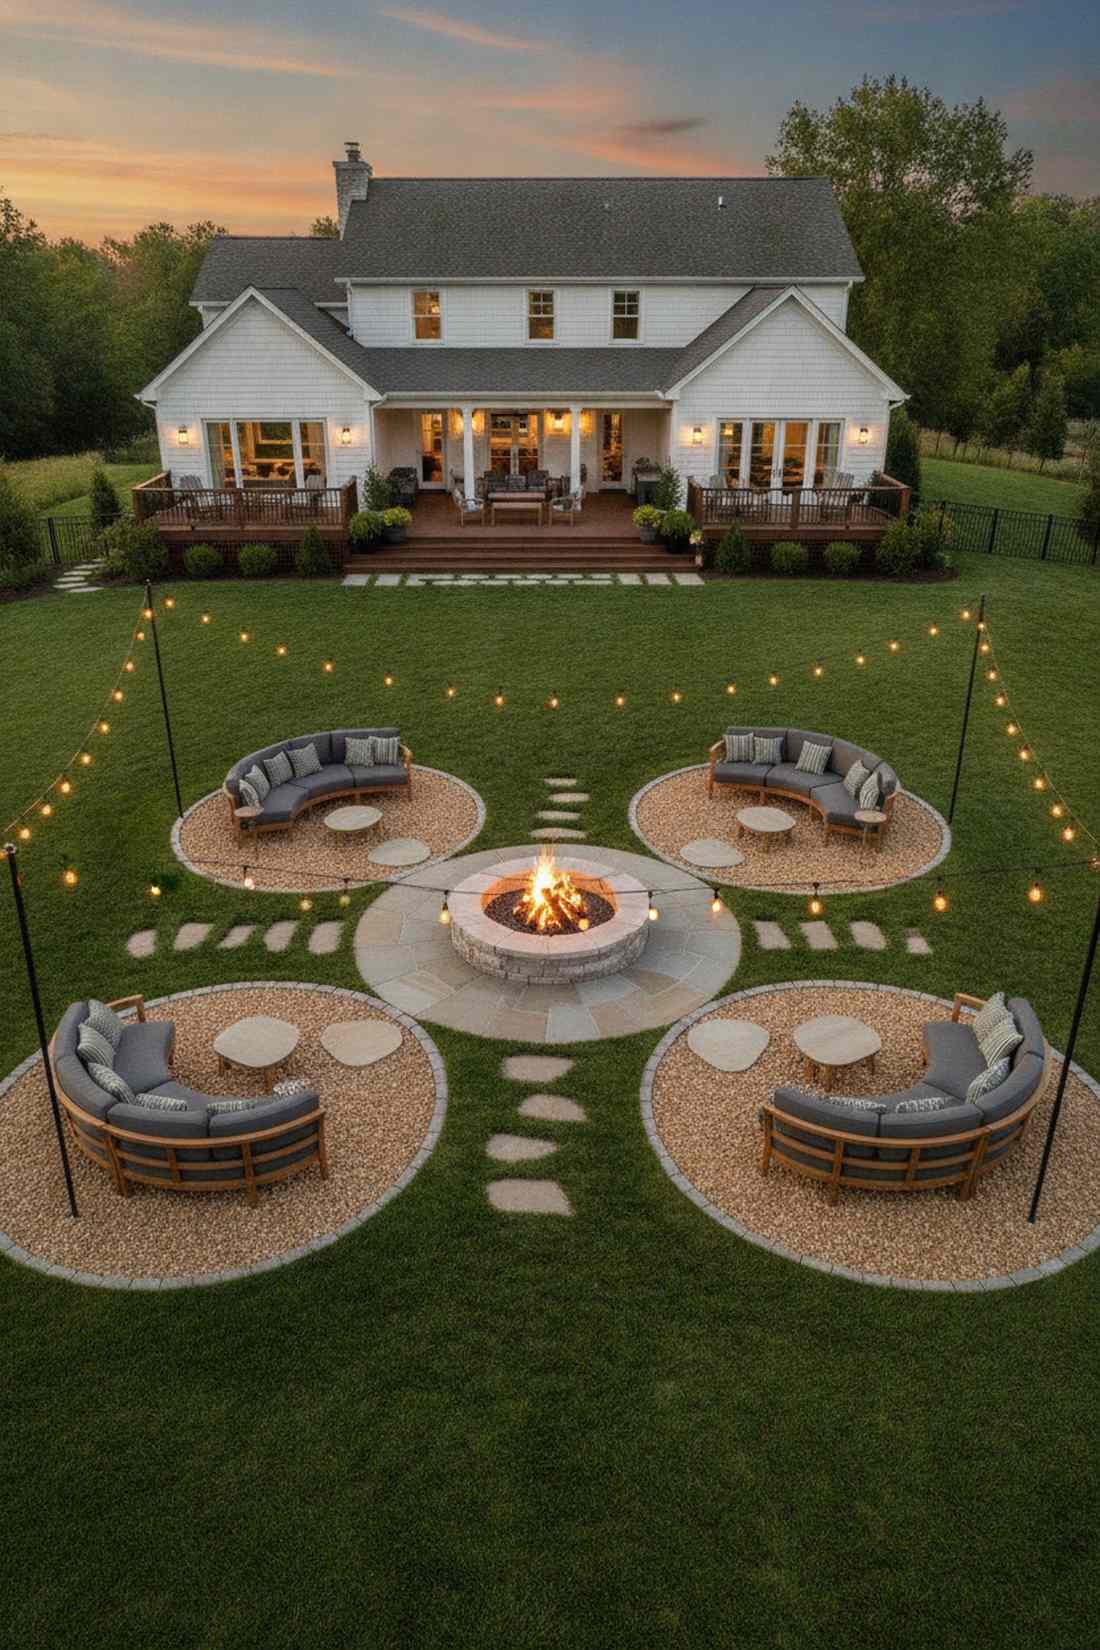
Cultivates an incredibly engaging, party-ready atmosphere reminiscent of a trendy rooftop bar. An orbiting conversation pit design is unmatched for breaking up a massive, intimidating lawn.
Creating mini breakout zones completely prevents the awkwardness of forcing 20 guests into one giant seating ring. By combining a core masonry fire kit with smaller satellite pebble zones, the entire backyard ecosystem feels remarkably cohesive yet private.
Grounding this multi-zone setup costs roughly $350–$600. Pin this to your ultimate outdoor entertaining board!
- Key Materials: Central fire pit kit, pea gravel, stepping stones
- Vibe / Style: Social rooftop lounge
- Difficulty: Moderate layout planning
- Budget Breakdown: Core Pit: $200 | Gravel: $100 | Stepping Stones: $80
- Creator’s Tip: Link the satellites with matching curved stepping stones to encourage guests to wander.
- Smart Sourcing: pre-packaged steel fire pit ring kits and bulk rounded pea gravel.
13. Figure-Eight Dual Focus Layout
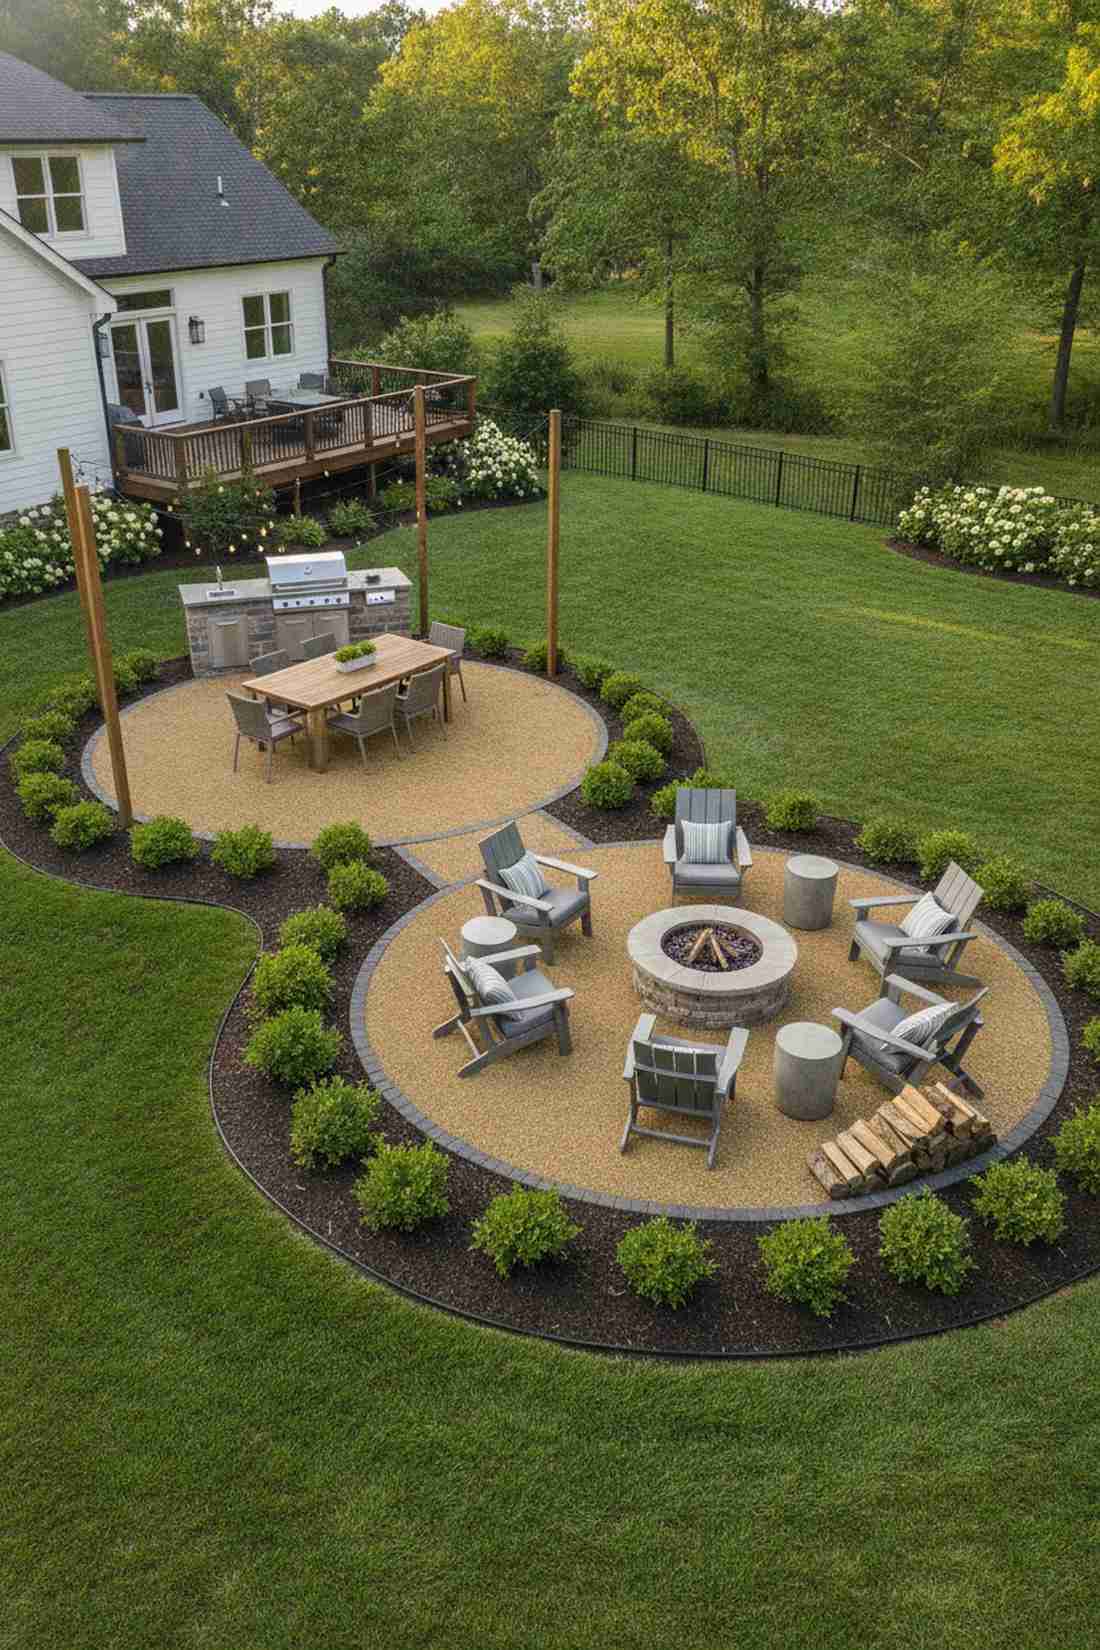
Delivers the perfect dual-purpose sanctuary, cleanly separating messy cooking from relaxing lounging. A two-loop patio design naturally divides your noisy grill area from the peaceful fire side.
It looks mathematically complex, but framing two identical circles connected at a shared waist is actually incredibly efficient to build. Anchor the perimeter using heavy-duty flexible landscape edging to achieve a perfectly smooth, professional edge that holds back mulch effortlessly.
You can lay the complete groundwork for this layout for $300–$500 using quality aggregates.
- Key Materials: Decomposed granite, flexible edging, leveling sand
- Vibe / Style: Structured dual-purpose
- Difficulty: Easy surface leveling
- Budget Breakdown: Granite: $150 | Edging: $80 | Sand: $50
- Creator’s Tip: Elevate the dining circle 6 inches higher than the fire circle to establish a clear room transition.
- Smart Sourcing: pro-grade flexible landscape edging and stabilizing polymeric sand (bulk bags).
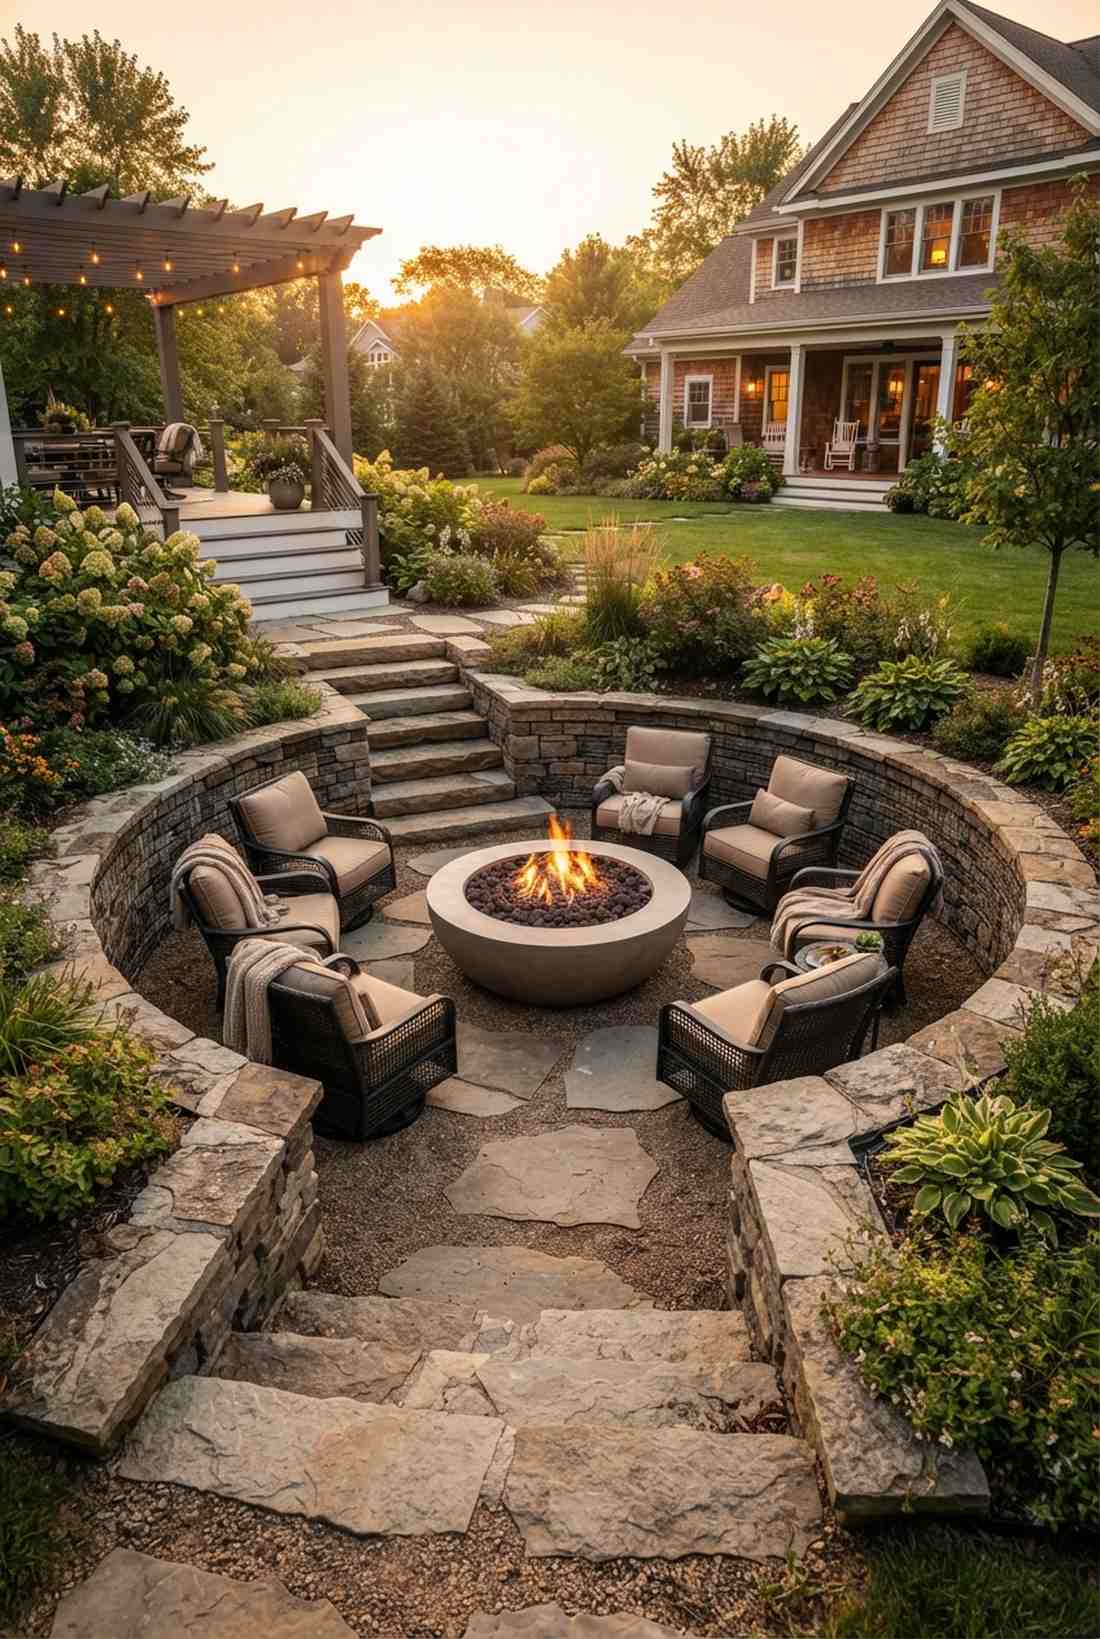
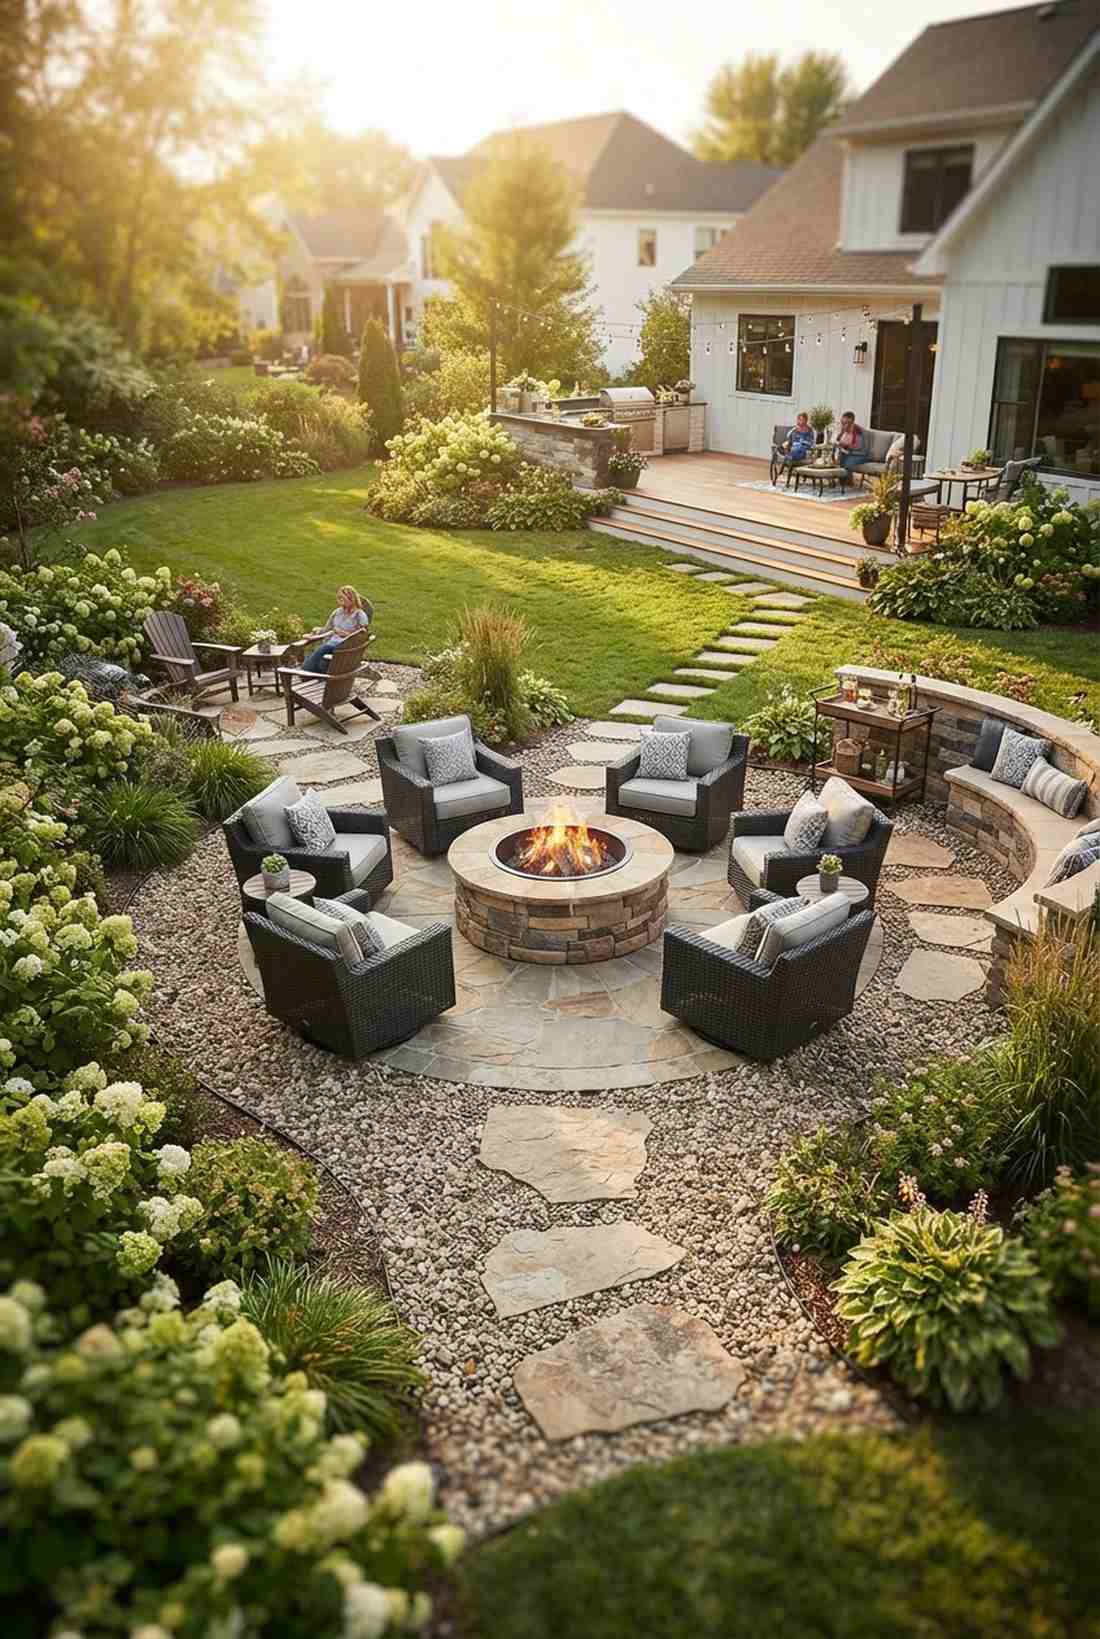
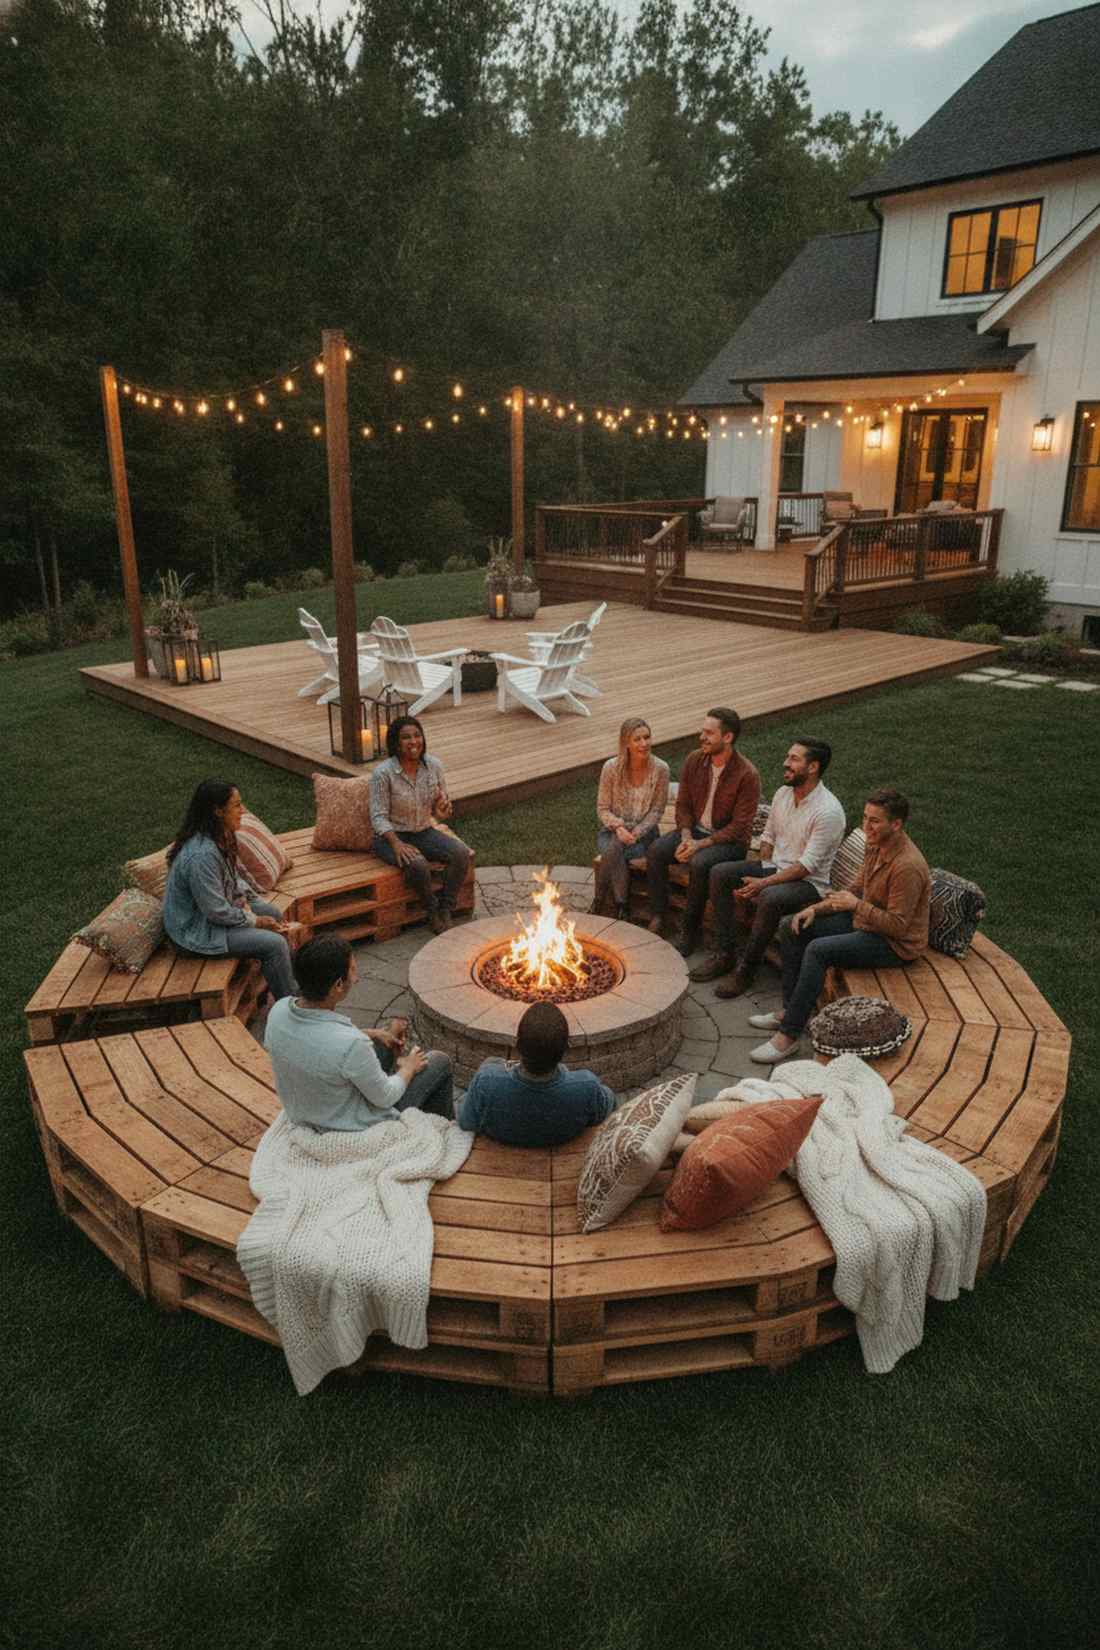
14. Concentric Ring Amphitheater
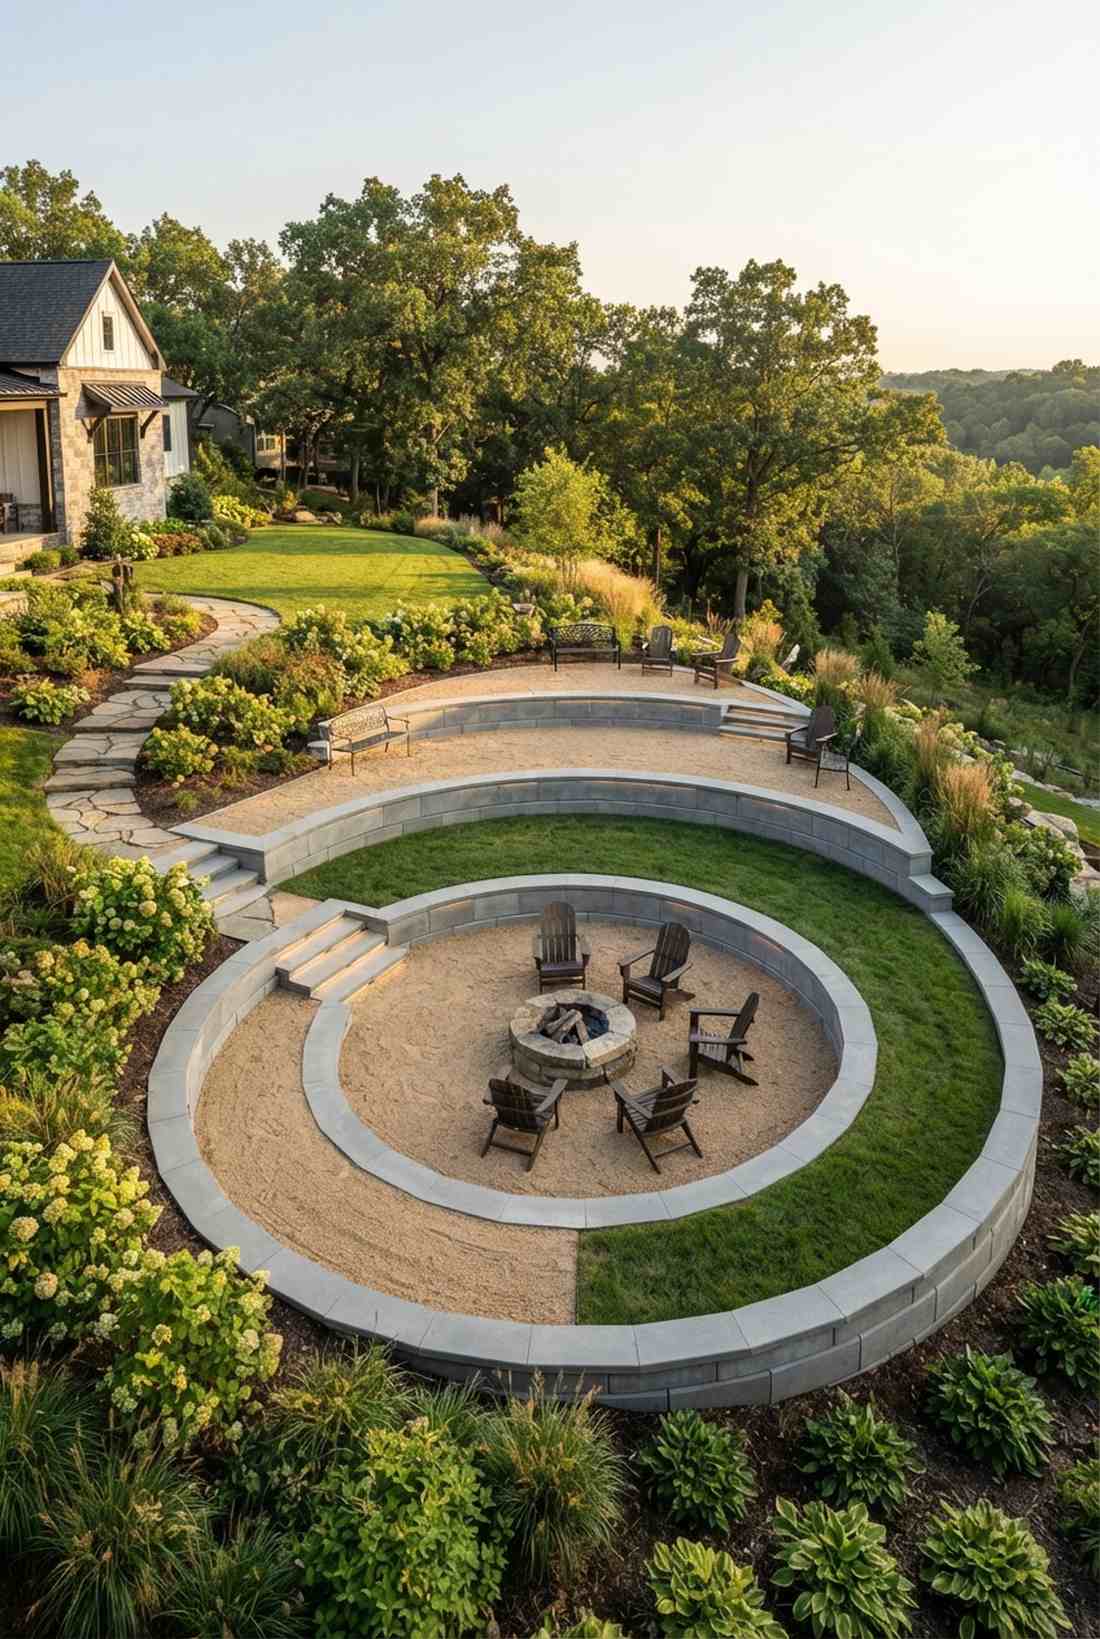
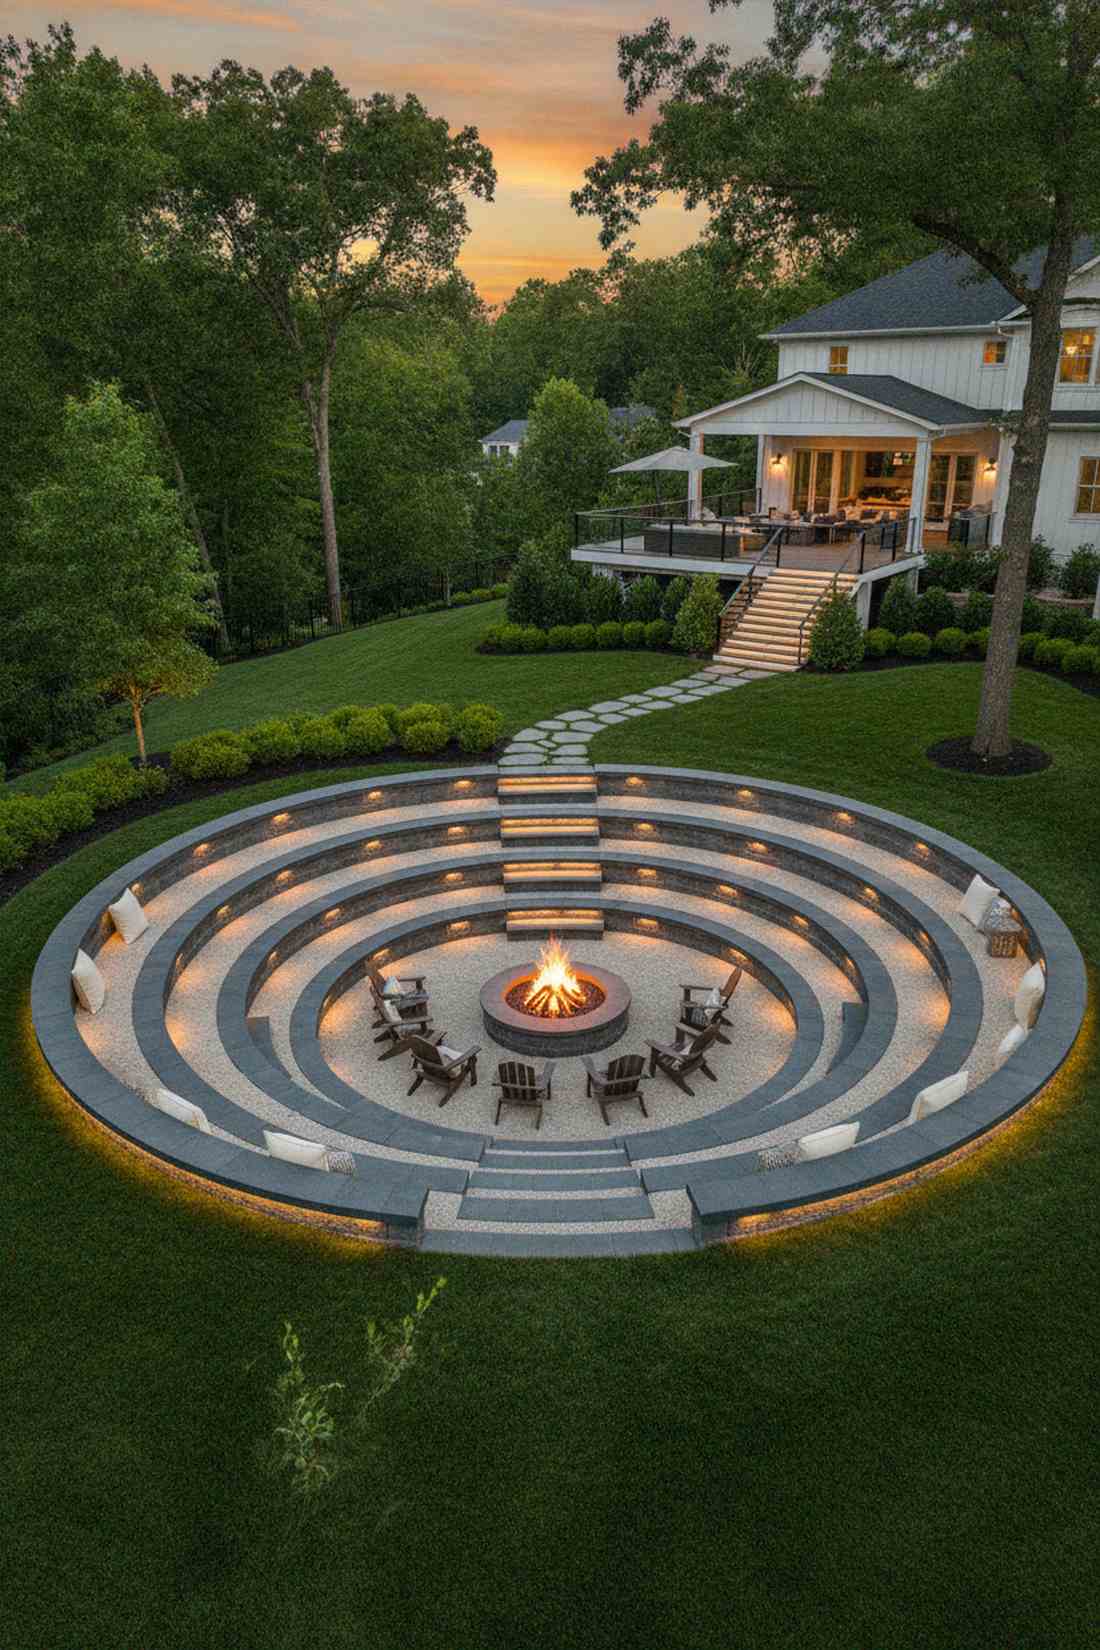
Rivals the cozy, grand aesthetics of a private, open-air cinema. This stepped circular terrace is the ultimate solution for properties cursed with a steep natural downward slope.
Don’t fight a sloped yard; terracing it downward yields a breathtaking, designer-level finish that skyrockets your property value. Building the retaining edges with pre-cast concrete curve blocks ensures earth-stopping strength and razor-sharp, uniform aesthetics.
Because it requires heavy materials, budget $600–$1,200 depending on the total tier count. Highly recommended for a high-impact property upgrade.
- Key Materials: Concrete curve blocks, compacted gravel, drainage pipe
- Vibe / Style: Grand architectural stadium
- Difficulty: Advanced structural terracing
- Budget Breakdown: Blocks: $600 | Gravel: $150 | Drainage: $100
- Creator’s Tip: Tamp the base gravel relentlessly; even a half-inch of settling will ruin the perfect circular geometry.
- Smart Sourcing: pre-cast curved concrete retaining blocks (pallet) and heavy-duty steel hand tampers.
Stop buying cheap plastic patio chairs! The psychological impact of this next nested layout changes everything about how you relax outdoors.
15. Offset Concentric Meditation Rings
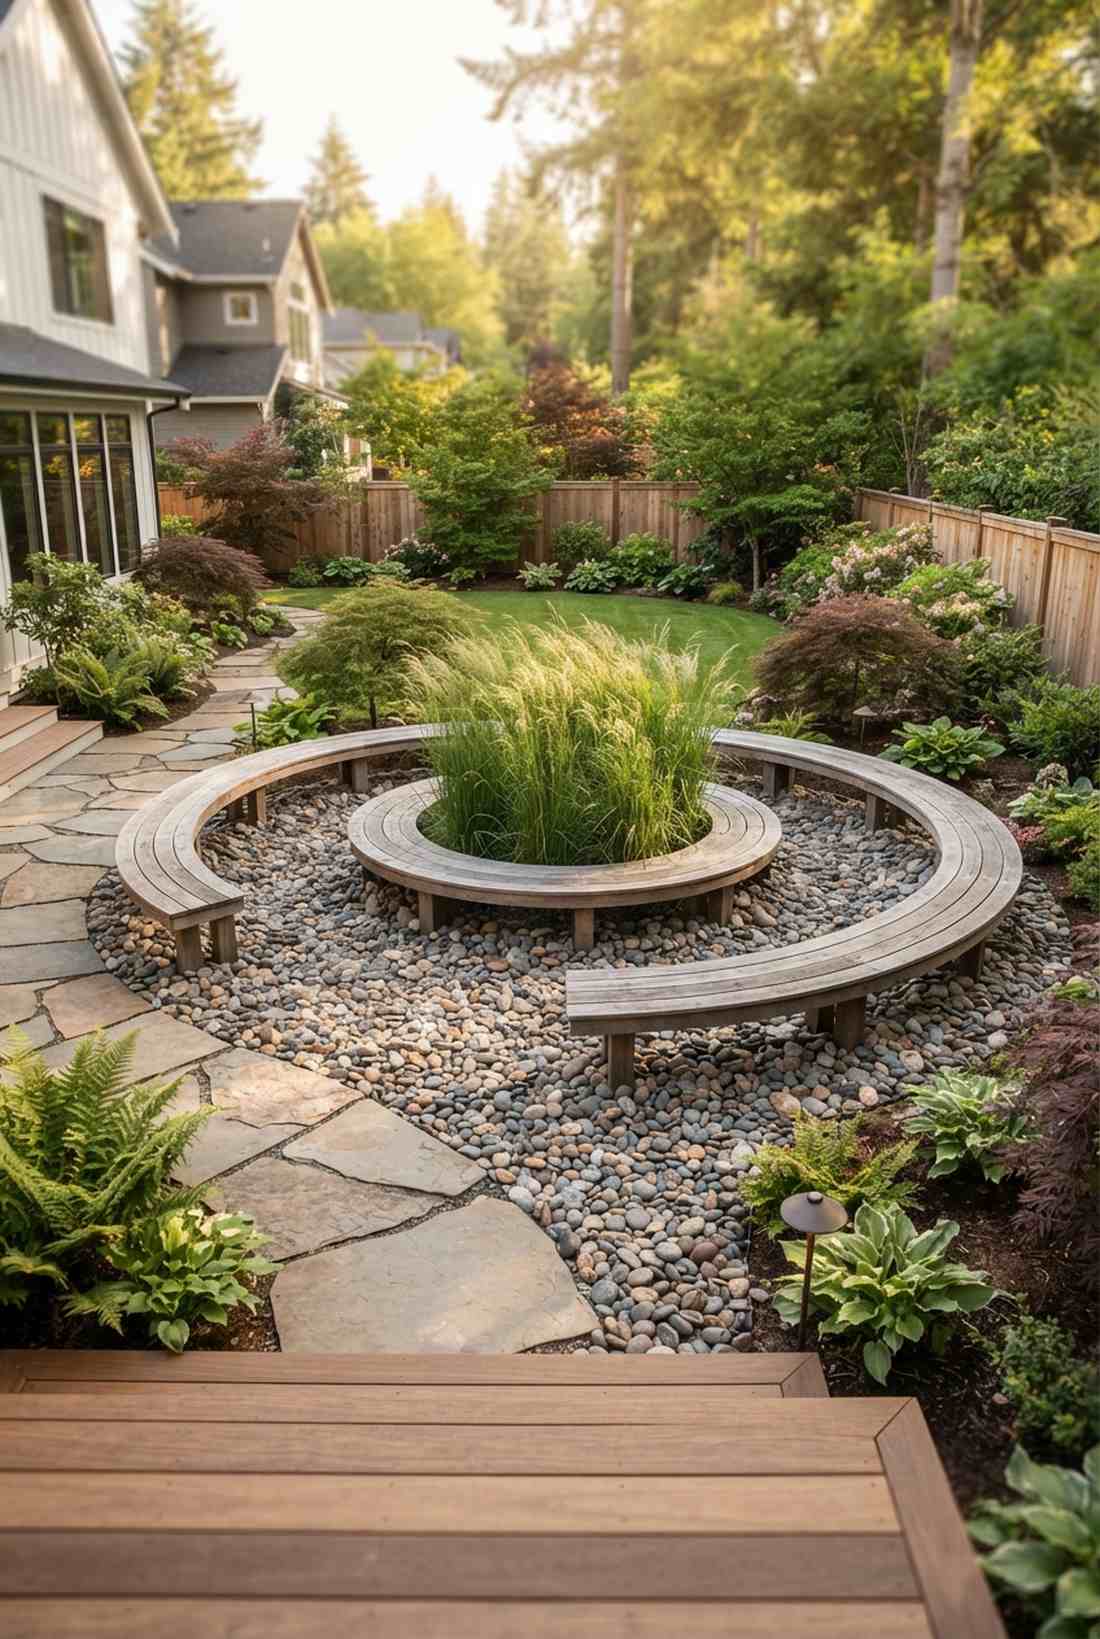
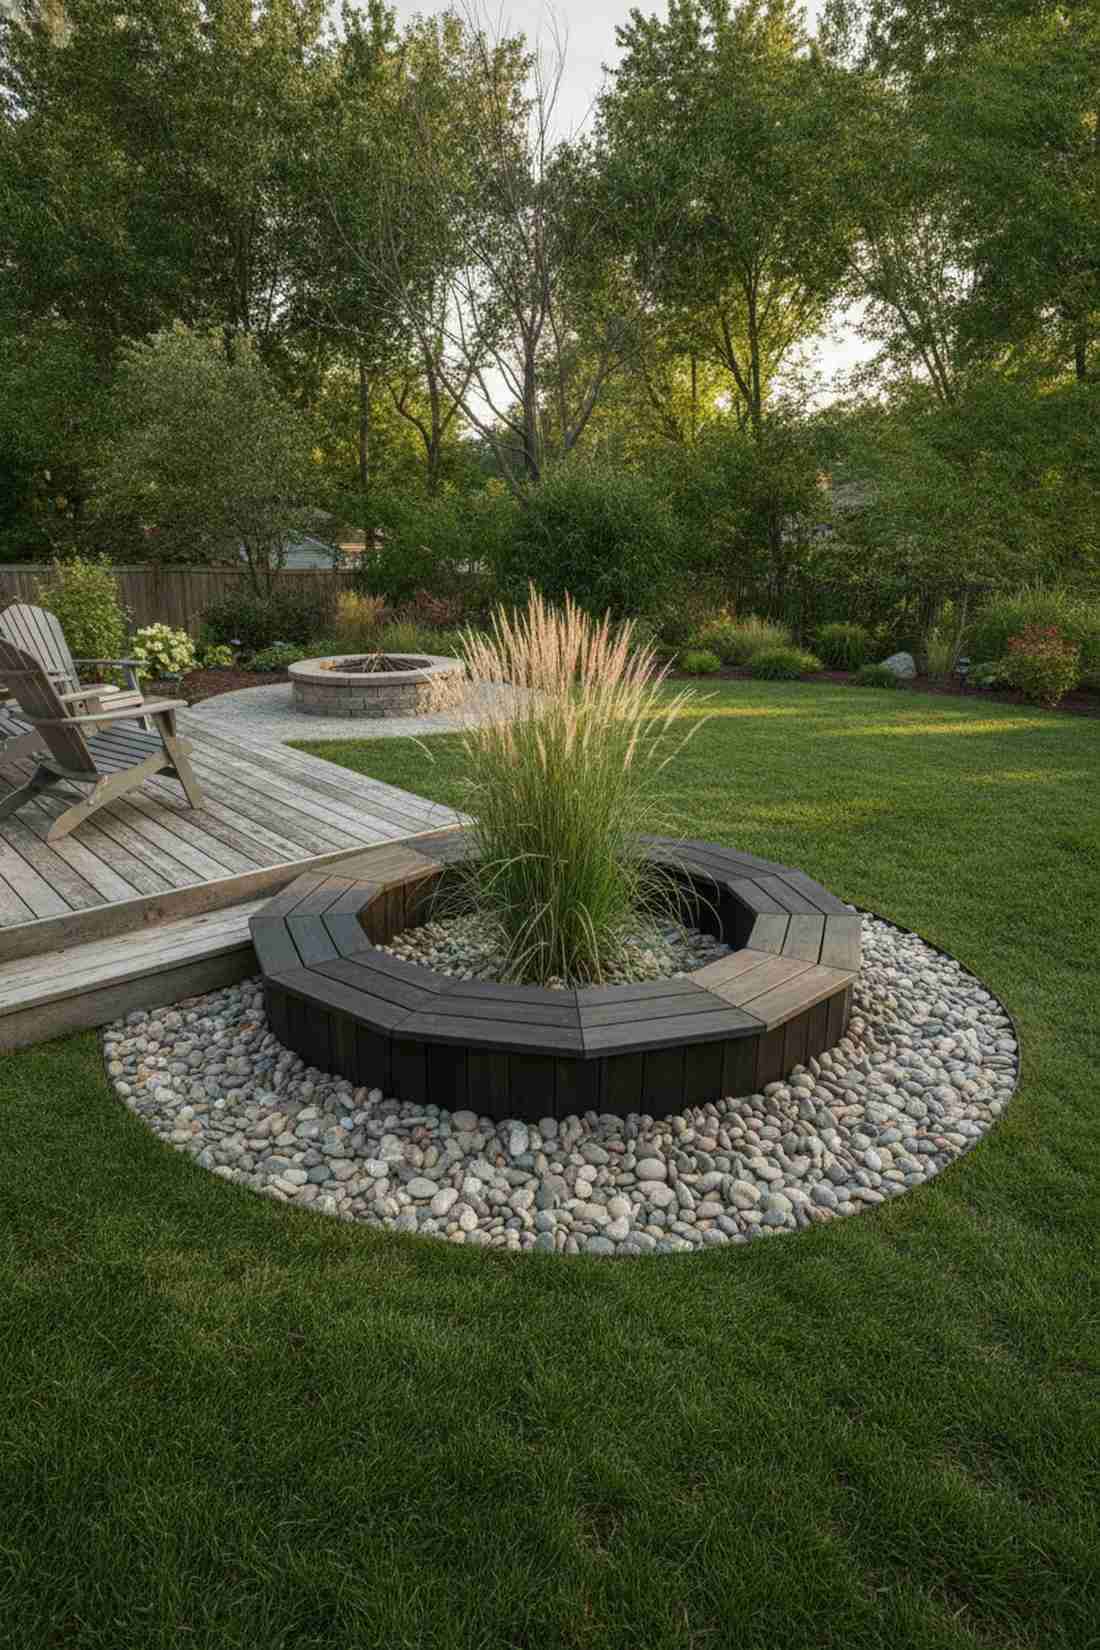
Radiates profound tranquility, perfectly mimicking the vibe of a serene Japanese Zen garden retreat. A double-ring sanctuary layout provides the ultimate shaded oasis for a quiet backyard corner.
Shifting the center points slightly off-axis creates a surprisingly sophisticated asymmetry that looks intentionally avant-garde. Using bulk bags of smooth river rock between the seating rings delivers massive texture while eliminating tedious weed growth forever.
The low-tech materials keep this incredibly peaceful build comfortably under $200.
- Key Materials: River rock, curved timber benches, ornamental grasses
- Vibe / Style: Asymmetric Zen retreat
- Difficulty: Easy surface design
- Budget Breakdown: Rock: $90 | Timber: $70 | Plants: $40
- Creator’s Tip: Plant tall ornamental grasses strictly in the center to create a swaying, living focal point.
- Smart Sourcing: polished river rock pebbles (bulk bags) and pre-cut curved timber bench kits.
Material Guide: Cheap vs. Premium Aesthetic
Knowing exactly where to save and where to spend makes all the difference in achieving that “looks expensive but isn’t” curved seating vibe.
- Standard vs. UV-Resistant/Premium: Standard wood grays and splinters in one season. Upgrading to UV-coated composites or marine-grade varnish stops fading entirely, saving you replacement costs.
- Pre-made Kits vs. Sourcing Locally: Bending wood from scratch requires expensive steam boxes. Buying pre-cut curved framing starter kits shaves 20 hours off your build time and guarantees mathematically perfect circles.
Adaptive Modular Rounds
Need ultimate flexibility? These adaptive formats give you the exact beauty of curved outdoor seating but can be dismantled, moved, or expanded whenever the party demands it.
16. Segmented Arc Modules
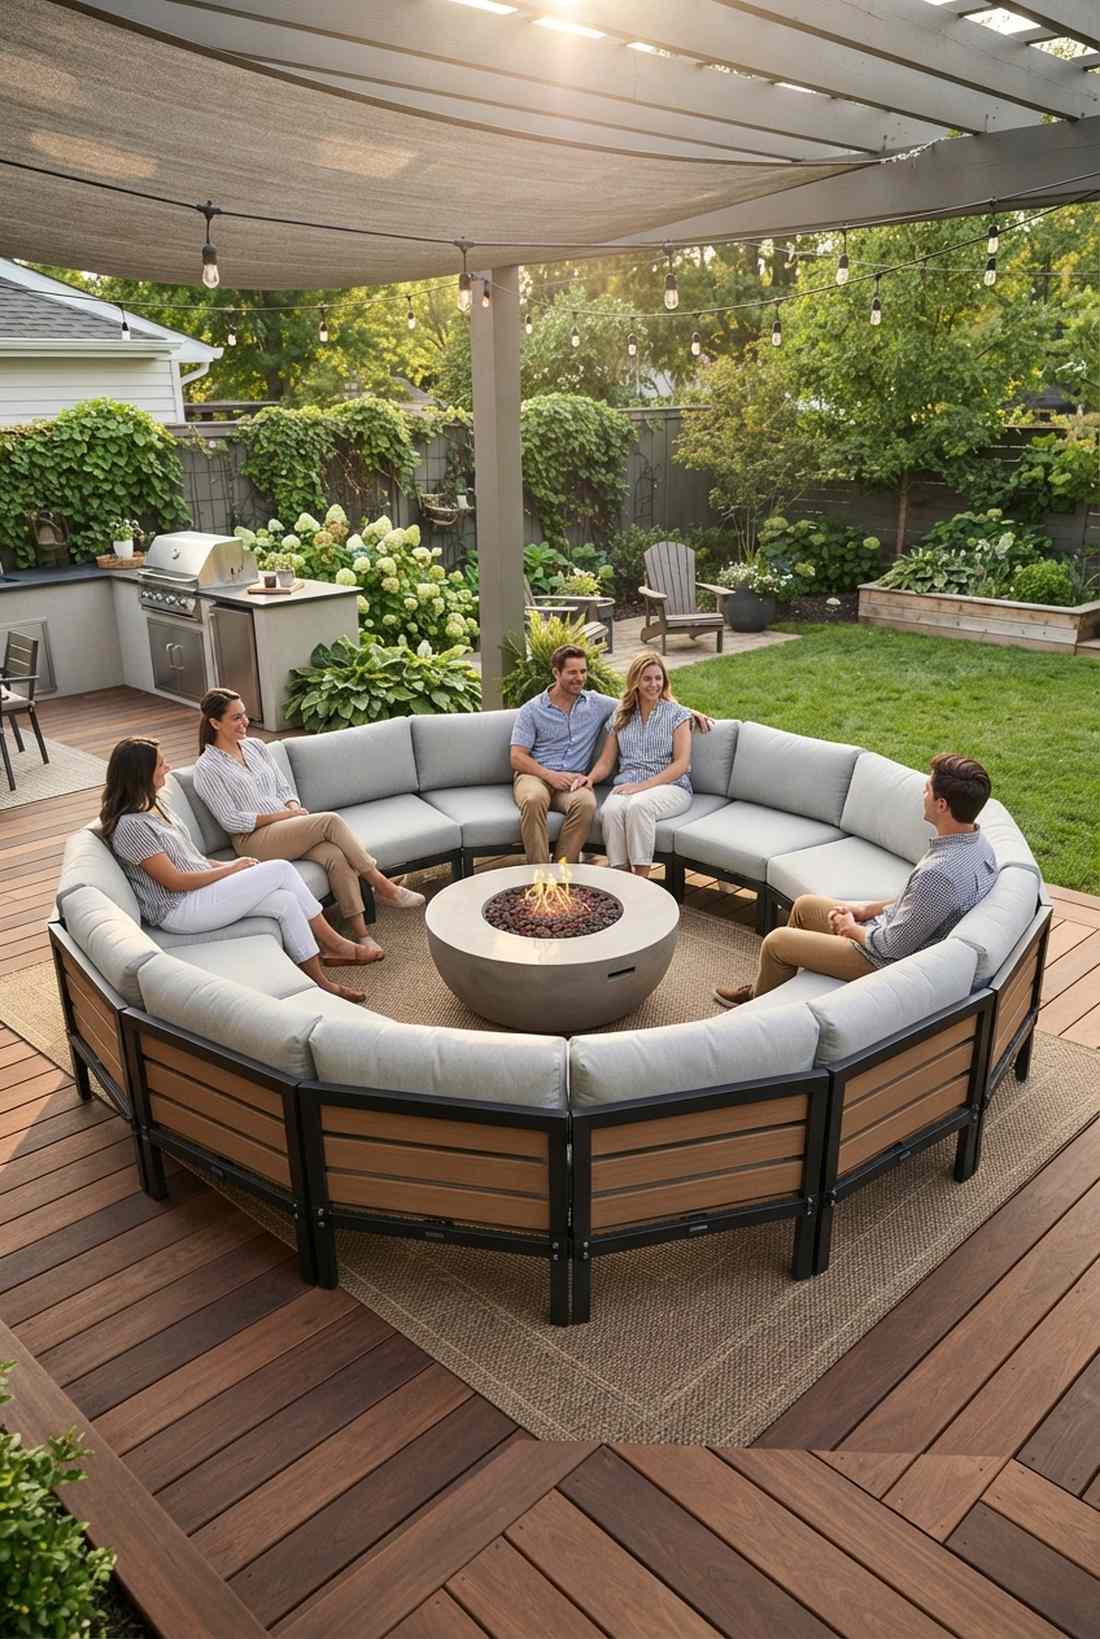
Brings the ultimate modular flexibility of expensive indoor sectionals out into the sun. Curved sectional outdoor seating adapts flawlessly for renters or homeowners with ever-changing patio layouts.
Forget pouring permanent concrete; assembling lightweight interlocking frames lets you redesign the party vibe in seconds without breaking a sweat. Sourcing UV-coated modular seating bases with commercial-grade connection clips ensures the pieces never drift awkwardly apart.
Building or buying these custom modular units ranges from $300 to $700. Save this idea if you love rearranging your layout constantly!
- Key Materials: Aluminum frame modules, composite slats, locking clips
- Vibe / Style: Flexible modern lounge
- Difficulty: Easy assembly
- Budget Breakdown: Frames: $200 | Slats: $150 | Clips: $30
- Creator’s Tip: Store unused segments vertically in the garage during winter to save massive floor space.
- Smart Sourcing: modular curved seating frame kits and heavy-duty sectional furniture connectors.
17. Telescoping Circular Platform
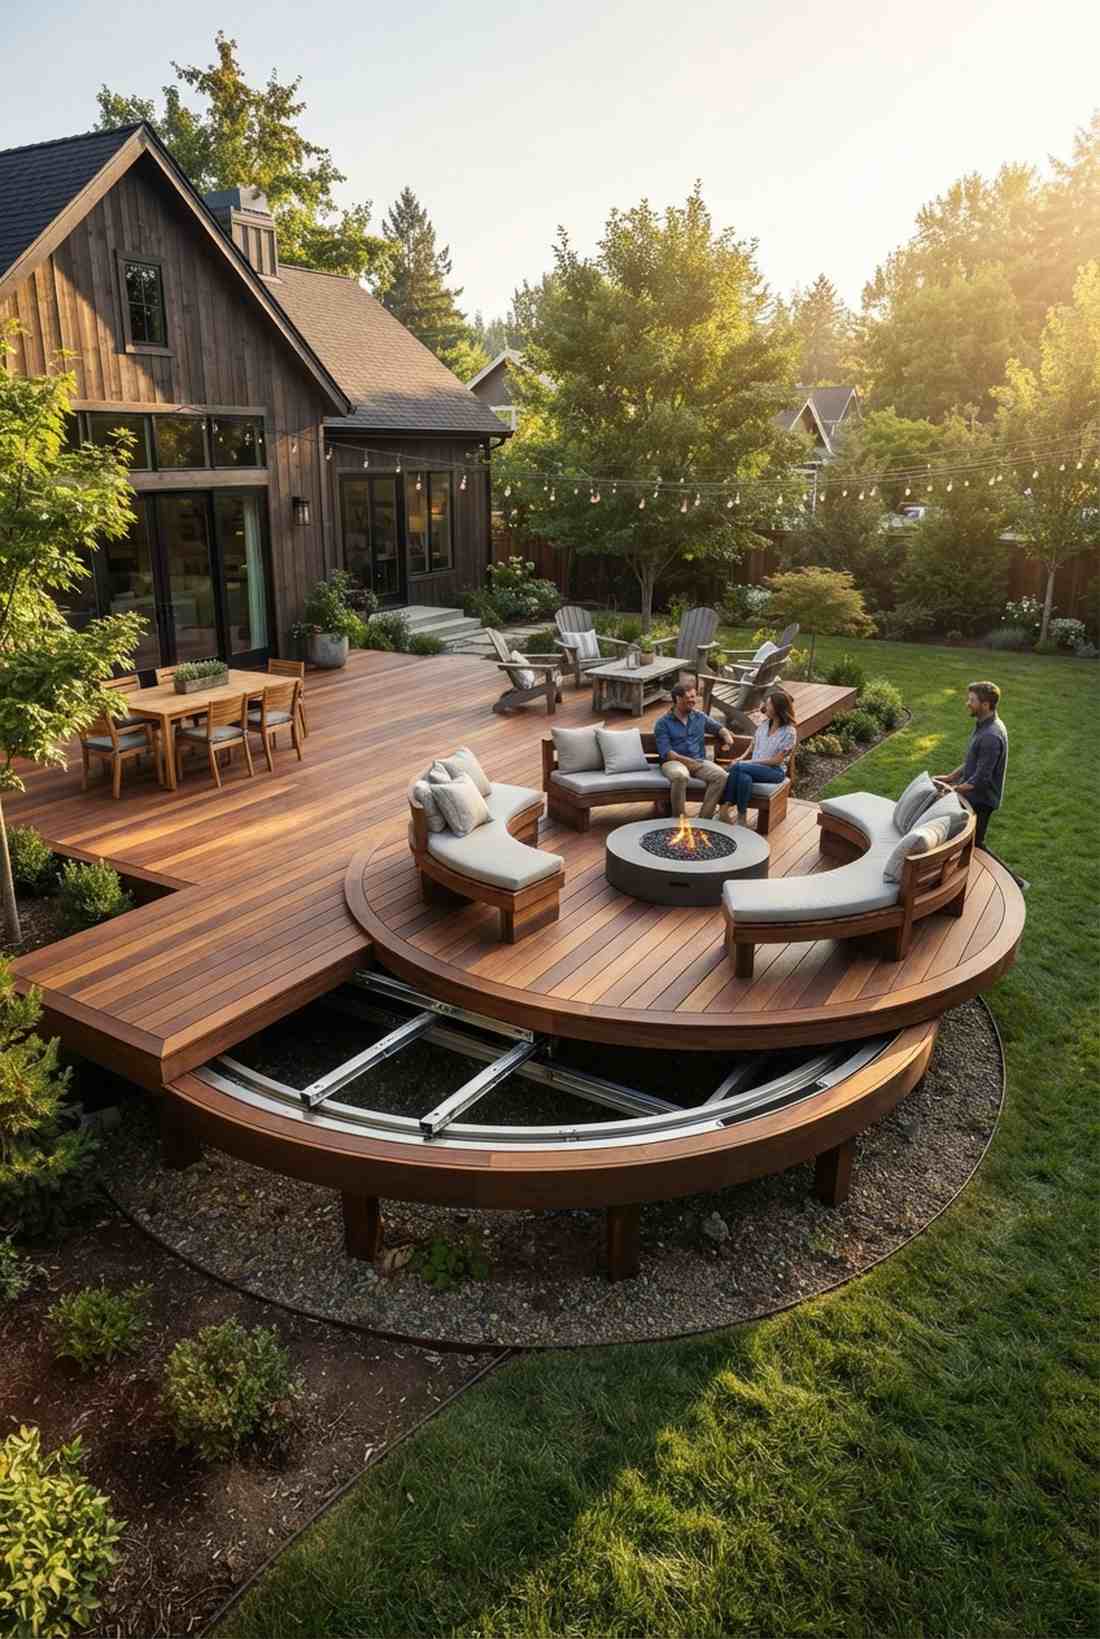

Feels like a piece of futuristic architecture unfolding right before your eyes. An expandable deck ring is the absolute peak of interactive, space-saving design for small yards.
Most static decks just waste space, but engineering a hidden track system delivers a jaw-dropping aesthetic when guests arrive. You absolutely must use heavy-duty outdoor drawer slides and waterproof structural grease to keep the telescoping motion silky smooth year-round.
The specialty hardware pushes the cost to $500–$900, but the architectural flex is unmatched.
- Key Materials: Heavy-duty slides, nested deck frames, waterproof grease
- Vibe / Style: Kinetic architectural flex
- Difficulty: Expert level engineering
- Budget Breakdown: Slides: $200 | Subframe: $300 | Decking: $250
- Creator’s Tip: Ensure the lowest moving surface is at least 3 inches above the soil to avoid dirt jamming the tracks.
- Smart Sourcing: heavy-duty outdoor locking drawer slides and marine-grade waterproof lithium grease.
18. Curved Pallet Bench Collection
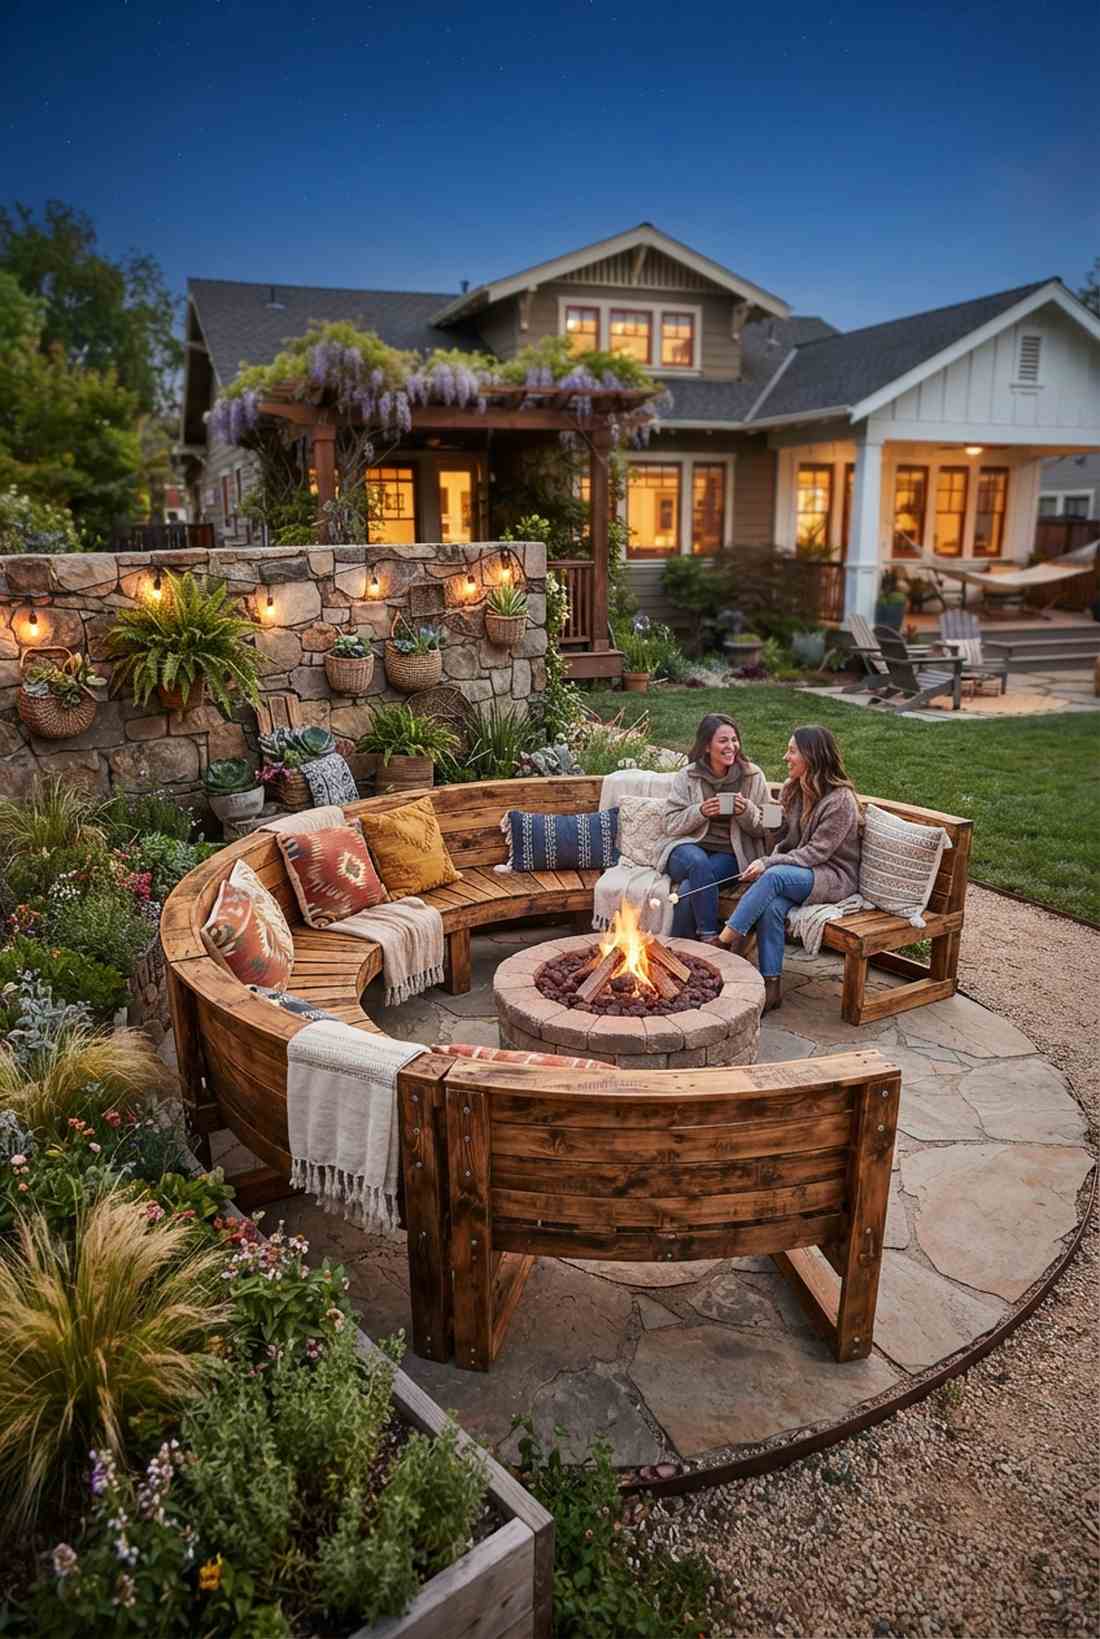
Delivers that sought-after rustic, bohemian festival energy straight to your fire pit. A reclaimed wood arc bench is the ultimate sustainable budget hack for DIY beginners wanting a custom look.
Using raw, straight pallets is clunky, but steam-bending the salvaged planks into gentle arcs creates a surprisingly premium upcycled aesthetic. Treat the highly porous wood with a deep-penetrating exterior timber oil to aggressively prevent splintering and moisture rot.
Assuming you find free pallets, your only real cost is $40–$80 in premium sealants and strong screws. Pin this for a hyper-cheap weekend project!
- Key Materials: Heat-treated pallets, 2×4 runners, exterior timber oil
- Vibe / Style: Boho sustainable chic
- Difficulty: Moderate upcycling
- Budget Breakdown: Screws: $20 | Oil: $45 | Wood: $0
- Creator’s Tip: Only use pallets stamped “HT” (Heat Treated) to ensure they aren’t loaded with toxic chemical spills.
- Smart Sourcing: deep-penetrating exterior timber oil (gallon) and self-drilling exterior wood screws (bulk box).
19. Rotating Pie Wedge Sections
Injects an incredibly playful, kinetic energy into your morning coffee routine. Pivoting sun-lounger wedges allow you to literally chase the warmth across a shaded patio all day long.
Static furniture gets stuck in the shade, but installing a central bearing system completely revolutionizes your outdoor comfort levels. Invest strictly in marine-grade stainless steel pivot hardware so the rotation remains effortless despite heavy rain or winter snow.
You can engineer the entire dynamic base for around $200–$350.
- Key Materials: Steel center post, marine-grade bearings, triangular frames
- Vibe / Style: Playful interactive lounging
- Difficulty: Advanced hardware mounting
- Budget Breakdown: Bearings: $80 | Post: $50 | Wood Frame: $120
- Creator’s Tip: Add a simple drop-pin lock to each wedge so they don’t spin uncontrollably on windy days.
- Smart Sourcing: marine-grade stainless lazy susan bearings and heavy-duty drop pin locking hardware.
If you have absolutely zero building skills but want instant luxury, this next ultra-lightweight trick will blow your mind…
20. Inflatable Curved Ottoman Array

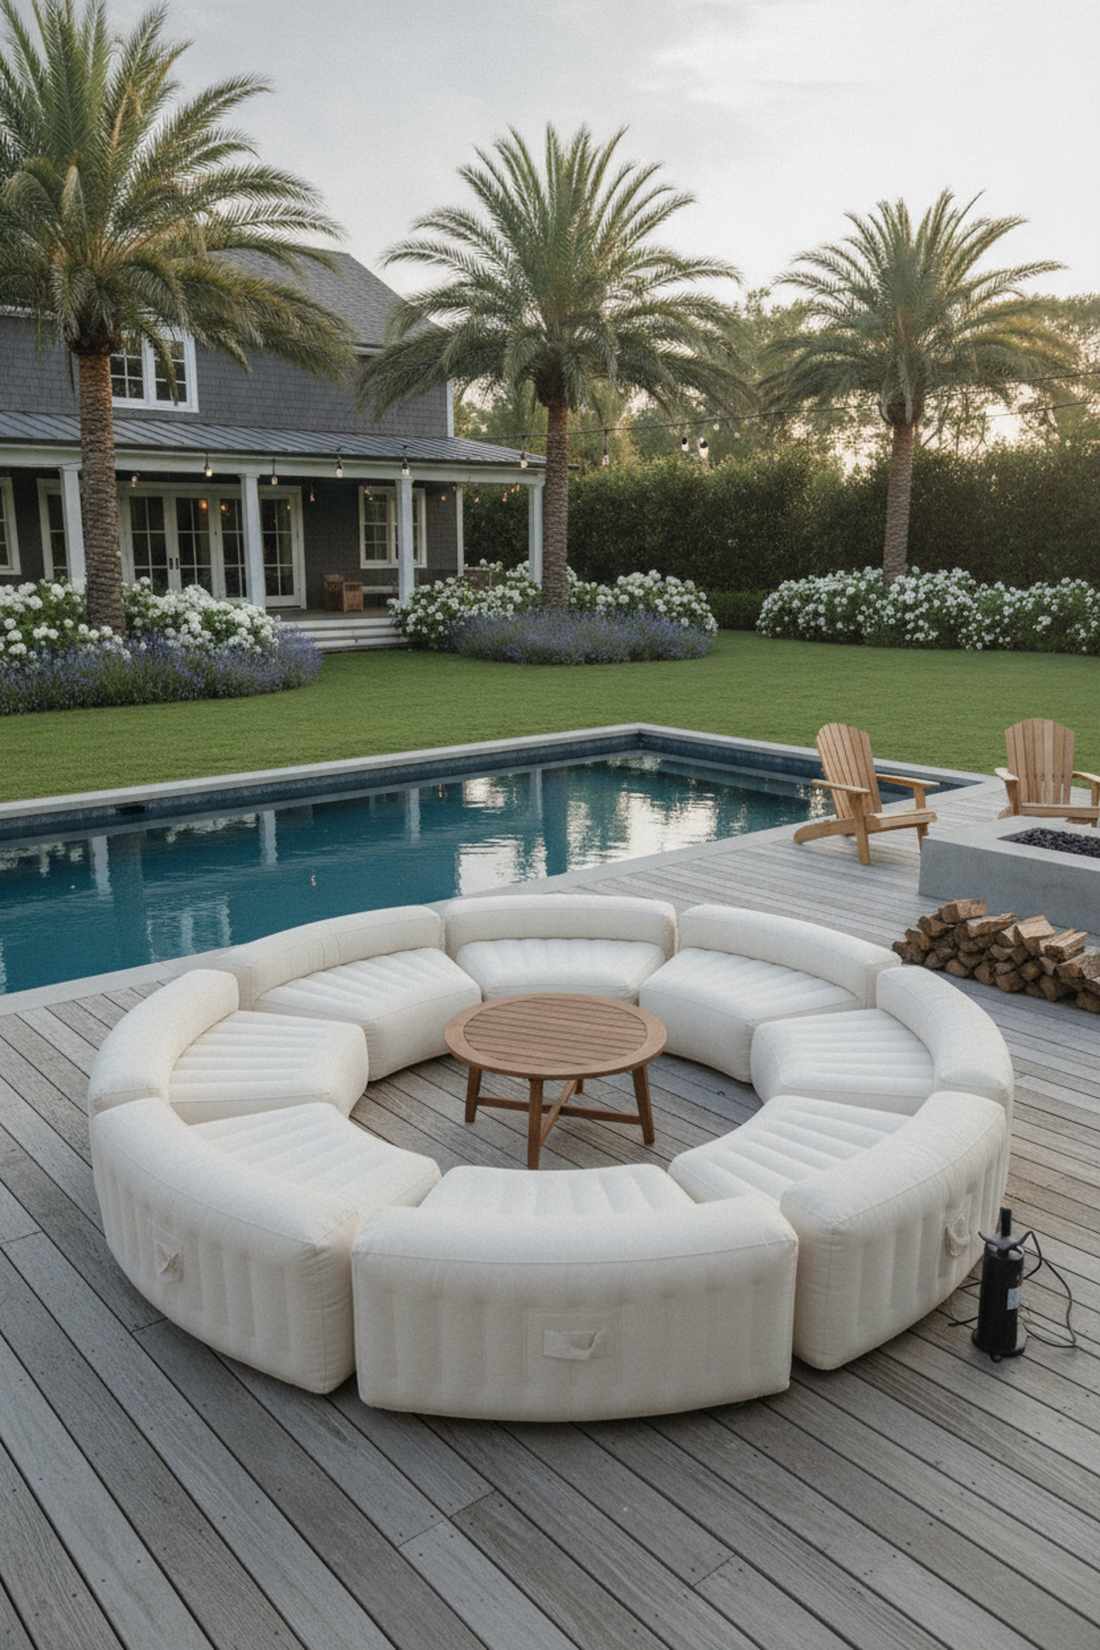
Gives off effortless, luxury poolside glamping vibes without the massive furniture invoice. A modular inflatable lounge ring operates as the ultimate pop-up seating for unexpected weekend bashes.
Standard inflatables look cheap and tacky, but commercial-grade, fabric-wrapped crescents emulate high-end yacht furniture instantly. Seek out puncture-proof PVC starter kits that feature UV-resistant canvas covers to totally disguise their lightweight, air-filled nature.
A full 12-piece ring of these premium inflatables runs about $150–$300. Save this if you rent and can’t build permanent structures!
- Key Materials: Commercial PVC inflatables, UV canvas covers, electric pump
- Vibe / Style: Portable glamping luxury
- Difficulty: Extremely easy setup
- Budget Breakdown: Ottomans: $200 | Pump: $30 | Covers: $50
- Creator’s Tip: Slightly under-inflate them by 10% so they contour comfortably to the body rather than feeling like hard balloons.
- Smart Sourcing: heavy-duty inflatable outdoor ottoman kits and UV-resistant slipcovers (multi-pack).
21. Hinged Folding Bench Wheel
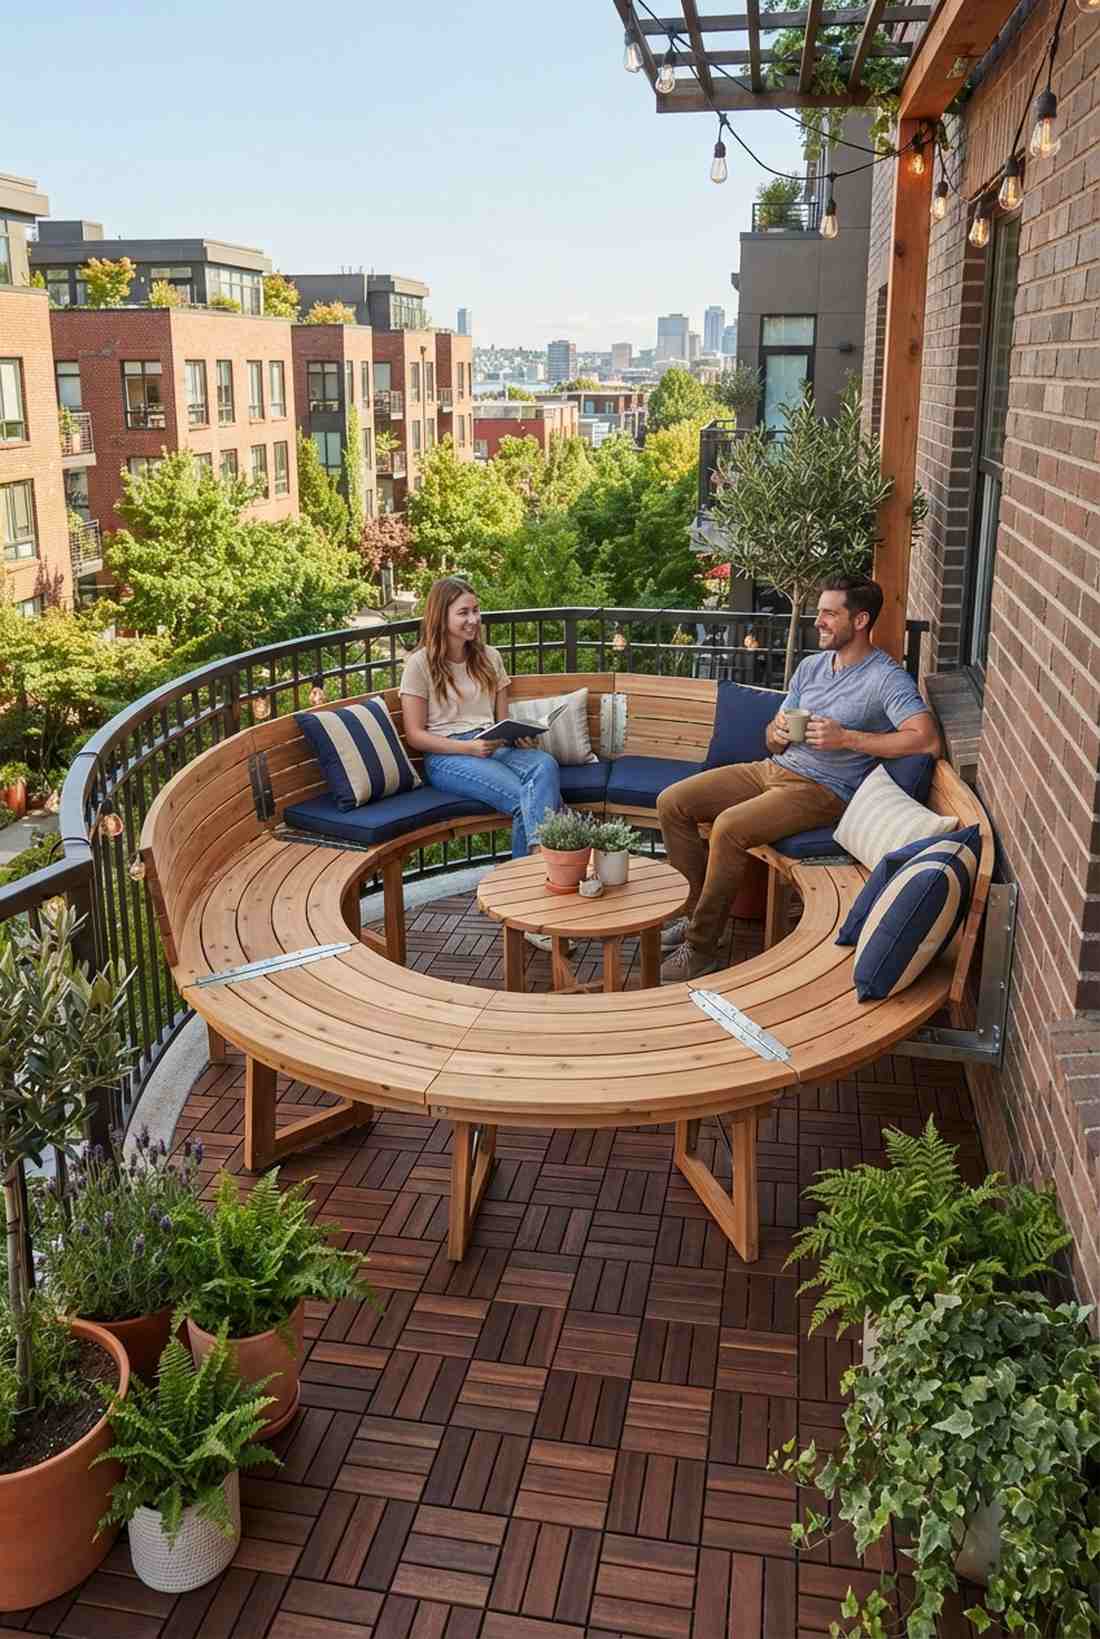
Represents an absolute masterclass in tiny-house-style spatial efficiency. A collapsible circular seating ring shines brightest on cramped urban balconies or narrow temporary patios.
Clunky chairs eat up valuable floor space constantly, whereas a continuous hinged loop folds completely flat against the wall when the party ends. You strictly need heavy-duty rust-proof piano hinges to safely carry the dynamic weight of multiple guests without snapping.
Expect to spend $250–$400 for structural lumber and serious hinge hardware.
- Key Materials: Stainless piano hinges, folding leg brackets, light lumber
- Vibe / Style: Hyper-efficient urban smart-design
- Difficulty: Intermediate hardware installation
- Budget Breakdown: Hinges: $120 | Lumber: $100 | Leg Brackets: $60
- Creator’s Tip: Install gas struts on the heaviest sections so they deploy smoothly without pinching your fingers.
- Smart Sourcing: marine-grade continuous piano hinges and heavy-duty folding leg bracket kits.
22. Magnetic Coupling Arc Benches

Feels like building with life-sized, incredibly satisfying magnetic blocks. This quick-connect curved seating empowers you to split one massive circle into intimate date-night pods in two seconds flat.
Mechanical latches inevitably jam and rust, but embedding high-strength rare-earth magnets into the frames feels like sheer luxury magic. Ensure you thoroughly encapsulate the magnets in a two-part waterproof epoxy resin to protect them from extreme patio moisture.
Adding the magnetic tech brings this build to around $300–$500. Save this for the coolest backyard party trick ever!
- Key Materials: Neodymium magnets, waterproof epoxy, curved bench modules
- Vibe / Style: Futuristic tool-free modularity
- Difficulty: Moderate embedding precision
- Budget Breakdown: Magnets: $90 | Epoxy: $30 | Benches: $200
- Creator’s Tip: Double-check polarity before gluing; you want the arcs to attract each other, not repel!
- Smart Sourcing: heavy-duty neodymium block magnets (bulk pack) and marine-grade waterproof epoxy resin kits.
23. Tracked Circular Pergola Seating
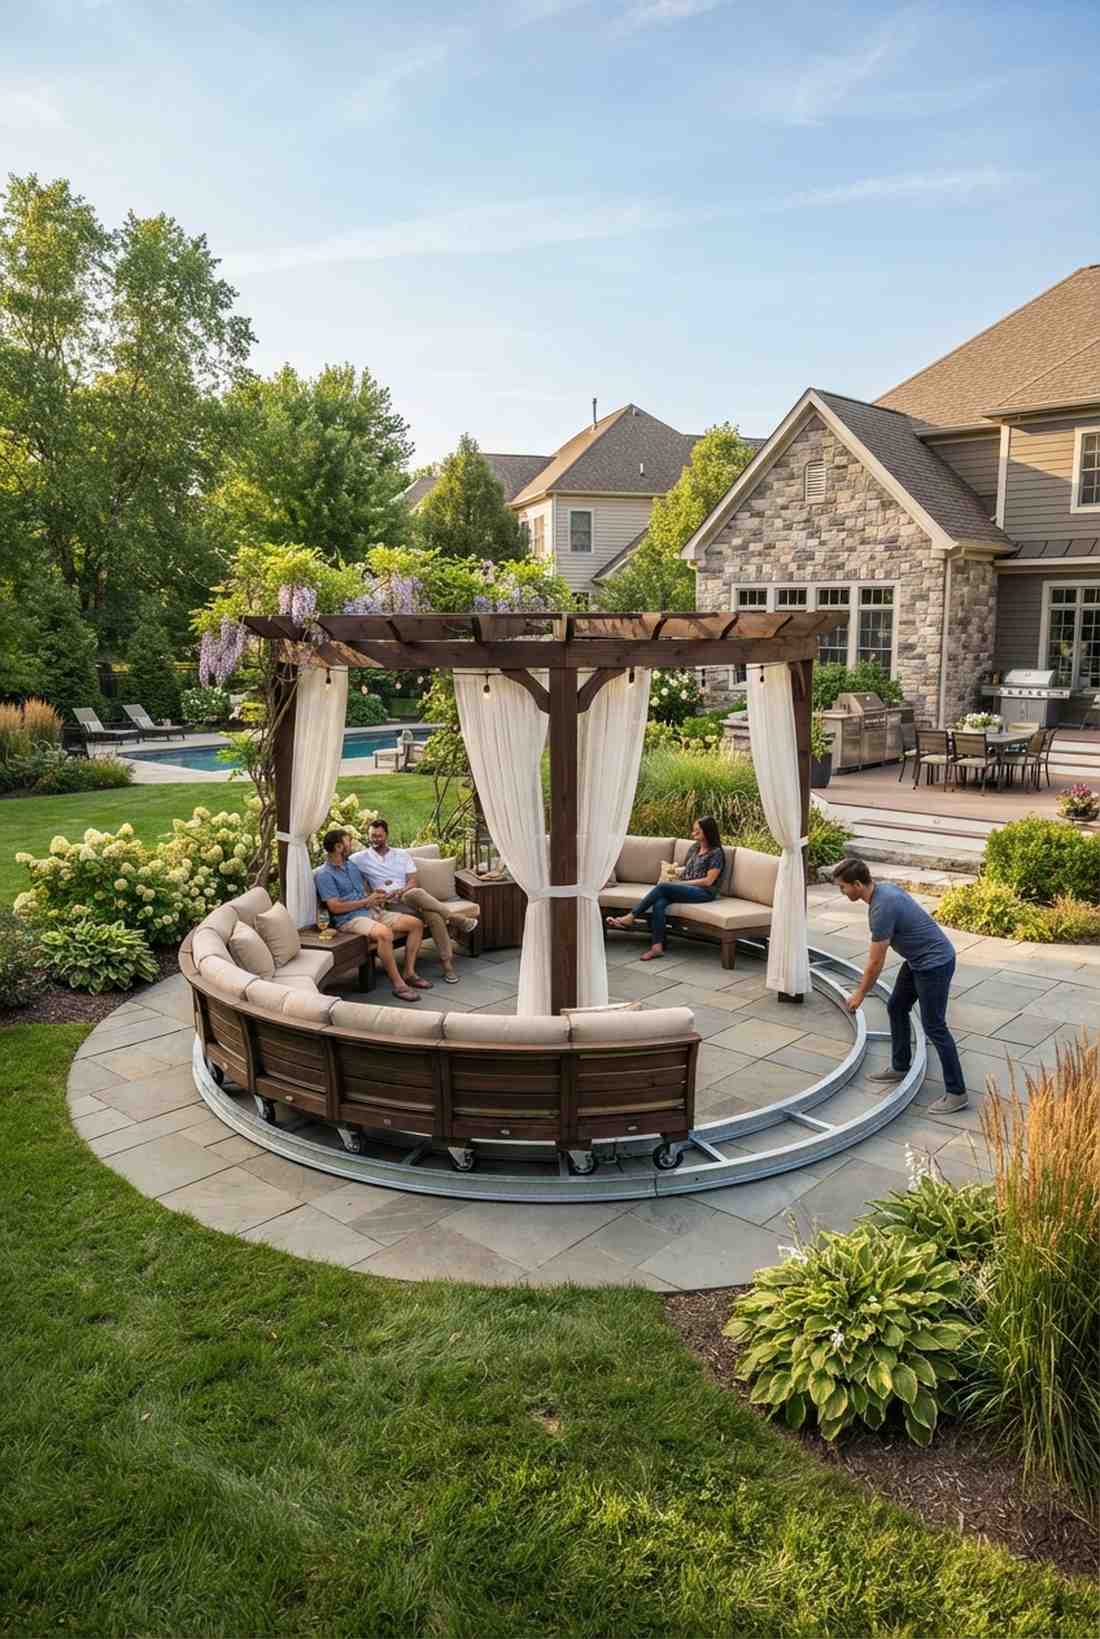
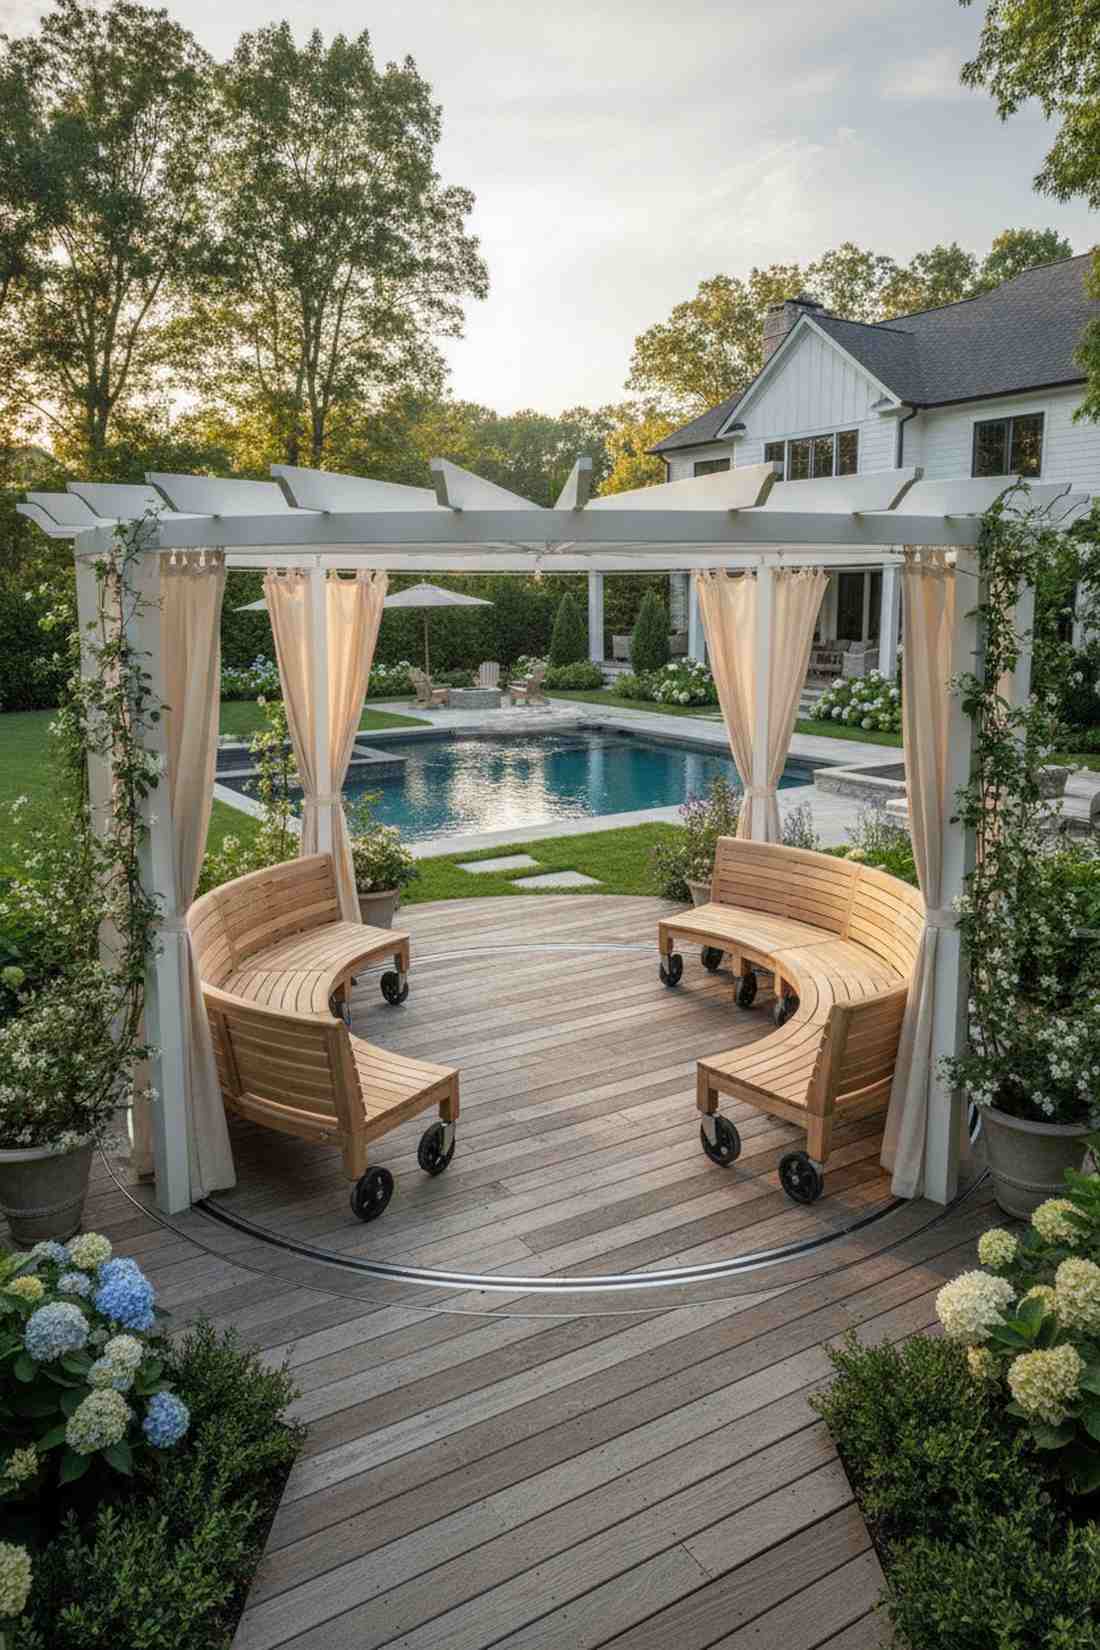
Radiates the sophisticated, breezy energy of a private, moving cabana. A rolling track bench system gives you ultimate mastery over the shifting, relentless summer sun.
Fixed pergola seating always ends up baking in the heat eventually, but a wheeled base solves this eternally annoying problem forever. Installing a low-profile galvanized steel floor track with commercial caster wheels delivers incredibly smooth, effortless repositioning all day.
This massive hybrid architectural build costs upwards of $800–$1,500.
- Key Materials: Galvanized floor track, v-groove caster wheels, pergola frame
- Vibe / Style: High-end dynamic cabana
- Difficulty: Expert level track alignment
- Budget Breakdown: Track: $150 | Wheels: $80 | Frame/Seating: $600
- Creator’s Tip: Sweep the track groove weekly to prevent small pebbles from derailing your rolling benches.
- Smart Sourcing: galvanized steel floor track kits and heavy-duty v-groove sliding gate casters.
Conclusion
These 23 high-end outdoor seating round formats prove that curved geometry completely dominates standard, cheap-looking linear arrangements. Whether you opt for a rapid modular arc kit, a sunken terraced lounge, or an affordable upcycled pallet circle, integrating curved seating instantly elevates the perceived value of your property. Stop settling for basic layouts—evaluate your exact budget, source those premium weatherproof materials, and construct a gathering space that looks and feels genuinely expensive.
Frequently Asked Questions
What is the minimum diameter for comfortable circular seating?
A 10-foot diameter circle provides adequate space for 6-8 adults, but scaling down further creates cramped knees and cheapens the luxury feel. If you are building around a heavy-duty fire pit base, expand to 12-14 feet so the heat distribution remains comfortable, not dangerous. Always secure pre-cut curved framing kits that guarantee you maintain at least 18-24 inches of seating width per guest.
How do curved benches handle drainage compared to straight designs?
Curved benches demand the identical 1/8-inch per foot slope, but water must be directed outward radially to avoid pooling in the center. Upgrading to premium composite wood or UV-coated resin framing stops moisture warping entirely, which is where cheap raw wood fails along the curve. Always elevate the base at least 6 inches using waterproof deck risers to ensure maximum airflow.
Can I build curved outdoor seating without specialized tools?
Yes, by leveraging modular, faceted straight cuts (like an octagon) you achieve the high-end curved aesthetic without buying complex steam-bending equipment. For a flawless true arc, simply purchase flexible composite deck boards or pre-bent starter kits that eliminate all the hard carpentry work. Gluing laminated strips is another budget-friendly trick to achieve an expensive designer curve using only standard clamps.
What materials work best for permanent curved seating installations?
Poured concrete and commercial-grade masonry blocks offer bomb-proof durability and deliver that premium architectural weight. If you prefer wood, high-density composite decking kits bend easily to moderate radii while completely resisting rot, fading, and insect damage. Never use cheap pressure-treated pine for tight curves; it will inevitably split, forcing you to replace the entire setup.
How do I calculate bench length needed for a specific circular diameter?
Use the standard circumference formula (C = π × diameter) to map out your exact material purchases and avoid wasting money. A 12-foot diameter requires roughly 37.7 feet of benching, but always subtract the width of your pathway gaps before ordering bulk lumber. Dividing the final length by 20 inches gives you the exact guest capacity, ensuring you buy the correct amount of weatherproof seating cushions.
Should curved seating face inward or outward toward views?
Inward-facing layouts generate massive social warmth and are mandatory if you are installing a high-end fire feature or central table. Outward-facing arcs work brilliantly for framing sweeping landscape views, though they isolate guests. To get the best of both worlds, build an S-curved serpentine bench using flexible composite materials, allowing guests to choose their preferred focal point naturally.