An outdoor living deck instantly upgrades a boring yard into a premium sanctuary. Smart material sourcing makes these multi-level entertainment zones surprisingly budget-friendly. Skip the basic setups and build a high-end retreat without designer price tags.
Design Snapshot Key Principles
- Zone Definition: Separate spaces for cooking, dining, lounging, and recreation prevent crowding and enhance flow
- Vertical Layering: Multi-level designs add visual interest while naturally organizing activities by function
- Material Transitions: Combining wood, stone, and composite materials creates boundaries without physical barriers
- Lighting Integration: Layered illumination from overhead, perimeter, and accent sources extends entertainment hours safely
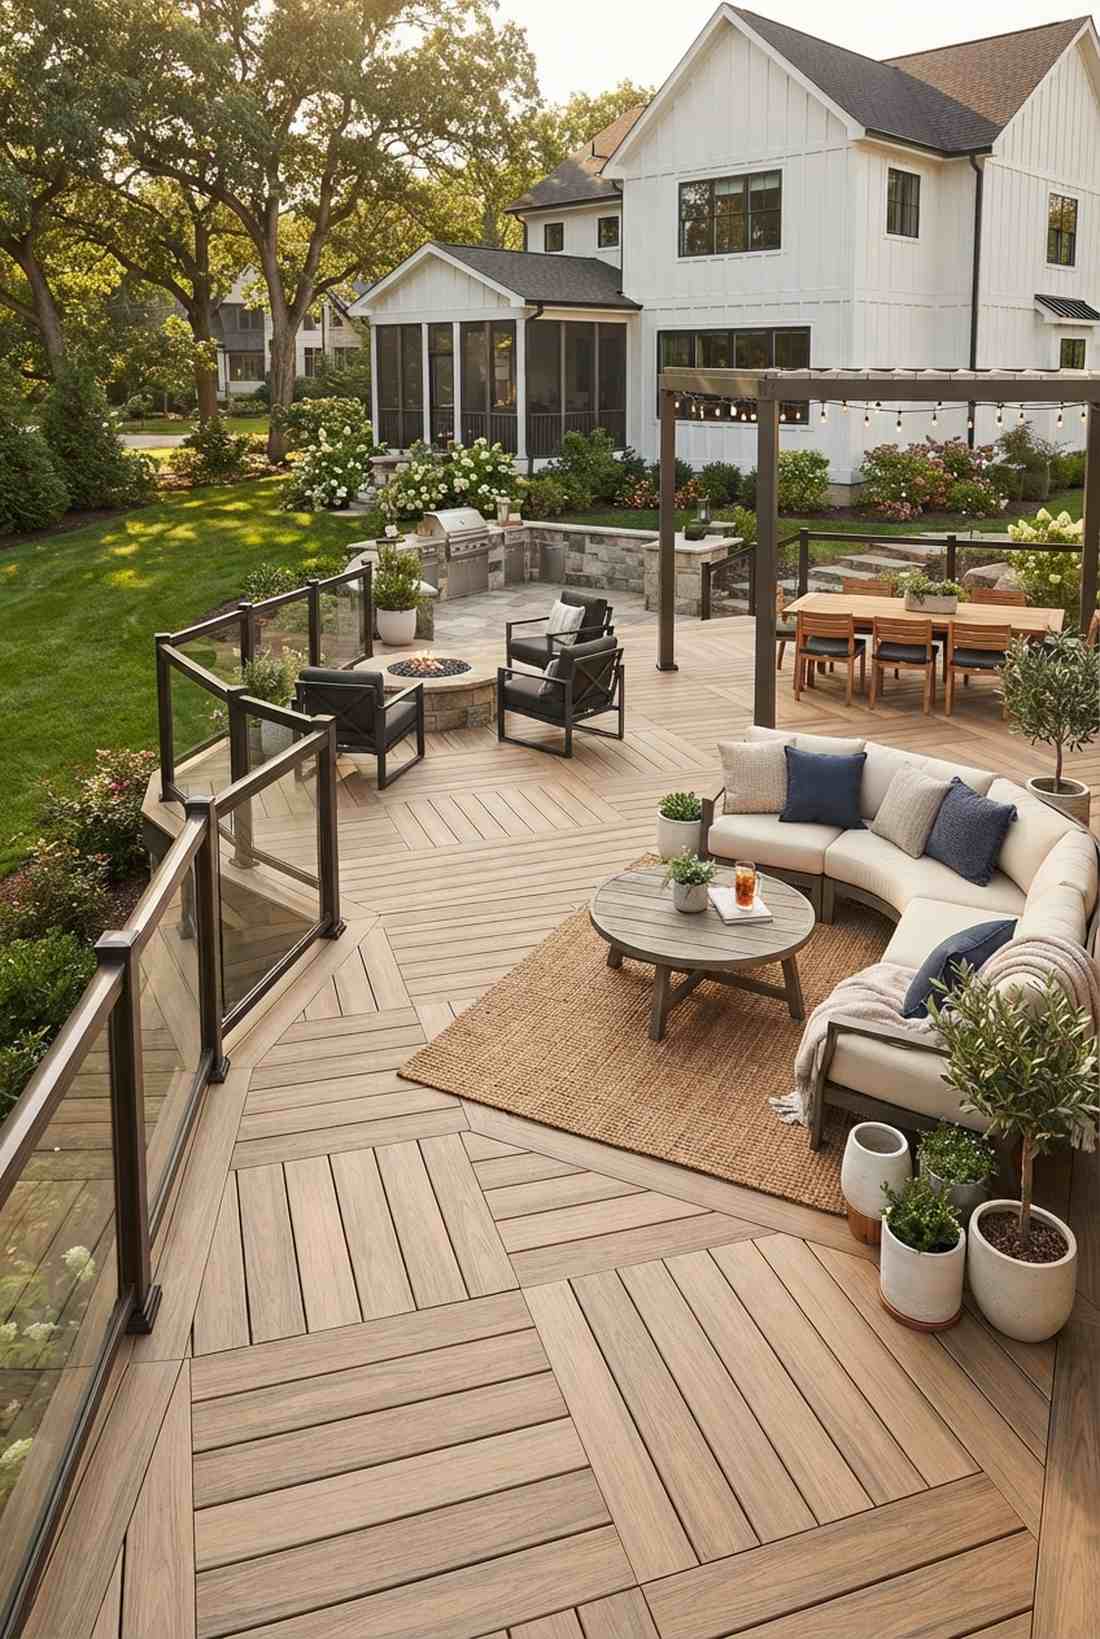
Multi-Level Entertainment Zones
Multi-level decks organize entertainment functions vertically, creating natural separation between cooking, dining, and relaxation areas. This approach works particularly well on sloped lots where elevation changes enhance architectural drama.
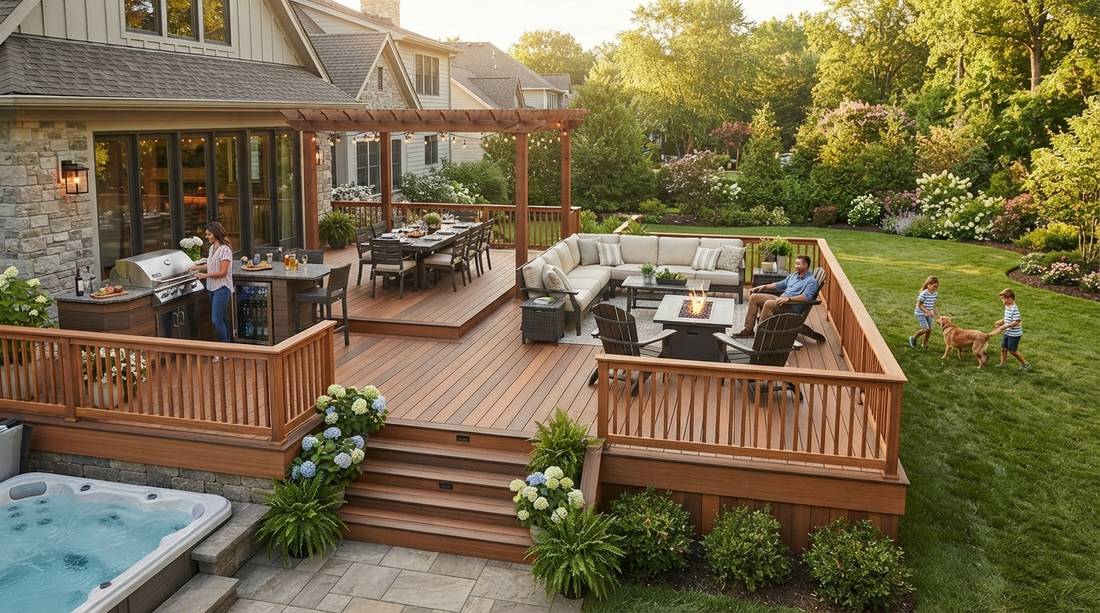
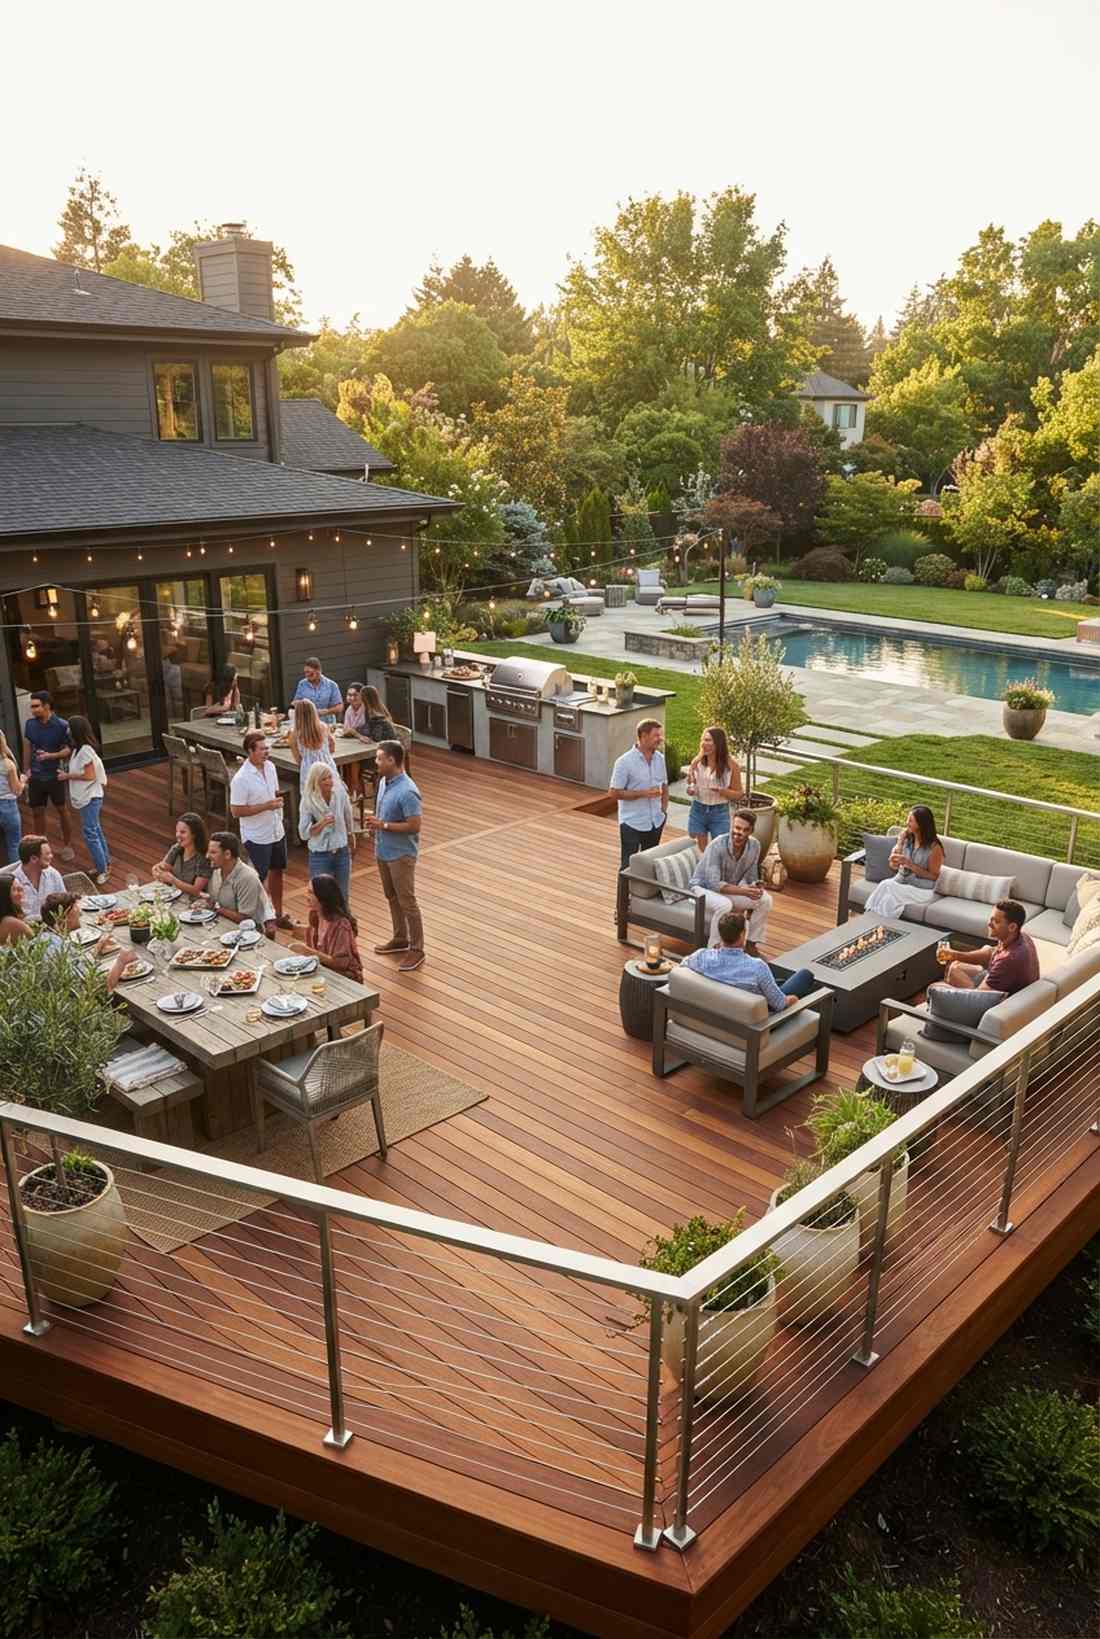
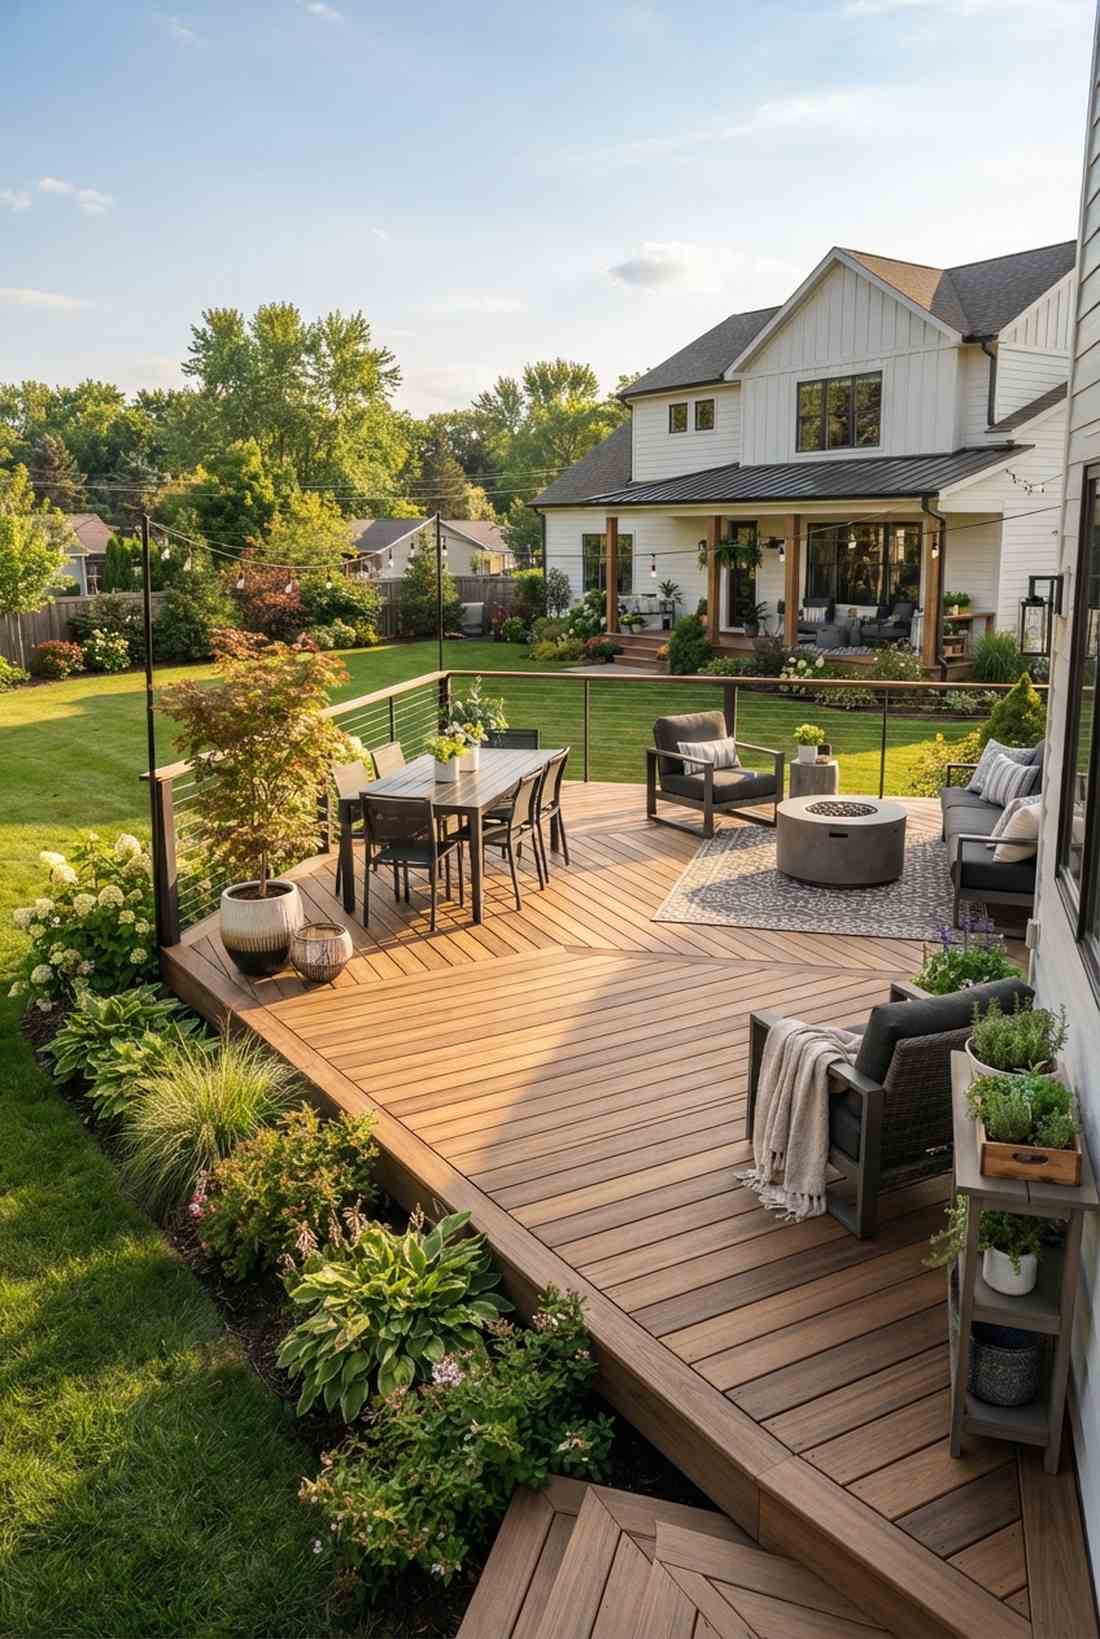
1. Three-Tier Entertainment Oasis
This layout feels like an exclusive mountain resort you just unlocked. Featuring a gorgeous multi-tiered entertainment platform, it works exceptionally well for sloping backyards that need structured zones.
Instead of battling uneven ground, this configuration delivers a surprisingly premium look by stacking activities vertically. Integrating waterproof composite fascia and high-end outdoor patio furniture creates an undeniable architectural statement.
You can execute this foundation for around $3,500–$5,000 depending on lumber prices. Save this to your DIY backyard remodel board!
- Key Materials: UV-resistant composite decking boards
- Vibe / Style: Luxury mountain lodge
- Difficulty: Advanced weekend build
- Budget Breakdown: Materials: $3500 | Hardware: $400
- Creator’s Tip: Use hidden fasteners on the middle tier to ensure a perfectly smooth barefoot walking surface.
- Smart Sourcing: pre-drilled composite deck kits and heavy-duty adjustable deck risers.
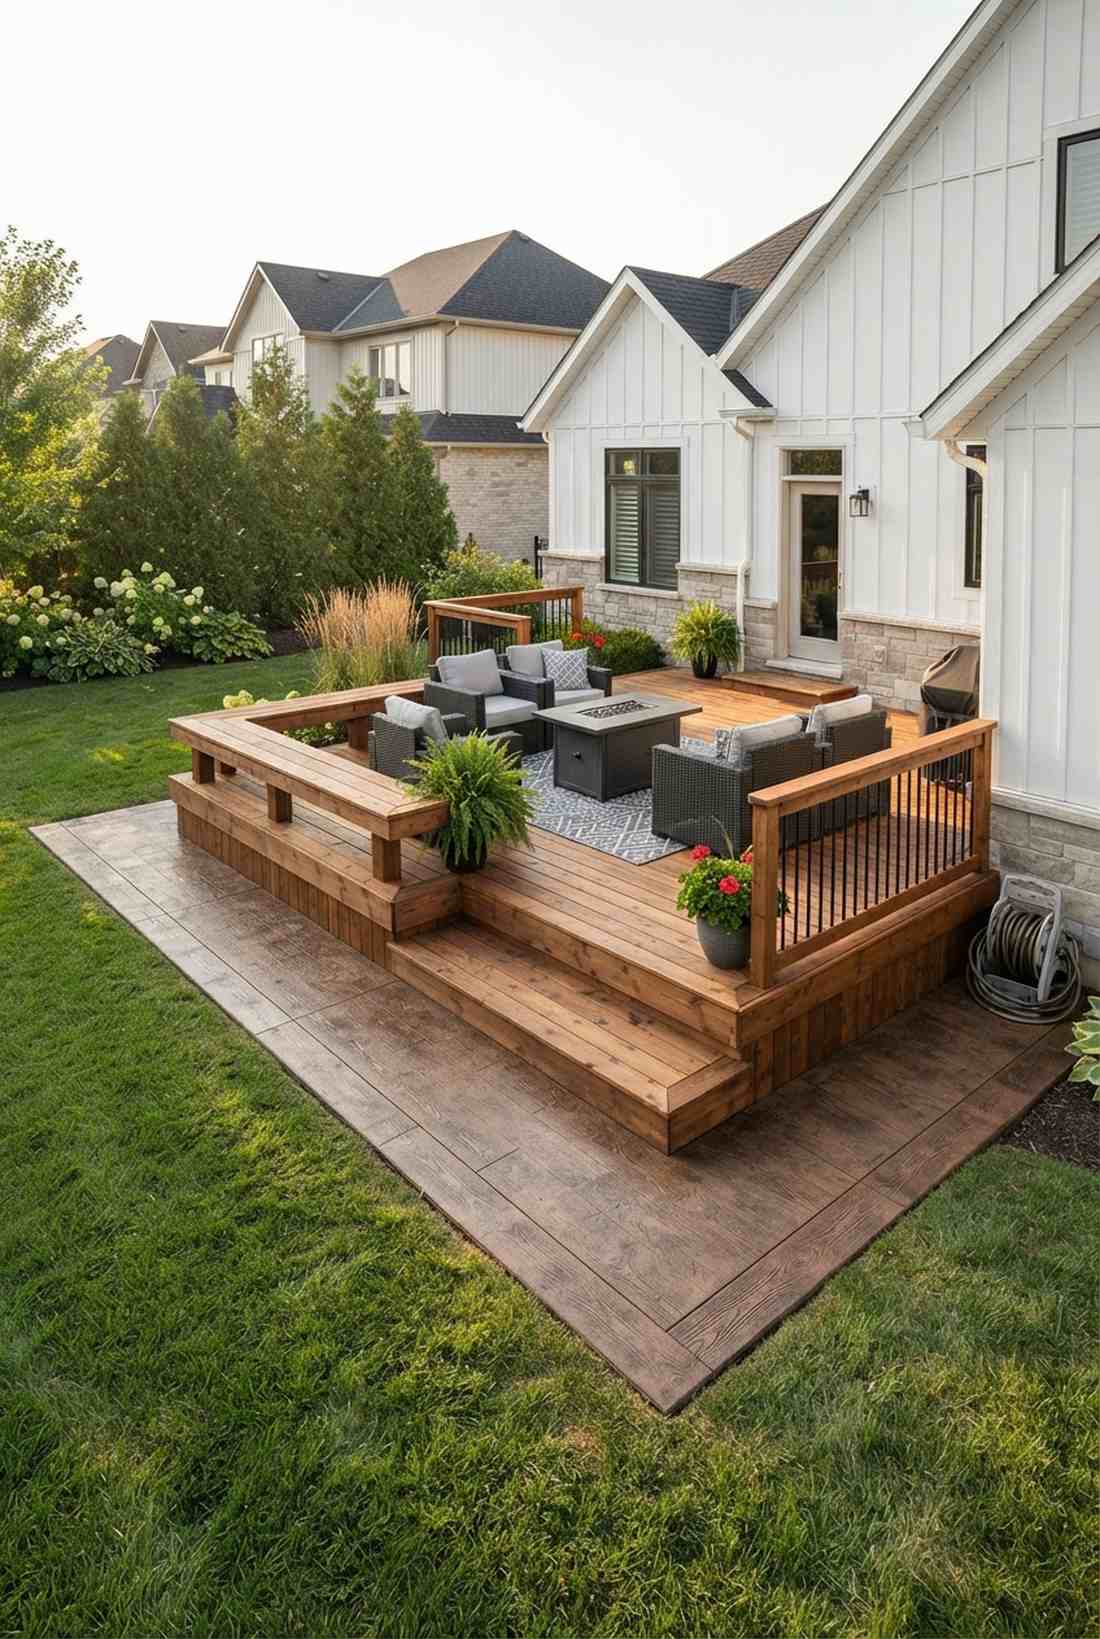
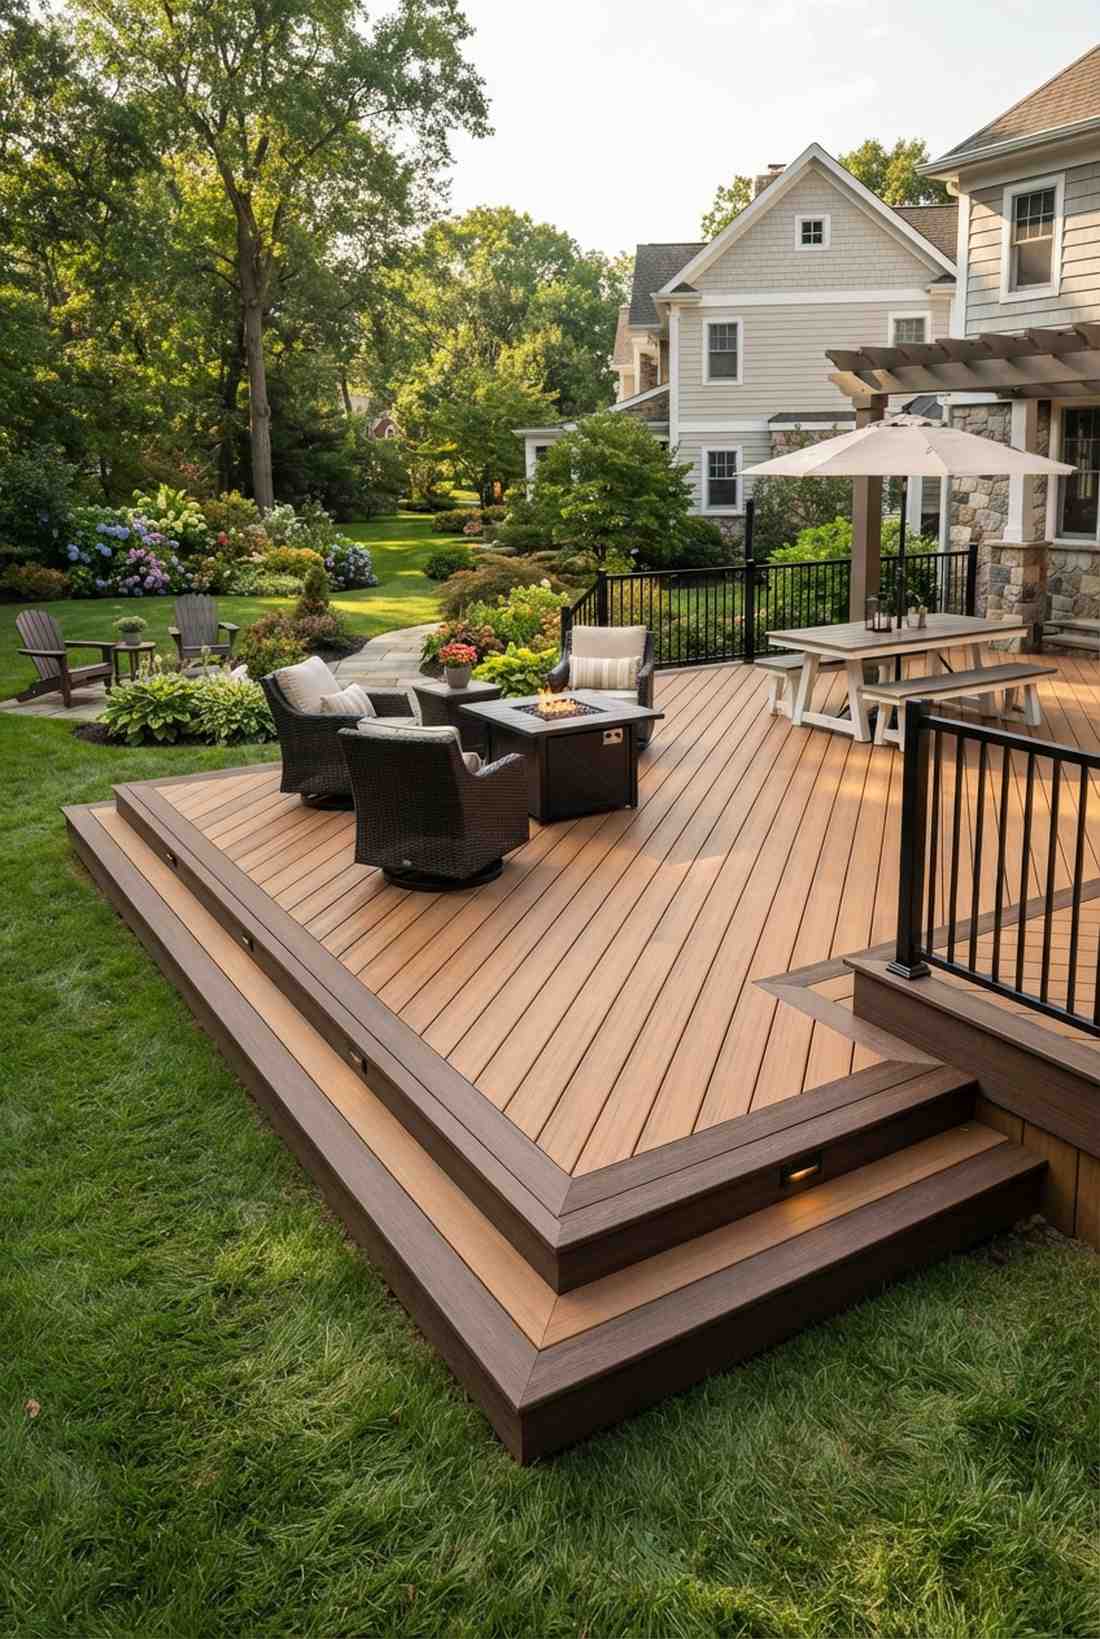
2. Split-Level Dining and Lounge
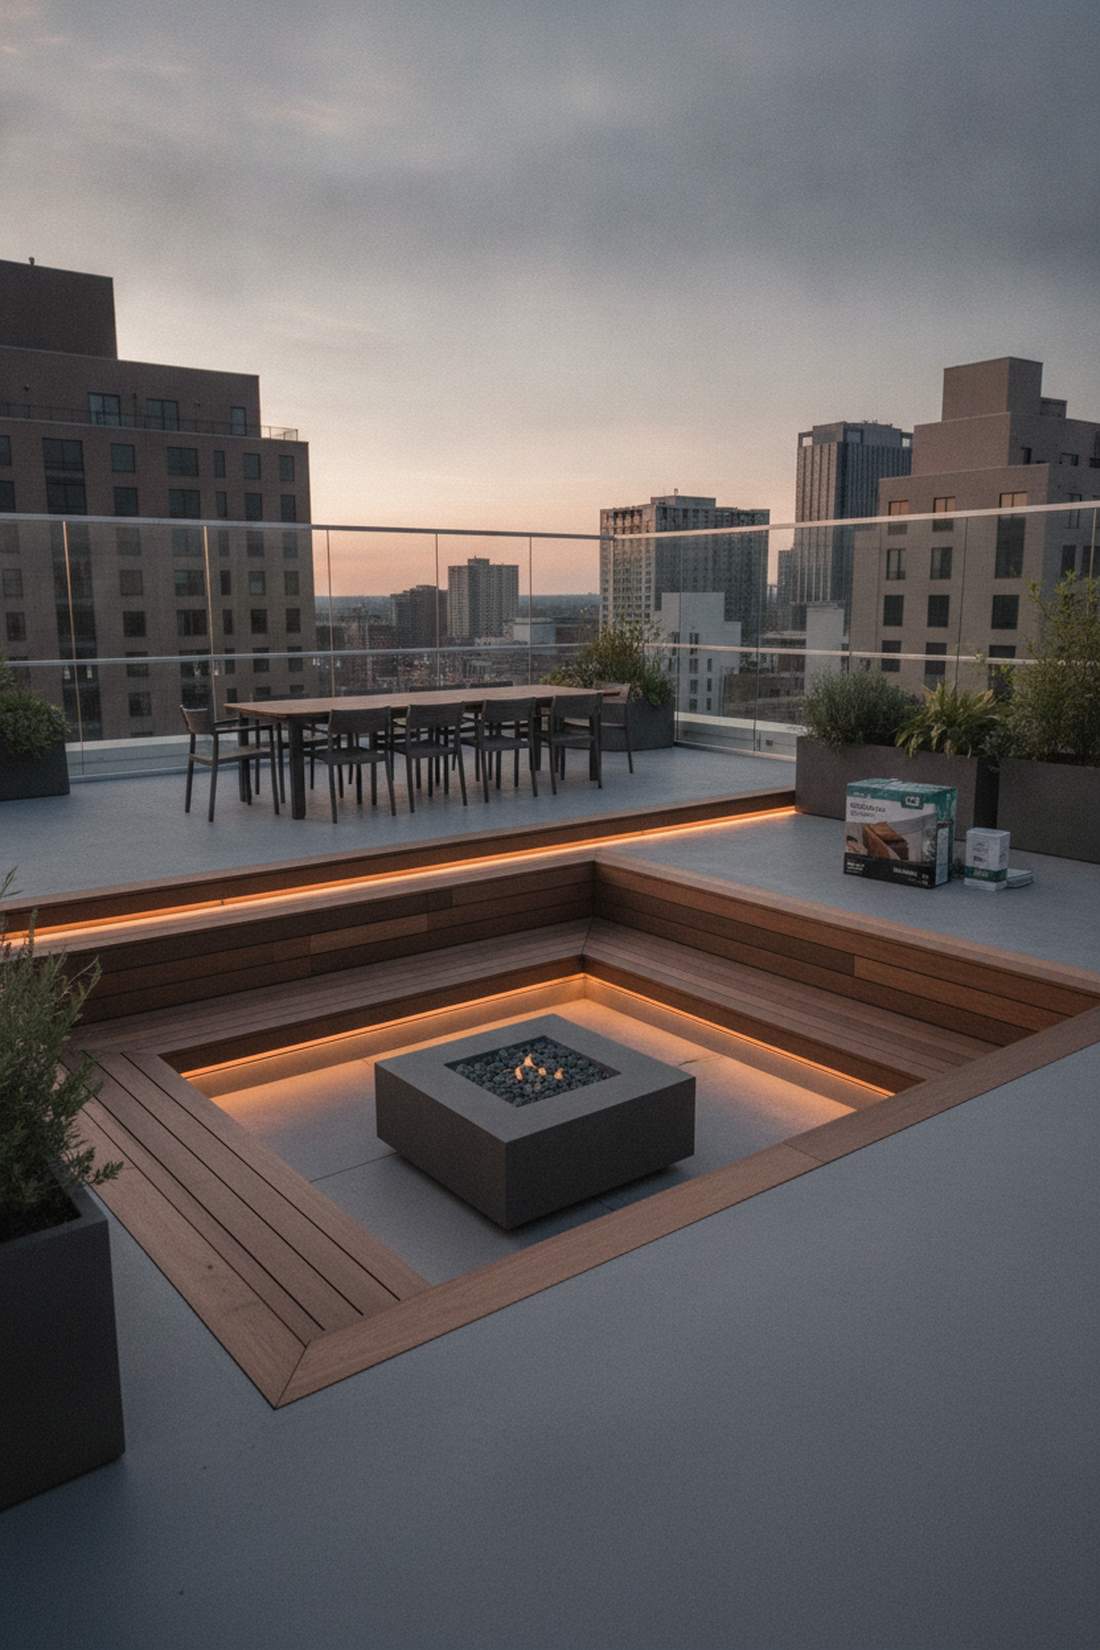
Stepping onto this design feels like entering a chic urban rooftop. The split-level outdoor dining space is absolute perfection for separating rowdy dinner parties from quiet conversation nooks.
Creating a simple one-step transition looks far more expensive than it is. Dropping the lounge area forces guests to naturally congregate, while sleek acrylic railing panels maintain an open, airy sightline.
Expect to spend roughly $1,200–$2,800 to pull this off. It’s a highly recommended layout for a quick property value boost.
- Key Materials: Pre-cut wooden bench seating
- Vibe / Style: Modern minimalist host
- Difficulty: Intermediate project
- Budget Breakdown: Lumber: $1200 | Sealant: $80
- Creator’s Tip: Add a contrasting edge board to clearly highlight the step and prevent tripping hazards at night.
- Smart Sourcing: weatherproof outdoor stain (bulk pack) and pre-cut perimeter bench kits.
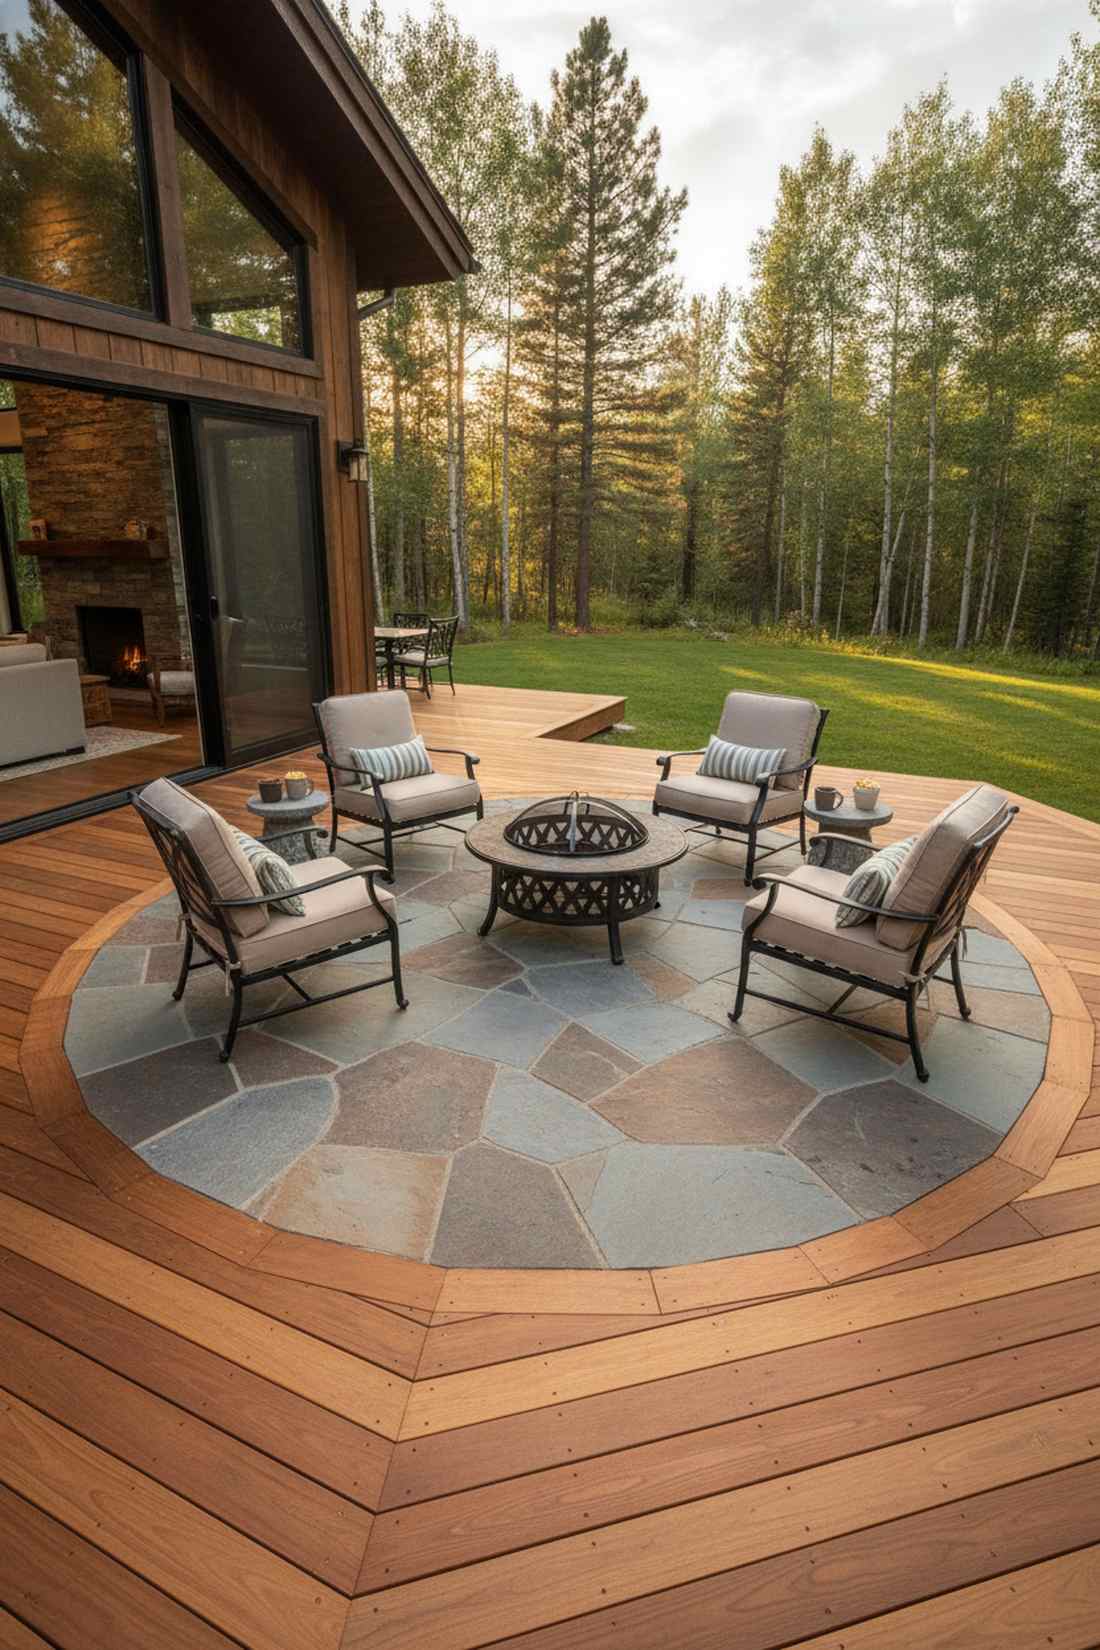
3. Octagonal Multi-Platform Design
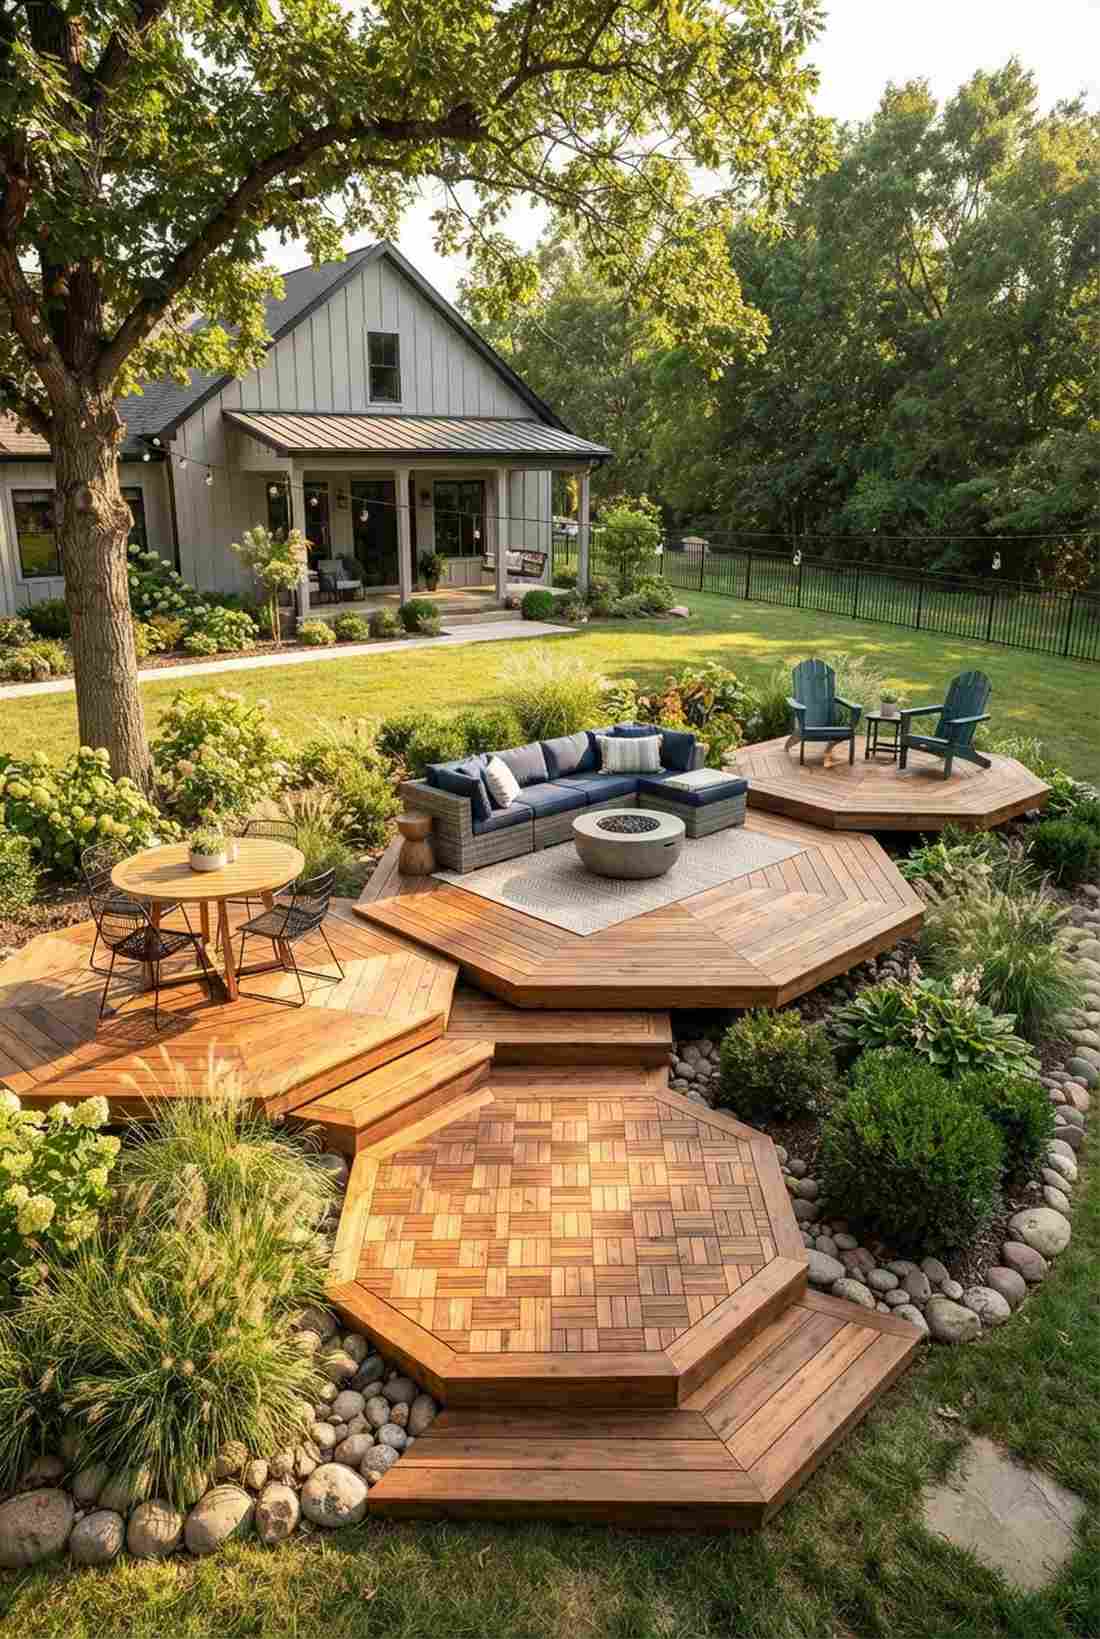
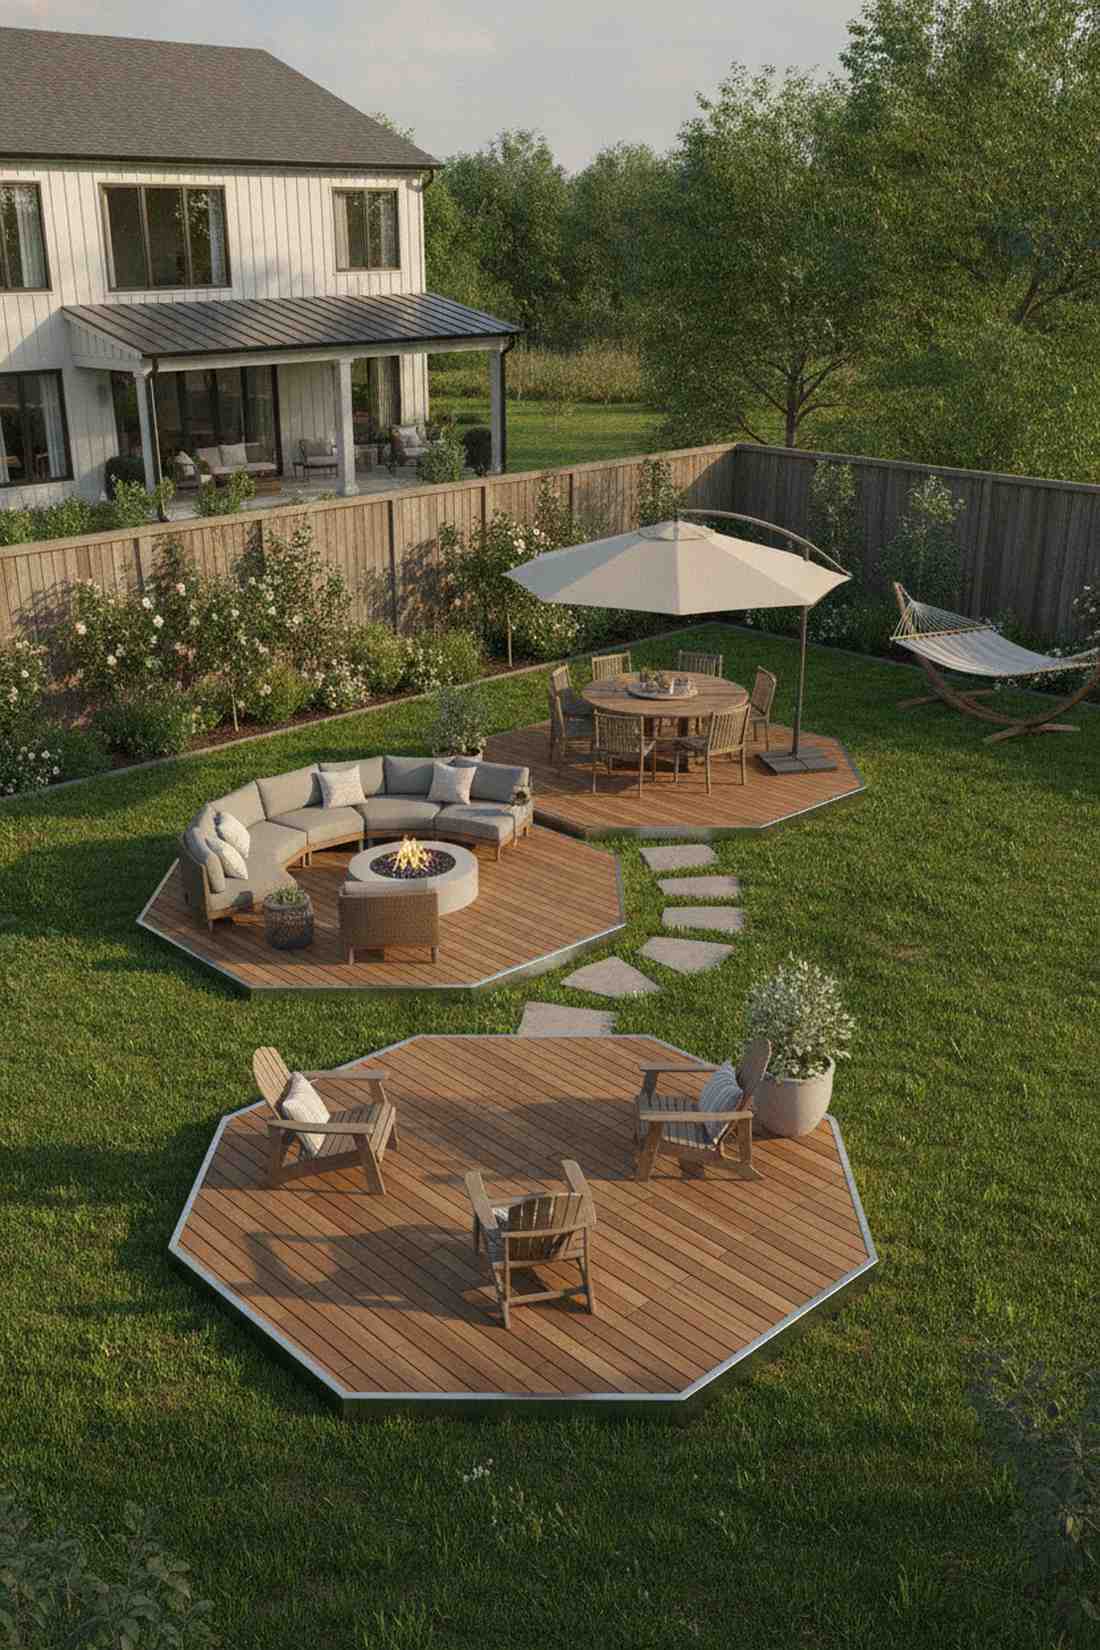
This dynamic geometry feels like a secret garden pavilion. The octagonal deck platforms are brilliant for creating distinct pockets of activity across an awkward or wide yard.
Ditching standard squares for angled edges completely transforms the space into a custom architectural marvel. Combining premium interlocking deck tiles with these unique shapes drastically cuts down installation time while mimicking a high-end contractor job.
You can tackle an octagonal platform for under $2,000 using modular systems. Pin this if you’re tired of boring rectangular patios!
- Key Materials: Modular interlocking deck tiles
- Vibe / Style: Contemporary geometric garden
- Difficulty: Moderate
- Budget Breakdown: Base Frame: $800 | Decking: $1200
- Creator’s Tip: Pre-build the octagonal frames on the ground before raising them onto the structural posts.
- Smart Sourcing: snap-together acacia wood tiles and galvanized corner brackets (bulk pack).
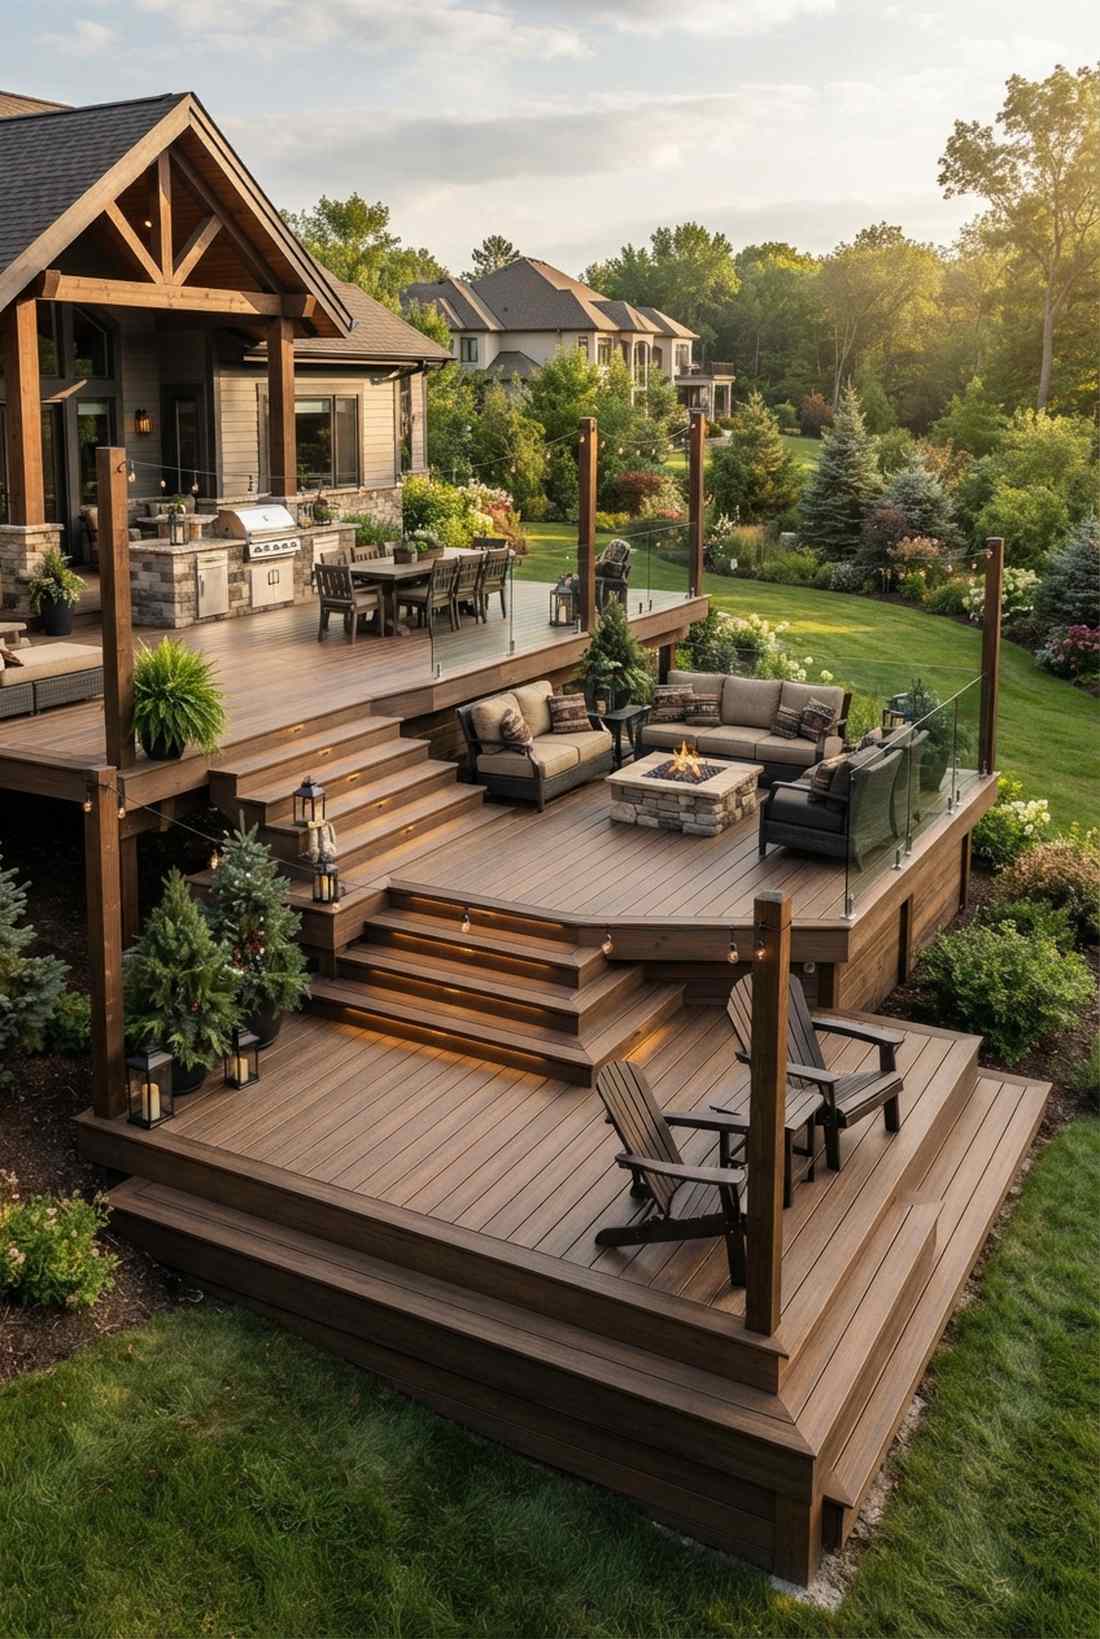
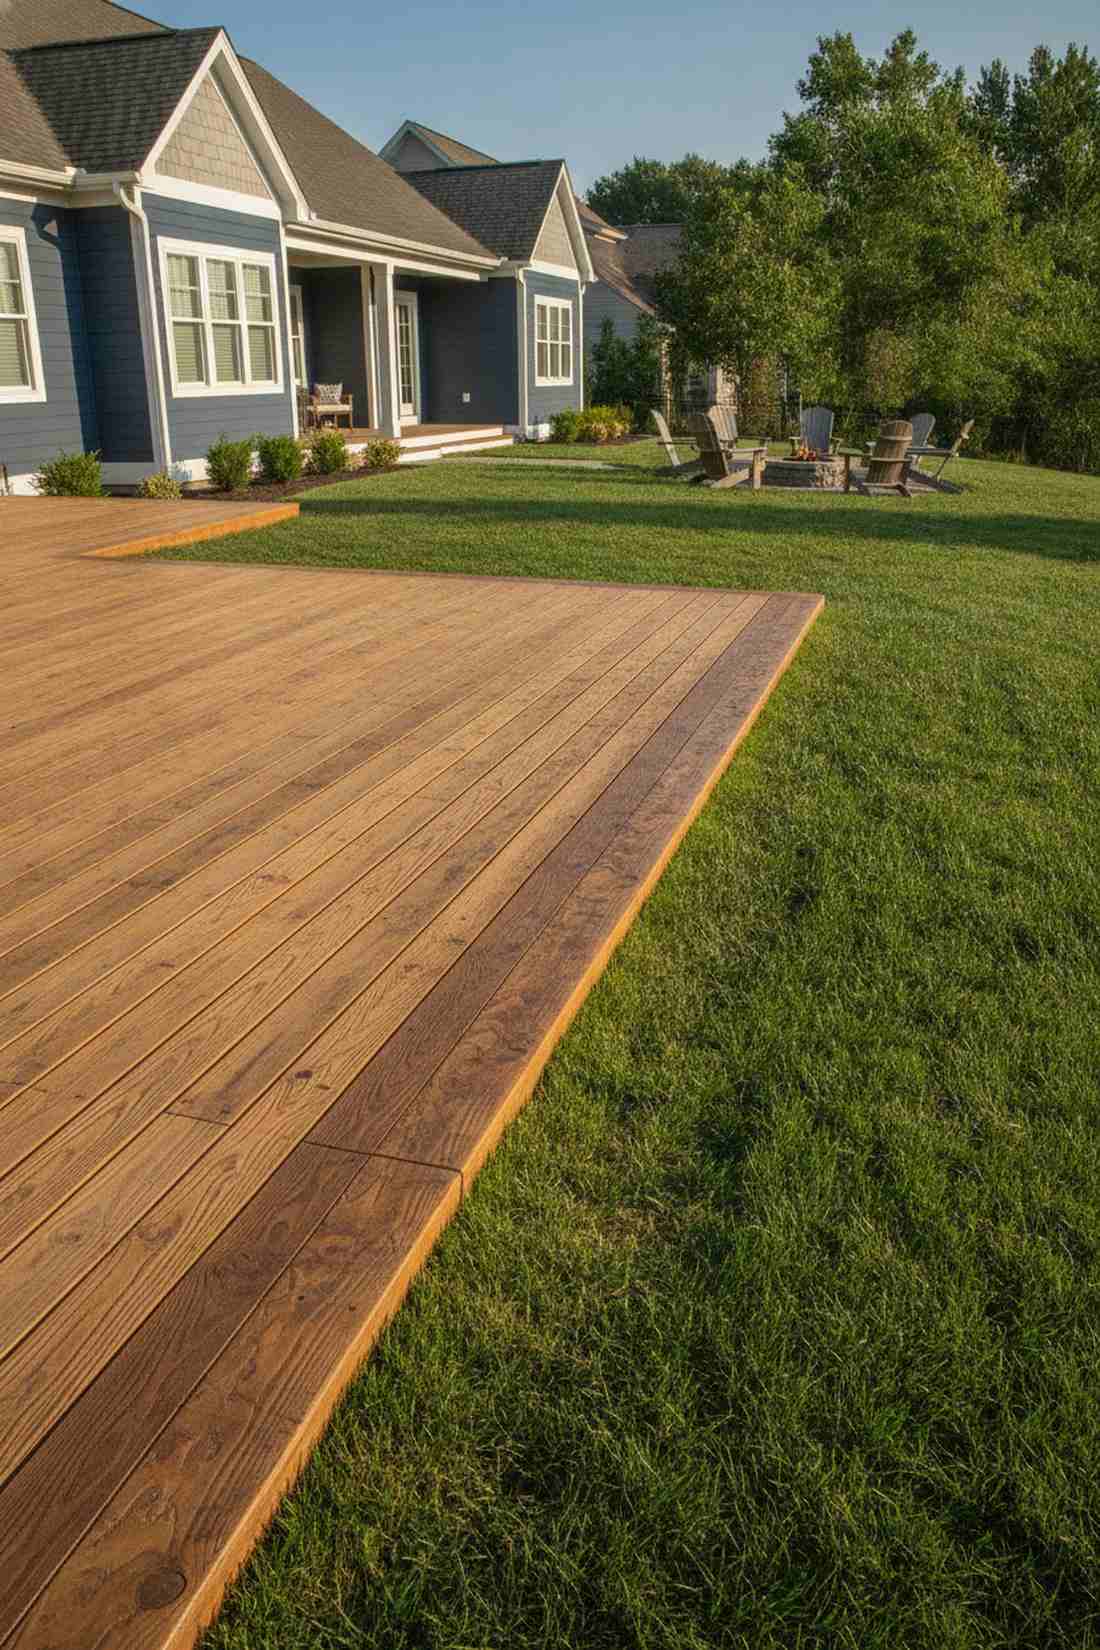
4. Cascading Stairway Entertainment Deck
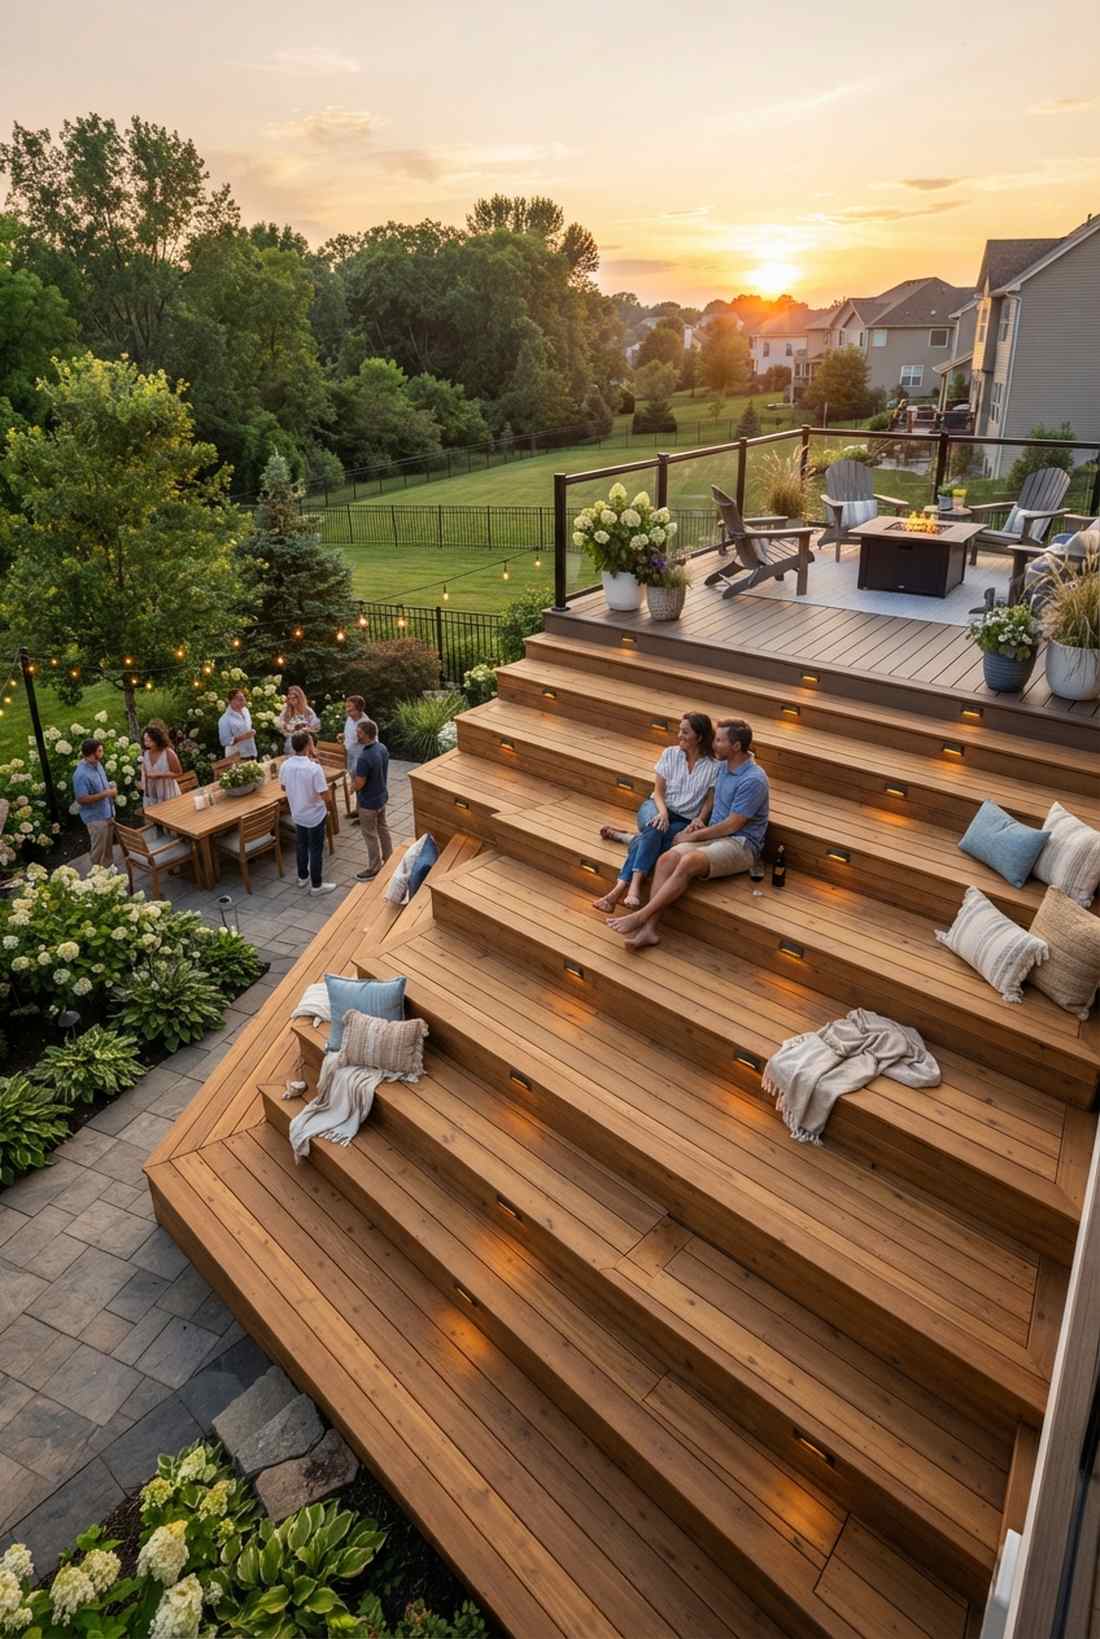
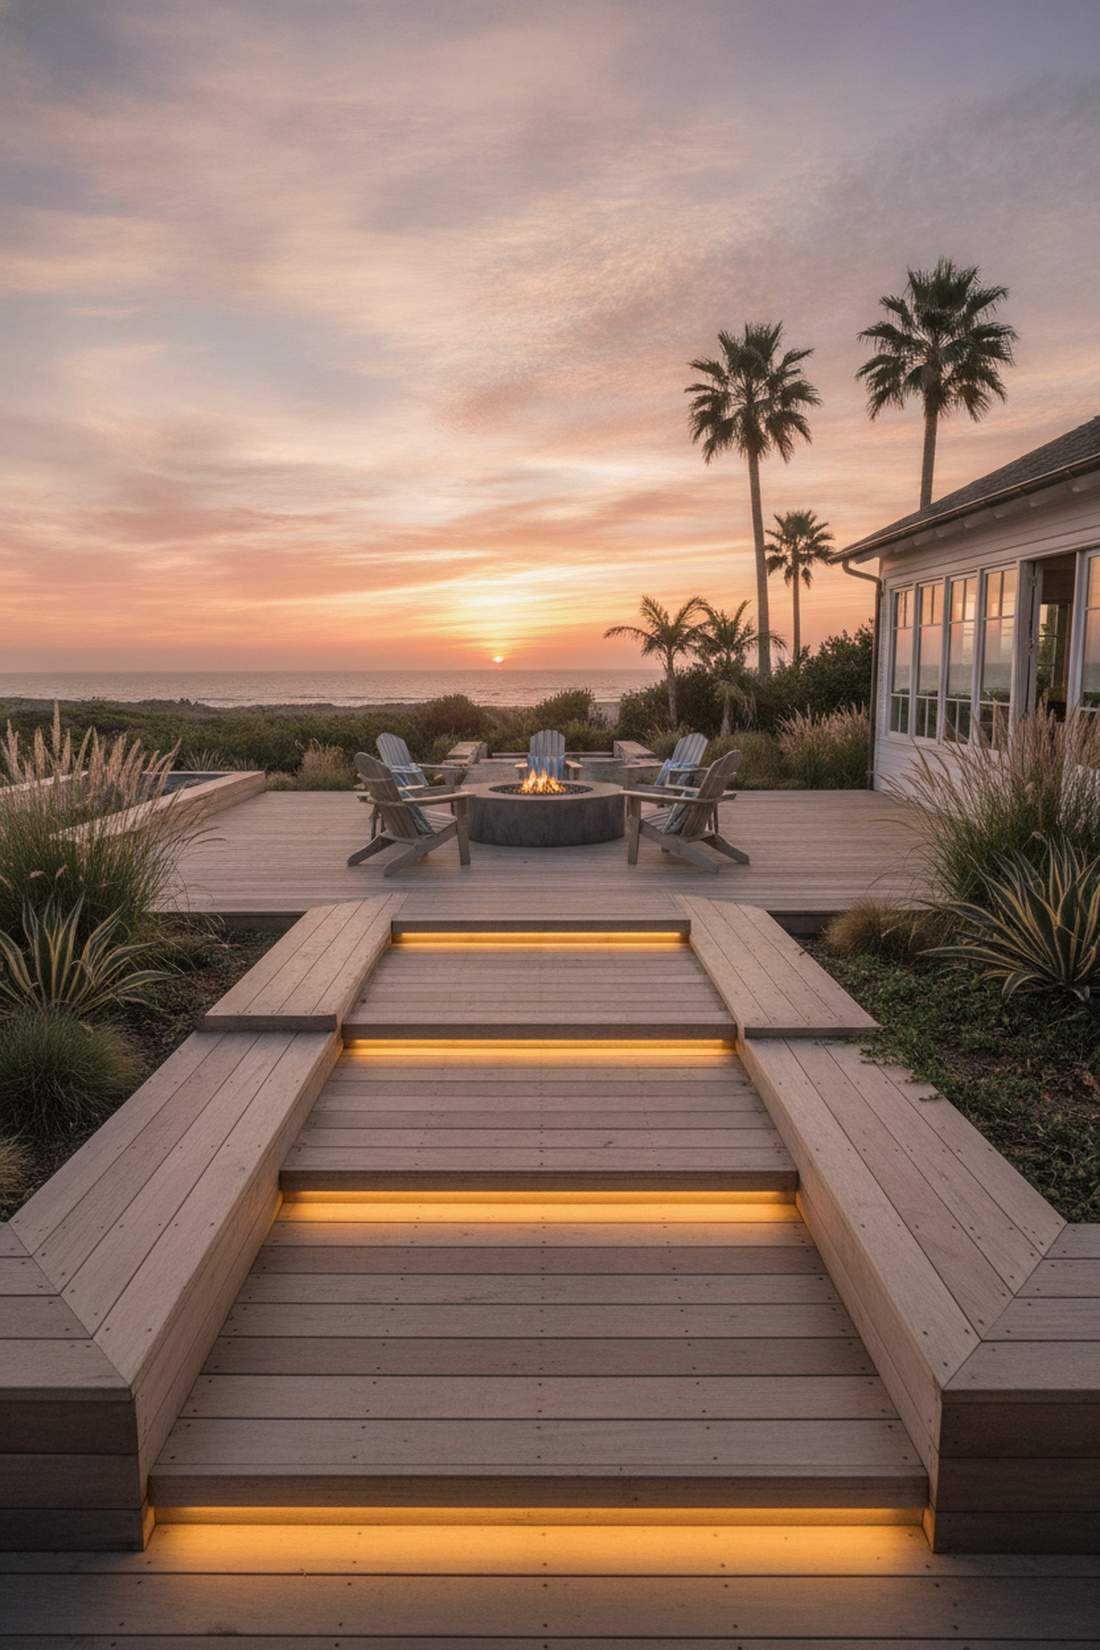
Walking down this space feels like descending into a luxury amphitheater. The cascading outdoor stairway serves as both a grand entrance and built-in party seating.
Most standard stairs are wasted space, but stretching them into wide benches gives a designer-level finish. Integrating hardwired riser lights and marine-grade lumber turns a simple walkway into the ultimate sunset-watching spot.
Budget around $800–$1,500 specifically for the expanded staircase materials. It creates a stunning focal point without breaking the bank.
- Key Materials: Extra-wide treated pine planks
- Vibe / Style: Casual coastal gathering
- Difficulty: Intermediate
- Budget Breakdown: Stair Stringers: $200 | Treads: $600
- Creator’s Tip: Keep the riser height slightly lower than standard (around 6 inches) to make them comfortable for long-term seating.
- Smart Sourcing: pre-cut 4-step stringers and low-voltage LED stair lights (starter kit).
This next setup is ridiculously cheap but looks like a $10,000 custom architectural spa display…
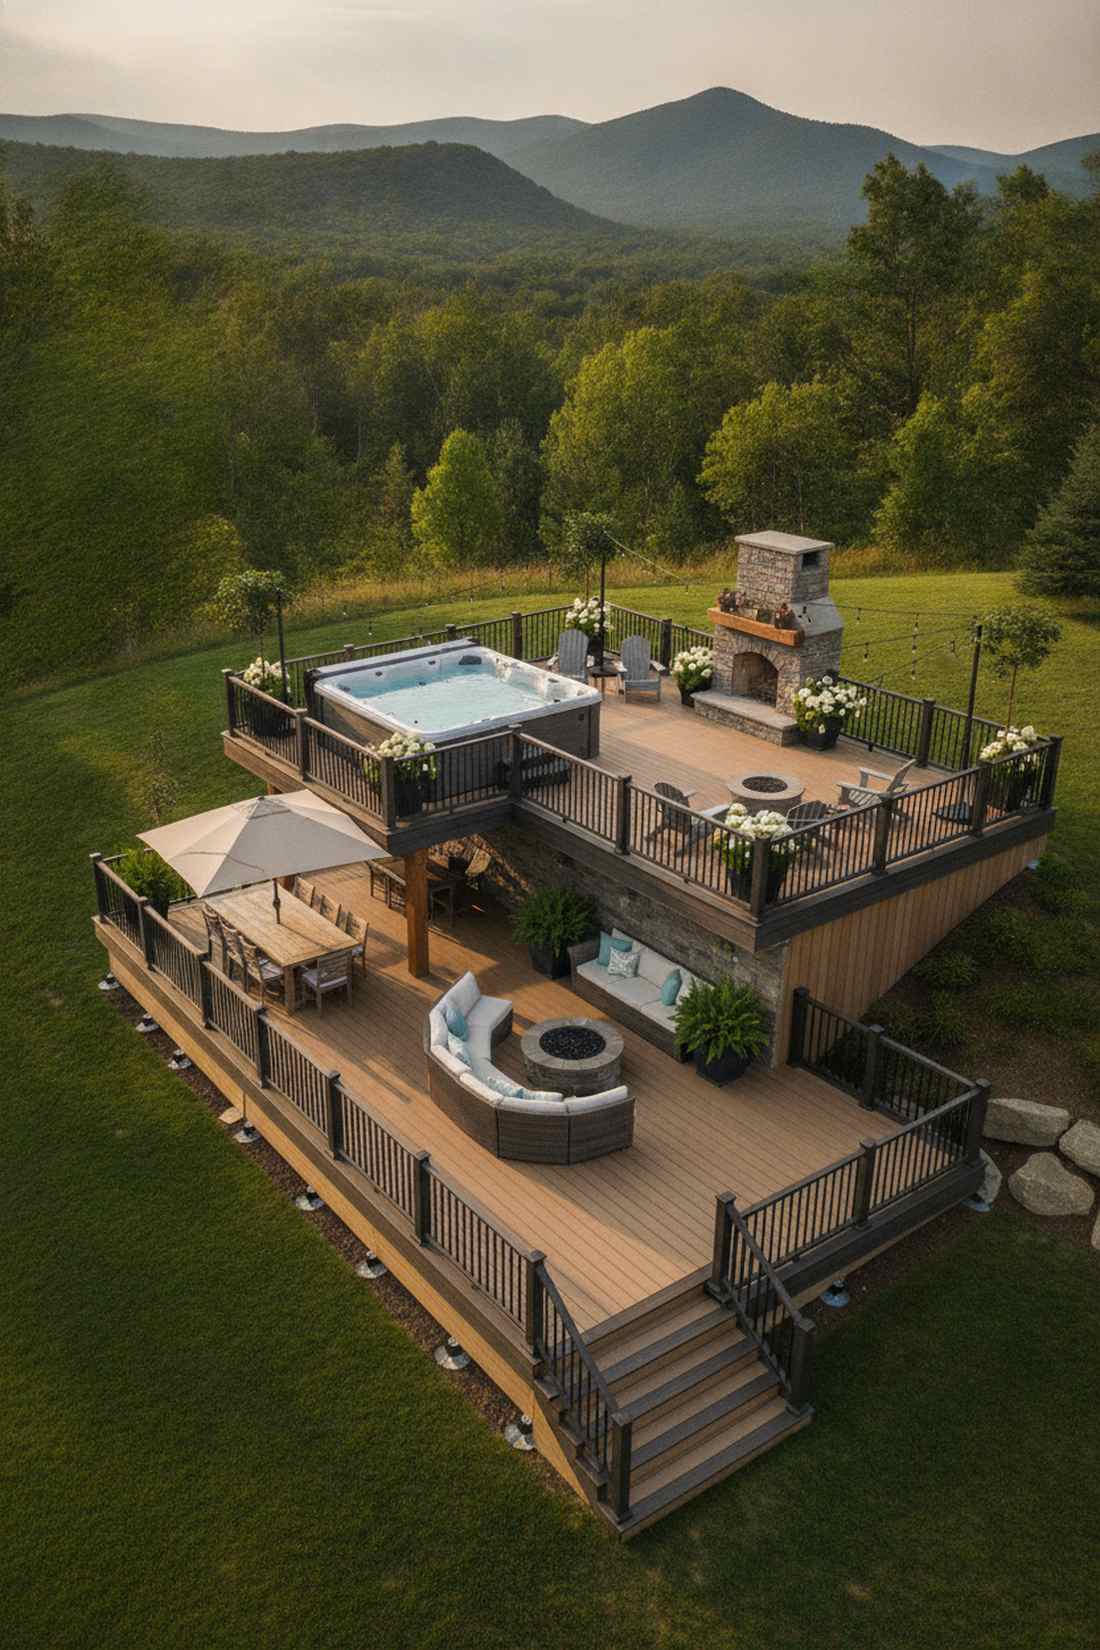
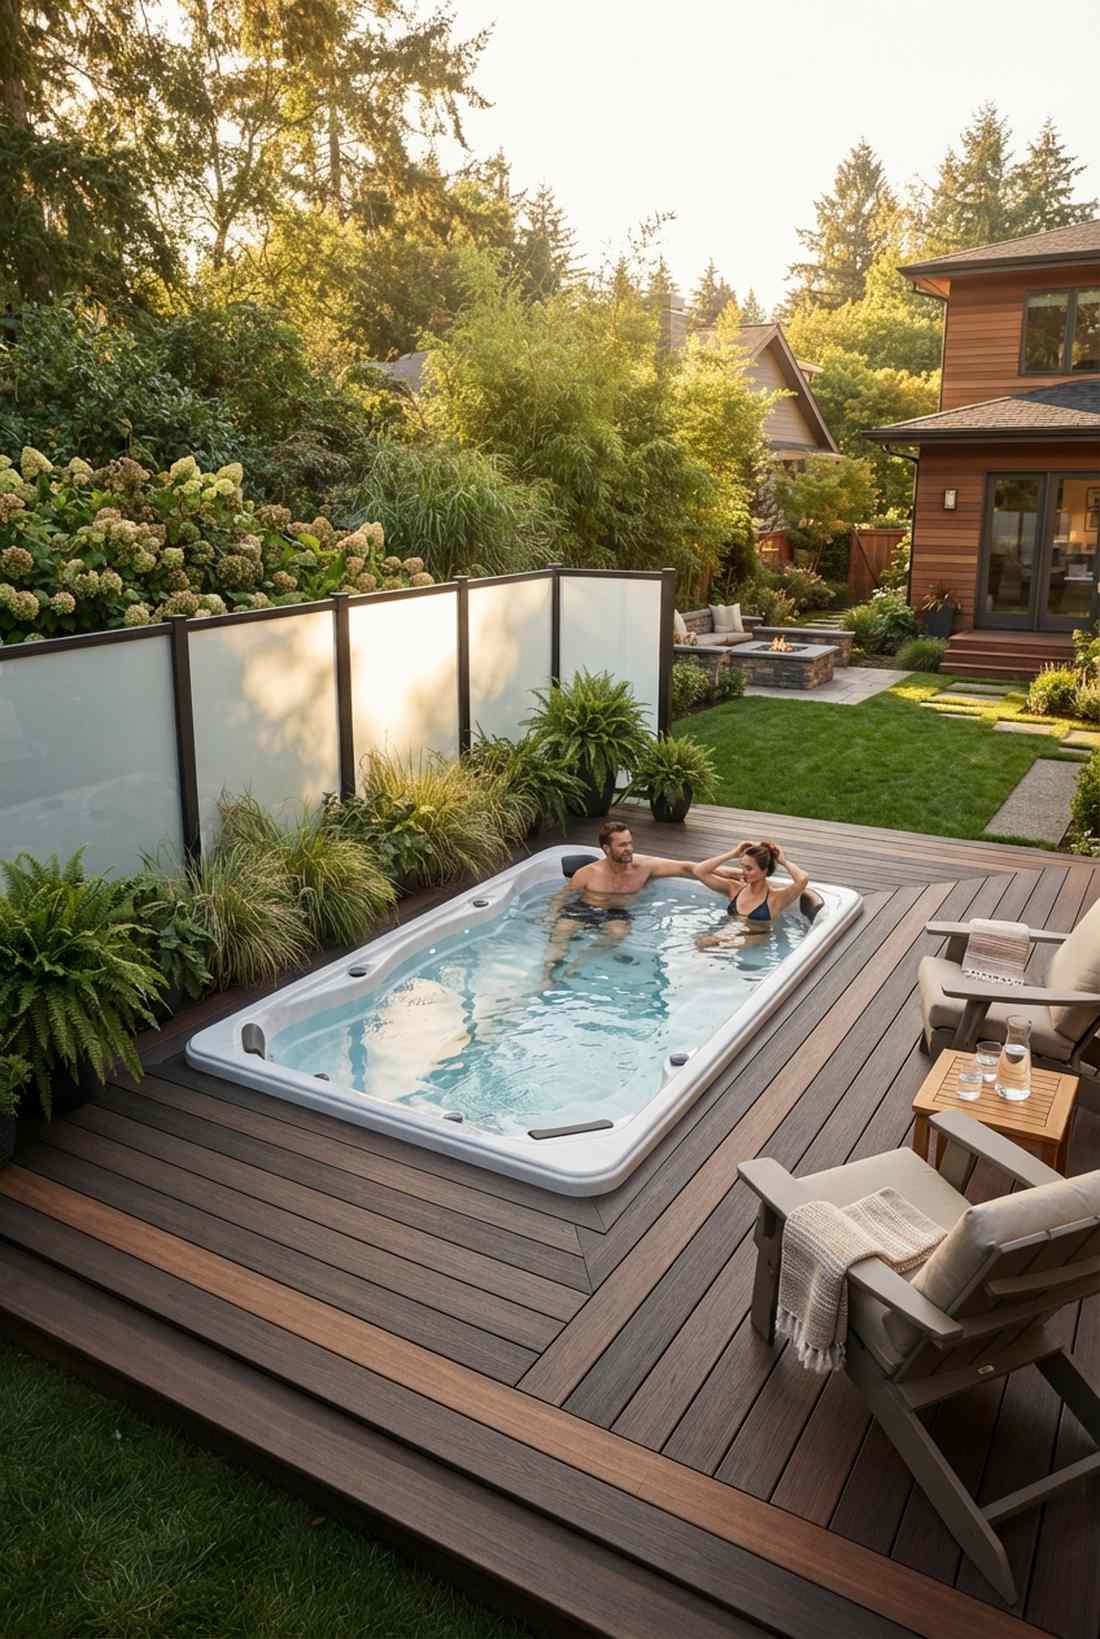
5. Elevated Hot Tub Sanctuary

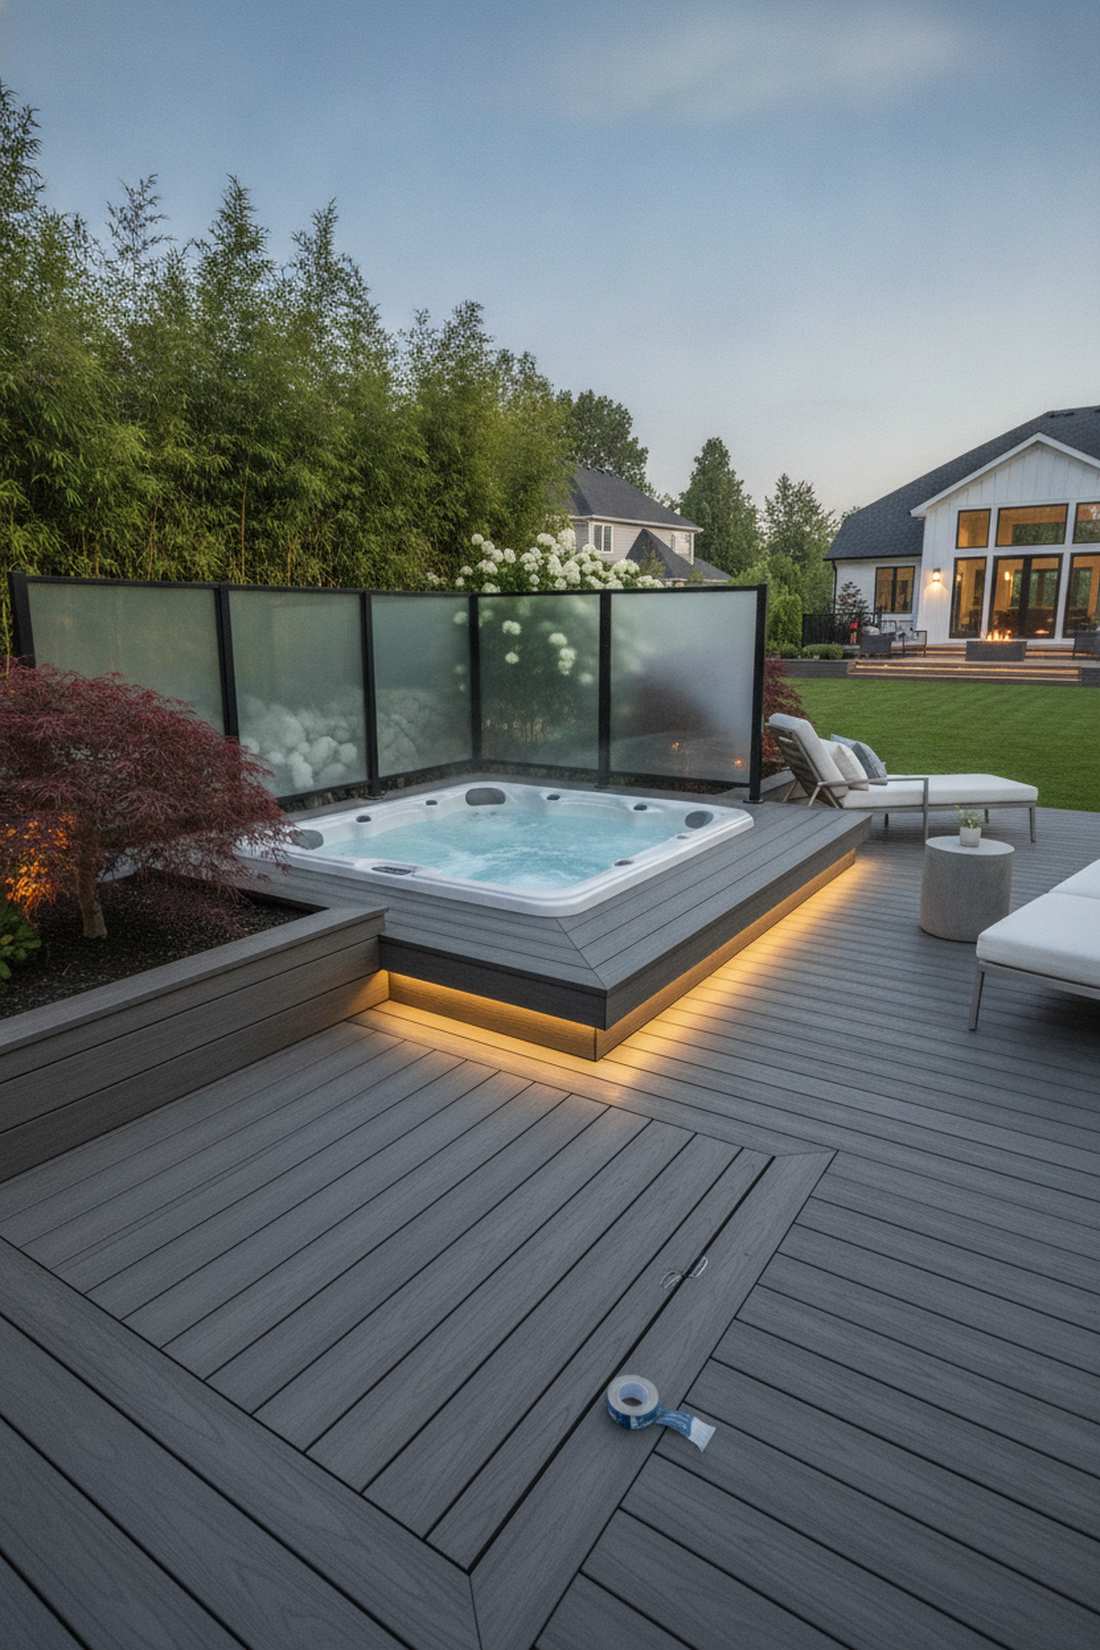
This hidden oasis feels like a private wellness retreat in your own backyard. Building a raised hot tub platform works wonders for adding privacy and creating a dedicated relaxation zone.
Sinking a spa into a deck is a nightmare for maintenance, but elevating the platform around it achieves that seamless custom look effortlessly. Utilizing moisture-blocking underlayment keeps the surrounding wood pristine despite constant splashing.
You can frame out this spa surround for roughly $900–$1,400. Save this to your ultimate backyard spa board!
- Key Materials: Moisture-resistant composite decking
- Vibe / Style: Zen wellness sanctuary
- Difficulty: Intermediate
- Budget Breakdown: Framing: $400 | Composite Finish: $500
- Creator’s Tip: Build a hidden trapdoor into the deck surface for easy access to the hot tub’s motor and plumbing.
- Smart Sourcing: waterproof deck tape (bulk roll) and anti-slip decking strips.
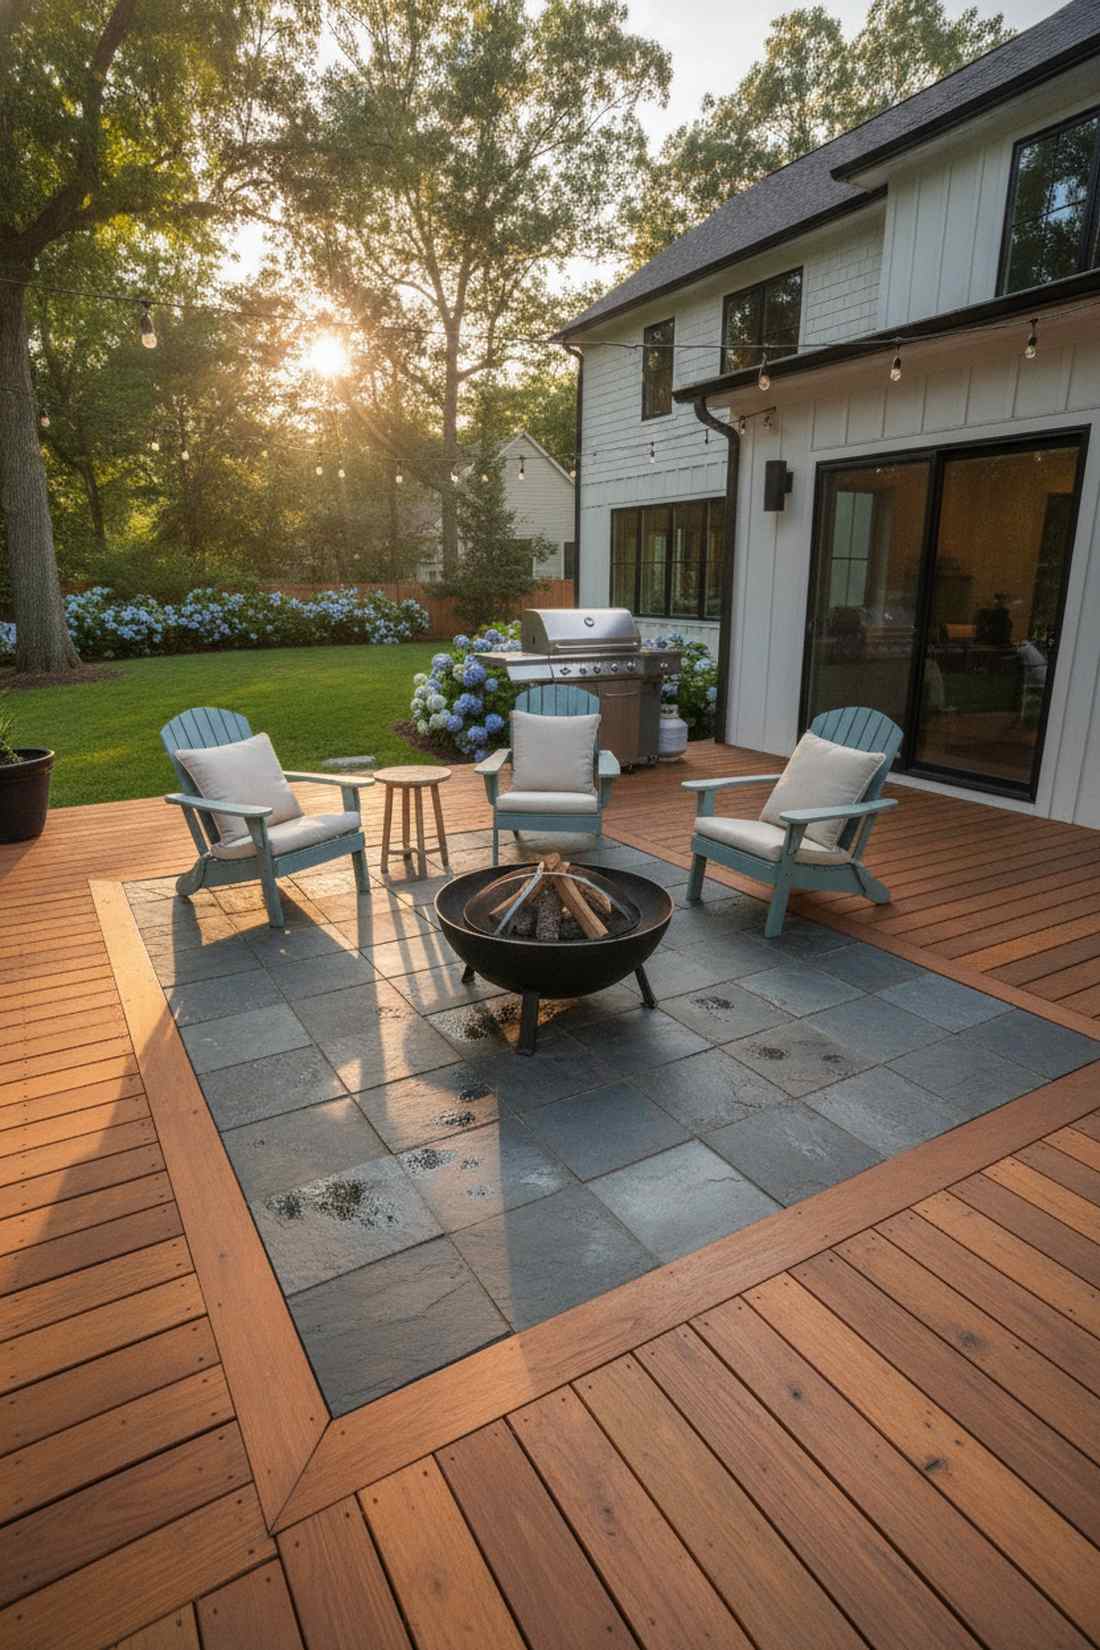
6. Upper Dining Lower Patio Combination
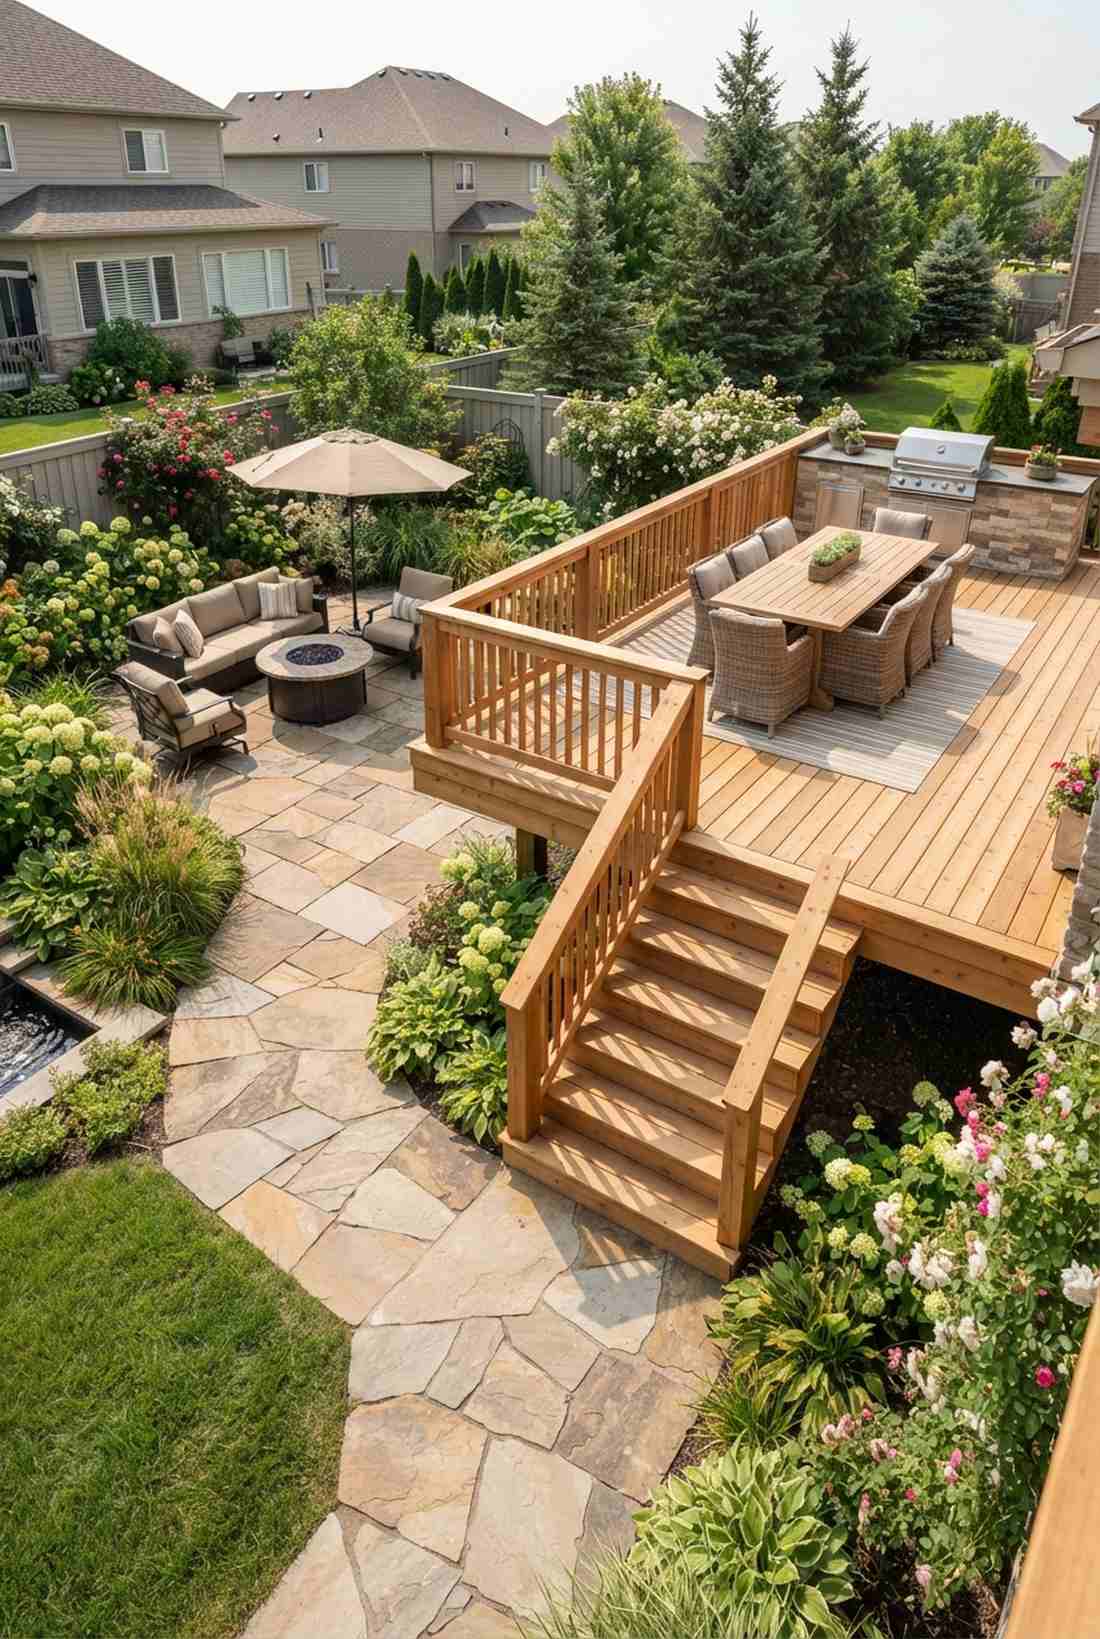
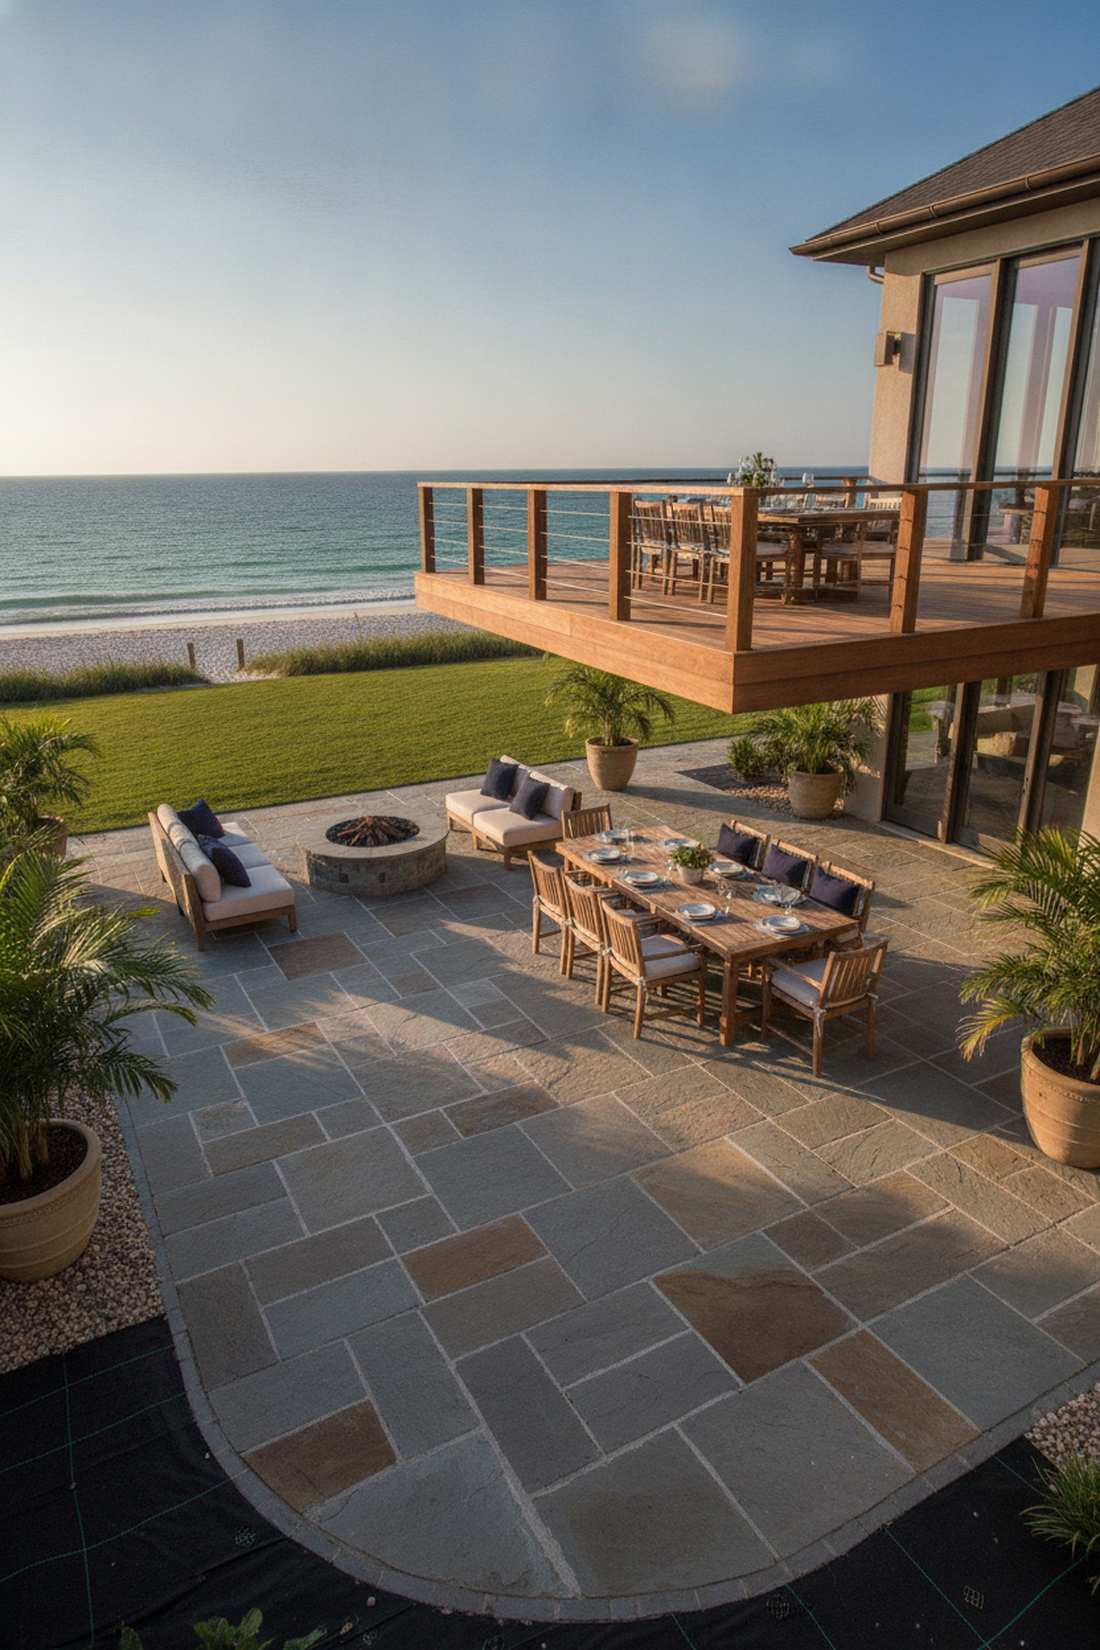
The flow of this space feels exactly like a high-end beachfront villa. The deck-to-patio transition layout is the absolute perfect move for mixing wet and dry entertainment spaces.
Blending an elevated wood platform with a stone paver foundation forces a massive upgrade in backyard aesthetics. Using polymeric sand for the patio joints ensures no weeds ruin the luxury vibe below the dining zone.
Setting up this dual-material paradise generally runs $2,500–$4,000. The mixed-texture contrast is visually stunning!
- Key Materials: Flagstone pavers and natural cedar
- Vibe / Style: Transitional modern estate
- Difficulty: Advanced
- Budget Breakdown: Wood Decking: $1500 | Pavers & Sand: $1000
- Creator’s Tip: Match the stain of the upper deck railings to a color found naturally in your lower patio stone to tie the zones together.
- Smart Sourcing: weed-blocking landscaping fabric (heavy-duty) and polymeric jointing sand.
7. Circular Gazebo Tiered Deck
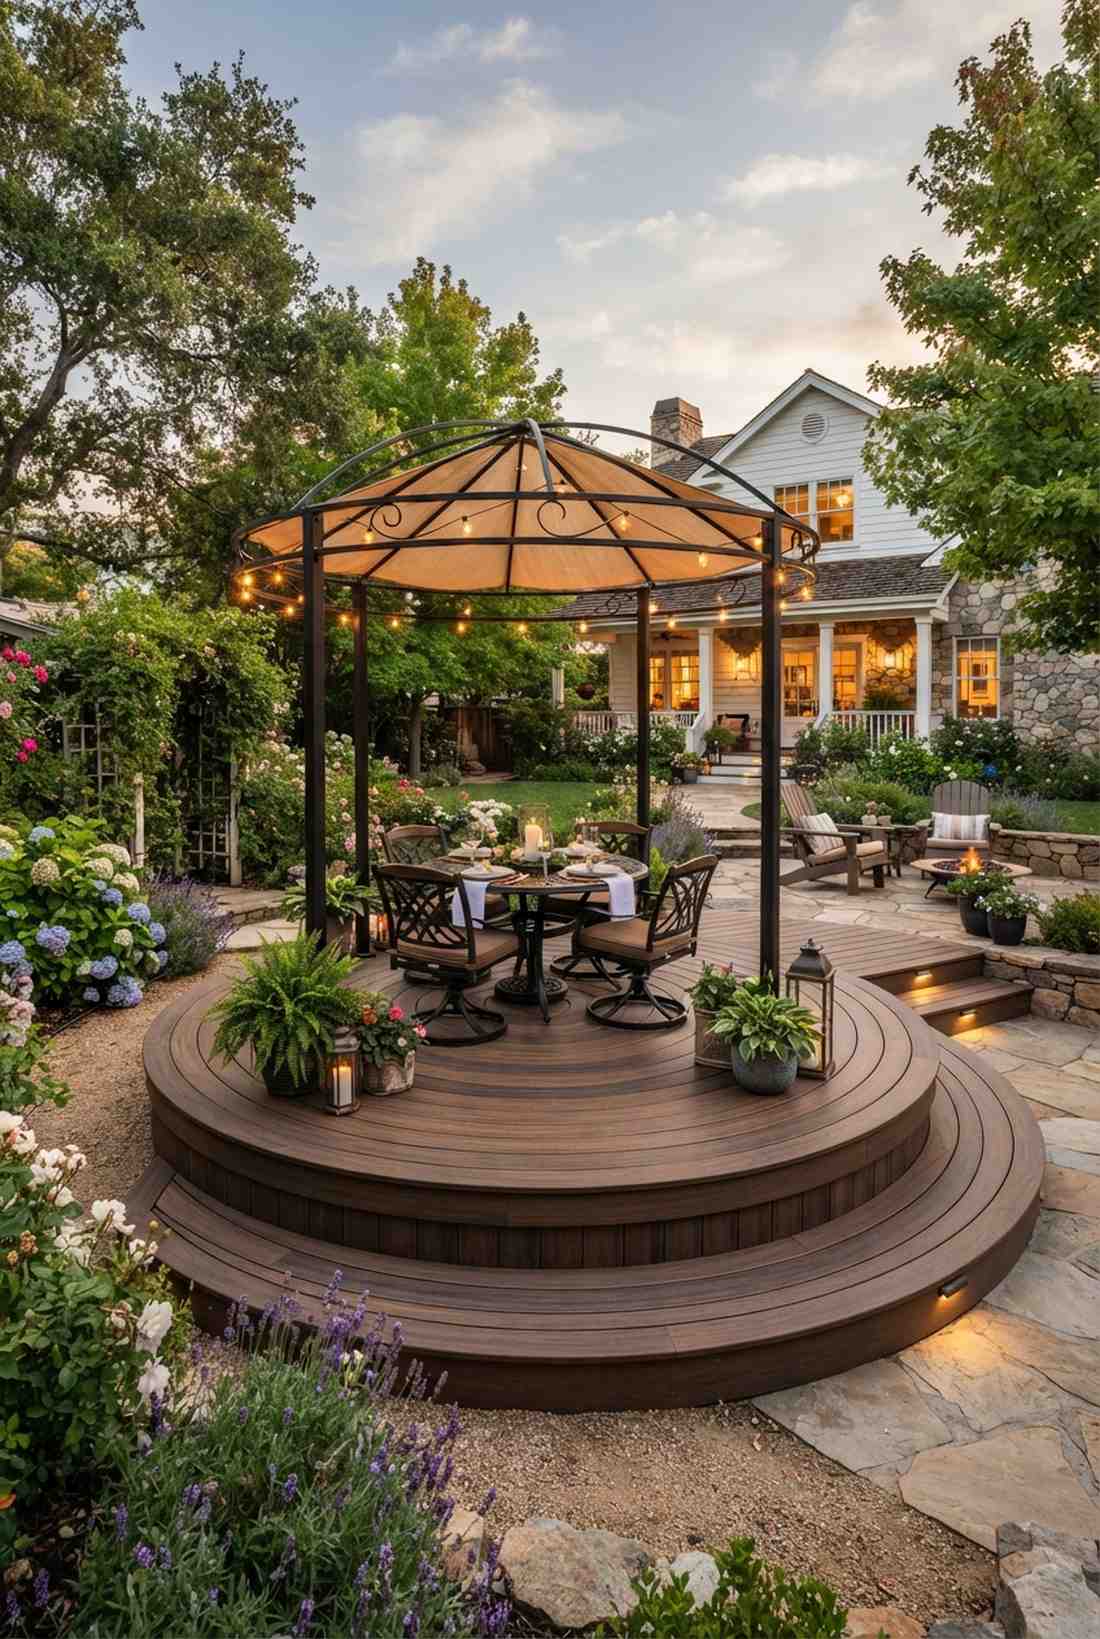
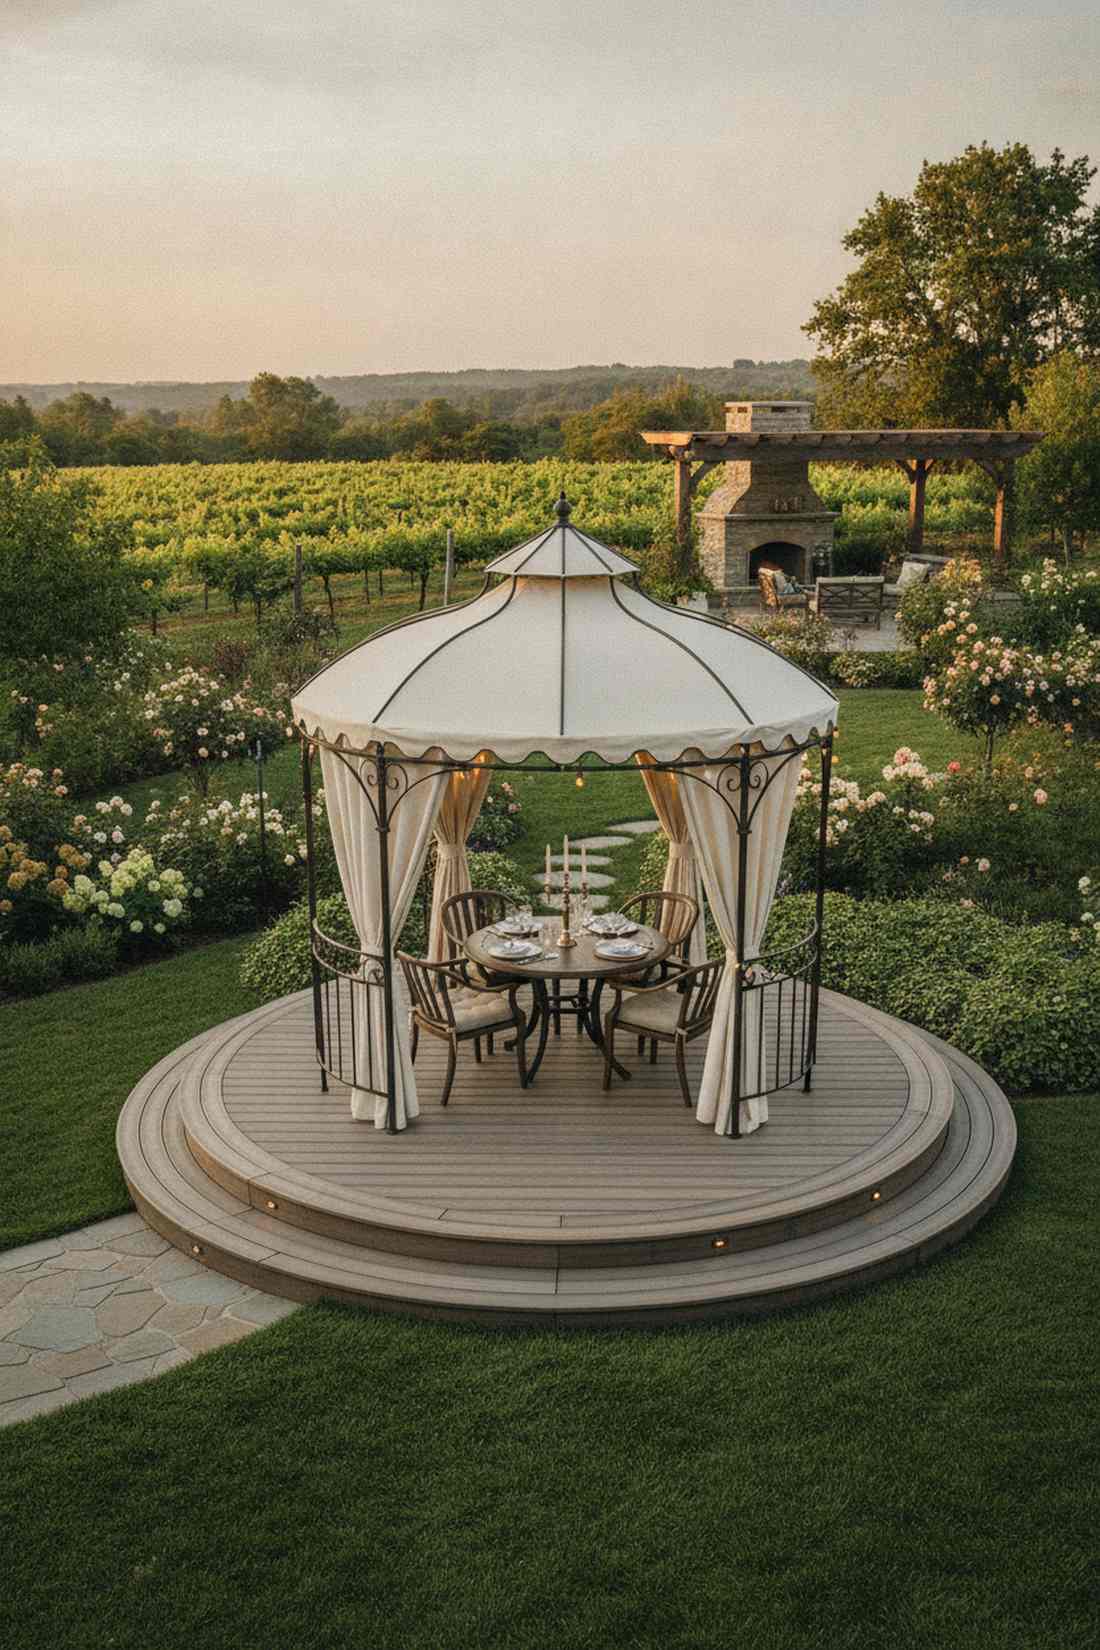
This romantic setup feels like a scene straight out of a classic vineyard. A circular outdoor gazebo base creates an incredibly intimate dining room right in the fresh air.
While square structures are common, injecting a circular focal point completely disrupts the standard backyard aesthetic for the better. Framing this with flexible bender board and premium composite materials turns an average yard into an estate.
Expect to spend around $1,800–$3,000 for the foundational build. Pin this if you love elegant, traditional outdoor architecture!
- Key Materials: Flexible composite trim
- Vibe / Style: Classic romantic garden
- Difficulty: Advanced precision cuts
- Budget Breakdown: Curve Framing: $600 | Finishing: $1200
- Creator’s Tip: Soak wood bender boards in water for 24 hours before installation to prevent snapping during tight curve formations.
- Smart Sourcing: flexible composite fascia boards and gazebo canopy replacement covers.
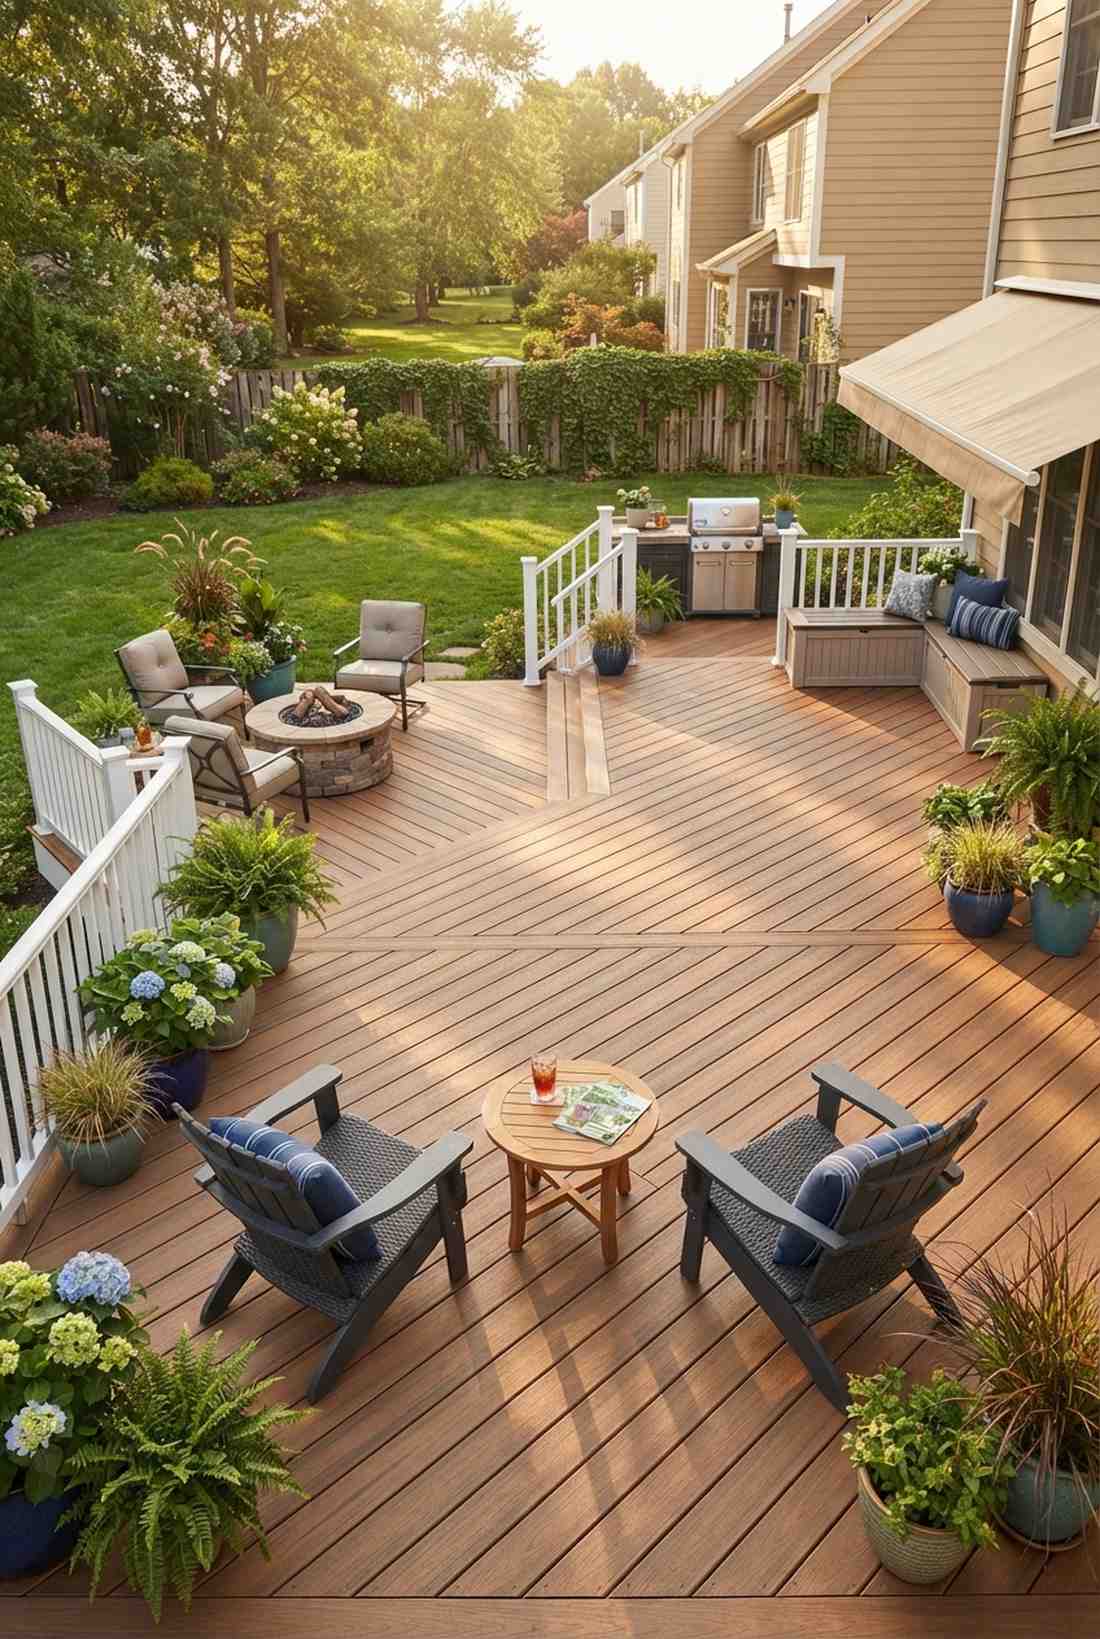
Single-Level Open Concept Layouts
Single-plane decks prioritize accessibility and unobstructed views, making them ideal for flat yards and contemporary architectural styles. Strategic furniture placement and built-in features define zones without vertical changes.
8. L-Shaped Corner Maximizer
This wraparound concept feels like a seamless extension of your living room. An L-shaped patio deck is the ultimate solution for utilizing dead space on the side of a house.
Most homeowners ignore narrow side yards, but extending the deck around the corner instantly doubles your entertainment footprint. Adding privacy screens on the shorter leg creates a cozy, wind-blocked corner that looks incredibly intentional.
This corner-hugging upgrade usually costs around $1,500–$2,500. A fantastic layout for maximizing every inch of a small lot!
- Key Materials: Standard pressure-treated pine
- Vibe / Style: Seamless indoor-outdoor flow
- Difficulty: Easy beginner framing
- Budget Breakdown: Framing: $800 | Decking: $700
- Creator’s Tip: Place your grill on the smaller arm of the ‘L’ to keep smoke completely away from the main seating area.
- Smart Sourcing: pre-cut corner joist brackets and weatherproof outdoor rug panels.
9. Open Rectangular Party Platform
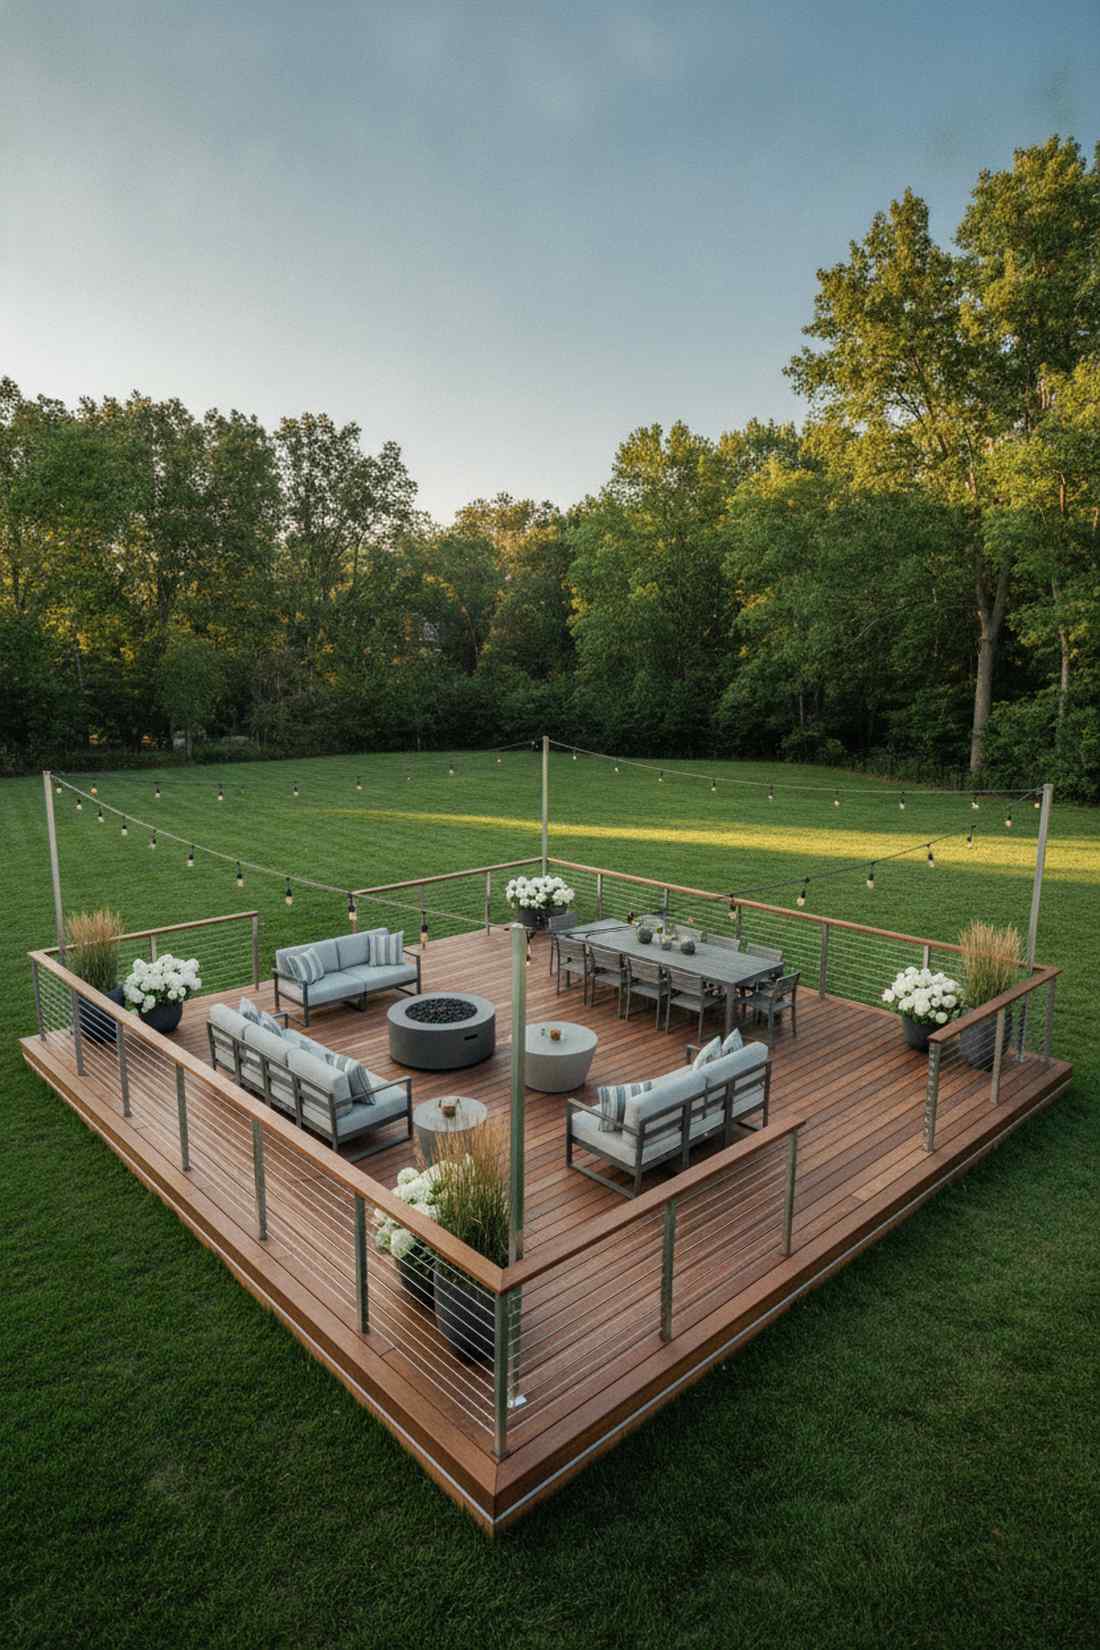
This wide-open space feels like an exclusive VIP lounge waiting for a crowd. The open-concept rectangular deck is an absolute dream for hosts who love massive, flexible gatherings.
Simplicity is often the ultimate sophistication; skipping complex levels for one massive, uninterrupted surface delivers a surprisingly premium look. Outfitting the edges with sleek cable railing ensures your backyard view is never obstructed.
You can frame and finish a massive platform for $2,000–$4,000. Save this idea if you host big summer barbecues!
- Key Materials: Stainless steel cable railing
- Vibe / Style: Modern minimalist party space
- Difficulty: Beginner friendly
- Budget Breakdown: Deck Boards: $1800 | Cable Hardware: $400
- Creator’s Tip: Use a picture-frame border technique around the perimeter to make the simple rectangular shape look like custom cabinetry.
- Smart Sourcing: stainless steel cable railing kits and concealed fastening clips (bulk pack).
💡 Must-Have Supplies for High-End Setups
To build these setups faster and ensure they last, skip the generic craft aisles and invest in the right foundational kits.
- Base & Support: heavy-duty adjustable deck risers
- Setup Tools: hidden fastening system starter kits
- Weather/Durability Protection: UV-resistant polyurethane clear sealant
Most people get their yard layout completely wrong… until they try the exact house-wrapping method coming up next.
10. Wraparound House-Perimeter Deck
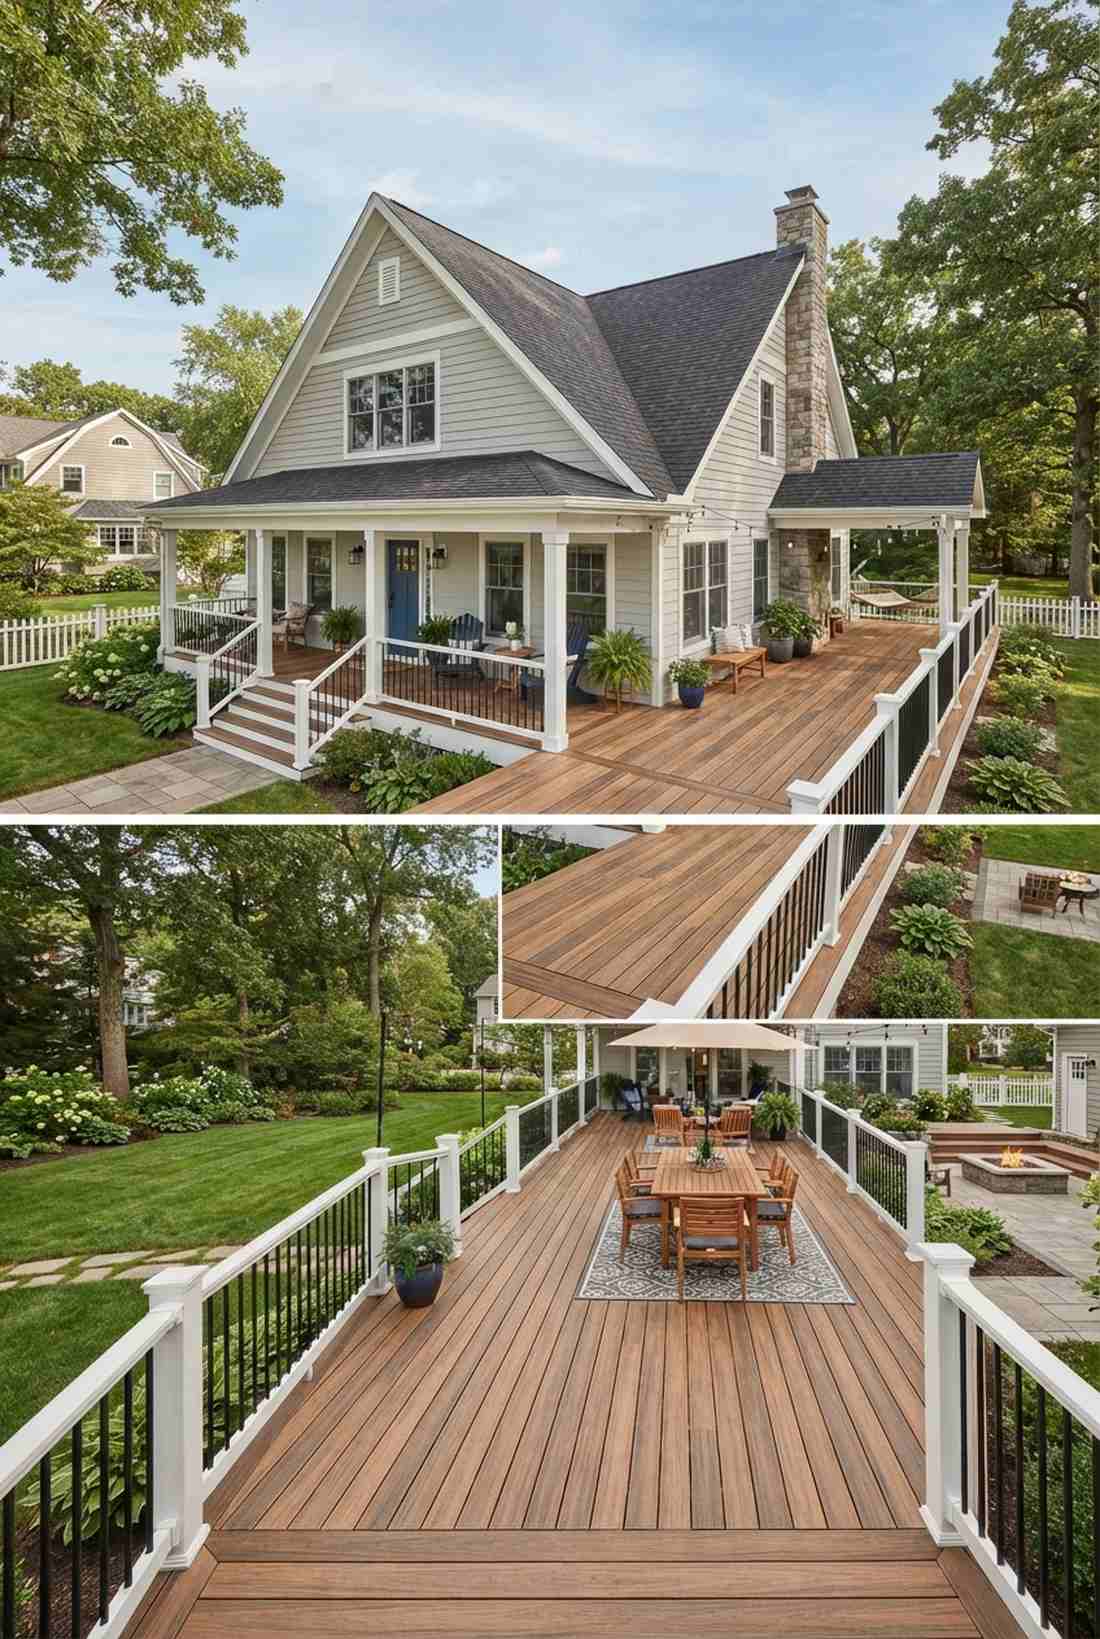
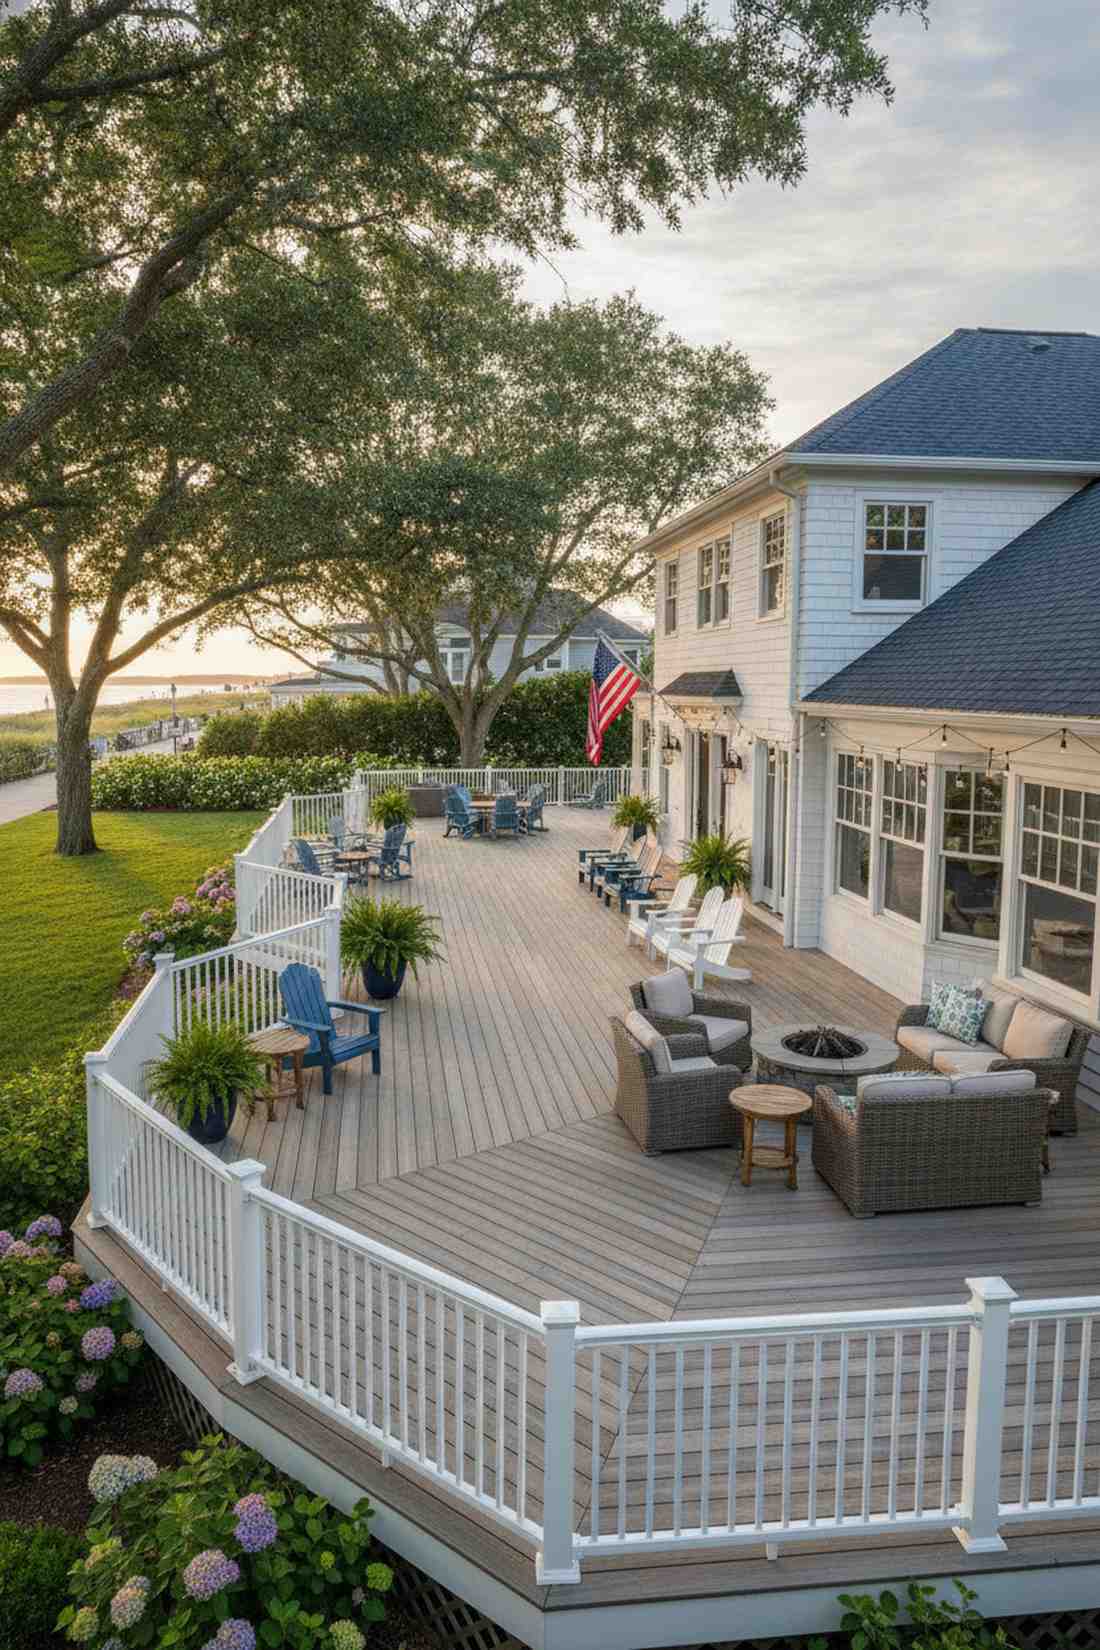
Walking this deck feels like strolling the promenade of a classic beachfront home. A wraparound house deck creates brilliant 360-degree access to your entire property.
While installing this requires significant linear footage, the payoff boosts curb appeal astronomically. Using durable composite decking ensures you won’t spend your entire summer staining this massive footprint.
Because of the size, this ranges from $4,000 to $8,000+. It completely changes the way you interact with your home’s exterior.
- Key Materials: Low-maintenance composite boards
- Vibe / Style: Classic Americana charm
- Difficulty: Advanced long-run framing
- Budget Breakdown: Materials: $5000 | Railings: $1500
- Creator’s Tip: Install breaker boards at the corners to avoid difficult and ugly 45-degree miter joints that separate over time.
- Smart Sourcing: bulk pack composite fascia and aluminum baluster starter kits.
11. Diagonal-Angled Layout
Looking at this layout feels like staring at a piece of modern art. A diagonal decking board layout is the ultimate visual trick to make a small backyard feel twice as large.
It takes a bit more math, but shifting your board angle by 45 degrees gives a designer-level finish that parallel boards just can’t match. This simple geometric pivot immediately turns basic lumber into a luxury aesthetic.
Expect to add about 15% to your material cost for the extra off-cuts, totaling around $1,800. Pin this to your modern landscape board!
- Key Materials: Premium grooved wood planks
- Vibe / Style: Dynamic contemporary chic
- Difficulty: Intermediate math & cuts
- Budget Breakdown: Lumber (incl. waste): $1500 | Fasteners: $300
- Creator’s Tip: Always order 15-20% more decking material than your square footage dictates to account for the intense angle cuts.
- Smart Sourcing: pre-angled joist hangers and pro-grade circular saw blades.
12. Floating Island Deck
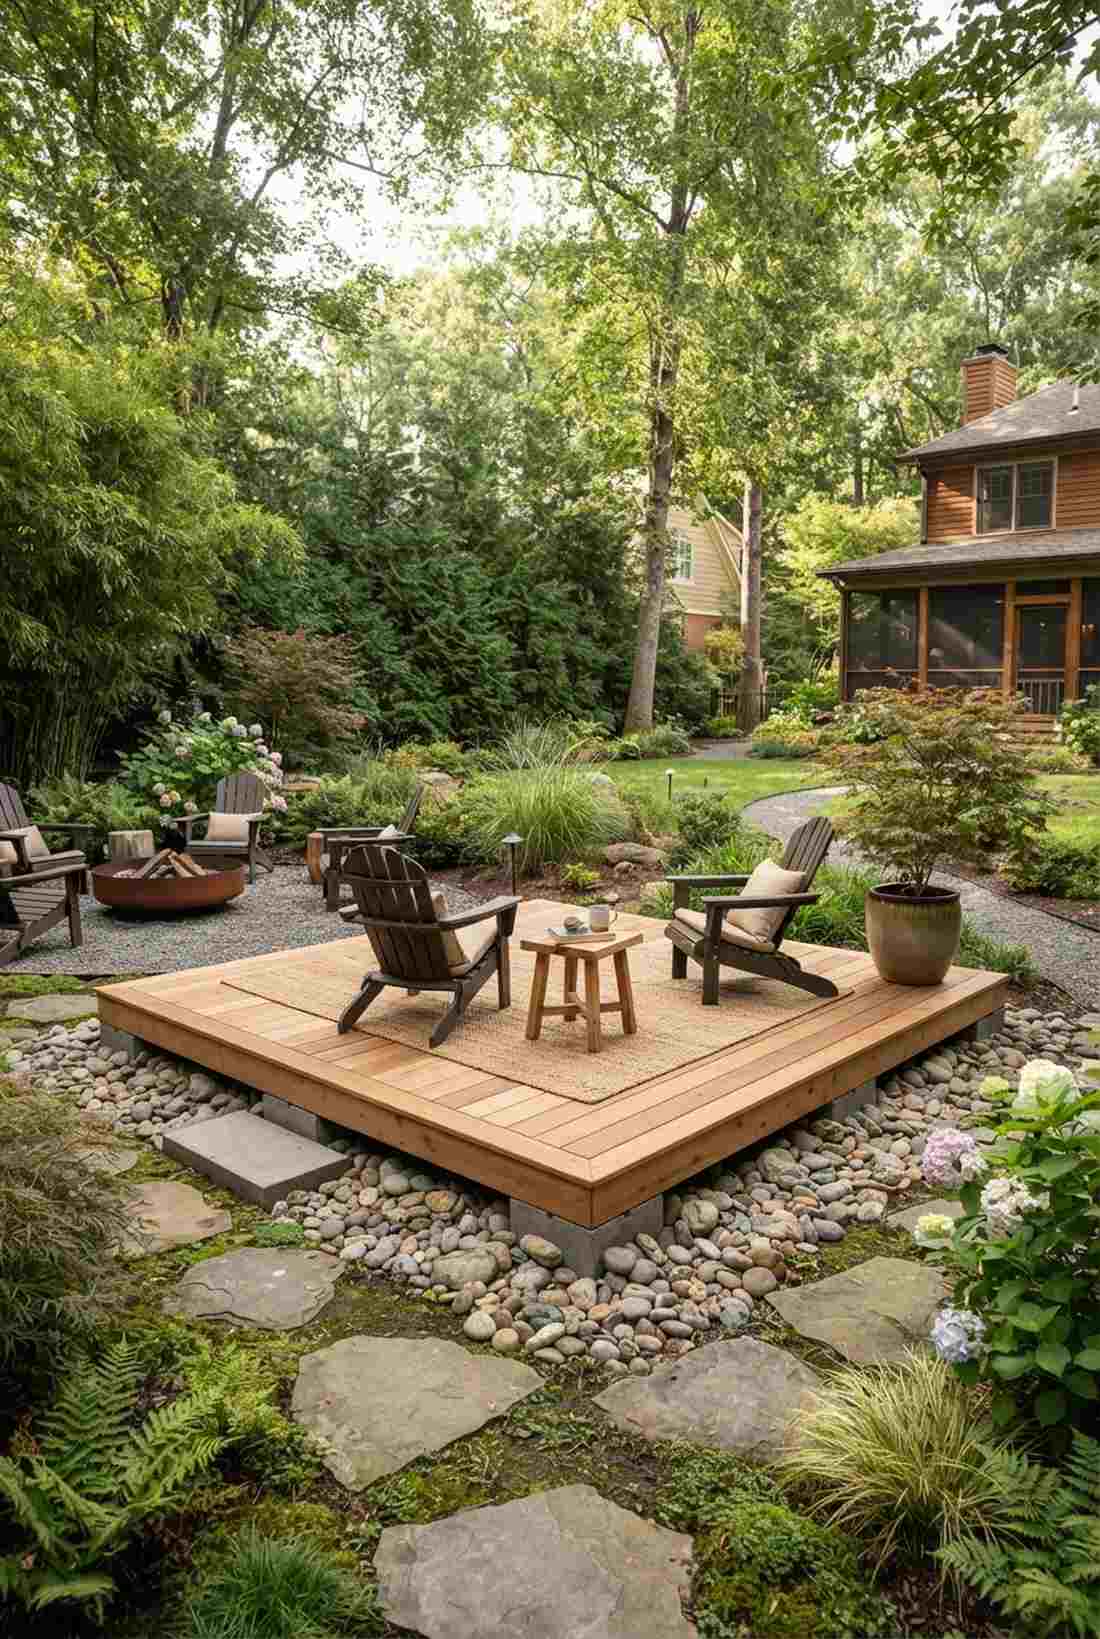
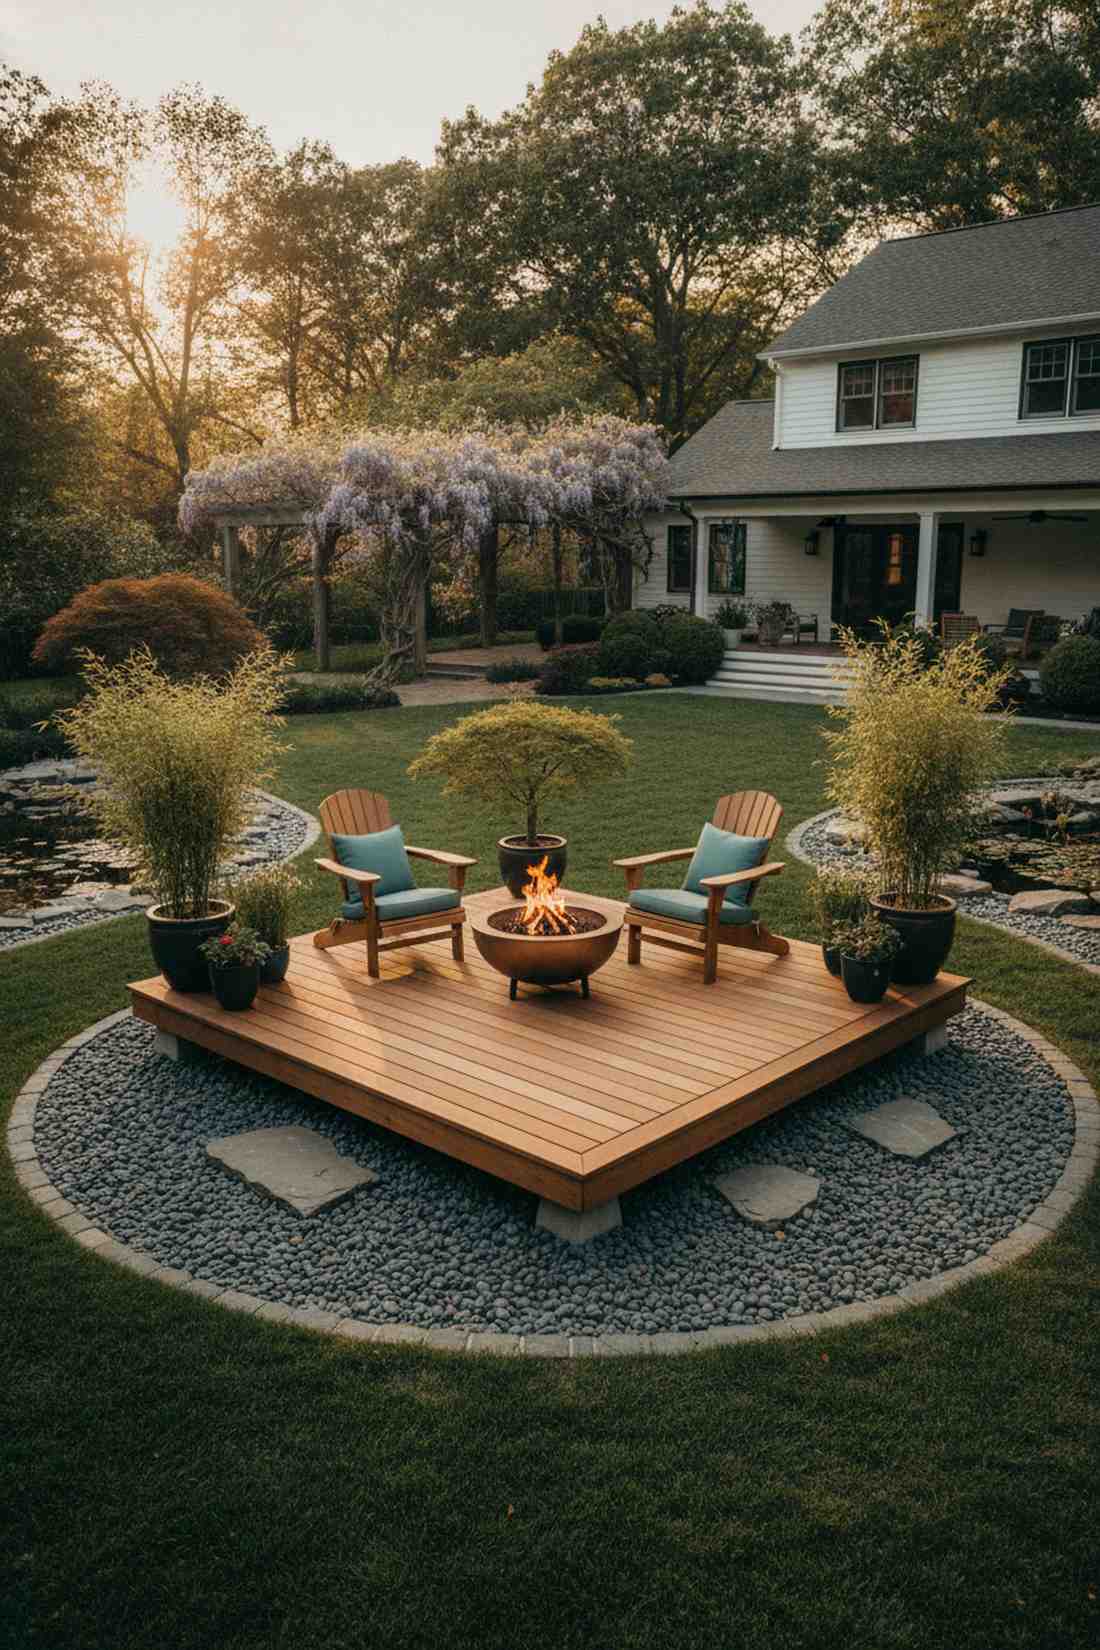
This isolated setup feels like you discovered a hidden oasis deep in your own garden. A freestanding floating patio works wonders for creating a quiet destination away from a noisy house.
Building away from the foundation means zero complicated ledger board attachments, making it incredibly beginner-friendly. Surrounding the base with thick river rock hides the concrete footings and delivers a stunning Zen garden aesthetic.
You can build a small island escape for as little as $600–$1,000. It’s the ultimate quick-win weekend project!
- Key Materials: Concrete deck blocks
- Vibe / Style: Zen garden retreat
- Difficulty: Easy beginner build
- Budget Breakdown: Deck Blocks: $50 | Lumber: $550
- Creator’s Tip: Use floating pre-cast concrete pier blocks instead of digging deep footings to finish the entire frame in one afternoon.
- Smart Sourcing: pre-cast concrete deck blocks (4-pack) and decorative river stones (bulk bags).
13. Curved-Edge Organic Platform
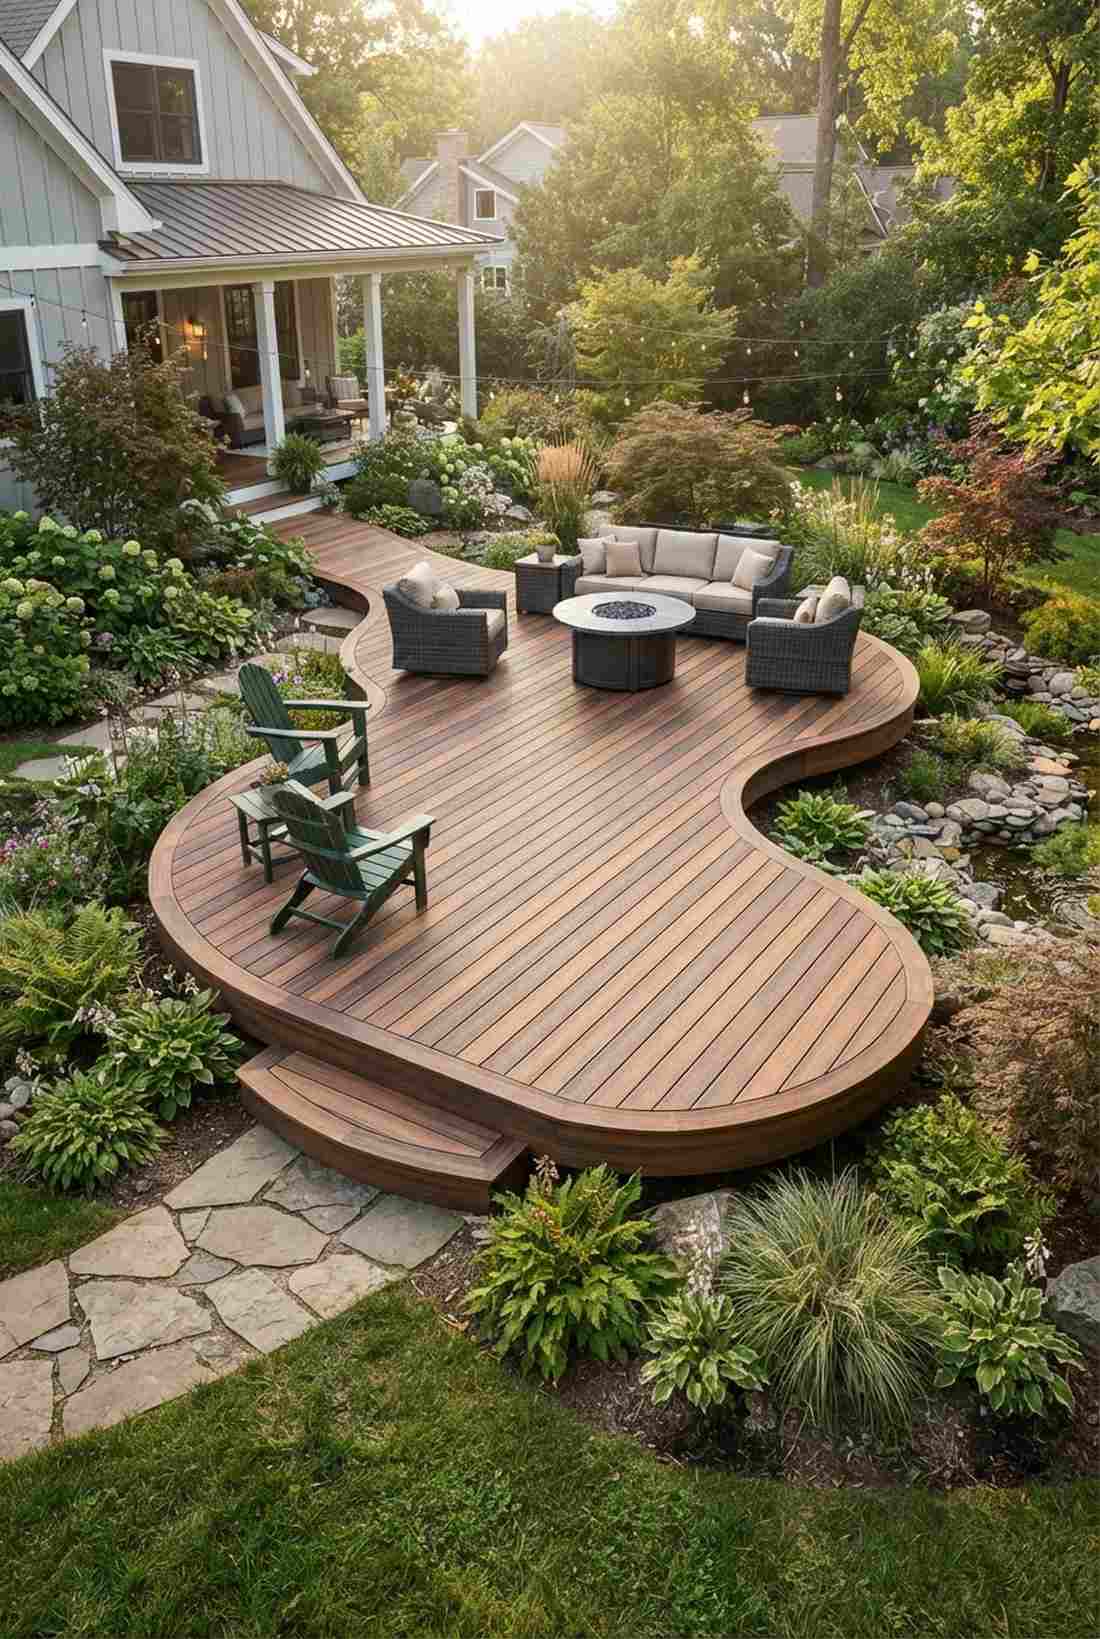
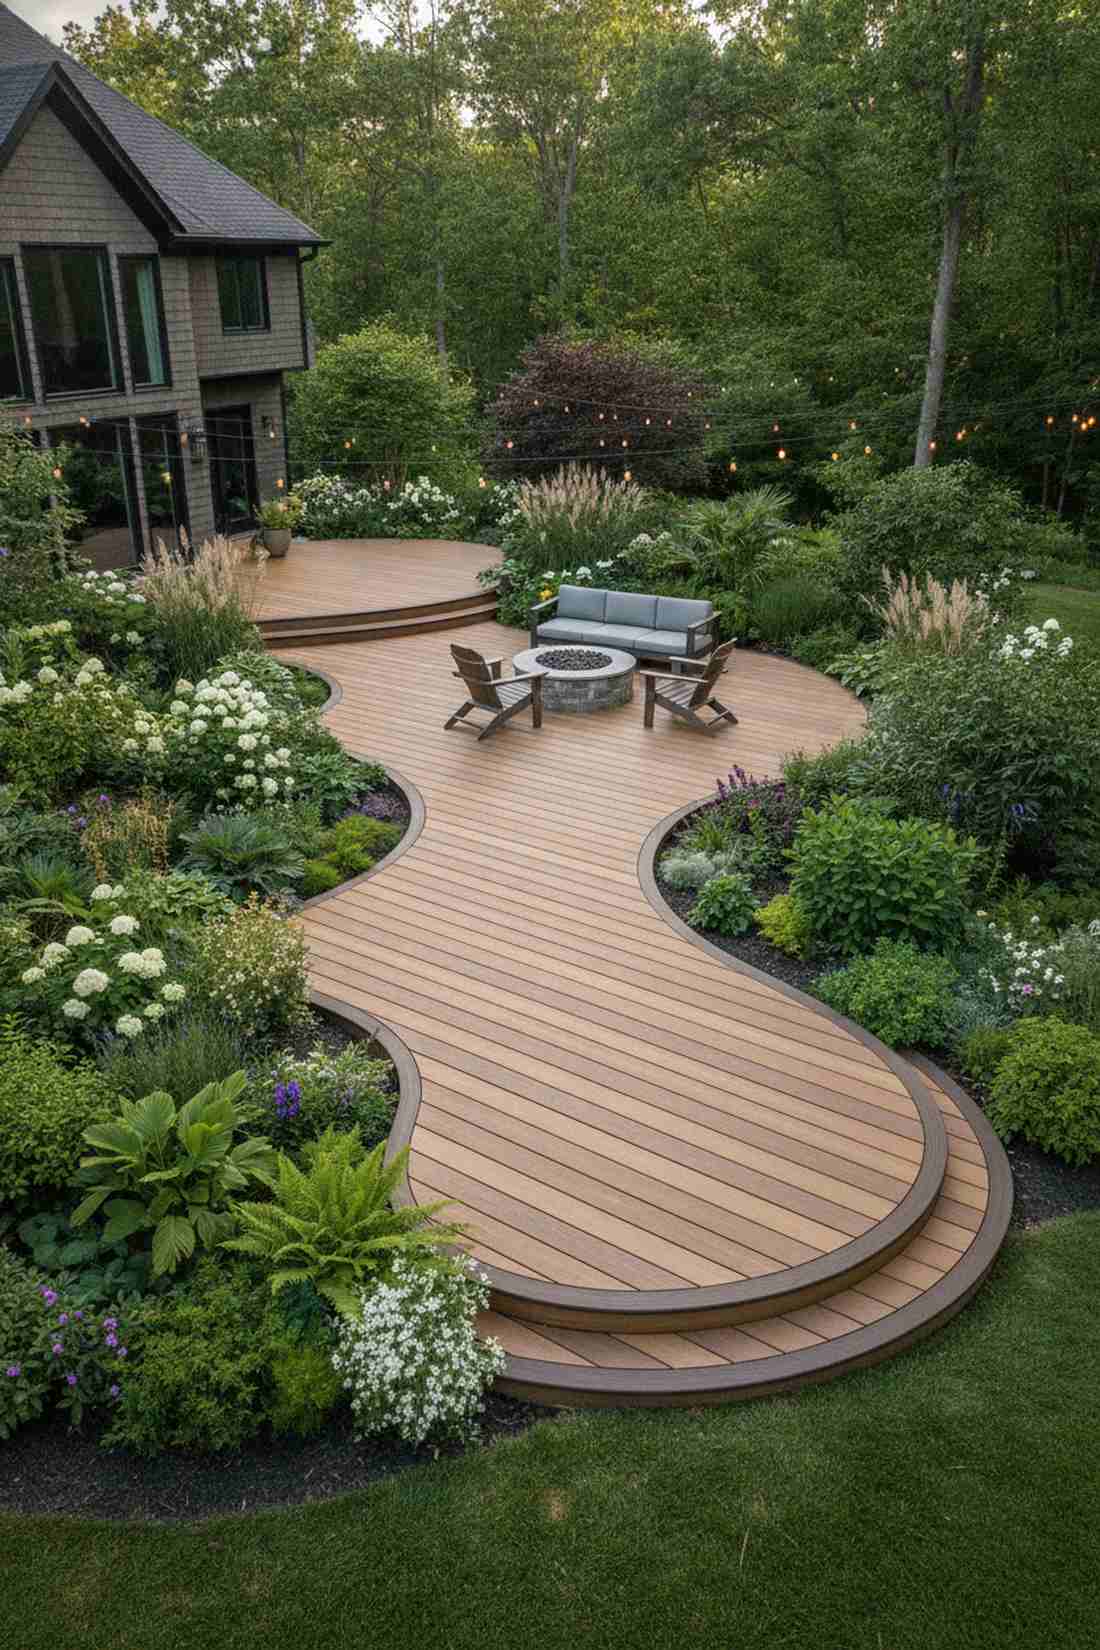
This layout feels incredibly soothing, mimicking the natural flow of a riverbank. Curved-edge deck platforms are perfect for integrating seamlessly into lush, untamed garden landscaping.
Harsh 90-degree angles can feel artificial, but manipulating the perimeter into soft waves looks wildly expensive and custom. Wrapping the edge with a heat-bent composite board solidifies the organic, flowing architectural vibe.
Due to the custom bending, expect to spend $2,500–$3,500. Save this if you want your yard to feel like a botanical garden!
- Key Materials: Heat-formable composite boards
- Vibe / Style: Organic botanical flow
- Difficulty: Advanced shaping
- Budget Breakdown: Framing: $1000 | Bendable Trim: $500
- Creator’s Tip: Cut the joists to your desired curve first, then use a specialized heat blanket to bend the composite fascia around the frame.
- Smart Sourcing: PVC decking heat bending kits and flexible edging material.
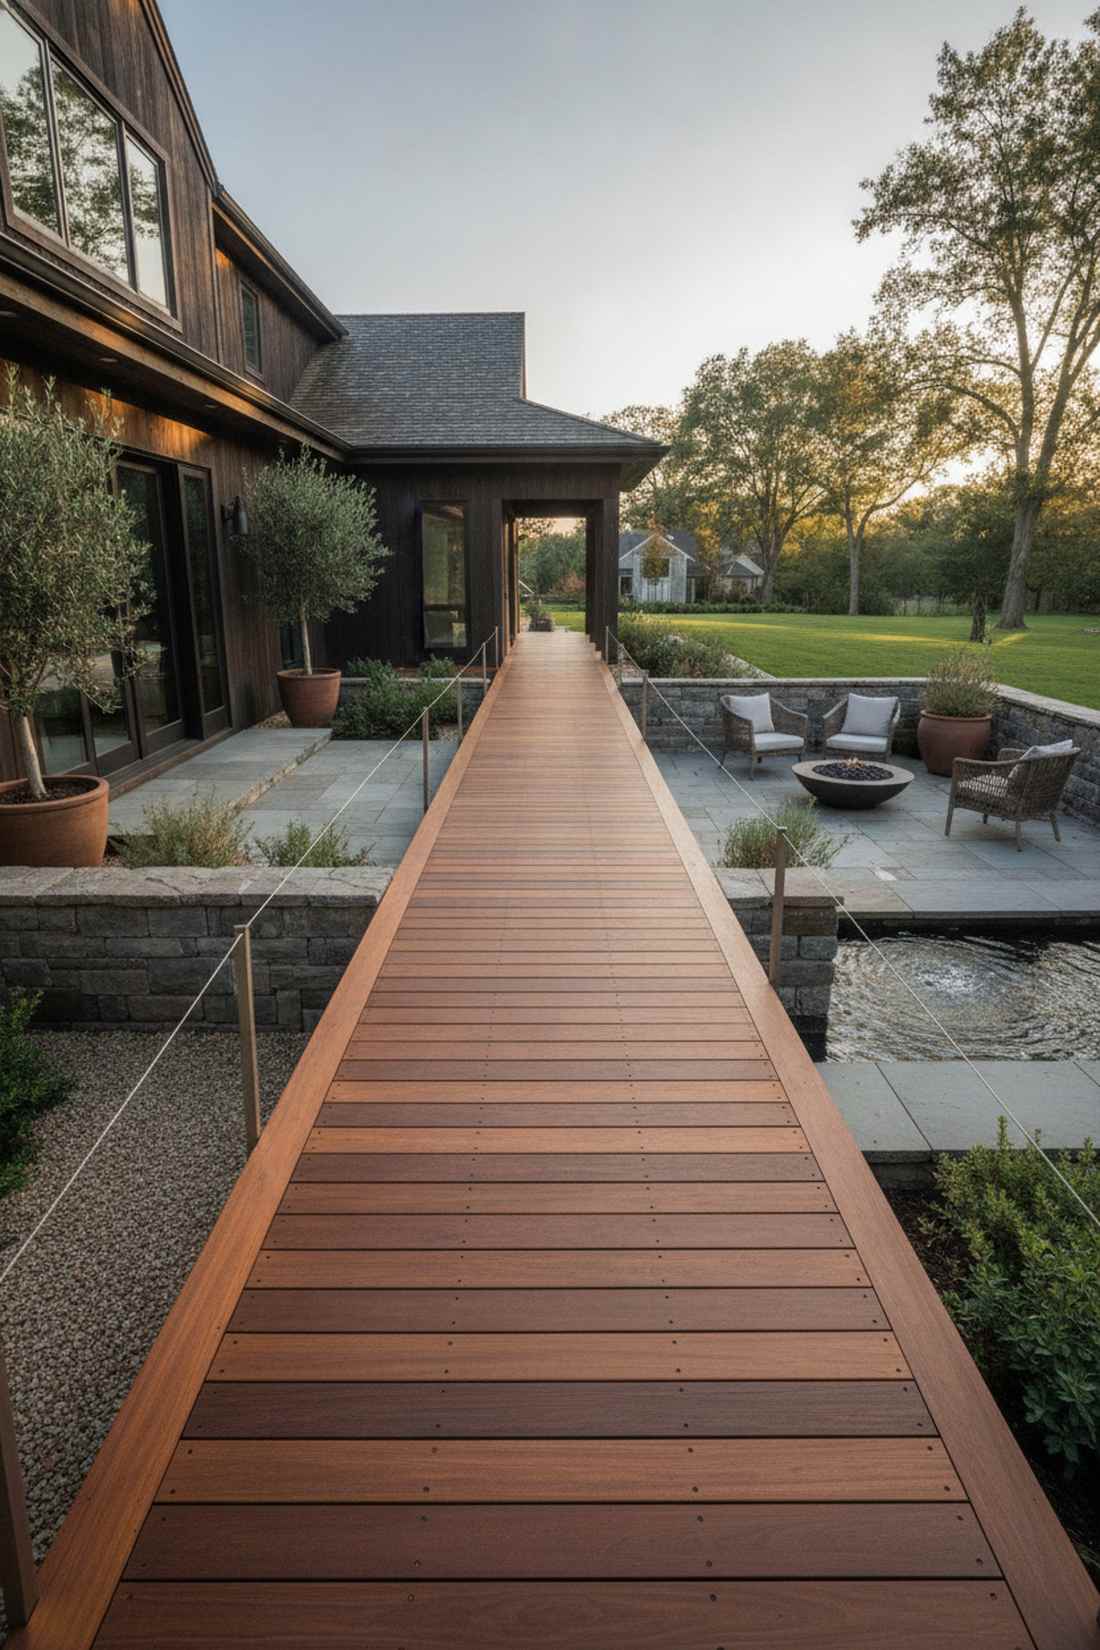
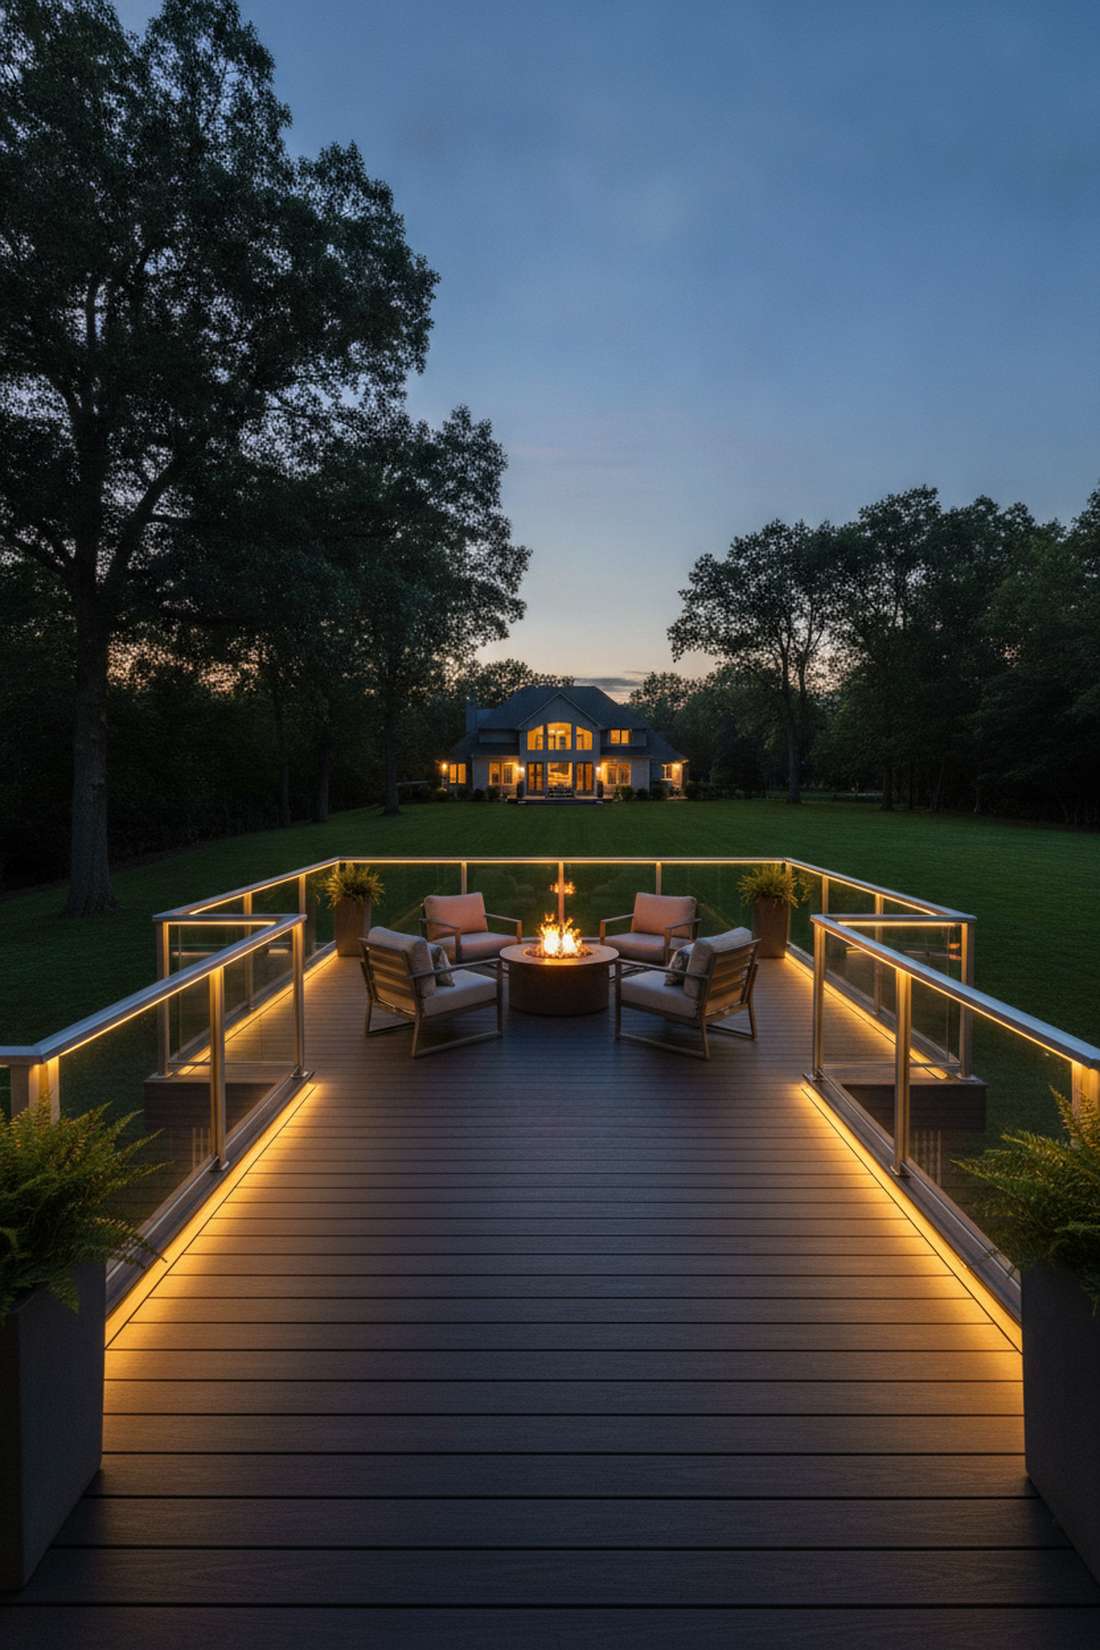
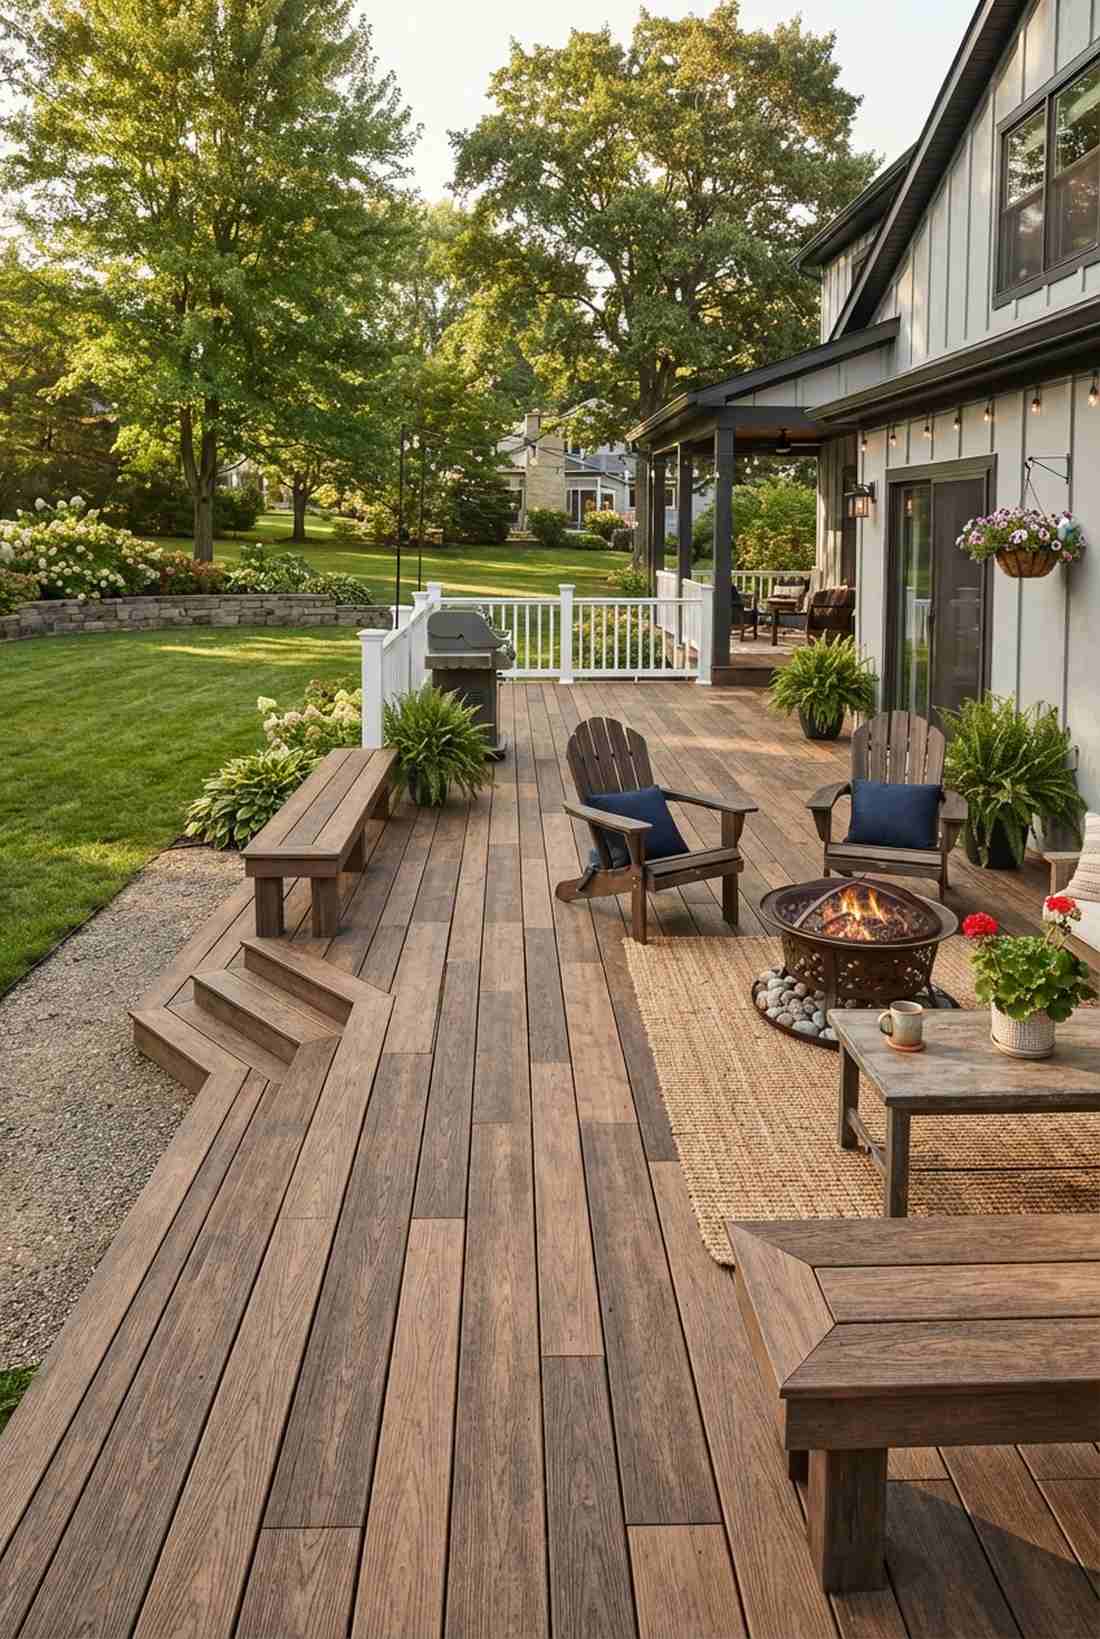
14. Boardwalk Extended Runway
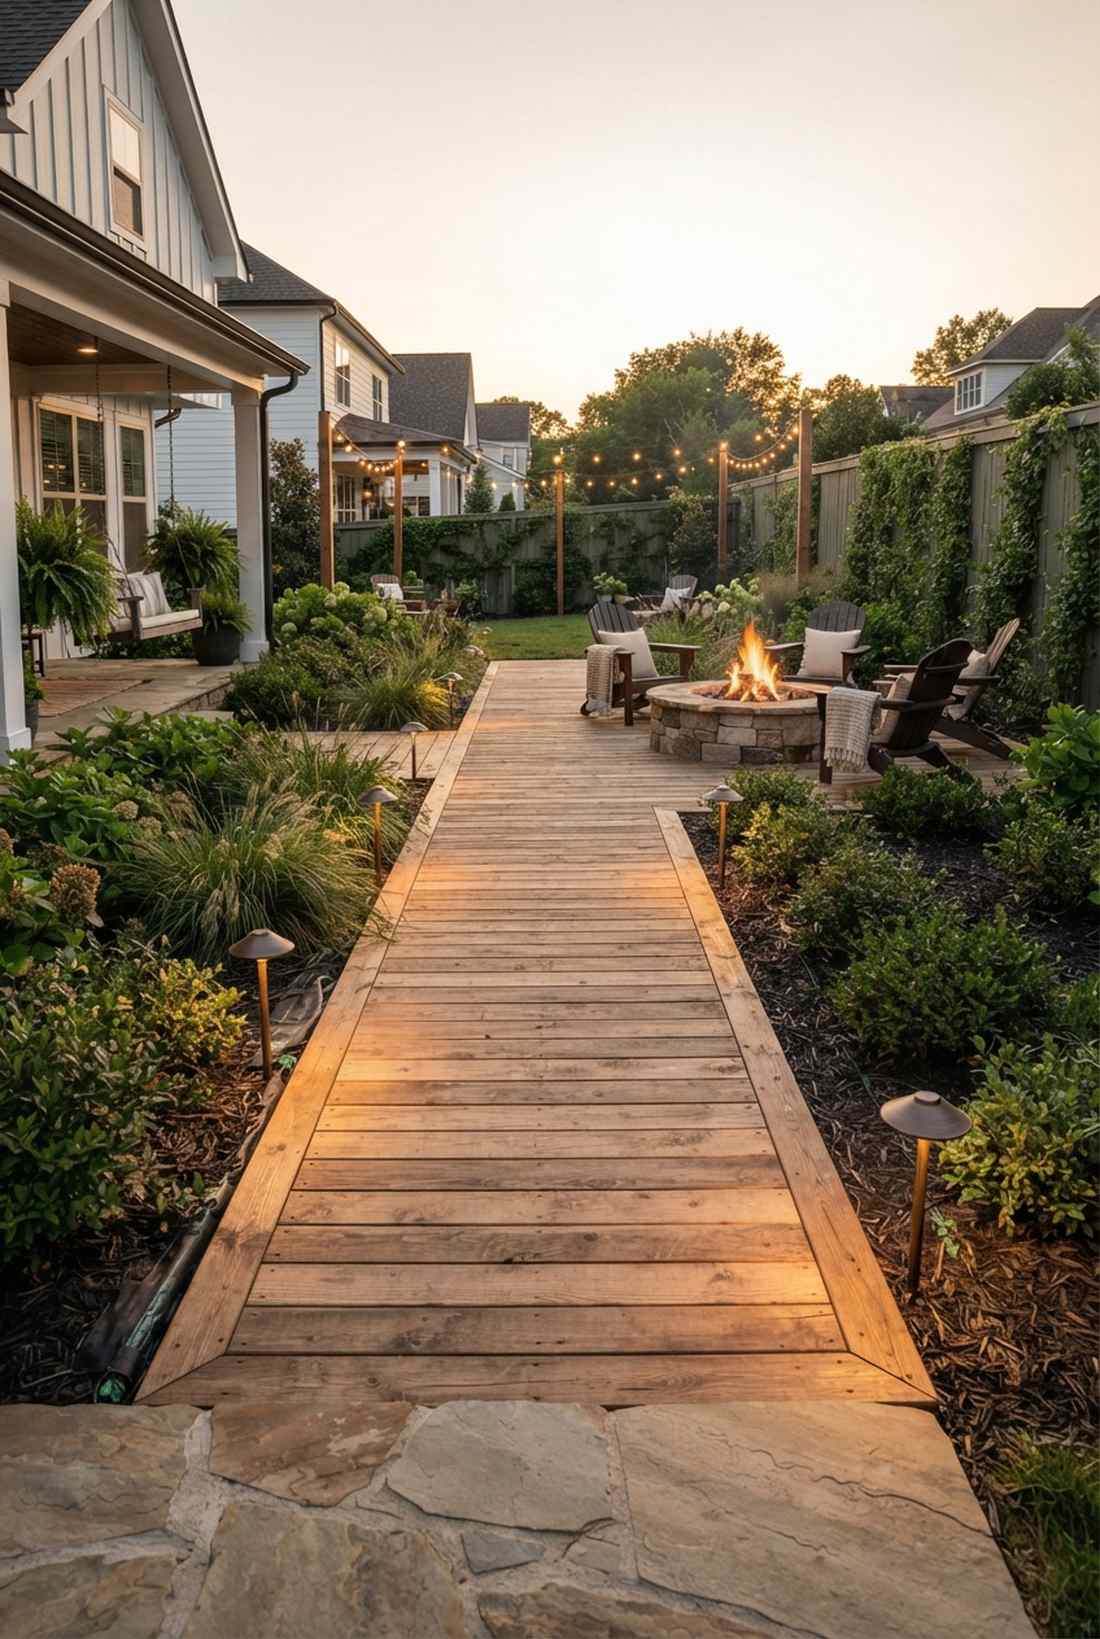
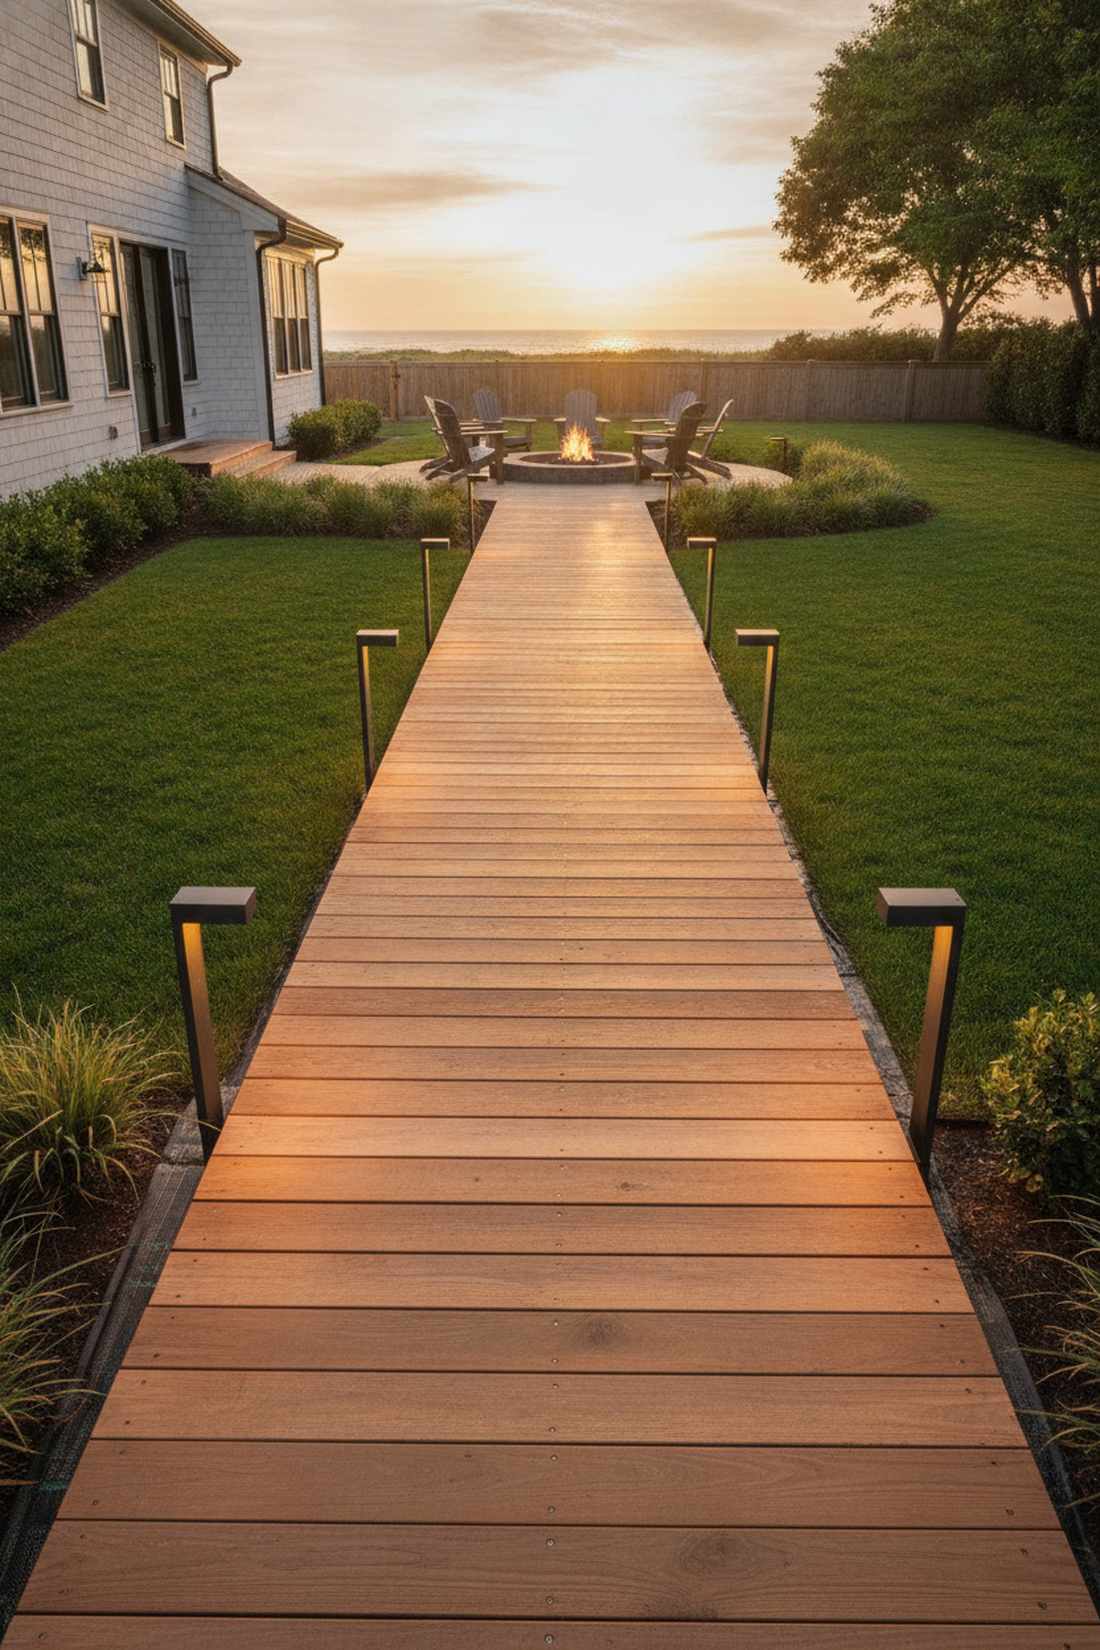
Walking this path feels like you’re heading down a luxury pier toward the ocean. The boardwalk-style long deck is a massive space-hack for deep, narrow suburban lots.
Instead of a square box near the back door, pulling a linear runway deep into the yard creates a captivating journey. Ending the runway with a fire pit transforms a cramped yard into a dynamic, multi-zone experience.
You can build this linear boardwalk for roughly $1,200–$2,000. A highly recommended layout for tricky, thin property lines.
- Key Materials: Rough-sawn cedar planks
- Vibe / Style: Coastal pier pathway
- Difficulty: Easy beginner repetition
- Budget Breakdown: Stringers: $400 | Top Boards: $800
- Creator’s Tip: Run the decking boards horizontally across the path to visually widen the narrow runway.
- Smart Sourcing: weatherproof landscape path lights (6-pack) and heavy-duty weed barrier rolls.
Wait until you see this next shade trick—it completely changes how your backyard feels during the blistering summer heat.
Covered Pergola Deck Designs
Overhead structures expand usability by providing shade and weather protection while maintaining the open-air ambiance that defines outdoor living. These designs integrate architectural elements that support climbing plants, lighting, and retractable shade systems.
15. Full-Roof Pavilion Deck
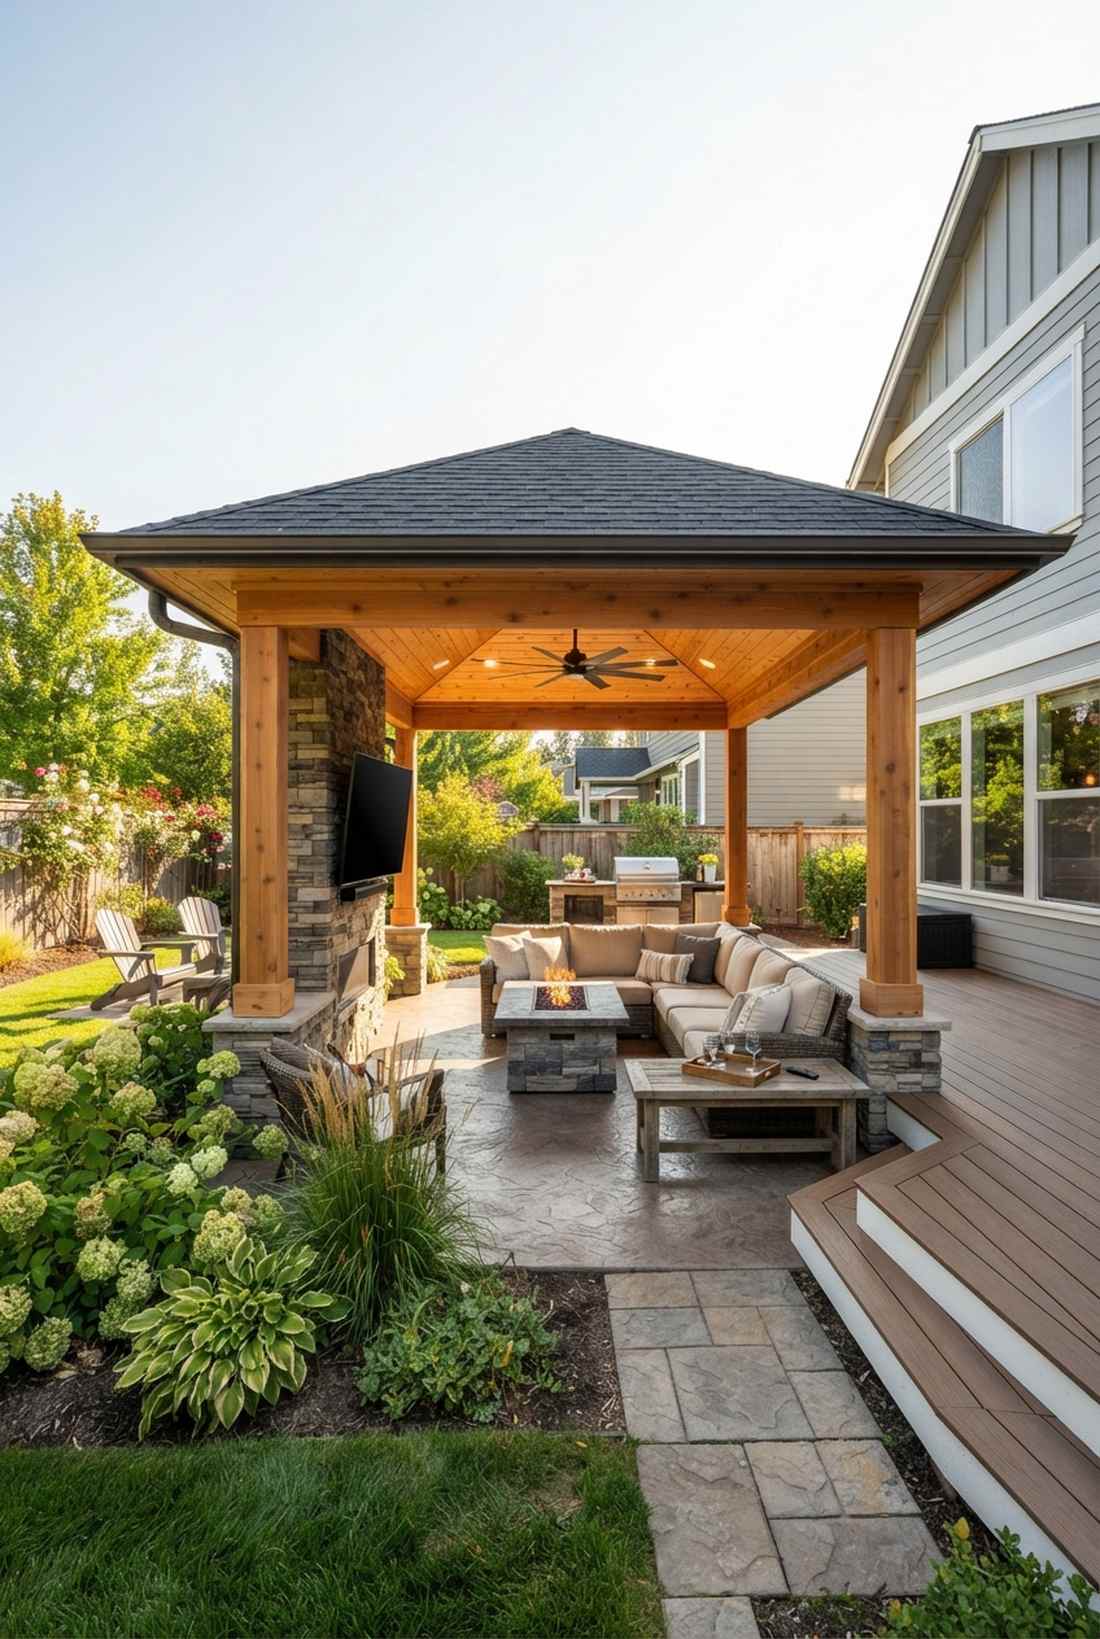
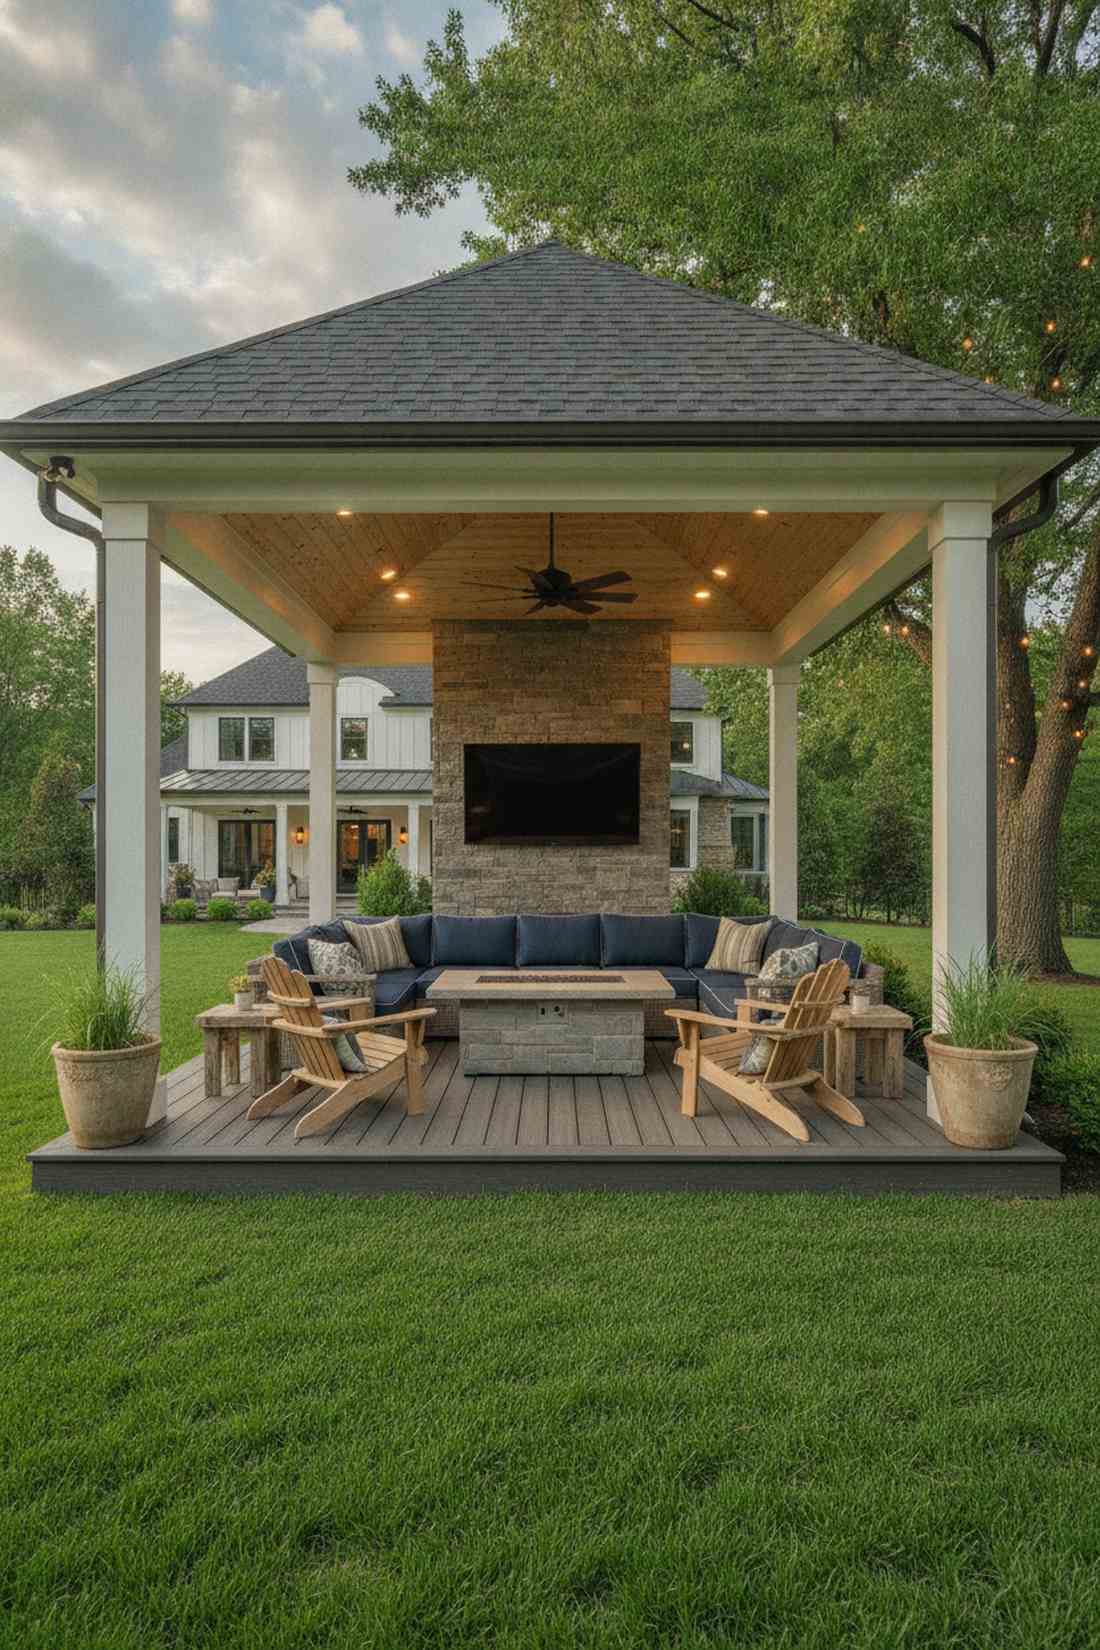
This shelter feels like an ultra-cozy outdoor living room that ignores the weather. A full-roof deck pavilion is brilliant for creating an all-season entertainment hub.
Adding a true solid roof immediately elevates the perceived property value over a standard open patio. Tucking an outdoor TV and ceiling fan under this protective canopy turns your backyard into the ultimate game-day destination.
Constructing a solid roof adds significant cost, usually around $4,000–$7,000. Save this to your ultimate man-cave or she-shed board!
- Key Materials: Asphalt shingles and tongue-and-groove ceiling
- Vibe / Style: All-weather luxury lounge
- Difficulty: Advanced structural build
- Budget Breakdown: Roof Framing: $2000 | Finishes: $2000
- Creator’s Tip: Install a proper gutter system on the pavilion to prevent water runoff from splashing back onto your dining area.
- Smart Sourcing: outdoor-rated ceiling fans and tongue-and-groove ceiling plank kits.
16. Adjustable Louvered Pergola
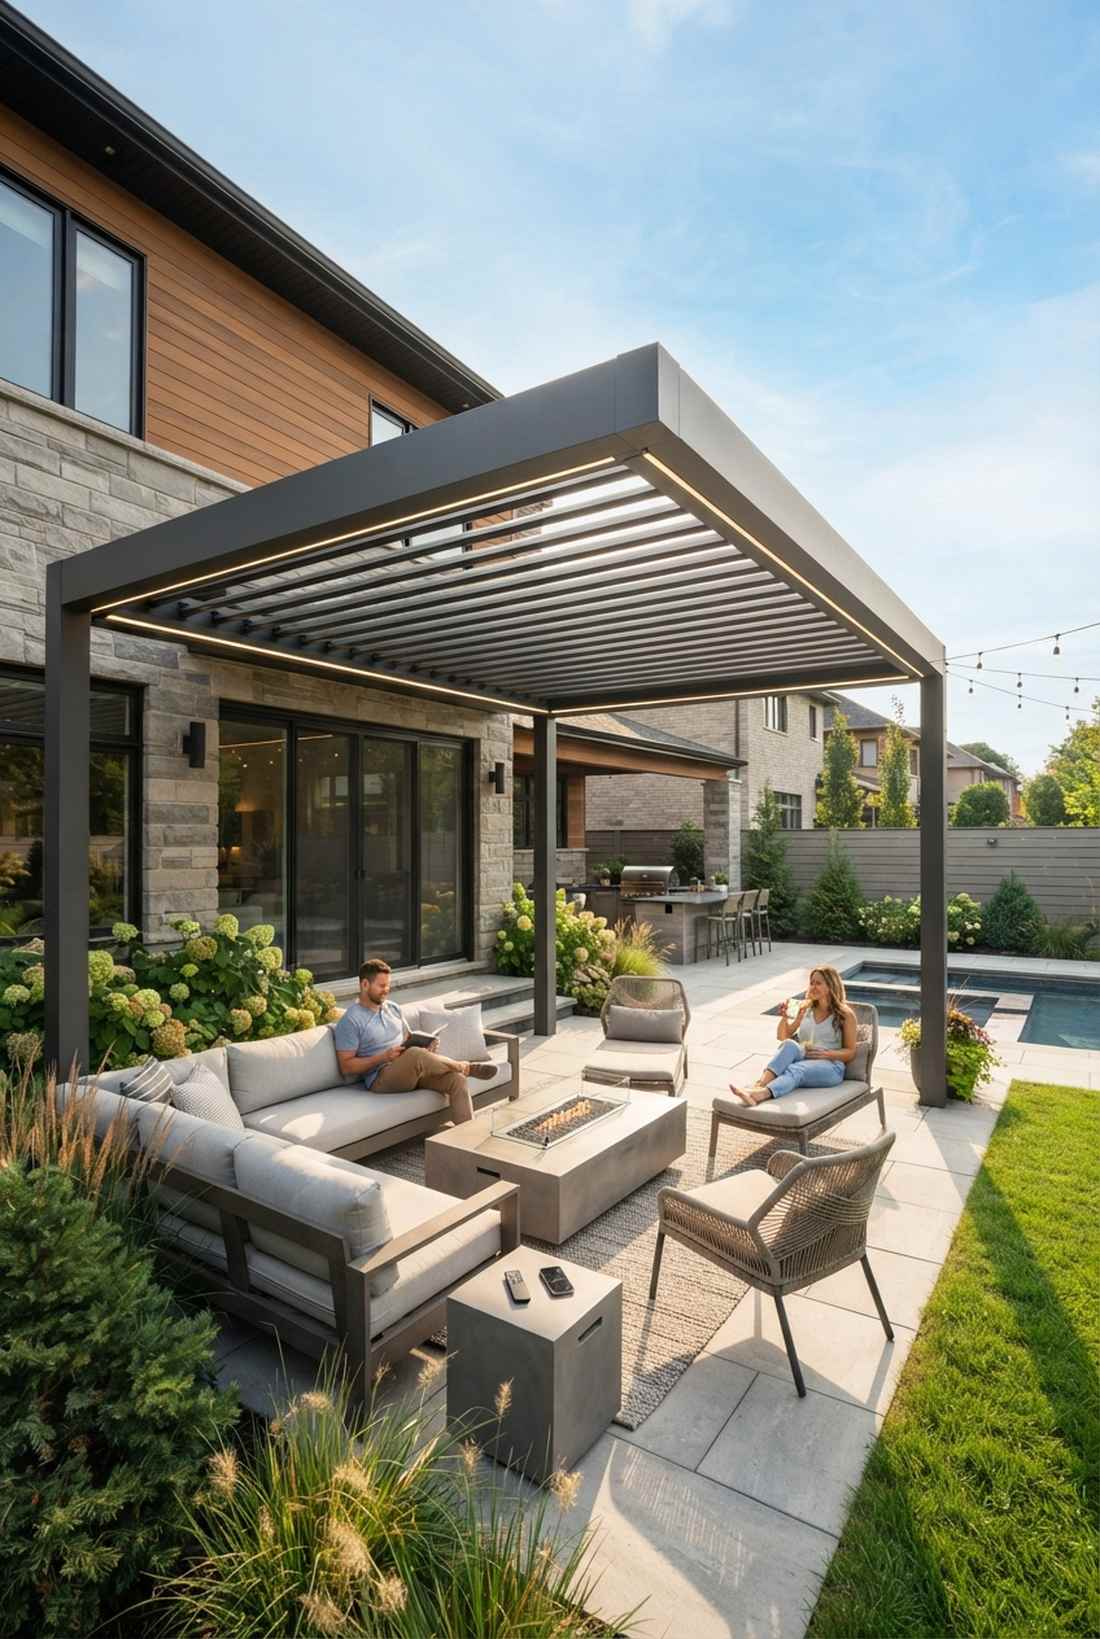
Sitting under this structure feels like controlling the weather with a remote. An adjustable louvered pergola is the ultimate modern flex for unpredictable climates.
Most shade structures force you into one lighting condition, but motorized aluminum louvers deliver a surprisingly premium look with unmatched versatility. Closing the roof completely during a summer shower ensures the party never has to move inside.
Premium louvered kits typically range from $3,000–$6,000. It’s an investment that completely revolutionizes outdoor living!
- Key Materials: Powder-coated aluminum frame
- Vibe / Style: Ultra-modern smart home
- Difficulty: Intermediate assembly
- Budget Breakdown: Pergola Kit: $3500 | Installation: $0 (DIY)
- Creator’s Tip: Ensure the pergola’s internal gutter system pitches slightly away from the house foundation to ensure proper drainage.
- Smart Sourcing: motorized aluminum louver kits and smart outdoor plug adapters.
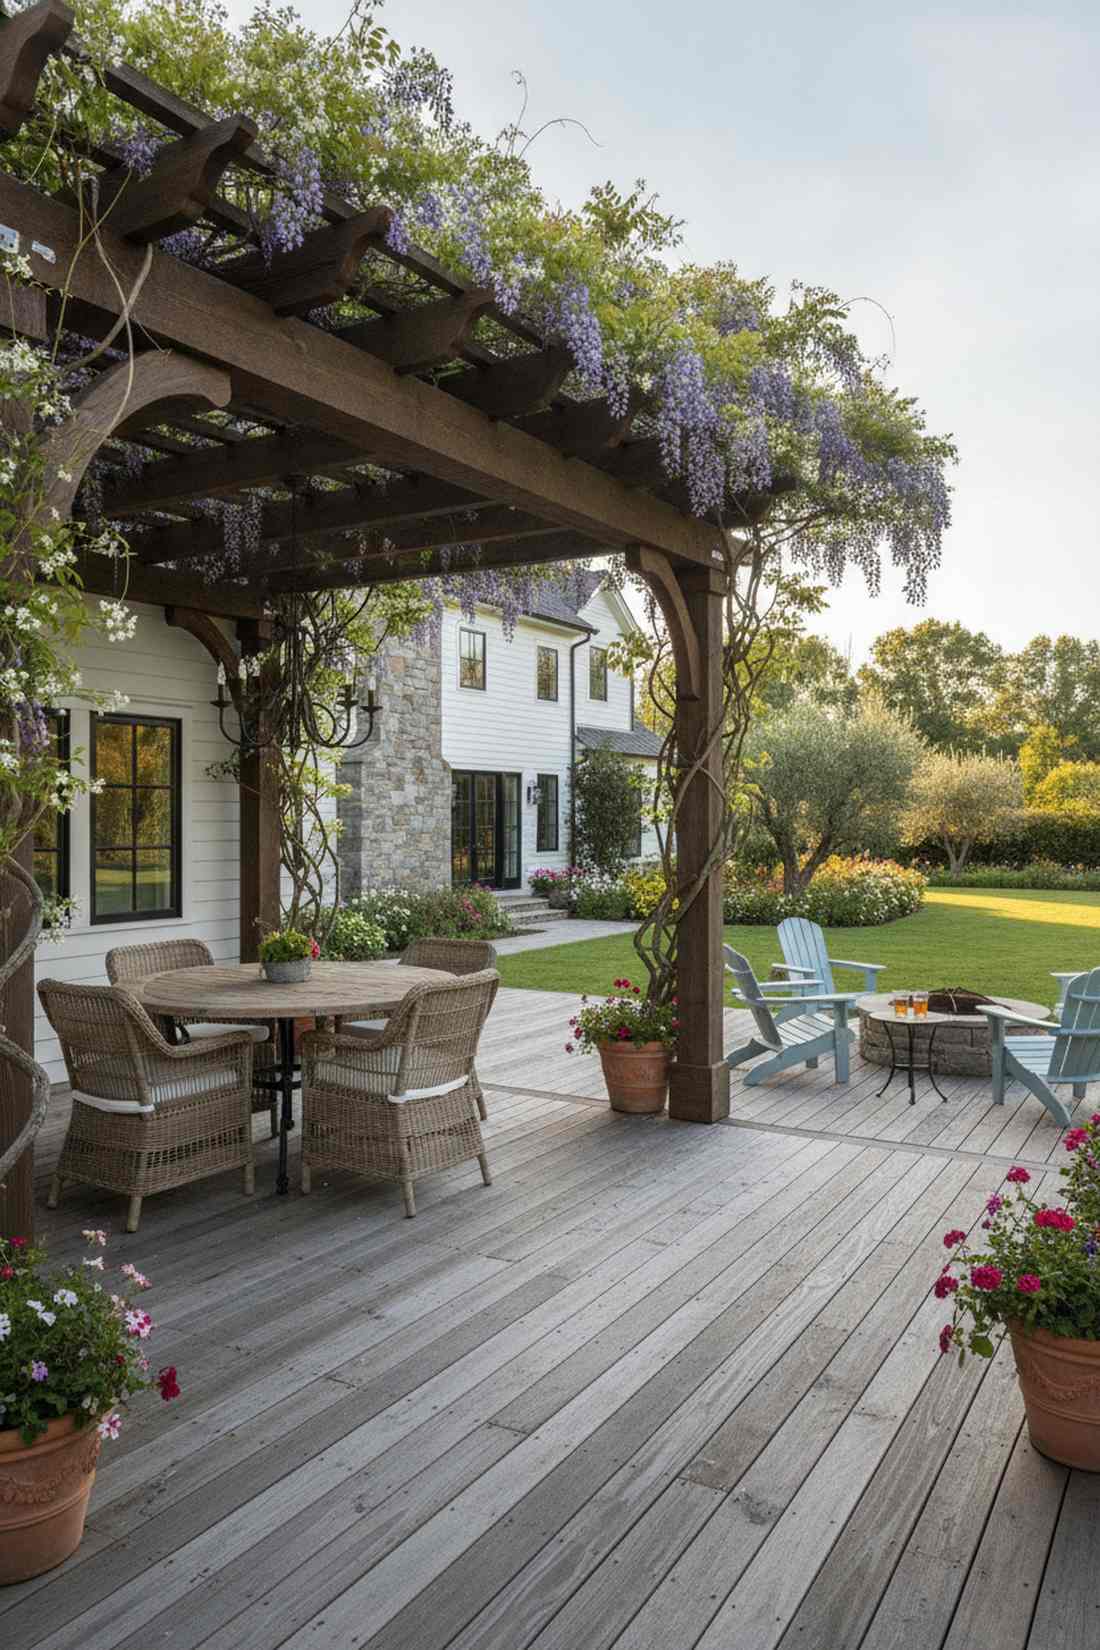
17. Timber Frame Pergola with Retractable Canopy
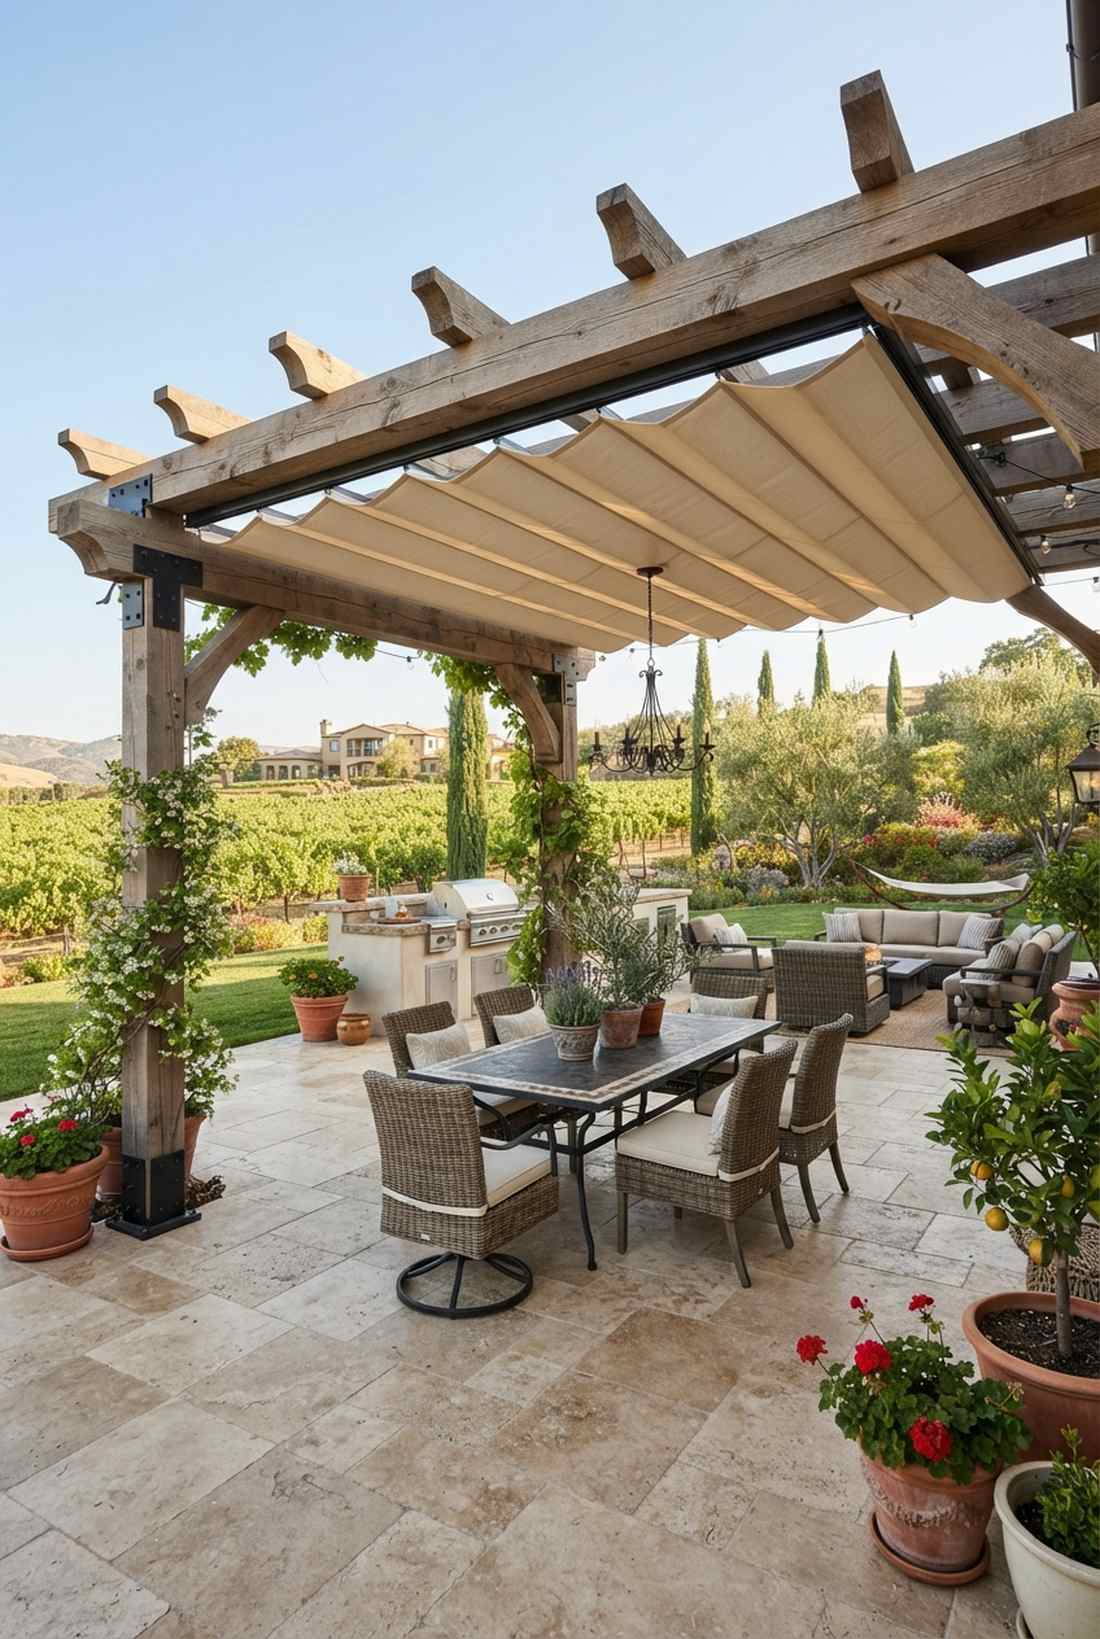
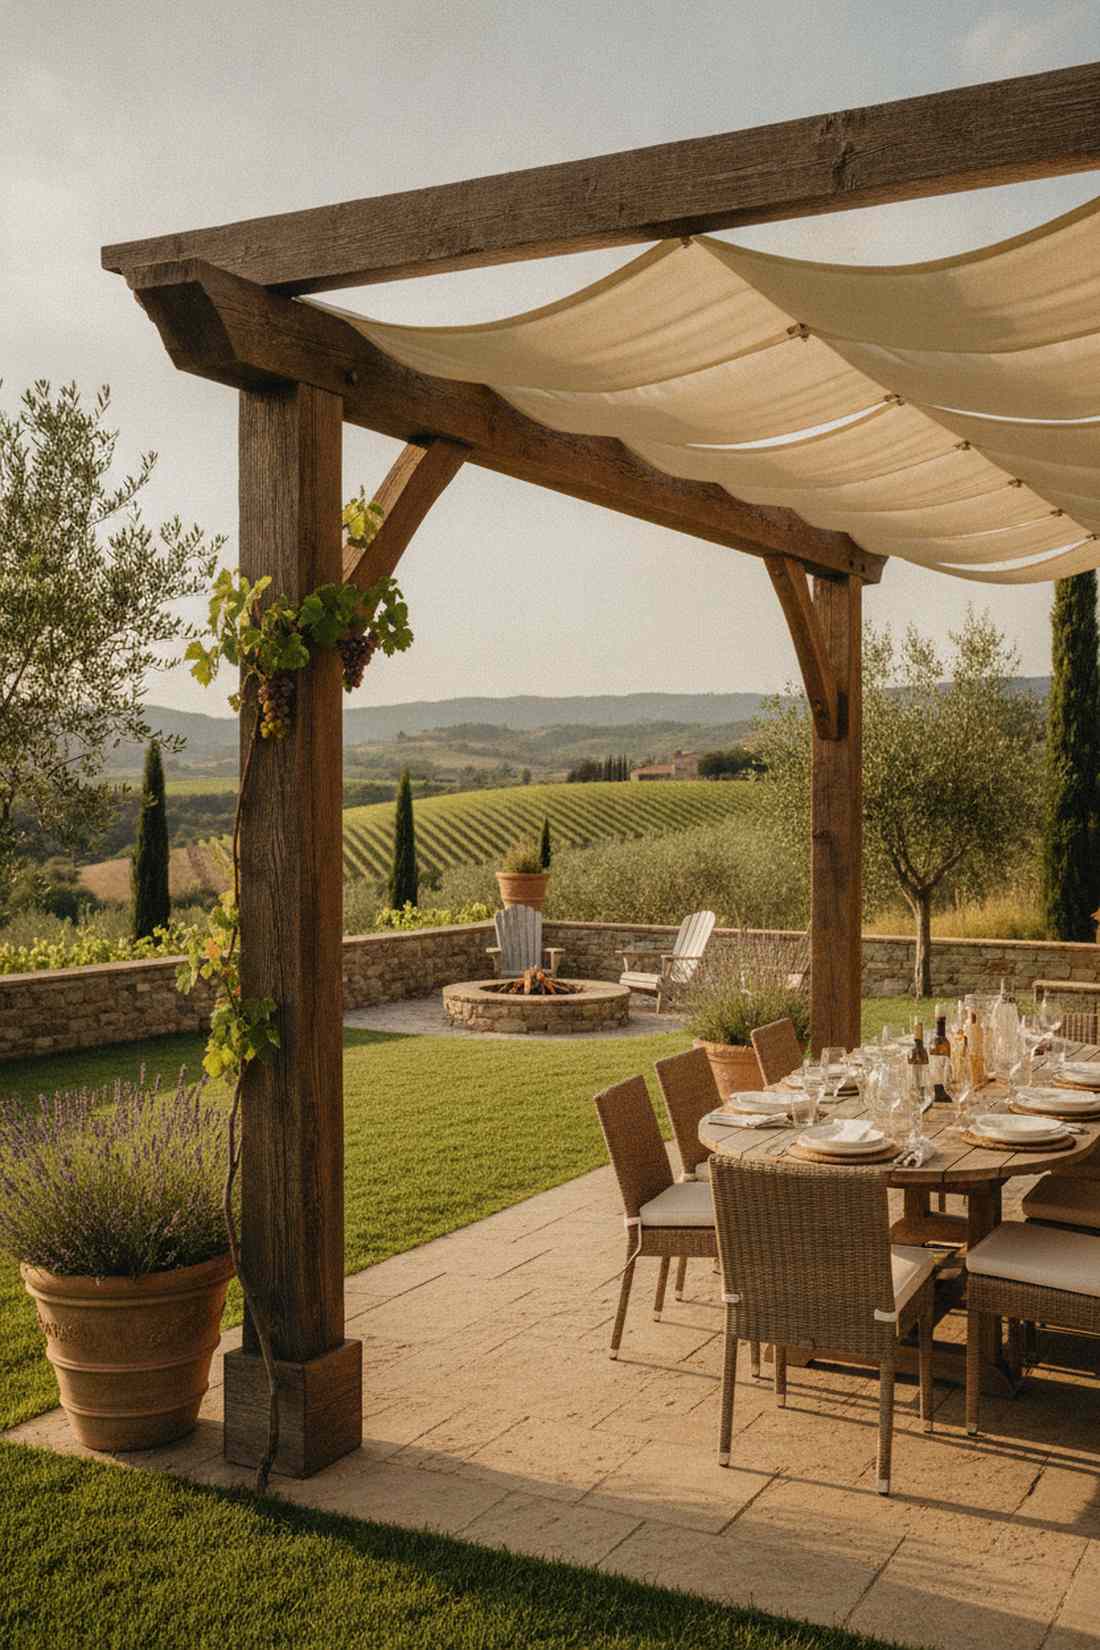
This layout feels like a Mediterranean villa patio in the heat of summer. A retractable canopy timber pergola works perfectly for protecting delicate outdoor dining furniture from harsh UV rays.
Combining heavy, rustic timber with sleek, sliding shade fabric gives a designer-level finish that bridges the gap between old-world and modern. The ability to pull the fabric back for stargazing makes this setup incredibly dynamic.
You can build the frame and add the sliding canopy for roughly $1,500–$2,800. Pin this if you love versatile outdoor dining!
- Key Materials: Heavy cedar posts and track-mounted fabric
- Vibe / Style: Tuscan vineyard estate
- Difficulty: Intermediate
- Budget Breakdown: Timber: $1200 | Shade Sail Kit: $300
- Creator’s Tip: Treat the fabric with an aftermarket waterproofing spray to ensure light rain rolls right off instead of pooling.
- Smart Sourcing: retractable pergola wave canopy kits and heavy-duty post base brackets.
18. Sail Shade Modern Pergola
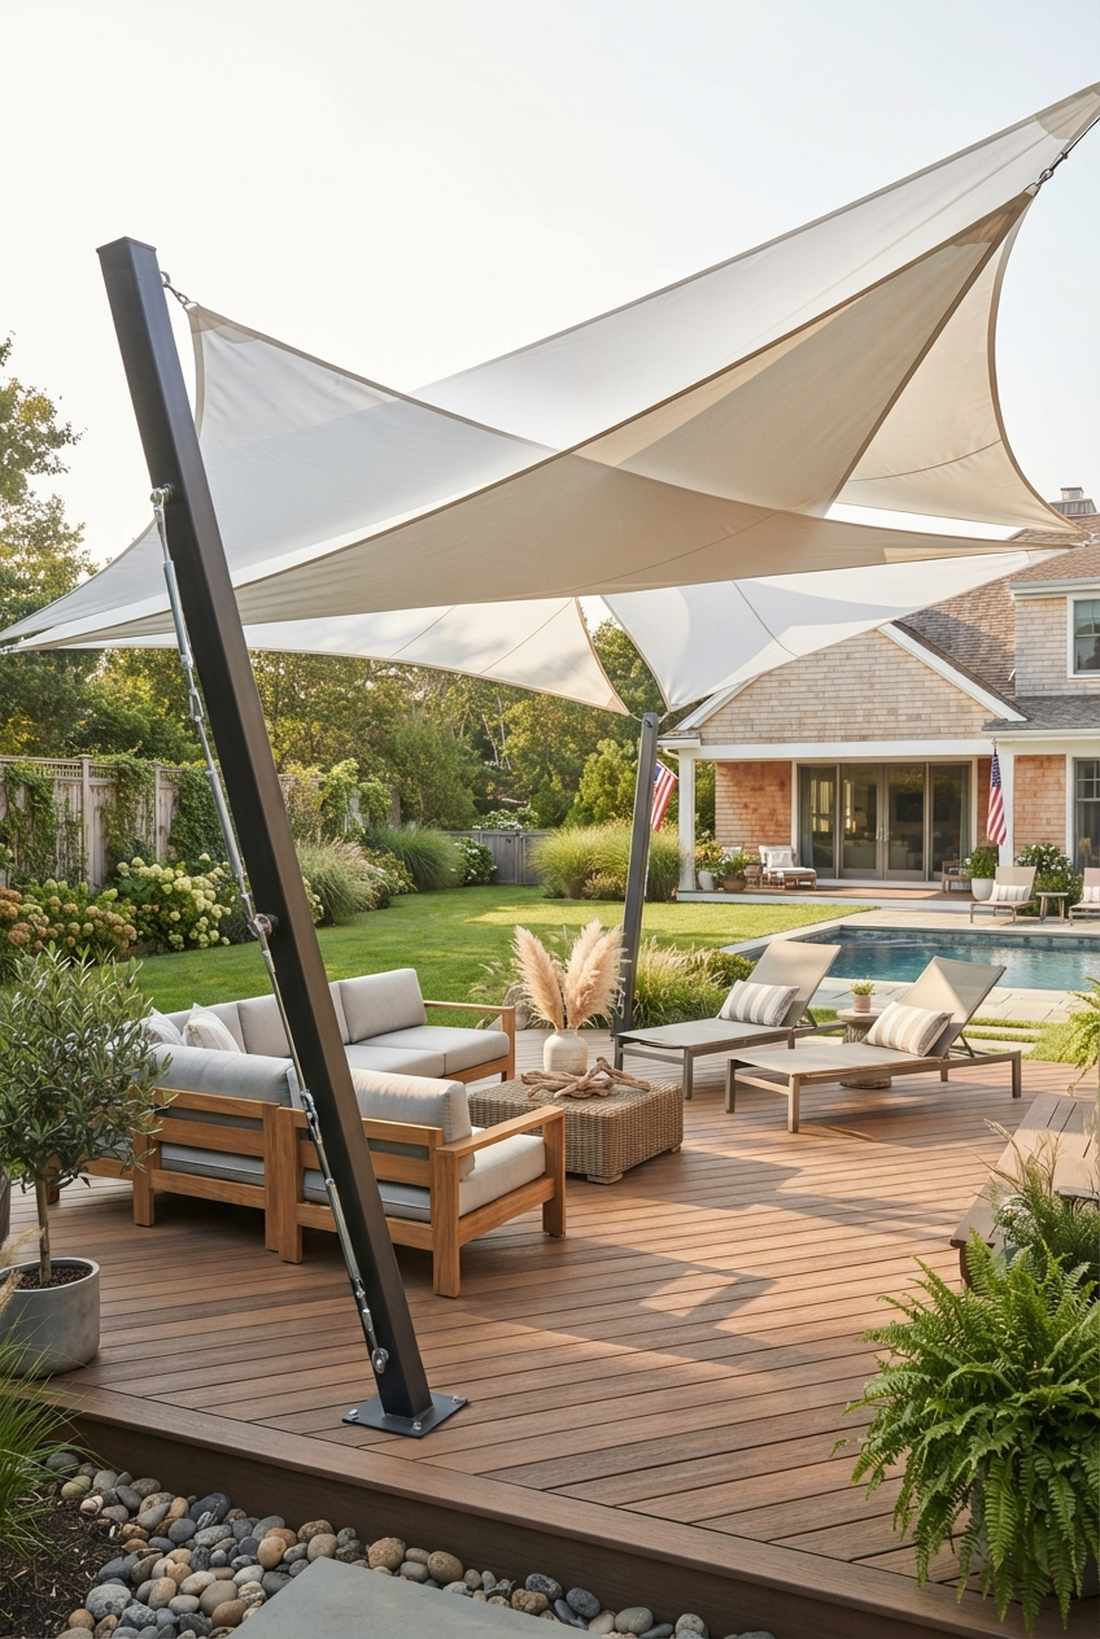
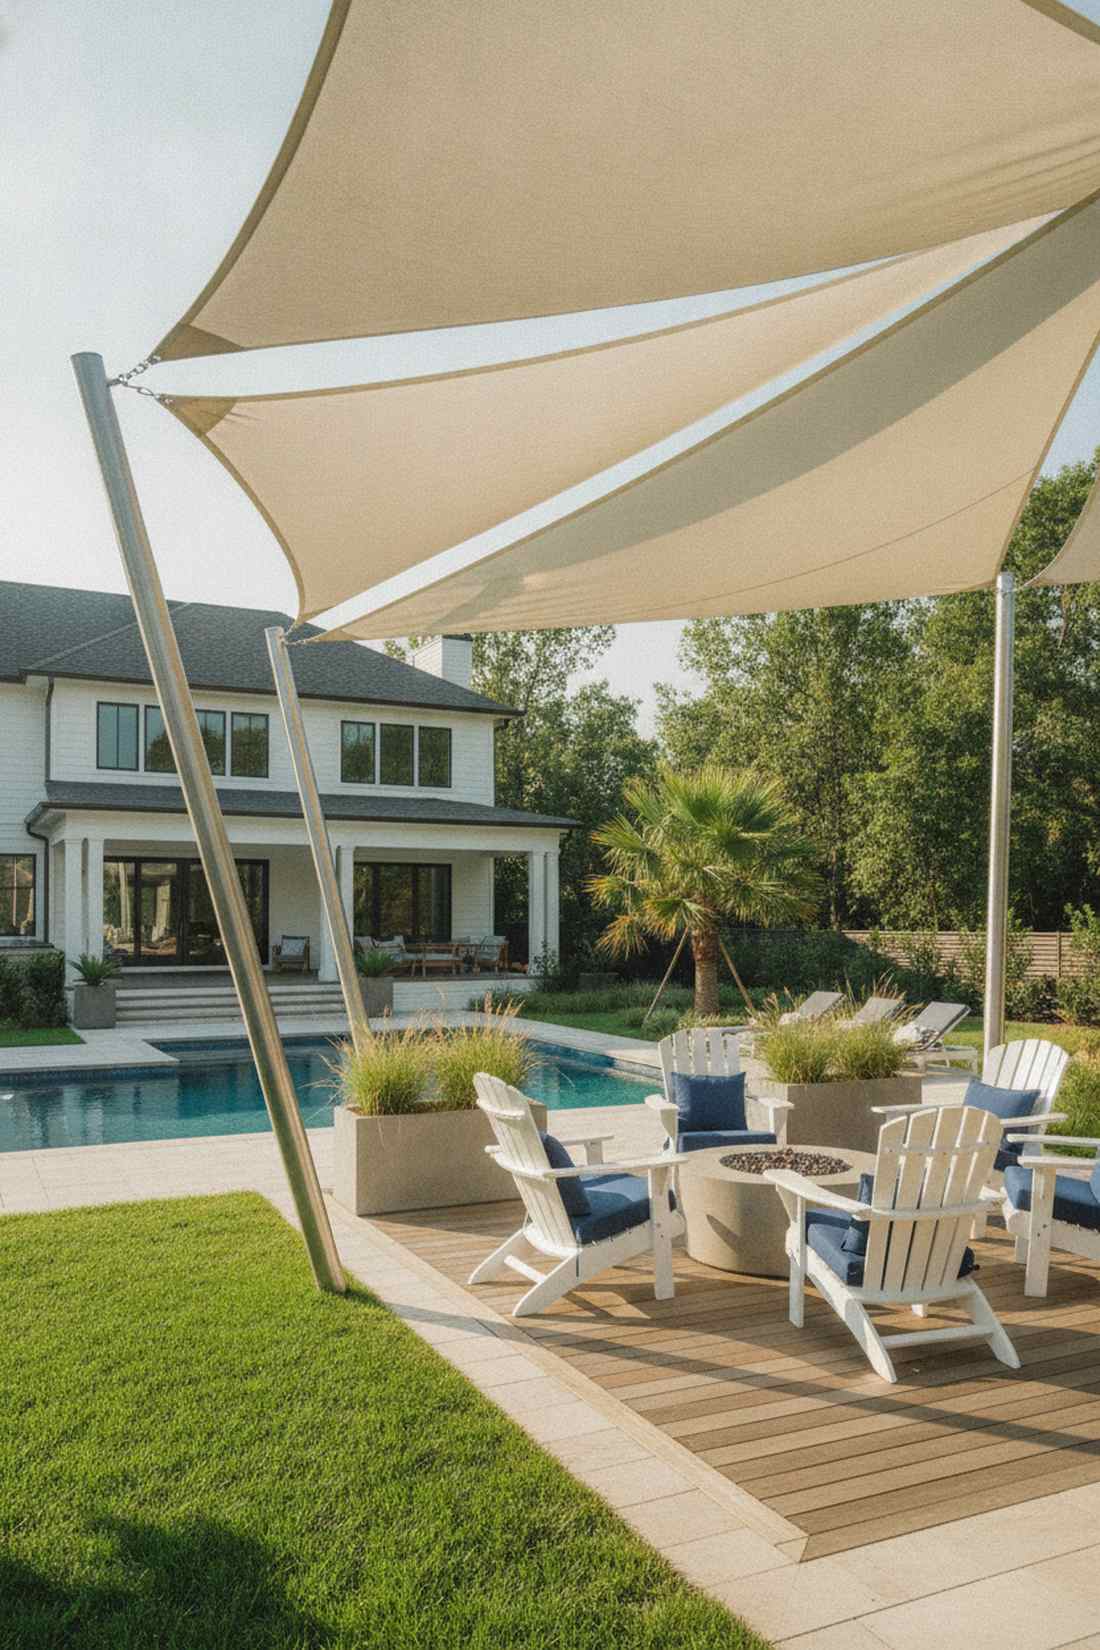
Looking up at this geometric canopy feels like chilling at an exclusive beach club. A tensioned sail shade patio is an insanely affordable way to cover massive square footage with high style.
Using rigid structures can feel heavy and blocky, but tensioned fabric creates sculptural, airy forms that look wildly modern. Anchoring these high-quality UV-resistant sails to steel posts creates striking shadows that shift beautifully throughout the day.
This minimalist shade solution costs a mere $300–$800. It’s the ultimate hack for rapid, budget-friendly sun protection.
- Key Materials: Commercial-grade shade sails
- Vibe / Style: Modern coastal resort
- Difficulty: Easy quick setup
- Budget Breakdown: Sails: $150 | Hardware & Posts: $250
- Creator’s Tip: Always install one corner of the triangle sail significantly lower than the others to ensure rapid water runoff.
- Smart Sourcing: UV-blocking sun shade sails (hardware included) and stainless steel turnbuckle tensioners.
19. Glass Roof Conservatory Deck
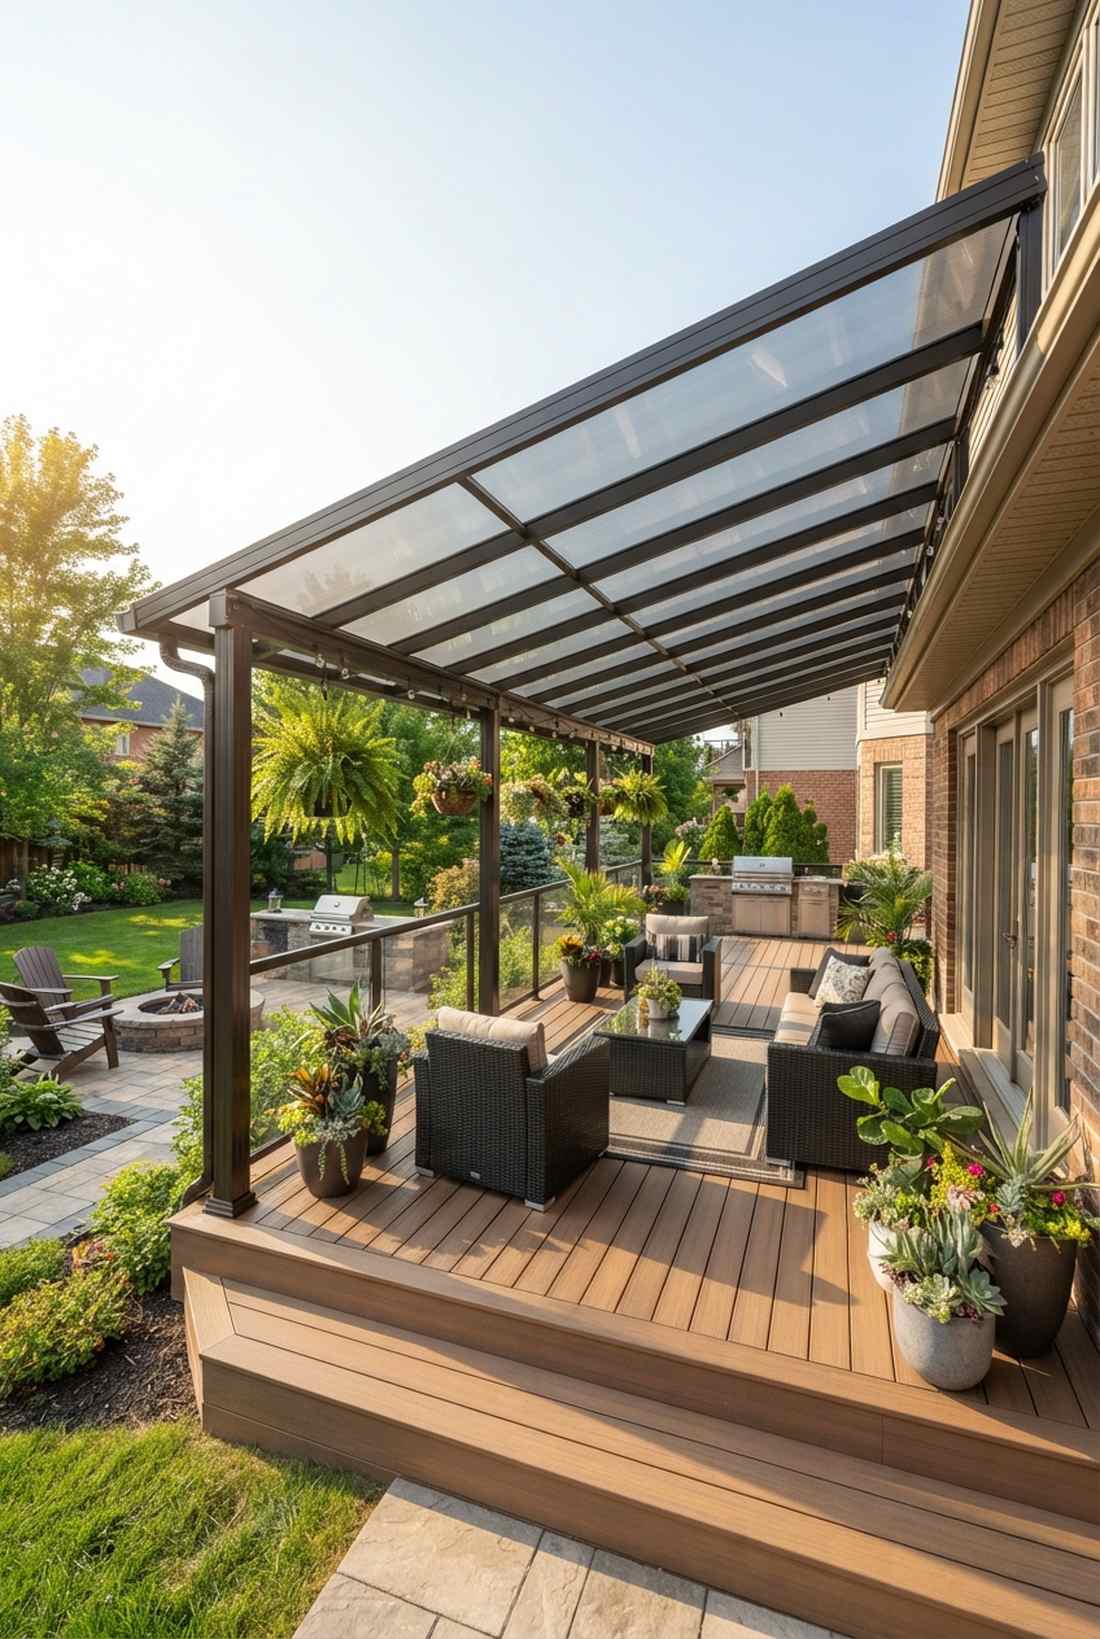
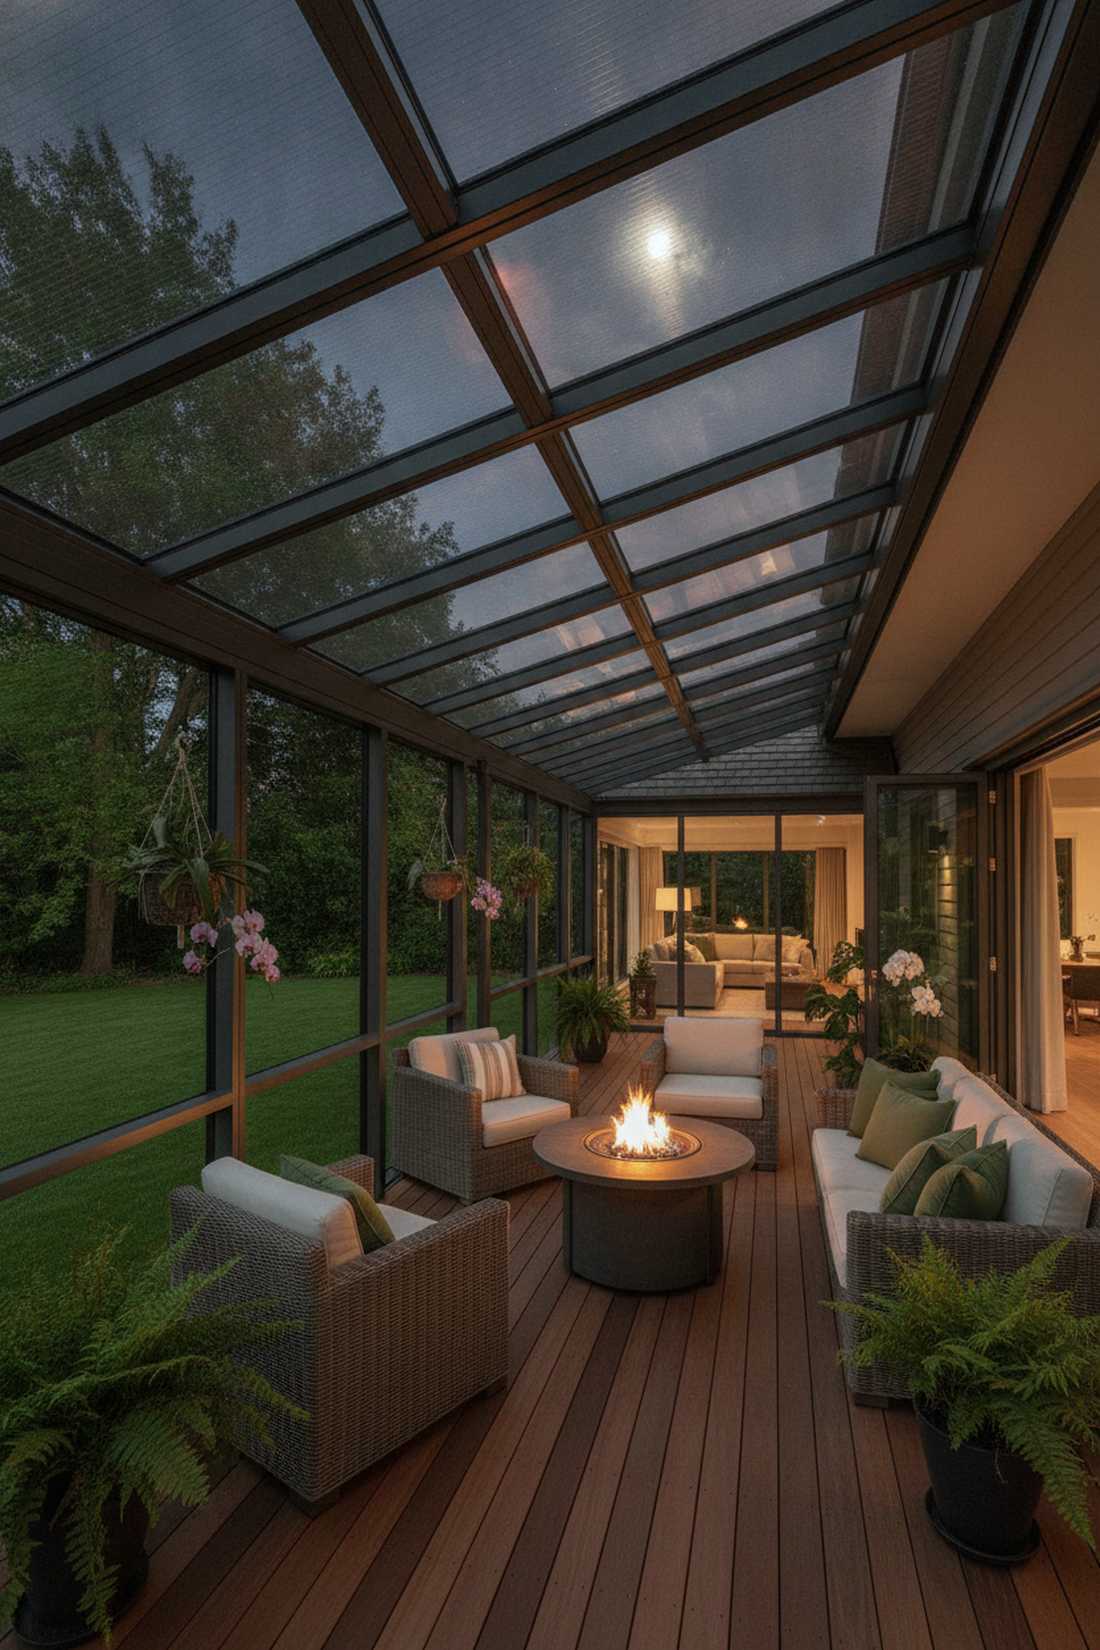
Stepping under this structure feels like entering a luxurious modern greenhouse. A glass roof patio cover is an absolute showstopper for maintaining bright, starry-night views without the rain.
Standard solid roofs often plunge the interior rooms of your house into darkness, but utilizing tinted polycarbonate panels completely solves this issue. This elegant shelter looks far more expensive than it is, giving you a crystal-clear connection to nature.
Installing a clear conservatory-style roof runs about $2,000–$4,000. Save this idea if you love natural light!
- Key Materials: Tinted polycarbonate roofing panels
- Vibe / Style: Modern botanical conservatory
- Difficulty: Advanced installation
- Budget Breakdown: Framing: $1000 | Clear Panels: $1500
- Creator’s Tip: Use panels with a slight bronze or grey tint to cut down the glaring greenhouse effect during peak afternoon sun.
- Smart Sourcing: multiwall polycarbonate roof panels and rubberized waterproof roofing screws.
Contractors usually charge an absolute fortune for this next feature, but smart sourcing makes it incredibly affordable…
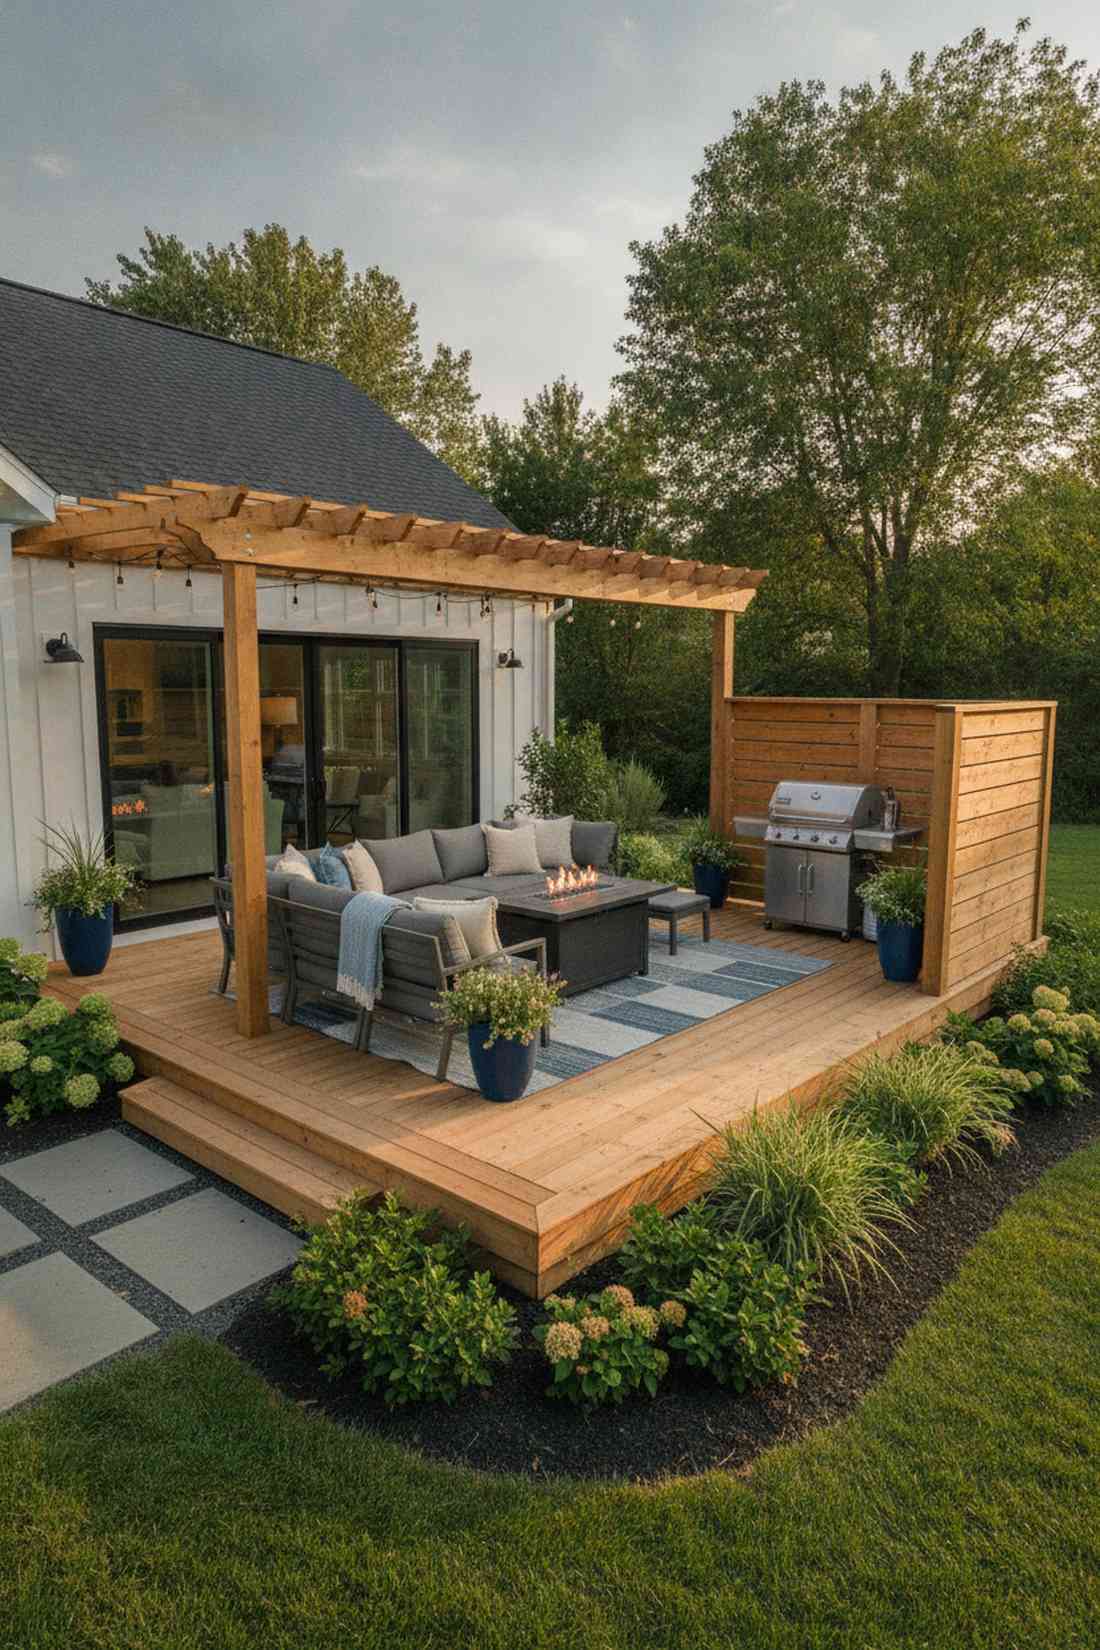
20. Partial Pergola with Open Sections
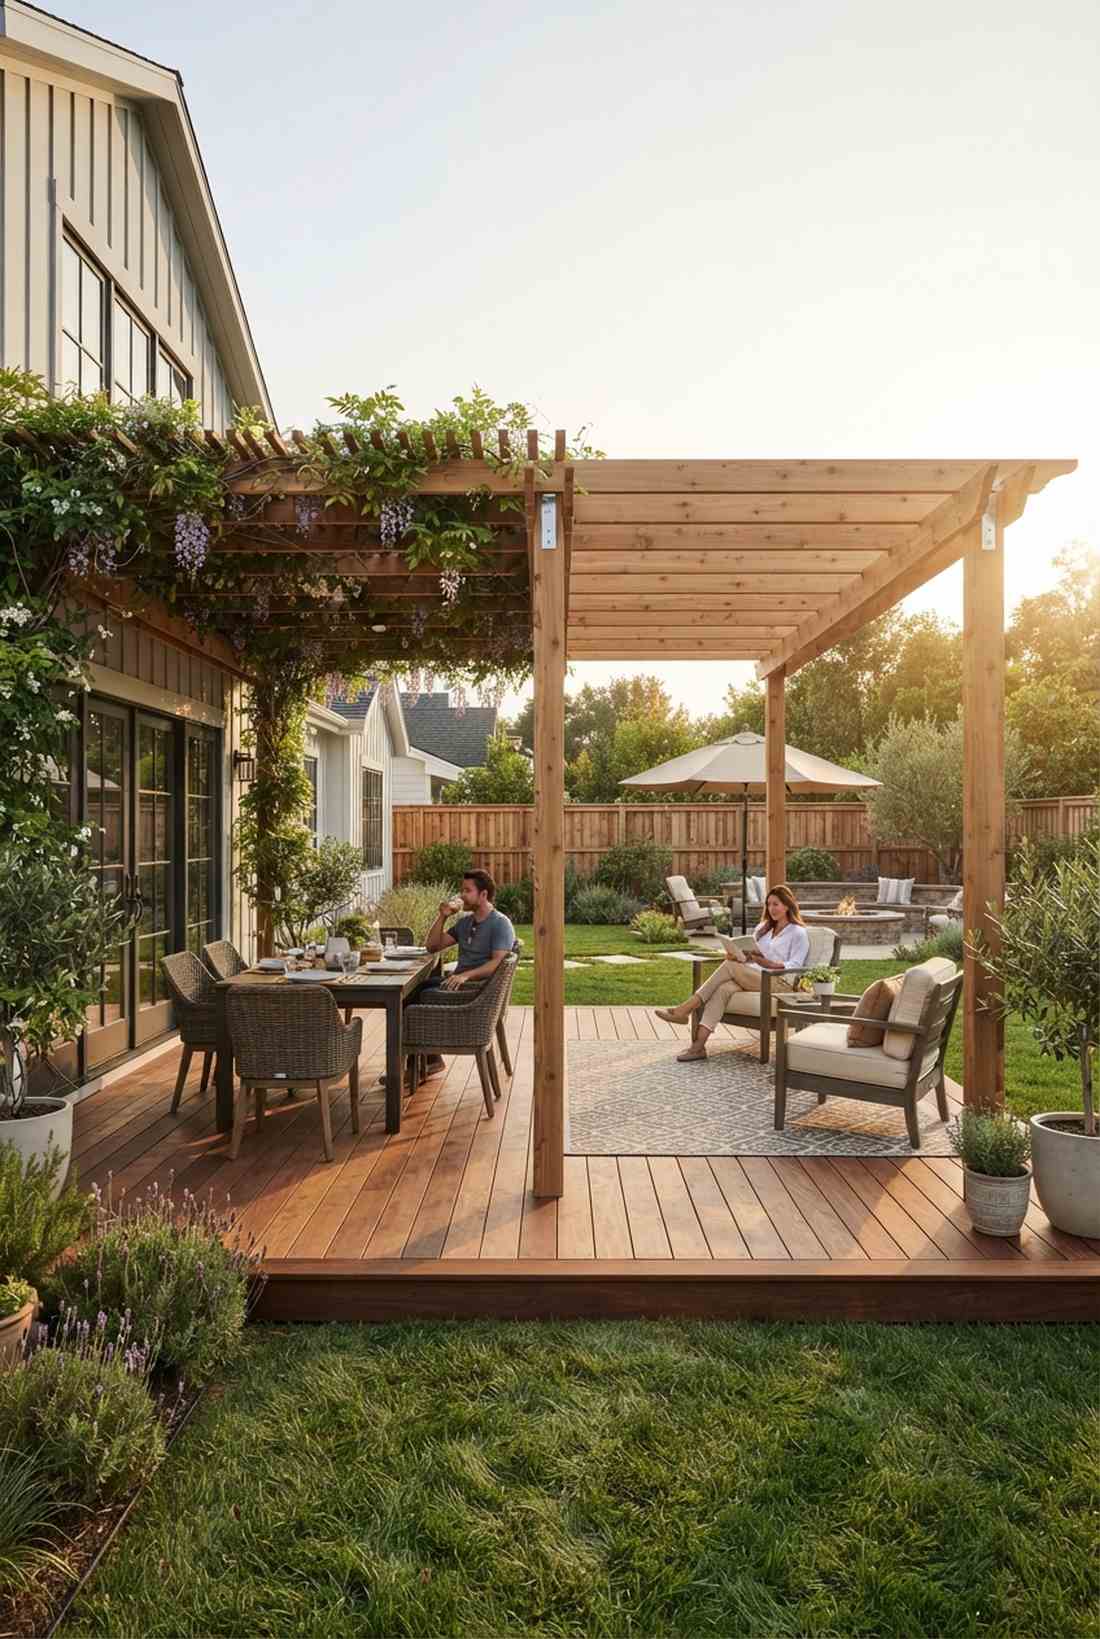
This layout feels like a perfectly balanced sun-and-shade retreat. Building a half-covered pergola deck is ideal for couples where one loves to tan and the other needs deep shade.
Why pay to cover the whole deck when a selective approach looks infinitely more architectural? Creating an intentional transition from a dark, cozy dining nook out into an open sun-drenched lounge delivers a surprisingly premium look.
By halving the overhead materials, this drops the price to a manageable $800–$1,500. A highly strategic layout choice for maximizing usability!
- Key Materials: Pre-cut lumber and climbing vines
- Vibe / Style: Balanced Mediterranean courtyard
- Difficulty: Intermediate
- Budget Breakdown: Lumber: $700 | Hardware: $100
- Creator’s Tip: Plant fast-growing wisteria or jasmine at the post bases to quickly create a “living roof” over the slatted section.
- Smart Sourcing: decorative rafter tail templates and stainless steel pergola brackets (starter kit).
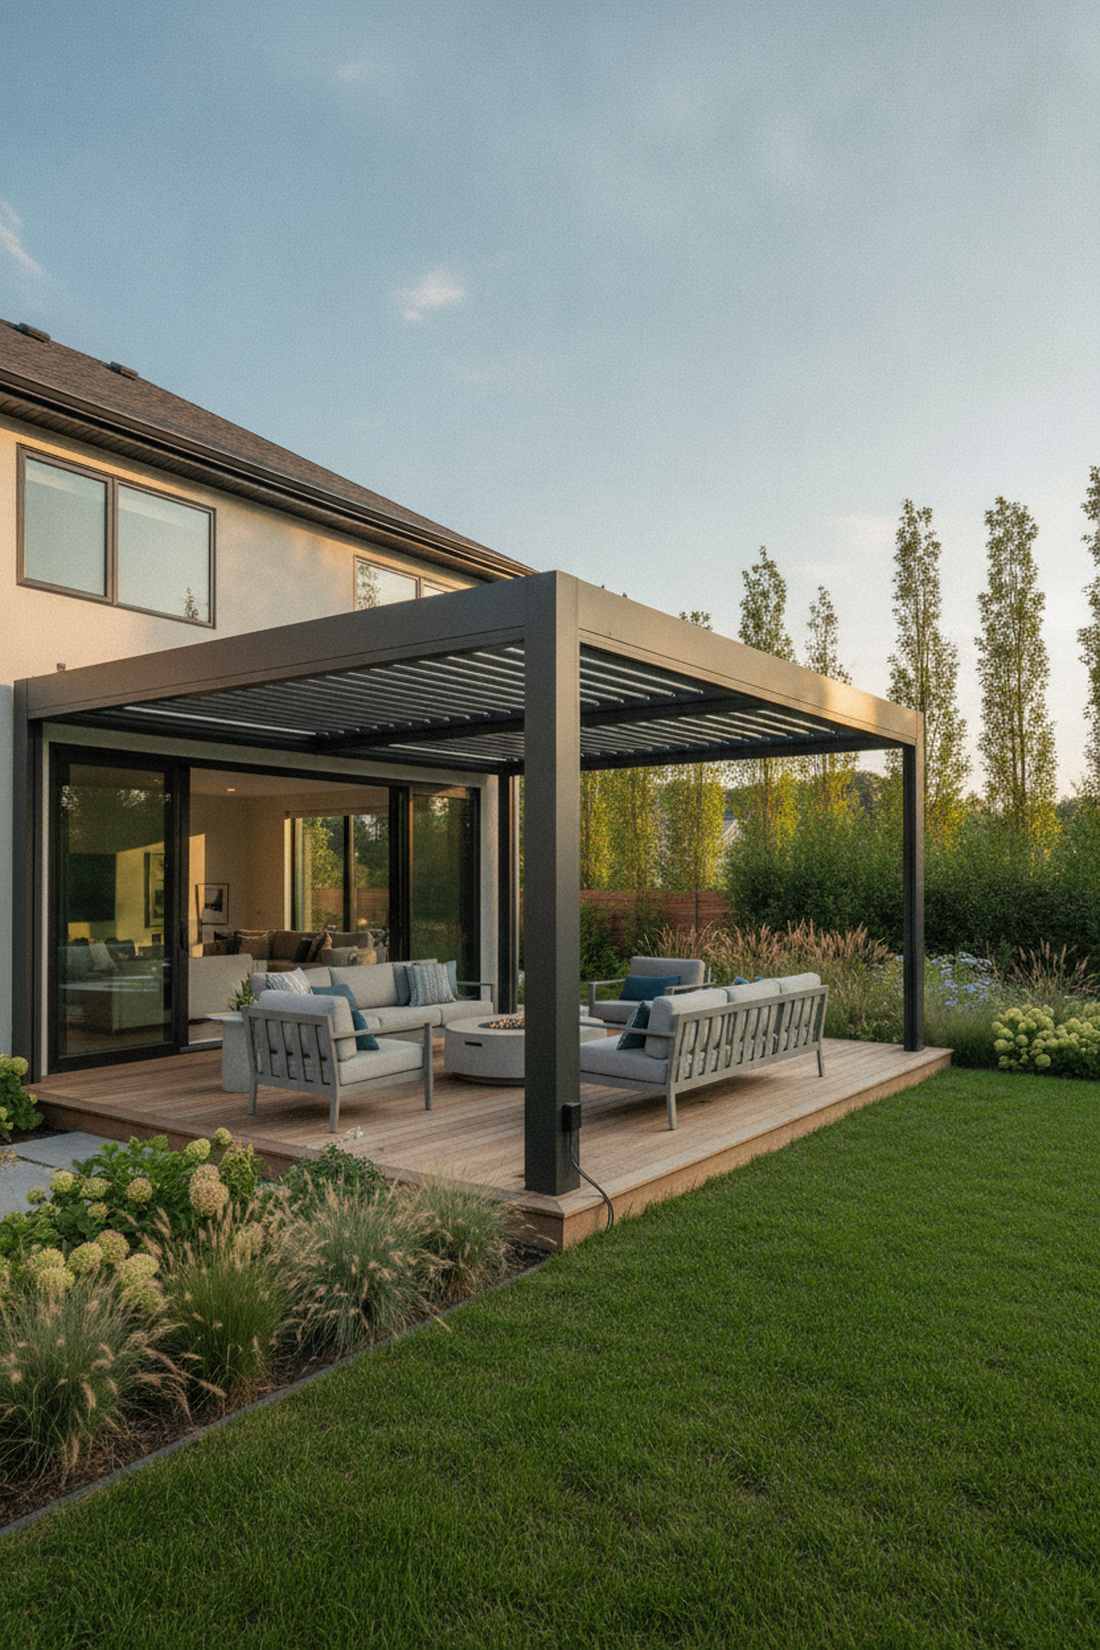
21. Black Steel Contemporary Pergola
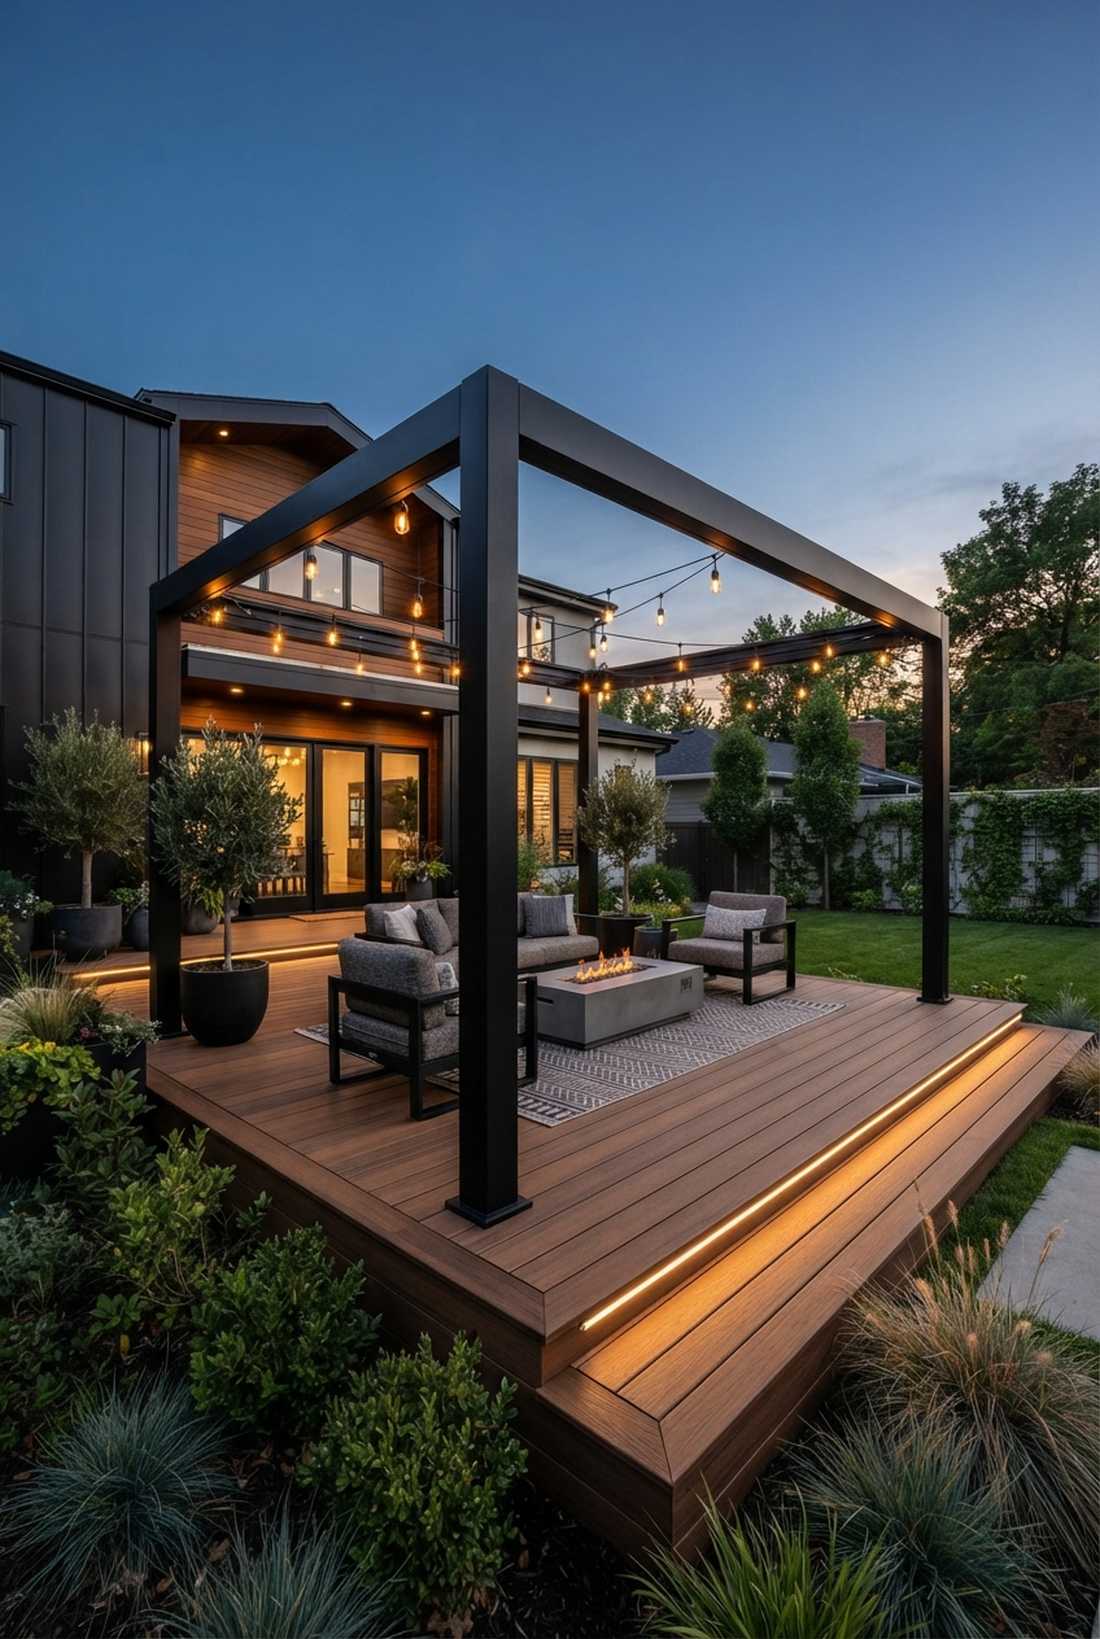

Standing beneath this frame feels like hanging out at a chic industrial loft. A matte black steel pergola provides razor-sharp modern contrast against traditional wooden decking.
Heavy wood can sometimes look dated, but powder-coated metal framing immediately injects a designer-level finish into the backyard. Hanging Edison bulbs against the dark minimalist metal creates an unbelievably moody evening aesthetic.
Pre-fab steel kits typically run $1,500–$2,800. Pin this to your modern industrial home design board!
- Key Materials: Powder-coated black steel beams
- Vibe / Style: Urban industrial chic
- Difficulty: Intermediate assembly
- Budget Breakdown: Steel Kit: $1800 | Lighting: $200
- Creator’s Tip: Keep the aesthetic clean by routing the string light wiring directly through the hollow metal posts.
- Smart Sourcing: matte black steel pergola kits and commercial-grade outdoor string lights.
Specialized Entertainment Features
Purpose-built elements transform standard decks into entertainment powerhouses equipped for specific activities. These integrated features eliminate the need for portable equipment while creating focal points that anchor the design.
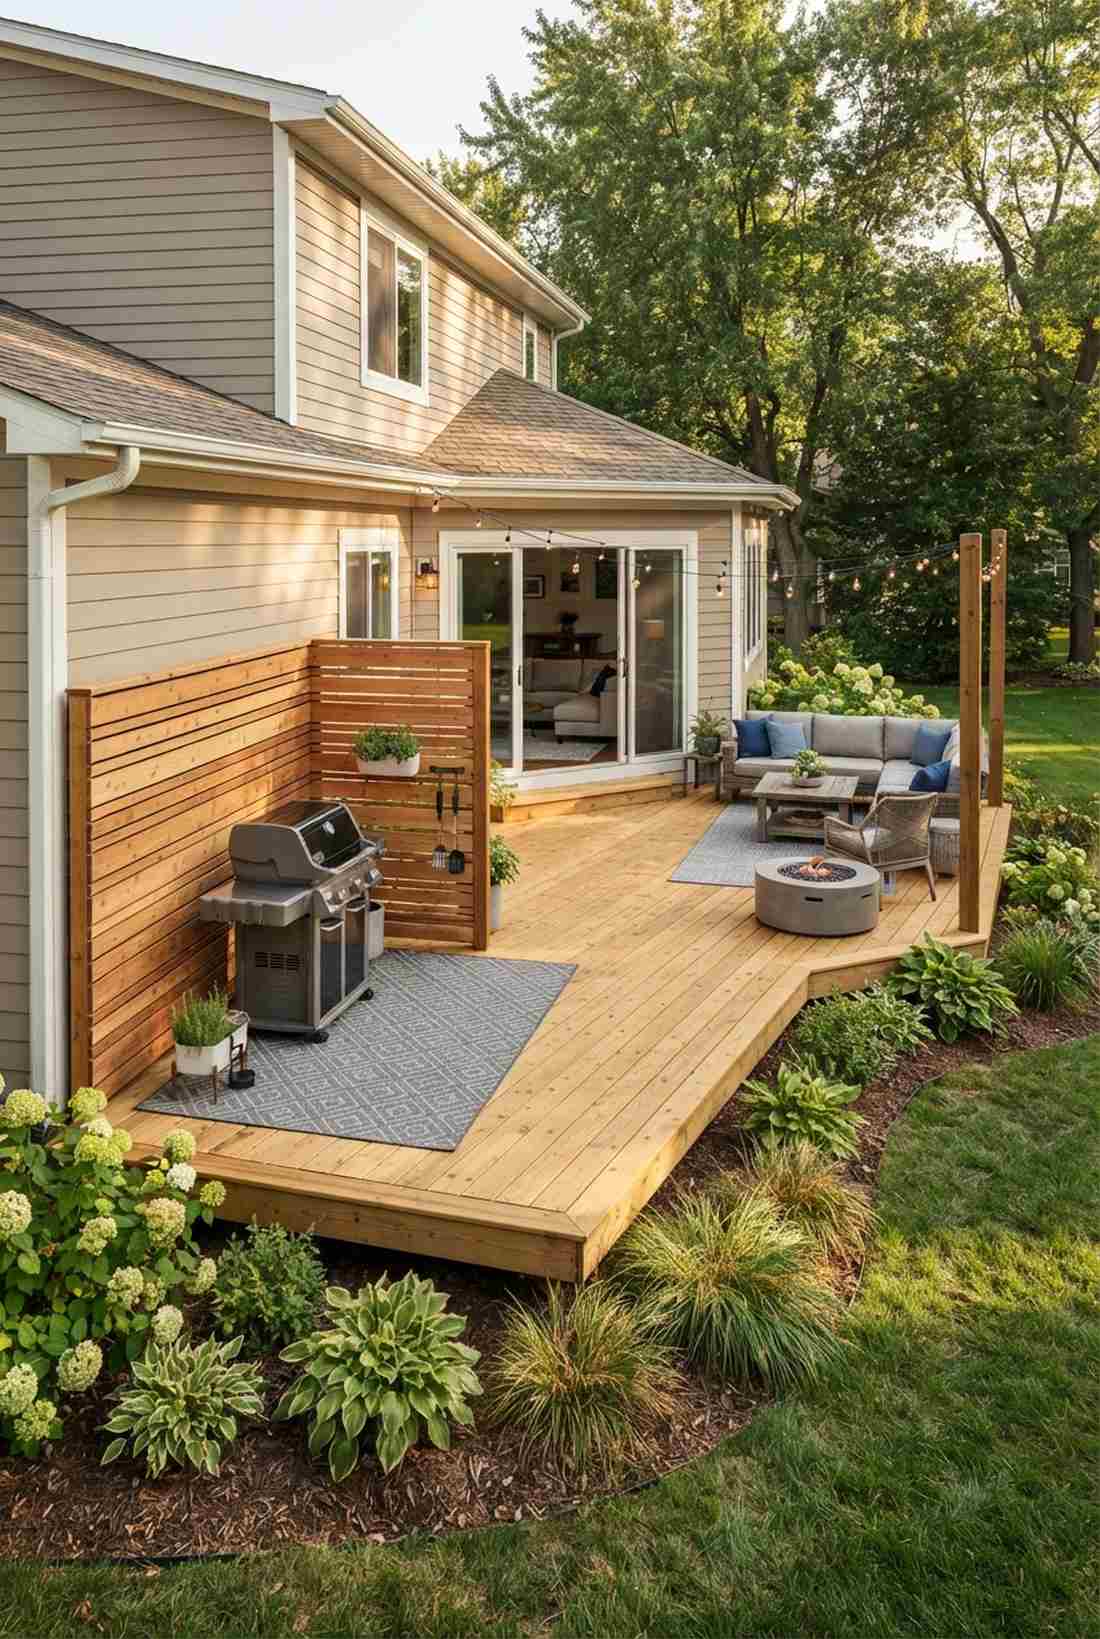
22. Built-In Grill Station with Counters
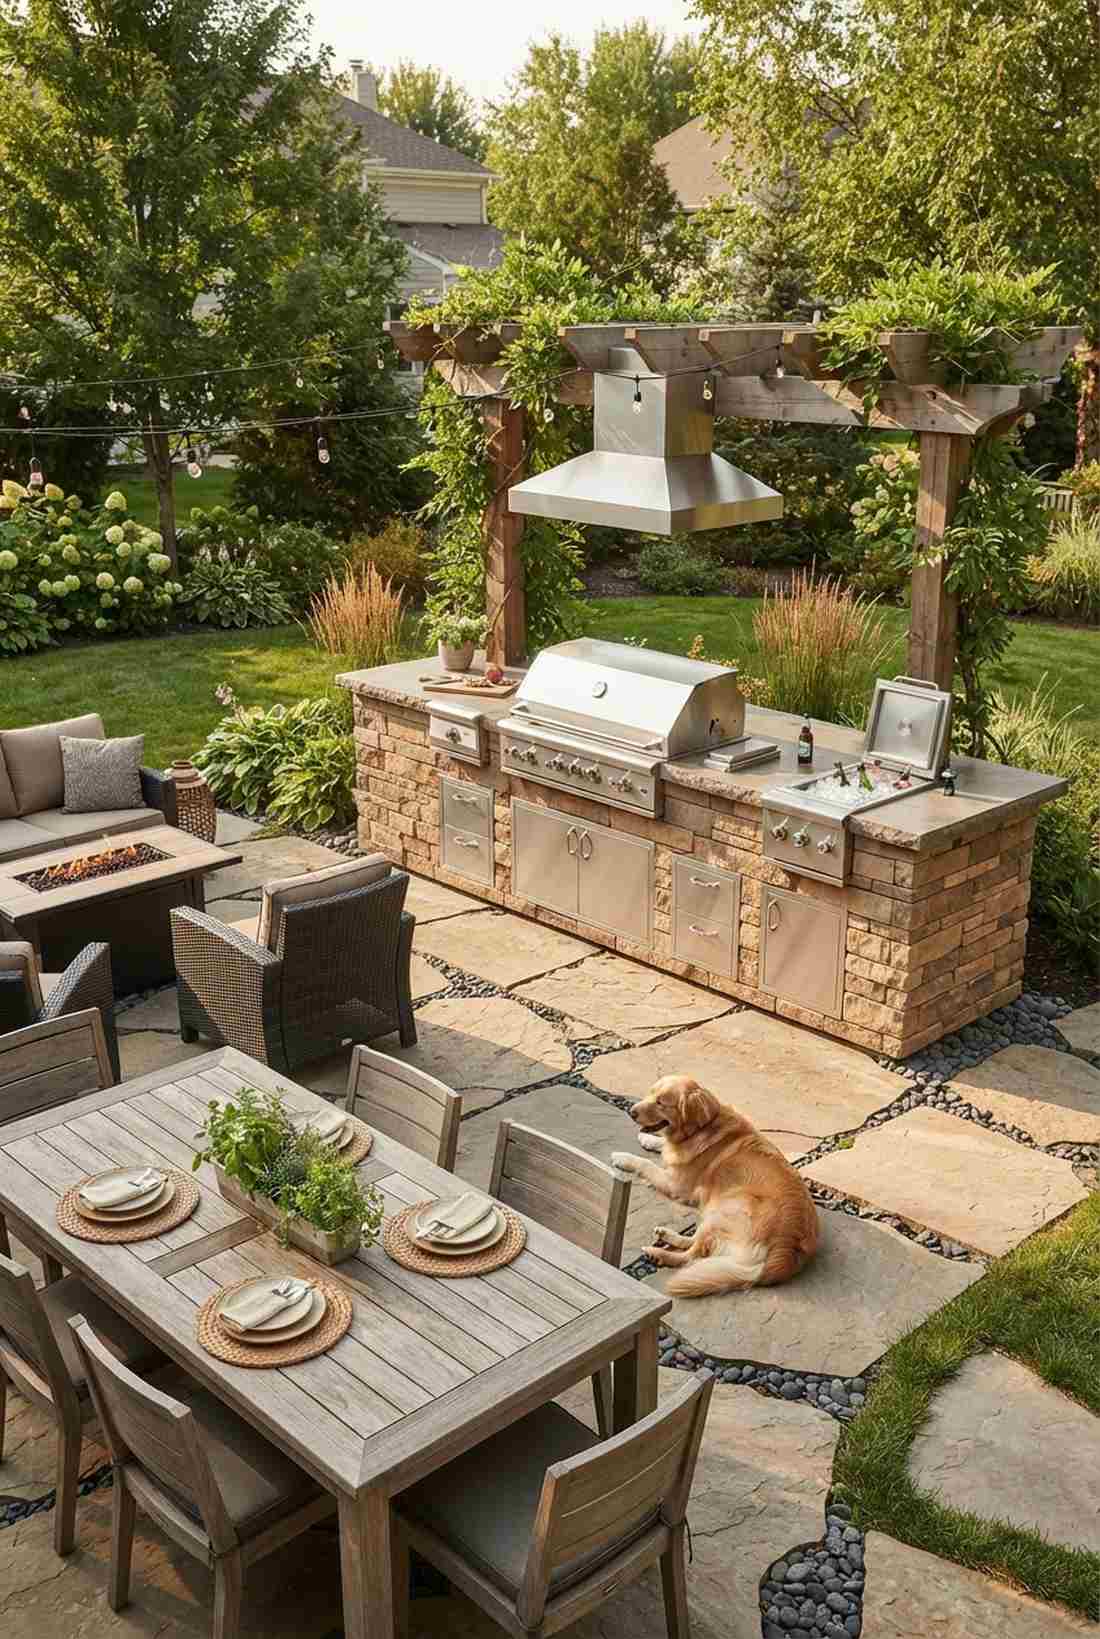
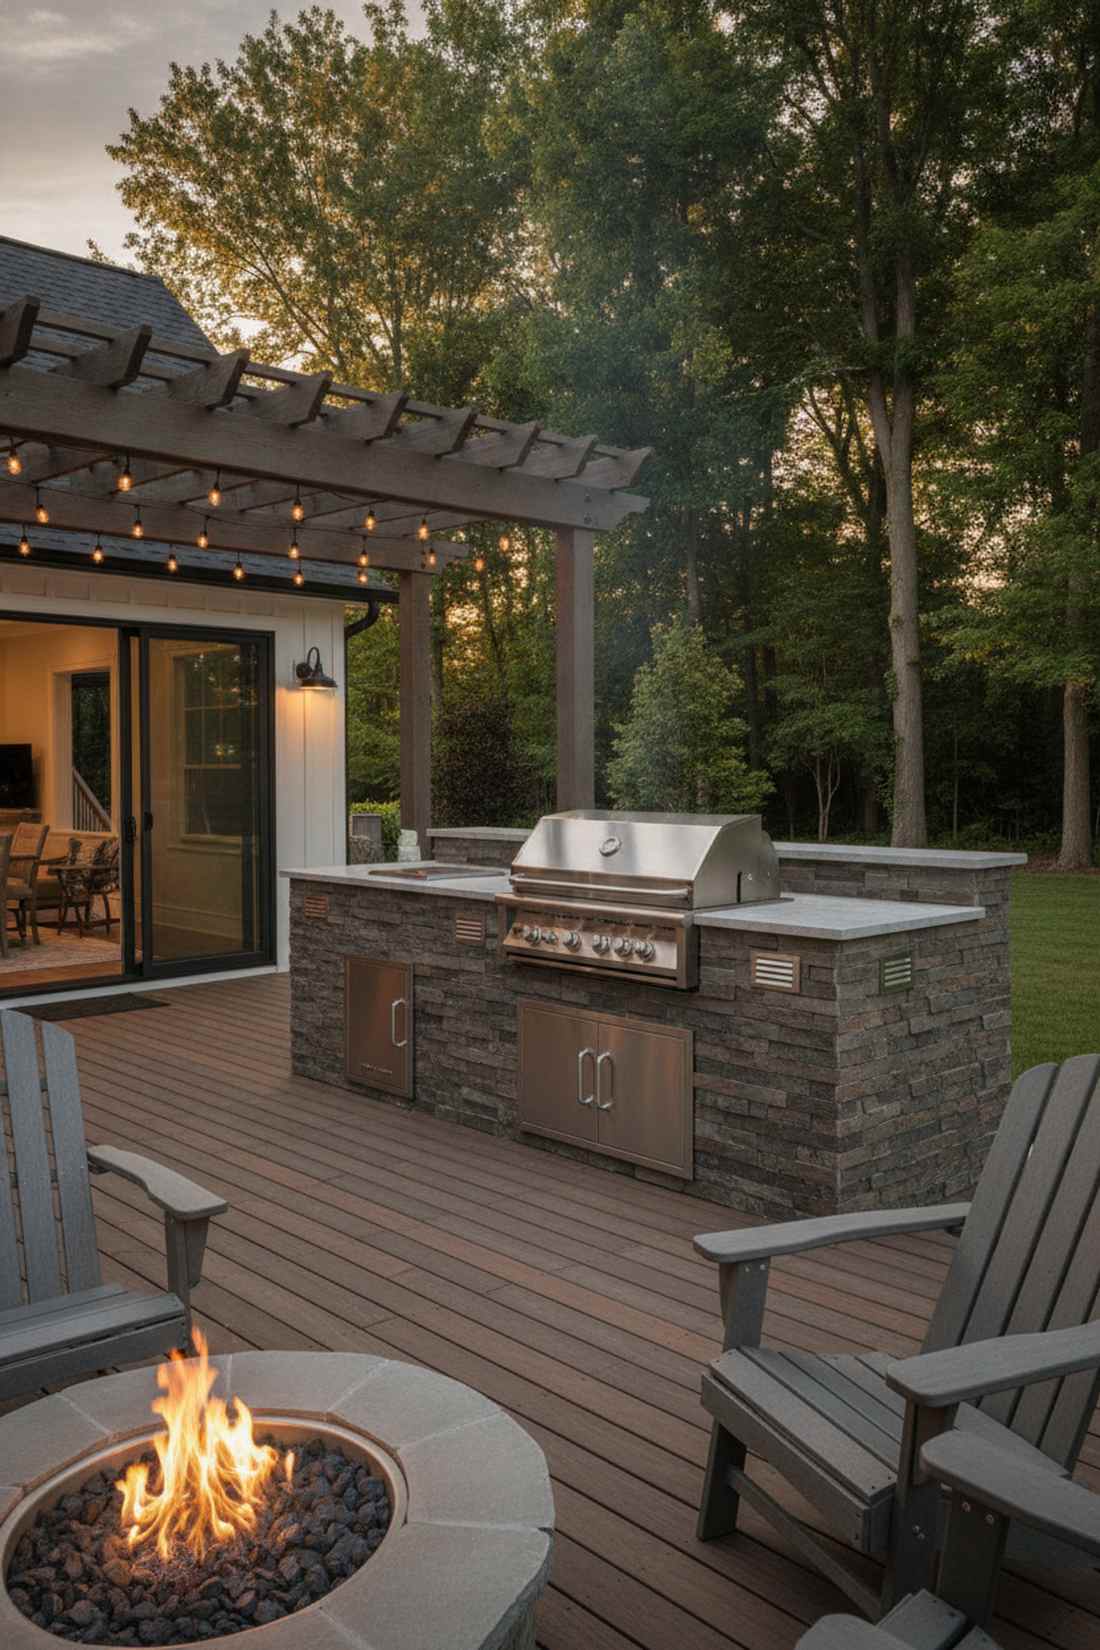
This cooking zone feels like you brought a high-end restaurant kitchen outside. An integrated outdoor BBQ station completely eliminates the chaotic back-and-forth trips to your indoor kitchen.
Freestanding grills look sloppy, but wrapping your equipment in stone veneer and weather-resistant countertops upgrades the entire property value. Sneaking in a drop-in ice chest and stainless storage doors creates a seamless, professional chef experience.
You can DIY a framed-in grill island for about $1,000–$2,000 (excluding the grill). It’s a game-changer for summer hosts.
- Key Materials: Cement board and peel-and-stick stone veneer
- Vibe / Style: Professional pitmaster setup
- Difficulty: Advanced framing
- Budget Breakdown: Frame/Board: $300 | Veneer & Top: $700
- Creator’s Tip: Always install stainless steel heat shields and proper venting panels to prevent heat buildup inside the wooden frame.
- Smart Sourcing: stainless steel outdoor access doors and outdoor-rated drop-in grill heads.
23. Outdoor Bar with Refrigeration
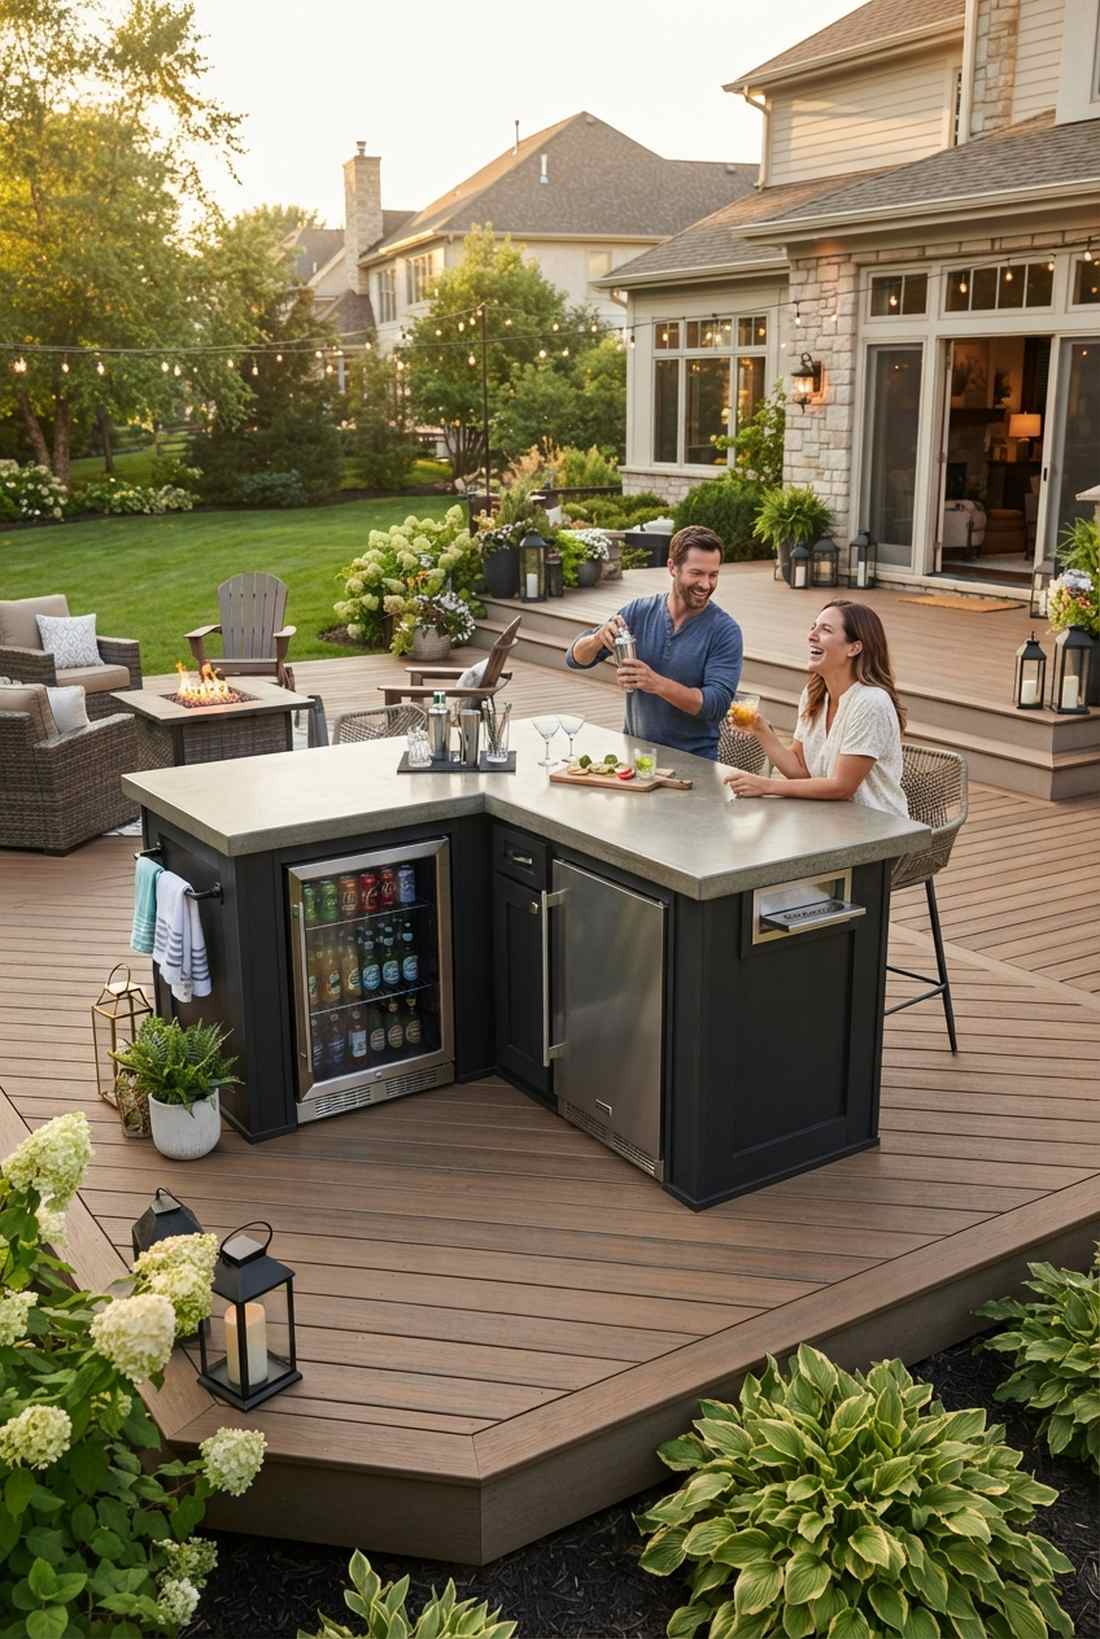
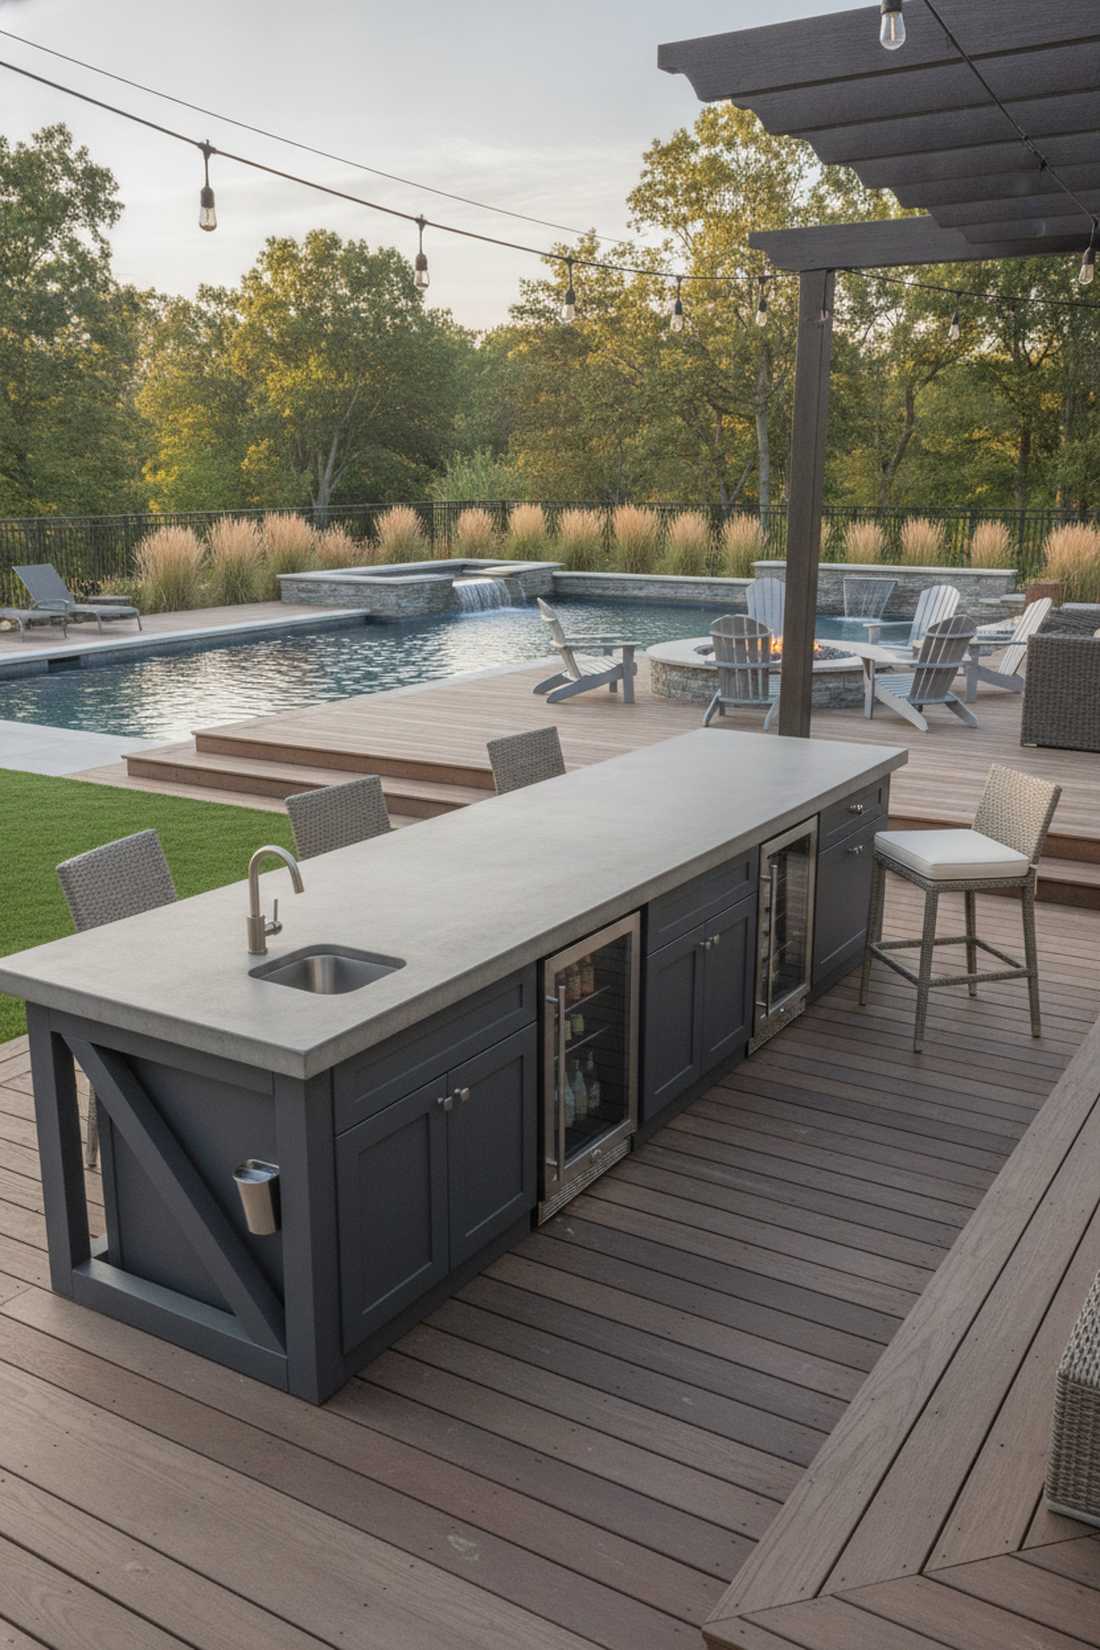
Sitting at this counter feels exactly like grabbing drinks at a luxury resort pool. A built-in patio wet bar is the ultimate flex for mixing evening cocktails without missing the conversation.
Nobody wants to dig through a messy cooler; installing drop-in coolers and mini-fridges into waterproof cabinetry delivers a surprisingly premium look. Topping it off with a sleek poured concrete counter adds an indestructible, modern touch.
Framing and finishing a custom bar setup costs around $1,200–$2,500. Save this if you love hosting happy hour!
- Key Materials: Weatherproof PVC cabinetry
- Vibe / Style: High-end resort lounge
- Difficulty: Intermediate plumbing/electrical
- Budget Breakdown: Cabinets: $600 | Fridge: $400 | Top: $300
- Creator’s Tip: Integrate an under-counter bottle cap catcher directly into the framing to keep the deck completely free of sharp metal trash.
- Smart Sourcing: outdoor-rated beverage coolers and concrete countertop mix (bulk bag).
24. Stone Fireplace Entertainment Wall
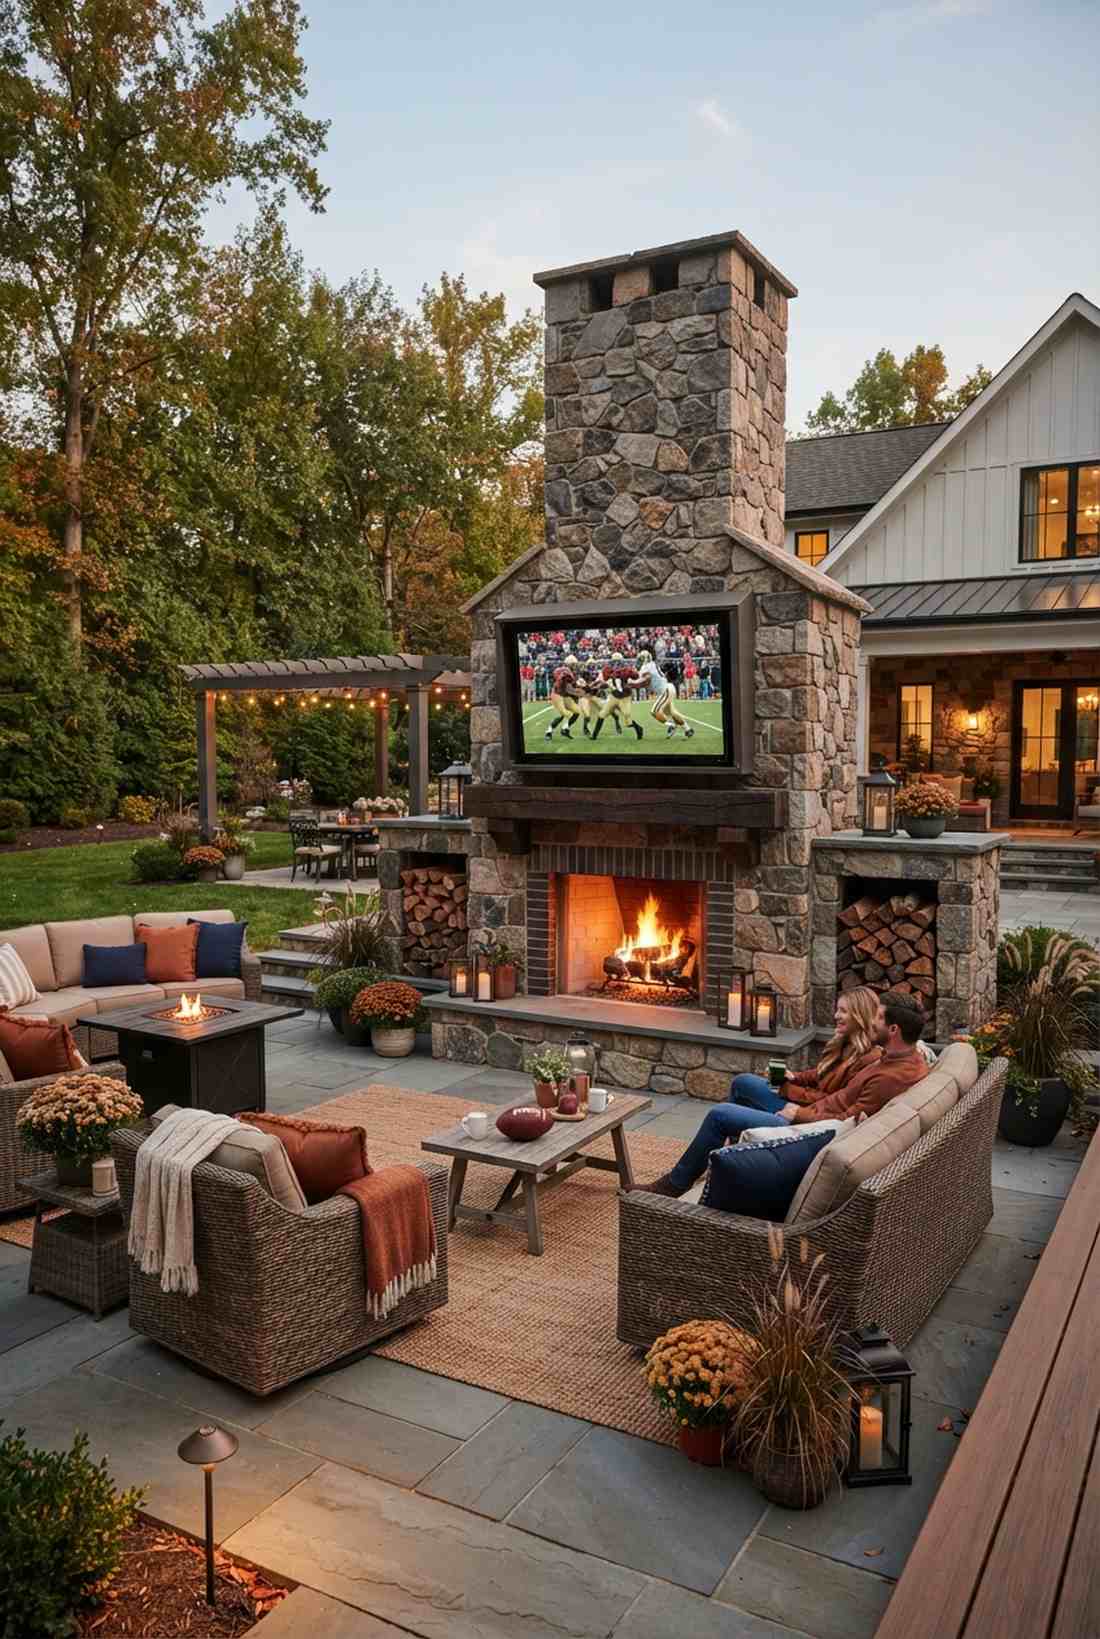
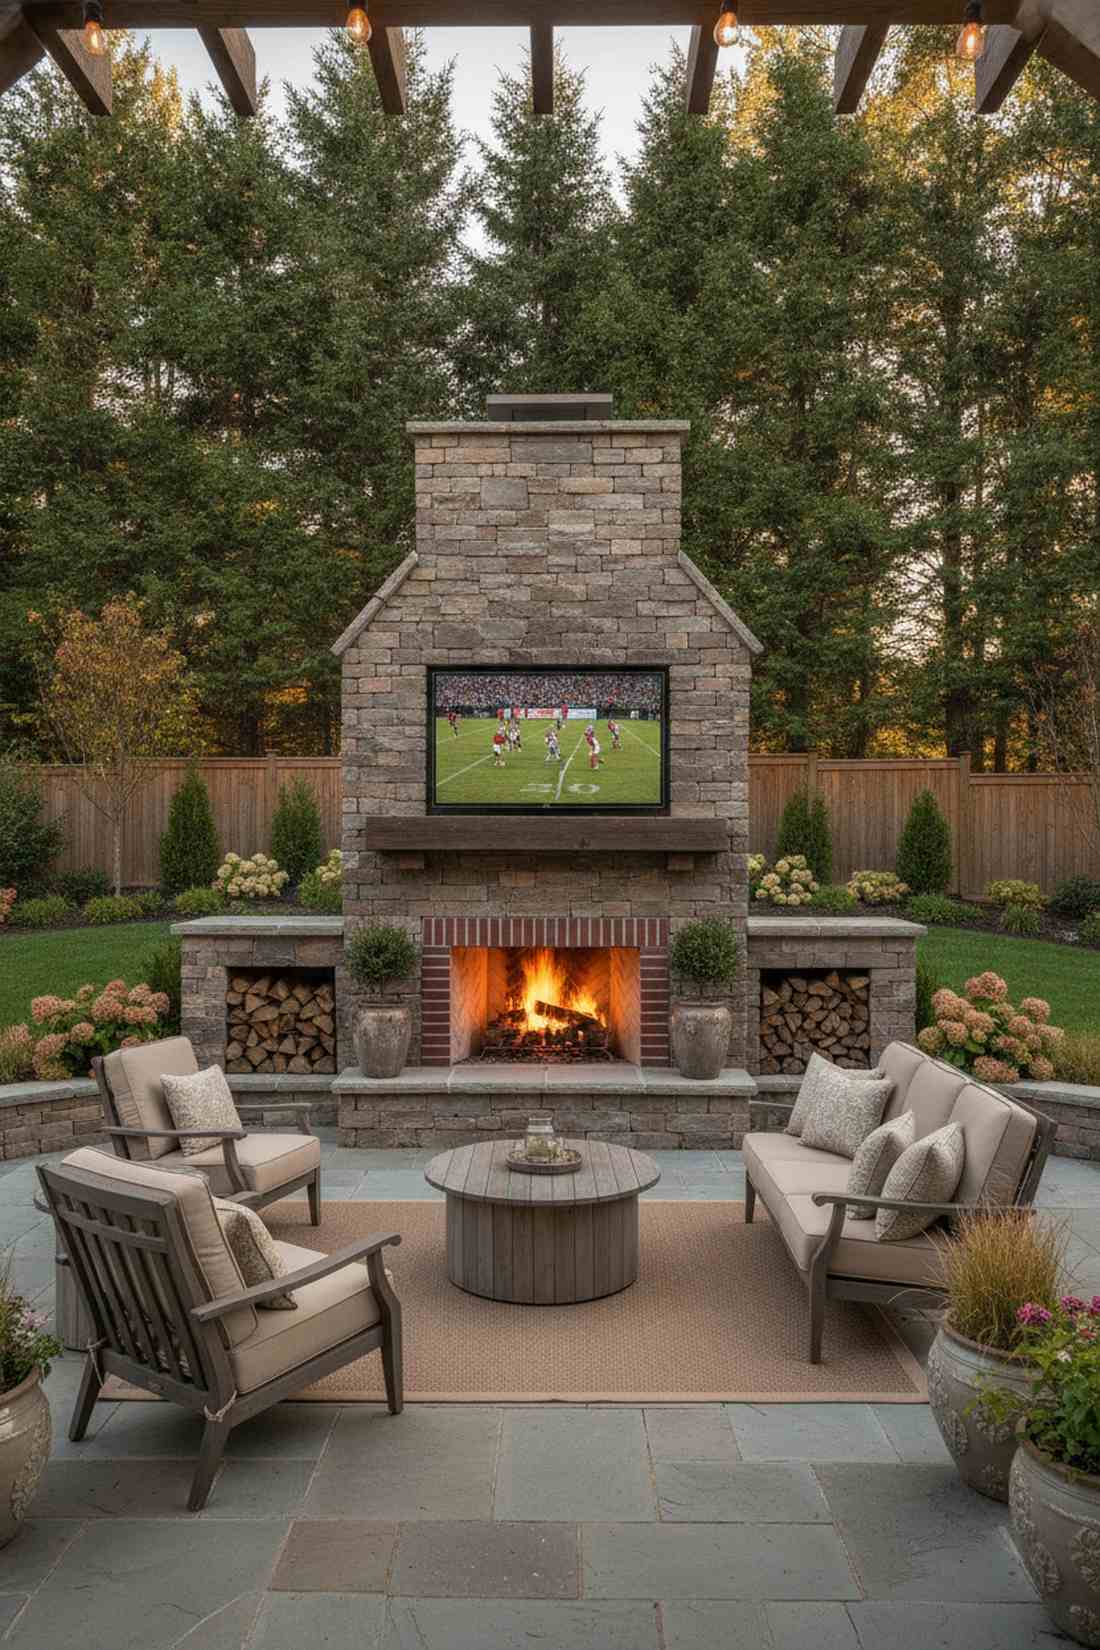
This towering feature feels like a cozy ski-lodge hearth plopped in your backyard. A massive stone outdoor fireplace instantly becomes the undeniable visual anchor of the entire landscape.
While standard fire pits are nice, a vertical entertainment wall commands attention and blocks out nosy neighbors simultaneously. Recessing an outdoor-rated television above the mantel creates the absolute best spot for crisp fall football games.
A full stone hearth build will set you back $3,000–$6,000. It transforms the space into a true four-season living room.
- Key Materials: Natural stone veneer and firebrick
- Vibe / Style: Majestic rustic estate
- Difficulty: Advanced masonry
- Budget Breakdown: Firebox: $800 | Stone Finish: $2000
- Creator’s Tip: Install a deep, heavy wood mantel to properly deflect intense heat away from the television mounted above.
- Smart Sourcing: weatherproof outdoor TV enclosures and pre-mixed heat resistant mortar.
If you think custom fire features are too expensive, this upcoming layout hack will completely blow your mind.
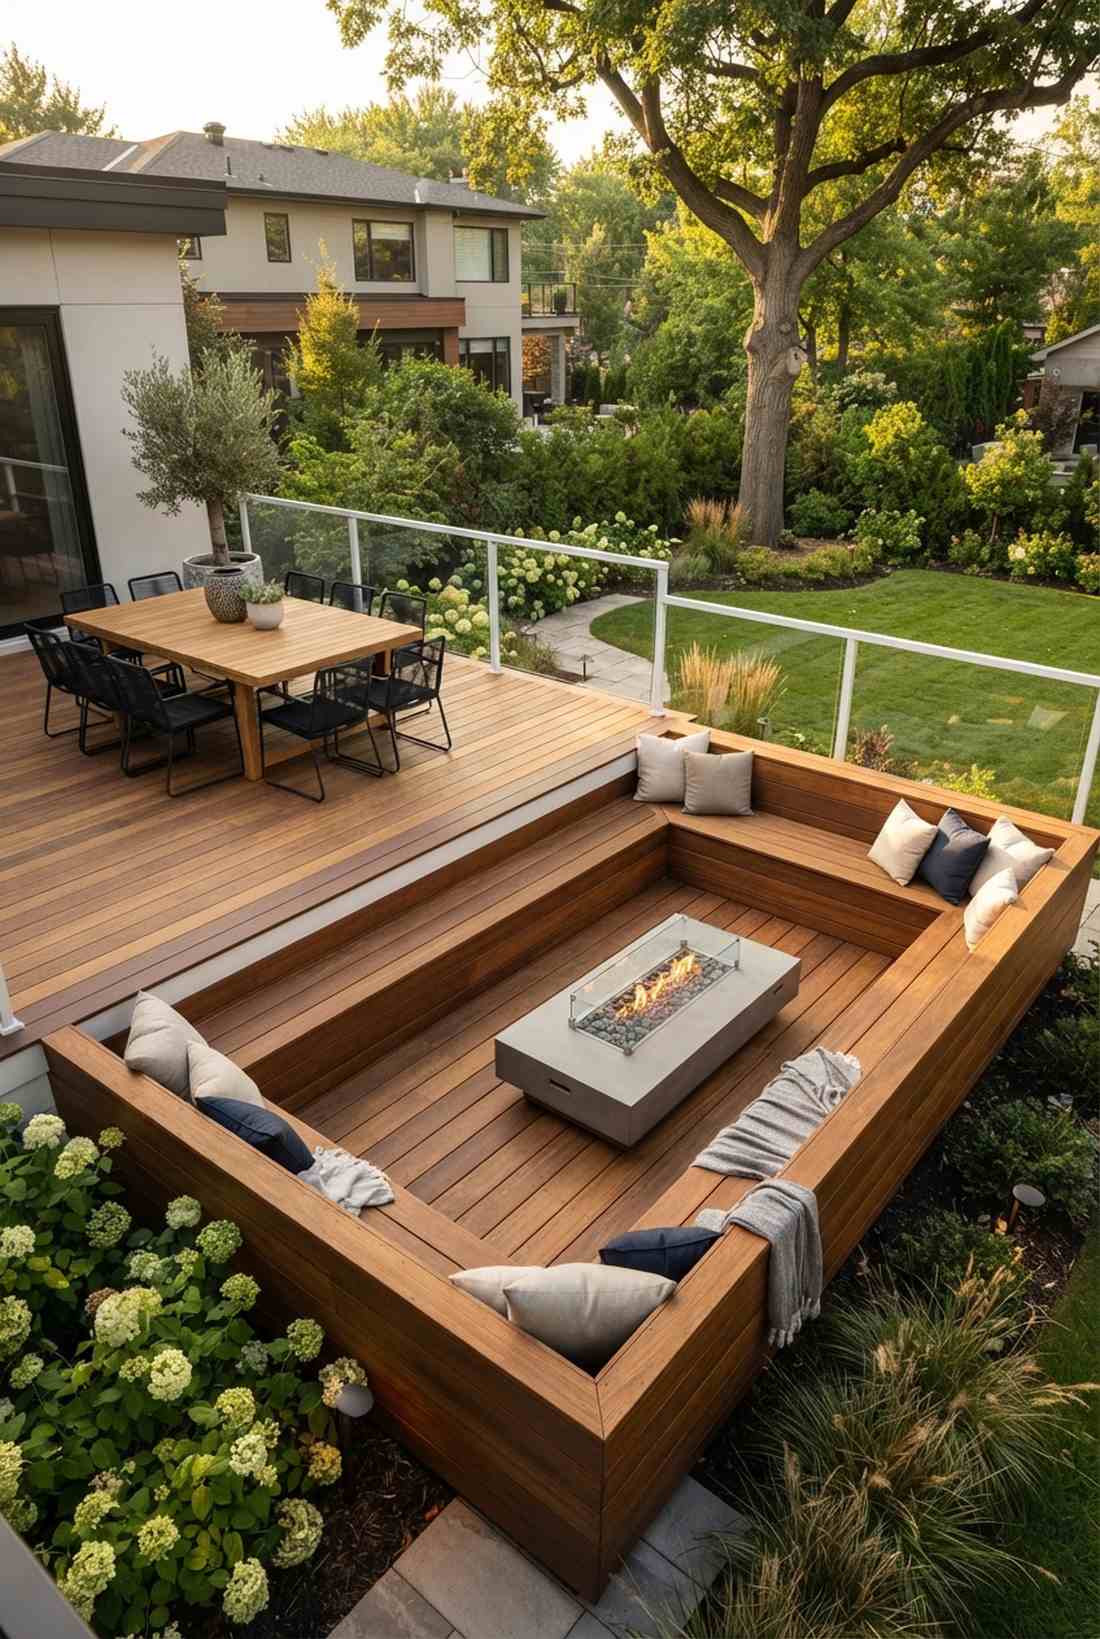
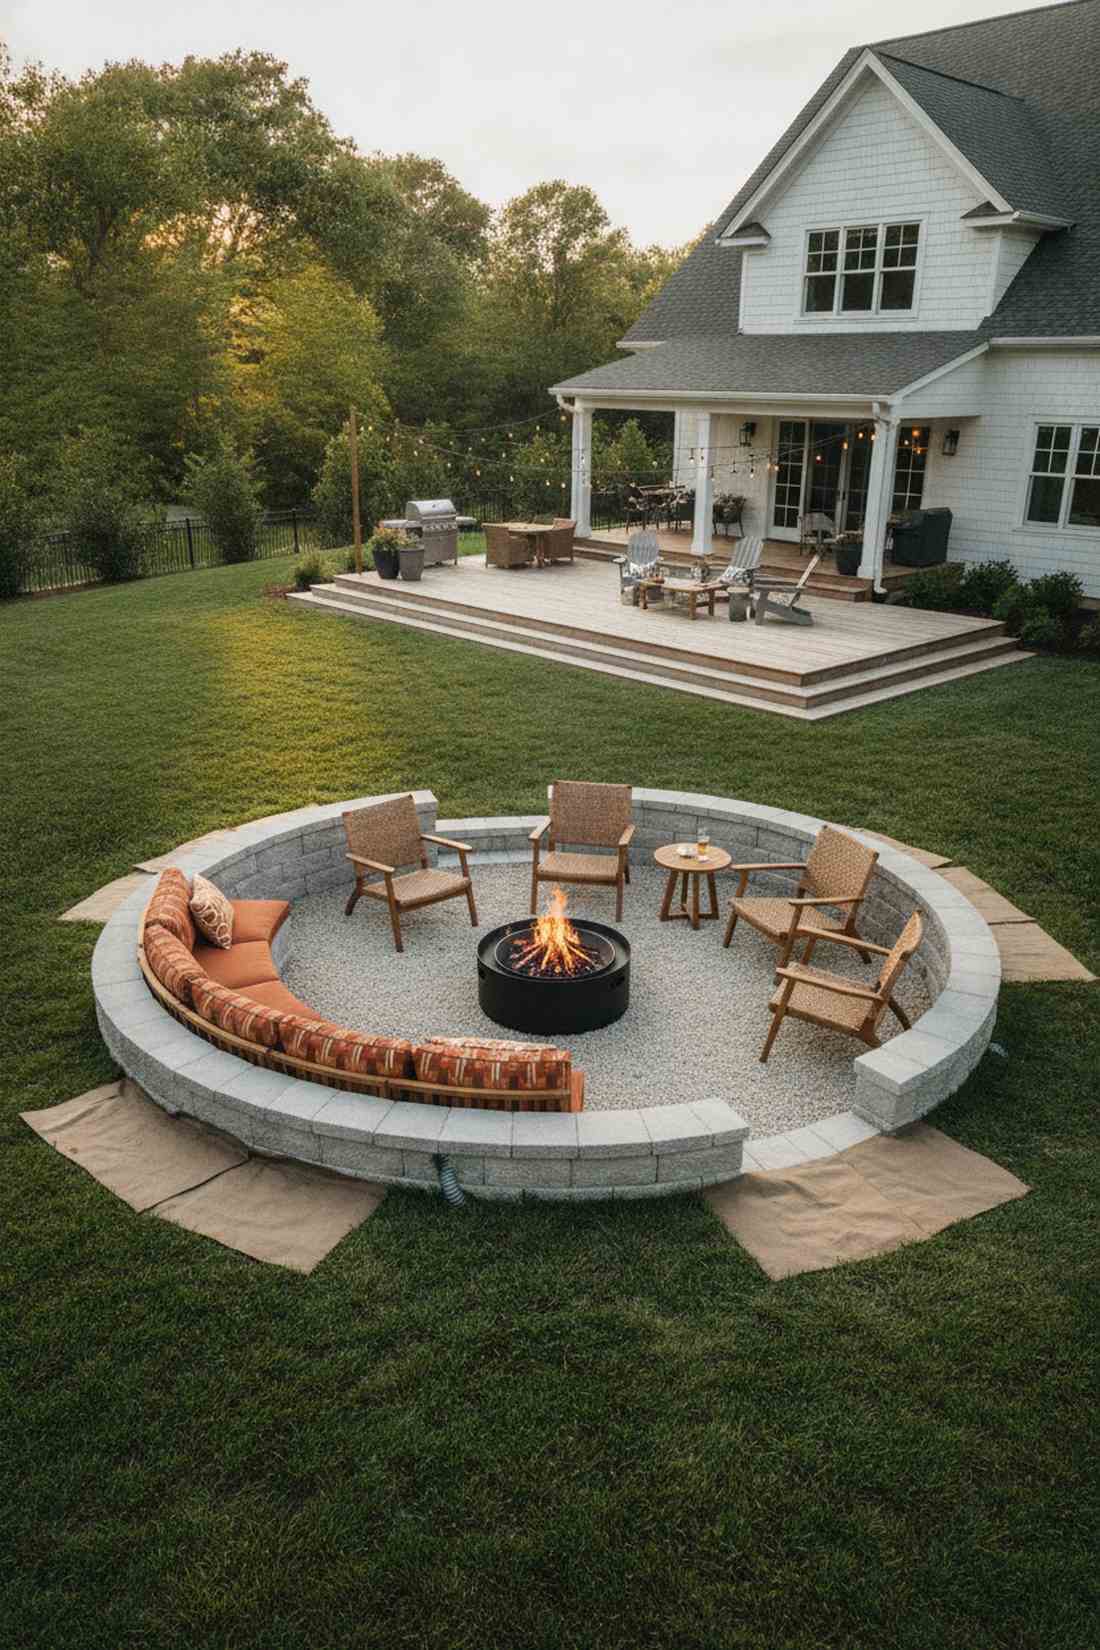
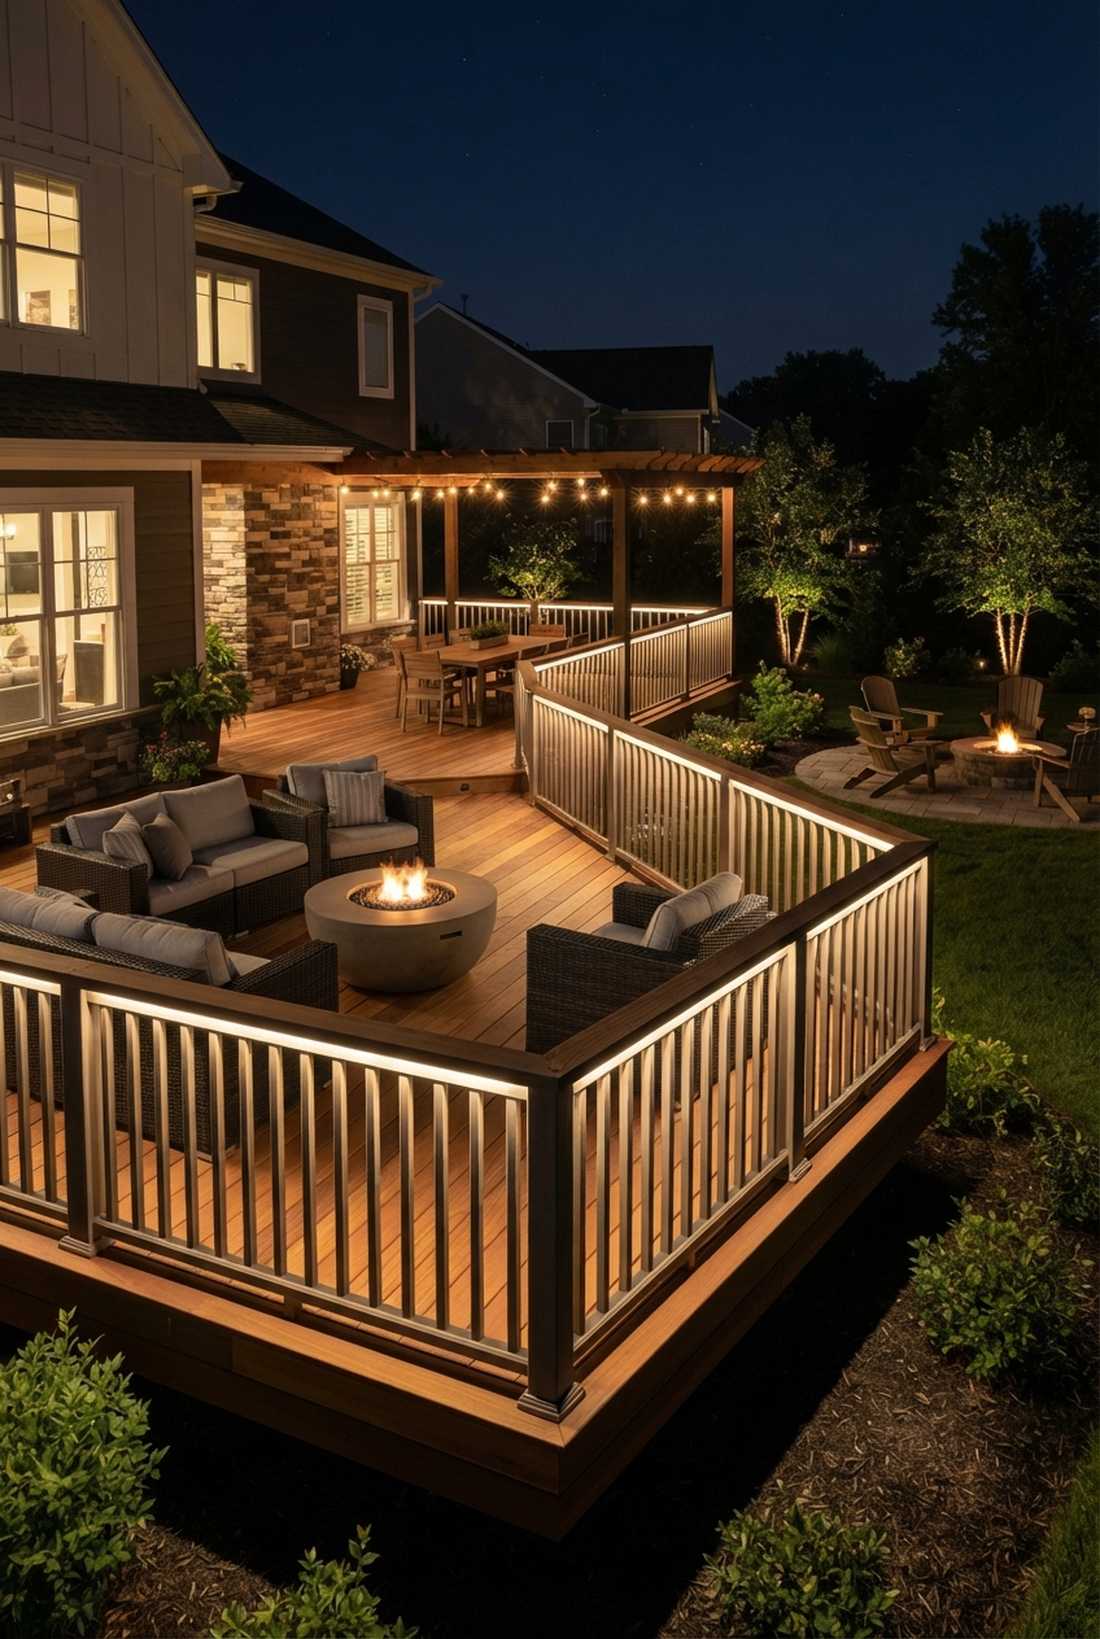
25. Circular Fire Pit Conversation Zone
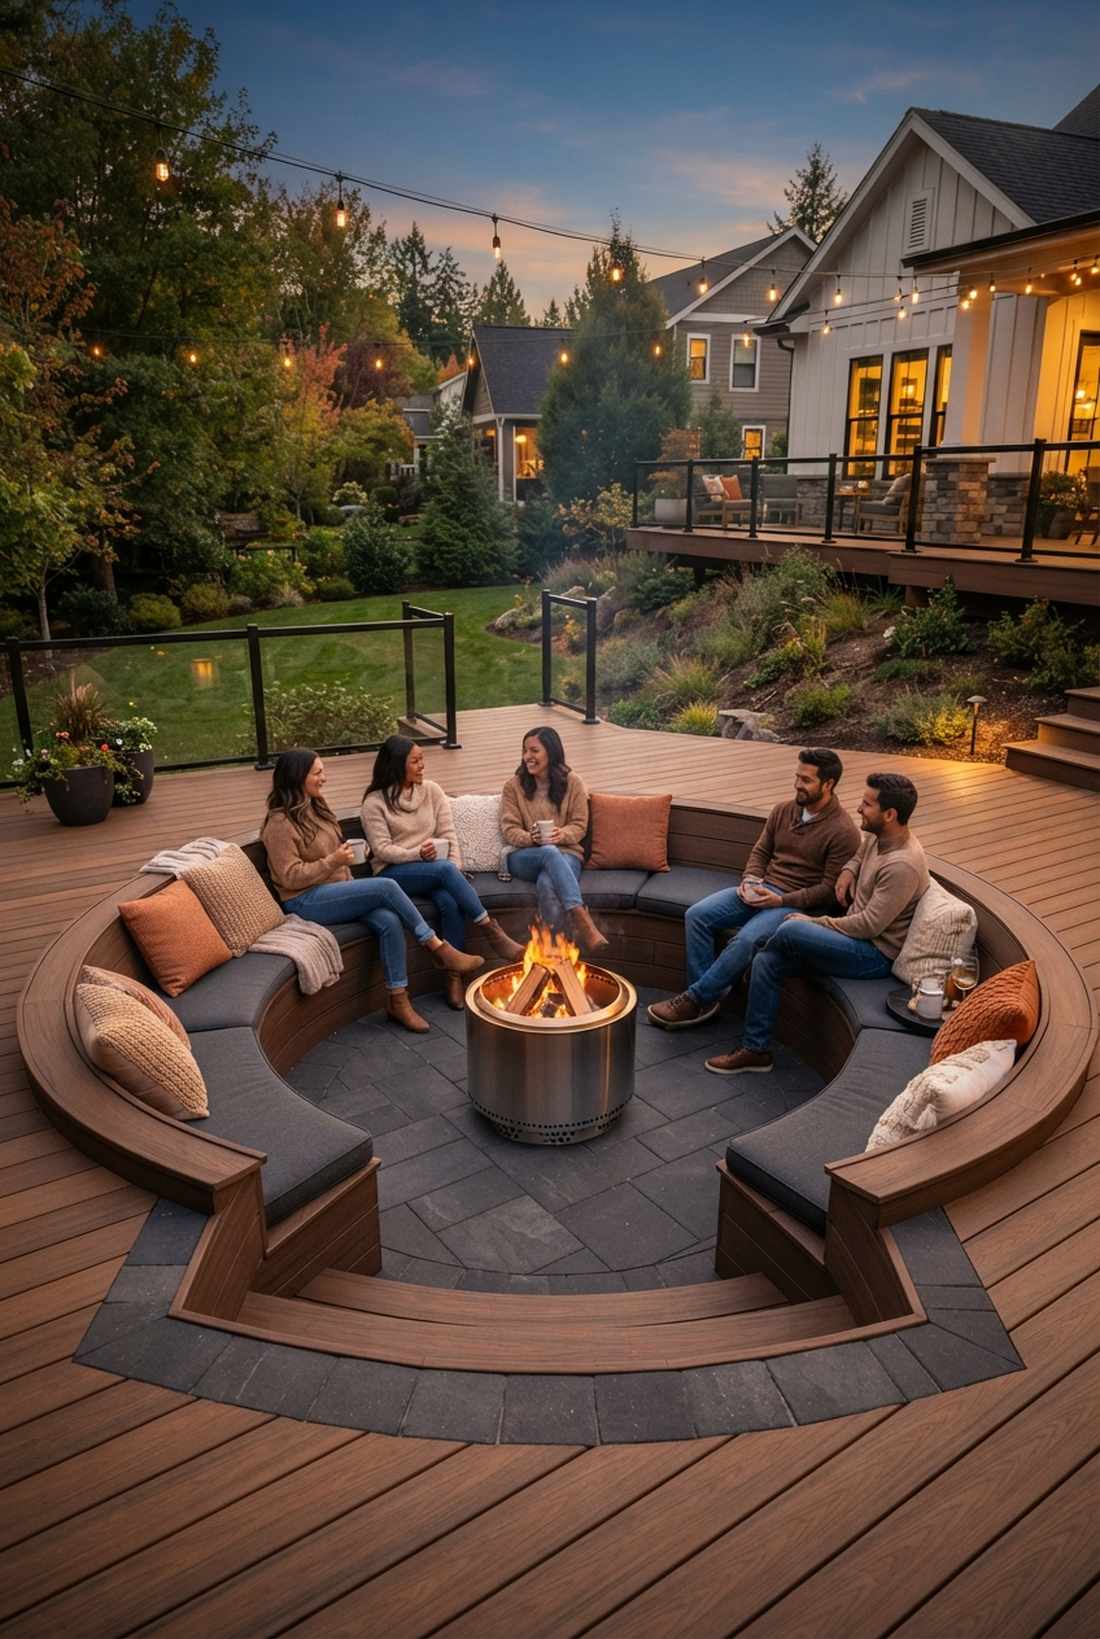
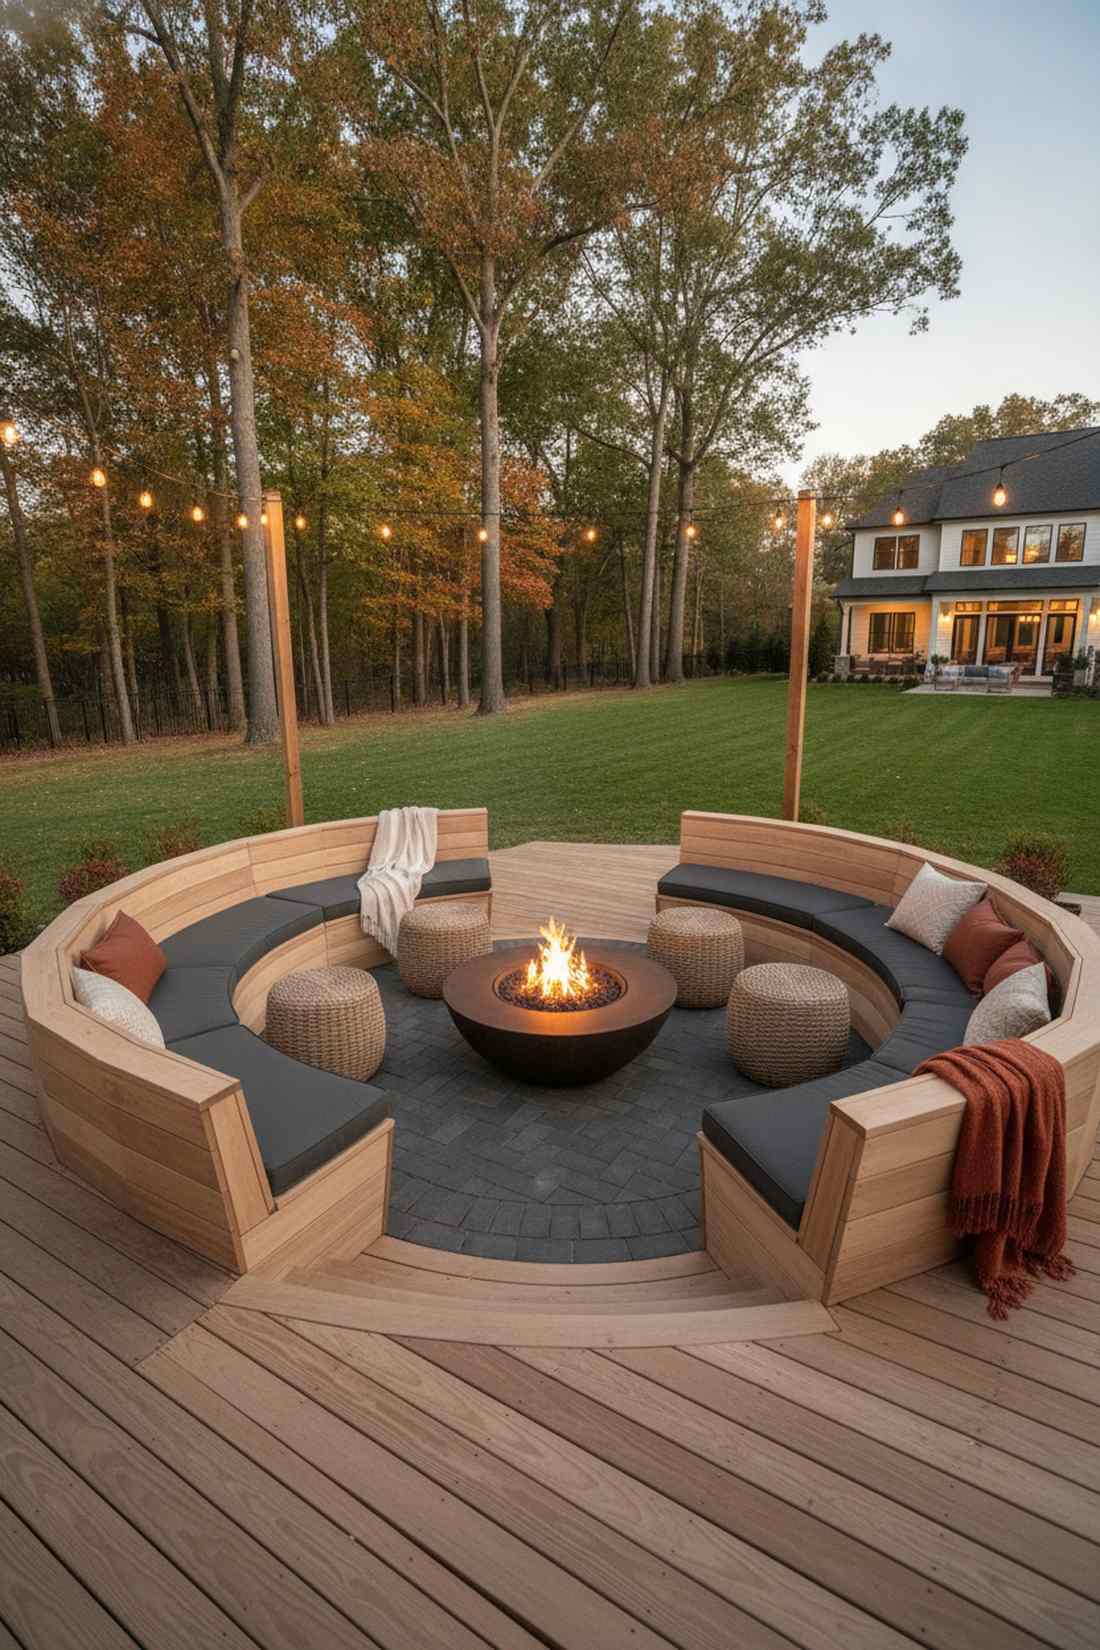
Sitting here feels like the ultimate campfire bonding experience with a luxury upgrade. A sunken circular fire lounge forces everyone to face inward, creating incredibly intimate evening conversations.
Instead of scattering cheap folding chairs, framing curved bench seating around a smokeless fire feature gives a designer-level finish. Utilizing heat-resistant paver aprons directly under the pit ensures your wooden deck stays totally protected.
You can build out this cozy focal point for roughly $800–$1,500. Pin this to your cozy outdoor autumn board!
- Key Materials: Curved composite bench boards
- Vibe / Style: Intimate modern campfire
- Difficulty: Intermediate
- Budget Breakdown: Seating Frame: $400 | Smokeless Pit: $350
- Creator’s Tip: Angle the bench backs slightly outward at 15 degrees for massive ergonomic comfort during long storytelling sessions.
- Smart Sourcing: smokeless stainless steel fire pits and heat-resistant deck protector mats.
26. Integrated Hot Tub with Privacy Screen
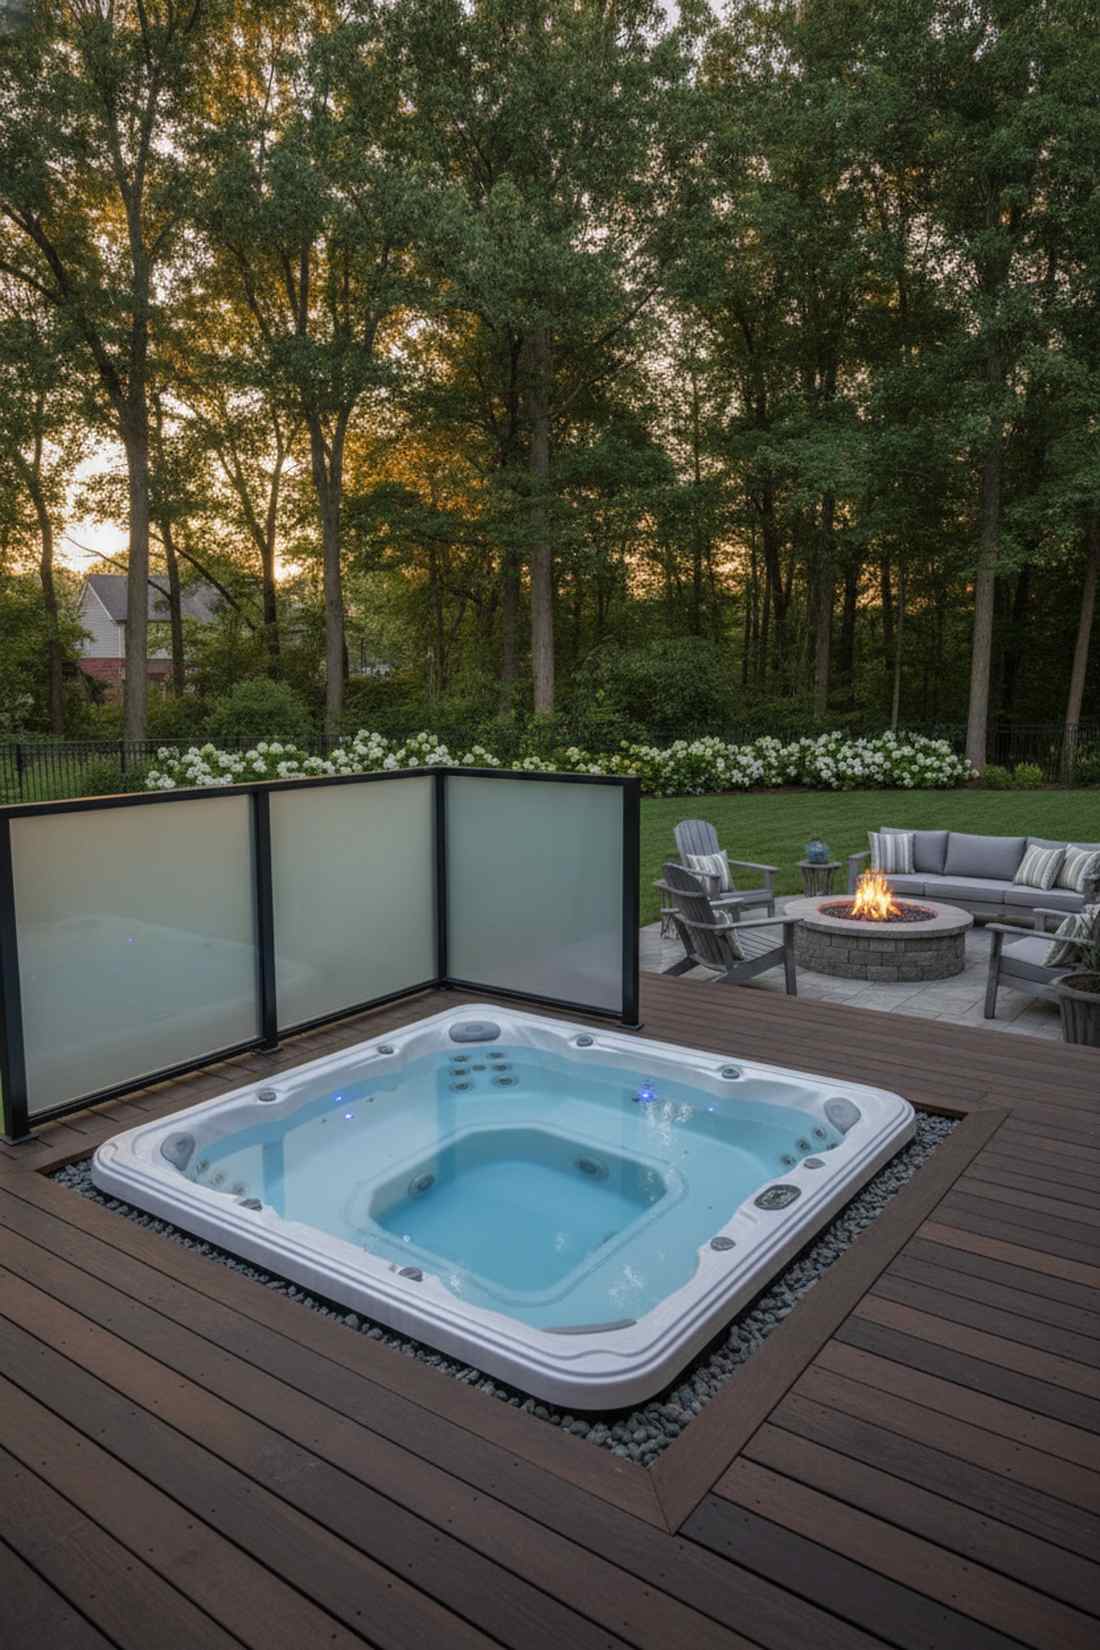
This hidden spa setup feels like a private VIP club tucked away from the world. A deck-flush hot tub installation completely erases the ugly plastic siding of traditional spas.
Standard hot tubs look bulky, but dropping it into the joists and throwing up a frosted glass privacy wall creates an incredibly sleek, high-end look. This smart integration makes sliding into the water infinitely easier and safer.
Surrounding your spa with decking and screening costs about $1,200–$2,000. A must-do layout for serious relaxation enthusiasts.
- Key Materials: Frosted acrylic privacy panels
- Vibe / Style: Secluded modern spa
- Difficulty: Advanced framing/load-bearing
- Budget Breakdown: Extra Support Framing: $600 | Screens: $500
- Creator’s Tip: Leave a 1-inch gap between the deck boards and the tub shell to allow for expansion and easy acrylic cleaning.
- Smart Sourcing: outdoor frosted privacy screens (pre-framed) and heavy-duty joist support jacks.
27. Outdoor Pizza Oven Station
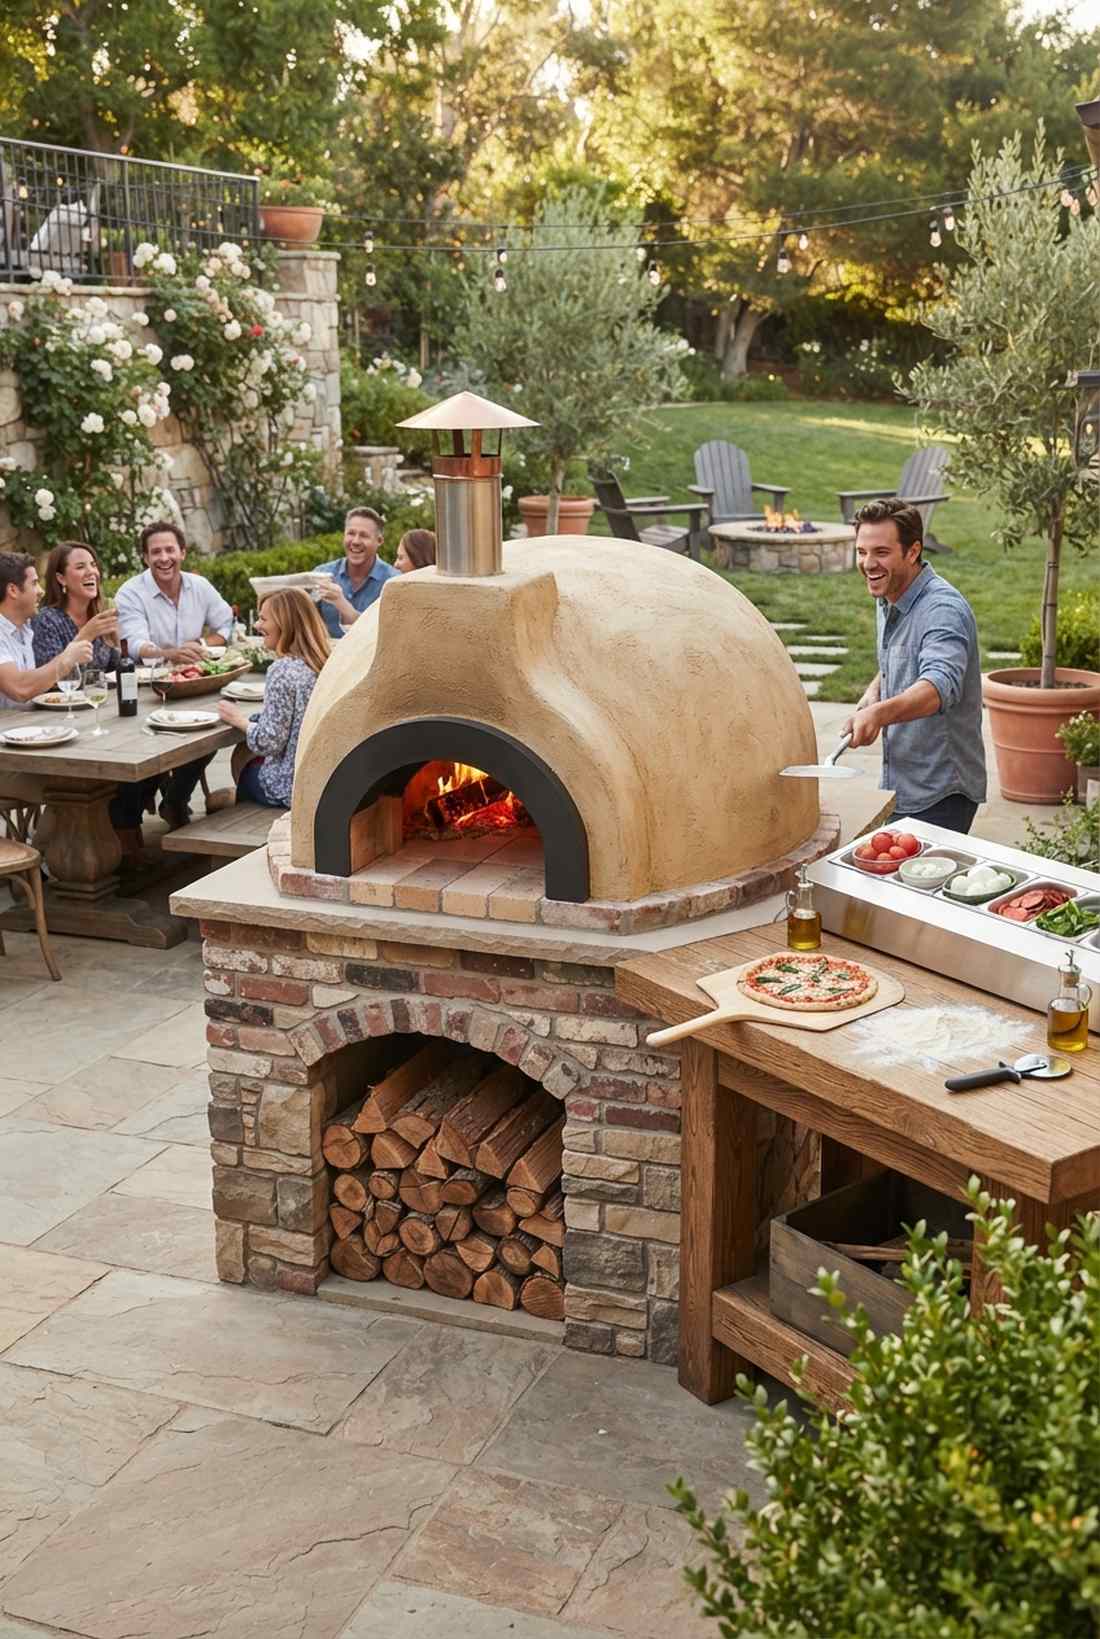
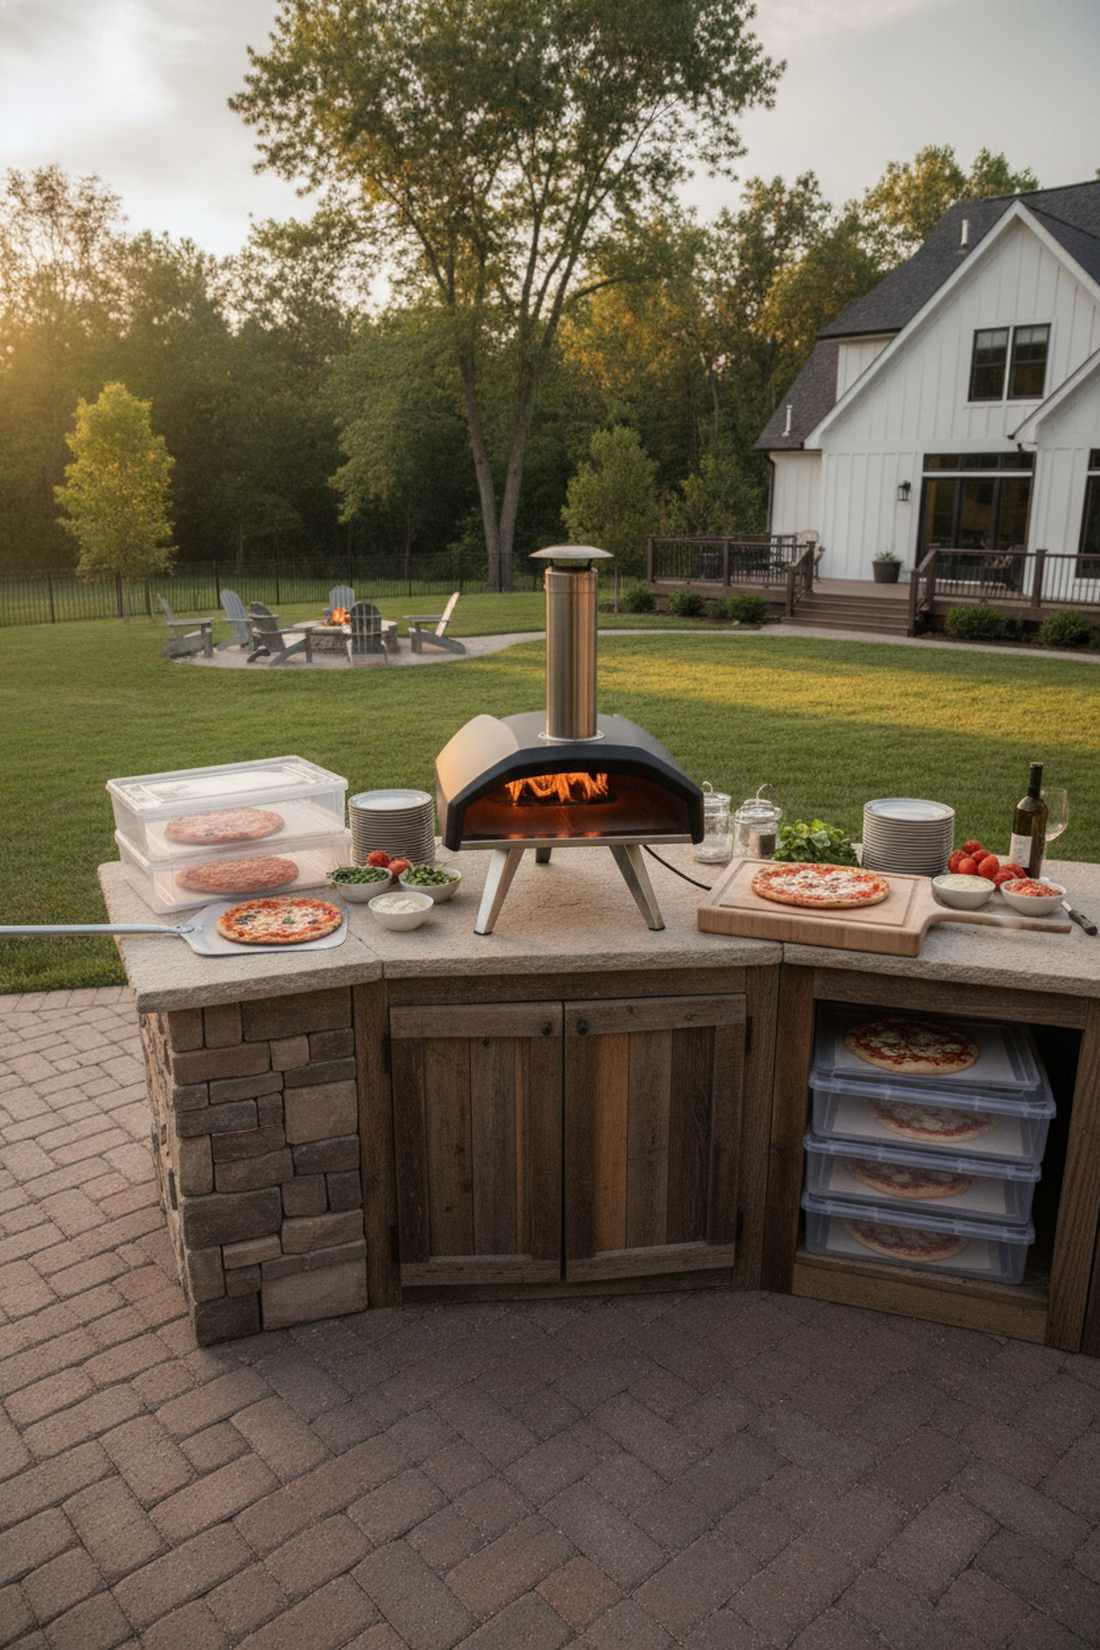
Cooking here feels like running a rustic Italian pizzeria right in your backyard. An integrated outdoor pizza oven is the ultimate culinary party trick that gets every guest involved.
Most backyard cooking focuses on burgers, but a wood-fired dome creates an interactive, fiery centerpiece that looks far more expensive than it is. Stacking a simple cinderblock base and covering it in stucco turns a DIY oven kit into a masterpiece.
You can build a stunning oven station for $900–$1,800. Save this if you’re obsessed with artisan backyard cooking!
- Key Materials: Refractory cement and fire bricks
- Vibe / Style: Rustic Italian villa
- Difficulty: Intermediate masonry
- Budget Breakdown: Oven Kit: $800 | Base Materials: $300
- Creator’s Tip: Build a hollow arch underneath the oven base to store a neat, dry stack of seasoned hardwood for immediate cooking.
- Smart Sourcing: DIY wood-fired pizza oven kits and high-heat refractory cement (bulk pail).
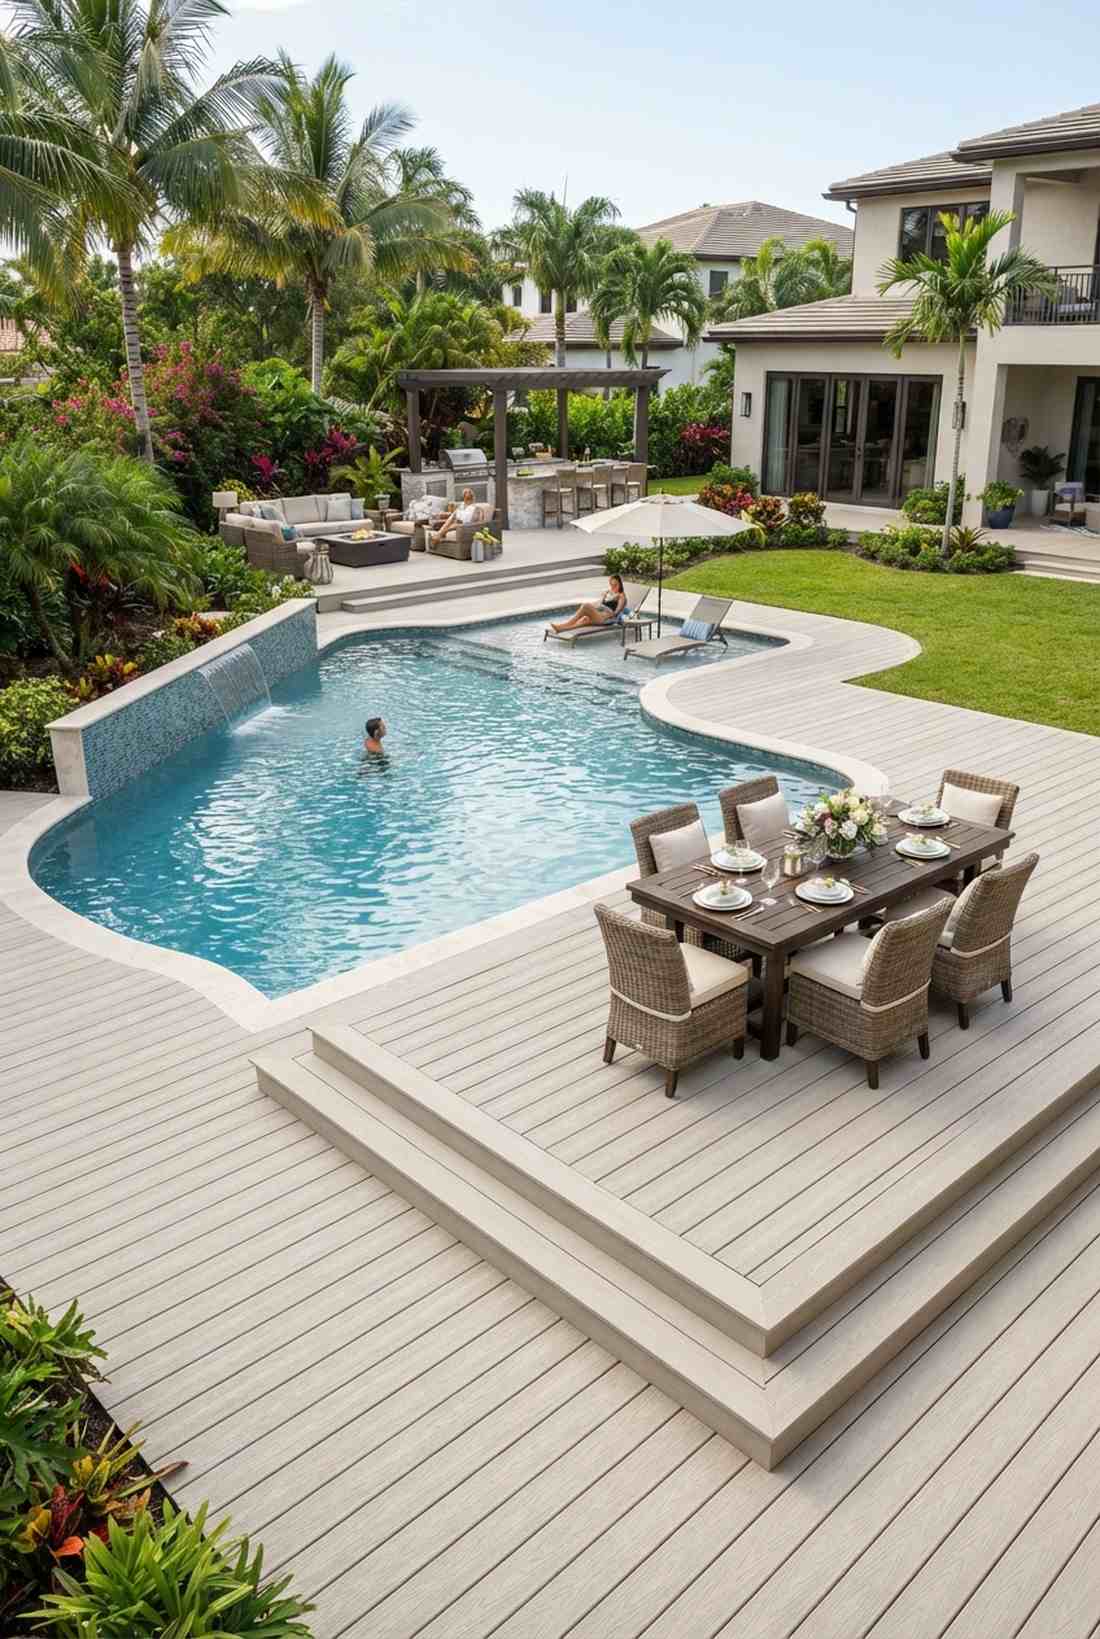
28. Swim-Up Deck Bar
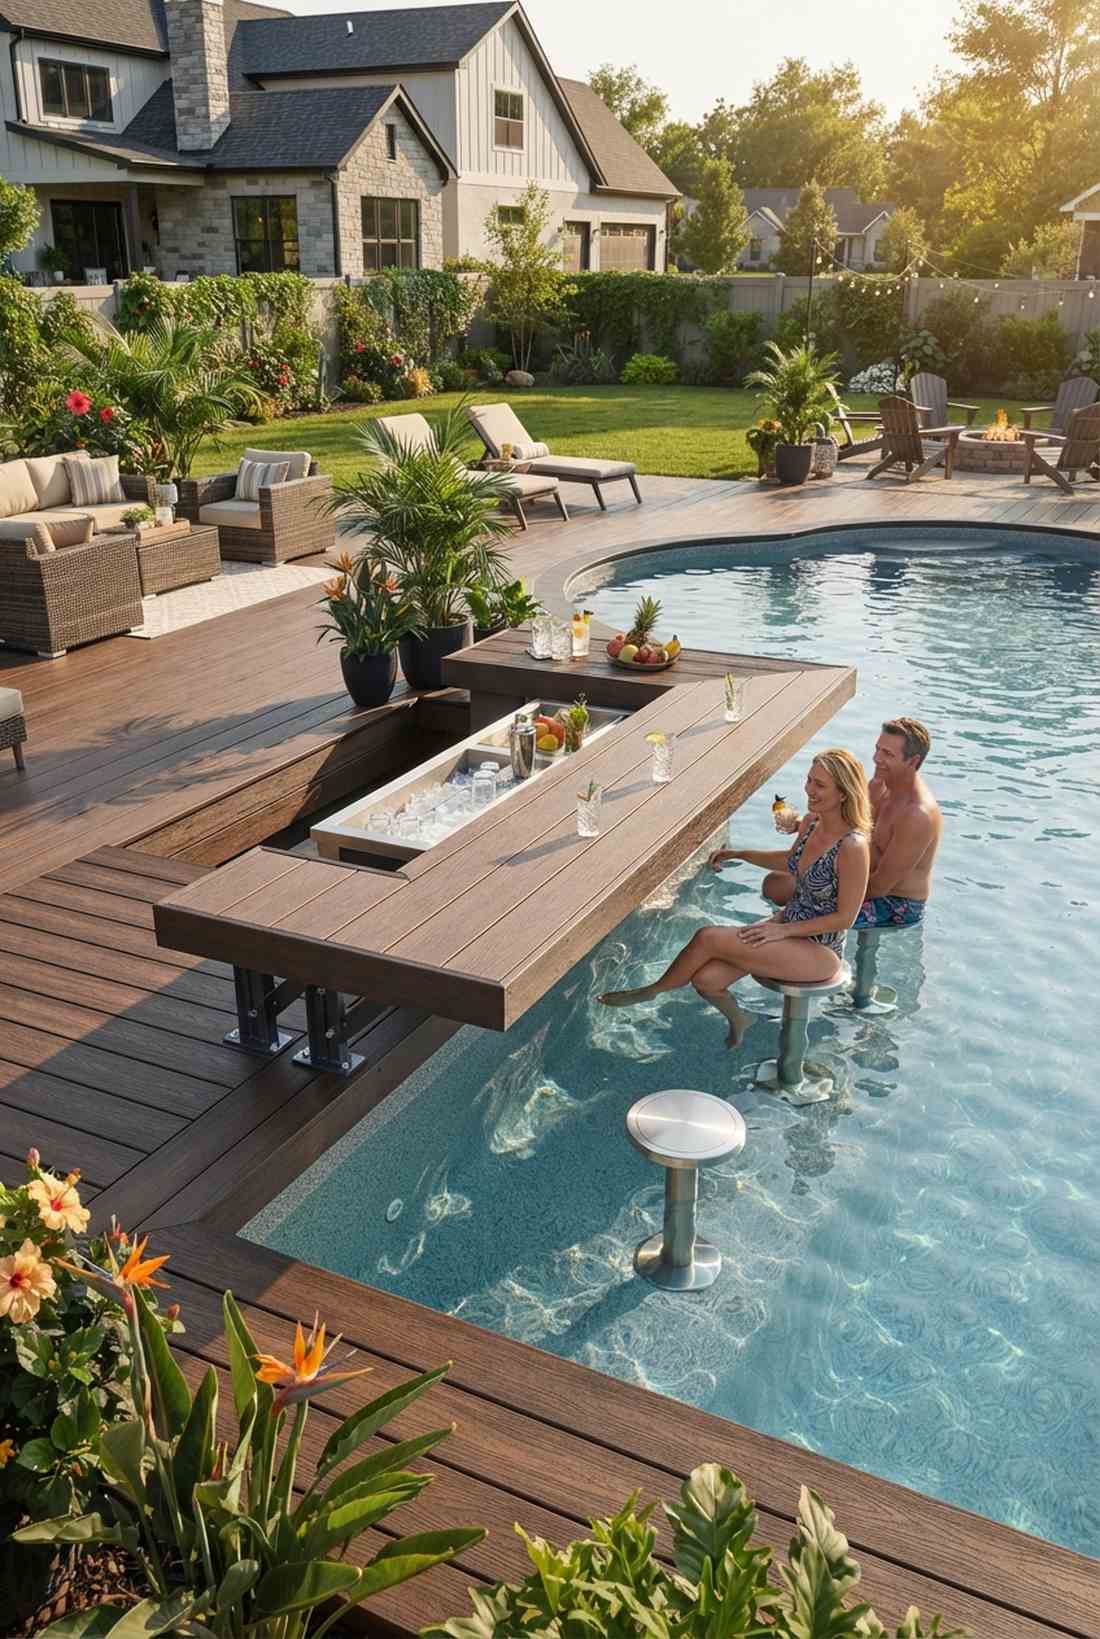
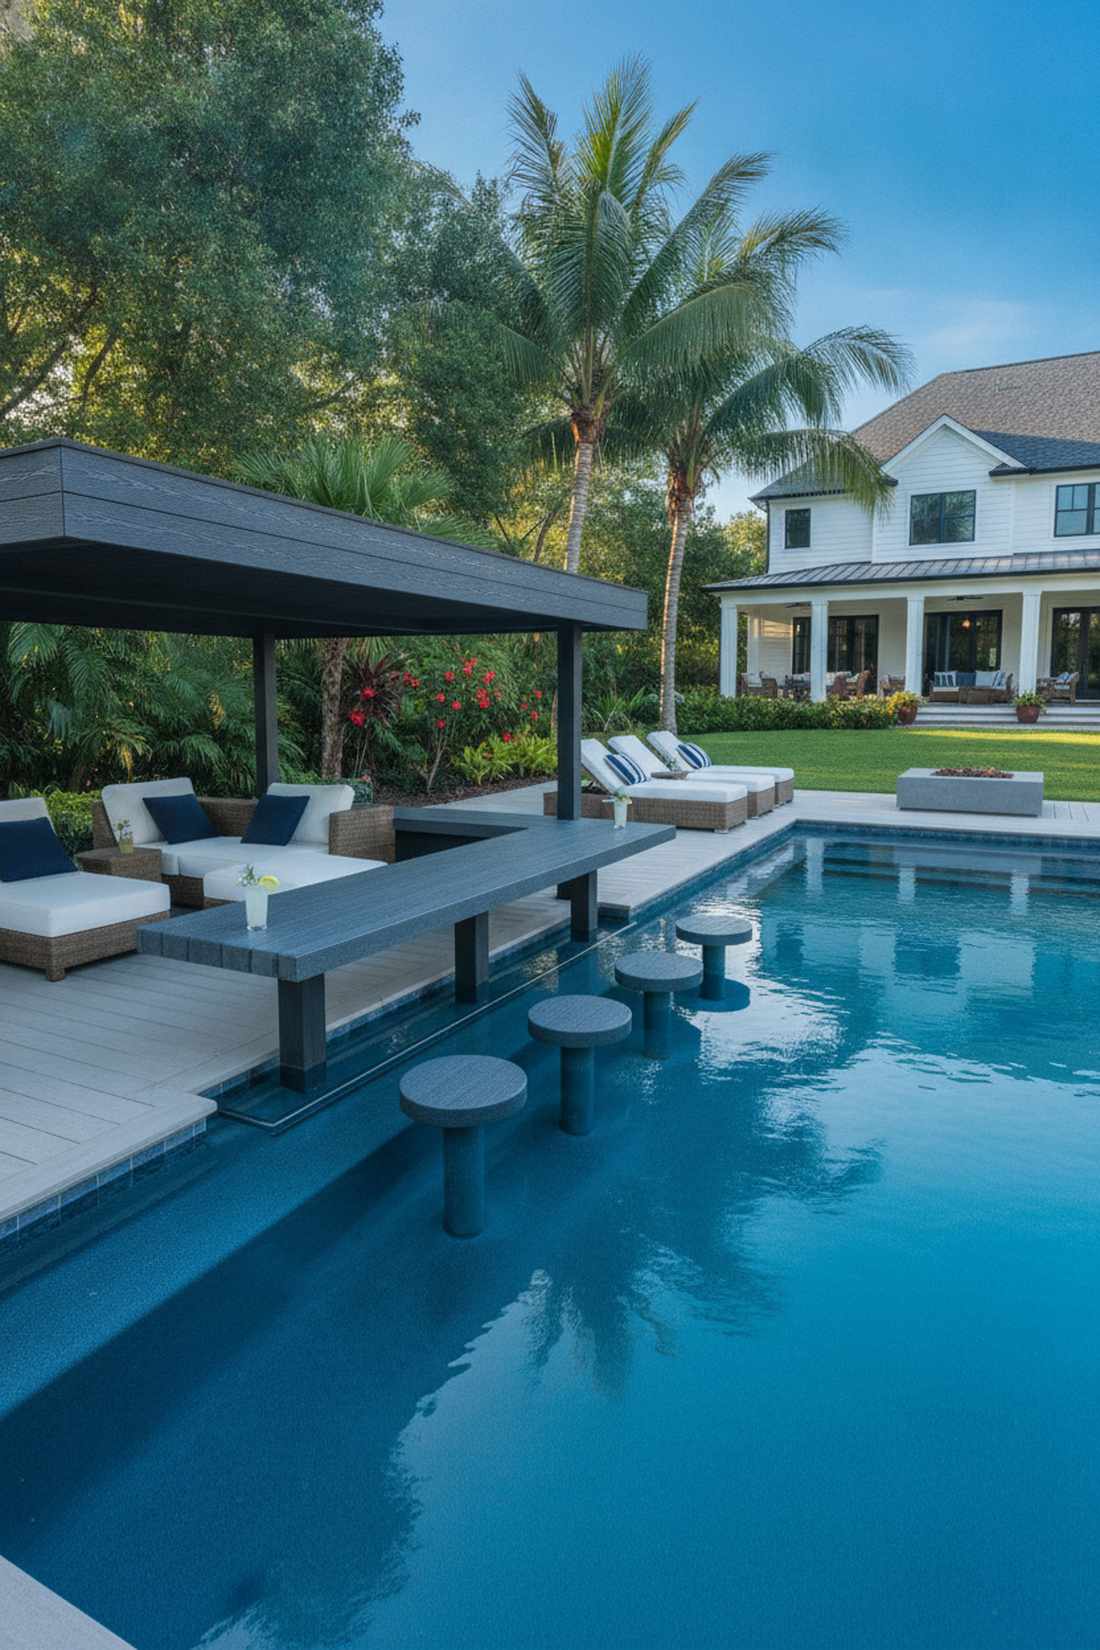
Lounging here feels like you never left your Caribbean vacation. A cantilevered swim-up pool bar seamlessly bridges the gap between dry deck lounging and aquatic fun.
Why make swimmers get out for a drink? Extending a sturdy composite overhang directly over the pool edge delivers a surprisingly premium look straight out of a 5-star hotel. Dropping submersible stools into the shallow end completes the fantasy.
Creating this custom overhang generally costs $1,000–$2,500. It’s the ultimate upgrade for any backyard pool setup.
- Key Materials: Waterproof composite and steel supports
- Vibe / Style: Tropical luxury resort
- Difficulty: Advanced structural engineering
- Budget Breakdown: Steel Supports: $500 | Waterproof Top: $600
- Creator’s Tip: Use marine-grade polymer boards for the bar top—it will never rot, warp, or degrade from constant chlorine exposure.
- Smart Sourcing: marine-grade polymer lumber and submersible pool bar stools.
29. Sunken Conversation Pit
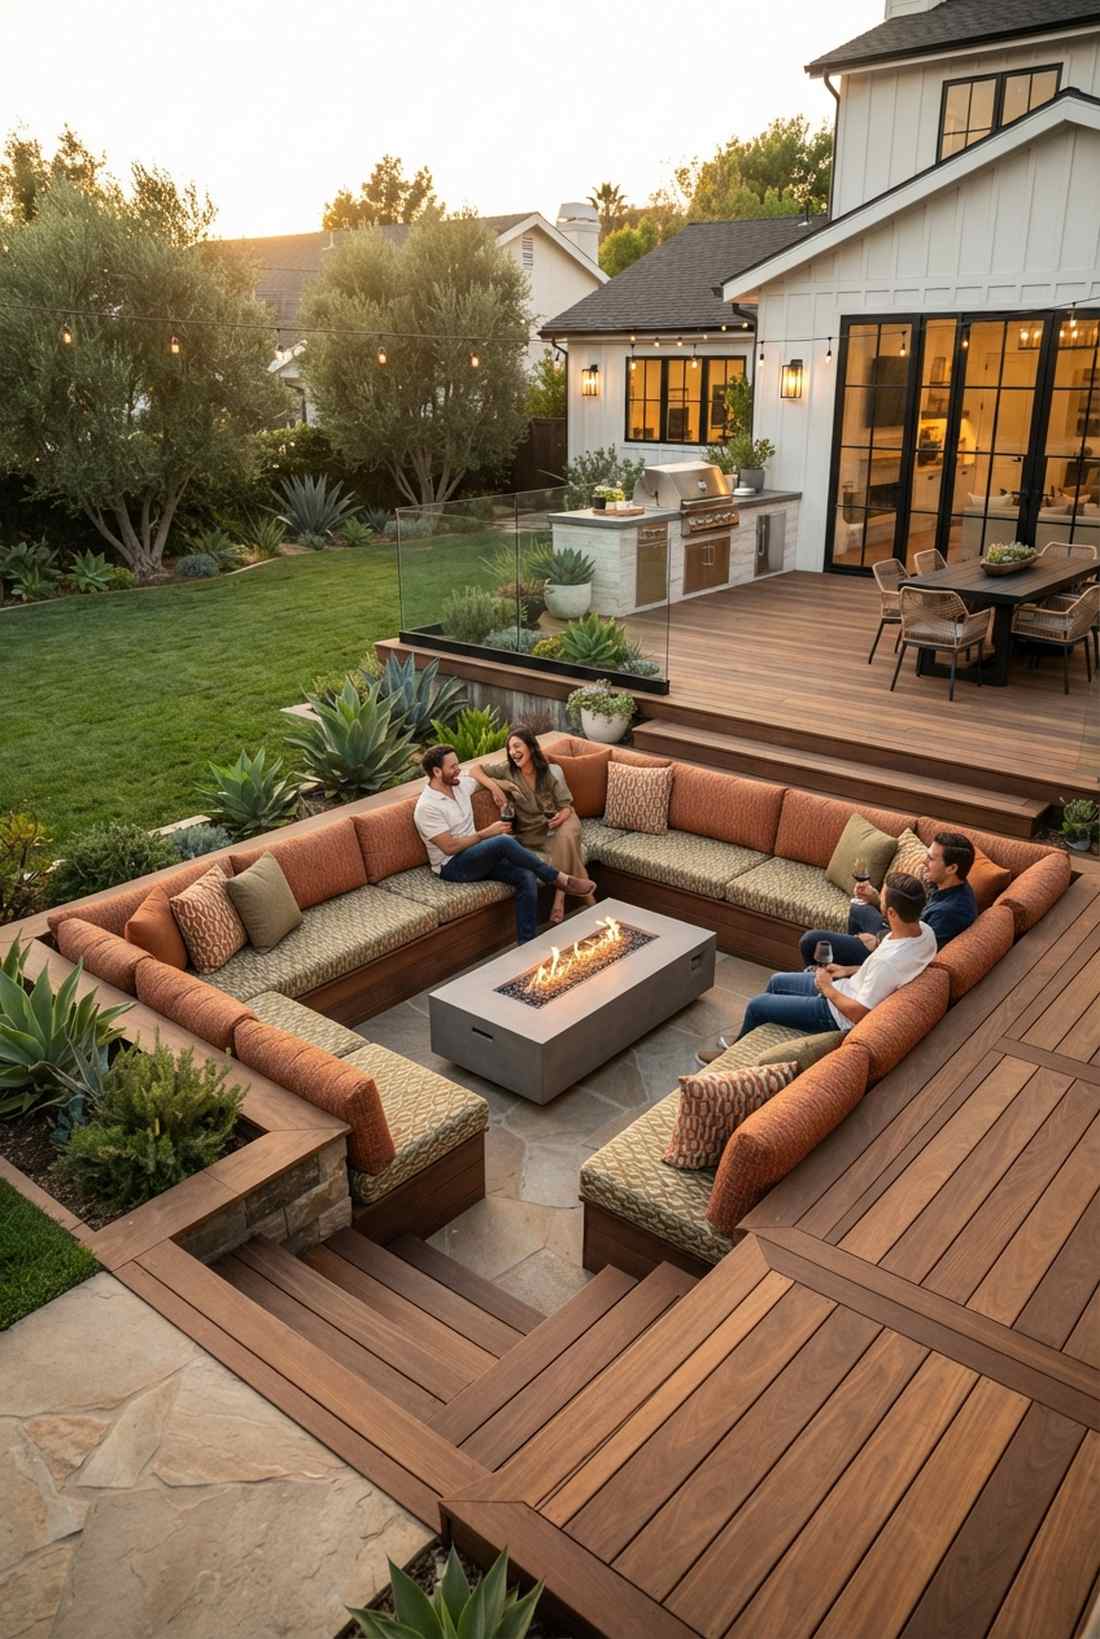
This layout feels incredibly retro-chic, like a stylish 1970s lounge reborn for the modern era. A recessed outdoor conversation pit creates an incredibly cozy, wind-protected bubble for late-night chats.
Creating a negative-space lounge completely disrupts boring, flat deck designs and looks wildly expensive. Lining the drop-down perimeter with plush, weatherproof cushions turns the raw structure into a massive outdoor sofa.
Framing this drop-down feature costs around $1,500–$3,000. Pin this to your ultimate custom landscape architecture board!
- Key Materials: Custom weatherproof outdoor cushions
- Vibe / Style: Retro modern lounge
- Difficulty: Advanced multi-level framing
- Budget Breakdown: Recessed Framing: $800 | Custom Cushions: $1200
- Creator’s Tip: Install a discrete central floor drain in the pit—otherwise, your beautiful lounge will turn into a swimming pool during rainstorms.
- Smart Sourcing: custom-cut outdoor foam (bulk sizes) and waterproof canvas fabric covers.
The way this next design handles the transition into the yard is an absolute masterclass in outdoor staging…
Outdoor Living Patio Transitions
Blending deck and patio materials creates layered entertainment zones that combine the warmth of wood with the durability of stone. These hybrid layouts leverage each material’s strengths while establishing visual variety.
30. Deck to Paver Patio Flow
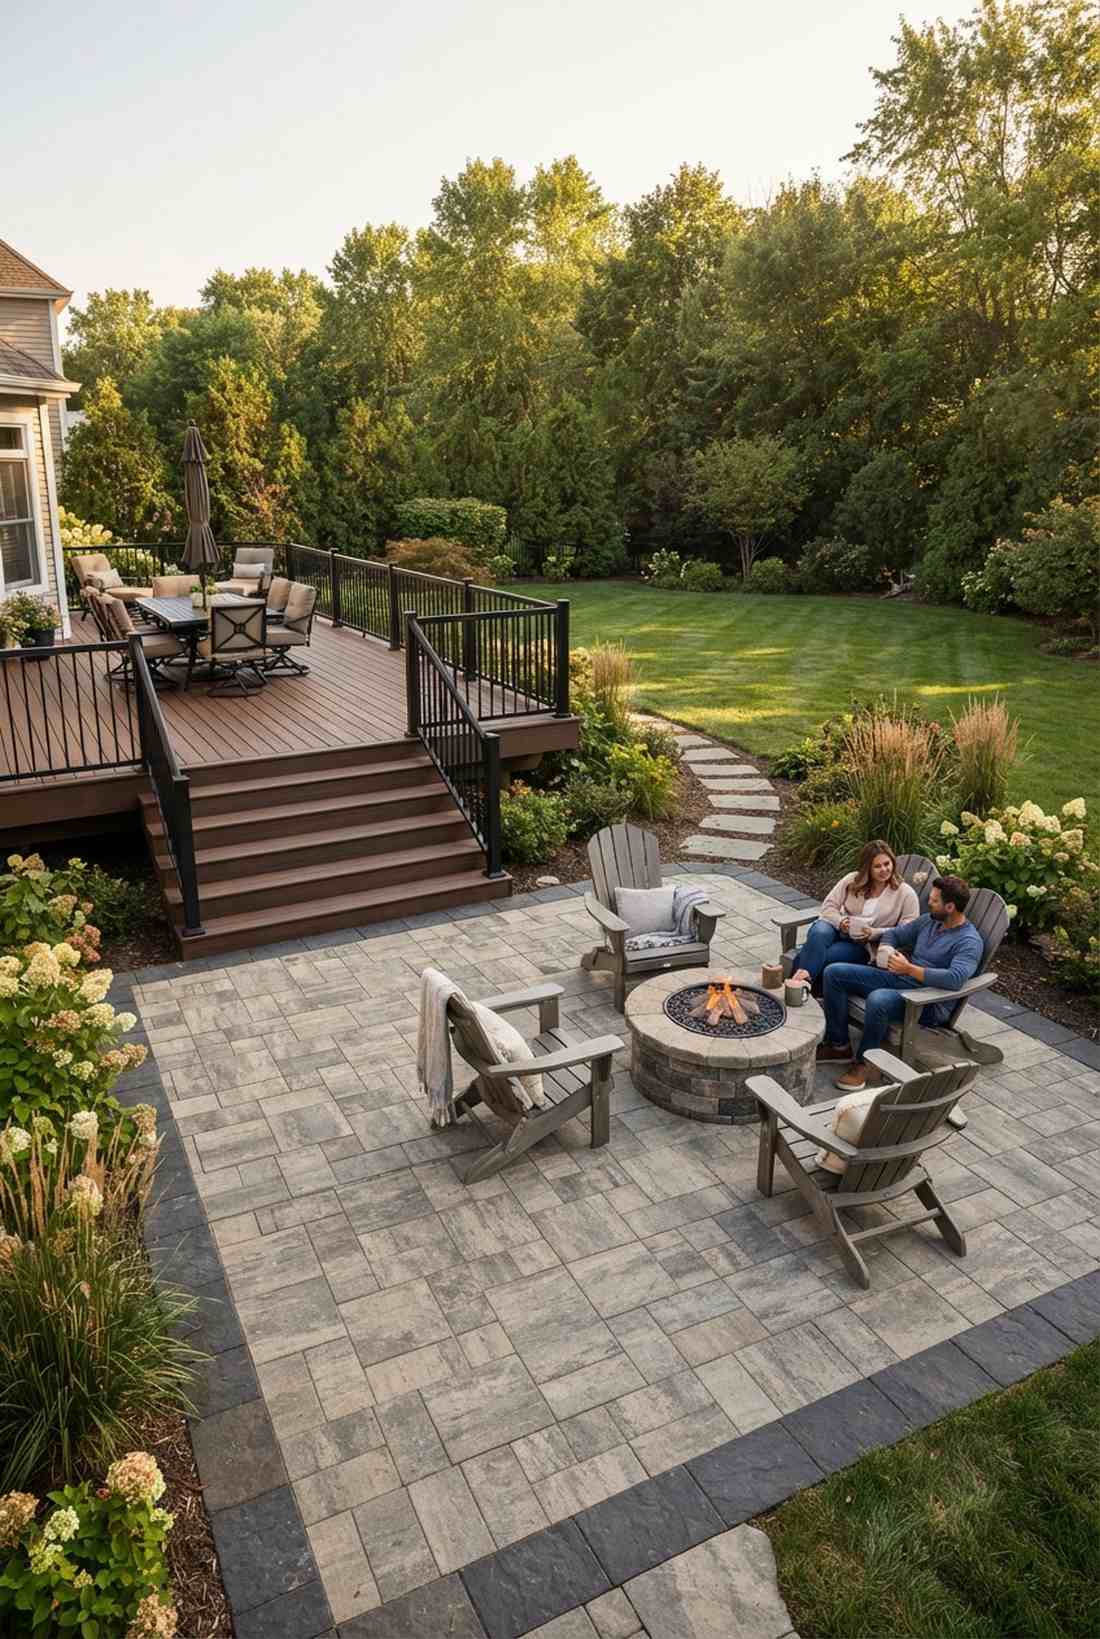
This layout feels like a perfectly choreographed journey into nature. The composite deck to stone paver transition is the ultimate hack for extending your entertaining space without building massive, expensive timber frames.
Monolithic decks can feel heavy, but stepping down into a permeable paver zone gives a designer-level finish that breaks up the textures beautifully. It keeps the high-traffic dining area dry while handling messy fire pit ashes on the durable stone below.
You can seamlessly blend these materials for $2,000–$3,500. A highly practical layout for messy backyard activities!
- Key Materials: Permeable concrete pavers
- Vibe / Style: Textured transitional modern
- Difficulty: Intermediate grading/leveling
- Budget Breakdown: Pavers: $1200 | Base Gravel: $300
- Creator’s Tip: Use the exact same color family for the deck railings and the patio border stones to lock the two distinct zones together visually.
- Smart Sourcing: paver leveling sand (bulk) and permeable patio block kits.
31. Wood Deck Stone Patio Combination
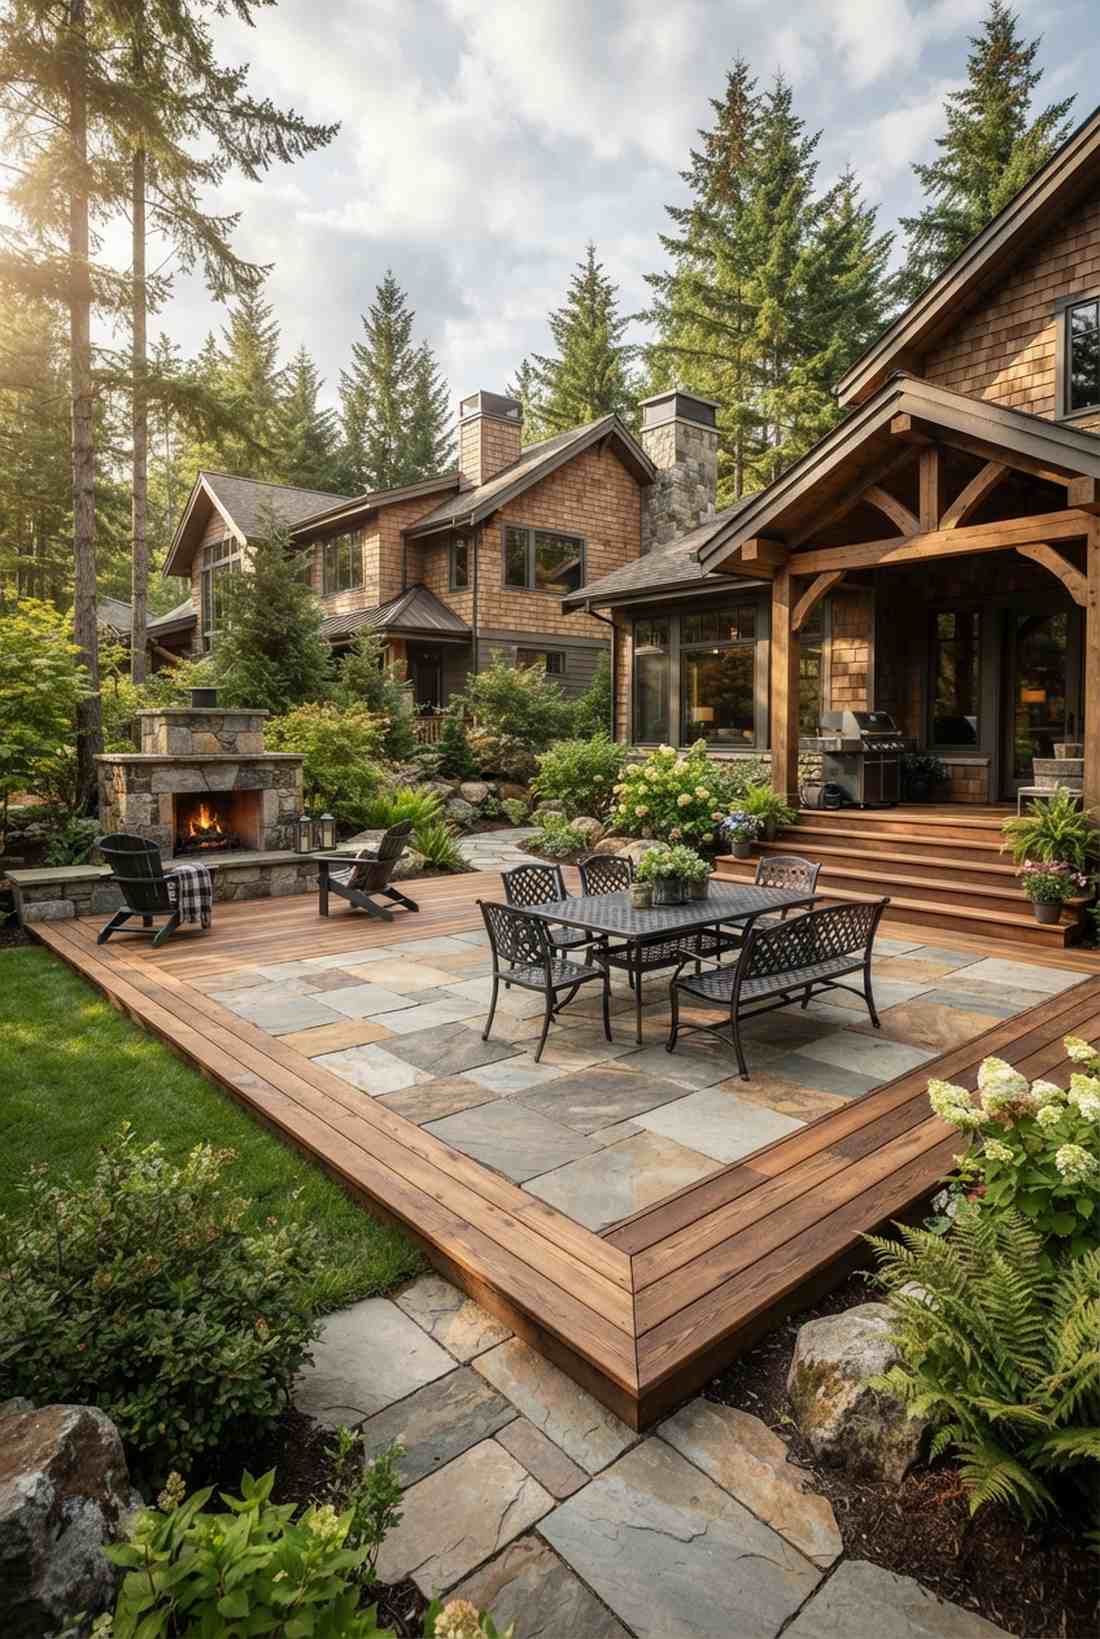
This combination feels like a luxury mountain cabin meets modern architecture. A wood border surrounding a stone patio provides a warm, barefoot-friendly frame around a cool, indestructible center.
Using 100% stone can feel a bit cold and industrial, but wrapping it in natural cedar edging completely softens the aesthetic. This hybrid approach allows you to place heavy wrought-iron furniture on the stone without scratching expensive deck boards.
Mixing these premium materials typically costs $2,500–$4,500. Save this if you love rich material contrast!
- Key Materials: Natural cedar planks and flagstone
- Vibe / Style: Rustic contemporary blend
- Difficulty: Advanced material matching
- Budget Breakdown: Stone Center: $1800 | Wood Border: $800
- Creator’s Tip: Seal the natural stone immediately after installation so spilled BBQ grease or red wine won’t permanently stain the porous surface.
- Smart Sourcing: penetrating natural stone sealer and premium cedar decking boards.
32. Gravel Patio with Deck Islands
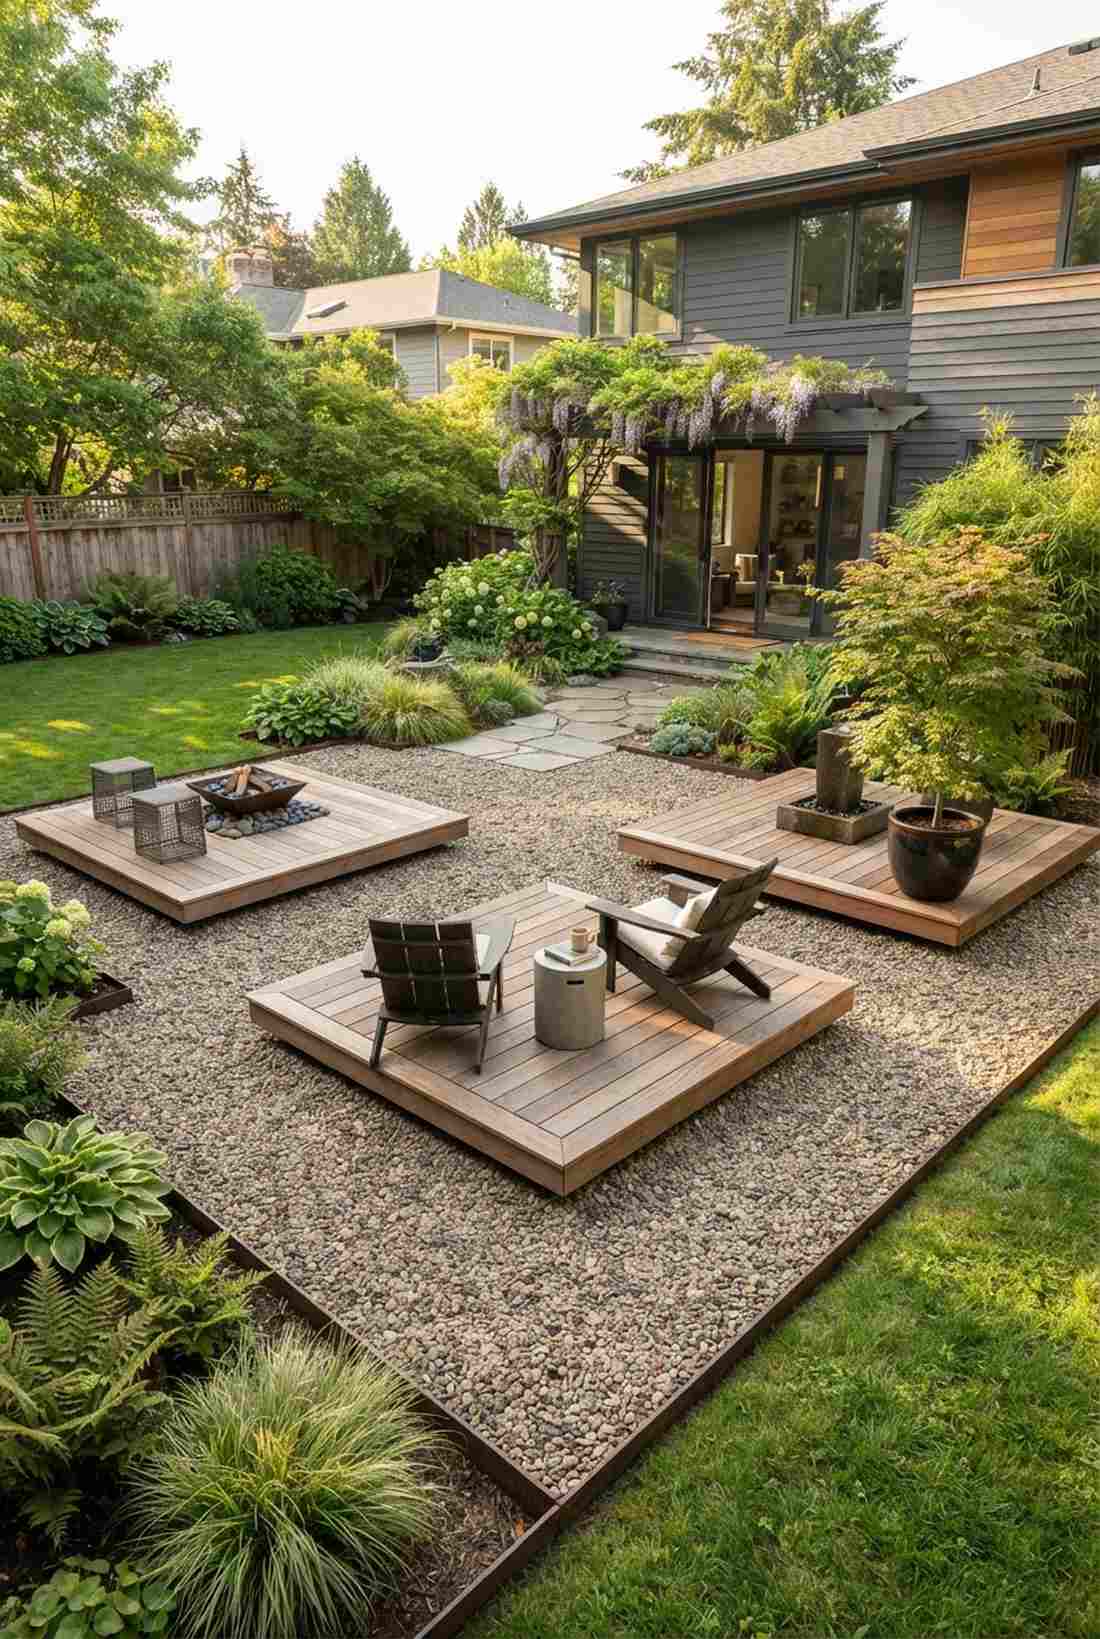
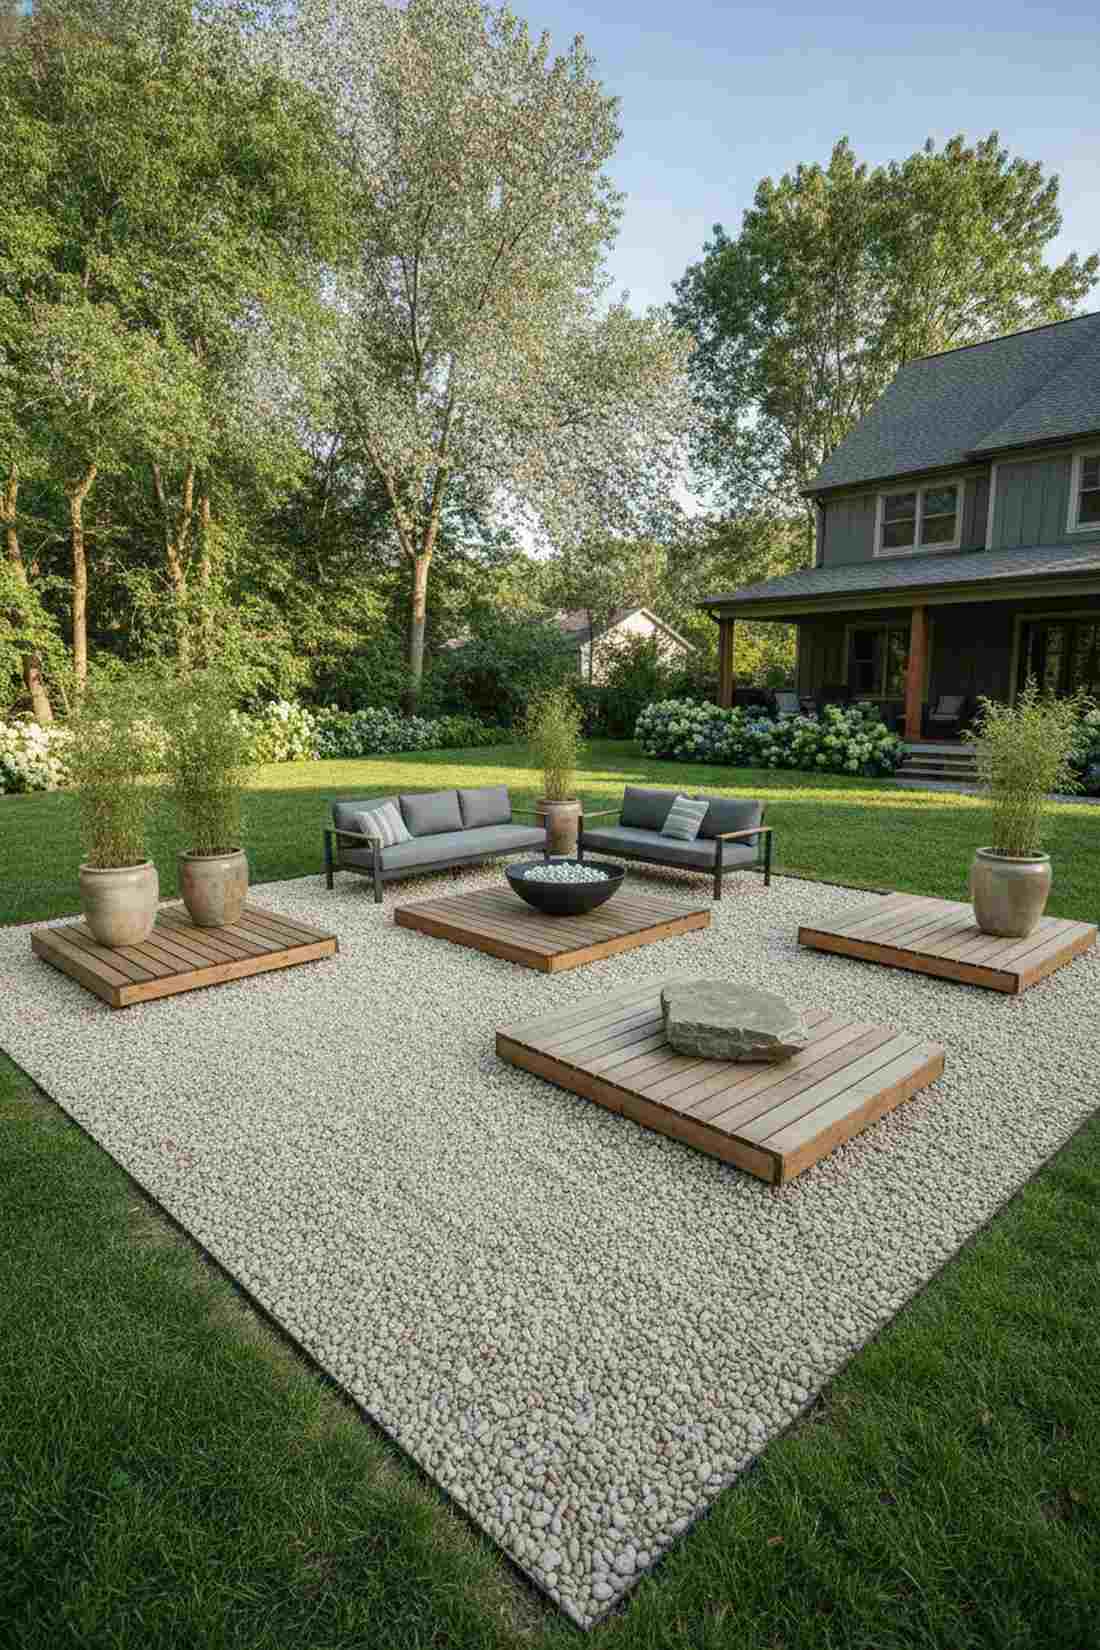
Walking through this setup feels like navigating a peaceful Japanese Zen garden. Creating floating deck islands in a gravel patio is an insanely cheap way to cover a massive footprint with high aesthetic impact.
Pouring concrete or building a 500-square-foot deck is wildly expensive, but floating small wooden platforms over cheap pea gravel looks surprisingly premium. It naturally dictates where furniture goes while ensuring 100% perfect drainage.
You can execute this modern island look for as little as $800–$1,500. It’s the ultimate budget-friendly layout hack!
- Key Materials: Pea gravel and pre-made deck pallets
- Vibe / Style: Minimalist Zen courtyard
- Difficulty: Easy weekend DIY
- Budget Breakdown: Gravel/Fabric: $300 | Island Frames: $600
- Creator’s Tip: Install rigid metal edging around the entire gravel perimeter to stop stones from kicking out into your grass when walking.
- Smart Sourcing: heavy-duty steel landscape edging and decorative pea gravel (bulk delivery).
33. Stamped Concrete Deck Border
This edge finish feels like a custom commercial courtyard. A stamped concrete patio apron perfectly protects the delicate edges of your wood deck from lawnmower damage and weed whacker strings.
Standard grass meeting a wooden deck often turns into a muddy, rotted mess over time. Pouring a textured concrete border gives a designer-level finish that visually anchors the structure while providing a zero-maintenance buffer zone.
Adding a decorative border usually runs $1,000–$2,000. Pin this to save your deck from rotting wood!
- Key Materials: Concrete mix and polyurethane stamping mats
- Vibe / Style: Clean commercial transition
- Difficulty: Advanced concrete finishing
- Budget Breakdown: Concrete: $400 | Stamp Rentals/Colors: $300
- Creator’s Tip: Use an acid stain on the concrete border that mimics the exact wood grain tone of your main deck for a seamless optical illusion.
- Smart Sourcing: concrete wood-grain texture stamps and reactive acid concrete stain.
34. Integrated Pool Deck Patio
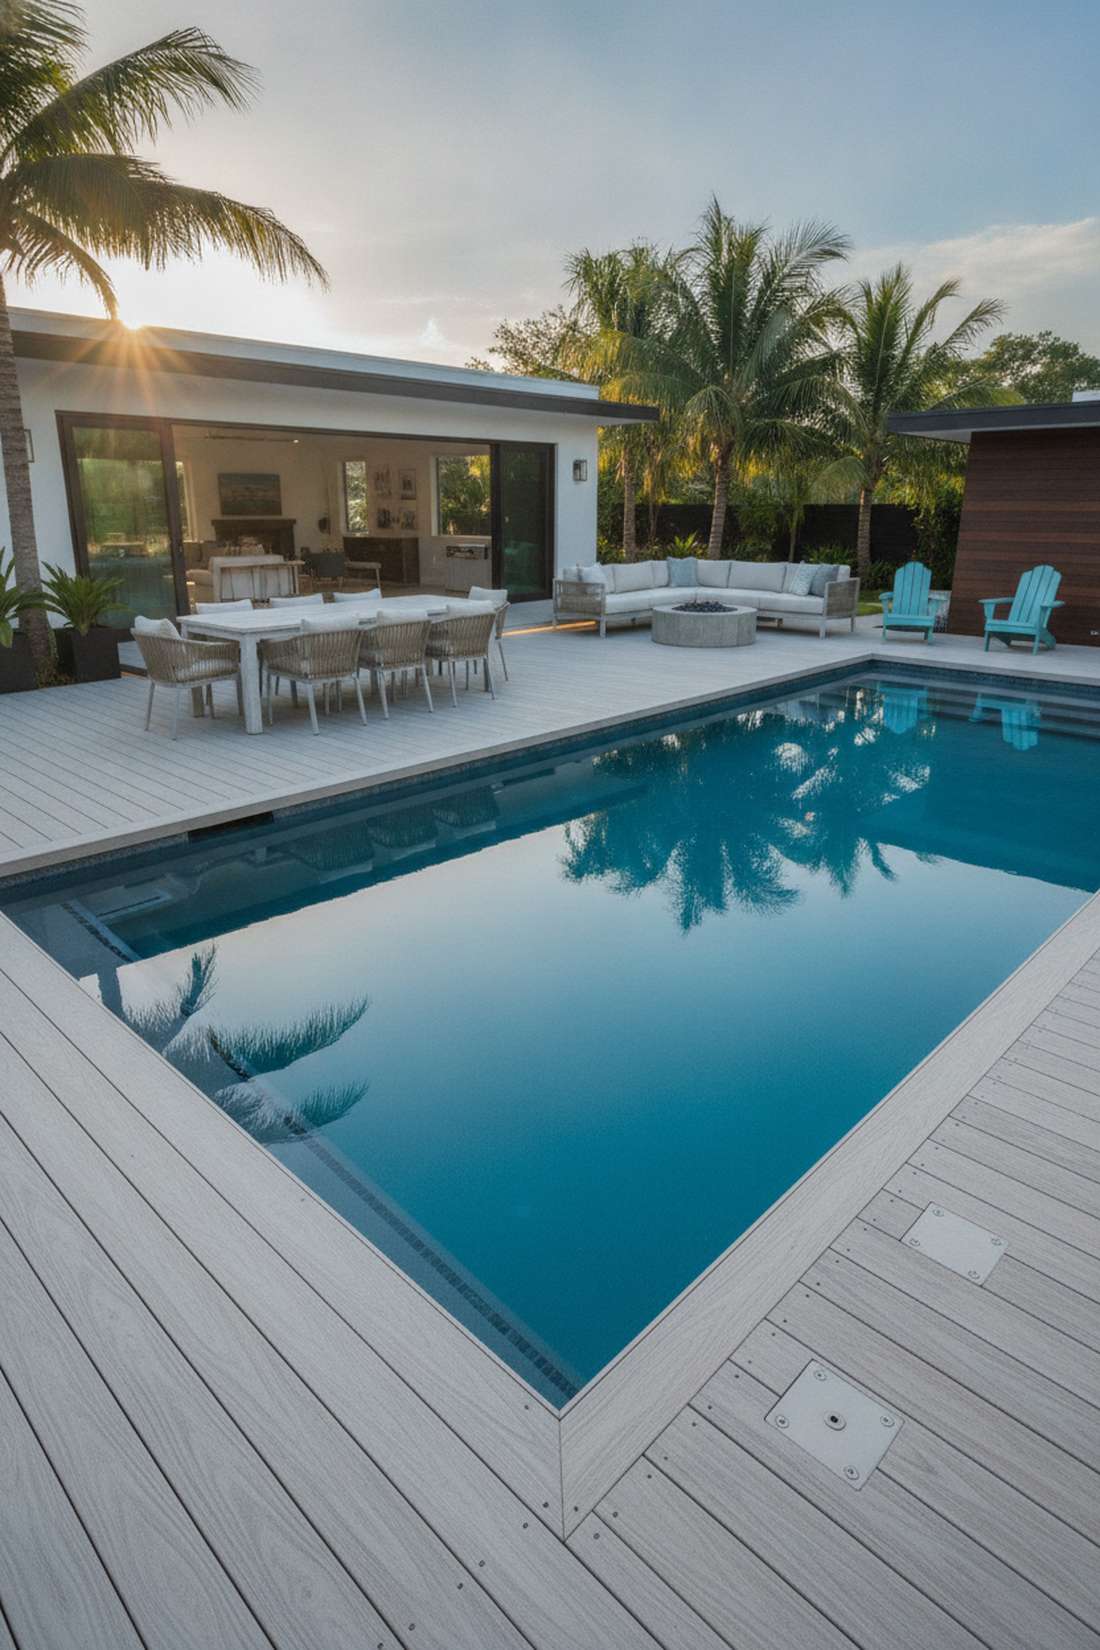
This layout feels like a seamless luxury pool deck at a Miami hotel. An integrated composite pool surround is absolutely essential for keeping swimmers safe while looking incredibly sleek.
Slippery concrete is dangerous and outdated; replacing the splash zone with textured, slip-resistant composite decking completely elevates the pool’s safety and style. Elevating the dining zone just slightly above the splash line keeps your food perfectly dry.
Expect to invest $3,000–$6,000 for high-end waterproof materials. It’s a mandatory upgrade for modern pool owners.
- Key Materials: PVC-capped composite decking
- Vibe / Style: High-end resort pool
- Difficulty: Advanced moisture-proofing
- Budget Breakdown: PVC Decking: $3500 | Waterproof Fasteners: $400
- Creator’s Tip: Avoid dark-colored deck boards right next to the pool—they absorb massive amounts of solar heat and will burn bare wet feet.
- Smart Sourcing: heat-reflective composite decking and stainless steel hidden deck clips.
Stop scrolling for a second—this upcoming lighting technique is the absolute secret sauce behind every viral backyard photo on Pinterest.
35. Courtyard Patio with Connecting Deck
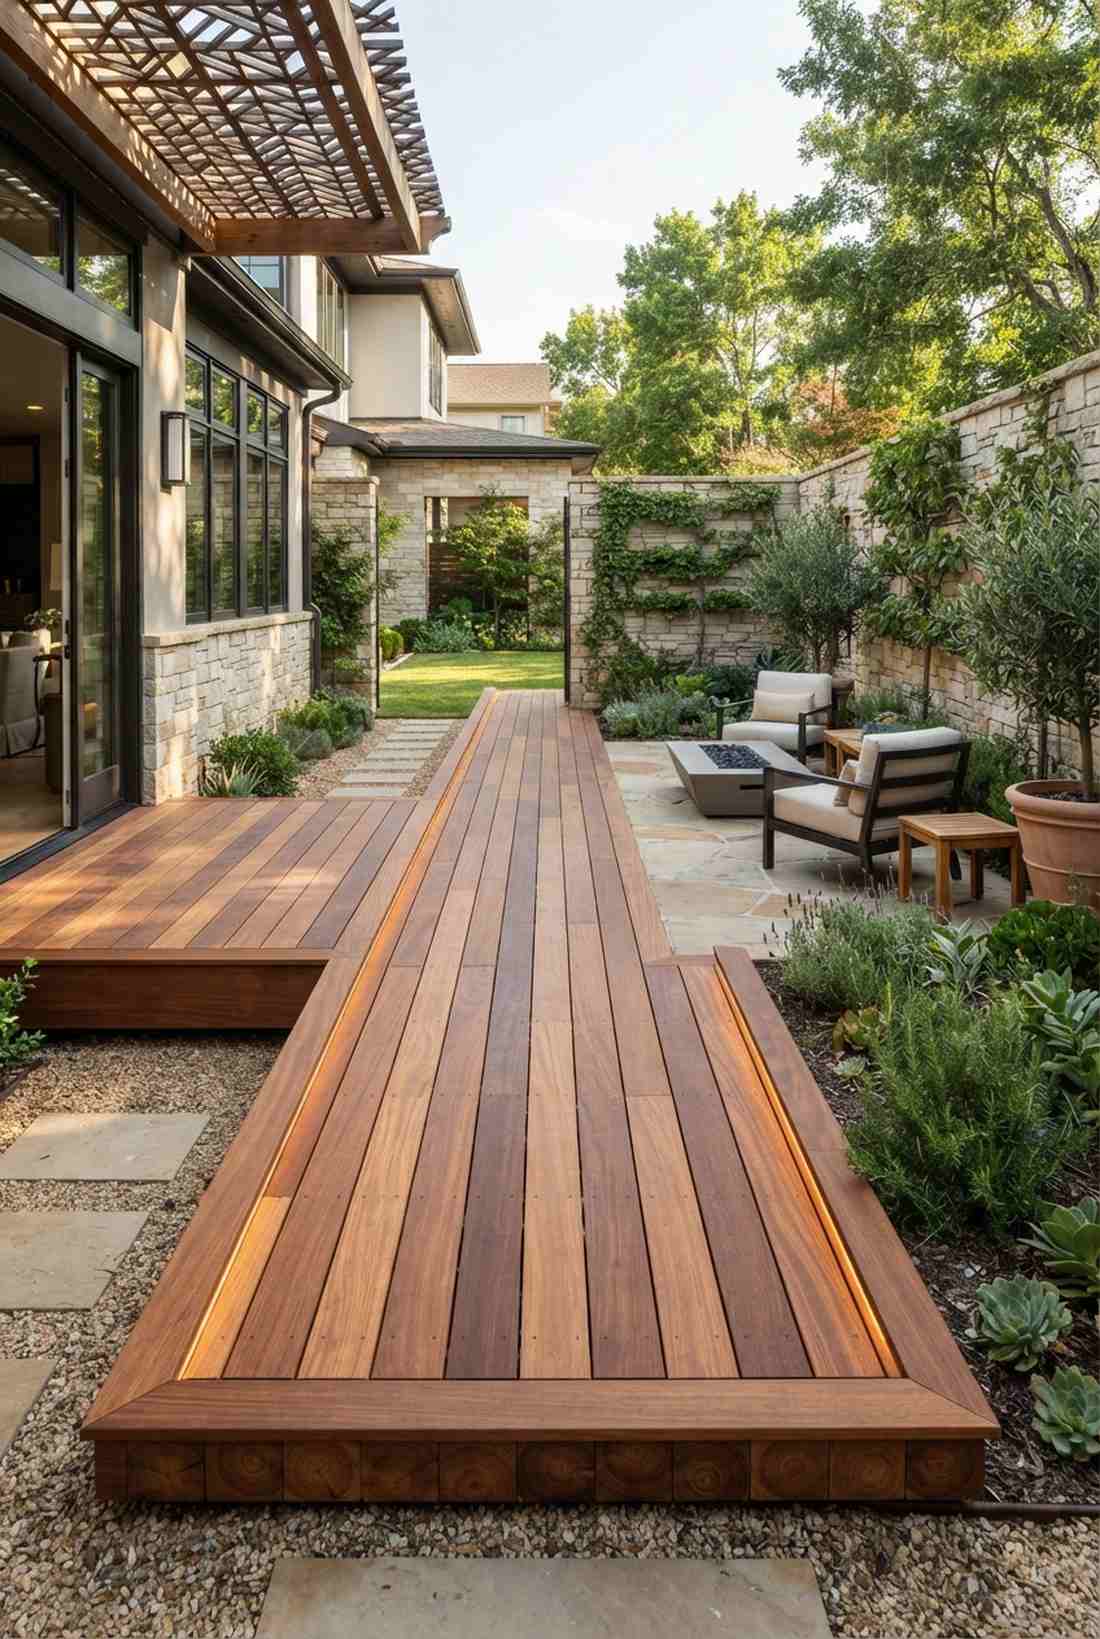
This passage feels like walking through an ancient, modernized cloister. A raised wooden connecting deck acts as a beautiful transitional bridge between the main house and an enclosed stone courtyard.
Instead of stepping directly into the dirt or gravel, elevating the walkway delivers a surprisingly premium look that keeps shoes totally clean. This raised hallway effect draws the eye outward, making the entire property feel larger and more intentional.
Building this architectural bridge costs around $1,000–$1,800. Save this if your house has a disconnected garden space!
- Key Materials: Premium hardwood decking (Ipe or Teak)
- Vibe / Style: Architectural gallery walkway
- Difficulty: Intermediate
- Budget Breakdown: Hardwood: $800 | Framing: $300
- Creator’s Tip: Run the walkway boards completely parallel to the path of travel to create an optical illusion of extreme length.
- Smart Sourcing: pre-grooved tropical hardwood boards and hardwood end-grain sealer.
Lighting & Ambiance Layouts
Strategic illumination transforms outdoor living decks from daytime spaces into evening destinations. Layered lighting—ambient, task, and accent—creates depth while ensuring safety and extending usable hours.
36. String Light Canopy
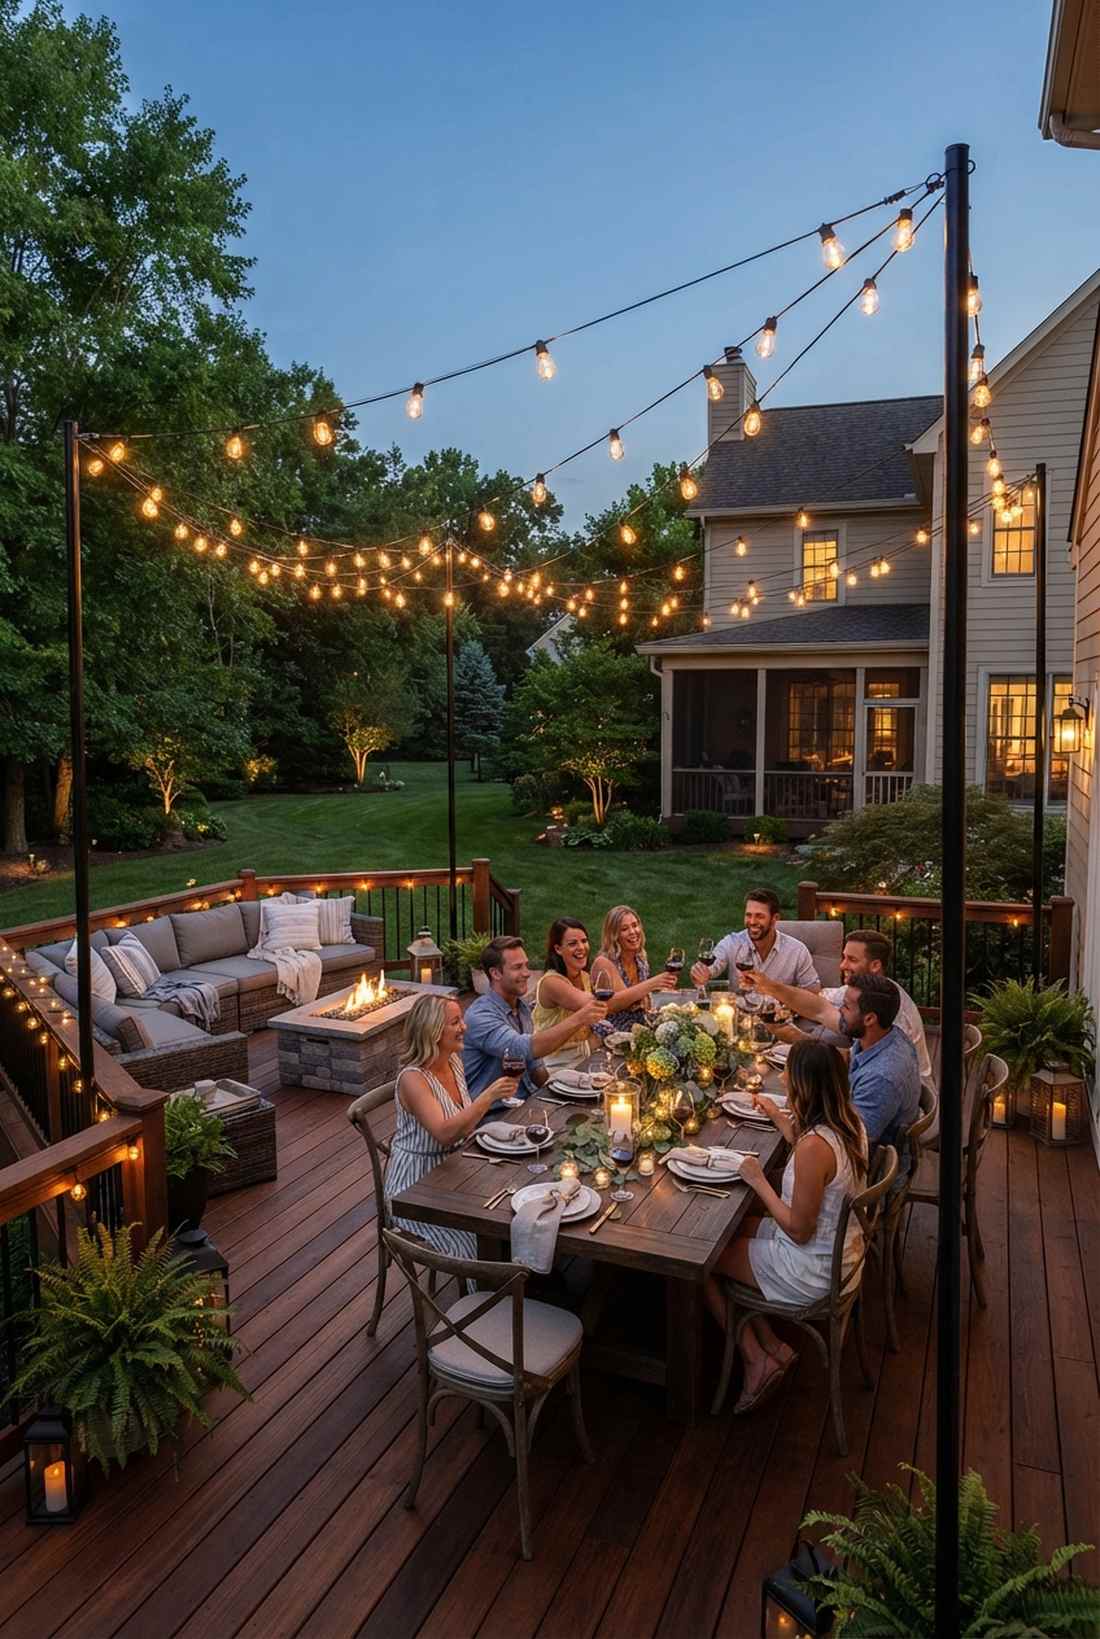
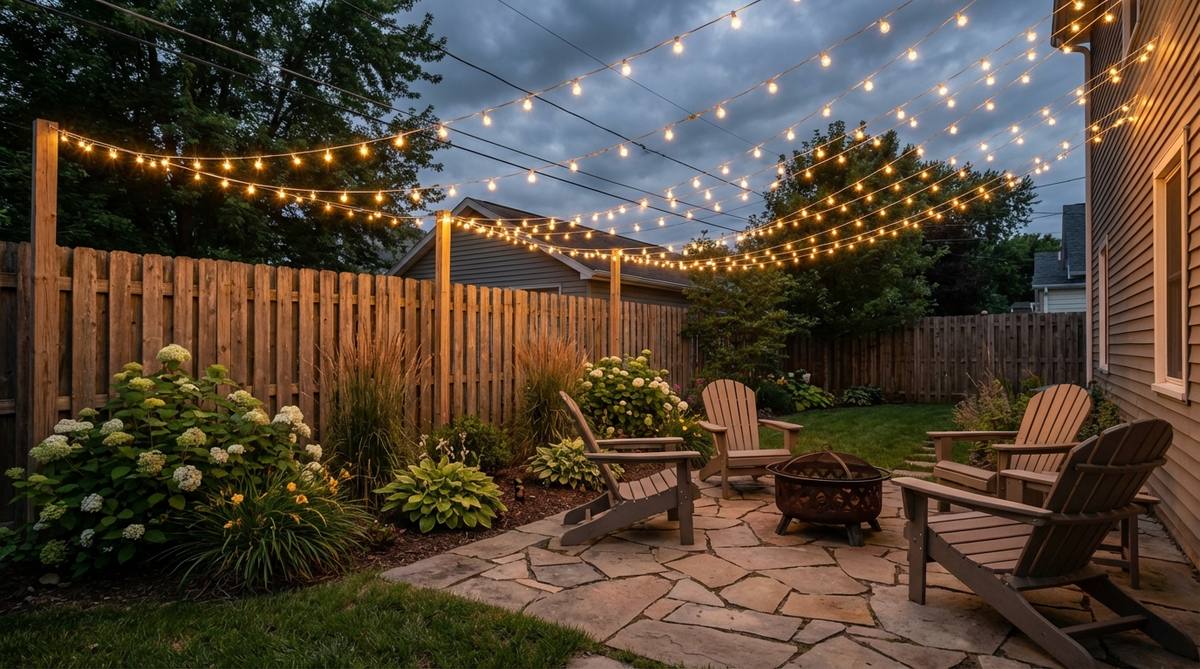
Sitting under this warm glow feels like dining at a bustling European street cafe. Creating an overhead string light canopy is the fastest, cheapest way to inject massive ambiance into a flat, open deck.
Harsh floodlights completely ruin the nighttime vibe, but crisscrossing Edison bulbs above the dining table looks wonderfully festive and expensive. Installing tall steel poles at the deck corners allows you to create a “roof of light” without needing a physical pergola.
You can execute this viral lighting trick for under $150. It’s the ultimate high-impact, low-budget weekend win!
- Key Materials: Heavy-duty Edison string lights and steel planter poles
- Vibe / Style: Festive bistro dining
- Difficulty: Easy quick install
- Budget Breakdown: Lighting: $80 | Planter Poles/Concrete: $60
- Creator’s Tip: Always use a steel guide wire to hang the lights; it prevents the heavy rubber cables from sagging sadly in the summer heat.
- Smart Sourcing: shatterproof LED bistro lights and string light suspension wire kits.
37. Recessed Deck Board Lighting
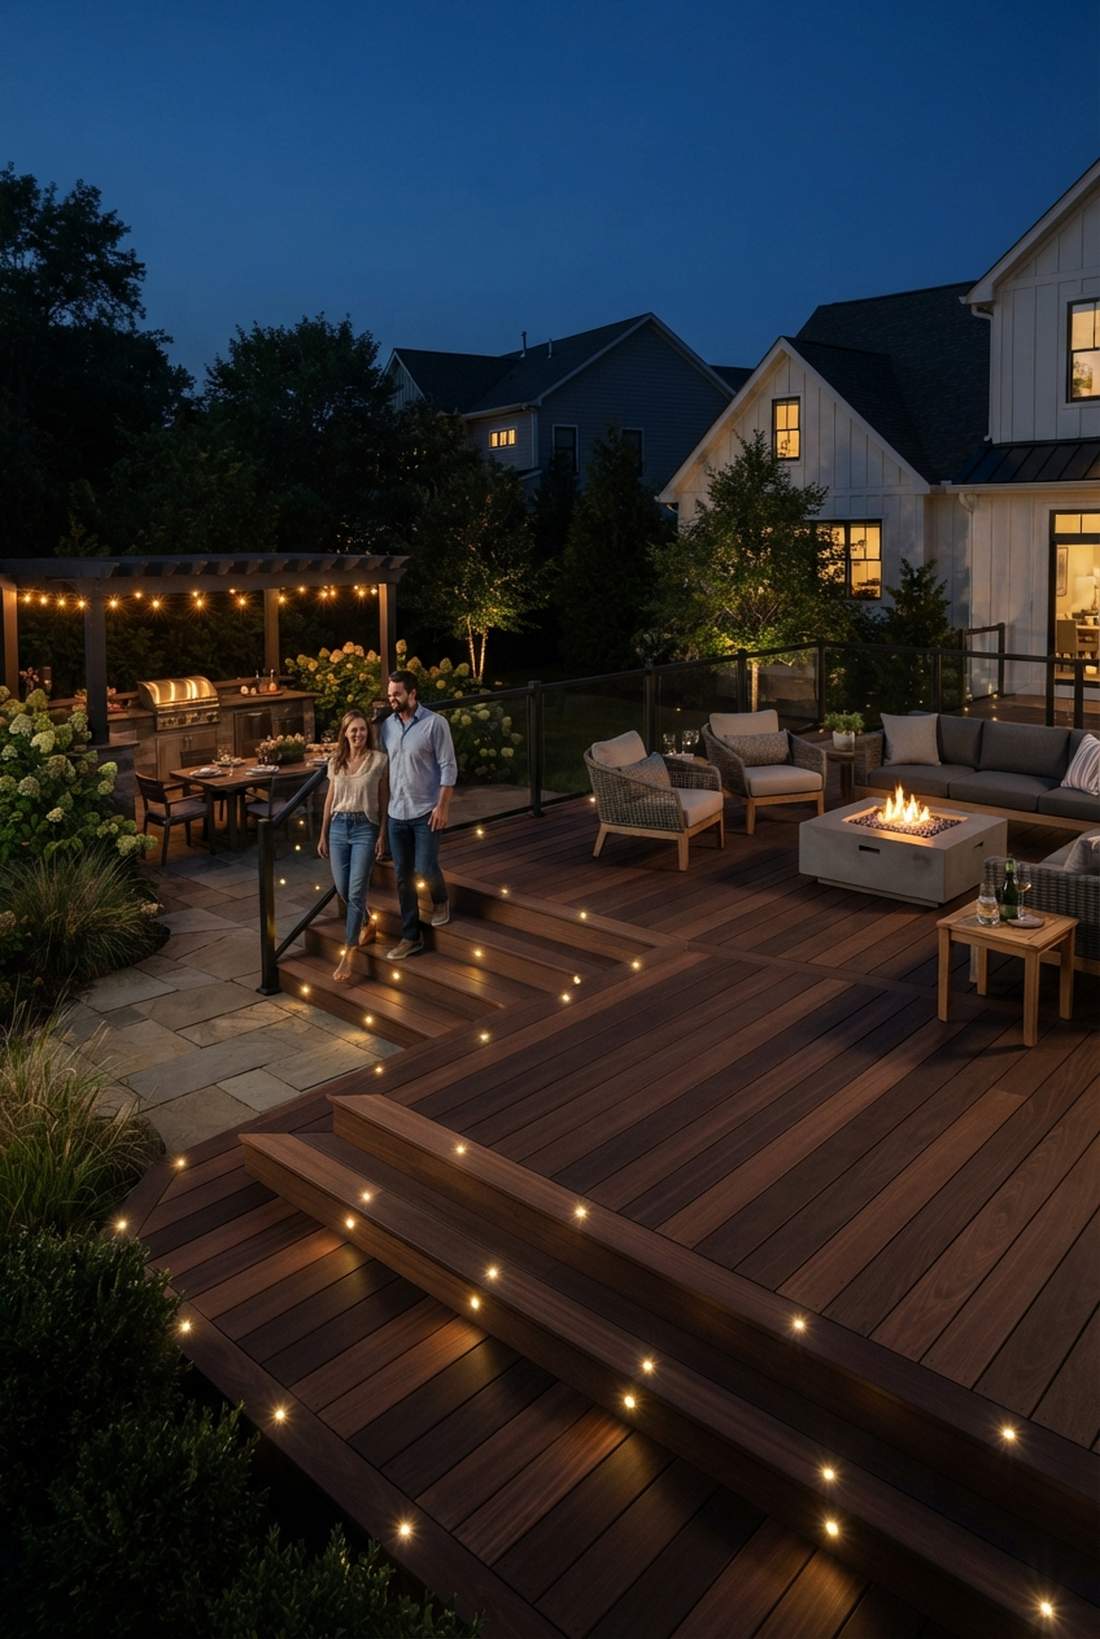
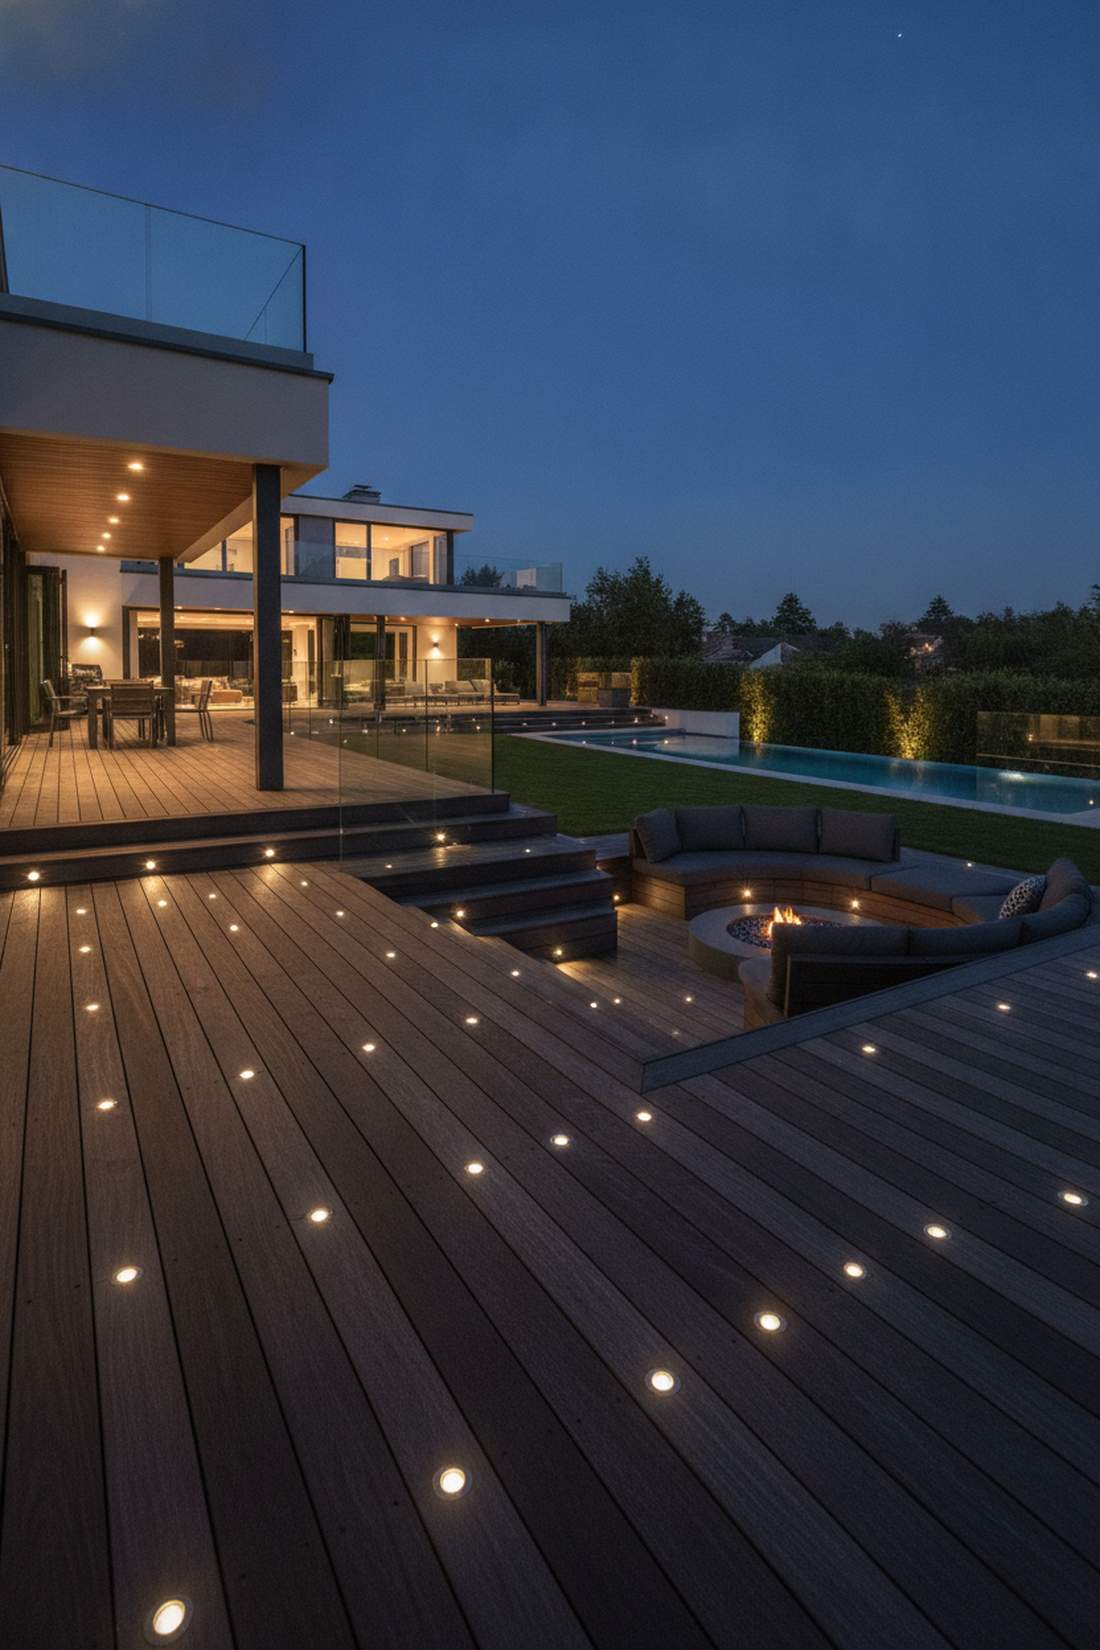
Walking on this surface at night feels like stepping onto a sci-fi luxury yacht. Flush-mounted deck board lights provide an incredible starfield effect right beneath your feet.
Standard post lights are fine, but drilling tiny LED nodes directly into the floor perimeter gives a designer-level finish that screams luxury architecture. It beautifully highlights the edges of the deck while keeping the light source completely hidden from eye-level glare.
A starter kit of recessed dots costs roughly $200–$400. Pin this for the sleekest nighttime safety upgrade!
- Key Materials: Micro LED deck dot lights
- Vibe / Style: Ultra-modern luxury yacht
- Difficulty: Intermediate drilling & wiring
- Budget Breakdown: Light Kit: $150 | Transformer/Wire: $80
- Creator’s Tip: Use a perfectly sized Forstner bit rather than a standard drill bit to get a clean, tear-free hole for the flush lights.
- Smart Sourcing: low-voltage recessed LED deck lights and waterproof wire connector nuts.
38. Post Cap Light Perimeter
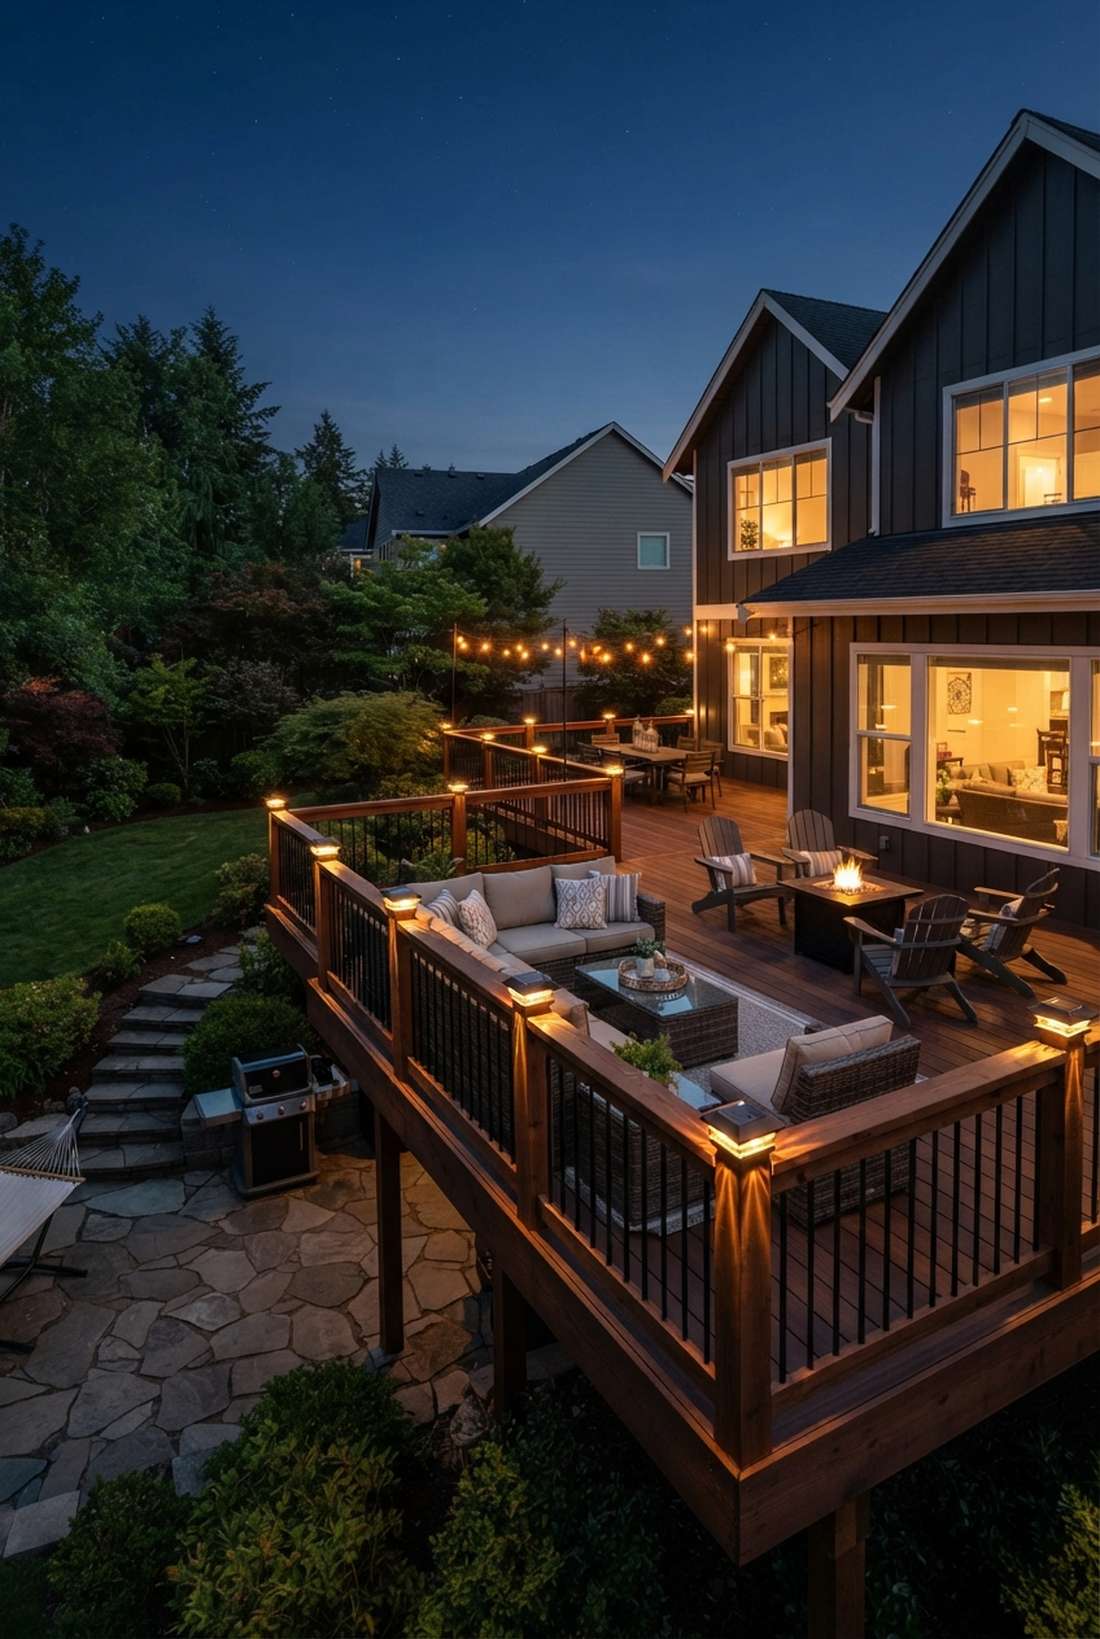
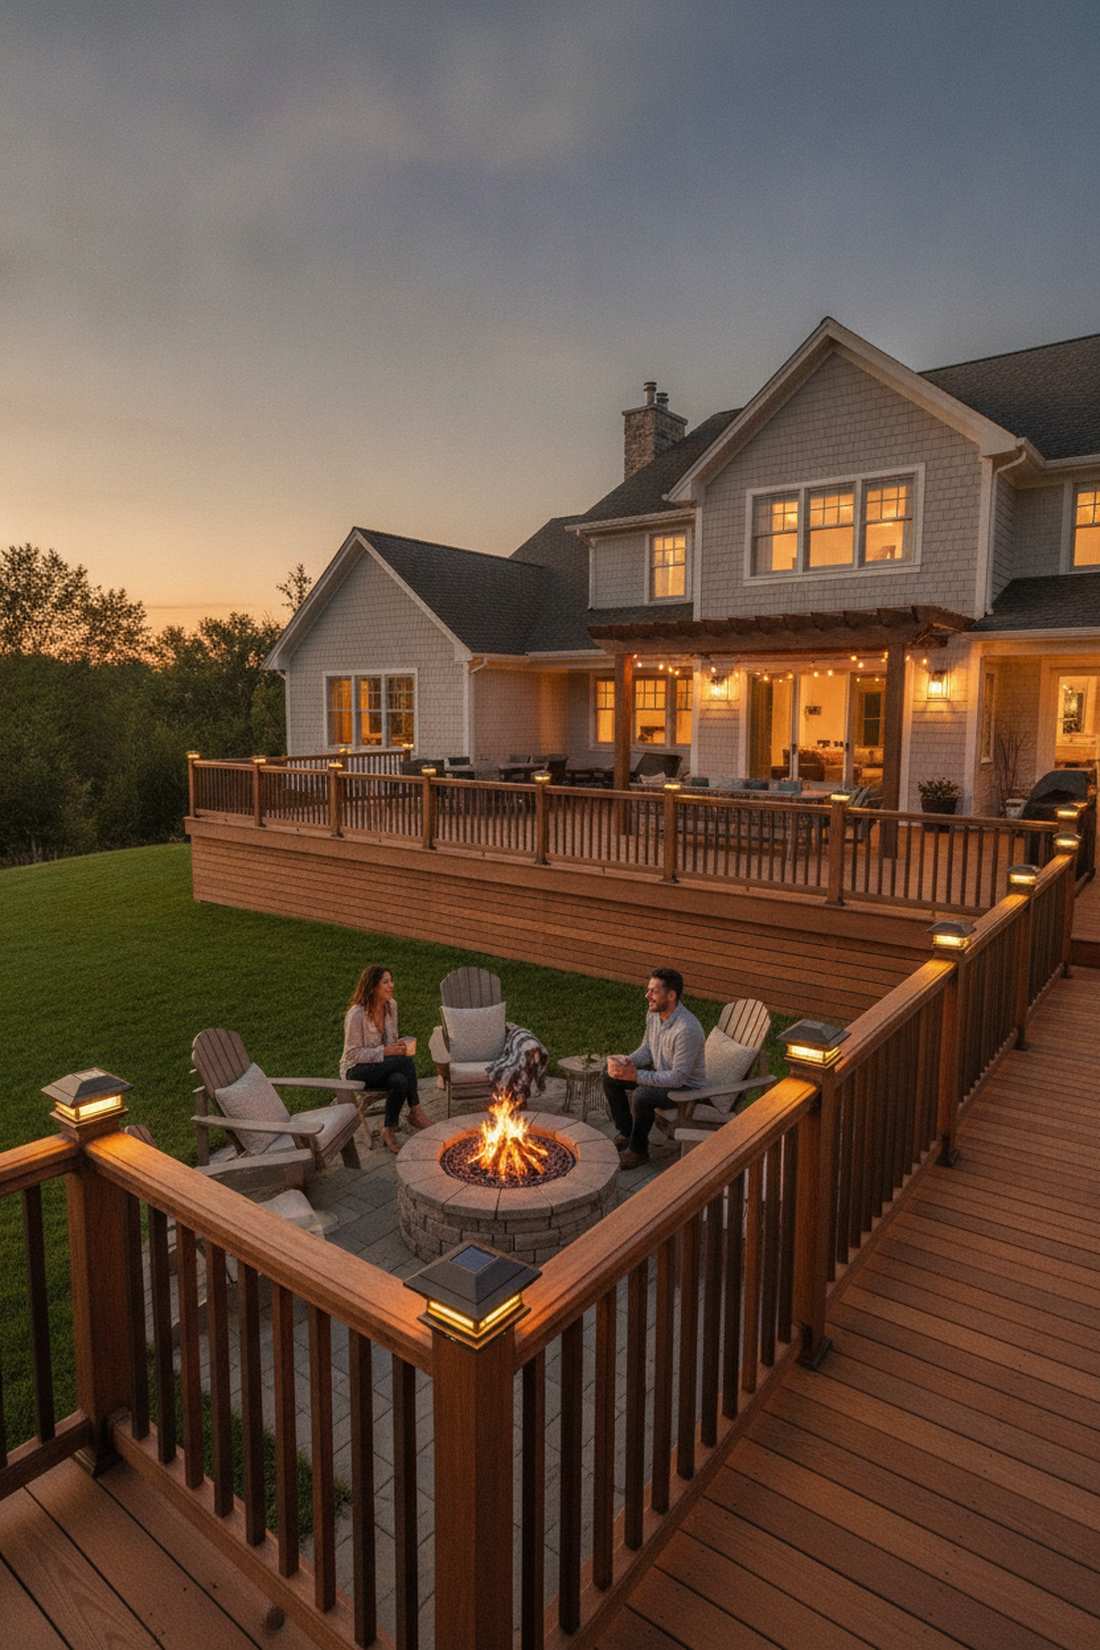
Looking at this boundary feels like your yard is protected by glowing sentinels. Illuminated railing post caps are brilliant for defining the absolute edges of your entertainment zone in pitch darkness.
Most people leave their railings completely dark, but capping the posts with warm LEDs creates a gorgeous rhythmic pattern that looks incredibly expensive. Going with high-quality solar caps eliminates the nightmare of running wires through existing wooden posts.
You can outfit a standard deck with premium solar caps for $150–$300. A highly recommended fix for dark, dangerous edges.
- Key Materials: Solar-powered LED post caps
- Vibe / Style: Classic glowing perimeter
- Difficulty: Easy 10-minute install
- Budget Breakdown: Solar Caps (10 units): $200
- Creator’s Tip: Buy caps that are slightly oversized and use outdoor construction adhesive—wood posts swell and shrink, which can pop tight caps right off.
- Smart Sourcing: premium cast-aluminum solar post caps and heavy-duty exterior mounting tape.
39. Under-Rail LED Strips
This hidden lighting trick feels like an upscale nightclub lounge setup. Installing under-railing LED light strips creates a stunning, indirect floating wash of light across the entire deck surface.
Exposed bulbs can blind your guests, but hiding waterproof LED tape directly under the handrail lip delivers a surprisingly premium look. The light cascades down the balusters, highlighting the architectural details without ever showing the ugly light source.
Running continuous tape lighting usually costs $100–$250. Save this for the ultimate seamless lighting hack!
- Key Materials: Waterproof exterior LED tape strips
- Vibe / Style: Sleek indirect modern glow
- Difficulty: Easy peel-and-stick
- Budget Breakdown: LED Reels: $80 | Aluminum Channels: $50
- Creator’s Tip: Always mount the LED tape inside a cheap aluminum track with a frosted diffuser cover to eliminate the “dotted” reflection on the floor.
- Smart Sourcing: IP68 waterproof LED strip lights and frosted aluminum LED channel diffusers.
You are going to want to steal this next illumination trick immediately. It looks insanely premium and prevents major accidents.
40. Stair Riser Accent Lights
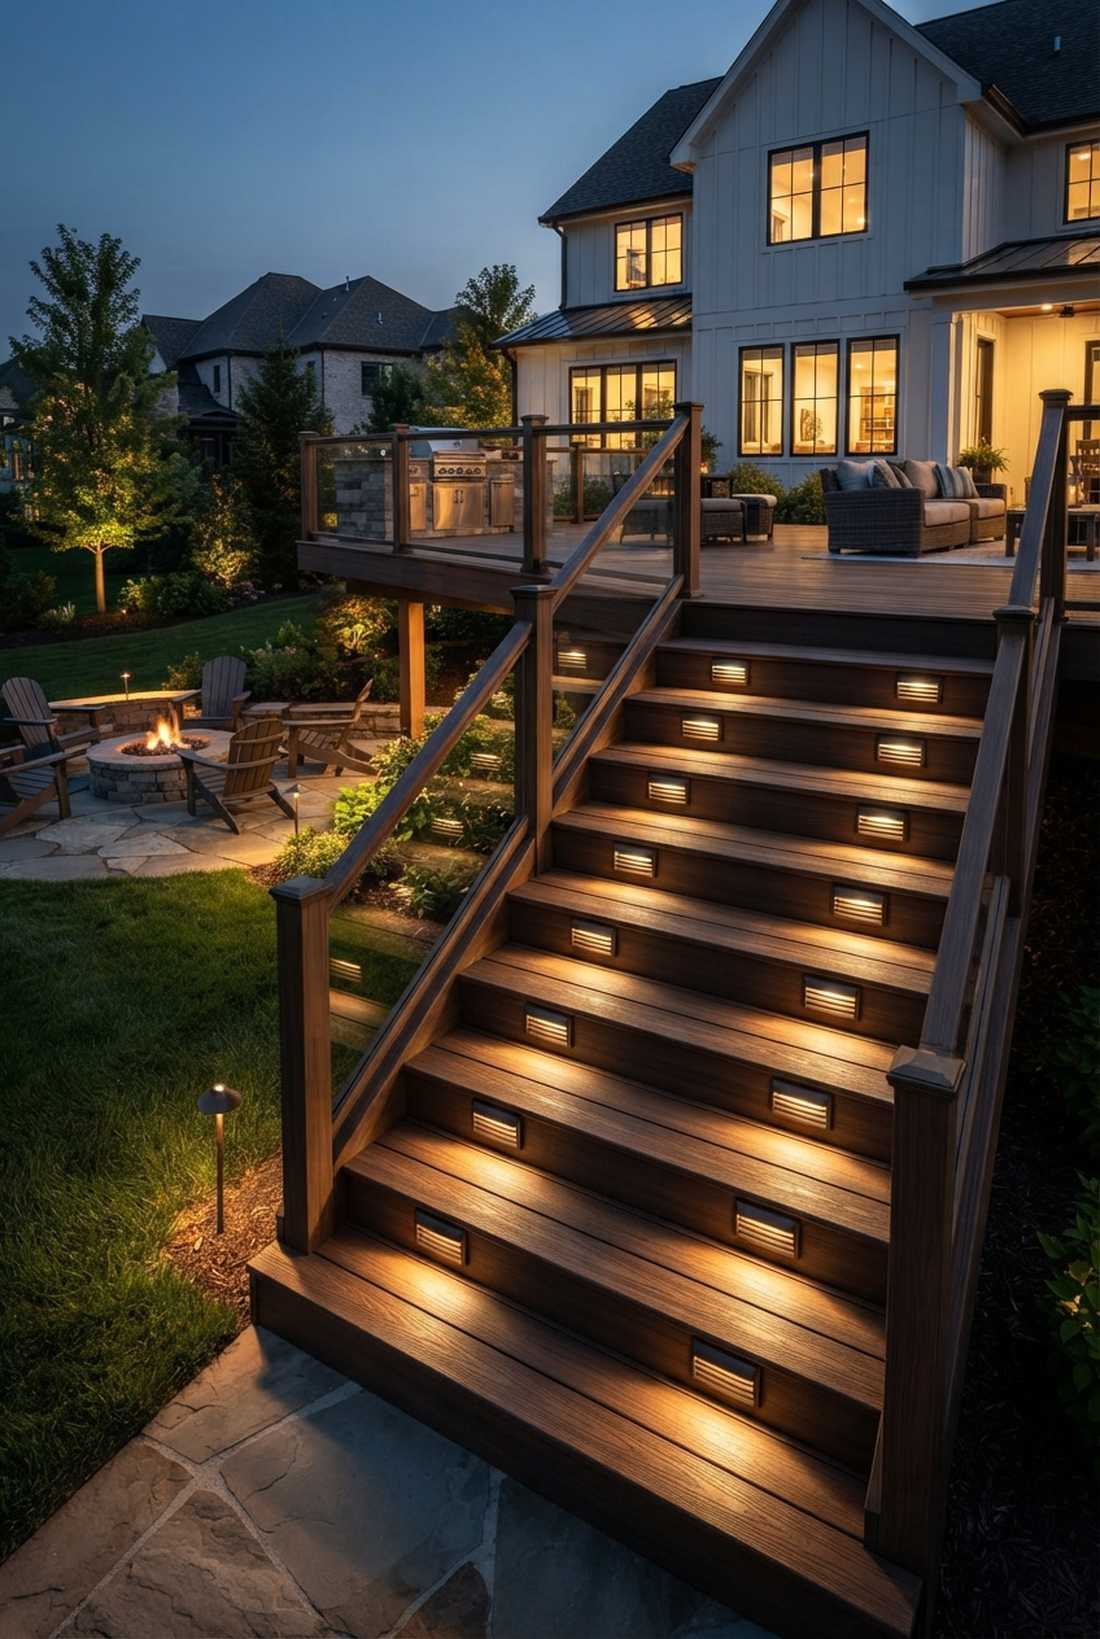
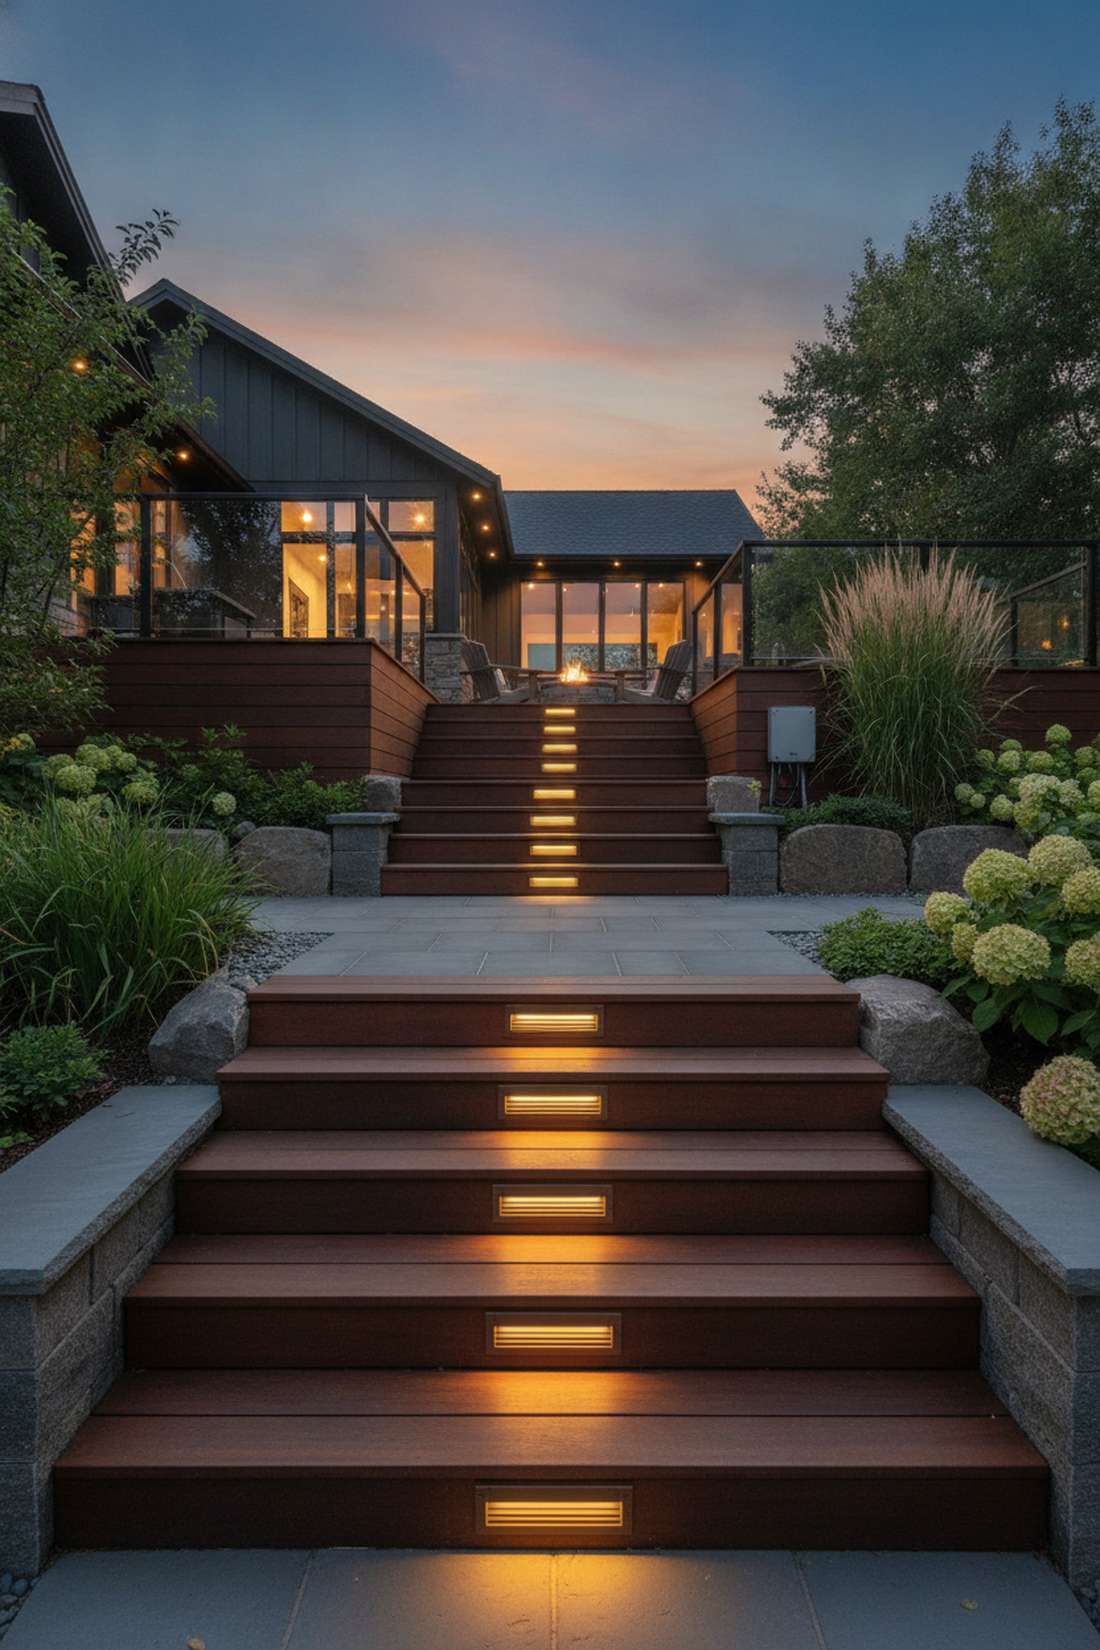
Walking down these steps feels like entering a high-end commercial theater. Hardwired stair riser lights are an absolute necessity for preventing catastrophic falls while adding massive curb appeal.
A dark staircase is a massive liability, but embedding sleek bronze fixtures directly into the vertical risers completely solves the problem while looking wildly expensive. The targeted downward beam highlights the tread texture without blinding the person walking up.
Lighting a standard flight of stairs costs roughly $200–$350. It is the single most important safety upgrade for multi-level setups.
- Key Materials: Louvered low-voltage step lights
- Vibe / Style: Safe & stylish commercial-grade
- Difficulty: Intermediate wiring
- Budget Breakdown: Fixtures: $150 | Wire & Transformer: $100
- Creator’s Tip: Hook these lights up to a smart astronomical timer so they automatically turn on exactly at dusk every single night without you touching a switch.
- Smart Sourcing: bronze louvered step lights (bulk pack) and smart Wi-Fi landscape lighting transformers.
41. Landscape Uplighting Integration
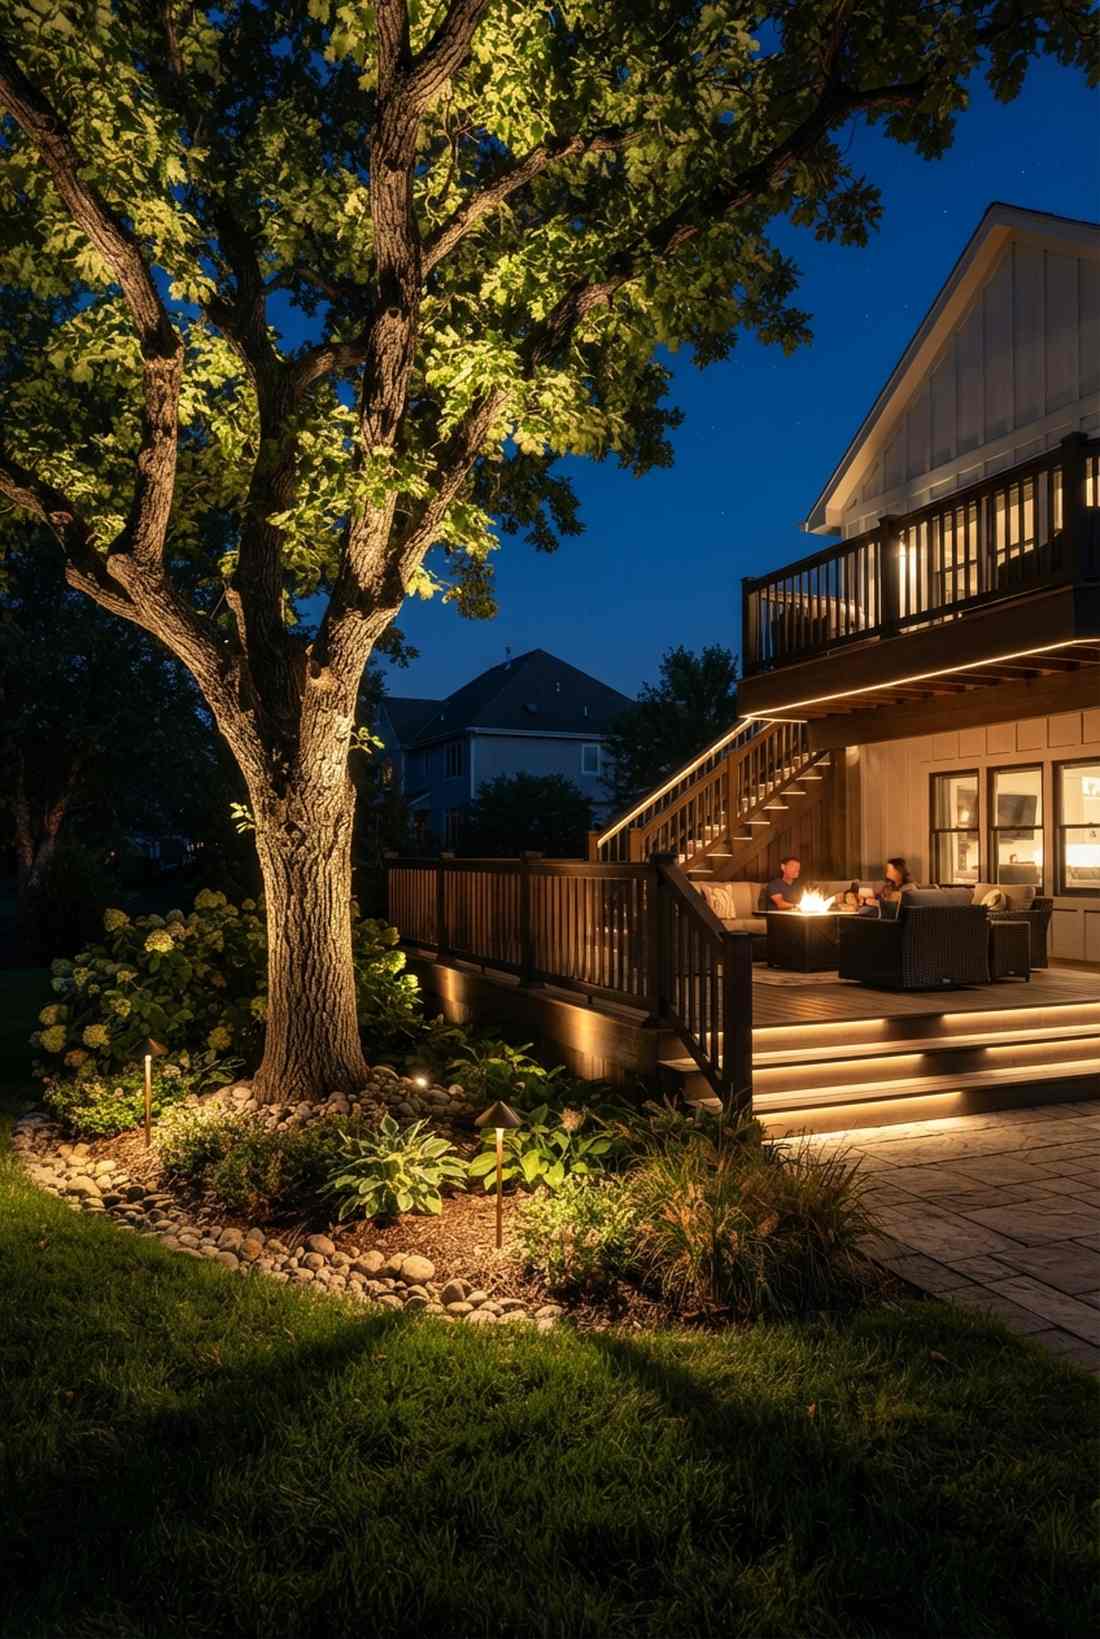
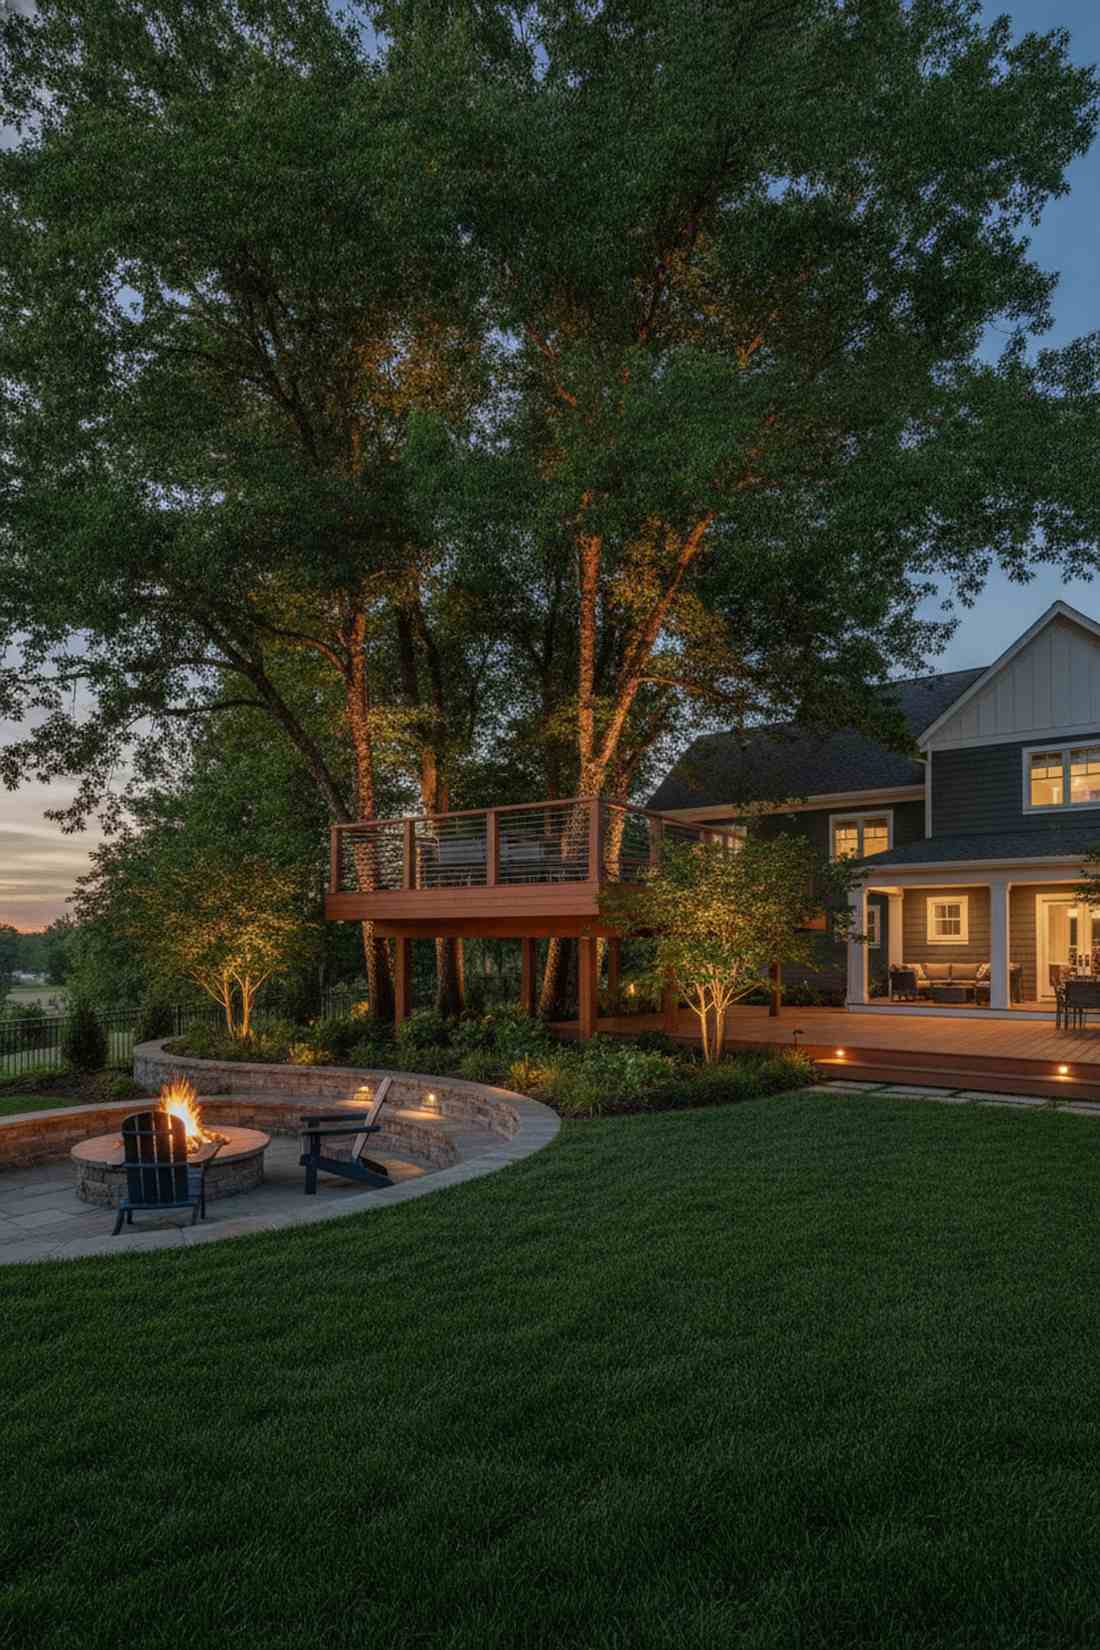
This layout trick feels like a dramatic Hollywood set design. Using ground-mounted landscape uplighting completely blurs the line between your deck structure and the surrounding natural garden.
Shooting light downward is standard, but pushing bright, warm beams up through the branches of nearby trees or even through the gaps of a cantilevered deck gives a designer-level finish. It creates massive, moody shadows that make small yards feel infinitely deep.
A basic uplighting kit runs about $150–$300. Pin this to add serious architectural drama to your yard!
- Key Materials: Brass directional uplight fixtures
- Vibe / Style: Dramatic estate landscape
- Difficulty: Easy landscape wiring
- Budget Breakdown: Brass Spotlights: $200 | Wiring: $50
- Creator’s Tip: Keep the bulb temperature strictly around 2700K (warm white)—anything cooler (blue) will make your green trees look artificial and creepy.
- Smart Sourcing: solid brass landscape uplights and direct burial low-voltage wire (bulk roll).
42. Chandelier Outdoor Statement
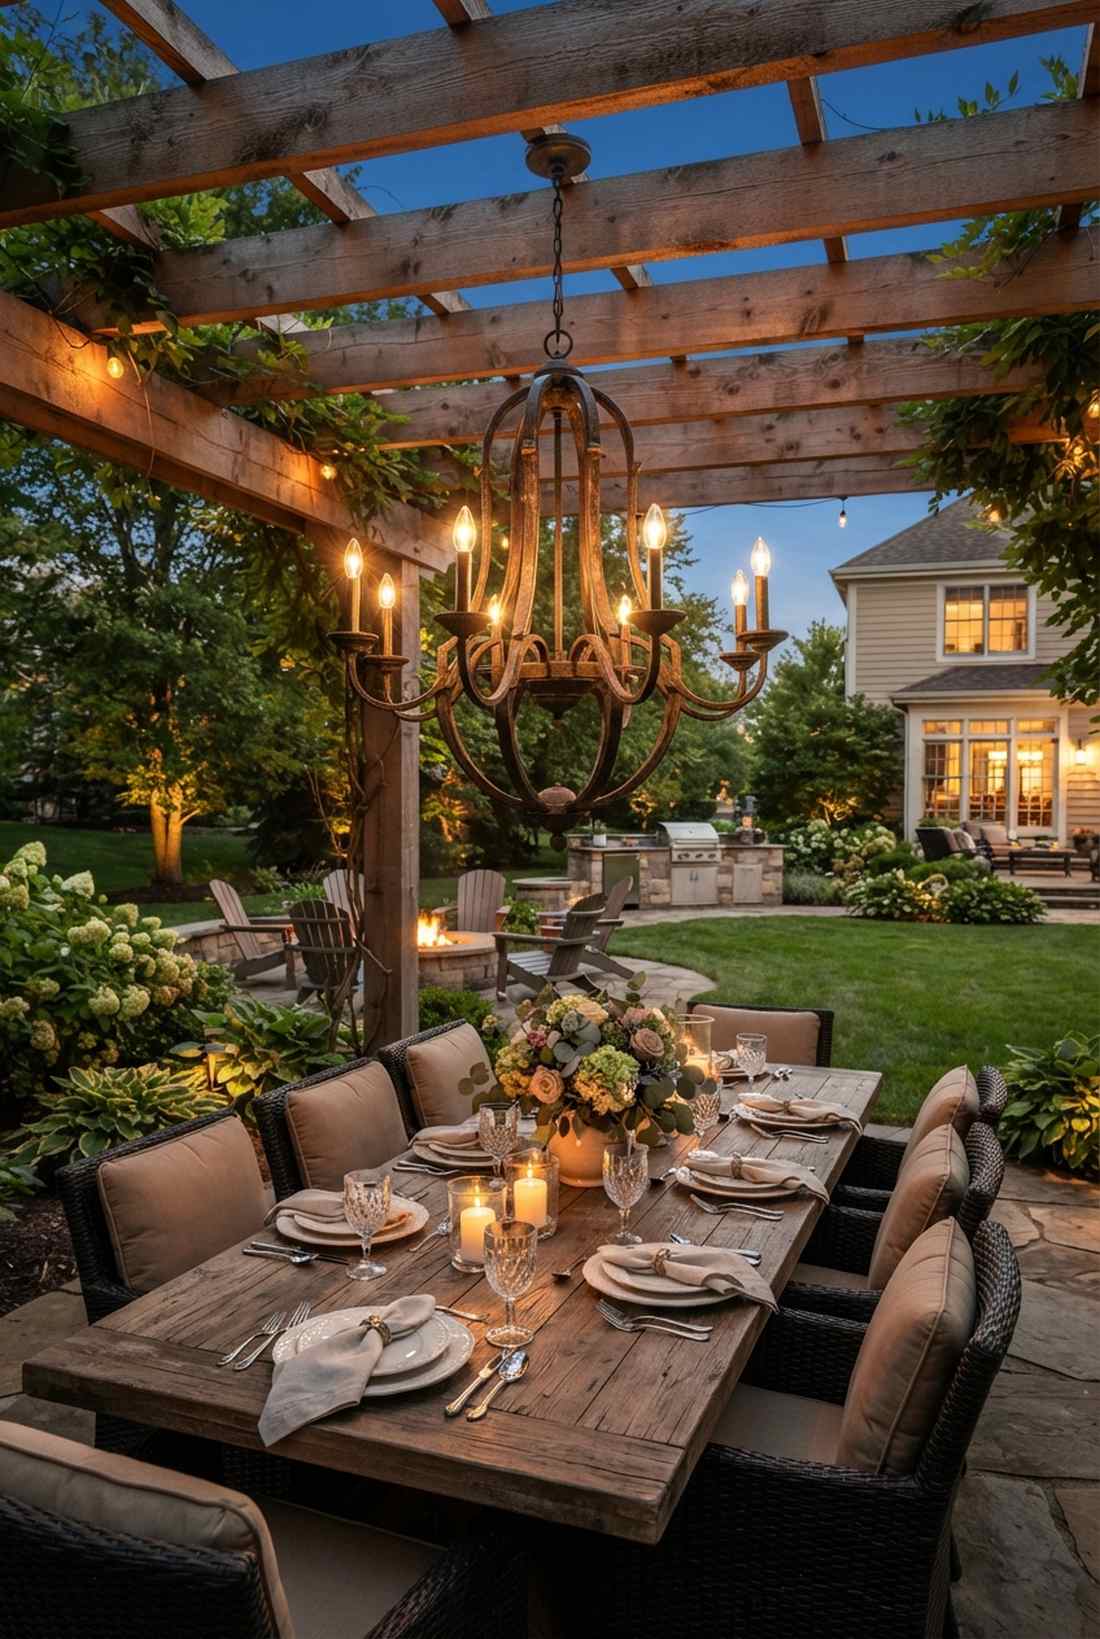
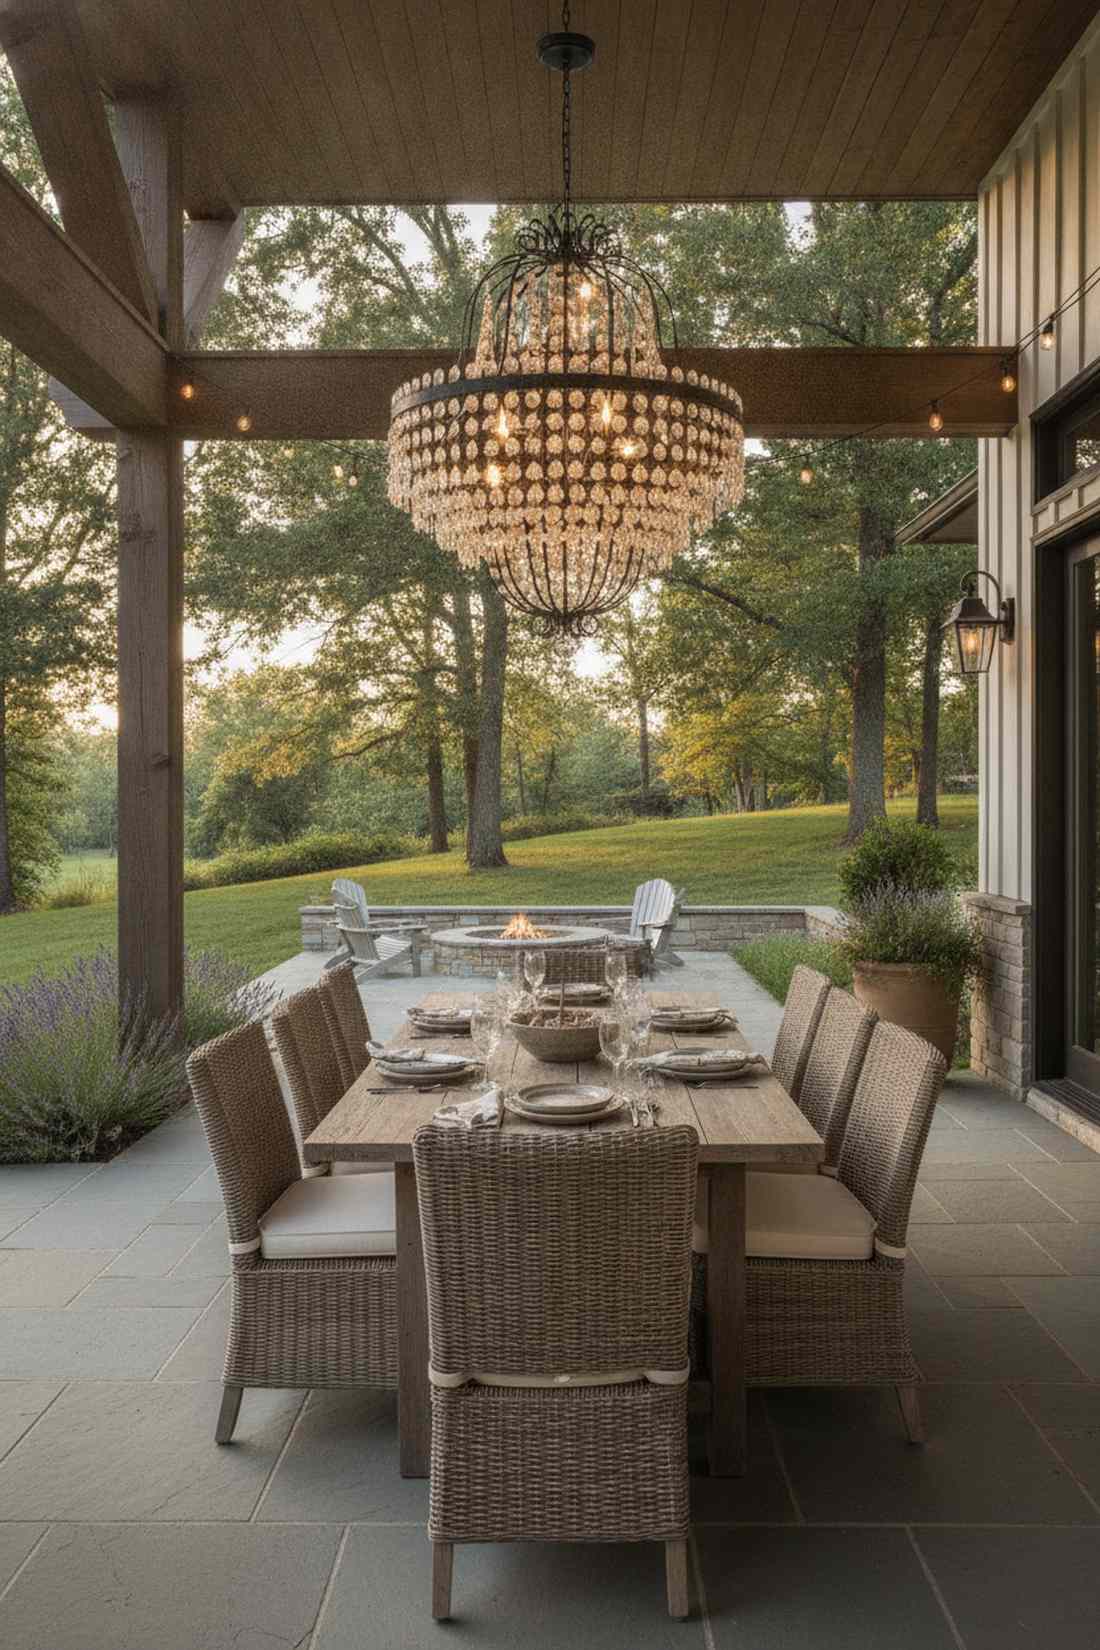
Dining under this fixture feels like you brought a luxury dining room directly into the wild. Hanging an oversized outdoor statement chandelier completely redefines the elegance of a covered patio or pergola.
Most outdoor lighting is purely functional, but dropping a massive crystal or wrought-iron piece over a rustic wood table looks far more expensive than it actually is. It acts as the ultimate centerpiece, forcing the eye upward to appreciate the overhead structure.
You can find stunning weather-rated fixtures for $200–$500. Save this idea if you want to leave your dinner guests speechless.
- Key Materials: Damp/Wet-rated outdoor chandelier
- Vibe / Style: Opulent outdoor elegance
- Difficulty: Intermediate electrical
- Budget Breakdown: Fixture: $300 | Heavy-duty mount: $30
- Creator’s Tip: If you don’t want to run hardwiring, buy a gorgeous fixture, cut the wires, and place remote-controlled, battery-operated LED puck lights where the bulbs go!
- Smart Sourcing: wet-rated outdoor farmhouse chandeliers and battery-operated LED puck lights (with remote).
Material Guide: Cheap vs. Premium Aesthetic
Knowing exactly where to save and where to spend makes all the difference in achieving that “looks expensive but isn’t” vibe.
- Standard vs. UV-Resistant/Premium: Standard wood warps and splinters quickly, but investing in capped composite boards stops fading and eliminates the nightmare of yearly sanding and staining.
- Pre-made Kits vs. Sourcing Locally: Purchasing pre-cut pergola kits or bulk hardware online often slashes installation time in half while drastically lowering overall premium hardware costs.
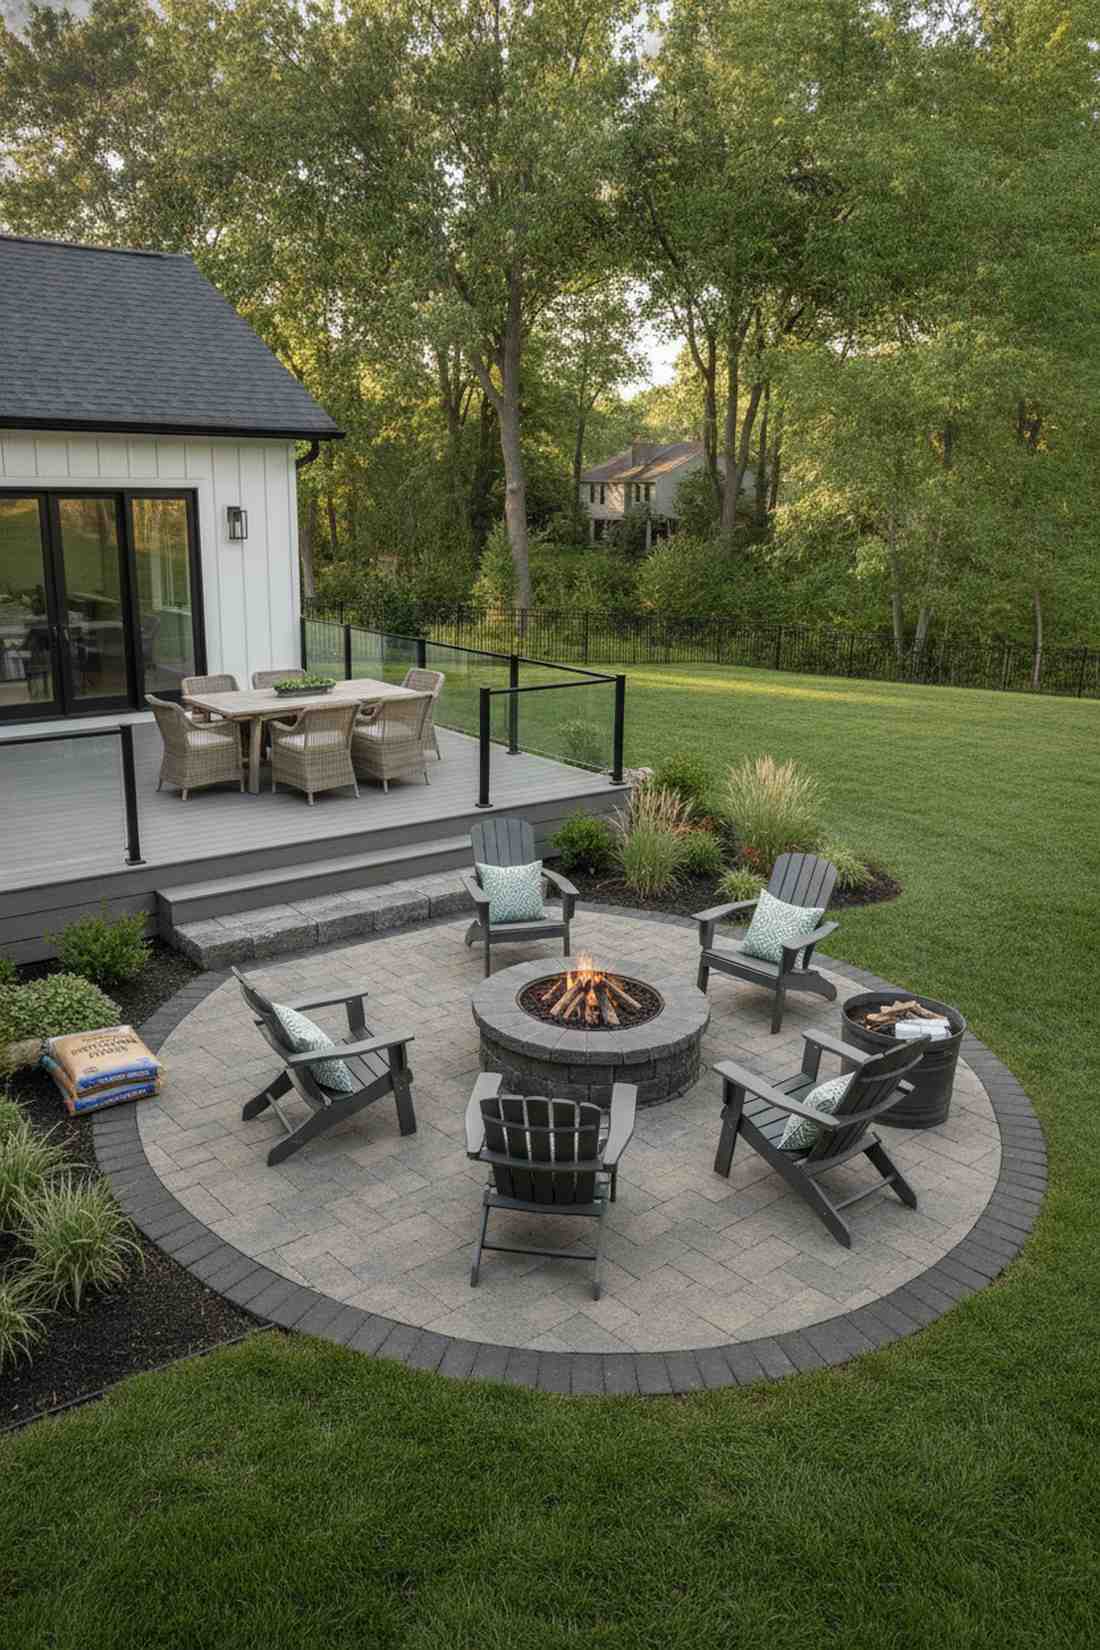
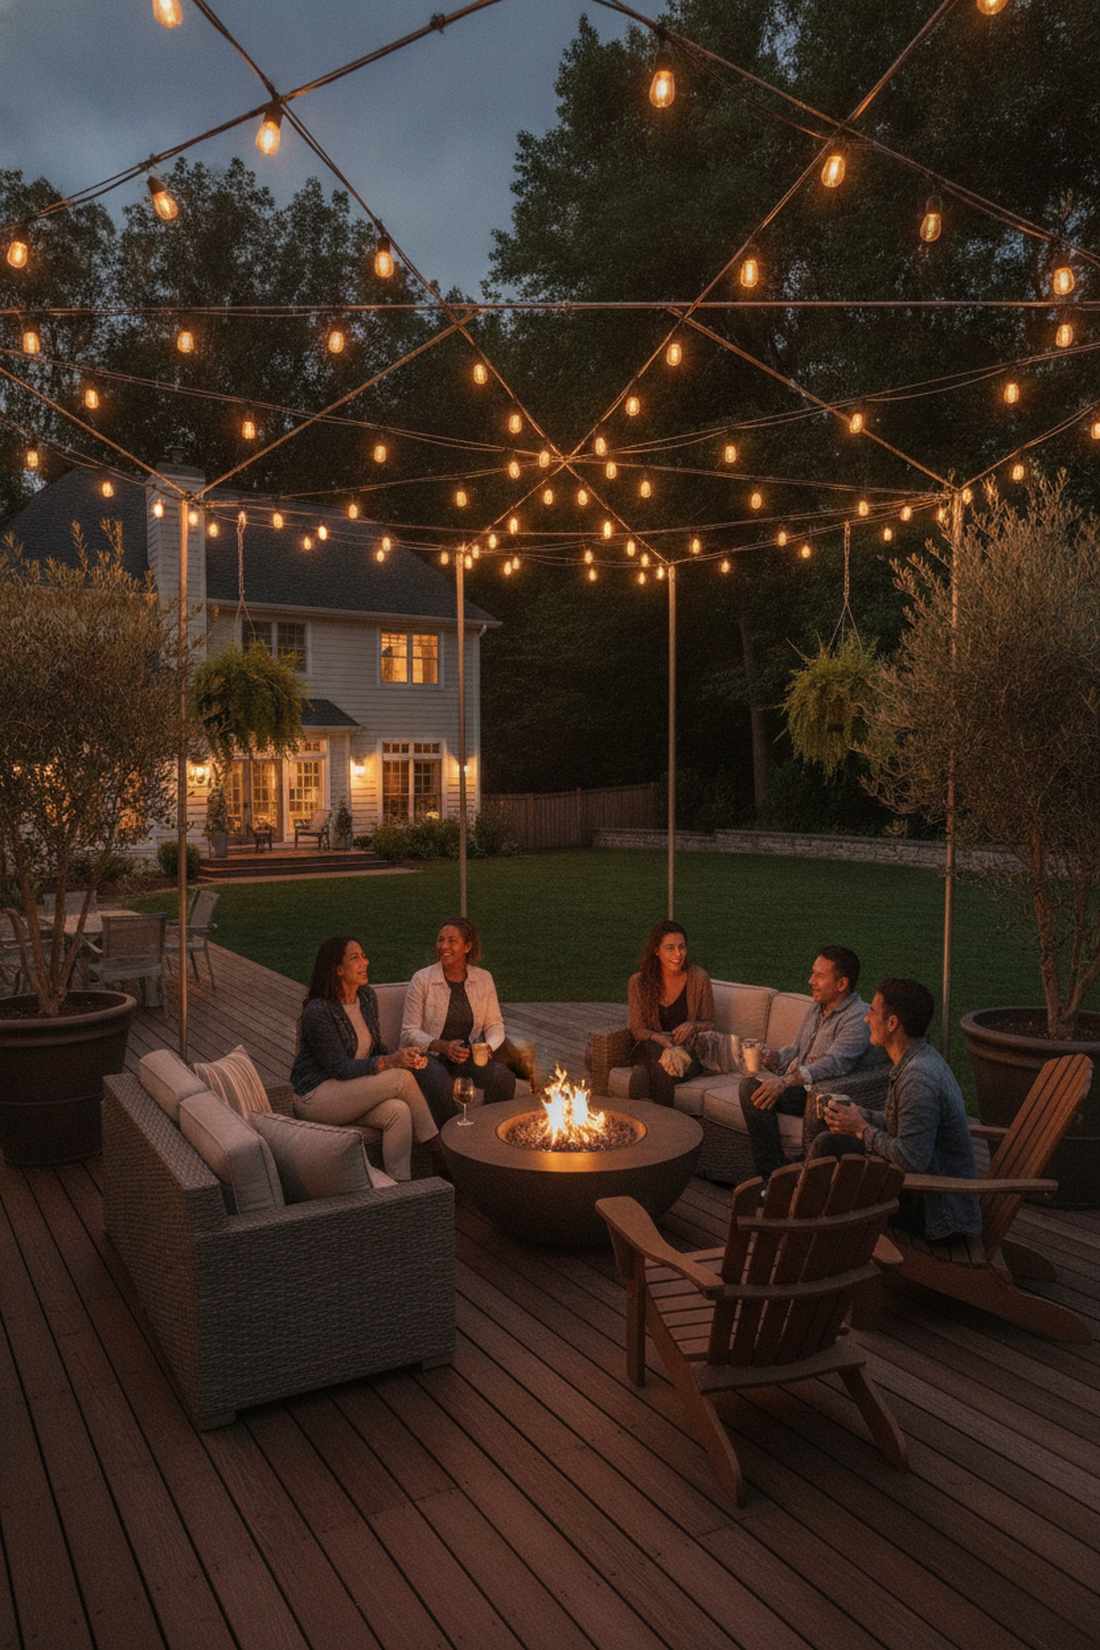
43. Fire Feature Ambient Glow
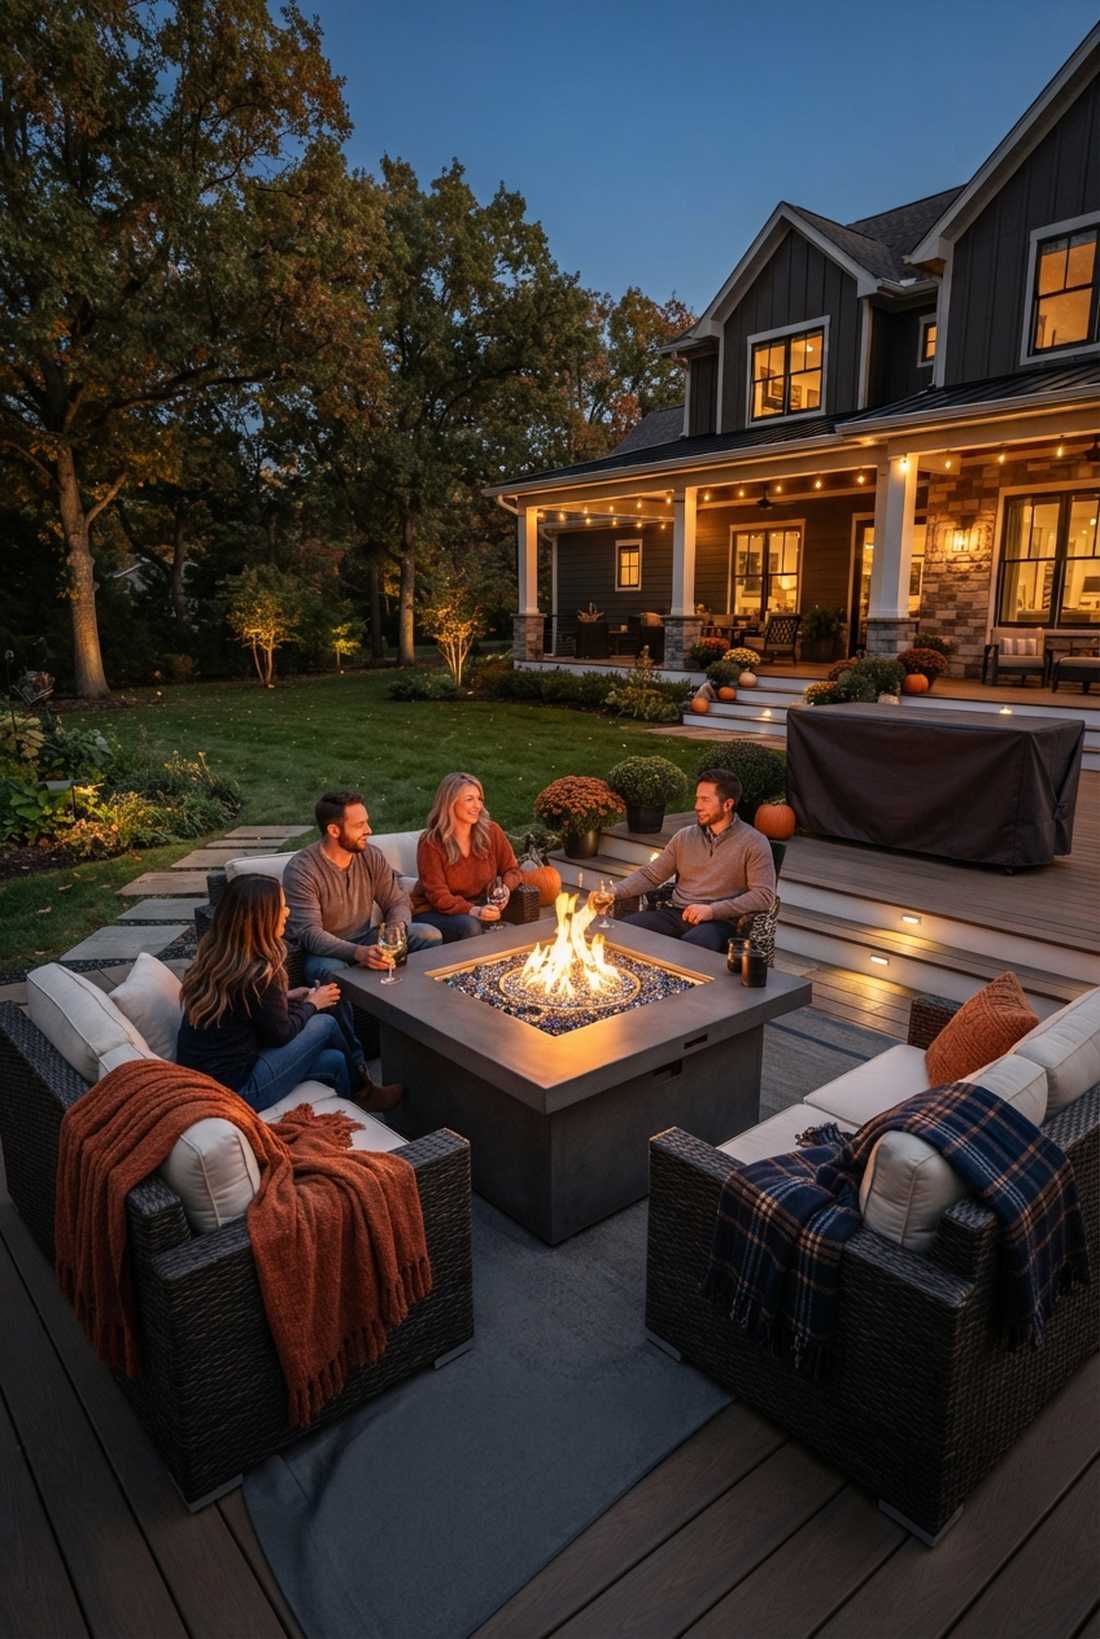
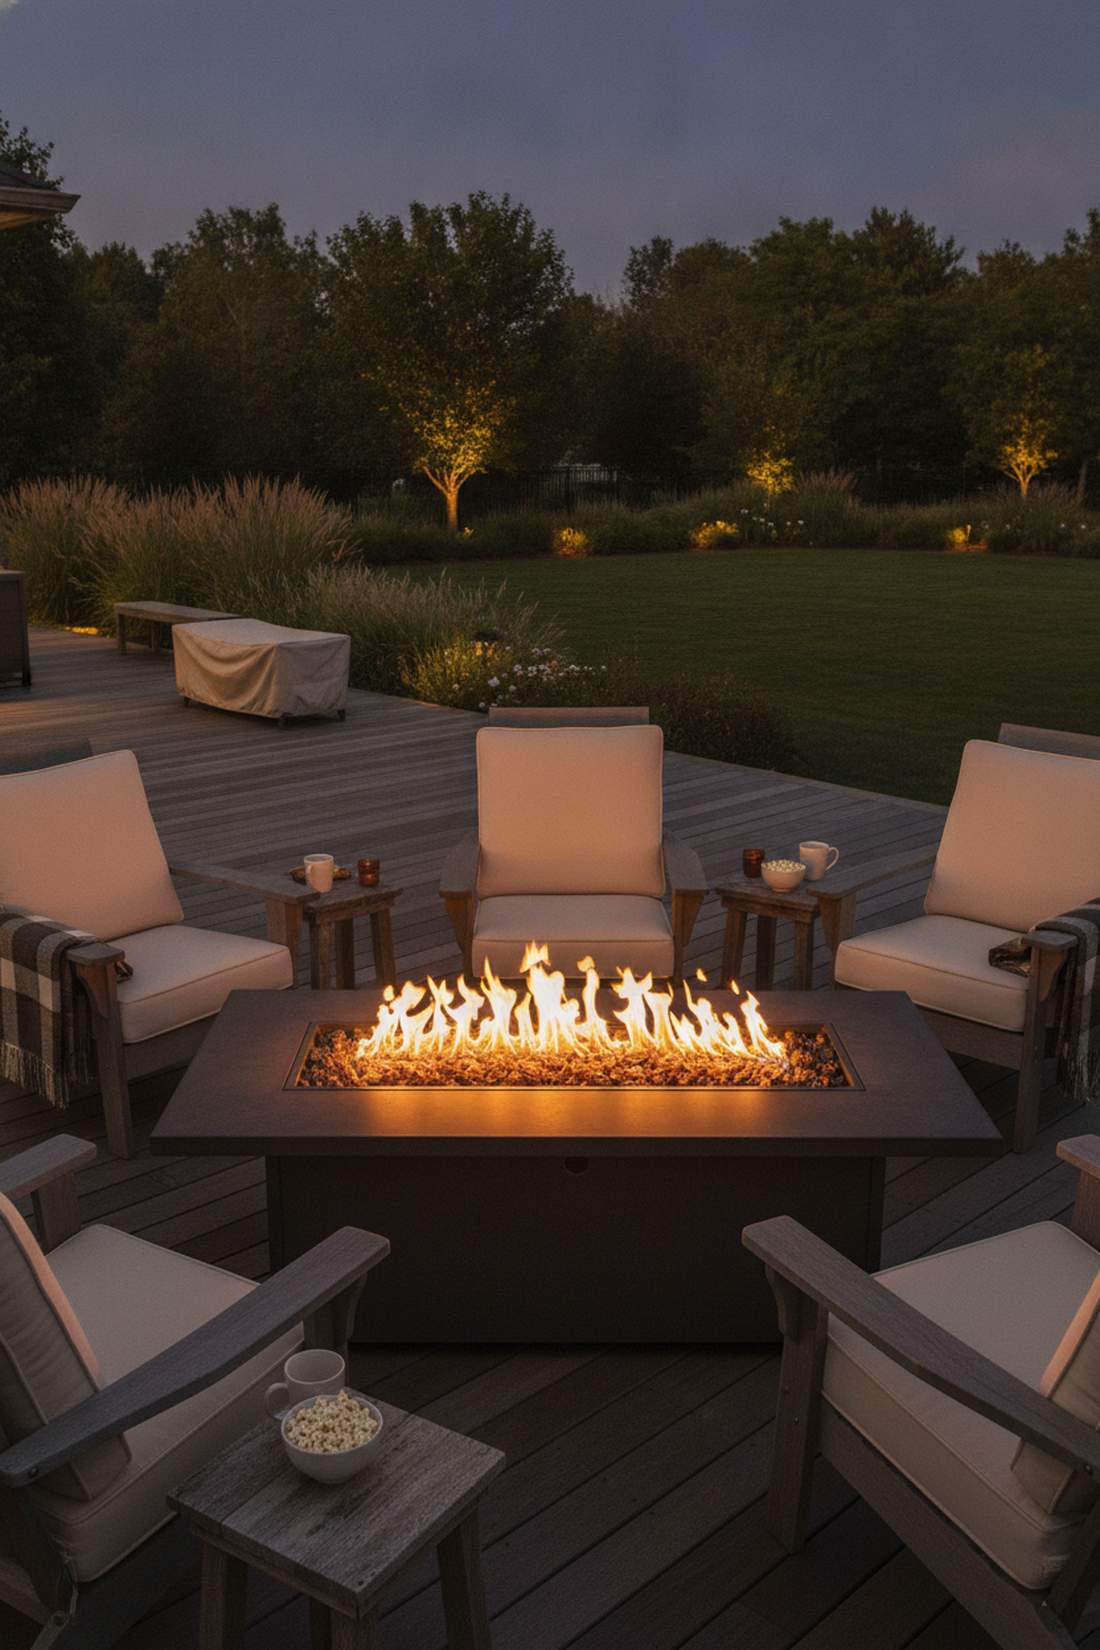
Sitting around this feature feels incredibly primal yet intensely luxurious. Using a central gas fire table as your primary source of ambient light creates a mesmerizing, flickering environment that bulbs simply cannot replicate.
Overhead lights kill the mood, but letting the warm orange glow of a fire feature illuminate your guests’ faces delivers a surprisingly premium look. It draws everyone into a tight circle, making it the perfect low-light lounge hack.
A beautiful propane fire table costs roughly $300–$800. It’s an instant party-starter for chilly autumn nights.
- Key Materials: Propane or natural gas fire table
- Vibe / Style: Cozy mesmerizing lounge
- Difficulty: Easy plug-and-play
- Budget Breakdown: Fire Table: $400 | Decorative Glass: $50
- Creator’s Tip: Swap out the cheap lava rocks that come with the kit for reflective, crushed fire glass to instantly double the light output and make it look hyper-modern.
- Smart Sourcing: reflective tempered fire glass (bulk jug) and weatherproof fire table covers.
Privacy-Enhanced Deck Configurations
Urban and suburban lots often require screening to create intimate outdoor living environments. Thoughtful privacy elements block unwanted sightlines while maintaining airflow and style.
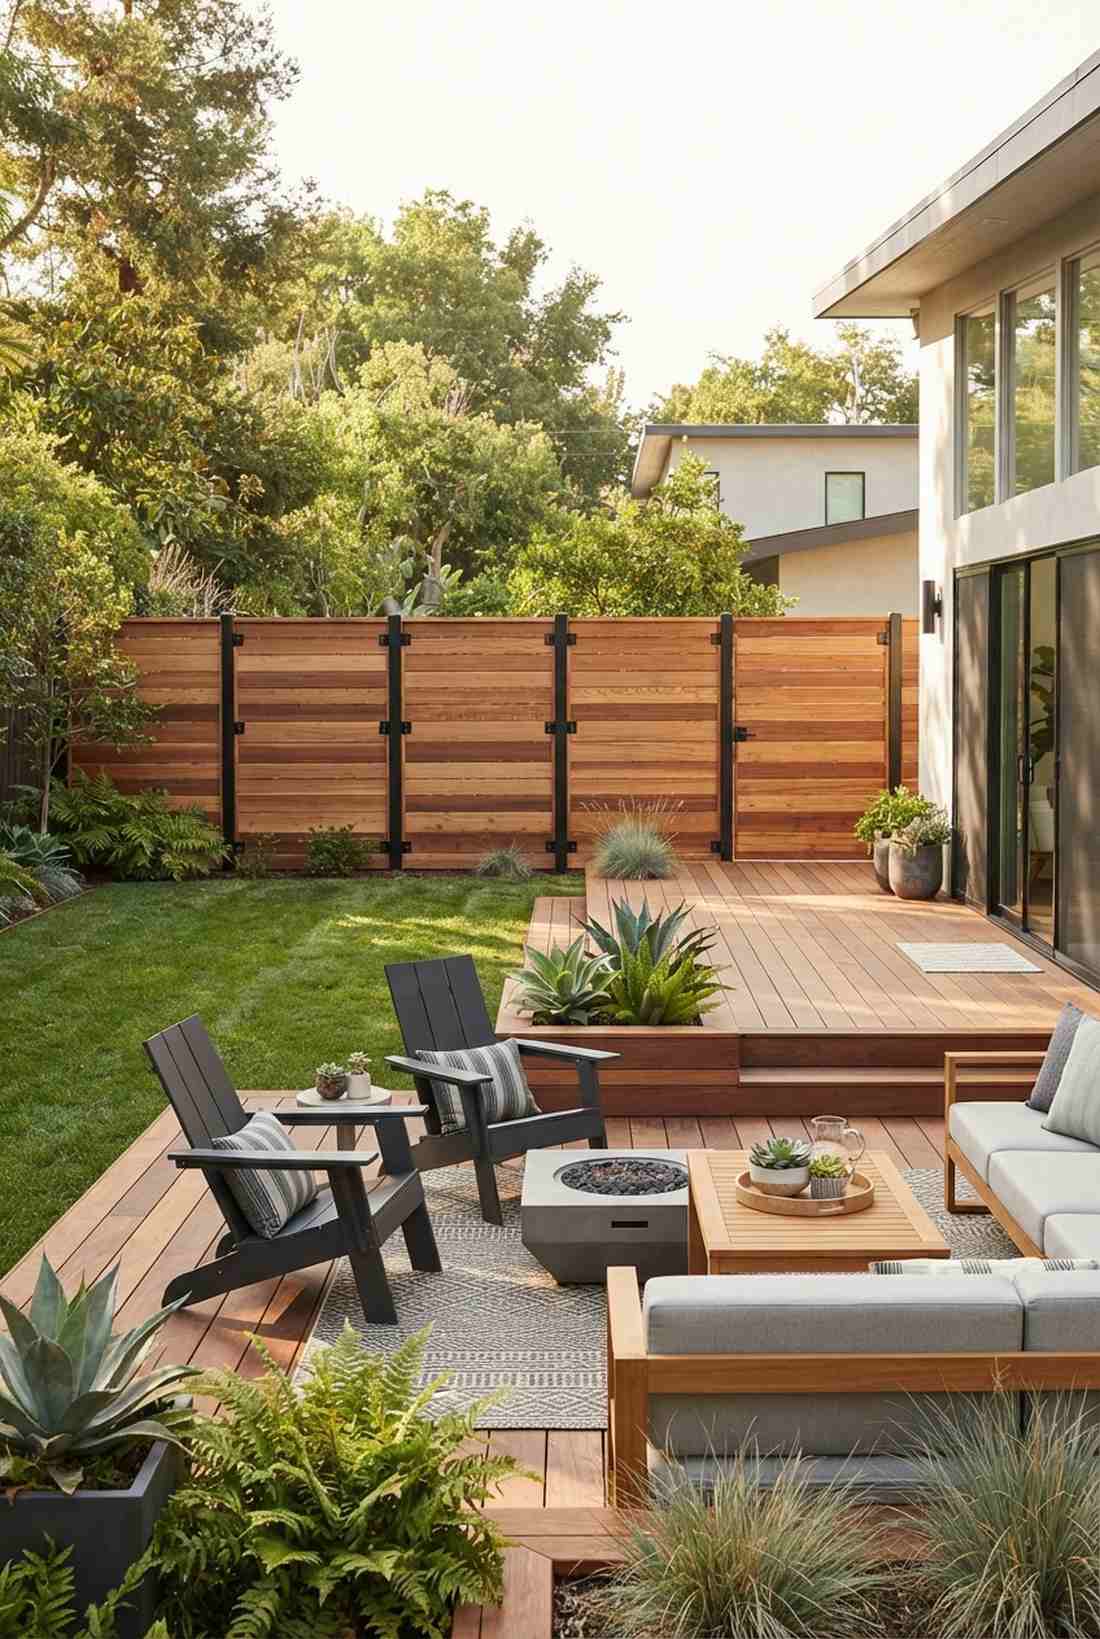
44. Vertical Slat Privacy Wall
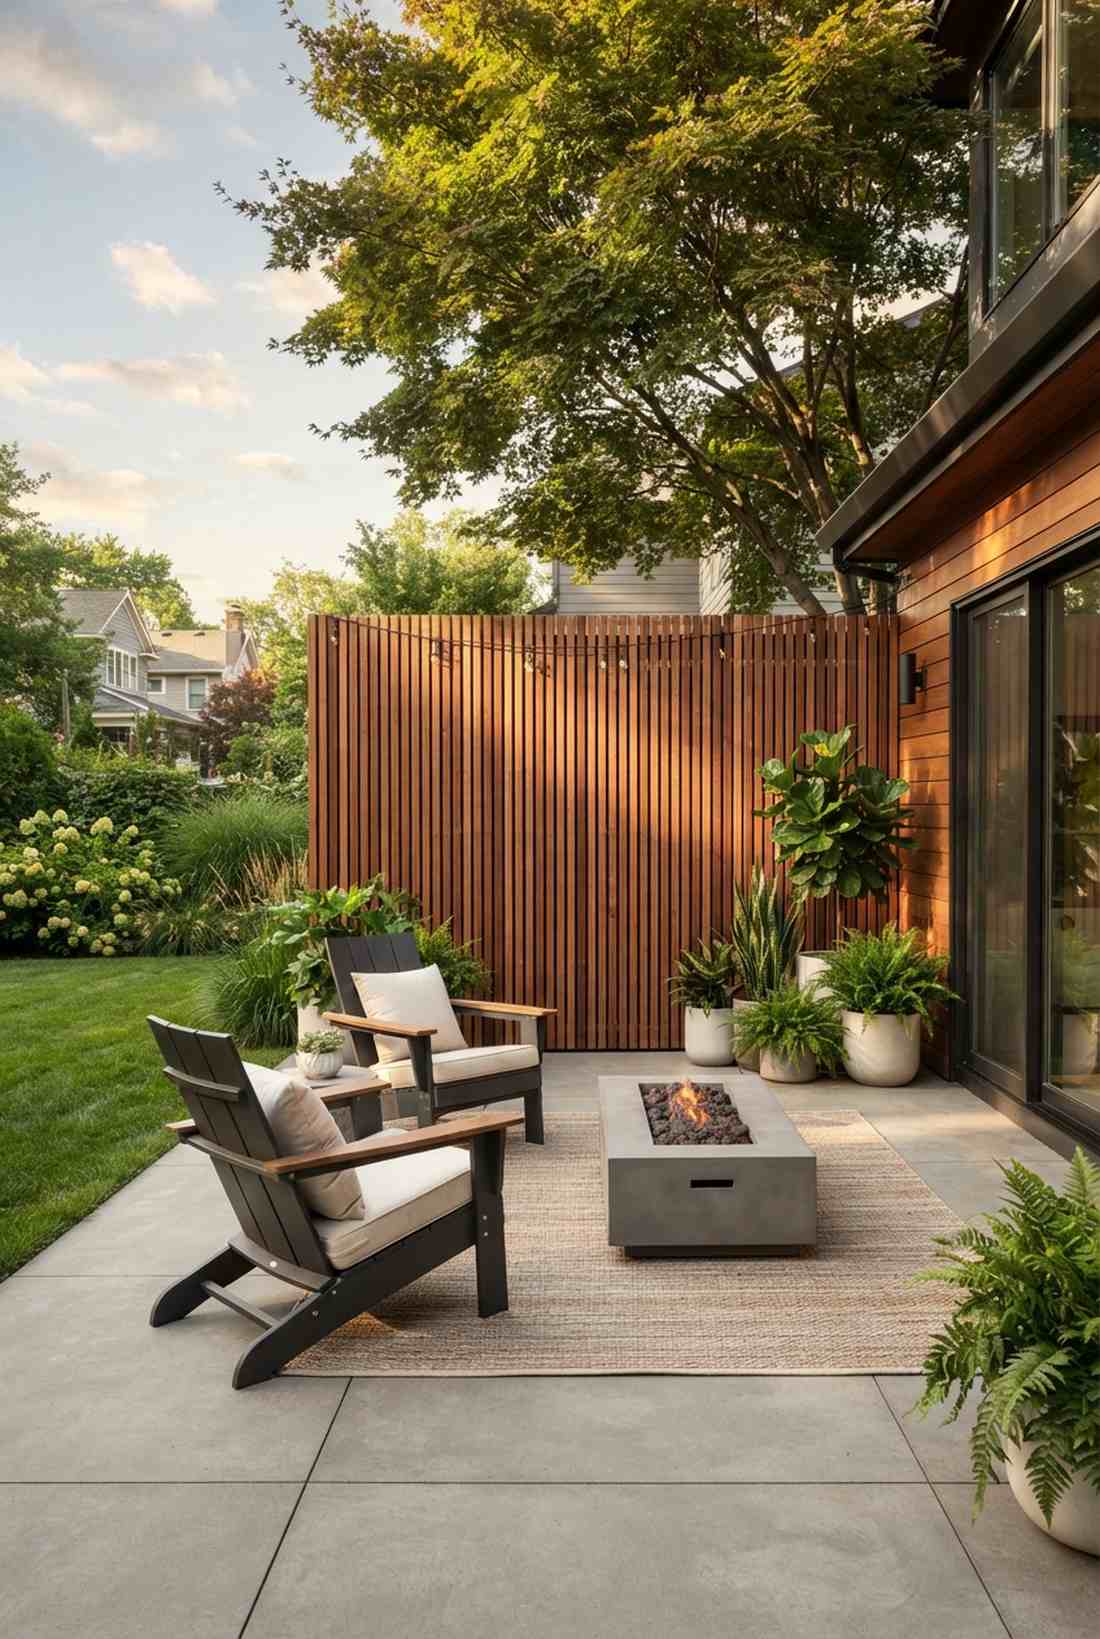
This architectural barrier feels like the wall of a high-end minimalist spa. A vertical wooden slat privacy screen completely blocks out nosy neighbors while letting cool breezes flow through effortlessly.
Solid fences look aggressively hostile, but spacing thin slats an inch apart gives a designer-level finish that feels intentional and chic. Staining the wood a deep charcoal or rich cedar makes small urban spaces feel like an exclusive retreat.
You can build a stunning 10-foot slat wall section for under $300. Pin this to stop neighbors from staring at your dinner plate!
- Key Materials: 1×2 or 1×3 cedar furring strips
- Vibe / Style: Modern architectural spa
- Difficulty: Easy measuring & nailing
- Budget Breakdown: Slats: $150 | Frame: $50 | Stain: $40
- Creator’s Tip: Use a spare piece of 1-inch thick wood as a universal spacer block to ensure absolutely perfect, rapid spacing between every single slat.
- Smart Sourcing: pre-milled cedar slat bundles and marine-grade wood stain.
Privacy doesn’t have to look like a boring, heavy fence. This next screening hack feels like a luxury eco-resort…
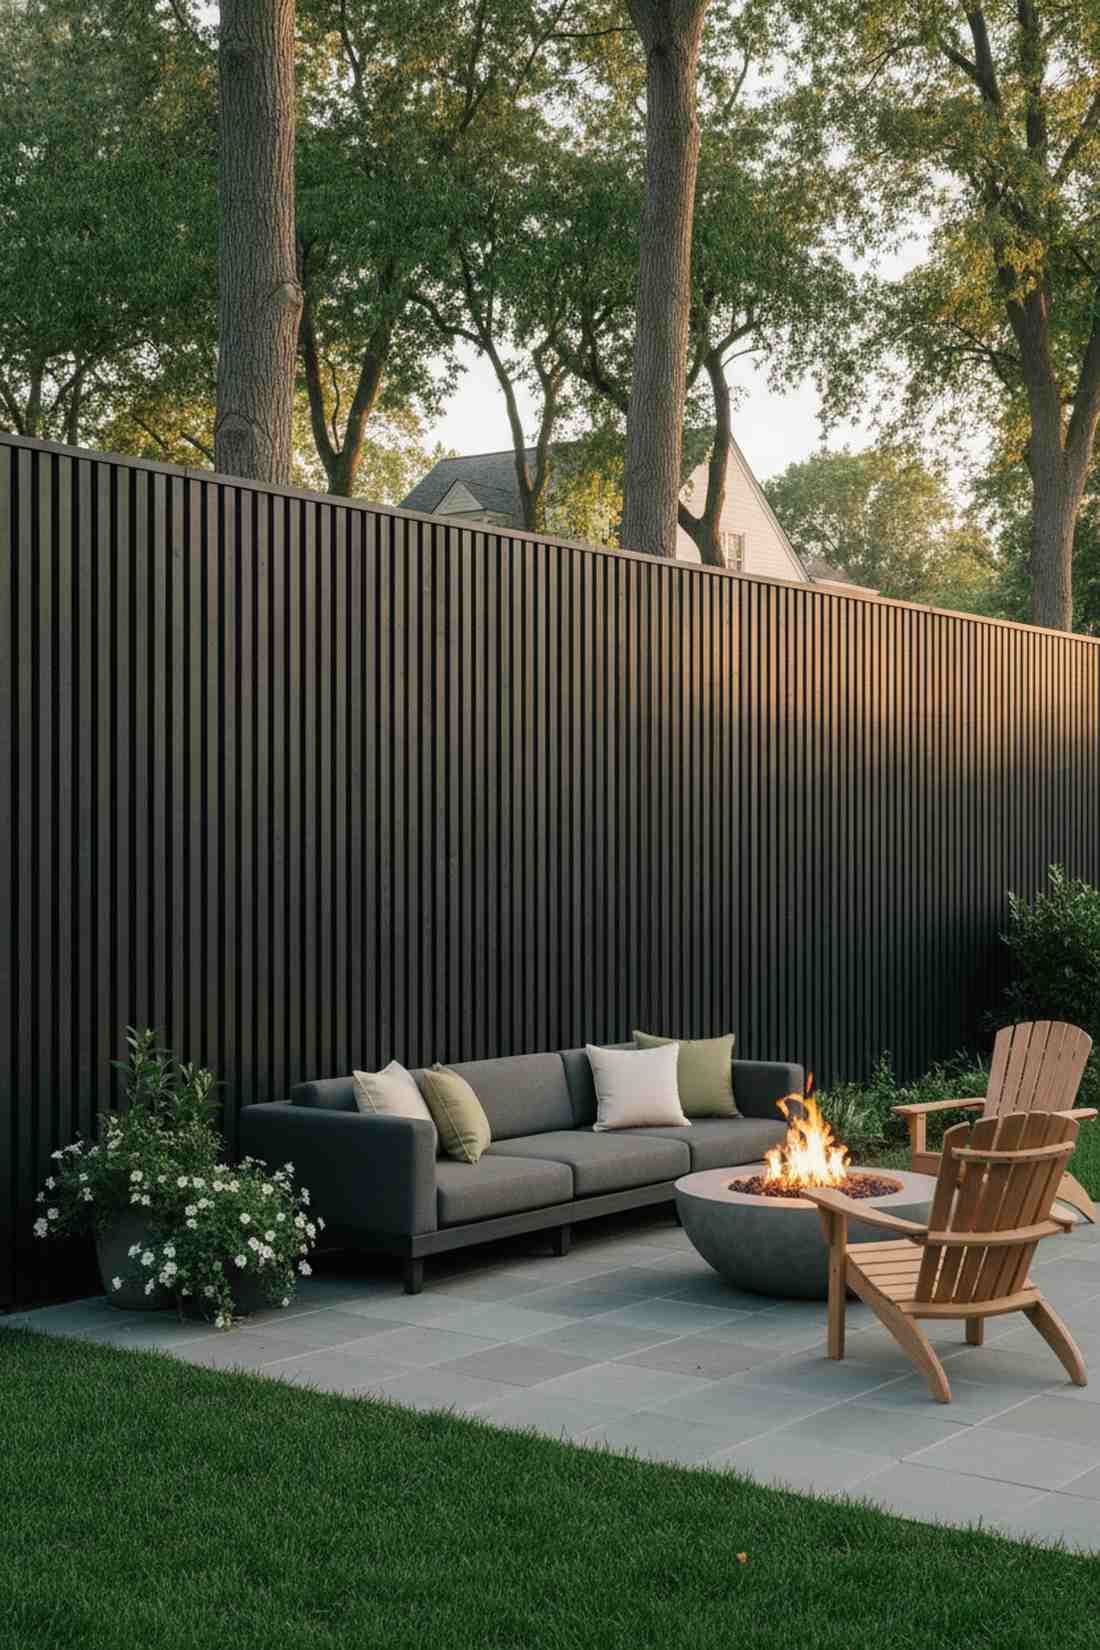
45. Horizontal Board Privacy Fence
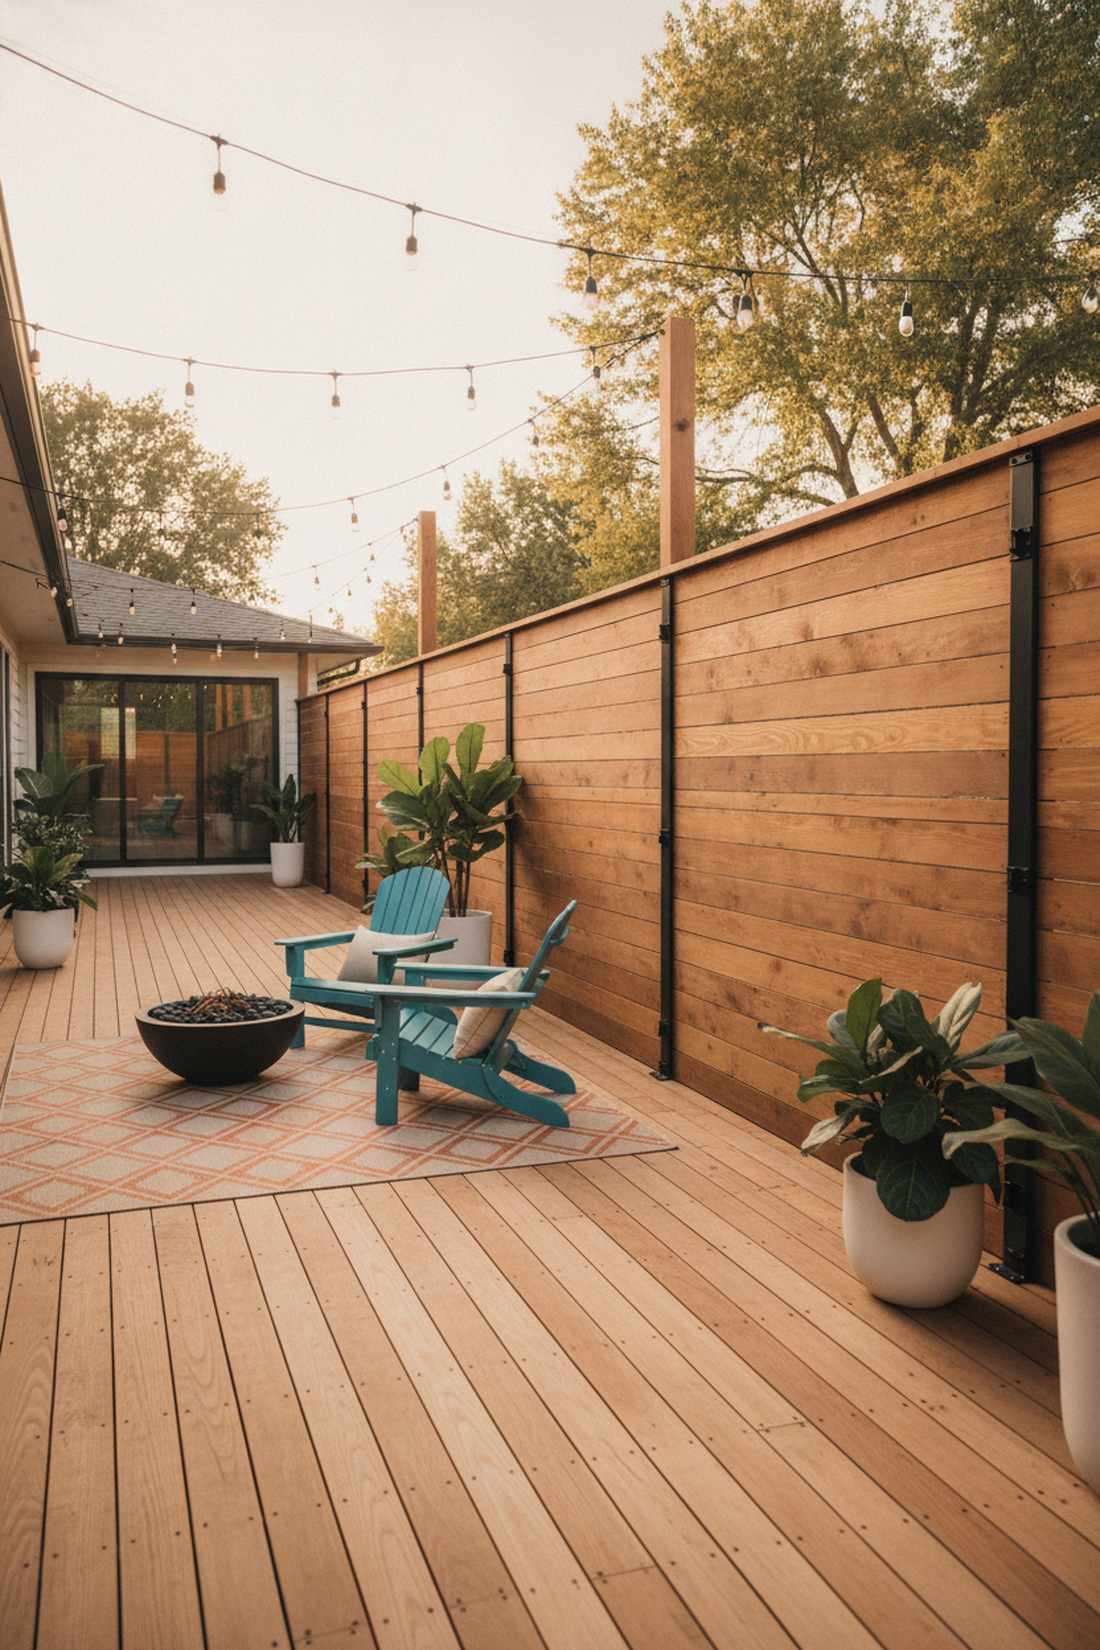
Looking at this wall feels like you’ve stepped into a slick mid-century modern courtyard. The wide horizontal board privacy wall is the ultimate trick for making a cramped deck feel incredibly wide and spacious.
Traditional vertical dog-ear fences scream “cheap builder grade,” but turning premium boards horizontally completely disrupts the standard aesthetic. Mixing board widths (like alternating 4-inch and 6-inch planks) creates wild textural interest that looks custom-built.
This modern screening upgrade costs roughly $250–$500 per section. Highly recommended for contemporary homes!
- Key Materials: Mixed-width deck boards
- Vibe / Style: Mid-century modern expanse
- Difficulty: Intermediate leveling
- Budget Breakdown: Boards: $300 | Heavy Posts: $100
- Creator’s Tip: Horizontal boards are prone to sagging in the middle; ensure your vertical support posts are never spaced more than 4 to 5 feet apart.
- Smart Sourcing: black metal fence post brackets and pre-stained horizontal fence planks.
46. Lattice Screen with Climbing Vines
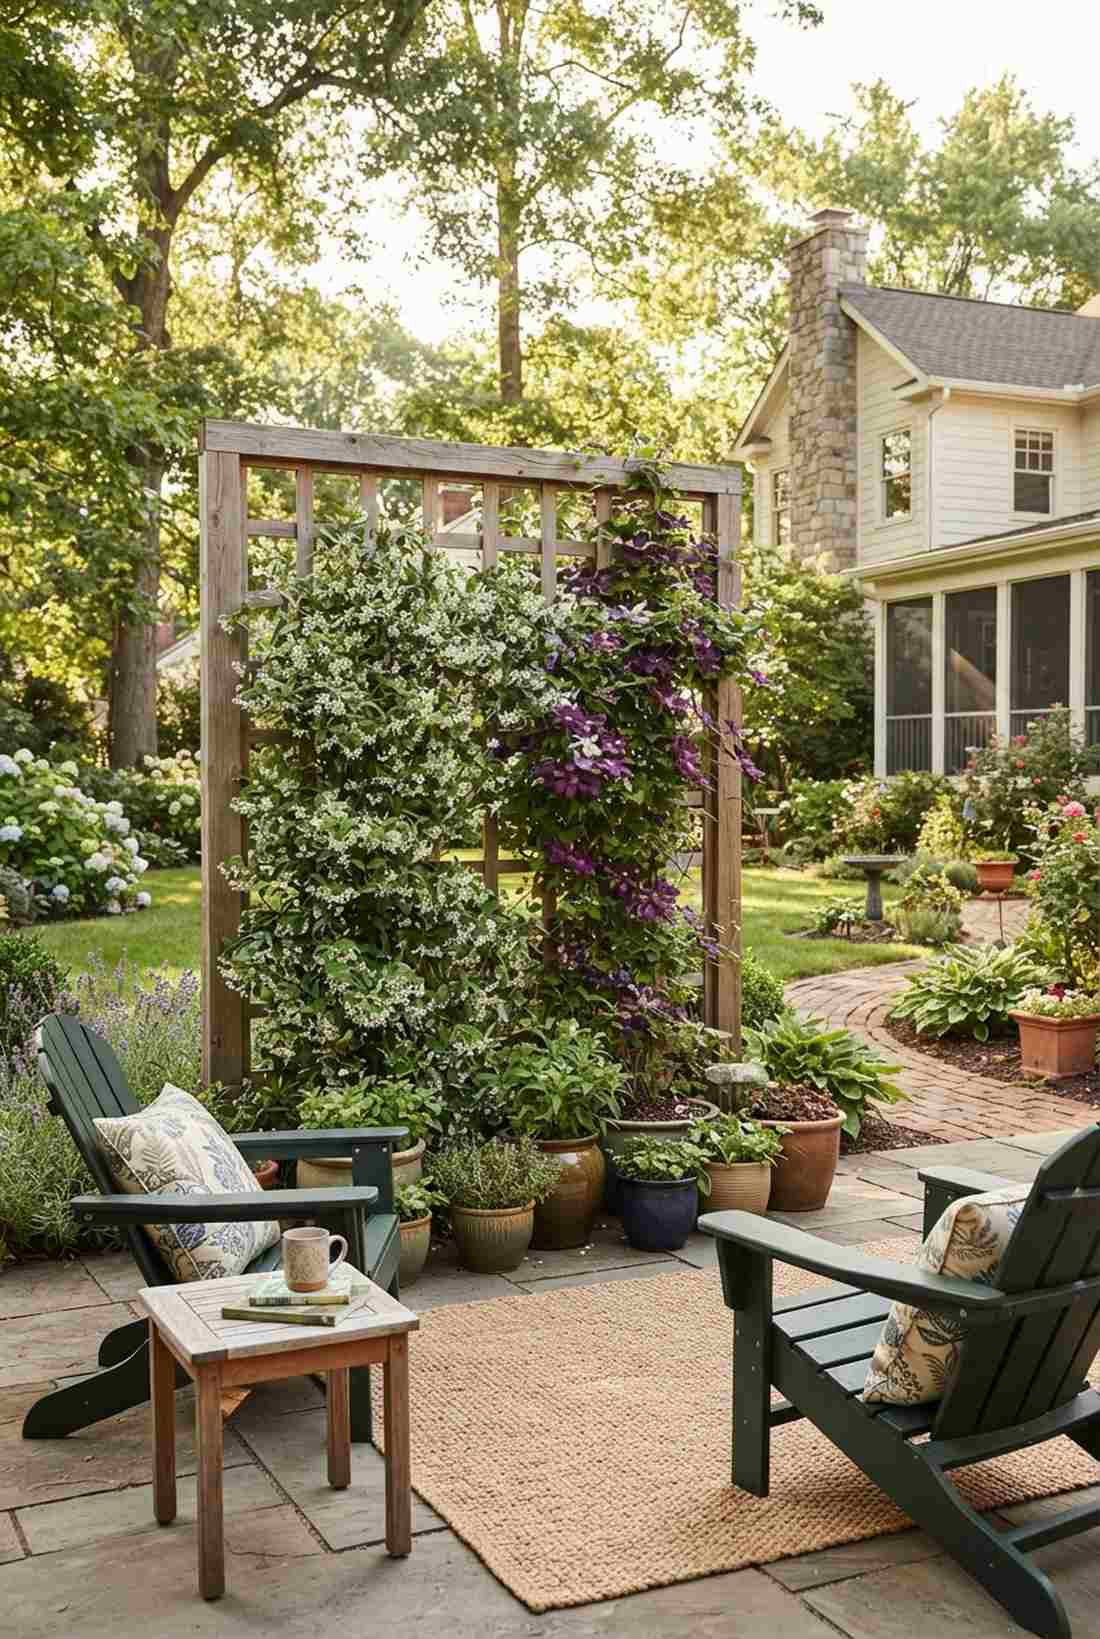
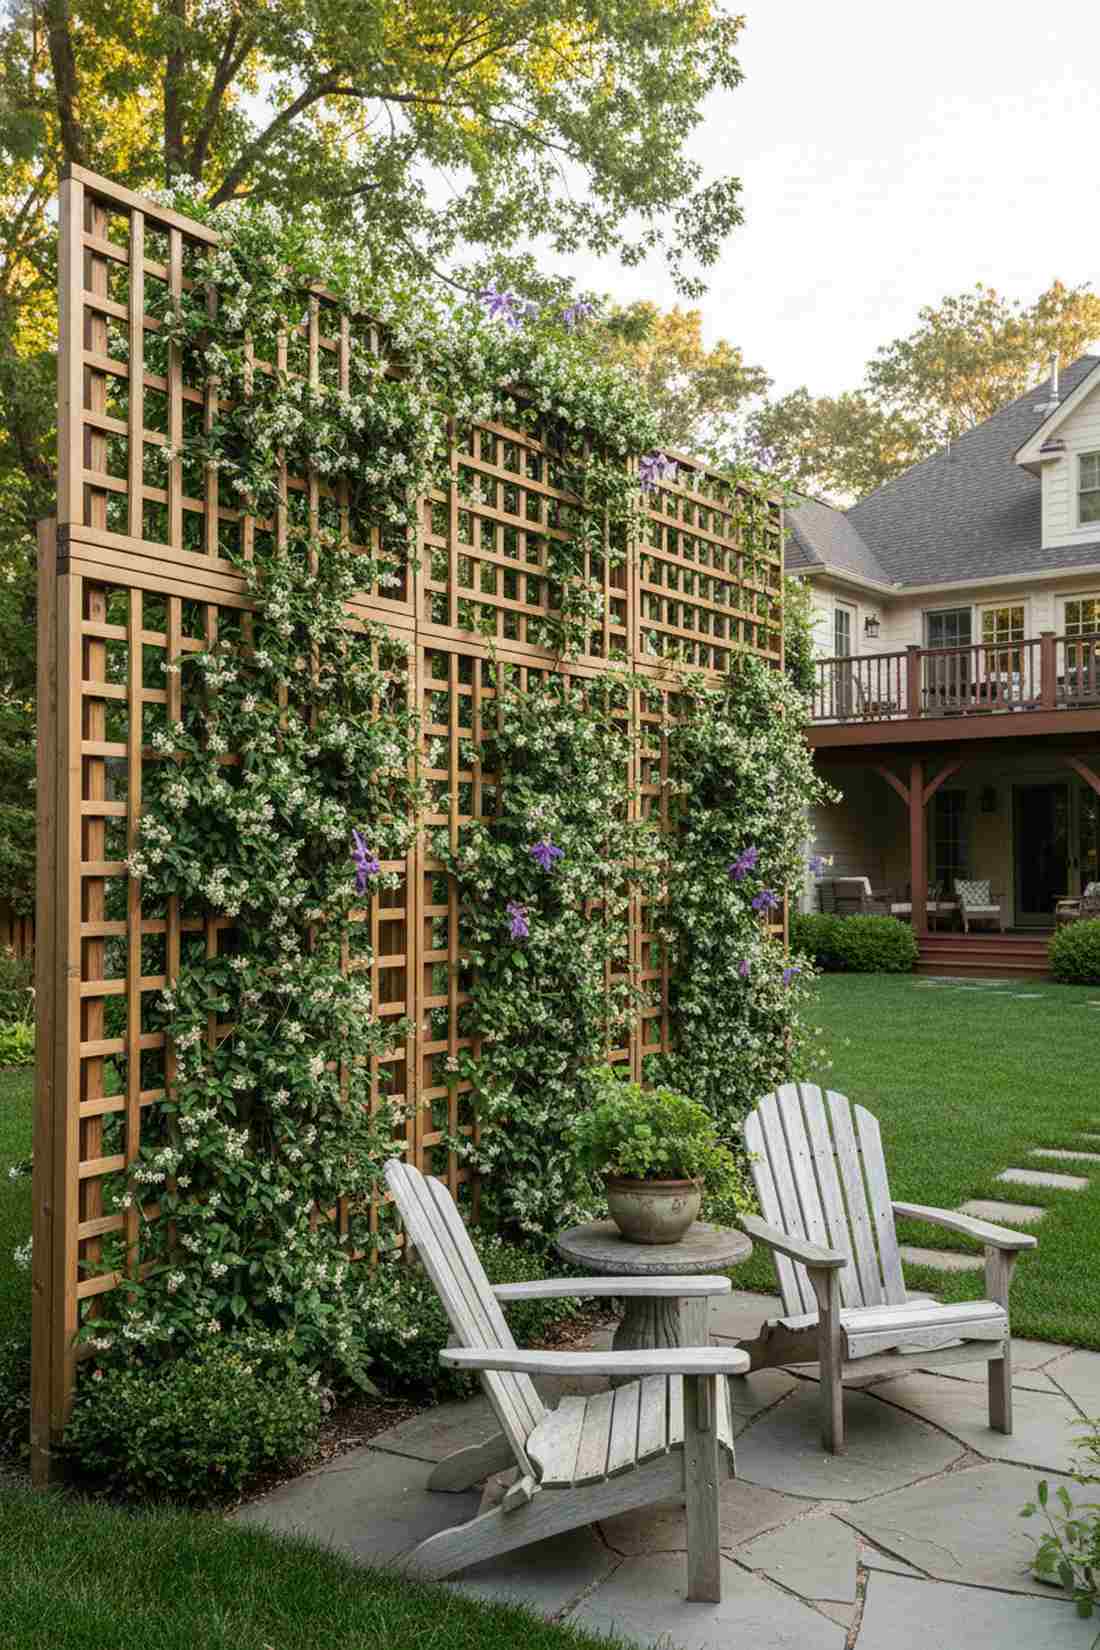
Sitting near this feature feels like relaxing in a centuries-old English garden. A lattice privacy screen with climbing vines is the absolute cheapest way to grow a massive, lush living wall.
Basic plastic lattice looks incredibly cheap on its own, but using it purely as a structural frame for fast-growing jasmine or clematis delivers a surprisingly premium look. Within one season, you get a solid wall of fragrant green privacy.
You can set up a lattice wall and plant starters for under $100. Save this for the ultimate budget-friendly botanical privacy hack!
- Key Materials: Heavy-duty wood lattice and fast-climbing vines
- Vibe / Style: Classic botanical garden
- Difficulty: Easy beginner project
- Budget Breakdown: Lattice/Frame: $60 | Vine Starters: $30
- Creator’s Tip: Don’t use standard diagonal lattice; seek out square/grid lattice panels—they instantly look 10x more modern and architectural even before the plants grow.
- Smart Sourcing: heavy-duty square wood lattice panels and climbing plant starter kits.
47. Frosted Glass Panel Divider
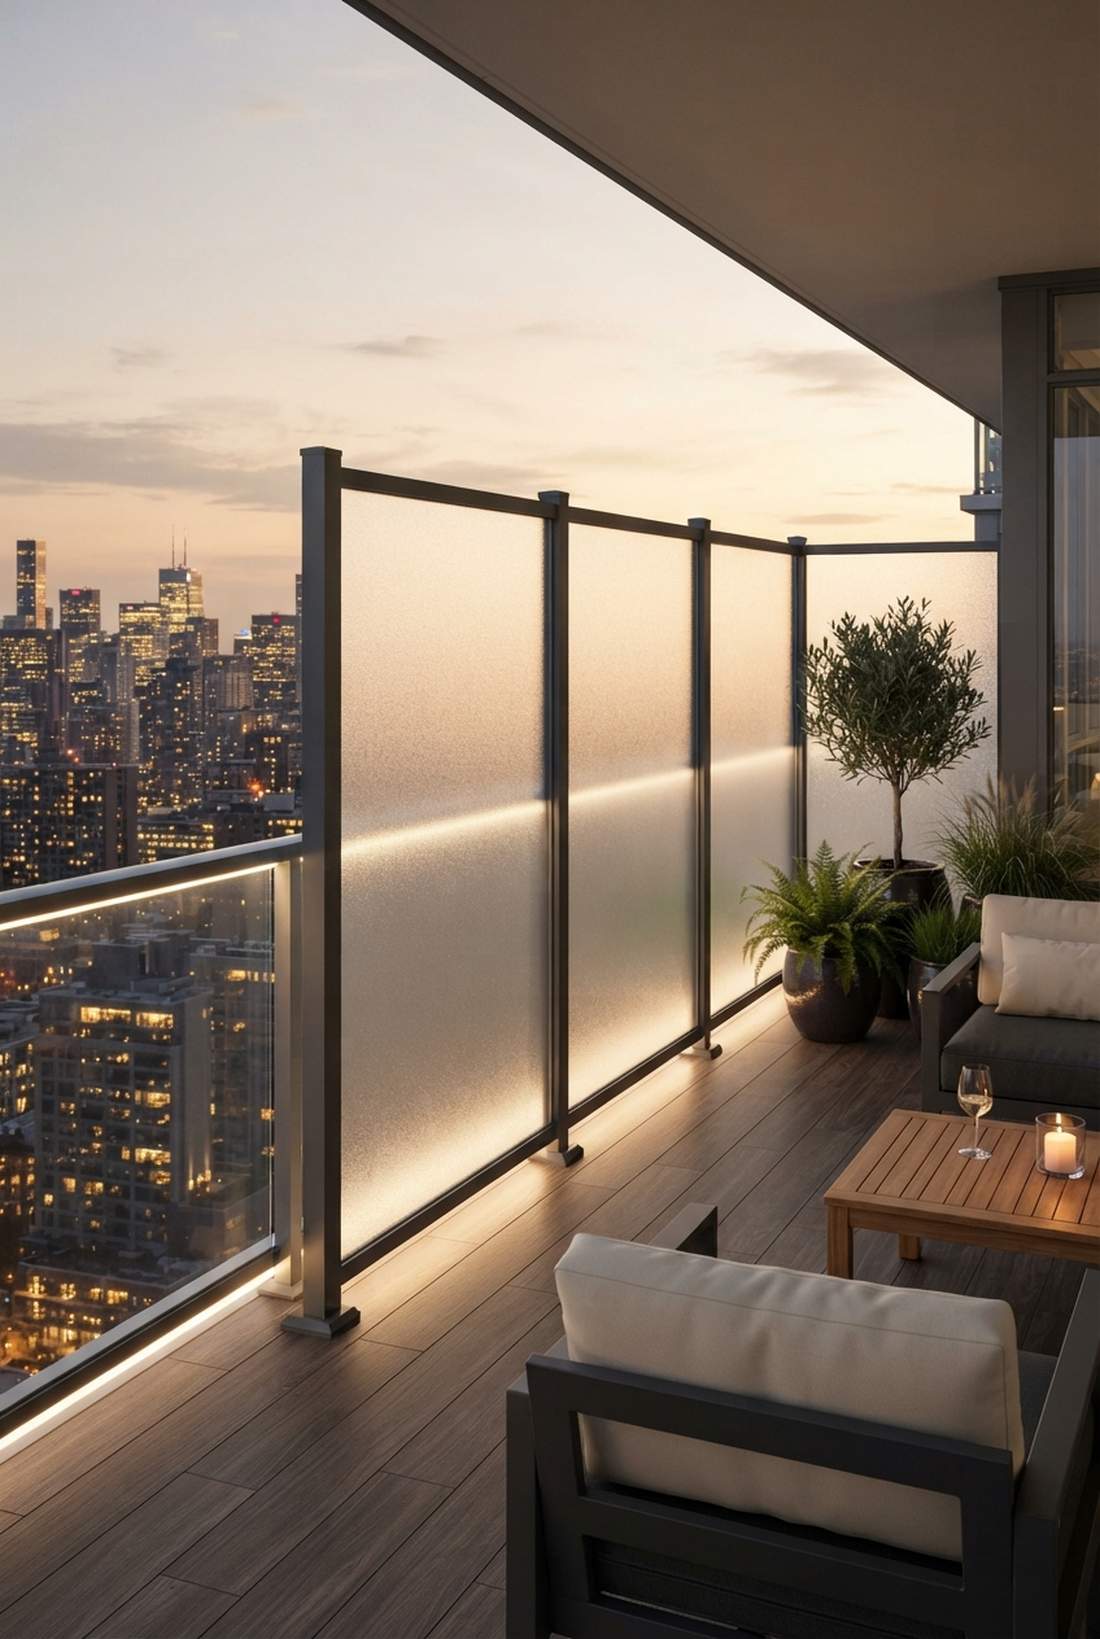
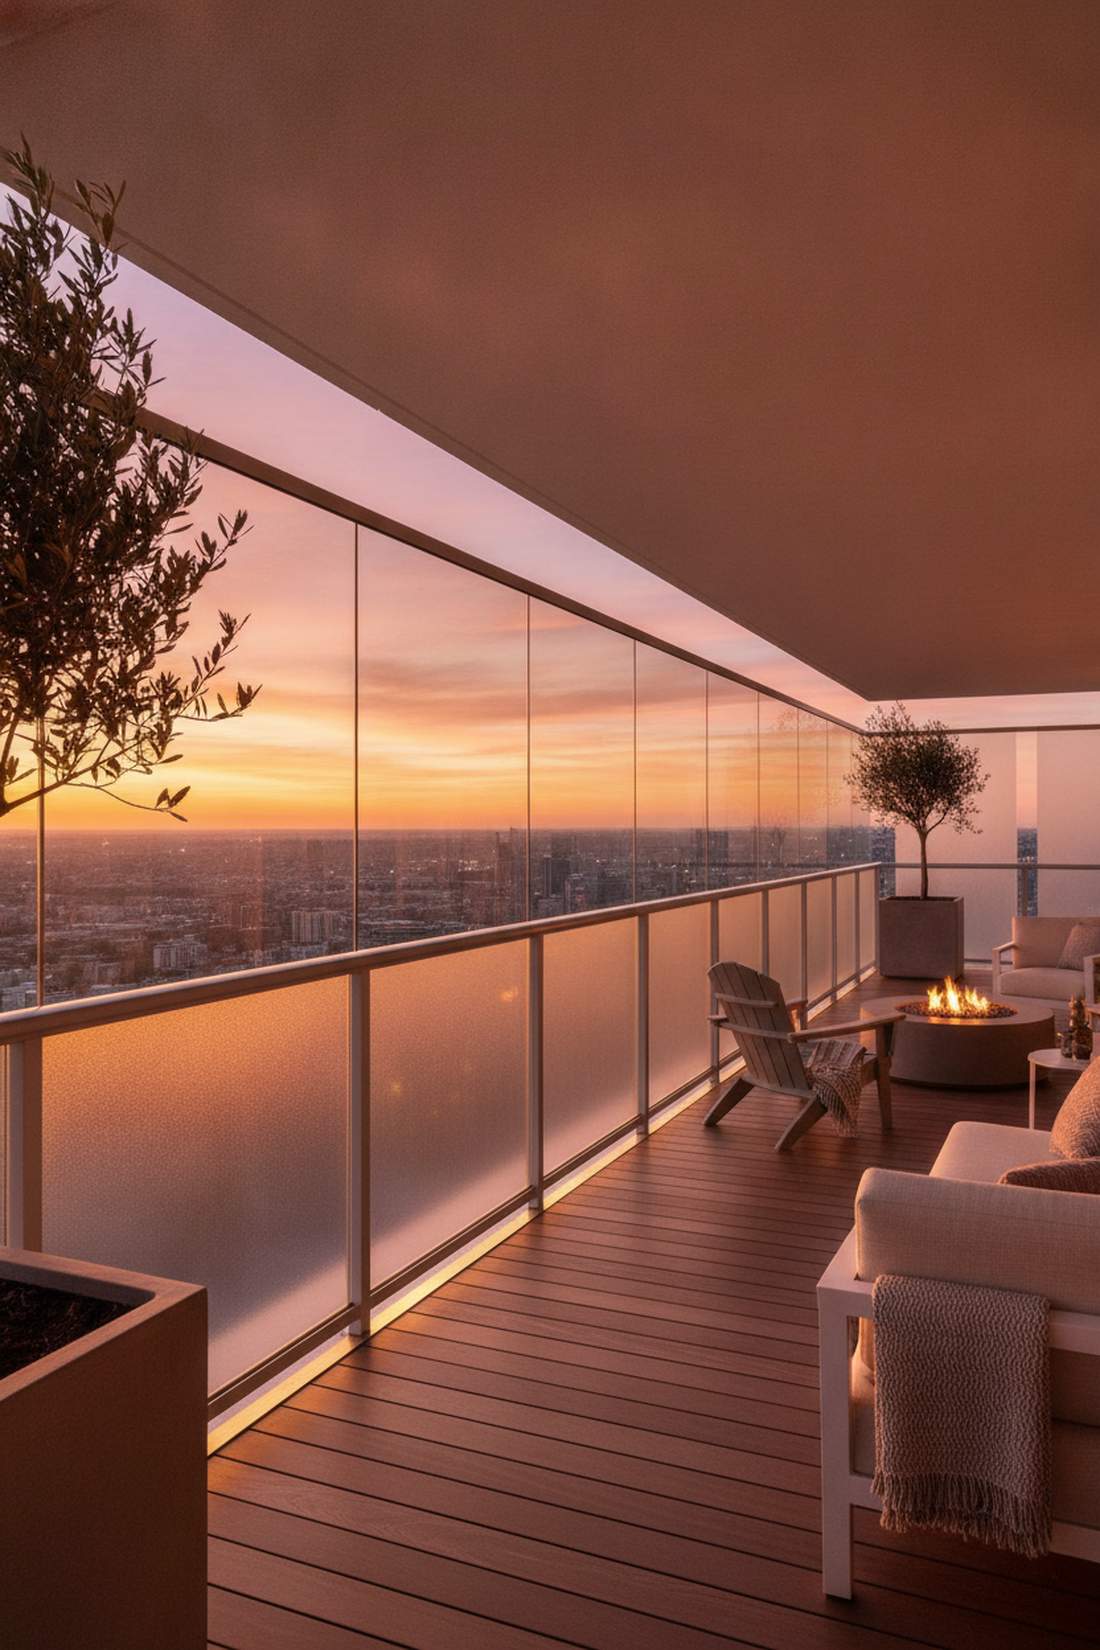
This barrier feels like the balcony of a luxury high-rise condo. A frosted tempered glass privacy divider is the perfect solution when you need to block a view but absolutely cannot afford to lose natural sunlight.
Wood walls can make small decks feel claustrophobic and dark, but translucent glass completely solves this issue while looking wildly expensive. The soft, diffused light glowing through the panels at sunset is breathtaking.
Glass systems are an investment, usually running $500–$1,000 per section. It’s the ultimate premium privacy solution.
- Key Materials: Frosted tempered safety glass
- Vibe / Style: Ultra-chic penthouse
- Difficulty: Advanced delicate handling
- Budget Breakdown: Glass Panels: $600 | Aluminum Frame: $200
- Creator’s Tip: Install LED strip lights at the bottom edge of the glass channel; the frosted glass will capture the light and glow entirely at night.
- Smart Sourcing: aluminum glass railing channel kits and pre-cut frosted tempered glass panels.
48. Living Wall Planter Screen
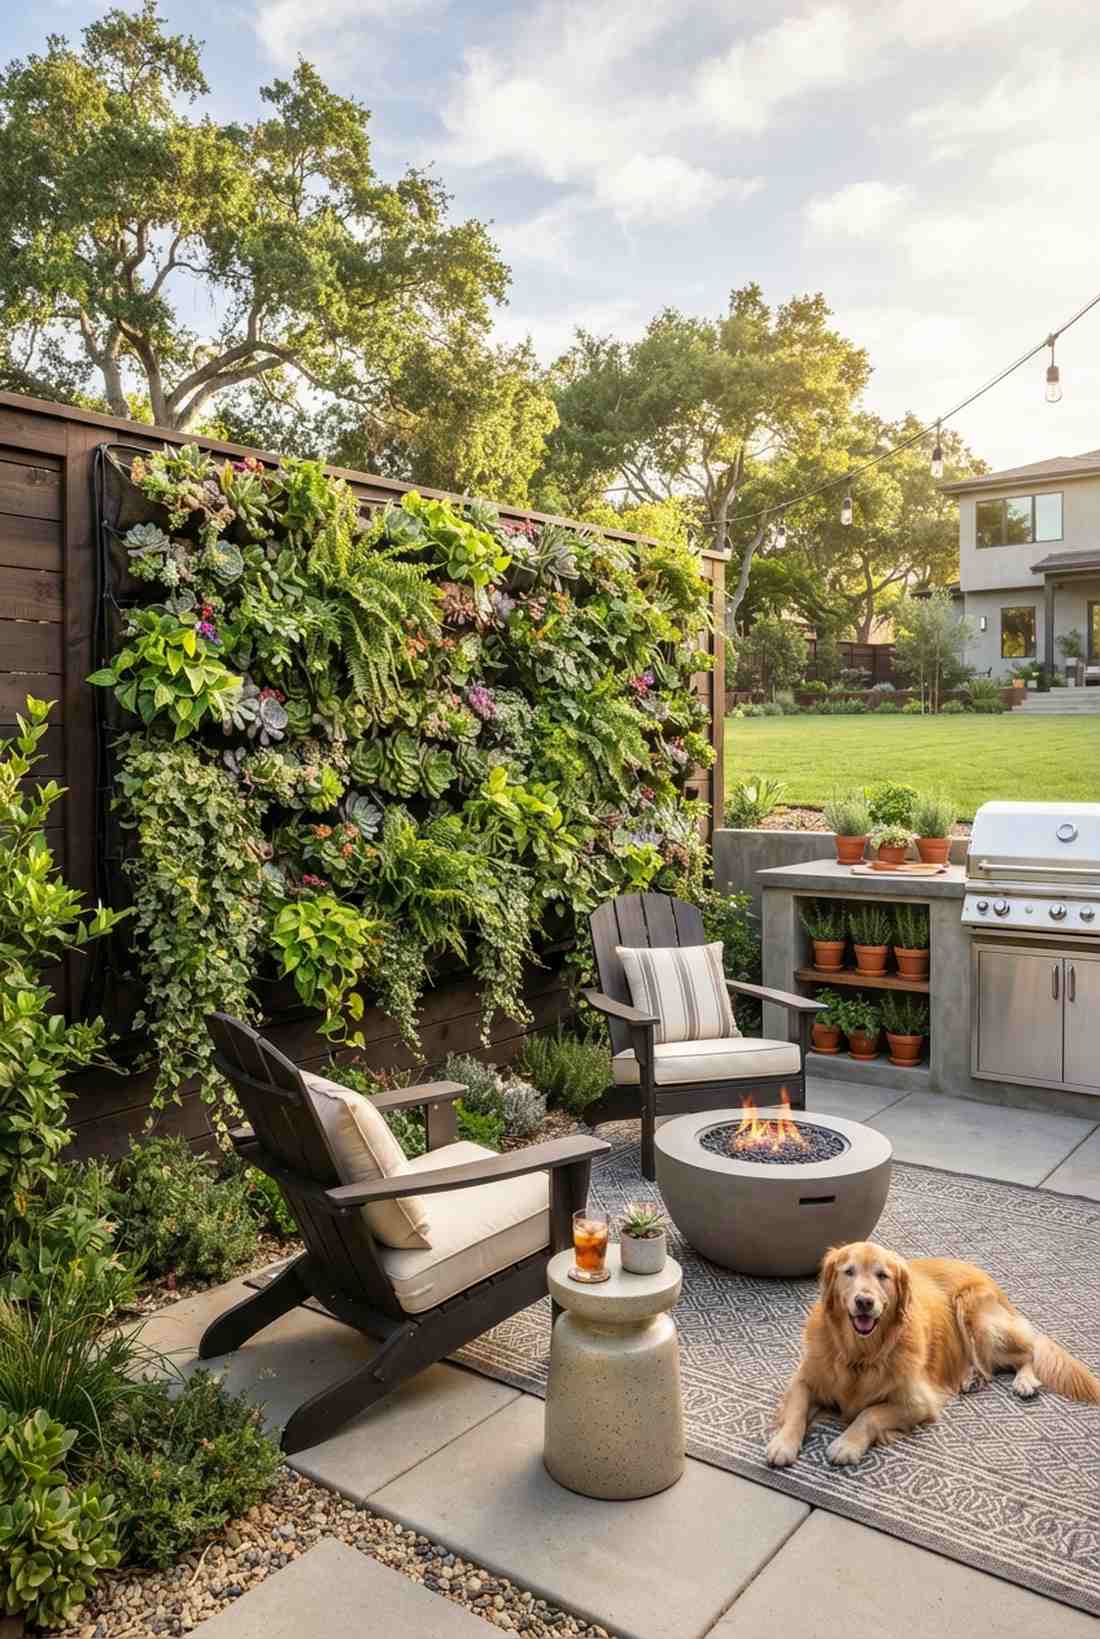
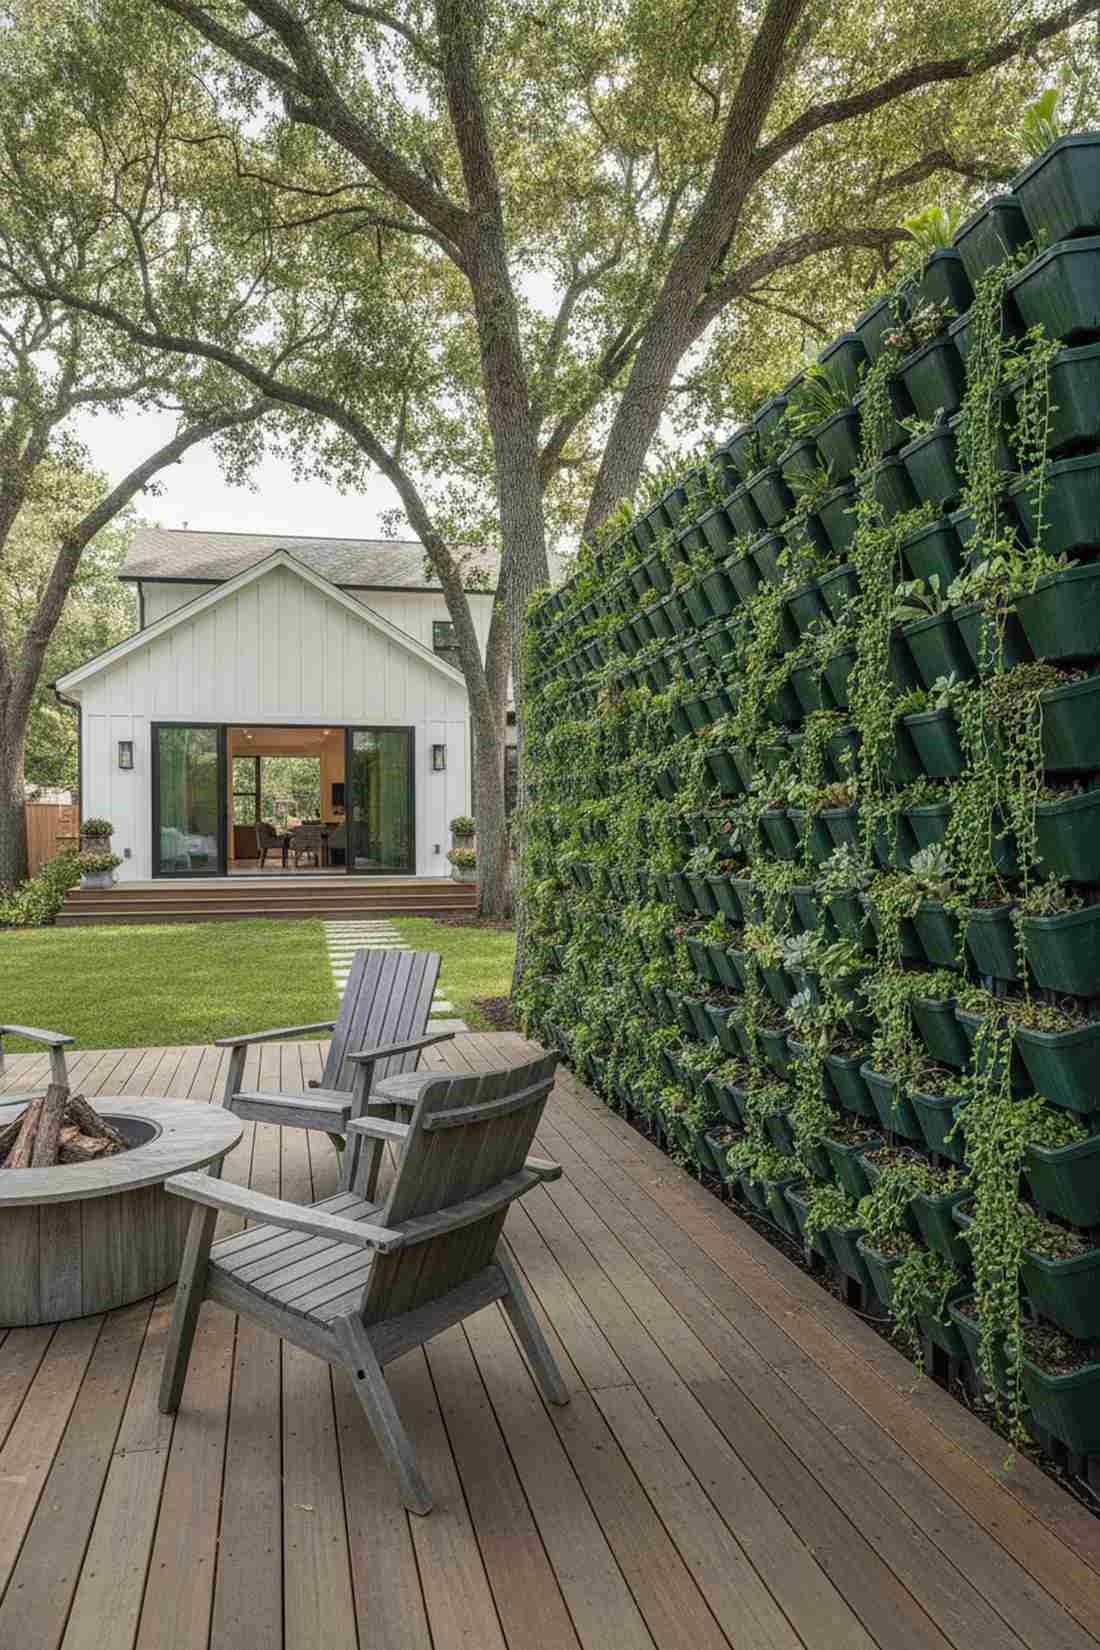
Being near this feature feels like hanging out at a trendy eco-cafe. A vertical living wall planter screen completely transforms a dead boundary line into a vibrant, cascading garden.
Most fences are dead space, but hanging modular planters to create a solid curtain of succulents or ferns gives a designer-level finish. It acts as a massive sound dampener, absorbing neighborhood noise while looking incredibly lush.
You can piece together a modular planter wall for $200–$500. Pin this if you want to maximize your planting space!
- Key Materials: Modular vertical pocket planters
- Vibe / Style: Trendy urban eco-oasis
- Difficulty: Intermediate plumbing (for irrigation)
- Budget Breakdown: Planter System: $150 | Soil/Plants: $200
- Creator’s Tip: Always weave a simple 1/4-inch drip irrigation line through the pockets during installation, or you will hate watering this wall every single day.
- Smart Sourcing: modular vertical garden planter kits and micro-drip irrigation starter kits.
49. Retractable Privacy Screen
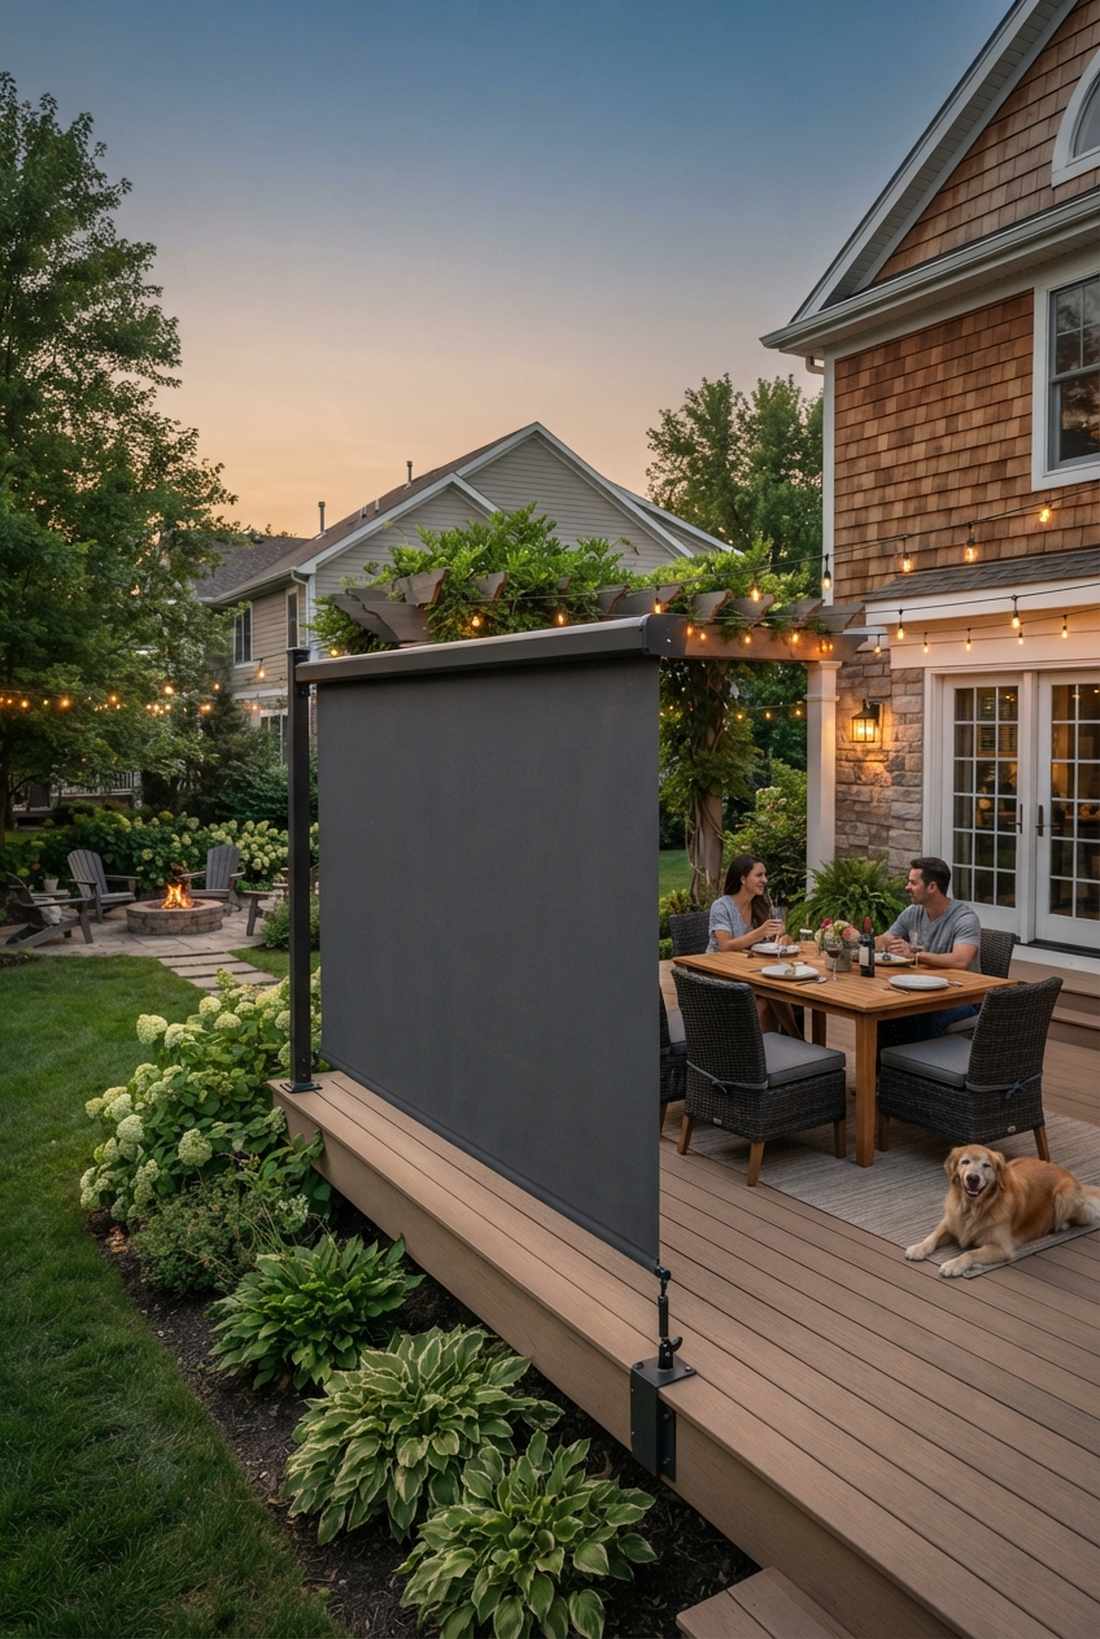
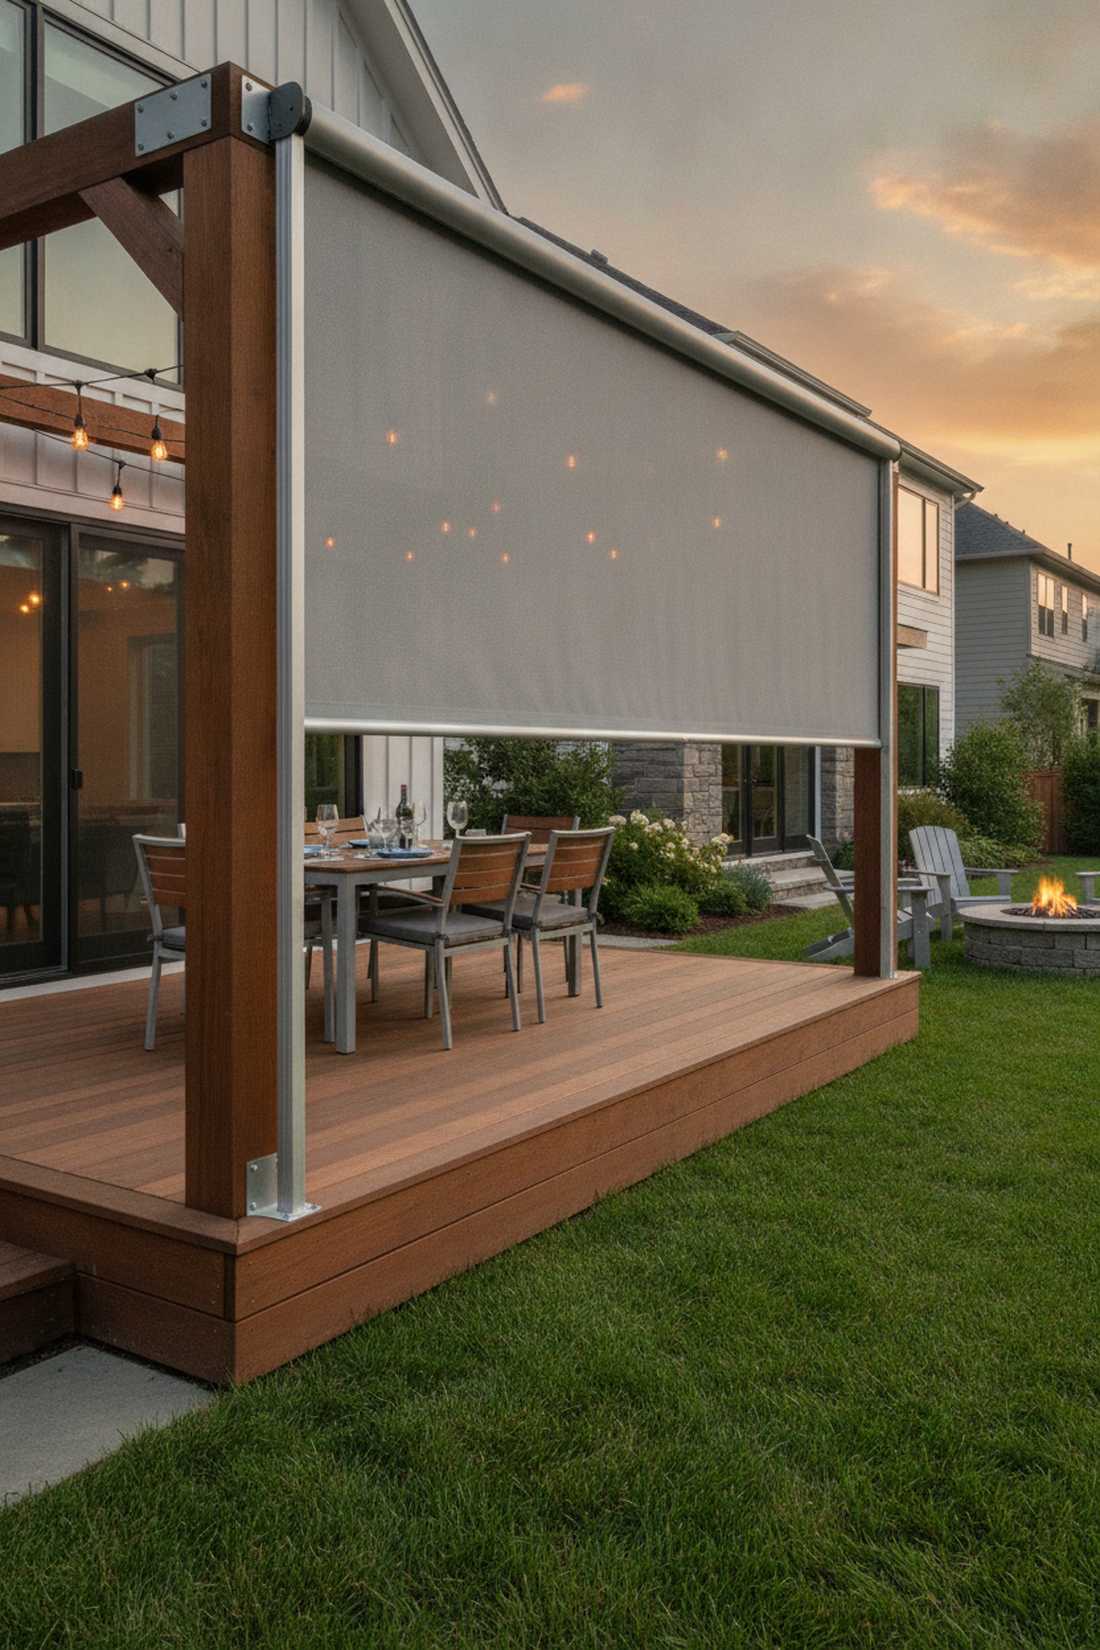
This flexible setup feels like a high-tech patio hack. A pull-out retractable privacy shade allows you to have wide-open views during the day and total seclusion during dinner.
Building permanent walls traps you into one layout, but a spring-loaded fabric screen looks far more expensive than it is and offers ultimate versatility. Simply pull it across the deck like a giant roller blind when the neighbors come out.
High-quality side awnings cost around $150–$300. It’s the smartest “sometimes-you-need-it” privacy solution on the market.
- Key Materials: Spring-loaded weather-resistant fabric screen
- Vibe / Style: Versatile smart-patio
- Difficulty: Easy drill-and-mount
- Budget Breakdown: Screen Unit: $180 | Mounting Anchors: $20
- Creator’s Tip: Ensure the receiving post is bolted directly into a structural deck joist, not just the floorboard, as the spring tension is surprisingly powerful.
- Smart Sourcing: retractable patio side awnings (UV-coated) and heavy-duty lag bolts.
Do not finalize your deck plans without checking this upcoming board pattern. It shifts the entire aesthetic from basic to billionaire.
50. Decorative Metal Screen Panels
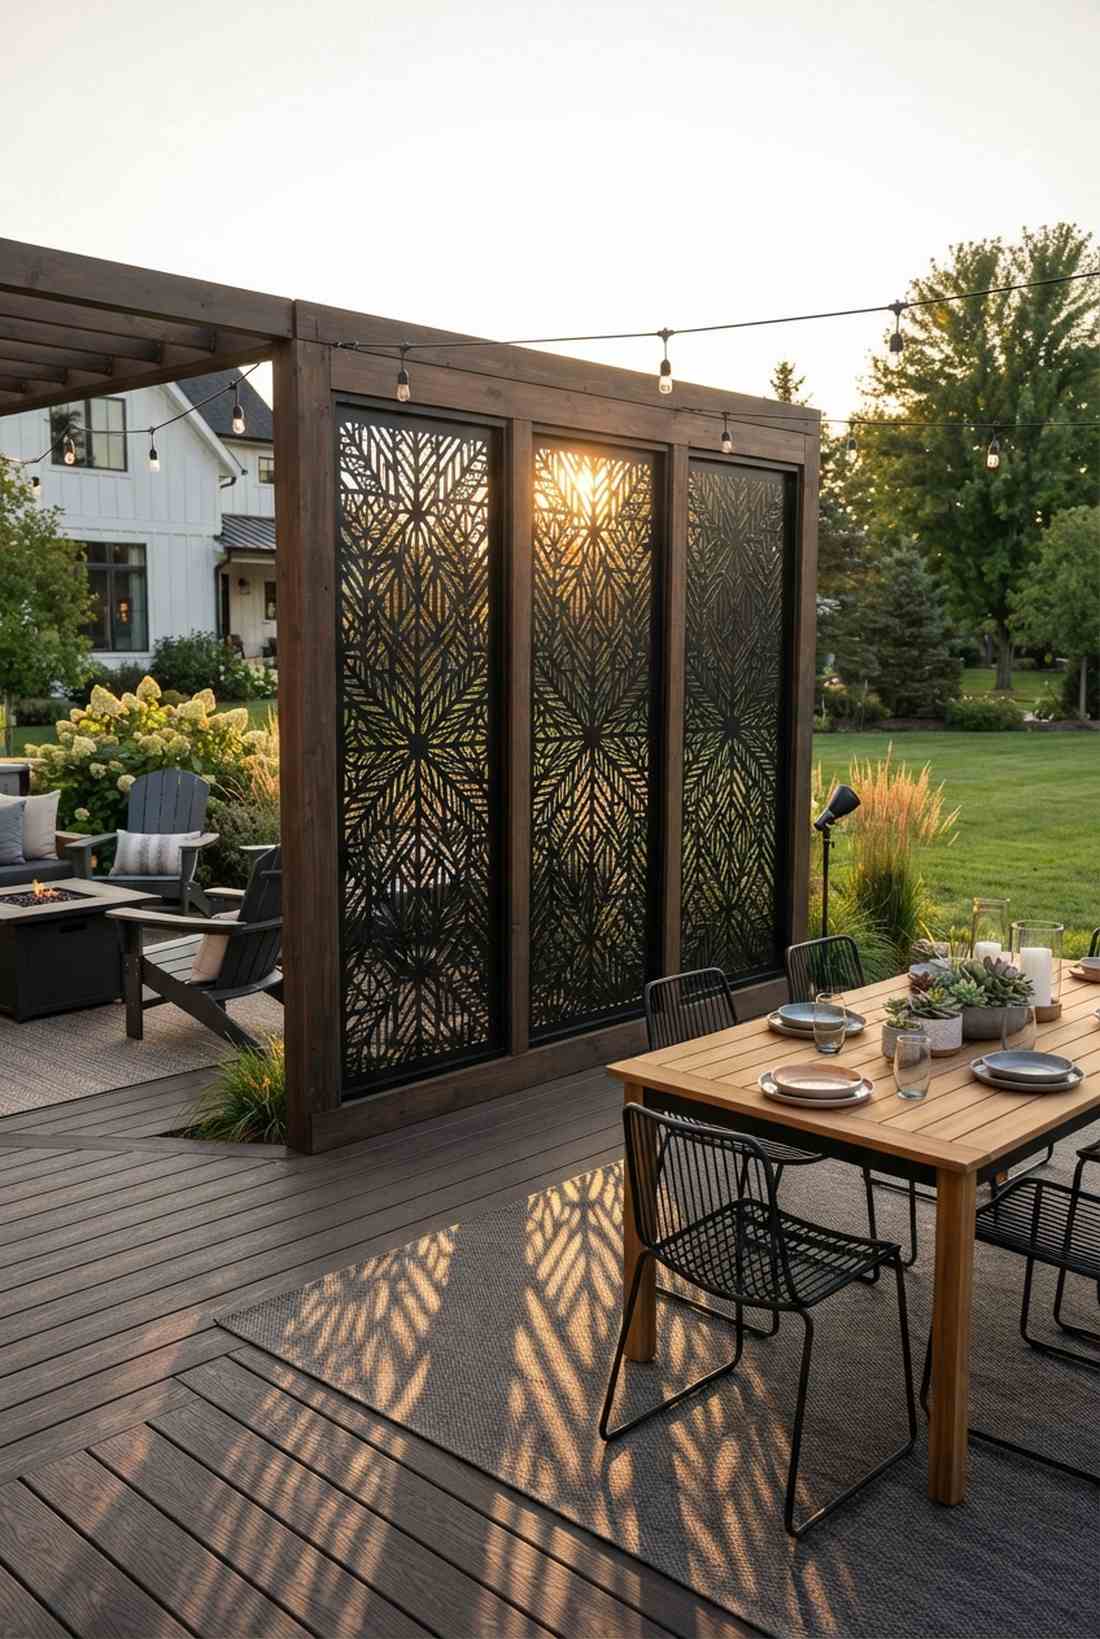
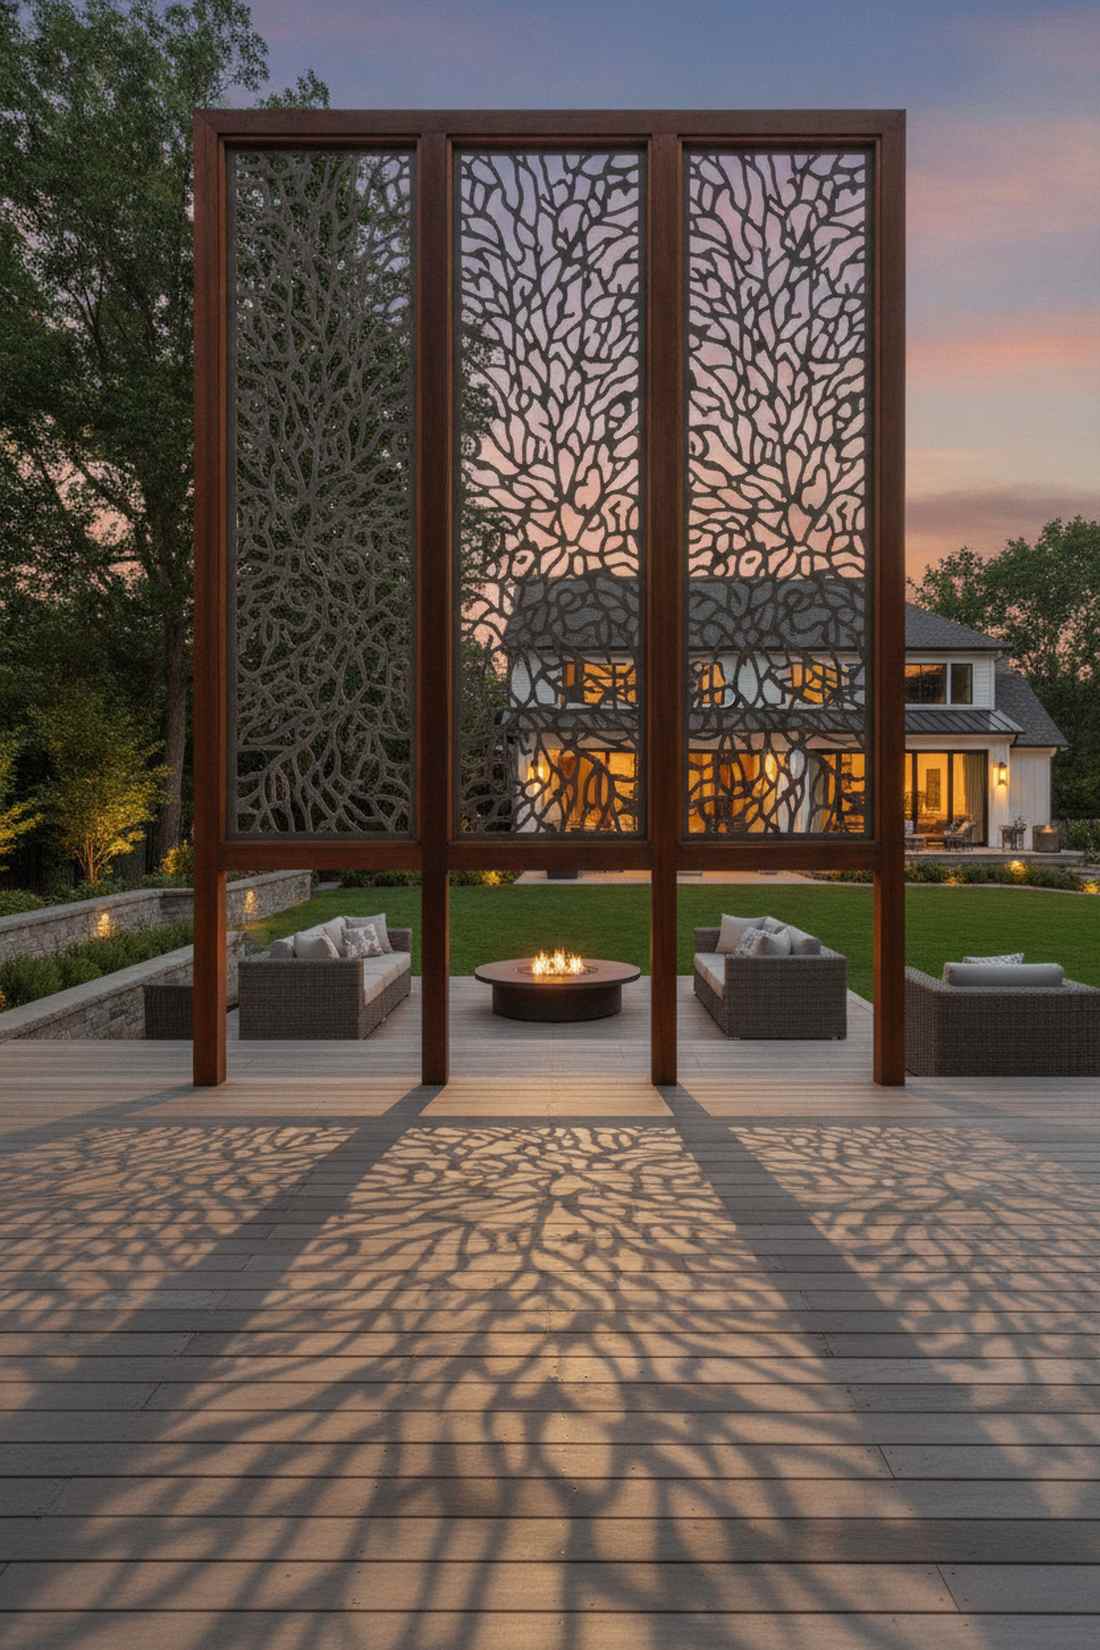
Looking through this barrier feels like viewing modern laser-cut art. Decorative perforated metal screen panels are the ultimate way to block sightlines while adding a massive focal point to your yard.
Basic wood slats get boring, but dropping in geometric or botanical laser-cut aluminum completely disrupts the standard backyard aesthetic. They never rot, never need staining, and cast mind-blowing intricate shadows across your deck at sunset.
You can buy premium 3×6 foot panels for about $100–$250 each. Save this for a zero-maintenance luxury look!
- Key Materials: Powder-coated laser-cut aluminum panels
- Vibe / Style: Modern art gallery exterior
- Difficulty: Easy frame insertion
- Budget Breakdown: Panels (x3): $450 | Wood Frame: $100
- Creator’s Tip: Mount a landscape spotlight slightly behind and angled at the panel to project the intricate laser-cut pattern onto your deck floor at night.
- Smart Sourcing: laser-cut decorative metal privacy screens and aluminum panel mounting brackets.
Material & Pattern Innovations
Modern decking installations go beyond simple parallel boards, incorporating pattern variations and mixed materials that add visual complexity. These approaches transform functional surfaces into design statements.
51. Herringbone Pattern Deck
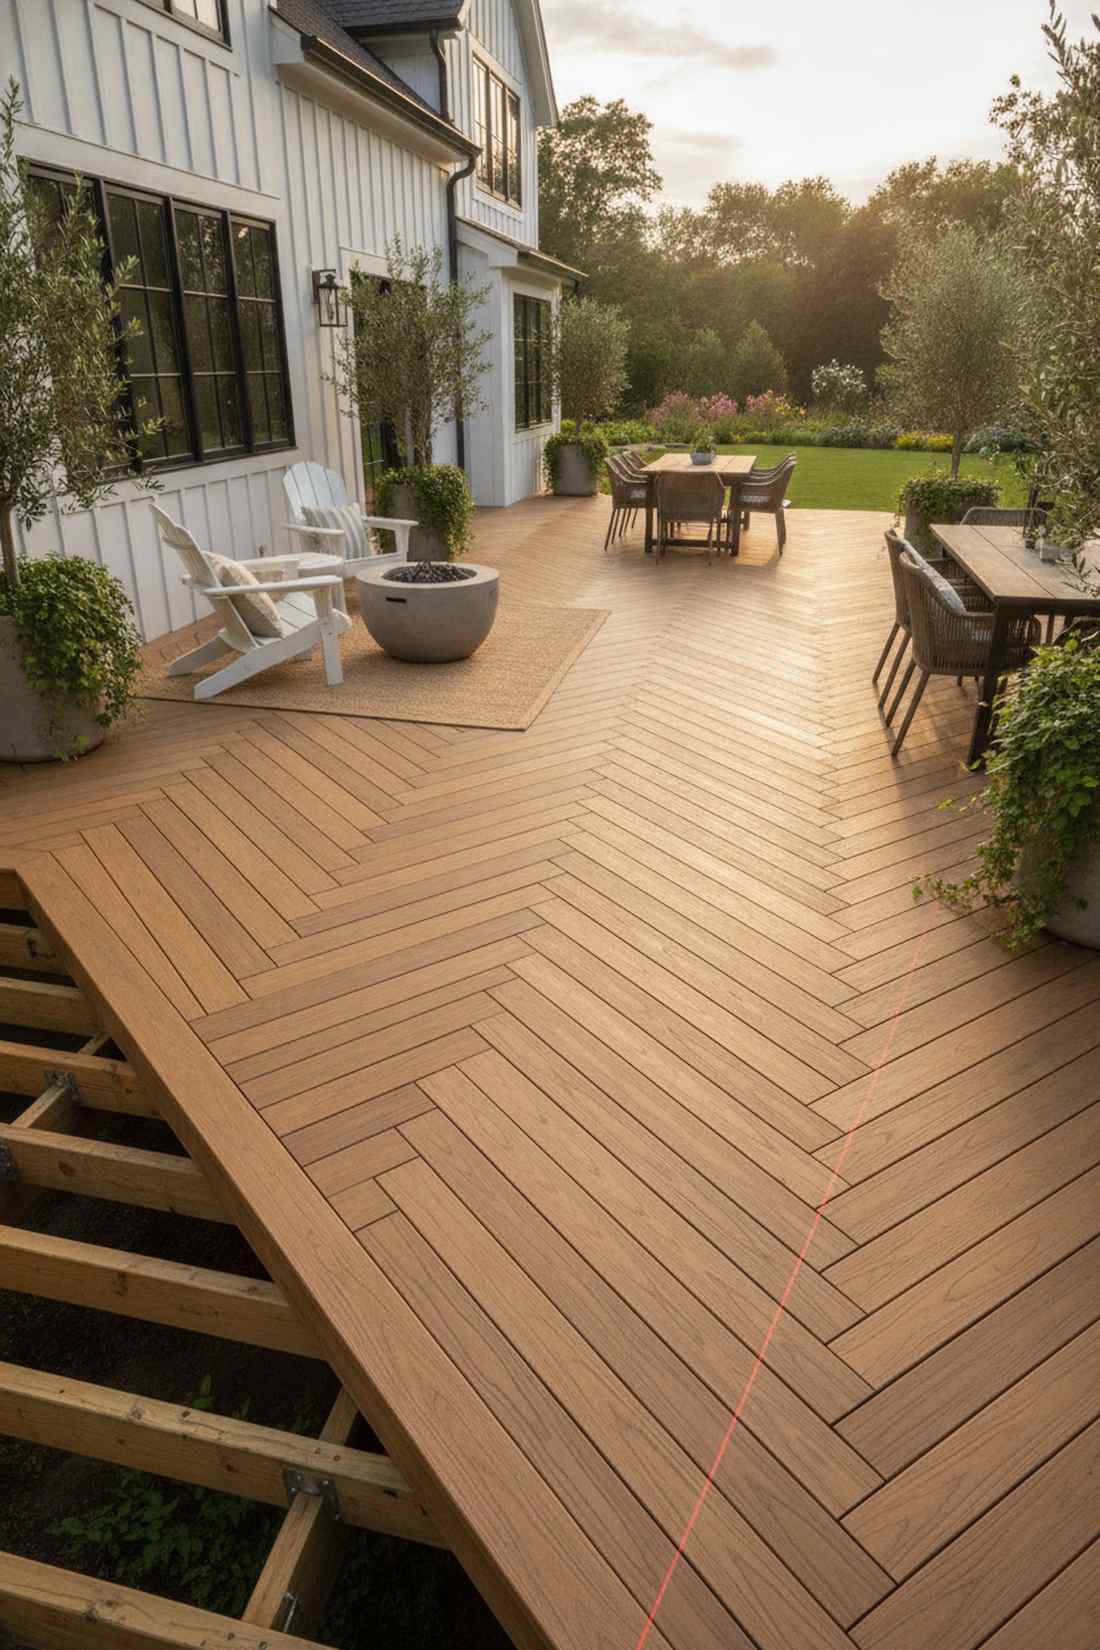
Walking on this surface feels exactly like strolling through a vintage Parisian apartment. A herringbone pattern decking layout completely elevates outdoor flooring into high-end interior design territory.
Running boards in straight lines is what everyone does, but interlocking diagonal zig-zags gives a designer-level finish that screams luxury craftsmanship. It requires intense precision and extra material, but the visual payoff is astronomically high.
Expect a 20% increase in material waste and double the labor time. Pin this if you want the most beautiful deck floor in the neighborhood!
- Key Materials: Premium uniform composite decking
- Vibe / Style: High-end Parisian elegance
- Difficulty: Expert level cutting & math
- Budget Breakdown: Decking (+20% waste): $2400 | Extra Joists: $300
- Creator’s Tip: You MUST space your substructure joists much closer together (typically 12 inches on center instead of 16) to support the diagonal board spans properly.
- Smart Sourcing: premium capped composite deck boards and laser tape measure tools.
52. Picture Frame Border Design

Looking down at this edge feels like admiring a piece of custom, fine-wood cabinetry. A contrasting picture frame deck border is the easiest optical illusion to make a basic shape look highly customized.
Exposing the raw, cut ends of deck boards looks sloppy, but wrapping the entire perimeter with a perpendicular board of a darker color delivers a surprisingly premium look. It acts as a visual safety boundary, clearly highlighting where the deck ends.
This adds very little cost (maybe $50 in extra framing) but completely transforms the aesthetic. Highly recommended for a quick visual upgrade!
- Key Materials: Contrasting accent color deck boards
- Vibe / Style: Custom tailored cabinetry
- Difficulty: Intermediate framing
- Budget Breakdown: Main Boards: $1000 | Accent Boards: $150
- Creator’s Tip: Install flat blocking blocks between your perimeter joists to give the picture frame board a solid, unbending surface to screw into.
- Smart Sourcing: dark walnut composite accent boards and joist blocking hardware kits.
53. Diagonal Board Layout
This layout trick feels dynamic, pulling your eye outward into the landscape. A simple 45-degree diagonal decking layout is the ultimate hack to make a tiny, boxy deck feel long and expansive.
Parallel boards emphasize narrowness, but shifting the angle completely disrupts the boxy visual and looks wildly expensive. It significantly strengthens the deck structure by acting as a massive shear-brace across the entire joist system.
Account for about 15% extra material waste for the angled cuts. Save this if you’re dealing with a small, square patio!
- Key Materials: Standard composite or wood decking
- Vibe / Style: Dynamic visual flow
- Difficulty: Intermediate cutting
- Budget Breakdown: Materials (+15% waste): $1200 | Fasteners: $150
- Creator’s Tip: Snap a chalk line across the entire joist frame at exactly 45 degrees to ensure your very first starter board is absolutely flawless.
- Smart Sourcing: marking chalk line reels and heavy-duty hidden deck fasteners (bulk pack).
54. Mixed-Width Plank Pattern
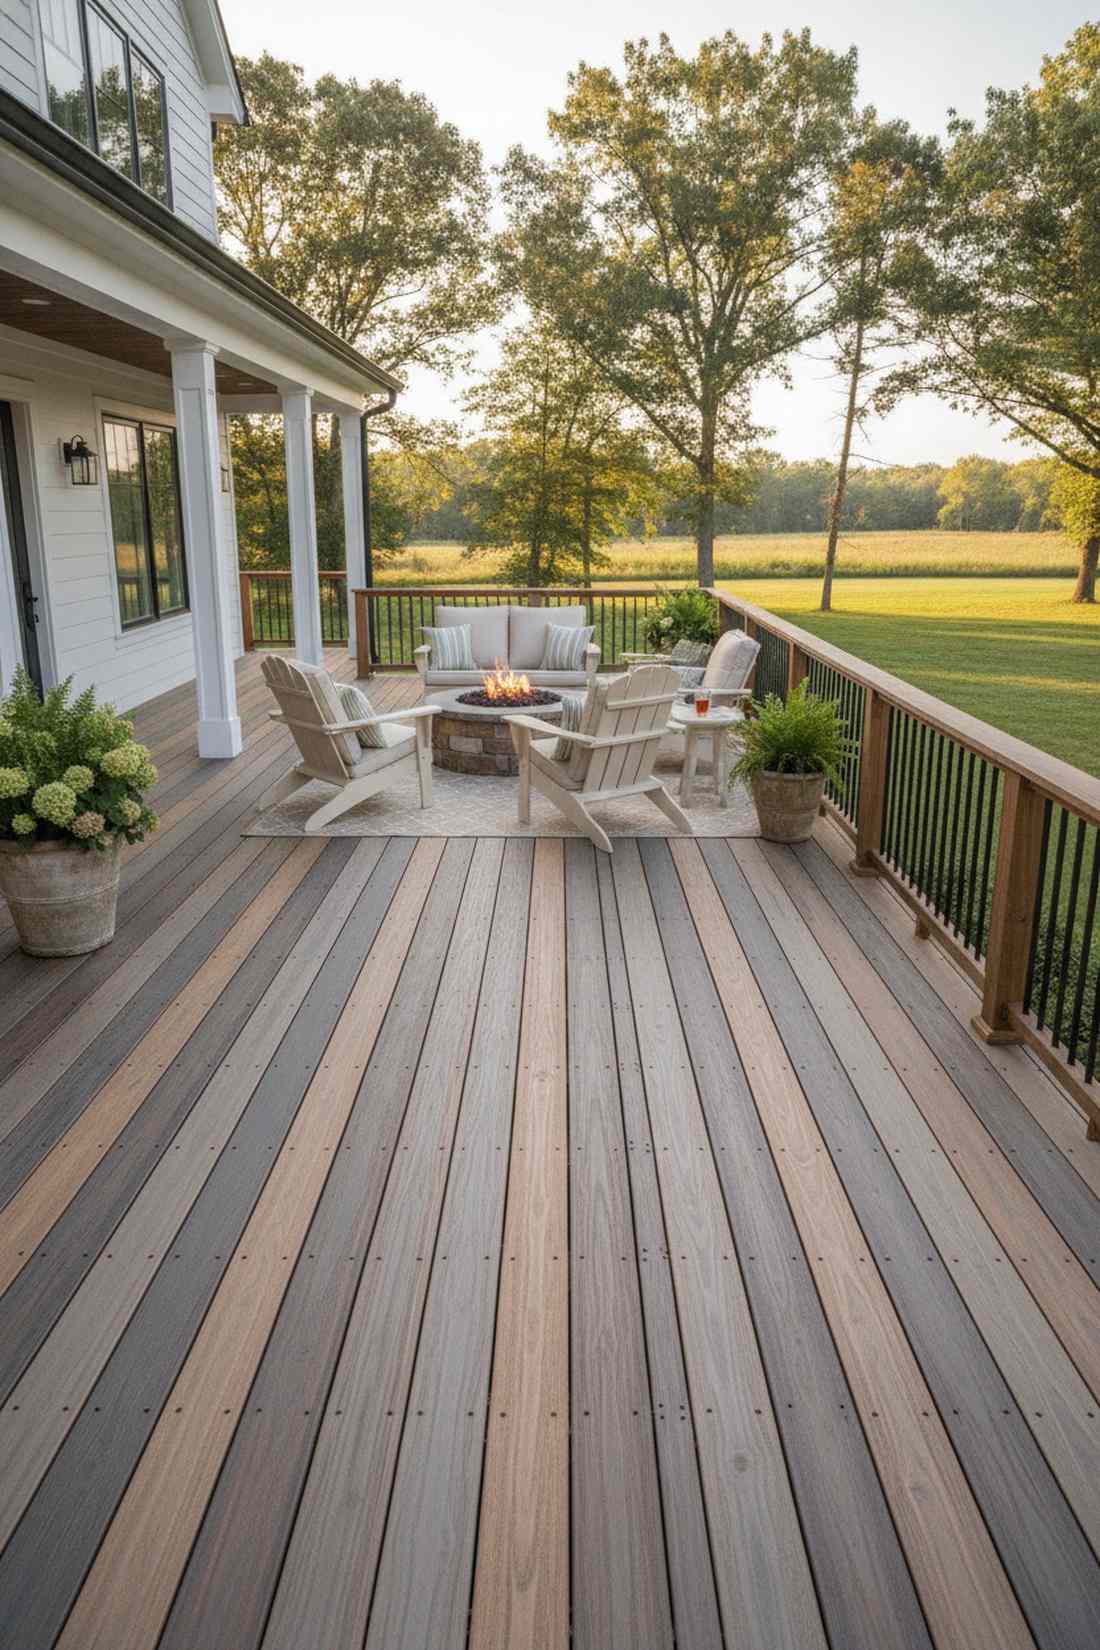
Walking on this deck feels like you reclaimed wood from a 100-year-old historic barn. A mixed-width decking plank pattern is the absolute best way to fake the look of authentic, expensive interior hardwood.
Standard uniform boards look highly manufactured, but alternating 3-inch, 5-inch, and 7-inch boards gives a designer-level finish full of rustic texture. This intentional irregularity brilliantly hides minor installation mistakes or warping.
Specialty mixed-width packs cost a bit more, usually around $2,500 for a medium deck. Pin this for the ultimate farmhouse exterior!
- Key Materials: Multi-width PVC or composite plank bundles
- Vibe / Style: Historic reclaimed farmhouse
- Difficulty: Intermediate planning
- Budget Breakdown: Multi-Width Bundles: $2500 | Fasteners: $300
- Creator’s Tip: Draw out your board repetition pattern (e.g., Narrow, Wide, Medium, Wide) on paper first to ensure you don’t accidentally run out of one specific size.
- Smart Sourcing: multi-width composite decking kits and color-matched exterior deck screws.
This final layout trick is the ultimate “looks expensive, costs nothing” design secret…
55. Stone Inset Accent Zones
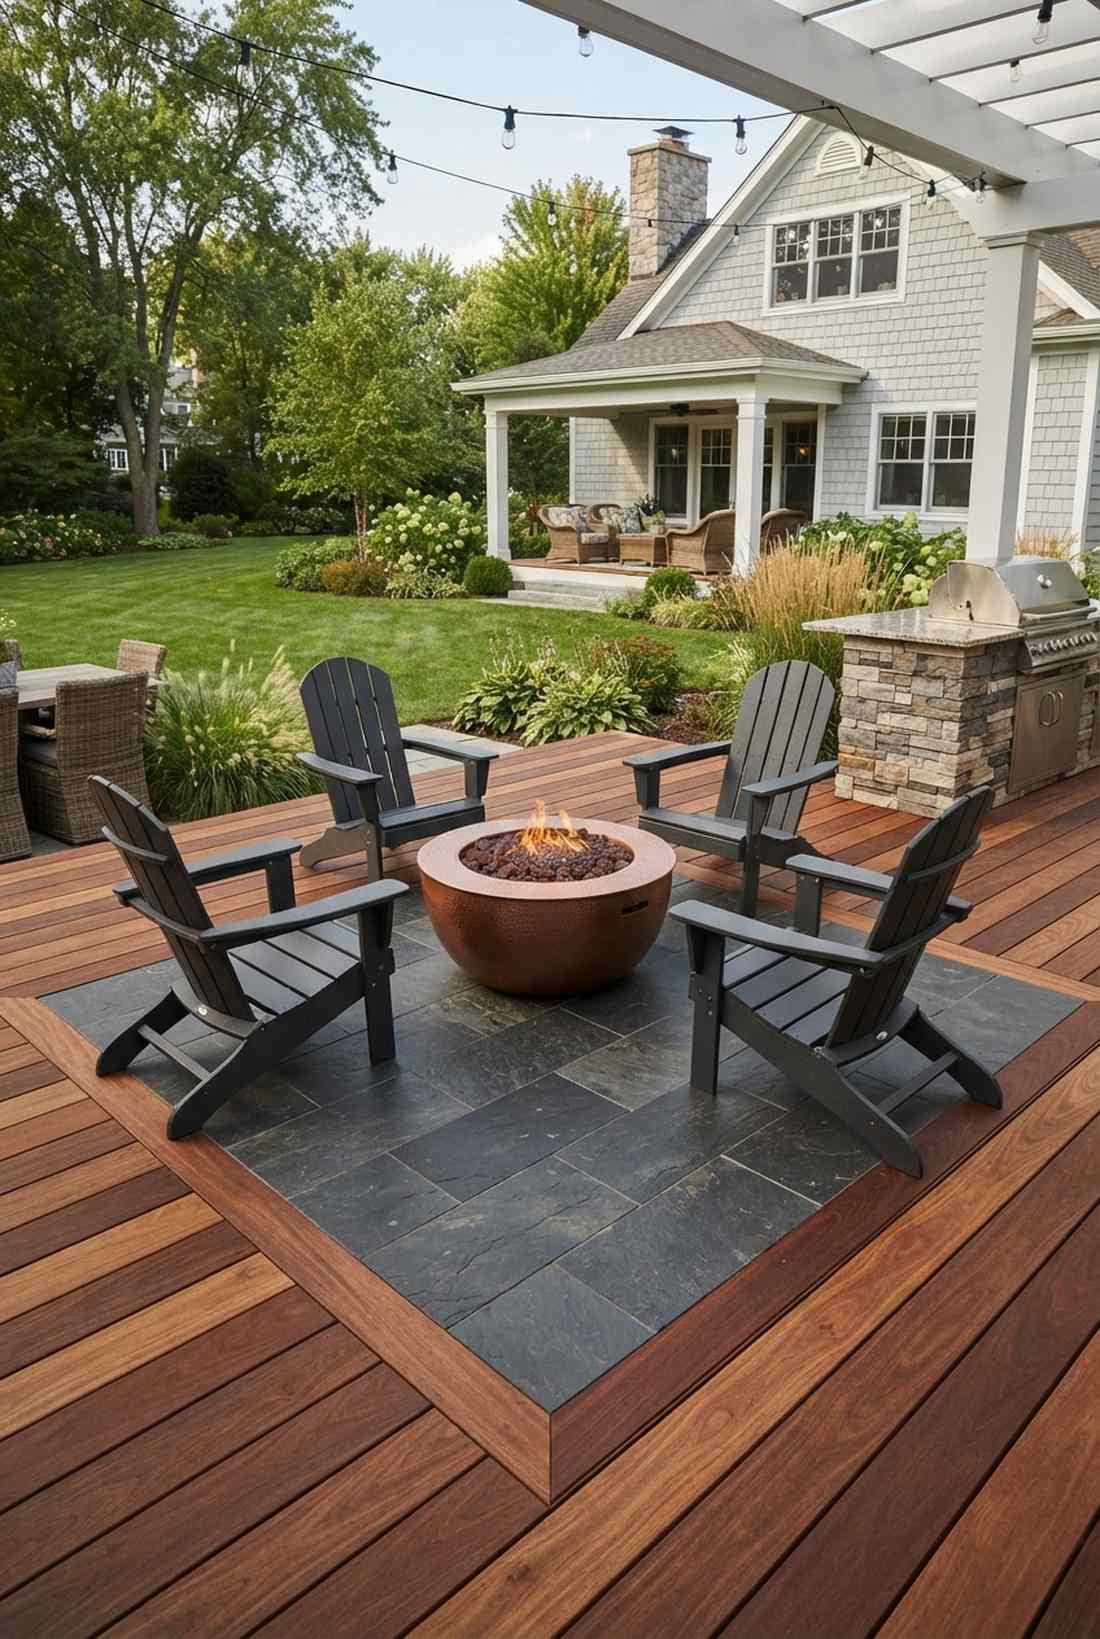
This hybrid feature feels like a custom architectural masterpiece. Dropping a flush stone tile inset directly into wood decking creates a stunning, heat-resistant permanent rug under your fire pit or grill.
Throwing a cheap grill mat on your beautiful deck looks awful, but recessing gorgeous slate tiles completely solves the safety hazard while looking incredibly custom. The material contrast creates an undeniable focal point without building a single wall.
Framing and tiling a small inset costs roughly $200–$400. It’s the ultimate custom flex for an outdoor kitchen.
- Key Materials: Slate tiles and exterior cement board
- Vibe / Style: Custom luxury masonry
- Difficulty: Advanced framing & tiling
- Budget Breakdown: Tile/Grout: $150 | Framing/Backer: $100
- Creator’s Tip: Pitch the inset structure just a fraction of an inch so rain water naturally drains off the tiles instead of pooling and freezing in winter.
- Smart Sourcing: exterior-grade slate floor tiles and flexible outdoor tile grout.
56. Two-Tone Deck Board Design
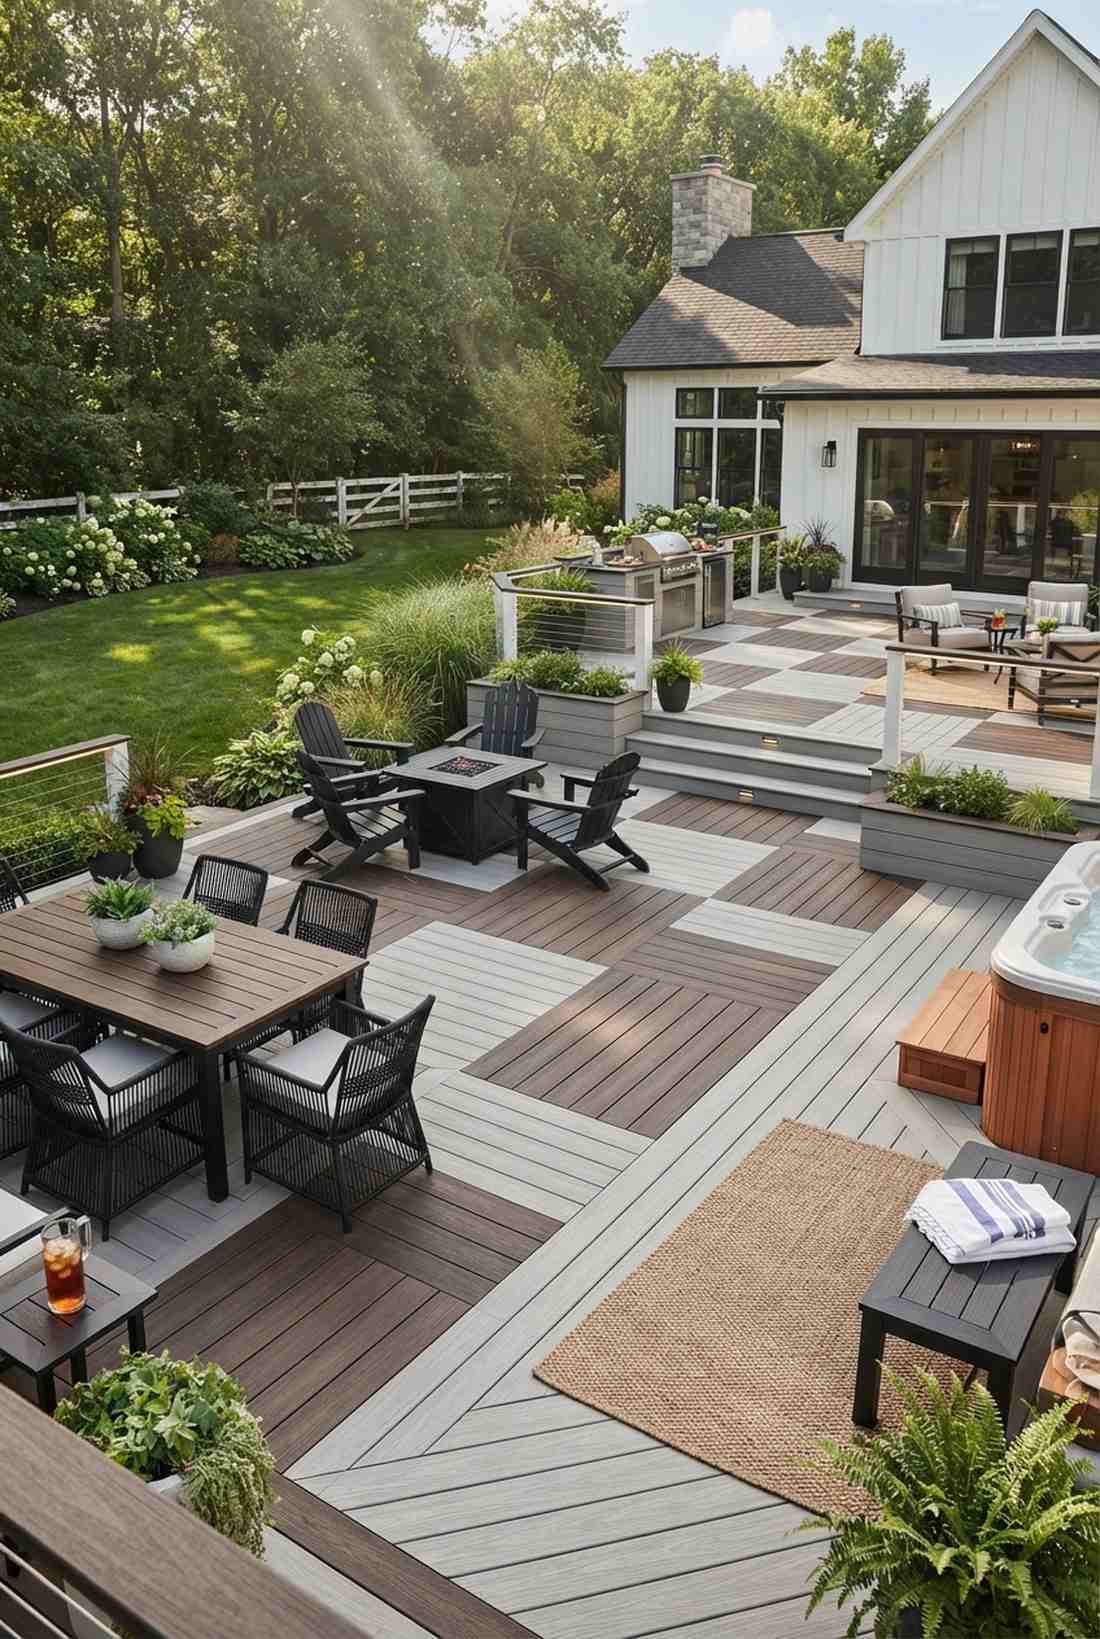
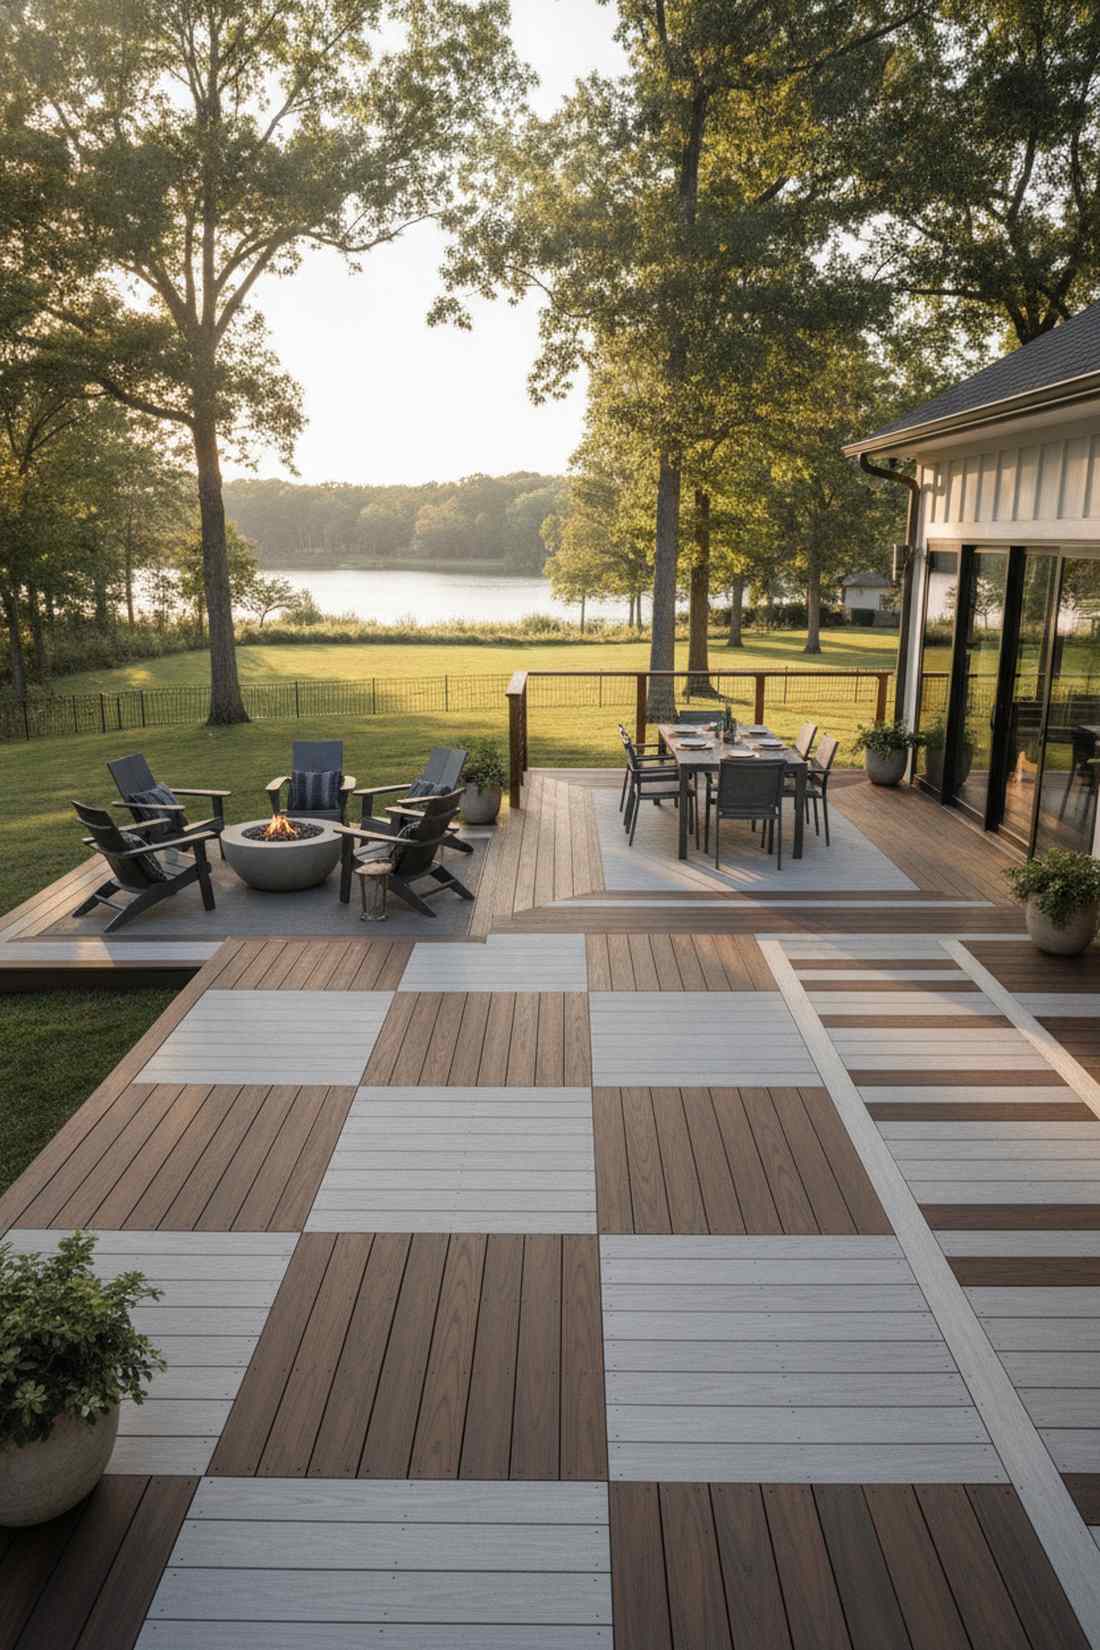
Looking at this surface feels like walking on a massive outdoor checkerboard or geometric rug. A two-tone colored decking layout is an incredibly clever way to visually separate zones without spending a dime on walls.
Using one solid color is safe, but splicing dark walnut boards directly into light gray fields looks far more expensive than it is. You can create permanent “stripes” to lead the eye toward a view, or block out a dark square specifically for dining.
Since it’s just mixing colors you’re already buying, it costs nothing extra in materials. Save this idea for high-impact visual zoning!
- Key Materials: Two highly contrasting colors of composite
- Vibe / Style: Bold graphic modernism
- Difficulty: Intermediate layout planning
- Budget Breakdown: Main Color: $1200 | Accent Color: $400
- Creator’s Tip: Order physical samples of the two colors and leave them in direct sunlight for a day—sometimes contrasting colors look totally different under harsh UV rays than in a catalog.
- Smart Sourcing: UV-protected composite board sample packs and camo hidden fastening systems.
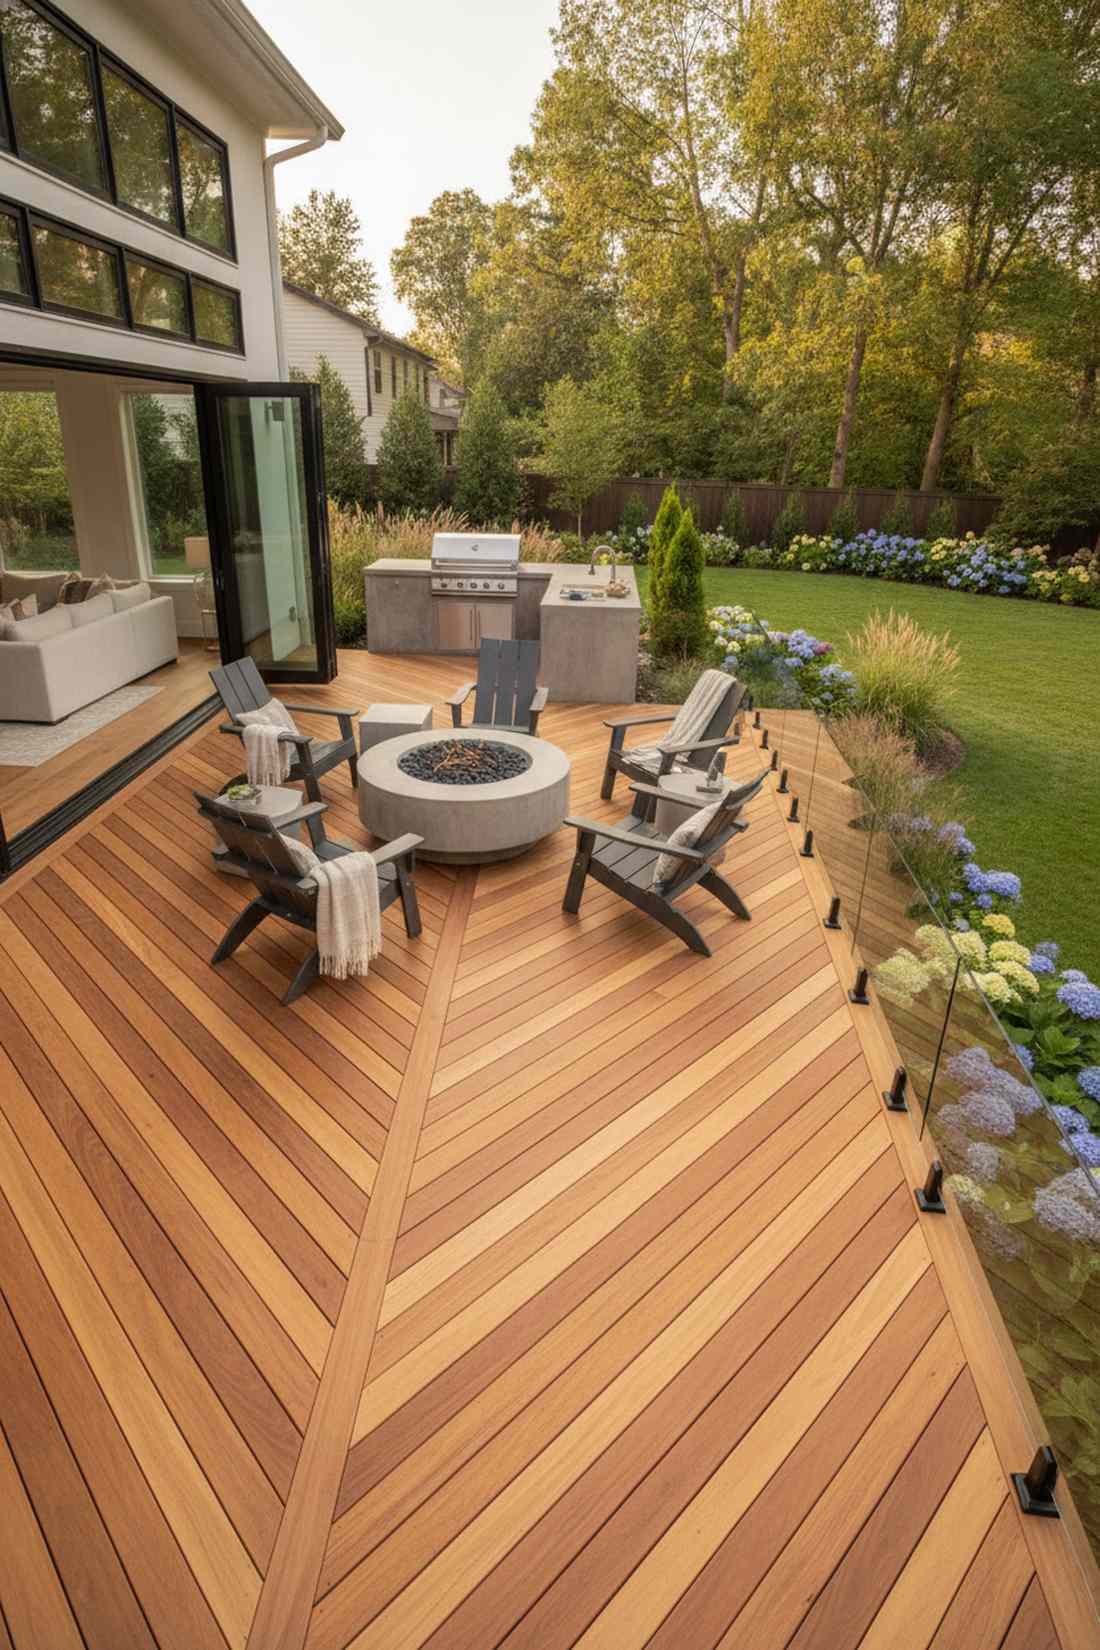
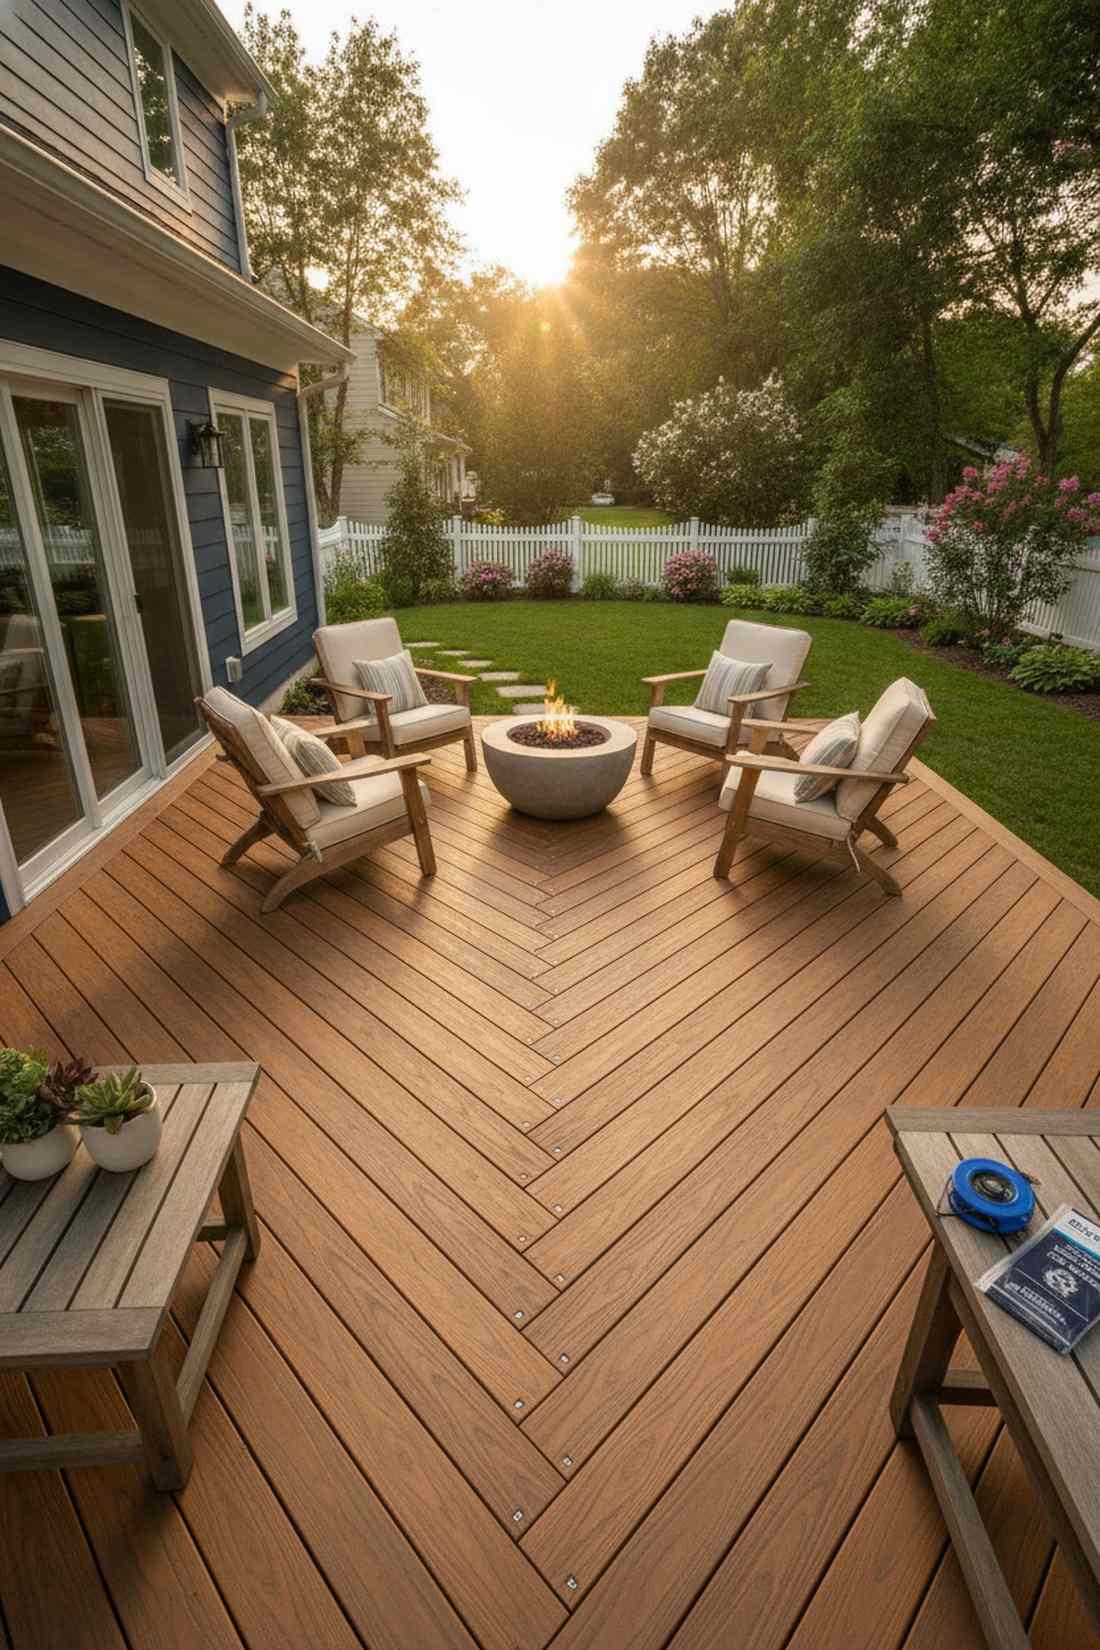
57. Chevron V-Pattern Decking
This layout feels like the grand entrance of a luxury European estate. The continuous V-shape chevron deck pattern is the absolute pinnacle of high-end outdoor floor design.
While similar to herringbone, chevron boards meet at a perfectly sharp center point, creating an aggressive arrow effect that pulls the eye directly toward your yard’s best feature. Executing this flawless geometric spine gives a designer-level finish that will literally drop jaws.
This requires master-level cutting and about 20% extra material, but the result is priceless. Pin this if you want absolute perfection!
- Key Materials: Premium hardwood or luxury PVC boards
- Vibe / Style: Elite European estate
- Difficulty: Expert master carpentry
- Budget Breakdown: Premium PVC (+20%): $3000 | Center Spine Framing: $200
- Creator’s Tip: Install a double joist down the exact center line of the deck; this gives you a massive, solid base to perfectly screw down the tight V-joints.
- Smart Sourcing: premium PVC deck planks and heavy-duty sliding compound miter saws.
Conclusion
Designing an outdoor living deck for elevated entertainment requires balancing functional zones with smart, budget-friendly aesthetic choices. The exactly 57 blueprints presented here demonstrate how strategic material sourcing, premium UV-resistant decking kits, and thoughtful visual layouts completely transform standard yards into high-end entertainment venues. Whether you select a multi-tiered design, a budget-friendly floating island, or a heavily modified pergola setup, success depends on investing in the right foundational supplies and clever layouts. Skip the generic contractor basics, grab your tools, and use these exact strategies to build a luxury outdoor retreat that looks unbelievably expensive.
Frequently Asked Questions
What is the ideal size for an outdoor living deck designed for entertaining?
Entertainment-focused decks typically require 300-600 square feet to comfortably separate cooking and lounging zones. To maximize your budget, consider utilizing bulk packs of composite decking or modular deck tiles to expand the footprint affordably. Multi-level designs offer the best bang for your buck by stacking zones vertically rather than eating up precious yard space.
How do multi-level decks improve entertainment functionality?
Multi-level configurations act as a natural barrier, allowing you to create a premium outdoor living patio vibe without building expensive privacy walls. Dropping a level specifically for a hot tub kit or smokeless fire pit keeps the loud activities completely separated from quiet dining zones above. Furthermore, using adjustable deck riser kits makes building these elevation changes incredibly fast and structurally sound.
What materials work best for outdoor living deck layouts in high-traffic areas?
For high-traffic areas, skipping cheap wood and investing in premium UV-resistant capped composite boards is the ultimate money-saving move over time. These materials eliminate the nightmare of yearly staining and splintering. If you’re building an outdoor kitchen zone, utilizing heat-resistant peel-and-stick stone veneer or exterior slate tiles provides a stunning, durable barrier against grease and dropped embers.
How should I plan lighting for evening entertainment on my deck?
Layered lighting is the secret to making an outdoor living deck look incredibly expensive at night. Start with commercial-grade LED bistro string lights for ambient overhead glow, then heavily invest in low-voltage recessed deck dot lights and solar post caps. Buying a comprehensive low-voltage starter kit with a smart transformer ensures your entire yard illuminates automatically at dusk with zero daily effort.
What are the key design principles for creating zones on a single-level deck?
Defining zones on a flat surface requires clever visual trickery, like switching up your deck board patterns (such as adding a picture-frame border) or dropping down a weatherproof outdoor rug panel. Utilizing pre-built modular planter boxes or affordable laser-cut privacy screens acts as a gorgeous architectural divider. Maintain 36-48 inches of walking space between your furniture kits to keep the premium, uncrowded resort feel.
How can I add privacy to my outdoor living deck without blocking views?
The smartest and most budget-friendly way to add privacy is by using semi-transparent materials that block sightlines but let light through. Consider installing pre-cut frosted acrylic panels or a retractable UV-coated side awning that you can pull out only when the neighbors are loud. For a botanical vibe, attaching fast-growing ivy to heavy-duty square lattice kits creates a stunning, inexpensive living wall.