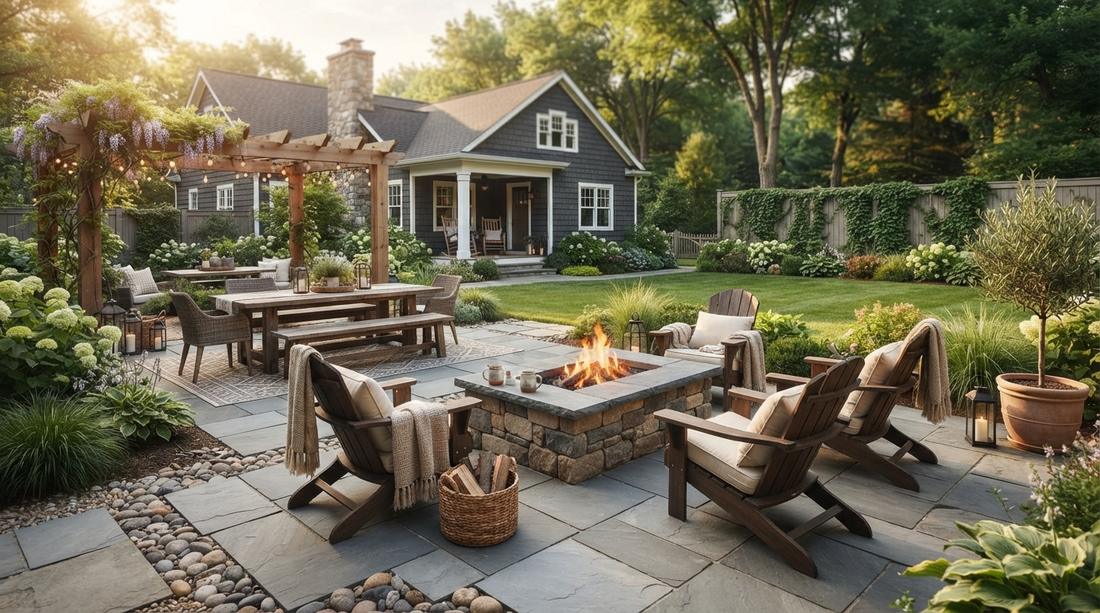
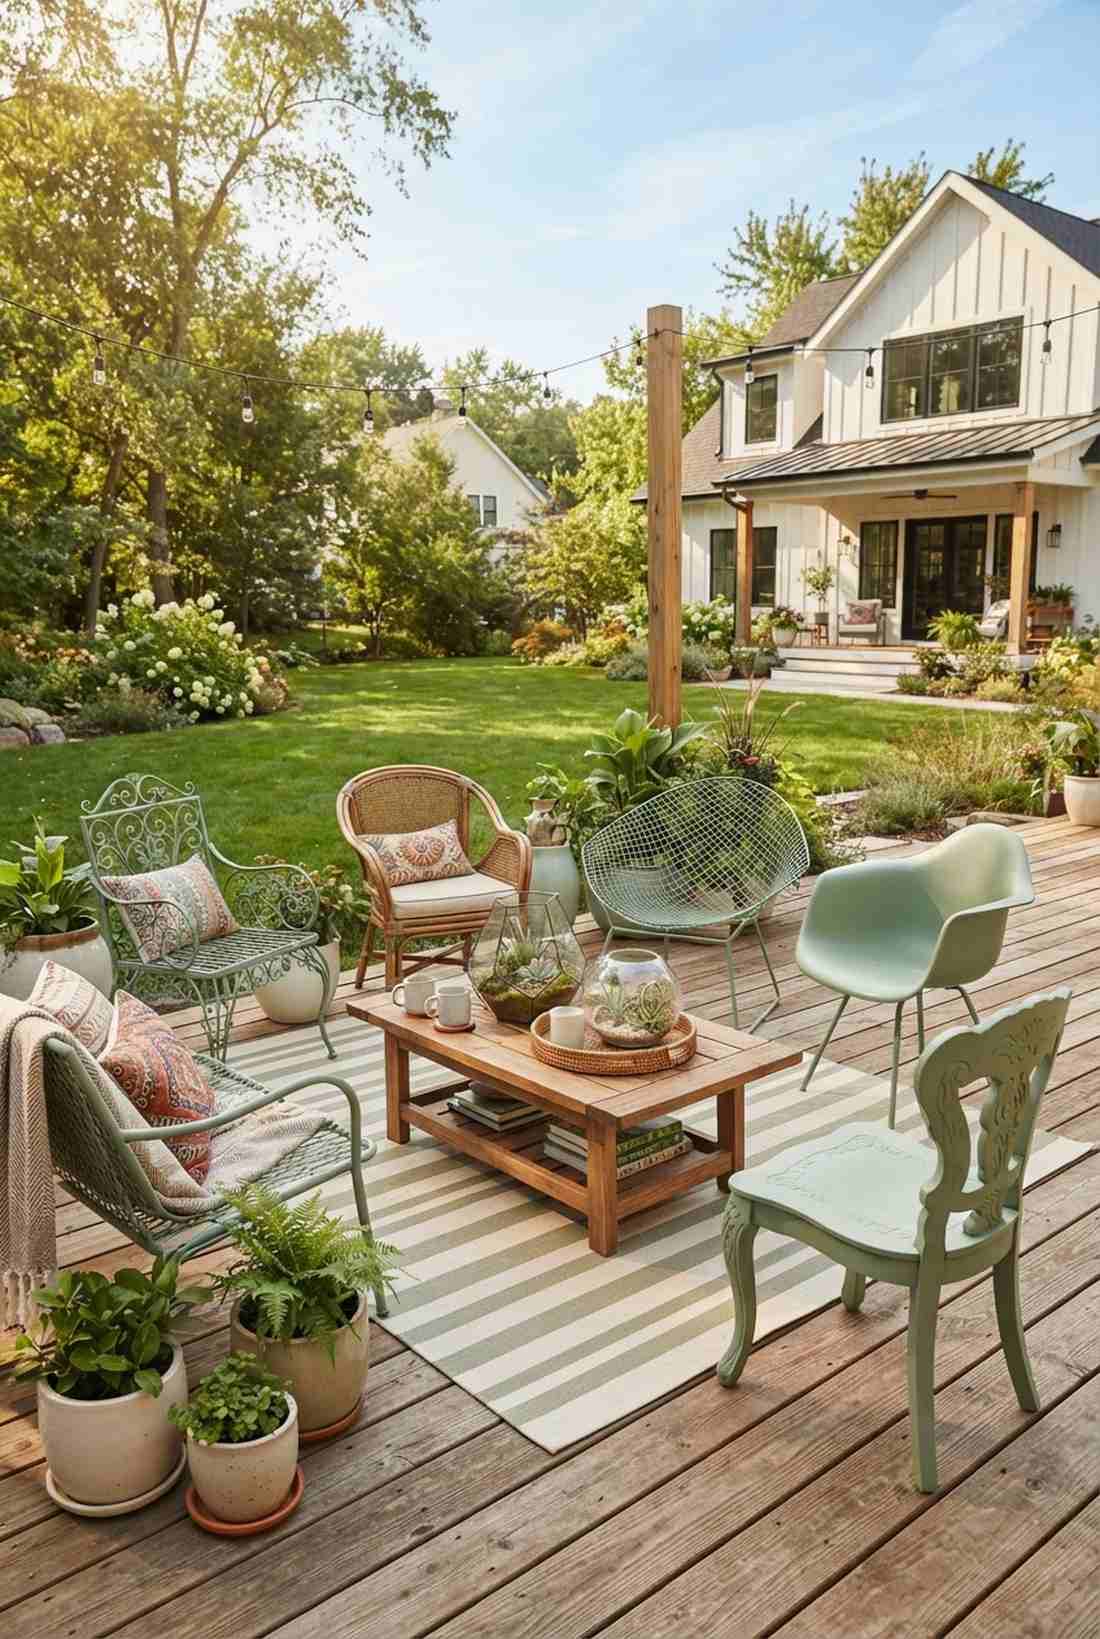
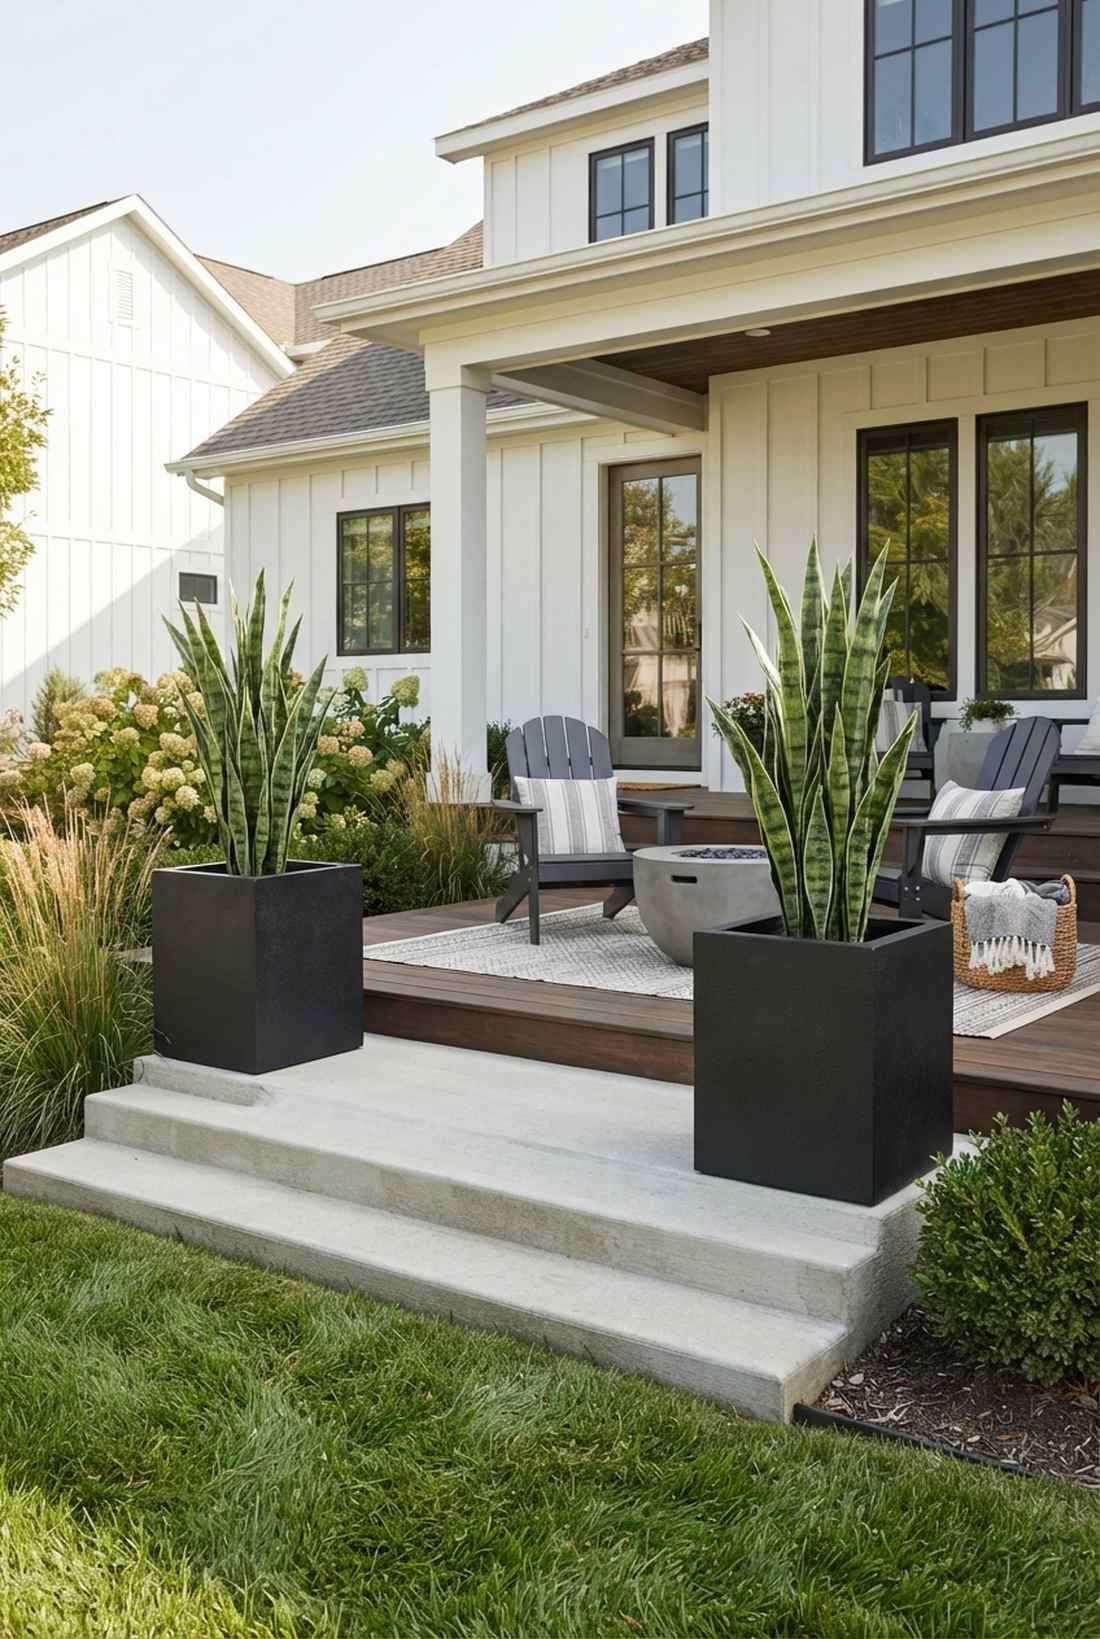
The smartest garden patio ideas merge rugged materials with brilliant designer layouts. Upgrading your outdoor living space guarantees high-end aesthetics without ridiculous construction costs. These structural blueprints maximize functionality effortlessly.
Design SnapshotKey Principles
- Material Selection: Choose paving materials suited to your climate—composite for humid regions, natural stone for hot climates, sealed pavers for cold areas
- Spatial Zones: Define distinct areas for dining, lounging, and entertaining using furniture placement, level changes, or material transitions
- Biophilic Integration: Blend hardscape with softscape through organic edges, vertical gardens, and native plantings to create visual harmony
- Sustainability Focus: Incorporate permeable surfaces, recycled materials, and energy-efficient lighting to reduce environmental impact
FoundationGarden Patio Paving Materials
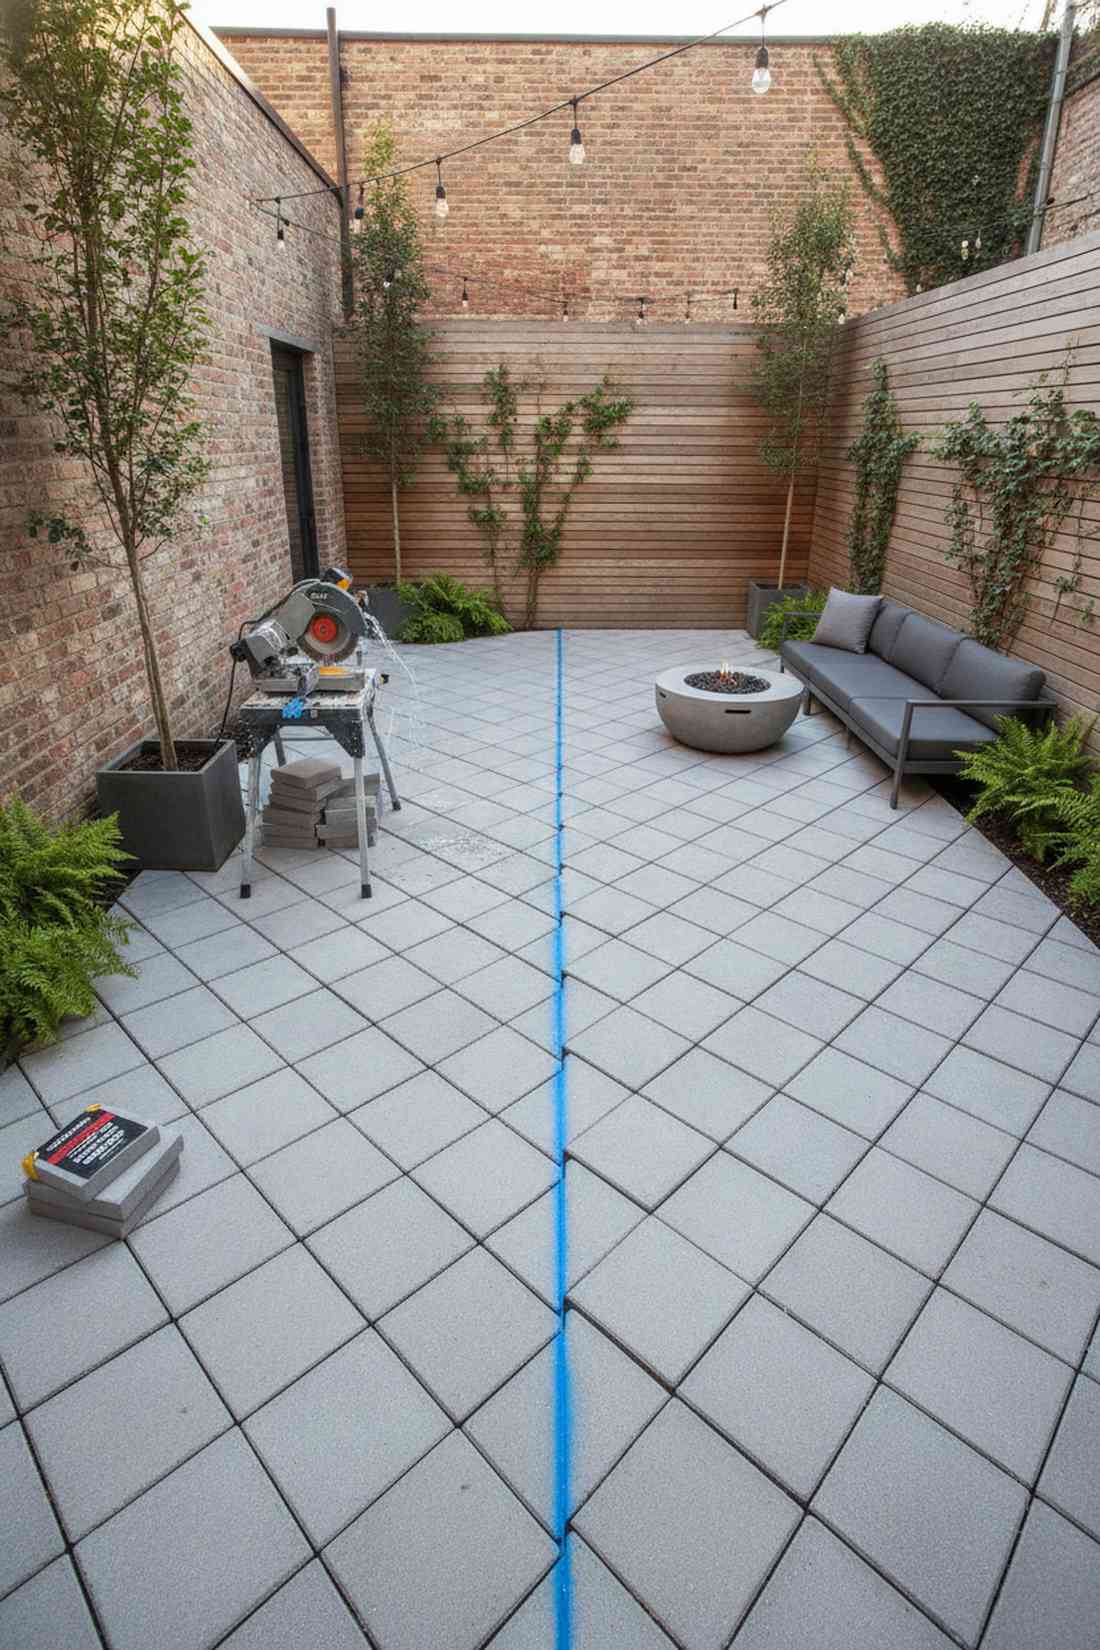
1. Porcelain Tile Paving
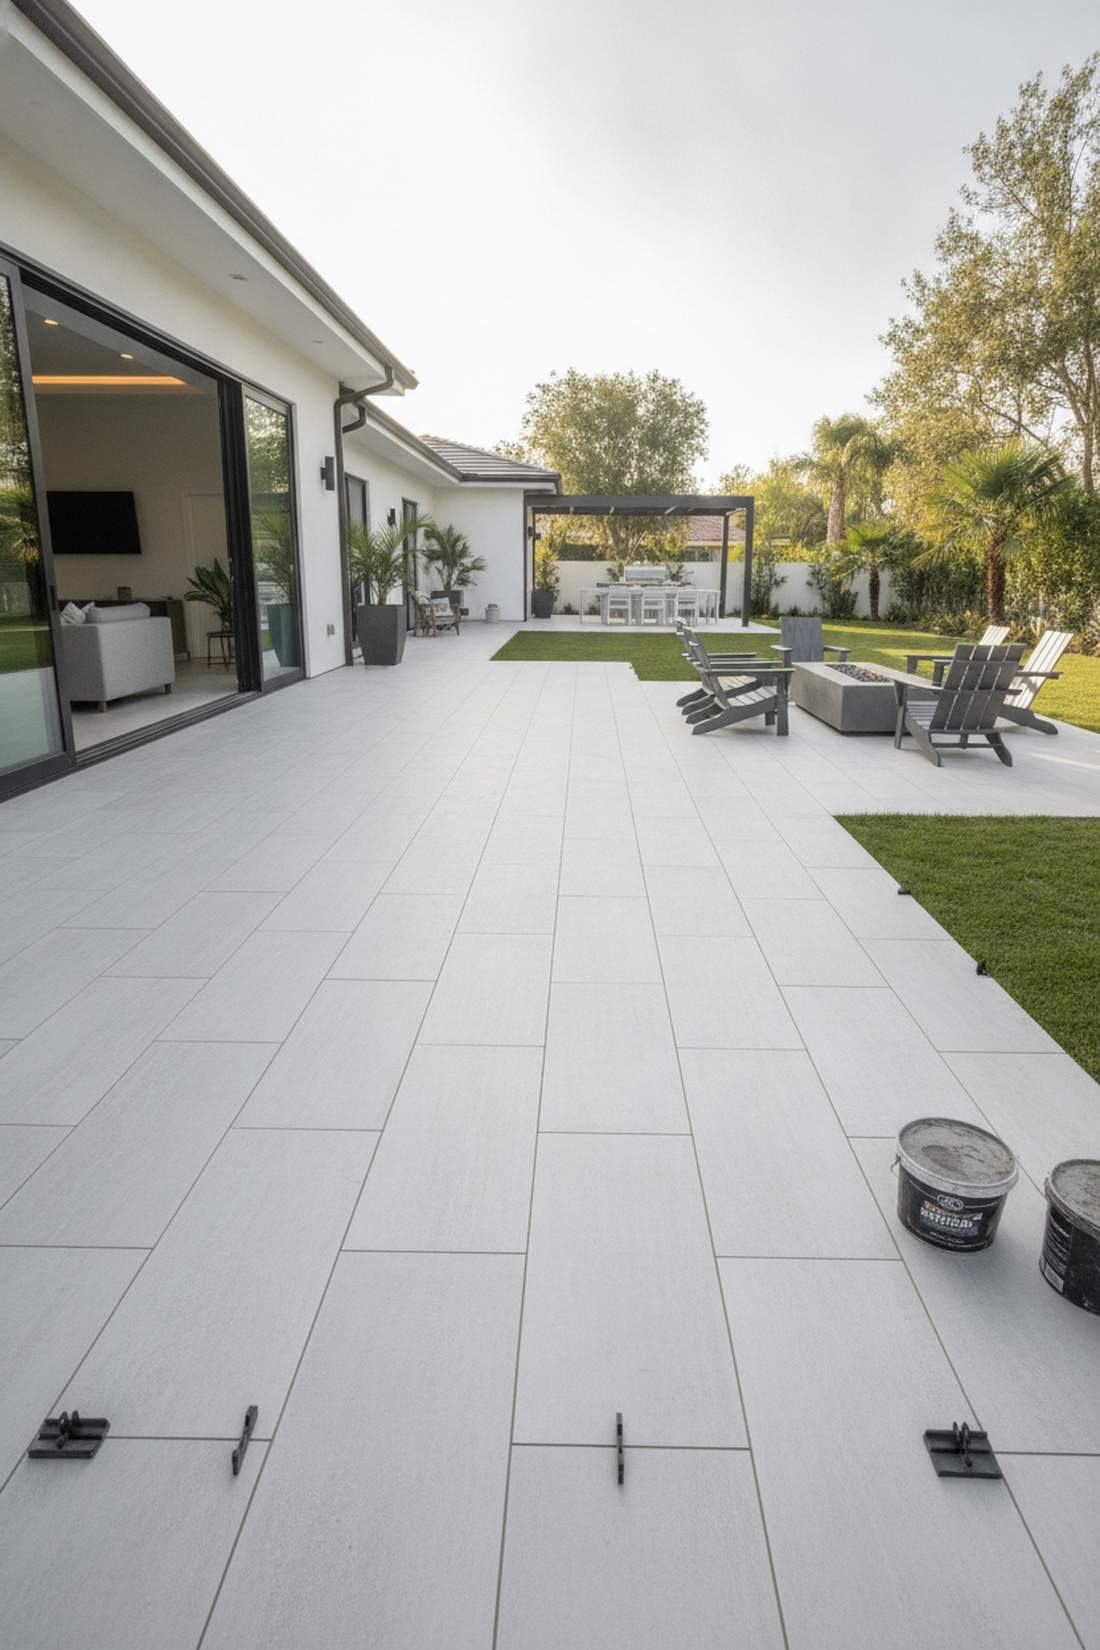
Feels like a pristine luxury resort you accidentally stumbled into. Modern porcelain patio surfaces work exceptionally well for uncovered sunny backyards.
Most beginners ignore this material entirely, but it delivers a surprisingly premium look for decades. Grab commercial heavy-duty tile leveling kits to lock everything in flawlessly without professional help.
You can easily pull this off for around $10–$15 per square foot. Pin this if you’re planning a massive outdoor upgrade!
- Key Materials: Large-format porcelain tiles, leveling spacers
- Vibe / Style: Sleek minimalist luxury
- Difficulty: Intermediate DIY
- Budget Breakdown: Materials: $12/sq.ft | Base Setup: $4/sq.ft
- Creator’s Tip: Use outdoor-rated epoxy grout to prevent annoying weed growth completely.
- Smart Sourcing: textured slip-resistant porcelain packs and pre-mixed outdoor grout tubs.
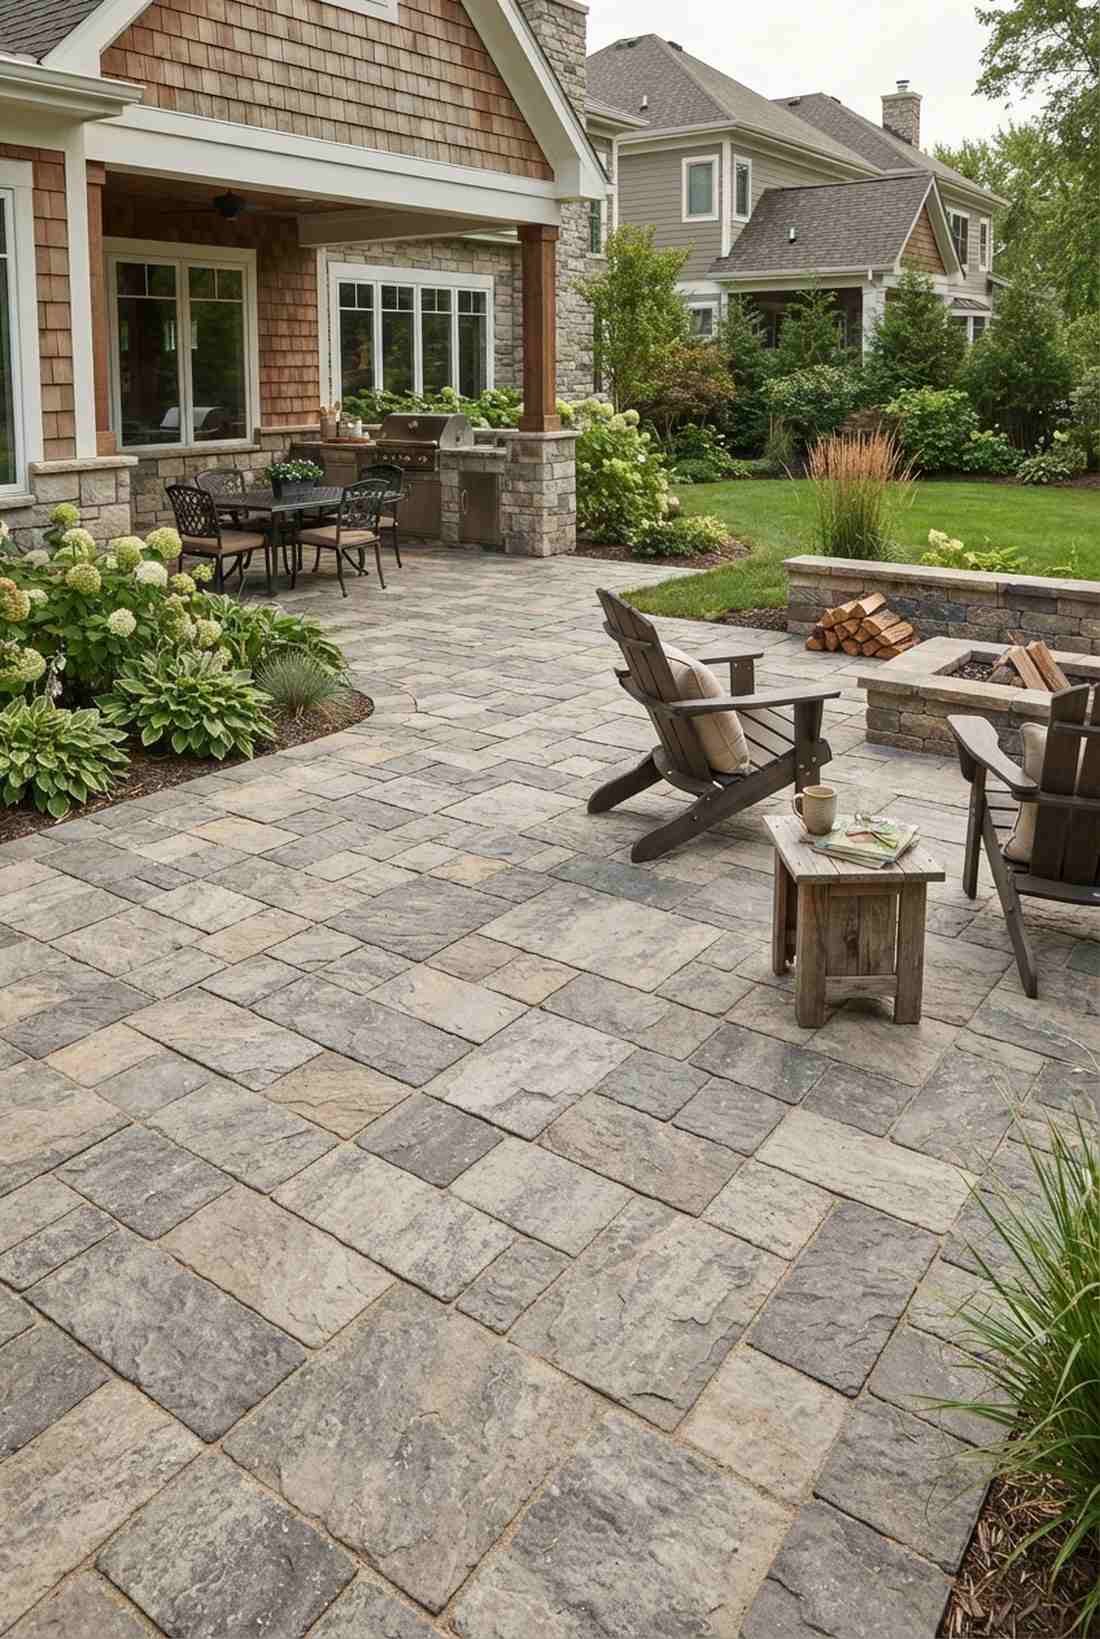
2. Natural Stone Flagstone
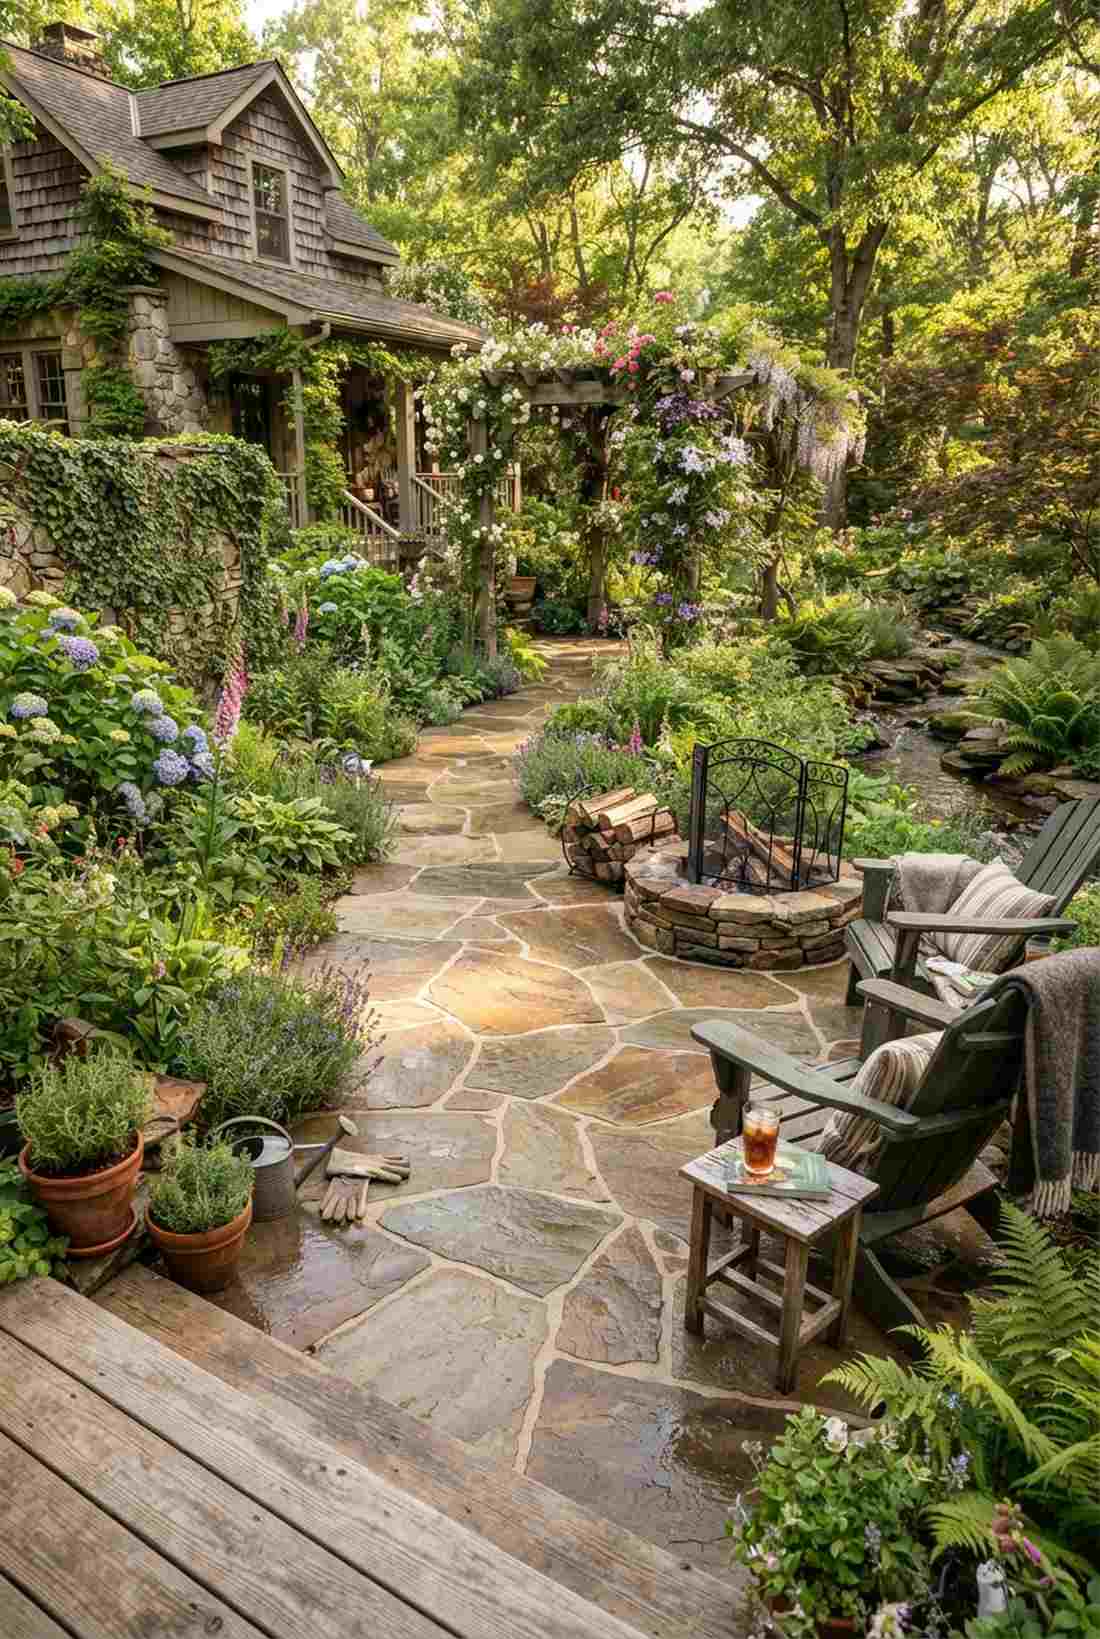
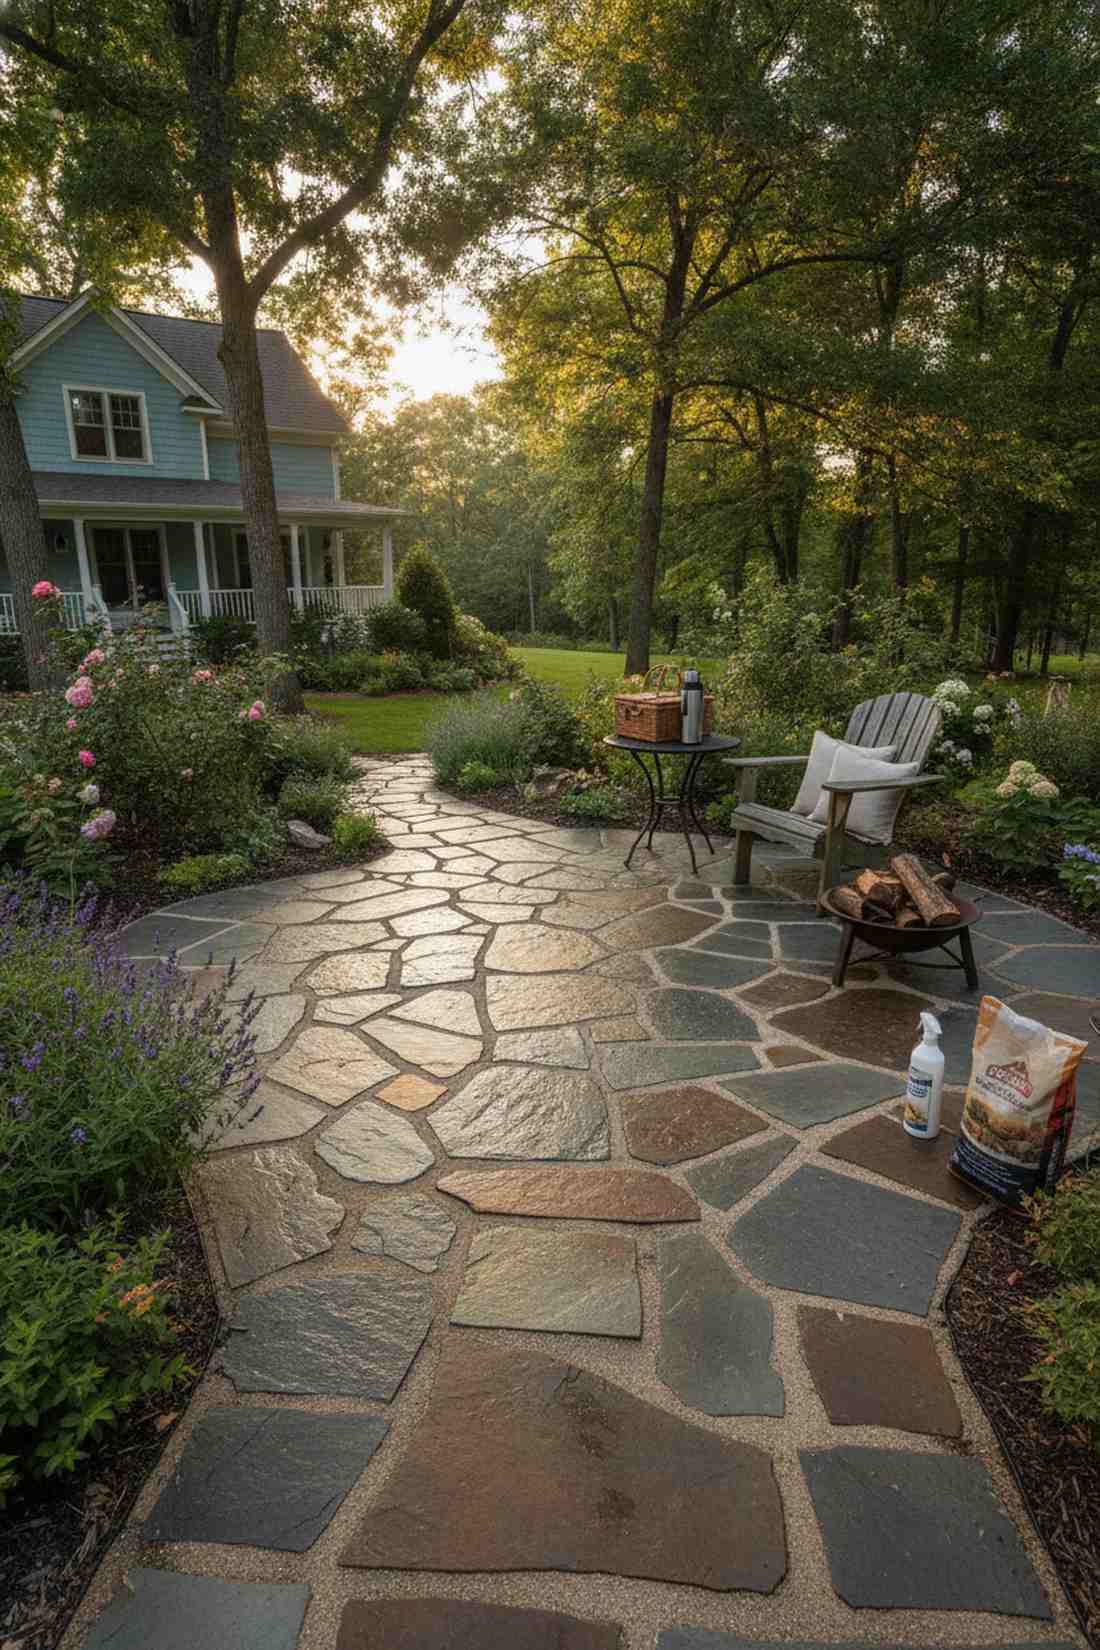
Gives off massive enchanted forest vibes immediately. Organic stone patio layouts are perfect for cozy, rustic garden corners.
Contractors will charge thousands for this, yet laying it yourself gives a designer-level finish for pennies on the dollar. Sourcing a premium landscaping sealant spray will dramatically pop those earthy colors.
Expect to spend around $18 per square foot if you self-install. It’s a fast upgrade that completely changes the vibe.
- Key Materials: Irregular flagstone cuts, polymeric sand
- Vibe / Style: Cottagecore retreat
- Difficulty: Moderate heavy-lifting
- Budget Breakdown: Stone: $15/sq.ft | Sand Base: $3/sq.ft
- Creator’s Tip: Stagger large stones along the main walking path to prevent tripping.
- Smart Sourcing: bulk-pack polymeric jointing sand and UV-blocking stone sealers.
3. Travertine Pavers
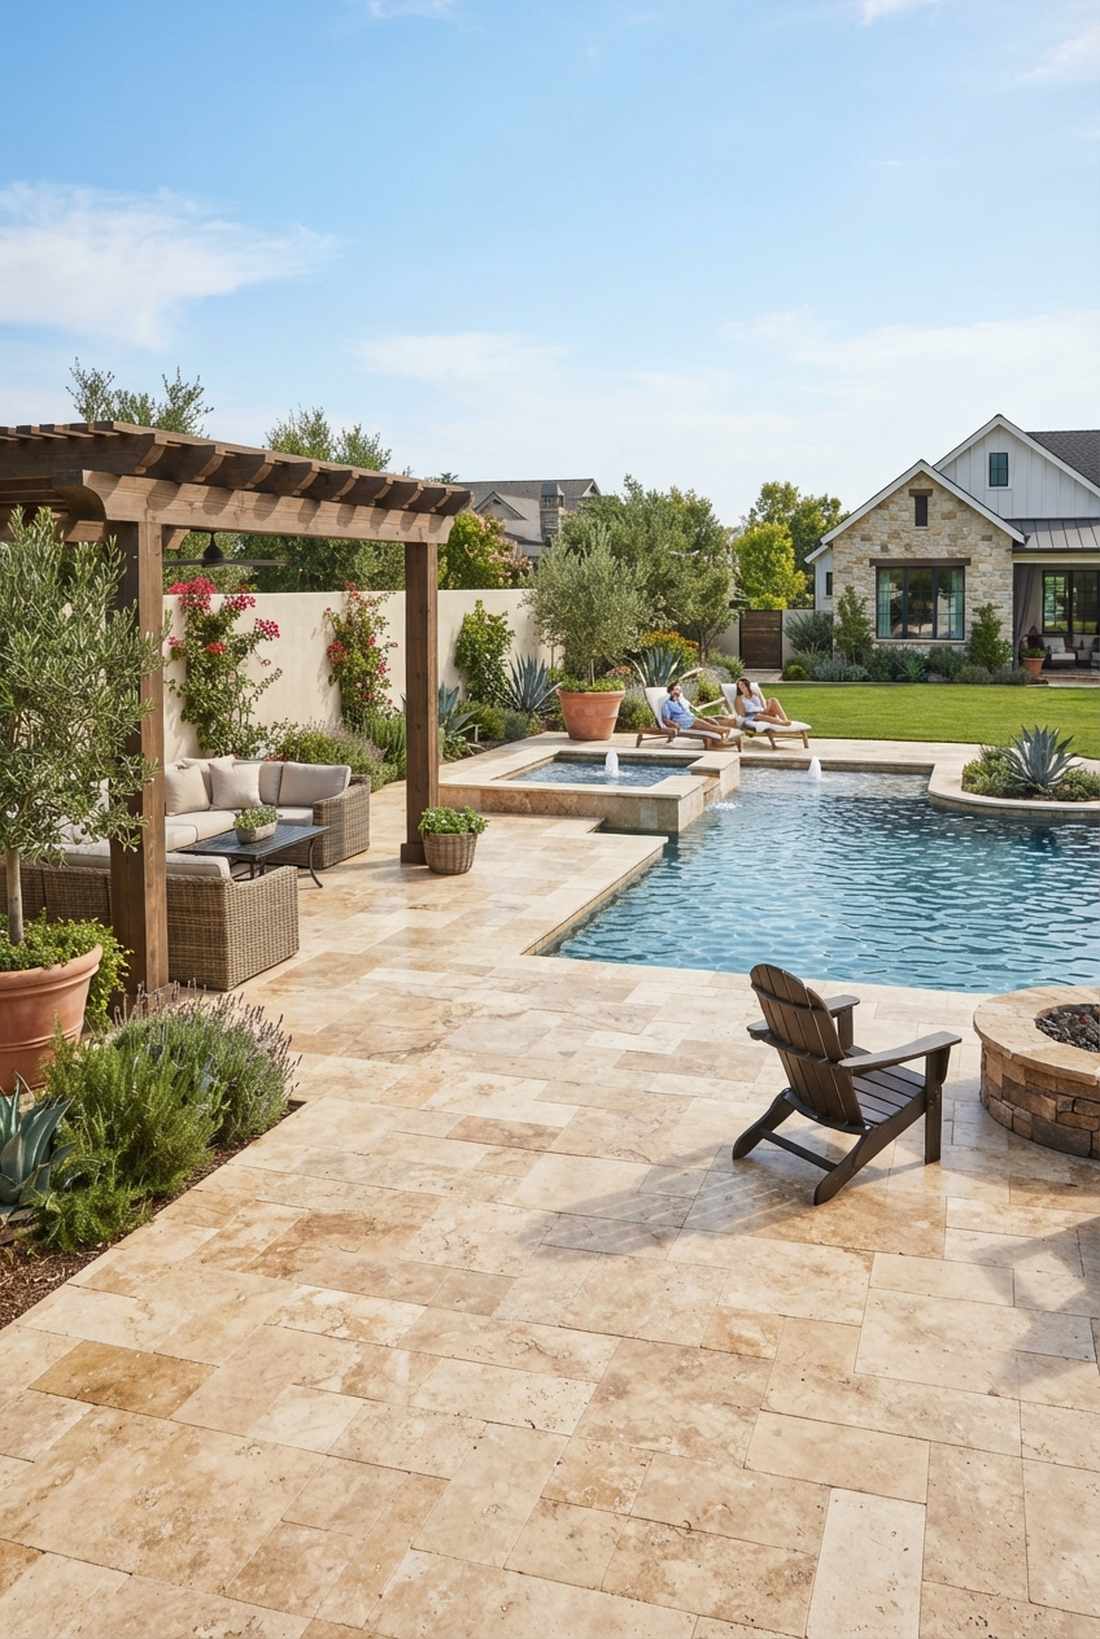
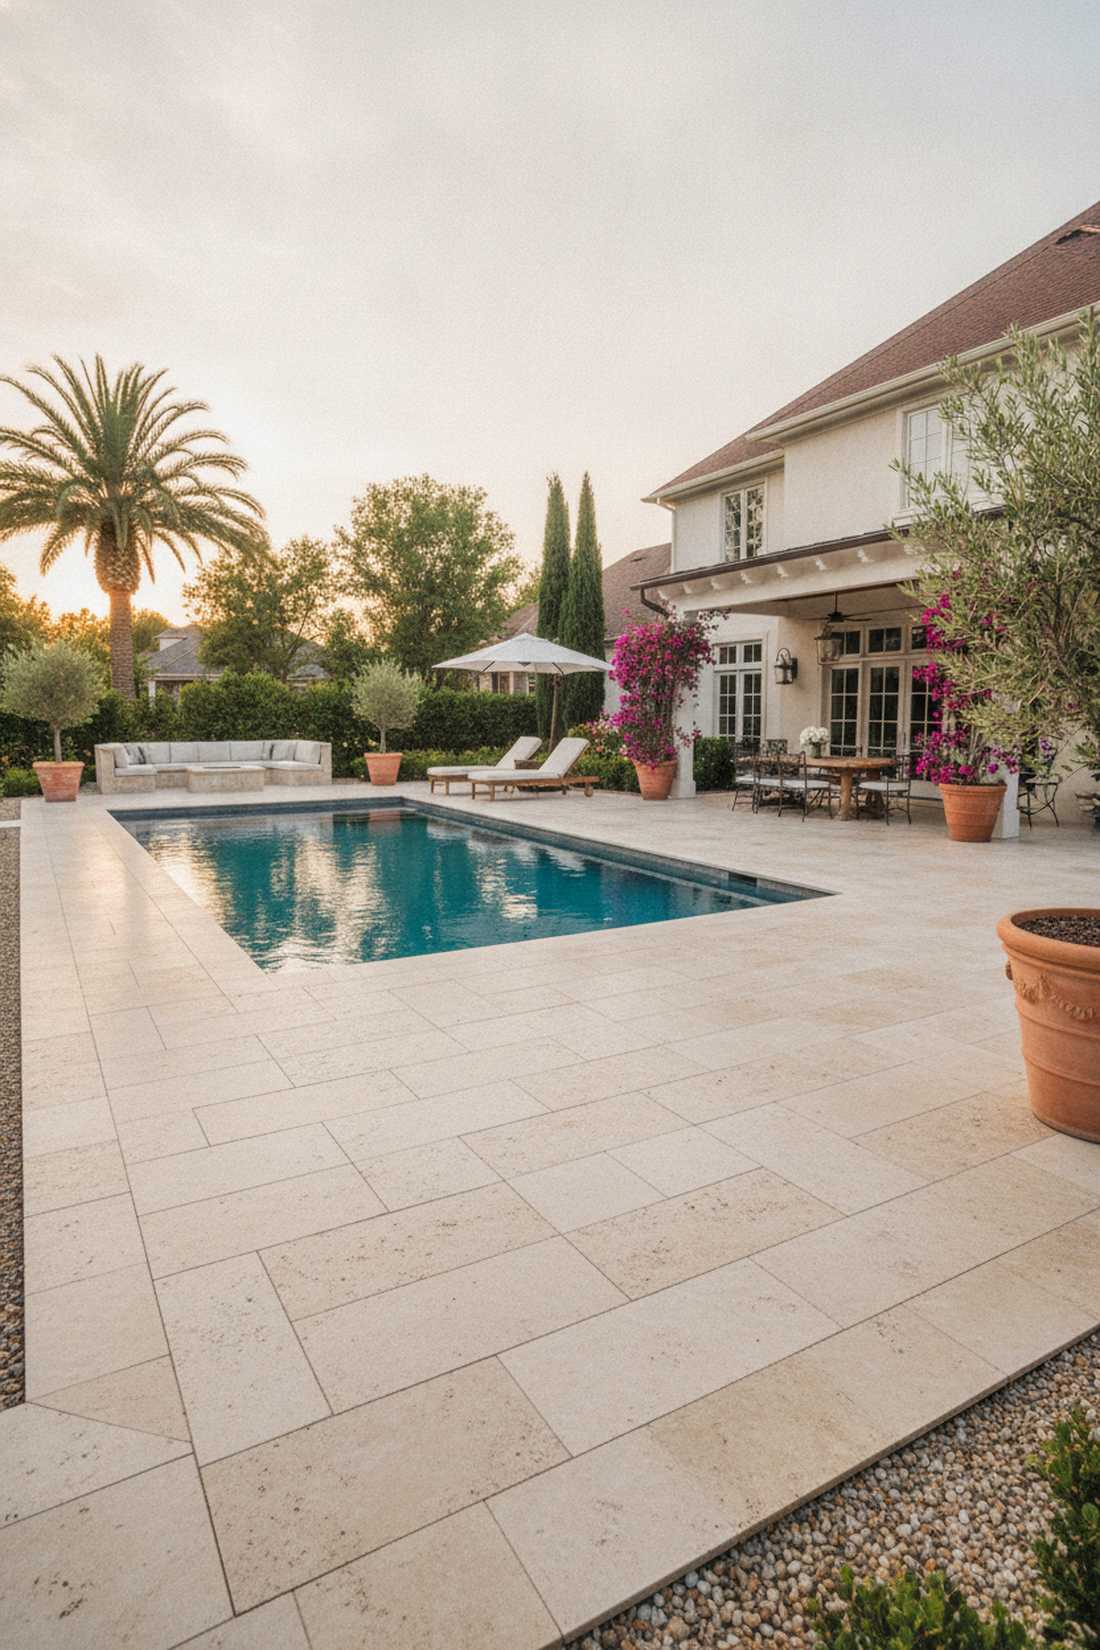
Feels like a Mediterranean villa sitting directly in your backyard. Lightweight travertine pool decks work exceptionally well for high-heat southern climates.
Skip the cheap concrete pads because this heat-deflecting stone looks far more expensive than it actually is. Utilizing weatherproof masonry adhesives keeps those border tiles from ever sliding into the dirt.
Budget roughly $14–$20 per square foot for a brilliant finish. Save this to your summer remodeling board!
- Key Materials: Honed travertine pavers, gravel base
- Vibe / Style: Coastal European elegance
- Difficulty: Advanced beginner
- Budget Breakdown: Pavers: $14/sq.ft | Finishing: $6/sq.ft
- Creator’s Tip: Always seal travertine immediately upon installation to block stubborn organic stains.
- Smart Sourcing: pre-cut travertine paver bundles and heavy-duty penetrating sealants.
4. Composite Decking Tiles
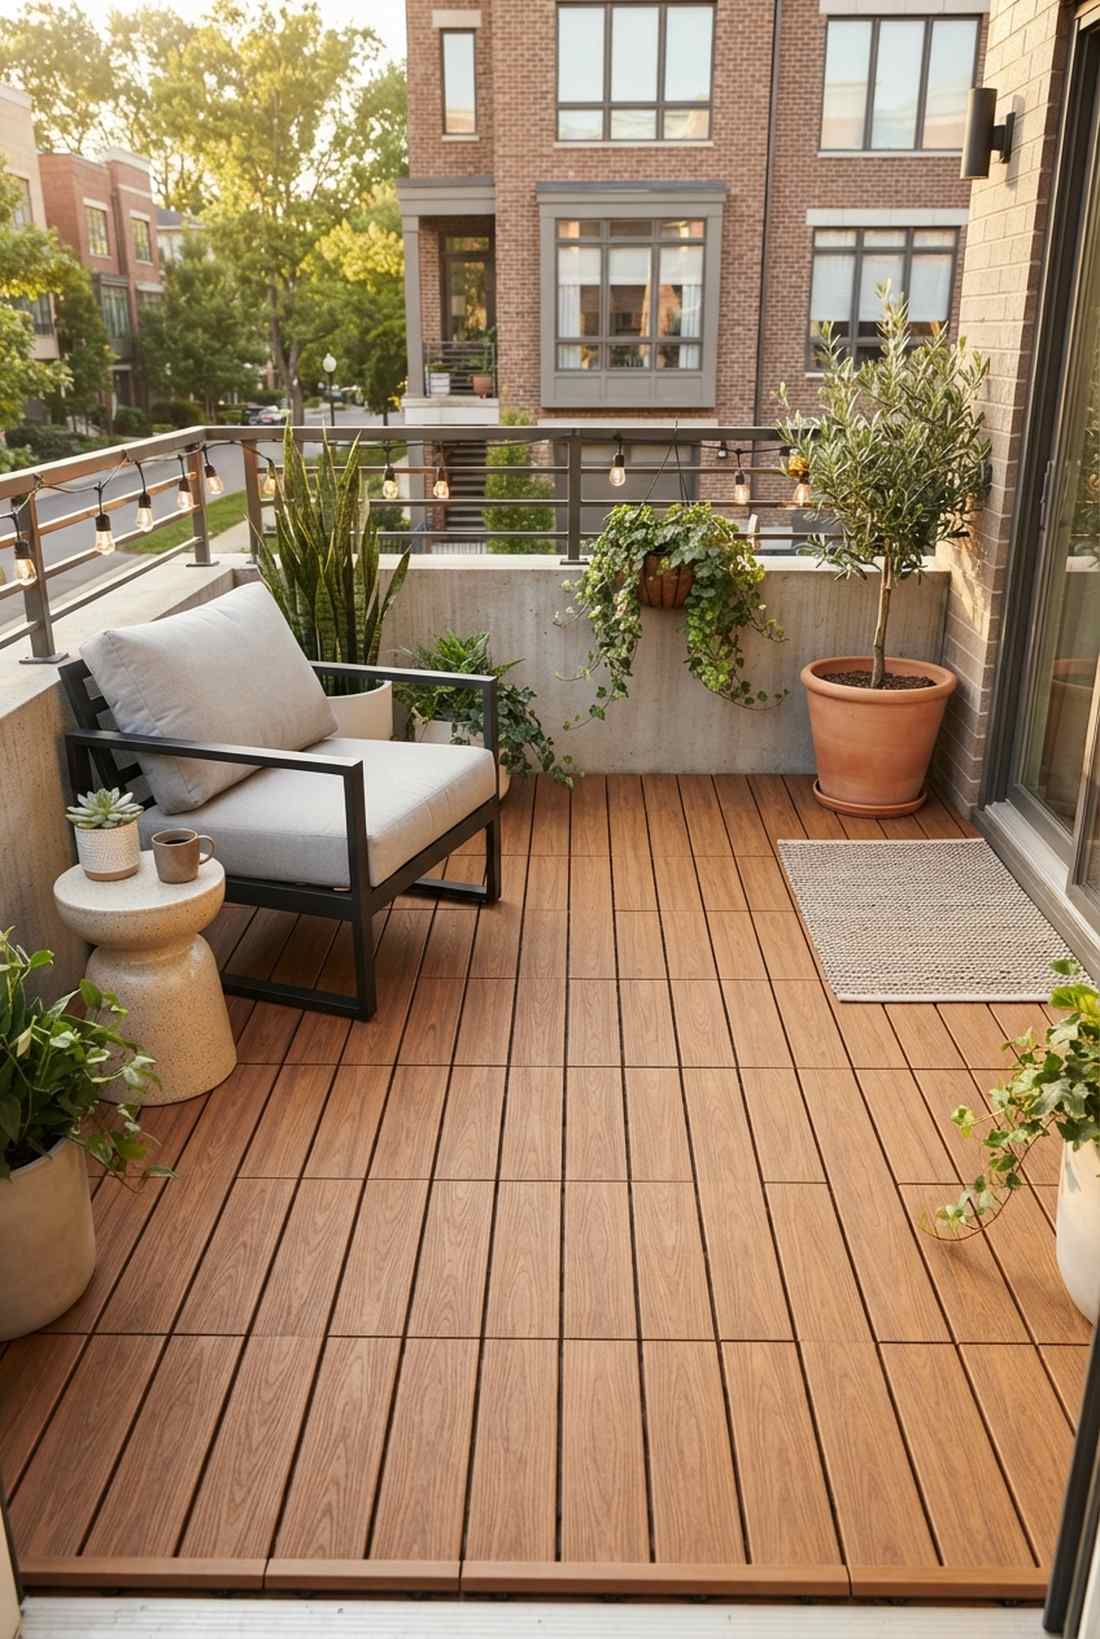
Radiates sleek, modern townhouse energy instantly. Snap-together composite tiles are an absolute lifesaver for hiding ugly apartment balconies.
People waste days painting old concrete, but this snap-and-go system delivers an ultra-premium aesthetic in under an hour. Investing in UV-coated interlocking deck kits guarantees they won’t fade by August.
You can transform a small space for right around $120 total. Highly recommended for a quick weekend win.
- Key Materials: Interlocking composite squares, edge trim
- Vibe / Style: Urban modern chic
- Difficulty: Easiest beginner setup
- Budget Breakdown: Tile Packs: $100 | Trim Kits: $20
- Creator’s Tip: Hose off the concrete beneath the tiles first to prevent weird odors in humid months.
- Smart Sourcing: UV-resistant composite tile bulk packs and snap-on corner transition pieces.
Most people completely ruin their backyard budget… until they see the genius hack coming up next.
5. Stamped Concrete Paving
Looks like a million-dollar cobblestone driveway you see in luxury magazines. Seamless stamped concrete patios are perfect for massive entertaining zones.
This layout is deceivingly cheap but mimics high-end natural stone beautifully without the brutal weed pulling. Using commercial-grade stamping mats allows you to imprint stunning textures directly into fresh pours.
You can easily pull this off for $12–$18 per square foot. Pin this layout to your dream home exterior board!
- Key Materials: Concrete mix, color release powder
- Vibe / Style: Grand estate traditional
- Difficulty: Professional or advanced DIY
- Budget Breakdown: Concrete: $8/sq.ft | Stamping Tools: $4/sq.ft
- Creator’s Tip: Use a dark powder release over a light base color for insane 3D depth.
- Smart Sourcing: reusable concrete texture stamping mats and high-gloss acrylic concrete sealers.
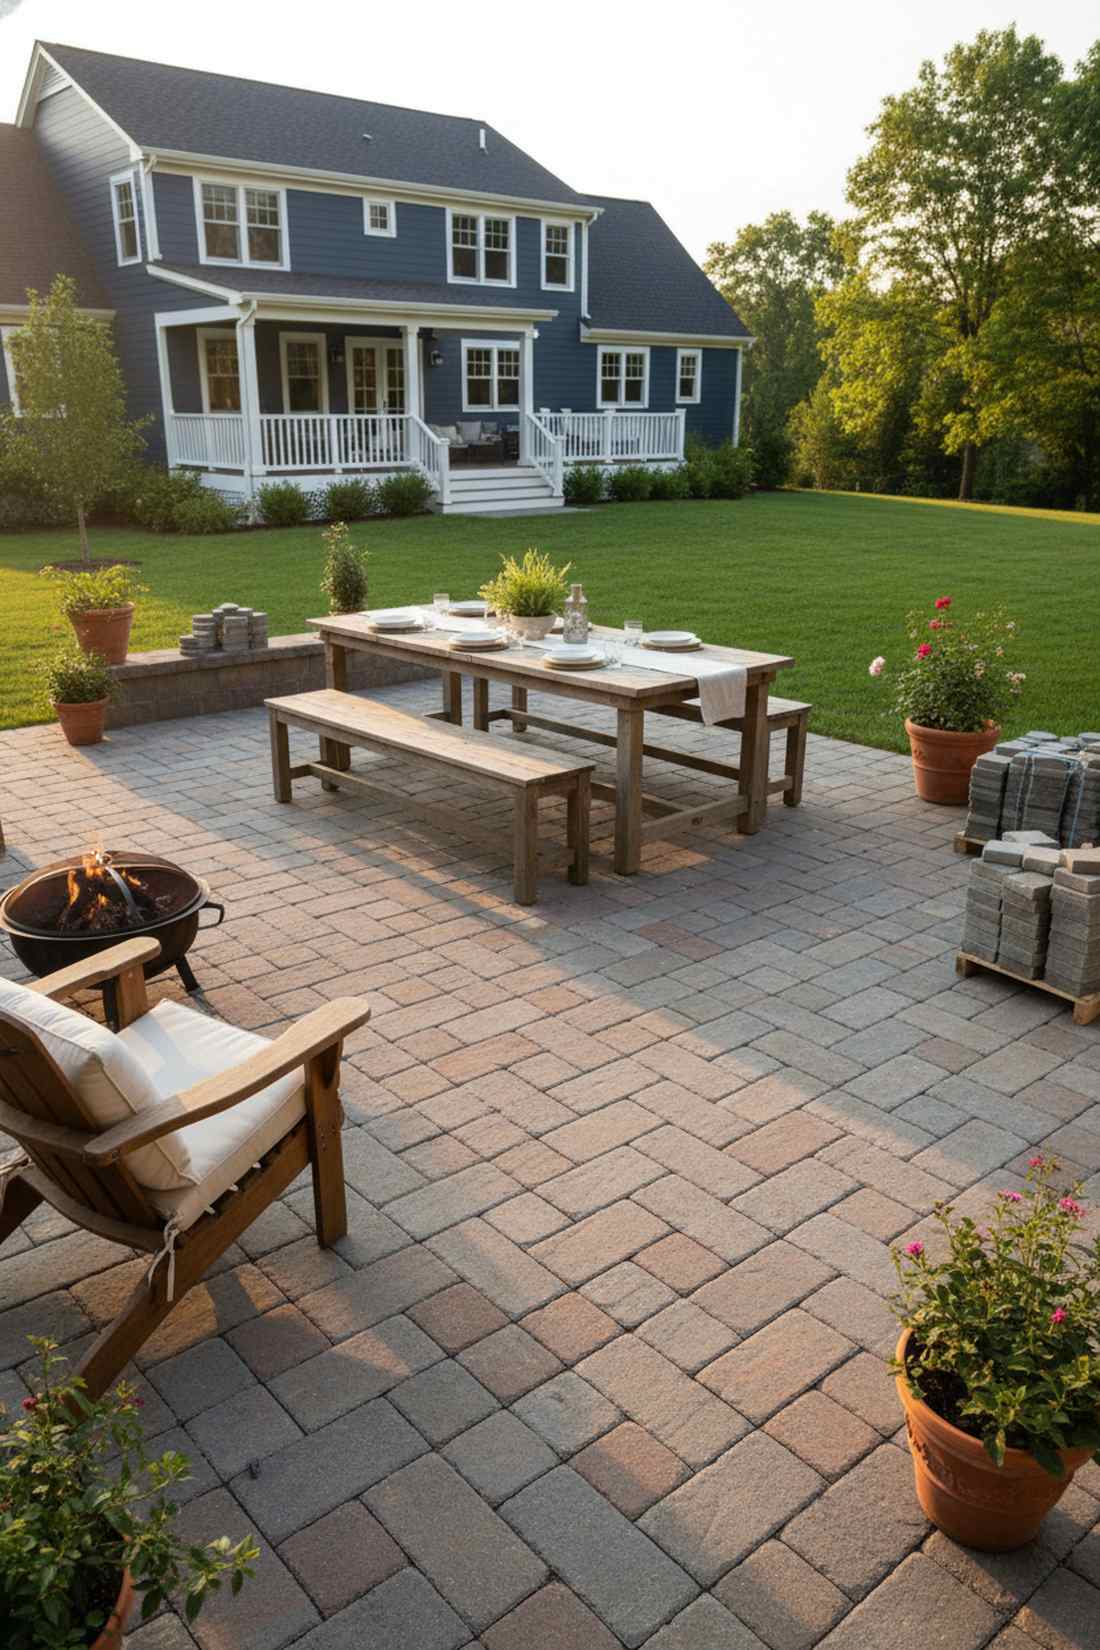
6. Clay Brick Pavers
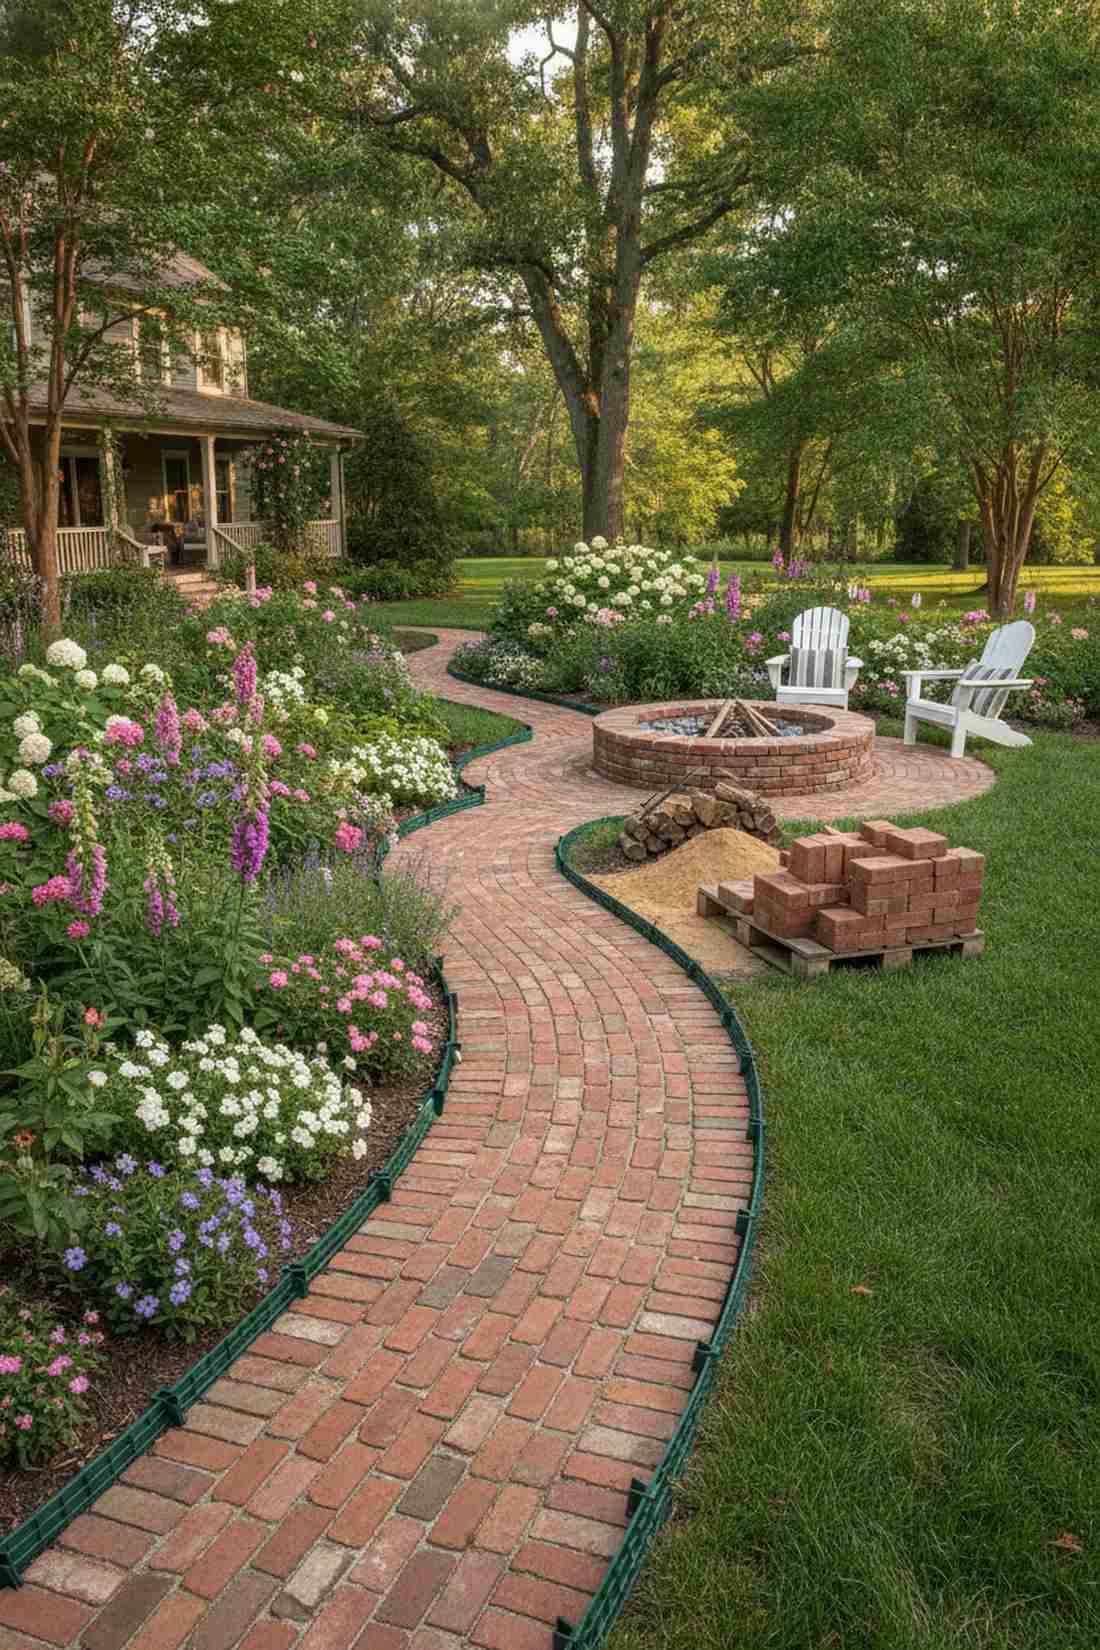
Feels like a historic colonial secret garden you discovered by accident. Classic red brick pathways are perfect for wrapping around established flower beds.
Fad materials come and go, but this timeless aesthetic holds incredible value and never looks outdated. Securing everything with high-grade paver edging kits guarantees your bricks won’t slowly migrate into the lawn.
Tackle a fire pit surround for roughly $200 in materials. It’s a gorgeous weekend project to transform your grass.
- Key Materials: Fired clay bricks, leveling sand
- Vibe / Style: Vintage historical charm
- Difficulty: Beginner-friendly patience
- Budget Breakdown: Bricks: $150 | Sand/Edging: $50
- Creator’s Tip: Sweep fine masonry sand over the top for three straight days to lock bricks completely solid.
- Smart Sourcing: heavy-duty plastic paver restraints and bulk fired clay brick pallets.
7. Permeable Concrete Pavers
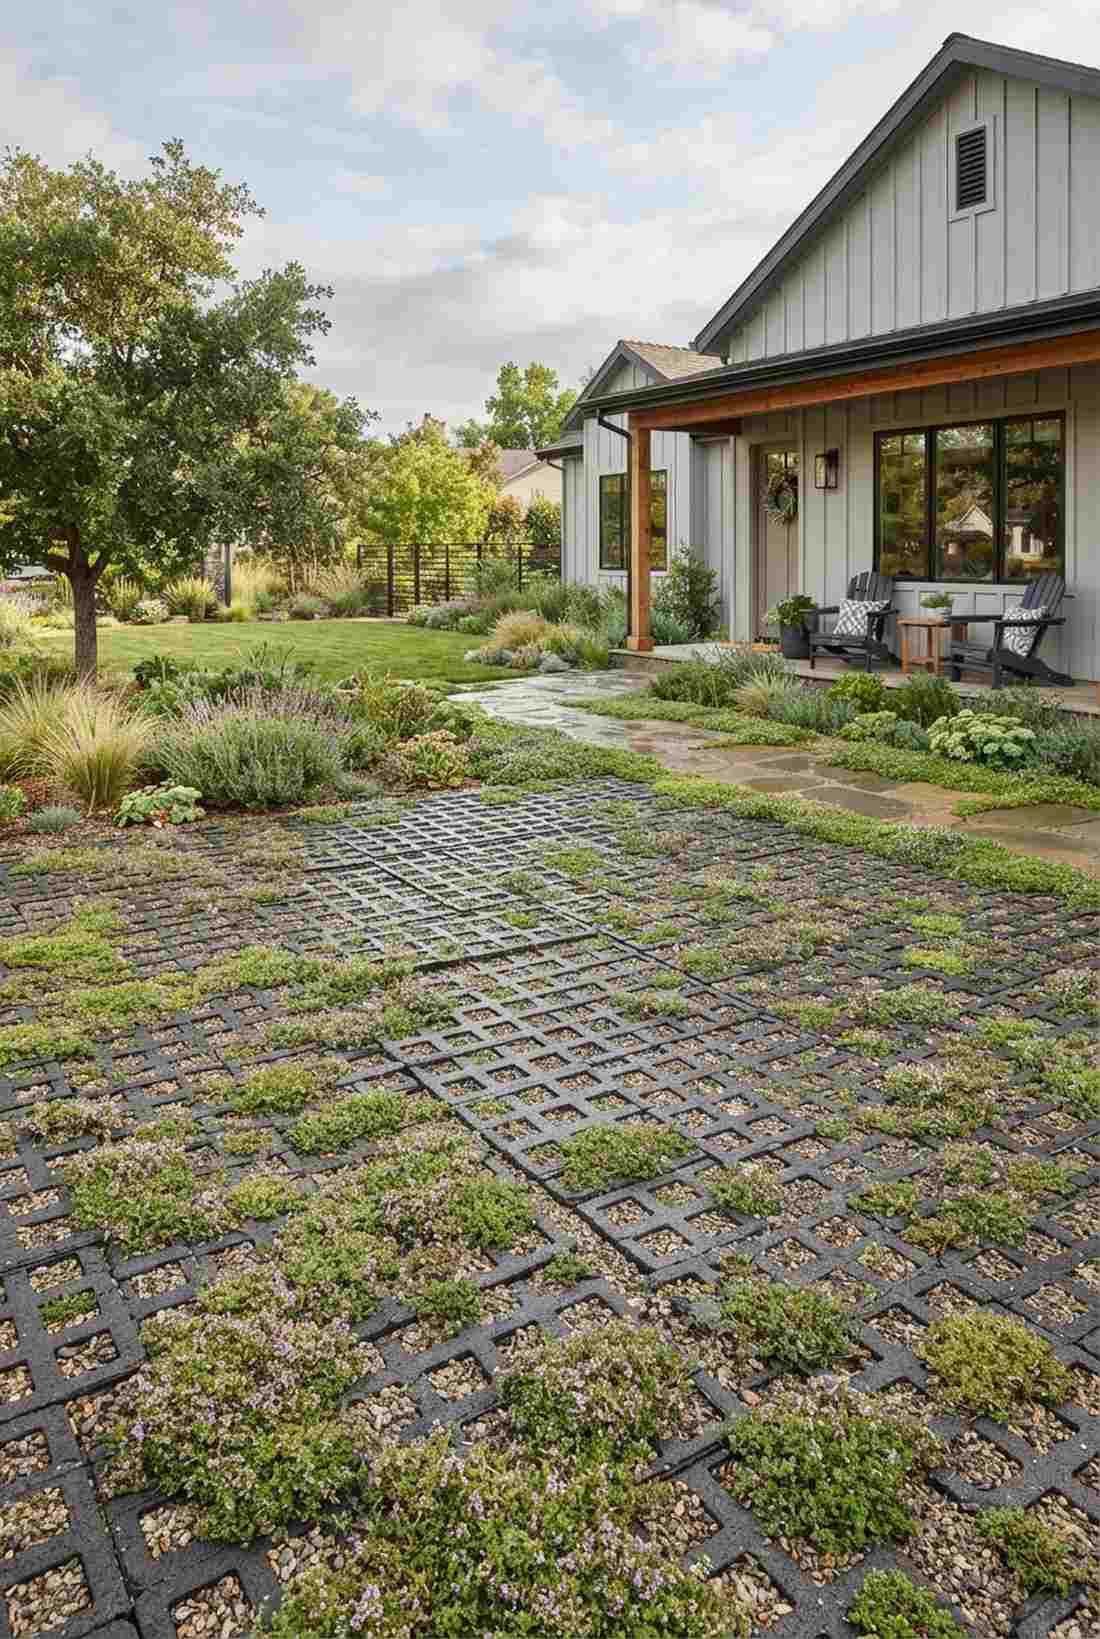
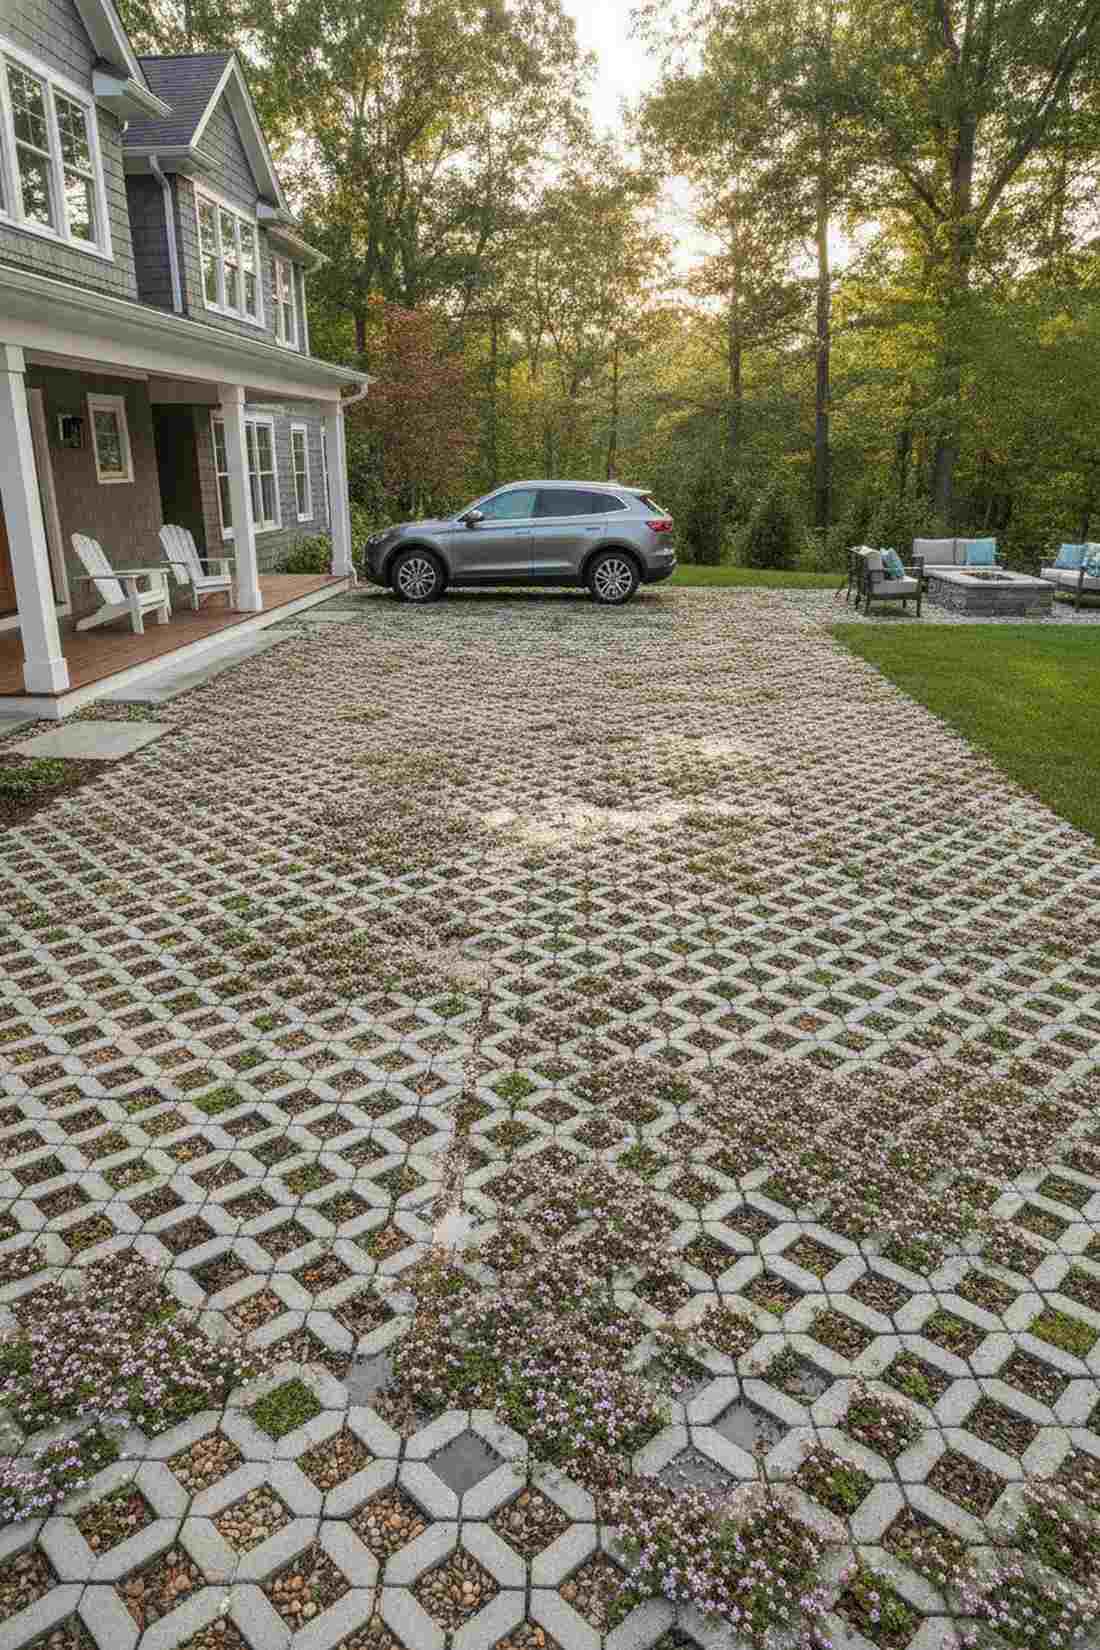
Gives off eco-conscious architectural digest vibes. Open-grid permeable driveway pavers work wonderfully for areas prone to heavy rain pooling.
Traditional slabs ruin local drainage, but this genius system provides a designer-level finish while eating up stormwater instantly. Injecting drought-resistant creeping thyme seeds between the grids makes the entire surface bloom beautifully.
A smart long-term investment costing about $15 per square foot. Save this if you deal with a soggy backyard!
- Key Materials: Permeable grid blocks, crushed gravel
- Vibe / Style: Modern eco-chic
- Difficulty: Intermediate
- Budget Breakdown: Grids: $10/sq.ft | Aggregate: $5/sq.ft
- Creator’s Tip: Never use fine sand in the joints, or you’ll instantly destroy the drainage capability.
- Smart Sourcing: heavy-duty permeable paver grids and bulk groundcover seed starter kits.
8. Slate Tiles
Feels like stepping into a moody, modern mountain retreat. Dark cleft slate patios are incredibly effective for heavily shaded backyard lounge areas.
Standard beige pavers look incredibly cheap next to this, delivering a surprisingly premium look that anchors modern furniture perfectly. Treating the stone with a color-enhancing wet-look sealer makes those subtle copper tones explode visually.
You can execute a stunning layout for about $18–$25 per square foot. Highly recommended for sophisticated fire pit zones.
- Key Materials: Natural slate tiles, thinset mortar
- Vibe / Style: Moody contemporary
- Difficulty: Advanced DIY
- Budget Breakdown: Slate: $16/sq.ft | Mortar/Sealant: $4/sq.ft
- Creator’s Tip: Avoid laying slate in direct baking sun as the dark surface absorbs massive heat.
- Smart Sourcing: premium natural slate tile bundles and color-enhancing stone sealants.
9. Decomposed Granite
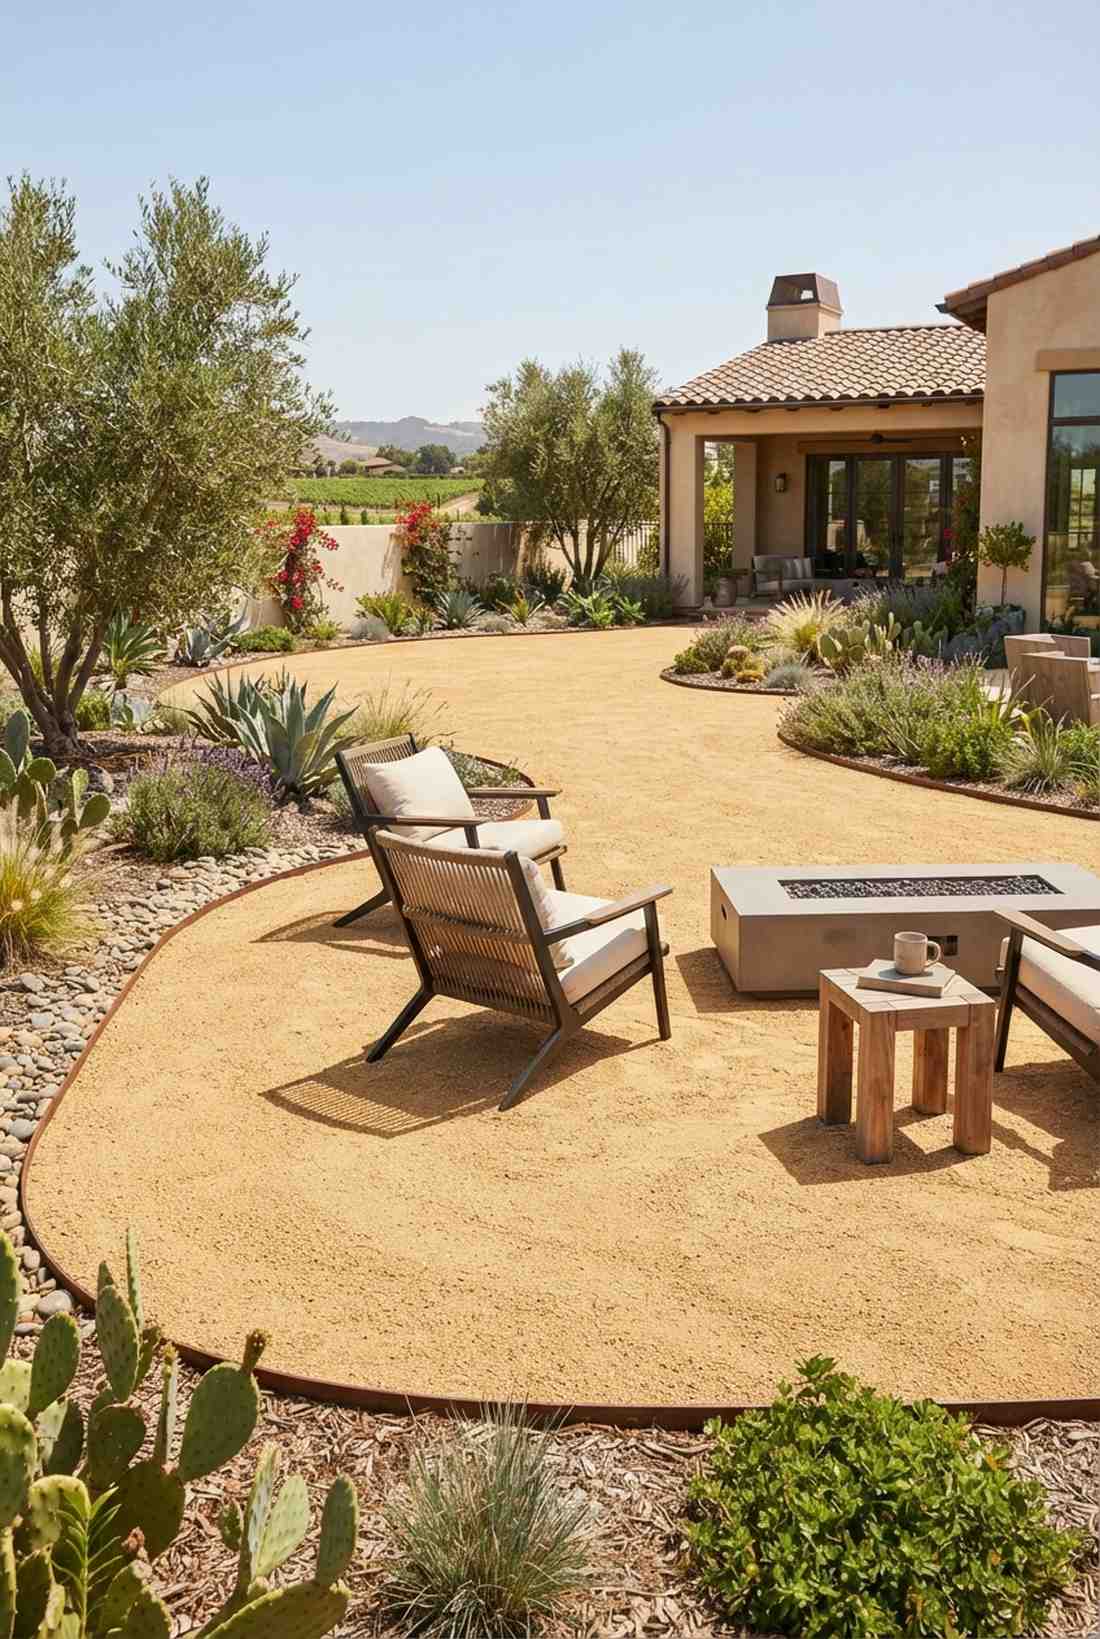
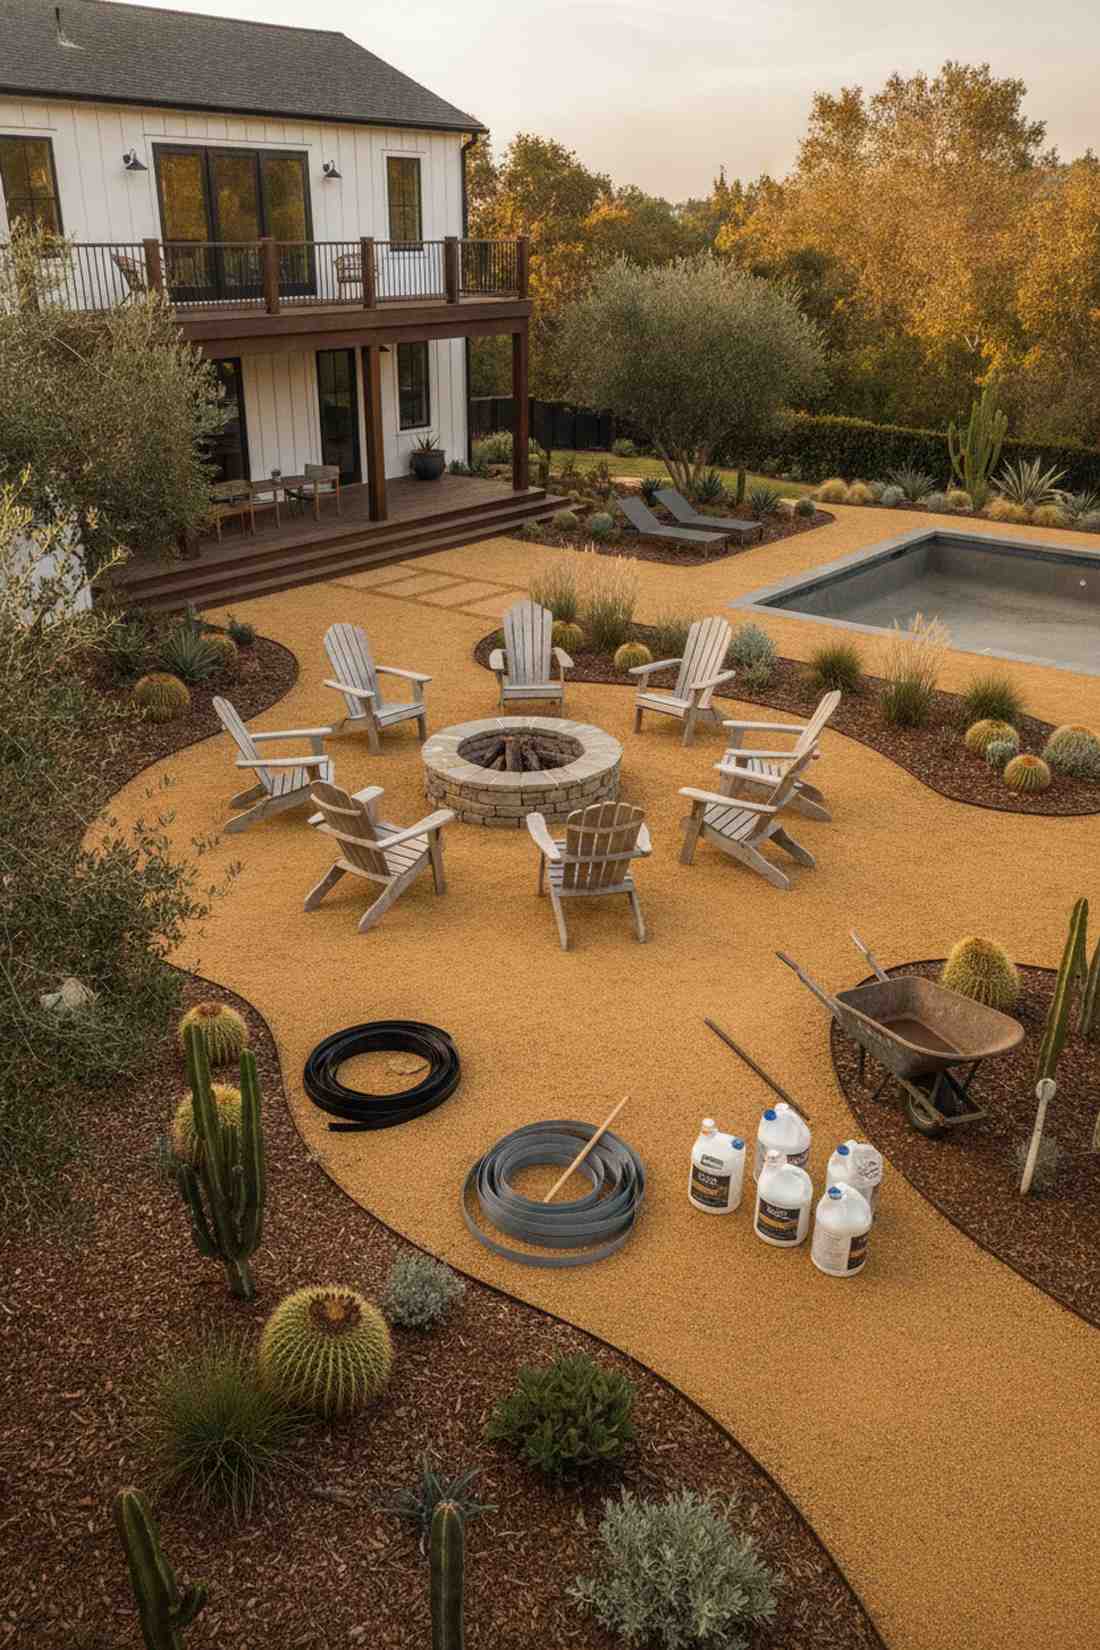
Straight out of a sun-drenched Californian vineyard estate. Compact decomposed granite areas are the ultimate cheap solution for massive, empty drought-prone yards.
Grass is dead, but this layout delivers an insanely expensive organic aesthetic for absolute pennies. Mixing in a commercial granite binding stabilizer stops the dust from ever tracking into your living room.
You can easily cover a huge seating zone for under $300. Pin this to your ultra-budget landscaping board!
- Key Materials: Gold DG, binding agent
- Vibe / Style: Desert oasis minimalist
- Difficulty: Easy beginner
- Budget Breakdown: DG Soil: $200 | Stabilizer: $100
- Creator’s Tip: Rent a heavy water-filled roller to compact the granite so it feels like solid concrete.
- Smart Sourcing: liquid granite stabilizer jugs and flexible steel landscape edging rolls.
💡 Must-Have Supplies for High-End Setups
To build these setups faster and ensure they last, skip the generic craft aisles and invest in the right foundational kits.
- Base & Support: commercial-grade leveling sand kits
- Setup Tools: heavy-duty masonry starter tools
- Weather/Durability Protection: UV-resistant clear acrylic sealants
This next layout is ridiculously cheap but visually mimics a $5,000 custom installation…
10. Rubber Paver Tiles
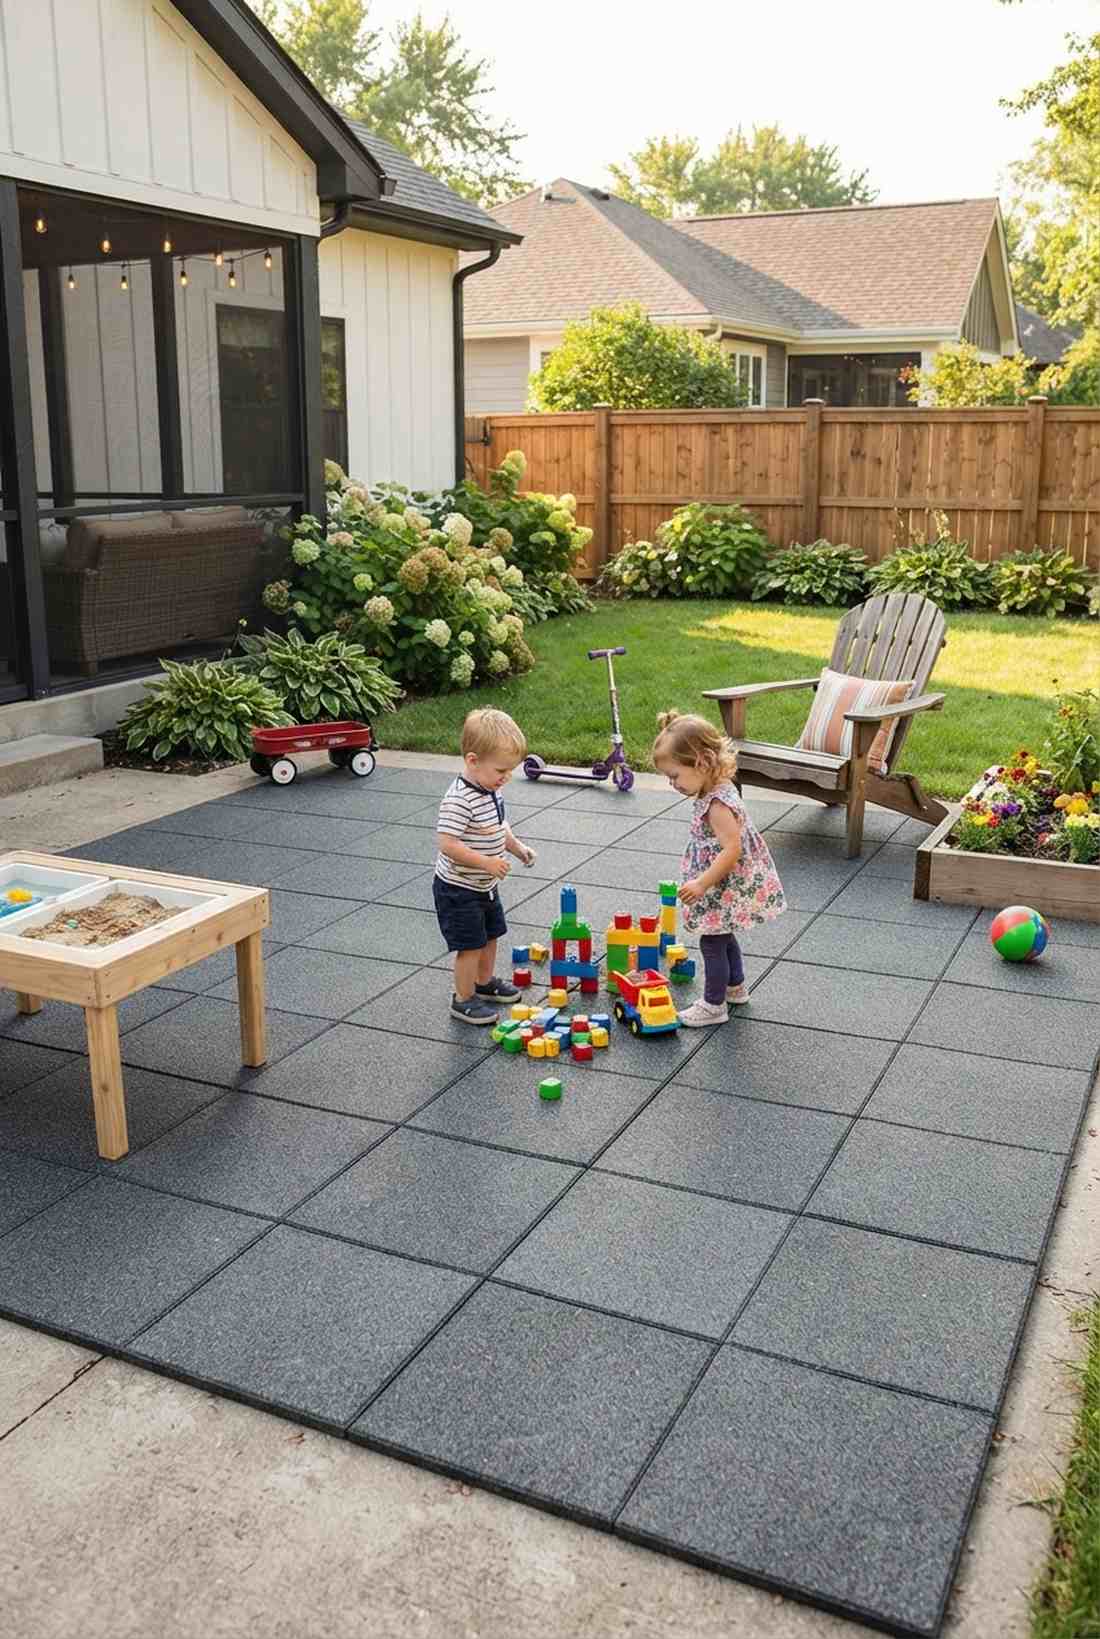
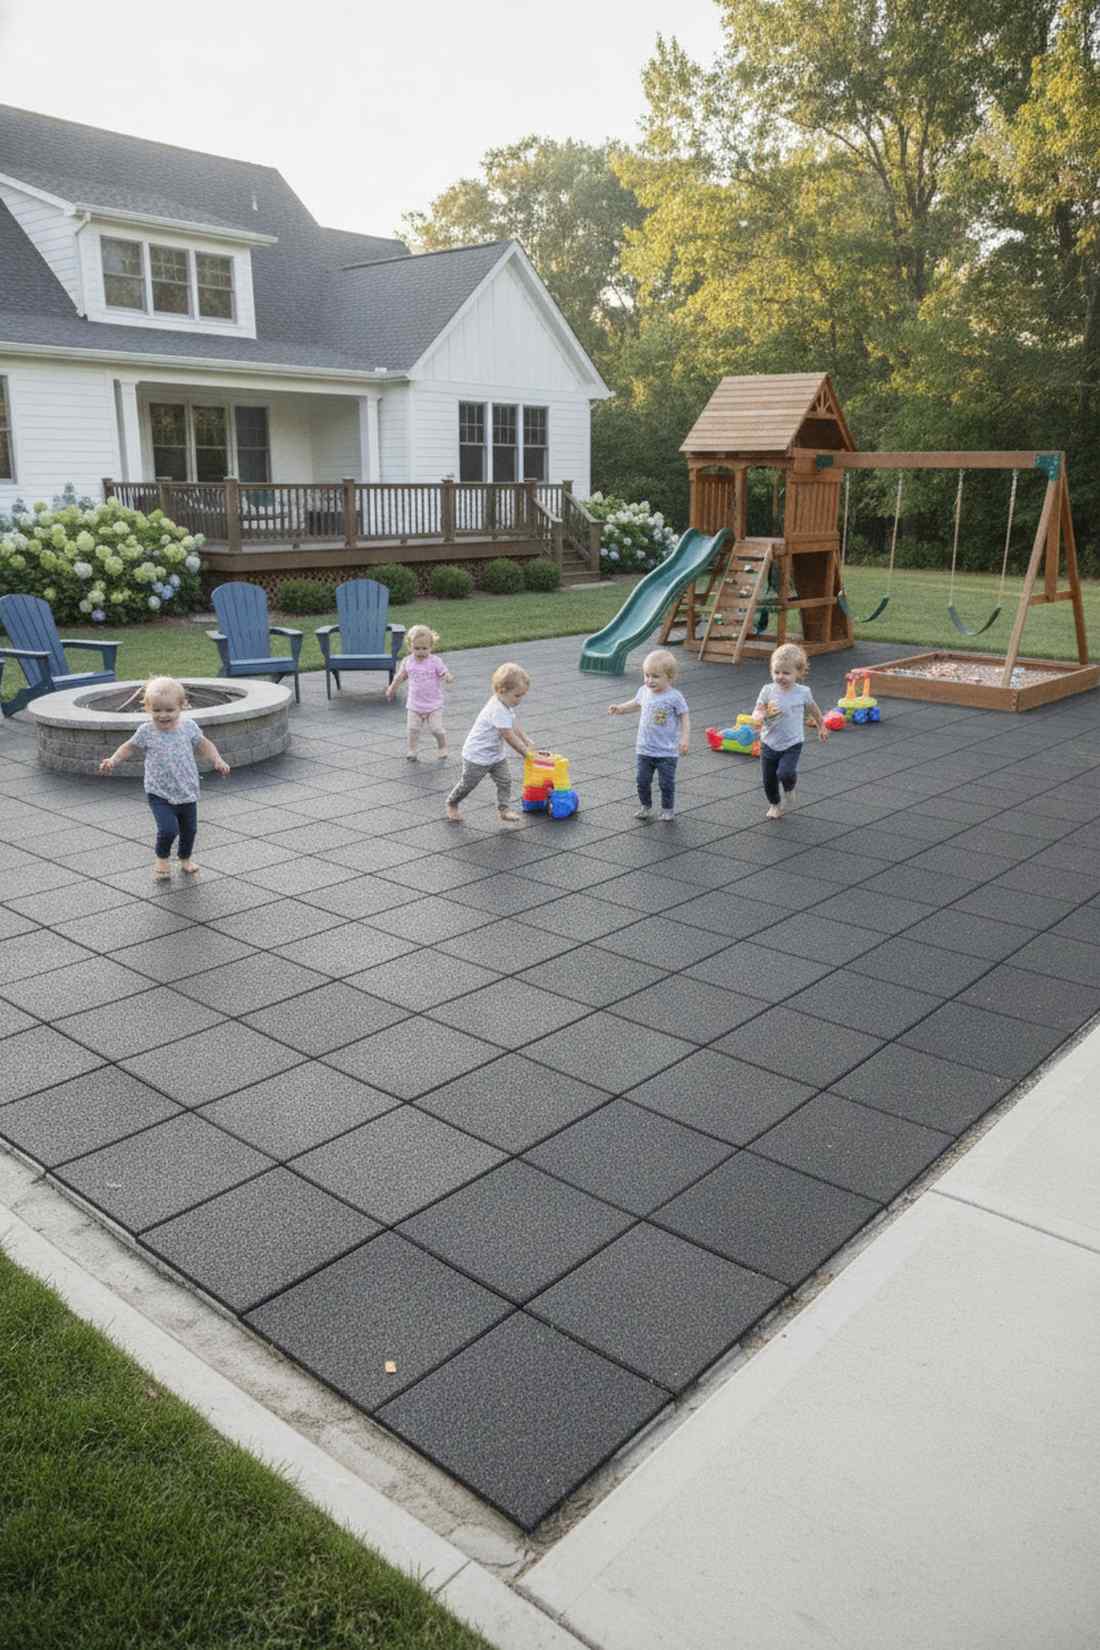
Feels like a bouncy, ultra-safe playground hidden in plain sight. Recycled rubber patio tiles are incredibly practical for spaces where toddlers constantly run.
Concrete is brutal on knees, but this shock-absorbing material gives a designer-level finish while completely child-proofing the backyard. Securing them with outdoor-grade polyurethane adhesives ensures they survive brutal winter freezes without lifting.
Transform a play zone quickly for under $5 per square foot. It’s a fast upgrade that completely changes the safety vibe.
- Key Materials: Interlocking rubber squares, utility knife
- Vibe / Style: Family-first functional
- Difficulty: Beginner friendly
- Budget Breakdown: Rubber Tiles: $4/sq.ft | Adhesive: $1/sq.ft
- Creator’s Tip: Lay these directly over cracked, ugly concrete for an instant 1-hour facelift.
- Smart Sourcing: bulk recycled rubber patio tiles and heavy-duty outdoor construction adhesive.
Creative Paving Patterns For Garden Patio Designs
11. Diagonal Grid Layout

Instantly makes a tiny claustrophobic space feel luxuriously wide. Diagonal diamond paving patterns work magic for aggressively small urban courtyards.
Straight lines emphasize small boundaries, but this optical illusion looks far more expensive than it actually is. Utilizing precision masonry cutting blades is the only way to get those sharp corner angles absolutely perfect.
Expect a 15% increase in material waste, but the visual payoff is massive. Save this if you’re trying to fake more square footage!
- Key Materials: Square pavers, wet saw
- Vibe / Style: Expansive modern geometry
- Difficulty: Intermediate
- Budget Breakdown: Extra Pavers: $50 | Blade Rentals: $40
- Creator’s Tip: Snap a neon chalk line exactly down the middle before laying your first guide piece.
- Smart Sourcing: diamond-tipped masonry wet saw blades and heavy-duty marking chalk boxes.
12. Circular Medallion Centerpiece


Feels like standing in the exact center of an Italian piazza. Pre-cast circular stone medallions serve as flawless anchors for heavy cast-iron dining sets.
Cutting perfect circles manually takes years of skill, but dropping in a pre-made kit delivers a surprisingly premium look by lunchtime. Grab a pre-cut radial paver kit to skip the agonizing geometry calculations completely.
You can easily pull this off for around $250 for the centerpiece. Pin this to your luxury landscape inspiration board!
- Key Materials: Pre-cut circle kits, base sand
- Vibe / Style: Classic European focal point
- Difficulty: Intermediate
- Budget Breakdown: Medallion Kit: $200 | Border Stones: $50
- Creator’s Tip: Build the circle first and lay the rest of the patio outward from the center.
- Smart Sourcing: pre-cut circular paver starter kits and commercial-grade leveling screed pipes.
13. Random Ashlar Pattern
Radiates the chaotic beauty of an ancient countryside castle. Multi-sized ashlar paver layouts are perfect for breaking up the boring grid look of standard patios.
Most DIYers fear random patterns, but utilizing a manufacturer template delivers an insanely expensive organic aesthetic with zero guesswork. Keep your gaps tight by dropping in rigid joint spacers during the entire installation.
A stunning upgrade that costs the exact same as a boring straight lay. Highly recommended for a quick weekend win.
- Key Materials: 3-piece paver sets, joint sand
- Vibe / Style: Rustic architectural
- Difficulty: Intermediate
- Budget Breakdown: Paver sets: $6/sq.ft | Base: $3/sq.ft
- Creator’s Tip: Never let four corners meet at a single intersection to maintain the randomized illusion.
- Smart Sourcing: multi-size ashlar paver bundles and bulk-pack rigid tile spacers.
14. Herringbone Brick Design
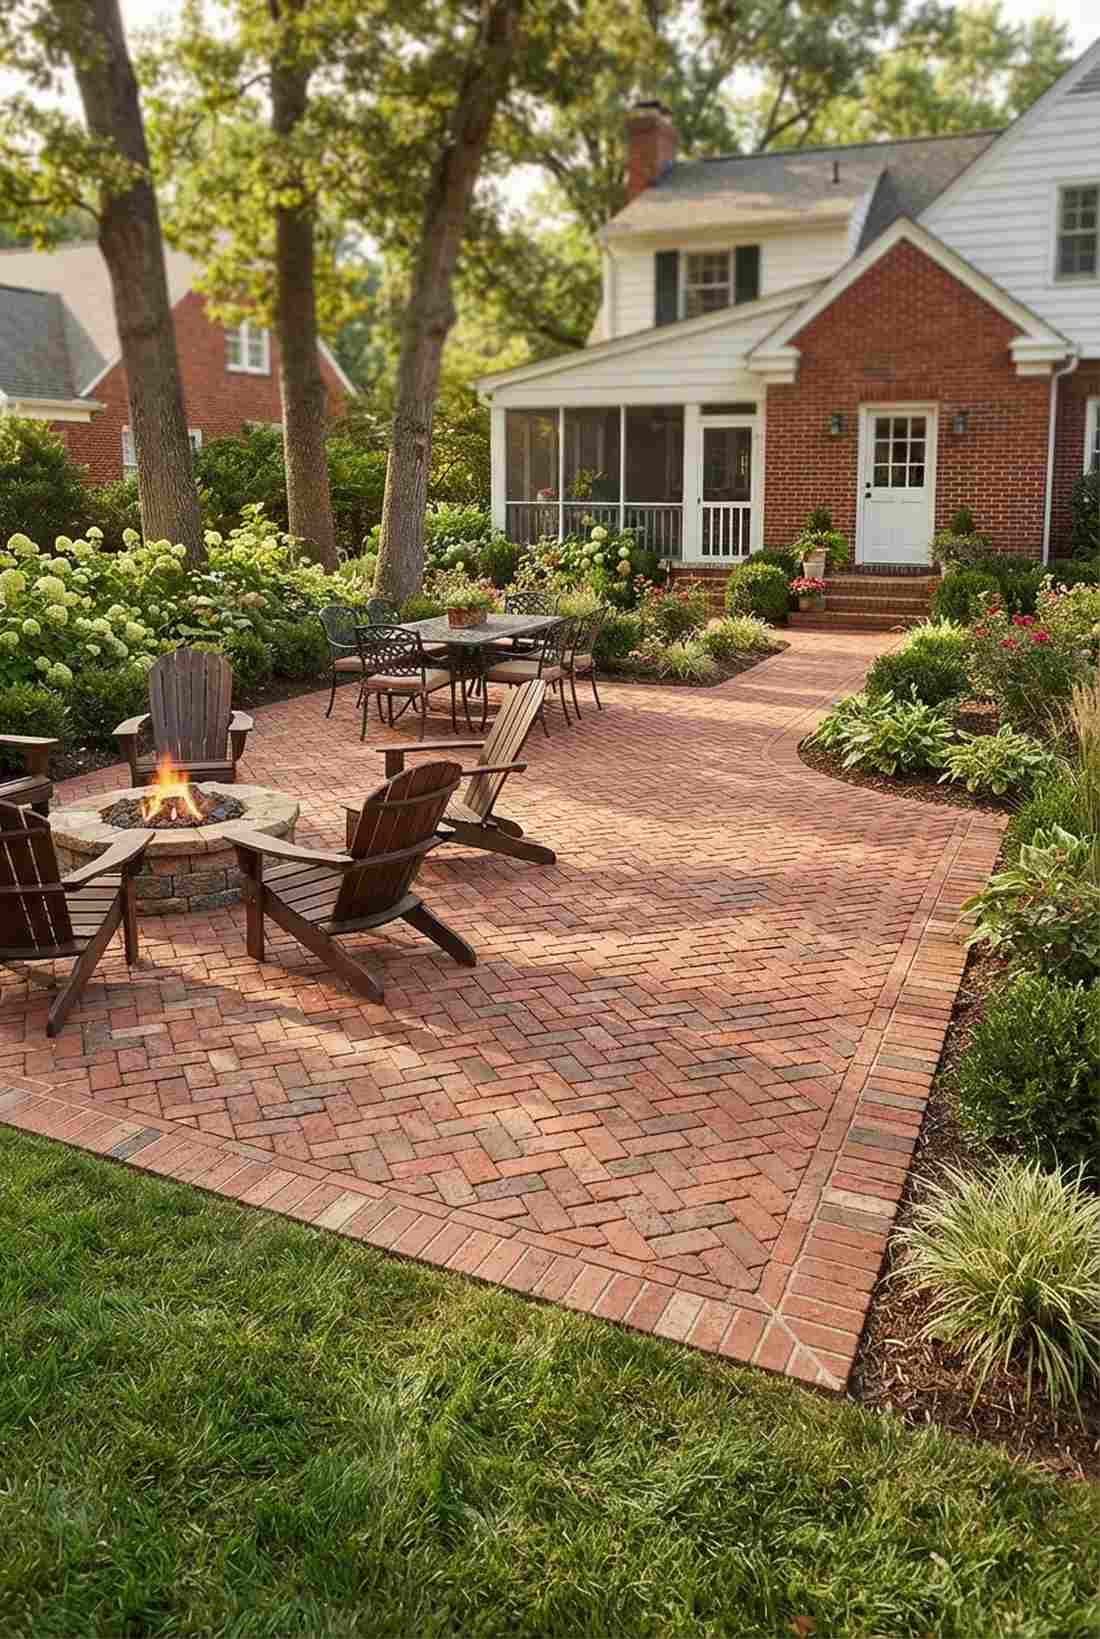
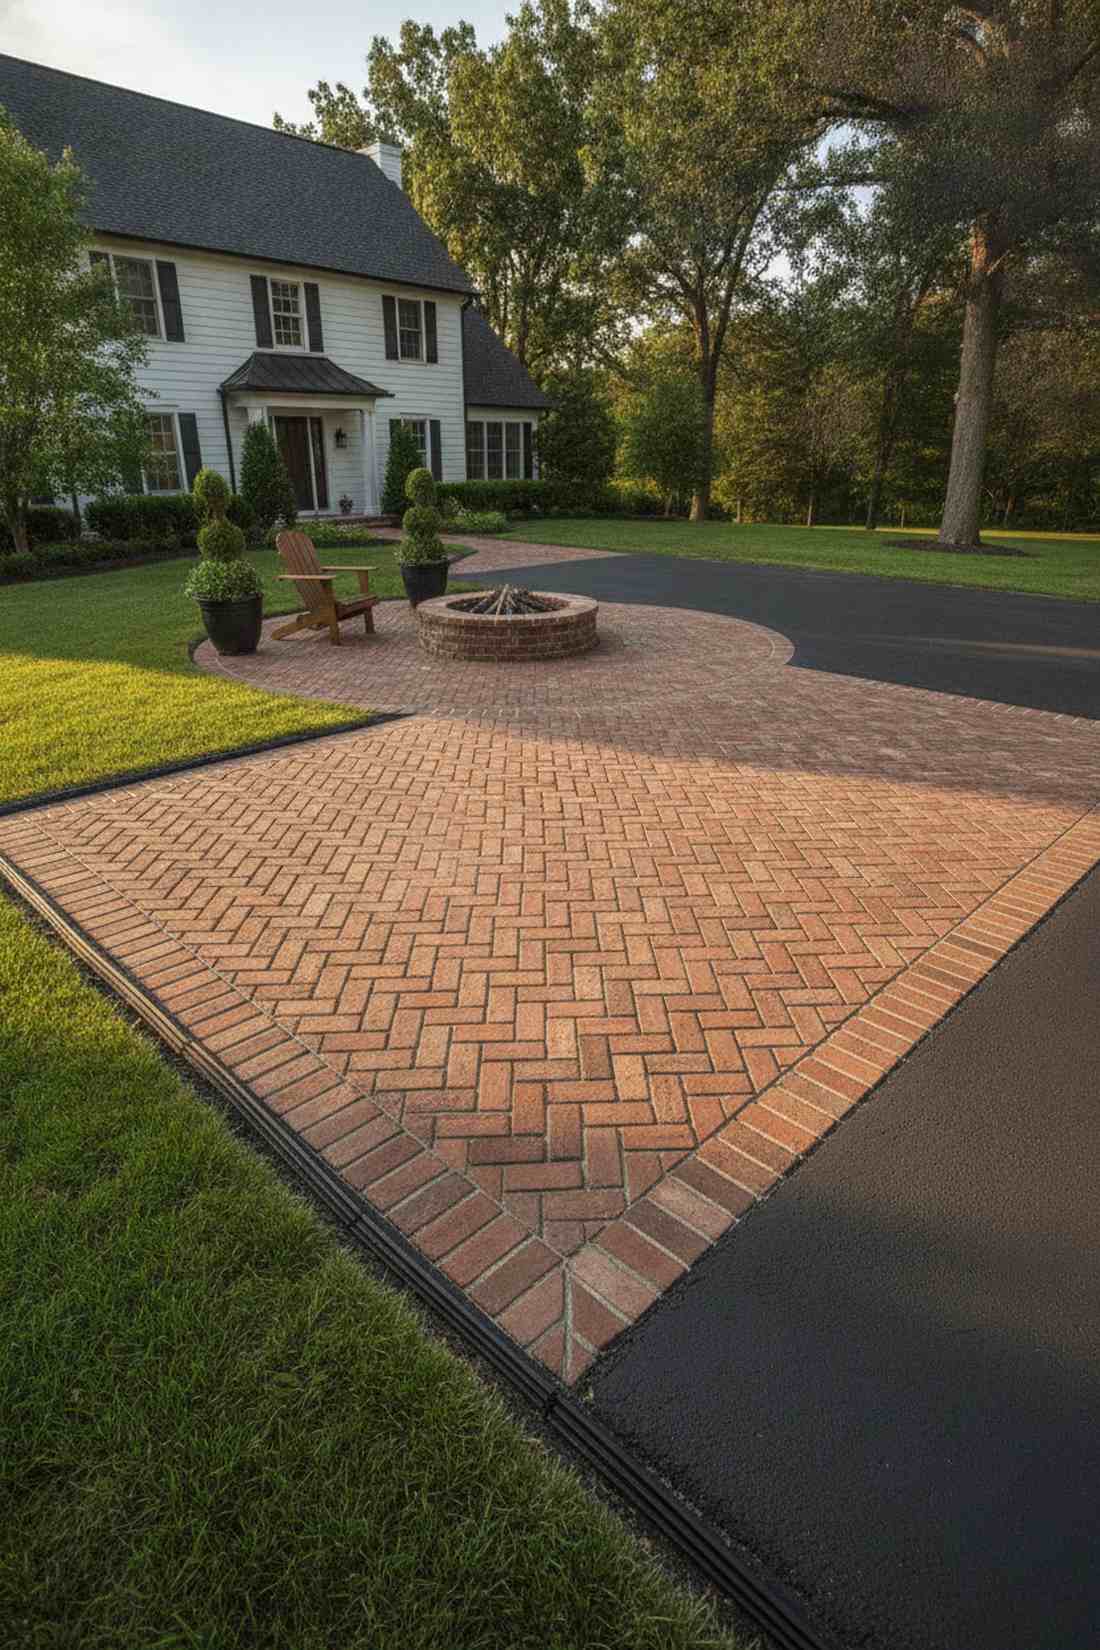
Straight out of a timeless English botanical garden. Interlocking herringbone brick layouts are the undisputed champions for high-traffic driveway borders or heavy seating zones.
Straight patterns shift under tire weight, but this V-locking matrix gives a designer-level finish that physically cannot be pushed apart. Utilizing heavy-duty soldier course borders traps the crazy zig-zags permanently in place.
Requires patience, but costs roughly $10 per square foot. Save this to your heavy-duty DIY weekend board!
- Key Materials: Standard bricks, concrete edge restraints
- Vibe / Style: Traditional bulletproof elegance
- Difficulty: Advanced beginner
- Budget Breakdown: Bricks: $8/sq.ft | Edge Restraint: $2/sq.ft
- Creator’s Tip: Always cut the difficult edge triangles last after the entire middle section is locked.
- Smart Sourcing: heavy-duty plastic edge restraints and bulk fired clay brick packs.
Stop scrolling if you have a tiny yard—this next trick forces small spaces to look massive.
15. Basketweave Pattern
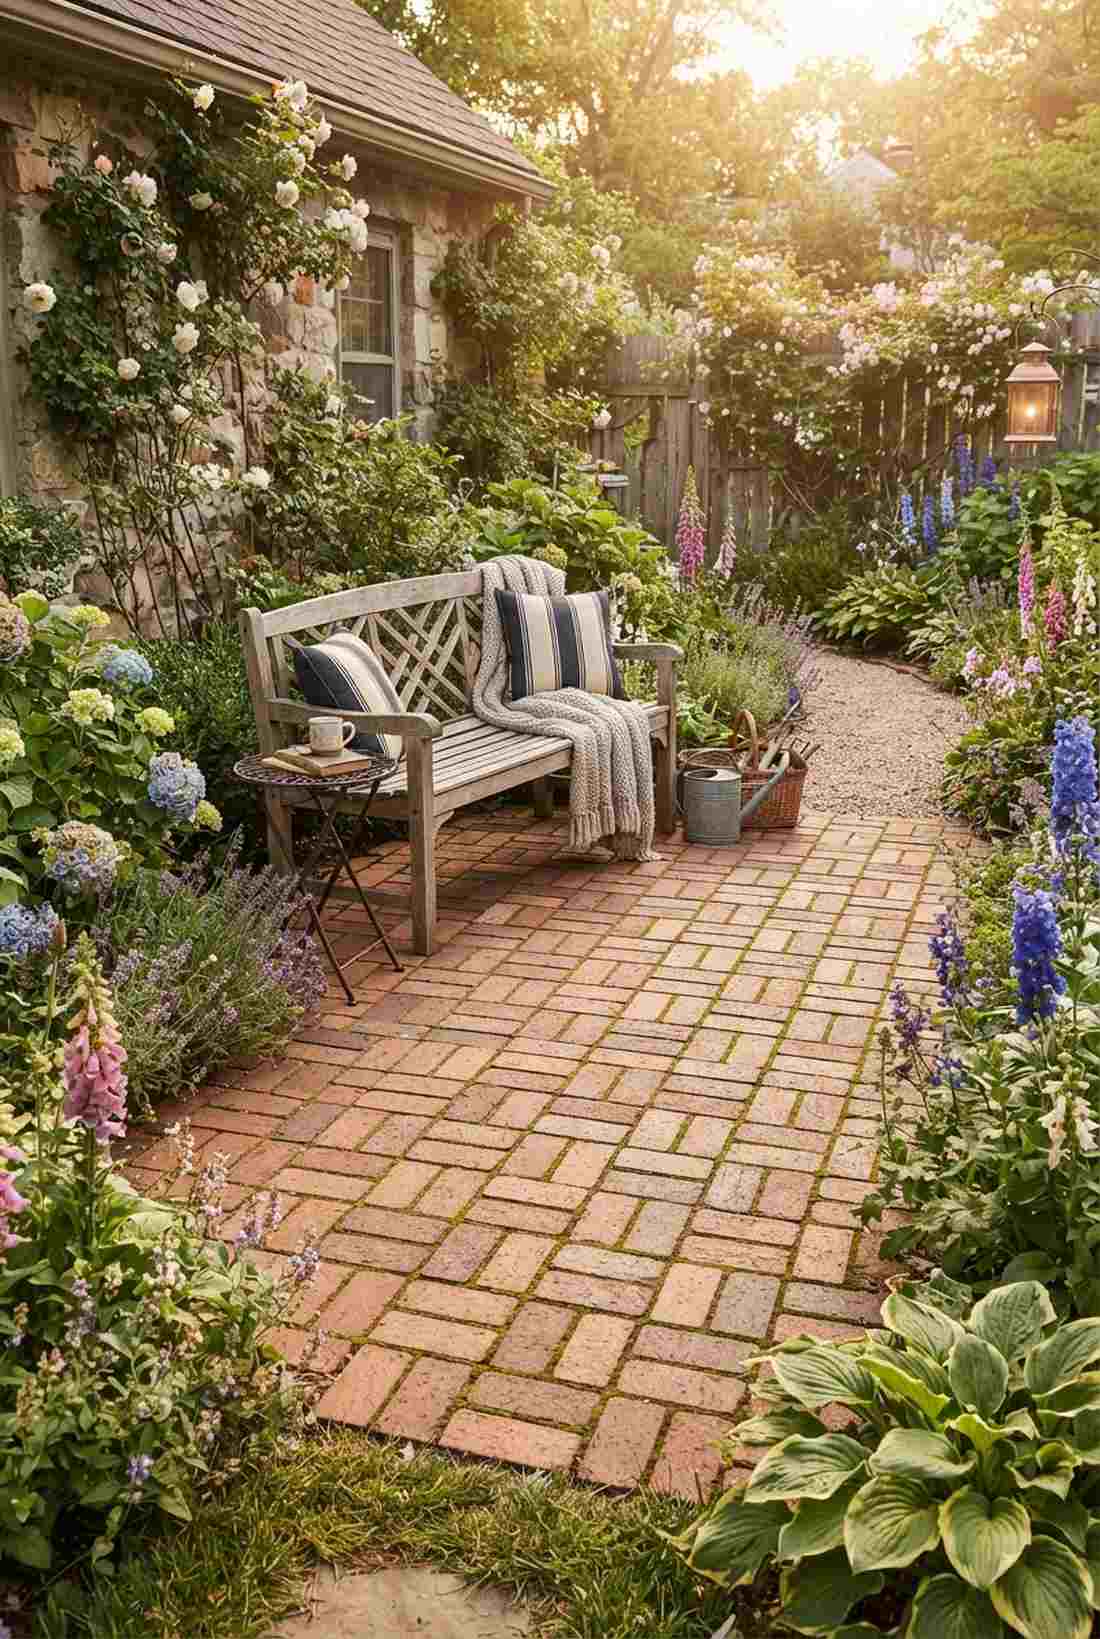
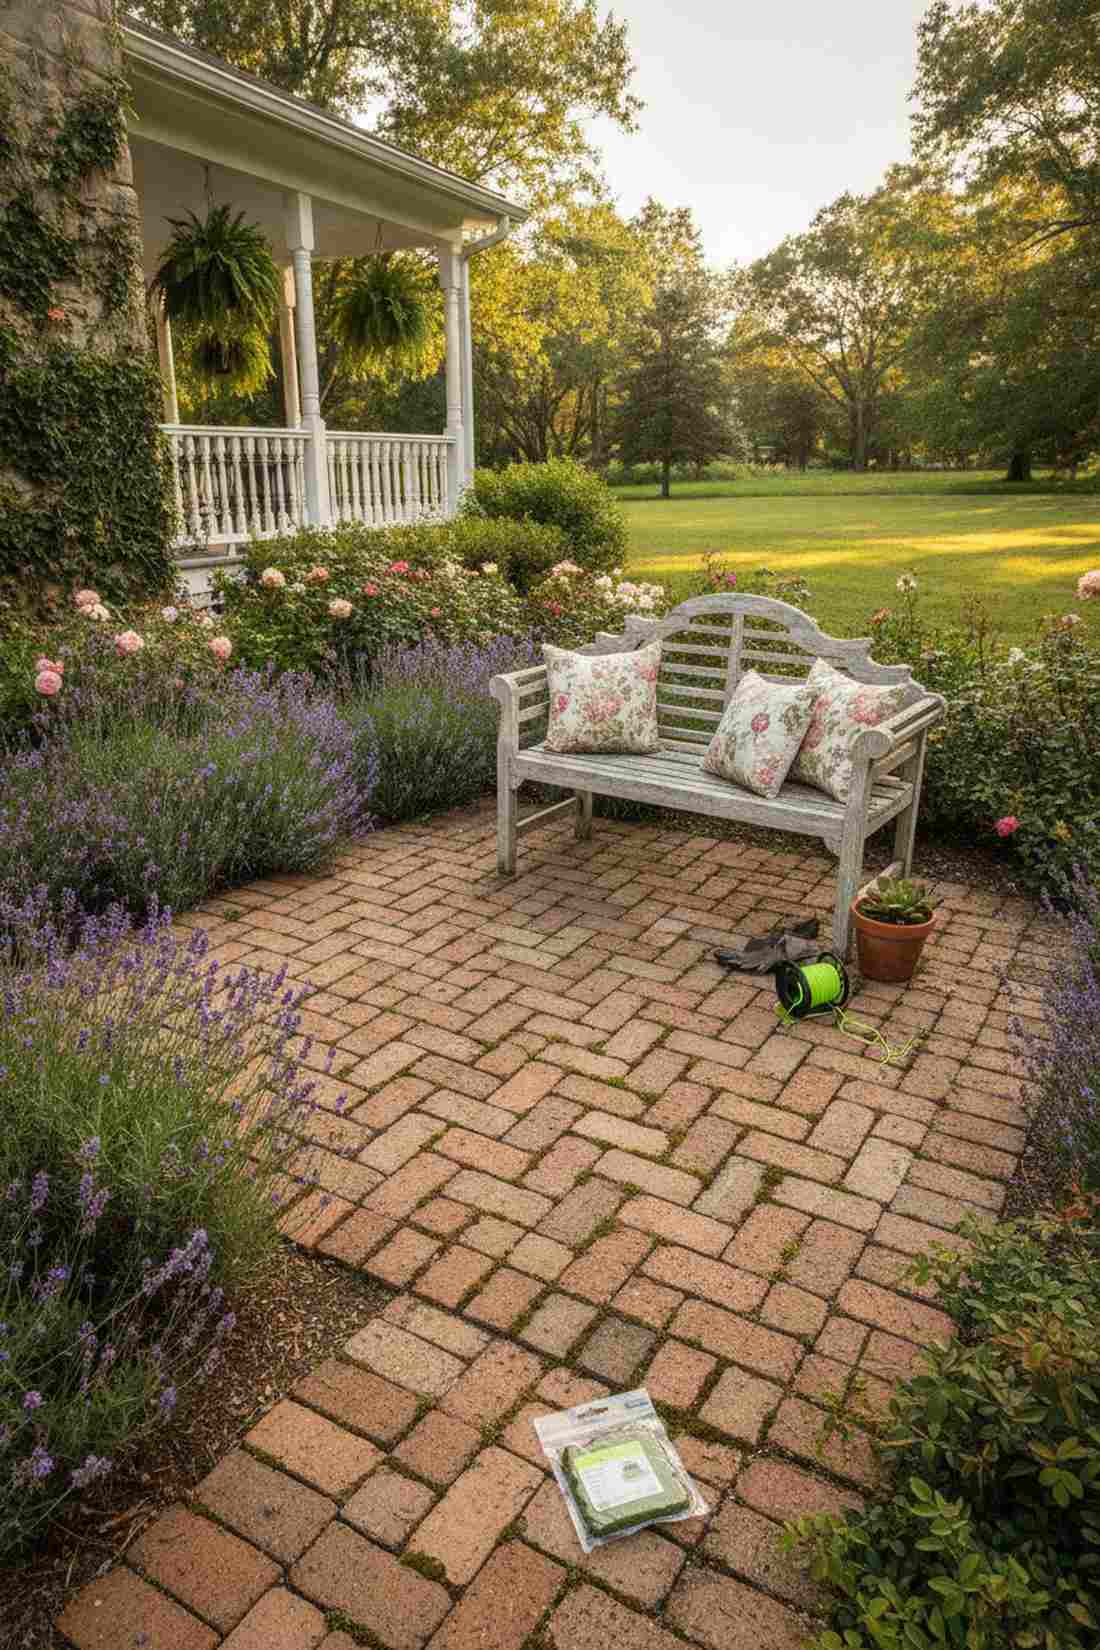
Feels like a cozy, sun-baked vintage courtyard. Alternating basketweave block layouts work beautifully for framing small, intimate garden benches.
Herringbone takes endless cutting, but this layout delivers a surprisingly premium look using only whole bricks and zero saw work. You can sneak in miniature garden supplies like tiny moss accents in the joints for a lived-in feel.
You can easily execute a small seating pad for $150. It’s a fast upgrade that completely changes the vibe.
- Key Materials: Clay pavers, jointing sand
- Vibe / Style: Nostalgic cottage
- Difficulty: Easy beginner
- Budget Breakdown: Bricks: $130 | Sand Base: $20
- Creator’s Tip: Keep your joint lines perfectly straight by using a taut mason’s string line every 3 feet.
- Smart Sourcing: neon mason string line reels and pre-cut moss joint filler packs.
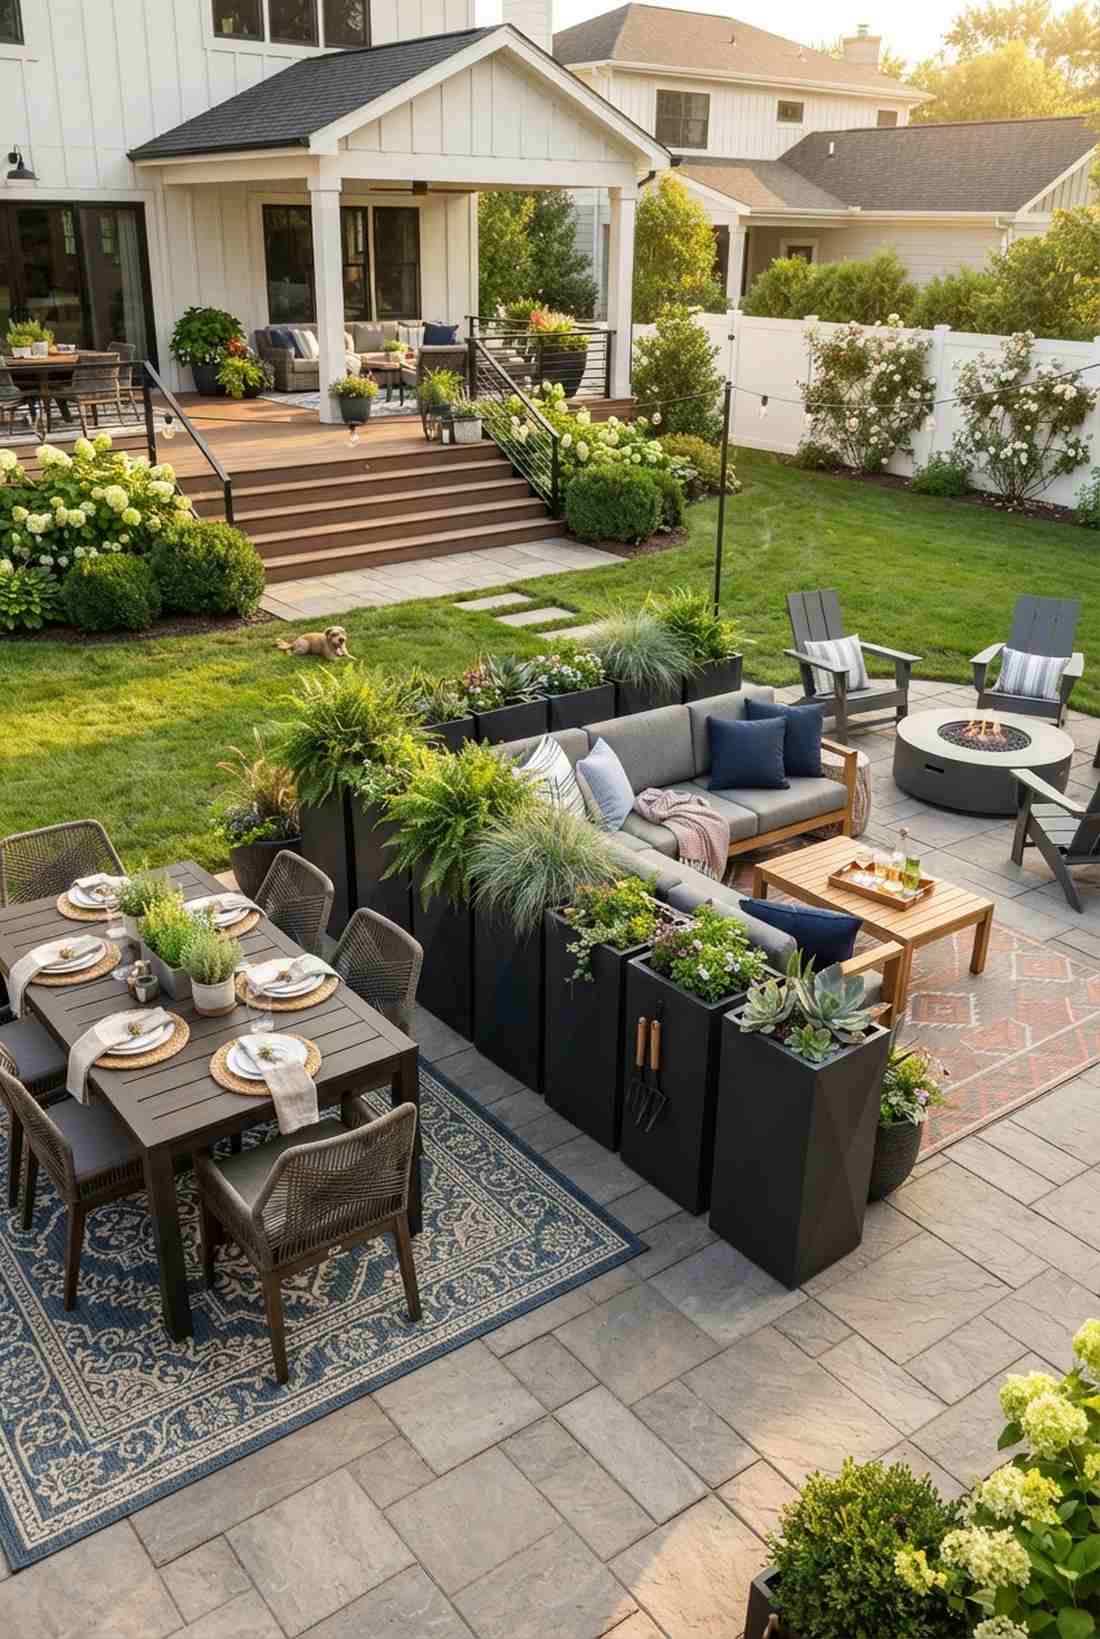
16. Mixed Material Zones
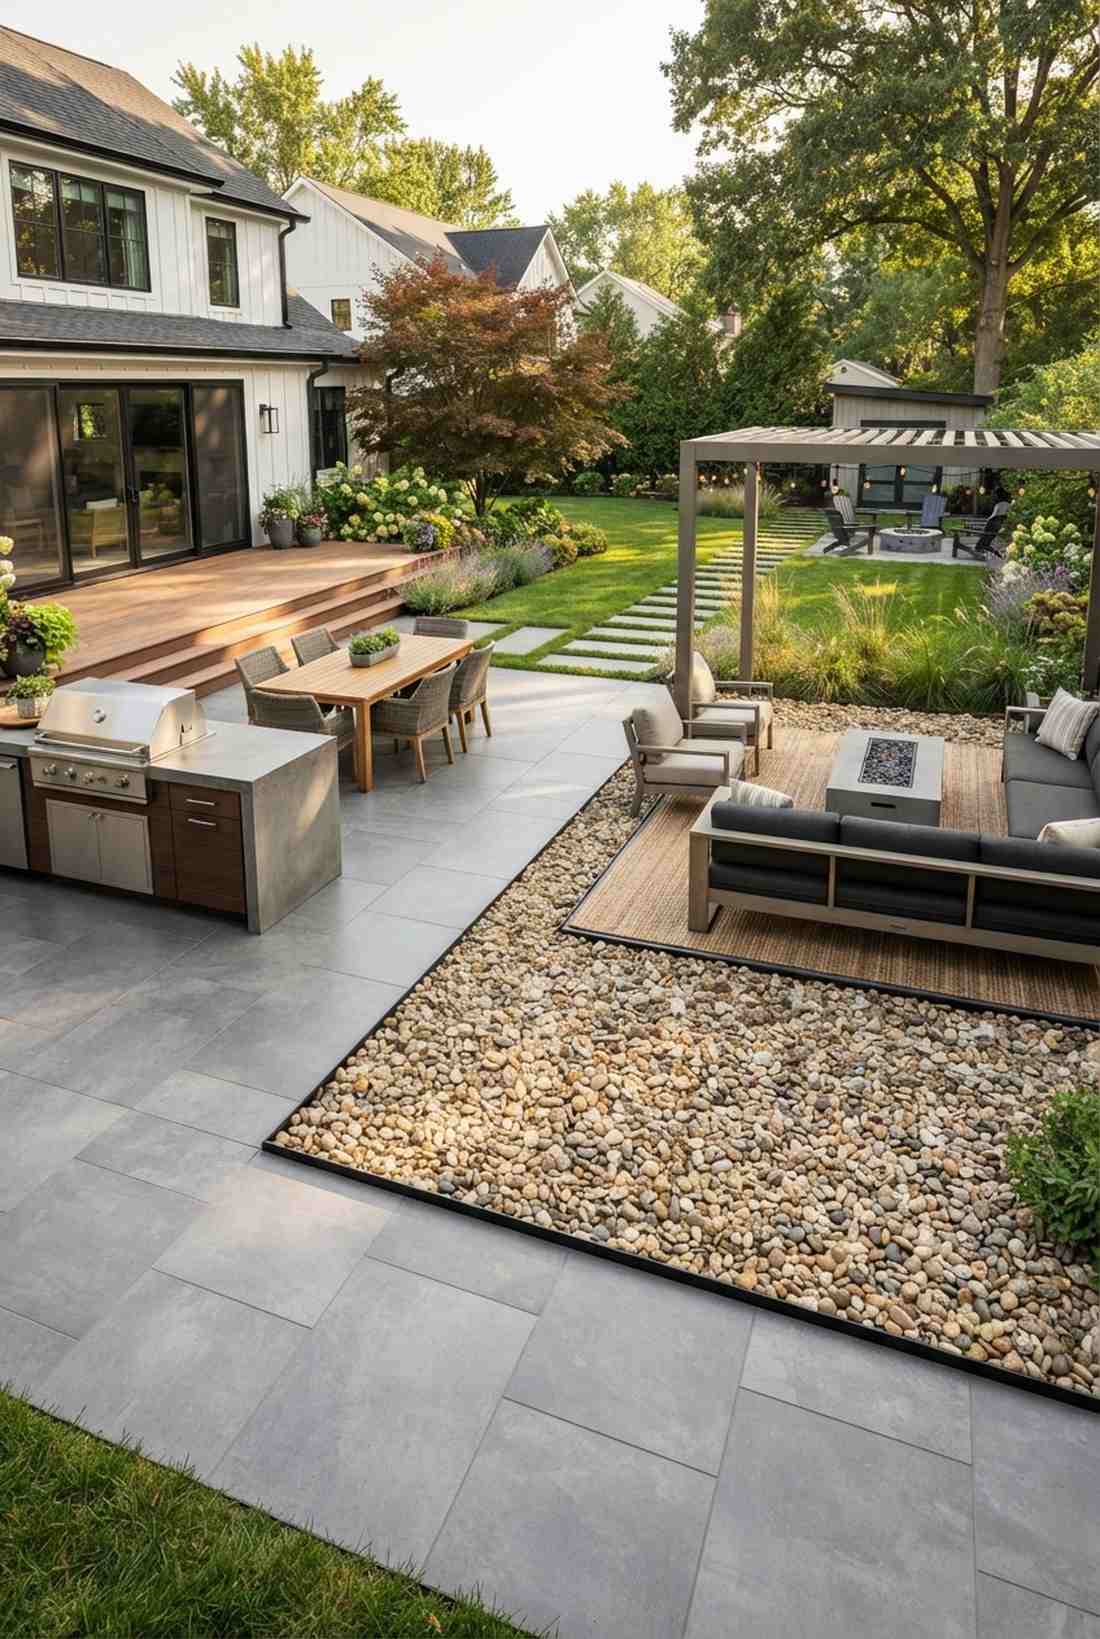
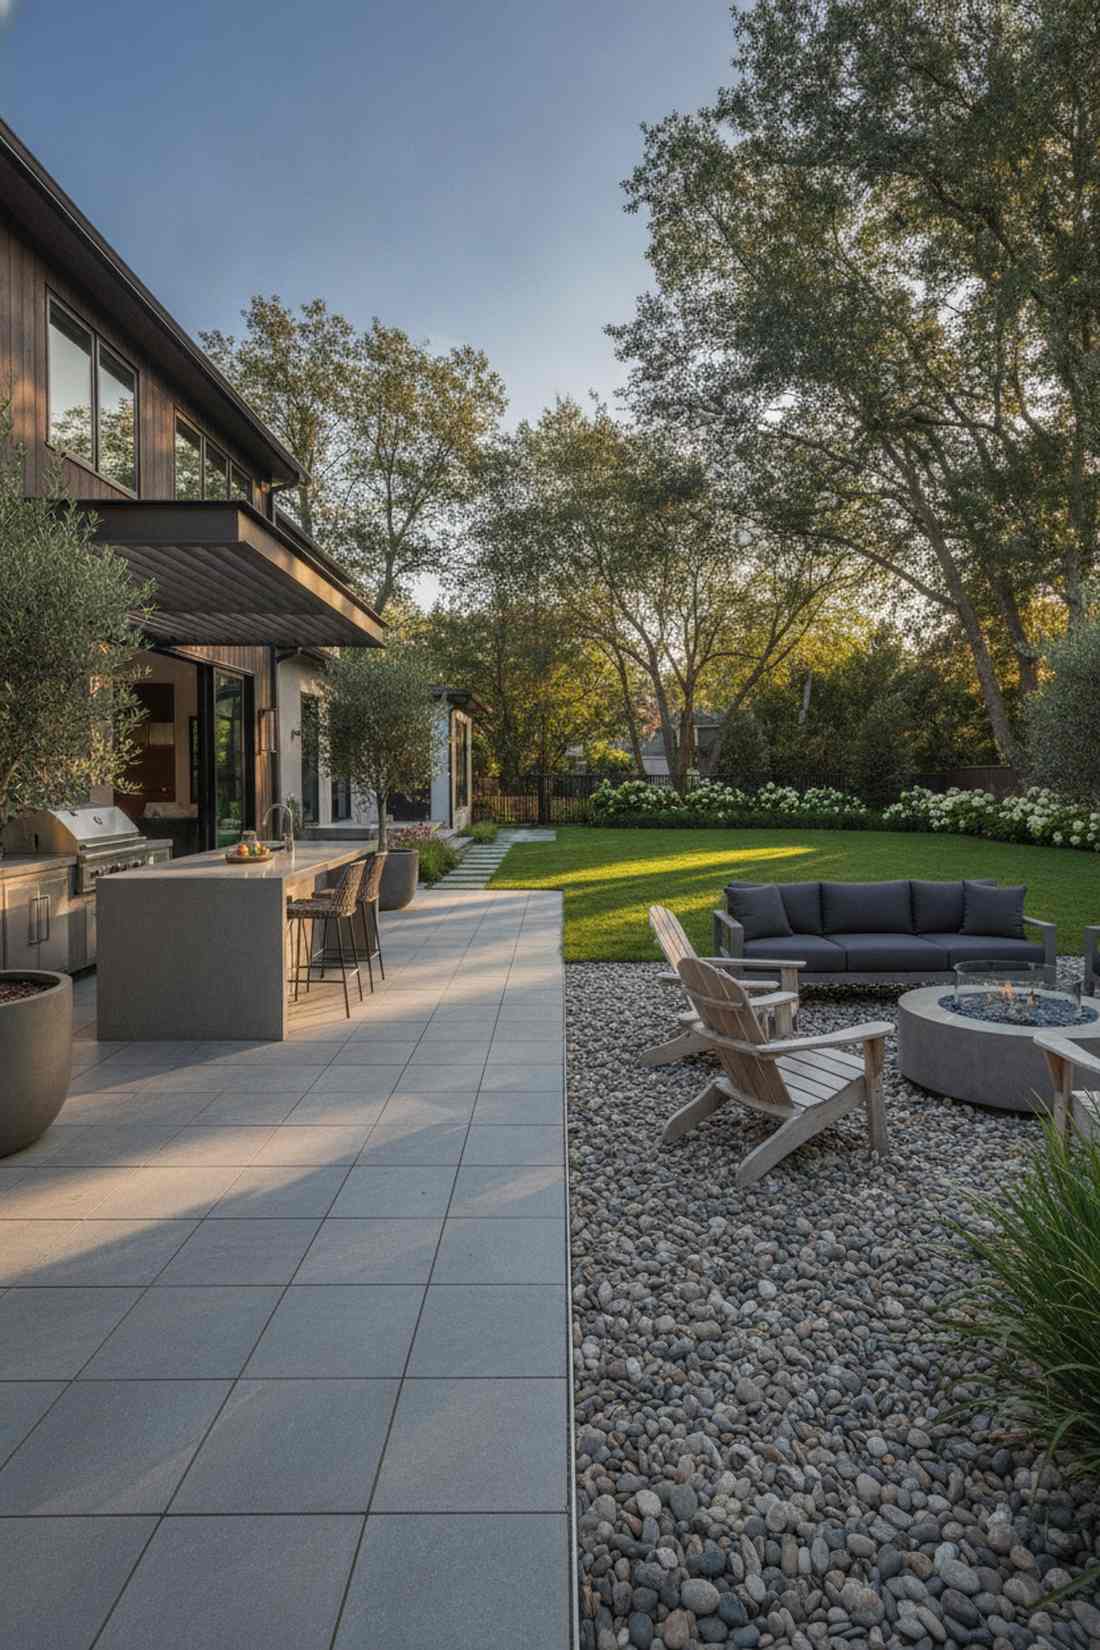
Looks like a high-budget architectural magazine cover shoot. Contrasting material border transitions are flawless for separating an outdoor kitchen from the lounge area.
Building physical walls blocks the view, but switching from sleek tile to crunchy gravel gives a designer-level finish without pouring concrete footers. Installing flexible aluminum landscape edging ensures the rocks never bleed onto your pristine dining tiles.
A genius layout hack that usually saves money by using cheaper filler materials. Pin this if you love open-concept spaces!
- Key Materials: Pavers, river rock, metal edging
- Vibe / Style: Modern dynamic landscape
- Difficulty: Intermediate
- Budget Breakdown: Primary Pavers: $300 | Rock Fill: $80
- Creator’s Tip: Keep all materials perfectly flush at the exact same height to prevent a massive tripping hazard.
- Smart Sourcing: flexible aluminum landscape edging rolls and bulk polished river rock bags.
17. Geometric Color Blocks
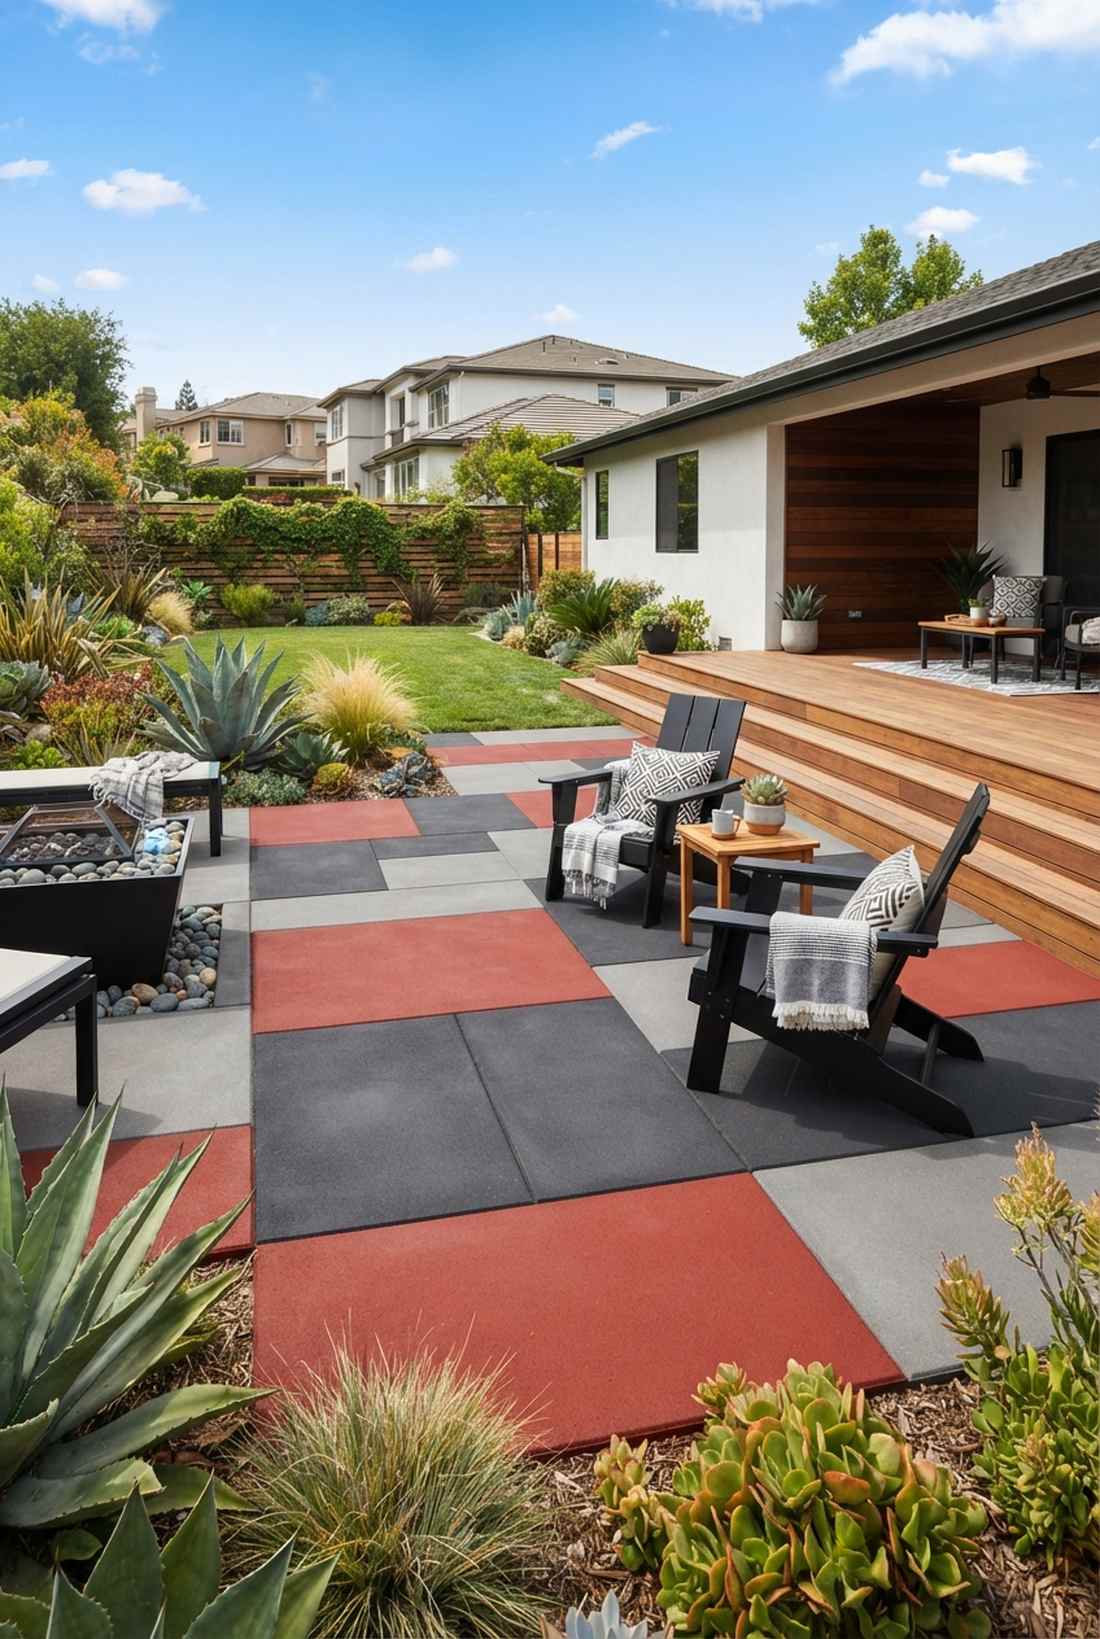
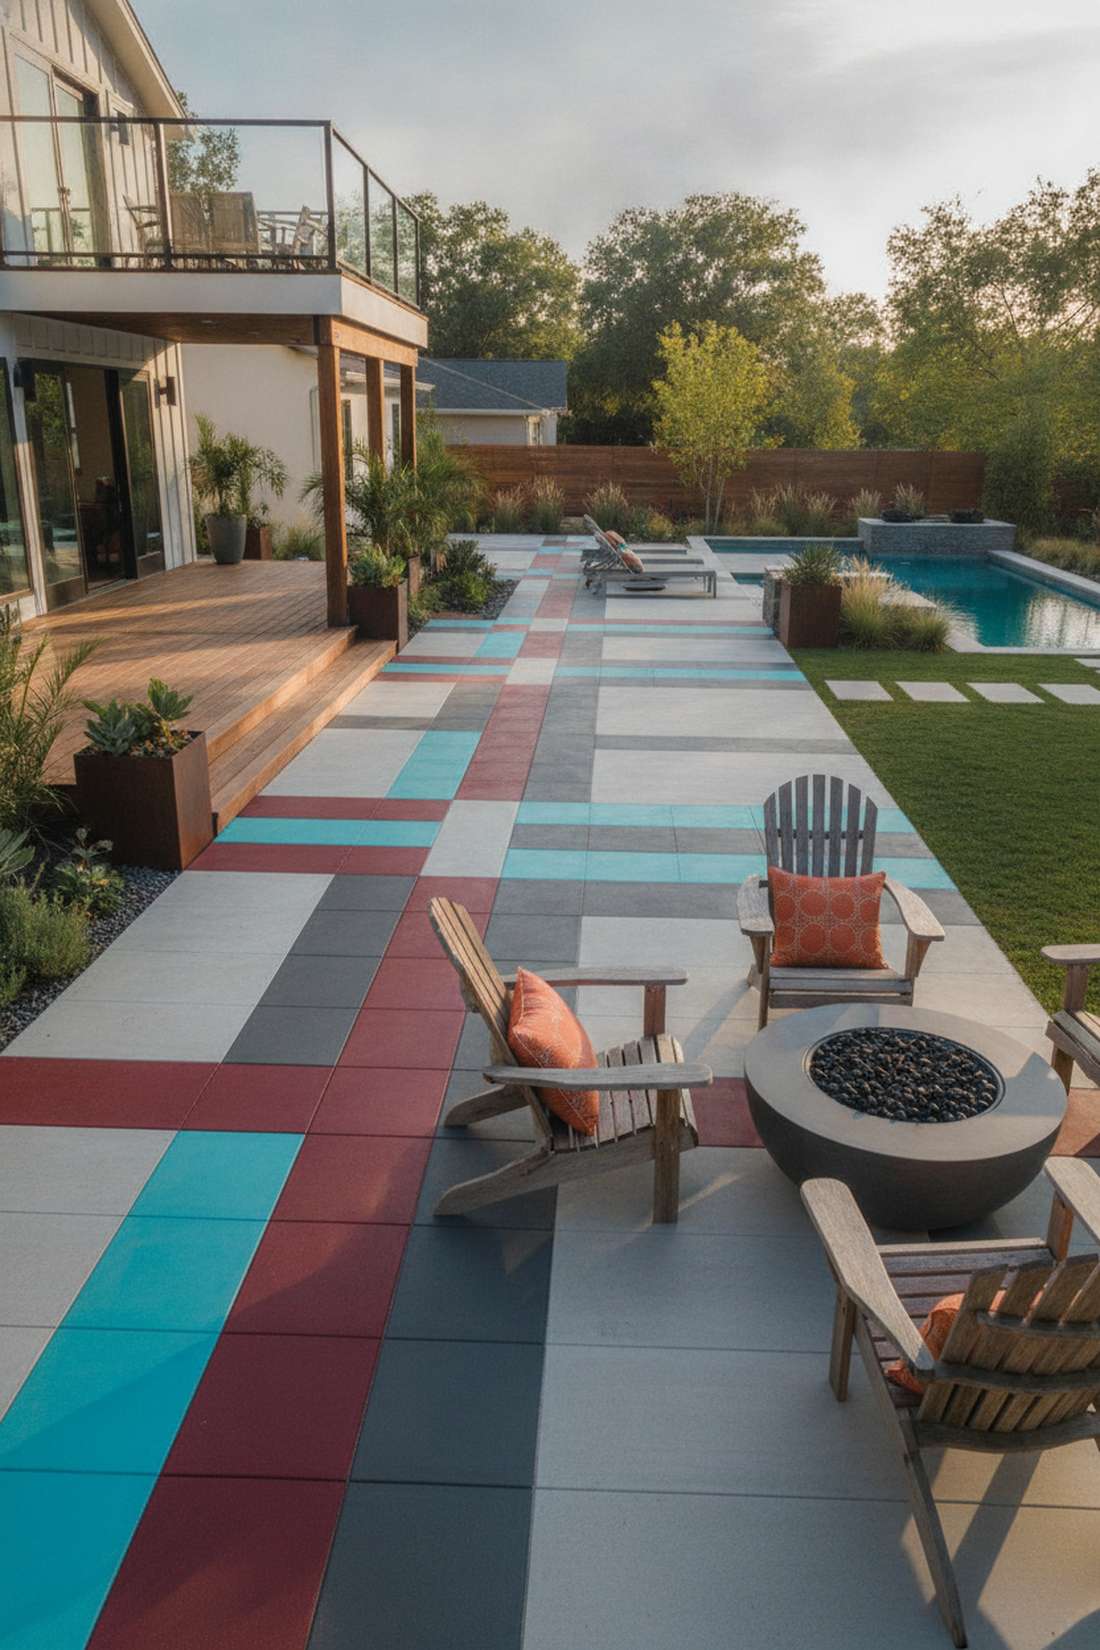
Radiates bold, ultra-modern Miami art district energy. High-contrast colored concrete block layouts completely revitalize dull, monochromatic suburban backyards.
Most patios are a sea of boring gray, but injecting oxblood red or charcoal stripes looks far more expensive than it actually is. Utilizing UV-resistant concrete masonry stains lets you color-block plain cheap pavers yourself over a weekend.
You can pull off this custom dye job for under $60 in materials. Highly recommended for a vibrant weekend win.
- Key Materials: Concrete dye, basic cheap pavers
- Vibe / Style: Trendy contemporary
- Difficulty: Easy beginner
- Budget Breakdown: Stains: $40 | Sealer: $20
- Creator’s Tip: Map the color blocks out digitally on your phone before ever opening a can of stain.
- Smart Sourcing: UV-resistant concrete masonry stains and heavy-duty painter’s layout tape.
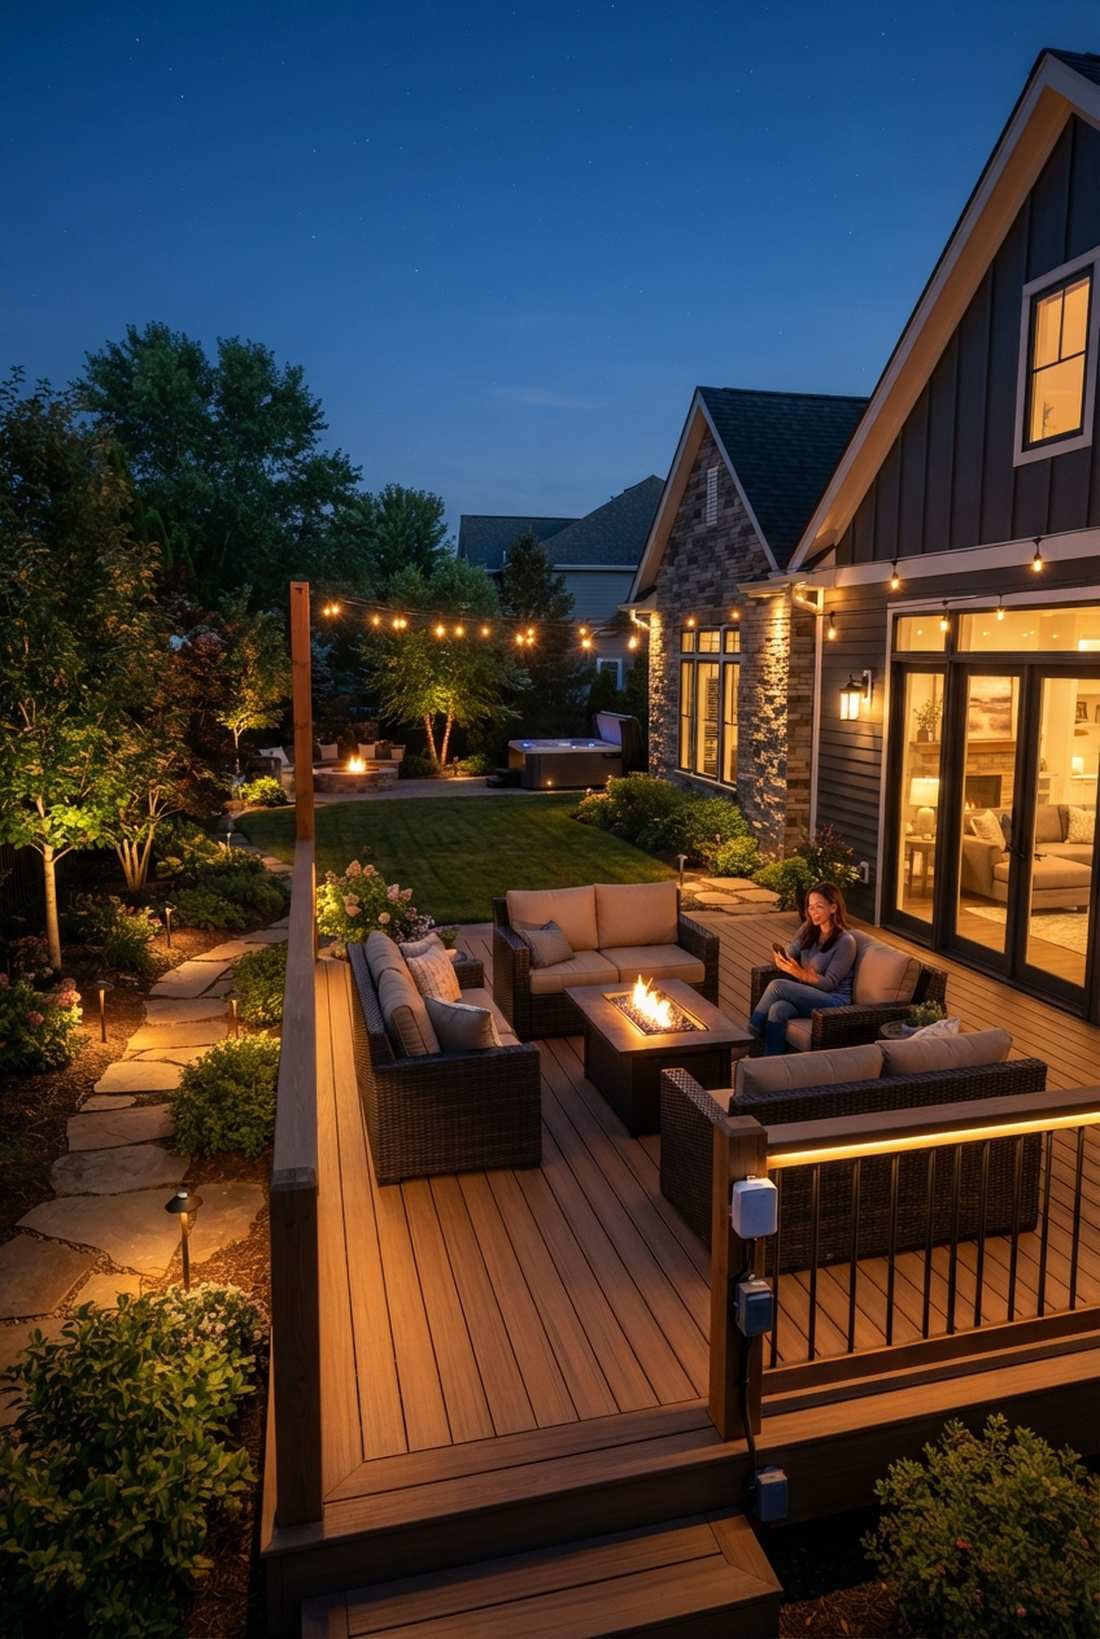
Garden Patio Seating Zones That Maximize Comfort
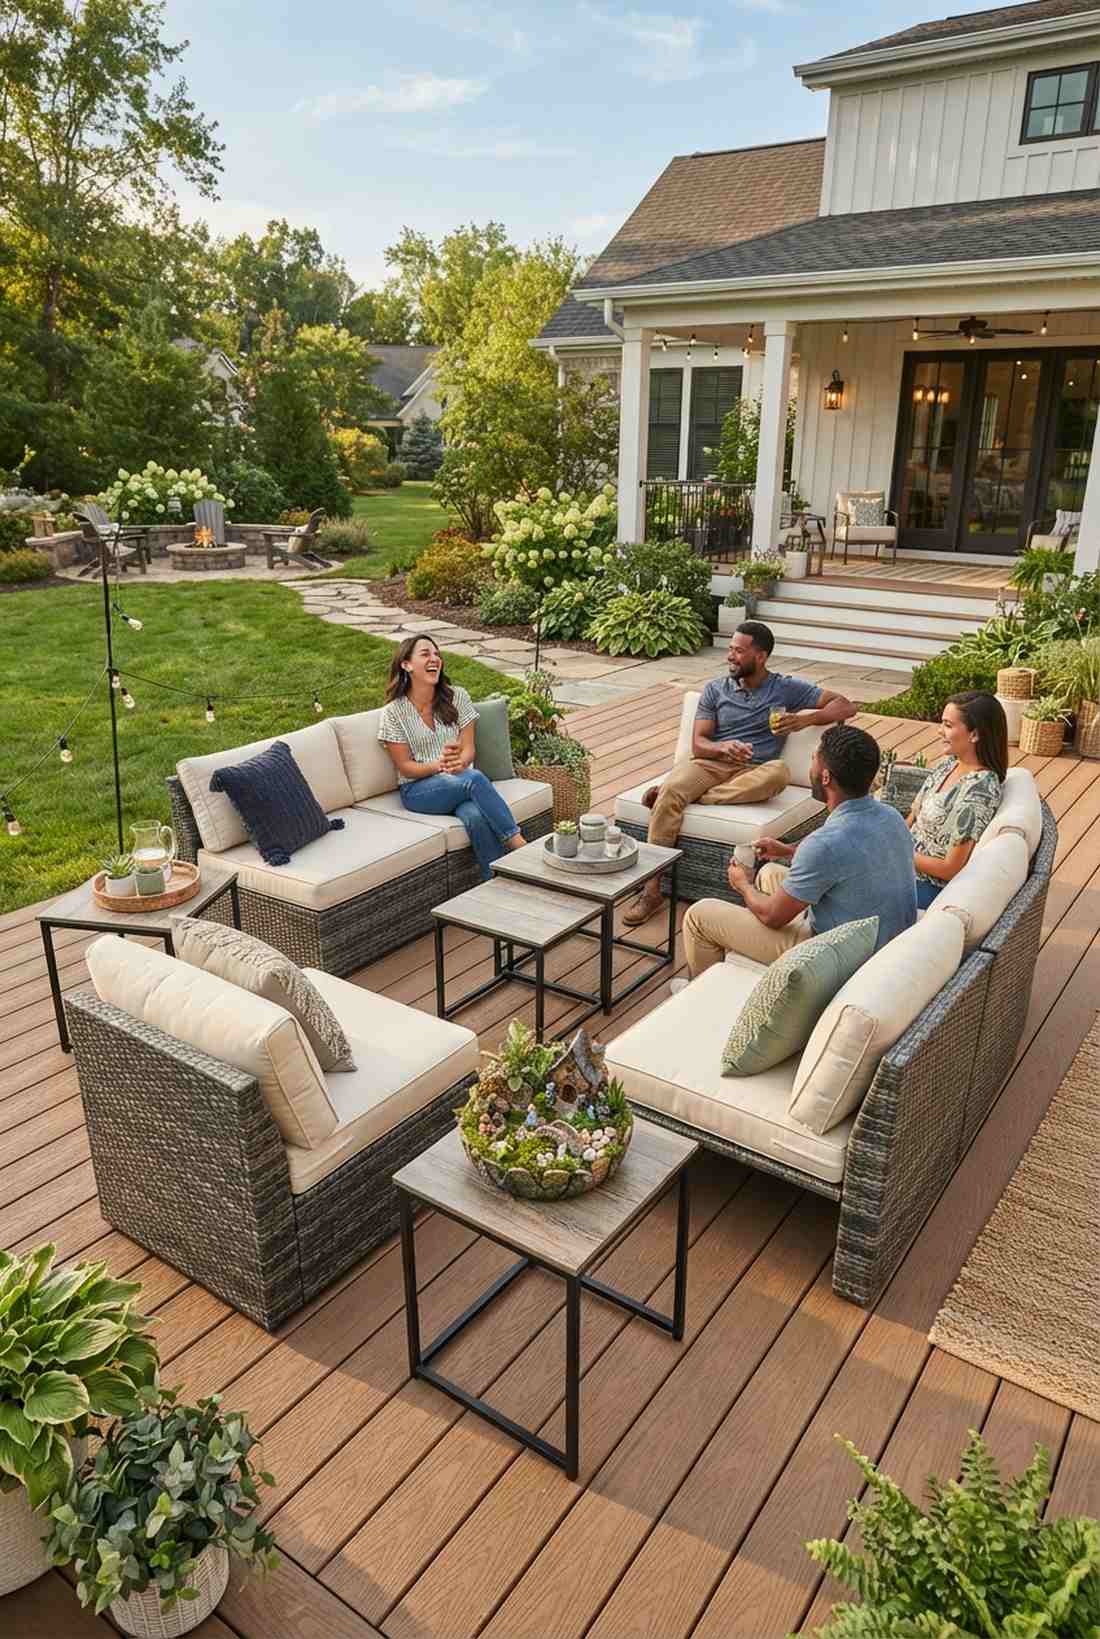
18. U-Shaped Sectional Arrangement
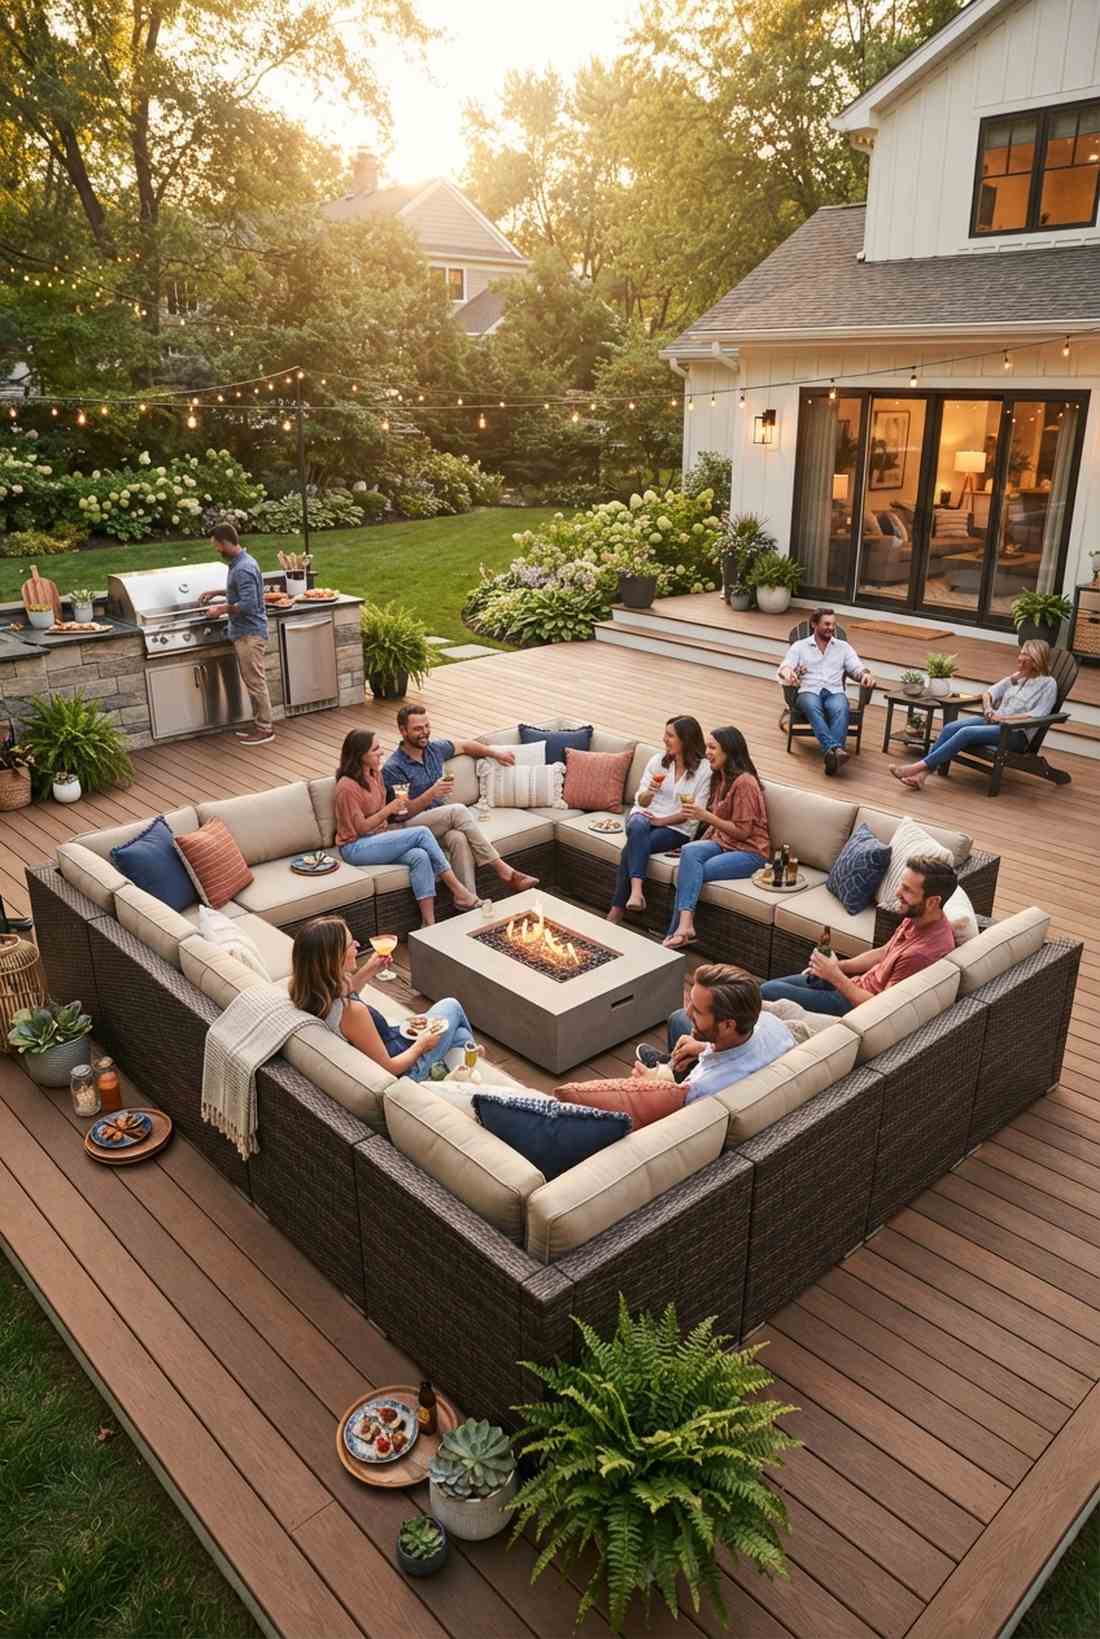
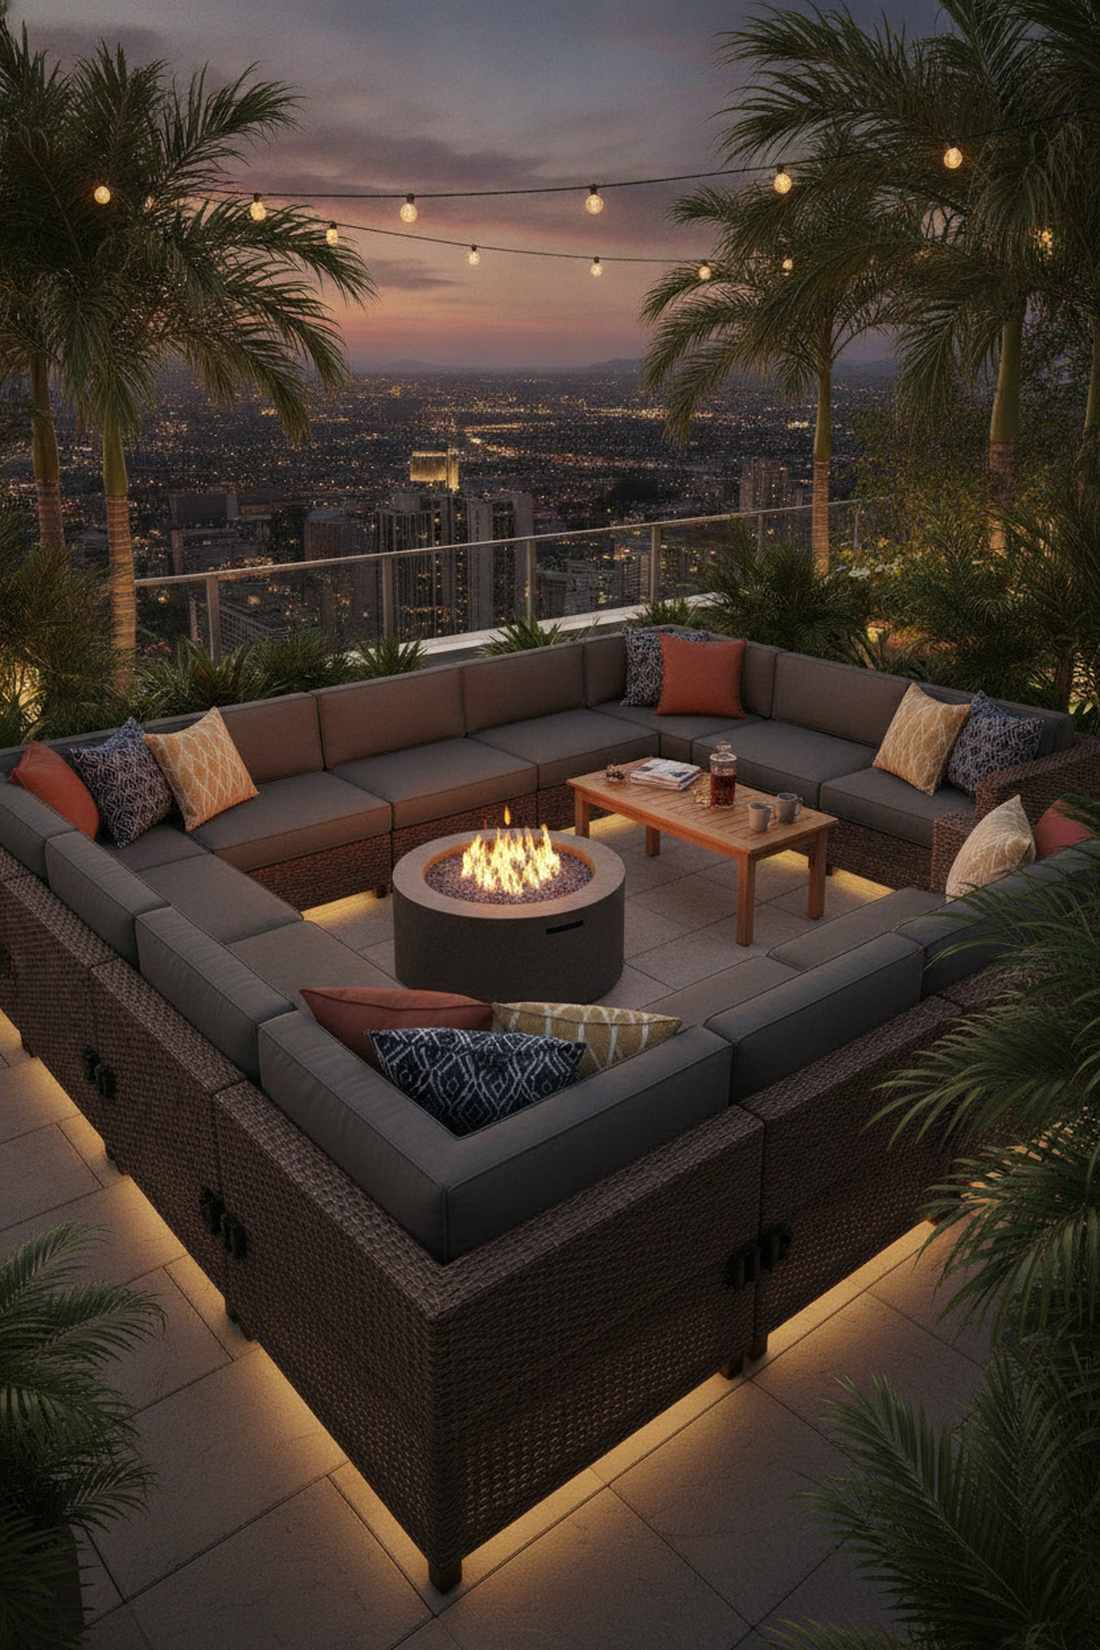
Feels like an exclusive VIP lounge at a rooftop bar. Oversized U-shaped modular outdoor sectionals are the ultimate hack for hosting massive summer night parties.
Tiny metal chairs kill the party vibe, but this wrapping structure delivers an insanely expensive organic aesthetic that forces people to socialize comfortably. Snagging solution-dyed acrylic cushion covers guarantees your investment won’t bleach out in the July sun.
A layout shift that costs nothing if you already own modular pieces. Save this to your outdoor entertaining board!
- Key Materials: Modular wicker pieces, outdoor clips
- Vibe / Style: Ultra-cozy social hub
- Difficulty: Simple arrangement
- Budget Breakdown: Furniture Clips: $15 | Throw Pillows: $60
- Creator’s Tip: Buy heavy-duty resin clips to snap the underside of the couches together so they never slide apart.
- Smart Sourcing: heavy-duty patio furniture connector clips and UV-resistant acrylic cushion covers.
19. Dining Set With Bench Seating
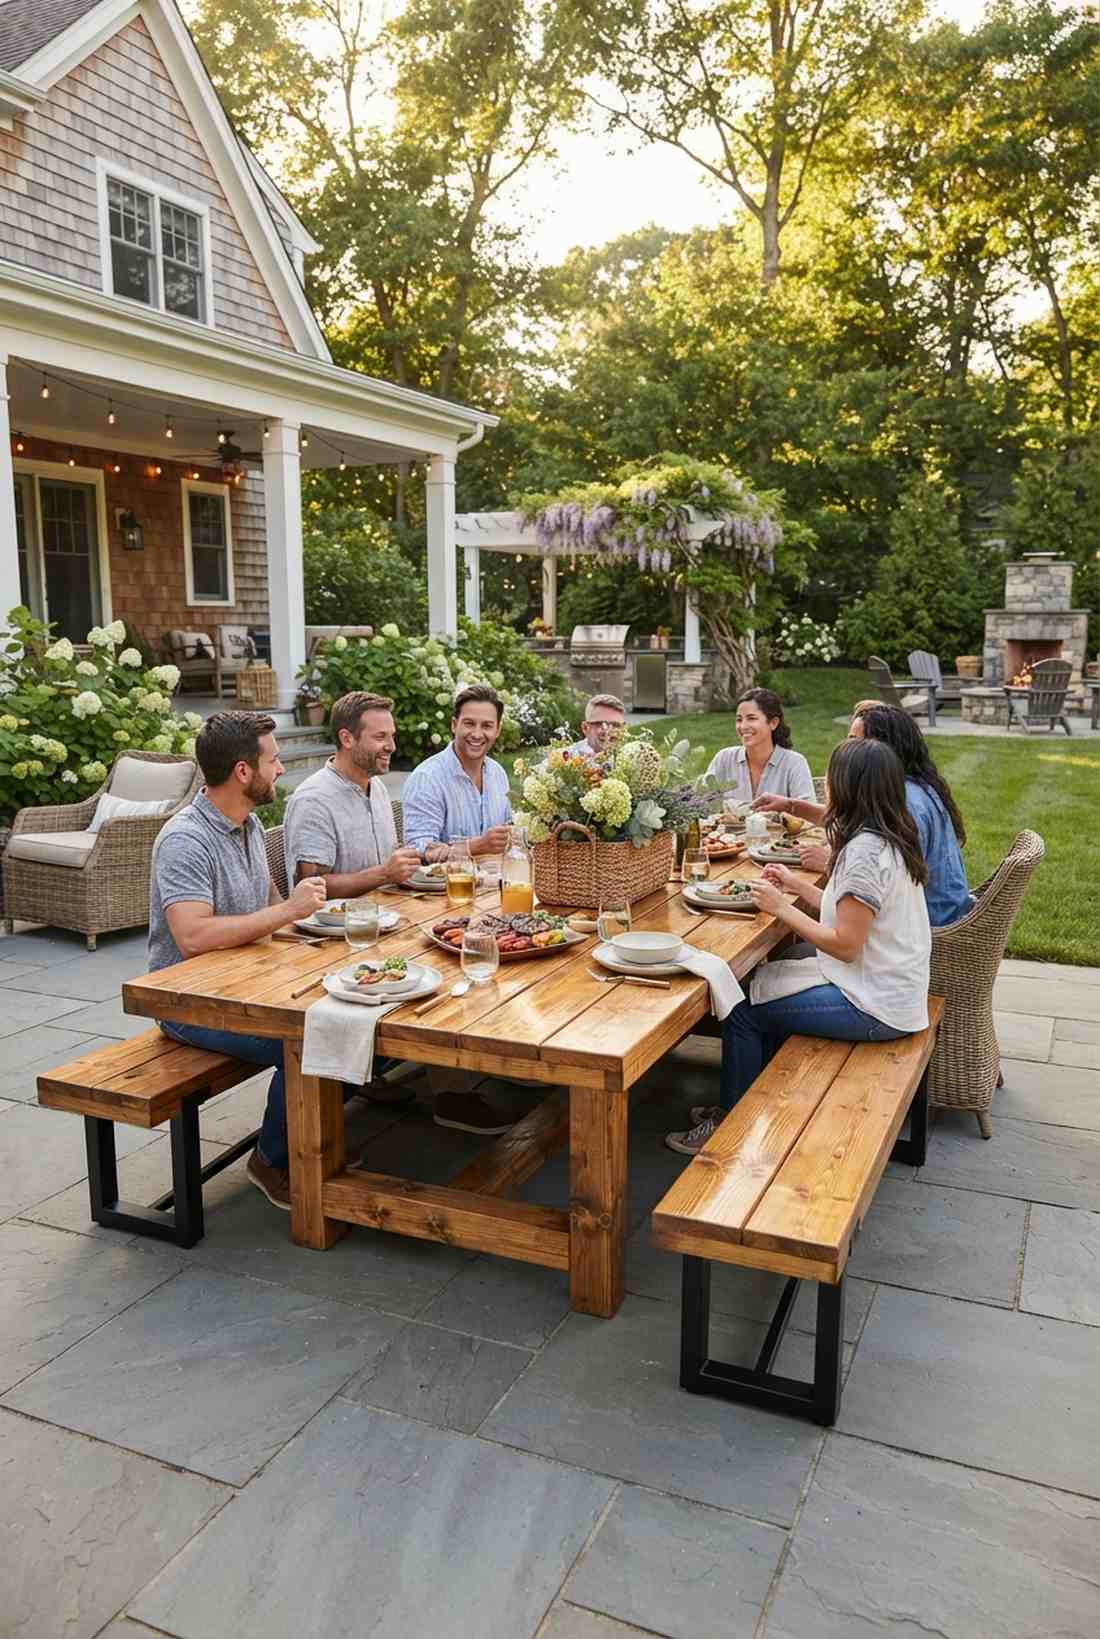
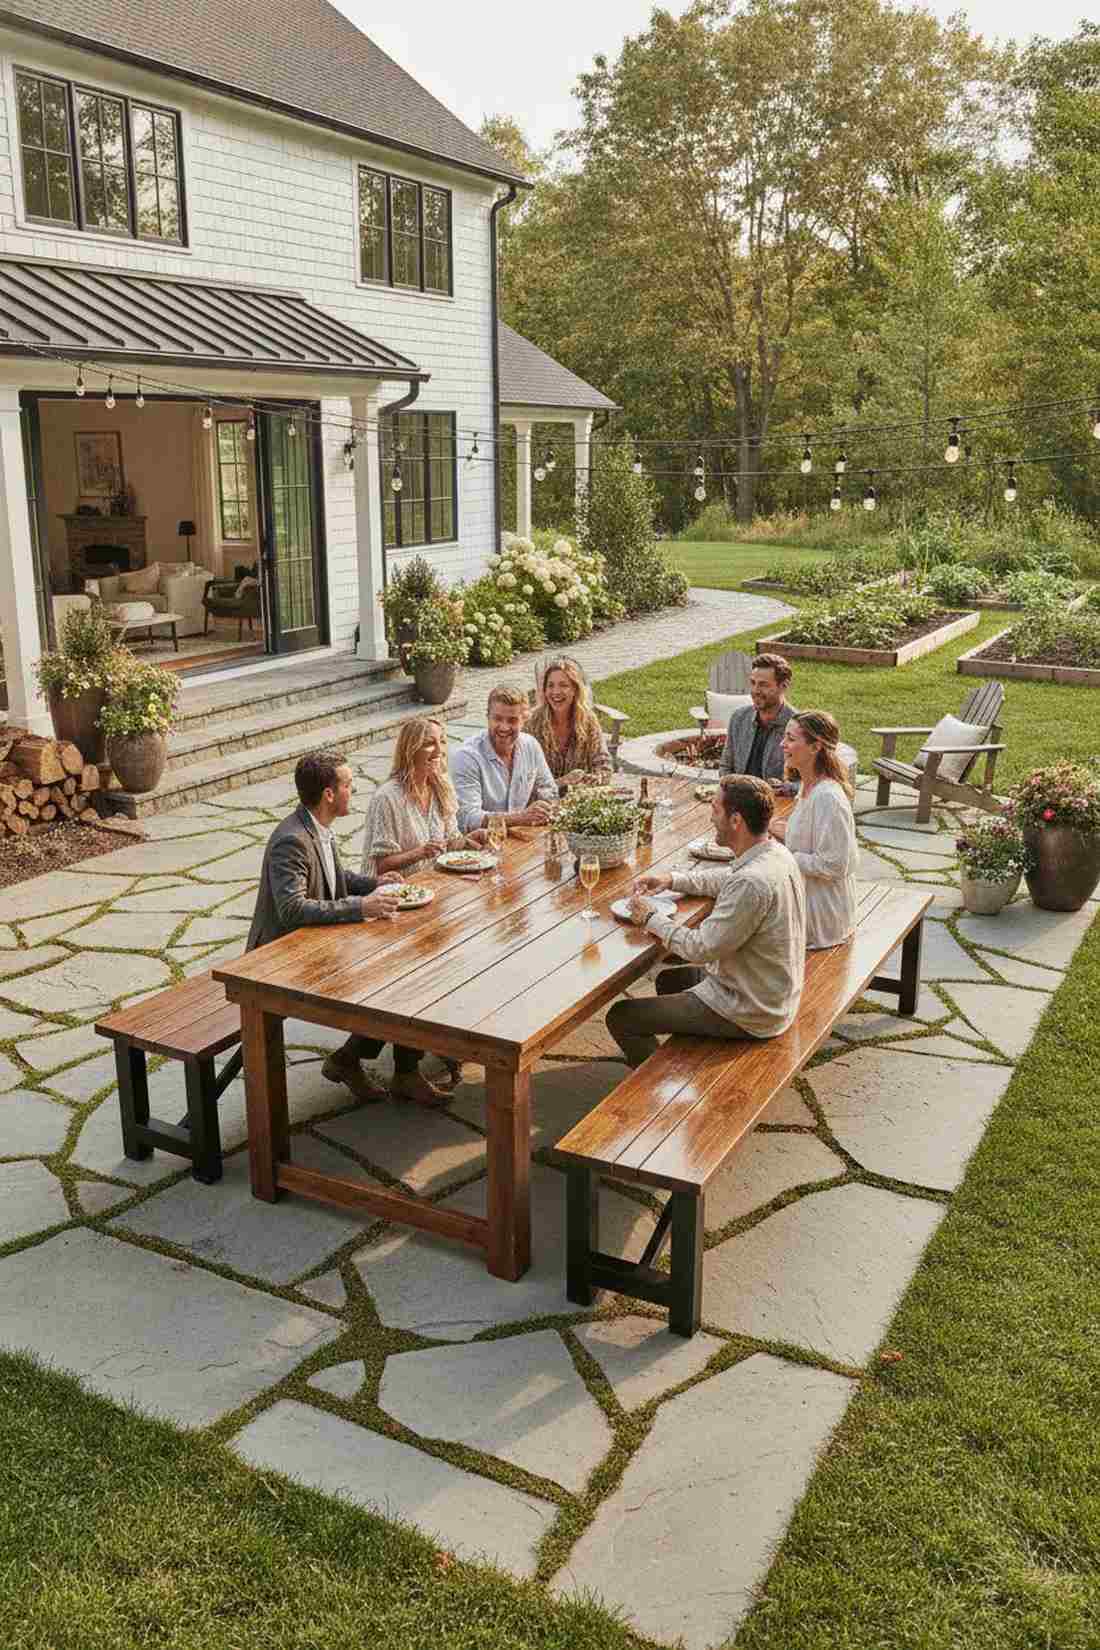
Straight out of a massive rustic farmhouse gathering. Long wooden dining tables paired with benches are absolutely brilliant for maximizing seating on a narrow patio.
Bulky armchairs waste entirely too much space, but sliding a bench underneath looks far more expensive while doubling your guest capacity instantly. Treating the wood with marine-grade spar urethane protects it from catastrophic water rot.
You can easily build a custom bench setup for around $80. It’s a fast upgrade that completely changes the vibe.
- Key Materials: Treated lumber, waterproof stain
- Vibe / Style: Modern communal farmhouse
- Difficulty: Beginner DIY
- Budget Breakdown: Lumber: $60 | Urethane: $20
- Creator’s Tip: Ensure the bench sits exactly 12 inches lower than the tabletop for perfect ergonomic eating.
- Smart Sourcing: marine-grade spar urethane finish and heavy-duty steel bench bracket kits.
90% of outdoor makeovers fail because they ignore this exact seating strategy coming up…
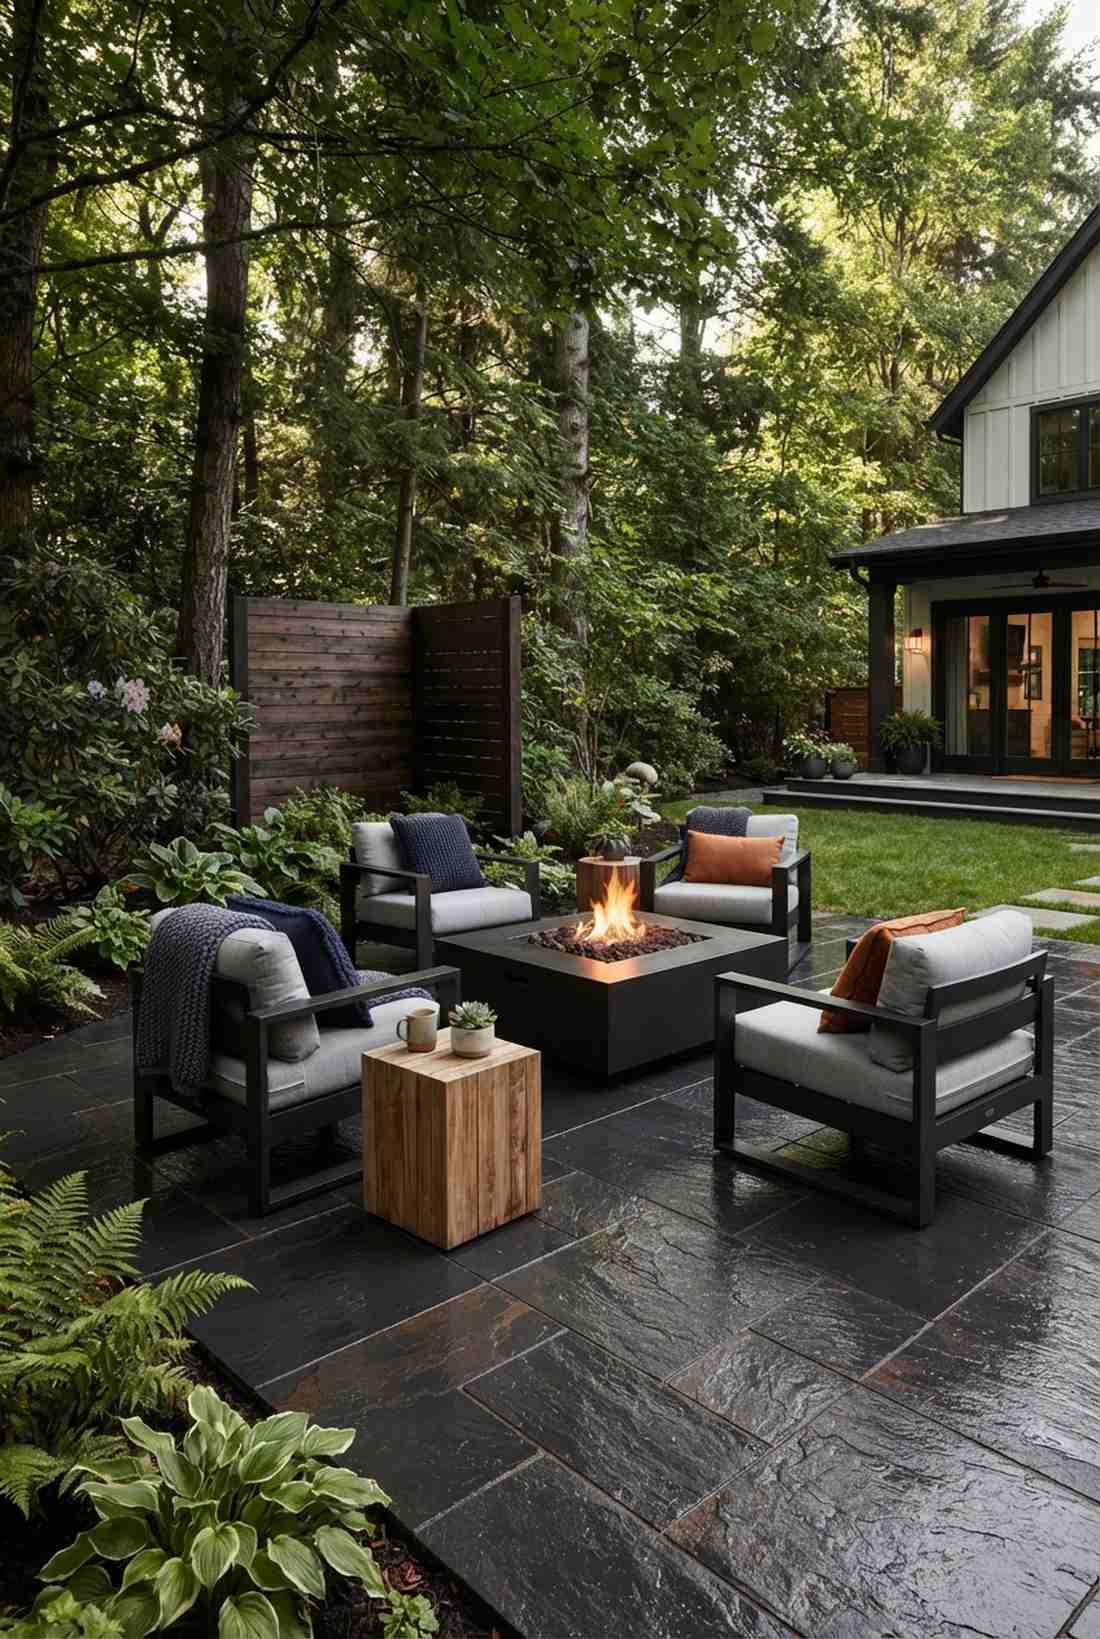
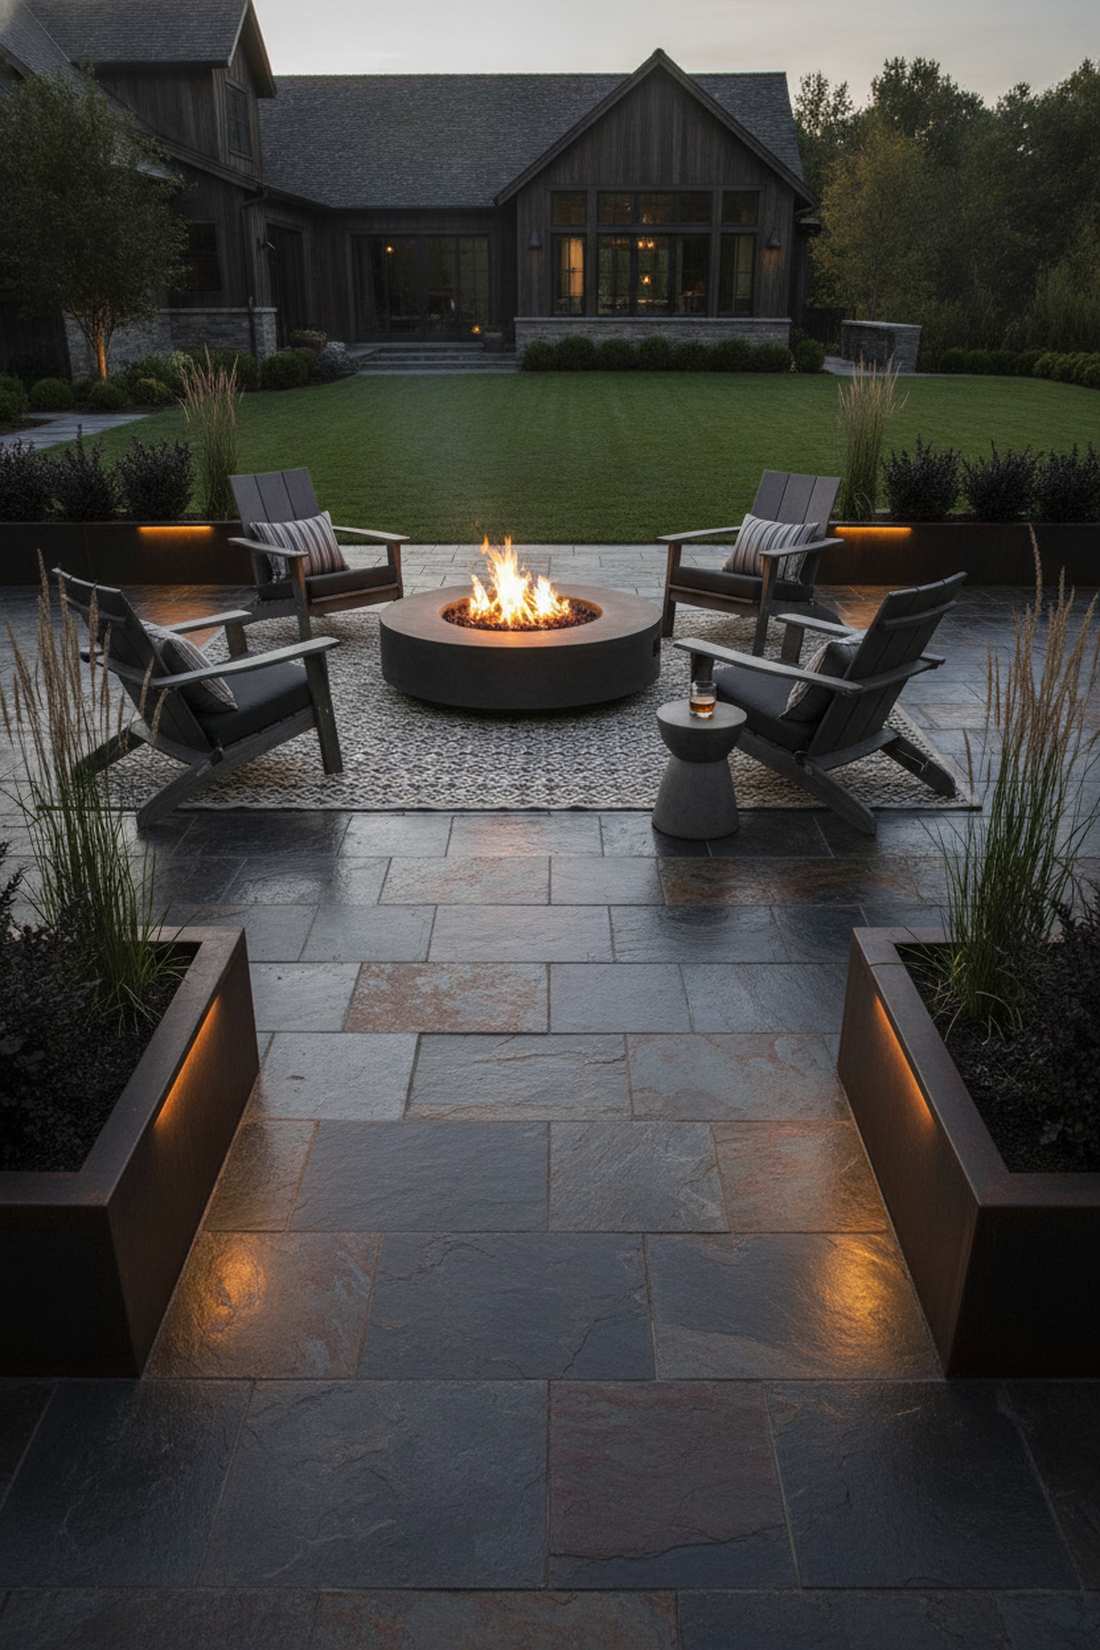
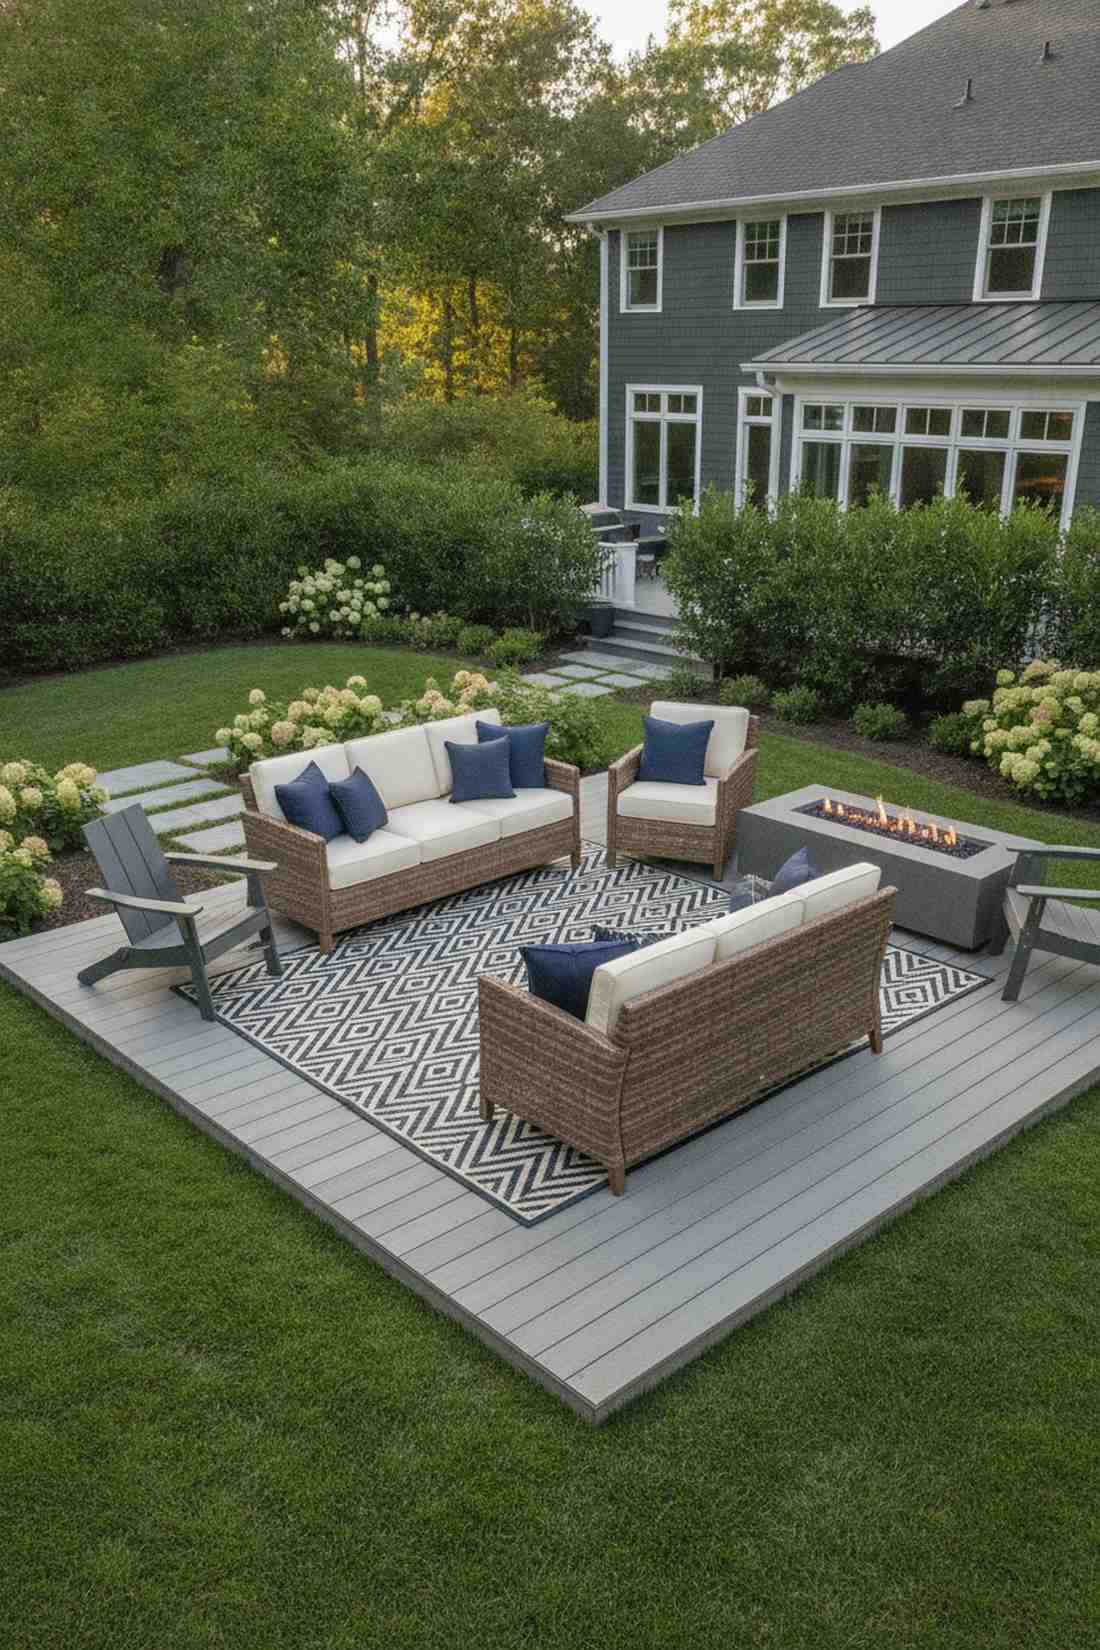
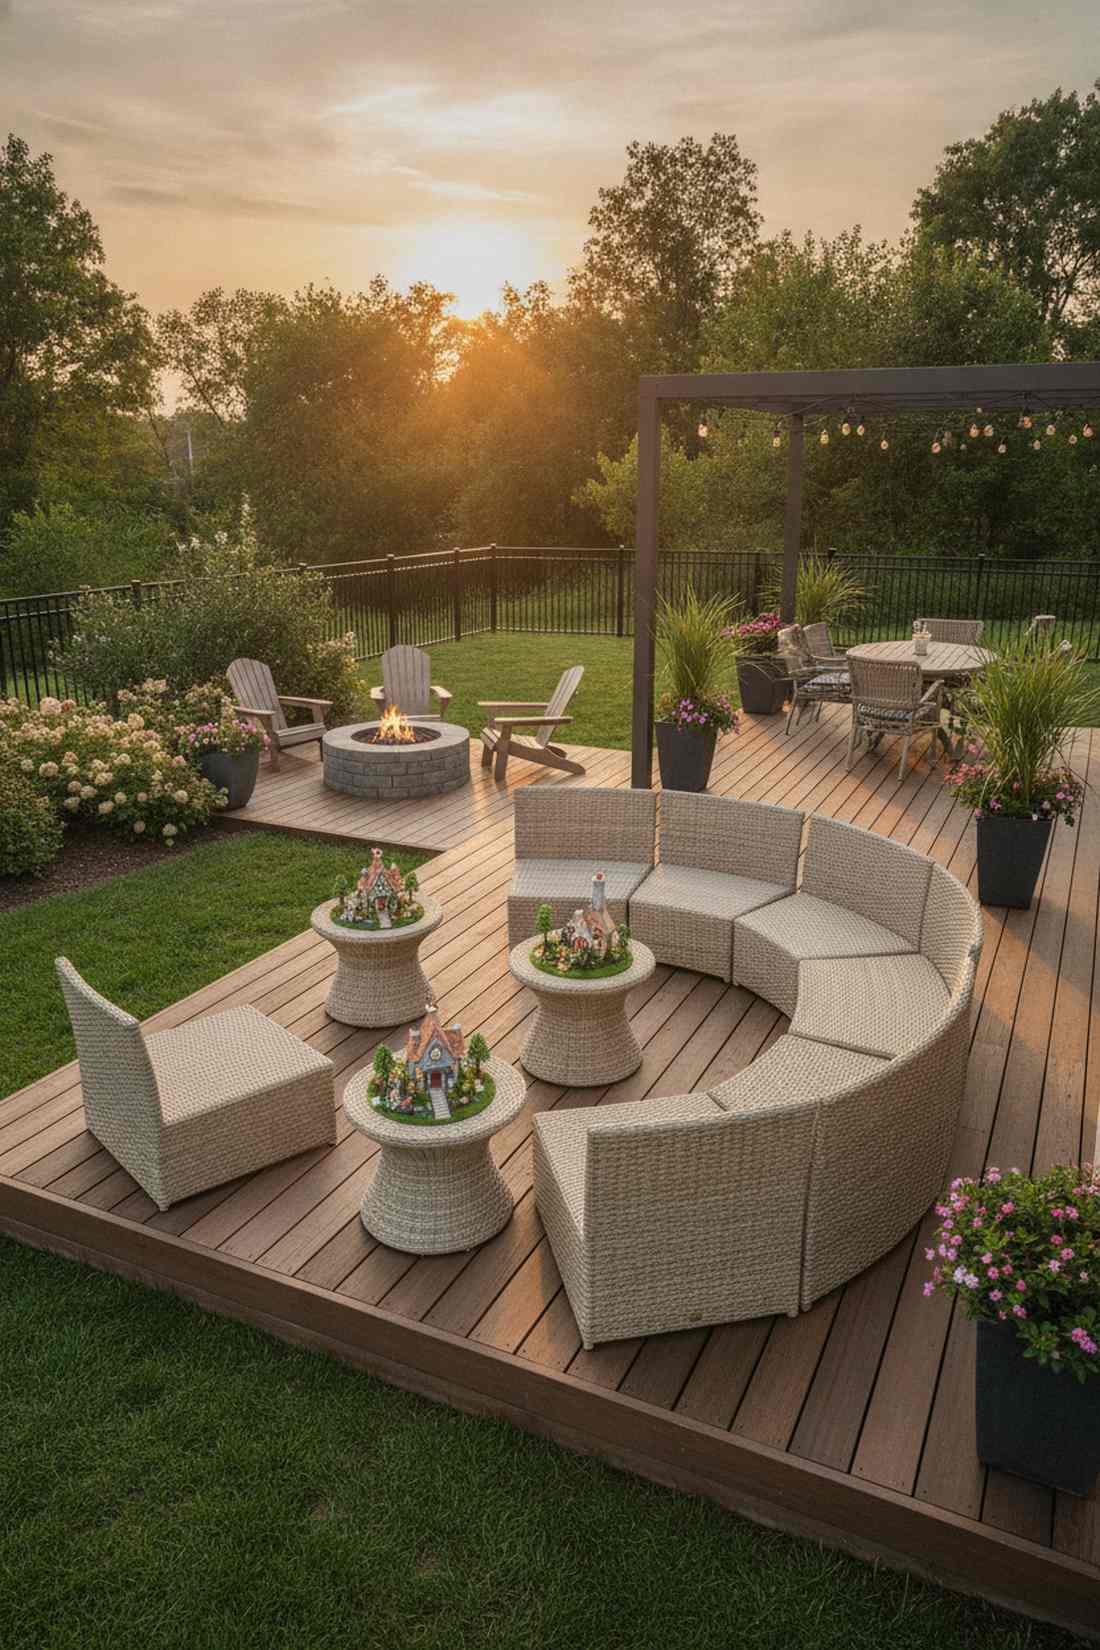
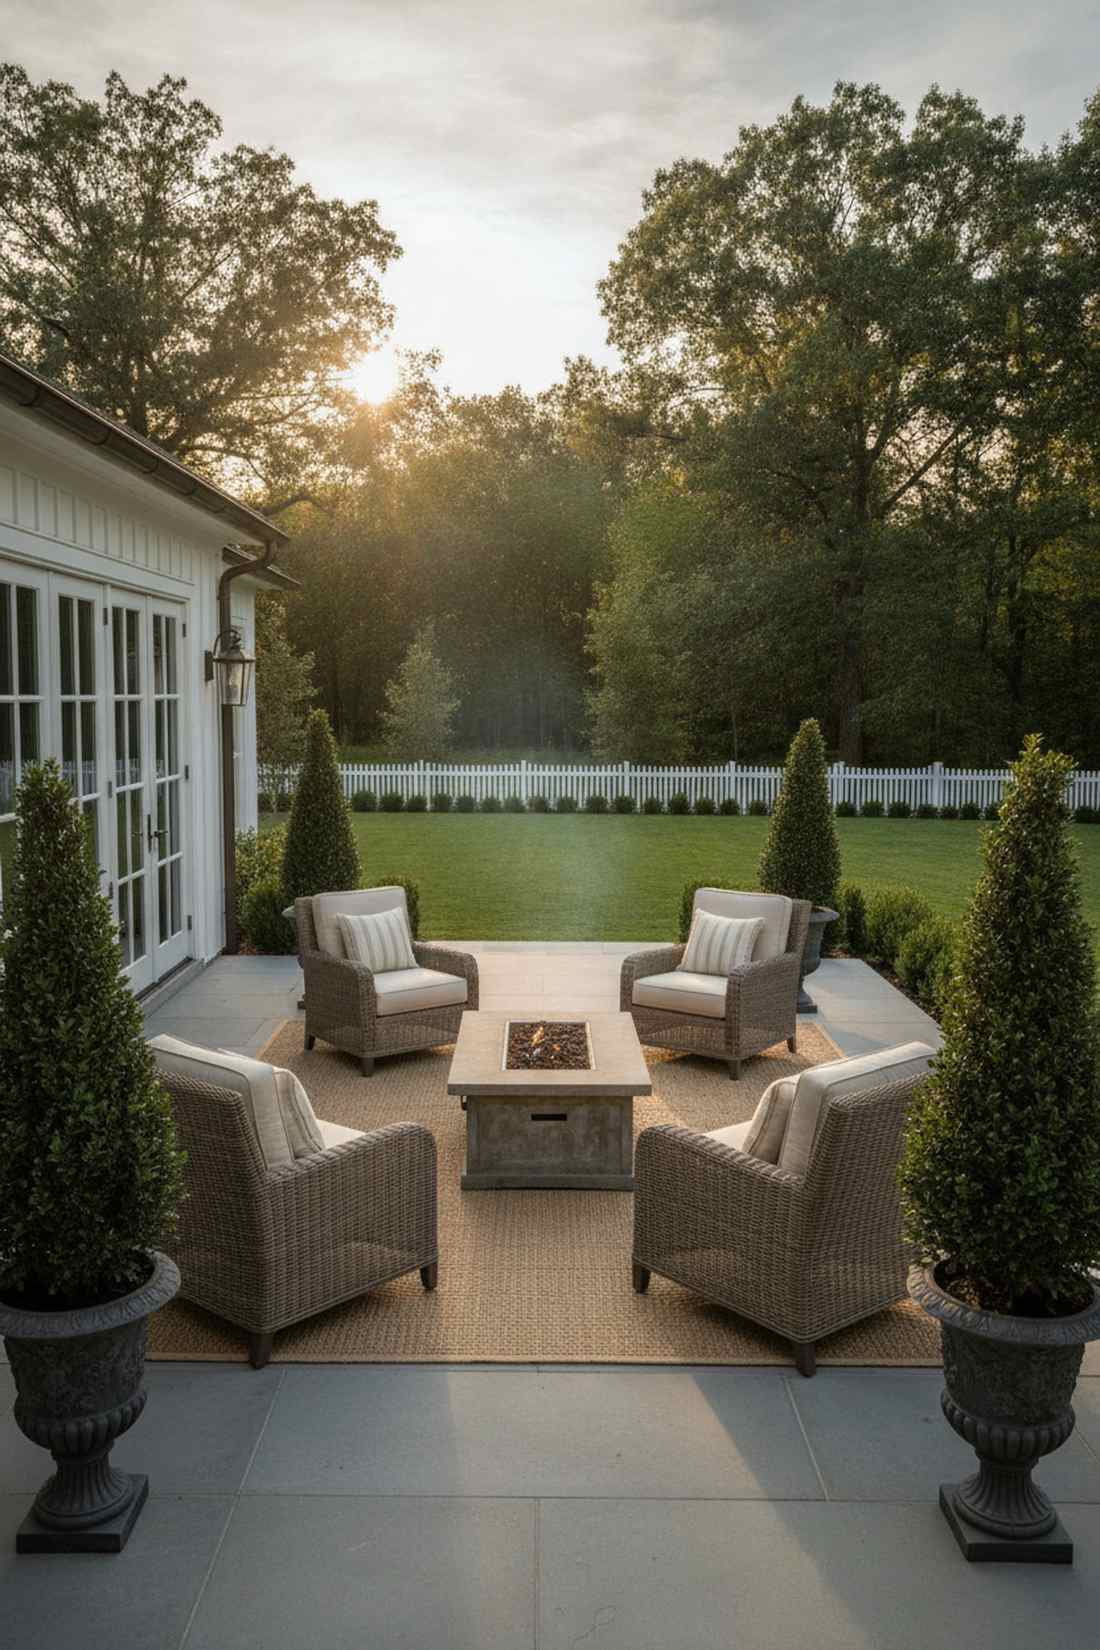
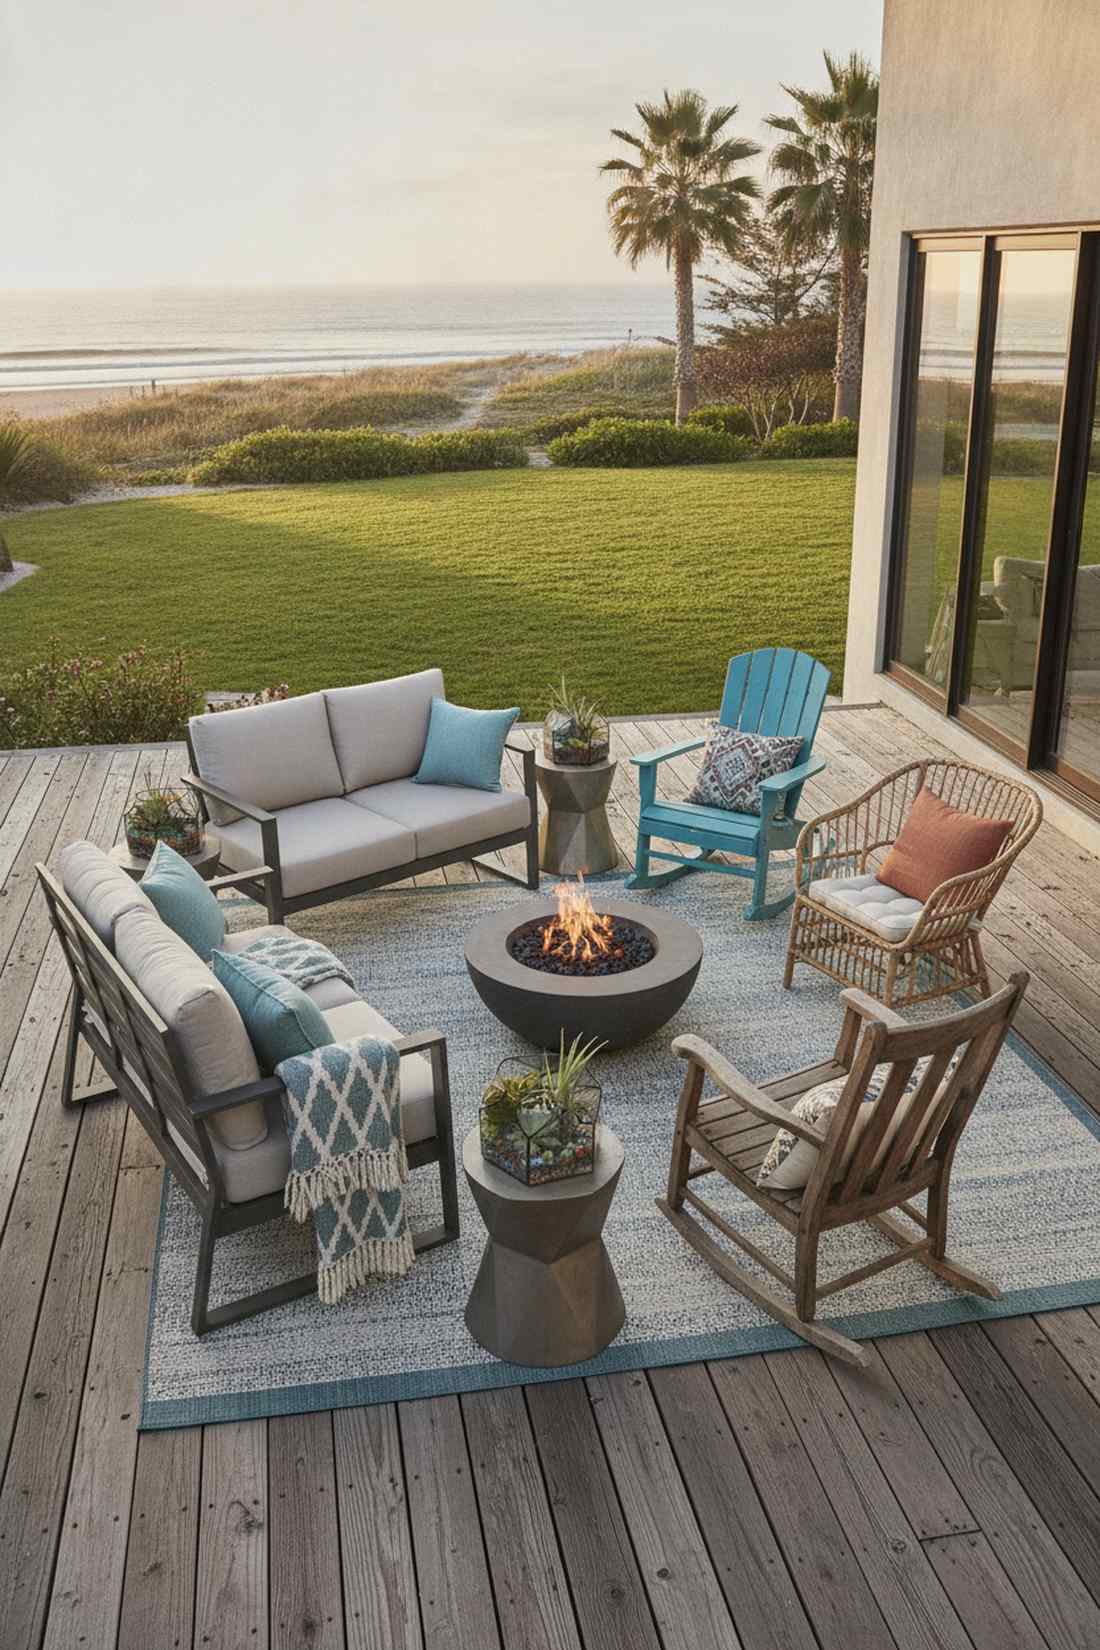
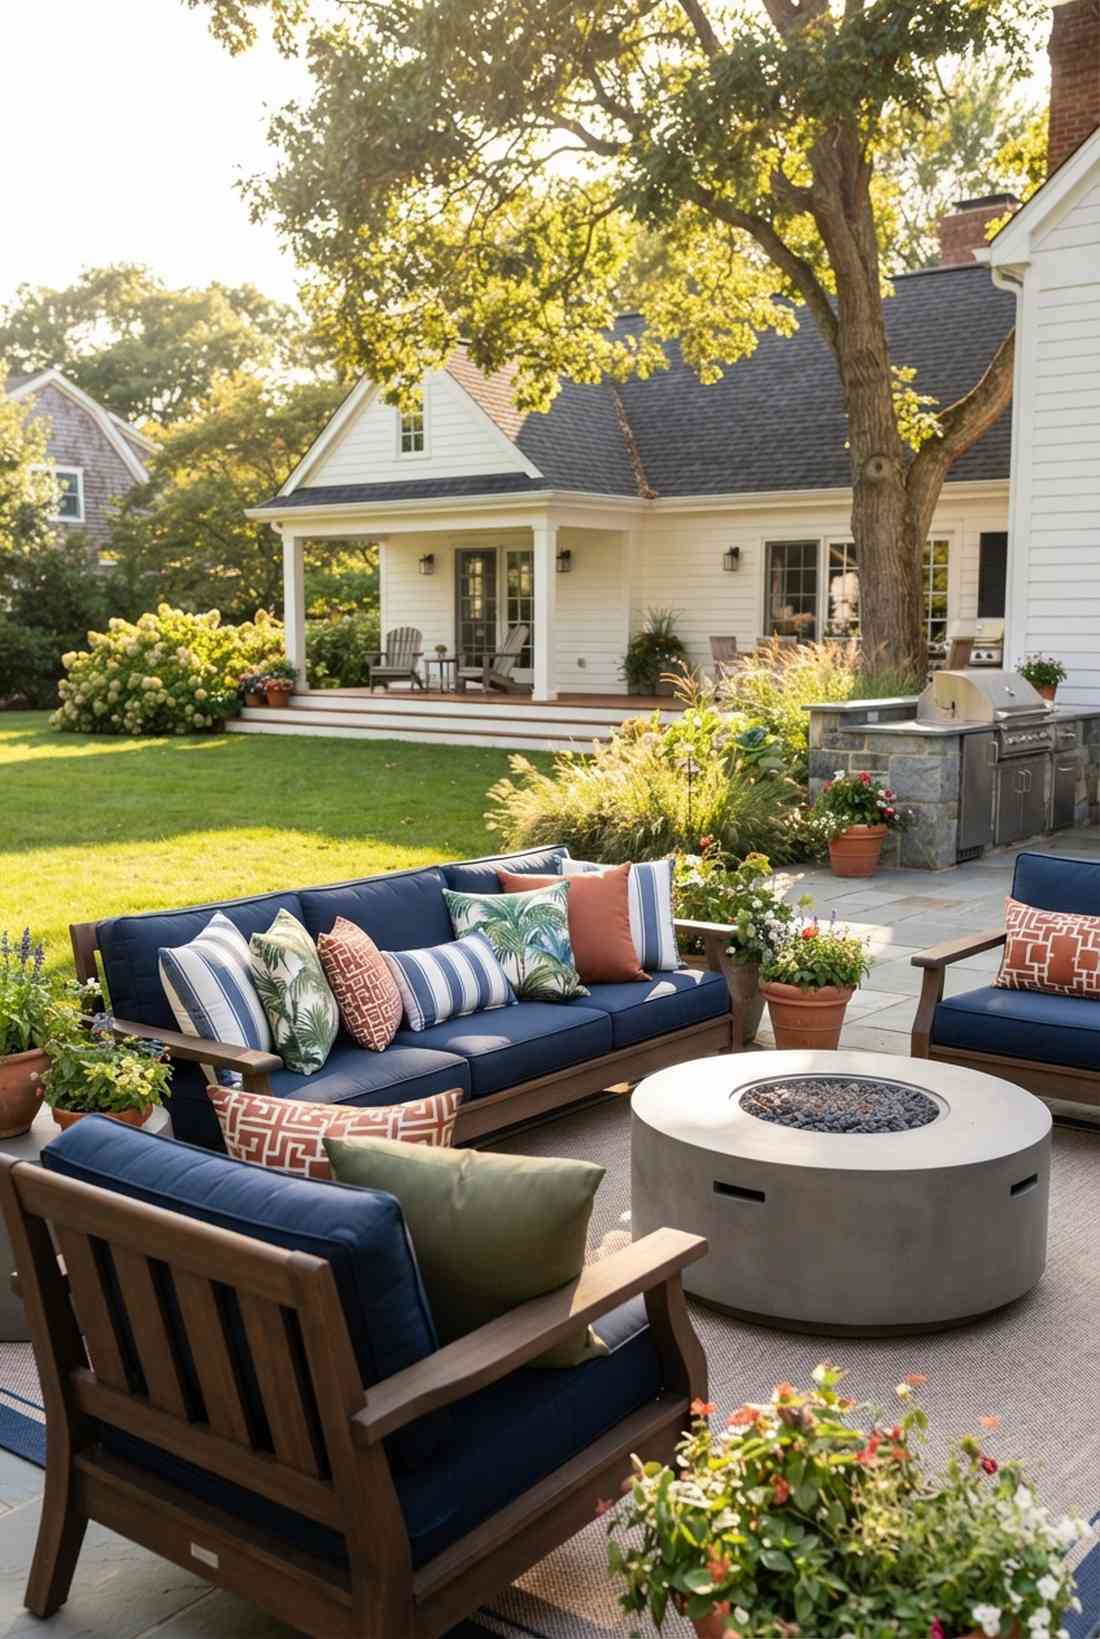
20. Circular Seating Around Fire Features
Radiates the ultimate late-night campfire storytelling aesthetic. Curved Adirondack chair arrangements are strictly mandatory for any built-in backyard fire pit.
Square layouts around round fires look incredibly awkward, but matching the geometry gives a designer-level finish that maximizes radiant heat for everyone. Investing in weatherproof protective chair covers ensures you aren’t wiping down dew every single evening.
Optimize your fire zone positioning for absolutely zero cost. Pin this layout to your cozy autumn aesthetic board!
- Key Materials: Curved seating, fire pit anchor
- Vibe / Style: Intimate evening gathering
- Difficulty: Simple arrangement
- Budget Breakdown: Layout Cost: $0 | Protective Gear: $50
- Creator’s Tip: Keep exactly 36 inches of clearance between the fire ring and the front legs of the chairs.
- Smart Sourcing: heavy-duty waterproof chair covers and high-density polyethylene folding Adirondacks.
21. Built-In Perimeter Seating
Feels like a permanent architectural masterpiece carved into your yard. Cinderblock retaining wall benches brilliantly solve seating issues on sloped property lines.
Buying endless chairs clutters the floor, but this floating wall hack delivers a surprisingly premium look while holding a dozen guests simultaneously. Topping the rough blocks with pre-finished cedar planking kits instantly warms up the cold concrete.
You can construct a 10-foot seating wall for around $150. Highly recommended for permanent, high-value hardscaping.
- Key Materials: Cinderblocks, construction adhesive, cedar
- Vibe / Style: Integrated modern architecture
- Difficulty: Intermediate DIY
- Budget Breakdown: Blocks/Glue: $80 | Wood Tops: $70
- Creator’s Tip: Angle the wooden backrest back at exactly 15 degrees—anything perfectly straight will ruin your spine.
- Smart Sourcing: pre-cut cedar bench slat bundles and heavy-duty outdoor masonry adhesive.
22. Sofa With Loveseat Pairing
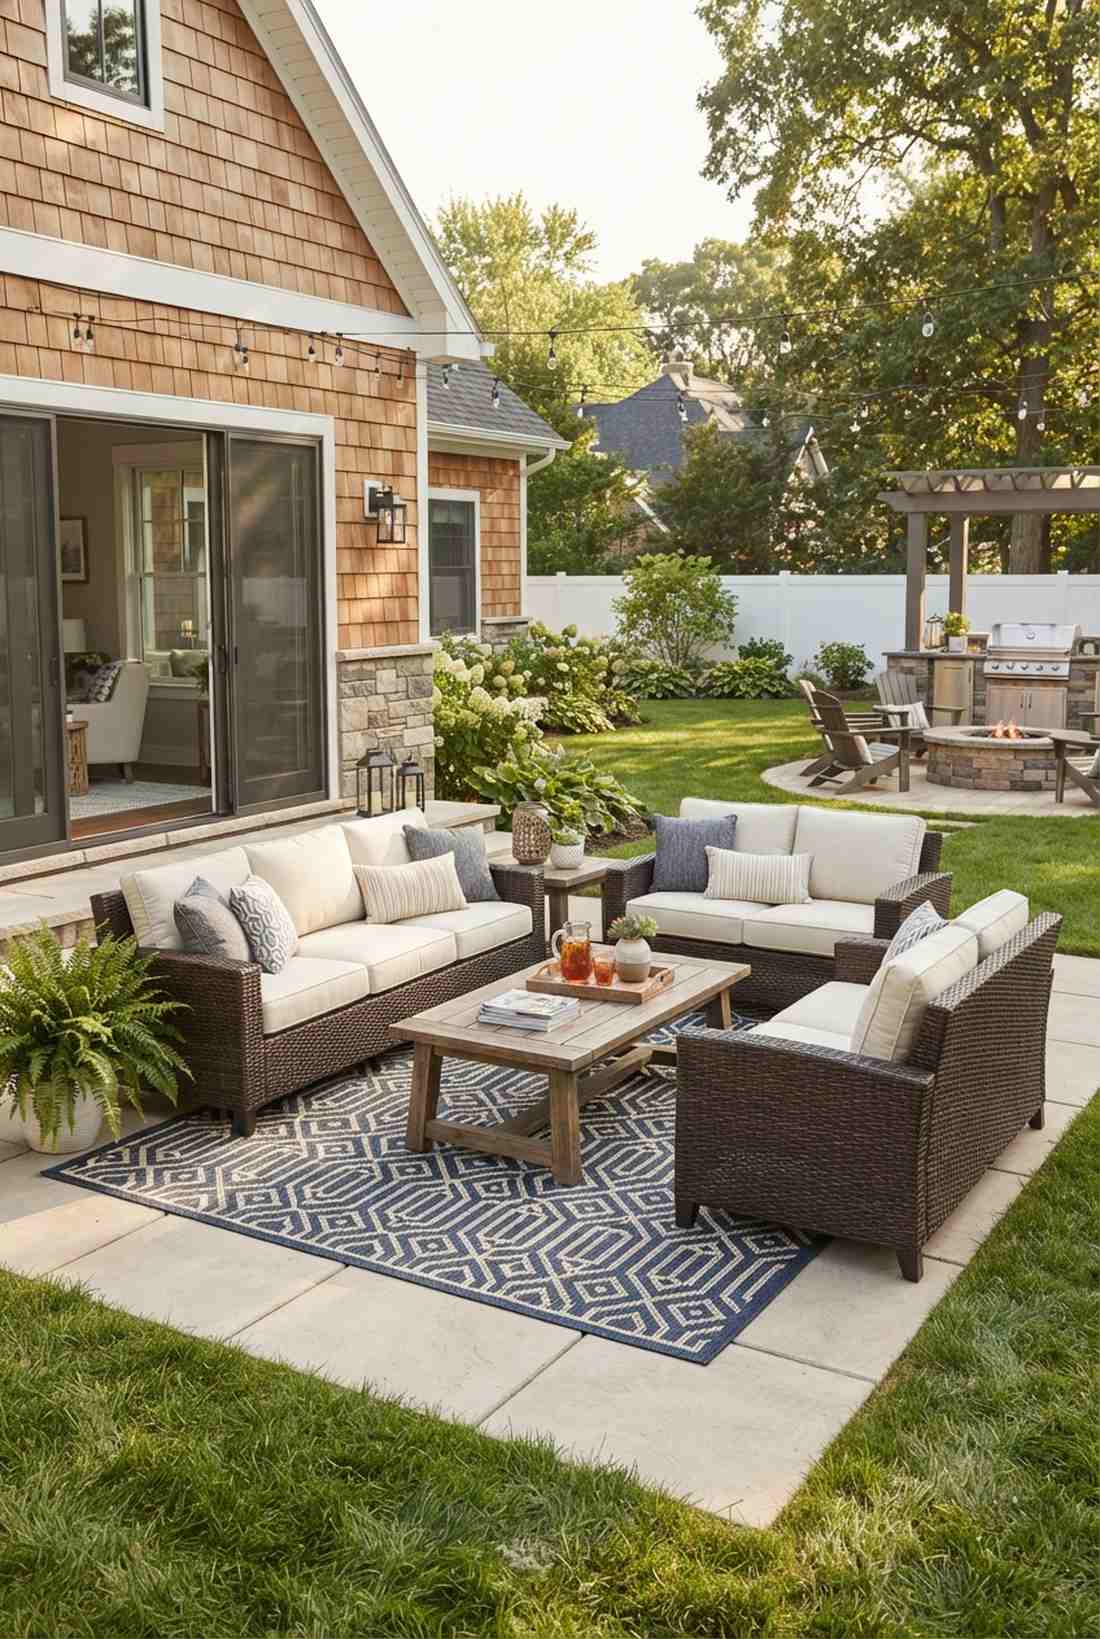
Gives off instant high-end interior living room vibes, just placed outside. Perpendicular outdoor sofa and loveseat setups anchor floating patios flawlessly.
Pushing all furniture against the house rail looks terrible, but floating them at a 90-degree angle looks far more expensive and forces intimate conversation. Tying the gap together with a massive UV-resistant geometric outdoor rug makes the space feel intentionally designed.
Re-arranging your current setup costs absolutely nothing. Save this if your patio currently feels disjointed and awkward!
- Key Materials: 2-piece sofa sets, large area rug
- Vibe / Style: Structured conversational elegance
- Difficulty: Simple arrangement
- Budget Breakdown: Rug: $80 | Layout: $0
- Creator’s Tip: Ensure the front two legs of both the sofa and loveseat are sitting completely on the rug.
- Smart Sourcing: UV-resistant geometric outdoor rugs and waterproof resin wicker loveseat sets.
23. Sunken Conversation Area
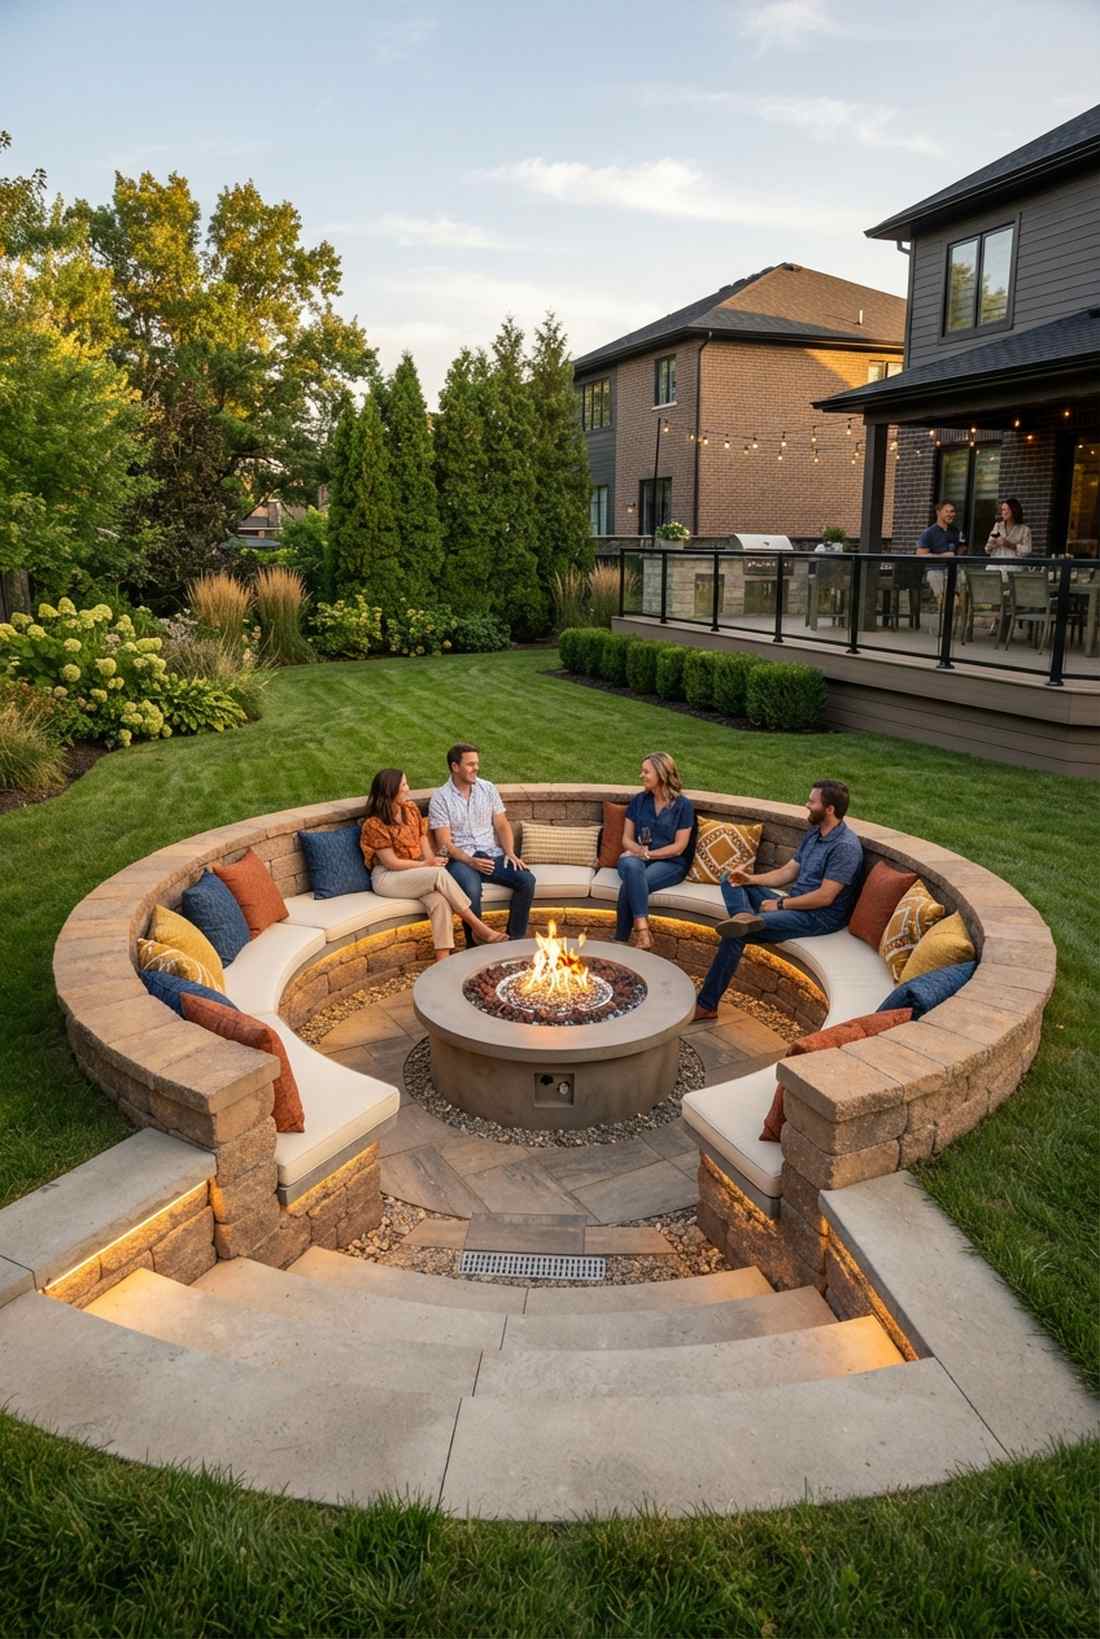
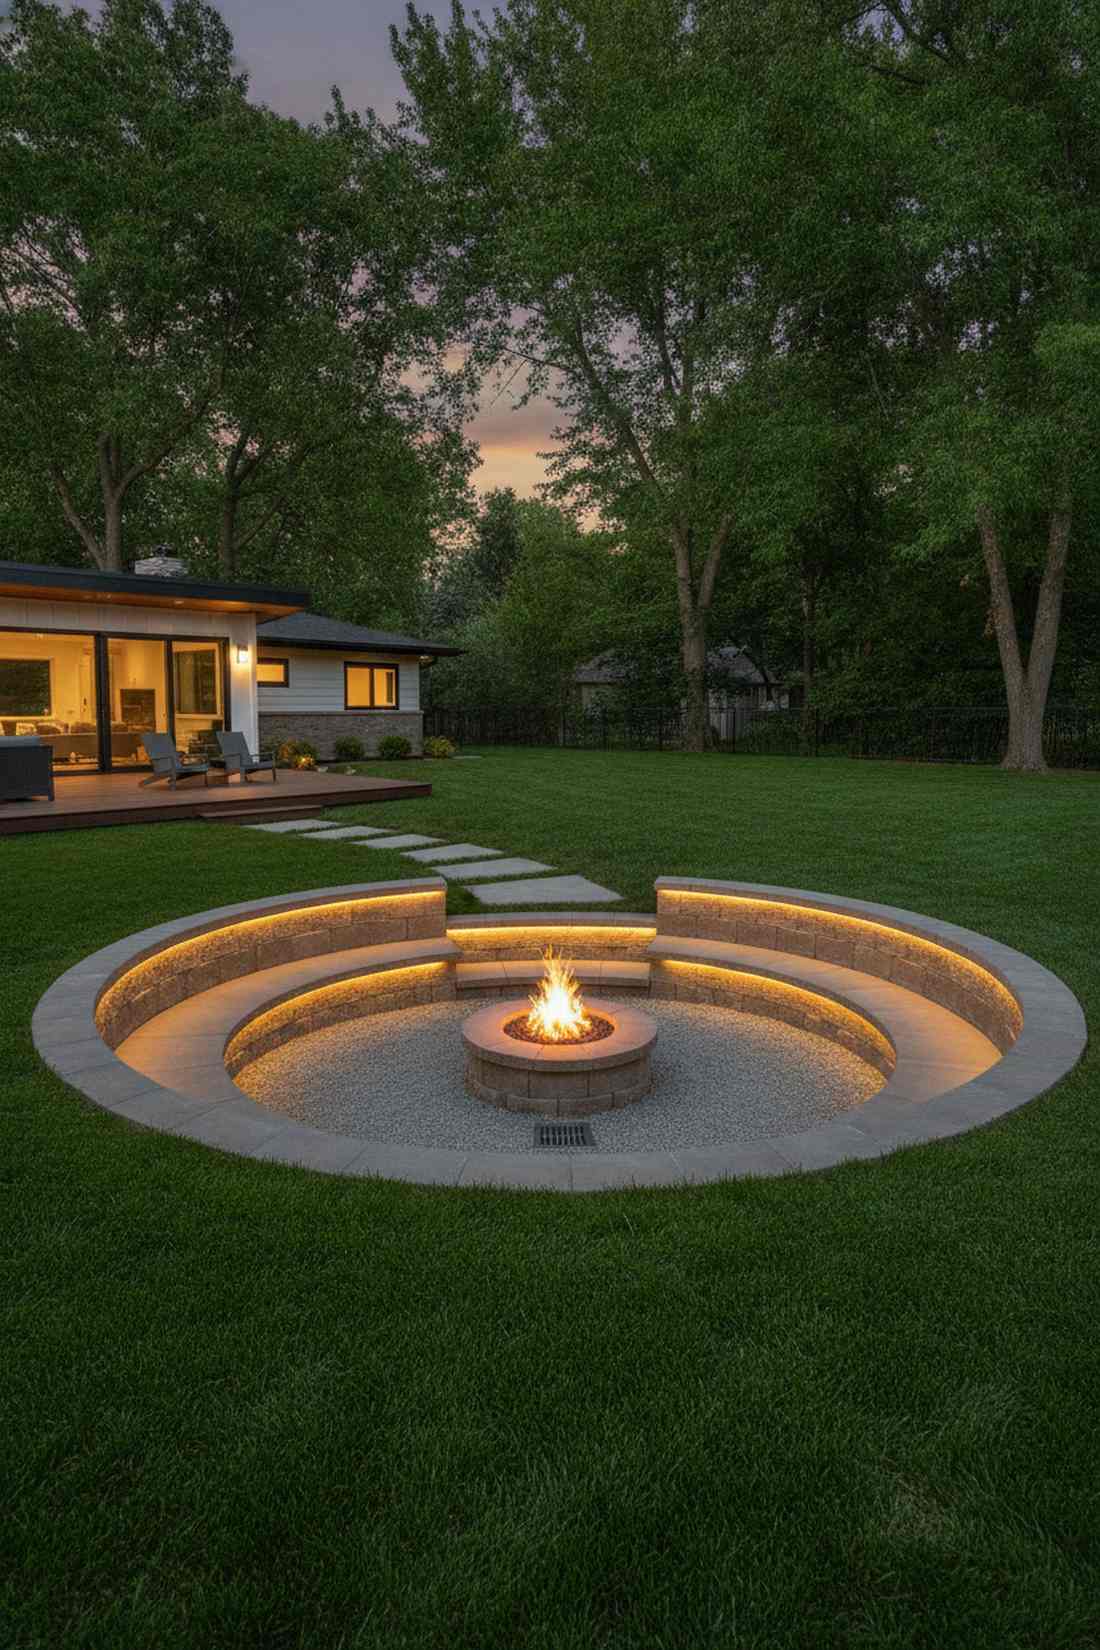
Straight out of a retro-modern 1970s architectural masterpiece. Recessed fire pit seating bowls create the ultimate wind-protected sanctuary in completely flat yards.
Everyone builds up, but digging down gives a designer-level finish that naturally blocks nosy neighbors and aggressive breezes. Incorporating a commercial drainage pump system at the bottom is absolutely mandatory so it doesn’t become a swimming pool.
This is a heavy investment requiring professional excavation. Pin this to your ultimate dream backyard vision board!
- Key Materials: Retaining blocks, sump pump, gravel
- Vibe / Style: Bespoke retro luxury
- Difficulty: Advanced/Professional
- Budget Breakdown: Excavation/Drainage: $800 | Wall Blocks: $600
- Creator’s Tip: Install low-voltage LED strip lights directly under the seating lip to prevent dangerous nighttime falls.
- Smart Sourcing: commercial-grade outdoor sump pumps and waterproof LED strip lighting kits.
24. Floating Deck Seating
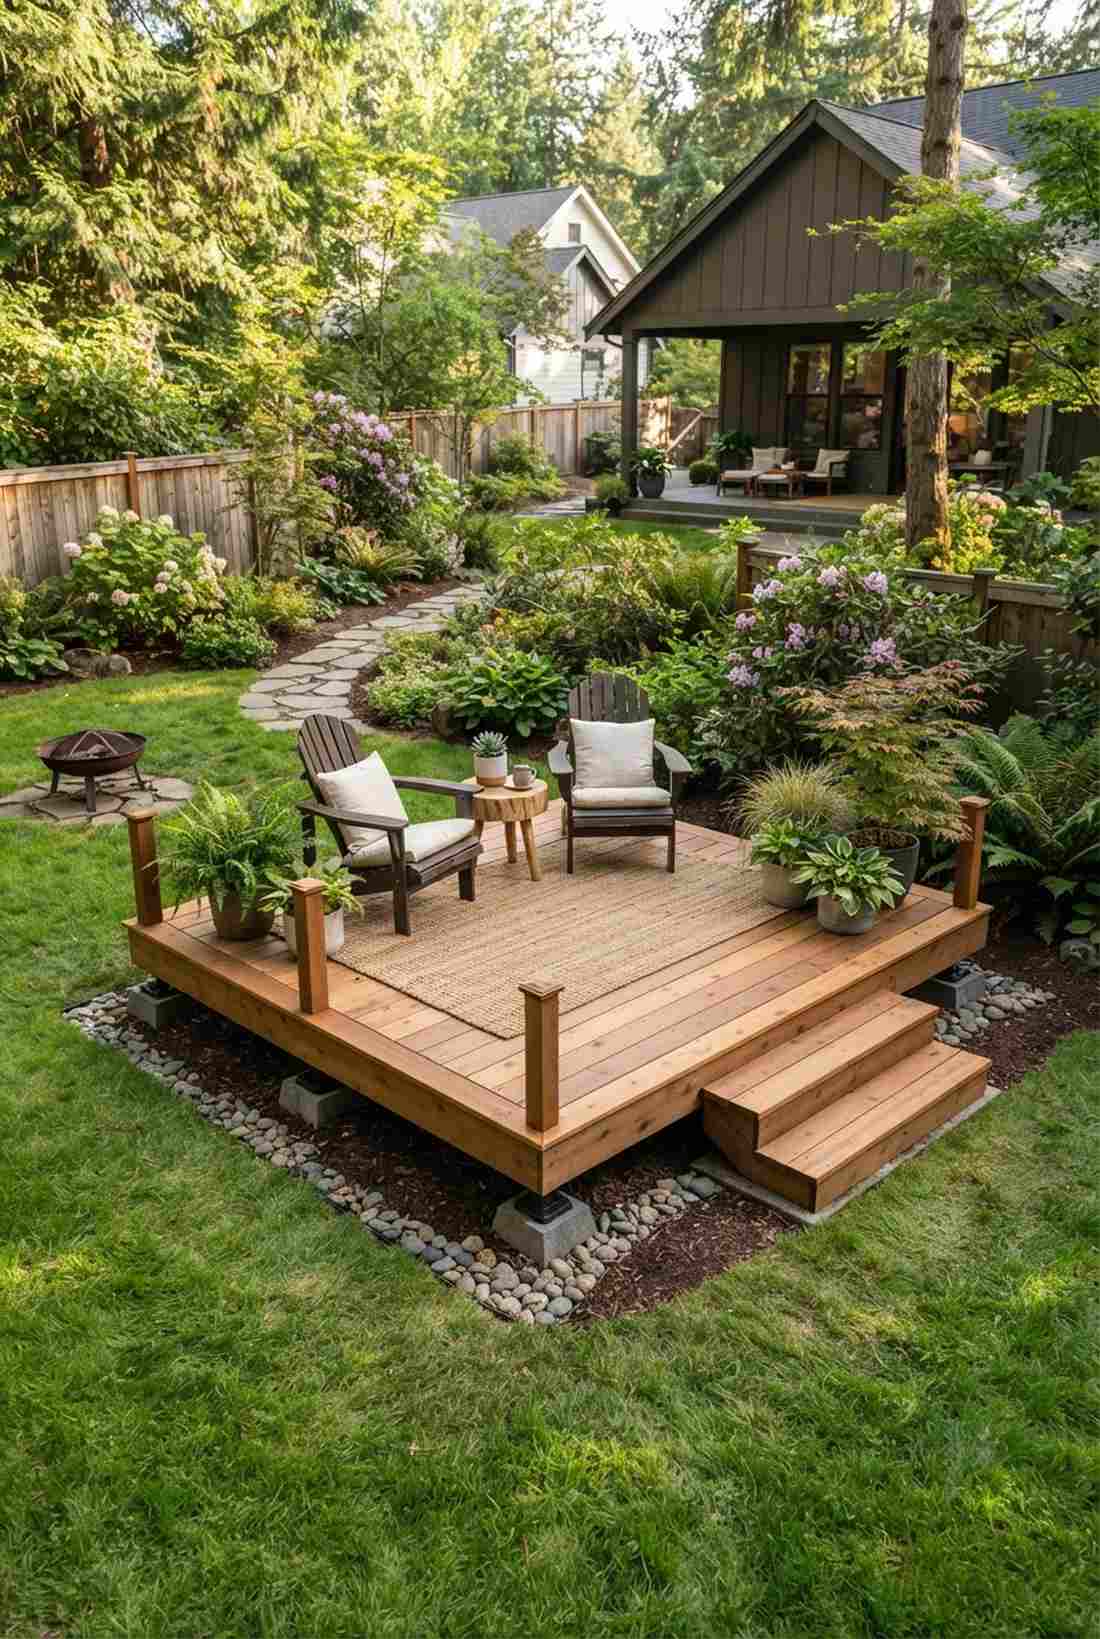
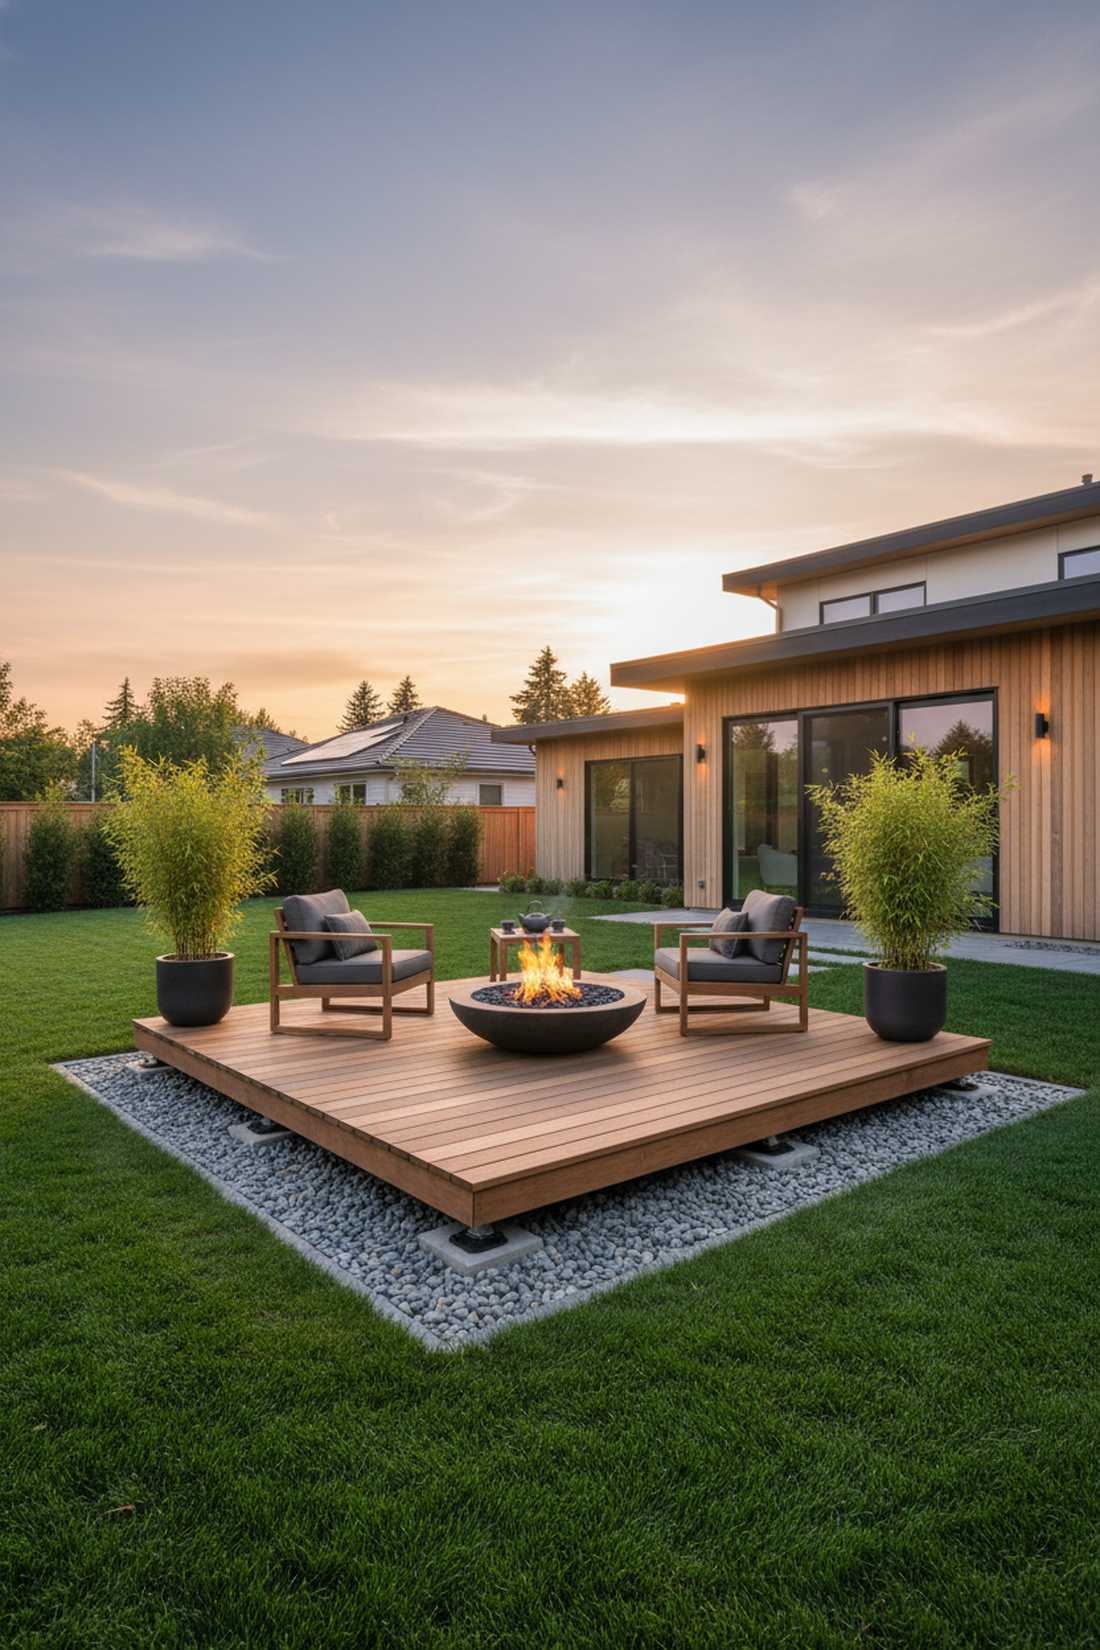
Feels like a secluded zen island floating above a sea of grass. Standalone elevated wooden platforms are a genius way to conquer an unusable muddy yard corner.
Attaching a deck to a house requires massive permits, but a freestanding platform delivers an insanely expensive organic aesthetic with zero city red tape. Using adjustable structural deck riser kits guarantees a perfectly level surface even on terrible terrain.
You can easily pull off an 8×8 platform for roughly $400. It’s a fast upgrade that completely changes the vibe.
- Key Materials: Treated lumber, adjustable risers
- Vibe / Style: Modern zen retreat
- Difficulty: Intermediate DIY
- Budget Breakdown: Lumber: $300 | Hardware/Risers: $100
- Creator’s Tip: Build the frame on concrete deck blocks rather than digging deep post holes to save brutal labor.
- Smart Sourcing: adjustable structural deck pedestal kits and heavy-duty concrete deck blocks.
Don’t even think about buying furniture until you’ve seen this next modular layout hack.
25. Modular Furniture Clusters
Instantly transforms to fit whatever chaotic party you are currently hosting. Separable lightweight modular seating pods are mandatory for people who entertain wildly different group sizes.
Buying massive, heavy cast-iron pieces locks you into one layout forever, but this lightweight alternative looks far more expensive while offering infinite flexibility. Snagging fairy garden kits for the center coffee tables adds an incredible tiny focal point.
You can pull this dynamic layout off instantly if you own sectional pieces. Save this to your adaptable hosting board!
- Key Materials: Lightweight wicker pods, central tables
- Vibe / Style: Dynamic modern lounge
- Difficulty: Simple arrangement
- Budget Breakdown: Layout: $0 | Accent Decor: $30
- Creator’s Tip: Ditch the massive heavy wooden coffee table for three small lightweight nesting tables that move easily.
- Smart Sourcing: UV-coated resin fairy cottage kits and lightweight outdoor nesting table sets.
26. Hammock Lounge Zone
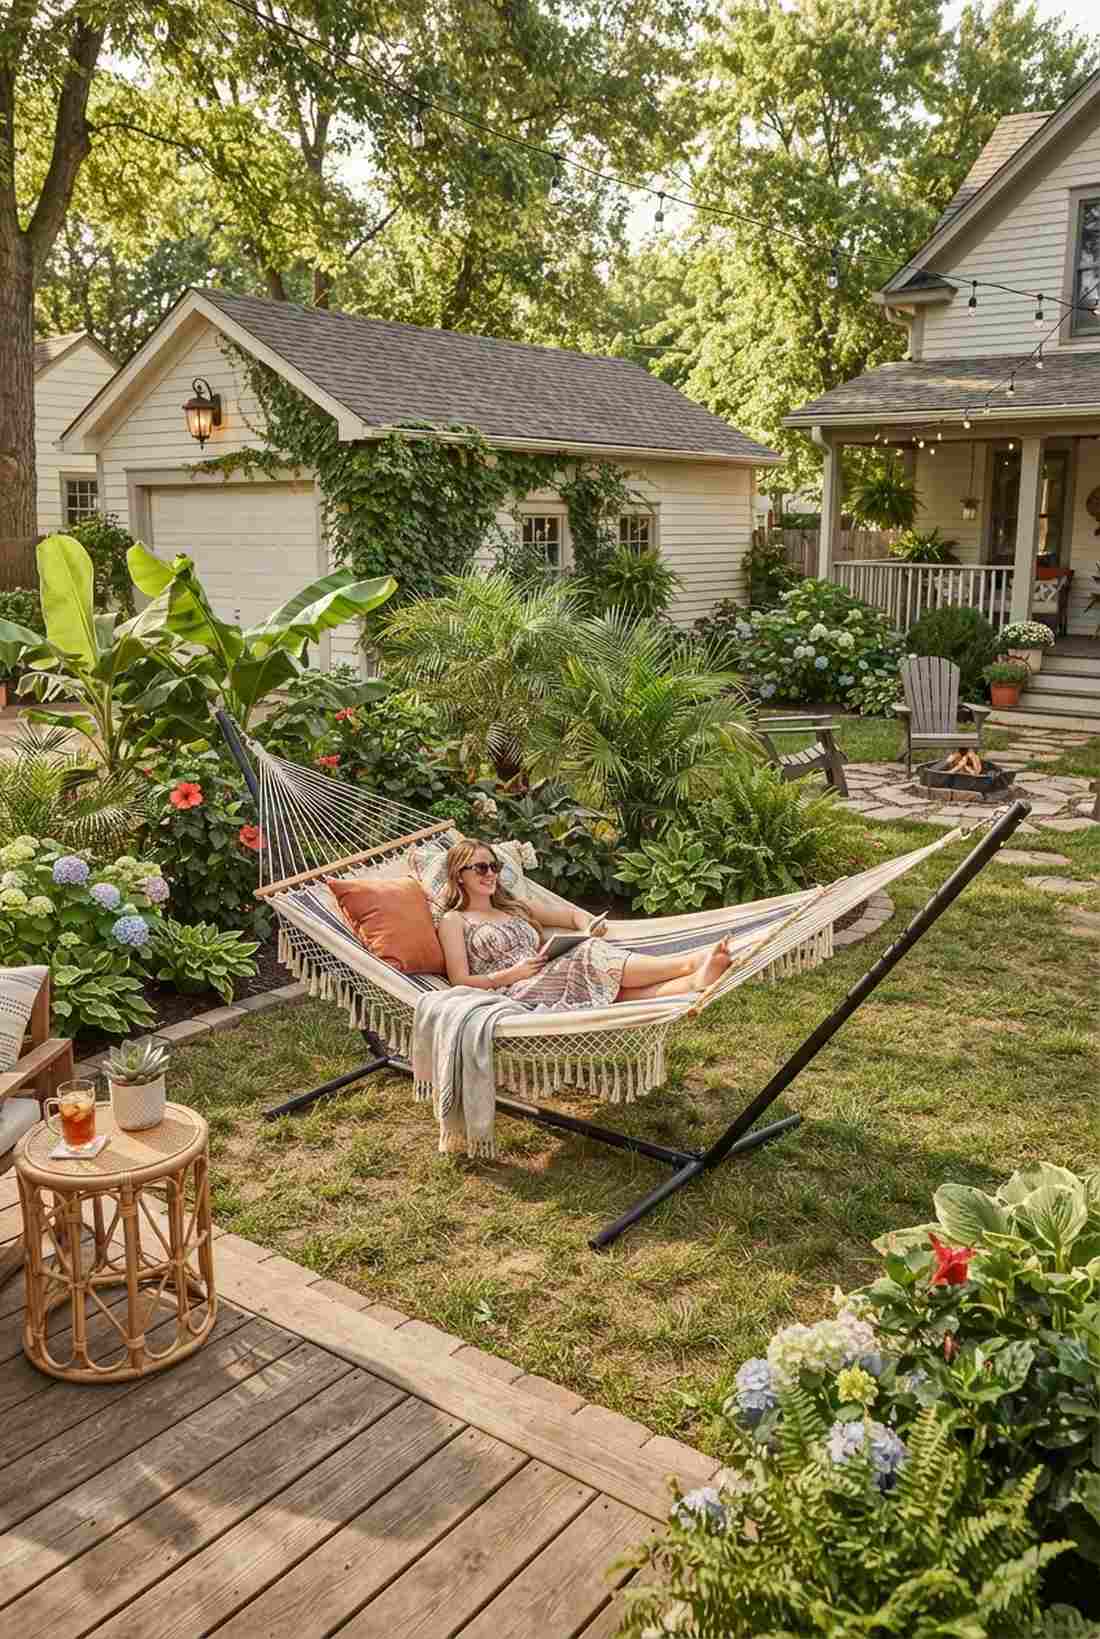
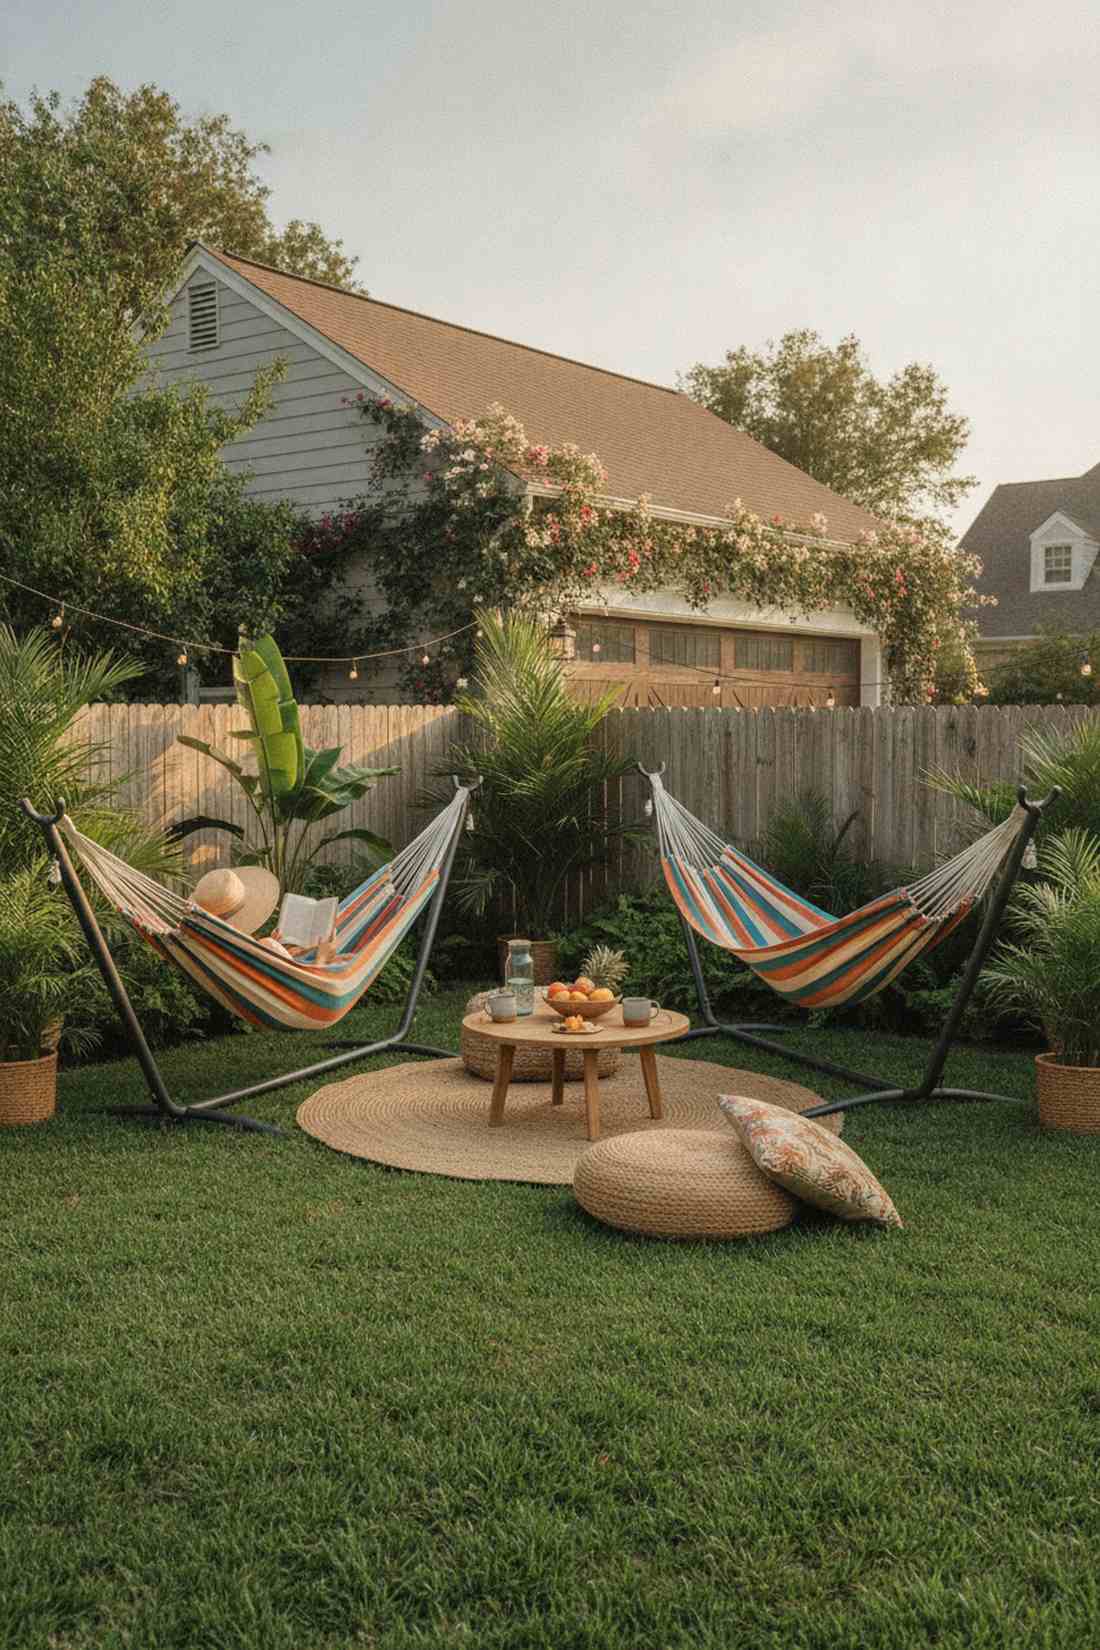
Feels like a tropical vacation resort hidden behind your garage. Freestanding suspended hammock stations immediately create a dedicated, stress-free reading sanctuary.
Dragging chairs into the grass ruins the lawn, but this suspended setup gives a designer-level finish that screams pure relaxation. Utilizing heavy-duty steel hammock stands means you don’t need two perfectly spaced mature trees to pull this off.
Grab a premium stand and canvas setup for under $100. Highly recommended for a quick weekend win.
- Key Materials: Canvas hammock, steel stand
- Vibe / Style: Bohemian tropical escape
- Difficulty: Easy beginner
- Budget Breakdown: Hammock: $40 | Stand: $60
- Creator’s Tip: Always unhook and store the fabric hammock inside when it rains to prevent massive mold outbreaks.
- Smart Sourcing: heavy-duty steel hammock stand kits and weatherproof canvas outdoor hammocks.
Smart Furniture Layouts For Garden Patios
27. Kitchen-Adjacent Dining
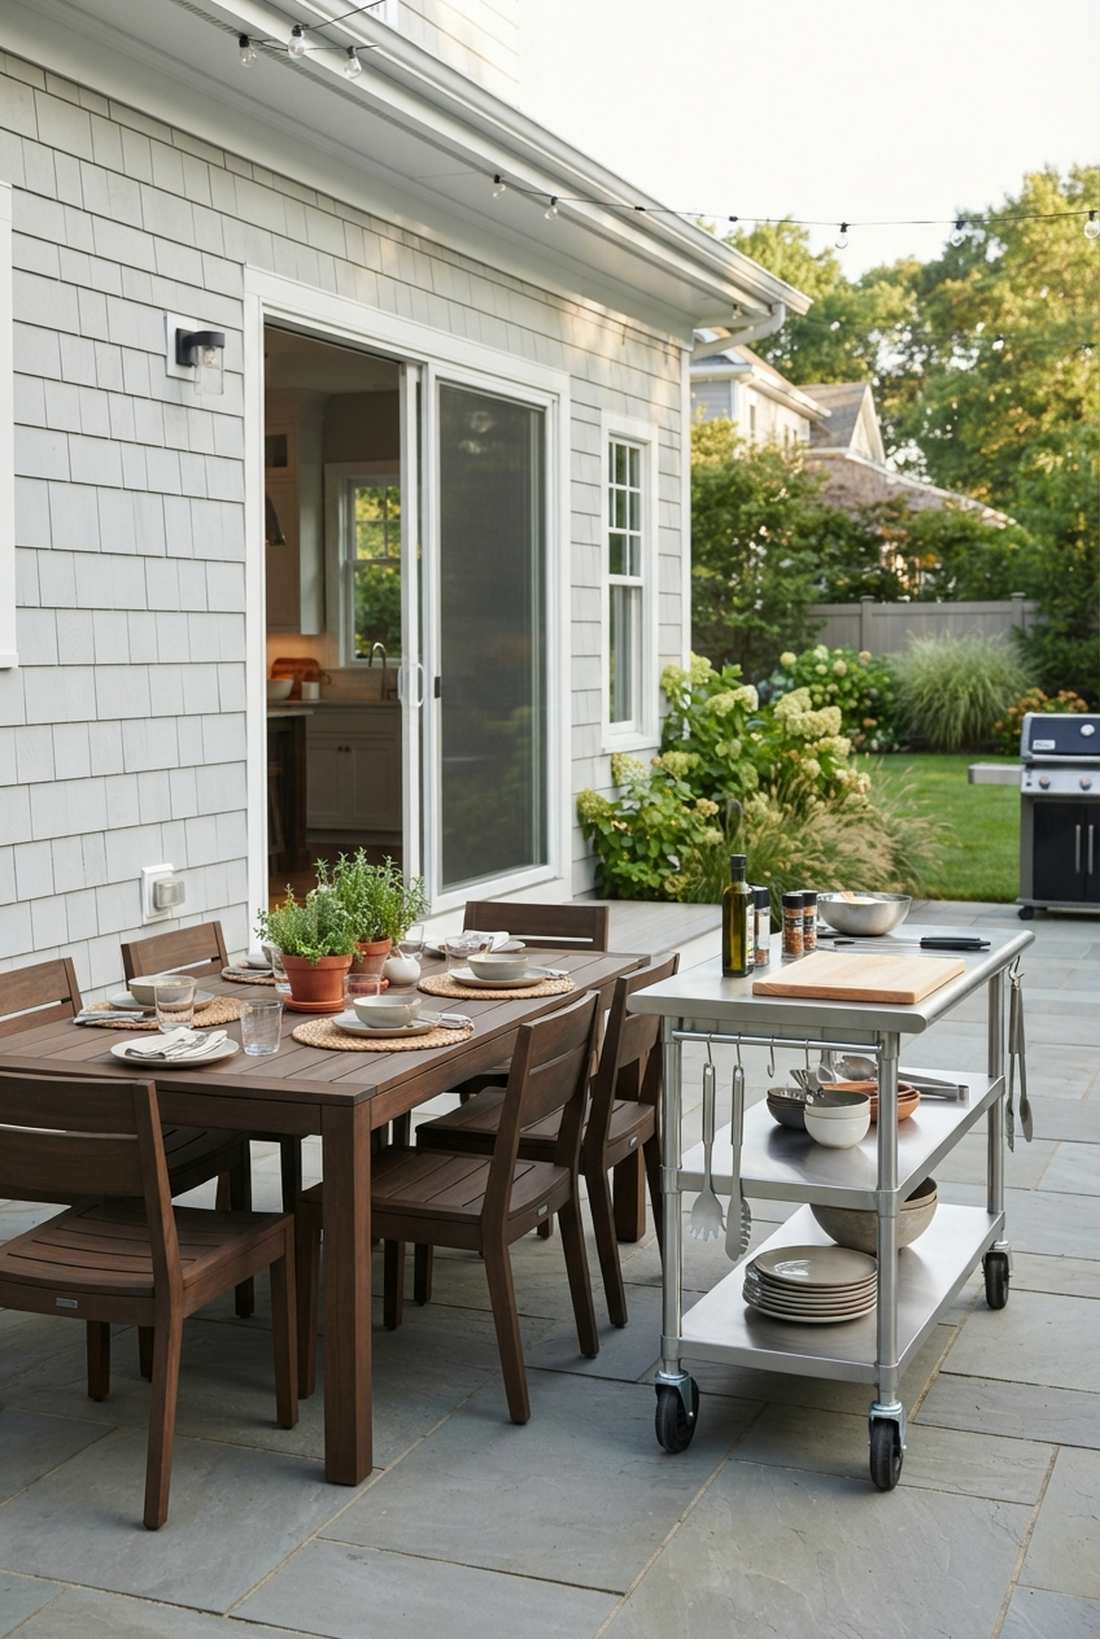
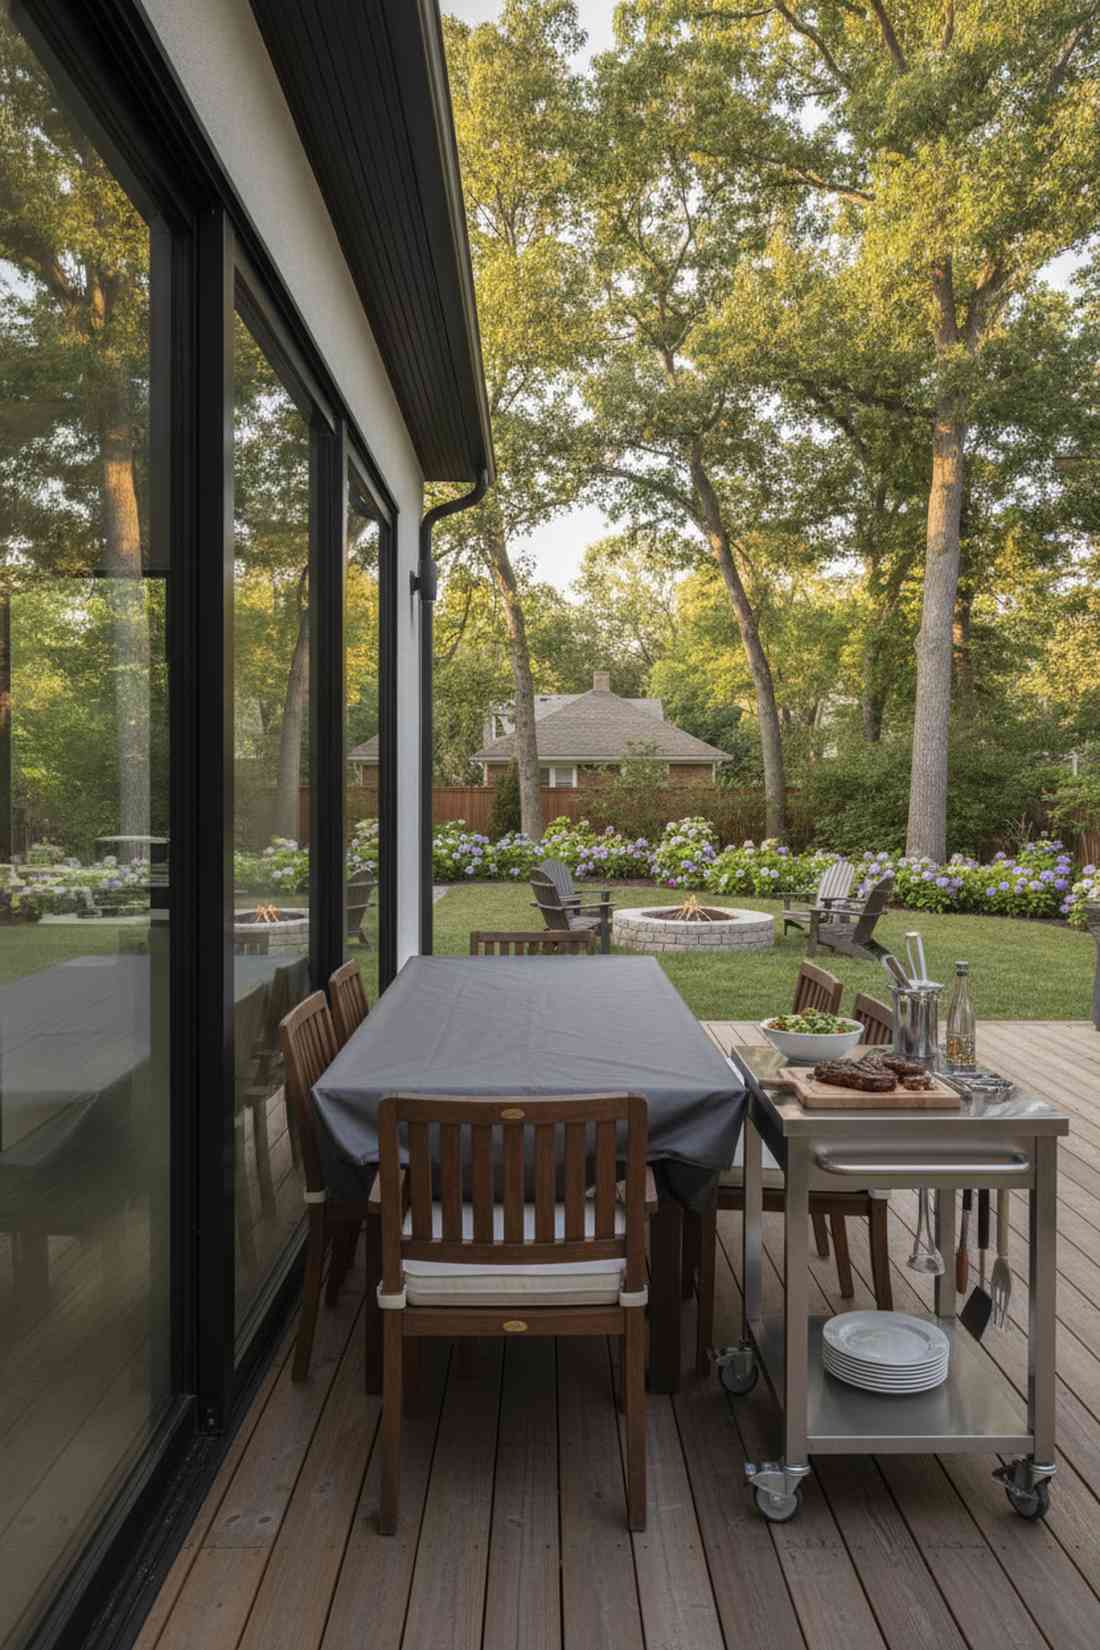
Gives off instant high-efficiency outdoor restaurant energy. Placing the dining table flush against the exterior kitchen wall is the ultimate entertaining shortcut.
Most people put the table way out in the yard, but this layout delivers a surprisingly premium look while stopping you from dropping steaks in the grass. Installing a commercial-grade outdoor serving cart right next to the door changes the entire prep game.
Slide your table over today for absolutely zero cost. Pin this to your outdoor kitchen layout board!
- Key Materials: Dining set, serving cart
- Vibe / Style: Practical culinary hub
- Difficulty: Simple arrangement
- Budget Breakdown: Layout: $0 | Prep Cart: $80
- Creator’s Tip: Ensure you leave exactly 36 inches of clearance between the pulled-out chairs and the sliding glass door.
- Smart Sourcing: stainless steel outdoor prep carts and heavy-duty weatherproof dining table covers.
28. Dual-Zone Patio Layout
Feels like navigating a massive, professionally staged luxury home. Creating strict visual barriers between eating and lounging forces a tiny slab to feel enormous.
Cramming everything into the middle looks chaotic, but using large planters as a faux-wall gives a designer-level finish that separates the vibes perfectly. You can inject miniature garden supplies into those dividing planters for an incredible aesthetic pop.
Rearrange your zones this weekend to instantly double your perceived space. Save this genius blueprint!
- Key Materials: Tall rectangular planters, outdoor rugs
- Vibe / Style: Structured resort living
- Difficulty: Simple arrangement
- Budget Breakdown: Planter Dividers: $150 | Rugs: $100
- Creator’s Tip: Use two completely different colored outdoor rugs to trick the brain into seeing two different rooms.
- Smart Sourcing: tall geometric privacy planters (bulk pack) and UV-resistant outdoor divider rugs.
29. Corner Maximization
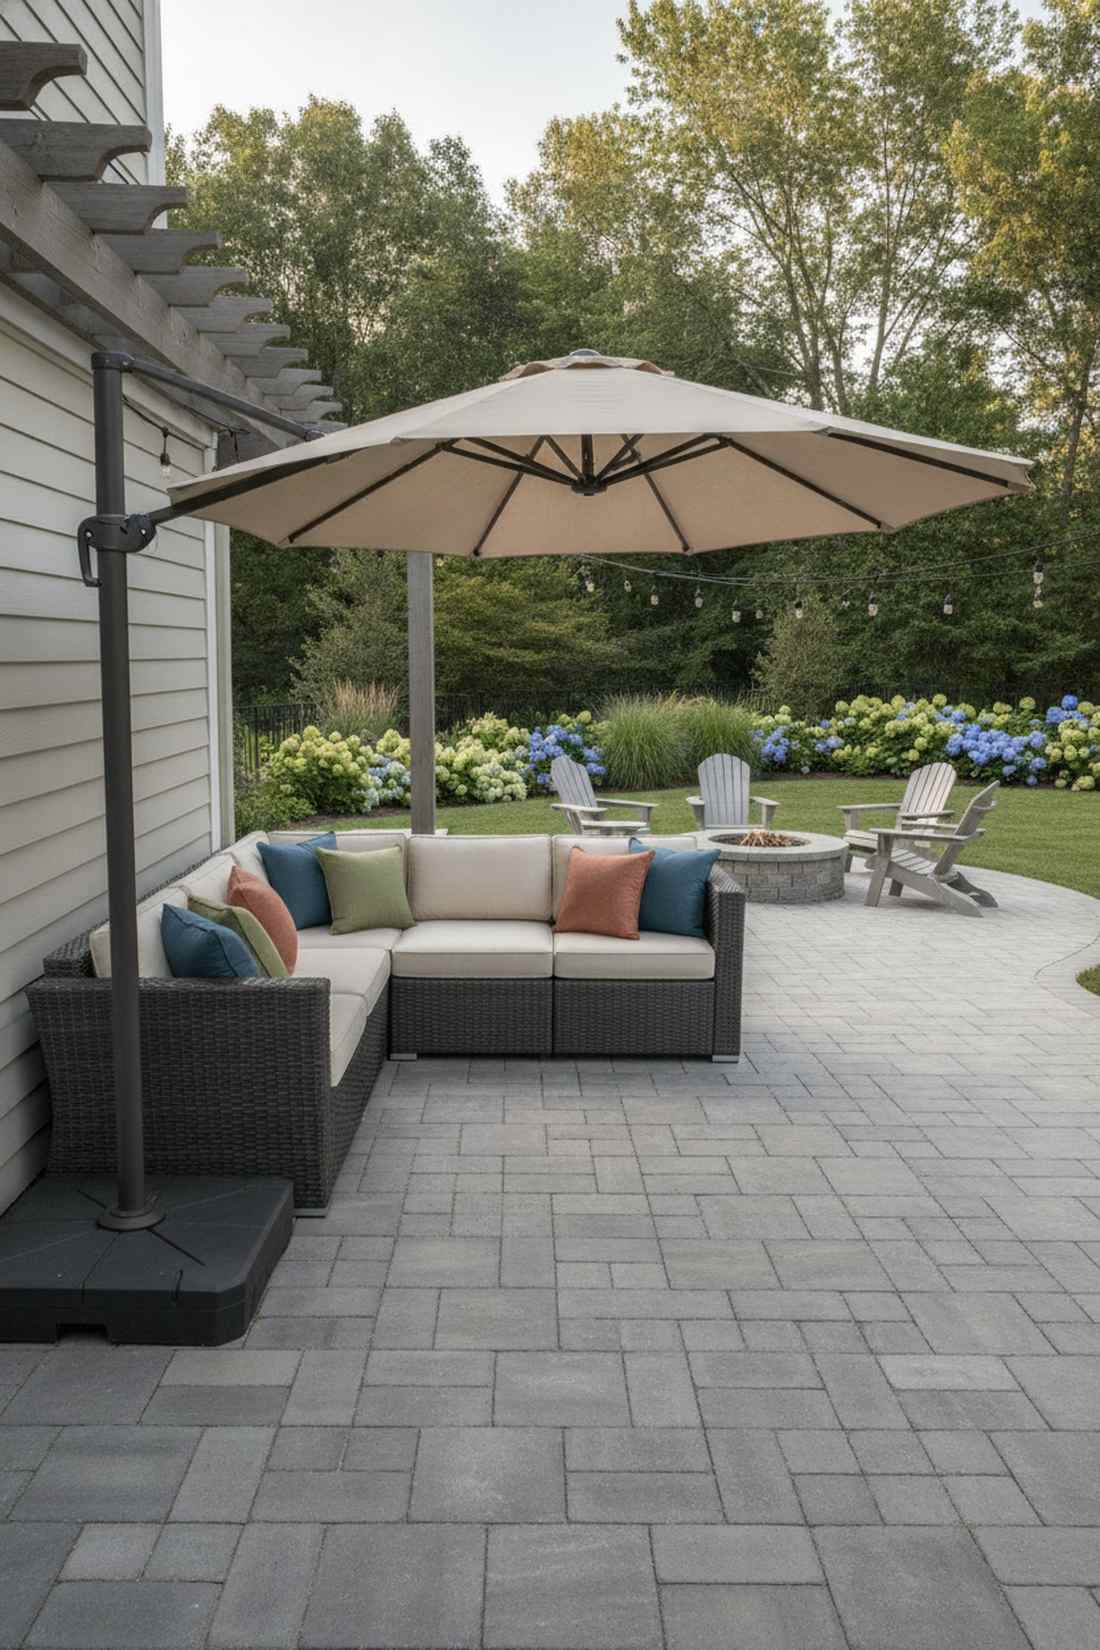
Looks like a custom-built banquette at a high-end cafe. Shoving massive L-shaped sectionals deep into hard patio corners reclaims the entire center for dancing or fire pits.
Placing couches dead center eats the whole slab, but this edge-hugging strategy looks far more expensive and opens up the main traffic arteries. Adding a heavy-duty offset cantilever umbrella over the corner creates an instant shaded cabana.
This spatial trick costs nothing if you already own the furniture. Highly recommended for a quick weekend win.
- Key Materials: L-shaped sectional, offset umbrella
- Vibe / Style: Cozy space-saving chic
- Difficulty: Simple arrangement
- Budget Breakdown: Layout: $0 | Umbrella setup: $120
- Creator’s Tip: Never push the wicker completely flush against the house siding; leave 4 inches for crucial airflow.
- Smart Sourcing: heavy-duty offset cantilever umbrellas and waterproof resin wicker corner sets.
This next setup completely breaks traditional design rules, and the result is stunning…
30. Poolside Furniture Placement
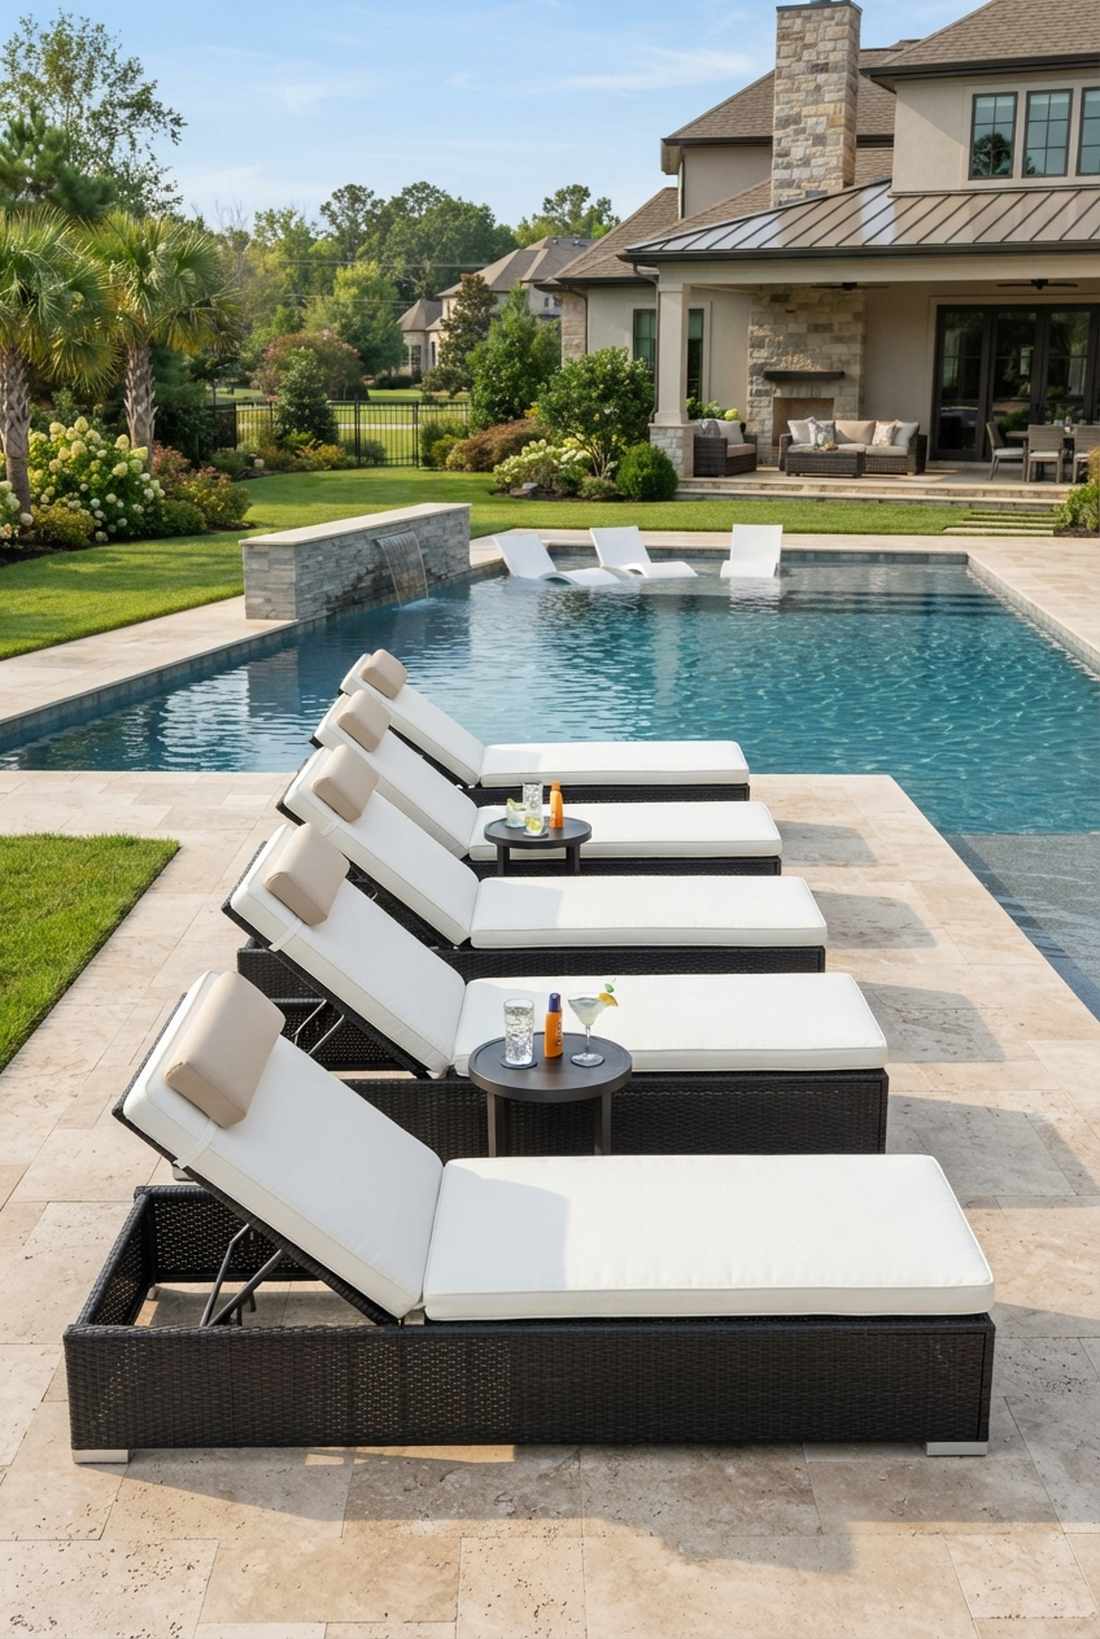
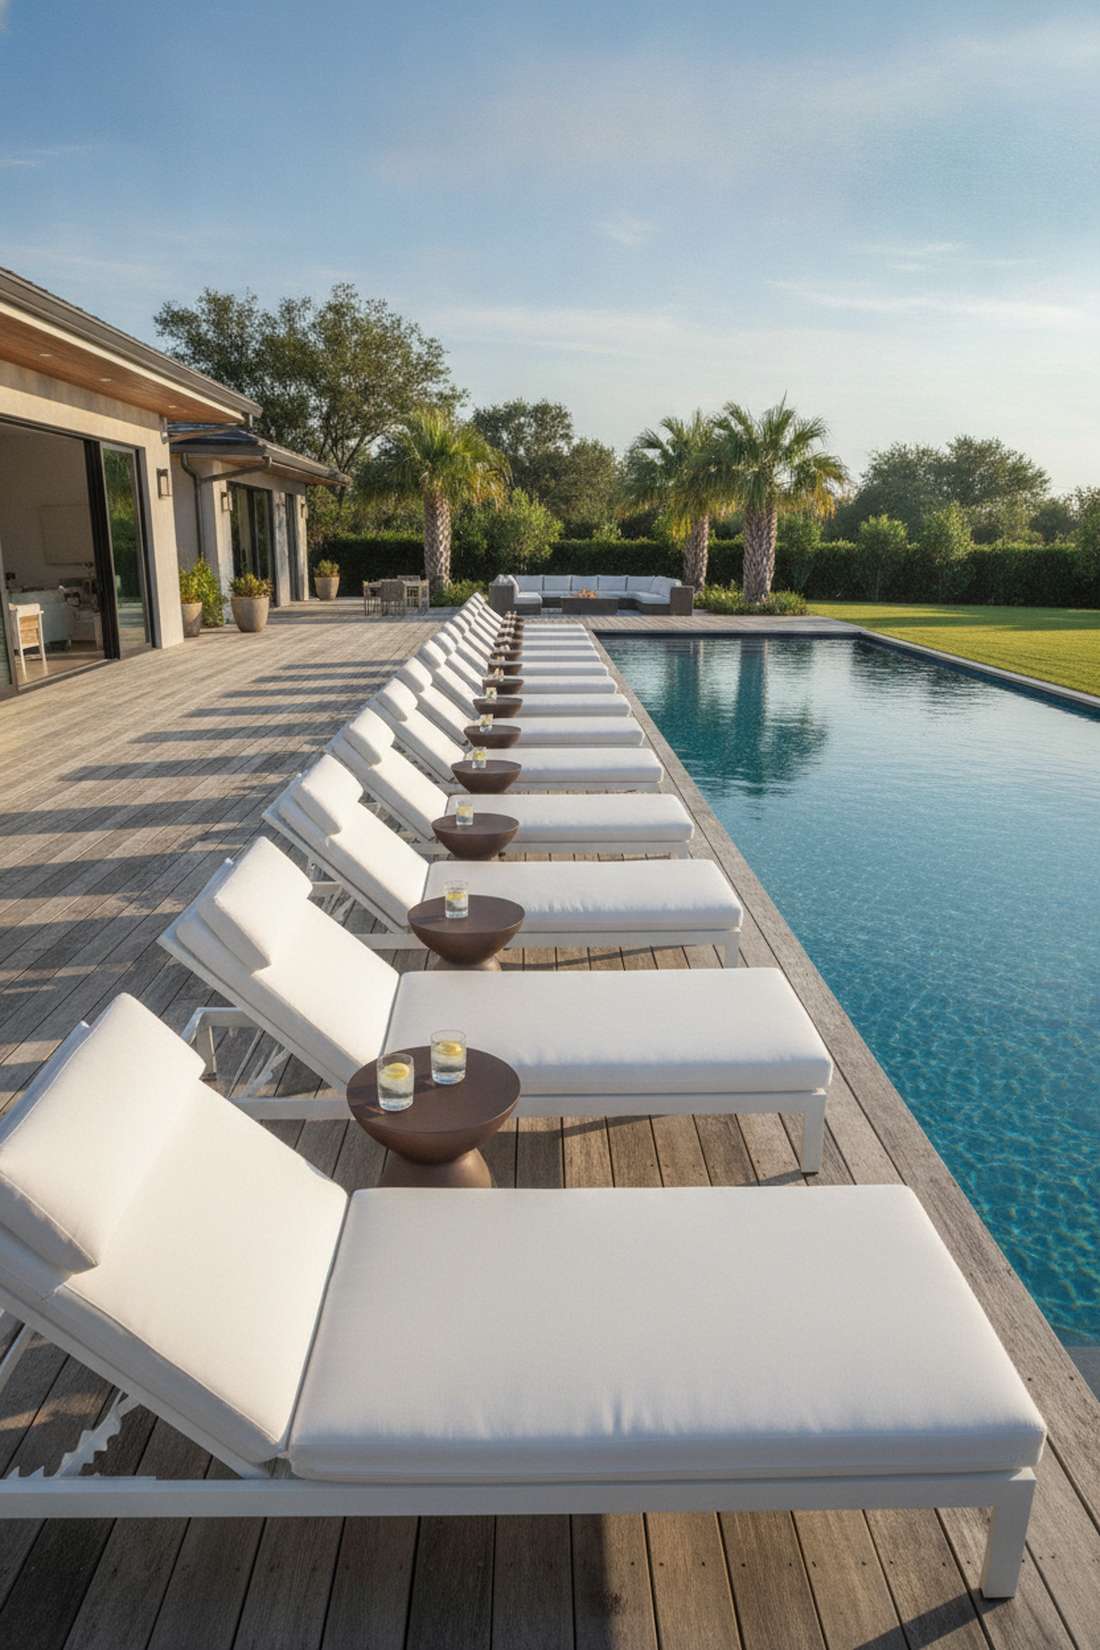
Radiates massive five-star Vegas dayclub energy. Lining up identical chaise lounges perfectly parallel to the water turns a basic backyard pool into a resort.
Scattering chairs randomly looks terrible, but strict geometric alignment gives a designer-level finish that screams luxury wealth. Always source marine-grade waterproof cushion foam because regular pillows will rot internally within a month of splashing.
You can upgrade your cushion inserts for around $40 each. Pin this to your ultimate pool renovation board!
- Key Materials: Matching lounger pairs, side tables
- Vibe / Style: High-end resort pool
- Difficulty: Simple arrangement
- Budget Breakdown: Foam Inserts: $80 | Layout: $0
- Creator’s Tip: Place a tiny 18-inch drink table exactly between every two chairs so nobody kicks their glass over.
- Smart Sourcing: marine-grade waterproof cushion foam kits and UV-coated resin side tables.
31. Symmetrical Formal Layout
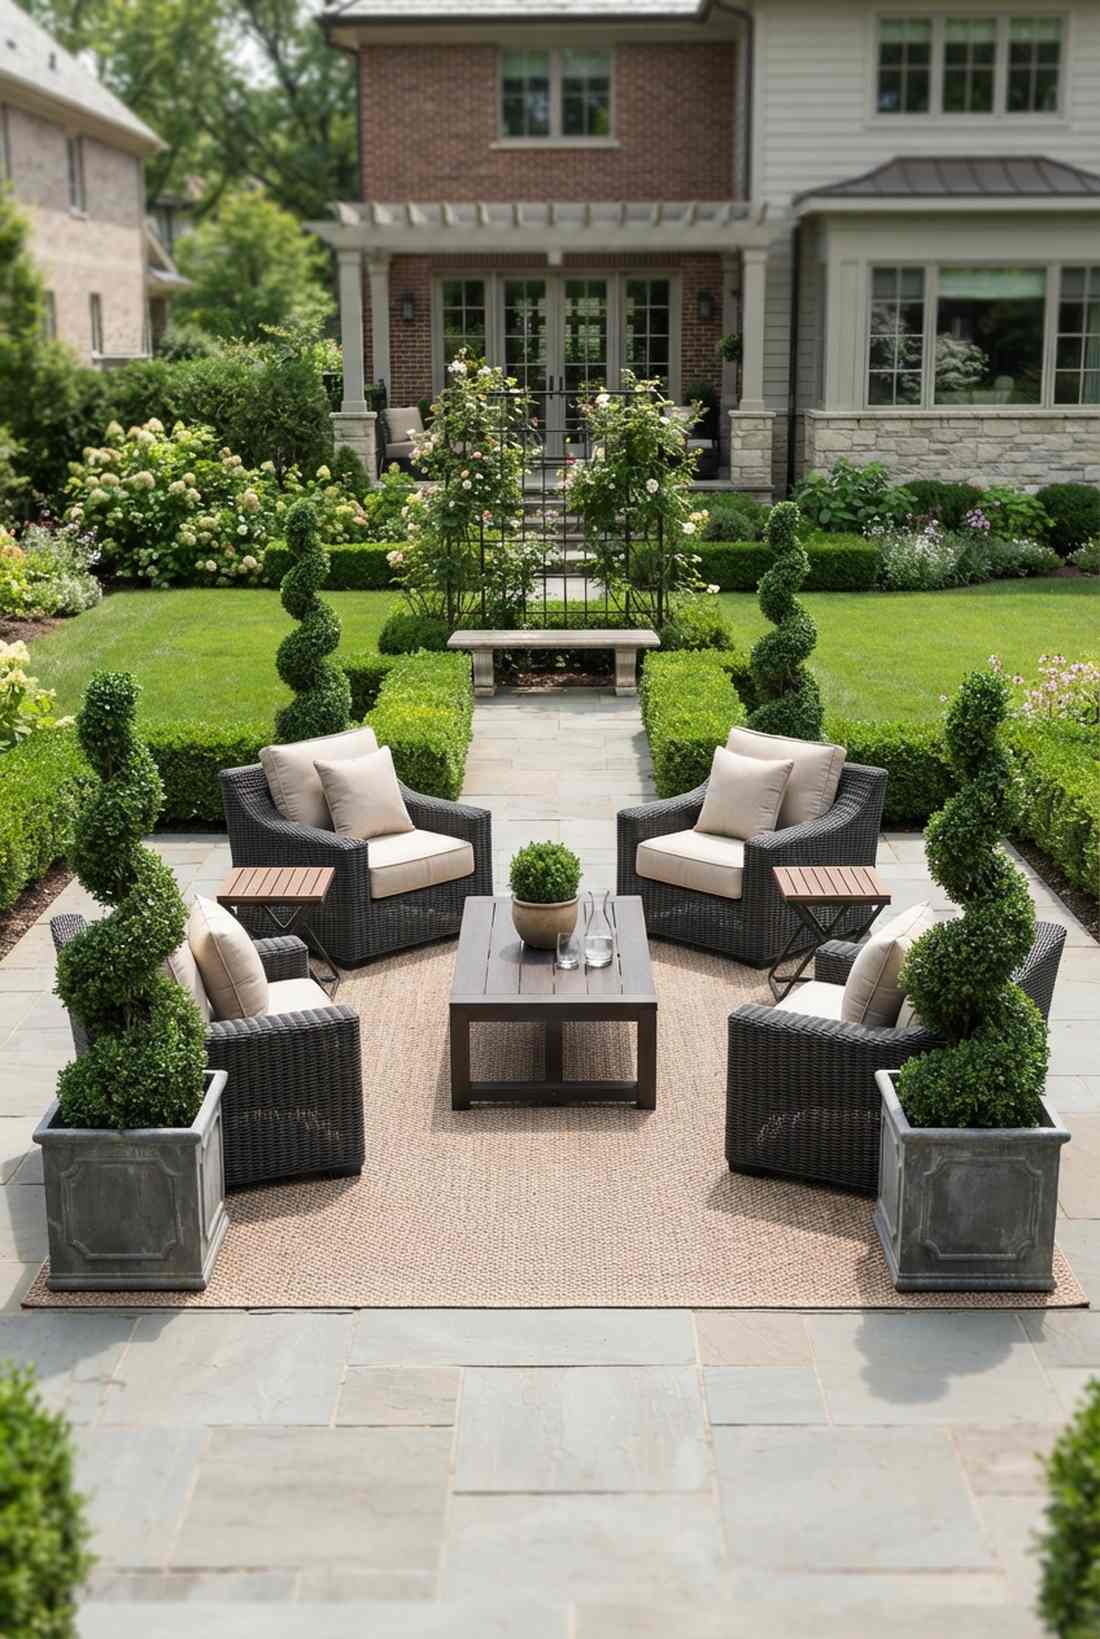
Feels like stepping onto the grounds of a historic French chateau. Mirror-imaging every single piece of furniture perfectly down a central axis is a powerful aesthetic hack.
Asymmetry often looks like a messy college dorm, but aggressive symmetry looks surprisingly premium and brings massive visual order to chaotic backyards. Flanking the setup with two pre-cut faux topiary trees locks the classic formal aesthetic instantly.
Re-centering your current patio costs exactly zero dollars. Save this if you crave extreme visual neatness!
- Key Materials: Matching chair pairs, flanking planters
- Vibe / Style: Classic architectural order
- Difficulty: Simple arrangement
- Budget Breakdown: Layout: $0 | Topiaries: $90
- Creator’s Tip: Find the exact physical center of your back door and measure outward to place your anchoring rug.
- Smart Sourcing: UV-resistant faux topiary trees (bulk pack) and heavy-duty symmetrical planter sets.
32. Asymmetrical Organic Arrangement
Straight out of an ultra-trendy coastal modern loft. Mixing totally unmatched seating styles in an uneven circle creates a relaxed, collected-over-time aesthetic.
Matching catalog sets look stiff and boring, but blending a modern metal sofa with vintage wicker chairs gives a designer-level finish. Throwing in terrarium accessories on the mixed side tables ties the chaotic materials together with greenery.
Hit the local thrift shop and spend maybe $50 on accent chairs. It’s a fast upgrade that completely changes the vibe.
- Key Materials: Mismatched chairs, unified textiles
- Vibe / Style: Eclectic modern bohemian
- Difficulty: Intermediate styling
- Budget Breakdown: Thrifted Chairs: $50 | Paint: $20
- Creator’s Tip: The secret to mismatching is making sure every completely different chair is painted the exact same color.
- Smart Sourcing: premium outdoor rust-stopping spray paint and UV-resistant terrarium accessories.
Garden Patio Decor Elements That Add Character
33. Outdoor Rugs
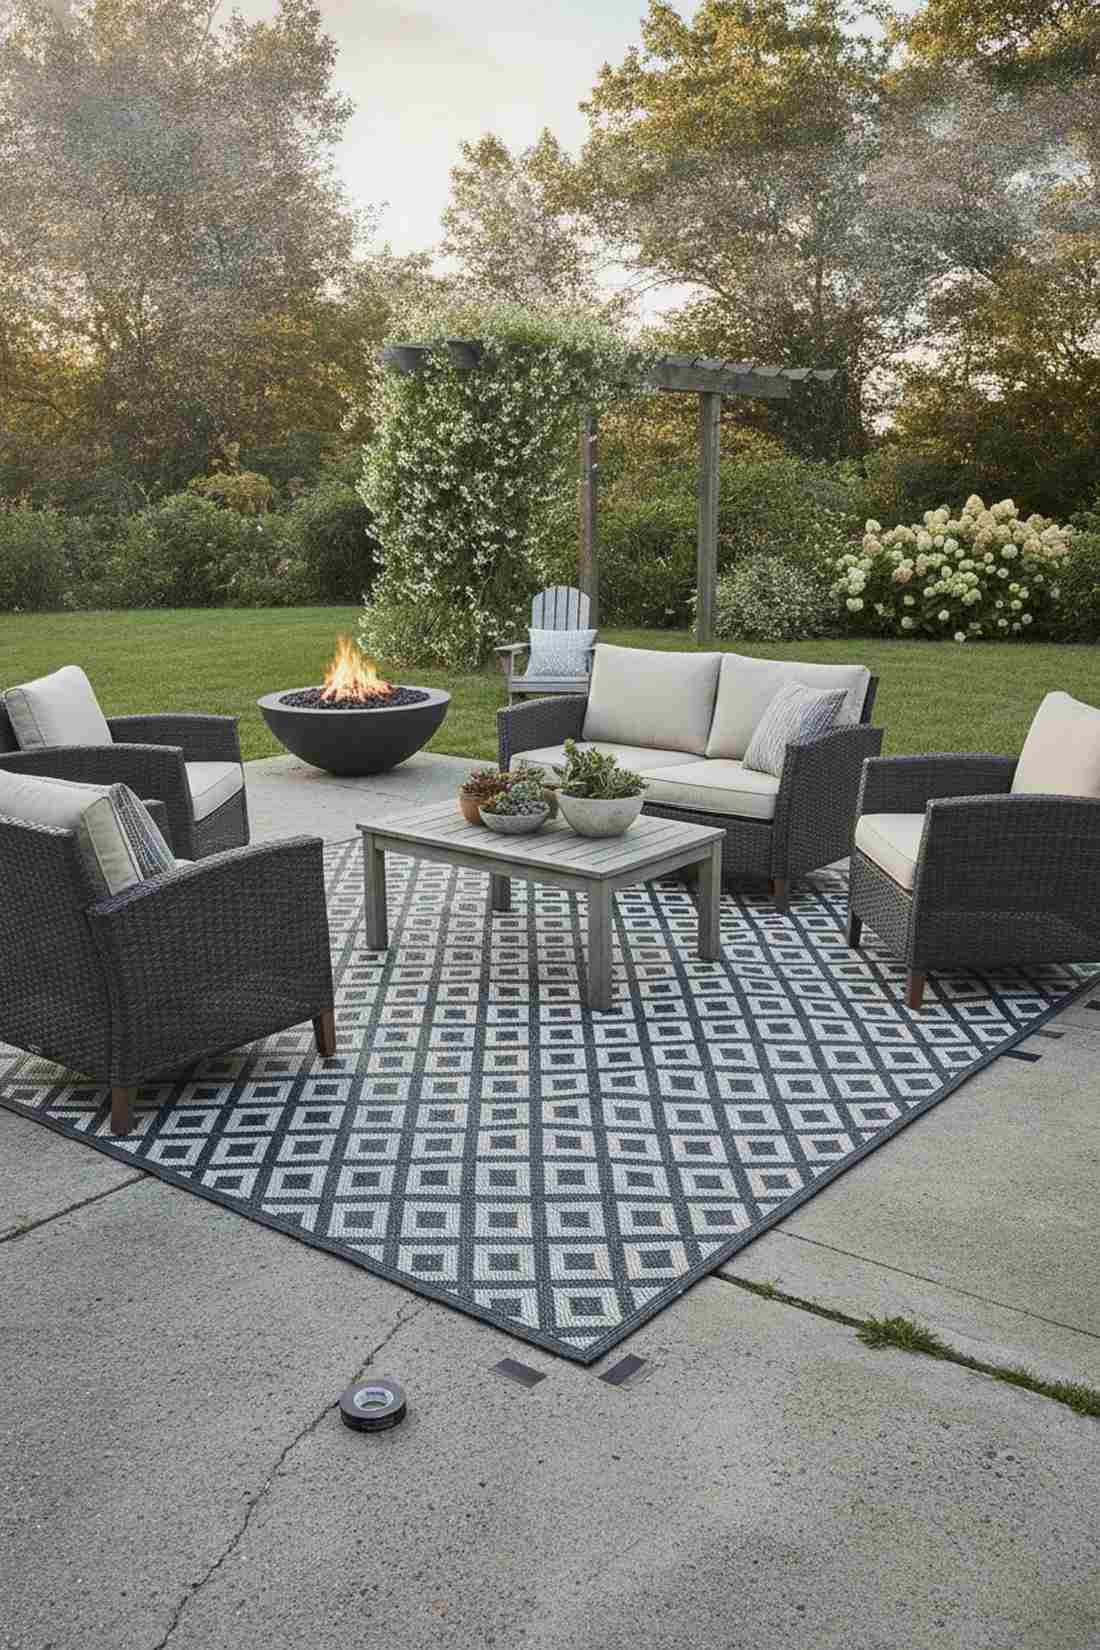
Instantly makes a cold concrete slab feel like a cozy interior living room. Massive weather-resistant geometric area rugs are the ultimate cheat code for hiding ugly, cracked patios.
Tearing up old concrete costs thousands, but rolling out a synthetic rug delivers an insanely expensive organic aesthetic in literally two minutes. Sticking them down with heavy-duty outdoor rug tape guarantees you won’t trip when the wind blows.
You can easily cover an 8×10 eyesore for around $70. Pin this to your absolute fastest patio upgrades board!
- Key Materials: Polypropylene rug, outdoor tape
- Vibe / Style: Instant cozy foundation
- Difficulty: Easiest beginner setup
- Budget Breakdown: 8×10 Rug: $60 | Tape: $15
- Creator’s Tip: Never buy a rug that is too small; all the front legs of your furniture MUST sit on it.
- Smart Sourcing: heavy-duty double-sided outdoor rug tape and recycled plastic waterproof area rugs.
34. Throw Pillows And Cushions
Feels like sinking into a plush luxury hotel cabana bed. Aggressively over-layering contrasting outdoor throw pillows immediately softens brutal metal or wooden furniture.
Most people leave their chairs bare and uncomfortable, but this plush layout looks far more expensive than it actually is. Swapping out your cheap fabric for solution-dyed acrylic cushion covers stops them from fading into a sad gray by mid-summer.
You can completely refresh your color palette for under $50. Highly recommended for a quick weekend win.
- Key Materials: Weatherproof inserts, UV covers
- Vibe / Style: Plush designer comfort
- Difficulty: Easiest beginner setup
- Budget Breakdown: Inserts: $30 | Covers: $40
- Creator’s Tip: Buy pillow inserts that are exactly two inches larger than the cover for that overstuffed, expensive look.
- Smart Sourcing: solution-dyed acrylic cushion covers (bulk pack) and marine-grade waterproof pillow inserts.
Want a designer look on a dollar-store budget? The next idea is basically a cheat code.
35. Vertical Gardens
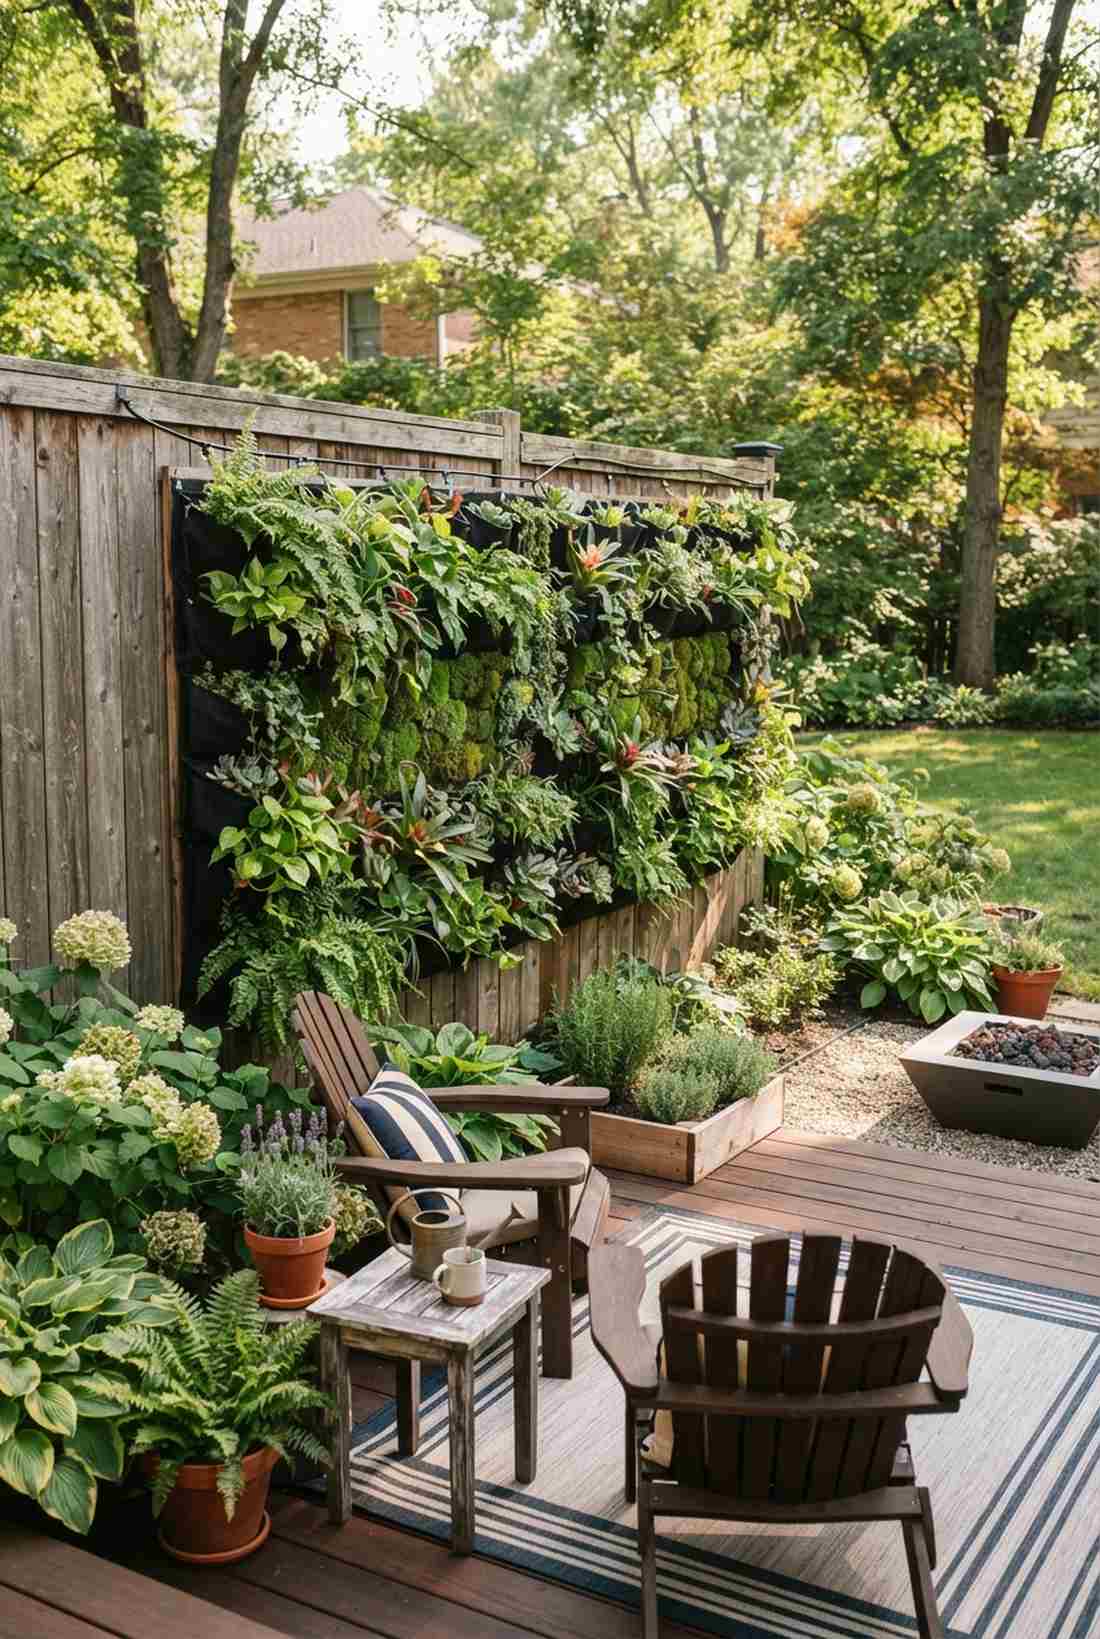
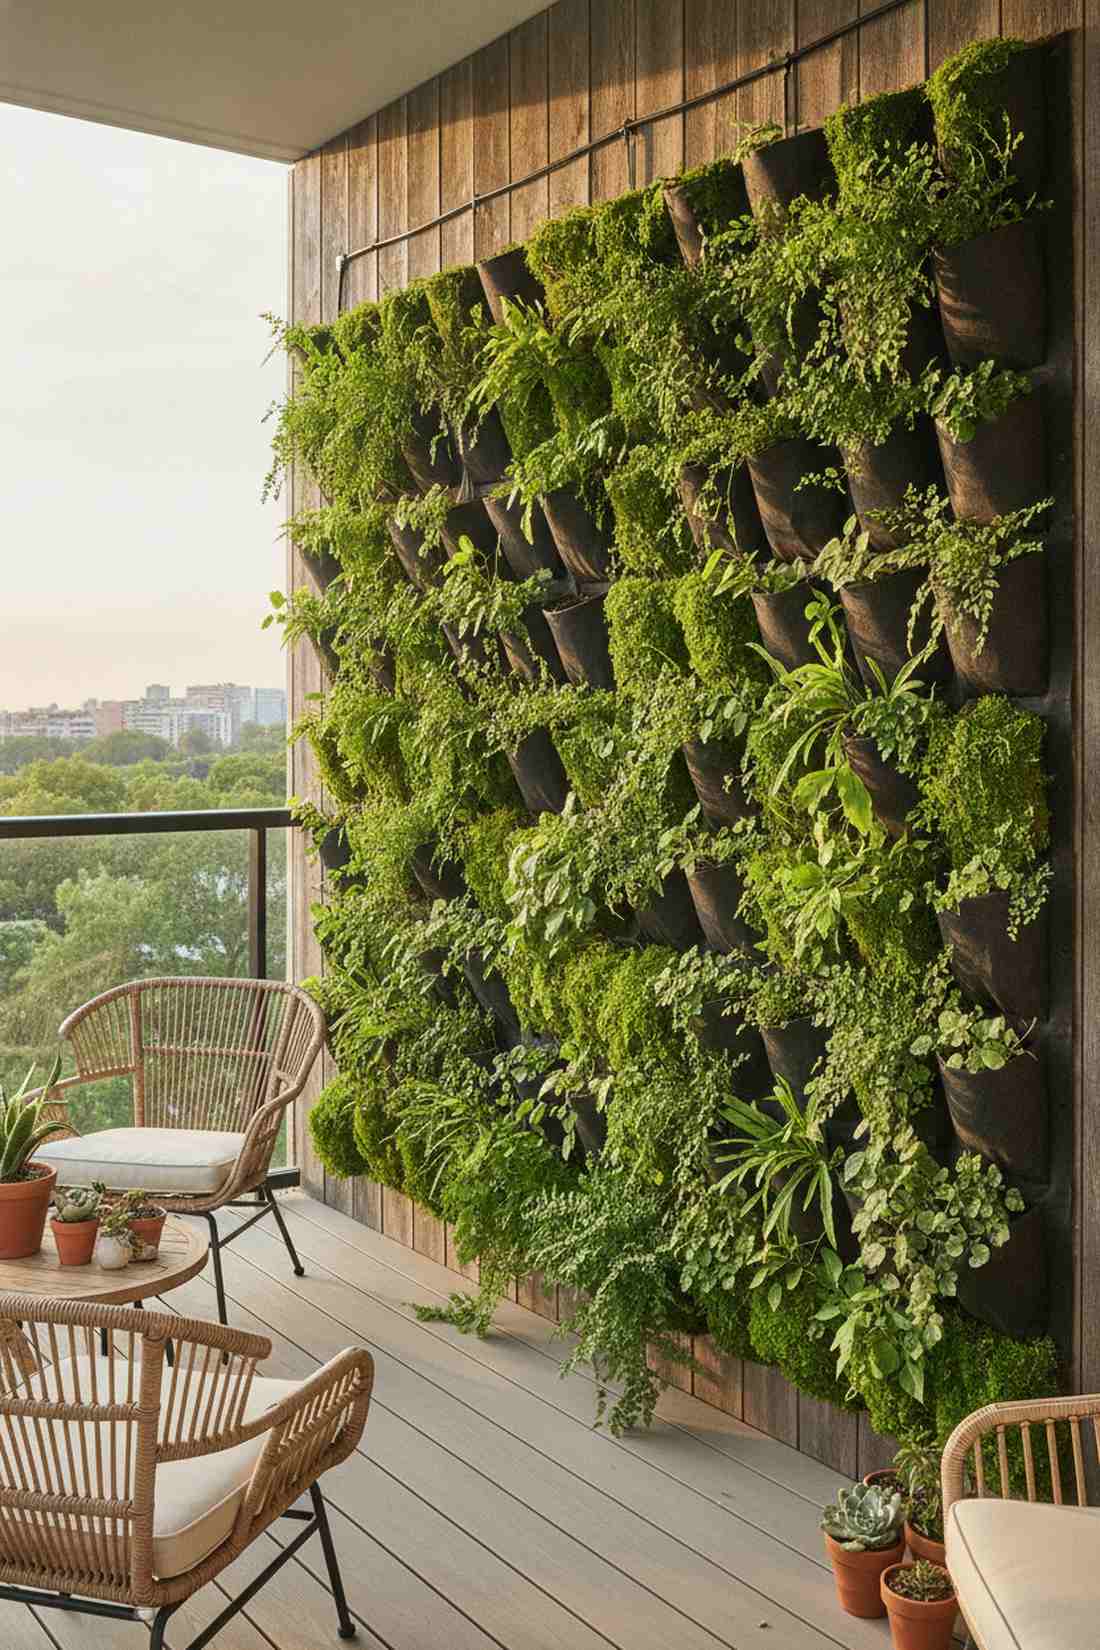
Straight out of a high-end botanical conservatory. Mounting lush living plant walls directly onto boring wooden fences instantly creates a massive biophilic focal point.
Staring at a blank neighbor’s fence is depressing, but this vertical trick gives a designer-level finish while completely hiding ugly borders. Using pre-cut moss panels mixed with trailing ferns guarantees an explosion of green all season long.
You can easily build a 4×4 living wall for roughly $80. Save this to your apartment balcony garden board!
- Key Materials: Wall planters, potting soil mix
- Vibe / Style: Lush urban jungle
- Difficulty: Intermediate DIY
- Budget Breakdown: Pocket Planters: $40 | Soil/Plants: $50
- Creator’s Tip: Hook up a simple gravity-fed drip line to the top row; watering a wall by hand is miserable.
- Smart Sourcing: pre-cut preserved moss sheets (bulk pack) and heavy-duty vertical pocket planter kits.
36. Geometric Planters

Radiates powerful, structured modern art museum energy. Oversized matte black cubic planters act as perfect architectural pillars at the entrance of your patio.
Flimsy plastic pots crack in winter, but sourcing fiberglass faux-stone delivers a surprisingly premium look without the 300-pound weight of real concrete. Dropping pre-potted faux snake plants inside means zero watering and immortal style.
Grab a pair of giant dramatic pots for under $120. Pin this layout to your modern exterior design board!
- Key Materials: Fiberglass cubes, drainage rock
- Vibe / Style: Sharp architectural modernism
- Difficulty: Easy beginner
- Budget Breakdown: Planters: $90 | Filler Base: $10
- Creator’s Tip: Fill the bottom half of giant planters with crushed empty water bottles to save tons of expensive soil.
- Smart Sourcing: lightweight fiberglass geometric planter sets and UV-coated faux architectural plants.
37. Water Features


Feels exactly like a high-end hidden spa retreat. Self-contained recirculating water walls are the ultimate weapon for drowning out annoying neighborhood traffic noise.
Building a real pond is an expensive nightmare, but a plug-and-play fountain gives a designer-level finish in about five minutes. Incorporating waterproof miniature garden supplies into the basin creates a stunning little aquatic terrarium.
You can buy a massive modern fountain kit for around $150. Highly recommended for instantly lowering your blood pressure.
- Key Materials: Plug-in fountain kit, river stones
- Vibe / Style: Peaceful sensory oasis
- Difficulty: Easy beginner
- Budget Breakdown: Fountain Kit: $130 | River Rocks: $20
- Creator’s Tip: Add a drop of bird-safe algaecide every week so the water stays crystal clear instead of swampy green.
- Smart Sourcing: commercial-grade plug-and-play fountain kits and UV-coated waterproof miniature garden accessories.
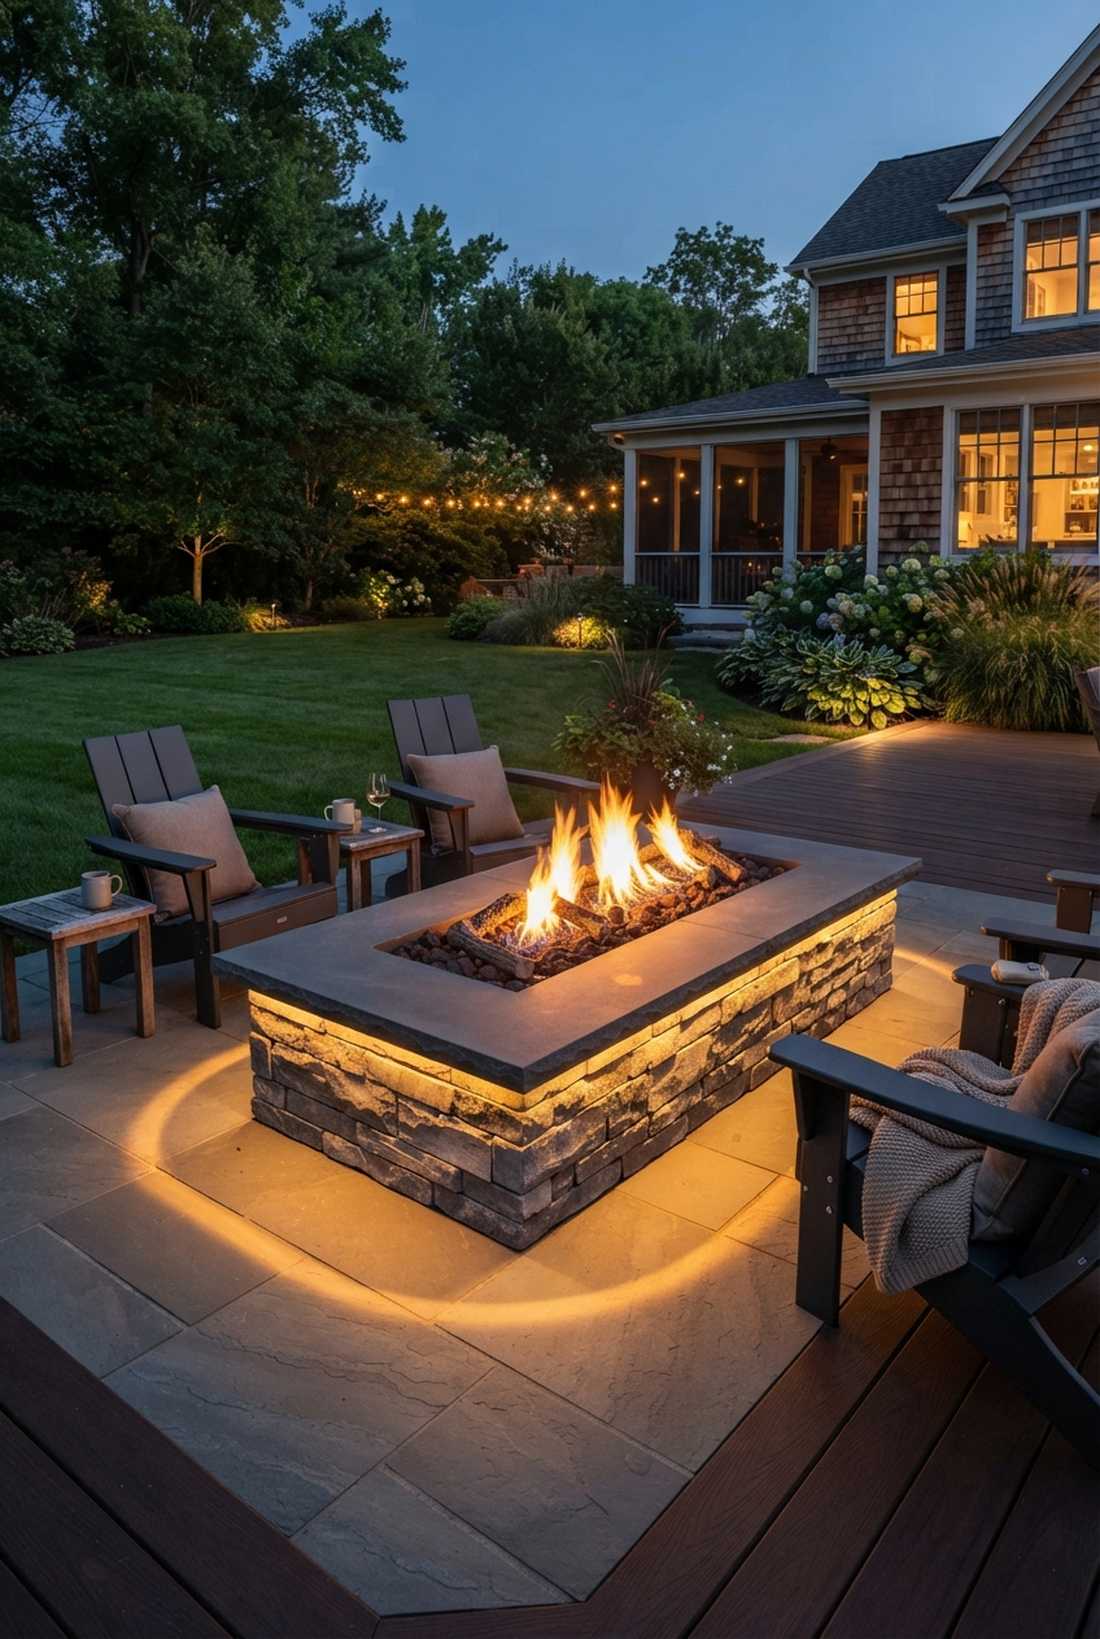
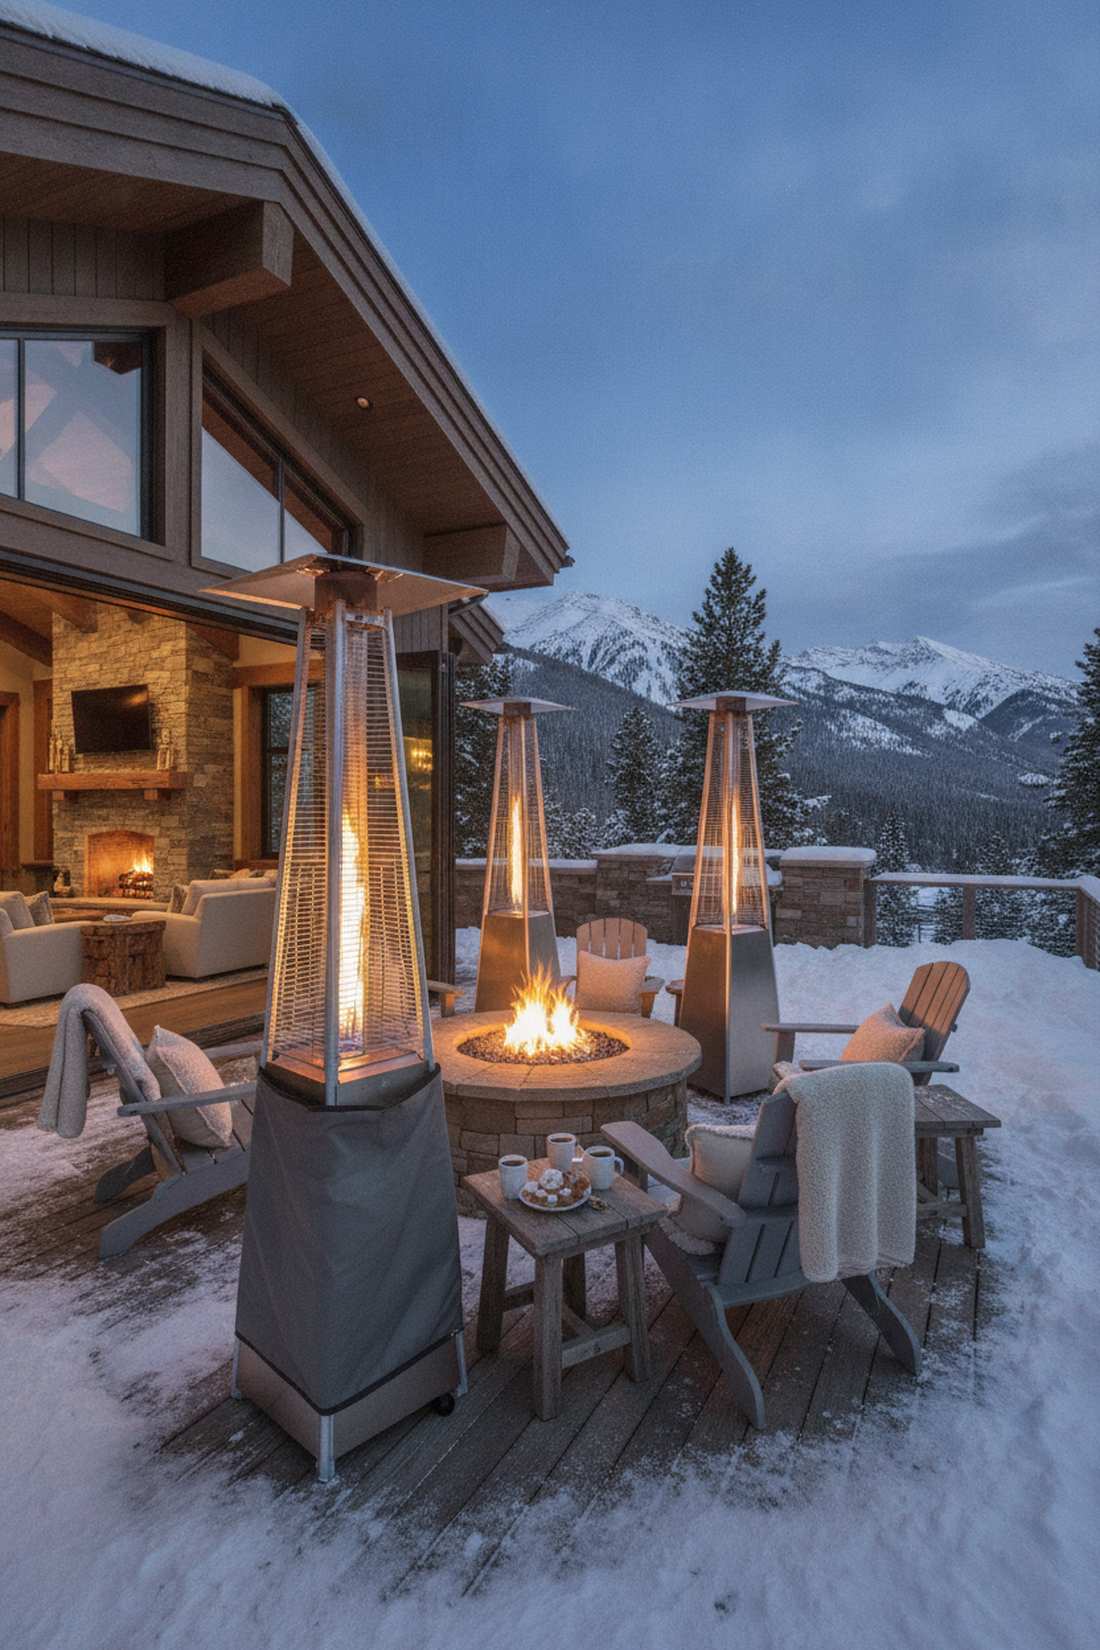
38. Fire Pits And Fireplaces
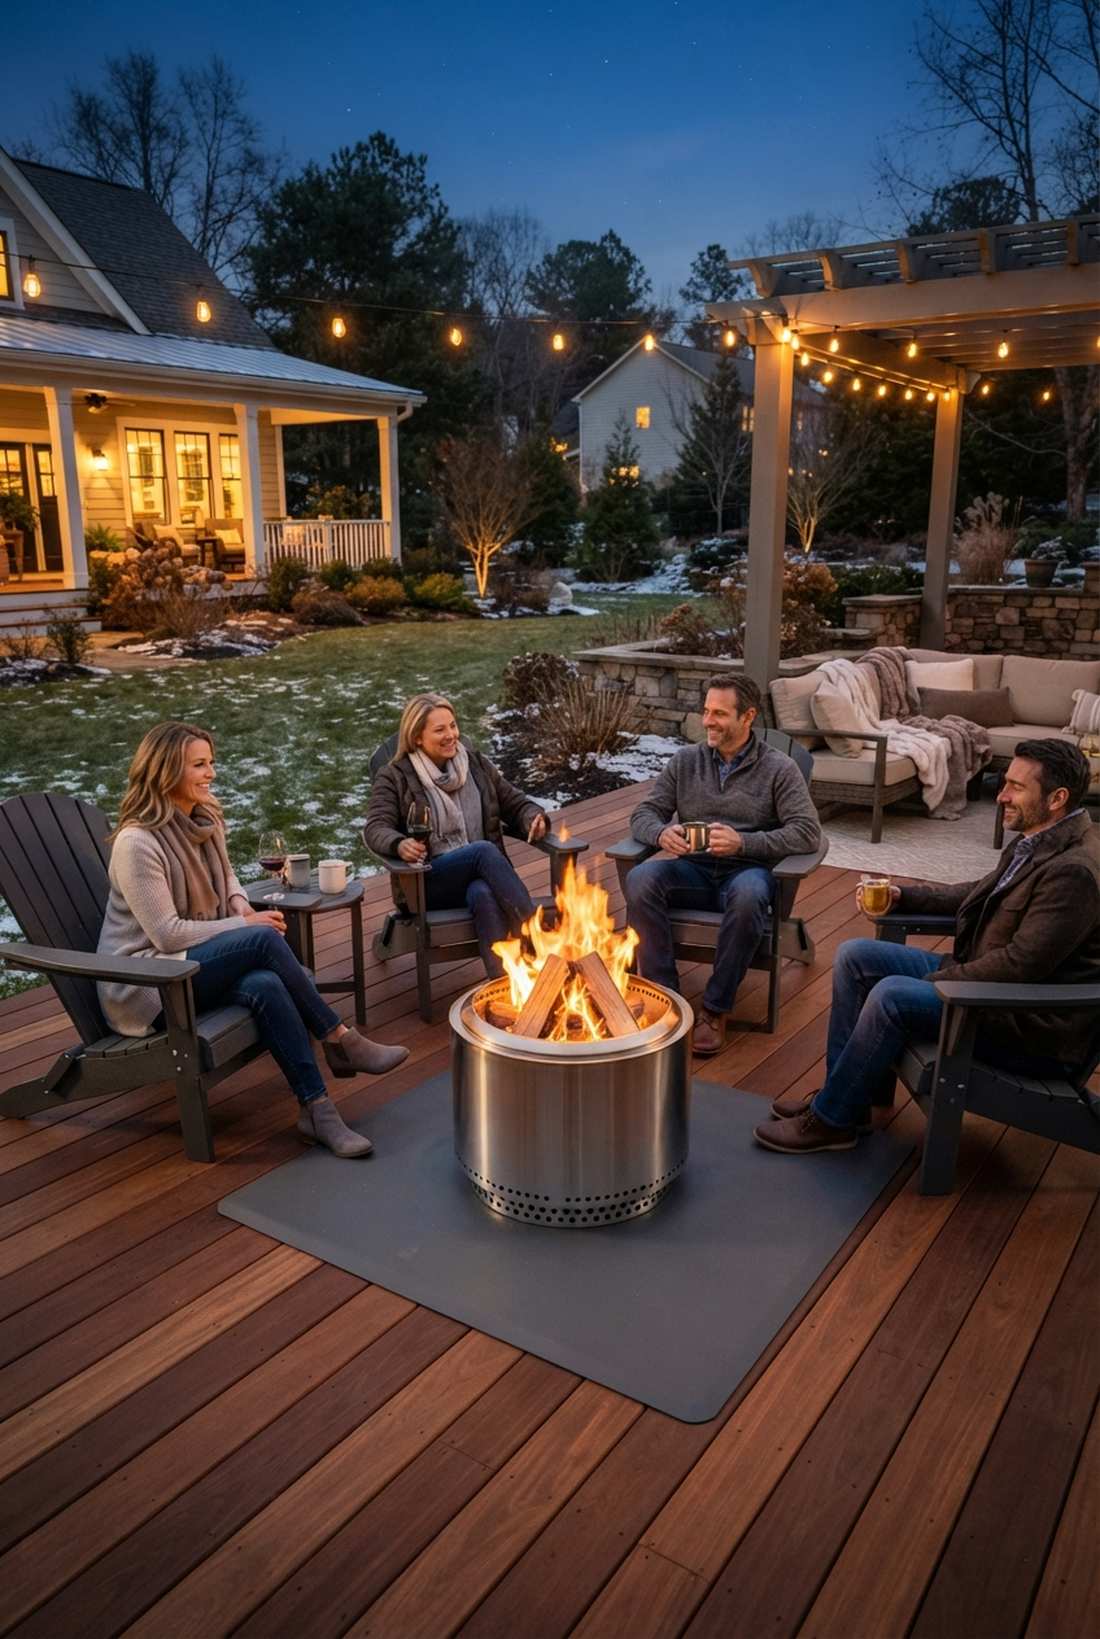
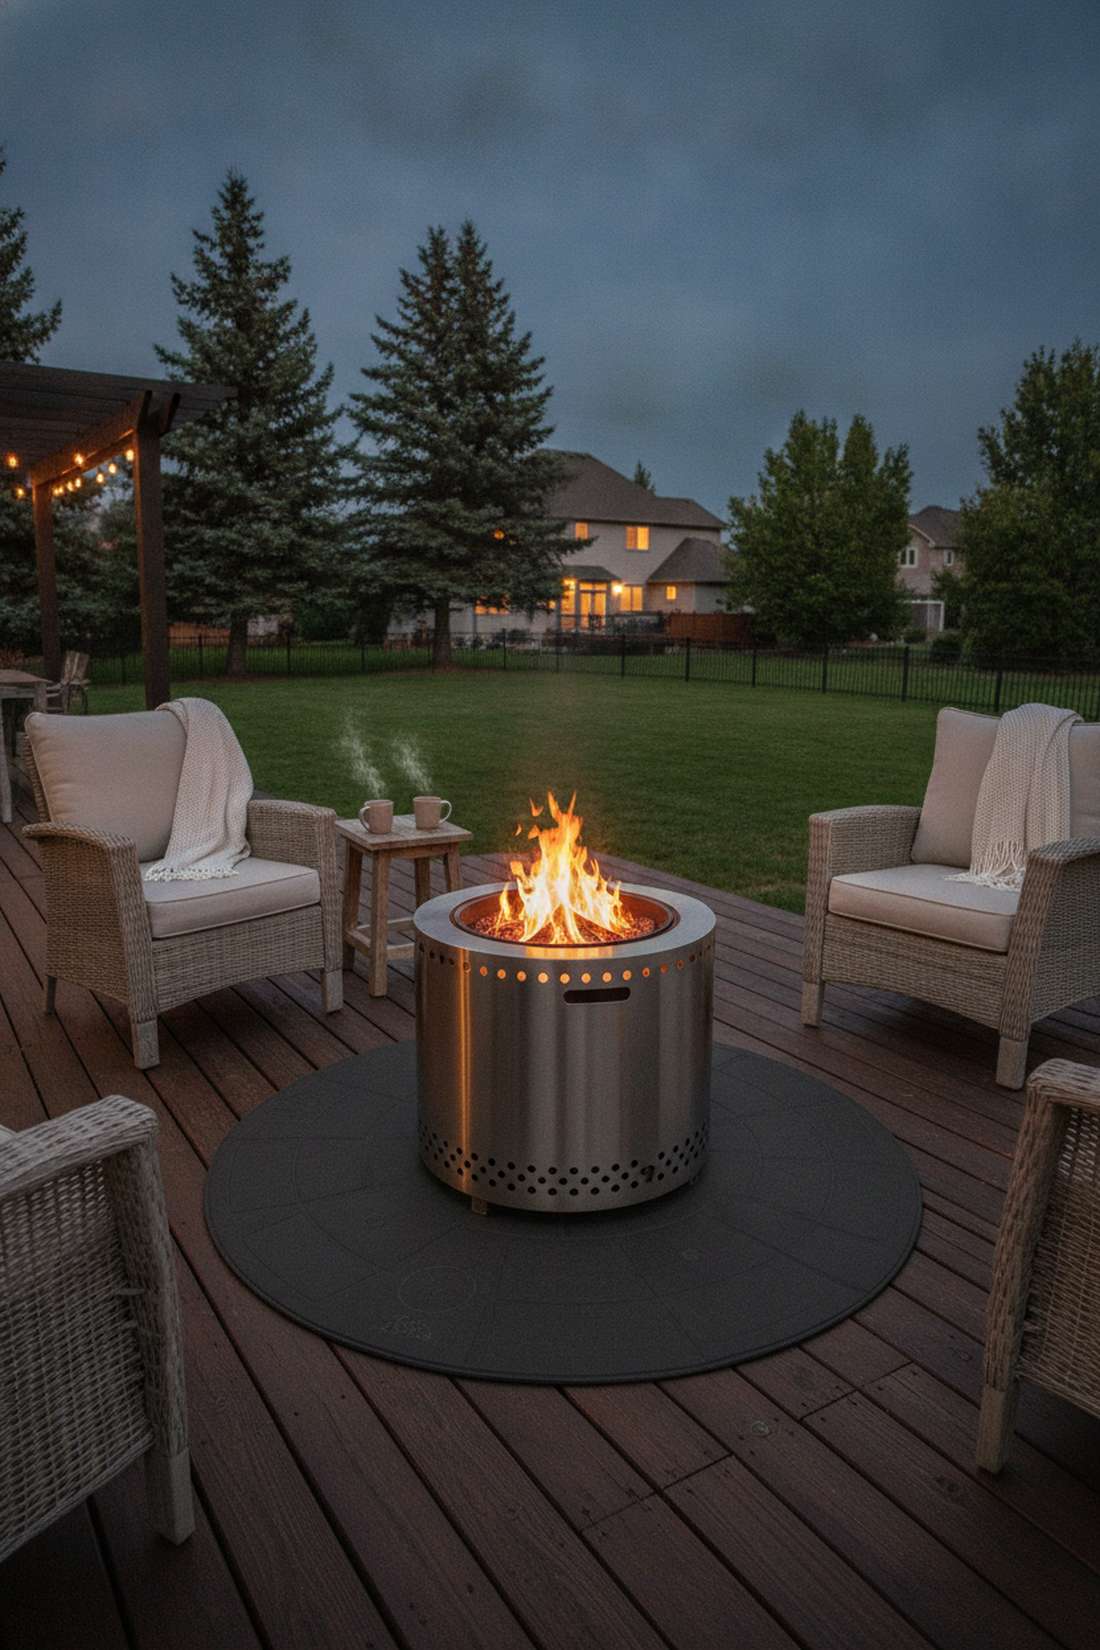
Gives off instant ski-lodge luxury in the dead of winter. Sleek smokeless stainless steel fire pits completely revolutionize how late you stay out on the patio.
Cheap rusty bowls blow smoke into everyone’s eyes, but this modern secondary-burn technology looks far more expensive while destroying annoying smoke entirely. Dropping it onto a heavy-duty heat deflector mat guarantees you won’t scorch your expensive decking.
You can upgrade to a smokeless system for roughly $200. Save this to your ultimate winter patio board!
- Key Materials: Smokeless pit, heat shield
- Vibe / Style: Modern cozy campfire
- Difficulty: Easiest beginner setup
- Budget Breakdown: Pit Unit: $180 | Deflector Shield: $40
- Creator’s Tip: Only burn kiln-dried hardwood; soft woods will ruin the smokeless airflow engineering instantly.
- Smart Sourcing: heavy-duty deck heat deflector mats and stainless steel smokeless fire pit kits.
39. Pergolas And Shade Structures
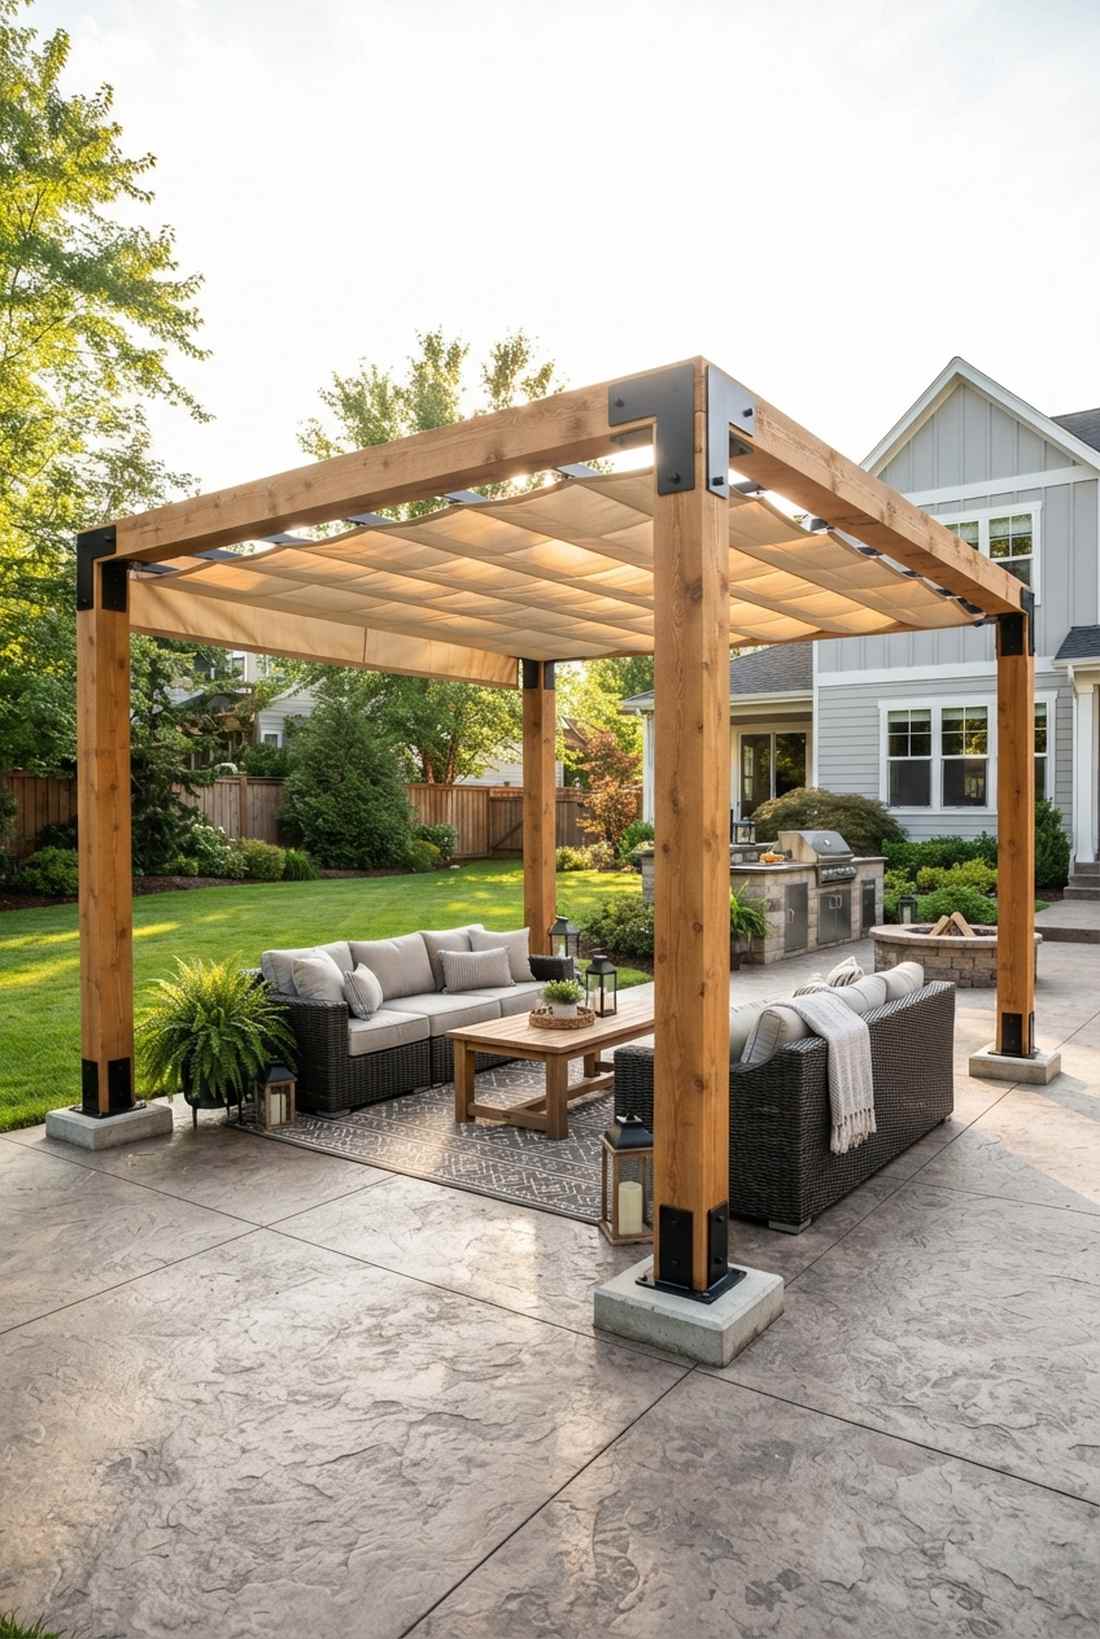
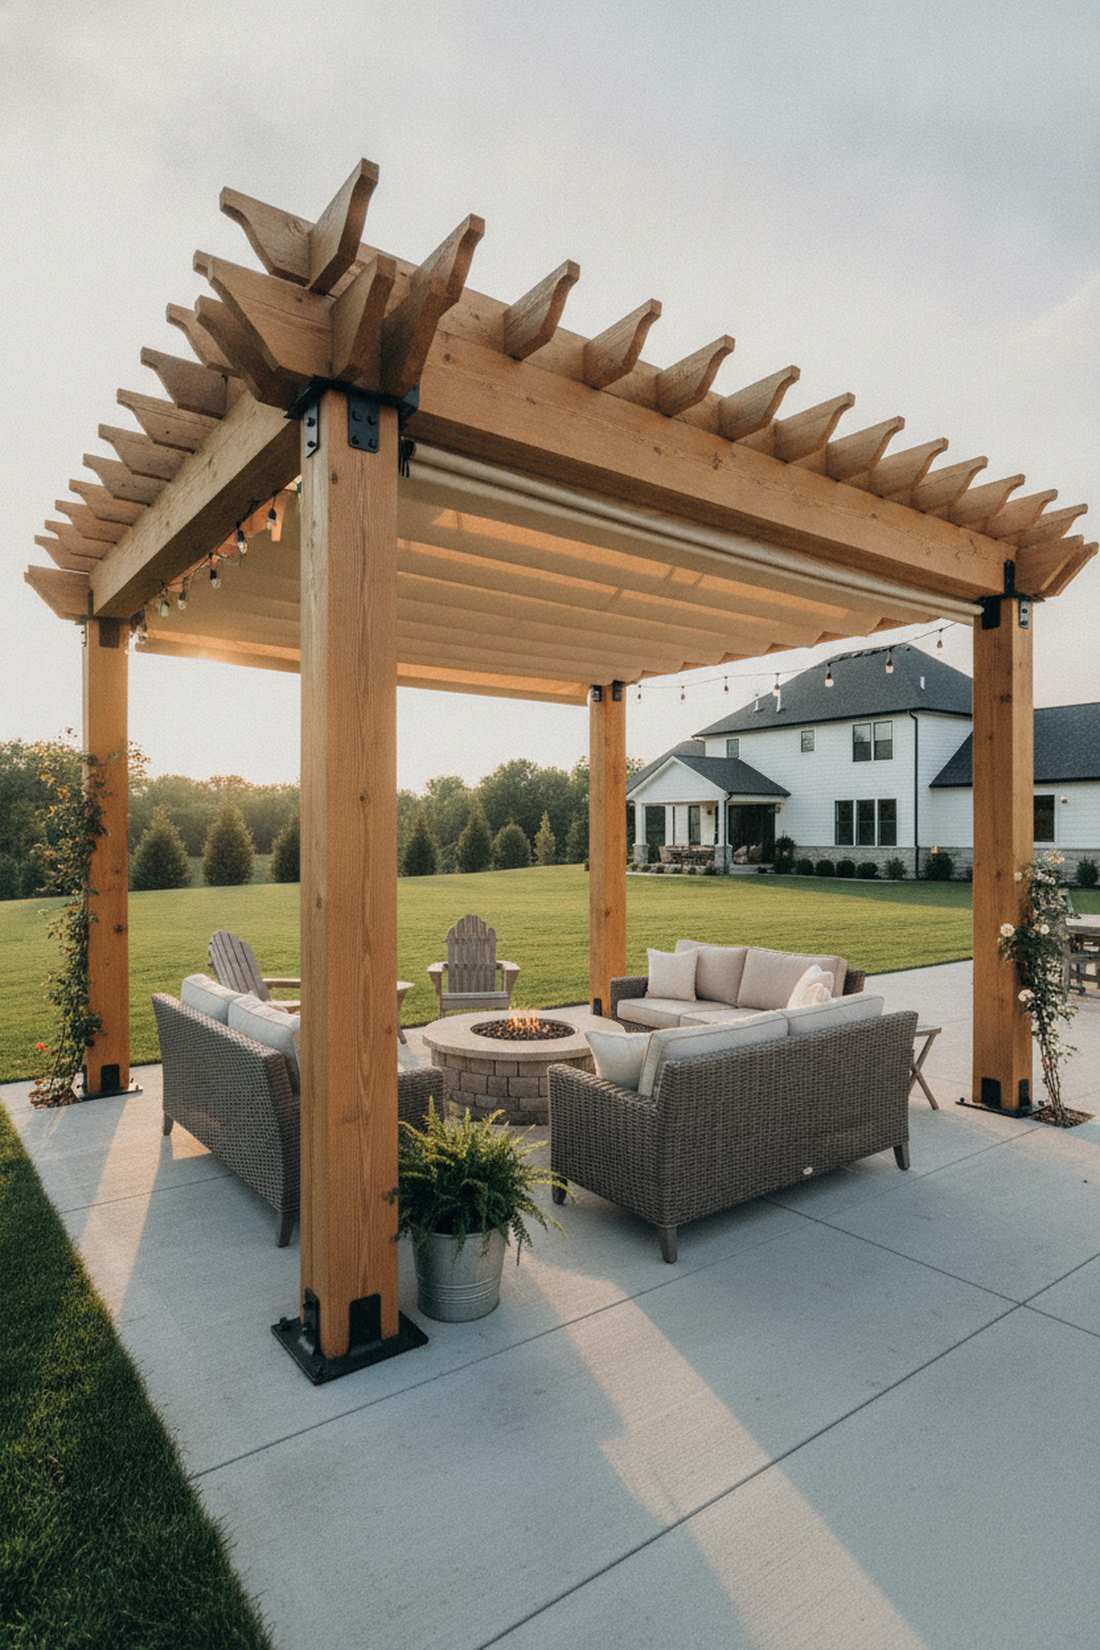
Feels like an architectural masterpiece that came straight with the house. Chunky cedar pergola frames instantly turn a flat, naked slab into an actual outdoor living room.
Most patios bake uselessly in the August sun, but this overhead structure delivers an insanely expensive organic aesthetic while providing massive cooling shade. Bolting on a UV-resistant retractable canvas canopy lets you control the exact amount of sunlight hitting your guests.
A major DIY build costing around $600 in lumber. It’s an aggressive upgrade that completely changes the home’s value.
- Key Materials: 6×6 cedar posts, steel brackets
- Vibe / Style: Grand architectural shade
- Difficulty: Advanced DIY
- Budget Breakdown: Timber: $450 | Bracket Hardware: $150
- Creator’s Tip: Always secure the base posts into structural concrete footings, never just bolt them to thin patio tiles.
- Smart Sourcing: heavy-duty structural steel pergola bracket kits and UV-resistant retractable canvas shades.
Material Guide: Cheap vs. Premium Aesthetic
Knowing exactly where to save and where to spend makes all the difference in achieving that looks expensive but isn’t vibe.
- Standard vs. UV-Resistant/Premium: Upgrading to UV-coated finishes stops immediate sun fading and prevents brittle cracking over winter.
- Pre-made Kits vs. Sourcing Locally: Bulk pack starter kits often bypass massive retail markups while providing perfectly matched components.
If your yard lacks privacy, this next structural trick changes the entire game…
40. Privacy Screens
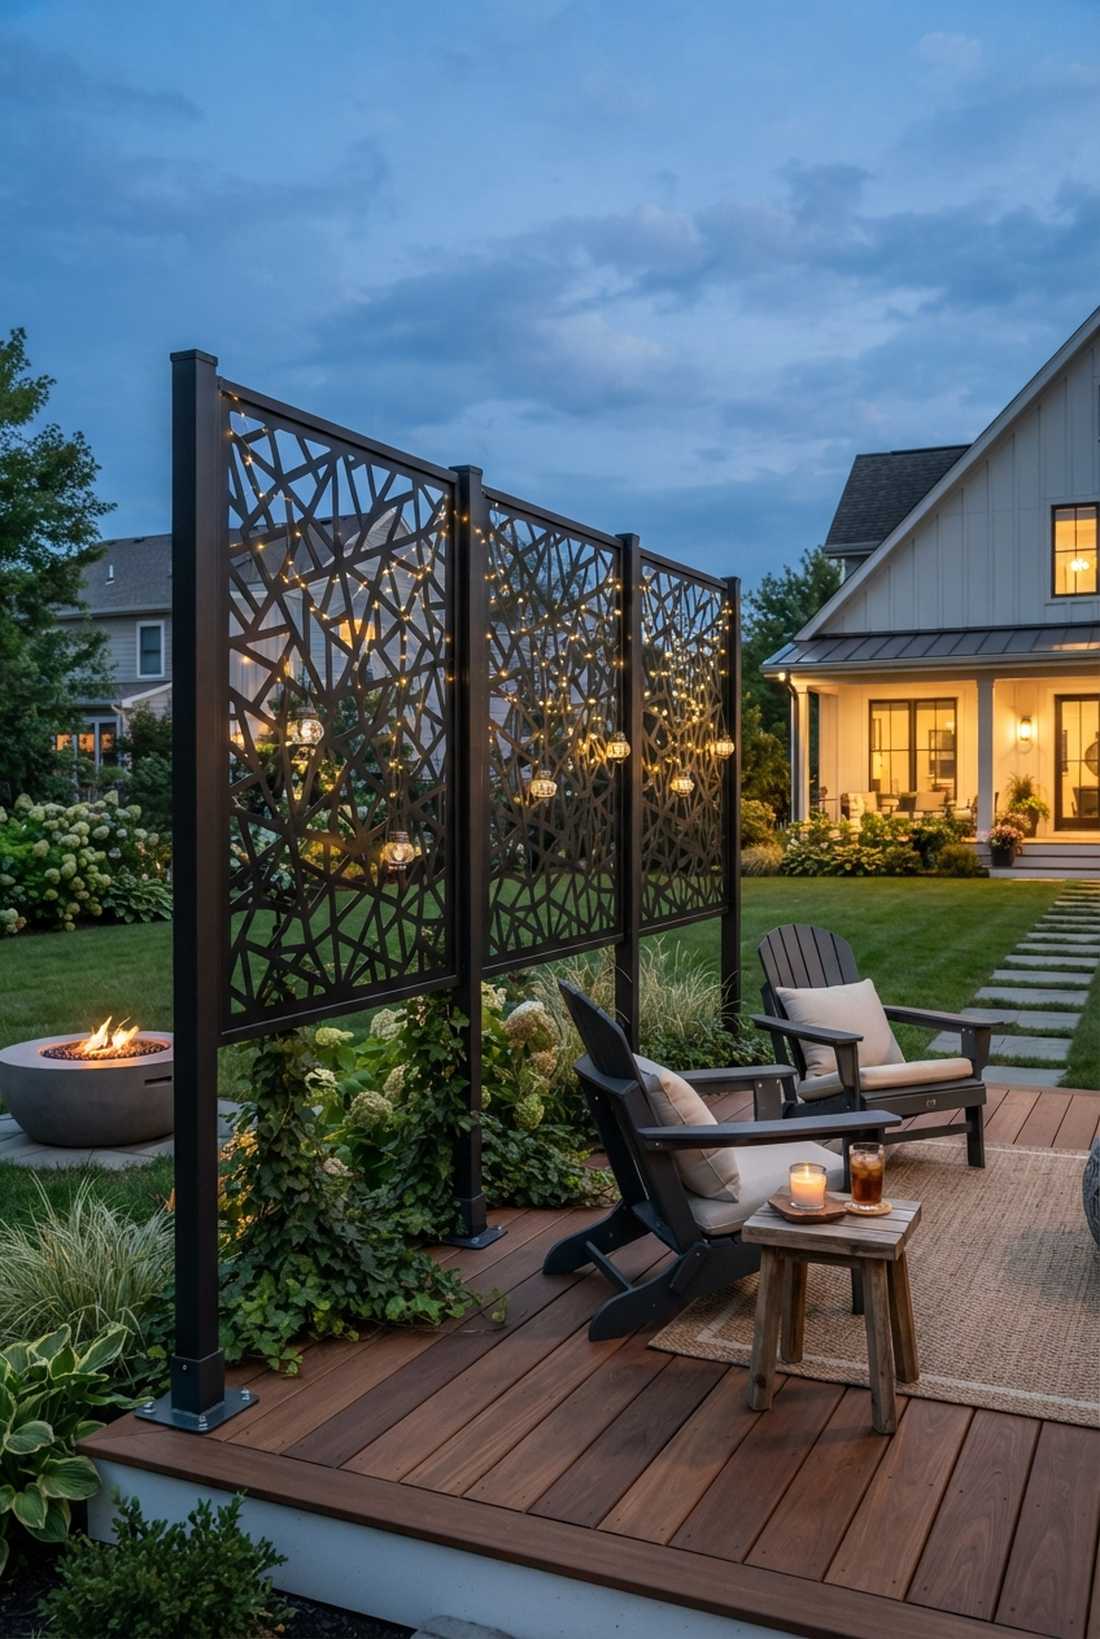

Straight out of a high-end secluded urban penthouse. Laser-cut geometric metal privacy panels are the ultimate sleek fix for completely blocking out nosy neighbors.
Flimsy wooden lattice looks incredibly cheap and rots fast, but powder-coated steel gives a designer-level finish that lasts for generations. You can hang fairy garden supplies or tiny lanterns directly in the laser-cut holes for a magical evening glow.
You can easily install three massive panels for under $250. Pin this if you need immediate backyard seclusion!
- Key Materials: Metal privacy screens, mounting posts
- Vibe / Style: Sleek hidden sanctuary
- Difficulty: Intermediate DIY
- Budget Breakdown: Metal Panels: $180 | Anchors: $40
- Creator’s Tip: Mount them slightly staggered rather than in a perfectly flat line to allow cool breezes to flow through.
- Smart Sourcing: powder-coated geometric privacy screen kits and heavy-duty metal post anchor bases.
41. Outdoor Artwork
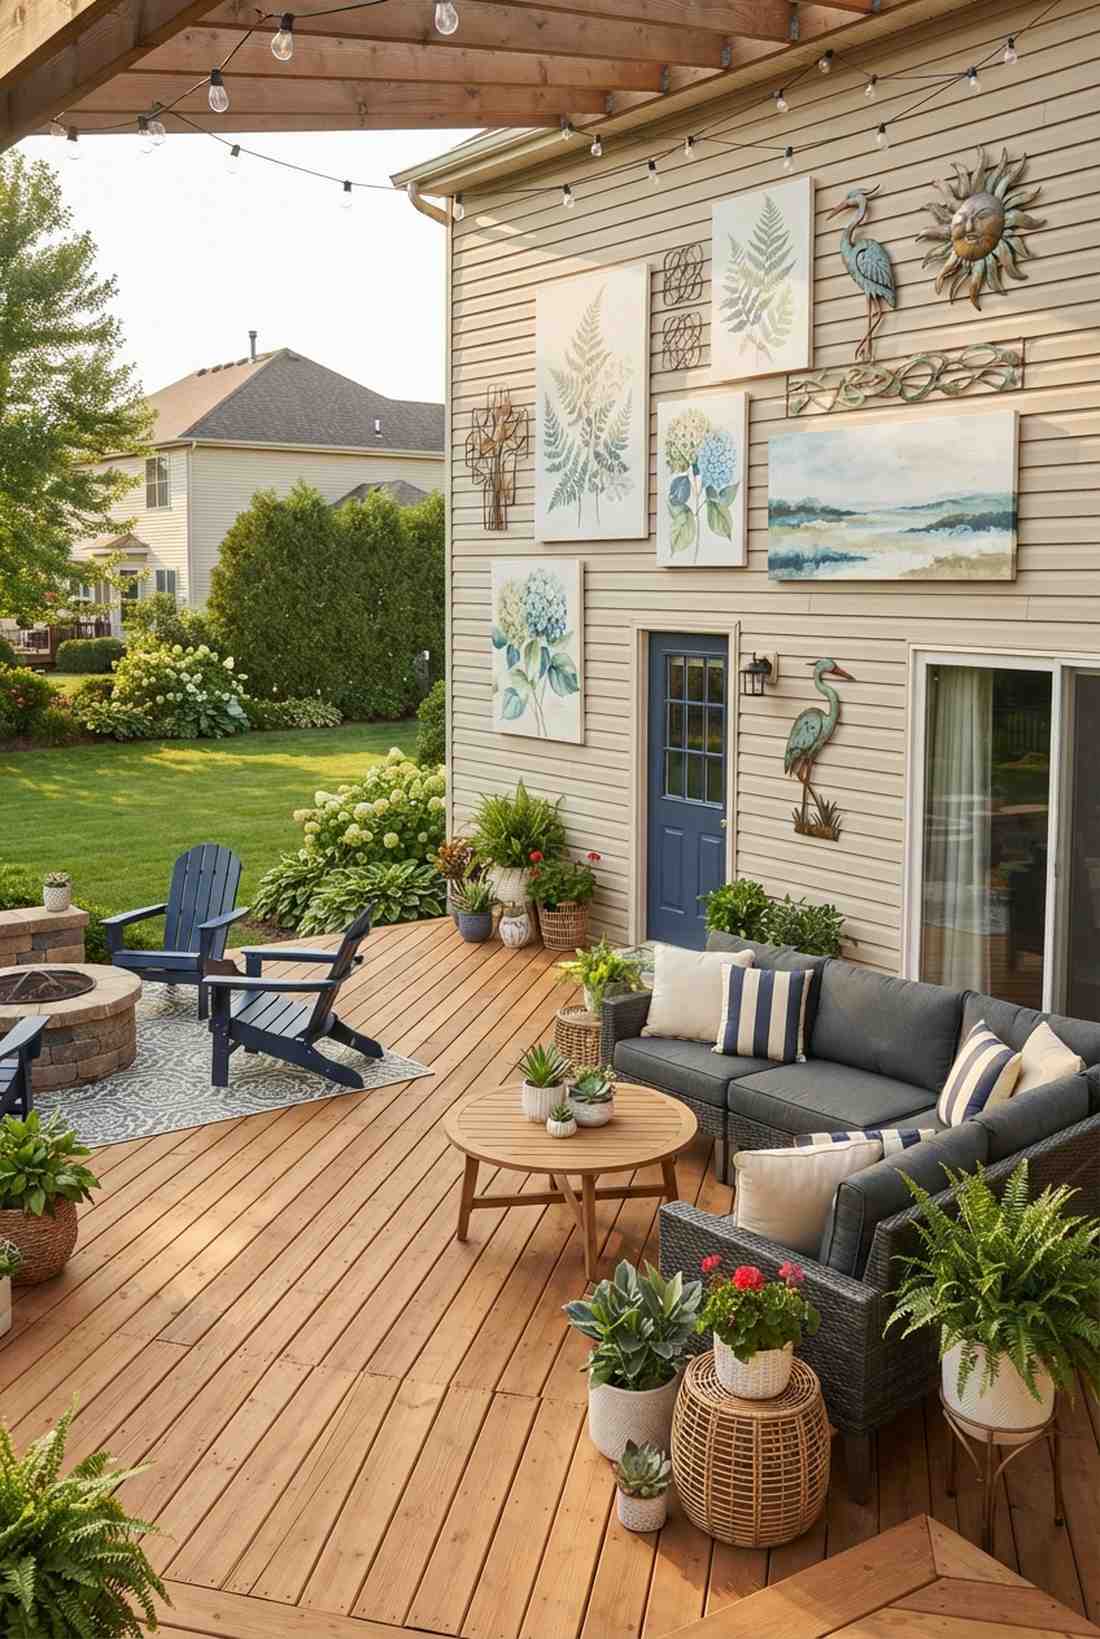
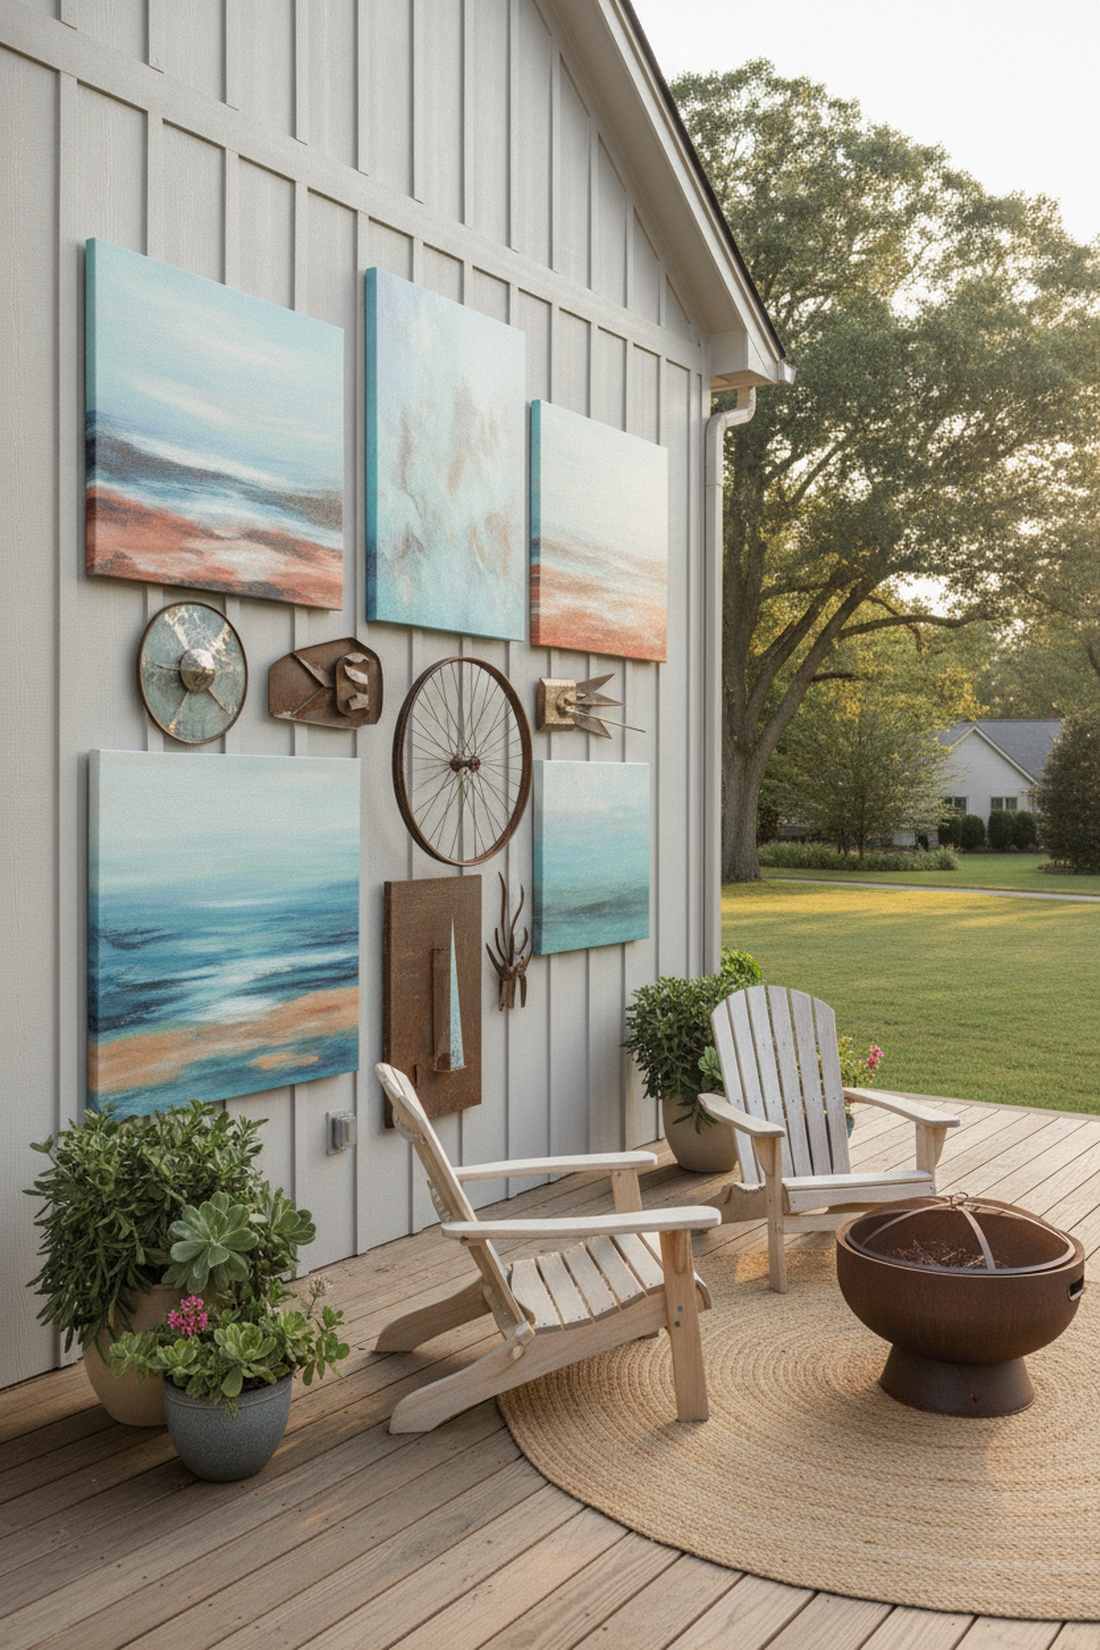
Feels like an exclusive curated gallery walk right on your deck. Oversized weatherproof canvas prints completely eliminate boring, massive stretches of empty vinyl siding.
Blank exterior walls ruin the living room illusion, but this art hack looks far more expensive and pulls the whole design together. Coating cheap thrift-store metal pieces with UV-resistant clear acrylic spray turns basic trash into immortal outdoor sculptures.
You can easily pull this off for around $30 if you upcycle. Save this to your weekend DIY decor board!
- Key Materials: Outdoor canvas, clear sealants
- Vibe / Style: Curated exterior gallery
- Difficulty: Easiest beginner setup
- Budget Breakdown: Thrifted Art: $20 | Sealant: $10
- Creator’s Tip: Never use glass frames outside; wind will shatter them. Always stick to canvas or powder-coated metals.
- Smart Sourcing: UV-resistant clear acrylic sealant sprays and waterproof outdoor canvas wall art.
42. Decorative Lighting Fixtures
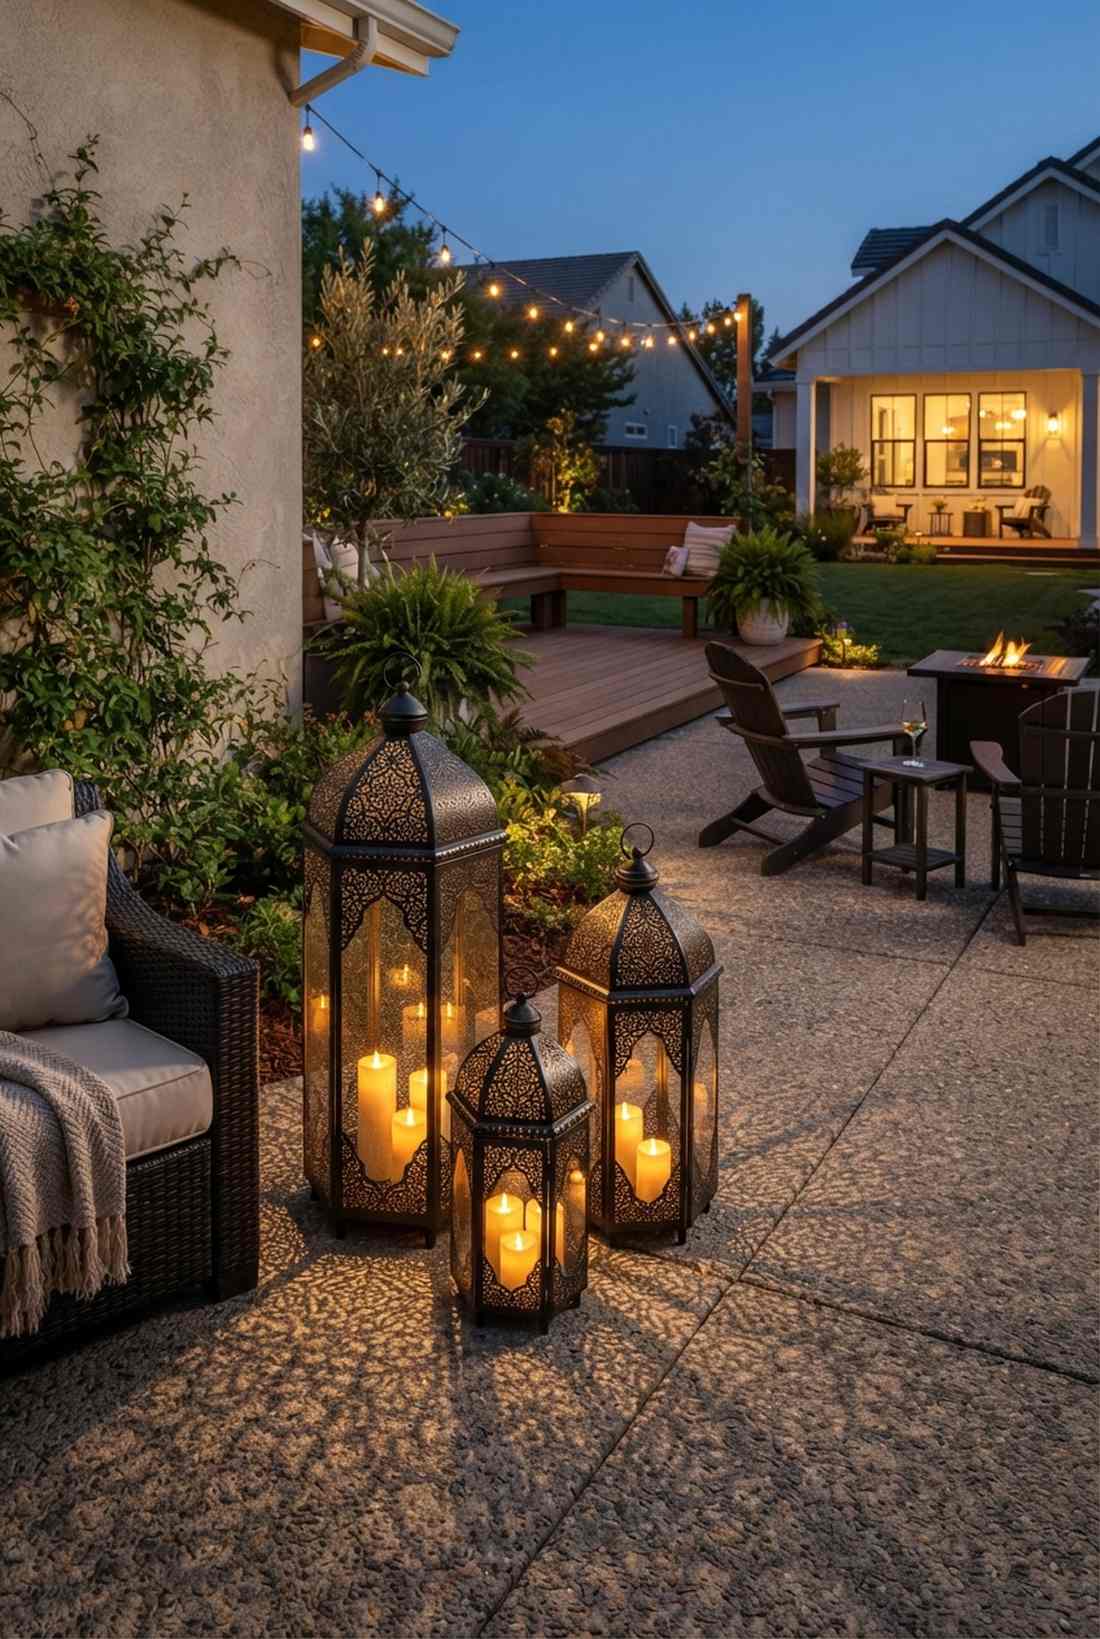

Radiates the romantic energy of a candlelit Moroccan courtyard. Oversized punched-metal floor lanterns cast incredible, complex shadow patterns across boring concrete at night.
Standard floodlights blind your guests, but this layered ambient strategy delivers a surprisingly premium look with zero hardwiring required. Dropping flickering LED pillar candles (bulk pack) inside guarantees perfect mood lighting that wind can never blow out.
Grab a set of three huge lanterns for roughly $80. Highly recommended for instantly setting the evening mood.
- Key Materials: Metal lanterns, LED pillars
- Vibe / Style: Moody bohemian evenings
- Difficulty: Easiest beginner setup
- Budget Breakdown: Lantern Sets: $60 | Candles: $20
- Creator’s Tip: Cluster them in groups of three varying heights in the darkest, deadest corner of your patio.
- Smart Sourcing: weatherproof flickering LED pillar candles (bulk pack) and oversized punched-metal outdoor lanterns.
43. Outdoor Textiles
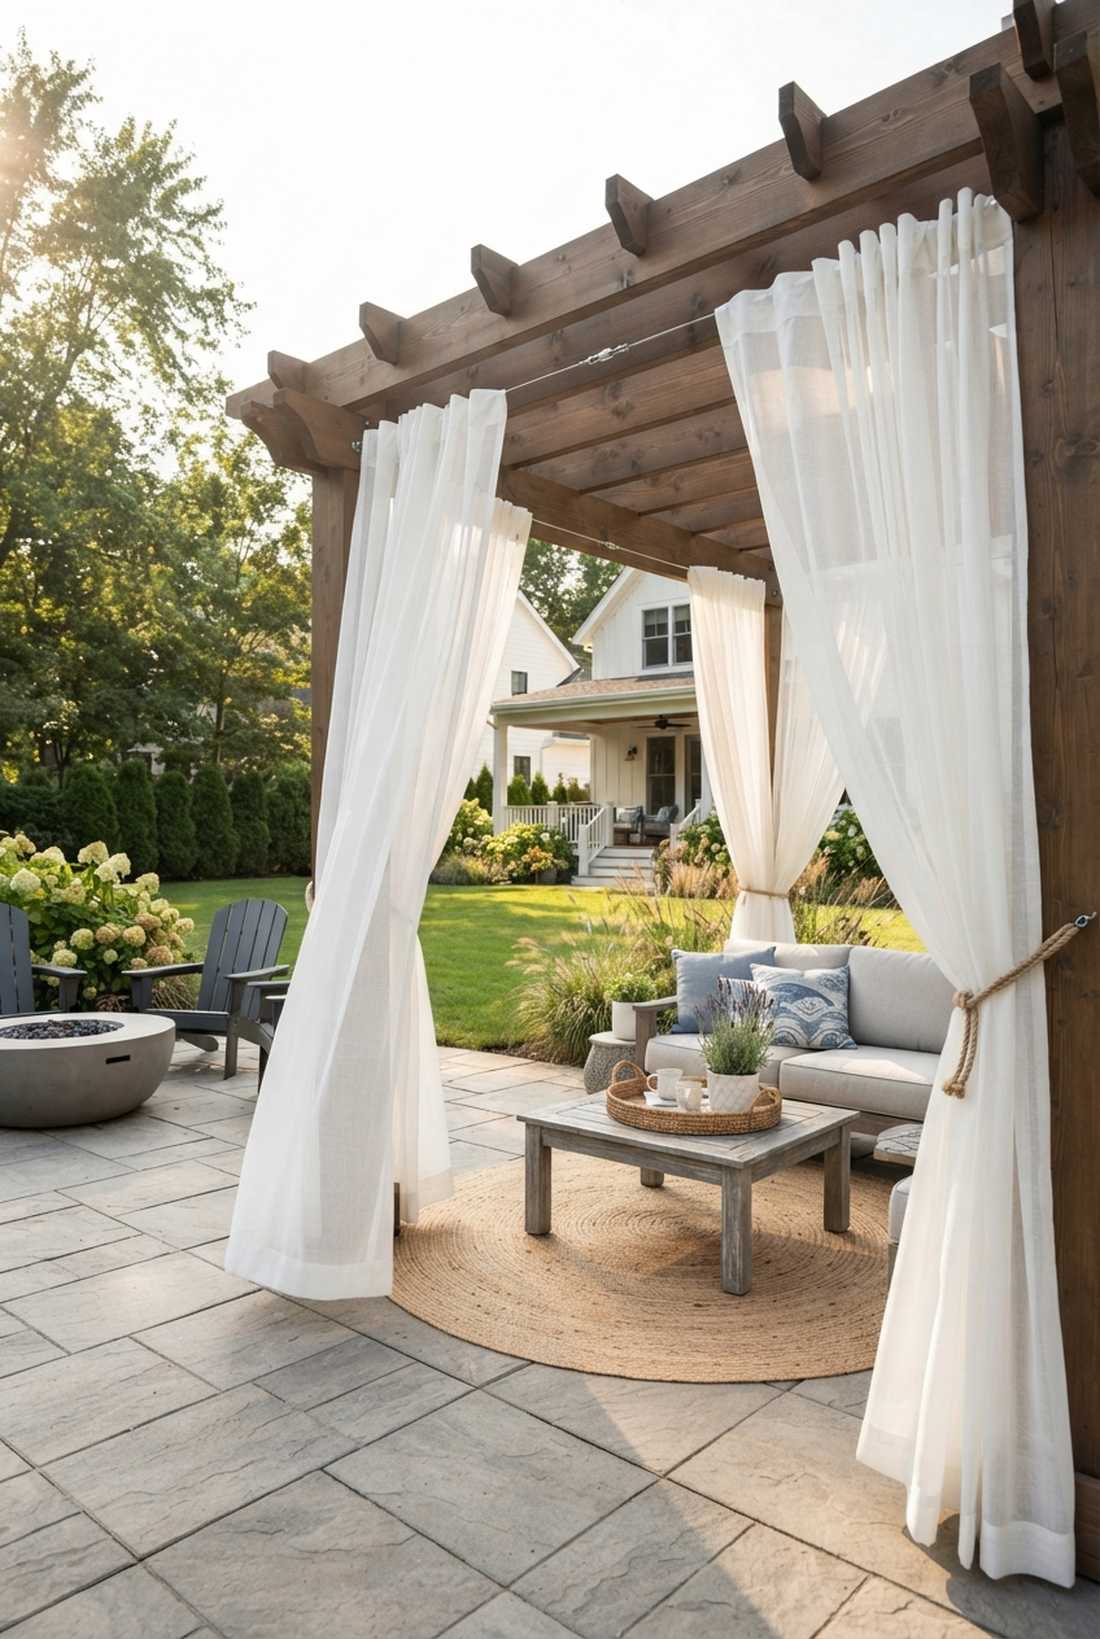
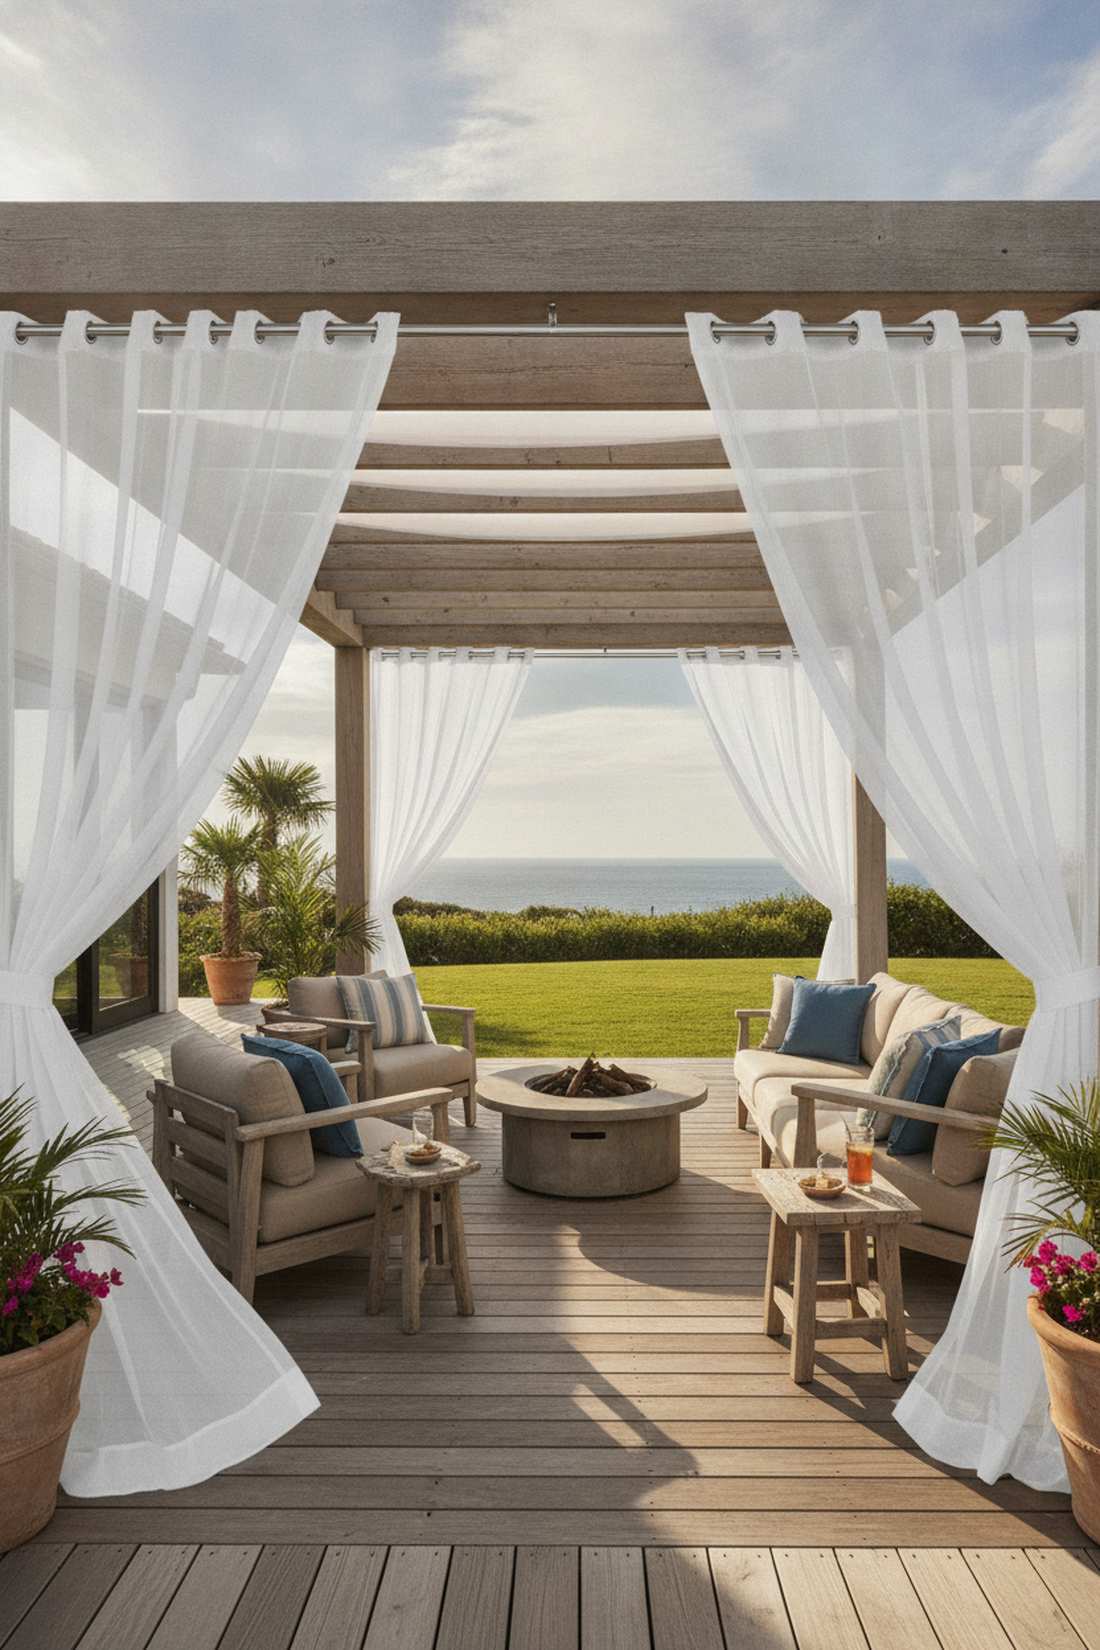
Feels like a luxurious billowing cabana in Saint-Tropez. Sheer weatherproof pergola curtains instantly soften brutal wooden beams while keeping aggressive mosquitos away.
Hardscapes feel cold and rigid, but wrapping your structure in flowing fabric gives a designer-level finish that screams relaxation. Stringing up commercial-grade stainless steel tension wire allows you to slide the curtains open flawlessly without rusty rods.
You can drape an entire pergola for under $100. Pin this to your luxury outdoor styling board!
- Key Materials: Outdoor sheer panels, tension wire
- Vibe / Style: Breezy coastal resort
- Difficulty: Beginner friendly
- Budget Breakdown: Curtains: $60 | Wire Kit: $30
- Creator’s Tip: Sew heavy fishing weights into the bottom hem of the curtains so they don’t whip violently in the wind.
- Smart Sourcing: commercial-grade stainless steel tension wire kits and UV-coated sheer outdoor curtain panels.
44. String Light Canopies
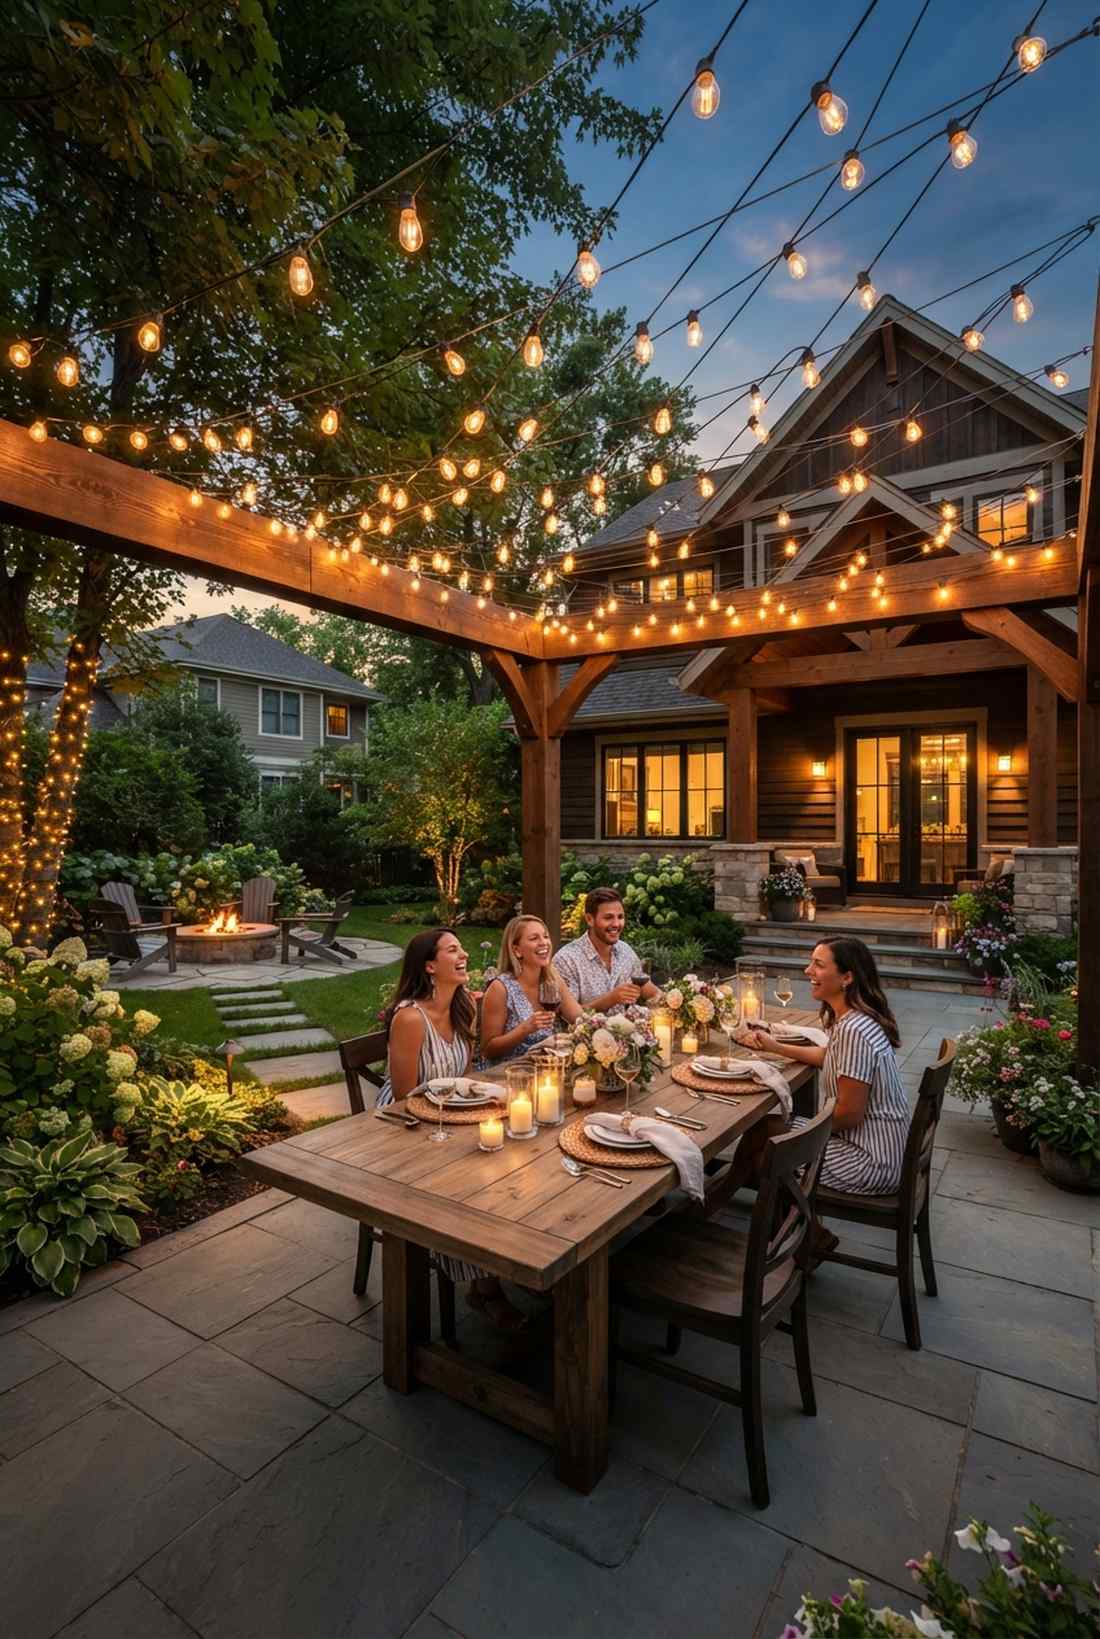
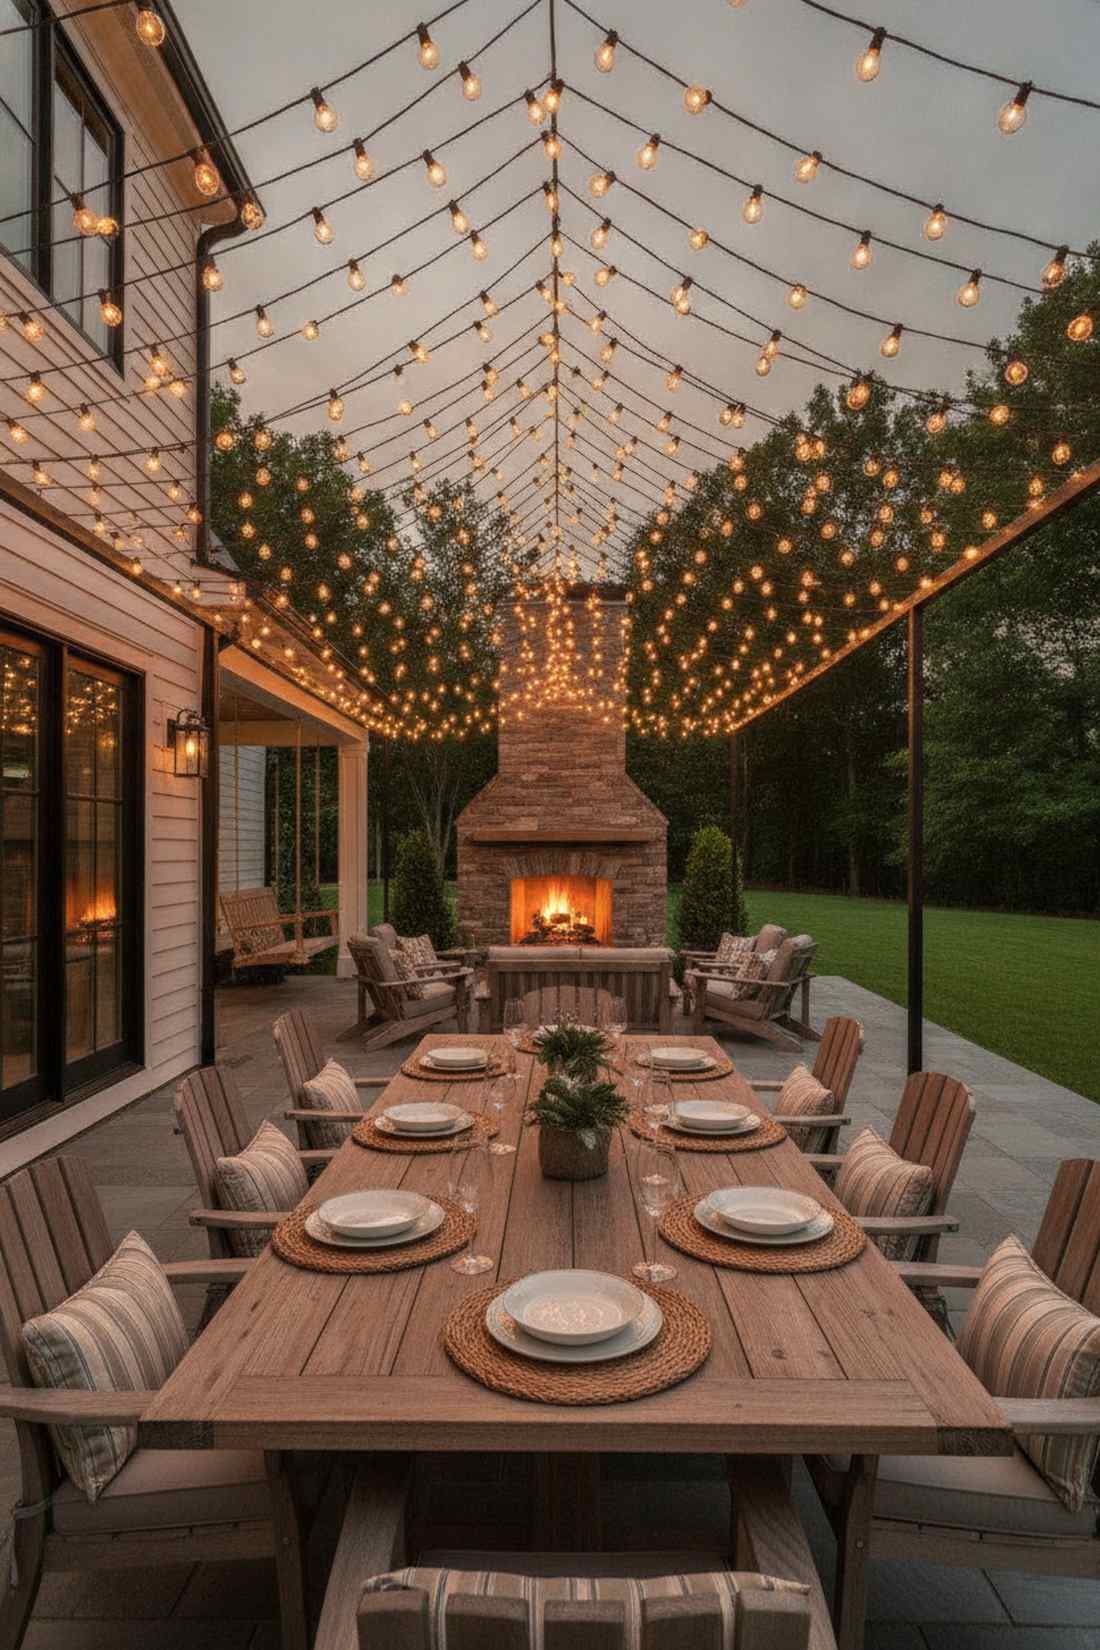
Straight out of a magical European summer night festival. Criss-crossing vintage Edison bulbs directly over the dining table is the absolute pinnacle of patio ambiance.
Throwing a single bulb against the house is lazy, but building a dense overhead glowing roof looks far more expensive than it actually is. Utilizing shatterproof LED bistro string kits ensures you won’t have dangerous glass shards exploding over your dinner plates.
You can string up a massive glowing canopy for around $50. Save this to your outdoor entertaining essentials!
- Key Materials: LED string lights, suspension cables
- Vibe / Style: Warm festive bistro
- Difficulty: Intermediate DIY
- Budget Breakdown: Lights: $40 | Guide Wire: $15
- Creator’s Tip: Never hang lights by their own electrical cord; always zip-tie them to a tight steel guide wire.
- Smart Sourcing: shatterproof LED bistro string light kits and heavy-duty steel cable suspension kits.
Almost everyone gets patio lighting wrong—here is the exact aesthetic fix you need.
45. Uplighting For Trees
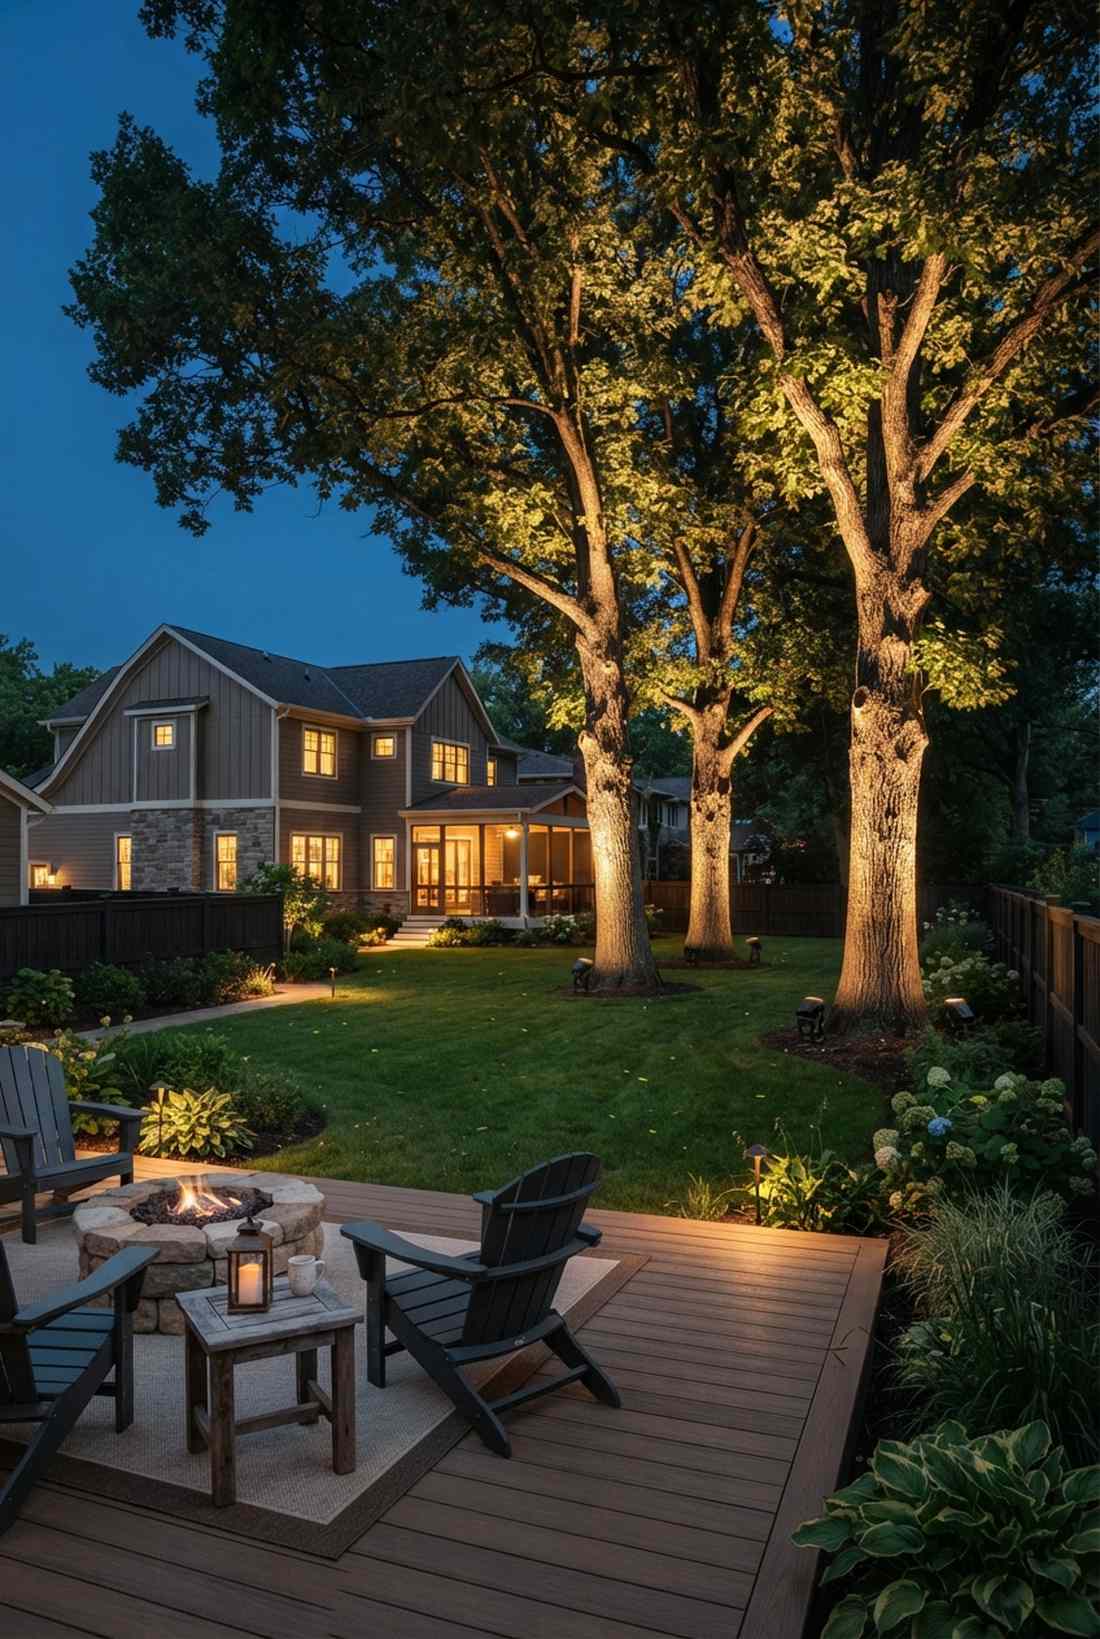

Instantly makes your basic backyard look like a professionally landscaped estate. Positioning high-lumen LED spotlights directly at the base of mature trees adds massive dramatic height.
Most yards go completely pitch black at the edges, but this uplighting trick delivers an insanely expensive organic aesthetic by turning tree branches into glowing architecture. Snagging solar-powered directional landscaping kits means you don’t have to bury a single electrical wire.
You can easily light up three massive oak trees for $60. Highly recommended for a quick weekend win.
- Key Materials: Solar spotlights, ground stakes
- Vibe / Style: Dramatic estate elegance
- Difficulty: Easiest beginner setup
- Budget Breakdown: Lighting Kits: $60 | Wiring: $0
- Creator’s Tip: Place the light slightly behind the trunk facing the foliage, not blasting straight onto the bare bark.
- Smart Sourcing: high-lumen solar-powered directional landscape kits and heavy-duty metal ground stakes.
46. Path Lighting

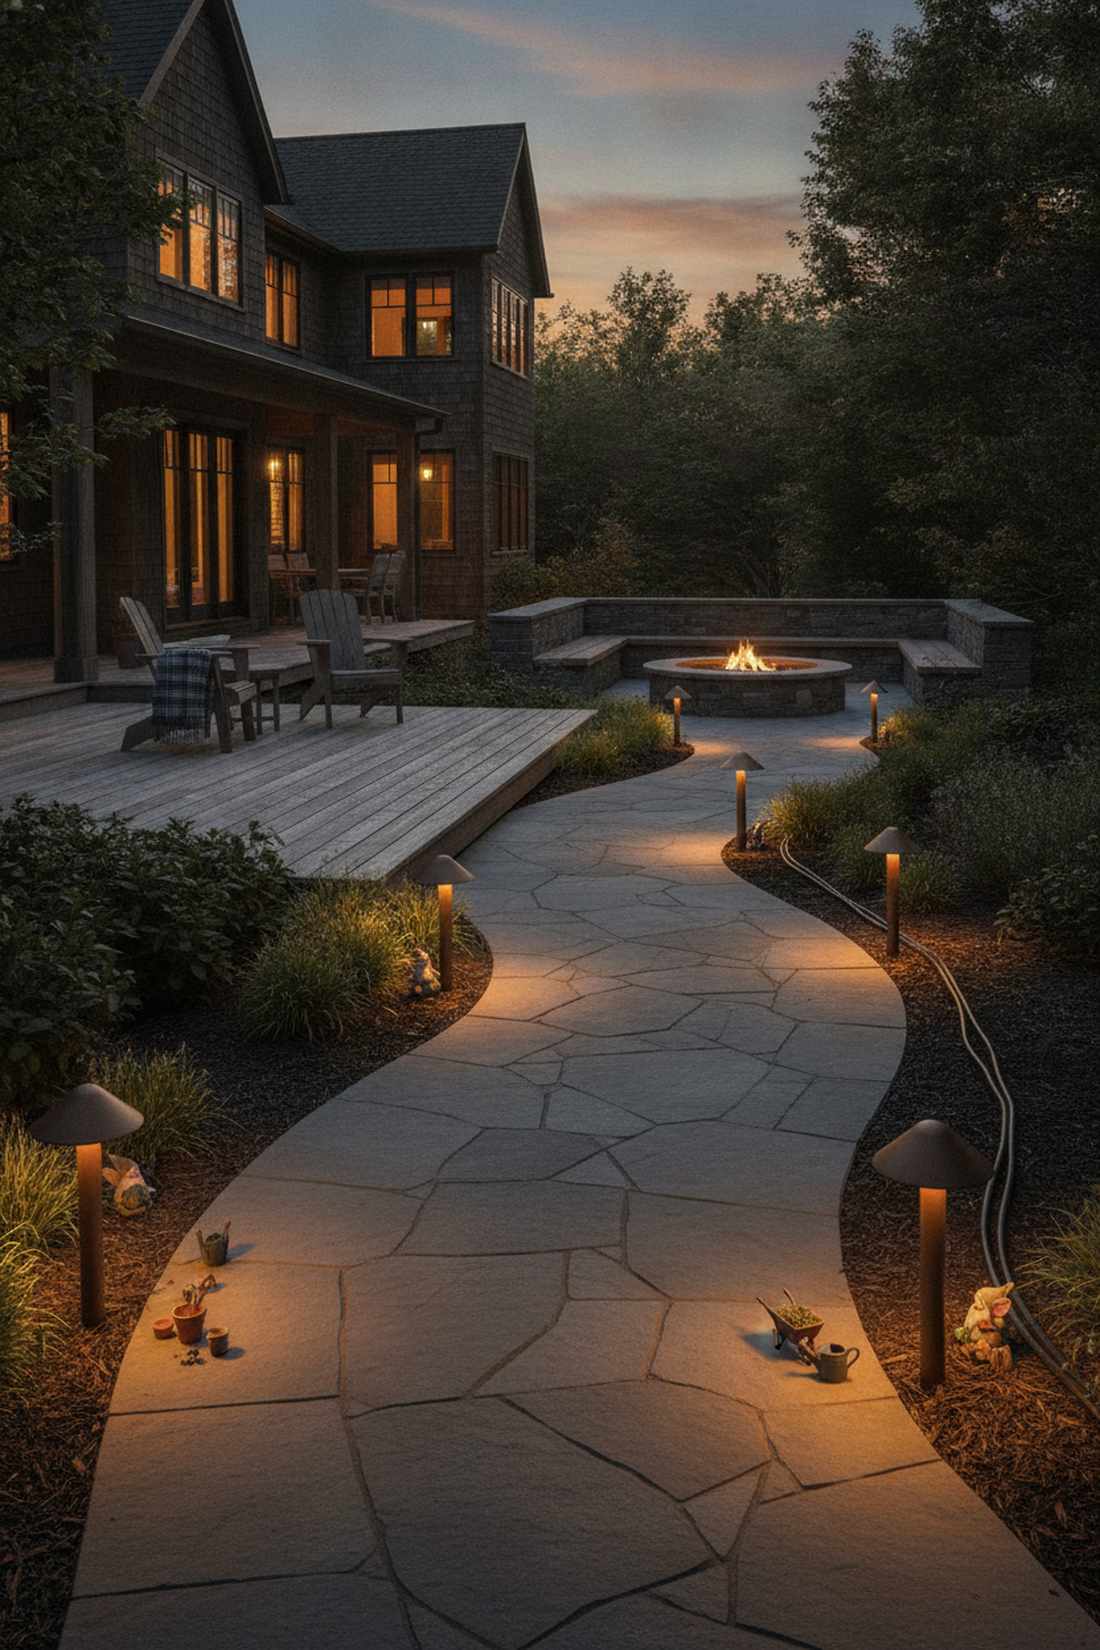
Feels like a guided runway at a luxury woodland retreat. Low-voltage warm mushroom lights flanking the walkway guarantee nobody twists an ankle walking to the fire pit.
Solar stakes from the dollar store break in a week, but wiring a proper low-voltage system gives a designer-level finish that works flawlessly even in winter. You can subtly illuminate tiny miniature garden supplies placed along the borders for a magical floor-level view.
Expect to spend about $150 for a reliable wired system. Pin this if you want permanent, reliable safety lighting!
- Key Materials: Low-voltage fixtures, transformer, burial wire
- Vibe / Style: Safe architectural glow
- Difficulty: Intermediate DIY
- Budget Breakdown: Fixtures: $100 | Transformer/Wire: $50
- Creator’s Tip: Stagger the lights in a zig-zag pattern down the path rather than perfectly parallel airport-runway style.
- Smart Sourcing: low-voltage landscape lighting starter kits and direct-burial outdoor electrical wire rolls.
47. Wall Wash Lighting
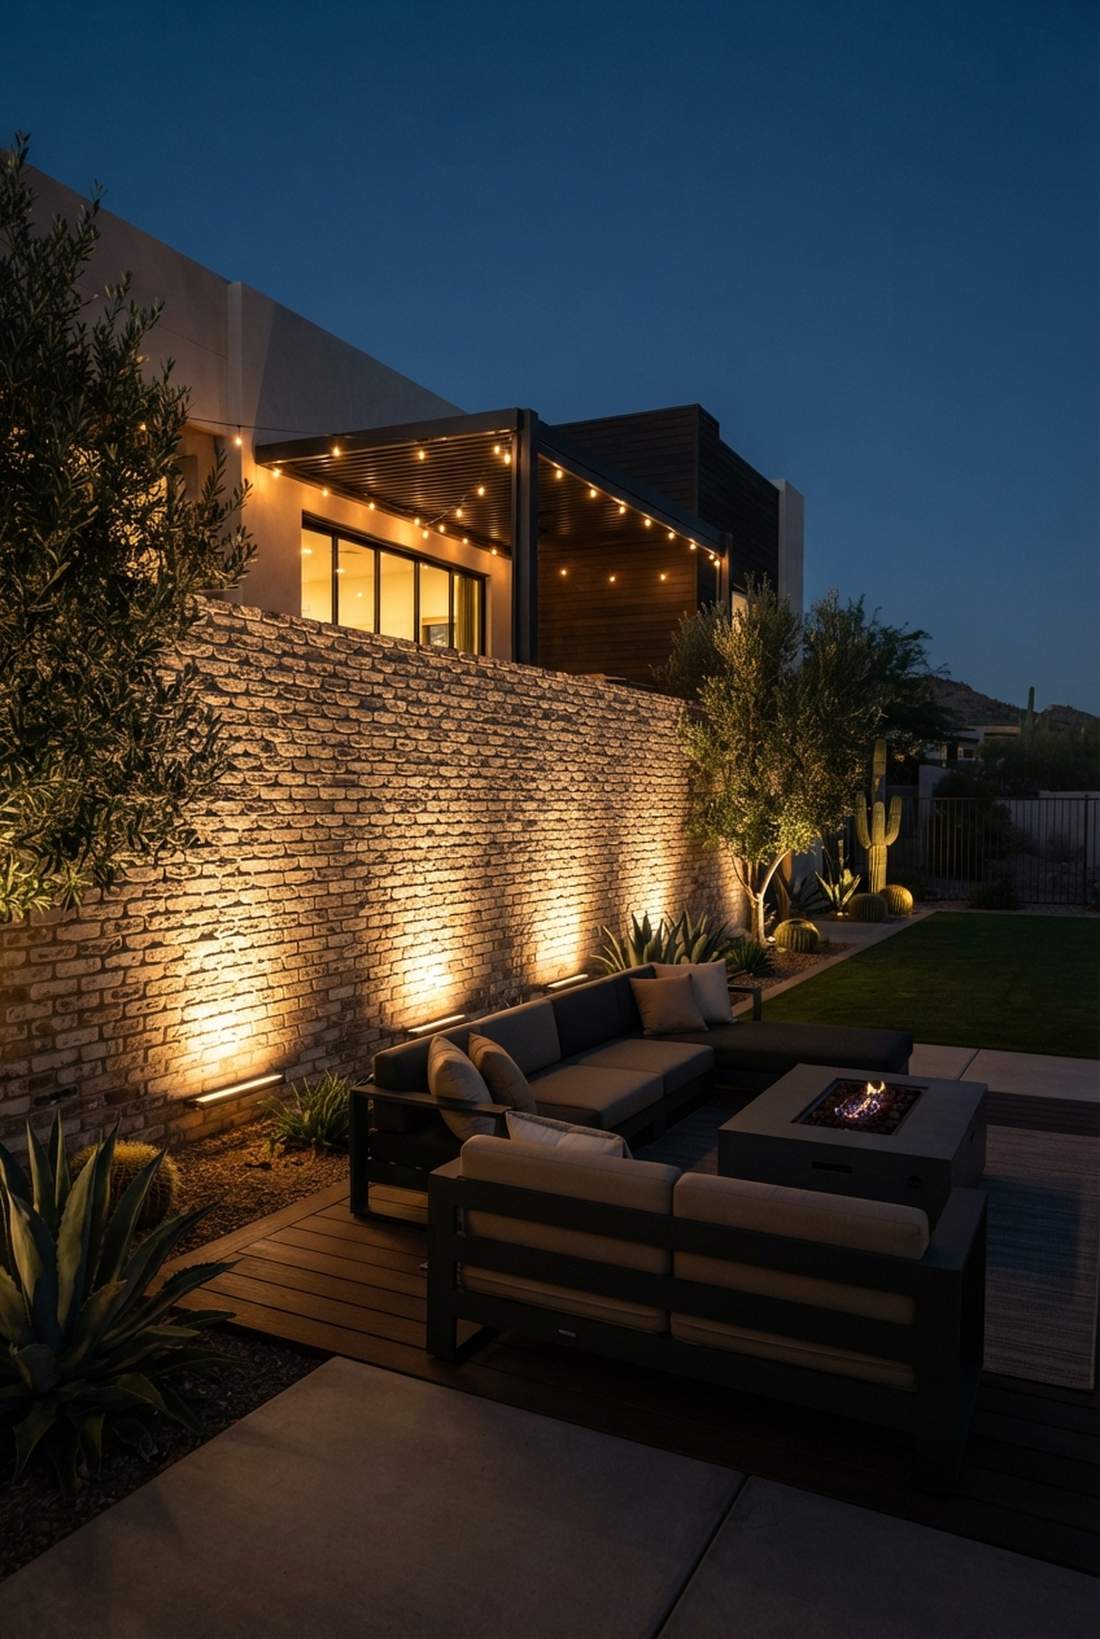
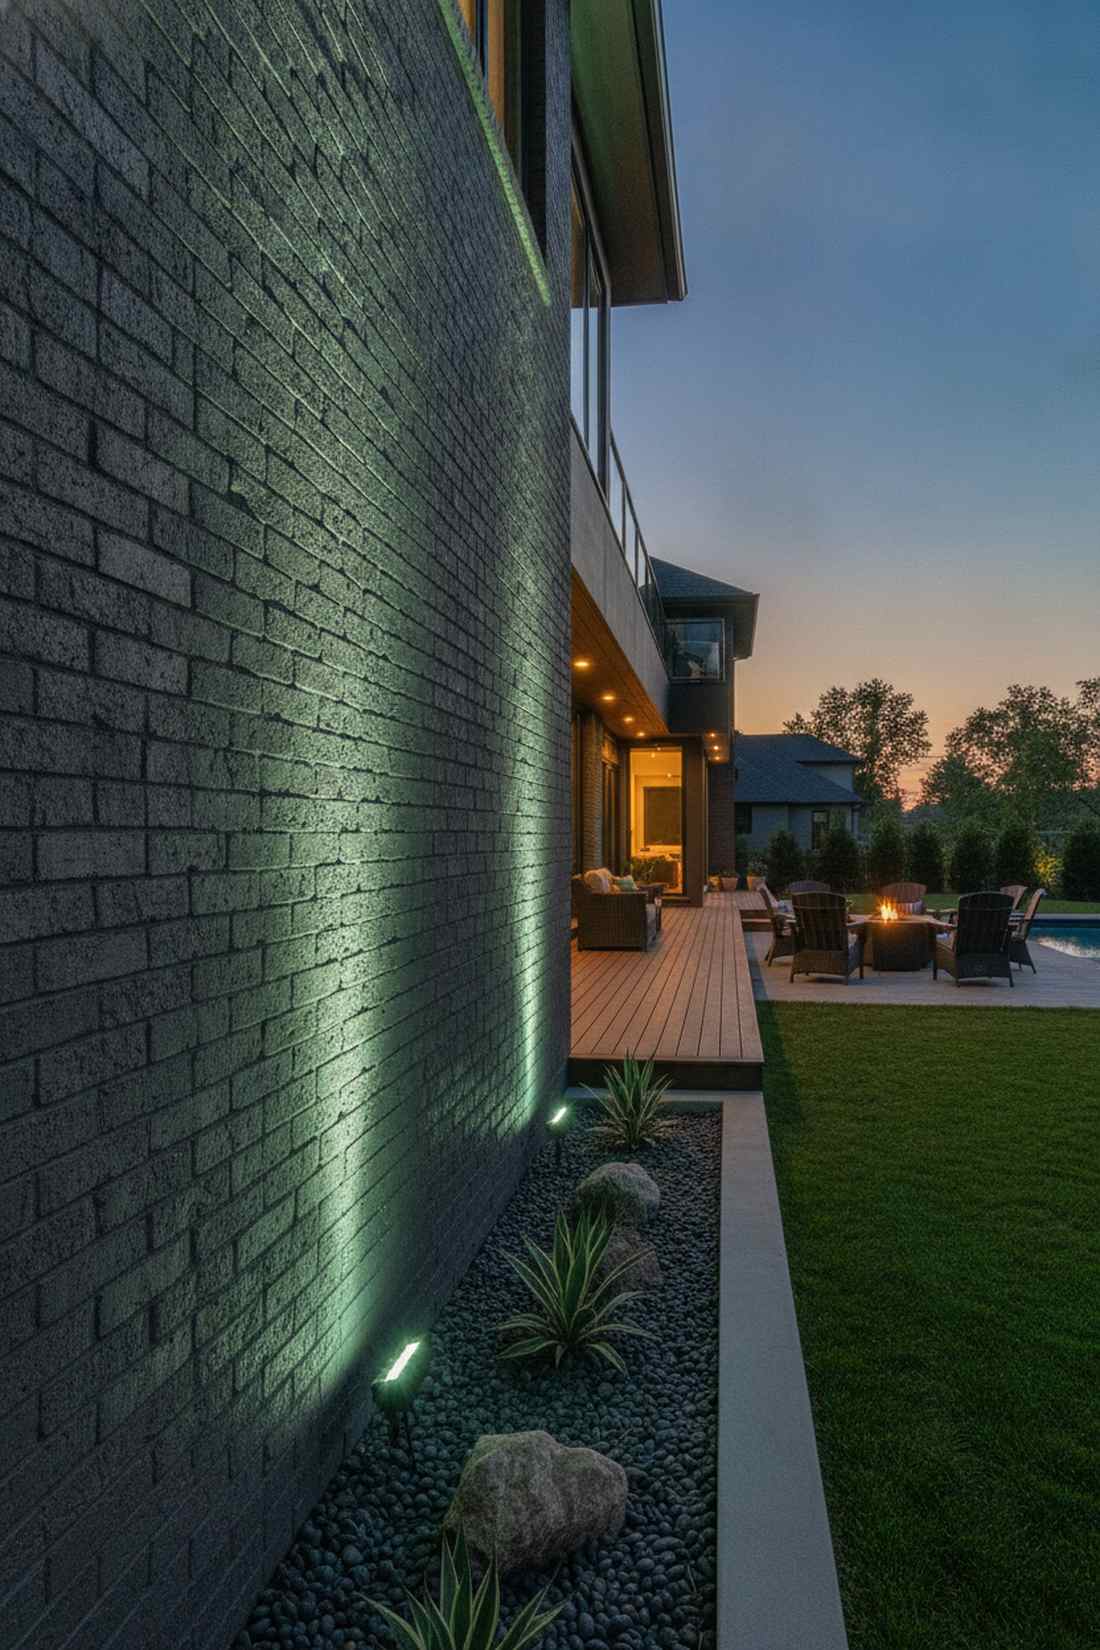
Looks like a high-end contemporary art gallery exterior. Wide-angle LED bars grazed directly upward against textured masonry completely transforms boring brick walls.
Flat floodlights destroy all texture, but scraping light tightly against the wall delivers a surprisingly premium look by highlighting every single bump and groove. Choosing smart RGB outdoor flood kits lets you change the wall color entirely for different holidays.
You can wash a massive wall for around $80. Save this to your modern exterior lighting board!
- Key Materials: Linear wall washers, smart plugs
- Vibe / Style: Contemporary architectural drama
- Difficulty: Beginner friendly
- Budget Breakdown: LED Bars: $60 | Smart Plugs: $20
- Creator’s Tip: Keep the fixture exactly 6 inches away from the wall base for the sharpest, most dramatic shadow effect.
- Smart Sourcing: smart RGB outdoor floodlight kits and heavy-duty weatherproof smart plugs.
48. Fire Feature Lighting
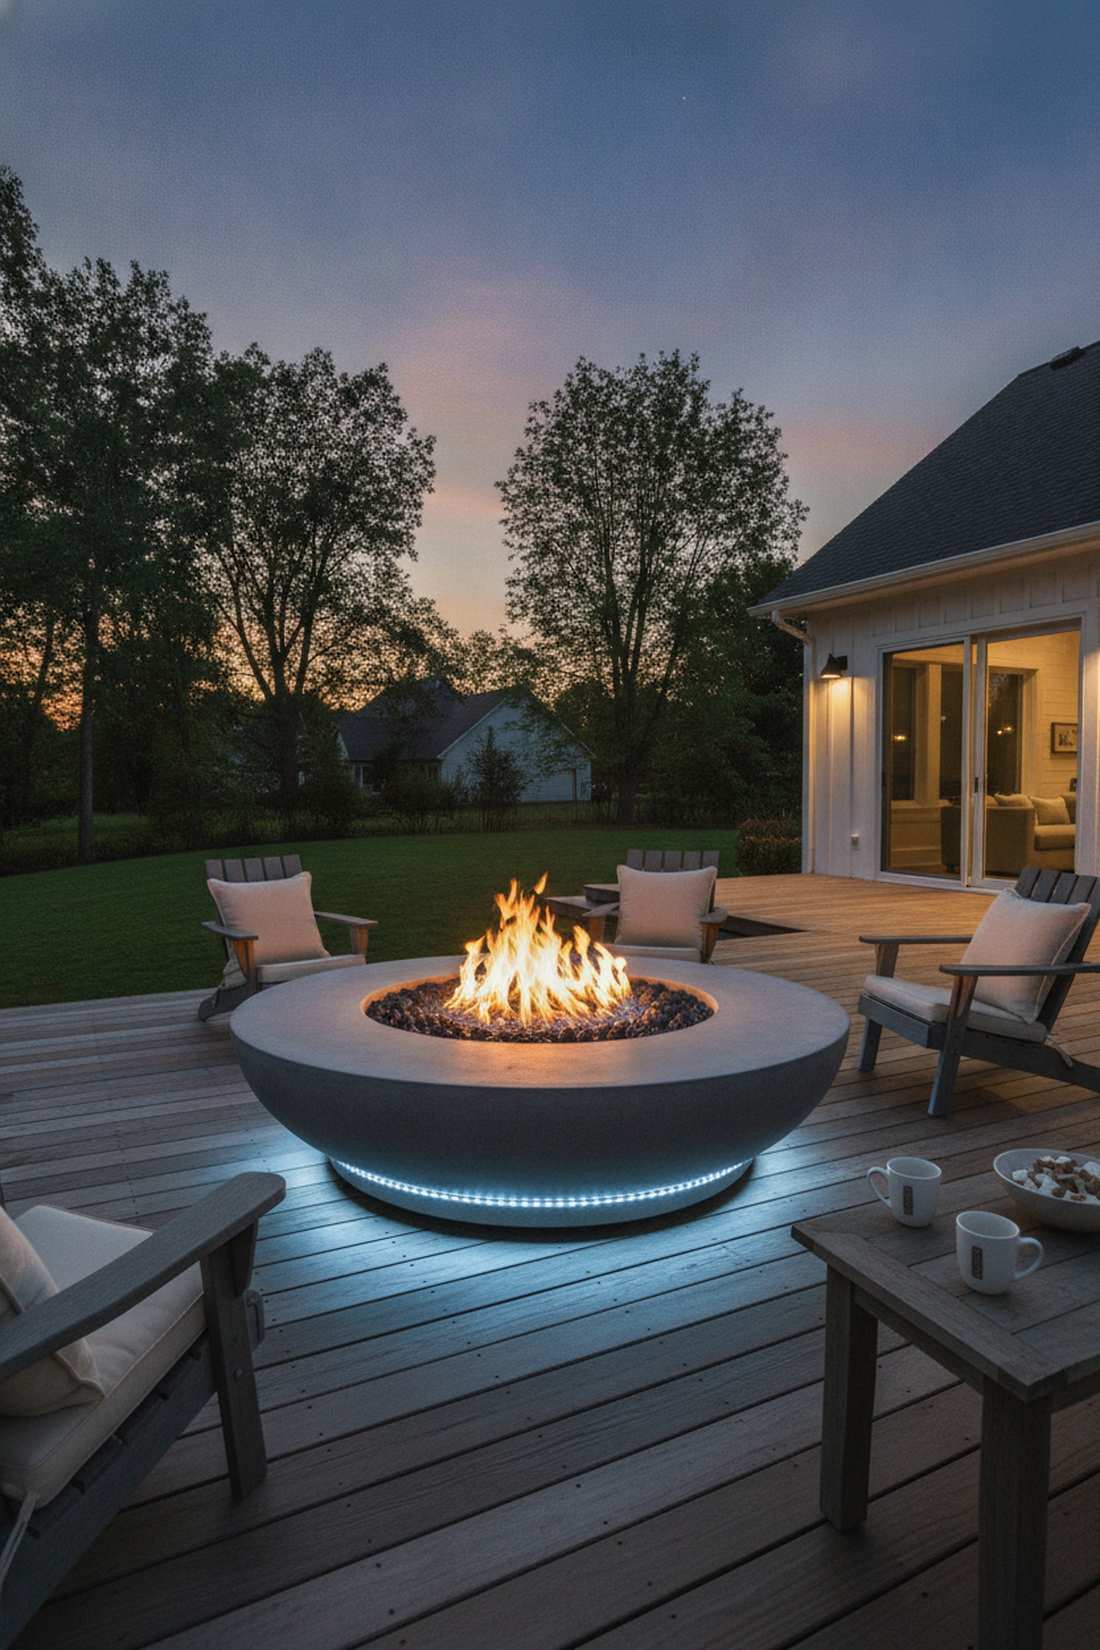
Radiates intense sci-fi luxury directly from the flames. Hiding waterproof LED strips under the seating lip of a fire pit creates a breathtaking floating effect.
Overhead lights completely ruin the campfire vibe, but this hidden under-glow gives a designer-level finish while illuminating the floor safely. Always use heat-resistant silicone LED channels so the bulbs don’t instantly melt when the fire roars.
You can easily install this hidden safety glow for under $40. It’s a fast upgrade that completely changes the vibe.
- Key Materials: LED strips, heat shields
- Vibe / Style: Futuristic cozy warmth
- Difficulty: Intermediate
- Budget Breakdown: Strip Lights: $25 | Silicone Channels: $15
- Creator’s Tip: Wire these to a completely separate dimmer switch from the rest of the patio so the fire remains the star.
- Smart Sourcing: heat-resistant silicone LED channels and waterproof outdoor LED strip kits.
49. Smart Lighting Systems
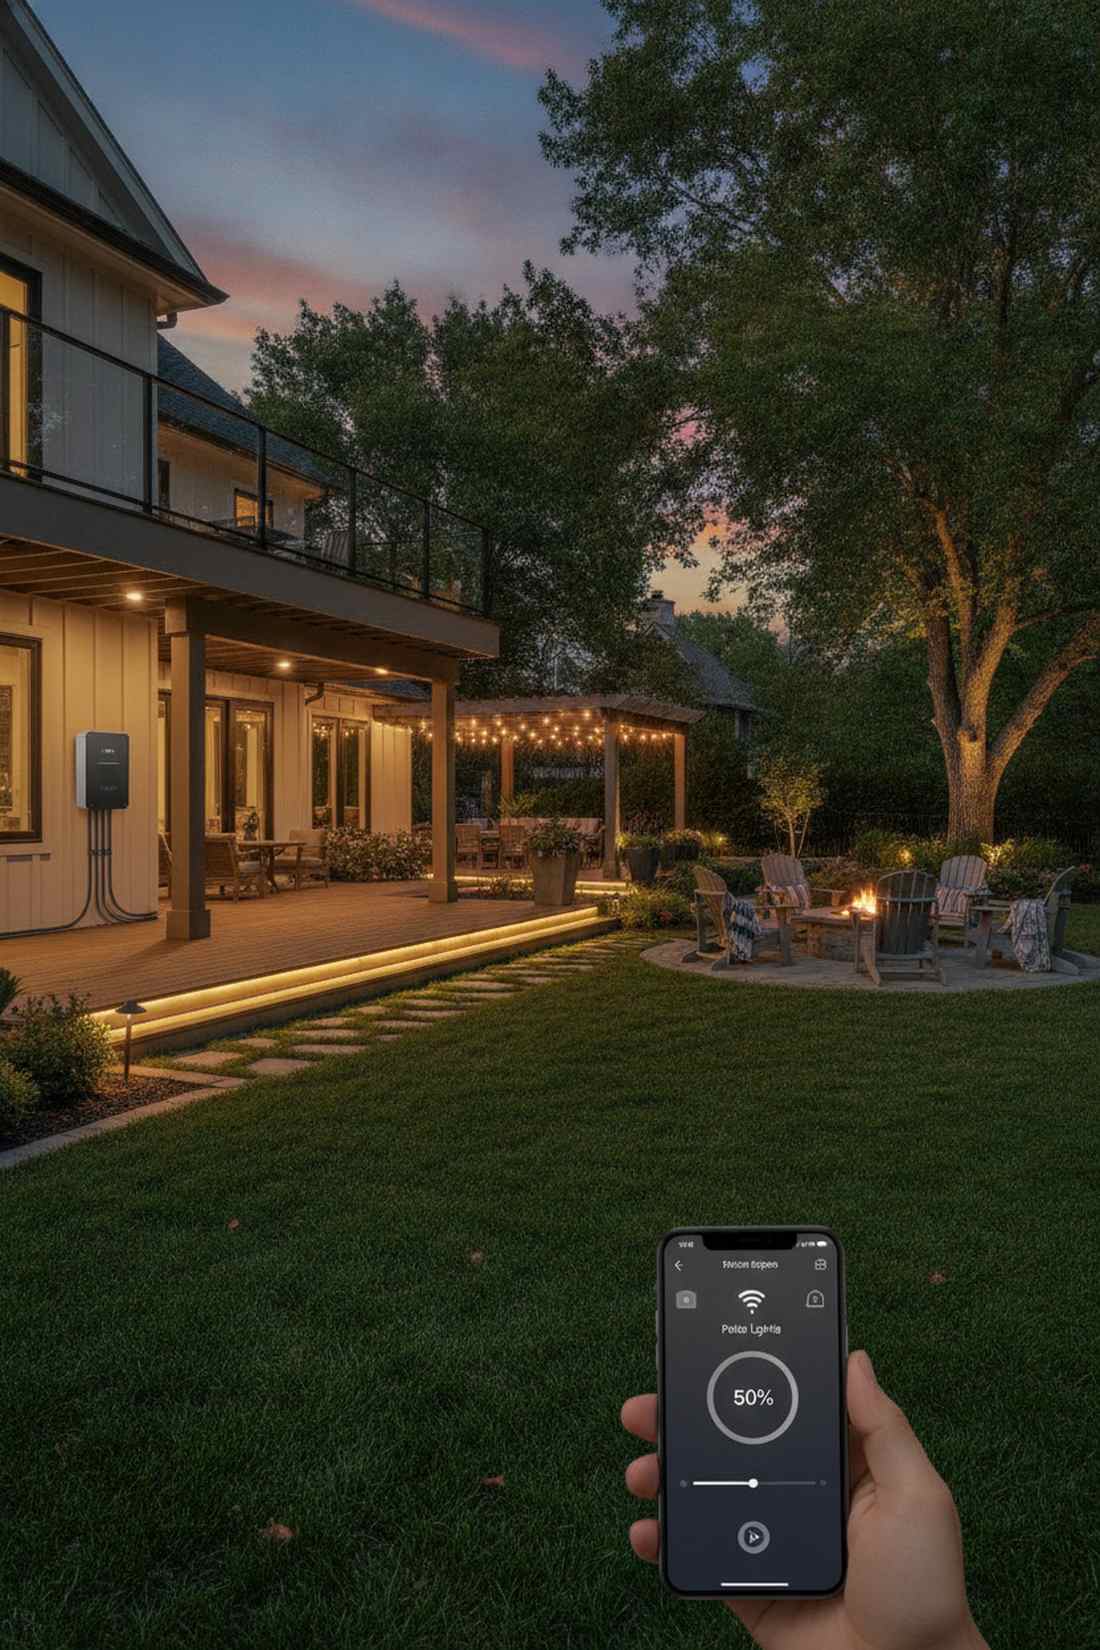
Feels like living in a billionaire’s fully automated smart home. WiFi-controlled outdoor lighting hubs allow you to dim the entire backyard from your phone without leaving the couch.
Flipping physical switches is archaic, but this setup looks far more expensive and automatically turns everything on exactly at sunset. Upgrading your outlets with heavy-duty weatherproof smart hubs takes literally ten minutes to plug in.
Automate your entire patio for roughly $50. Pin this to your ultimate smart home upgrades board!
- Key Materials: Smart plugs, WiFi landscape transformer
- Vibe / Style: Effortless tech luxury
- Difficulty: Easiest beginner setup
- Budget Breakdown: Smart Transformer: $60 | Outlet Plugs: $25
- Creator’s Tip: Set a routine that automatically dims the lights by 50% at 10 PM to create an ultra-cozy late-night vibe.
- Smart Sourcing: WiFi-enabled outdoor lighting transformers and heavy-duty weatherproof smart plug hubs.
This next high-tech upgrade costs almost nothing but makes your garden feel futuristic…
50. Solar Accent Lights
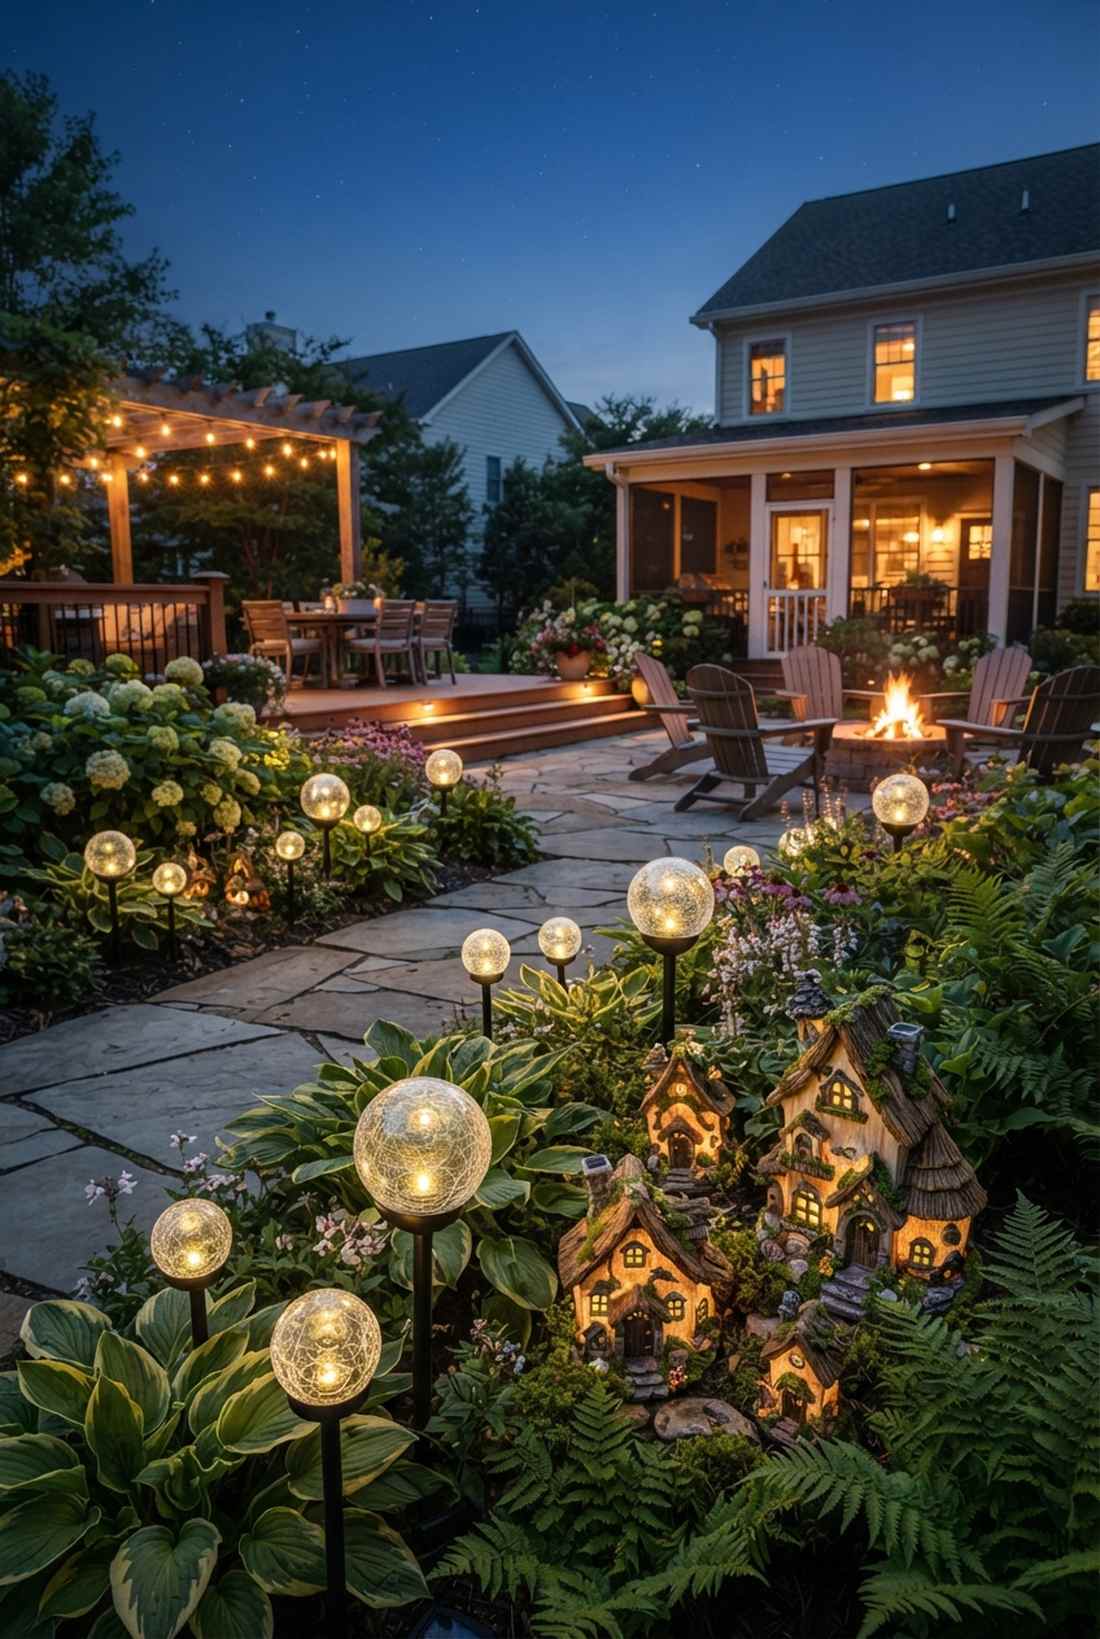
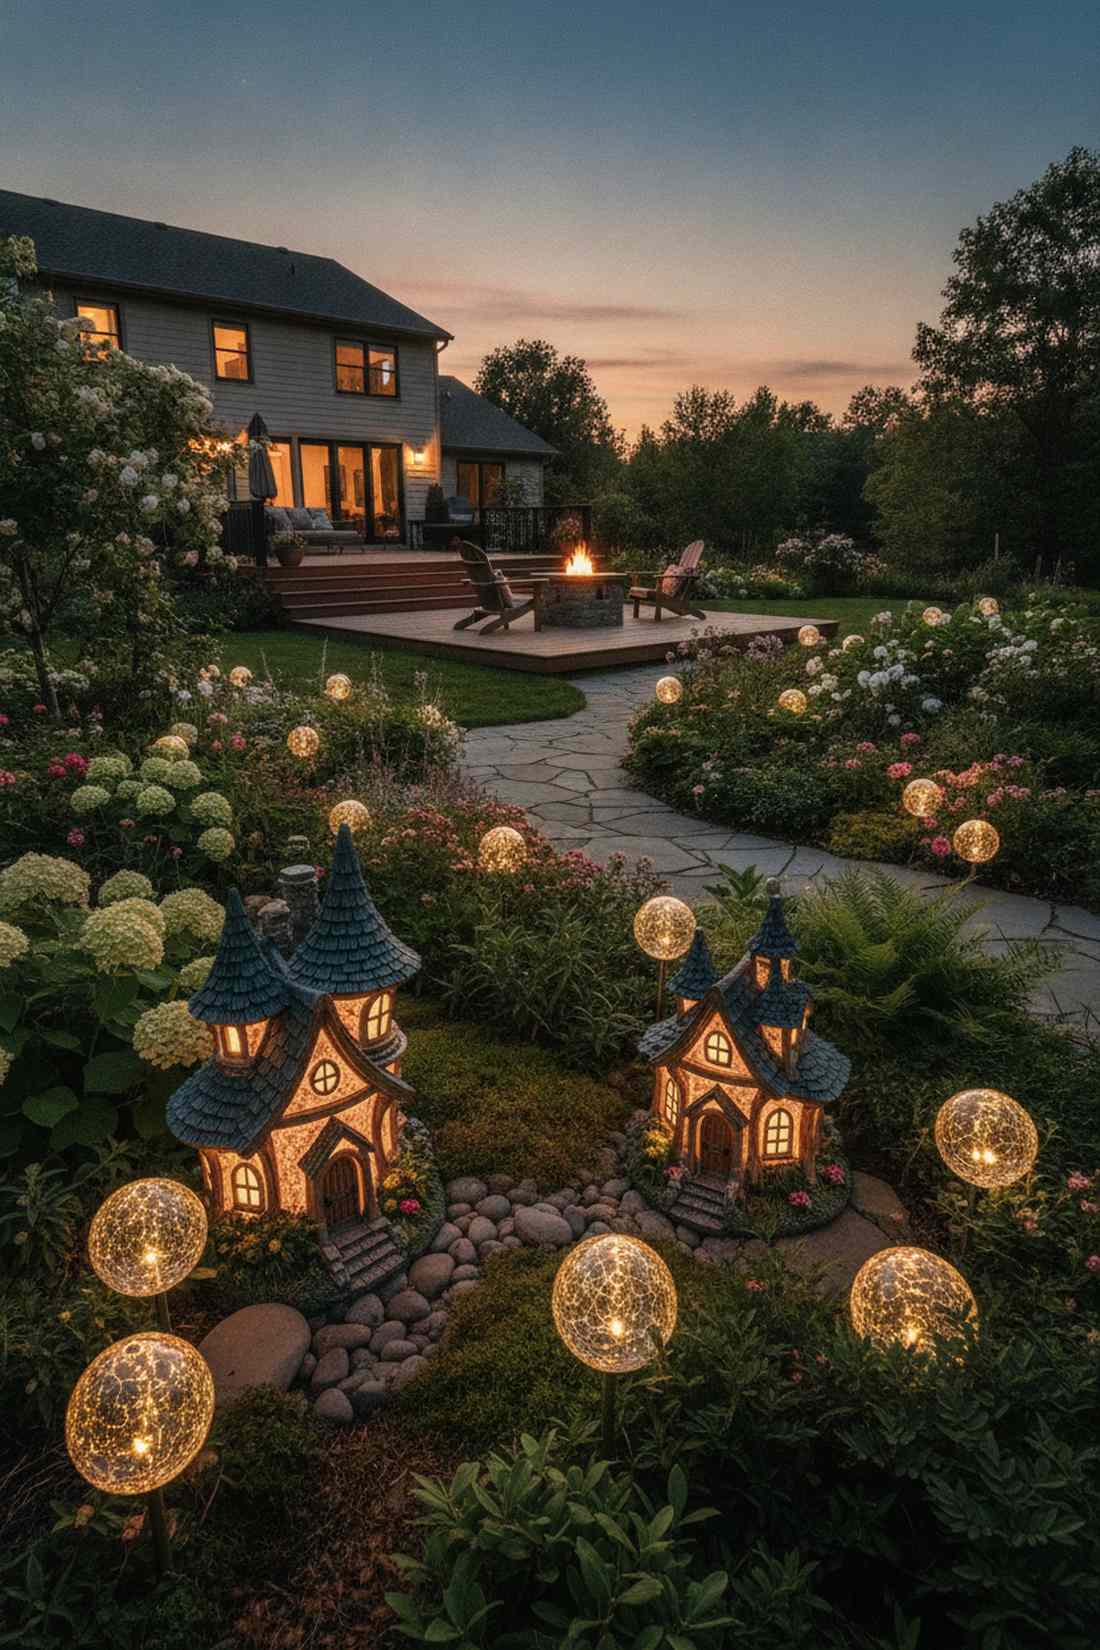
Straight out of a magical, glowing fairy-tale garden. Discreet solar-powered crackle glass globes hidden in the flower beds provide the perfect subtle twinkle.
Big ugly plastic solar panels ruin the daytime aesthetic, but these hidden gems deliver an insanely expensive organic aesthetic when the sun goes down. Snagging UV-coated resin fairy cottage kits to place next to them creates an adorable illuminated miniature village.
Grab a bulk pack of glass globes for around $35. Highly recommended for a quick weekend win.
- Key Materials: Glass solar globes, garden stakes
- Vibe / Style: Enchanted evening garden
- Difficulty: Easiest beginner setup
- Budget Breakdown: Solar Globes: $35 | Accents: $15
- Creator’s Tip: Wipe the solar panels down with a microfiber cloth once a month or they will stop charging entirely.
- Smart Sourcing: crackled glass solar globe sets (bulk pack) and UV-coated resin fairy cottage kits.
51. Pendant Lighting Over Dining
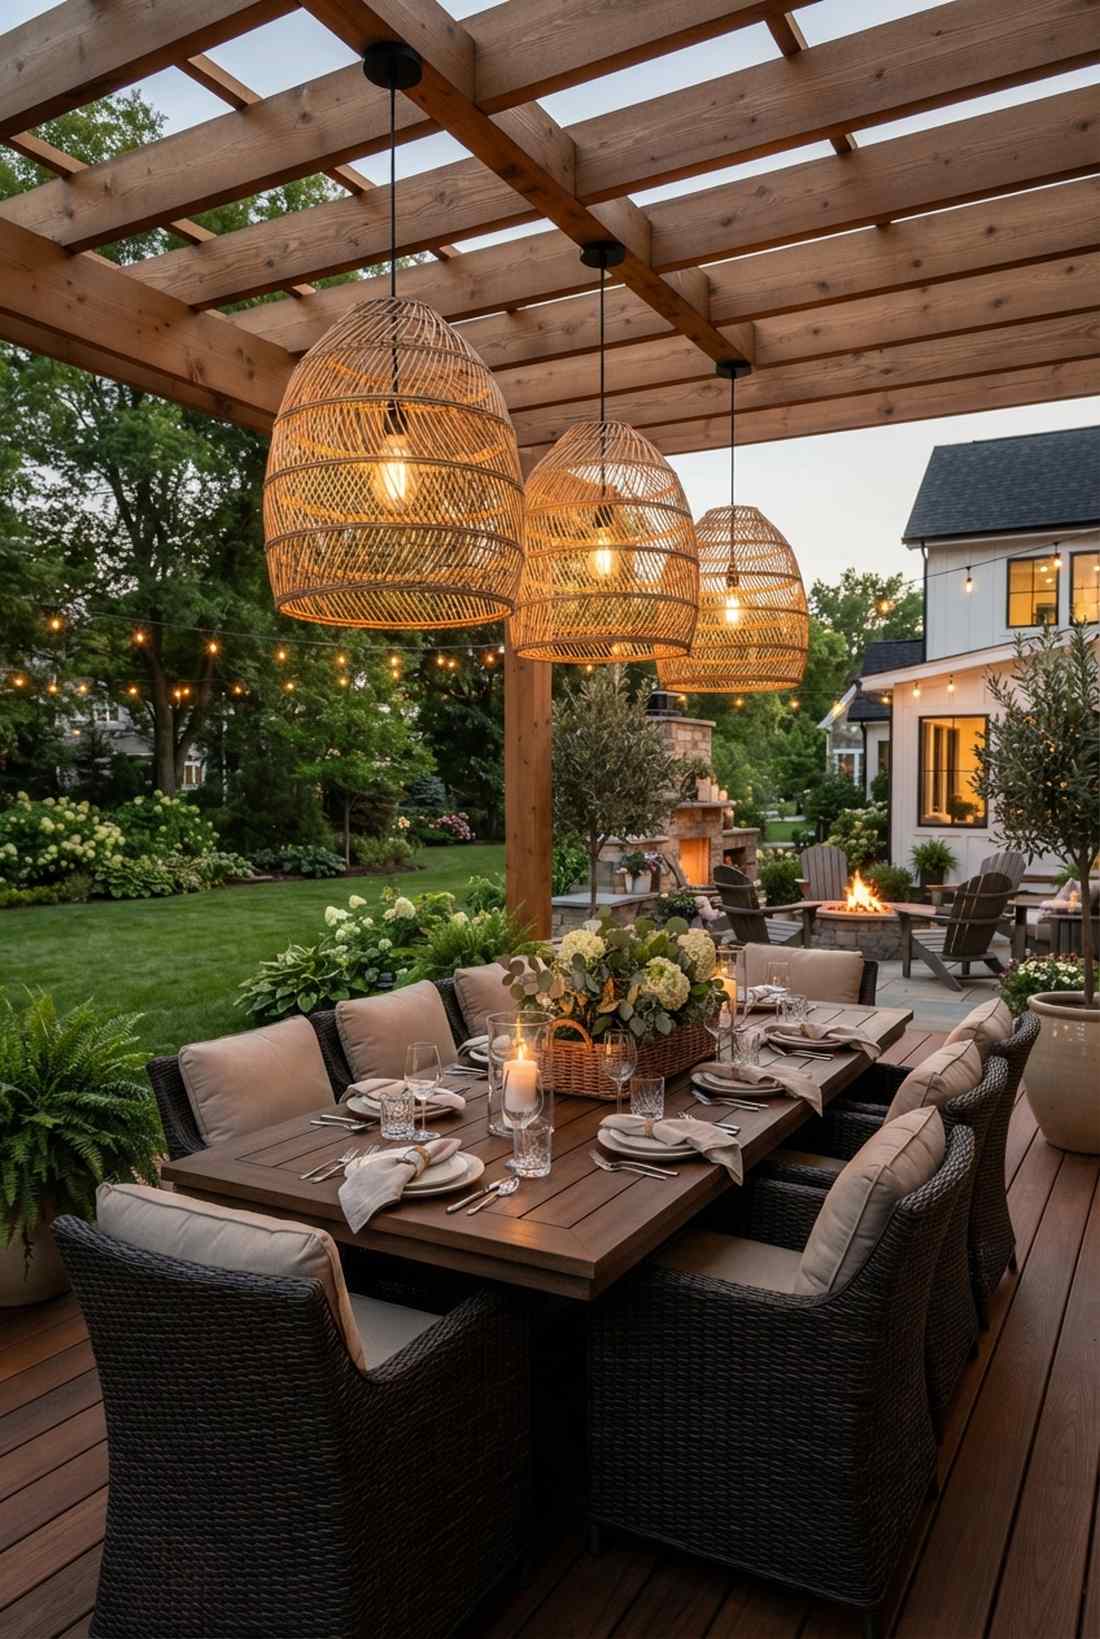
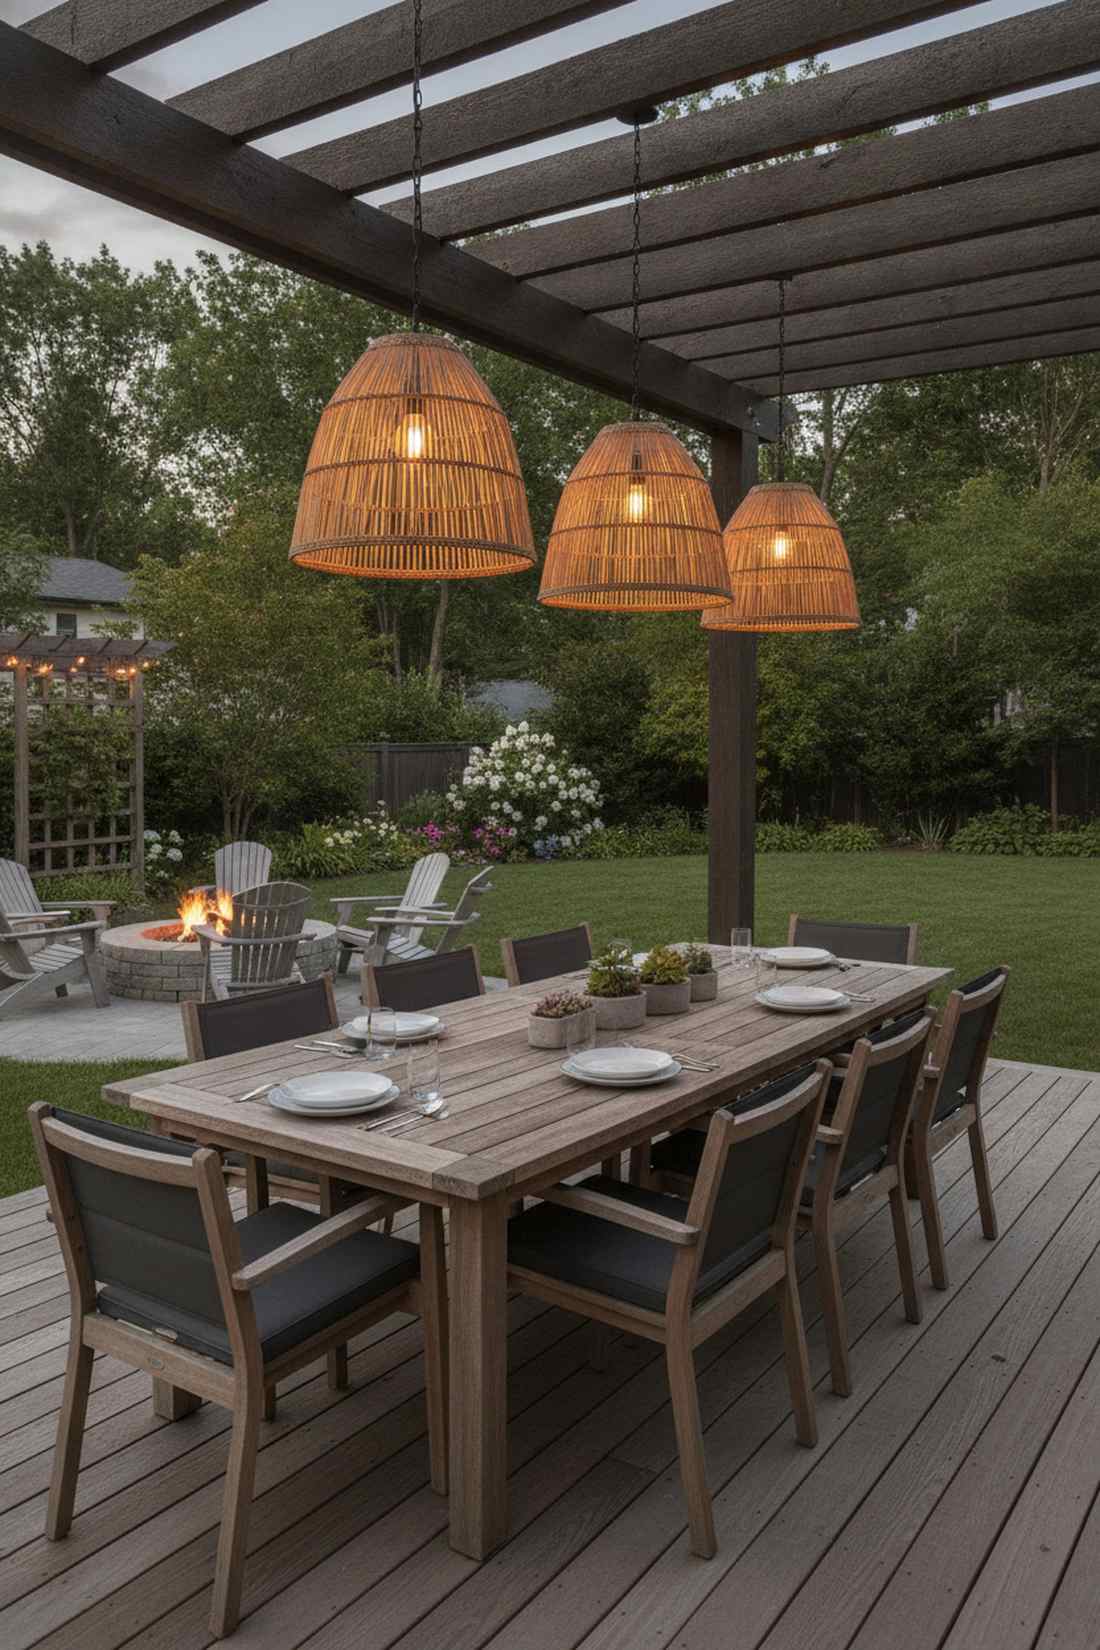
Feels exactly like a private dining room at a five-star resort. Suspended oversized woven rattan pendants hung directly over the outdoor table completely anchor the eating zone.
Eating outside usually means relying on a terrible blinding porch light, but this overhead drop-down gives a designer-level finish that makes the food look incredible. Utilizing shatterproof heavy-duty outdoor bulbs ensures extreme temperature swings won’t pop the glass.
You can execute this resort look for under $90. Save this to your outdoor dining room inspiration board!
- Key Materials: Wicker pendant shade, outdoor cord kit
- Vibe / Style: High-end resort dining
- Difficulty: Beginner DIY
- Budget Breakdown: Woven Shade: $50 | Cord Set: $25
- Creator’s Tip: Hang the bottom of the pendant exactly 36 inches above the tabletop so nobody bumps their head standing up.
- Smart Sourcing: weatherproof plug-in pendant cord kits and shatterproof heavy-duty outdoor LED bulbs.
52. Retractable Awnings
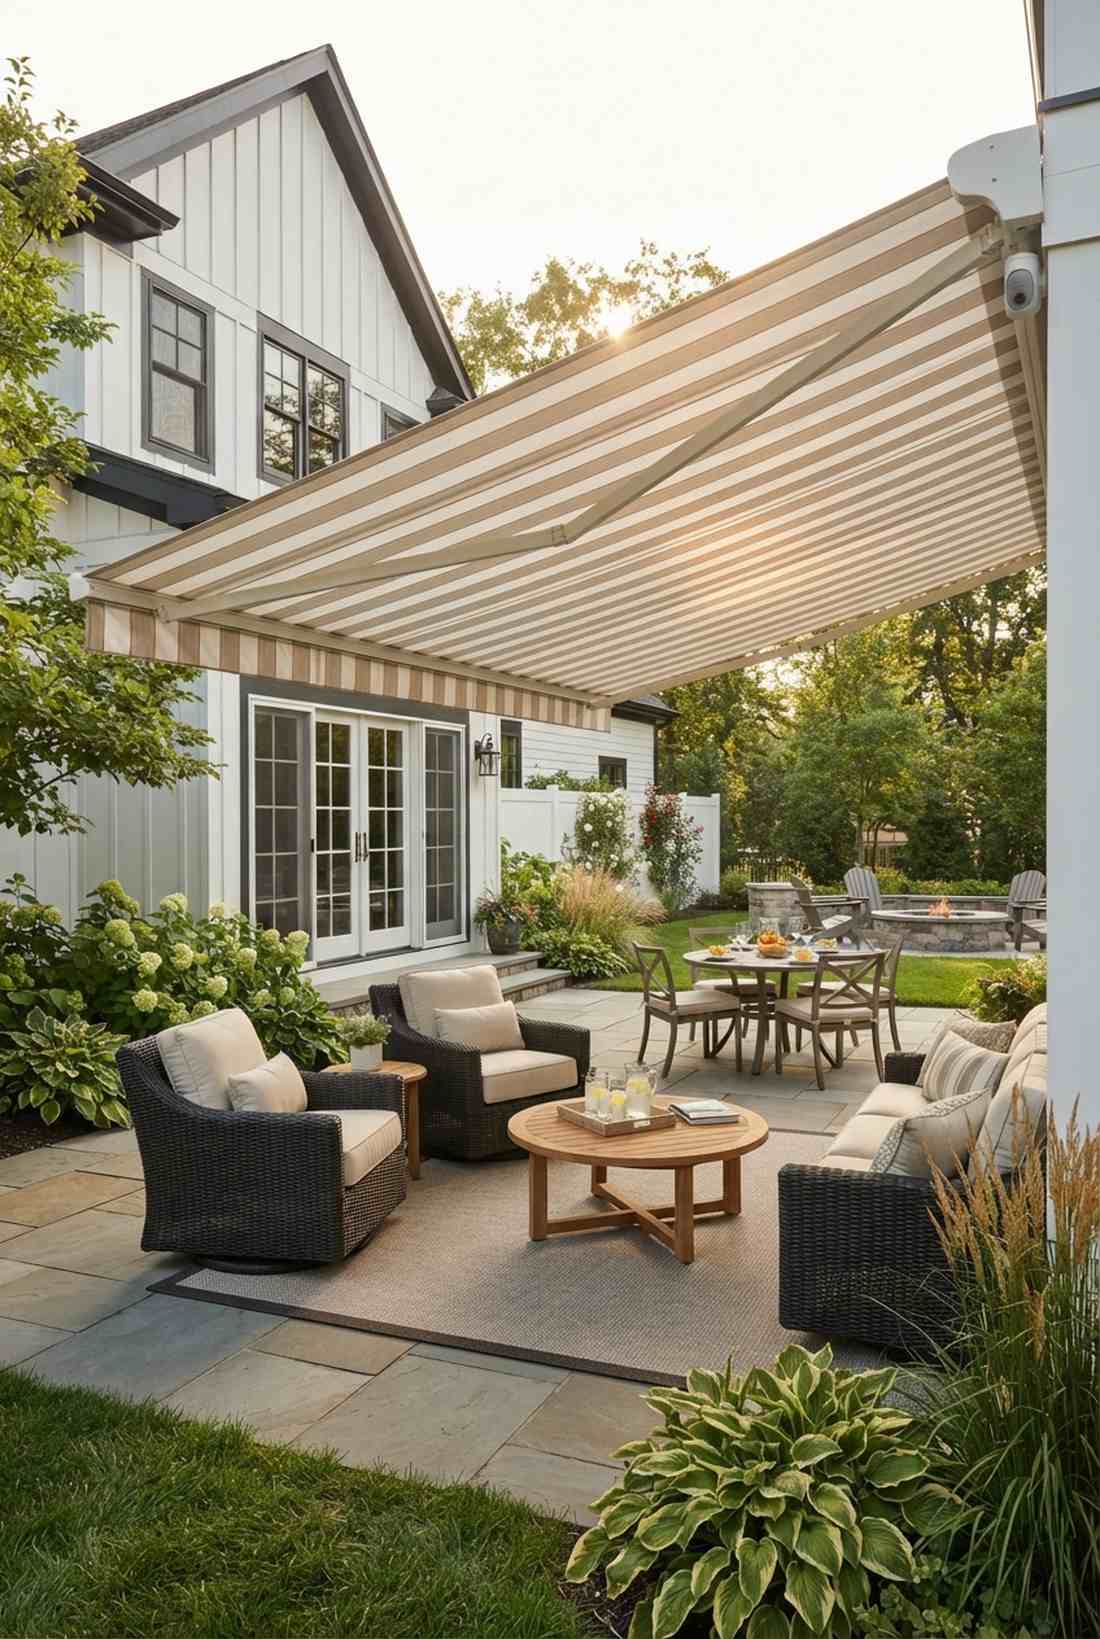
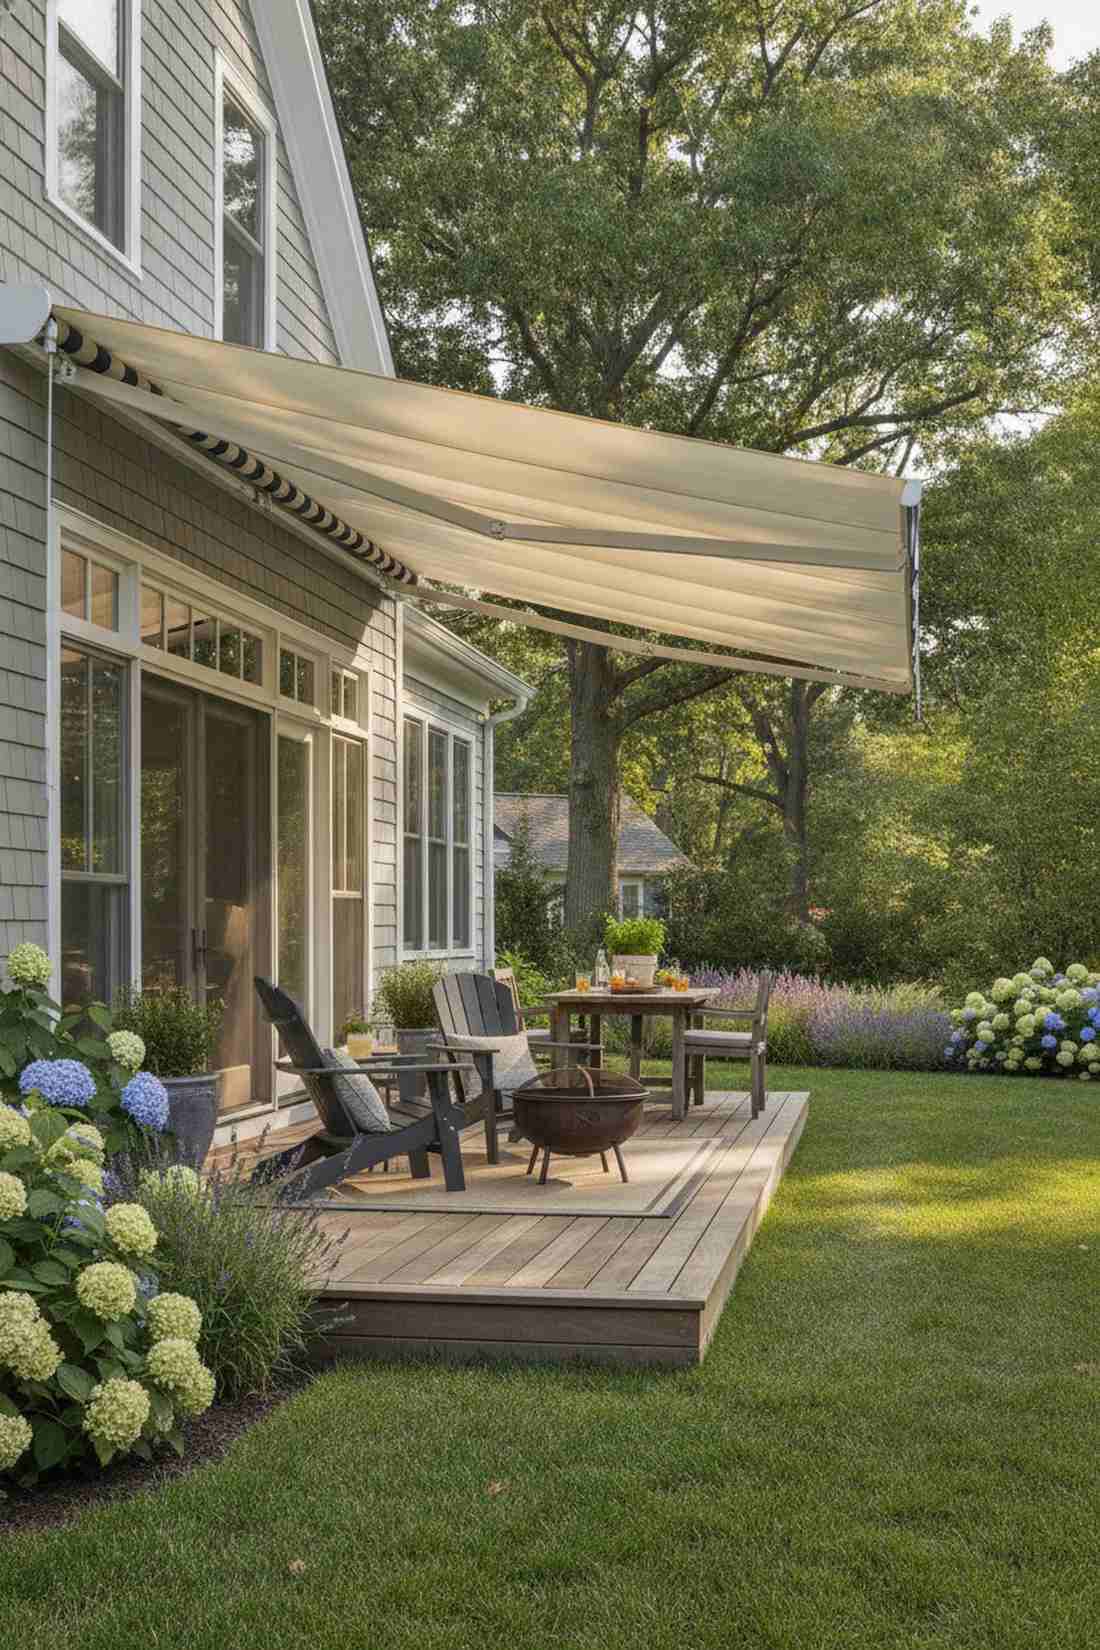
Gives off instant European cafe street vibes. Motorized retractable fabric awnings are the ultimate cheat code for patios that bake in the afternoon sun but want starry nights.
Permanent roofs block all the natural interior house light, but this mechanical flex looks surprisingly premium and adapts to the weather instantly. Investing in solution-dyed acrylic awning replacement fabrics means it won’t rot after one rainy season.
Expect to invest around $500 for a motorized kit. Pin this if you desperately need temporary shade!
- Key Materials: Motorized awning kit, lag bolts
- Vibe / Style: Adaptable modern comfort
- Difficulty: Advanced DIY installation
- Budget Breakdown: Awning Unit: $400 | Hardware: $40
- Creator’s Tip: Buy a unit with a built-in wind sensor so it automatically rolls itself up before a storm destroys it.
- Smart Sourcing: heavy-duty motorized retractable awning kits and solution-dyed acrylic outdoor fabric rolls.
53. Outdoor Heaters
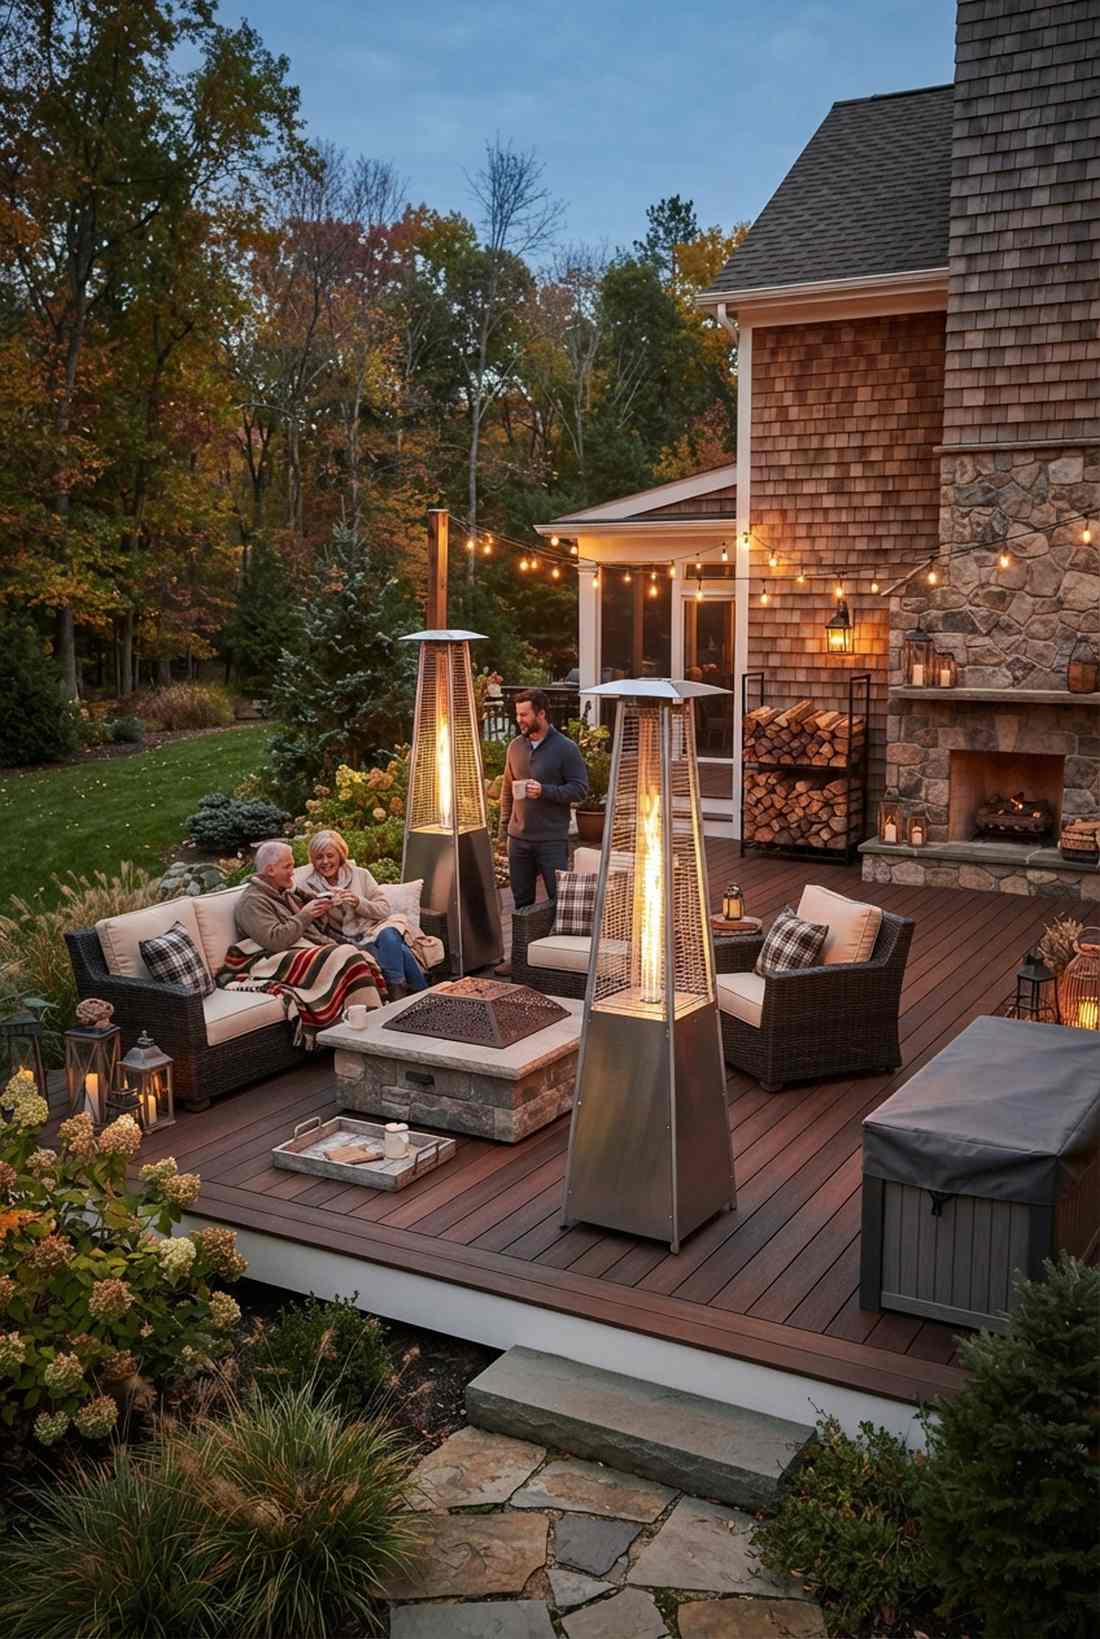
Feels like sitting in a luxury ski lodge during a blizzard. Commercial-grade stainless steel pyramid heaters visually anchor a space while pumping out massive radiant warmth.
Flimsy tabletop heaters are entirely useless, but these towering fire-glass pillars look far more expensive and actually extend your patio season into November. Grabbing heavy-duty weatherproof heater covers prevents the metal from rusting out over the humid summer.
You can grab a massive pyramid heater for roughly $180. Highly recommended for chilly autumn nights.
- Key Materials: Propane pyramid heater, glass tube
- Vibe / Style: Upscale winter lodge
- Difficulty: Simple assembly
- Budget Breakdown: Heater Unit: $150 | Cover/Tank: $50
- Creator’s Tip: Buy a specialized heat reflector shield to clamp on top; it pushes 30% more heat down to your seating level.
- Smart Sourcing: stainless steel pyramid patio heater kits and heavy-duty weatherproof heater covers.
54. Weather-Resistant Furniture Covers
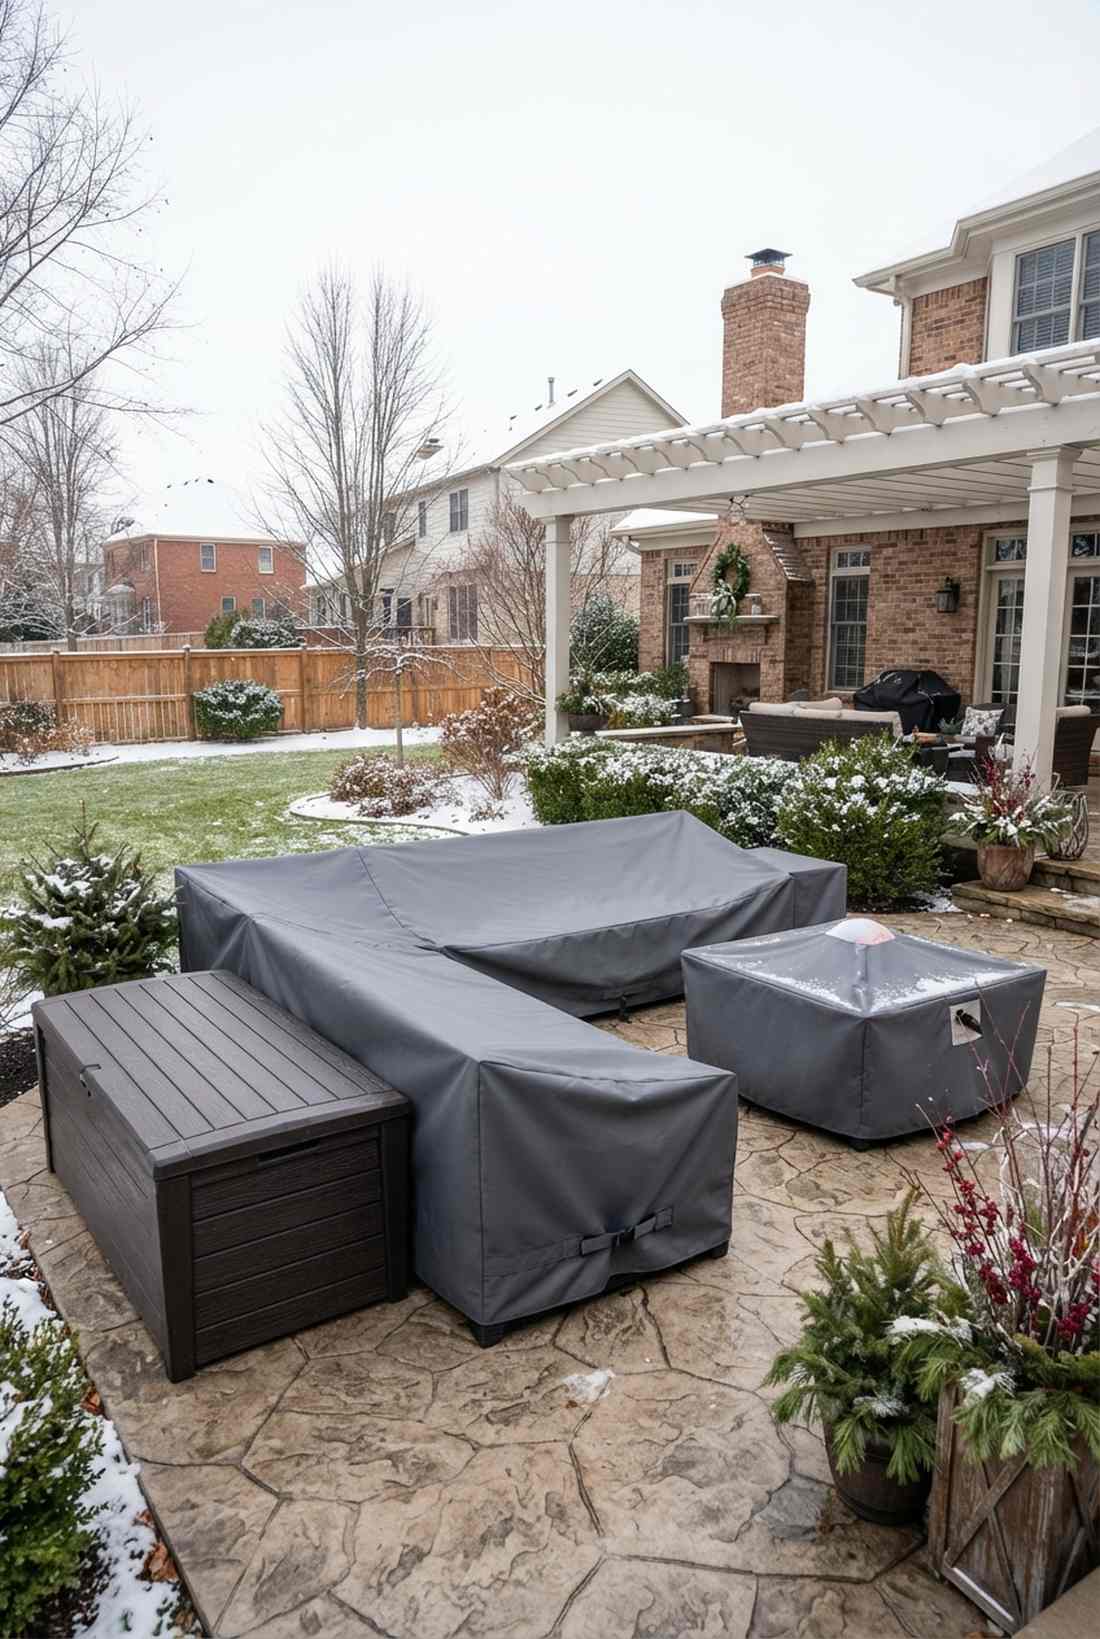
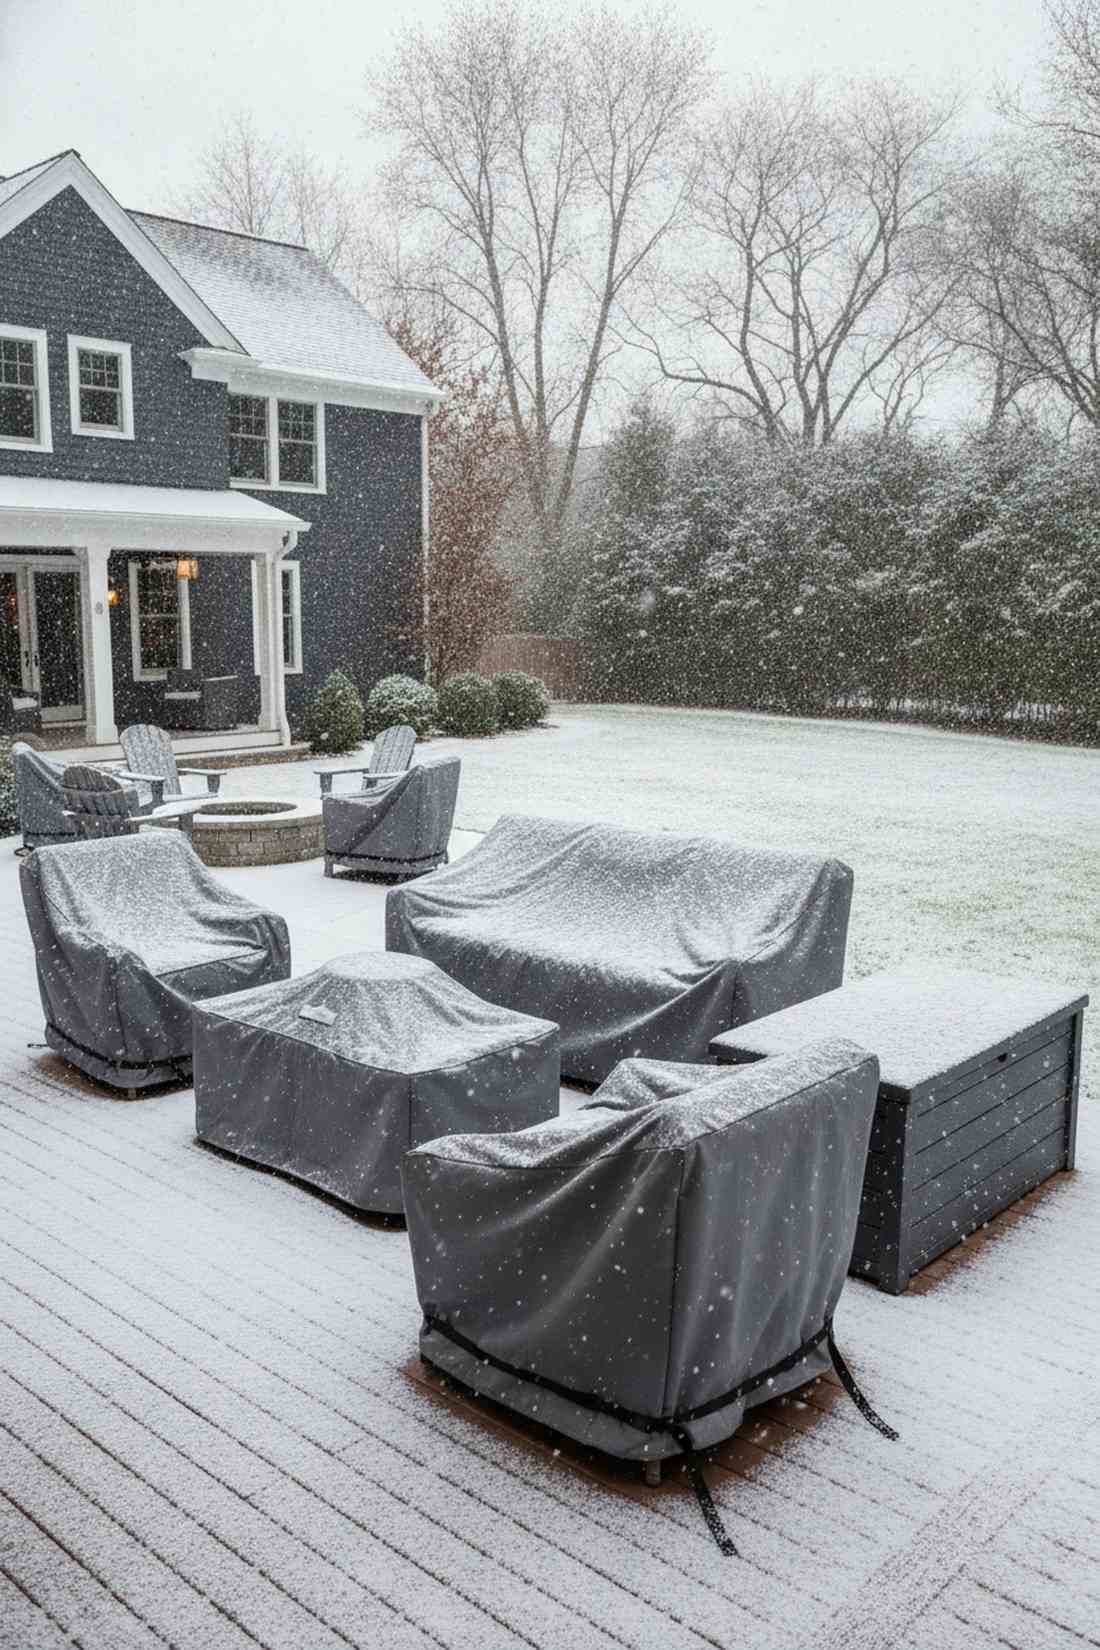
Protects your entire investment so it looks brand new next April. Custom-fit high-denier polyester furniture covers are absolute mandatory armor for any outdoor living room.
Most people leave their expensive couches exposed to rot, but snapping on these tailored suits gives a surprisingly premium look even during a snowstorm. Sourcing heavy-duty waterproof deck boxes completely hides the bulky covers when guests arrive in the summer.
You can armor your entire setup for under $100. Save this to your winterizing maintenance board!
- Key Materials: Heavy-denier covers, buckle straps
- Vibe / Style: Clean winter maintenance
- Difficulty: Easiest beginner setup
- Budget Breakdown: Cover Set: $80 | Storage Box: $60
- Creator’s Tip: Put an inflated beach ball under the cover in the center of your table so melting snow runs right off.
- Smart Sourcing: heavy-denier custom-fit patio furniture covers and heavy-duty waterproof resin deck boxes.
The absolute smartest way to transition your patio for winter is coming up right now…
55. Container Garden Rotation
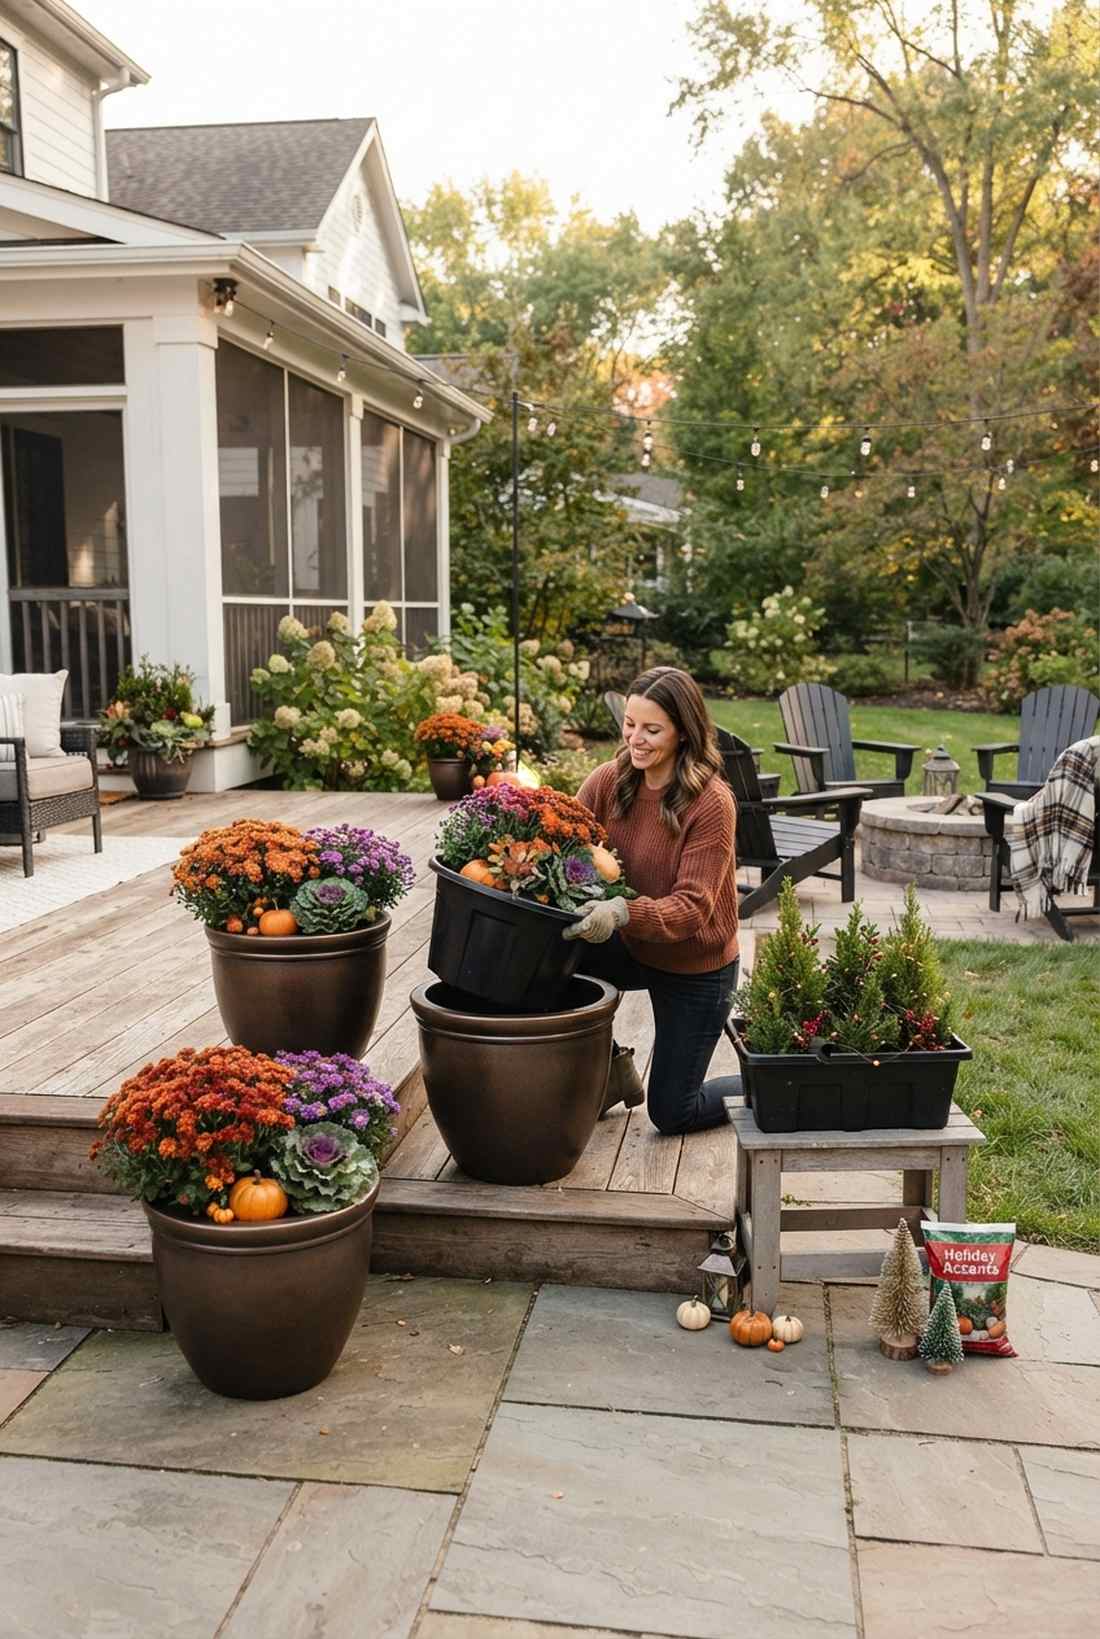
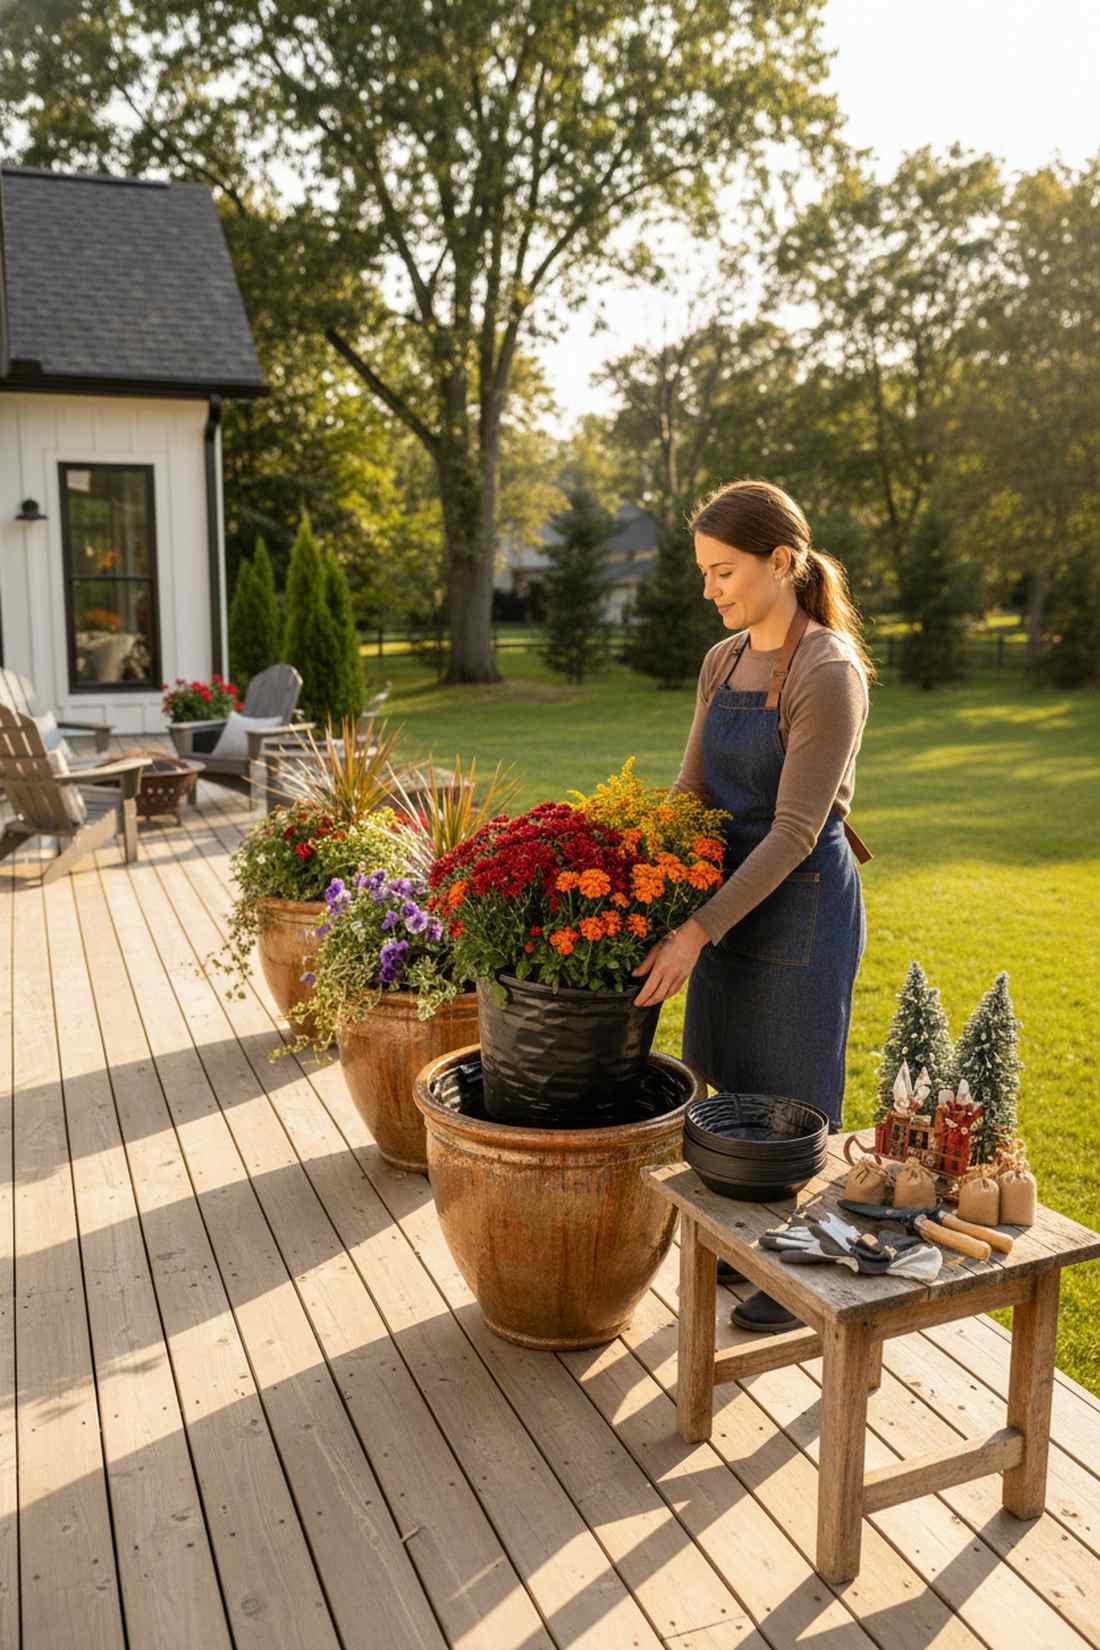
Feels like you hired a massive professional landscaping crew every three months. Swapping pre-potted seasonal nursery liners directly into giant decorative planters is the ultimate lazy-gardener hack.
Digging out frozen dirt is a nightmare, but using plastic drop-in liners delivers an insanely expensive organic aesthetic with zero actual shoveling. Dropping miniature garden supplies into the autumn arrangements creates a stunning, dynamic holiday display.
You can swap a whole patio’s vibe for $40 a season. It’s a fast upgrade that completely changes the vibe.
- Key Materials: Drop-in planter liners, seasonal blooms
- Vibe / Style: Ever-changing botanical beauty
- Difficulty: Easiest beginner setup
- Budget Breakdown: Nursery Liners: $20 | Flowers: $30
- Creator’s Tip: Standardize every single display pot you own to exactly 12 inches so you can swap liners blindly.
- Smart Sourcing: heavy-duty plastic drop-in planter liners (bulk pack) and UV-coated miniature garden holiday kits.
Transform Your Outdoor Space With These Garden Patio Ideas
Implementing these 55 garden patio ideas guarantees a designer-level aesthetic using smart sourcing and premium DIY setups. Start with durable foundational kits, then layer in UV-resistant cushions, heavy-duty lighting, and bulk-pack materials to slash your budget. Whether you’re dropping in a pre-cut modular kit or doing a full layout overhaul, these high-end blueprints deliver massive value for your outdoor living space.
Frequently Asked Questions
What is the most durable paving material for garden patios in cold climates?
Sealed concrete pavers paired with commercial-grade polymeric sand perform flawlessly in brutal freeze-thaw cycles. Grabbing UV-resistant clear acrylic sealants stops winter cracking entirely, making these heavy-duty setups far superior to cheap DIY tiles.
How much space should I allow between patio furniture pieces?
Always maintain 36-48 inches of clearance around heavy-duty outdoor dining sets to avoid a claustrophobic layout. For lounging, keep 18-24 inches between your UV-coated resin wicker seating and central fire pit setups to ensure safe, premium airflow.
What are the best low-maintenance garden patio materials?
Interlocking composite deck tiles (bulk packs) and premium porcelain slabs require absolutely zero annual sanding or staining. Skip cheap wood completely and invest in pre-cut low-maintenance starter kits that only need a quick hose-down.
How can I make a small patio feel larger?
Using diagonal grid layouts and oversized weather-resistant geometric area rugs tricks the eye into seeing a massive space. Hanging heavy-duty vertical pocket planter kits draws the eyes up, making tiny balconies feel like high-end urban jungles.
What type of outdoor lighting is most energy-efficient for patios?
High-lumen solar-powered directional landscape kits and smart RGB outdoor floodlights consume almost zero electricity while delivering a custom, expensive aesthetic. Upgrading to shatterproof LED bistro string kits prevents bulb blowouts all winter long.
How do I choose patio furniture that withstands weather?
Always source powder-coated aluminum frames and high-density polyethylene wicker sets to completely block rust and sun rot. Upgrading your cushions with solution-dyed acrylic fabric covers guarantees your setup looks brand new year after year.