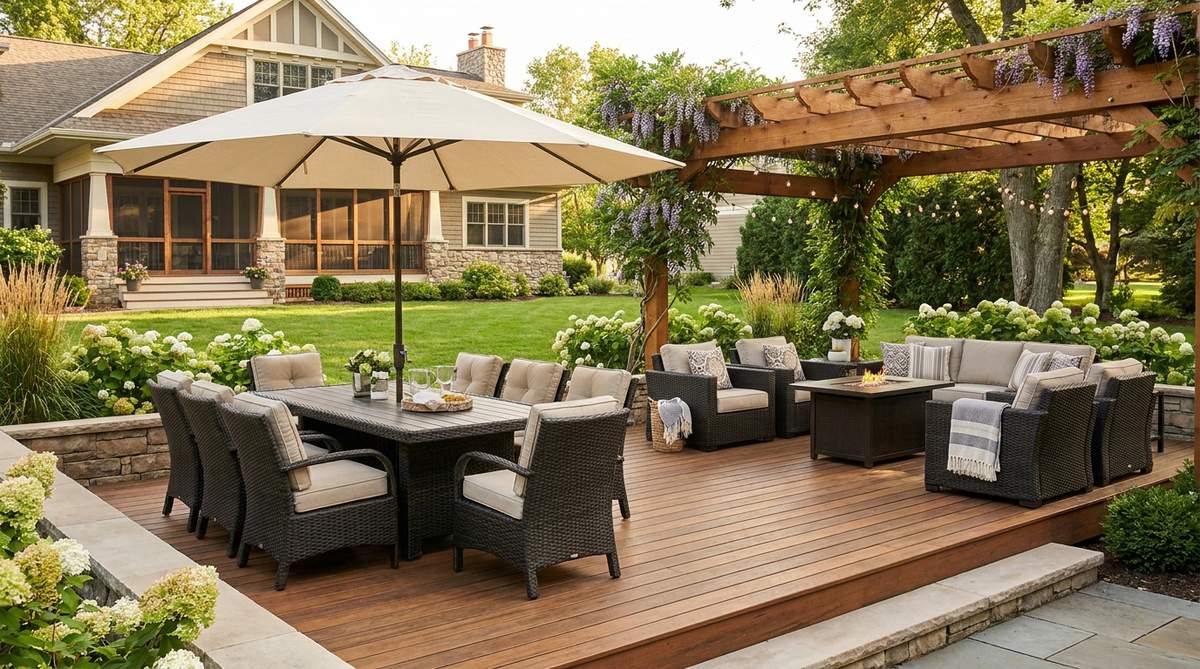
A well-placed garden patio set instantly turns cramped yards into luxury entertaining zones. Smart furniture orientation and UV-resistant materials deliver a custom designer finish. Steal these exact floor plans for maximum visual impact.
Designer Checklists & Core Frameworks
- Visual Anchors: Ground lightweight seating with heavy, weather-sealed outdoor rugs to define the space.
- Traffic Manipulation: Force foot traffic entirely around the exterior of your setup to protect conversational flow.
- Material Syncing: Blend heavy raw textures like concrete with lightweight synthetic rattan for high contrast.
- Sourcing Secrets: Buying modular pieces in bundle starter kits slashes your baseline layout costs significantly.
Compact Dining Configurations
Transforming restricted square footage requires strategic positioning and clever material selection. These highly efficient blueprints maximize seating capacity while ensuring the area still breathes beautifully.
1. Bistro Set Against Railings
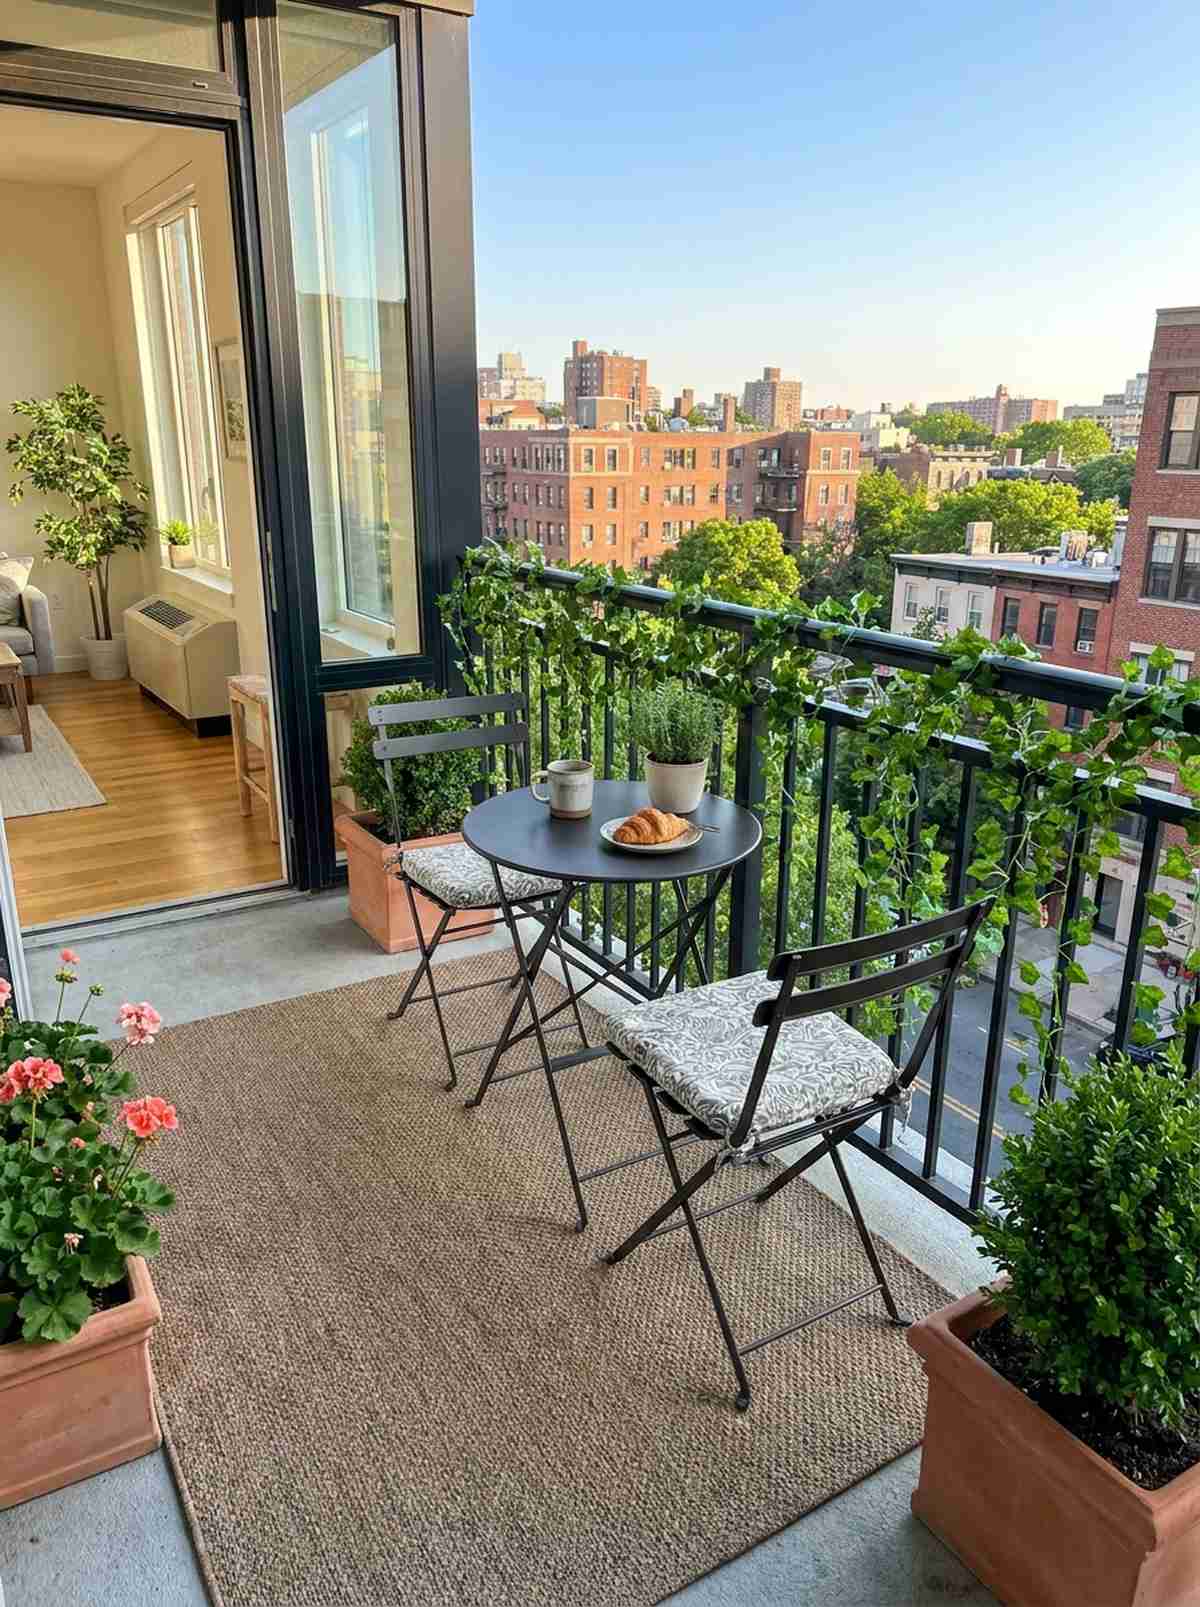
Capturing the essence of a hidden European café, this apartment balcony bistro styling feels intimately charming. It works exceptionally well for narrow city deck railings where inward space is severely limited.
Many homeowners waste central footprint area by floating their chairs awkwardly. Shoving a compact table flush against the barrier delivers a surprisingly premium look while preserving walkway clearance. Secure a heavy-duty waterproof cover to ensure the metal frame outlasts harsh winter exposure.
You can easily pull this off for around $80–$150. Pin this if you’re planning a small space upgrade for the upcoming season!
- Key Materials: Powder-coated steel folding chairs
- Vibe / Style: Parisian morning coffee nook
- Difficulty: Beginner setup
- Budget Breakdown: Table & Seating: $110 | Accessories: $25
- Creator’s Tip: Zip-tie fake ivy along the railing directly behind the table to frame the area effortlessly.
- Smart Sourcing: Pre-assembled steel bistro starter kits and bulk pack UV-coated faux ivy vines.
2. Dining Bench in Corner Nook
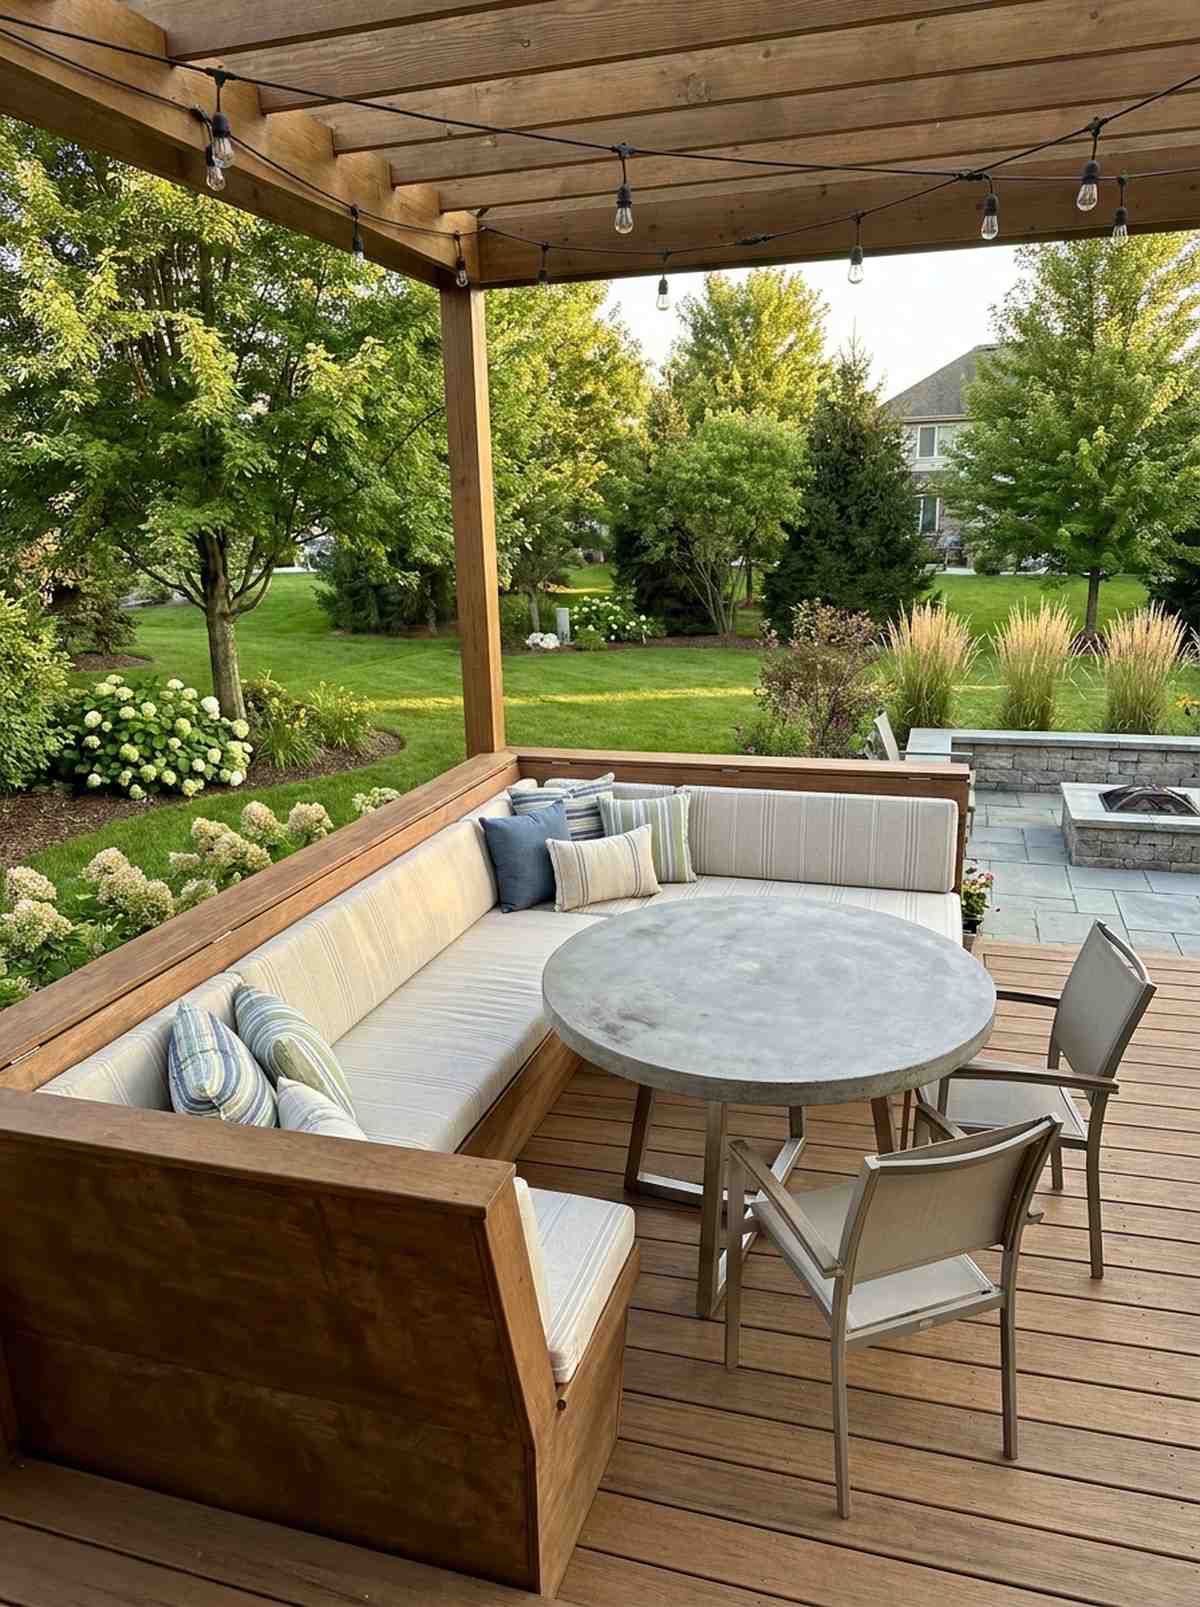
Wrapping around your space like a cozy sanctuary, an outdoor built-in dining nook brings heavy architectural appeal. This geometry is brilliant for under-utilized deck corners or brick patio dead zones.
People assume you need massive square footage for hosting, but pushing seating to the perimeter completely changes the dynamic. It looks far more expensive than it is when you use high-density foam inserts wrapped in solution-dyed acrylics. Keep the dining surface pushed slightly off-center to prevent cramped knees.
Expect a material cost of $180–$300 depending on your wood and textile choices. Highly recommended for a quick weekend win.
- Key Materials: Marine-grade plywood, thick seat foam
- Vibe / Style: Custom architectural lounge
- Difficulty: Intermediate weekend project
- Budget Breakdown: Wood base: $90 | Waterproof Textiles: $120
- Creator’s Tip: Build a hinged top into the bench to secretly stash extra throw pillows during rainstorms.
- Smart Sourcing: Pre-cut heavy-duty outdoor foam blocks and weatherproof acrylic cushion slipcovers.
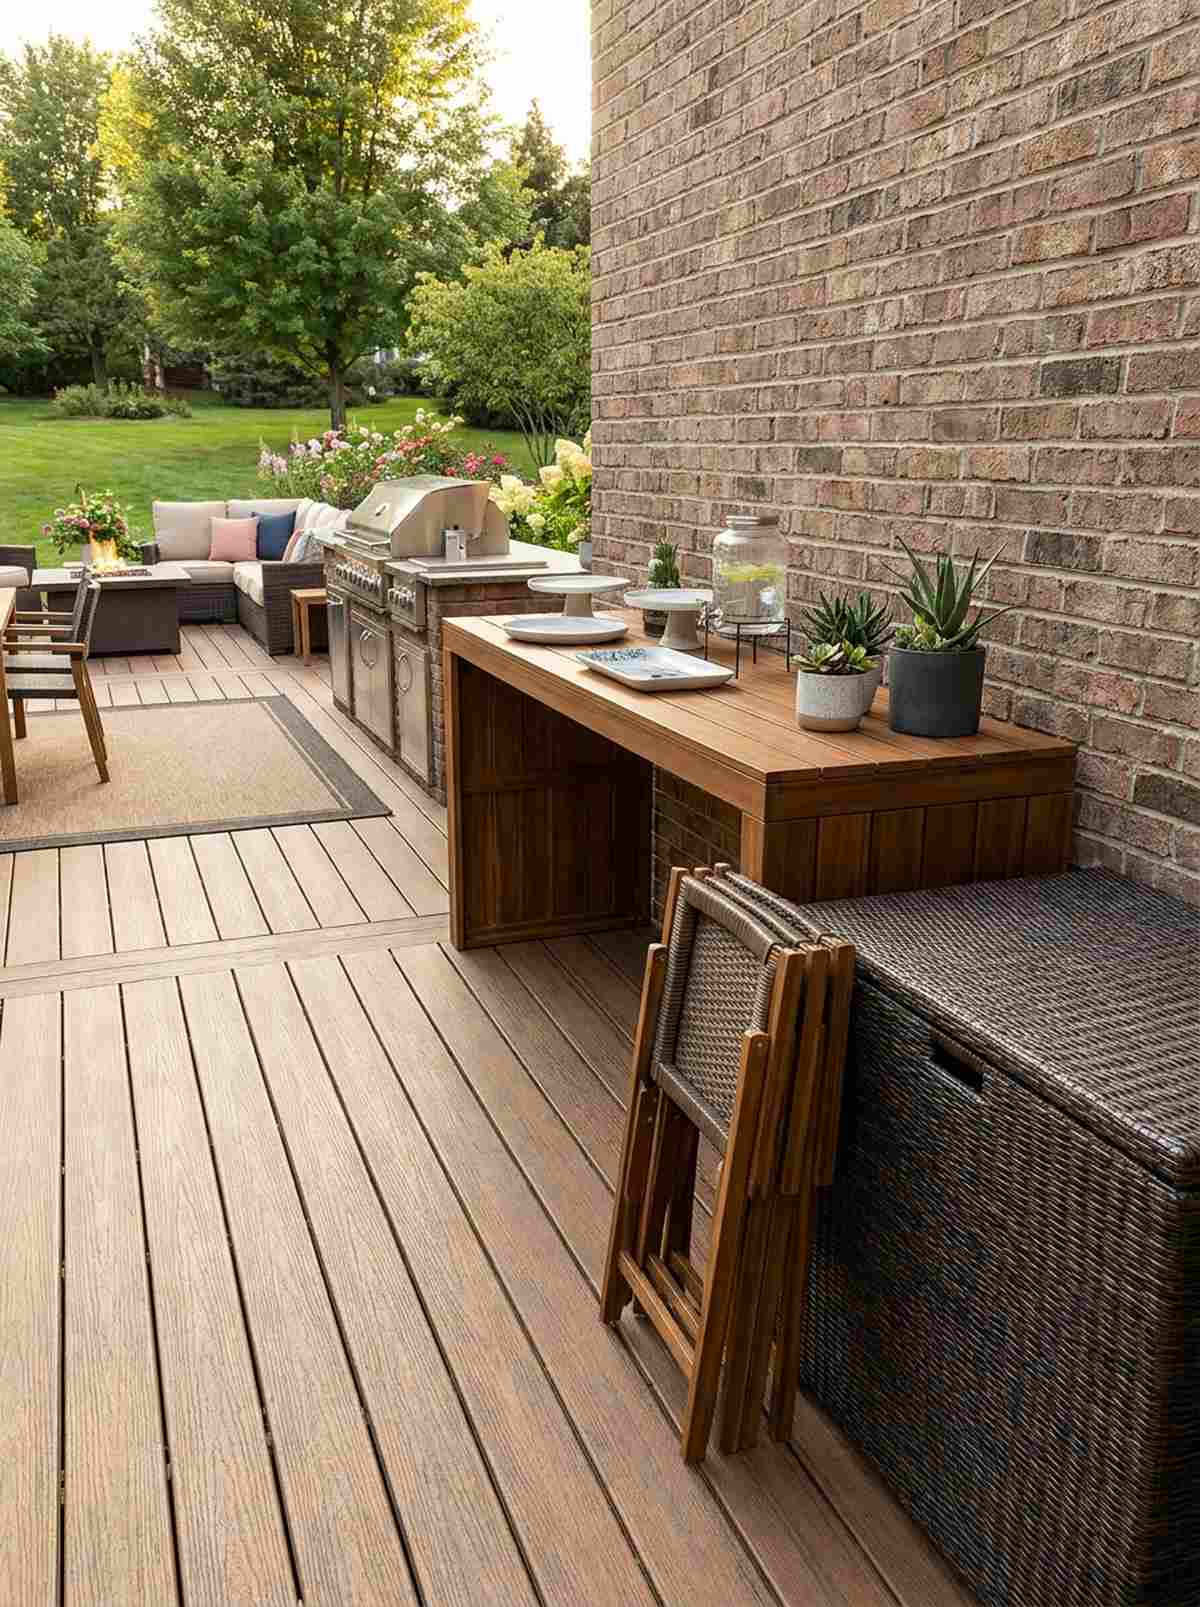
3. Wall-Mounted Drop-Leaf Table
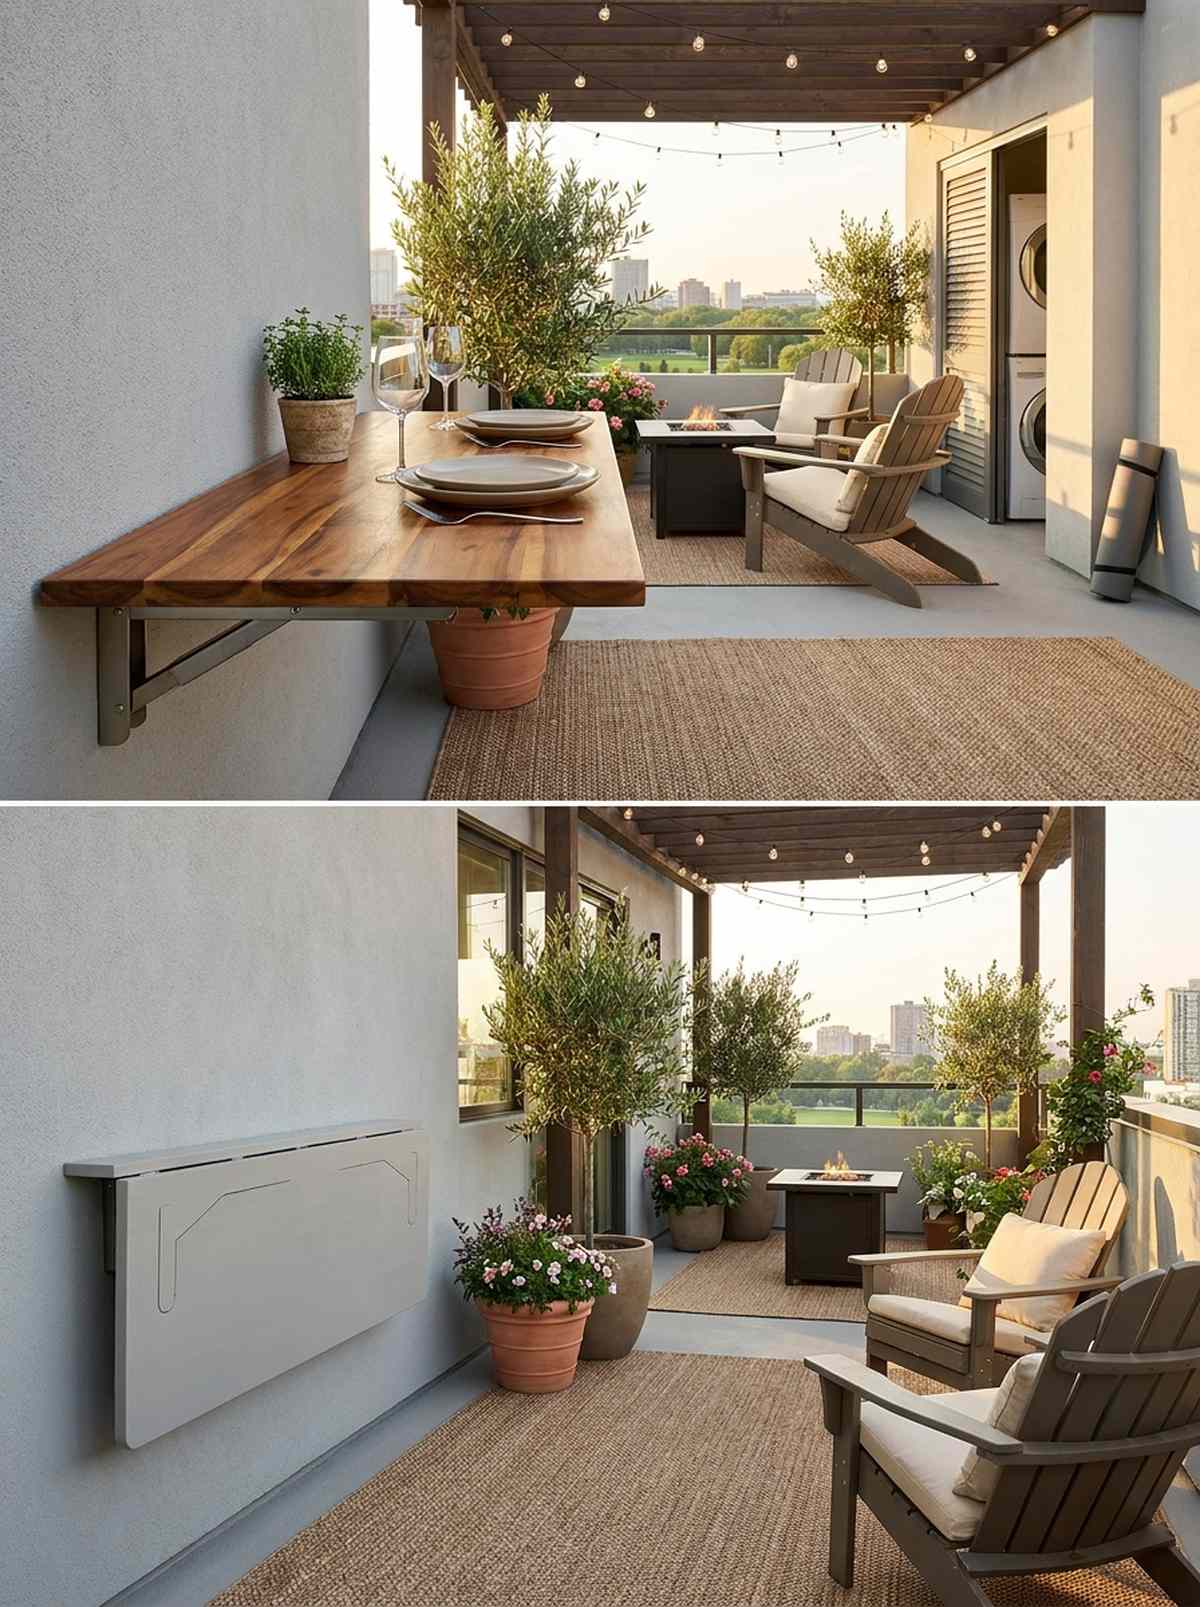
Feeling like a brilliant hidden compartment, a foldaway wall-mounted dining setup disappears the moment you finish eating. Ideal for condo terraces that double as yoga spots or laundry zones.
Traditional freestanding tables create visual clutter that makes tiny spaces feel claustrophobic. Opting for marine-grade hinges gives a designer-level finish that supports full dinner plates without sagging. This specific setup relies entirely on premium wall anchors to prevent catastrophic drywall tearing.
Setting this up will typically run you $75–$120. Save this to your DIY weekend garden board!
- Key Materials: Treated acacia wood drop-leaf, locking brackets
- Vibe / Style: Minimalist hidden utility
- Difficulty: Easy wall-mount installation
- Budget Breakdown: Brackets: $30 | Treated Wood: $50
- Creator’s Tip: Paint the underside of the table to match your exterior wall so it vanishes completely when collapsed.
- Smart Sourcing: Commercial-grade folding shelf brackets (heavy duty) and pre-sealed acacia wood slabs.
4. Bar-Height Counter Table
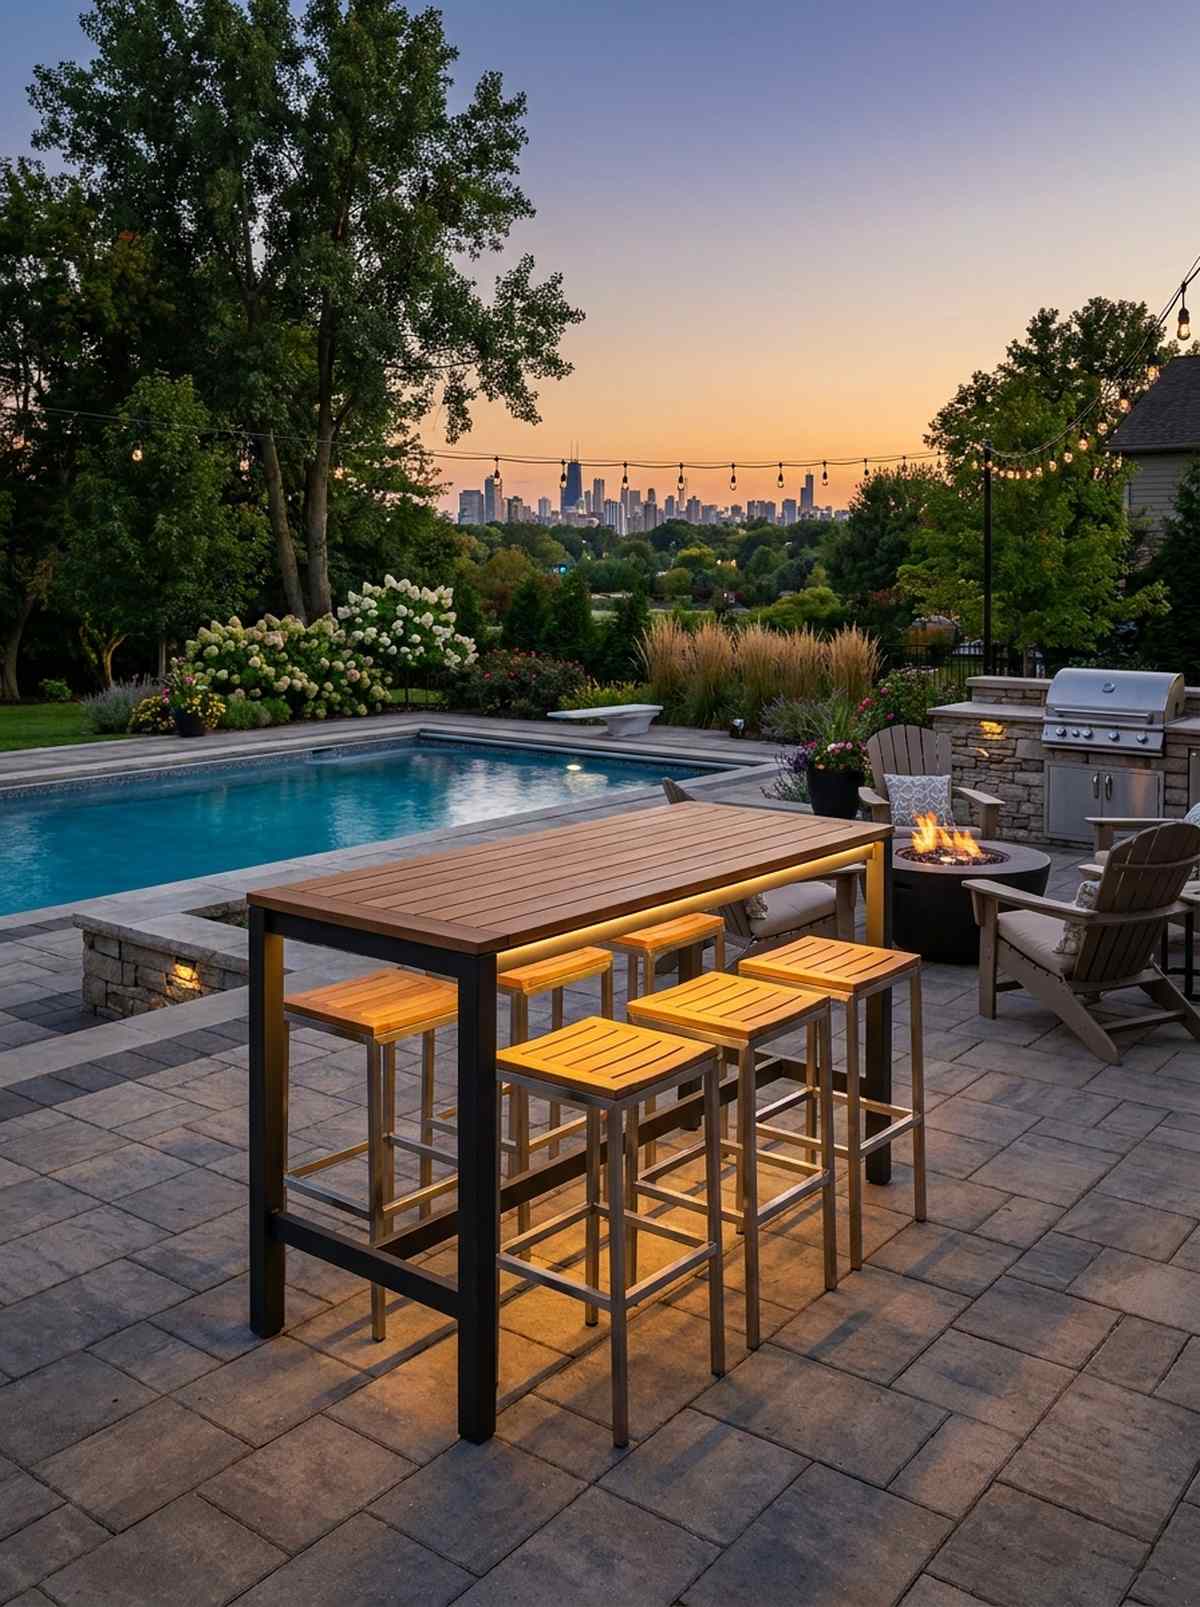
Elevating the sightline to mimic a rooftop cocktail lounge, this tall outdoor bar arrangement feels incredibly chic. It is absolutely perfect for patios overlooking a garden, pool, or cityscape.
Standard height tables block your view with their clunky profiles and wide chairs. Elevating the height to 42 inches instantly creates an ultra-luxurious footprint because backless stools tuck completely away. Mixing aluminum frames with teak accents pulls high-CPC commercial design into a residential backyard.
This layout generally costs between $200–$400 for a quality matching set. It’s a fast upgrade that completely changes the vibe.
- Key Materials: Aluminum bar frames, backless teak stools
- Vibe / Style: High-end rooftop resort
- Difficulty: Simple placement
- Budget Breakdown: Elevated Table: $180 | Stools: $120
- Creator’s Tip: Add an outdoor-rated LED strip under the lip of the table for an incredible nighttime glowing effect.
- Smart Sourcing: UV-protected backless outdoor barstools (2-pack) and waterproof LED strip light kits.
Most people get this completely wrong… until they try the exact transformative layout coming up next.
5. Expandable Console to Dining Table
Like a magic trick for tight spaces, an expanding outdoor buffet table feels both practical and deeply sophisticated. It is the ultimate solution for side-yards that only occasionally host dinner parties.
Committing to a massive 8-person table permanently destroys your daily walking path. A butterfly-leaf mechanism solves this by maintaining a sleek 16-inch profile during the week while stretching into a full dining zone on weekends. Grabbing a synthetic rattan finish ensures the moving parts never warp from humidity.
You can execute this dual-purpose layout for $250–$450. Pin this layout to remember the clever space hack!
- Key Materials: Synthetic teak expandable console
- Vibe / Style: Stealthy modern entertainer
- Difficulty: Zero-build setup
- Budget Breakdown: Console: $300 | Foldable Chairs: $100
- Creator’s Tip: Store your folding chairs in a separate waterproof deck box so the console remains visually clean.
- Smart Sourcing: Pre-assembled convertible patio consoles and resin wicker deck box kits.
6. Triangular Corner Table
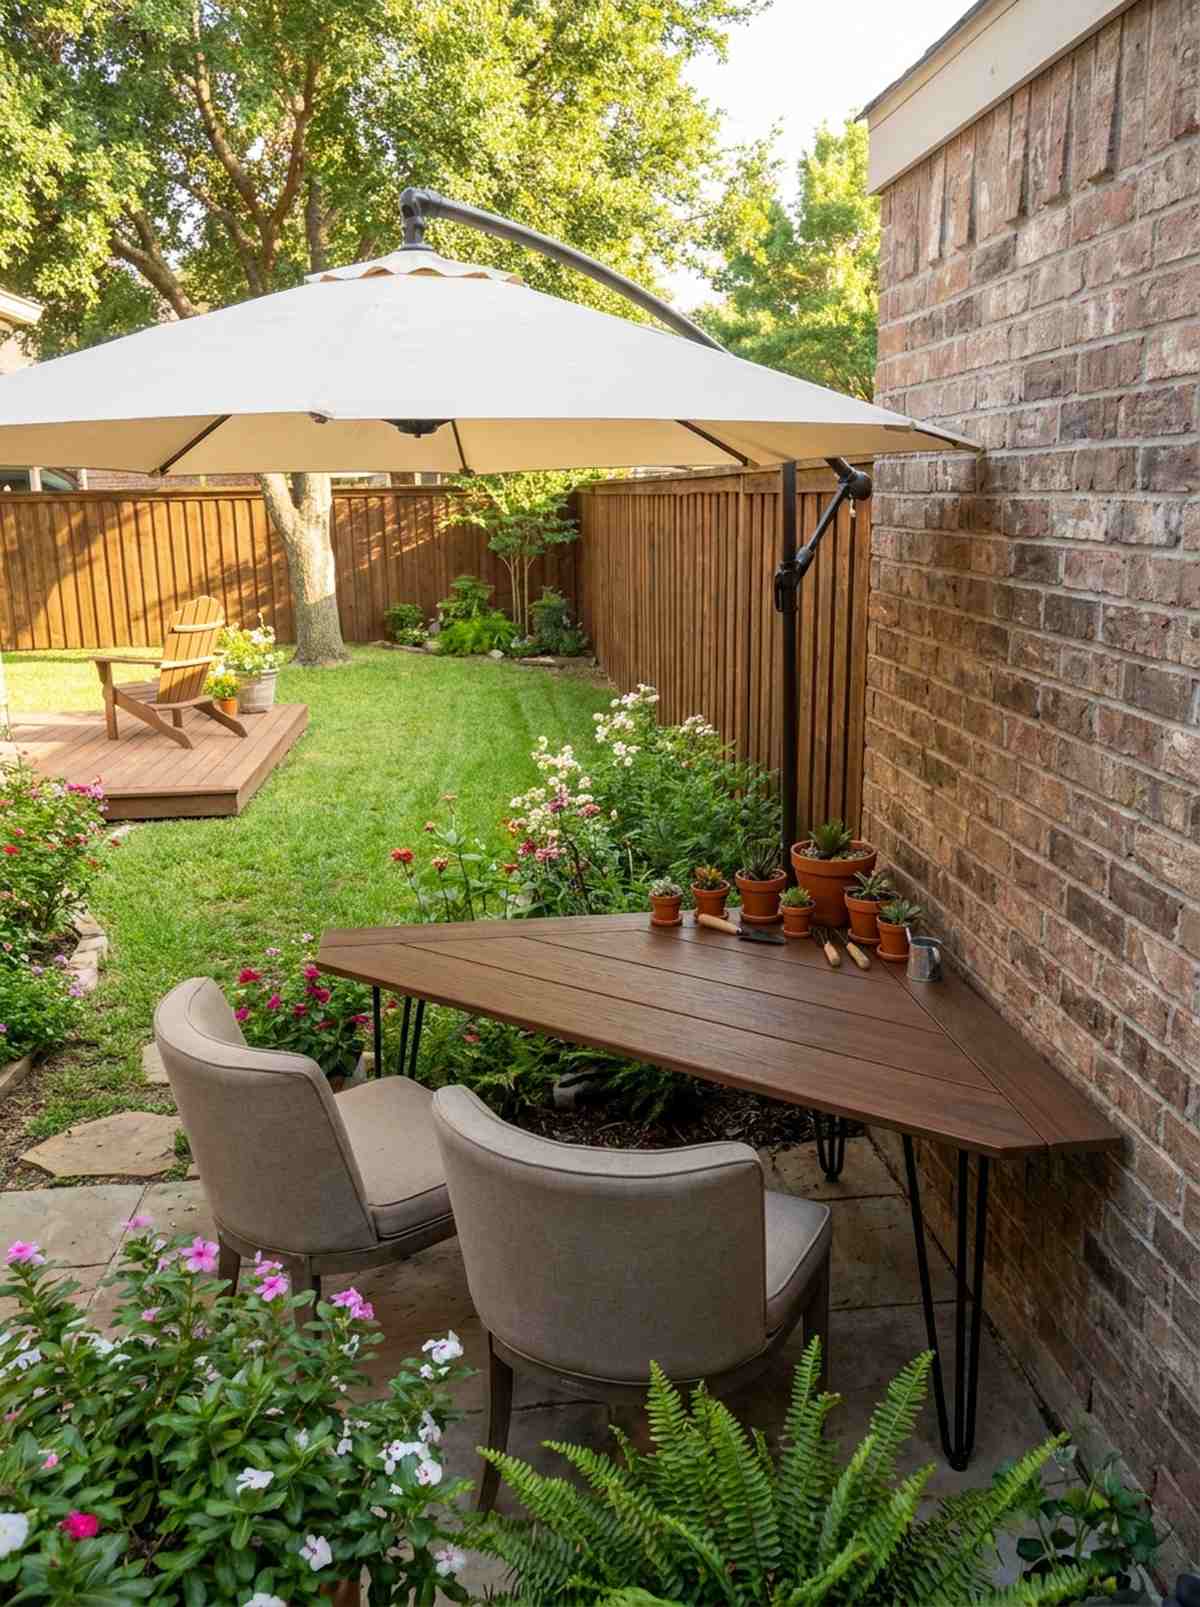
Carving out an intimate breakfast spot, a geometric corner dining wedge feels like a secret garden escape. This fits flawlessly into dead 90-degree corners against privacy fences or brick walls.
Square tables placed in corners always leave one unusable leg poking out to trip your guests. A custom triangular wedge reclaims that dead zone and elevates the standard backyard aesthetic by hugging the wall perfectly. Integrating miniature garden supplies alongside the tabletop edge softens the sharp geometry.
A custom build or niche find will run about $100–$200. This is a brilliant way to reclaim forgotten square footage.
- Key Materials: Angled composite wood table, curved chairs
- Vibe / Style: Smart geometric maximization
- Difficulty: Intermediate geometry build
- Budget Breakdown: Custom Top: $80 | Support Legs: $40
- Creator’s Tip: Use an outdoor umbrella with an offset base to shade the corner without a pole blocking the middle.
- Smart Sourcing: Heavy-duty metal hairpin legs (powder coated) and UV-resistant corner patio umbrellas.
Garden Patio Table Setups for Versatile Entertaining
Mid-sized zones need adaptable pieces that flex from quiet morning coffees to chaotic family barbecues. These blueprints focus heavily on commercial-grade durability mixed with high-end visual scaling.
7. Extendable Sintered Stone Dining Set
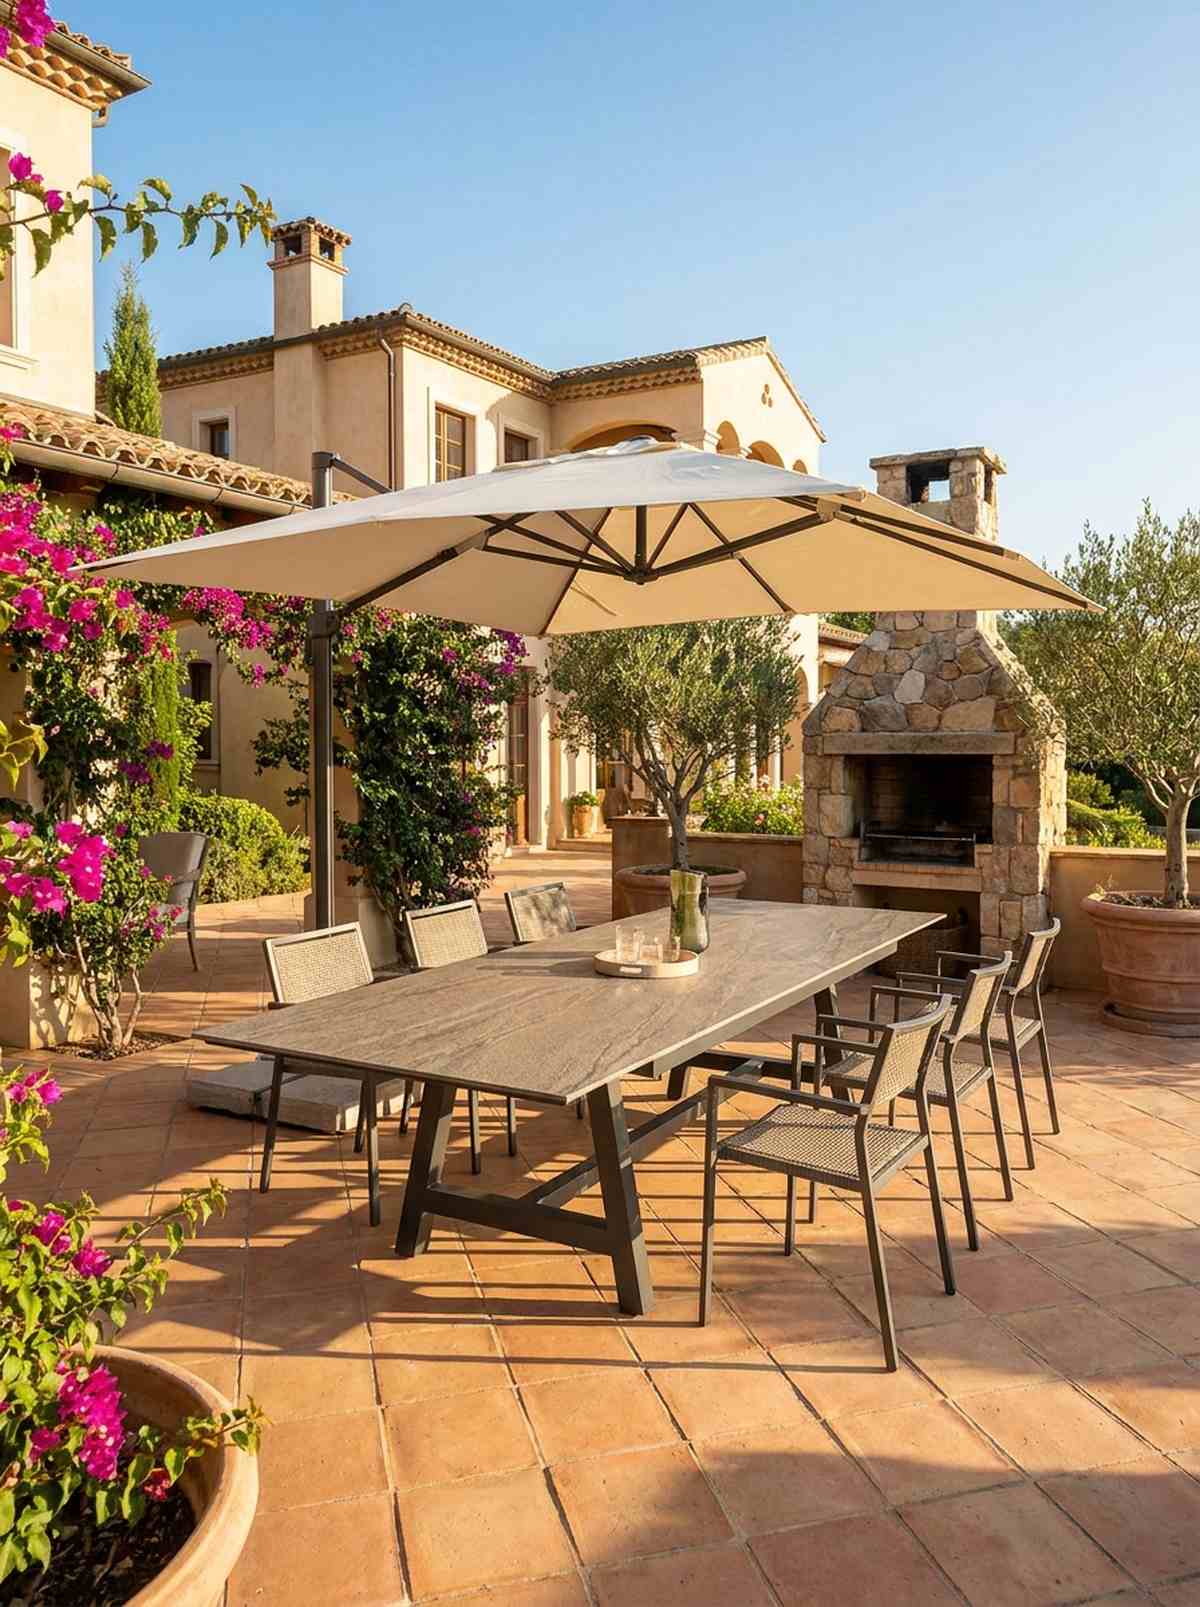
Radiating heavy Mediterranean villa energy, an oversized stone patio dining set feels impossibly luxurious and permanent. It thrives in open, sun-drenched central patios where the table is the undeniable star.
Glass shatters and wood rots, but sintered stone holds its pristine look through brutal heatwaves and freezing winters. Pairing a massive stone slab with a lightweight aluminum frame creates a striking contrast that looks like a $5,000 custom install. The thermal shock resistance is unmatched.
Sourcing these materials typically lands between $600–$1,200 depending on table length. Pin this to your luxury backyard mood board!
- Key Materials: Sintered stone tabletop, graphite aluminum base
- Vibe / Style: Modern Tuscan villa
- Difficulty: Heavy lifting required
- Budget Breakdown: Stone Top Table: $800 | Stackable Armchairs: $300
- Creator’s Tip: Keep the stone cool during peak summer by deploying a massive cantilever umbrella directly overhead.
- Smart Sourcing: Commercial-grade sintered stone dining tables and fade-resistant stackable patio chairs (bulk set).
8. Teak Table with Mixed Seating
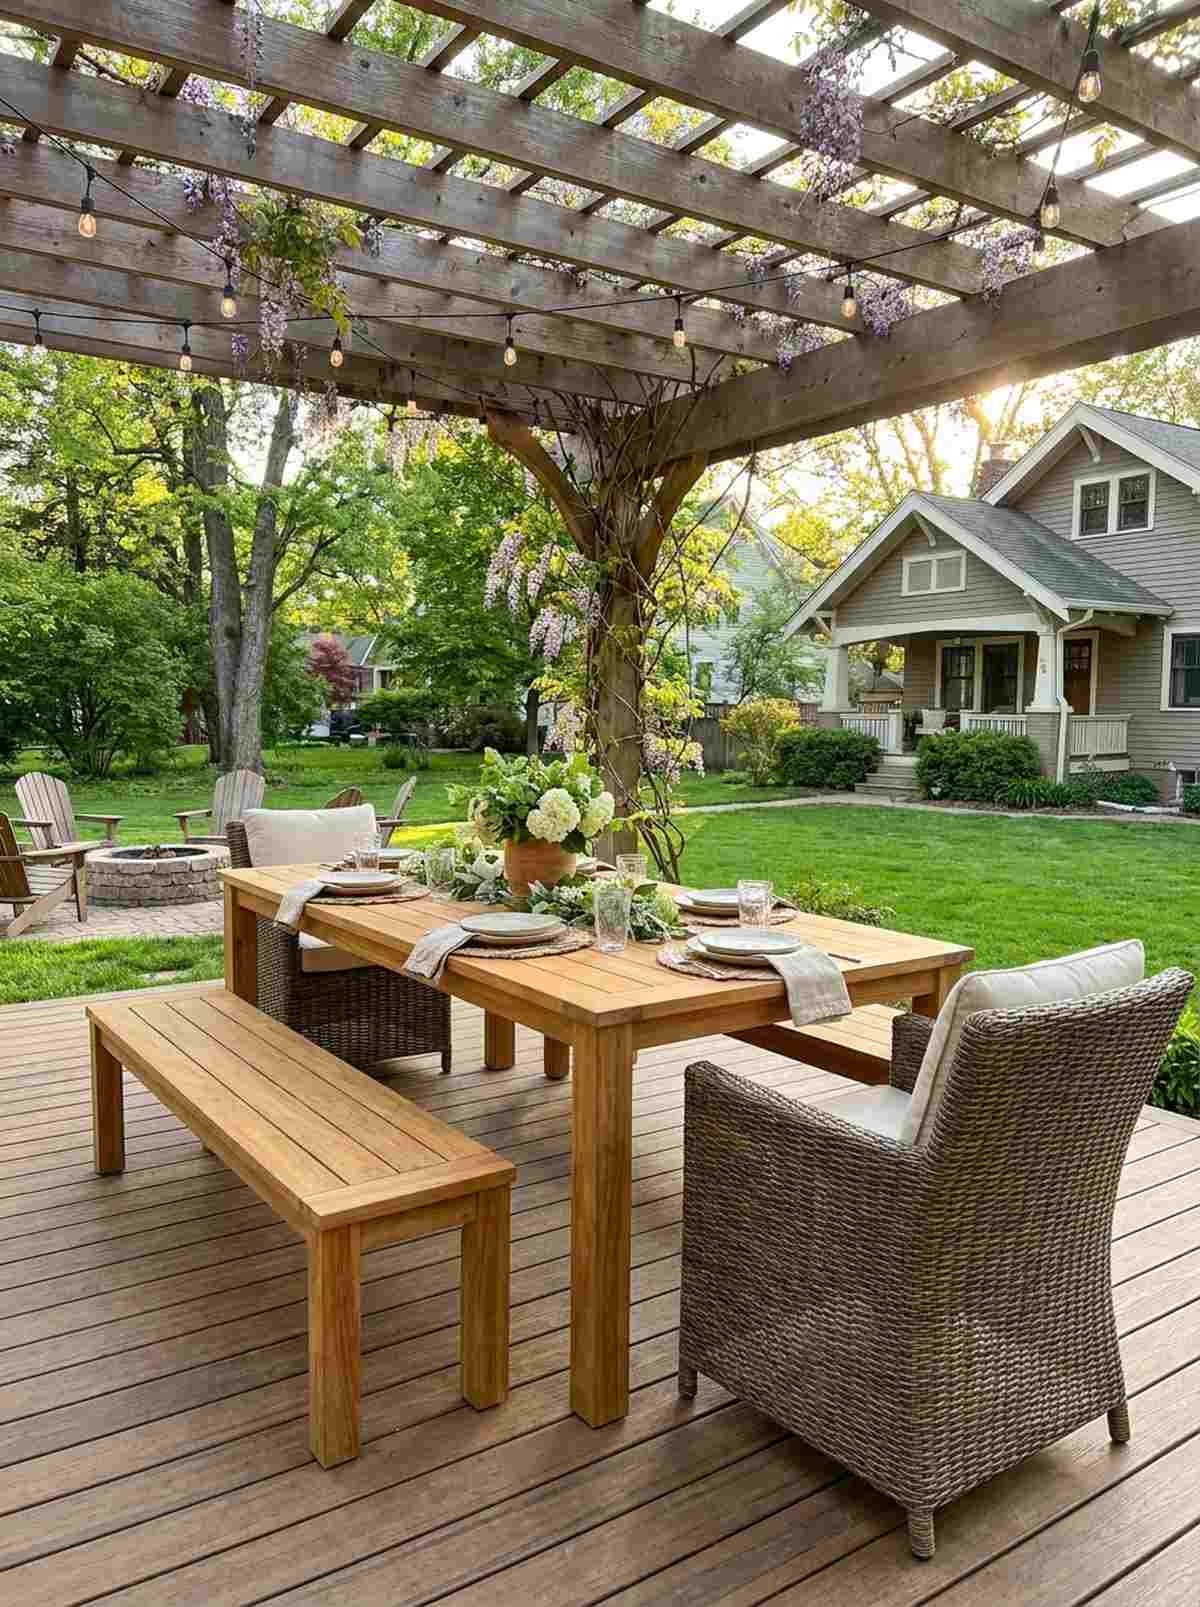
Blending rustic warmth with structured elegance, a mixed-material teak dining arrangement feels inviting and perfectly unpretentious. Ideal for long wooden decking or beneath a sprawling pergola.
Matching table-and-chair sets often look like cheap showroom displays that lack personality. Slipping a backless bench on one side while using bold armchairs on the other delivers a curated, interior-designer edge. To keep it looking rich, you must actively decide whether to seal the wood or let it silver naturally.
You can create this curated look for roughly $400–$800. It’s a gorgeous setup that ages beautifully over the years.
- Key Materials: Natural grade-A teak, synthetic wicker armchairs
- Vibe / Style: Organic modern farmhouse
- Difficulty: Routine maintenance needed
- Budget Breakdown: Teak Table: $350 | Mixed Chairs/Bench: $250
- Creator’s Tip: Treat the teak with a UV-blocking oil twice a year to maintain that rich, golden-honey tone.
- Smart Sourcing: Premium teak brightener and sealer kits and weatherproof wicker armchairs (set of 2).
9. Concrete Top with Metal Base
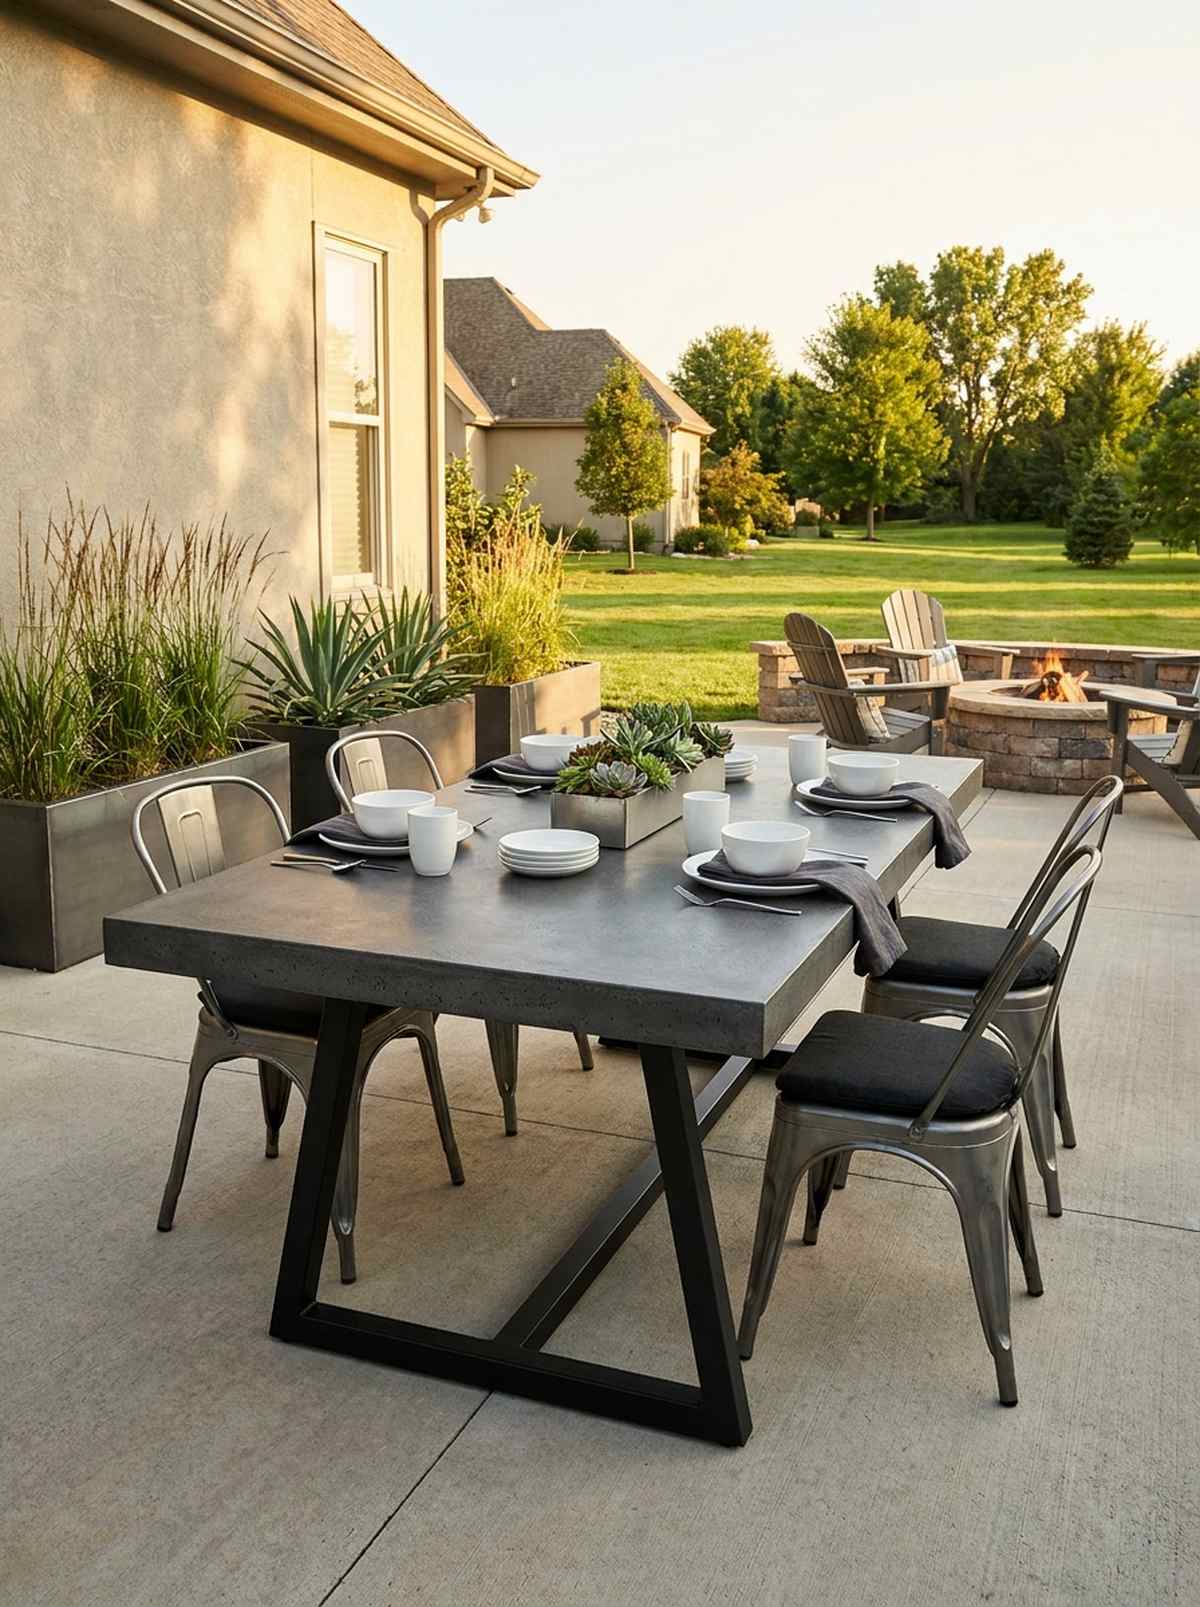
Channeling an edgy downtown loft vibe, a poured concrete outdoor table feels solid, raw, and incredibly grounding. This works beautifully against stucco walls, poured concrete pads, or modern steel planters.
Flimsy patio furniture blows away in a storm, but a heavy thermal mass table stays anchored forever. Contrast the brutalist heavy top with a sleek geometric steel base so the piece doesn’t look like a solid block of cement. Make sure to apply a penetrating sealant so wine spills don’t stain the porous surface.
DIYing a concrete top drops the cost to $150–$300 compared to a $1,500 retail version. Save this idea if you love industrial outdoor aesthetics!
- Key Materials: High-strength concrete mix, powder-coated steel base
- Vibe / Style: Industrial modern heavy
- Difficulty: Advanced DIY pouring
- Budget Breakdown: Concrete/Mold: $80 | Steel Base: $120
- Creator’s Tip: Vibrate the edges of the mold with a rubber mallet aggressively to release trapped air bubbles.
- Smart Sourcing: High-gloss penetrating concrete sealer (gallon) and heavy-duty steel dining table legs.
💡 Must-Have Supplies for High-End Setups
To build these setups faster and ensure they last, skip the generic craft aisles and invest in the right foundational kits.
- Base & Support: Commercial-grade rust-proof aluminum framing kits
- Setup Tools: Heavy-duty patio furniture leveling shims (bulk pack)
- Weather/Durability Protection: Industrial UV-blocking fabric waterproofing sprays
This next setup is ridiculously cheap but looks like a custom $100 display straight out of a magazine…
10. Slat-Top Rectangular Table
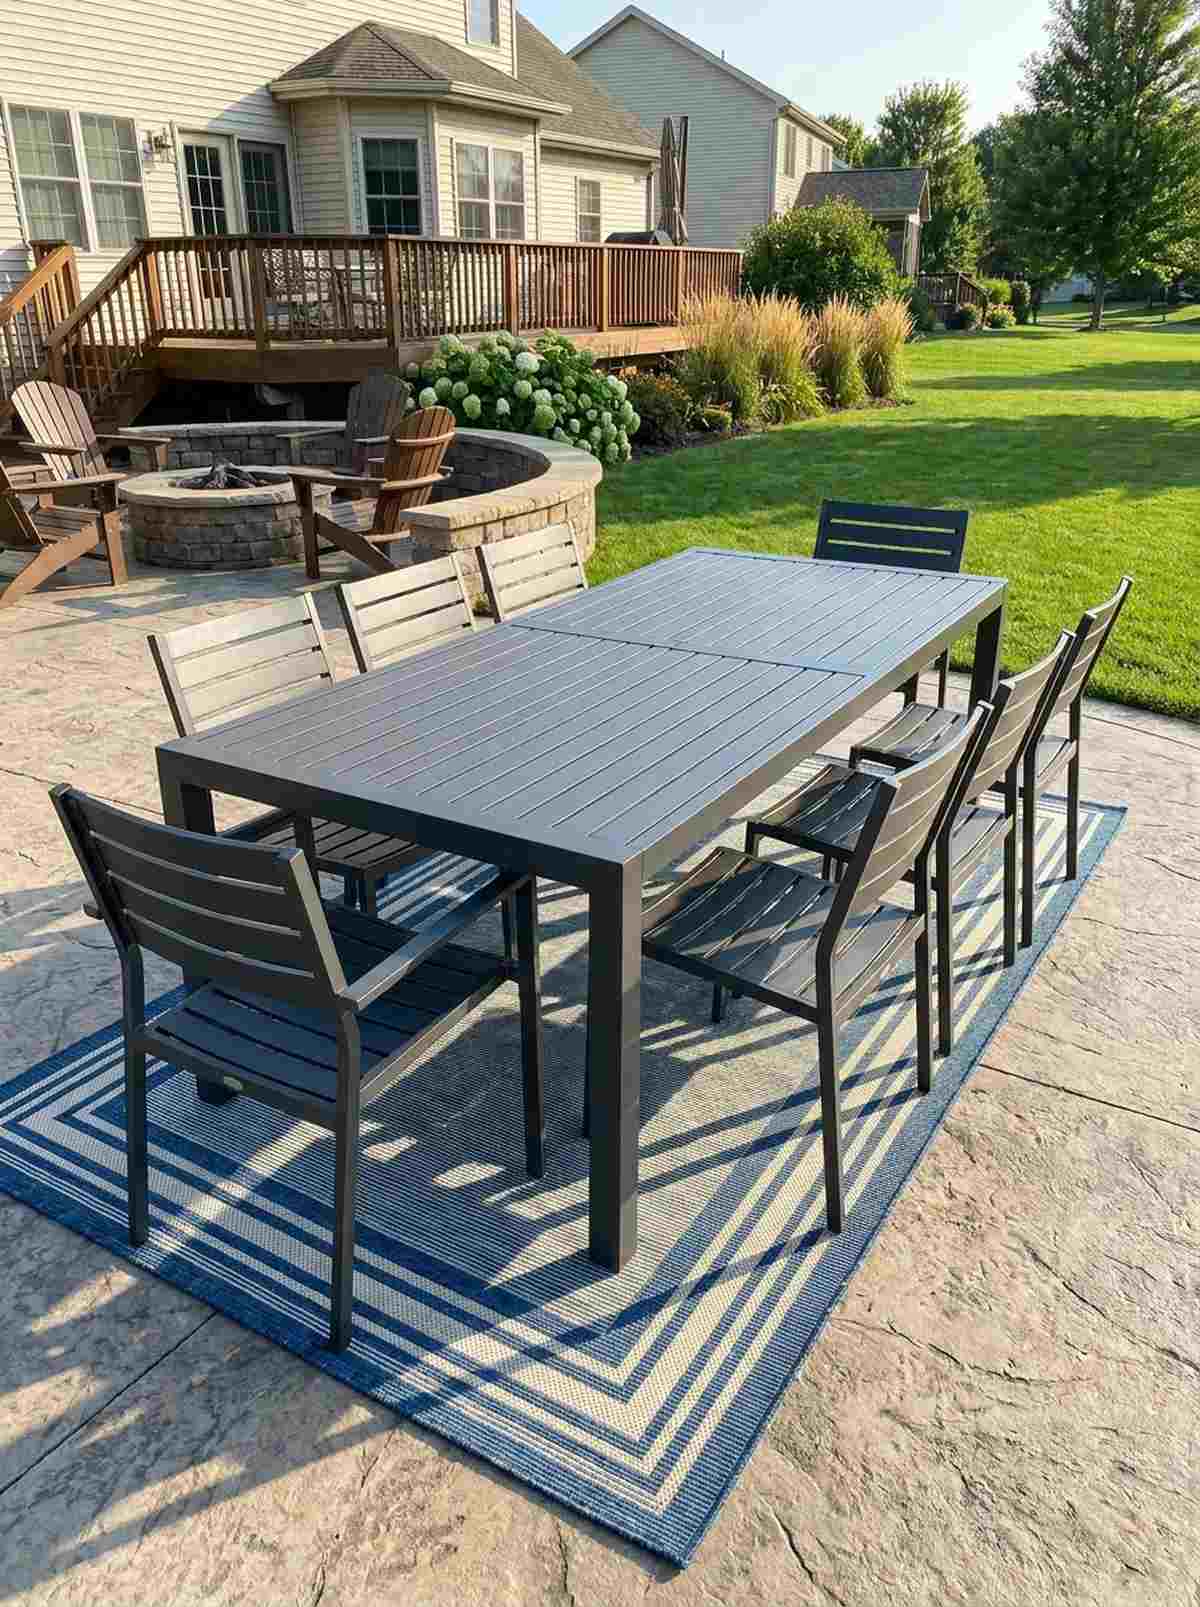
Projecting clean, linear symmetry, an aluminum slat-top dining setup feels crisp and flawlessly organized. It fits perfectly on stamped concrete patios or long, narrow grassy side yards.
Solid tables collect massive puddles that eventually destroy the surface finish after heavy rain. Incorporating a 1/4-inch gap between rigid slats completely eliminates water pooling and mimics a highly expensive designer-level finish. Aluminum won’t warp, making it vastly superior to cheap pine slats.
A sleek slat setup will cost roughly $200–$450. A fantastic, no-fuss option for rainy climates.
- Key Materials: Rust-free aluminum slats, weather-resistant caps
- Vibe / Style: Contemporary linear crispness
- Difficulty: Easy out-of-box assembly
- Budget Breakdown: Slat Table: $180 | Slat Chairs: $150
- Creator’s Tip: Run a strip of outdoor rug underneath that strictly follows the same linear direction to stretch the space visually.
- Smart Sourcing: Rust-proof aluminum patio dining sets and UV-resistant striped outdoor runner rugs.
11. Round Pedestal Table for Conversation
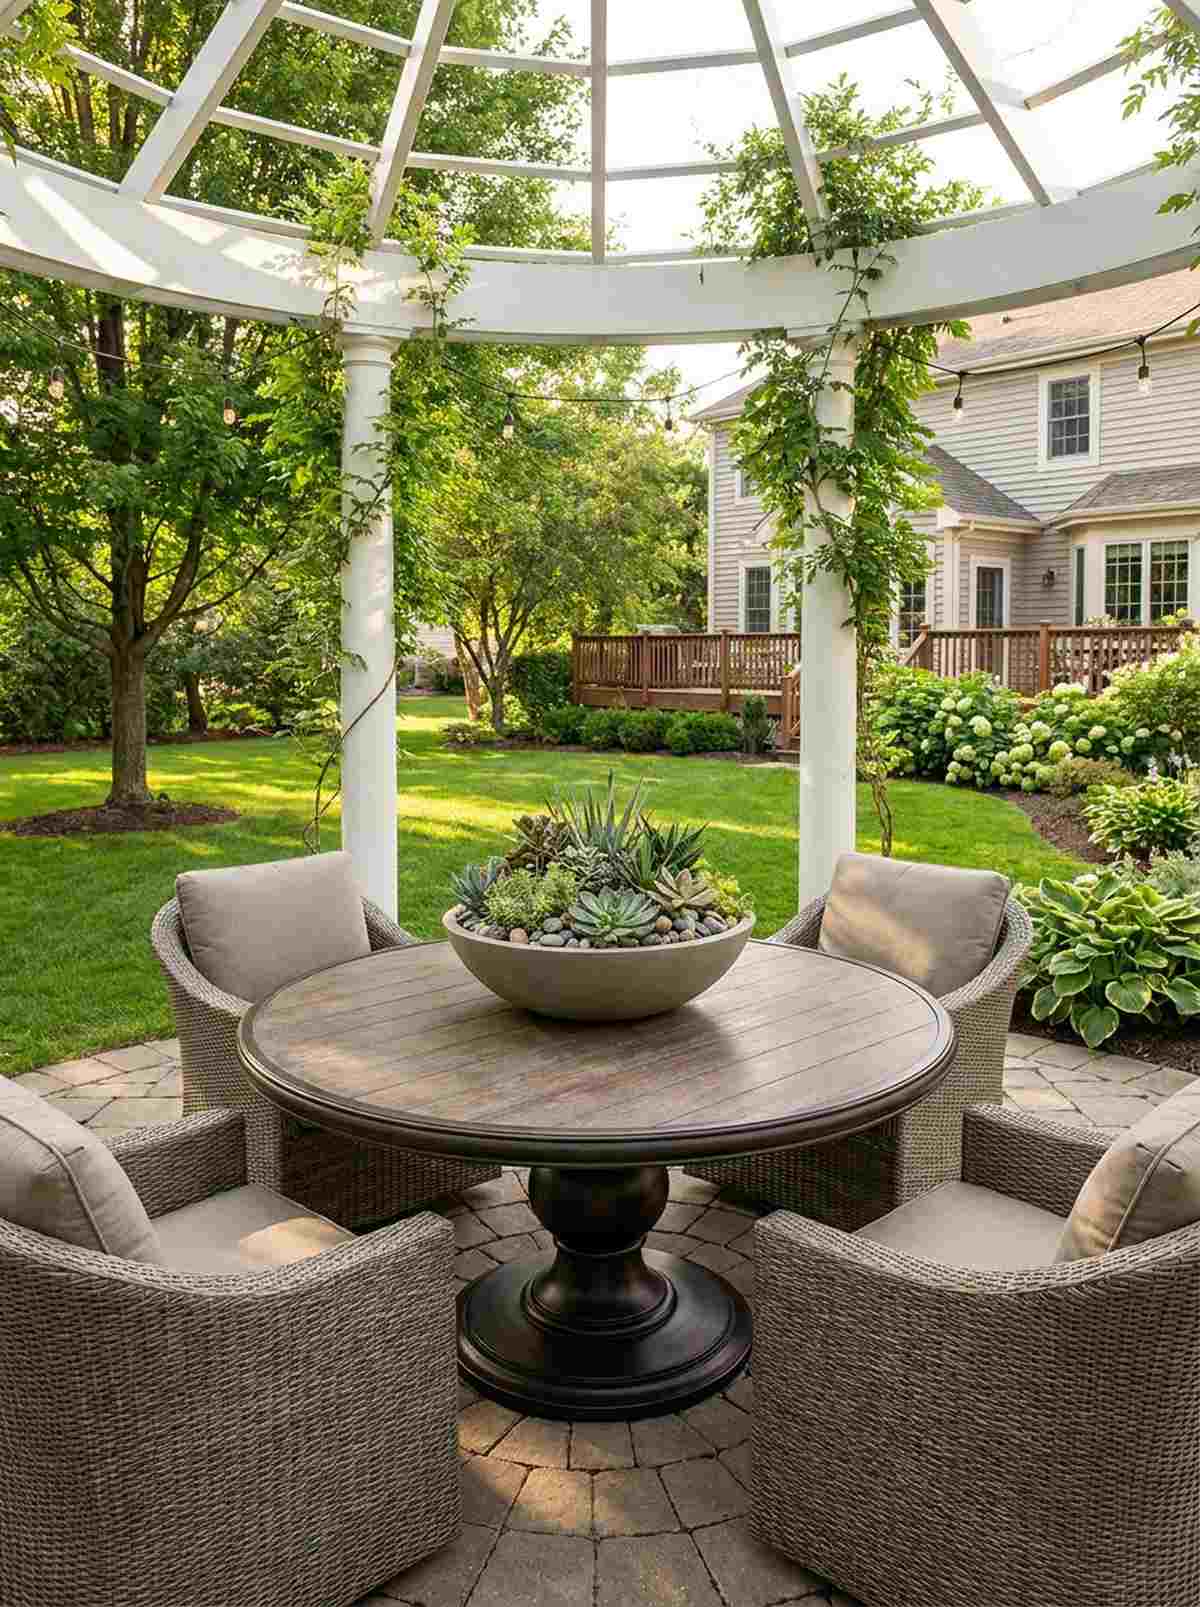
Fostering an intimate, campfire-like dynamic, a circular garden pedestal table feels endlessly welcoming and communal. Best utilized right in the center of a square courtyard or under a rounded gazebo.
Four-legged tables awkwardly block knee space and dictate a rigid hierarchy of who sits at the head. A singular heavy pedestal base immediately elevates the standard backyard aesthetic by creating egalitarian seating where everyone locks eyes. Pushing the table to 54 inches guarantees plenty of room for heavy dinnerware.
You can upgrade to a round pedestal setup for $250–$600. Pin this layout to maximize your conversation zones!
- Key Materials: Heavy weighted pedestal base, fiberglass or wood top
- Vibe / Style: Egalitarian social hub
- Difficulty: Beginner setup
- Budget Breakdown: Pedestal Table: $300 | Curved Chairs: $200
- Creator’s Tip: Center a massive, low-profile succulent bowl in the middle so you don’t block guests’ sightlines.
- Smart Sourcing: Cast aluminum round outdoor tables and pre-made artificial succulent bowl centerpieces.
12. Oval Table for Narrow Patios
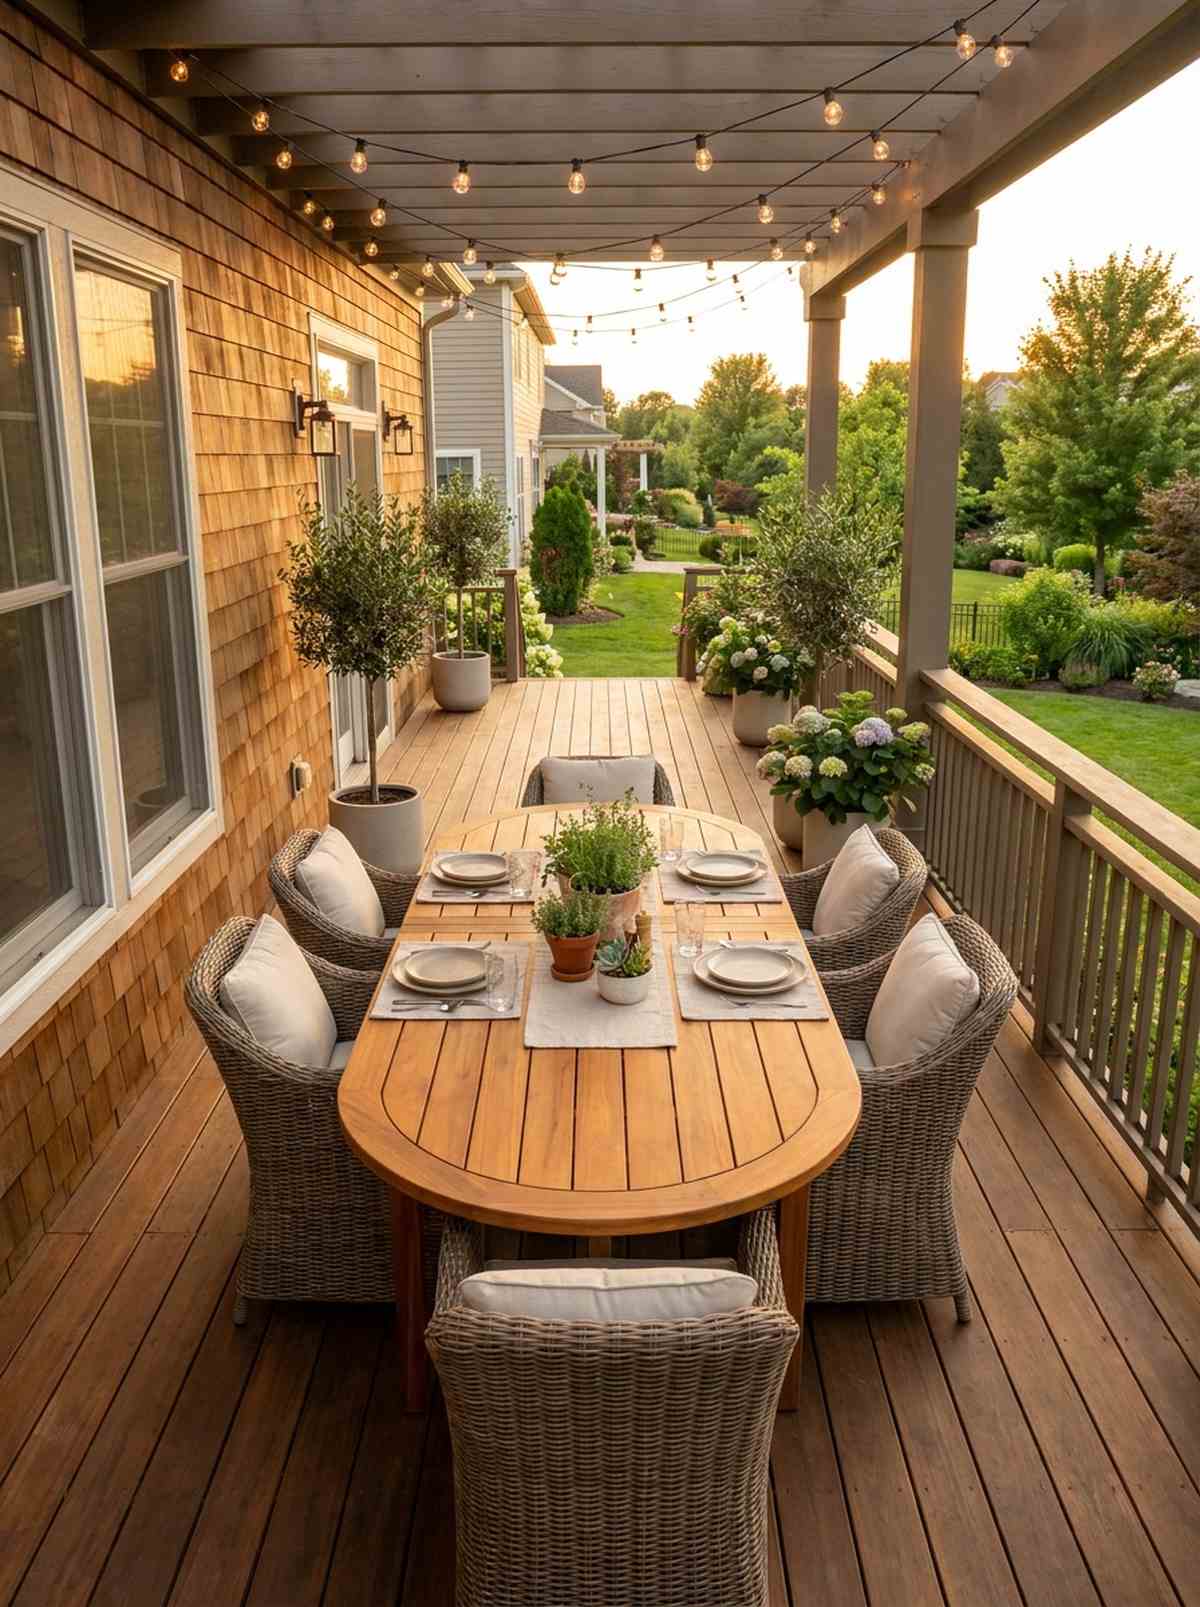
Smoothing out aggressive visual angles, an elongated oval patio arrangement feels fluid and elegantly stretched. It solves the nightmare of navigating narrow townhouse backyards or long wooden verandas.
Massive rectangular tables create brutal pinch points that force your guests to squeeze sideways just to walk by. The gentler sweeping curves of an oval profile give a designer-level finish while naturally guiding foot traffic around the edges. It combines the length of a rectangle with the social intimacy of a circle.
Expect this specific table shape to cost between $300–$700. It’s a lifesaver for tight corridor patios.
- Key Materials: Oval eucalyptus or polywood top
- Vibe / Style: Graceful corridor dining
- Difficulty: Simple placement
- Budget Breakdown: Oval Table: $350 | Dining Chairs: $200
- Creator’s Tip: Position the longest axis completely parallel to your house wall to maximize the flanking walking paths.
- Smart Sourcing: Weather-resistant polywood oval dining tables and commercial-grade patio furniture covers (oval fit).
13. High-Low Combo with Bar Extension
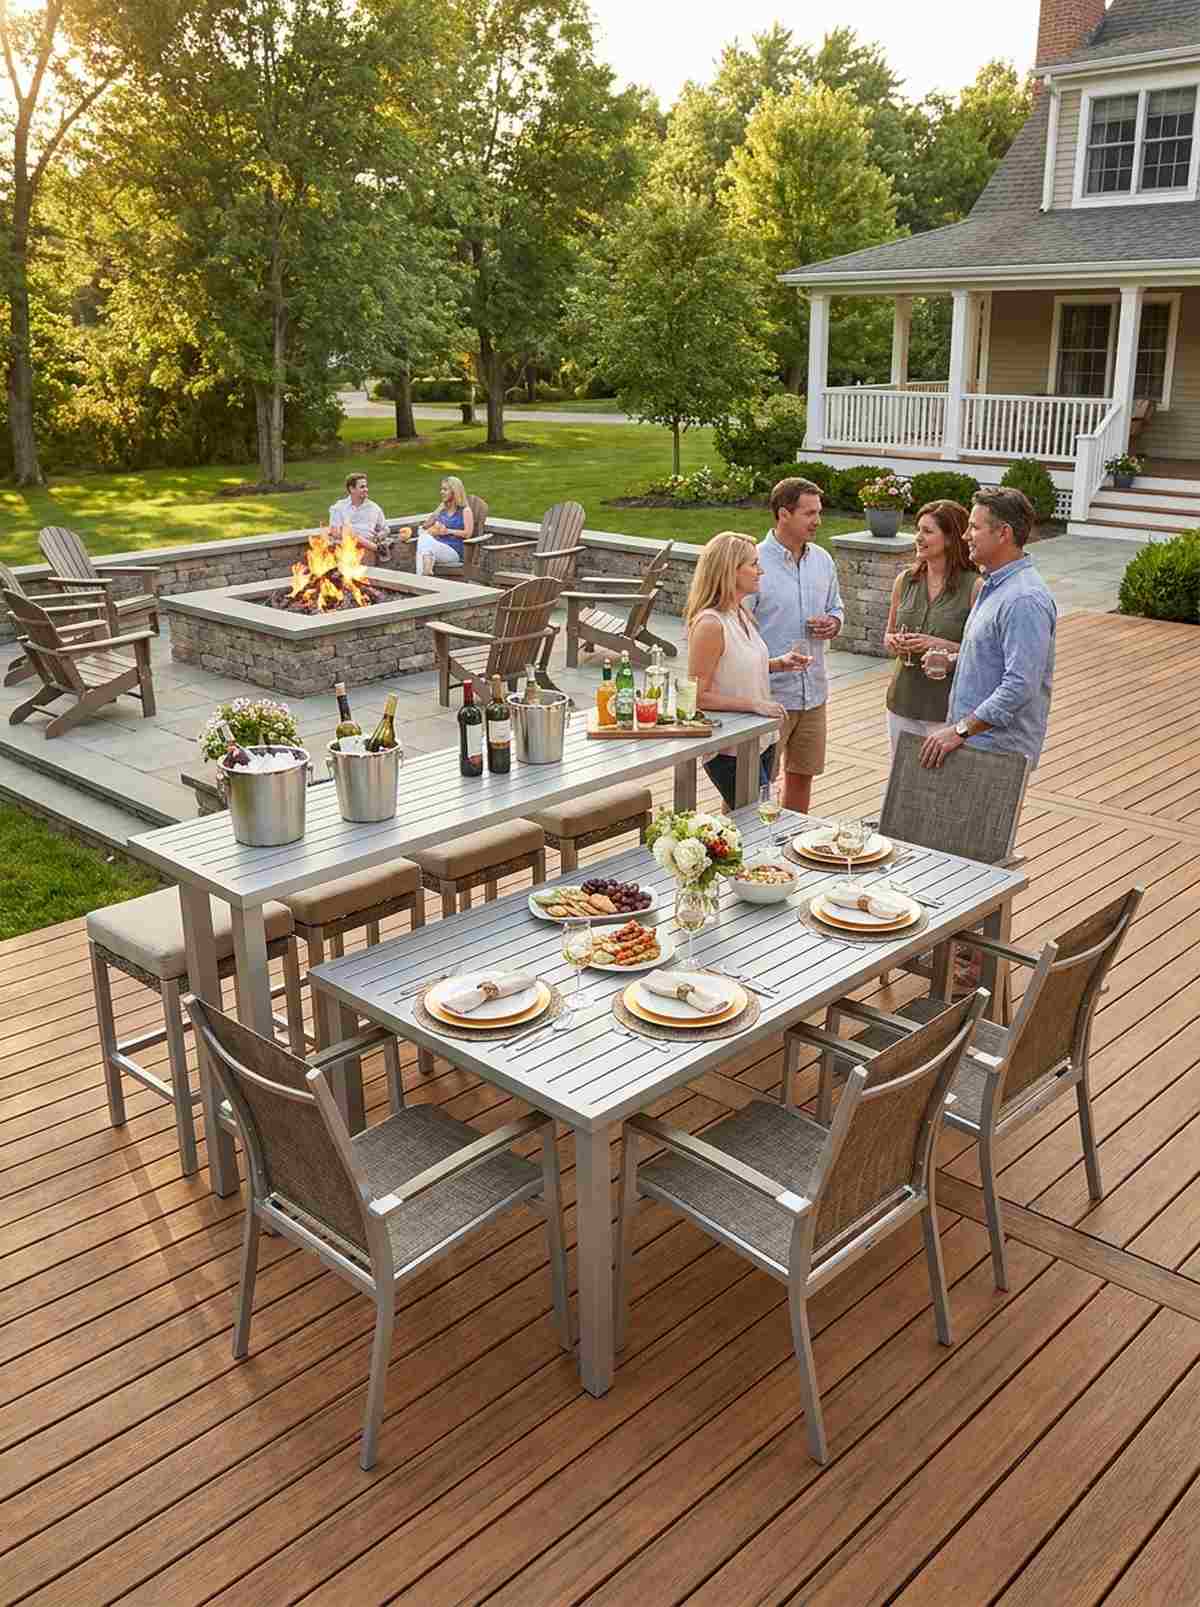
Creating a highly dynamic multi-tiered party zone, a split-level patio table setup feels like an exclusive VIP lounge. Brilliant for larger decks where you want distinct spaces without building physical walls.
Most basic garden patio table arrangements fall flat during big parties because standing guests loom awkwardly over seated eaters. Attaching a 42-inch high bar ledge directly to a 30-inch dining surface completely solves this by matching everyone’s eye level. It instantly transforms a boring dinner spot into a cocktail buffet.
This hybrid table approach runs about $400–$850. Save this idea if you love hosting massive summer cookouts!
- Key Materials: Dual-height aluminum frame, barstools, dining chairs
- Vibe / Style: Multi-tiered entertainer’s dream
- Difficulty: Intermediate assembly
- Budget Breakdown: Split Table Setup: $500 | Mixed Seating: $300
- Creator’s Tip: Use the elevated back ledge to hold ice buckets and wine bottles so the main eating surface stays clear.
- Smart Sourcing: Dual-height outdoor dining island kits and insulated double-wall outdoor ice buckets.
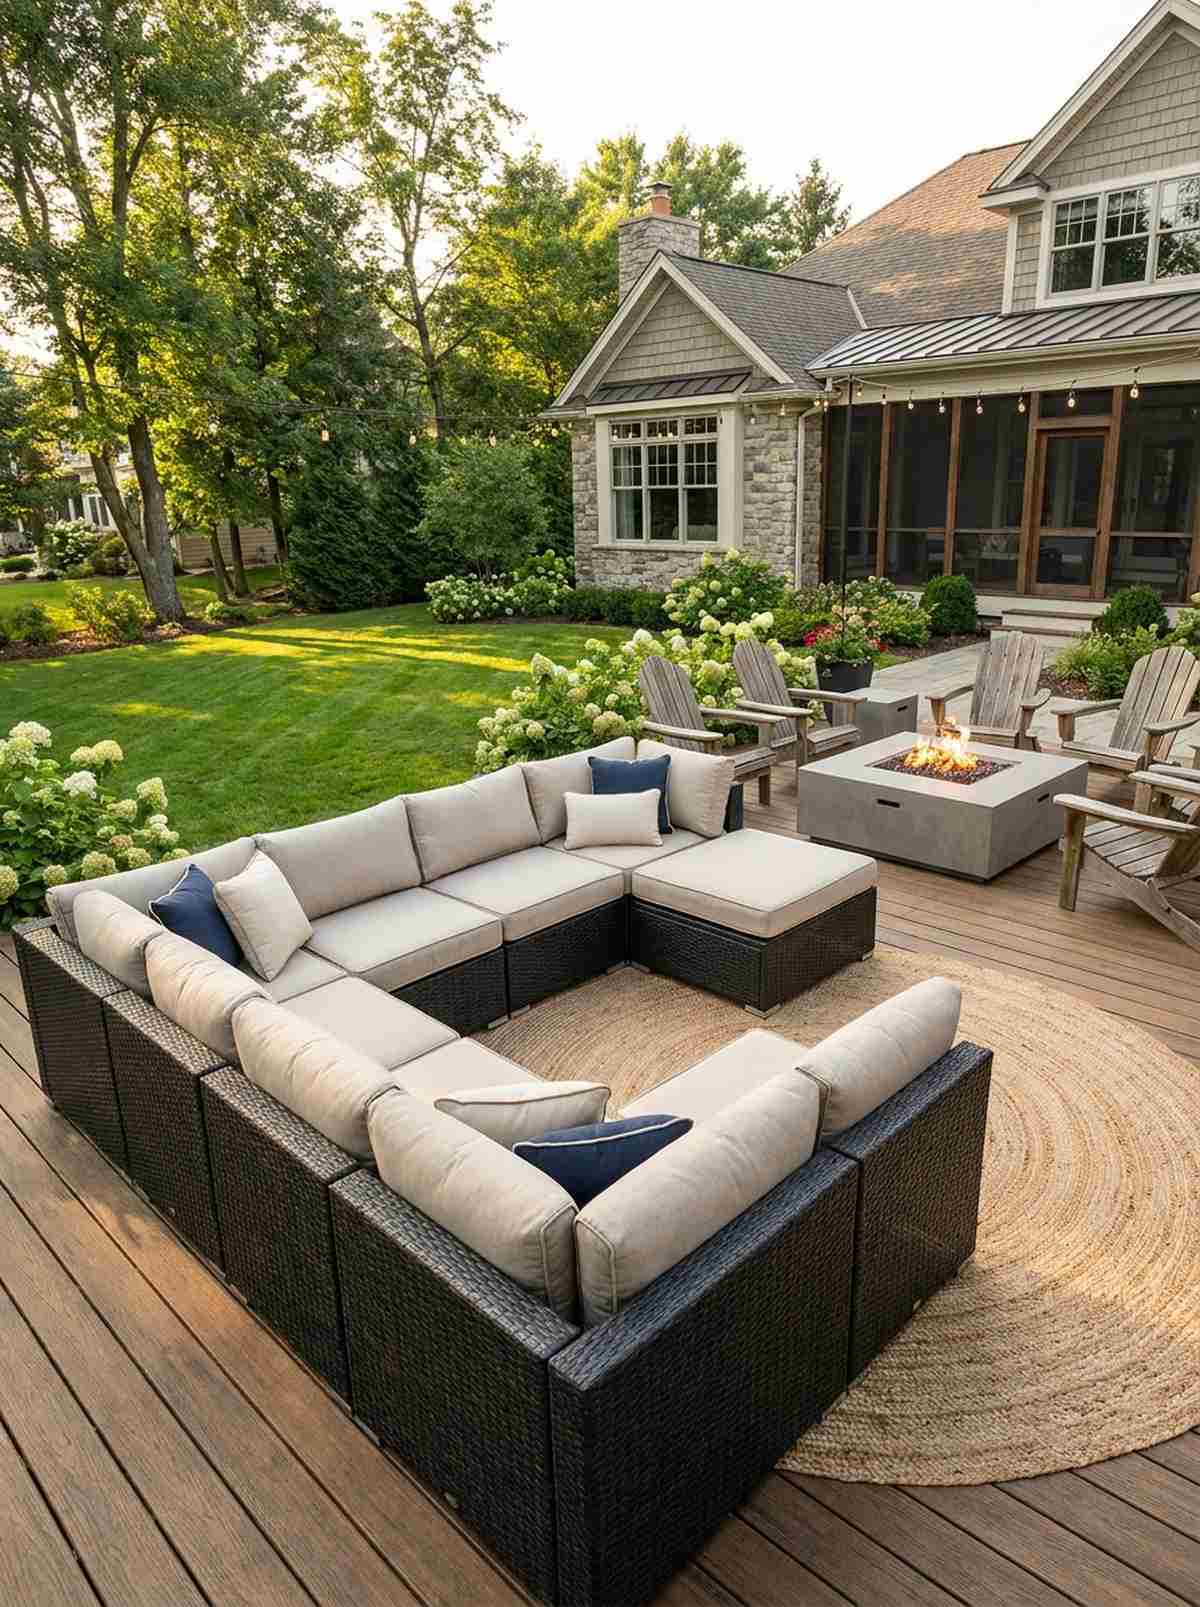
14. L-Shaped Sectional Corner Set
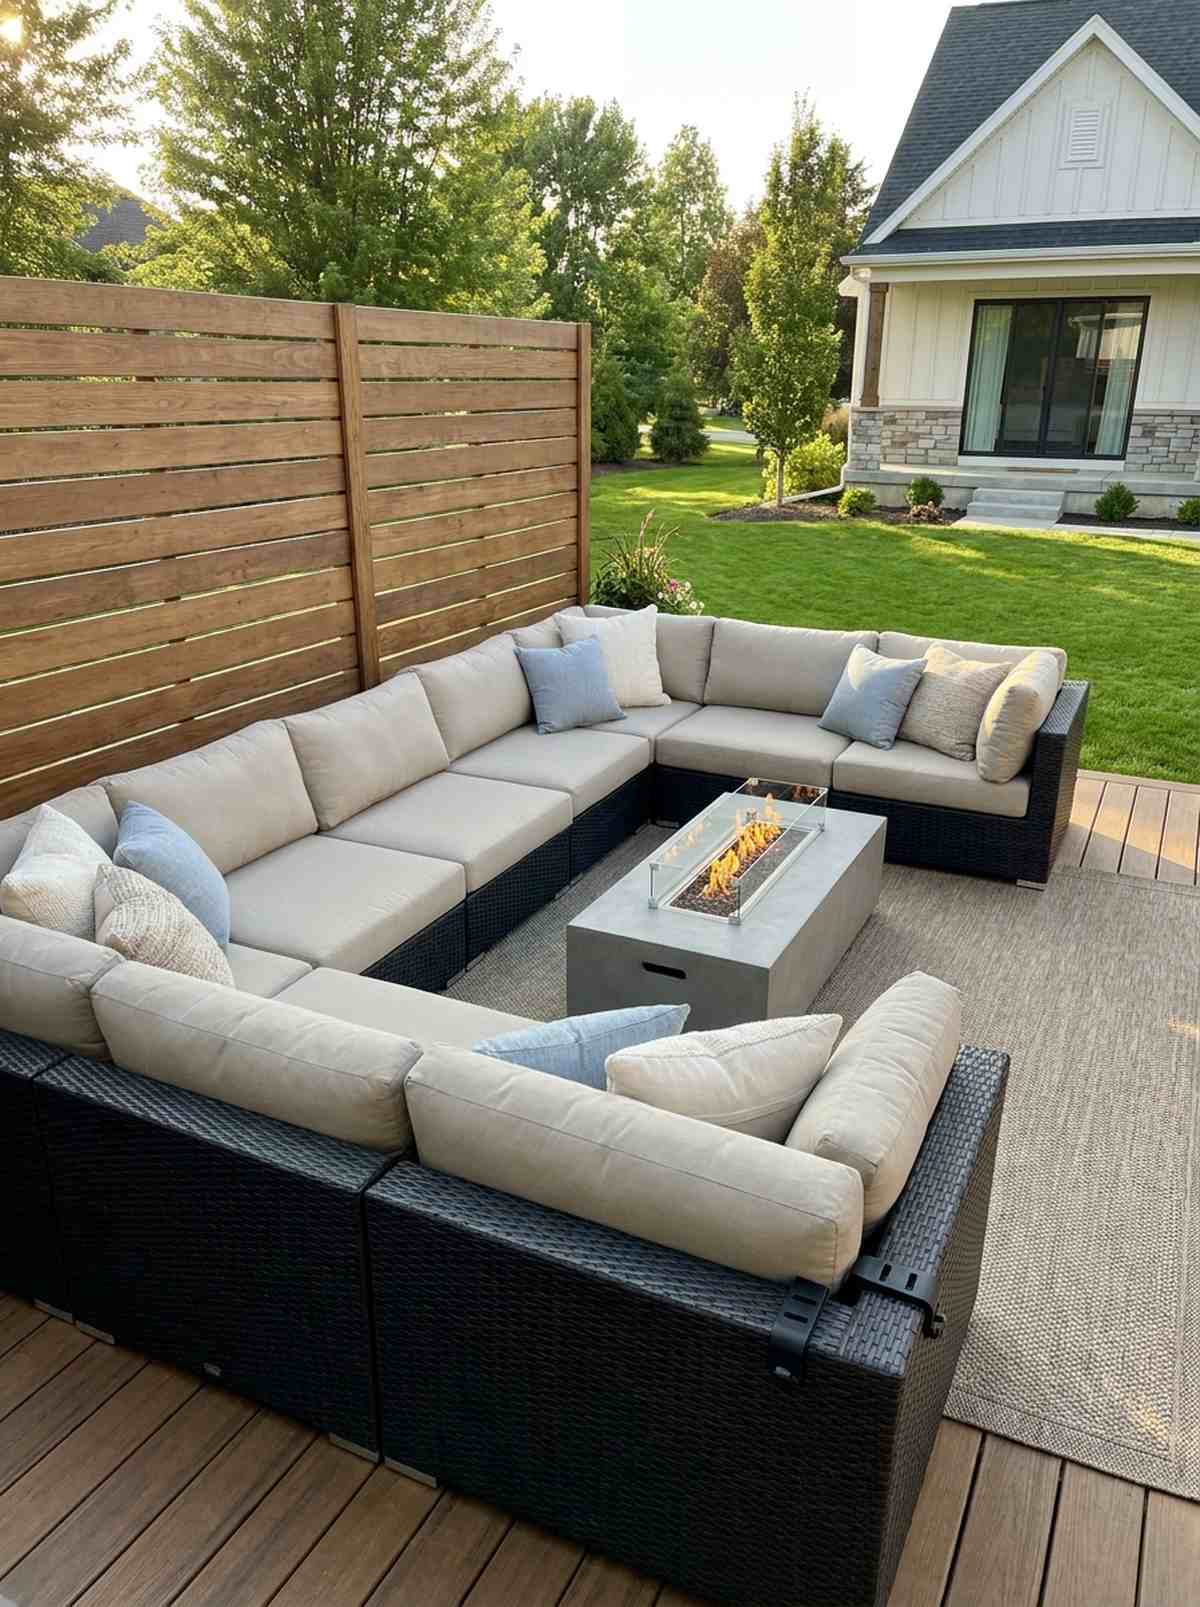
Anchoring the yard with massive visual weight, an outdoor L-shaped sectional couch feels like an extension of your indoor living room. This layout perfectly hugs the perimeter of a privacy fence or deck railing.
Scattering individual chairs makes a patio look cheap, cluttered, and impossible to navigate. Throwing down a massive modular L-shape delivers a surprisingly premium look by forcing a cohesive, structured relaxation zone. Keep the cushions wrapped in light valley sand colors to aggressively deflect summer heat.
A decent modular corner sectional will cost $500–$1,200. This is the ultimate layout for lounging all day.
- Key Materials: Aluminum base, resin wicker, thick foam cushions
- Vibe / Style: Deep-seated resort luxury
- Difficulty: Easy modular clipping
- Budget Breakdown: Sectional Base: $600 | Fire Table: $250
- Creator’s Tip: Buy heavy-duty furniture clips to lock the modules together so they don’t slide apart when you lay down.
- Smart Sourcing: All-weather L-shaped patio sectional kits and universal patio furniture modular clips (bulk pack).
If you think tight budgets mean sacrificing style, the next arrangement will completely change your mind…
Lounge-Focused Layouts
When the goal is heavy relaxation rather than upright dining, seating depth and ergonomic angles take absolute priority. These blueprints focus on maximum comfort, deep cushions, and low-slung profiles.
15. Facing Sofas with Central Table
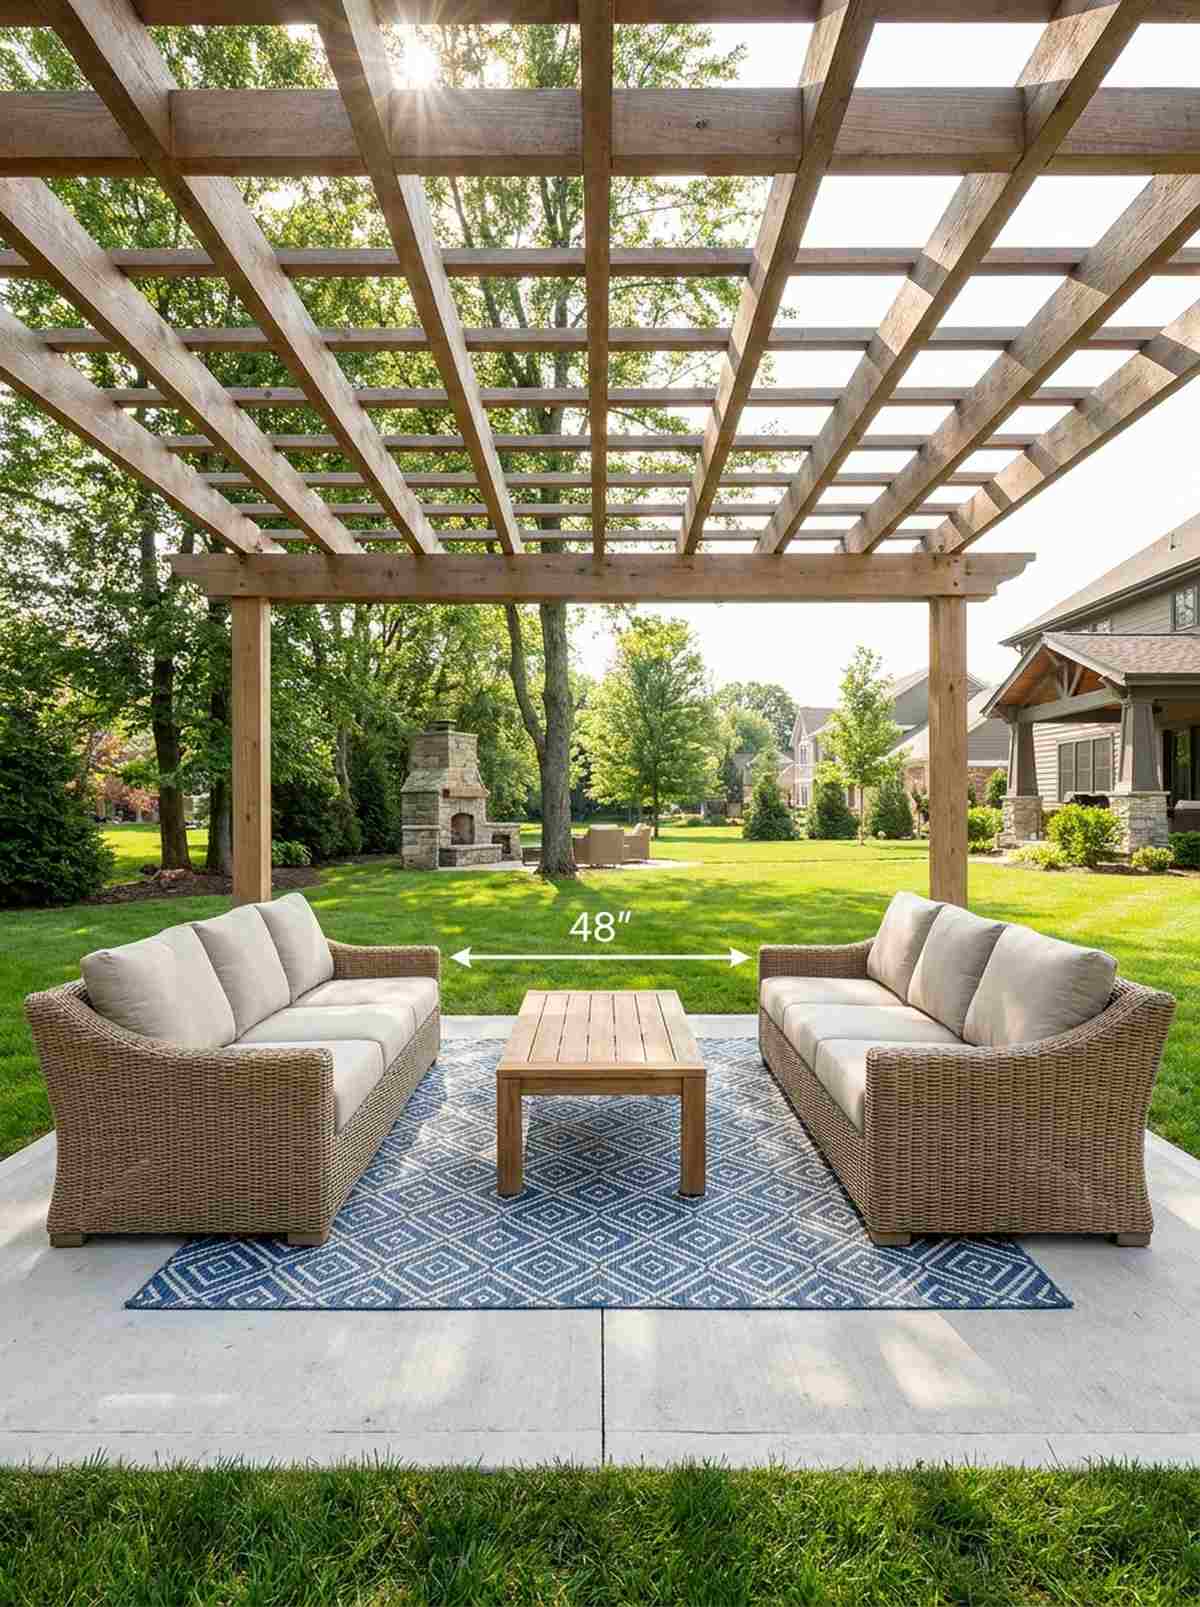
Establishing absolute formal symmetry, a parallel outdoor sofa arrangement feels incredibly structured and intensely conversational. It works wonders on perfectly square concrete pads or beneath symmetrical pergolas.
Asymmetrical layouts often look messy and chaotic to the eye. Dropping two identical three-seat sofas directly across from one another elevates the standard backyard aesthetic into a high-end country club vibe. Leave exactly 48 inches of knee space between them to maintain intimacy without crowding.
Buying dual sofas sets you back roughly $600–$1,400. Save this to your outdoor living room Pinterest board!
- Key Materials: Matching outdoor sofas, low coffee table
- Vibe / Style: Symmetrical formal lounge
- Difficulty: Easy placement mapping
- Budget Breakdown: Twin Sofas: $800 | Central Table: $150
- Creator’s Tip: Ground the entire arrangement with an oversized 8×10 outdoor rug to physically tie the pieces together.
- Smart Sourcing: Matching 3-seater outdoor sofa sets and waterproof geometric outdoor rugs (8×10).
16. Curved Frame Lounge Chairs
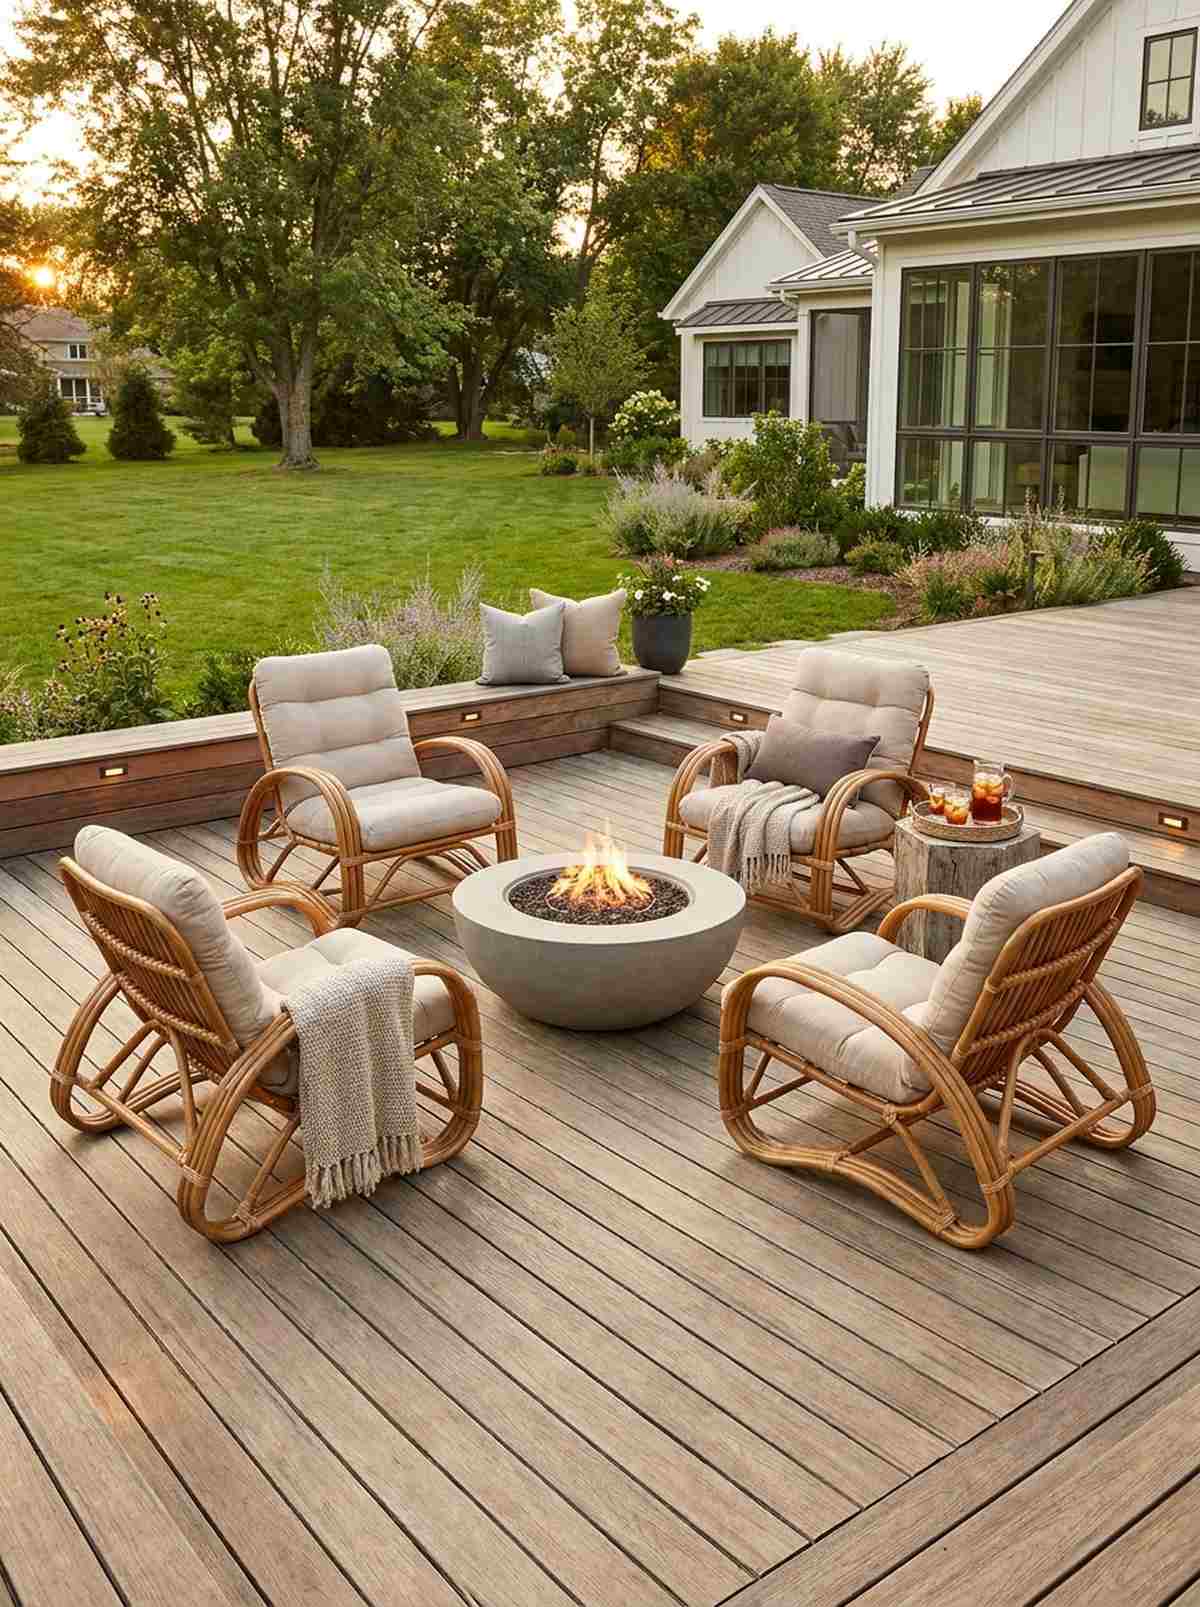
Swooping elegantly to cradle the body, a mid-century curved patio chair cluster feels soft, retro, and irresistibly comfortable. Place these in a loose circle around a crackling fire feature.
Rigid, boxy club chairs create harsh lines that fight against the organic flow of a natural garden. Swapping them for continuous-arc ergonomic frames gives a designer-level finish while actually reducing back pressure during long sitting sessions. The curved silhouette immediately softens hard concrete surroundings.
A cluster of four curved lounges runs about $400–$800. An absolute must-have for long evening chats.
- Key Materials: Molded poly-resin or bent rattan, contoured cushions
- Vibe / Style: Soft retro conversation circle
- Difficulty: Zero setup required
- Budget Breakdown: 4 Lounge Chairs: $500 | Center Fire Pit: $200
- Creator’s Tip: Angle all four chairs slightly outward rather than perfectly straight, creating a more relaxed, welcoming circle.
- Smart Sourcing: Ergonomic curved outdoor lounge chairs (set of 2) and gas-powered concrete fire pit bowls.
17. Chaise Lounge Grouping
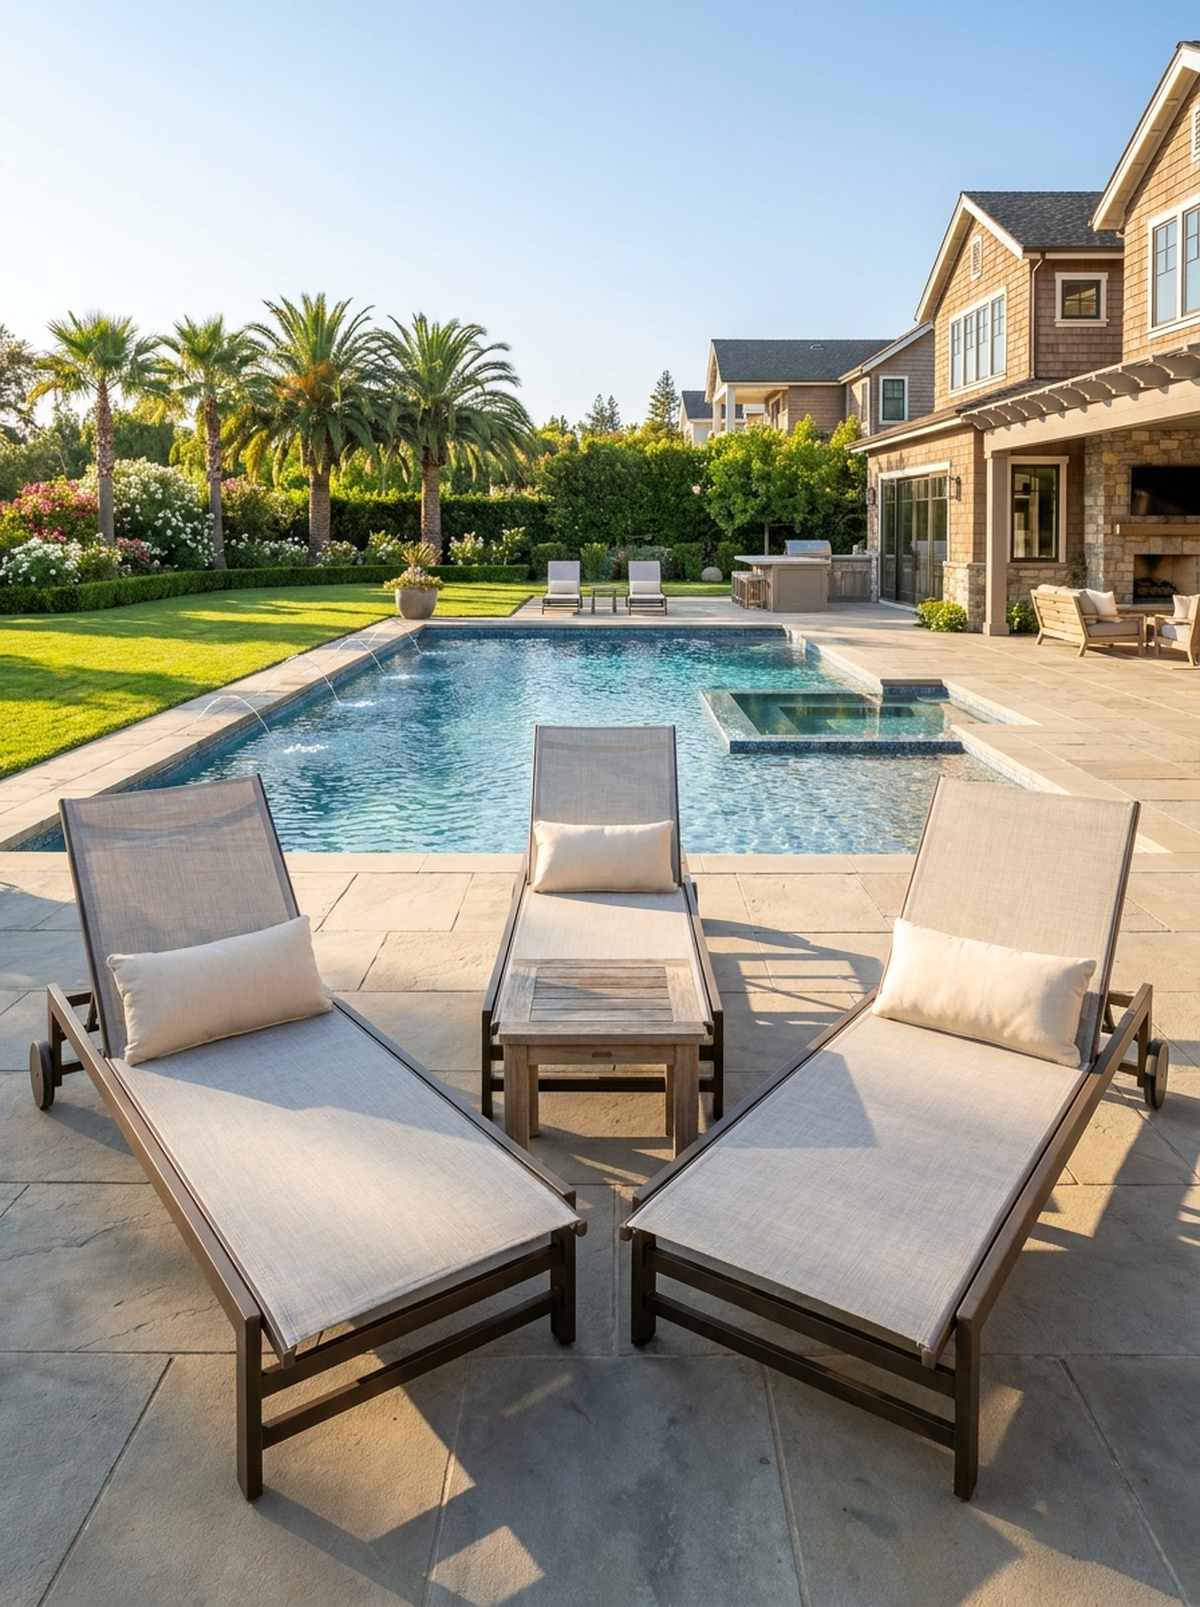
Basking in direct sunlight like a luxury hotel deck, a radial chaise lounge configuration feels like a permanent vacation. It is the undisputed king of poolside decking or large, unshaded lawns.
Lining up chairs in a perfectly straight military row looks incredibly clinical and boring. Fanning three massive 78-inch chaises outward from a shared center table delivers a surprisingly premium look that allows personal space without isolation. Tracking the sun’s afternoon path is critical here.
A high-quality chaise trio costs around $450–$900. Pin this layout to manifest your dream resort backyard!
- Key Materials: Sling-mesh reclining chaises, low shared side table
- Vibe / Style: 5-star poolside resort
- Difficulty: Sun-tracking placement
- Budget Breakdown: Chaises: $600 | Side Table: $80
- Creator’s Tip: Buy chaises with hidden rear wheels so you can effortlessly chase the sun across the patio all day.
- Smart Sourcing: Adjustable sling-mesh outdoor chaise lounges (with wheels) and fade-resistant lumbar support pillows.
18. Hammock and Lounge Chair Mix
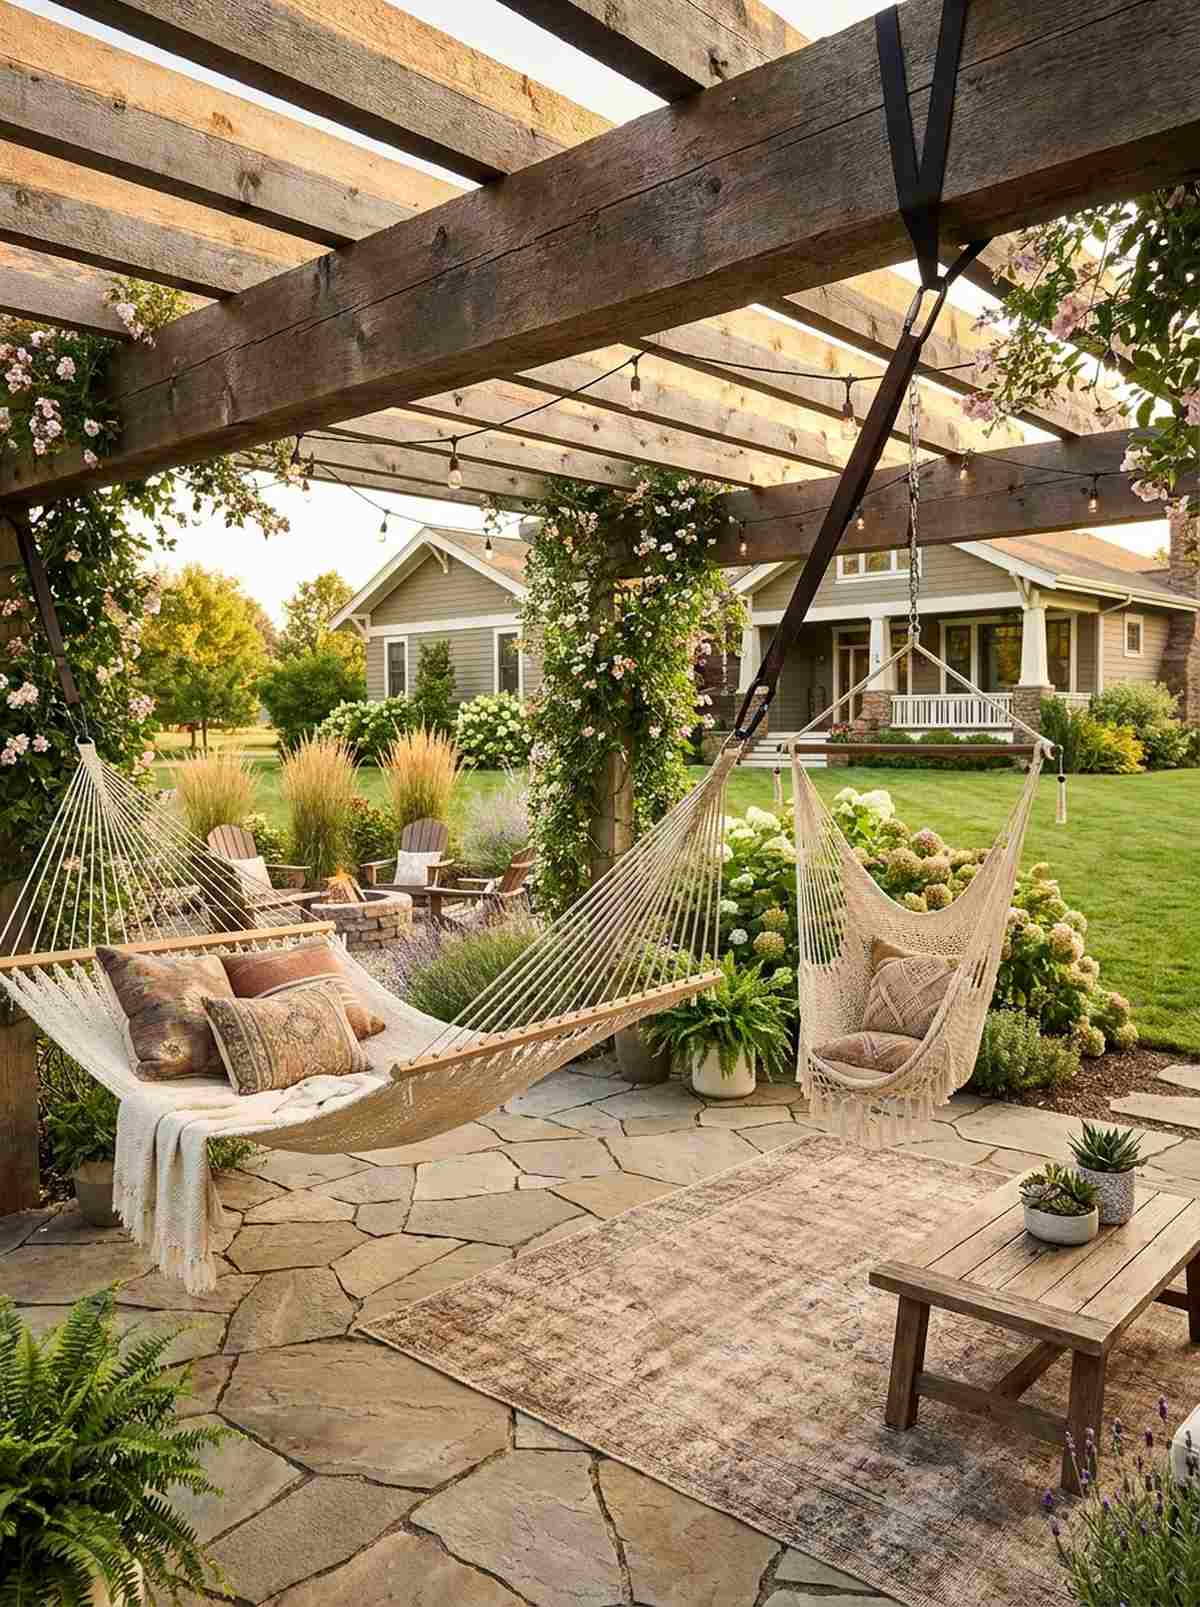
Injecting a gentle, swaying rhythm into the yard, a hybrid hammock and chair relaxation zone feels wonderfully bohemian. Suspend the centerpiece from heavy pergola beams or massive oak trees.
Static furniture alone can make a yard feel stiff. Introducing a hanging element creates an ultra-luxurious footprint by pulling the visual weight upward into the vertical space. Using synthetic weatherproof rope stops mildew dead in its tracks, unlike traditional cotton weaves.
You can mix these elements for $150–$350. Highly recommended for adding playful movement to your space.
- Key Materials: Weatherproof rope hammock, heavy suspension carabiners
- Vibe / Style: Breezy bohemian retreat
- Difficulty: Intermediate structural hanging
- Budget Breakdown: Hammock: $60 | Stand/Hardware: $80
- Creator’s Tip: Ensure your anchor points are at least 6-8 feet away from stationary seating so you don’t kick anyone while swinging.
- Smart Sourcing: Mildew-resistant double outdoor hammocks and heavy-duty tree strap suspension kits.
19. Daybed Platform Configuration

Transforming the patio into a sprawling outdoor bedroom, an oversized garden daybed platform feels wildly decadent and cozy. Tuck this setup deep into the corner of a lush garden for ultimate privacy.
Traditional outdoor sofas restrict you to sitting upright or awkwardly curling your legs. Dropping a massive 60×80 inch mattress onto an elevated base looks far more expensive than it is while encouraging total horizontal lounging. Keeping the platform at least 16 inches high protects the textiles from creeping ground moisture.
Building or buying an outdoor bed runs $350–$900. Save this blueprint for your ultimate stargazing sanctuary!
- Key Materials: Elevated wood platform, waterproof memory foam
- Vibe / Style: Decadent outdoor cabana
- Difficulty: Advanced DIY or premium purchase
- Budget Breakdown: Wood Base: $150 | Outdoor Mattress: $300
- Creator’s Tip: Surround the bed with tall, dense potted bamboo to instantly create a secluded, wind-blocked microclimate.
- Smart Sourcing: Waterproof outdoor daybed mattresses (queen size) and UV-blocking privacy screen planter boxes.
Most beginners ruin their patios with cheap plastic sets… until they see how easily you can fake a luxury build next.
Dual-Function Dining and Lounge Combinations
When you simply don’t have the square footage for two separate setups, hybrid pieces bridge the gap. These layouts magically transition from formal plated dinners to horizontal lounging in seconds.
20. Lounge-Dining Corner Set
Merging two massive footprints into one seamless hub, a hybrid corner sofa with an adjustable table feels like a brilliant spatial hack. It is essential for medium townhouses needing both dining and relaxing zones.
Trying to cram a huge dining set and a huge sofa into 150 square feet guarantees a chaotic, impassable mess. Swapping static pieces for a table that cranks from 18 inches to 28 inches elevates the standard backyard aesthetic by adapting to the hour. Pick taupe or sand fabrics so dropped barbecue sauce doesn’t ruin the vibe.
A high-quality adjustable hybrid set costs $700–$1,300. Pin this if you want maximum utility in minimal space!
- Key Materials: Height-adjustable metal table, deep corner sofa
- Vibe / Style: The ultimate space-saving chameleon
- Difficulty: Medium assembly time
- Budget Breakdown: Lift-top Table: $300 | Corner Sofa: $500
- Creator’s Tip: Ensure the table slides smoothly under the sofa cushions so guests don’t have to lean too far forward to eat.
- Smart Sourcing: Gas-lift adjustable height outdoor tables and stain-resistant patio sofa slipcovers.
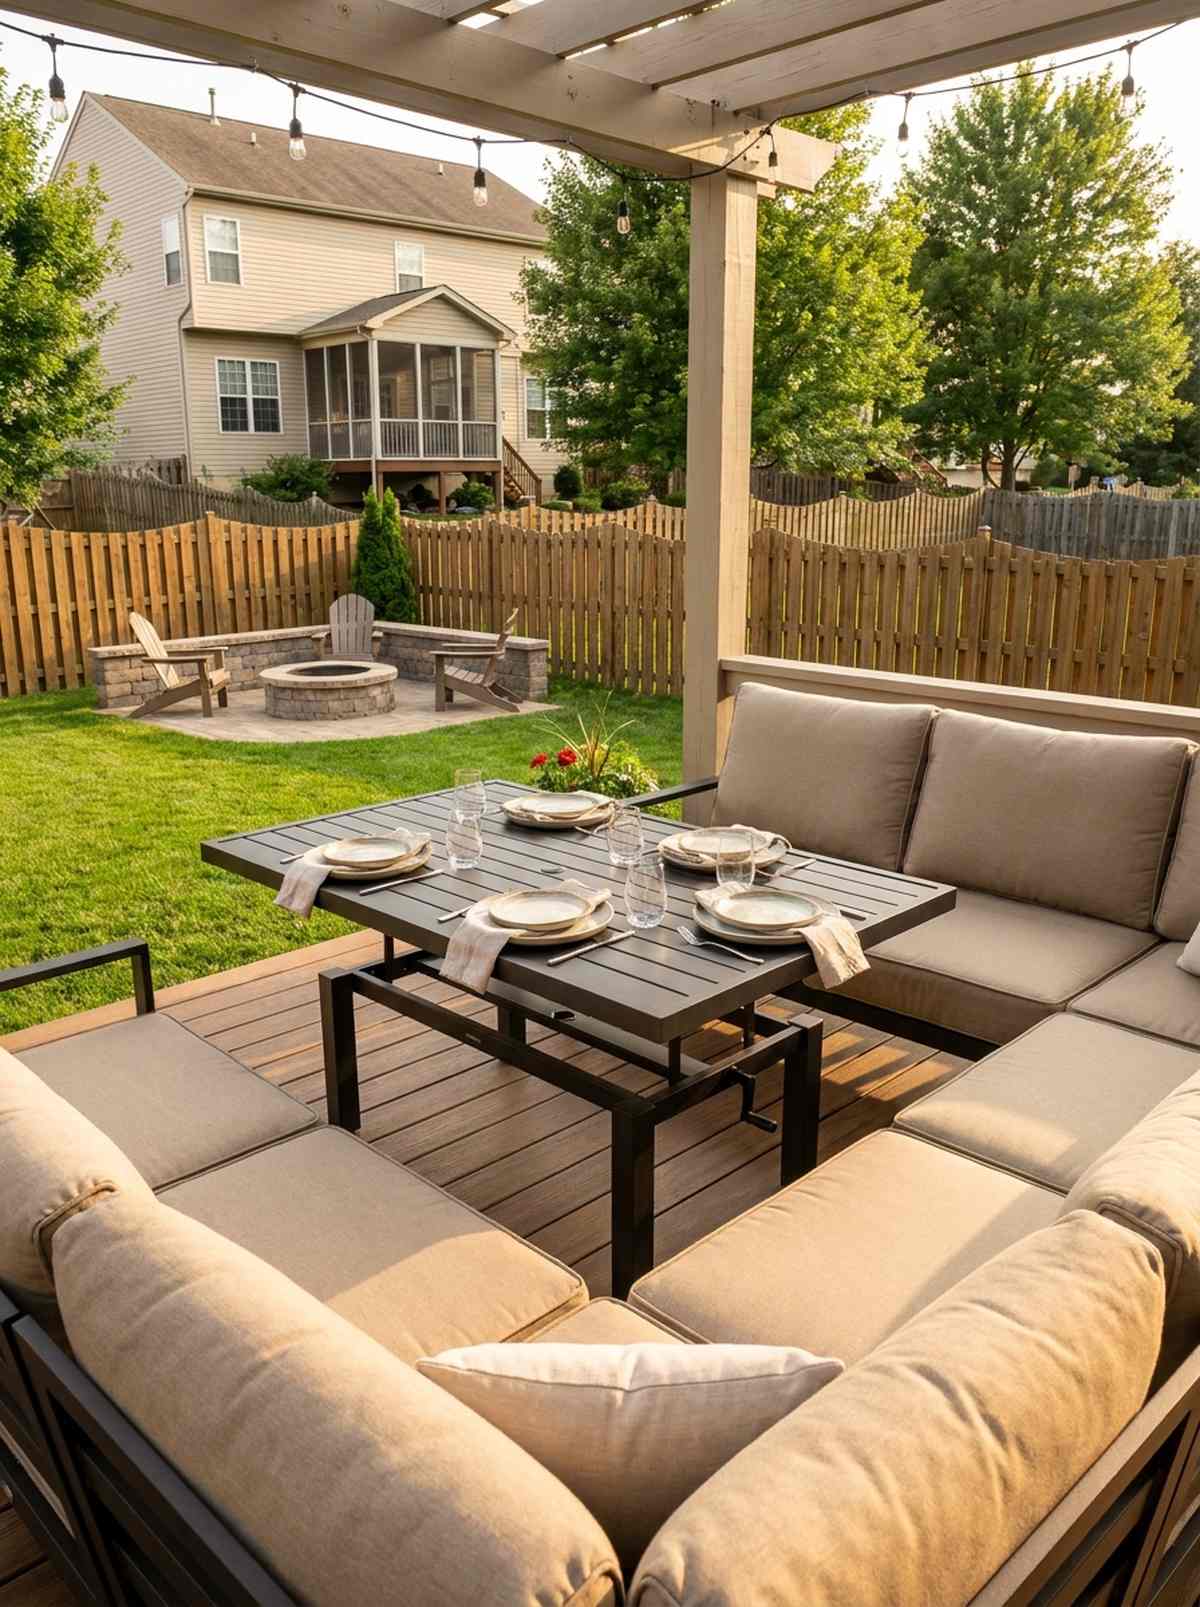
21. Sectional with Dining-Height Table
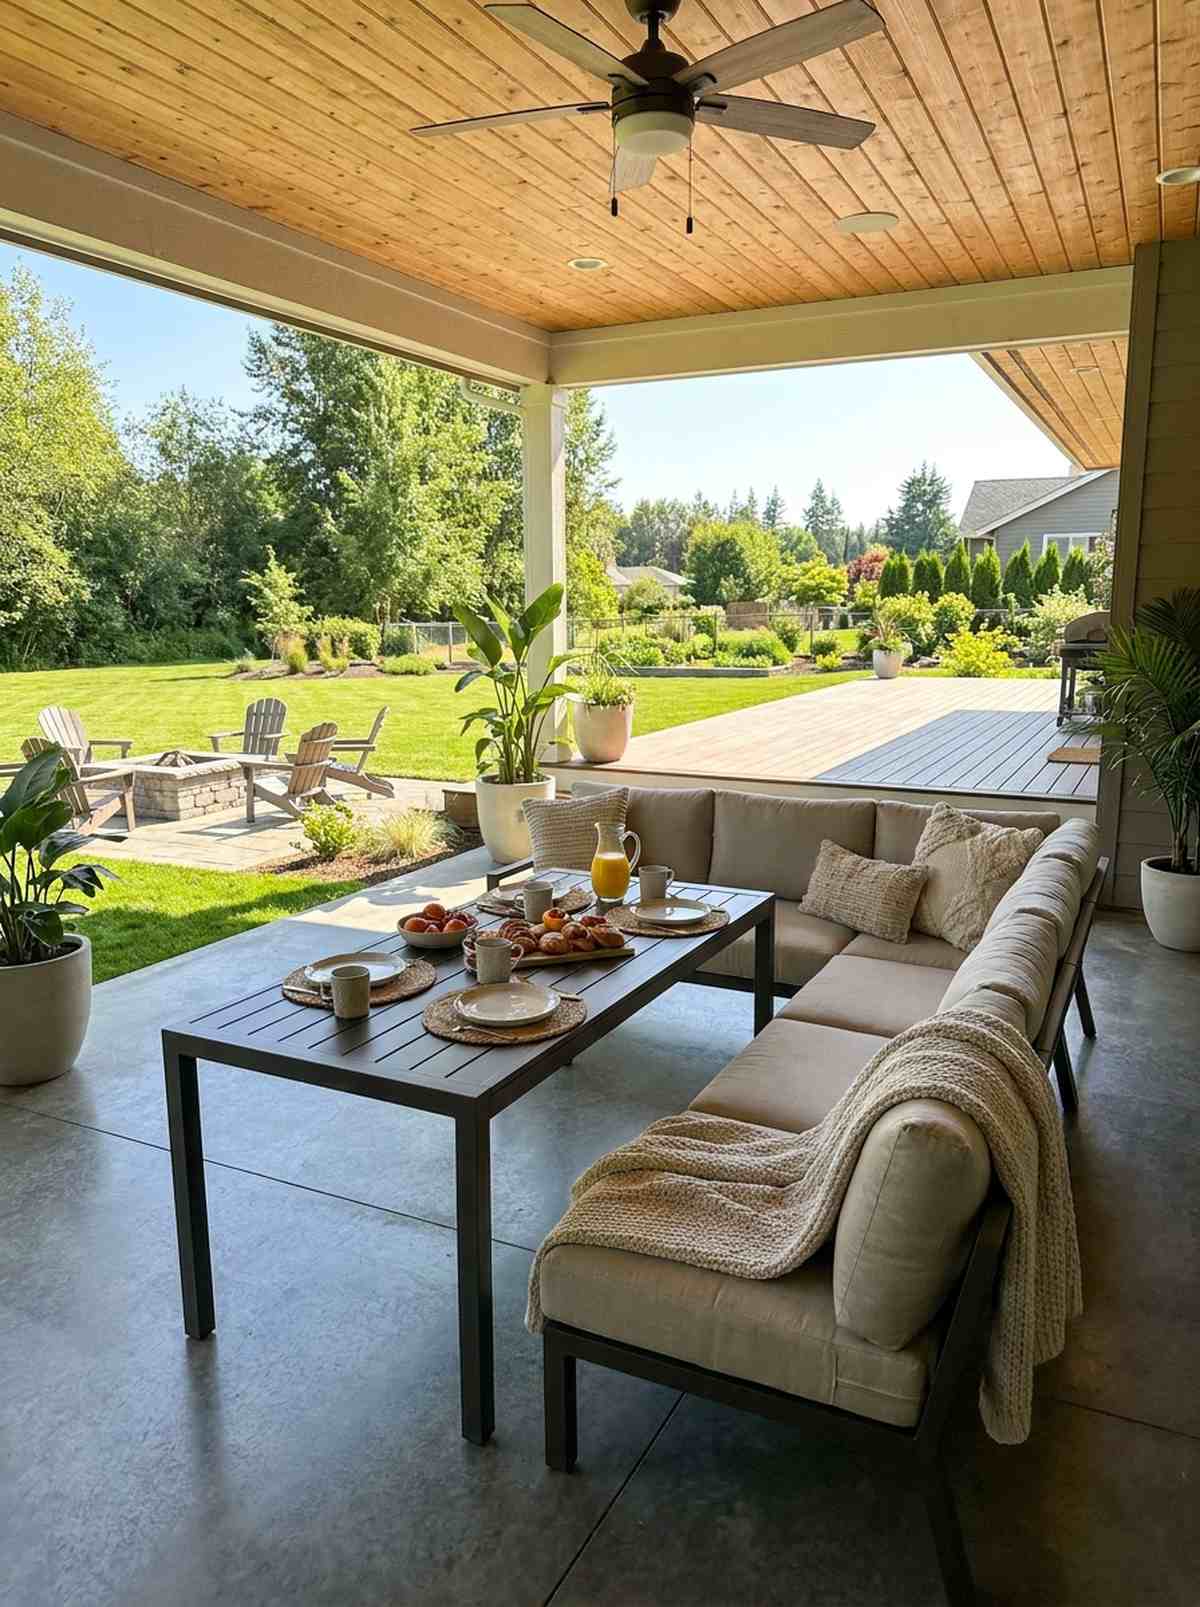
Blurring the lines between a casual brunch and a deep lounge, a high-table sectional pairing feels relaxed yet functional. This setup shines on covered porches where casual grazing happens all day.
Typical low coffee tables force you to hunch over painfully when eating anything more complicated than a cracker. Shoving a standard 30-inch dining table directly against a firm sectional couch delivers a surprisingly premium look while perfectly supporting upright eating posture. Choose a table slightly narrower than usual to offset the couch depth.
This layout will run you around $500–$950. A brilliant compromise for heavy grazers and casual hosts.
- Key Materials: Firm-seat sectional couch, narrow 30-inch high table
- Vibe / Style: Casual Sunday brunch lounge
- Difficulty: Easy piece matching
- Budget Breakdown: Firm Sectional: $600 | Narrow Table: $200
- Creator’s Tip: Ditch plush, sinking cushions for this setup; you need firm, high-density foam so diners don’t sink below table level.
- Smart Sourcing: High-density replacement outdoor couch cushions and narrow profile aluminum dining tables.
22. Bench Seating with Back Cushions
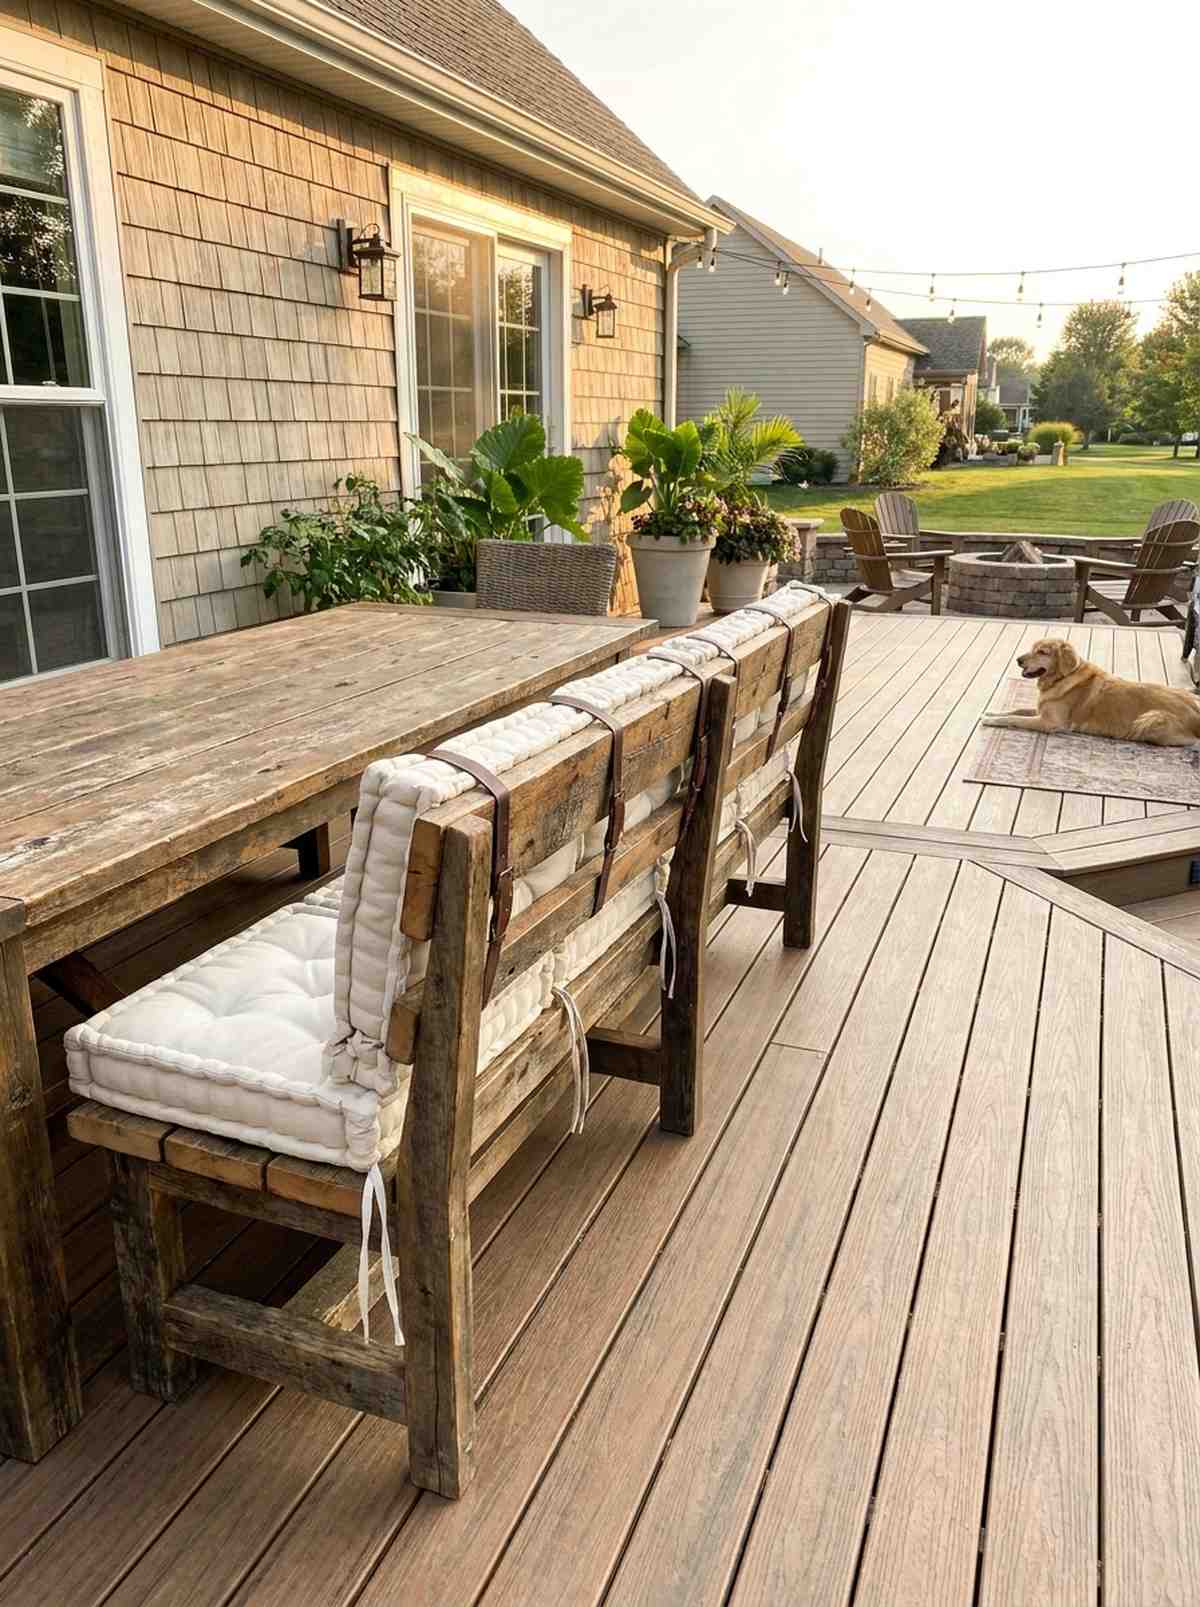
Transforming rigid wooden slats into a plush sofa substitute, an upholstered dining bench conversion feels incredibly clever. Perfect for rustic farm tables that need to double as an after-dinner lounge.
Hard wooden benches are brutal on the lower spine after a 30-minute meal. Strapping impossibly thick back cushions to the wall or the bench rail gives a designer-level finish while completely altering the seating angle into a reclined lounge posture. The cushions pop right off when you need the pure dining form back.
You can execute this comfort hack for just $100–$250. Save this to your DIY outdoor upholstery board!
- Key Materials: Dining-height wooden bench, heavy tie-on cushions
- Vibe / Style: Rustic comfort hybrid
- Difficulty: Quick cushion styling
- Budget Breakdown: Wooden Bench: $120 | Thick Cushions: $90
- Creator’s Tip: Install a beautiful wooden cleat directly onto your exterior siding to hang the back cushions using heavy leather straps.
- Smart Sourcing: Thick tufted outdoor bench cushions (with ties) and heavy-duty decorative leather hanging straps.
23. Swivel Dining Chairs
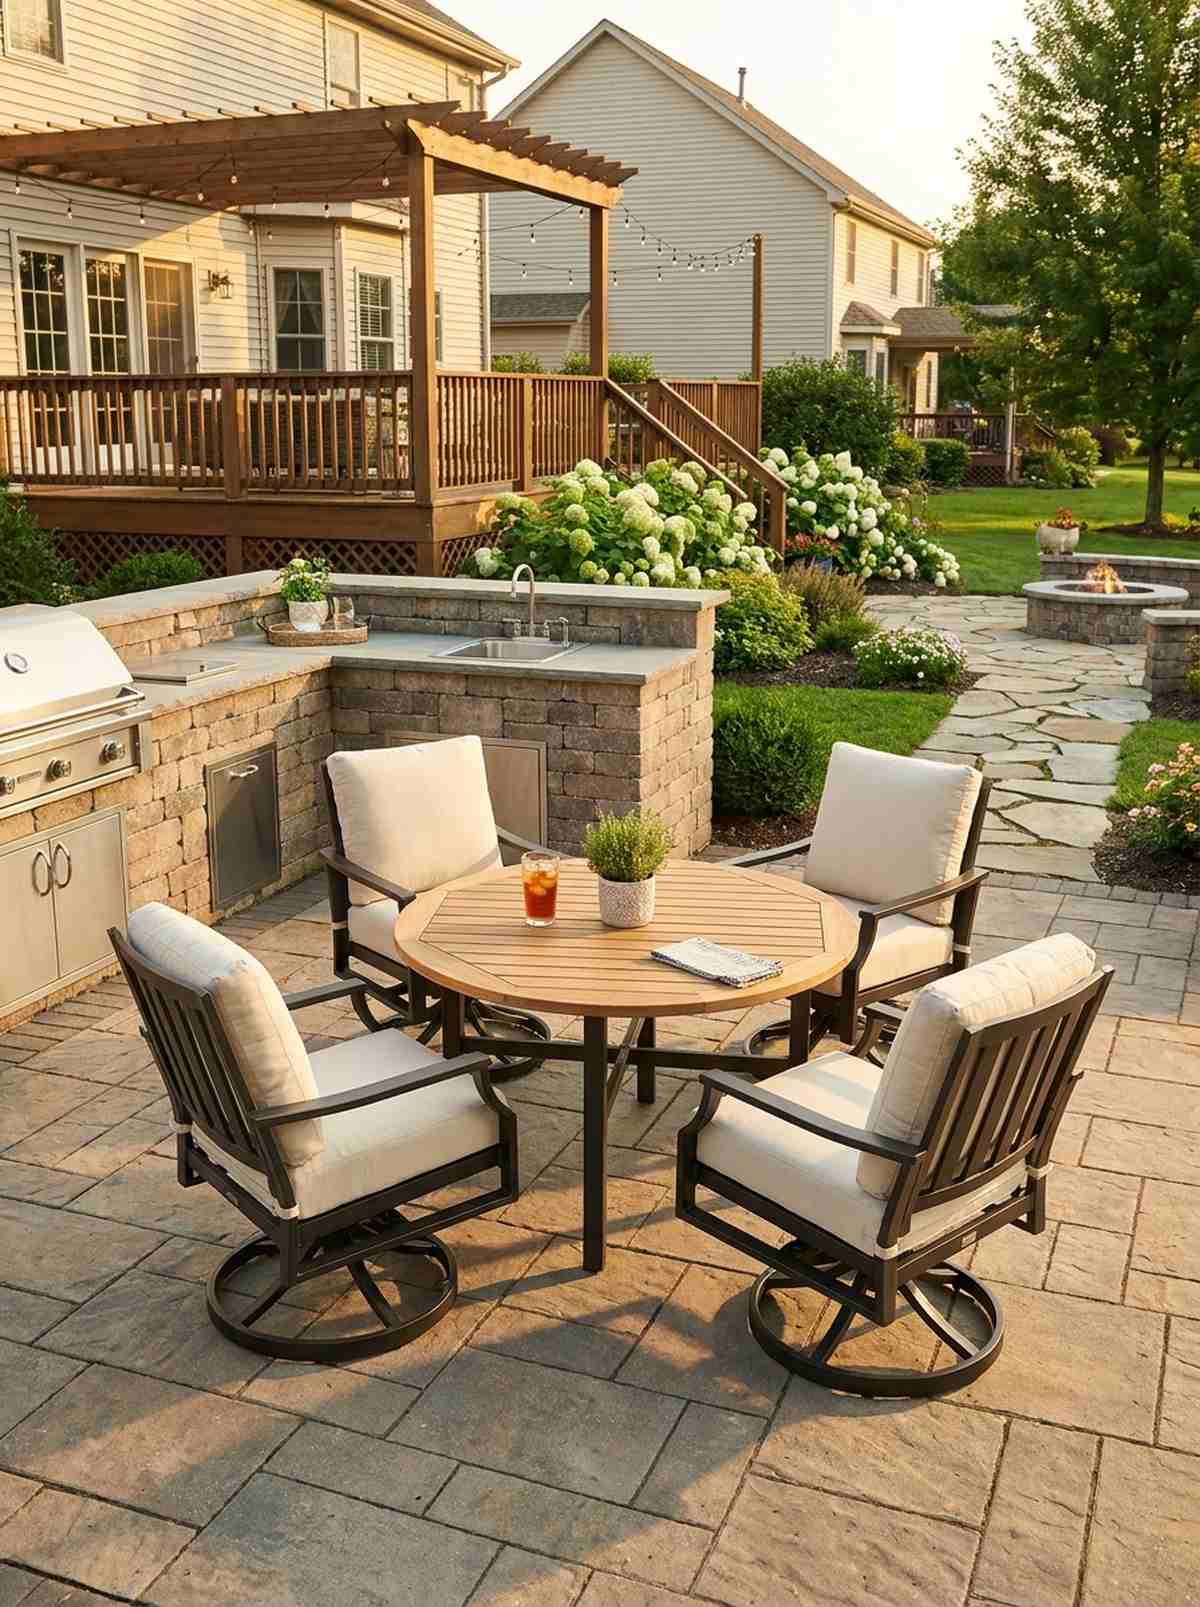
Unlocking 360 degrees of social interaction, a rotating patio chair dining set feels fluid and unrestrictive. These thrive between an outdoor kitchen zone and a garden view.
Dragging heavy metal chairs across concrete to turn toward the conversation creates horrific scratching noises and damages the patio. Upgrading to locked-base swivel chairs creates an ultra-luxurious footprint because guests can pivot seamlessly from their dinner plate to the sunset. Always insist on stainless steel ball bearings to prevent rust lockup.
A set of quality swivel chairs costs about $300–$700. Pin this if you hate dragging heavy furniture around!
- Key Materials: Aluminum frames, stainless steel swivel mechanisms
- Vibe / Style: Seamless interactive dining
- Difficulty: Simple base assembly
- Budget Breakdown: Swivel Chairs (4): $400 | Central Table: $200
- Creator’s Tip: Regularly spray the swivel plates with dry PTFE lubricant to keep the rotation buttery smooth through humid summers.
- Smart Sourcing: 360-degree swivel outdoor dining chairs (set of 2) and waterproof dry PTFE lubricant spray.
24. Ottoman Cluster for Flexible Seating
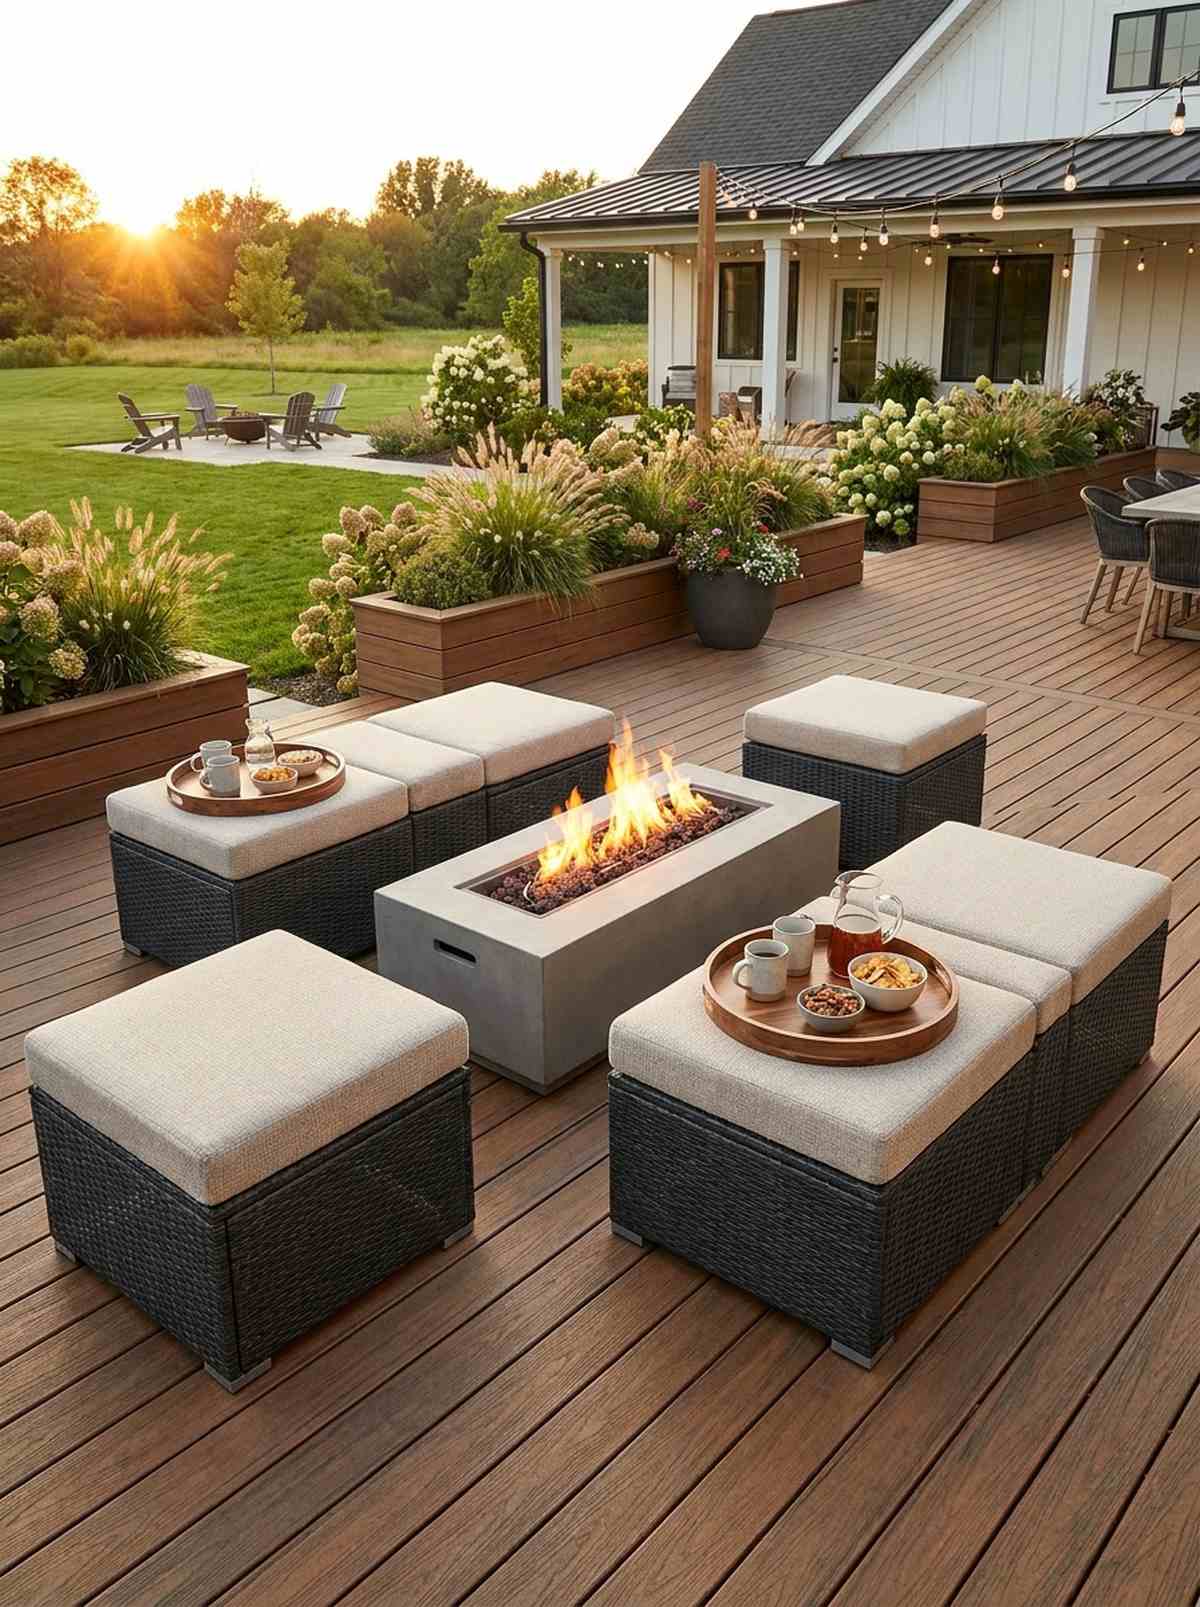
Operating as the ultimate shape-shifting furniture, an outdoor ottoman cluster formation feels playful, adaptable, and highly modern. Scatter these around a central fire pit or push them together for a makeshift daybed.
Committing to giant bulky chairs severely limits how many people you can squeeze into a tight patio. Utilizing waterproof 24×24 inch cubes looks far more expensive than it is, giving you instant modular seating, footrests, or side tables on demand. Hollow ottomans also secretly swallow up ugly garden hoses and kid’s toys.
A cluster of multi-use ottomans runs $150–$350. An absolute necessity for highly flexible entertaining spaces.
- Key Materials: Waterproof resin cubes, thick foam tops
- Vibe / Style: Playful modular modernism
- Difficulty: Zero setup
- Budget Breakdown: 4 Storage Ottomans: $200 | Serving Trays: $40
- Creator’s Tip: Keep large wooden serving trays nearby so you can instantly turn any soft ottoman into a hard surface for drinks.
- Smart Sourcing: Waterproof outdoor storage ottomans (cube style) and oversized wooden outdoor serving trays.
Before you waste money on permanent fixtures, look at how the next modular system adapts to literally any space…
Modular Systems for Adaptive Use
Static furniture traps you in one single layout forever. Modular blocks allow you to break apart and rebuild your entire patio flow based on exactly who is coming over.
25. Six-Piece Sectional System
Acting like adult building blocks, a multi-piece patio sectional kit feels deeply personalized and infinitely scalable. It dominates open-concept patios where the layout changes from party to party.
Buying a monolithic sofa means you are stuck if you ever move to a house with a different deck shape. A disconnected 6-piece system delivers a surprisingly premium look, allowing you to snap it into a massive U-shape, a long L-shape, or two separate facing couches instantly. Start with four pieces and expand next season.
Modular starter kits range wildly from $400–$1,500. Save this concept to future-proof your patio furniture!
- Key Materials: Individual wicker bases, interlocking clip hardware
- Vibe / Style: Scalable luxury lounge
- Difficulty: Easy rearranging
- Budget Breakdown: 6-Piece Set: $700 | Modular Clips: $20
- Creator’s Tip: Mark the bottom of each cushion with a sharpie (e.g., “Corner Left”) so you don’t play an endless puzzle game after washing them.
- Smart Sourcing: Modular outdoor wicker sectional kits (6-piece) and heavy-duty fabric waterproofing spray (gallon).
26. Stackable Chair Collection
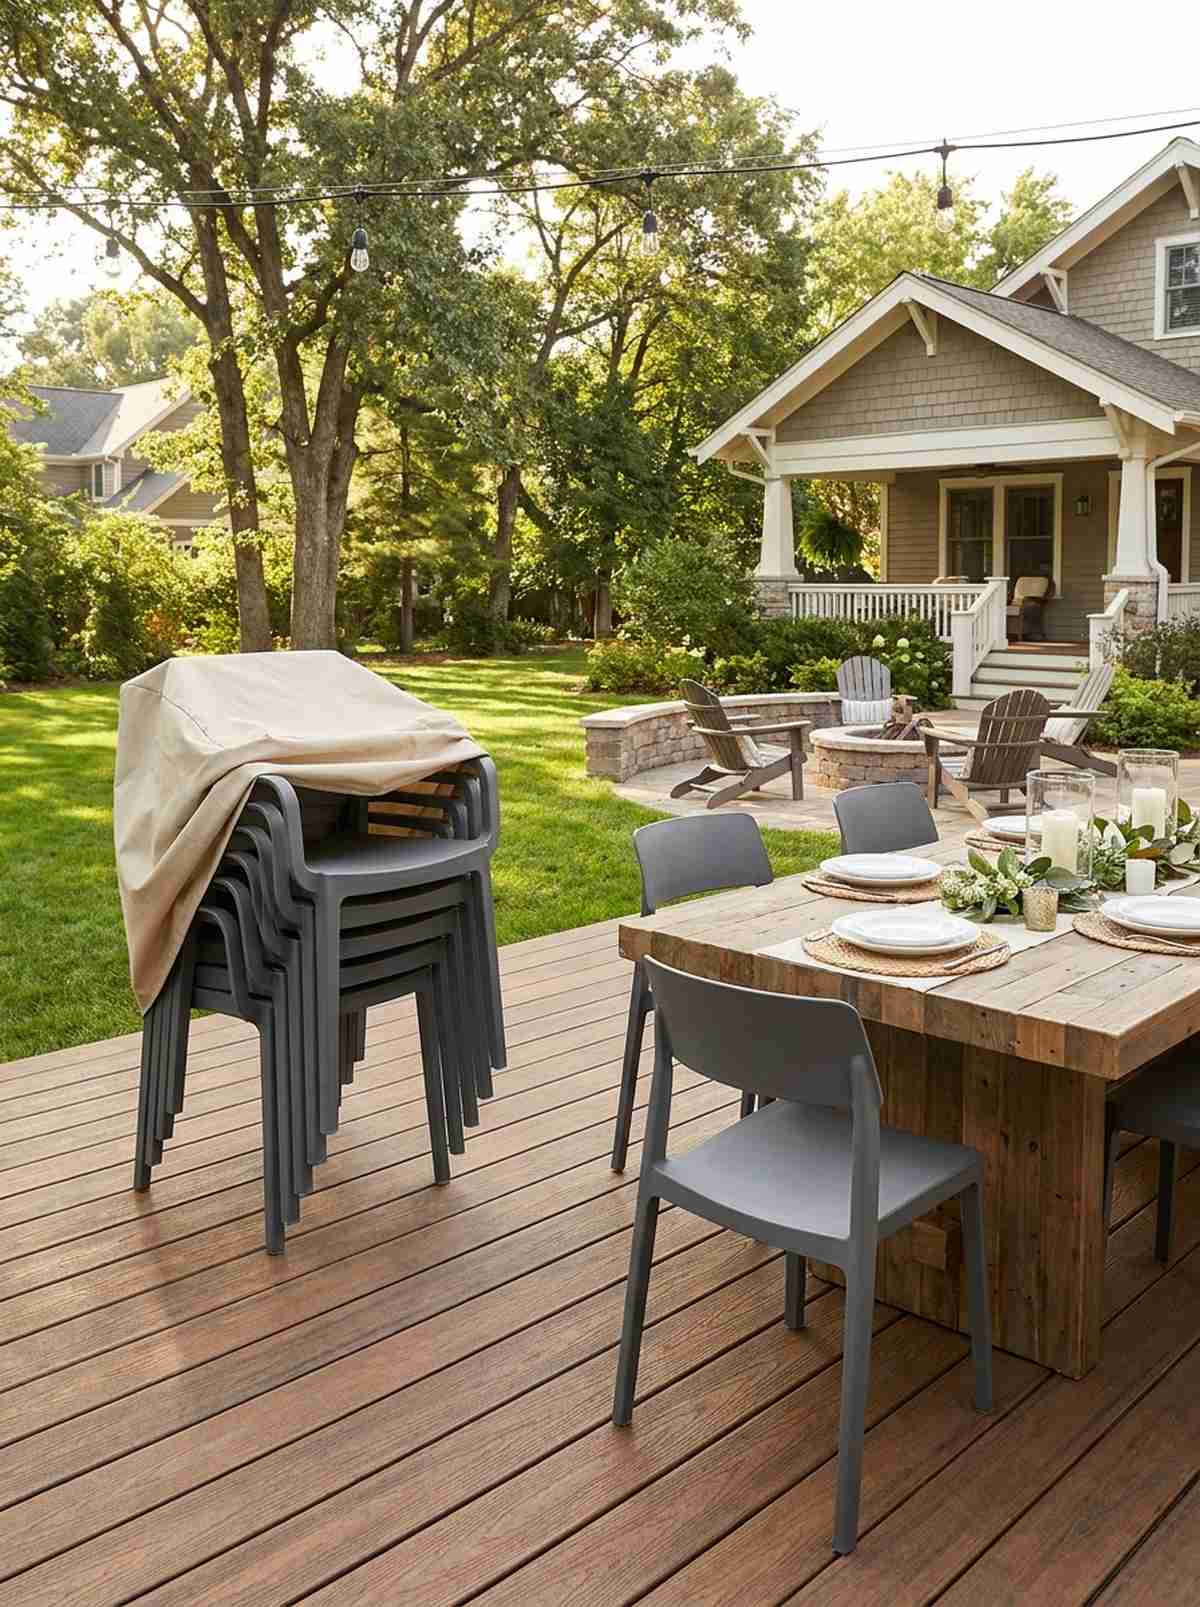
Fusing high capacity with microscopic storage, a stacking outdoor chair fleet feels organized and deeply practical. It is the holy grail for hosts who throw massive parties but have tiny storage sheds.
Nothing clutters a backyard faster than ten random folding chairs leaning against the siding. Investing in molded resin chairs that stack 6-high elevates the standard backyard aesthetic by looking like a chic designer collection while hiding away in a 2×2 foot footprint. Molded ribs prevent the legs from deeply scratching each other.
A set of eight premium stackers runs $250–$600. A highly practical buy for the serial entertainer.
- Key Materials: Molded fiberglass or poly-resin frames
- Vibe / Style: Clean event-ready minimalism
- Difficulty: Effortless storage
- Budget Breakdown: 8 Stackable Chairs: $400 | Storage Cover: $40
- Creator’s Tip: Buy a tailored, heavy-duty column cover to drop over the stacked tower, protecting them from UV fading while stored.
- Smart Sourcing: Commercial-grade stackable patio chairs (bulk set) and heavy-duty stackable chair tower covers.
Material Guide: Cheap vs. Premium Aesthetic
Knowing exactly where to save and where to spend makes all the difference in achieving that “looks expensive but isn’t” vibe without your garden patio table falling apart.
- Standard Foam vs. High-Density Quick-Dry: Cheap foam acts like a sponge, growing mold instantly. Upgrading to reticulated quick-dry foam ensures cushions survive heavy rain and stay firm.
- Pre-made Kits vs. Sourcing Locally: Scavenging thrift stores for matching chairs takes months. Buying UV-coated modular starter kits saves time, guarantees matched aesthetics, and usually offers bundle discounts.
27. Nesting Table Trio
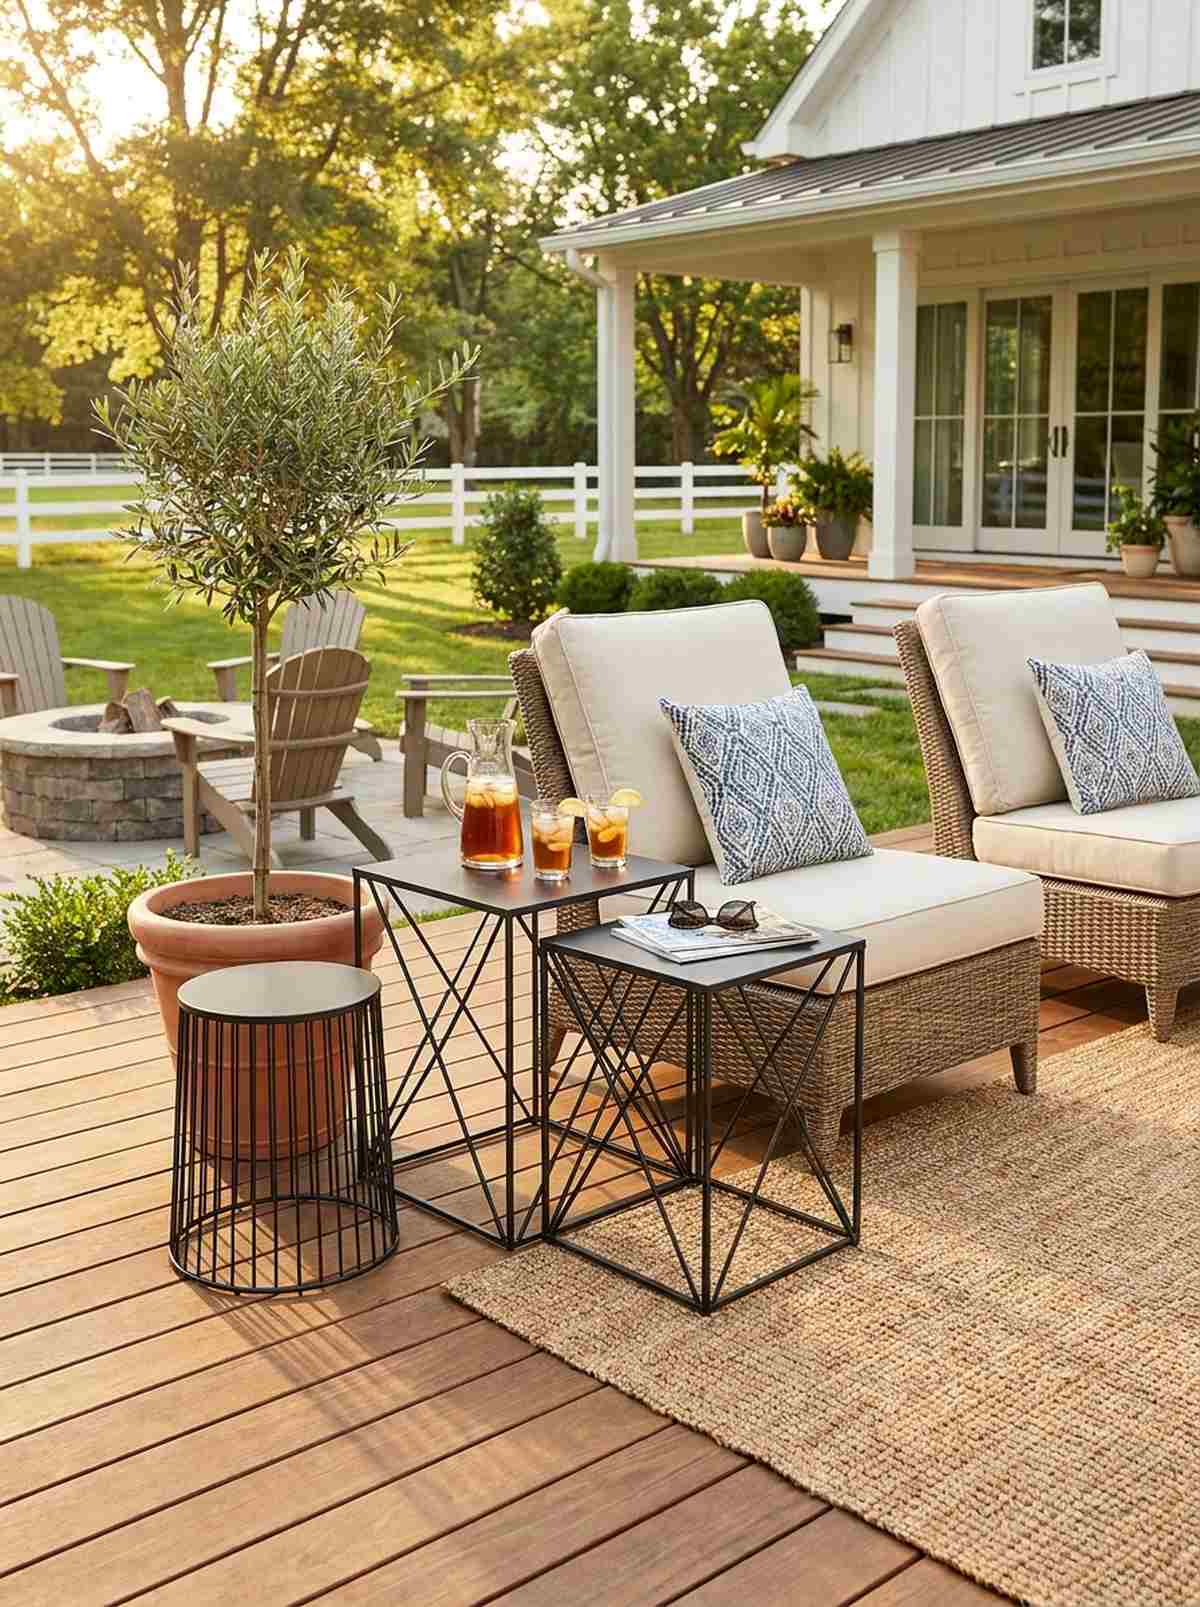
Providing instant tiered surface area, a graduated outdoor nesting table set feels incredibly clever and spatially efficient. Perfect for tucking beside lounge chairs where drink space is desperately needed.
Dragging one massive coffee table around is exhausting and leaves people at the edges without a place for their glass. A staggered trio of overlapping tables looks far more expensive than it is, giving you three distinct serving zones that collapse into a single tiny square when the party ends. Powder-coated steel silhouettes keep the visual weight ultra-light.
You can snag a sleek nesting trio for $80–$180. Pin this to your small patio hack board!
- Key Materials: Powder-coated steel frames, geometric wireframes
- Vibe / Style: Sharp geometric utility
- Difficulty: Zero setup
- Budget Breakdown: Table Trio: $120 | Decor: $30
- Creator’s Tip: Pull the smallest table out completely and use it as a dedicated plant stand to give the arrangement permanent vertical height.
- Smart Sourcing: Powder-coated metal nesting side tables (set of 3) and outdoor-rated geometric metal planters.
28. Folding Furniture Ensemble
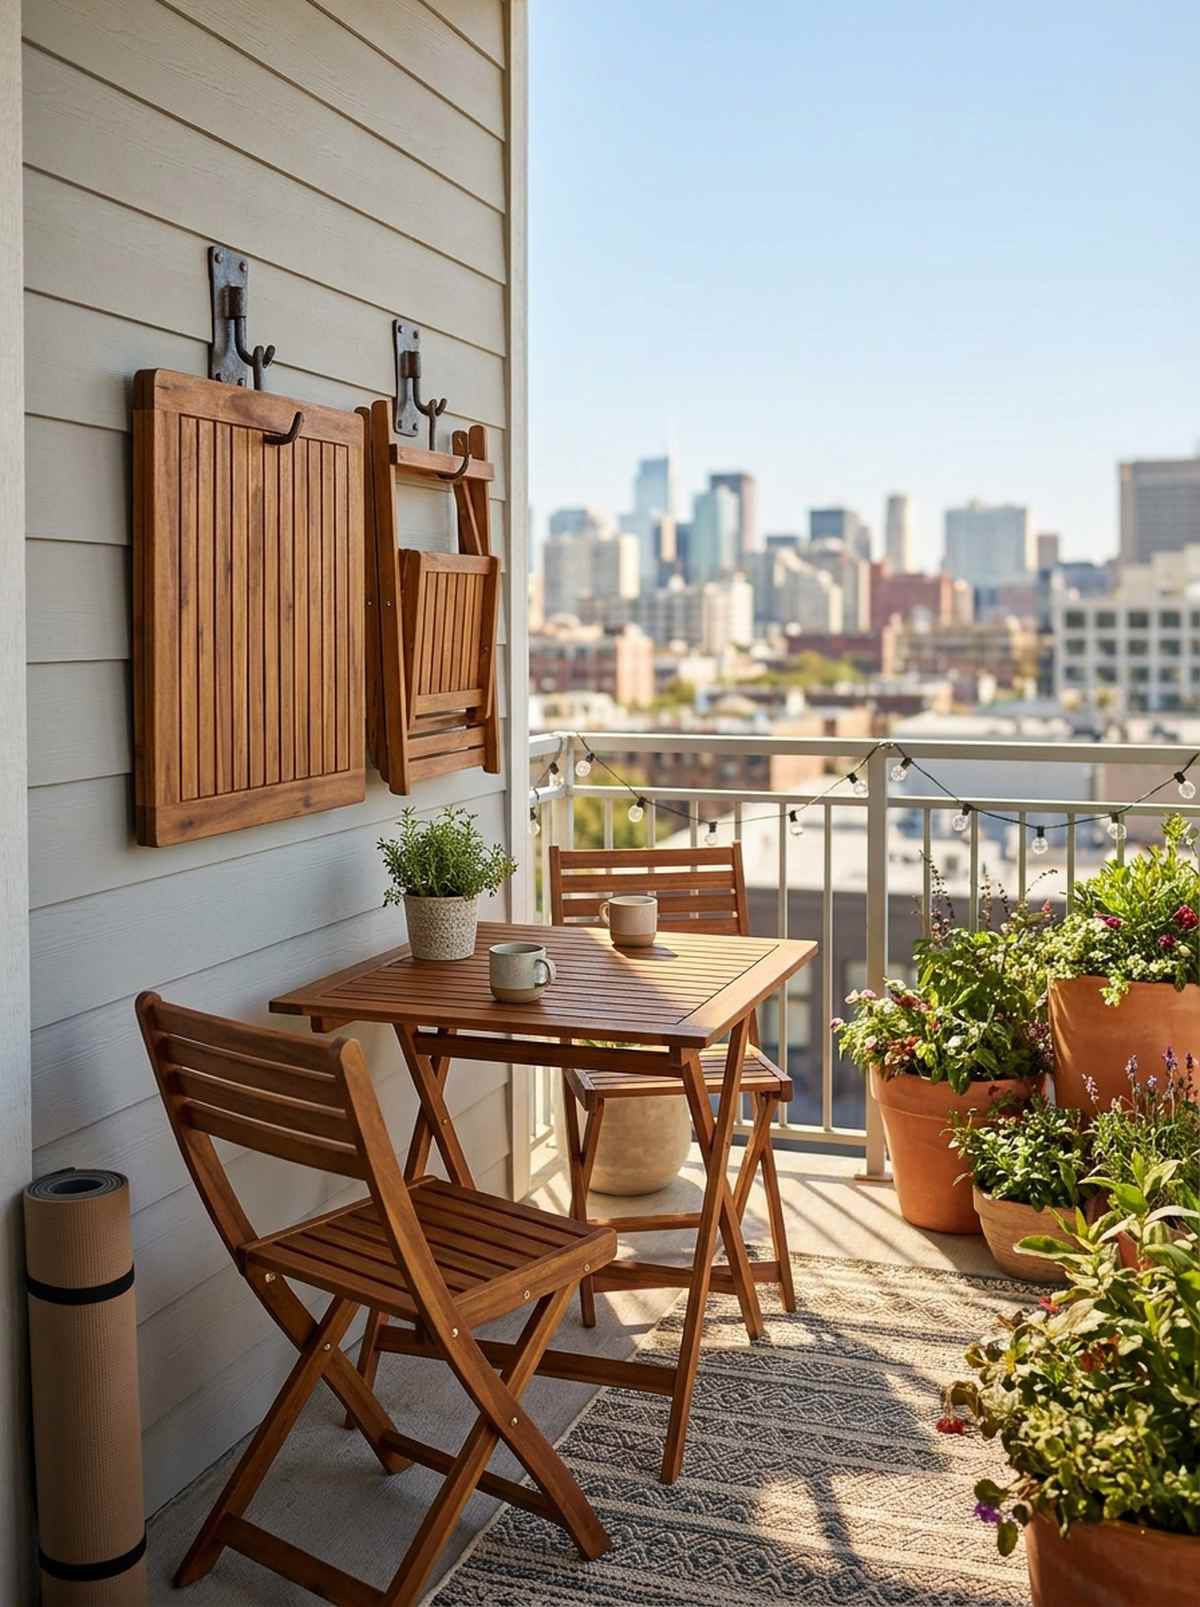
Disappearing completely on command, a collapsible wooden patio dining set feels like a secret weapon for tiny balconies. Ideal for spaces where you need a clear floor for morning yoga but a full table by dinner.
Leaving a full-sized setup out 24/7 on a 6×8 balcony completely suffocates the space. Utilizing commercial-grade locking piano hinges gives a designer-level finish while allowing a solid wood table to flatten down to a mere 6 inches thick. Steer clear of cheap pine and demand eucalyptus or acacia to prevent snapping.
A quality folding wood set costs $150–$350. A fantastic, space-saving investment that lasts years with oiling.
- Key Materials: Treated acacia wood, commercial-grade locking hinges
- Vibe / Style: Portable rustic bistro
- Difficulty: Easy fold-out action
- Budget Breakdown: Folding Set: $200 | Maintenance Oil: $20
- Creator’s Tip: Mount heavy-duty wall hooks on your exterior siding so the folded set hangs beautifully off the ground like wooden art.
- Smart Sourcing: Pre-sealed acacia wood folding patio sets and heavy-duty garage wall storage hooks.
29. Convertible Bench to Picnic Table
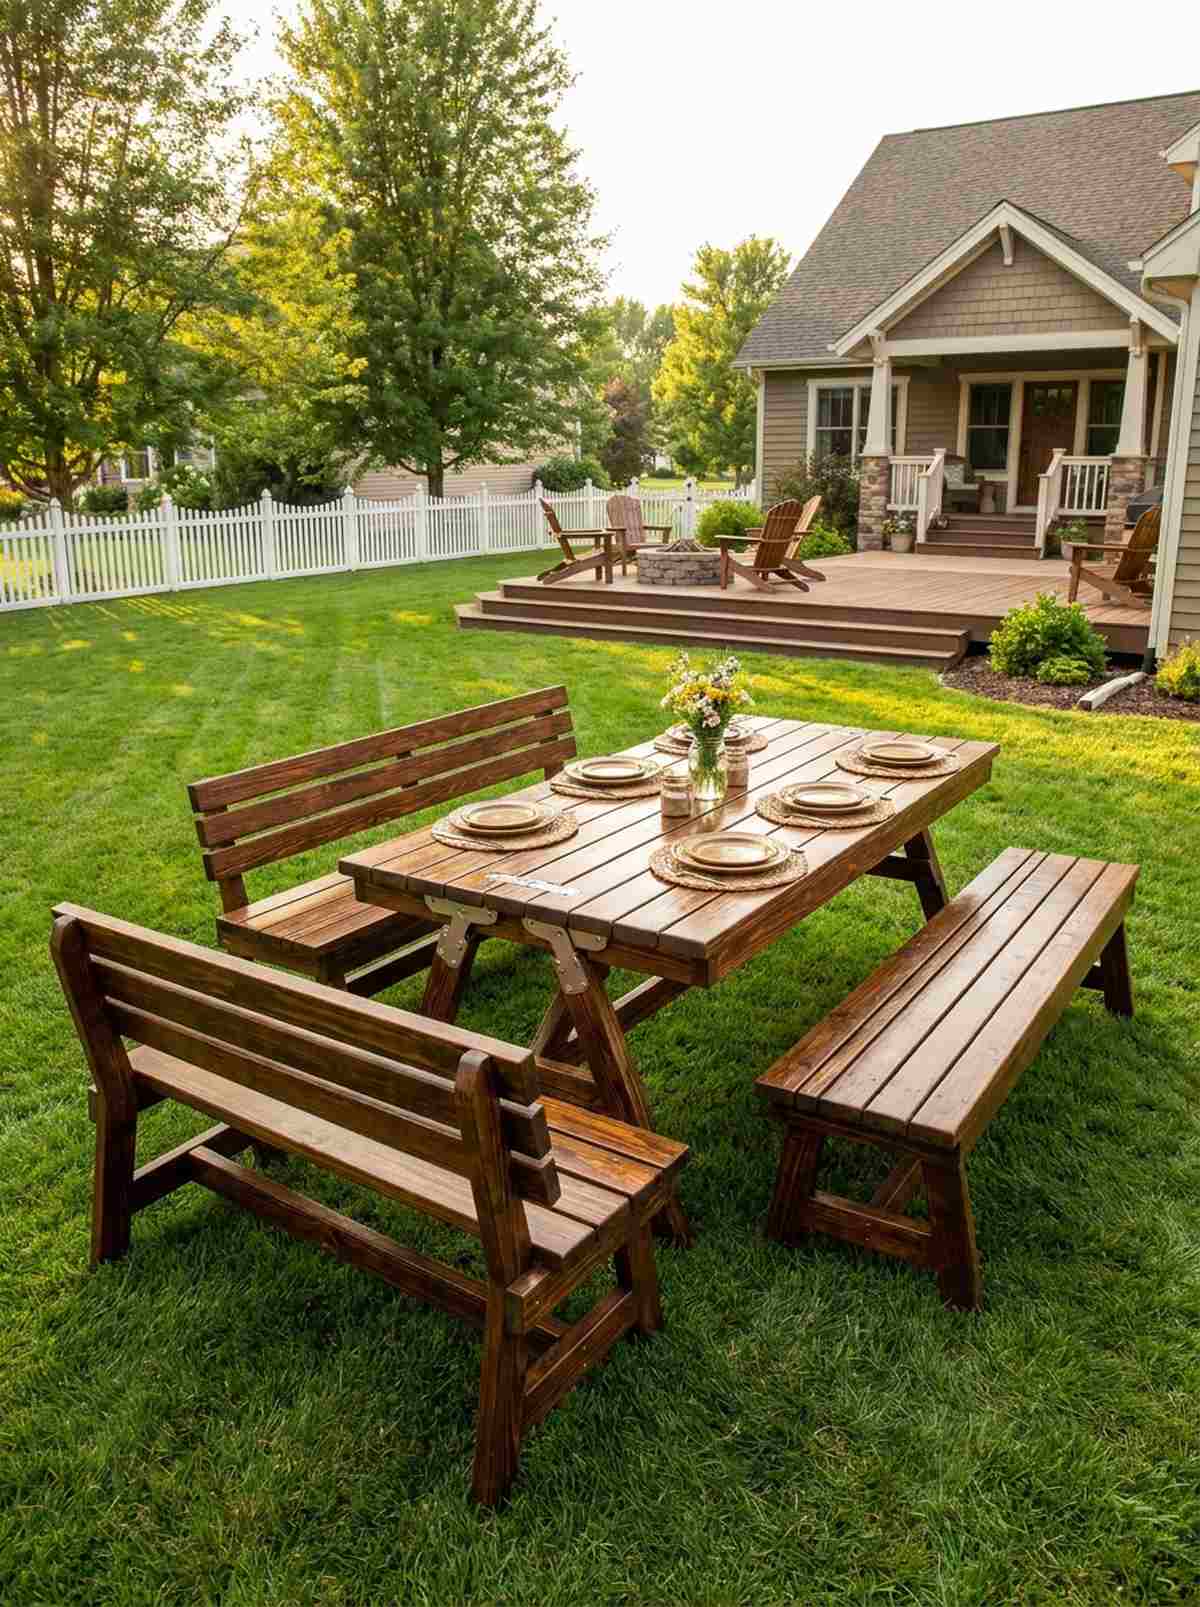
Executing a literal transformer trick, an innovative folding picnic bench hybrid feels mind-blowingly functional. It fits perfectly into grassy side yards where you only need a table 10% of the time.
Massive A-frame picnic tables are clunky eyesores that permanently kill your grass underneath. A hinged dual-mode mechanism creates an ultra-luxurious footprint by sitting as two facing park benches daily, then instantly rotating upward to lock into a 6-person dining surface. It requires zero tools and takes about 10 seconds to flip.
This convertible mechanism setup costs $200–$400. Save this brilliant engineering hack to your DIY board!
- Key Materials: Pivoting metal hinges, stained wood planks
- Vibe / Style: Smart park-style engineering
- Difficulty: Medium hardware assembly
- Budget Breakdown: Convertible Bench Kit: $250 | Wood Sealer: $30
- Creator’s Tip: Swap the standard zinc bolts for stainless steel carriage bolts during assembly so the pivot points never rust shut.
- Smart Sourcing: Convertible bench-to-table outdoor kits and marine-grade stainless steel carriage bolts (bulk pack).
This next accessory completely eliminates the need for a massive outdoor kitchen, saving you thousands…
30. Rolling Bar Cart as Side Table
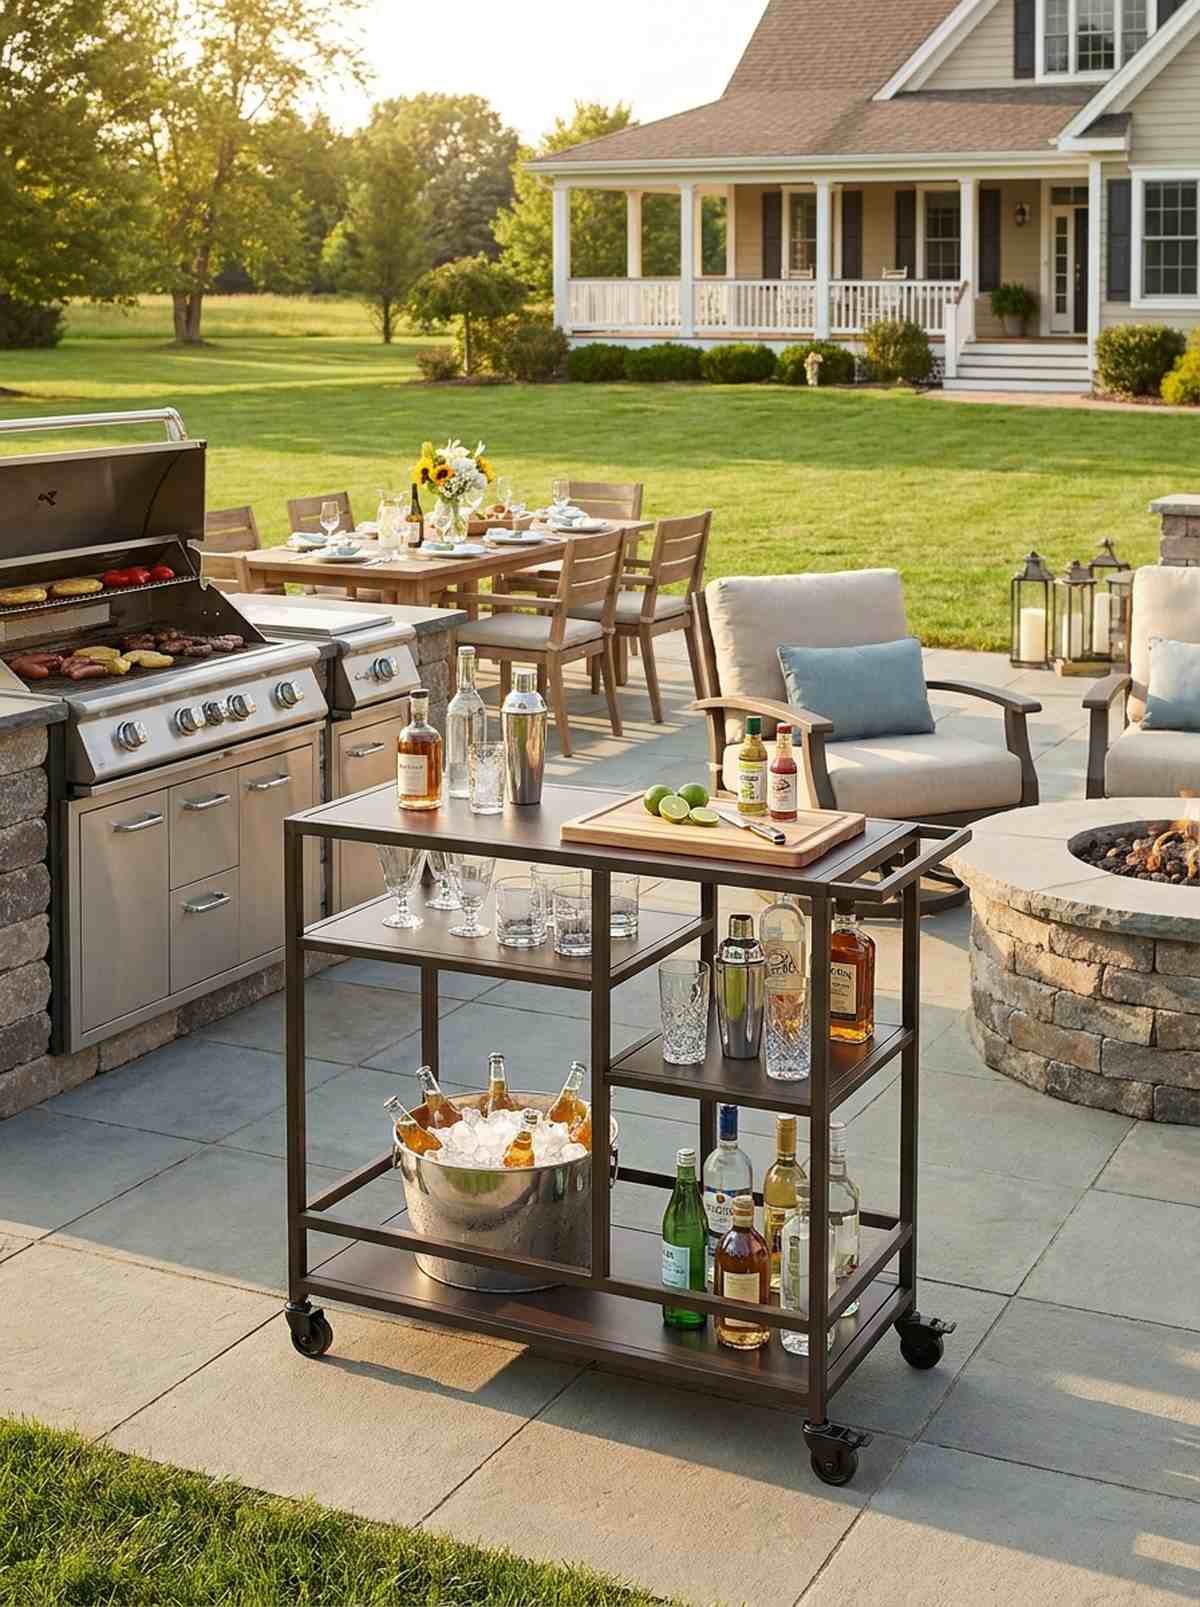
Gliding seamlessly across the patio, a tiered rolling outdoor bar cart feels like a high-end tableside service. It operates as the ultimate wingman connecting the grill, the dining table, and the lounge.
Constantly running back inside to fetch ketchup, ice, and drinks completely ruins the hosting experience. Introducing a wheeled utility cart delivers a surprisingly premium look while acting as a mobile prep station and side table all in one. Locking casters are mandatory so it doesn’t roll away during a wind gust.
A weather-resistant cart runs $100–$250. An essential mobile upgrade for any serious host.
- Key Materials: Rust-proof metal frame, heavy-duty locking casters
- Vibe / Style: Mobile resort hospitality
- Difficulty: Simple wheel attachment
- Budget Breakdown: Rolling Cart: $130 | Bar Accessories: $50
- Creator’s Tip: Use the bottom shelf exclusively for heavy items like an ice bucket to lower the center of gravity and prevent tipping.
- Smart Sourcing: Weather-resistant rolling outdoor bar carts and heavy-duty locking polyurethane casters.
Specialty Arrangements
Standard layouts fail when you introduce weird angles, drastic elevation changes, or aggressive landscaping. These specialty configurations solve complex backyard geometry with highly customized structural designs.
31. Built-in Seating Perimeter
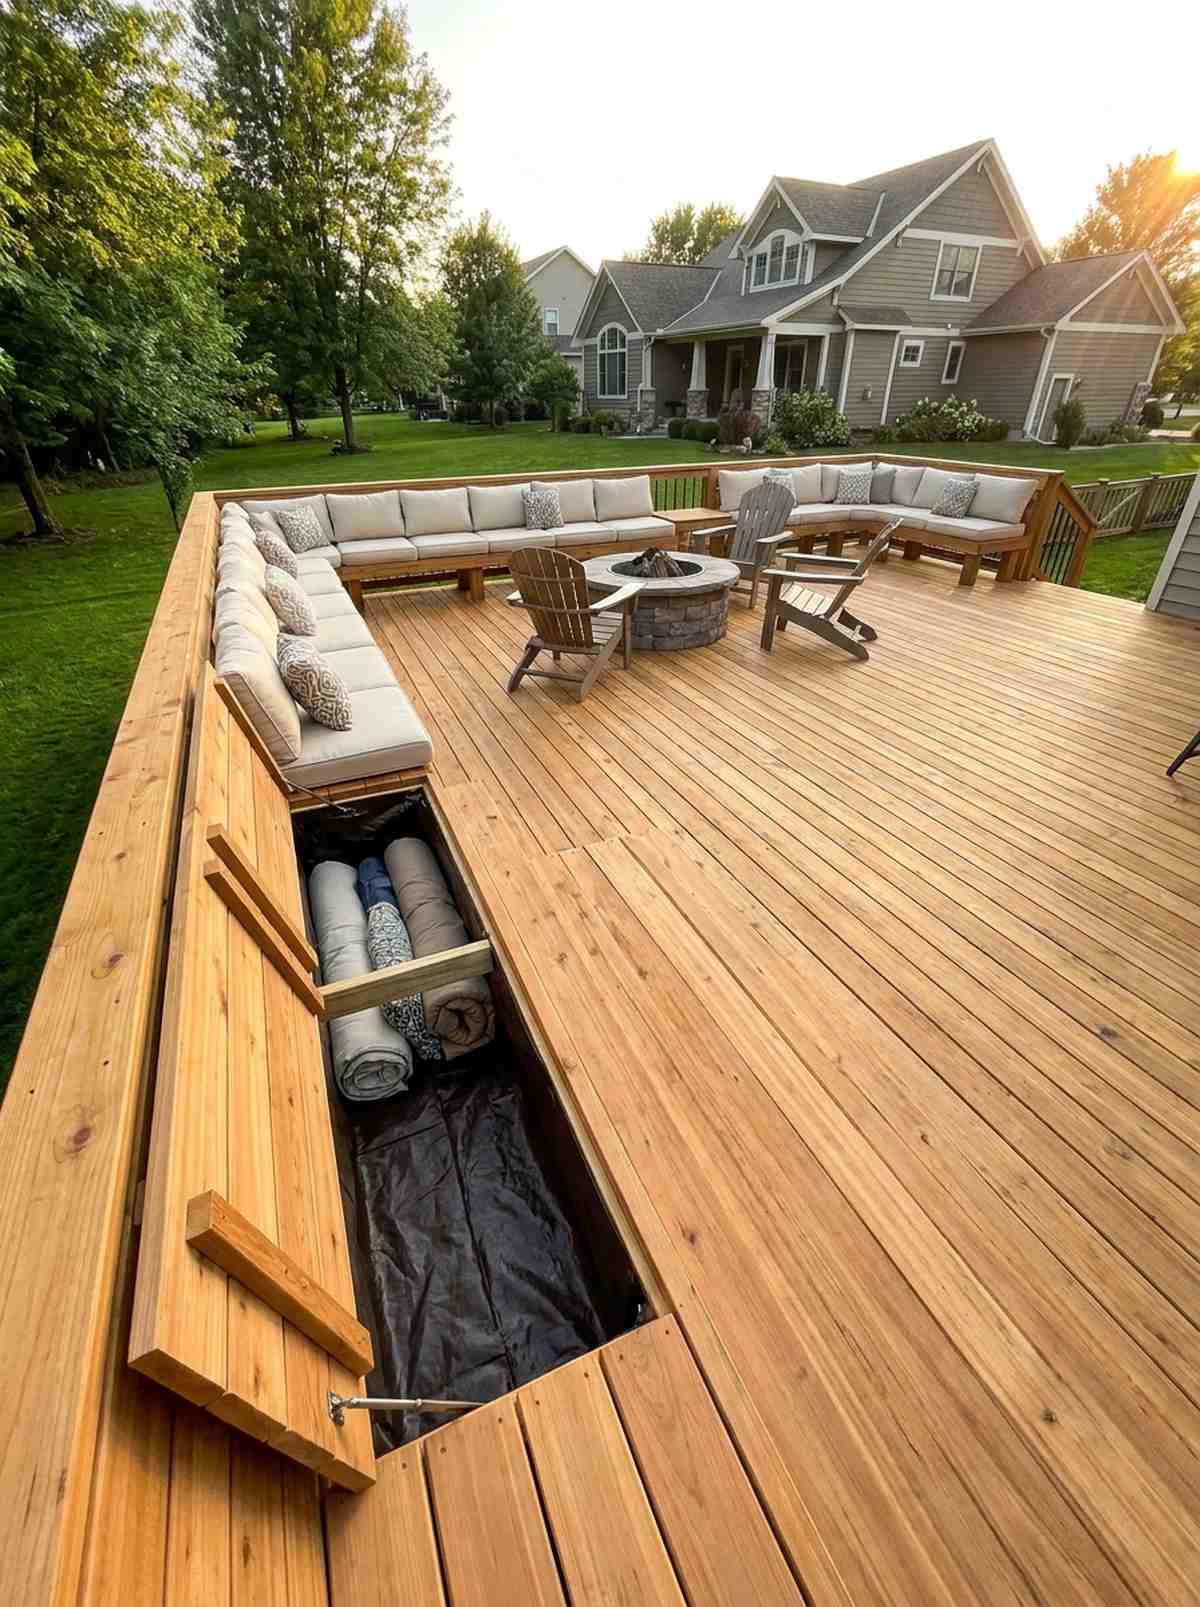
Integrating seamlessly into the architecture, a permanent deck perimeter bench feels incredibly custom and vastly expansive. This layout physically prevents your garden patio set from blocking the prime walking paths.
Freestanding chairs pushed near the edge of a deck are terrifying and notoriously easy to tip over. Constructing continuous wooden benches straight into the railing gives a designer-level finish while acting as a massive safety barrier and seating for twenty people. The hollow base underneath becomes a massive hidden vault for cushions.
Lumber and labor for this will cost $400–$1,200. Save this blueprint if you are redesigning your wooden deck!
- Key Materials: Decking boards, heavy structural joists, lift-hinges
- Vibe / Style: Custom architectural grandstand
- Difficulty: Advanced carpentry project
- Budget Breakdown: Lumber: $500 | Hardware/Hinges: $100
- Creator’s Tip: Line the inside of the storage bench with thick waterproof tarp material so your cushions don’t get destroyed by moisture seeping through the slats.
- Smart Sourcing: Heavy-duty gas strut lift hinges (for heavy lids) and commercial-grade waterproof tarp rolls.
32. Fire Pit Conversation Circle
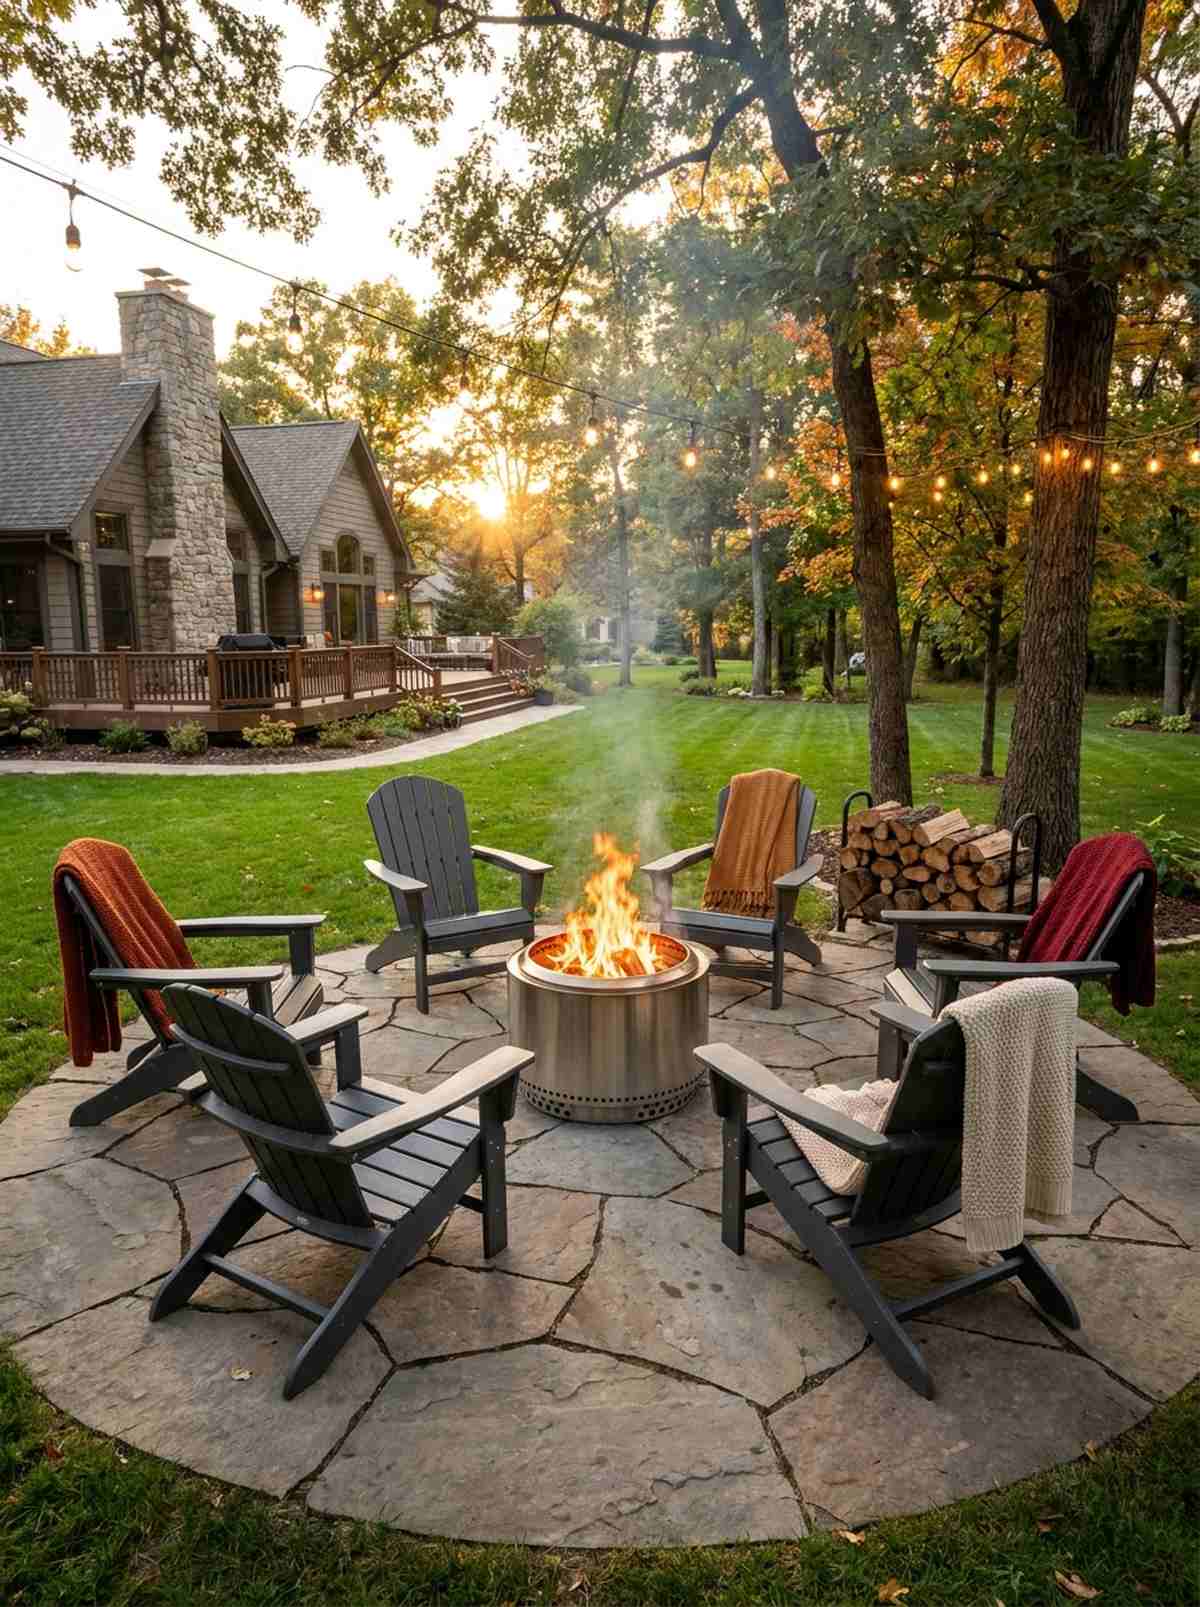
Drawing everyone toward a hypnotic center, a circular Adirondack fire pit setup feels deeply nostalgic and ruggedly cozy. It completely commands an open grass area or a large circular stone pad.
Shoving chairs into a square around a round fire creates bizarre dead zones where nobody can reach the heat. A perfect 14-foot radial circle looks far more expensive than it is, ensuring every single guest gets equal warmth and eye contact. The wide, flat armrests of Muskoka chairs completely eliminate the need for extra side tables.
A ring of solid chairs and a fire pit runs $600–$1,500. A must-have layout for crisp autumn evenings.
- Key Materials: Slanted Adirondack chairs, central heat source
- Vibe / Style: Classic cabin campfire
- Difficulty: Easy radial placement
- Budget Breakdown: 6 Chairs: $800 | Fire Pit: $300
- Creator’s Tip: Use polywood resin chairs instead of real wood; they never splinter, never need painting, and can sit near extreme heat safely.
- Smart Sourcing: All-weather polywood Adirondack chairs (set of 2) and smokeless stainless steel fire pits.
33. Pergola-Integrated Dining
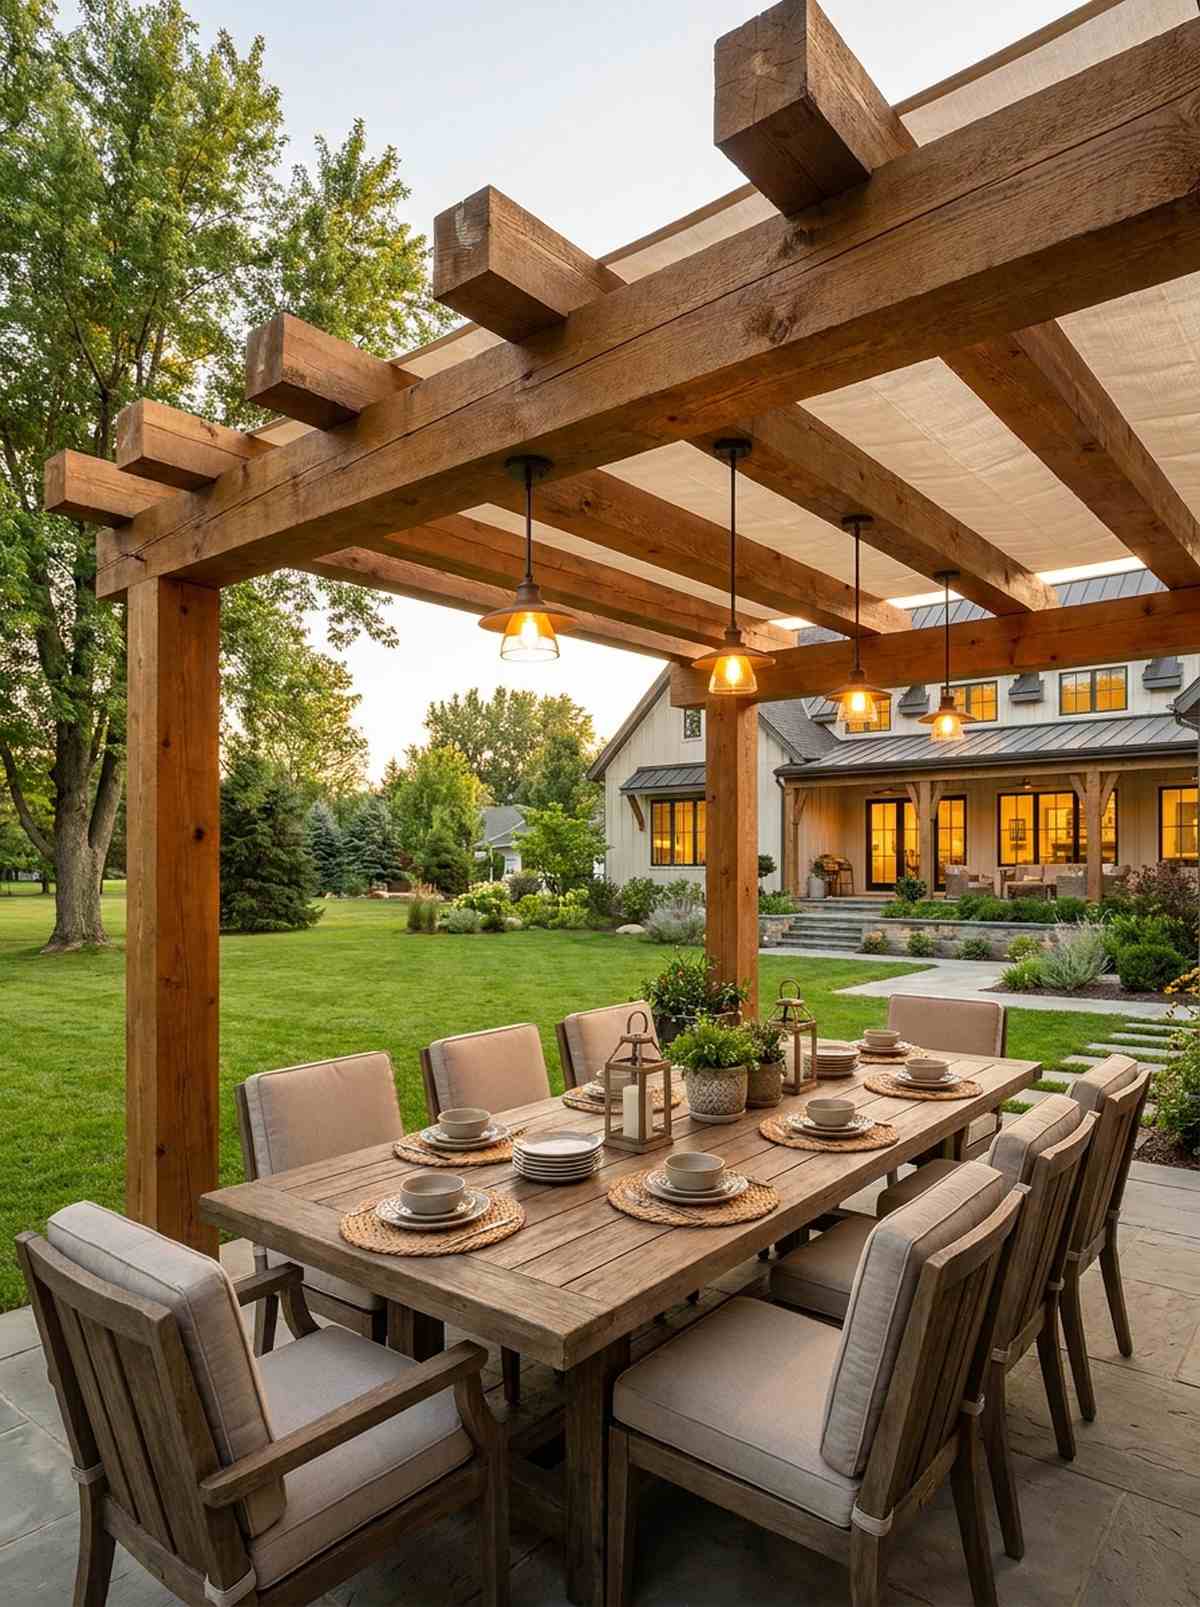
Framing the dining experience with heavy overhead architecture, a pergola-covered patio table feels like an exclusive outdoor dining room. It traps the intimacy perfectly in expansive, open yards.
Floating a table in the middle of a massive lawn makes guests feel wildly exposed and uncomfortable. Centering the table precisely under massive wooden crossbeams creates an ultra-luxurious footprint by establishing a defined “ceiling” out in nature. Hanging warm pendant lights directly down from the beams solidifies the room-like atmosphere.
Adding a pergola structure and table costs $1,000–$3,000. Pin this to your luxury backyard renovation board!
- Key Materials: Heavy timber pergola, large dining anchor table
- Vibe / Style: Defined architectural sanctuary
- Difficulty: Major structural build
- Budget Breakdown: Pergola Kit: $1200 | Lighting/Decor: $200
- Creator’s Tip: Install a retractable canvas shade track across the top beams so you can physically block the blistering midday sun.
- Smart Sourcing: Pre-cut cedar wood pergola kits and retractable waterproof canopy shade covers.
34. Sunken Lounge Pit
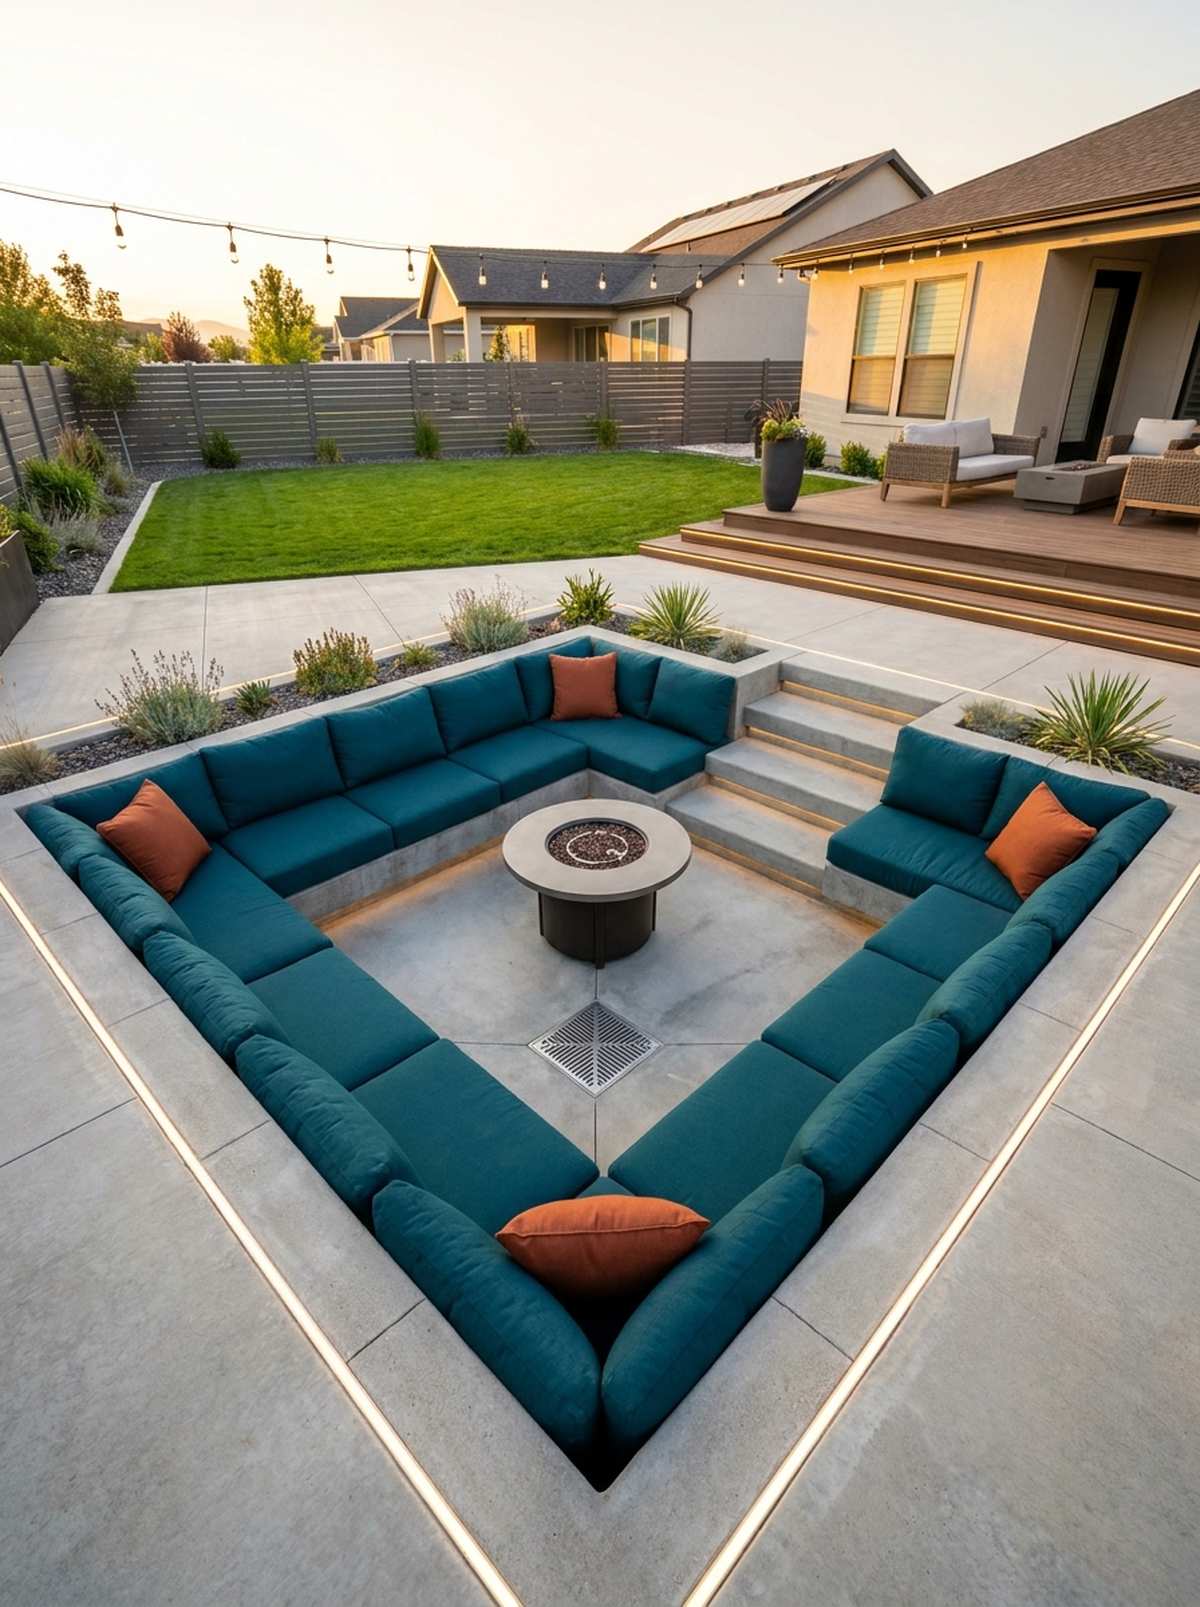
Sinking deep into the earth for ultimate wind protection, an excavated conversation pit feels incredibly retro and highly bespoke. This layout demands to be the jaw-dropping centerpiece of a modern concrete hardscape.
Building upward blocks sightlines across your yard, making the space feel instantly smaller. Dropping the seating area 24 inches below grade delivers a surprisingly premium look, adding intense psychological coziness and a sleek, uninterrupted horizon line. You must install a flawless French drain system, or this will literally become a swimming pool.
Excavation and masonry for this push the budget to $2,000–$5,000. Save this for your ultimate dream home build!
- Key Materials: Retaining wall blocks, heavy drainage gravel, custom cushions
- Vibe / Style: 1970s sunken luxury
- Difficulty: Expert excavation/masonry
- Budget Breakdown: Masonry/Digging: $2000 | Custom Cushions: $800
- Creator’s Tip: Pitch the concrete floor at a 2-degree angle straight toward the center drain grate to guarantee zero standing water.
- Smart Sourcing: Heavy-duty French drain channel grates and custom-cut outdoor reticulated foam (bulk).
Most backyard designs ignore vertical space entirely. This next multi-level approach changes everything…
35. Multi-Level Deck Zones
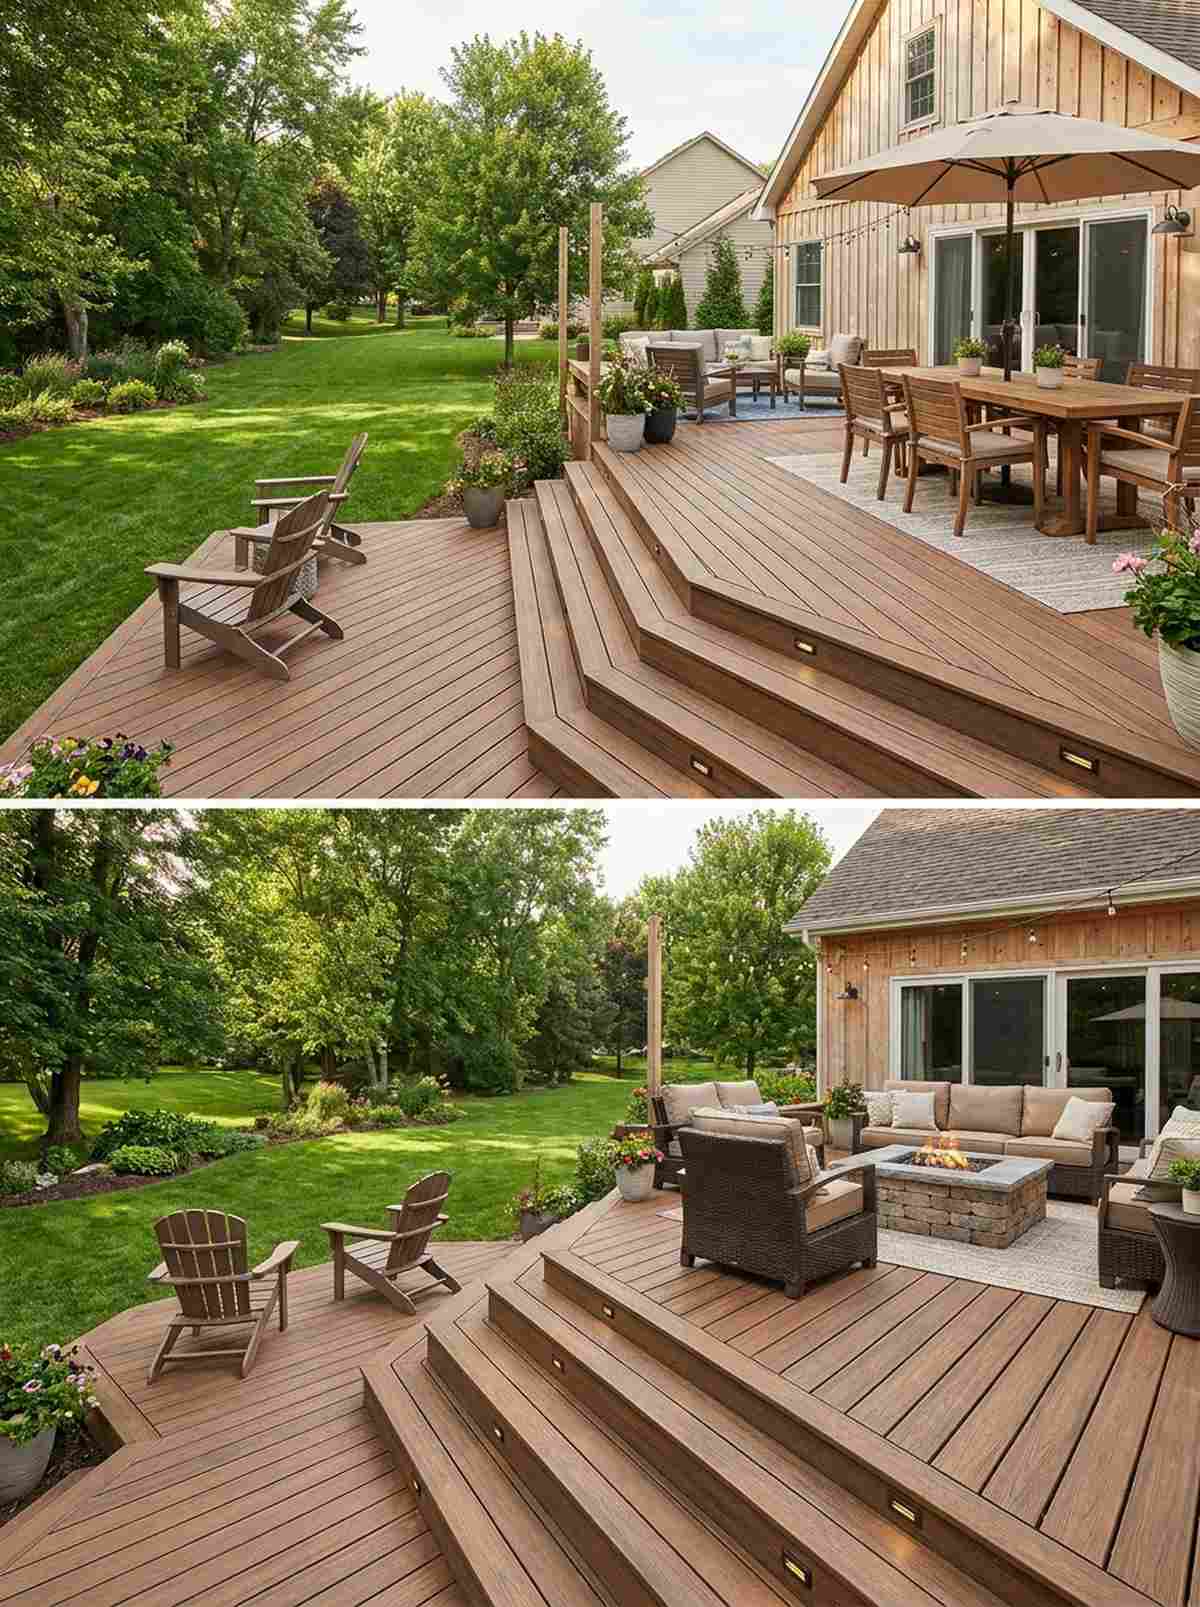
Stair-stepping down the landscape, a tiered multi-zone deck layout feels incredibly dynamic and organized. It naturally completely separates the chaotic dining zone from the quiet, sleepy lounge area.
Cramming everything onto one flat platform makes the space feel like a crowded furniture showroom. Using an 8-inch elevation drop gives a designer-level finish, creating invisible walls that psychologically separate the functions without blocking the view. The wide, sweeping transitional stairs double brilliantly as casual perch seating during massive parties.
Building out multiple tiers costs $2,500–$6,000+. A phenomenal way to handle a sloped backyard.
- Key Materials: Tiered framing joists, composite decking boards
- Vibe / Style: Structured topographic flow
- Difficulty: Advanced structural carpentry
- Budget Breakdown: Framing: $1000 | Composite Boards: $2000
- Creator’s Tip: Run the deck boards on the upper level horizontally, and the lower level diagonally, to visually emphasize the distinct zones.
- Smart Sourcing: Fade-resistant composite decking boards (bulk pack) and hidden deck fastener clip kits.
36. Poolside Lounge with Dining Bar
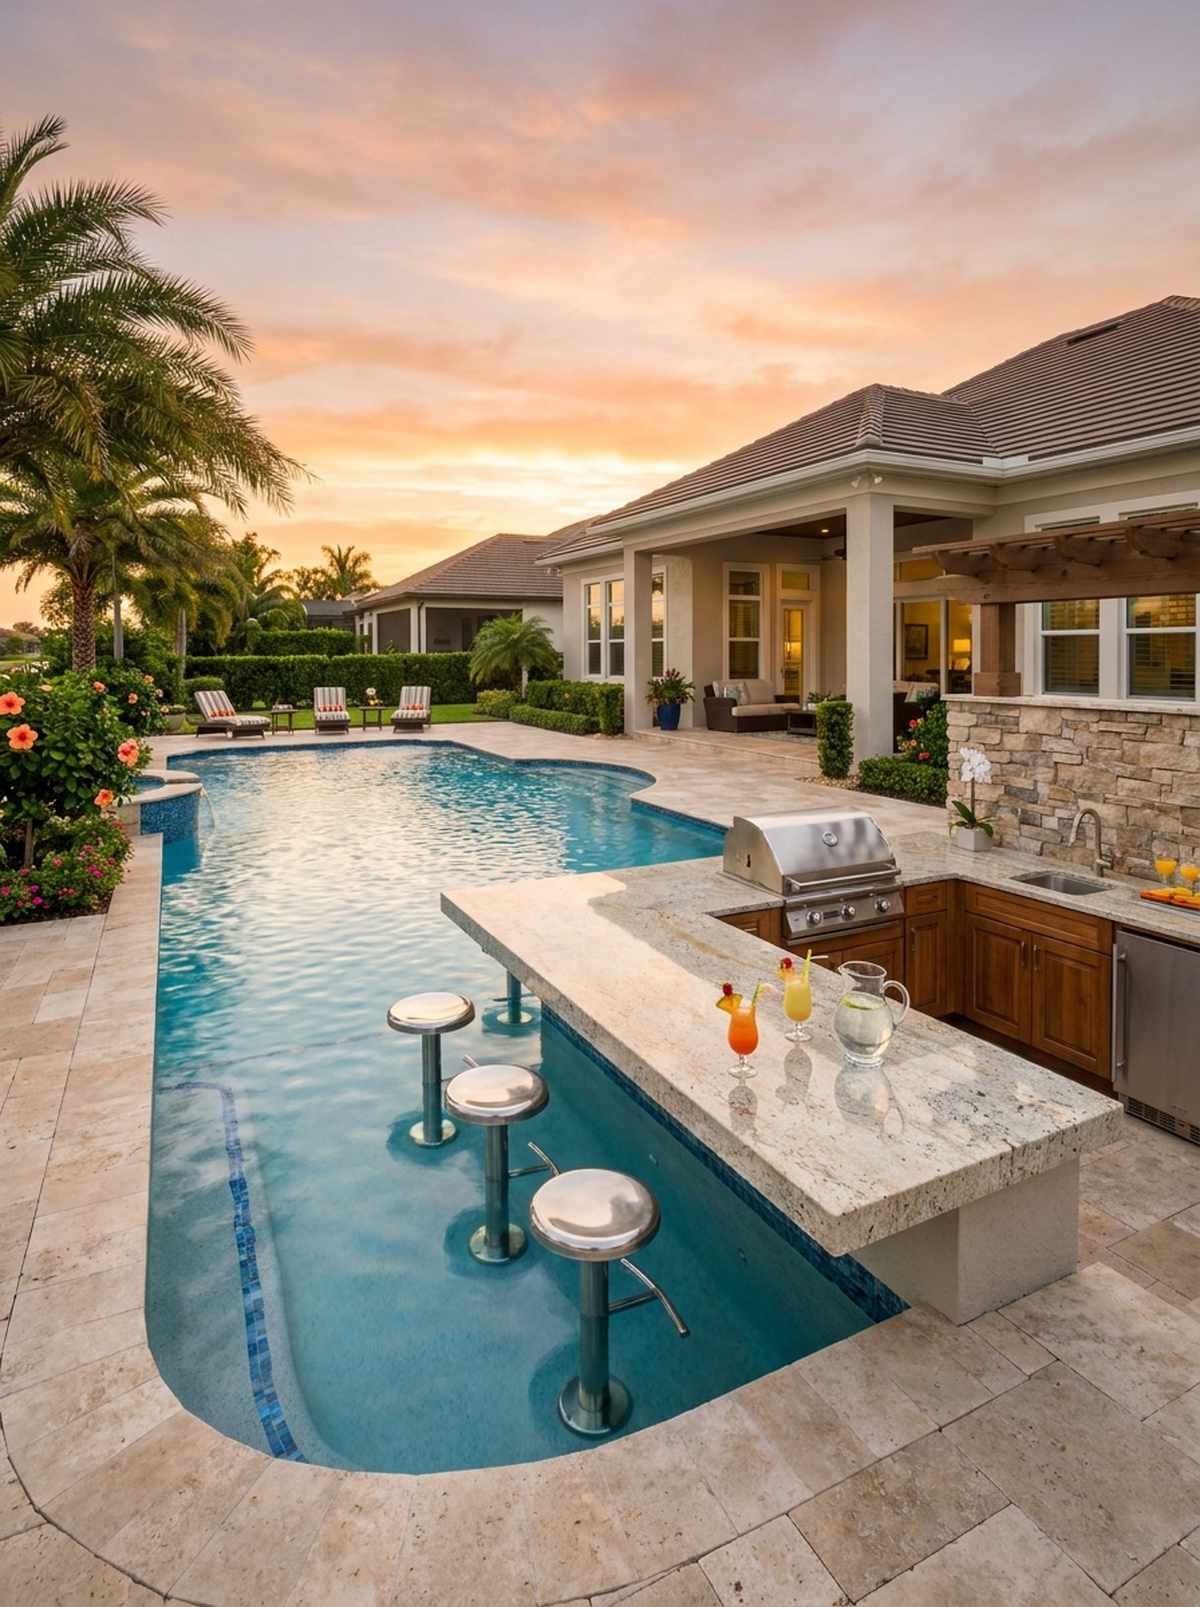
Merging the water directly with the patio, a submerged swim-up dining bar feels like an ultra-exclusive Caribbean resort. The absolute pinnacle of luxury for homes with existing shallow pool ledges.
Forcing wet guests to dry off just to grab a drink is a major buzzkill. Sinking stainless steel stools into 18 inches of water while placing the bartender on the dry deck creates an ultra-luxurious footprint that bridges both worlds perfectly. Every single piece of hardware must be marine-grade or it will rust out in weeks.
Retrofitting a wet bar runs $1,500–$3,500. Pin this to your ultimate pool design inspiration board!
- Key Materials: Marine-grade steel stools, waterproof stone counter
- Vibe / Style: Tropical swim-up exclusivity
- Difficulty: Expert pool contracting
- Budget Breakdown: Submerged Stools: $800 | Stone Counter: $1200
- Creator’s Tip: Ensure the dry-side overhang is at least 14 inches deep so swimmers don’t slam their knees into the pool wall underwater.
- Smart Sourcing: Marine-grade stainless steel in-pool barstools and waterproof epoxy stone sealers.
37. Vertical Garden Seating Wall
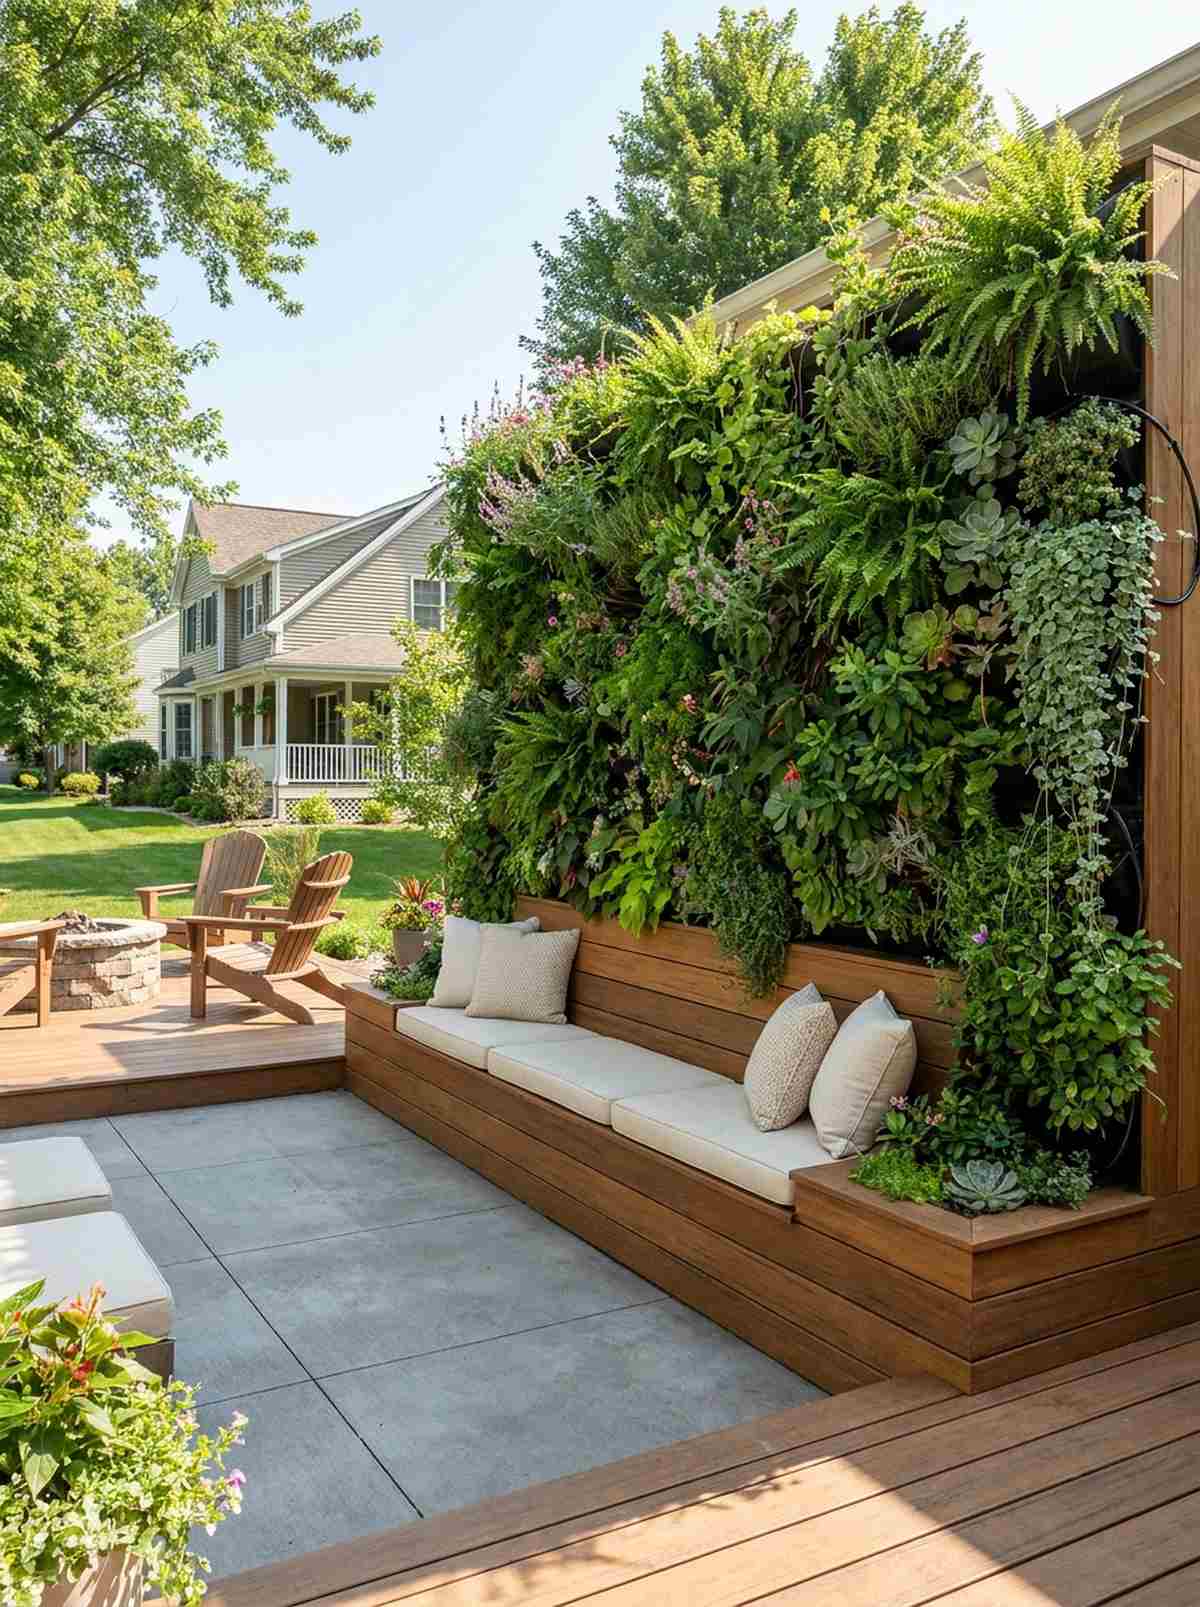
Exploding with lush, living greenery, a bench backed by a vertical planter wall feels like an immersive botanical escape. It provides massive visual impact and critical privacy in dense urban environments.
Staring at a blank vinyl fence while you eat is incredibly depressing. Integrating bench seating directly into a towering living wall looks far more expensive than it is, cooling the microclimate through natural plant transpiration. Sourcing miniature garden supplies and automated drip irrigation stops the wall from turning into a dead, brown eyesore.
Constructing a living wall bench costs $500–$1,200. The ultimate way to inject life into a sterile concrete patio.
- Key Materials: Waterproofed retaining wall, modular vertical planters, drip lines
- Vibe / Style: Immersive urban jungle
- Difficulty: Advanced plumbing and planting
- Budget Breakdown: Planter Wall: $400 | Seating/Irrigation: $300
- Creator’s Tip: Install a heavy-duty moisture barrier between the soil pockets and the back wall to prevent catastrophic rot on your house siding.
- Smart Sourcing: Modular vertical garden planter kits (with drip lines) and heavy-duty waterproof wall membrane rolls.
Bringing Your Garden Patio Set to Life
Executing the perfect luxury aesthetic isn’t about blind spending; it’s about matching one of these 35+ blueprints directly to your spatial geometry. Whether you are hunting for commercial-grade aluminum starter kits for a modular lounge or pouring a raw concrete garden patio table, your layout dictates your success. By copying these exact traffic flows and heavily prioritizing UV-resistant premium material sourcing, you guarantee an upscale, fade-proof entertaining zone that looks incredibly expensive all season long.
Frequently Asked Questions
How much space should I leave between my garden patio table and surrounding furniture?
To avoid a cramped, cheap-looking layout, you must enforce a strict 36-42 inch buffer between your table edge and any surrounding walls. High-traffic arteries feeding into your outdoor kitchen require a minimum of 48 inches to prevent bottlenecking. If you’re working with a tiny footprint, ditch the massive dining sets and invest in premium drop-leaf tables or modular starter kits to reclaim that critical walking space.
What garden patio set materials work best for full sun exposure?
Cheap plastics and untreated woods will literally disintegrate under heavy UV bombardment. You must upgrade to powder-coated aluminum frames and solution-dyed acrylic textiles to stop brutal color fading. When shopping for a heavy garden patio table, prioritize sintered stone or concrete—these materials laugh at thermal shock and refuse to warp, unlike cheap PVC wicker that turns brittle and shatters after one summer.
Can I combine dining and lounge furniture in one garden patio set configuration?
Absolutely, but you have to use visual anchors to stop it from looking like a messy garage sale. Push your primary garden patio table near the house for easy food transport, then drop a massive, UV-coated outdoor rug 10 feet away to physically define the separate lounge zone. If your square footage is miserable, buy an adjustable-height hybrid table kit that cranks from coffee-table height up to dining height instantly.
How do I arrange patio furniture to encourage conversation?
Linear, stadium-style seating destroys conversation because everyone has to crane their necks sideways. You need to force a radial or U-shaped geometry using modular sectional kits that angle inward toward a central fire pit or low table. Keep the furthest seats exactly 8-10 feet apart; any wider, and you lose the intimacy, forcing guests to awkwardly yell across the patio.
What size garden patio table fits a family of four for regular outdoor dining?
A 48-inch square or 54-inch round garden patio table is the absolute sweet spot, giving four people plenty of room for heavy plates and central serving bowls without banging elbows. If your space is shaped like a bowling alley, grab a 60×36 inch rectangular slat-top table instead. To bulletproof your investment, buy a commercial-grade extendable table so you aren’t forced to buy a whole new set when extra guests show up.