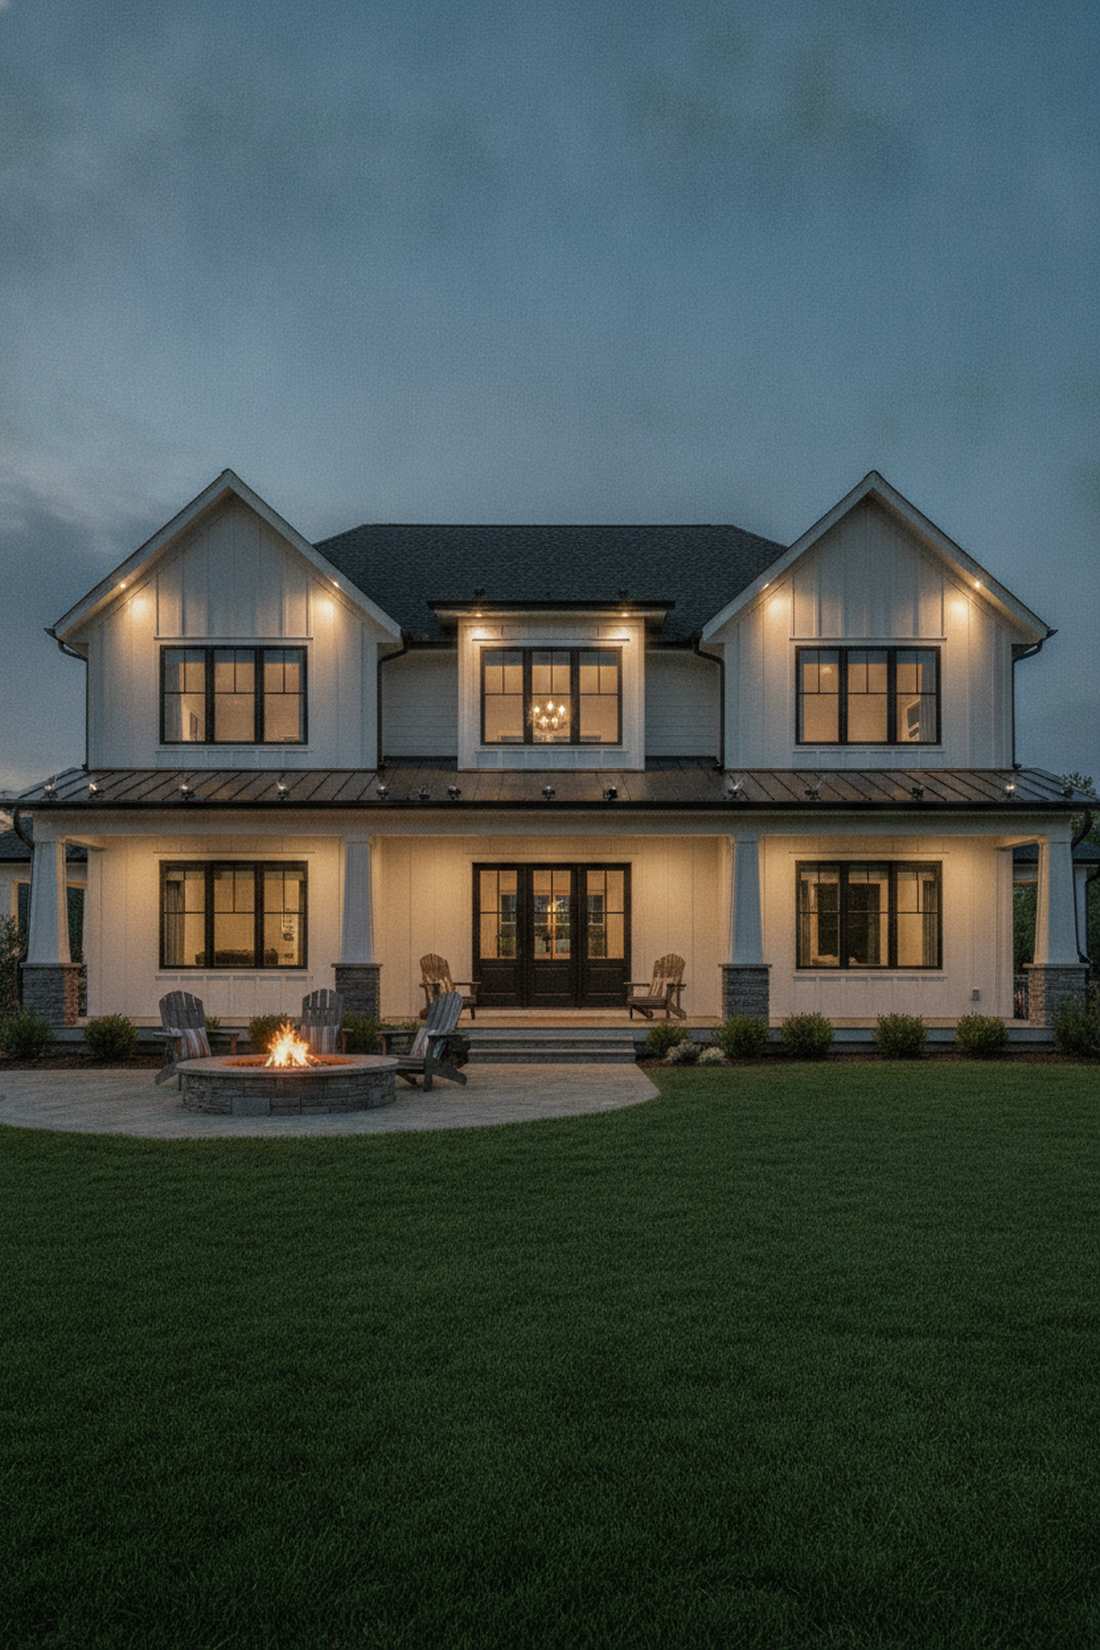
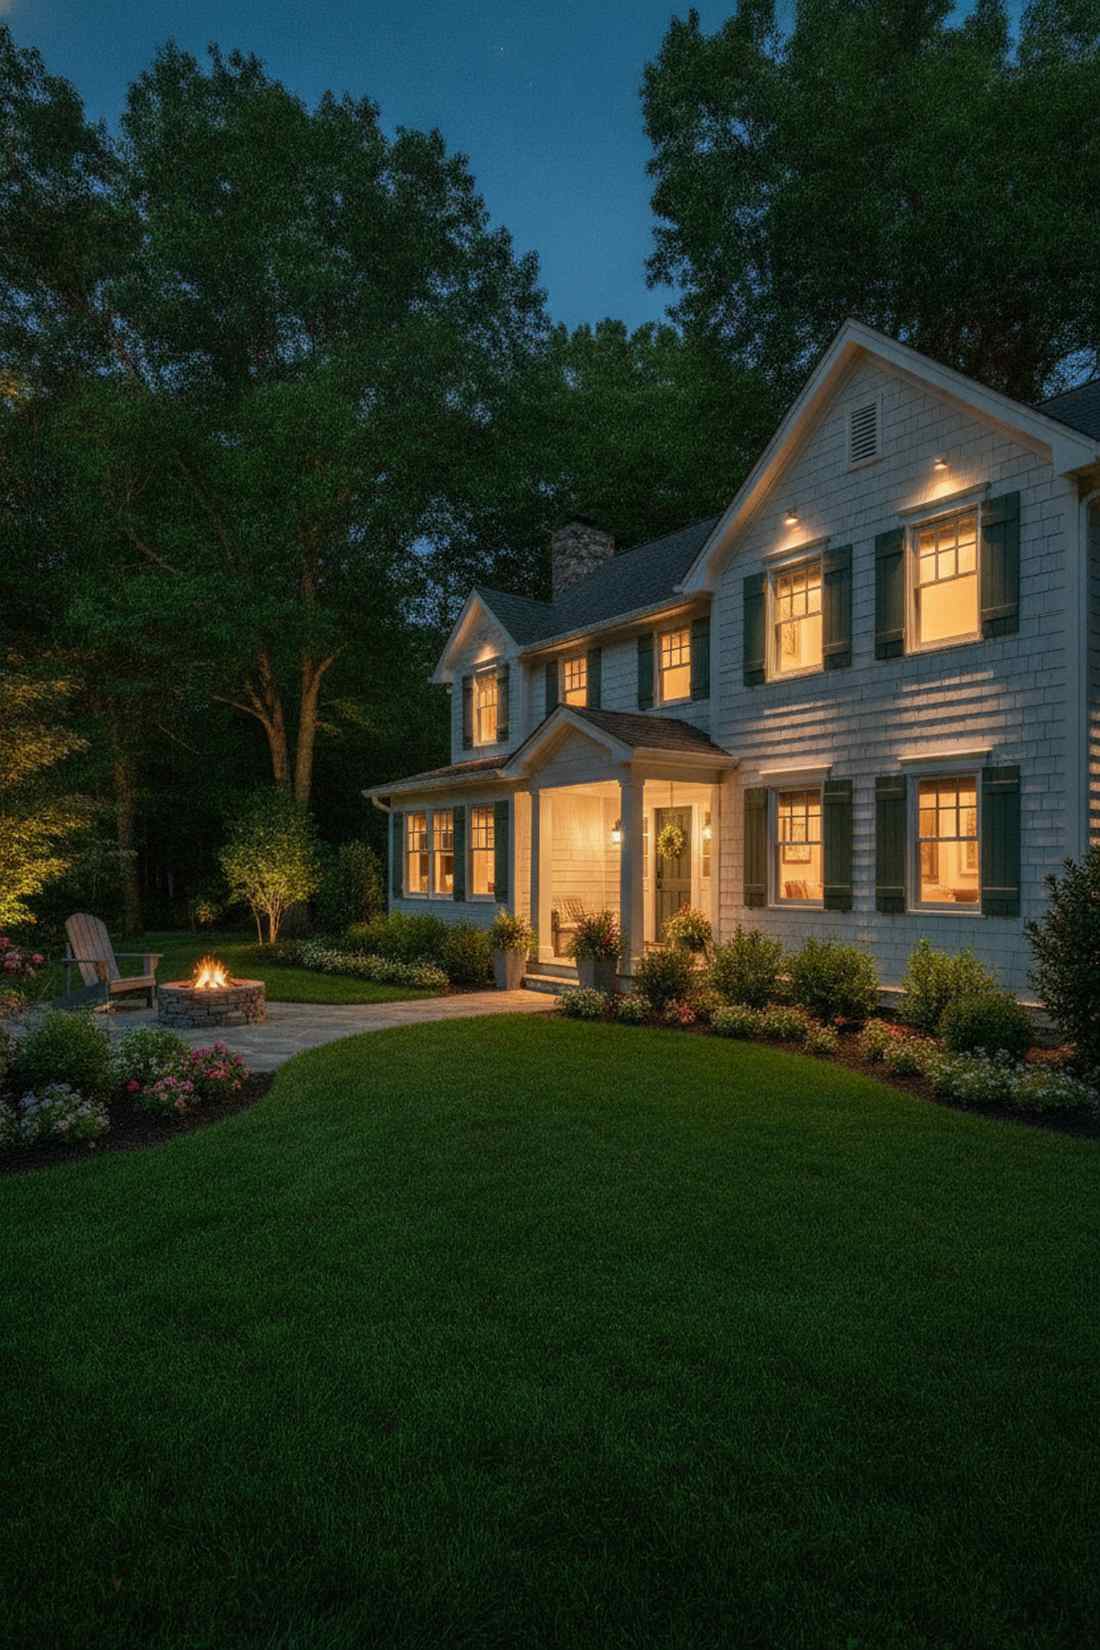
Strategic low voltage garden lights completely dictate your property’s nighttime curb appeal. This exact blueprint breaks down premium sourcing, weather-resistant hardware, and designer-level placements for every budget. Lock in that luxury architectural glow without overpaying for standard fixtures.
Design Snapshot Key Principles
- Voltage Efficiency: 12-15V systems reduce energy consumption by 80-85% compared to line voltage
- Layered Illumination: Combine uplighting, downlighting, and path lighting for depth and dimension
- LED Integration: Solid-state technology delivers 10-20 year lifespan with minimal heat emission
- Strategic Placement: Space fixtures 6-10 feet apart for uniform coverage without over-illumination
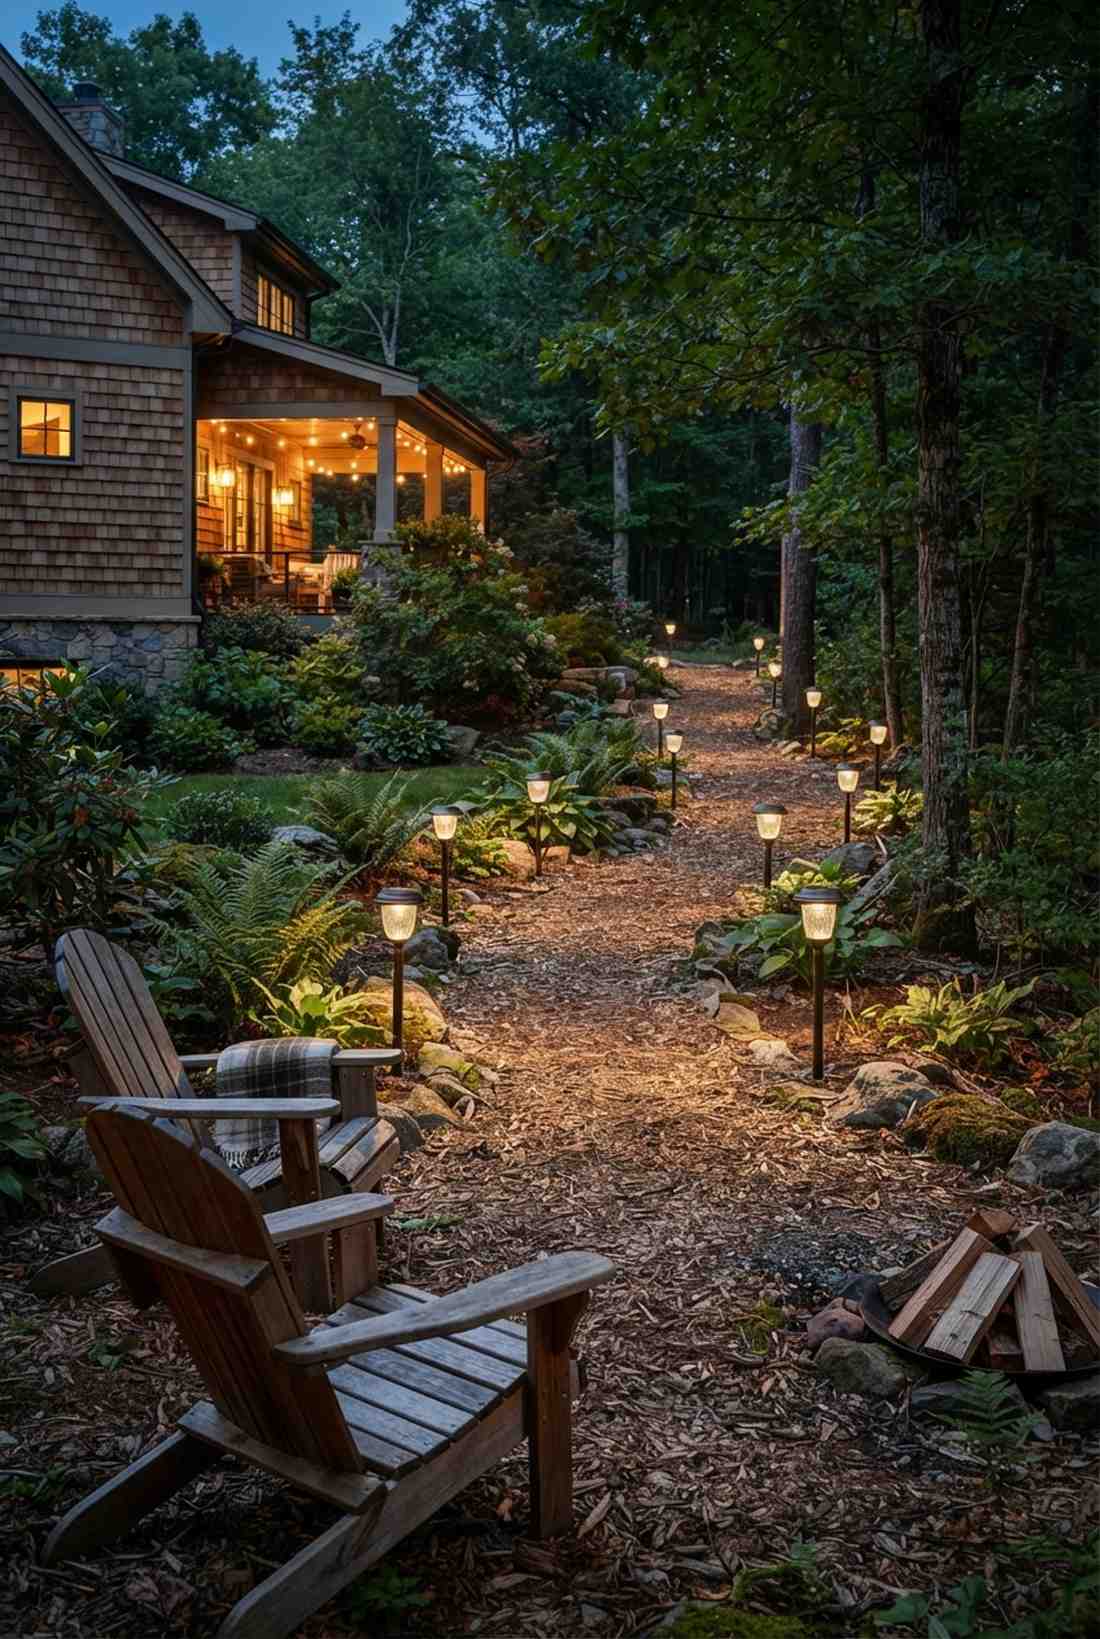
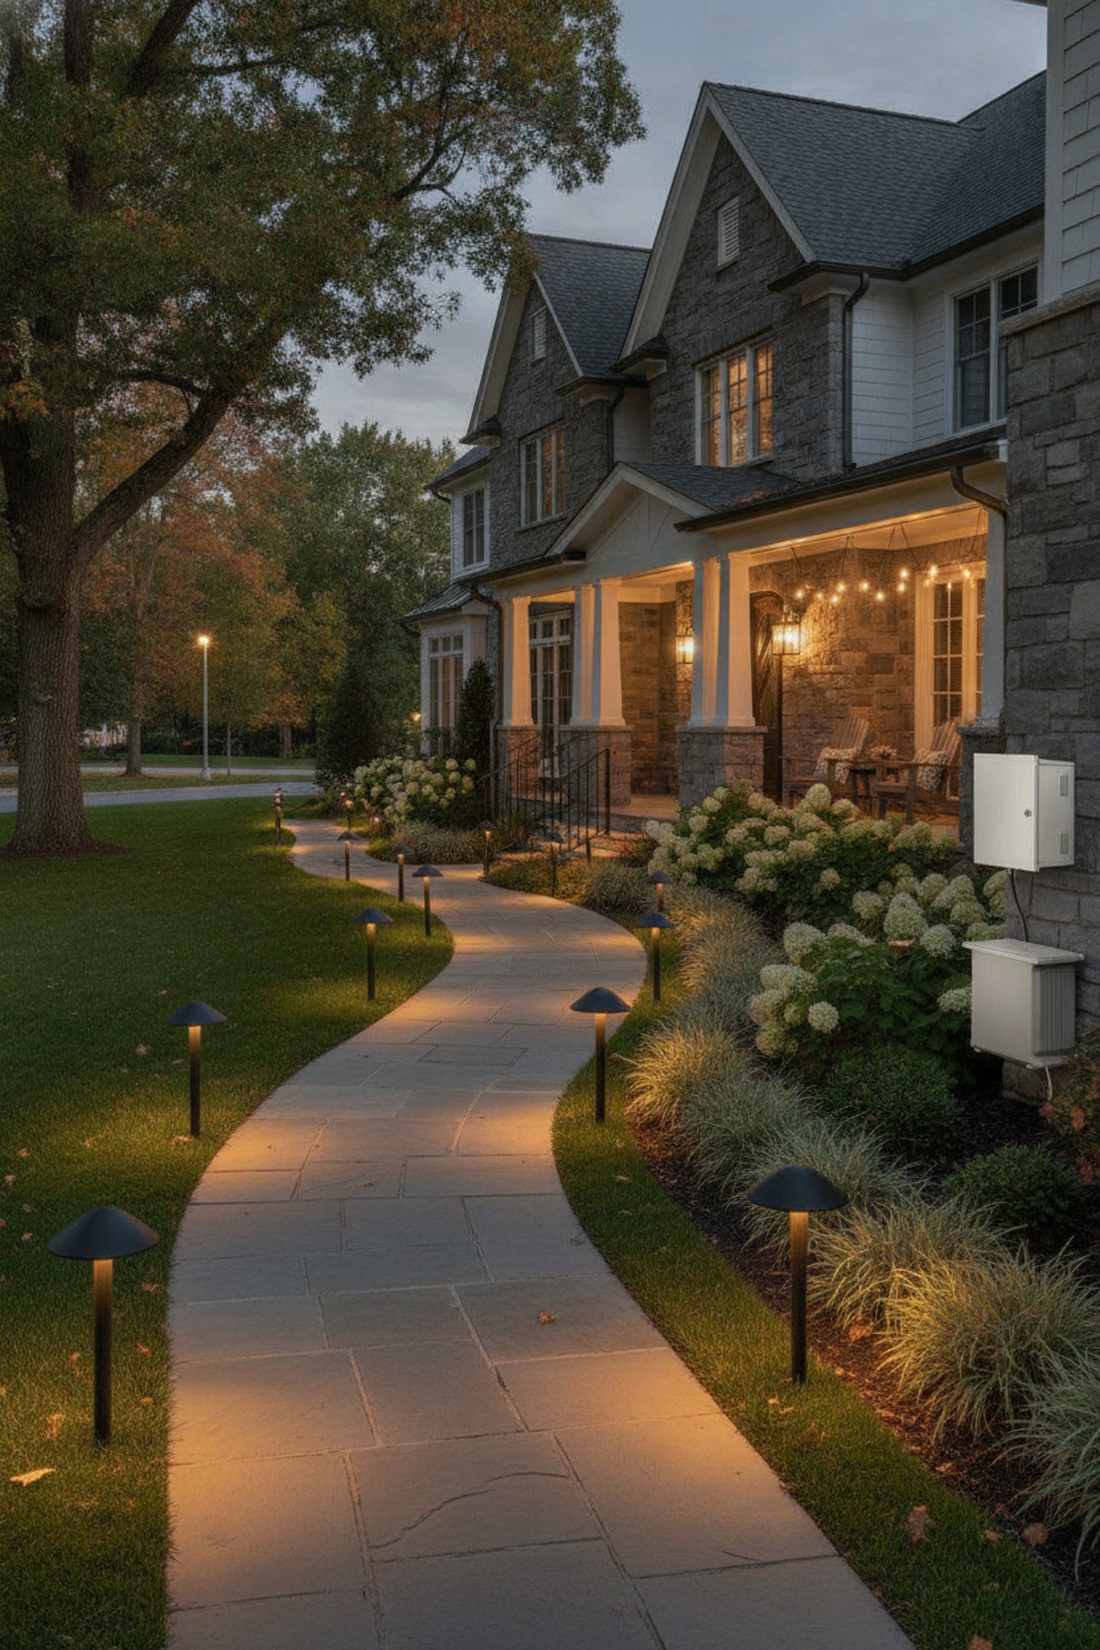
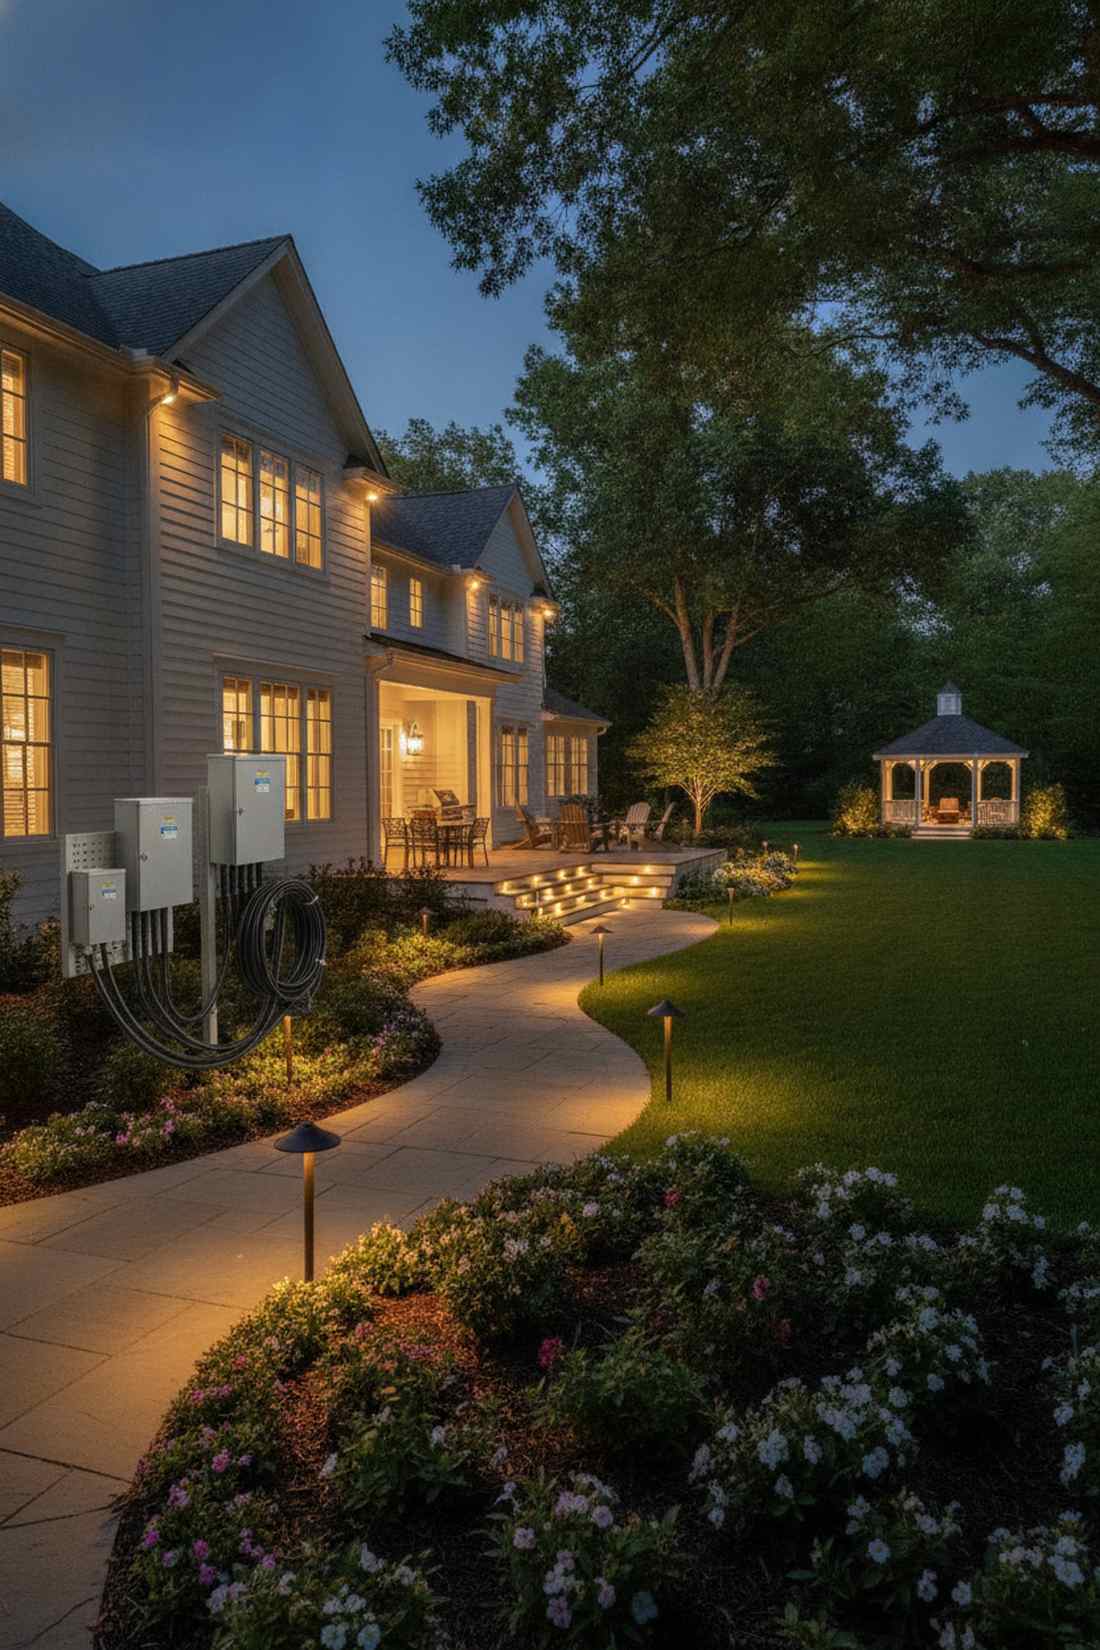
Pathway and Hardscape Illumination
Professional pathway lighting creates safe passage while establishing visual rhythm throughout the property. These systems guide movement and define circulation zones using strategically positioned low-voltage fixtures.
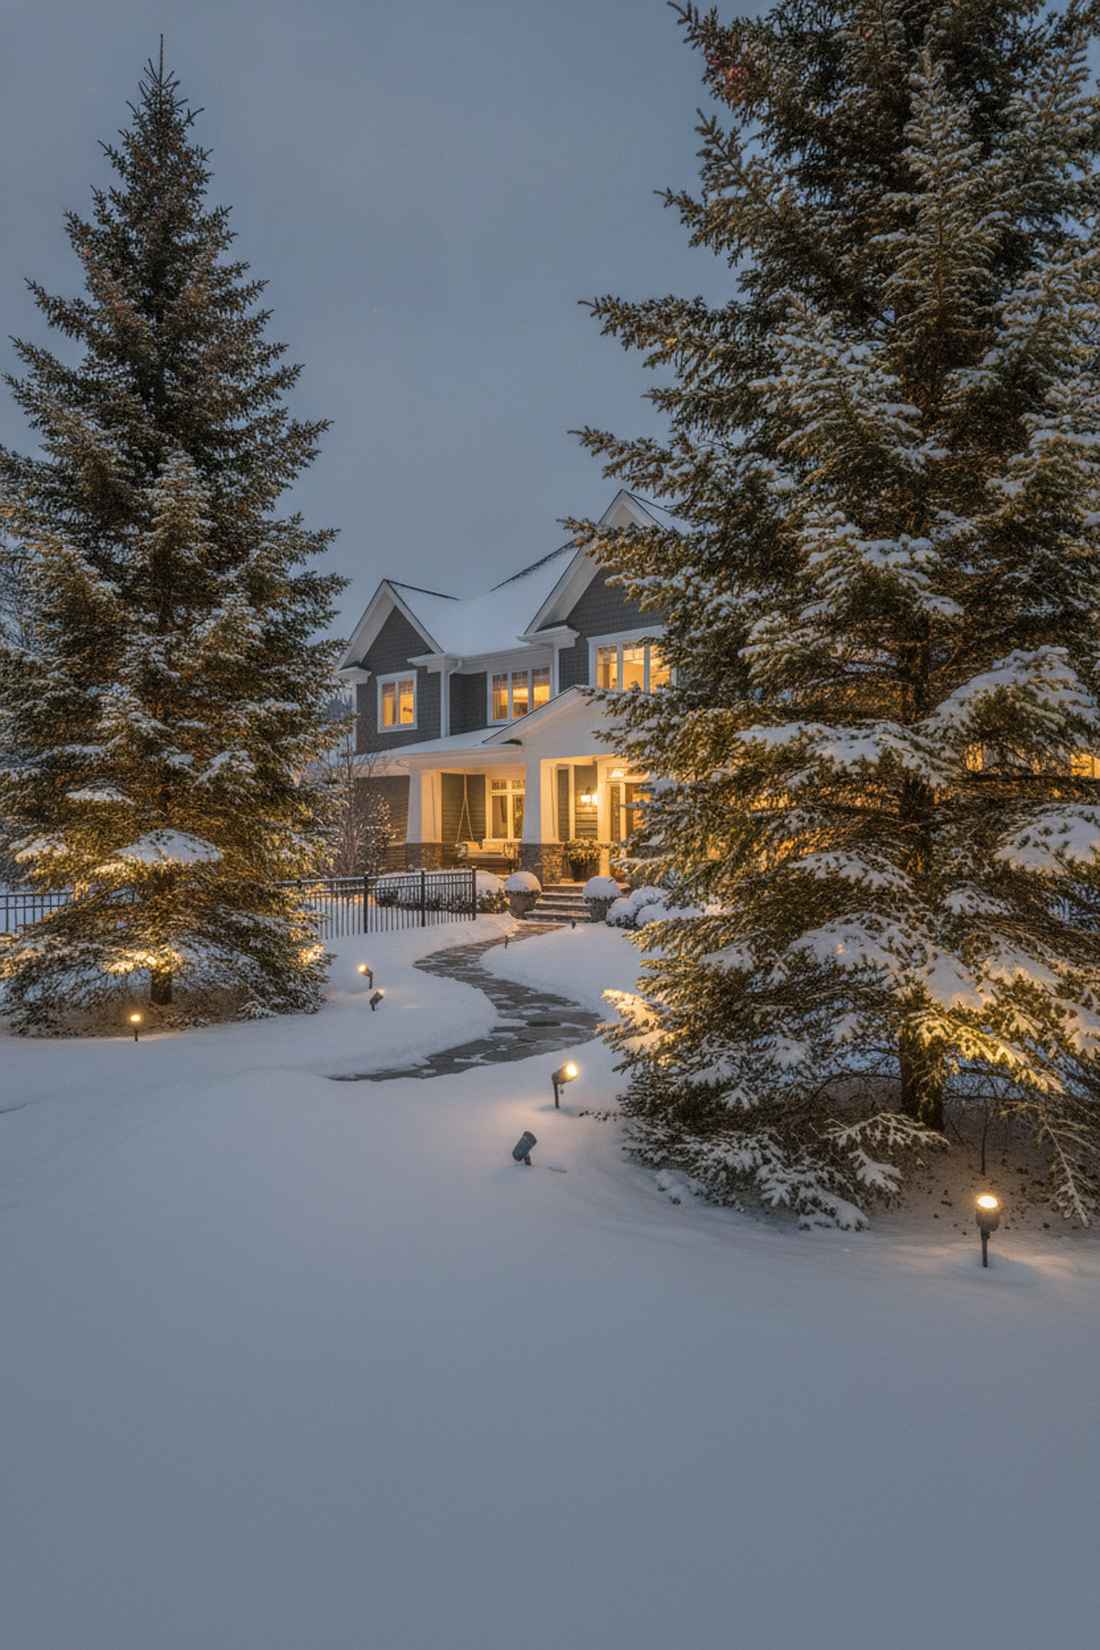
1. Mushroom Cap Path Lights
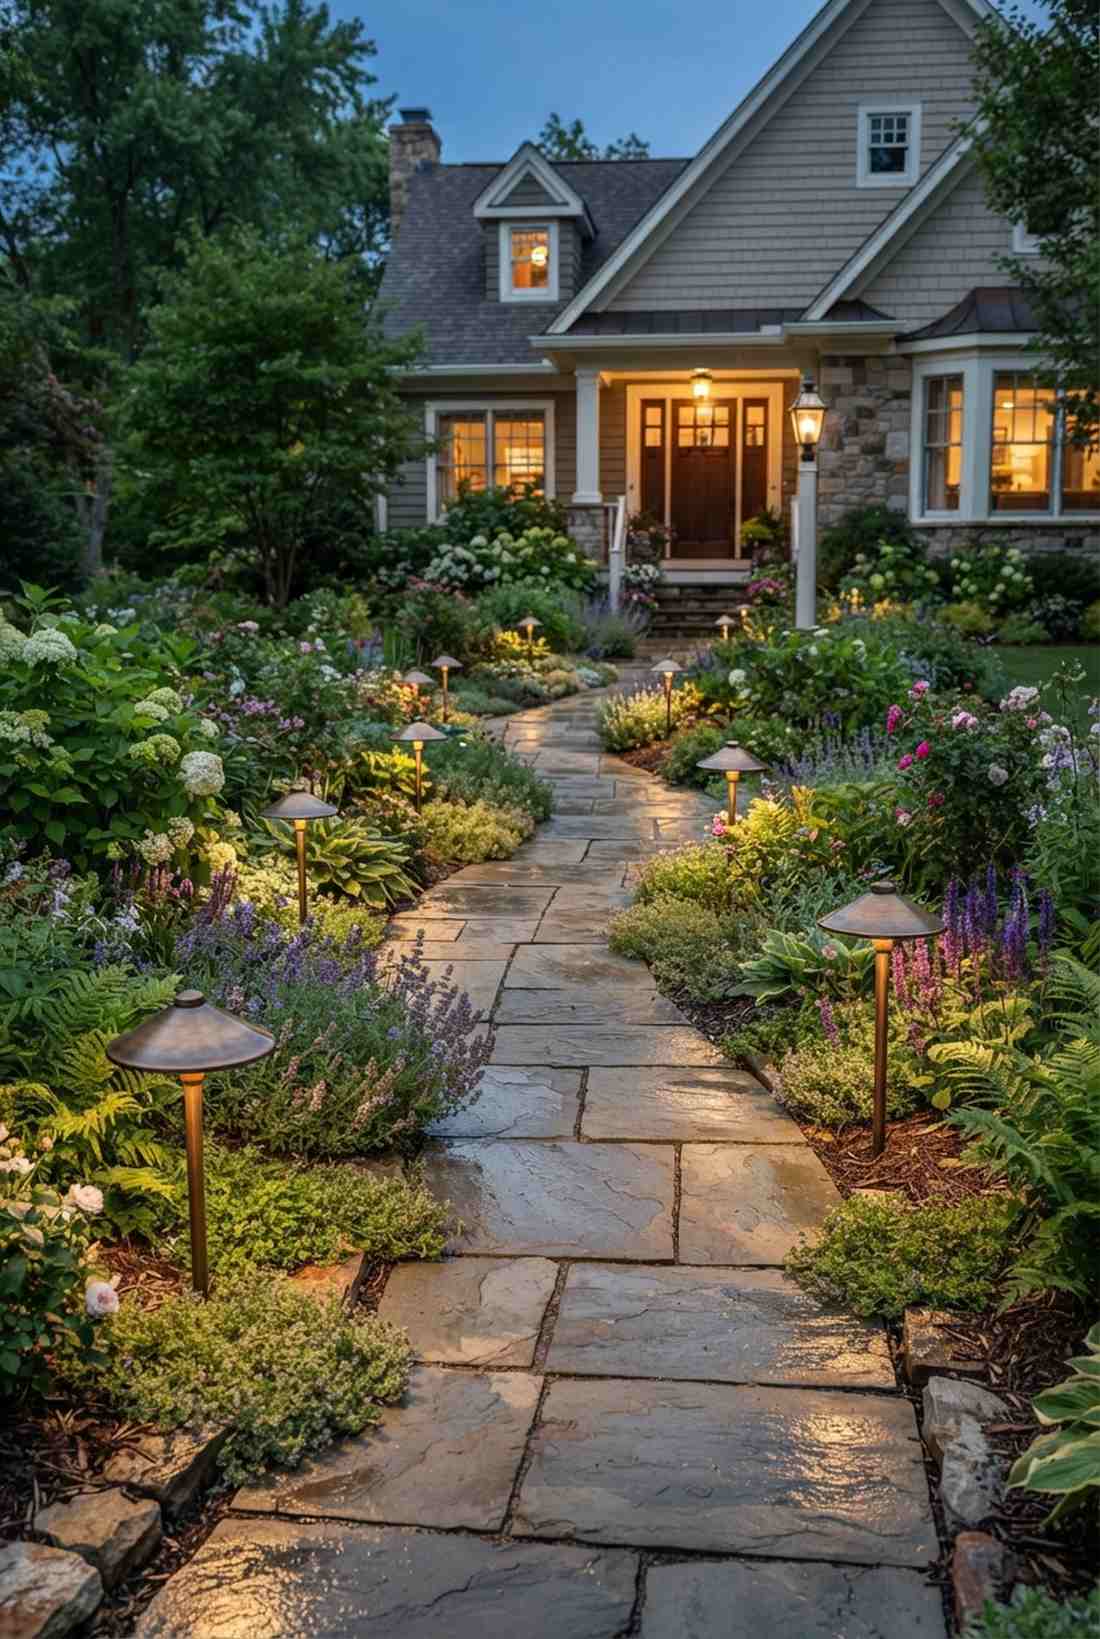
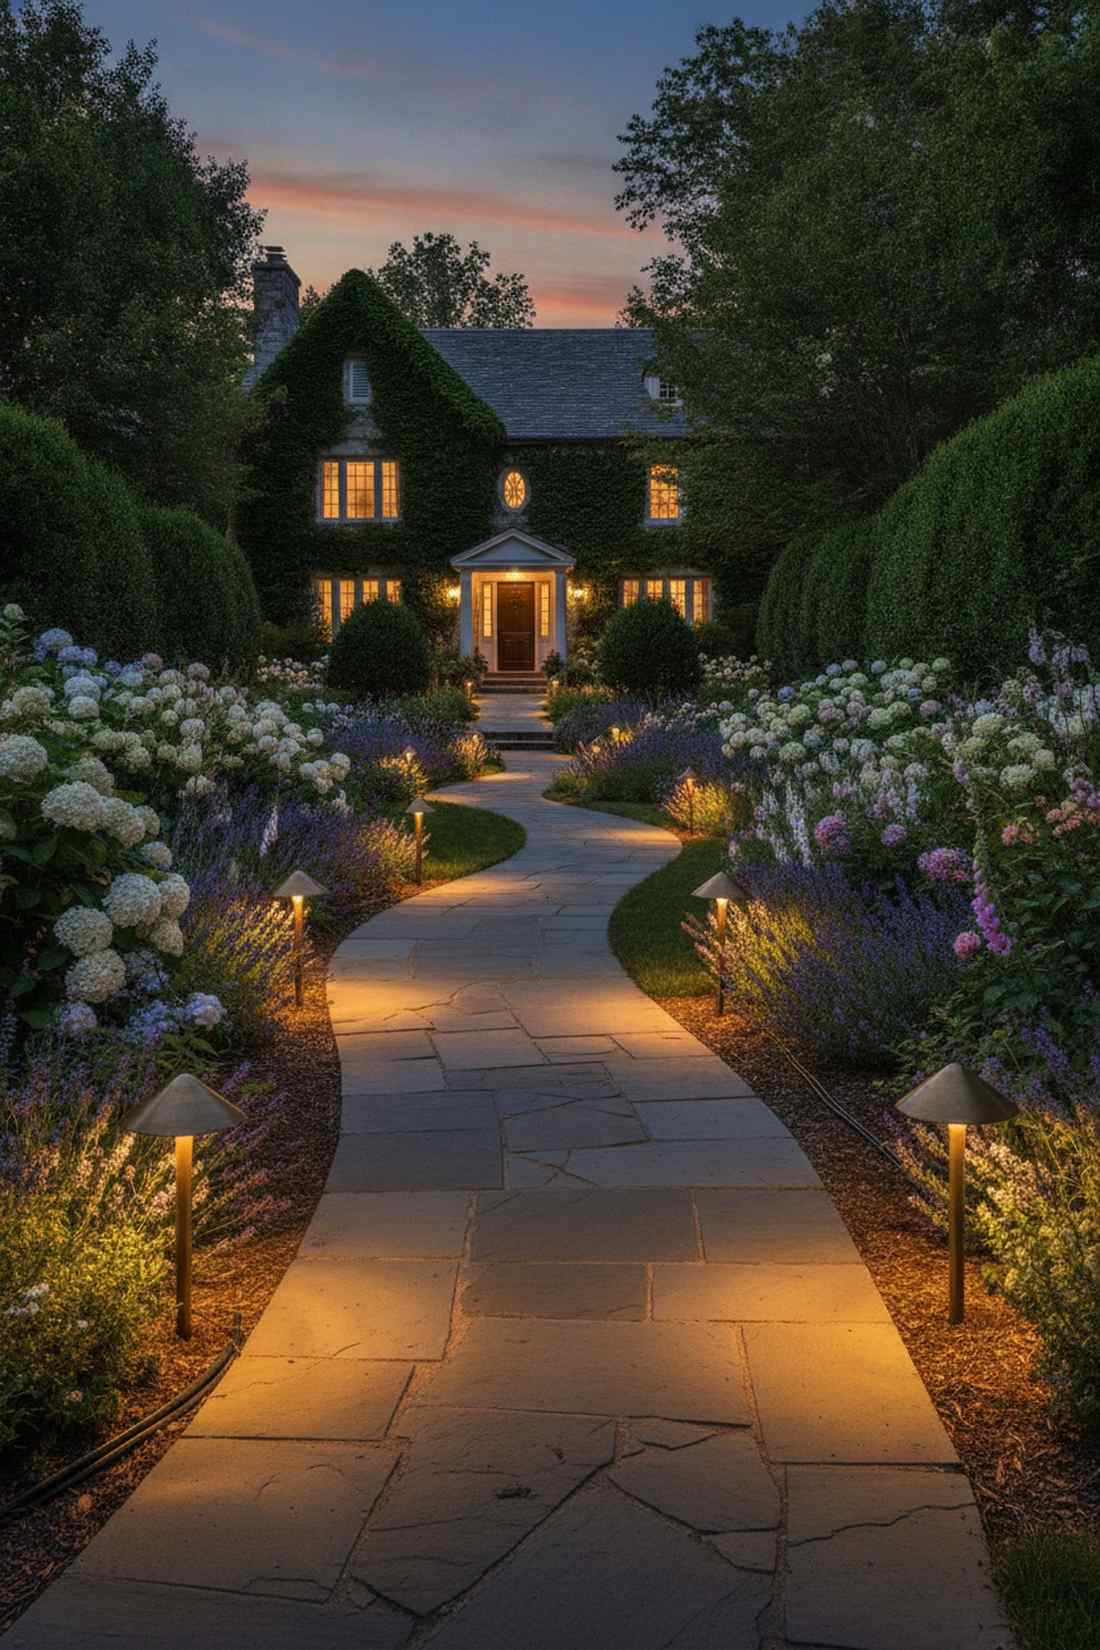
Radiates a deeply welcoming, vintage charm with mushroom pathway garden decor. Works exceptionally well for guiding guests through a lush, heavily planted cottage garden walkway.
Most beginners buy cheap plastic spikes that snap in a month, completely ruining the aesthetic. Instead, opt for heavy-duty brass fixtures spaced 8-10 feet apart along curved pathways to establish consistent, overlapping pools of brightness. Utilizing commercial-grade outdoor landscape lighting kits guarantees this classic downlight effect without the nasty glare.
You can easily pull this off for around $40–$65 per fixture. Pin this to your front yard renovation board for quick reference later.
- Key Materials: Solid brass mushroom cap housings
- Vibe / Style: Classic estate elegance
- Difficulty: Intermediate trenching required
- Budget Breakdown: Fixtures: $50 | Wiring & Connectors: $15.
- Creator’s Tip: Stagger them in a zig-zag pattern rather than a straight runway line to make the path look wider.
- Smart Sourcing: weather-sealed low voltage wire (bulk spool), solid-brass mushroom path lights (pack of 6).
2. Bollard Lights for Driveway Edges
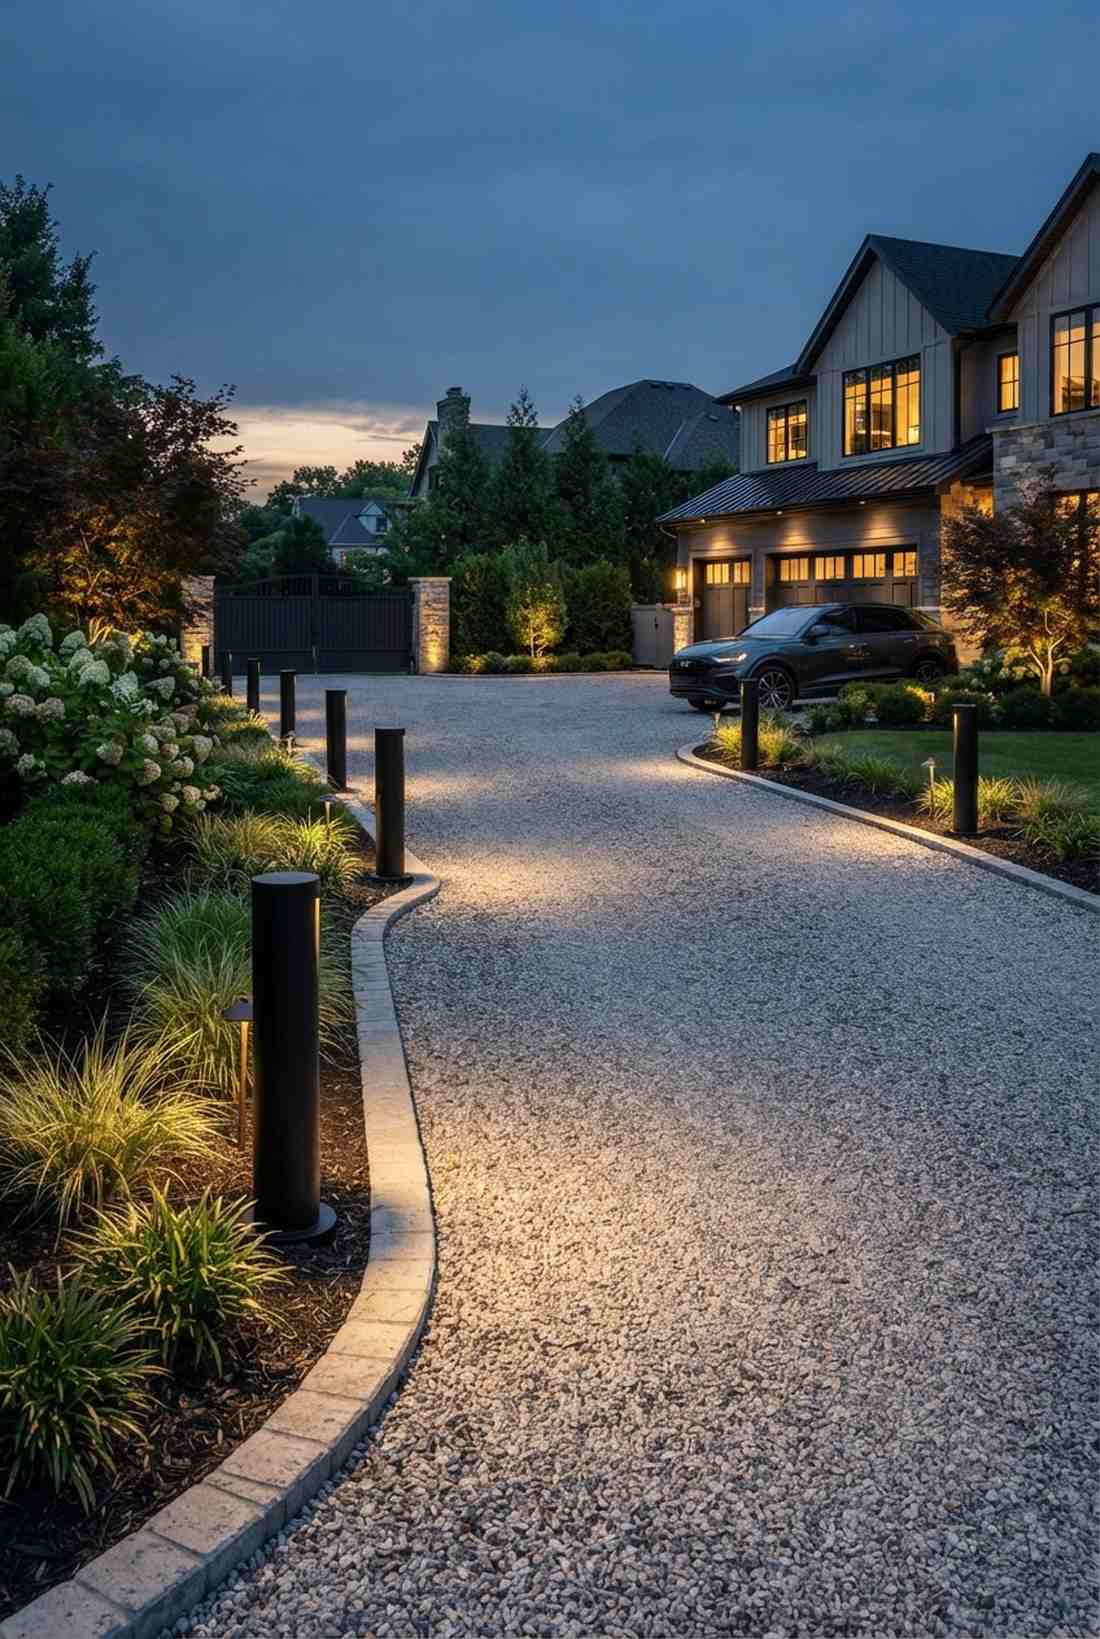

Delivers an intensely modern, resort-like arrival experience with architectural driveway lighting. Perfectly positioned for long, sweeping gravel or concrete vehicular entrances.
People often install flimsy solar stakes here, which look instantly cheap next to parked cars. You need taller, 24-36 inch cylindrical columns housing heavy-duty LED modules to illuminate wider expanses without creating harsh shadows. Securing high-lumen commercial bollard lighting creates that million-dollar estate boundary.
Expect a budget footprint of $80–$150 per bollard. Highly recommended for a high-impact weekend exterior win.
- Key Materials: Powder-coated aluminum bollards
- Vibe / Style: Ultra-modern luxury
- Difficulty: Advanced leveling needed
- Budget Breakdown: Bollard units: $120 | Concrete bases: $20.
- Creator’s Tip: Use a post hole digger and quick-set concrete for the bases to ensure they survive accidental bumper taps.
- Smart Sourcing: commercial-grade LED driveway bollards, heavy-duty direct burial cable.
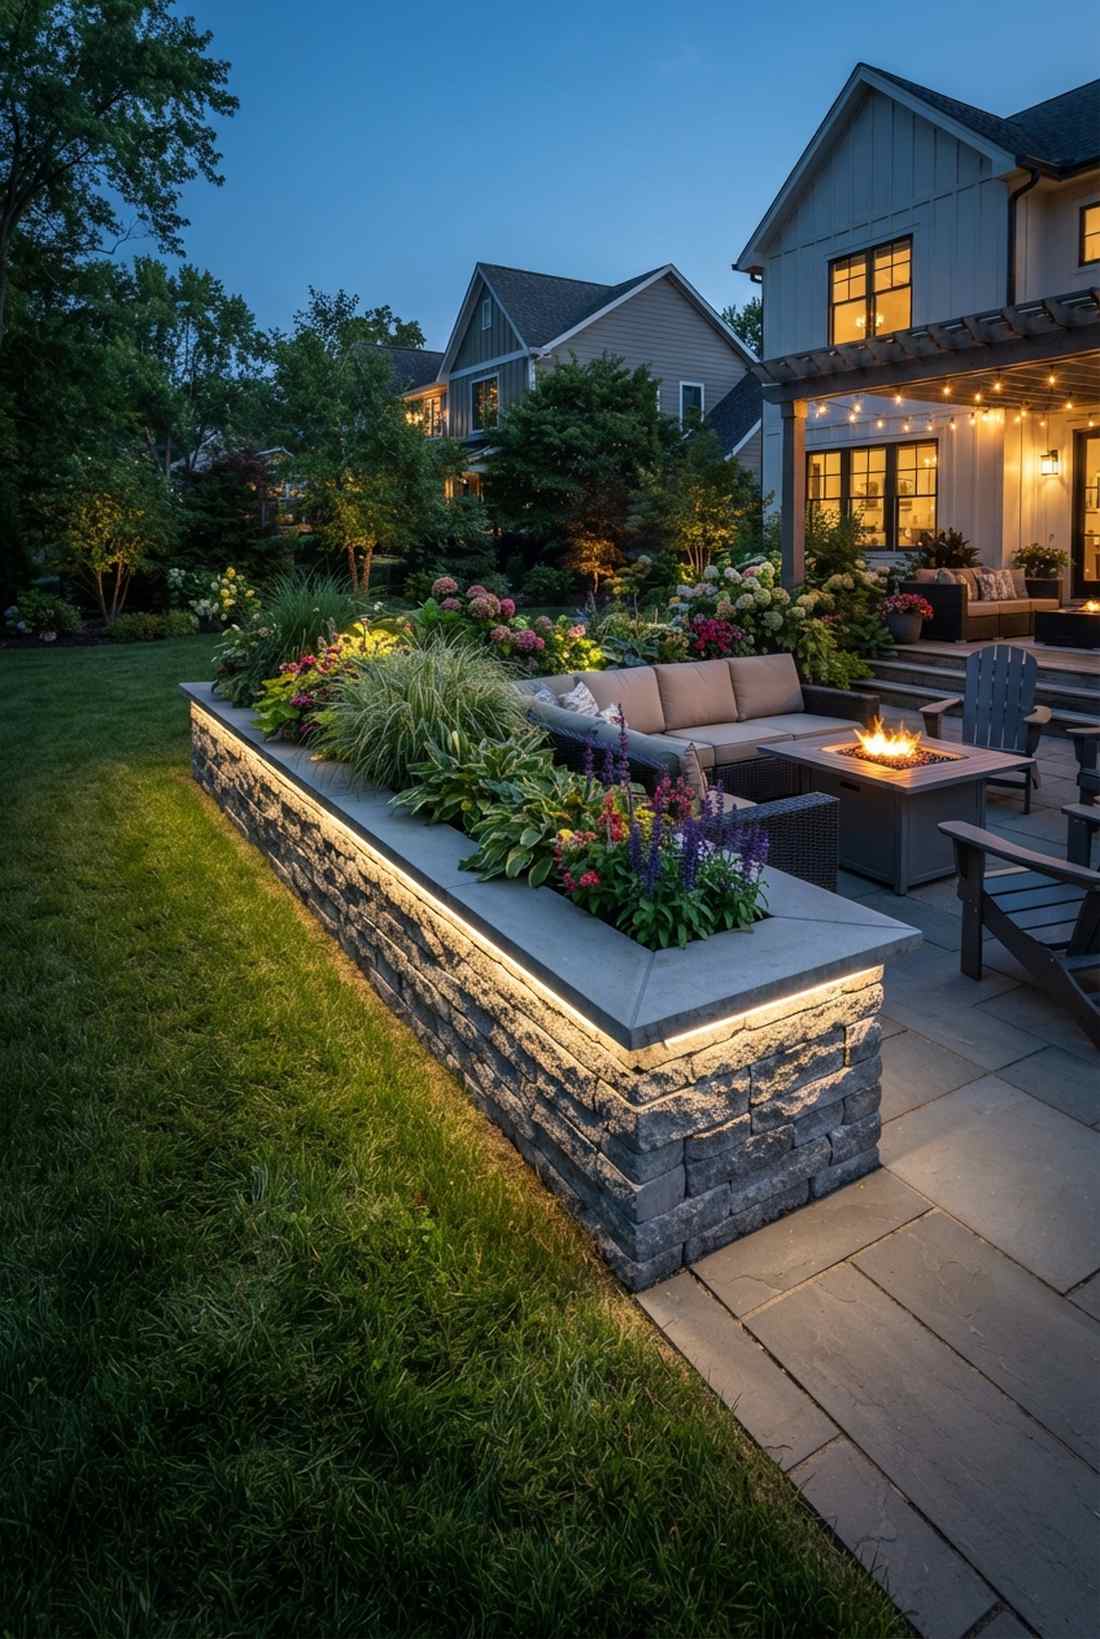
3. Brick Paver Integrated Systems
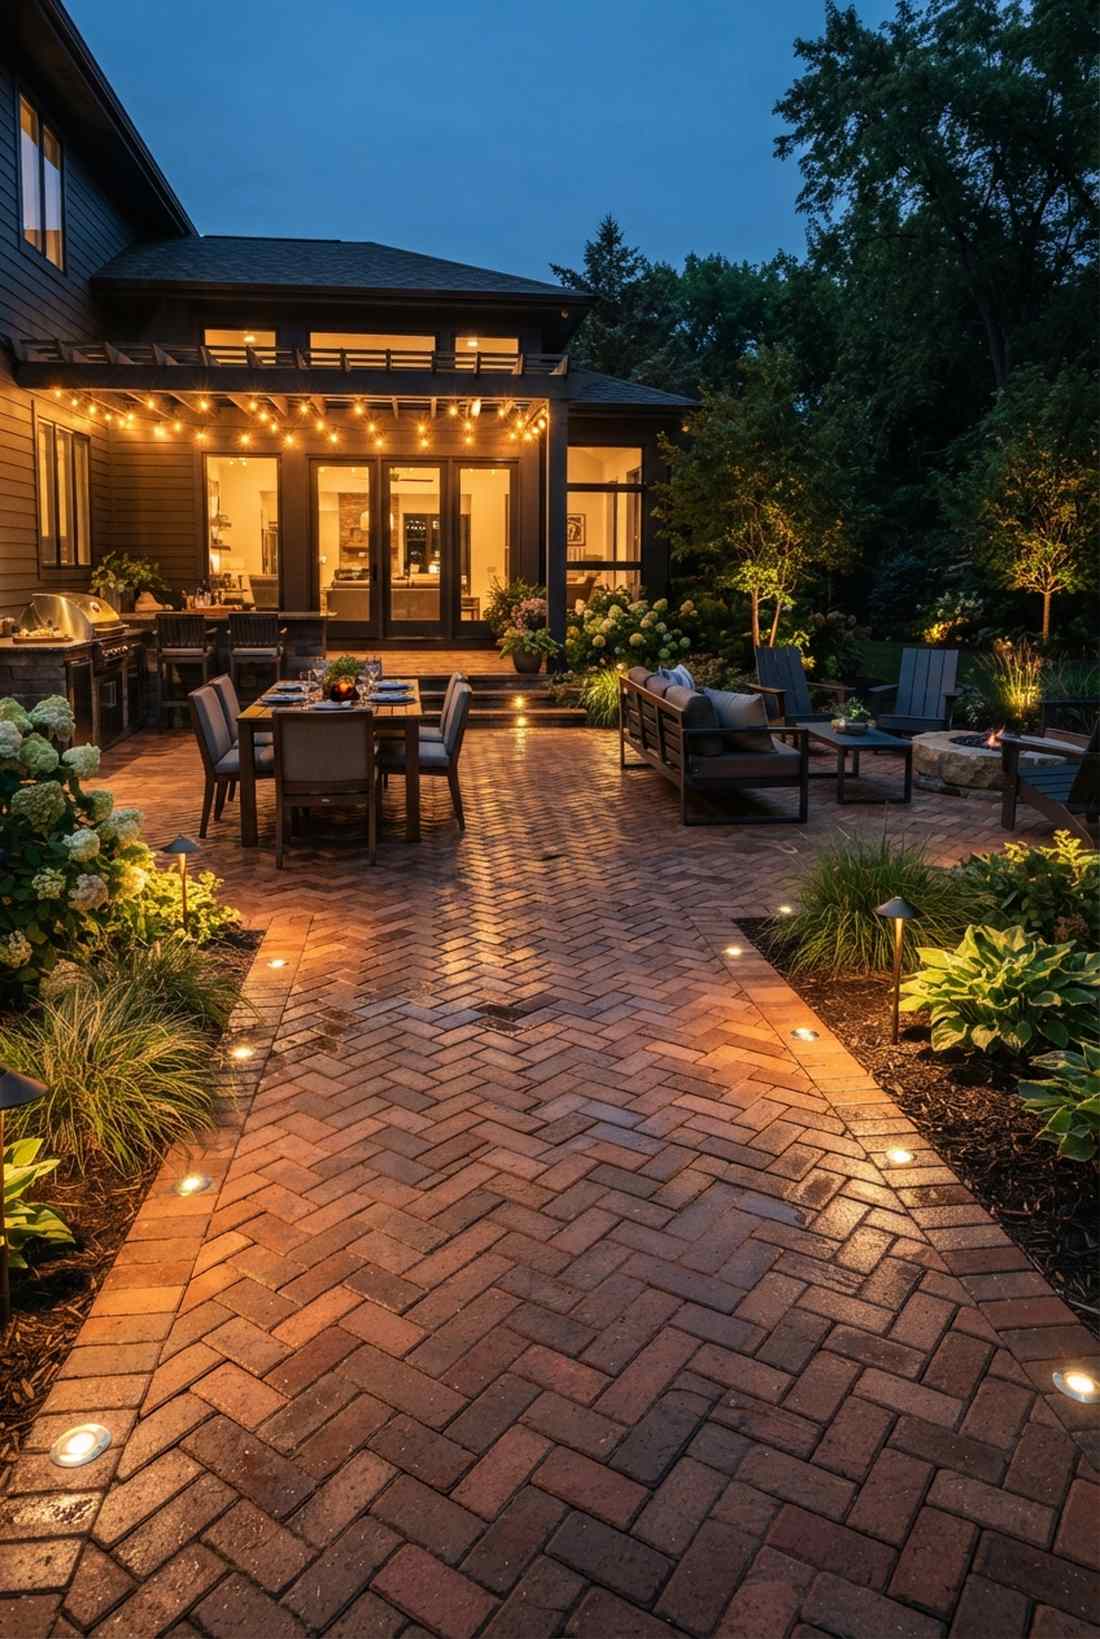
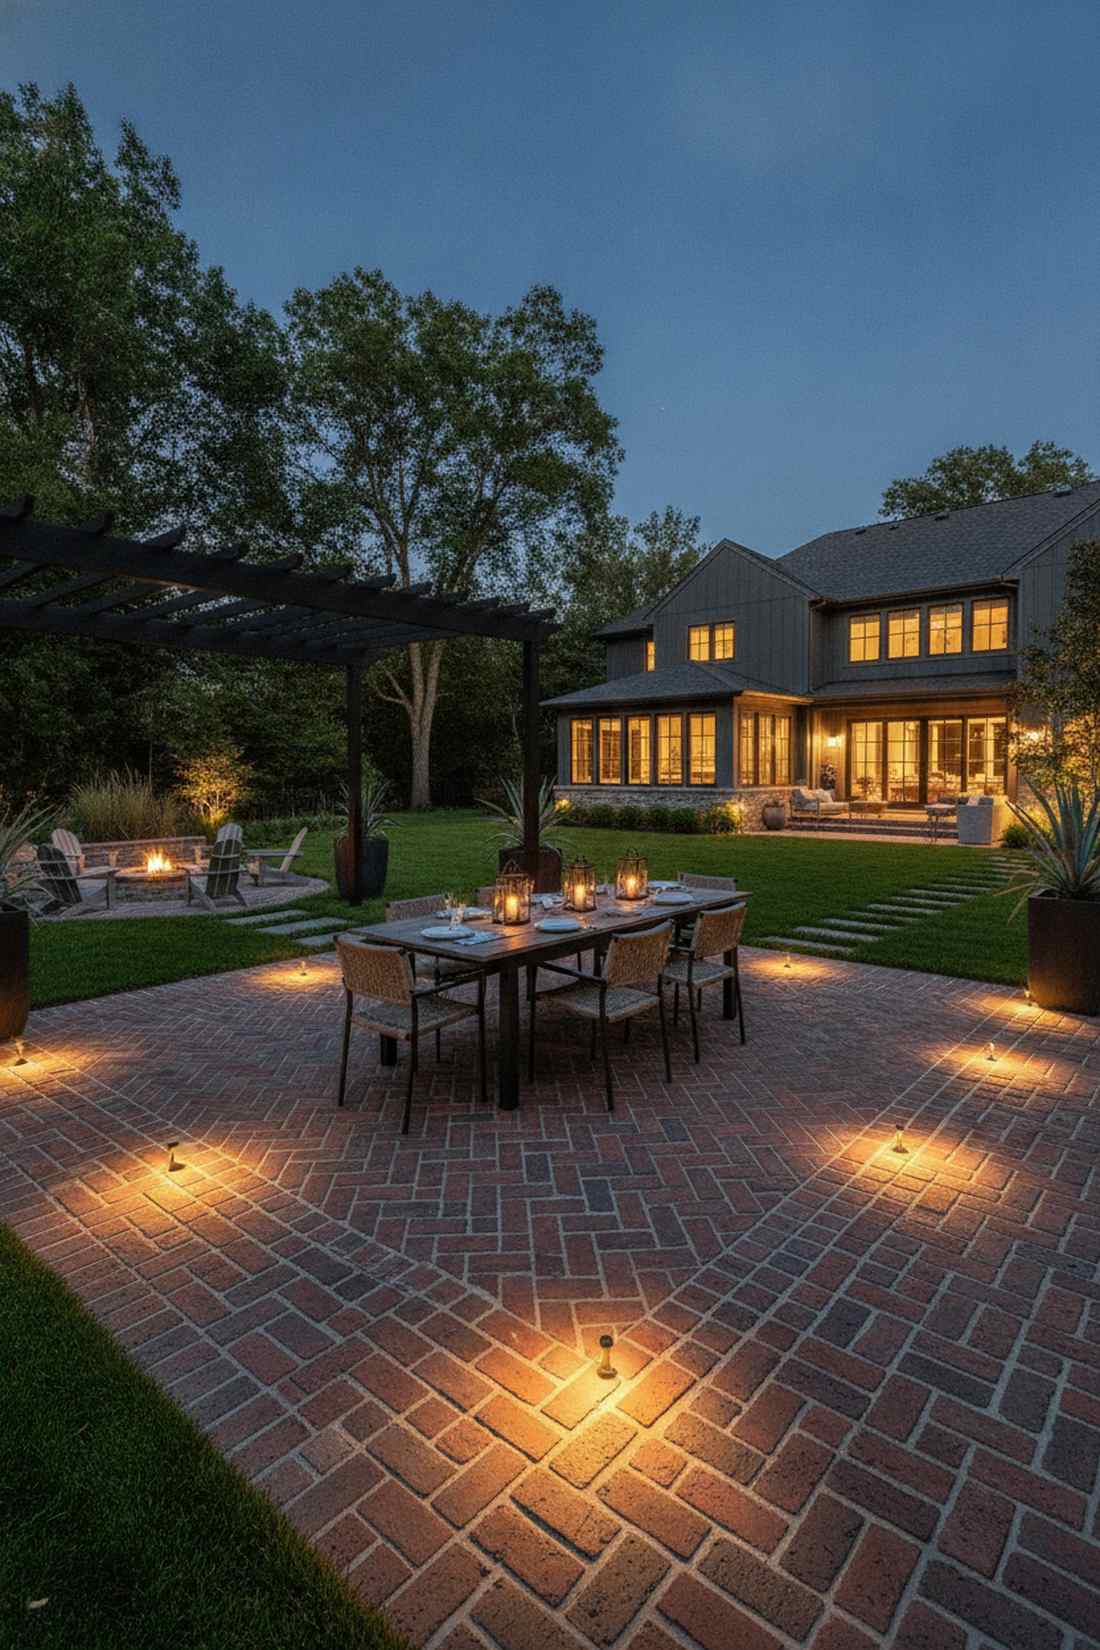
Feels like a glowing magical terrace straight out of a high-end design magazine using flush paver lights. Flawless for modern patio dining spaces and intricate brick courtyards.
Contractors will quote thousands for this, but integrating recessed fixtures between pavers is actually a straightforward weekend job. These compact LED units fit perfectly into hardscape joints, creating seamless illumination that emphasizes the paving patterns from the ground up. Integrating specialized masonry light kits gives a genuinely designer-level finish.
Set aside roughly $25–$40 per integrated light. Save this if you are planning a patio teardown soon.
- Key Materials: Walk-over rated recessed paver LEDs
- Vibe / Style: Sleek minimalist courtyard
- Difficulty: Requires paver cutting/lifting
- Budget Breakdown: Lights: $30 | Masonry blade: $15.
- Creator’s Tip: Always run your conduit beneath the paver sand base before laying the final stones to prevent future settling issues.
- Smart Sourcing: UV-coated resin paver lights, pre-wired flush mount deck kits.
4. Solar Pathway Markers
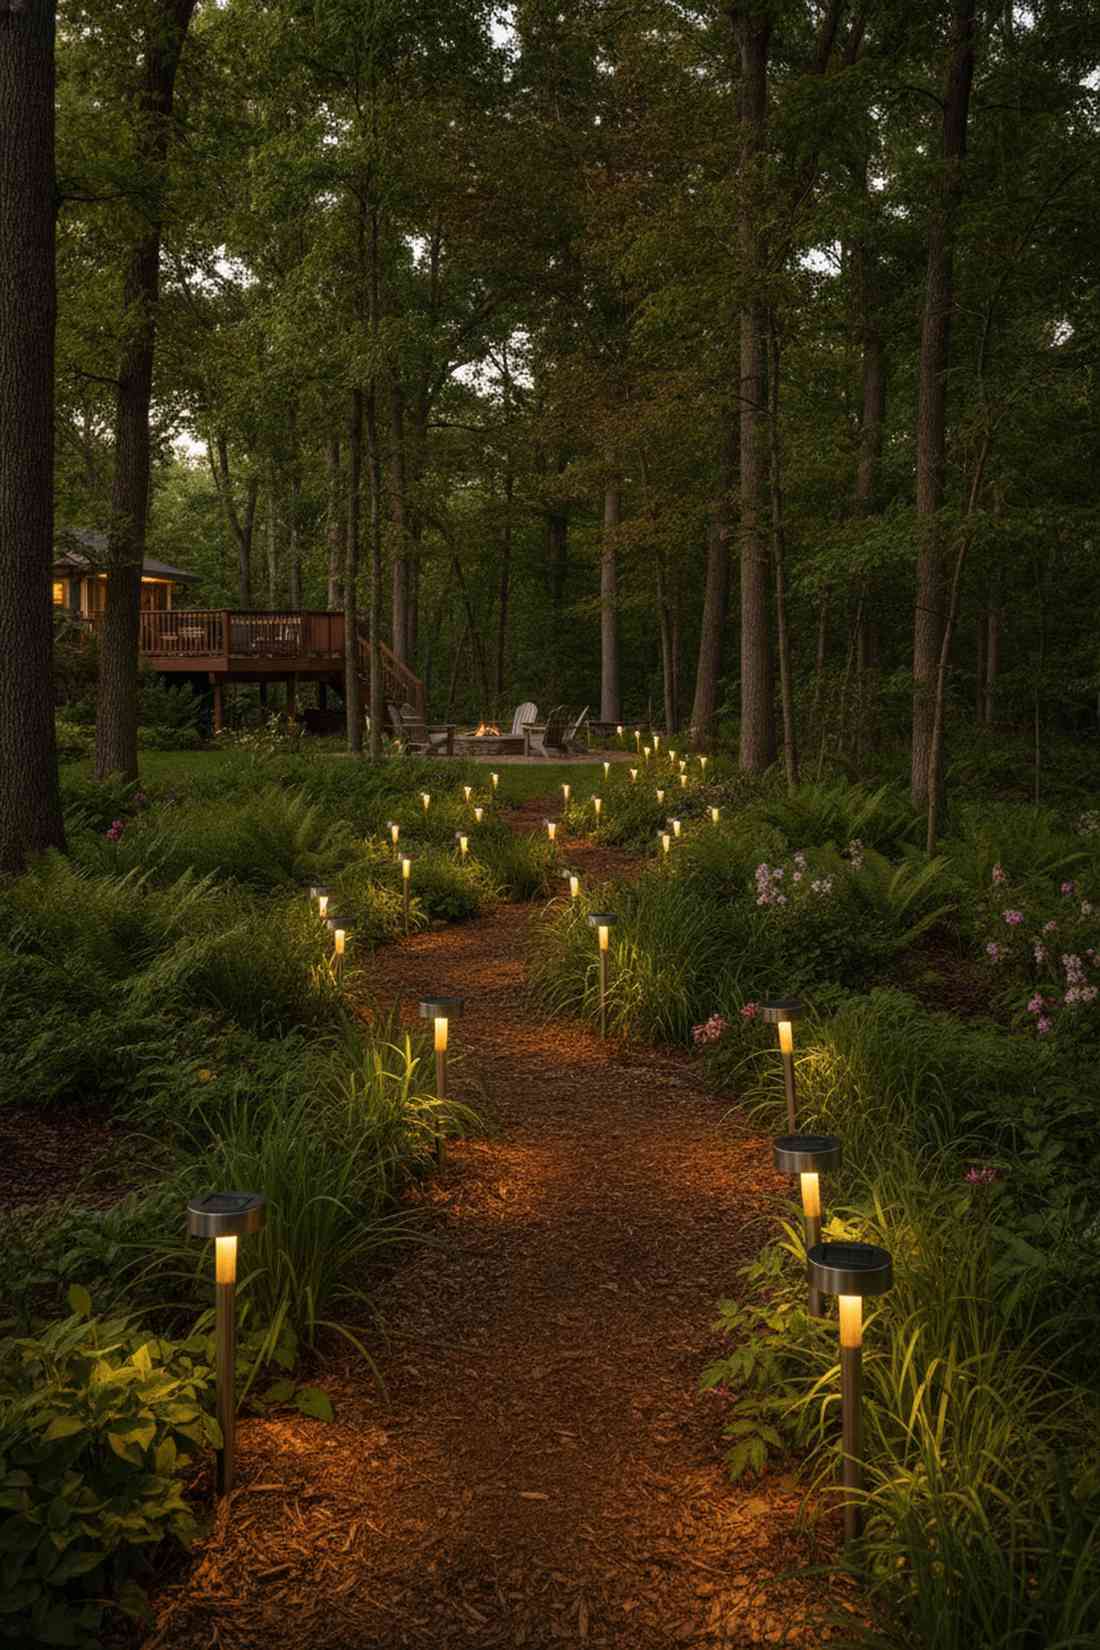
Emits a gentle, ambient glow that feels like capturing fireflies in remote garden trail decor. The ultimate hands-off solution for massive backyards or deeply wooded secondary paths.
A shocking number of homeowners dismiss solar as “too dim,” completely ignoring recent tech upgrades. Deploying high-efficiency photovoltaic panels powers warm-white LEDs for a solid 6-8 hours, easily defining boundaries where trenching proves impossible. Snagging premium solar landscape supplies prevents that dreaded blue-tinted, fading light after a month.
This off-grid approach costs a mere $15–$25 per marker.
- Key Materials: High-capacity monocrystalline solar stakes
- Vibe / Style: Eco-friendly nature walk
- Difficulty: Absolute beginner
- Budget Breakdown: Solar stakes: $20 | Replacement batteries: $5.
- Creator’s Tip: Wipe the solar panels down with a damp cloth every month; dust cuts their charging capacity in half.
- Smart Sourcing: high-lumen solar pathway kits (bulk pack), lithium-ion outdoor replacement batteries.
5. Cobblestone Accent Uplights
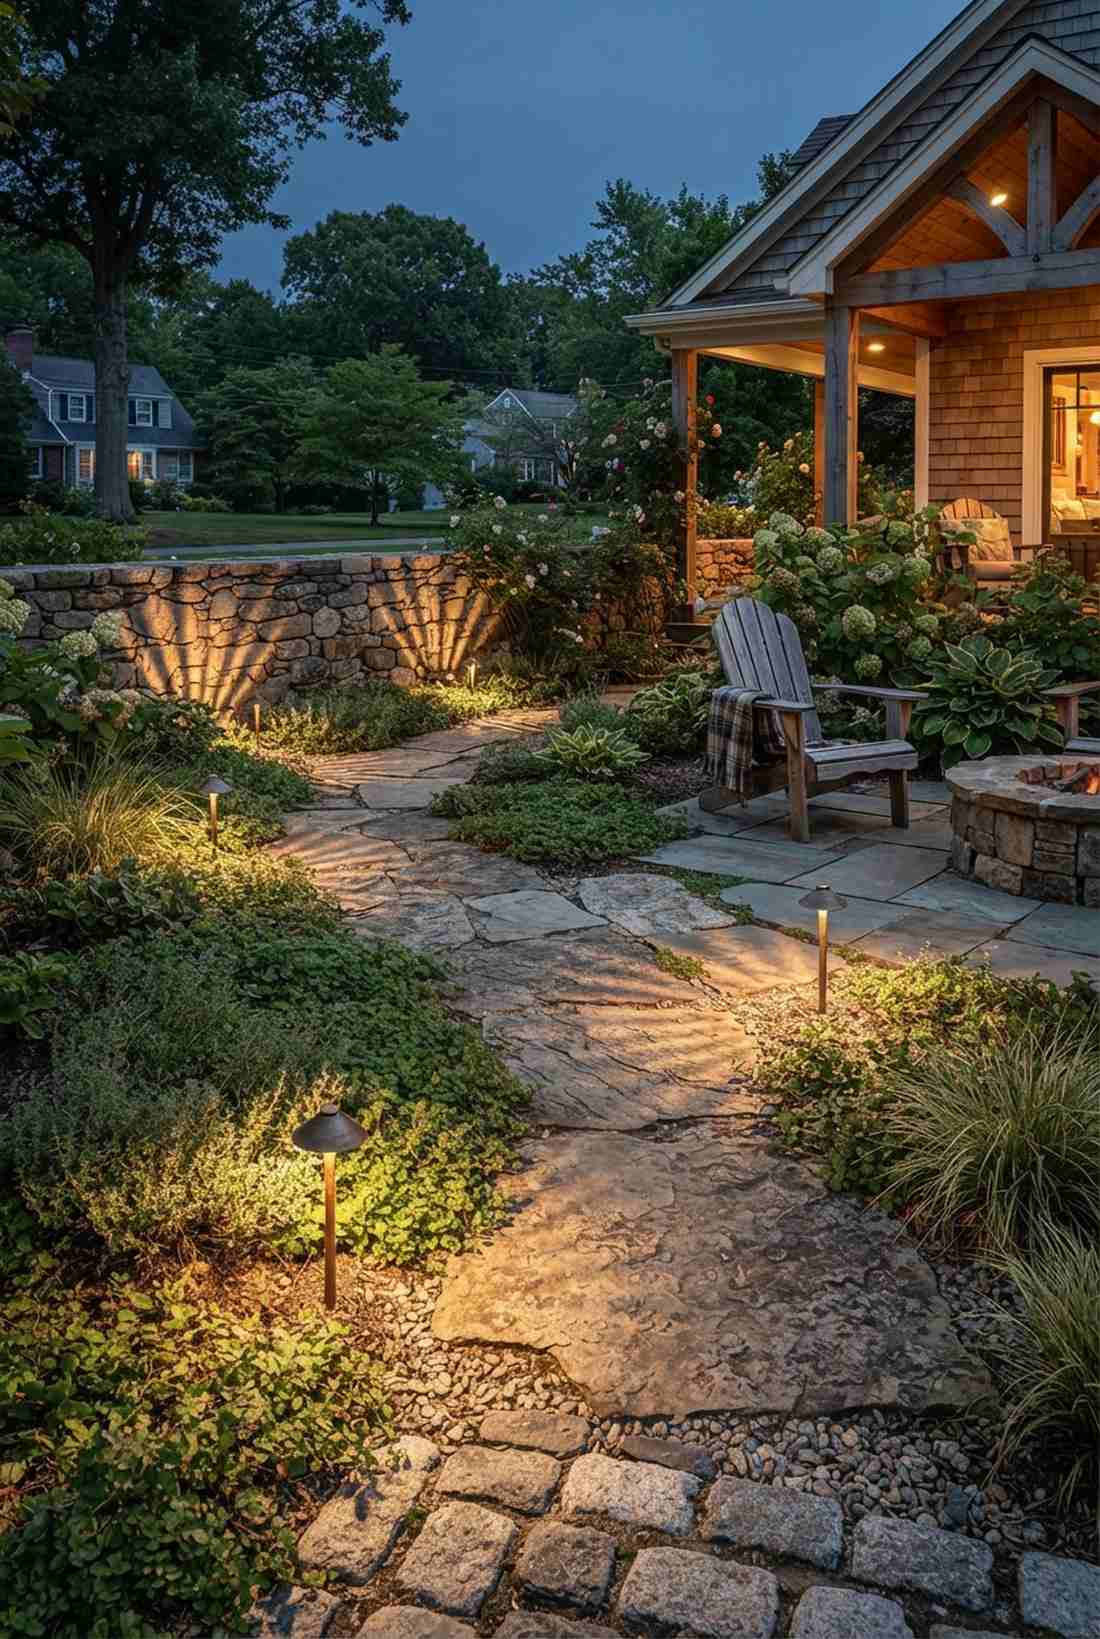

Casts breathtaking, dramatic shadows using miniature ground-recessed uplighting. Exceptionally tailored for grazing textured flagstone walls or wild, creeping groundcover beds.
Placing giant spotlights here destroys the natural vibe. Instead, angle narrow-beam, low-profile well lights at 30-45 degrees to perfectly skim the cobblestone textures. Finding the right miniature garden supplies ensures the light source stays entirely invisible during the day.
You can achieve this subtle drama for $35–$50 per well light. Pin this if you love historical or rustic exterior designs.
- Key Materials: Brass micro-well lights
- Vibe / Style: Old-world rustic charm
- Difficulty: Moderate digging
- Budget Breakdown: Micro fixtures: $45 | Gravel drainage: $5.
- Creator’s Tip: Dig the hole two inches deeper than needed and fill the bottom with pea gravel so water drains away from the bulb housing.
- Smart Sourcing: corrosion-proof brass well lights, pre-cut waterproof wire connectors.
This next layout is shockingly affordable but mimics a $5,000 custom architectural installation…
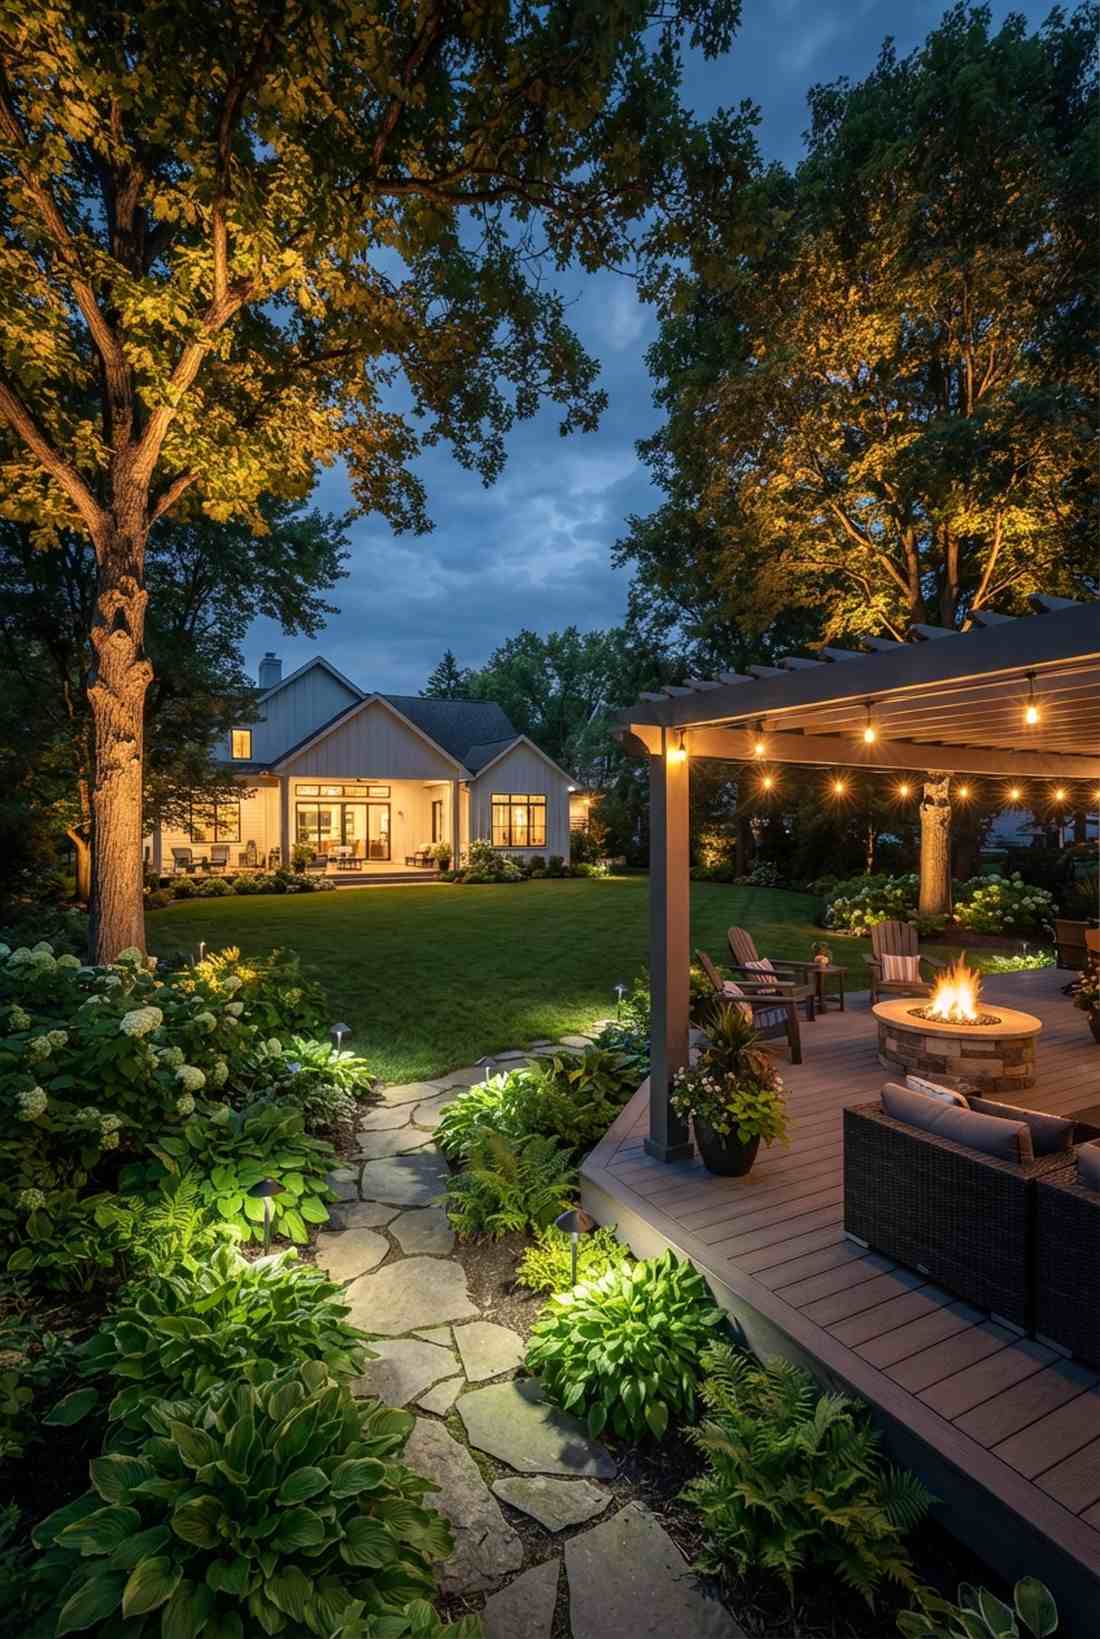
6. Timed Dusk-to-Dawn Path Systems
Provides a totally hands-free, resort-style welcome home with automated low voltage pathing. A total lifesaver for long front walks when returning home late at night.
Relying on manual switches is an outdated mistake that leaves houses looking dark and vulnerable. Photocell-equipped transformers activate circuits exactly when ambient light drops, ensuring pathways remain beautifully lit without any daily thought. Hooking up a commercial-grade landscape transformer setup guarantees zero flickering when the sun sets.
Expect the core system base to cost around $100–$200 for the hub.
- Key Materials: Photocell sensor transformer hub
- Vibe / Style: Smart-home automation
- Difficulty: Electrical box mounting
- Budget Breakdown: Smart Transformer: $150 | Photo-eye extension: $20.
- Creator’s Tip: Never mount the photo-eye directly under an eave or porch light, or it will constantly cycle on and off all night.
- Smart Sourcing: stainless steel low voltage landscape transformers, weather-sealed photocell sensors.
7. Color-Changing RGB Path Lights
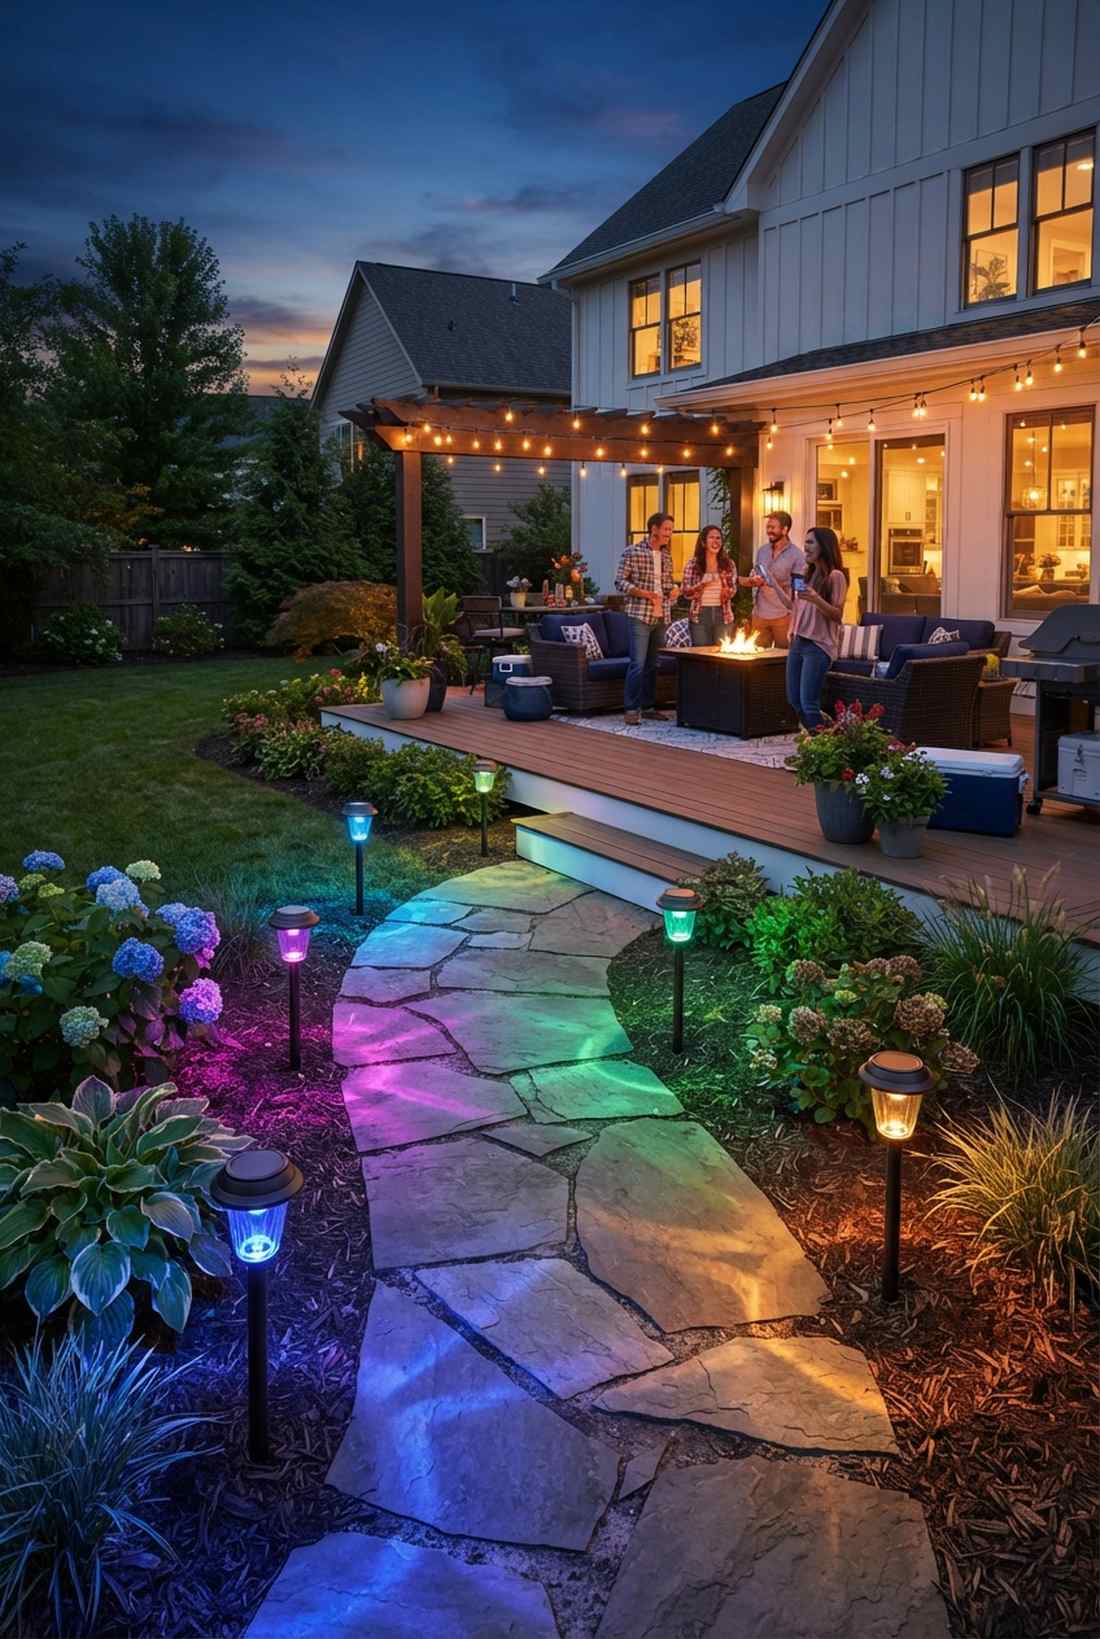
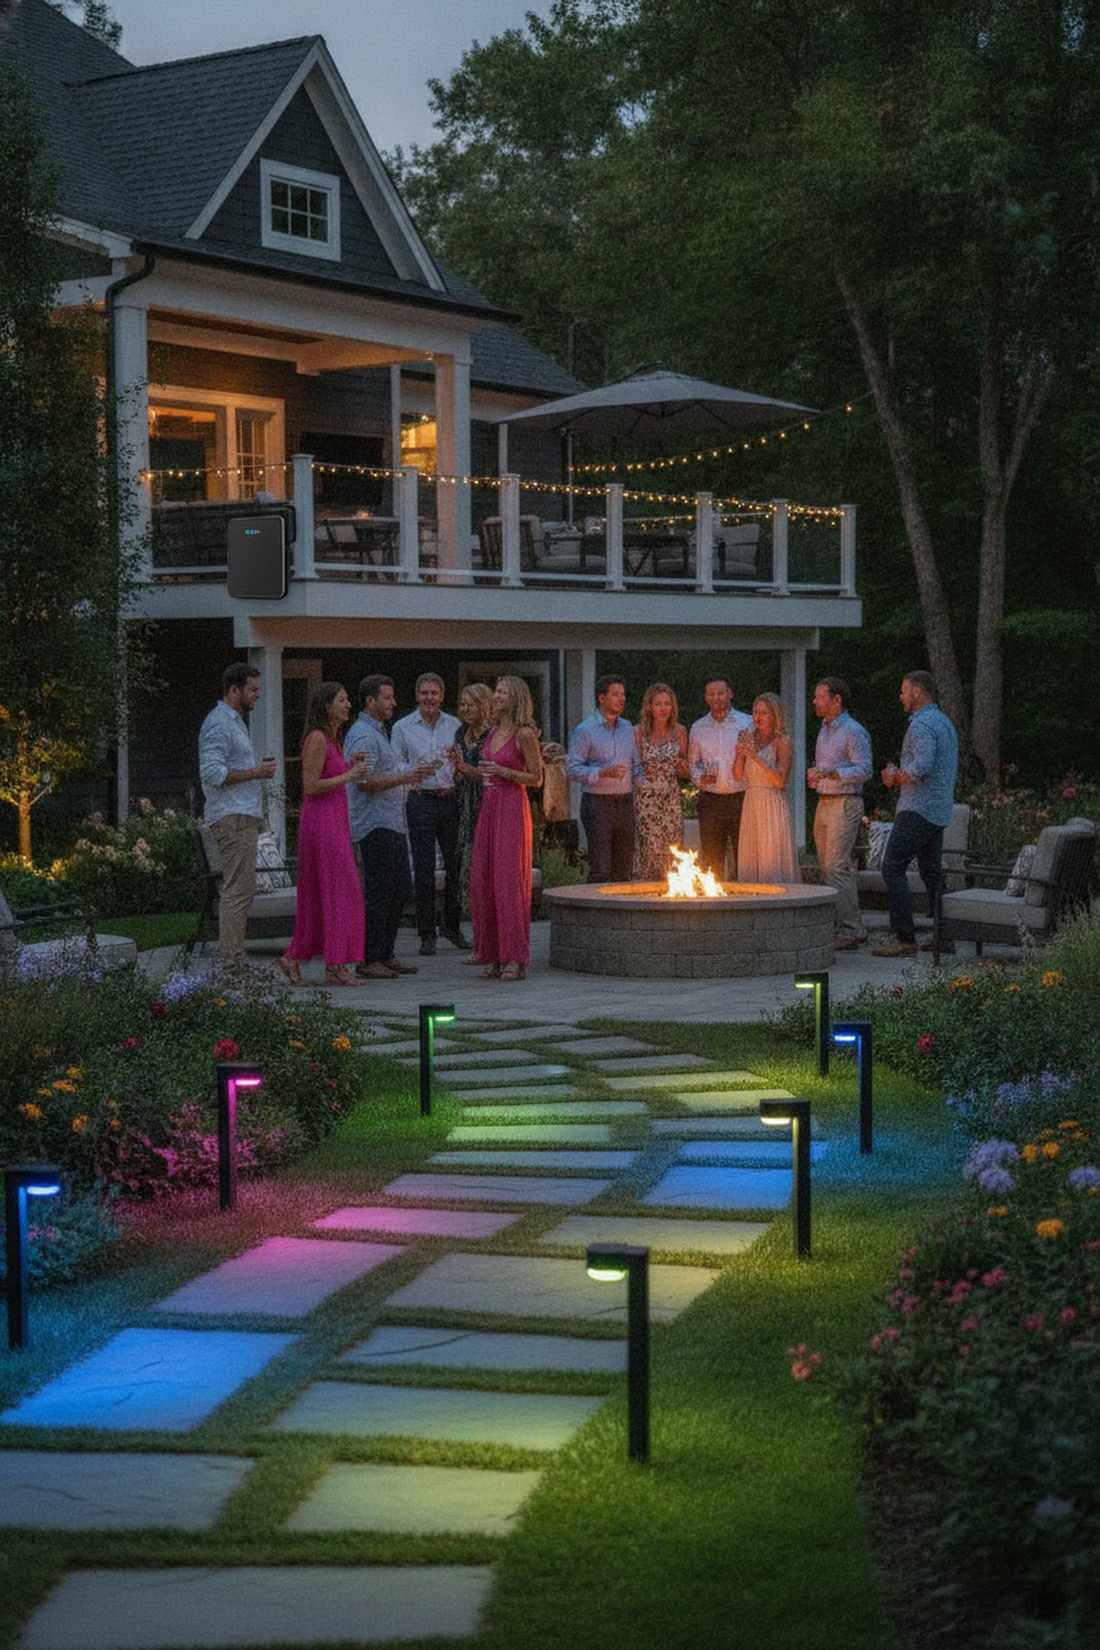
Delivers a high-energy, totally customizable party atmosphere through smart RGB pathway decor. Incredible for holiday enthusiasts or houses that frequently host outdoor events.
Standard white lights are great, but skipping RGB capability means missing out on instant seasonal theme changes via your smartphone. You can keep a warm white glow for daily use, then instantly saturate your walkways with vibrant hues for a backyard bash. Grabbing app-controlled LED outdoor lighting systems makes color shifting ridiculously easy.
These dynamic systems usually run $60–$90 per fixture. Save this to your ultimate backyard party ideas board.
- Key Materials: WiFi-enabled RGB path stakes
- Vibe / Style: Festive dynamic entertainment
- Difficulty: App synchronization needed
- Budget Breakdown: RGB Fixtures: $75 | WiFi Hub: $40.
- Creator’s Tip: Ensure your outdoor WiFi router reaches the furthest fixture, or the color-sync will lag during animations.
- Smart Sourcing: smart-enabled RGB outdoor kits (starter kit), outdoor-rated mesh WiFi extenders.
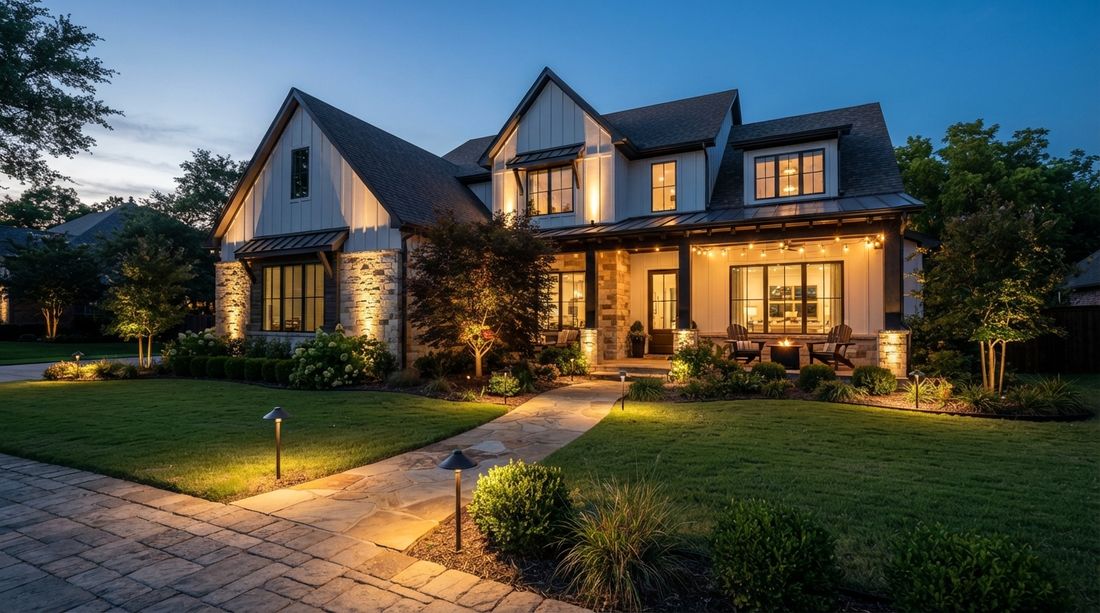
Architectural Accent Systems
Garden lights landscape professionals use architectural accent lighting to highlight structural elements and create vertical interest. These targeted systems draw attention to building facades, columns, and decorative features.
8. Wall Grazing Spotlights
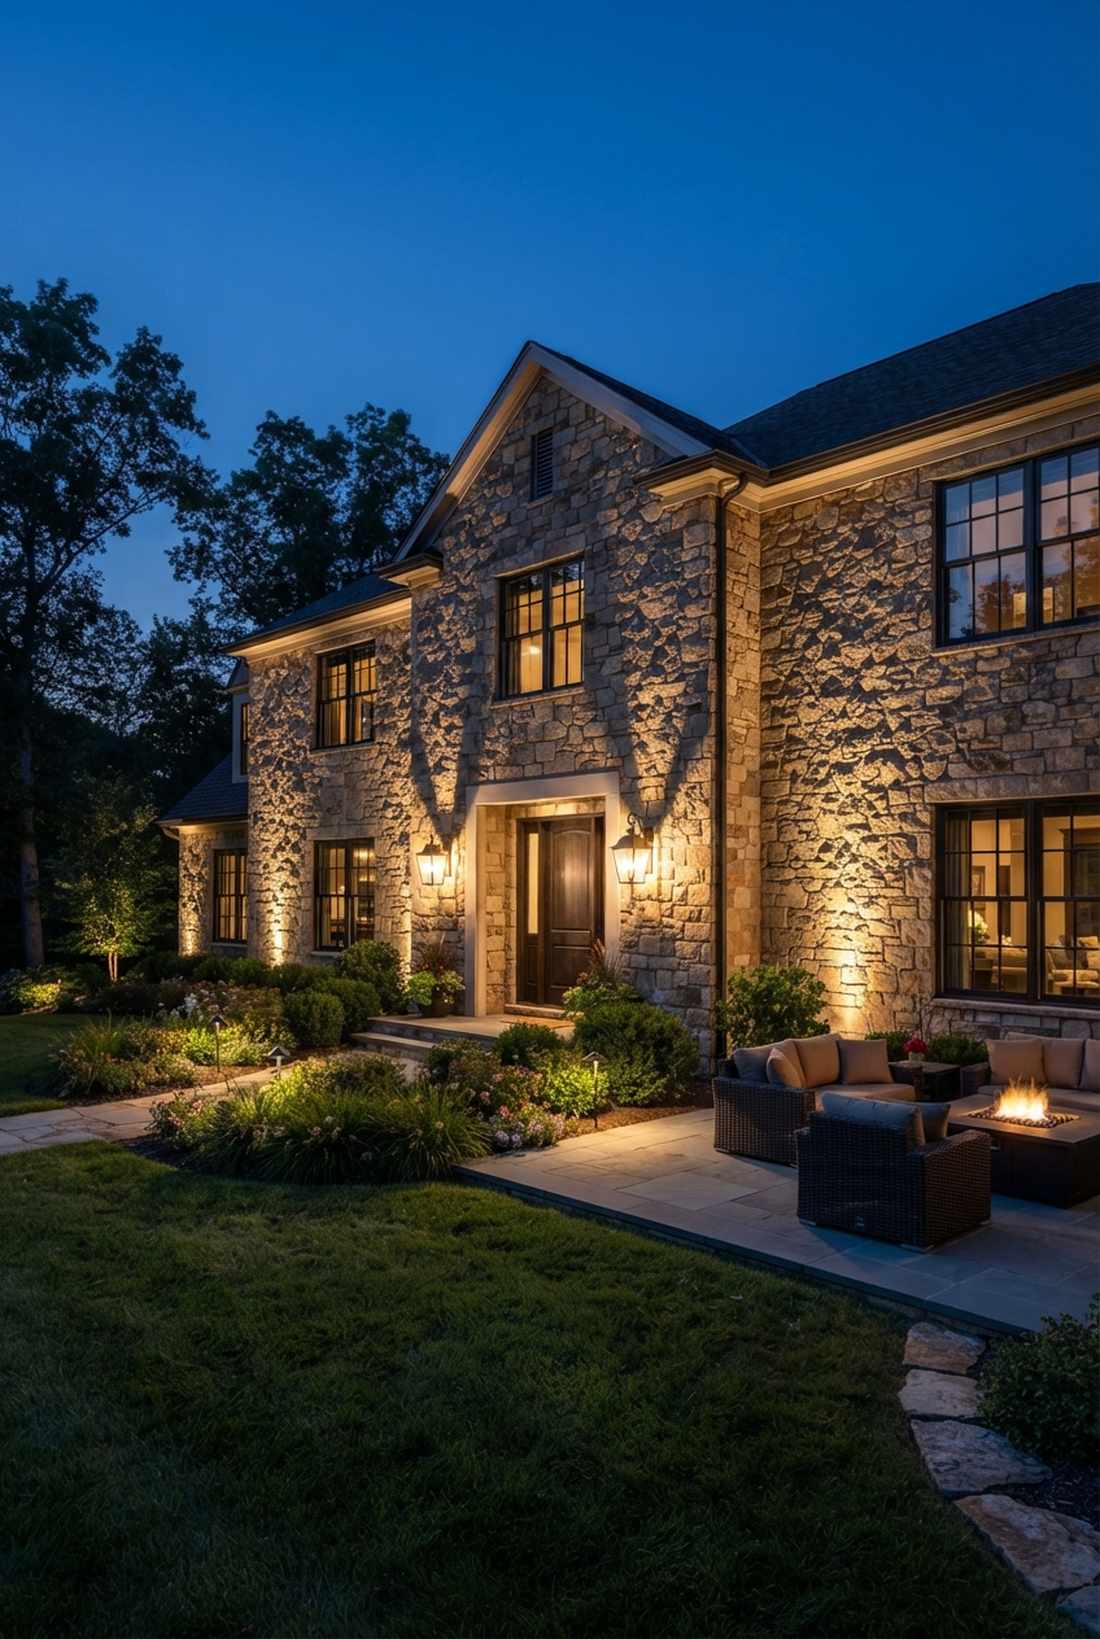
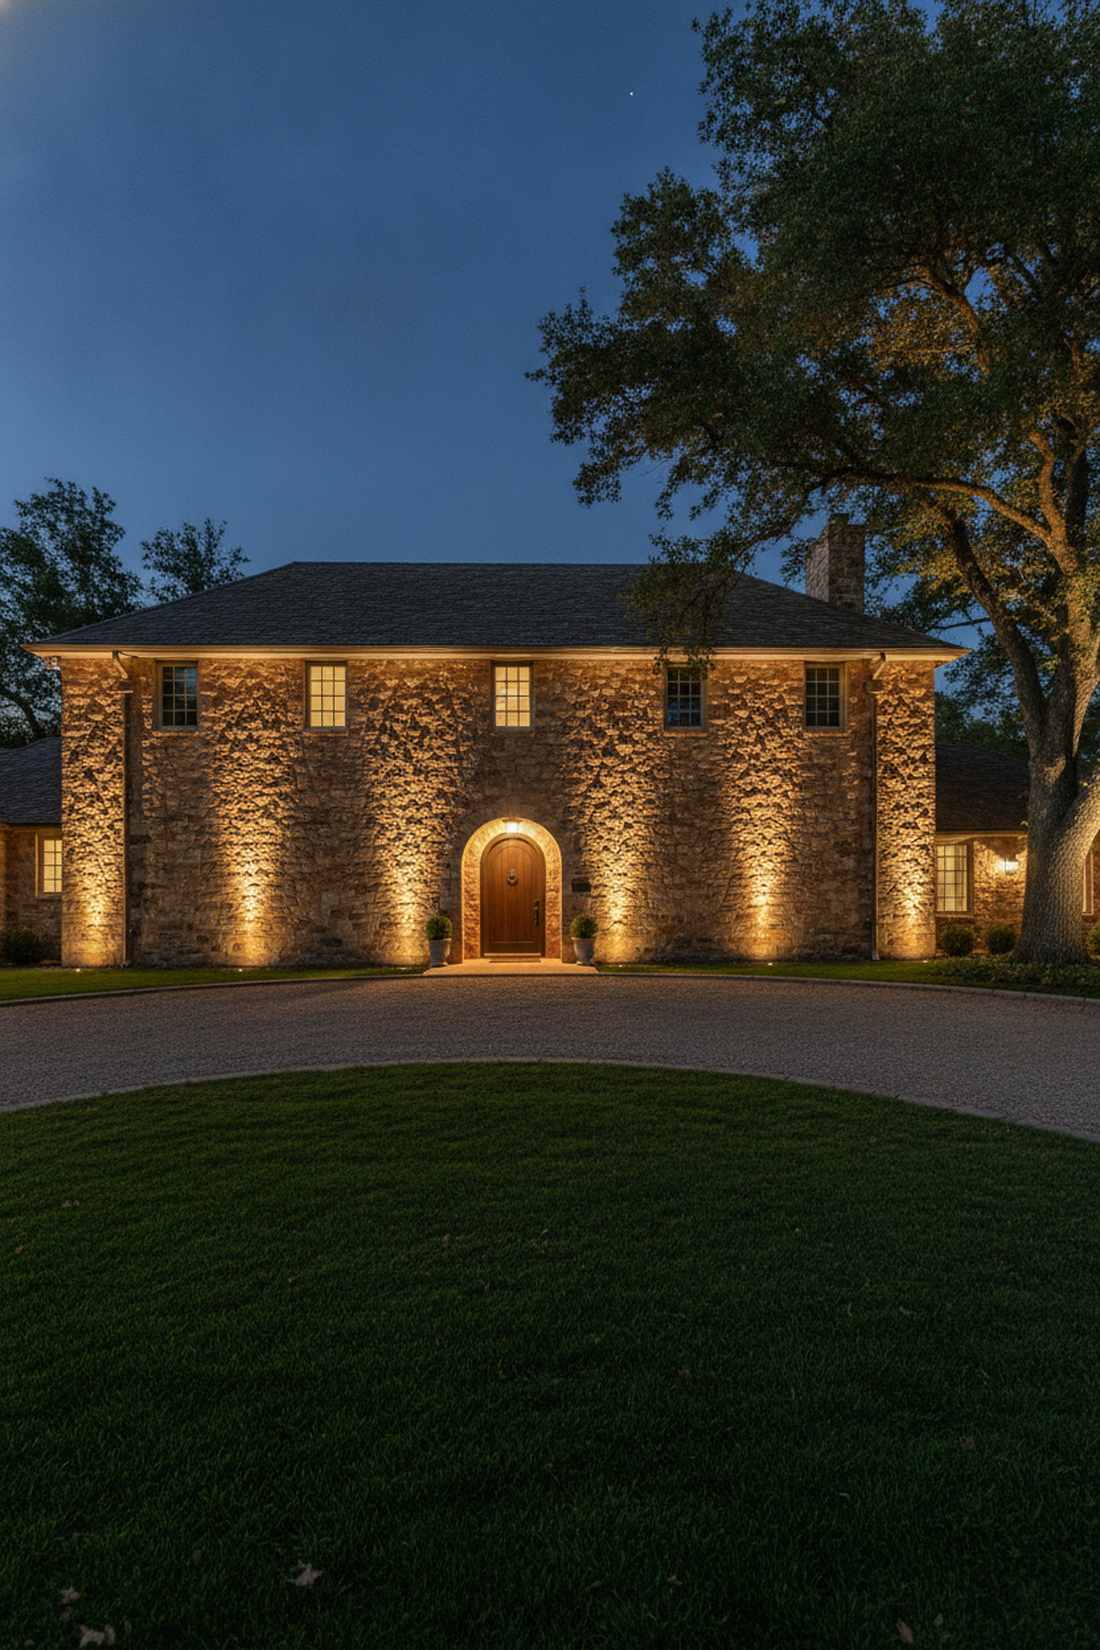
Creates an unbelievably moody, castle-like facade using exterior wall grazing techniques. The absolute best way to make flat stucco, brick, or stone siding look aggressively expensive.
Far too many people point spotlights directly at the wall, washing out every single detail in a harsh glare. You must mount narrow-beam spotlights 12-18 inches from the base, shooting straight up to skim the surface and exaggerate shadow depth. Selecting premium 3000K landscape accents ensures the natural brick tones stay warm and inviting.
This architectural trick costs roughly $50–$85 per grazing unit.
- Key Materials: Narrow-beam LED directional spots
- Vibe / Style: High-end estate facade
- Difficulty: Precise angle calibration
- Budget Breakdown: Spotlights: $60 | LED bulbs: $10.
- Creator’s Tip: Wait until pitch black to aim these. Even a half-inch adjustment changes the entire shadow pattern on the masonry.
- Smart Sourcing: narrow-beam LED outdoor spots (bulk pack), anti-glare hex louvers.
9. Column Uplighting Systems
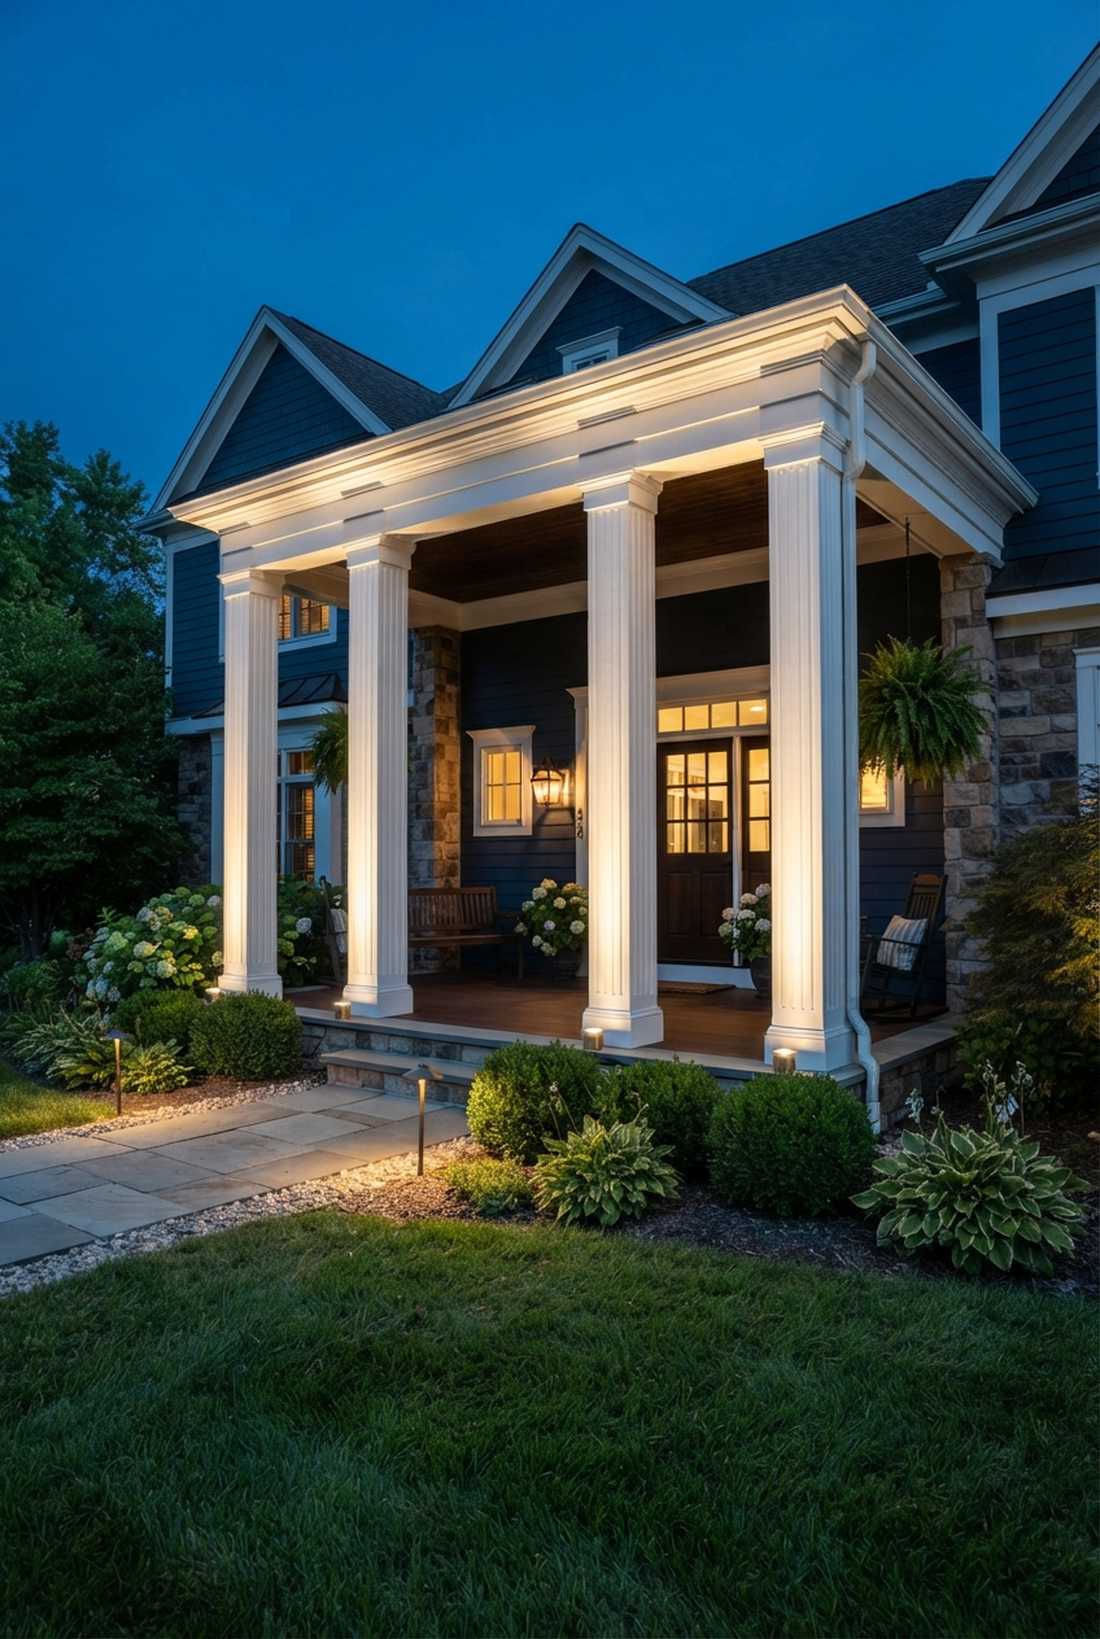
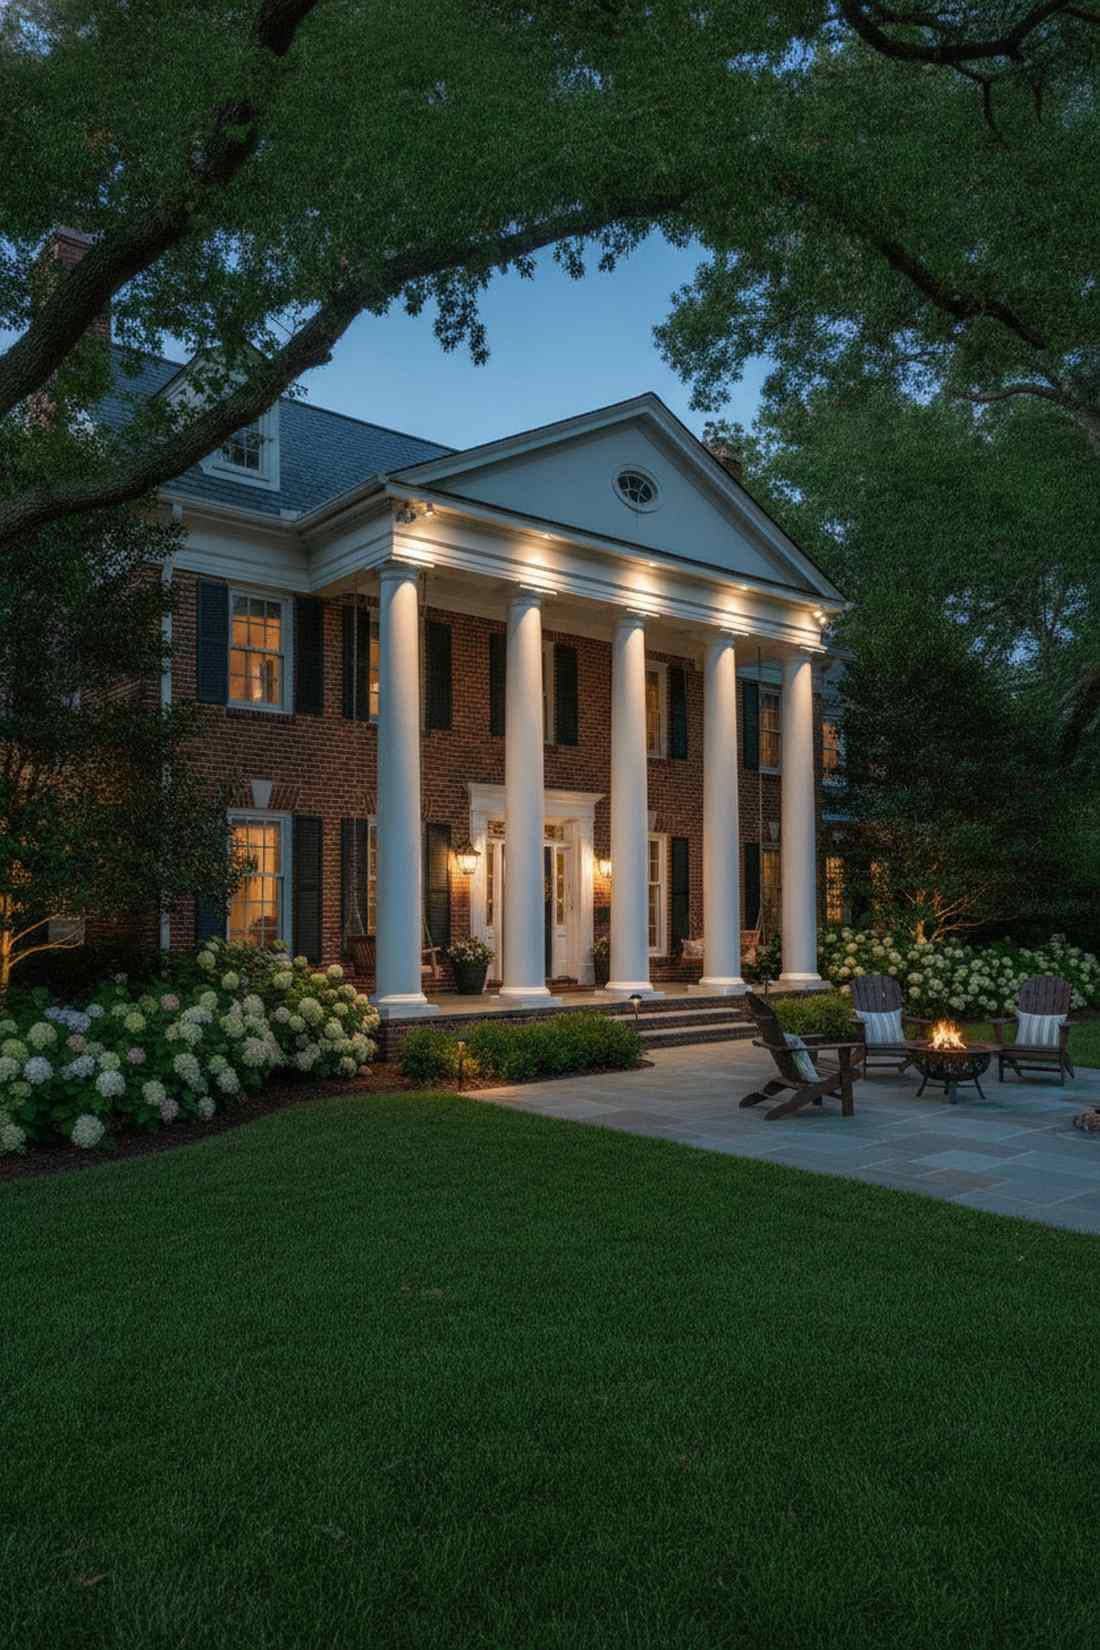
Commands instant respect and grandeur with vertical column illumination. Completely elevates standard front porch pillars, porticos, or massive backyard pergolas.
Ignoring column bases is the fastest way to make a large house look unfinished at night. Dropping in-ground well lights directly at the base projects a powerful beam upward, catching the architectural edges and visually raising the roofline. Investing in adjustable gimbal mount kits allows you to fine-tune the beam as the house settles.
You can execute this regal look for $45–$70 per column. Pin this if you’re upgrading a craftsman or colonial home front.
- Key Materials: Gimbal-adjustable well lights
- Vibe / Style: Classical imposing elegance
- Difficulty: Moderate concrete drilling
- Budget Breakdown: Gimbal fixtures: $55 | Core drill rental: $40.
- Creator’s Tip: If you have square columns, place the light slightly off-center to catch two faces of the pillar simultaneously for a 3D effect.
- Smart Sourcing: adjustable brass well lights (starter kit), commercial-grade LED MR16 bulbs.
💡 Must-Have Supplies for High-End Setups
To build these setups faster and ensure they last, skip the generic craft aisles and invest in the right foundational kits.
- Base & Support: marine-grade low voltage landscape transformers
- Setup Tools: heavy-duty direct burial wire cutters (starter kits)
- Weather/Durability Protection: silicone-filled waterproof wire nuts
10. Soffit-Mounted Downlights
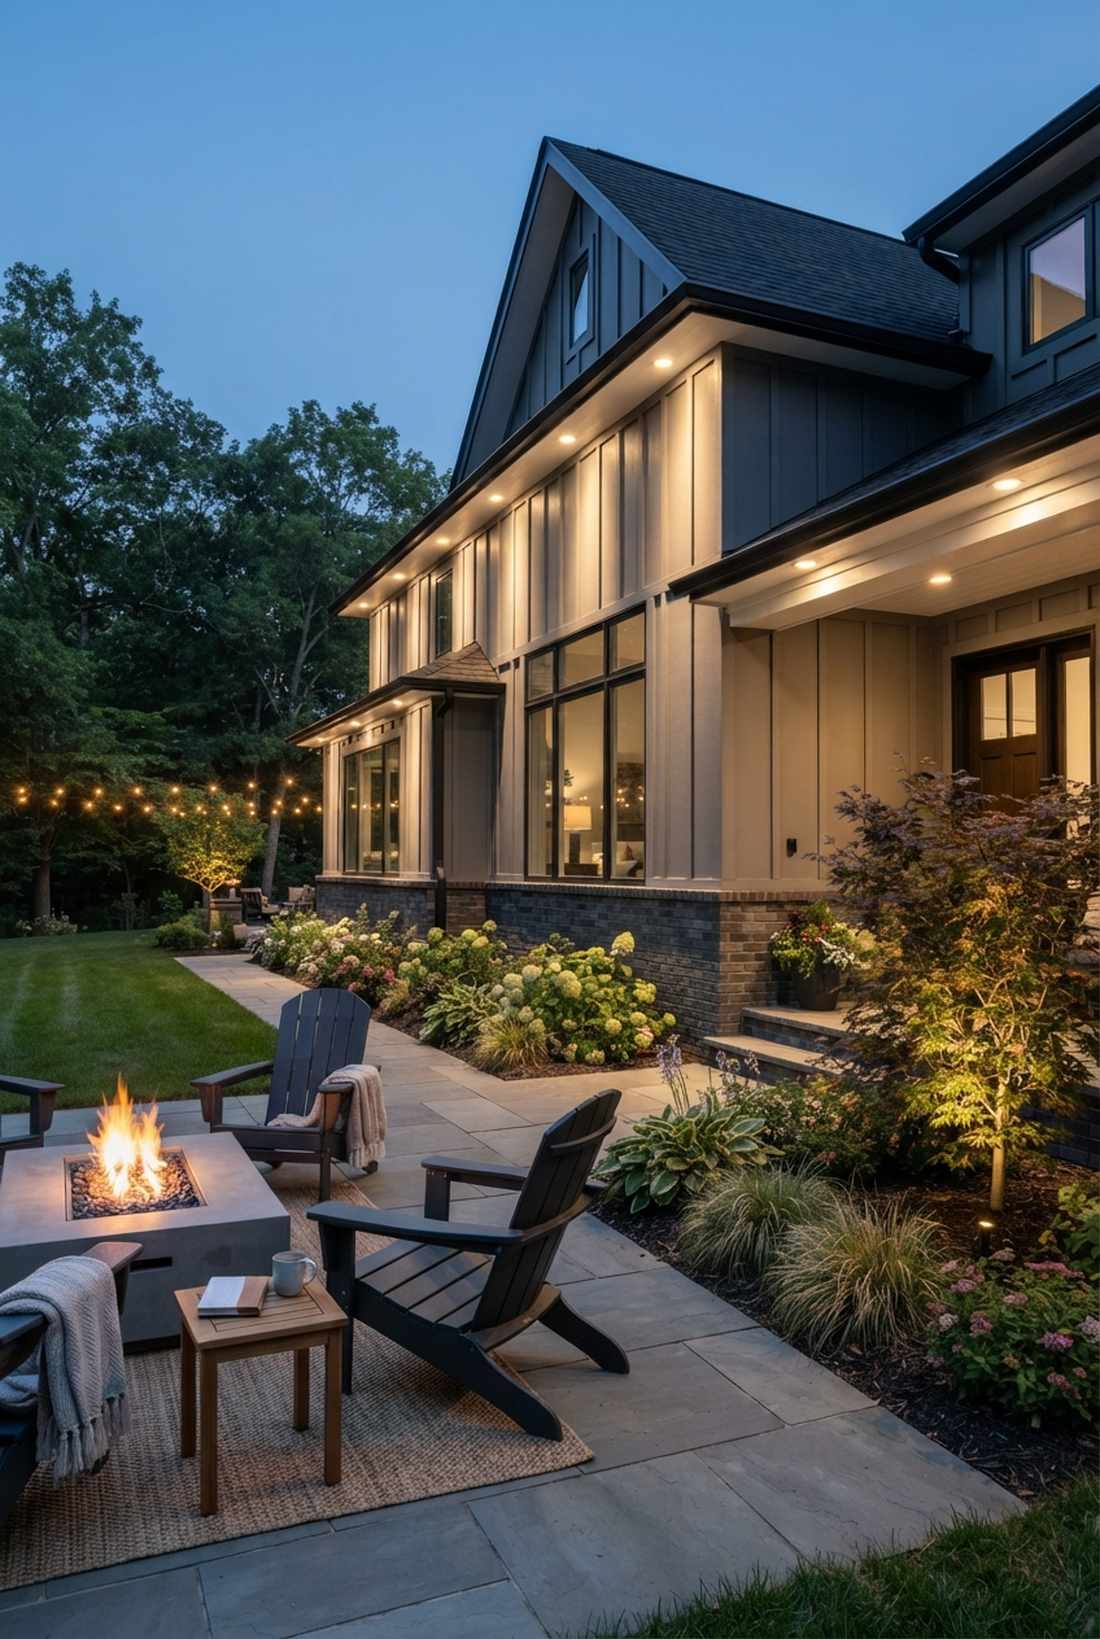
Projects a seamless, hidden cascade of light with recessed eave downlighting. Brilliant for hiding hardware while washing wide exterior walls and foundation shrubs.
Mounting ugly floodlights on your siding completely ruins the daytime aesthetic of your house. Recessed cans tucked up high into the soffits mimic natural moonlight, pushing wide beams down without exposing ugly wires or metal boxes. Sourcing high-quality retrofit LED hardware ensures you won’t be climbing a 20-foot ladder to change bulbs anytime soon.
Budget around $30–$55 per recessed can installation.
- Key Materials: Wet-rated recessed baffle trims
- Vibe / Style: Ultra-clean modern exterior
- Difficulty: Ladder and ceiling work
- Budget Breakdown: Cans & Trims: $40 | Romex wiring: $15.
- Creator’s Tip: Match the trim color exactly to your soffit paint. It should completely vanish when the lights are turned off.
- Smart Sourcing: wet-rated outdoor LED retrofit kits (bulk pack), pre-cut hole saws for soffits.
Stop scrolling if you have a dark exterior—this upcoming technique completely redefines nighttime property value.
11. Gutter-Mount Peak Lights
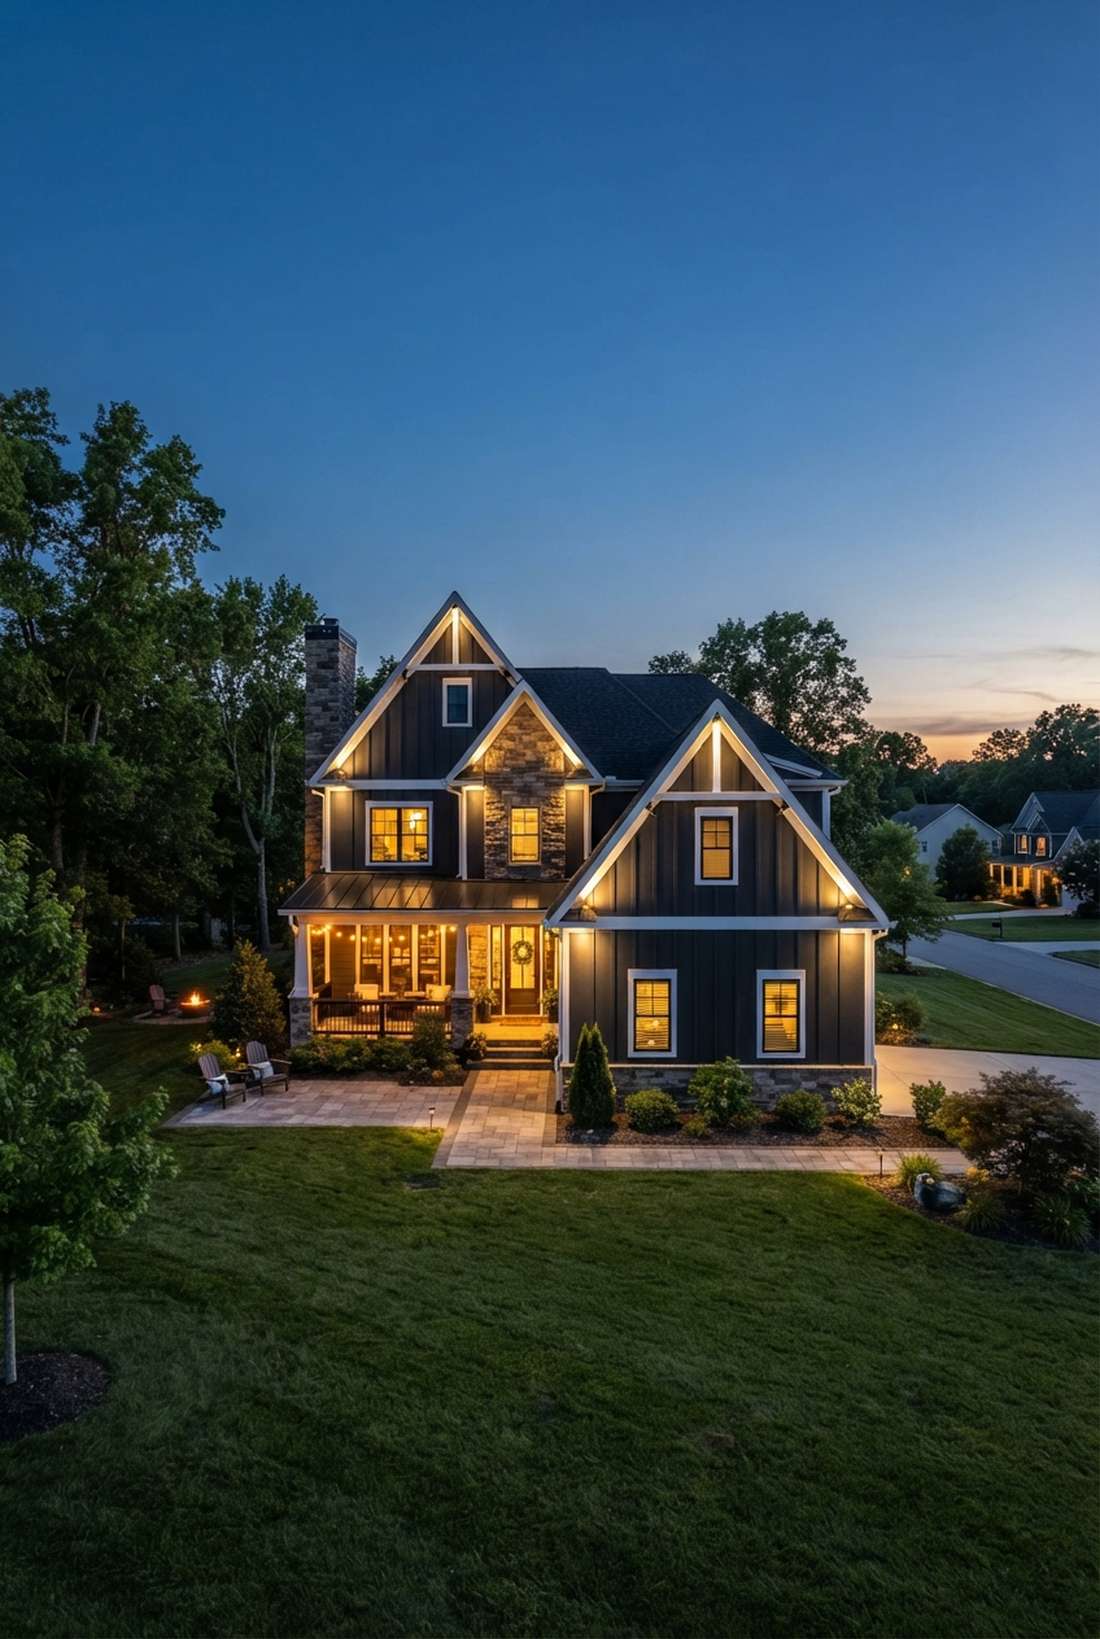
Highlights soaring second-story architecture using stealthy gutter bracket accents. A game-changer for illuminating sharp gables, dormers, and high decorative trim.
Most homeowners completely ignore their second story, making the house look cut in half from the street. Specialized non-invasive brackets grip right onto your existing gutters, allowing you to beam light directly onto high peaks without drilling into your pristine siding. Snagging dedicated roof-mount lighting hardware creates staggering vertical depth.
This quick upper-level upgrade runs $40–$60 per bracket setup. Save this for your ultimate exterior facade board.
- Key Materials: Universal gutter clamp brackets
- Vibe / Style: Towering multi-story drama
- Difficulty: High ladder comfort required
- Budget Breakdown: Gutter brackets: $15 | Bullet spots: $35.
- Creator’s Tip: Zip-tie the low voltage wire directly behind the downspout to keep the cable run completely invisible from the driveway.
- Smart Sourcing: aluminum gutter lighting brackets (pack of 4), miniature outdoor spotlights.
12. Window Silhouette Backlighting
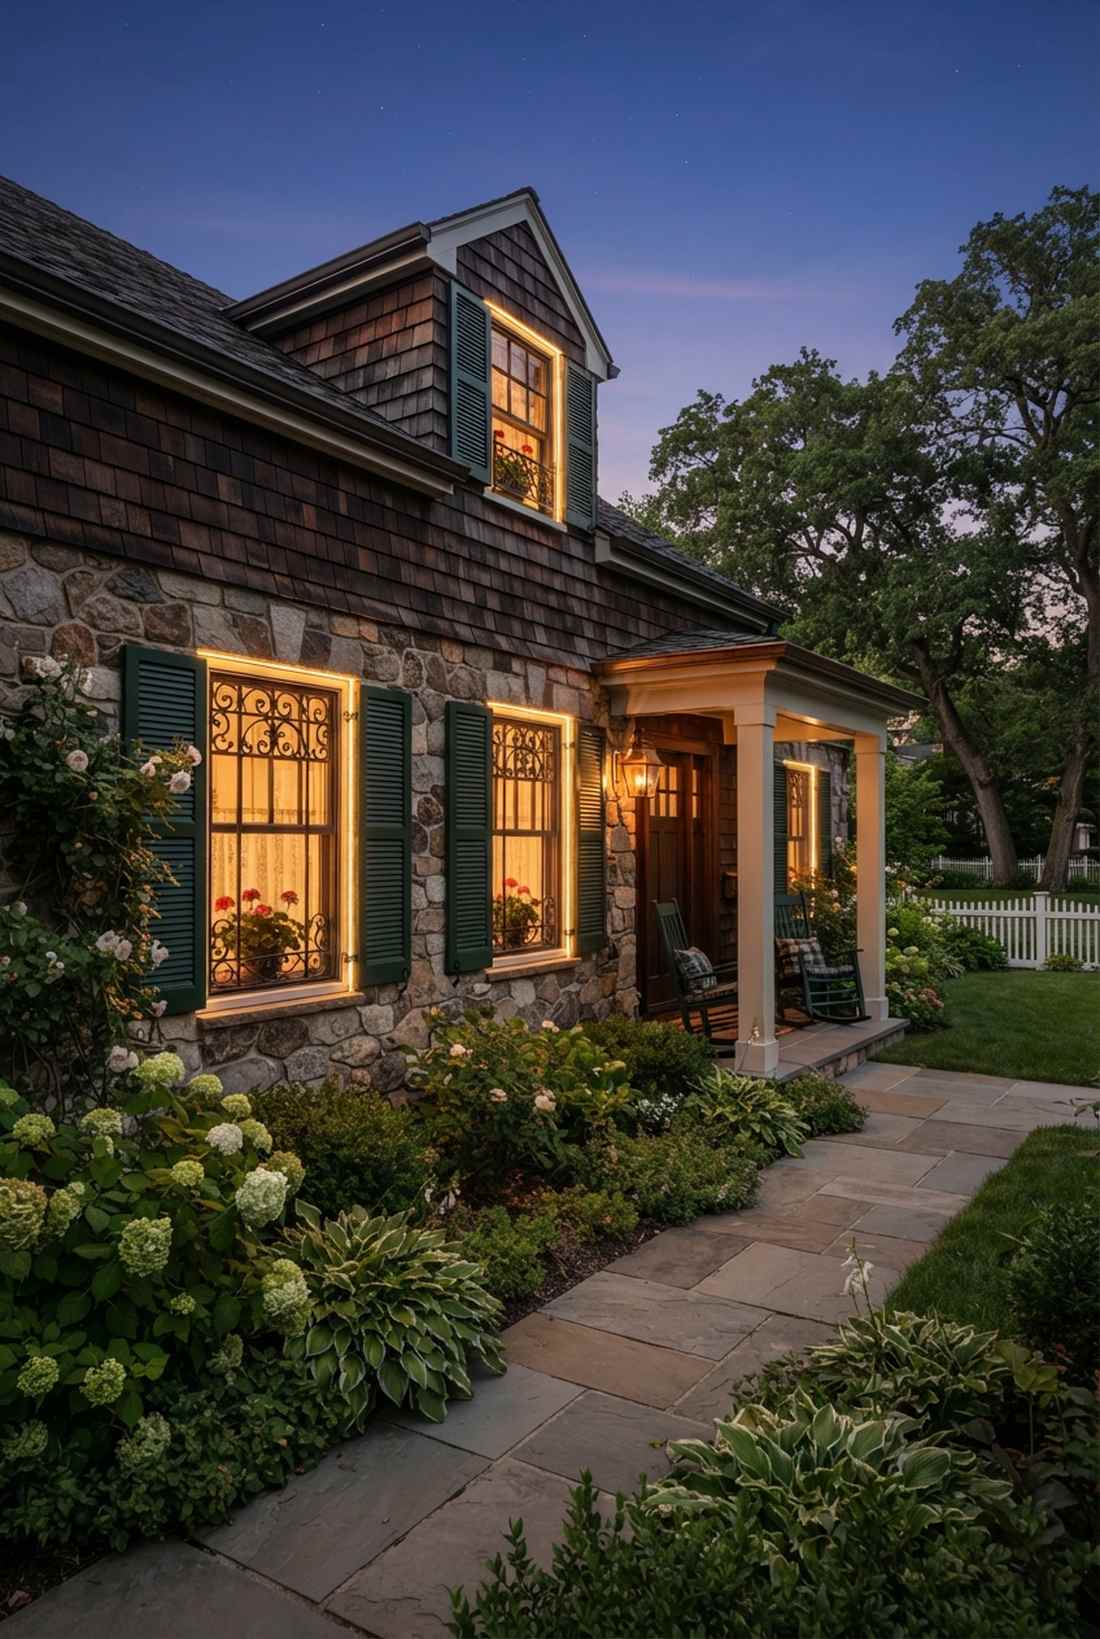
Builds a cozy, cinematic glow from within using exterior window backlighting. Perfect for accentuating beautiful shutters, intricate screens, or unique window trims.
Almost everyone focuses on lighting the wall, entirely forgetting that backlit windows add insane dimensional depth to a flat house. Slipping compact spotlights into the narrow gaps behind decorative shutters casts a glowing outline that makes the house feel alive and warm. Integrating micro exterior LED strips delivers a surprisingly premium look with almost zero footprint.
You can rig this silhouette effect for under $30 per window.
- Key Materials: Micro spotlights or LED tape
- Vibe / Style: Cinematic glowing cottage
- Difficulty: Easy hidden placement
- Budget Breakdown: Micro spots: $20 | Splitter cables: $10.
- Creator’s Tip: Use a warm 2700K bulb here. Anything cooler will make the house look like a stark commercial office building instead of a home.
- Smart Sourcing: weatherproof micro LED spotlights (starter kit), UV-coated exterior LED strips.
13. Address Number Illumination
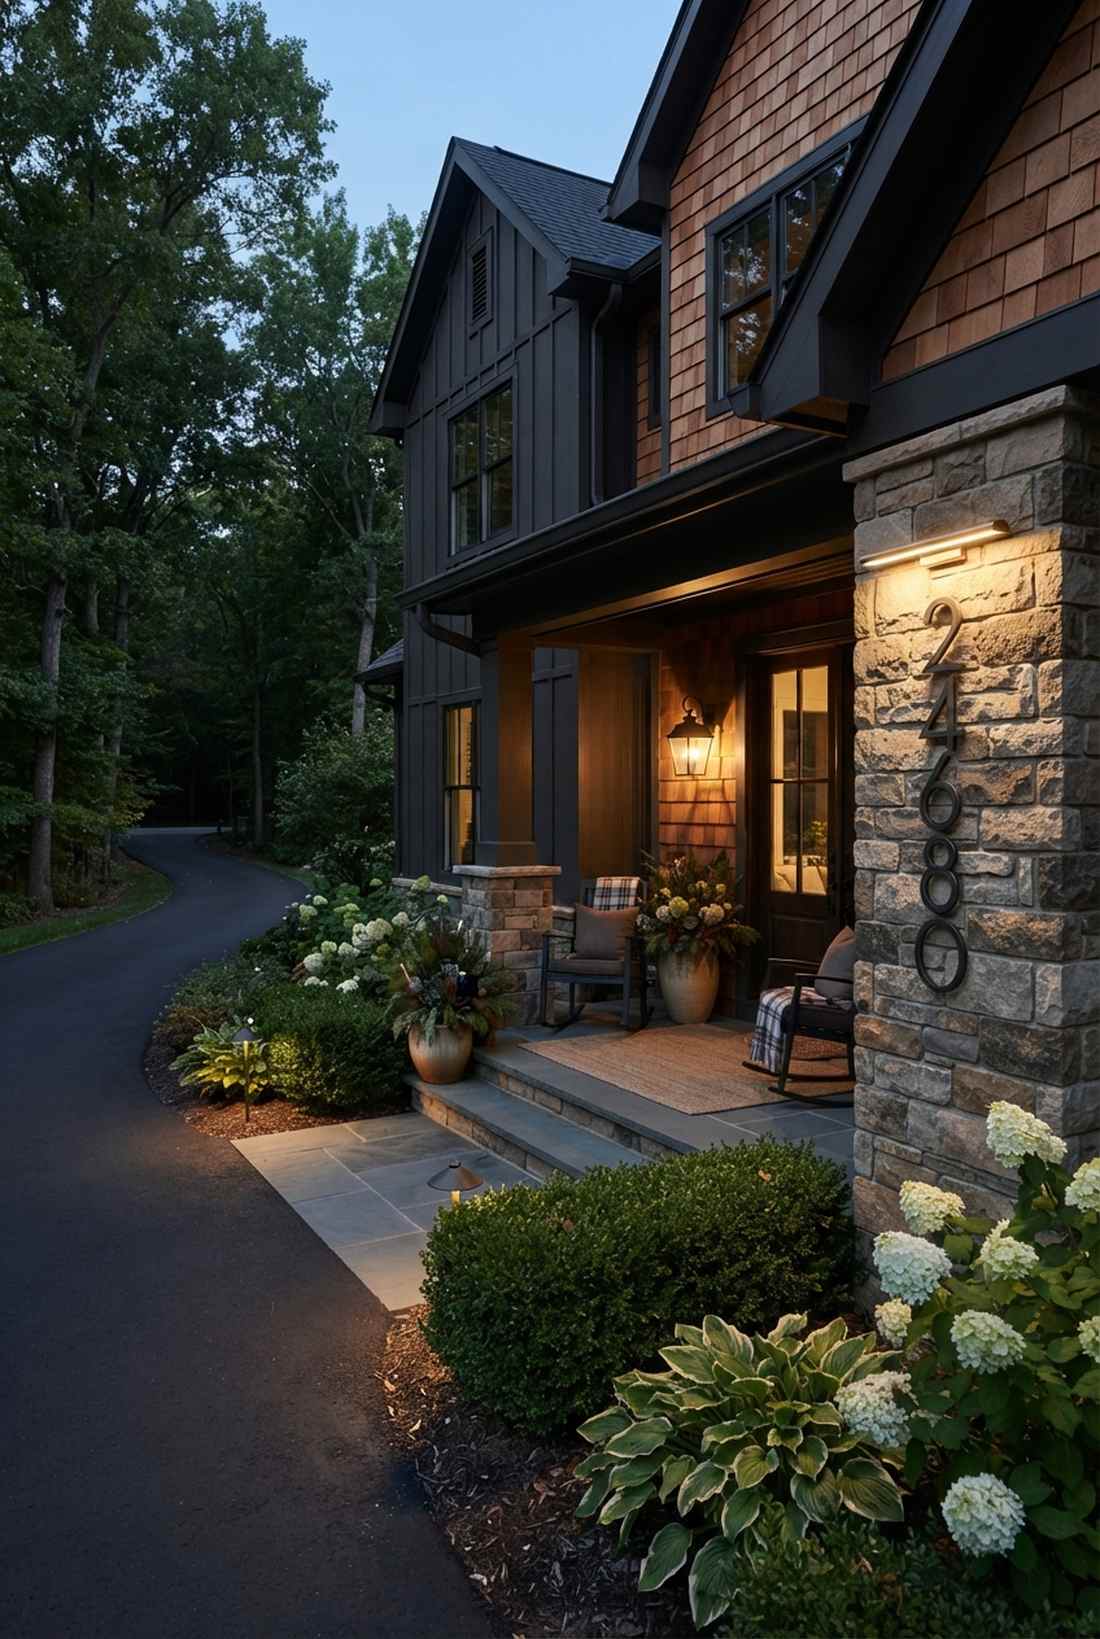
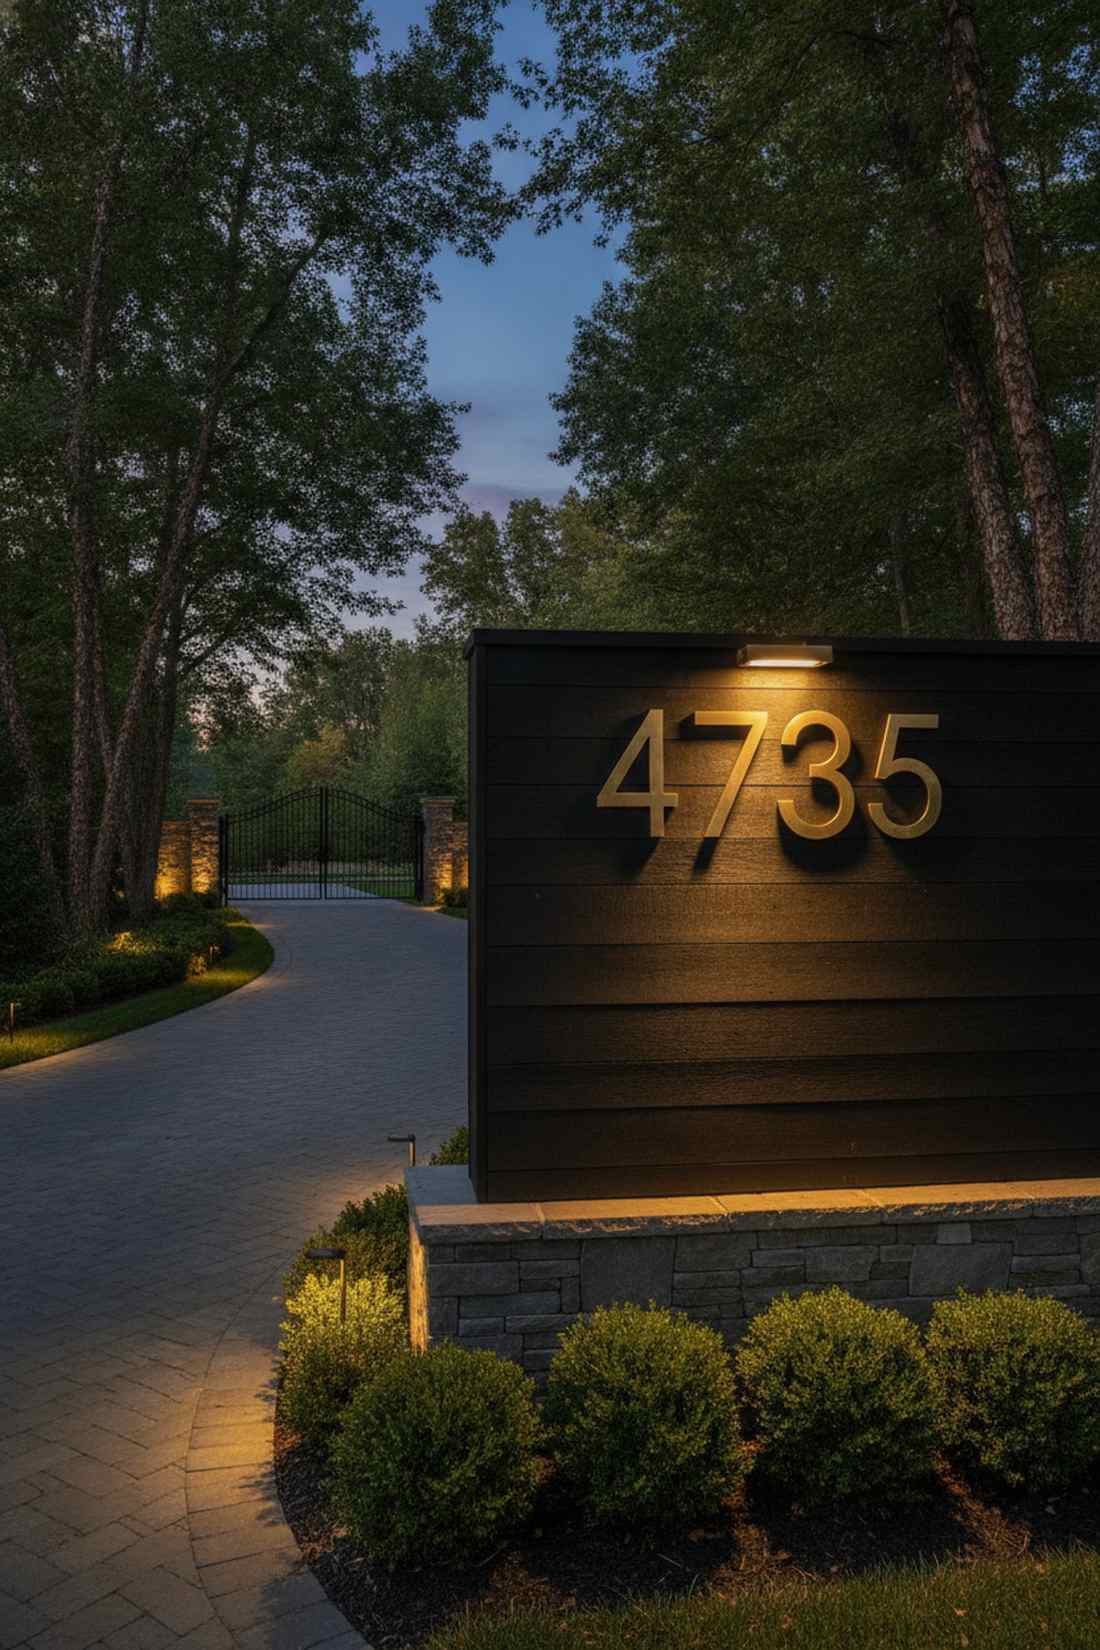
Screams luxury while solving a massive delivery headache with focused house number lighting. An absolute necessity for long, dark driveways or heavily wooded streets.
Nothing screams “cheap” louder than pizza delivery drivers using flashlights to find your house. A dedicated 1-2 watt narrow beam spot mounted directly above or below your numerals ensures crisp legibility without blinding the neighborhood. Upgrading to solid metal hardscape lighting fixtures makes your address pop like a luxury hotel entrance.
This simple safety upgrade only costs around $25–$45.
- Key Materials: Low-wattage lip lights
- Vibe / Style: Functional modern estate
- Difficulty: Quick surface mounting
- Budget Breakdown: Hardscape light: $30 | Mounting screws: $5.
- Creator’s Tip: If your numbers are reflective metal, mount the light above pointing down to avoid glare bouncing back to the street.
- Smart Sourcing: solid-brass hardscape retaining wall lights, pre-wired LED lip lights.
14. Chimney and Vertical Accent Washing
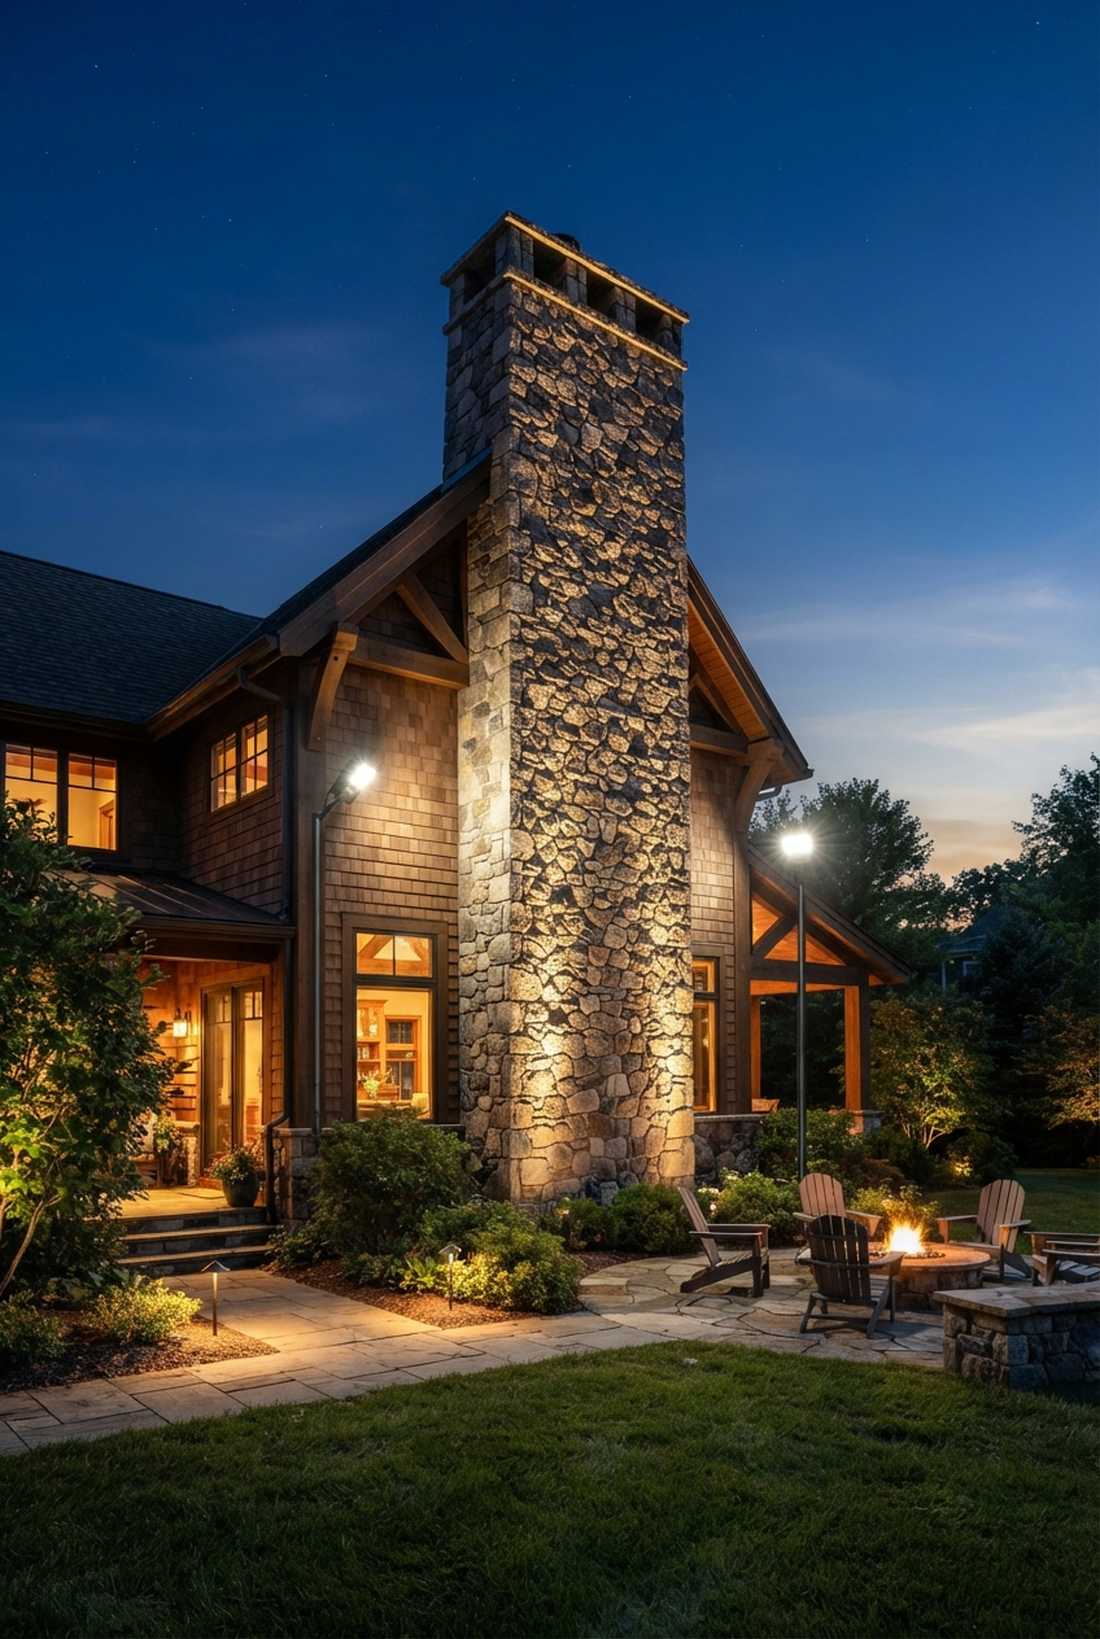
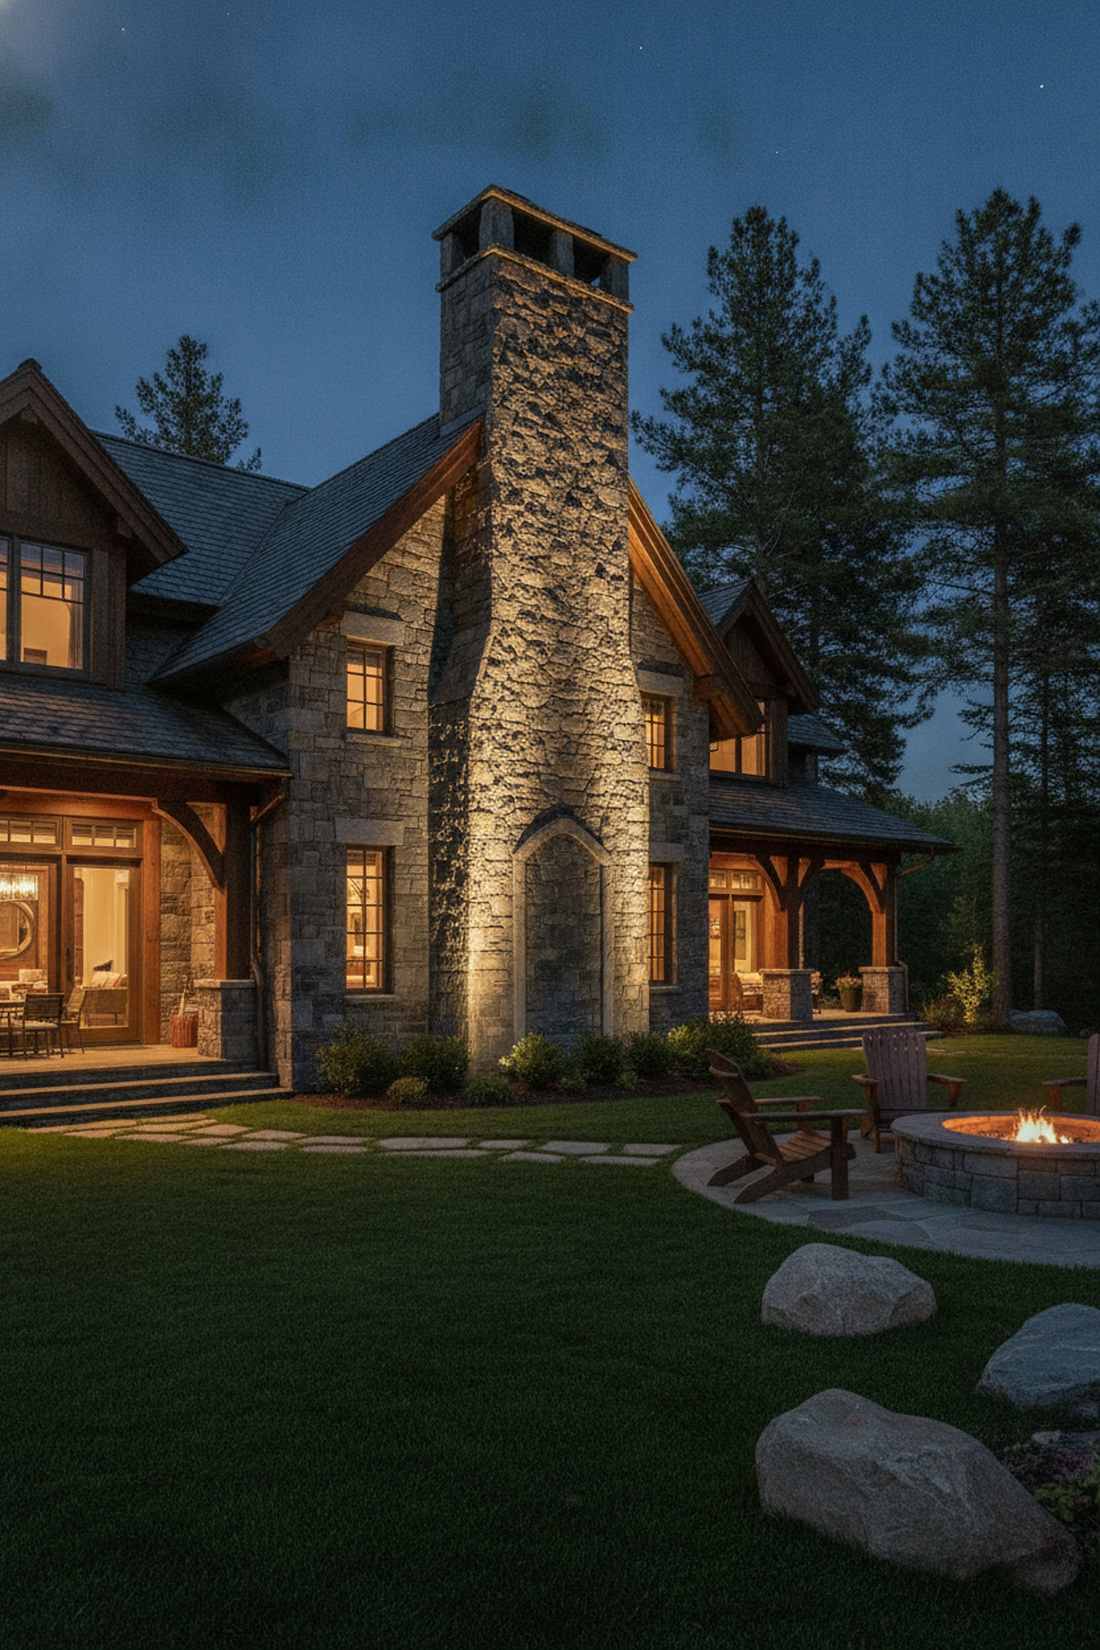
Transforms standard masonry into a towering nighttime monument using vertical chimney floods. Ideal for grand stone chimneys or tall brick architectural features on the side of a home.
Aiming a tiny path light at a 30-foot chimney is a complete waste of electricity and does absolutely nothing for your curb appeal. You need wide-beam floods positioned 10-15 feet back from the base to ensure full, even coverage across the entire vertical plane. Combining multiple directional landscape lighting supplies layers the light, erasing flat, boring shadows.
Expect to invest $70–$110 for high-output flood placement. Pin this trick if you have a massive stone feature on your house.
- Key Materials: High-output wide beam floods
- Vibe / Style: Towering majestic lodge
- Difficulty: Strategic distance spacing
- Budget Breakdown: High-output flood: $85 | Ground stake: $15.
- Creator’s Tip: Cross-illuminate large chimneys. Put one flood on the left and one on the right to reveal the deep texture of the stone.
- Smart Sourcing: high-lumen LED outdoor floodlights (bulk pack), heavy-duty metal mounting stakes.
Most DIYers completely overlook this next concept, yet it’s the exact secret high-end landscape architects use.
Tree and Foliage Techniques
Professional garden lights landscape designers employ specialized tree lighting methods to create natural night environments. These techniques celebrate plant forms while establishing spatial hierarchy within outdoor rooms.
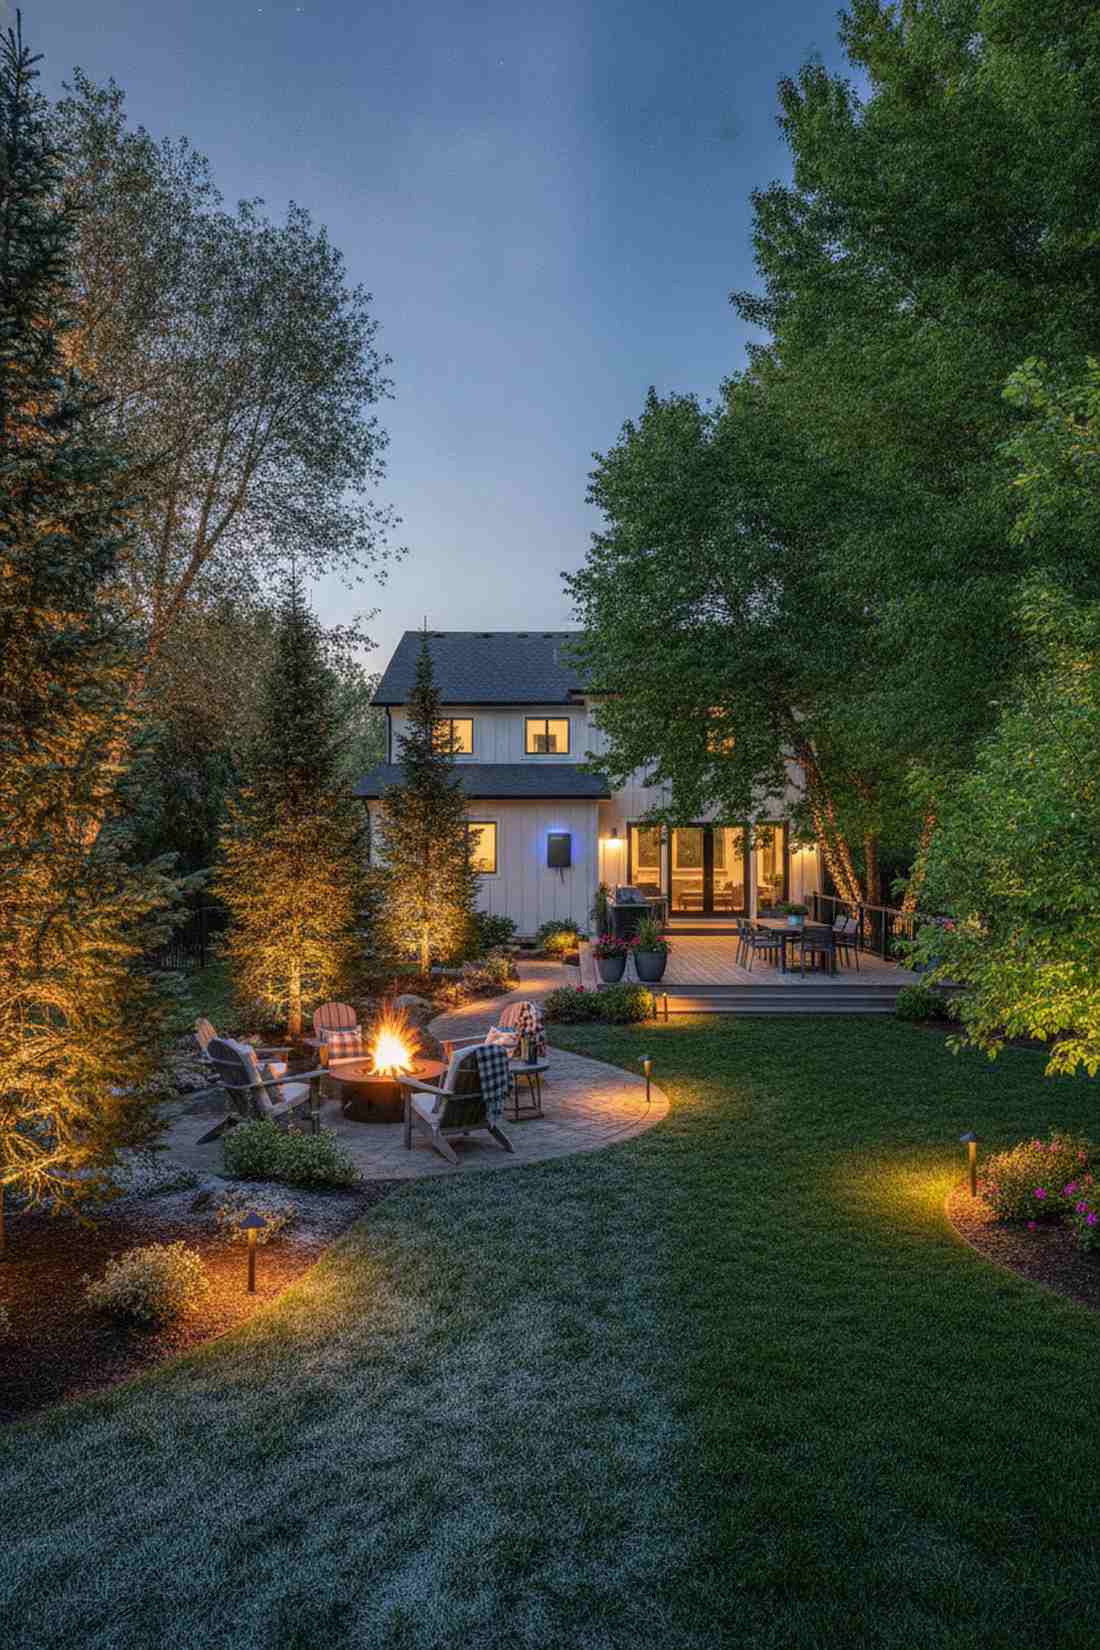
15. Canopy Uplighting
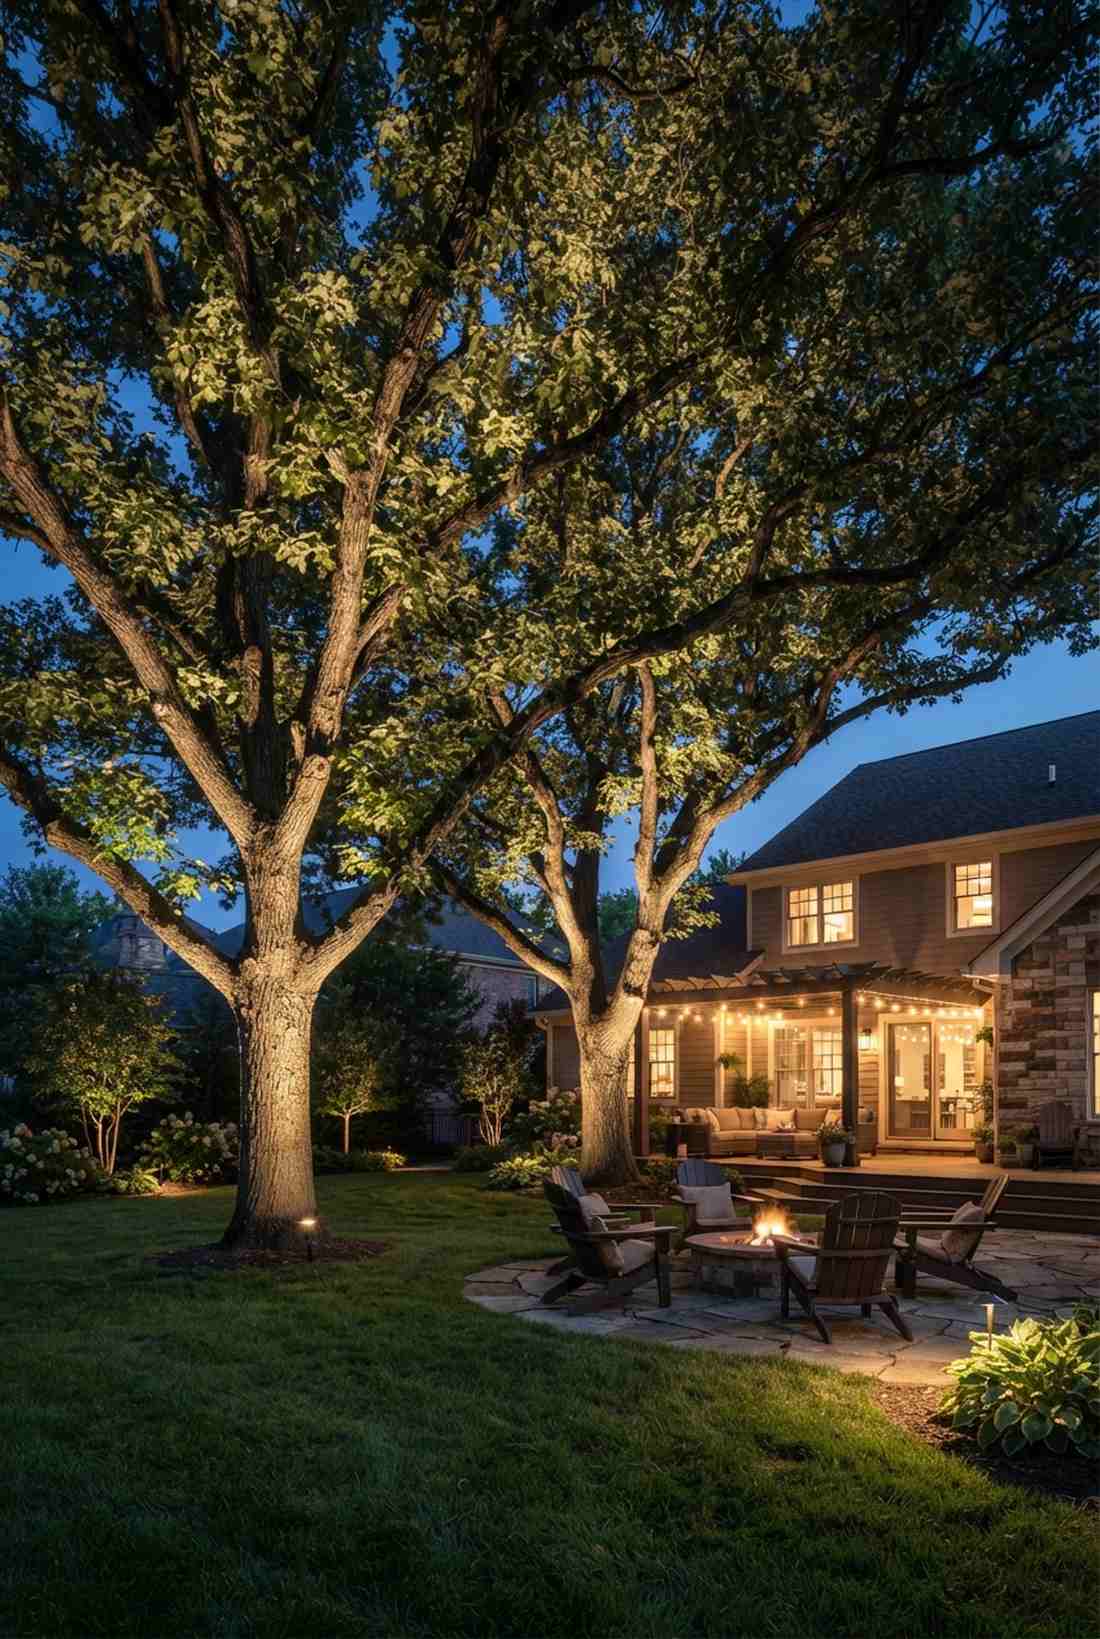
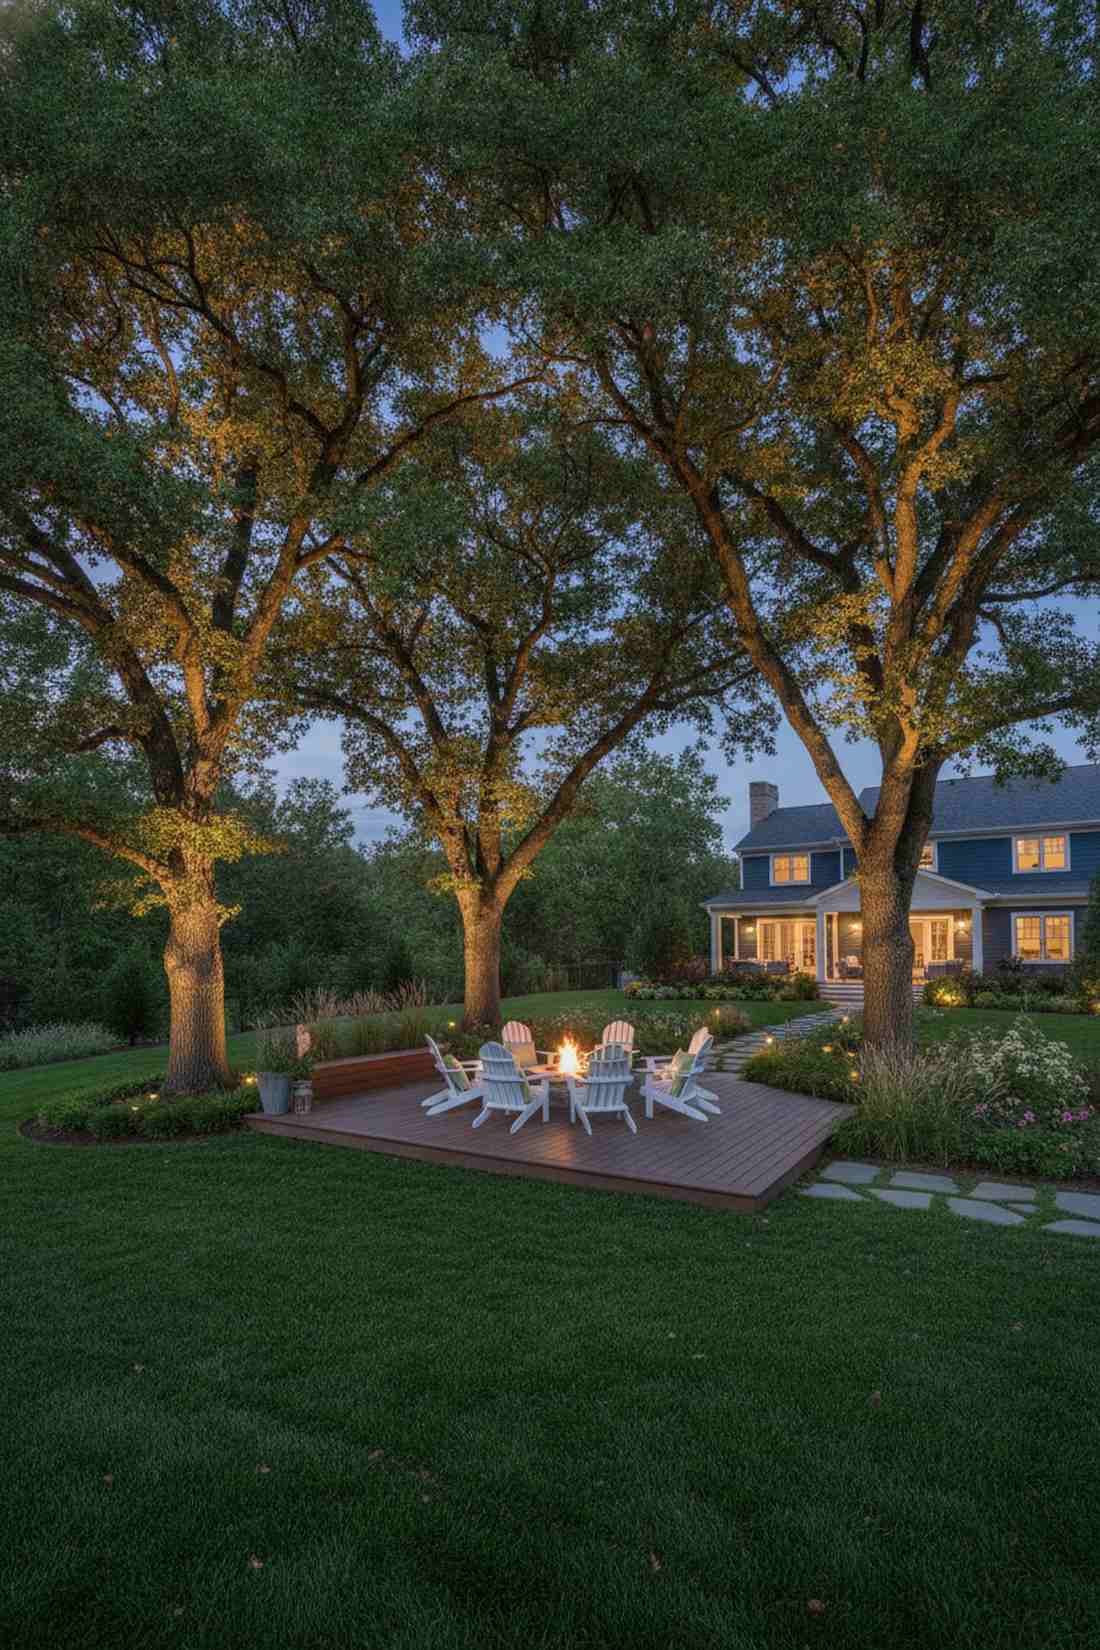
Injects intense, enchanted forest energy using base-to-canopy tree uplights. Stunning when deployed under giant mature oaks, maples, or sprawling weeping willows.
People constantly make the error of shoving the light directly against the trunk, leaving the massive leafy top completely hidden in darkness. By stepping back and angling a 15-25 watt LED spot slightly away from the center, you shoot light directly through the branches, revealing the true scale of the tree. Securing commercial arbor lighting equipment guarantees the beam punches all the way to the top leaves.
A proper canopy setup runs around $60–$90 per mature tree.
- Key Materials: 30-degree beam spread spots
- Vibe / Style: Majestic glowing forest
- Difficulty: Beam angle tweaking
- Budget Breakdown: Premium Spot: $70 | Protective lens: $10.
- Creator’s Tip: For dense evergreens, you need a much wider beam spread (60 degrees) so the light doesn’t just hit a wall of pine needles.
- Smart Sourcing: adjustable brass uplighting kits (starter kit), shatterproof glass convex lenses.
16. Moonlighting from High Canopies
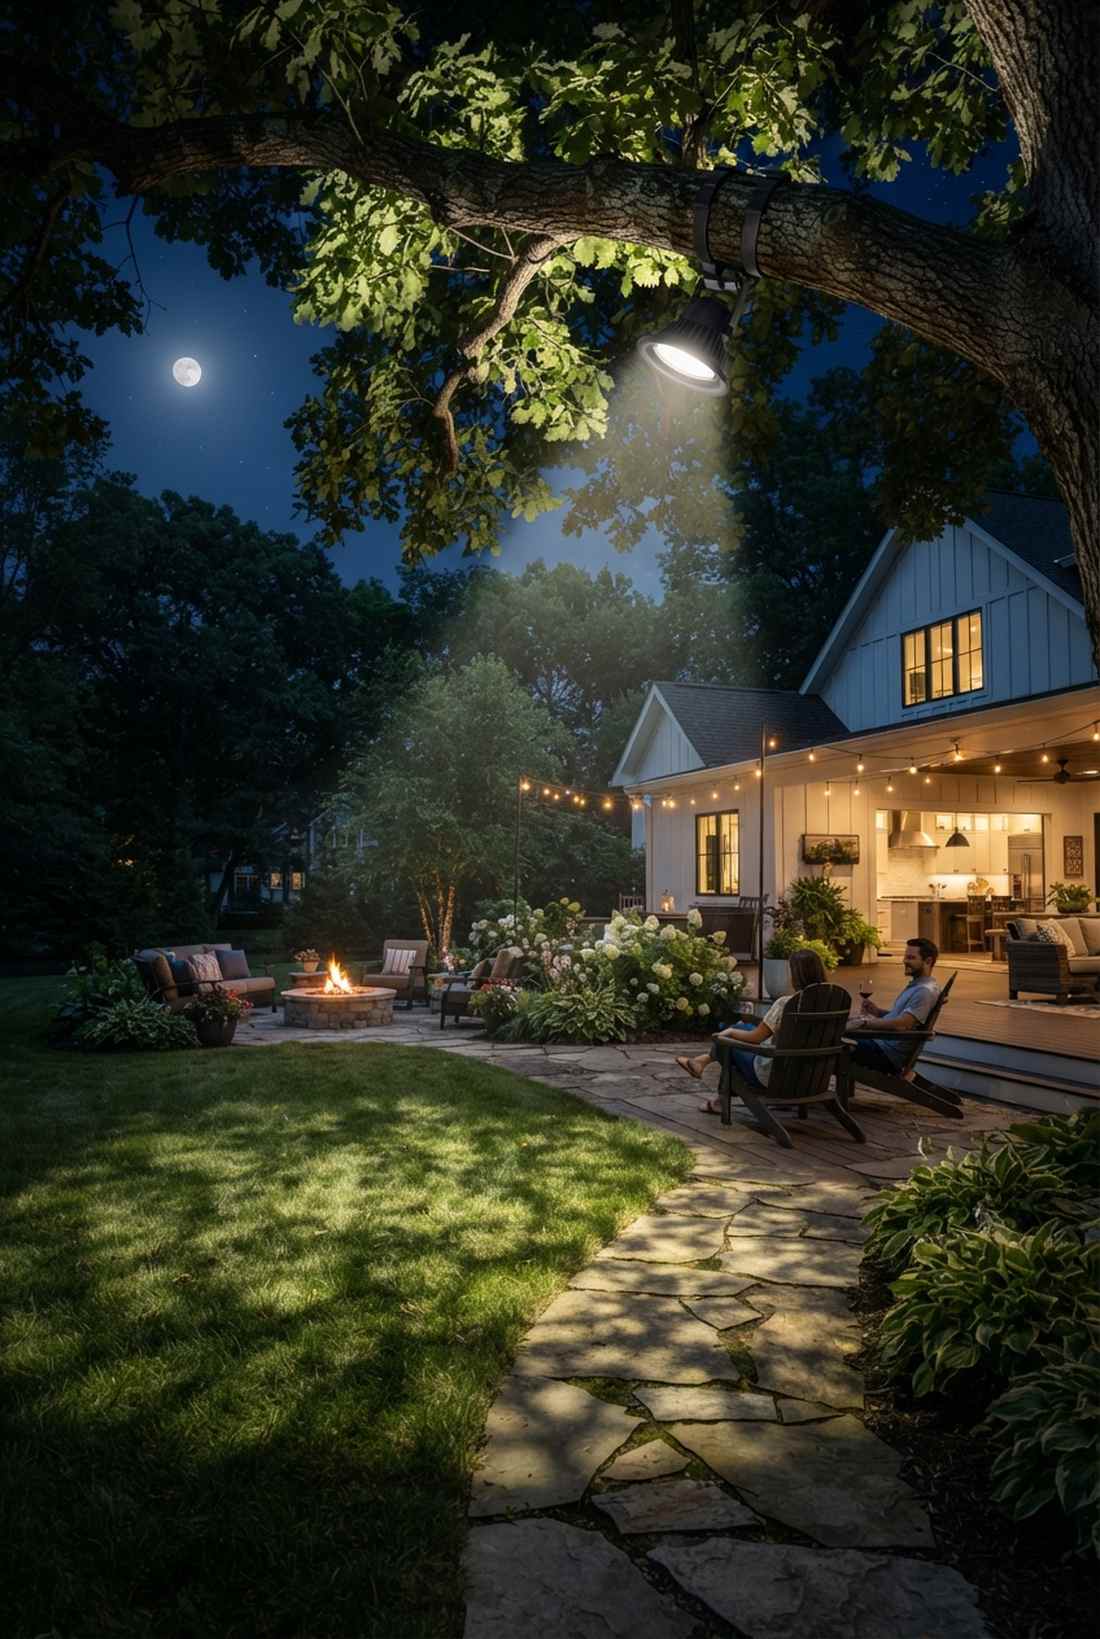
Feels like a permanent, romantic full moon night utilizing elevated canopy downlights. The absolute best way to cast dappled, naturalistic shadows across a boring stretch of lawn.
Ground lights can sometimes look artificial, but placing fixtures 20 feet up in a tree creates an incredibly soft, natural downward glow. Mounting weatherproof downlights to sturdy branches and aiming them at a 45-degree angle downward creates an effect that sways beautifully in the wind. Using specific tree-safe mounting hardware ensures you don’t slowly kill your expensive landscape over time.
This designer secret costs about $80–$130 per tree to rig safely. Save this to your dream backyard oasis board!
- Key Materials: Tree-safe mounting standoffs
- Vibe / Style: Romantic natural moonlight
- Difficulty: Advanced arbor climbing
- Budget Breakdown: Downlight: $75 | Tree straps: $25.
- Creator’s Tip: Never use screws directly into a growing tree trunk. Always use specialized rubberized tree straps that expand as the tree grows.
- Smart Sourcing: rubberized tree-mount lighting straps (bulk pack), glare-guarded outdoor downlights.
17. Shadow Casting on Walls
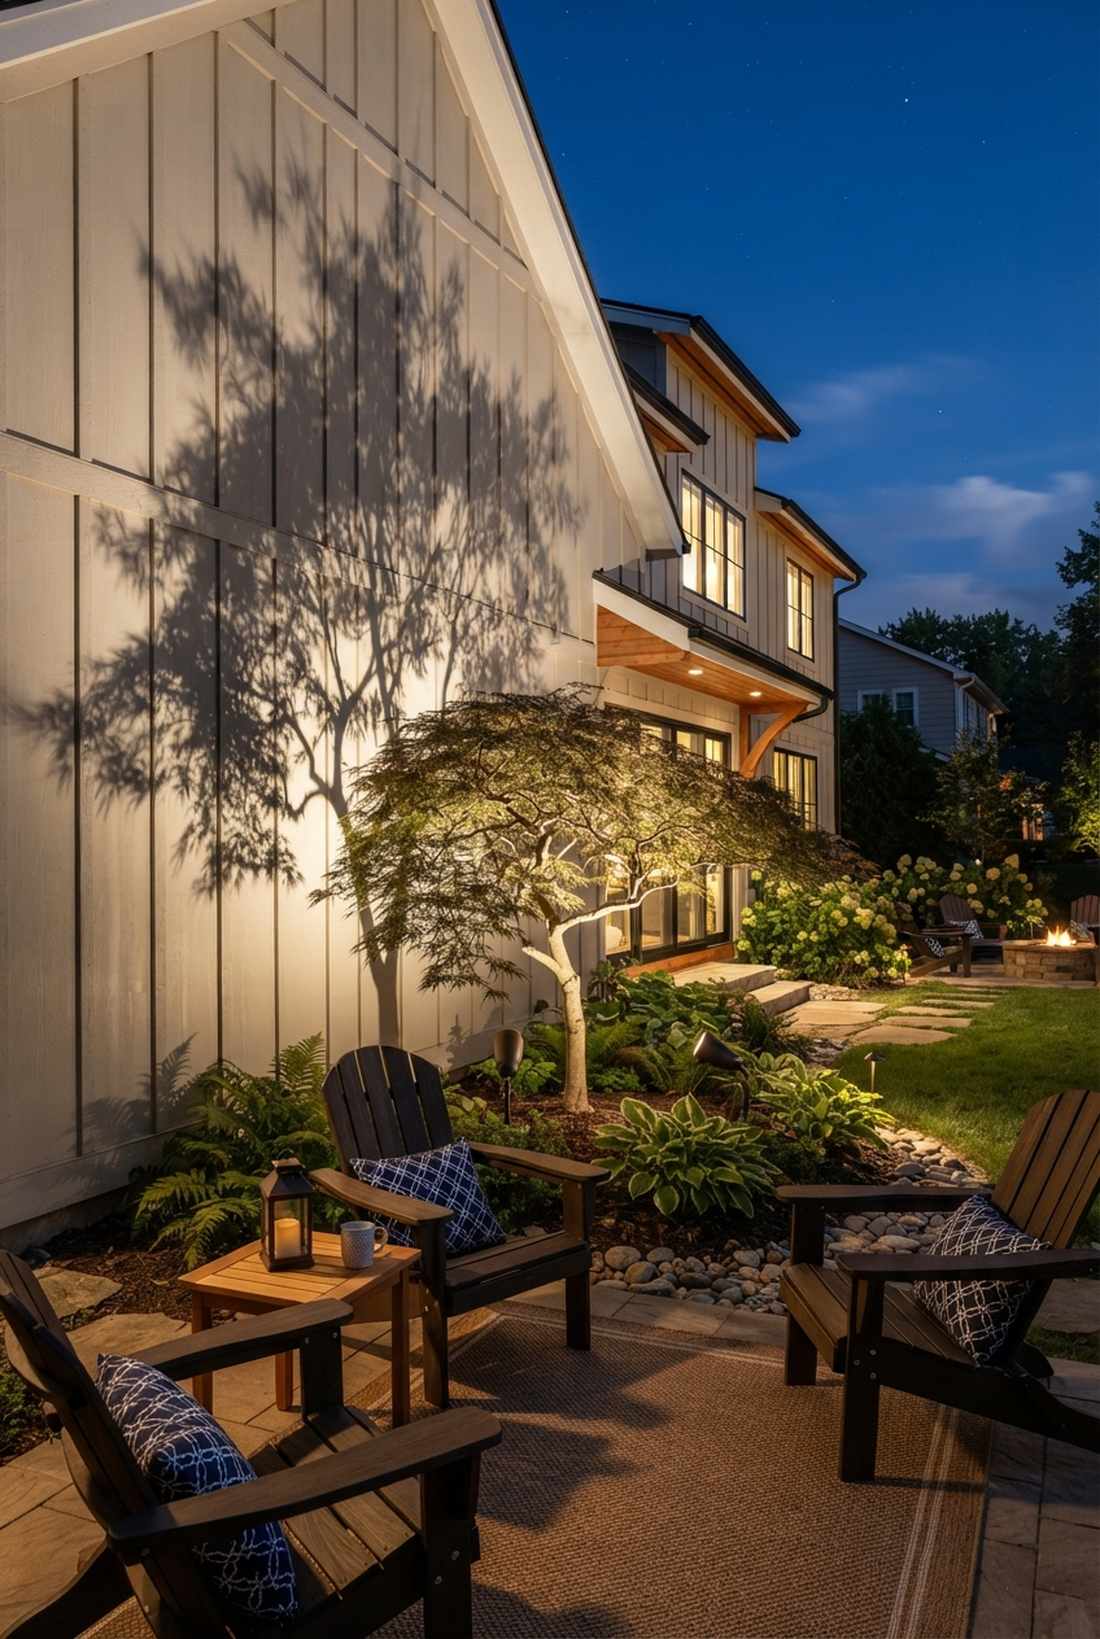
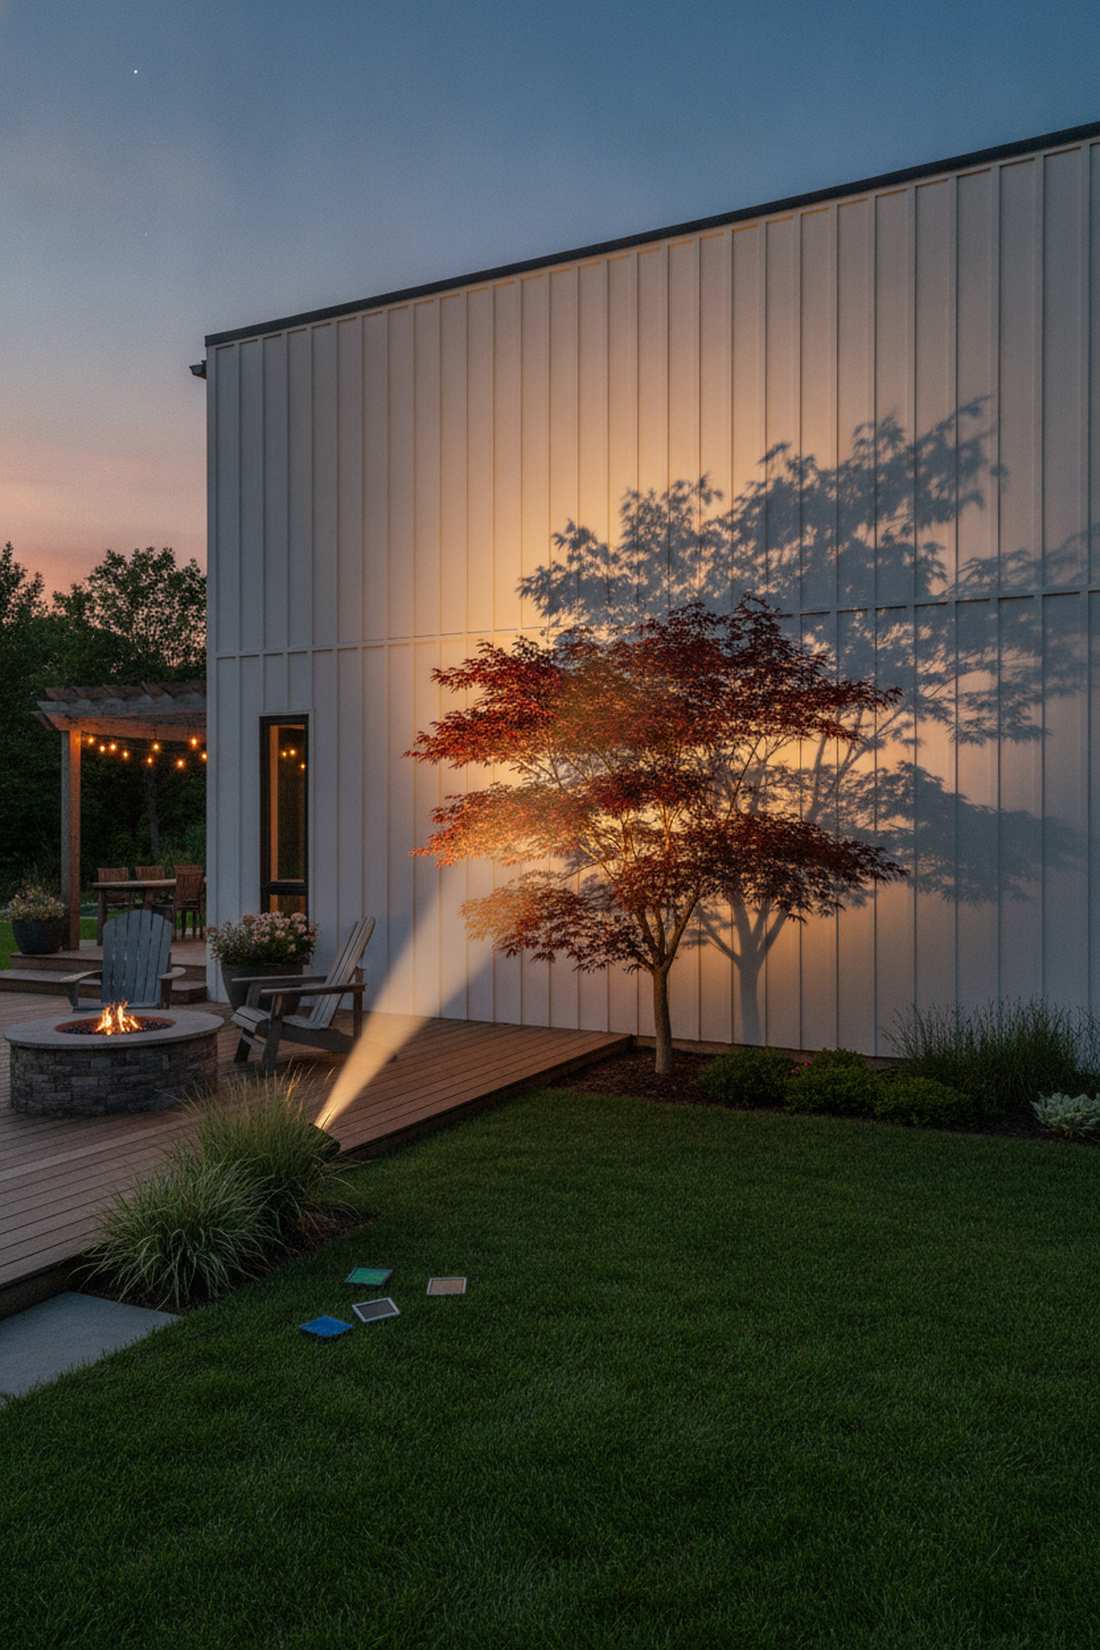
Turns plain siding into an animated art display using foliage silhouette shadow casting. Incredibly effective behind sculptural Japanese maples or intricate ornamental shrubs.
If you have a blank exterior wall, painting it is expensive—throwing a massive tree shadow across it is brilliant and cheap. By positioning a bright spotlight directly behind the plant and aiming it at the wall, you project a massive, wind-animated silhouette that looks like a high-end art gallery. Grabbing professional low voltage garden lights kits makes setting up this theatrical look surprisingly fast.
You can set up this shadow theater for just $40–$70.
- Key Materials: High-contrast directional spots
- Vibe / Style: Dynamic animated art
- Difficulty: Easy placement tweaking
- Budget Breakdown: Spotlight: $50 | Colored lens filters: $15.
- Creator’s Tip: Move the light closer to the tree for a massive, blurry shadow, or pull it further back for a sharp, highly detailed silhouette.
- Smart Sourcing: directional landscape spot fixtures, pre-cut colored lighting filters.
18. Multi-Trunk Birch Illumination
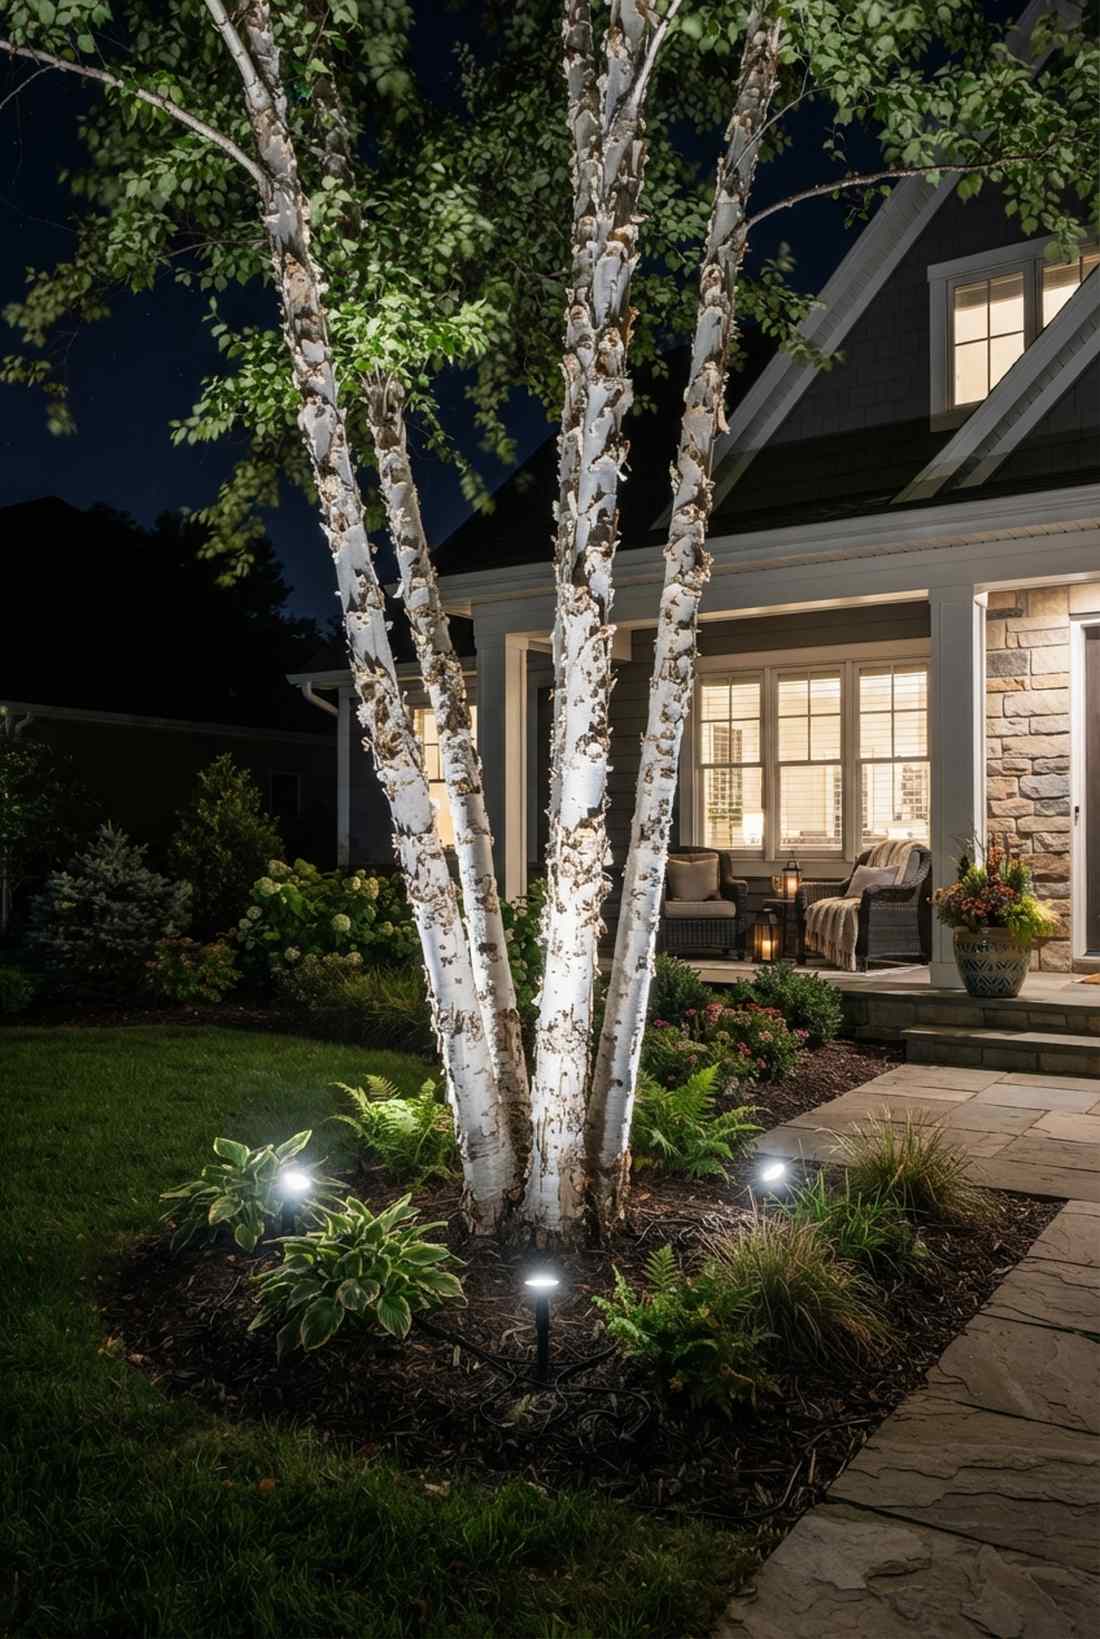
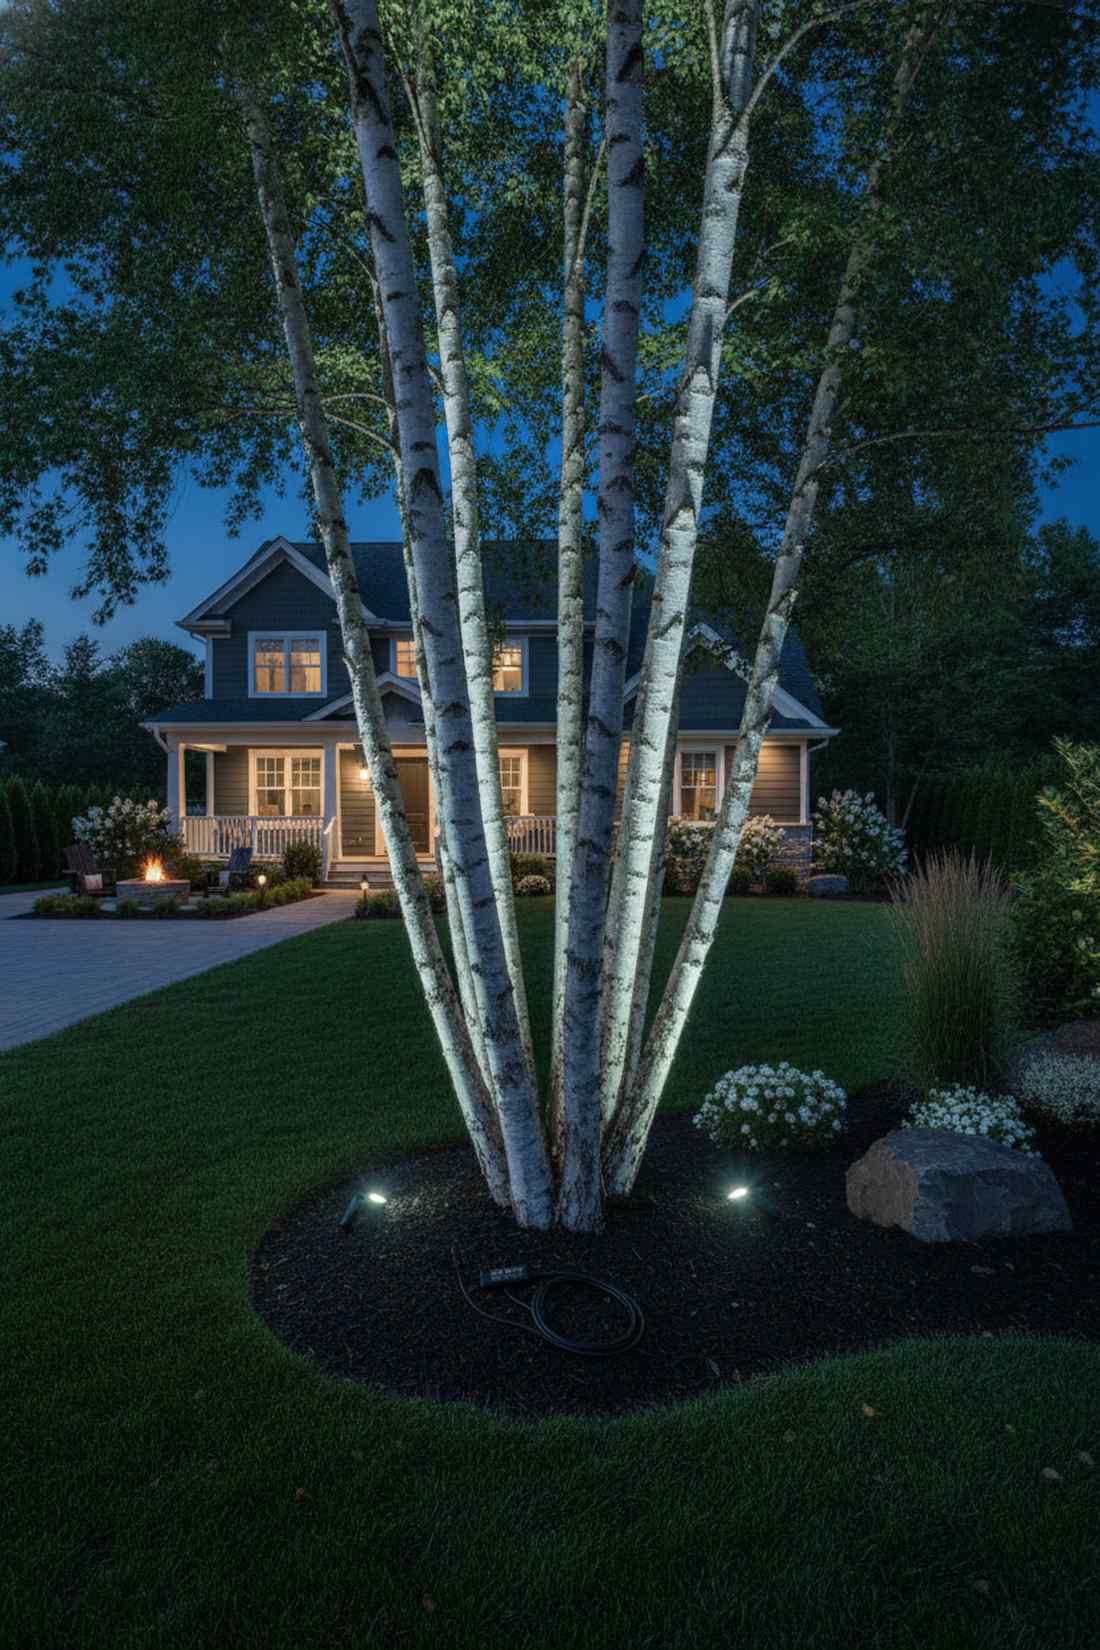
Highlights the striking, papery white texture of specific species with multi-point birch accents. Tailor-made for accenting the bright, peeling bark of river birches and aspens.
Lighting a birch from just one side flattens the trunks and ruins the beautiful cylindrical texture of the wood. Cross-lighting these clusters from opposing angles eliminates harsh dark spots, making the bright bark pop intensely against the black night sky. Sourcing premium miniature garden supplies allows you to hide multiple small fixtures around the root zone easily.
A multi-light cluster setup requires a $90–$140 investment. Pin this if you have feature trees in your front yard.
- Key Materials: Multiple low-wattage wash lights
- Vibe / Style: Striking botanical gallery
- Difficulty: Multi-angle balancing
- Budget Breakdown: 3 Wash lights: $105 | Splitter hub: $20.
- Creator’s Tip: Use cooler 4000K bulbs specifically for white birch trees; warm bulbs will make the gorgeous white bark look dull and yellowed.
- Smart Sourcing: cool-white LED landscape bulbs (pack of 6), multi-port waterproof wire splitters.
19. Palm Tree Symmetrical Uplighting
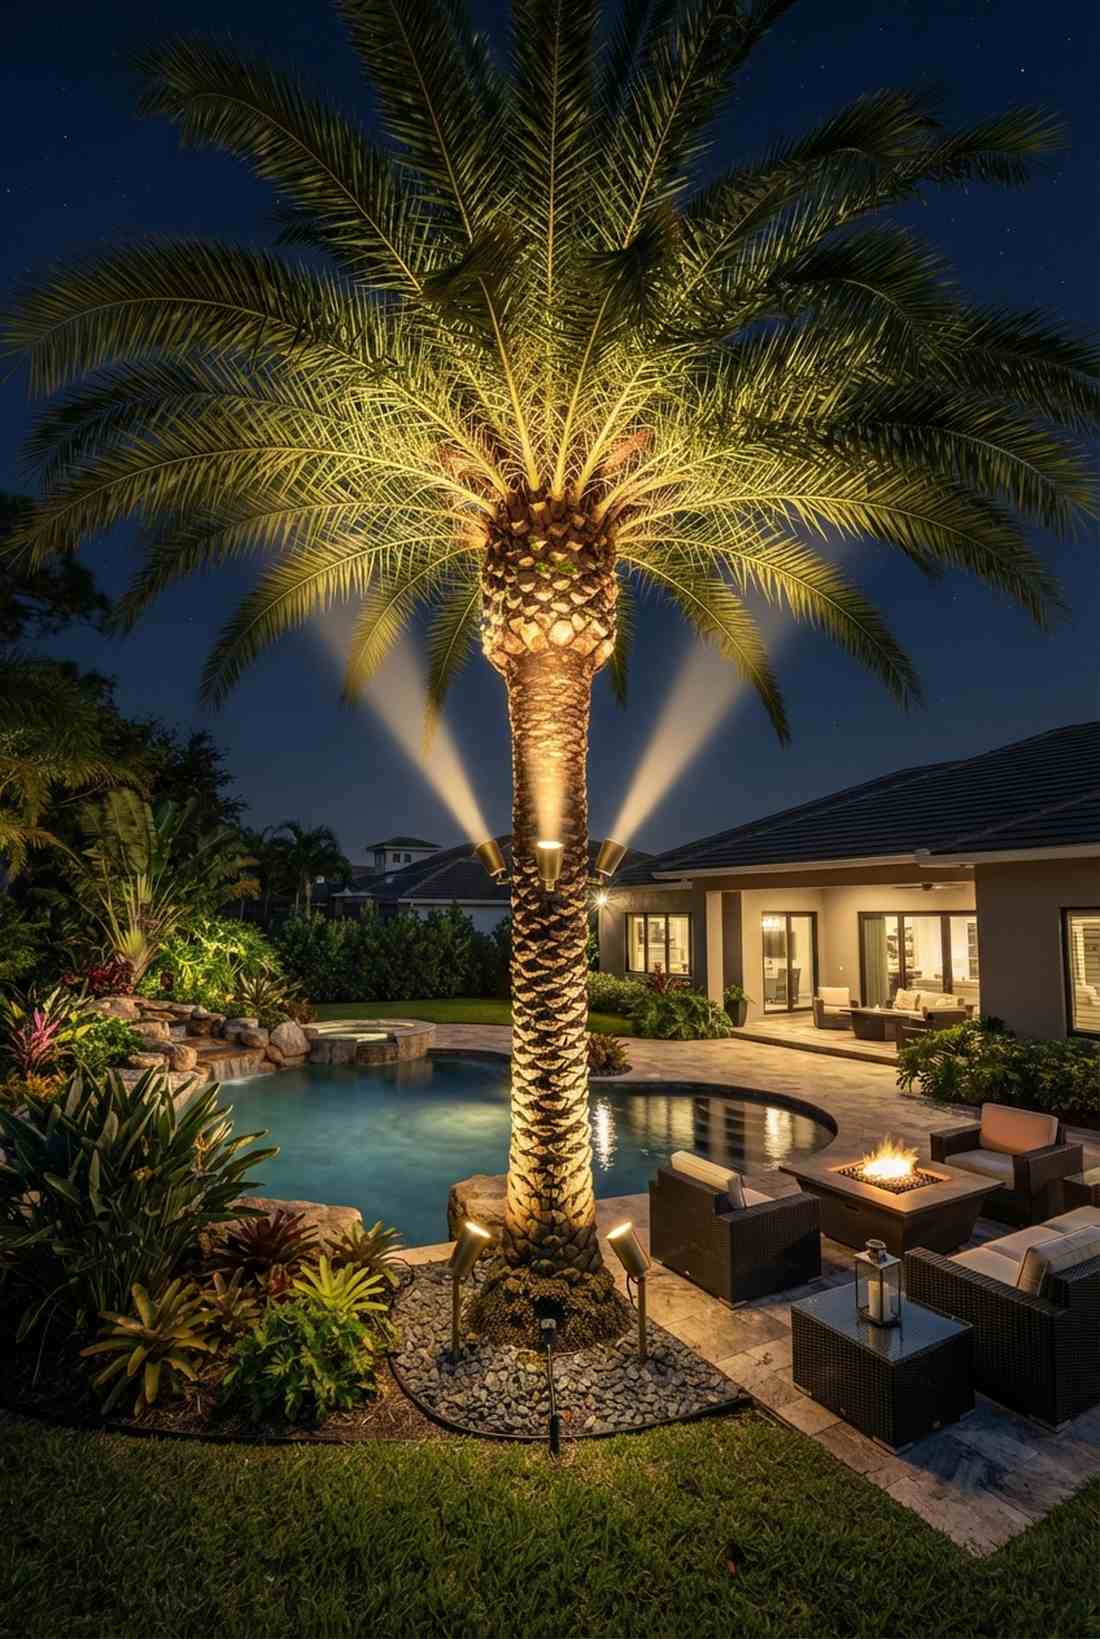
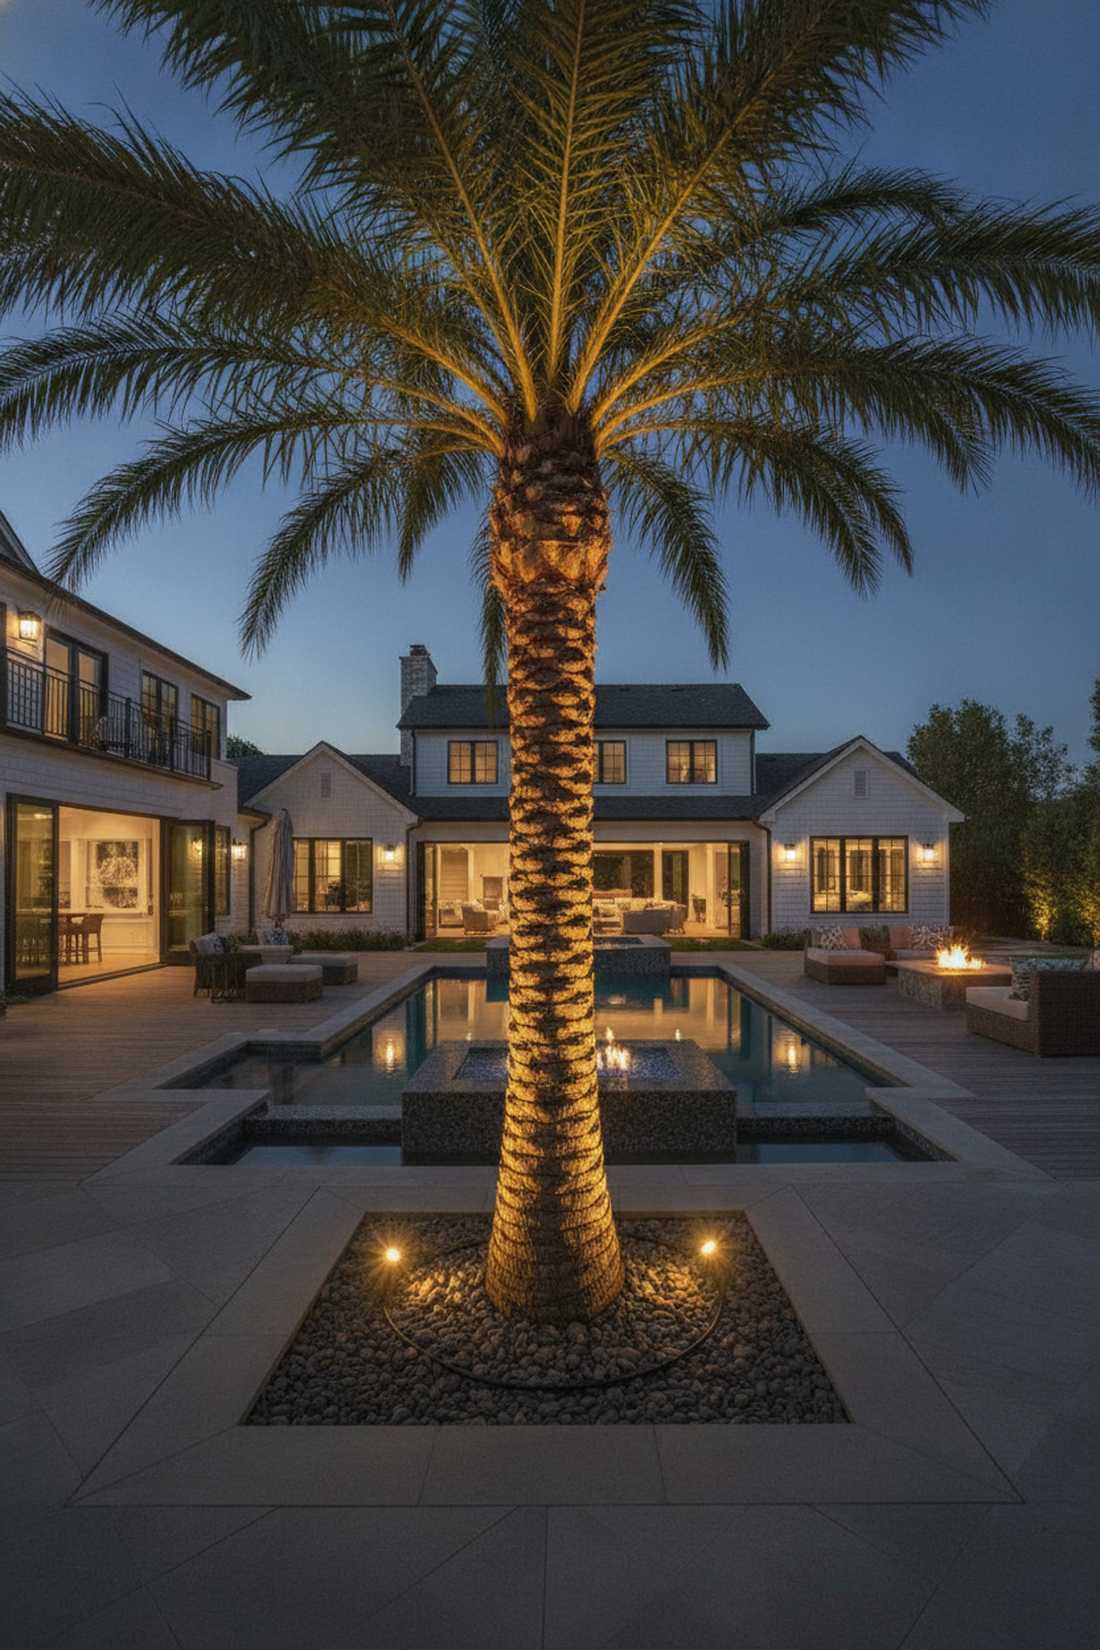
Delivers that unmistakable tropical resort luxury through symmetrical palm trunk lighting. The ultimate flex for solitary specimen palms near pools or massive entryways.
Throwing a single light at a giant palm tree makes it look lopsided and frankly, pathetic. You need a four-point square array surrounding the base, projecting equal intensity up the textured bark to catch the underside of the massive fronds. Hunting down commercial-grade fairy garden kits and heavy-duty spots guarantees that 360-degree tropical architecture vibe.
This premium 360-degree look costs roughly $150–$250 per massive tree.
- Key Materials: 4-point spotlight array
- Vibe / Style: Five-star tropical resort
- Difficulty: Cable management
- Budget Breakdown: 4 Spots: $180 | Ring wiring: $30.
- Creator’s Tip: Aim the fixtures slightly inward so the beams cross right at the base of the fronds, making the canopy explode with light.
- Smart Sourcing: solid-brass outdoor spotlights (bulk pack), pre-cut direct burial landscape wire.
Wait until you see this next approach. It takes less than an hour but completely transforms how a garden feels after dark.
20. Ornamental Grass Backlighting
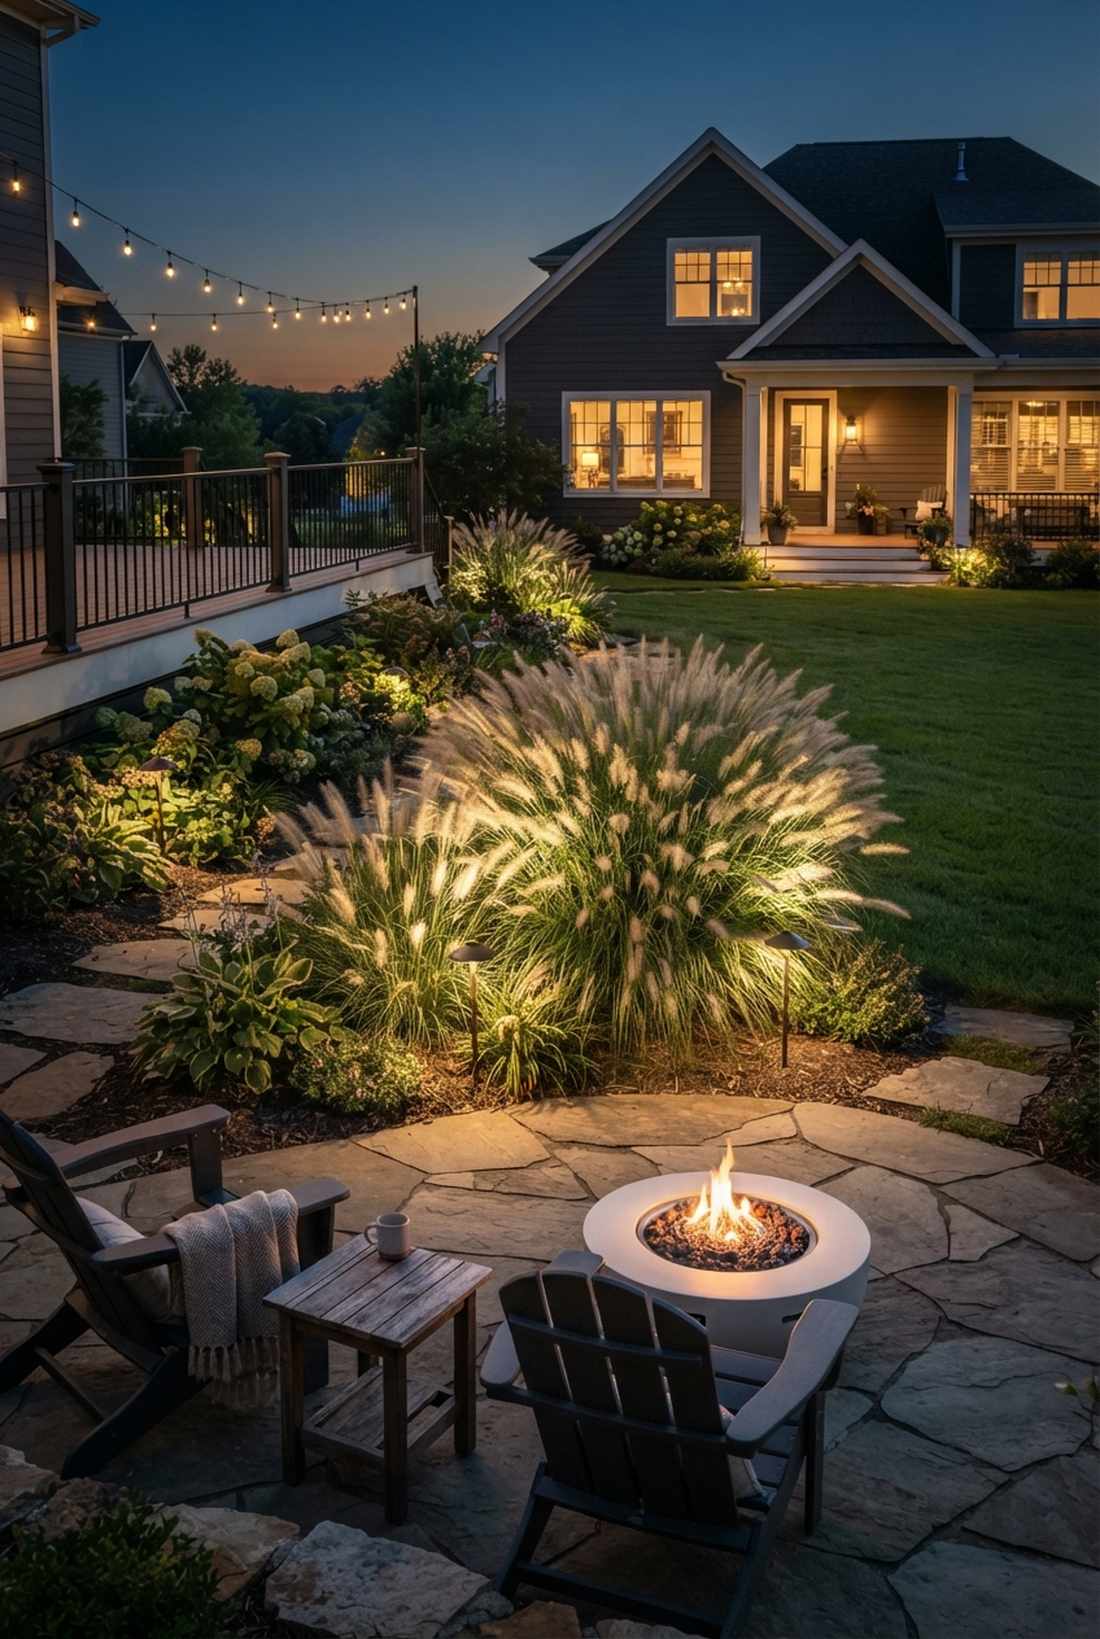
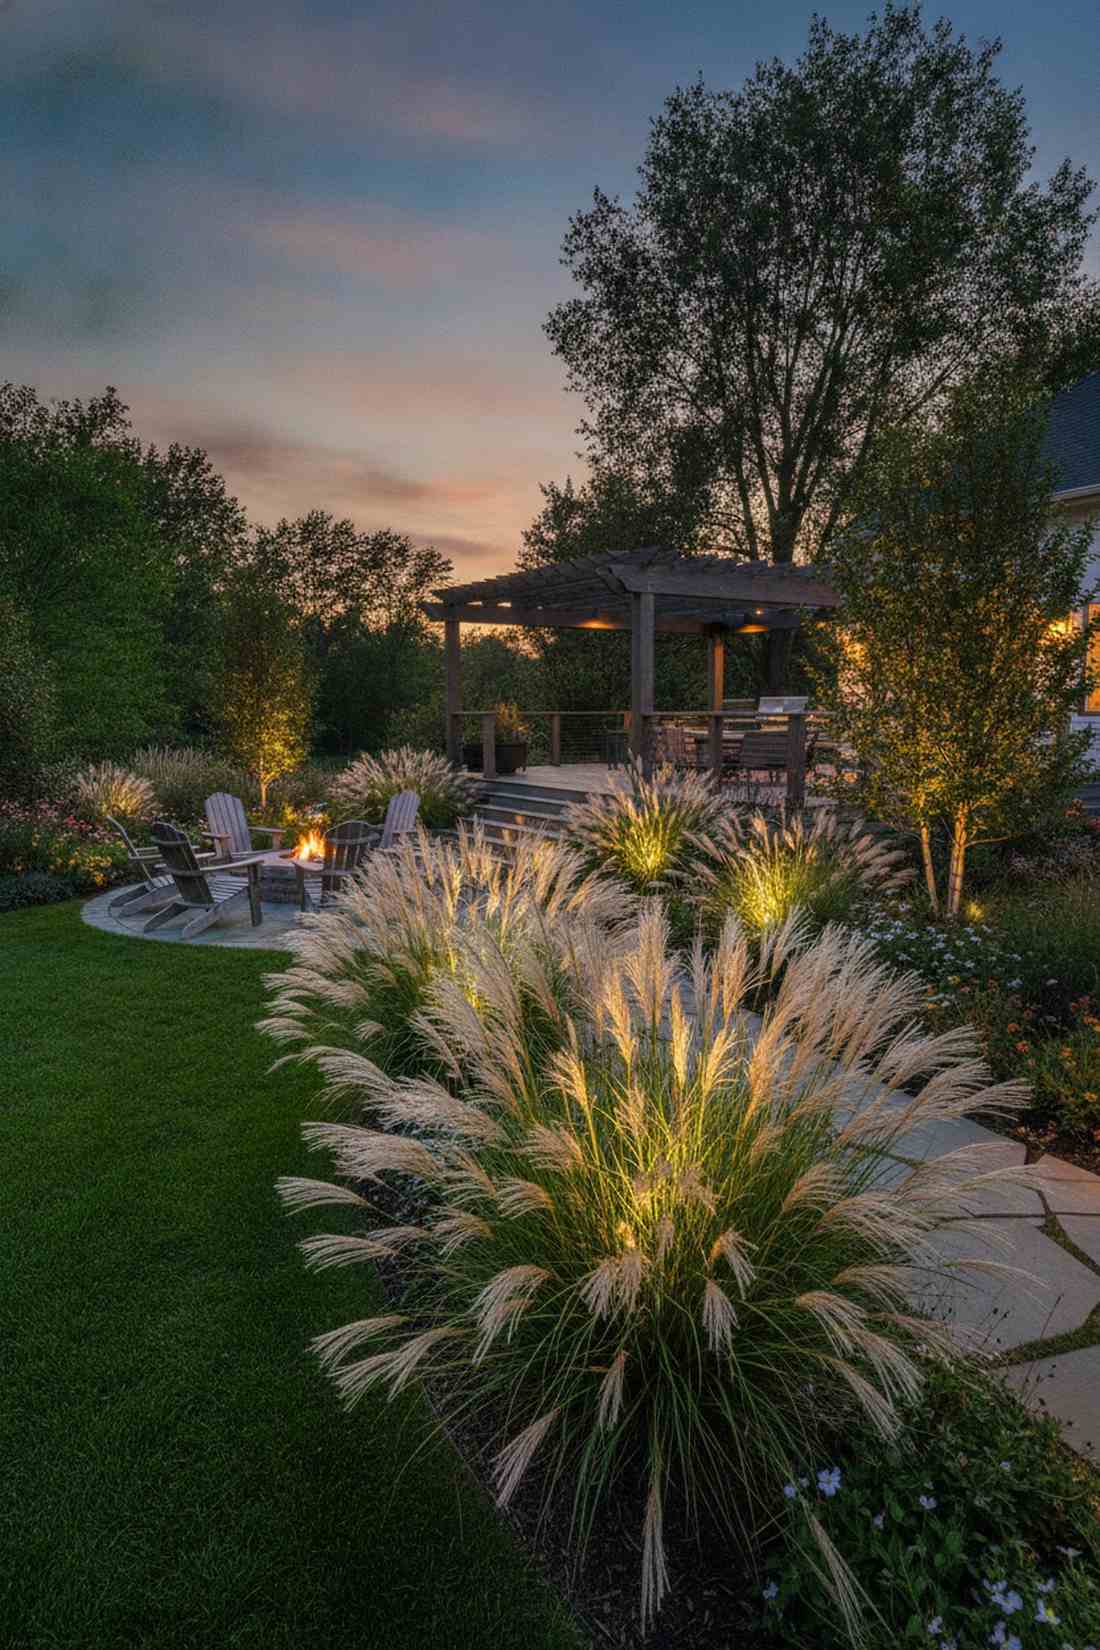
Creates a translucent, glowing halo effect utilizing low-profile grass backlights. Looks incredibly ethereal when the evening breeze hits large clumps of pampas or fountain grass.
Lighting grass from the front just makes it look like a messy green blob. By hiding a 3-5 watt LED directly behind the mass, the light filters through the fine blades, turning the entire plant into a glowing, moving sculptural form. Picking up some stealthy terrarium accessories and micro-spots gives a surprisingly premium look for pennies.
You can rig this magical glowing effect for just $20–$35 a plant. Highly recommended for a quick weekend win.
- Key Materials: Micro 3W LED spots
- Vibe / Style: Ethereal moving meadow
- Difficulty: Absolute beginner
- Budget Breakdown: Micro spot: $25 | Stake: $5.
- Creator’s Tip: Wait until late summer when the grass plumes are tallest to finalize the angle, ensuring maximum glow through the top seeds.
- Smart Sourcing: micro LED garden stakes (starter kit), UV-resistant wire sheathing.
21. Conifer Seasonal Uplighting
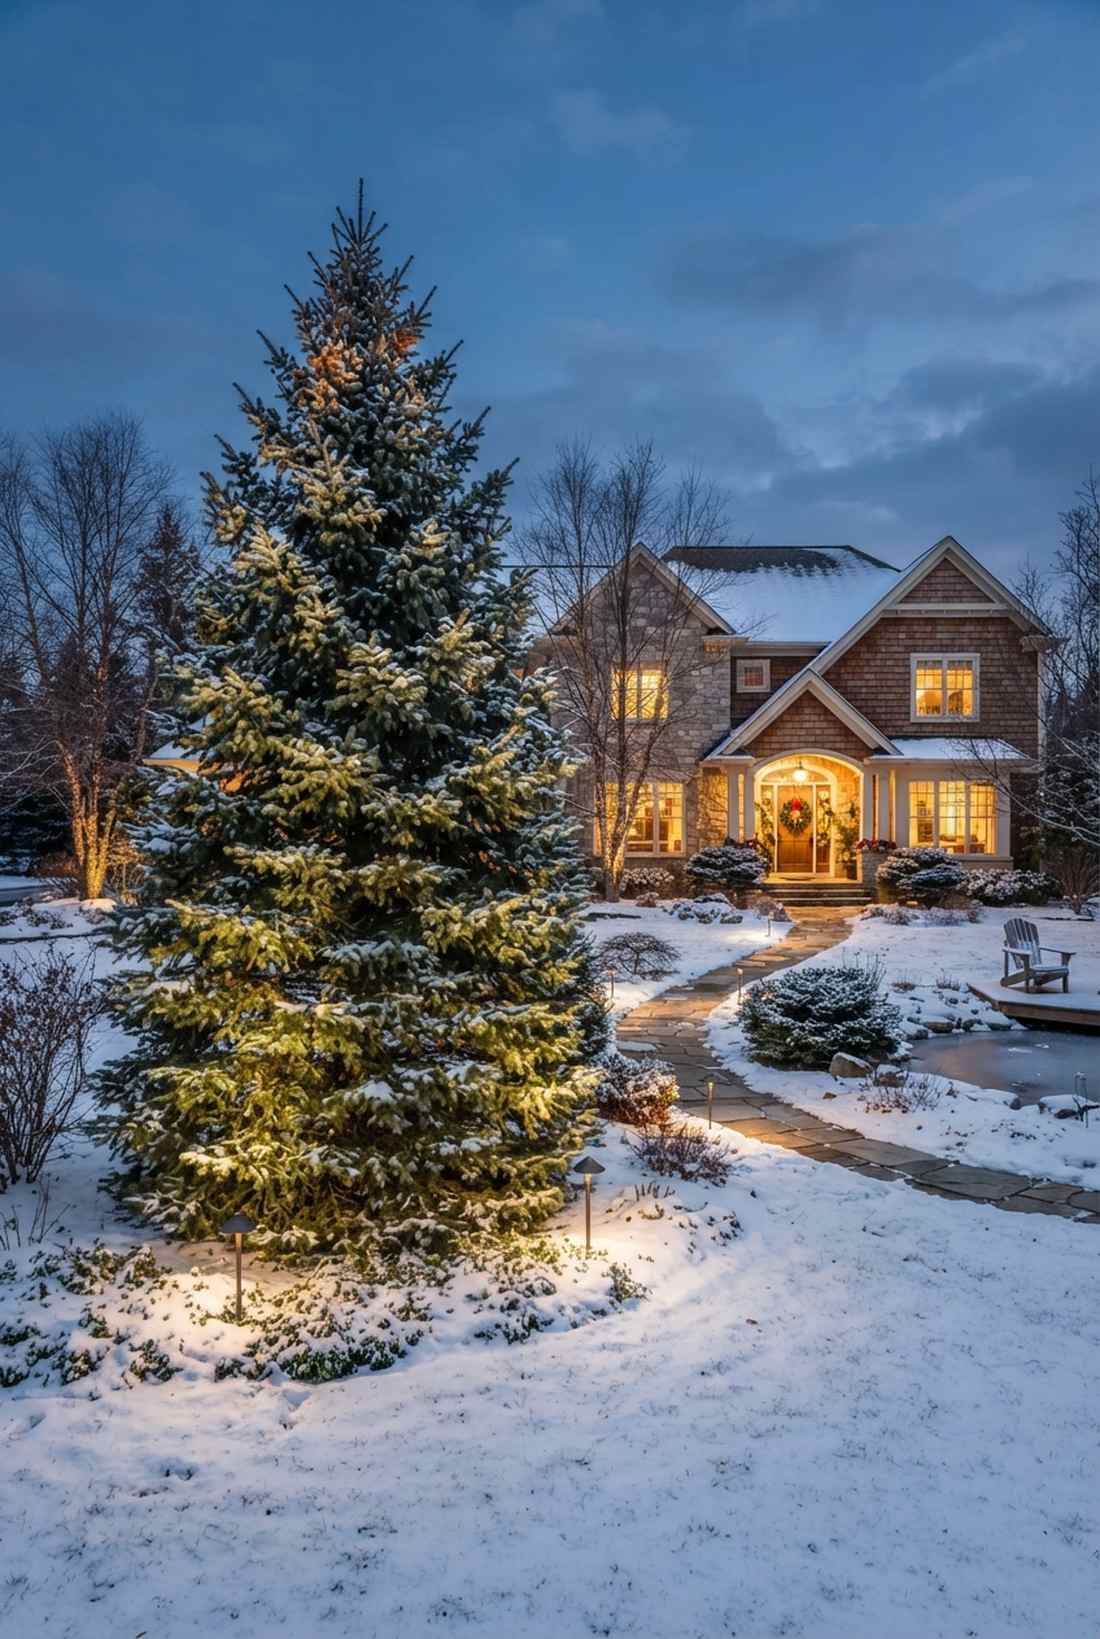
Maintains deep, dramatic winter curb appeal using evergreen foliage washing. An absolute must-have to keep your property looking alive when all the other trees lose their leaves.
Skinny beams completely fail on thick pine trees, creating awful, tiny hot spots of light. You have to deploy medium-beam floods to gently push light into the dense needle masses without aggressive glare. Investing in adaptive low voltage garden lights allows you to easily dial back the intensity when winter snow makes everything super reflective.
Expect to spend $50–$80 per evergreen fixture.
- Key Materials: Medium-beam dimmable floods
- Vibe / Style: Crisp winter wonderland
- Difficulty: Easy ground staking
- Budget Breakdown: Flood fixture: $60 | Dimmable bulb: $15.
- Creator’s Tip: Wipe the glass lenses down before the first snow; baked-on summer dirt severely restricts the light output during winter.
- Smart Sourcing: wide-angle LED flood housings, smart-dimmable outdoor MR16 bulbs.
22. Flowering Tree Spring Spotlighting
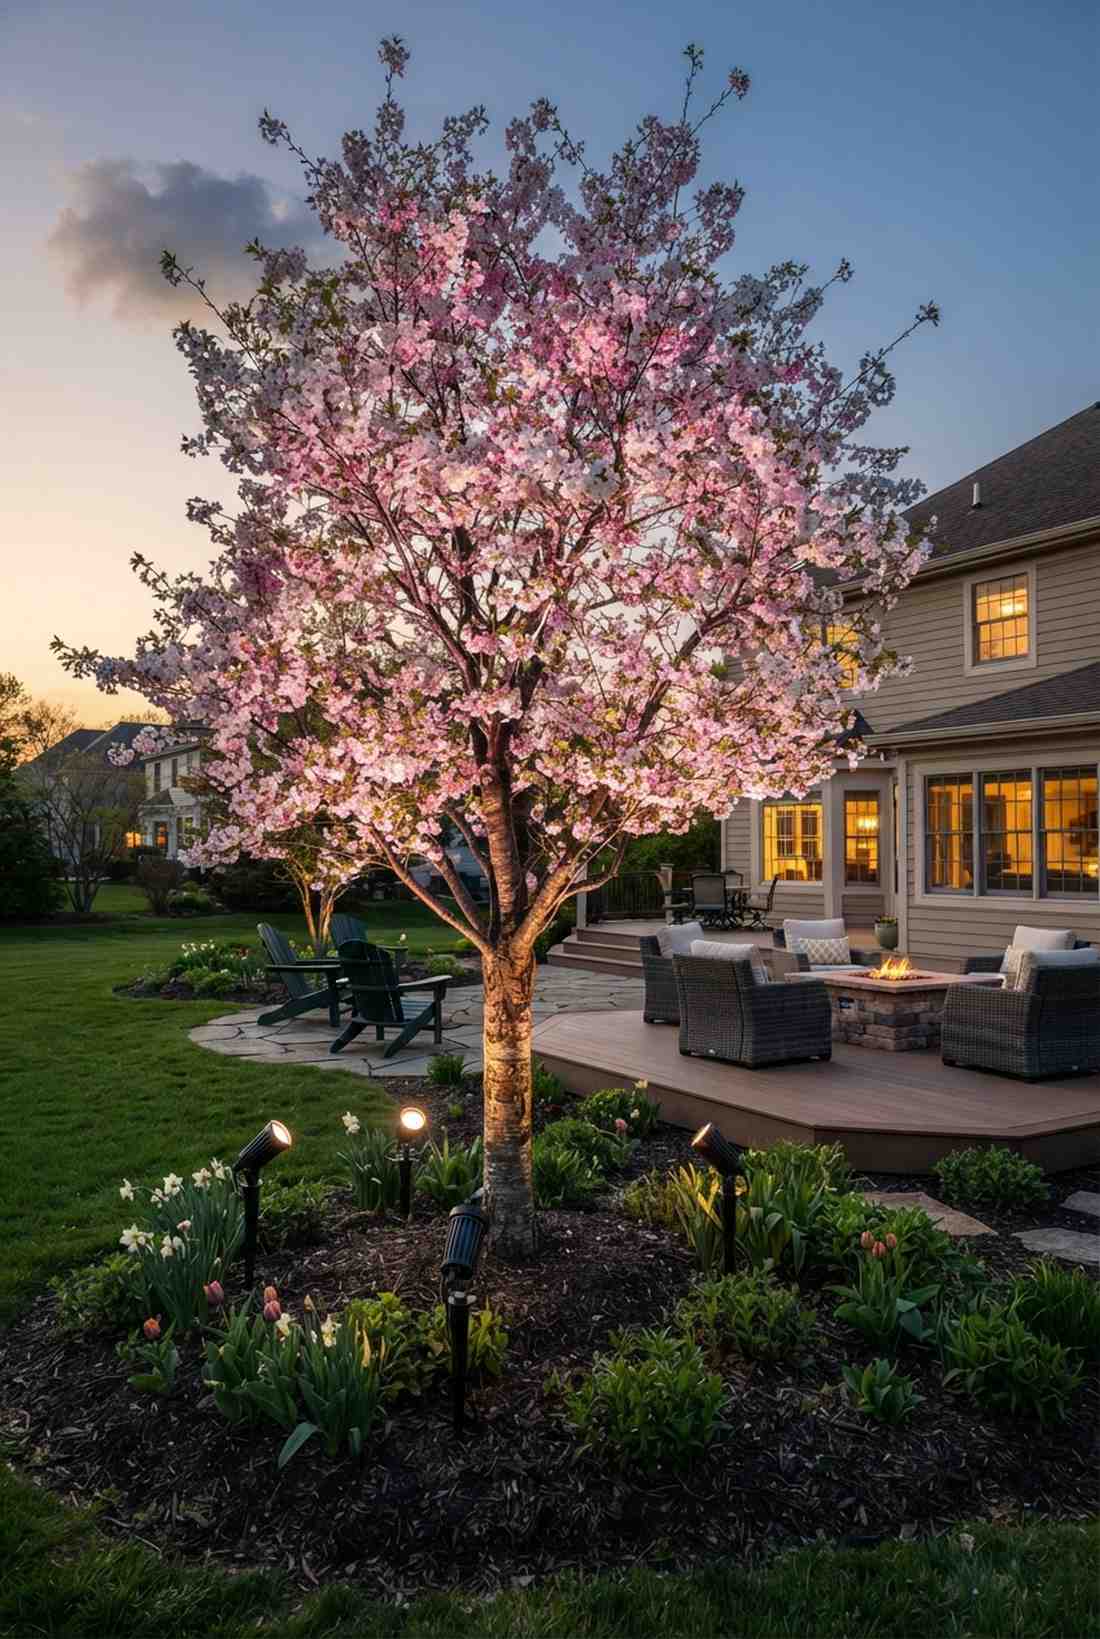
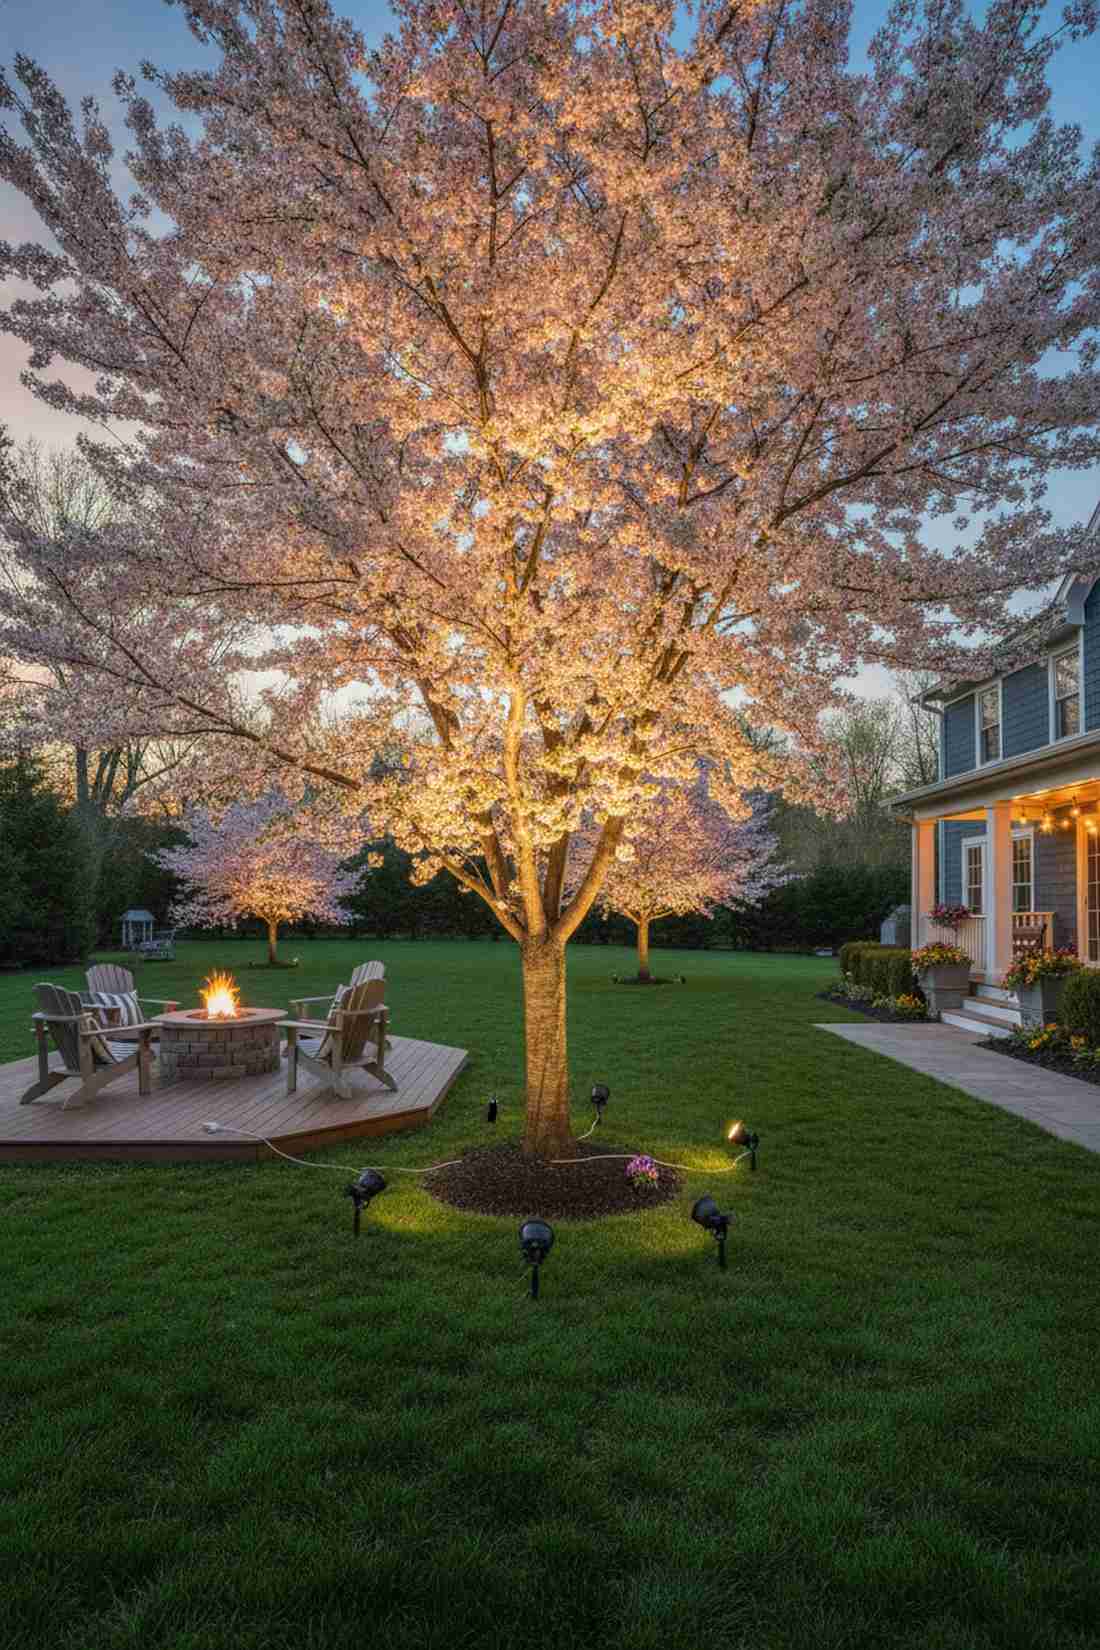
Explodes with vibrant, color-accurate beauty using temporary bloom accenting. The absolute best trick for showing off cherry blossoms, magnolias, and crabapples for those short spring weeks.
Using cheap hardware store bulbs entirely washes out the delicate pink and white tones of spring petals. You need color-correct LEDs that enhance the natural floral hues, paired with adjustable mounts so you can shift the focus back to the trunk once the blooms drop. High-CRI commercial outdoor lighting gear delivers a shockingly vibrant pop of color.
This adaptive seasonal setup costs about $45–$75. Save this to your spring garden prep board!
- Key Materials: High-CRI color-correct LEDs
- Vibe / Style: Vibrant botanical showcase
- Difficulty: Seasonal adjustment needed
- Budget Breakdown: Adjustable spot: $50 | High-CRI bulb: $20.
- Creator’s Tip: Leave a few extra feet of slack in the wire loop underground so you can physically move the light as the tree’s focal point changes.
- Smart Sourcing: High-CRI outdoor LED bulbs (pack of 4), heavy-duty adjustable ground spikes.
Water Feature Lighting
Aquatic lighting systems transform pools, fountains, and streams into nighttime focal points. Low voltage garden lights designed for submersion or waterside placement create reflective drama while maintaining safety standards.
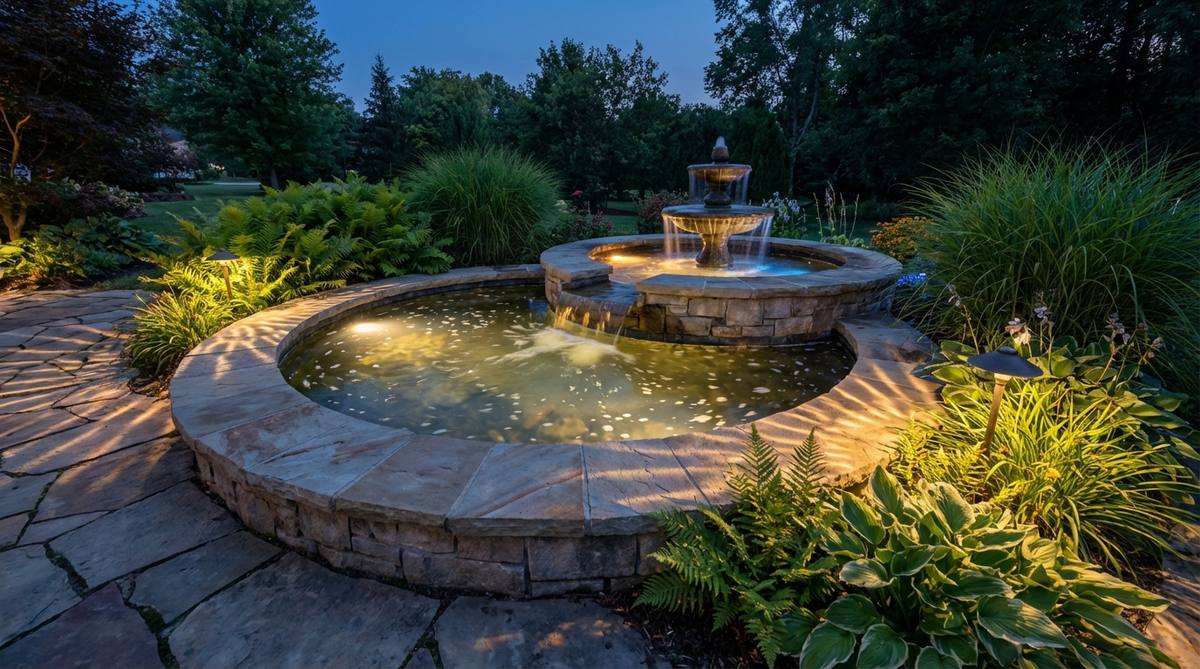
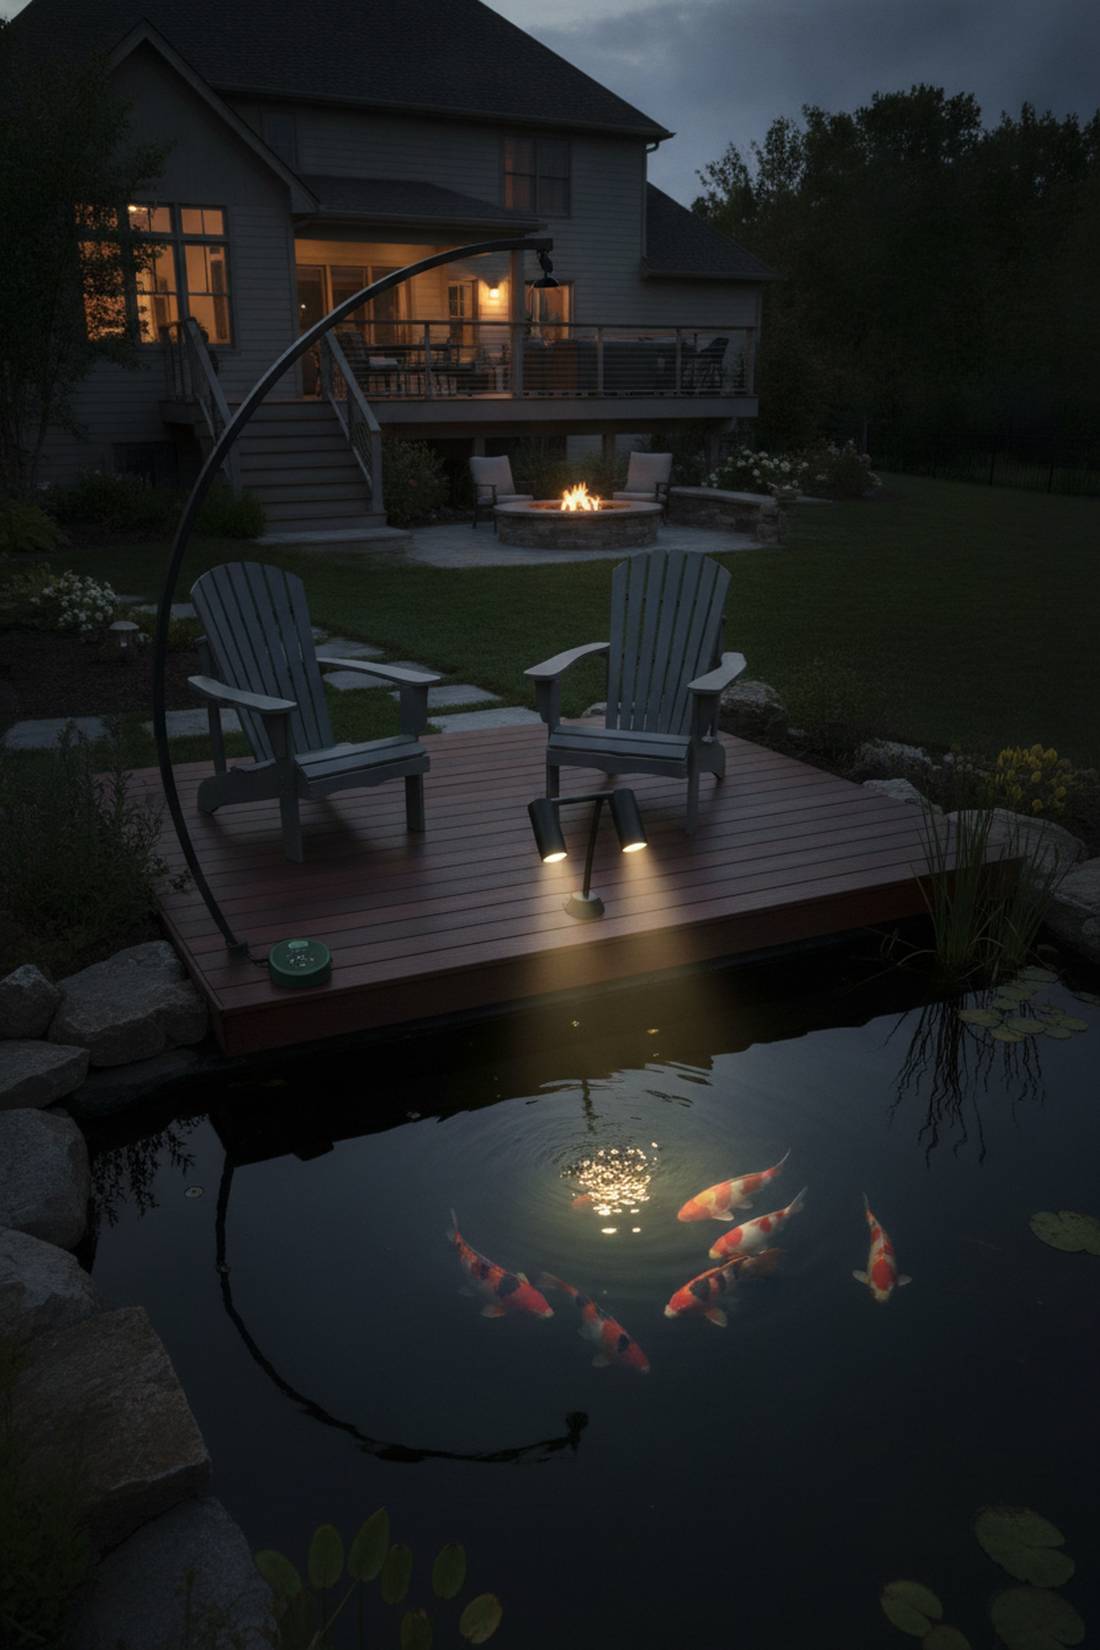
23. Submersible Pond LED Systems
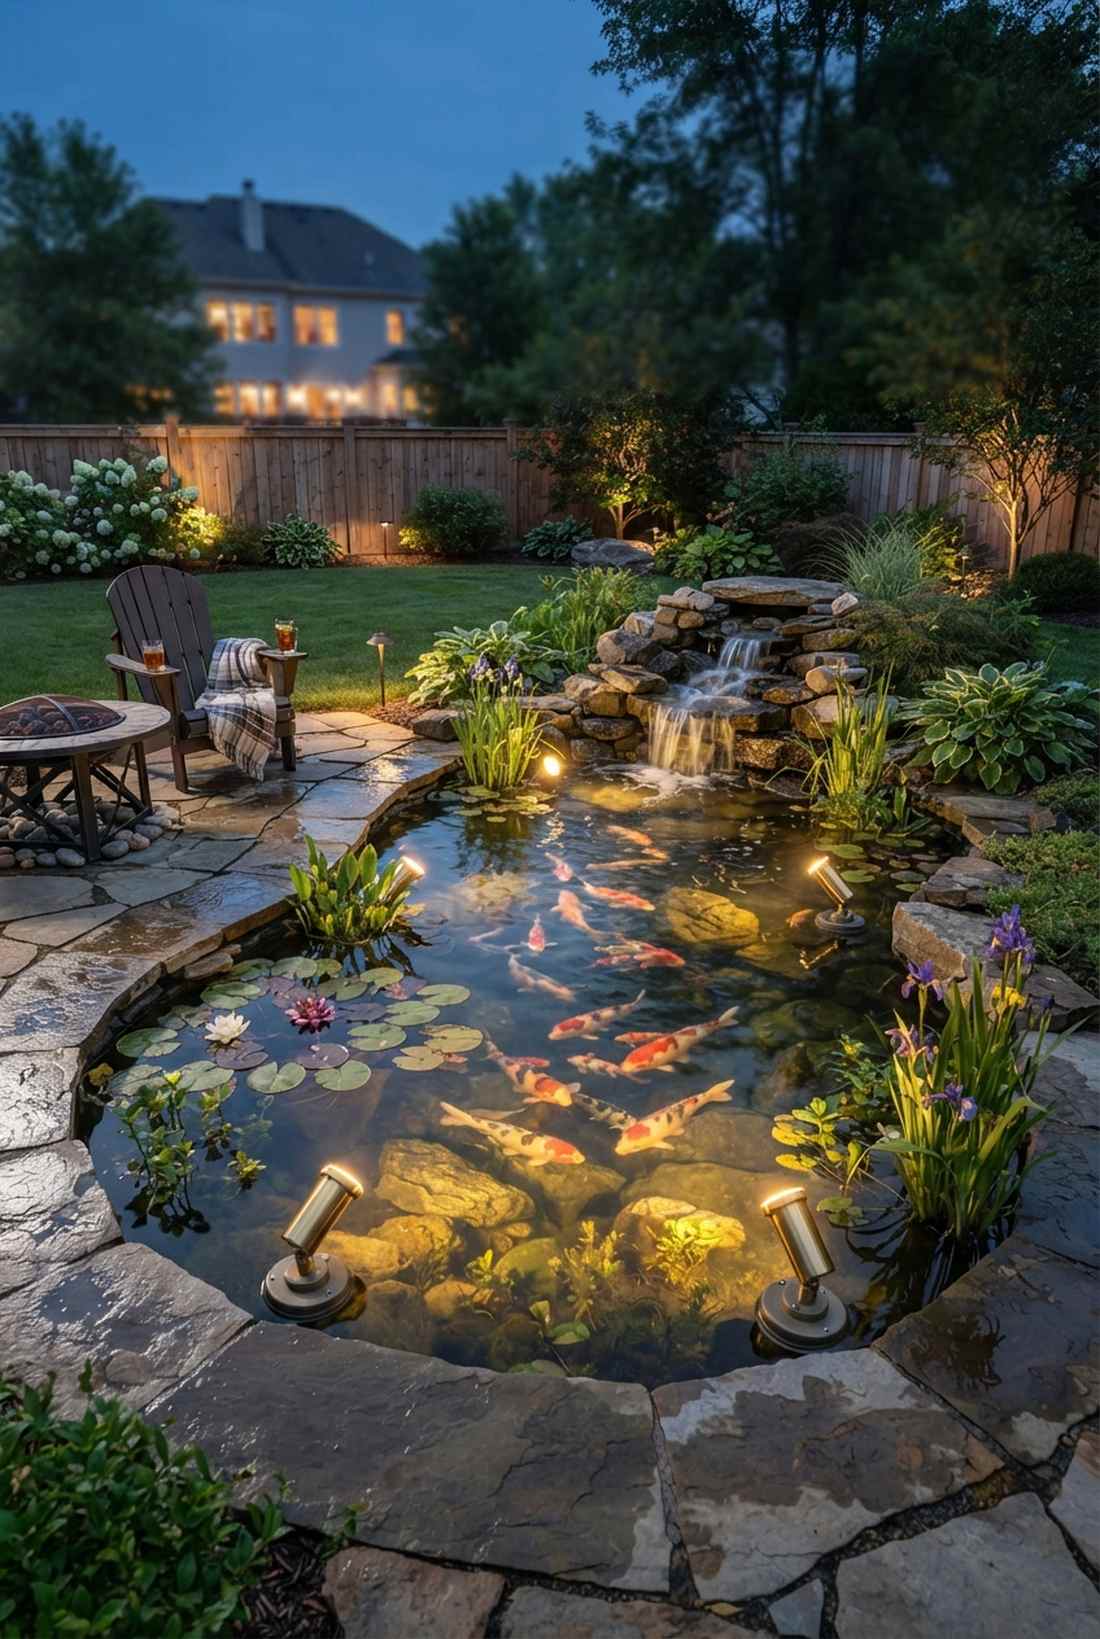
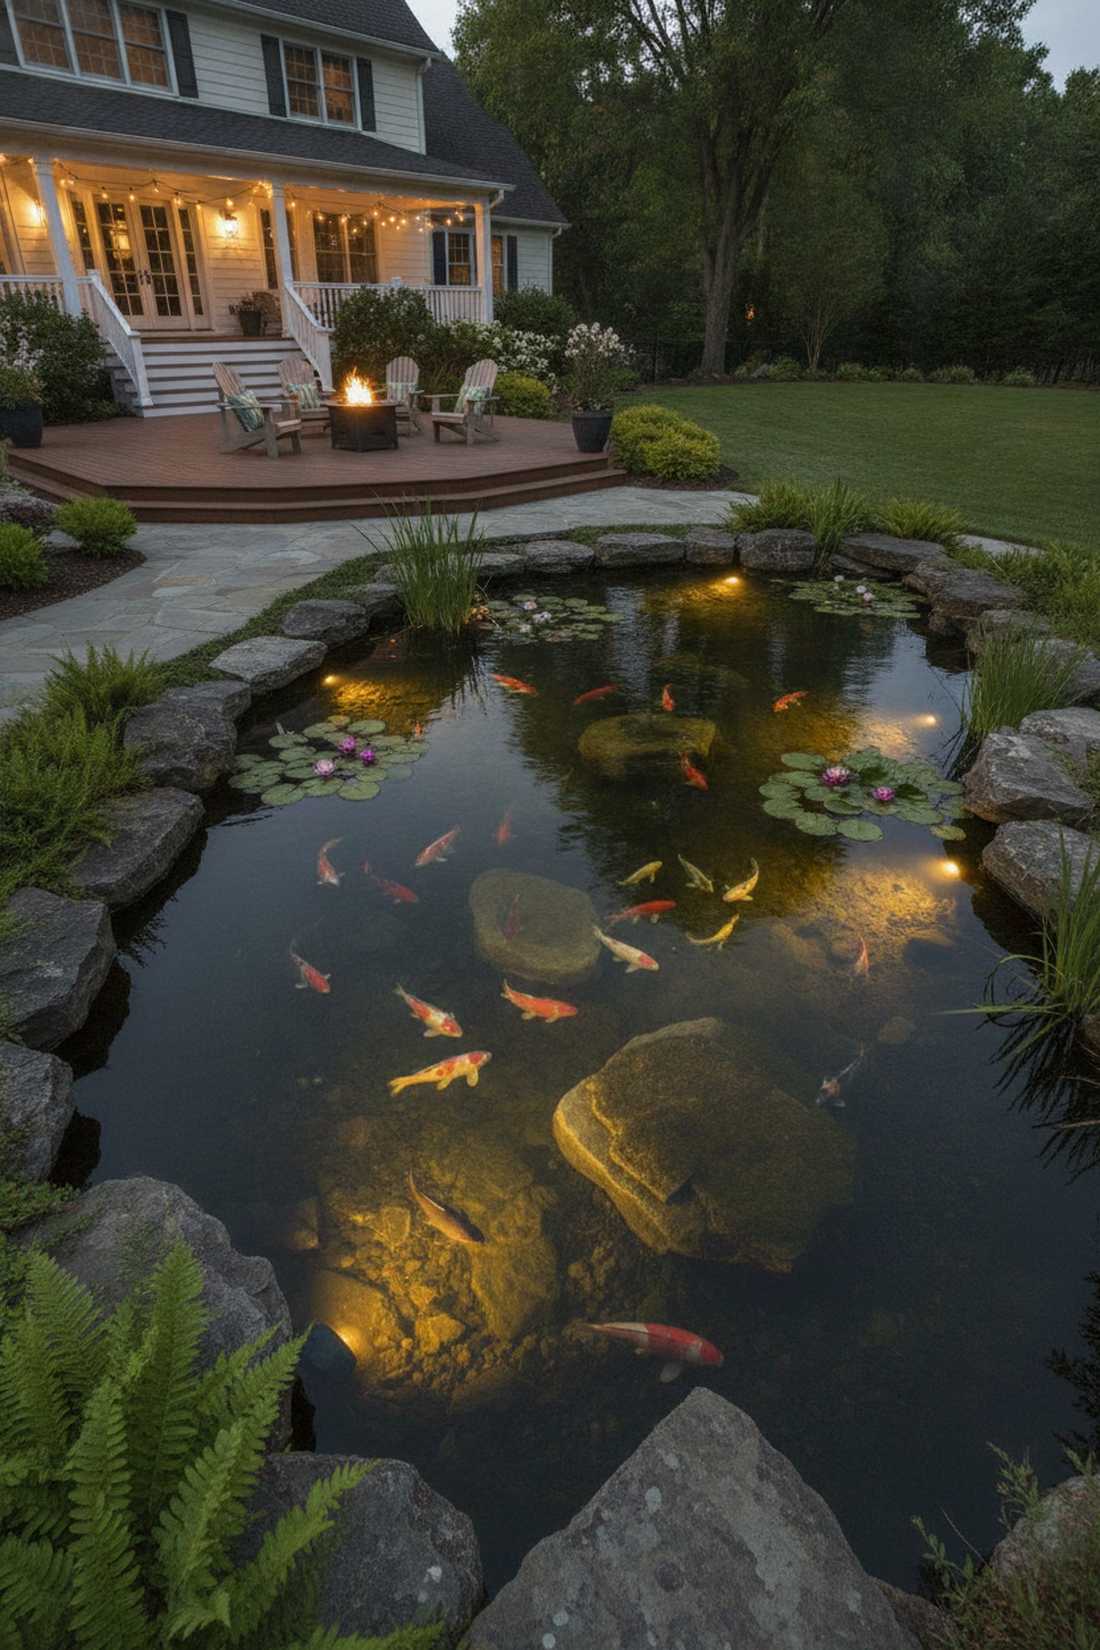
Feels like discovering a glowing, mystical oasis with deep submersible pond illumination. Crucial for highlighting vibrant koi fish, lilies, and sunken architectural rocks.
Never try to cheap out by using standard outdoor lights near water—they will short out and fail instantly. Fully waterproof, sealed LED units must be mounted beneath the surface, angled upward to catch the ripples and bottom structures without blinding people standing on the edge. Specialized marine-grade water lighting kits look far more expensive than they actually are.
A solid underwater array runs $70–$120 per fixture.
- Key Materials: IP68-rated submersible brass fixtures
- Vibe / Style: Mystical deep-water glow
- Difficulty: Requires waterproof splicing
- Budget Breakdown: Submersible unit: $90 | Weighted base: $15.
- Creator’s Tip: Only use 2700K warm bulbs underwater; cool blue light actually accelerates nasty algae growth in the pond.
- Smart Sourcing: IP68 rated brass pond lights (starter kit), underwater silicone wire splice kits.
24. Waterfall Edge Uplighting

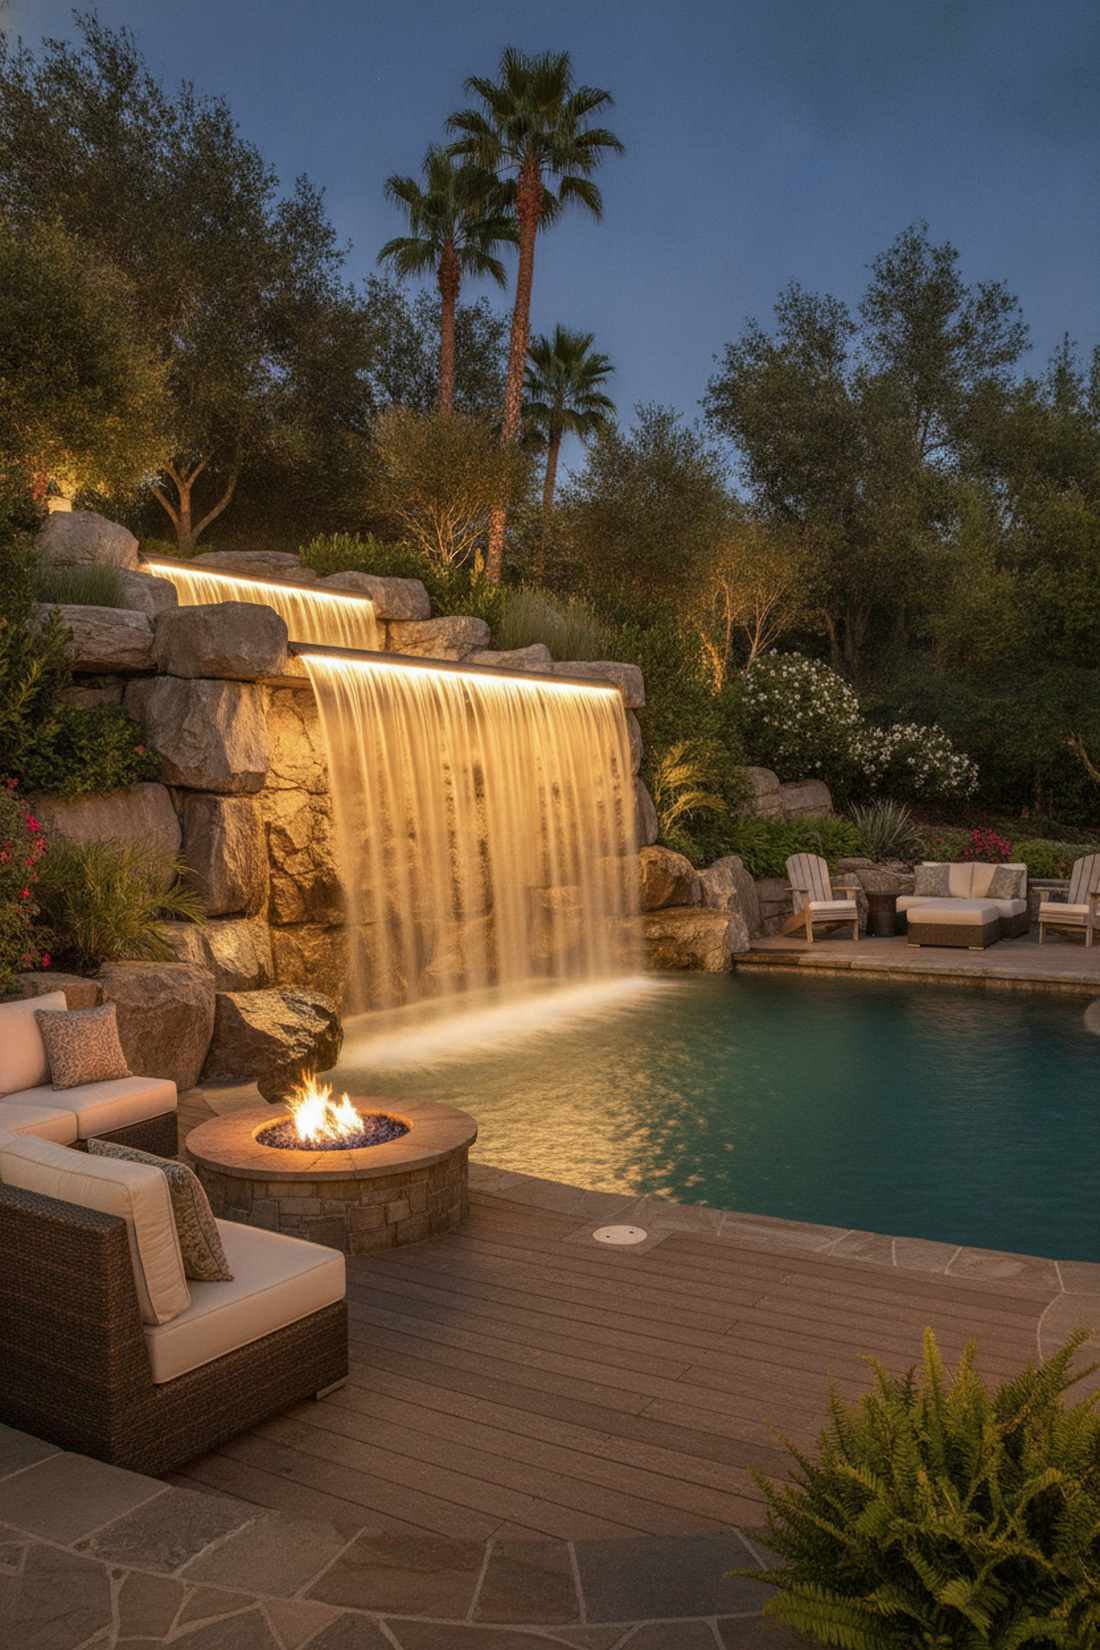
Creates a breathtaking, glowing curtain of water using spillway backlighting tactics. Perfectly suited for rigid backyard waterfalls, sheer descents, and tiered rock cascades.
Shooting a light straight at a waterfall from the front completely flattens the visual depth of the moving water. Recessing a compact, waterproof strip right under the lip of the stone projects light outward through the cascade, making every single drop glow from within. Getting your hands on premium underwater LED strips ensures this magical look doesn’t die after one season.
You can build this glowing water curtain for $60–$100. Pin this to your dream pool build board.
- Key Materials: Waterproof linear LED strips
- Vibe / Style: Luxury resort cascade
- Difficulty: Tight space mounting
- Budget Breakdown: Waterproof strip: $70 | Mounting track: $15.
- Creator’s Tip: Hide the wire feed completely behind the waterfall stones during the dry build phase so zero black cables are visible.
- Smart Sourcing: IP68 waterproof LED strip lights (pre-cut), aluminum waterfall mounting channels.
If you thought standard bulbs were enough, this upcoming aquatic lighting trick will blow your mind (and your neighbor’s).
25. Fountain Color-Changing RGB
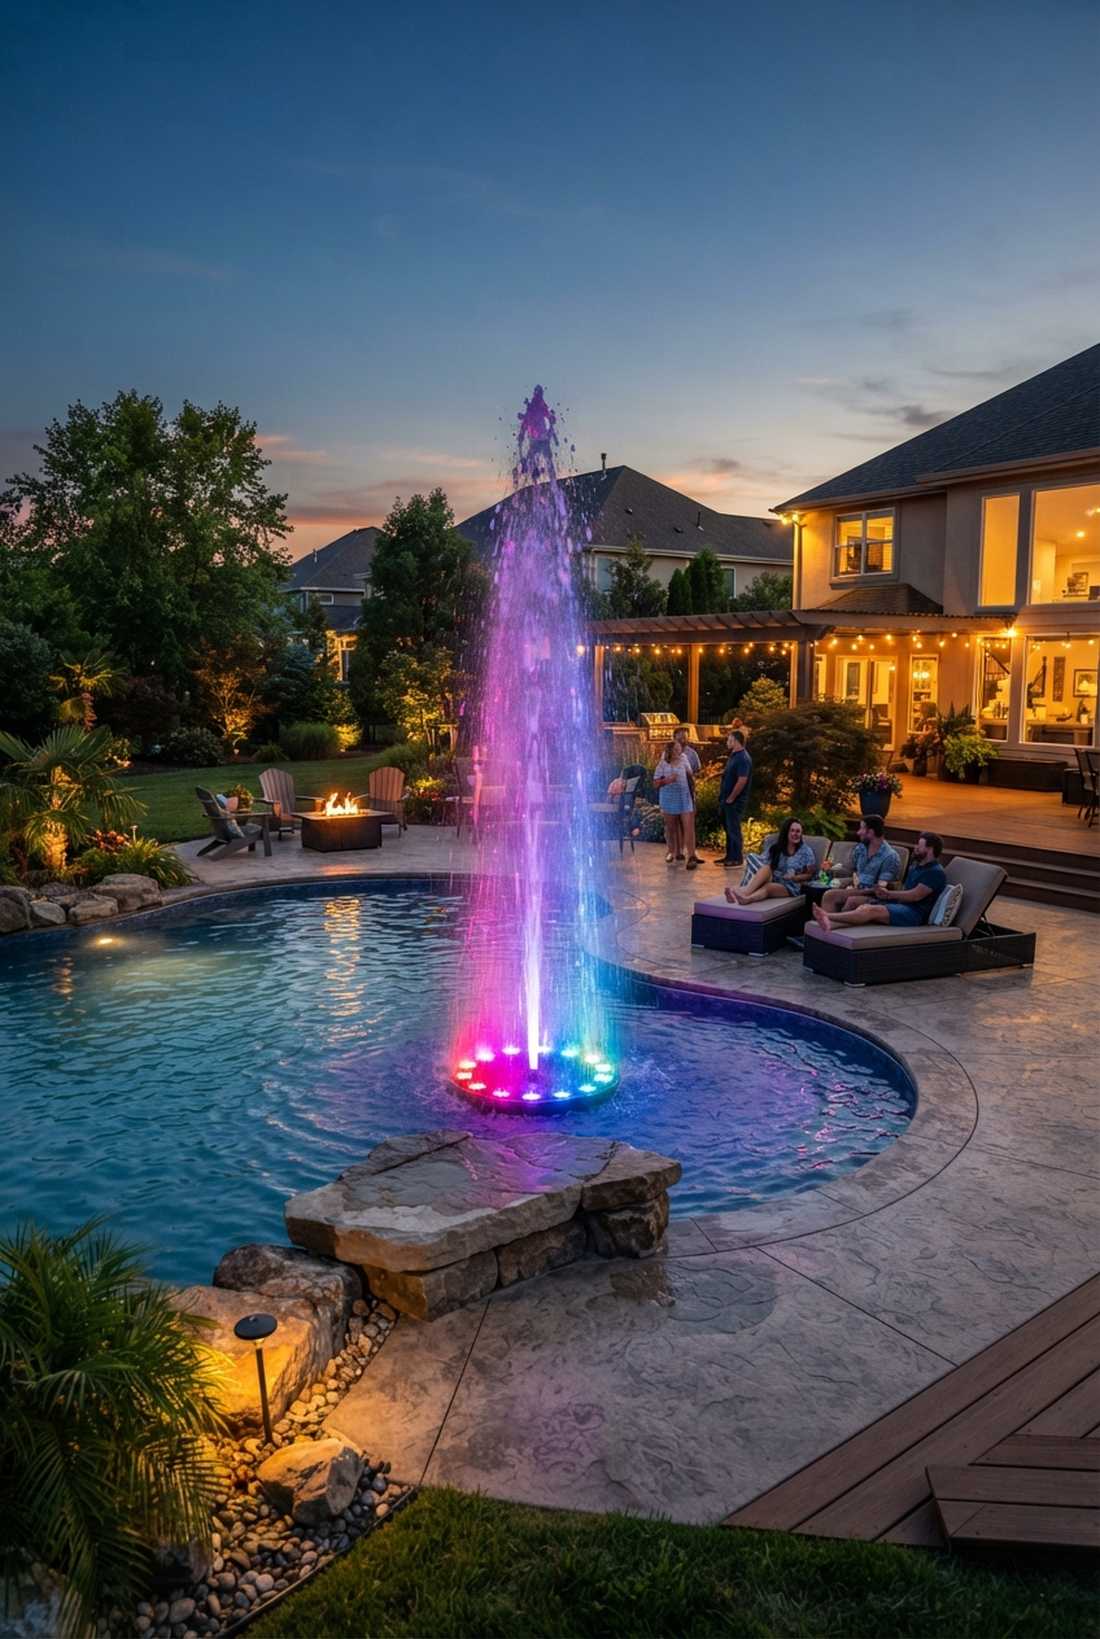
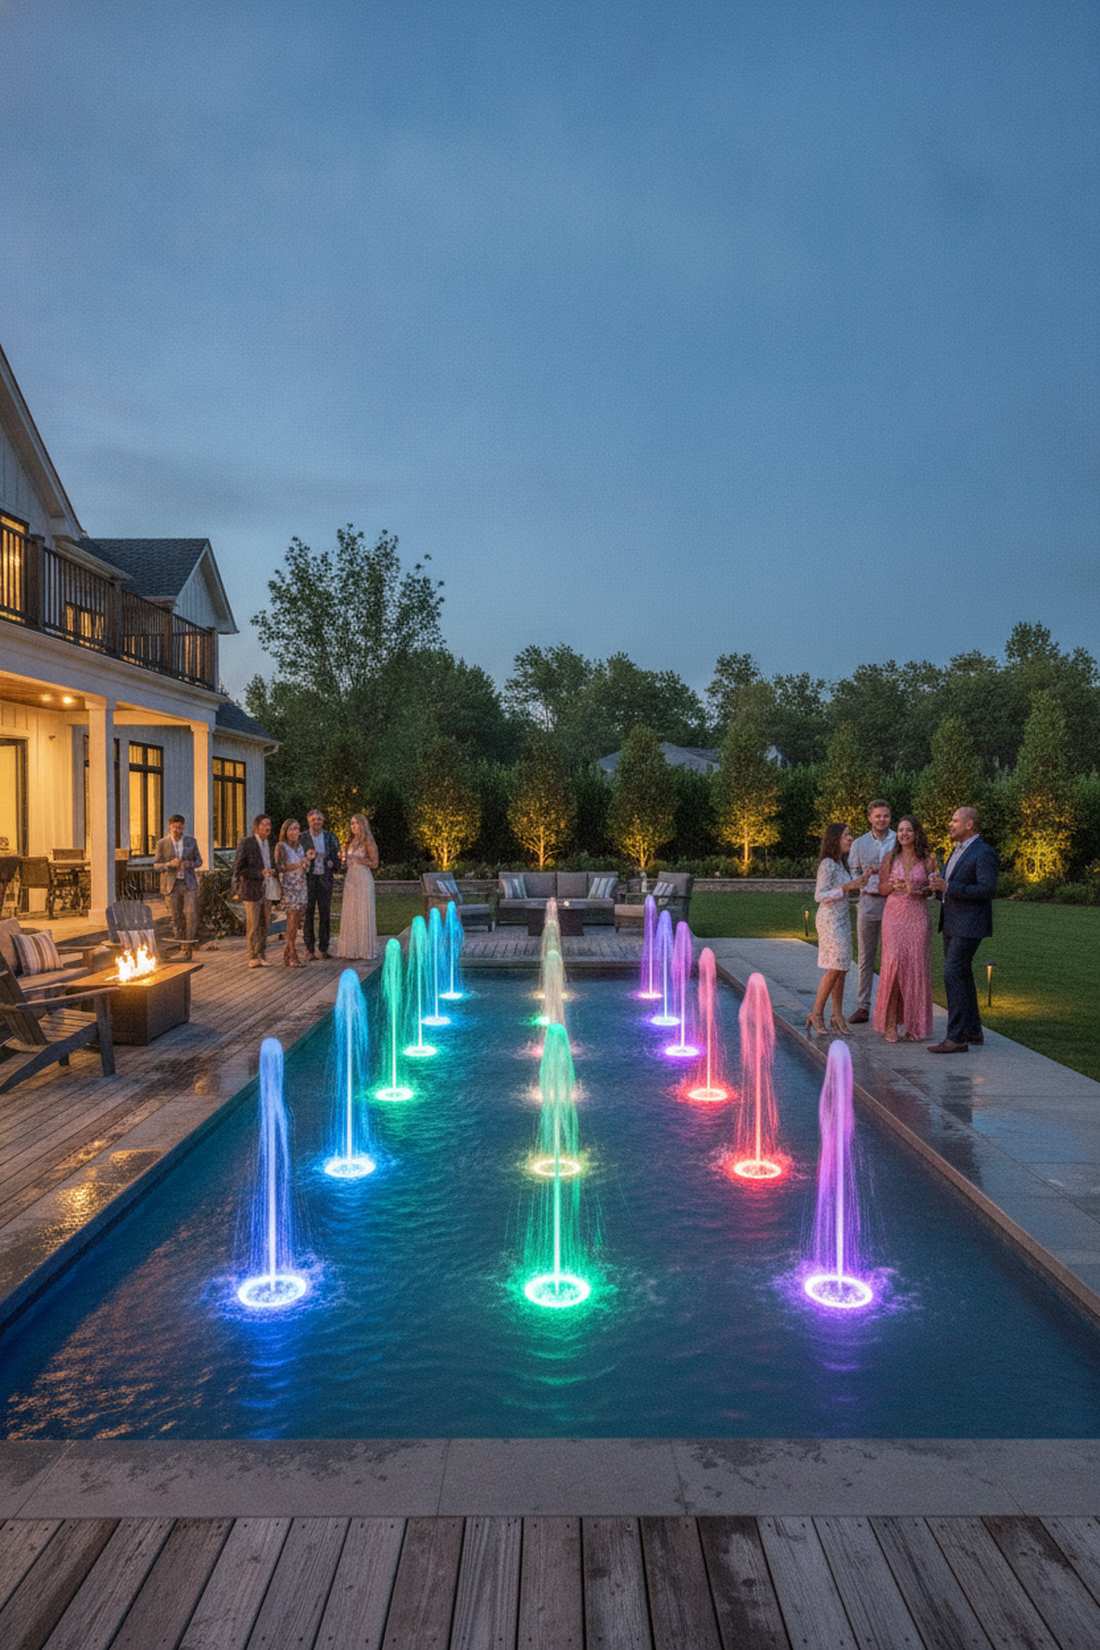
Turns a static backyard bubbler into a Las Vegas-style show using dynamic RGB fountain rings. The ultimate show-stopper for outdoor parties and high-end pool entertainment areas.
Why settle for boring white water when you can sync the spray to your music? Programmable RGB ring fixtures slip right over the fountain nozzle, shooting deeply saturated colors straight up through the water column for an insane visual impact. Grabbing smart-enabled landscape lighting controllers lets you swap from elegant white to party mode instantly.
These dynamic ring systems range from $90–$150 per nozzle.
- Key Materials: Center-hole RGB fountain rings
- Vibe / Style: Vegas-style dynamic water
- Difficulty: Plumbing integration needed
- Budget Breakdown: RGB Ring: $110 | Smart controller: $30.
- Creator’s Tip: Ensure the fountain pump doesn’t vibrate the light ring out of alignment; use a bead of marine silicone to lock it down.
- Smart Sourcing: smart RGB fountain light rings (bulk pack), marine-grade silicone sealant.
26. Stream Bed Rock Washing
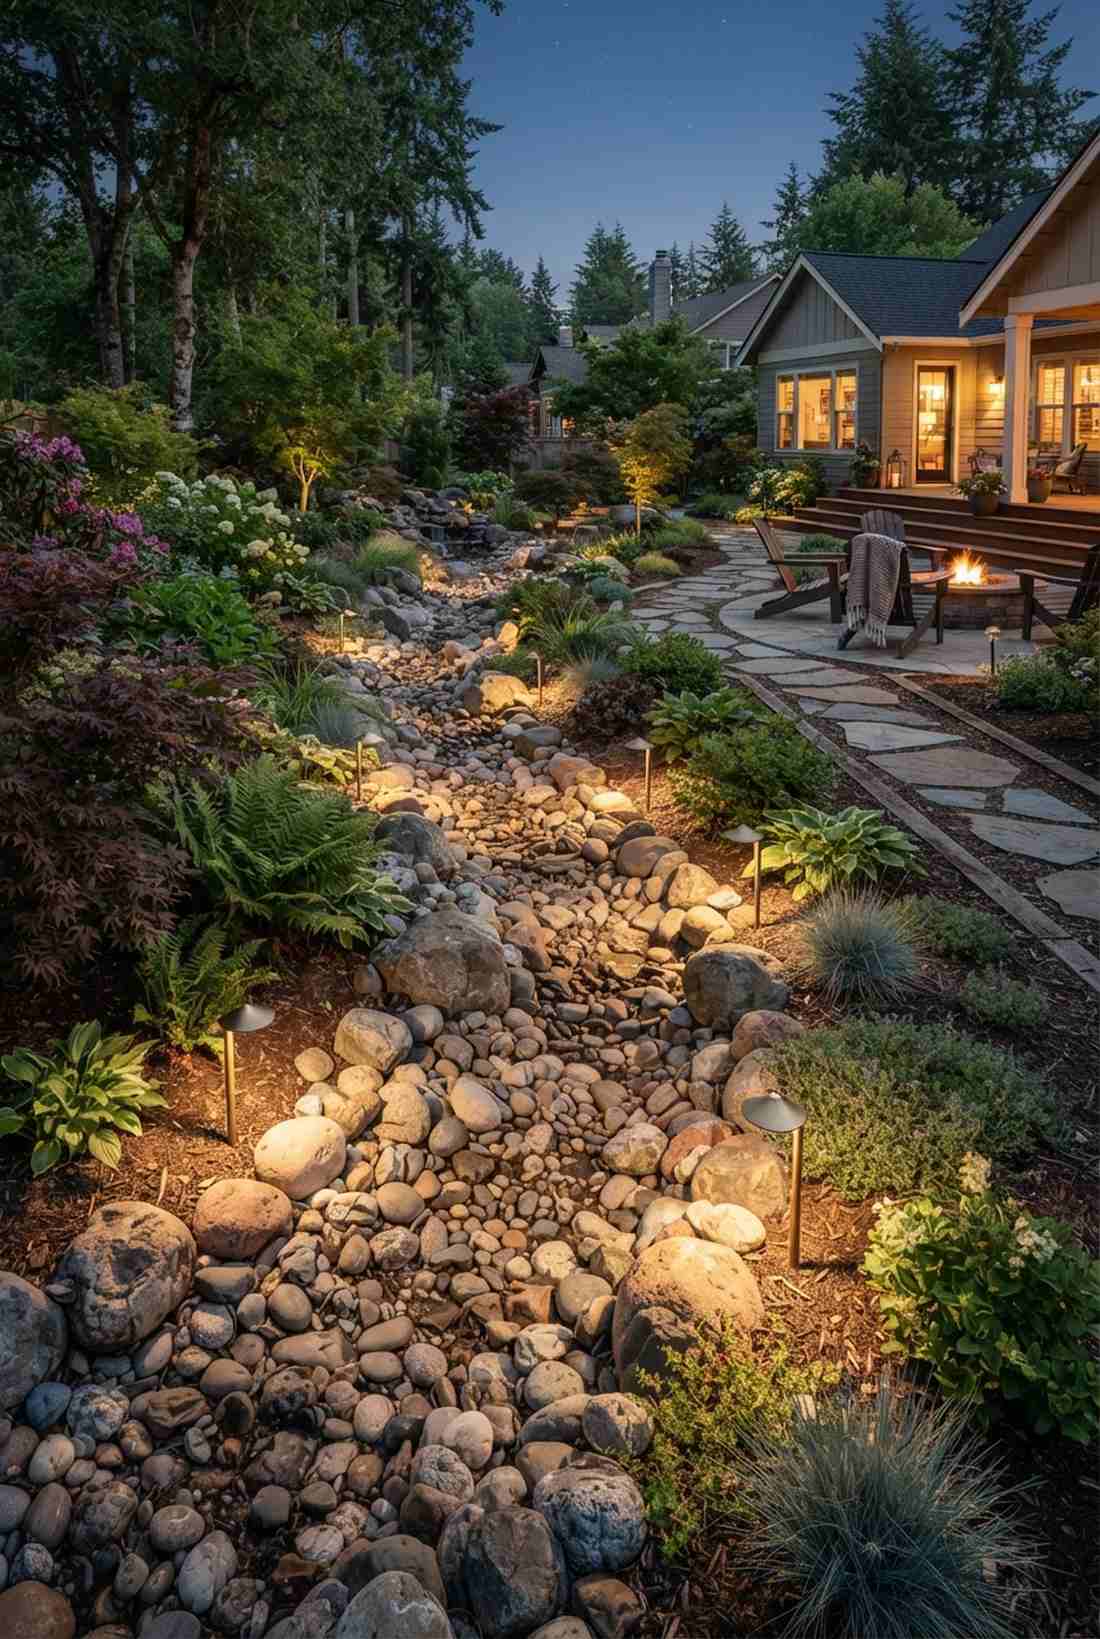

Exudes a deeply calming, Zen-garden tranquility with staggered river rock illumination. The finest way to make dry creek beds or trickling streams visible without ruining the nighttime serenity.
Lining a natural stream with perfectly straight, symmetrical lights looks like a cheap airport runway. You must stagger low-profile fixtures 6-10 feet apart on alternating banks, skipping areas to create natural, overlapping pools of soft light. Implementing subtle low voltage garden lights kits delivers a surprisingly premium look that feels totally organic.
This organic staggering approach costs about $35–$55 per bank fixture.
- Key Materials: Low-glare ground wash lights
- Vibe / Style: Serene Zen water trail
- Difficulty: Easy bank placement
- Budget Breakdown: Wash fixtures: $45 | Rock hiding materials: $5.
- Creator’s Tip: Actually bury the base of the light under the river rock so only the brass hood peeks out, making it totally invisible by day.
- Smart Sourcing: solid-brass ground wash lights (pack of 4), matte-finish glare guards.
27. Koi Pond Viewing Lights
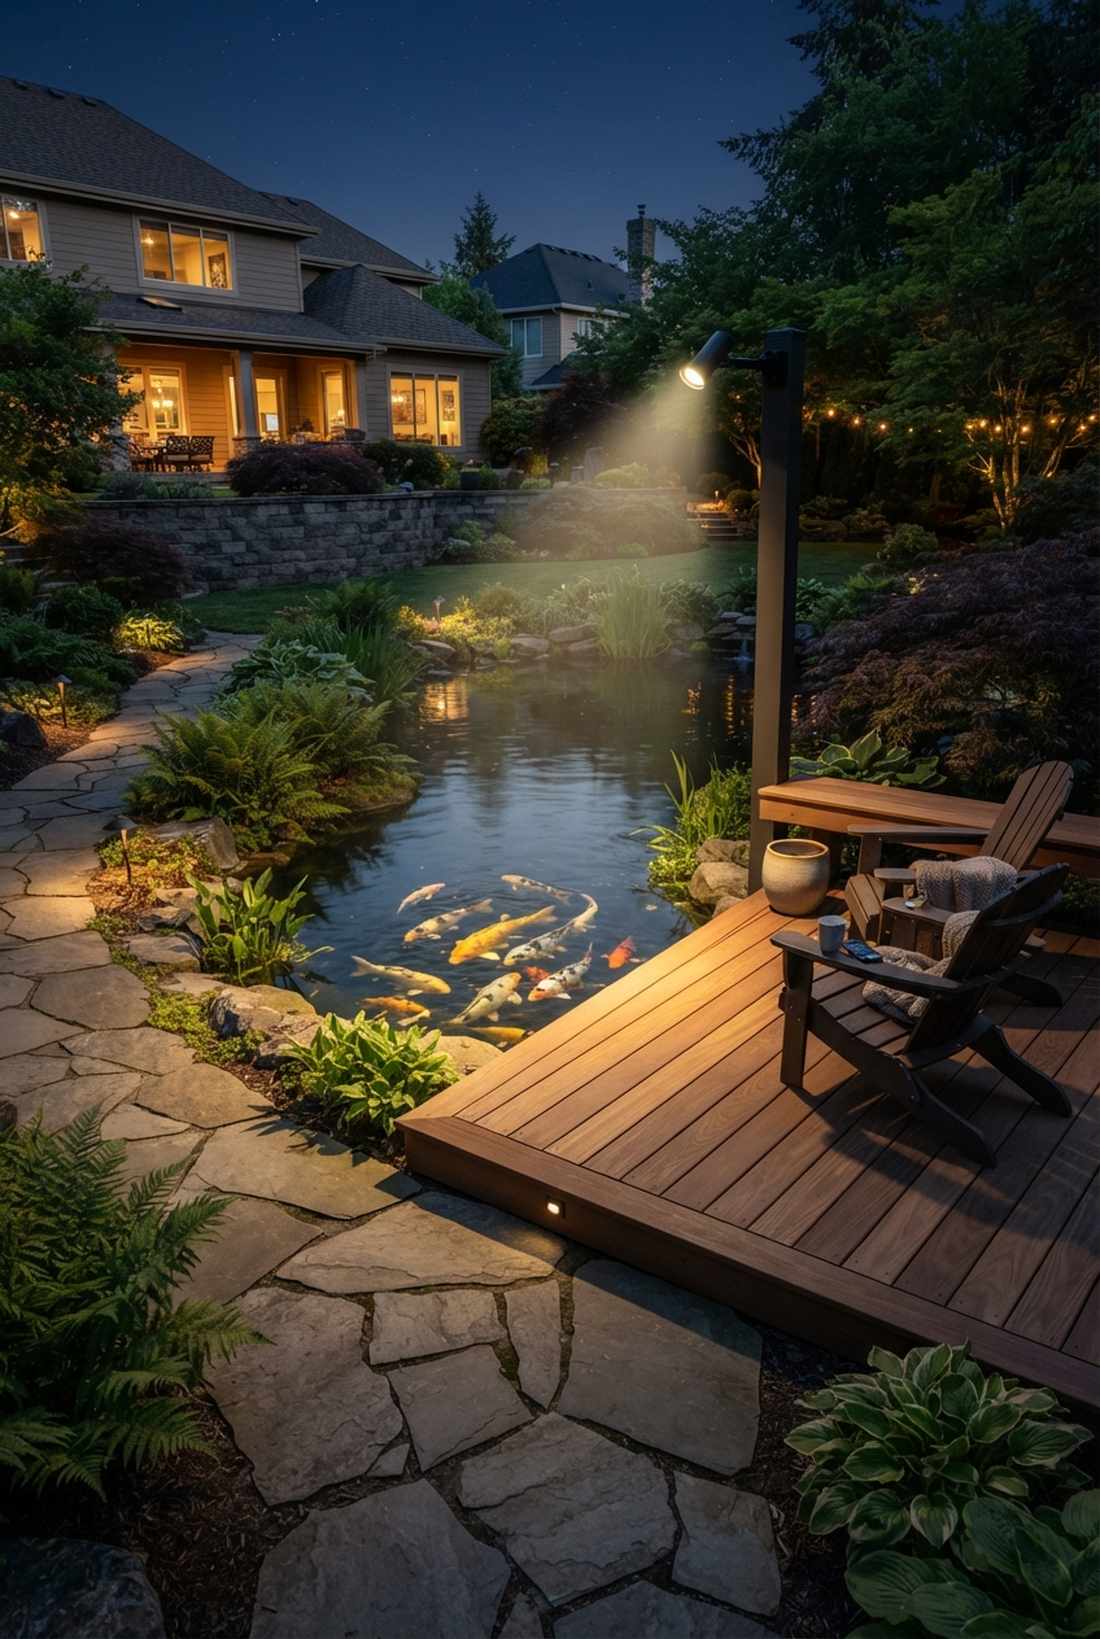
Creates a focused, dramatic wildlife theater utilizing directional pond feeding accents. Brilliant for illuminating specific viewing platforms without stressing out your expensive fish.
Blasting a pond with stadium-level floodlights will actually ruin the fish’s sleep cycle and stress them out. Dialing in a tight, dimmable narrow beam directly over the feeding zone allows for gorgeous evening observation while keeping the rest of the ecosystem safely dark. Upgrading to specialized terrarium accessories and smart dimmers protects your aquatic investment.
Set aside roughly $60–$90 for a dimmable viewing spot. Pin this if you are a serious pond hobbyist.
- Key Materials: Dimmable narrow-beam overhang spots
- Vibe / Style: Elite wildlife observation
- Difficulty: Careful angle aiming
- Budget Breakdown: Overhang spot: $75 | Smart dimmer: $15.
- Creator’s Tip: Angle the light slightly away from your viewing bench so the beam doesn’t reflect off the water’s surface directly into your eyes.
- Smart Sourcing: narrow-beam overhead pond spots, outdoor-rated smart dimmer plugs.
28. Reflection Pool Perimeter Lighting
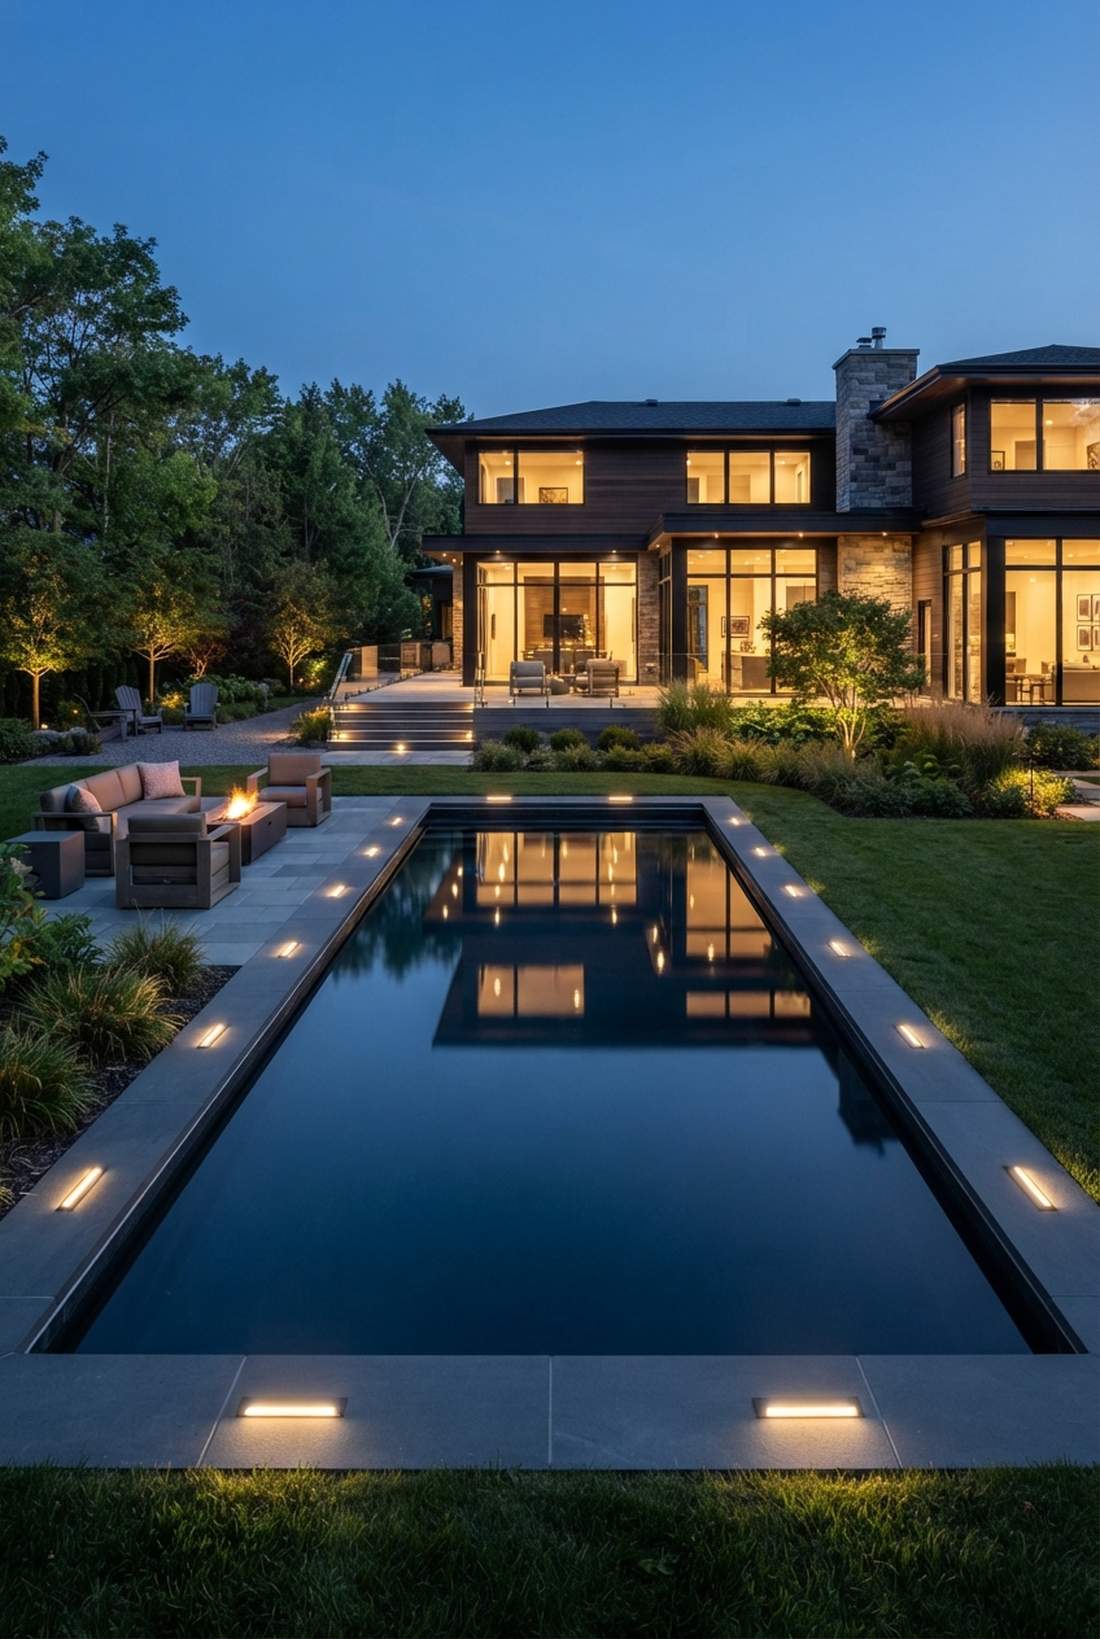
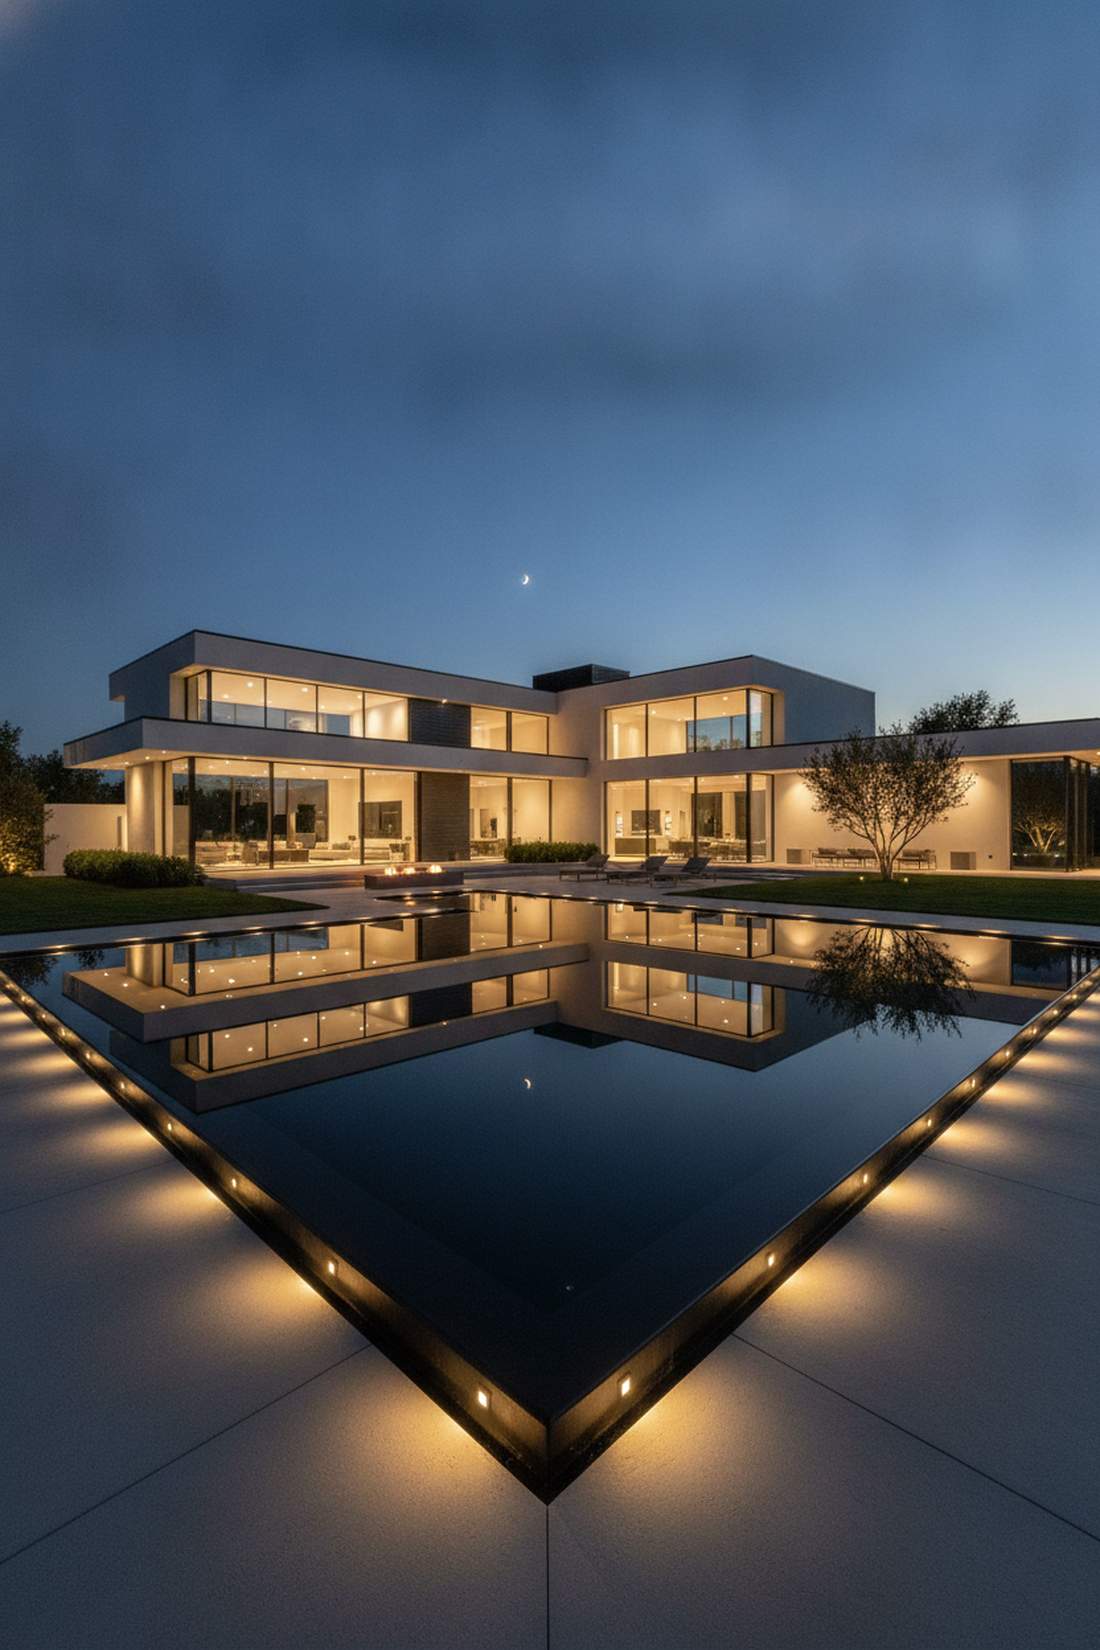
Acts like a massive, glowing black mirror using seamless edge-mounted perimeter lights. A breathtaking trick to double the visual impact of your home’s architecture through water reflection.
If you put lights inside a reflection pool, you destroy the mirror effect entirely. By encircling the outer edge with uniform, low-mounted fixtures aimed away from the water, the dark surface remains perfectly still, mirroring the lit house and sky perfectly. Utilizing flush-mount hardscape supplies creates an unbelievably sharp, clean line.
This perimeter border runs about $30–$50 per linear foot.
- Key Materials: Flush-mount perimeter pucks
- Vibe / Style: Ultra-sleek architectural mirror
- Difficulty: Precise symmetrical measuring
- Budget Breakdown: Edge pucks: $35 | Concealed wiring track: $10.
- Creator’s Tip: Use a laser level to ensure every single edge light is at the exact same millimeter height; reflections are unforgiving to mistakes.
- Smart Sourcing: flush-mount LED perimeter pucks (bulk pack), laser level kits.
Material Guide: Cheap vs. Premium Aesthetic
Knowing exactly where to save and where to spend makes all the difference in achieving that “looks expensive but isn’t” vibe.
- Standard vs. UV-Resistant/Premium: Standard plastic housings bake in the sun and turn chalky white within a year. Upgrading to solid brass or UV-coated aluminum stops fading, prevents cracking, and survives accidental weed-whacker hits.
- Pre-made Kits vs. Sourcing Locally: Buying individual pieces at big box stores drains your budget fast. Sourcing commercial bulk starter kits often saves both time and money, ensuring your wire gauges and transformer capacities match perfectly.
Deck and Step Safety
Safety-focused lighting prevents accidents while enhancing outdoor living spaces. These garden lights landscape systems illuminate elevation changes and circulation zones without creating glare.
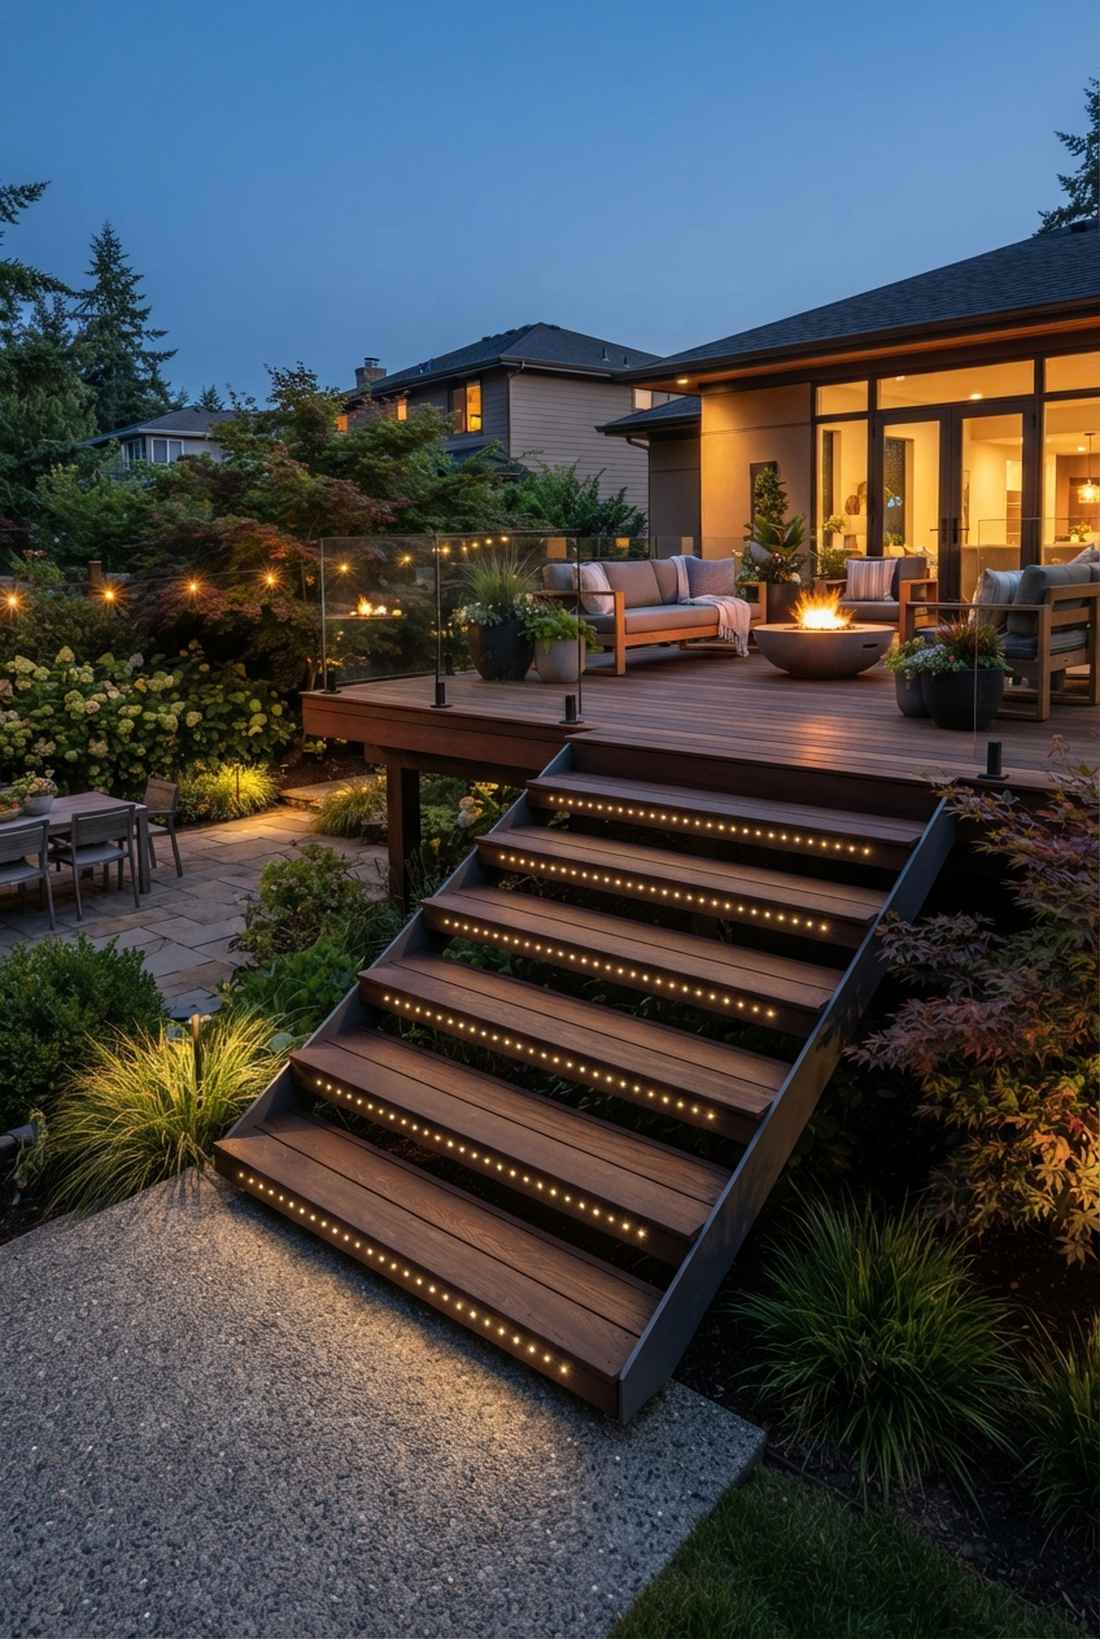
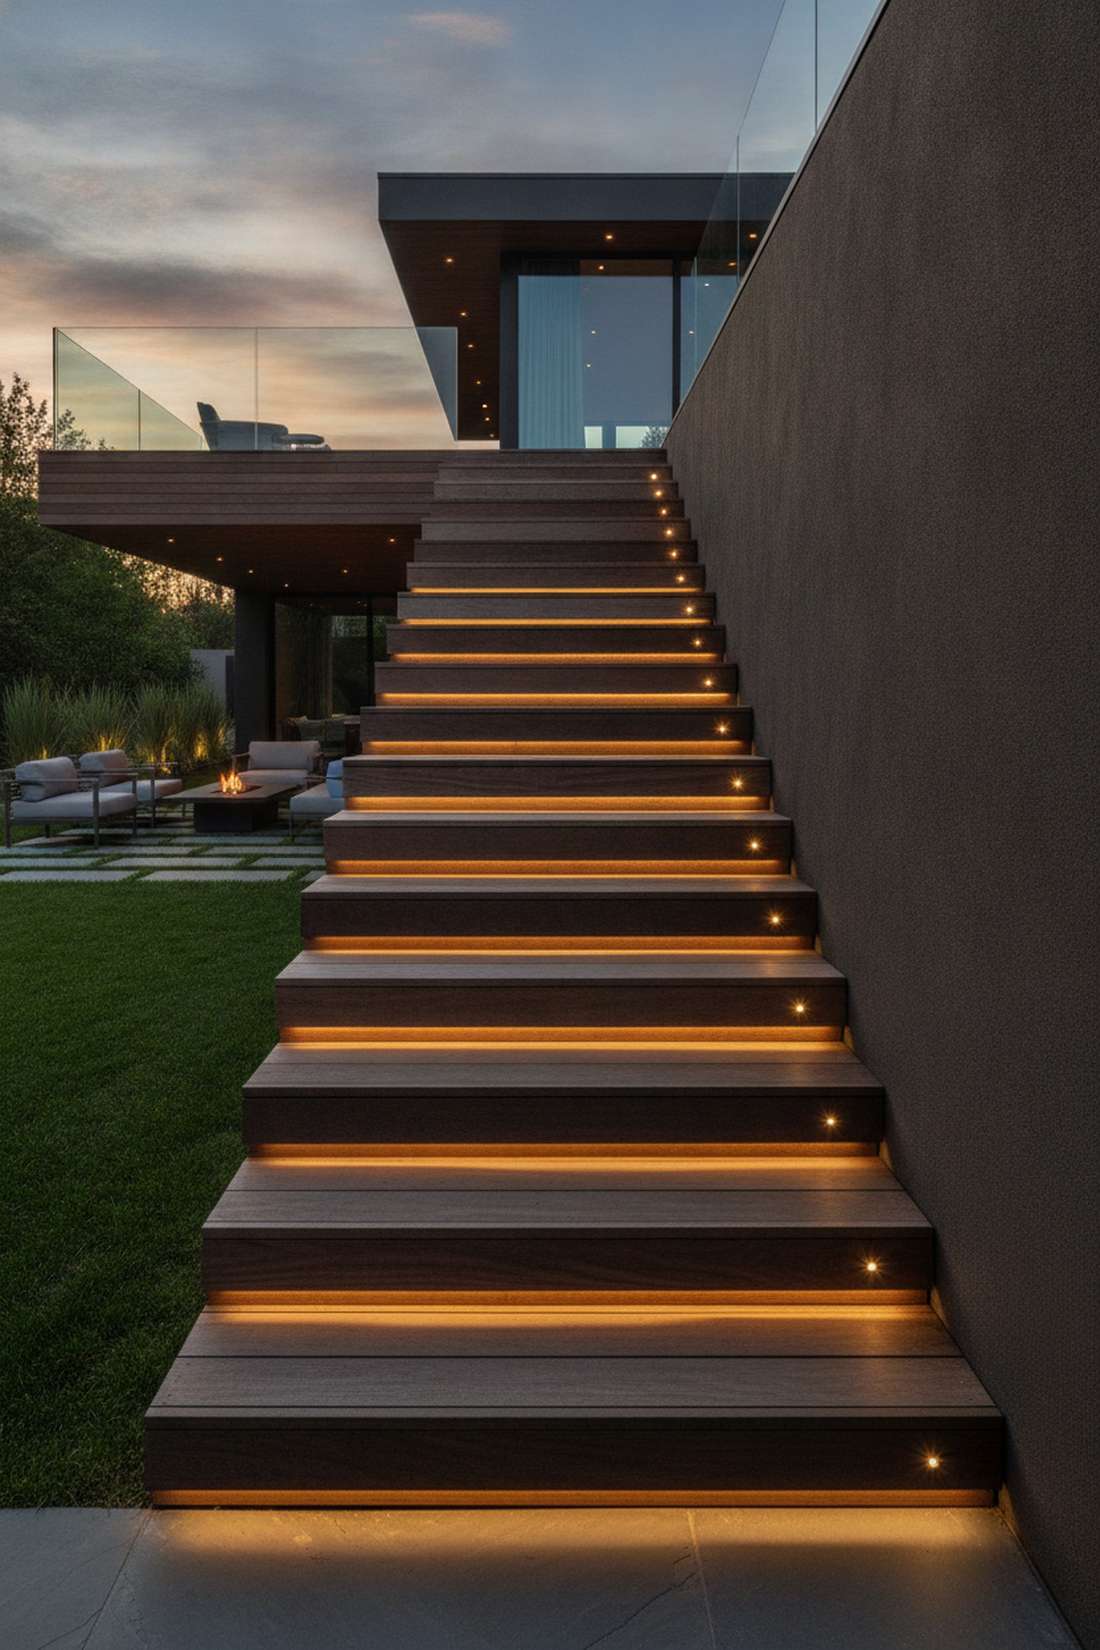
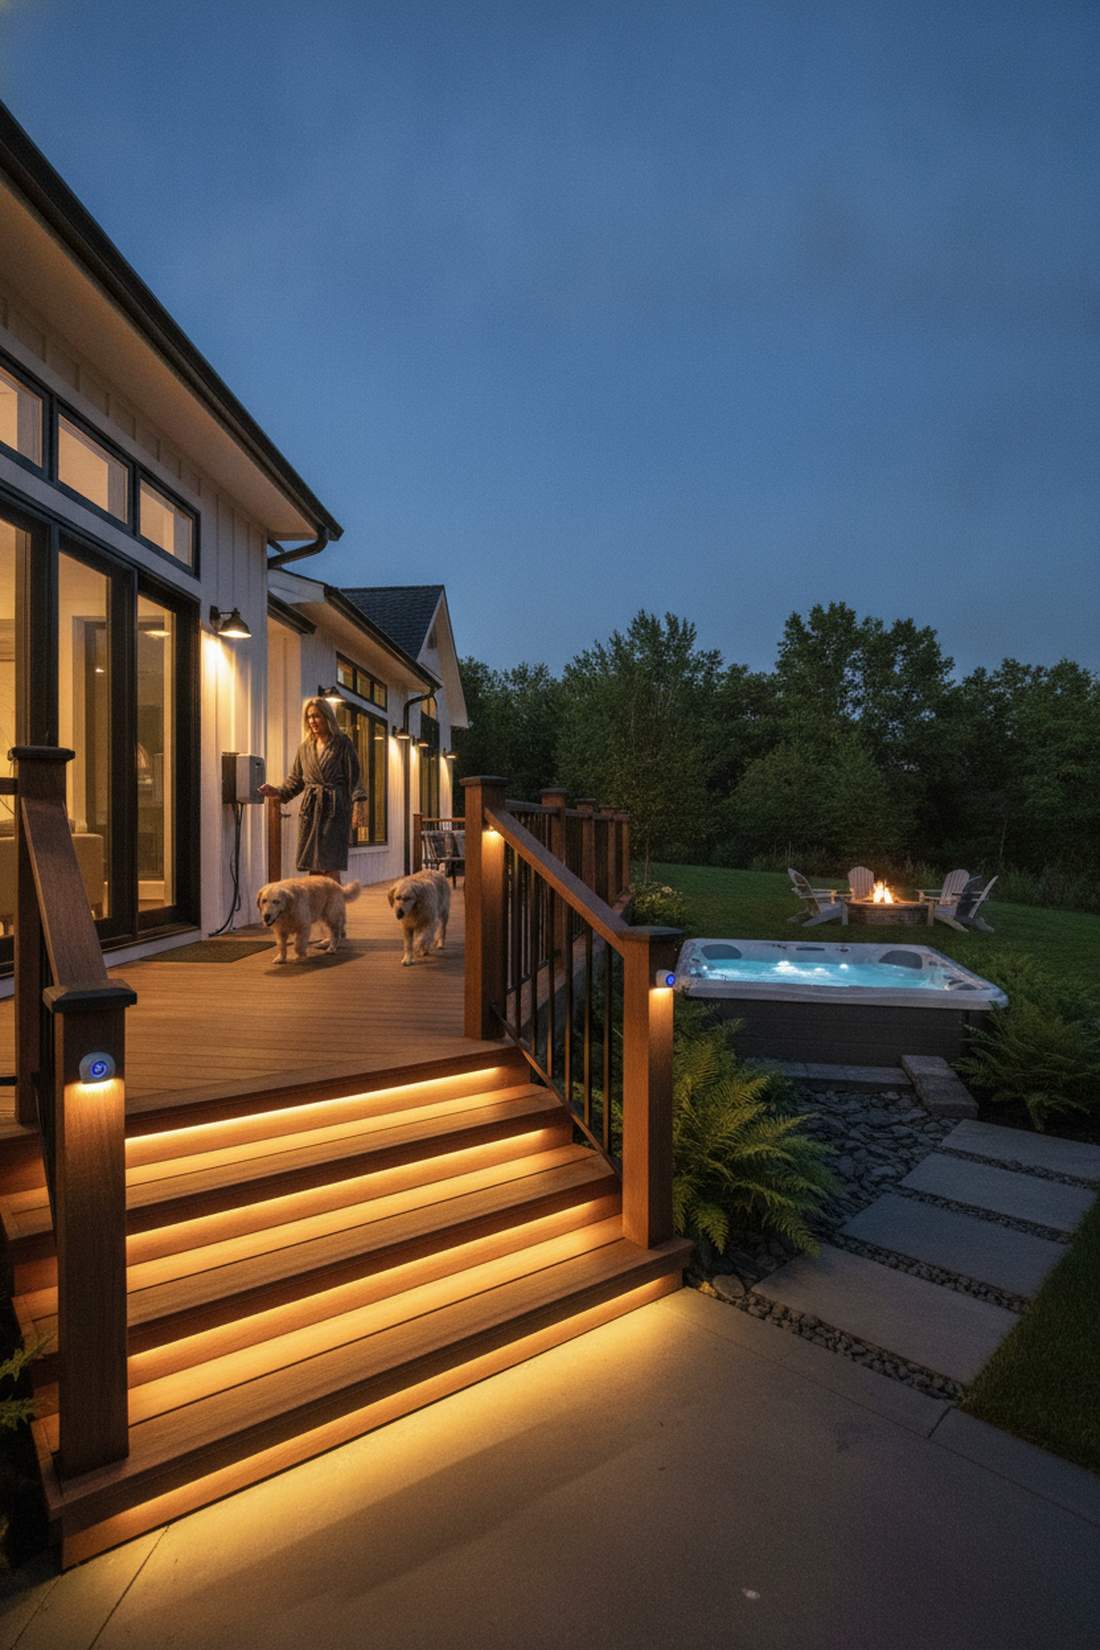
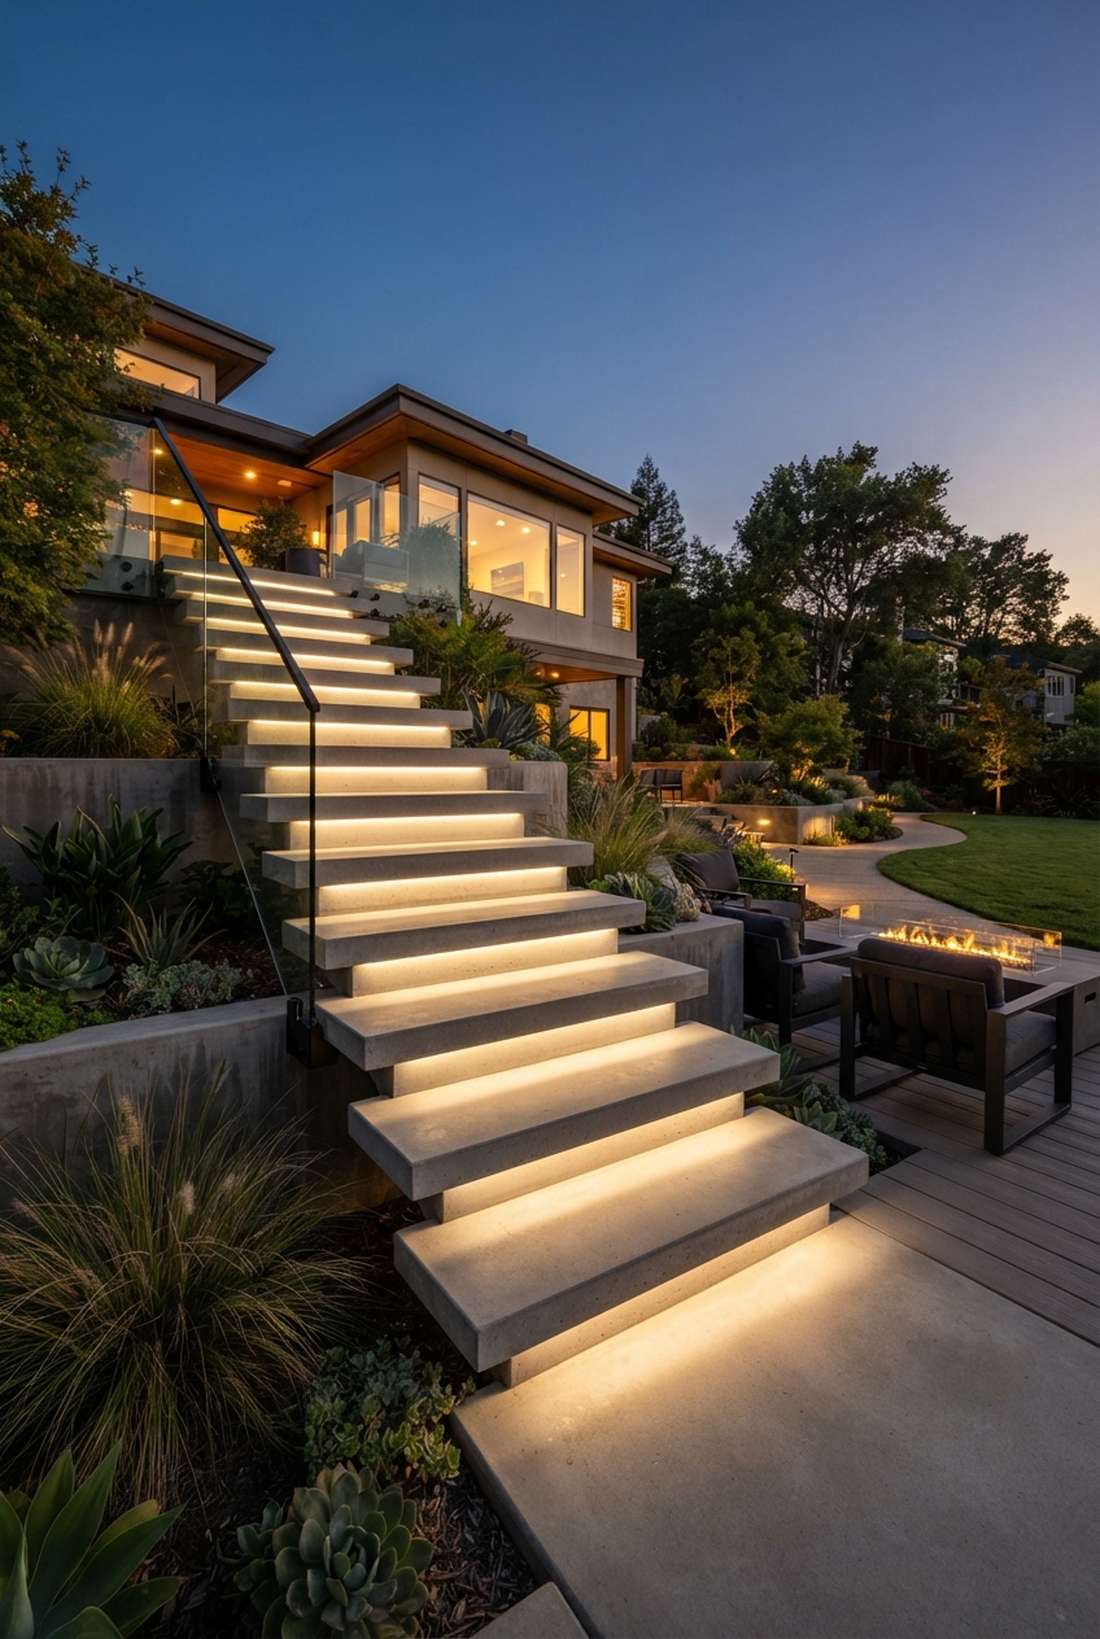
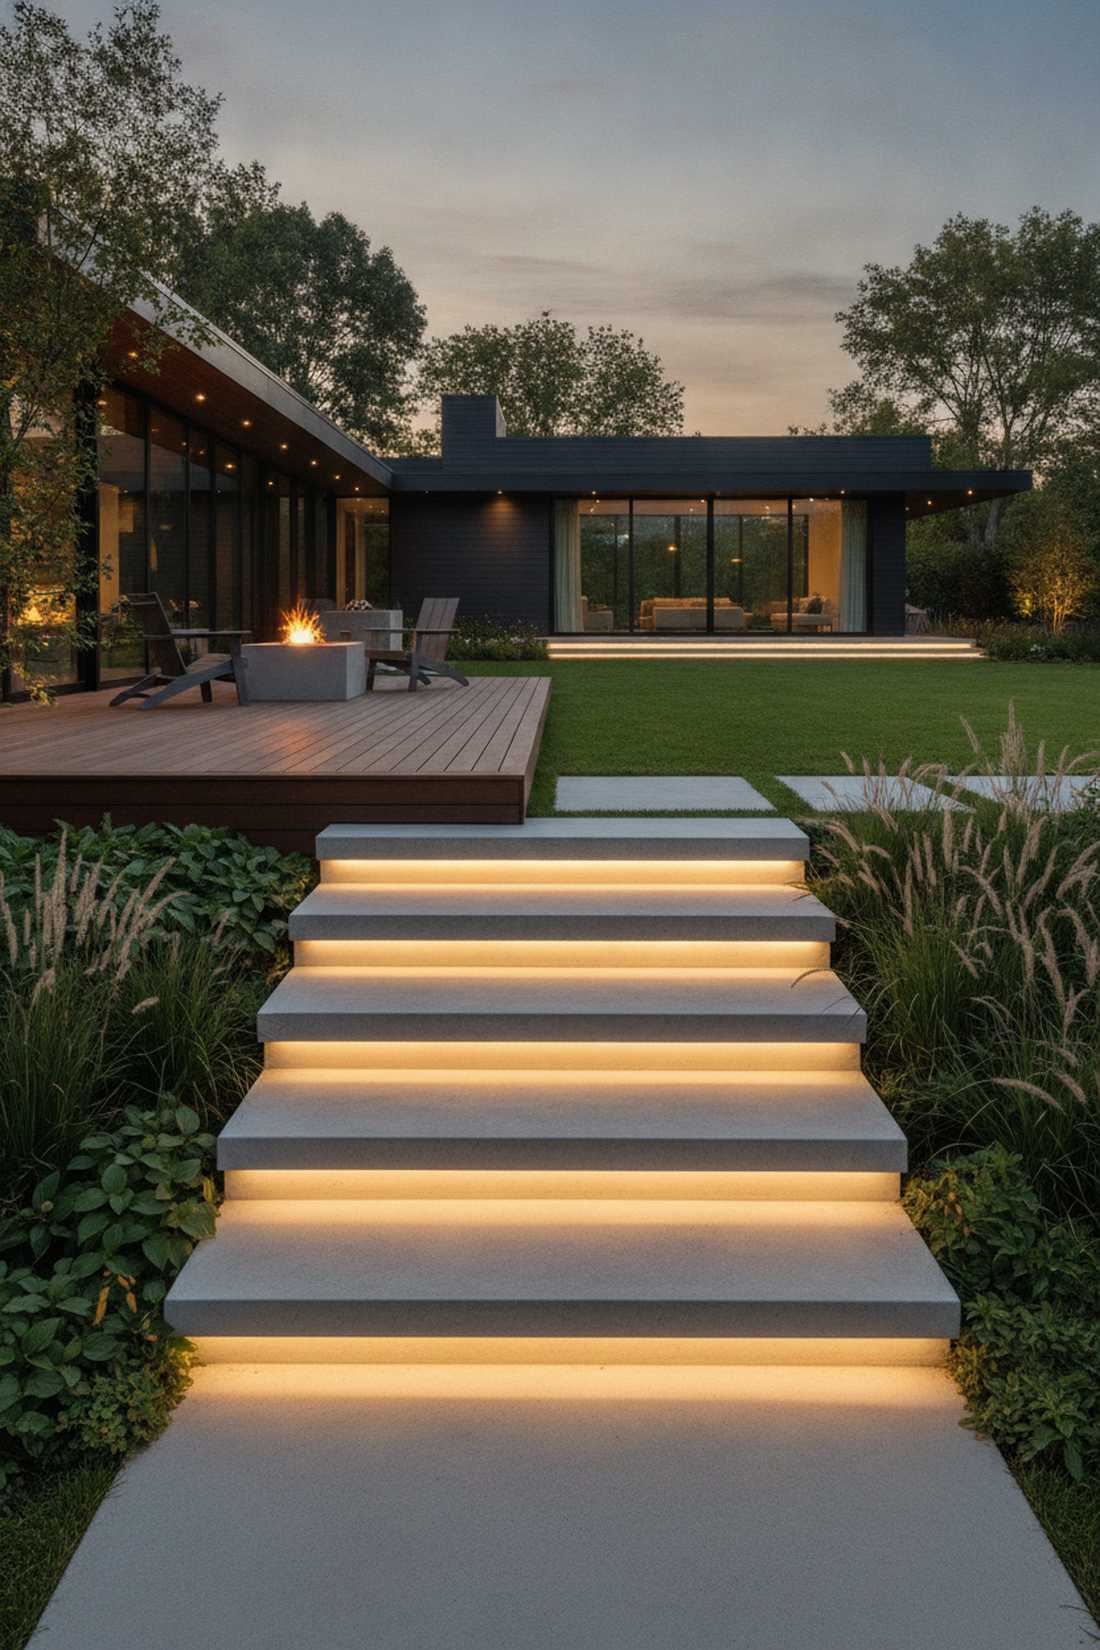
29. Recessed Step Lights
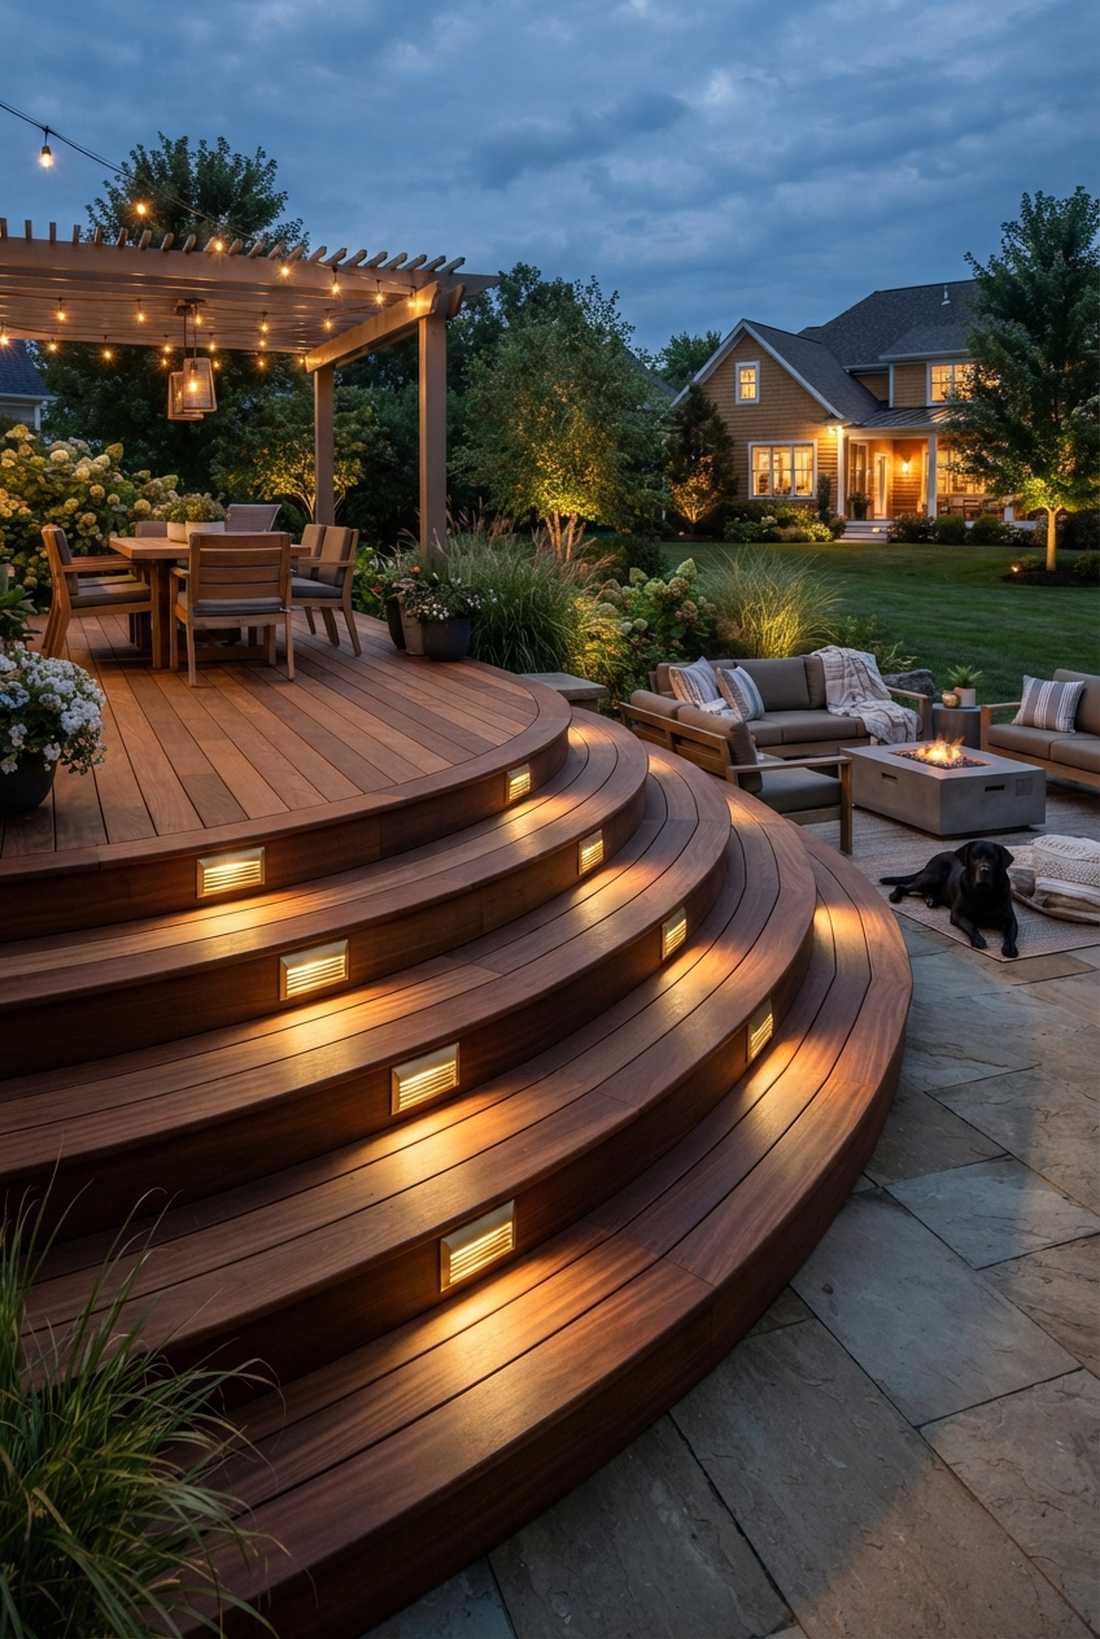
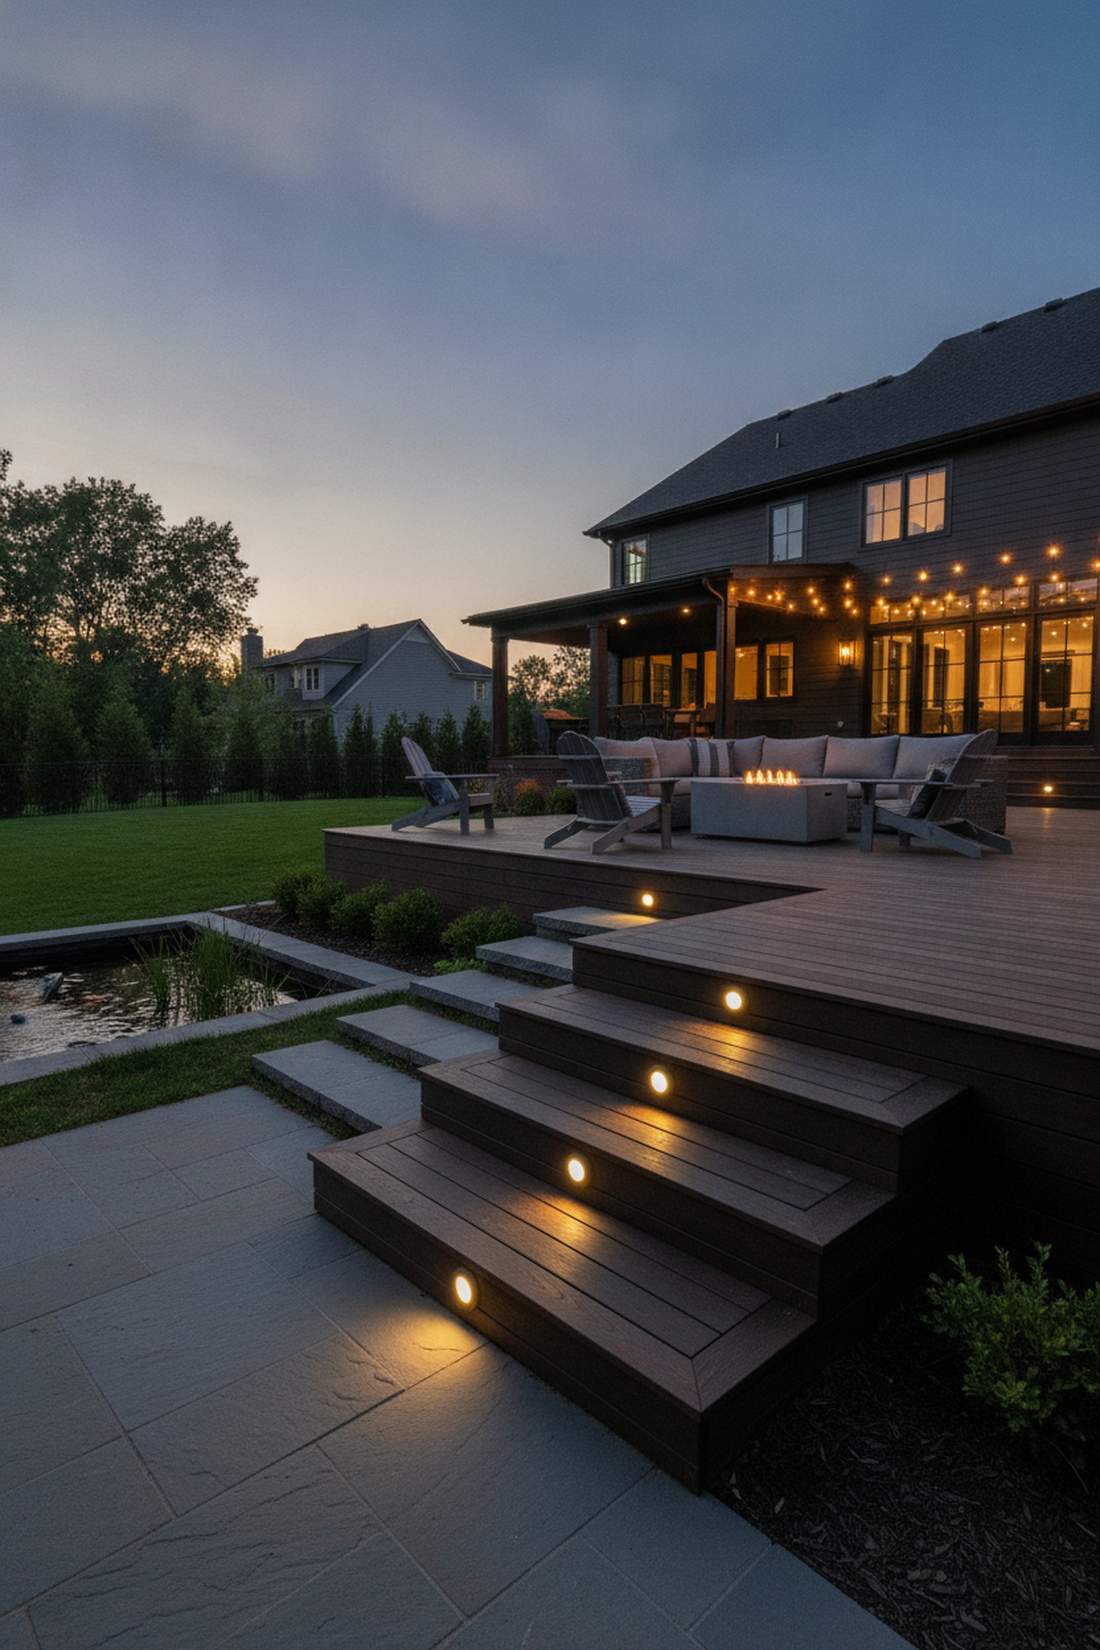
Builds a deeply secure, highly polished deck transition using flush riser illumination. The best possible way to stop guests from tripping on dark patio stairs.
Bolting bulky path lights next to the stairs looks messy and creates a massive trip hazard in itself. Recessing sleek, louvered fixtures directly into the stair riser pushes all the light straight down onto the tread, completely eliminating eye glare for anyone walking up. Snagging dedicated flush-mount outdoor LED hardware gives a designer-level finish.
You can execute this safety upgrade for $30–$55 per stair.
- Key Materials: Louvered flush-mount riser lights
- Vibe / Style: Clean modern safety
- Difficulty: Wood routing/cutting
- Budget Breakdown: Riser light: $40 | Forstner drill bit: $10.
- Creator’s Tip: Stagger the lights (left on step one, right on step two) for wider staircases to create a balanced, high-end look.
- Smart Sourcing: brass louvered step lights (pack of 6), woodworking Forstner bit sets.
30. Deck Post Cap Lights
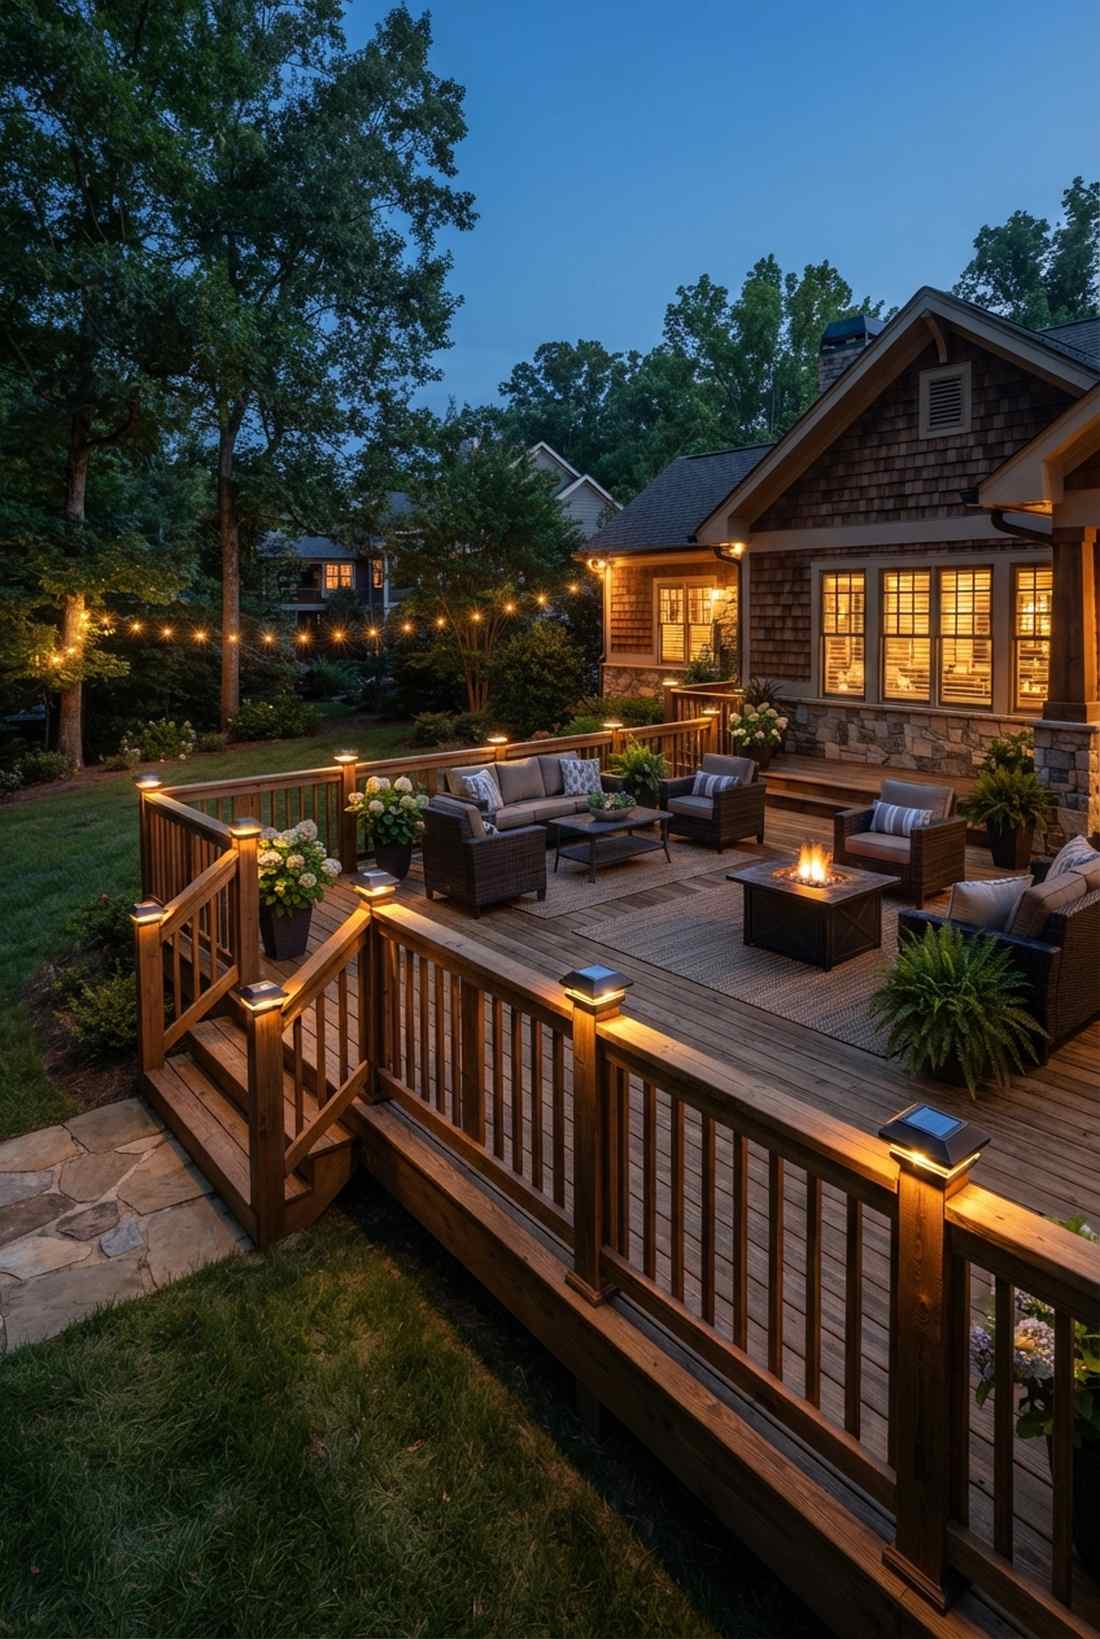
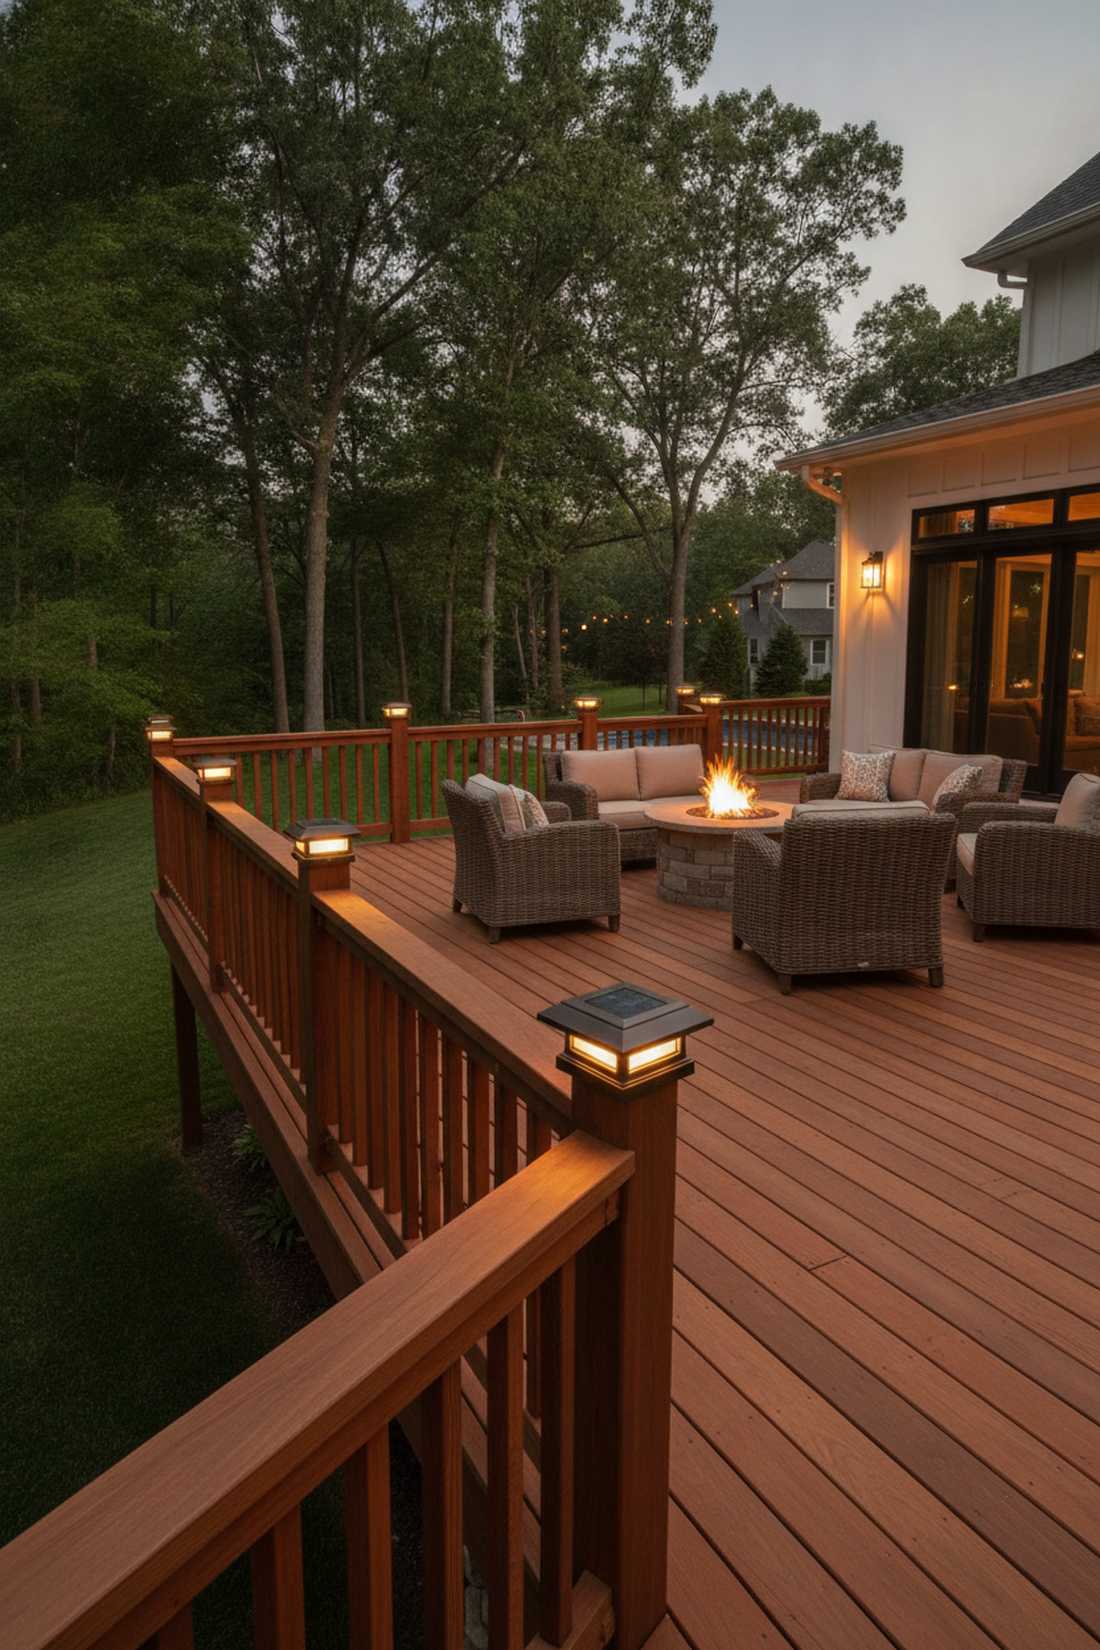
Caps off a beautiful wooden deck with a warm, inviting perimeter glow via illuminated railing post caps. Fantastic for establishing boundaries around elevated backyard living spaces.
Leaving posts bare makes a deck feel unfinished, but running wires through solid wood posts after they are built is a nightmare. Luckily, swapping out standard wooden caps for self-contained, low-voltage or premium solar caps instantly distributes soft ambient light across the whole railing. Utilizing UV-resistant architectural lighting kits looks far more expensive than it is.
These smart decorative caps run $25–$60 each. Save this if you are planning a summer deck build.
- Key Materials: Low-voltage or high-end solar post caps
- Vibe / Style: Finished craftsman deck
- Difficulty: Easy cap replacement
- Budget Breakdown: Lighted cap: $45 | Silicone adhesive: $5.
- Creator’s Tip: Don’t use screws to mount the caps. Use exterior-grade silicone; it holds tight and seals the top of your wood post from rotting.
- Smart Sourcing: solar deck post cap lights (starter kit), exterior-grade clear silicone.
Safety meets luxury in this next setup—nobody expects this level of detail on a standard backyard build…
31. Under-Rail LED Strip Systems
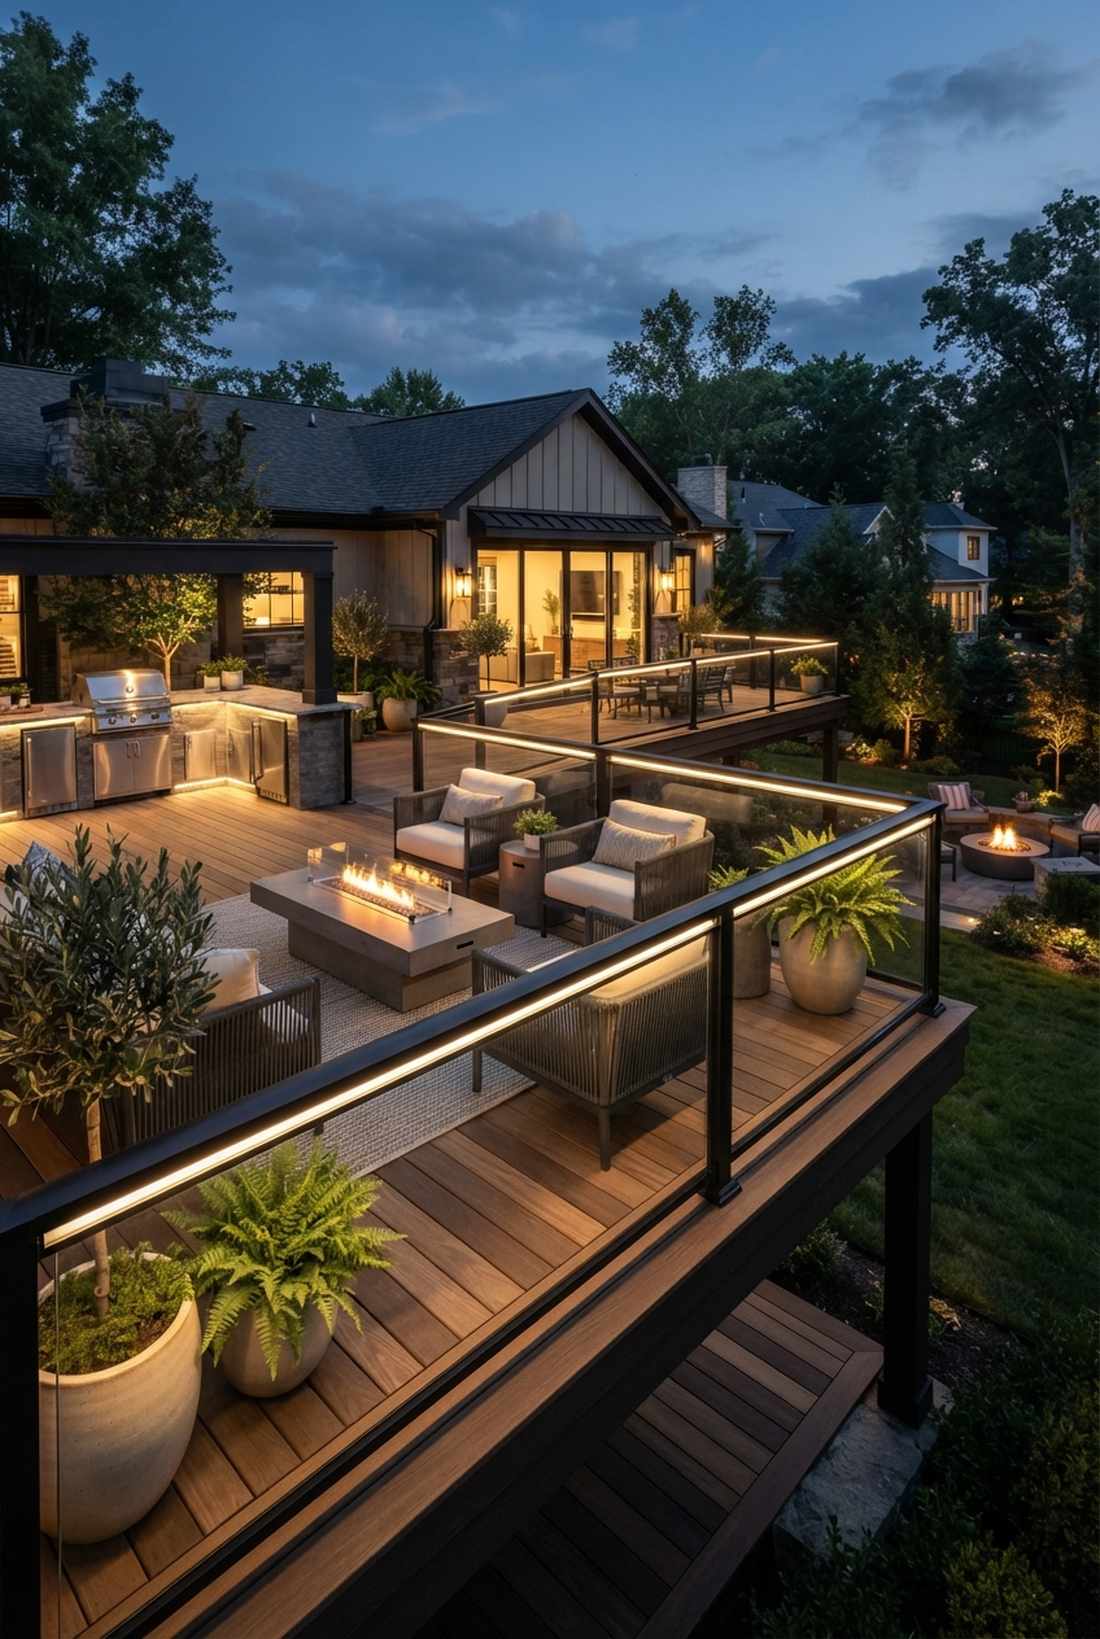
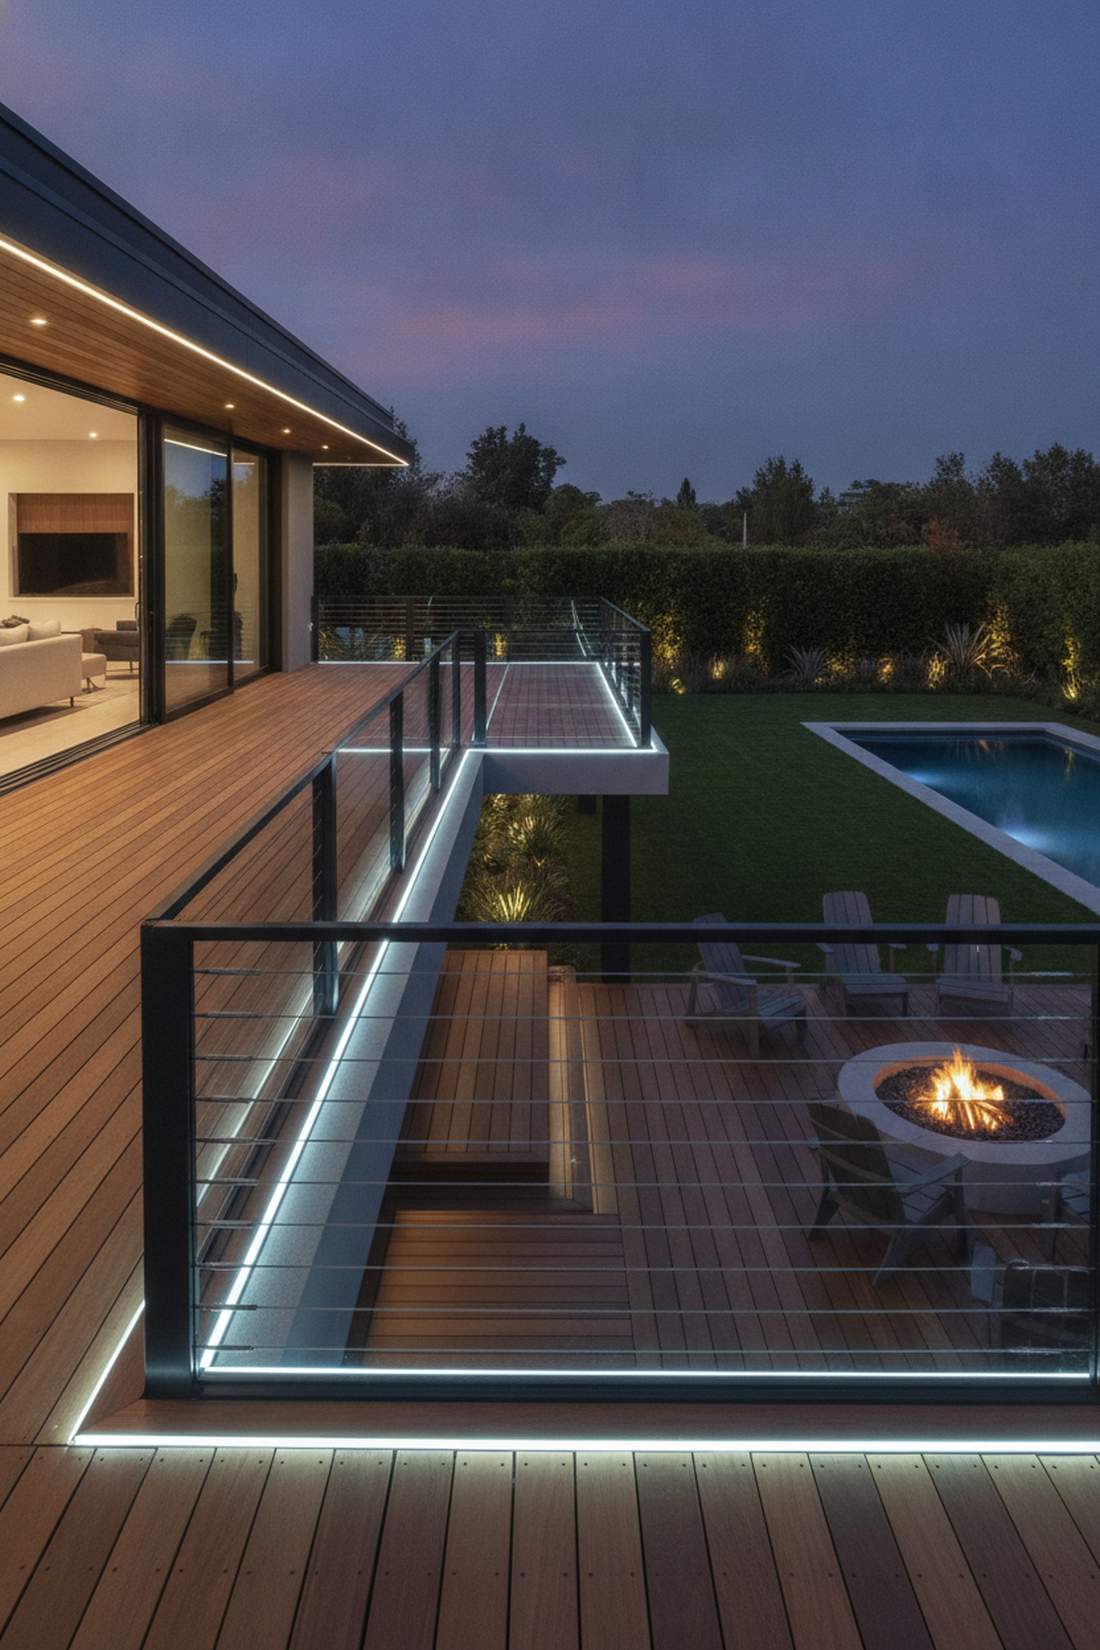
Delivers a flawless, floating neon boundary utilizing concealed under-railing tape lights. Breathtaking when wrapped around modern glass balconies or cable-railed terraces.
Spotlights on a deck create awful shadows and blinding hot spots. Tucking a continuous, weatherproof LED strip precisely under the lip of the handrail casts a totally seamless, buttery-smooth perimeter glow directly onto the deck boards. Finding commercial silicone-coated LED reels entirely changes the game here for longevity.
Expect to spend about $15–$25 per linear foot.
- Key Materials: IP65 silicone-coated LED tape
- Vibe / Style: Floating futuristic lounge
- Difficulty: Sticky tape routing
- Budget Breakdown: LED Reel: $50 | Aluminum channel: $20.
- Creator’s Tip: Never stick the LED tape directly to the wood; it will peel off in the heat. Always mount it inside an aluminum track.
- Smart Sourcing: IP65 outdoor LED strip reels (bulk pack), aluminum LED mounting channels.
32. Stair Nosing Marker Lights
Screams ultra-high-end contemporary design with micro-embedded tread nosing markers. The slickest way to outline massive, wide exterior concrete or wood steps.
Bulky riser lights don’t work on floating stairs or thin steel steps. By routing a tiny groove under the very edge (nosing) of the tread and embedding micro-LED dot markers, the foot placement is perfectly highlighted without a single visible piece of hardware. Picking up some specialized miniature garden supplies ensures a hyper-minimalist profile.
This designer detail costs roughly $40–$70 per tread.
- Key Materials: Micro LED dot modules
- Vibe / Style: Hyper-minimalist luxury
- Difficulty: Precision routing required
- Budget Breakdown: Micro dots: $45 | Wood router bit: $15.
- Creator’s Tip: Pre-drill the wiring channels through the stringers before assembling the staircase to keep the underside looking completely wire-free.
- Smart Sourcing: micro LED step marker dots (pack of 10), concealed wire routing bits.
33. Motion-Activated Deck Lighting

Provides an invisible, responsive security blanket using smart PIR triggered deck lighting. Absolutely perfect for late-night hot tub access or taking the dogs out.
Leaving full deck lights on all night wastes power and ruins your stargazing. Hooking up stealthy motion sensors at the entry points triggers the entire lighting circuit to smoothly fade up only when you step outside. Implementing smart home low voltage landscape transformers delivers a surprisingly premium look with zero effort.
Adding motion capability to a system runs an extra $60–$100.
- Key Materials: Outdoor PIR motion triggers
- Vibe / Style: Responsive smart-home security
- Difficulty: Sensor calibration
- Budget Breakdown: PIR Sensor: $75 | Override switch: $20.
- Creator’s Tip: Turn the sensitivity dial down slightly; otherwise, every raccoon or wind-blown branch will turn your deck into a disco.
- Smart Sourcing: outdoor-rated PIR motion sensors, smart landscape lighting transformers.
34. Floating Step Indirect Lighting
Creates a gravity-defying, magical staircase utilizing cantilevered under-step glowing. Designed specifically for modern floating concrete slabs or deep-lip wooden stairs.
Most contractors just slap a light on the wall next to the stairs, ignoring the architecture completely. By hiding linear strips far back underneath the cantilevered overhang, light pours out from the gaps, making heavy stone steps look like they are floating on thin air. Utilizing slim profile low voltage garden lights completely masks the light source.
You can achieve this floating illusion for $45–$80 per step. Pin this to your modern architecture inspiration board.
- Key Materials: Slim LED tape and diffusers
- Vibe / Style: Gravity-defying modernism
- Difficulty: Hidden mounting
- Budget Breakdown: Tape light: $40 | Milky diffusers: $15.
- Creator’s Tip: Use milky/frosted diffuser covers over the LED strips so you don’t see the ugly reflection of individual LED dots on the step below.
- Smart Sourcing: frosted LED diffuser channels (bulk pack), slim-profile outdoor LED strips.
Specialty Garden Lights Landscape
Advanced low voltage garden lights systems address unique design challenges and creative applications. These specialized solutions expand lighting possibilities beyond conventional categories.
35. Trellis and Arbor Downlighting
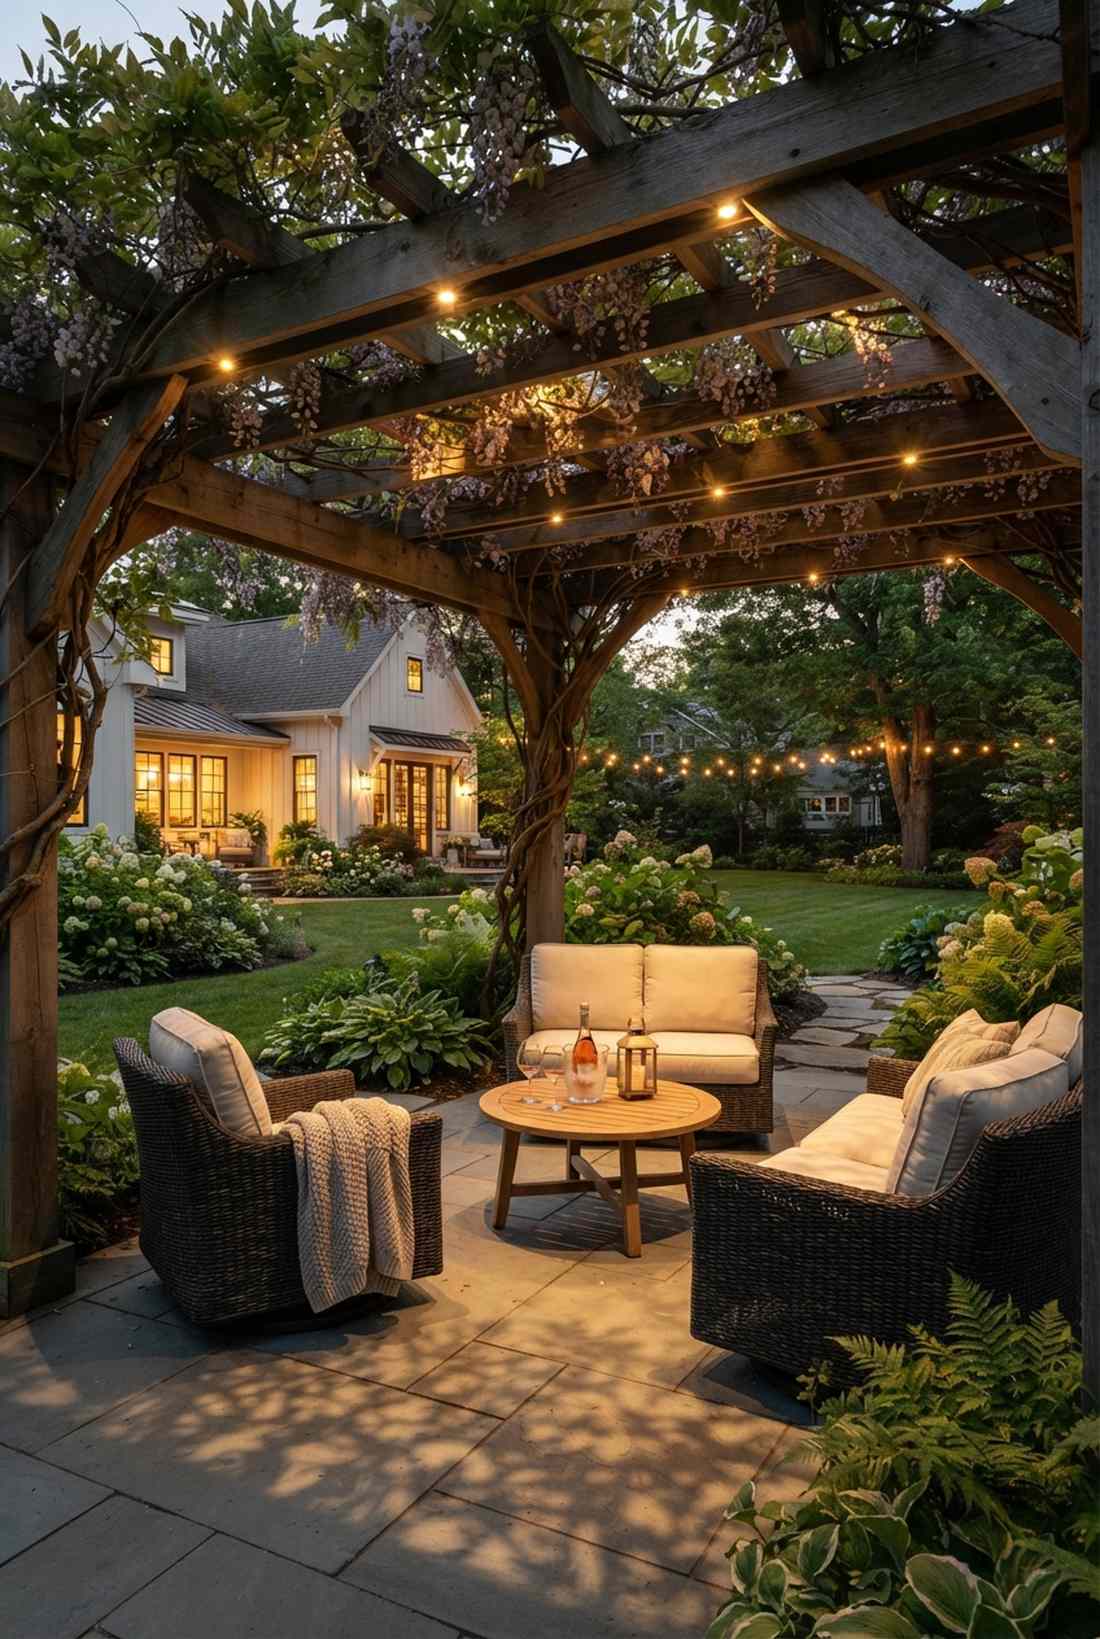
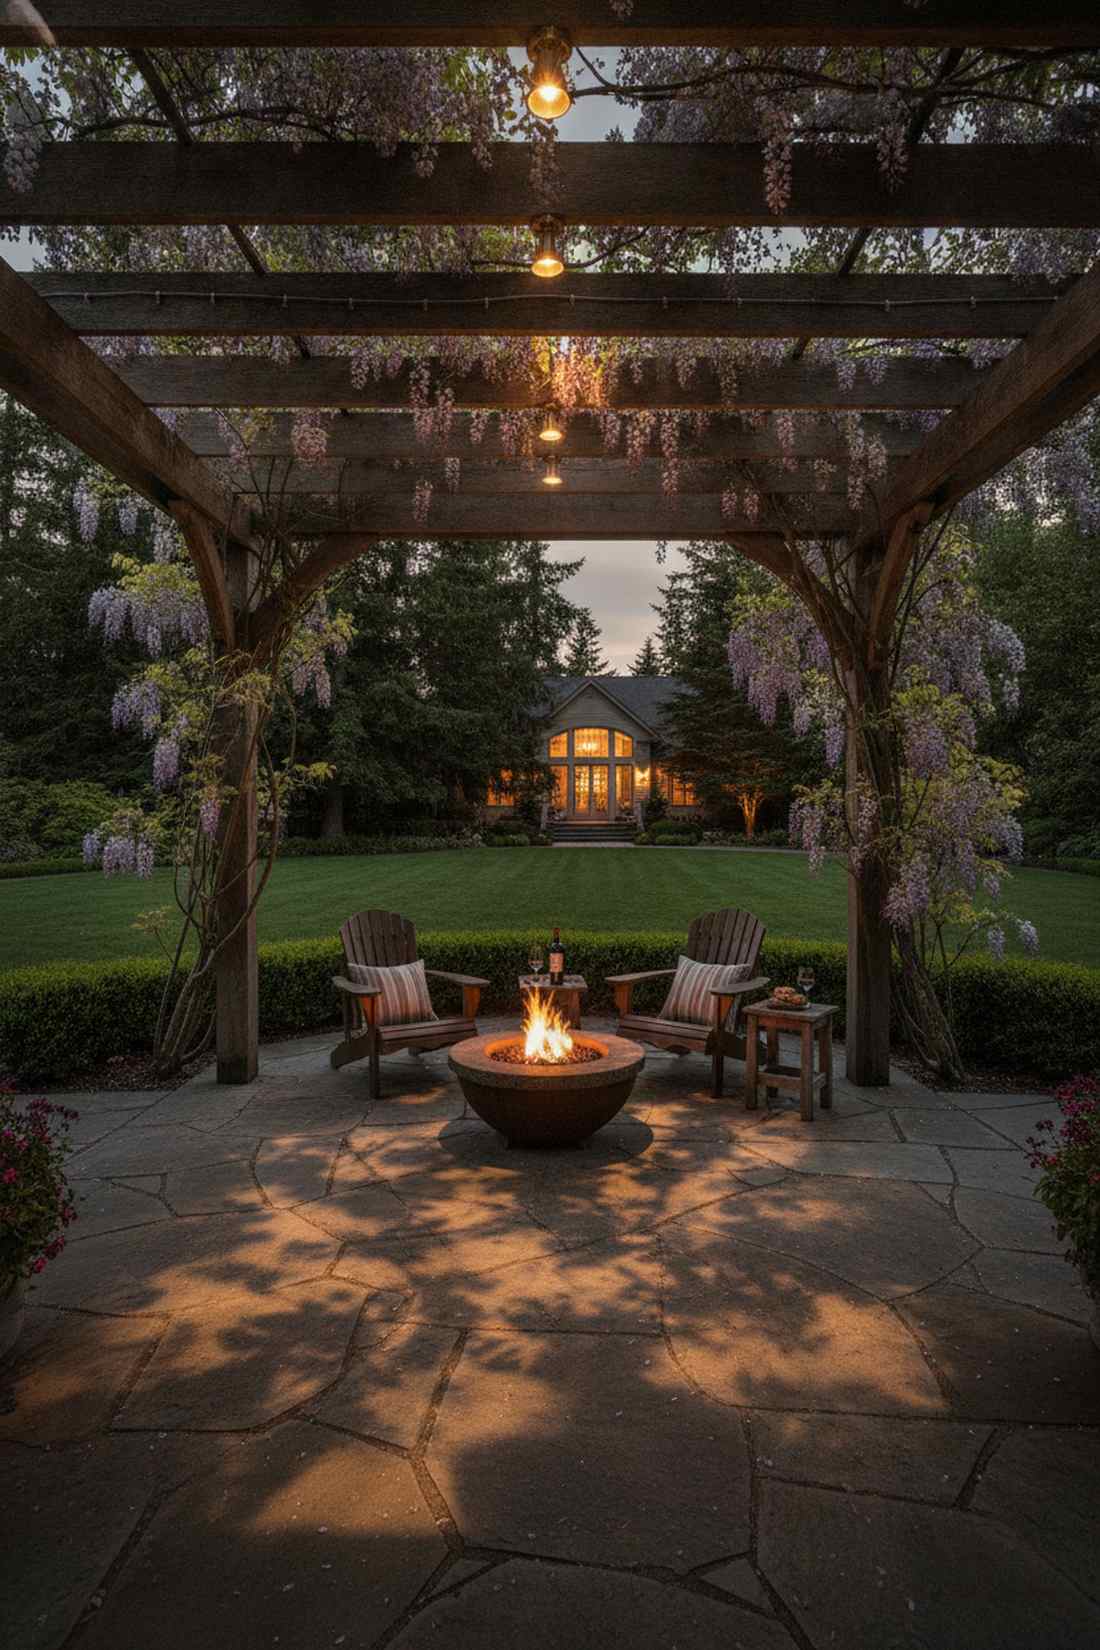
Casts a deeply romantic, filtered glow utilizing overhead arbor downlighting. The ultimate setup for intimate seating areas nestled under thick climbing roses or wisteria.
Sticking a path light next to a gorgeous trellis does nothing to highlight the overhead vines. Mounting tiny weatherproof spots high up on the crossbeams and aiming them straight down pushes light through the leaves, creating stunning, leafy shadows on the ground below. Finding high-quality miniature garden supplies makes the hardware vanish into the woodwork.
Expect this romantic overhead rig to cost $50–$85 per fixture.
- Key Materials: Micro brass downlights
- Vibe / Style: Intimate vineyard terrace
- Difficulty: Overhead wire hiding
- Budget Breakdown: Brass downlight: $60 | Cable staples: $5.
- Creator’s Tip: Paint the wire to match your trellis wood exactly, and staple it neatly along the back edge of the posts to keep it invisible.
- Smart Sourcing: micro brass arbor downlights (starter kit), wood-matching exterior cable staples.
Before you buy any generic fixtures, check out this incredible overhead layout that forces everyone to look up.
36. Garden Sculpture Accent Lighting
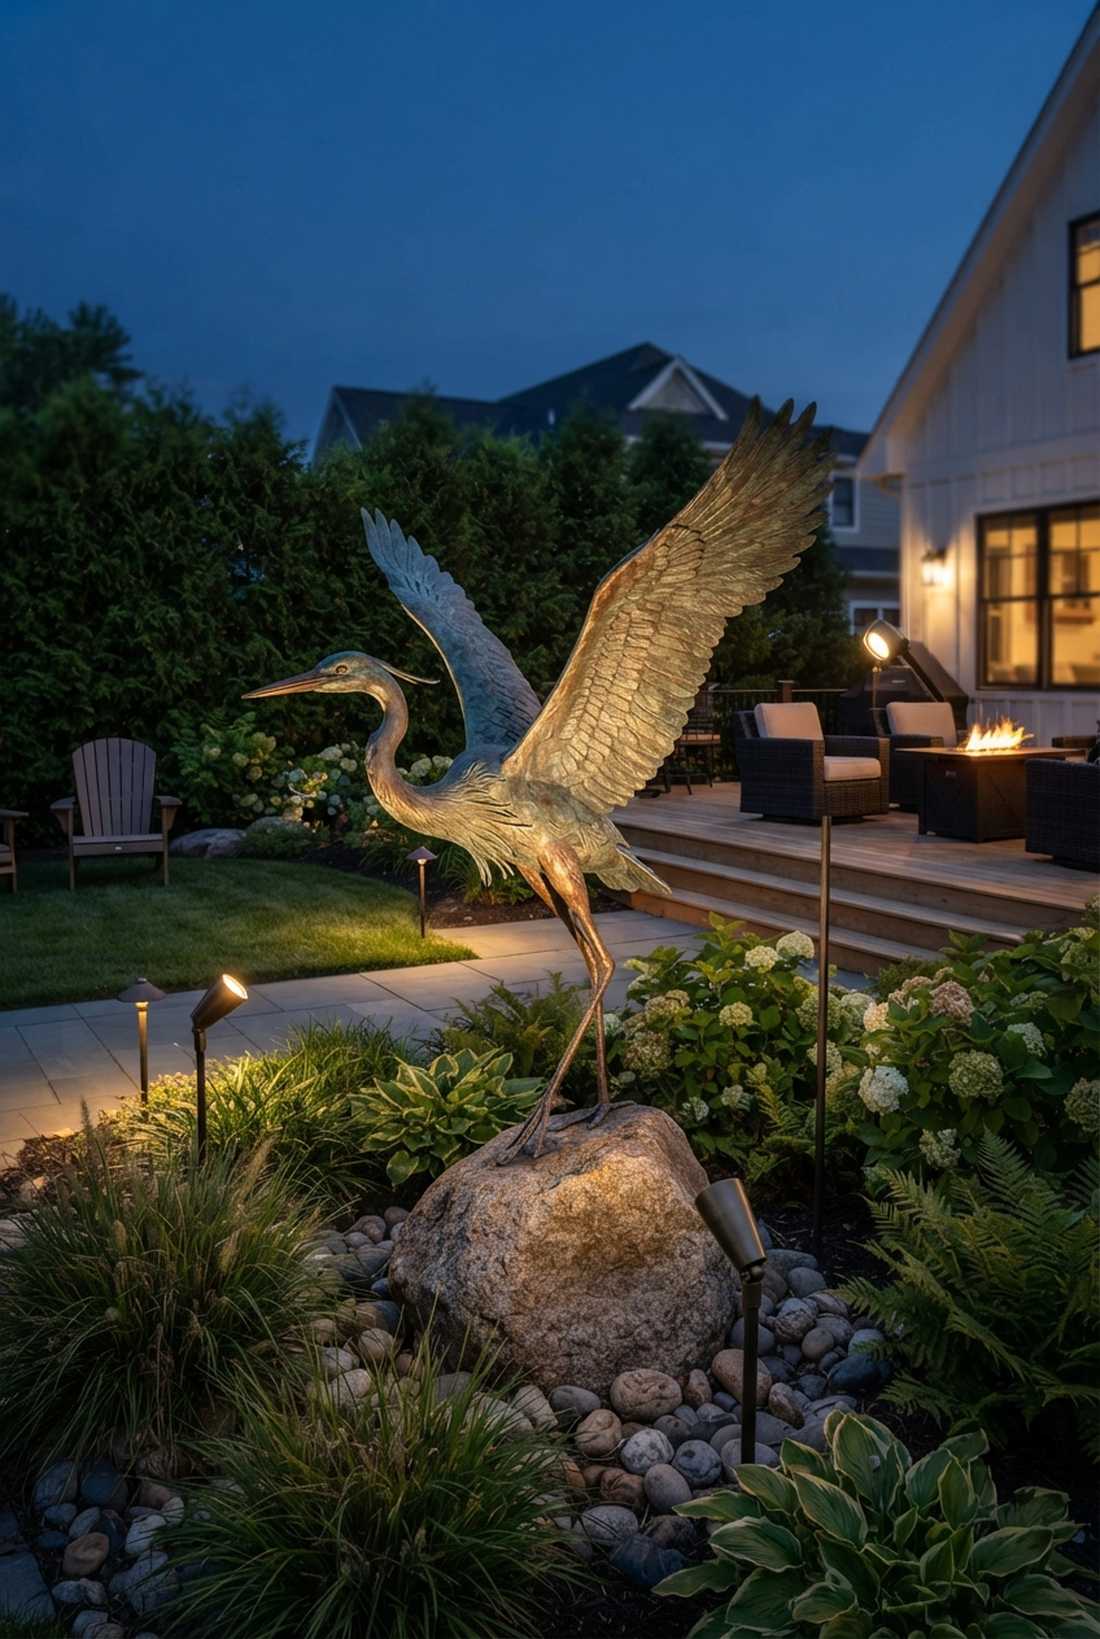
Transforms beautiful yard art into a museum-quality exhibit with dimensional sculpture cross-lighting. Mandatory for anyone with expensive statues, fountains, or intricate metal yard art.
Blasting a statue with a single cheap floodlight flattens it into a boring 2D shape. You must position 2-3 narrow beam spots at varying angles and distances to create intersecting shadows, popping the 3D texture and completely eliminating flat spots. Leveraging premium low voltage garden lights kits gives a genuinely designer-level finish.
A multi-light gallery setup runs $100–$160 per sculpture.
- Key Materials: Narrow beam brass spots
- Vibe / Style: High-end art gallery
- Difficulty: Precise shadow tuning
- Budget Breakdown: 3 Spots: $135 | Hex louvers: $15.
- Creator’s Tip: Put a hex louver inside the lens of the spotlight; it tightly controls the beam so light hits the statue, not the neighbor’s window.
- Smart Sourcing: narrow-beam brass landscape spotlights (pack of 4), anti-glare hex louver inserts.
37. Vegetable Garden Task Lighting
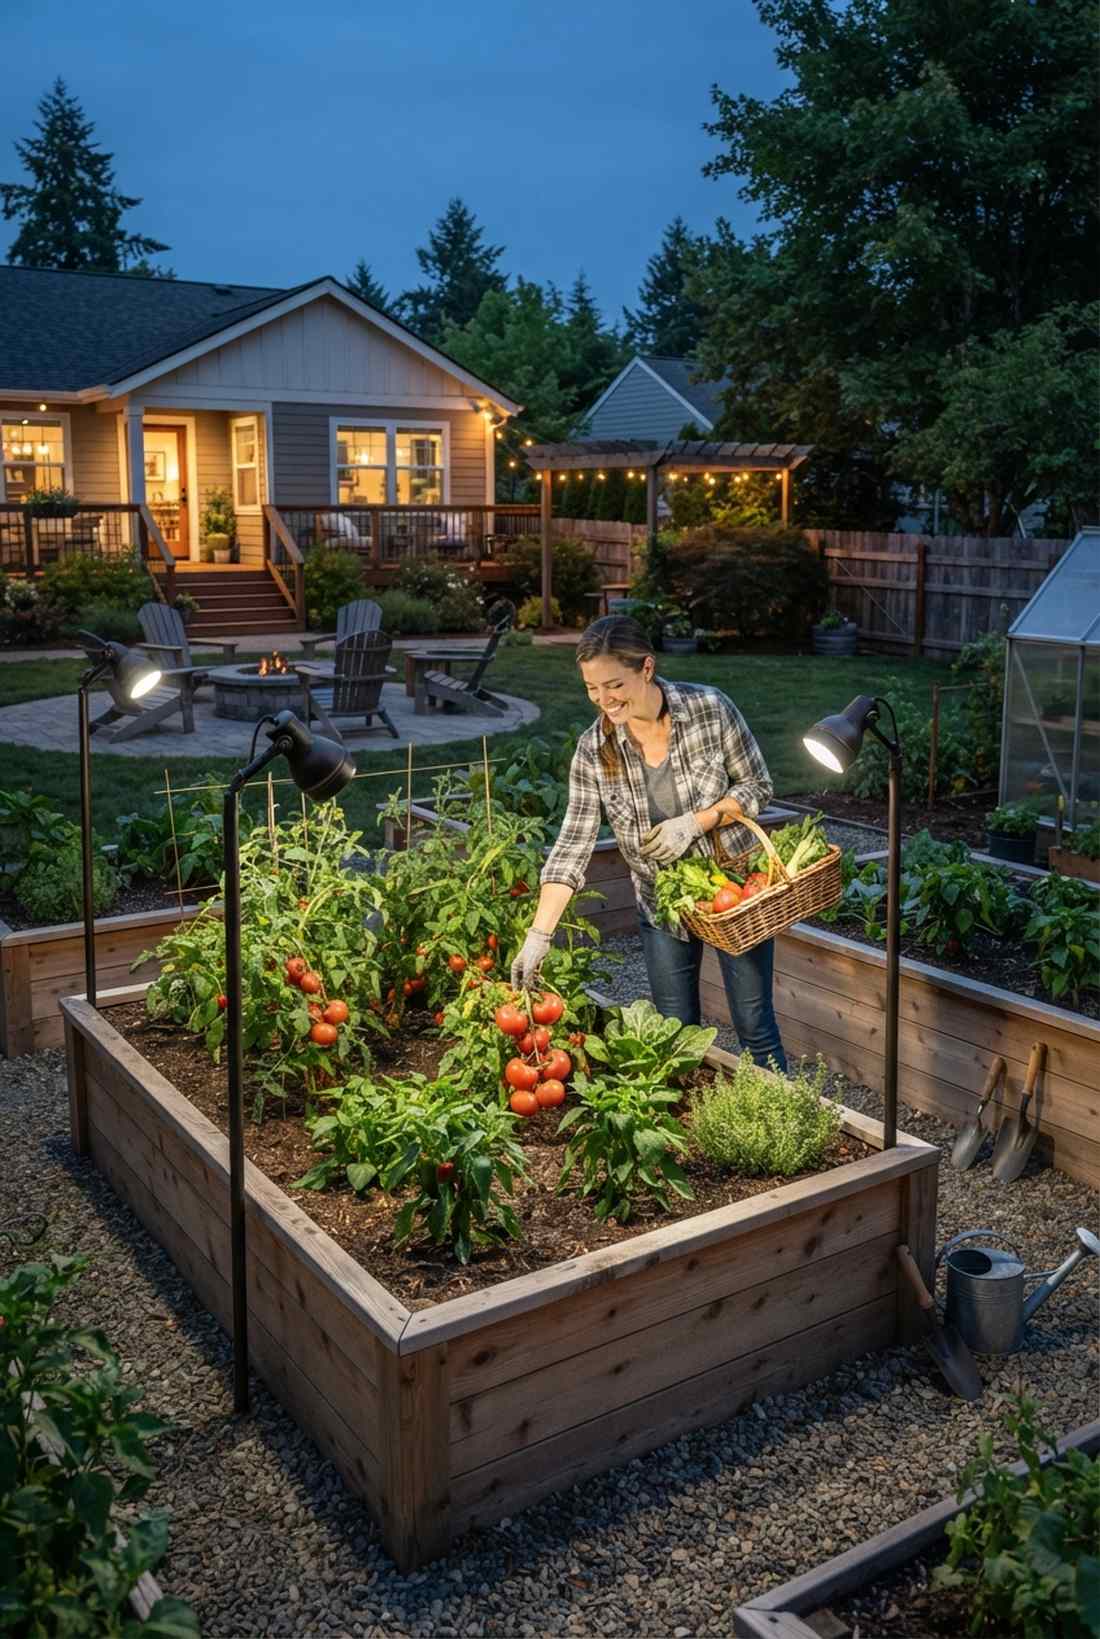

Extends your harvesting hours into the cool evening using functional raised bed illumination. A total game-changer for people who work late but still want to tend their crops.
Most people fumble around with flashlights trying to pick tomatoes in the dark. Driving tall, adjustable spotlights into the corners of your raised beds allows you to aim bright task lighting directly over the soil, completely avoiding the harsh midday heat. Grabbing heavy-duty outdoor lighting hardware ensures water and dirt won’t ruin the setup.
This incredibly practical setup costs around $40–$70 per bed. Pin this if you’re serious about homesteading!
- Key Materials: Tall adjustable stake lights
- Vibe / Style: Functional twilight homestead
- Difficulty: Easy stake driving
- Budget Breakdown: Tall stake spot: $55 | Extra wire: $10.
- Creator’s Tip: Use a cooler 4000K daylight bulb here so you can easily spot pests, diseases, and the true color of ripe vegetables.
- Smart Sourcing: tall adjustable landscape spikes (starter kit), cool-white LED task bulbs.
38. Pergola String Light Integration
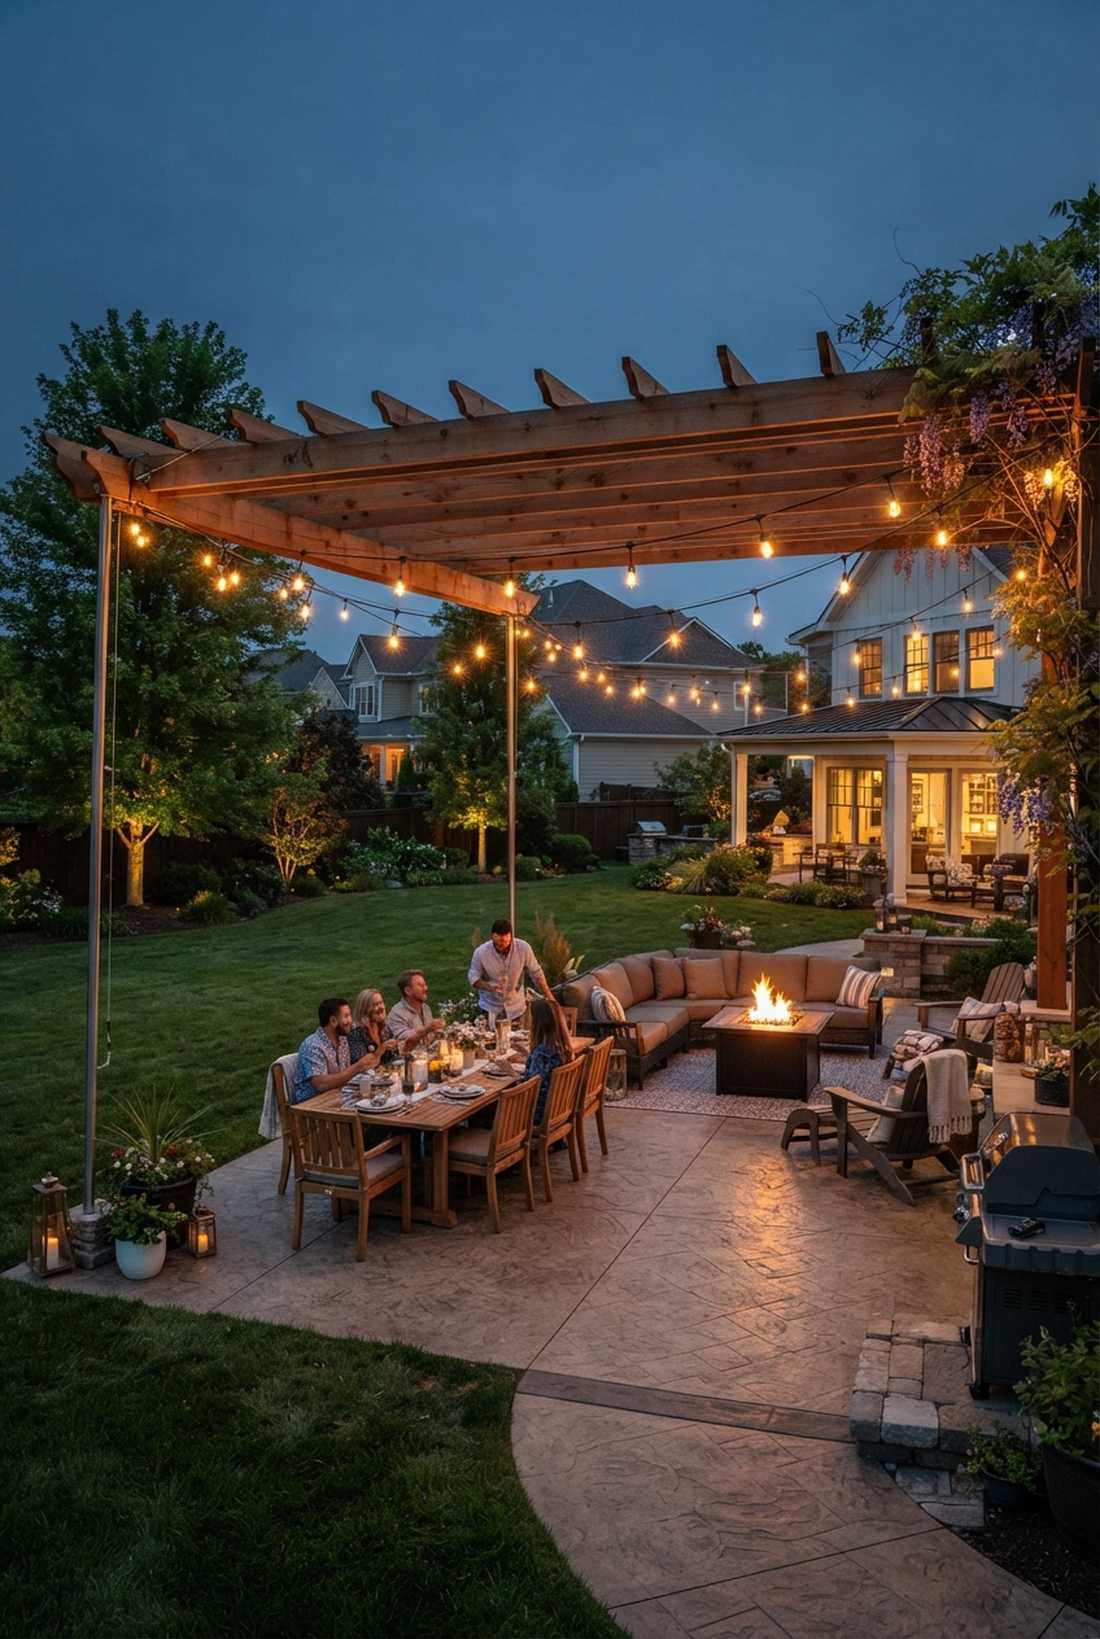
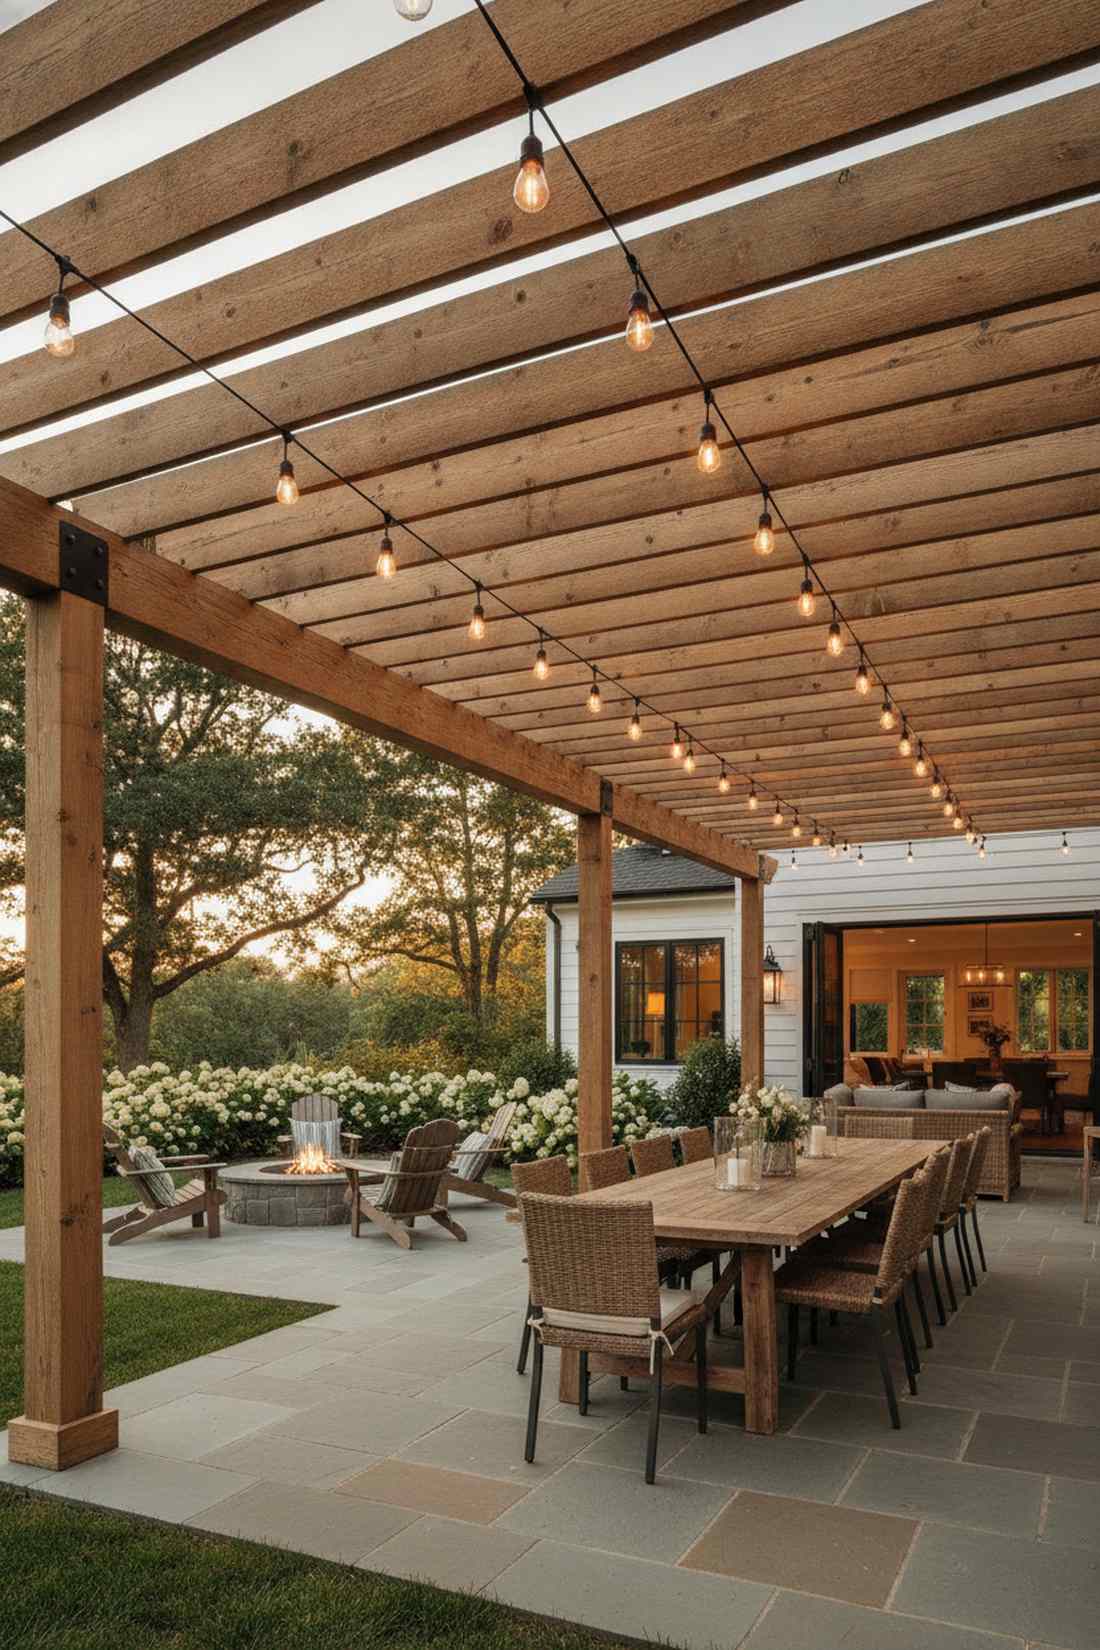
Radiates a deeply casual, bistro-style warmth using suspended festoon string lighting. The undisputed champion for cozying up massive outdoor dining spaces and fire pit zones.
Stapling cheap Christmas lights to your expensive pergola looks incredibly tacky. You need commercial-grade low voltage festoon bulbs hung in sweeping, perfectly spaced catenary curves to create that heavy, premium outdoor cafe vibe. Upgrading to shatterproof string light supplies completely changes the game here.
A high-end string light rig will run $70–$120 per strand.
- Key Materials: Commercial-grade LED string lights
- Vibe / Style: Warm European bistro
- Difficulty: Suspension wire rigging
- Budget Breakdown: Festoon strand: $85 | Steel guide wire: $25.
- Creator’s Tip: Always hang a steel guide wire first and zip-tie the lights to it. If you hang the light wire by itself, it will sag and snap eventually.
- Smart Sourcing: commercial-grade LED festoon lights (bulk pack), stainless steel string light suspension kits.
39. Raised Planter Edge Lighting
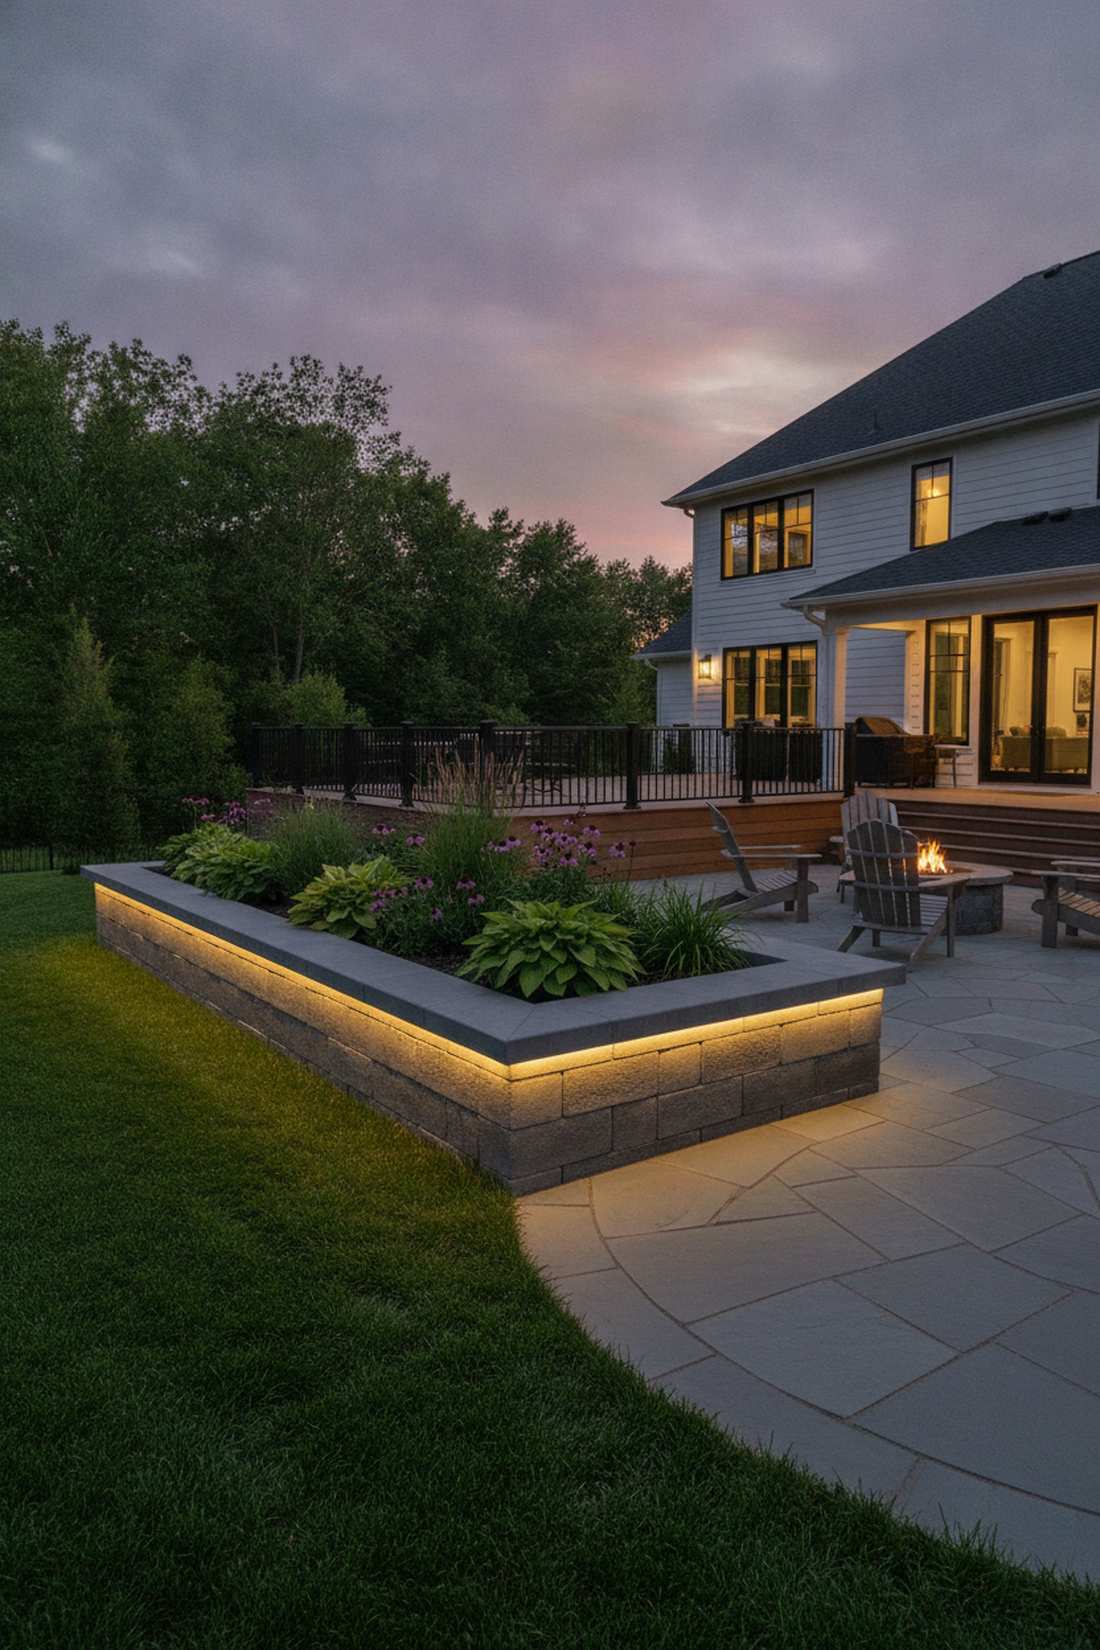
Creates a crisp, glowing boundary using under-rim planter lip lighting. Flawlessly separates elevated masonry beds from the dark grass or patio below.
Shining lights at a concrete box just highlights dirt and water stains. By hiding flexible LED strips directly under the overhanging lip of the planter, you cast a gorgeous downward wash that highlights the masonry texture without showing a single bulb. Using fully encased landscape strip lighting delivers a surprisingly premium look that handles heavy watering.
You can rig a beautiful planter edge for $20–$40 per linear foot.
- Key Materials: Fully encased waterproof LED strips
- Vibe / Style: Sleek architectural landscaping
- Difficulty: Clean track mounting
- Budget Breakdown: LED Strip: $30 | Mounting clips: $5.
- Creator’s Tip: Ensure the strip is pushed as far back under the lip as possible so it doesn’t get soaked directly by your irrigation drippers.
- Smart Sourcing: silicone-encased outdoor LED strips (pre-cut), plastic LED track mounting clips.
This final stretch covers the rarest, highest-impact zoning tricks that actually save you hundreds on your power bill…
40. Bocce Court Perimeter Lighting

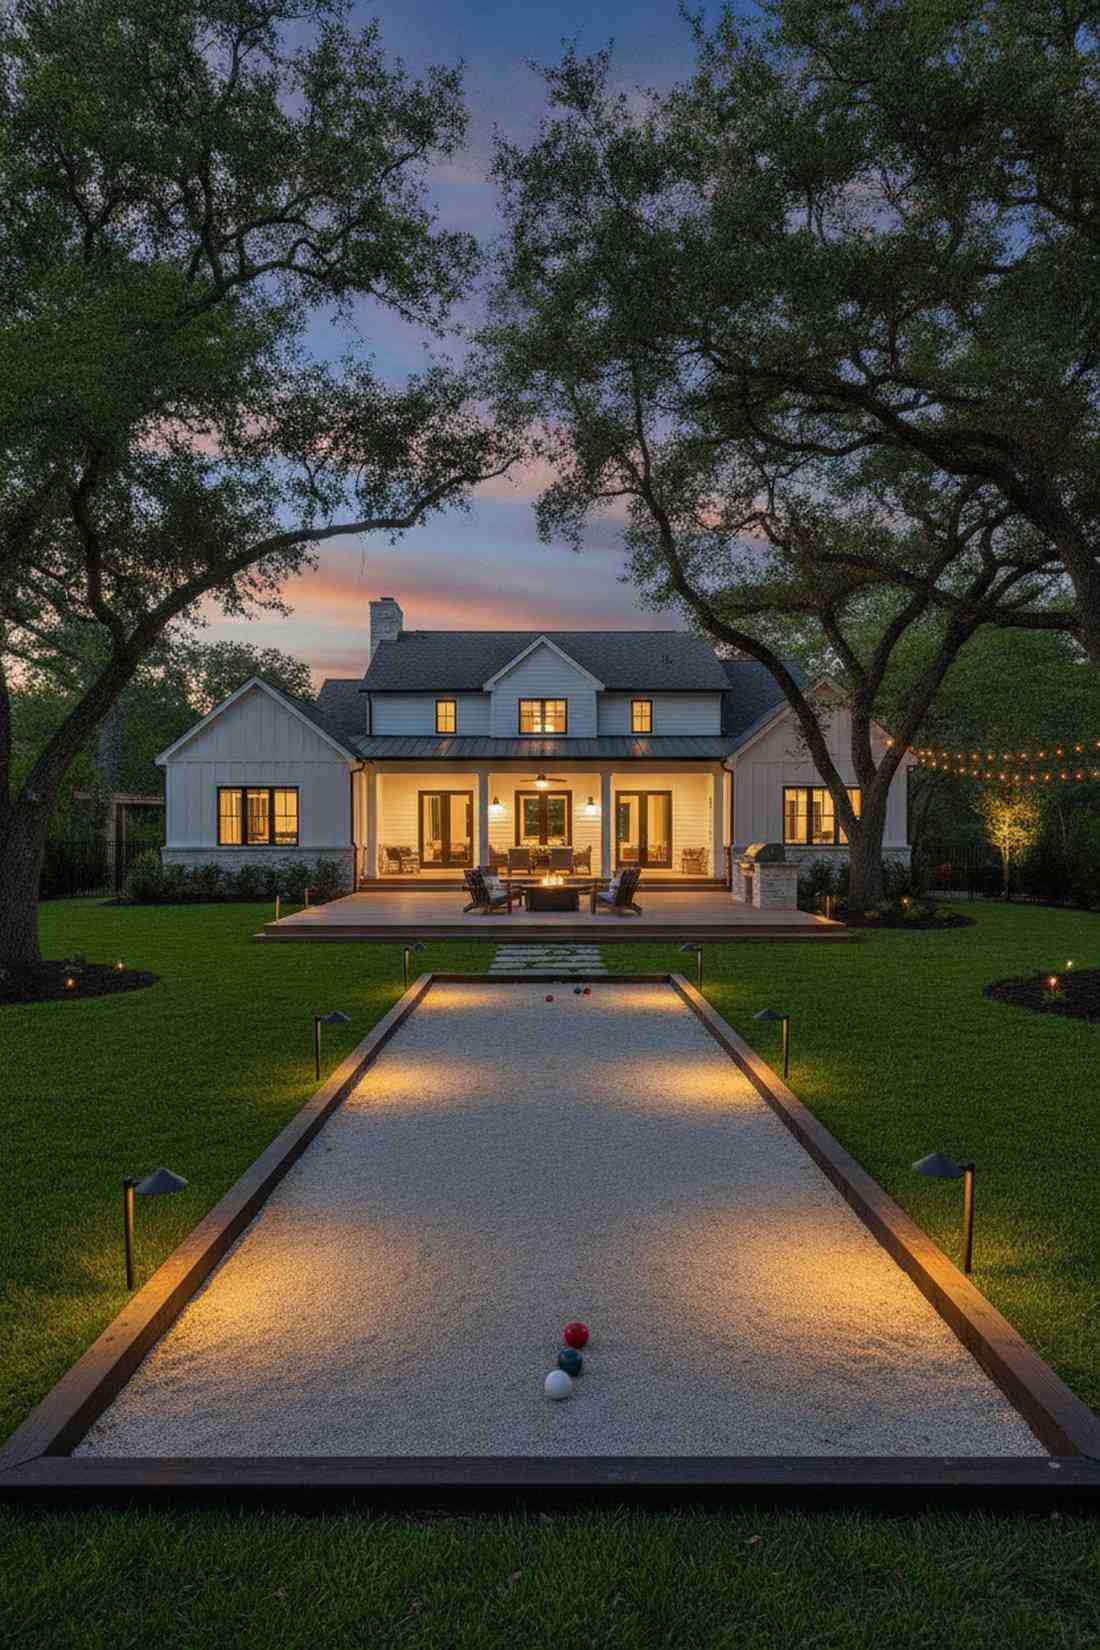
Delivers flawless, shadow-free gameplay late into the night utilizing low-angle sports perimeter accents. The absolute standard for backyard bocce, horseshoes, or putting greens.
Putting a giant street lamp over your court creates blinding glare and confusing multi-directional shadows on the balls. The pro secret is spacing low-mounted fixtures every 8 feet along the extreme outer boundary, crossing the beams tightly over the playing surface for perfect tracking. Picking up high-lumen commercial outdoor hardware makes the court playable past midnight.
A full sports perimeter setup runs around $300–$500 total. Save this to your ultimate backyard games board!
- Key Materials: Wide-angle perimeter wash lights
- Vibe / Style: Professional twilight sports
- Difficulty: Even spacing calculations
- Budget Breakdown: 8 Wash lights: $360 | Long wire run: $40.
- Creator’s Tip: Mount the lights exactly 12 inches off the ground; any higher and they will shine directly into the eyes of the players tossing the ball.
- Smart Sourcing: wide-angle landscape wash lights (pack of 8), 12-gauge low voltage landscape wire.
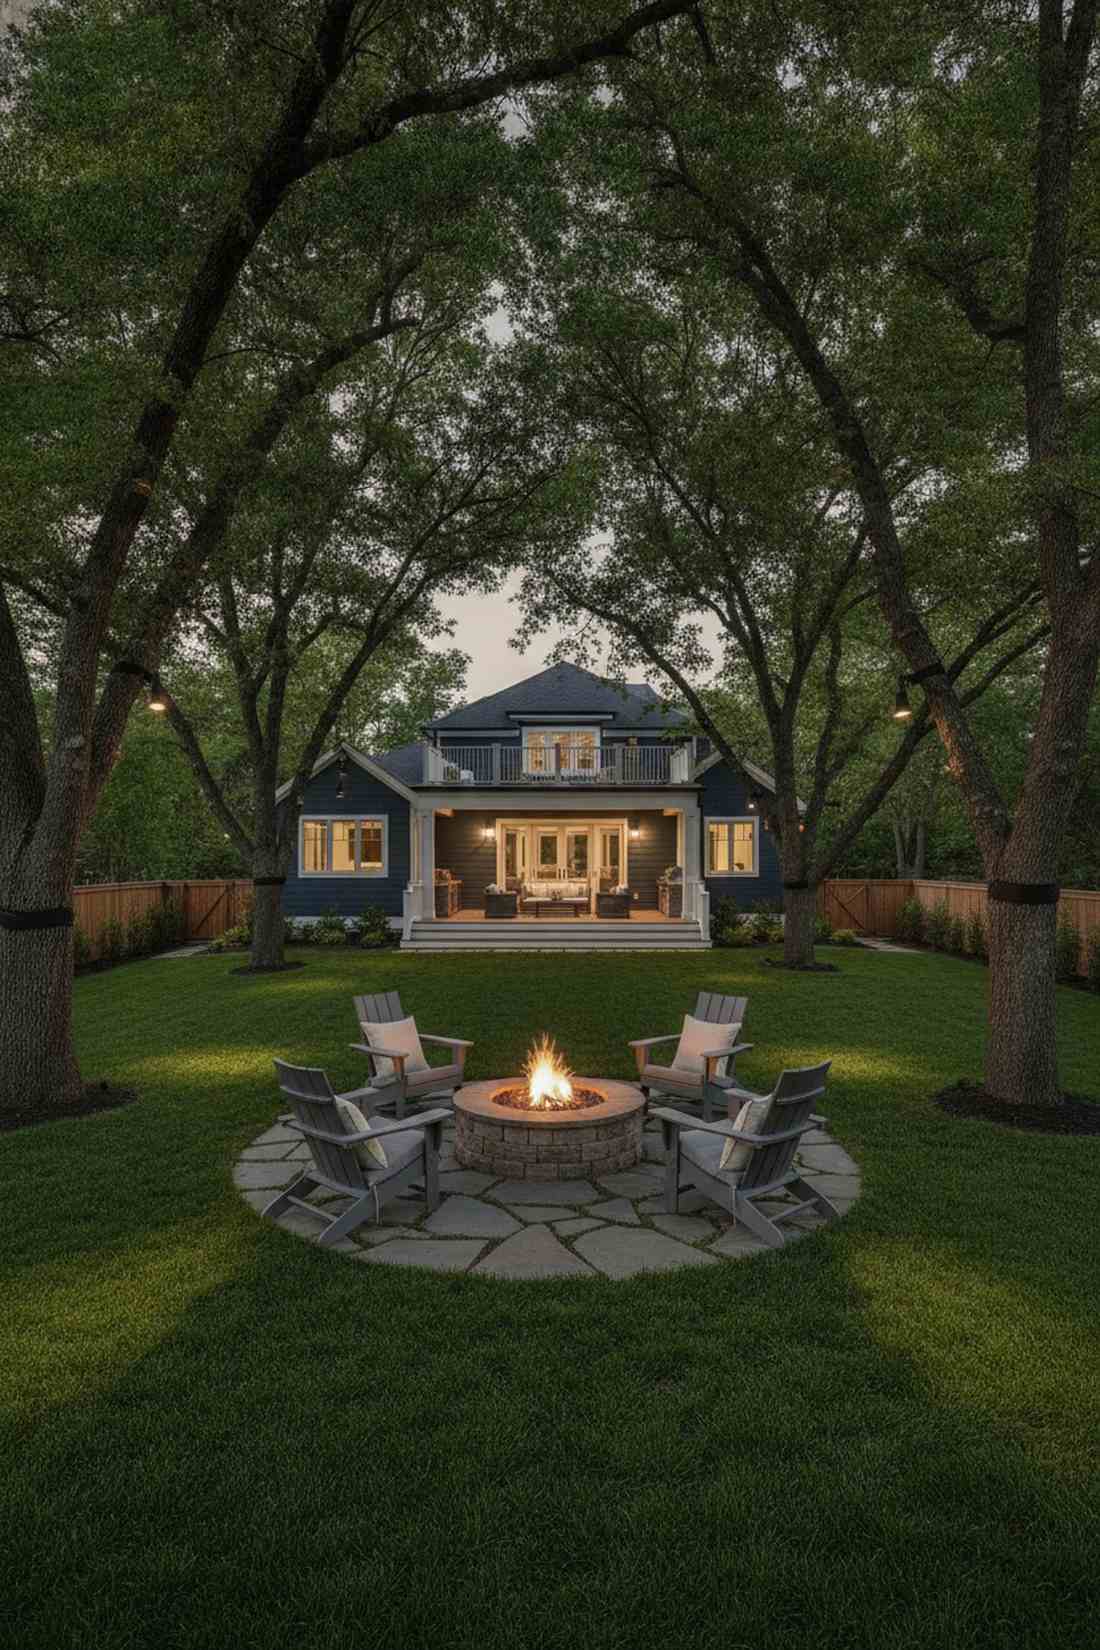
41. Fire Pit Surrounding Accent Rings
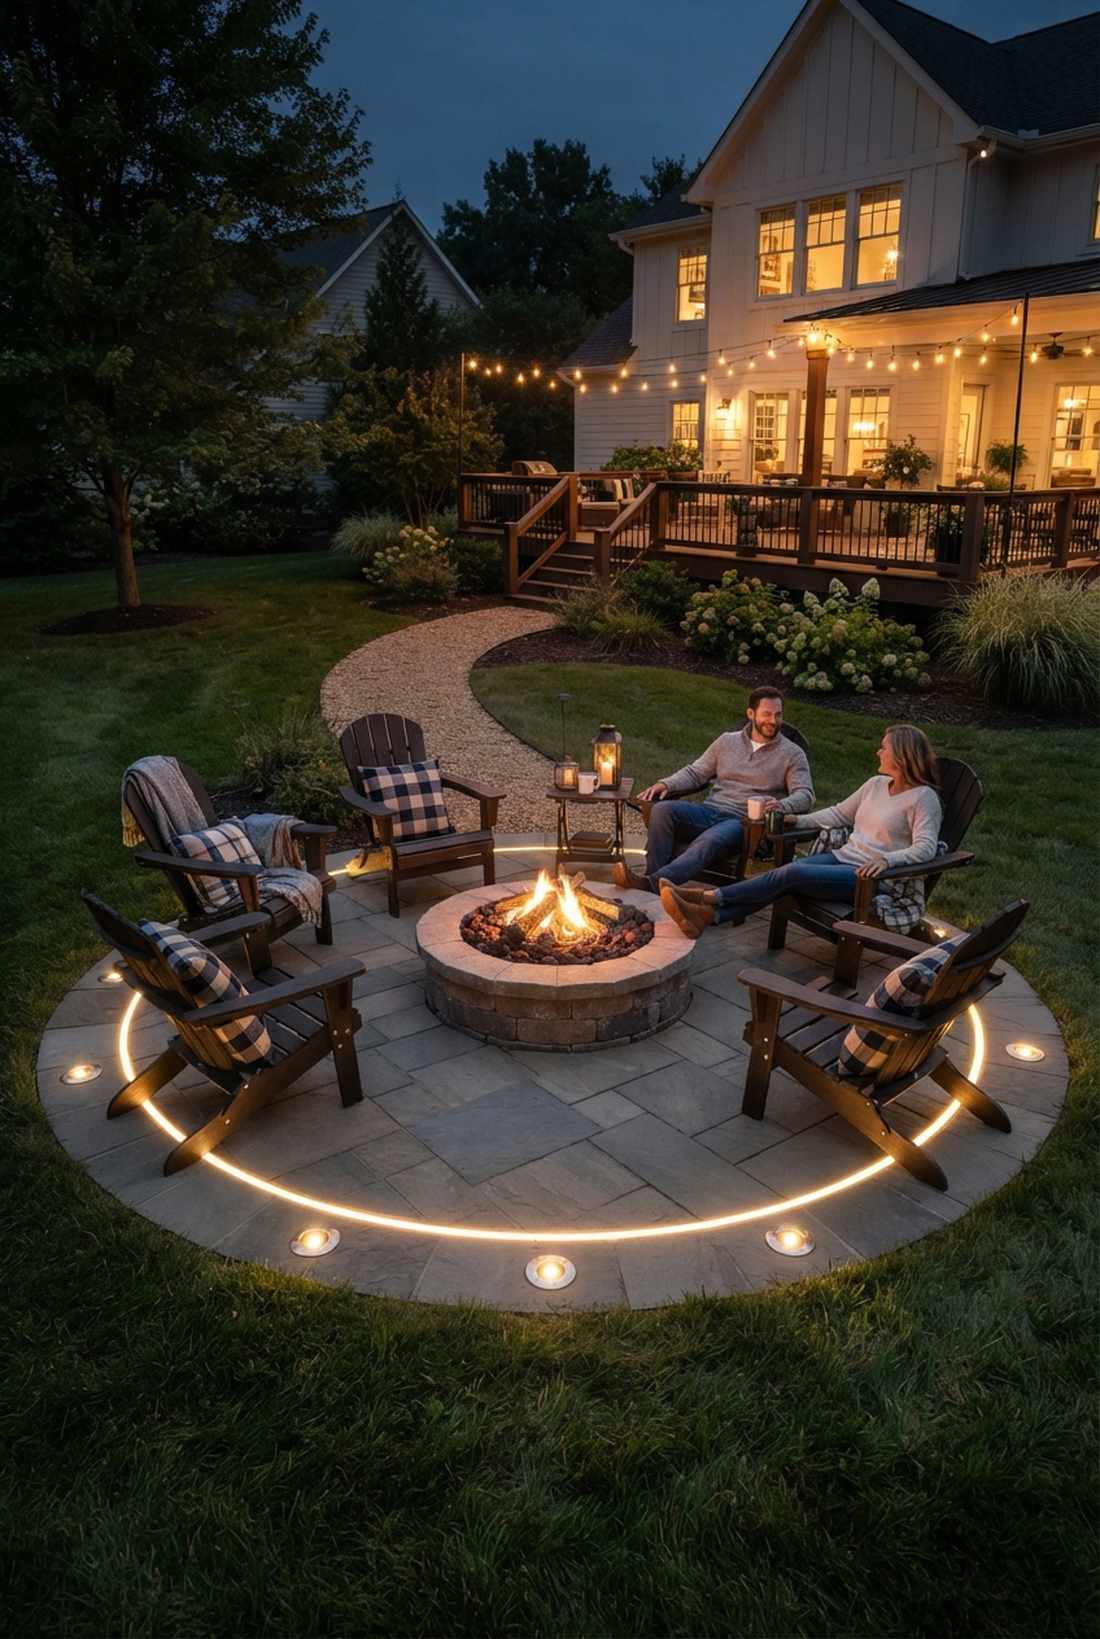
Establishes a safe, incredibly cozy seating perimeter using circular fire pit boundary lights. Essential for keeping guests from tripping over chairs or stepping into the ash in the dark.
When the fire dies down, the pit area turns into a pitch-black trip hazard. Embedding a ring of tiny, flush ground lights 6 feet out from the center creates a permanent, glowing safety halo that defines the hangout zone perfectly. Sourcing heavy-duty drive-over garden lights landscape units ensures they won’t shatter when someone kicks them.
This subtle safety ring costs about $150–$250 for a full circle.
- Key Materials: Flush hardscape uplights
- Vibe / Style: Cozy, safe campfire lounge
- Difficulty: Circular trenching
- Budget Breakdown: 6 Flush lights: $200 | Connectors: $20.
- Creator’s Tip: Keep the lights at least 6 feet away from the actual fire ring; extreme radiant heat will melt the silicone seals on the fixtures.
- Smart Sourcing: drive-over rated flush ground lights (pack of 6), heat-resistant wire sleeves.
42. Driveway Bollard Illumination
Exudes commanding, estate-level authority via heavy-duty commercial bollard integration. The only choice for massive motor courts or circular luxury driveways.
Thin plastic spikes will get crushed by a delivery truck on day one. You absolutely must upgrade to massive, powder-coated aluminum bollards that can survive an accidental bump while throwing a wide, glare-free wash across the pavement. Dropping the cash on premium architectural lighting kits looks far more expensive than it is and lasts decades.
These massive fixtures range from $120–$250 each.
- Key Materials: Impact-resistant aluminum bollards
- Vibe / Style: Commanding luxury estate
- Difficulty: Deep footing required
- Budget Breakdown: Bollard: $180 | Rebar & concrete: $30.
- Creator’s Tip: Sink a PVC pipe into the concrete base first, then run your wires through it. This makes future wiring repairs ridiculously easy.
- Smart Sourcing: commercial aluminum driveway bollards, direct-burial PVC conduit kits.
43. Smart Home Integrated Systems
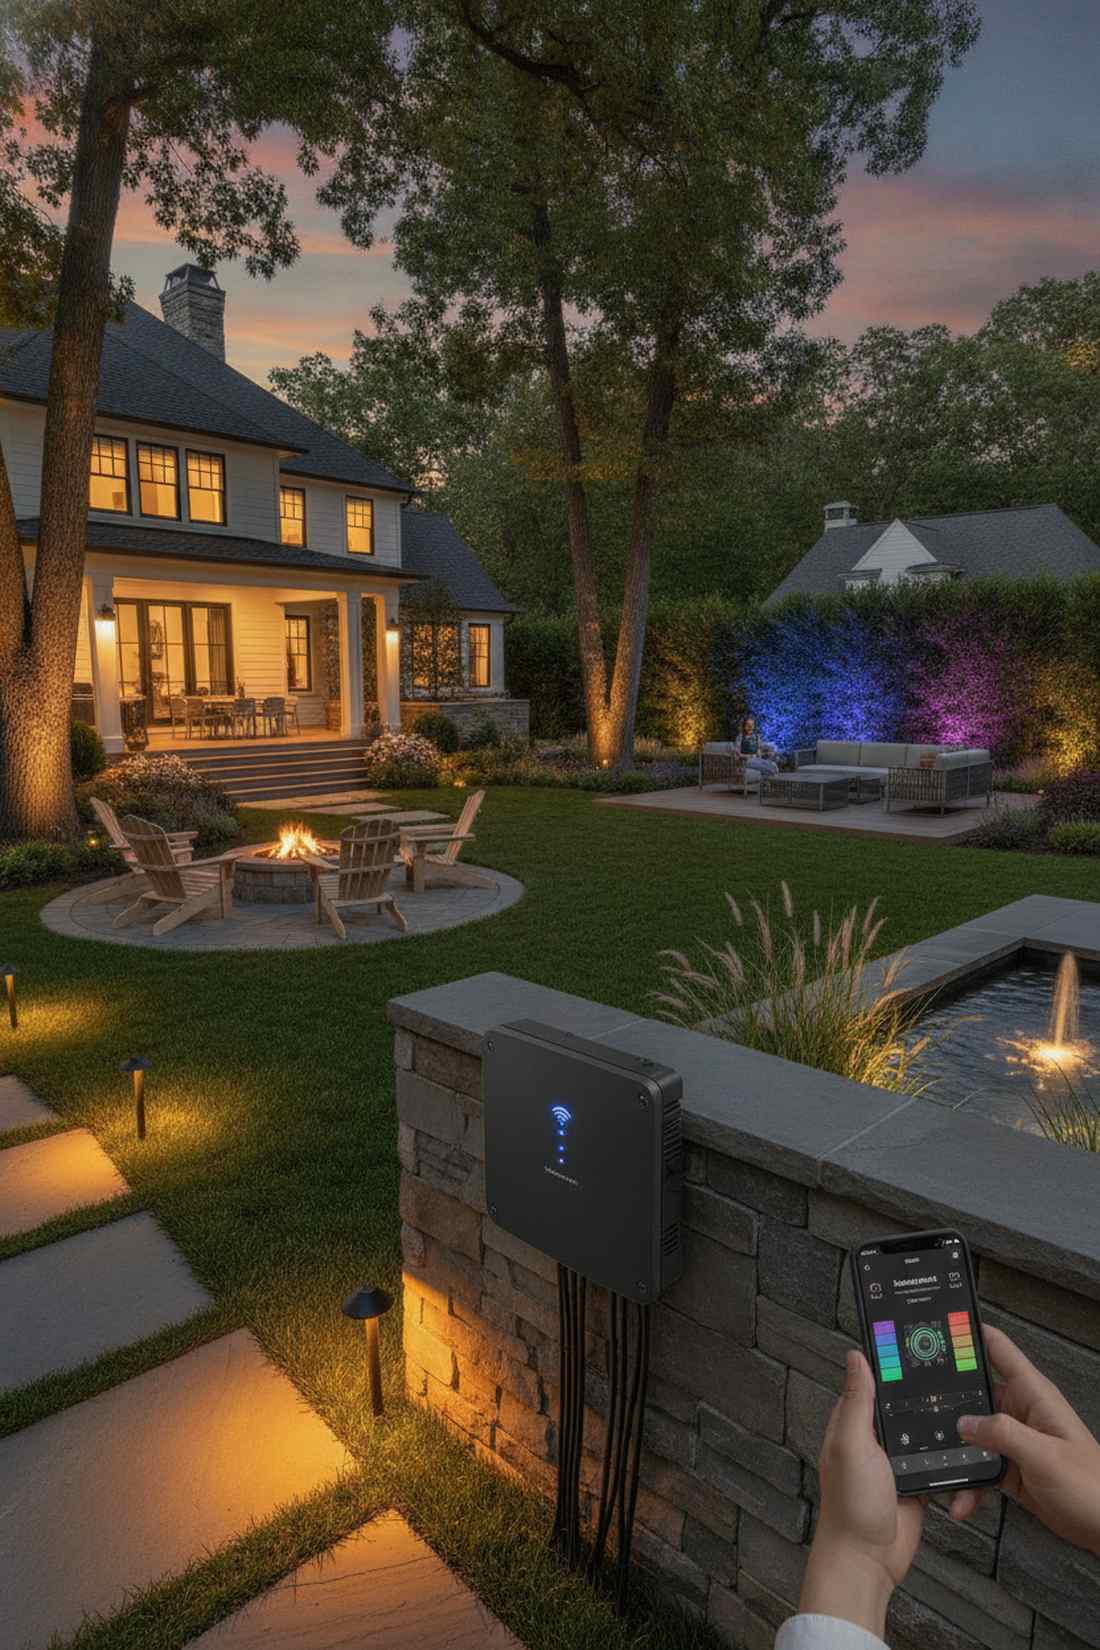
Brings your entire exterior into the future with app-controlled lighting hubs. The ultimate flex for tech lovers who want voice-activated backyard vibes.
Relying on clunky, analog dial timers from 1995 is a massive waste of energy and limits your control. Linking WiFi-enabled transformers allows you to dim zones, change schedules based on sunset, or instantly turn on the front yard using Alexa or your phone. Upgrading to smart landscape transformers entirely changes the game here.
A smart transformer brain will run you $150–$300. Pin this if you’re building a fully automated smart home.
- Key Materials: WiFi-enabled landscape transformer
- Vibe / Style: High-tech automated luxury
- Difficulty: App and network setup
- Budget Breakdown: Smart Hub: $200 | WiFi extender: $50.
- Creator’s Tip: Put the front yard and back yard on separate “zones” within the app so you can turn off the front at midnight while keeping the backyard party going.
- Smart Sourcing: WiFi-enabled landscape lighting transformers (starter kit), smart home ecosystem bridges.
44. Seasonal Color Temperature Adjustment
Adapts to the shifting weather flawlessly utilizing tunable white LED technology. Incredible for keeping the yard feeling cozy in winter and crisp in the summer.
Most people are stuck with one color temperature all year, making their yard look weird when the seasons change. Tunable systems let you slide the bulb from a warm, cozy 2700K during snowy months, to a cooler 4000K to make green summer foliage pop violently. Grabbing specialized tunable outdoor fairy garden kits gives a designer-level finish.
These tunable bulbs cost roughly $30–$50 per fixture.
- Key Materials: App-tunable white LED bulbs
- Vibe / Style: Adaptive seasonal aesthetic
- Difficulty: Quick bulb swapping
- Budget Breakdown: Tunable bulb: $35 | Hub link: $10.
- Creator’s Tip: Group all your tree uplights into one color zone, and all your path lights into another so you can contrast the temperatures for intense depth.
- Smart Sourcing: tunable white outdoor LED bulbs (pack of 4), multi-zone smart lighting hubs.
45. Zone-Based Transformer Distribution
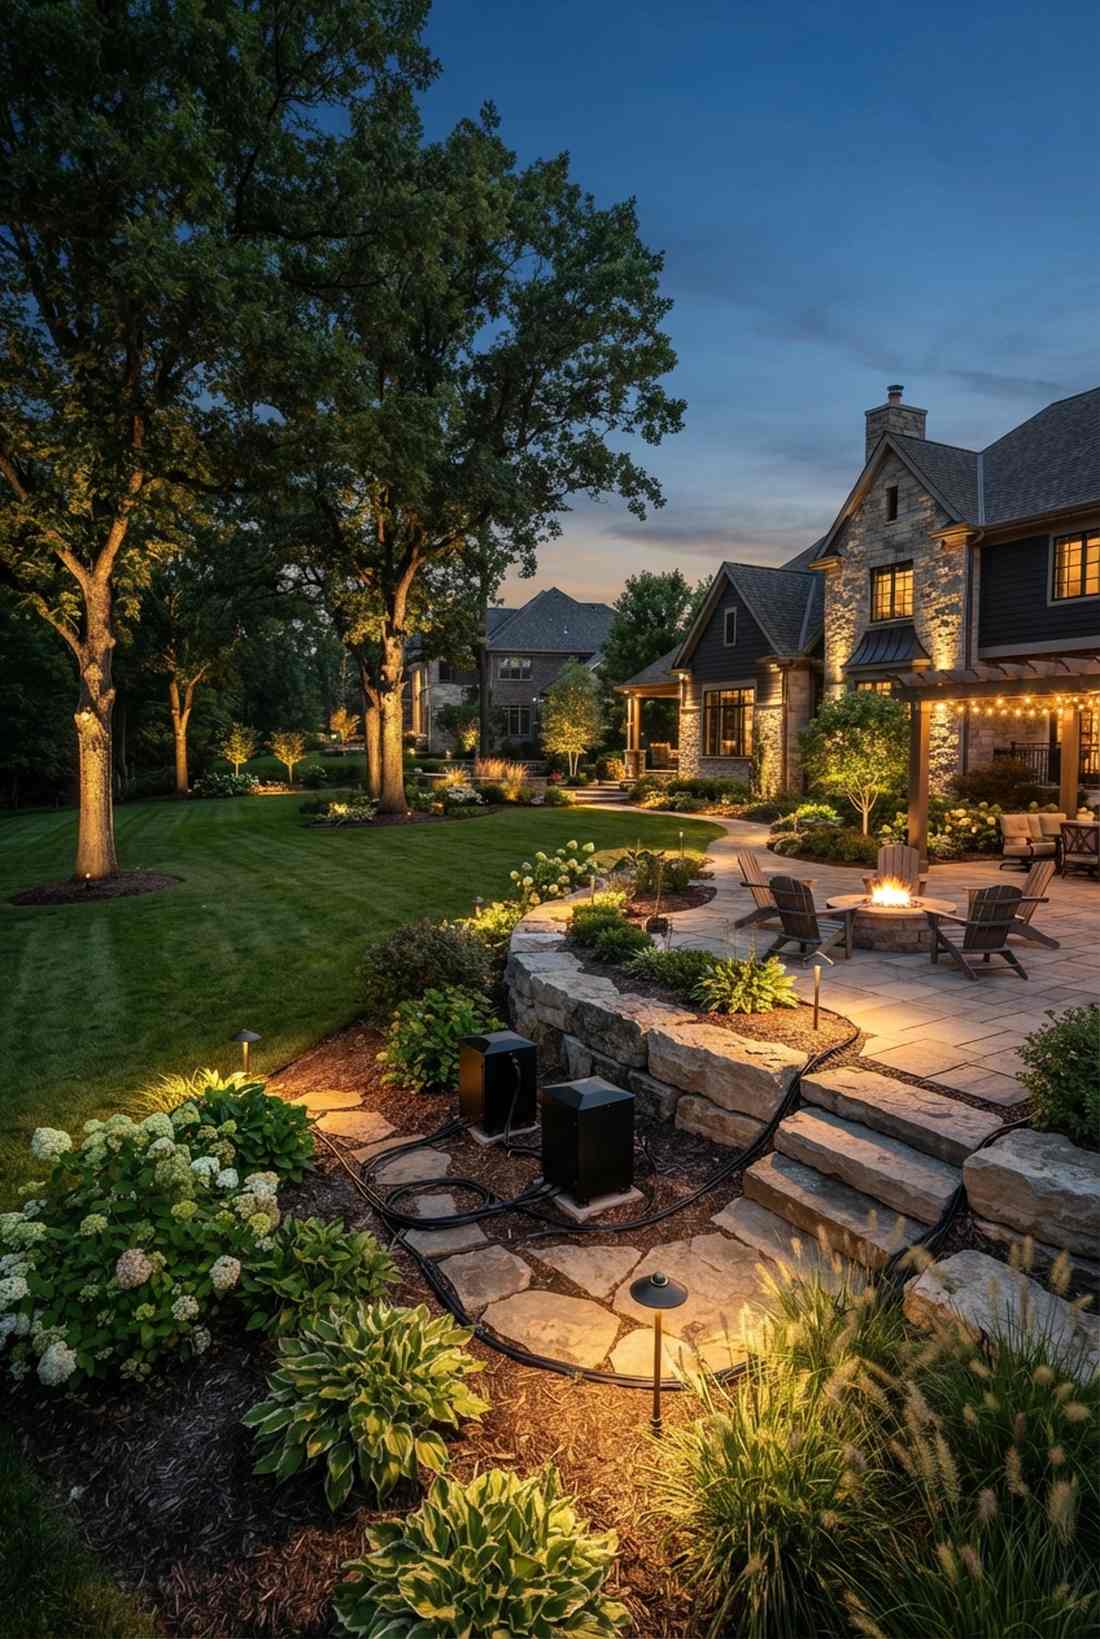
Guarantees perfectly even, blazing bright lights across massive properties using multi-hub zoning architecture. The only way to stop the lights at the end of the line from looking dim and pathetic.
Running 300 feet of wire from a single tiny transformer is a rookie mistake that causes massive “voltage drop,” killing the lights at the end. You must distribute multiple transformers strategically across the property to keep the power loads short and intense. Implementing commercial-grade low voltage garden lights hubs entirely changes the game here.
Expect to invest $400–$800 for a proper multi-hub foundation. Save this critical tech tip for massive yard overhauls.
- Key Materials: Multiple mid-size transformers
- Vibe / Style: Flawless commercial execution
- Difficulty: Advanced voltage math
- Budget Breakdown: 3 Transformers: $450 | Heavy-gauge wire: $150.
- Creator’s Tip: Always size your transformer with a 20% capacity reserve. If you need 100 watts of power, buy a 120-watt minimum box to prevent burnout.
- Smart Sourcing: commercial low voltage landscape transformers (bulk pack), 10-gauge heavy duty landscape wire spools.
Conclusion
Mastering these 45 specific low voltage garden lights systems entirely dictates the luxury feel of your exterior architecture. By skipping cheap retail options and directly sourcing commercial-grade materials, weather-sealed wiring, and premium heavy-duty brass kits, you lock in a $10,000 architectural aesthetic for a fraction of the cost. Whether you are precisely grazing a stone chimney or dropping submersible spots into a koi pond, the secret lies entirely in strategic placement and high-CRI illumination.
Frequently Asked Questions
What transformer size do I need for low voltage garden lights?
Always calculate your total fixture wattage and add a strict 20-30% capacity reserve to prevent system burnout. For example, 10 fixtures running at 7 watts each require 70 watts minimum, meaning you must secure a high-end 100-150 watt low voltage landscape transformer. If you have a massive yard, buying multiple commercial-grade transformers in bulk to create separate zones completely eliminates voltage drop and keeps every bulb blazing bright.
How far apart should pathway lights be spaced?
You absolutely must space pathway fixtures 6-10 feet apart to create beautiful, overlapping illumination pools instead of an ugly airport runway. Tighter spacing (6-8 feet) looks incredibly premium on sweeping, curved front paths, while straight walkways can stretch to 10 feet. Always check the beam spread on your landscape lighting starter kits—wider floods allow you to buy fewer fixtures and space them further apart.
Are LED or halogen bulbs better for landscape lighting?
LED bulbs completely obliterate halogen in outdoor applications, consuming 85% less energy and lasting up to 20 years instead of constantly burning out. Because LEDs generate almost zero heat, they eliminate fire risks near dry garden mulch and delicate plants. Snagging bulk packs of high-CRI outdoor LED landscape bulbs costs slightly more upfront but saves you hundreds in electrical bills and replacement headaches within the first year.
What color temperature works best for garden lights?
Warm white LEDs sitting perfectly between 2700K and 3000K are the absolute gold standard for making natural brick, wood, and garden foliage look cozy and incredibly expensive. This specific temperature matches luxury resort aesthetics without distorting the green of your plants. Avoid anything above 4000K unless you are highlighting specific blue spruces or stark modern concrete, as cool light makes traditional homes look like sterile gas stations.
How deep should landscape lighting wire be buried?
You must bury low voltage landscape wire exactly 6-8 inches deep inside planting beds to protect it from errant shovels, aerators, and heavy foot traffic. Never lay wire directly on the surface unless it’s completely hidden under thick river rock. Always use heavy-duty direct burial cable and silicone-filled waterproof wire connectors to ensure your premium lighting setup survives decades of rain, snow, and soil moisture.