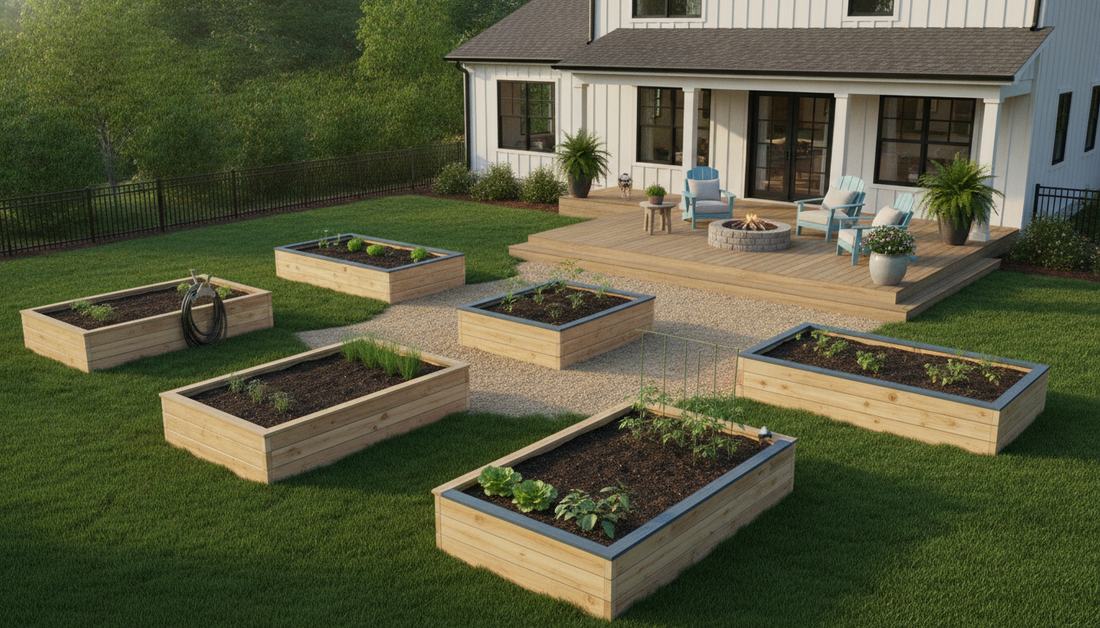
Upgrading to structured raised beds wood systems instantly transforms messy dirt into high-yield architecture. Master these exact material setups to unlock superior drainage without overpaying. Achieve that premium landscaping finish on a surprisingly tight budget.
Design Snapshot Key Principles
- Material Longevity: Cedar and redwood offer 15-20 years of rot resistance without chemical treatment
- Optimal Dimensions: 4-foot width allows comfortable reach from both sides without soil compaction
- Structural Integrity: 4×4 corner posts with 2×6 boards create durable frames that resist bowing
- Depth Requirements: 16-18 inches accommodates deep-rooted vegetables and promotes healthy drainage
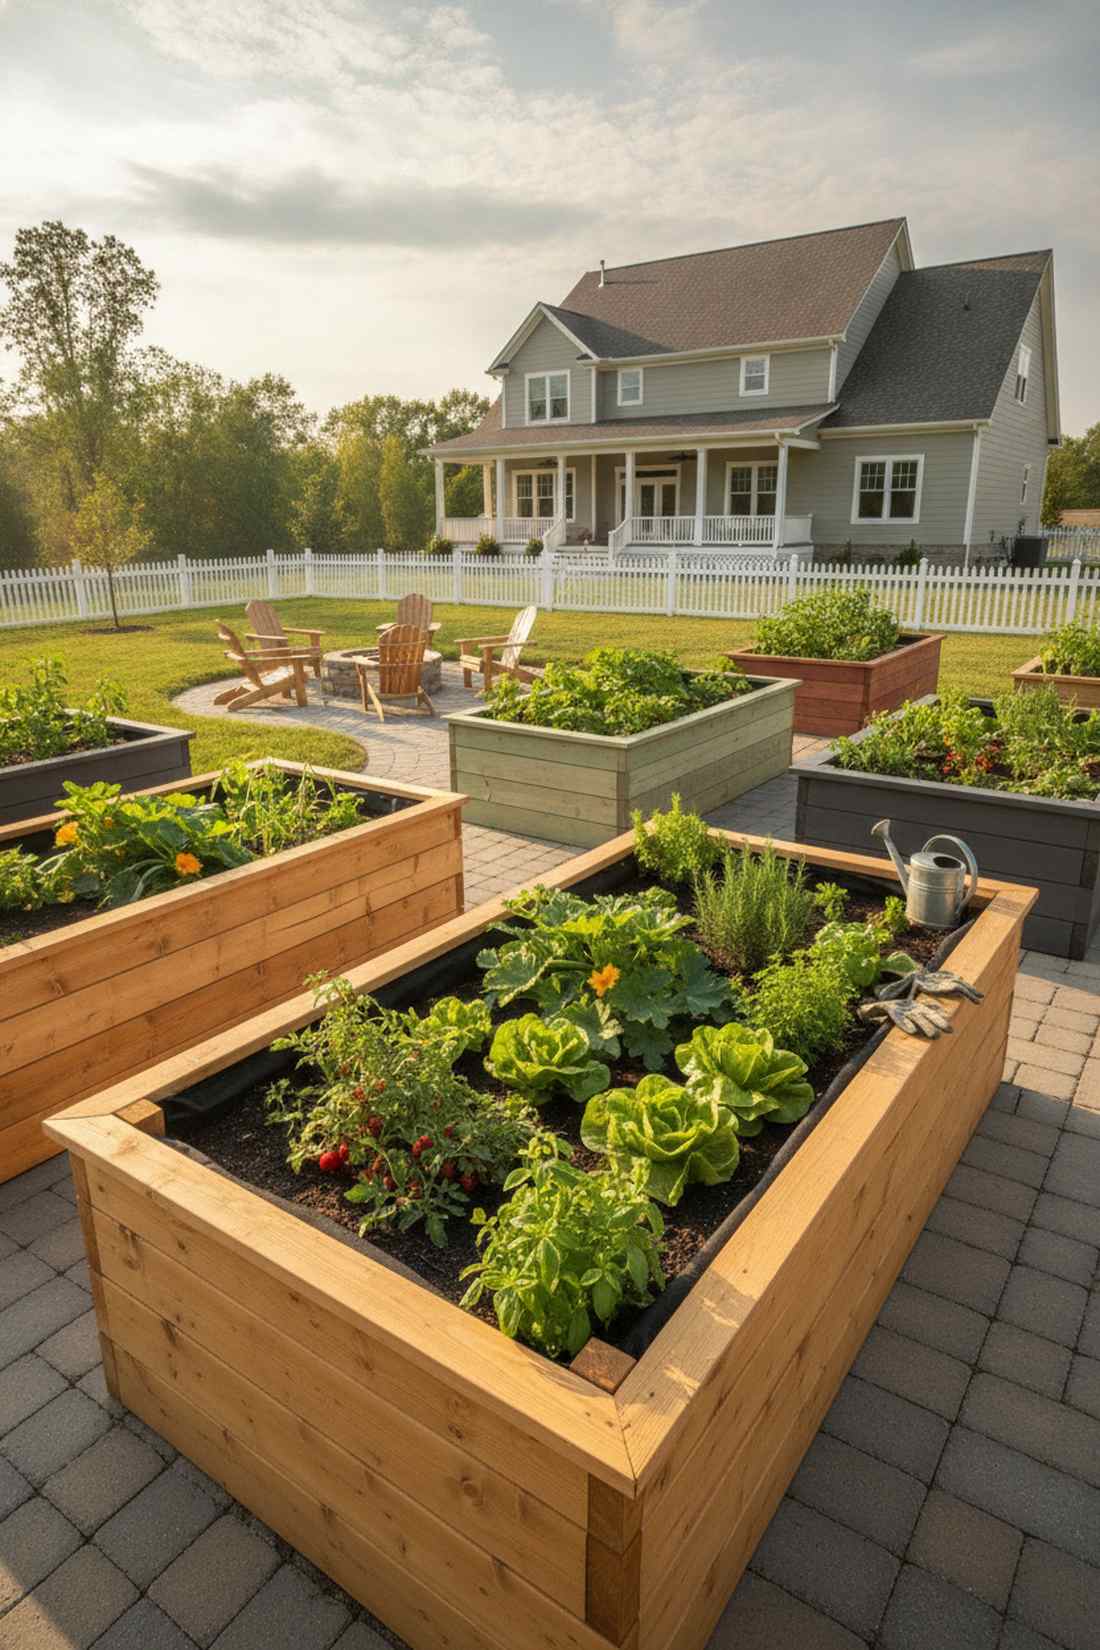
Classic Cedar and Redwood Frames for Long-Lasting Performance
Cedar and redwood remain the premium choices for raised bed construction due to their natural rot resistance and structural stability. These materials contain oils that repel insects and prevent decay without chemical treatment, creating safe growing environments for organic produce.
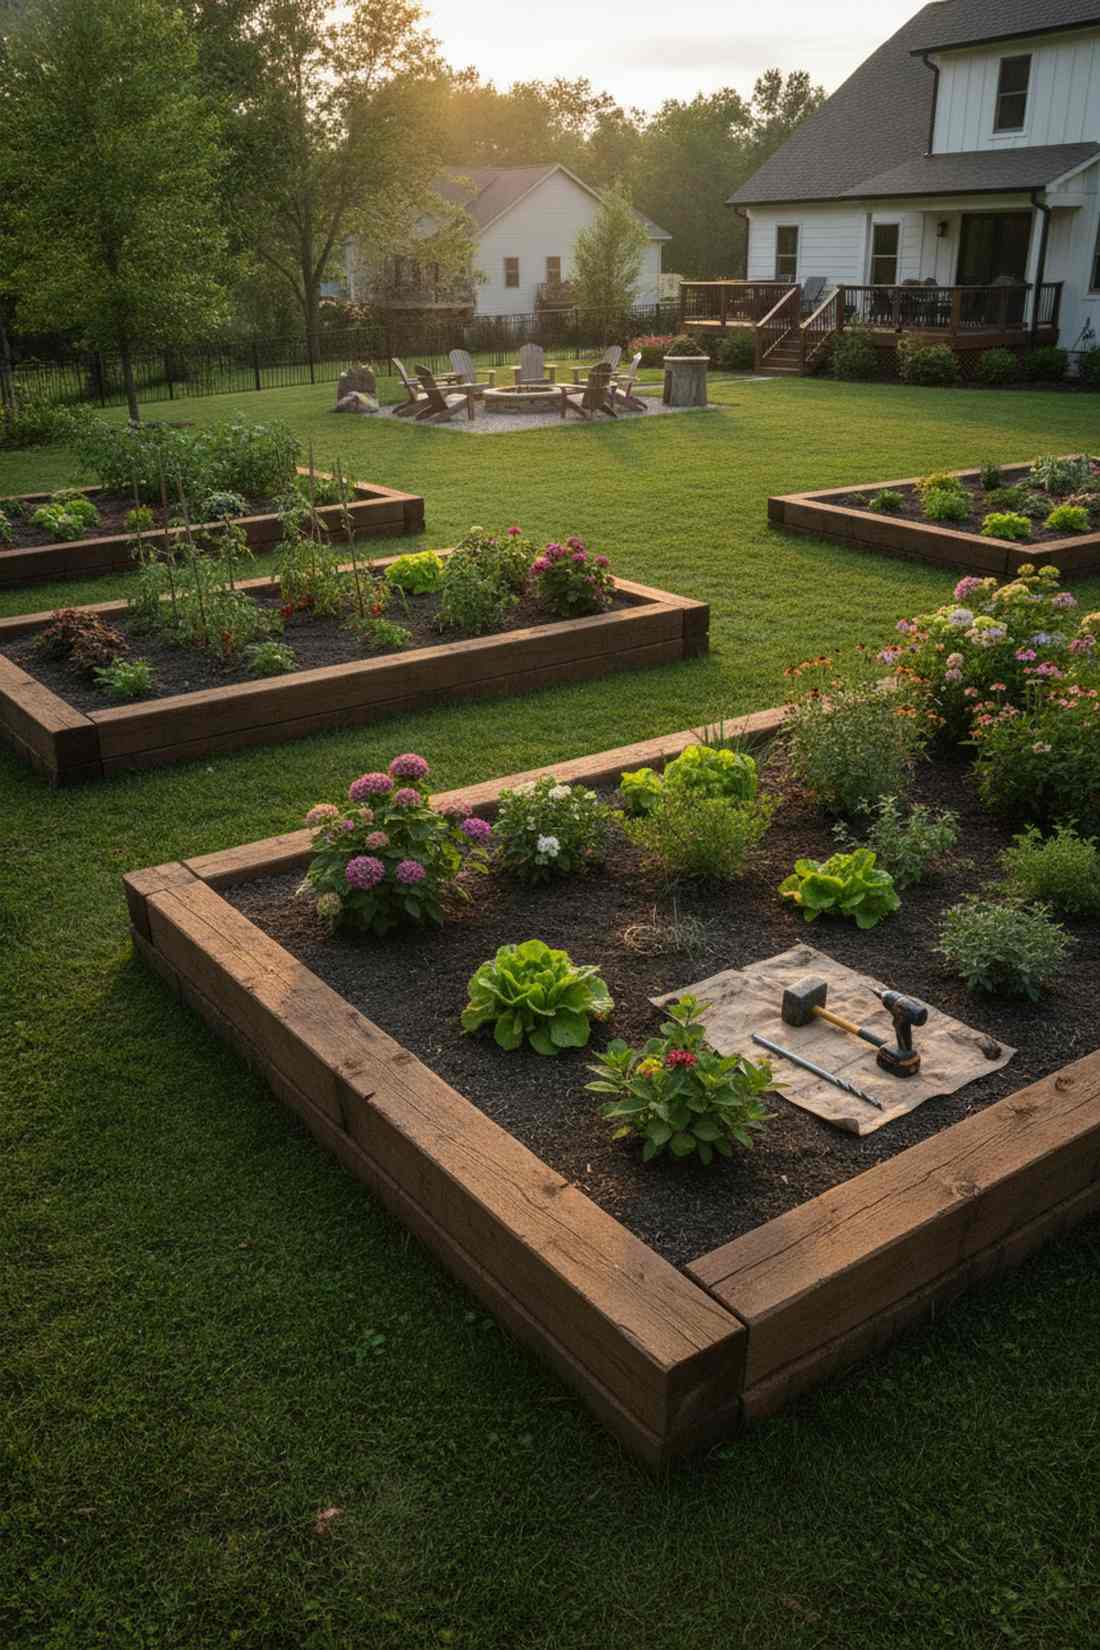
1. Standard 4×8 Cedar Frame with Corner Posts
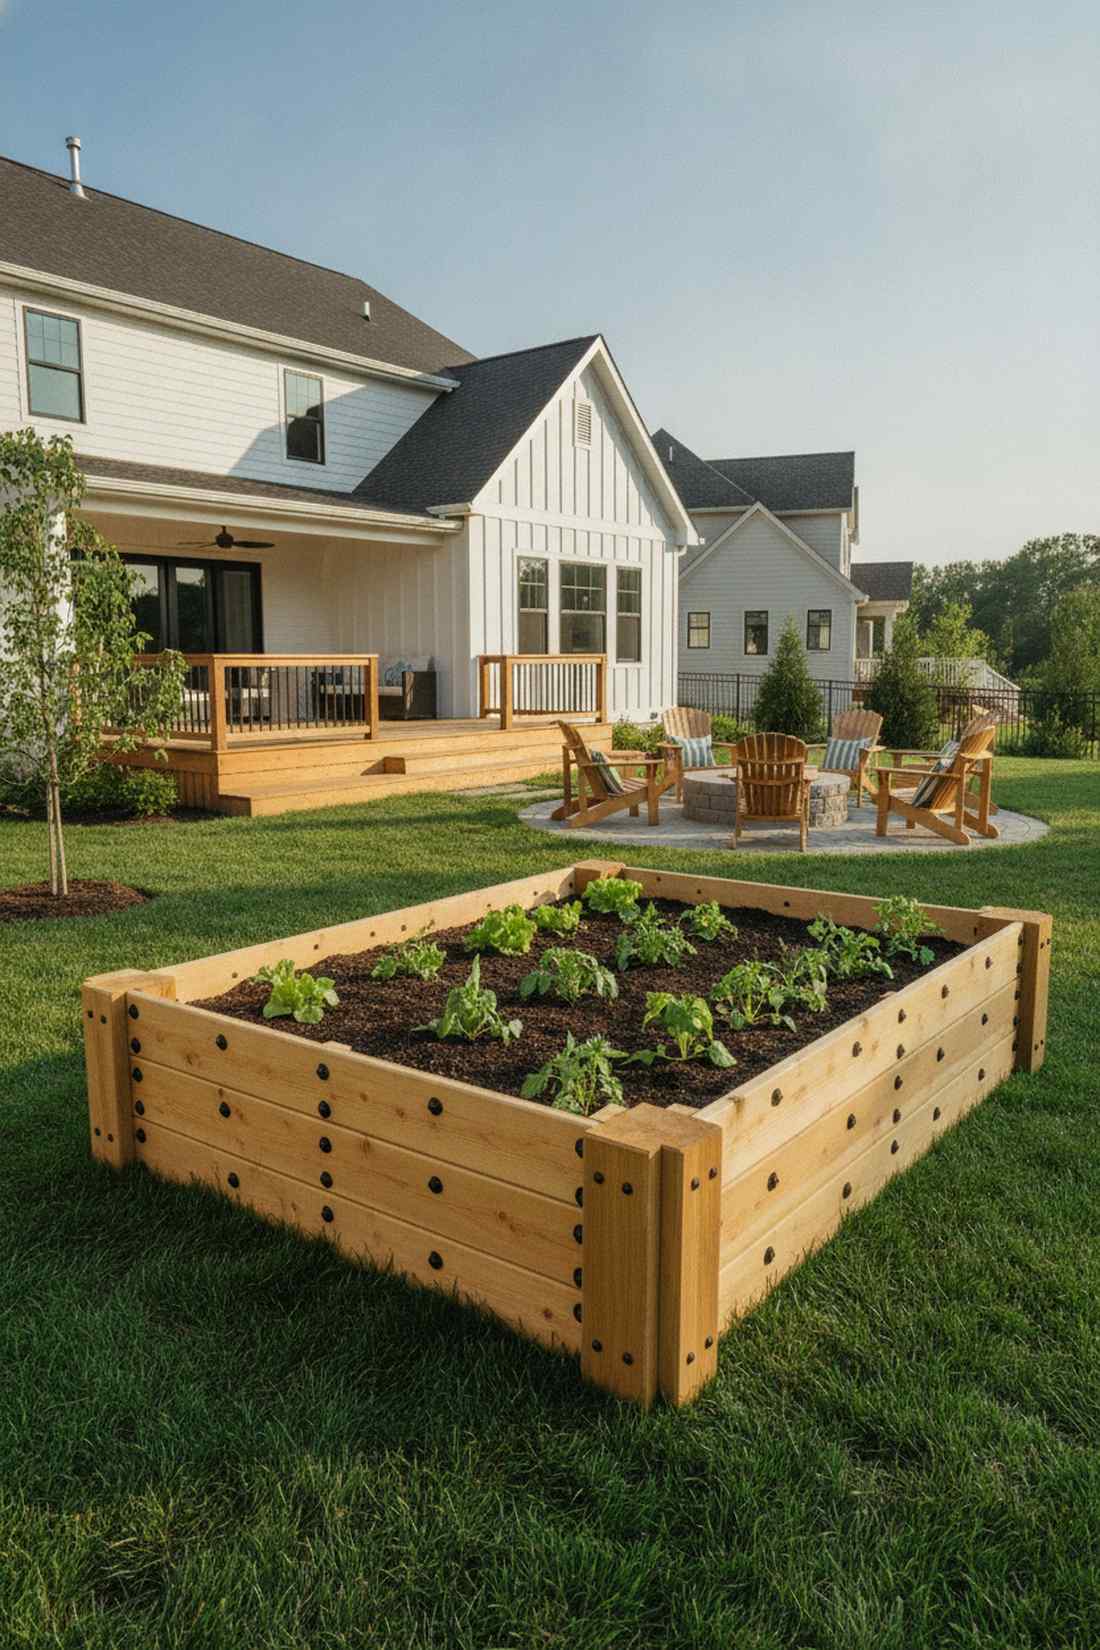
Feels like a pristine suburban oasis. Classic cedar garden boxes work perfectly for establishing a sunny backyard vegetable plot.
This layout gives a designer-level finish without complicated joinery. By utilizing heavy-duty outdoor supplies, the simple stacked boards avoid the typical bowing issues that ruin cheaper DIY projects.
You can easily pull this off for around $45–$60 per frame depending on local lumber costs. Pin this if you’re planning a quick weekend yard upgrade!
- Key Materials: Pre-cut 2×6 cedar boards
- Vibe / Style: Clean modern homestead
- Difficulty: Easy beginner setup
- Budget Breakdown: Materials: $45 | Fasteners: $10.
- Creator’s Tip: Pre-drill every hole to ensure the dry cedar never splits under pressure.
- Smart Sourcing: bulk exterior deck screws and pre-cut heavy-duty corner posts.
2. Heart Redwood Double-High Bed
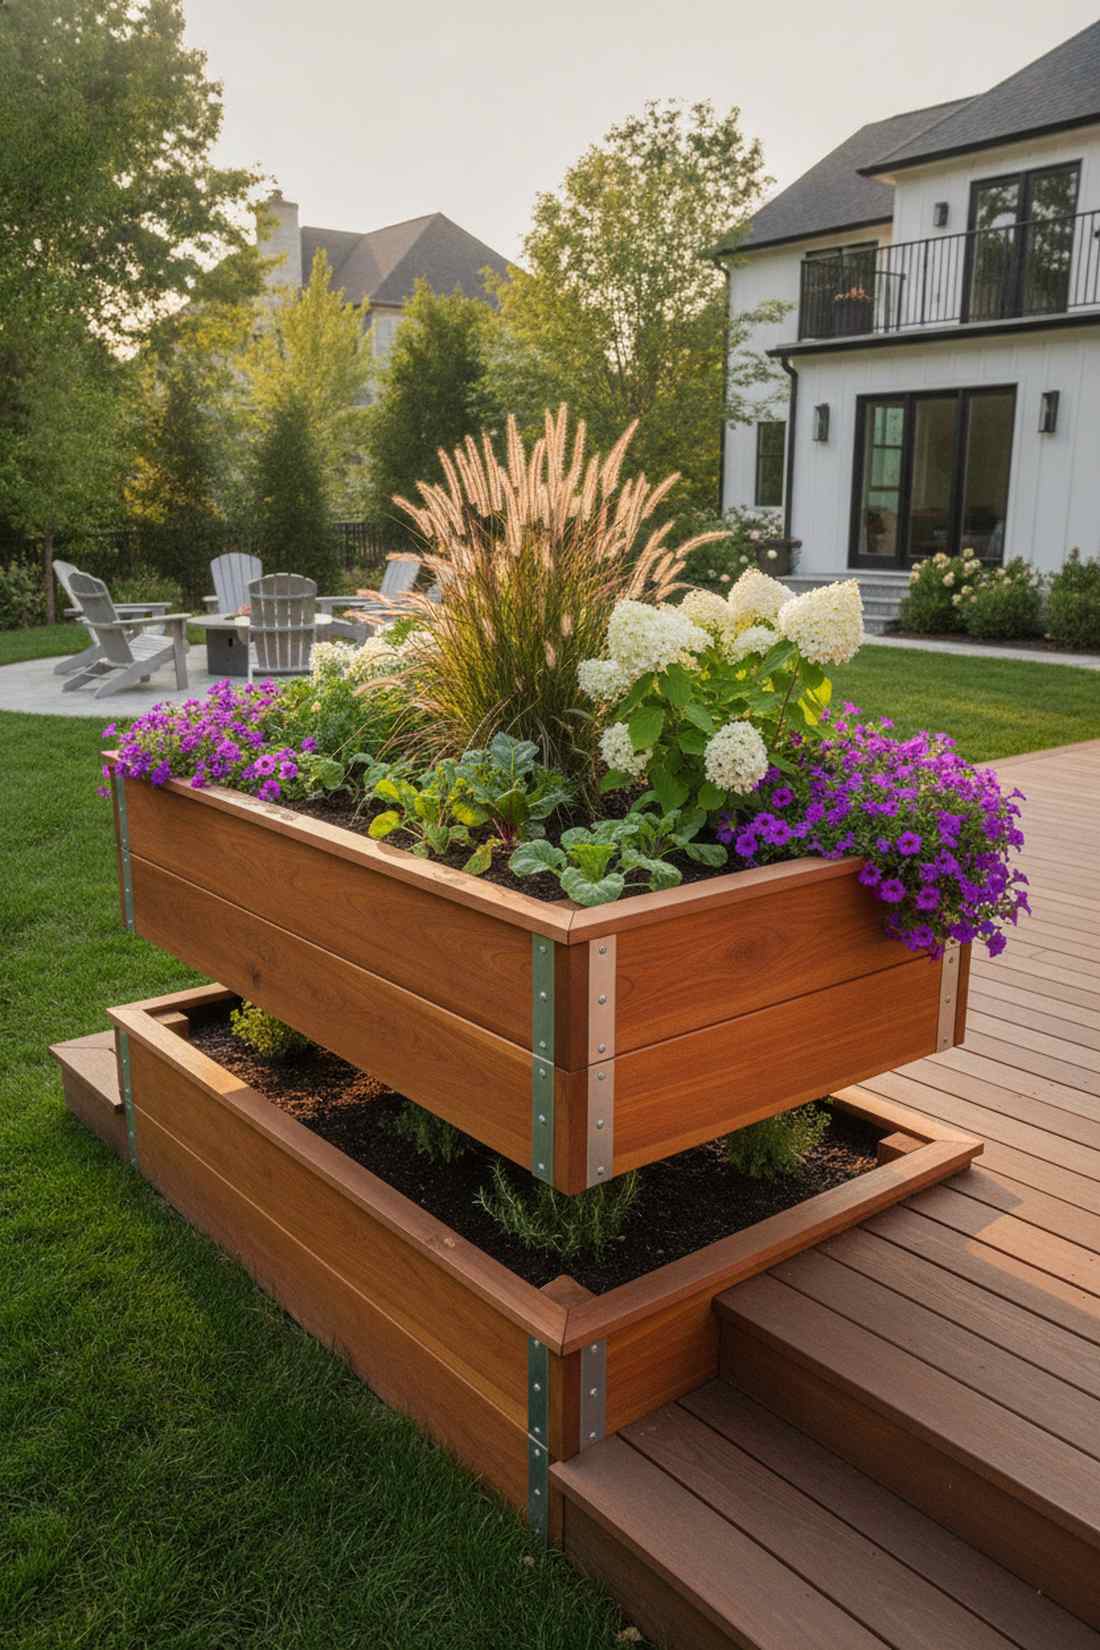
Delivers that deep, rich tone that feels incredibly luxurious. Premium redwood planters are phenomenal for accentuating high-end patio transitions.
Most beginners skip internal bracing, but this double-stacked blueprint requires it for maximum soil load management. This premium approach ensures the rich wood grain stays flawless for decades rather than warping after one harsh winter.
Expect to invest $80–$120 for these elite materials. It’s a permanent upgrade that completely changes the property’s vibe.
- Key Materials: Heart redwood 2×8 planks
- Vibe / Style: Architectural luxury
- Difficulty: Intermediate structural build
- Budget Breakdown: Lumber: $90 | Bracing: $15.
- Creator’s Tip: Coat the inside with a raw linseed oil mix to block moisture bleed-through.
- Smart Sourcing: galvanized steel mending plates (bulk pack) and UV-resistant wood sealer.
3. Triple-Stacked Cedar with Cap Rail
Evokes the charm of a professional botanical garden. Capped wooden growing frames provide a phenomenal aesthetic for open courtyard spaces.
Adding a top rail completely hides ugly end-grain and looks far more expensive than it is. This trick transforms a basic dirt box into functional seating while you prune and harvest your organic vegetables.
Adding the trim costs an extra $20 but doubles the visual value. Save this to your garden seating inspiration board!
- Key Materials: 2×2 cedar trim strips
- Vibe / Style: Refined English garden
- Difficulty: Moderate precision cuts
- Budget Breakdown: Main Frame: $60 | Cap Trim: $20.
- Creator’s Tip: Use finishing nails and waterproof glue for a seamless top rail with zero visible screw heads.
- Smart Sourcing: weatherproof construction adhesive and stainless steel brad nails.
4. Douglas Fir Budget Alternative
Provides a bright, inviting texture that feels wonderfully warm. Economical fir timber boxes are a fantastic choice for massive, high-yield urban farming setups.
Many contractors keep this cheap alternative a secret because it paints and stains so beautifully. With the right protective layers, you get the strength of high-end wood at a mere fraction of the standard retail markup.
You can construct these for just $25–$35 each. Highly recommended if you are building multiple beds on a strict budget.
- Key Materials: Standard Douglas Fir 2×6 boards
- Vibe / Style: Practical farm functional
- Difficulty: Ultra-fast assembly
- Budget Breakdown: Timber: $25 | Sealer: $10.
- Creator’s Tip: Focus heavily on sealing the end grains where water absorption is the fastest.
- Smart Sourcing: food-safe botanical wood wax and heavy-duty weed barrier fabric.
This next setup is ridiculously cheap but looks like a custom $200 landscaping feature…
5. Wide Board Single-Layer Design
Brings a sleek, low-profile energy that feels incredibly modern. Single-plank shallow beds integrate seamlessly into flat minimalist backyards.
Skipping the stacking process slashes build time in half and delivers an effortlessly clean silhouette. By concealing corner brackets internally, this configuration achieves that highly sought-after floating border aesthetic for shallow-rooted crops.
Expect to spend around $30 for a seamless, elegant look. Pin this layout for your minimalist landscape planning!
- Key Materials: 2×12 wide cedar planks
- Vibe / Style: Minimalist modern
- Difficulty: Zero-skill required
- Budget Breakdown: Wood: $30 | Hidden Brackets: $12.
- Creator’s Tip: Ensure your ground is perfectly level before placing, as single boards easily highlight sloped yards.
- Smart Sourcing: concealed steel L-brackets and pre-mixed organic potting soil.
6. Tongue-and-Groove Cedar Planks
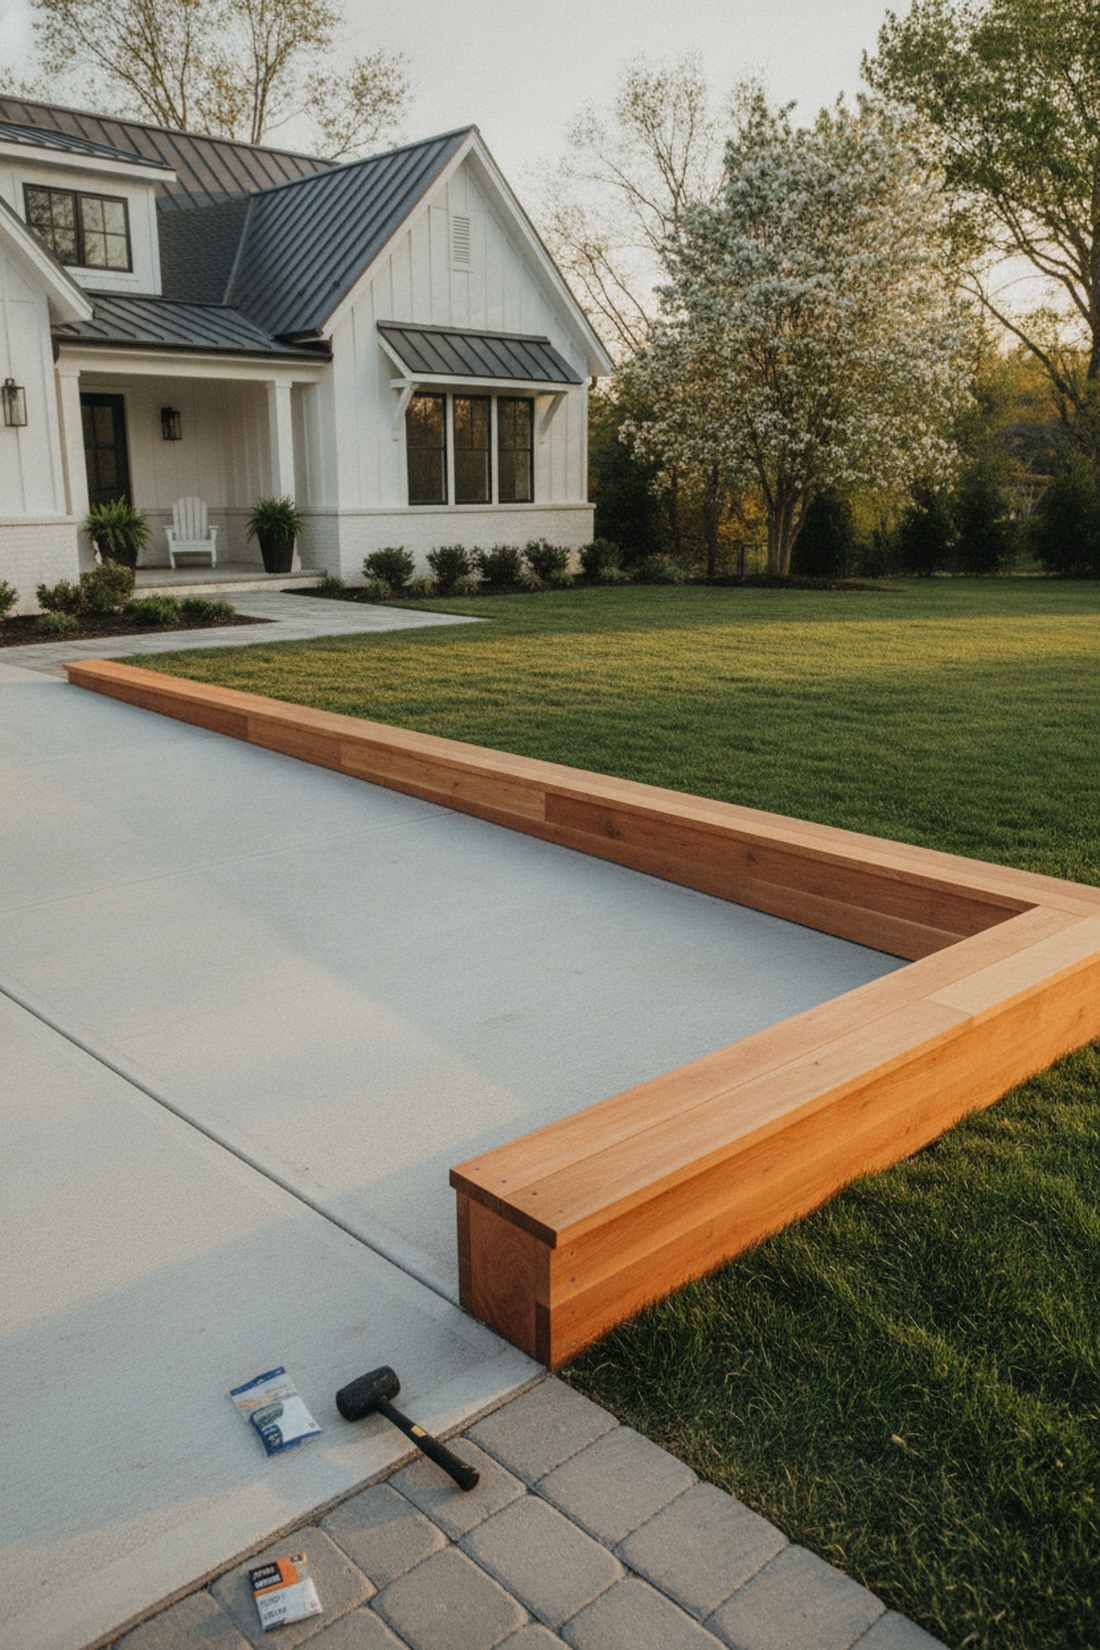
Radiates a flawless, interlocking perfection that feels utterly professional. Seamless timber raised frames look incredible bordering concrete driveways.
This interlocking method is heavily underutilized but provides absolute structural dominance over shifting soil. By burying the screws directly into the tongue sections, you completely hide all metal hardware from the outward-facing profile.
The specialized lumber bumps the cost to $50–$75, but the result is stunning. Save this trick for permanent front-yard installations.
- Key Materials: Tongue-and-groove cedar landscape timber
- Vibe / Style: Seamless contemporary
- Difficulty: Moderate joint alignment
- Budget Breakdown: Specialty Planks: $65 | Hardware: $5.
- Creator’s Tip: Use a rubber mallet to gently tap the grooves together without denting the soft wood fibers.
- Smart Sourcing: hidden trim screws (bulk pack) and non-marring rubber mallets.
7. Mitered Corner Premium Finish
Gives off major architectural designer energy. Precision cut garden perimeters elevate basic vegetable growing into literal lawn art.
Most DIY beds look amateur because of exposed butt joints, but cutting 45-degree angles changes the game entirely. This sharp framing technique creates a gallery-quality border that neighbors will swear you hired a professional carpenter to build.
Material costs stay low around $40, but the visual return is massive. A perfect weekend project to flex your saw skills.
- Key Materials: Premium straight-grain cedar
- Vibe / Style: High-end custom craftsmanship
- Difficulty: Advanced precision required
- Budget Breakdown: Wood: $40 | Glue & Screws: $10.
- Creator’s Tip: Over-cut by a fraction of an inch to ensure the miters squeeze perfectly tight when screwed.
- Smart Sourcing: polyurethane waterproof wood glue and corner clamping jigs.
8. Redwood with Internal Dividers
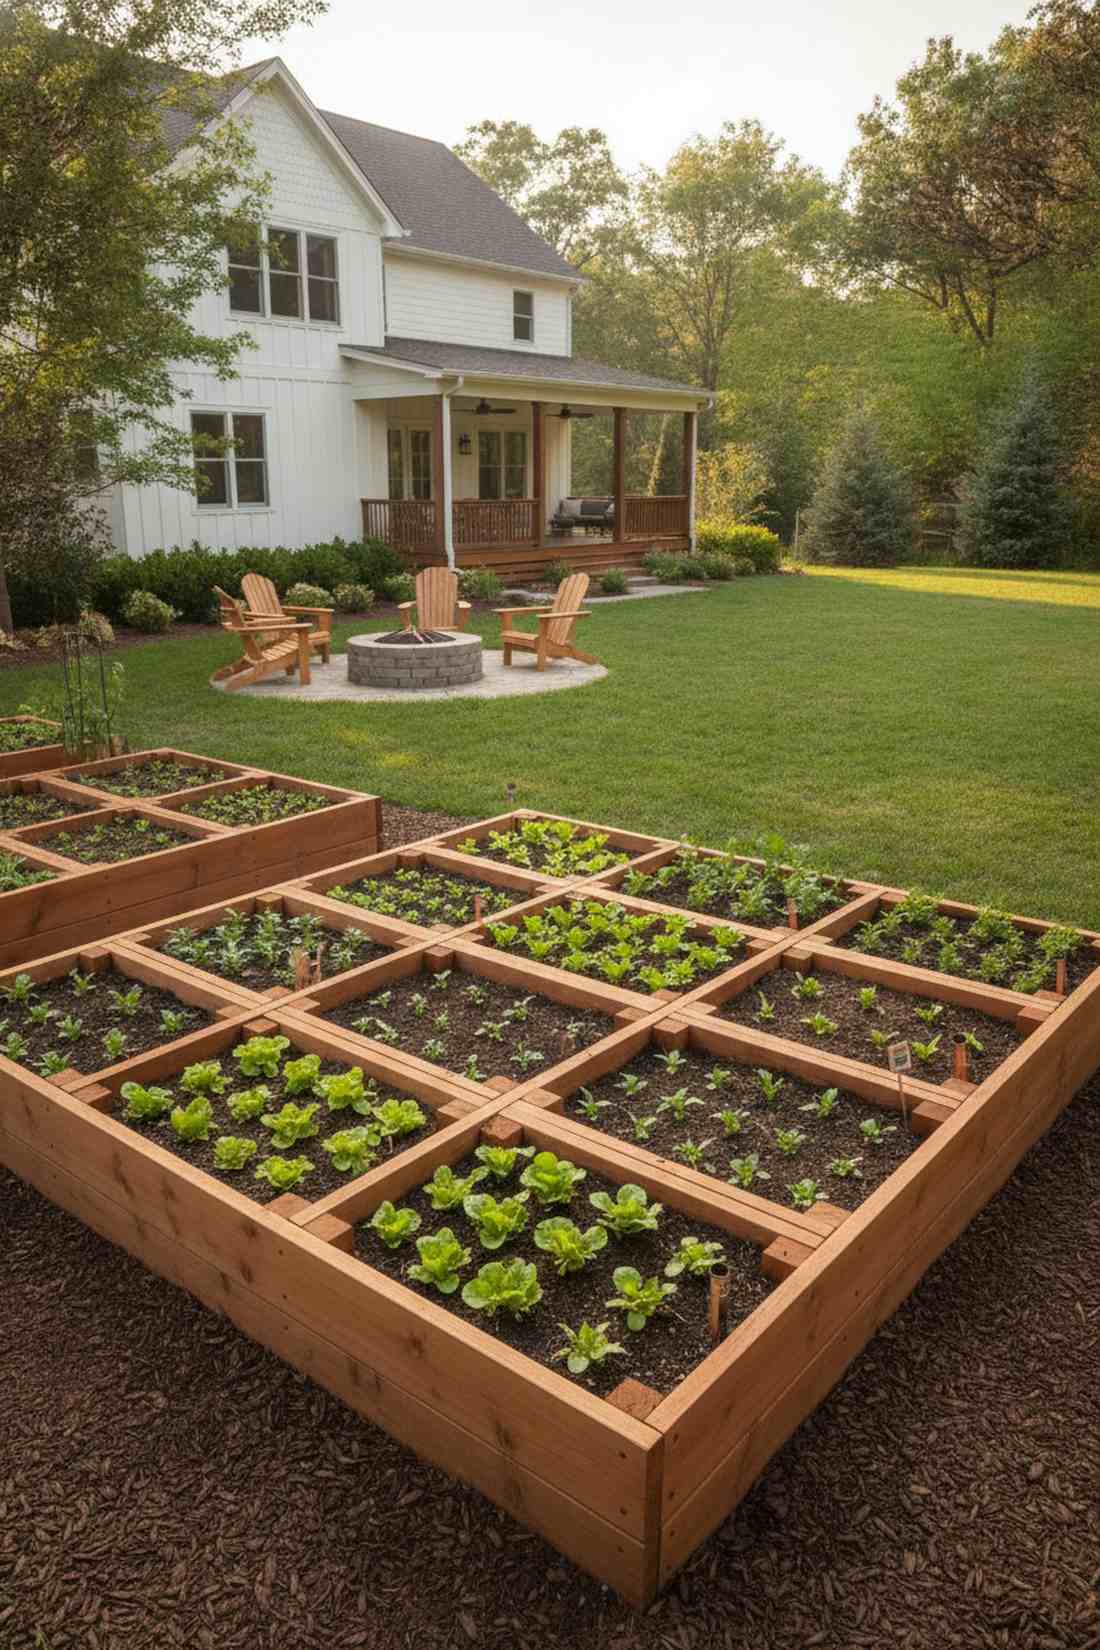
Feels like a hyper-organized farm-to-table laboratory. Partitioned growing grids are brilliant for intensive backyard crop rotation.
Segmenting the soil stops aggressive plants dead in their tracks while maintaining a beautiful exterior shell. This internal framing layout makes square-foot gardening visually appealing while allowing you to isolate specific soil amendments per quadrant.
The extra dividing boards add about $15 to the total. Pin this if you love micro-managing your vegetable yields!
- Key Materials: 2×6 redwood slats
- Vibe / Style: Methodical urban farm
- Difficulty: Easy notch cutting
- Budget Breakdown: Main Frame: $80 | Dividers: $15.
- Creator’s Tip: Make the dividers removable so you can easily pull them out during end-of-season soil tilling.
- Smart Sourcing: heavy-duty soil test kits and copper plant marker stakes.
💡 Must-Have Supplies for High-End Setups
To build these setups faster and ensure they last, skip the generic craft aisles and invest in the right foundational kits.
- Base & Support: heavy-duty concealed corner brackets (bulk pack)
- Setup Tools: premium corner clamping starter kits
- Weather/Durability Protection: UV-resistant clear wood sealants
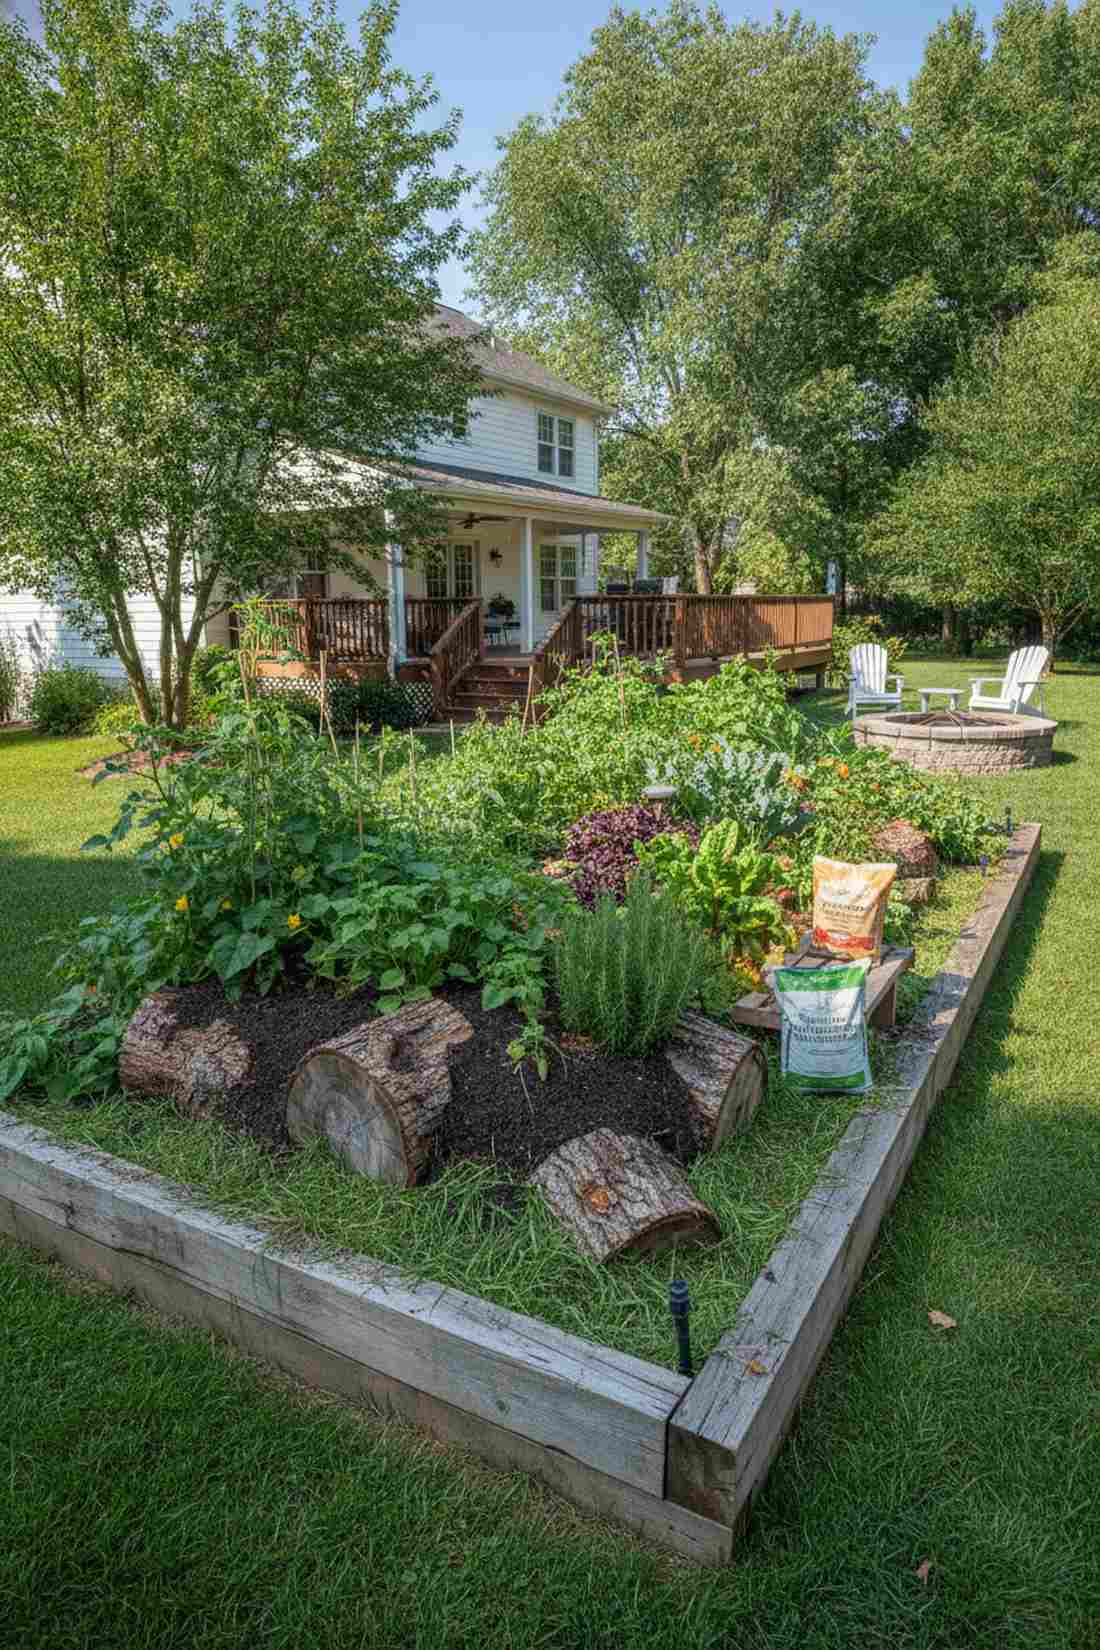
Natural Raised Beds with Logs for Free Construction
Log construction eliminates material costs entirely when you have access to fallen trees or cleared timber. These organic structures decompose slowly while enriching soil through natural wood breakdown processes, creating self-sustaining growing systems.
9. Hemlock Log No-Till Beds
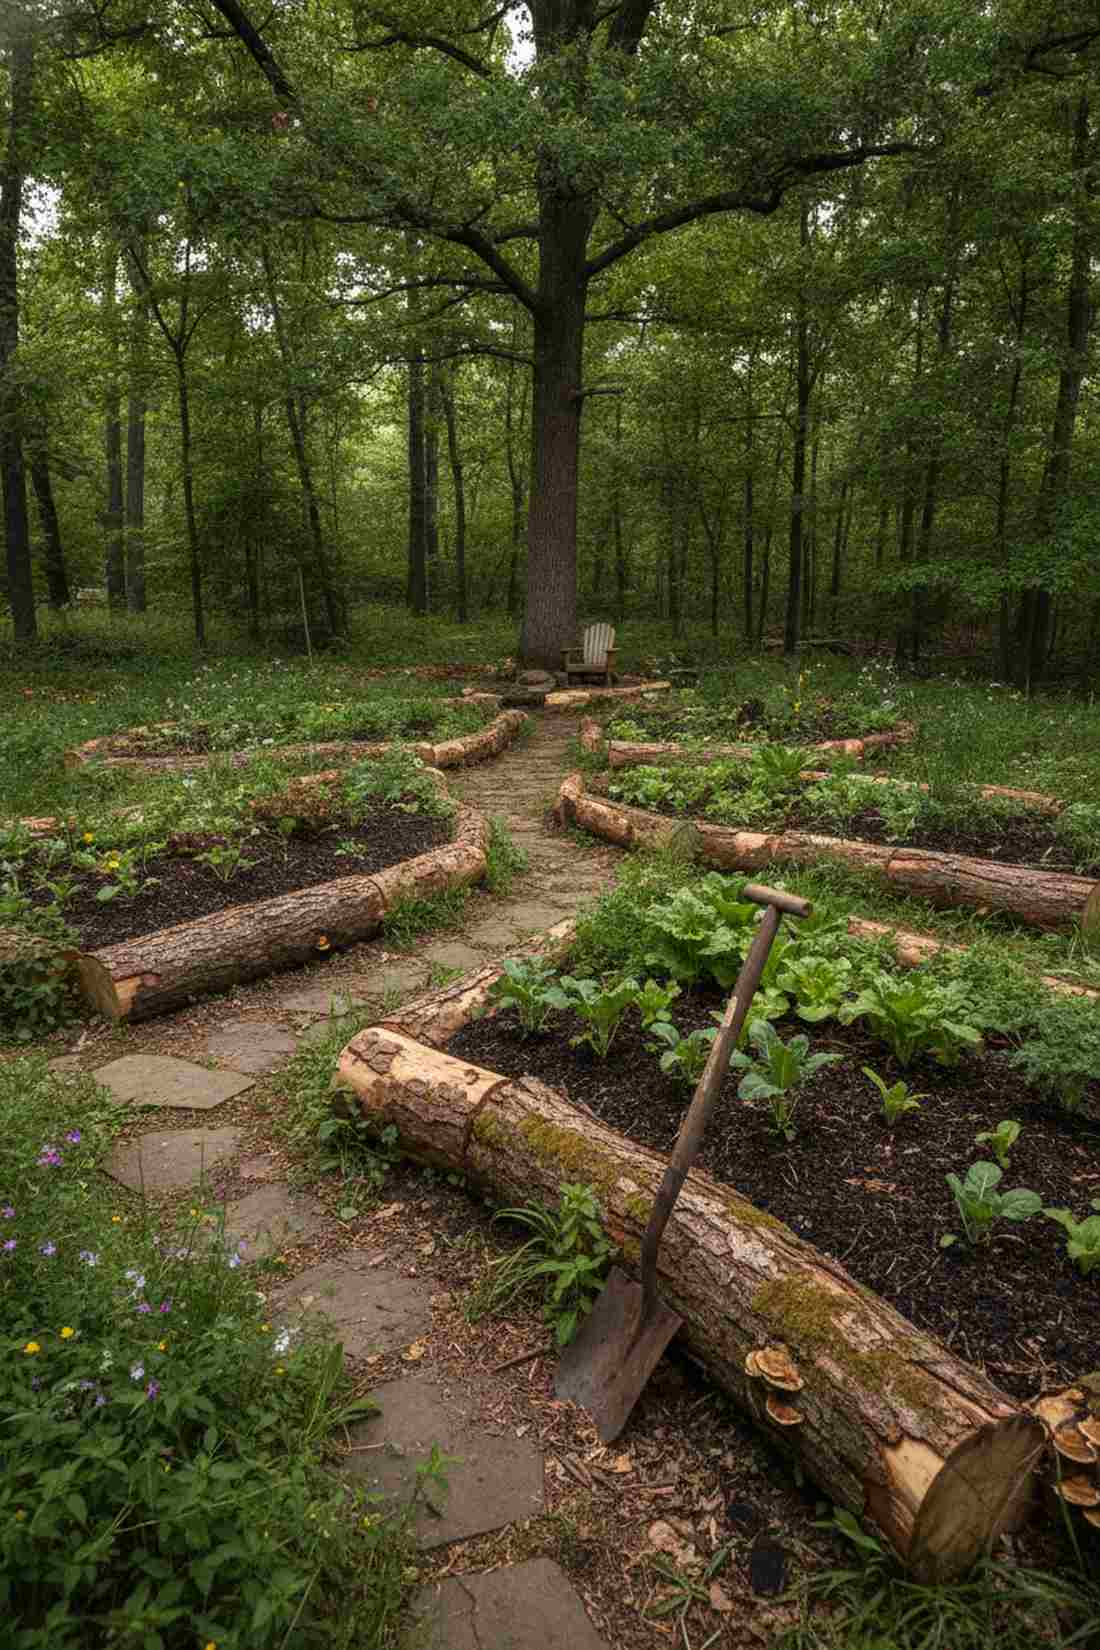
Feels like a forgotten forest path you accidentally stumbled upon. Using raw organic timber barriers creates magical woodland borders under heavy shade trees.
Embracing raised beds with logs completely eliminates the lumber yard bill while adding rich fungal networks straight into your ecosystem. Leaving the bark strictly intact acts as a natural moisture sponge, dramatically reducing the need for constant summer watering.
This layout is effectively free if you have access to downed trees. Save this idea for an ultra-sustainable organic project.
- Key Materials: Unprocessed hemlock logs
- Vibe / Style: Untamed forest floor
- Difficulty: Physically demanding but simple
- Budget Breakdown: Materials: $0 | Backfill Soil: $20.
- Creator’s Tip: Bury the bottom quarter of the log into the soil to lock it permanently in place.
- Smart Sourcing: bulk organic mushroom compost and heavy-duty landscaping trench spades.
Most people get this completely wrong… until they try the genius stacking method coming up next.
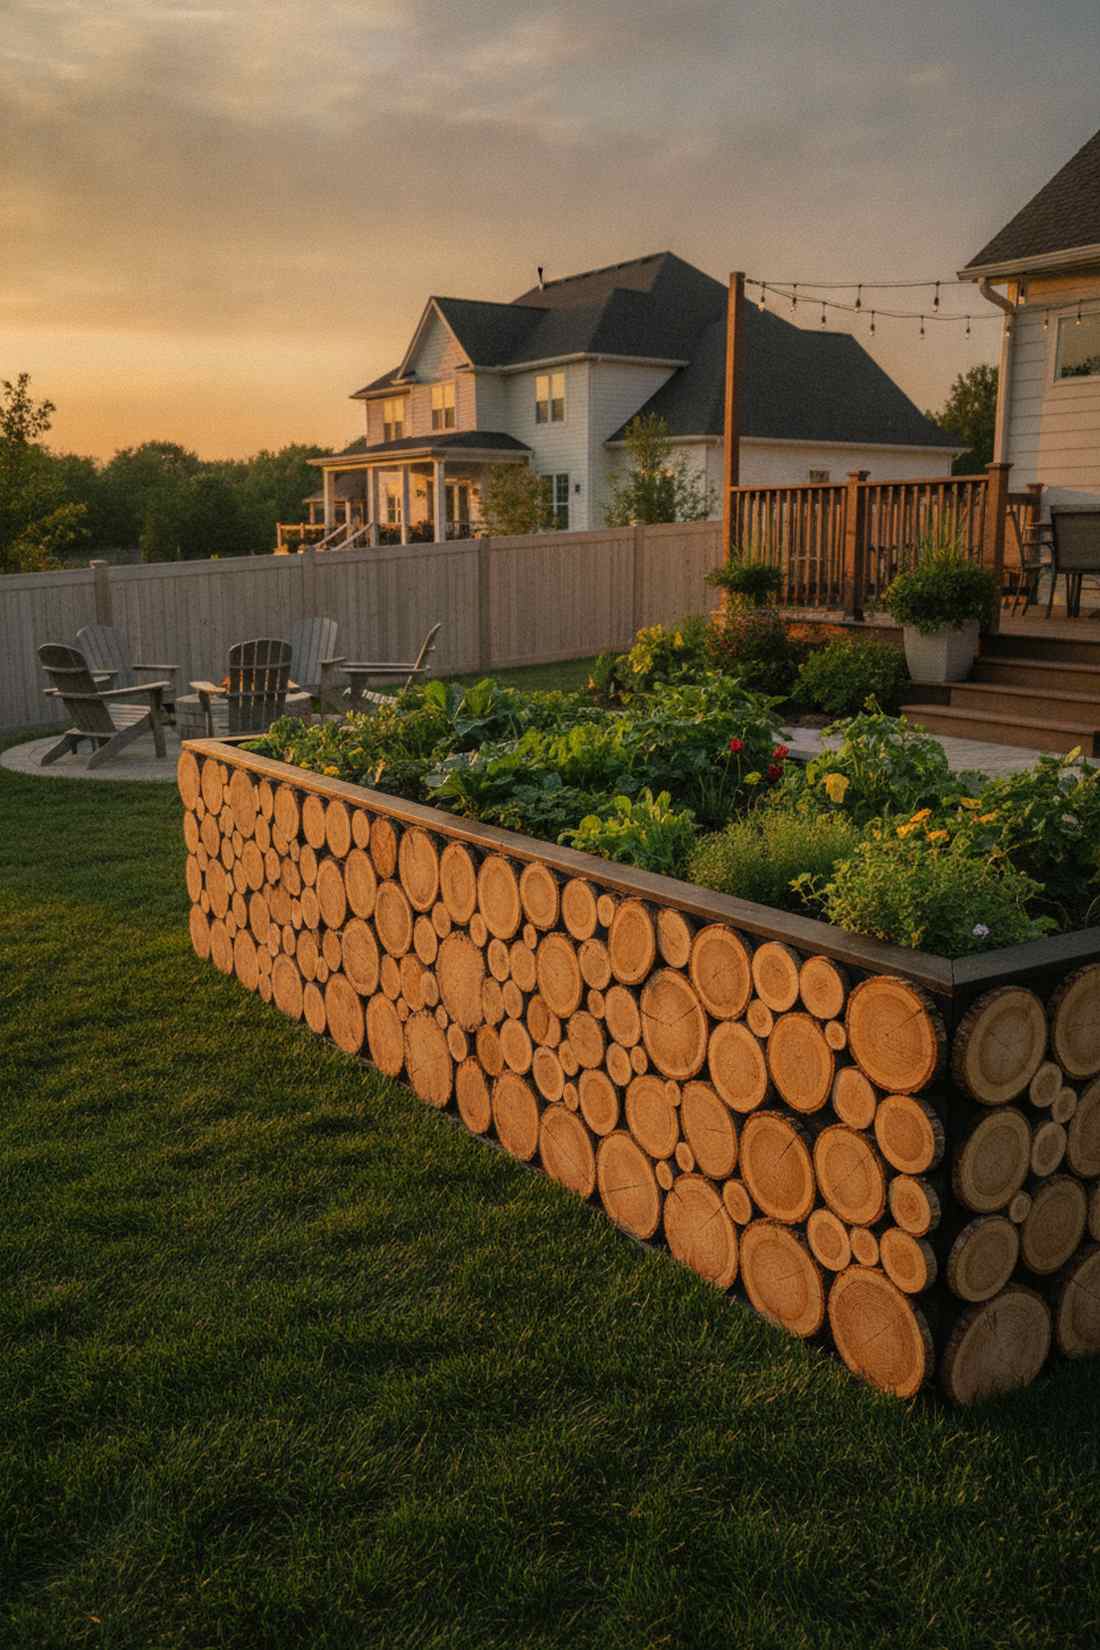
10. Double-Log Stacked Walls
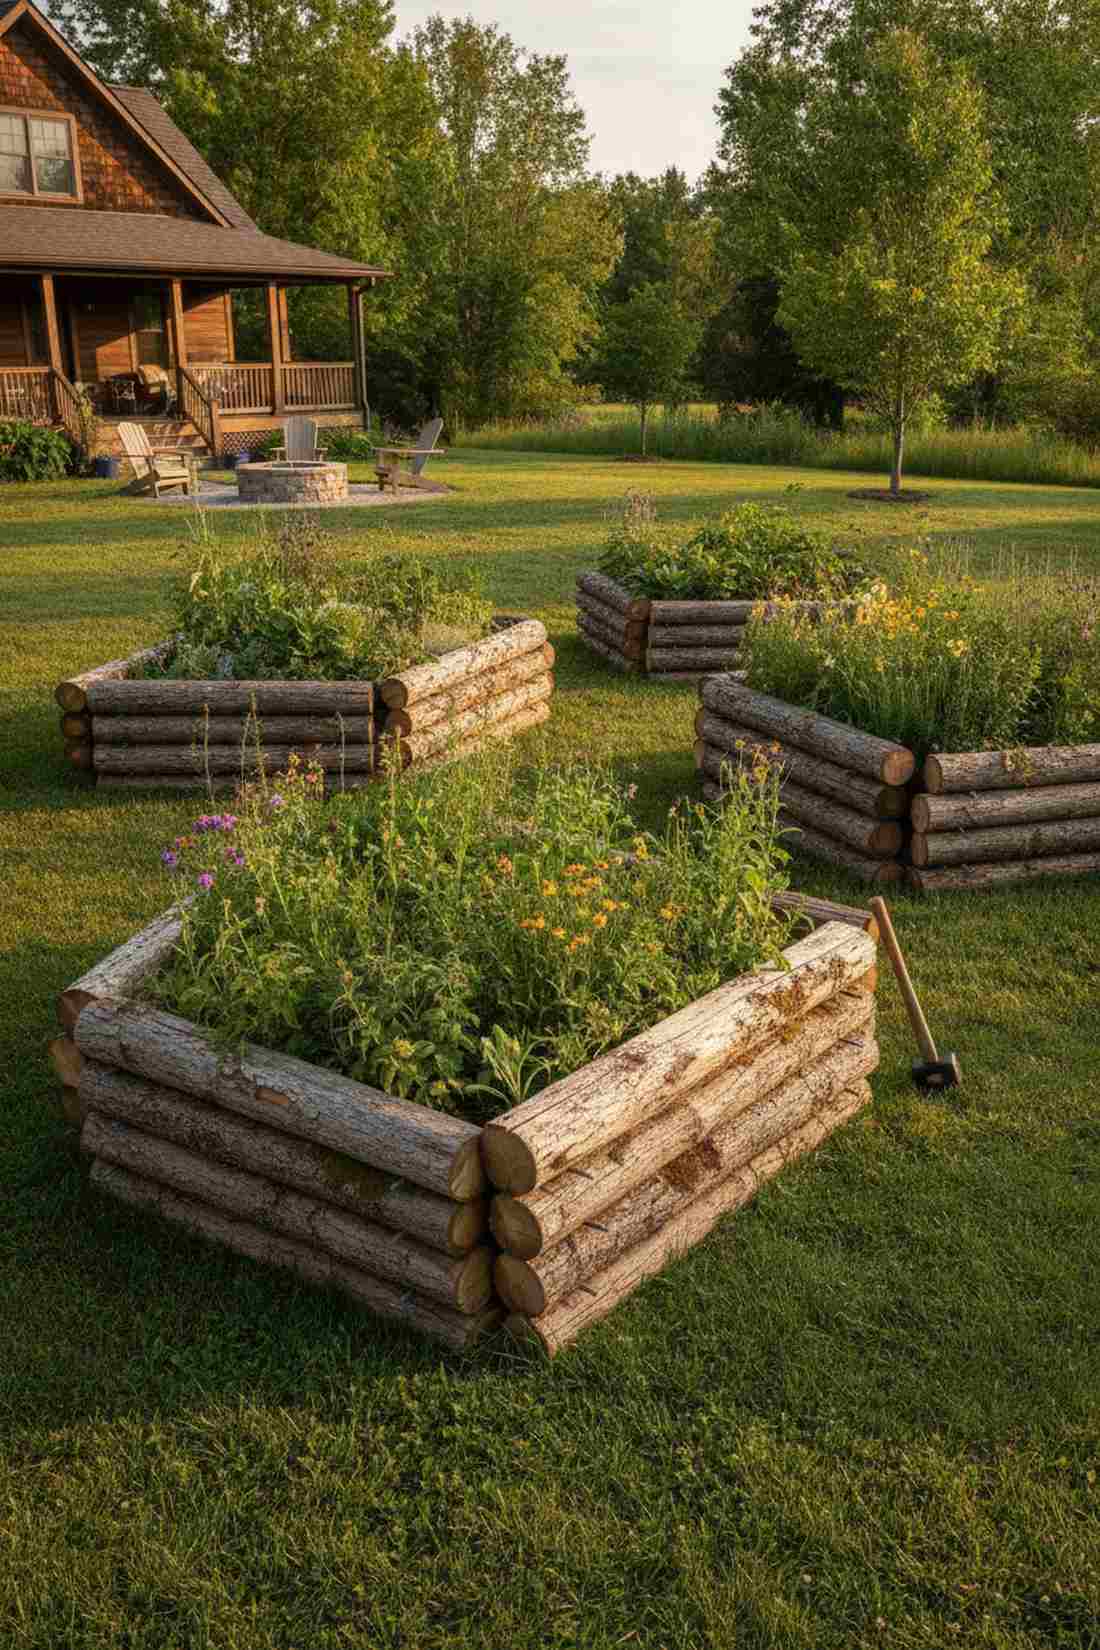
Radiates a rugged, cozy cabin-in-the-woods energy. Stacked rustic log borders perfectly complement messy cottagecore garden beds.
Applying heavy-duty landscaping spikes prevents the frustrating rolling effect that ruins most round-wood setups. This layered raised beds logs design naturally creates tiny air pockets that act as luxury real estate for beneficial garden insects.
Aside from the metal spikes, this build costs next to nothing. Pin this if you love raw, natural landscaping aesthetics!
- Key Materials: 6-inch diameter timber rounds
- Vibe / Style: Rustic pioneer homestead
- Difficulty: Requires heavy lifting
- Budget Breakdown: Logs: $0 | Steel Spikes: $15.
- Creator’s Tip: Alternate the thickest ends of the timber to keep the wall perfectly level as it builds height.
- Smart Sourcing: 12-inch galvanized landscape spikes and heavy-duty sledgehammers.
11. Split-Log Flat-Sided Construction
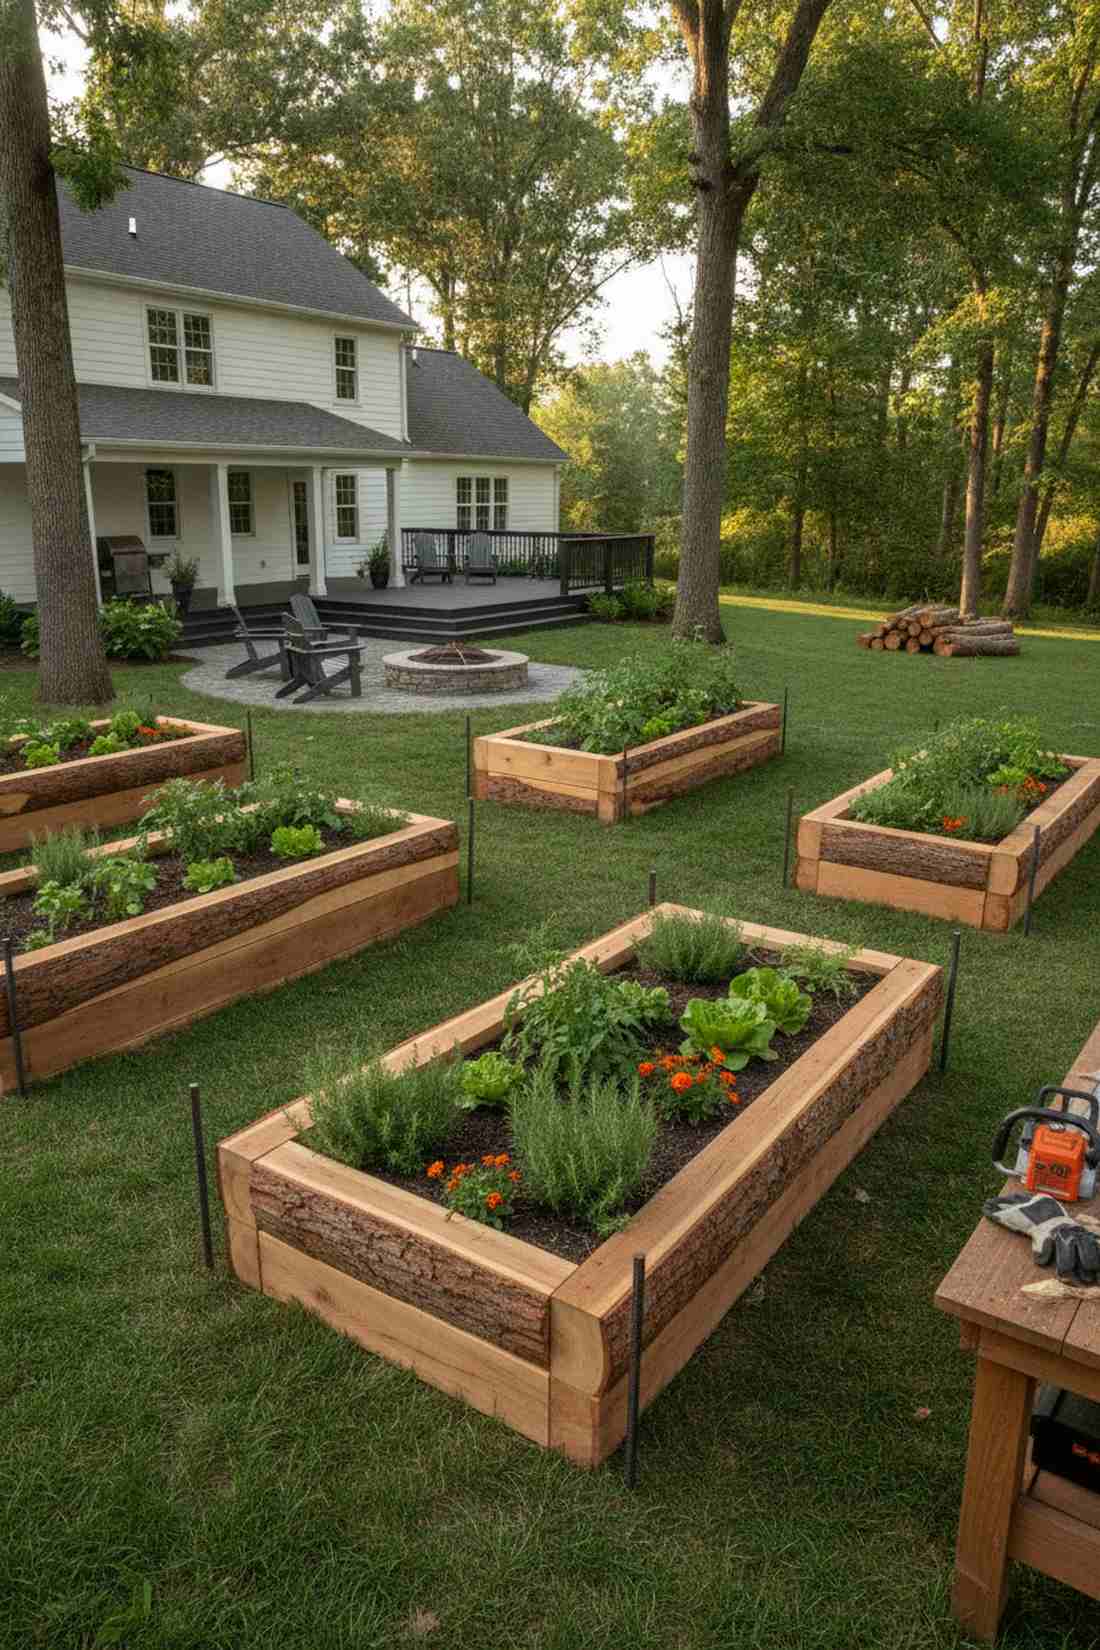
Delivers an incredibly robust, fortress-like garden presence. Milled half-log siding transforms chaotic branches into uniform, high-end planting zones.
This setup bridges the gap between wild raised beds with logs and sharp structural engineering. By turning the flat side inward, you drastically reduce soil escape gaps while letting the natural bark face outward for maximum visual texture.
Renting a chainsaw mill might cost $40, but the custom timber is priceless. It’s a phenomenal way to upcycle dead property trees.
- Key Materials: Split hardwood halves
- Vibe / Style: Polished park reserve
- Difficulty: Requires milling equipment
- Budget Breakdown: Timber: $0 | Rebar anchors: $25.
- Creator’s Tip: Drill vertical channels through the split ends and drive rebar deep into the earth for unbreakable corners.
- Smart Sourcing: pre-cut steel rebar stakes and chainsaw slabbing attachments.
12. Cedar Log Premium Longevity

Feels like an elite mountain resort landscaping feature. Aromatic cedar log walls stand strong against the harshest weather conditions.
Utilizing premium cedar raised beds logs guarantees zero termite invasion without pouring toxic chemicals near your food. The silvery weathered patina that develops over the first year provides an incredibly expensive-looking finish to your organic setups.
While sourcing raw cedar can take effort, the zero-maintenance lifespan makes it invaluable. Save this for creating permanent heirloom gardens.
- Key Materials: 12-inch whole cedar logs
- Vibe / Style: Premium mountain lodge
- Difficulty: Requires a chain saw
- Budget Breakdown: Logs: Free to $50 | Base rock: $15.
- Creator’s Tip: Let the freshly cut logs dry for an entire season so they lose water weight before you heave them into place.
- Smart Sourcing: heavy-duty log lifting tongs and protective chainsaw chaps.
13. Hugelkultur Log Base System
Evokes the ultimate permaculture off-grid fantasy. Buried wood moisture traps act as an invisible, self-watering garden engine.
Burying massive timber directly beneath the soil layer creates a slow-release nutrient sponge that obliterates drought anxiety. This controversial raised beds with logs technique completely eliminates the need to buy expensive filler soil for extra-deep beds.
This method slashes your water bill and fertilizer costs down to zero. Pin this secret if you live in a dry, unforgiving climate!
- Key Materials: Large rotting trunk sections
- Vibe / Style: Invisible organic powerhouse
- Difficulty: Heavy excavation needed
- Budget Breakdown: Wood: $0 | Topsoil Cap: $30.
- Creator’s Tip: Pack the air gaps between the big logs tightly with green grass clippings to kickstart the thermal breakdown.
- Smart Sourcing: bulk organic nitrogen fertilizer and premium mycorrhizal inoculant granules.
14. Log-and-Stone Hybrid
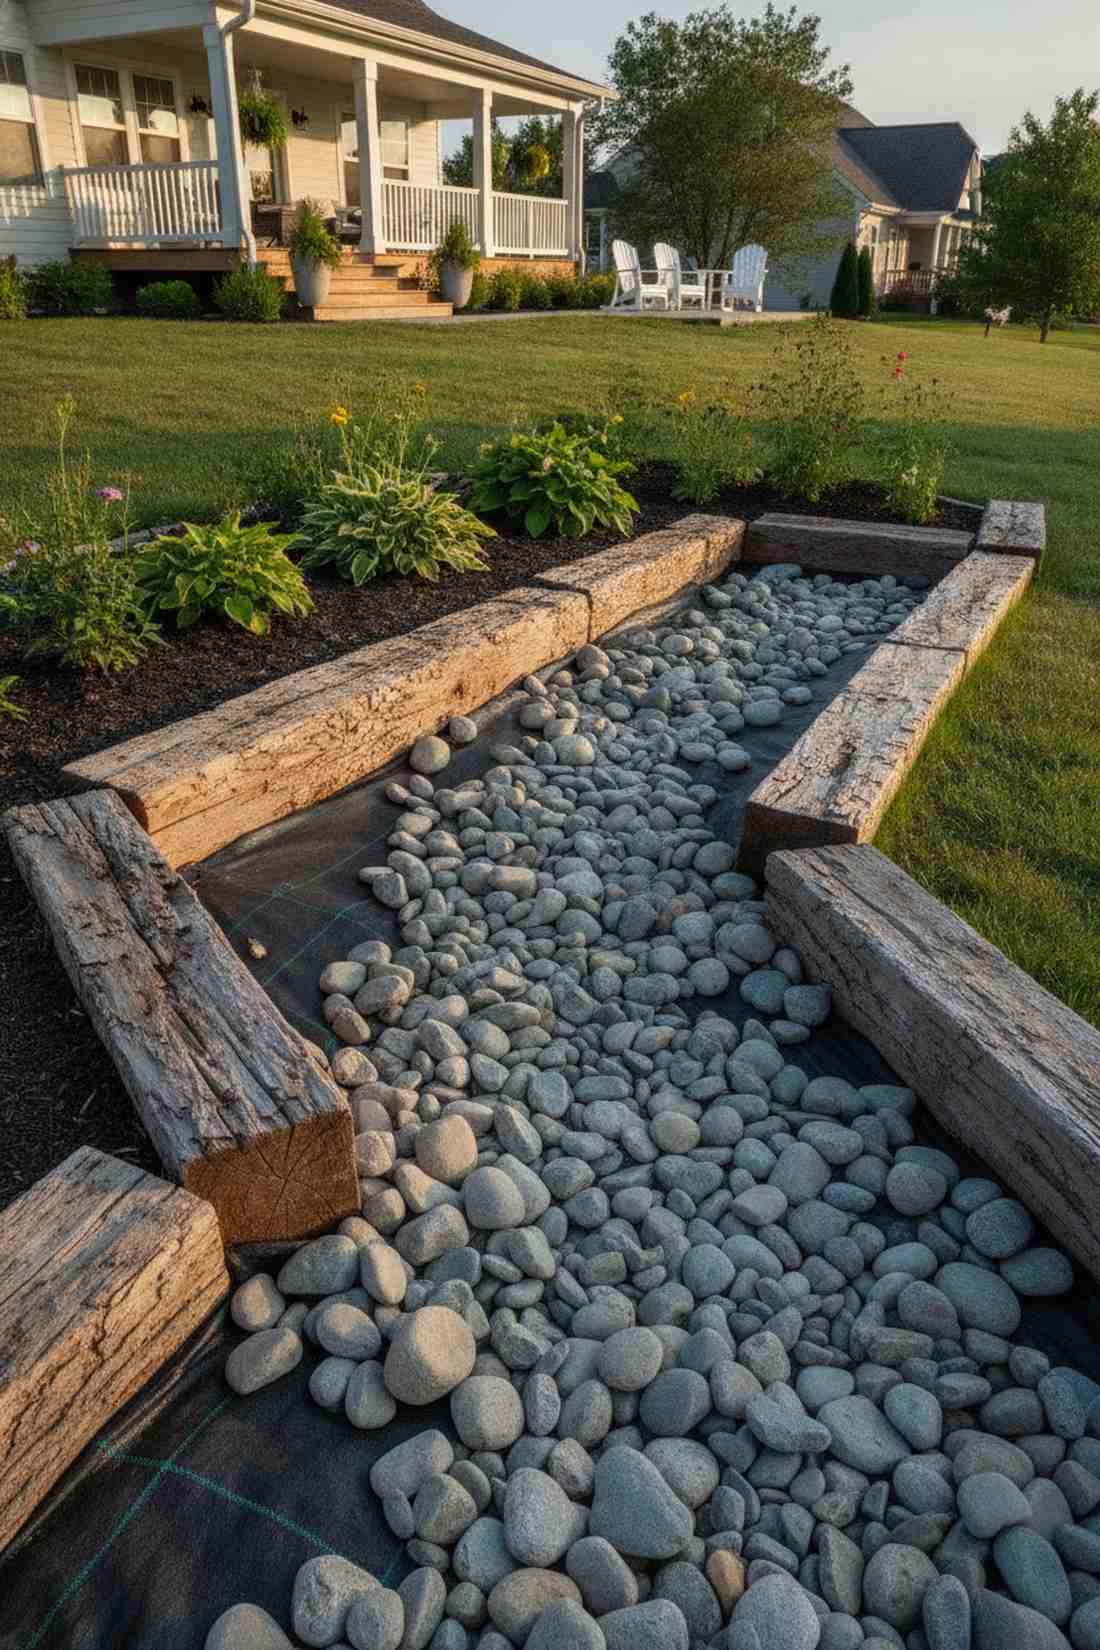
Looks like a babbling brook edge straight out of a fairy tale. Timber and gravel hybrid bases fit perfectly into naturally sloped terrain.
Sitting raised beds logs directly on crushed stone is the absolute best way to double their lifespan by eliminating ground moisture rot. The hardcore contrast between the smooth river rock and the jagged bark creates an undeniably premium aesthetic.
Expect to spend around $20 on gravel per bed. A highly recommended fix if you struggle with heavy, waterlogged clay soil.
- Key Materials: Medium logs and drainage gravel
- Vibe / Style: Zen river-rock garden
- Difficulty: Moderate trenching
- Budget Breakdown: Stone Base: $25 | Timber: $0.
- Creator’s Tip: Use a thick layer of landscape fabric beneath the stone to stop weeds from swallowing the rock bed.
- Smart Sourcing: commercial grade weed barrier (bulk roll) and decorative drainage gravel bags.
If you think logs look too messy, the next vertical trick will completely change your mind…
Rustic Raised Beds Logs Designs for Cottage Aesthetics
Rustic log applications emphasize natural imperfections and organic forms that complement informal garden styles. These designs celebrate the raw beauty of wood while creating productive growing spaces.
15. Vertical Log Edging
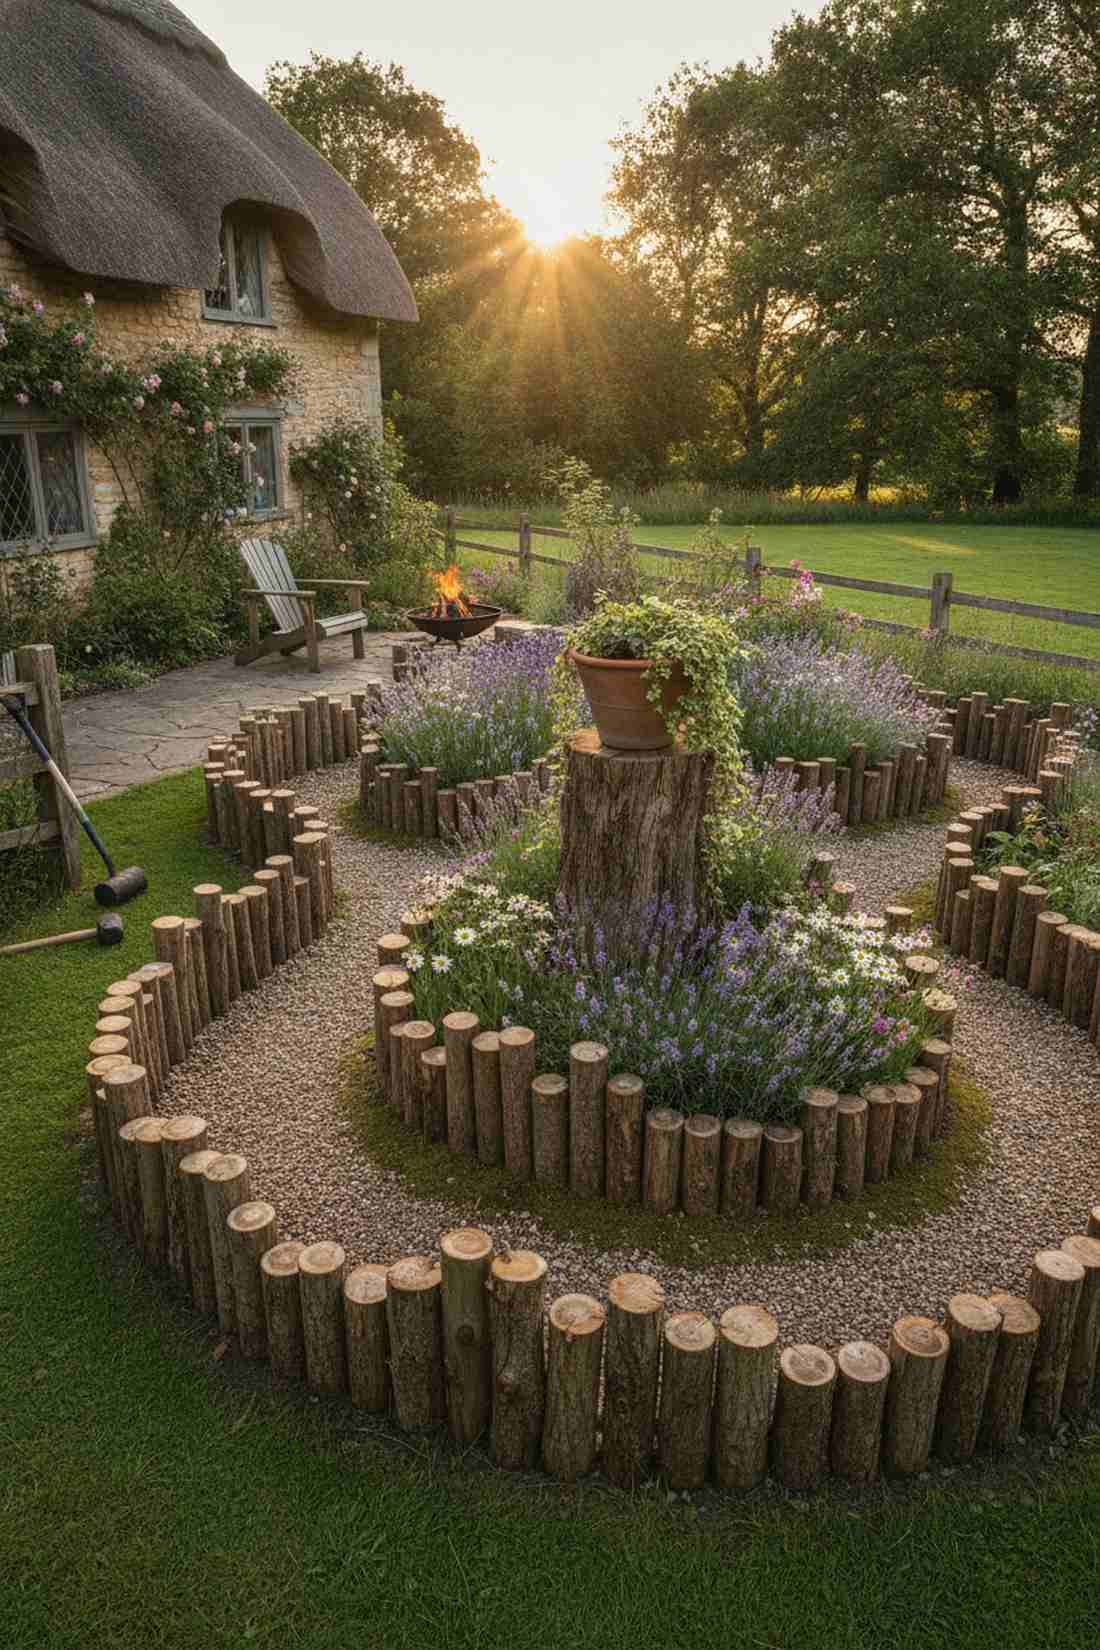
Radiates major medieval palisade vibes. Upright timber stake borders create dramatic, swooping curves along winding garden pathways.
Flipping the orientation vertically allows you to build raised beds with logs using the thin, awkward branches you’d normally burn. Varying the heights intentionally delivers a stunning organic wave that rigid lumber simply cannot replicate.
This utilizes absolute scrap wood for a highly custom designer look. Pin this if you want to frame round garden centerpieces!
- Key Materials: 4-inch branch segments
- Vibe / Style: Enchanted cottagecore
- Difficulty: Tedious but simple
- Budget Breakdown: Branches: $0 | Mallet: $10.
- Creator’s Tip: Sharpen the buried ends into harsh points so they drive through tough roots without splintering the top.
- Smart Sourcing: heavy-duty post hole diggers and clear exterior wood preservative.
16. Horizontal Branch Layering

Feels exactly like finding a tiny woodland bird nest. Woven branch boundary frames integrate flawlessly into deep shade hosta gardens.
Notching thin saplings at the corners delivers a surprisingly premium look that mirrors authentic pioneer cabin craftsmanship. Packing the slight gaps with vivid green moss creates a lush, living wall that traps moisture and looks outrageously beautiful.
A completely free weekend project that brings massive charm. Save this to your whimsical garden ideas board!
- Key Materials: 3-inch straight saplings
- Vibe / Style: Fairy garden overgrown
- Difficulty: Requires basic notching
- Budget Breakdown: Wood: $0 | Twine: $5.
- Creator’s Tip: Use live, green branches for the build as they will bend slightly without snapping during assembly.
- Smart Sourcing: natural jute twine bulk spools and live decorative moss patches.
17. Weathered Barn Wood Logs
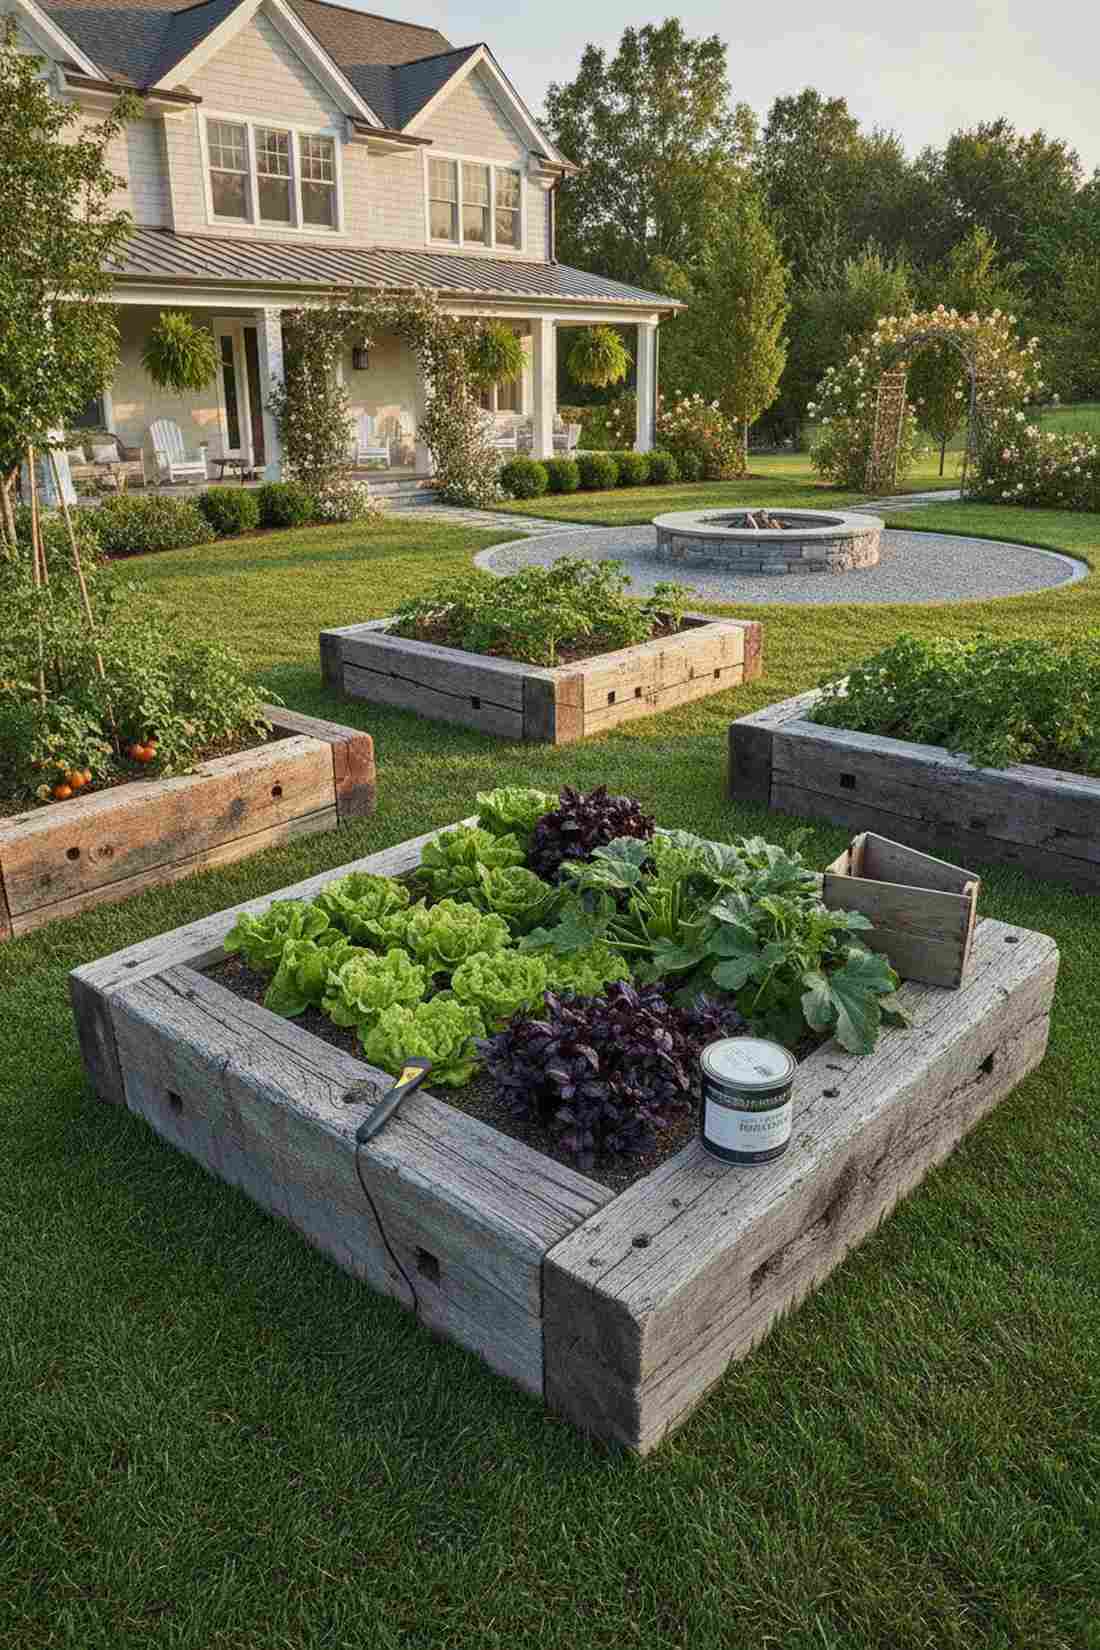
Gives off an incredibly rich, historical farmhouse aura. Reclaimed heritage timber beds are the ultimate flex for chic front-yard vegetable displays.
Using centuries-old, pre-weathered raised beds logs guarantees absolute stability because the wood has already finished shrinking and checking. The silver patina provides instant maturity to a brand new garden space, making it look incredibly expensive.
Reclaimed timber can be pricey (upwards of $100), but the visual payoff is unmatched. A top-tier choice for high-visibility zones.
- Key Materials: 8×8 reclaimed structural beams
- Vibe / Style: Vintage heritage farmhouse
- Difficulty: Extremely heavy lifting
- Budget Breakdown: Reclaimed Wood: $120 | Sealant: $15.
- Creator’s Tip: Pass a strong metal detector over every inch before you ruin a $50 saw blade on an antique hidden nail.
- Smart Sourcing: handheld metal detector wands and premium end-grain sealers.
18. Log Rounds Border
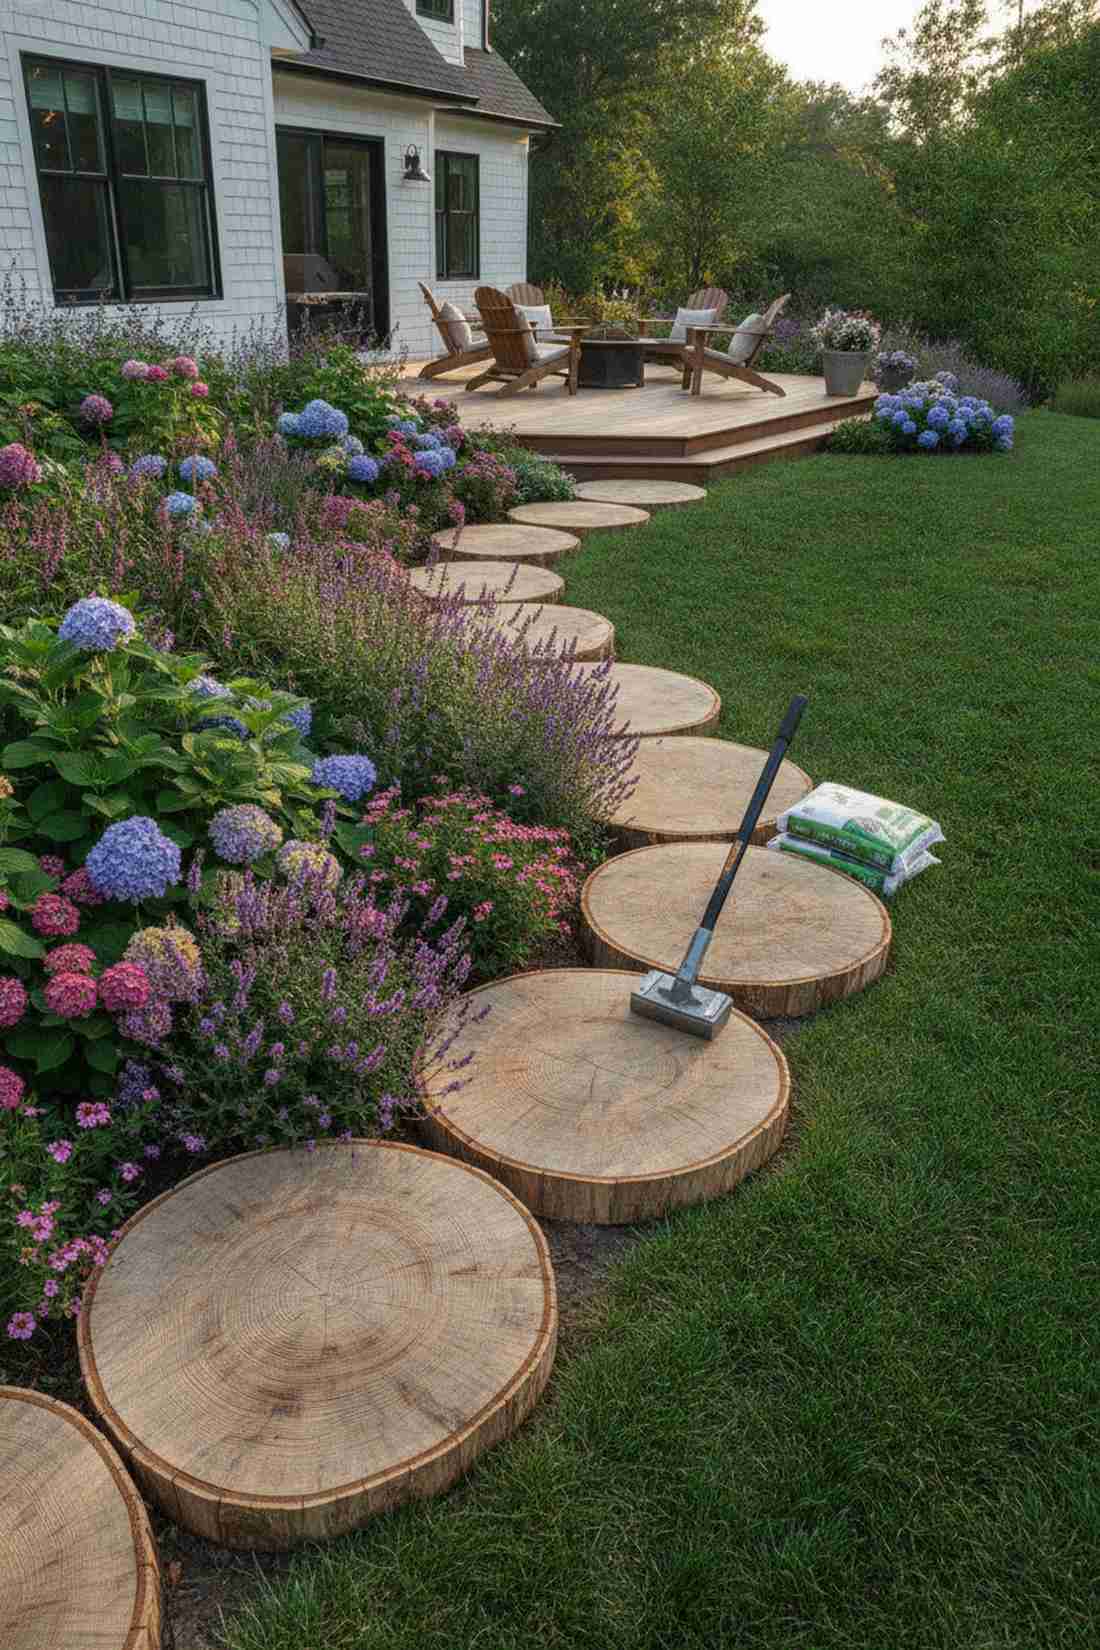
Looks like giant wooden coins scattered across a magical landscape. Stepping-stone wood slices define whimsical borders around massive floral displays.
Slicing up large raised beds with logs into decorative discs completely reimagines how retaining edges function. Burying them halfway locks them in, while exposing the beautiful concentric tree rings to weather naturally in the sun.
A fast, free chainsaw project that completely changes the property vibe. Pin this to your creative landscaping layout board!
- Key Materials: 8-inch thick timber slices
- Vibe / Style: Playful stepping-stone path
- Difficulty: Fast chainsaw work
- Budget Breakdown: Wood: $0 | Base sand: $10.
- Creator’s Tip: Tamp a layer of leveling sand beneath each round to prevent them from sinking unevenly after heavy rain.
- Smart Sourcing: leveling paver sand bags and heavy steel tamping tools.
19. Cordwood Masonry Walls
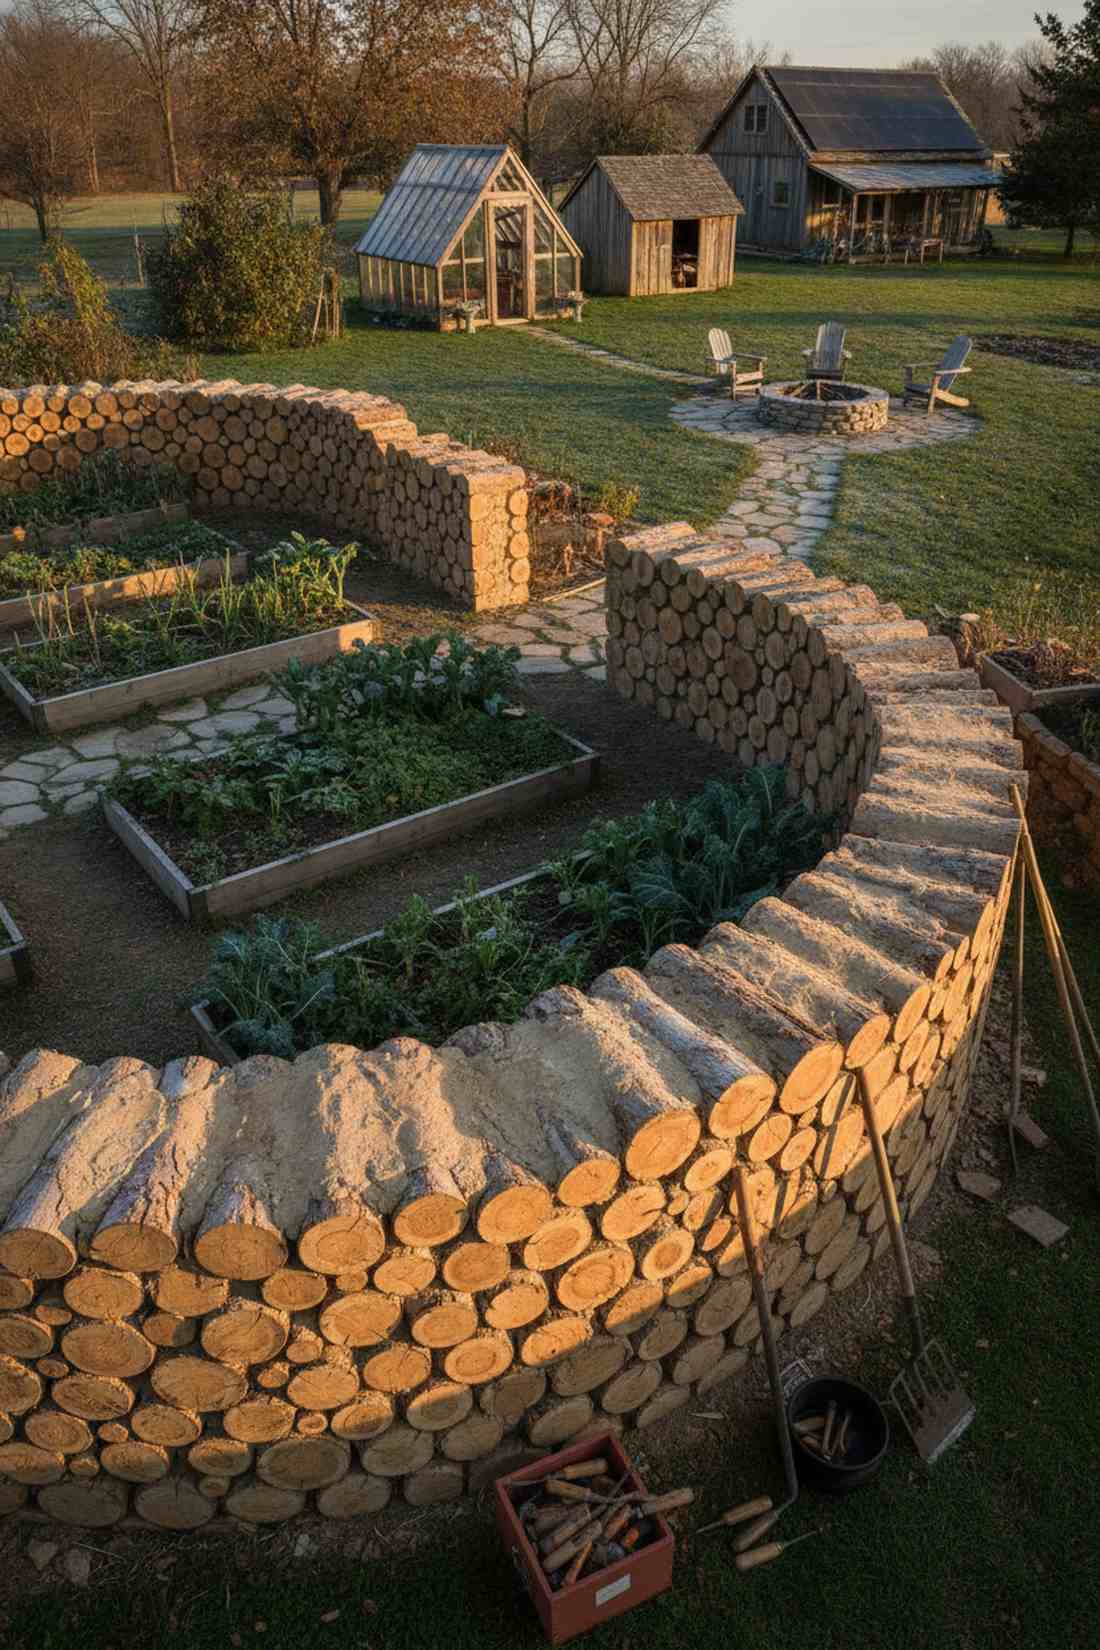
Radiates an ancient, indestructible stone-fortress aesthetic. Mortared log-end barriers provide insane thermal insulation for delicate winter crops.
Blending rustic raised beds logs with a natural clay-lime mortar looks far more expensive than it is. This dense thermal mass captures daily sun heat and slowly releases it into the soil overnight, dramatically extending your frost-free growing window.
Mixing the mortar costs about $30 but the wall lasts for decades. Save this advanced technique for serious homesteading setups.
- Key Materials: 12-inch log chunks and natural mortar
- Vibe / Style: Traditional eco-village
- Difficulty: Advanced masonry blending
- Budget Breakdown: Mortar Mix: $35 | Logs: $0.
- Creator’s Tip: Keep the log ends protruding slightly past the mortar line to highlight the wood texture and shadow depth.
- Smart Sourcing: natural hydraulic lime powder and masonry pointing trowel kits.
Most people leave the ugly bark on, but this next modern stripping trick is an absolute game changer…
20. Peeled Log Contemporary
Feels like a hyper-modern Scandinavian wellness retreat. Stripped blonde log boundaries pop brilliantly against dark, moody foliage.
Power-washing the bark off your raised beds with logs totally removes the messy rustic vibe and replaces it with slick contemporary lines. This vital preparation step strips away hidden insect eggs and vastly extends the lifespan of the smooth white wood.
A little elbow grease and $15 in clear sealer is all it takes. Pin this if you want natural wood in a modern setting!
- Key Materials: Bark-stripped hardwood lengths
- Vibe / Style: Clean Nordic minimal
- Difficulty: Messy preparation
- Budget Breakdown: Sealer: $20 | Tools: $15.
- Creator’s Tip: Strip the bark while the tree is freshly cut (green) before the sap hardens like literal concrete.
- Smart Sourcing: traditional steel draw knives and UV-blocking clear satin varnish.
21. Log Slice Vertical Accent
Evokes the feeling of an expensive mosaic art installation. Textured wood-slice panels break up the boring monotony of long suburban fence lines.
Applying thin raised beds logs as an exterior veneer gives a designer-level finish to an otherwise basic plywood box. This high-contrast mosaic catches shadows beautifully during sunset, turning a functional vegetable bin into the focal point of the yard.
The construction adhesive runs about $15 to secure the artistic layout. A brilliant way to hide ugly structural materials.
- Key Materials: 2-inch wood discs and backing board
- Vibe / Style: Artistic woodland mosaic
- Difficulty: Fun puzzle assembly
- Budget Breakdown: Discs: $0 | Exterior Adhesive: $20.
- Creator’s Tip: Paint the backing board pitch black before gluing the slices so the gaps look like deep, empty shadows.
- Smart Sourcing: extreme weather construction adhesive (bulk pack) and matte black exterior spray paint.
Tiered and Multi-Level Wooden Raised Beds
Multi-level constructions maximize vertical growing space while creating architectural interest through dimensional layering. These designs suit sloped properties and small spaces requiring intensive production.
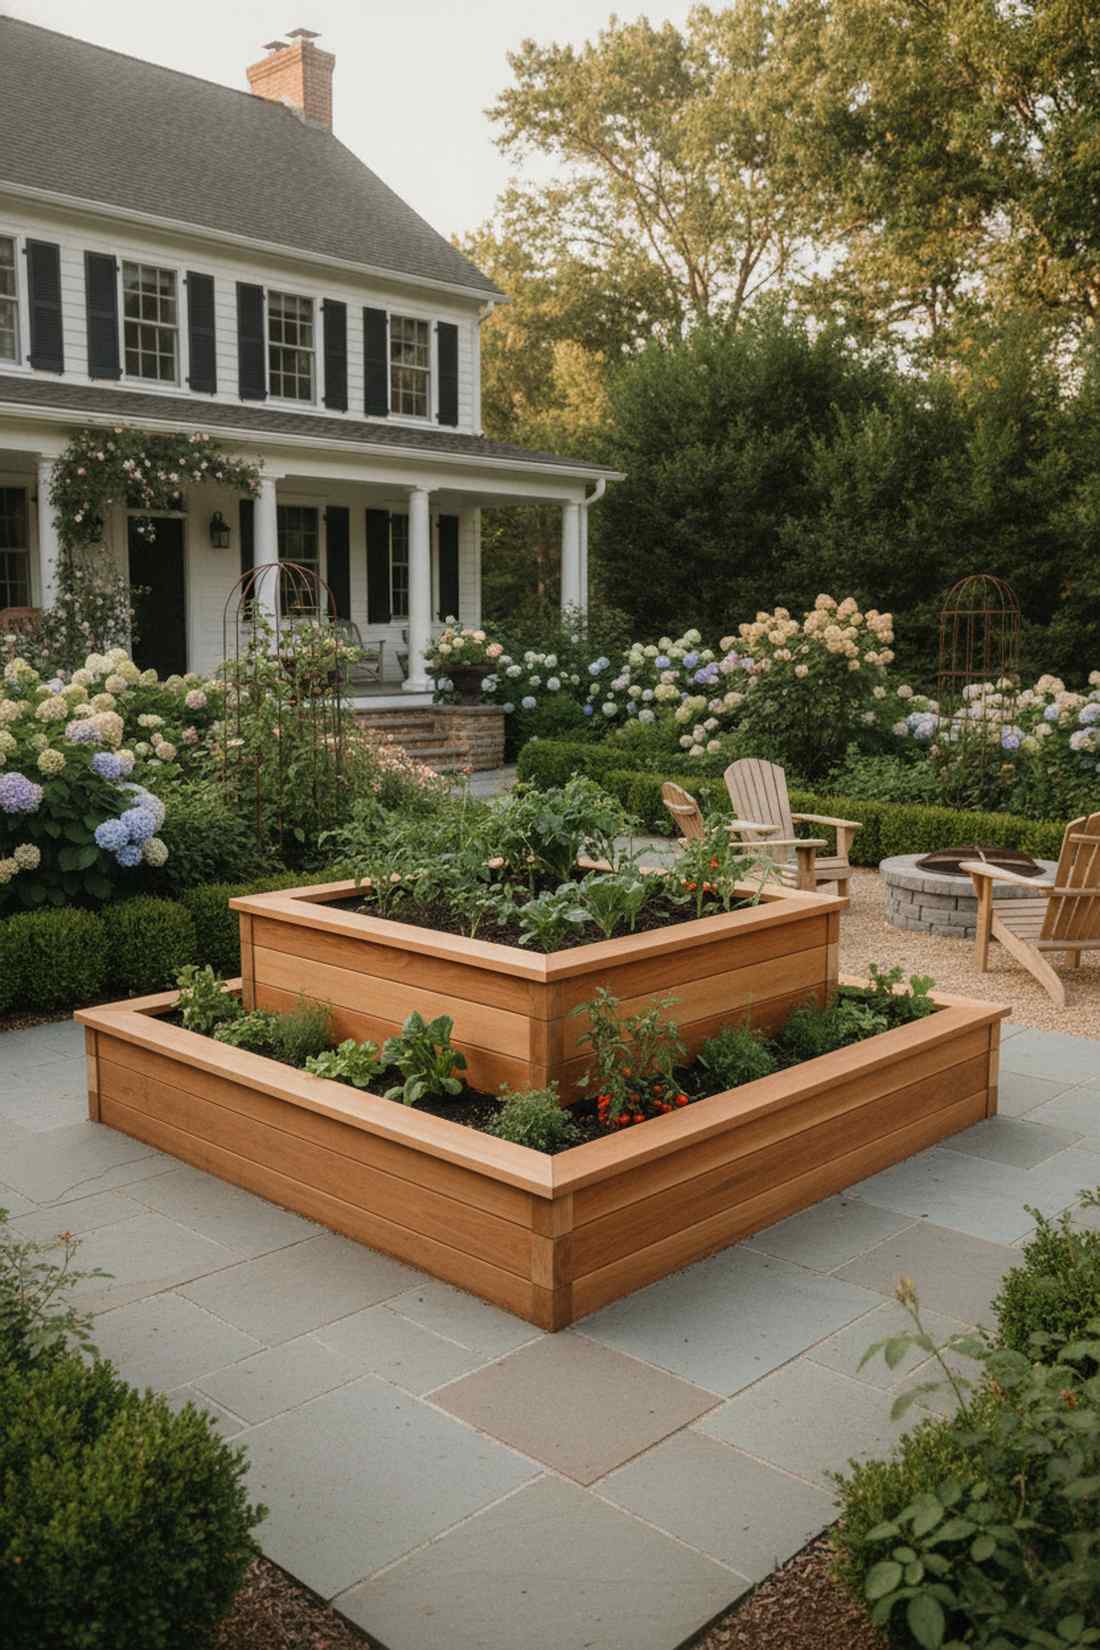
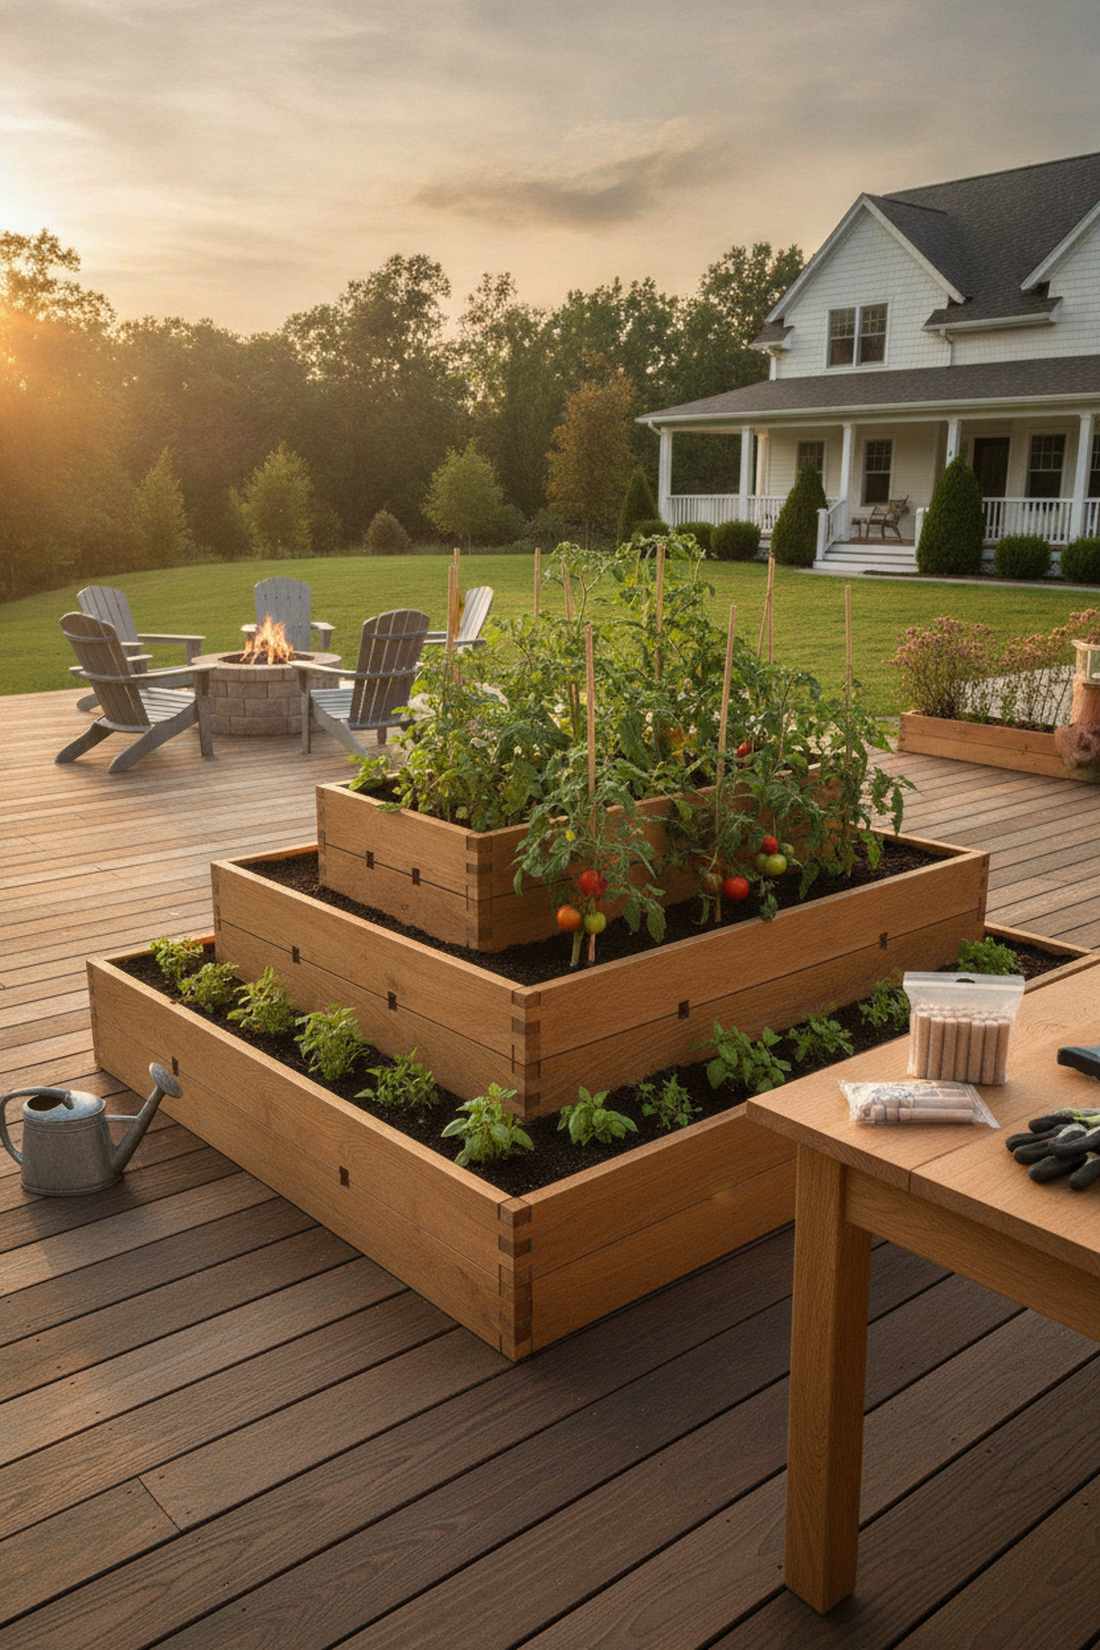
22. Three-Tier Cascading Beds
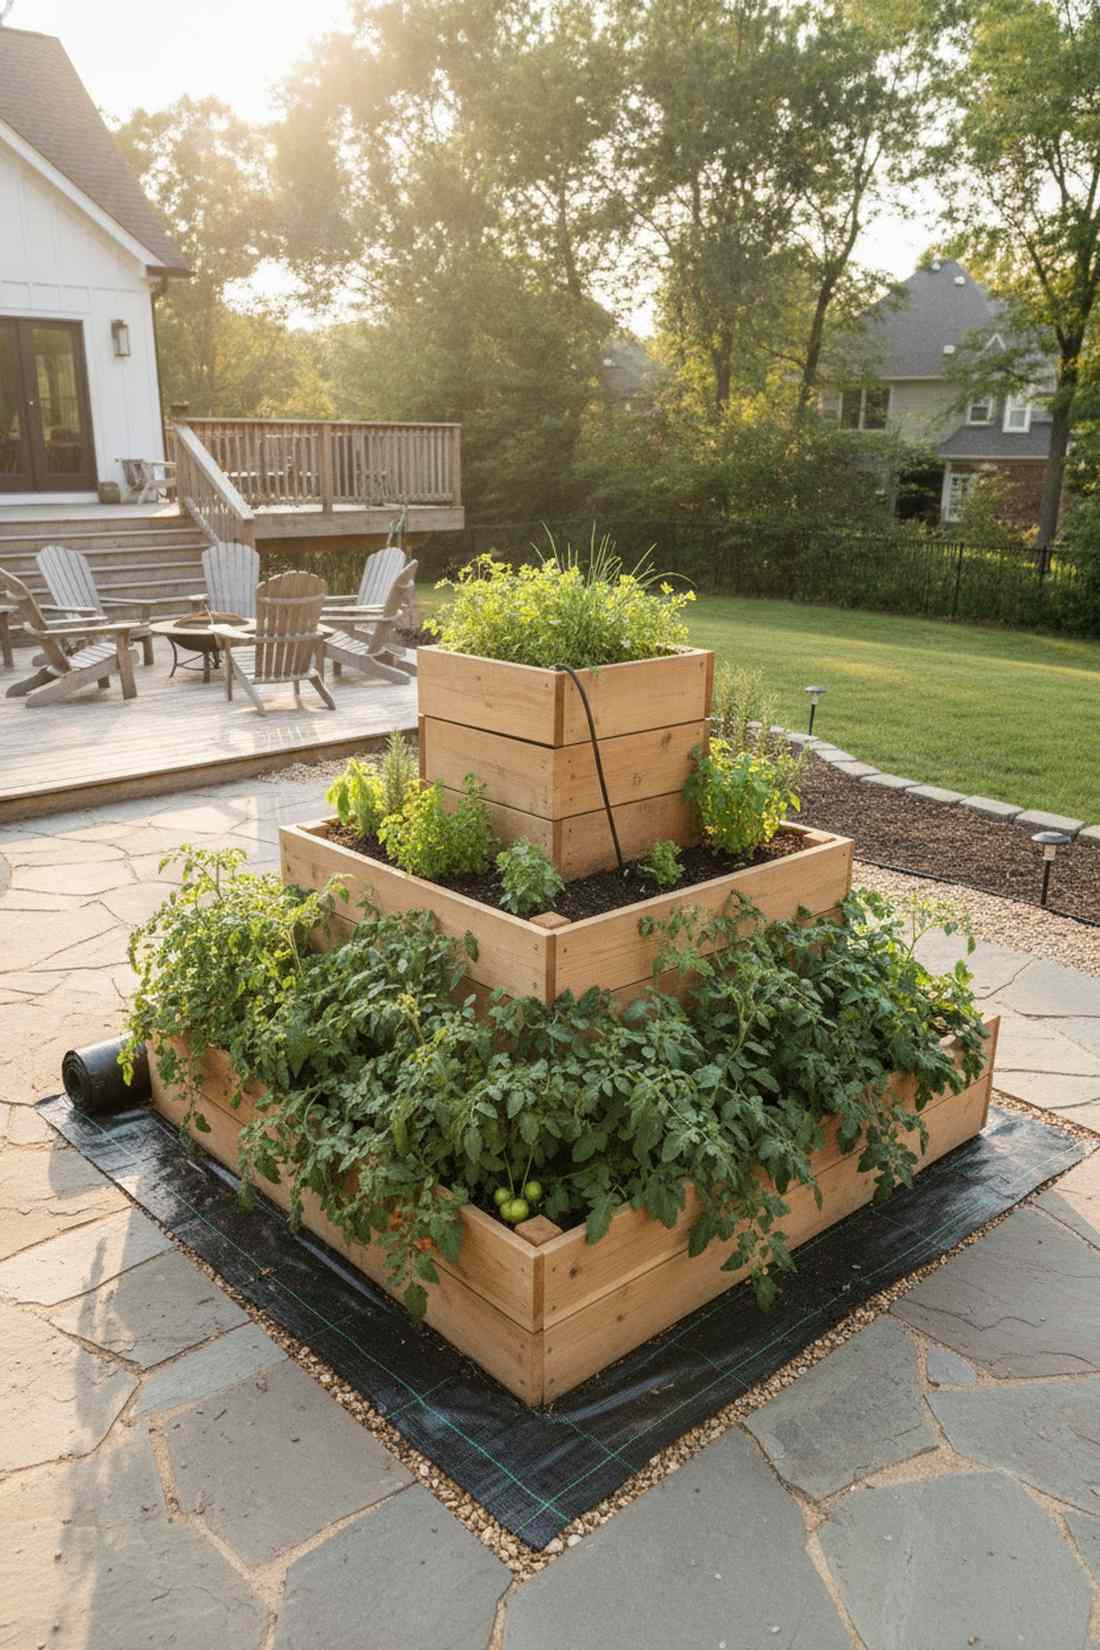
Radiates the majesty of an ancient hanging garden. Pyramid cascading boxes are phenomenal centerpieces for compact, sun-drenched patios.
Stacking these levels strategically multiplies your harvest area and avoids the classic rotting mistake of zero air-flow. The cascading terraces perfectly accommodate massive sprawling vines on the bottom while keeping delicate herbs safe and dry at the very peak.
Lumber for all three tiers will run about $110. Pin this layout if you need to maximize every square inch of sunlight!
- Key Materials: 2×8 dimensional lumber
- Vibe / Style: Structured hanging gardens
- Difficulty: Moderate measuring
- Budget Breakdown: Wood: $110 | Soil Volume: $60.
- Creator’s Tip: Run a hidden drip irrigation line up through the center before filling it with dirt to make watering effortless.
- Smart Sourcing: micro-drip irrigation starter kits and heavy-duty weed barrier rolls.
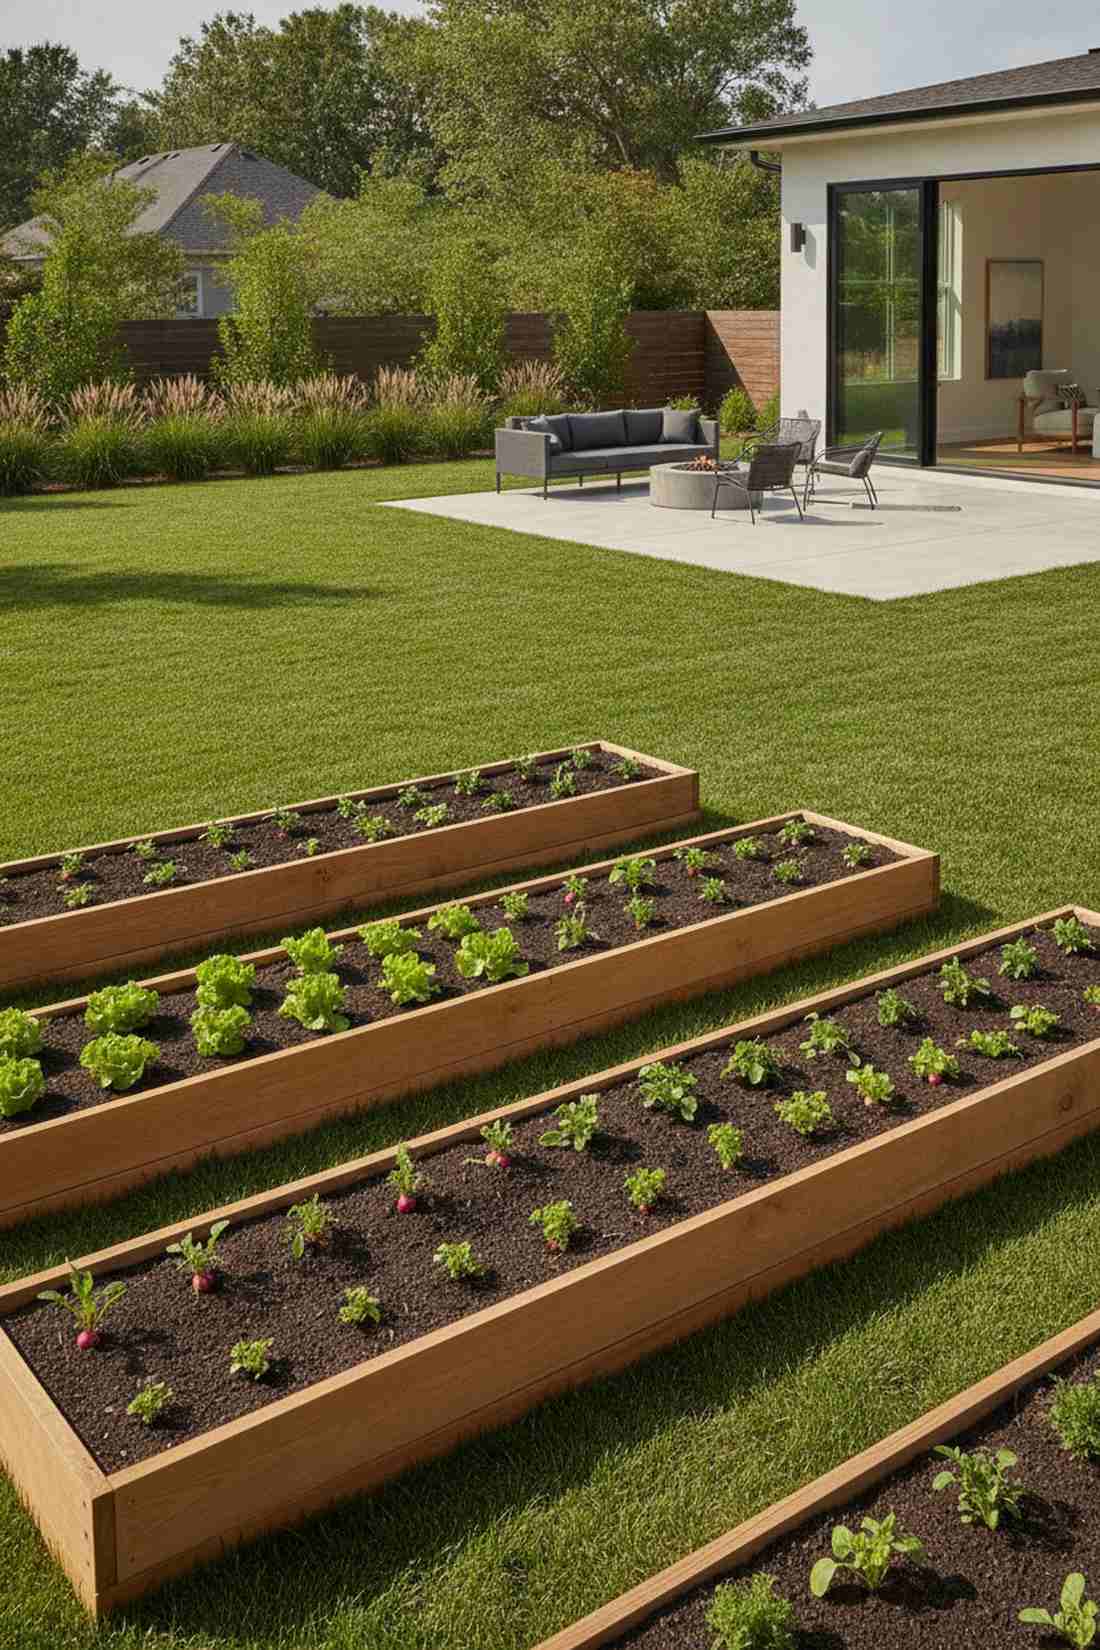
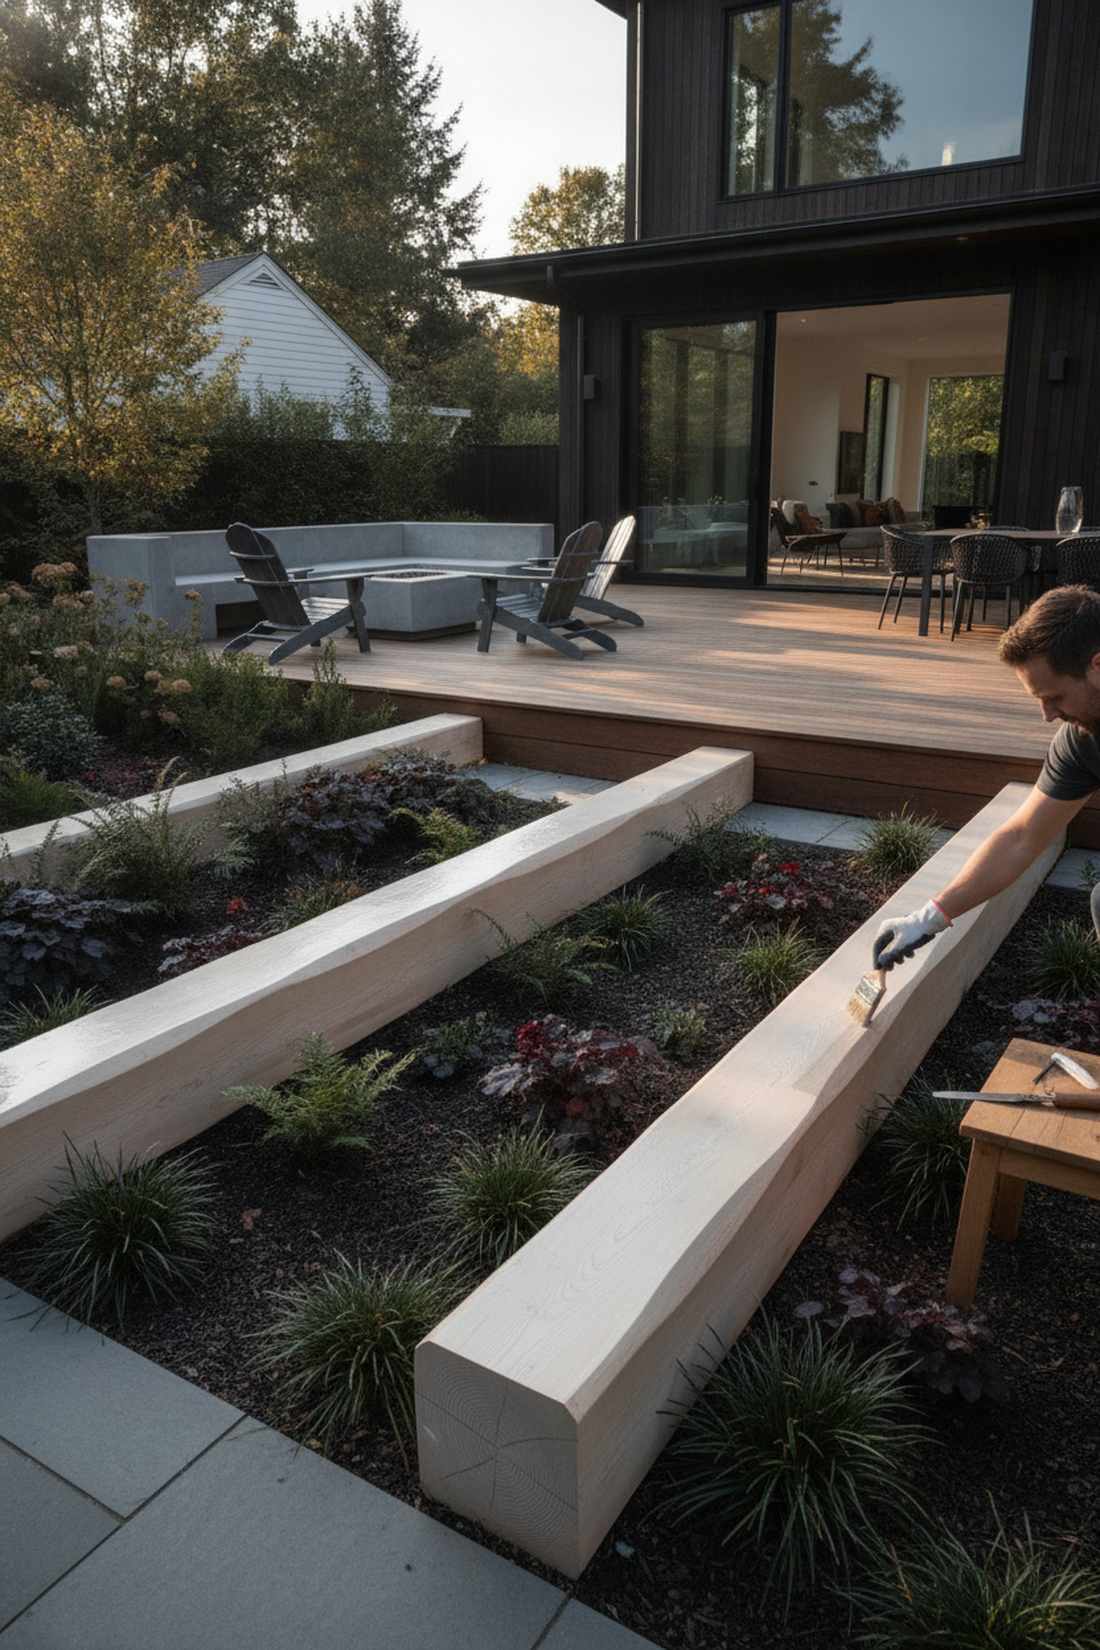
23. Stair-Step Hillside Integration
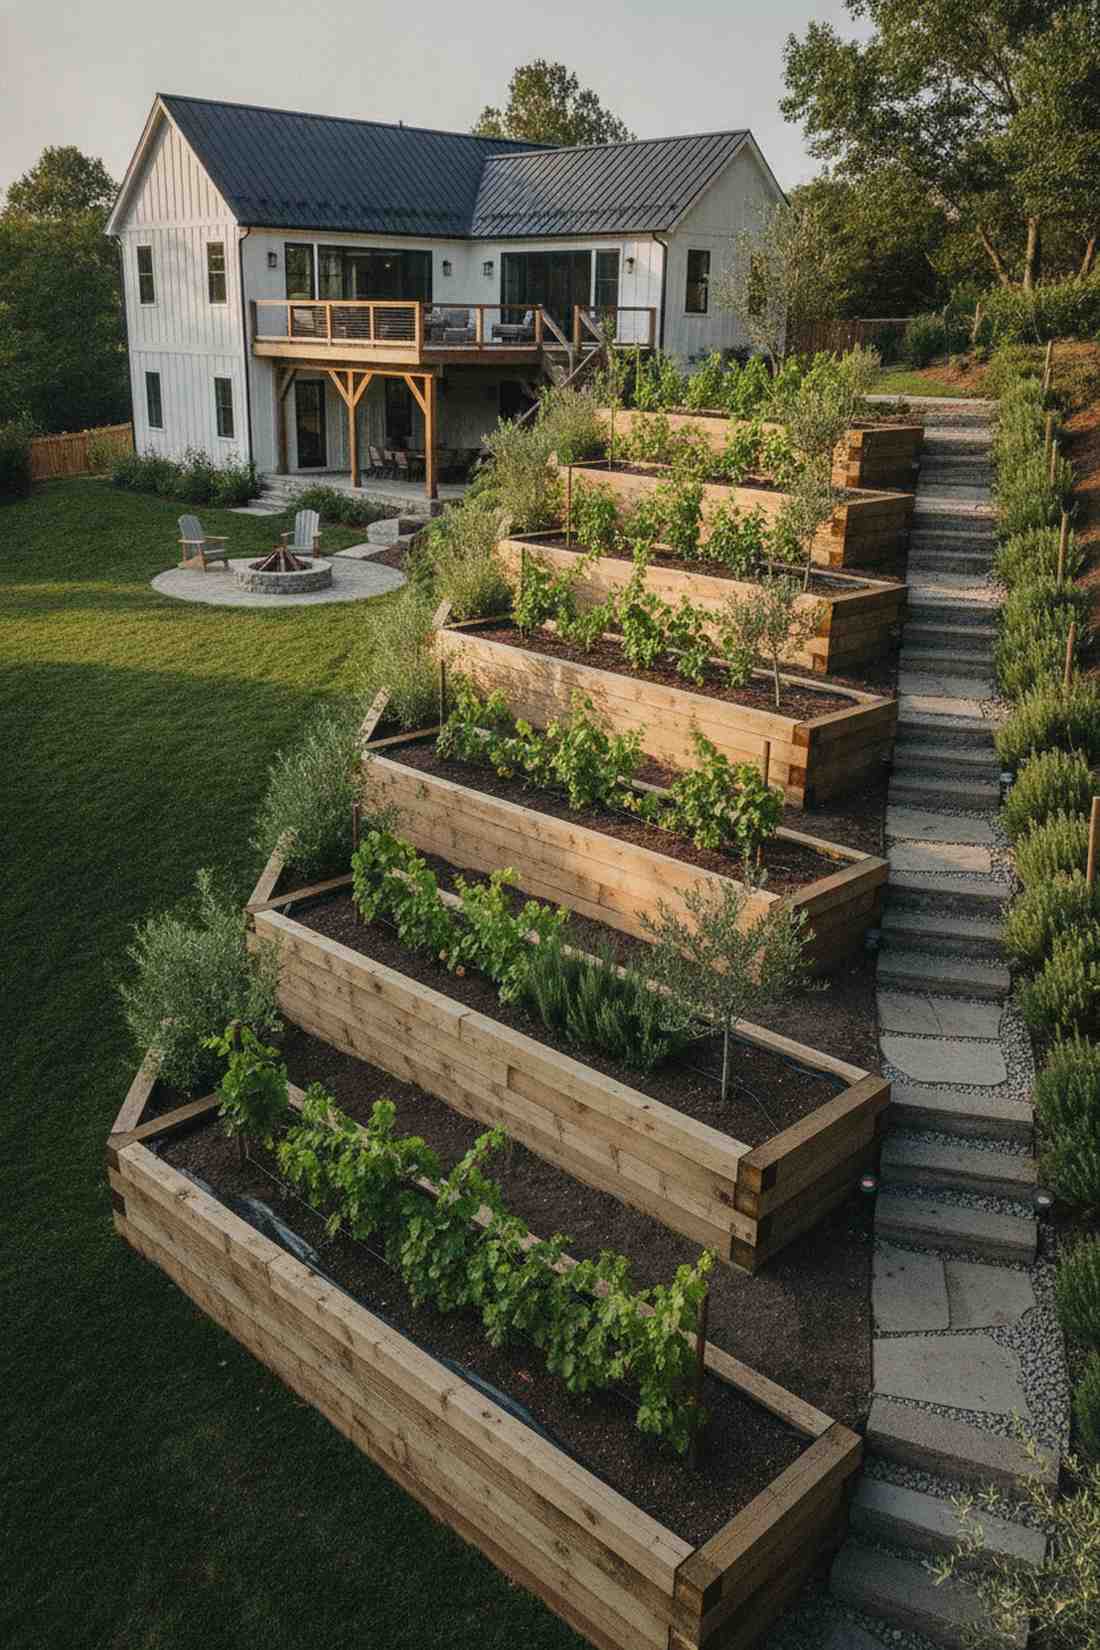
Feels like discovering a secret terraced vineyard in Italy. Stepped retaining planters transform steep, useless yard slopes into high-value real estate.
Locking these frames directly into a hillside delivers an impressively premium look while simultaneously solving massive erosion nightmares. Stepping them back creates deep, level soil pockets that completely stop rain runoff from washing your expensive compost away.
Expect to spend around $60 per step for heavy-duty reinforcement. Highly recommended for turning nightmare slopes into productive assets.
- Key Materials: 2×10 pressure-treated boards
- Vibe / Style: Italian hillside terrace
- Difficulty: Heavy hillside excavation
- Budget Breakdown: Lumber: $70 | Rebar Pins: $20.
- Creator’s Tip: Overlap the back edge of the lower bed with the front of the upper bed to create an unbreakable soil lock.
- Smart Sourcing: heavy-duty 24-inch rebar stakes and geotextile drainage fabric.
24. Corner Pyramid Design
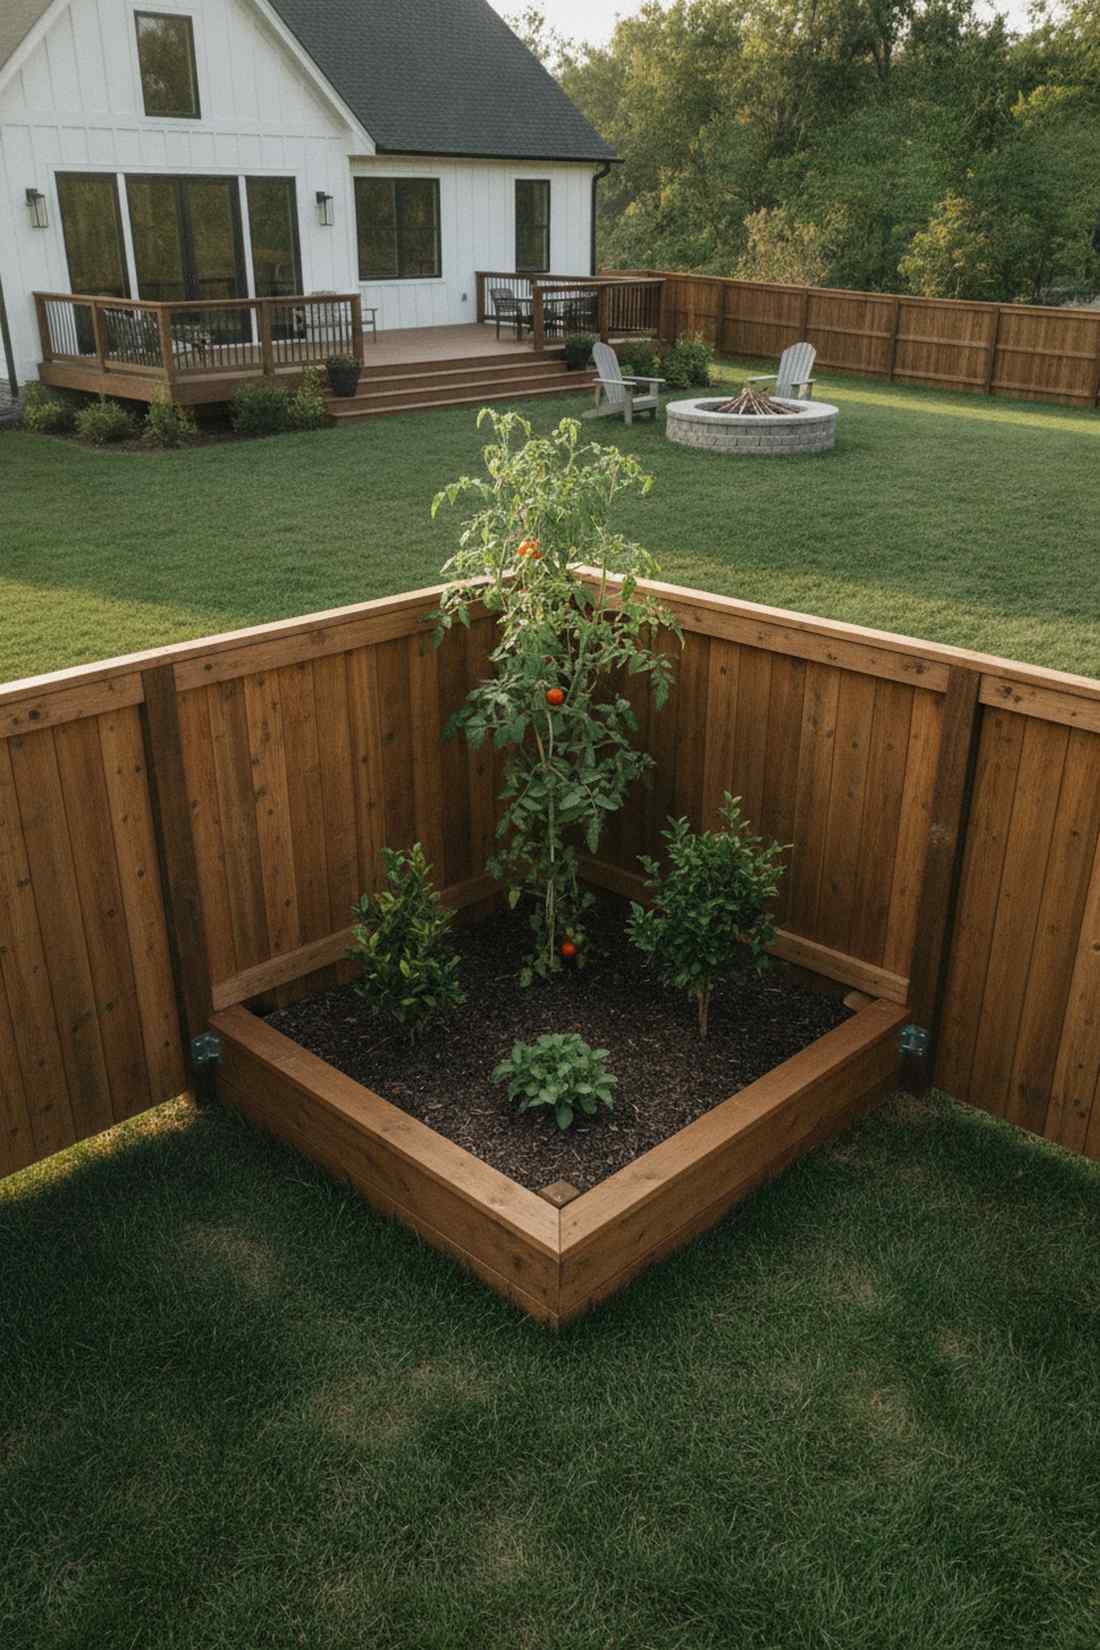
Brings sharp, modern geometry to forgotten dead zones. Triangular corner frames are perfect for utilizing awkward spaces where fences meet.
Cutting precise 45-degree angles eliminates wasted space and gives a highly customized, built-in look. This clever layout creates a massive deep-root zone right in the back corner, perfectly designed for a giant feature plant like an heirloom tomato or dwarf fruit tree.
You can build this geometric upgrade for around $45. Save this to your small-space garden hacks board!
- Key Materials: 2×6 angled cuts
- Vibe / Style: Sleek geometric integration
- Difficulty: Needs precise angle cuts
- Budget Breakdown: Wood: $40 | Corner Braces: $10.
- Creator’s Tip: Leave a slight 2-inch air gap between the wood and your fence to prevent trapping moisture against your property line.
- Smart Sourcing: adjustable steel angle brackets and premium cedar wood stain.
Most backyard setups waste ridiculous amounts of soil, but this next split-level hack cuts your dirt bill in half…
25. Bi-Level Split Depth
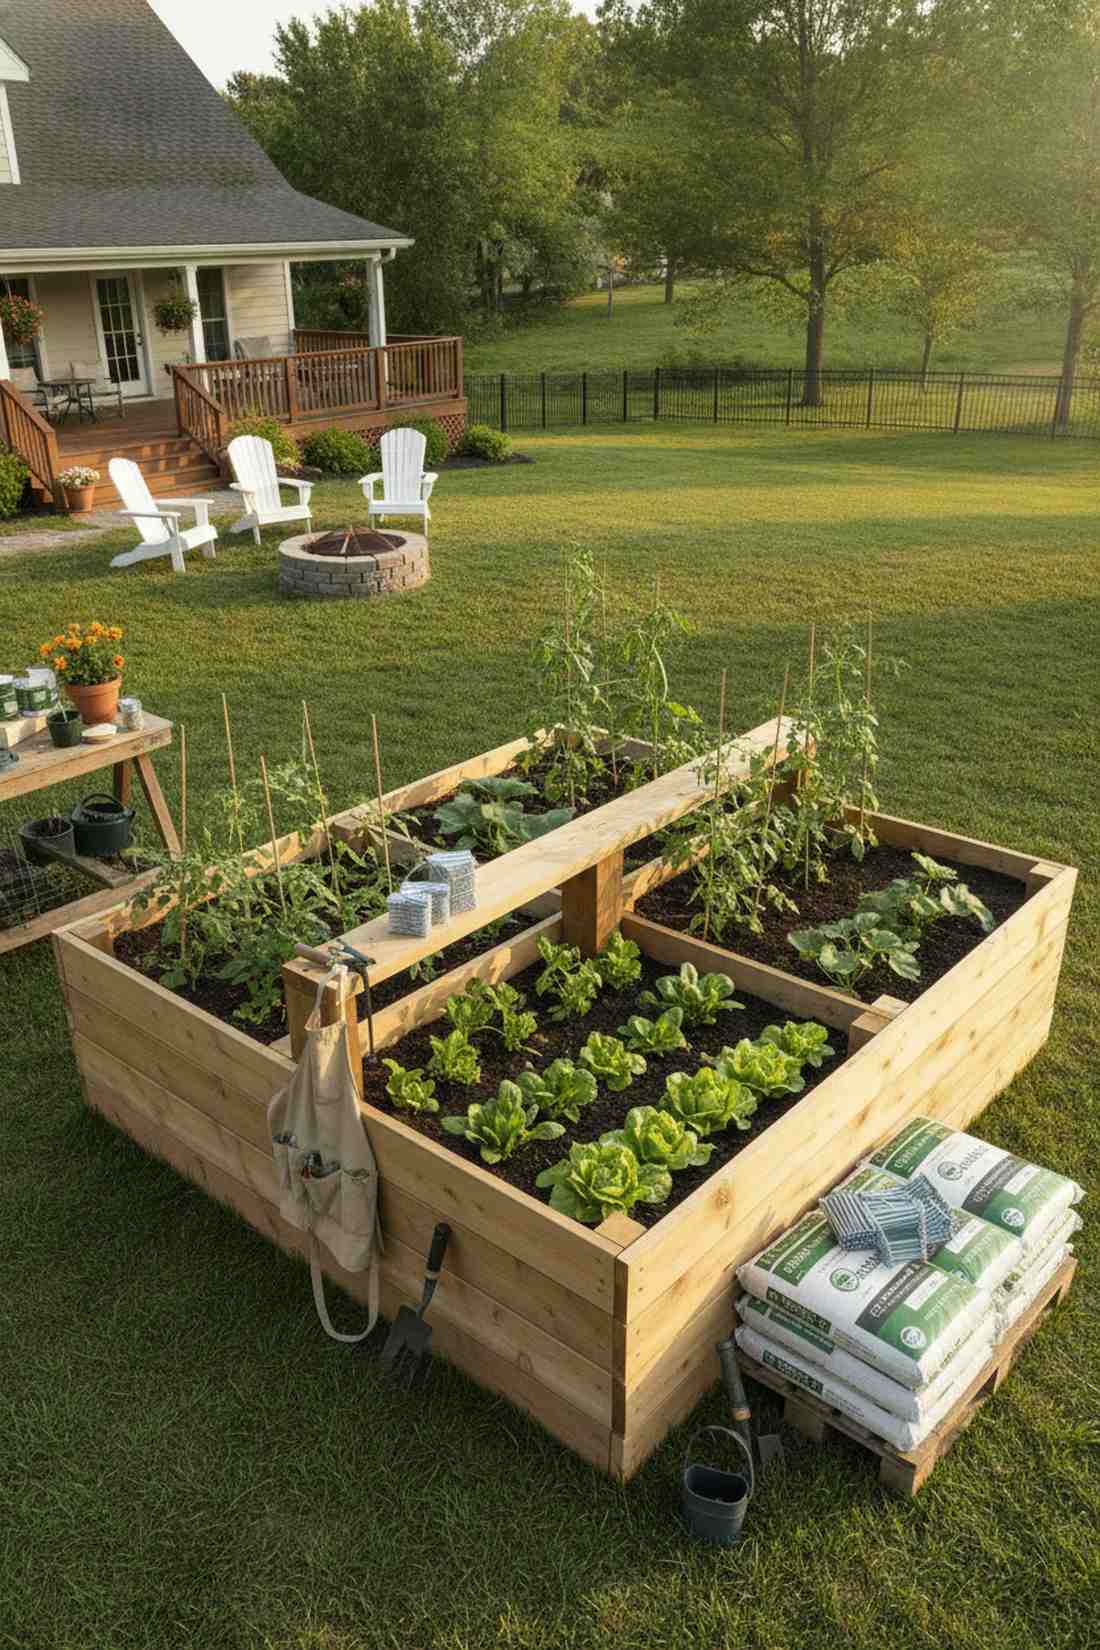
Looks like a highly engineered professional greenhouse rig. Dual-depth growing partitions look sharp while aggressively managing soil volume budgets.
Dividing a single frame into a shallow zone and a deep trench looks far more expensive than it is. This layout strictly reserves your expensive organic compost for the deep-root vegetables while using minimal soil for shallow salad greens.
Adding the divider drops your soil cost by 30% instantly. Pin this genius hack for keeping your soil budget under control!
- Key Materials: Center 4×4 dividing post
- Vibe / Style: Hyper-efficient nursery
- Difficulty: Easy modification
- Budget Breakdown: Wood: $55 | Soil Savings: -$30.
- Creator’s Tip: Orient the short section toward the South so the tall plants in the back never cast shadows on your small crops.
- Smart Sourcing: compressed organic coco coir bricks and heavy-duty wood screws (bulk pack).
26. Amphitheater Curved Tiers
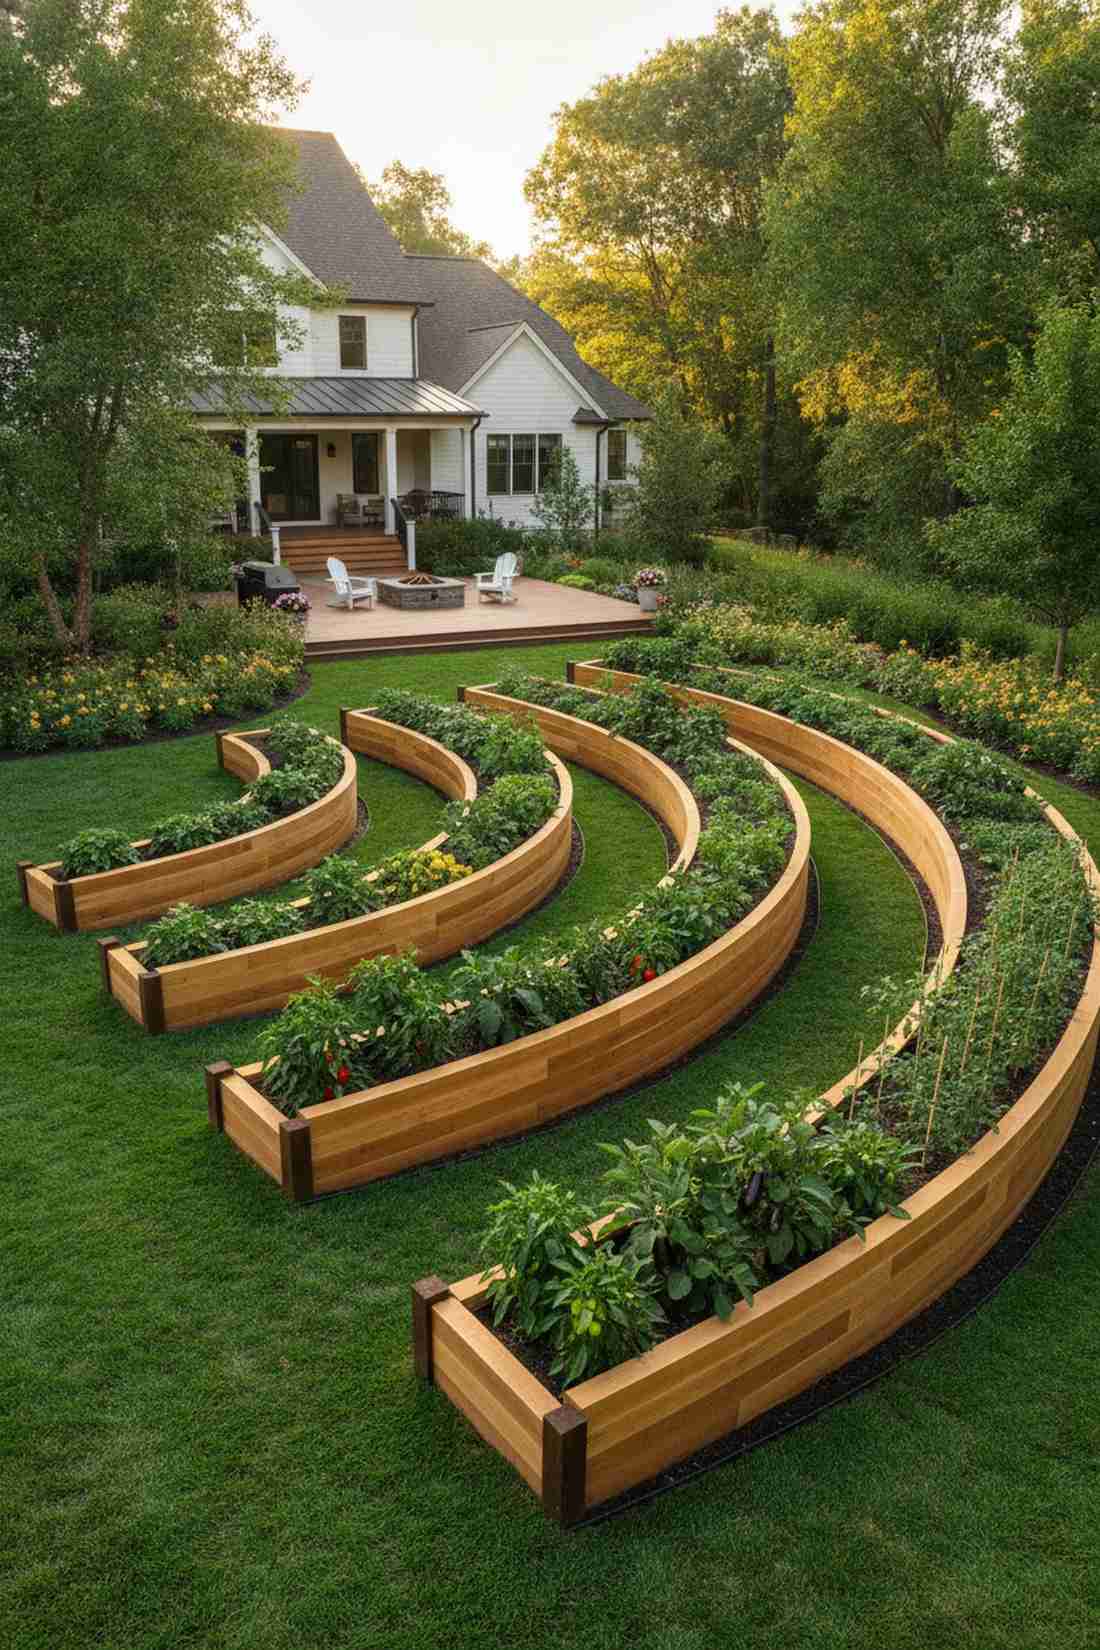
Radiates the dramatic energy of a gorgeous botanical theater. Concentric curved barriers serve as a mind-blowing focal point for flat lawns.
Using flexible thin cedar to steam-bend gentle curves avoids the rigid, blocky look of standard DIY builds. This sweeping, stadium-style architecture traps sunlight like a solar oven, keeping heat-loving peppers and eggplants thriving late into the season.
The thin flexible boards cost around $90 but deliver a $1,000 custom look. A brilliant weekend upgrade for a boring square yard.
- Key Materials: 1-inch thick flexible cedar boards
- Vibe / Style: Dramatic botanical showcase
- Difficulty: Advanced steam-bending
- Budget Breakdown: Flexible Wood: $100 | Anchors: $25.
- Creator’s Tip: Soak the thin boards in water overnight and bend them slowly around heavy stakes to prevent dangerous snap-back.
- Smart Sourcing: heavy-duty wooden landscaping stakes and flexible landscape edging rolls.
27. Offset Dual-Height

Feels like a chic, stylized urban roof garden. Staggered parallel boxes create stunning visual depth perception in brutally small backyards.
Pushing a towering 24-inch frame directly behind a low 11-inch frame delivers an absurdly high-end layered finish. This strategic height variation breaks up the ugly flat plane of a tiny yard, allowing massive vines and tiny berries to coexist without fighting for light.
This dynamic layout costs around $130 to build simultaneously. Save this idea if your tiny yard feels overwhelmingly flat!
- Key Materials: Mixed 2×6 and 2×12 lumber
- Vibe / Style: Dynamic urban roof-deck
- Difficulty: Simple box assembly
- Budget Breakdown: Lumber: $120 | Joining Brackets: $15.
- Creator’s Tip: Leave exactly 18 inches between the two frames so you have a hidden trench to stand in while pruning.
- Smart Sourcing: flat steel mending plates (bulk pack) and heavy-duty knee pads.
Space-Efficient Wood Raised Bed Layouts
Intelligent spatial planning transforms limited areas into productive gardens through clever bed orientation and dimensional optimization. These configurations prioritize accessibility and plant density.
28. Keyhole Garden Bed
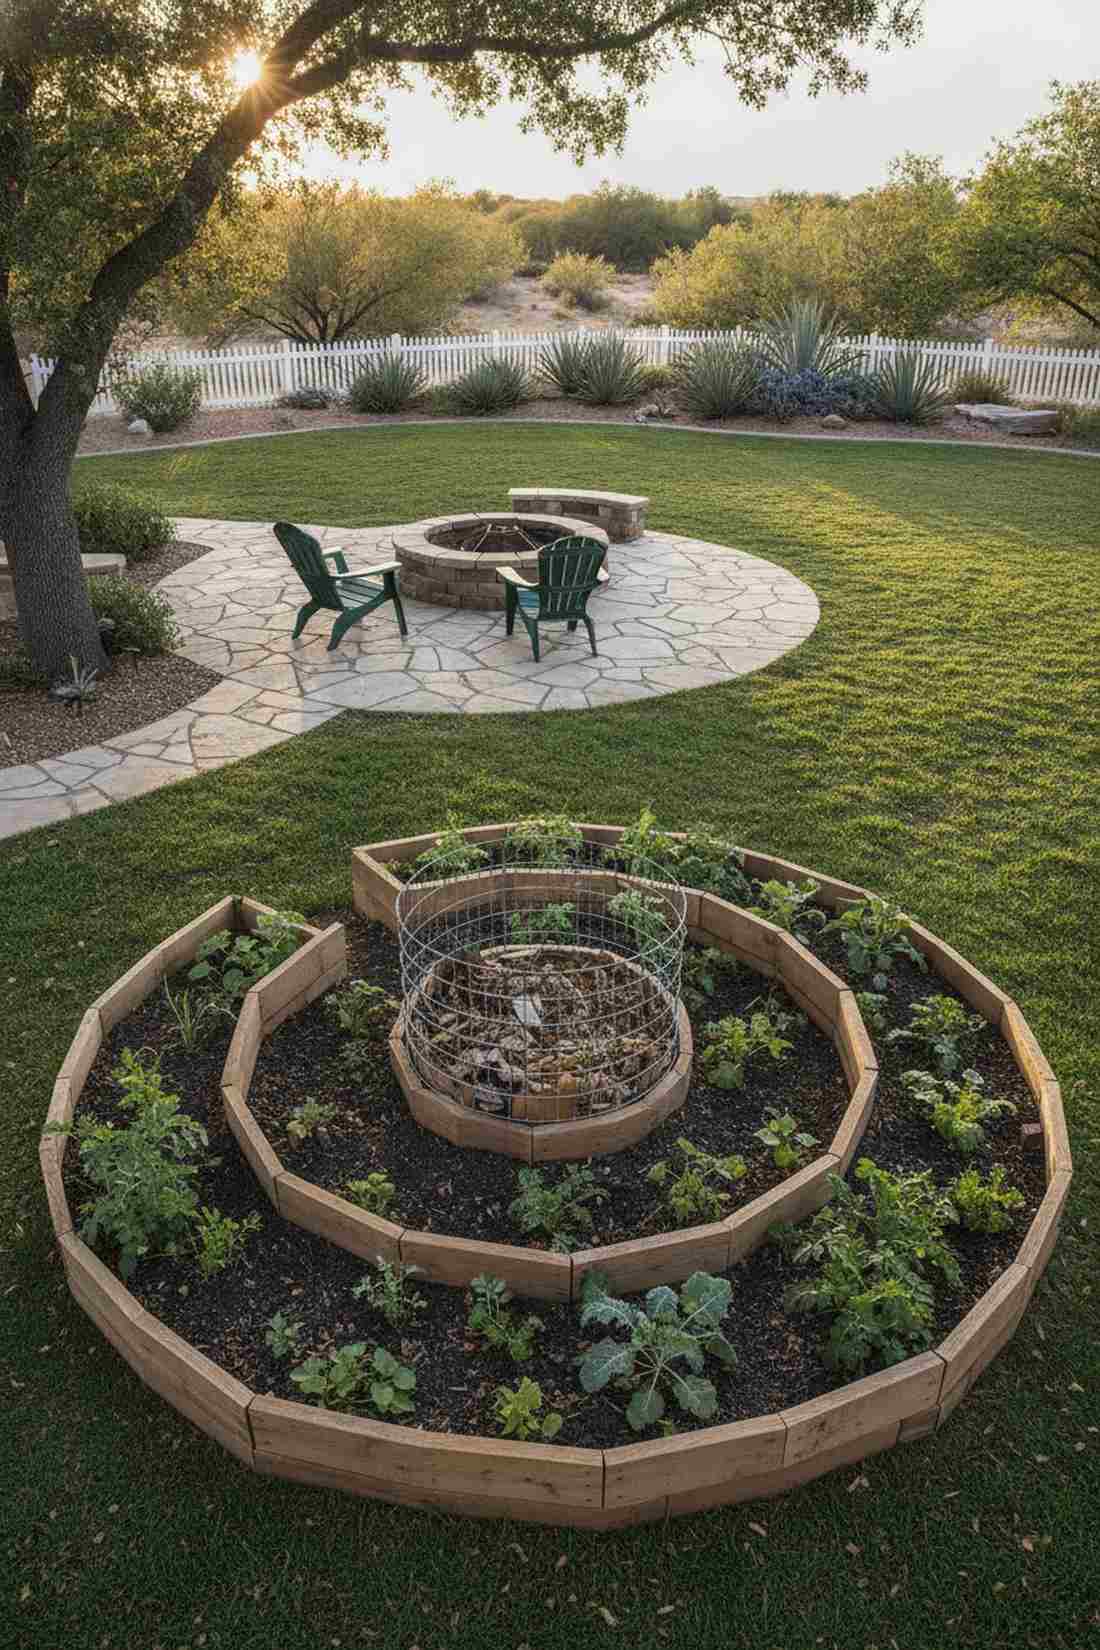
Evokes the brilliance of ancient drought-proof desert farming. Circular keyhole feeding stations are an absolute marvel for ultra-dry backyard climates.
Integrating a central compost tower right into the structure delivers an absurdly high-end finish with zero wasted pathway space. By tossing kitchen scraps directly into the center cage, deep moisture and organic nutrients wick outward into the soil completely automatically.
The wire core and lumber cost around $70 total. Pin this if you want a garden that practically fertilizes itself!
- Key Materials: Curved wood and central wire mesh
- Vibe / Style: Permaculture genius
- Difficulty: Moderate circular framing
- Budget Breakdown: Wood: $50 | Wire Mesh: $20.
- Creator’s Tip: Line the central compost basket with loose cardboard to retain moisture while letting the worms travel freely.
- Smart Sourcing: heavy-duty galvanized hardware cloth (bulk roll) and premium compost starter powder.
29. L-Shaped Corner Utilization
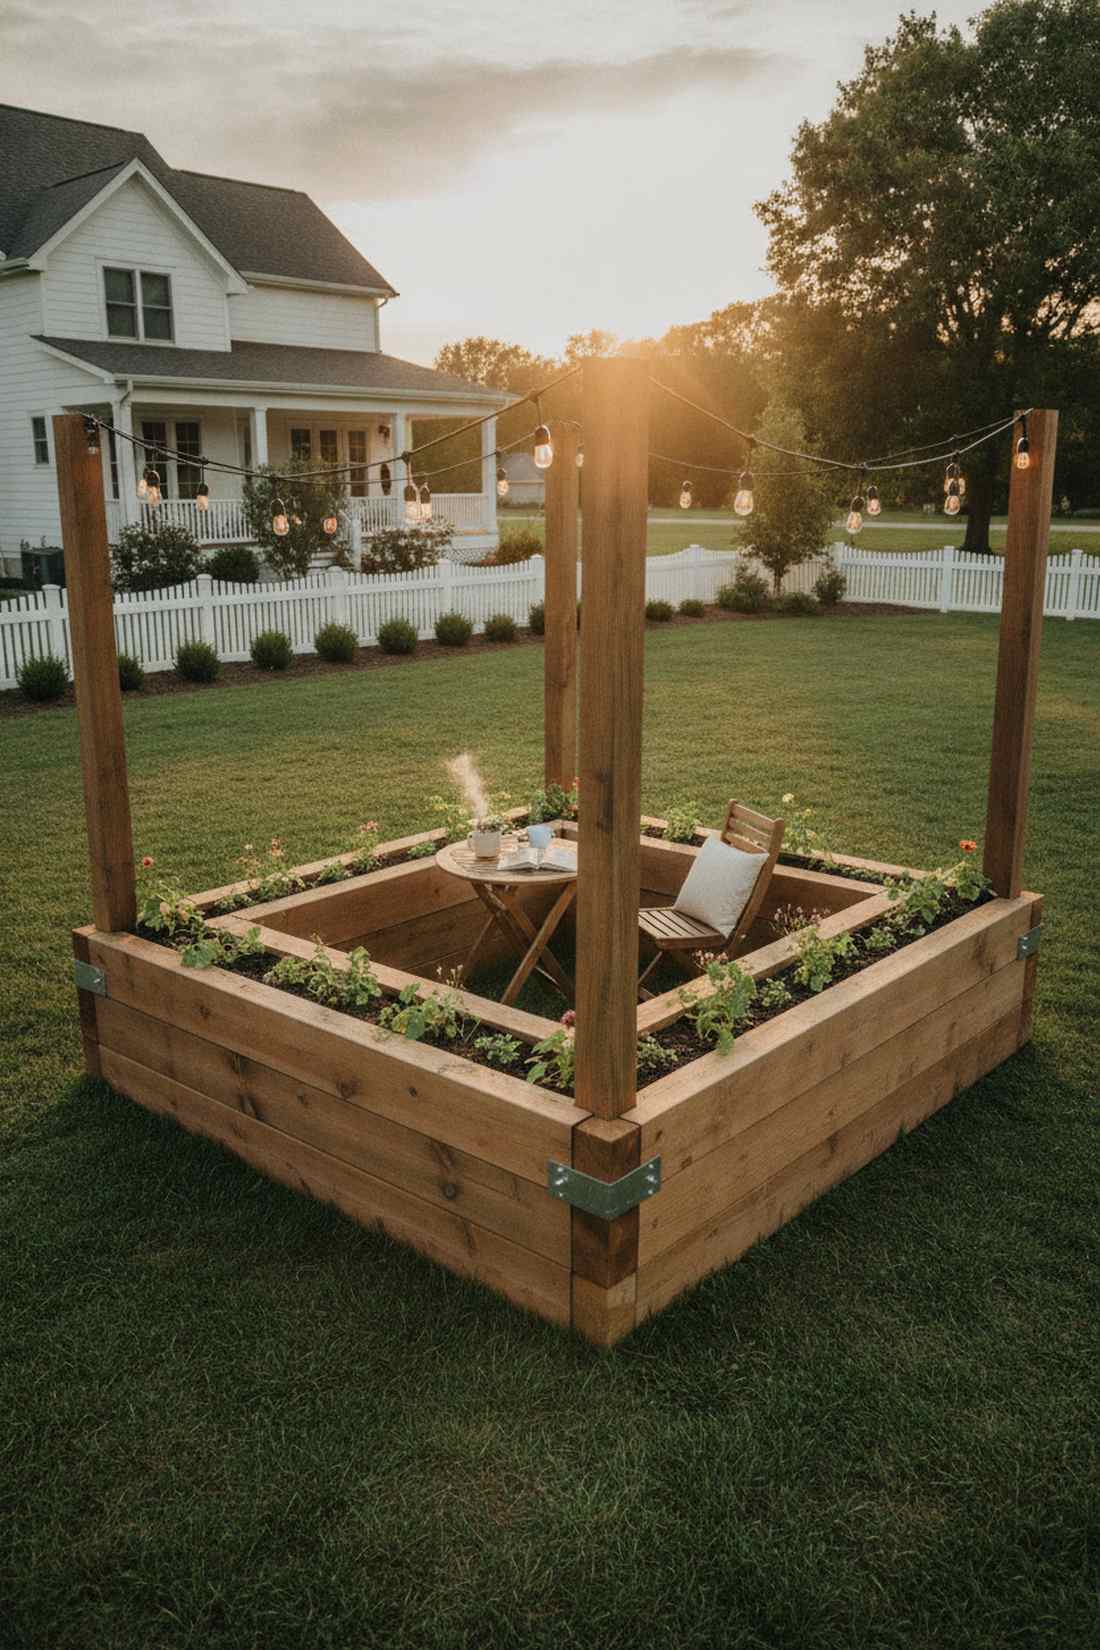
Feels like a cozy, private courtyard oasis. Wrap-around timber borders turn unused fence junctions into a massively productive wrapping sanctuary.
Fusing two boxes with a shared structural post avoids the ugly gap that plagues most modular yard setups. This continuous hugging layout creates a brilliant micro-climate that physically blocks harsh winter winds, protecting delicate seedlings from snapping.
Building the connected “L” runs about $85 in materials. A must-save idea if you have empty, dead corners in your yard.
- Key Materials: 4×4 joining posts and long planks
- Vibe / Style: Sheltered courtyard embrace
- Difficulty: Requires square corner alignment
- Budget Breakdown: Wood: $80 | Corner Post: $15.
- Creator’s Tip: Use the interior negative space of the “L” to place a small bistro chair for an instant hidden reading nook.
- Smart Sourcing: heavy-duty right-angle corner clamps and weatherproof outdoor string lights.
30. Narrow Access Beds
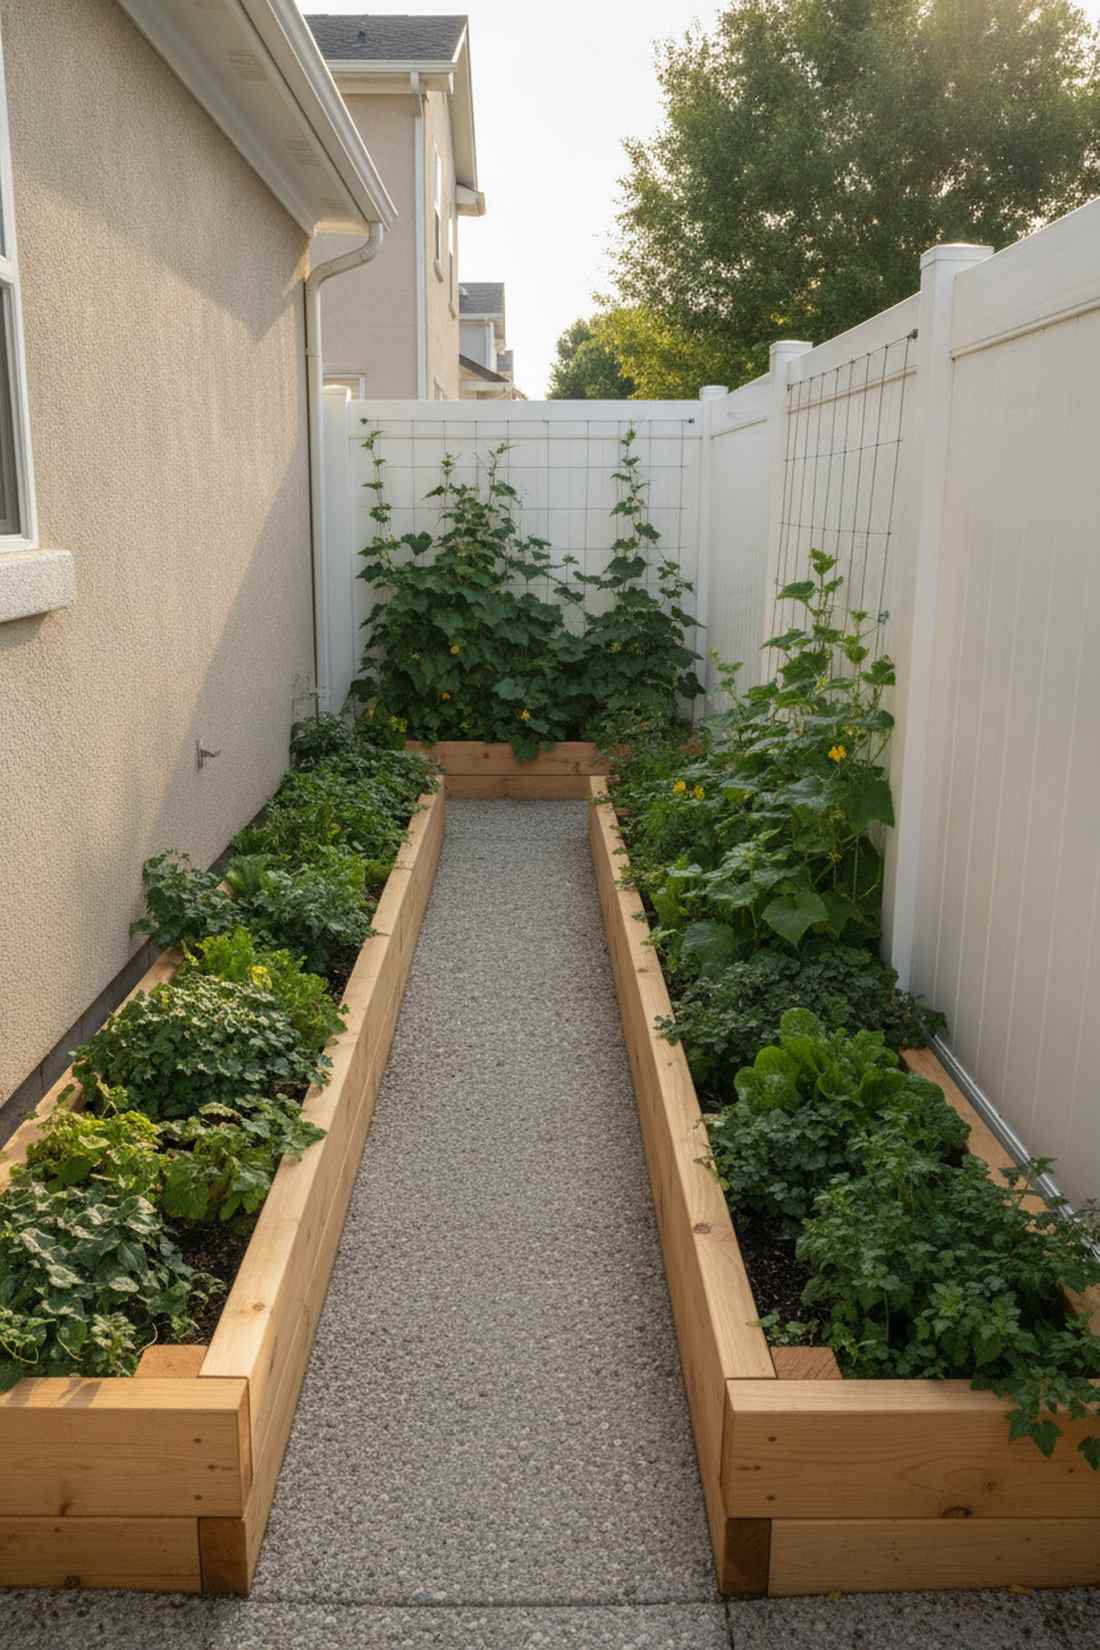
Radiates a crisp, highly manicured alleyway aesthetic. Slim perimeter frames look incredibly sharp hugging the edge of a bright vinyl fence.
Restricting the width to a mere 24 inches looks far more expensive than it is by forcing a dense, lush wall of green. This space-saving layout guarantees you never have to step directly on the soil, which prevents the deadly root compaction that ruins vegetable yields.
These slender units cost only $30 to piece together. Pin this if you have a narrow side-yard that desperately needs life!
- Key Materials: 2×8 dimensional planks
- Vibe / Style: Clean side-yard alley
- Difficulty: Ultra-fast beginner build
- Budget Breakdown: Wood: $30 | Anchors: $5.
- Creator’s Tip: Install an invisible wire trellis on the fence immediately behind the box to drag the greenery upwards.
- Smart Sourcing: stainless steel wire trellis kits and heavy-duty vine training clips.
Most backyard setups get permanently stuck in one layout, but this next modular trick lets you change your mind every single year…
31. Modular Grid System
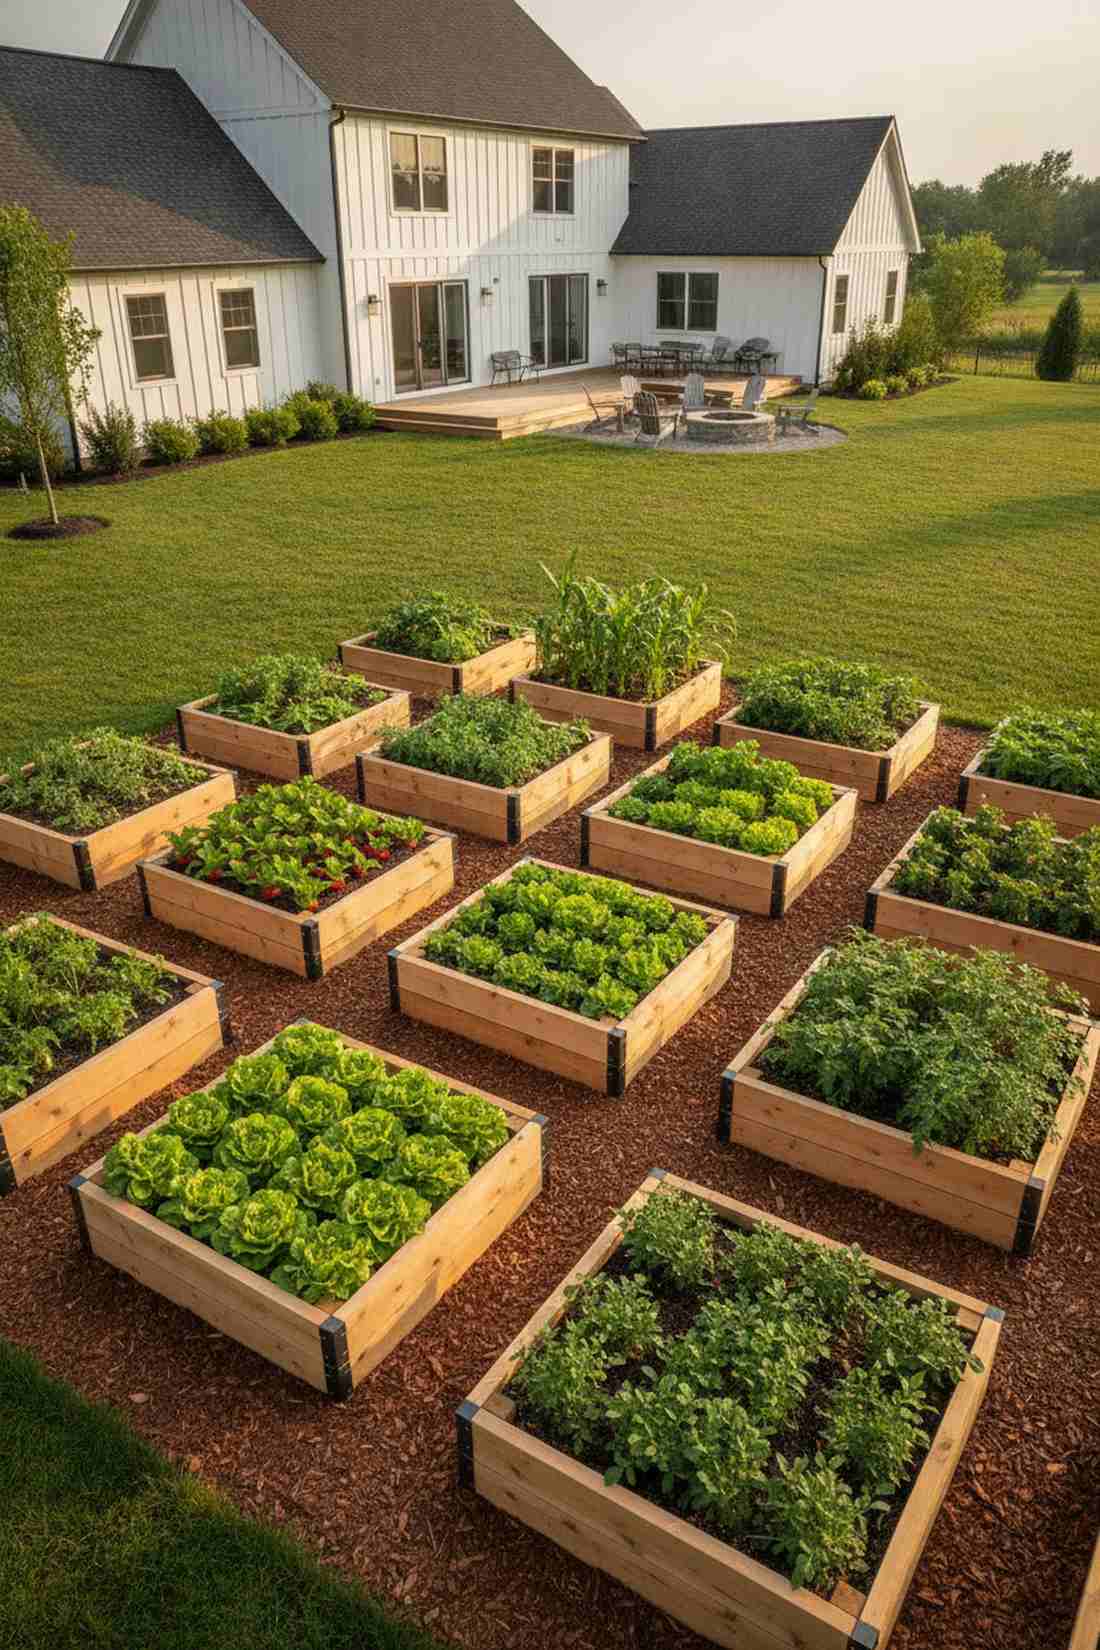
Feels like a pristine, perfectly scaled architectural model. Uniform block planting grids deliver an immensely satisfying visual order to chaotic yards.
Utilizing tool-free drop-in brackets completely changes the game by allowing you to unpin and move the entire farm during winter. Spacing these identical cubes perfectly apart gives a high-end designer landscape flow while making crop rotation ridiculously easy to track.
Each box drops to roughly $25 when you buy the wood in bulk. Save this layout for the ultimate flexible backyard system.
- Key Materials: 3×3 identical cuts and pin-brackets
- Vibe / Style: Orderly grid matrix
- Difficulty: Repetitive but very easy
- Budget Breakdown: Per Bed Wood: $15 | Brackets: $15.
- Creator’s Tip: Fill the walking paths between the grids with deep cedar chips to completely eradicate muddy shoes after watering.
- Smart Sourcing: modular raised bed hinge brackets and bulk organic cedar mulch.
32. Wagon Wheel Spoke Design
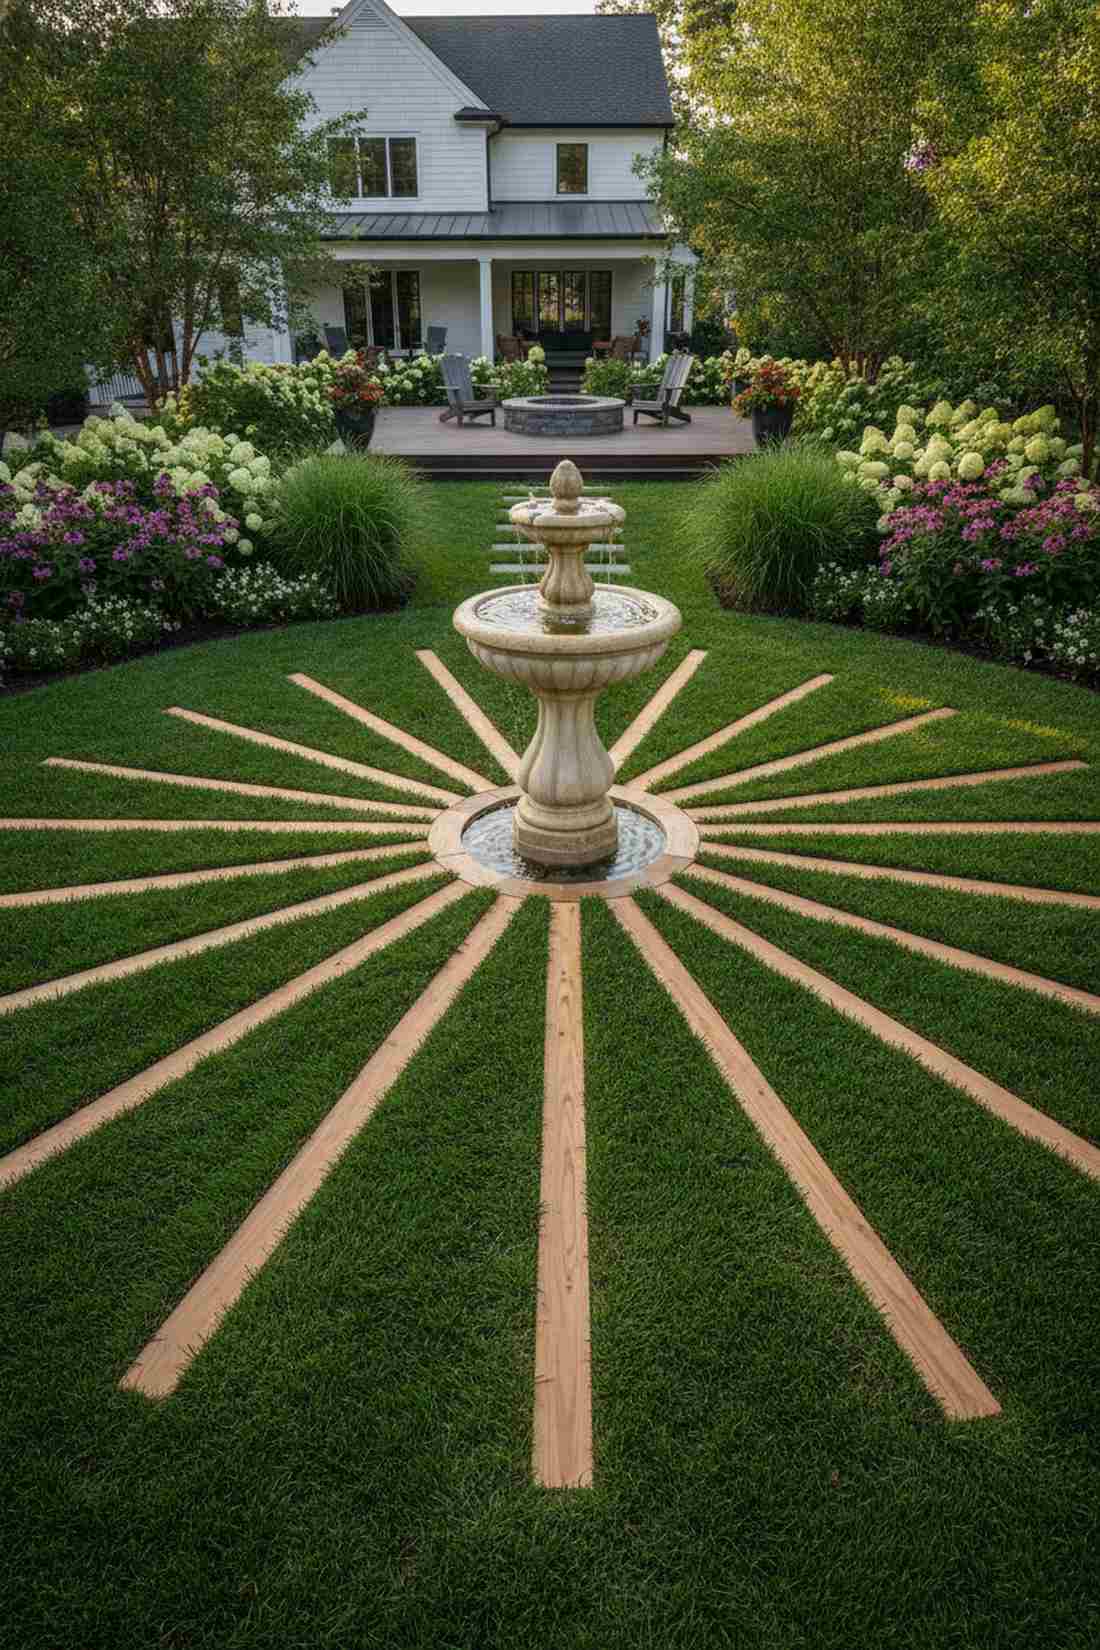
Looks like a majestic sun-dial from a royal botanical estate. Radiating triangular spokes transform flat lawns into breathtaking geometric centerpieces.
Angling the cuts to form perfect pie slices completely removes the boring, blocky aesthetic of traditional yard farms. This radiating pattern naturally forces brilliant pathways that funnel directly to a stunning central focal point, like a birdbath or giant cascading pot.
This complex layout costs roughly $150 to complete perfectly. Pin this if you want an absolute showstopper in the middle of your grass!
- Key Materials: Precision angled lumber
- Vibe / Style: Royal estate centerpiece
- Difficulty: Advanced measuring needed
- Budget Breakdown: Wood: $130 | Center Feature: $40.
- Creator’s Tip: Use a central hub post to temporarily anchor a stringline compass so every spoke is mathematically perfectly spaced.
- Smart Sourcing: premium outdoor stone birdbaths and heavy-duty digital angle finders.
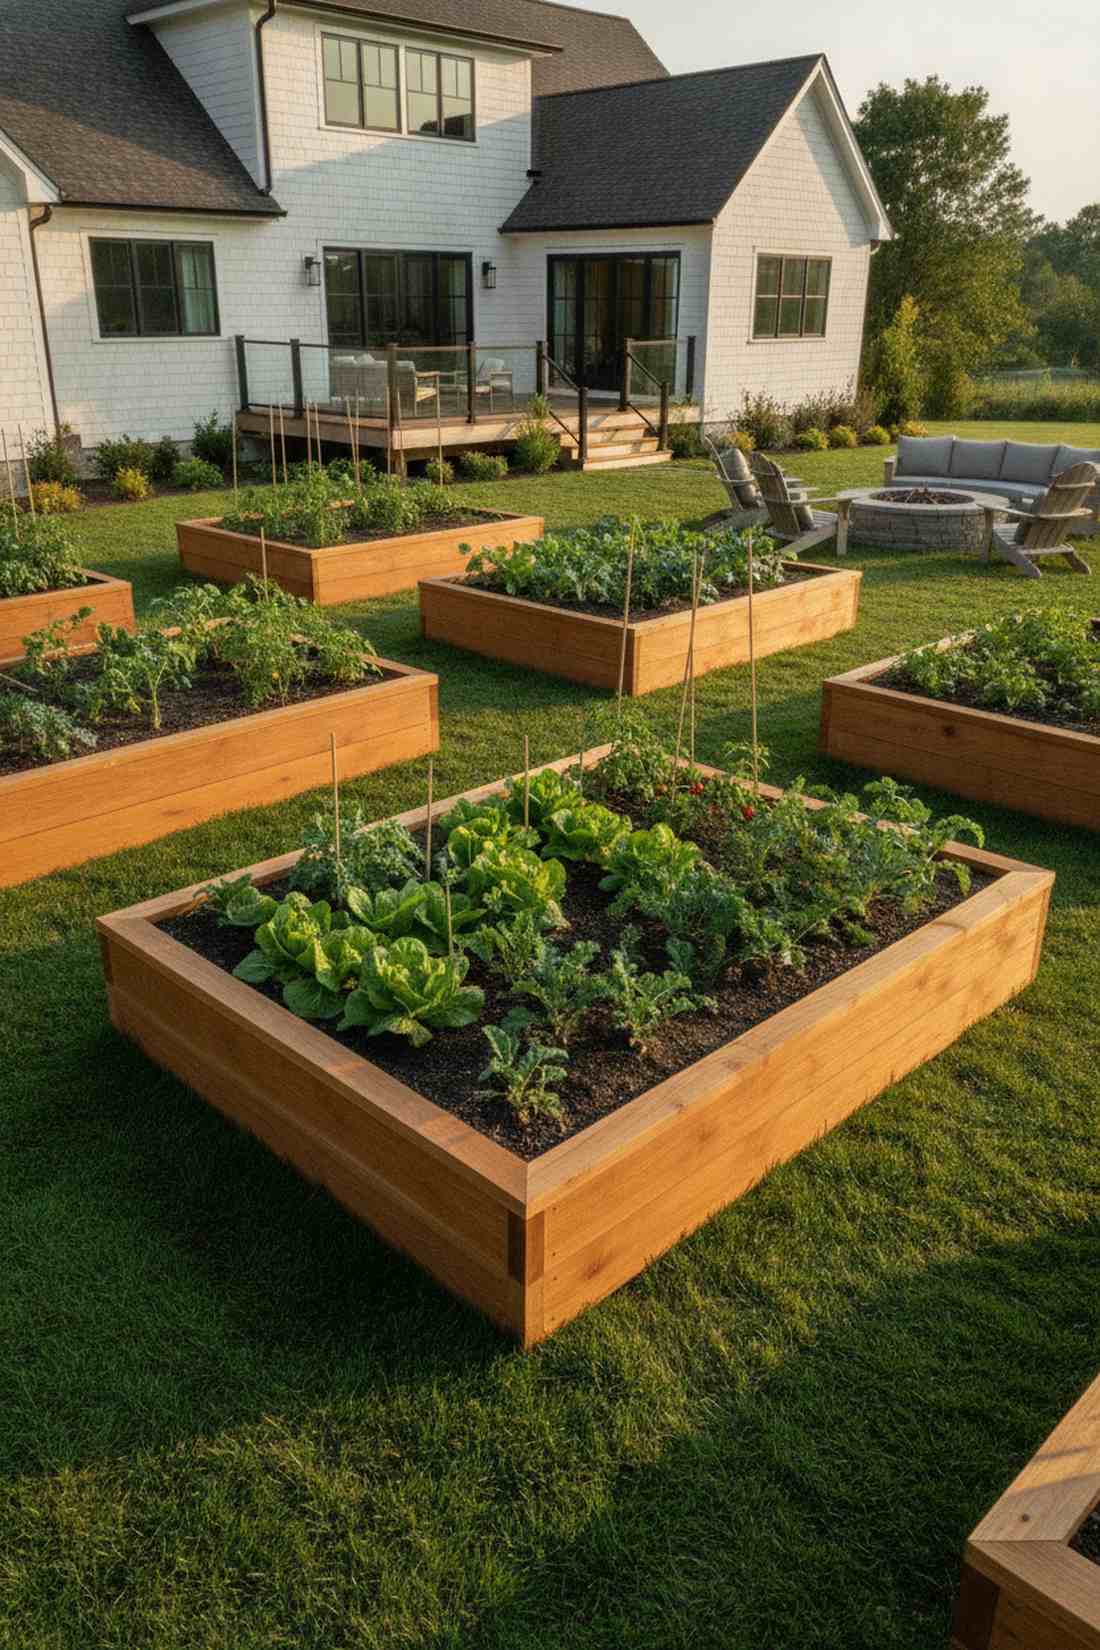
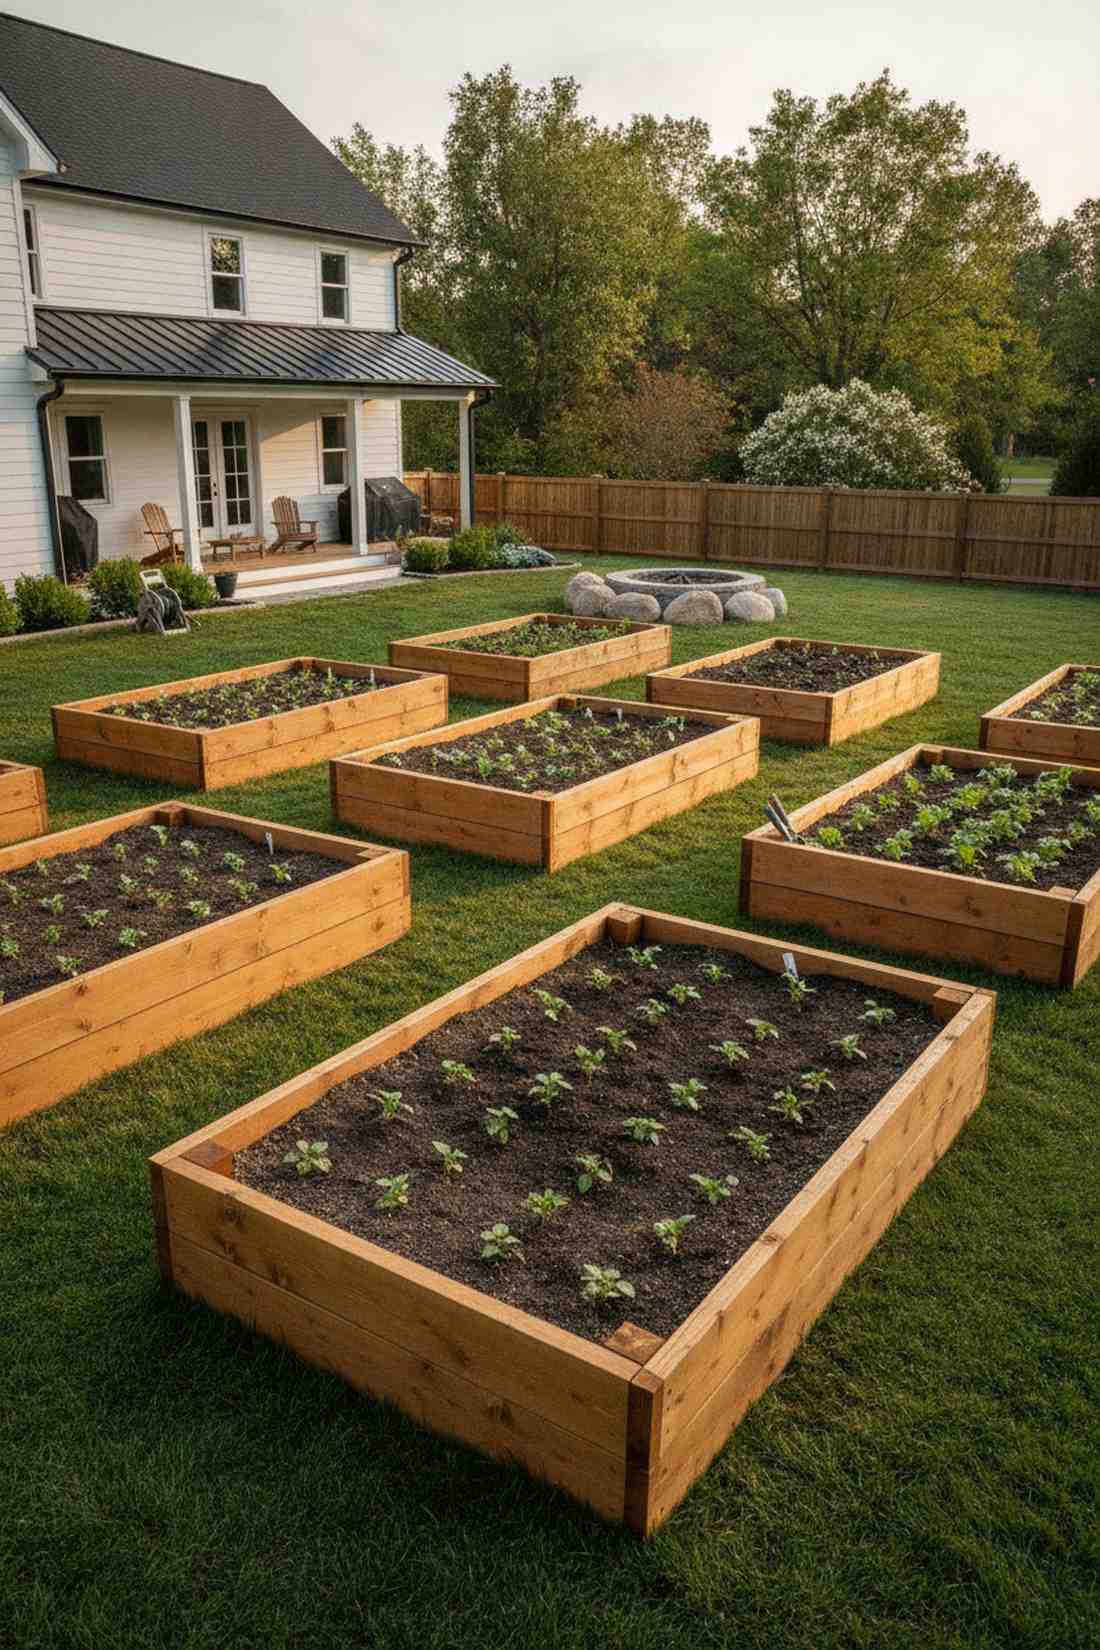
33. Twin Parallel Beds
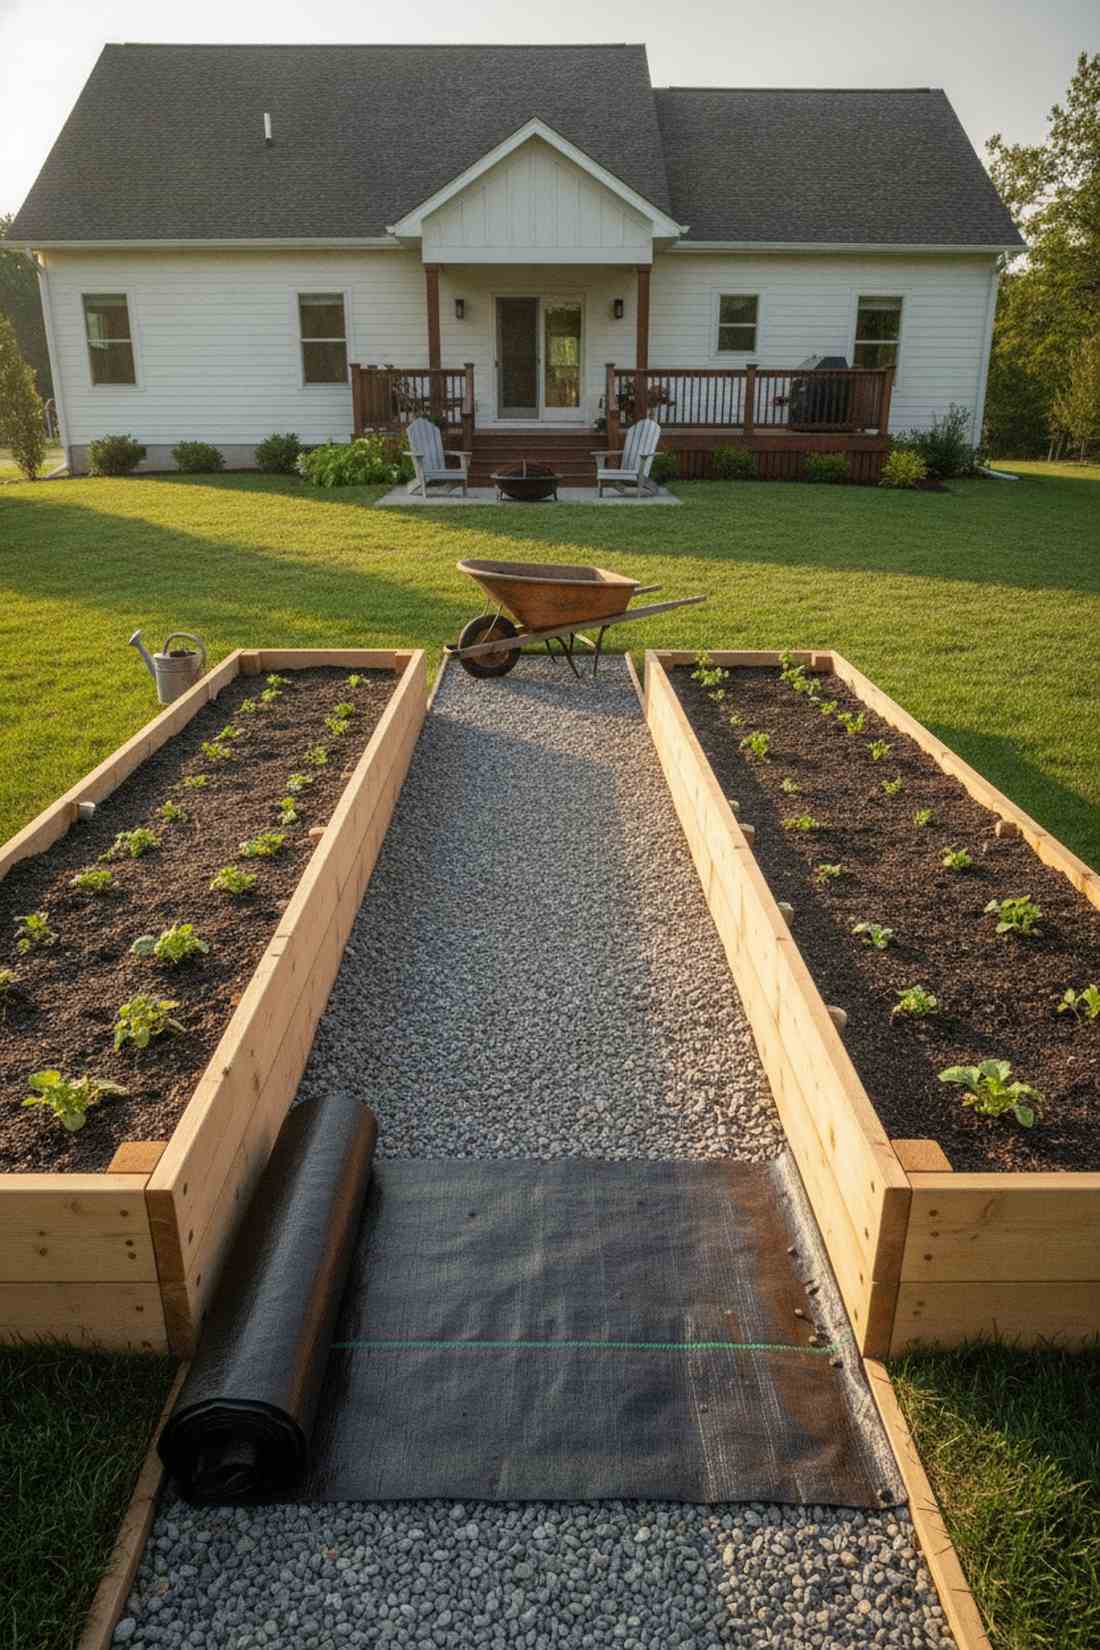
Radiates a crisp, highly professional commercial growing vibe. Symmetrical mirrored frames bring ultimate harmony to long, narrow property lines.
Duplicating the exact same blueprint across a 3-foot gravel aisle delivers a surprisingly premium look by forcing absolute visual symmetry. This classic orientation guarantees perfect, unshaded sun exposure while providing plenty of wheelbarrow clearance for heavy harvest days.
Building twins drops your waste cuts to zero, costing about $90 total. Highly recommended for optimizing boring rectangular backyards.
- Key Materials: Twin 4×8 identical frames
- Vibe / Style: Professional mirror symmetry
- Difficulty: Fast, straight cuts
- Budget Breakdown: Wood x2: $80 | Screws: $10.
- Creator’s Tip: Lay down a heavy strip of weed fabric in the central aisle before pouring gravel to ensure the path stays pristine forever.
- Smart Sourcing: commercial grade weed barrier (bulk roll) and premium organic potting soil mix.
34. U-Shaped Workspace
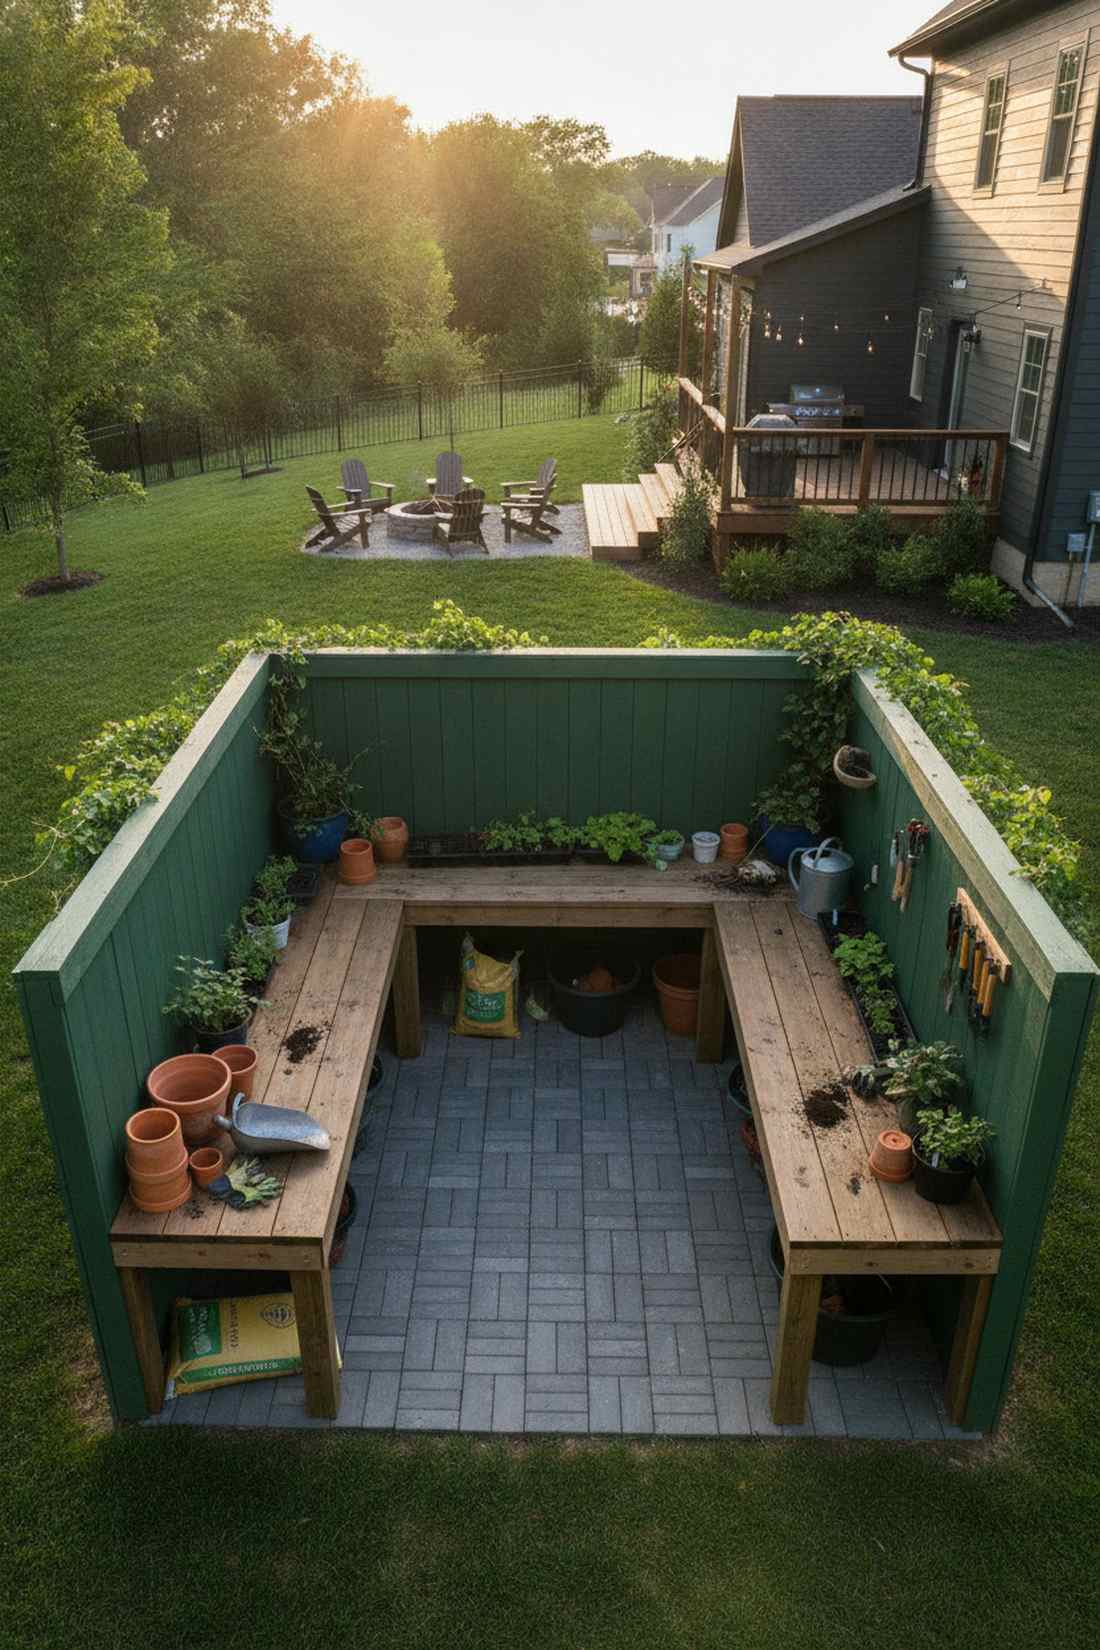
Feels like stepping into a private, green-walled command center. Enclosed wrap-around perimeters act as the ultimate immersive potting station.
Fusing three sides together blocks out ugly neighborhood sights and avoids the classic mistake of scattering tools across the yard. This contained layout effectively builds an outdoor room, keeping your mess fully hidden while you mix soils and prep fragile seedlings.
The connected structure runs about $140 for massive production capability. Save this to your master garden layout board!
- Key Materials: Long connecting backboards
- Vibe / Style: Immersive working cove
- Difficulty: Moderate alignment needs
- Budget Breakdown: Lumber: $120 | Brackets: $25.
- Creator’s Tip: Cap the interior open space with high-end patio pavers so you have a rock-solid, mud-free floor to stand on.
- Smart Sourcing: interlocking outdoor deck tiles and heavy-duty potting soil scoops.
Most beginners think you have to spend hundreds on lumber, but this next literal trash-to-treasure hack proves them totally wrong…
Budget-Friendly Wood Constructions Under $50
Cost-effective building methods utilize reclaimed materials, simplified joinery, and strategic material selection to create functional raised beds on minimal budgets. These approaches prioritize resourcefulness over premium materials.
35. Pallet Deconstruction Beds
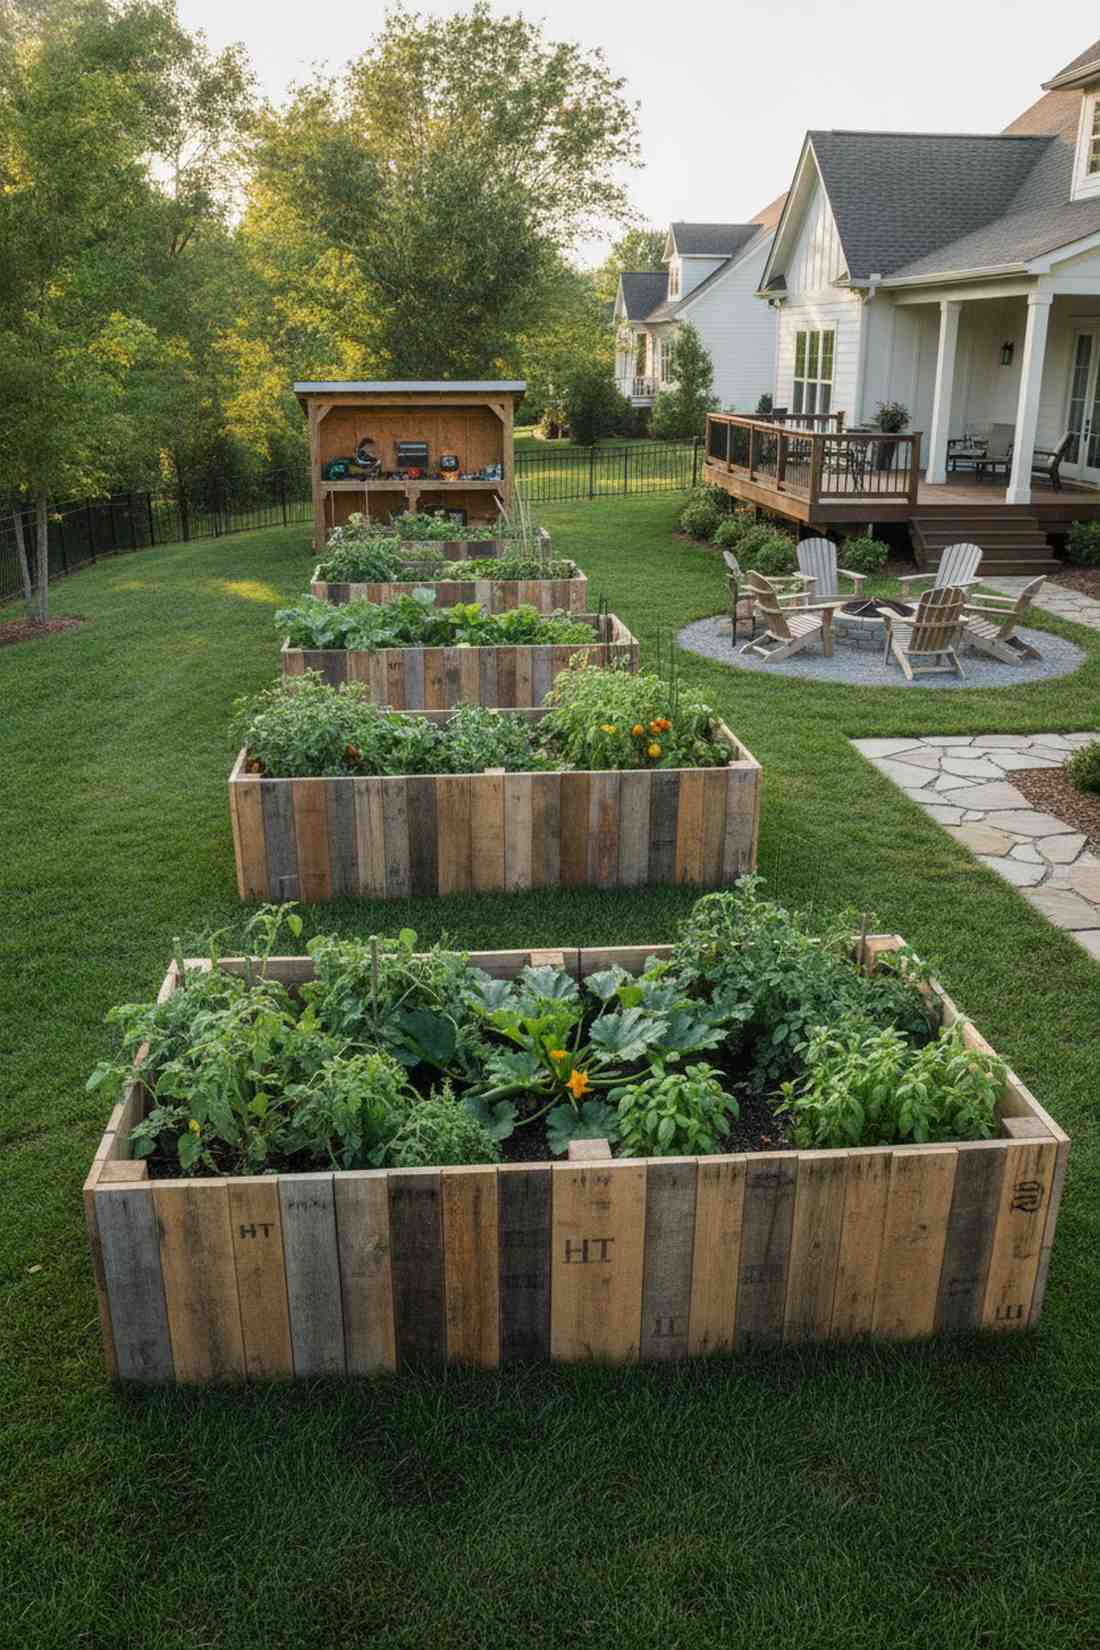
Radiates the ultimate gritty, sustainable upcycling triumph. Salvaged shipping pallet borders are the absolute pinnacle of zero-dollar garden hacks.
Slicing through the nails with a metal blade completely removes the frustrating splitting that ruins most pallet teardowns. As long as you confirm the HT (Heat-Treated) stamp, this rough-hewn look perfectly mimics expensive reclaimed boutique wood with absolutely zero toxic chemical leaks.
This layout is literally 100% free if you own a saw. Pin this for the ultimate zero-budget backyard flex!
- Key Materials: HT-stamped shipping pallets
- Vibe / Style: Zero-waste industrial rustic
- Difficulty: Demanding teardown labor
- Budget Breakdown: Wood: $0 | Blades: $10.
- Creator’s Tip: Do not use a hammer to pry the boards; use a reciprocating saw to slice the hidden nails instantly.
- Smart Sourcing: metal-cutting reciprocating saw blades (bulk pack) and heavy-duty pry bar sets.
36. Pine Board Economy
Feels like a clean, bright blank canvas waiting to flourish. Treated raw pine frames are the undisputed kings of high-volume, low-cost farming.
Slapping a heavy coat of natural oil on standard cheap pine completely avoids the classic rotting mistake that destroys softwoods in a single season. This incredibly cheap setup looks indistinguishable from expensive cedar once you stain it, letting you build massive grids on pennies.
A single massive box costs under $20. Save this secret if you need to build ten beds on a shoestring budget.
- Key Materials: 2×10 standard untreated pine
- Vibe / Style: Clean budget functional
- Difficulty: Extremely simple setup
- Budget Breakdown: Pine: $15 | Oil: $5.
- Creator’s Tip: Drench the inside faces of the pine with pure raw linseed oil to naturally waterproof it without killing your soil biology.
- Smart Sourcing: 100% pure raw linseed oil and bulk exterior wood stain.
37. Corner Bracket Assembly
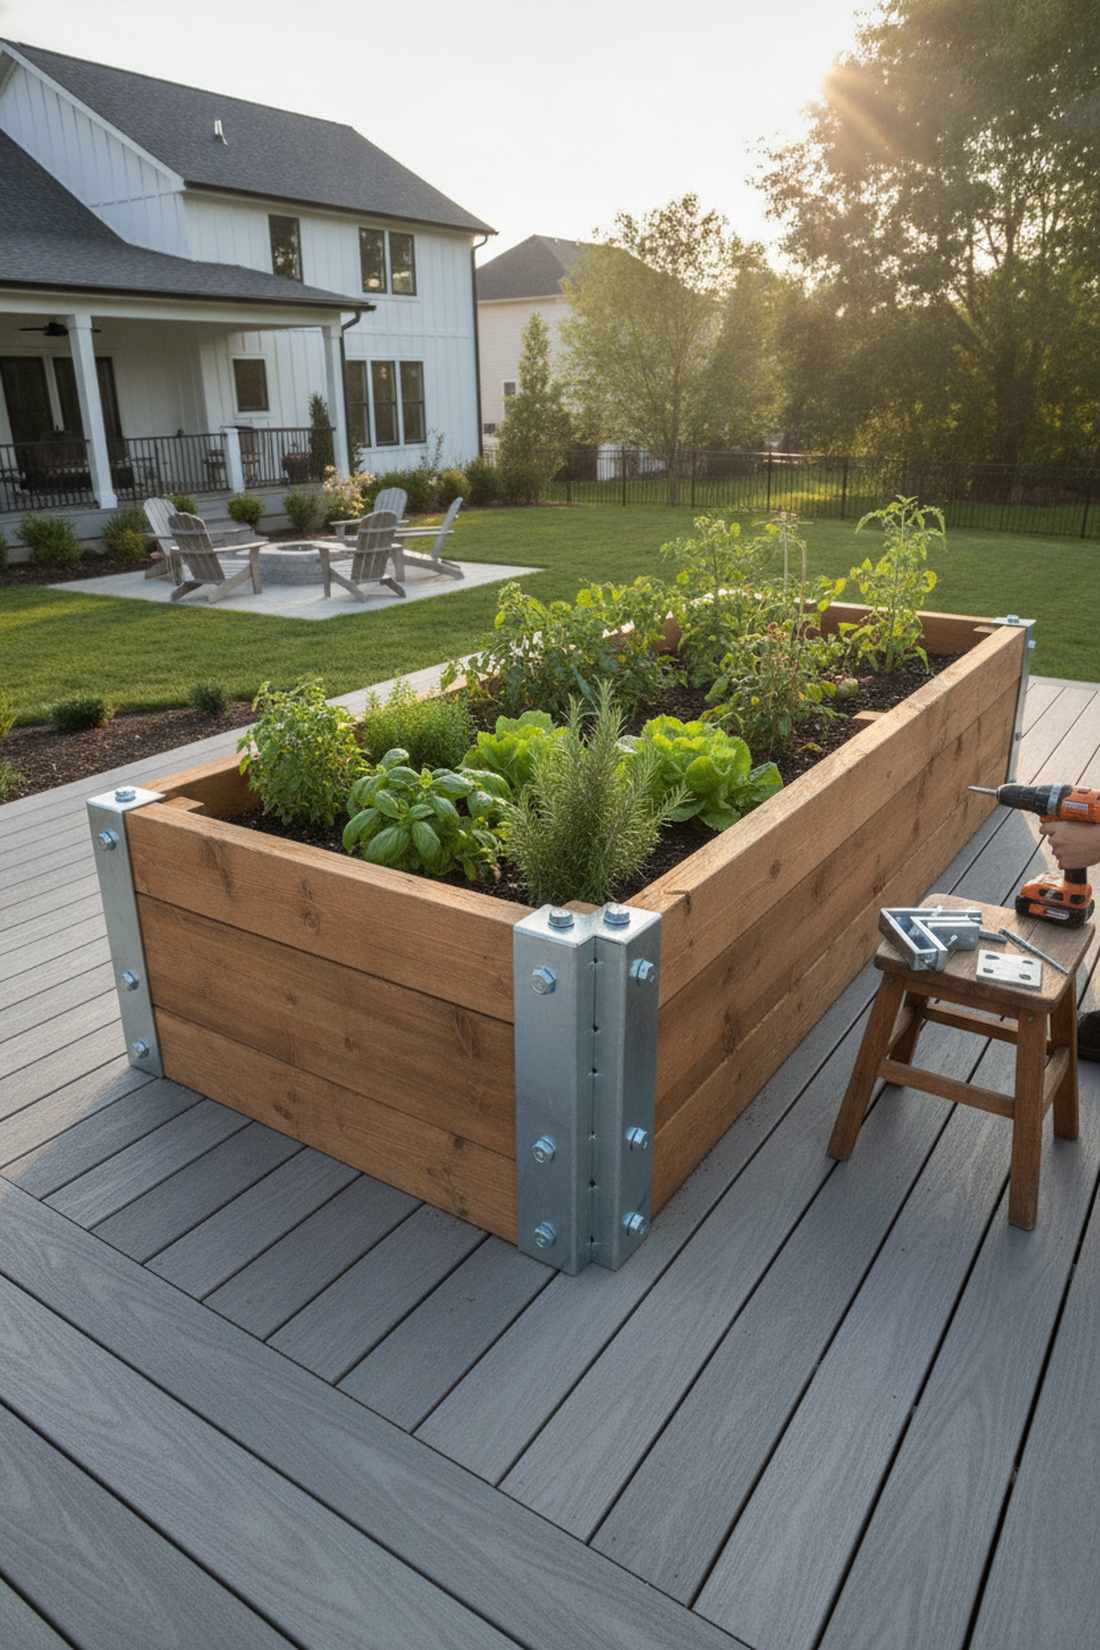
Gives off an incredibly slick, industrial-chic exposed hardware look. Steel-braced corner boxes eliminate the bulky wooden corner posts entirely.
Slamming galvanized L-brackets directly into the corners delivers a surprisingly premium look while cutting the lumber bill down significantly. This tool-light technique creates an ultra-sleek, sharp exterior profile that can be effortlessly unscrewed and packed flat when moving to a new house.
The brackets and wood together total roughly $35. Pin this brilliant hack if you are currently renting your yard!
- Key Materials: 2×8 boards and heavy steel L-brackets
- Vibe / Style: Industrial minimalist
- Difficulty: Fast bracket alignment
- Budget Breakdown: Wood: $20 | Steel Brackets: $15.
- Creator’s Tip: Clamp the corners perfectly flush before driving the screws to ensure the box doesn’t twist out of alignment.
- Smart Sourcing: heavy-duty galvanized corner braces (bulk pack) and premium corner clamping jigs.
38. Single Board Height
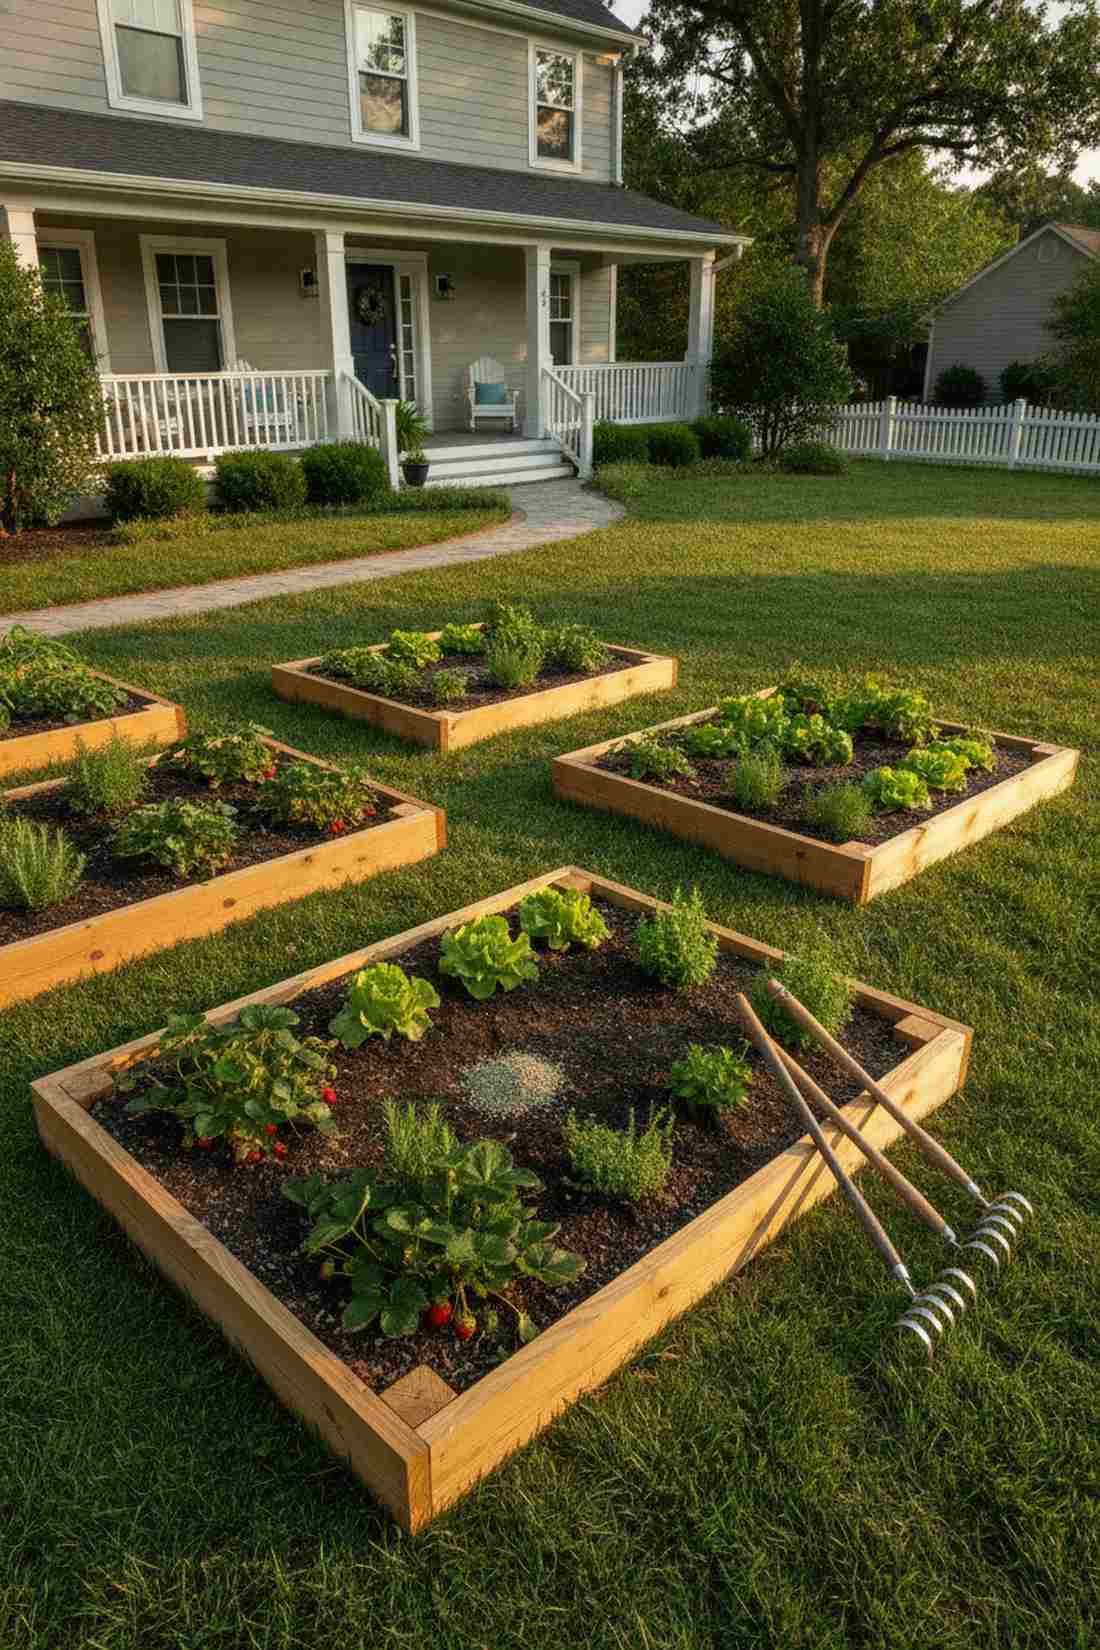
Looks like a neatly tailored carpet of thriving greens. Ultra-low profile frames beautifully organize strawberry patches without obstructing yard sightlines.
Skipping the multi-stacking process cuts lumber usage by 75% and creates a subtle, low-lying border that blends seamlessly into the grass. This minimal intervention perfectly houses shallow herbs and lettuce without requiring expensive truckloads of filler soil to reach the brim.
These incredibly cheap perimeters cost around $18 to assemble. A highly recommended trick for rapid front-yard herb displays.
- Key Materials: One layer of 2×12 lumber
- Vibe / Style: Subtle tailored edging
- Difficulty: Absolute beginner friendly
- Budget Breakdown: Wood: $15 | Fasteners: $3.
- Creator’s Tip: Dig a tiny 2-inch trench for the boards to sit in so your lawnmower wheel can ride the edge cleanly.
- Smart Sourcing: organic granular herb fertilizer and manual hand-tiller cultivators.
39. Scrap Wood Mosaic
Radiates an insanely charming, eclectic boho-chic energy. Mismatched patchwork boundaries are the ultimate expression of artistic upcycling.
Combining random leftover construction chunks delivers a surprisingly premium look that mirrors expensive custom boutique woodwork. Intentionally mixing a 2×4 with a 2×6 to reach the exact same height creates an unpredictable, highly textured wall that looks like deliberate modern art.
This layout uses literal dumpster scraps, dropping the cost to zero. Save this idea if you have a massive pile of leftover project wood!
- Key Materials: Random off-cut dimensional lumber
- Vibe / Style: Eclectic boho-artisan
- Difficulty: Fun puzzle matching
- Budget Breakdown: Scraps: $0 | Screws: $10.
- Creator’s Tip: Paint the different widths in varying shades of wood stain to aggressively highlight the beautiful mismatched texture.
- Smart Sourcing: weatherproof exterior wood screws (bulk pack) and premium assorted wood stain kits.
40. Landscape Timber Basic
Feels like a rugged, heavy-duty park ranger installation. Chunky treated landscape borders bring indestructible thickness to casual home gardens.
Slamming massive landscape timber together avoids the classic bowing mistake that plagues thin, cheap boards entirely. The sheer weight of these rounded blocks resists massive outward soil pressure without needing any complicated internal cross-bracing or intricate corner joinery.
These beefy frames run about $25 a piece at local hardware stores. Pin this for the absolute toughest budget build possible!
- Key Materials: Flat-sided 4×4 landscape timbers
- Vibe / Style: Indestructible park classic
- Difficulty: Requires a heavy hammer
- Budget Breakdown: Timber: $20 | Spikes: $8.
- Creator’s Tip: Drill a pilot hole straight through the top timber so your massive spikes drive in straight without splitting the wood.
- Smart Sourcing: 10-inch galvanized landscape spikes (bulk pack) and extra-long titanium drill bits.
Most fences end up in a landfill, but this next genius trick turns garbage wood into stunning garden architecture…
41. Fence Board Upcycling
Evokes the gorgeous, sun-bleached look of driftwood. Reclaimed privacy fence walls bring instant age and character to brand new flower setups.
Stripping the rotted ends off old fence pickets gives a designer-level finish that flawlessly mimics expensive, weathered beachfront aesthetics. Because the boards are notoriously thin, reinforcing the middle with a single hidden stake prevents the soil from bowing the fragile wood outward.
A completely free material hack that looks incredibly chic. Save this to your Pinterest board before your neighbor tears down their fence!
- Key Materials: Weathered cedar fence pickets
- Vibe / Style: Sun-bleached coastal
- Difficulty: Easy teardown and cut
- Budget Breakdown: Pickets: $0 | Support Stakes: $5.
- Creator’s Tip: Line the thin interior with black plastic sheeting to protect the brittle wood from wet soil and extend its life.
- Smart Sourcing: heavy-duty 6mil black plastic sheeting and heavy-duty staple gun kits.
Material Guide: Cheap vs. Premium Aesthetic
Knowing exactly where to save and where to spend makes all the difference in achieving that “looks expensive but isn’t” vibe.
- Standard vs. UV-Resistant/Premium: Upgrading your raw pine with a thick UV-blocking sealant stops the sun from turning your golden boxes into a dull, cracking gray mess.
- Pre-made Kits vs. Sourcing Locally: While finding scrap wood is free, buying pre-cut, heavy-duty corner bracket kits guarantees perfectly square alignment and saves you 5 hours of frustrating math.
Advanced Wood Raised Bed Features
Professional-grade enhancements transform basic raised beds into high-performance growing systems through integrated structures and functional additions. These refinements increase productivity and extend the growing season.
42. Integrated Trellis Posts
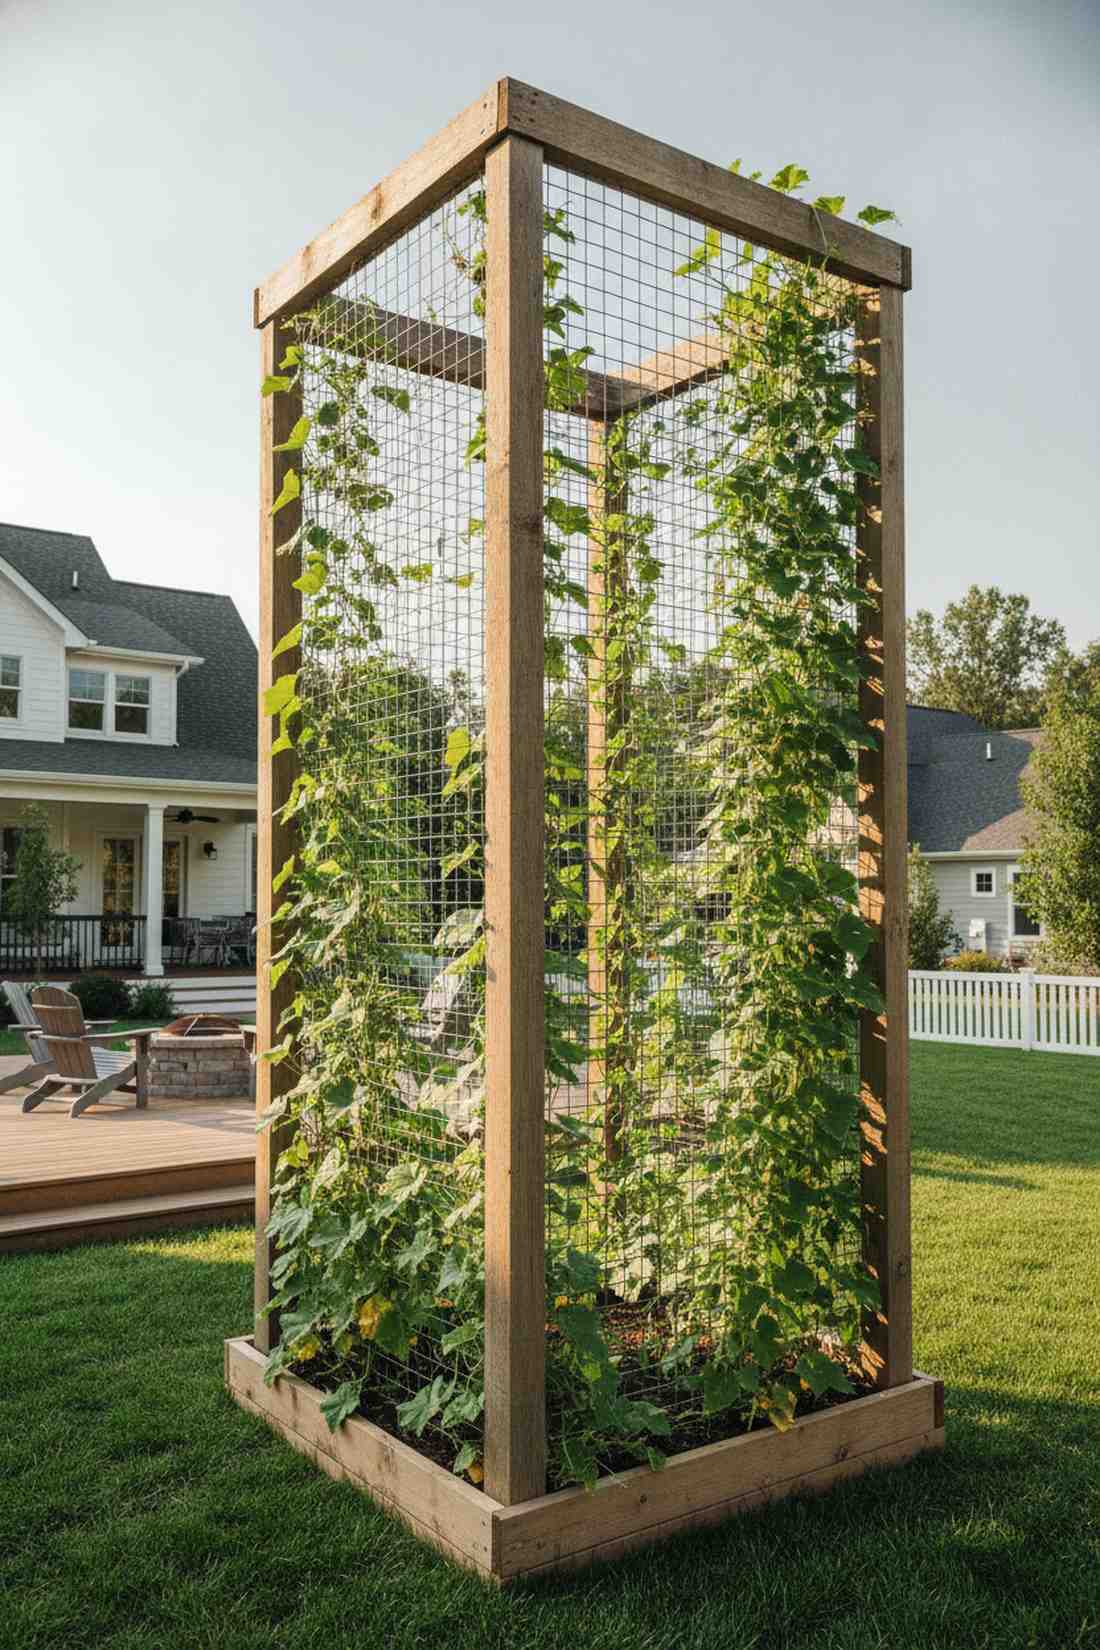
Radiates the lush energy of a towering Italian vineyard. Sky-high integrated climbing frames turn boring flat boxes into massive vertical production walls.
Extending the bulky corner posts six feet into the sky looks far more expensive than it is by framing the garden like permanent architecture. Strung with heavy wire, this layout handles aggressive cucumber and melon vines perfectly without collapsing under the massive fruit weight.
The extra tall posts add about $25 to the build. Pin this brilliant layout if you want to grow massive vertical yields!
- Key Materials: 8-foot 4×4 corner posts and wire
- Vibe / Style: Towering vertical vineyard
- Difficulty: Moderate heavy framing
- Budget Breakdown: Tall Posts: $35 | Wire mesh: $20.
- Creator’s Tip: Bolt heavy-duty cattle panels between the posts instead of string; they are indestructible and look highly professional.
- Smart Sourcing: galvanized welded wire fencing (bulk roll) and heavy-duty galvanized U-nails.
43. Cold Frame Convertible
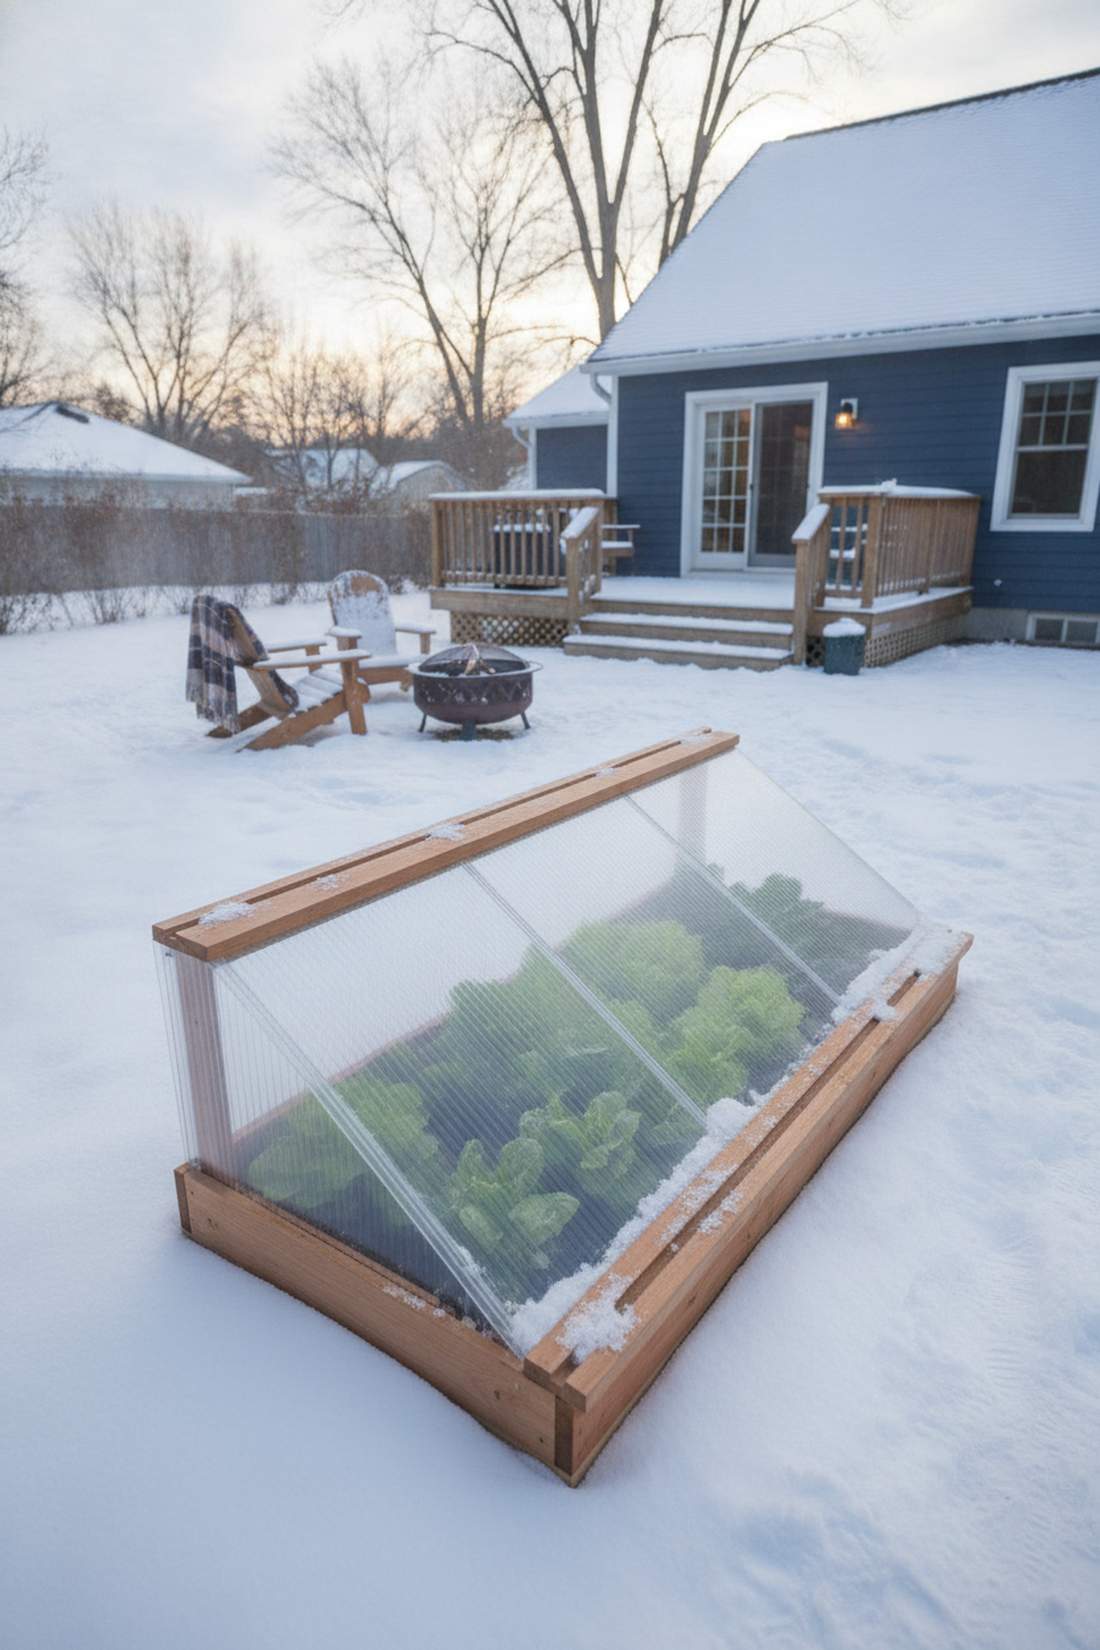
Feels like unlocking a secret cheat code against winter weather. Slotted winter greenhouse conversions completely dominate frosty morning temperatures.
Routing a tiny groove directly into the top edge avoids the classic rotting mistake of trapping moisture under heavy glass. By simply sliding polycarbonate panels into the track, you instantly create a high-end micro-climate that forces lettuce to grow straight through January snowstorms.
The router work is free, and the plastic runs about $30. Save this absolute lifesaver if you want a 12-month harvest cycle!
- Key Materials: Polycarbonate sheets and routed boards
- Vibe / Style: Winter-proof botanical
- Difficulty: Requires a wood router
- Budget Breakdown: Plastic Panels: $30 | Hardware: $0.
- Creator’s Tip: Cut the track at a slight downward angle so the morning condensation drips onto the soil instead of pooling on the wood.
- Smart Sourcing: twin-wall polycarbonate greenhouse panels and premium carbide router bit sets.
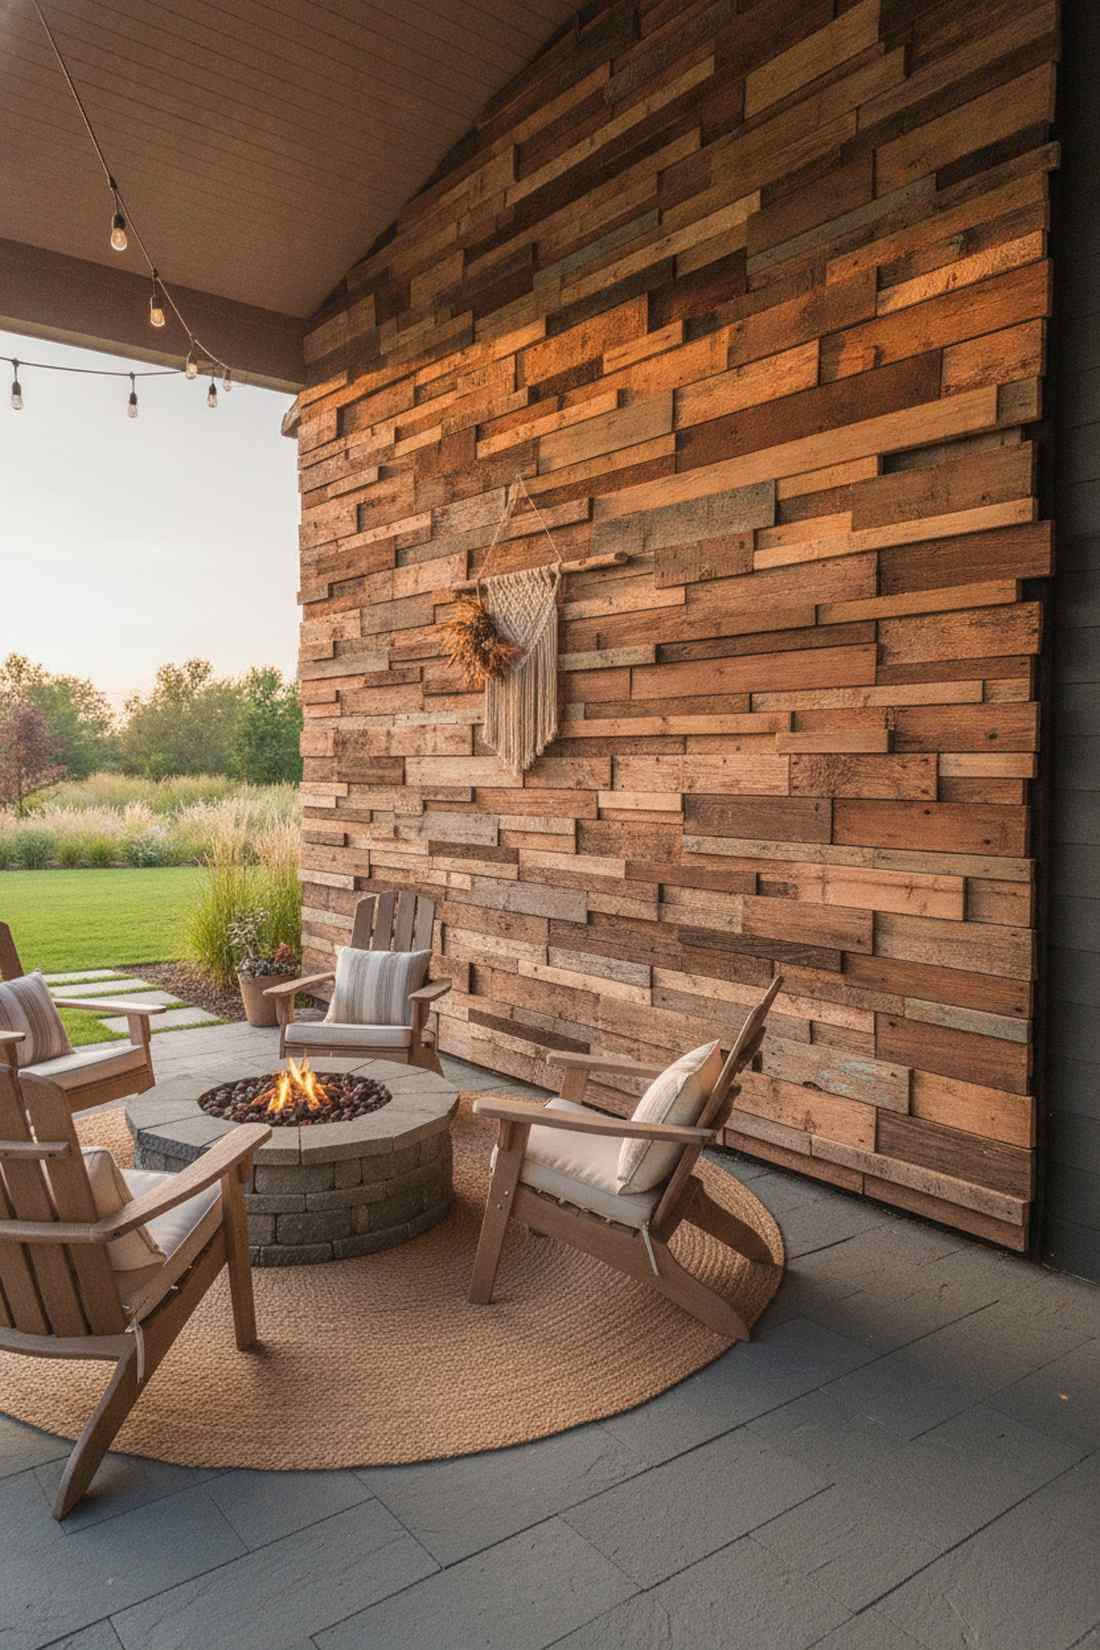
44. Built-In Seating Ledge
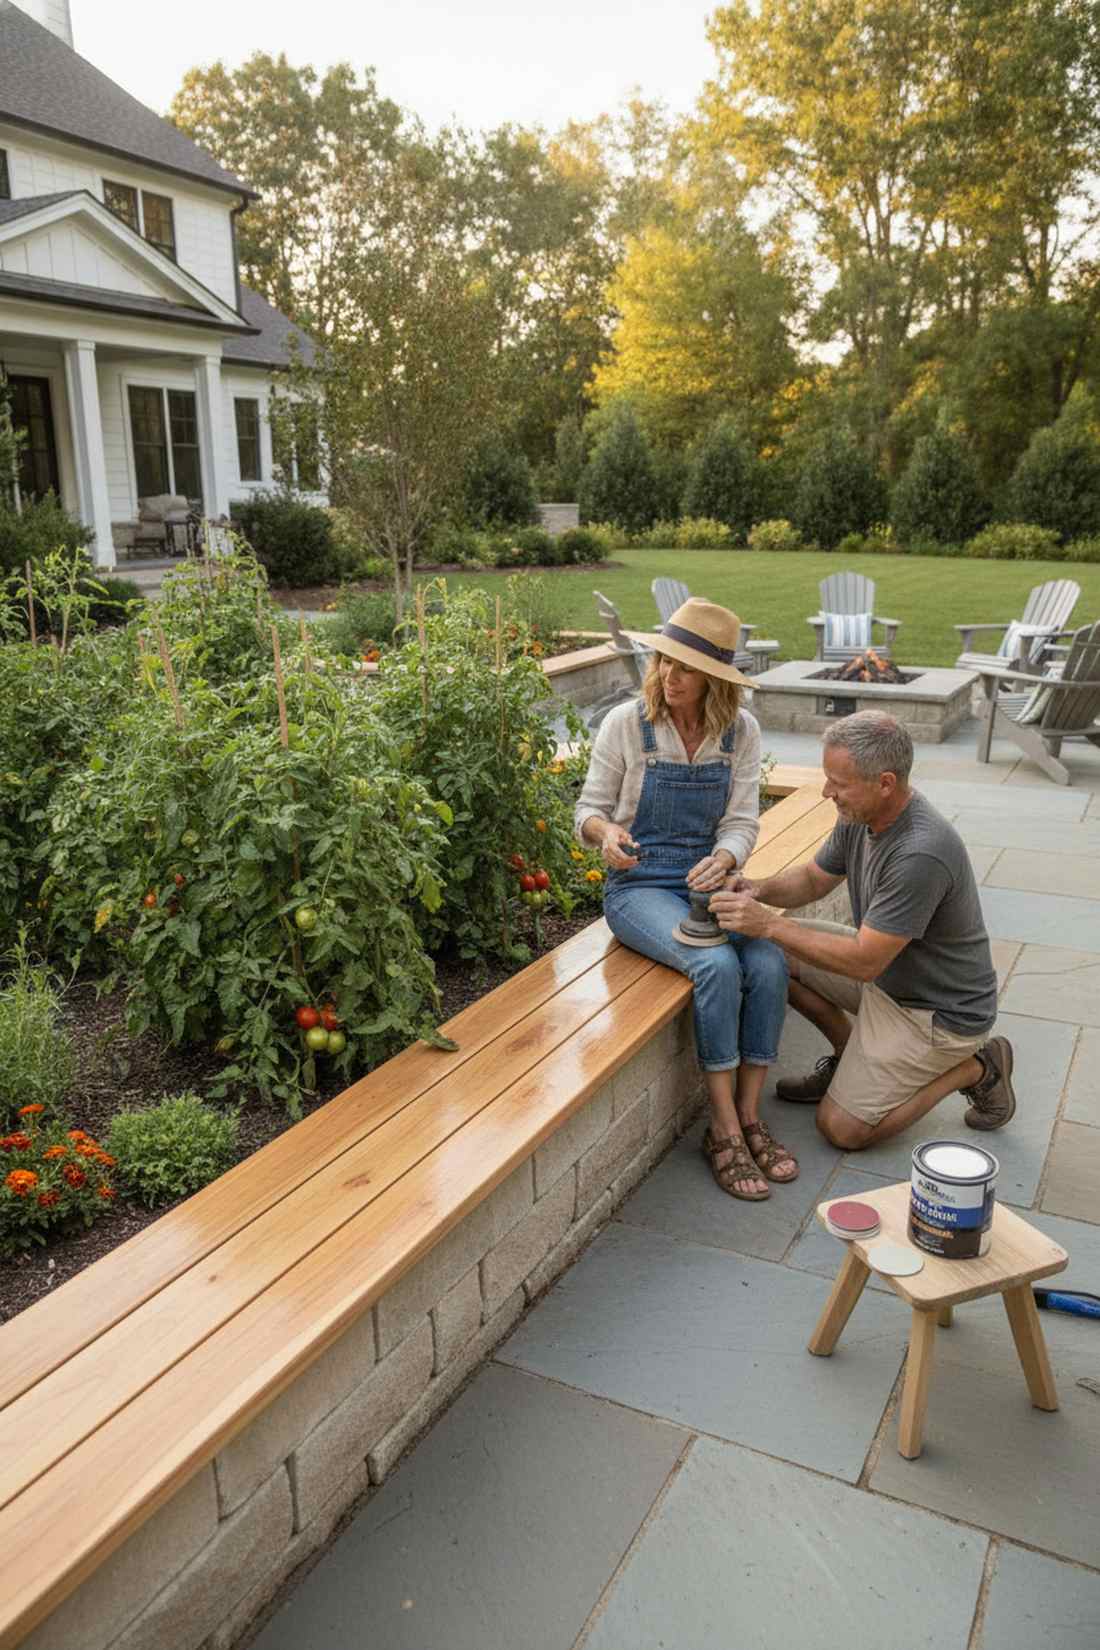
Looks like a custom installation from a luxury landscape architect. Wide perimeter resting benches turn a chore zone into a gorgeous outdoor lounge.
Adding an oversized flat cap around the brim delivers a surprisingly premium look that instantly covers messy soil edges. This functional trim completely saves your knees and back by providing a rock-solid, comfortable platform to sit on while meticulously pruning your prized tomatoes.
Adding the bench rim costs around $40 in wide lumber. Pin this if you are tired of crouching in the dirt!
- Key Materials: 2×6 smooth cedar cap boards
- Vibe / Style: Luxury courtyard seating
- Difficulty: Intermediate miter cuts
- Budget Breakdown: Cap Wood: $40 | Adhesive: $10.
- Creator’s Tip: Sand the sitting edge with 120-grit paper and apply a thick satin varnish so you never snag your clothes on rough splinters.
- Smart Sourcing: premium exterior satin spar urethane and random orbital sander kits.
45. Irrigation Channel Integration
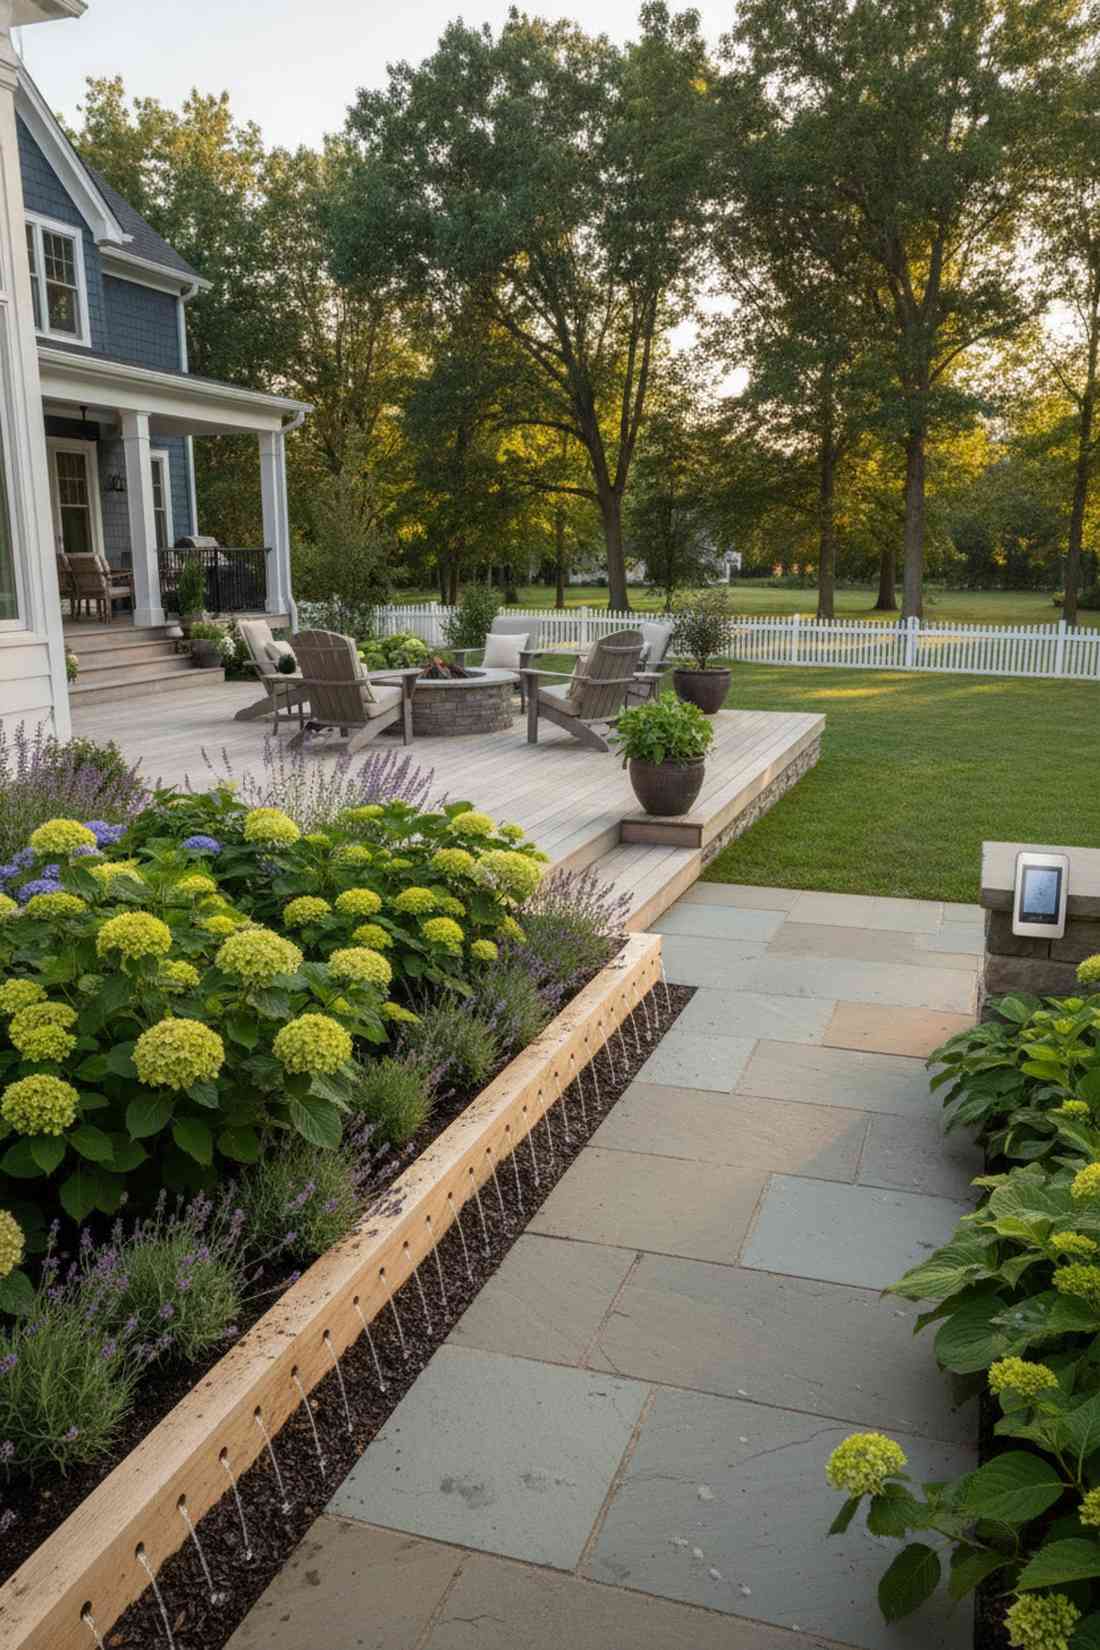
Feels like a hyper-advanced smart-home integration. Hidden routed water tubing lines completely eliminate ugly black hoses from your pristine garden.
Concealing the drip lines inside a hollowed-out channel looks far more expensive than it is by keeping the aesthetic completely spotless. This protective trench blocks the vicious summer UV rays from melting the plastic lines, effectively tripling the lifespan of your automated watering system.
The concealment is a free modification that saves money long-term. Save this trick to upgrade your garden into an automated powerhouse.
- Key Materials: Drip tubing and routed trim
- Vibe / Style: Invisible tech seamless
- Difficulty: Requires careful drilling
- Budget Breakdown: Tubing Kit: $40 | Modification: $0.
- Creator’s Tip: Drill tiny exit holes strictly on the inside face so the emitters drop water directly onto the root zone completely unseen.
- Smart Sourcing: automated digital water timers and premium 1/4-inch drip irrigation kits.
Most gardeners quit when gophers eat their roots, but this next invisible armor stops pests dead in their tracks…
46. Hardware Cloth Base
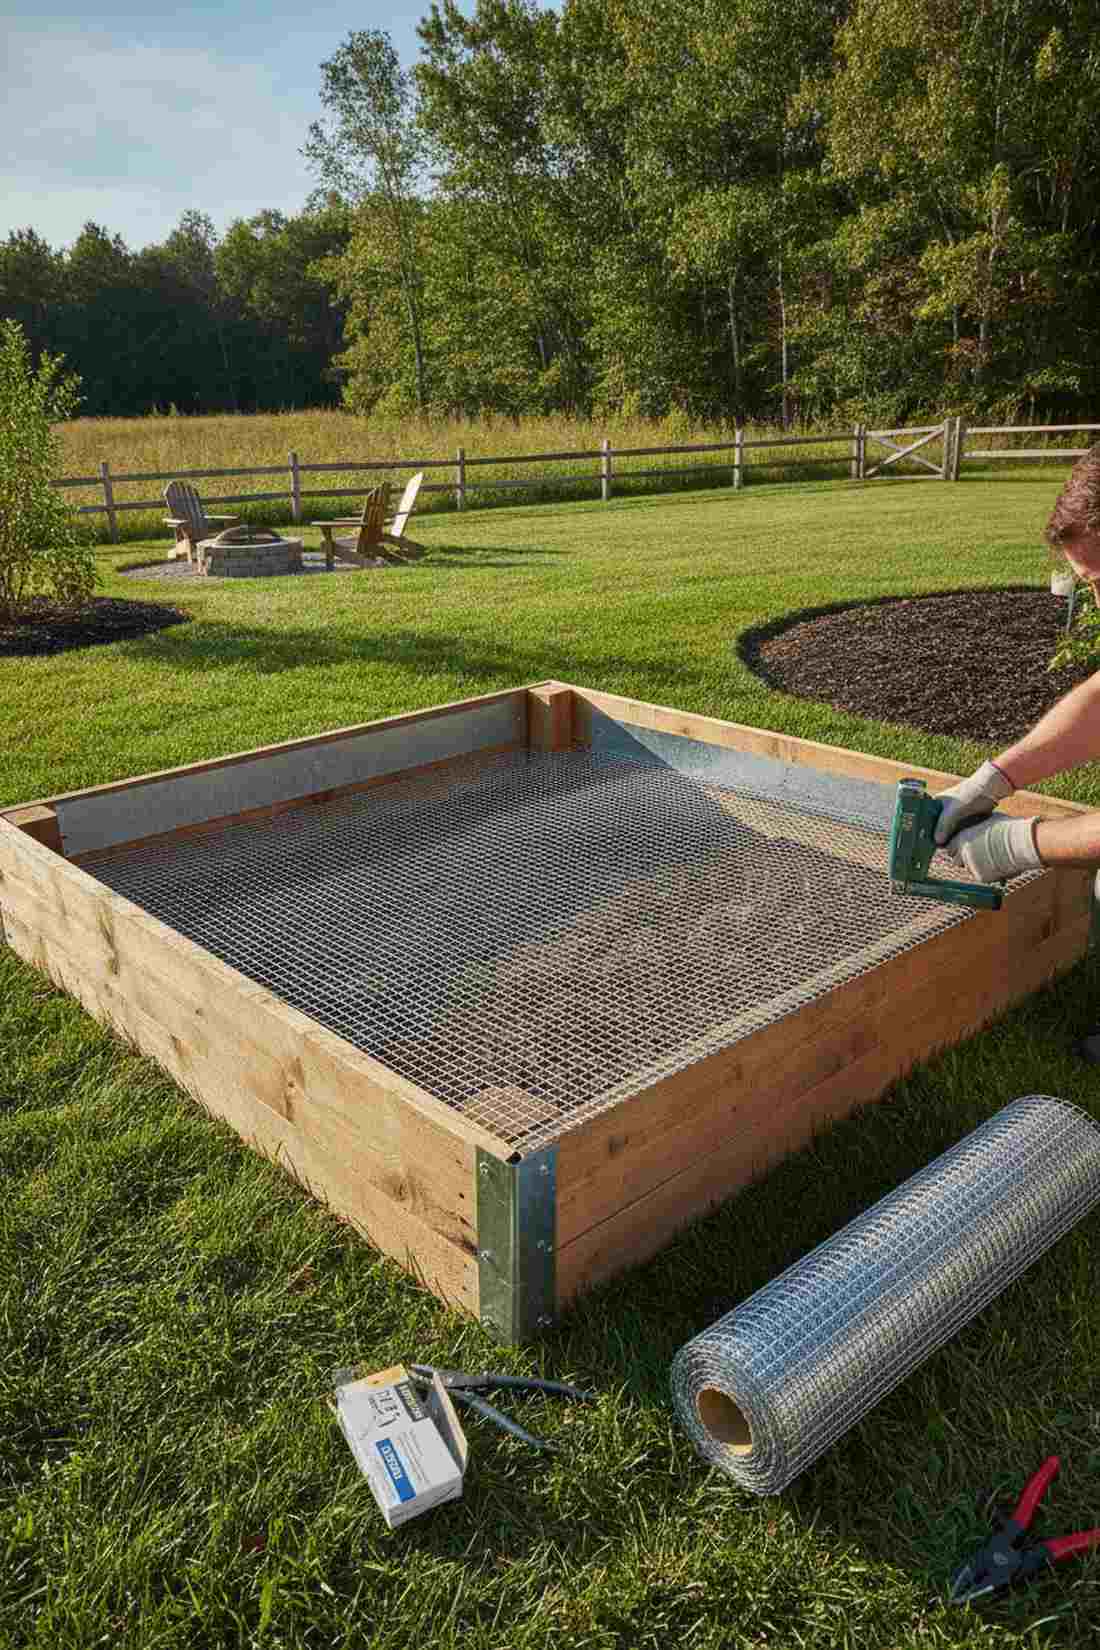
Acts as an impenetrable underground vault for your precious roots. Galvanized steel mesh flooring is the ultimate insurance policy against digging yard pests.
Stapling this heavy metal armor to the bottom avoids the classic rotting mistake of using solid plastic which drowns plants. The mesh lets heavy rain drain effortlessly while completely shattering the teeth of any mole, vole, or gopher trying to tunnel into your expensive organic compost.
A roll of armor mesh costs roughly $30 per box. Pin this absolute necessity if you live near wild fields or woods!
- Key Materials: 0.25-inch galvanized hardware cloth
- Vibe / Style: Impenetrable fortress base
- Difficulty: Simple but sharp cutting
- Budget Breakdown: Metal Mesh: $30 | Staples: $5.
- Creator’s Tip: Bend the mesh upward by one inch along the inside walls before stapling to create a seamless, gap-free steel bucket.
- Smart Sourcing: heavy-duty galvanized hardware cloth (bulk roll) and industrial heavy-duty staple guns.
47. Adjustable Height System
Radiates brilliant, adaptable engineering energy. Modular stacking wall sections allow your layout to evolve seamlessly season after season.
Locking loose frames together with hidden internal dowels delivers a surprisingly premium look without any permanent screws ruining the wood. This genius layout lets you start shallow for cheap herbs in spring, then pop on a secondary tier to bury deep tomato roots by mid-summer.
The dowel system costs $5 and saves massive headaches. Save this to your flexible homesteading hacks board!
- Key Materials: Matching frame rings and wood dowels
- Vibe / Style: Evolving modular system
- Difficulty: Requires aligned drilling
- Budget Breakdown: Base Rings: $40 | Dowels: $5.
- Creator’s Tip: Use thick hardwood oak dowels instead of pine so the heavy upper dirt layers don’t snap the pegs under sheer pressure.
- Smart Sourcing: thick fluted oak dowel pins (bulk pack) and precision doweling jig kits.
48. Tool Hook Rail
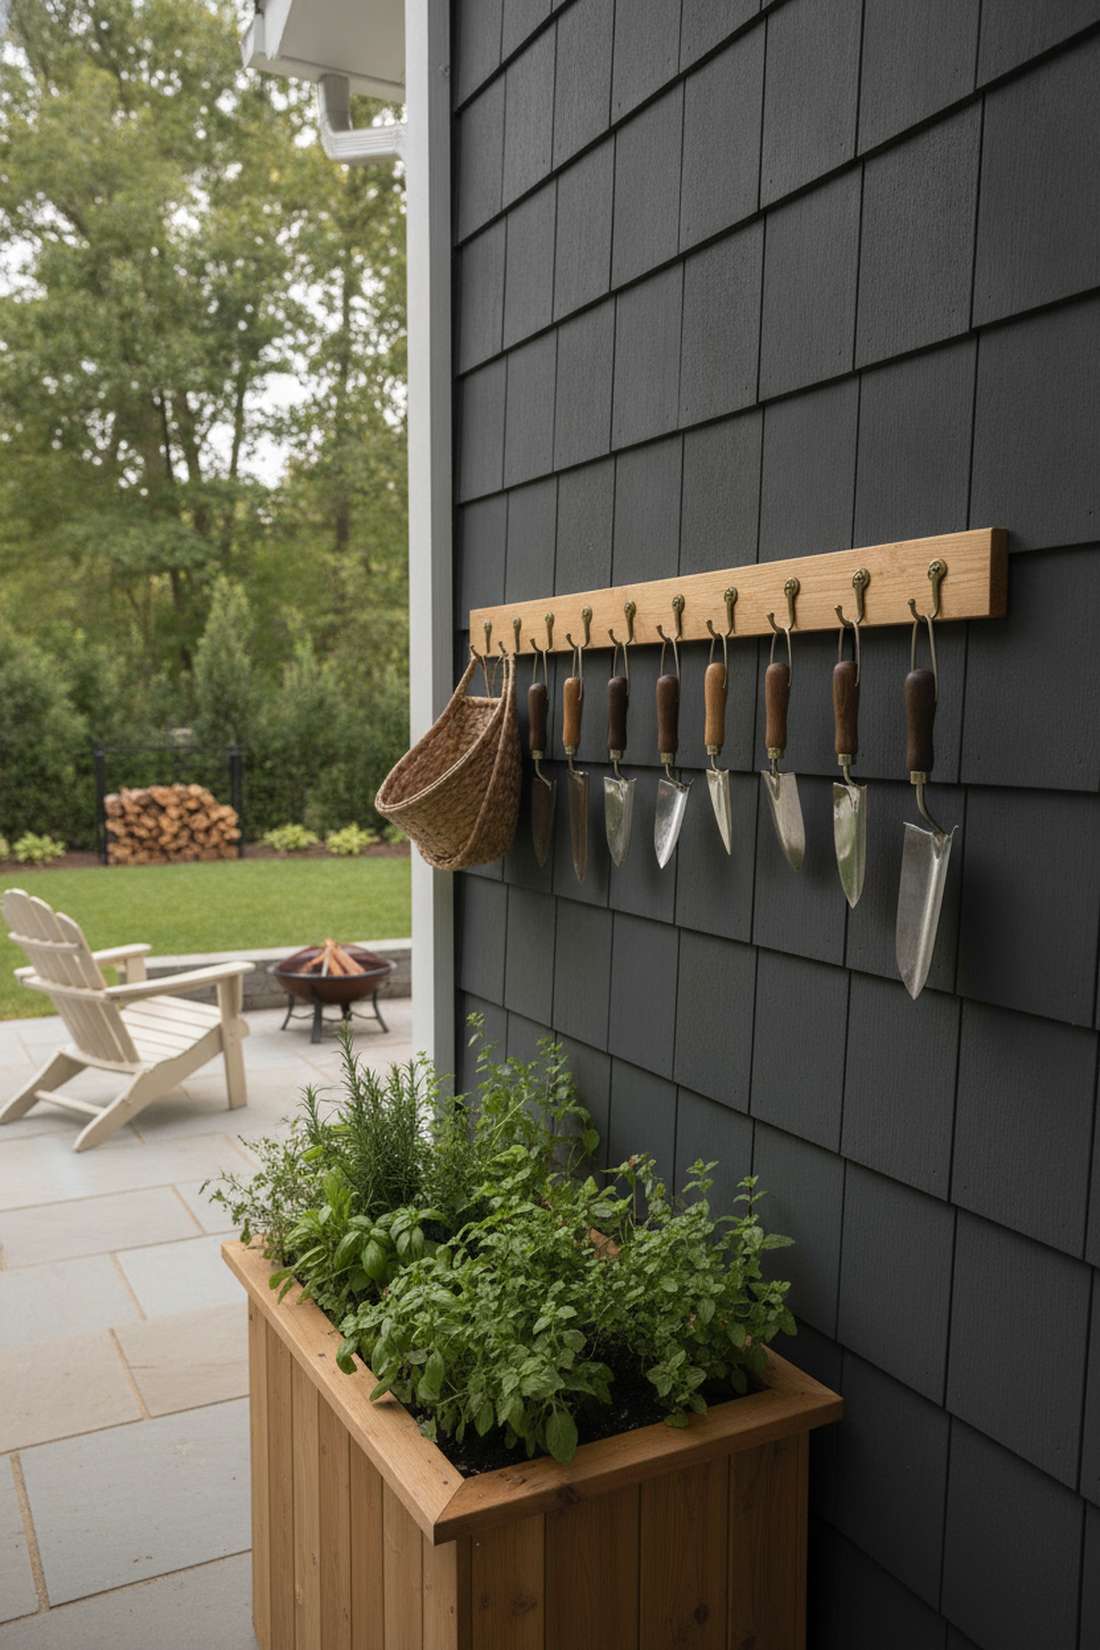
Feels like a hyper-organized chef’s kitchen brought outdoors. Exterior mounted tool holsters ensure you never lose a dirty trowel in the grass again.
Slapping a simple cedar strip on the outside profile gives a designer-level finish while optimizing your rapid workflow. Keeping your snips and baskets suspended in the open air prevents soil rust and stops you from carrying filthy tools back into the house.
A $5 strip of wood and some hooks change everything. Pin this micro-upgrade for an instantly cleaner workspace!
- Key Materials: 1×2 cedar strip and cup hooks
- Vibe / Style: Tidy functional workstation
- Difficulty: Ultra-fast drill and screw
- Budget Breakdown: Wood Strip: $5 | Hooks: $5.
- Creator’s Tip: Mount the rail on the shaded North-facing side so the sun doesn’t bake and crack the rubber handles of your tools.
- Smart Sourcing: heavy-duty brass cup hooks (bulk pack) and premium forged steel hand trowels.
49. Label Holder Slots
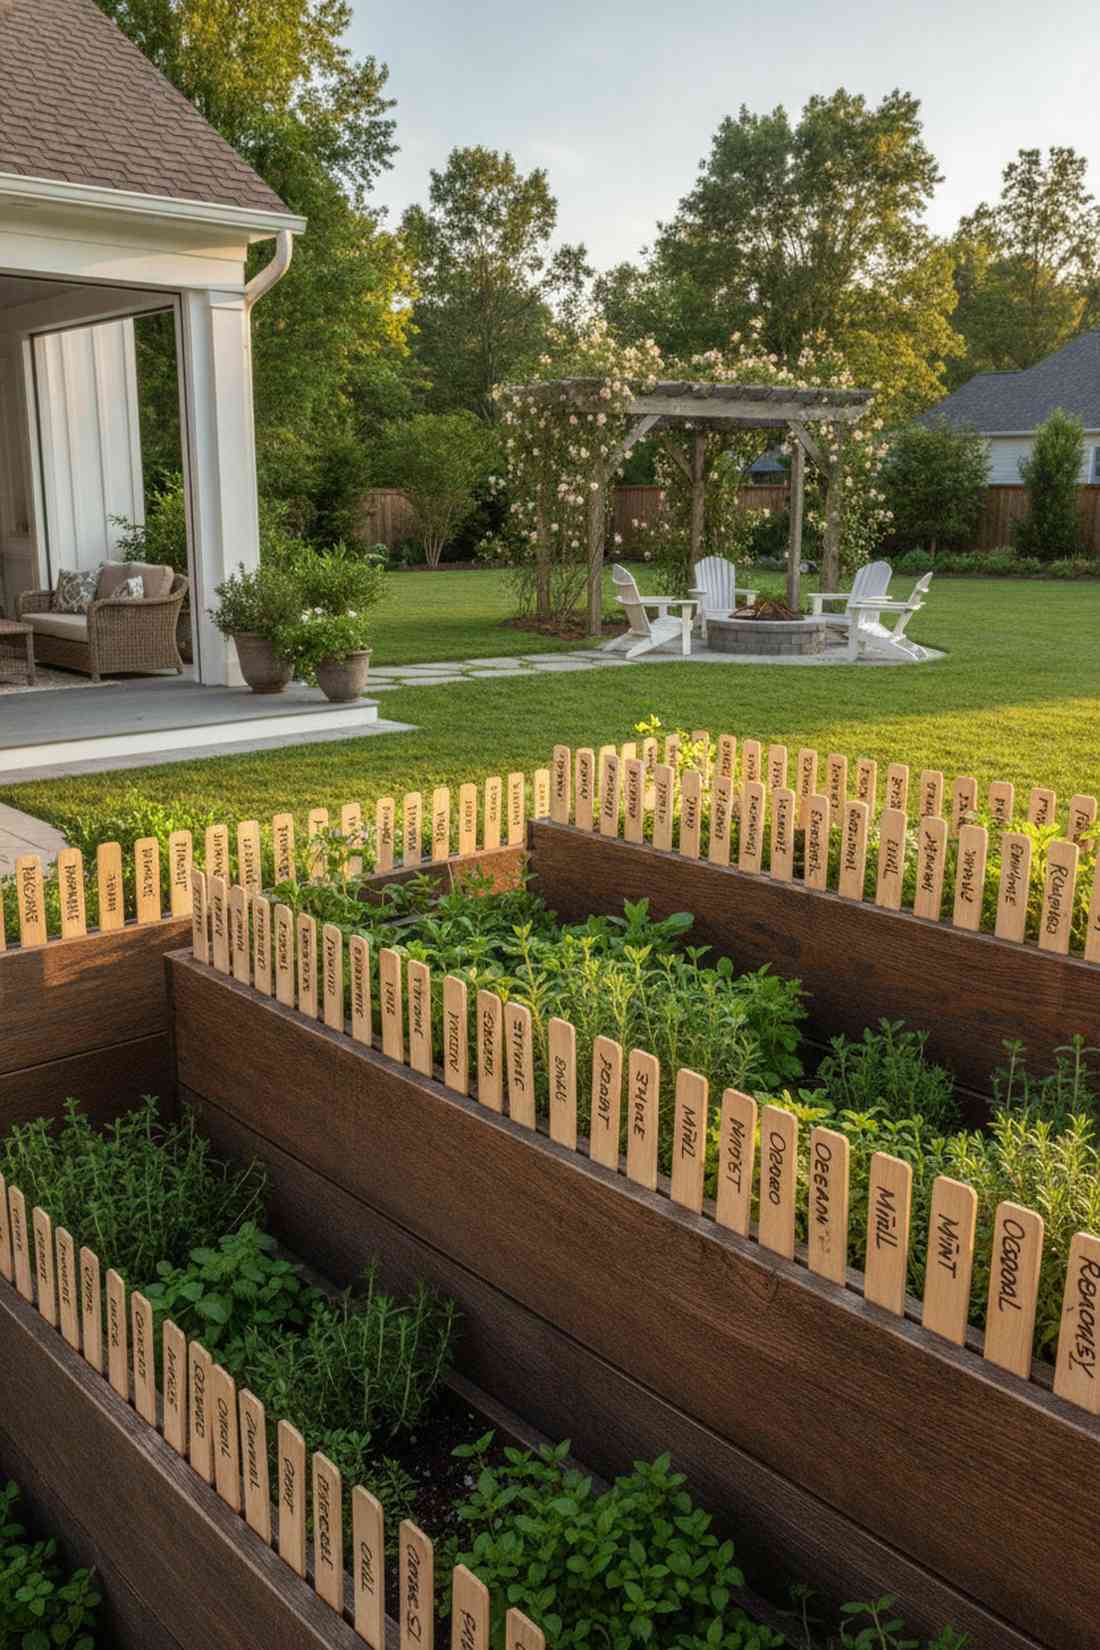
Looks like a beautifully curated vintage botanical library. Precision slotted ID tracks completely eliminate the messy look of plastic stakes sticking out of the dirt.
Slicing tiny, uniform grooves into the top cap looks far more expensive than it is by forcing meticulous organization. Dropping custom wooden tags into these permanent slots secures them from blowing away while giving your heirloom beds an insanely polished, museum-quality aesthetic.
This zero-dollar modification requires only a saw blade. Save this for an ultra-chic, highly organized herb display.
- Key Materials: Thin saw kerf cuts and wood tags
- Vibe / Style: Curated botanical index
- Difficulty: Fast, shallow saw cuts
- Budget Breakdown: Cuts: $0 | Wood Tags: $10.
- Creator’s Tip: Write on the wooden tags with a heavy outdoor paint pen and seal them with clear polish so the rain never blurs the ink.
- Smart Sourcing: weatherproof bamboo plant labels (bulk pack) and fine-tip oil-based paint pens.
50. Drainage Pipe Foundation
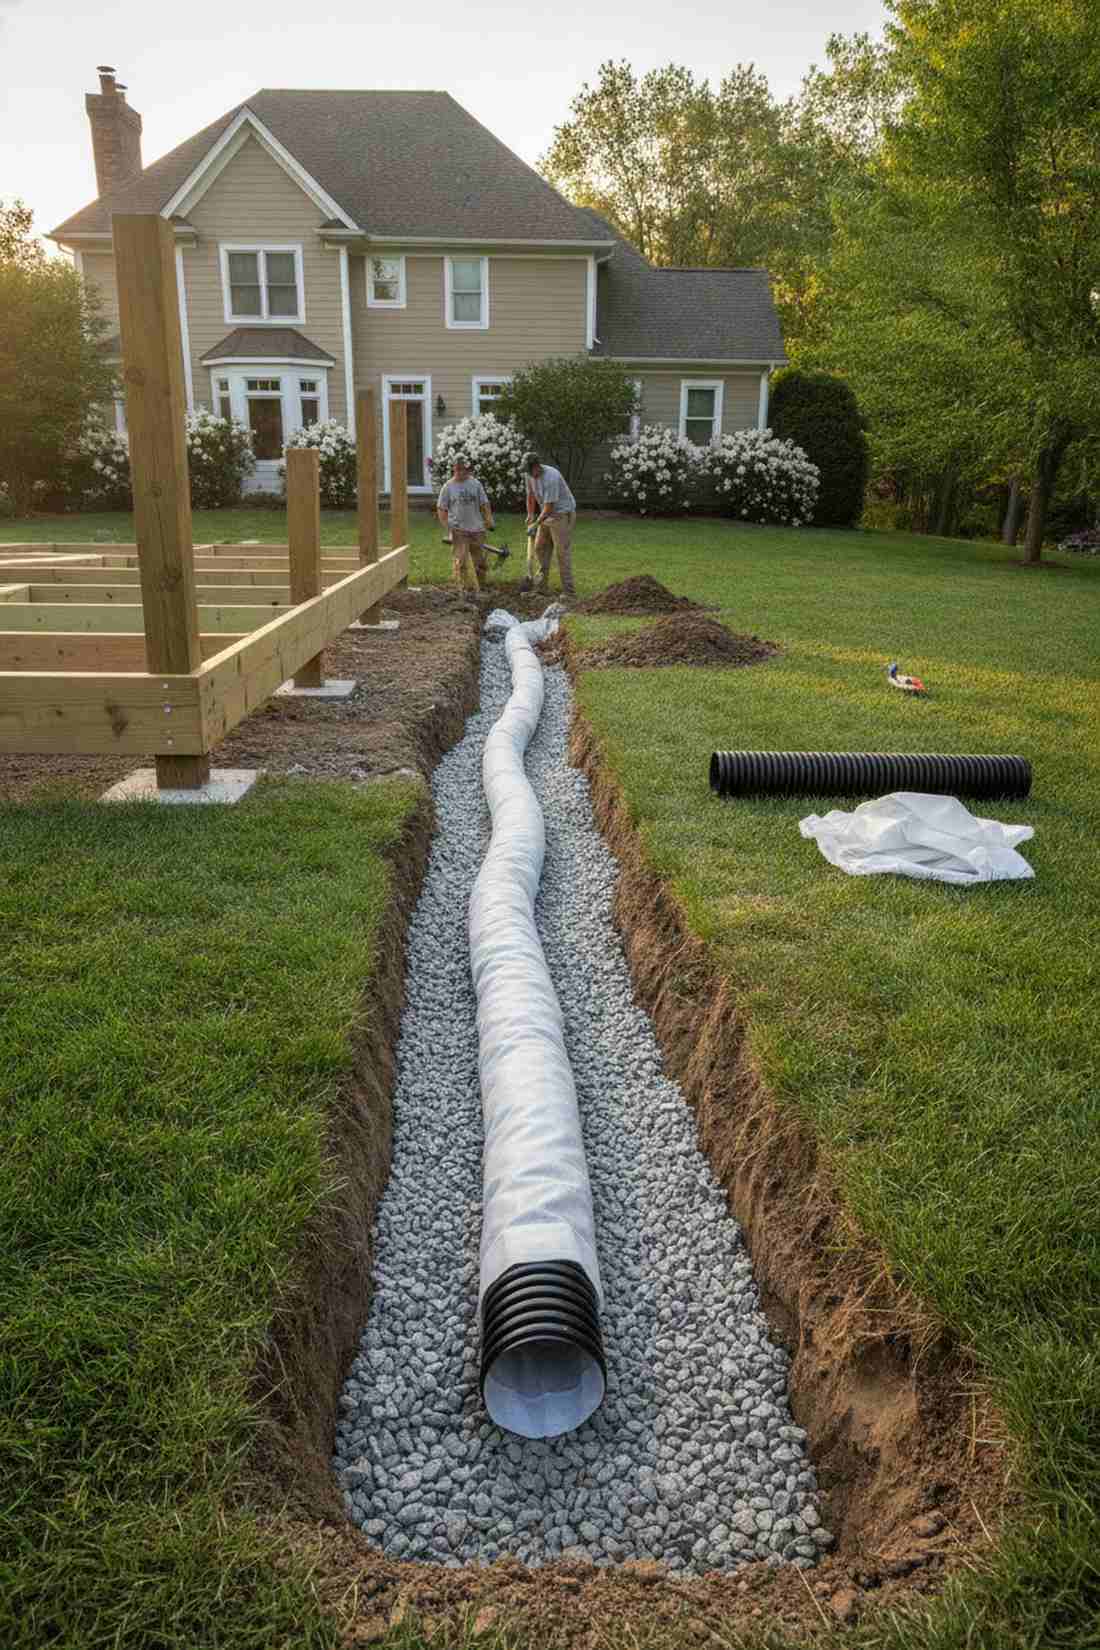
Acts like a heavy-duty commercial plumbing system for your plants. Buried perforated stone trenches completely neutralize toxic, waterlogged yards.
Burying a corrugated pipe directly under the foundation avoids the classic rotting mistake of letting heavy wood sit in stagnant yard puddles. This invisible subsurface upgrade aggressively sucks away torrential downpours, stopping root rot dead and adding years to the lifespan of your lumber.
The pipe and gravel cost around $30 but save hundreds in ruined wood. Pin this life-saving trick if your yard floods during spring!
- Key Materials: 4-inch perforated pipe and crushed rock
- Vibe / Style: Invisible structural integrity
- Difficulty: Moderate trench digging
- Budget Breakdown: Pipe: $15 | Gravel: $20.
- Creator’s Tip: Wrap the entire pipe in a geotextile sleeve before burying it so mud never clogs the tiny water-draining holes.
- Smart Sourcing: corrugated perforated drainage pipe (bulk roll) and heavy-duty geotextile filter fabric sleeves.
Most backyard setups waste the valuable corners entirely, but this final micro-upgrade changes everything…
51. Corner Shelf Brackets
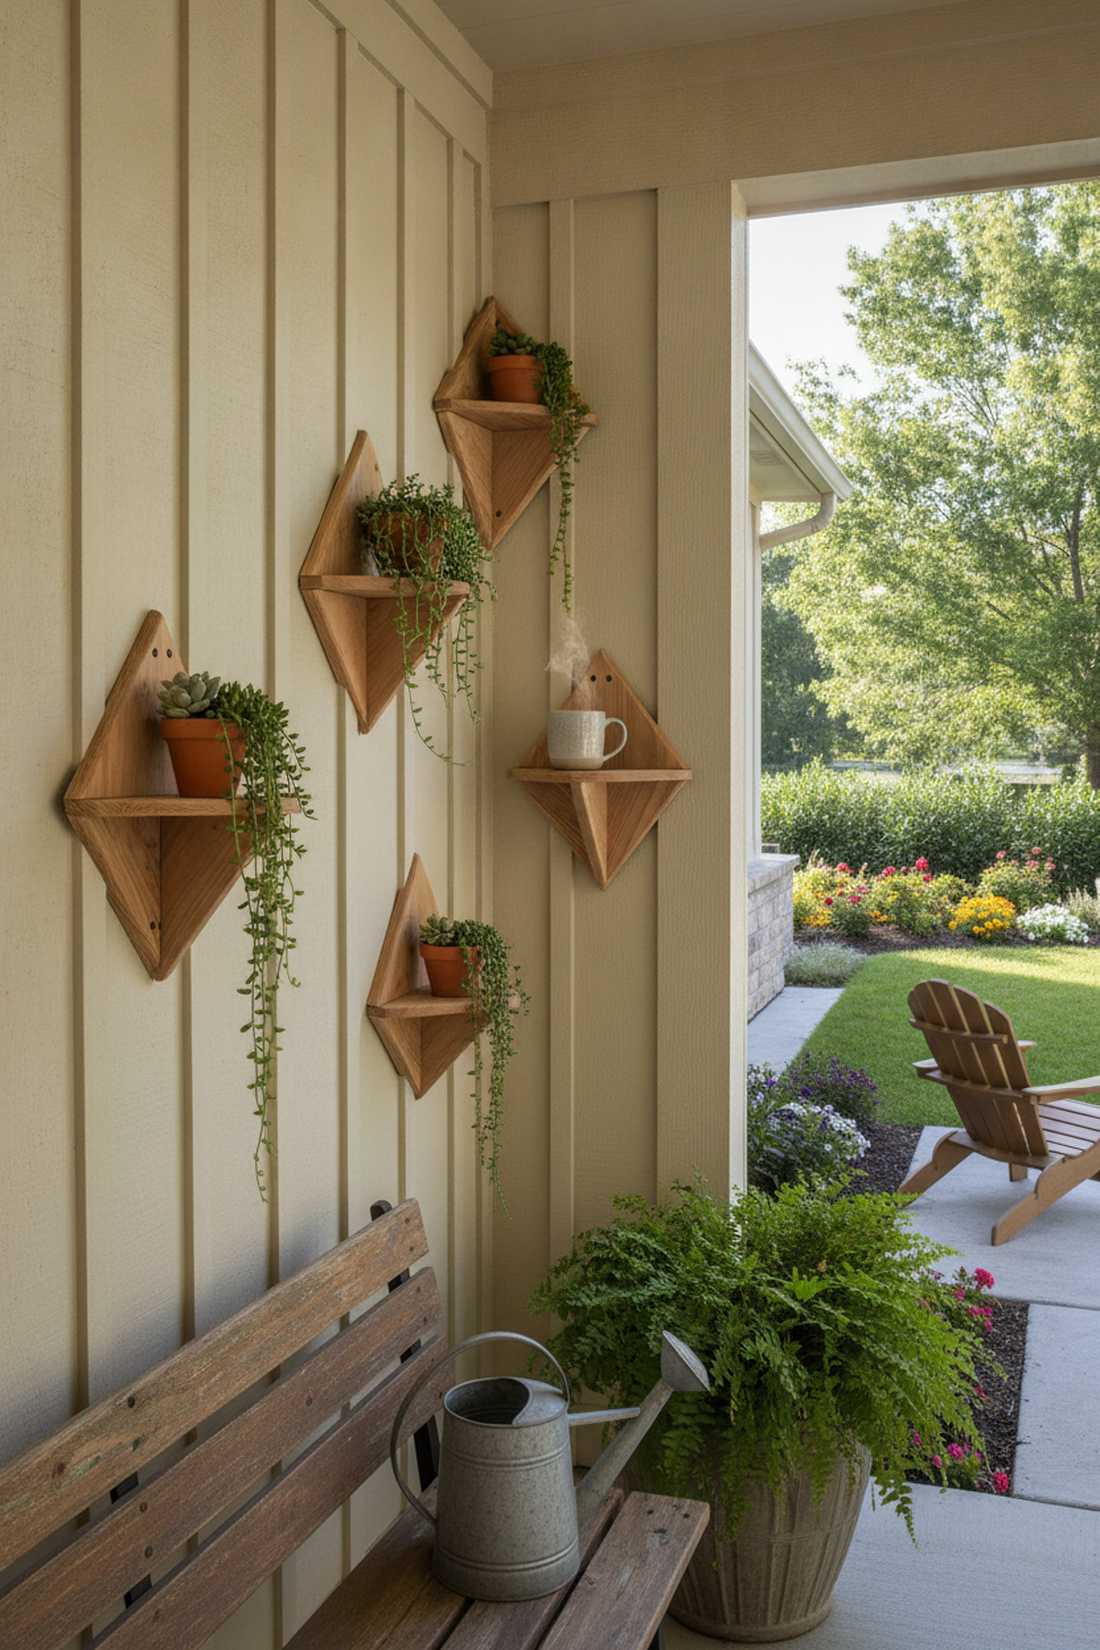
Feels like discovering a secret display shelf in a boutique nursery. Triangular corner perches squeeze massive aesthetic value out of completely dead space.
Screwing simple cedar triangles into the interior corners delivers a surprisingly premium look by elevating small, delicate accents above the dirt. This micro-layout perfectly houses trailing succulents or a cup of coffee while keeping them completely safe from splashing mud during heavy watering.
These tiny shelves cost roughly $5 in scrap wood to install. Save this genius little detail to finish off your premium aesthetic!
- Key Materials: 0.75-inch scrap cedar triangles
- Vibe / Style: Delicate boutique display
- Difficulty: Easy quick-screw
- Budget Breakdown: Scrap Wood: $0 | Screws: $3.
- Creator’s Tip: Pre-drill the tiny triangles carefully; driving a massive screw directly into a small piece of cedar will instantly split it in half.
- Smart Sourcing: miniature terracotta accent pots (bulk pack) and premium trailing succulent assortments.
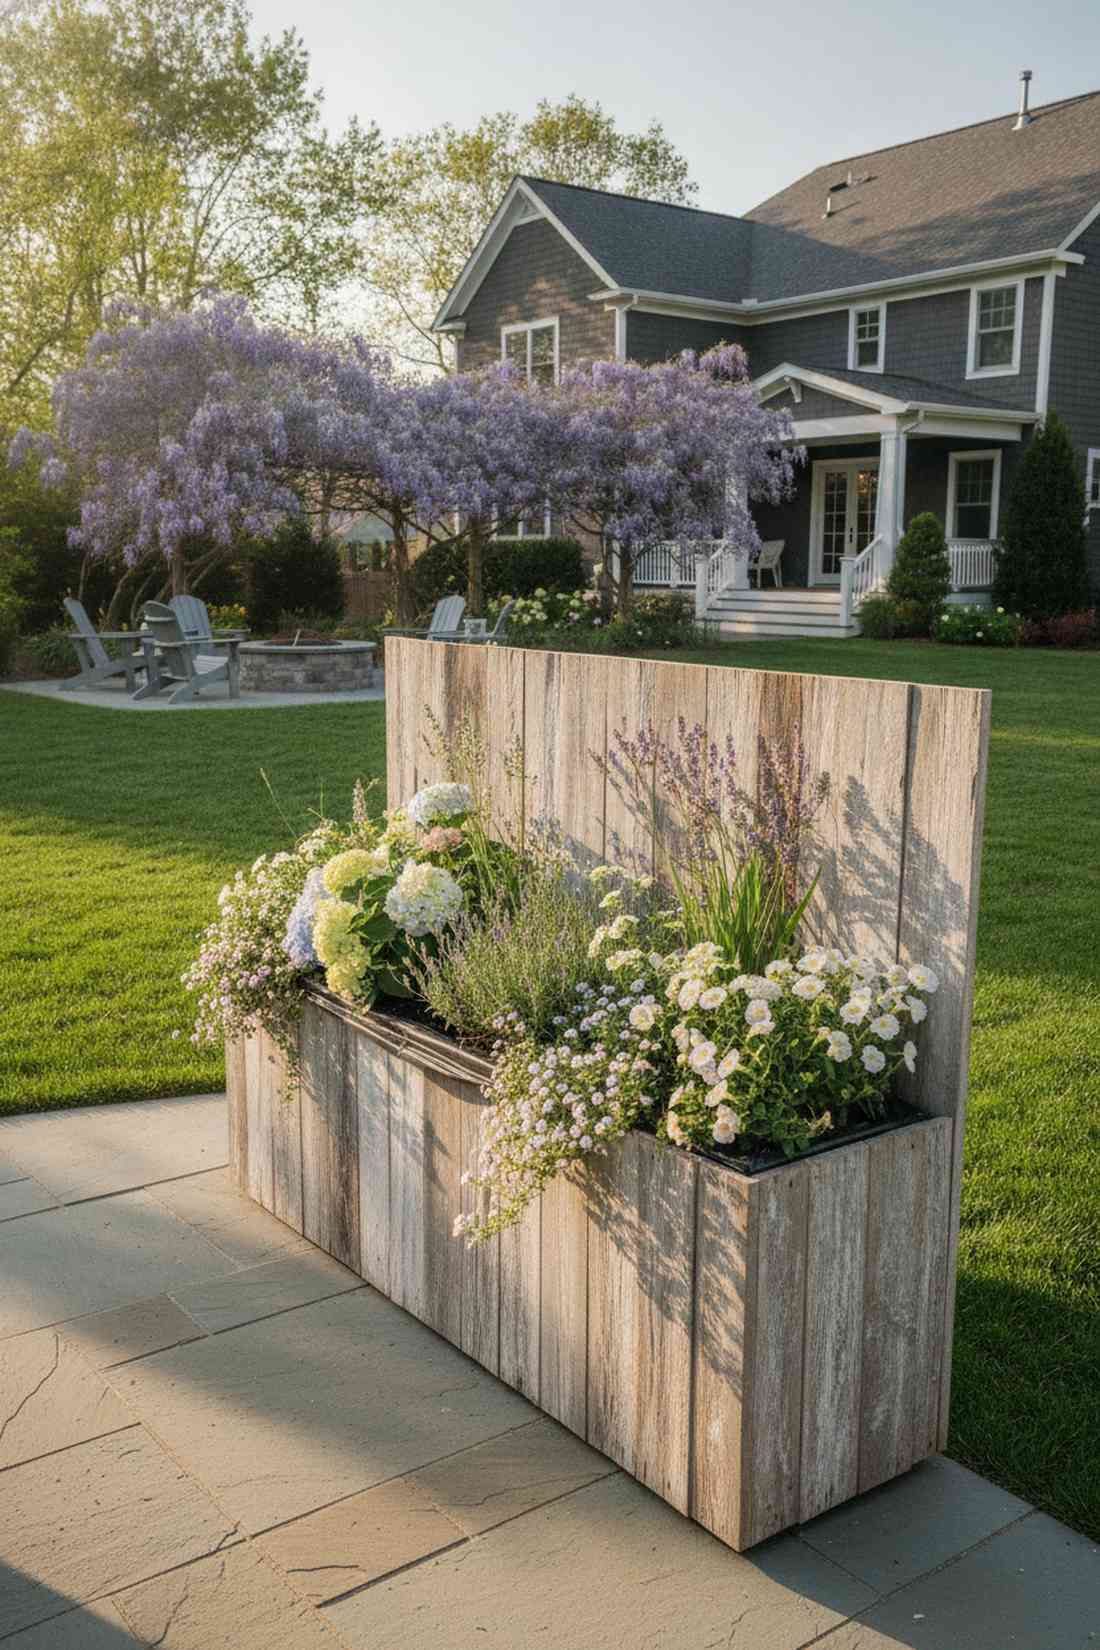
52. Rain Gutter Attachment
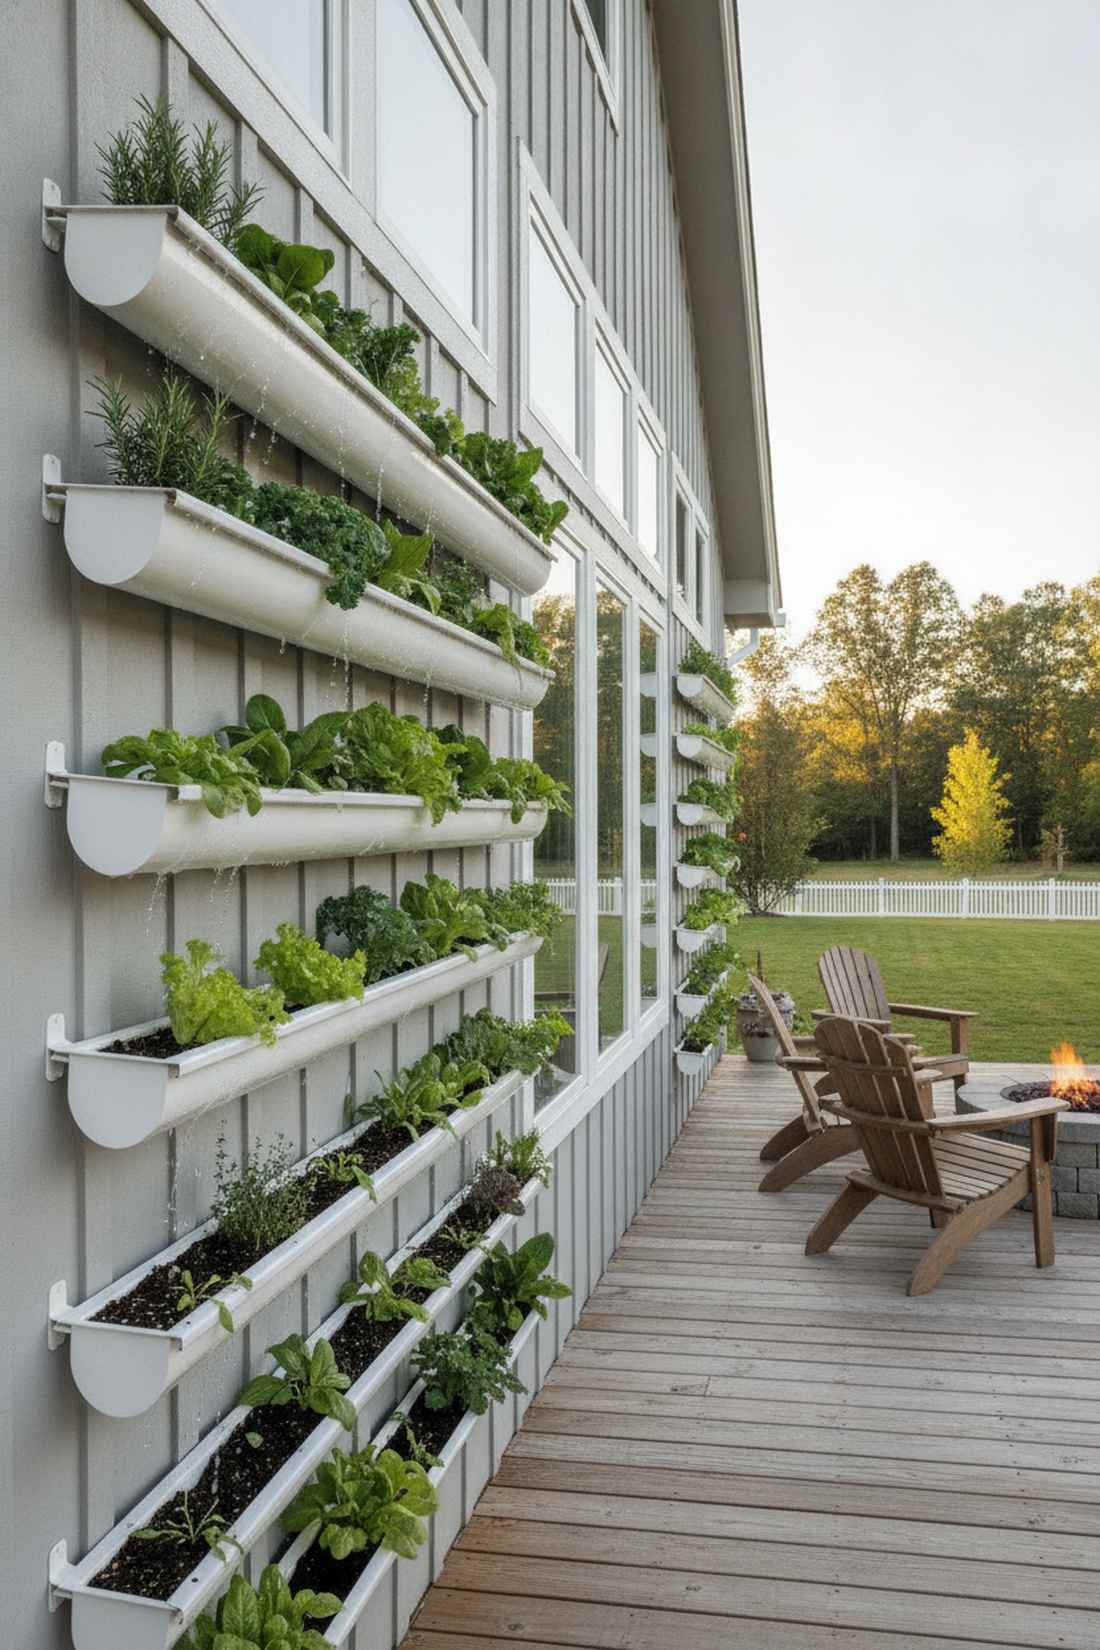
Radiates high-tech vertical farming brilliance. Suspended vinyl side-troughs act as the ultimate high-yield hack for incredibly tiny spaces.
Bolting cheap plastic gutters to the blank outside walls looks far more expensive than it is by creating a lush, cascading waterfall of edible greens. This elevated trench strictly separates delicate salad crops from heavy soil pests, completely neutralizing the slug attacks that normally decimate low-lying herbs.
A single gutter runs $10 and adds an entire extra row of food. Pin this brilliant hack to maximize every square inch of your lumber!
- Key Materials: Vinyl gutter sections and brackets
- Vibe / Style: Hyper-efficient vertical farm
- Difficulty: Fast bracket mounting
- Budget Breakdown: Gutter: $10 | End Caps: $6.
- Creator’s Tip: Drill massive half-inch drainage holes every 4 inches along the bottom so the shallow roots don’t drown in stagnant rainwater.
- Smart Sourcing: heavy-duty hidden gutter hanger brackets and premium organic seed starter mix.
Building Your Raised Bed Wood Garden
These 52 blueprint configurations prove that achieving an incredibly high-end, premium garden aesthetic doesn’t require overpaying for pre-built designer units. By utilizing strategic material sourcing, heavy-duty hidden fasteners, and smart structural layouts, you can build elite raised beds wood systems that easily last decades. Whether you are hacking together free zero-budget pallets, upgrading to indestructible aromatic cedar, or transforming wild timber into gorgeous raised beds logs borders, the secret lies in aggressive moisture management and rock-solid corners. Grab your tools, pick a high-yield blueprint from above, and transform your chaotic backyard dirt into a structured, highly productive oasis.
Frequently Asked Questions
What type of wood lasts longest for raised beds without chemical treatment?
If you want ultimate longevity without touching toxic chemicals, premium cedar and heart redwood are undisputed champions, easily lasting 15-20 years thanks to their aggressive natural pest-repelling oils. However, if you are building on a budget, investing in standard Douglas fir and coating it with a UV-resistant clear wood sealant or natural raw linseed oil gives you a high-end look for a fraction of the cost, usually lasting a solid 10-12 years before requiring replacement.
How deep should raised beds wood constructions be for vegetables?
Achieving massive vegetable yields requires 16-18 inches of rich soil depth, which allows massive taproots from tomatoes and carrots to plunge downward without hitting hardpan clay. To save a fortune on potting dirt, you can utilize the split-depth trick or buy compressed organic coco coir bricks (bulk pack) to fill the bottom layers cheaply, reserving your expensive premium compost exclusively for the top 6 inches where the delicate feeder roots live.
Are raised beds with logs safe for organic vegetable growing?
Absolutely—raw, untreated timber from species like cedar, oak, or locust provides one of the purest, most biologically active growing environments possible for a true organic setup. As your raised beds with logs slowly break down over the years, they naturally feed your soil with highly beneficial fungal networks; just ensure you never use reclaimed railroad ties, and jumpstart your soil web by mixing in a premium mycorrhizal inoculant starter kit.
What is the most cost-effective wood choice for multiple raised beds?
When mass-producing garden boxes, skipping the expensive cedar aisle and grabbing untreated pine or hemlock drops your lumber bill by a staggering 60%. To prevent rapid rotting, line the interior walls with a heavy-duty commercial weed barrier (bulk roll) to stop wet soil contact, and use pre-cut corner bracket kits to ensure these cheap boards stay perfectly square and structurally rigid for up to a decade.
Do raised beds logs need to be treated or sealed?
While natural log borders look stunning as they decay and feed the soil, applying a quick layer of protection drastically prevents the bark from crumbling and looking messy within the first two years. For an ultra-premium aesthetic that locks in the rich wood grain, strip the bark off your raised beds logs entirely and apply a thick coat of food-safe botanical wood wax or an exterior satin spar varnish to lock out destructive moisture.
What width is optimal for wood raised beds?
The golden rule for high-yield farming is restricting the absolute maximum width to exactly 4 feet, which guarantees you can comfortably reach the dead center without ever stepping on the dirt. Stepping on the soil causes deadly root compaction that suffocates plants; if you must build wider boxes, install heavy-duty stepping stone pavers down the middle to create a safe, permanent walking zone that protects your organic compost structure.
How long do raised beds with logs last before replacement?
Depending heavily on your climate, a dense hardwood log border will fight off rot for an impressive 12-18 years, while softer pine logs might break down into compost after 5-8 years. You can instantly double the lifespan of any raised beds logs setup by elevating the bottom tier off the wet mud using a thick, compacted layer of decorative drainage gravel wrapped securely in geotextile fabric.