Upgrading your garden pathway instantly elevates your entire landscape value. These premium stepping stones concrete designs deliver expensive aesthetics on a beginner budget. Grab the exact material blueprints for durable, weather-proof outdoor walkways.
Design Snapshot: Smart Sourcing Principles
- Grid Optimization: Position stones exactly 24 inches center-to-center to maximize material yield and reduce total bulk concrete costs
- Base Foundation: Always compact a 4-inch heavy-duty gravel base to prevent ground heaving and expensive replacement work
- Commercial Grade Thickness: Pour DIY mixes at a strict 3-inch depth to guarantee structural integrity against heavy yard equipment
- Premium Durability: Invest in high-adhesion freeze-thaw concrete additives and UV-blocking clear sealants for zero-maintenance longevity
Classic Concrete Foundations
Nailing the foundation phase is where budget-friendly projects transform into luxury landscaping. These core blueprints focus on maximum durability and high-end geometric symmetry.
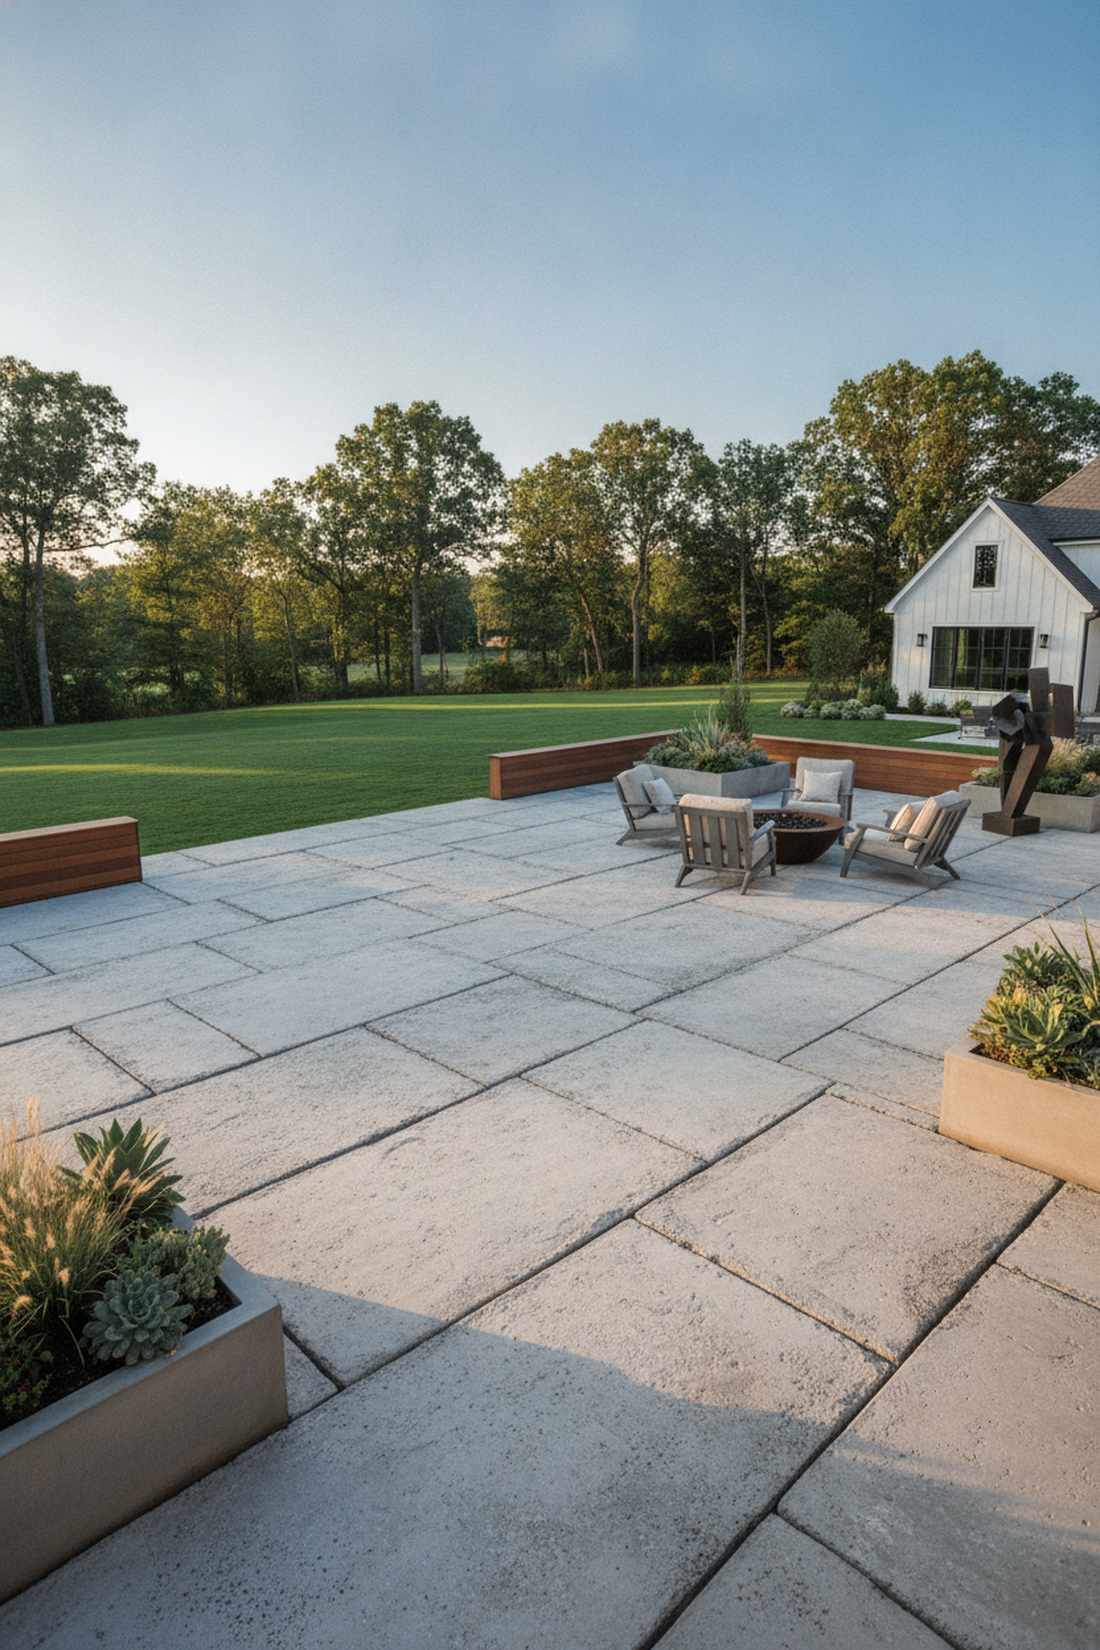
1. Square Paver Grid Layout
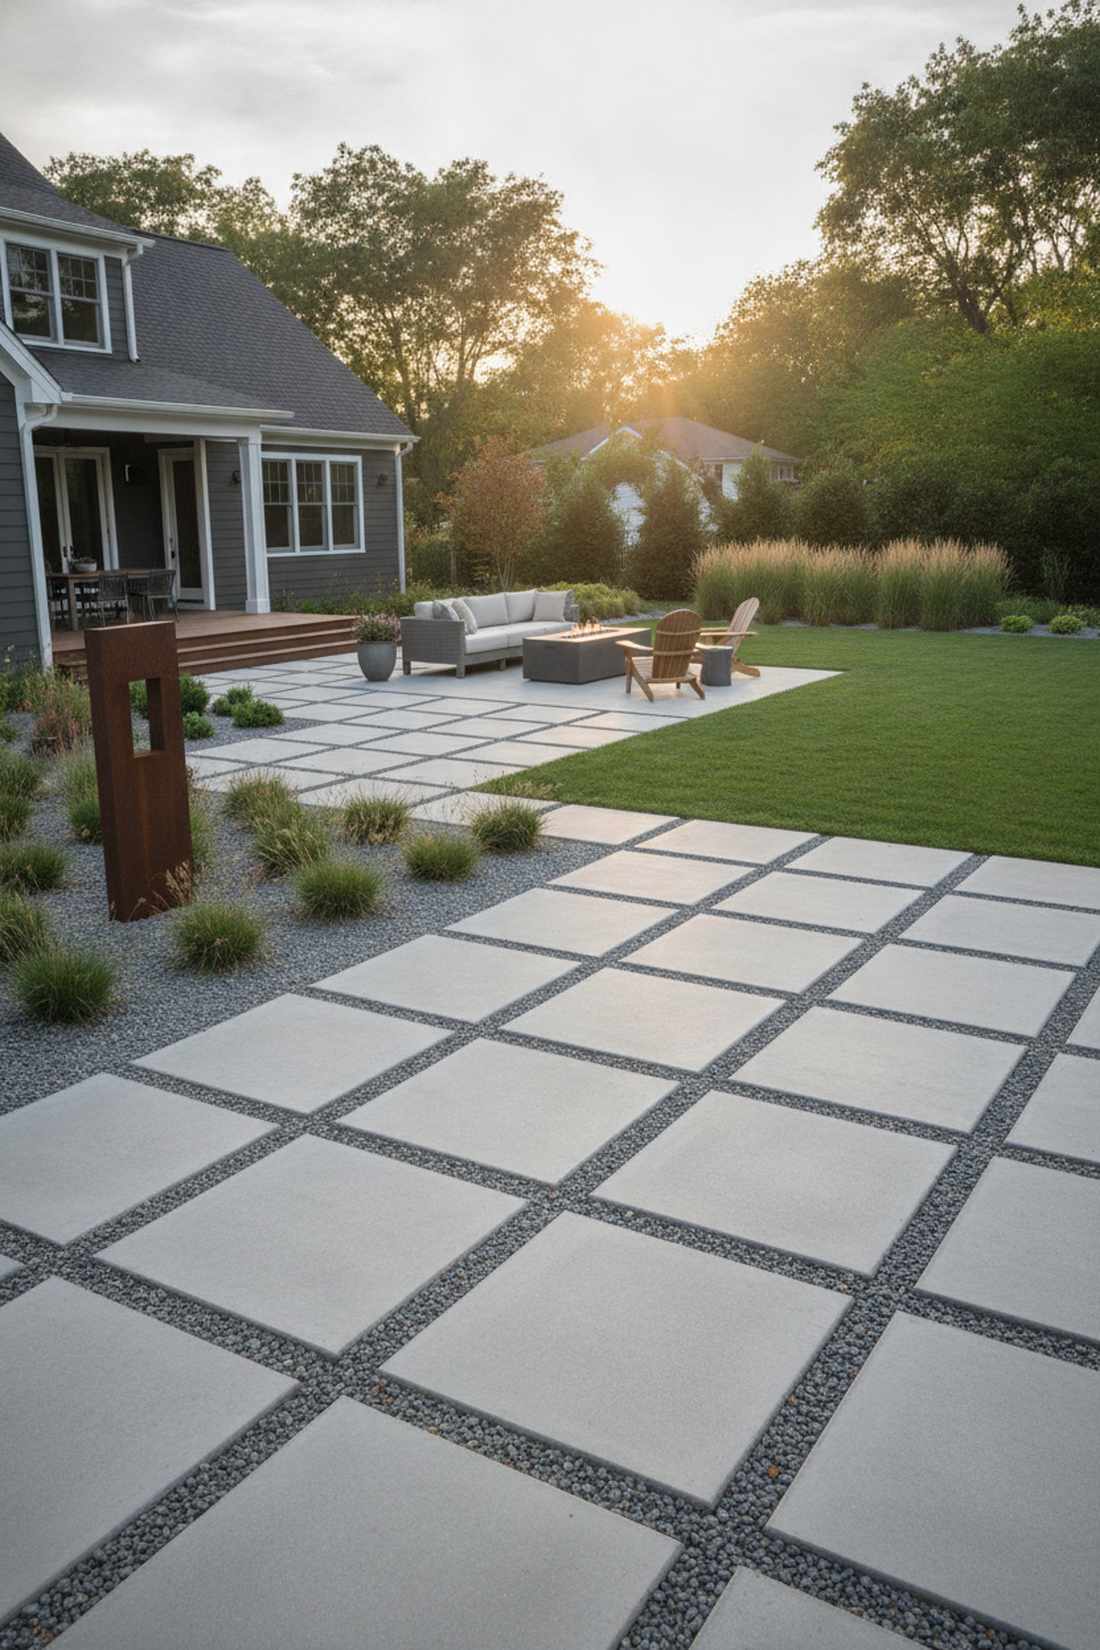
Feels like a high-end architectural exhibit. Modern grid patio pathways define clear boundaries beautifully. Works exceptionally well for connecting minimalist front yards to back patios.
Dropping massive pre-cast blocks completely changes spatial perception instantly. Standard fiber-reinforced mixes deliver a surprisingly premium look when spaced uniformly over crushed stone.
You can easily pull this off for around $18–$25 per slab. Save this to your DIY weekend garden board!
- Key Materials: Heavy-duty square silicone paver molds
- Vibe / Style: Modern architectural luxury
- Difficulty: Beginner friendly pouring
- Budget Breakdown: Concrete: $8 | Base Gravel: $10 | Sealant: $3.
- Creator’s Tip: Use a rubber mallet to vibrate the mold and eliminate all surface air bubbles.
- Smart Sourcing: reusable 24×24 inch paver molds (bulk pack) and high-yield fast-setting concrete mix.
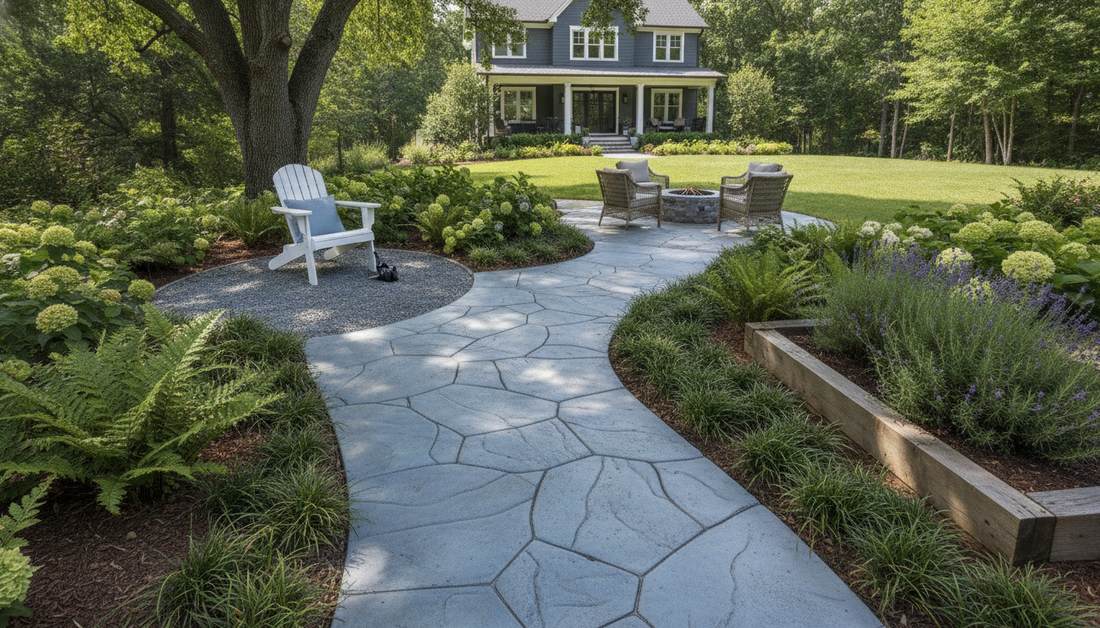
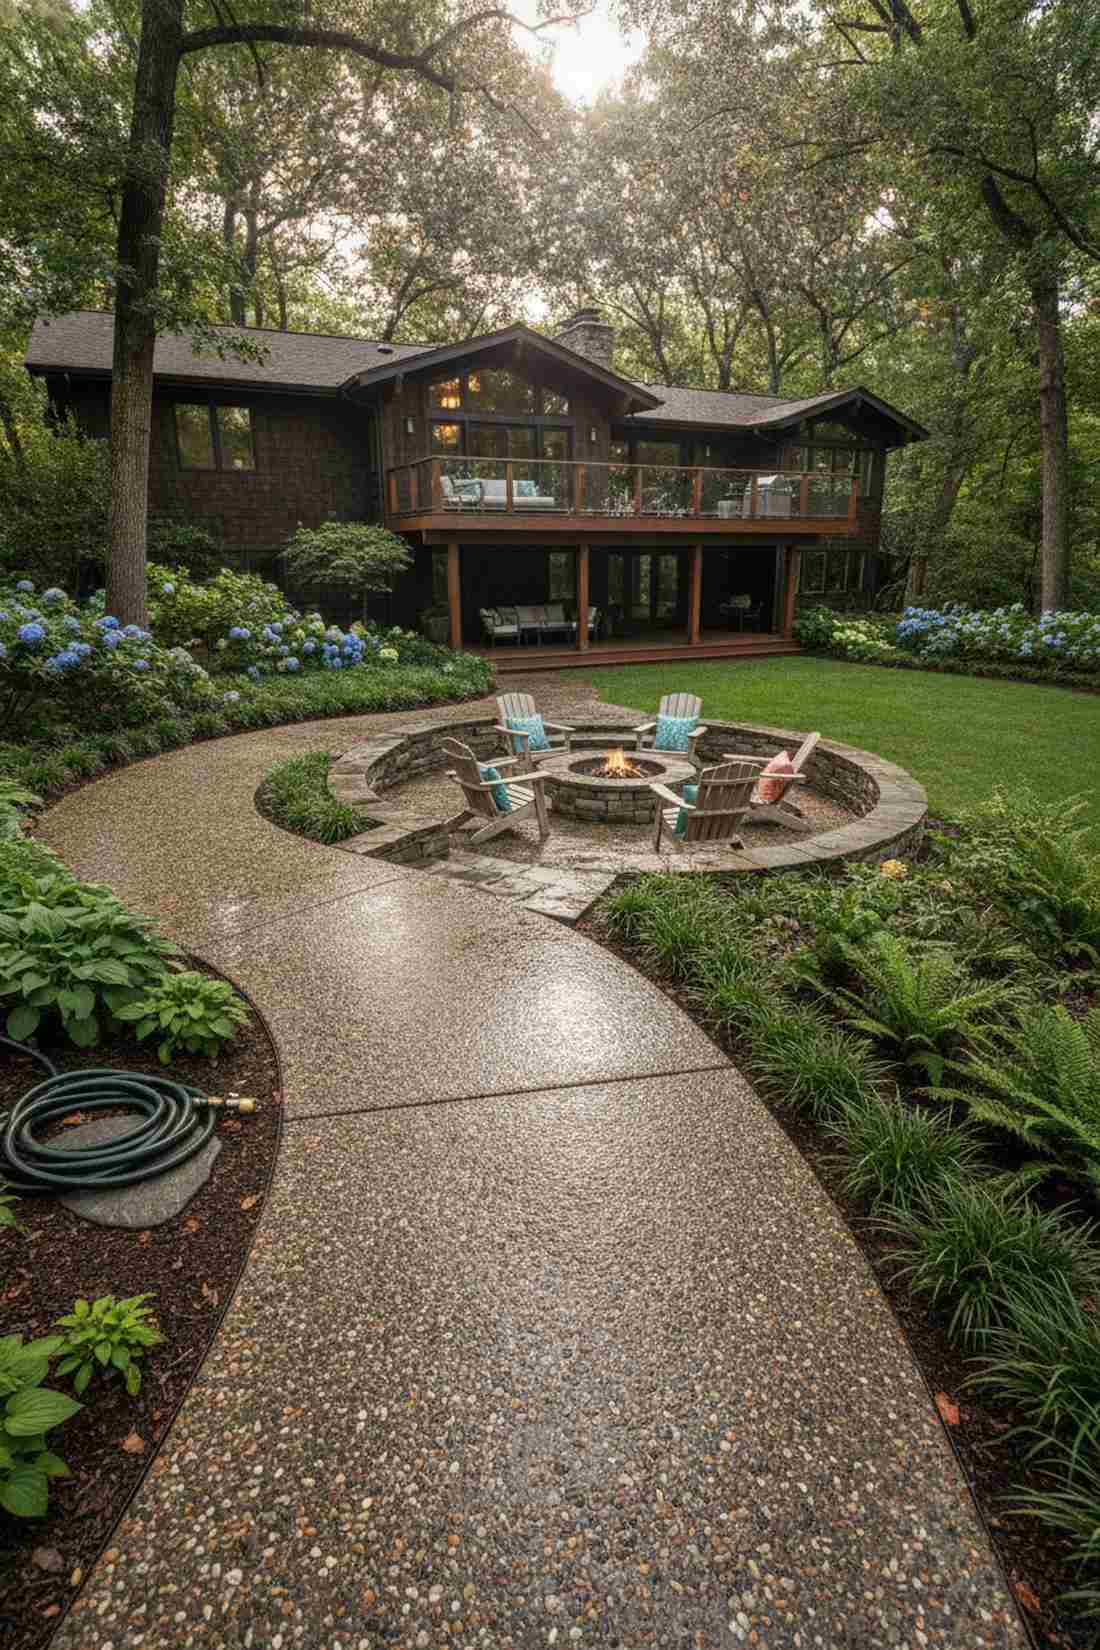
2. Circular Stepping Discs
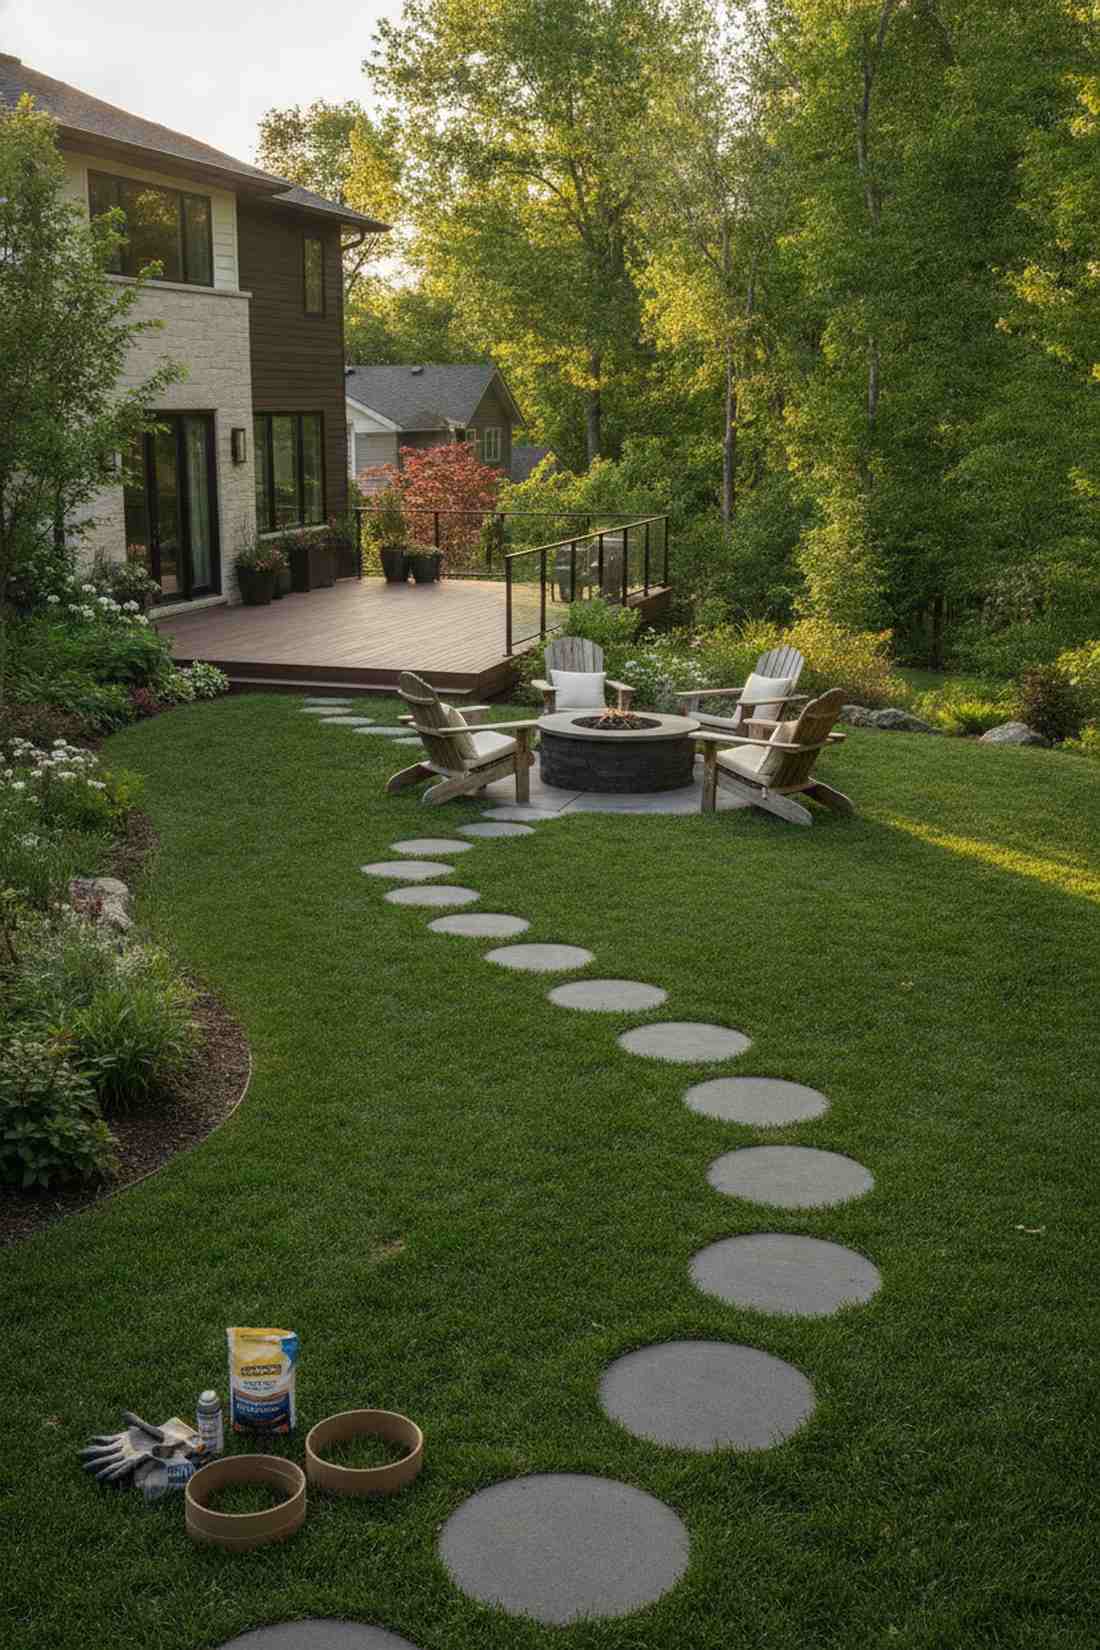
Straight out of a storybook landscape. Curved garden walkway decor creates an inviting, gentle flow. Unbeatable for meandering routes around sharp fire pits.
Geometric circles break up harsh landscaping angles effortlessly. Using commercial-grade silicone templates gives a designer-level finish without the steep masonry price tag.
Expect to spend roughly $12 per disc for materials. It’s a fast upgrade that completely changes the vibe.
- Key Materials: Pre-cut circular forming tubes
- Vibe / Style: Soft contemporary landscape
- Difficulty: Easy weekend project
- Budget Breakdown: Cement: $5 | Forms: $7.
- Creator’s Tip: Coat the inside of the tubes with vegetable oil for instant release.
- Smart Sourcing: heavy-duty concrete release agent spray and pre-cut 16-inch casting rings.
3. Rectangular Pathway Slabs
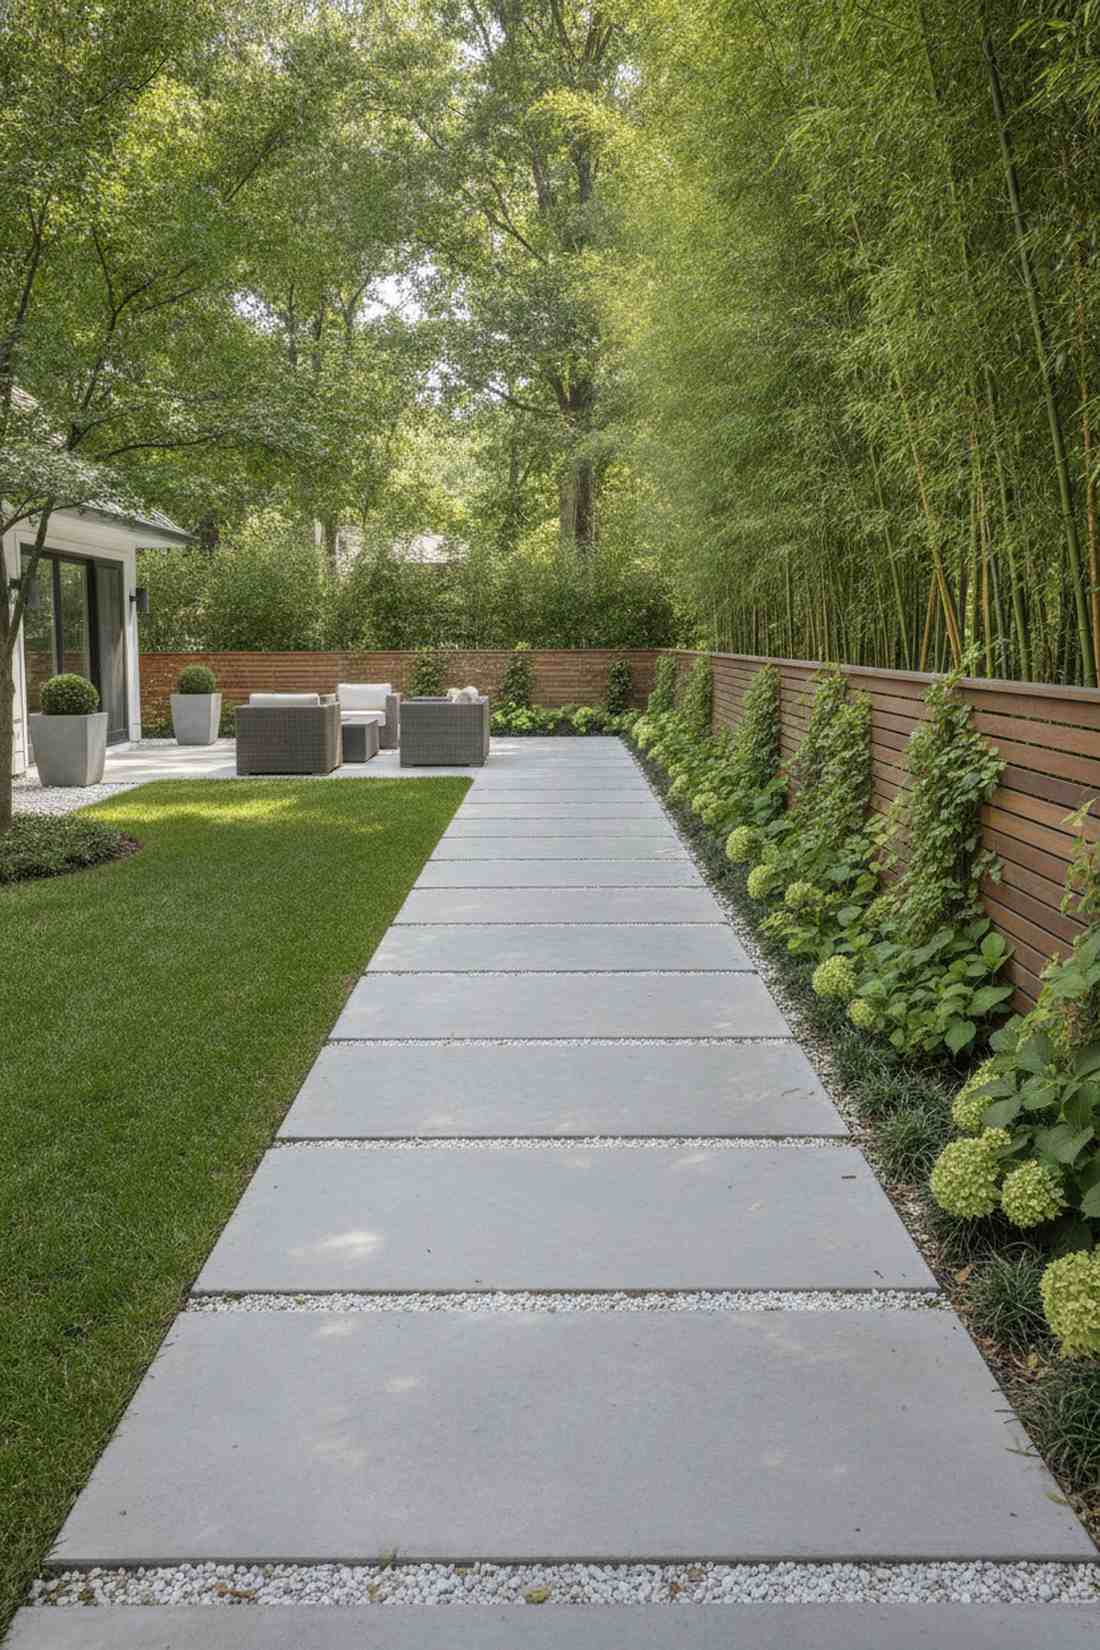
Brings absolute resort-level luxury outdoors. Elongated flagstone-style paths guide foot traffic elegantly. Ideal for narrow side-yard space transitions.
Linear placements trick the eye into seeing a much larger space immediately. Sourcing bulk high-strength cement mixes ensures these elongated slabs won’t crack under heavy weather.
Budget roughly $18 to $25 per large rectangle block.
- Key Materials: Rigid rectangular pour forms
- Vibe / Style: 5-Star hotel courtyard
- Difficulty: Intermediate leveling required
- Budget Breakdown: Materials: $15 | Reinforcement: $5.
- Creator’s Tip: Bury a layer of steel mesh directly in the center to double the weight capacity.
- Smart Sourcing: galvanized steel remesh sheets and UV-blocking acrylic concrete sealer.
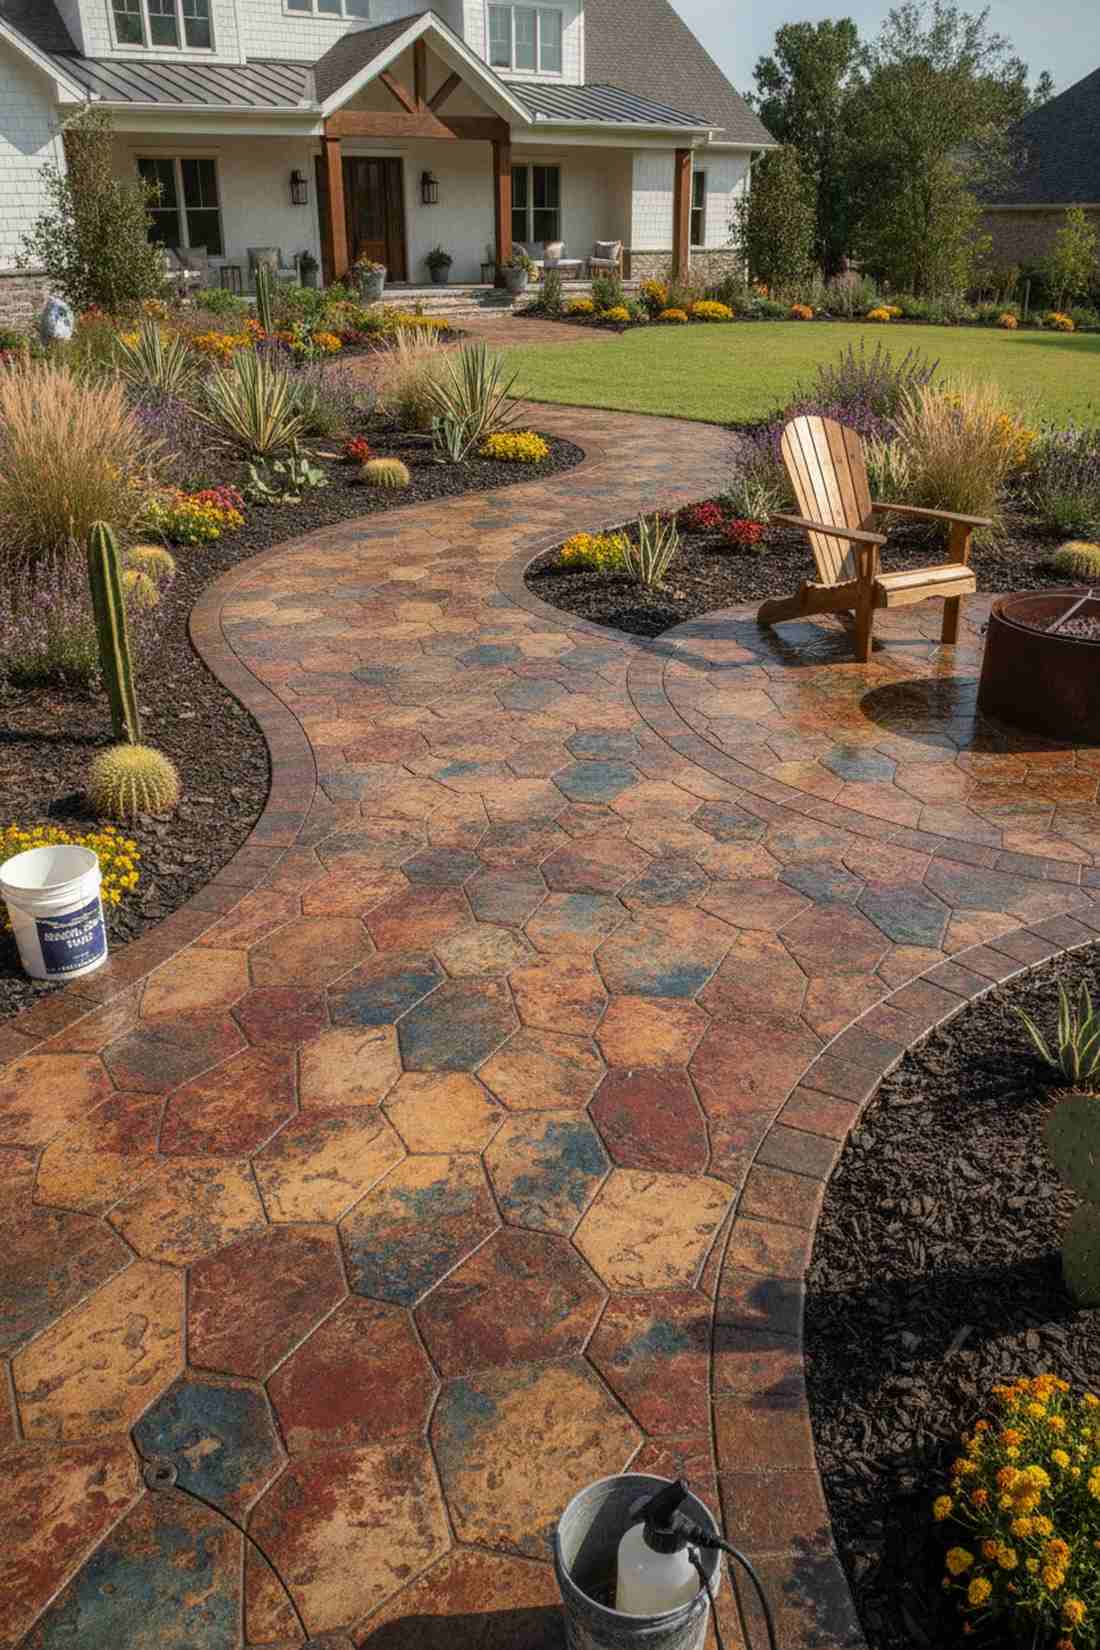
4. Hexagonal Honeycomb Pattern
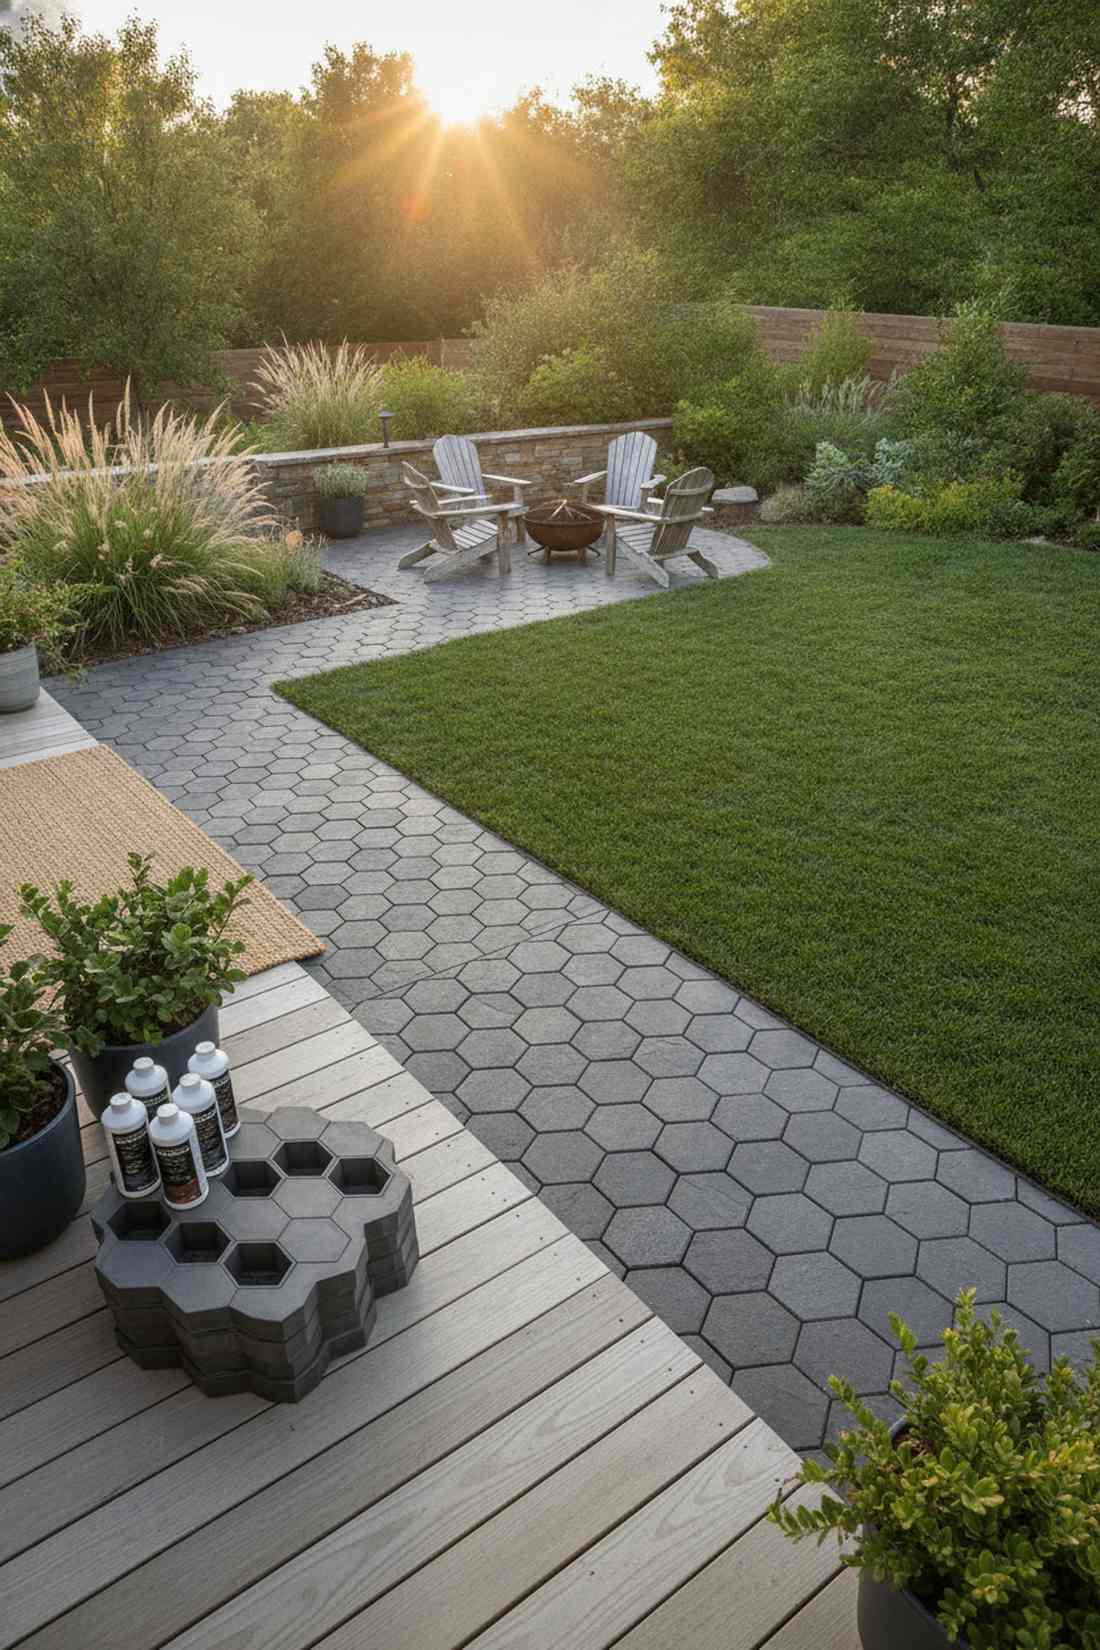
Looks like a mesmerizing organic puzzle. Interlocking honeycomb garden paths bring trendy geometry right to your lawn. Perfect for wide patio extension borders.
Ditching traditional squares for six-sided pavers creates instant neighbor envy. Snagging reusable plastic paving templates makes rapid batch-pouring shockingly easy and extremely lucrative.
Keep costs low at around $10 per square foot. Pin this if you’re planning a small space upgrade!
- Key Materials: Interlocking honeycomb template grids
- Vibe / Style: Trendy geometric boho
- Difficulty: Fast batch production
- Budget Breakdown: Concrete: $6 | Molds: $4.
- Creator’s Tip: Tint the mix with liquid charcoal for a moody slate appearance.
- Smart Sourcing: interlocking hexagon paving molds (multi-pack) and liquid cement colorant concentrate.
This next setup is ridiculously cheap but looks like a $100 custom display…
Geometric & Modern Patterns
Take your landscaping out of the dark ages with sharp, angular blueprints. These modern configurations trick the eye and maximize high-traffic durability.
5. Linear Offset Stagger
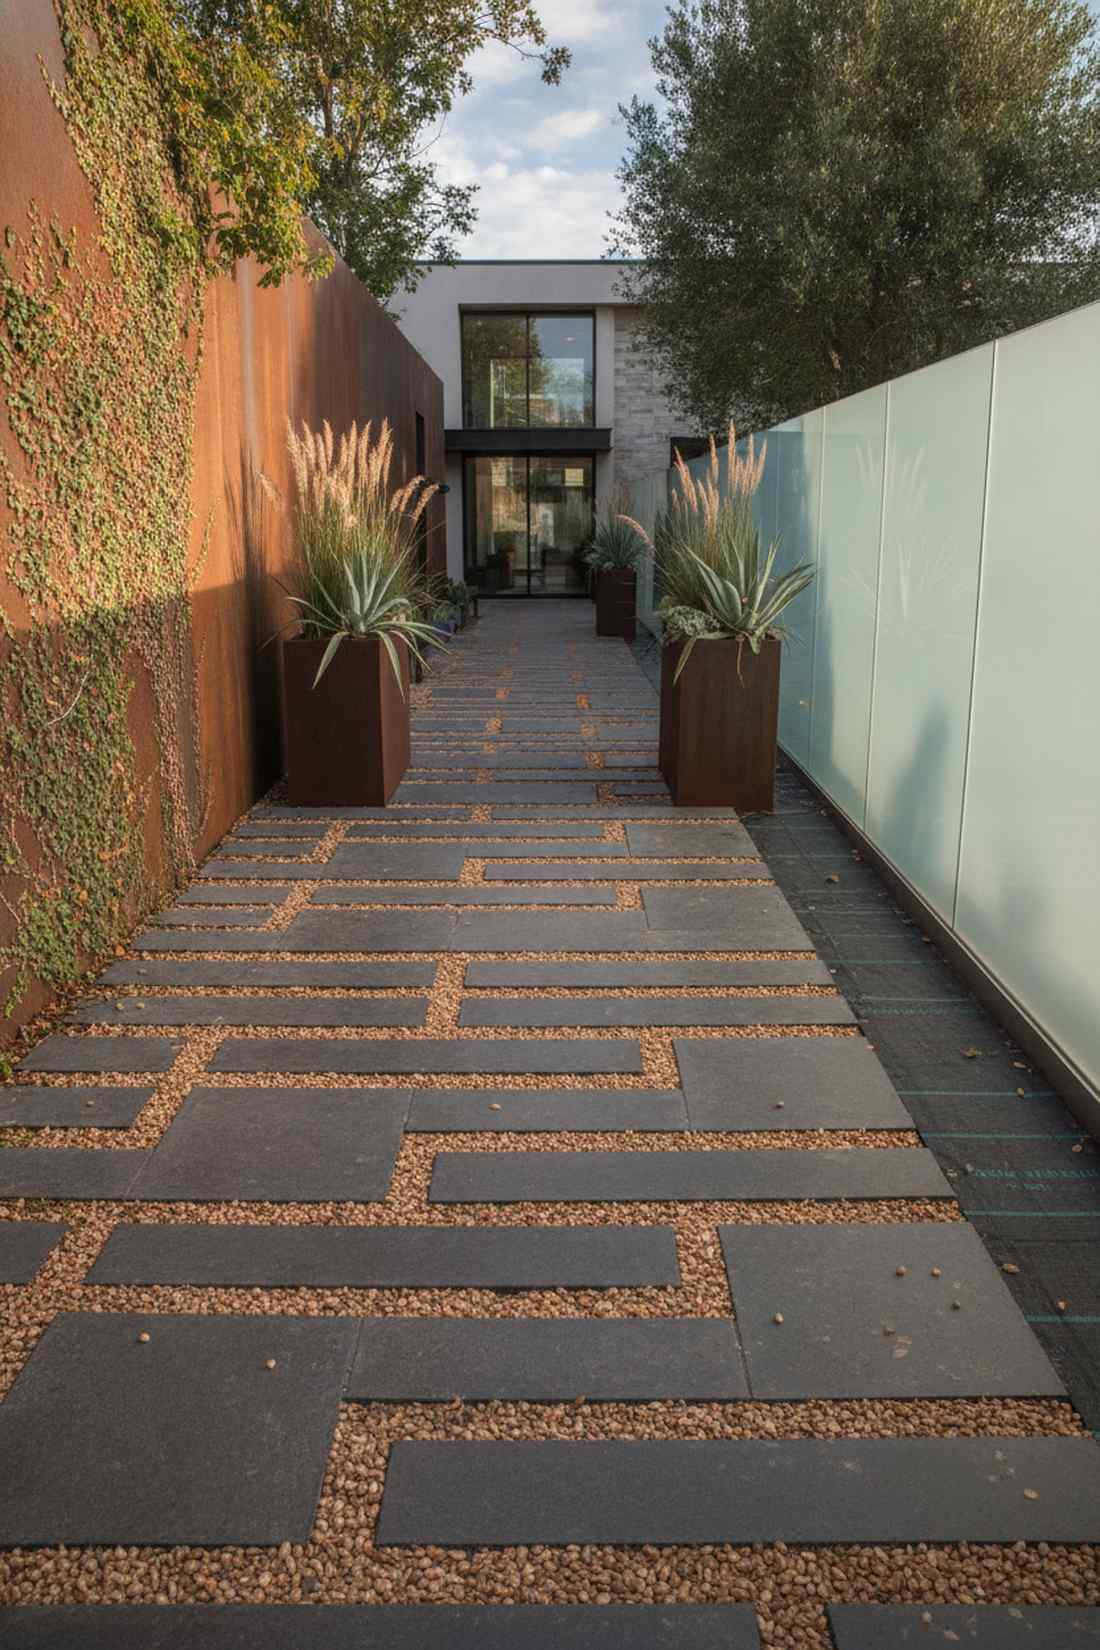
Gives that sought-after contemporary museum courtyard energy. Staggered running-bond pavers provide dynamic structural movement. Perfect for long, narrow garden alleys.
Offsetting traditional slabs dramatically increases load-bearing capacity while looking incredibly sleek. Grabbing UV-coated weather sealants keeps the minimalist aesthetic crisp year-round.
Material costs hover near $15 per slab section. Highly recommended for a quick weekend win.
- Key Materials: Decomposed granite infill
- Vibe / Style: Urban industrial chic
- Difficulty: Precision spacing needed
- Budget Breakdown: Slabs: $10 | Granite Infill: $5.
- Creator’s Tip: Use exact wooden spacer blocks to keep the stagger mathematically perfect.
- Smart Sourcing: premium decomposed granite bags and heavy-duty landscape weed barrier.
6. Diamond Angle Placement
Delivers pure mathematical elegance to unkempt grass. Angled diamond yard pavers command attention immediately. Striking focal point for formal botanical spaces.
Rotating a basic square 45 degrees feels almost like cheating the design system. Pouring these over a compacted crushed gravel base prevents annoying winter frost heaves entirely.
Setup runs about $14 a stone plus base materials.
- Key Materials: Standard 16×16 square molds
- Vibe / Style: Formal English estate
- Difficulty: Easy alignment
- Budget Breakdown: Base prep: $6 | Paver: $8.
- Creator’s Tip: Plant creeping thyme between the points to soften the harsh edges naturally.
- Smart Sourcing: creeping thyme seed starter kits and pre-cut steel edger strips.
7. Triangular Mosaic Arrangement
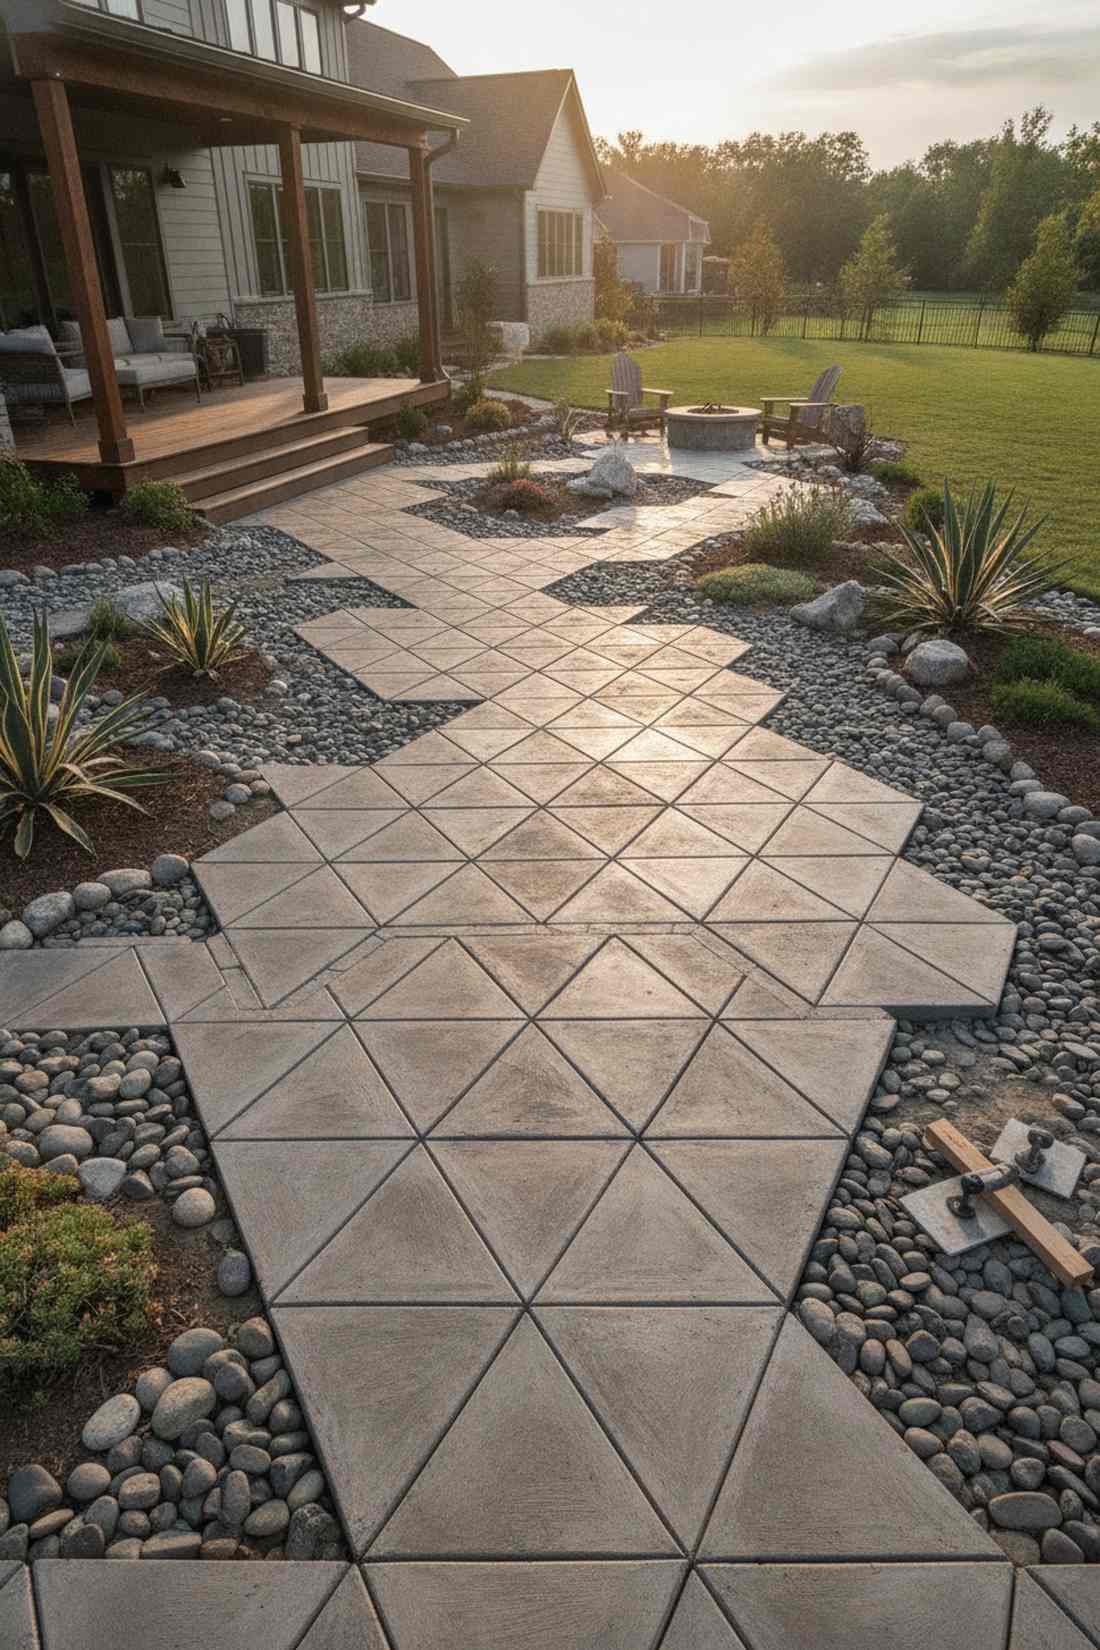
Feels like walking across a shattered mosaic masterpiece. Geometric triangle pathway layouts break all the traditional landscaping rules beautifully. Excellent for modern rock gardens.
Abstract tessellations force visitors to slow down and admire the ground beneath them. Utilizing fast-setting concrete bags lets you build complex star patterns in a single afternoon.
Expect to drop roughly $8 per individual triangle segment. Save this visual to your hardscaping inspiration board!
- Key Materials: Custom triangle form boards
- Vibe / Style: Avant-garde artistic
- Difficulty: Intermediate geometry
- Budget Breakdown: Lumber forms: $3 | Mix: $5.
- Creator’s Tip: Alternate the brushed finish direction on each triangle to catch the light dynamically.
- Smart Sourcing: rapid-set high strength concrete and concrete finishing trowel kits.
8. Oversized Monolith Slabs
Anchors your outdoor space like ancient monumental architecture. Massive monolith yard slabs project immense visual power. Fantastic for deep backyard viewing decks.
Going oversized eliminates trip hazards while looking far more expensive than it is. Burying heavy-duty steel rebar grids inside guarantees these giants survive brutal freeze-thaw cycles.
This premium look will run you about $40 to $60 per slab.
- Key Materials: Steel rebar mesh grids
- Vibe / Style: Brutalist landscape architecture
- Difficulty: Heavy lifting required
- Budget Breakdown: Concrete bulk: $30 | Rebar: $20.
- Creator’s Tip: Rent a portable mixer; mixing these massive blocks by hand will break your back.
- Smart Sourcing: pre-cut steel rebar grids and industrial concrete bonding adhesive.
Most people get this completely wrong… until they try the exact layout coming up next.
💡 Must-Have Supplies for High-End Setups
To build these setups faster and ensure they last, skip the generic craft aisles and invest in the right foundational kits.
- Base & Support: heavy-duty woven landscape fabric (bulk roll)
- Setup Tools: professional concrete finishing trowel starter kits
- Weather/Durability Protection: UV-coated commercial penetrating concrete sealer
Nature-Inspired Organic Shapes
Blend heavy masonry with the delicate curves of the natural world. These organic outlines fool the eye and fit perfectly into heavily planted, lush environments.
9. Giant Leaf Imprints
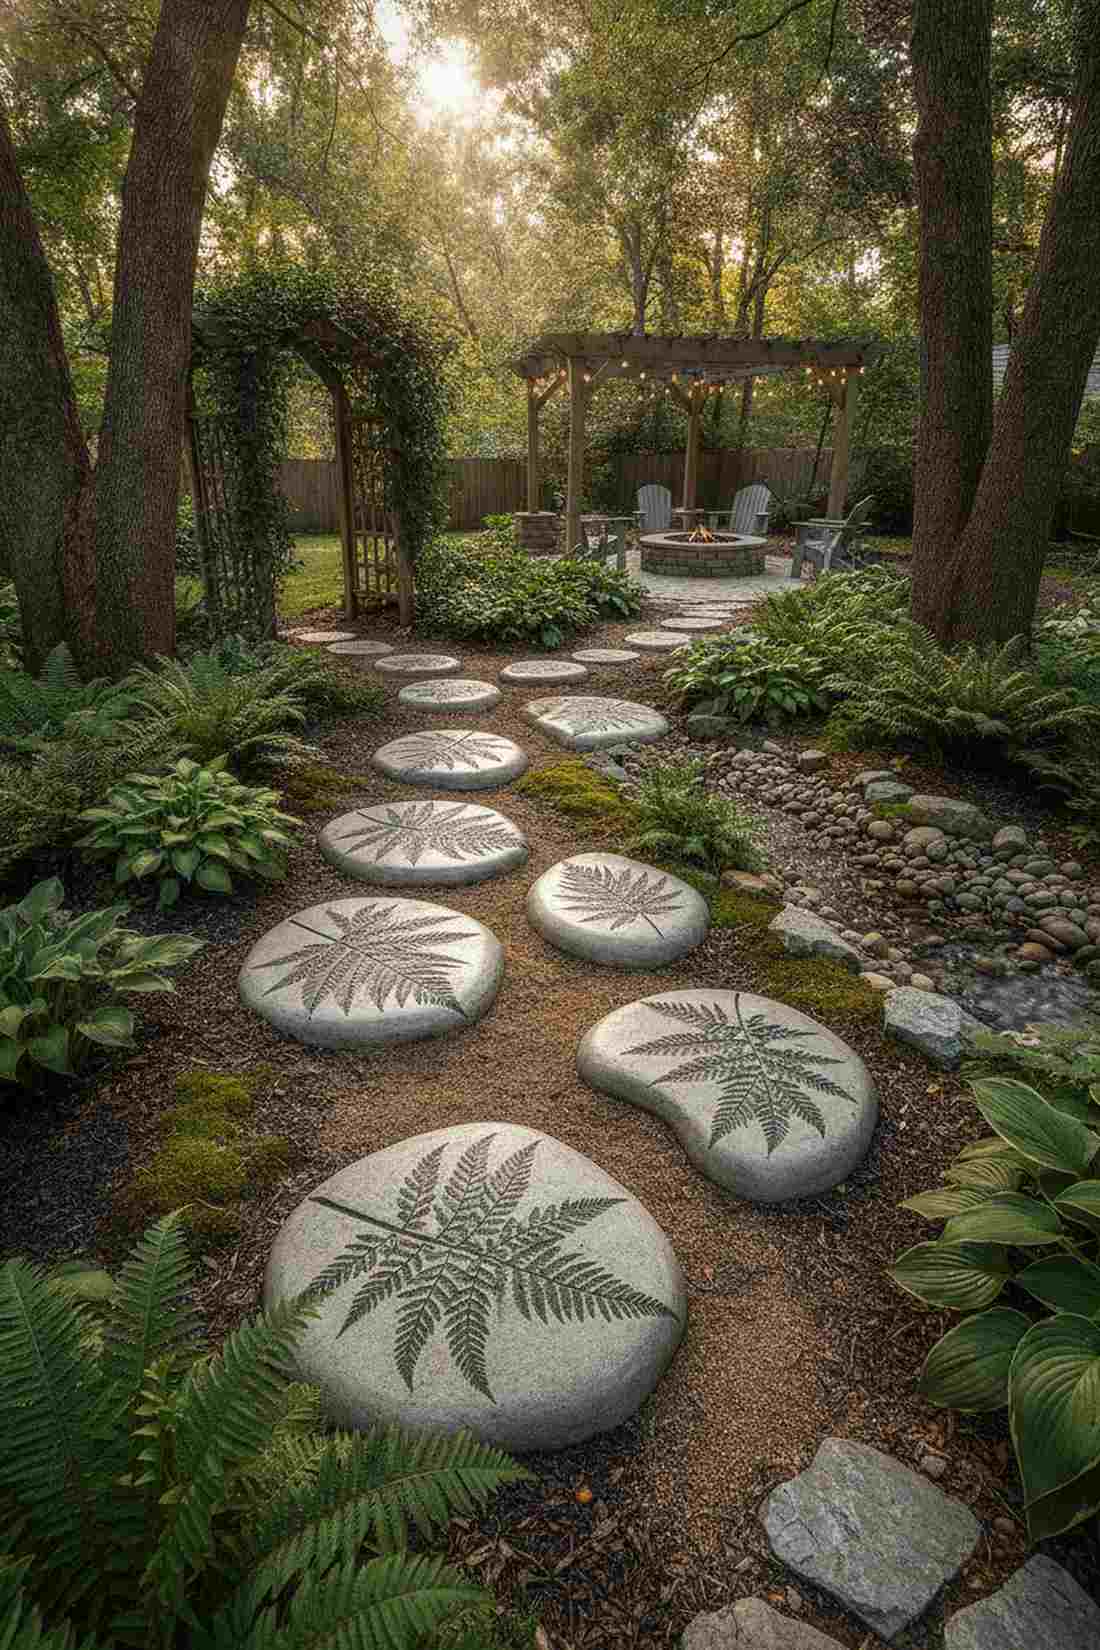
Feels like a hidden forest you accidentally discovered. Botanical leaf imprint stones capture incredible organic detail instantly. Outstanding for shaded hosta and fern gardens.
Pressing real elephant ear foliage creates textures no machine can replicate. Brushing on a concrete bonding adhesive primer ensures the delicate leaf veins dry razor-sharp.
A highly affordable project costing just $5 to $10 per leaf. Pin this for your next magical garden project!
- Key Materials: Large live botanical leaves
- Vibe / Style: Whimsical fairy forest
- Difficulty: Fun beginner craft
- Budget Breakdown: Fine sand mix: $6 | Sealer: $4.
- Creator’s Tip: Build a mound of wet sand under the leaf to give the stone a natural curved dome shape.
- Smart Sourcing: fine-finish sand topping mix and waterproof clear acrylic sealant spray.
10. Irregular Flagstone-Style

Mimics untouched nature with stunning accuracy. Faux flagstone concrete paths deliver rustic charm immediately. Perfect for cottage-core flowerbed borders.
Free-form pouring completely eliminates the nightmare of sourcing heavy natural stone pallets. Picking up premium concrete colorants lets you perfectly match local natural geology effortlessly.
Cost effectively mimics $30 stones for just $7 each.
- Key Materials: Flexible plastic garden edging
- Vibe / Style: Rustic quarried stone
- Difficulty: Creative free-handing
- Budget Breakdown: Edging forms: $3 | Tinted mix: $4.
- Creator’s Tip: Dust dry pigment powder randomly on the wet surface for realistic, uneven stone shading.
- Smart Sourcing: dry-shake antique release powder and bendable plastic formwork strips.
11. River Rock Replica
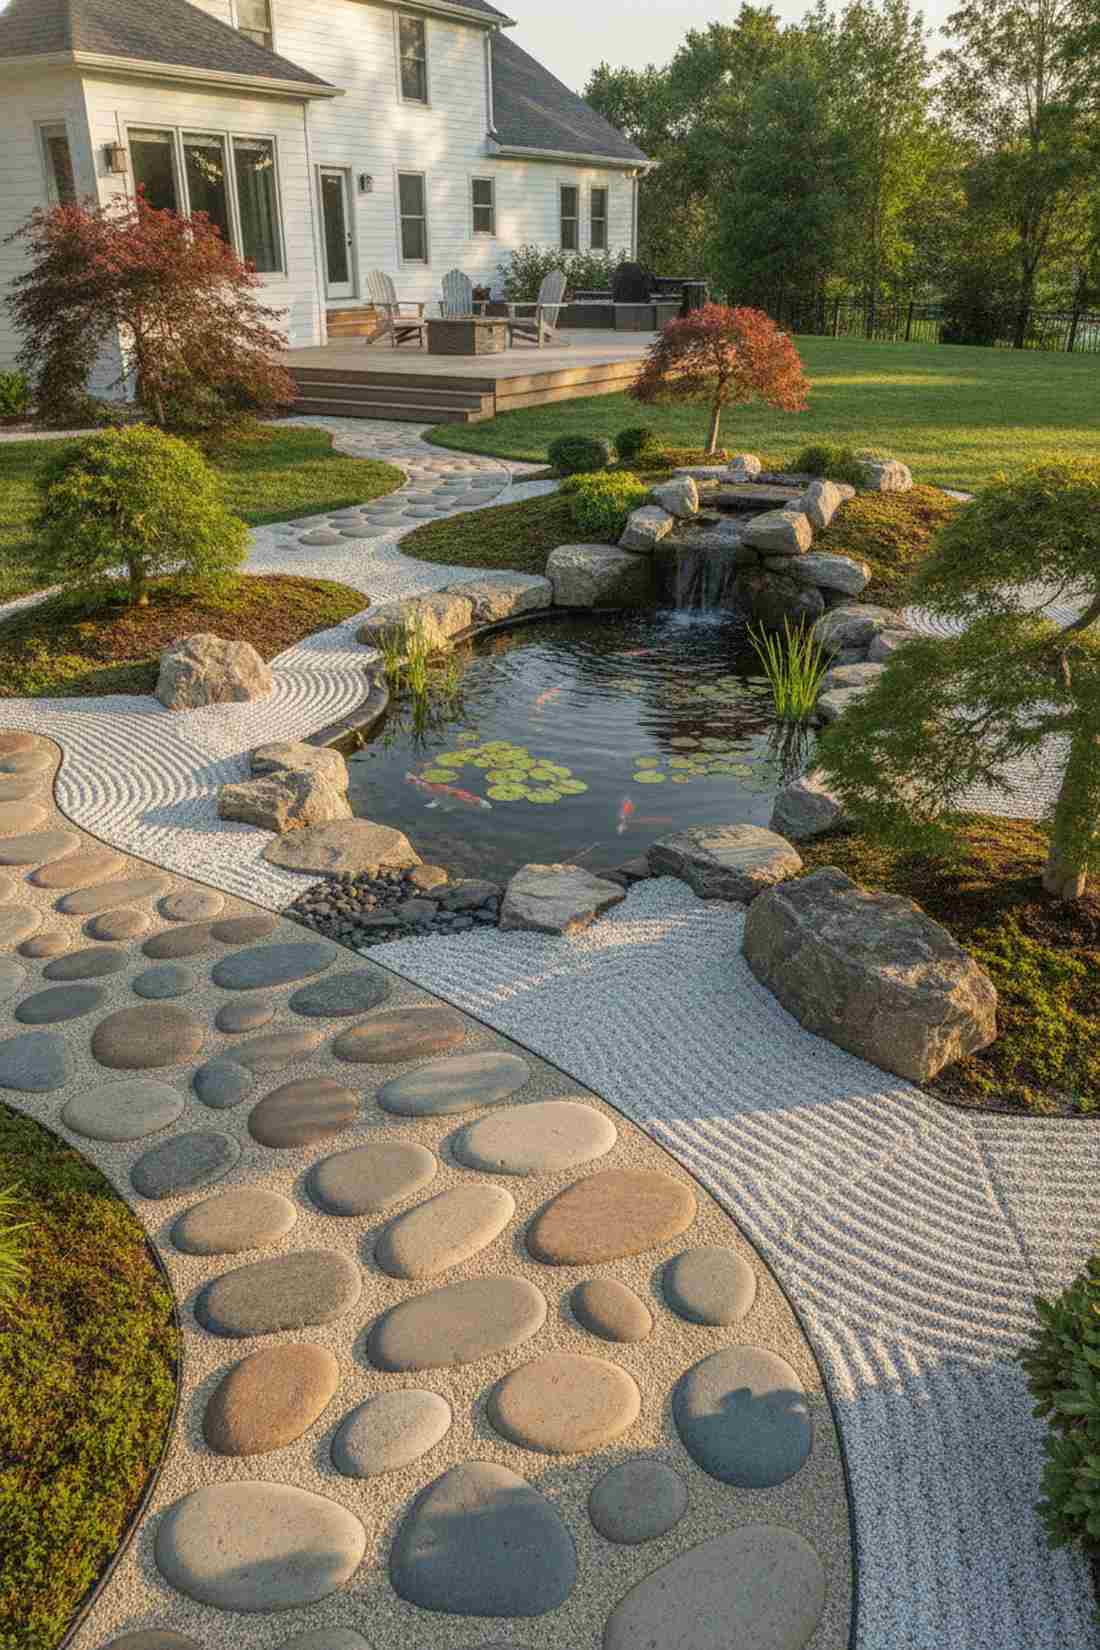
Channels the serene energy of a zen mountain stream. Smooth river cobble stones soften harsh outdoor aesthetics. Beautiful alongside koi ponds or cascading water features.
Hand-troweling rounded edges delivers an incredibly tranquil, barefoot-friendly walking surface. Mixing miniature garden supplies like fine aggregate sand prevents rough pitting and maintains that water-polished illusion.
Easily achieve this for about $6 per oblong stone.
- Key Materials: Fine aggregate mortar mix
- Vibe / Style: Japanese zen garden
- Difficulty: Easy shaping
- Budget Breakdown: Mortar: $5 | Finish tools: $1.
- Creator’s Tip: Rub the semi-dry stones with a damp sponge to expose a perfectly smooth, sandy finish.
- Smart Sourcing: high-strength mortar mix bags and masonry finishing sponge kits.
12. Abstract Free-Form Shapes
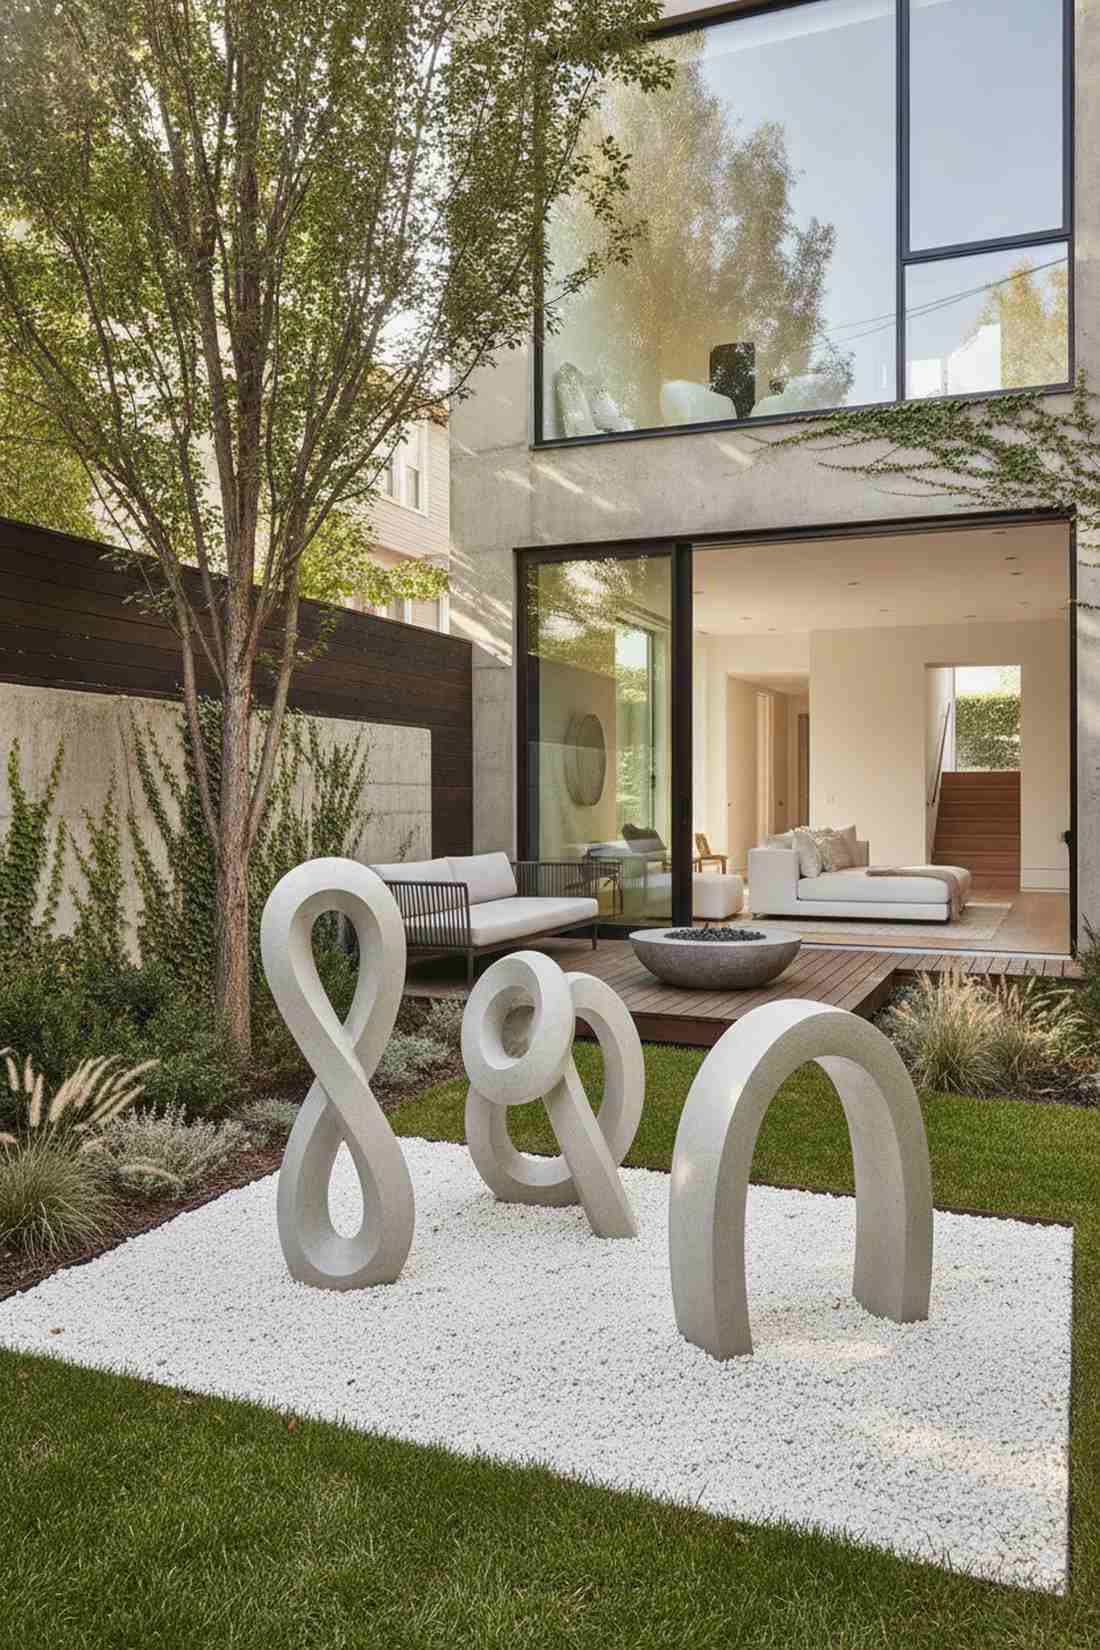
Turns your lawn into an interactive art gallery. Sculptural free-form garden decor reflects bold personal style. Best suited for eclectic urban courtyards.
Ditching symmetrical molds entirely opens up limitless creative terrain. Using foam board formwork makes shaping bizarre, fluid outlines shockingly straightforward and cheap.
Calculate around $10 to $15 per unique shape poured. Save this to your avant-garde design board!
- Key Materials: High-density foam board strips
- Vibe / Style: Contemporary eclectic art
- Difficulty: Custom templating
- Budget Breakdown: Foam strips: $5 | Concrete: $8.
- Creator’s Tip: Keep the narrowest parts of your shape at least 8 inches wide so they don’t snap under body weight.
- Smart Sourcing: flexible foam concrete form rolls and alkali-resistant glass fibers.
If you think concrete is boring, this next hybrid technique is about to blow your mind completely…
Resin-Enhanced Decorative Stones
Smash raw industrial strength together with glowing jewelry aesthetics. Integrating resins creates absolute showstoppers that command attention both day and night.
13. Resin Inlay Medallions
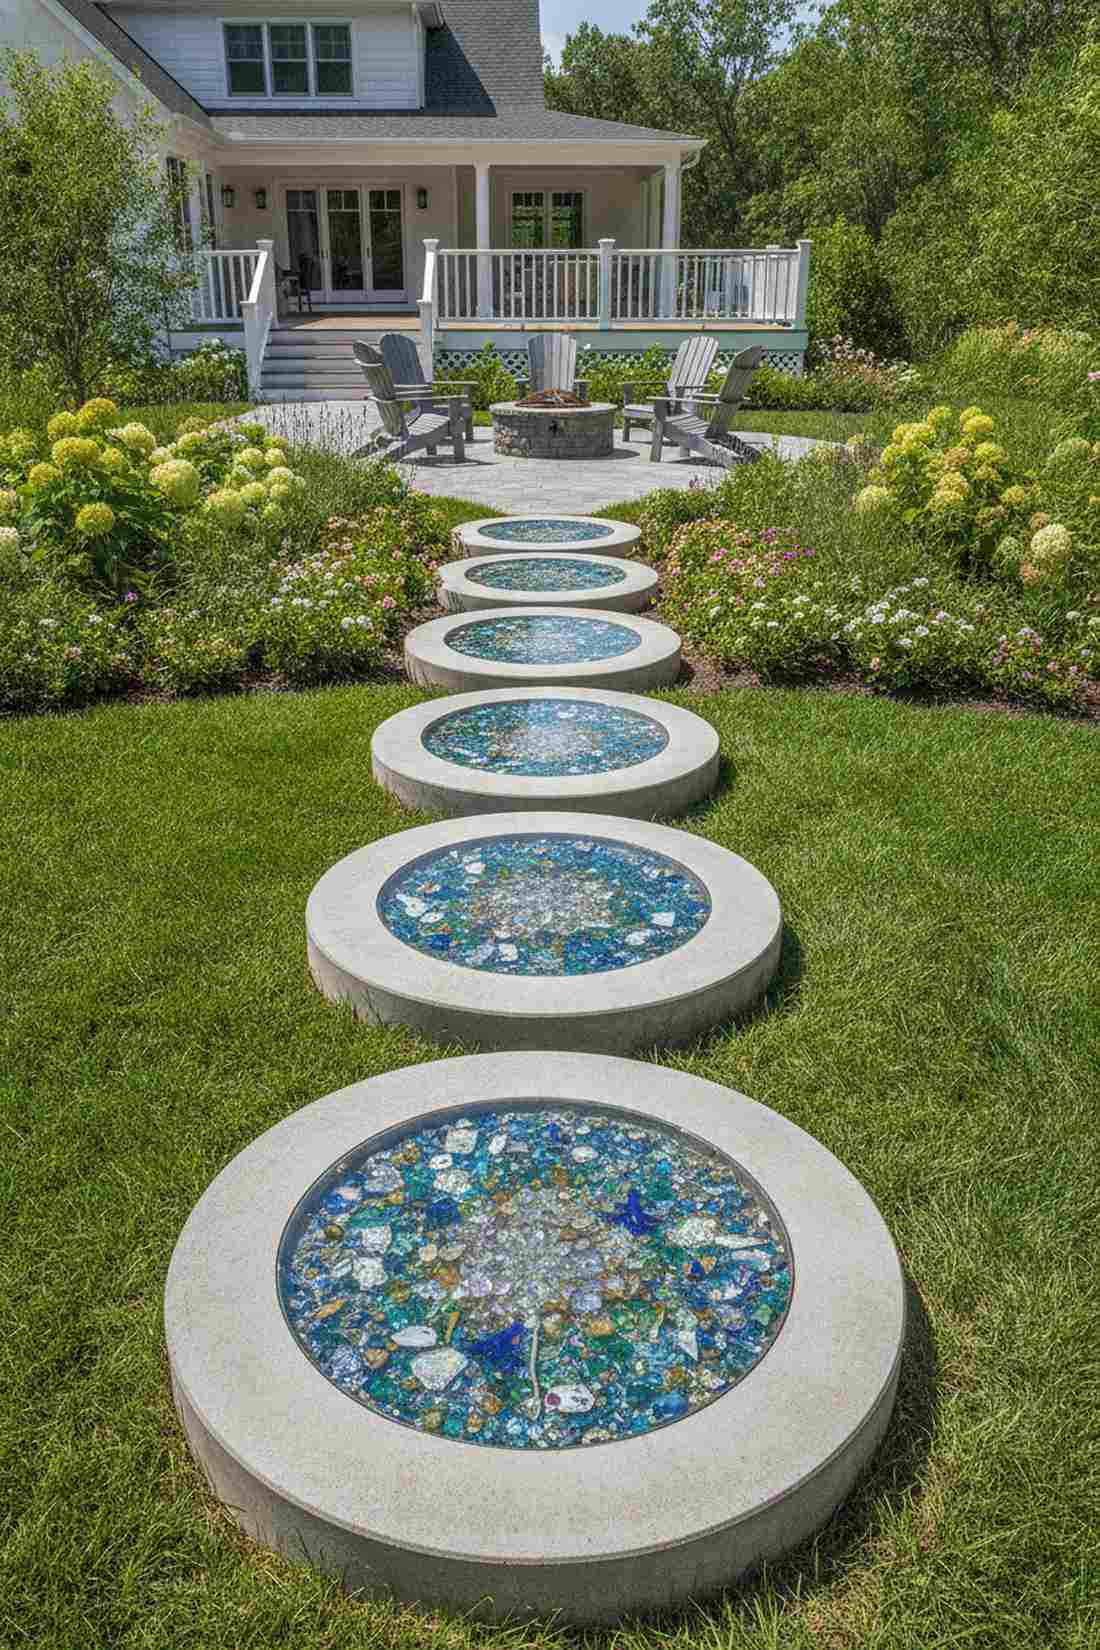
Sparkles like buried treasure under the midday sun. Resin inlay concrete accents fuse industrial strength with jewel-like beauty. Incredible for highlighting pathway intersections.
Embedding vibrant epoxy centers creates focal points that look insanely luxurious. Pairing stepping stones resin kits with deep concrete molds guarantees edge protection against lawnmower blades.
This showstopper costs roughly $20 per medallion. Pin this if you love mixed-material projects!
- Key Materials: Deep-pour casting epoxy
- Vibe / Style: High-end artistic fusion
- Difficulty: Multi-day curing
- Budget Breakdown: Resin mix: $12 | Concrete base: $8.
- Creator’s Tip: Press a plastic bowl into the wet concrete to create the perfect uniform cavity for your resin pour.
- Smart Sourcing: UV-resistant clear casting epoxy (starter kit) and crushed decorative glass bulk pack.
14. Transparent Resin Windows
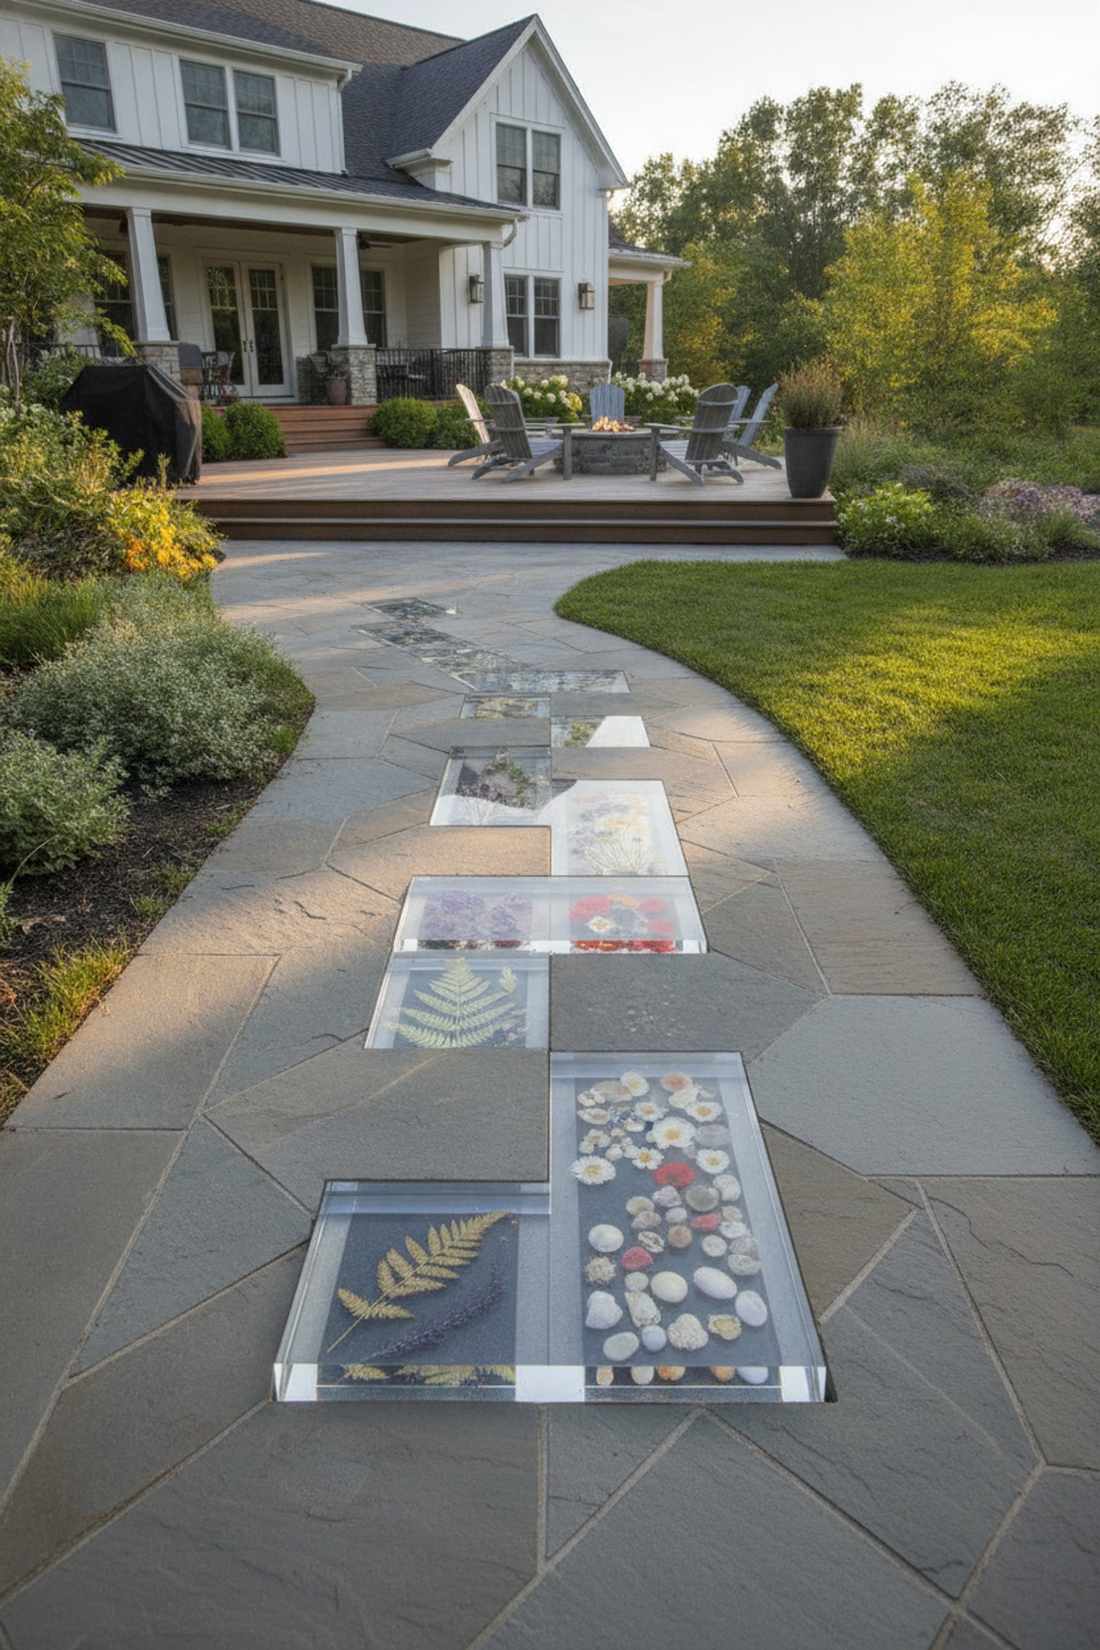
Captures light like a magical stained glass floor. Clear resin pathway windows freeze natural elements in time forever. Ideal for displaying dried botanicals or seashells.
Creating hollow voids for transparent fills tricks visitors into thinking they cost a fortune. Opting for UV-resistant deep pour epoxy stops the dreaded yellowing effect entirely.
A slightly pricier craft at $25 to $35 per window stone.
- Key Materials: Clear acrylic block inserts
- Vibe / Style: Botanical museum display
- Difficulty: Advanced pouring technique
- Budget Breakdown: Premium Resin: $20 | Add-ins: $10.
- Creator’s Tip: Always seal dried flowers with hairspray before embedding them so the resin doesn’t burn the petals.
- Smart Sourcing: pressed dried botanicals (bulk pack) and bubble-free epoxy resin kits.
15. Swirled Resin Patterns

Flows like a vibrant psychedelic marble floor. Marbled resin topcoat pavers offer a glossy, fluid aesthetic. Highly recommended for sunny patio entrances.
Layering colored epoxies over cured cement bases delivers a surprisingly premium look. Using an industrial heat gun pops surface bubbles and blends fairy garden kits seamlessly into the design.
You can pull this off for around $22 a stone.
- Key Materials: Mica powder colorants
- Vibe / Style: Polished luxury marble
- Difficulty: Fast working time
- Budget Breakdown: Base slab: $6 | Epoxy & Pigment: $16.
- Creator’s Tip: Swipe a toothpick through the wet resin to create razor-sharp, realistic marble veining.
- Smart Sourcing: metallic mica pigment powder packs and dual-temperature craft heat guns.
16. Glow Stone Pathways
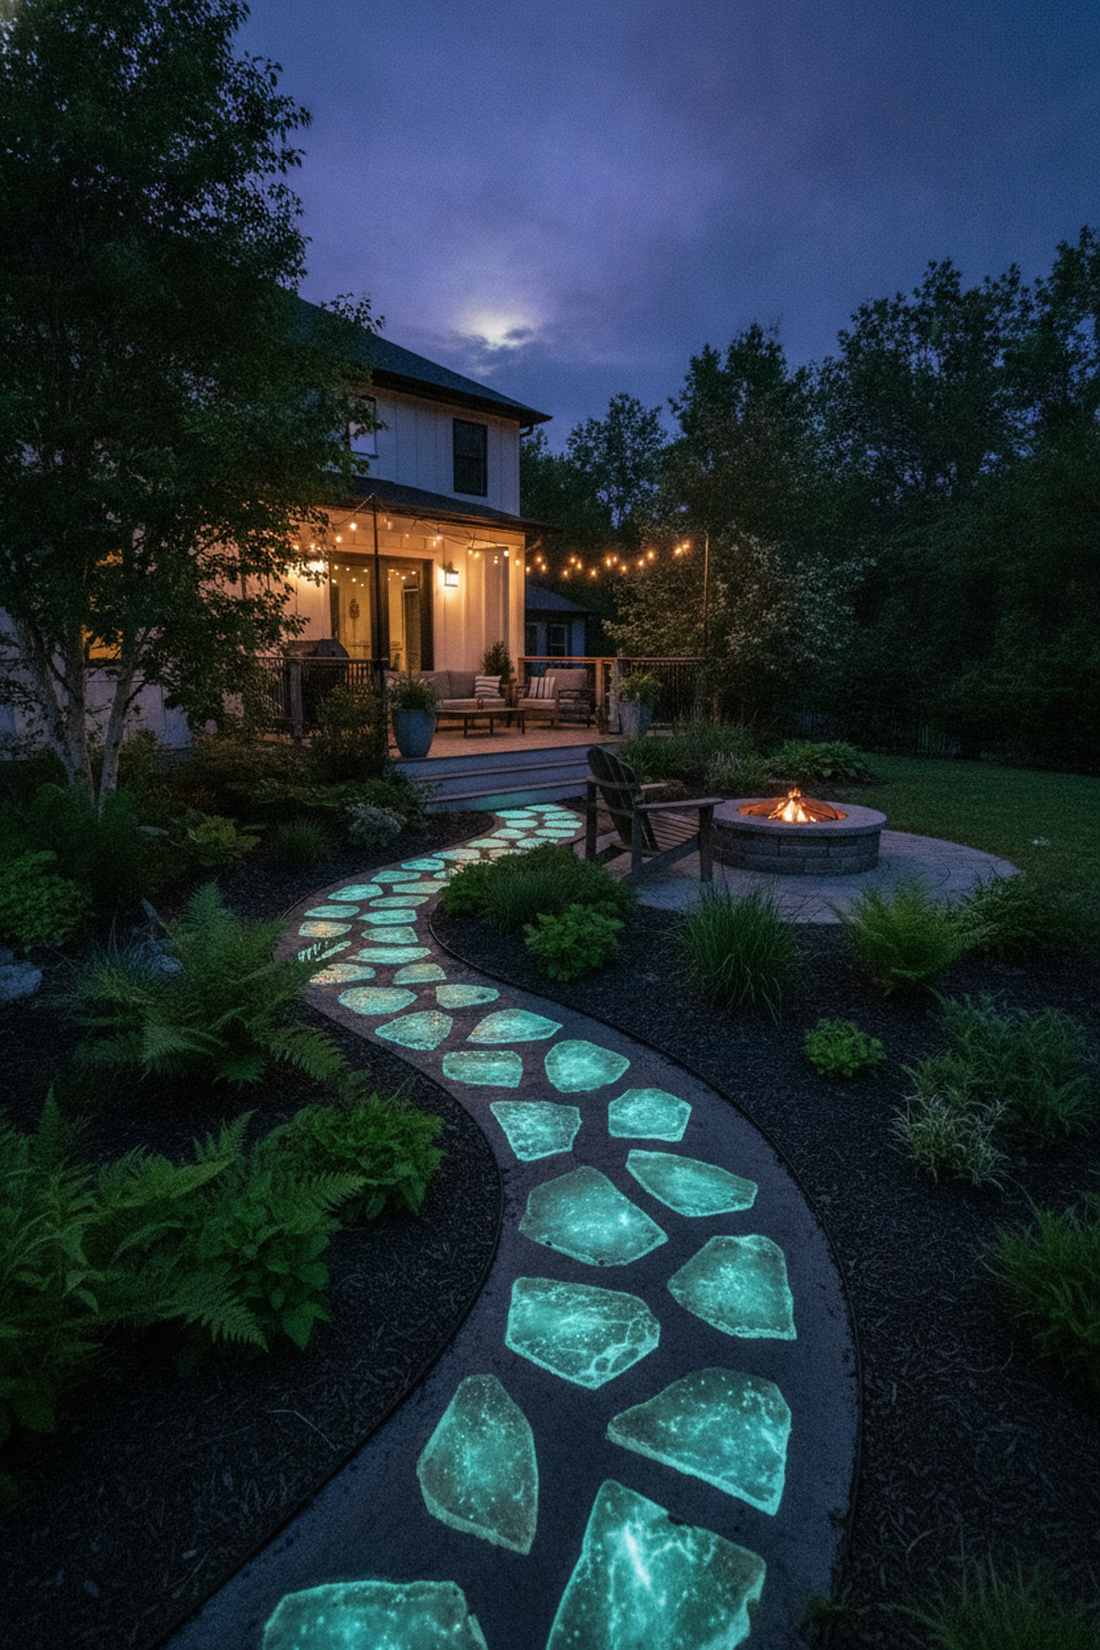
Emits an ethereal fairy-tale glow when night falls. Photoluminescent garden paths bring safety and literal magic simultaneously. Perfect for unlit backyard routes.
Strontium aluminate powders charge up freely and glow for hours flawlessly. Mixing stepping stones resin with glow powder as a topcoat saves money compared to full-batch coloring.
Expect to spend $18 to $25 per glowing step. Save this brilliant nightscape idea!
- Key Materials: Strontium aluminate glow powder
- Vibe / Style: Enchanted nightscape
- Difficulty: Easy mixing
- Budget Breakdown: Glow powder: $15 | Clear coat: $5.
- Creator’s Tip: Use blue or green glow powders; they burn much brighter and longer than red or purple hues.
- Smart Sourcing: premium long-lasting glow powder and high-gloss protective resin sealant.
Before you run to the hardware store, wait until you see how cheap this next masonry trick is…
Brick & Concrete Hybrid Designs
Combining rugged clay borders with smooth poured centers offers unmatched structural protection and vintage architectural appeal.
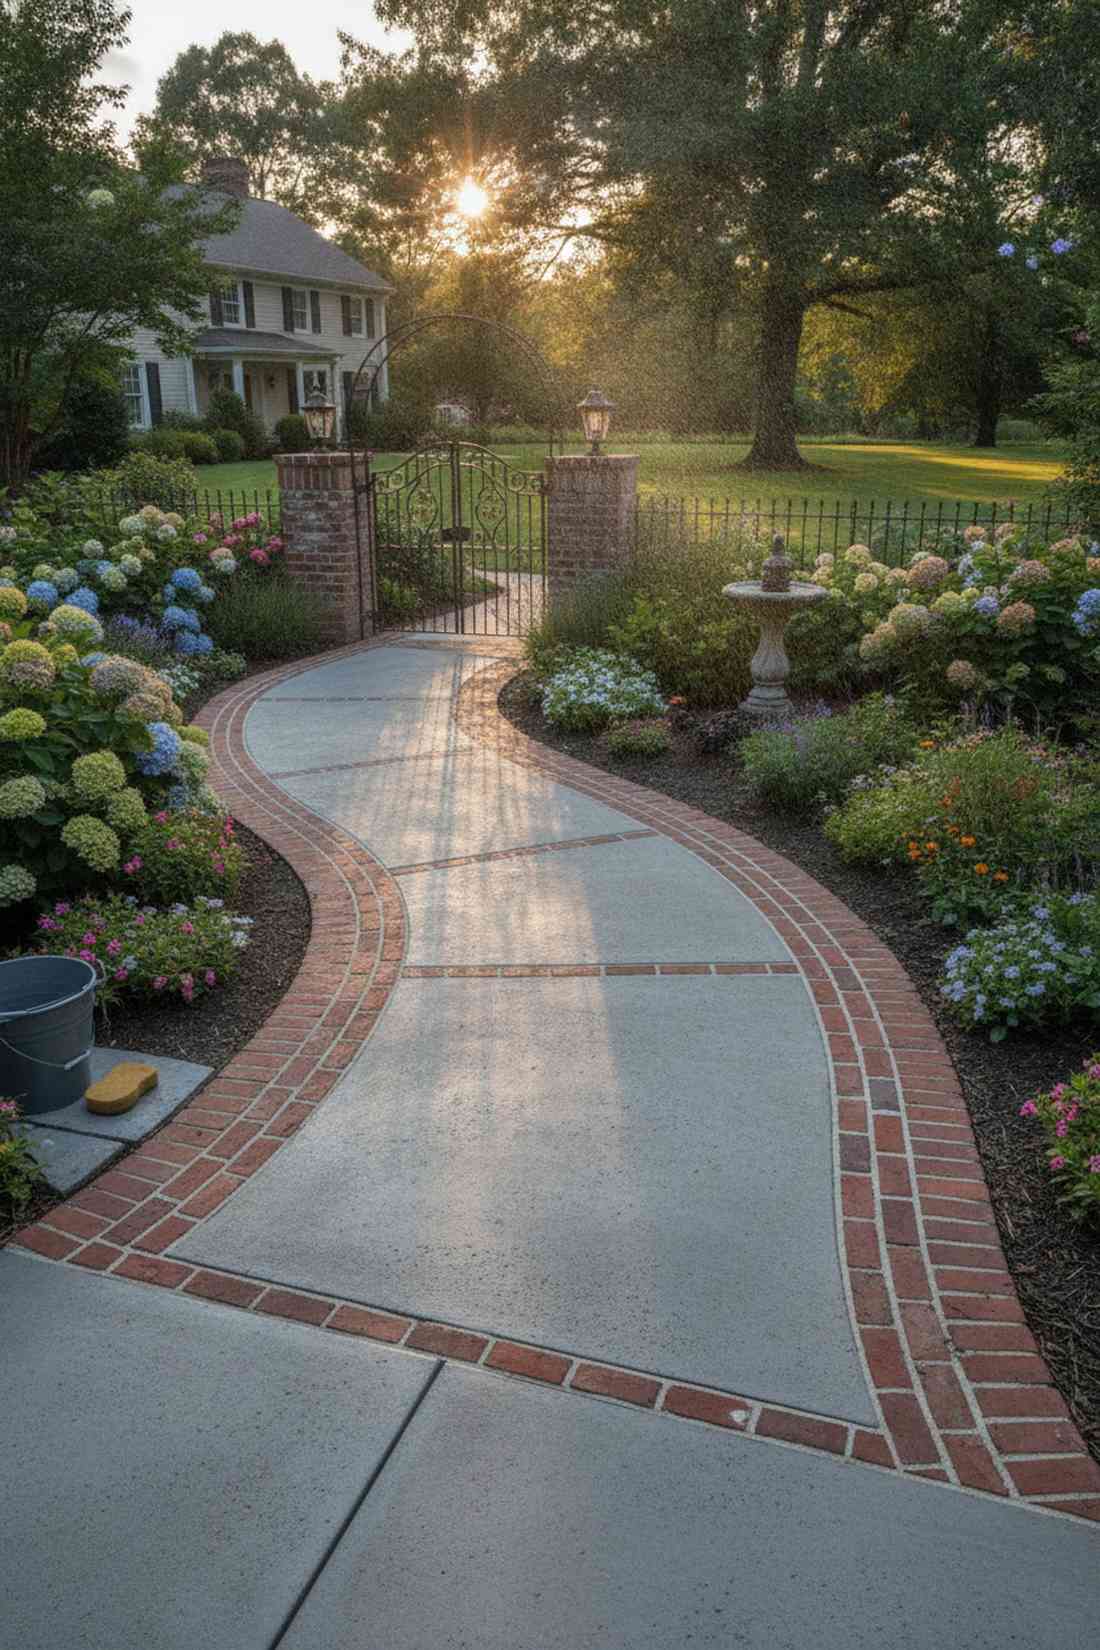
17. Brick Border Concrete Center

Merges vintage masonry warmth with modern concrete durability. Brick-framed courtyard paths establish elegant, distinct borders. Excellent for transitioning off formal patios.
Wrapping raw cement in fired clay looks far more expensive than it is. Utilizing pre-cut stepping stones brick borders prevents chipping and hides uneven concrete edges perfectly.
Material combinations run around $15 to $20 per framed block.
- Key Materials: Thin clay brick veneers
- Vibe / Style: Classic transitional estate
- Difficulty: Beginner masonry
- Budget Breakdown: Bricks: $10 | Concrete core: $5.
- Creator’s Tip: Glue the bricks down to the mold edges with double-sided tape before pouring the concrete center.
- Smart Sourcing: pre-cut clay brick veneers (bulk pack) and polyurethane construction adhesive.
18. Mosaic Brick Inlay
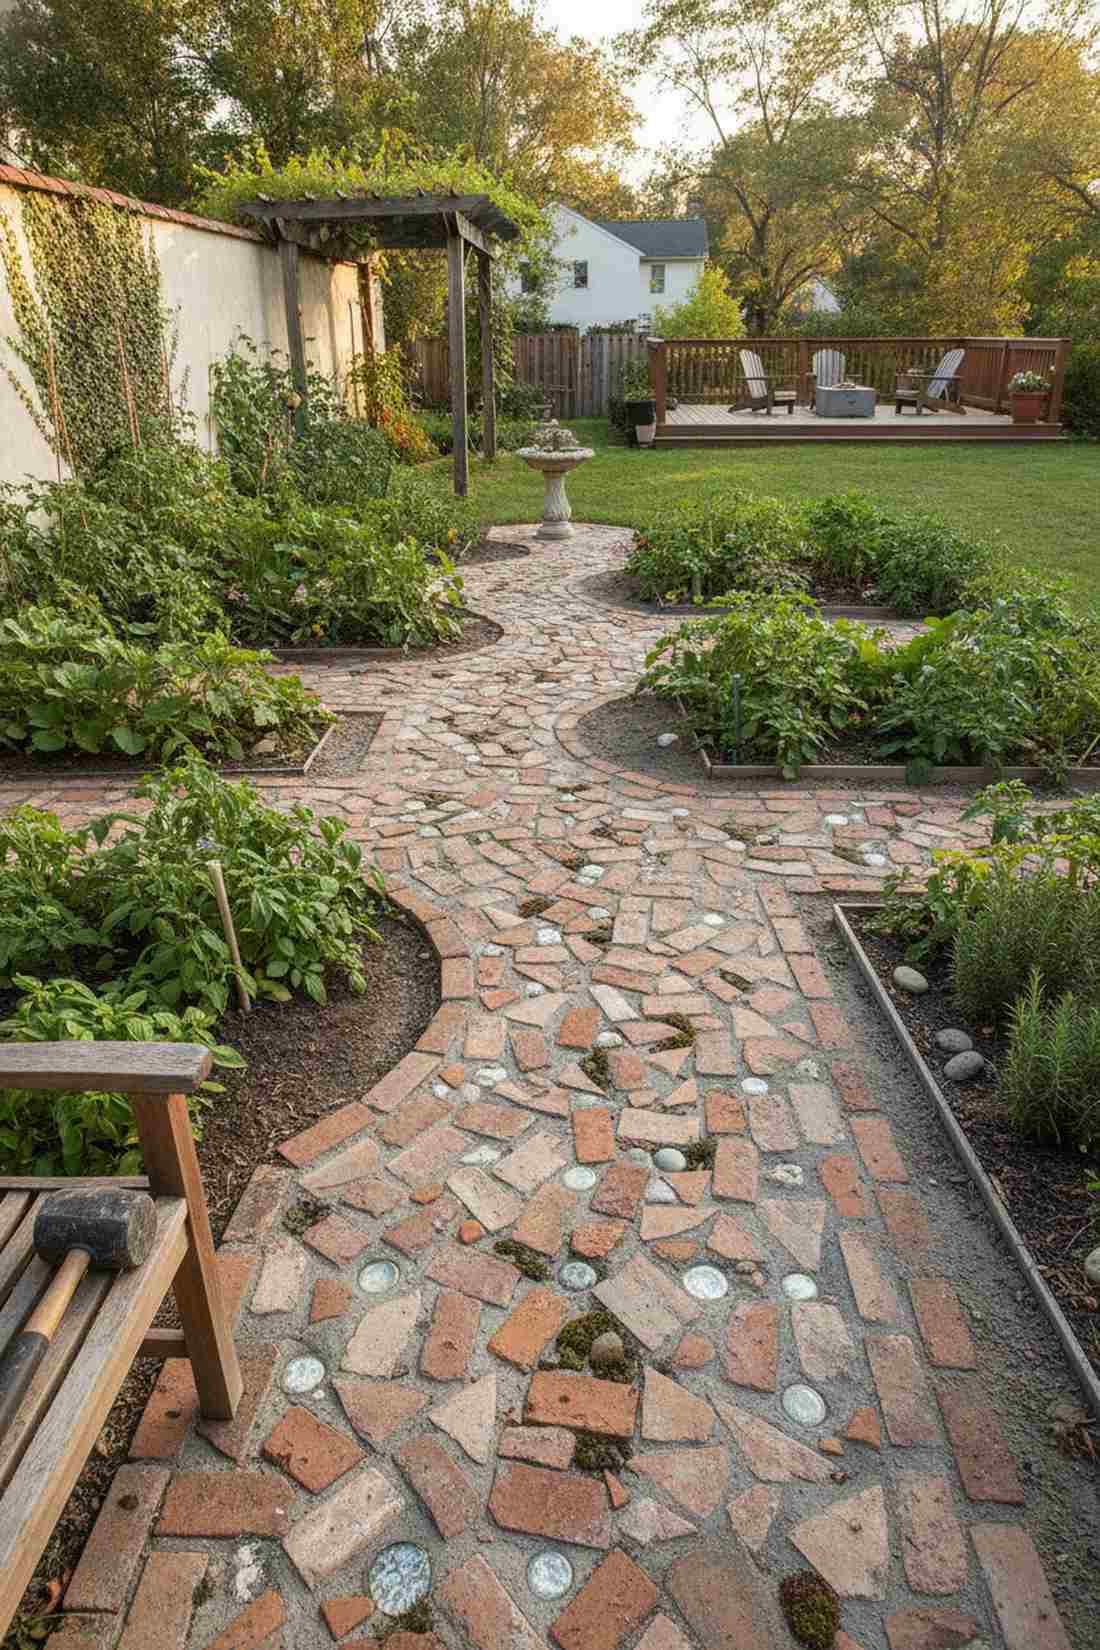
Boasts that rugged, handcrafted Tuscan villa charm. Broken brick mosaic concrete recycles debris into absolute art. A stunning fit for rustic vegetable gardens.
Smashing up leftover clay pavers creates an intricate layout with zero precision required. Pressing terrarium accessories and brick fragments into wet mortar requires just a simple rubber mallet.
Virtually free if you upcycle old bricks, or $10 with new materials. Save this to your frugal gardening board!
- Key Materials: Reclaimed shattered bricks
- Vibe / Style: Rustic Italian villa
- Difficulty: Zero precision needed
- Budget Breakdown: Mortar base: $8 | Debris: $2.
- Creator’s Tip: Tumble the broken brick pieces in a cement mixer first to knock off the razor-sharp edges.
- Smart Sourcing: rubber masonry mallets and premium fast-setting mortar mix.
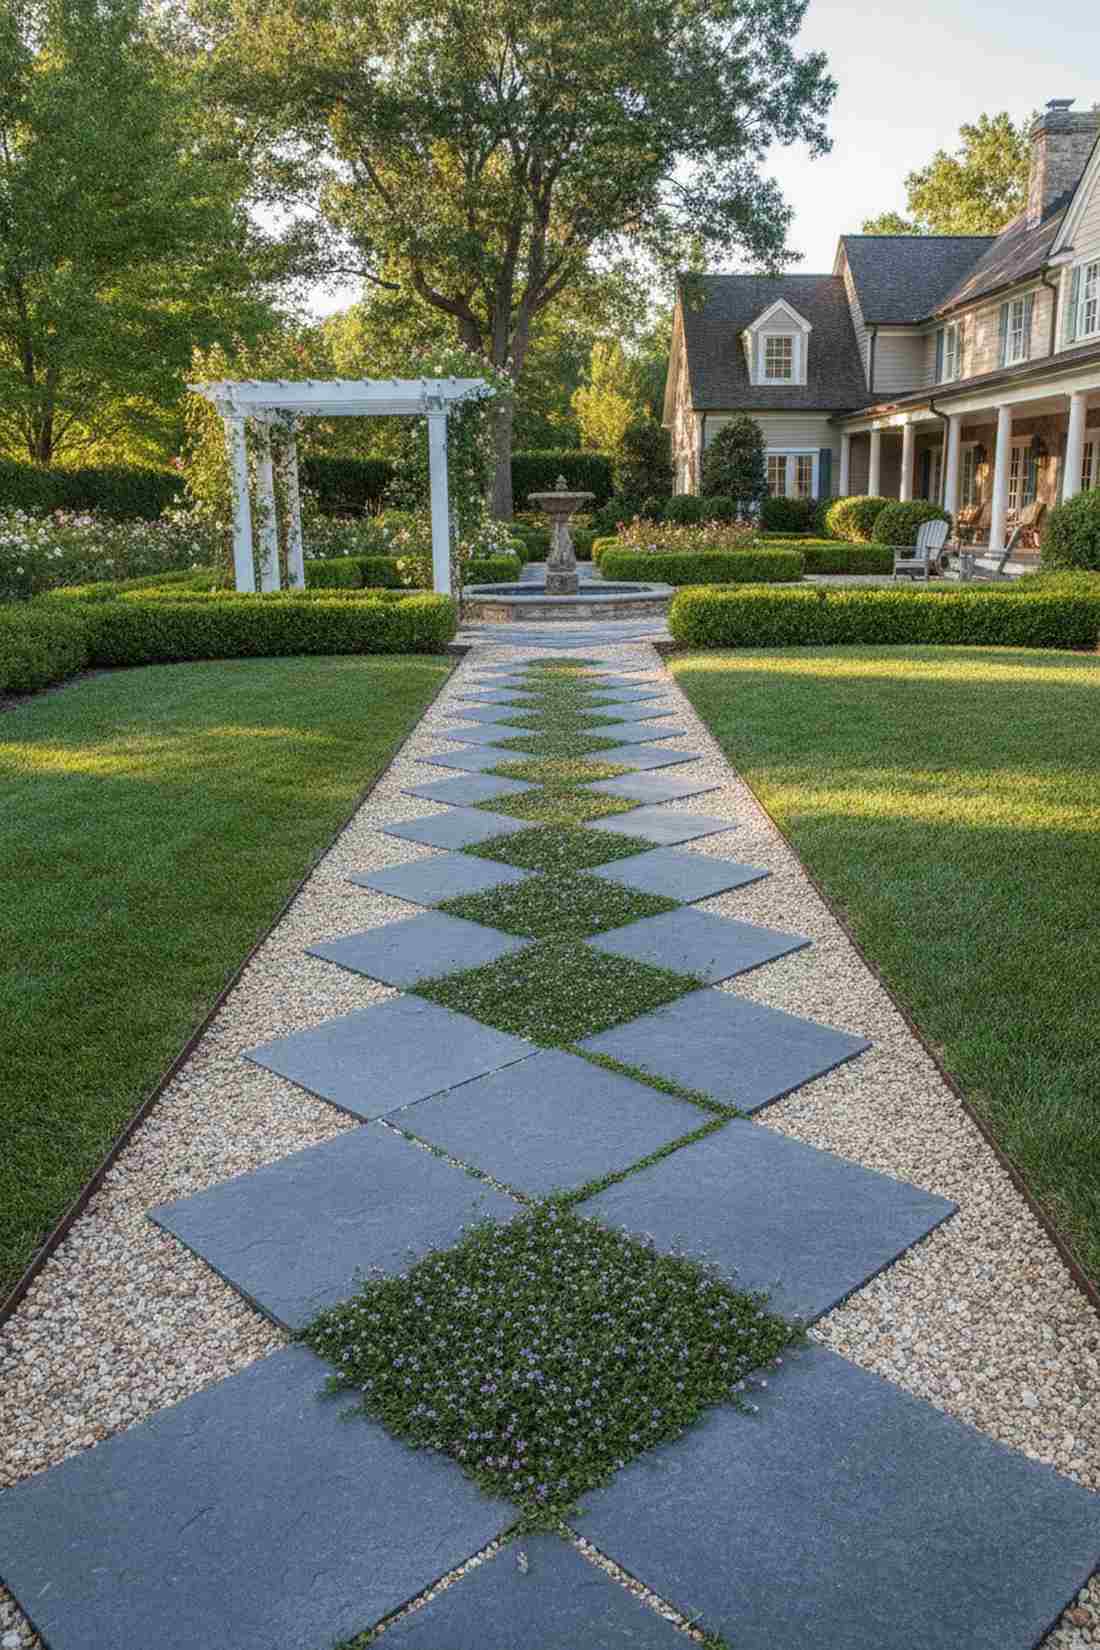
19. Checkerboard Brick & Concrete
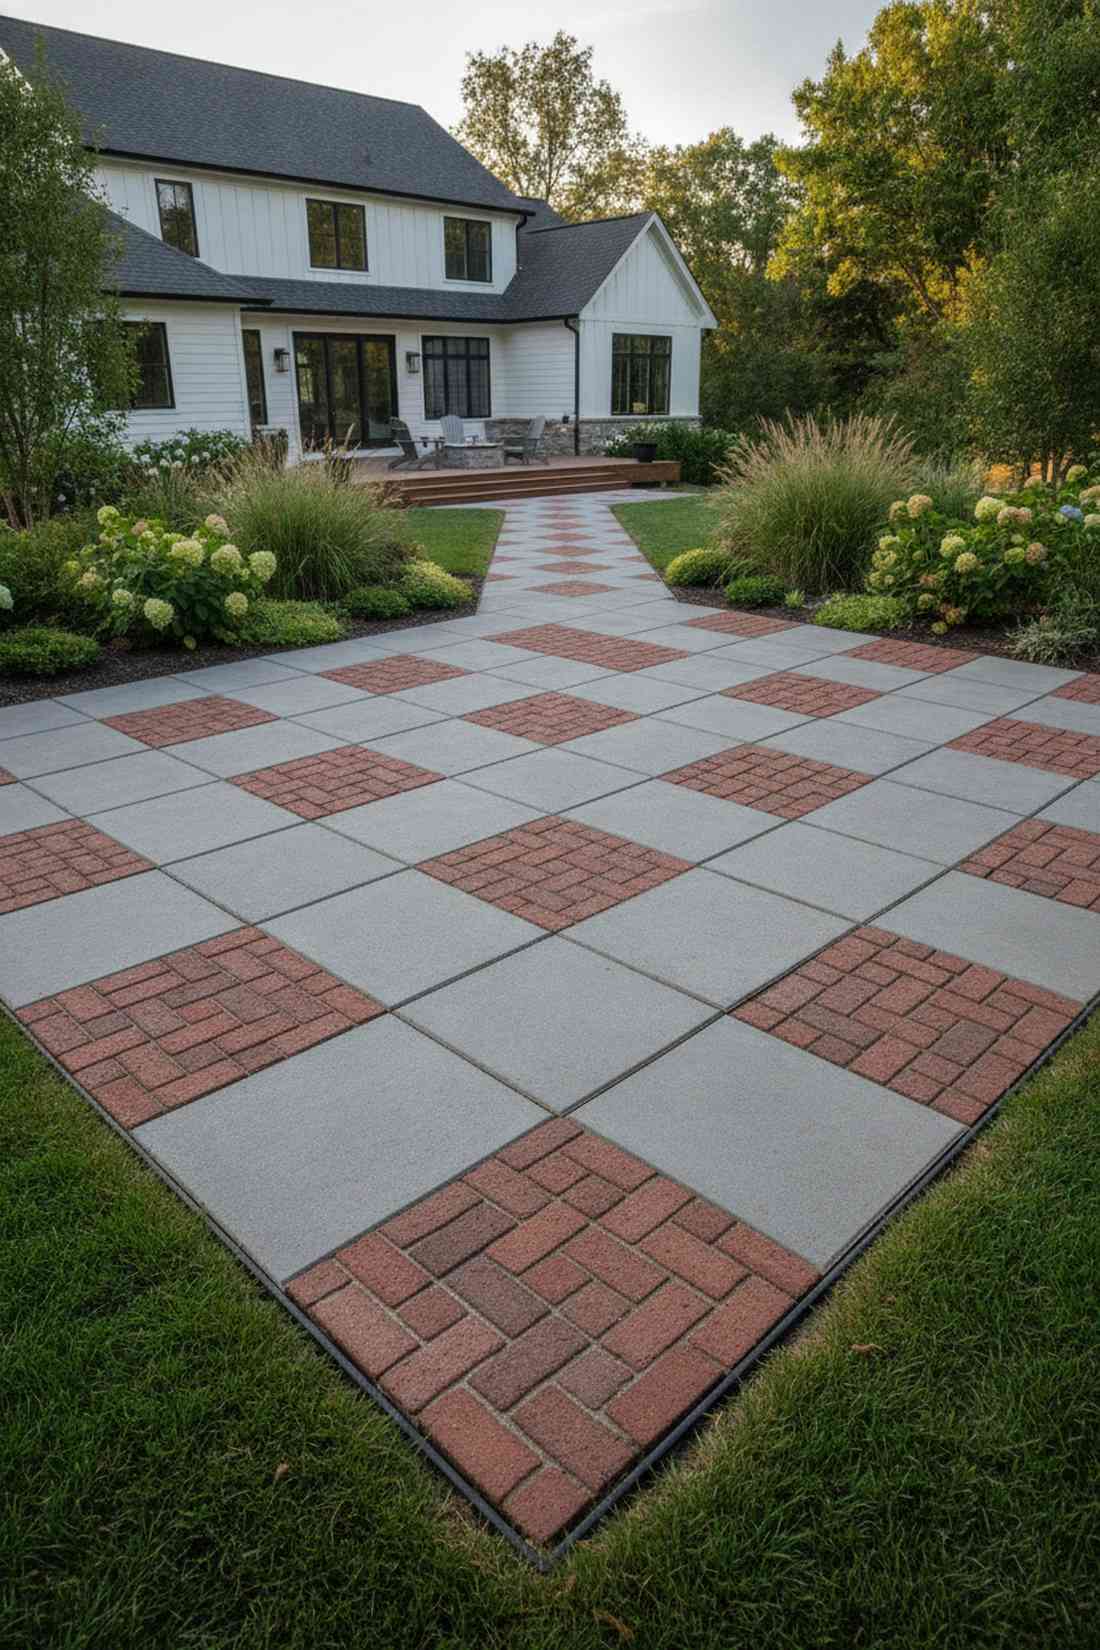
Commands authority with striking geometric rhythm. Alternating brick concrete grids provide immense visual weight and high traction. Ideal for wide, high-traffic side yards.
Mixing smooth squares with textured stepping stones brick creates a brilliant tactile contrast. Securing rigid plastic edging guarantees those crisp 90-degree corners never blow out during pouring.
Budget roughly $12 per alternating square section.
- Key Materials: Paver base panels
- Vibe / Style: High-end botanical park
- Difficulty: Intermediate grid measuring
- Budget Breakdown: Brick grid: $7 | Concrete grid: $5.
- Creator’s Tip: Sweep polymeric sand into the joints to lock the alternating materials together permanently.
- Smart Sourcing: heavy-duty polymeric jointing sand and rigid paver edge restraints.
Material Guide: Cheap vs. Premium Aesthetic
Knowing exactly where to save and where to spend makes all the difference in achieving that “looks expensive but isn’t” vibe.
- Standard vs. UV-Resistant Sealers: Spending $10 more on a premium UV-blocking sealant stops your colored or resin elements from yellowing and cracking after one brutal summer.
- Pre-made Kits vs. Sourcing Locally: Bulk silicone mold kits save you hours of building wooden forms, guaranteeing factory-perfect edges every single pour.
20. Curved Brick Accent Strips
Adds subtle designer pinstripes to boring gray slabs. Curved brick masonry inlays introduce elegant directional flow effortlessly. Brilliant for highlighting garden entryways.
Slicing thin clay veneers creates intricate lines without compromising slab integrity. Leveraging specialized masonry wet saws ensures those radius cuts look factory-perfect.
This detailed look runs about $18 per custom stone. Pin this if you appreciate fine details!
- Key Materials: Flexible brick layout strips
- Vibe / Style: Tailored architectural detail
- Difficulty: Advanced cutting
- Budget Breakdown: Base mud: $8 | Veneers: $10.
- Creator’s Tip: Use a wet sponge to wipe away cement bleed water immediately before it stains the porous red brick.
- Smart Sourcing: flexible faux brick veneer rolls and diamond masonry saw blades.
Textured Surface Treatments
Never leave a slab bare. These ultra-cheap texturing techniques eliminate dangerous slip hazards while mimicking high-end quarried stone finishes flawlessly.
21. Brushed Linear Texture
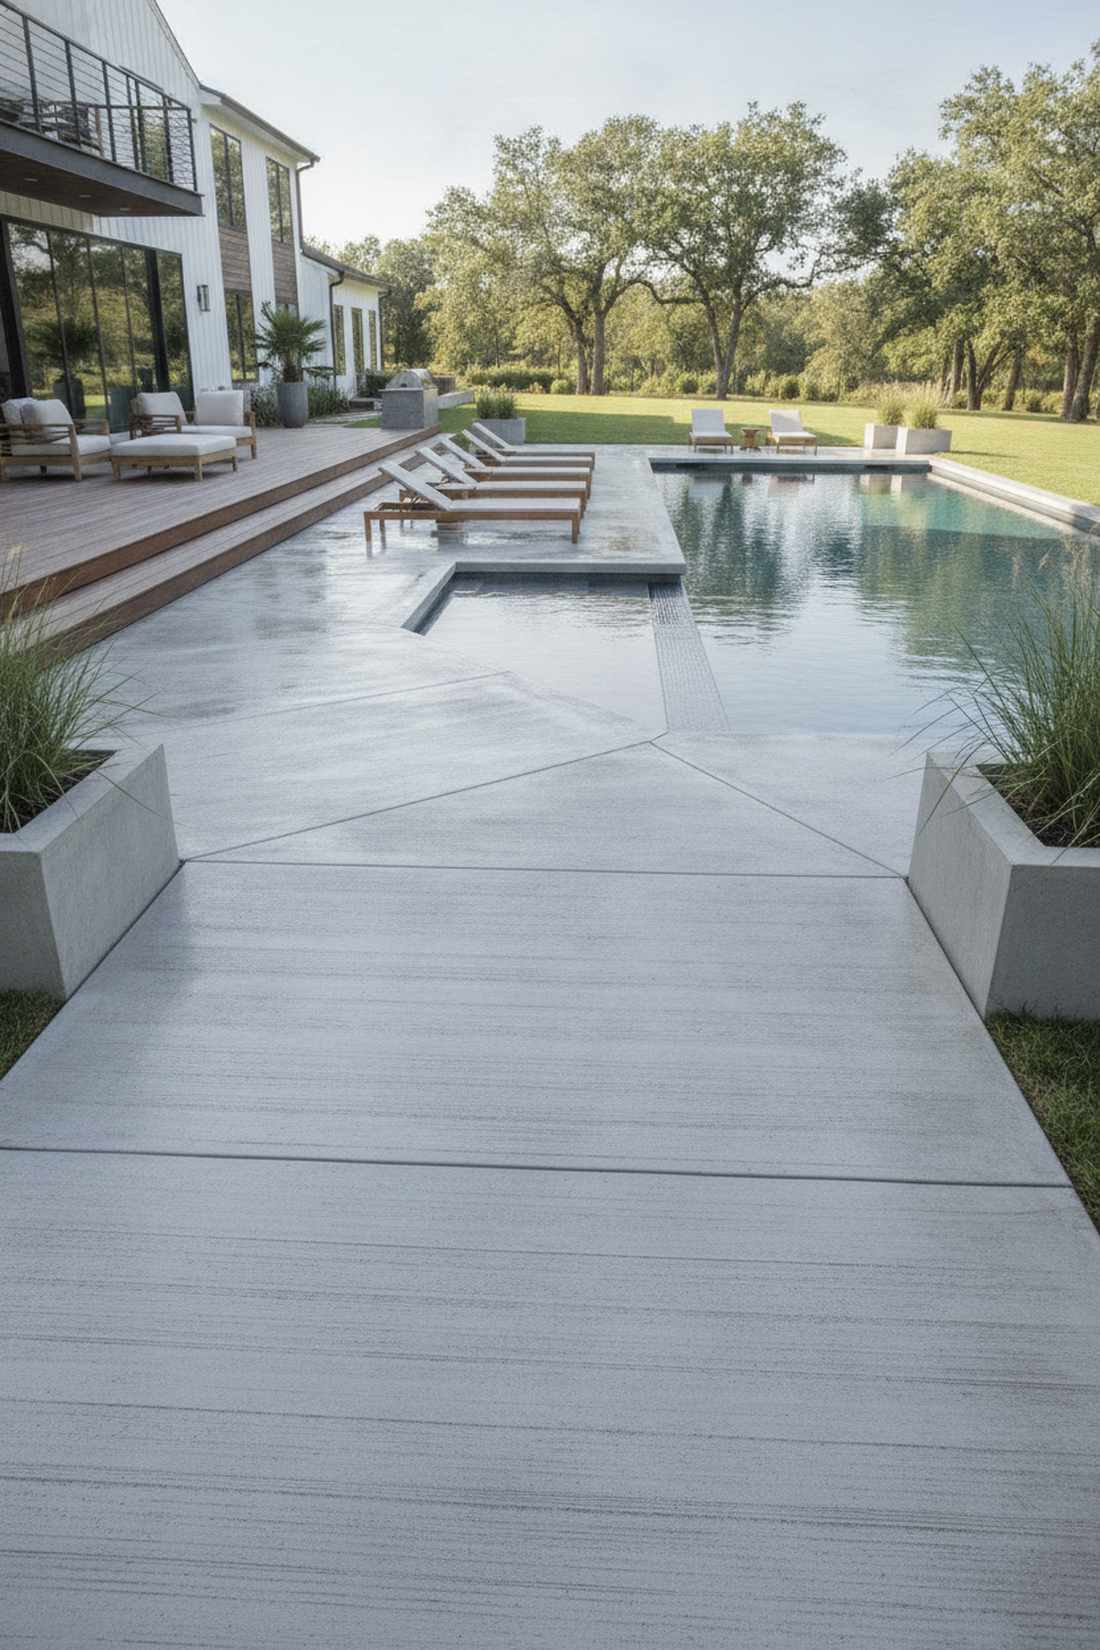
Delivers the ultimate slip-proof minimalist surface. Broom-finished pathway stones provide essential grip with a clean look. Essential for wet pool deck approaches.
Dragging stiff bristles across wet cement is the oldest trick for a flawless texture. Applying a clear penetrating concrete sealer locks in the grooves and prevents winter spalling.
Incredibly cheap, costing under $5 per basic slab.
- Key Materials: Stiff-bristle concrete brooms
- Vibe / Style: Clean industrial modern
- Difficulty: Foolproof beginner finish
- Budget Breakdown: Mix: $4 | Tool cost: $1.
- Creator’s Tip: Only drag the broom in one single direction; sawing back and forth creates an ugly, muddy mess.
- Smart Sourcing: professional concrete finishing brooms and penetrating waterproofing silane sealer.
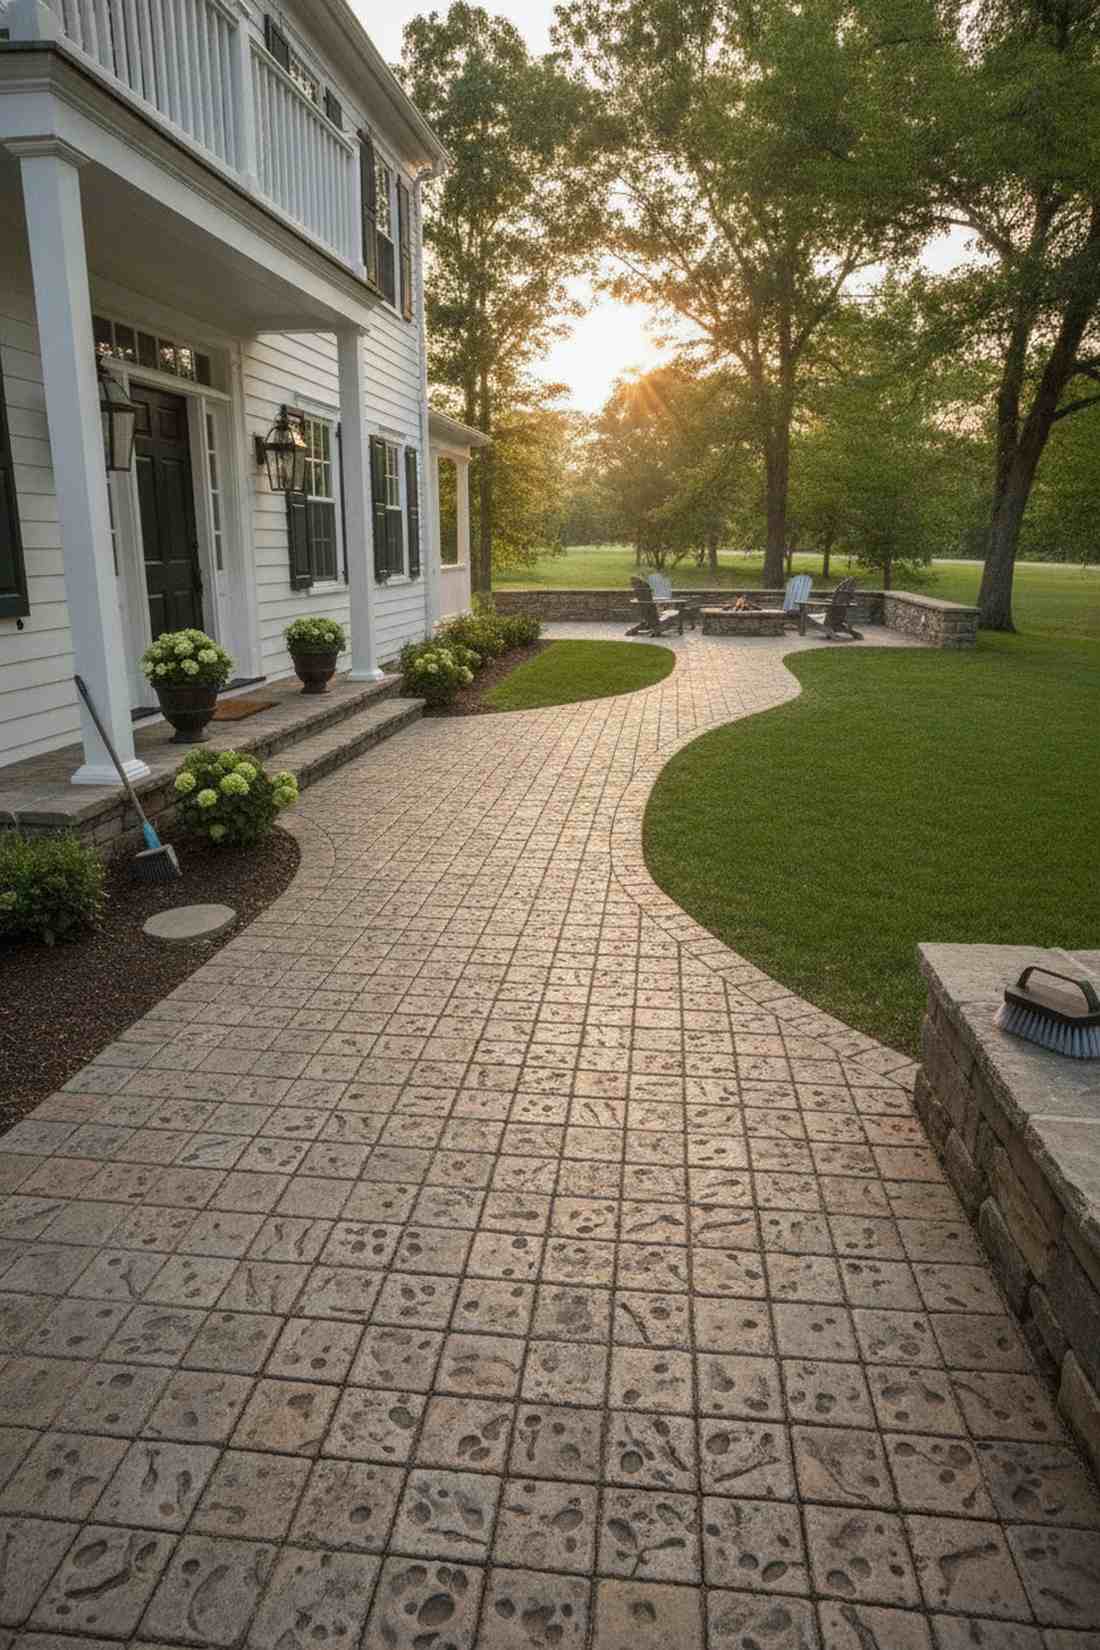
22. Stamped Stone Impression
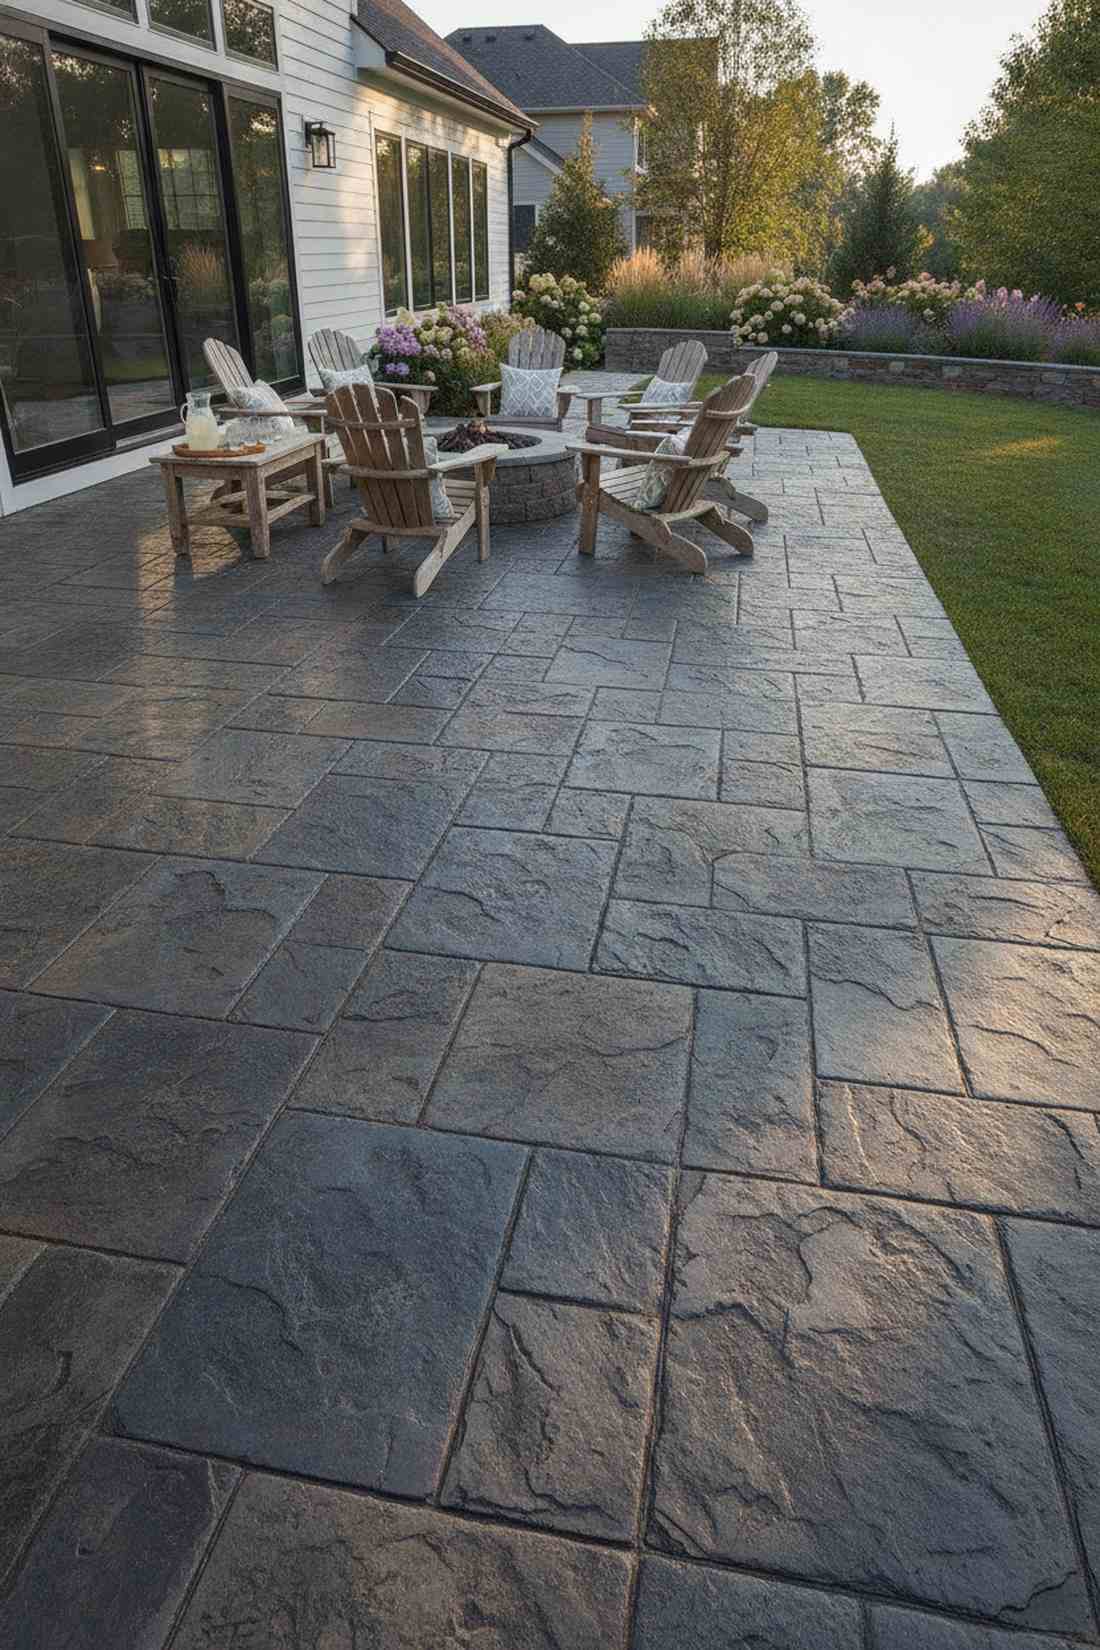
Replicates luxury slate patios at a fraction of the cost. Stamped faux stone pavers trick the eye spectacularly. Incredible for dressing up plain backyard spaces.
Using polyurethane texture mats transforms cheap gray mud into premium limestone instantly. Broadcasting a colored antique release agent highlights those deep 3D crevices beautifully.
Setup costs drop to $8 a stone once you own the mats. Pin this for high-end budget dupes!
- Key Materials: Polyurethane stamping mats
- Vibe / Style: Expensive quarried slate
- Difficulty: Time-sensitive stamping
- Budget Breakdown: Concrete: $5 | Release agent: $3.
- Creator’s Tip: Stomp the mat with your body weight to ensure the texture transfers deep into the heavy cement.
- Smart Sourcing: seamless slate concrete texture stamps and colored liquid stamp release.
Skip the expensive landscaping quotes. This next finishing secret is what professionals use to charge double…
23. Exposed Aggregate Finish
Offers an incredibly rich, gravel-studded walking surface. Exposed pebble concrete finishes glow beautifully when wet. Unbeatable traction for sloped garden routes.
Washing away the top cement paste reveals hidden decorative stones beneath. Utilizing a commercial surface retarder chemical slows the top-set, making the washing process totally foolproof.
This premium texture runs about $12 per decorative stone.
- Key Materials: Decorative pea gravel mix
- Vibe / Style: Classic mid-century landscape
- Difficulty: Timing is critical
- Budget Breakdown: Pebble mix: $8 | Retarder: $4.
- Creator’s Tip: Gently blast the surface with a garden hose nozzle (not a pressure washer) to reveal the pebbles safely.
- Smart Sourcing: concrete surface retarder spray and high-gloss wet-look acrylic sealer.
24. Swirl Trowel Pattern
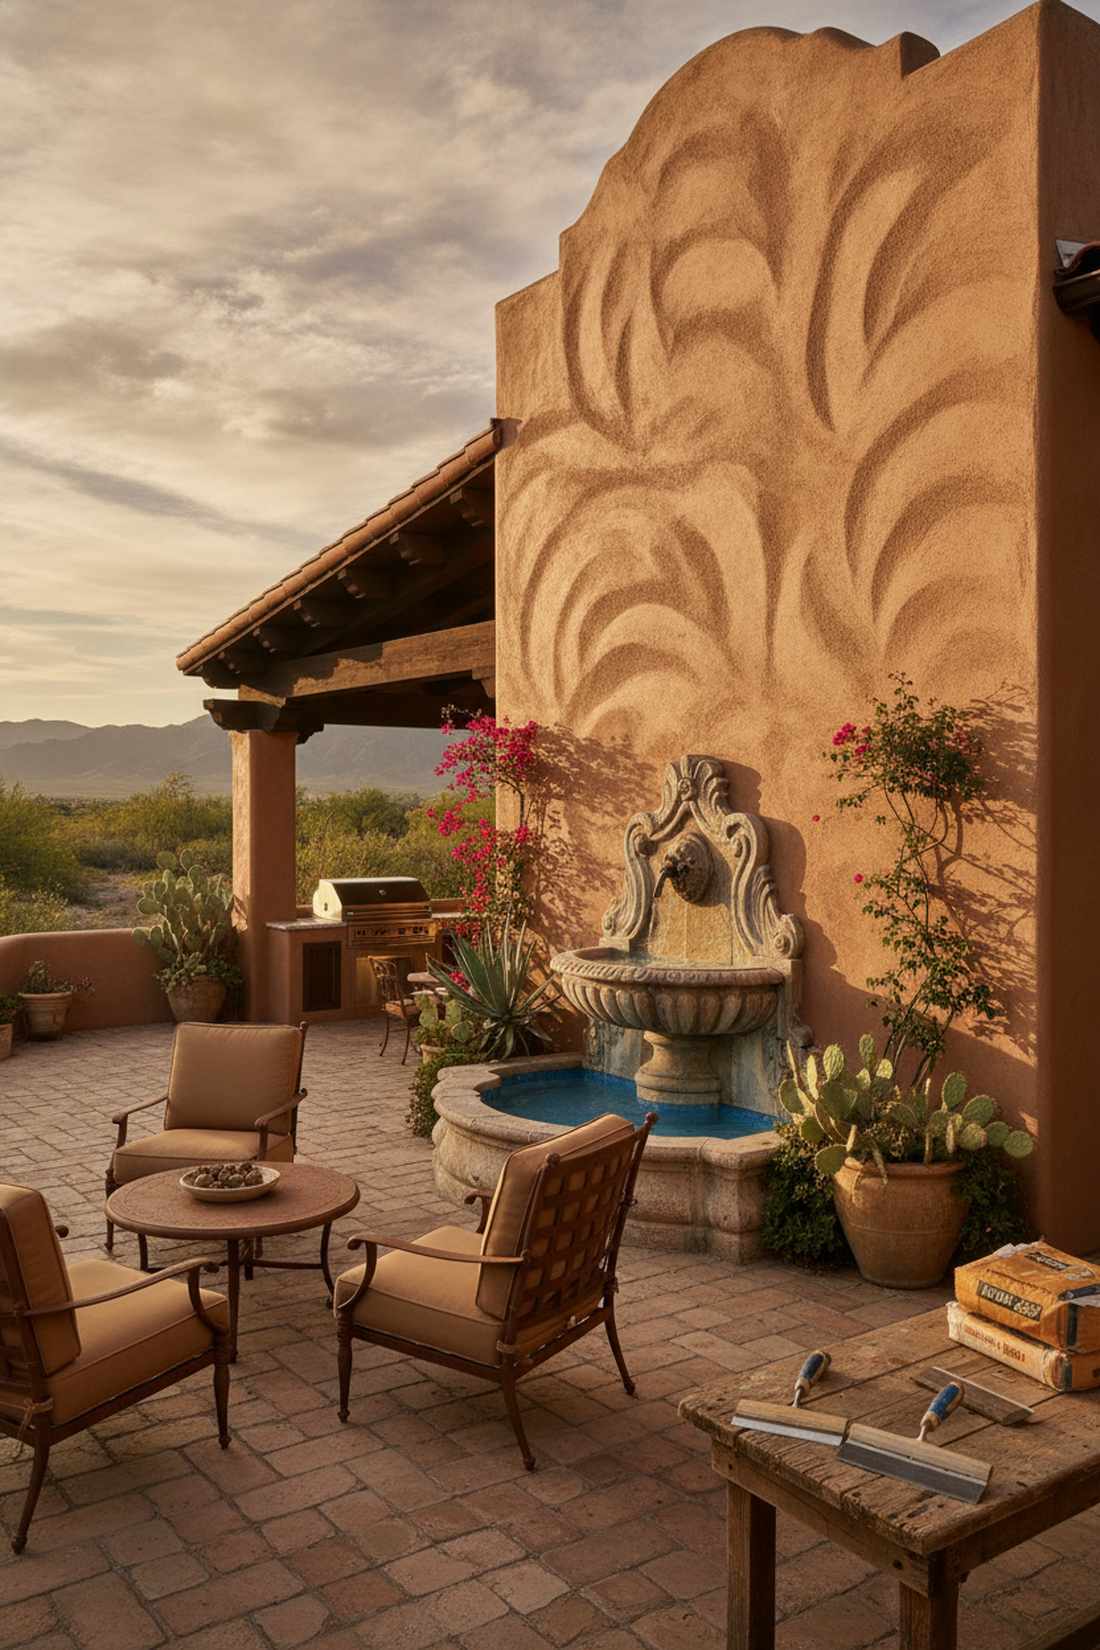
Captures the motion of wind-blown desert sand. Hand-troweled swirl patterns catch sunlight dynamically throughout the afternoon. Perfect for Spanish-style outdoor spaces.
Mastering the overlapping steel trowel arc takes a little practice but delivers breathtaking results. Working quickly before the bleed water evaporates ensures the ridges stay razor sharp.
Just $6 per stone since the texture tool is your only extra cost. Save this brilliant technique!
- Key Materials: Magnesium finishing hand trowels
- Vibe / Style: Artisan stucco finish
- Difficulty: Requires wrist technique
- Budget Breakdown: Mix: $5 | Tool wear: $1.
- Creator’s Tip: Keep your trowel edge slightly elevated to carve the swirl; laying it flat will just erase your work.
- Smart Sourcing: magnesium concrete hand floats and high-workability masonry cement.
25. Salted Surface Pitting
Looks instantly weathered and rich with historical character. Rock salt pitted pavers provide a gorgeous distressed texture. Unmatched for colonial or vintage home exteriors.
Dissolving coarse salt crystals leaves behind craters that look centuries old. Broadcasting the salt aggressively into fresh slabs gives a designer-level finish for literal pennies.
A practically free upgrade keeping costs under $7 per stone.
- Key Materials: Coarse water-softener rock salt
- Vibe / Style: Weathered historical estate
- Difficulty: Insanely easy hack
- Budget Breakdown: Concrete: $6 | Rock salt: $1.
- Creator’s Tip: Flood the stone with hot water 24 hours later to dissolve every last bit of salt instantly.
- Smart Sourcing: extra-coarse agricultural rock salt and heavy-duty concrete washing brushes.
26. Hand-Carved Custom Designs
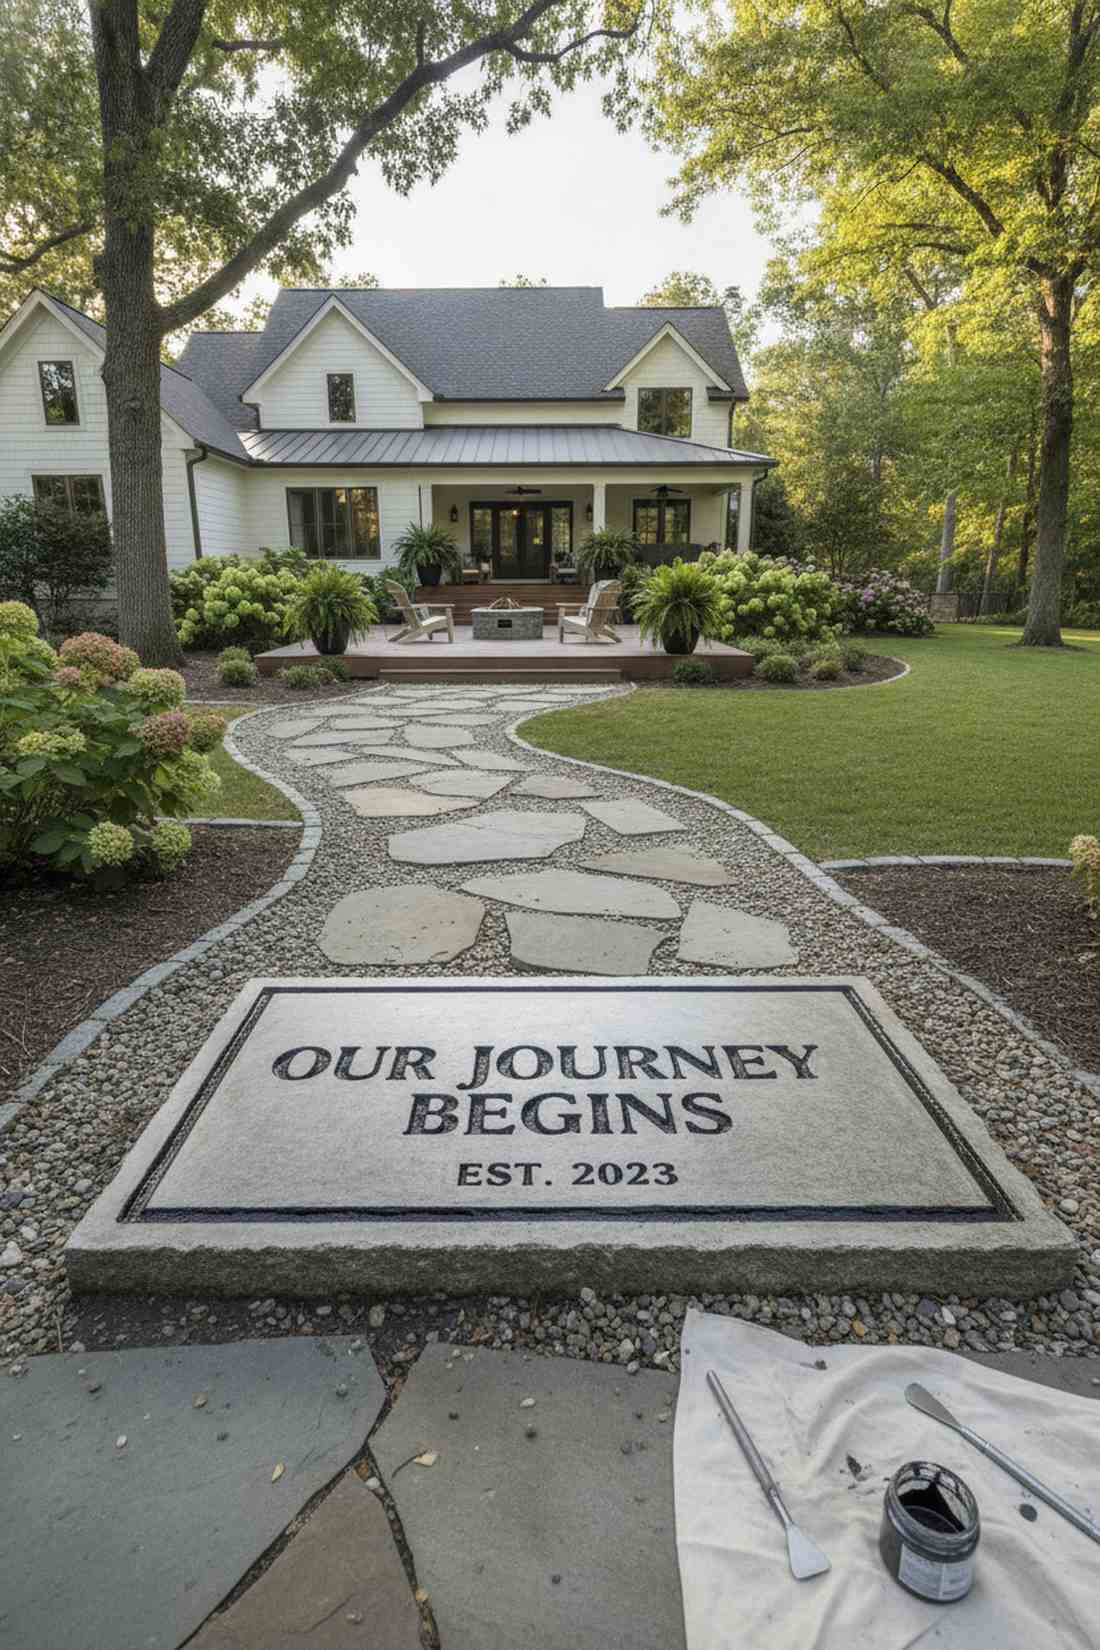
Transforms functional paths into highly personalized family heirlooms. Custom engraved garden stones immortalize quotes or dates permanently. Best placed at the very entrance of a yard.
Scribing deep channels into firming cement lets you build literal outdoor artwork. Applying a dark miniature garden supplies gel stain later settles into the carved lines, making them pop violently.
Expect zero extra costs, keeping this around $5 per base stone. Save this for a sentimental weekend project!
- Key Materials: Metal etching styluses
- Vibe / Style: Personalized artisan craft
- Difficulty: Artistic patience needed
- Budget Breakdown: Base mix: $5 | Gel stain: $0 (use scraps).
- Creator’s Tip: Wait until the surface loses its watery sheen before carving, otherwise the lines will slump back together.
- Smart Sourcing: metal clay sculpting tool kits and antiquing concrete gel stains.
27. Color-Stained Variations
Mimics the complex, vibrant geology of canyon rock. Acid-stained decorative pavers bring massive depth and earthy tones. Amazing for blending paths into heavy mulch beds.
Chemical stains react unpredictably, guaranteeing absolutely no two stones ever look identical. Coating the finished pieces in an ultra-high-gloss acrylic sealer makes the colors look permanently wet.
A massive visual upgrade that costs about $14 per stone total.
- Key Materials: Reactive acid concrete stains
- Vibe / Style: Desert canyon geology
- Difficulty: Chemical handling required
- Budget Breakdown: Stone base: $6 | Acid stain: $8.
- Creator’s Tip: Neutralize the acid stain with a baking soda wash before applying your final clear sealer.
- Smart Sourcing: reactive acid concrete stain kits and chemical-resistant pump sprayers.
Conclusion
These 27 premium stepping stones concrete blueprints prove that you don’t need a massive landscaping budget to achieve high-end yard aesthetics. By leveraging smart commercial molds, hybrid resin kits, and clever brick layouts, you can engineer durable, weather-proof outdoor walkways that look incredibly expensive. Start by compacting a proper gravel base, invest in high-quality UV sealants or starter kits to protect your work, and mix different texture treatments to design a fully custom pathway that instantly elevates your home’s exterior value.
Frequently Asked Questions
How thick should concrete stepping stones be for outdoor walkways?
To avoid cracking under heavy foot traffic, DIY stepping stones concrete paths must be a minimum of 3 inches thick. If you’re building oversized pavers (24+ inches), upgrade to a 4-inch depth and drop a pre-cut steel remesh grid directly into the center of the wet mix. Skimping on thickness to save a few dollars will guarantee your stones snap during the first winter freeze.
What is the ideal spacing between stepping stones?
For a natural walking stride, position your stones exactly 24 inches apart from center-to-center. The gap between the actual edges should sit between 3 to 6 inches, which leaves perfect room to fill with premium decomposed granite bags or creeping ground cover. Always test your layout by physically walking the path before permanently compacting the base layer.
Can you combine resin and concrete in stepping stones?
Absolutely, mixing industrial cement with stepping stones resin kits creates visually stunning, high-end landscape features. The concrete acts as the indestructible structural shell, while the deep-pour epoxy adds glowing or transparent accents. Always ensure you are using a UV-resistant clear casting epoxy so your decorative windows don’t turn yellow from harsh outdoor sun exposure.
How do you prevent concrete stepping stones from cracking?
Stopping cracks starts beneath the stone: you must lay and aggressively compact a 4-inch heavy crushed gravel base for proper water drainage. Next, fortify your pour by mixing in alkali-resistant glass fibers or laying down wire mesh grids. Finally, never let the stones dry too fast in direct sunlight; mist them with water and cover them in plastic for a slow, ultra-strong 7-day cure.
What concrete mix works best for DIY stepping stones?
Skip the cheap stuff and grab high-strength fiber-reinforced concrete mix, or use a fine-finish sand topping mix if you are doing delicate molds. If you live in a harsh winter climate, it is mandatory to use mixes labeled with freeze-thaw protection. To speed up production, buy rapid-set high strength concrete so you can safely pop your stones out of their reusable molds in just a few hours.