
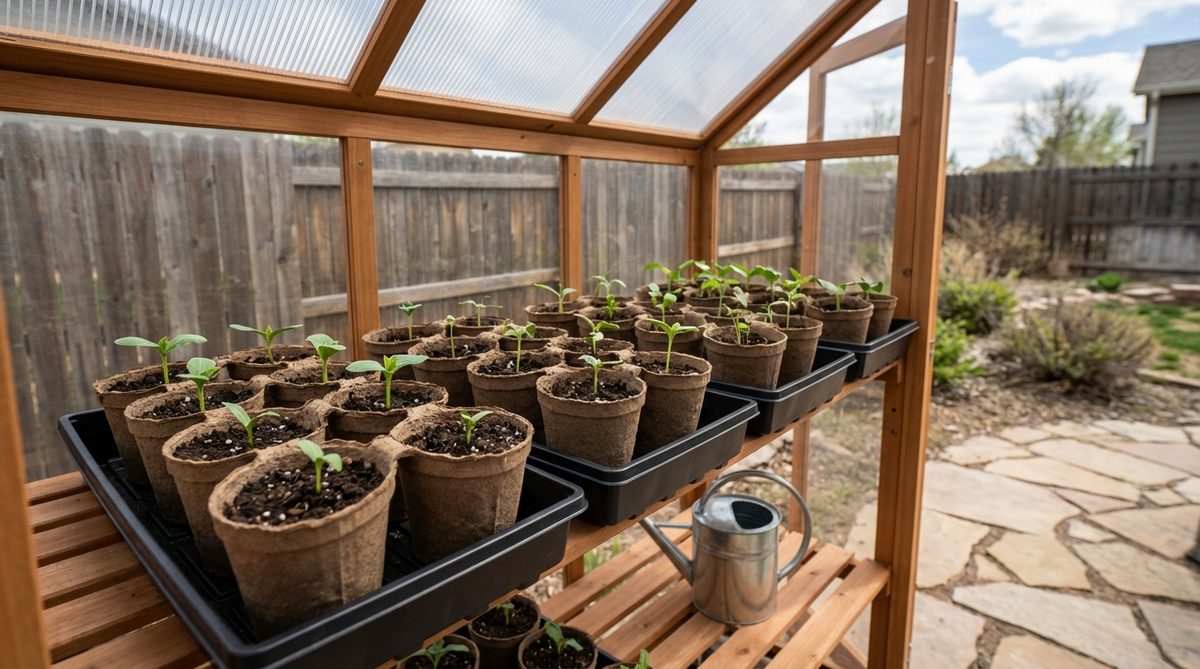
A premium mini garden greenhouse eliminates germination guesswork by locking in exact humidity and temperature levels. These expert-approved kits protect vulnerable sprouts while delivering a designer-level finish. Upgrade your spring planting setup instantly without breaking the bank.
Design Snapshot Key Principles
- Humidity Control: Adjustable vents prevent damping-off while maintaining moisture for germination
- Cell Size Matters: 1.5-inch cells provide adequate root development without transplant shock
- Light Access: Clear domes maximize natural light penetration or integrate with grow lights
- Drainage System: Bottom trays with overflow channels prevent waterlogged roots and fungal growth
Windowsill & Compact Solutions
1. Jiffy Windowsill Greenhouse 12-Pellet Kit
Feels like a tiny professional nursery tucked into your kitchen window. This compact indoor propagation station works exceptionally well for narrow spaces where you still want a structured aesthetic.
Achieving that designer-level finish doesn’t require massive floor space. Utilizing high-quality seed starting supplies like expandable peat bases gives a surprisingly premium look with an incredibly minimal footprint.
You can easily pull this off for around $8–$15. Save this to your DIY spring garden board if you’re planning a small-space upgrade.
- Key Materials: Expandable peat core pellets
- Vibe / Style: Clean culinary herb display
- Difficulty: Absolute beginner setup
- Budget Breakdown: Pellets: $5 | Watertight Base: $8.
- Creator’s Tip: Bottom-water the tray to encourage deeper root systems without compacting the topsoil.
- Smart Sourcing: bulk pack biodegradable peat pellets and heavy-duty clear acrylic dome covers.
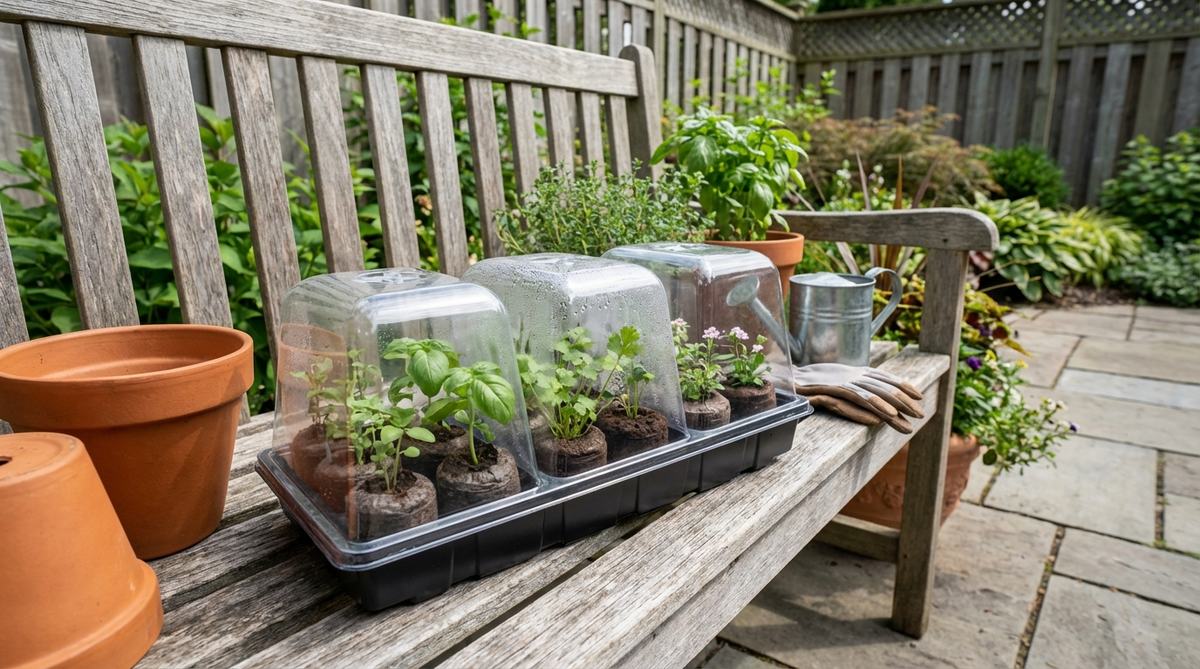
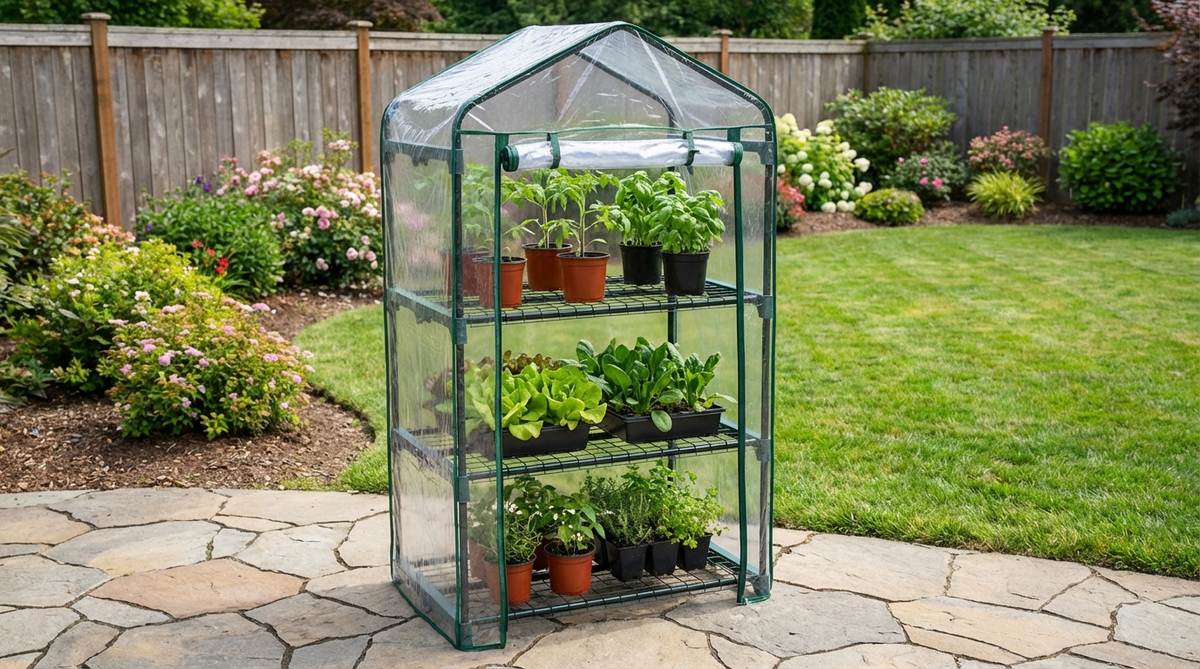
2. Three-Pack Windowsill Trays with Humidity Domes
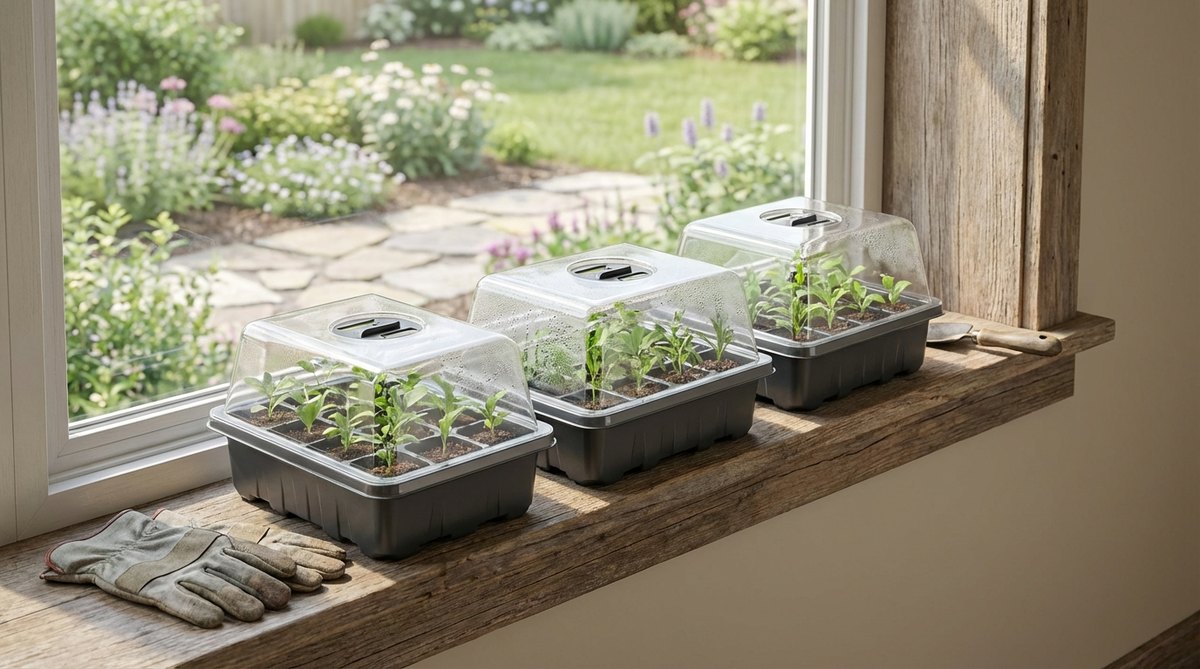
Straight out of an elegant urban greenhouse catalog. These stackable succession planting kits are perfect for a sun-drenched apartment living room where aesthetics matter.
Rather than flimsy single-use plastics, this layout looks far more expensive than it actually is. Swapping basic materials for thick, crack-resistant bases elevates your entire windowsill to commercial-grade levels.
Expect to spend roughly $15–$25 for a set of three. It’s a fast upgrade that completely changes the vibe of your plant shelf.
- Key Materials: Rigid plastic bases with adjustable top vents
- Vibe / Style: Modern botanical laboratory
- Difficulty: Easy quick-start project
- Budget Breakdown: Tray Pack: $18 | Soil Mix: $7.
- Creator’s Tip: Rotate the trays 180 degrees every two days to prevent seedlings from leaning toward the glass.
- Smart Sourcing: pre-molded rigid base trays (3-pack) and UV-coated humidity dome replacements.
3. Repurposed Container Mini Greenhouse
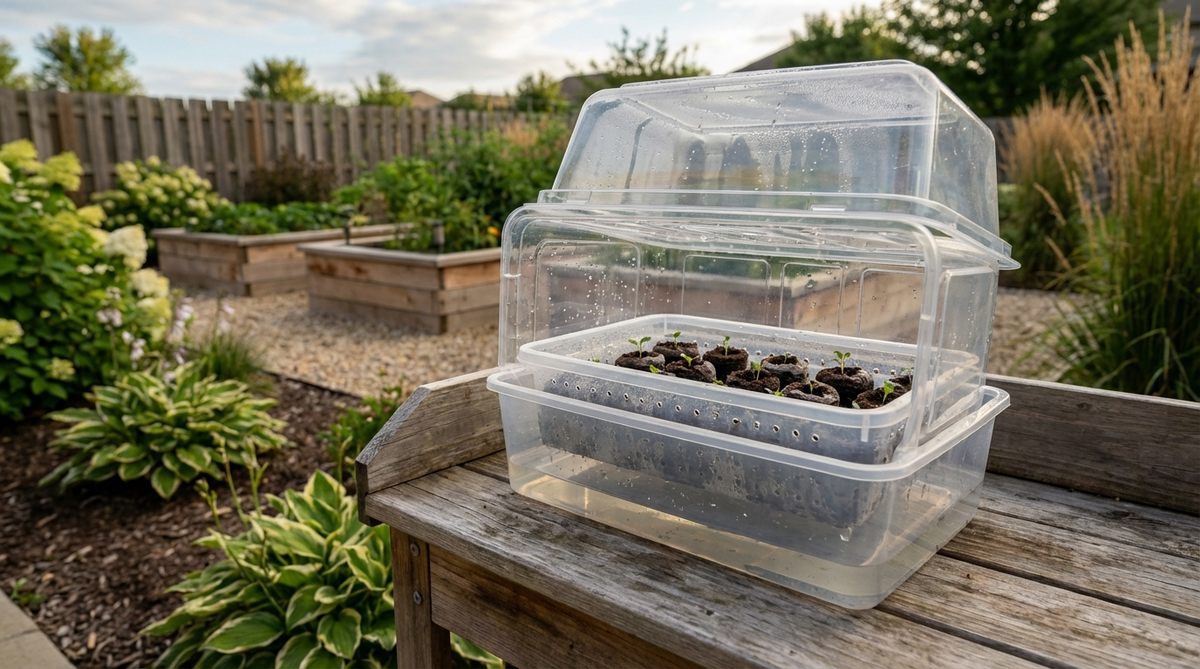
Brings a charming, rustic upcycled energy to your space. This budget-friendly eco-propagator is perfect for testing small seed batches on a sunny breakfast counter.
Don’t underestimate the power of clever reuse; it delivers a surprisingly chic, eclectic look when staged correctly. Integrating basic terrarium accessories inside the container masks the repurposed nature entirely.
You can execute this genius hack for literally $0–$5. Pin this idea for those rainy weekend zero-budget projects.
- Key Materials: Clear takeout boxes and perforated inserts
- Vibe / Style: Thrifty eco-chic garden
- Difficulty: Fast DIY assembly
- Budget Breakdown: Containers: Free | Premium Soil: $5.
- Creator’s Tip: Use a hot needle to melt clean, perfectly round drainage holes into the plastic without cracking it.
- Smart Sourcing: premium organic seed starting mix and pre-cut capillary watering mats.
4. Compact Six-Cell Herb Starter
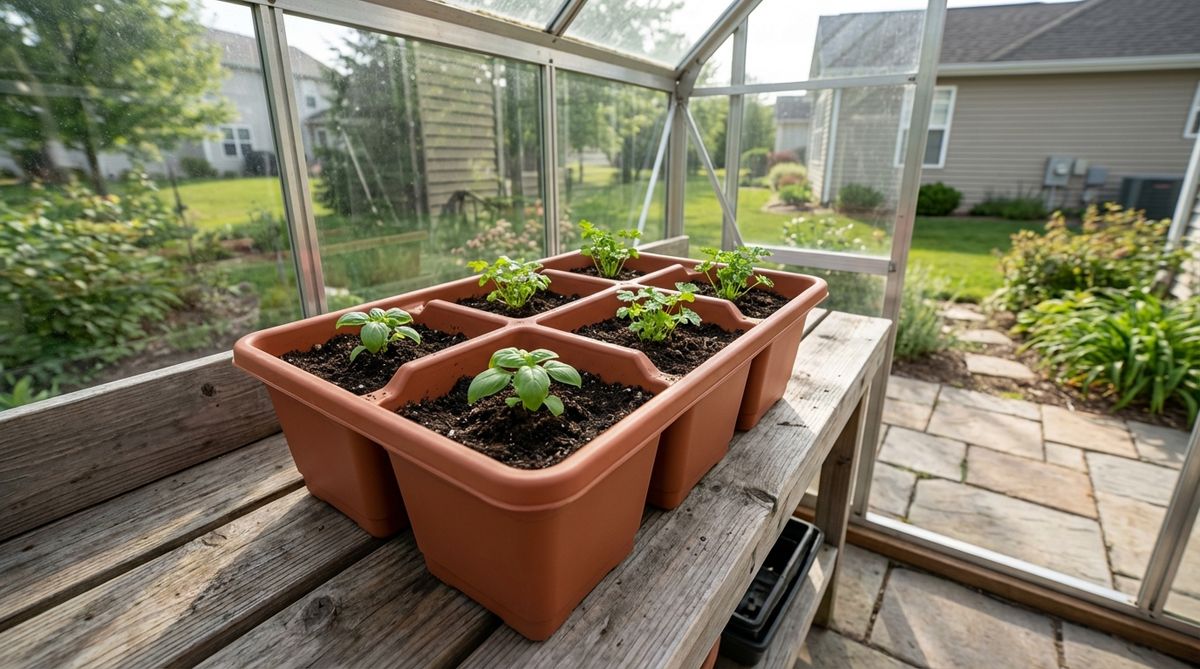
Feels like a curated chef’s garden right on your countertop. This minimalist culinary herb station is highly recommended for keeping fresh basil and cilantro within arm’s reach while cooking.
It skips the chaotic look of mismatched pots and instantly gives a clean, streamlined finish. Strategic miniature garden supplies ensure the root walls stay perfectly contained.
Setting this up usually runs about $10–$18. Highly recommended for adding a pop of functional green to your kitchen.
- Key Materials: Reinforced 6-cell inserts
- Vibe / Style: Sleek chef’s countertop
- Difficulty: Foolproof setup
- Budget Breakdown: Cell Insert: $6 | Drip Base: $8.
- Creator’s Tip: Plant contrasting colored herbs (like purple basil next to curly parsley) for maximum visual impact.
- Smart Sourcing: heavy-duty 6-cell starter inserts and premium culinary herb seed vaults.
Most people get this completely wrong… until they try the exact layout coming up next.
Professional Tray Systems
5. Johnny’s Mini Greenhouse Kit with T5 Light
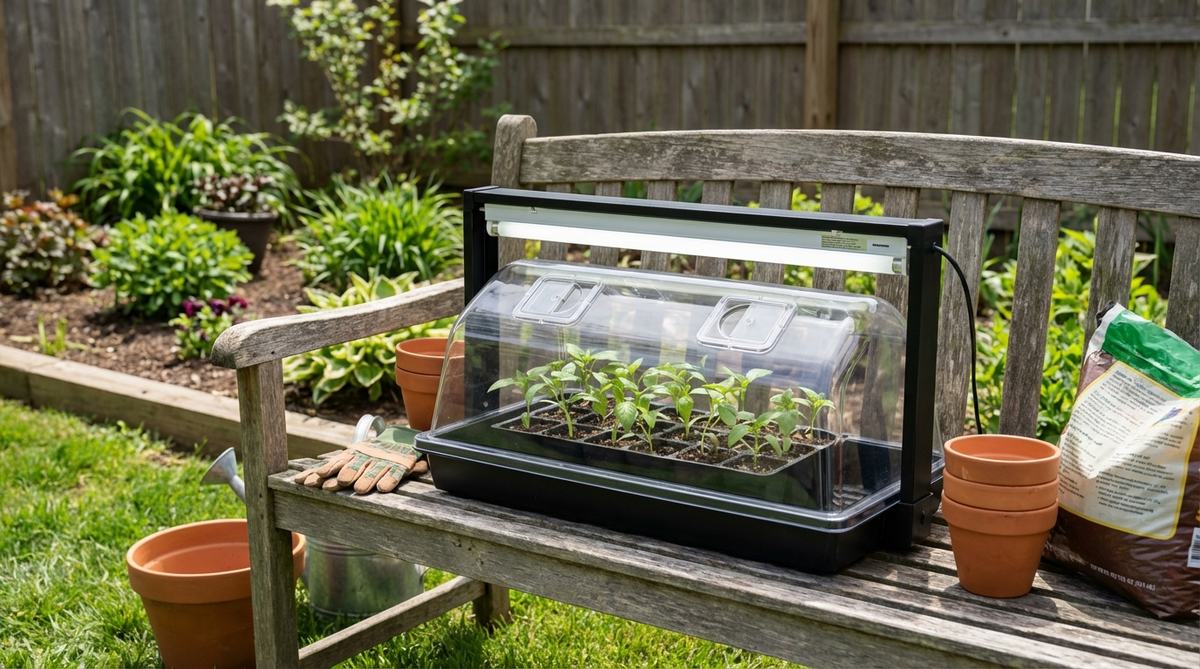
Radiates the sleek glow of a high-tech botany lab. This illuminated high-yield propagator serves brilliantly as an eye-catching focal point in a shaded home office.
Nothing looks cheaper than leggy, sad seedlings stretching for light. By integrating custom spectrums, this layout solves the light problem while looking incredibly professional and deliberately designed.
Your total cost will land between $40–$60 for the integrated light system. Save this setup if you want guaranteed, vibrant green growth all winter.
- Key Materials: 7-inch NanoDome and 11-watt T5HO strip
- Vibe / Style: High-end botanical display
- Difficulty: Plug-and-play installation
- Budget Breakdown: Base Kit: $25 | Lighting System: $35.
- Creator’s Tip: Rest the T5 directly in the dome’s recessed groove to trap heat and accelerate germination by days.
- Smart Sourcing: high-output T5 grow light strips and vented extra-tall propagation domes.
6. MIXC Ten-Pack Tray System (120 Cells)
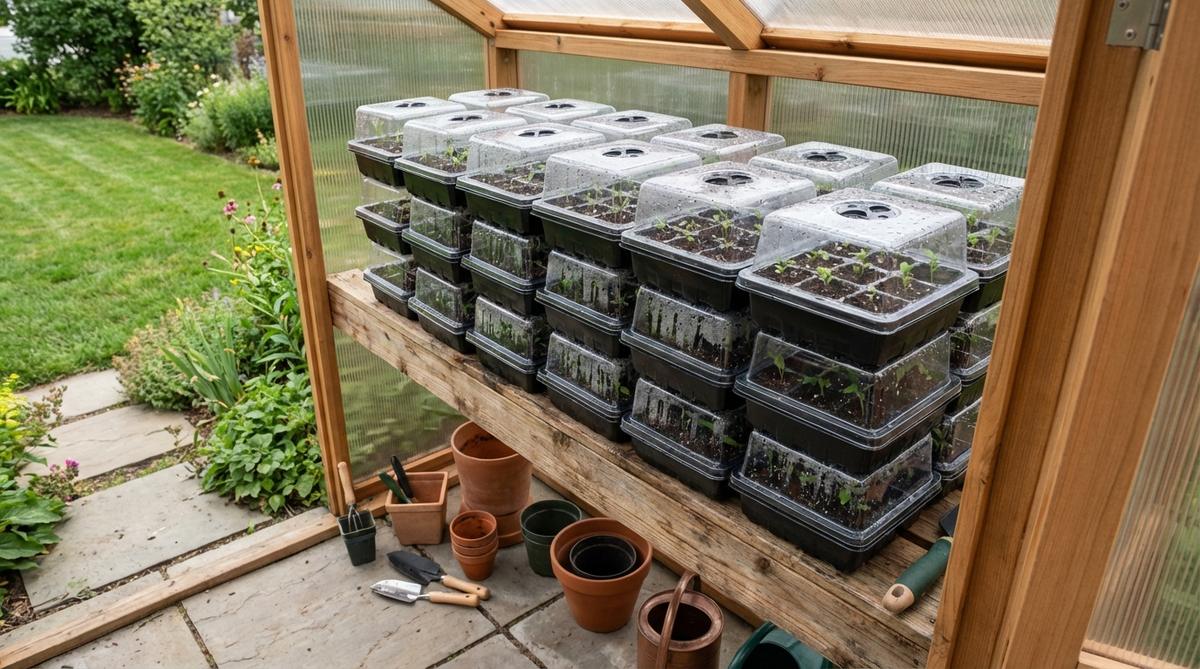
Feels like stepping into a vast, meticulously organized commercial nursery. This high-volume grid layout is the ultimate solution for basement staging areas or large garden prep zones.
Using uniform, repeated patterns delivers a surprisingly premium look compared to scattered random pots. Deploying bulk fairy garden kits or uniform plug trays creates a satisfying visual symmetry.
Grabbing a ten-pack runs about $25–$40. It’s an incredibly cost-effective way to scale up your spring planting game.
- Key Materials: 12-cell inserts with adjustable rotary vents
- Vibe / Style: Industrial modern growing
- Difficulty: Moderate scale planning
- Budget Breakdown: Bulk Tray Pack: $30 | Substrate: $10.
- Creator’s Tip: Color-code your tray vents with markers to easily identify different microclimate zones at a glance.
- Smart Sourcing: bulk pack 120-cell starter kits and waterproof plant nursery labels.
7. Seed Starter Tray with Twelve-Cell Configuration
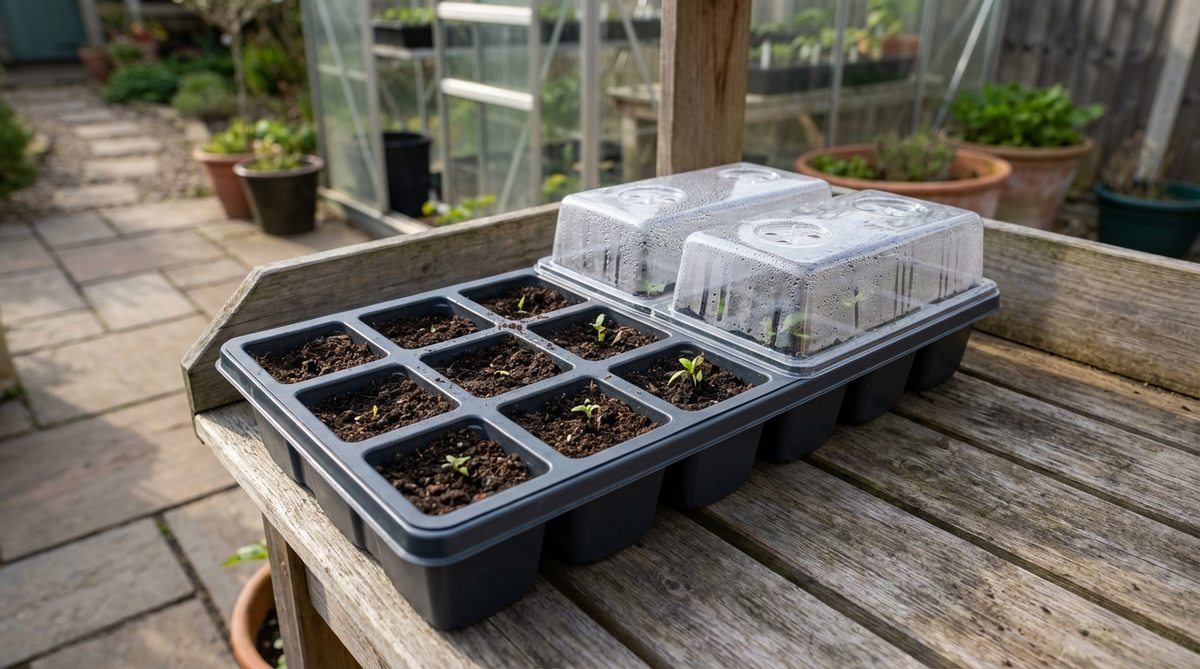
Captures the essence of a flawless, sunlit spring morning. A transparent monitoring tray is perfect for the visual learner who loves checking daily root progress on the dining buffet.
The clear aesthetic looks far more expensive than standard black plastic. Upgrading to non-toxic transparent molds gives a designer-level finish while letting you catch moisture issues early.
You can set this visual beauty up for just $12–$20. Pin this if you love watching the whole growth process from root to leaf.
- Key Materials: Clear rigid 1.5-inch cell modules
- Vibe / Style: Crystal-clear modern staging
- Difficulty: Simple maintenance
- Budget Breakdown: Clear Base: $15 | Dome: $5.
- Creator’s Tip: Keep the tray away from direct, scorching afternoon sunlight to prevent the clear plastic from magnifying heat and cooking roots.
- Smart Sourcing: heavy-duty transparent seed trays and pre-mixed sterile starting soils.
8. Fifty-Cell Plug Tray for High-Volume Starting
Brings a heavy-hitting, agricultural efficiency straight to your garage shelves. A dense plug-tray system is the ideal layout for rapid-fire lettuce and greens production.
Most home setups waste massive amounts of spatial real estate. Tightening the configuration not only yields more plants but creates an impressive, carpet-like canopy that feels extremely pro.
These commercial inserts only cost about $15–$25 for a stack. A highly recommended route for urban homesteaders.
- Key Materials: Professional 50-cell 1020 tray inserts
- Vibe / Style: Serious urban homestead
- Difficulty: Intermediate handling required
- Budget Breakdown: 50-Cell Stack: $18 | 1020 Base: $7.
- Creator’s Tip: Use a specialized plug popper tool to slide the delicate greens out without crushing their fragile stems.
- Smart Sourcing: commercial-grade 50-cell plug sheets and heavy-duty bottom watering trays.
9. Seventy-Two-Cell Compact Starter Tray

Looks like a lush, dense carpet of green magic. Using this maximum density footprint works wonderfully for maximizing output on a single heated germination mat.
Many beginners spread their seeds too thin, resulting in sparse, sad-looking shelves. Compacting the layout builds an aggressive, high-end look while maintaining optimal moisture retention across the board.
You can fully stock this setup for around $20–$30. Save this strategy to your spring prep board to multiply your flower yields.
- Key Materials: 72-cell rigid plastic matrix
- Vibe / Style: Hyper-efficient nursery wall
- Difficulty: Precision seeding needed
- Budget Breakdown: 72-Cell Insert: $12 | Heat Mat: $18.
- Creator’s Tip: Invest in a precision seed syringe to avoid dropping doubles into these tiny one-inch squares.
- Smart Sourcing: pre-cut 72-cell starter packs and precision seed sowing dispensers.
This next setup is ridiculously cheap but looks like a $150 custom display when placed correctly…
💡 Must-Have Supplies for High-End Setups
To build these setups faster and ensure they last, skip the generic craft aisles and invest in the right foundational kits.
- Base & Support: Heavy-duty 1020 propagation trays without drainage holes
- Setup Tools: Complete UV-resistant indoor greenhouse starter kits
- Weather/Durability Protection: Thick acrylic humidity domes with adjustable ventilation
10. Biodegradable Paper Pot Chain System
Offers a deeply satisfying, earthy aesthetic that practically begs to be photographed. This interconnected organic pot chain is the perfect solution for eco-conscious patio gardeners.
Moving away from plastics gives a surprisingly premium, artisanal look. By utilizing high-end terrarium supplies and paper mechanics, you completely eliminate transplant shock while elevating your bench’s visual appeal.
Implementing paper chains costs roughly $25–$35 for the starter rig. A brilliant choice for organic growers aiming for zero waste.
- Key Materials: Interlocking honeycomb paper pots
- Vibe / Style: Rustic zero-waste garden
- Difficulty: Beginner-friendly
- Budget Breakdown: Paper Chain Kit: $25 | Base Support: $10.
- Creator’s Tip: Make sure the paper walls stay consistently damp; if they dry out, they pull moisture away from the seedling roots.
- Smart Sourcing: biodegradable paper pot starter kits and organic root-boosting inoculants.
LED-Equipped Kits
11. Seed Starter Tray with Full-Spectrum LED
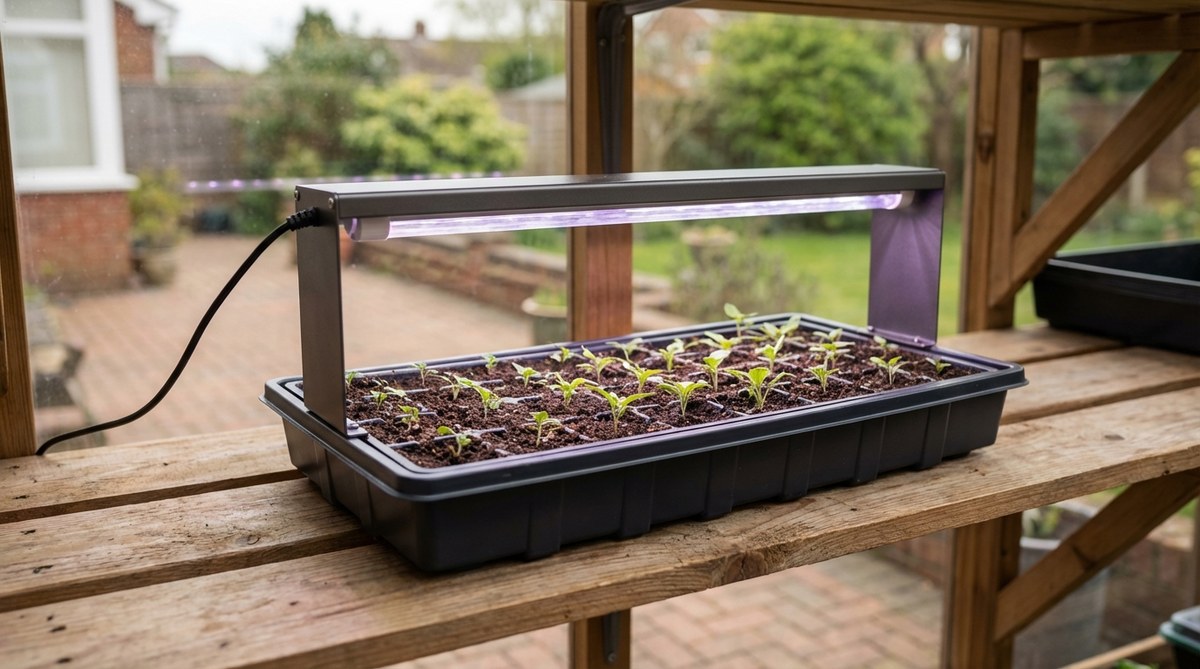
Bathes your room in a warm, life-giving halo. This all-in-one illuminated dome is incredibly perfect for dark apartments or winter basements craving a pop of life.
Standalone grow lights can look messy and cluttered. This integrated approach delivers a surprisingly premium look, neatly hiding the tech while flooding the canopy with optimized, season-extending energy.
An integrated LED tray will cost you around $30–$50. Pin this if you’re tired of relying on unpredictable window lighting.
- Key Materials: Built-in full-spectrum LED panel
- Vibe / Style: Sleek futuristic botany
- Difficulty: Plug-and-play
- Budget Breakdown: LED Dome Kit: $35 | Base Tray: $10.
- Creator’s Tip: Lower the light panel right after germination to prevent stems from stretching, then raise it weekly.
- Smart Sourcing: full-spectrum LED mini greenhouse kits and adjustable height light risers.
12. Twelve-Cell Kit with Programmable LED Timer
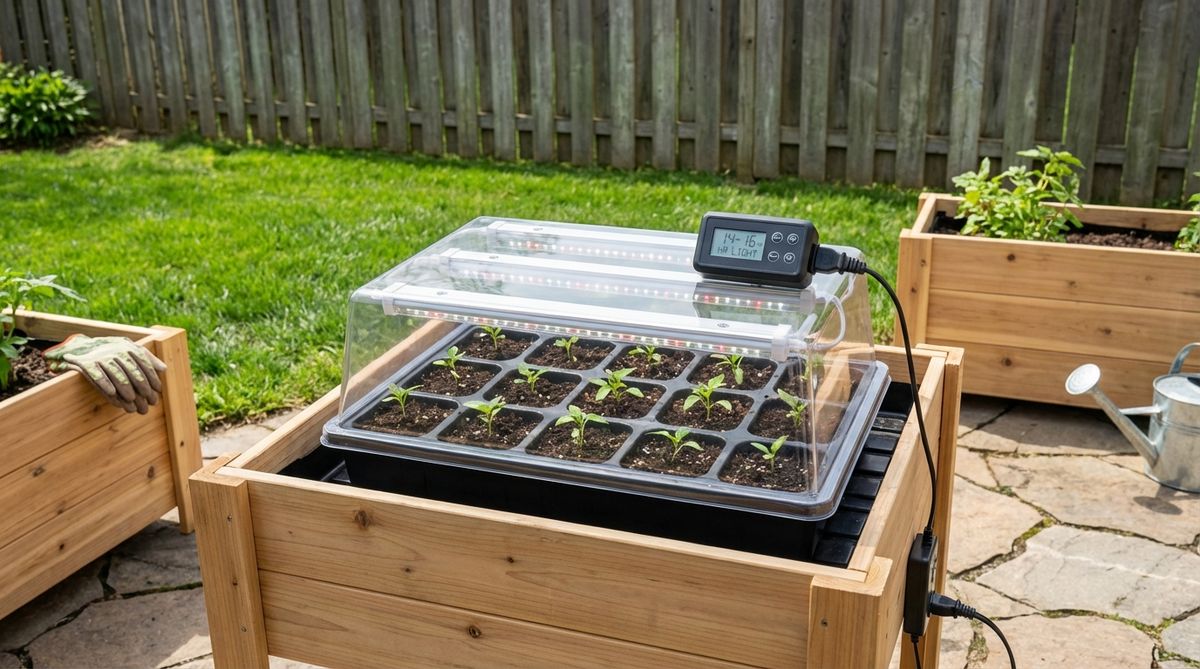
Operates like a silent, automated garden guardian. This smart-timed light station is perfectly suited for busy professionals who travel but still want lush spring transplants.
Manual light switching often leads to erratic growth and weak plants. Automating your setup with a timer looks far more expensive than it is and creates robust, stocky seedlings automatically.
You can automate your lighting for around $35–$55. It’s a massive quality-of-life upgrade that pays for itself quickly.
- Key Materials: Auto-timer hub and 12-cell pods
- Vibe / Style: Hands-free smart garden
- Difficulty: Easy automation setup
- Budget Breakdown: Timer Kit: $40 | Pods: $10.
- Creator’s Tip: Set the timer to mirror the exact daylight hours of mid-spring (usually 14-16 hours) for the strongest growth.
- Smart Sourcing: programmable LED grow light starter kits and heavy-duty digital outlet timers.
13. Dual-Tray LED System with Adjustable Arms
Looks like a high-end photography rig for your plants. This flexible gooseneck lighting layout works exceptionally well for multi-level shelving units where vertical space is tight.
Most fixed lights restrict you to one growth stage. These adjustable arms give a designer-level finish while letting you seamlessly manage fresh seeds and mature starts side-by-side.
This dual-arm powerhouse runs about $45–$70. Save this to your indoor setup board for maximum spatial efficiency.
- Key Materials: Twin gooseneck LEDs and dual bases
- Vibe / Style: Adaptive modern studio
- Difficulty: Intermediate spacing required
- Budget Breakdown: Gooseneck Lamp: $45 | Trays: $20.
- Creator’s Tip: Use one tray for direct illumination and angle the second light to bounce off a white wall for softer ambient coverage.
- Smart Sourcing: clip-on adjustable LED grow lights (dual head) and premium shatterproof drip trays.
14. Red-Blue Spectrum Propagation Station
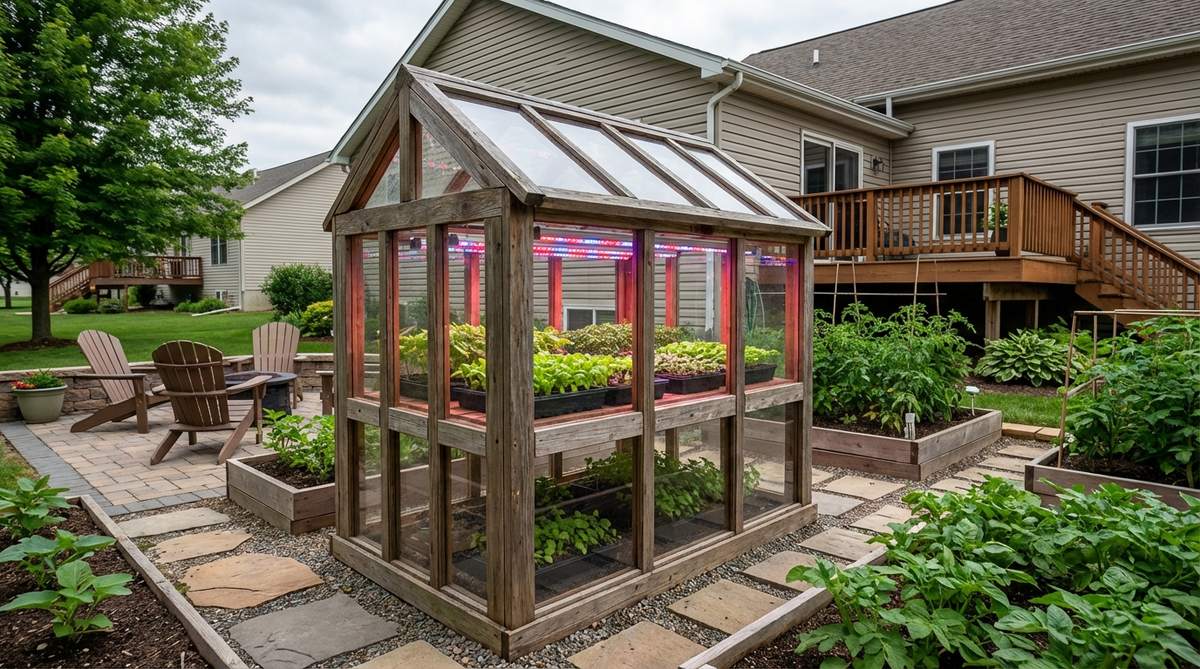
Casts a striking, cyberpunk neon glow across the room. This targeted spectrum incubator is highly recommended for tech-loving gardeners looking to hyper-optimize root development.
While some find the purple hue intense, it’s undeniably effective. Using specific blue/red wavelengths acts as a commercial-grade seedling starter hack that forces bushy, ultra-compact growth fast.
Expect to spend about $35–$60 for this specialized light rig. Pin this if you want the absolute fastest germination times.
- Key Materials: Red/Blue LED diodes and heavy cover
- Vibe / Style: Neon scientific efficiency
- Difficulty: Simple technical setup
- Budget Breakdown: Spectrum Light: $40 | Domes: $15.
- Creator’s Tip: Keep this setup out of your bedroom—the intense red/blue light can heavily disrupt your sleep cycle.
- Smart Sourcing: red/blue spectrum propagation light kits and bulk pack heat retention domes.
Wait until you see the lighting on this next one—it’s the secret behind those viral social media plant shelves.
Outdoor Portable Greenhouses
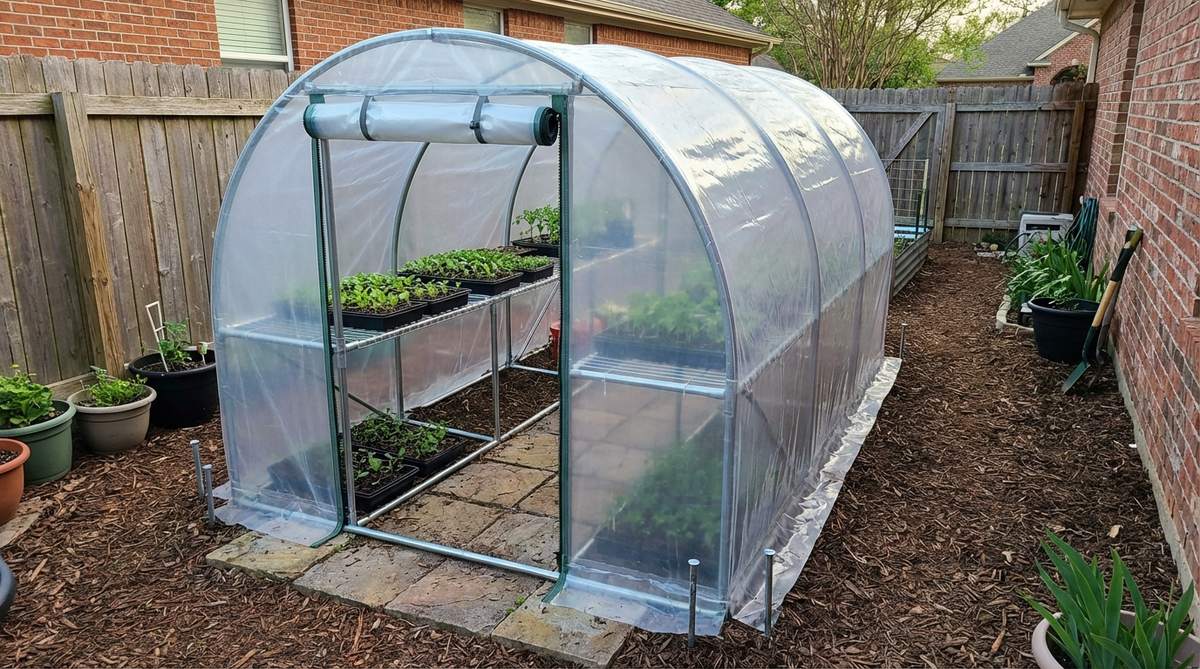
15. Outsunny Nine-Foot Tunnel Greenhouse
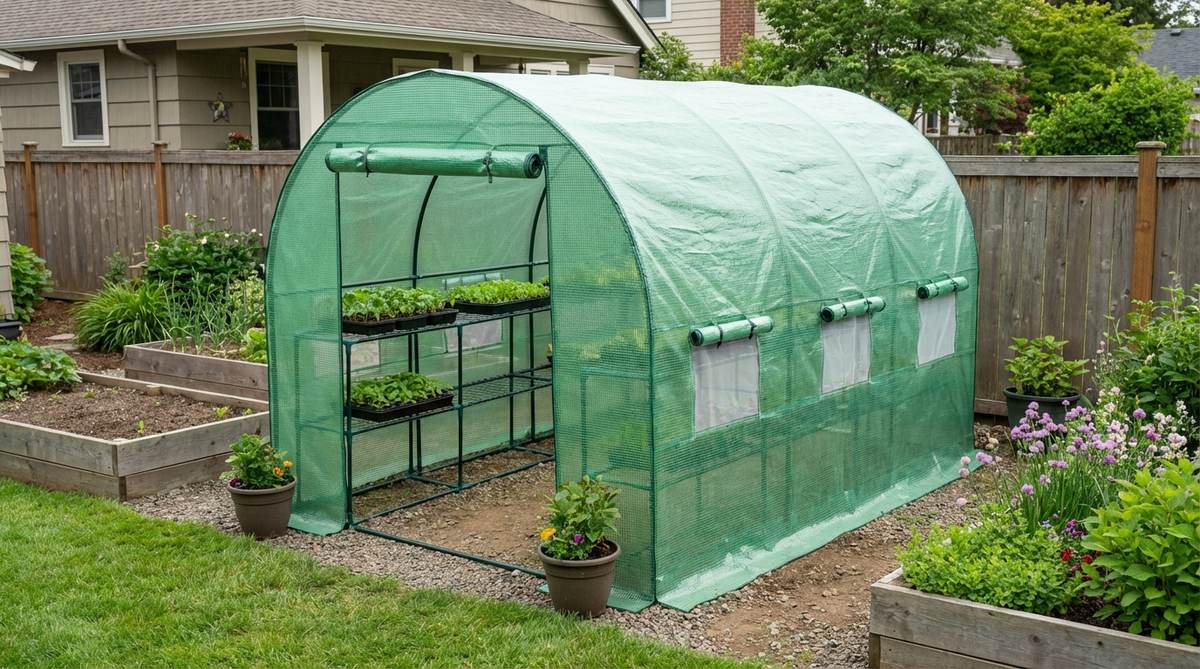
Feels like a secret botanical sanctuary right in your backyard. This walk-in portable tunnel is brilliant for expansive patios where you need to stage hundreds of plants.
Building a permanent glass structure costs thousands. Opting for a high-quality PE cover tunnel delivers a surprisingly premium look and professional climate control at a fraction of the cost.
You can construct this backyard sanctuary for roughly $90–$140. Save this blueprint for your ultimate spring yard transformation.
- Key Materials: Powder-coated steel frame and UV PE cover
- Vibe / Style: Backyard nursery estate
- Difficulty: Two-person assembly
- Budget Breakdown: Frame/Cover: $120 | Anchors: $20.
- Creator’s Tip: Weigh down the base skirt with heavy decorative stones to completely seal out cold drafts and pests.
- Smart Sourcing: UV-resistant walk-in greenhouse kits and heavy-duty steel ground anchors.
16. Six by Three Compact Outdoor Starter
Sits snugly like a glowing green jewel against your fence. A narrow profile outdoor station fits perfectly in tight side yards or urban balcony corners.
Small spaces don’t have to mean sacrificing yield. This condensed layout looks far more expensive than it is, providing incredible thermal mass protection without eating up your lawn.
This compact shelter runs a highly affordable $50–$80. Pin this if you’re working with strict HOA or apartment sizing rules.
- Key Materials: Roll-up zipper panels and metal tubing
- Vibe / Style: Urban alley oasis
- Difficulty: Fast weekend project
- Budget Breakdown: Compact Kit: $65 | Zip Ties: $5.
- Creator’s Tip: Add a layer of black weed fabric on the floor to absorb daily solar heat and slowly release it at night.
- Smart Sourcing: compact outdoor greenhouse tents and bulk pack weather-resistant zip ties.
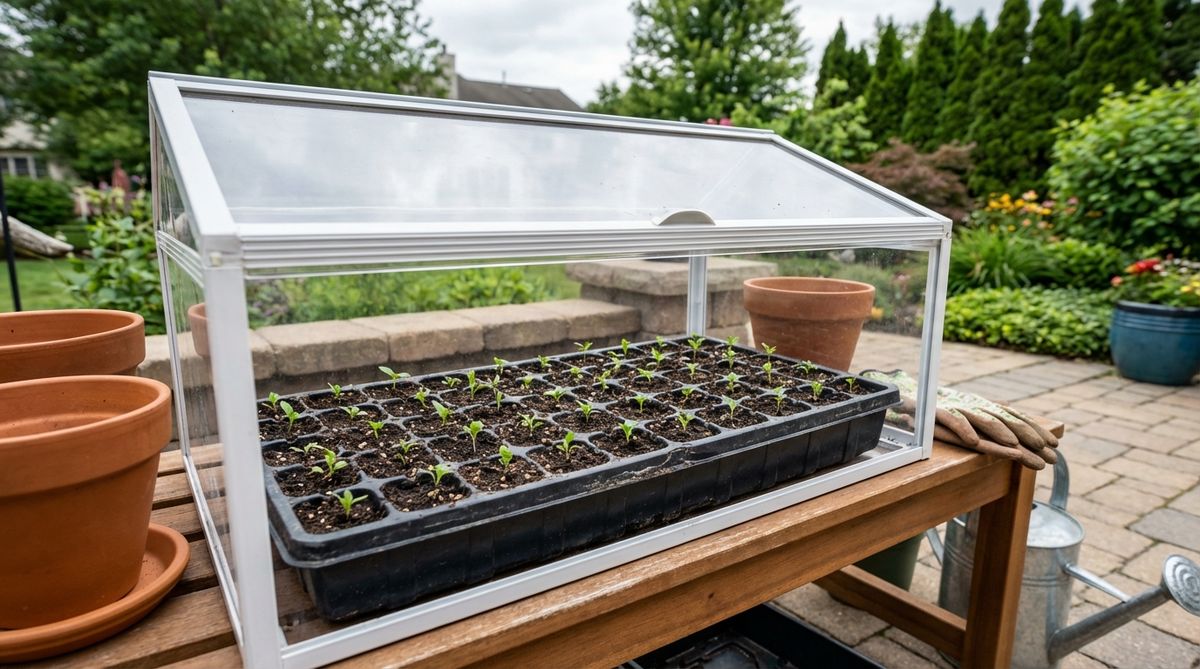
17. Pop-Up Frame Greenhouse with Clear Panels
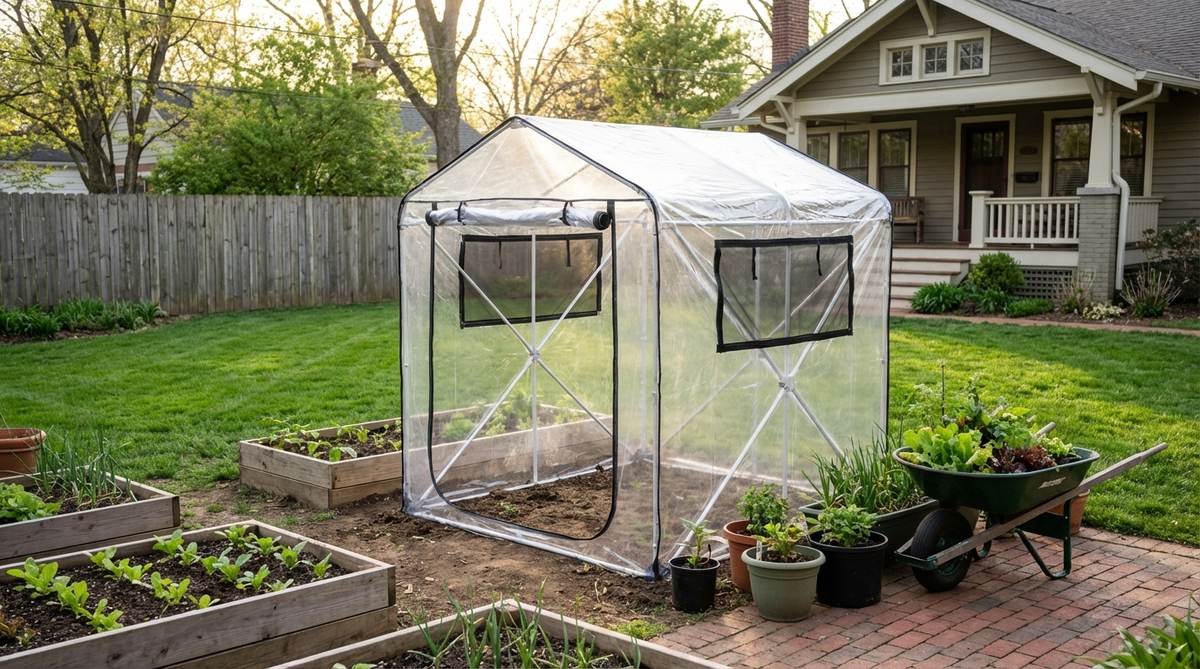
Deploys instantly like magic when the frost warnings hit. This spring-loaded temporary shelter is practically mandatory for protecting tender starts during unpredictable spring transitions.
Hard-sided cold frames take hours to build and store. Utilizing a high-quality pop-up design gives a designer-level finish instantly, and folds completely flat when the warm weather finally holds.
Grabbing a reliable pop-up costs around $30–$50. A fantastic, stress-free investment for unpredictable climates.
- Key Materials: Flexible tension rods and clear PVC
- Vibe / Style: Instant rescue shelter
- Difficulty: Zero-tool setup
- Budget Breakdown: Pop-up Frame: $40 | Ground Stakes: $10.
- Creator’s Tip: Leave the top vent unzipped on sunny afternoons; the internal temperature can easily spike over 100 degrees and fry plants.
- Smart Sourcing: instant pop-up mini greenhouse kits and UV-coated clear PVC replacement covers.
18. Lean-To Style Mini Greenhouse
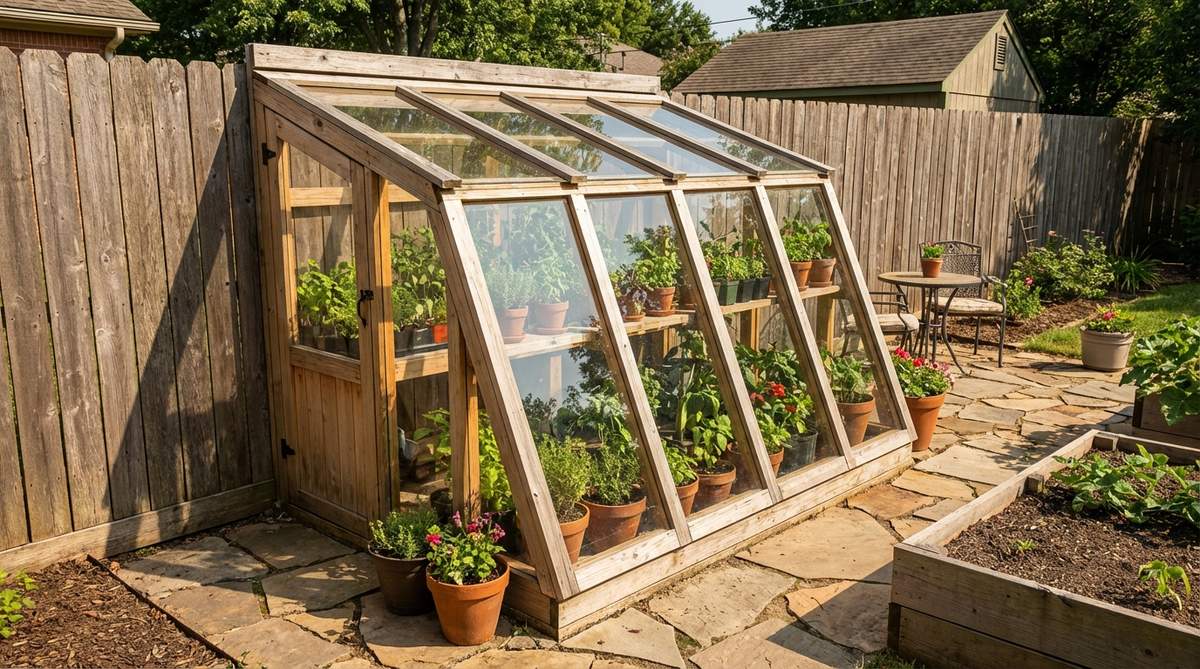
Blends seamlessly against the side of your brick house. This wall-anchored thermal trap works phenomenally well on south-facing exterior walls to soak up winter sun.
Freestanding units lose heat rapidly from all sides. Leveraging your home’s existing structure creates a surprisingly premium look while massively boosting overnight heat retention for free.
Expect to spend around $70–$120 for a sturdy lean-to rig. Save this idea to maximize your home’s passive solar energy.
- Key Materials: Sloped roof frame and wall anchors
- Vibe / Style: European courtyard attachment
- Difficulty: Intermediate anchoring needed
- Budget Breakdown: Lean-to Frame: $90 | Masonry Anchors: $15.
- Creator’s Tip: Caulk the seam where the greenhouse meets the siding to prevent rain from running down the wall into your trays.
- Smart Sourcing: lean-to outdoor greenhouse kits and heavy-duty masonry anchor bolt sets.
Material Guide: Cheap vs. Premium Aesthetic
Knowing exactly where to save and where to spend makes all the difference in achieving that “looks expensive but isn’t” vibe.
- Standard vs. UV-Resistant/Premium: Investing in UV-coated PVC covers prevents that cloudy, brittle plastic look after just one single season in the hot sun.
- Pre-made Kits vs. Sourcing Locally: Commercial-grade seed starting starter kits often bundle lights, heat mats, and domes, easily saving you 30% compared to buying the components piecemeal.
If you’ve been wasting money on weak seedlings, this upcoming vertical hack changes everything immediately.
Multi-Tier Vertical Systems
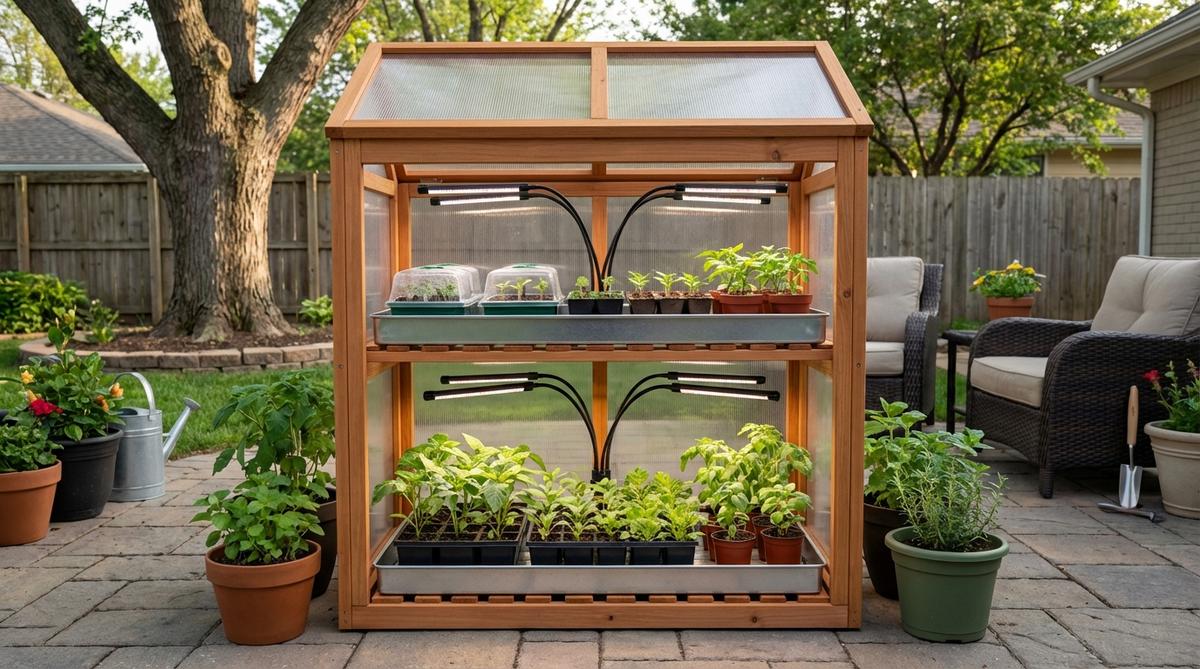
19. Four-Tier Mini Greenhouse (63 Inches Tall)
Transforms an empty garage corner into a towering wall of green. This multi-level vertical staging rack is the ultimate lifehack for maximizing production in tight indoor footprints.
Sprawling trays all over the floor is a messy, inefficient disaster. Stacking the grow space upward creates a surprisingly premium look and allows you to curate distinct heat zones on every shelf.
You can construct this vertical powerhouse for $40–$70. Pin this to your apartment gardening board immediately.
- Key Materials: 4 wire shelves and zippered PE jacket
- Vibe / Style: High-rise botanical condo
- Difficulty: Easy slot-together assembly
- Budget Breakdown: 4-Tier Rack: $50 | Base Mats: $15.
- Creator’s Tip: Always place your heaviest soil trays on the bottom shelf to lower the center of gravity and prevent tipping.
- Smart Sourcing: 4-tier vertical mini greenhouse kits and waterproof shelf liner rolls.
20. Three-Tier Rolling Greenhouse Cart
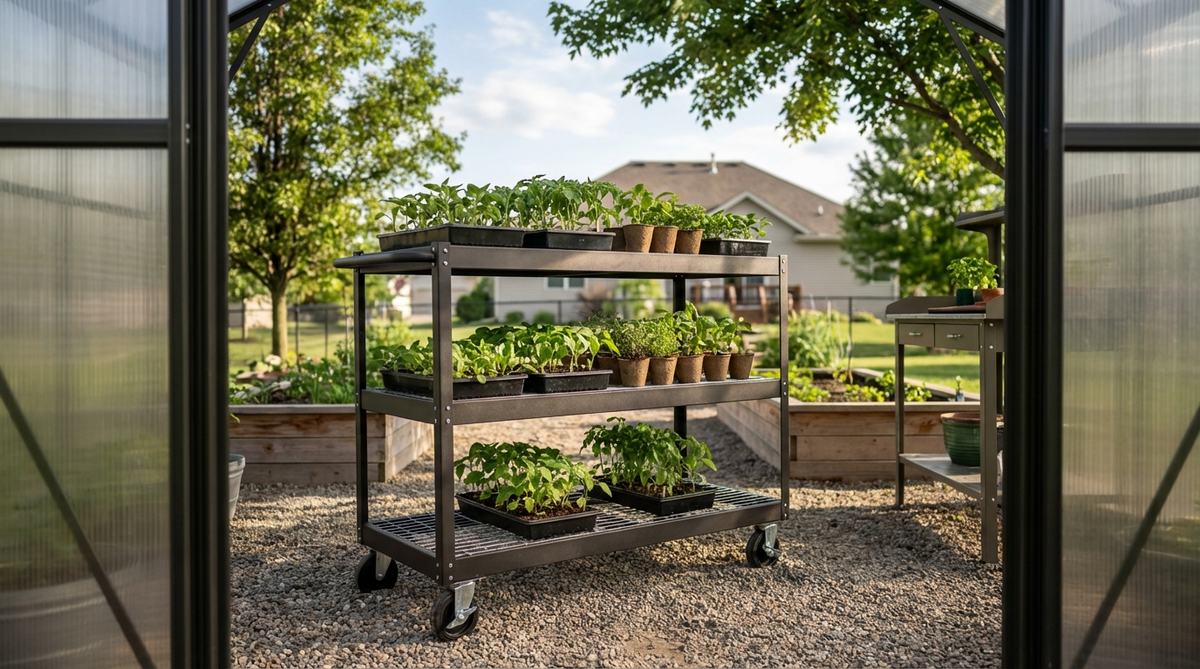
Rolls effortlessly like a high-end serving cart of foliage. A mobile locking caster system is perfect for chasing the sun across a large patio throughout the day.
Static heavy shelving is a nightmare when you need to harden off plants outdoors. Opting for a wheeled setup gives a designer-level finish while completely eliminating the back-breaking labor of moving individual trays.
A heavy-duty rolling cart runs about $60–$90. It’s an absolute game-changer for easing the spring outdoor transition.
- Key Materials: Locking casters and mesh metal shelves
- Vibe / Style: Mobile tactical staging
- Difficulty: Simple bolt assembly
- Budget Breakdown: Rolling Cart: $75 | Cover: $15.
- Creator’s Tip: Upgrade the stock plastic wheels to rubberized casters so it rolls smoothly over deck bumps without jarring your delicate plants.
- Smart Sourcing: heavy-duty rolling greenhouse carts and premium rubber swivel casters.
21. Five-Shelf Heavy-Duty Seed Starting Tower
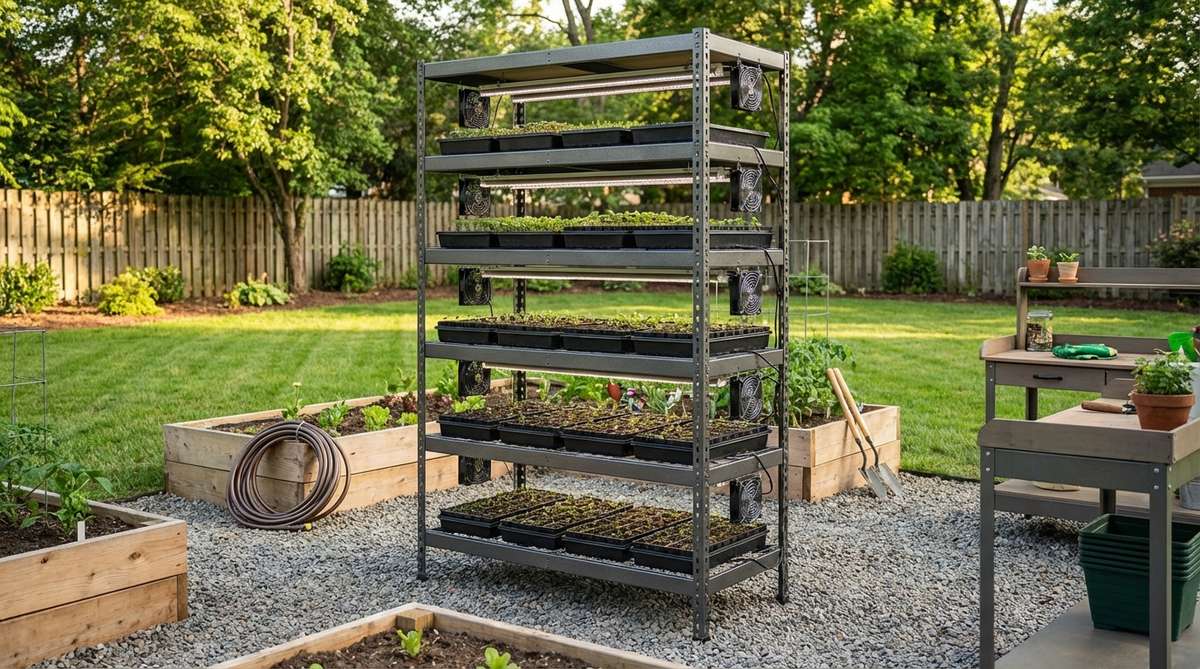
Commands the room like a true professional farming installation. This industrial-capacity growing tower is heavily recommended for serious gardeners producing hundreds of vegetable transplants.
Flimsy wire racks will eventually buckle under the weight of wet soil. Investing in heavy-duty commercial metal looks far more expensive than it is and guarantees years of rock-solid, wobble-free propagation.
Expect to invest $100–$160 for a true industrial rack. Save this layout if you’re prepping for a massive market garden season.
- Key Materials: 50-pound capacity steel shelving
- Vibe / Style: Commercial production powerhouse
- Difficulty: Heavy lifting required
- Budget Breakdown: Industrial Rack: $120 | Tray Sets: $40.
- Creator’s Tip: Zip-tie long LED shop lights directly to the underside of the wire shelf above to seamlessly light the entire row below.
- Smart Sourcing: industrial 5-tier wire shelving units and bulk pack heavy-duty zip ties.
Specialty & Advanced Kits
22. Heated Propagation Mat System
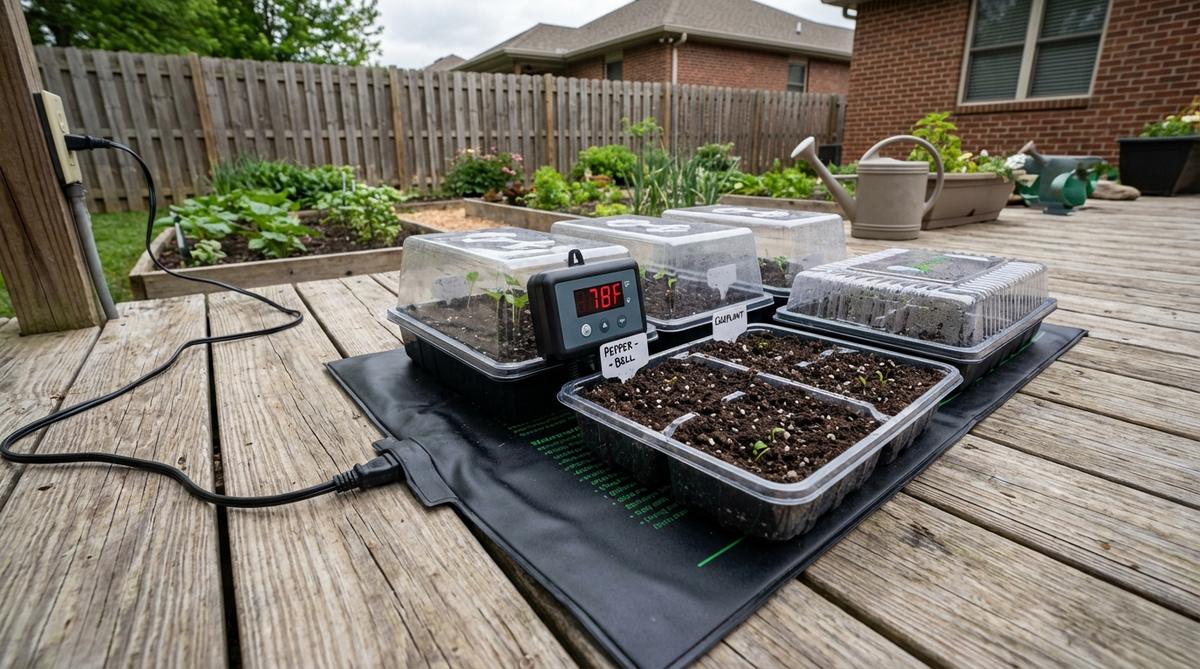
Provides a cozy, warm underbelly that seeds absolutely love. Adding a thermostat-controlled heat mat is highly recommended for cold-climate growers trying to sprout stubborn peppers and eggplants.
Relying on ambient room temperature takes weeks and risks root rot. Upgrading to a digital bottom-heat system acts as a high-end miniature garden supply hack, slashing germination time in half with zero effort.
A reliable mat and thermostat combo runs $30–$50. It’s the single best upgrade for guaranteeing rapid, even sprouting.
- Key Materials: Waterproof heating element and digital thermostat
- Vibe / Style: Precision thermal lab
- Difficulty: Plug-and-set simplicity
- Budget Breakdown: Heat Mat: $25 | Thermostat Controller: $20.
- Creator’s Tip: Place a folded towel under the heat mat to force all the warmth upward into the soil rather than losing it to a cold table.
- Smart Sourcing: seedling heat mat with digital thermostat kits and heavy-duty 1020 drip trays.
23. Automatic Watering Capillary Mat Kit
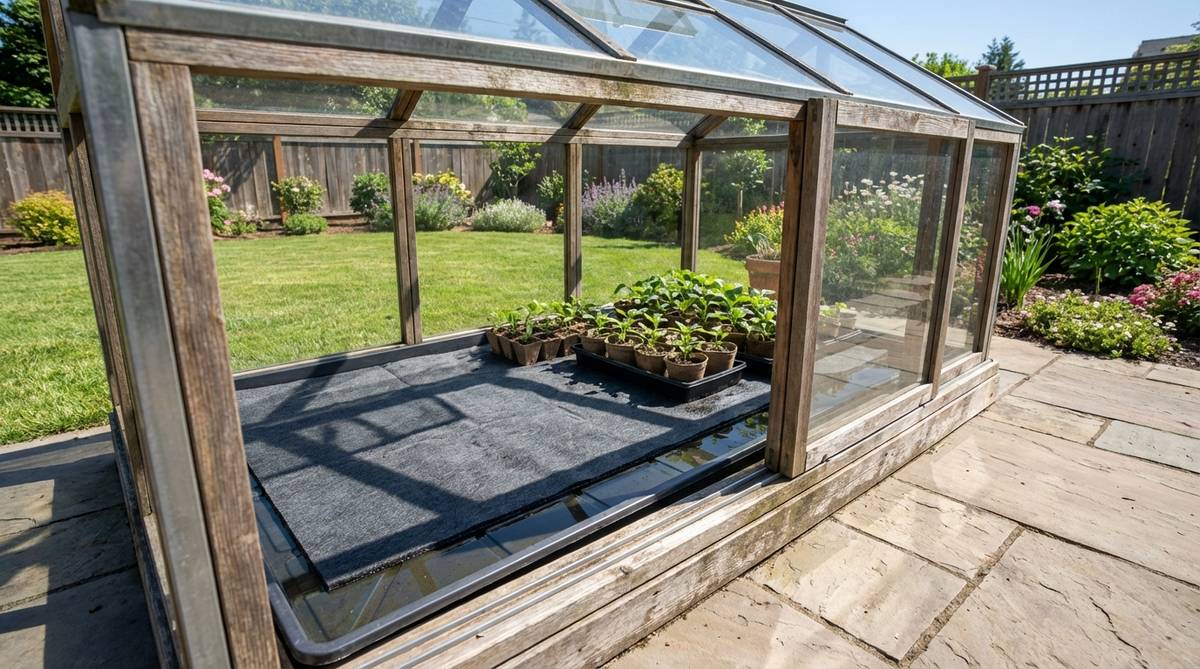
Acts like an invisible, self-sustaining aquifer for your roots. This passive wicking moisture system is brilliant for gardeners who constantly over-water or dry out their delicate starts.
Surface watering often blasts tiny seeds out of their soil pockets. Utilizing capillary fabric delivers a surprisingly premium look by hiding the water source while delivering flawless, deep-root hydration.
You can retrofit your trays with wicking mats for about $20–$35. Save this to your garden hacks board to finally stop drowning your plants.
- Key Materials: Absorbent felt mat and reservoir base
- Vibe / Style: Automated stress-free growth
- Difficulty: Simple tray layering
- Budget Breakdown: Wicking Fabric: $15 | Deep Reservoir: $15.
- Creator’s Tip: Add a highly diluted organic liquid fertilizer to the reservoir to passively feed the seedlings every time they drink.
- Smart Sourcing: pre-cut capillary watering mat rolls and deep reservoir plant trays.
24. Silicone Seed Starting Tray (Reusable System)
Pops out perfect root cubes like a deeply satisfying ice tray. These flexible food-grade silicone molds are exceptionally perfect for avoiding the tragic broken roots of plastic cell extraction.
Cracked, brittle plastic trays look terrible and harbor disease. Swapping to indestructible silicone looks far more expensive than it is and guarantees decades of beautiful, easily sanitized reuse.
A high-quality silicone tray set costs roughly $25–$40. A highly recommended long-term investment for the serious hobbyist.
- Key Materials: Thick non-porous silicone cell blocks
- Vibe / Style: Modern indestructible utility
- Difficulty: Zero-stress transplanting
- Budget Breakdown: Silicone Trays: $30 | Dome Cover: $10.
- Creator’s Tip: Toss the silicone trays right into the dishwasher on the sanitize cycle at the end of the season to kill all lingering mold.
- Smart Sourcing: reusable silicone seed starting trays (bulk pack) and premium seed starting soil blocks.
A lot of beginners skip this next method, but seasoned pros use it constantly for zero-waste propagation…
25. Growers Edition Kit with Drip Irrigation
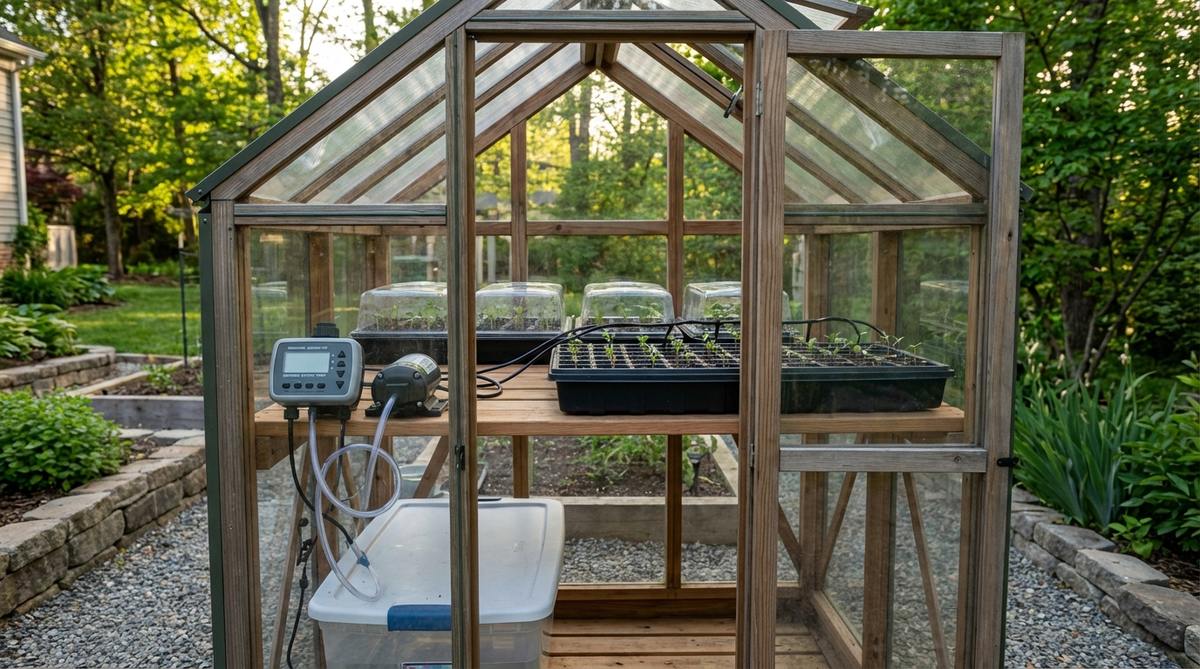
Looks like a complex architectural marvel of tubing and timers. Integrating a micro-drip automated watering rig is absolutely vital if you plan to take spring vacations while your seeds grow.
Hand-watering 120 tiny cells is incredibly tedious. Automating the flow with micro-emitters gives a designer-level finish and eliminates the #1 cause of failure: inconsistent weekend watering.
This vacation-proof tech setup will run you $50–$85. Pin this if you love building smart, hands-off botanical systems.
- Key Materials: Battery pump, micro-tubing, and emitters
- Vibe / Style: High-tech hydration grid
- Difficulty: Intermediate plumbing setup
- Budget Breakdown: Drip Kit: $45 | Reservoir Bucket: $15.
- Creator’s Tip: Soak the ends of the micro-tubing in hot water for 10 seconds before pushing them onto the plastic emitters to prevent cracking.
- Smart Sourcing: indoor micro drip irrigation starter kits and programmable battery water timers.
26. Soil Block Maker Kit with Blocking Mix
Creates incredibly satisfying, freestanding cubes of pure life. The hand-pressed soil blocking method is the ultimate flex for traditional organic growers who refuse to use plastic.
Buying endless flimsy containers is expensive and wasteful. Compressing your own blocks using premium garden supplies creates a strikingly beautiful, rustic layout that air-prunes roots automatically for superior strength.
A heavy-duty metal blocker costs around $35–$60. Save this technique to completely eliminate transplant shock from your garden.
- Key Materials: Metal block press and specialized fibrous soil
- Vibe / Style: Artisanal heritage farming
- Difficulty: Requires mix consistency practice
- Budget Breakdown: Steel Blocker: $45 | Peat Mix: $15.
- Creator’s Tip: Your soil mix must be considerably wetter than normal—almost like thick brownie batter—for the blocks to hold their shape perfectly.
- Smart Sourcing: heavy-duty steel soil block makers and premium soil blocking nutrient mixes.
27. Cedar Mini Greenhouse with Cold Frame Lid
Stands like a stunning, high-end piece of custom patio furniture. A natural wood cold frame works phenomenally well for directly starting seeds in their final outdoor resting beds.
Flimsy plastic boxes blow away in spring storms. Building with thick, aromatic cedar looks far more expensive than it is and provides massive insulation while naturally repelling rot and pests.
You can construct or buy this premium frame for $120–$200. It’s a gorgeous permanent addition that elevates the entire backyard aesthetic.
- Key Materials: Untreated cedar planks and hinged polycarbonate
- Vibe / Style: Premium craftsman garden
- Difficulty: Moderate woodworking/assembly
- Budget Breakdown: Cedar Kit: $150 | Heavy Hardware: $20.
- Creator’s Tip: Install an automatic vent opener arm that physically pushes the lid open when the internal temp hits 75 degrees, saving your plants from overheating.
- Smart Sourcing: cedar cold frame mini greenhouse kits and automatic temperature vent openers.
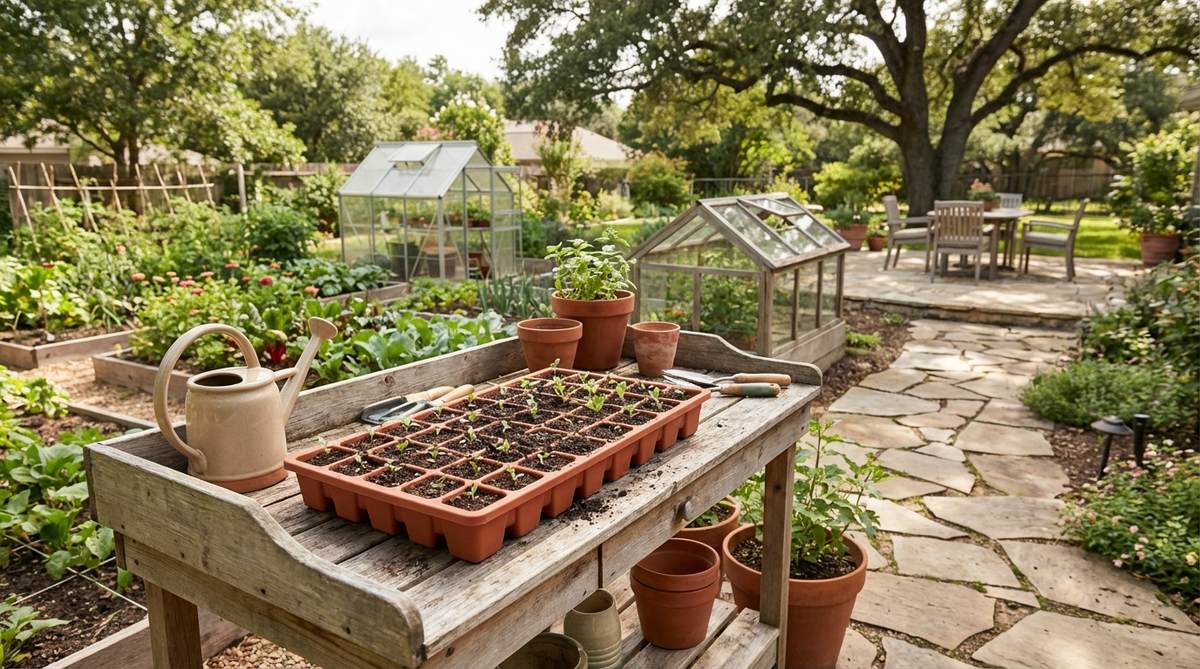
Final Thoughts on High-End Mini Garden Greenhouses
Selecting the right mini garden greenhouse kit from these 27 proven blueprints comes down to spatial planning and smart sourcing. Small apartment setups thrive on compact illuminated LED trays, while ambitious backyard homesteaders should invest in multi-tier racks or heavy-duty outdoor tunnels. By skipping generic craft plastic and sourcing premium UV-resistant domes, automated irrigation, and reliable heating mats, you guarantee a designer-level aesthetic that lasts for years. Start with a solid, high-quality foundation, and watch your seeds transform into incredibly vigorous, garden-ready transplants.
Frequently Asked Questions
What size cells should I choose for different vegetable seeds?
Tomatoes, peppers, and eggplants perform best when you invest in 1.5 to 2-inch cells that support 4 to 6 weeks of deep root growth. Lettuce and greens need only 1-inch cells since they transplant young. Squash and cucumbers require 2 to 3-inch cells or individual pots due to their massive seeds and fast growth rates. Match cell size to the crop’s root development speed using premium seed starter kits to maximize your timeline.
Do I need a heat mat for seed starting success?
Heat mats significantly improve germination rates for warm-season crops like peppers, tomatoes, and basil, which explode out of the soil best between 75 and 85 degrees Fahrenheit. Cool-season crops like lettuce and peas germinate well at room temperature without supplemental heat. However, if your indoor temp drops below 60 degrees, a thermostat-controlled heat mat is highly recommended to accelerate sprouting and prevent costly fungal issues.
How many hours of light do seedlings need daily?
Seedlings require 14 to 16 hours of bright light daily for compact, healthy growth that looks professional. Natural windowsill light often provides weak intensity, causing leggy, sad stems. Installing full-spectrum LED grow light kits positioned just 2 to 4 inches above the canopy delivers the exact premium intensity they crave. Always use an automated digital timer to maintain perfect consistency.
When should I remove the humidity dome from my seedlings?
Remove heavy acrylic domes once 50 to 75 percent of the seeds have popped and the first cotyledon leaves are fully open. Gradually increase the airflow by sliding open the adjustable vents on your heavy-duty 1020 propagation trays for 2 to 3 days before pulling the lid completely. This smart transition prevents total transplant shock while drastically reducing your damping-off disease risk.
Can I reuse seed starting trays between seasons?
Quality thick plastic and reusable silicone seed starting trays easily last multiple seasons when sourced correctly. Always wash them in hot, soapy water, then disinfect with a 10 percent bleach wipe down for 10 minutes to kill everything off. This guarantees you eliminate lingering fungal spores. Throw out flimsy, cracked plastic immediately, as the micro-fissures harbor disease that will destroy next year’s premium seeds.