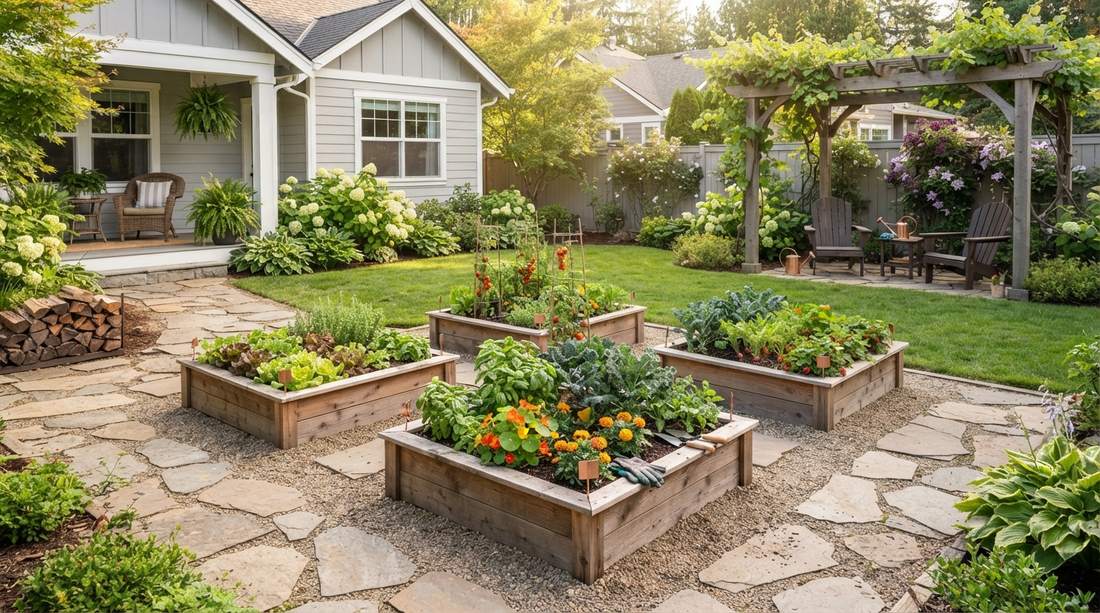
A perfectly executed mini garden bed delivers massive yields without dominating your yard. Upgrading a tiny space requires exact blueprints, rot-resistant frames, and smart soil layering. Steal these exact configurations to build a premium growing setup today.
Design SnapshotKey Principles
- Accessibility First: Keep bed widths between 3-4 feet to ensure comfortable reach from all sides without soil compaction from stepping
- Intensive Planting: Use closer spacing than traditional row gardens to maximize yields per square foot while maintaining adequate air circulation
- Vertical Integration: Incorporate trellises, stakes, and tiered structures to expand growing area upward rather than outward
- Strategic Positioning: Place taller plants on the north side to prevent shading, with cascading varieties along bed edges to soften boundaries
Space-Efficient Foundation Layouts
These foundational designs form the backbone of successful small-scale gardening. Each layout maximizes planting area while maintaining easy access for maintenance and harvesting.
1. Classic 4×4 Square Foot Grid
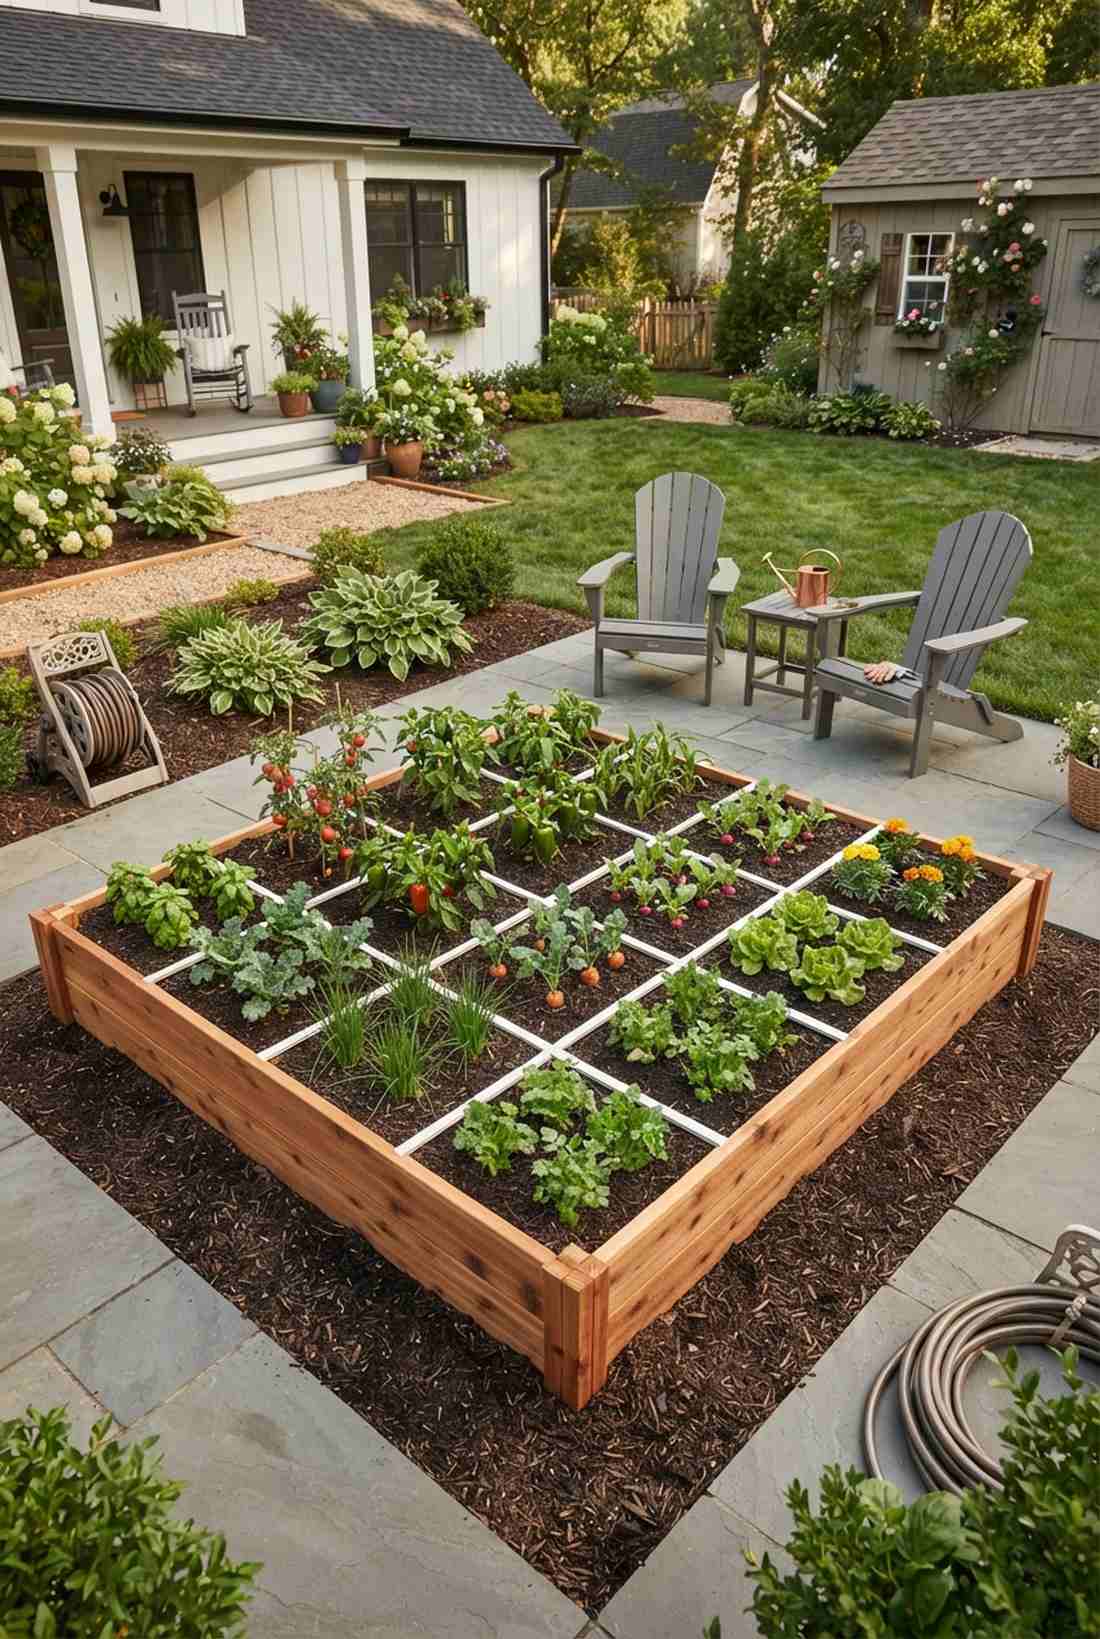

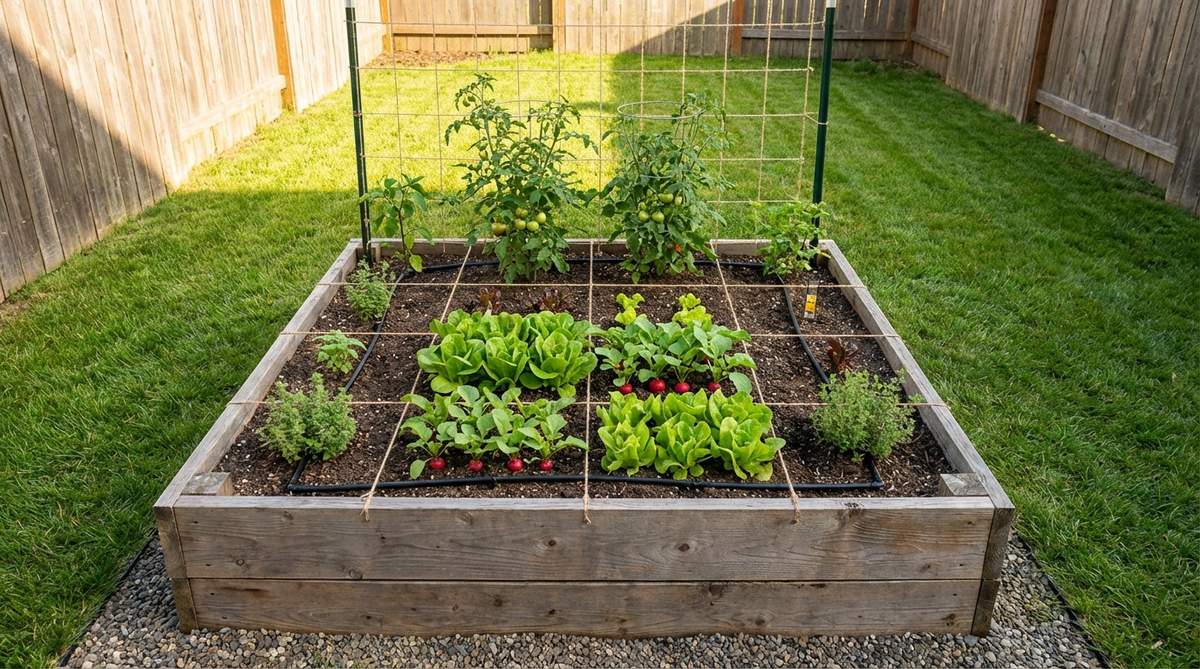
Feels like a flawlessly organized urban oasis. This compact raised square grid works exceptionally well for a sunny backyard patio looking for structure.
Most beginners just throw seeds randomly, but mapping out precise zones gives a designer-level finish. Utilizing durable dividers and premium soil blends ensures your layout stays geometrically perfect without overgrown chaos.
You can easily pull this off for around $35–$50 using pre-cut wood. Pin this if you’re planning a small space upgrade this weekend!
- Key Materials: Pre-cut cedar panels, UV-resistant string
- Vibe / Style: Modern structured farmhouse
- Difficulty: Easy beginner setup
- Budget Breakdown: Materials: $30 | Base Soil: $20
- Creator’s Tip: Paint the grid lines directly onto the wood frame so they never snap during harvest.
- Smart Sourcing: Grab pre-cut rot-resistant cedar panels (starter kit) and a bulk pack organic compost blend.
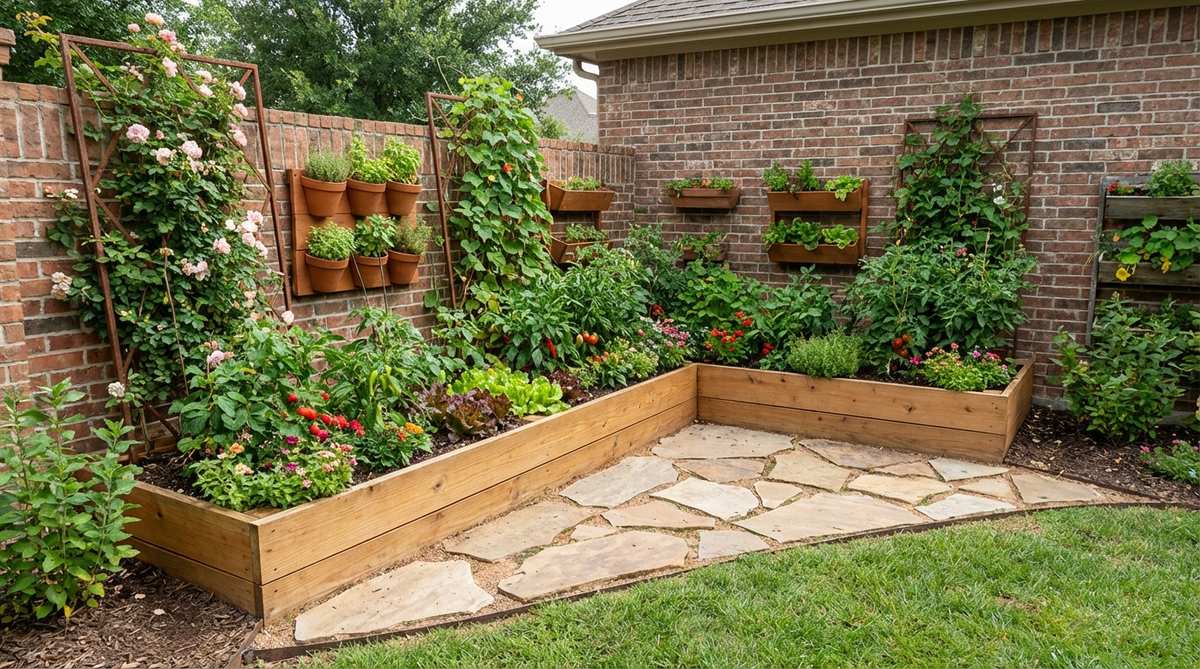
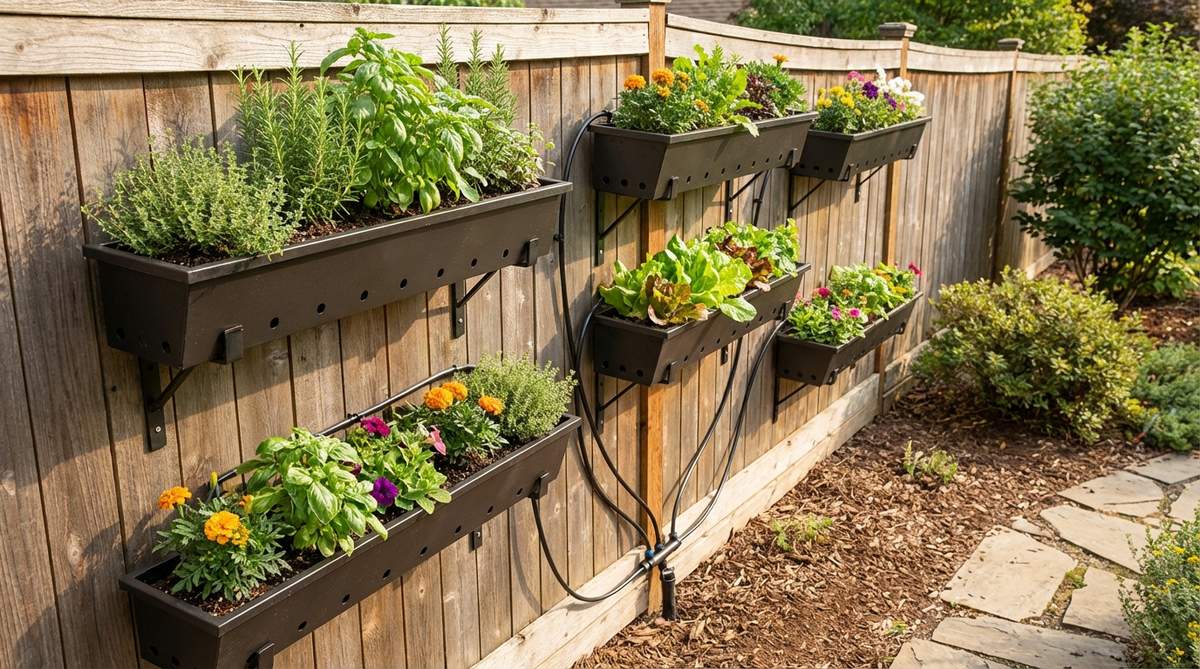
2. Narrow Border Bed
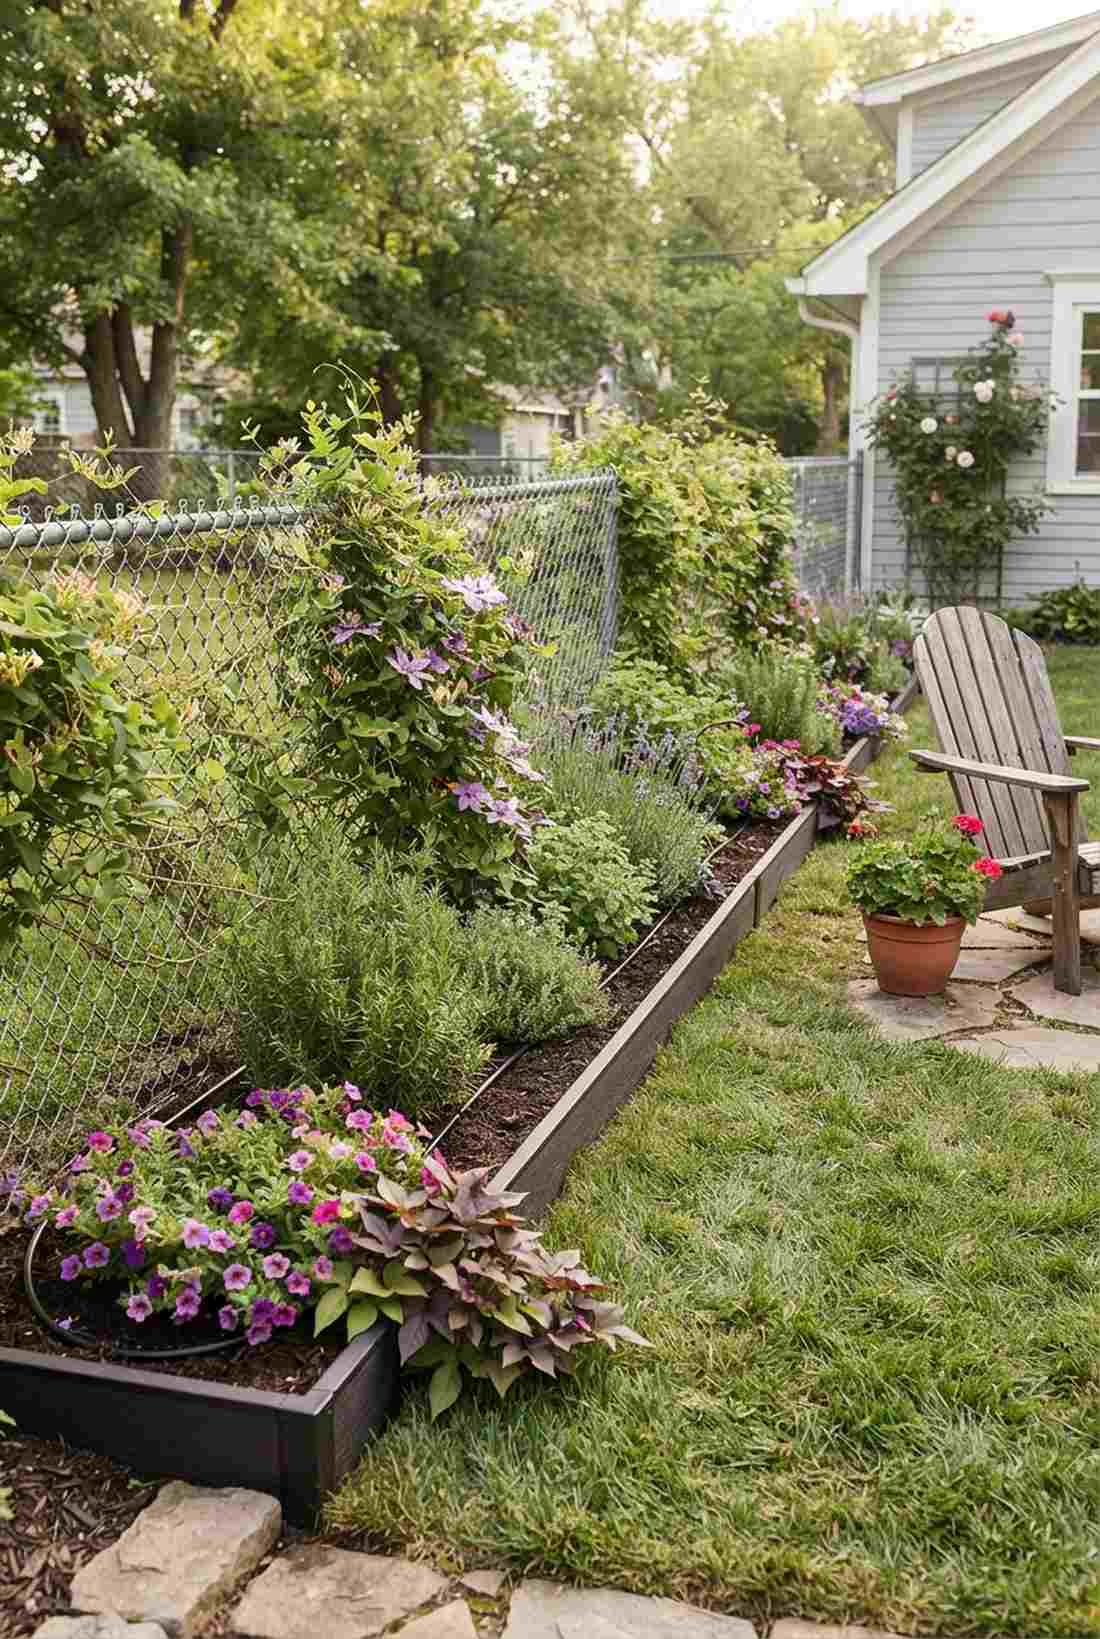
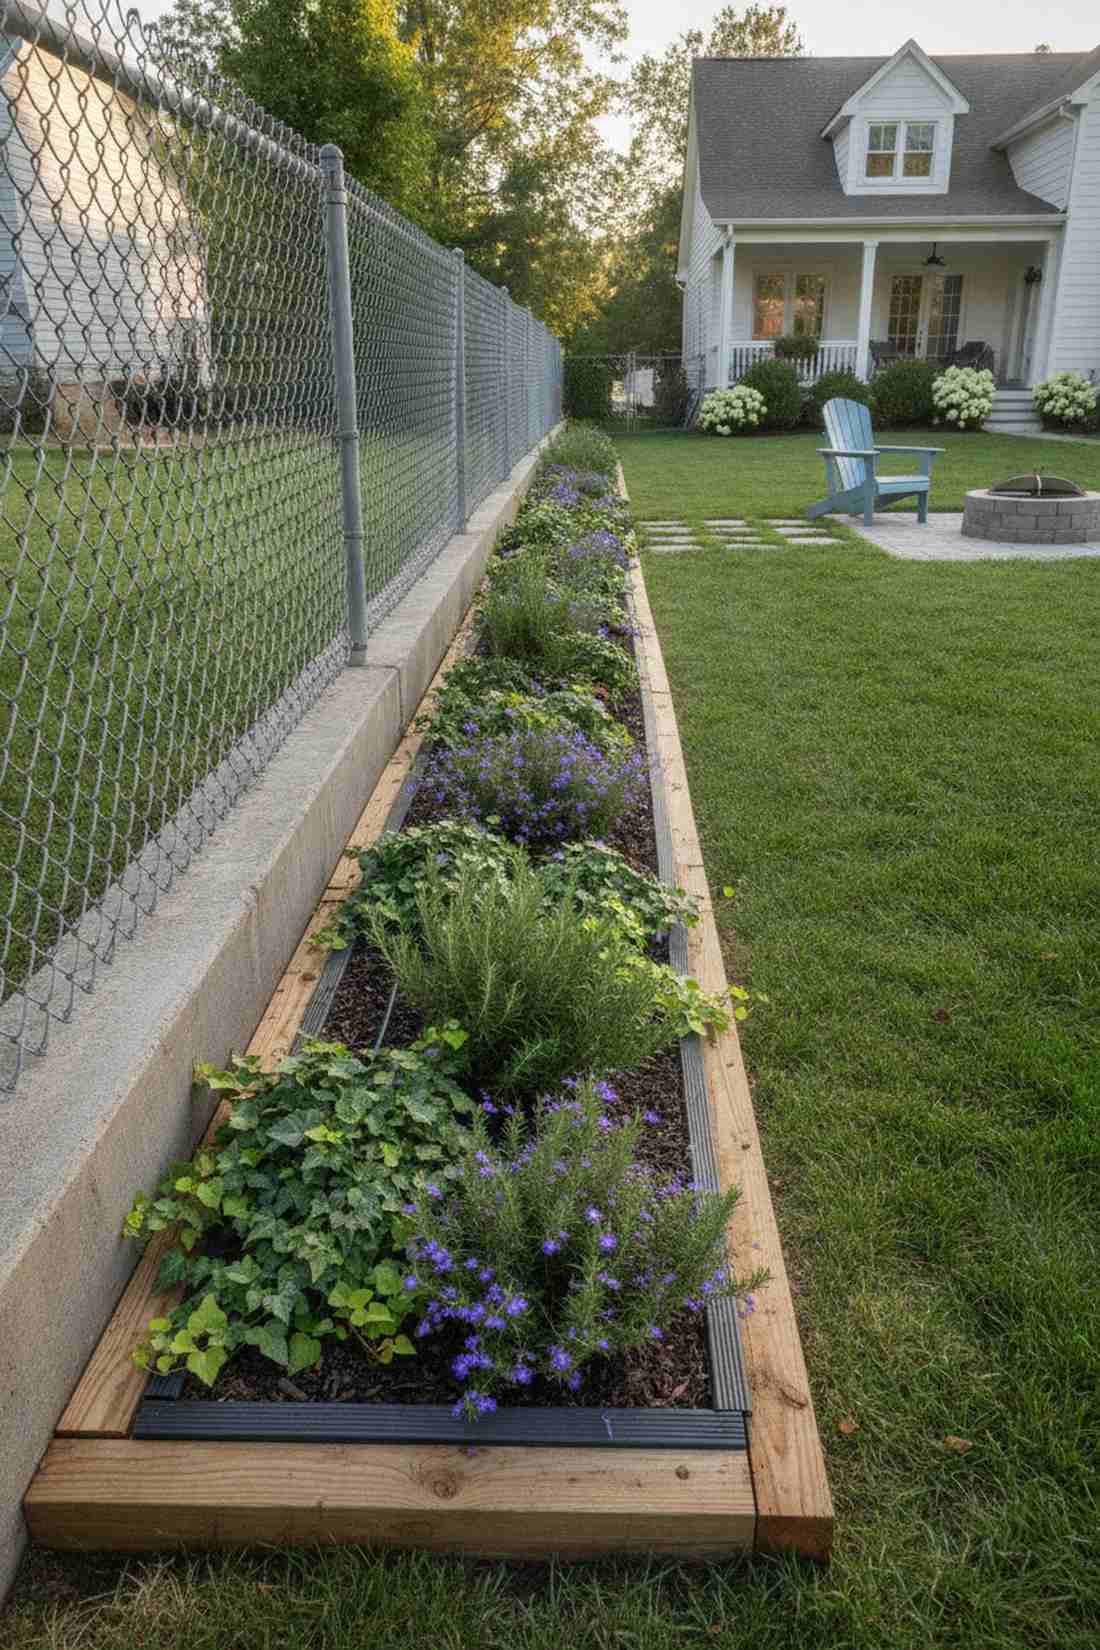
Straight out of an English cottage estate. This slim perimeter planter is perfect for hugging ugly chain-link fences or blank concrete walls.
Leaving borders empty is a wasted opportunity, and framing them out delivers a surprisingly premium look. You can sneak in gorgeous cascading vines or fresh herbs to transform a dead zone into a high-yield feature.
It’s a fast upgrade that completely changes the yard’s vibe for just $20–$40.
- Key Materials: Landscape timber, composite edging
- Vibe / Style: Lush property line border
- Difficulty: Very low
- Budget Breakdown: Edging: $25 | Fill: $15
- Creator’s Tip: Install a stealthy micro-drip line along the back edge so you never have to drag a hose.
- Smart Sourcing: Use heavy-duty composite edging (bulk pack) and a pre-assembled micro-drip irrigation kit.
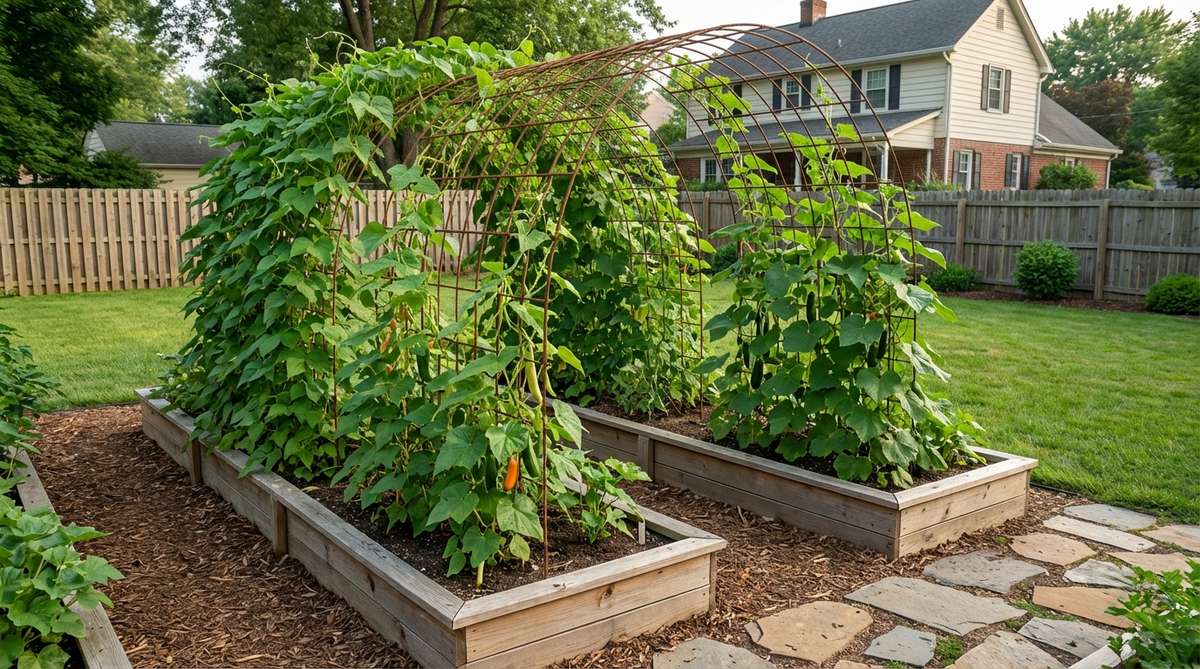
3. Double-Wide Raised Rectangle
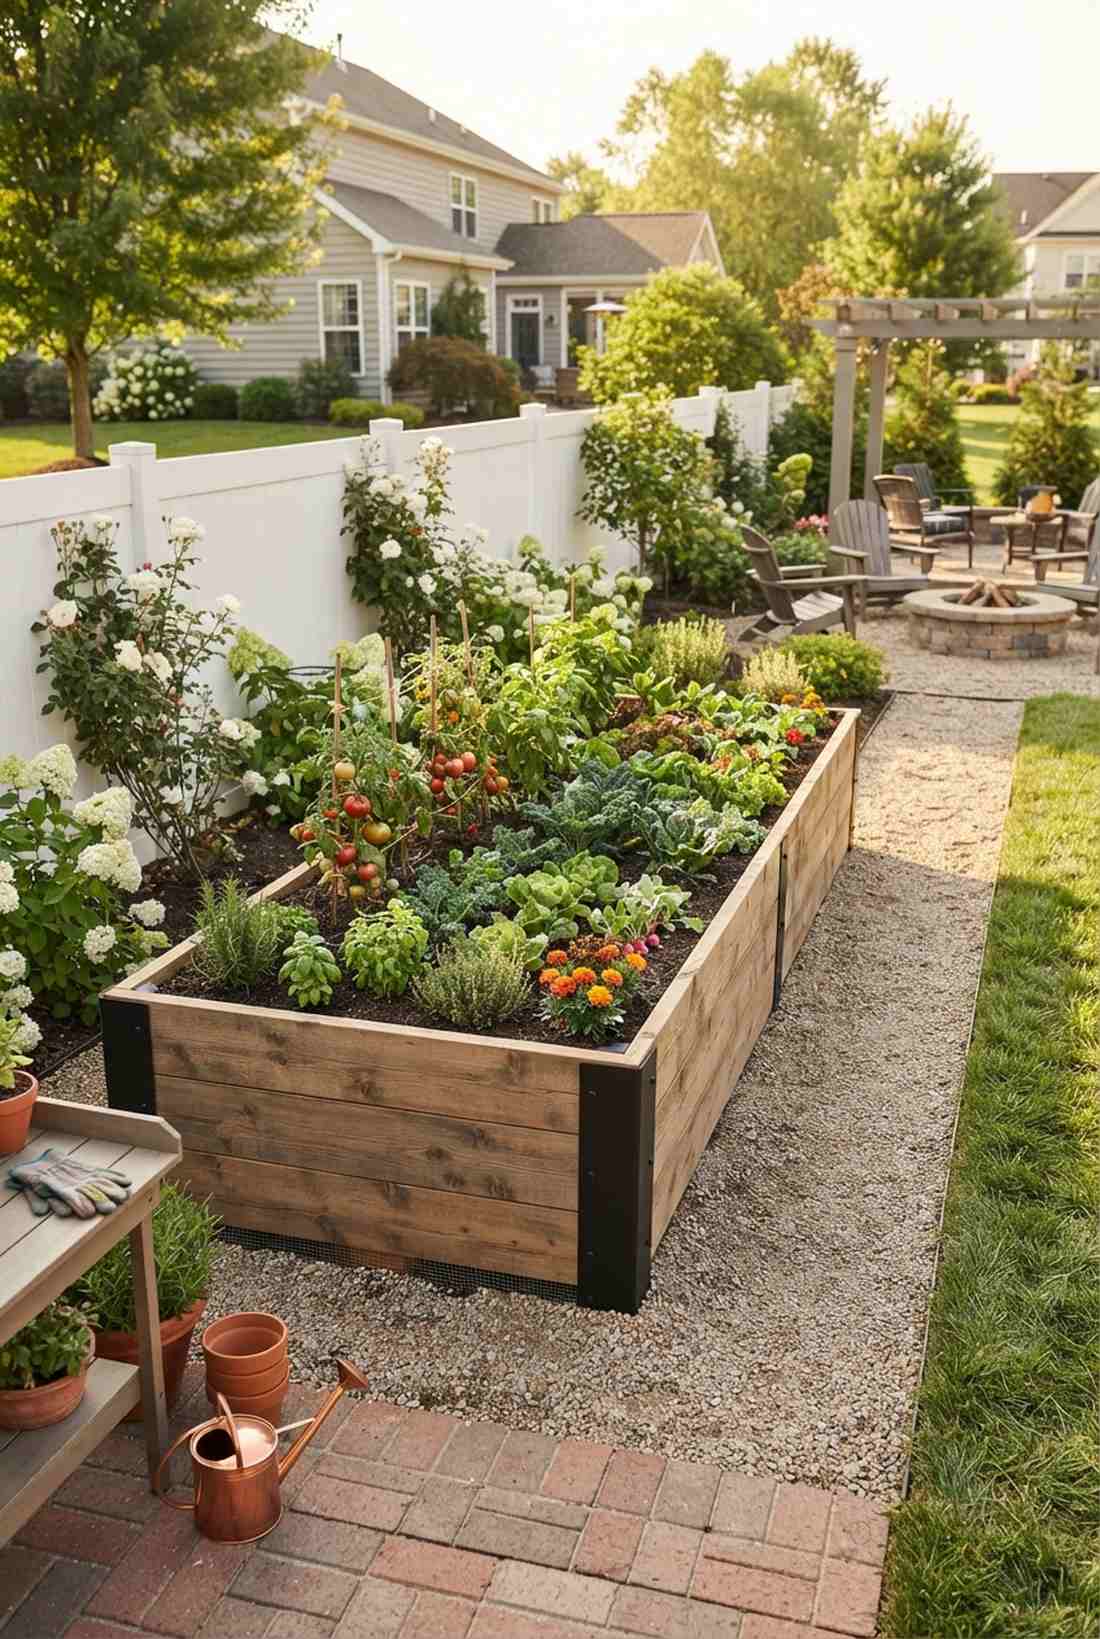

Feels like a professional market garden scaled down for your home. This extended rectangular planter works flawlessly along a sun-drenched side yard.
People often build beds too wide, but this strict 4×8 footprint looks far more expensive than it is while preventing soil compaction. Adding sleek corner brackets elevates the entire aesthetic from a basic DIY to a premium installation.
You can construct this heavy-duty workhorse for about $60–$90 depending on wood prices. Save this to your backyard layout board!
- Key Materials: 2×10 lumber boards, heavy-duty brackets
- Vibe / Style: Professional chef’s garden
- Difficulty: Moderate weekend build
- Budget Breakdown: Wood: $50 | Hardware: $20
- Creator’s Tip: Staple galvanized hardware cloth to the bottom before adding soil to keep moles out forever.
- Smart Sourcing: Invest in powder-coated structural corner brackets (4-pack) and heavy-duty galvanized hardware cloth.
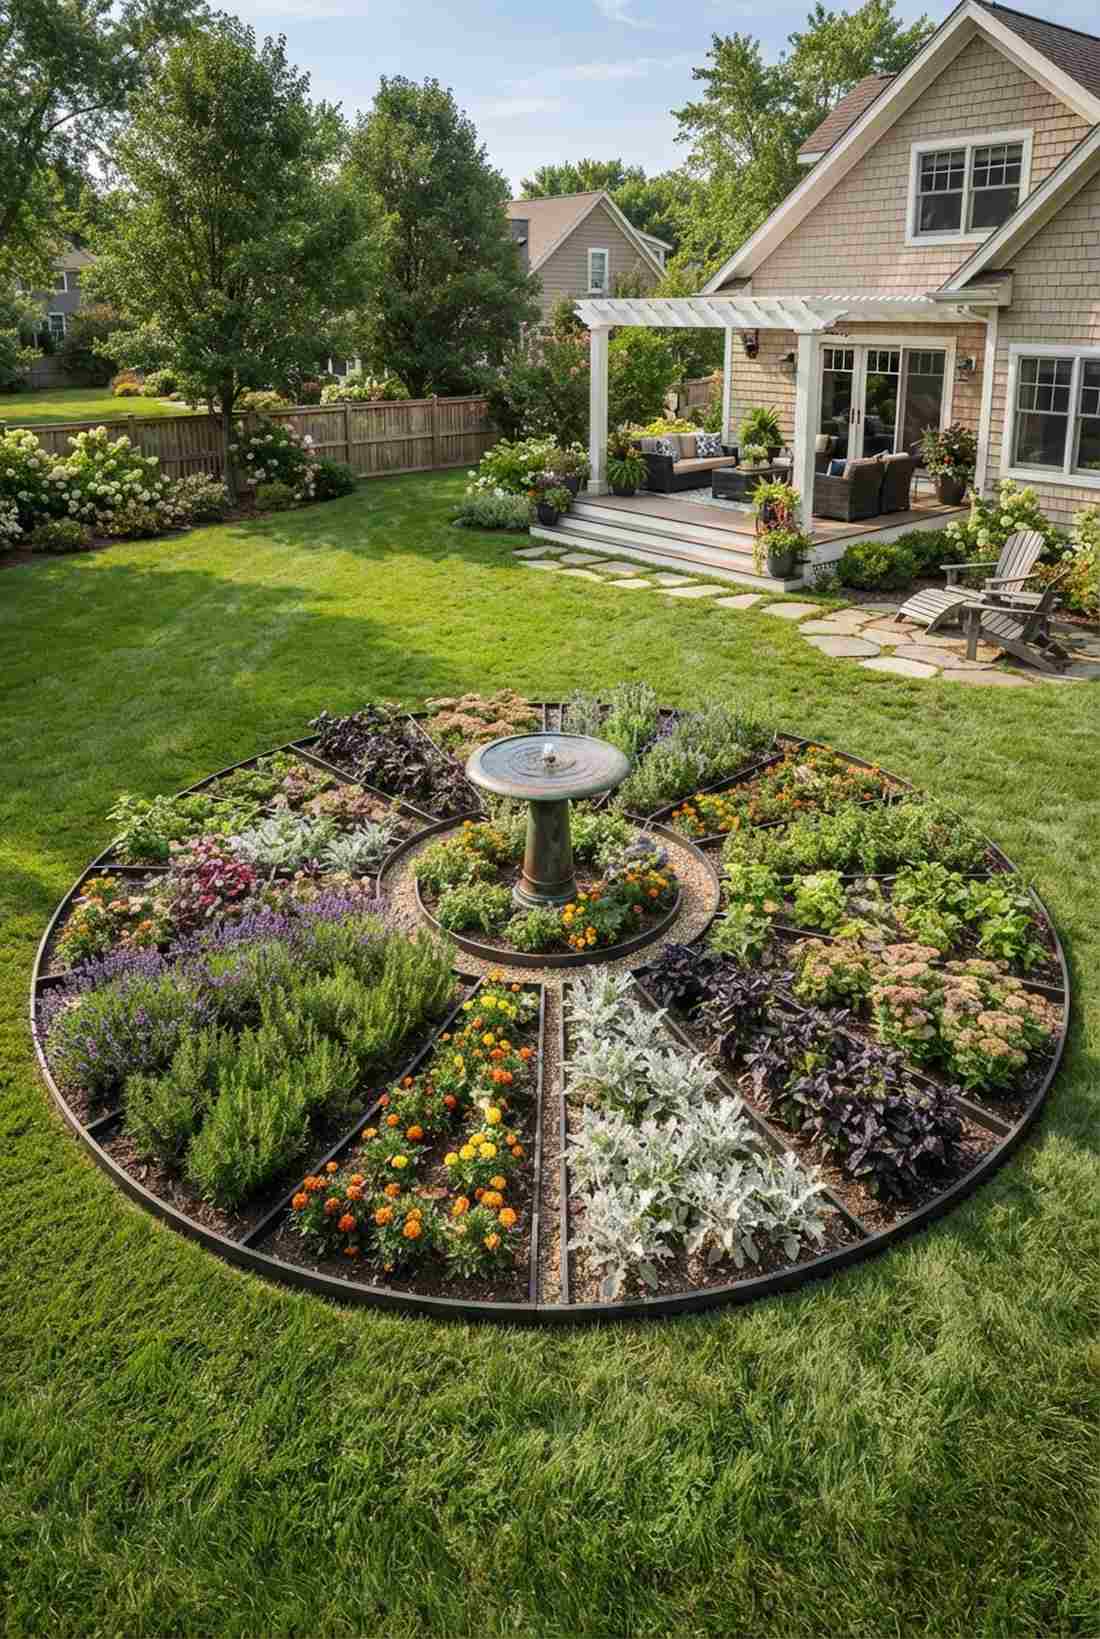
4. Circular Central Planter
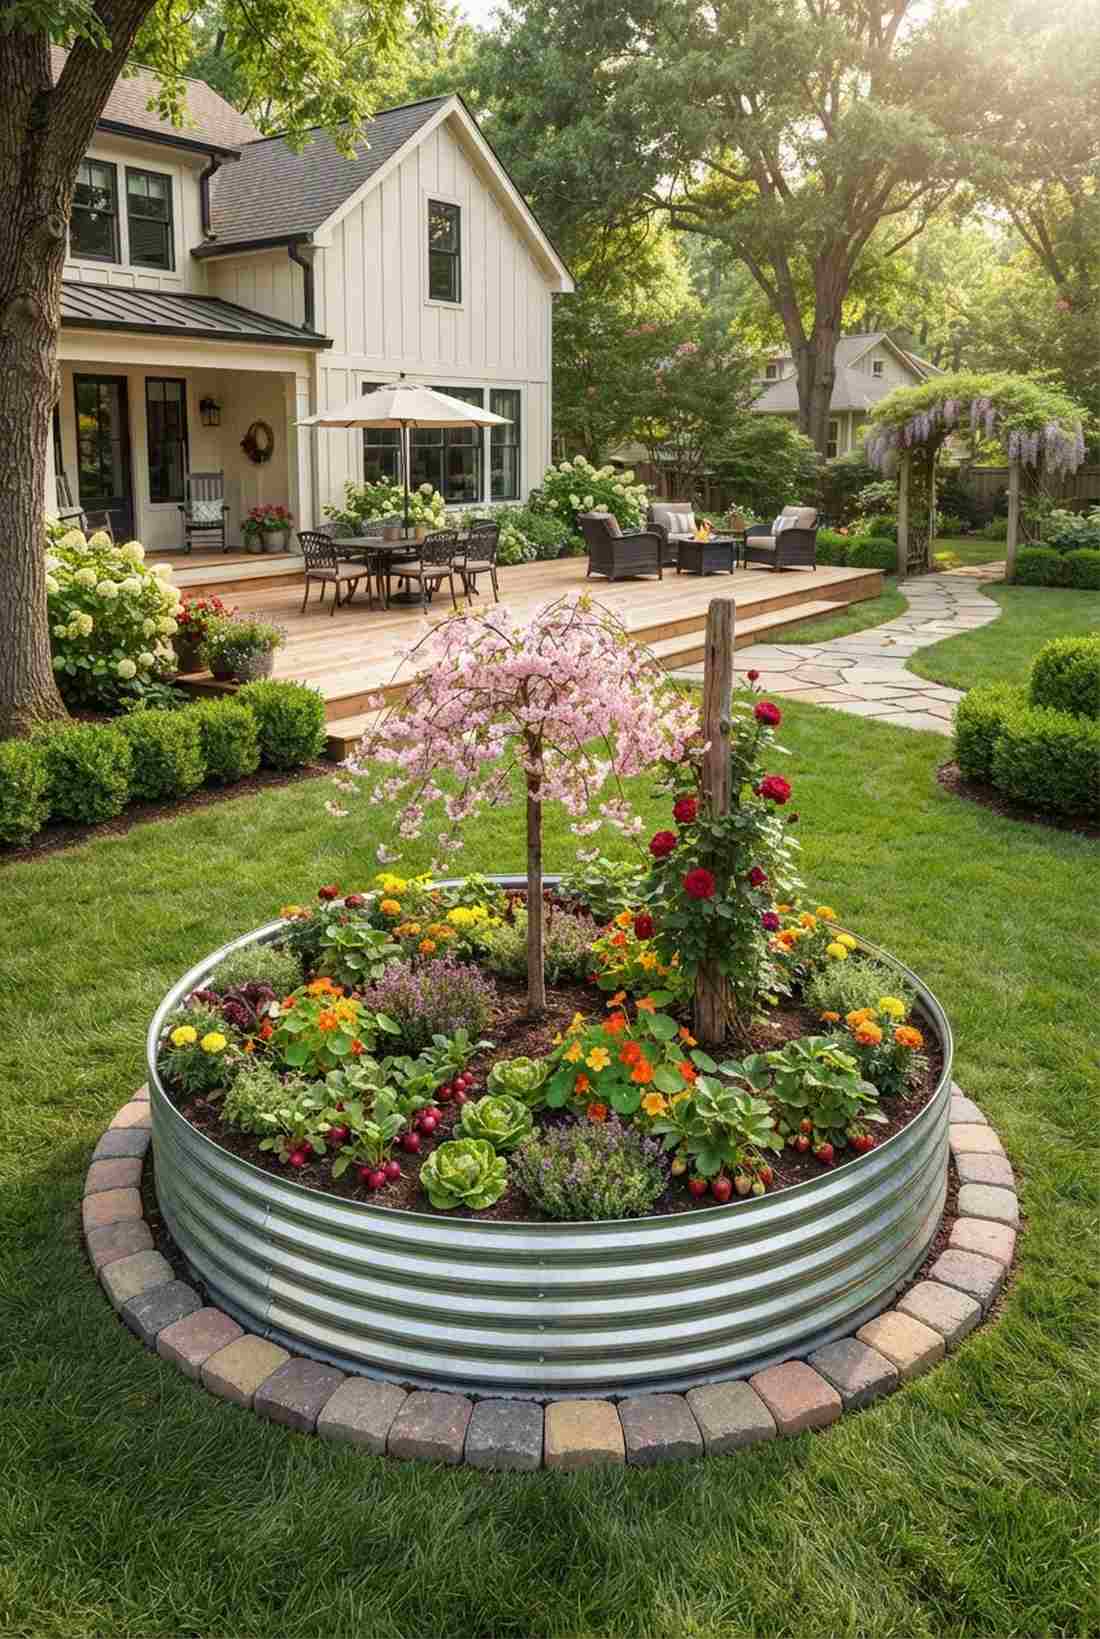
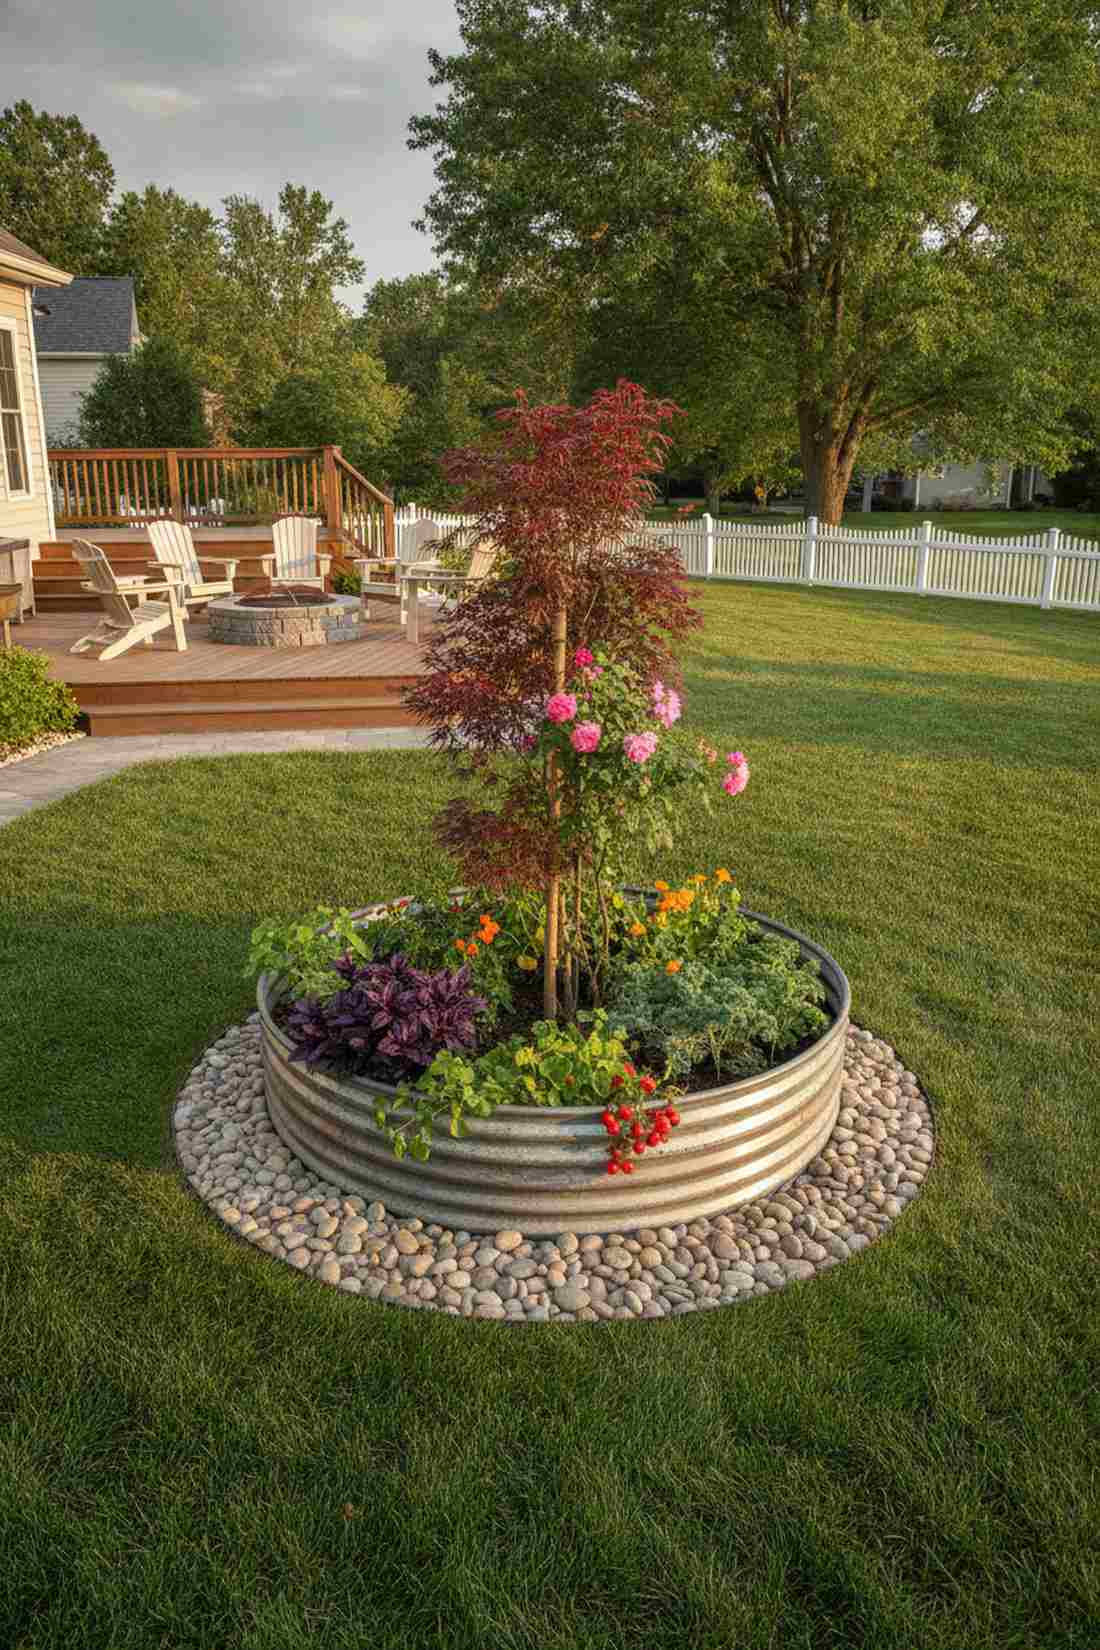
Creates a dramatic focal point that feels deeply romantic. This round island garden bed is the ultimate centerpiece for a flat, boring lawn.
Square boxes are predictable, but curved edges instantly make any landscape look professionally designed. By centering a dwarf tree and ringing it with colorful edibles, you maximize square footage without any dead corners.
This stunning focal piece generally costs $45–$70 to set up.
- Key Materials: Corrugated metal rings, stone pavers
- Vibe / Style: Classic botanical garden
- Difficulty: Easy to assemble
- Budget Breakdown: Metal Ring: $40 | Stones: $20
- Creator’s Tip: Use a central support stake to train a climbing rose or tomato for instant vertical height.
- Smart Sourcing: Buy pre-rolled corrugated galvanized steel rings and UV-coated decorative landscape stones.
Most people get this completely wrong… until they try the exact layout coming up next. It instantly doubles your growing space without touching the lawn!
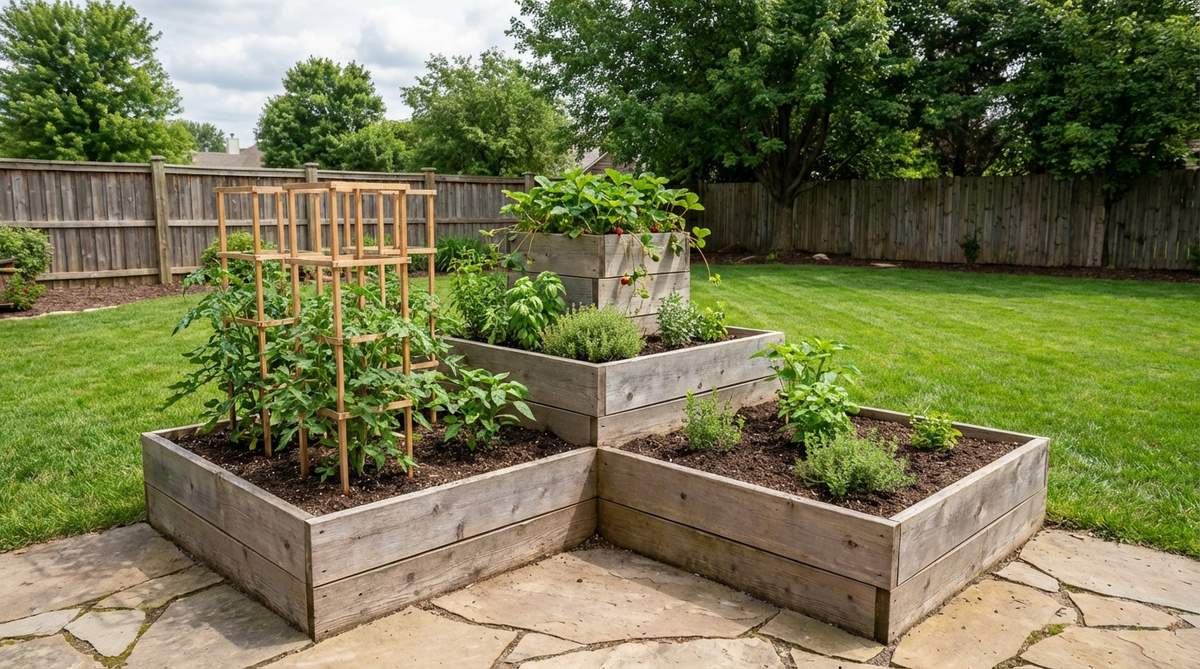
5. L-Shaped Corner Maximizer
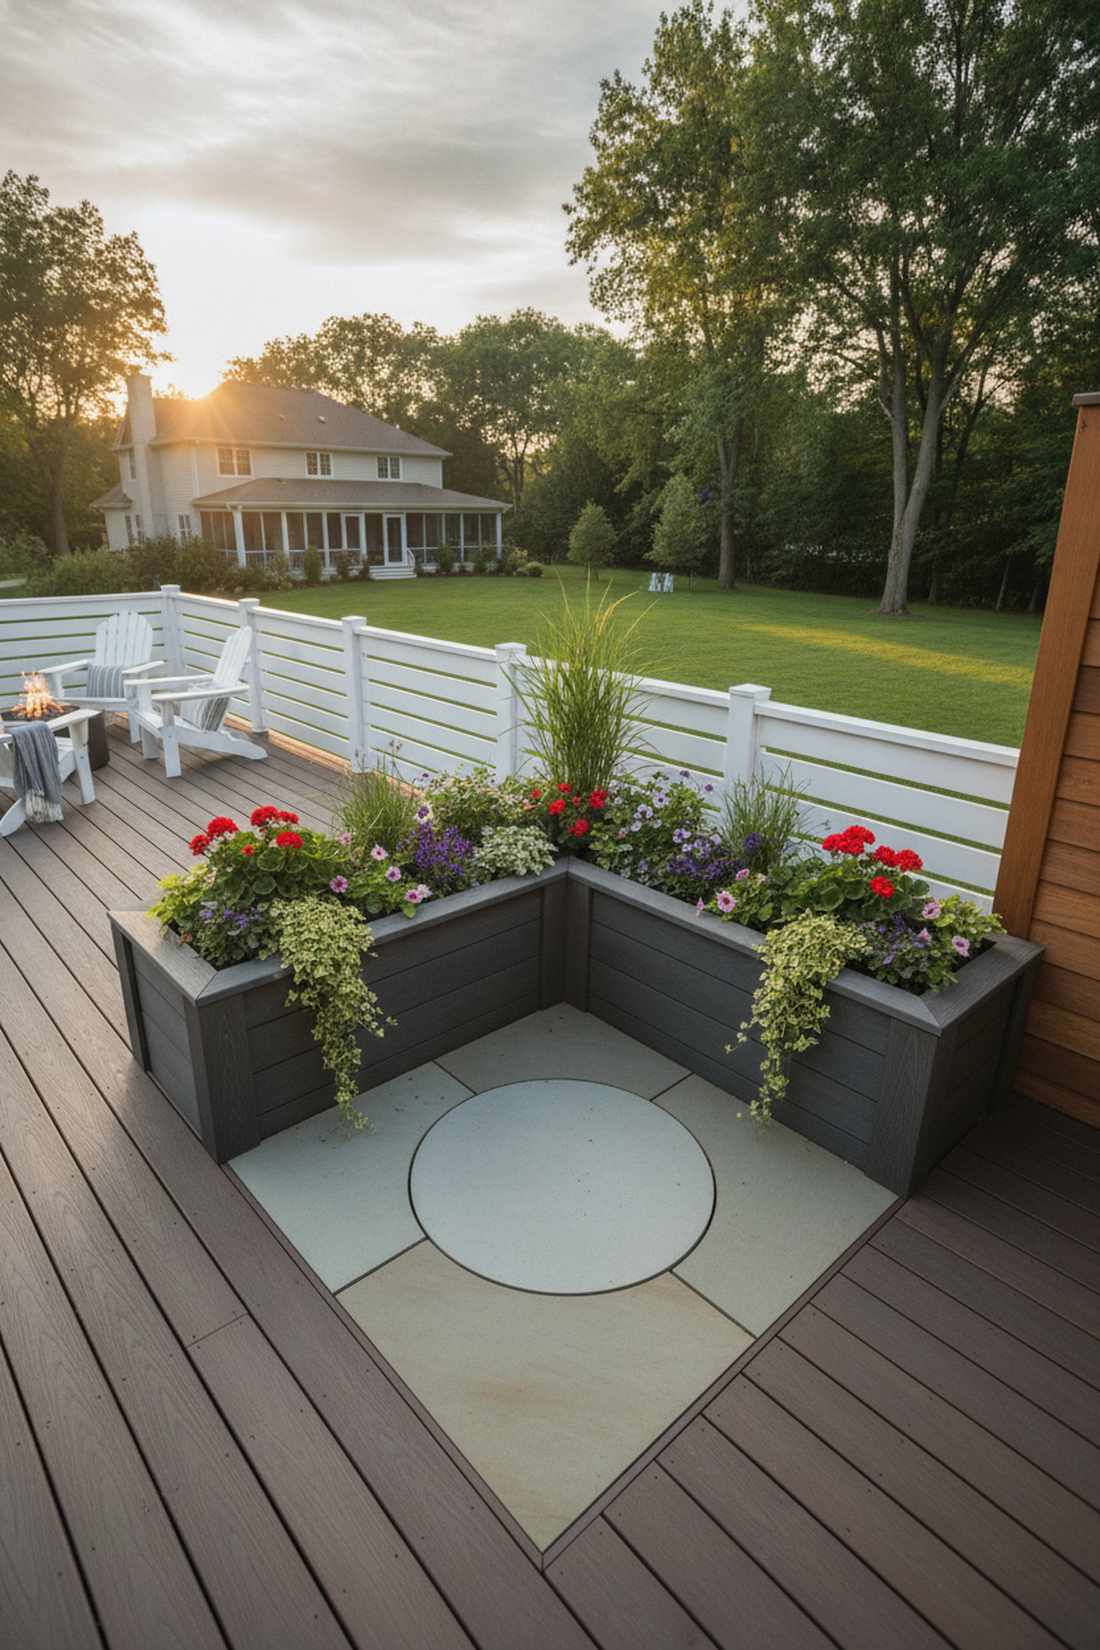
Feels like a cozy secret courtyard. This angled corner planter box is the perfect solution for awkward patio edges or fence lines.
Corners usually collect debris, but wrapping a bed around the angle provides a massive structural upgrade. This setup acts like a natural windbreak and traps heat, accelerating plant growth better than isolated boxes.
Expect to spend around $50–$80 for a solid corner wrap setup. Pin this to remember for your patio remodel!
- Key Materials: Interlocking composite boards, wall anchors
- Vibe / Style: Modern space-saving chic
- Difficulty: Moderate measuring required
- Budget Breakdown: Boards: $60 | Anchors: $10
- Creator’s Tip: Add a diagonal stepping stone right at the vertex so you never crush the soil reaching the back.
- Smart Sourcing: Opt for interlocking composite garden bed kits and pre-cut diagonal stepping stones.
6. Wading Pool Mini Bed
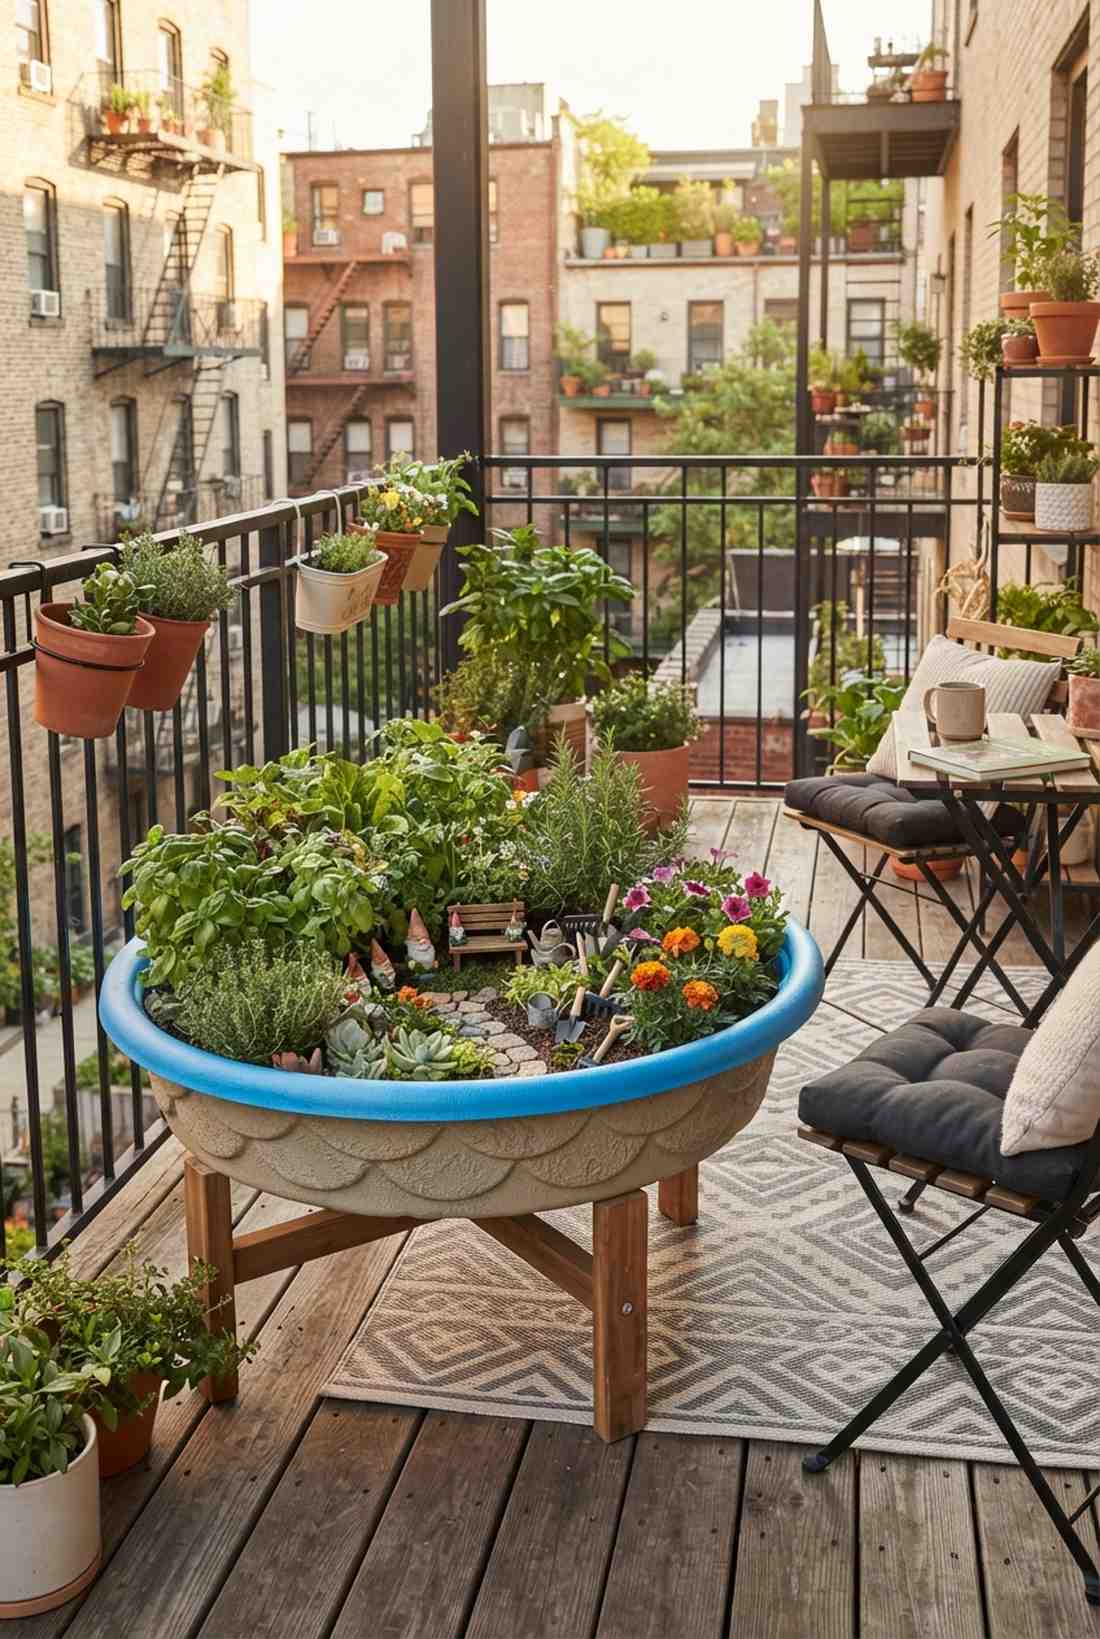
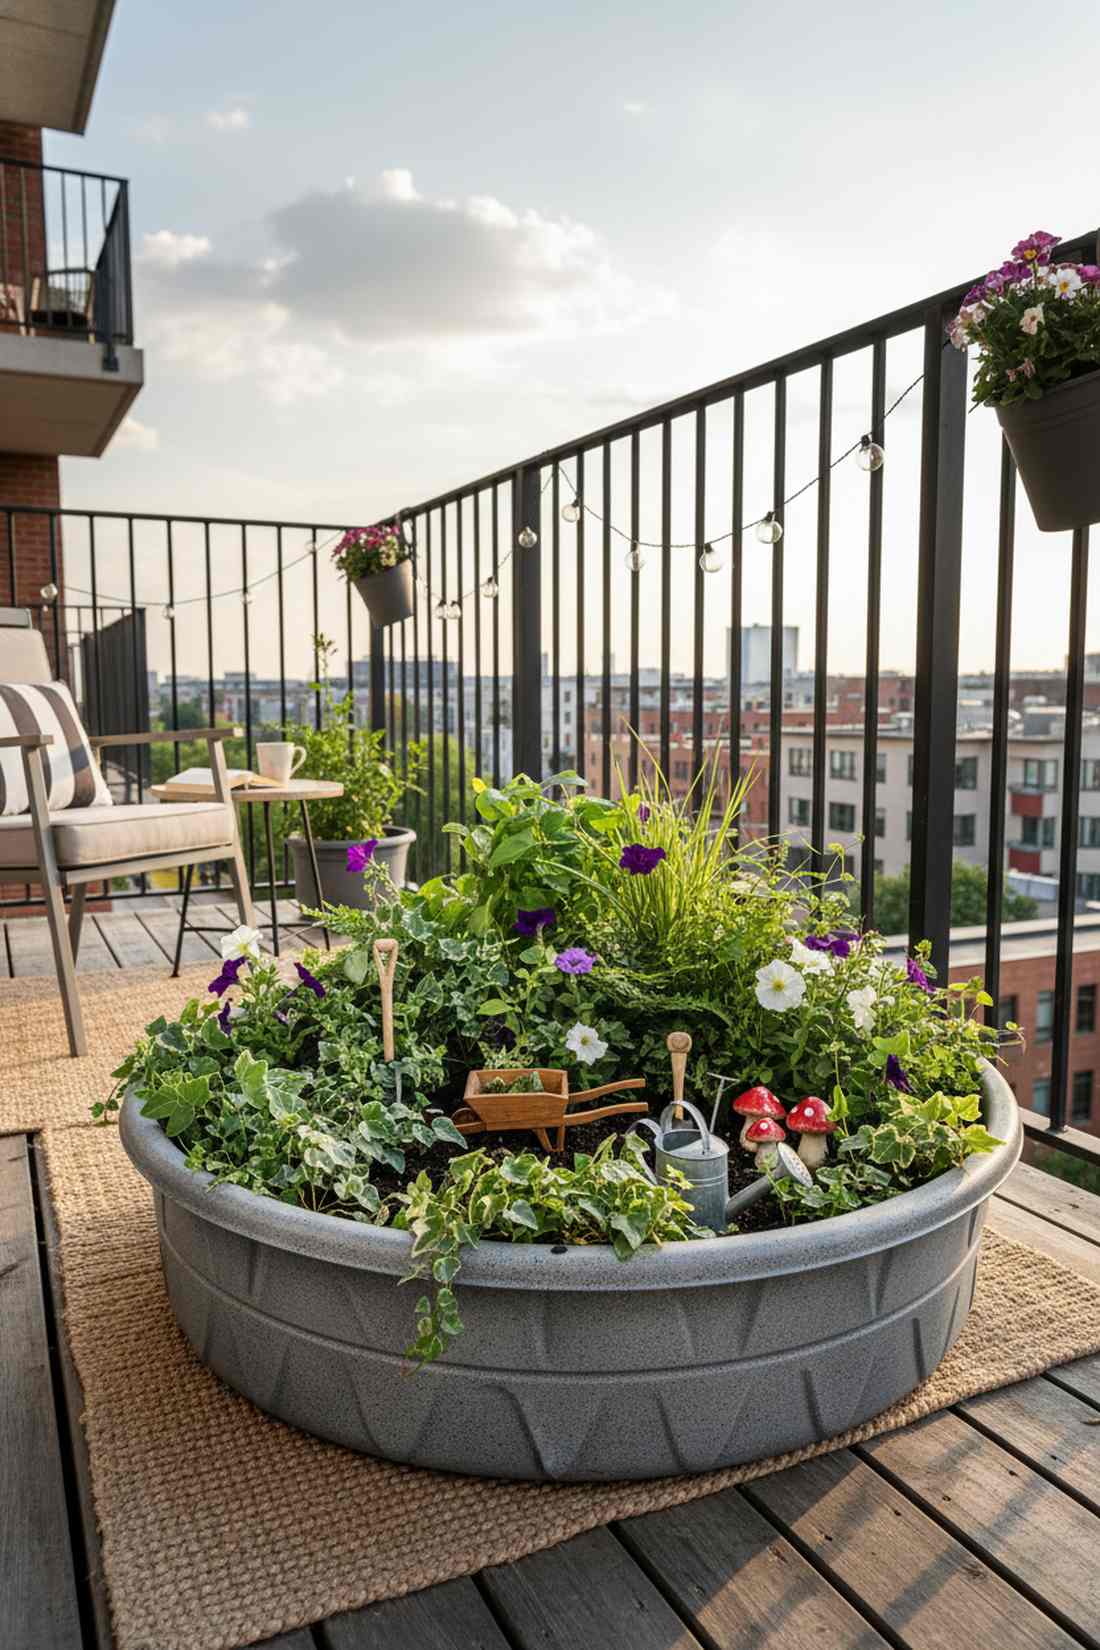
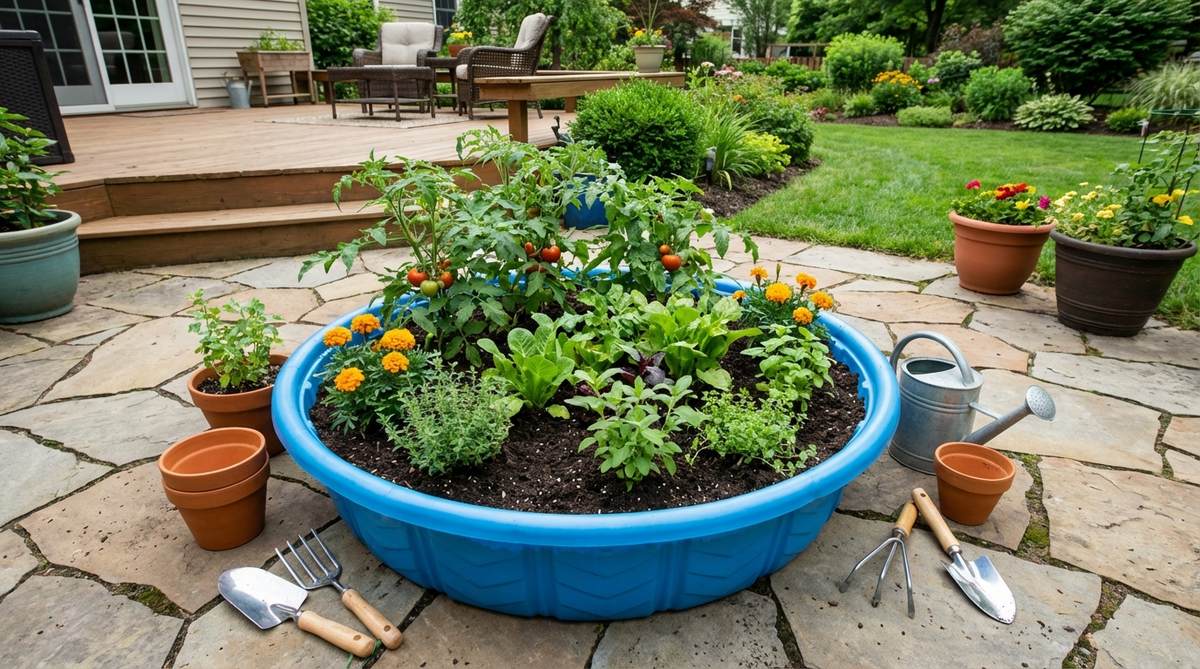
Feels like a playful, unexpected hack that actually works. This repurposed shallow planter works exceptionally well for apartment balconies or temporary renting setups.
Upcycling cheap plastics is a genius move that delivers a surprisingly premium look once painted. If you fill it with lush greens and hide miniature garden supplies between the leaves, no one will know it used to be a kids’ toy.
You can easily pull this off for just $15–$25. Highly recommended for a quick weekend win.
- Key Materials: Hard plastic shell, spray paint, drainage drill bit
- Vibe / Style: Quirky upcycled urban chic
- Difficulty: Absolute beginner
- Budget Breakdown: Pool: $10 | Paint/Soil: $15
- Creator’s Tip: Spray paint the outside with a matte stone-texture finish to completely disguise the plastic.
- Smart Sourcing: Use matte stone textured spray paint (UV-coated) and grab some premium miniature garden supplies (starter kits) to decorate.
Vertical & Tiered Configurations
These designs expand growing area upward, making them ideal for extremely limited footprints. Vertical structures and stacked levels multiply planting capacity without increasing ground-level square footage.
7. Three-Tier Cascade Bed
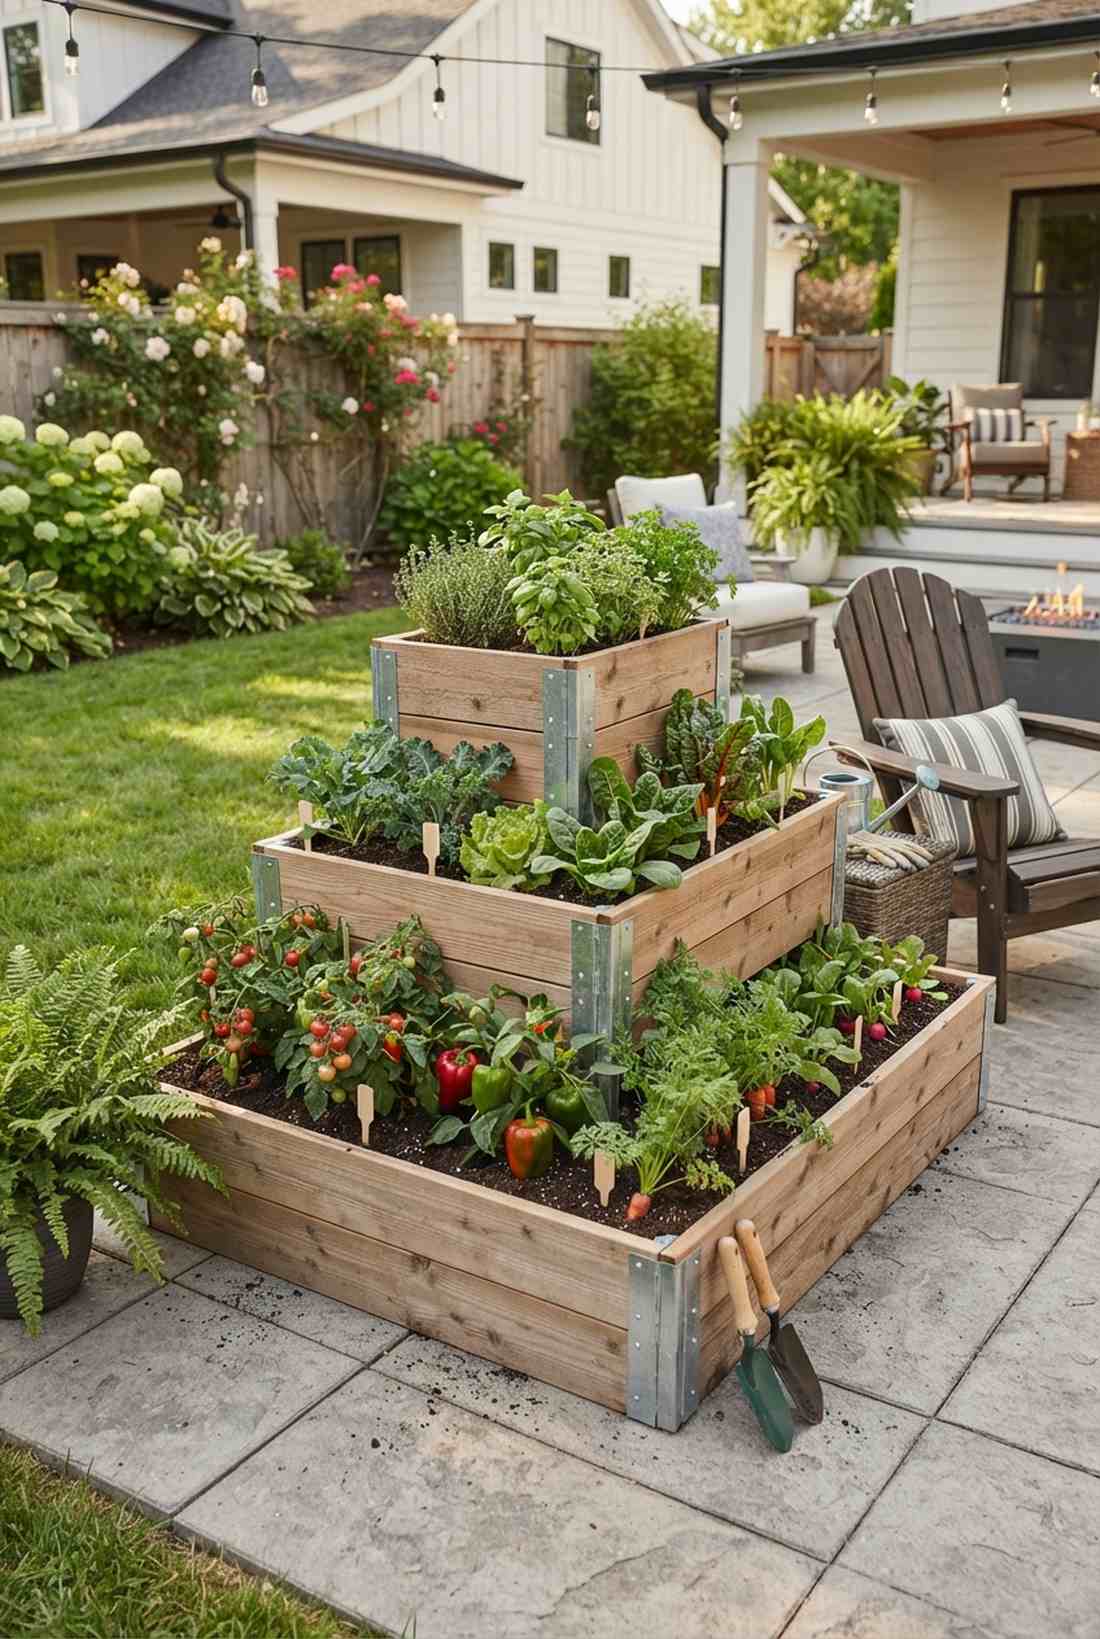
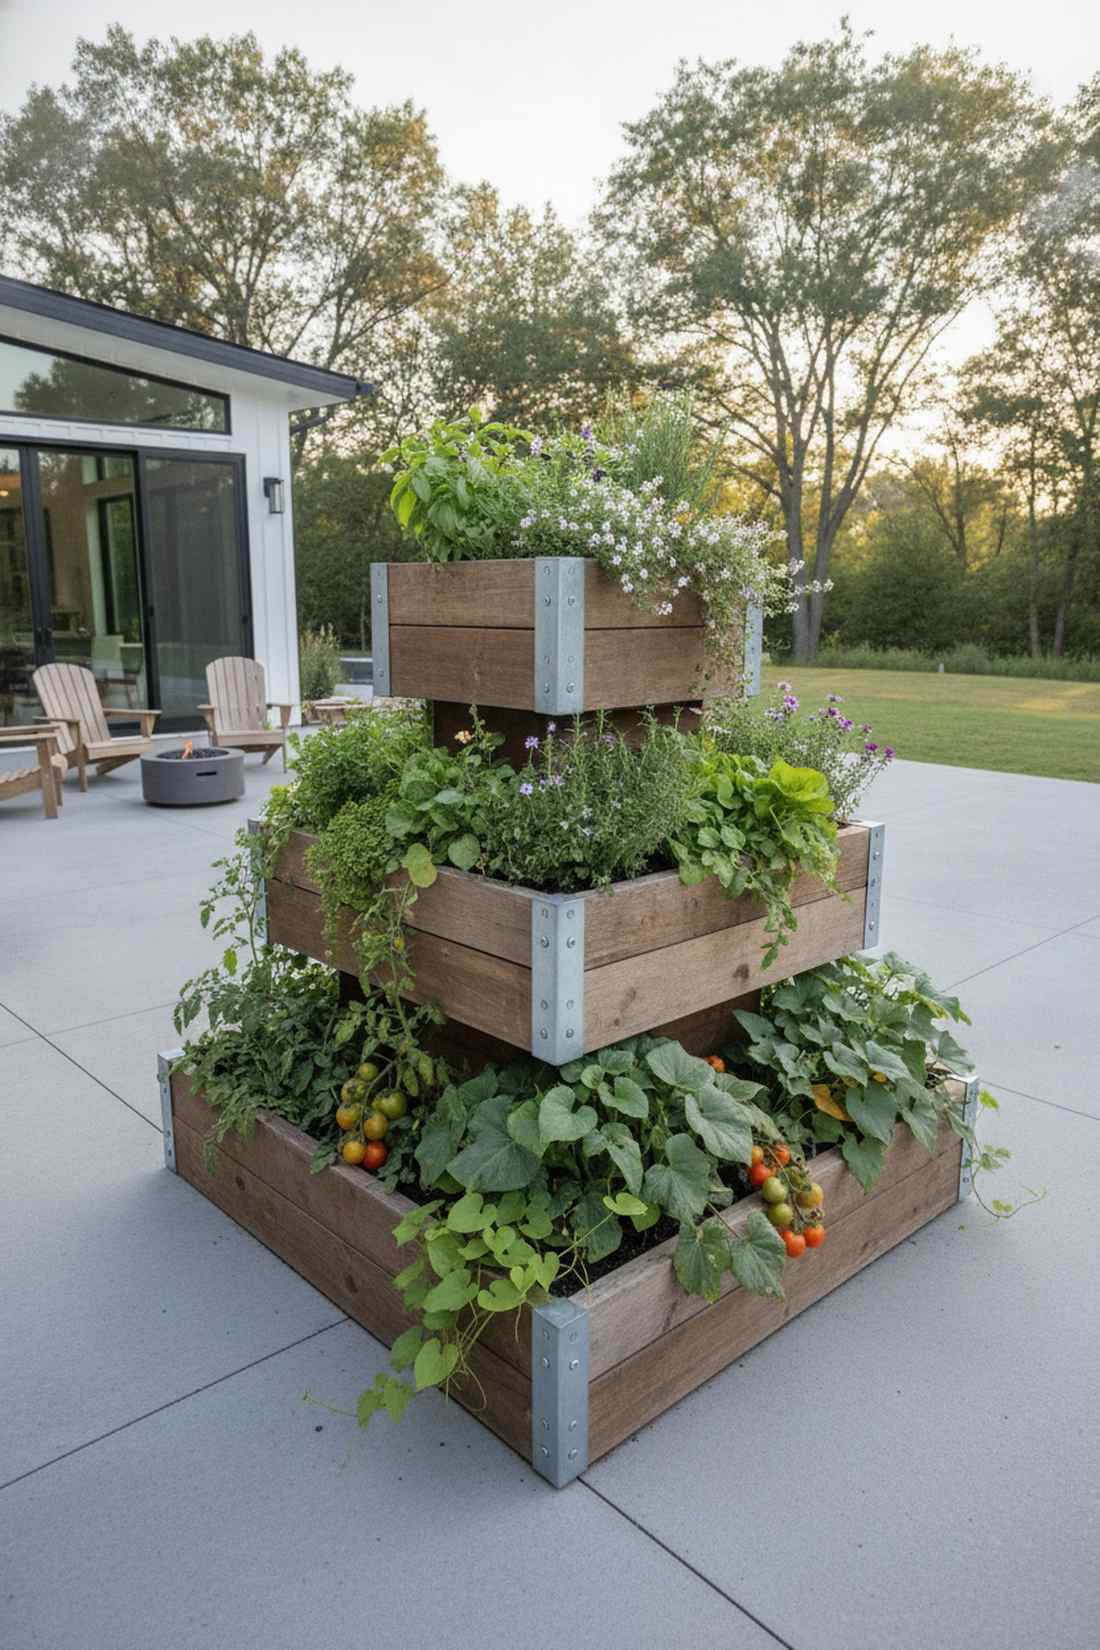
Looks like a lush, overflowing waterfall of greenery. This stepped pyramid planter is perfect for maximizing yields on a tight concrete deck.
Flat gardens waste airspace, but tiering your boxes gives a designer-level finish while doubling your harvest. Deep-rooted veggies thrive at the bottom, while the top shelf stays perfectly drained for delicate herbs.
Building a multi-level structure costs around $70–$100. Save this genius space-saving blueprint!
- Key Materials: Staggered wood planks, metal brackets
- Vibe / Style: Architectural cascading garden
- Difficulty: Intermediate carpentry
- Budget Breakdown: Lumber: $60 | Hardware: $25
- Creator’s Tip: Offset the tiers slightly backward so rain naturally cascades from the top level into the bottom beds.
- Smart Sourcing: Buy heavy-duty galvanized tiered brackets (bulk pack) and a premium lightweight potting mix.
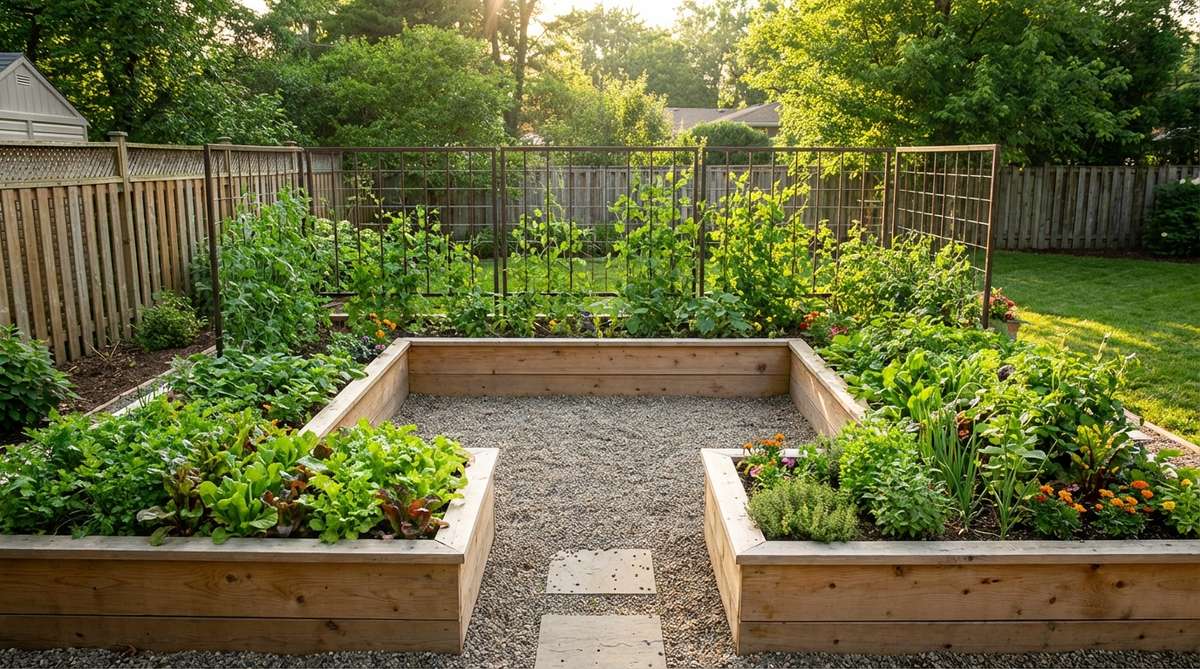
8. Trellis Arch Corridor
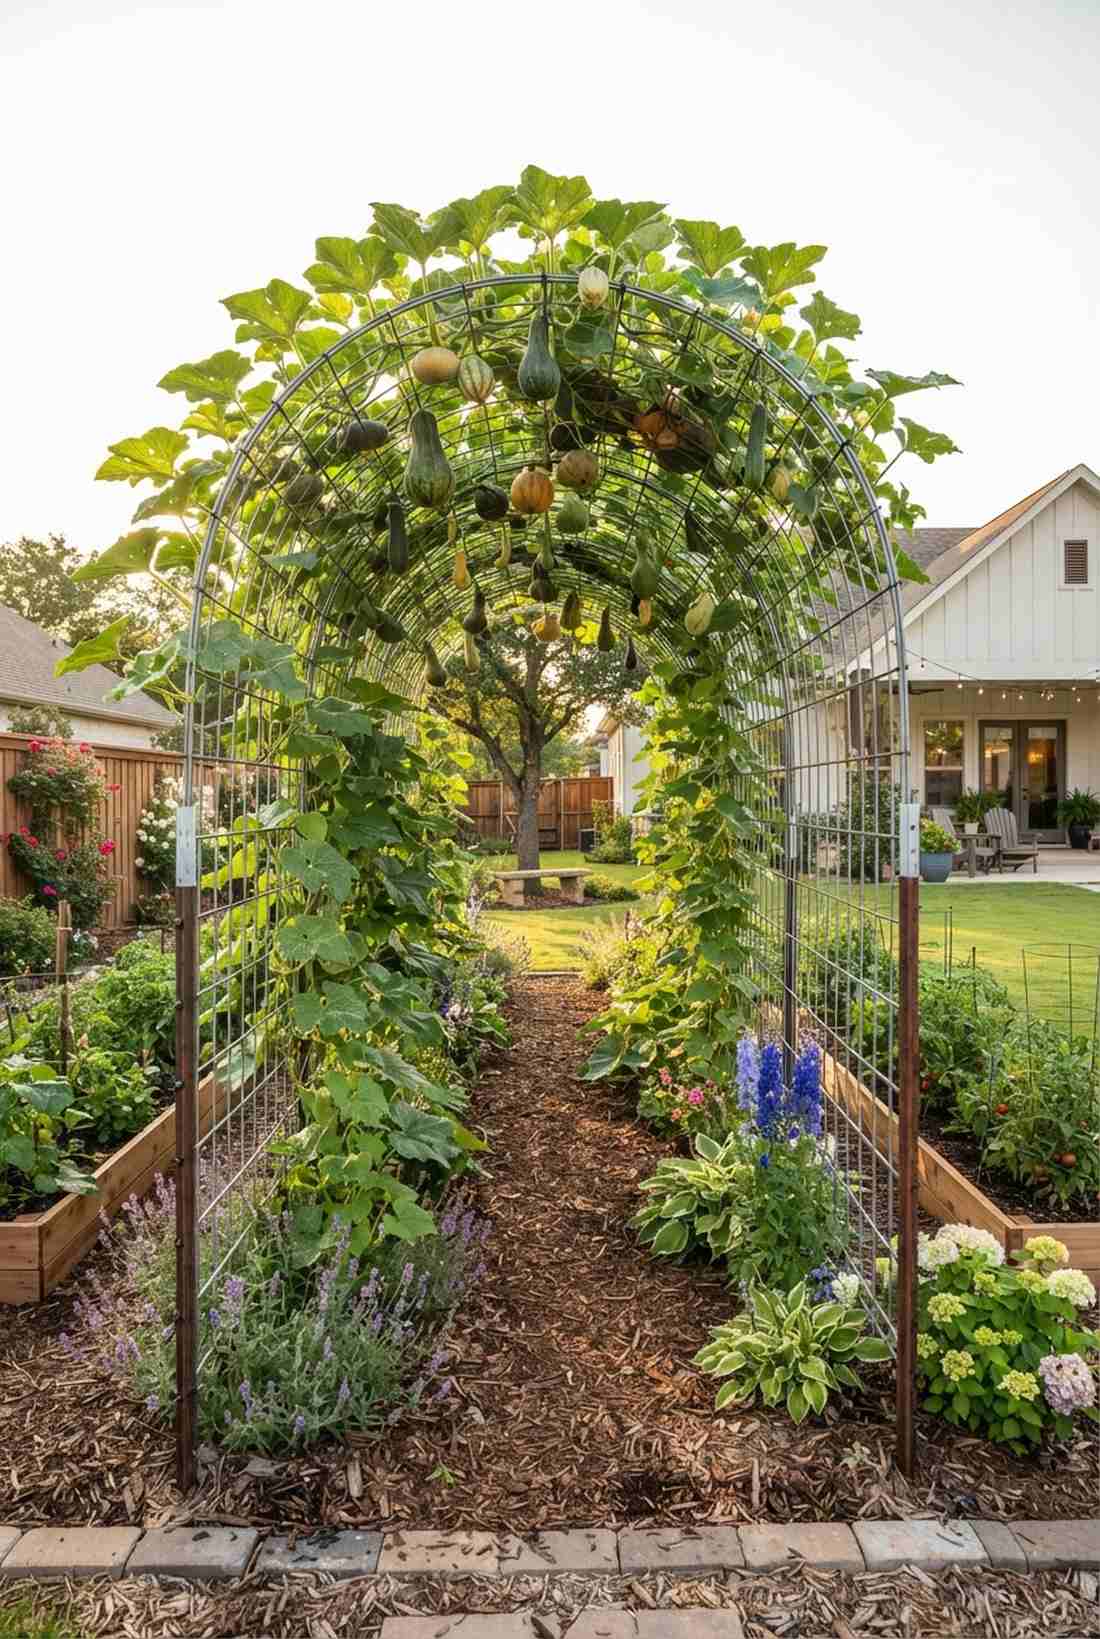
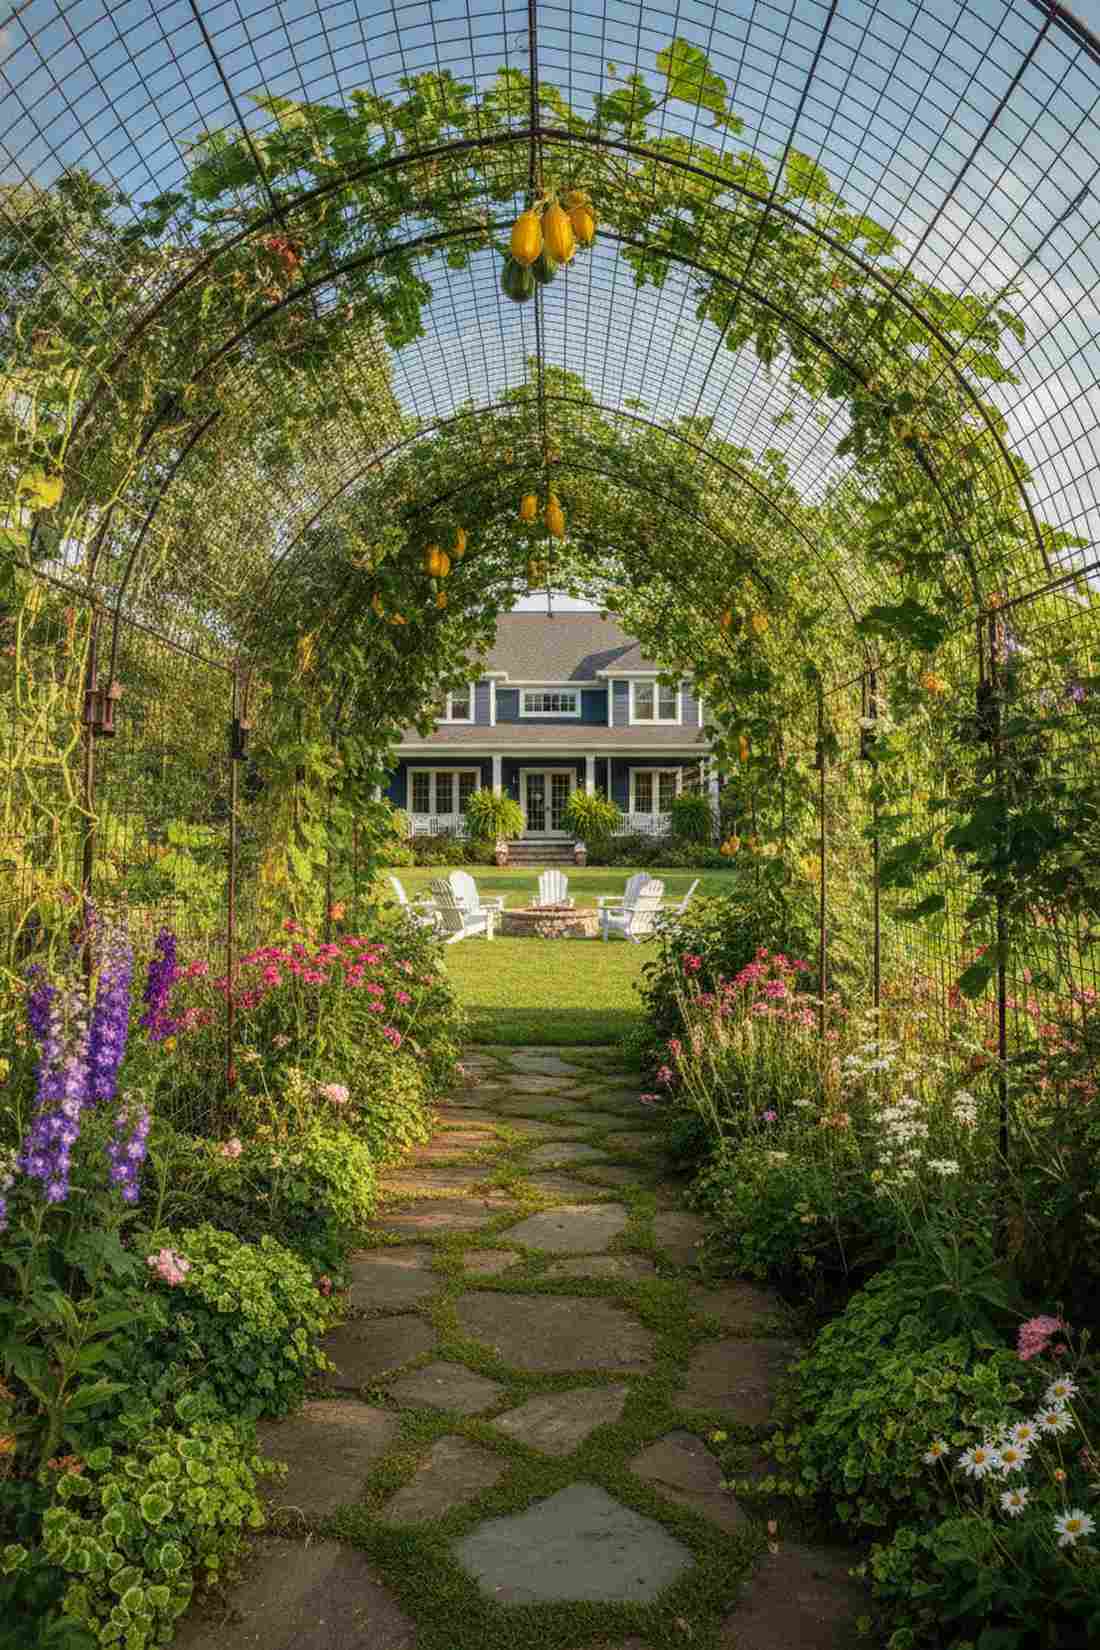
Feels like a hidden forest tunnel you accidentally discovered. This arched vine canopy is stunning as an entryway or pathway connector.
Most trellises are flat and boring, but bending them into an arch looks far more expensive than it is. Growing heavy crops like squash overhead keeps them perfectly clean and frees up all the ground space below.
You can set up this magical garden tunnel for about $40–$60.
- Key Materials: Cattle panels, T-posts, zip ties
- Vibe / Style: Enchanted garden pathway
- Difficulty: Easy with two people
- Budget Breakdown: Panels: $30 | Posts: $20
- Creator’s Tip: Use heavy-duty wire cattle panels; they bend perfectly into an arch and never snap under heavy fruit weight.
- Smart Sourcing: Grab galvanized steel cattle panels (pre-cut) and heavy-duty outdoor zip ties (bulk pack).
9. A-Frame Vertical Pocket Bed
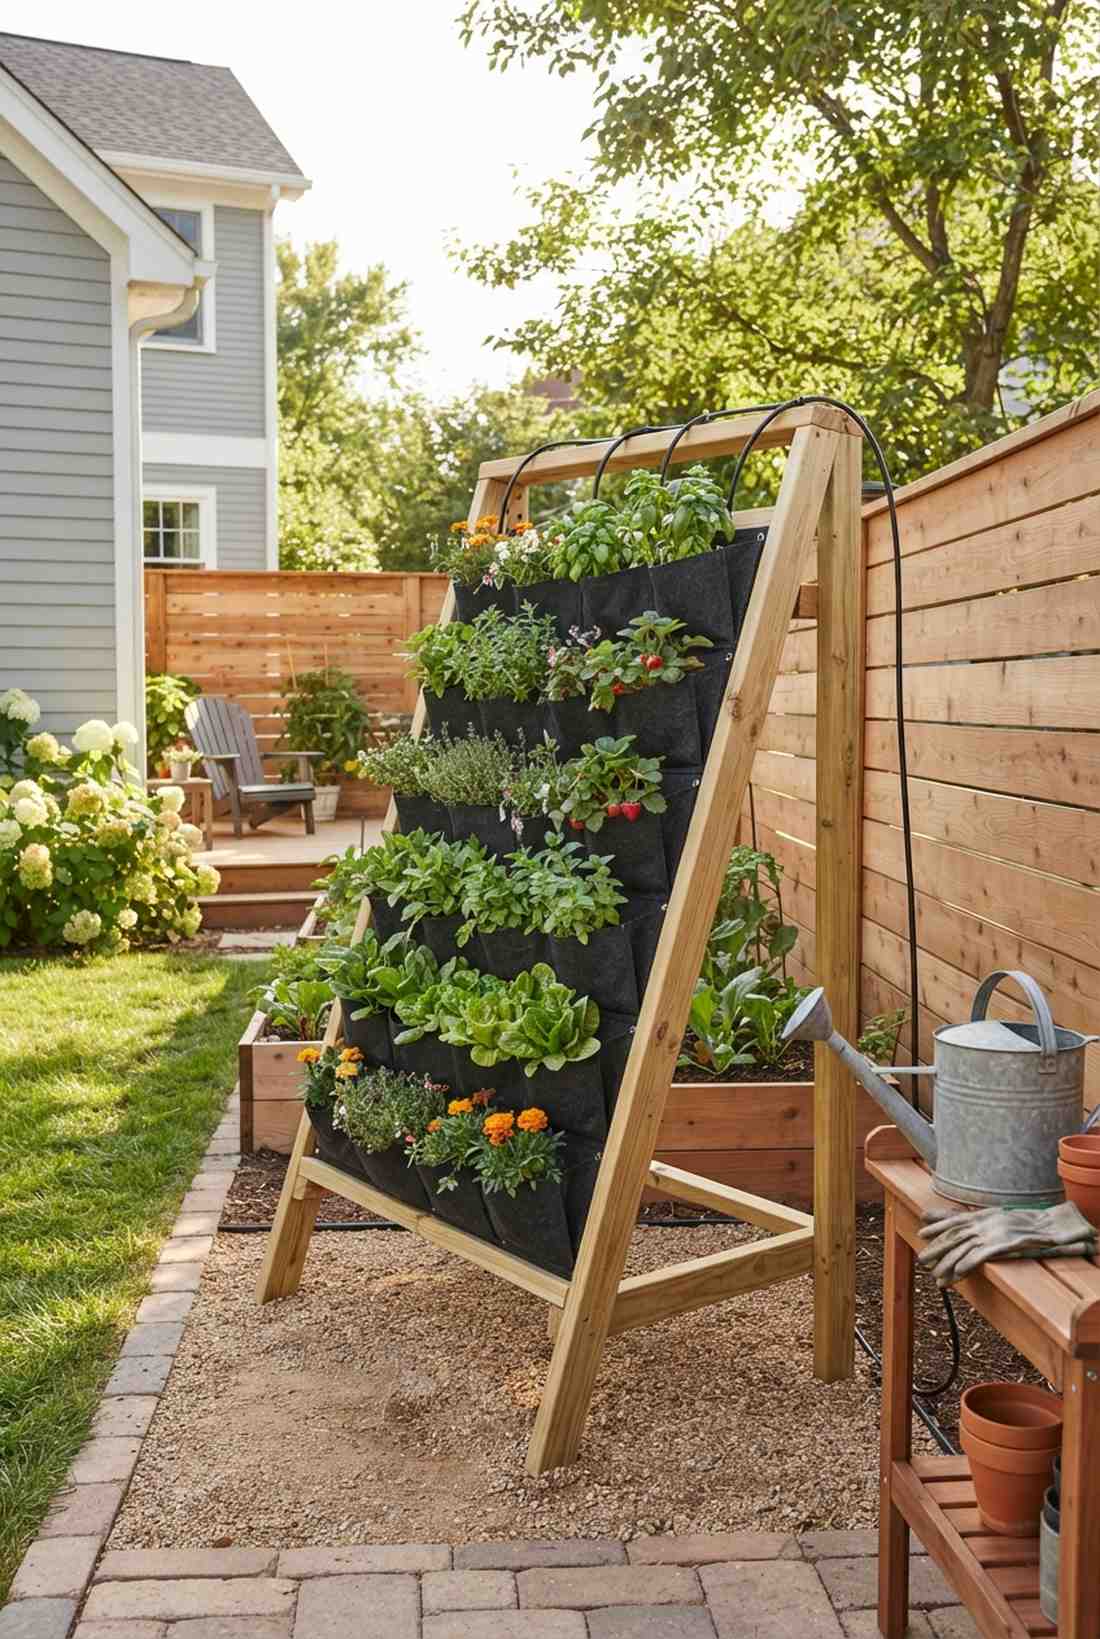
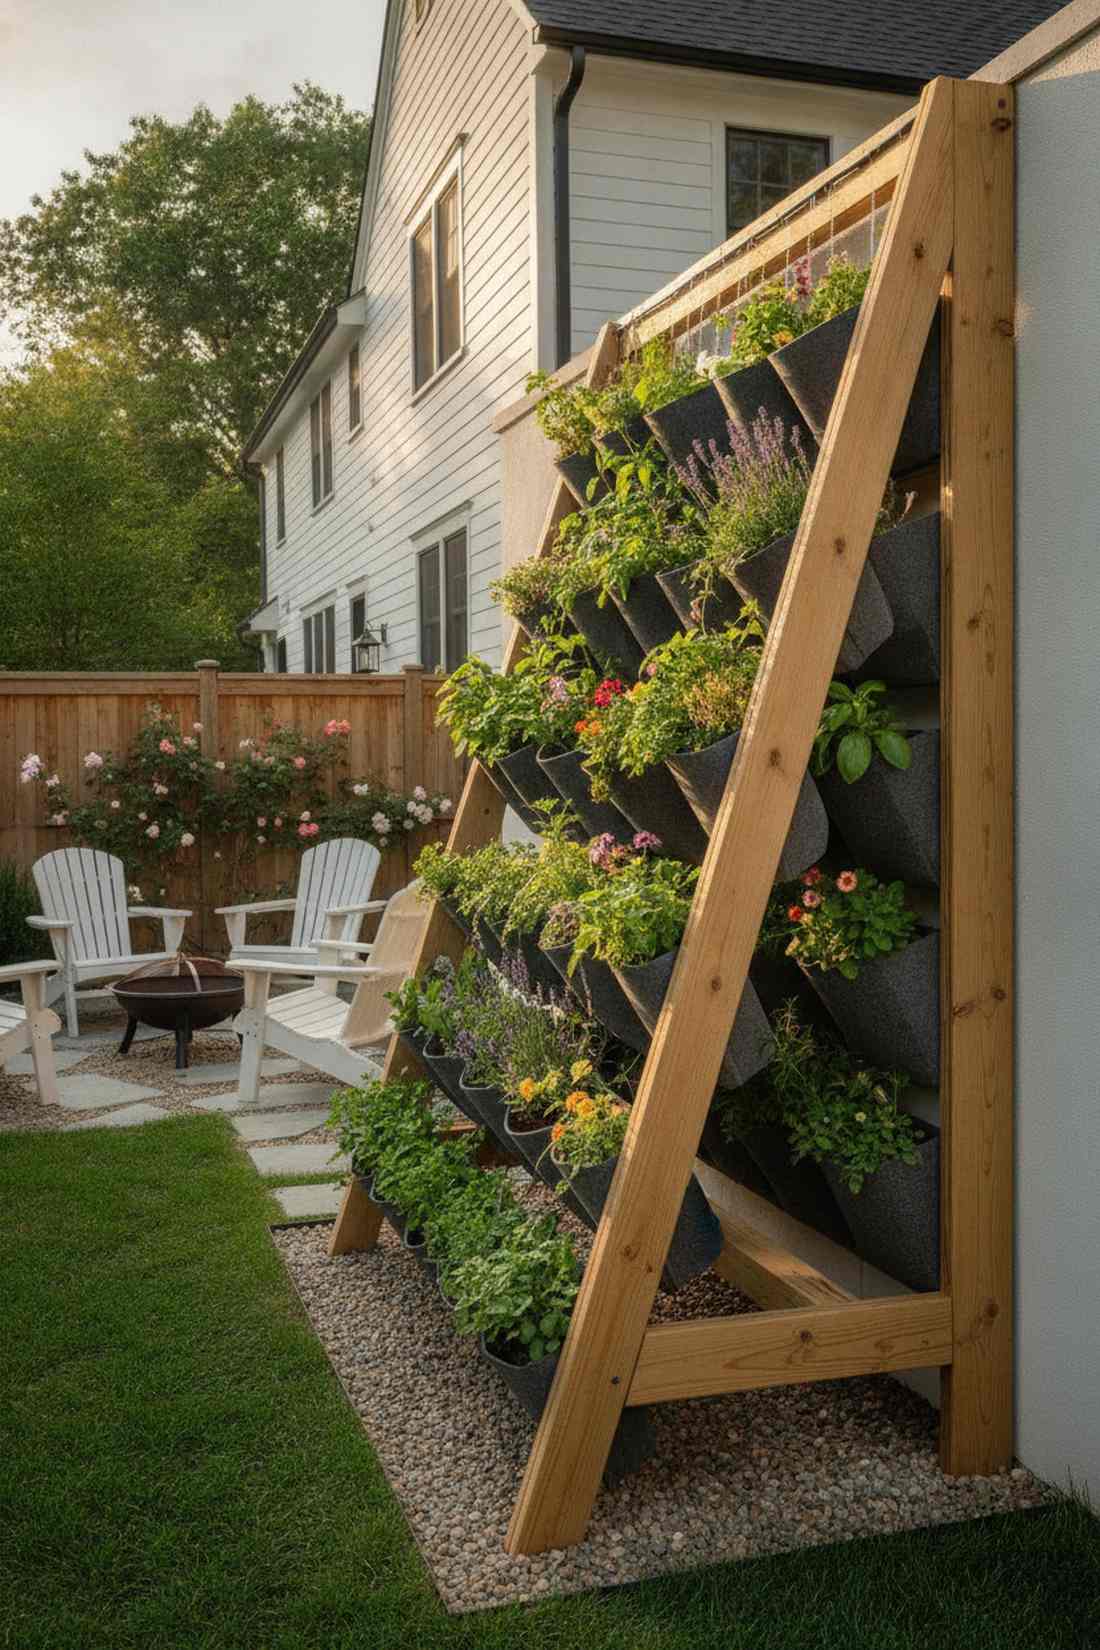
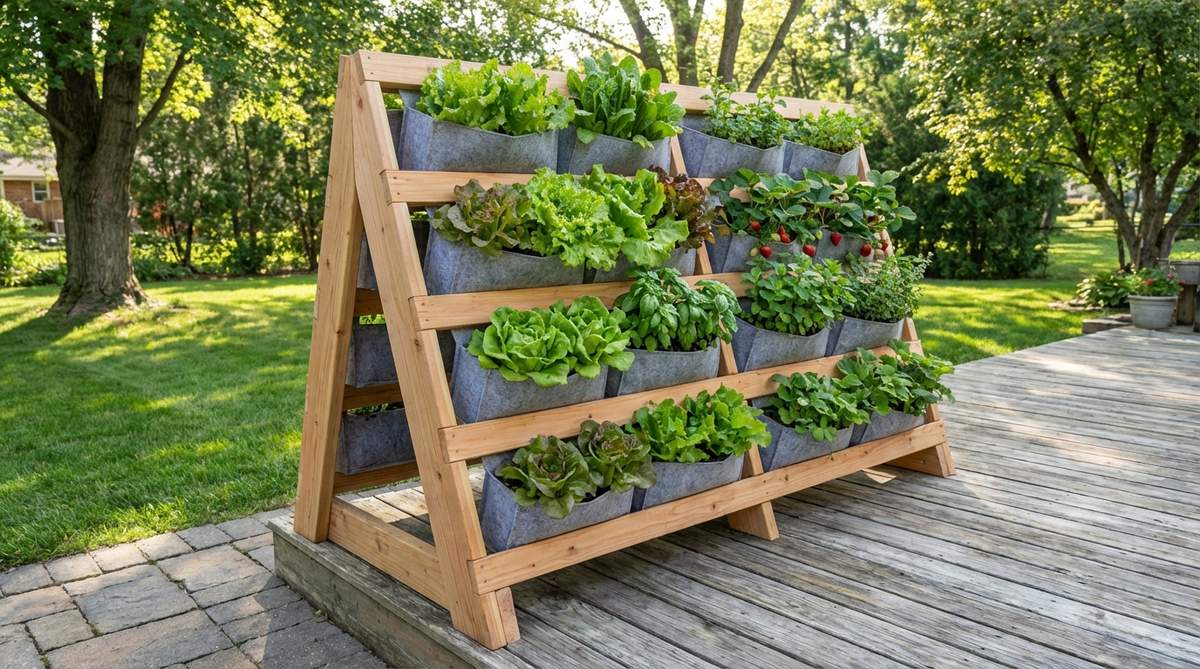
Feels like a brilliant feat of modern engineering. This slanted vertical pocket stand is the ultimate solution for narrow alleyways or tight side yards.
Growing against a flat wall limits sunlight, but an angled A-frame delivers maximum solar exposure to every single tier. It dramatically increases airflow and transforms a two-foot footprint into twenty plant spaces.
You can construct this vertical powerhouse for $45–$65. Pin this for your vertical garden goals!
- Key Materials: 2×4 lumber, fabric pocket liners
- Vibe / Style: Modern high-density vertical
- Difficulty: Intermediate
- Budget Breakdown: Wood Frame: $30 | Pockets: $25
- Creator’s Tip: Install a simple drip hose across the very top rung so water naturally trickles down through all the pockets.
- Smart Sourcing: Invest in heavy-duty felt vertical grow pockets (starter kit) and weather-resistant 2×4 brackets.
This next setup is ridiculously cheap but looks like a $100 custom display once the plants start trailing down…
💡 Must-Have Supplies for High-End Setups
To build these setups faster and ensure they last, skip the generic craft aisles and invest in the right foundational kits.
- Base & Support: Pre-cut rot-resistant cedar panels (bulk pack)
- Setup Tools: Heavy-duty modular corner brackets (starter kits)
- Weather/Durability Protection: UV-coated clear wood sealant sprays
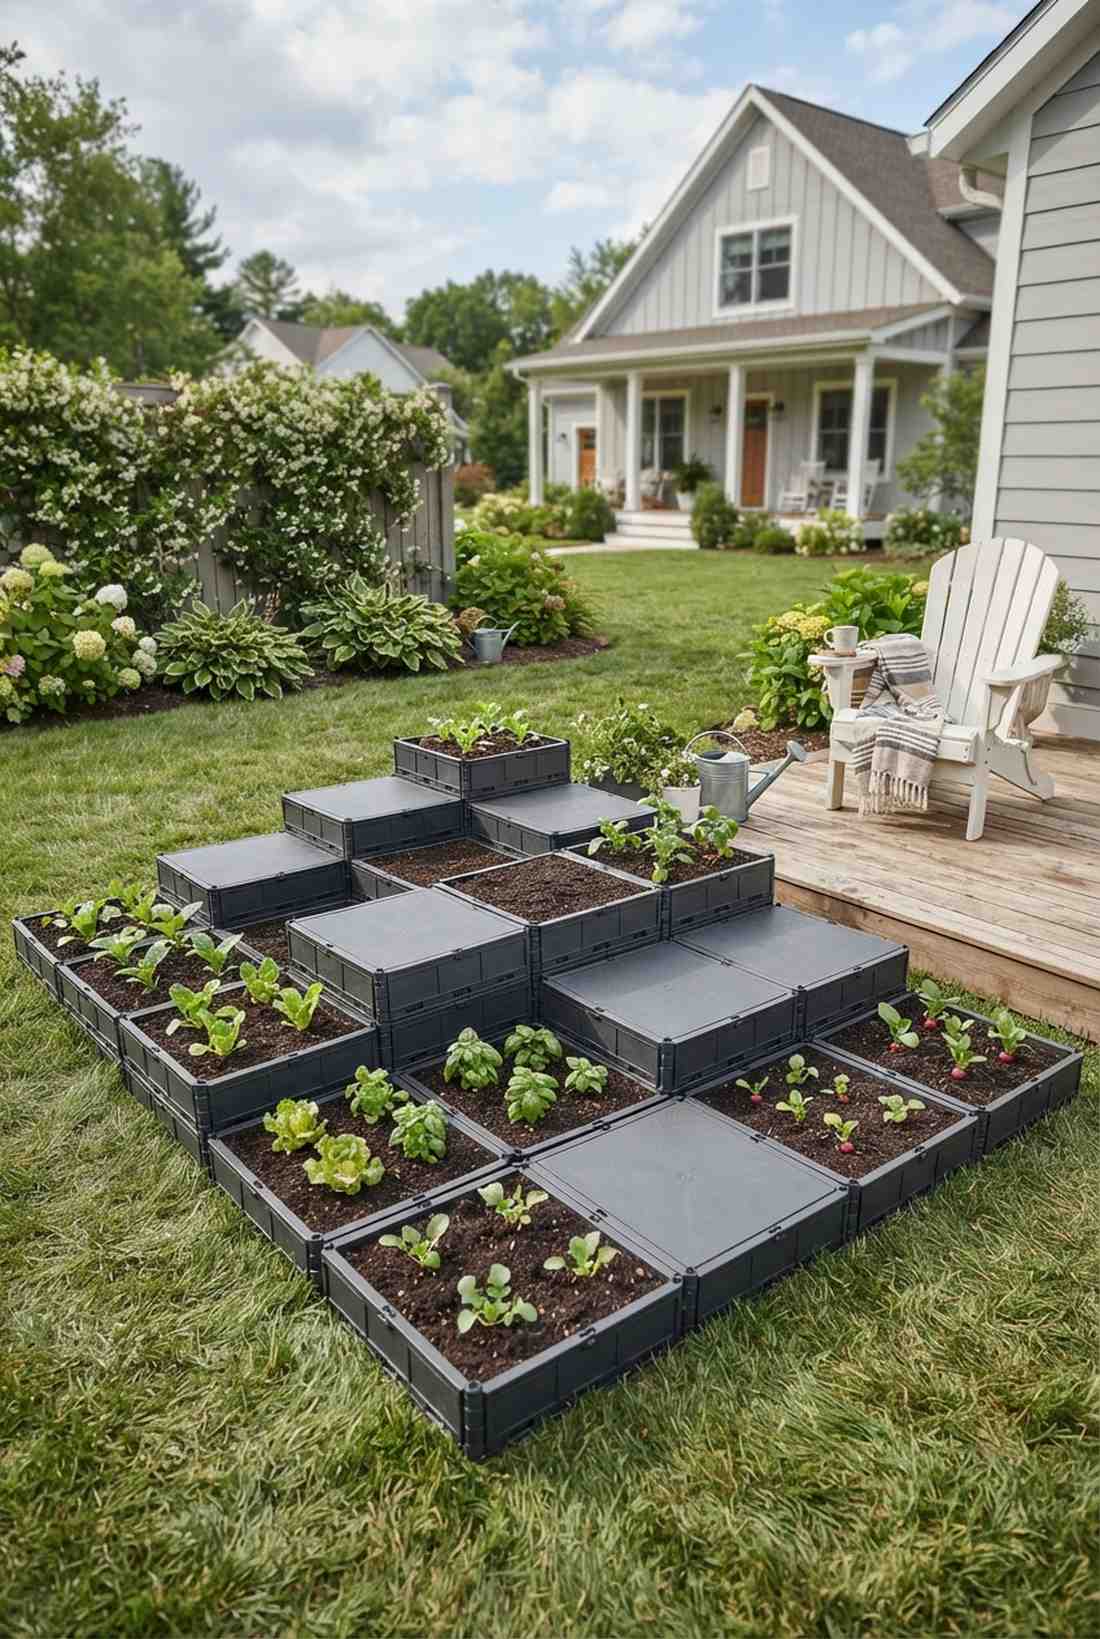
10. Stacked Crate Tower
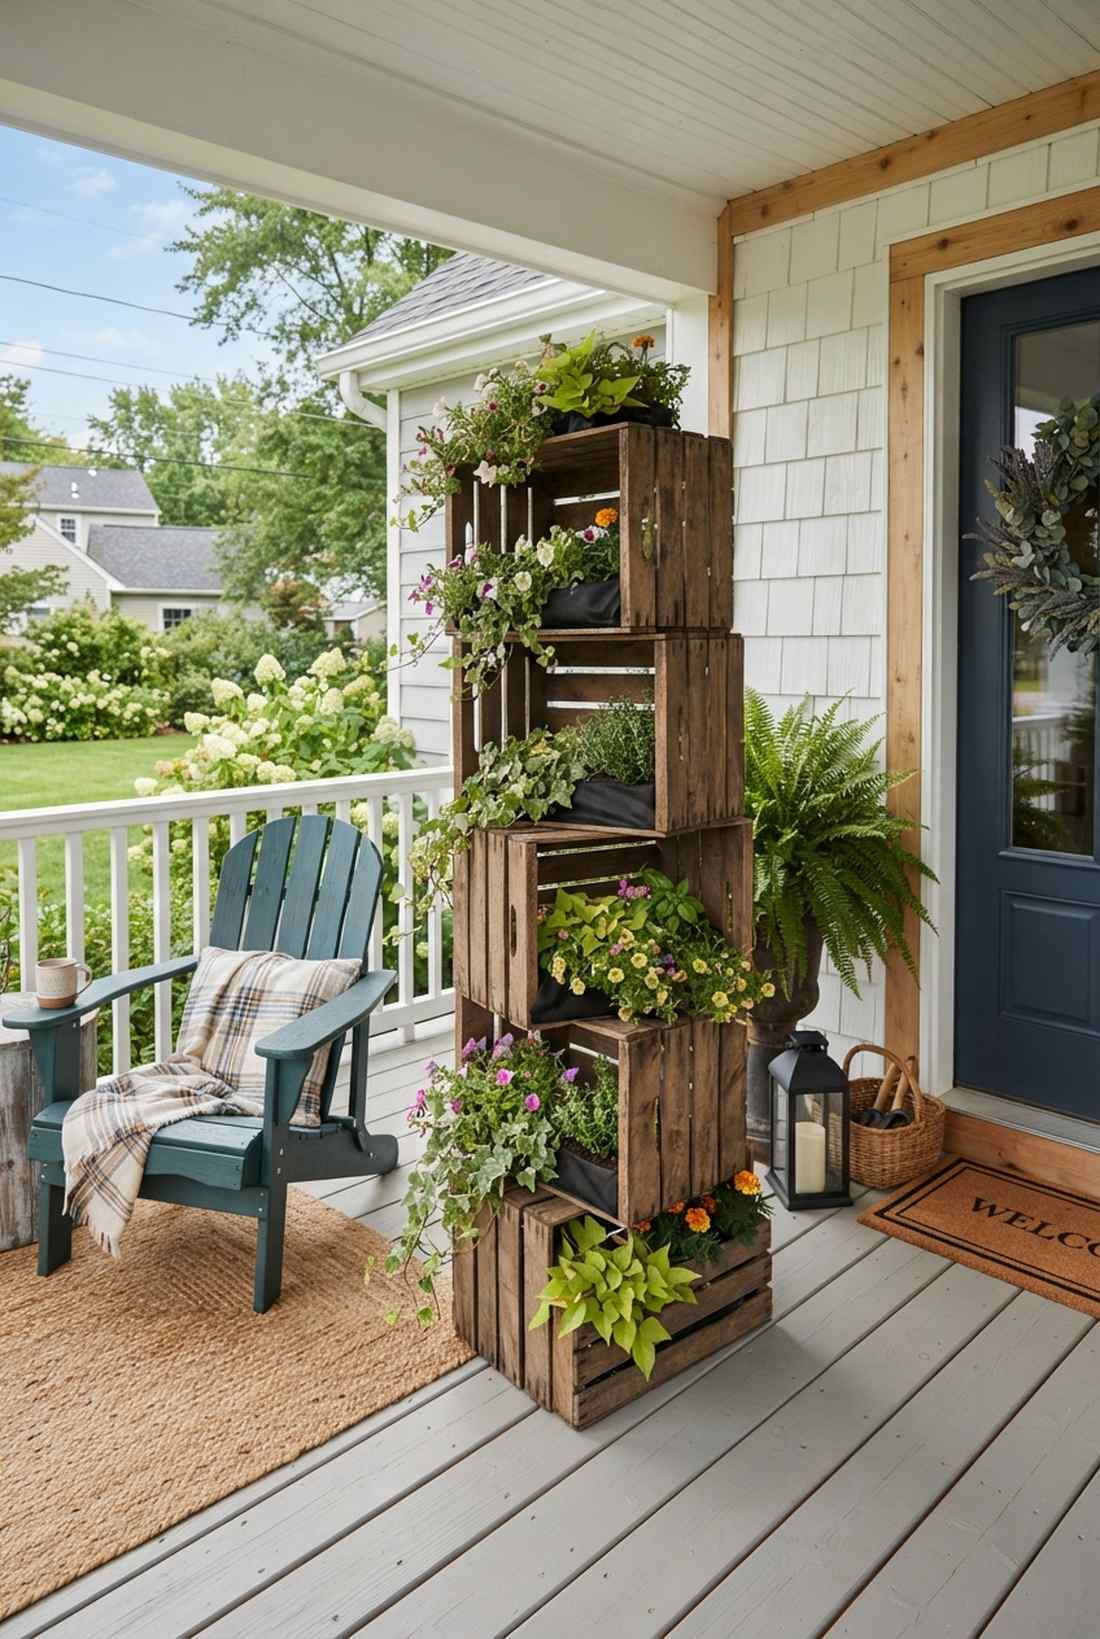

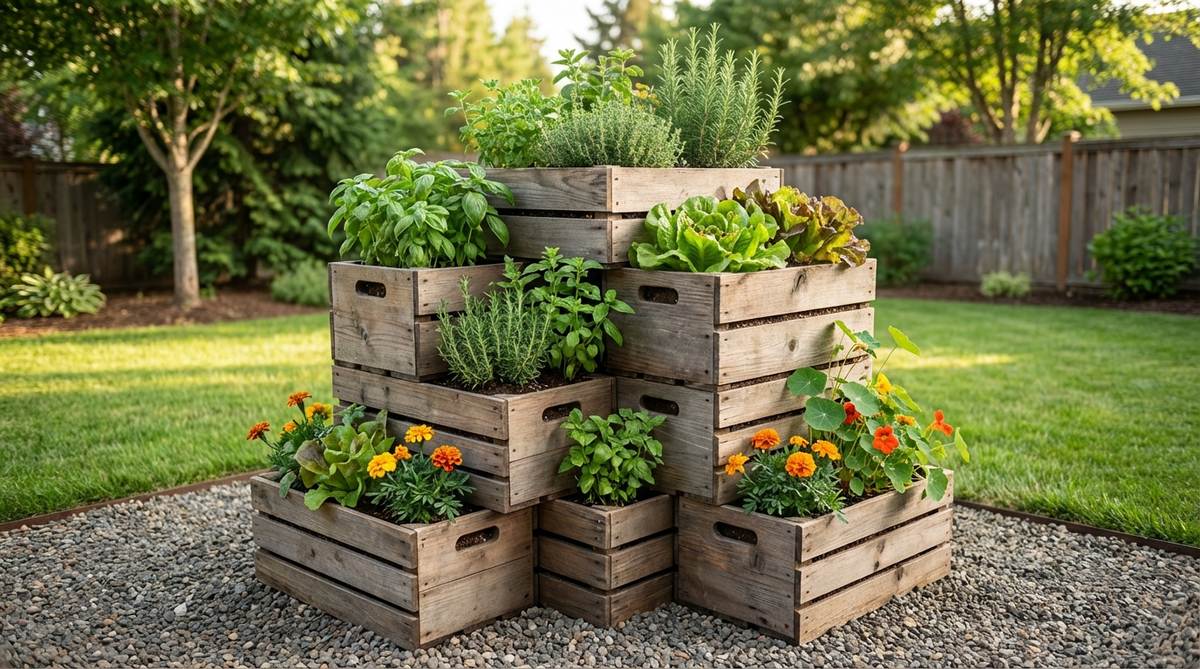
Gives off a perfectly rustic, farmhouse-chic vibe. This modular wooden crate stack works exceptionally well for a tight porch corner.
Standard planters are static, but staggering crates at 90-degree angles gives a designer-level finish with zero cutting required. The open sides create perfect little windows for trailing vines to spill out beautifully.
You can easily pull this off for $30–$50 depending on where you source the boxes.
- Key Materials: Wooden slatted crates, weed barrier fabric
- Vibe / Style: Rustic upcycled homestead
- Difficulty: Beginner friendly
- Budget Breakdown: Crates: $30 | Fabric: $10
- Creator’s Tip: Staple heavy-duty landscape fabric inside each crate to hold the soil while letting water drain through the slats.
- Smart Sourcing: Buy pre-treated vintage wooden crates (bulk pack) and permeable landscape fabric rolls.
11. Terraced Slope Bed
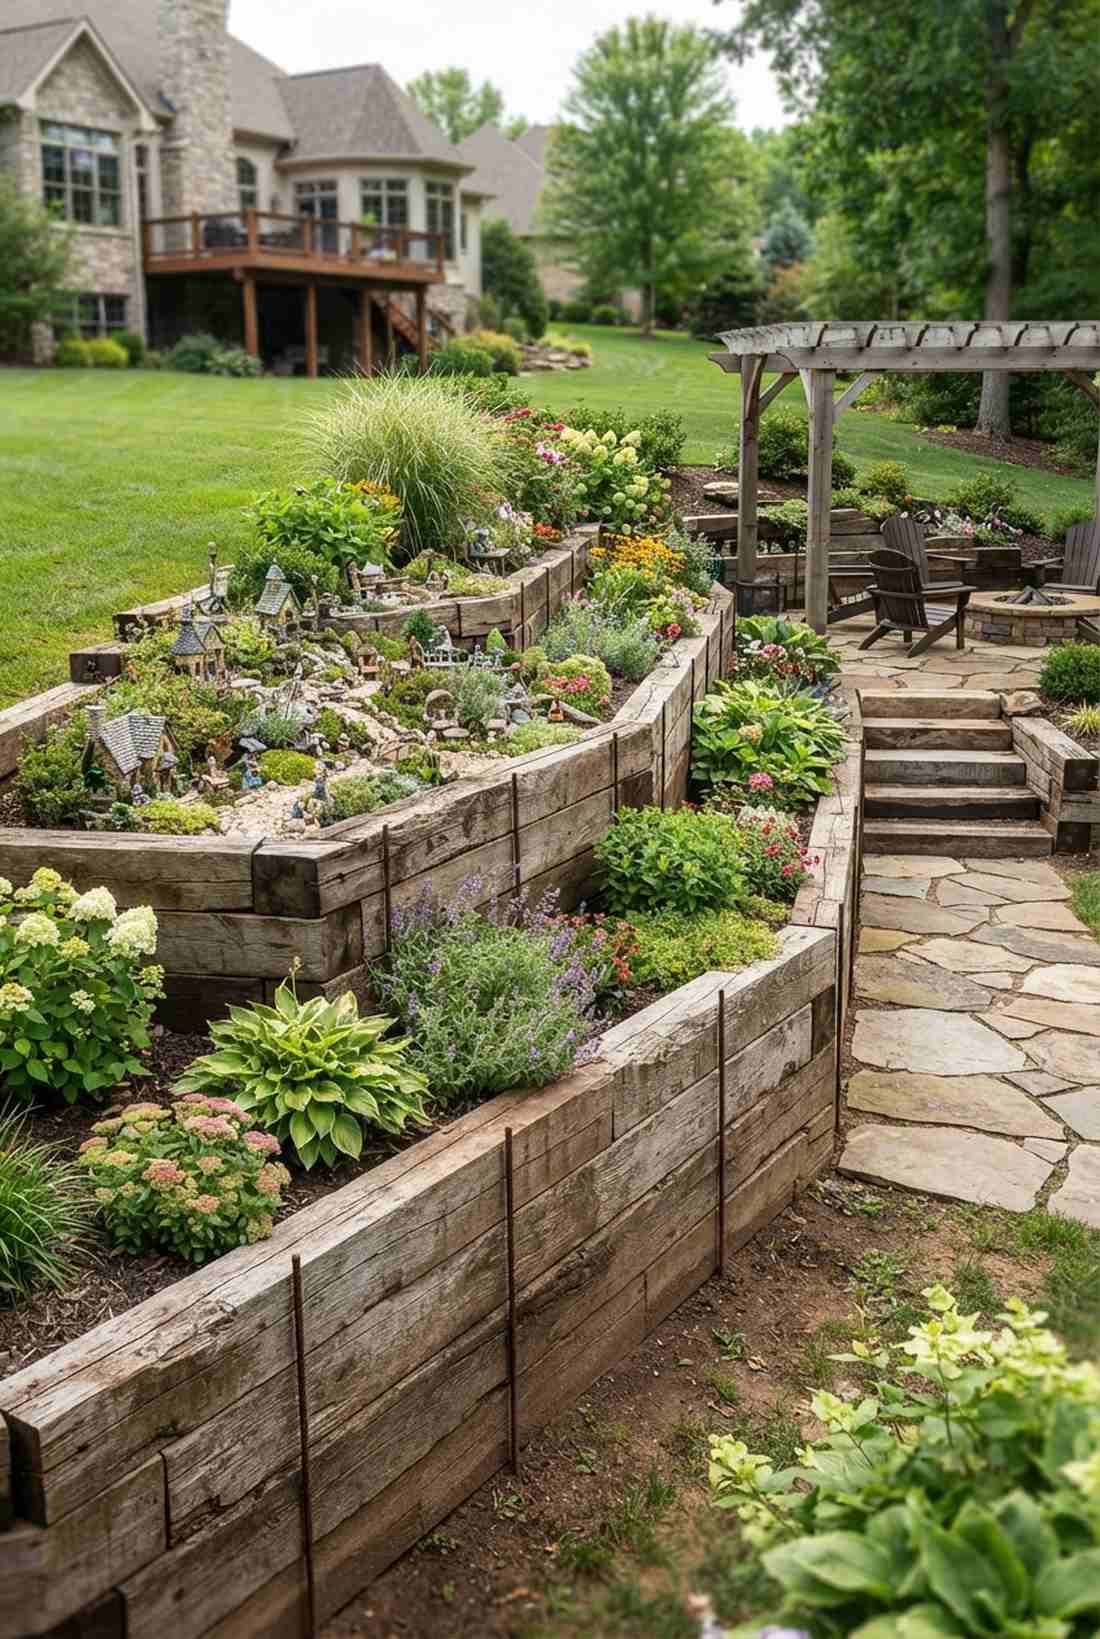
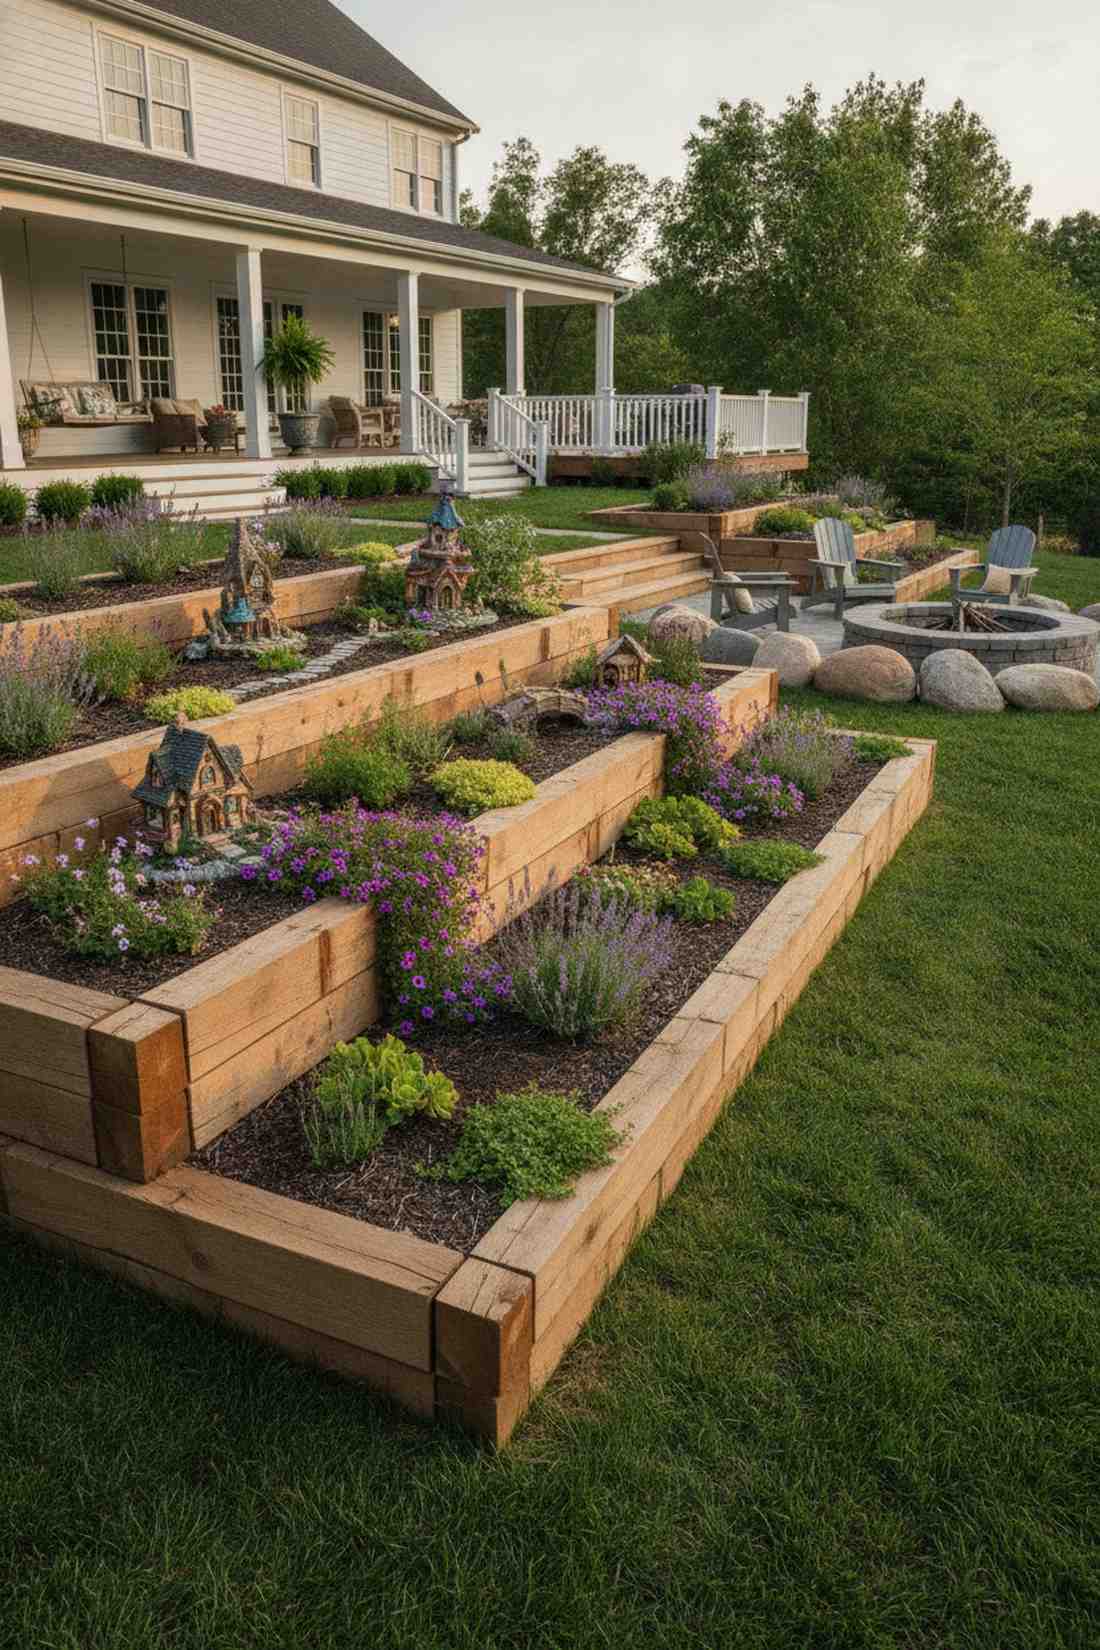
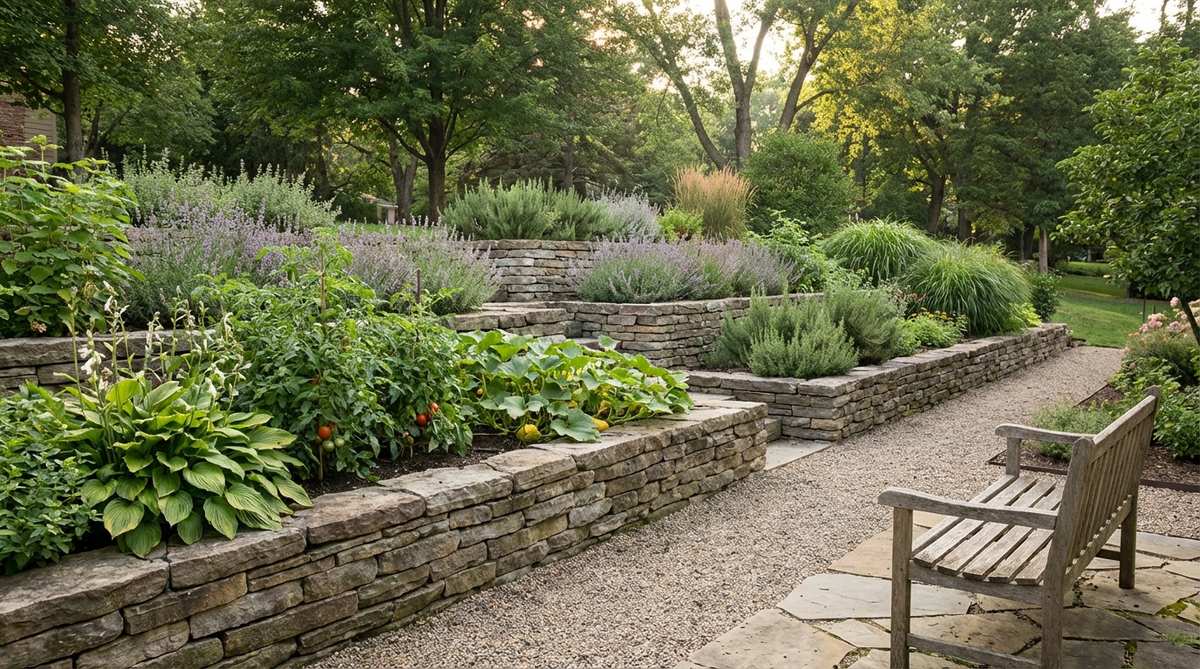
Feels like an ancient mountainside vineyard in your own backyard. This stepped retaining planter is ideal for transforming useless sloped lawns.
Hillsides usually erode away, but locking them down with timber steps stops runoff while creating a premium aesthetic. Adding fairy garden kits on the top tiers turns a basic retaining wall into an enchanting landscape feature.
Expect to spend about $80–$120 for the heavy timber. Save this to solve your tricky yard slopes!
- Key Materials: Heavy landscaping timbers, steel rebar
- Vibe / Style: Stately terraced estate
- Difficulty: Advanced hardscaping
- Budget Breakdown: Timbers: $80 | Rebar: $20
- Creator’s Tip: Drill holes through the timber and pound thick rebar deep into the earth so the steps never slide downhill.
- Smart Sourcing: Source pre-cut landscaping rebar stakes (bulk pack) and stunning UV-coated resin fairy cottage kits for decoration.
12. Window Box Vertical Array
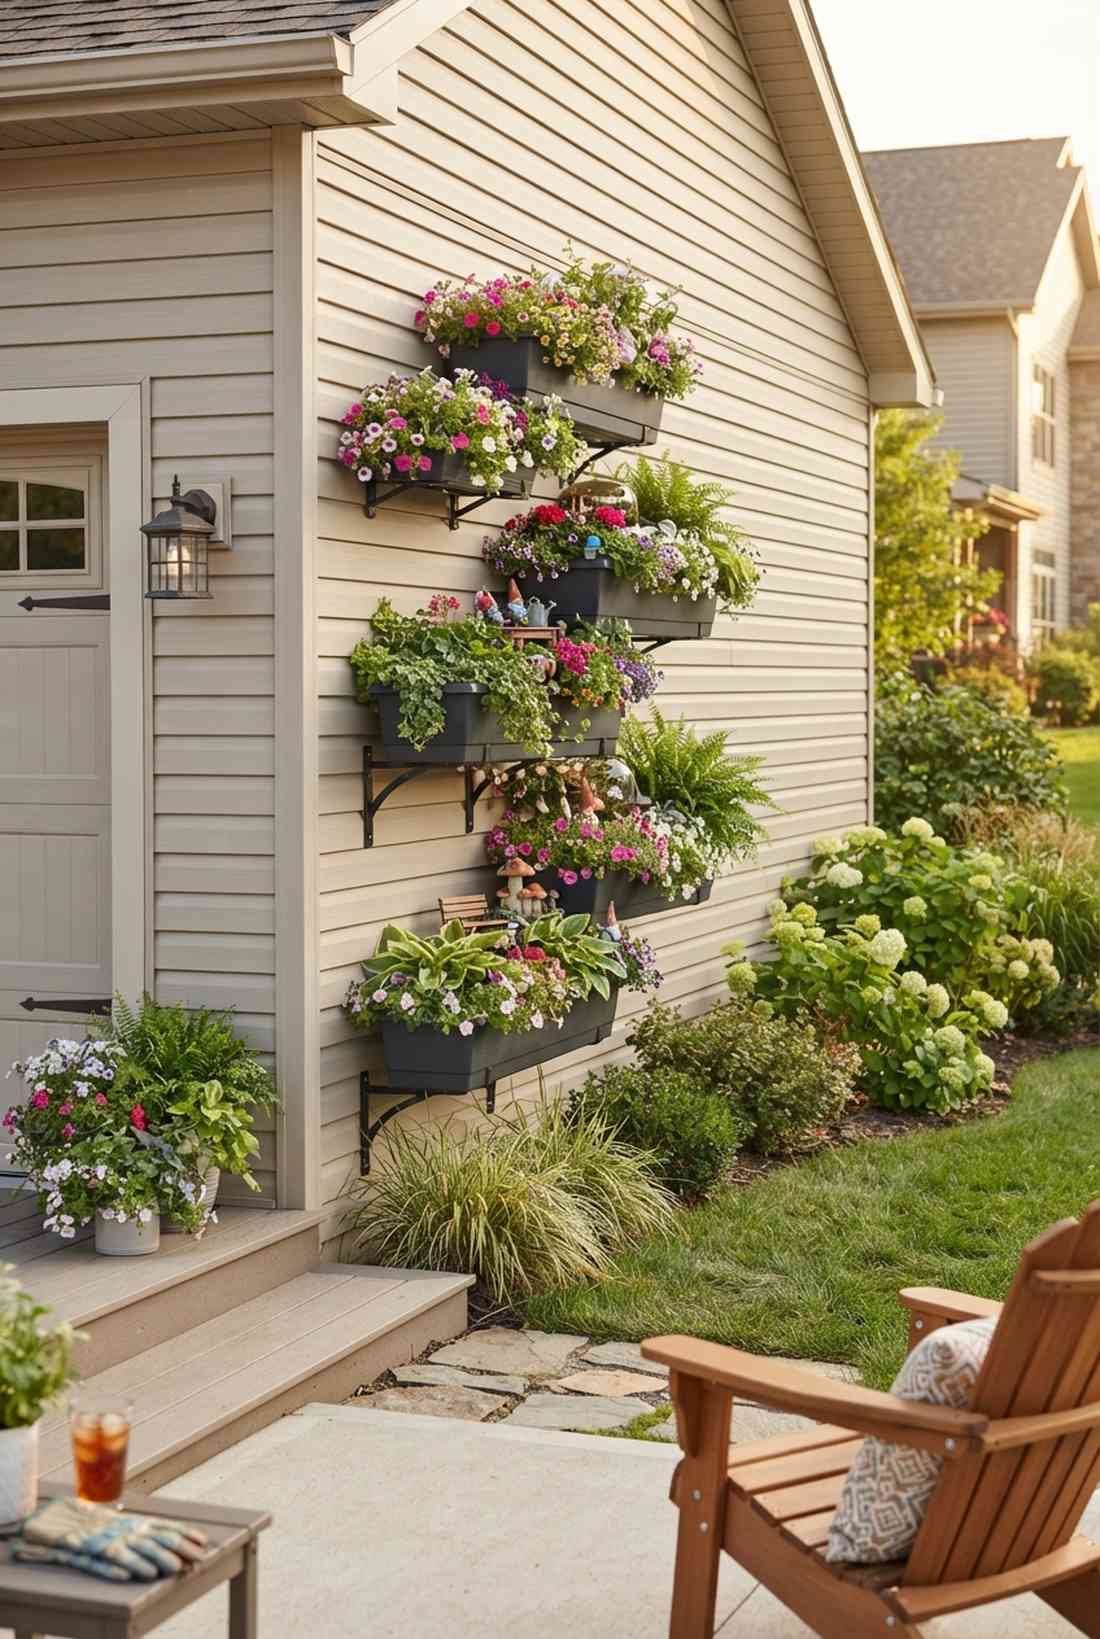
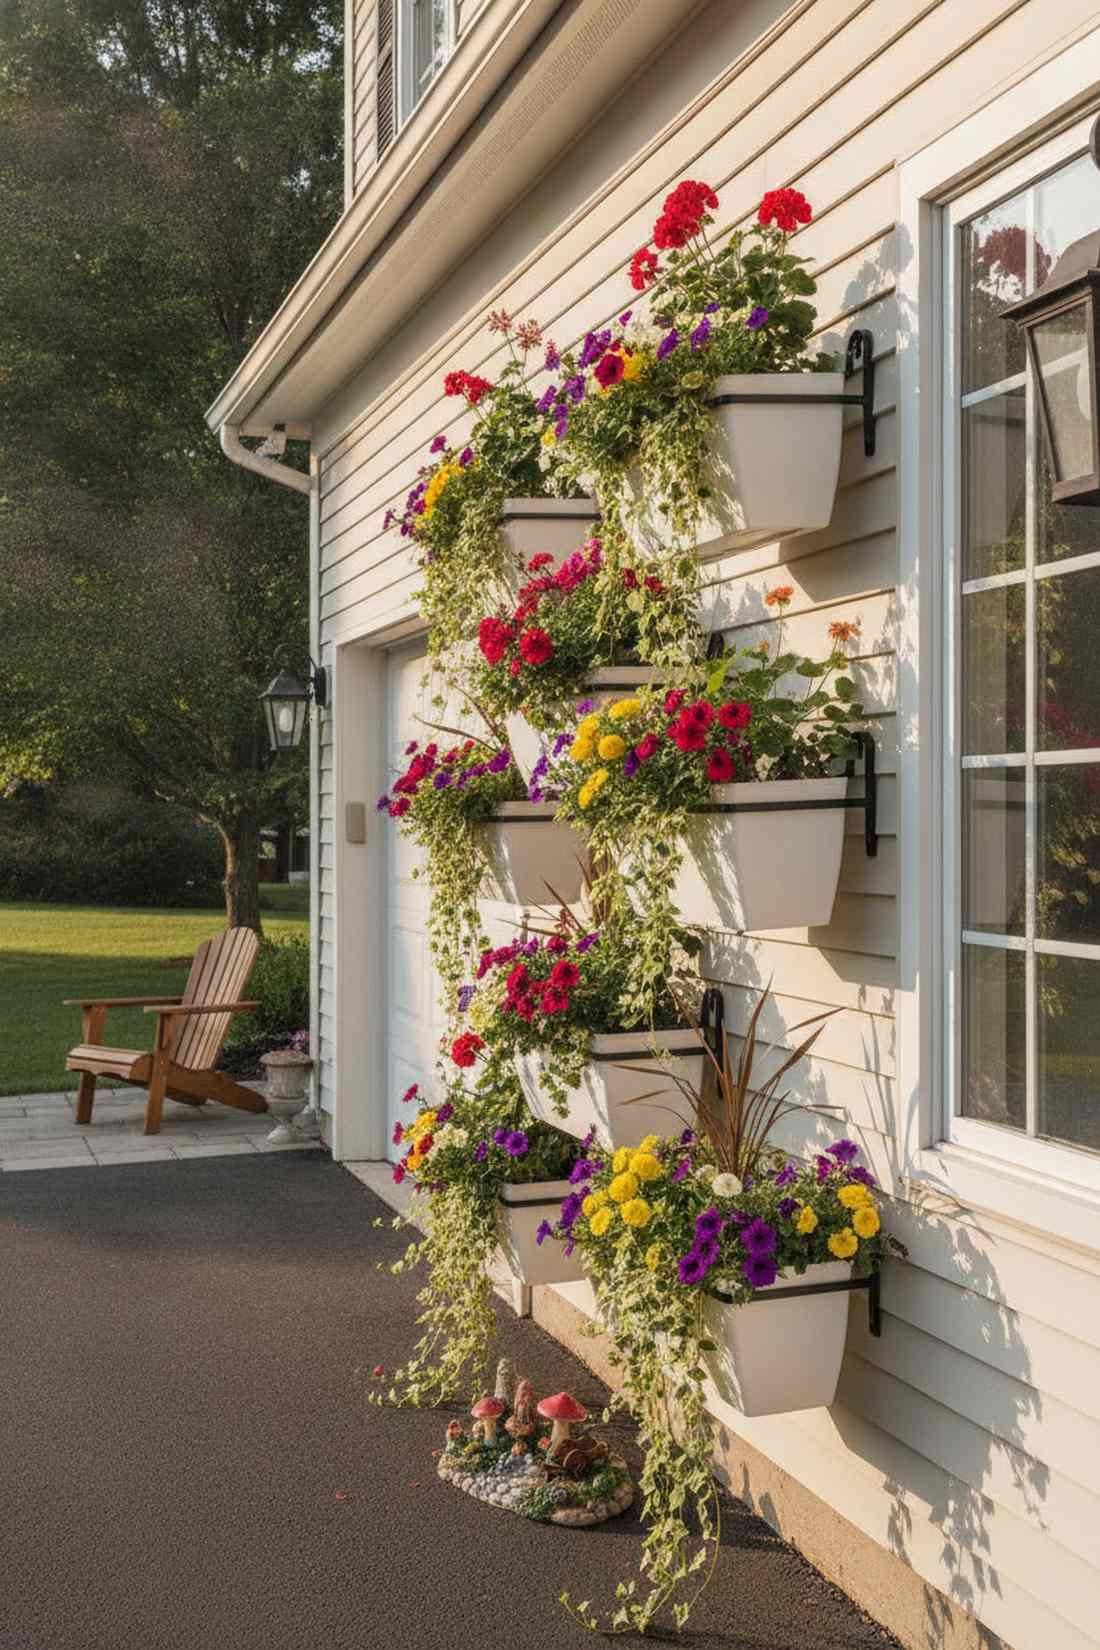
Brings a burst of colorful joy right to eye level. This staggered wall-mounted planter system works perfectly against a bland garage wall.
Bare siding is an eyesore, but mounting an array of boxes gives a designer-level finish that softens the entire exterior. Tucking miniature garden supplies into the boxes adds a whimsical touch that guests will absolutely love.
You can build out this floating garden wall for $40–$70.
- Key Materials: Railing planters, heavy wall brackets
- Vibe / Style: Floating floral showcase
- Difficulty: Easy with a drill
- Budget Breakdown: Boxes: $35 | Hardware: $20
- Creator’s Tip: Always mount into the actual wall studs; wet soil gets incredibly heavy and will rip out drywall anchors.
- Smart Sourcing: Buy self-watering window boxes (starter kits) and an adorable terrarium accessories (bulk pack) for styling.
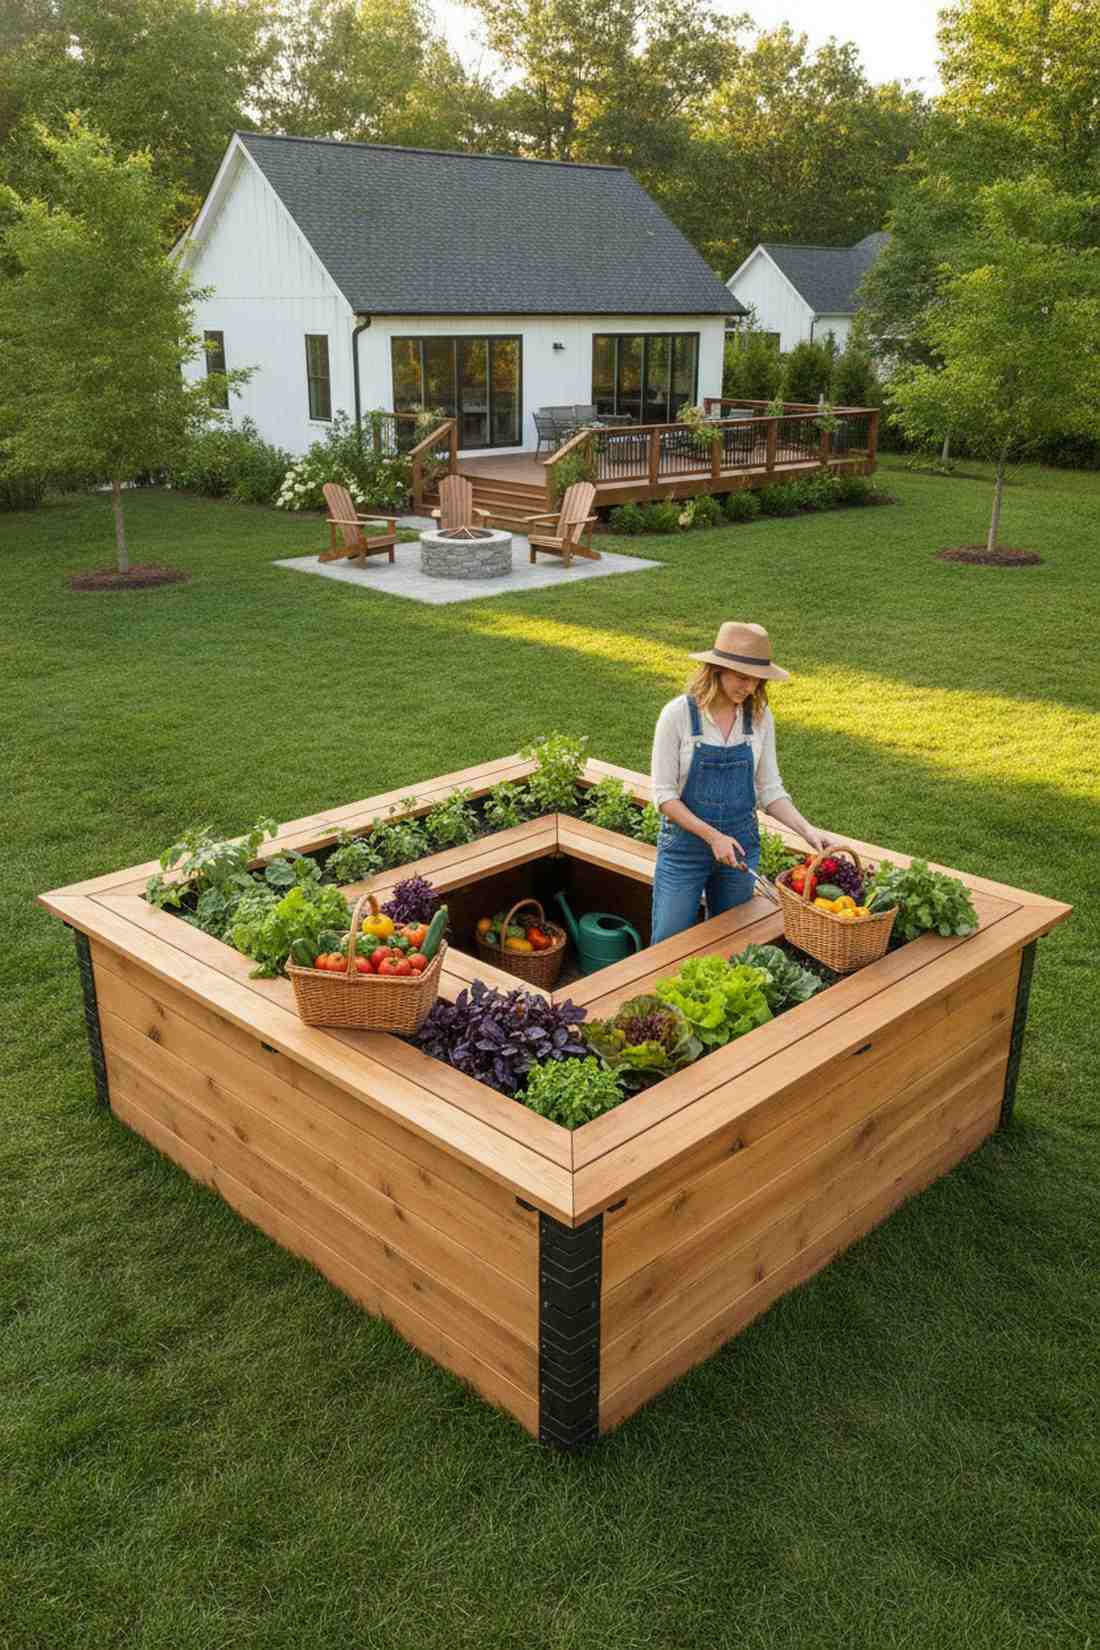
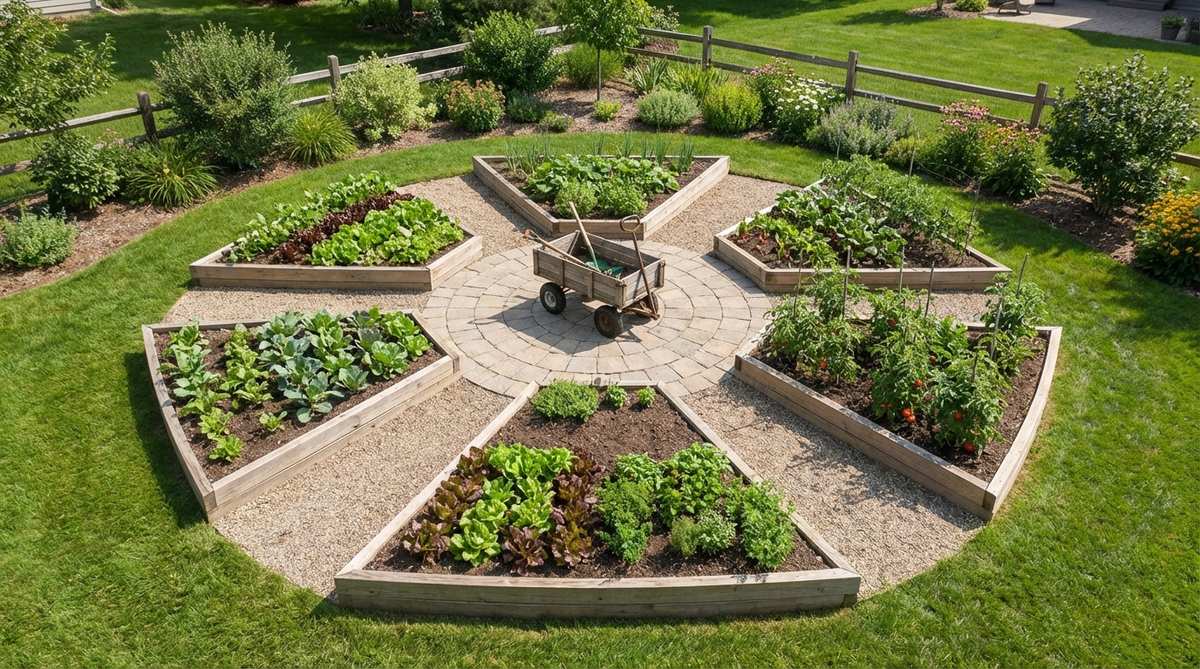
13. Keyhole Garden Bed
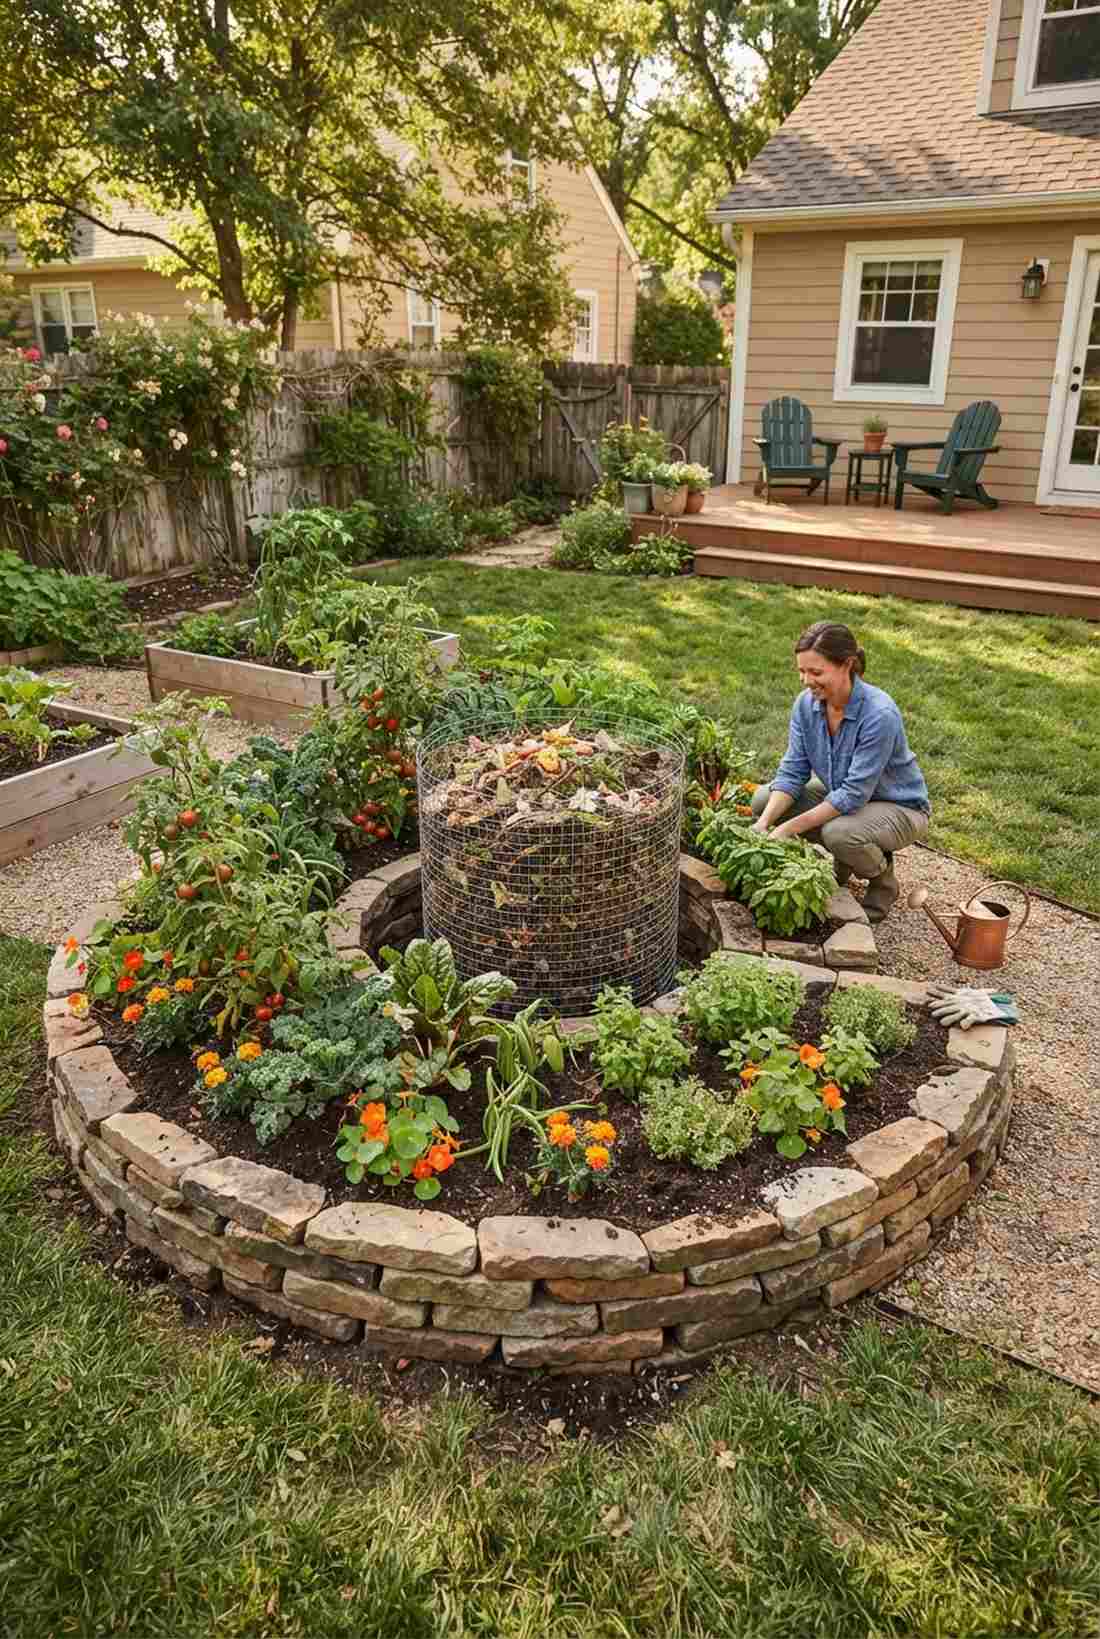
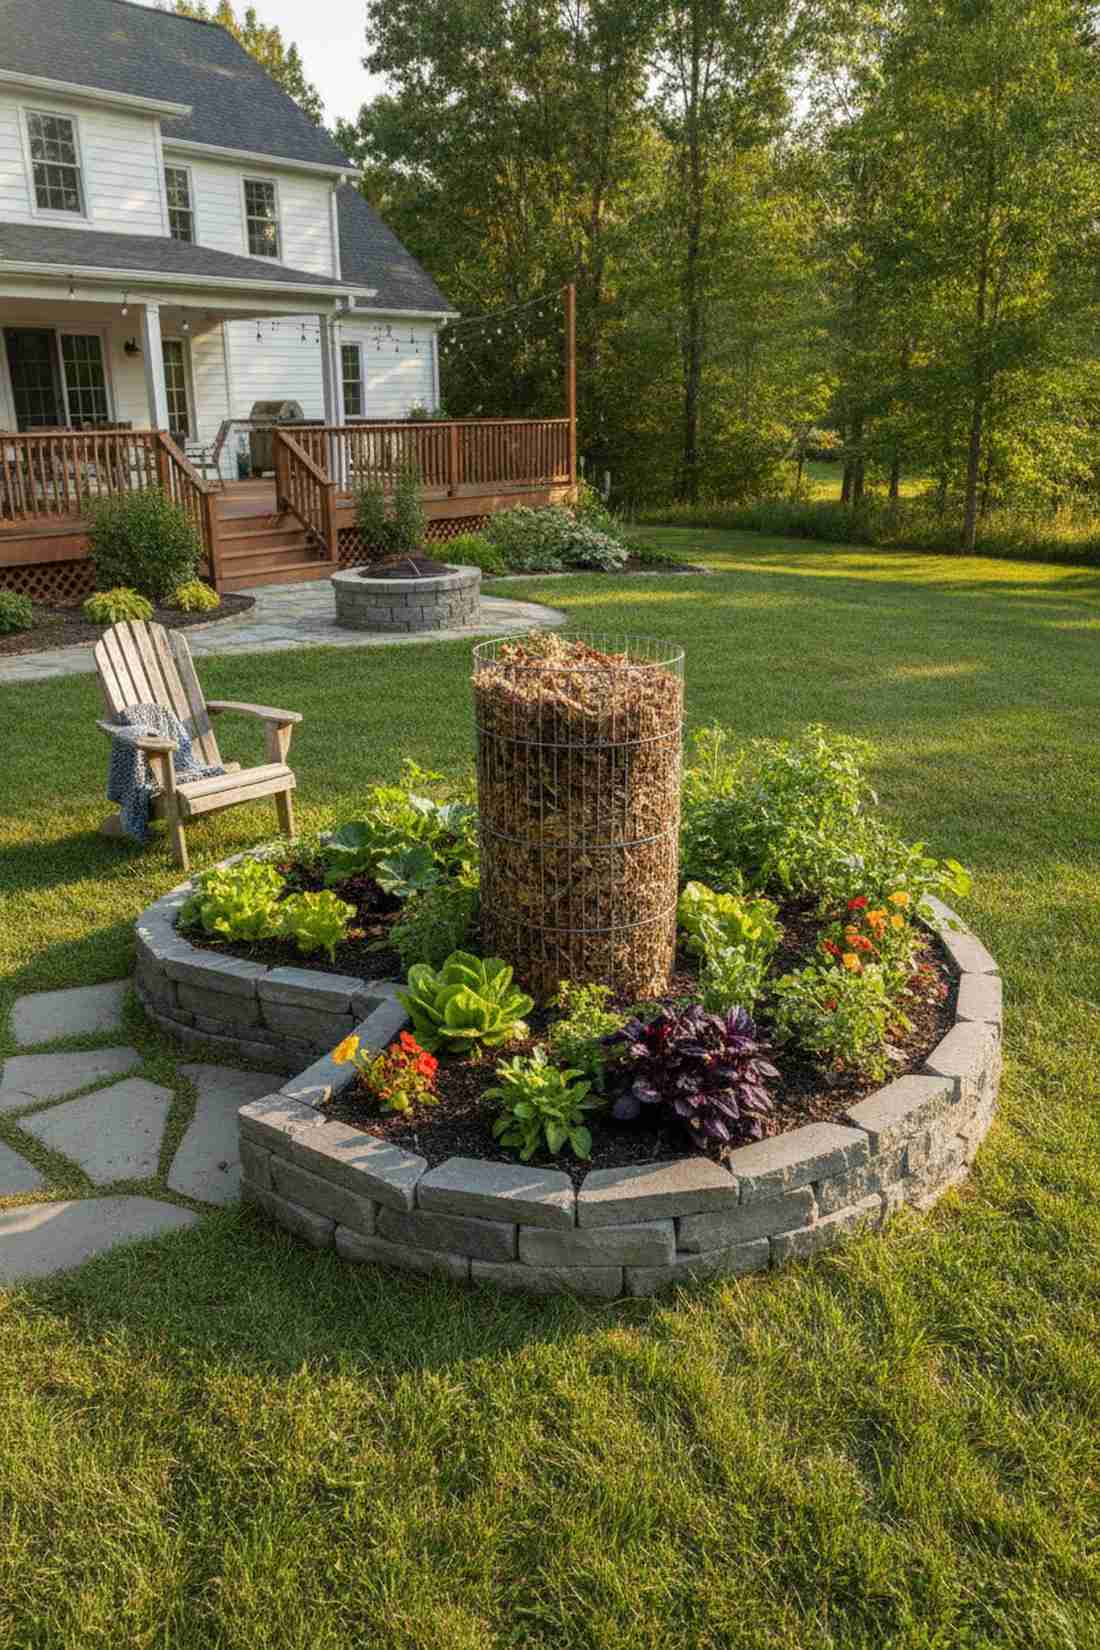
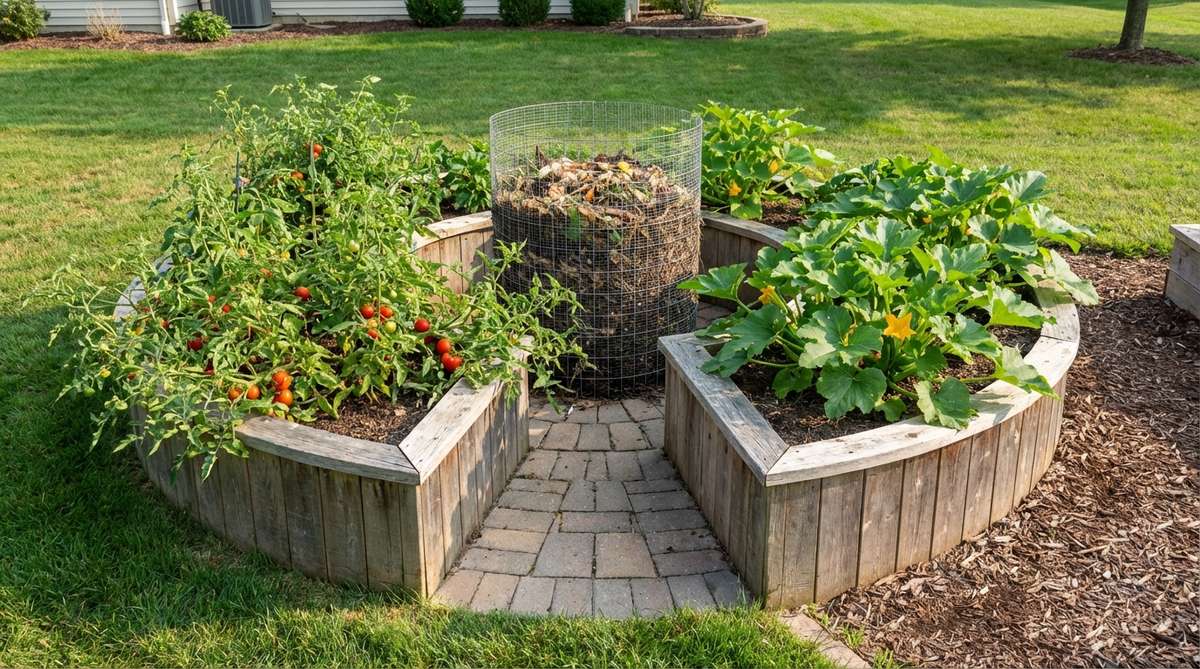
Feels like a self-sustaining eco-paradise. This circular notched layout is the absolute perfect shape for a deep backyard space.
Reaching into deep boxes hurts your back, but the genius inner cutout looks far more expensive than it is while offering 360-degree access. The central compost basket feeds the surrounding plants automatically, saving you tons on fertilizer.
This permaculture masterpiece costs around $60–$90 to build. Pin this if you love sustainable gardening!
- Key Materials: Stone or brick border, wire mesh tower
- Vibe / Style: Smart permaculture homestead
- Difficulty: Moderate building
- Budget Breakdown: Border: $60 | Wire Mesh: $15
- Creator’s Tip: Slope the soil slightly downward from the center basket so watering naturally pushes compost tea to the outer roots.
- Smart Sourcing: Get heavy-duty galvanized wire mesh (pre-cut) and stackable landscape edging stones.
14. Spiral Herb Tower
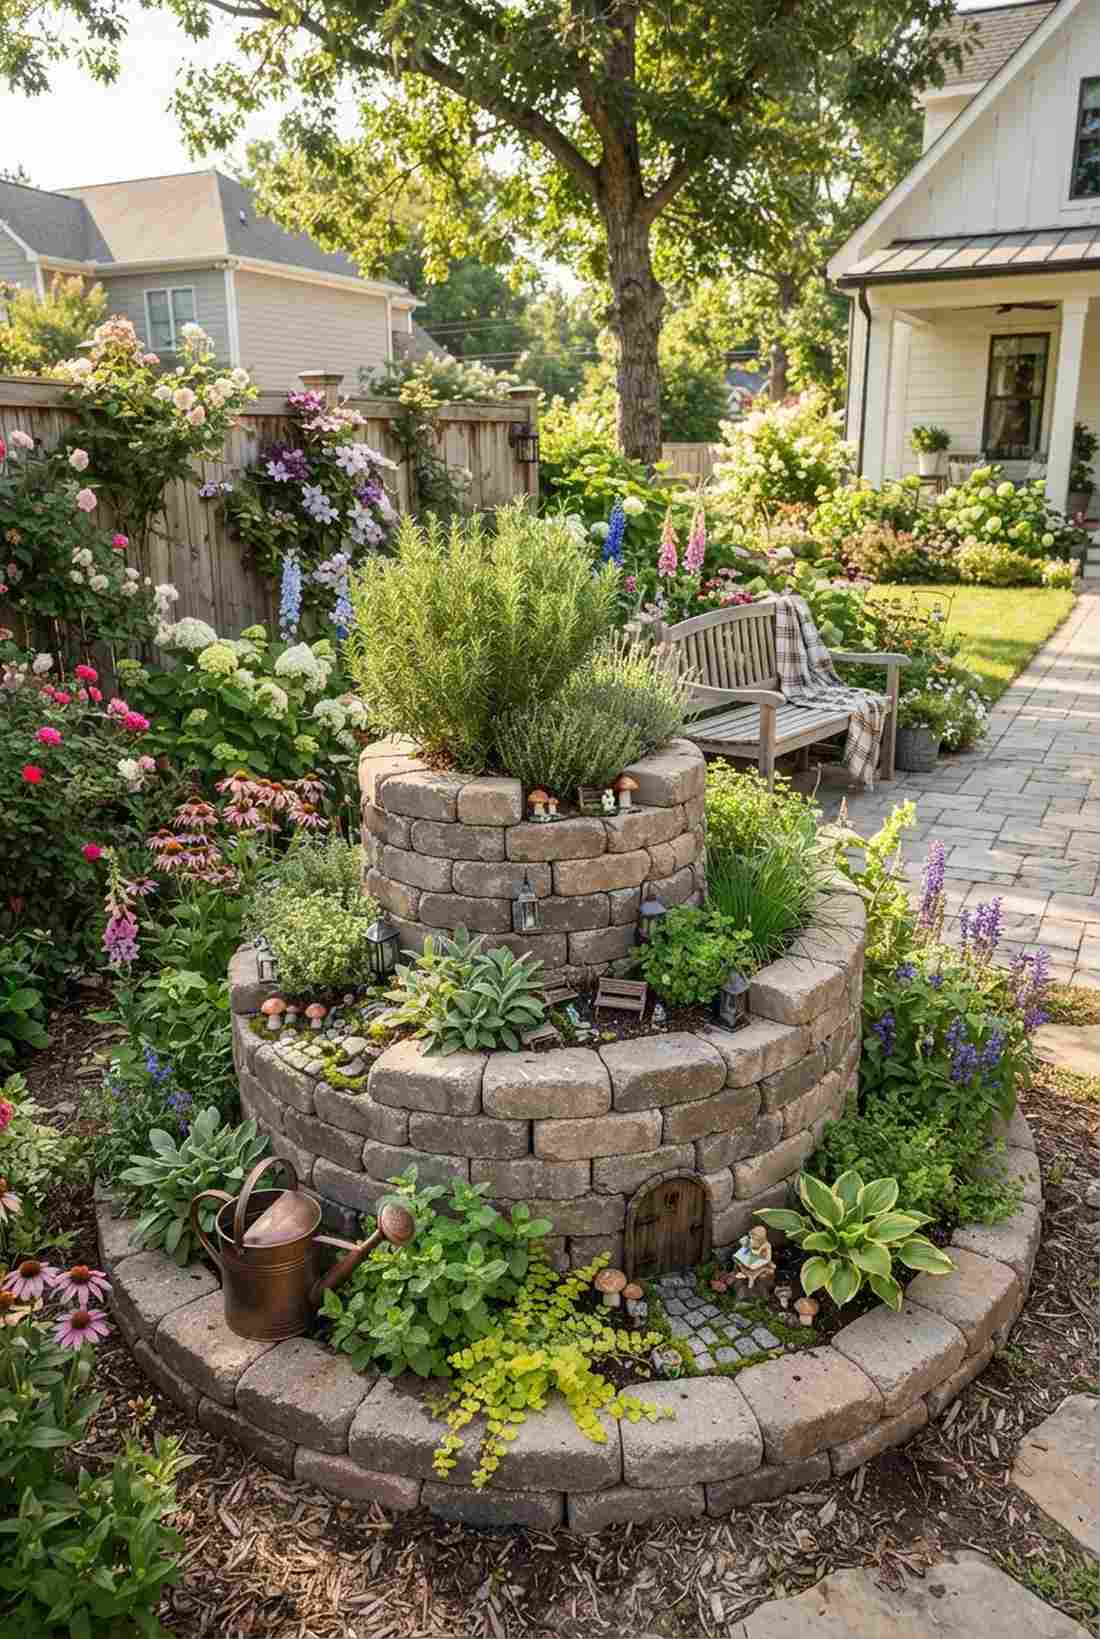
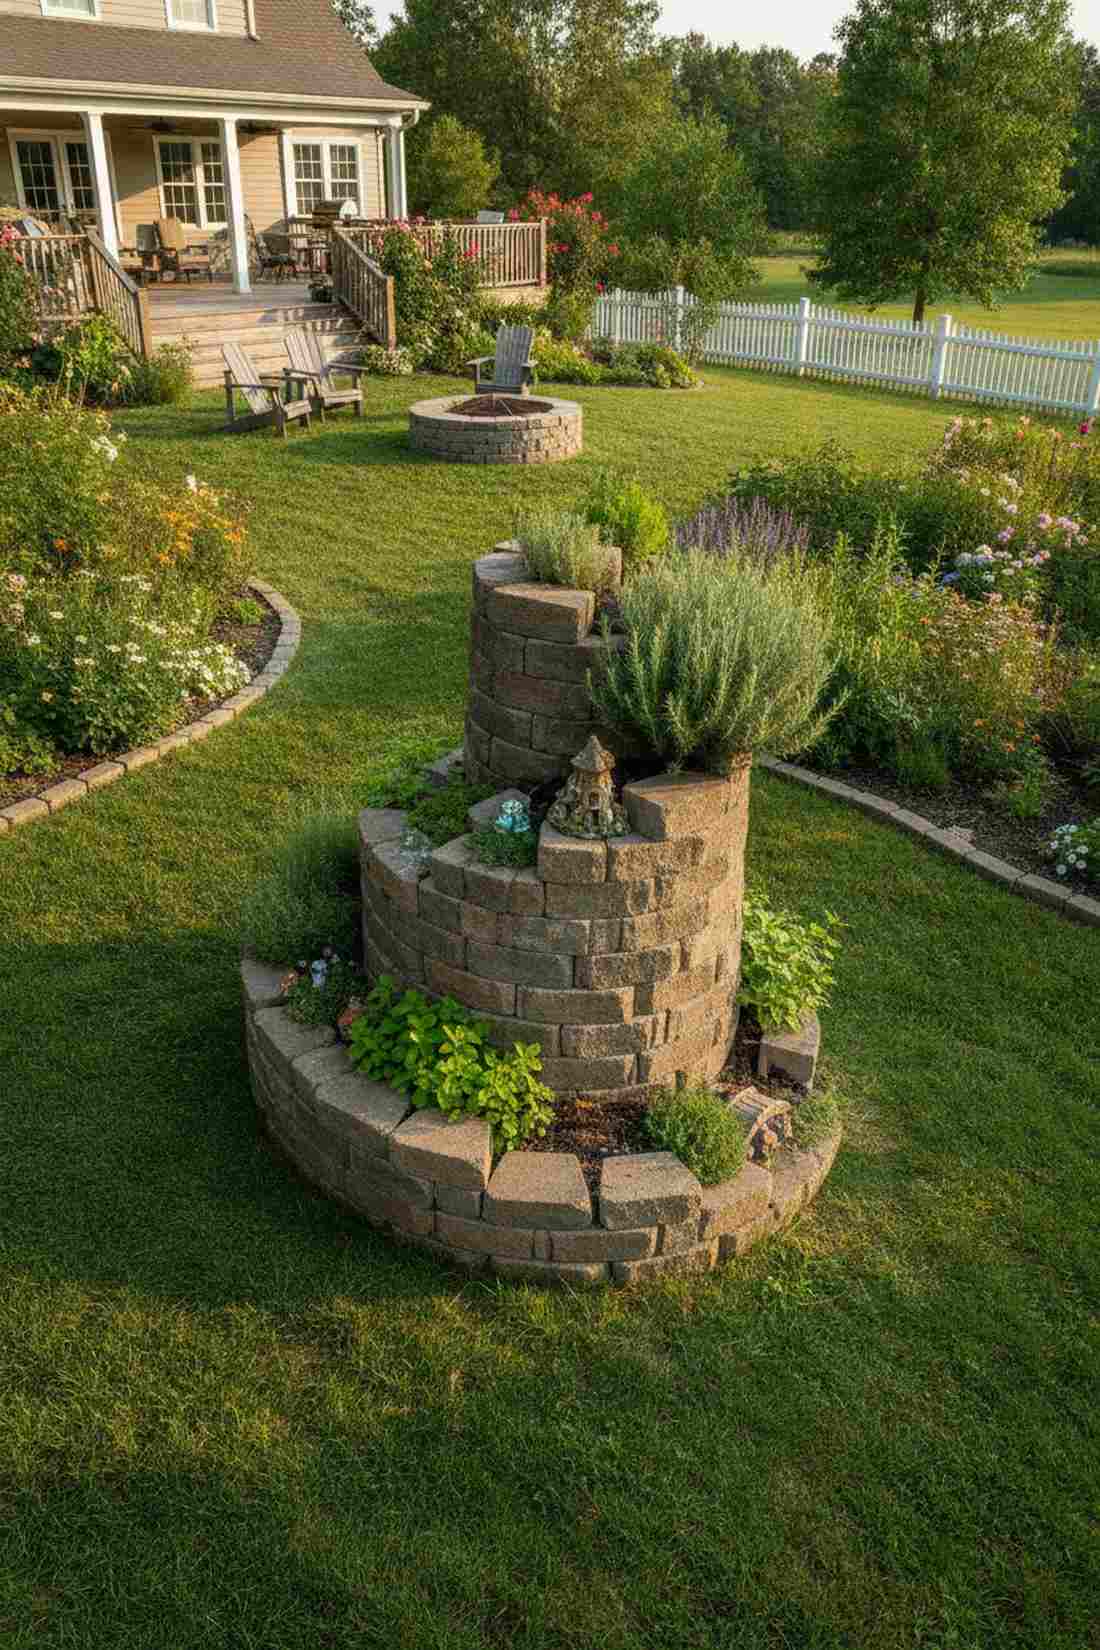
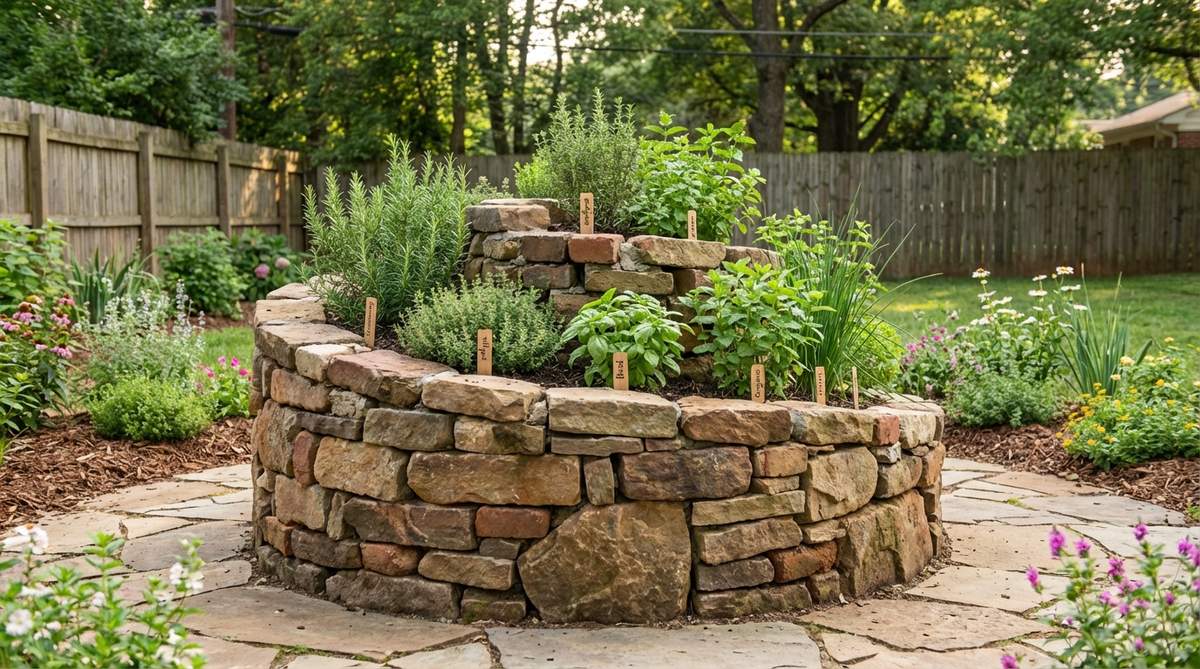
Looks like a mystical piece of garden architecture. This ascending stone coil is phenomenal for separating dry Mediterranean plants from thirsty greens.
Flat herb patches always drown half your plants, but a rising spiral creates distinct microclimates that deliver a surprisingly premium look. Adding hidden fairy garden kits along the stone path turns it into a magical focal point.
You can easily pull this off for $35–$60 using basic retaining blocks.
- Key Materials: Tumbled stone blocks, mixed soils
- Vibe / Style: Enchanted cottagecore feature
- Difficulty: Easy stacking
- Budget Breakdown: Stones: $40 | Soil: $15
- Creator’s Tip: Plant drought-loving rosemary at the sunny peak, and put thirsty mint at the shaded, damp base.
- Smart Sourcing: Order tumbled retaining wall blocks (bulk pack) and weather-proof miniature garden supplies for styling.
Wait until you see how simple it is to build the next one—it looks like a professional landscape architect charged thousands for it…
Specialty Geometric Patterns
These distinctive shapes offer both functional benefits and aesthetic appeal. Geometric patterns create visual interest while addressing specific growing challenges through thoughtful design.
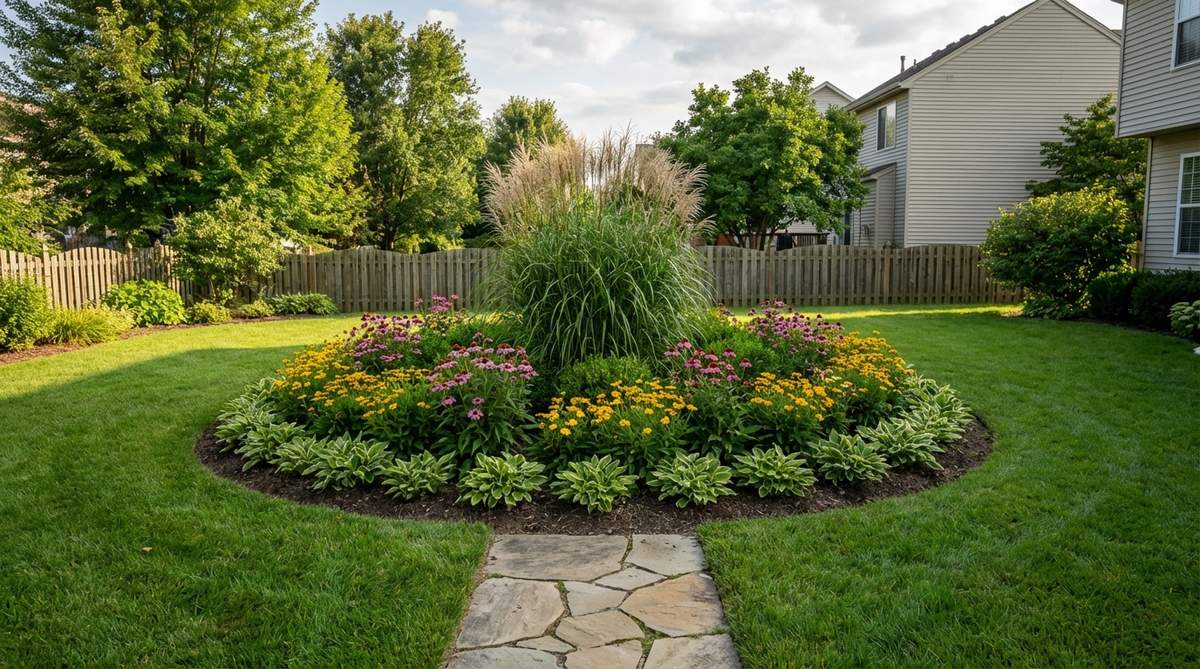
15. Mandala Circle Garden
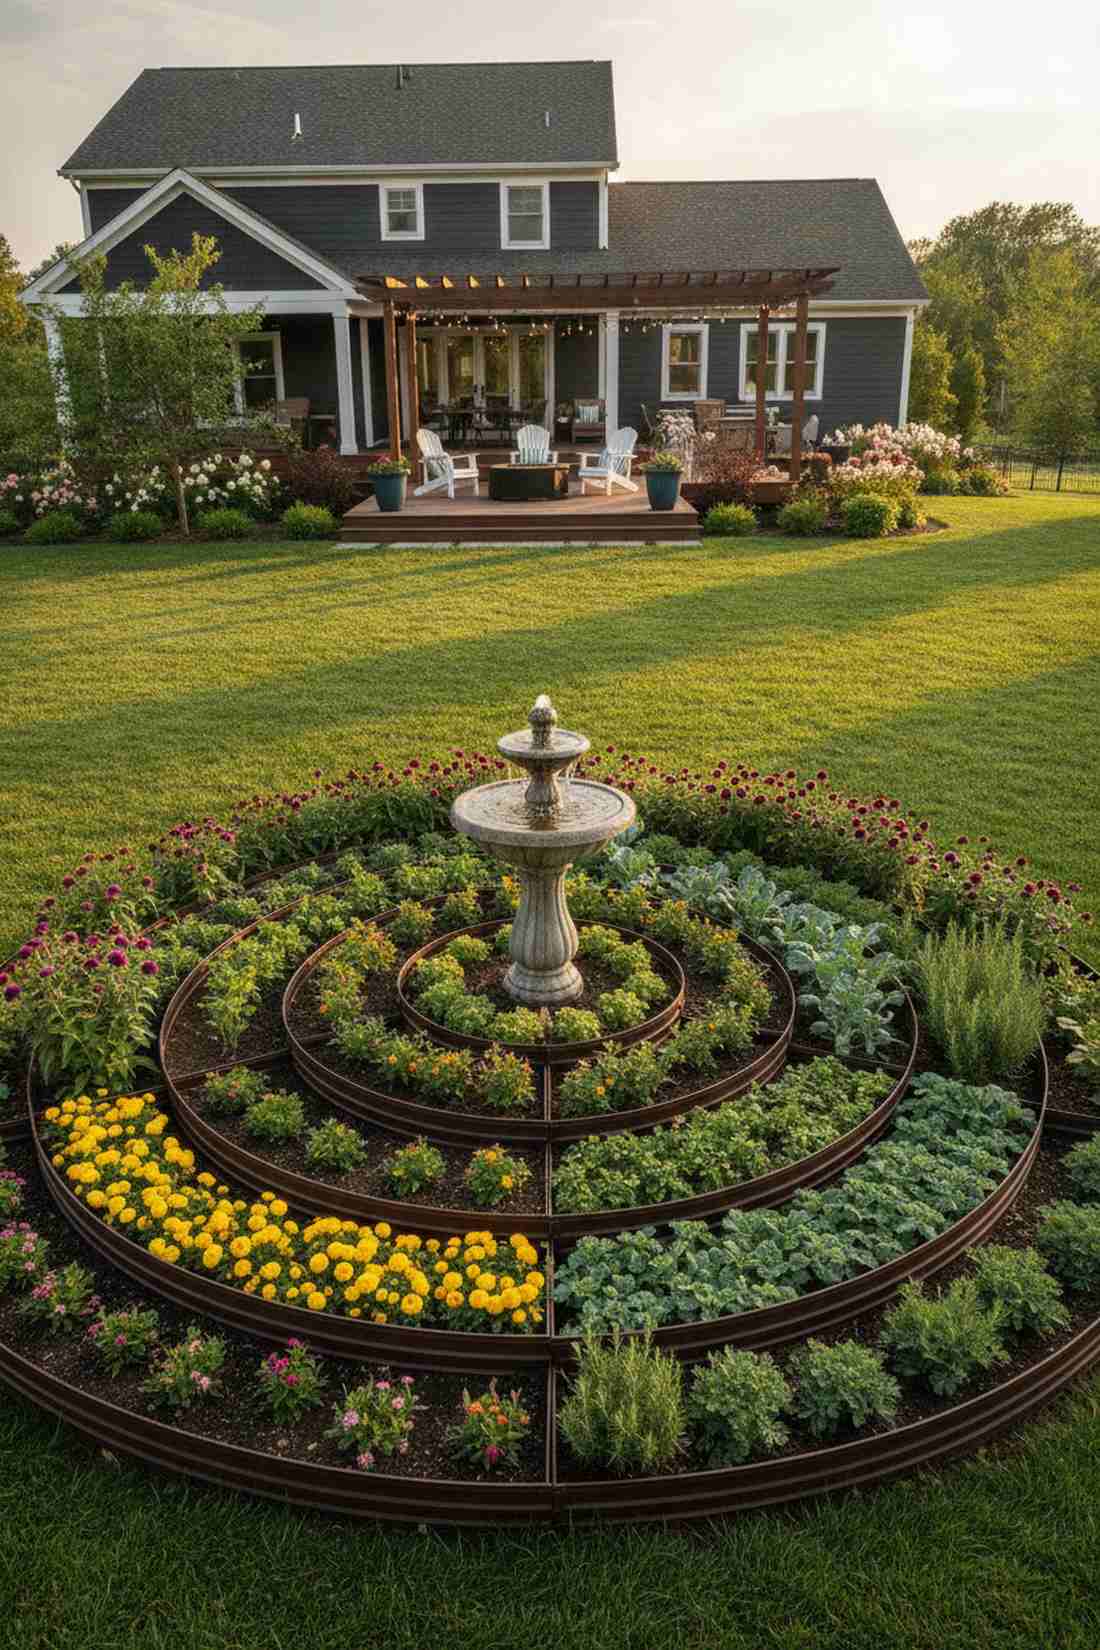
Radiates a deep sense of peace and natural rhythm. This symmetrical wedge formation is visually stunning when placed in the center of an open yard.
Basic rows are incredibly boring, but a sacred geometry layout gives a designer-level finish that completely elevates the property. It perfectly separates plant families for easy crop rotation while maintaining a gorgeous aesthetic.
Laying out this intricate pattern costs around $50–$75. Save this for your dream garden layout!
- Key Materials: Flexible bender board, central focal piece
- Vibe / Style: Zen botanical sanctuary
- Difficulty: Moderate layout planning
- Budget Breakdown: Edging: $40 | Centerpiece: $25
- Creator’s Tip: Use a stake and string like a giant compass to draw perfect circles before you start digging.
- Smart Sourcing: Invest in flexible composite bender board (bulk pack) and a premium solar birdbath centerpiece.
16. Hexagonal Honeycomb Cluster
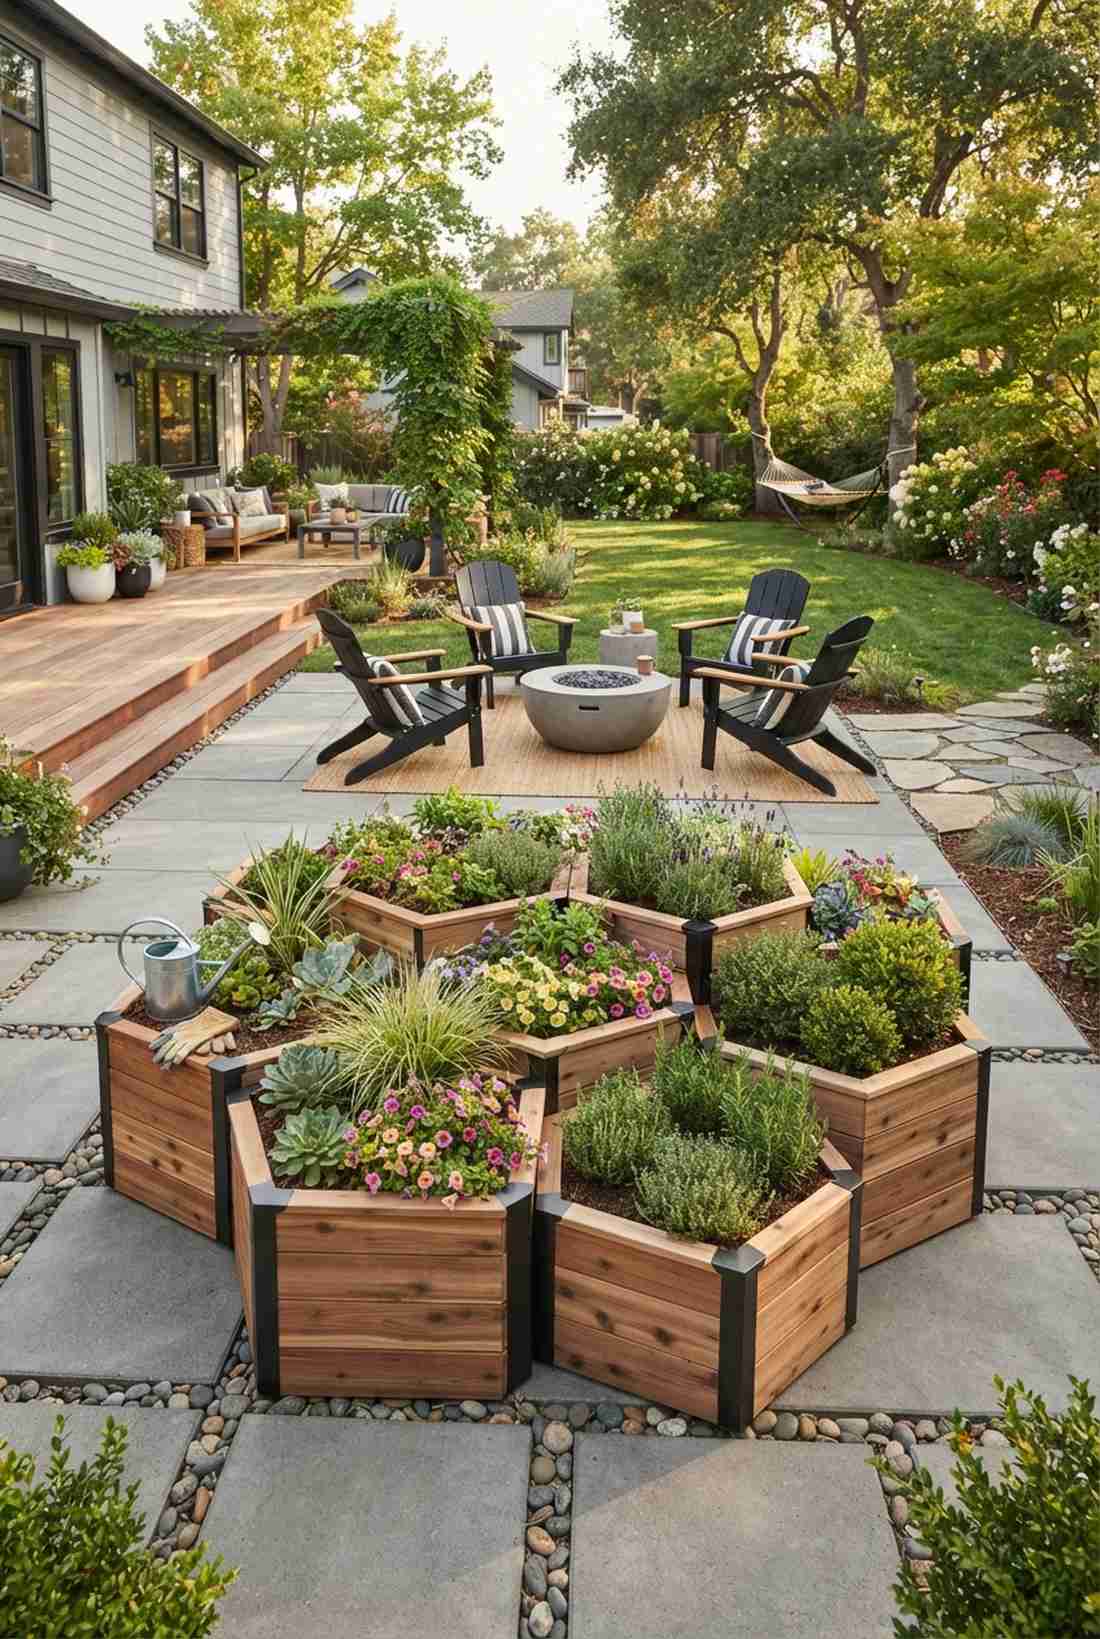
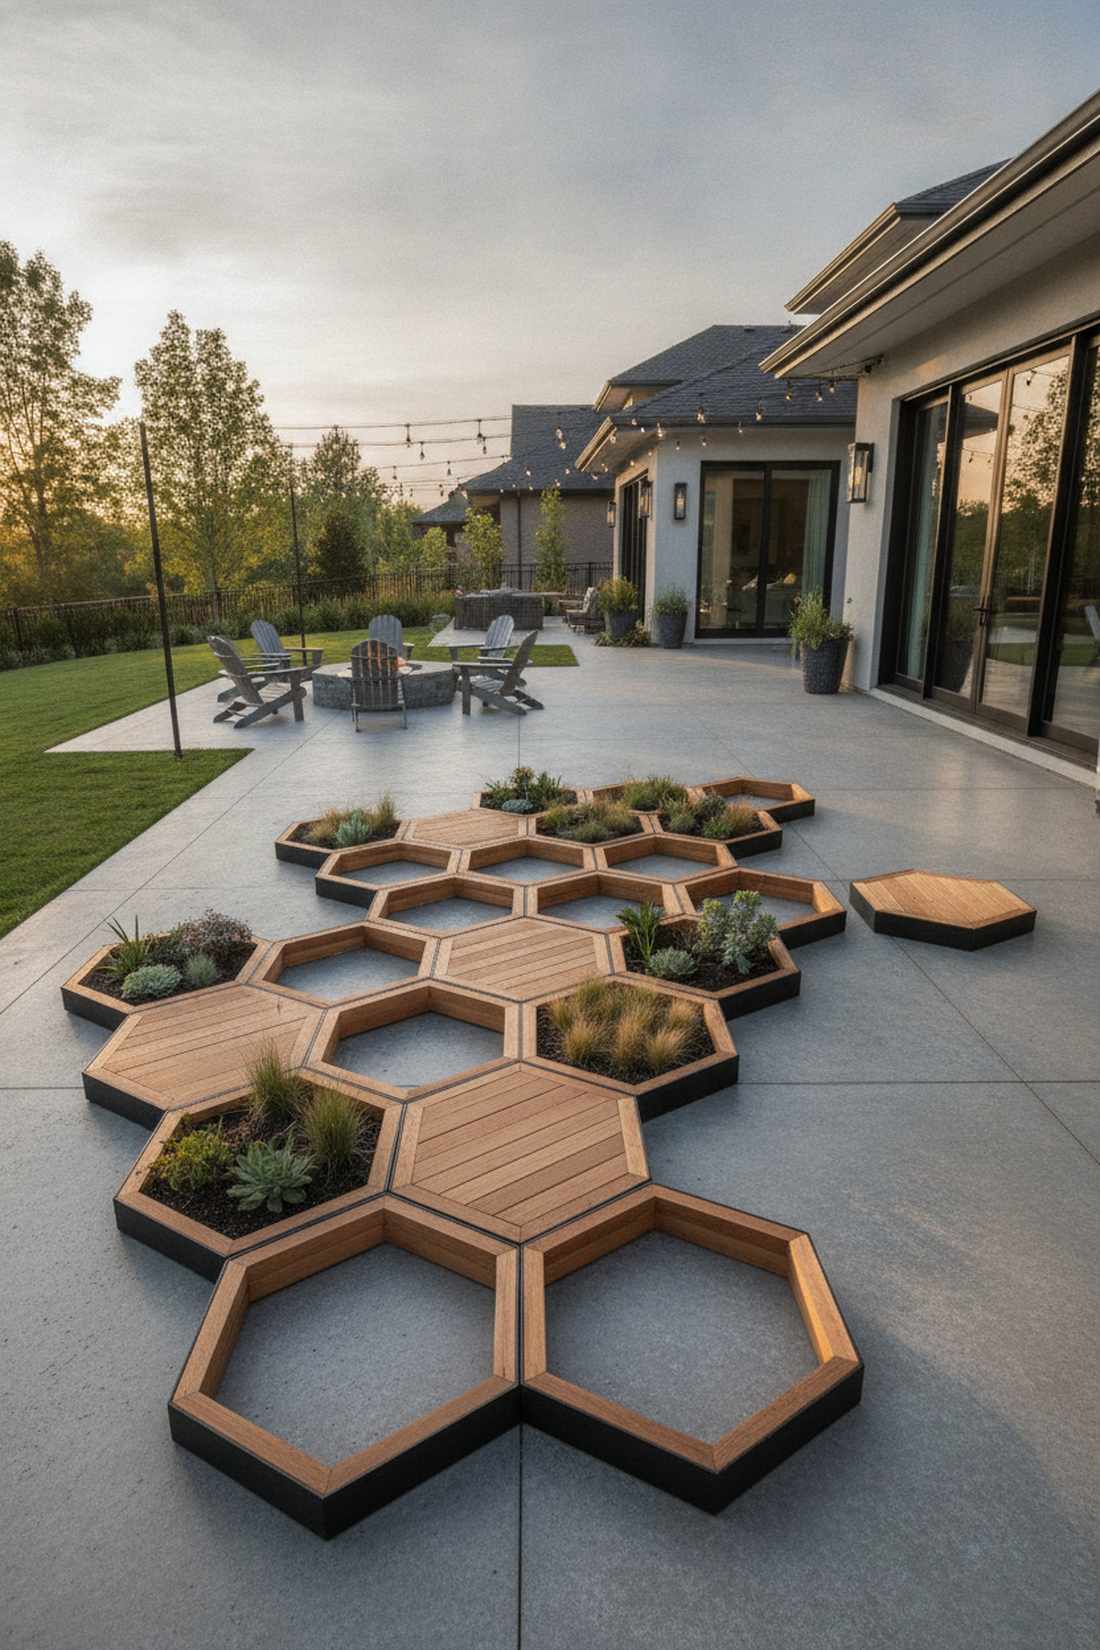
Feels like a hyper-modern, organic art installation. This interlocking geometric setup works exceptionally well for modular patios that need to expand over time.
Square boxes leave awkward gaps, but nesting hexagons together looks far more expensive than it is and wastes zero space. You can easily add a new pod every season without messing up the overall design.
You can start a cluster of three for about $70–$100.
- Key Materials: 60-degree bracket joints, cedar planks
- Vibe / Style: Sleek geometric modernism
- Difficulty: Advanced angle cuts
- Budget Breakdown: Wood: $60 | Brackets: $30
- Creator’s Tip: Buy pre-angled corner brackets to skip the nightmare of cutting perfect 60-degree angles on a saw.
- Smart Sourcing: Use pre-cut hexagonal corner brackets (starter kit) and weather-treated wood panels.
17. Diamond Four-Point Bed
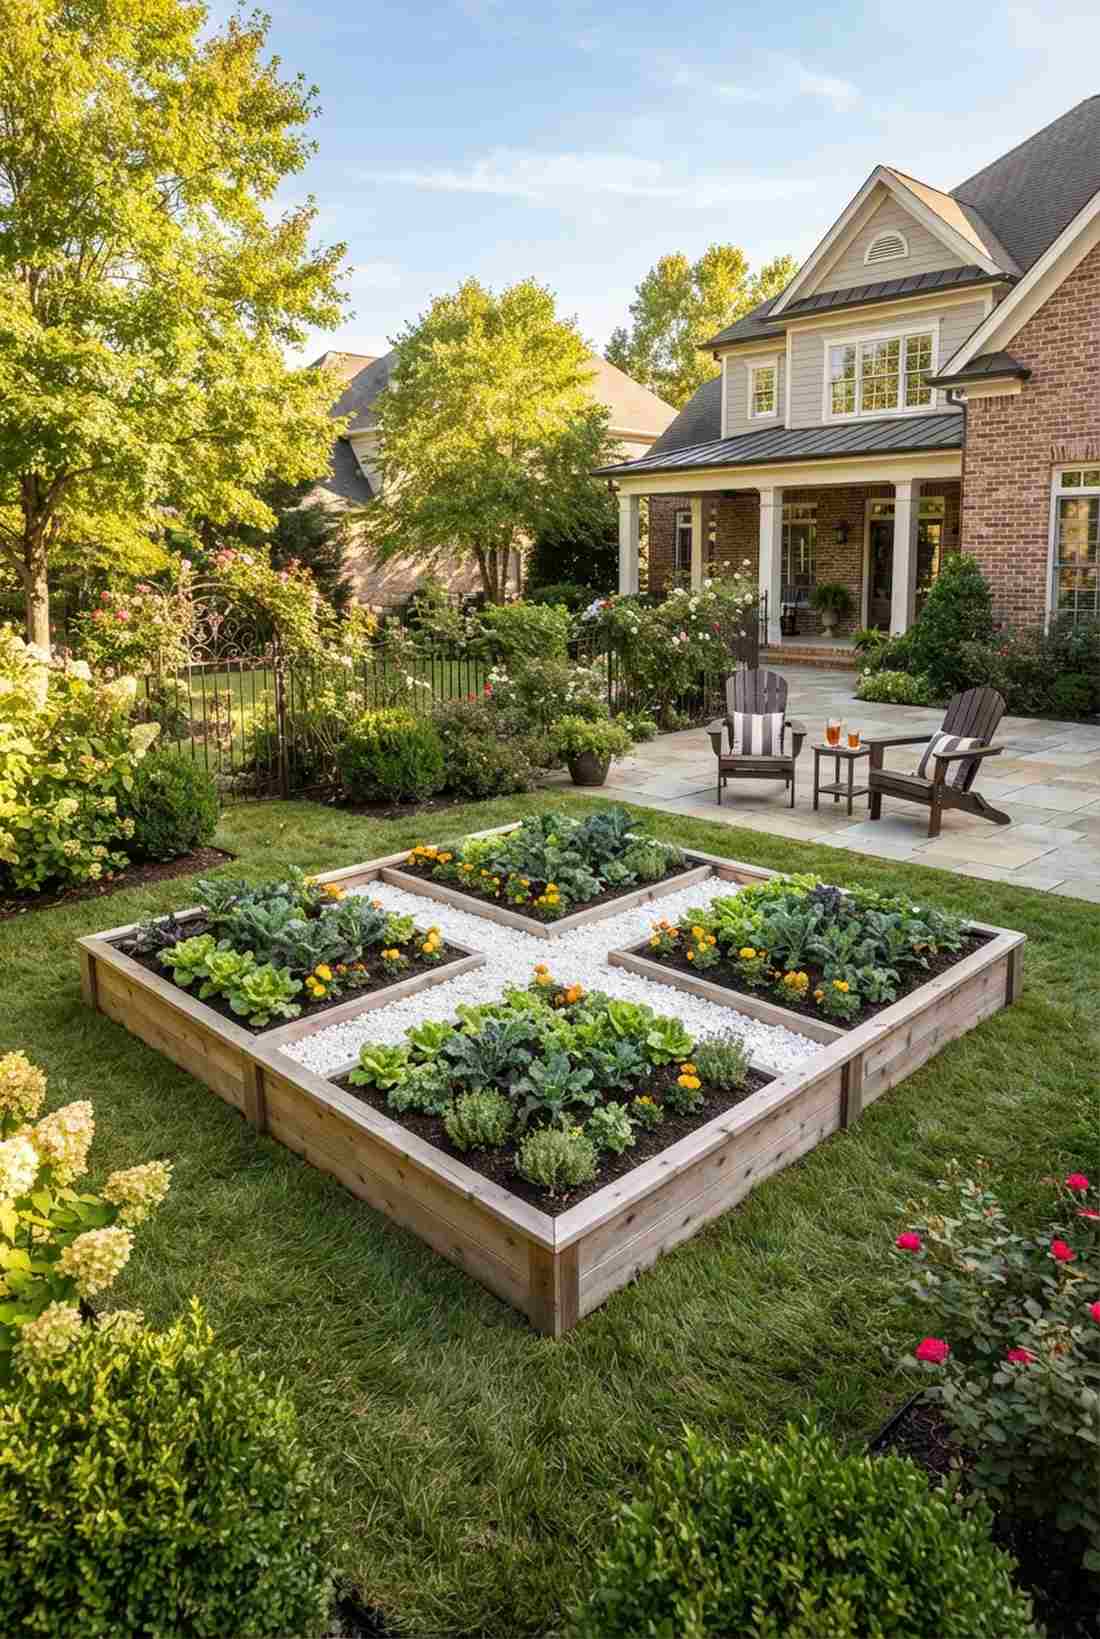
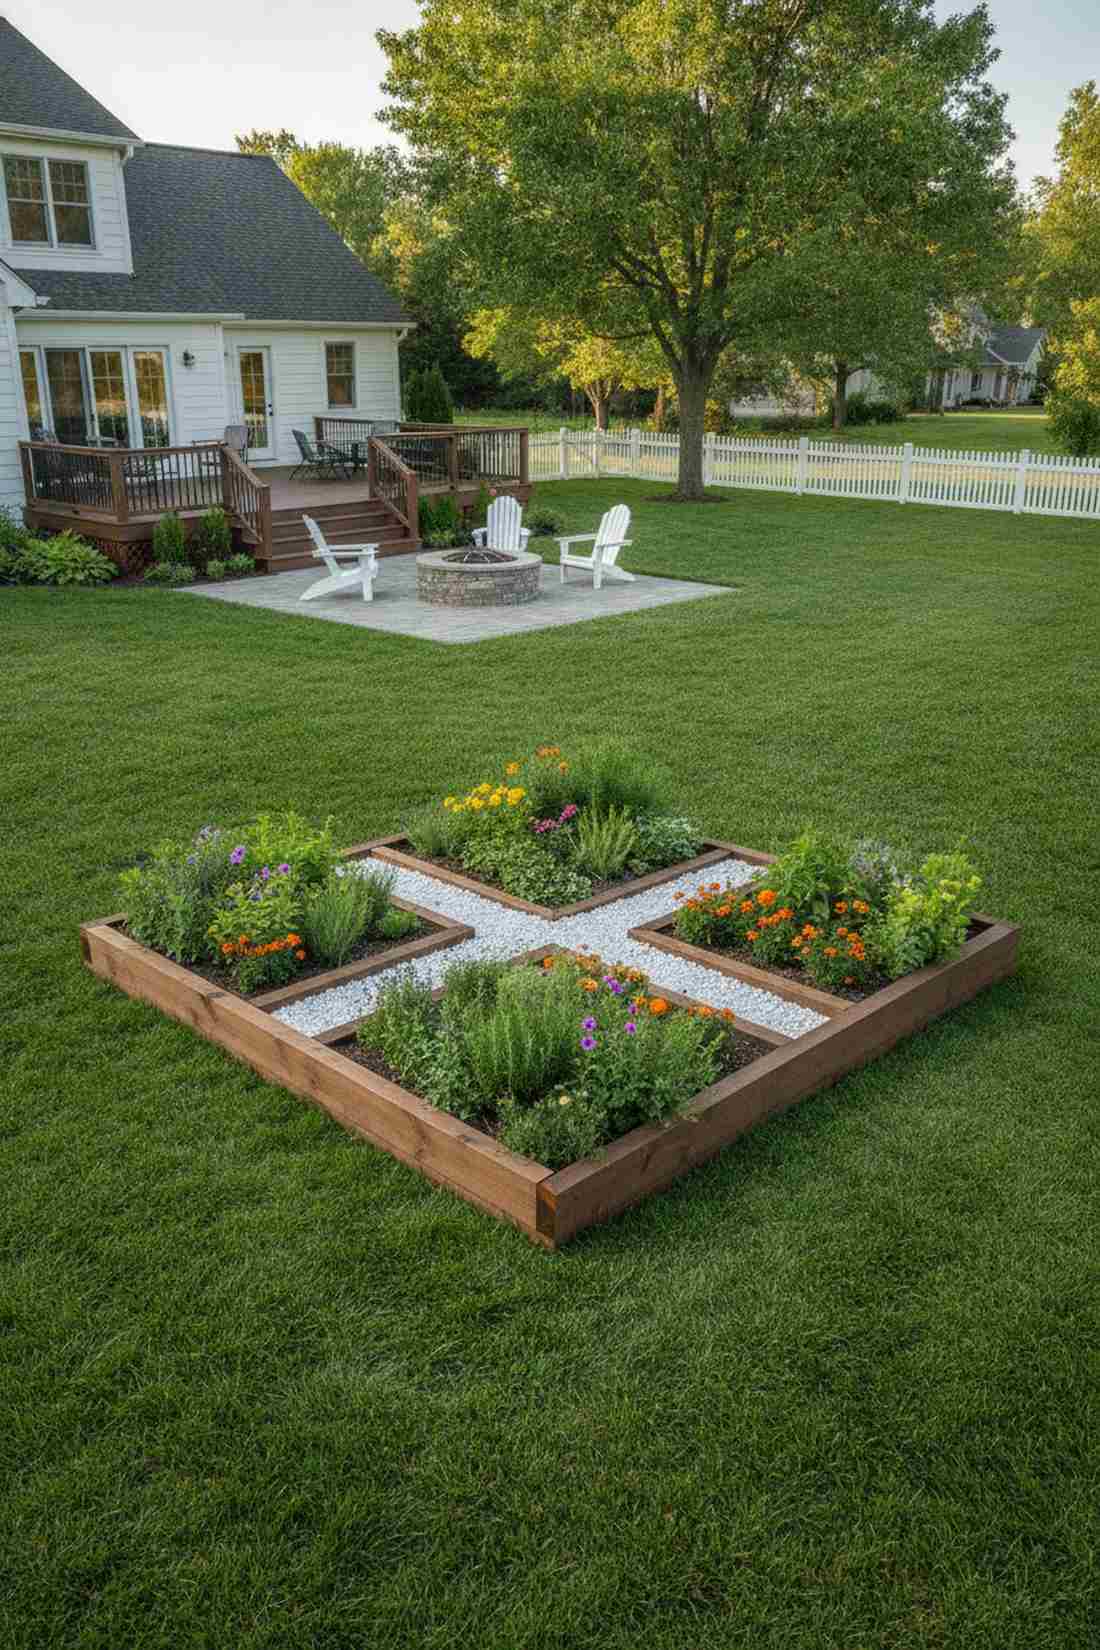
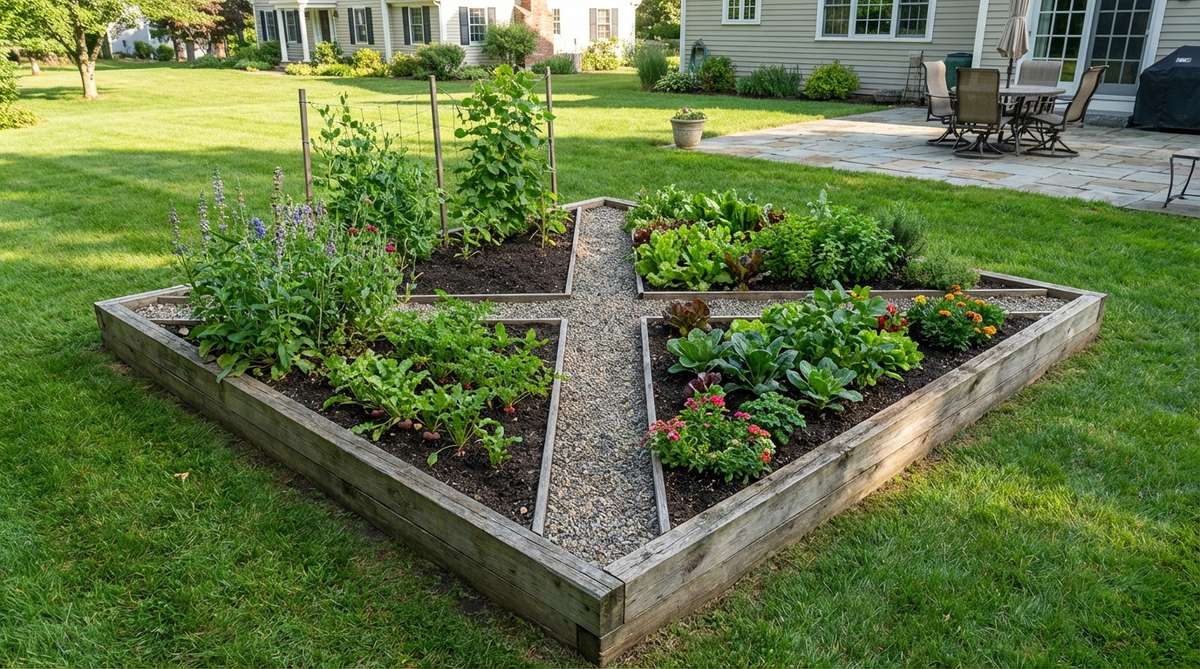
Gives off an elegant, formal estate energy. This rotated angular planter is perfect for maximizing sunlight exposure in a partially shaded yard.
Most beds sit perfectly parallel to the house, but rotating the frame 45 degrees delivers a surprisingly premium look. The pointed corners naturally face the cardinal directions, ensuring every single leaf catches the sun as it passes.
Building this striking shape costs around $40–$60. Pin this to outsmart a shady yard!
- Key Materials: Square frame, crossed pathway dividers
- Vibe / Style: Formal French parterre
- Difficulty: Easy beginner setup
- Budget Breakdown: Frame: $35 | Dividers: $15
- Creator’s Tip: Fill the crossed inner pathways with bright white gravel to make the diamond shape pop visually from afar.
- Smart Sourcing: Buy pre-cut raised bed kits (UV-coated) and crushed white decorative gravel (bulk pack).
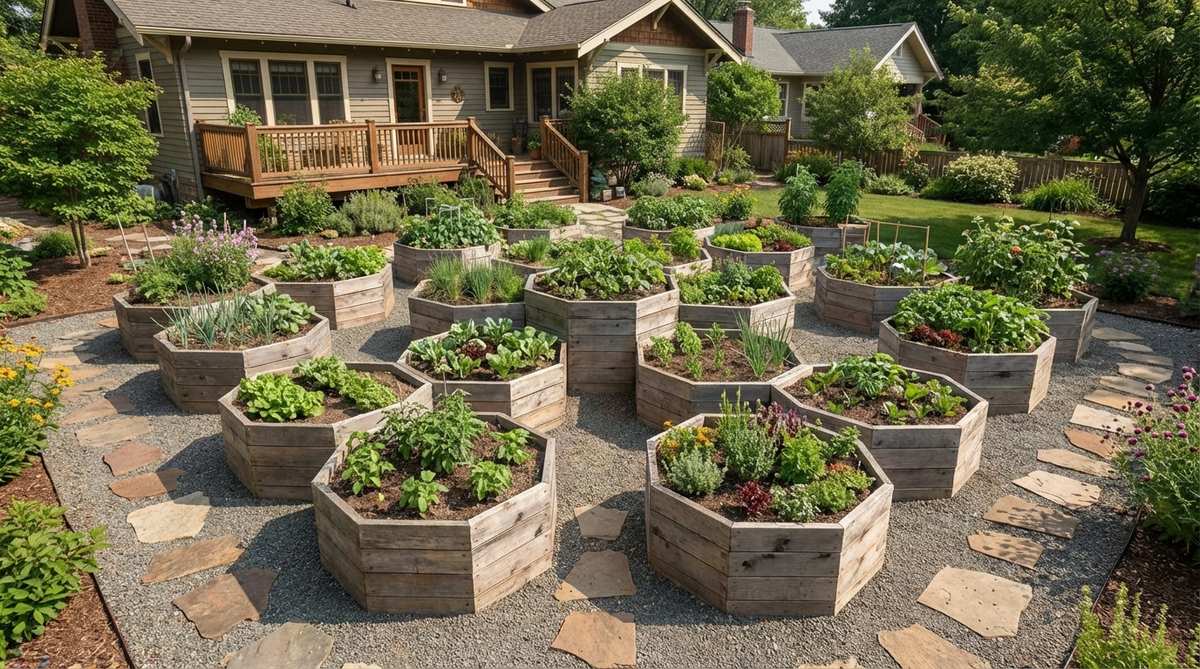
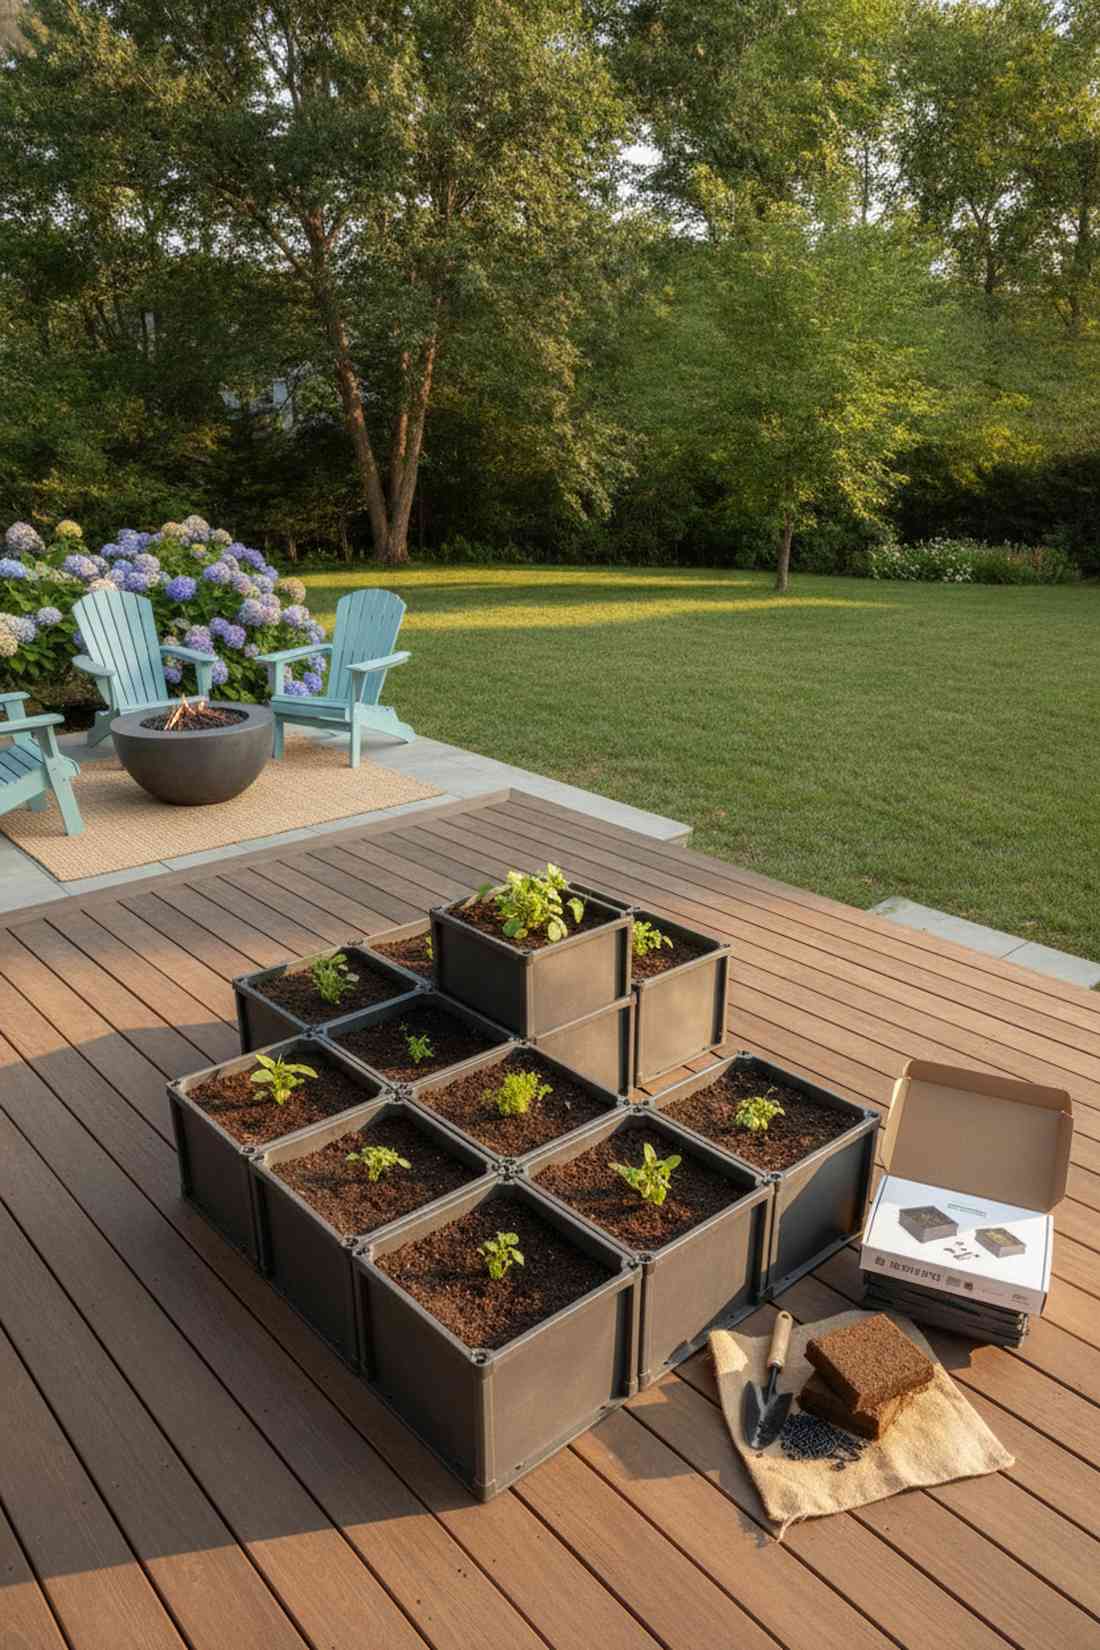
18. Rectangular Grid Matrix
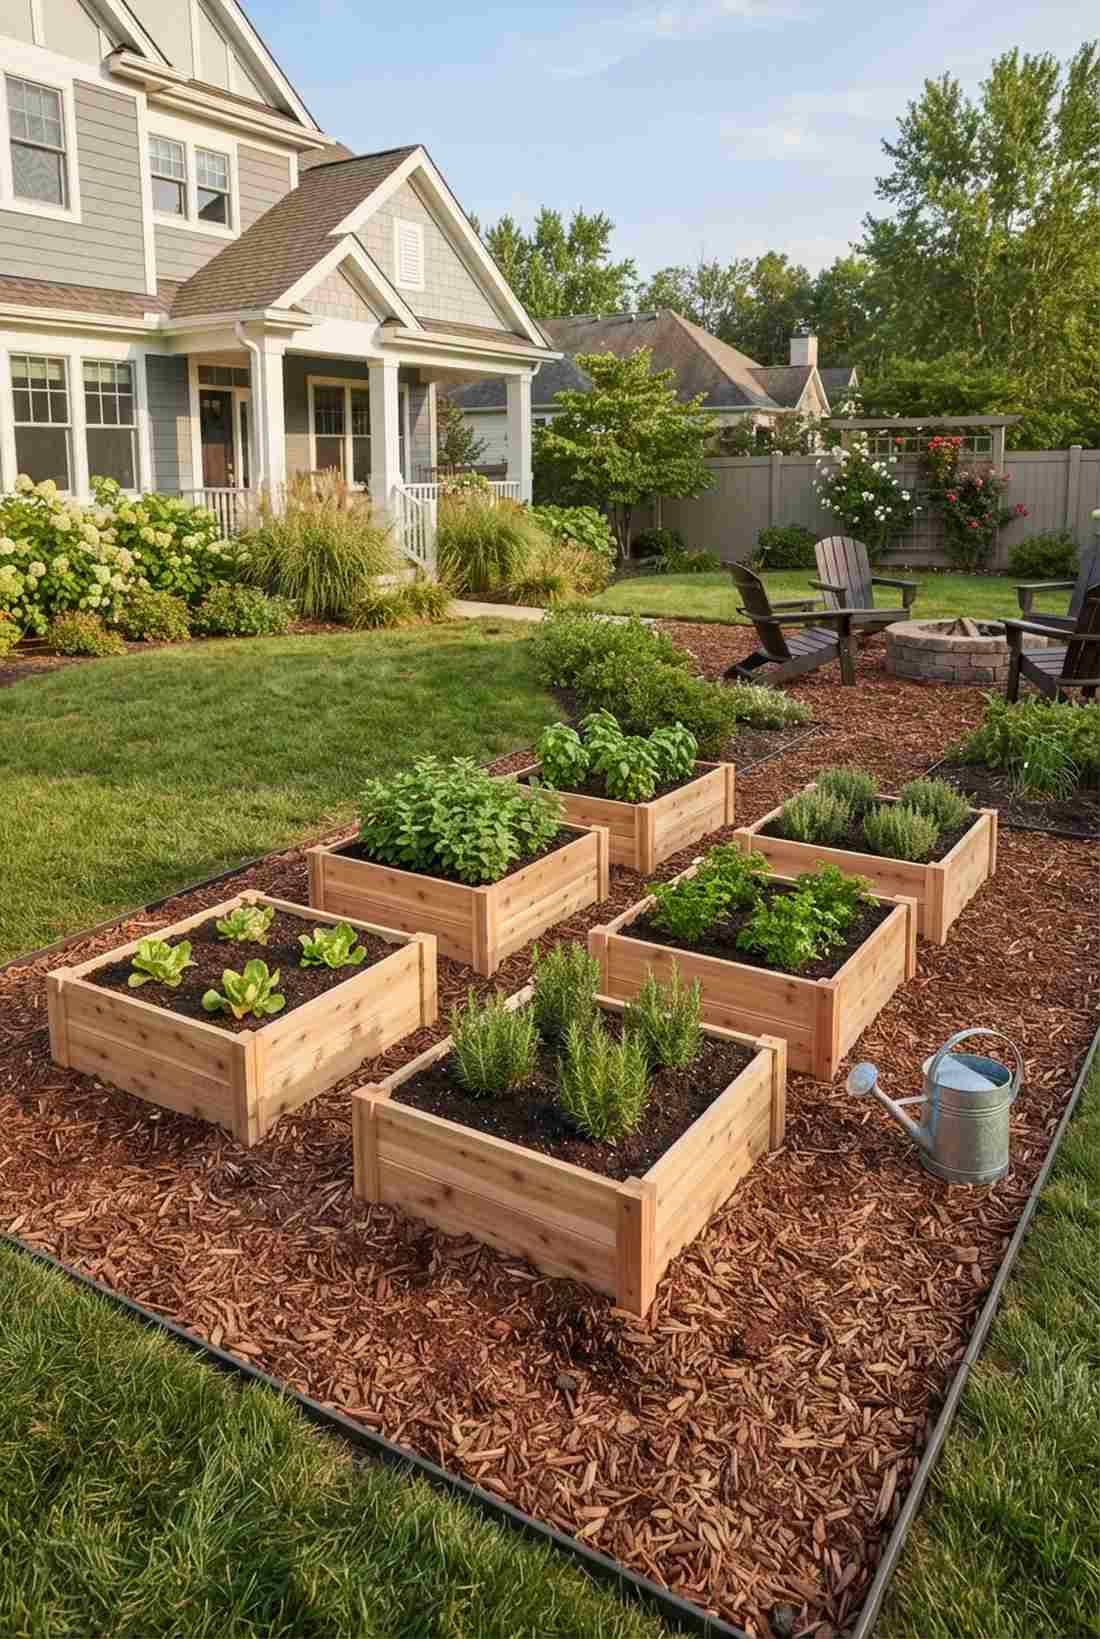
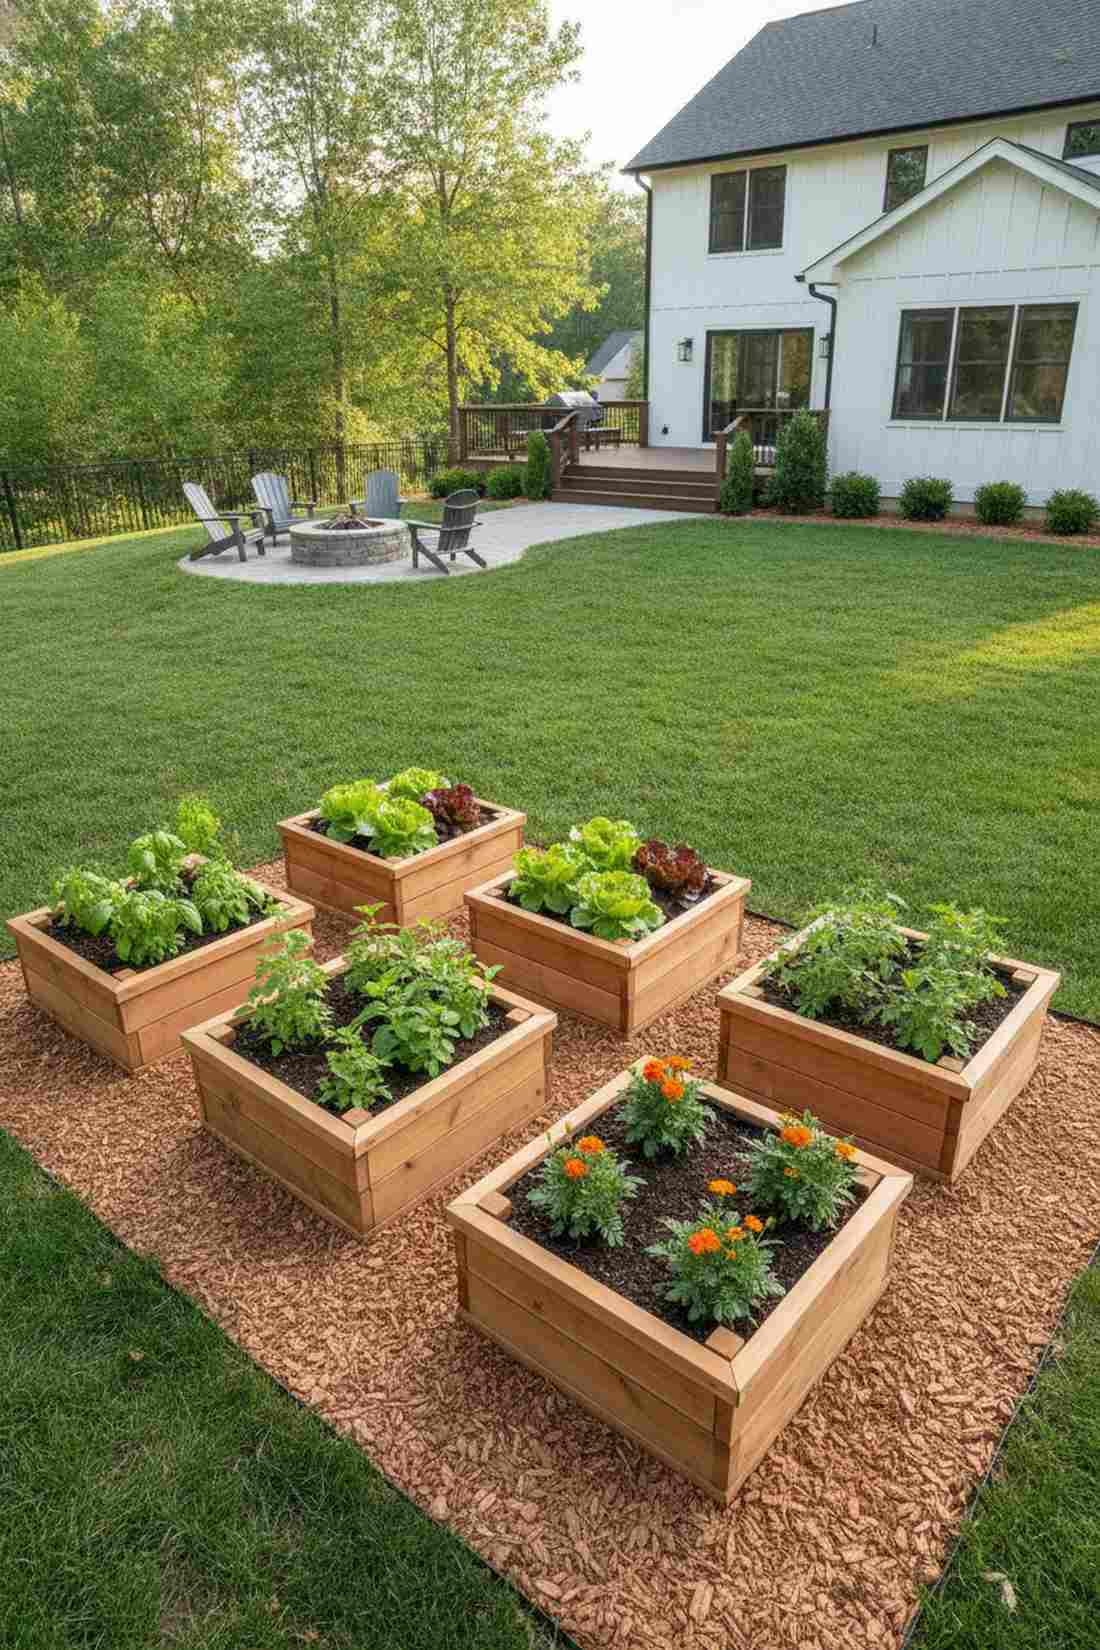
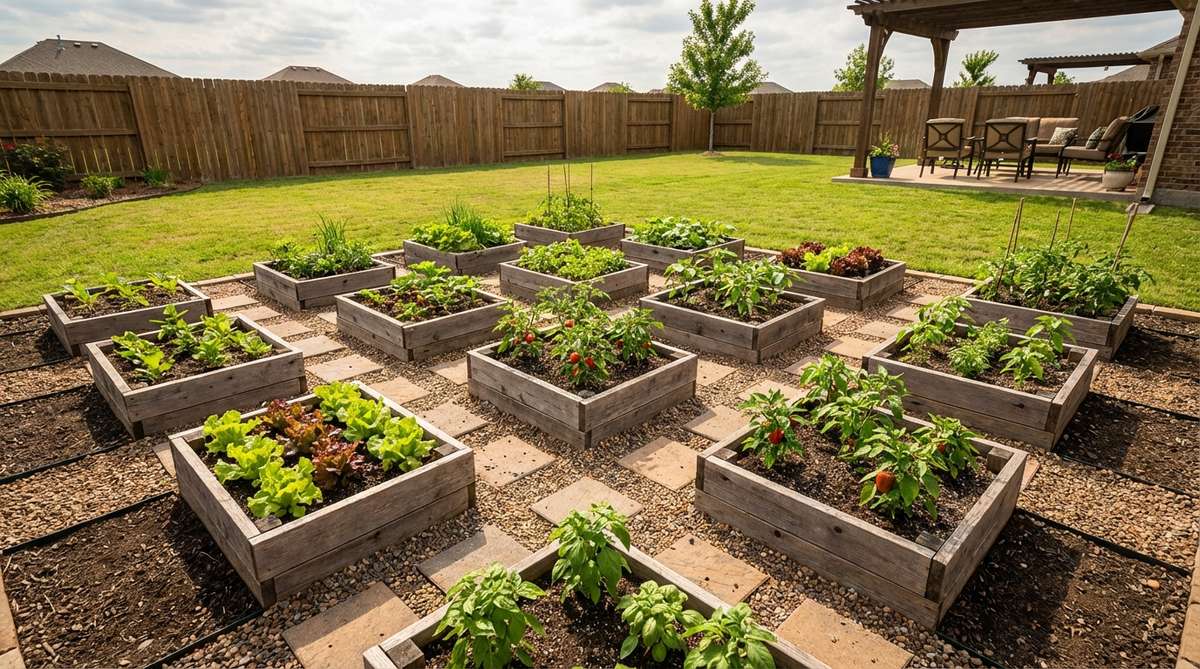
Feels incredibly clean, efficient, and deeply satisfying. This separated mini-box network is ideal for extreme organization and rapid succession planting.
Massive single beds get messy fast, but dividing the space into standalone pods looks far more expensive than it is. It naturally contains invasive herbs like mint and stops soil diseases from wiping out your entire crop.
You can set up a matrix of six small boxes for $60–$90.
- Key Materials: Small wooden crates, mulch pathways
- Vibe / Style: Ultra-organized modern grid
- Difficulty: Easy but repetitive
- Budget Breakdown: Boxes: $60 | Mulch: $20
- Creator’s Tip: Leave exactly 18 inches between every box so you can comfortably kneel or roll a wheelbarrow through.
- Smart Sourcing: Grab modular cedar planter boxes (bulk pack) and premium cedar mulch.
Material Guide: Cheap vs. Premium Aesthetic
Knowing exactly where to save and where to spend makes all the difference in achieving that “looks expensive but isn’t” vibe.
- Standard vs. UV-Resistant/Premium: Upgrading to UV-coated plastics and rot-resistant cedar stops your beds from turning gray, cracking, or splintering after one hot summer.
- Pre-made Kits vs. Sourcing Locally: While buying raw lumber seems cheaper, interlocking pre-made starter kits save hours of measuring and eliminate the need for expensive power tools.
If you’re tired of walking on mud to reach your tomatoes, this next pathway-integrated design is an absolute game-changer…
Path-Integrated Systems
These layouts incorporate pathways as functional design elements rather than wasted space. Strategic path placement improves accessibility while creating distinct growing zones that enhance garden productivity.
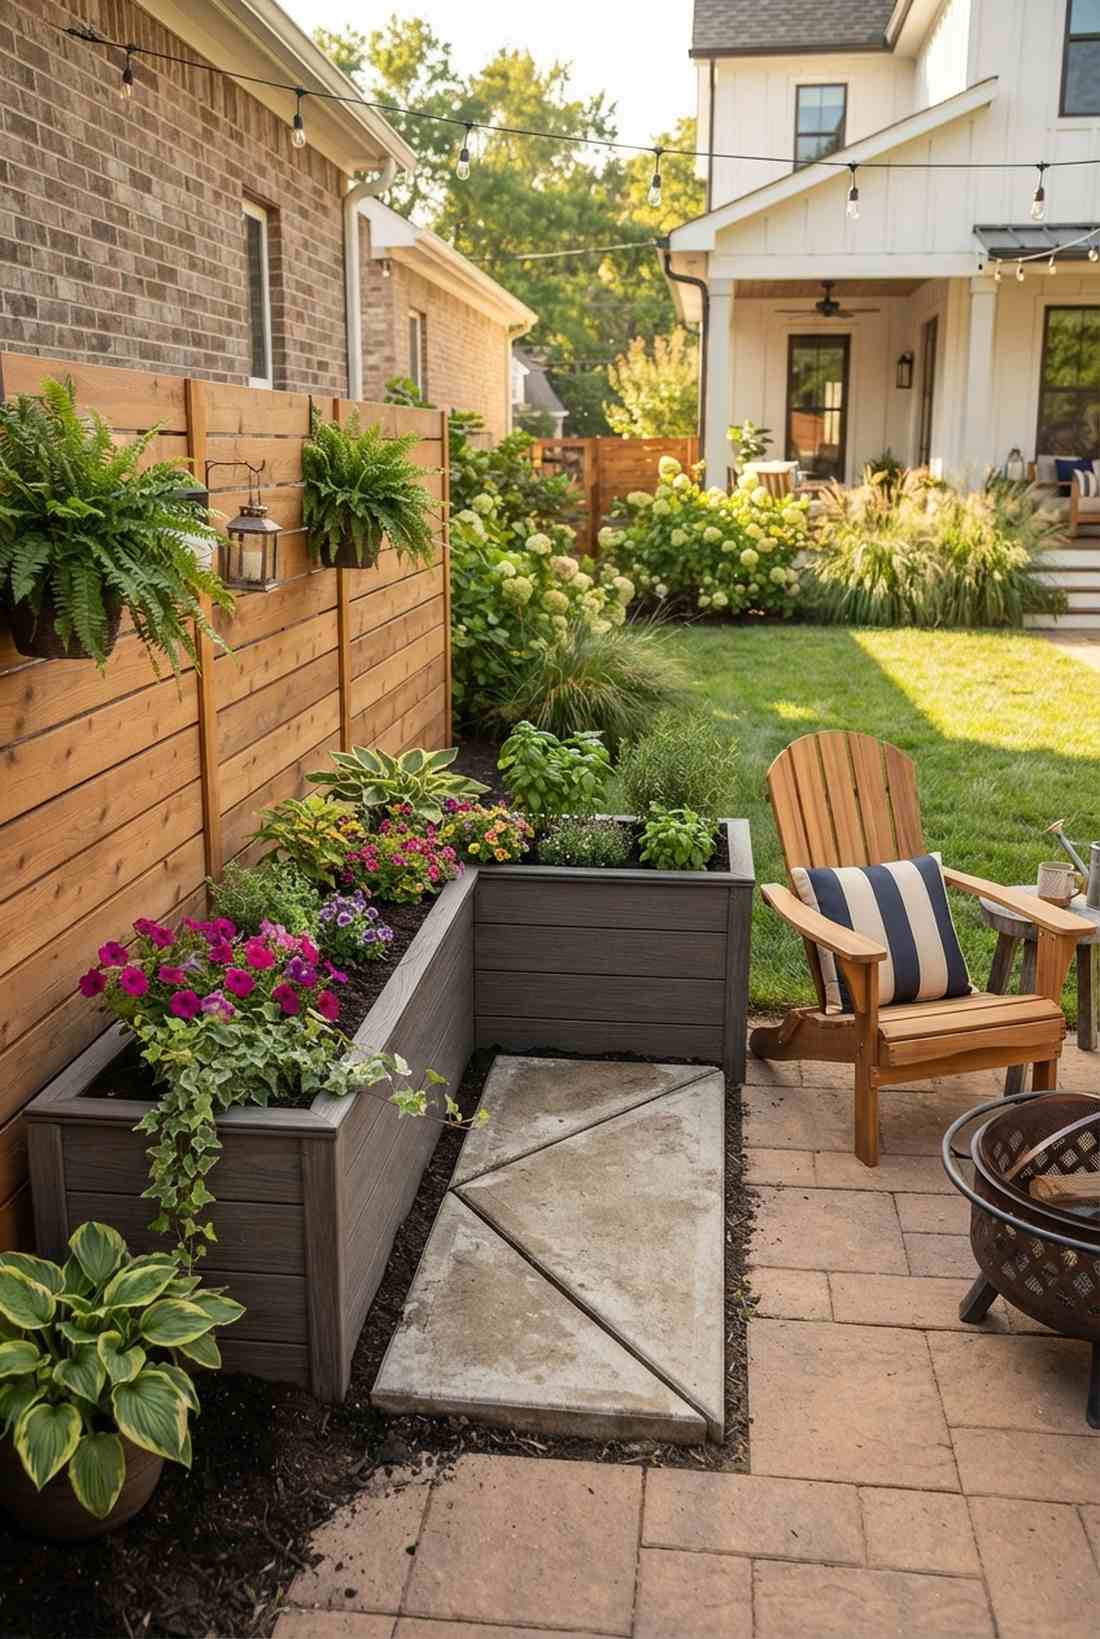
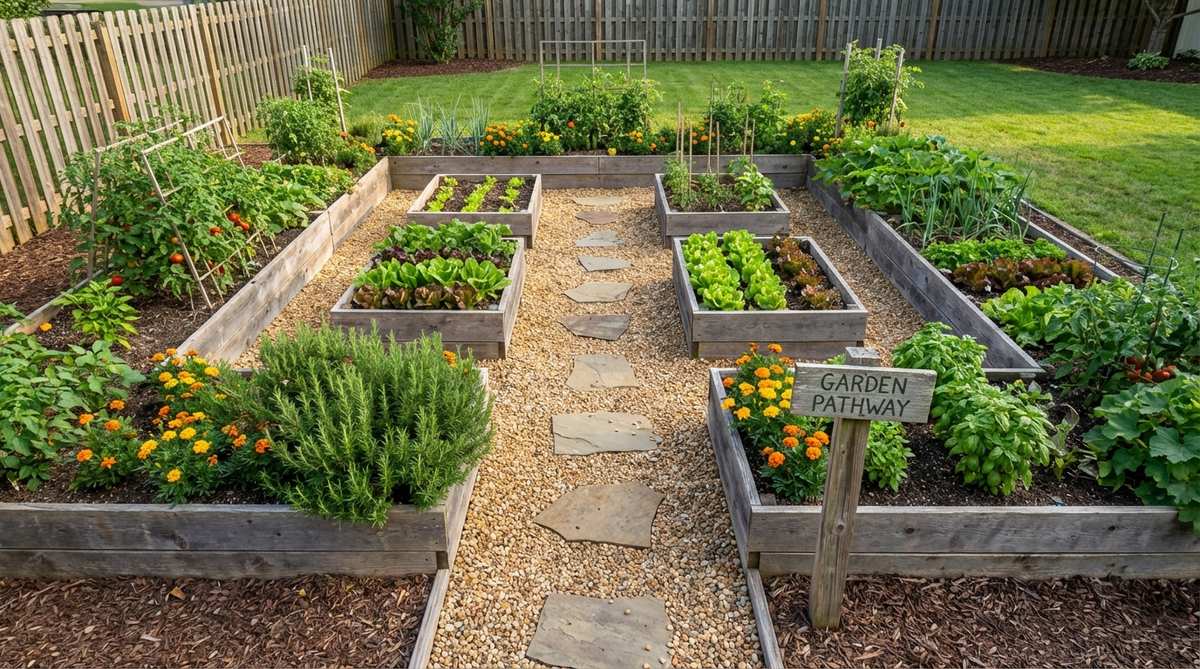
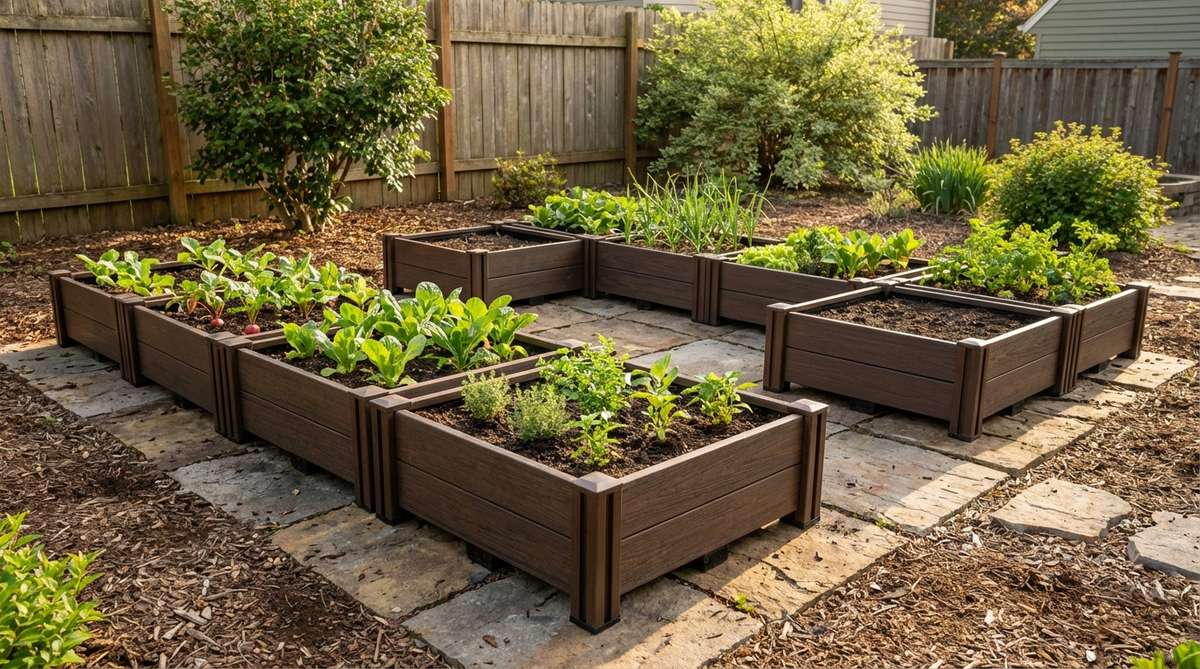
19. U-Shaped Embrace Bed
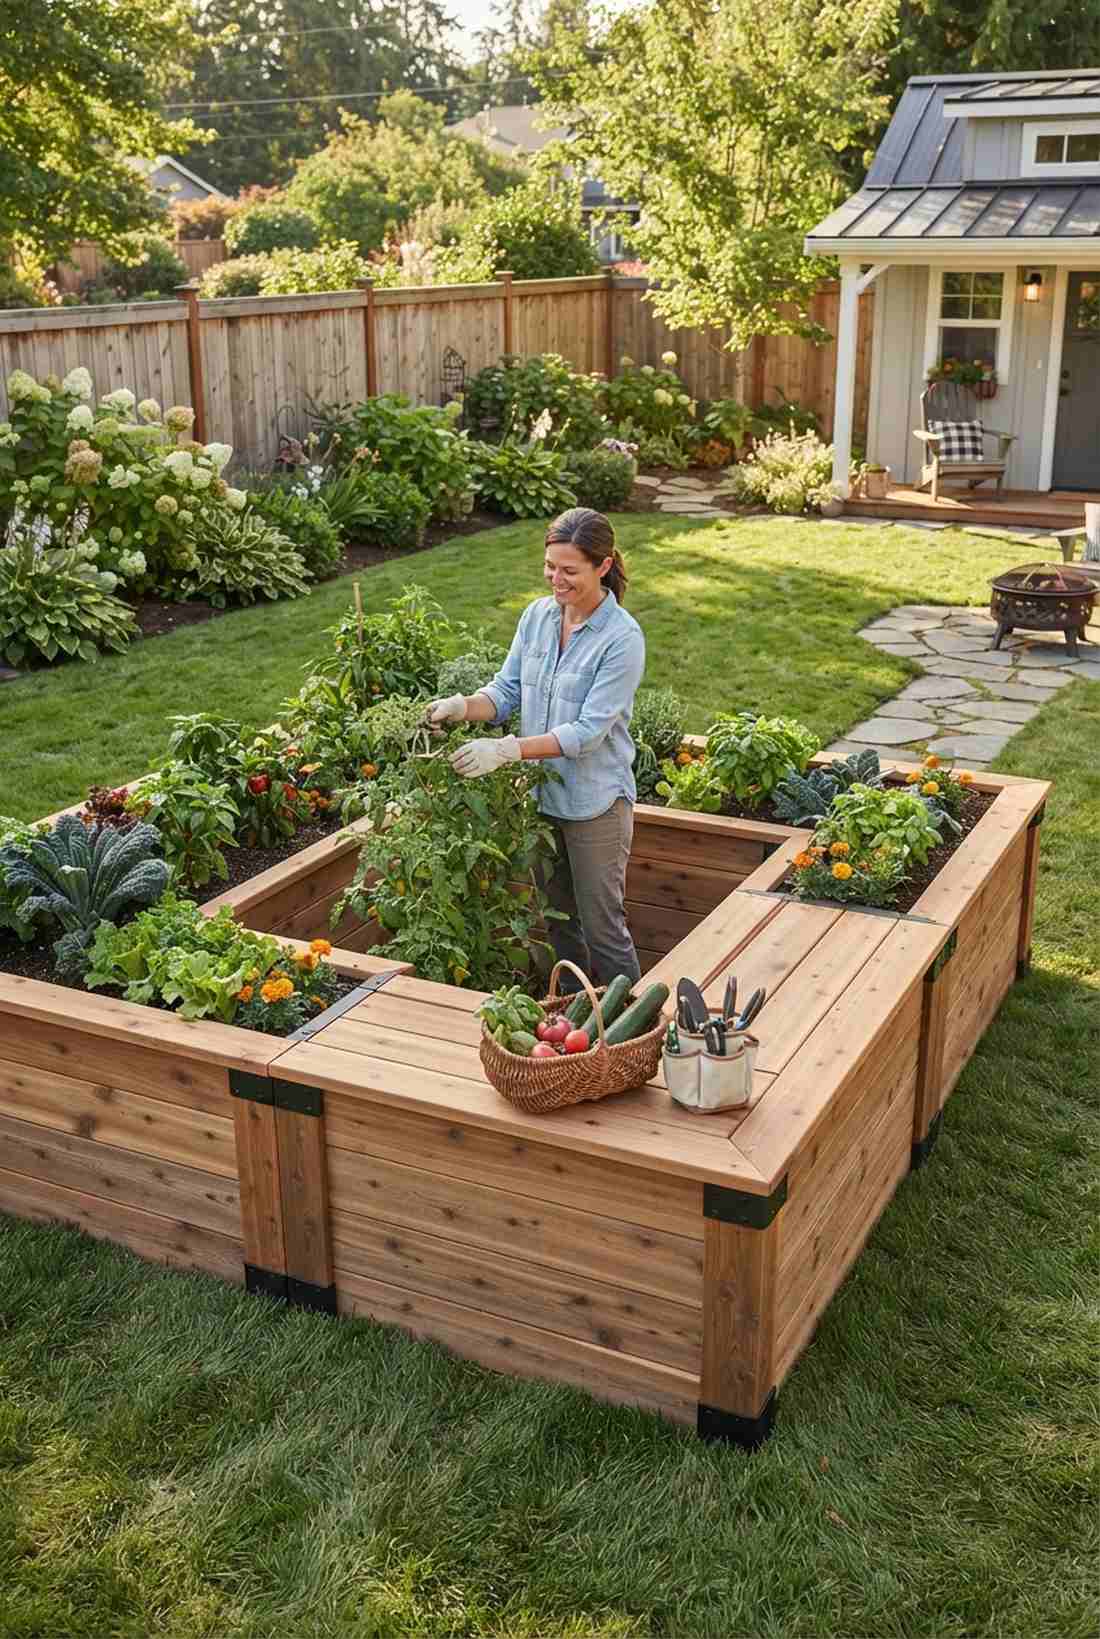
Feels like a personalized gardening cockpit. This wraparound planter bay works exceptionally well for keeping your tools and harvest baskets right at the center.
Straight lines force you to walk endlessly, but a U-shape enclosure delivers a surprisingly premium look and supreme efficiency. You can literally stand in one spot and water, prune, and harvest an enormous amount of food.
You can easily pull this off for $80–$120. Save this for the ultimate ergonomic setup!
- Key Materials: Long side planks, short connector boards
- Vibe / Style: High-efficiency command center
- Difficulty: Intermediate
- Budget Breakdown: Wood: $90 | Brackets: $25
- Creator’s Tip: Cap the top edges with a flat 2×4 so you have a built-in bench to sit on while you work.
- Smart Sourcing: Order heavy-duty modular corner connectors (starter kits) and premium cedar capping boards.
20. Curved Pathway Borders
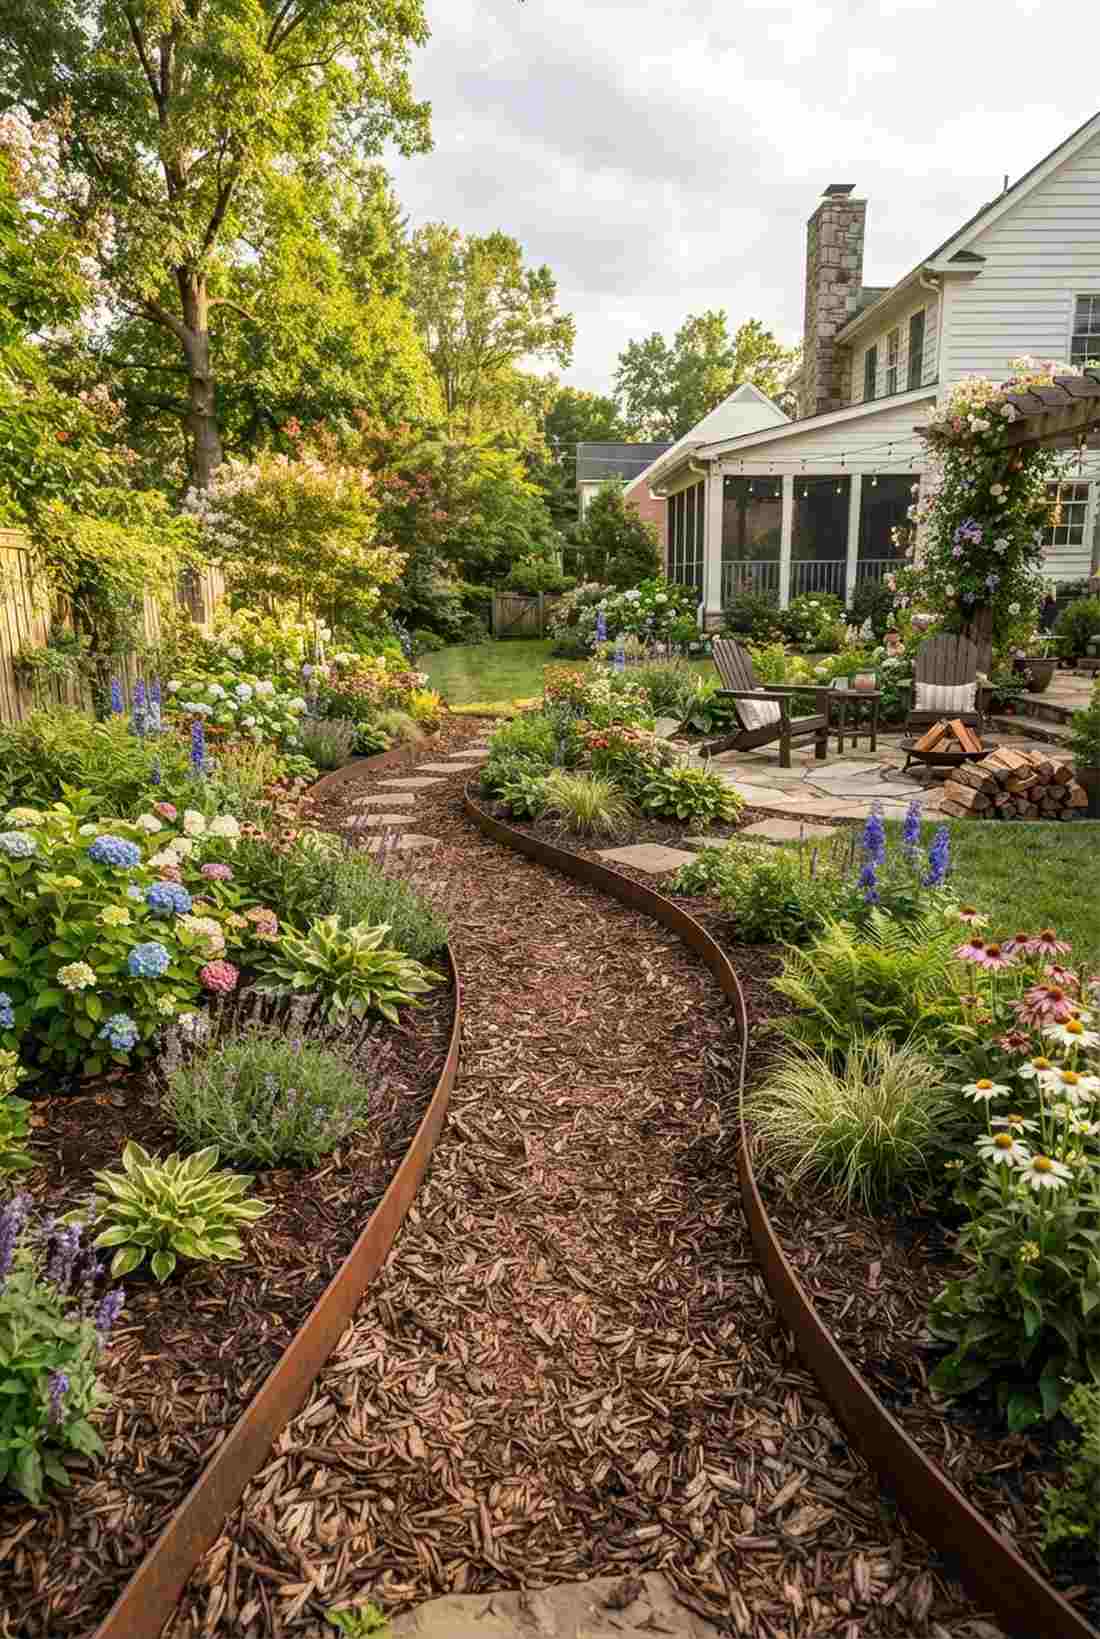
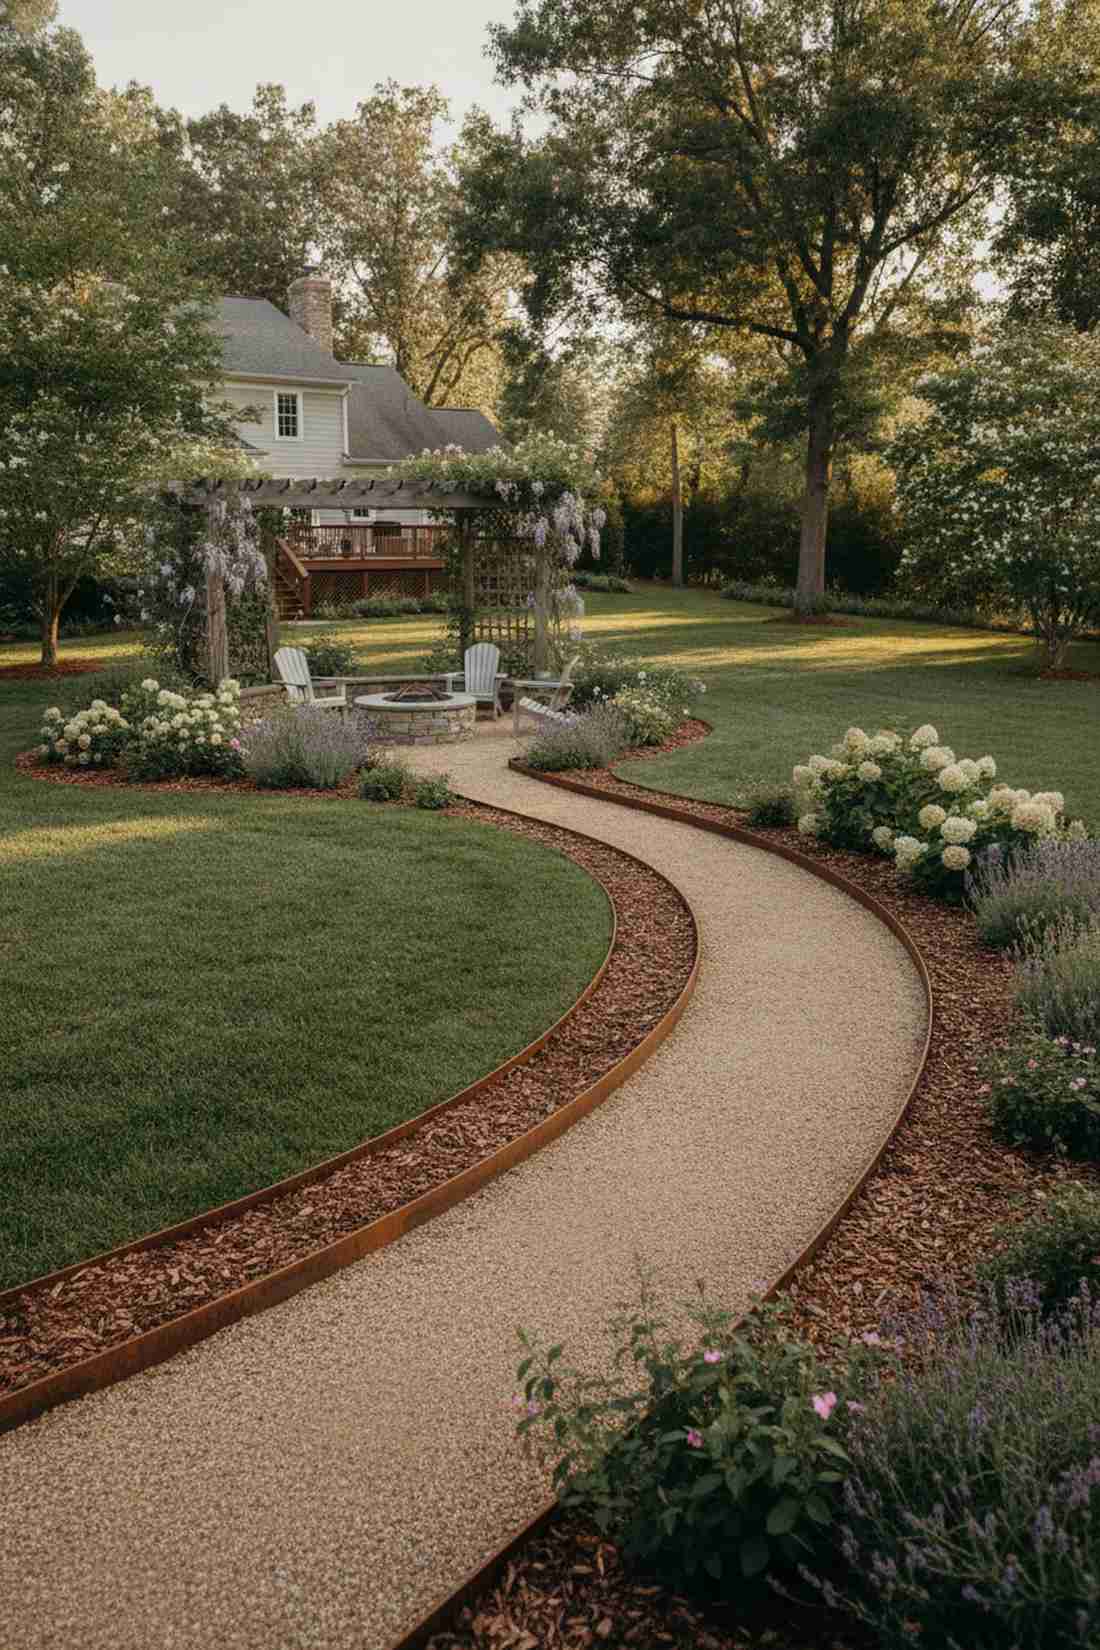
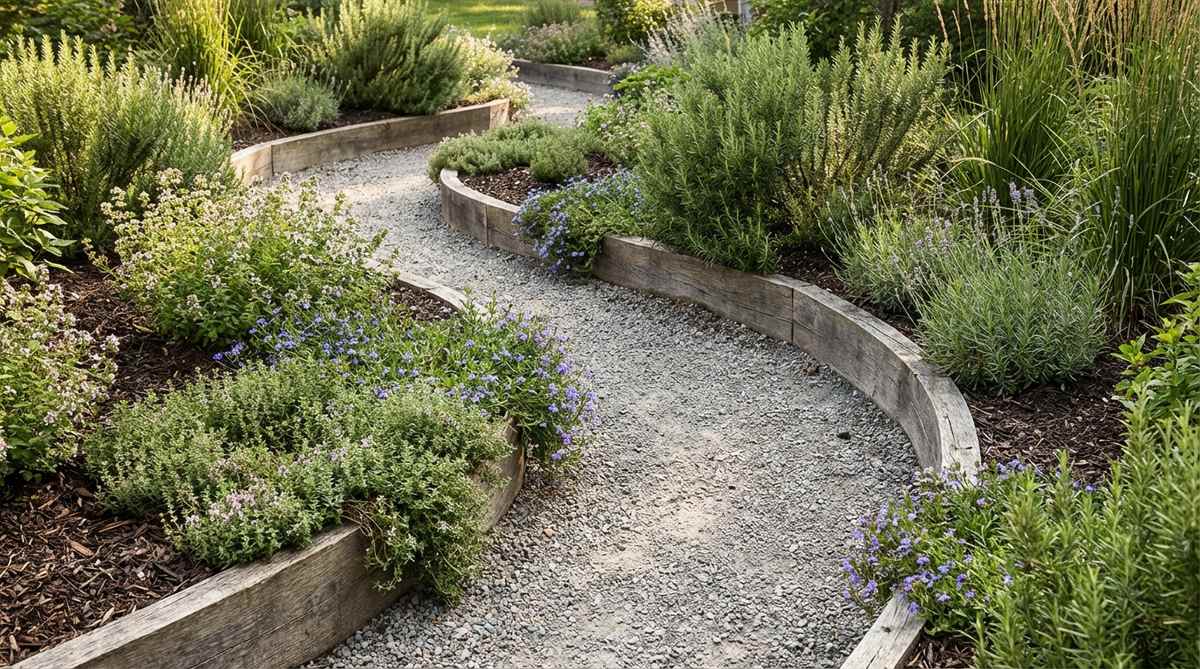
Brings a soft, enchanting flow to a rigid landscape. This meandering edge planter is perfect for guiding guests gently toward a backyard seating area.
Harsh rectangular boxes can look industrial, but sweeping organic curves give a designer-level finish. It naturally slows people down, making a small backyard feel much larger and more mysterious.
Adding these flowing borders usually costs $40–$70 for the edging materials.
- Key Materials: Bendable steel edging, wood chips
- Vibe / Style: Flowing organic cottagecore
- Difficulty: Easy shaping
- Budget Breakdown: Steel Edge: $45 | Wood Chips: $20
- Creator’s Tip: Lay out a garden hose to mock up the perfect natural curve before digging your trench.
- Smart Sourcing: Use bendable Cor-Ten steel edging (bulk pack) and organic shredded wood mulch.
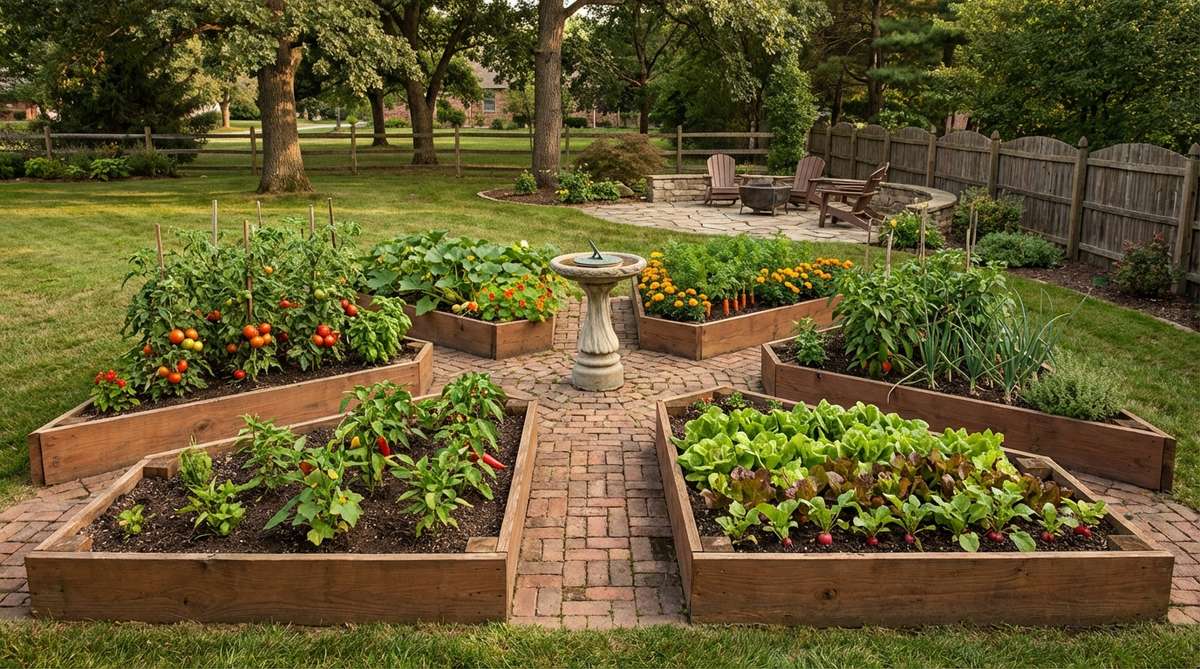
21. Central Spine with Side Pockets

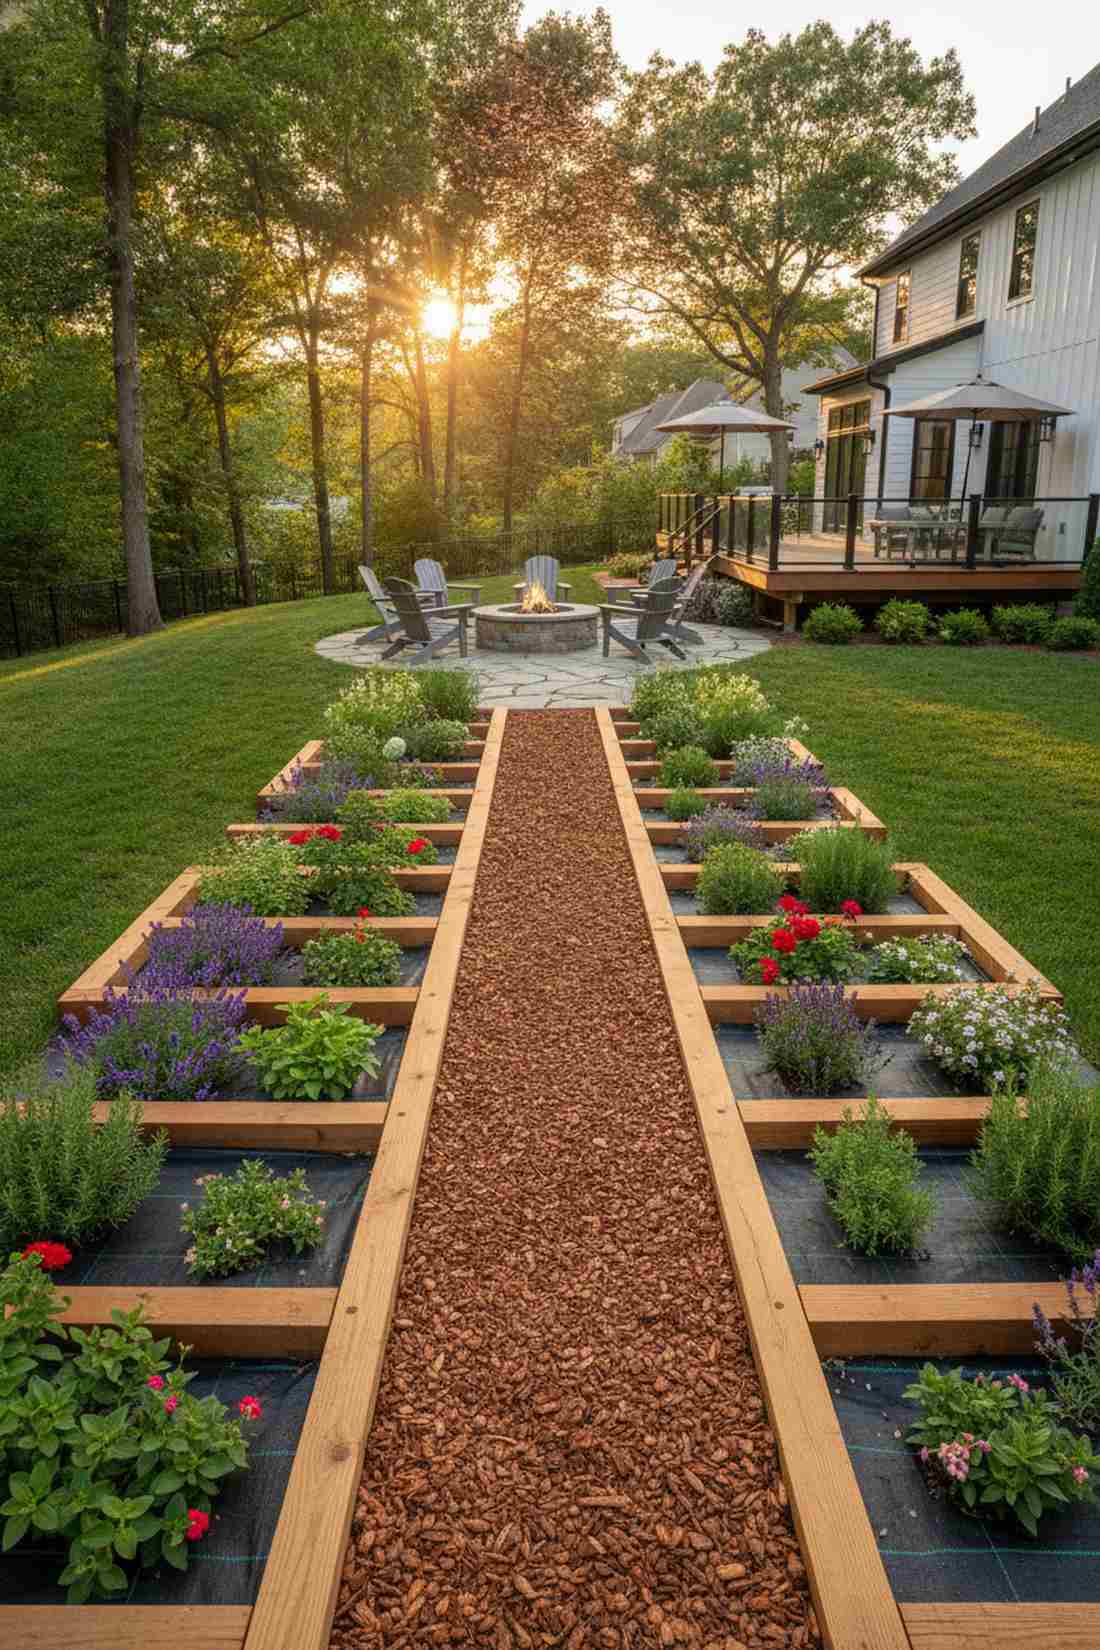
Feels incredibly smart and structurally imposing. This flanked pathway system is the absolute best way to break up a long, narrow property line.
A single long bed is hard to manage, but popping out alternating side pockets looks far more expensive than it is. It breaks up the visual monotony and lets you easily step in and out without crushing delicate root systems.
You can build this structured pathway for around $70–$100. Pin this to maximize a skinny yard!
- Key Materials: Main frame boards, perpendicular dividers
- Vibe / Style: Structured architectural walkway
- Difficulty: Moderate
- Budget Breakdown: Framing: $70 | Pathway Base: $20
- Creator’s Tip: Fill the main spine with thick wood chips to suppress weeds and create a soft, mud-free walking surface.
- Smart Sourcing: Grab pre-cut structural timber boards (starter kit) and heavy-duty landscape weed barrier.
22. Wagon Wheel Spoke Design
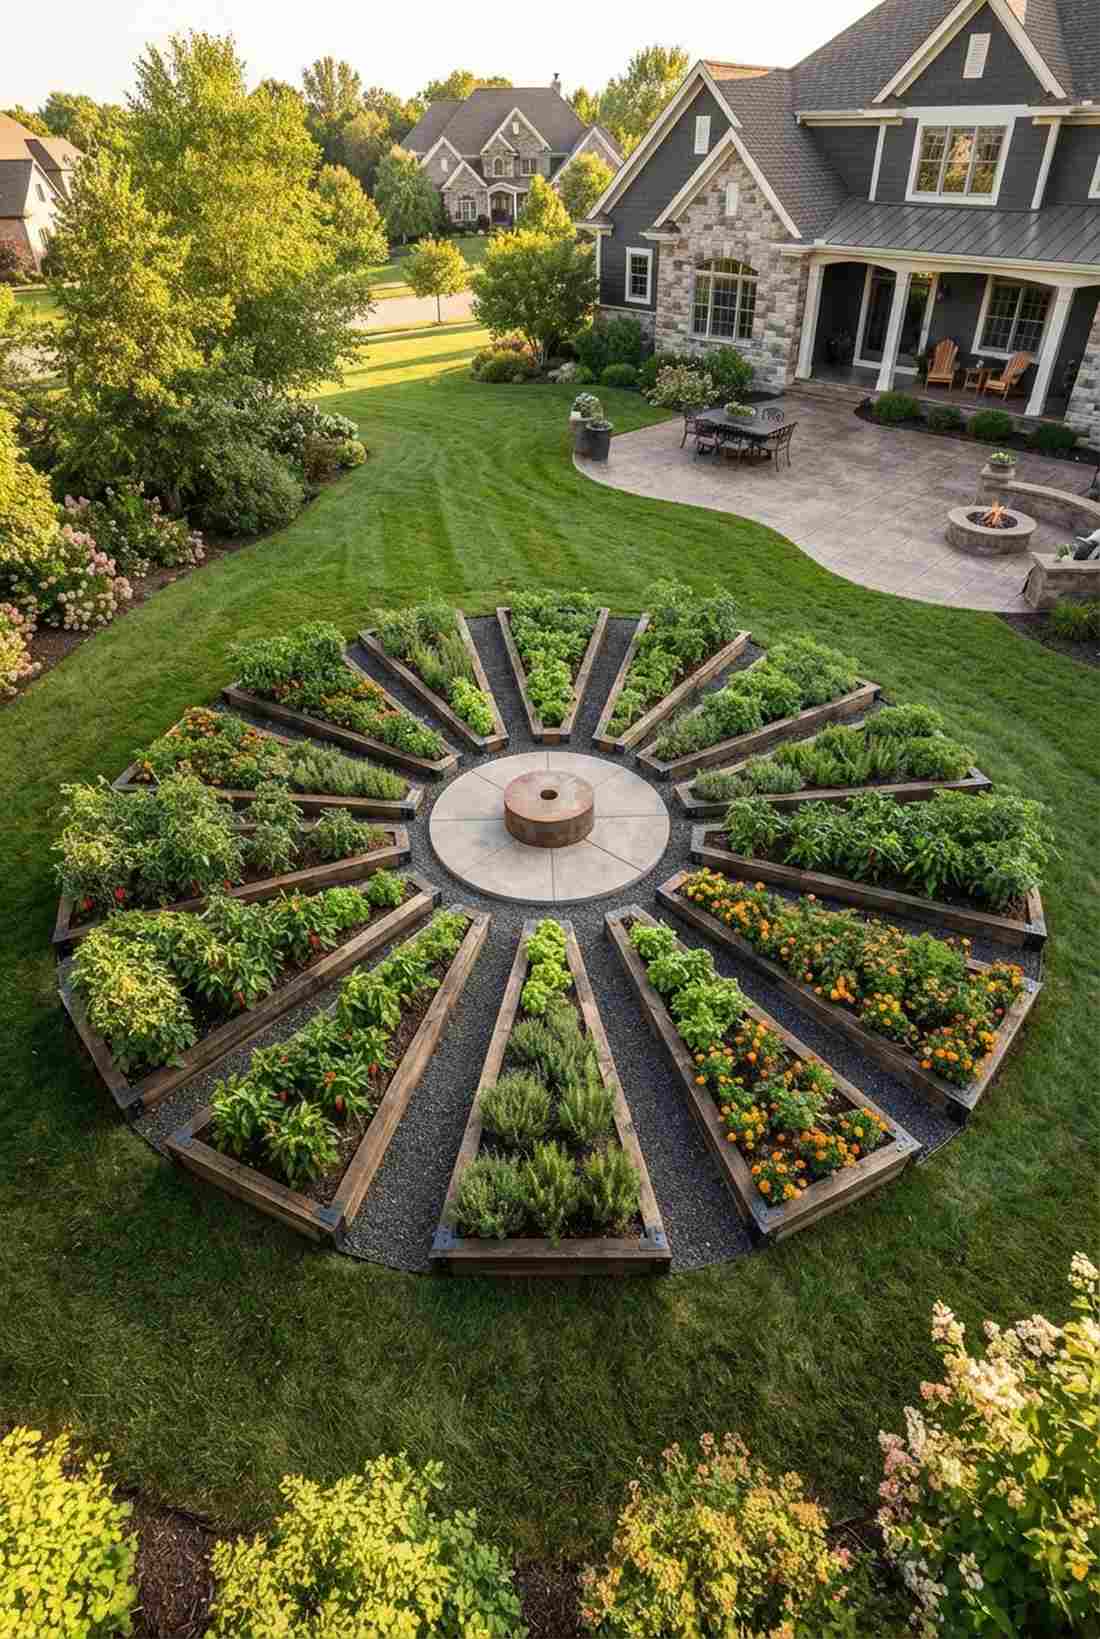
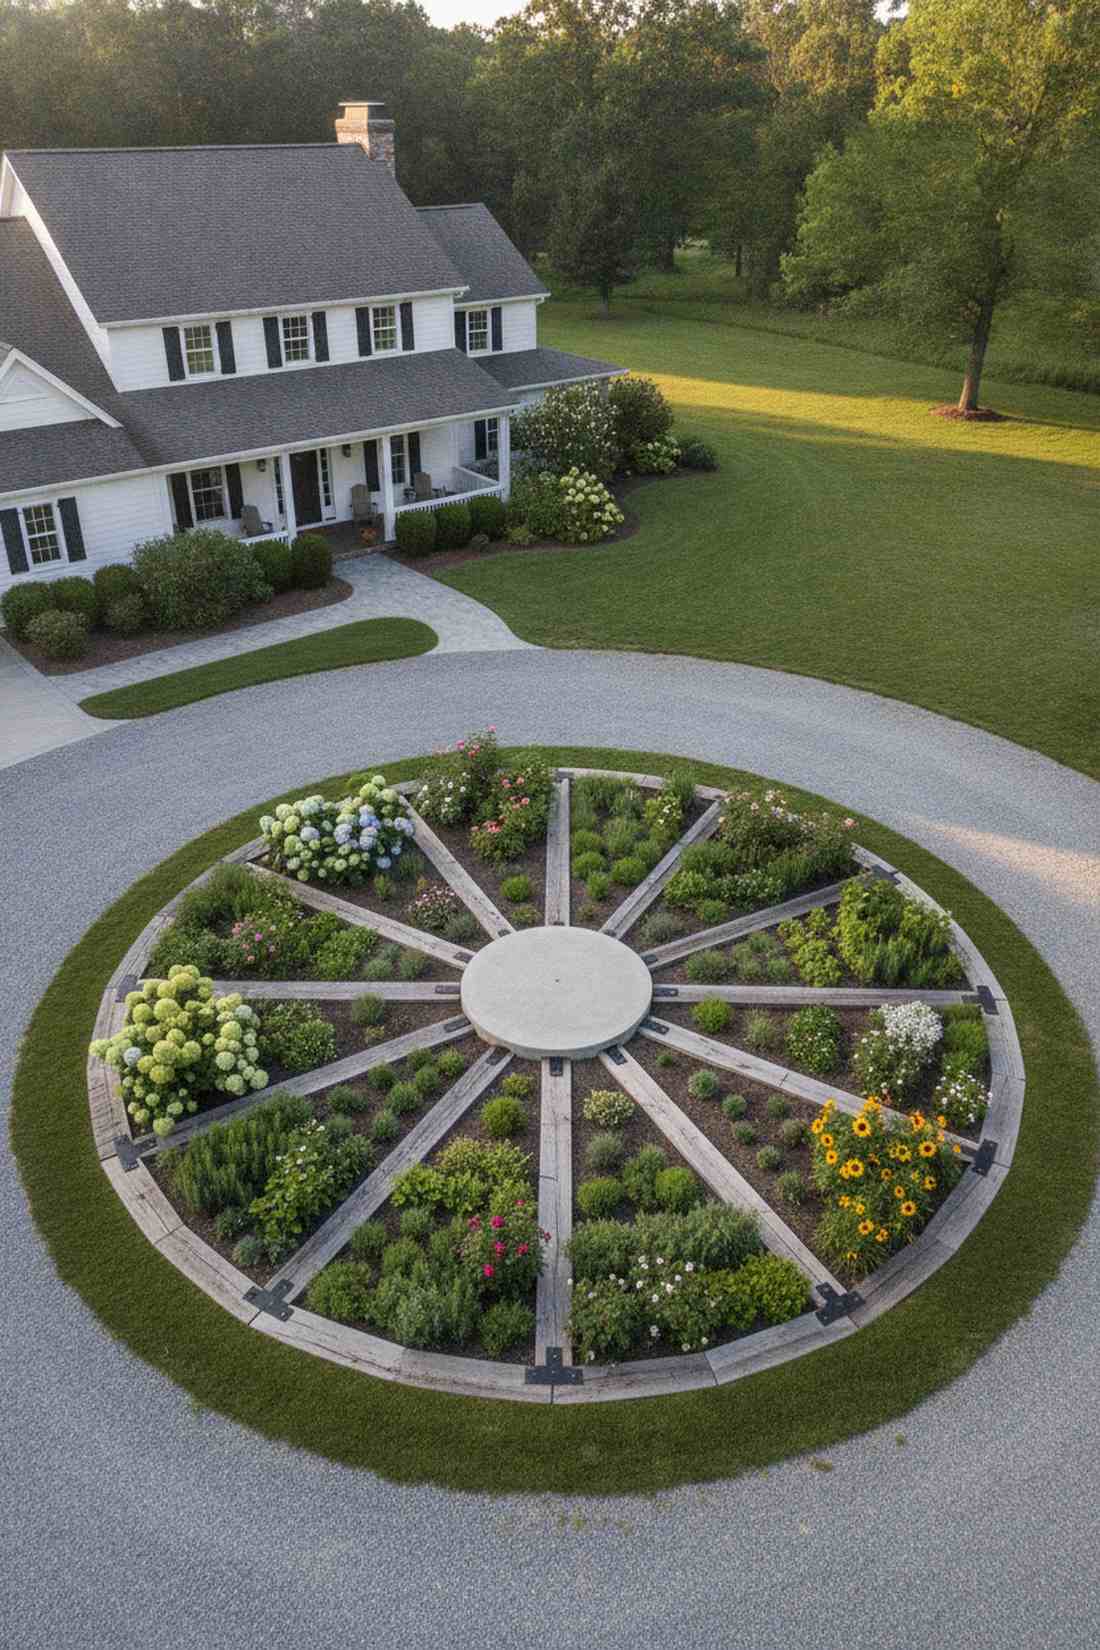
Looks like a stunning vintage centerpiece from a drone’s view. This radiating slotted garden is phenomenally attractive in the middle of a large circular driveway or lawn.
Traditional parallel rows waste pathway space, but tapering the beds inward gives a designer-level finish. The wide outer edges hold bulky plants, while the narrow inner points are perfect for tight herb clusters.
This striking geometry costs about $80–$130 to set up perfectly.
- Key Materials: Tapered wooden frames, central hub paver
- Vibe / Style: Historic European farmstead
- Difficulty: Advanced measuring
- Budget Breakdown: Lumber: $90 | Center Paver: $25
- Creator’s Tip: Make sure the central hub is large enough to easily turn a loaded wheelbarrow around 360 degrees.
- Smart Sourcing: Invest in custom-angle steel connecting brackets (bulk pack) and a premium large format concrete paver.
Don’t want to build a permanent structure? The next idea lets you move your entire garden whenever you want…
Modular & Container Approaches
Portable and adaptable systems offer flexibility for renters, seasonal growers, and those wanting to experiment before committing to permanent structures. These approaches allow easy reconfiguration based on changing needs and sun patterns.
23. Linked Square Modules
Feels like building blocks for adults. This snap-together grid system works exceptionally well for renters who need to break down their setup when they move.
Permanent wood beds are heavy commitments, but modular squares deliver a surprisingly premium look with zero permanent damage to the yard. You can effortlessly expand your garden month by month as your budget allows.
You can easily pull this off for $40–$60 per square. Save this genius renter-friendly hack!
- Key Materials: Pre-fab plastic or resin squares, linking pins
- Vibe / Style: Modern adaptable grid
- Difficulty: Absolute beginner
- Budget Breakdown: Modules: $45 | Soil Fill: $15
- Creator’s Tip: Stagger the height of alternating modules to create a cool checkerboard tiered effect.
- Smart Sourcing: Buy UV-coated interlocking resin garden modules (starter kits) and premium expanding coco coir bricks.
24. Rolling Pallet Garden
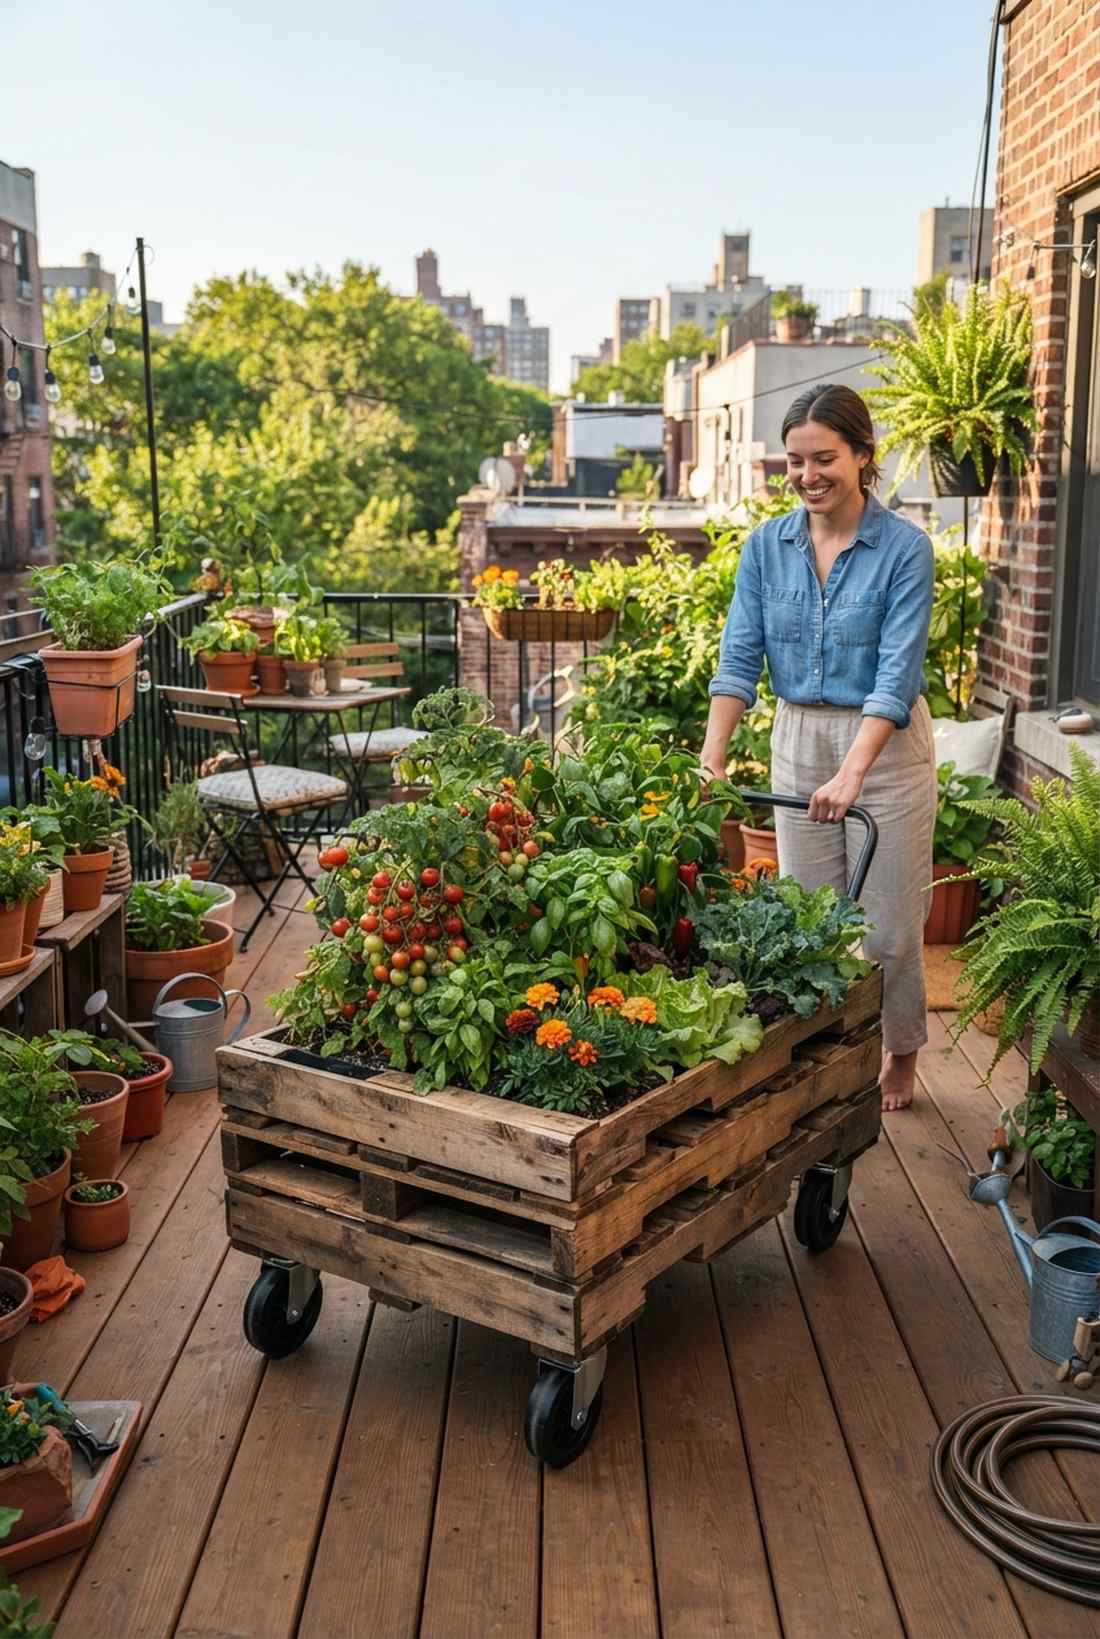
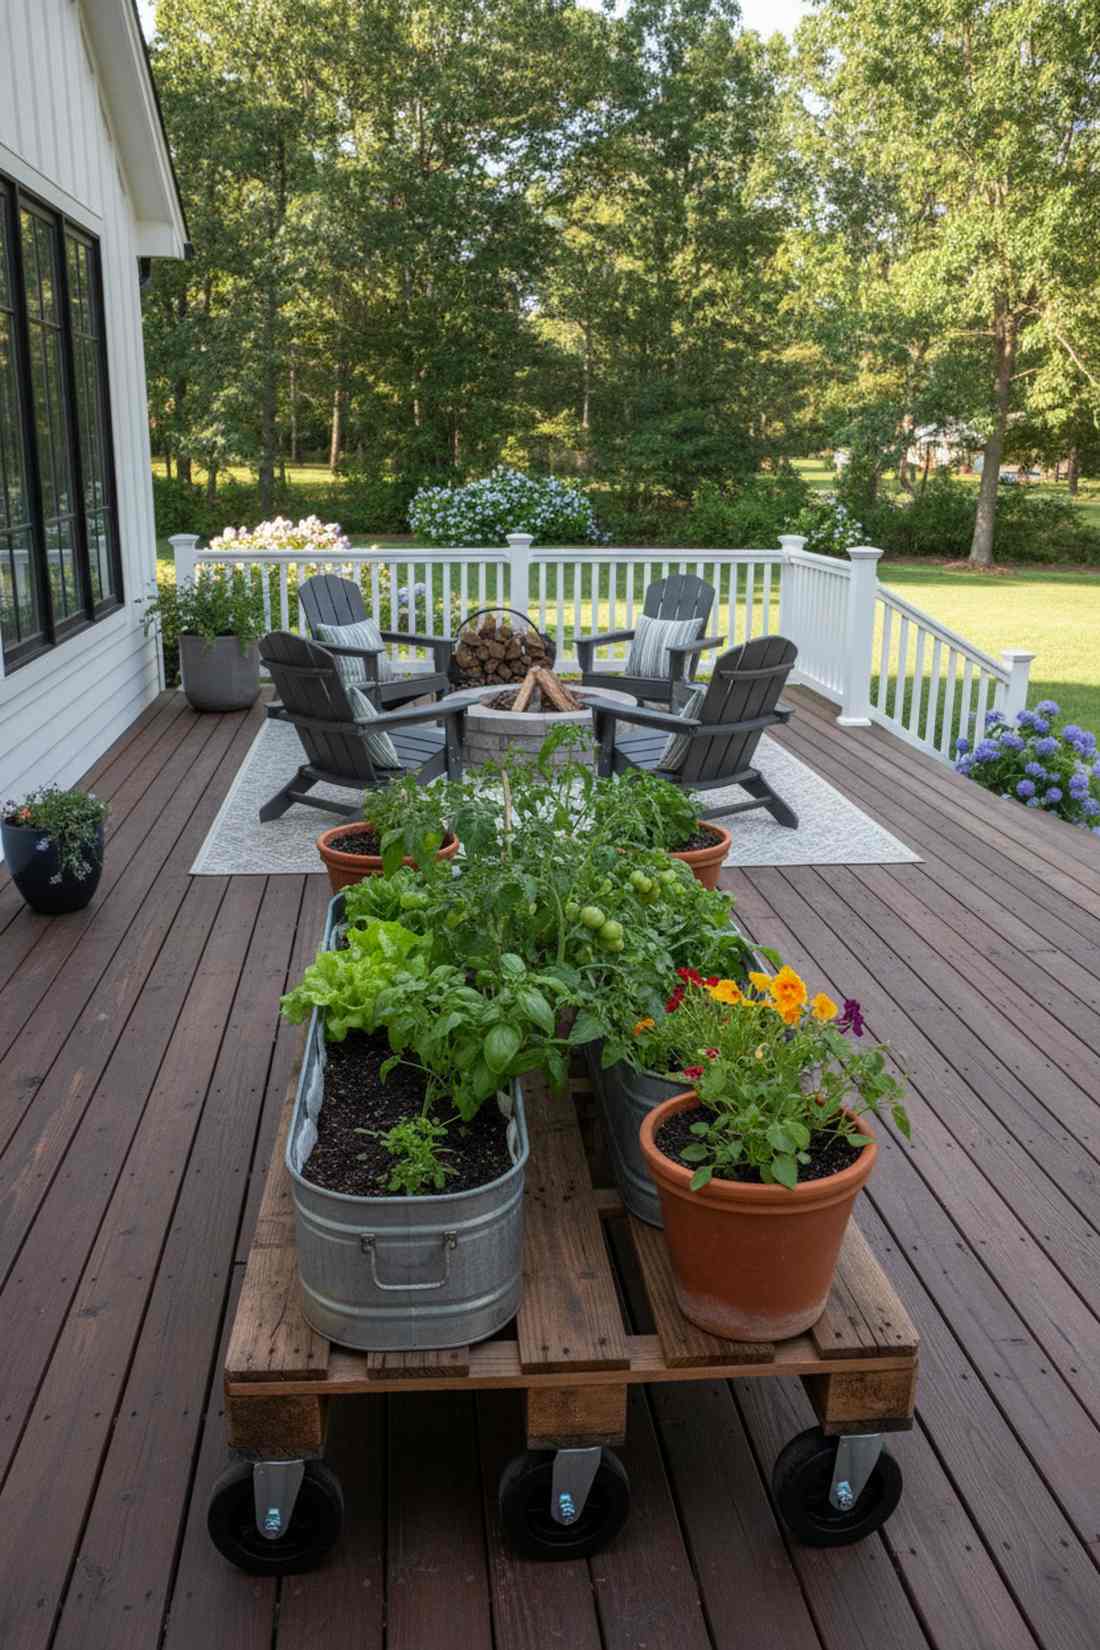

Brings rugged, mobile industrial energy to any space. This caster-mounted wood base is the ultimate life-saver for balconies that only get partial sun.
Heavy planters are stuck forever, but putting a base on locking wheels looks far more expensive than it is. You can literally roll your entire tomato crop across the patio to chase the afternoon sunlight.
You can build this rolling powerhouse for just $25–$40.
- Key Materials: Clean shipping pallet, heavy-duty casters
- Vibe / Style: Mobile industrial urbanite
- Difficulty: Easy with a drill
- Budget Breakdown: Casters: $25 | Pallet: Free-$5
- Creator’s Tip: Only buy casters rated for at least 200 lbs each; wet soil is shockingly heavy and will crush cheap wheels.
- Smart Sourcing: Use heavy-duty locking polyurethane casters (4-pack) and permeable fabric liners.
25. Fabric Pot Cluster


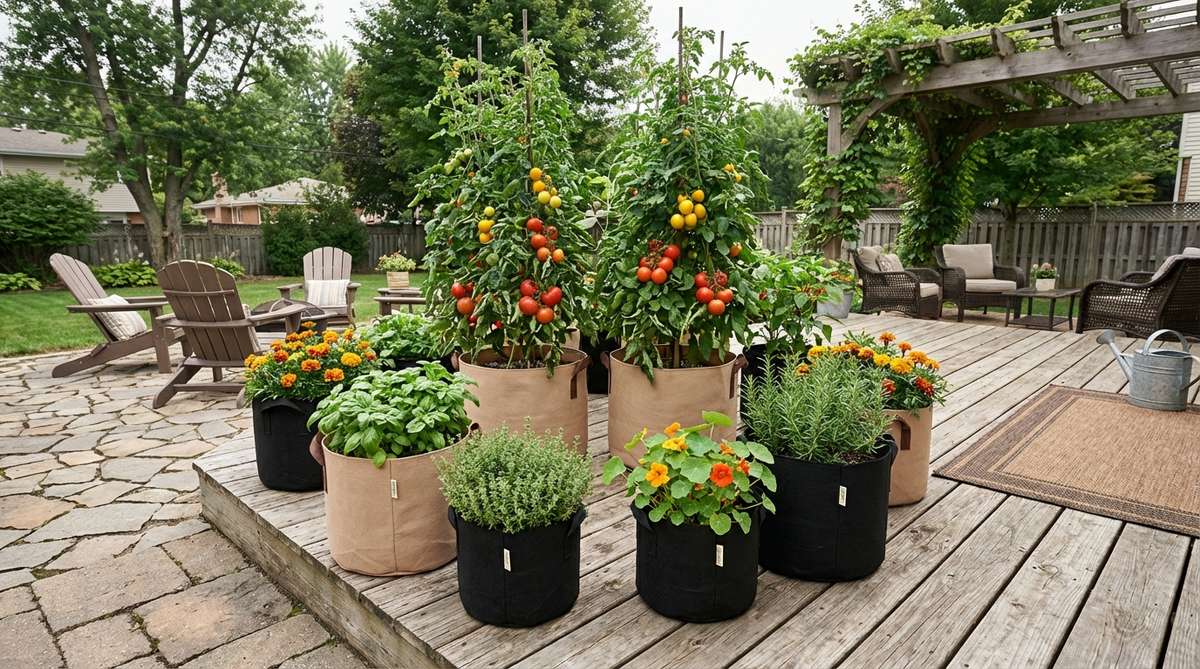
Feels luxuriously relaxed and highly breathable. This grouped soft-container layout works perfectly for hot climates where plastic pots bake the roots.
Hard plastic containers cause root binding, but utilizing soft porous materials gives a designer-level finish while air-pruning the roots naturally. Grouping them tightly together creates a stunning micro-jungle that regulates its own humidity.
You can set up a massive cluster for under $30. Pin this to save your plants from summer heat!
- Key Materials: Fabric grow bags of varying sizes, pot feet
- Vibe / Style: Casual breathable boho
- Difficulty: Very easy
- Budget Breakdown: Grow Bags: $20 | Pot Feet: $10
- Creator’s Tip: Always elevate fabric pots on tiny feet so the bottom doesn’t rot against the wet patio concrete.
- Smart Sourcing: Grab UV-resistant fabric grow bags (bulk pack) and heavy-duty rubber pot risers.
26. Gutter Garden Rail System
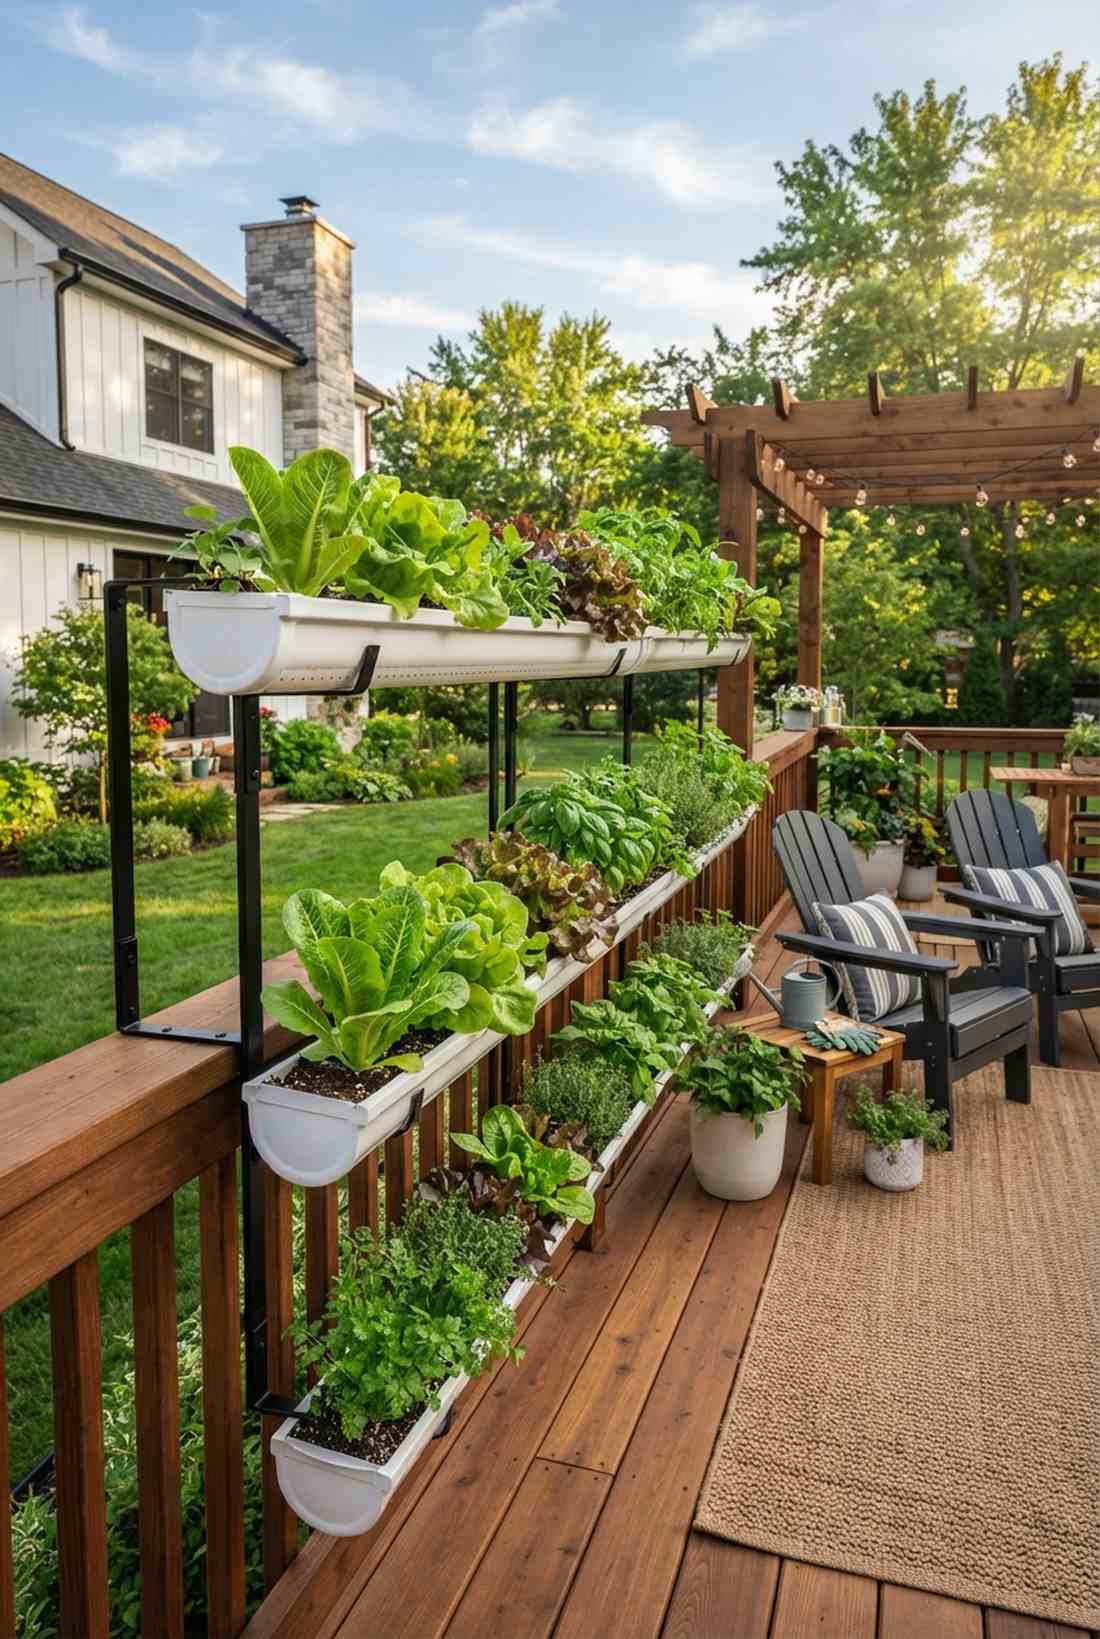
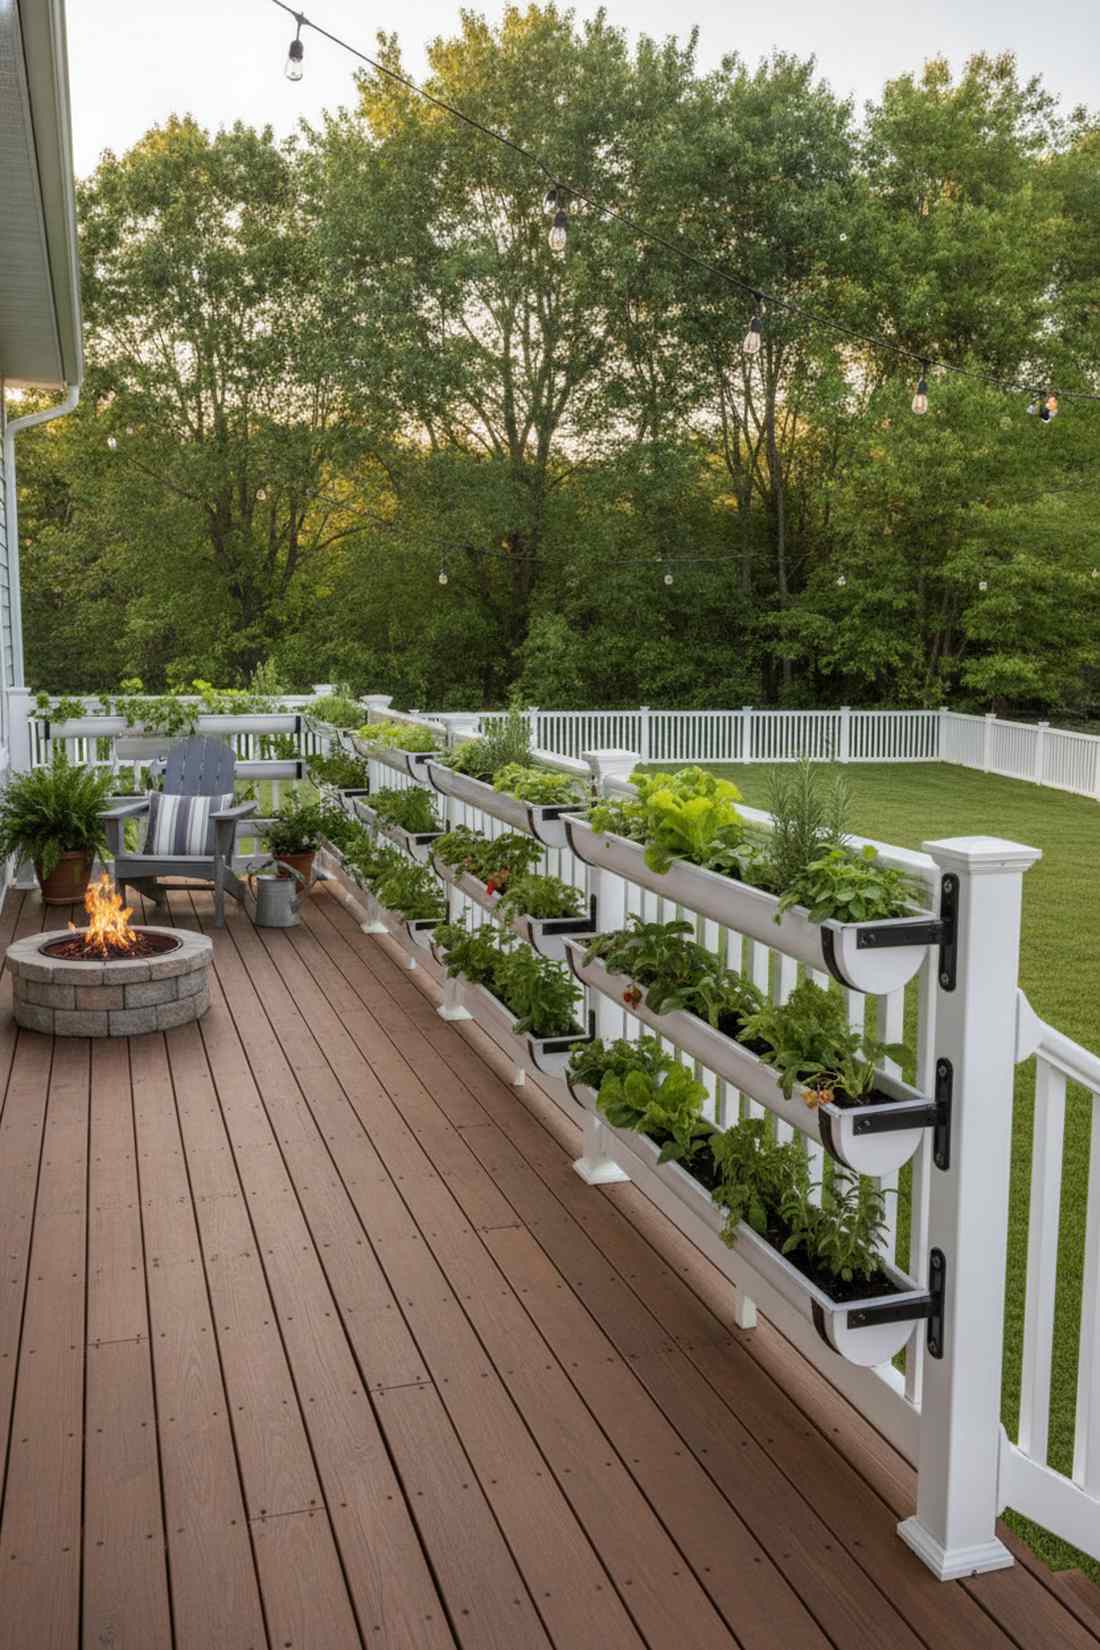
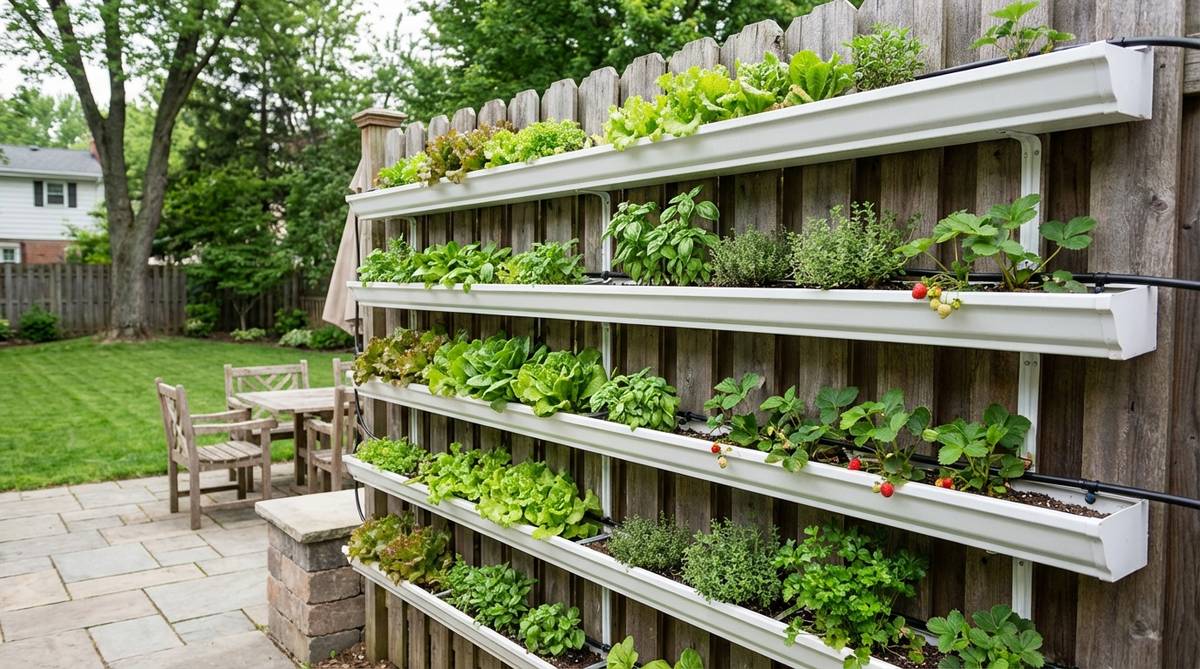
Looks like a sleek, suspended curtain of fresh food. This linear suspended trough is ideal for covering ugly deck railings without losing any floor space.
Railings are usually dead space, but hanging seamless troughs looks far more expensive than it is. It acts as an absolute fortress against ground pests like slugs, keeping your delicate lettuce pristine and untouched.
You can easily pull this off for $20–$35 per rail level.
- Key Materials: Vinyl rain gutters, mounting brackets, end caps
- Vibe / Style: Sleek floating hydroponic
- Difficulty: Easy drilling
- Budget Breakdown: Gutters: $15 | Hardware: $10
- Creator’s Tip: Drill hundreds of tiny drainage holes, not just a few big ones, so the shallow soil doesn’t turn to mud.
- Smart Sourcing: Order seamless vinyl gutter sections (pre-cut) and heavy-duty railing brackets (bulk pack).
27. Stacked Bin Corner Unit
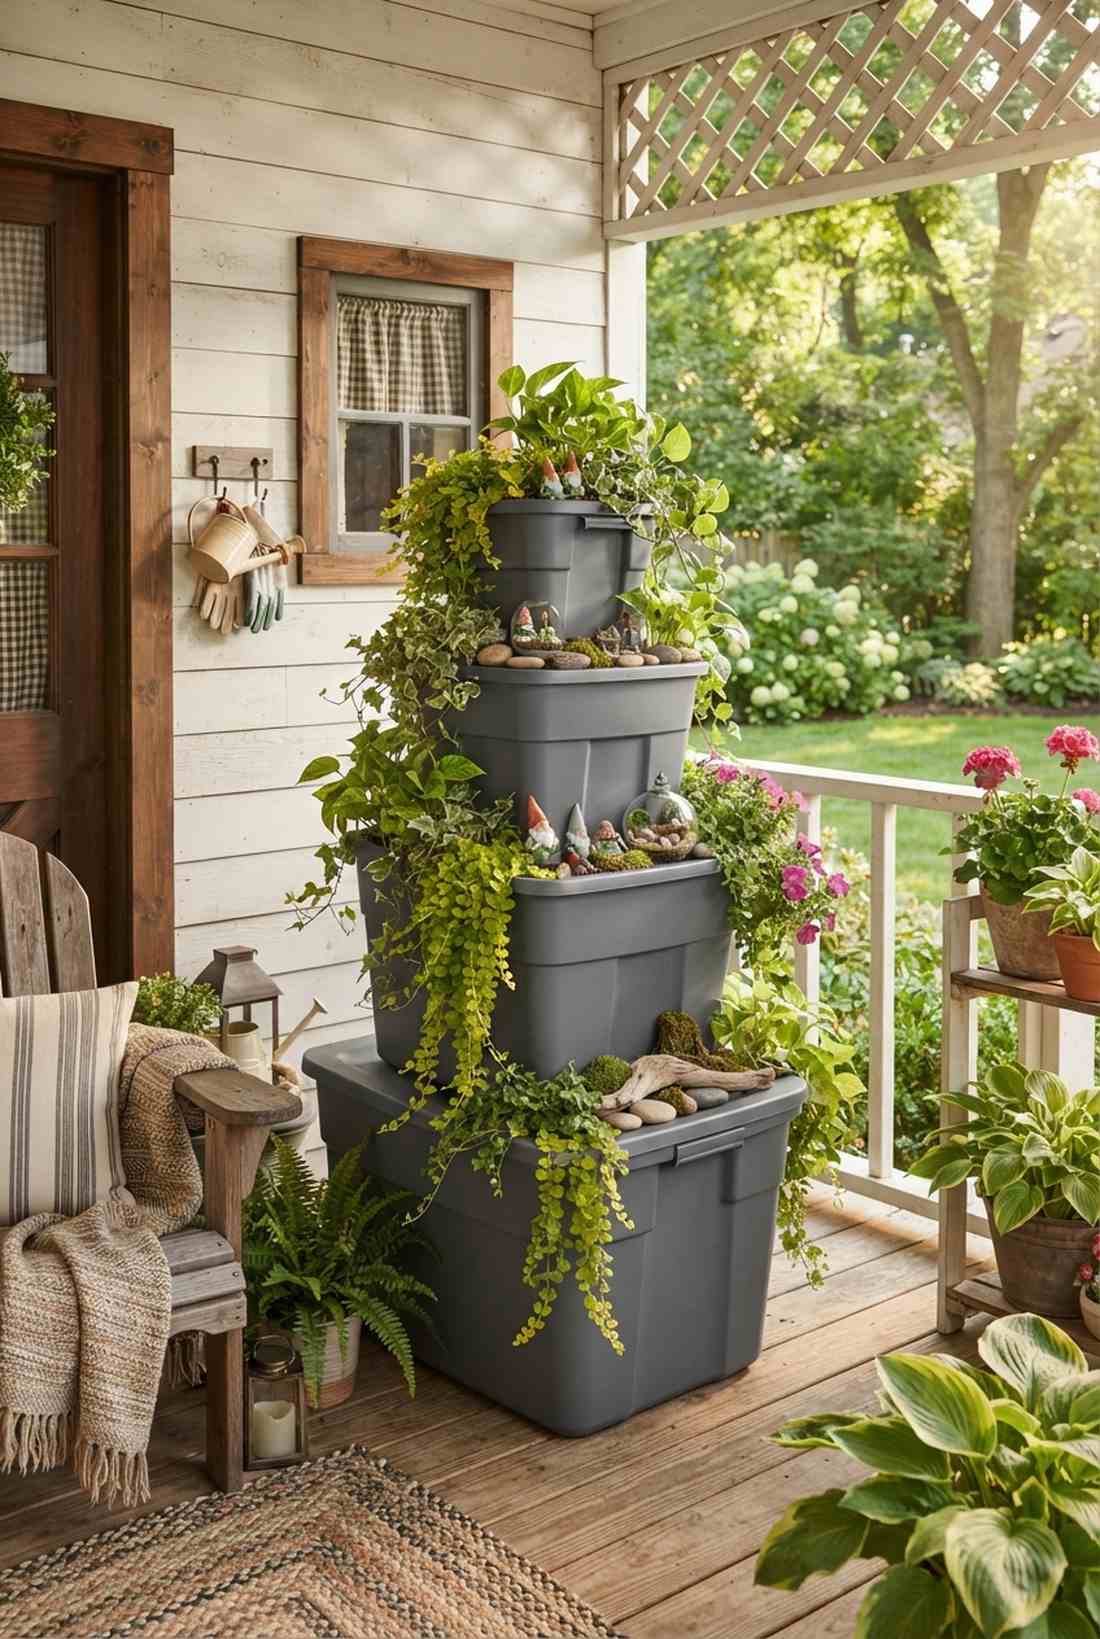
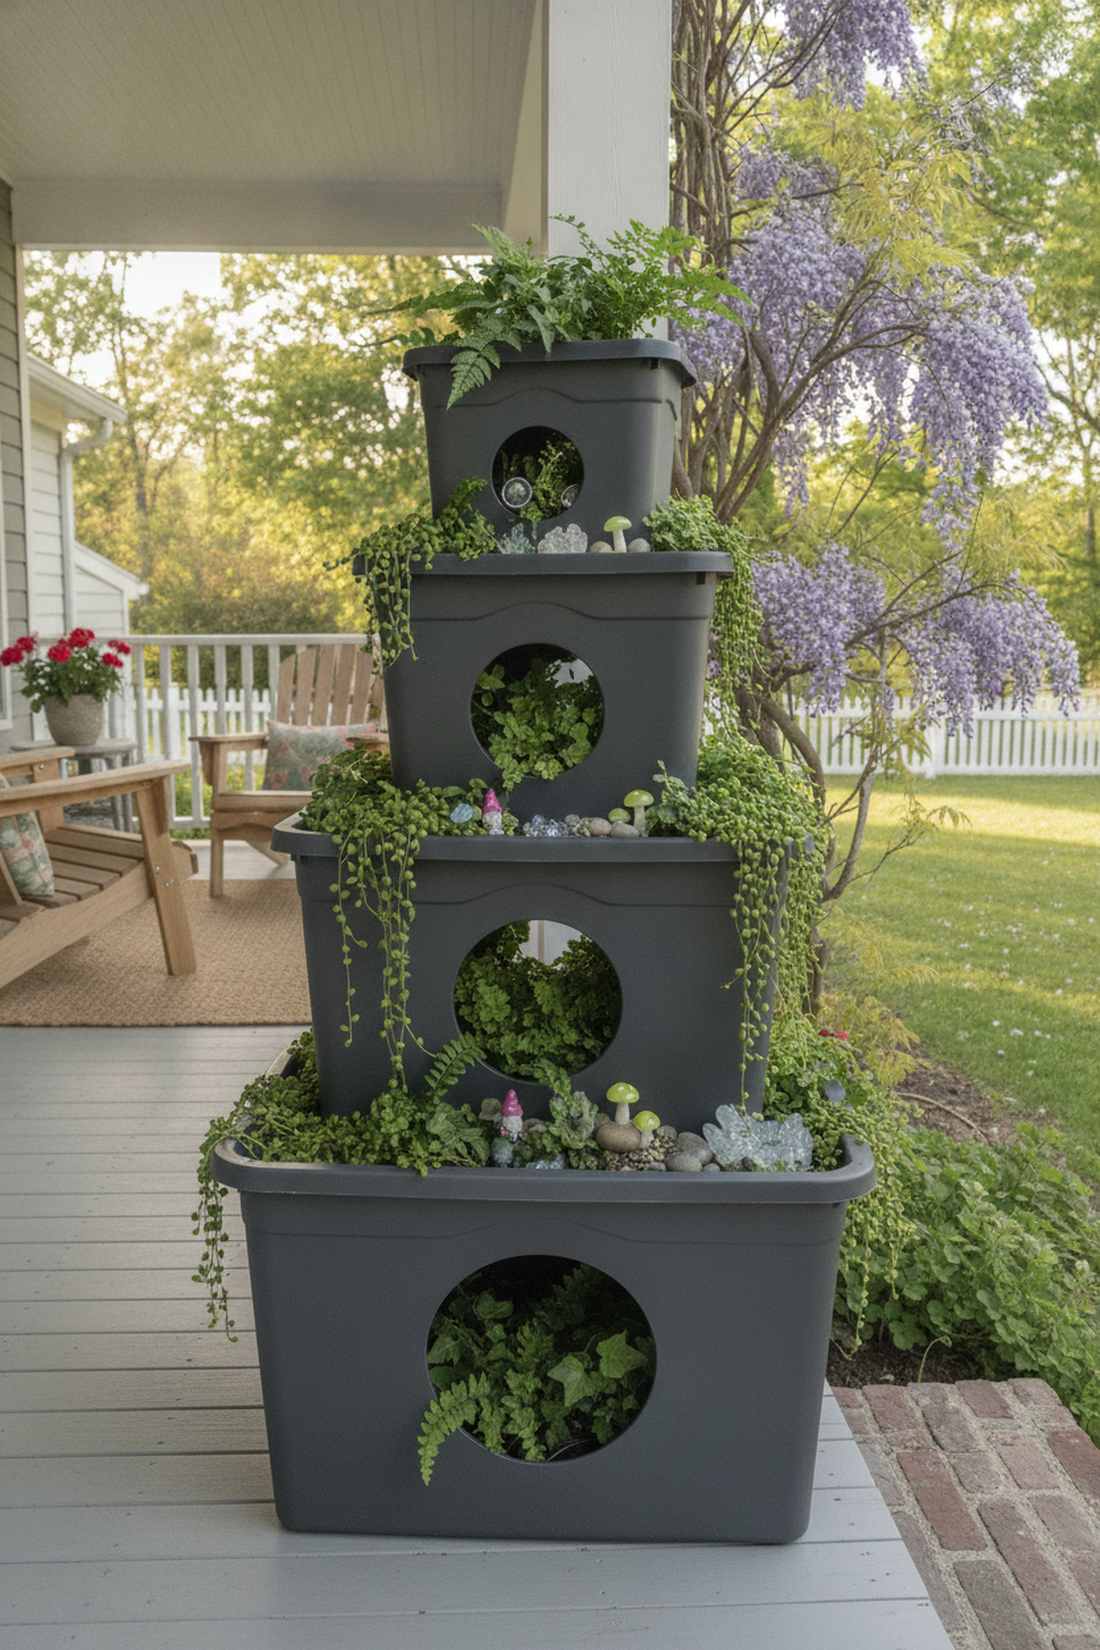
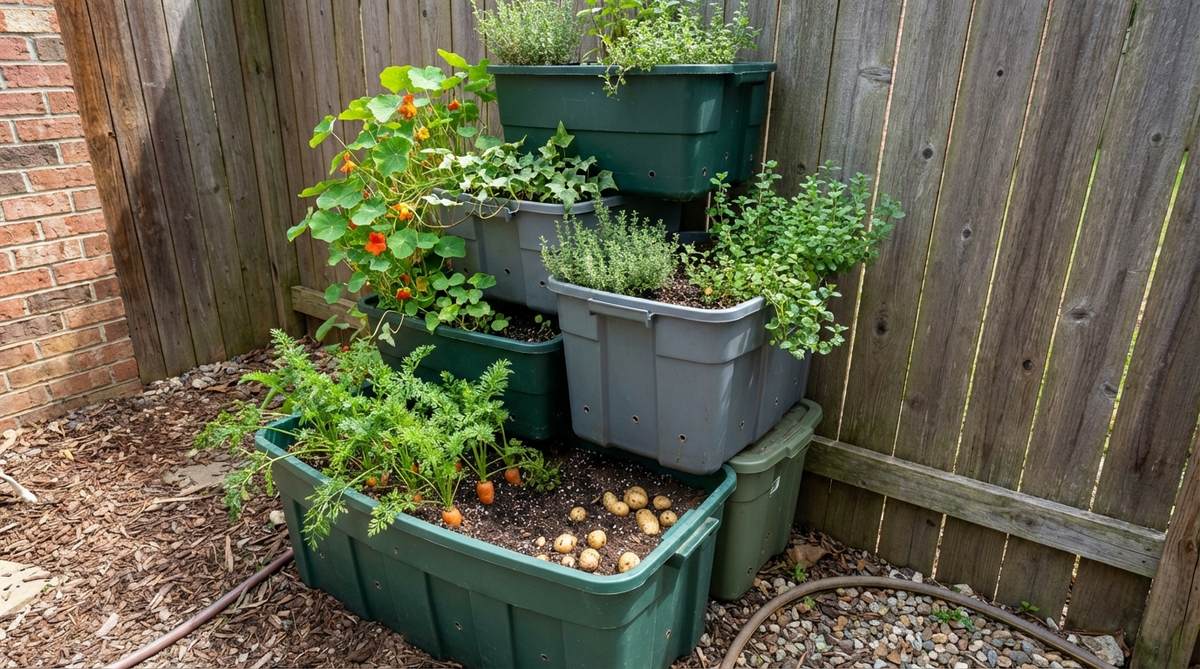
Feels like an ingenious, budget-friendly tower of power. This offset plastic tub system works exceptionally well for tucked-away porch corners.
Expensive ceramic pots break the bank, but stacking heavy-duty storage tubs gives a surprisingly premium look once the trailing foliage covers the plastic. Hiding terrarium accessories on the different levels turns a simple plastic stack into a whimsical conversation piece.
You can assemble this entire multi-level tower for $15–$25. Save this ultimate budget hack!
- Key Materials: Rugged storage bins of decreasing size
- Vibe / Style: Clever upcycled utility
- Difficulty: Absolute beginner
- Budget Breakdown: Bins: $15 | Drainage Rock: $5
- Creator’s Tip: Leave the lid on the bottom bins but cut a massive hole in the center; this keeps the stacked bins perfectly stable.
- Smart Sourcing: Use heavy-duty opaque plastic storage bins (starter kit) and waterproof terrarium accessories (bulk pack).
Conclusion
The right mini garden bed layout transforms spatial constraints into stunning, high-end focal points. Whether you choose the sleek aesthetic of the 27 modular and geometric layouts provided or leverage vertical stacking kits to maximize air space, achieving a premium look on a budget is completely possible. Skip the cheap materials, invest in UV-resistant starter kits, and execute these professional blueprints to guarantee massive yields and a gorgeous yard this season.
Frequently Asked Questions
What is the ideal width for a mini garden bed?
The optimal width is strictly 3-4 feet. This precise measurement allows you to comfortably reach the center without ever stepping on the soil and compressing the roots. If you are building against a fence, keep it under 3 feet. To make this easier, buying pre-cut cedar panels (bulk pack) ensures your dimensions are perfectly accurate without needing a saw.
How deep should raised mini garden beds be for vegetables?
For high-yield vegetables like tomatoes and peppers, a premium depth of 12-18 inches is mandatory to support massive root systems. Shallow greens like lettuce can survive in 6-8 inches, but investing in deeper starter kits gives you a much stronger buffer against summer heat drying out the soil.
Can I grow vegetables in a 2×2 foot mini garden bed?
Absolutely. A 2×2 foot grid is a high-density powerhouse if managed correctly. By using heavy-duty fabric grow bags or modular resin squares, you can easily pull 15-20 radishes or a massive indeterminate tomato plant from just four square feet. Always select compact or dwarf seeds for maximum efficiency.
What is the best soil mix for small raised garden beds?
Do not use standard backyard dirt. You need a premium blend of equal parts organic compost, expanding coco coir bricks, and coarse perlite. This exact formula guarantees flawless drainage while holding nutrients. Mixing in a slow-release granular fertilizer during the initial fill will drastically boost your early growth rate.
How do I prevent mini garden beds from drying out too quickly?
Evaporation is the number one killer of small beds. You must apply 2-3 inches of premium cedar mulch over the soil and install a micro-drip irrigation starter kit on a timer. For container setups, blending water-holding polymer crystals into the base soil traps moisture directly at the root zone, saving you from daily watering chores.