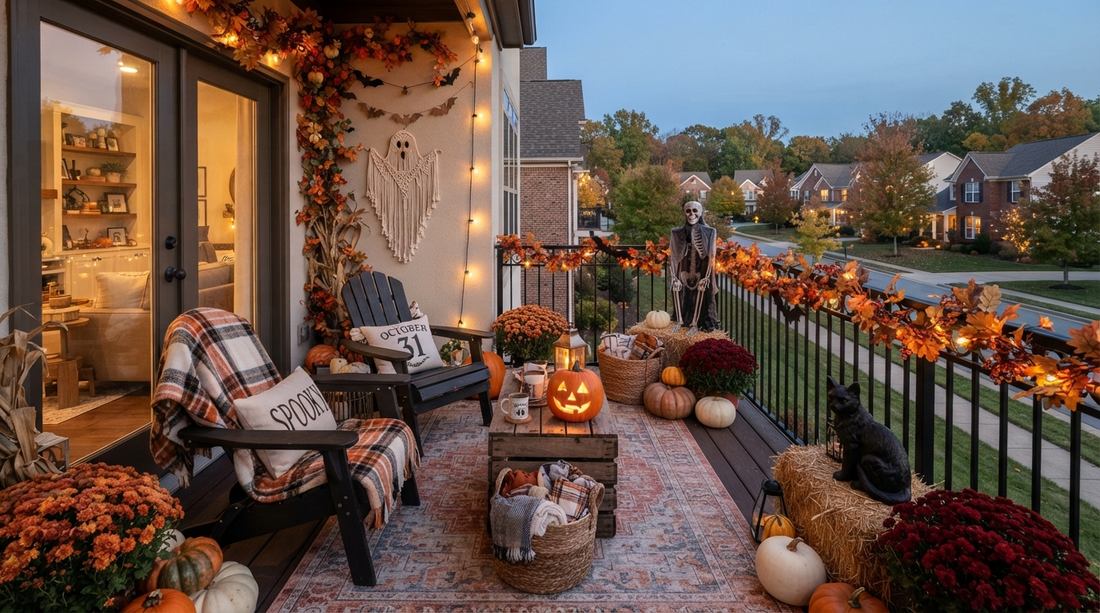
Transforming your outdoor space shouldn’t require a Hollywood prop budget. This setup breakdown reveals how smart halloween balcony decor sourcing creates designer-level aesthetics. Grab these premium material secrets for maximum visual impact.
Design Snapshot: Key Principles
- Vertical Impact: Maximize limited balcony space by utilizing railings, walls, and overhead areas for hanging decorations and layered displays.
- Weather Resistance: Choose durable materials like weather-resistant inflatables, sealed LED lights, and fade-proof fabrics designed for outdoor exposure.
- Transition Flexibility: Select pieces that easily shift from spooky Halloween to classic autumn by removing ghoulish elements while keeping pumpkins and warm lighting.
- Lighting Strategy: Layer ambient string lights with accent spotlights and flickering LEDs to create depth and drama after sunset.
Spine-Chilling Spooky Displays
1. Tangled Web Takeover
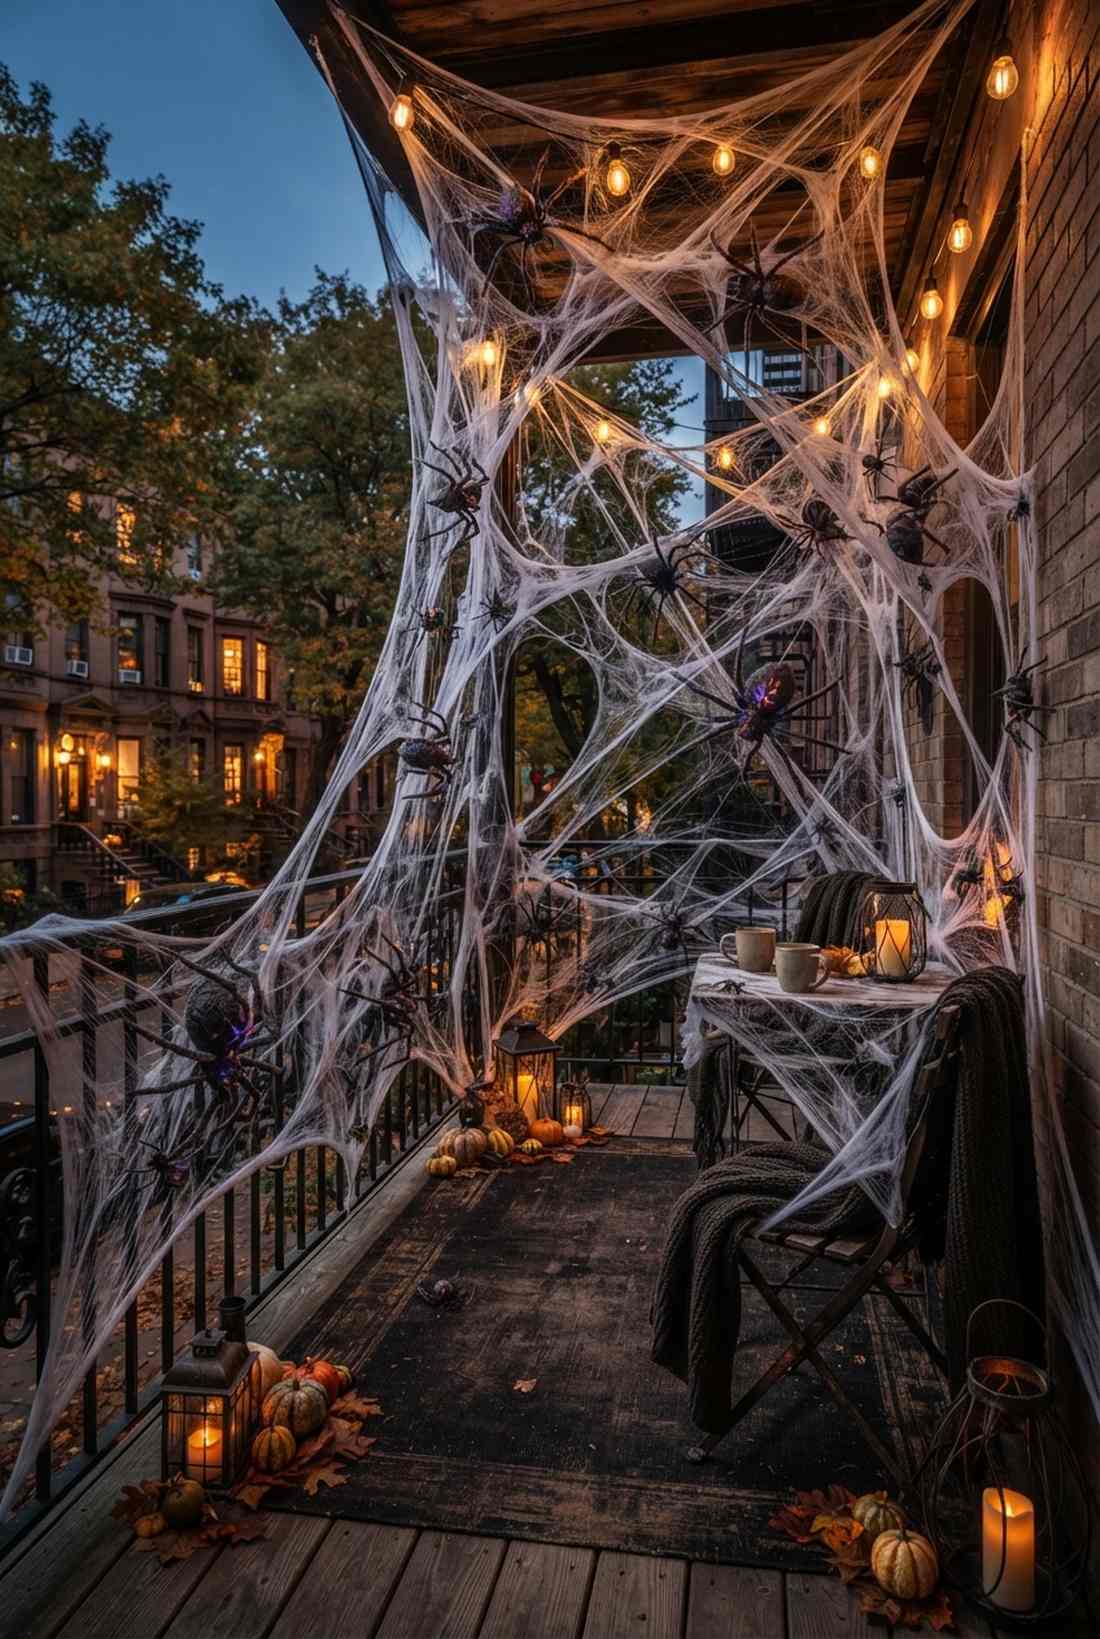
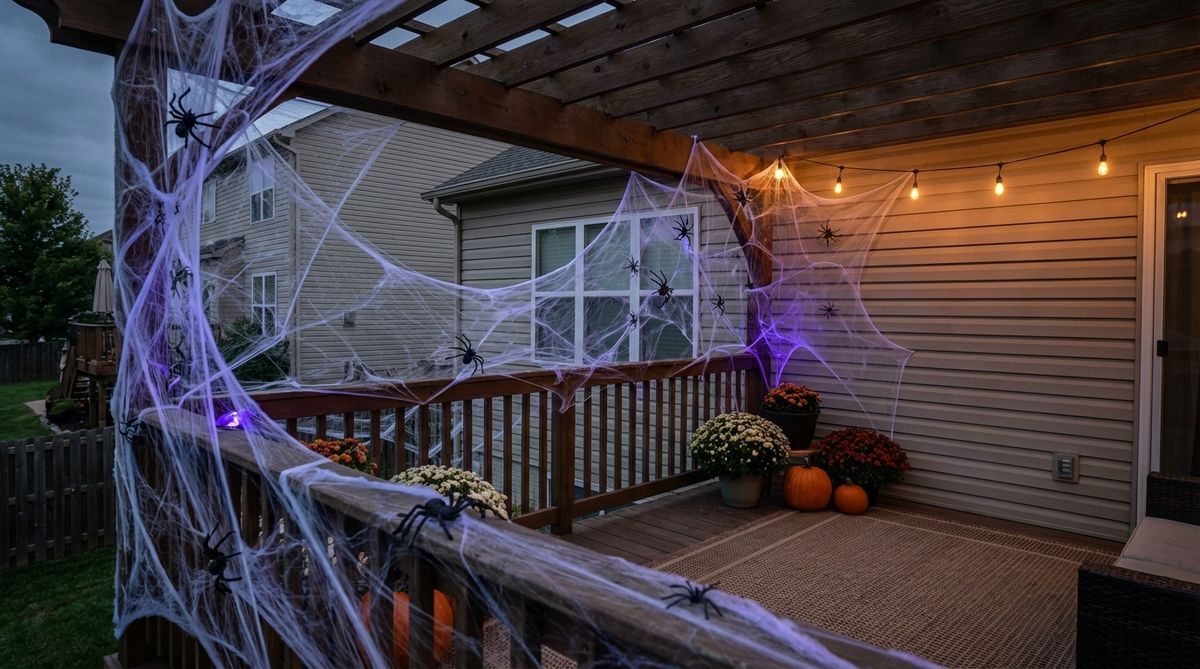
Feels like a forgotten crypt you accidentally stumbled across deep in the woods. This apartment balcony webbing setup is perfect for concealing boring railings and adding instant dimension to flat urban facades.
Standard decorating rules say less is more, but aggressively layering materials here delivers a surprisingly premium look. Utilizing professional-grade miniature garden supplies and hyper-realistic outdoor Halloween decorations entirely elevates the facade from cheap plastic to cinematic.
You can easily pull this off for around $15–$30. Pin this to your DIY weekend garden board for an immediate aesthetic upgrade.
- Key Materials: Heavy-duty stretch webbing and UV-reactive spider props.
- Vibe / Style: Abandoned urban haunted house.
- Difficulty: Easy beginner setup.
- Budget Breakdown: Materials: $18 | Base Setup: $10.
- Creator’s Tip: Anchor the webbing tightly to the corners first before stretching to create organic, tensioned tears.
- Smart Sourcing: pre-cut industrial stretch webbing (bulk pack) and UV-coated plastic spider kits.
2. Skeleton Family Gathering
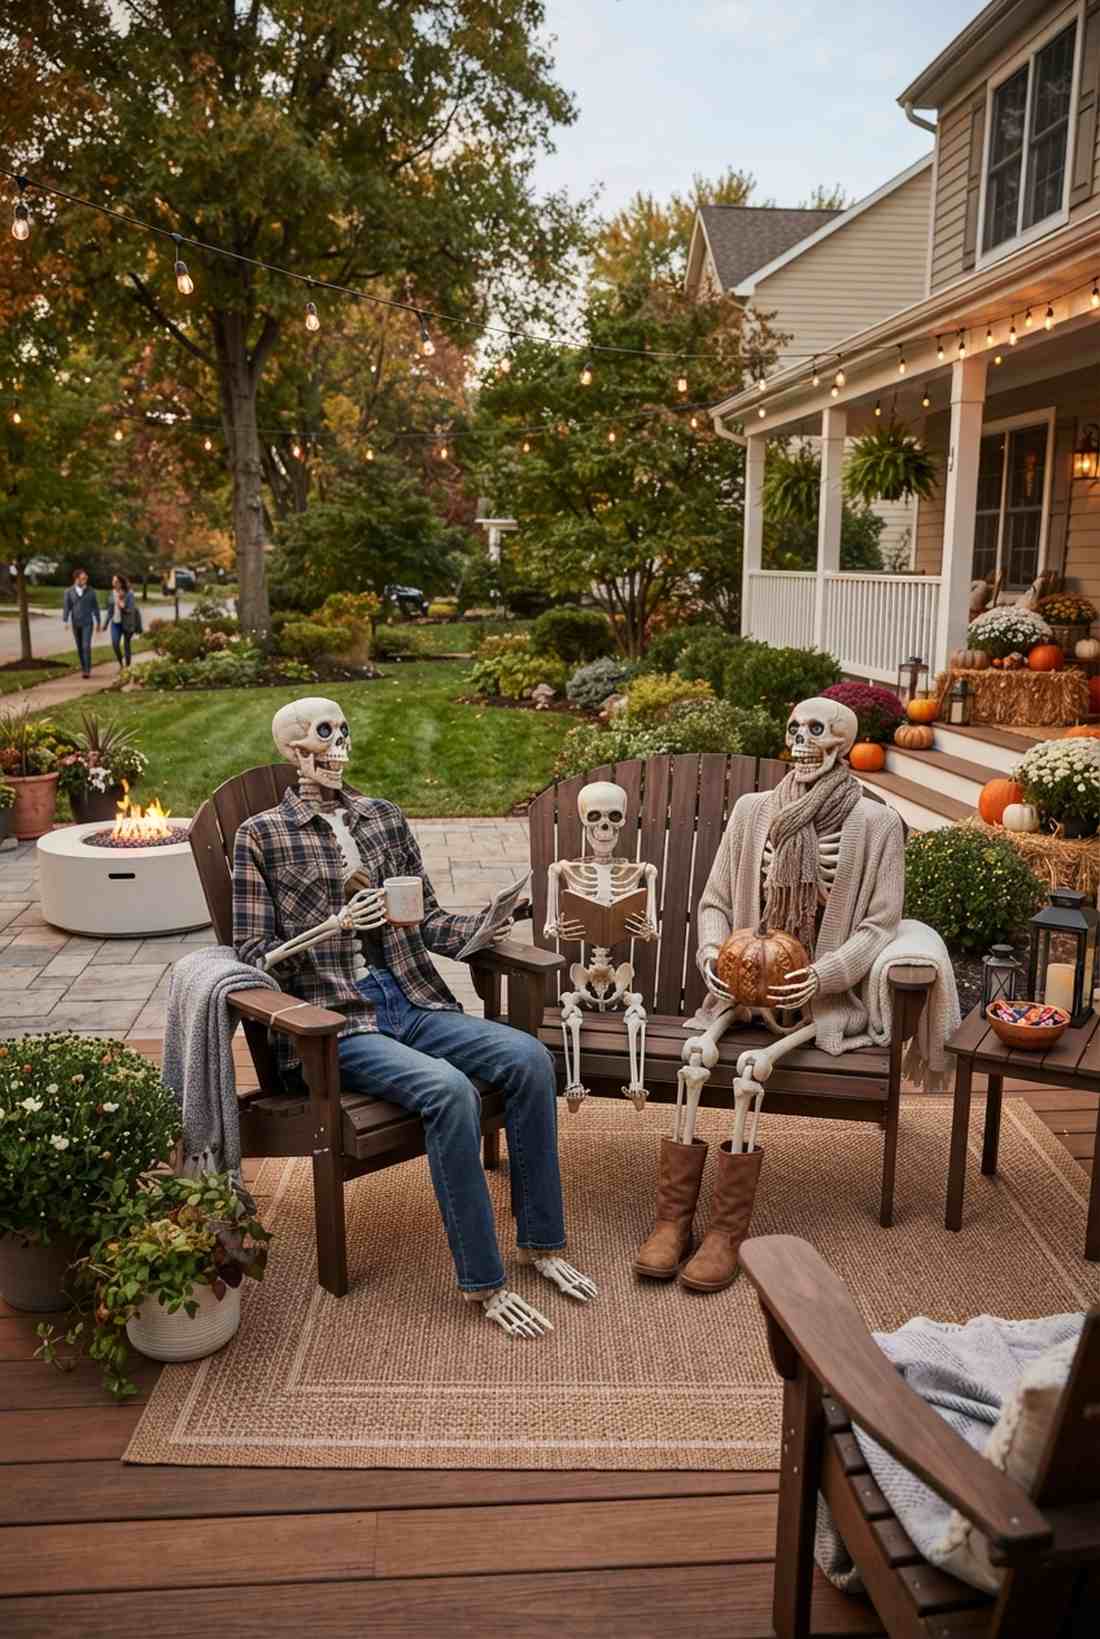
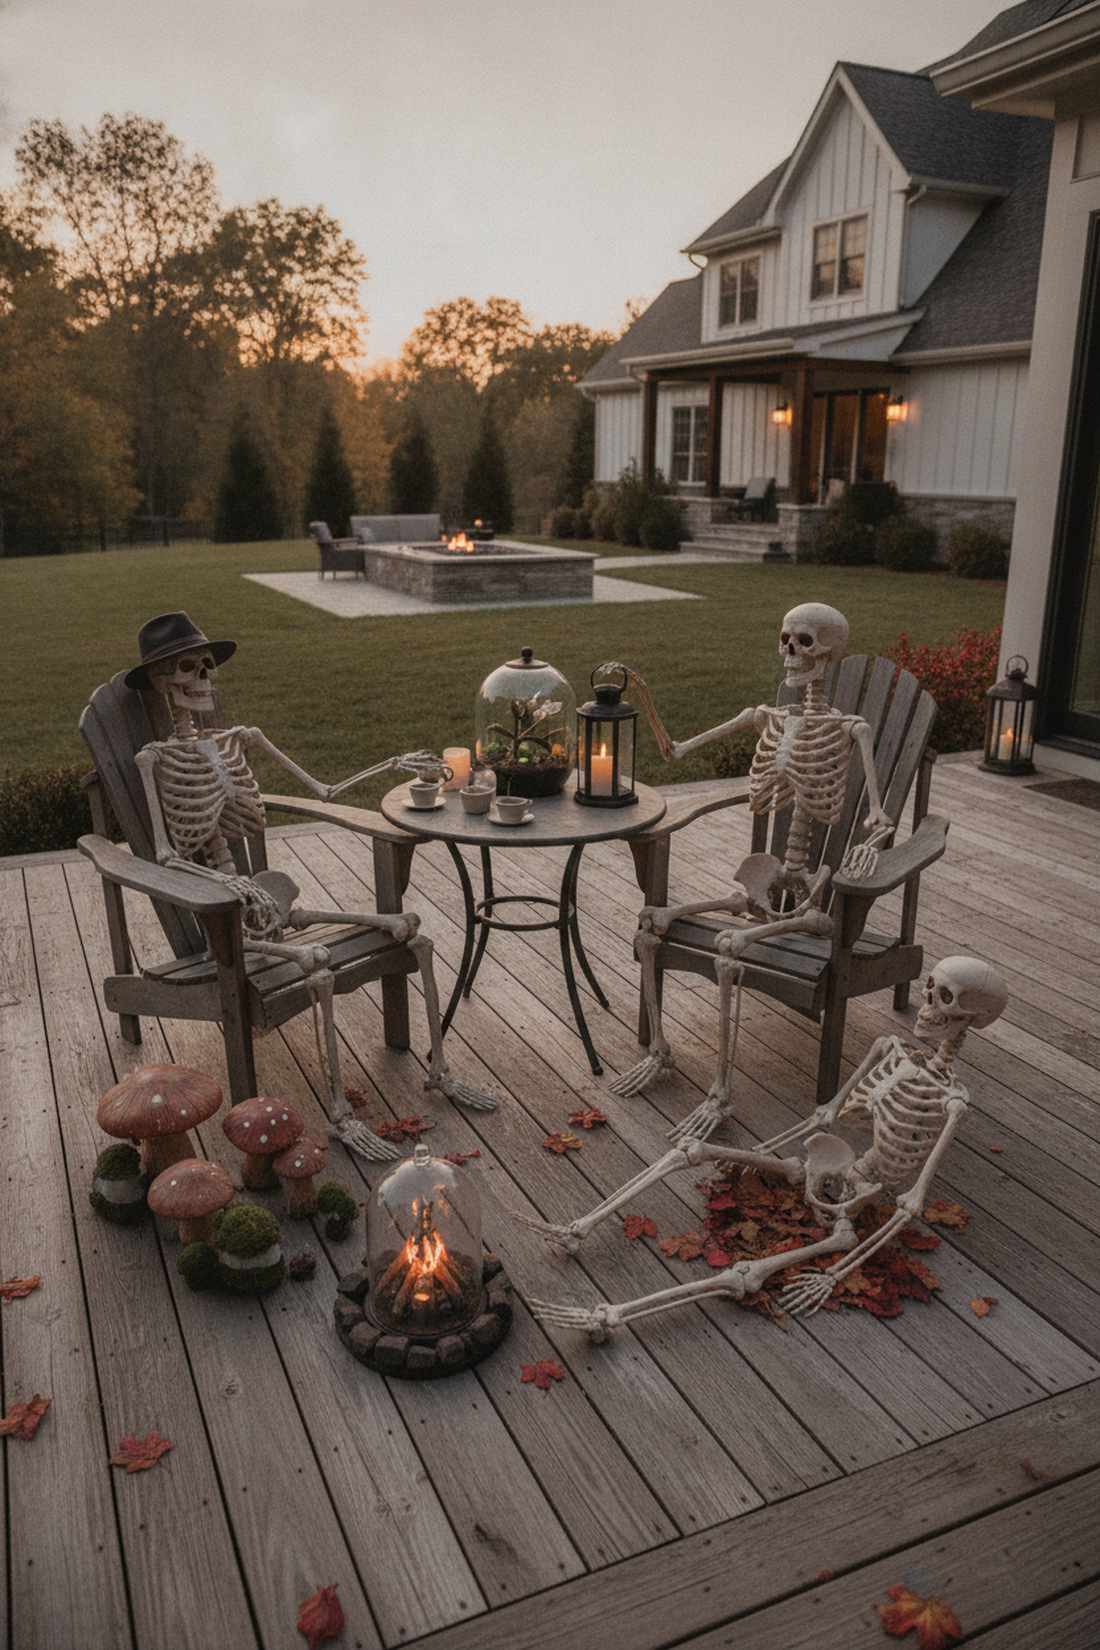

Straight out of a darkly humorous storybook illustration brought to life. This outdoor patio skeleton display works exceptionally well for ground-floor terraces or wide balconies where neighbors can enjoy the narrative.
Relying on static poses is a rookie mistake; articulating the joints dynamically guarantees a head-turning presentation. Weaving in high-quality terrarium accessories and weatherproof props creates a scene that looks far more expensive than it is.
Expect to spend roughly $45–$60 depending on the size of the figures. It’s a fast upgrade that completely changes the vibe of your exterior.
- Key Materials: Poseable life-size skeletons and outdoor zip ties.
- Vibe / Style: Macabre domestic comedy.
- Difficulty: Moderate posing required.
- Budget Breakdown: Figures: $50 | Fasteners: $5.
- Creator’s Tip: Use clear zip ties around the ribcages and attach them directly to your existing patio furniture to prevent wind damage.
- Smart Sourcing: weather-resistant posable skeletons (starter pack) and heavy-duty clear zip ties.
3. Caution Tape Crime Scene


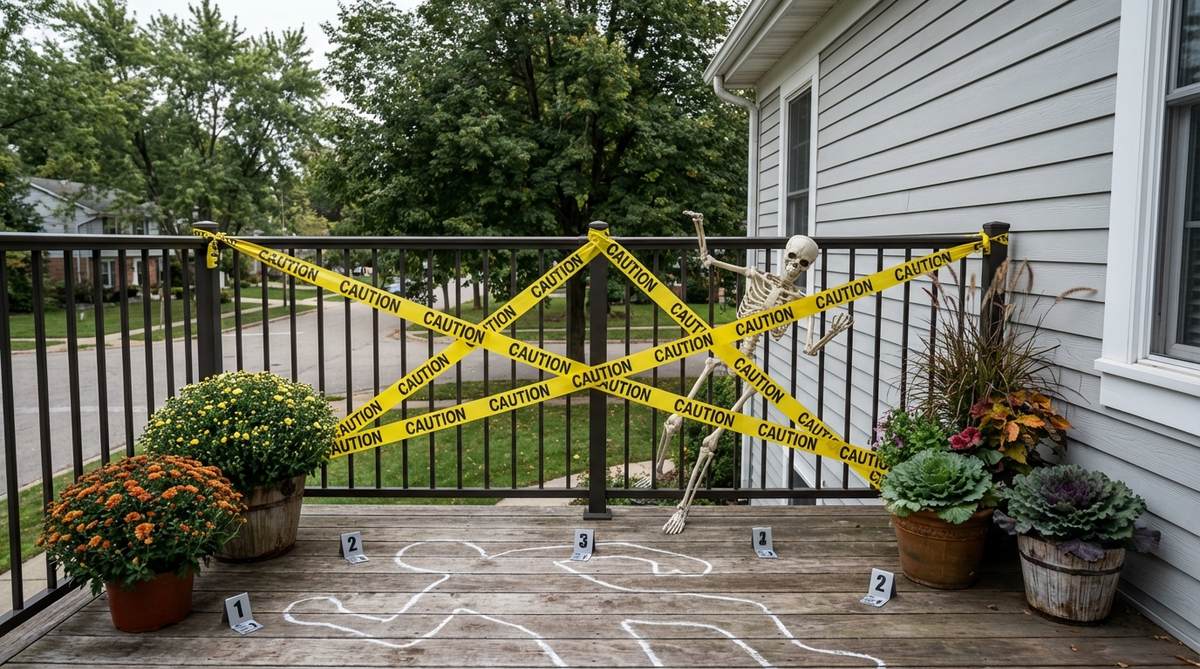
Gives the immediate thrill of a true-crime documentary unfolding right at your doorstep. This budget railing wrap aesthetic is a high-contrast choice perfectly suited for upper-floor apartment balconies visible from the street.
Most people throw up a single strip and call it a day, but creating a chaotic crisscross pattern creates a designer-level finish. Upgrading to industrial-grade tape rather than party-store paper ensures the look stays crisp through heavy autumn rain.
This entire setup usually costs under $15. Save this idea if you need a last-minute, high-impact installation.
- Key Materials: Industrial caution tape and chalk outline stencils.
- Vibe / Style: Gritty detective thriller.
- Difficulty: Zero-skill weekend project.
- Budget Breakdown: Tape: $8 | Props: $5.
- Creator’s Tip: Twist the tape occasionally as you wrap it around the railing to catch the wind and create a distressed, hurried look.
- Smart Sourcing: industrial-grade barrier tape (bulk roll) and washable liquid chalk markers.
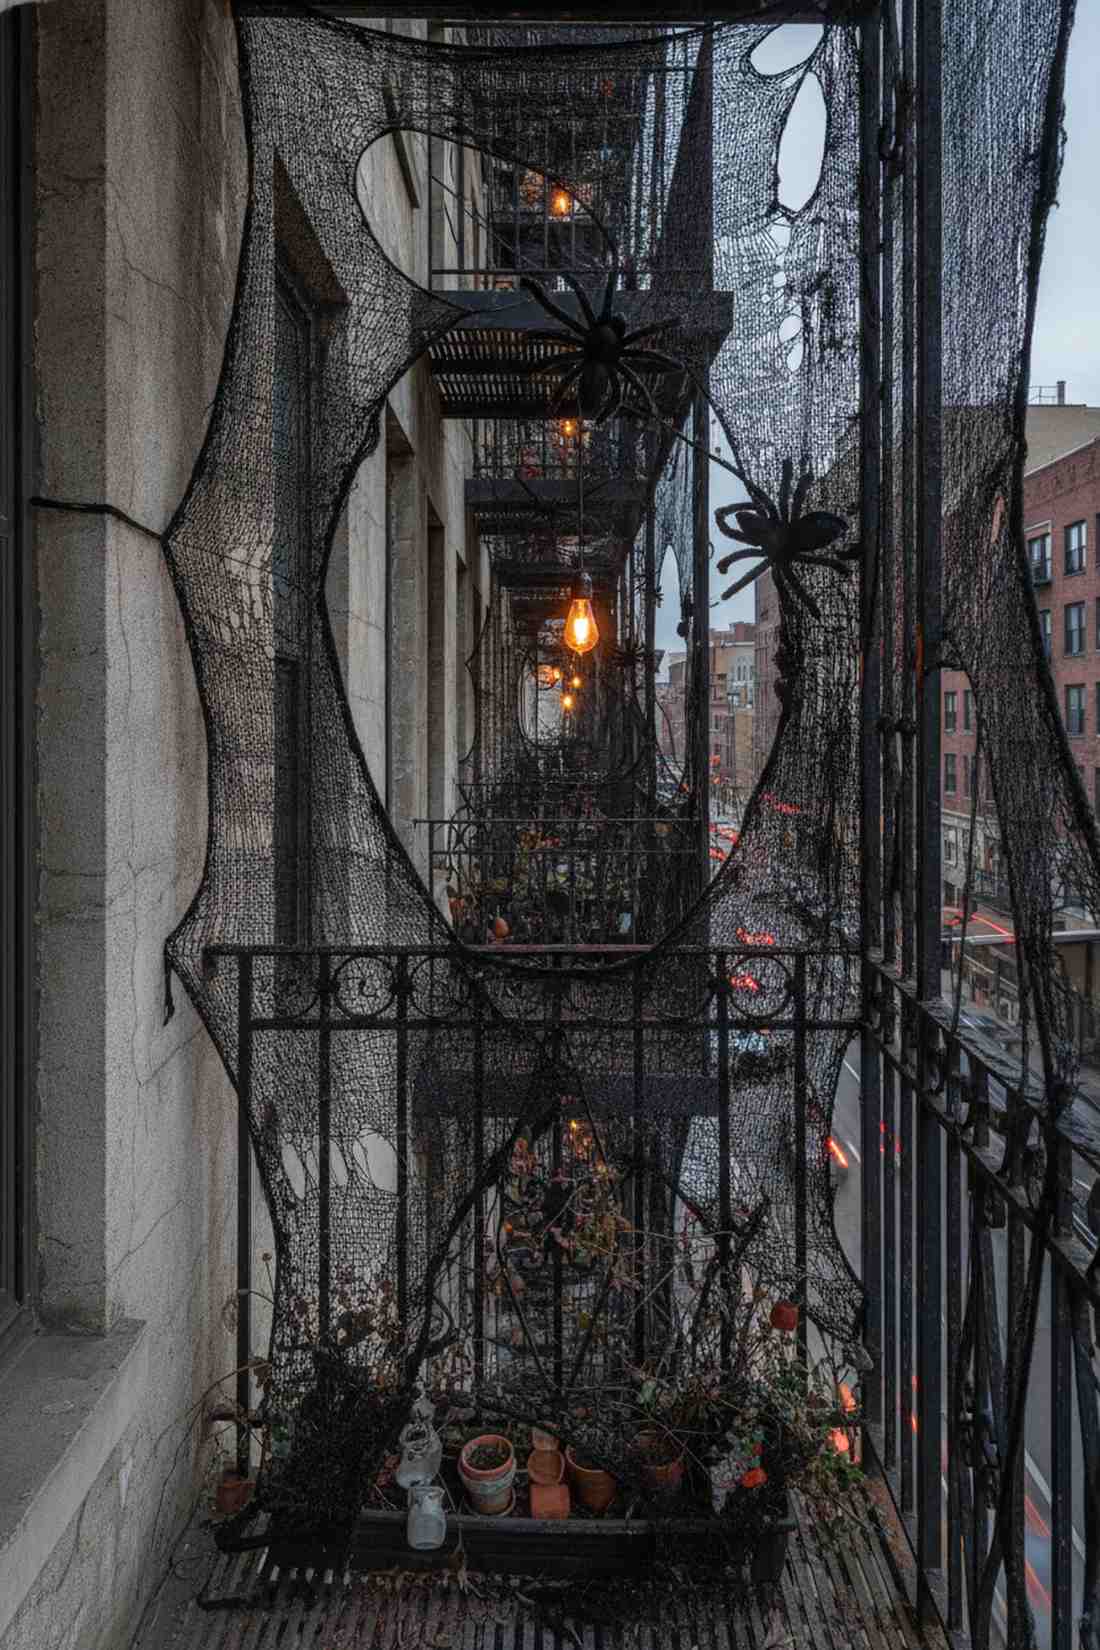
4. Reaching Hands Barrier
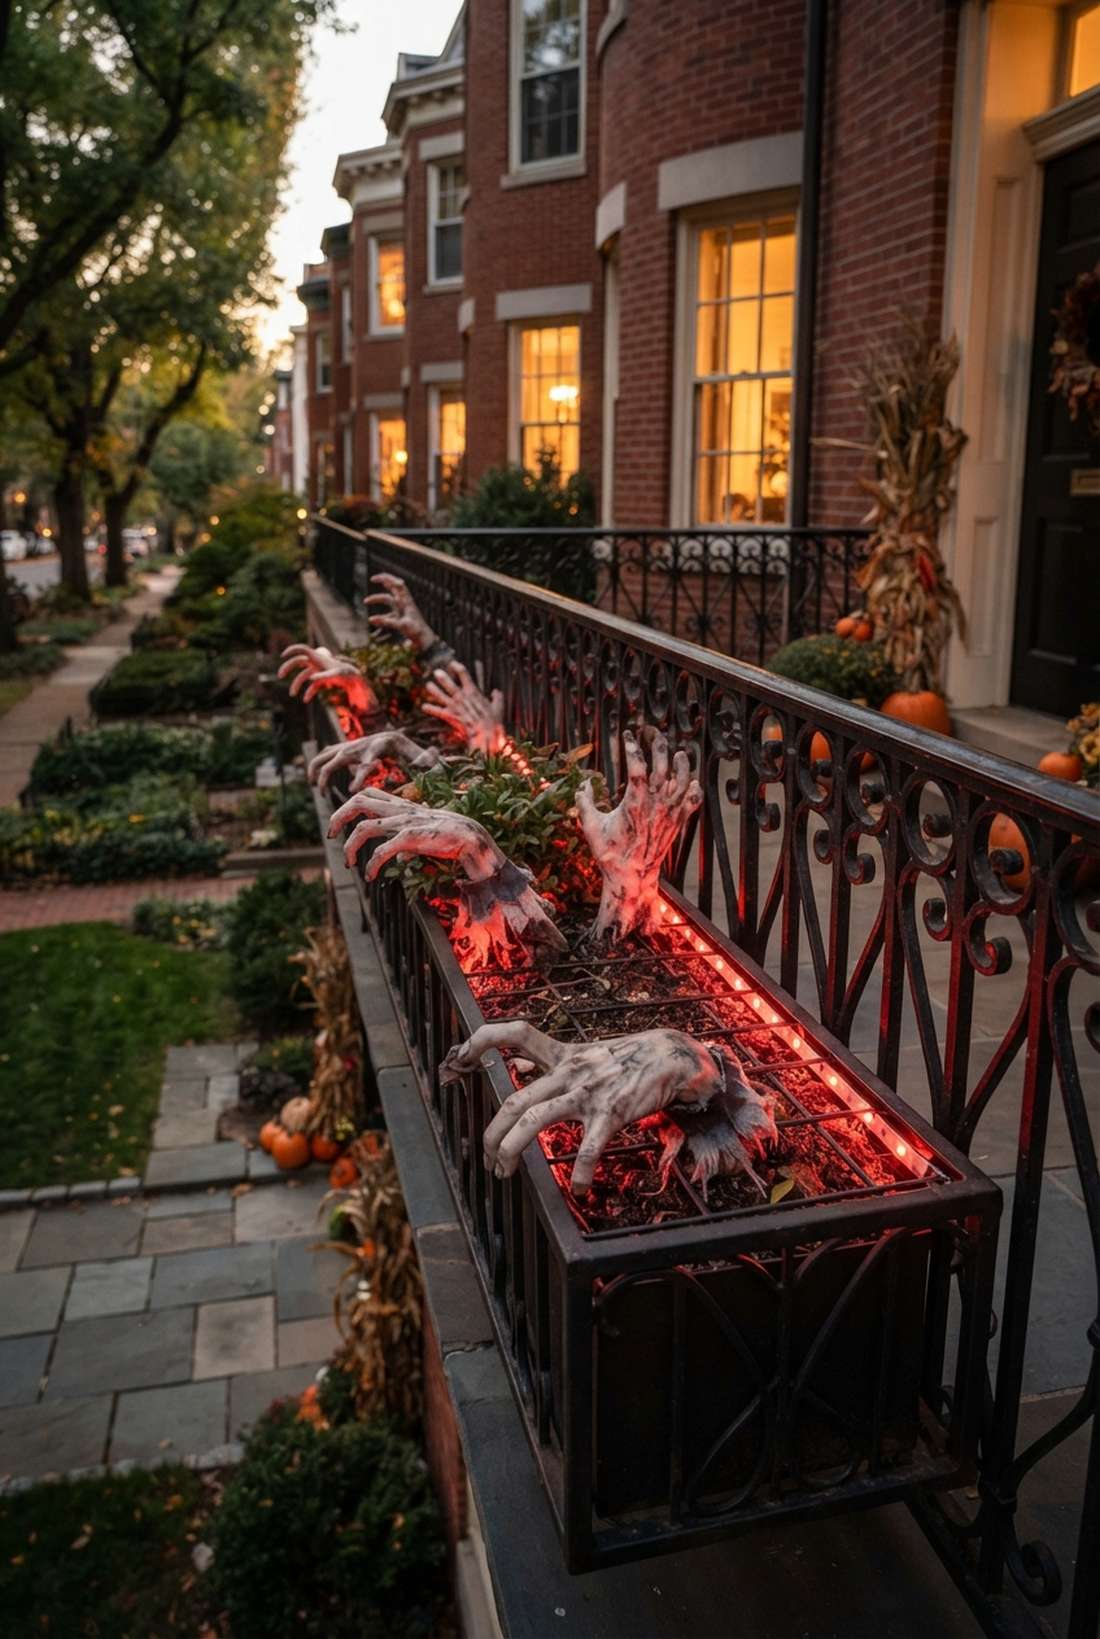
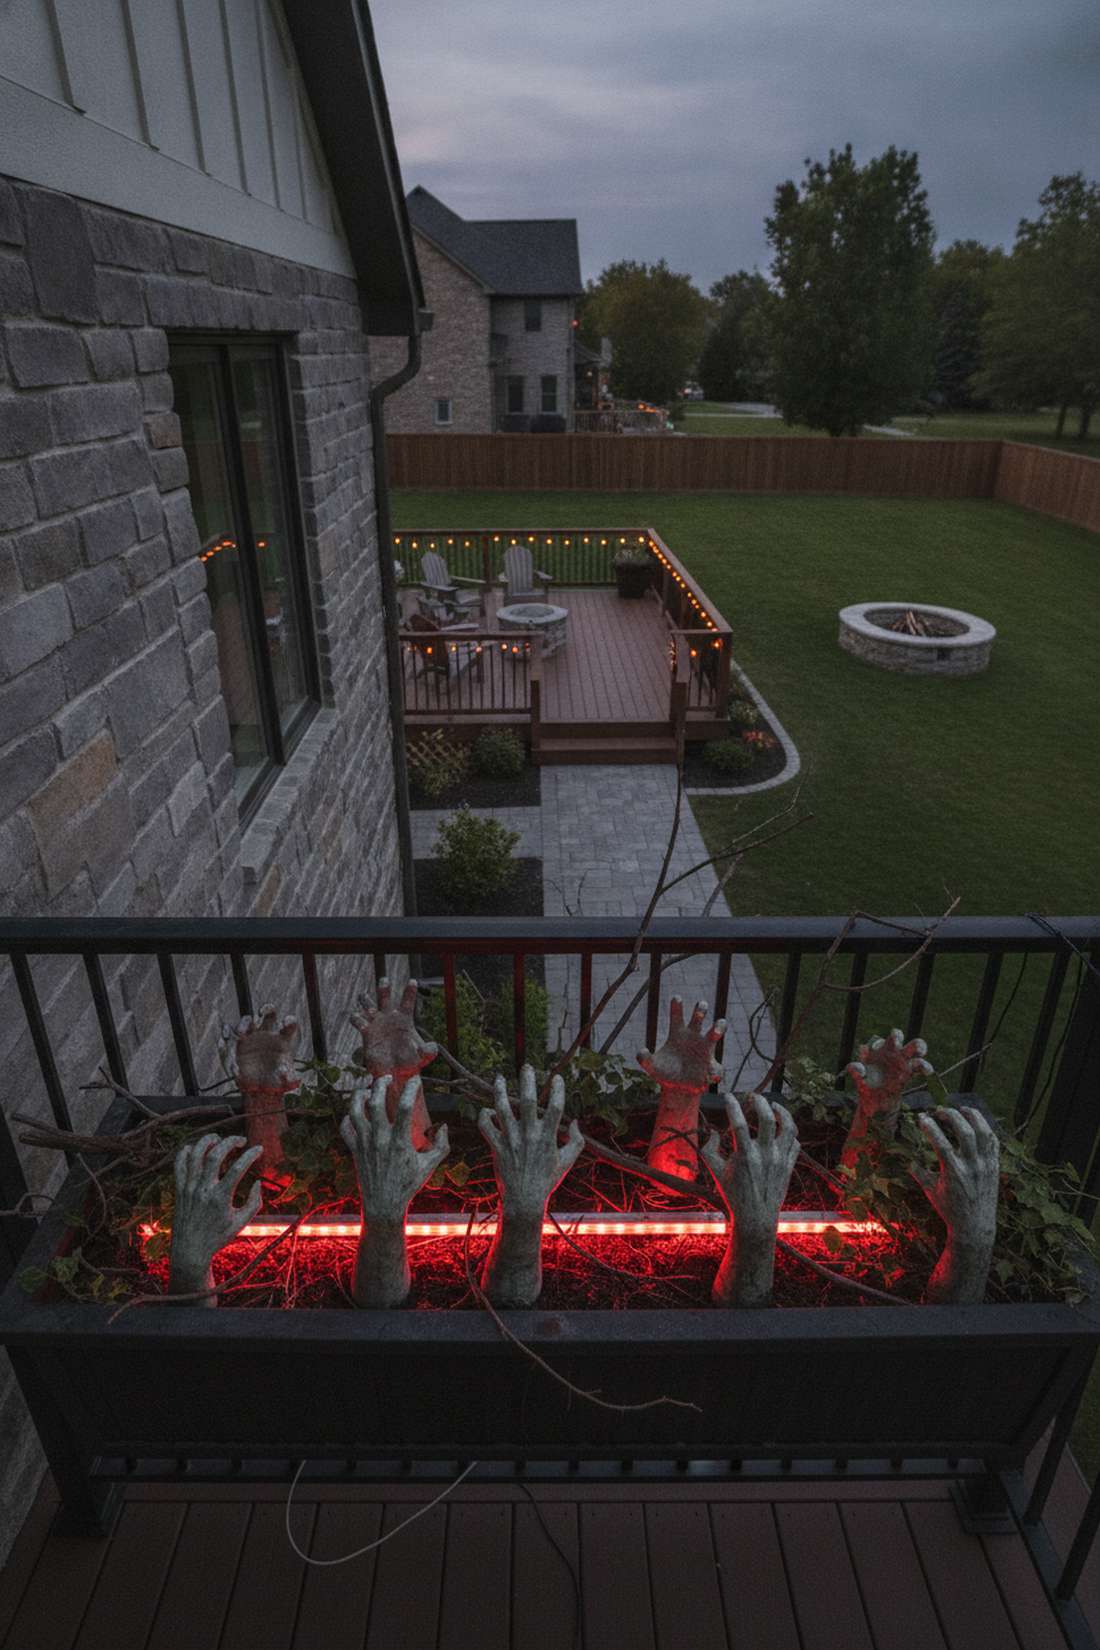
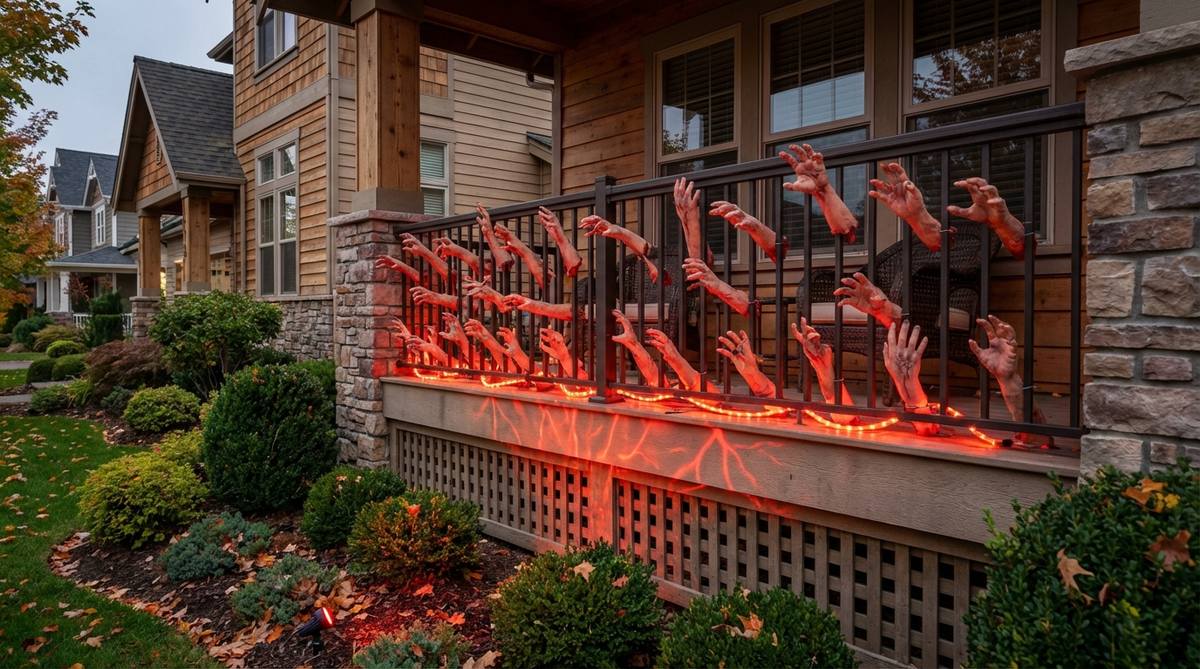
Feels like a terrifying subterranean portal trying to break through your floorboards. This creepy planter box decoration is brilliant for narrow Juliet balconies where floor space is virtually non-existent.
Most setups ignore the lower visual planes, but building upwards from the base gives a remarkably professional edge. Incorporating high-end latex props alongside outdoor LED string lights completely transforms ordinary metal grates into an interactive nightmare.
This layout will run you about $25–$40. Highly recommended for a quick weekend win that stops traffic.
- Key Materials: Textured latex severed hands and red under-glow lighting.
- Vibe / Style: Zombie apocalypse barrier.
- Difficulty: Quick temporary mounting.
- Budget Breakdown: Latex Props: $25 | Lighting: $15.
- Creator’s Tip: Hide the battery packs for the red LEDs inside small waterproof ziplock bags tucked behind the planters.
- Smart Sourcing: UV-coated realistic groundbreaker hands and waterproof red LED strip kits.
This next setup is ridiculously cheap but looks like a $150 custom atmospheric display…
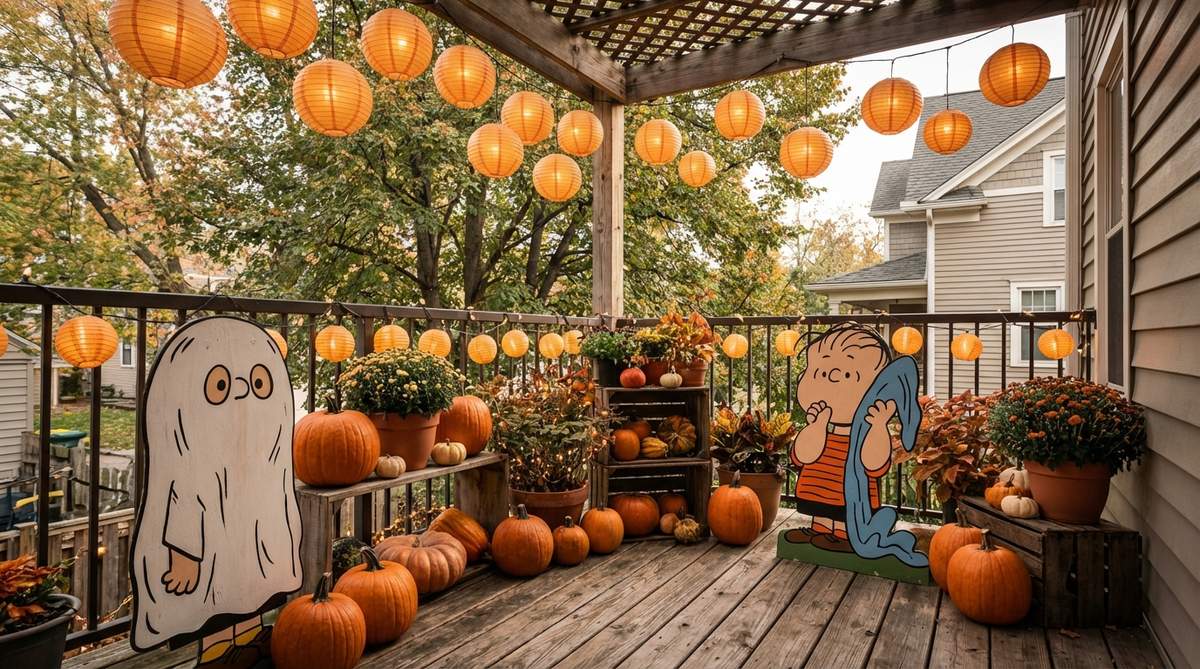
5. Ghost Invasion Canopy
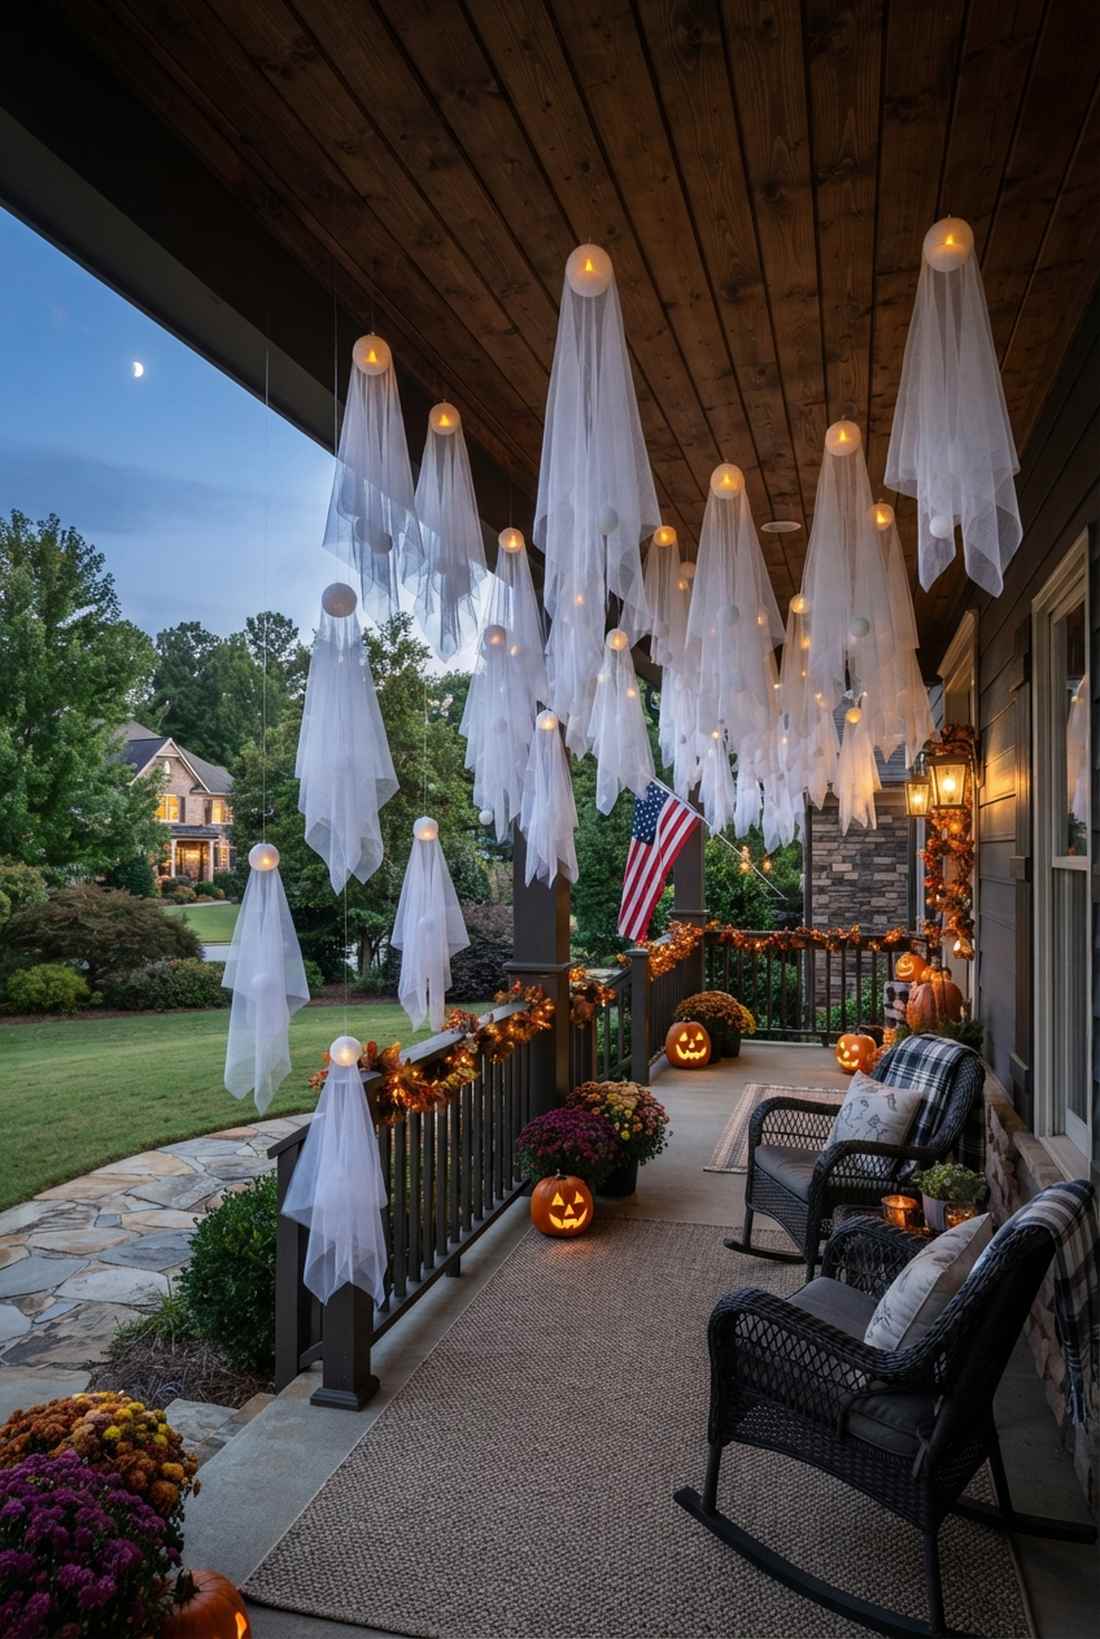
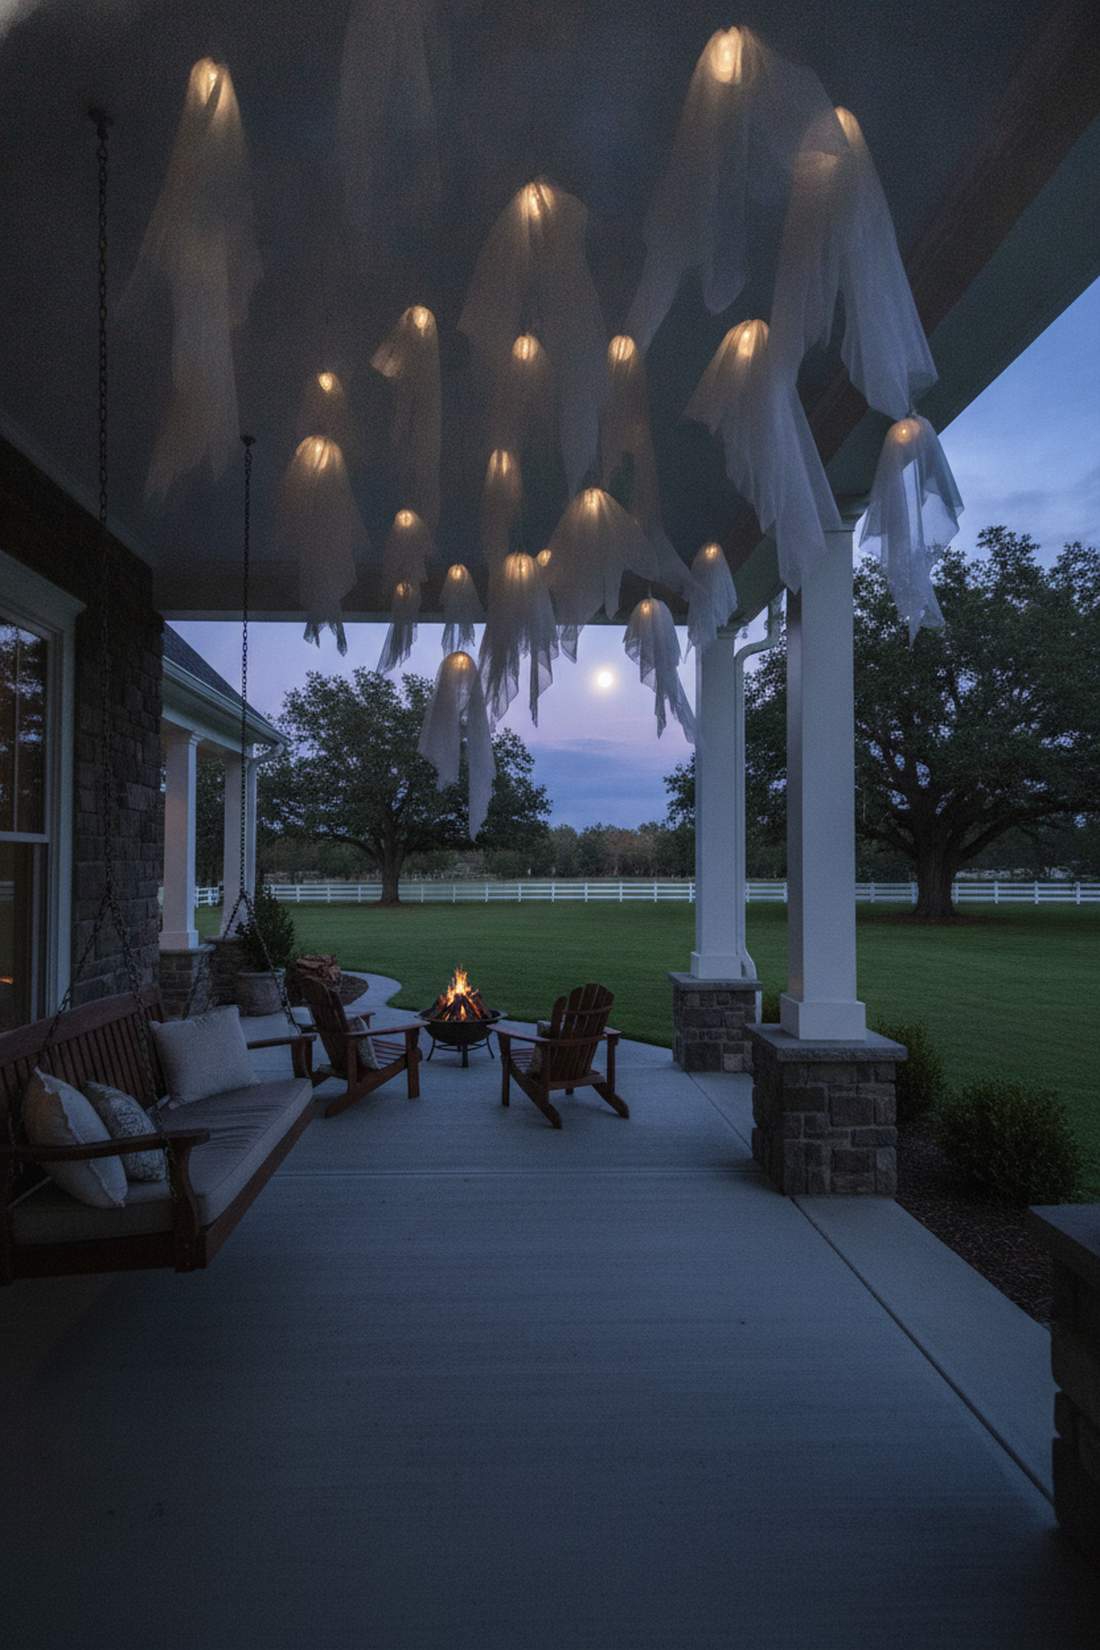
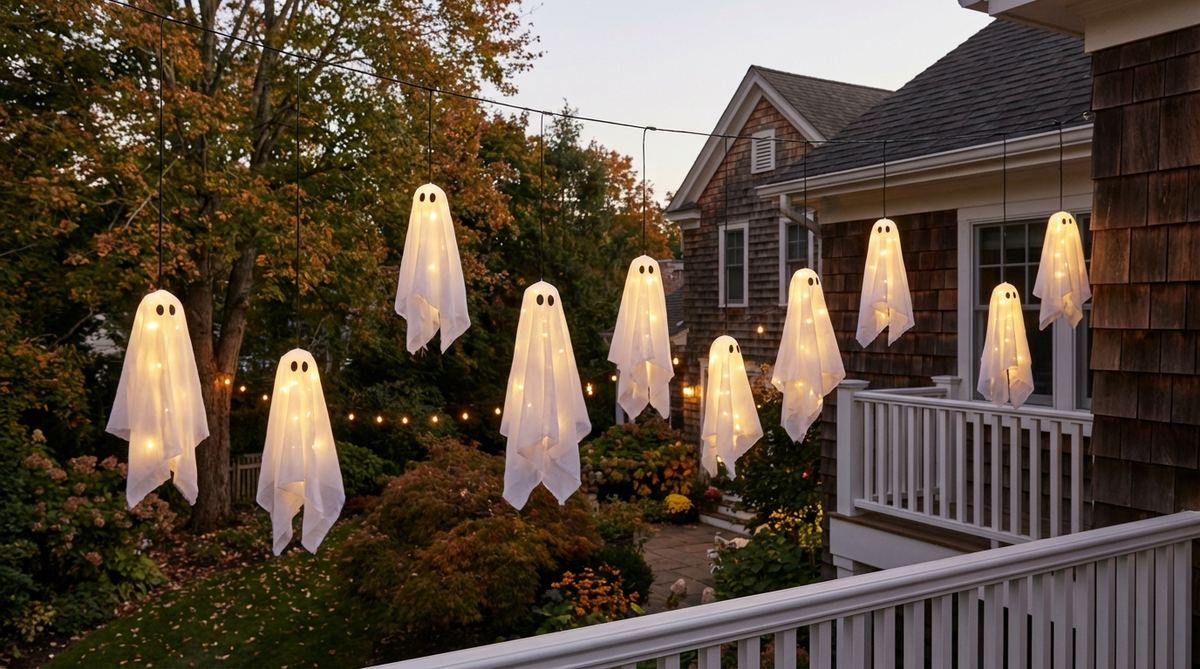
Captures the ethereal feeling of a haunted graveyard bathed in moonlight. This hanging porch canopy idea is the ultimate solution for shaded overhangs or deep covered terraces.
People often waste money on heavy mechanized props, but simple kinetic movement from the wind provides an unmatched, eerie elegance. Using waterproof fairy garden accessories and translucent fabrics generates an expensive ambiance that outlasts October showers.
You can execute this floating illusion for just $20–$35. Pin this if you want a family-friendly aesthetic that still looks deeply artistic.
- Key Materials: White outdoor fabric, foam spheres, and LED tea lights.
- Vibe / Style: Floating specter swarm.
- Difficulty: Beginner DIY crafting.
- Budget Breakdown: Fabric & Spheres: $15 | Lights: $10.
- Creator’s Tip: Stagger the fishing line at wildly different lengths to create forced perspective from the street below.
- Smart Sourcing: pre-cut sheer acrylic fabric squares and sealed outdoor LED tea lights (bulk pack).
Whimsical & Playful Halloween Scenes
6. Witches’ Tea Party
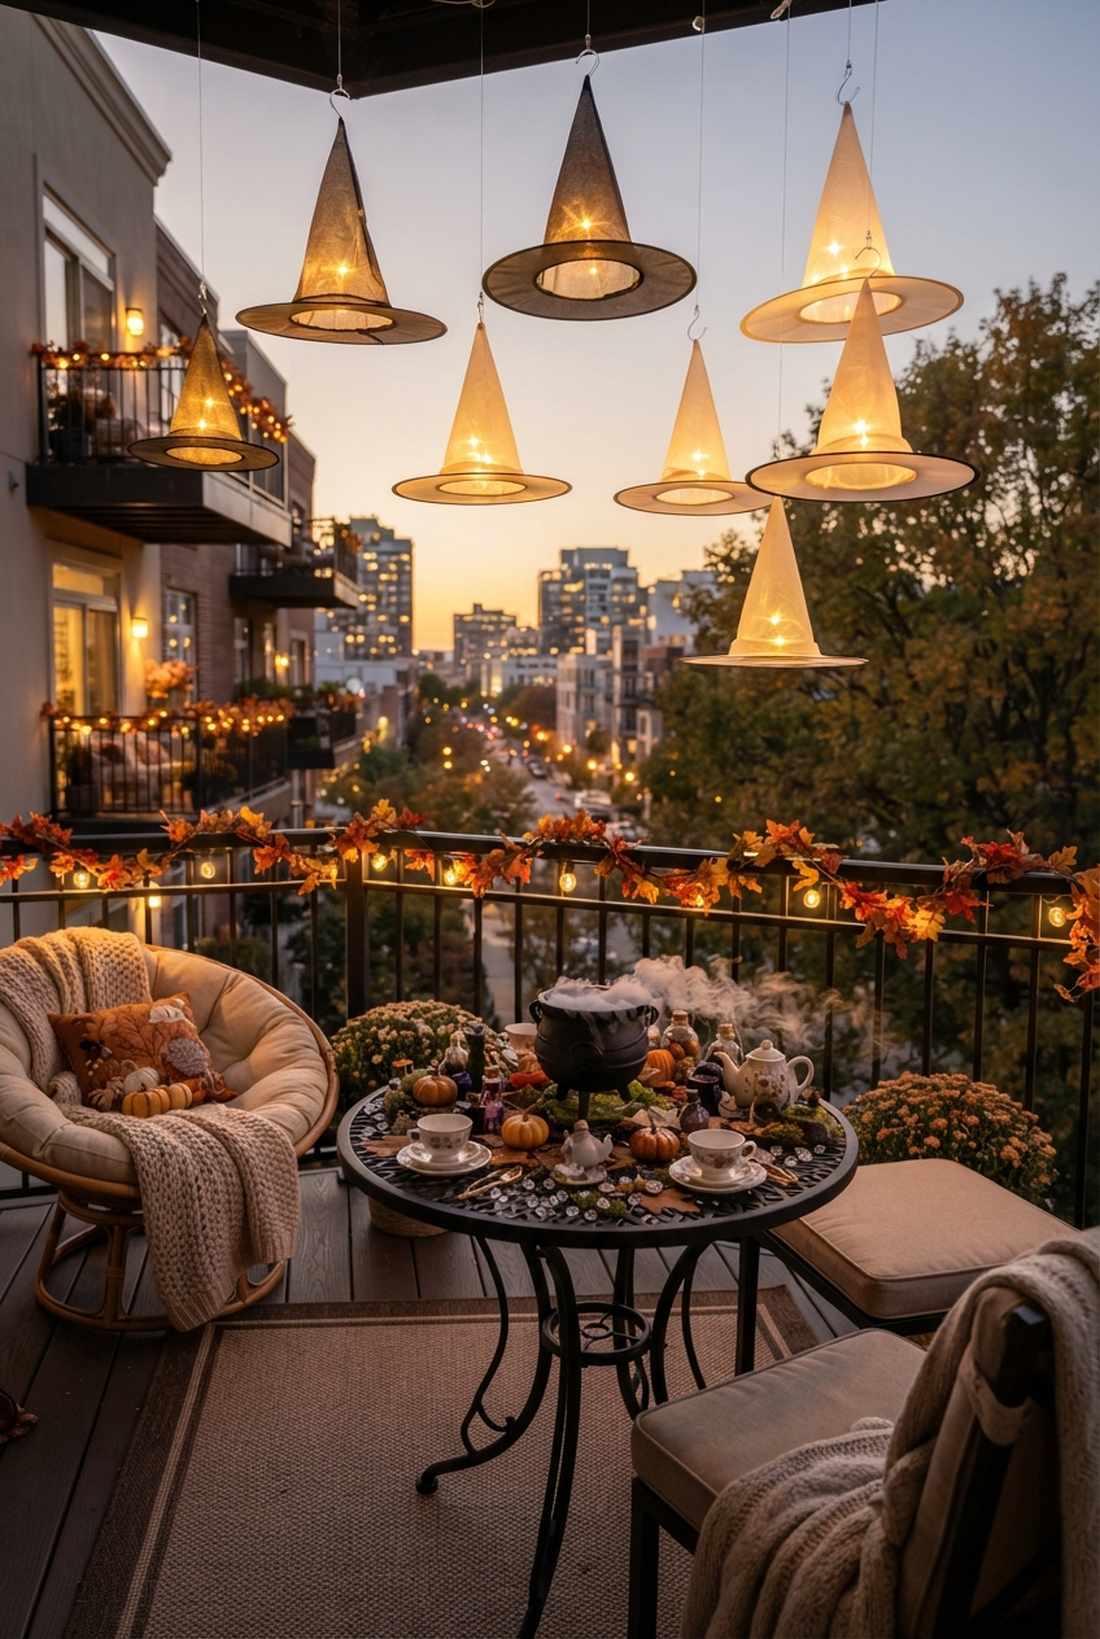
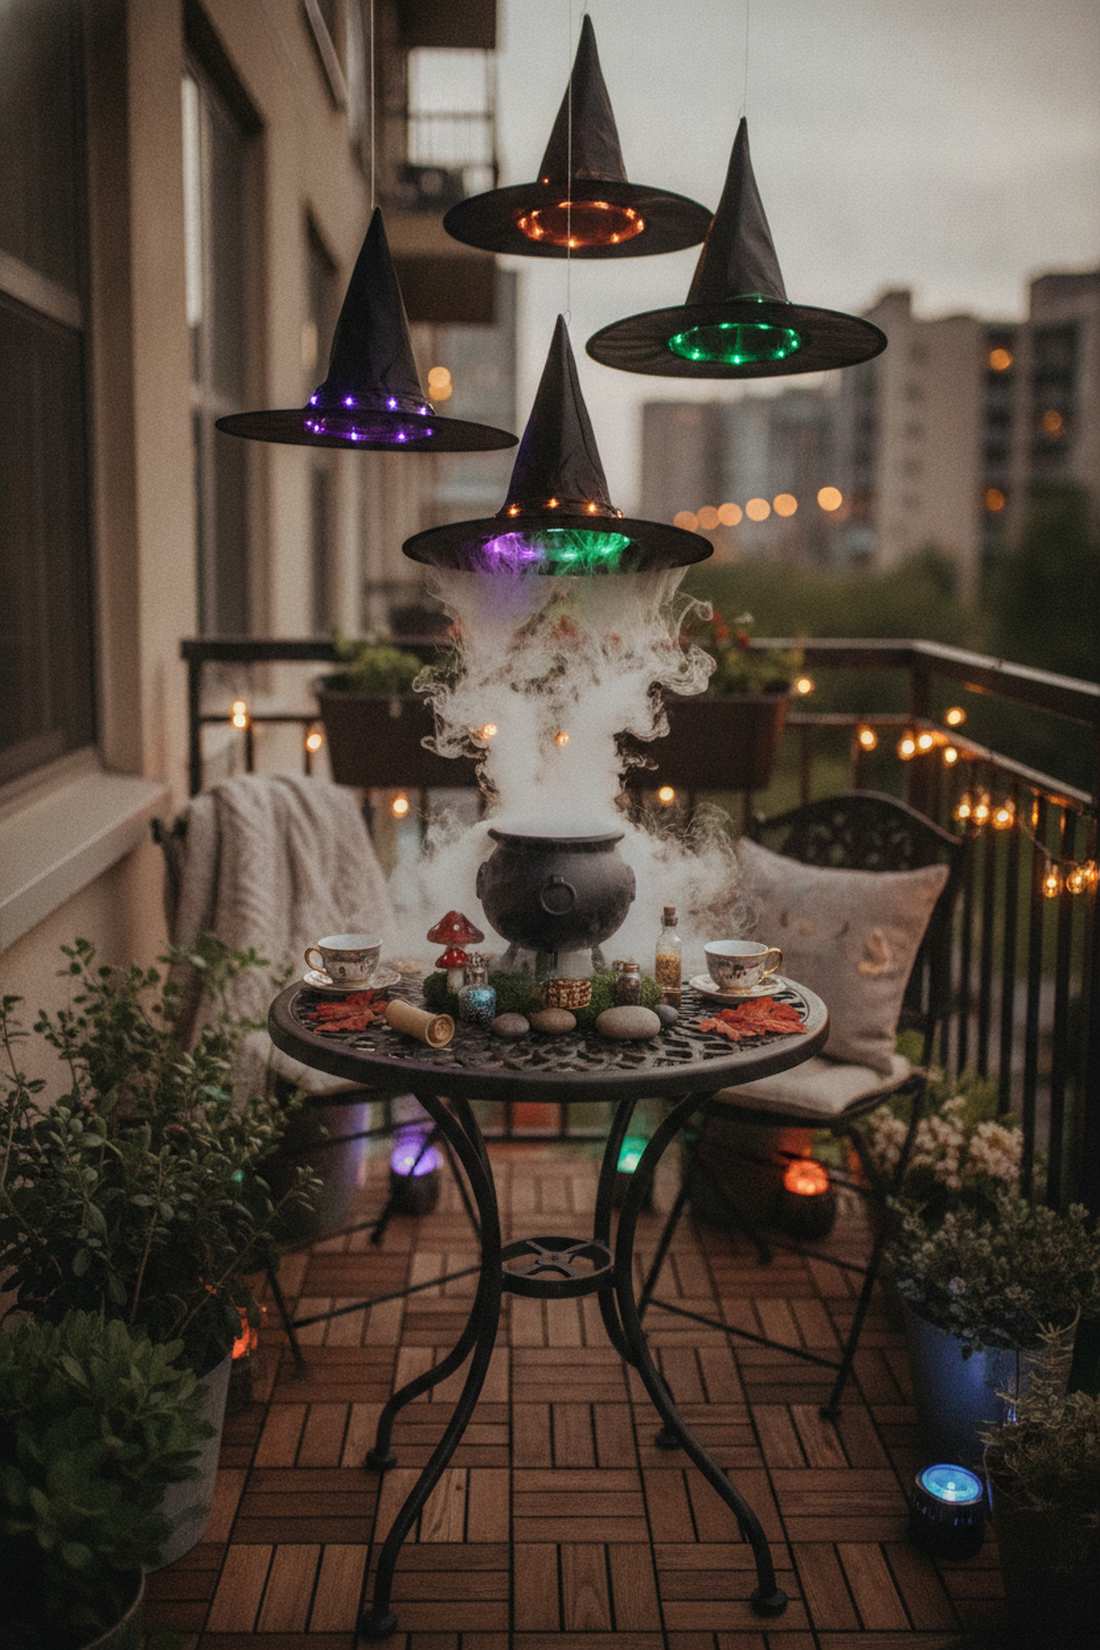
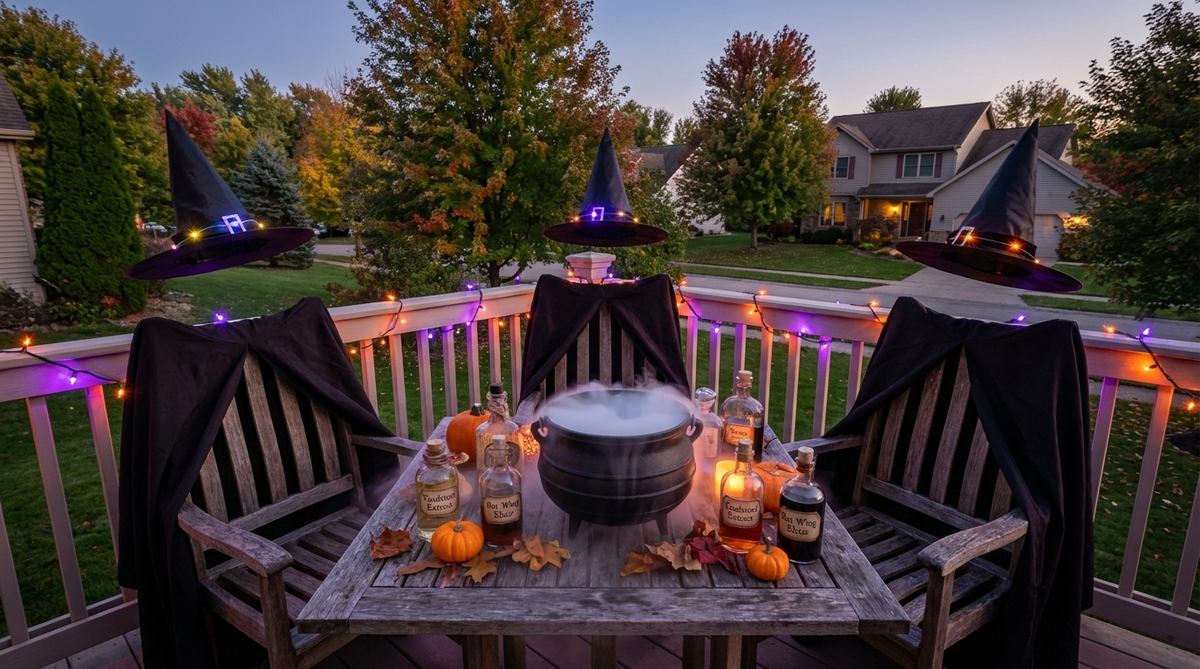
Feels like a secret magical gathering you just happened to interrupt. This small bistro table centerpiece perfectly maximizes tiny apartment balconies without sacrificing functionality.
While generic setups lean heavily into gore, this refined, colorful approach completely steals the show. Adding premium color-changing outdoor LEDs and miniature fairy garden supplies ensures the space shines with a professional, boutique-hotel charm.
Creating this magical vignette costs around $30–$50. It’s an unforgettable setup that easily transitions into a cozy autumn nook.
- Key Materials: Floating witch hats, mini cauldron, and dry ice.
- Vibe / Style: Playful magical coven.
- Difficulty: Moderate overhead rigging.
- Budget Breakdown: Hats & Cauldron: $30 | Lighting: $15.
- Creator’s Tip: Suspend the hats using clear monofilament wire attached directly to removable adhesive ceiling hooks.
- Smart Sourcing: pre-strung illuminated witch hats and color-changing waterproof puck lights.
7. Peanuts Pumpkin Patch
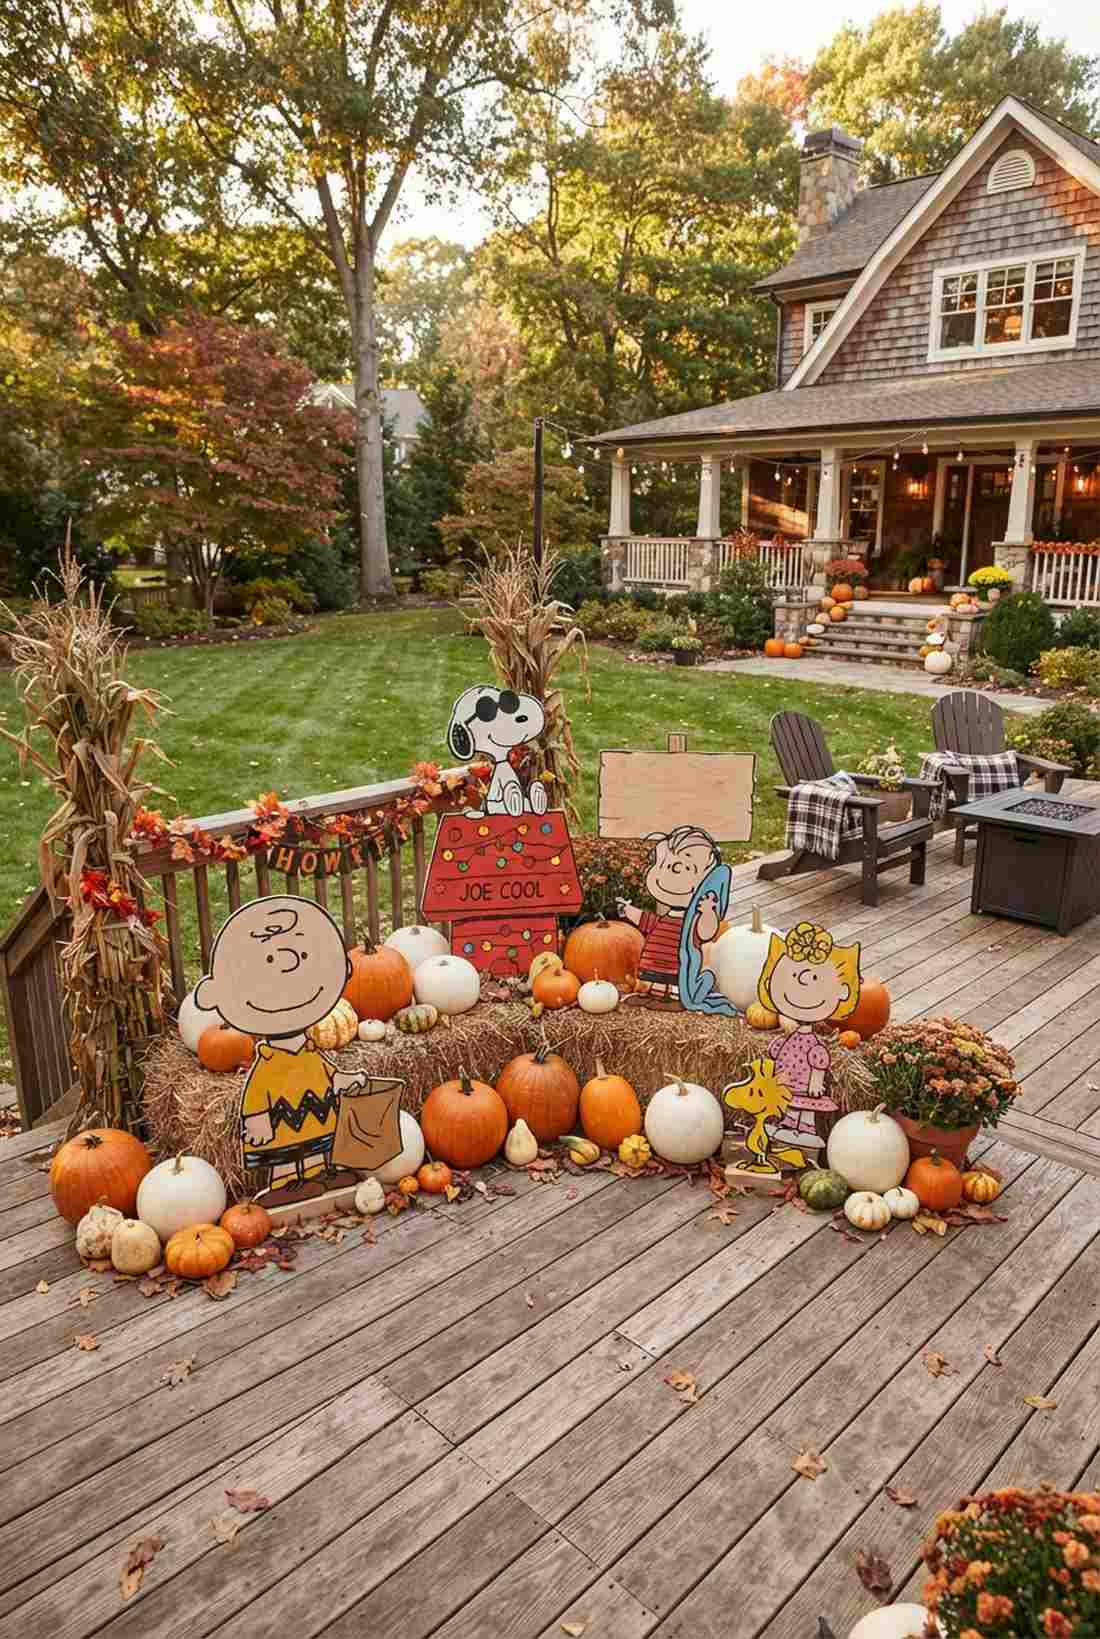
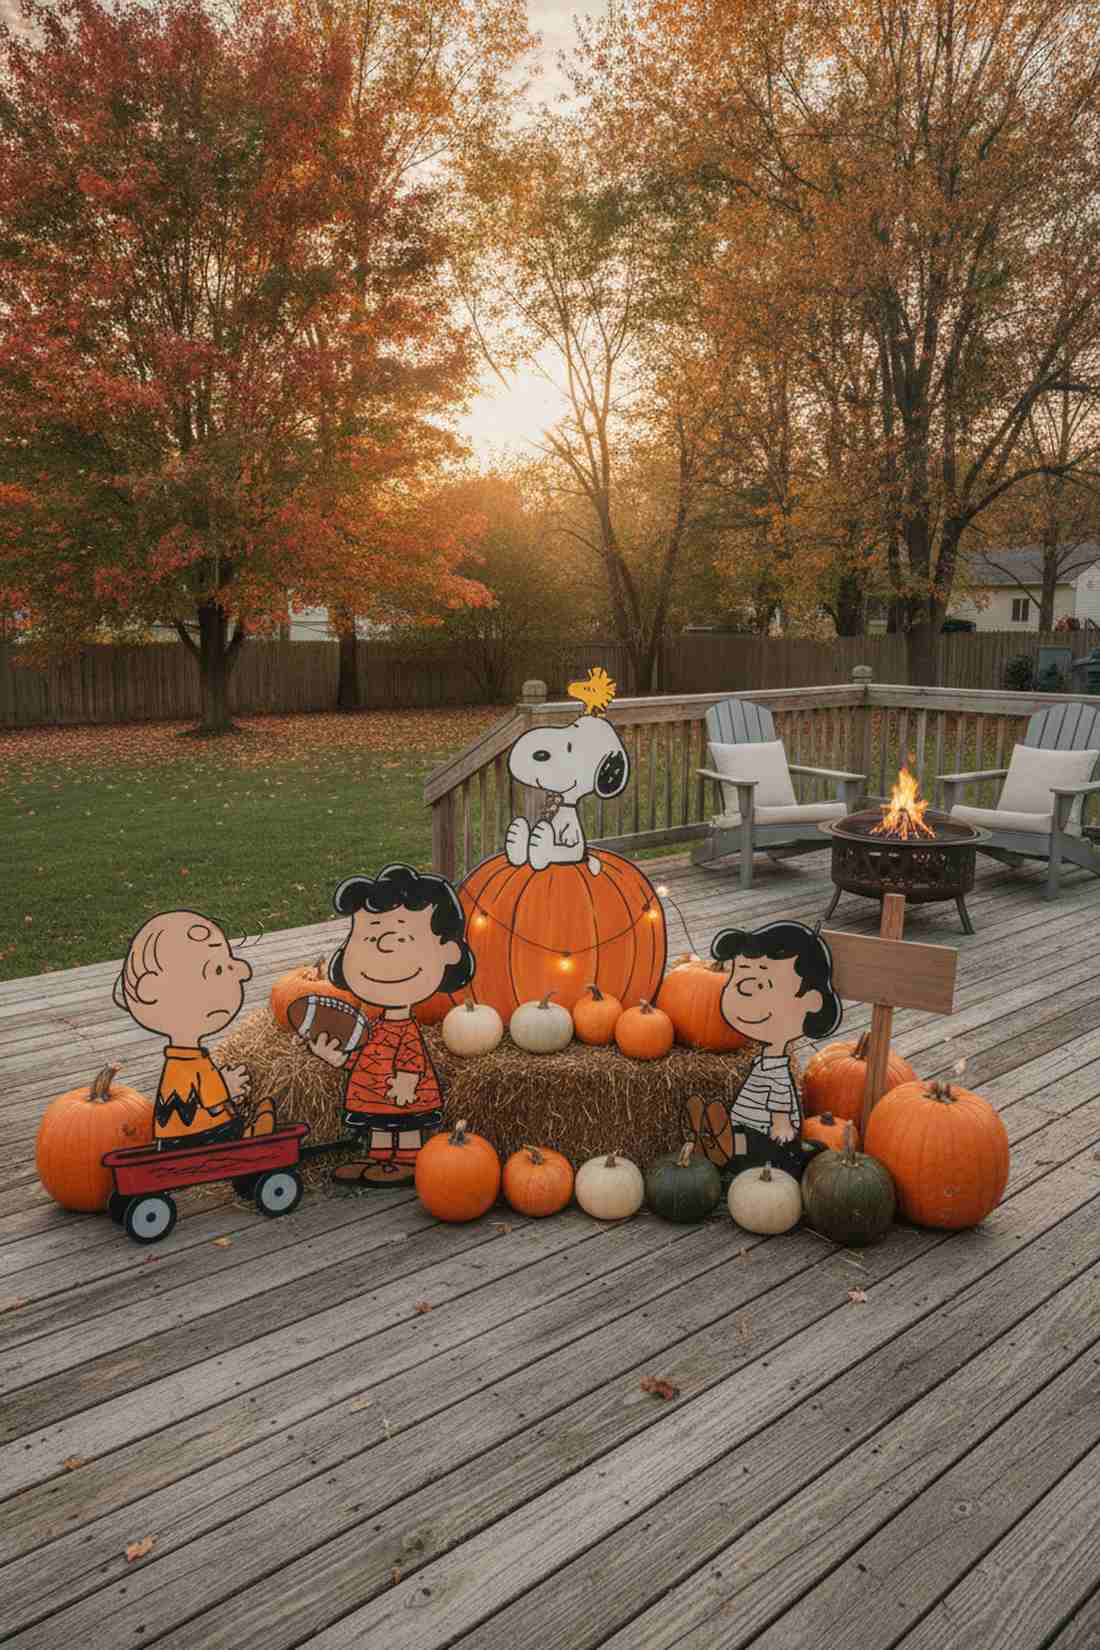
Instantly transports you back to cozy childhood evenings watching classic cartoons. This nostalgic corner display is a phenomenal choice for family-oriented neighborhoods or large deck spaces.
Ditching standard horror tropes for high-quality painted silhouettes instantly upgrades the emotional connection of the space. Integrating durable outdoor acrylics over raw wood delivers a surprisingly premium look that survives harsh weather.
You can build this entire patch for $40–$60. Save this to your seasonal crafting board for the ultimate family project.
- Key Materials: Weather-treated plywood, acrylic paints, and real pumpkins.
- Vibe / Style: Vintage cartoon nostalgia.
- Difficulty: Requires basic painting skills.
- Budget Breakdown: Wood & Paint: $25 | Pumpkins: $25.
- Creator’s Tip: Seal the edges of your plywood cutouts with marine varnish to prevent moisture from warping the characters.
- Smart Sourcing: pre-cut blank wooden yard stakes and UV-resistant outdoor acrylic paint kits.
8. Friendly Monster Garden
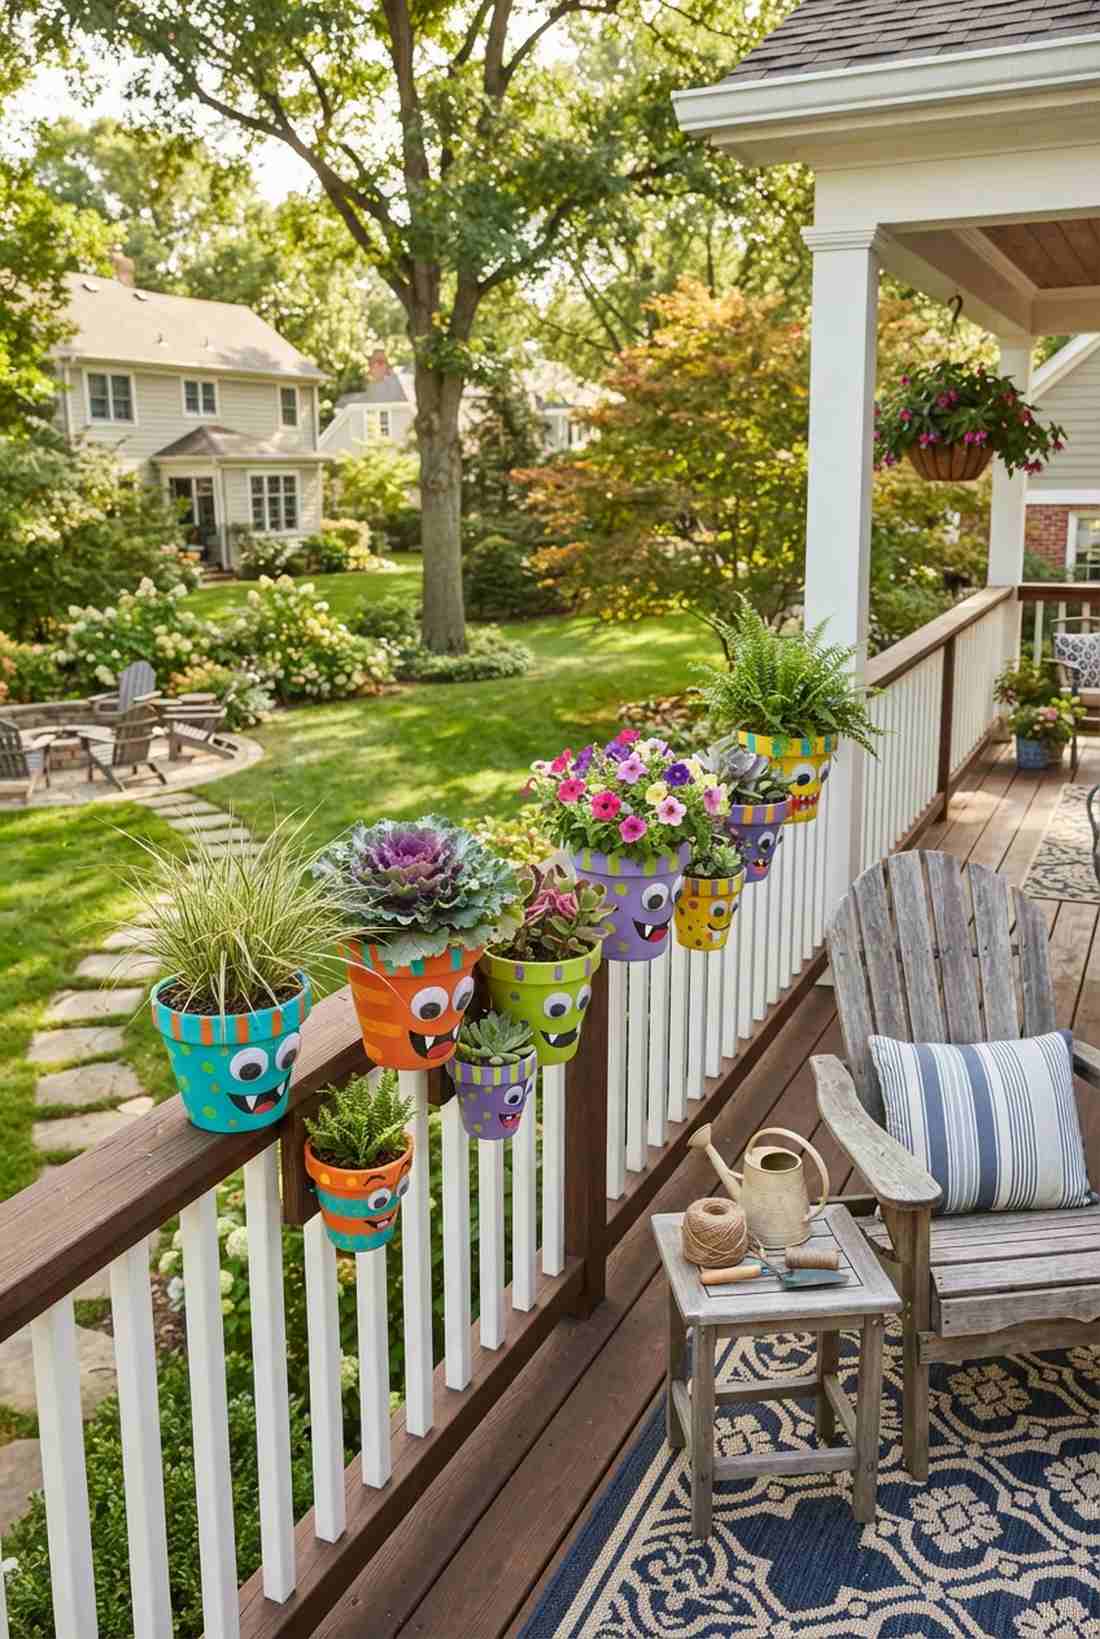
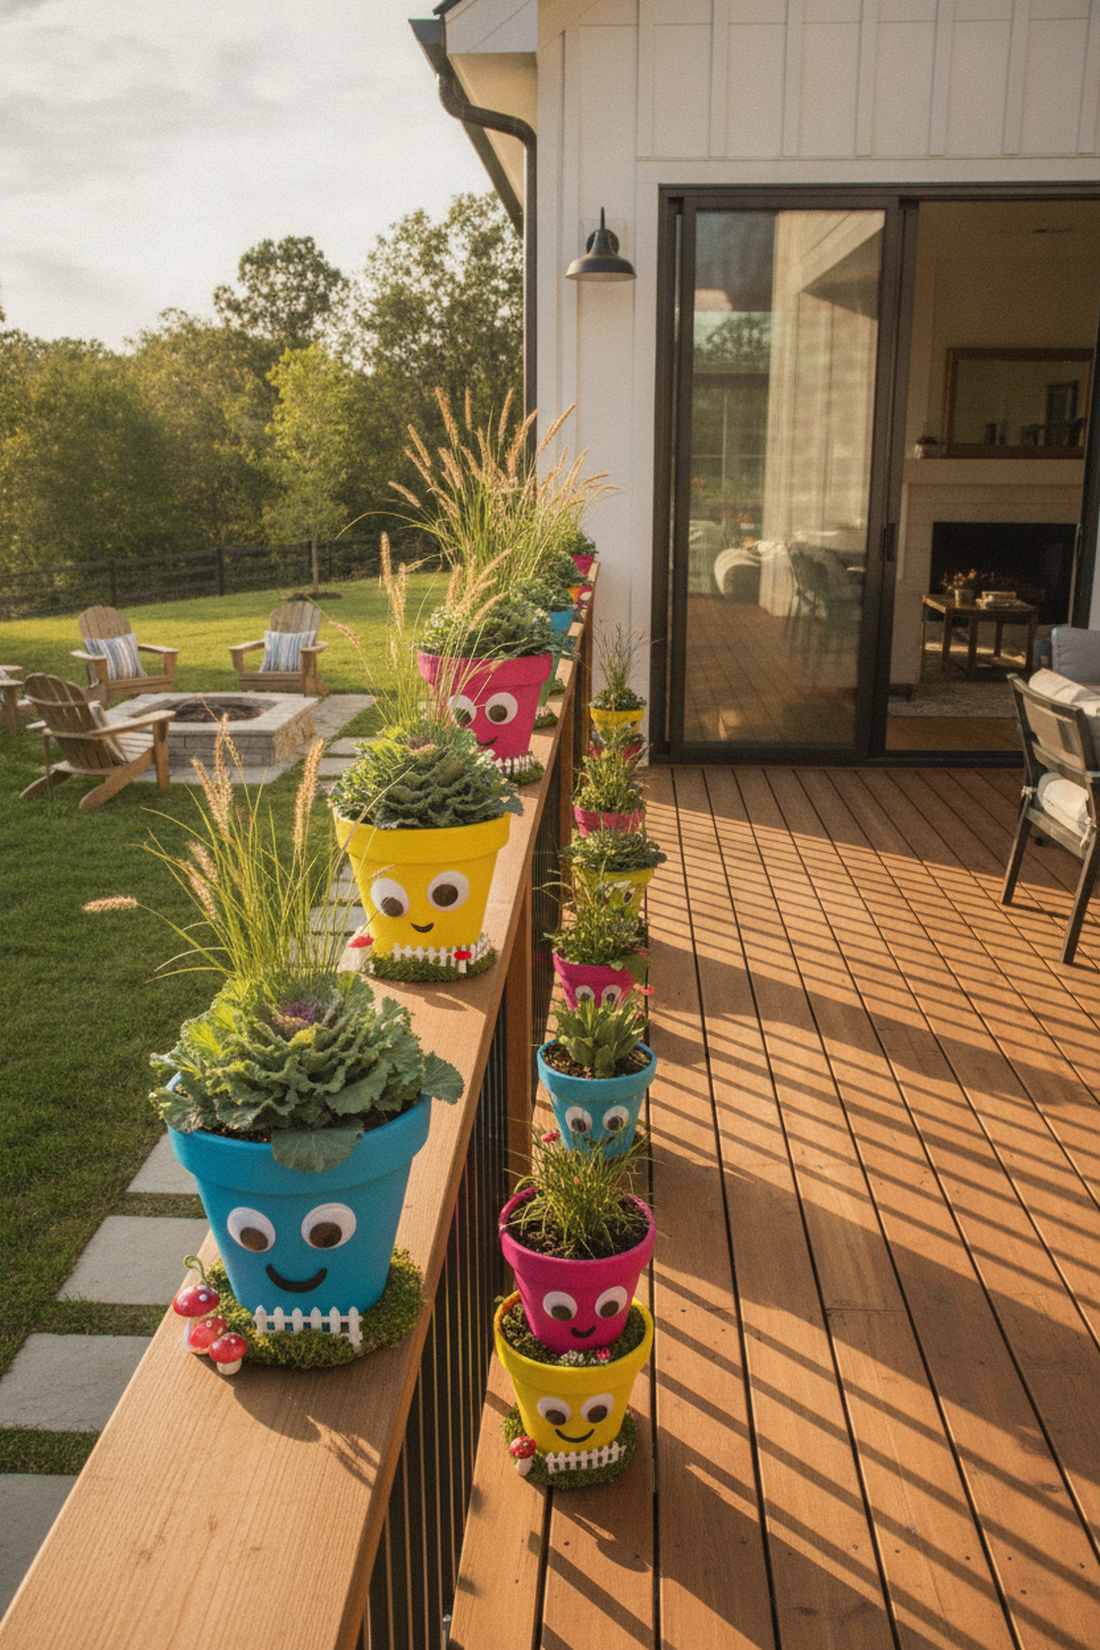
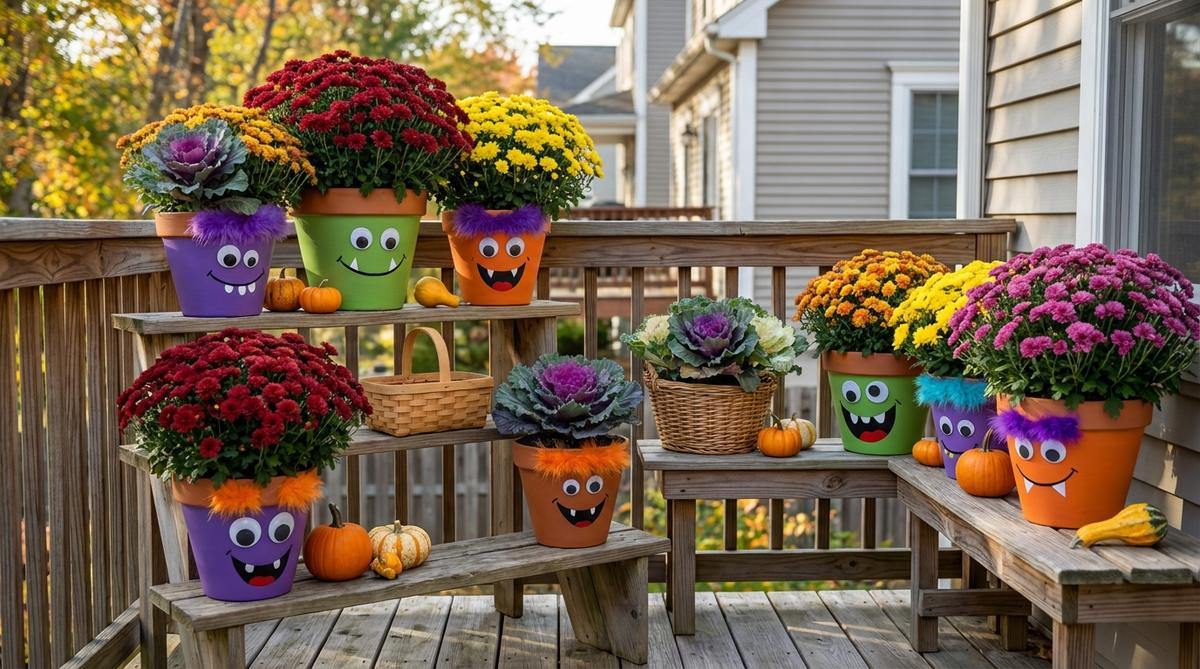
Feels like a vibrant, living cartoon world sprouting right out of your railing. This colorful balcony planter decor is an incredible way to inject life into dull terracotta pots.
Many decorators overlook their existing plants, but transforming functional greenery into holiday art provides a massive aesthetic return. Blending simple googly eyes with high-end miniature garden accessories makes the entire arrangement look meticulously curated.
This quick transformation only costs about $10–$20. Grab your paints and tackle this effortless afternoon upgrade.
- Key Materials: Terracotta pots, oversized craft eyes, and outdoor paint.
- Vibe / Style: Silly botanical monsters.
- Difficulty: Extremely easy and child-friendly.
- Budget Breakdown: Craft Supplies: $12 | Plants: Already owned.
- Creator’s Tip: Use ornamental kale or spiky grasses as the “hair” for the monsters for the best visual texture.
- Smart Sourcing: jumbo self-adhesive weather-proof eyes (bulk pack) and multi-surface outdoor spray paints.
Most people get their balcony railings completely wrong… until they try the exact layout coming up next.
9. Candy Corn Garland Cascade
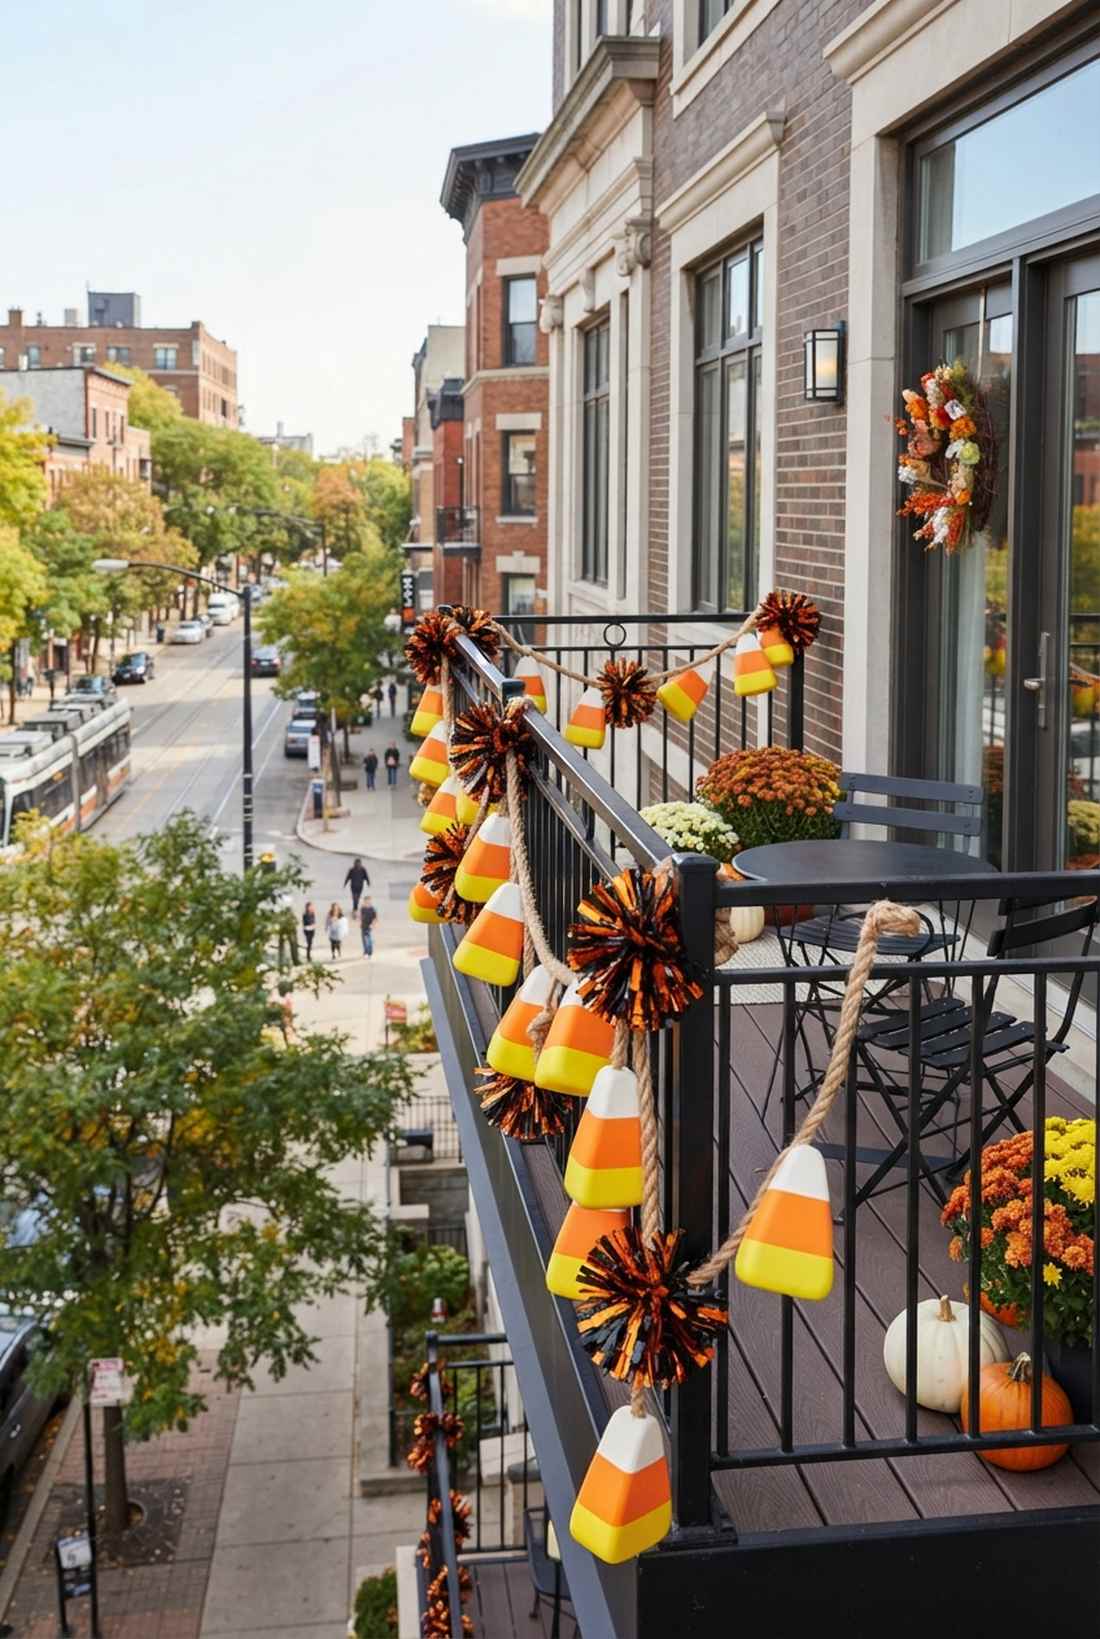
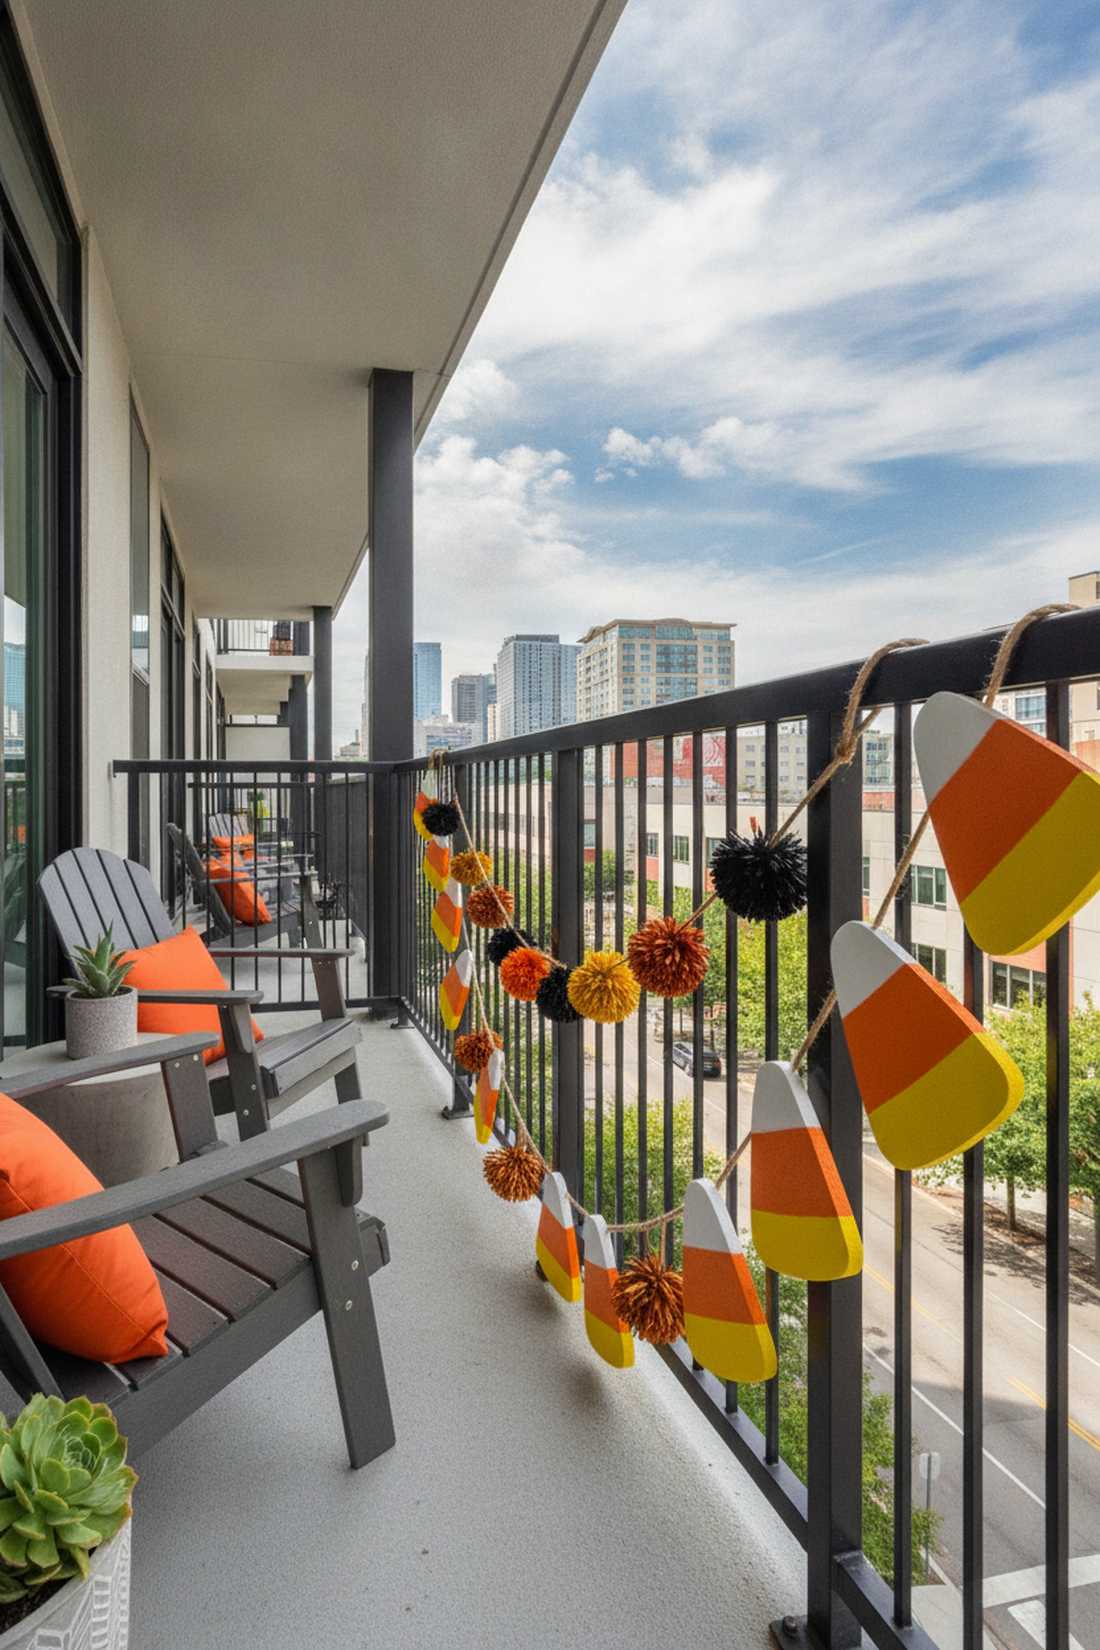
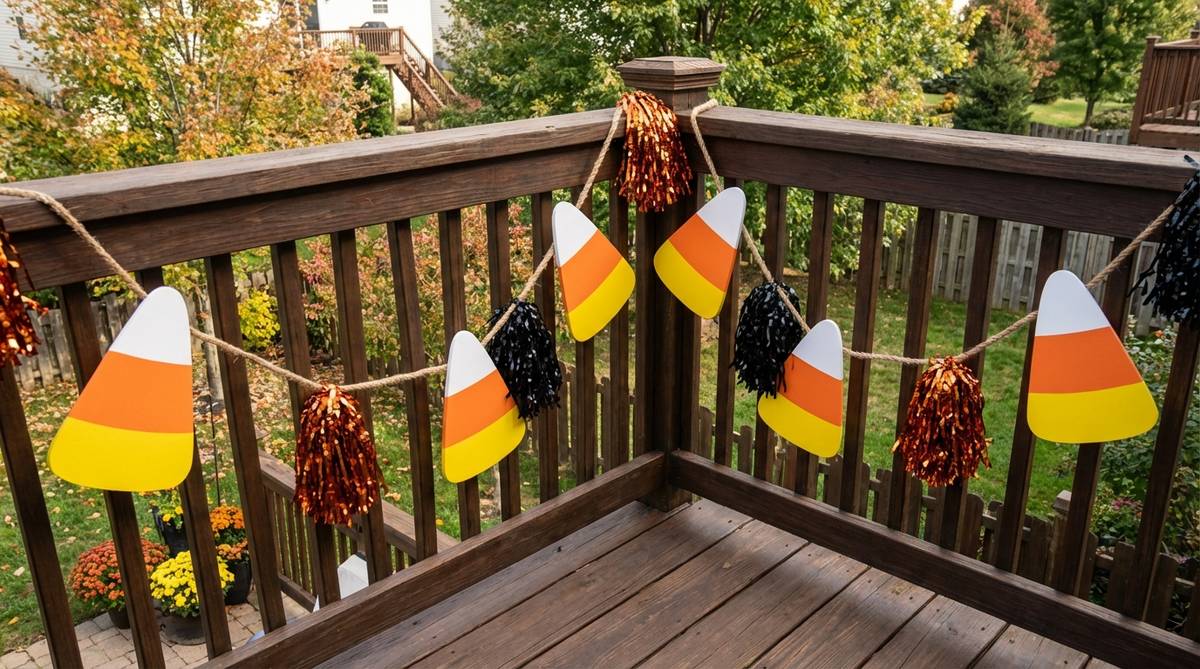
Brings a burst of oversized, sugary sweetness that pops aggressively against urban concrete. This graphic railing garland idea is flawless for bringing high-visibility color to second or third-story apartments.
Instead of relying on thin, unnoticeable paper chains, building chunky, structural foam elements gives a designer-level finish. Utilizing durable marine-grade rope alongside weather-sealed paints ensures the bright tri-color aesthetic remains immaculate.
You can assemble this eye-catching garland for under $25. Pin this if you love bright, non-traditional seasonal aesthetics.
- Key Materials: Foam board, jute rope, and tri-color spray paint.
- Vibe / Style: Pop-art candy explosion.
- Difficulty: Simple cutting and stringing.
- Budget Breakdown: Foam & Rope: $15 | Paint: $10.
- Creator’s Tip: Space out the candy corns with large black and orange metallic pompoms to prevent the heavy foam pieces from sliding together.
- Smart Sourcing: pre-cut rigid foam triangles (bulk pack) and thick natural jute rope spools.
💡 Must-Have Supplies for High-End Setups
To build these setups faster and ensure they last, skip the generic craft aisles and invest in the right foundational kits.
- Base & Support: heavy-duty transparent outdoor zip ties
- Setup Tools: battery-operated LED string light starter kits
- Weather/Durability Protection: UV-blocking clear matte acrylic sealant
10. Floating Hat Magic
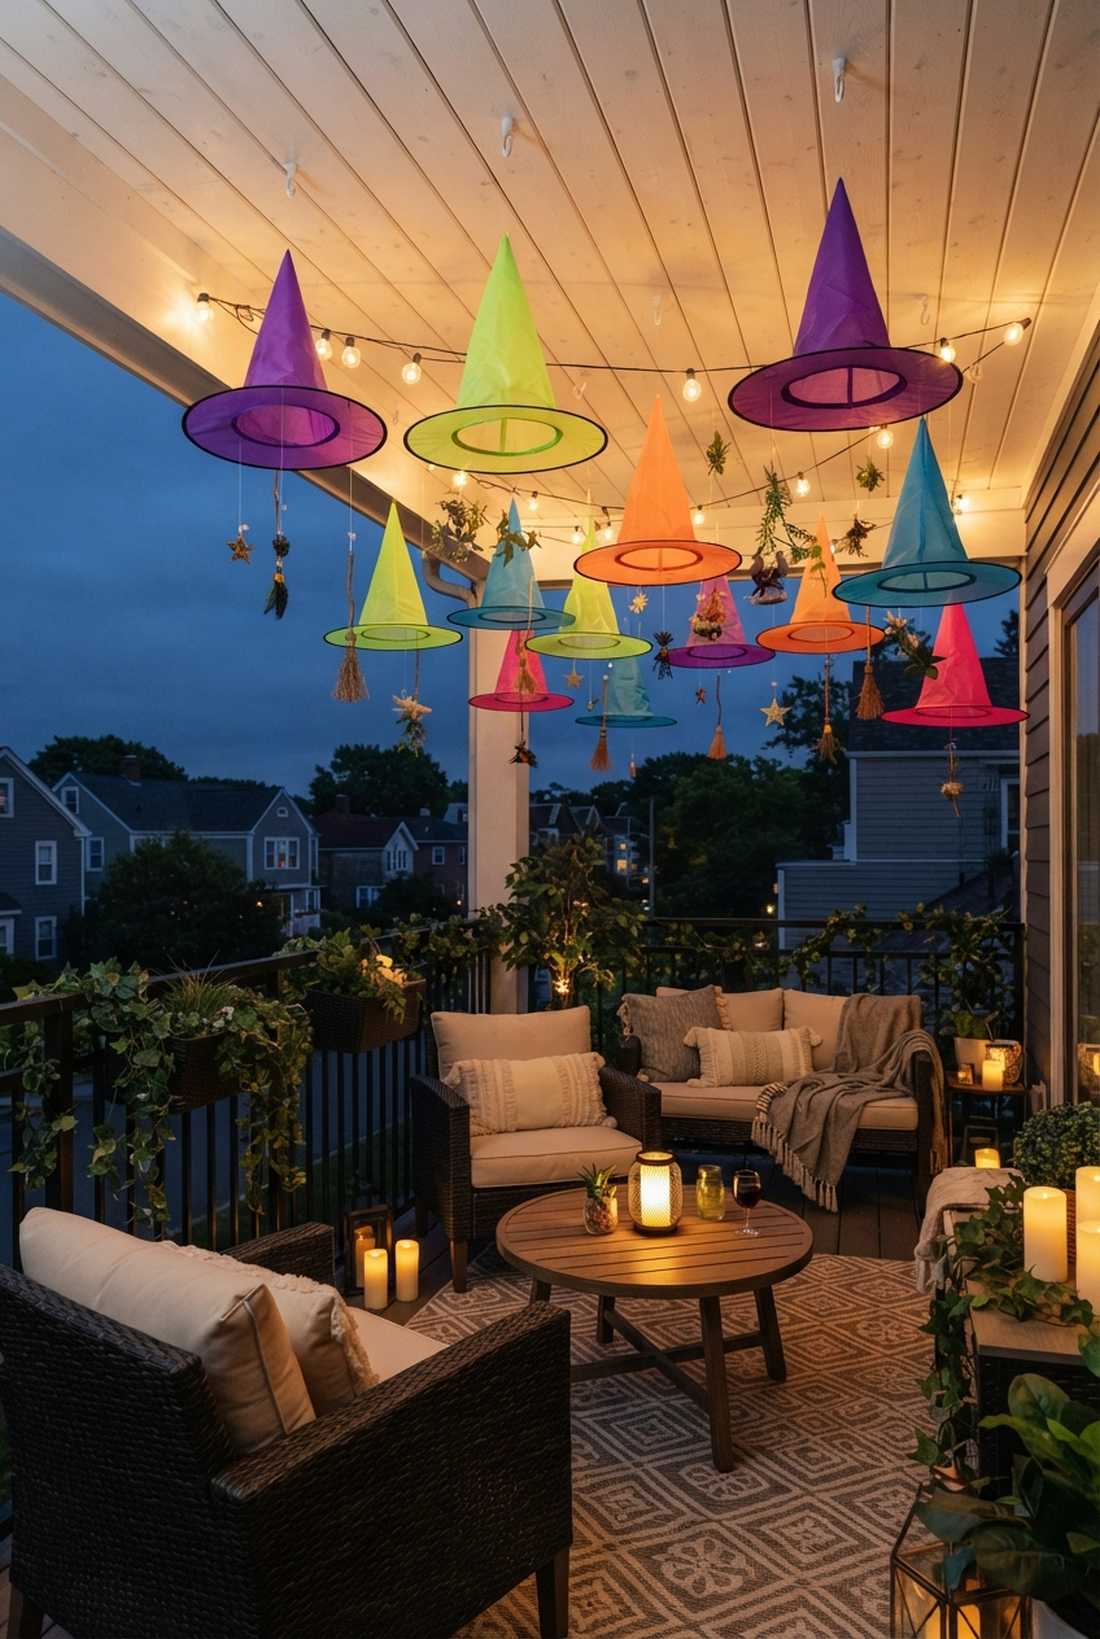
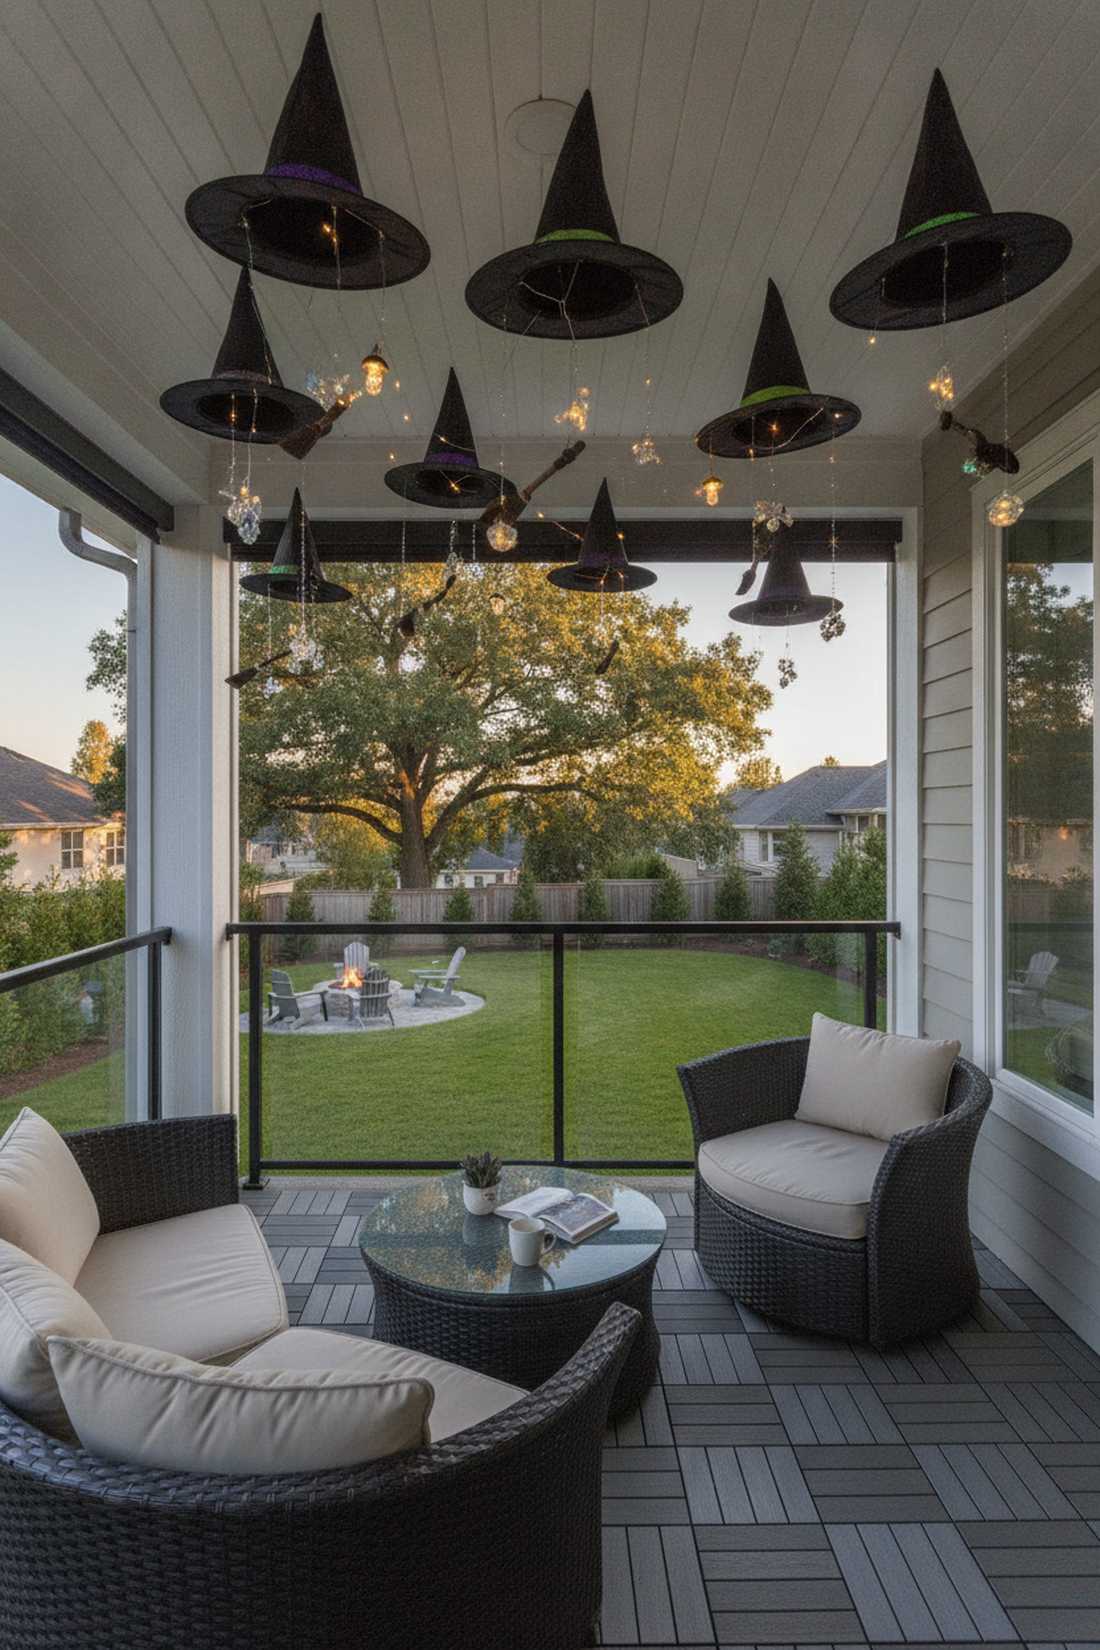
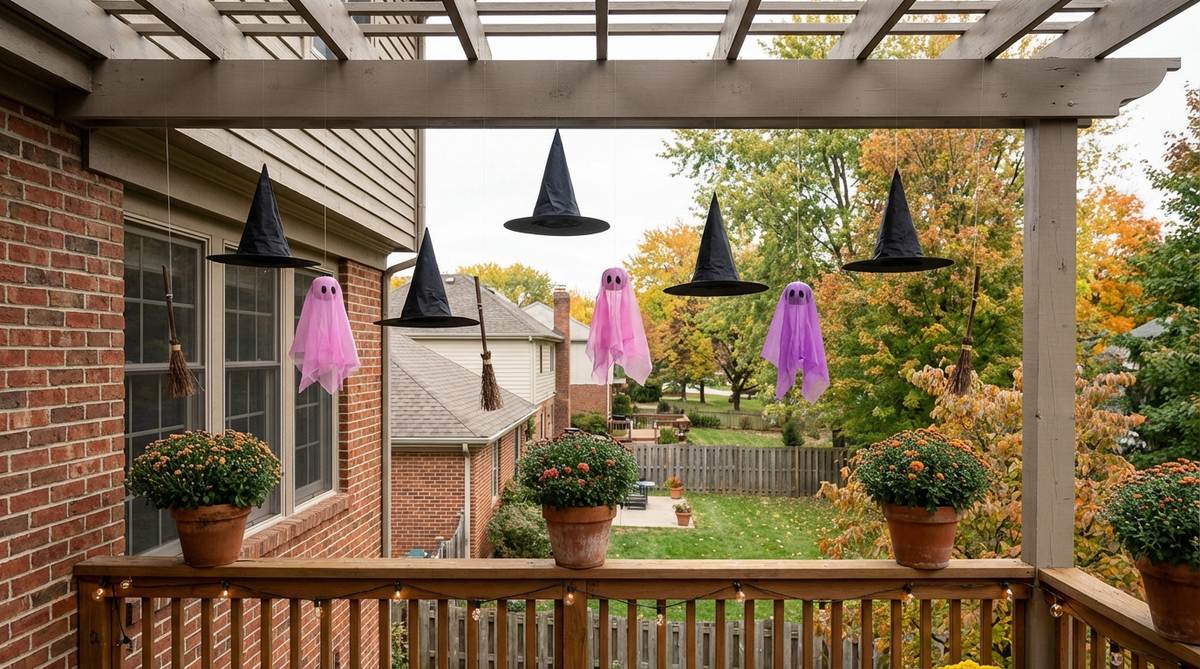
Looks exactly like a whimsical spell frozen in mid-air above your patio furniture. This overhead hanging decor concept perfectly utilizes the vertical dead space on enclosed balconies.
Tying decor directly to the railings is standard, but elevating elements into the ceiling plane completely transforms the spatial dynamics. Swapping basic black for neon accents and premium fairy garden kits turns a basic craft project into an upscale installation.
This floating fantasy will cost around $20–$35. It’s an elegant solution that requires zero permanent modifications to your space.
- Key Materials: Fabric witch hats, transparent fishing line, and mini brooms.
- Vibe / Style: Modern magical realism.
- Difficulty: Easy but requires a step ladder.
- Budget Breakdown: Hats: $20 | Rigging Hardware: $8.
- Creator’s Tip: Use outdoor-rated adhesive hooks on the ceiling to hang the line without drilling any holes in your rental property.
- Smart Sourcing: collapsible nylon witch hats (starter pack) and damage-free outdoor ceiling hooks.
Gothic & Dark Elegance
11. Victorian Mourning Parlor
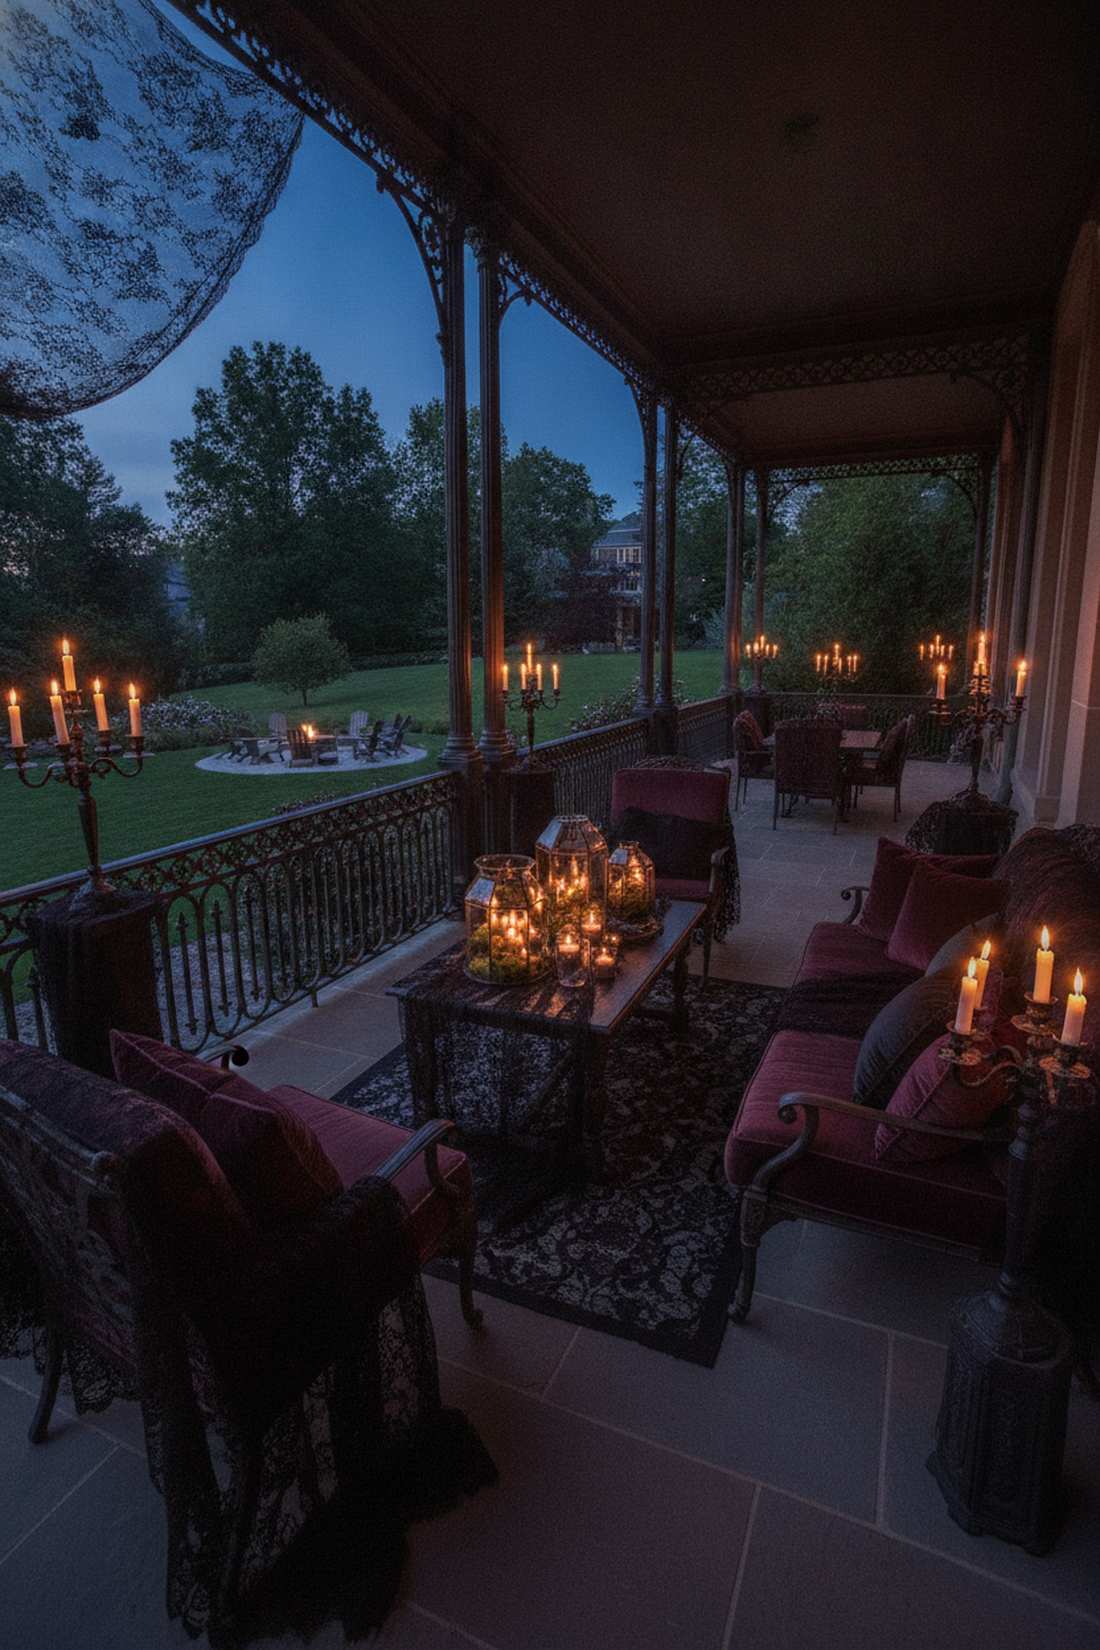
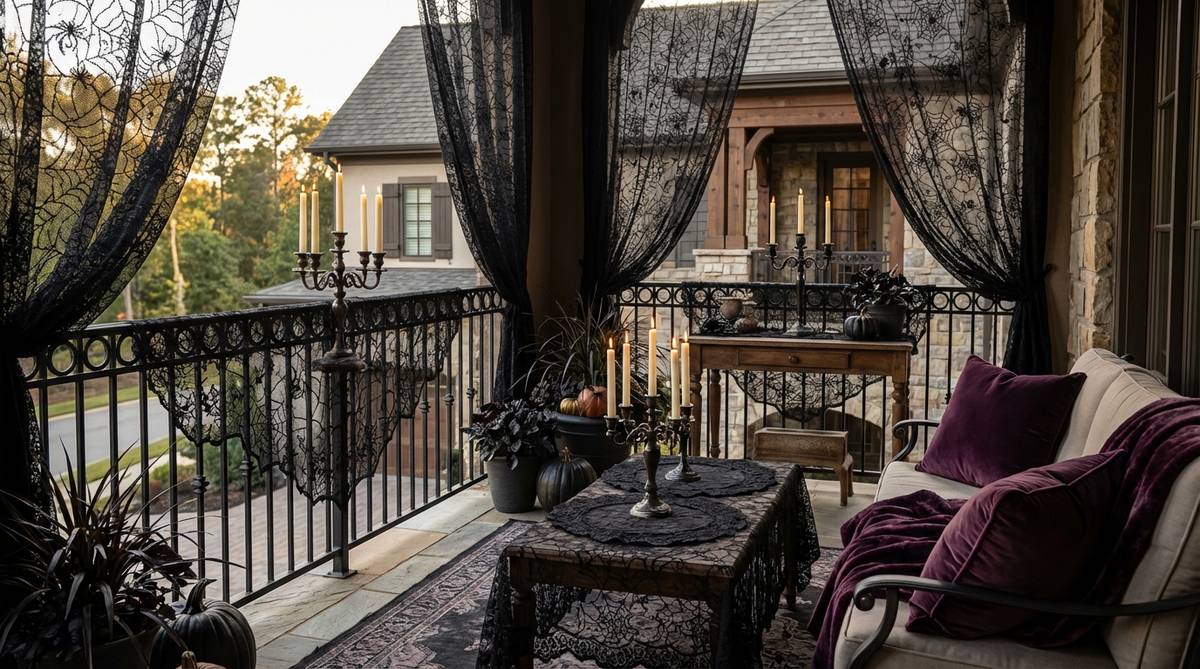
Emanates the brooding, luxurious atmosphere of a forgotten 19th-century haunted mansion. This dark academia patio setup is stunning for large terraces meant for sophisticated evening entertaining.
Most Halloween decor leans plastic and cheesy, but introducing rich textiles and faux-antiques guarantees an expensive, moody ambiance. Upgrading to heavy plum velvets and intricately detailed terrarium accessories shifts the narrative from juvenile to pure luxury.
Sourcing these elegant pieces usually runs between $50–$80. Pin this layout to your sophisticated holiday mood board immediately.
- Key Materials: Black lace yardage, vintage-style candelabras, and velvet pillows.
- Vibe / Style: Opulent gothic romance.
- Difficulty: Simple styling and draping.
- Budget Breakdown: Fabrics: $35 | LED Candles: $25.
- Creator’s Tip: Layer contrasting lace patterns over your existing outdoor chairs to instantly change their silhouette and color profile.
- Smart Sourcing: weatherproof outdoor velvet cushion covers and remote-control LED taper candle kits.
12. Raven Congregation
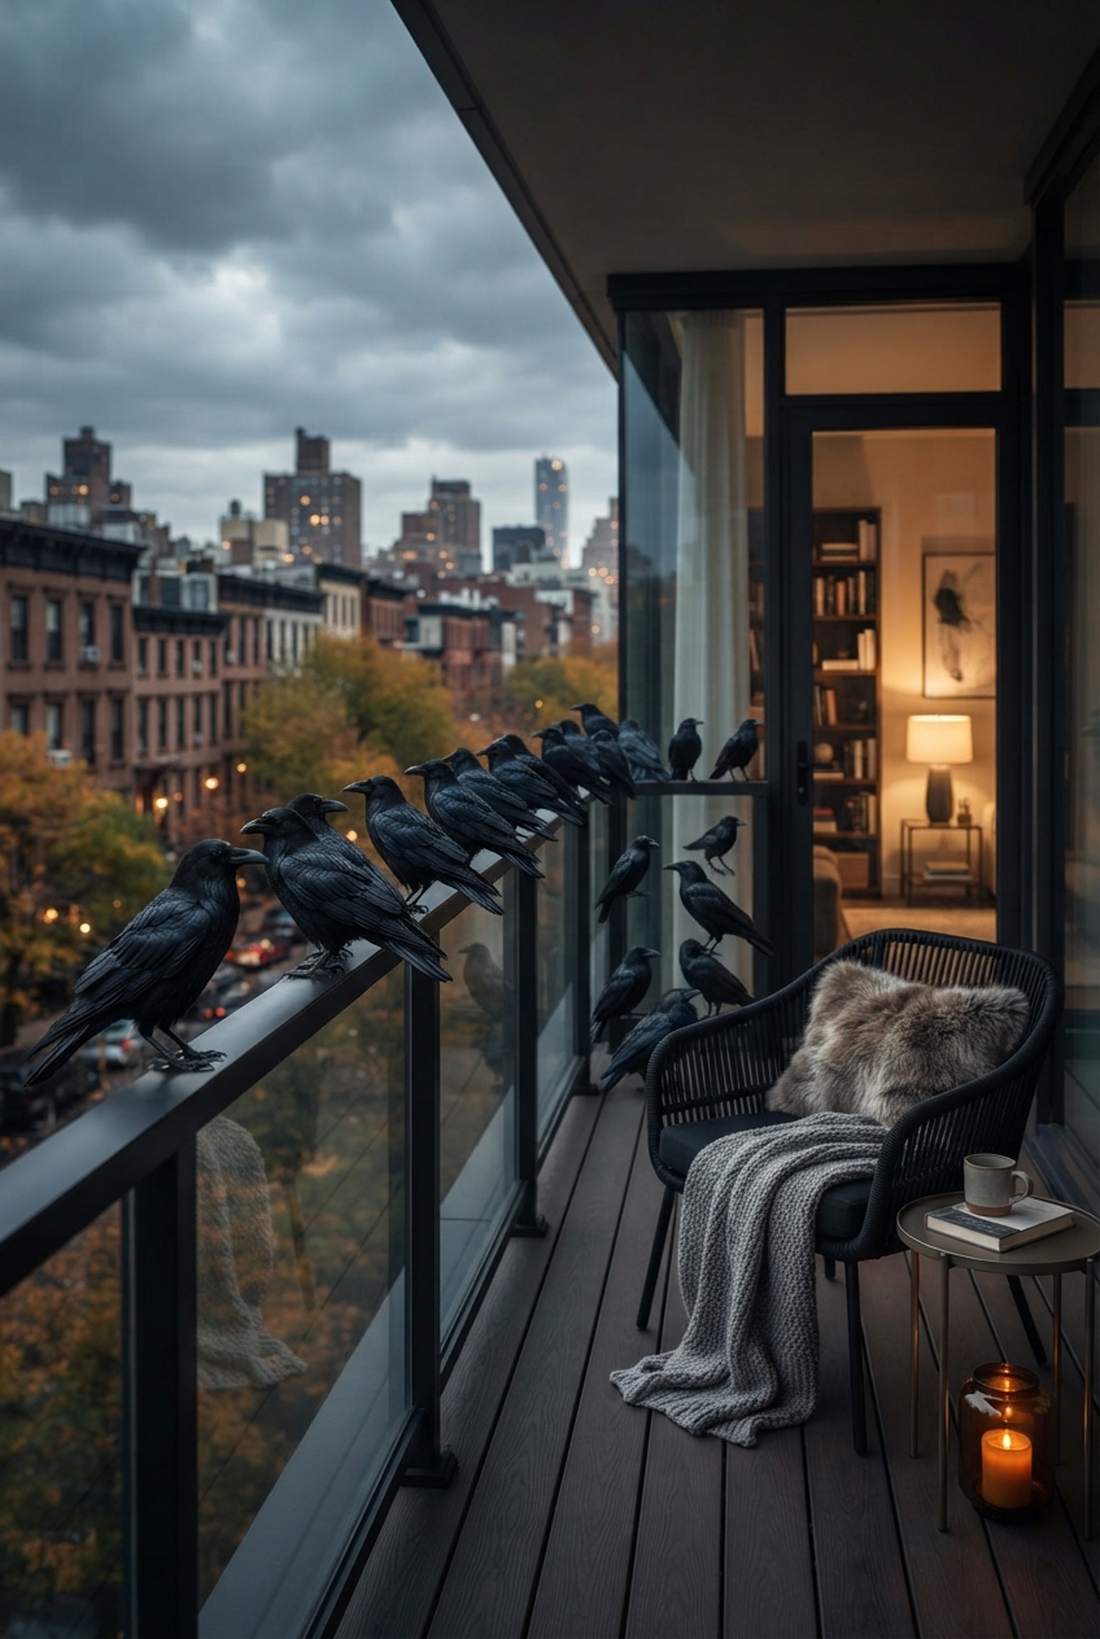


Feels like a chilling scene lifted straight from an Alfred Hitchcock masterpiece. This minimalist railing bird display is incredibly effective for modern, sleek balconies lacking deep floor space.
Scattering random props creates visual clutter, but massing a single type of hyper-realistic figure delivers a surprisingly premium look. Utilizing museum putty and premium fake bird assortments ensures they stay perfectly perched even in high autumn winds.
You can establish this unsettling flock for around $30–$45. A brilliantly fast setup that requires absolutely zero artistic skill.
- Key Materials: Lifelike feathered ravens and temporary mounting putty.
- Vibe / Style: Monochromatic cinematic suspense.
- Difficulty: Extremely fast mounting.
- Budget Breakdown: Raven Props: $35 | Putty: $5.
- Creator’s Tip: Face the majority of the ravens looking in one single direction to create a feeling of unified, eerie anticipation.
- Smart Sourcing: realistic feathered black crows (bulk pack) and outdoor-grade museum putty.
This upcoming lighting trick is the ultimate cheat code for making a cheap rental balcony look like a luxury gothic penthouse…
13. Gothic Cathedral Windows
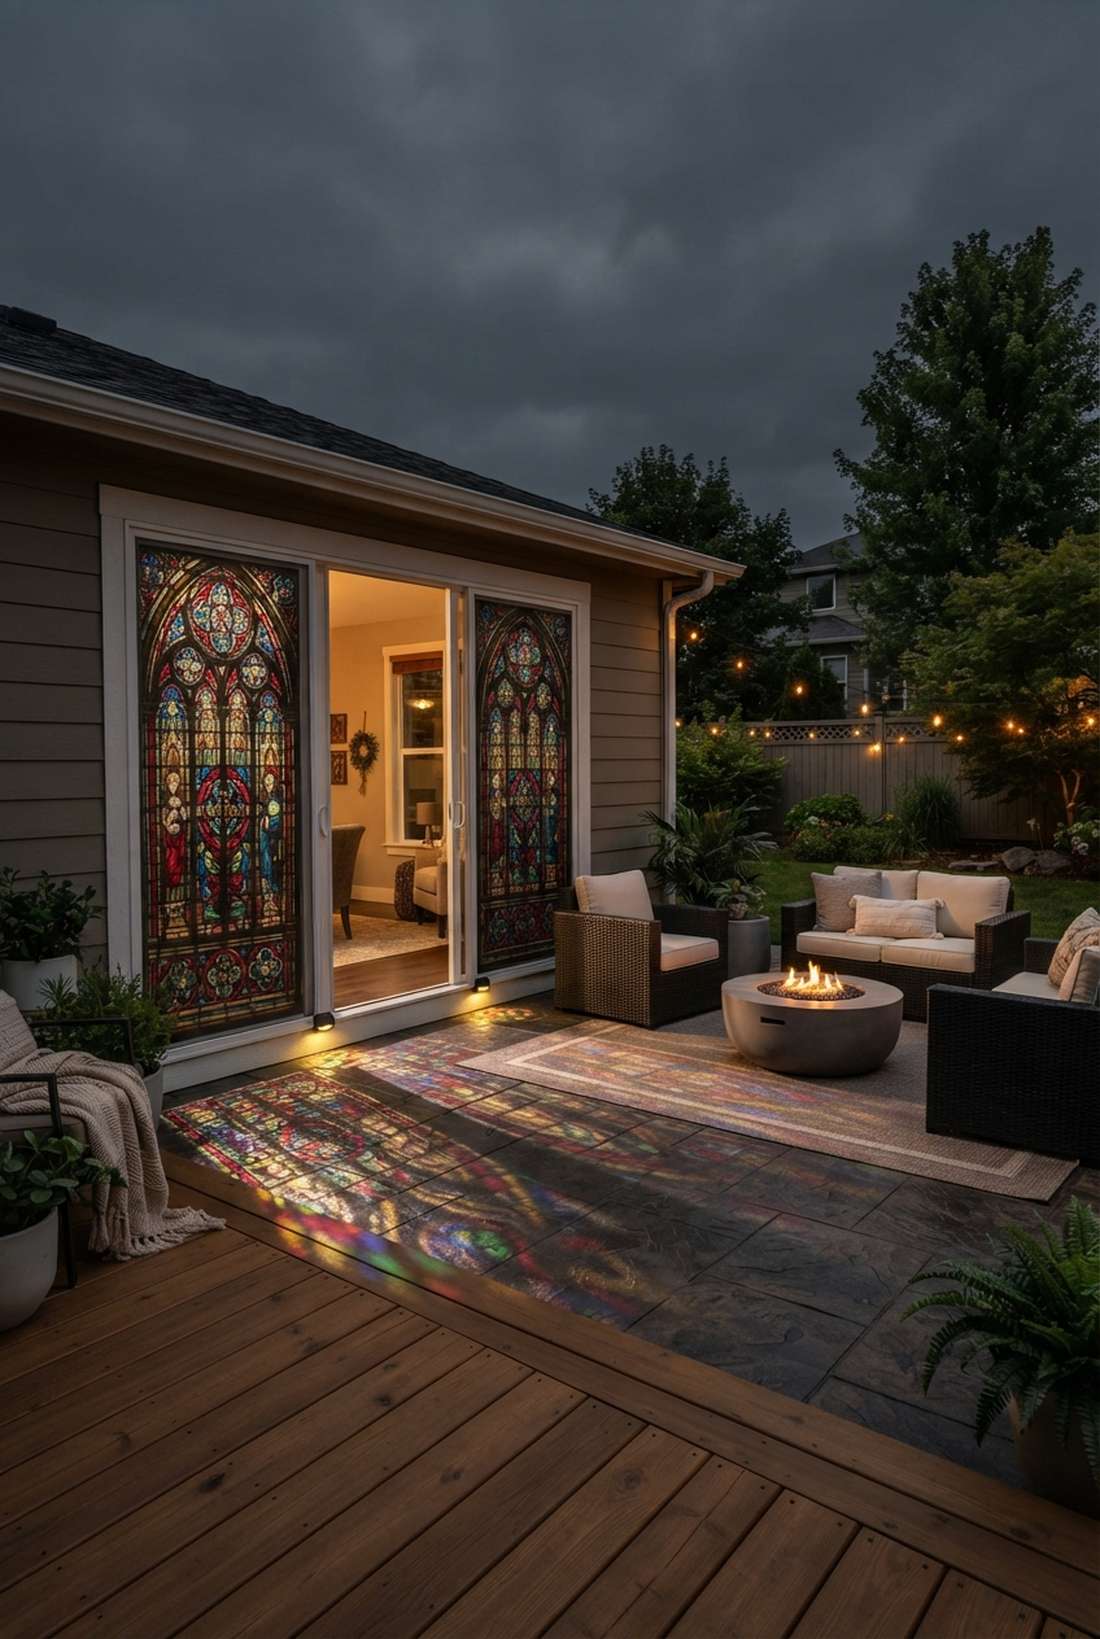
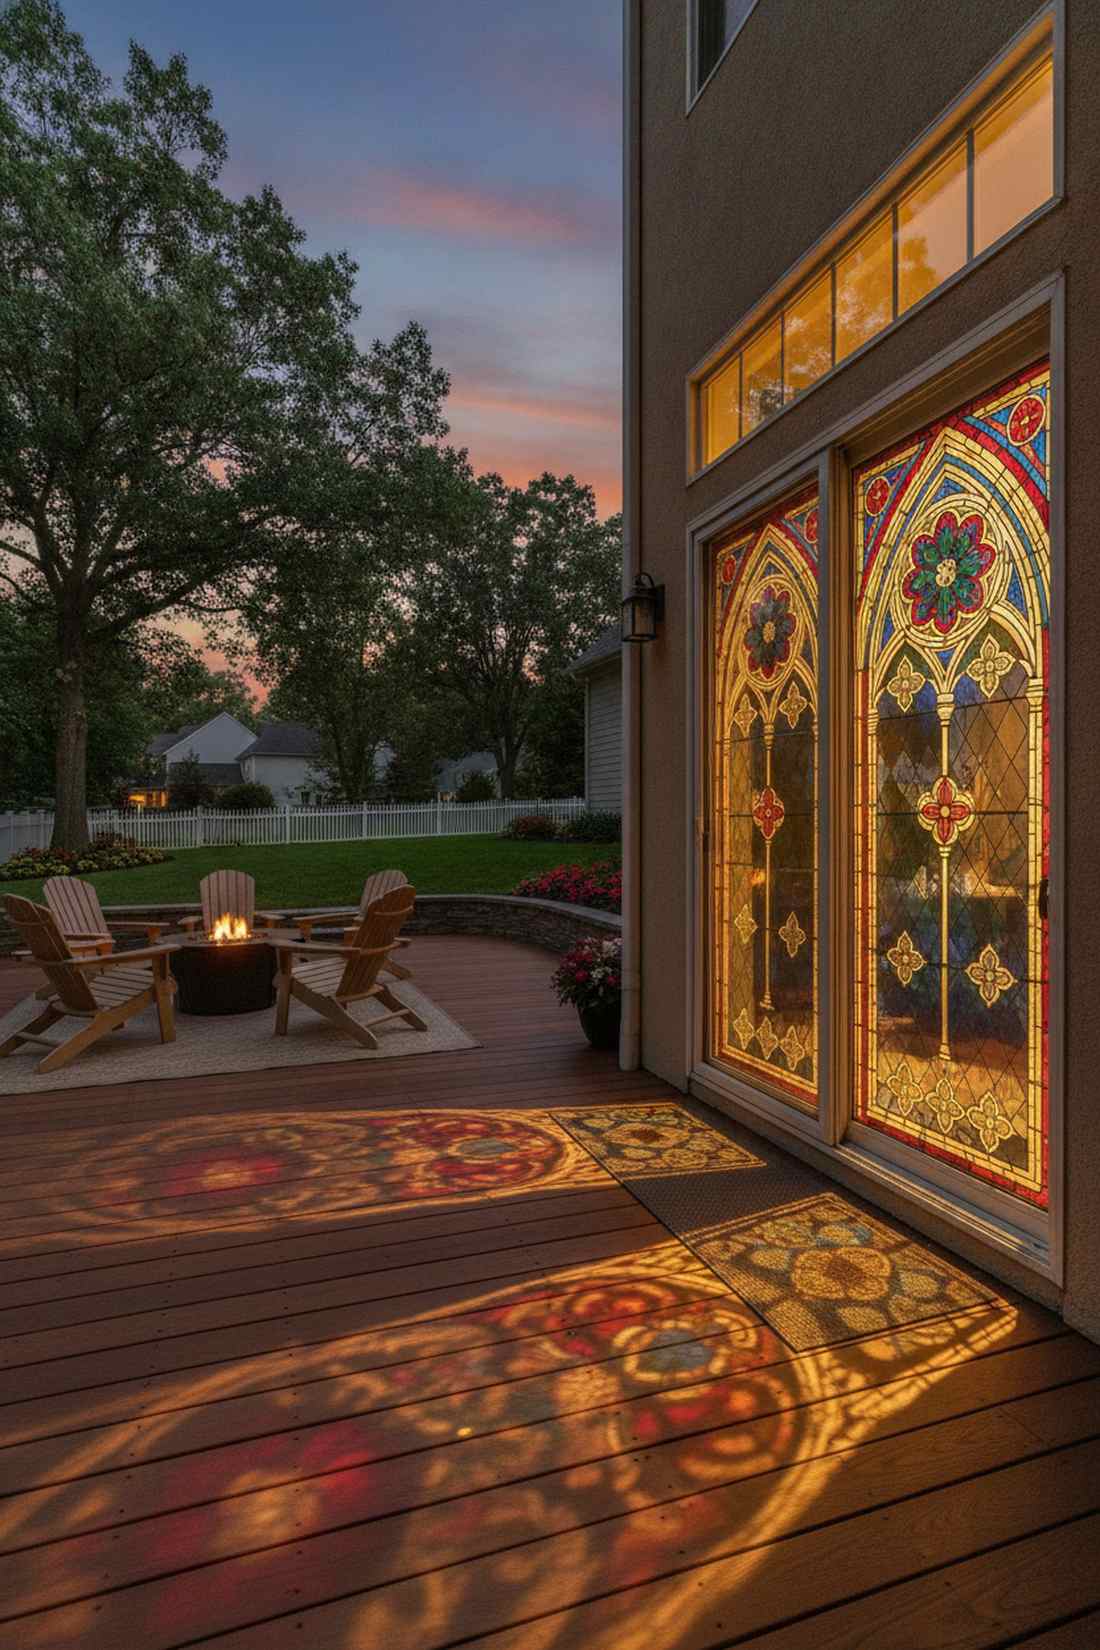
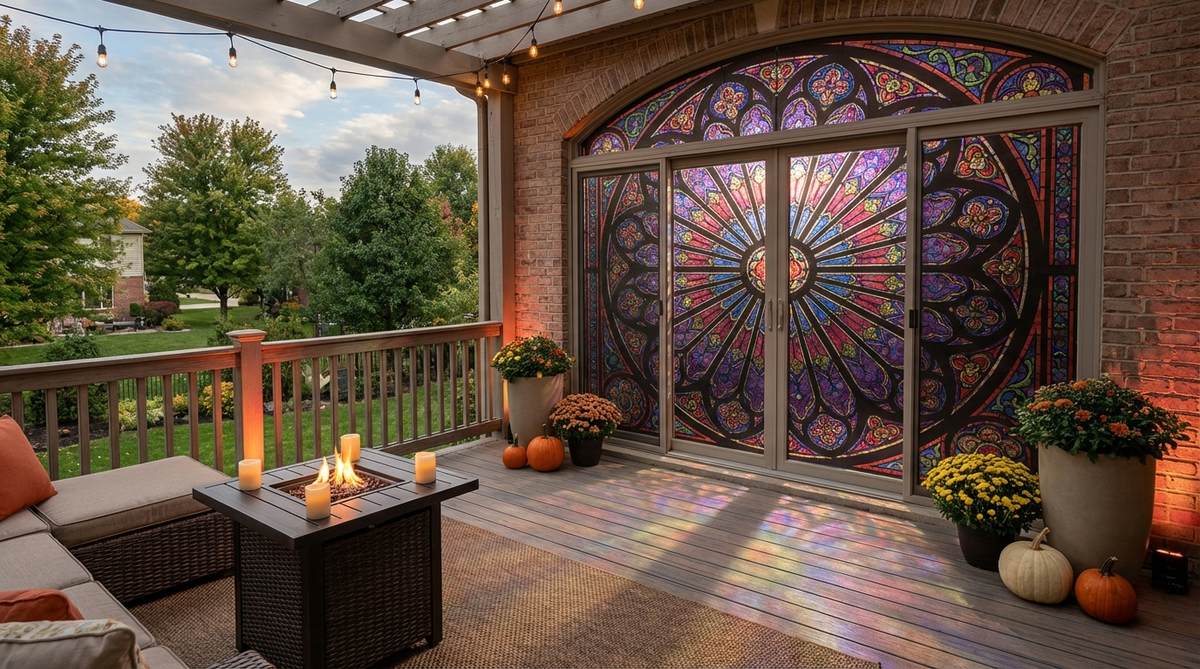
Casts a mesmerizing, colorful glow that mimics a grand medieval sanctuary. This sliding glass door upgrade is a phenomenal space-saving tactic that relies purely on ambient light rather than bulky floor props.
People usually ignore their window glass, but applying large-scale graphic films looks far more expensive than it is. Pairing deep jewel-toned films with smart outdoor lighting accessories dynamically projects the patterns onto your patio floor every single night.
This stunning optical illusion costs roughly $25–$40. Pin this if you want maximum visual drama without losing an inch of seating.
- Key Materials: Faux stained glass window clings and floor uplighting.
- Vibe / Style: Dramatic architectural illusion.
- Difficulty: Peel-and-stick simplicity.
- Budget Breakdown: Window Films: $20 | LED Spotlights: $15.
- Creator’s Tip: Use a squeegee and a spray bottle of soapy water for a flawless, bubble-free application on the glass.
- Smart Sourcing: UV-blocking stained glass window film rolls and plug-in outdoor LED uplight kits.
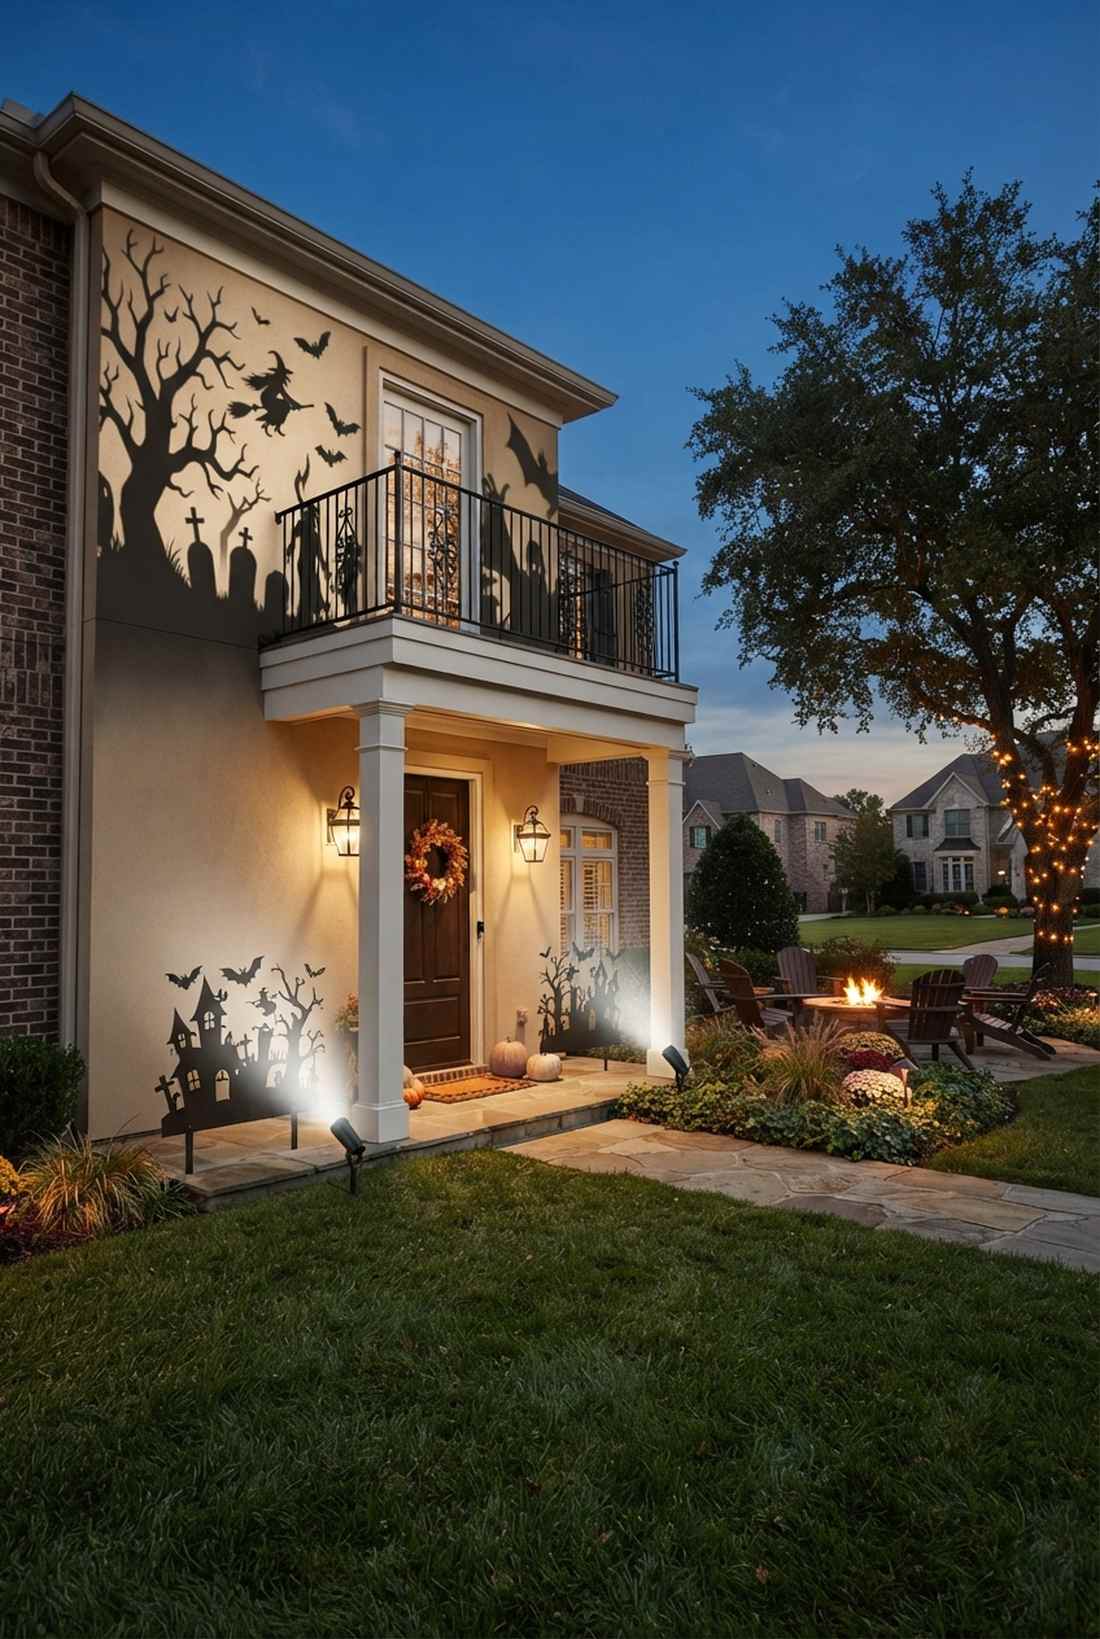
14. Wrought Iron Silhouettes
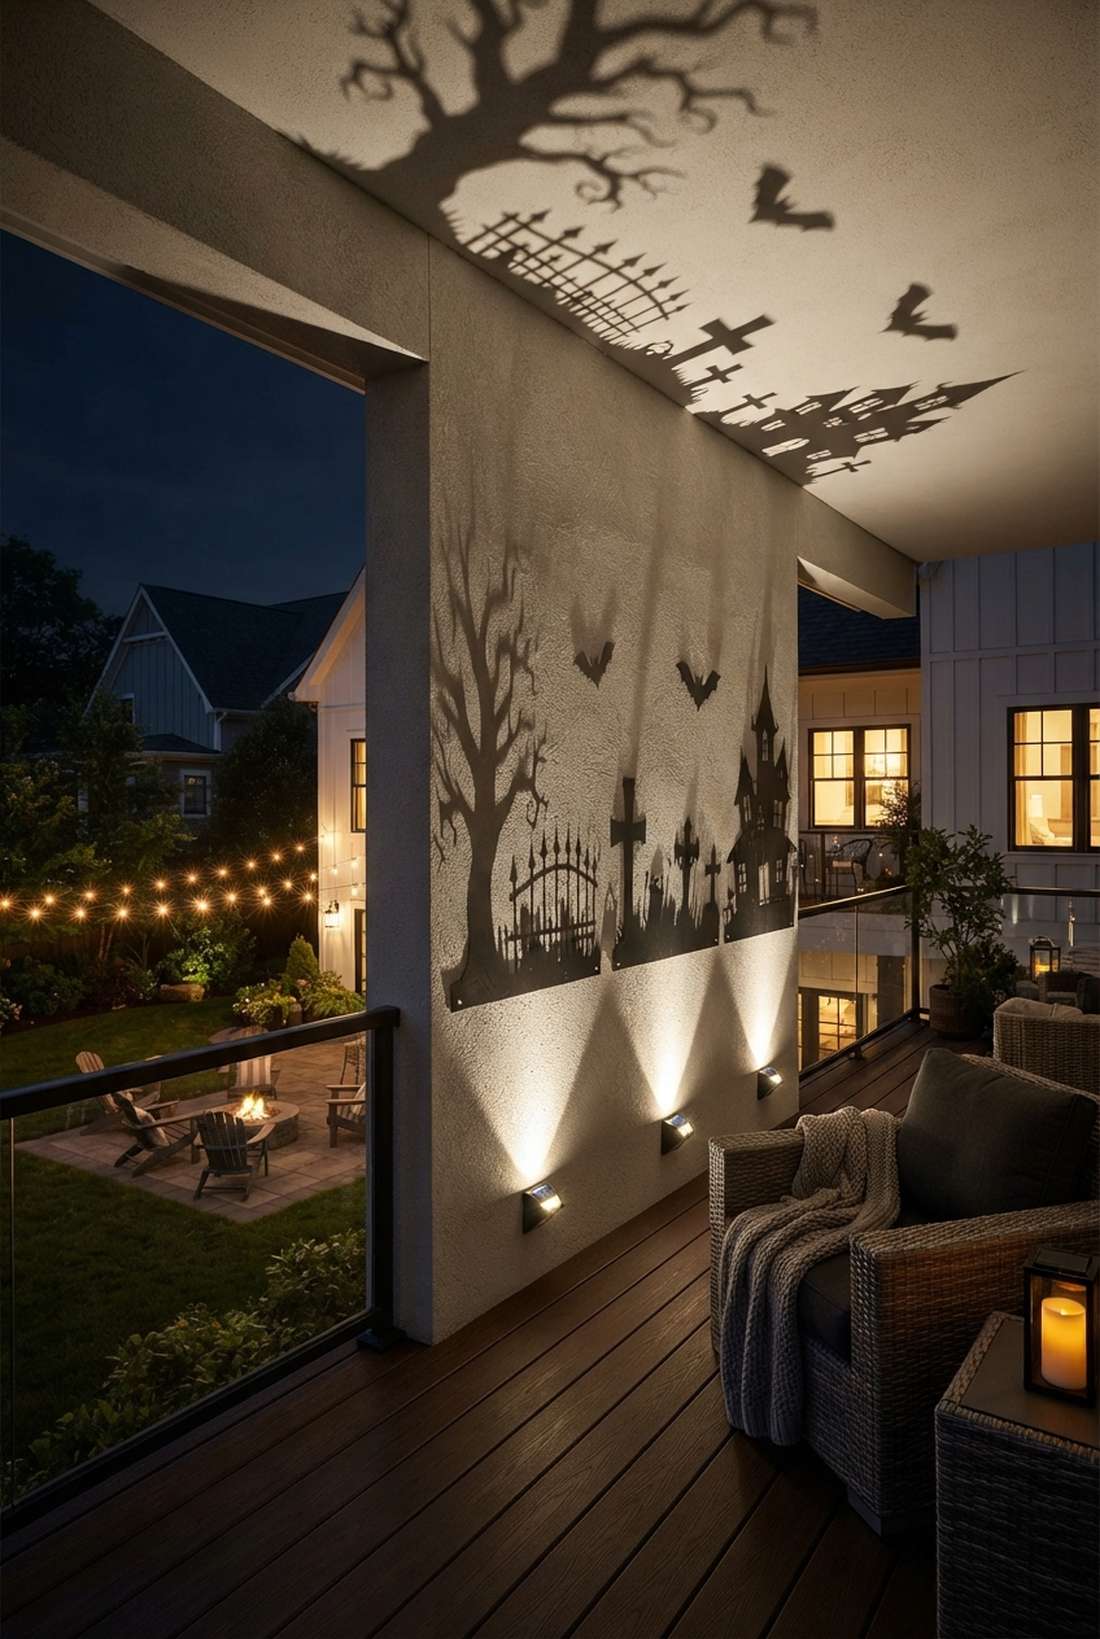
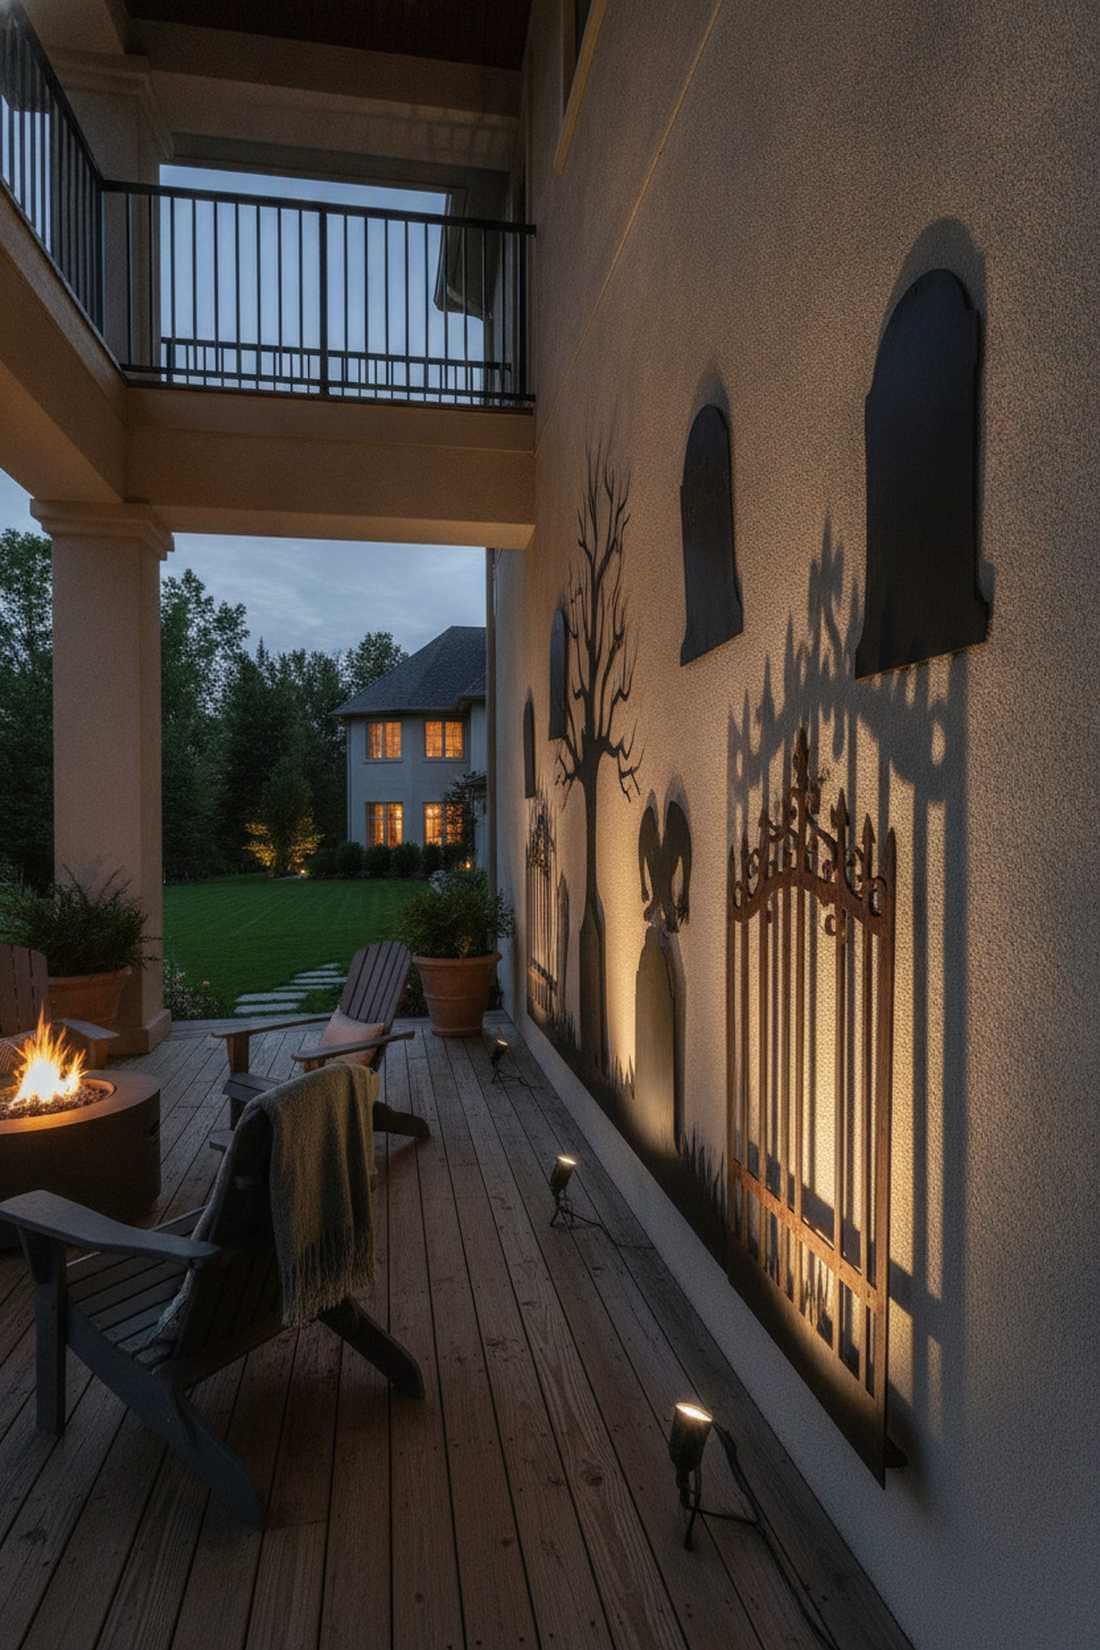
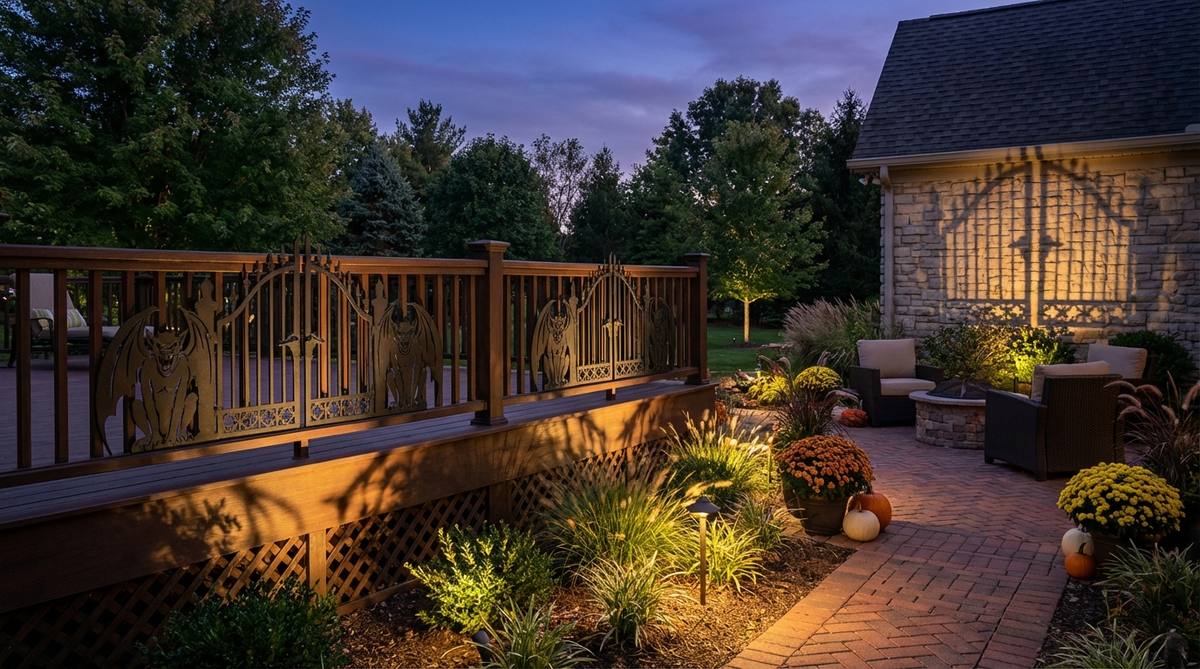
Casts looming, dramatic shadows that make your space feel twice as large. This architectural wall shadow setup is perfect for balconies featuring solid stucco or brick dividing walls.
Standard flat decorations disappear at night, but playing with negative space and severe backlighting completely elevates the facade. Investing in thick, weather-treated cutouts and sharp spotlighting creates a highly professional, museum-quality outdoor installation.
Setting up this shadow theatre runs about $35–$50. It’s a sophisticated layout that practically builds itself after dark.
- Key Materials: Heavy cardboard or metal cutouts and focused spotlights.
- Vibe / Style: Haunting architectural drama.
- Difficulty: Moderate positioning needed.
- Budget Breakdown: Silhouettes: $25 | Spotlights: $20.
- Creator’s Tip: Place the lights extremely close to the base of the cutouts pointing sharply upwards to stretch the shadows dramatically across the ceiling.
- Smart Sourcing: pre-cut corrugated plastic gothic graveyard sets and solar-powered directional spotlights.
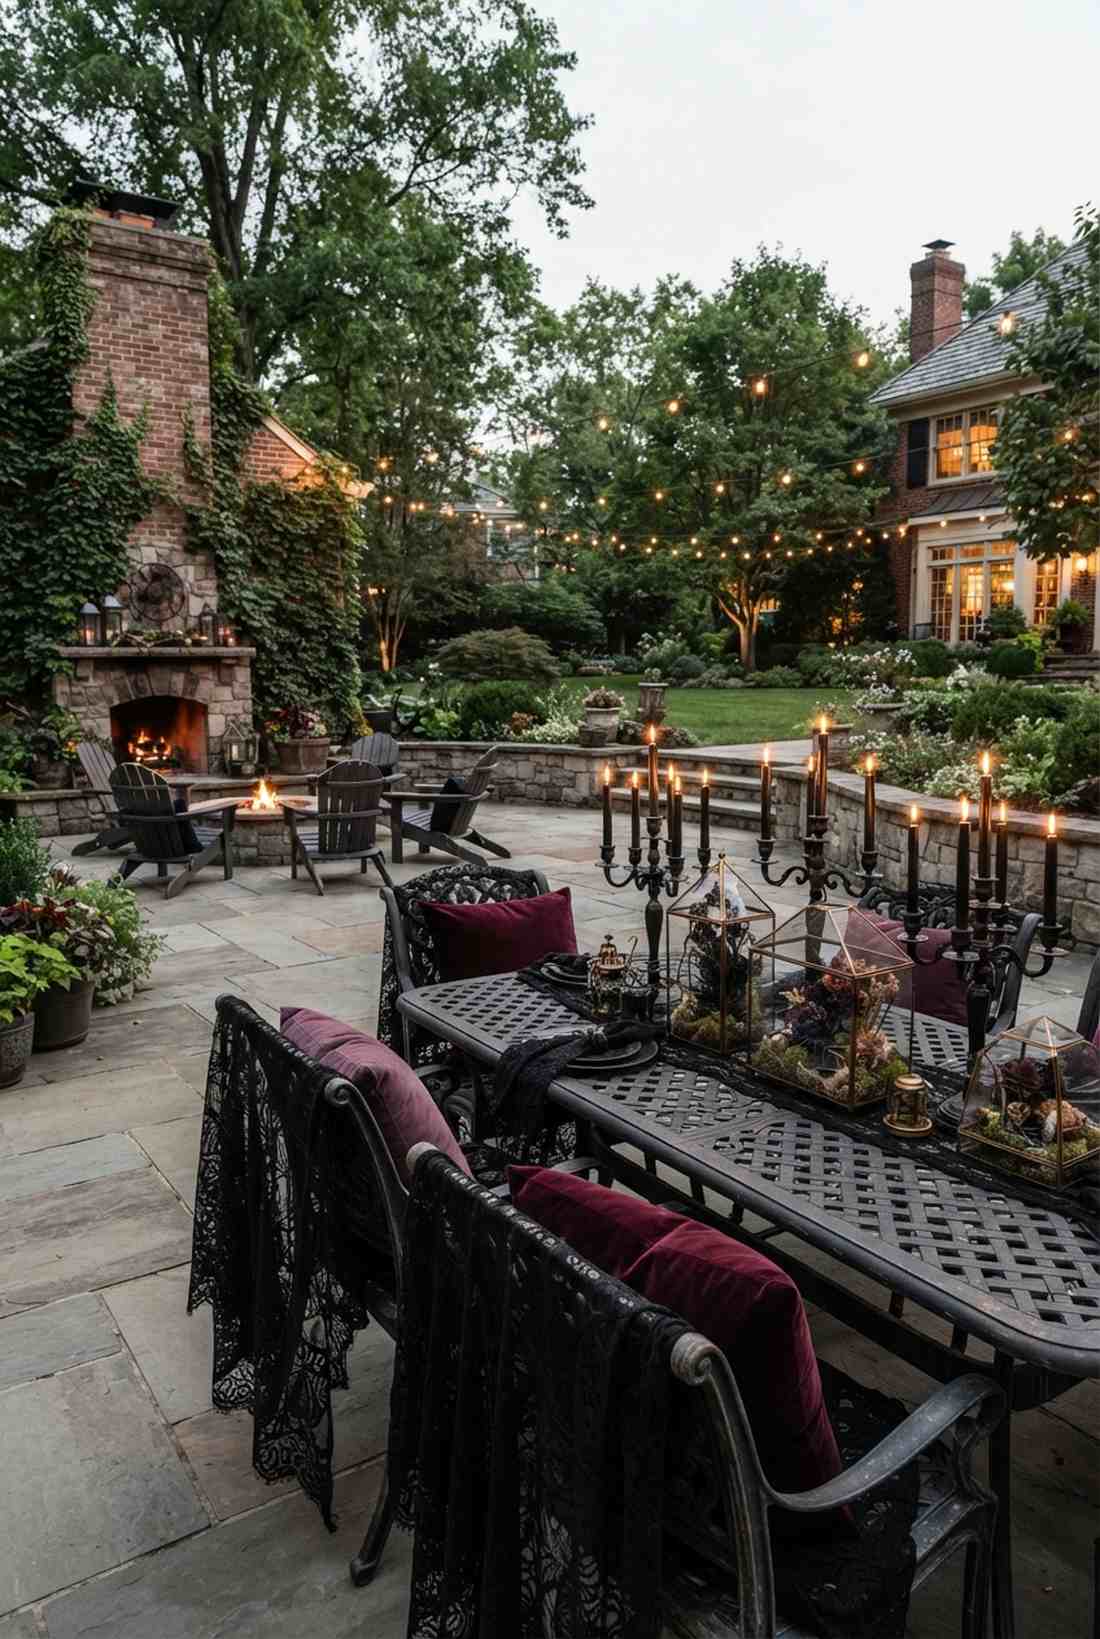
15. Crimson Velvet Throne
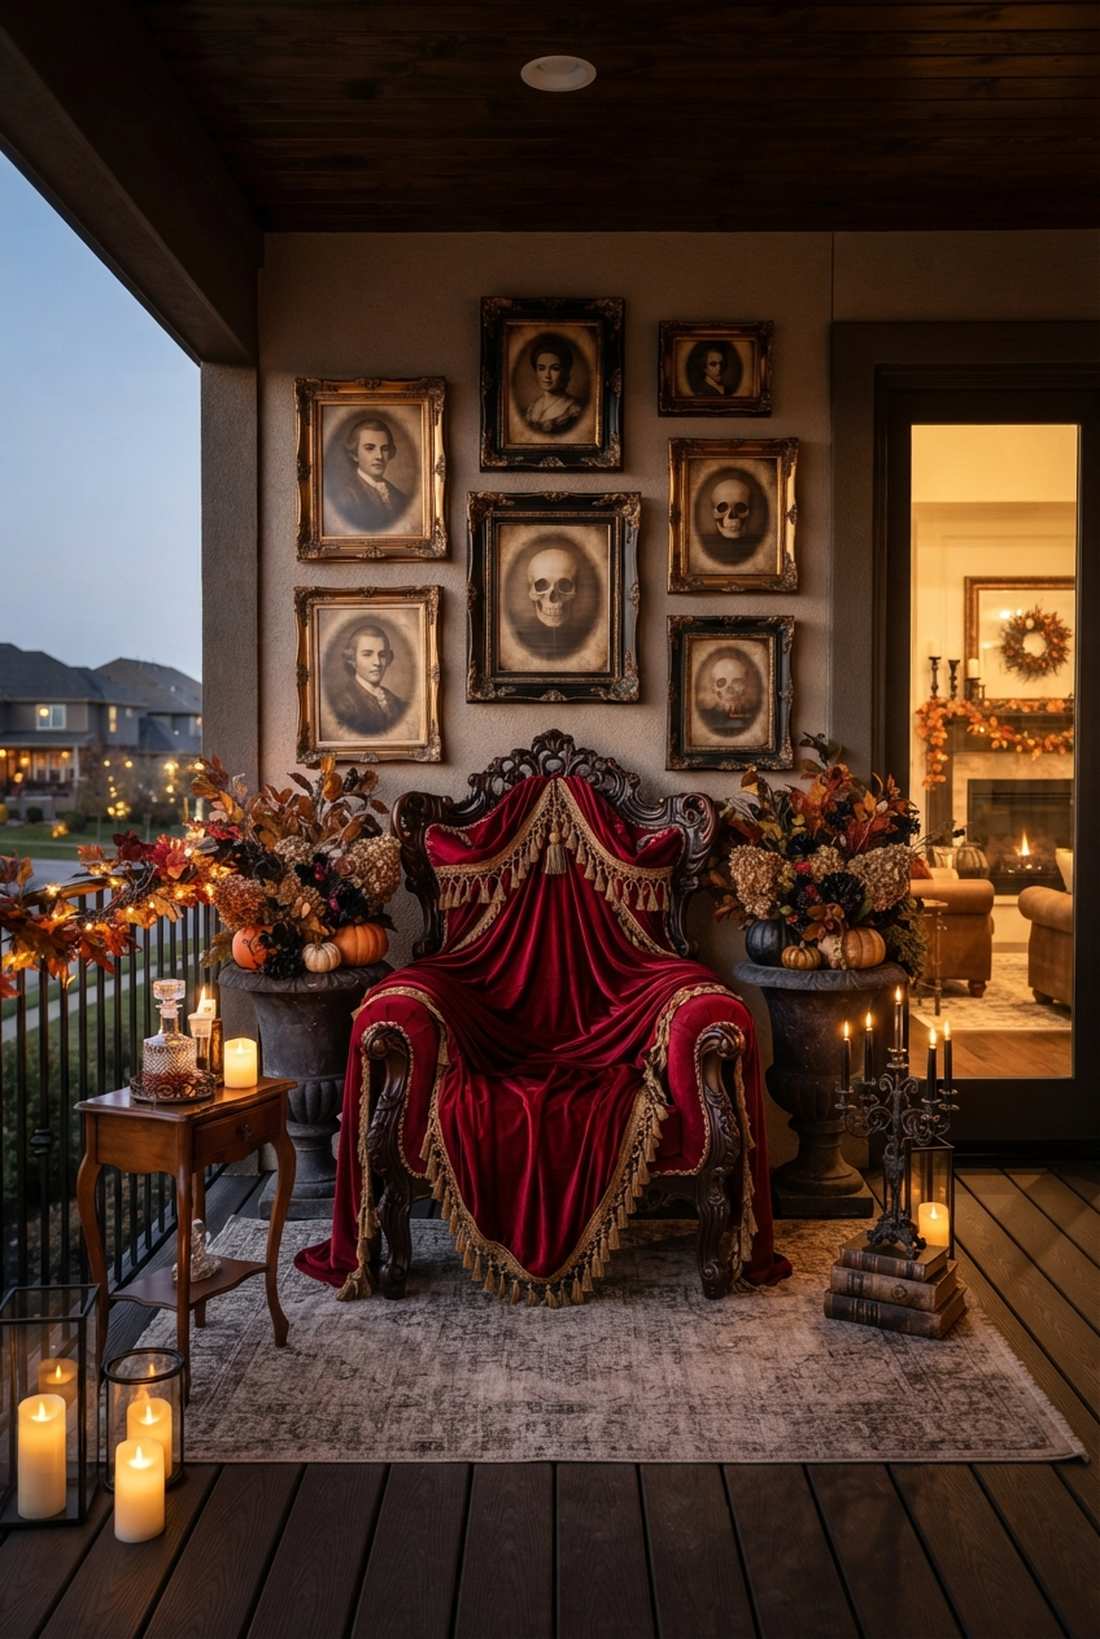
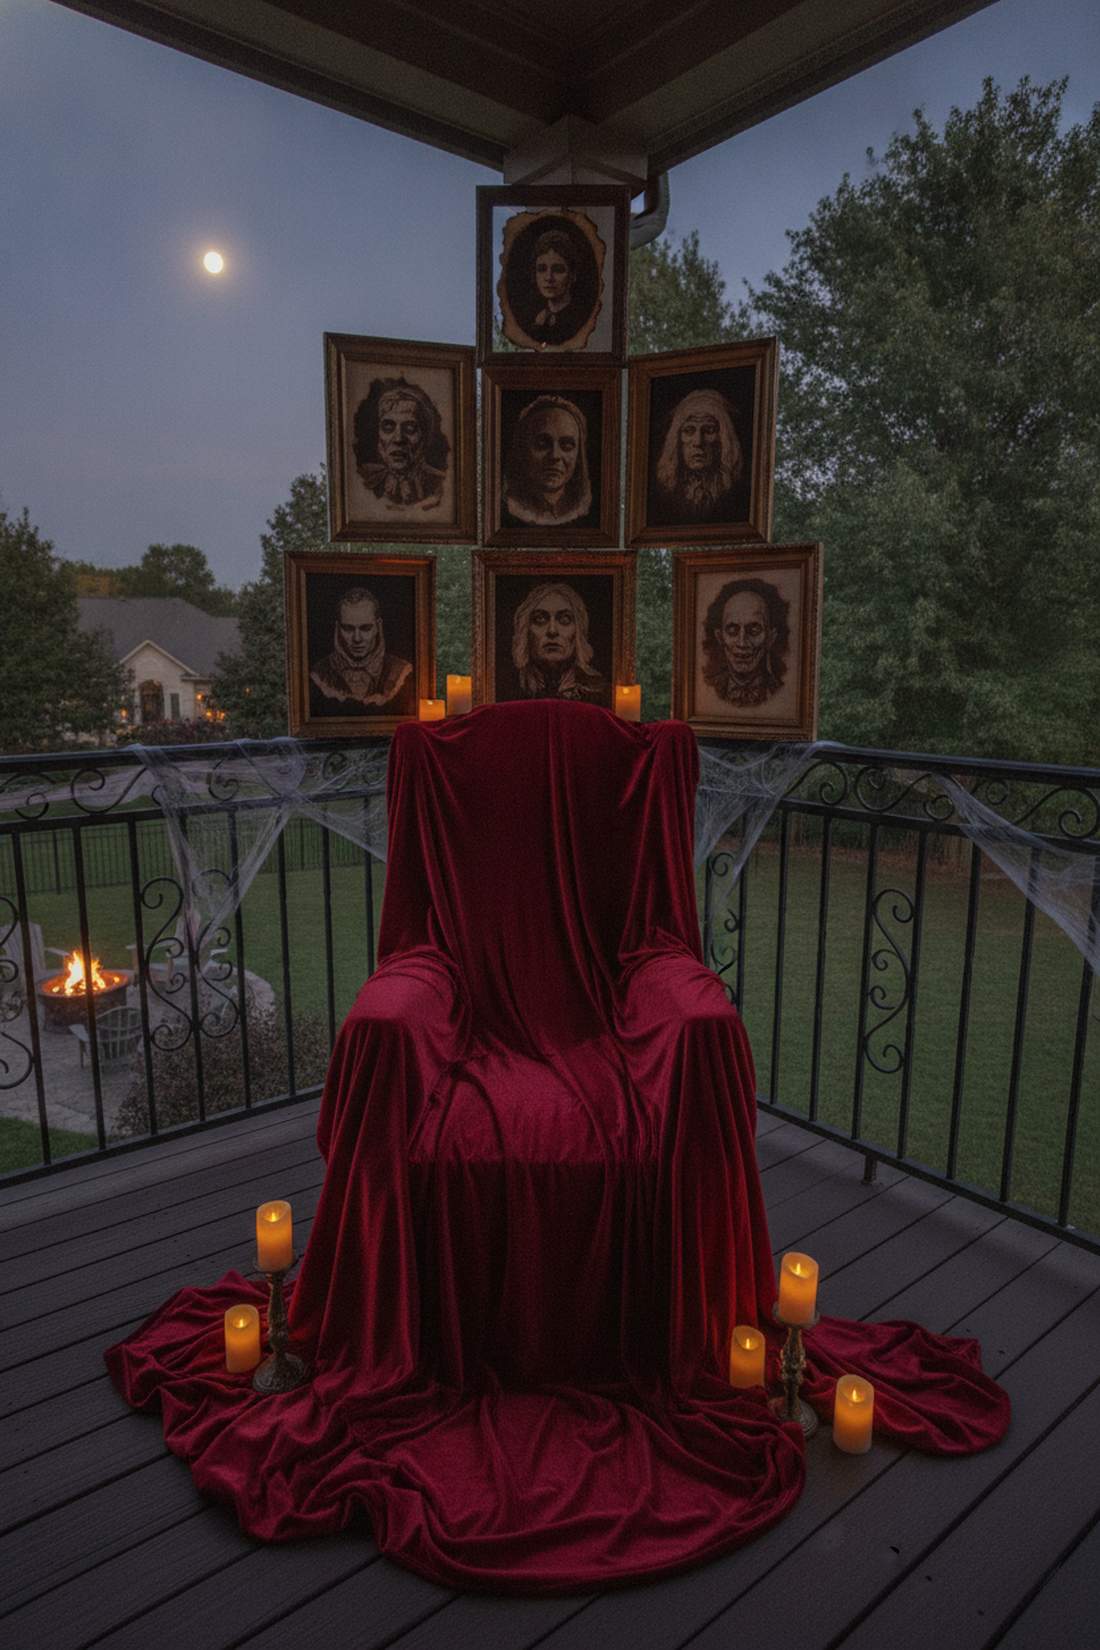
Feels like the abandoned resting place of a centuries-old aristocrat. This statement patio furniture makeover serves as an incredible focal point for deep balconies ready for a Halloween party.
Instead of spreading decorations thinly across the whole space, concentrating your budget into one massive set piece gives a designer-level finish. Layering vintage frames alongside premium outdoor upholstery fabrics completely eliminates the tacky factor associated with seasonal decorating.
You can curate this regal setup for roughly $40–$65. Save this to your high-end decor board for an unforgettable photo op.
- Key Materials: Deep red draped fabric, vintage frames, and creepy portraits.
- Vibe / Style: Vampiric royal elegance.
- Difficulty: Easy styling project.
- Budget Breakdown: Fabric: $30 | Frames/Prints: $25.
- Creator’s Tip: Print sepia-toned vintage portraits and lightly burn the edges with a lighter for an authentic, aged artifact appearance.
- Smart Sourcing: heavyweight outdoor acrylic crimson fabric and lenticular changing portrait packs.
16. Pumpkin Tower Stack
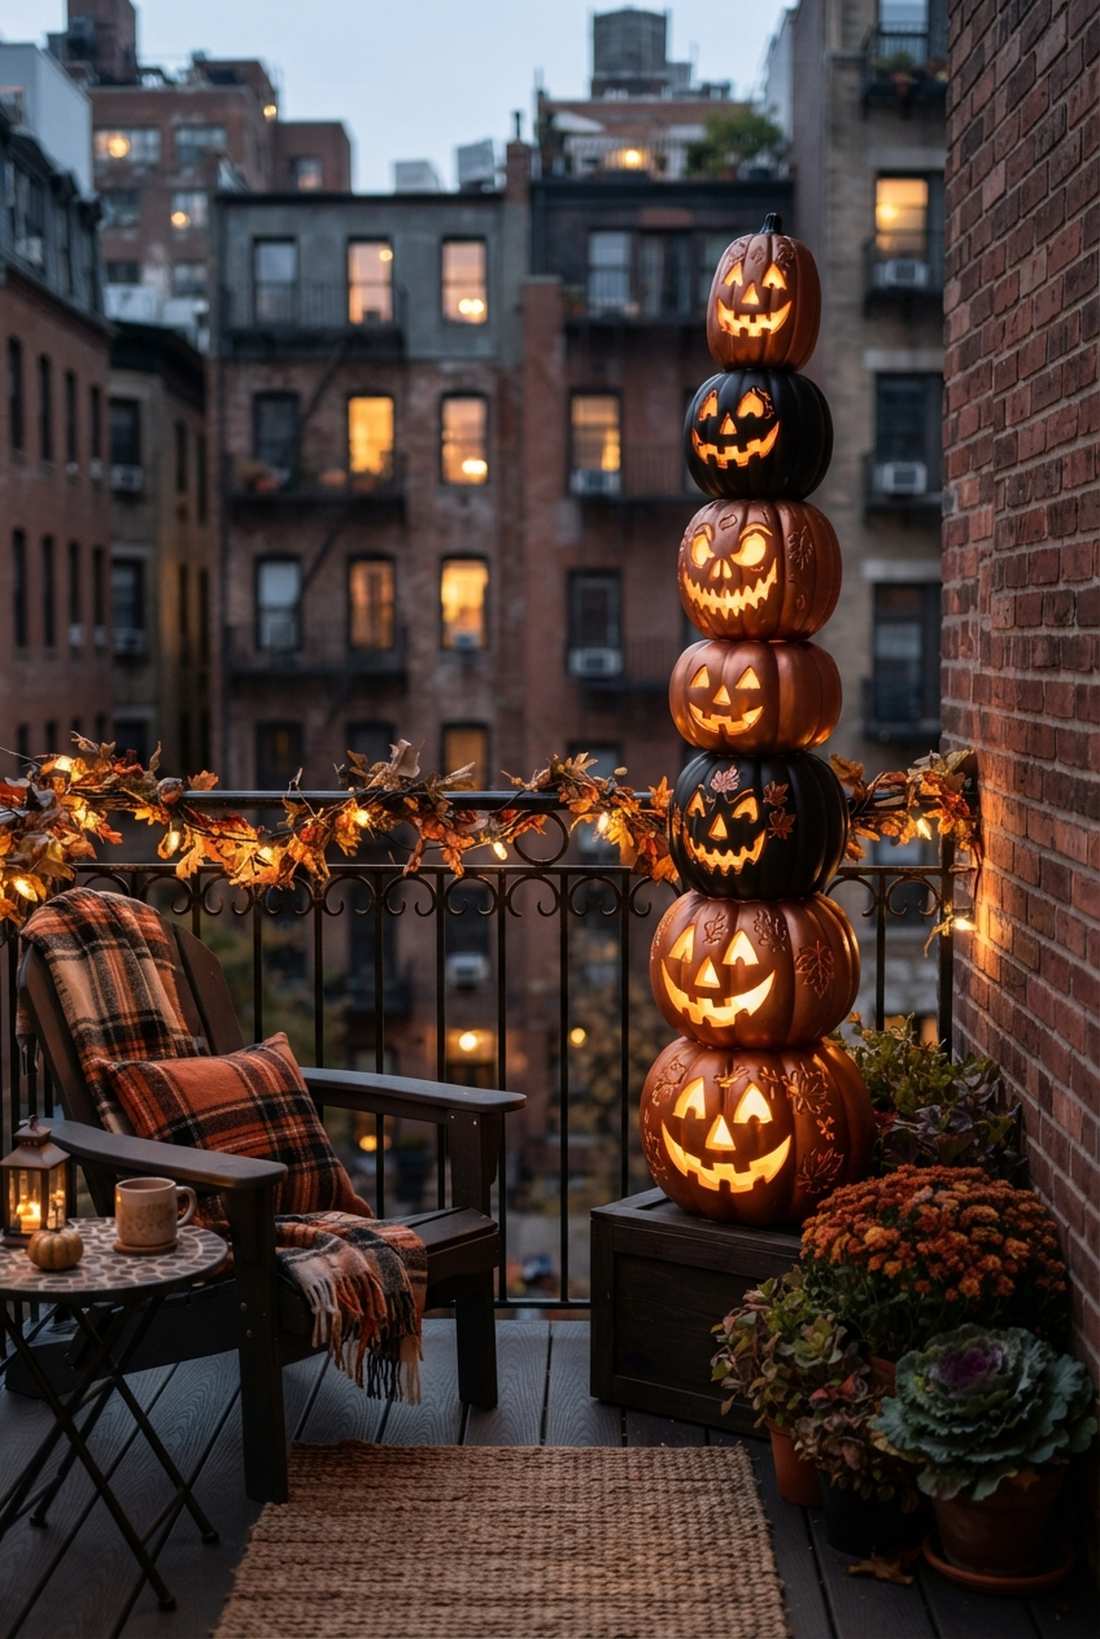
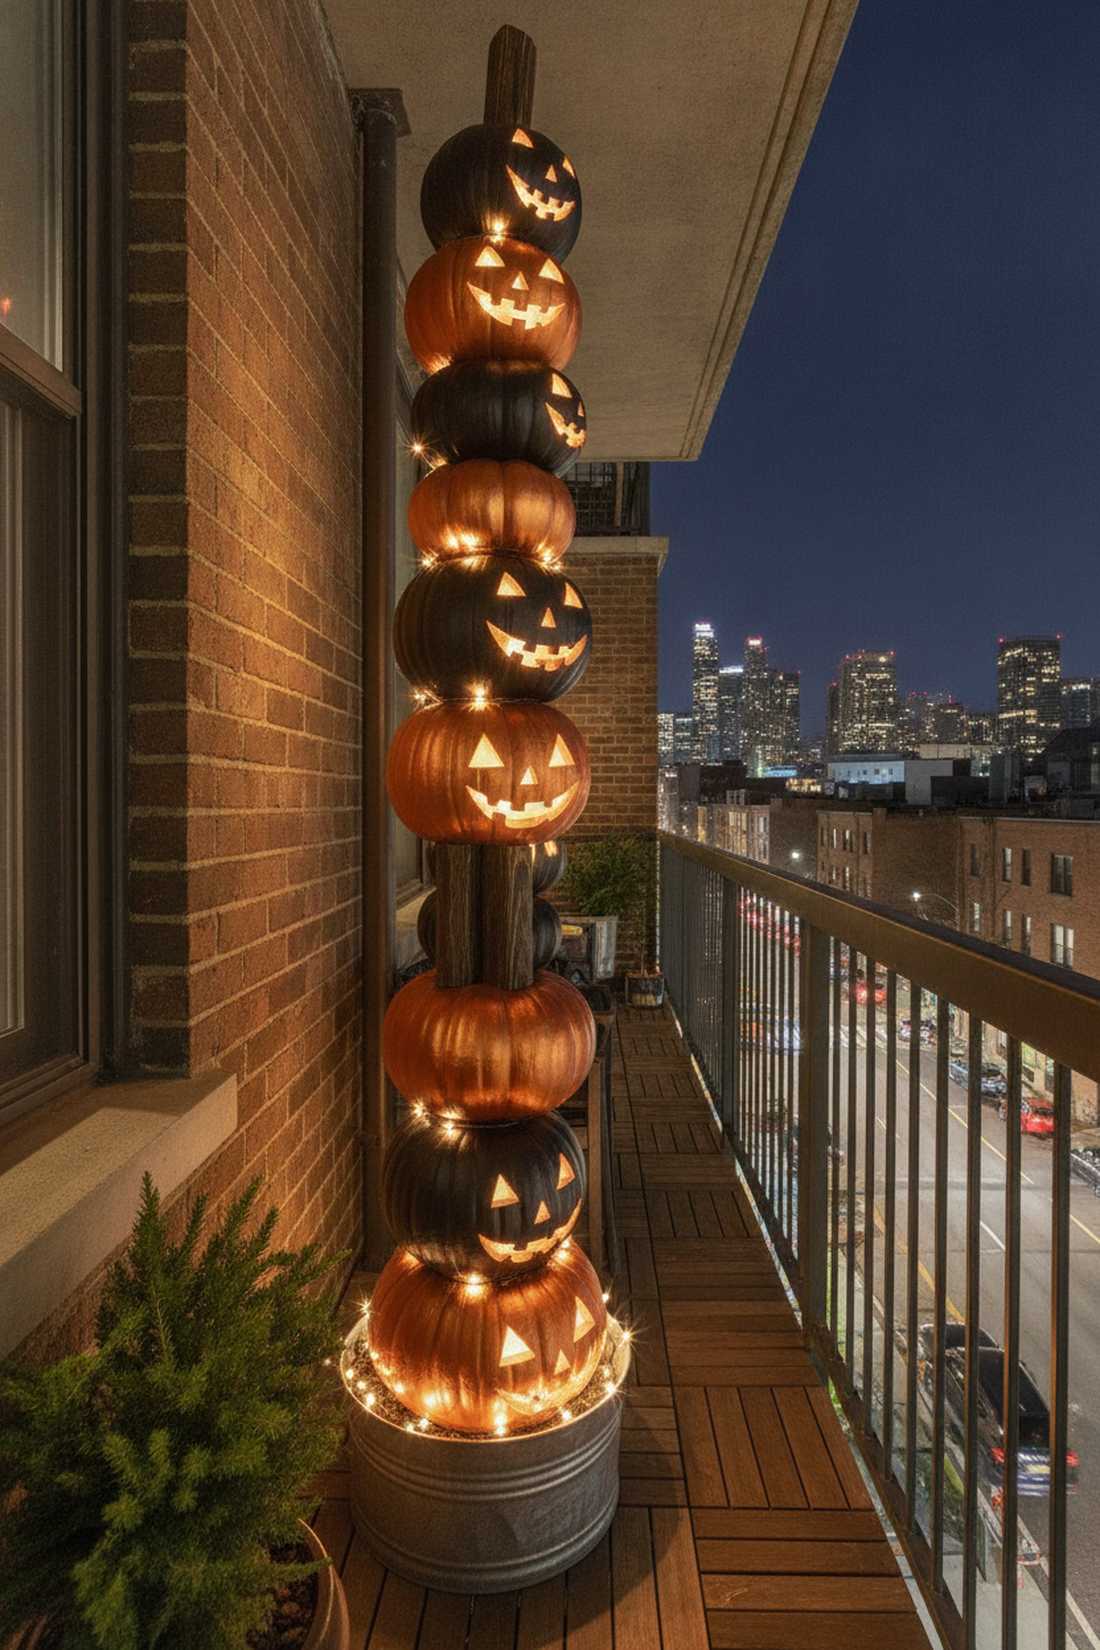
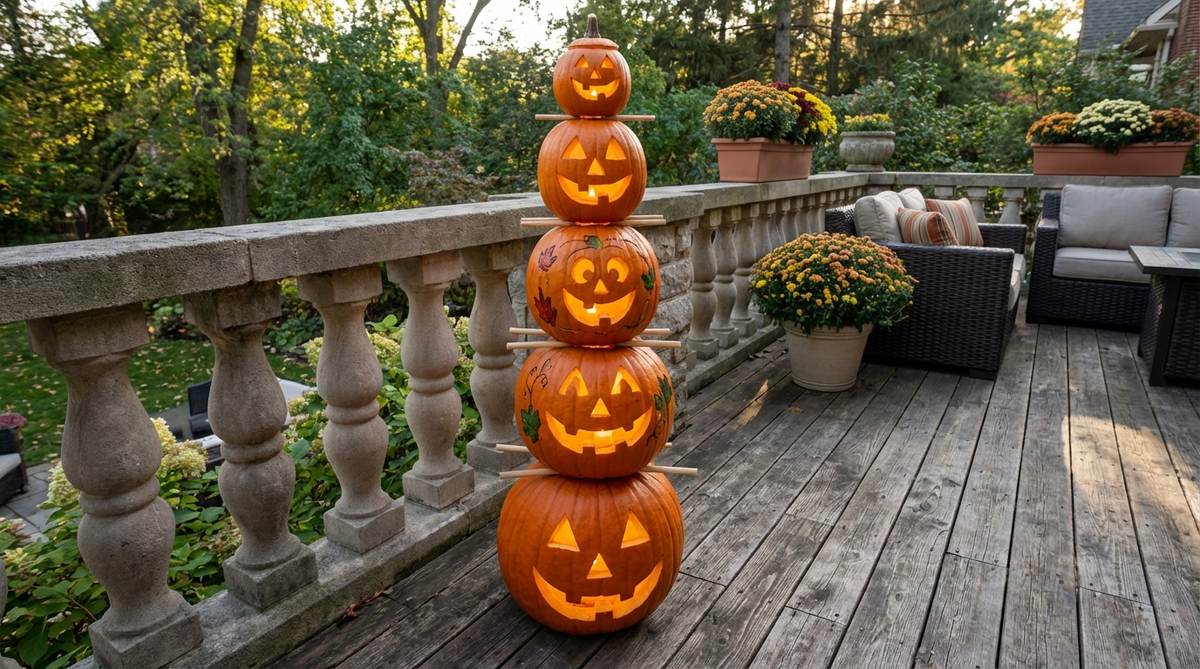
Stands like a glowing sentinel guarding your urban domain. This vertical patio gourd display solves the space crunch for incredibly narrow, walkway-style apartment balconies.
Spreading pumpkins across the floor eats up walking room, but forcing the arrangement vertically creates an eye-catching, expensive silhouette. Integrating heavy dowels and weather-sealed fairy garden kits ensures the entire structure survives strong coastal or city winds.
This towering beacon costs approximately $30–$45. A highly practical solution that delivers massive curb appeal from the street.
- Key Materials: Assorted size pumpkins, wooden structural dowels, and interior LEDs.
- Vibe / Style: Classic glowing harvest totem.
- Difficulty: Moderate drilling/stacking.
- Budget Breakdown: Pumpkins: $30 | Hardware: $10.
- Creator’s Tip: Paint the uncarved pumpkins in a matte black or metallic copper to create sharp contrast against the glowing orange faces.
- Smart Sourcing: pre-carved faux foam pumpkins (stackable sets) and heavy-duty wooden craft dowels.
Most people just throw a single pumpkin on a table, but the next layout is how you create a $200 designer backdrop on a $40 budget…
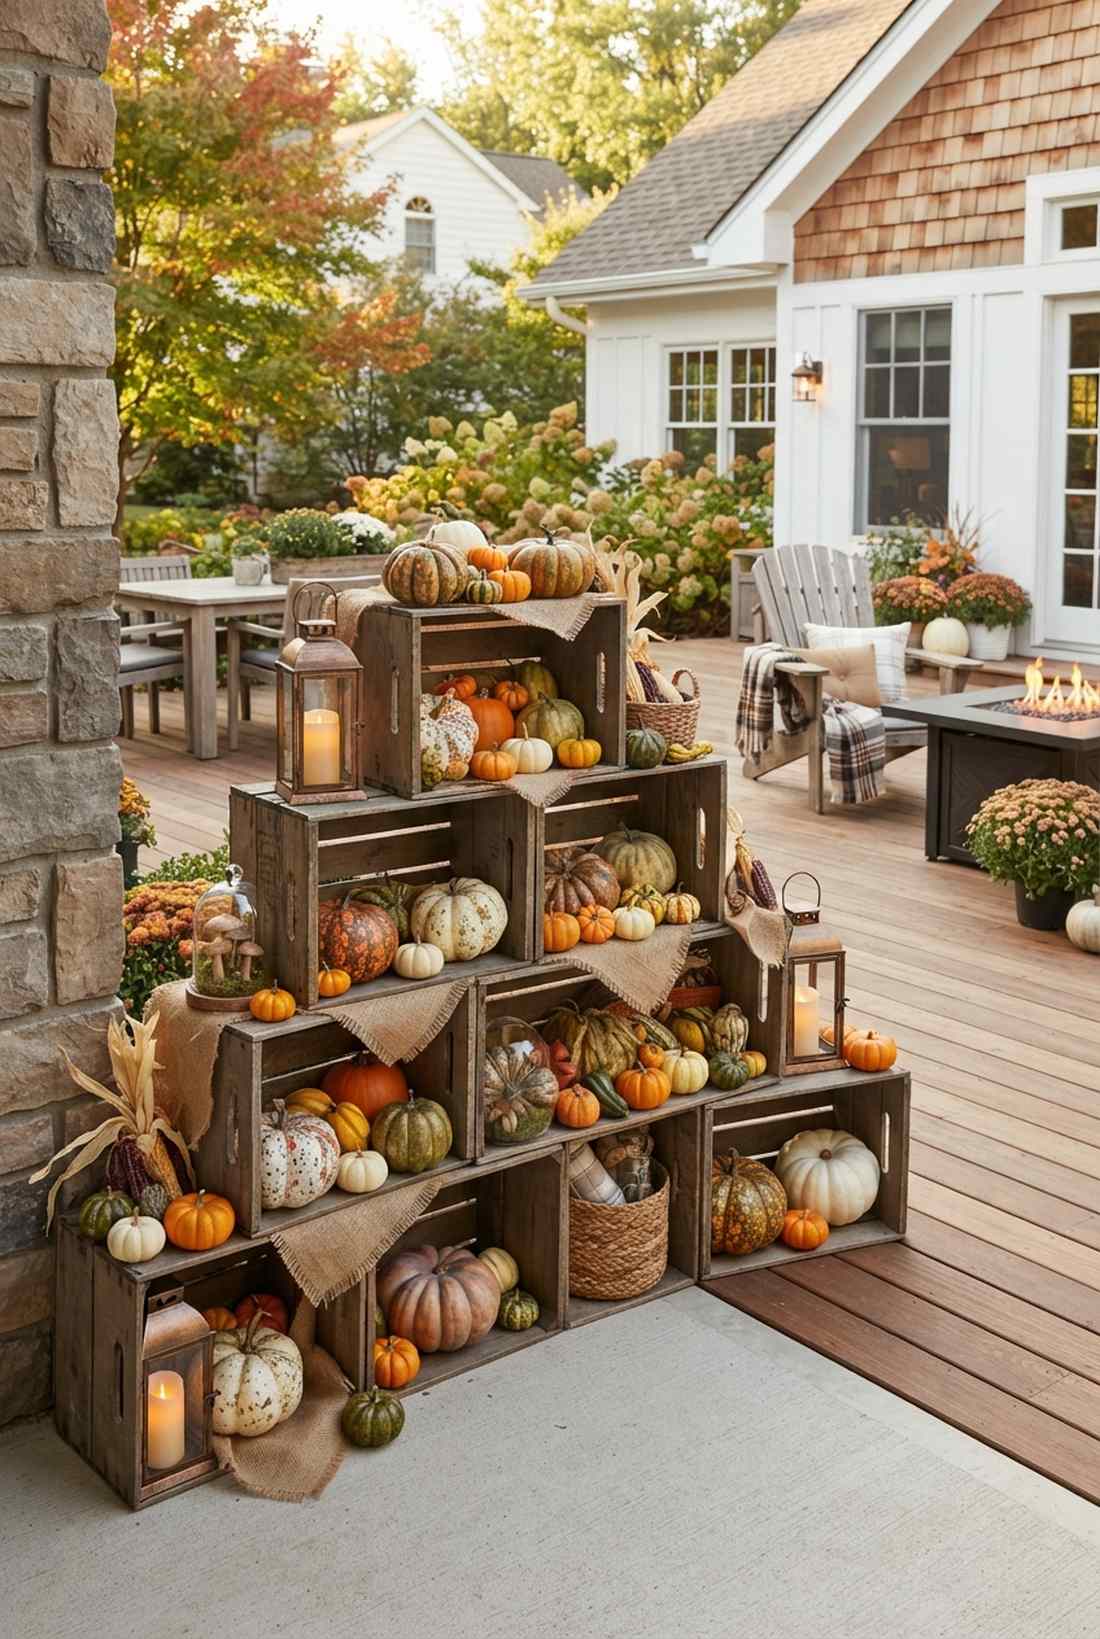
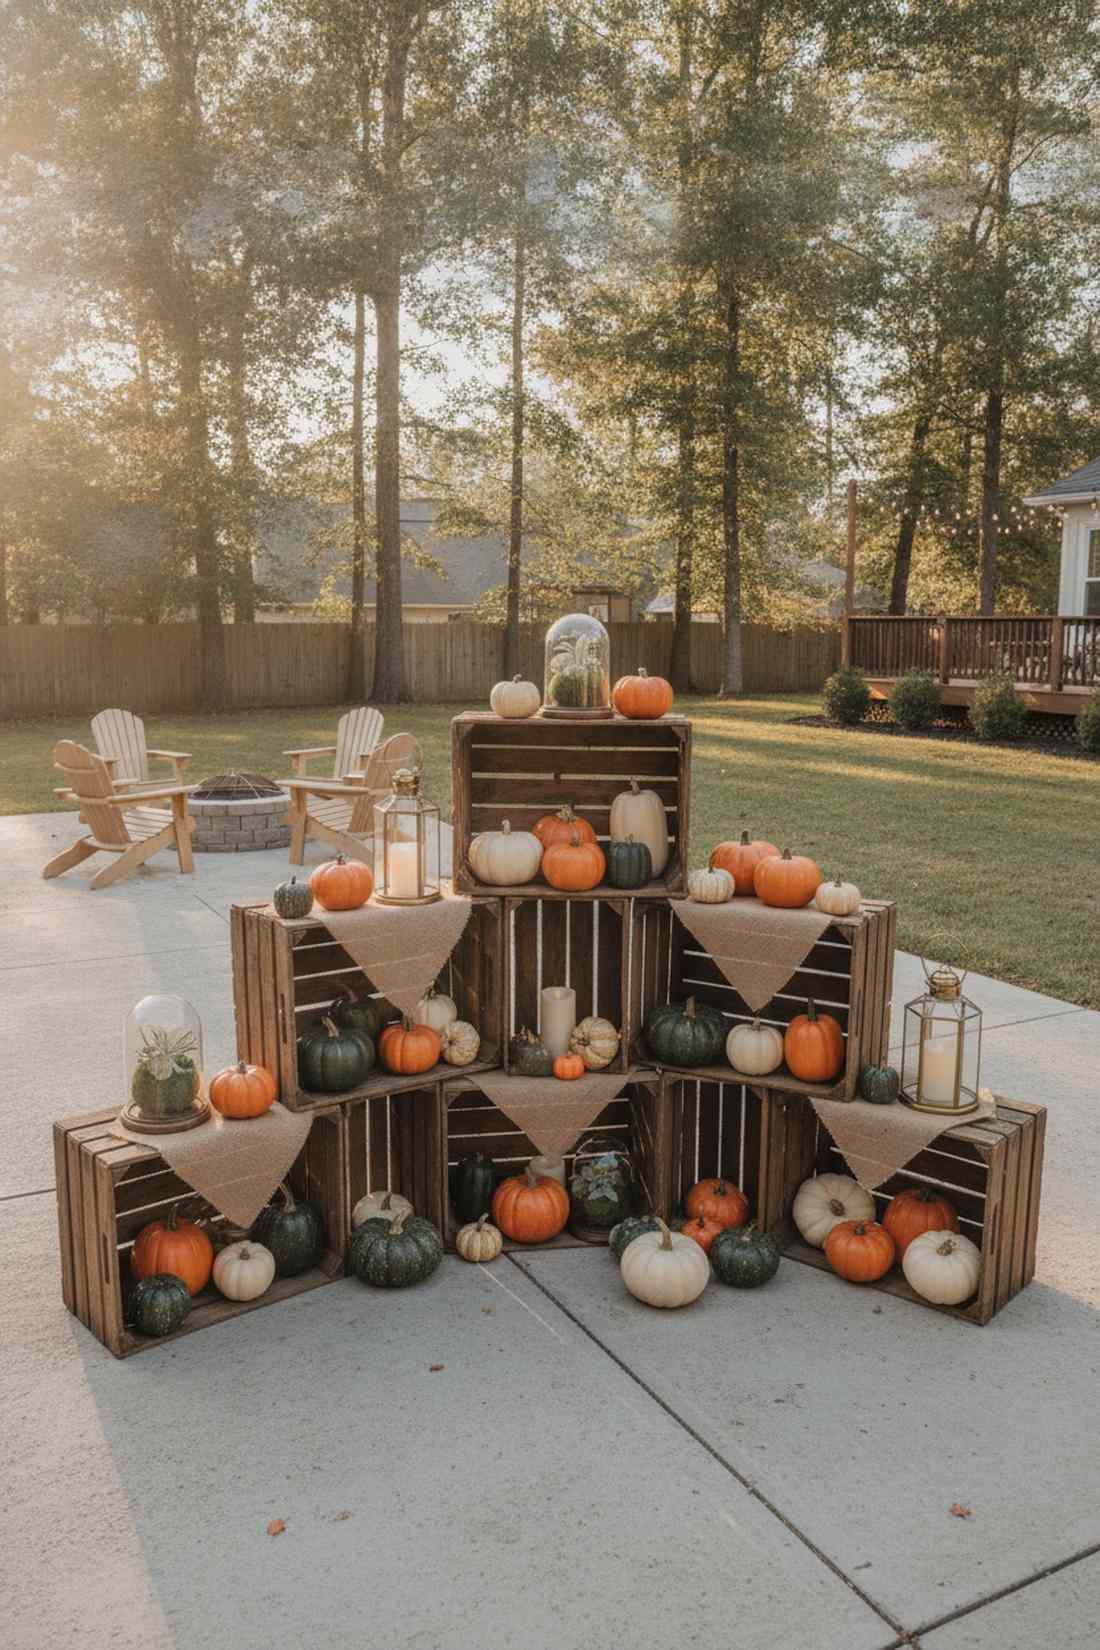
17. Illuminated Pumpkin Wall
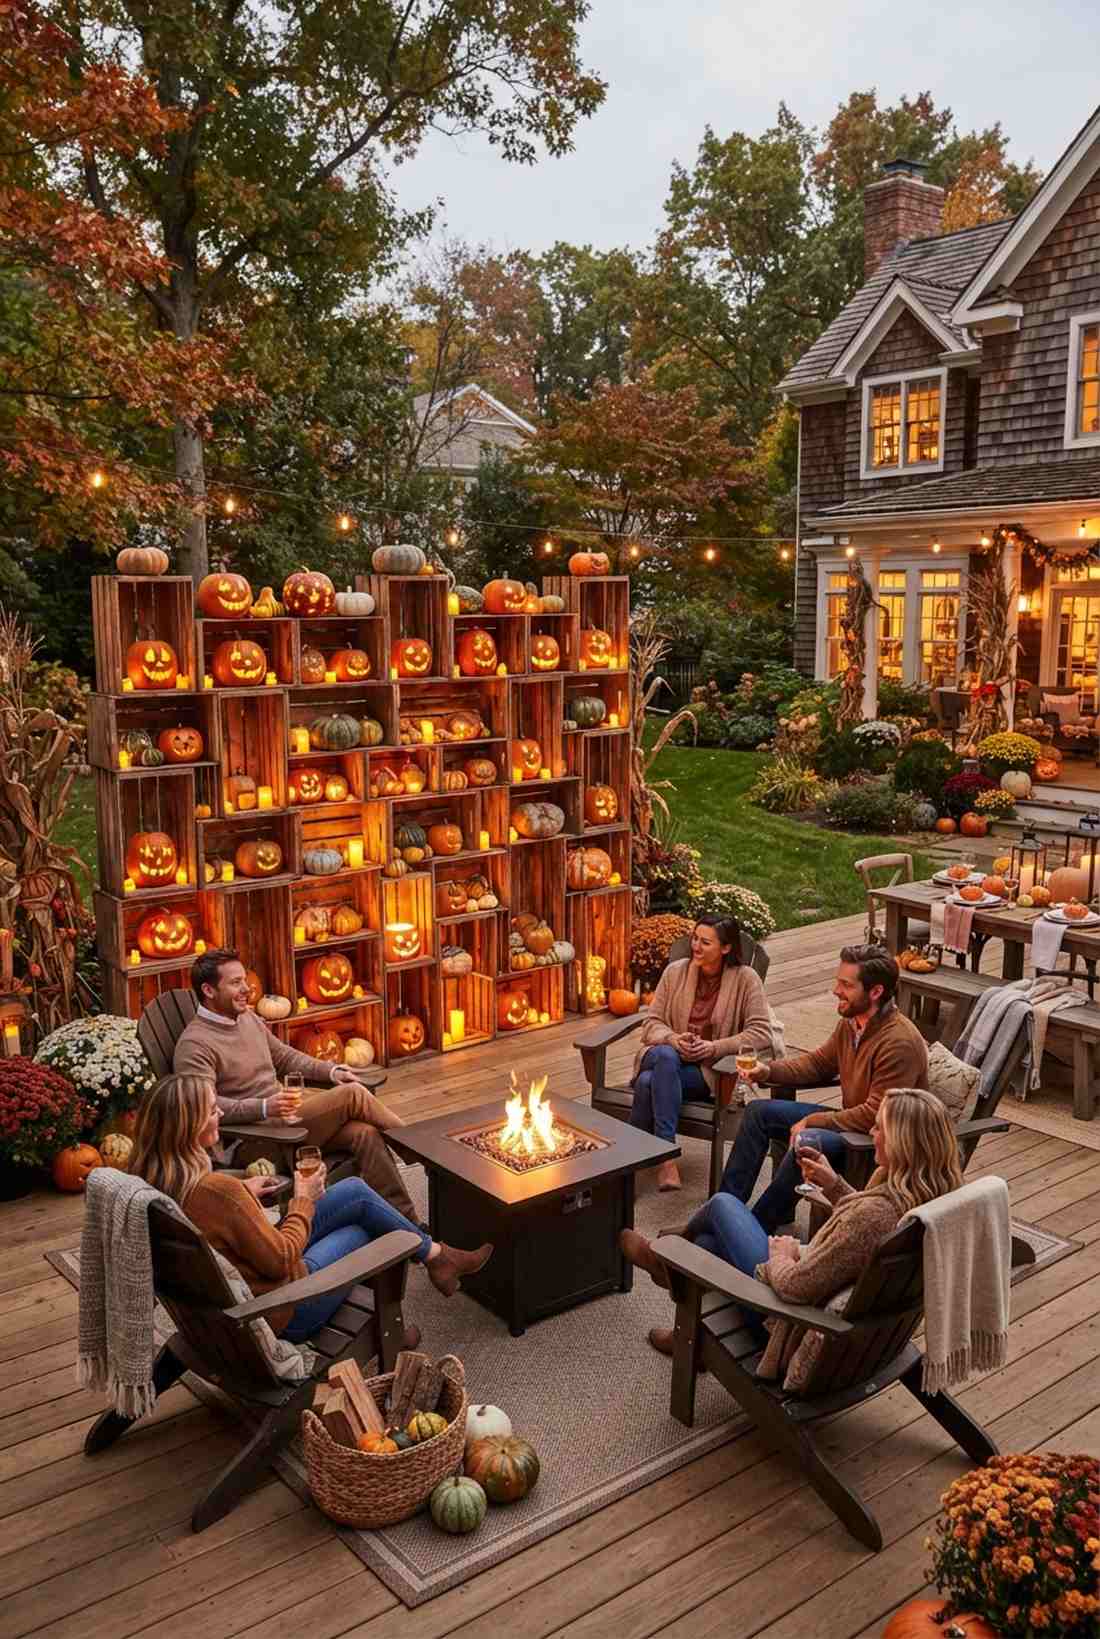
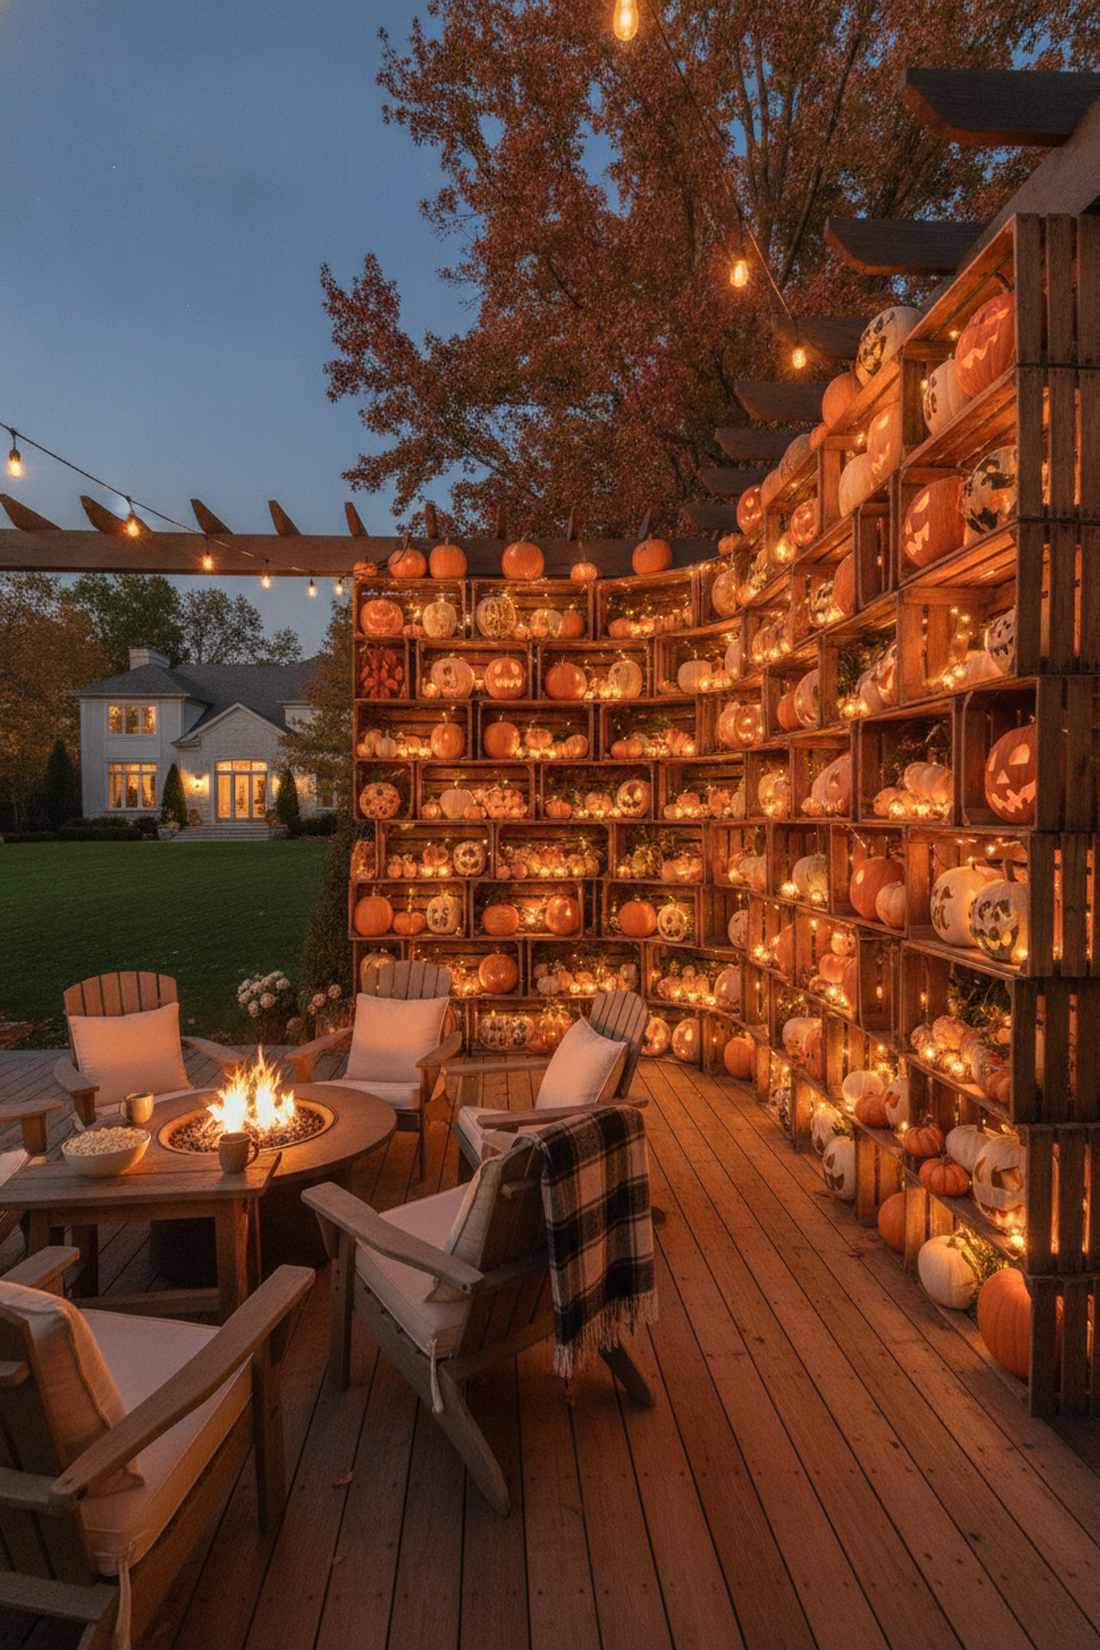

Surrounds you in a warm, immersive fortress of flickering orange light. This layered crate shelving concept is absolute perfection for creating a cozy, contained party atmosphere on an open terrace.
Relying on a single row looks amateurish, but stacking raw textures with dozens of light sources transforms plain corners entirely. Dropping in high-efficiency outdoor Halloween decorations and synchronized timers guarantees an automated, breathtaking light show every evening.
Expect to spend around $50–$75 to source the crates and gourds. Pin this if you host outdoor autumn gatherings and need a killer backdrop.
- Key Materials: Wooden crates, miniature pumpkins, and battery-operated tea lights.
- Vibe / Style: Glowing rustic abundance.
- Difficulty: Easy stacking and arrangement.
- Budget Breakdown: Crates: $40 | Lights/Pumpkins: $30.
- Creator’s Tip: Use a mix of carved, painted, and completely natural gourds to give the wall incredible textural variety.
- Smart Sourcing: unfinished wooden nesting crates (bulk pack) and waterproof flickering LED tea lights.
18. Ombre Pumpkin Gradient
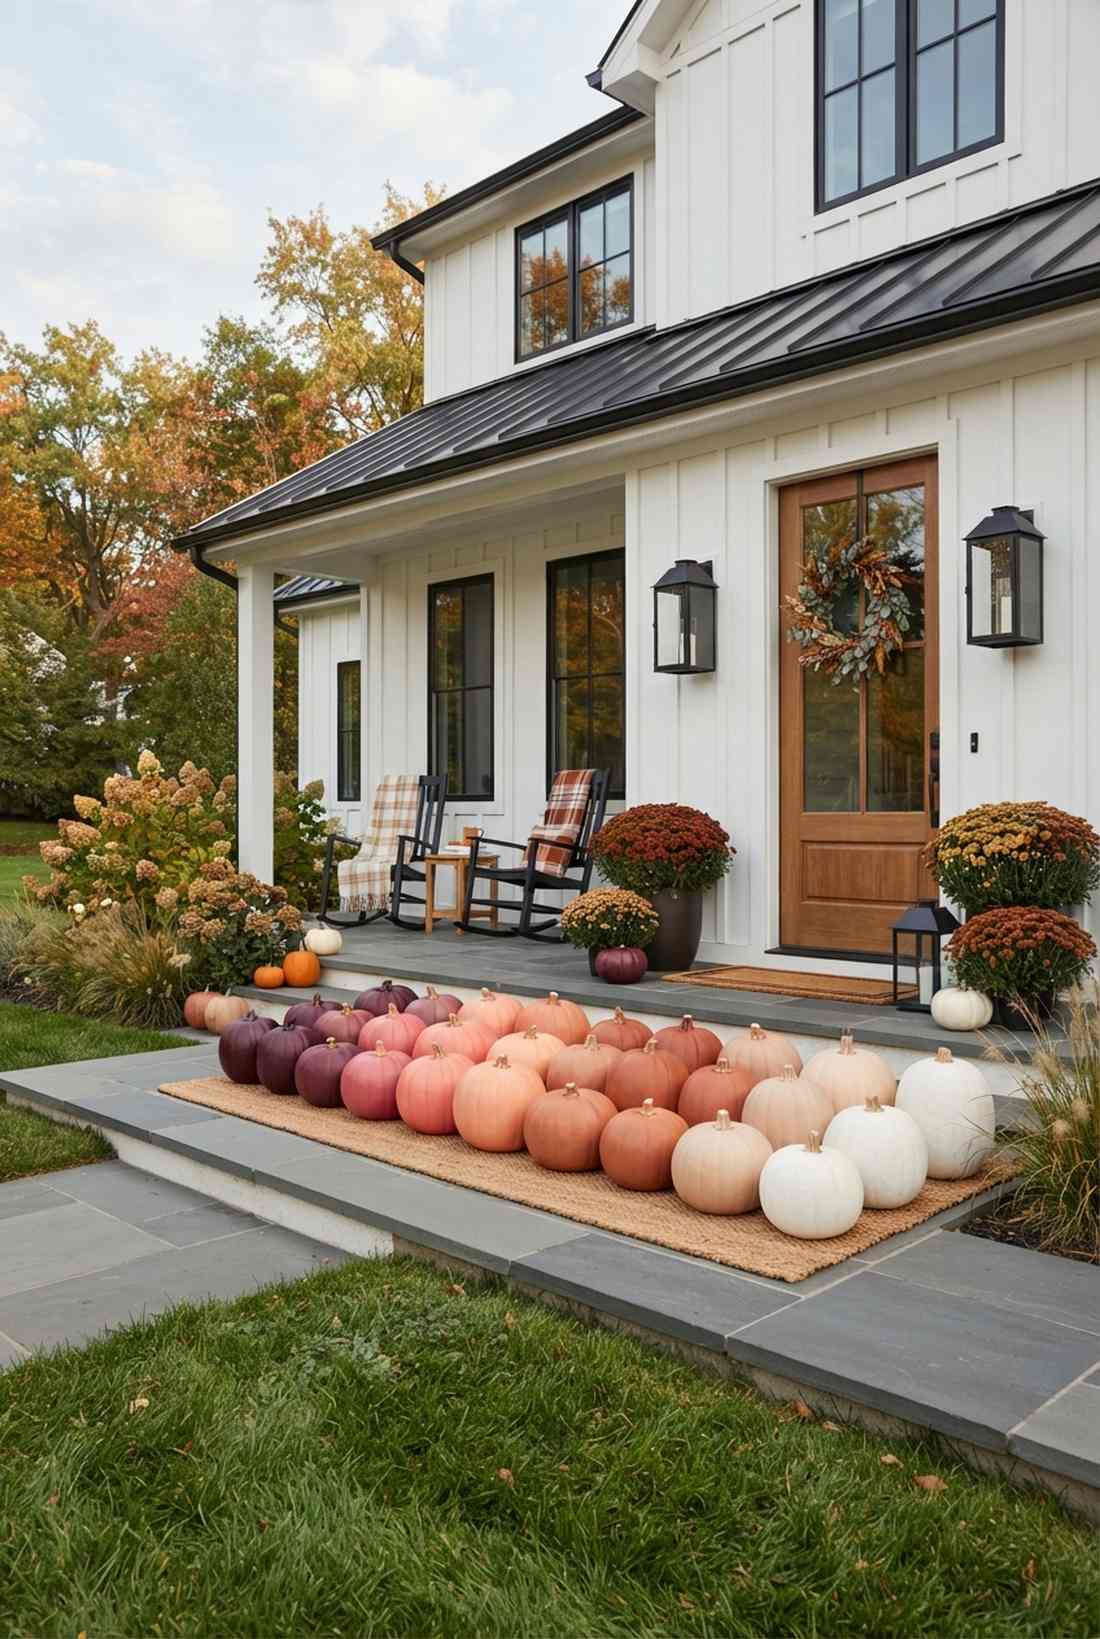

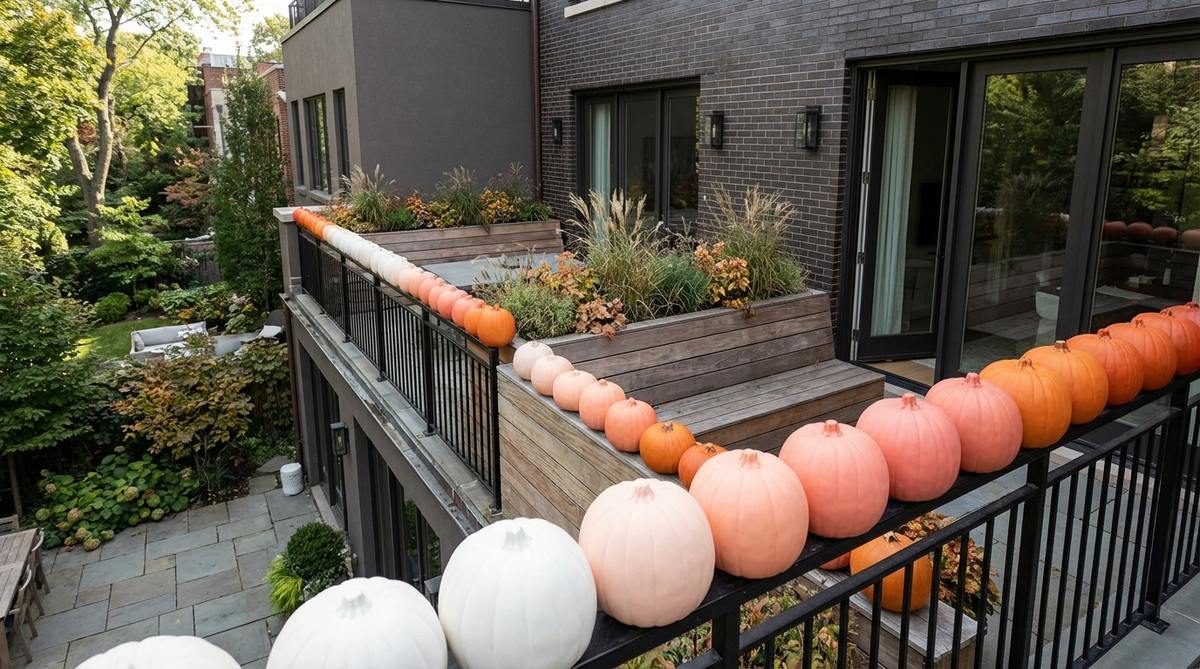
Brings a sleek, highly curated art gallery aesthetic directly to your outdoor space. This painted linear gourd arrangement is the ultimate hack for design-conscious decorators tired of traditional orange.
Skipping the carving knife and relying purely on sophisticated color theory completely elevates the facade from basic to bespoke. Using premium matte acrylics and UV-resistant sealants ensures the flawless gradient won’t chip or fade in the morning dew.
This artistic upgrade requires only $20–$35 in materials. It’s a stunning, mess-free alternative that lasts twice as long as carved pumpkins.
- Key Materials: Uniform pumpkins, gradient acrylic paints, and matte sealer.
- Vibe / Style: Modern minimalist chic.
- Difficulty: Requires patient painting.
- Budget Breakdown: Pumpkins: $15 | Paint & Sealer: $15.
- Creator’s Tip: Apply a white primer coat to the pumpkins first so the lighter coral and peach colors pop vividly without the orange bleeding through.
- Smart Sourcing: matte finish exterior acrylic paint sets and UV-blocking clear matte spray sealant.
19. Pumpkin Planter Hybrids
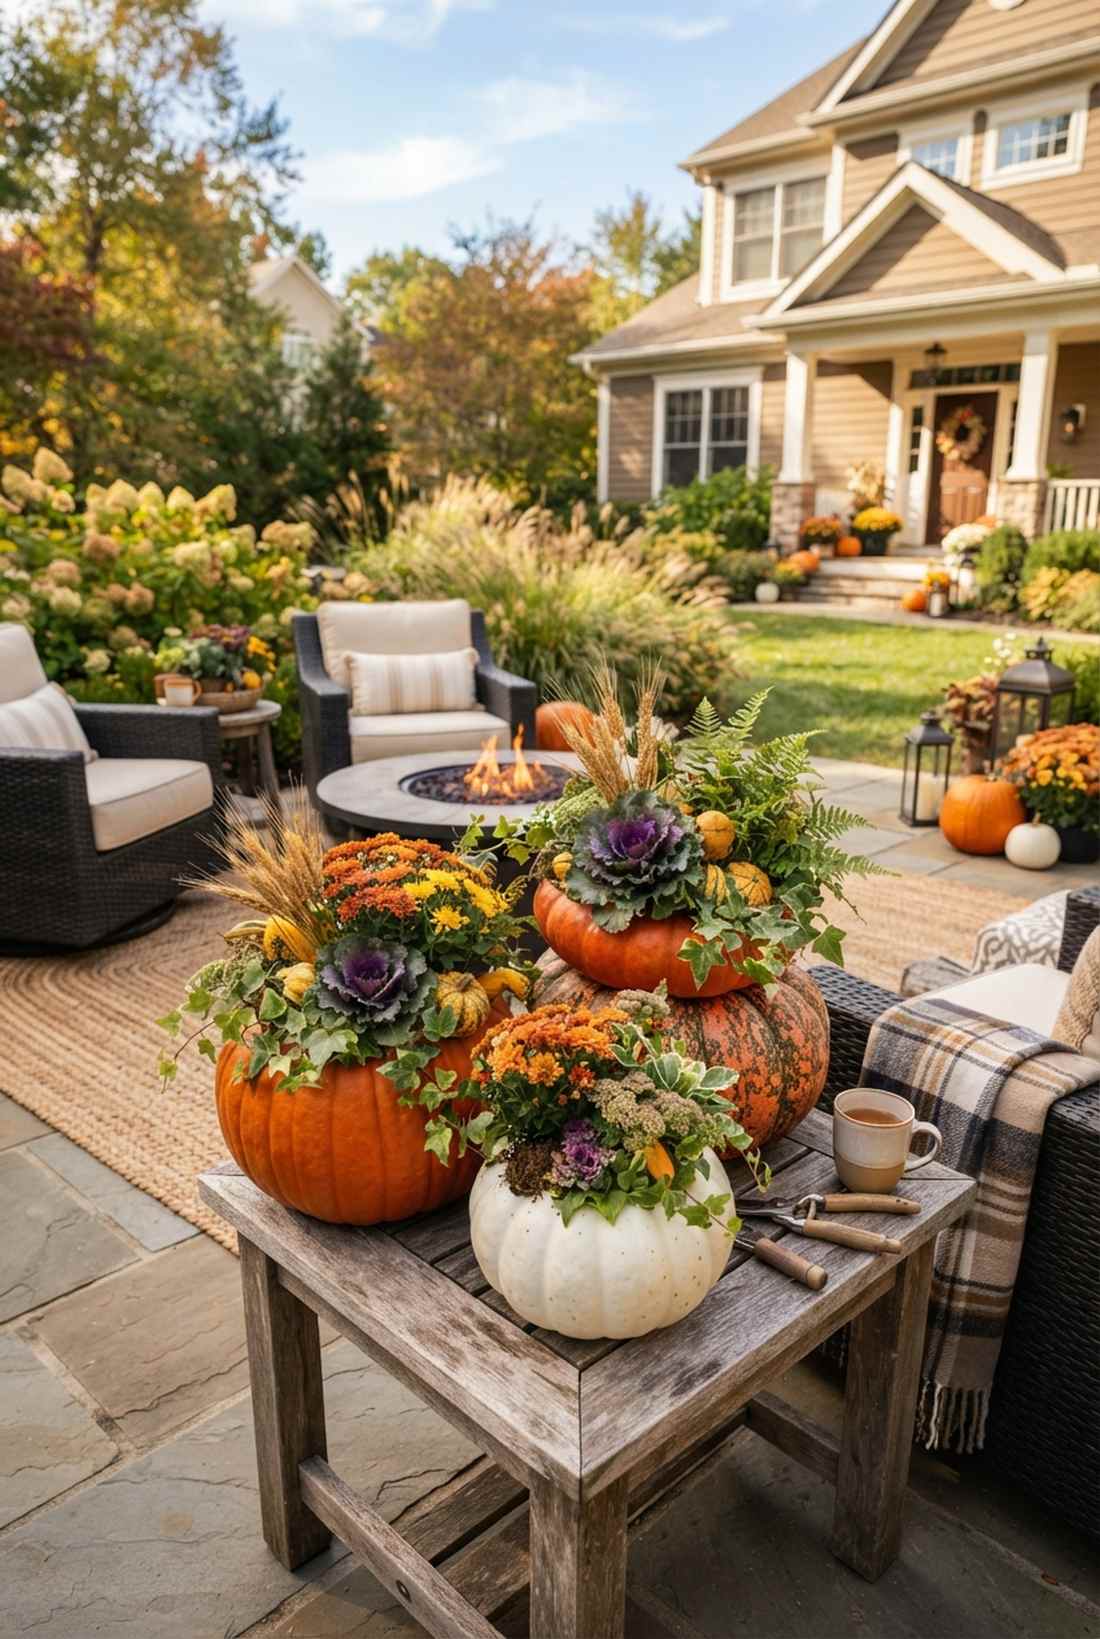
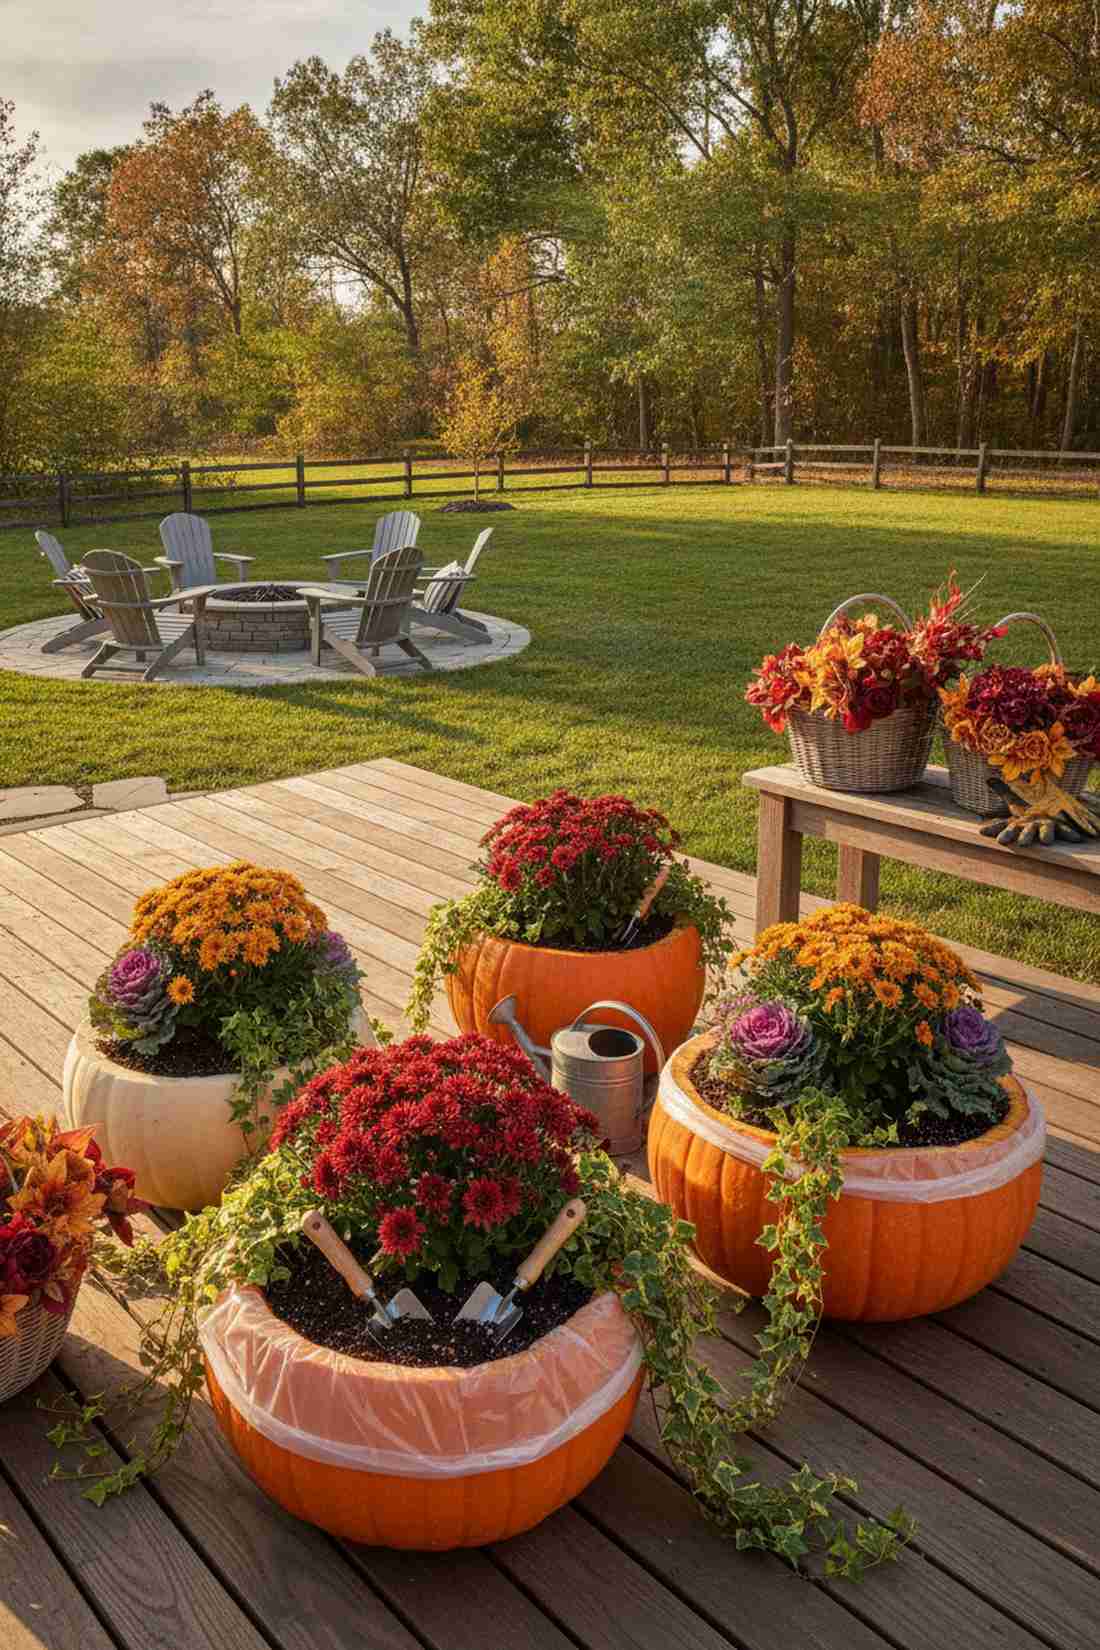
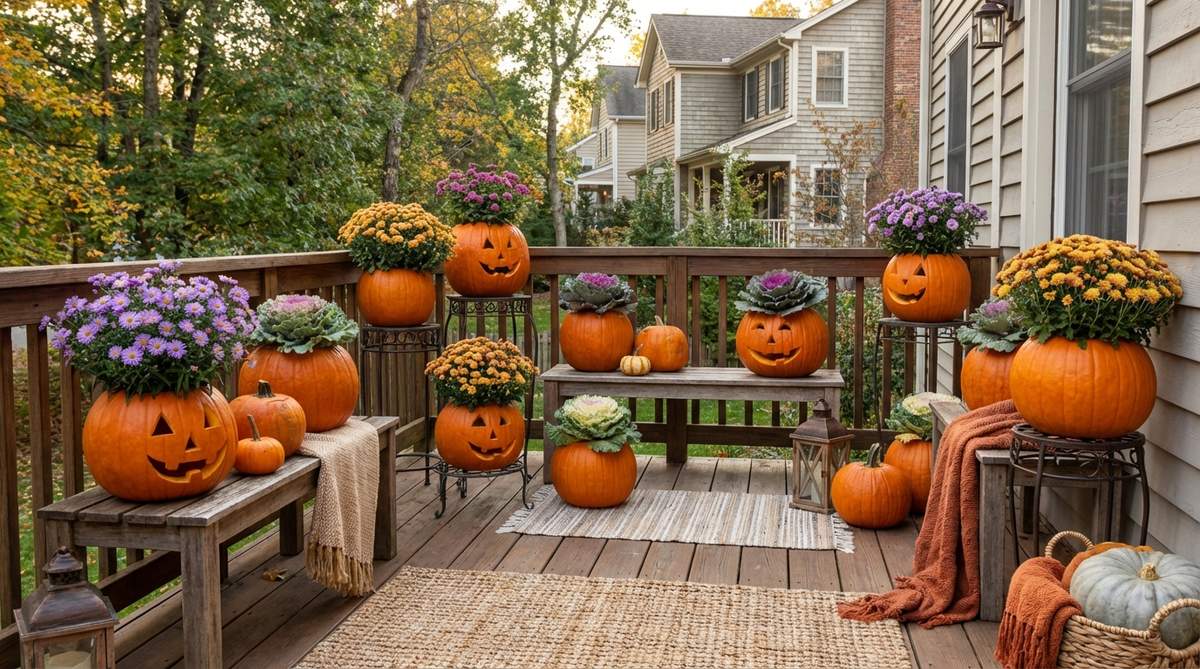
Feels like nature is directly reclaiming the harvest in real time. This living botanical gourd display is a gorgeous way to blend organic gardening with seasonal flair on sunny patios.
Standard carved pumpkins rot within days, but lining them and introducing living soil gives a designer-level finish that lasts weeks. Incorporating fresh autumnal blooms with miniature garden supplies bridges the gap between creepy Halloween and Thanksgiving elegance.
Creating these vibrant planters costs about $25–$40. Pin this to your urban gardening board for a brilliant dual-purpose project.
- Key Materials: Large hollowed pumpkins, plastic liners, and autumn florals (mums/kale).
- Vibe / Style: Fresh harvest horticulture.
- Difficulty: Simple potting skills.
- Budget Breakdown: Pumpkins/Liners: $15 | Plants: $20.
- Creator’s Tip: Coat the cut interior edges of the pumpkin with petroleum jelly to aggressively slow down the dehydration and rotting process.
- Smart Sourcing: heavy-duty plastic planter liners and premium artificial autumn floral bundles.
20. Floating Pumpkin Lanterns
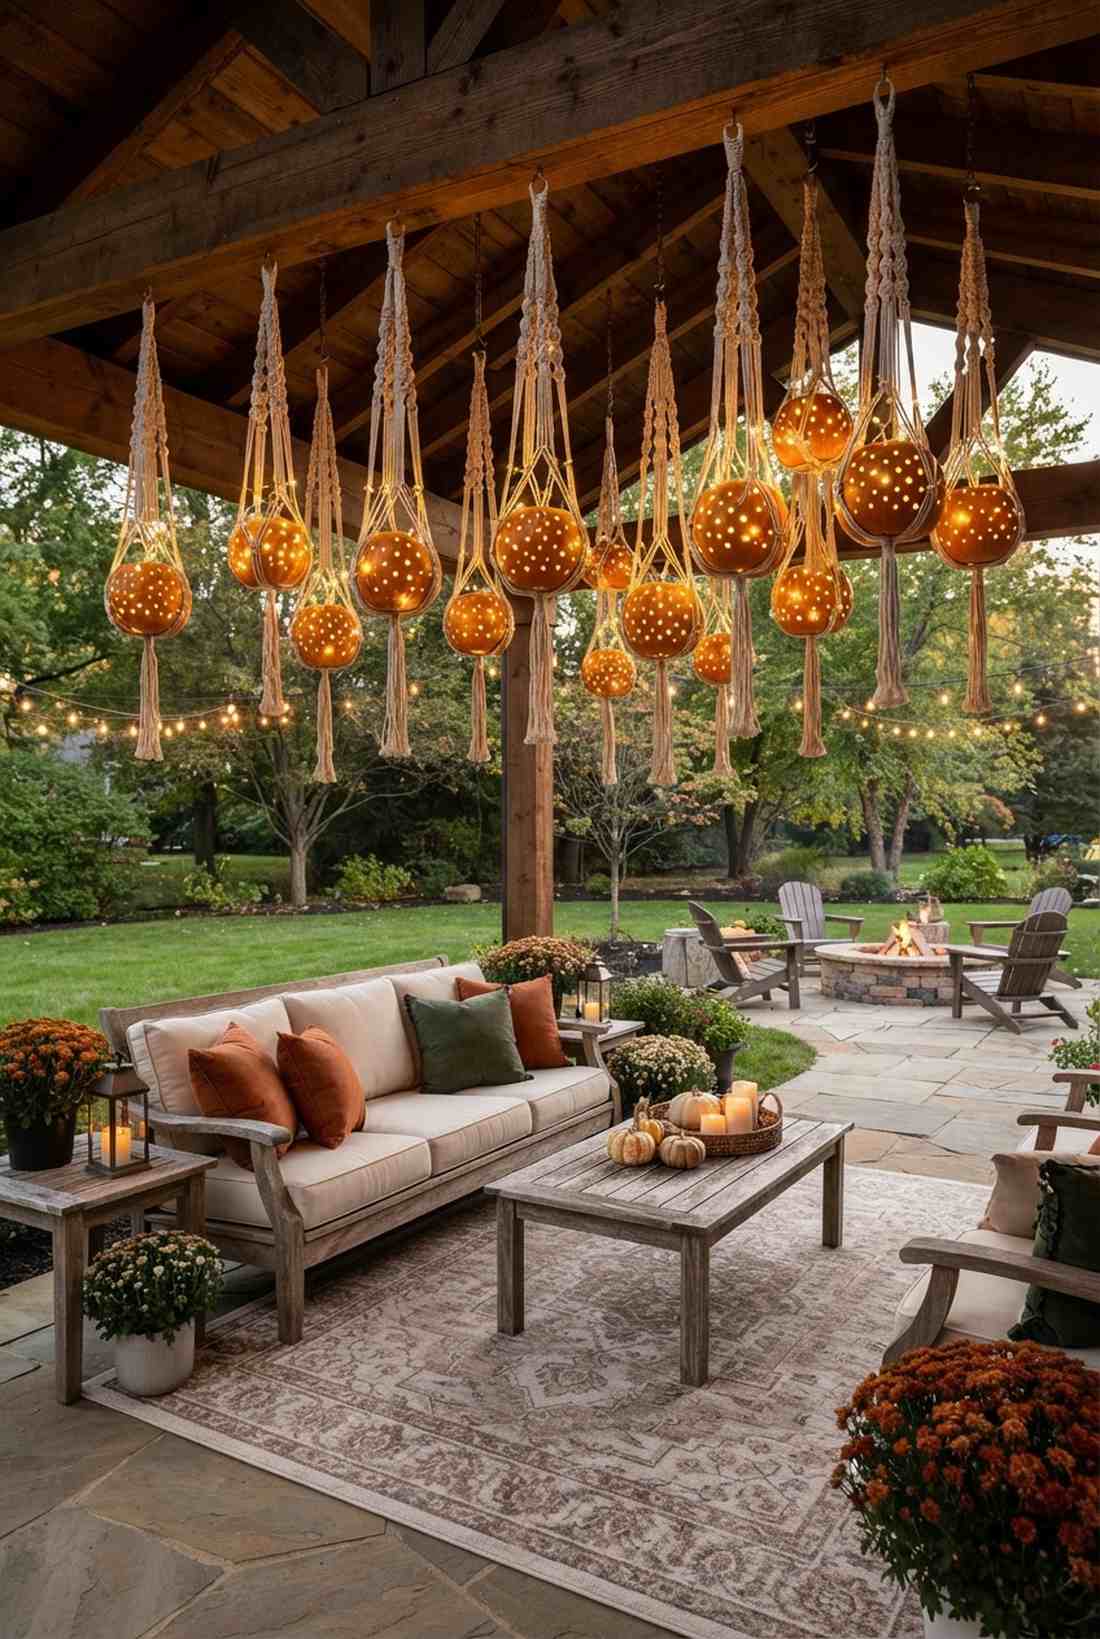
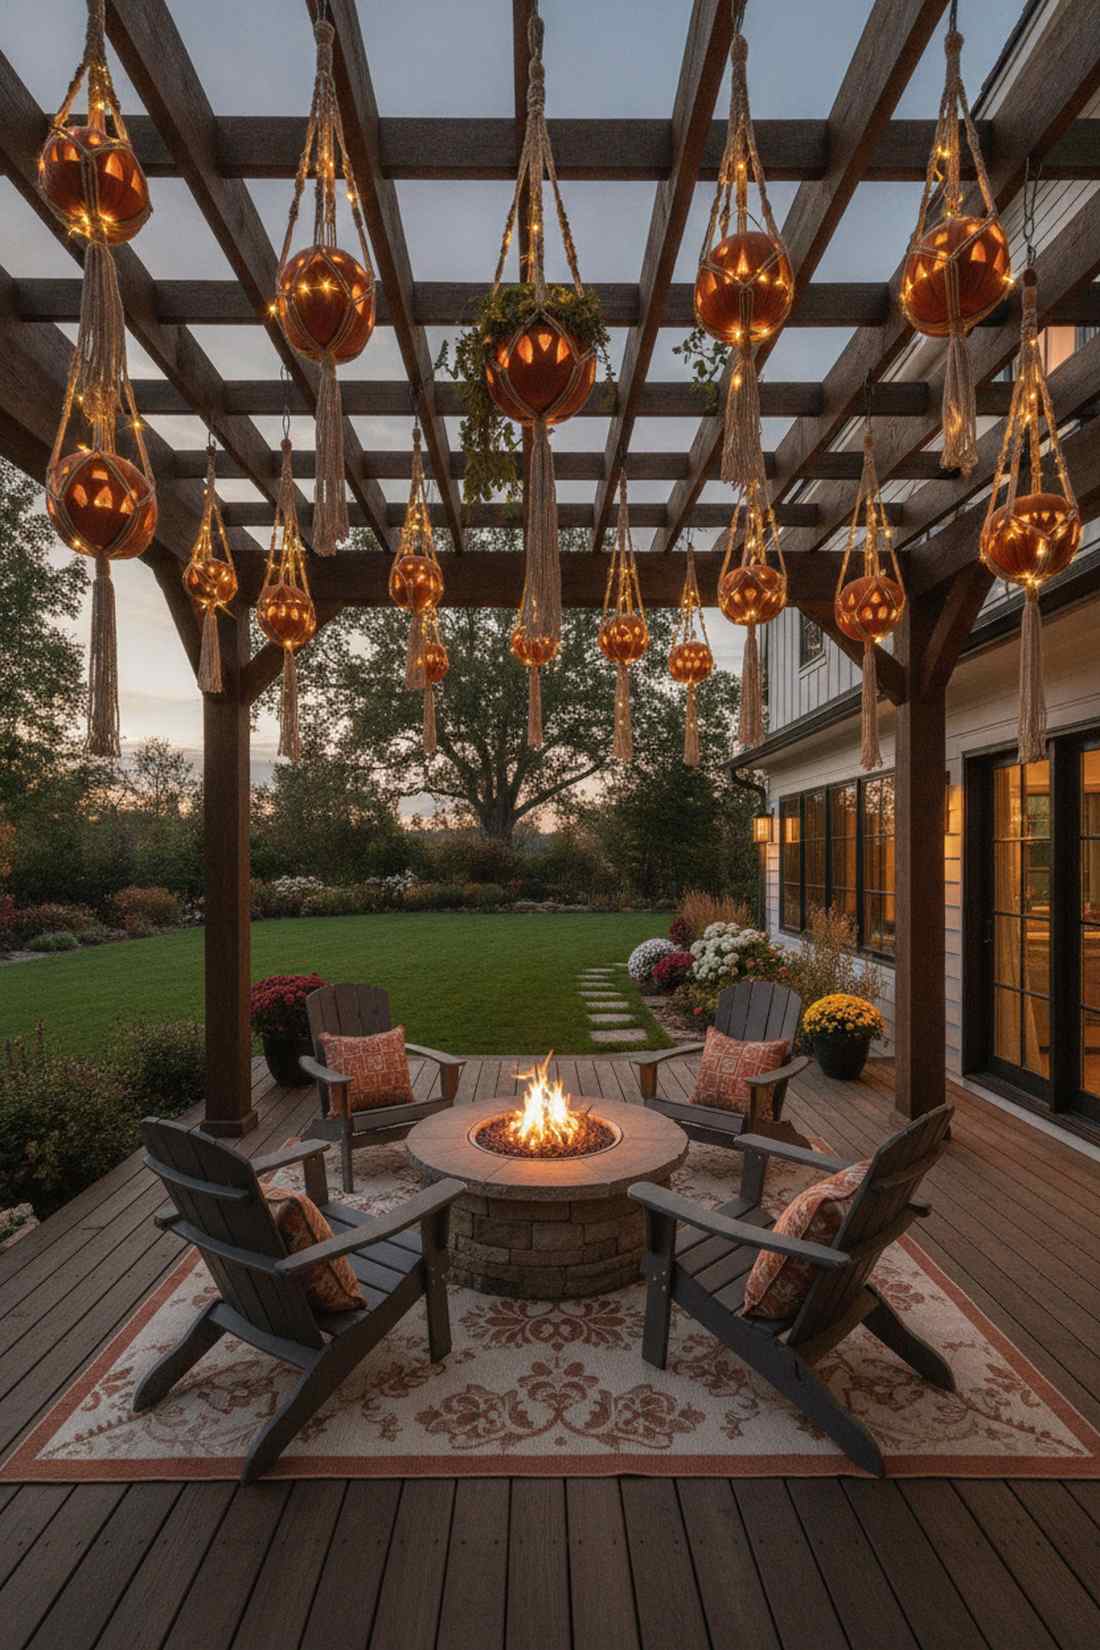
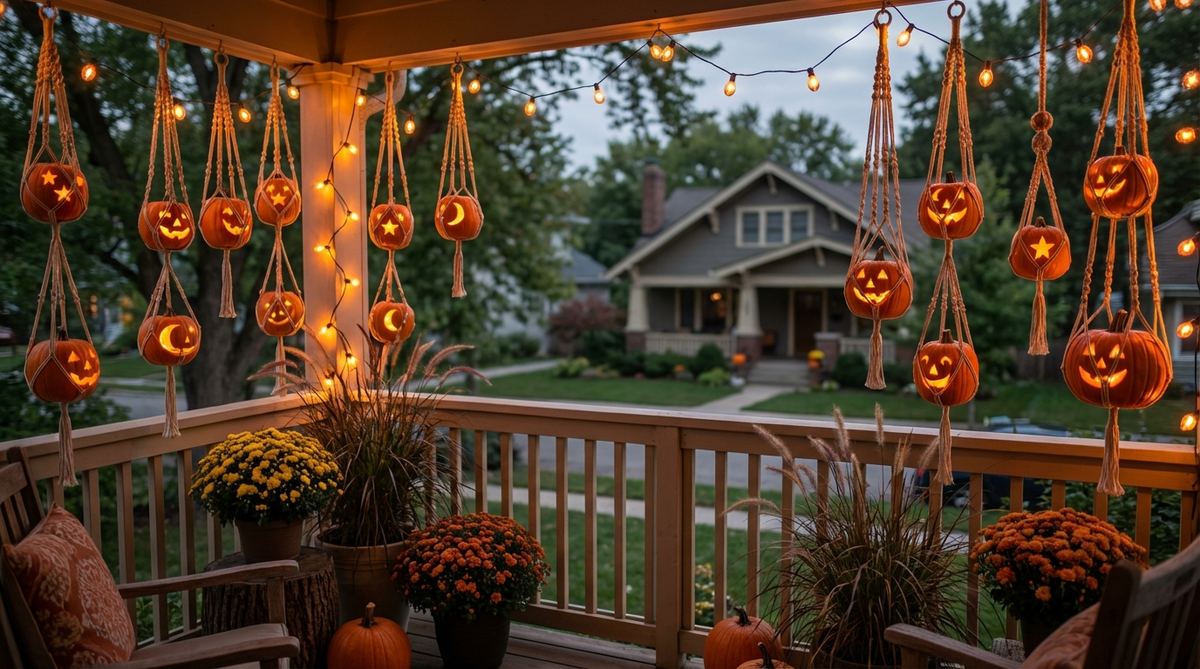
Suspends glowing warmth right at eye level like a sky full of rustic stars. This hanging macrame gourd setup is a brilliant vertical strategy for keeping the floor completely clear of trip hazards.
Leaving the ceiling bare wastes half your decorating canvas, but rigging up lightweight elements completely changes the spatial dynamics. Weaving micro-LED outdoor string lights through the hangers creates an enchanting, high-end patio atmosphere that feels boutique.
You can execute this hanging light display for roughly $20–$35. It is an incredibly cozy setup that sways beautifully in the evening breeze.
- Key Materials: Small pie pumpkins, macrame plant hangers, and micro fairy lights.
- Vibe / Style: Bohemian harvest twilight.
- Difficulty: Easy hanging project.
- Budget Breakdown: Hangers: $15 | Lights & Pumpkins: $15.
- Creator’s Tip: Use a power drill with a spade bit to create perfectly uniform geometric holes rather than struggling with a slippery carving knife.
- Smart Sourcing: weather-resistant outdoor macrame hangers (multipack) and copper wire waterproof fairy light kits.
Before you spend $50 on plastic props, look at how easily this next organic layout builds a high-end farmhouse aesthetic…
Autumnal Harvest Transitions
21. Corn Stalk Forest
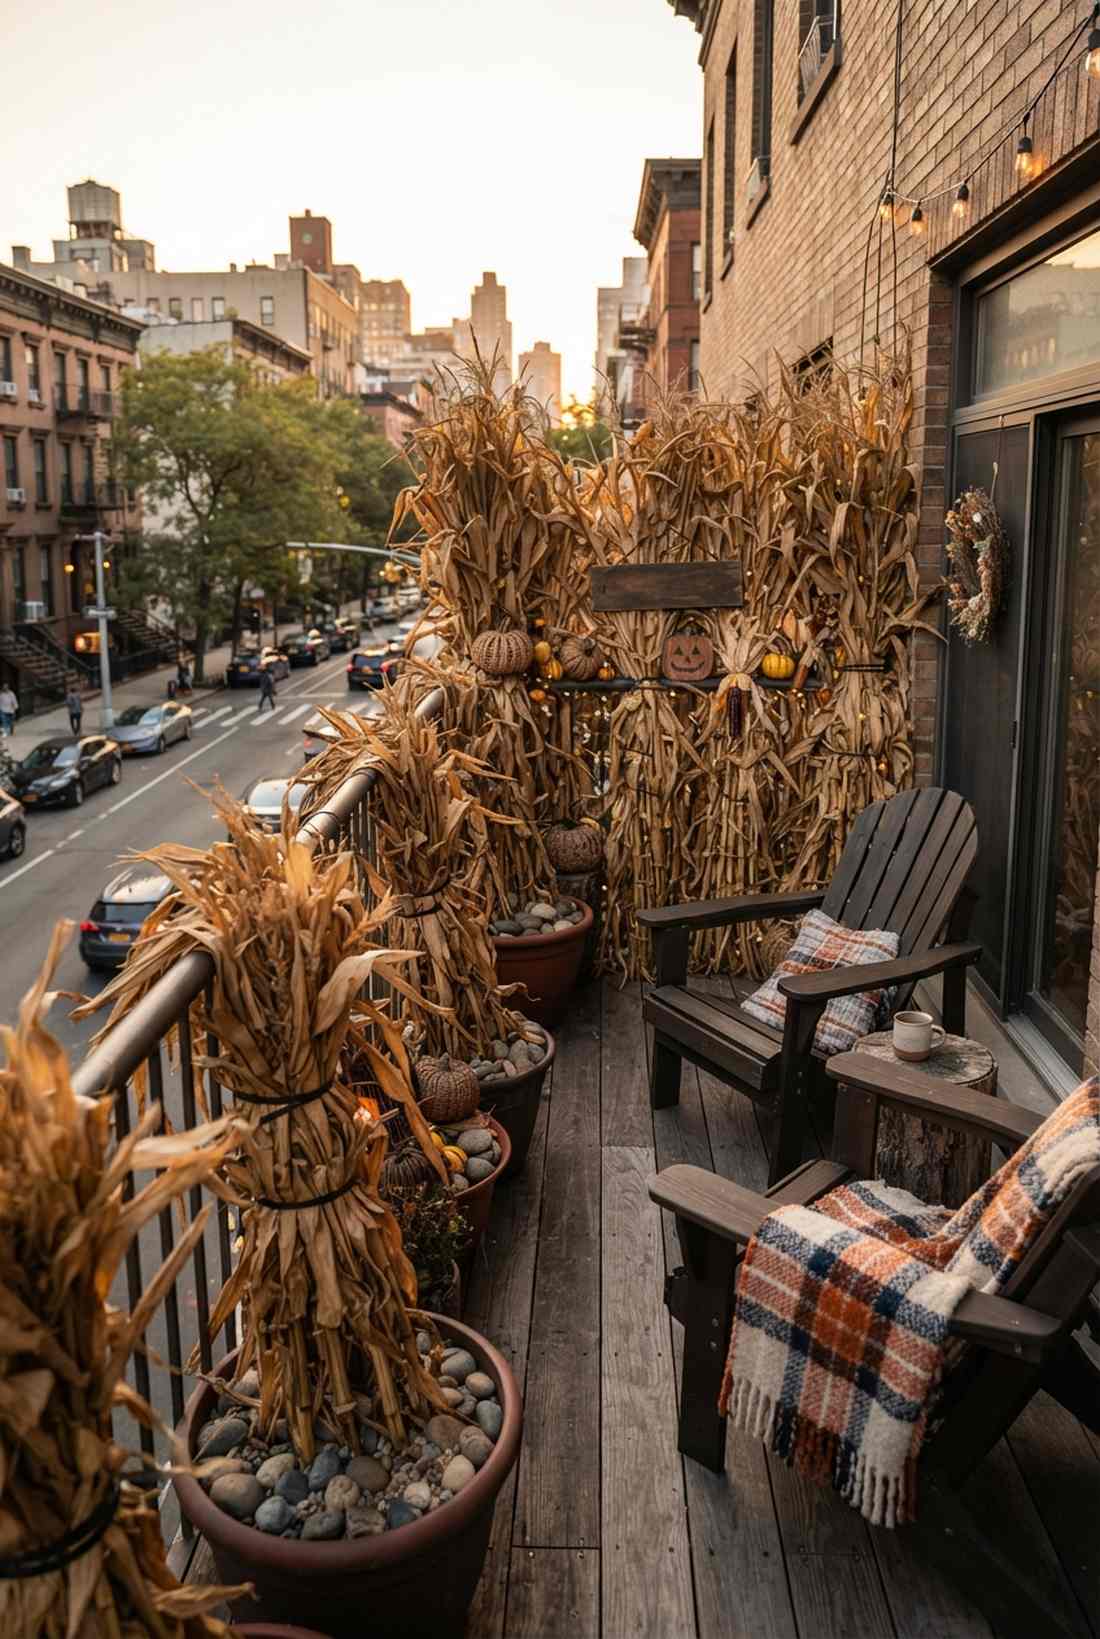
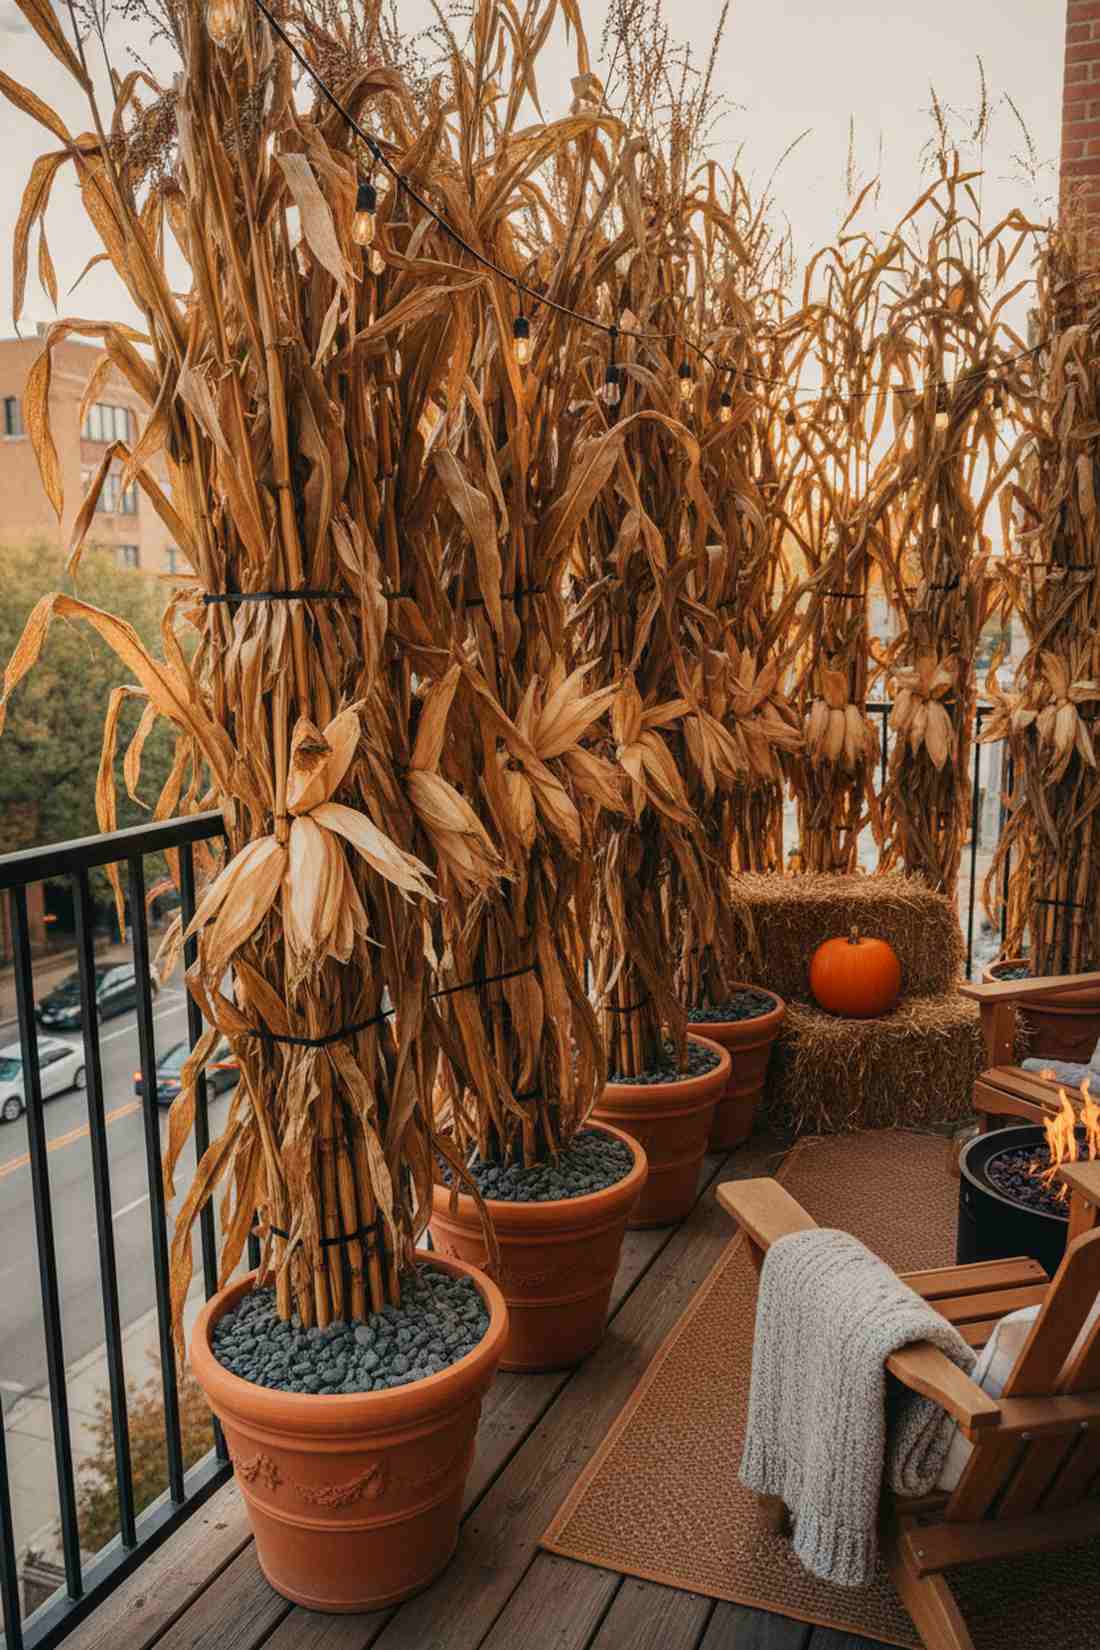
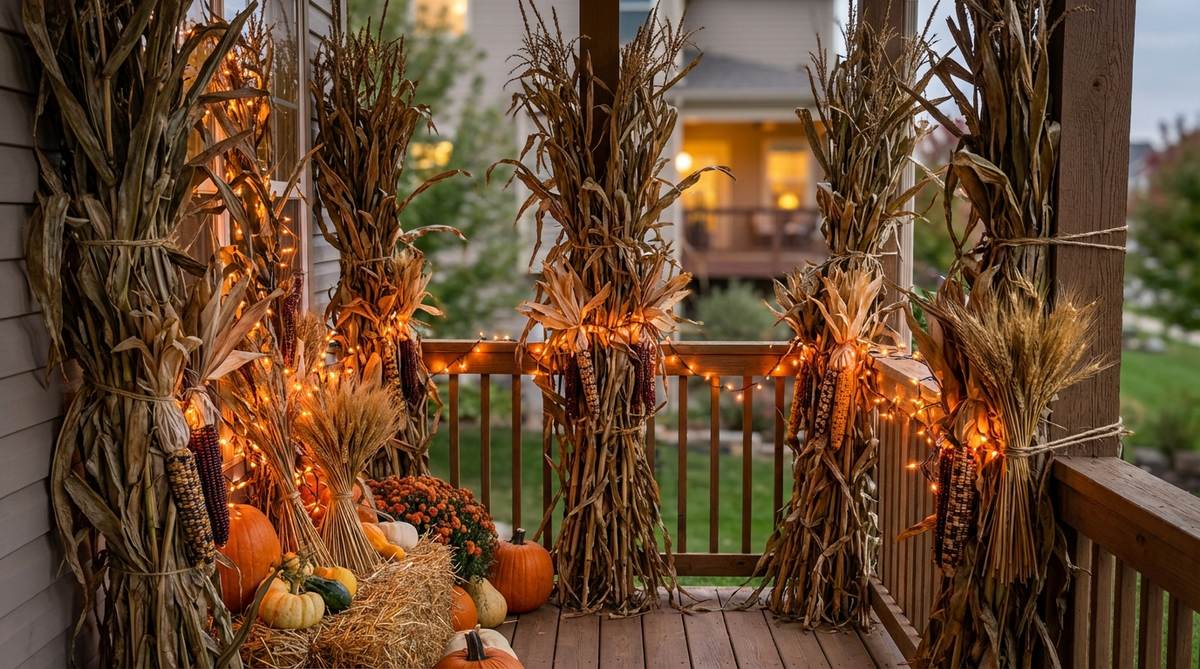
Instantly wraps your space in the rustling, golden warmth of an endless autumn field. This vertical agricultural railing decor is the ultimate privacy screen for exposed urban balconies facing busy streets.
Most rely on flimsy plastic banners, but utilizing massive natural textures completely elevates the facade to a luxury farmhouse tier. Securing these towering elements with heavy-duty ties and hiding outdoor Halloween decorations inside the stalks builds incredible depth.
Sourcing these natural materials runs about $25–$45. Pin this if you want a massive architectural impact that effortlessly survives through Thanksgiving.
- Key Materials: Dried corn stalk bundles, heavy zip ties, and weighted planter bases.
- Vibe / Style: Rustic agricultural hideaway.
- Difficulty: Requires strong securing.
- Budget Breakdown: Stalks: $30 | Fasteners: $10.
- Creator’s Tip: Plant the bases of the stalks deeply into pots filled with heavy gravel to prevent them from becoming dangerous sails in high winds.
- Smart Sourcing: natural dried Indian corn bundles and industrial strength UV-resistant zip ties.
22. Apple Crate Vignettes
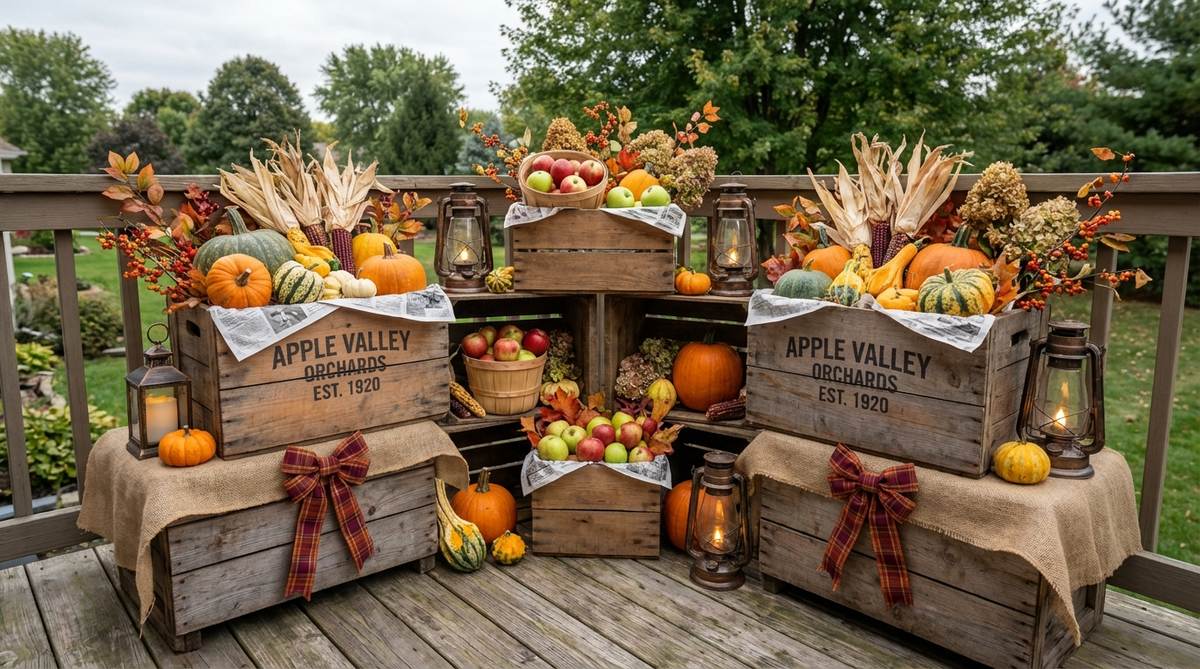
Emanates the wholesome, abundant feeling of a rural roadside farm stand. This modular wooden crate display is an insanely practical way to add multi-level shelving to otherwise flat, boring concrete spaces.
Tossing gourds directly on the floor looks messy, but introducing structured, staggered elevations delivers a surprisingly premium look. Blending faux produce with high-quality terrarium accessories and vintage lanterns guarantees a curated, interior-design quality finish.
This structured setup usually costs $40–$65. Save this to your seasonal transition board for a layout that requires zero takedown after Halloween.
- Key Materials: Vintage-style wooden crates, burlap runners, and seasonal produce.
- Vibe / Style: Organized farmhouse abundance.
- Difficulty: Simple modular stacking.
- Budget Breakdown: Crates: $35 | Props & Fabric: $20.
- Creator’s Tip: Stuff the bottom half of each crate with crumpled newspaper before adding the produce so it looks overflowing without requiring a massive budget.
- Smart Sourcing: distressed wooden nesting crates (starter set) and realistic artificial harvest gourd packs.
23. Mum Rainbow Cascade
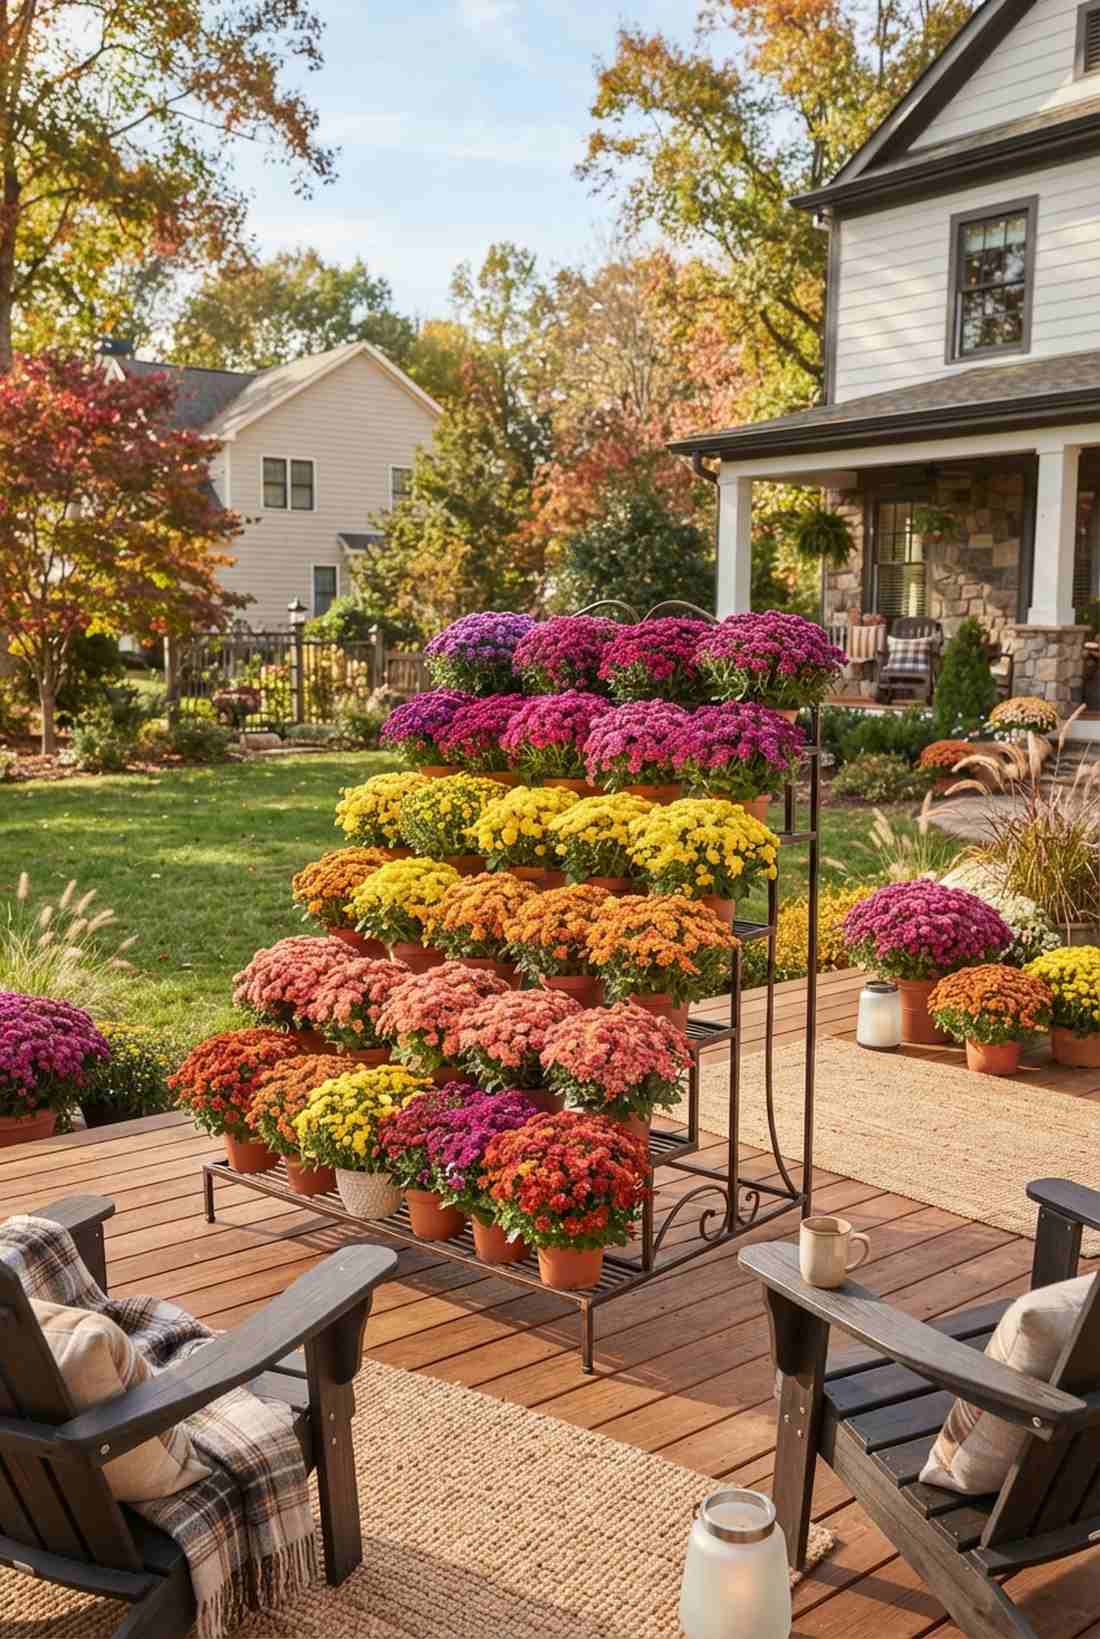
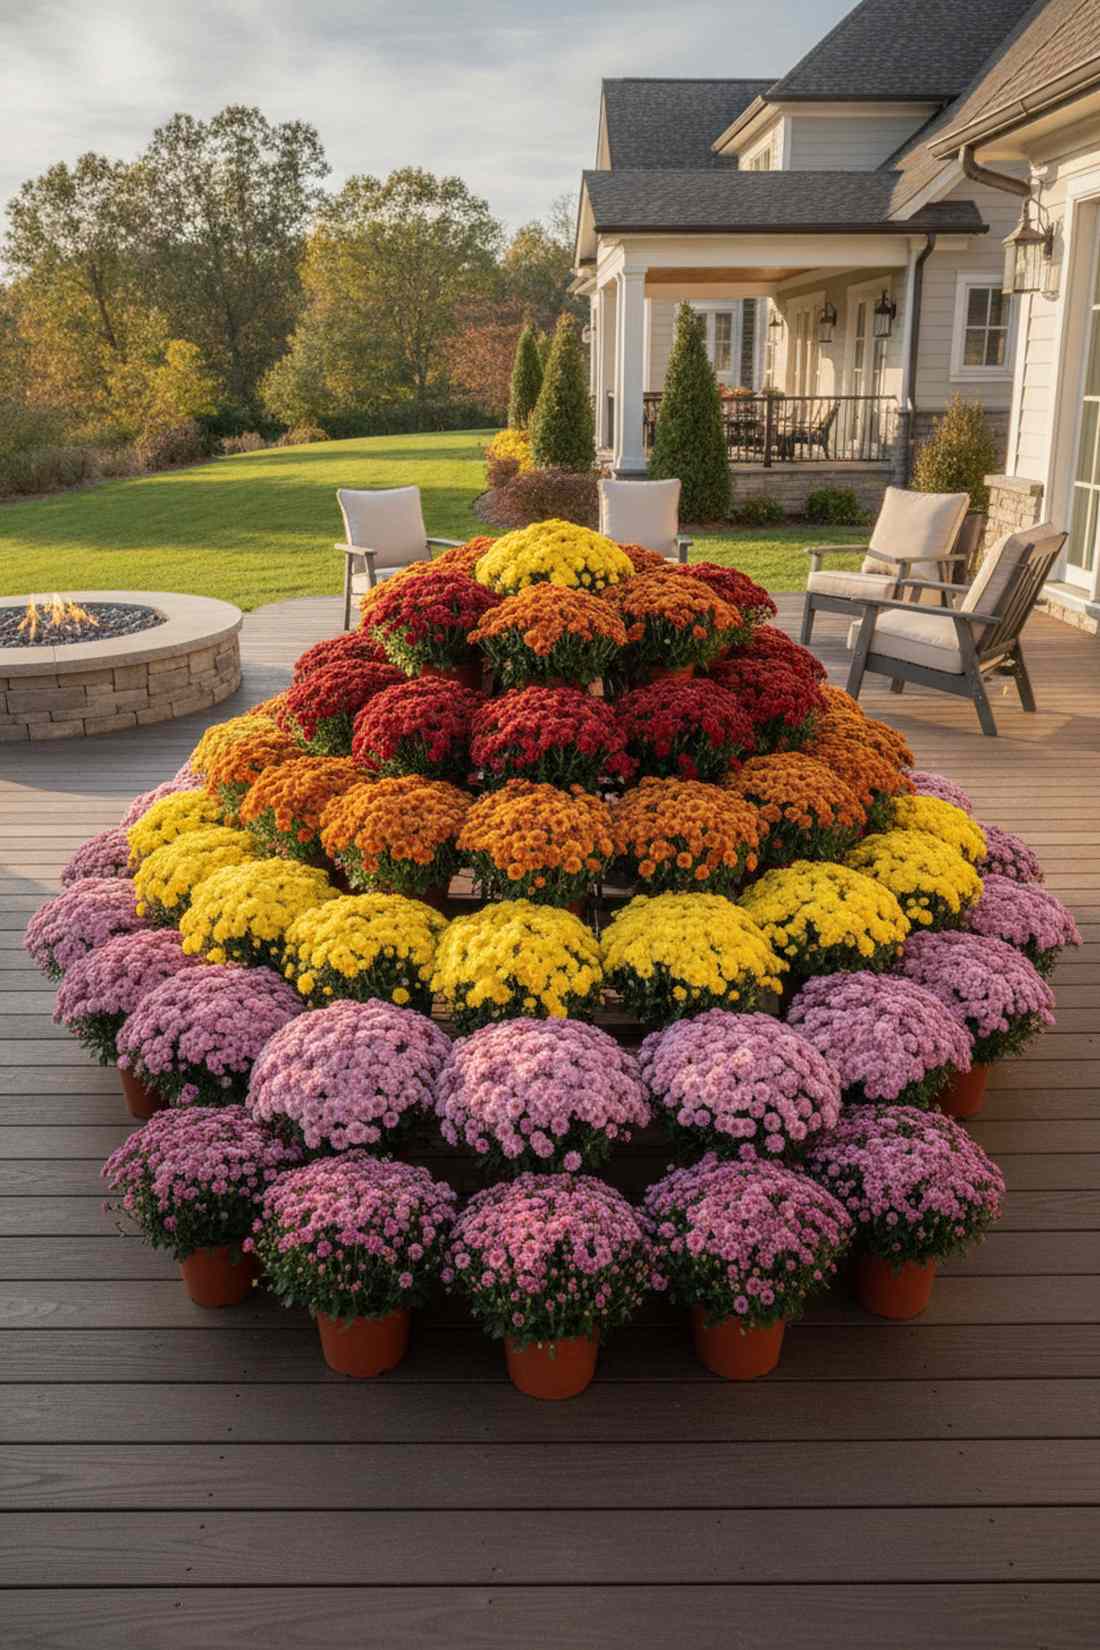
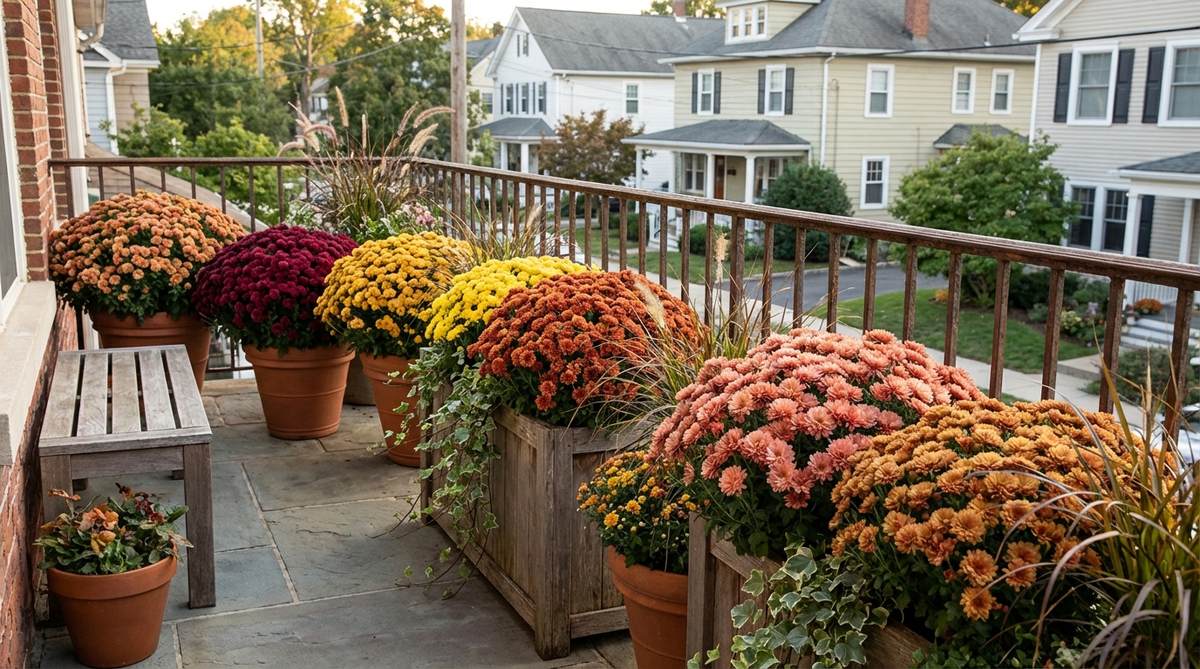
Erupts in a brilliant, living gradient that outshines every plastic decoration on the block. This tiered floral patio arrangement is a breathtaking option for sunny balconies that can support living horticulture.
While everyone else buys cheap synthetics, investing heavily in living color creates an expensive ambiance that naturally evolves. Sorting the pots into strict color blocks rather than a random jumble makes the entire layout look meticulously planned.
A full floral cascade runs roughly $45–$75. It’s an environmentally conscious upgrade that breathes literal life into your autumn aesthetic.
- Key Materials: Potted chrysanthemums in varying shades and tiered plant stands.
- Vibe / Style: Vibrant botanical gradient.
- Difficulty: Requires ongoing watering.
- Budget Breakdown: Flowers: $50 | Plant Stands: $20.
- Creator’s Tip: Buy your mums when they are mostly closed buds rather than full blooms so the color explosion lasts entirely through November.
- Smart Sourcing: heavy-duty tiered outdoor plant stands and slow-release bloom boosting fertilizer.
24. Wheat Bundle Chandelier

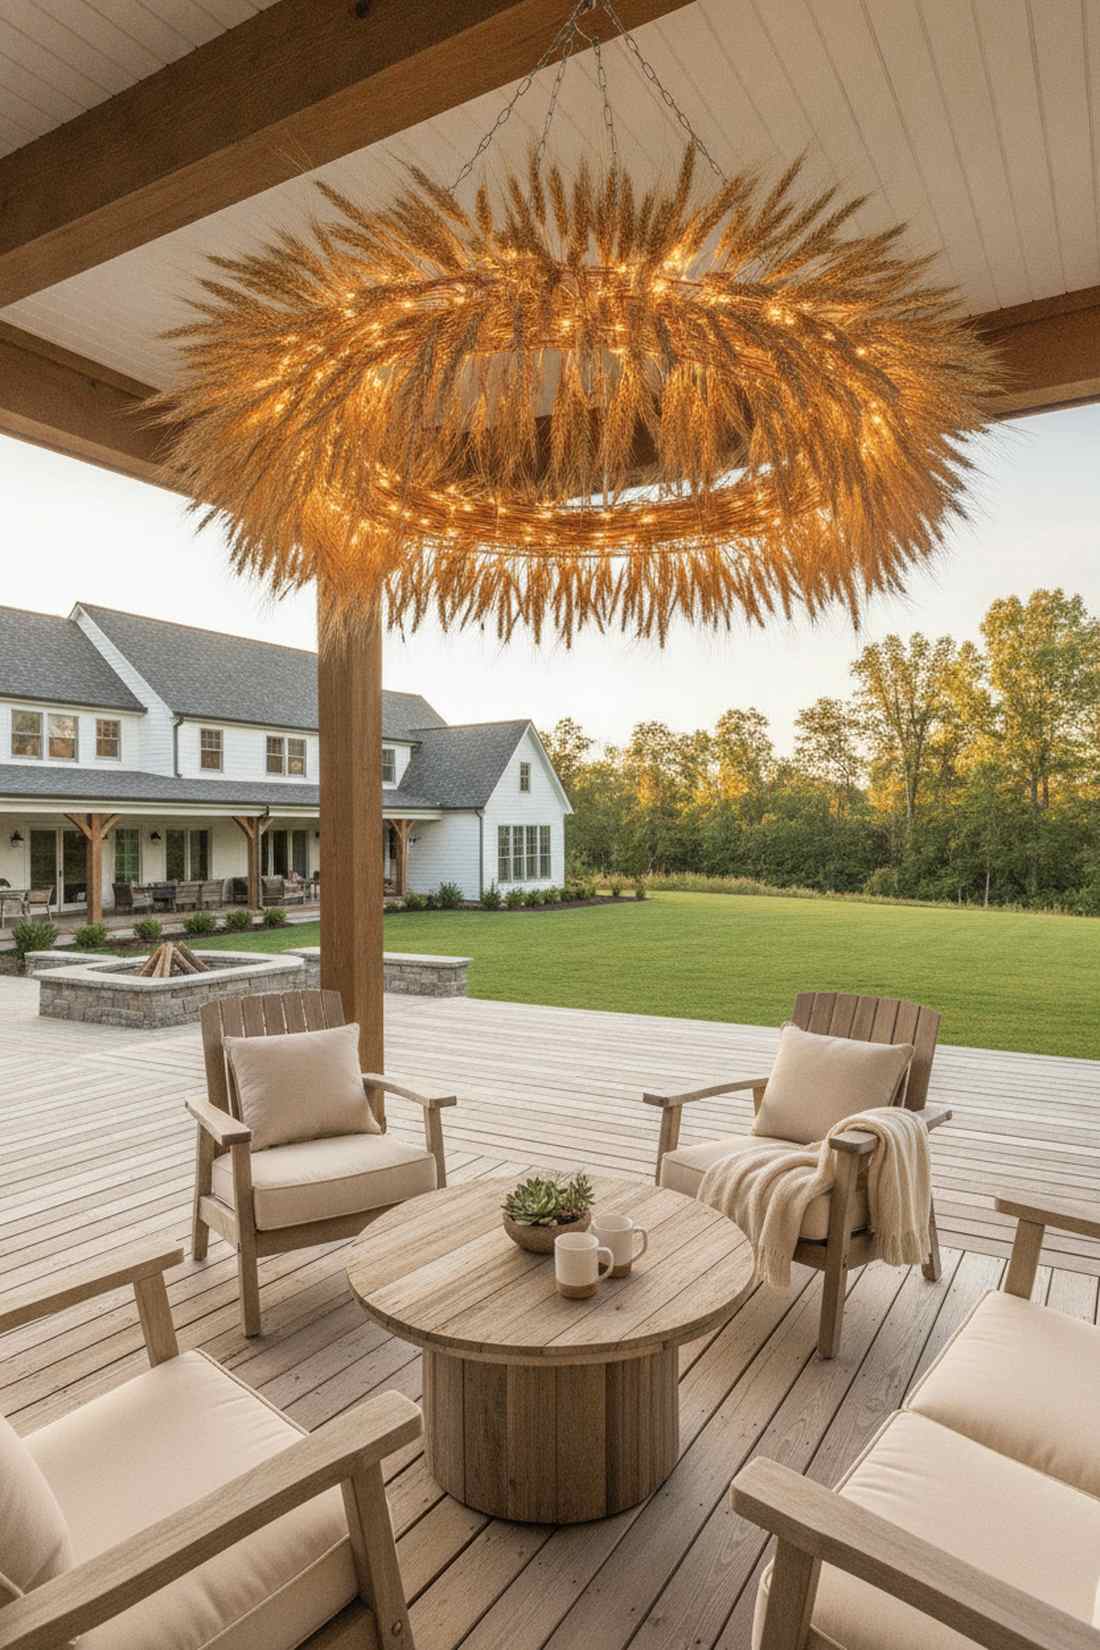

Hangs like a golden crown of harvest glory right above your seating area. This suspended agrarian ceiling piece is a phenomenal overhead statement for balconies that already have strong overhead anchor points.
Overlooking the ceiling is the biggest mistake DIYers make, but this lightweight installation completely transforms the spatial dynamics. Weaving battery-operated micro-LEDs through the dried stems looks far more expensive than it is, casting a buttery, warm glow over the patio.
You can craft this glowing chandelier for just $15–$25. Pin this if you crave sophisticated, neutral-toned autumn aesthetics.
- Key Materials: Dried wheat sheaves, wire wreath frame, and copper wire lights.
- Vibe / Style: Elegant rustic warmth.
- Difficulty: Moderate wire wrapping.
- Budget Breakdown: Wheat: $12 | Lights & Wire: $10.
- Creator’s Tip: Soak the wheat stems in warm water for 20 minutes before bending them to prevent the dry stalks from snapping during assembly.
- Smart Sourcing: natural dried golden wheat bundles (bulk pack) and metal wire wreath making frames.
Material Guide: Cheap vs. Premium Aesthetic
Knowing exactly where to save and where to spend makes all the difference in achieving that “looks expensive but isn’t” vibe.
- Standard vs. UV-Resistant/Premium: Standard plastic props fade pink within days of sun exposure. Spending an extra 15% on UV-coated materials stops fading, prevents cracking, and ensures your display survives through Thanksgiving.
- Pre-made Kits vs. Sourcing Locally: Scavenging craft stores often results in mismatched aesthetics. Leveraging specialized starter kits guarantees cohesive sizing, matches color palettes perfectly, and saves hours of frustrating trial and error.
Most renters give up on outdoor decor completely, but the next layout proves you can achieve a luxury modern look without a single hammer…
25. Gourd Garland Swags
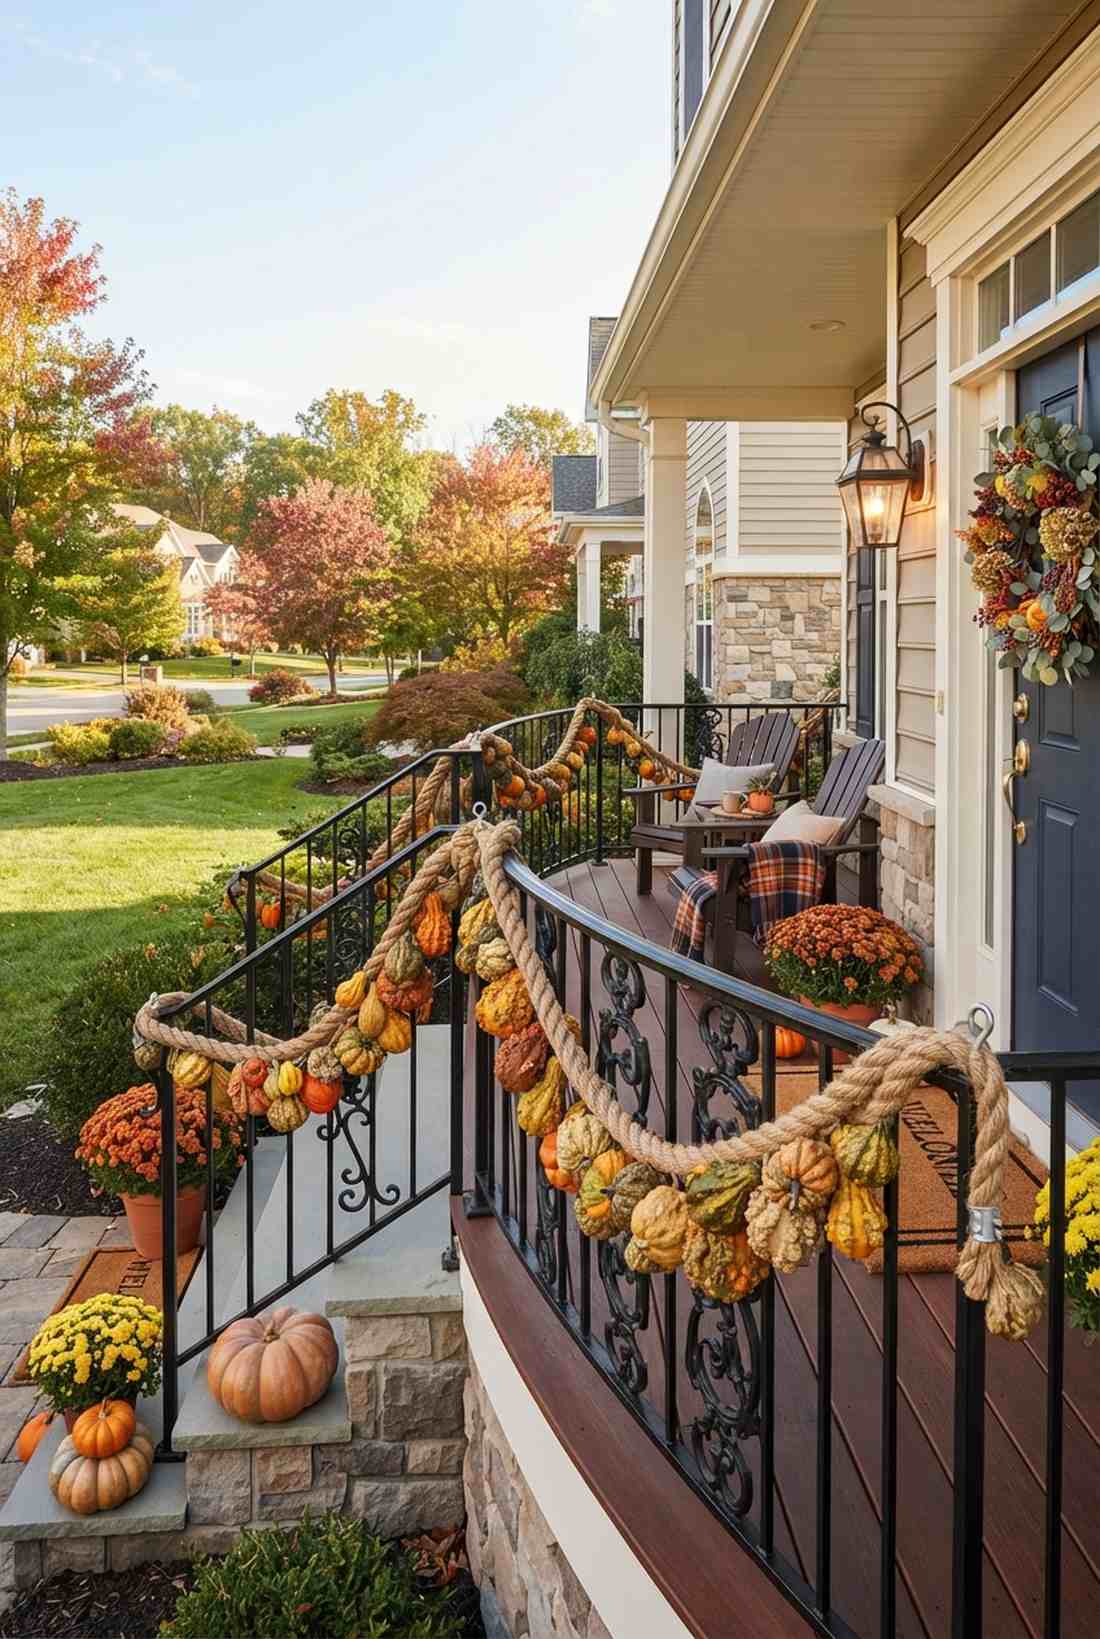
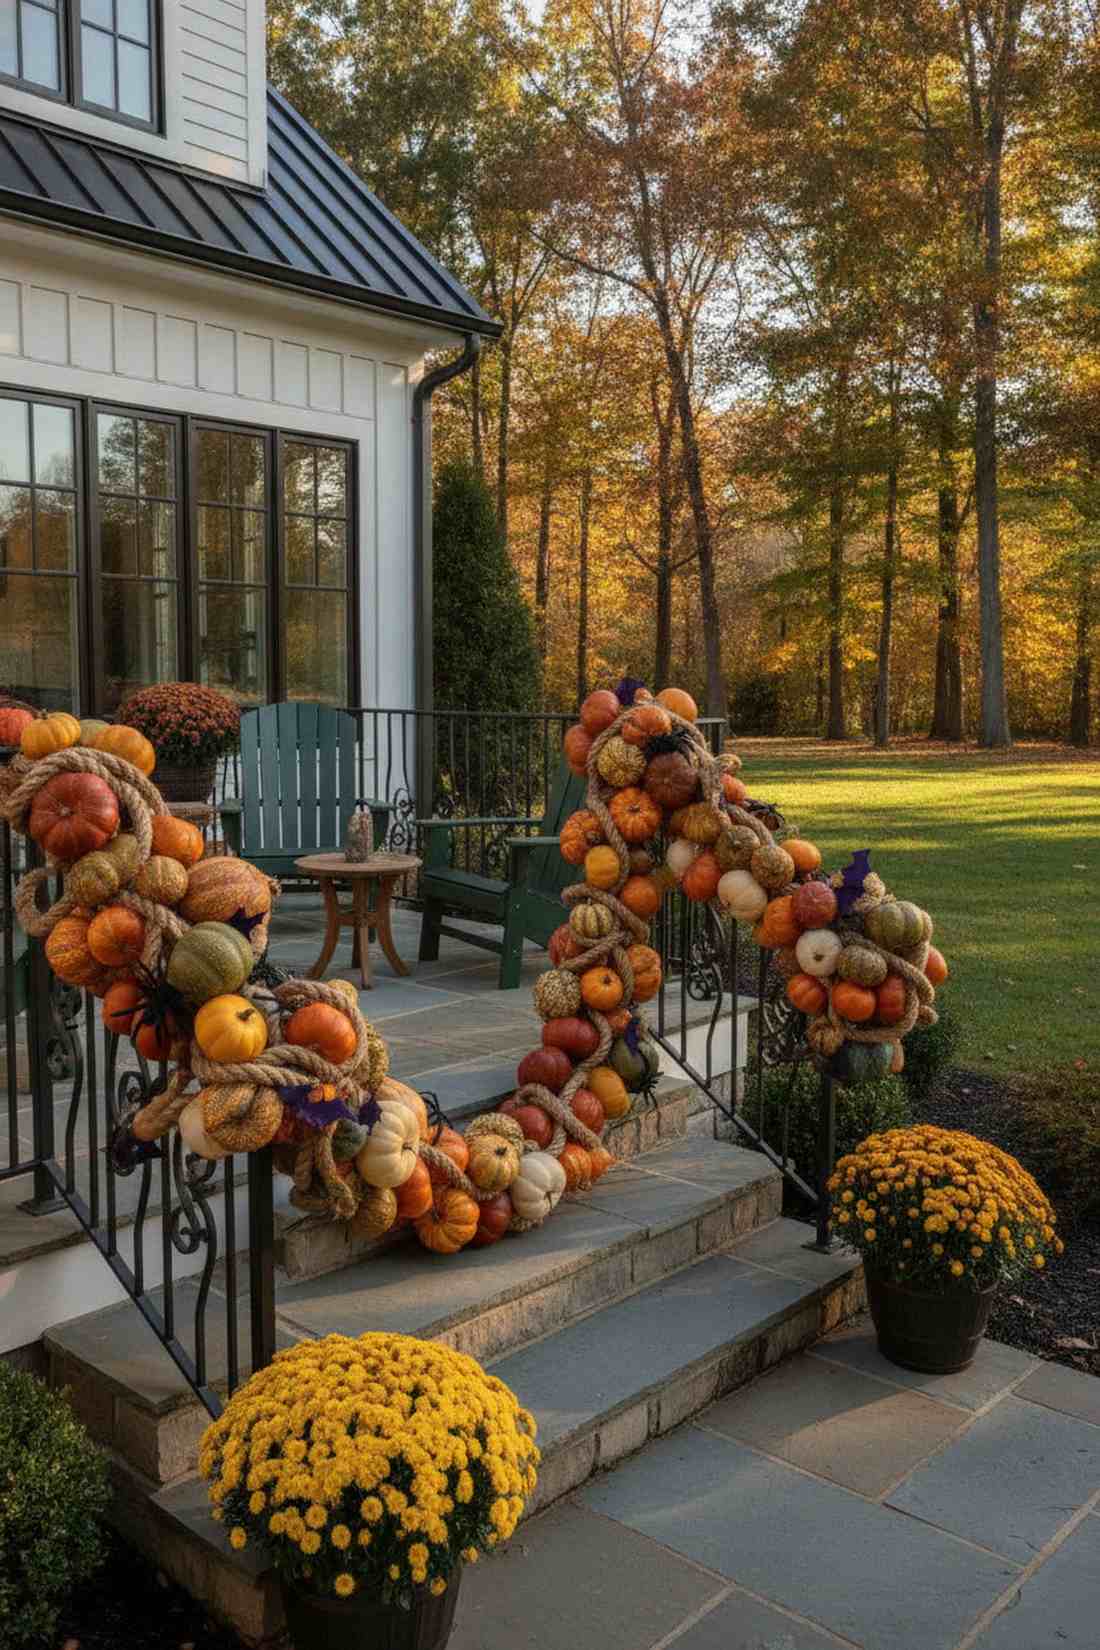
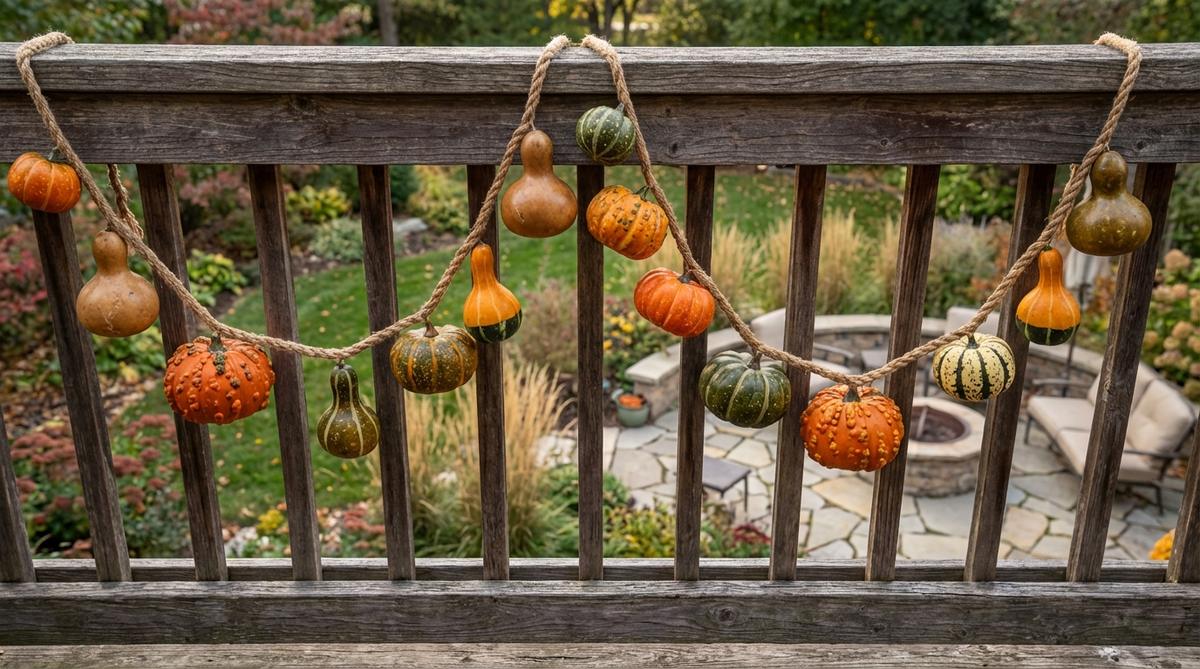
Drapes heavily across the metal railings like an opulent necklace of autumn bounty. This heavyweight harvest railing decor is visually striking and instantly softens the harsh lines of urban ironwork.
Flimsy paper leaf chains look cheap instantly, but utilizing substantial 3D forms gives a designer-level finish that screams luxury. Threading artificial gourds onto marine-grade rope combined with subtle outdoor Halloween decorations ensures the display survives intense weather without snapping.
Building this robust garland costs between $30–$50. It’s an incredibly rich, textural addition that defines the border of your space beautifully.
- Key Materials: Faux lightweight gourds, thick jute rope, and eye hooks.
- Vibe / Style: Opulent harvest weight.
- Difficulty: Requires drilling and threading.
- Budget Breakdown: Gourds: $30 | Hardware/Rope: $15.
- Creator’s Tip: Knot the thick rope before and after every single gourd so they stay perfectly spaced instead of sliding into a heavy clump in the middle.
- Smart Sourcing: lightweight artificial warty gourds (bulk pack) and rust-proof outdoor eye screw kits.
Minimalist & Modern Halloween
26. Single Statement Pumpkin
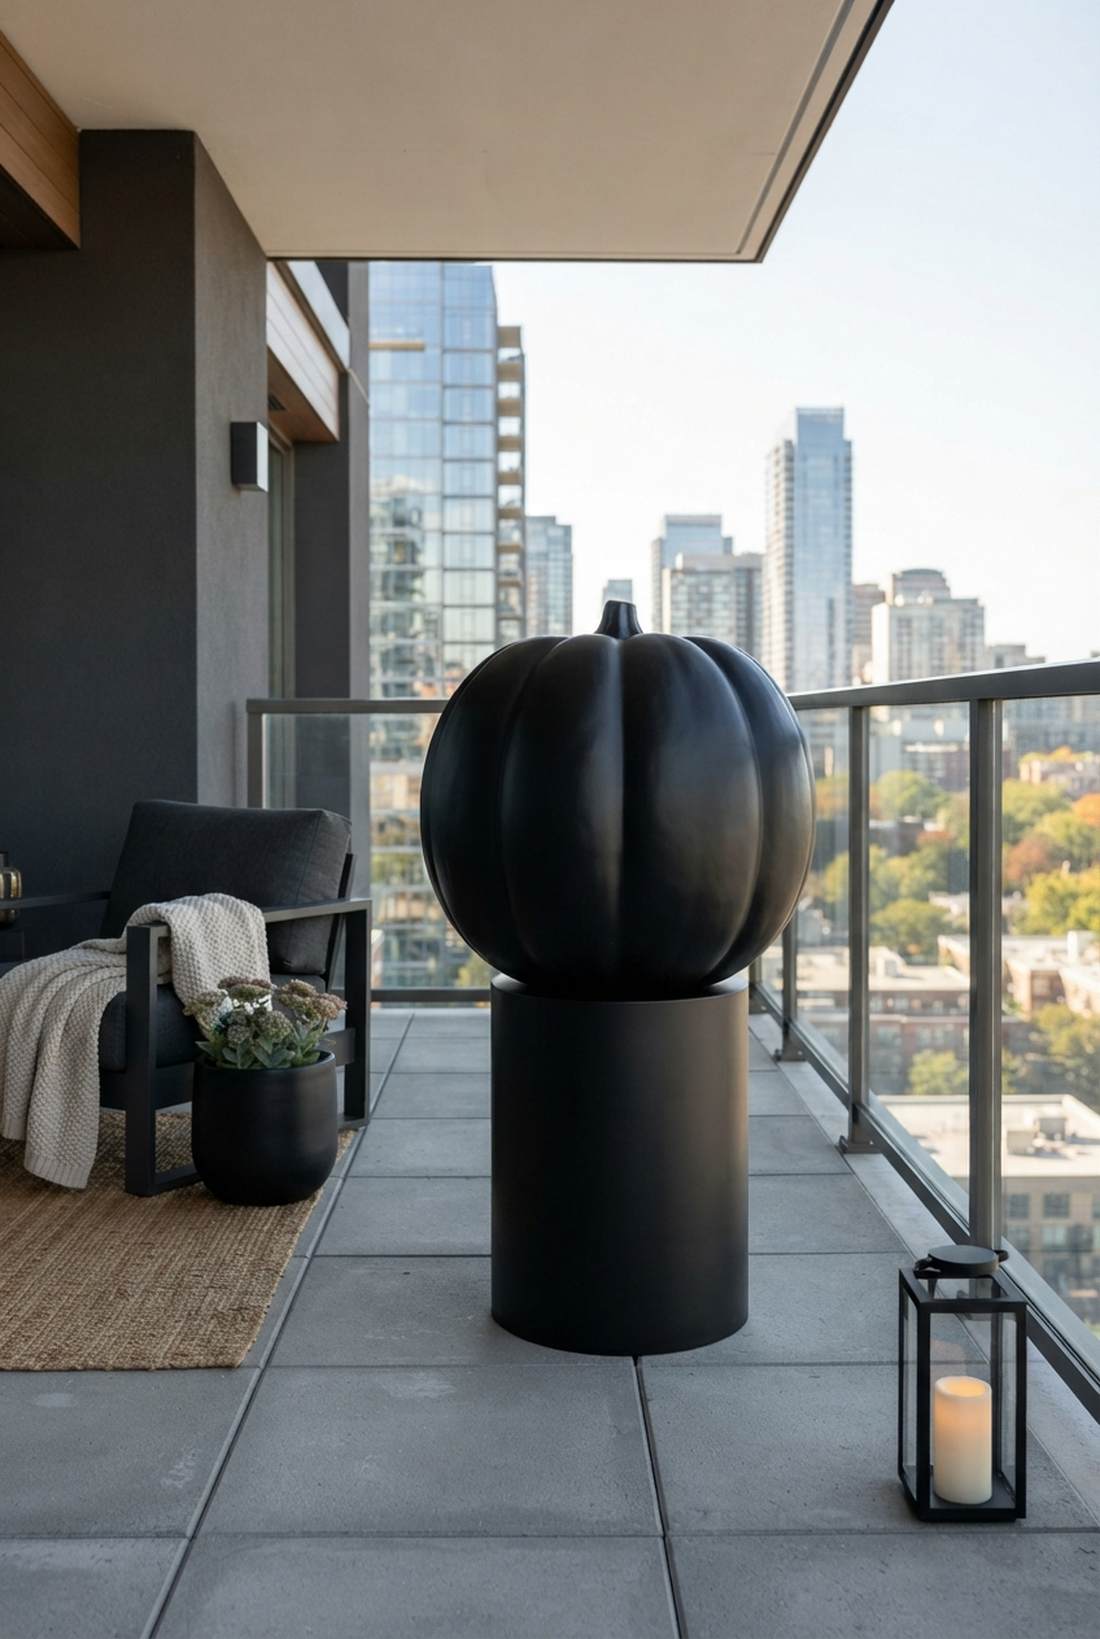

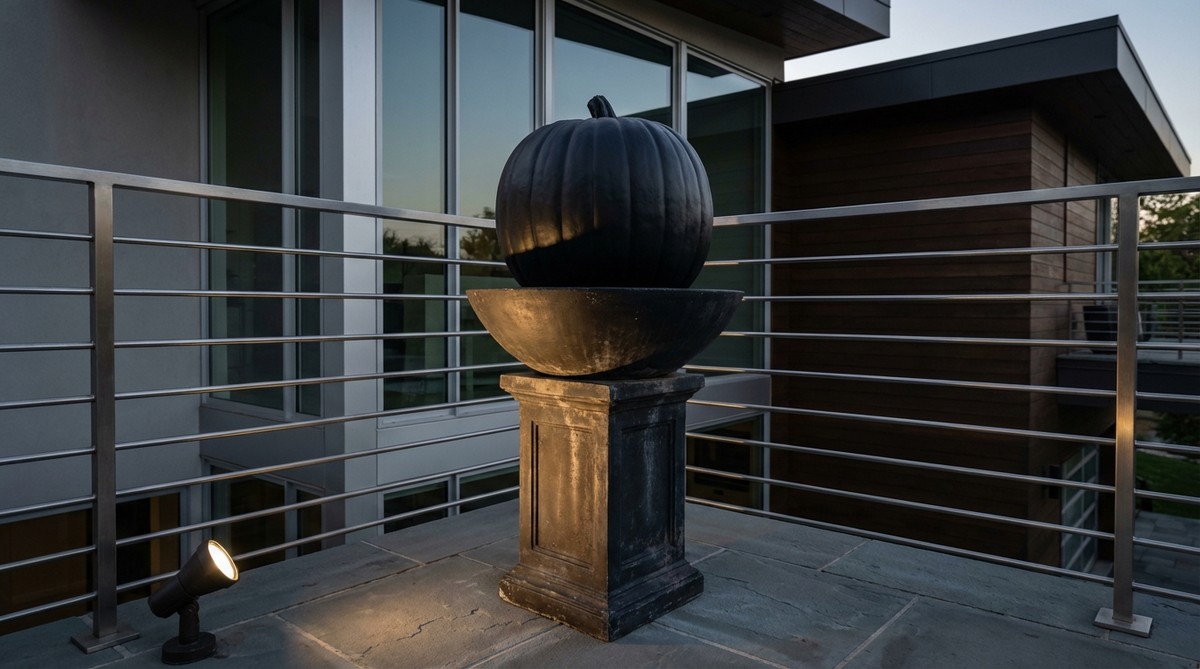
Commands the entire balcony with bold, sculptural dominance. This modern minimalist pedestal display is explicitly designed for hyper-clean architectural spaces where less is truly more.
Throwing twenty cheap items onto a patio looks cluttered, but curating one massive, flawless element completely elevates the facade. Painting a gigantic gourd in matte black or brilliant metallic gold completely destroys the tacky seasonal stereotype, establishing high-end modern art.
This singular focus piece costs roughly $20–$40. Pin this if your apartment aesthetic demands absolute sleekness and zero clutter.
- Key Materials: Oversized premium pumpkin, modern pedestal base, and metallic/matte paint.
- Vibe / Style: Museum-quality modernism.
- Difficulty: Extremely simple setup.
- Budget Breakdown: Large Pumpkin: $25 | Paint: $10.
- Creator’s Tip: Use a high-quality automotive spray paint primer before applying the top coat to ensure a perfectly smooth, manufactured-looking finish.
- Smart Sourcing: oversized faux carving pumpkins and premium metallic exterior spray paint.
27. Geometric Bat Mobile
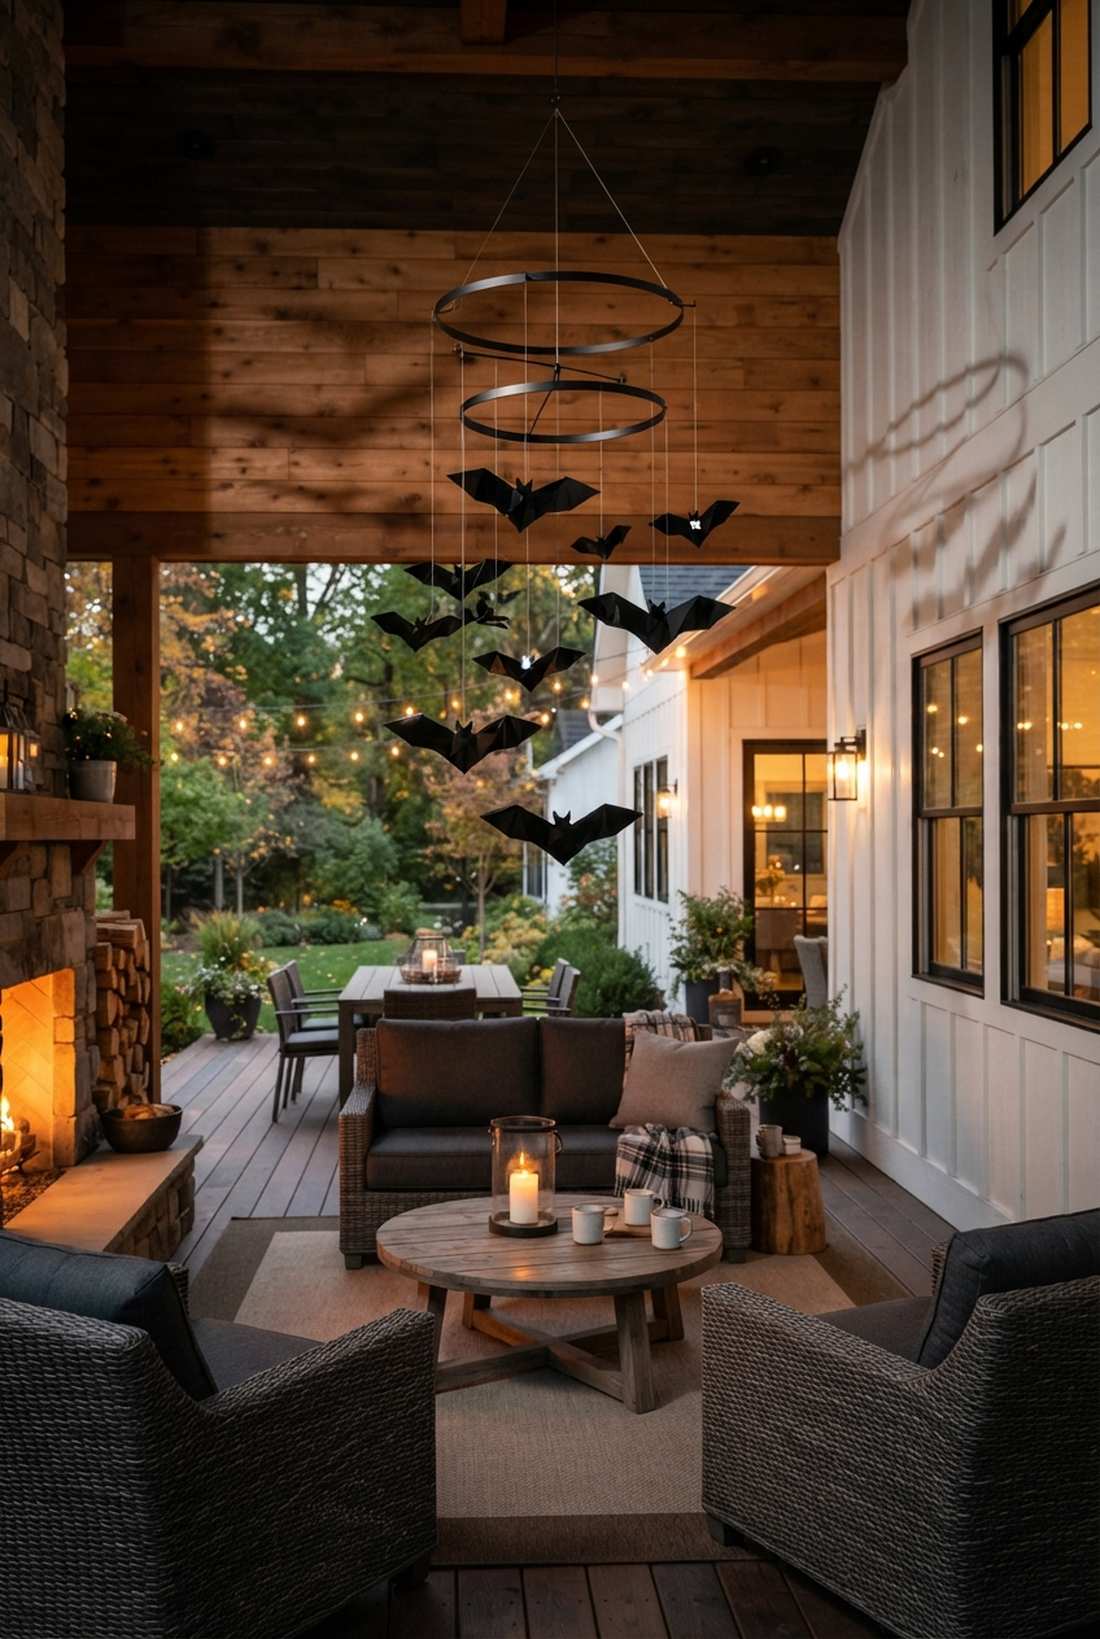
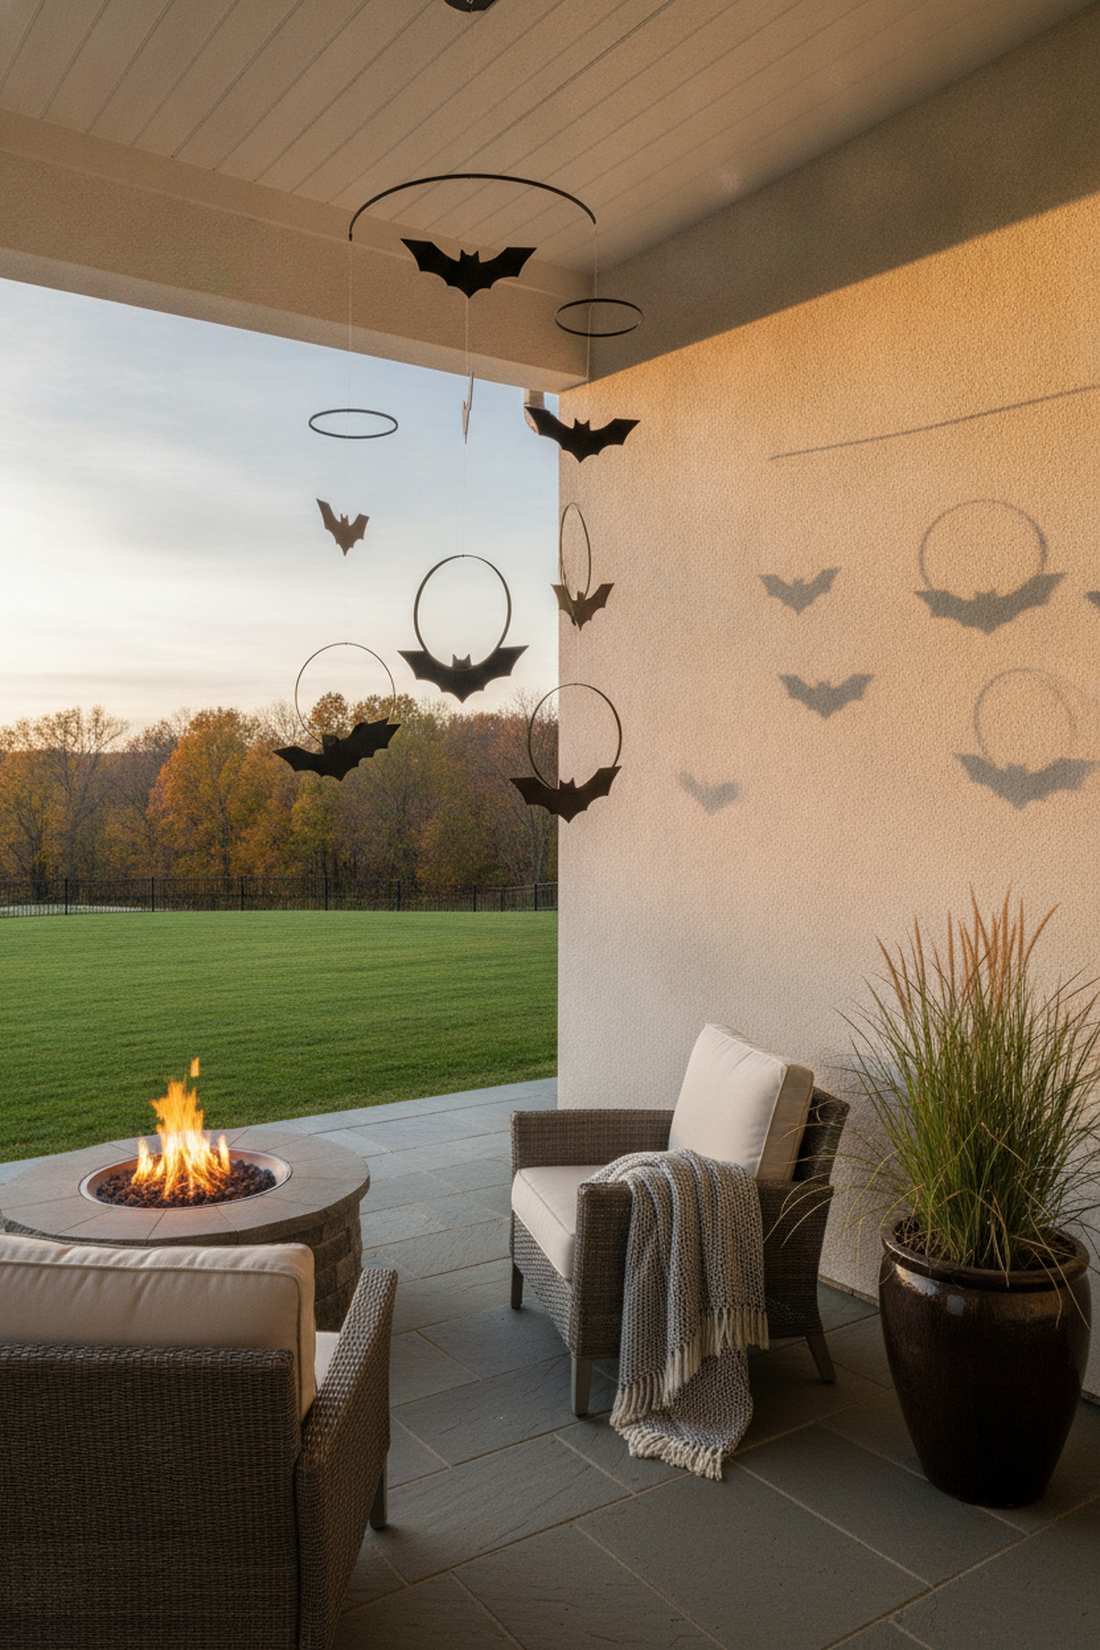
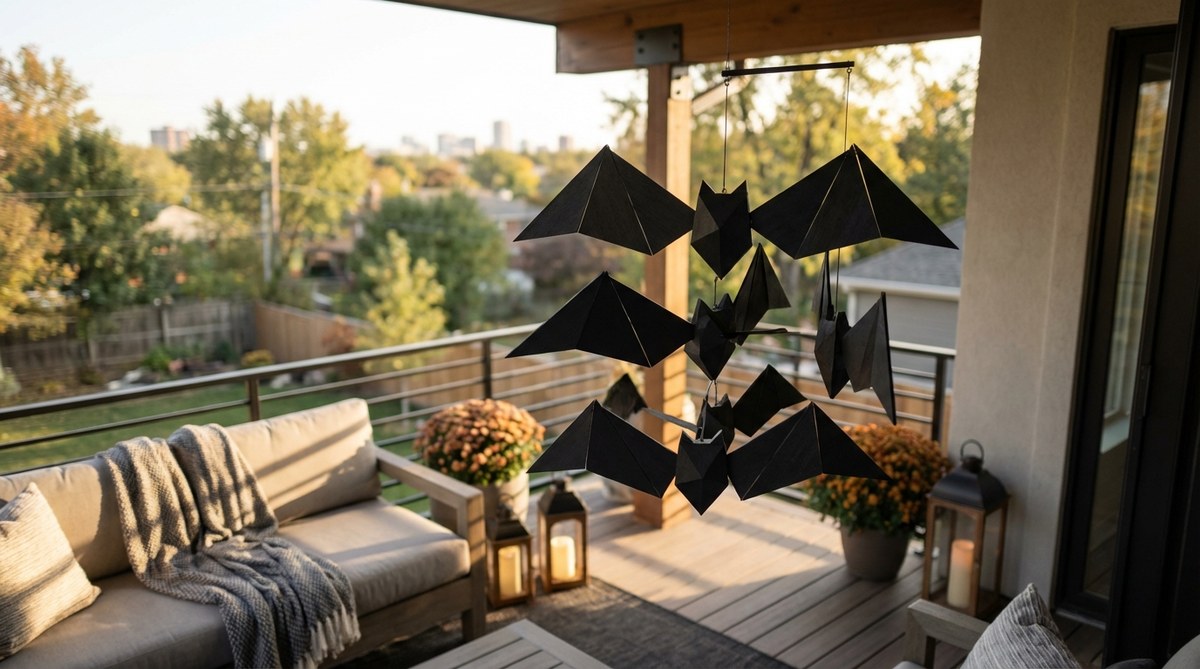
Casts slow, shifting shadows across the walls as it spins elegantly in the autumn wind. This kinetic patio hanging sculpture is an elite option for covered balconies needing dynamic vertical interest.
Gluing flimsy paper bats to the wall is overdone, but suspending them in an abstract structure looks far more expensive than it is. Utilizing pre-cut rigid acrylics over standard paper ensures the sharp geometric angles don’t curl or warp under high humidity.
You can assemble this architectural mobile for under $20. A sophisticated, artsy layout that completely avoids cartoonish tropes.
- Key Materials: Rigid black acrylic sheet cutouts, thin metal rings, and invisible thread.
- Vibe / Style: Sleek kinetic architecture.
- Difficulty: Requires balancing skills.
- Budget Breakdown: Acrylic Bats: $12 | Mobile Frame: $8.
- Creator’s Tip: Paint the metal support rings completely matte black so they vanish against the night sky, making the bats appear entirely unsupported.
- Smart Sourcing: pre-cut rigid acrylic bat decals (bulk pack) and metal craft hoop assortments.
28. Monochrome White Halloween
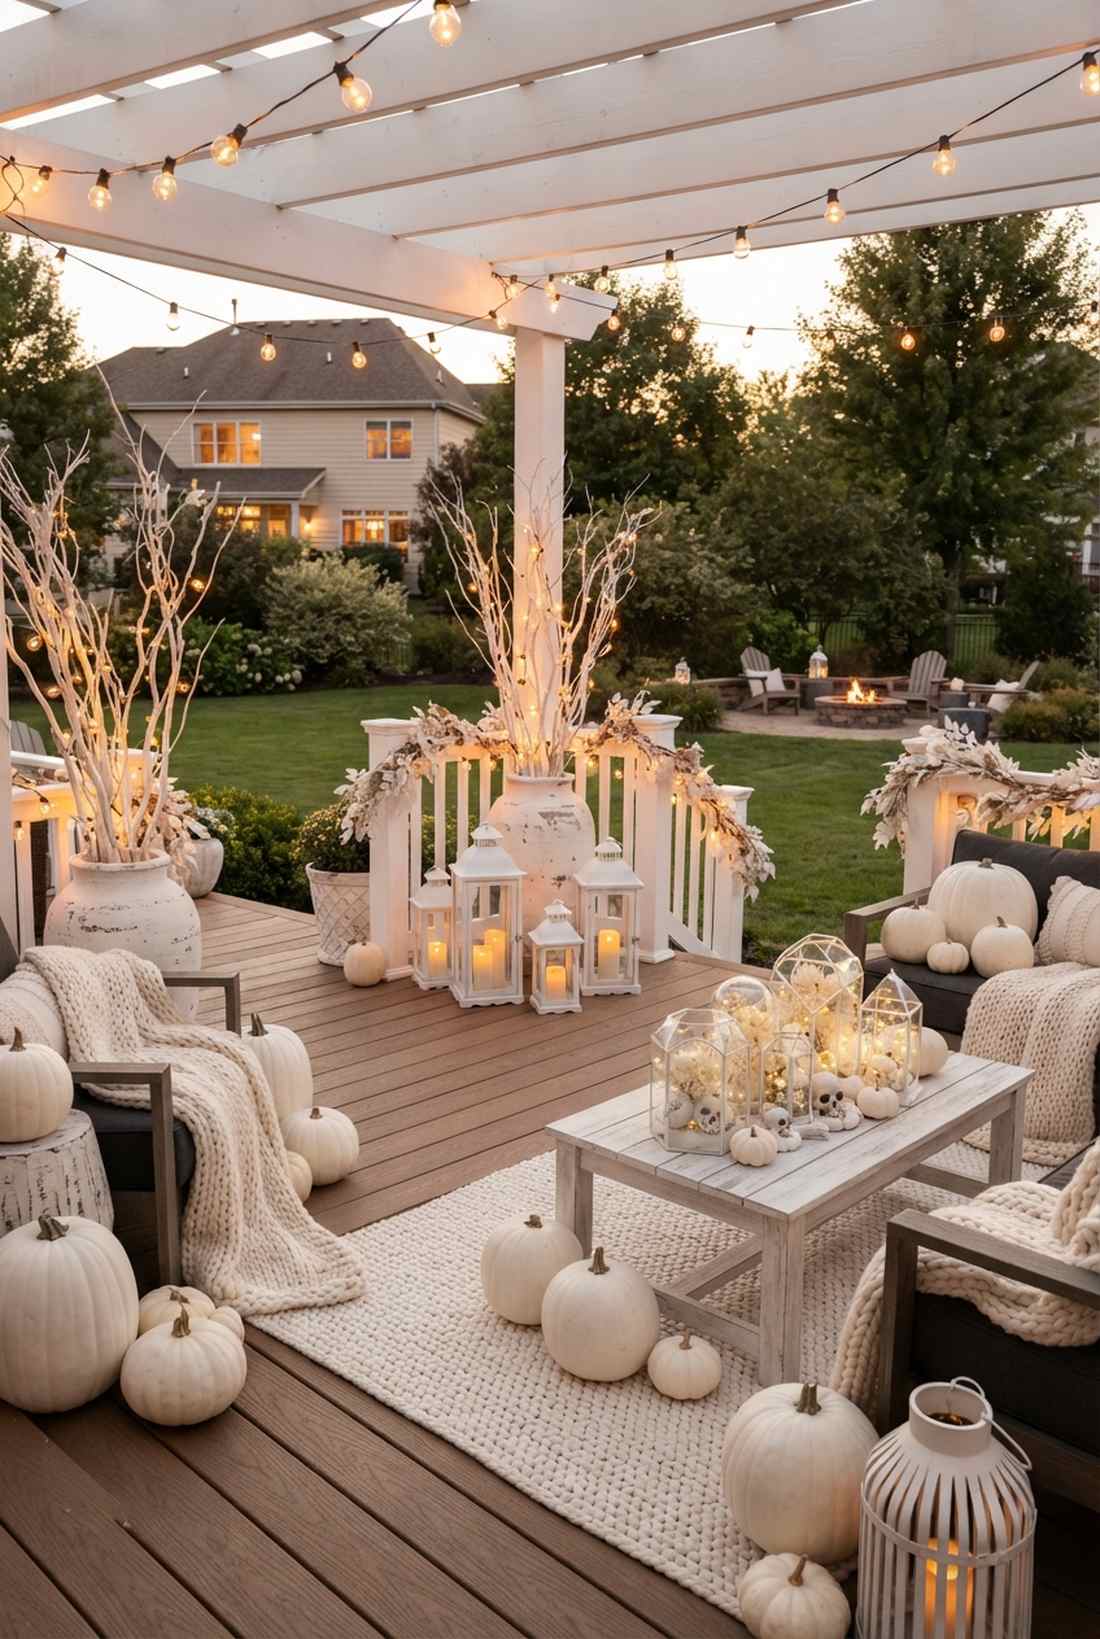
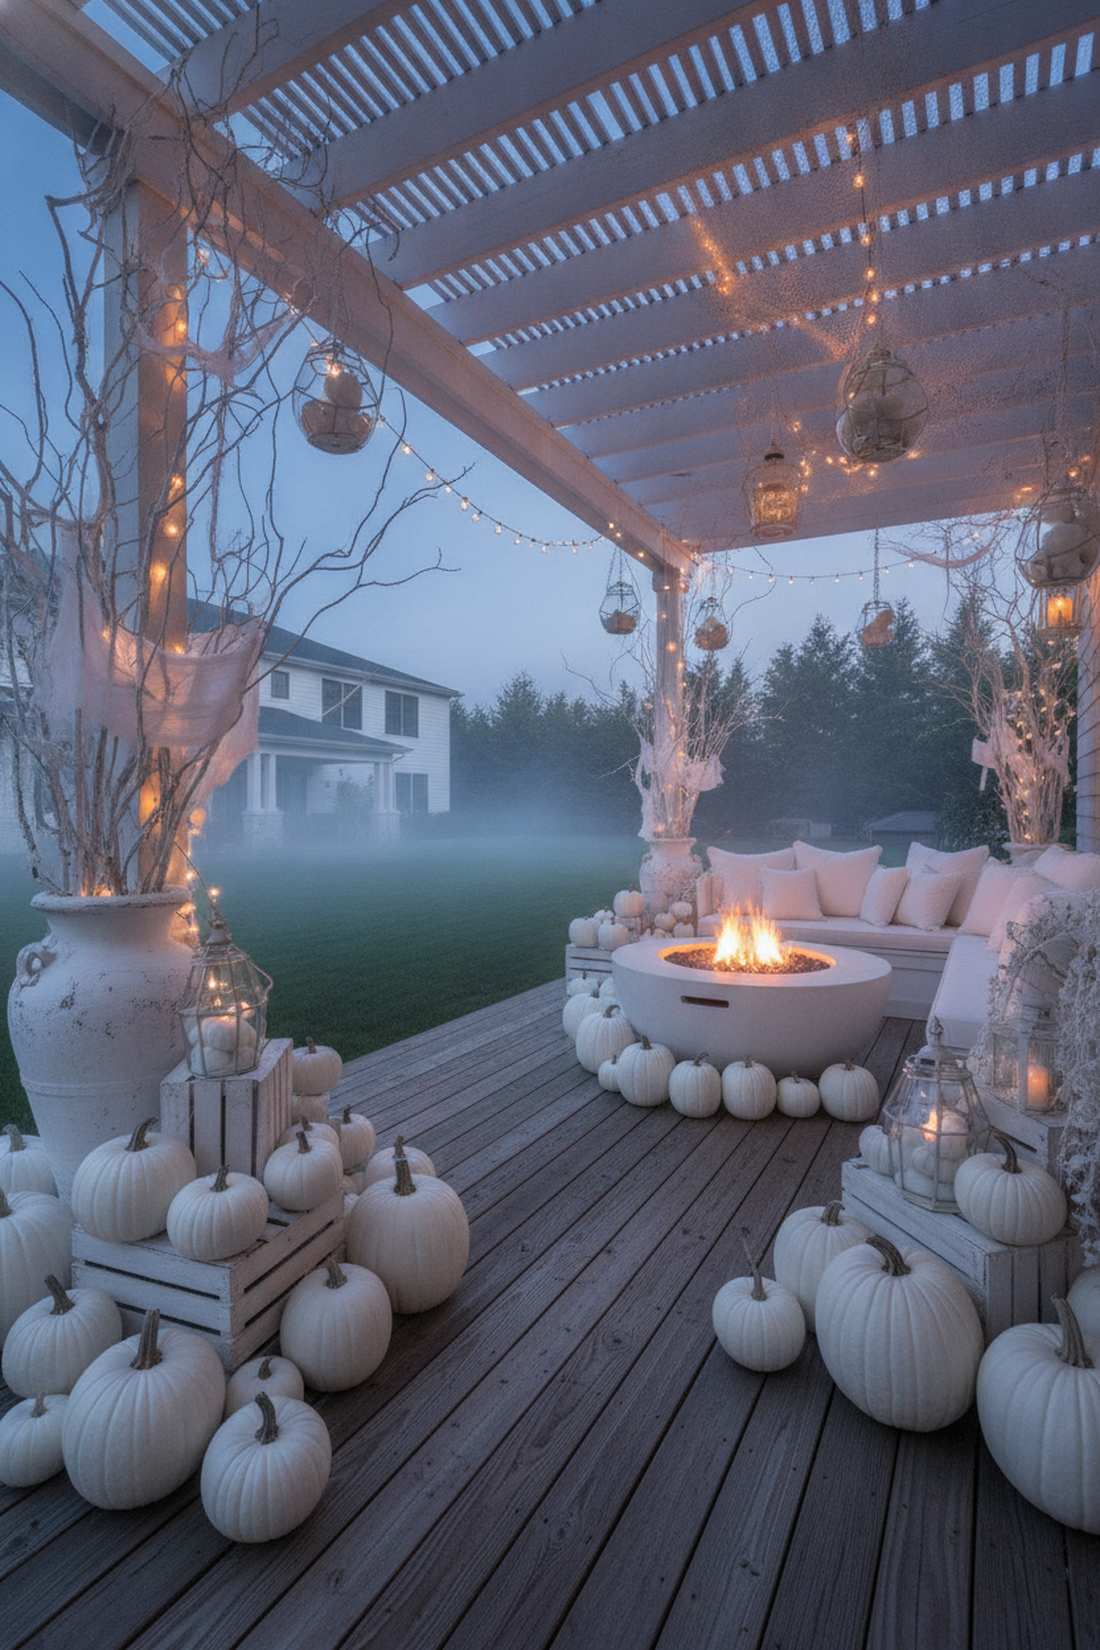
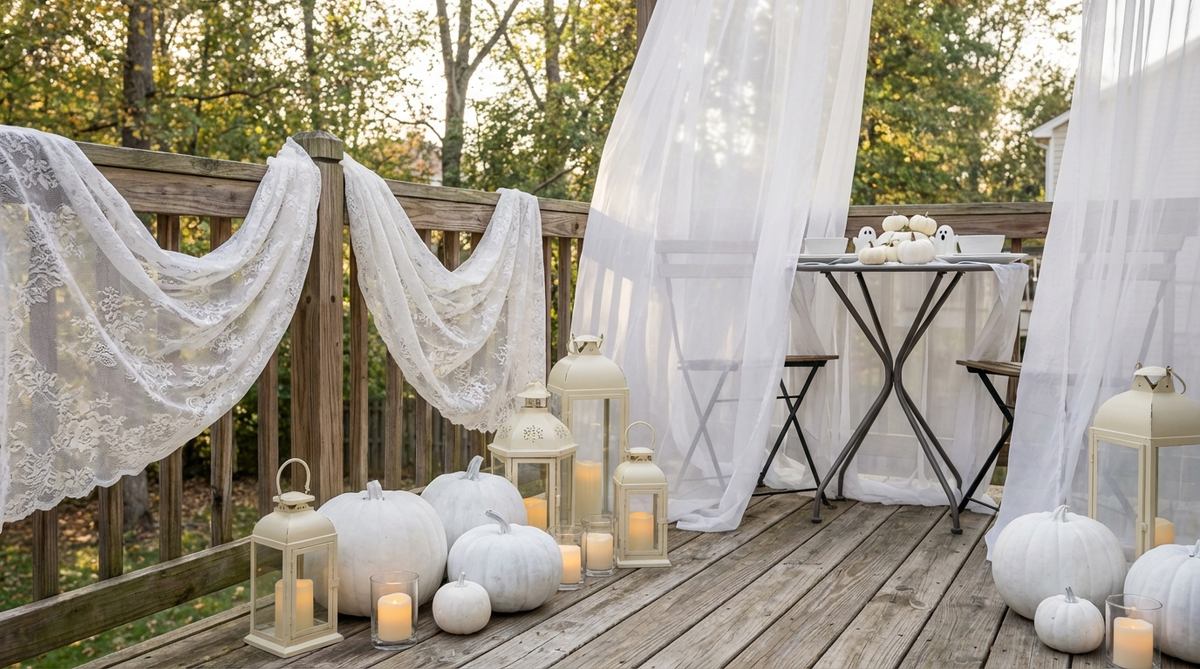
Feels like a chilling, frost-kissed phantom realm void of all earthly color. This all-white patio aesthetic is a massive flex for decorators who want to break away from the exhausted orange and black palette.
Most monochromatic setups fall flat, but hyper-layering textures within the same color family gives a designer-level finish. Combining bleached branches, white pumpkins, and stark white terrarium accessories creates a surreal, high-fashion editorial vibe right on your deck.
Curating this ghostly elegance costs around $40–$60. Save this to your premium home decor board if you love breaking traditional design rules.
- Key Materials: White Casper pumpkins, bleached branches, and white lanterns.
- Vibe / Style: Ghostly editorial chic.
- Difficulty: Requires strict color discipline.
- Budget Breakdown: White Pumpkins: $25 | Paint & Props: $25.
- Creator’s Tip: To avoid it looking like early Christmas decor, ensure your lighting uses strict amber or orange bulbs rather than cool white LEDs.
- Smart Sourcing: matte white artificial craft pumpkins (starter kits) and amber-glow outdoor fairy light strings.
If you think Halloween decor has to look chaotic, this next mathematically perfect layout will completely change your mind…
29. Linear Lantern Row
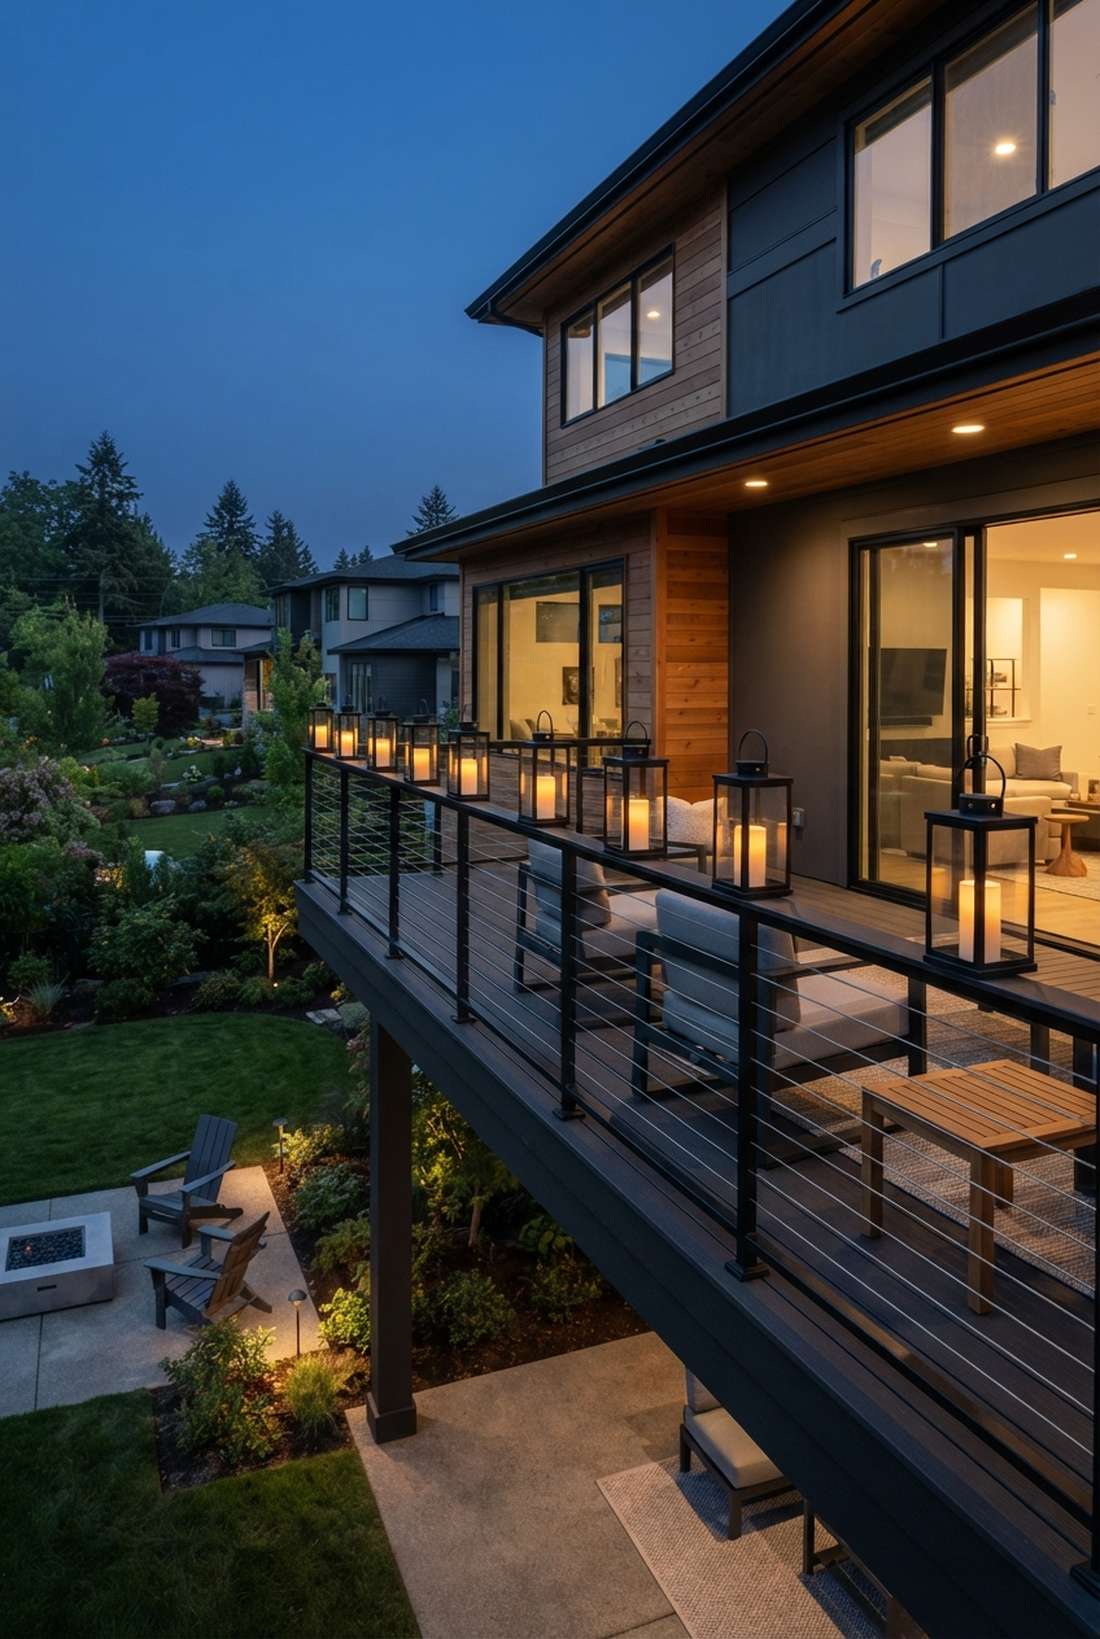

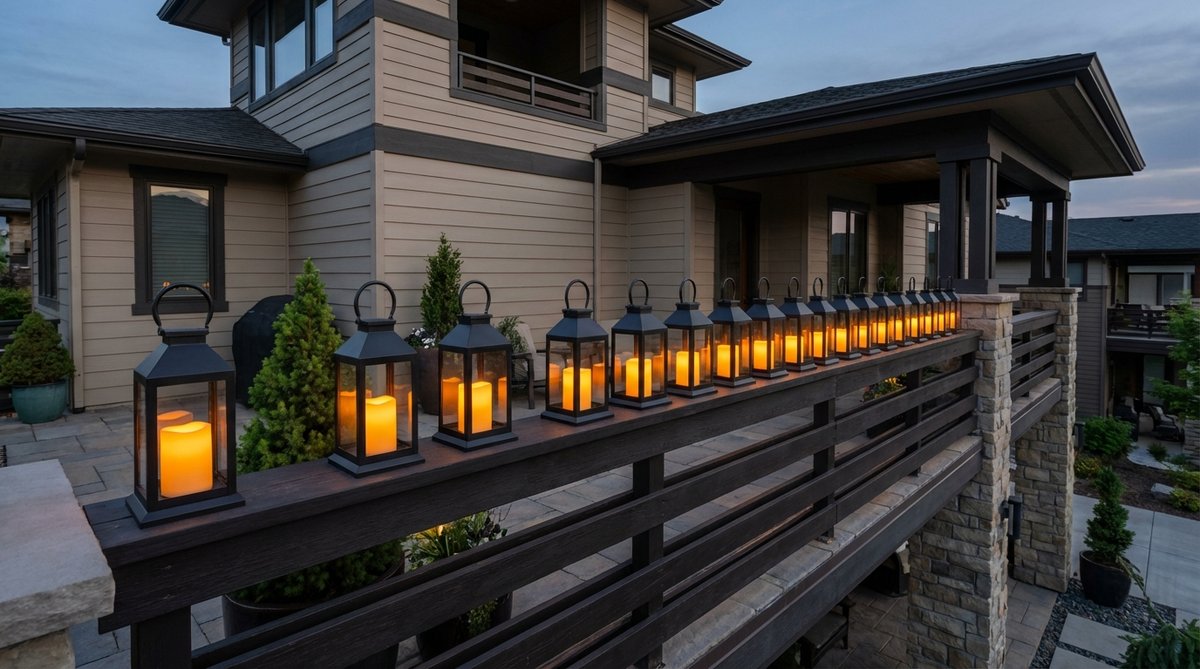
Slices through the darkness with mathematical, rhythmic perfection. This precision balcony lighting layout heavily favors modern buildings with stark horizontal railing architecture.
Haphazardly tossing lights around looks sloppy, but establishing a strict, regimented line of identical hardware completely transforms the spatial dynamics. Investing in high-end matching metal housings and timed outdoor LED string lights brings an upscale, hotel-lounge atmosphere to the exterior.
This structured brilliance runs between $60–$100 depending on lantern quality. It’s a permanent-looking upgrade that demands serious attention from the street.
- Key Materials: Identical modern metal lanterns and sequential LED candles.
- Vibe / Style: Disciplined architectural glow.
- Difficulty: Precise measuring required.
- Budget Breakdown: Lanterns: $70 | LEDs: $20.
- Creator’s Tip: Use a tape measure to space the lanterns exactly 18 inches apart; the visual power relies entirely on strict, unbroken repetition.
- Smart Sourcing: modern black metal outdoor lanterns (bulk pack) and waterproof sequential timer LED candles.
30. Shadow Projection Art
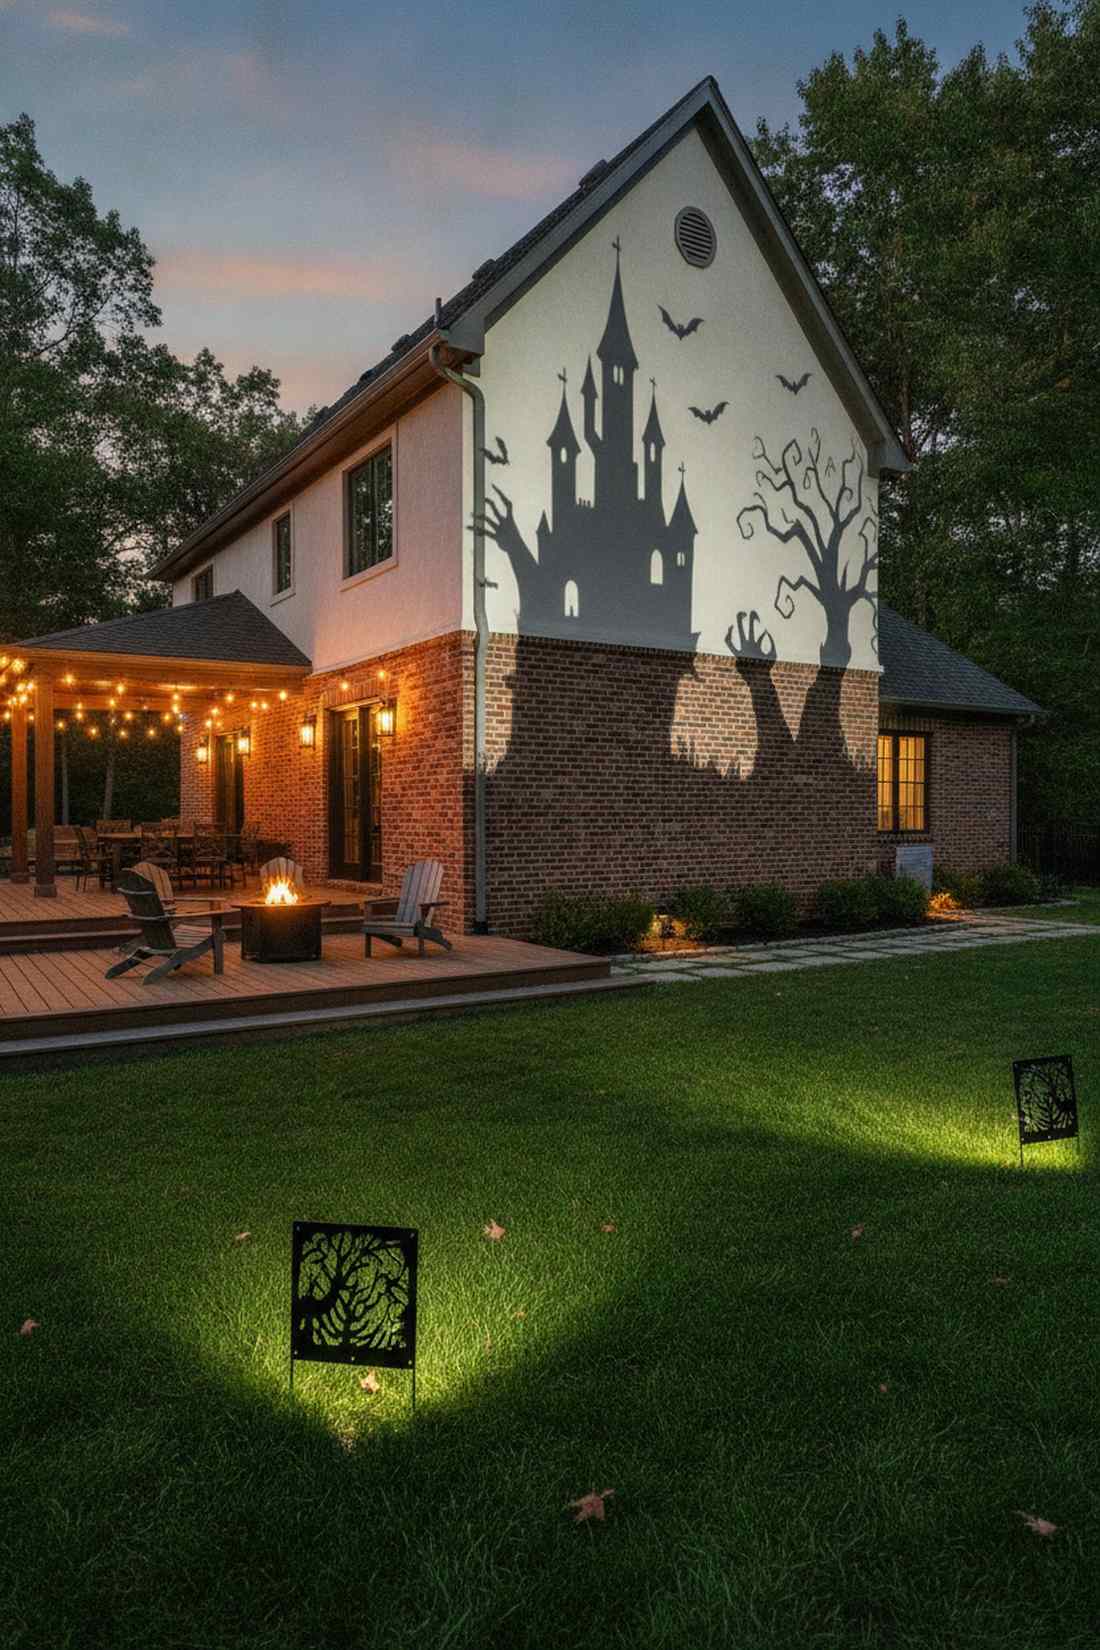
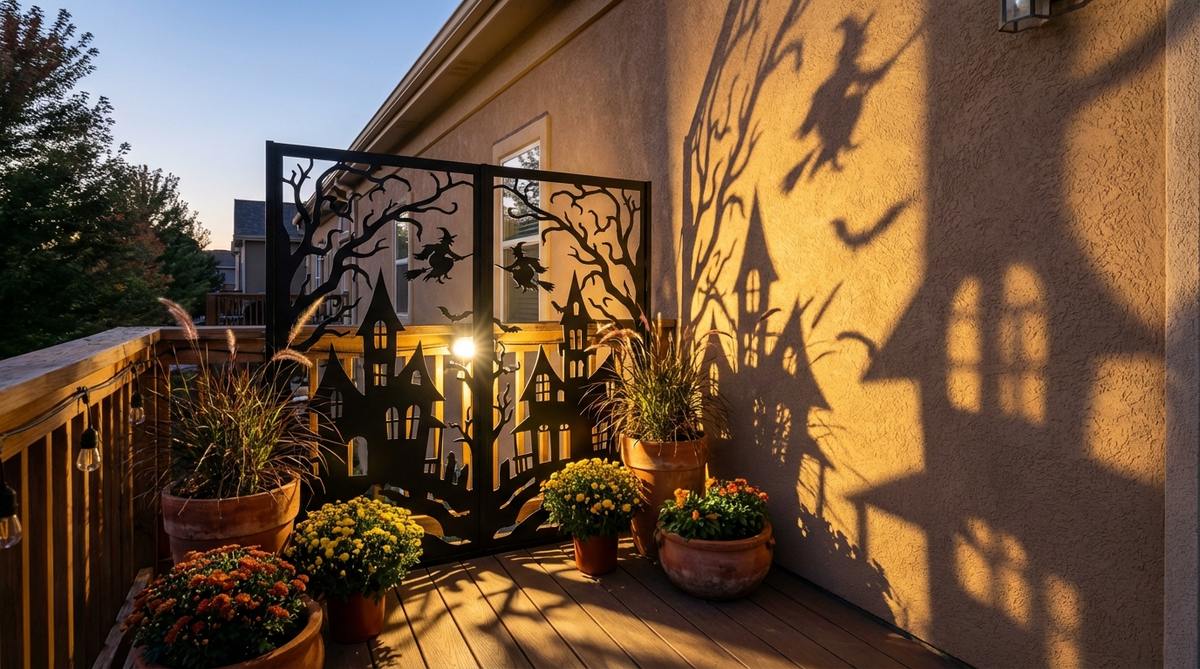
Paints your entire exterior wall with looming, crisp cinematic horror scenes. This high-contrast lighting installation is the absolute pinnacle of low-clutter, massive-impact design for stucco or brick balconies.
Why crowd your floor space when light projection looks far more expensive than it is? Hooking up high-powered spotlights behind precise laser-cut stencils creates a colossal visual footprint without requiring a single inch of permanent storage space post-holiday.
You can execute this shadow magic for $30–$50. Pin this to your minimal-effort/maximum-impact holiday board.
- Key Materials: Laser-cut metal screens and intense directional spotlighting.
- Vibe / Style: Colossal shadow theatre.
- Difficulty: Simple angle adjustments.
- Budget Breakdown: Projector/Lights: $35 | Screens: $15.
- Creator’s Tip: The further away the light source is from the stencil, the sharper the shadow. Keep the light source low and the stencil close for maximum stretch.
- Smart Sourcing: laser-cut metal Halloween silhouette templates and high-lumen outdoor LED spotlights.
31. Sculptural Branch Arrangement
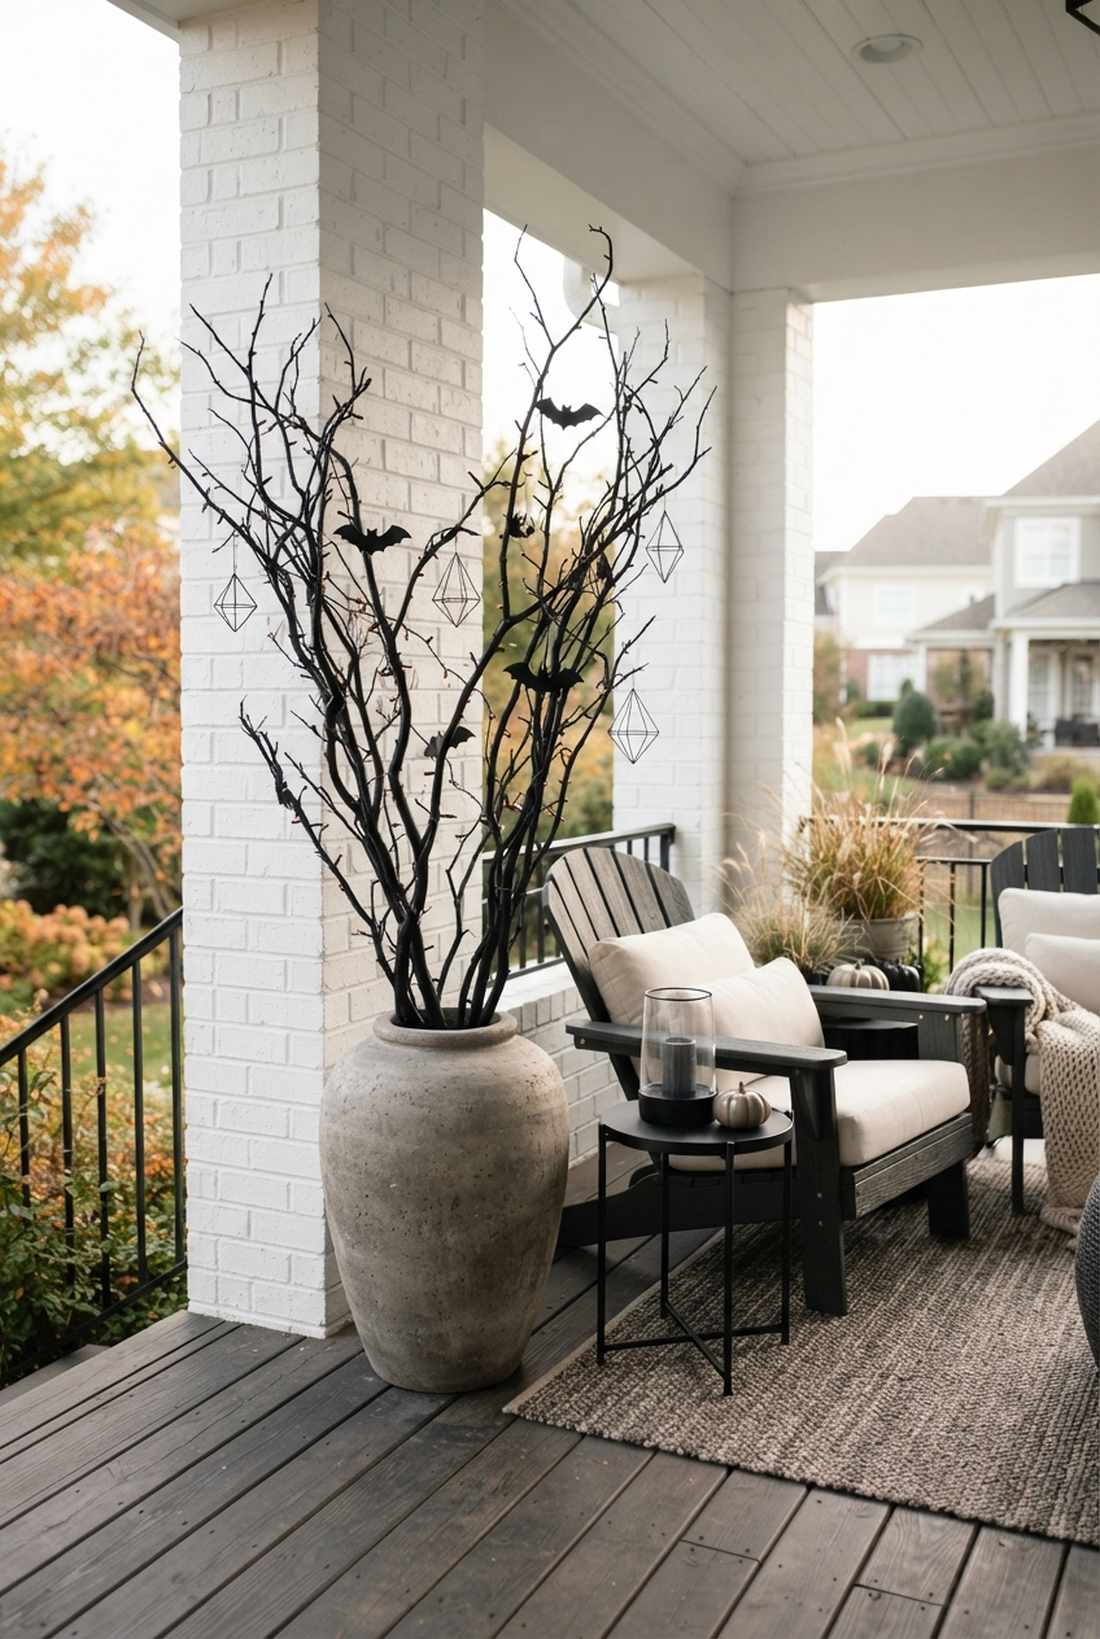
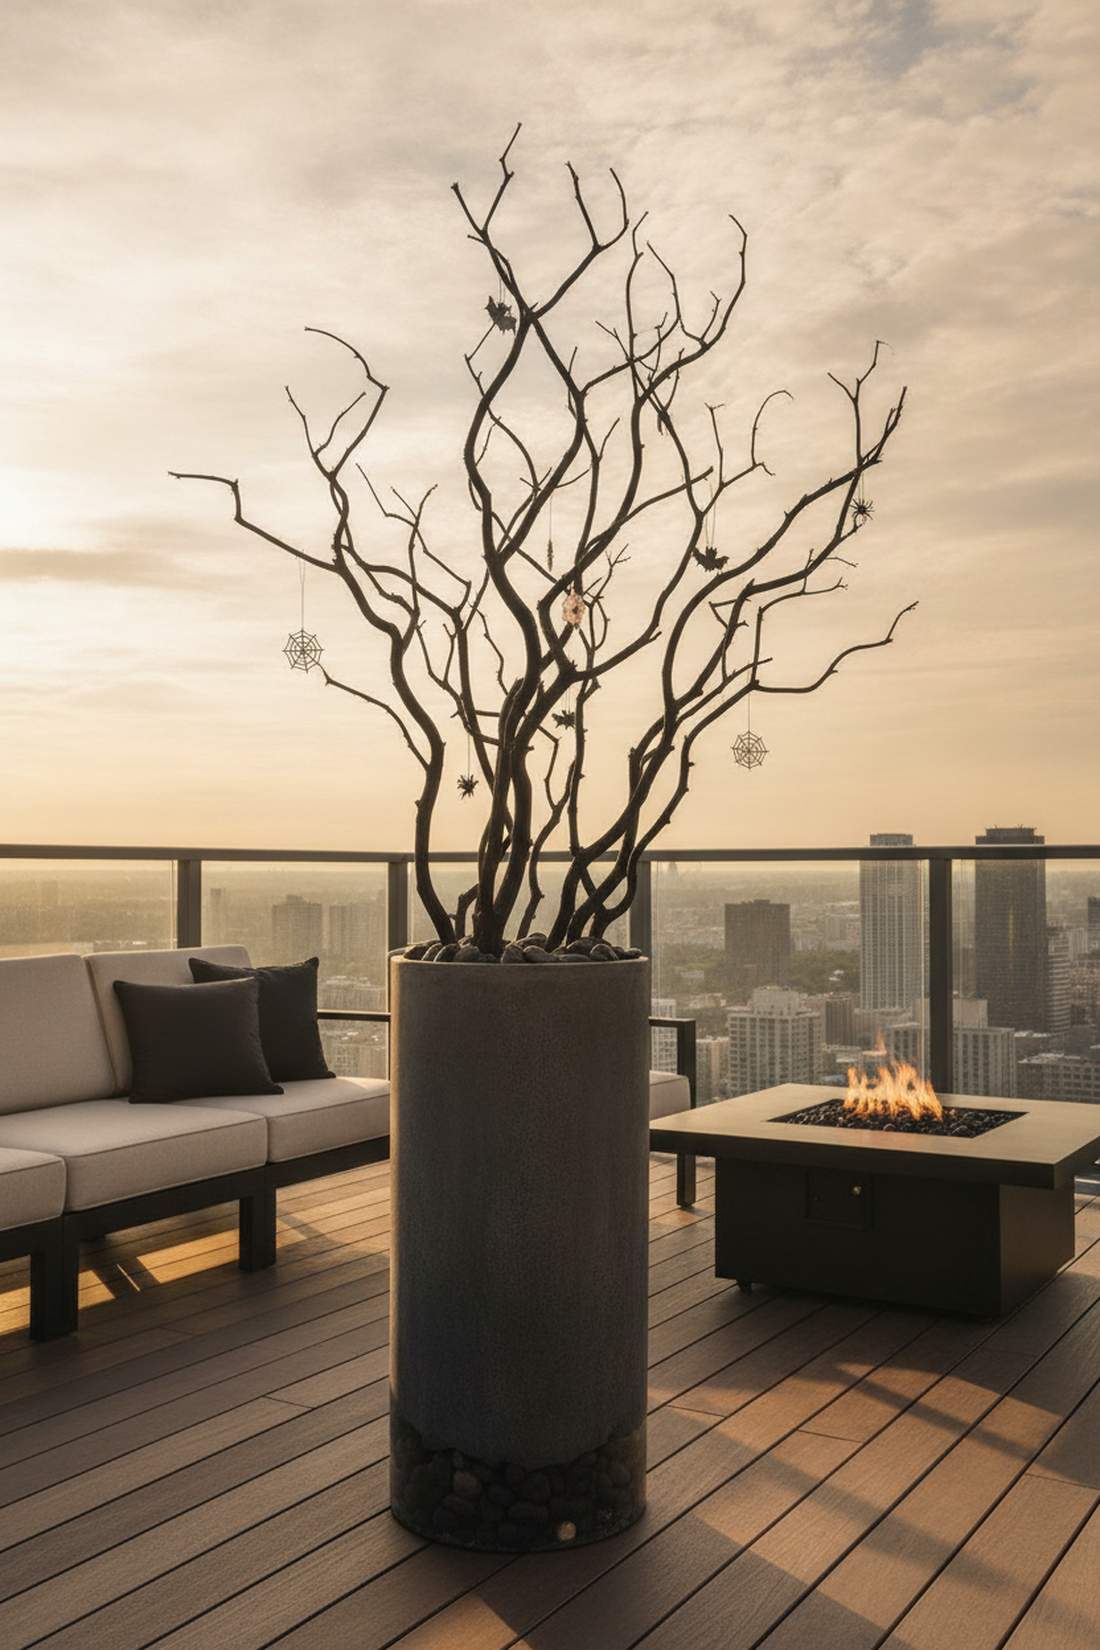
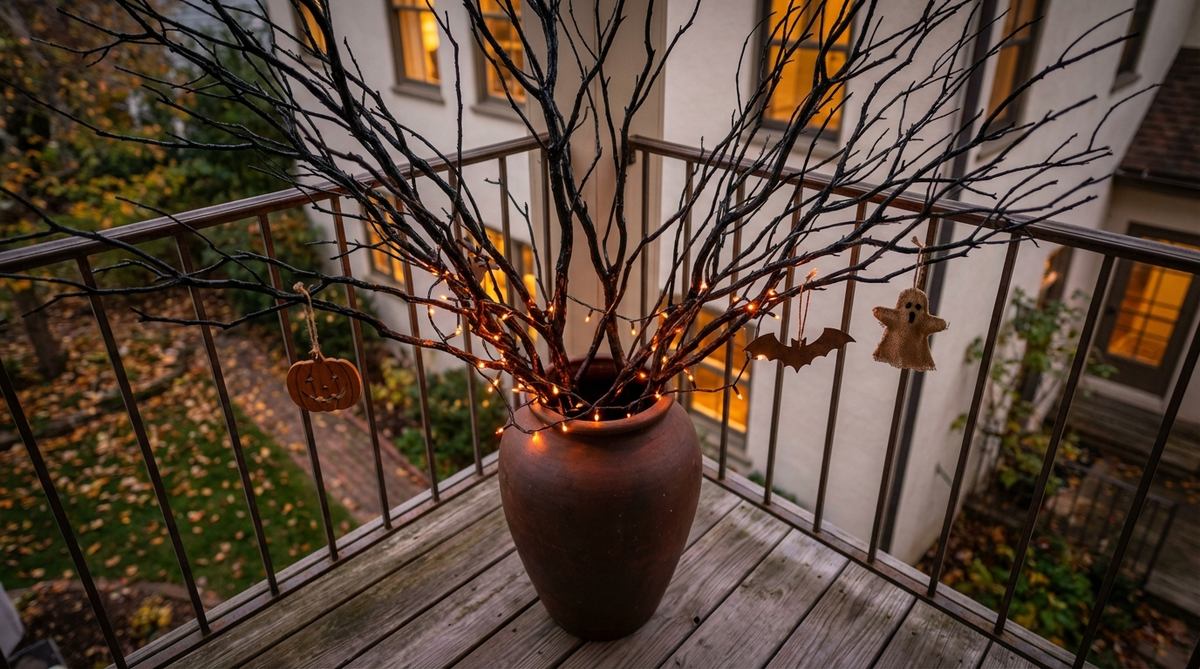
Stands in the corner like a twisted, beautiful claw reaching for the ceiling. This tall floor vase display is an incredibly chic way to add vertical drama to dead balcony corners.
While generic displays go wide, pulling the eye upward with stark natural elements creates an expensive ambiance instantly. Pairing heavy concrete vessels with matte black branches and tiny, curated outdoor Halloween decorations delivers a striking, high-fashion aesthetic.
This architectural focal point costs roughly $25–$45. A brilliantly fast setup that transitions flawlessly into winter just by swapping the ornaments.
- Key Materials: Tall bare branches, heavy floor vase, and micro ornaments.
- Vibe / Style: Stark gothic horticulture.
- Difficulty: Easy arranging.
- Budget Breakdown: Vase: $20 | Paint & Branches: $15.
- Creator’s Tip: Fill the bottom third of the floor vase with heavy river rocks to ensure the tall branches don’t tip over in strong autumn gusts.
- Smart Sourcing: natural dried Manzanita branch bundles and heavy-weight modern concrete outdoor planters.
32. Neon Sign Statement
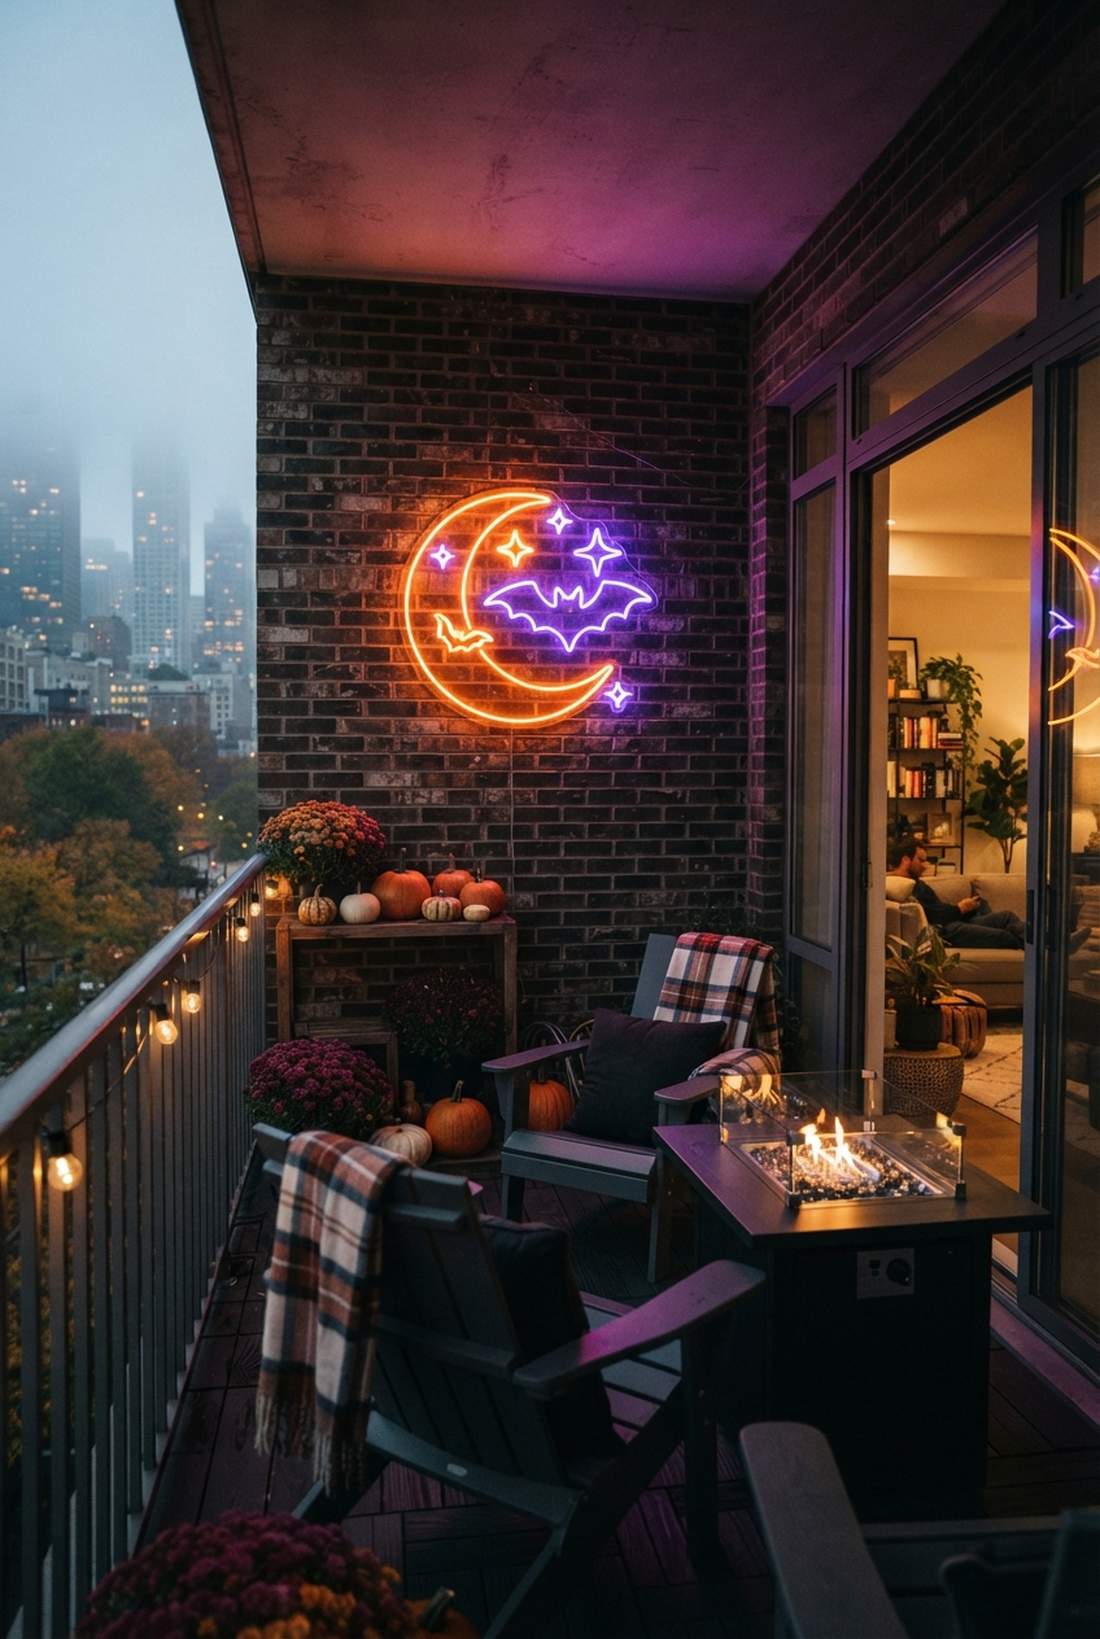
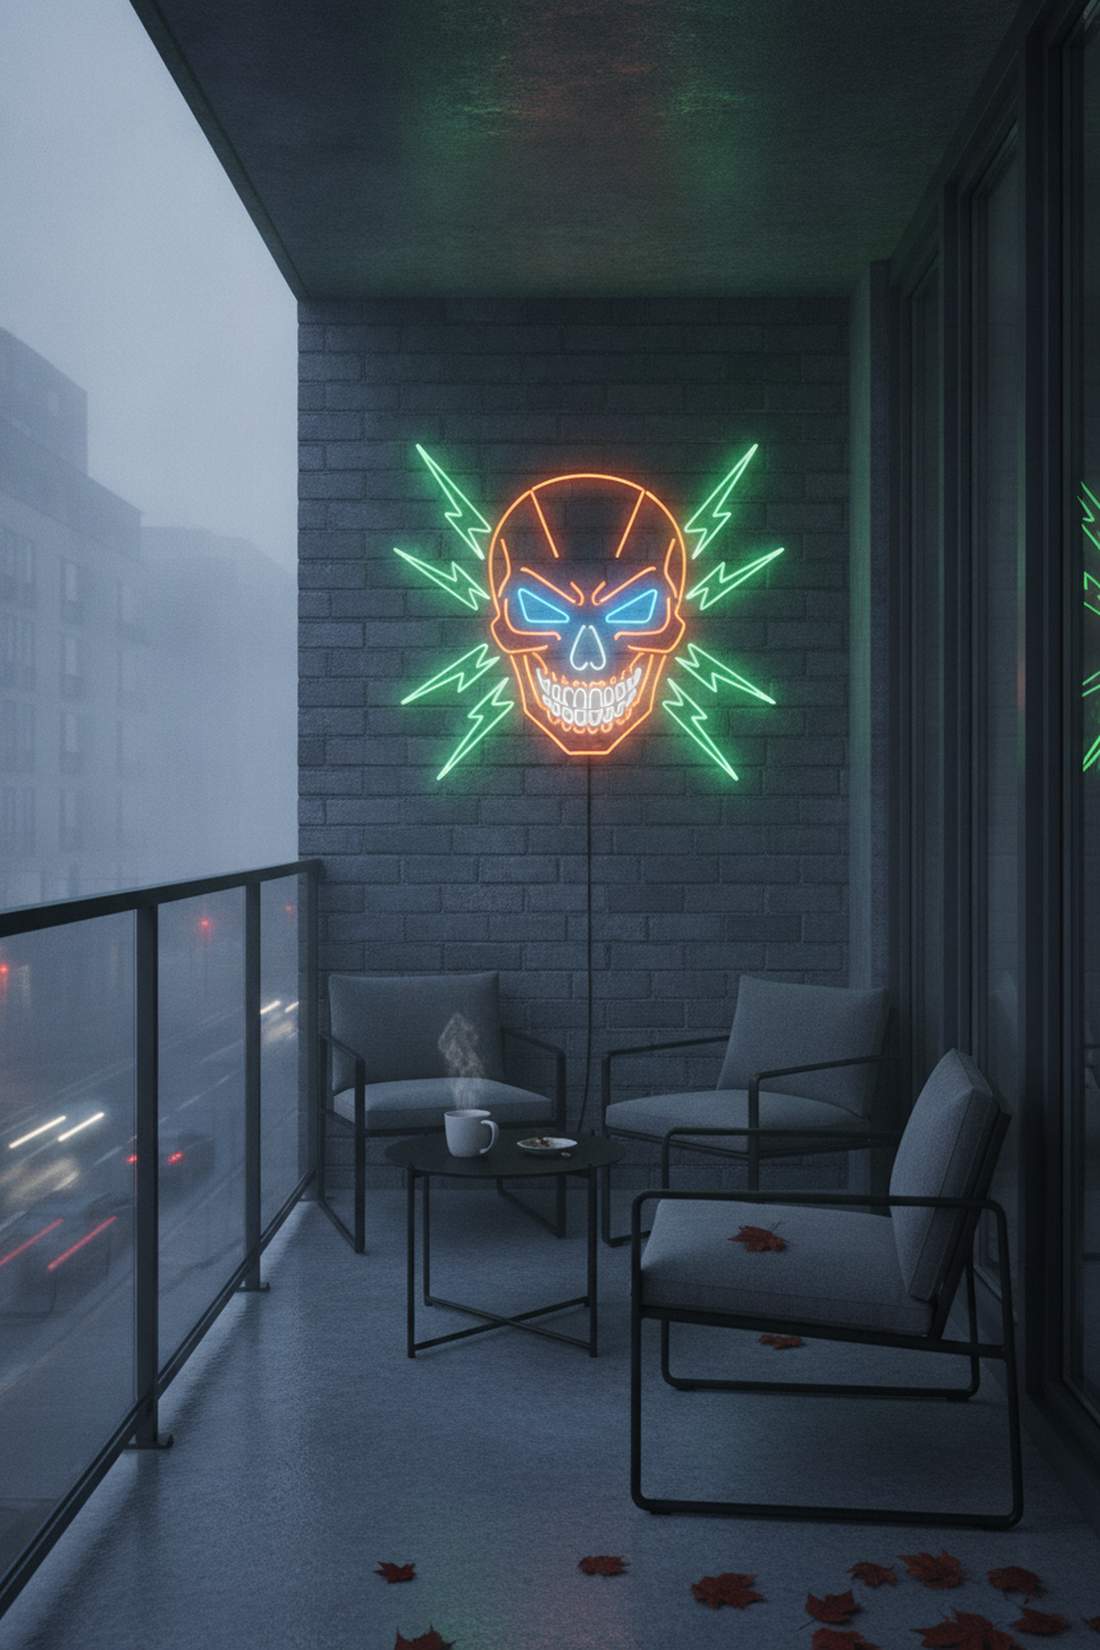
Cuts through the autumn fog with an unapologetic, cyberpunk-infused glow. This modern LED wall decor is an absolute game-changer for trendy, urban apartments looking for an edgy seasonal vibe.
Standard string lights are completely overdone, but mounting a crisp, graphic light tube delivers a surprisingly premium look. Sourcing weather-resistant neon-flex alternatives ensures brilliant, eye-searing color that draws immediate attention from street level.
Sourcing a quality sign runs about $40–$70. Pin this if you want a reusable, hyper-modern focal point that takes two minutes to plug in.
- Key Materials: Outdoor-rated LED neon sign and temporary wall mounts.
- Vibe / Style: Urban neon pop-art.
- Difficulty: Plug-and-play simplicity.
- Budget Breakdown: Sign: $50 | Hardware: $5.
- Creator’s Tip: Mount the sign slightly offset from the wall rather than perfectly flush so it creates a stunning glowing halo effect behind the tubes.
- Smart Sourcing: weatherproof LED neon Halloween signs (starter kit) and heavy-duty outdoor mounting tape.
Conclusion
Elevating your outdoor space doesn’t mean settling for cheap plastic clutter. These 32 premium halloween balcony decor blueprints prove that smart sourcing and strategic layouts yield high-end, weather-resistant results. Whether you lean into dramatic architectural shadow lighting or invest in UV-coated autumn botanical cascades, utilizing professional starter kits and bulk materials ensures your aesthetic looks expensive while staying on budget. Grab the specific waterproof gear recommended above, lock in your cohesive theme, and turn your balcony into the most visually striking space on the block this season.
Frequently Asked Questions
How can I secure Halloween decorations on a windy balcony?
To ensure your halloween balcony decor survives harsh autumn gusts without snapping, upgrade from basic tape to heavy-duty transparent outdoor zip ties. Lock your items directly to the metal railings in a triangulated pattern to prevent spinning. For freestanding pieces, always utilize weighted bases filled with gravel, and grab starter kits that include marine-grade tethers instead of relying on cheap string.
What are the best weather-resistant materials for outdoor Halloween balcony decor?
Skip the paper crafts and invest immediately in UV-coated resin figures and premium fake spider webs designed for extreme exterior use. Purchasing bulk packs of waterproof LED string lights ensures your illumination won’t short out during rainstorms. Opt for marine-grade acrylic fabrics and powder-coated metal supports that naturally resist rust, keeping your displays looking expensive through November.
How do I transition Halloween balcony decor to Thanksgiving?
The secret is building your foundation with high-CPC buyer-intent items like premium artificial harvest gourd packs and neutral-toned lanterns. Once October ends, simply remove the ghoulish accessories—like UV-coated plastic spiders or skeletons—and leave the expensive-looking autumn base intact. Swapping out black accents for natural burlap instantly shifts the vibe from spooky to a sophisticated harvest aesthetic without spending an extra dime.
Are there apartment-friendly Halloween decorations that don’t damage balcony surfaces?
Absolutely, and smart sourcing prevents losing your security deposit. Invest in heavy-duty outdoor mounting tape and damage-free outdoor ceiling hooks for all your vertical displays. Utilizing tension rods wedged between brick walls or employing weighted planter bases creates massive architectural impact without requiring a single drill hole, making it perfect for rental properties.
What lighting options work best for Halloween balcony ambiance?
Ditch the extension cords and upgrade to waterproof sequential timer LED candles and solar-powered directional spotlights for zero-hassle brilliance. Layering battery-operated LED string light starter kits creates immersive ambient depth, while specific colored floodlights (like deep amber or purple) instantly give the space a designer-level finish that outshines basic porch bulbs.
How many decorative elements should I use on a small balcony?
Avoid chaotic visual clutter by limiting yourself to one massive premium focal point and two supporting accents. Overcrowding tiny spaces ruins the luxury aesthetic. Instead, leverage overhead space using pre-strung illuminated witch hats or heavy vertical garlands to maximize your footprint, allowing you to achieve a dramatic, expensive look without sacrificing your actual walking area.