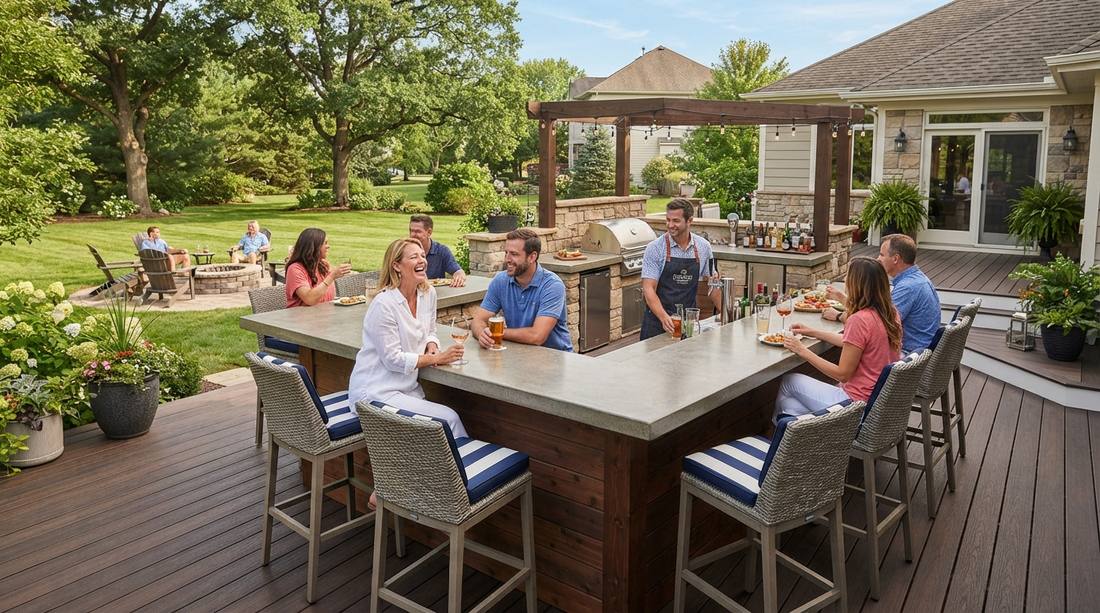
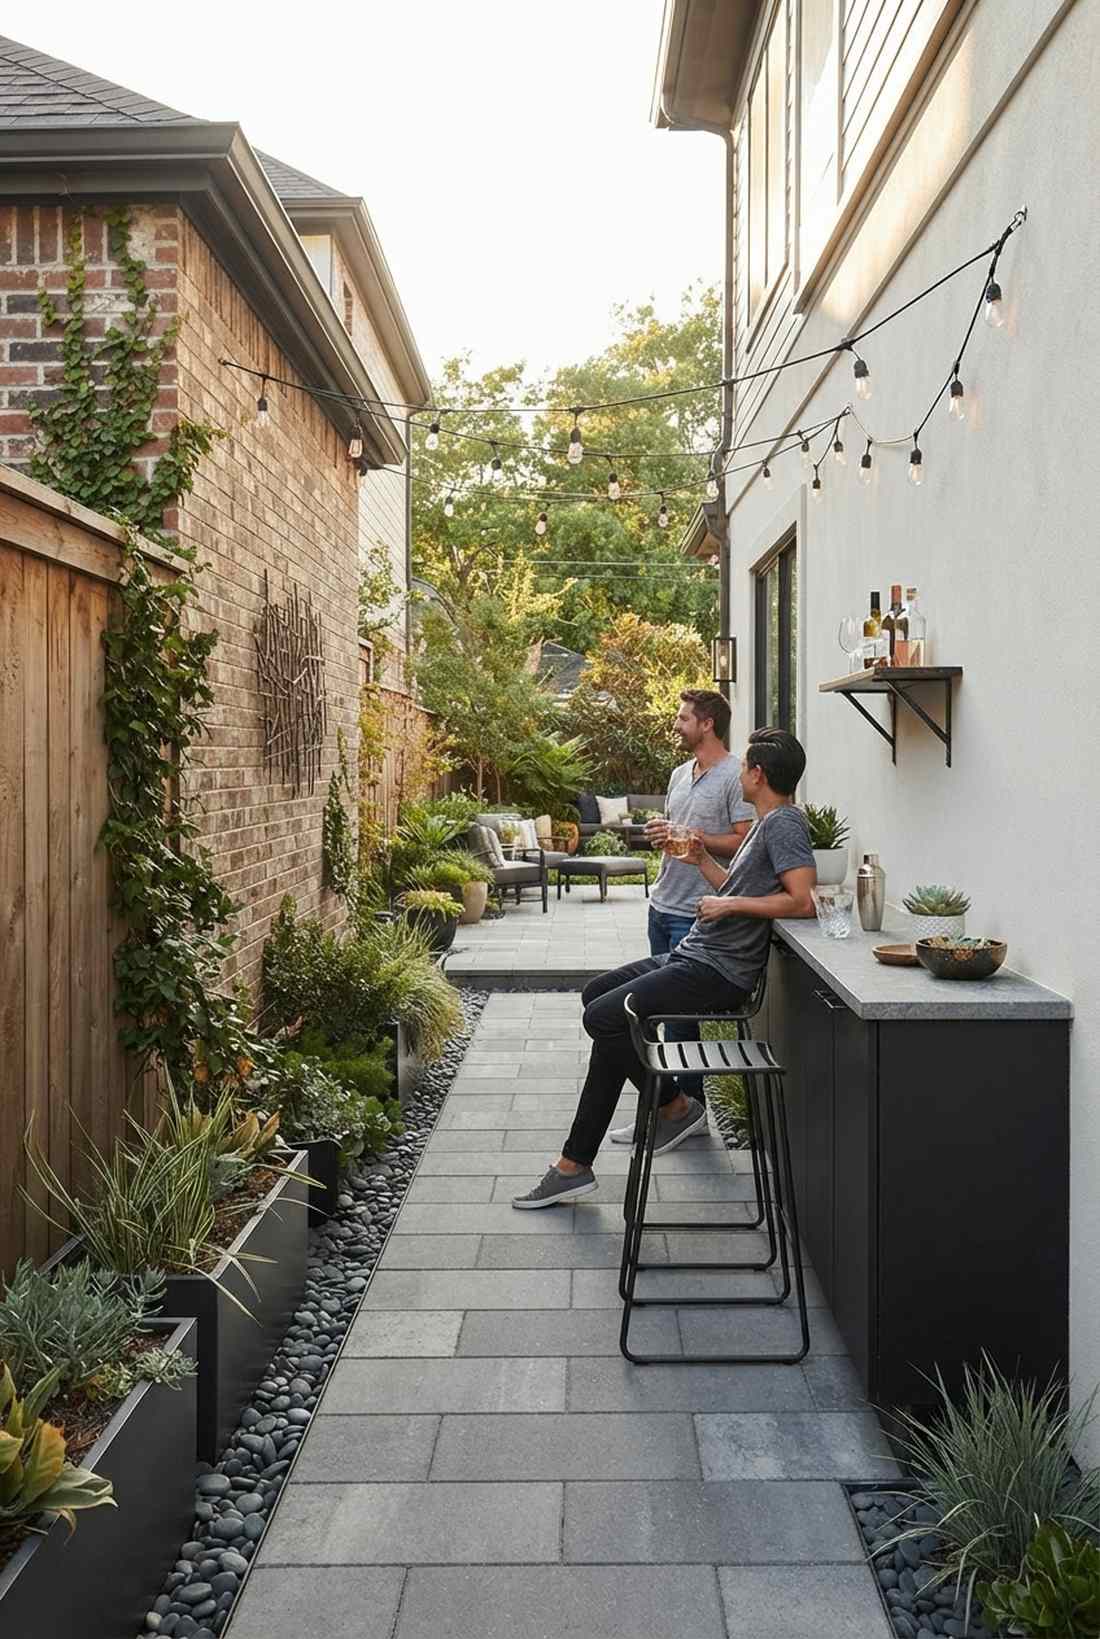
An outdoor seating bar instantly turns an ordinary patio into a high-end social lounge. This expert guide reveals how to source durable materials and build a stunning entertainment zone on any budget.
Design SnapshotKey Principles
- Material Selection: Choose weather-resistant countertops like granite, concrete, or recycled glass that withstand UV exposure and temperature fluctuations.
- Seating Ergonomics: Position bar stools 10-12 inches below the counter surface and space them 26-30 inches apart for optimal flow.
- Zoning Strategy: Create distinct areas for drink preparation, seating, and circulation to maximize gathering space.
- Weather Protection: Integrate smart shade systems to extend usability across changing seasons.
Premium Countertop Materials for Lasting Outdoor Seating Bars
The foundation of any high-end exterior space begins with the right materials. Skipping standard interior finishes and investing in properly rated architectural elements guarantees your setup survives the elements while maintaining a luxury aesthetic.
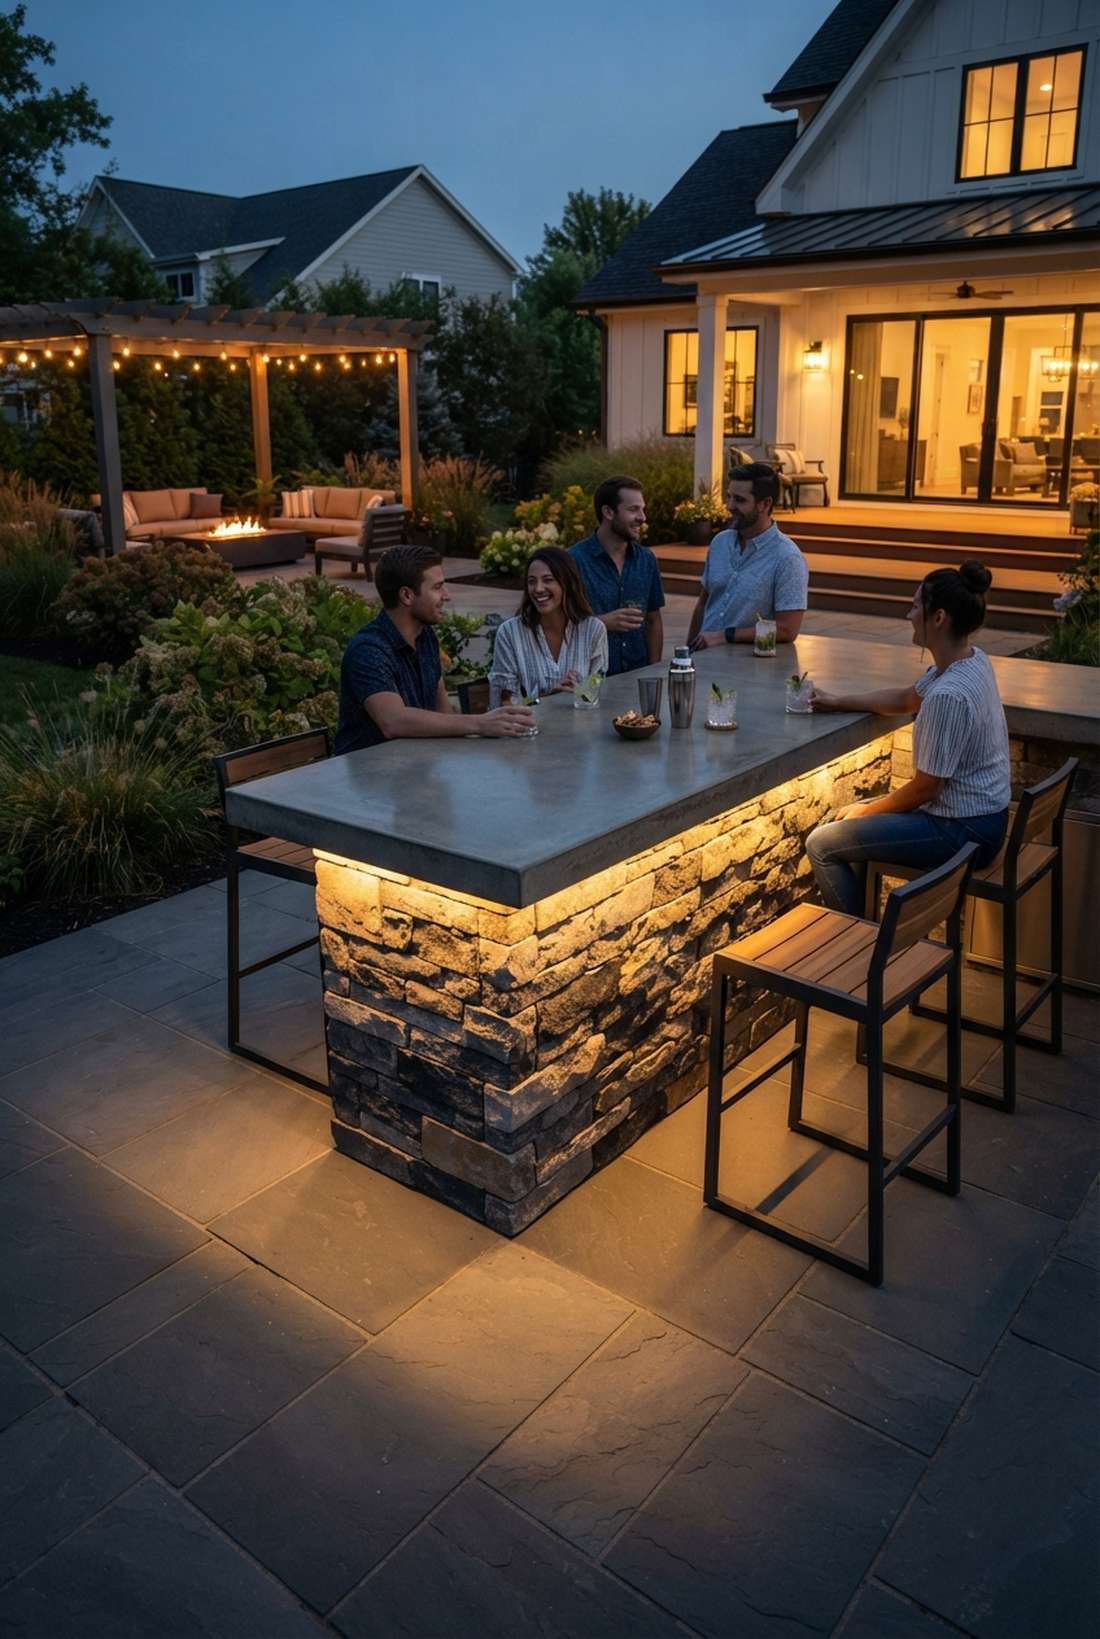
1. Granite Bar Counters with Sealed Finish
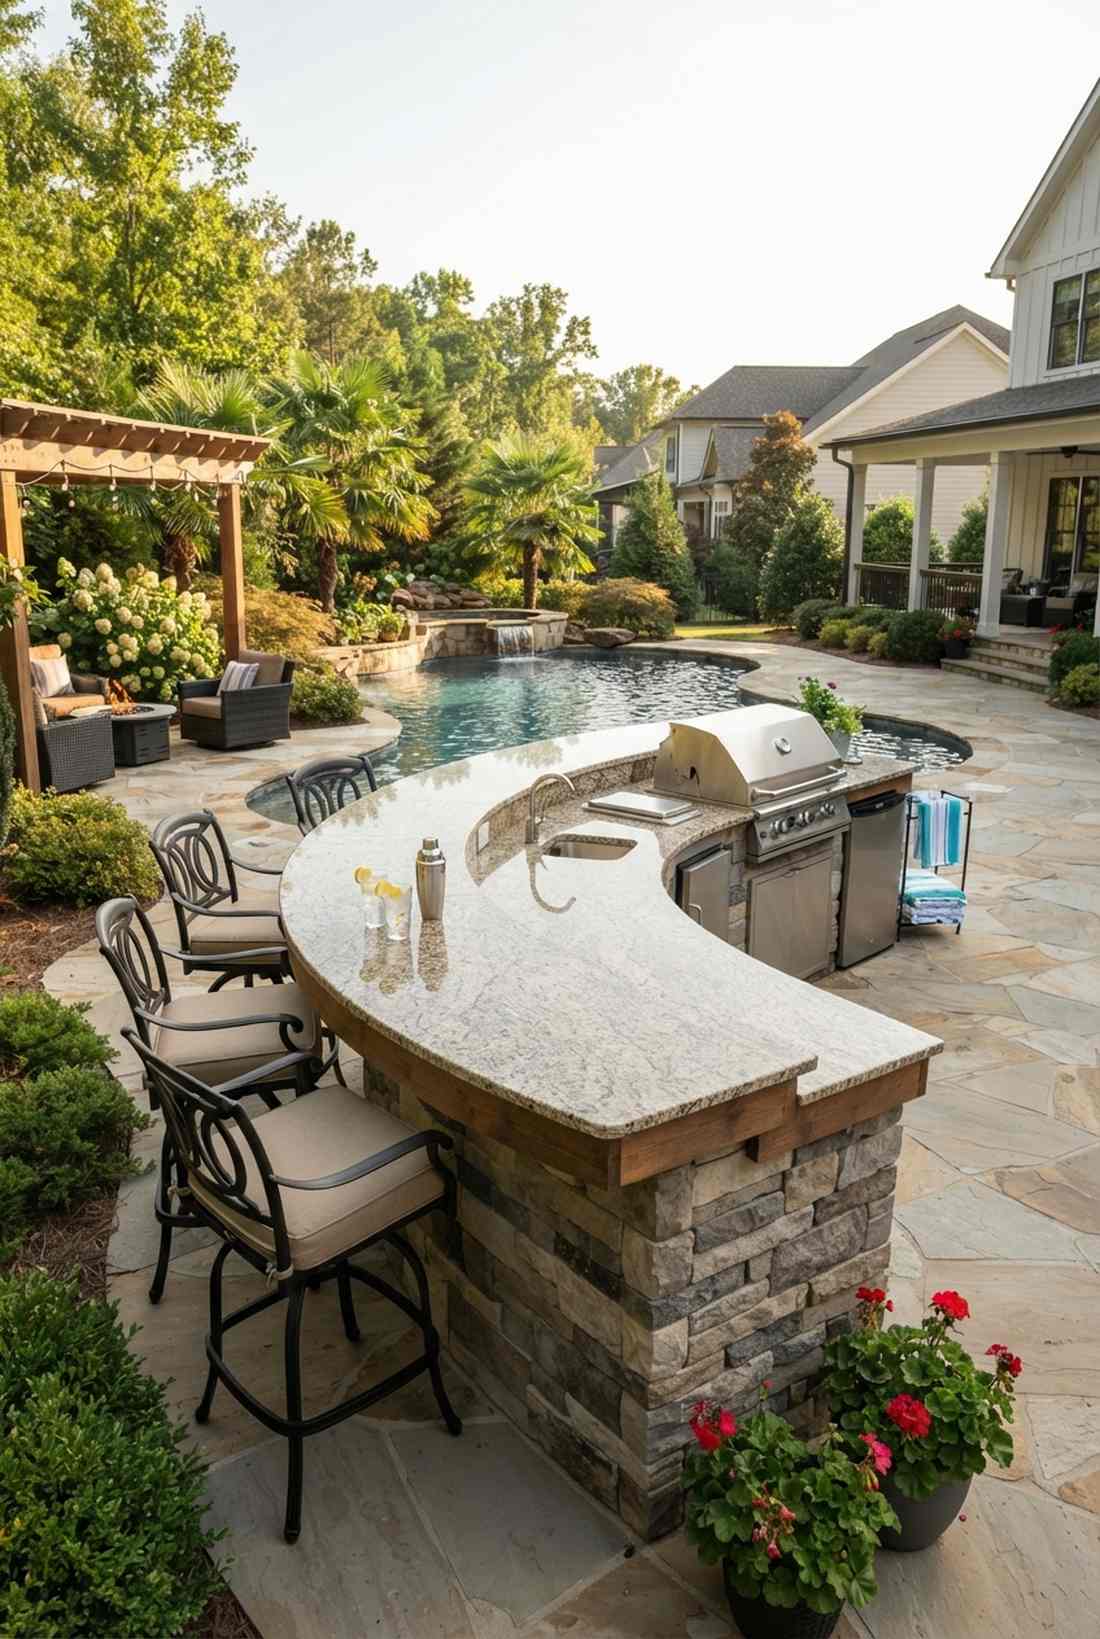
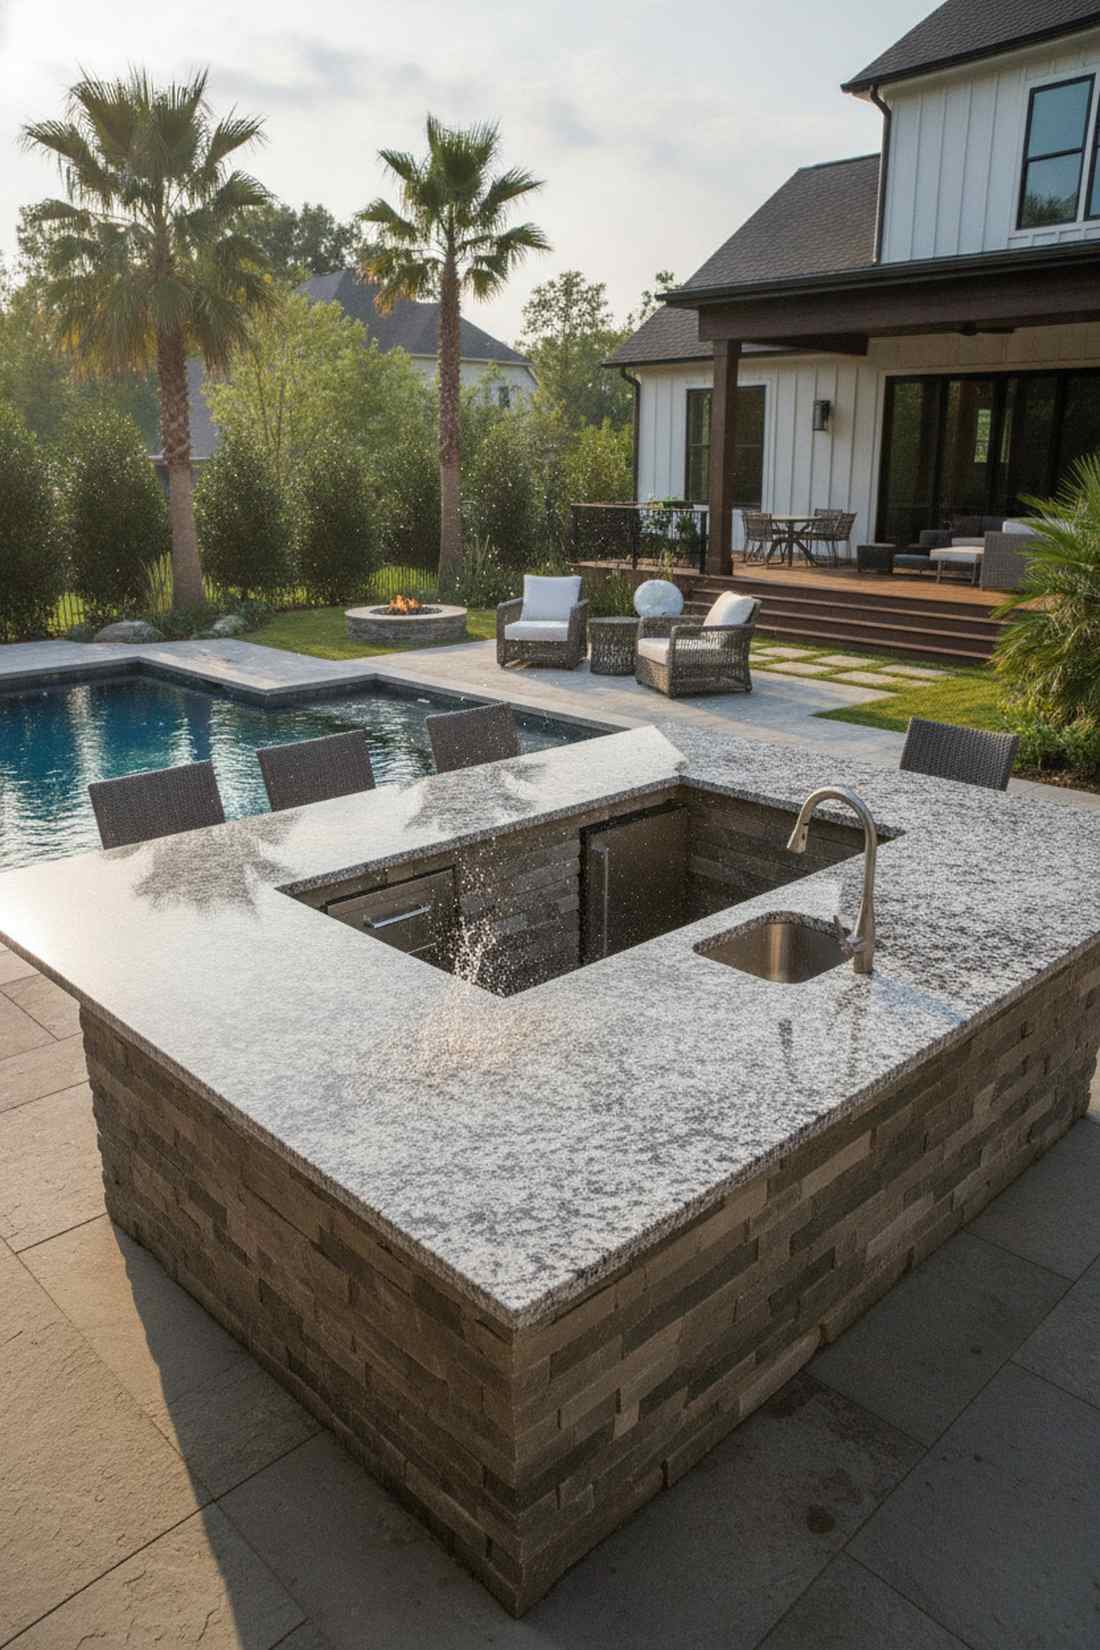
Feels like a secluded five-star resort cabana right in your own backyard. This sealed stone patio bar layout works exceptionally well for exposed poolside areas where water splashes are a daily reality.
Most beginners avoid natural stone fearing the cost, but opting for prefabricated slabs delivers a surprisingly premium look without the custom fabrication fees. Incorporating professional-grade outdoor kitchen installation supplies during the build completely weatherproofs the base against deep freezes.
You can realistically source and install a pre-cut slab for around $300–$600. Pin this to your ultimate backyard makeover board so you don’t lose the sourcing idea.
- Key Materials: Pre-sealed granite remnants, construction adhesive
- Vibe / Style: Luxury resort chic
- Difficulty: Intermediate lifting required
- Budget Breakdown: Stone Slab: $400 | Sealant & Base: $85.
- Creator’s Tip: Buy sink cutout remnants from local fabricators to save 70% off retail pricing.
- Smart Sourcing: heavy-duty stone adhesive (bulk pack) and commercial-grade penetrating granite sealer.
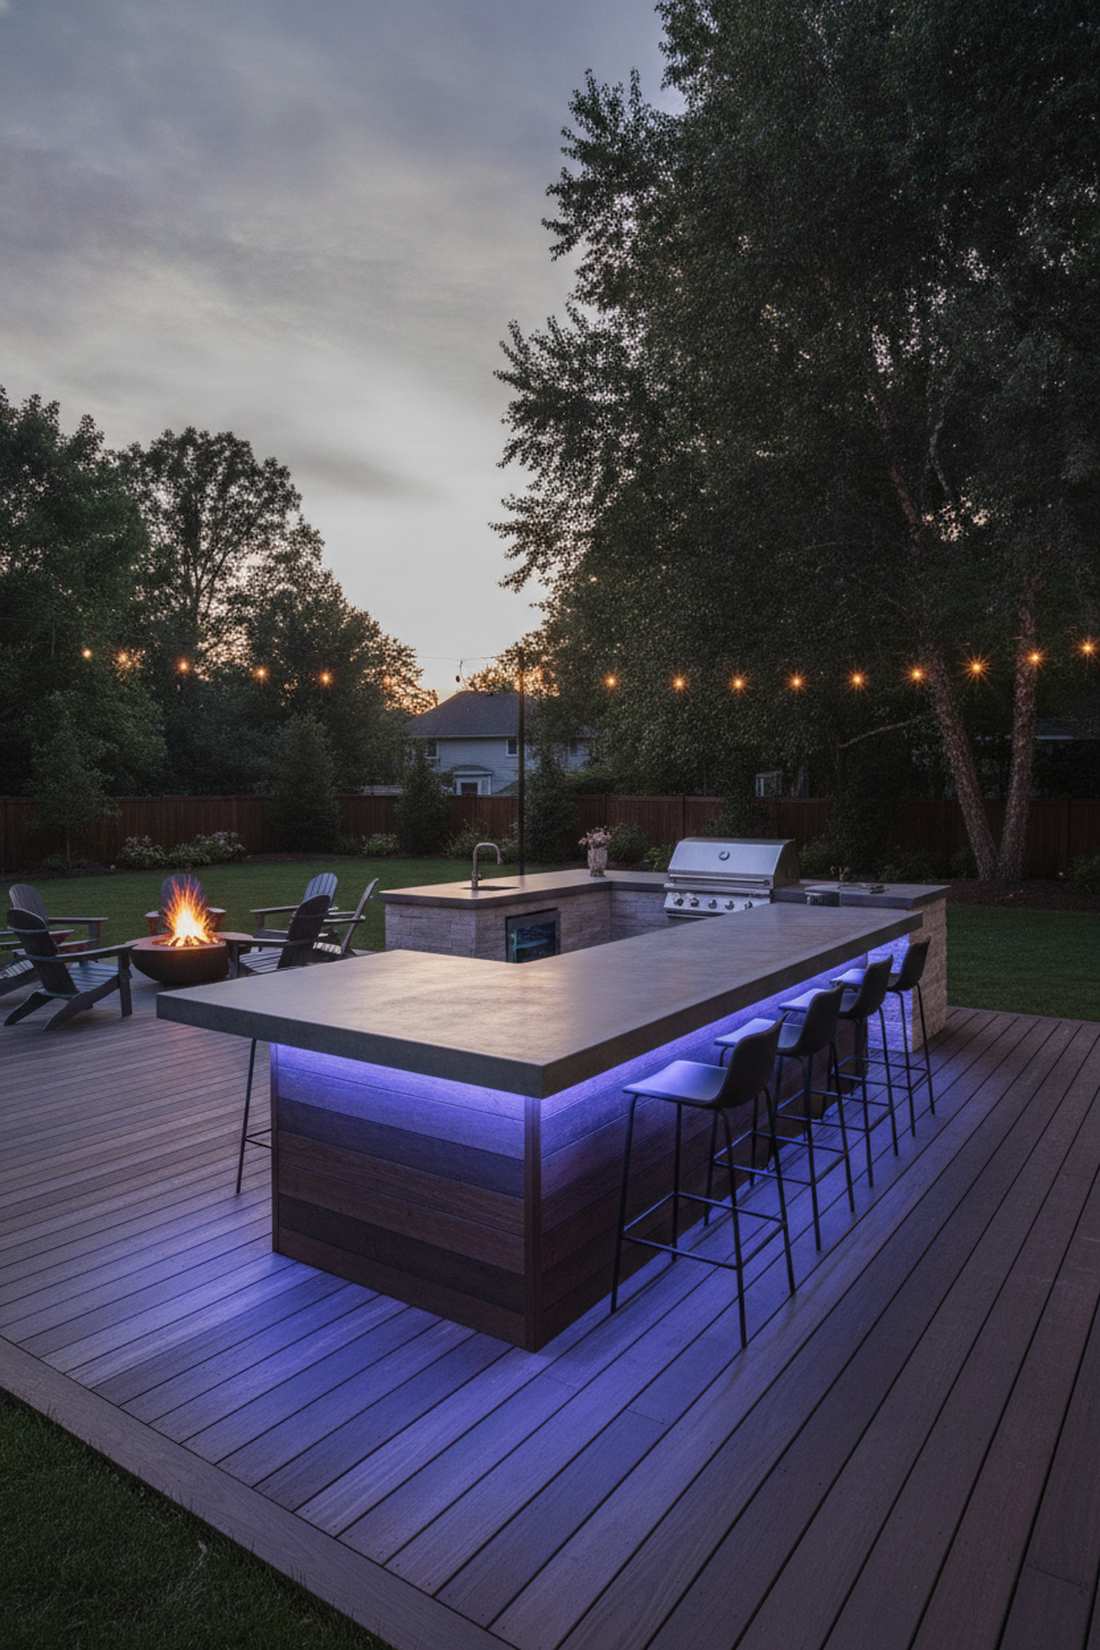
2. Poured Concrete with Custom Pigments
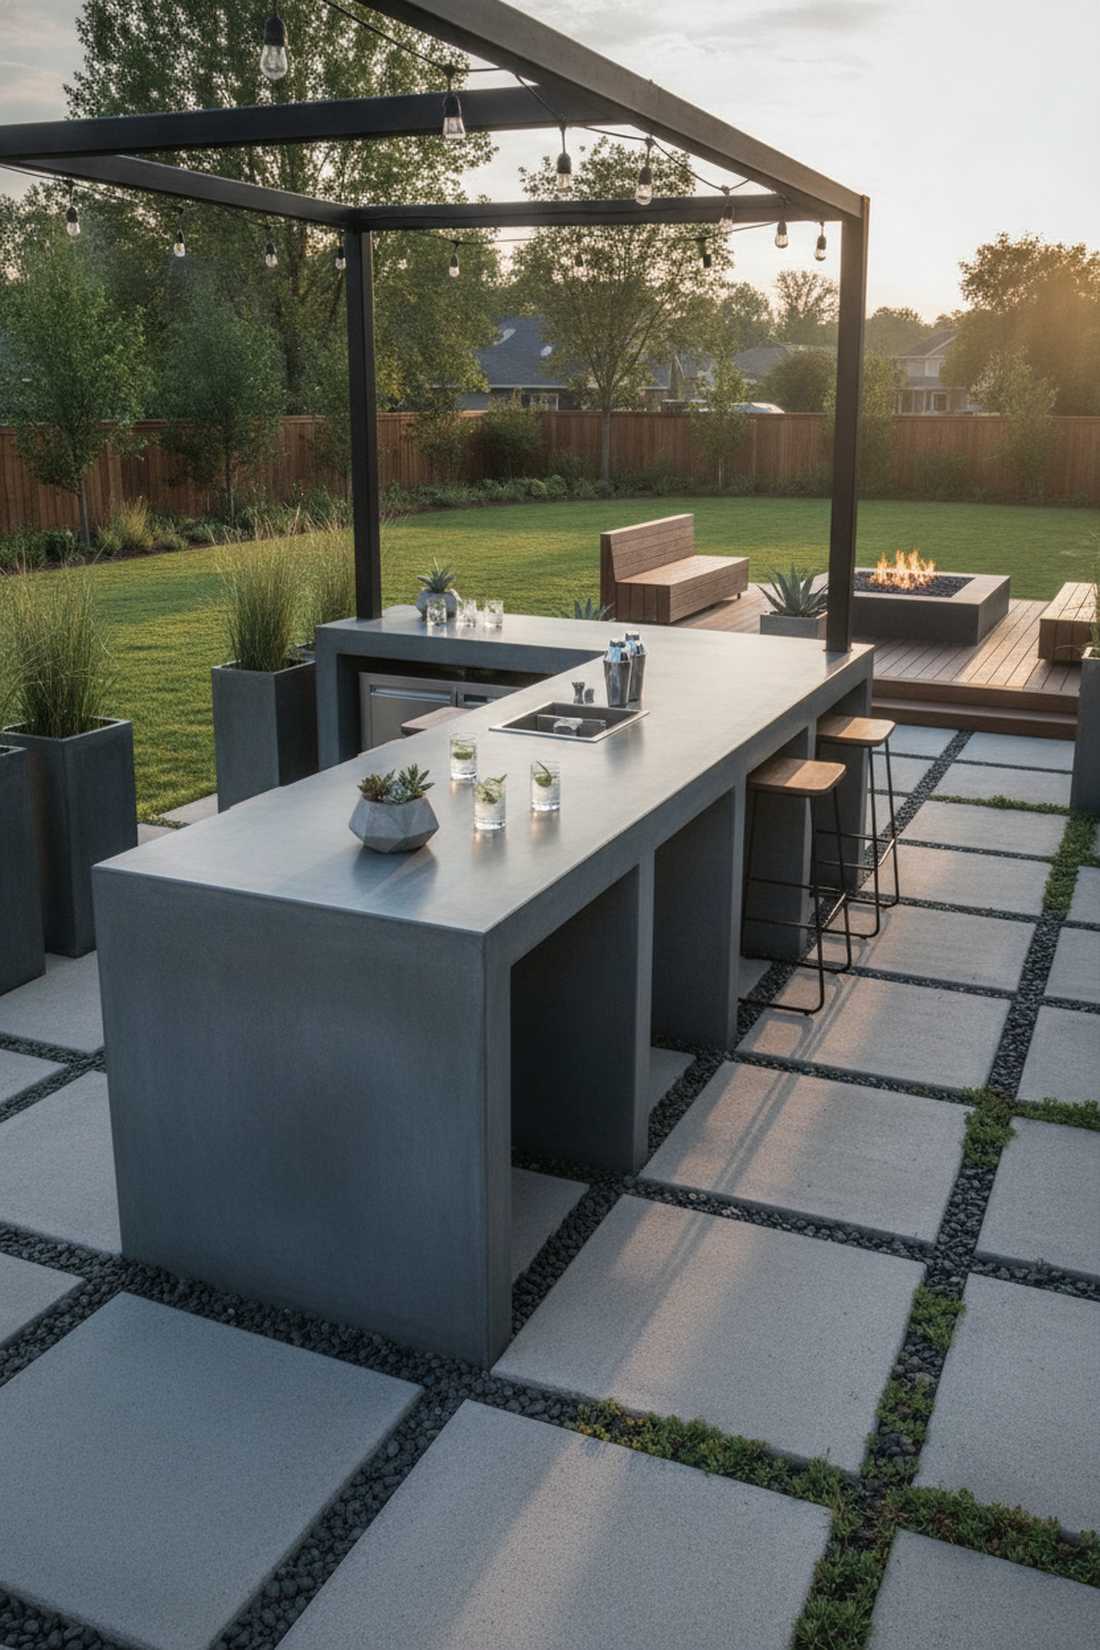
Gives off an effortlessly cool, modern warehouse vibe. A custom industrial backyard drink station is perfect for minimalist patios or geometric garden layouts.
Far too many people overpay for pre-cast stone when pouring your own surface looks far more expensive than it is. Utilizing DIY concrete bar top mold kits guarantees perfectly smooth edges without hiring a contractor.
Expect to spend roughly $100–$150 on the dry mix and pigment. It’s a highly durable weekend project that dramatically boosts property appeal.
- Key Materials: High-strength concrete, liquid pigment, melamine boards
- Vibe / Style: Modern industrial
- Difficulty: Advanced DIY
- Budget Breakdown: Concrete Mix: $50 | Molds & Tools: $60.
- Creator’s Tip: Vibrate the edges of your mold with a palm sander to eliminate all air bubbles before it cures.
- Smart Sourcing: concrete edge mold starter kits and UV-resistant liquid cement dye.
3. Recycled Glass Composite Surfaces

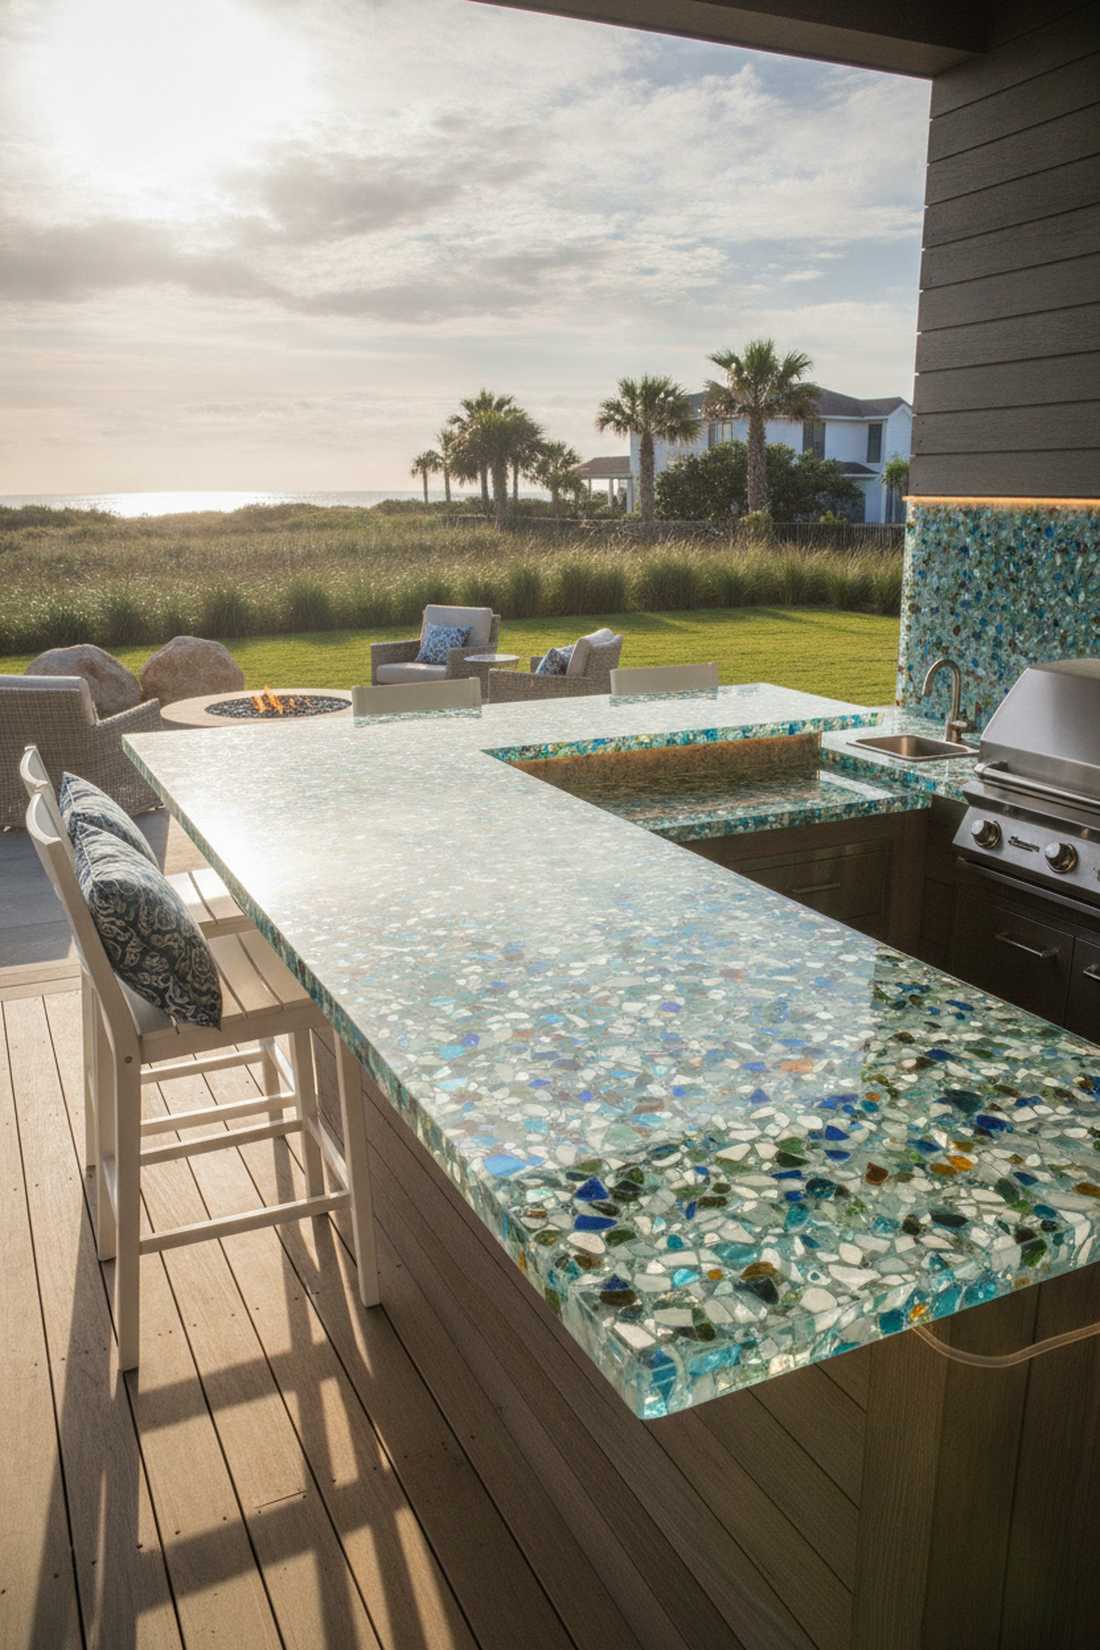
Straight out of a high-end architectural magazine. This eco-friendly illuminated counter functions flawlessly on sun-drenched southern-facing decks where the glass can catch the light.
While standard laminates peel after one season, this resin-bound approach gives a designer-level finish that never warps. Snagging premium prefabricated eco-surfaces online often undercuts local showroom prices by half.
Budget around $400 for a standard 6-foot run. Save this if you’re prioritizing sustainable building materials for your home.
- Key Materials: Glass composite slab, silicone caulking
- Vibe / Style: Coastal modern
- Difficulty: Easy installation
- Budget Breakdown: Material: $350 | Installation Gear: $30.
- Creator’s Tip: Backlight the overhang with LED strips to make the embedded glass fragments glow at night.
- Smart Sourcing: pre-cut crushed glass terrazzo slabs and weatherproof silicone sealant (3-pack).
4. Porcelain Tile in Wood-Grain Patterns
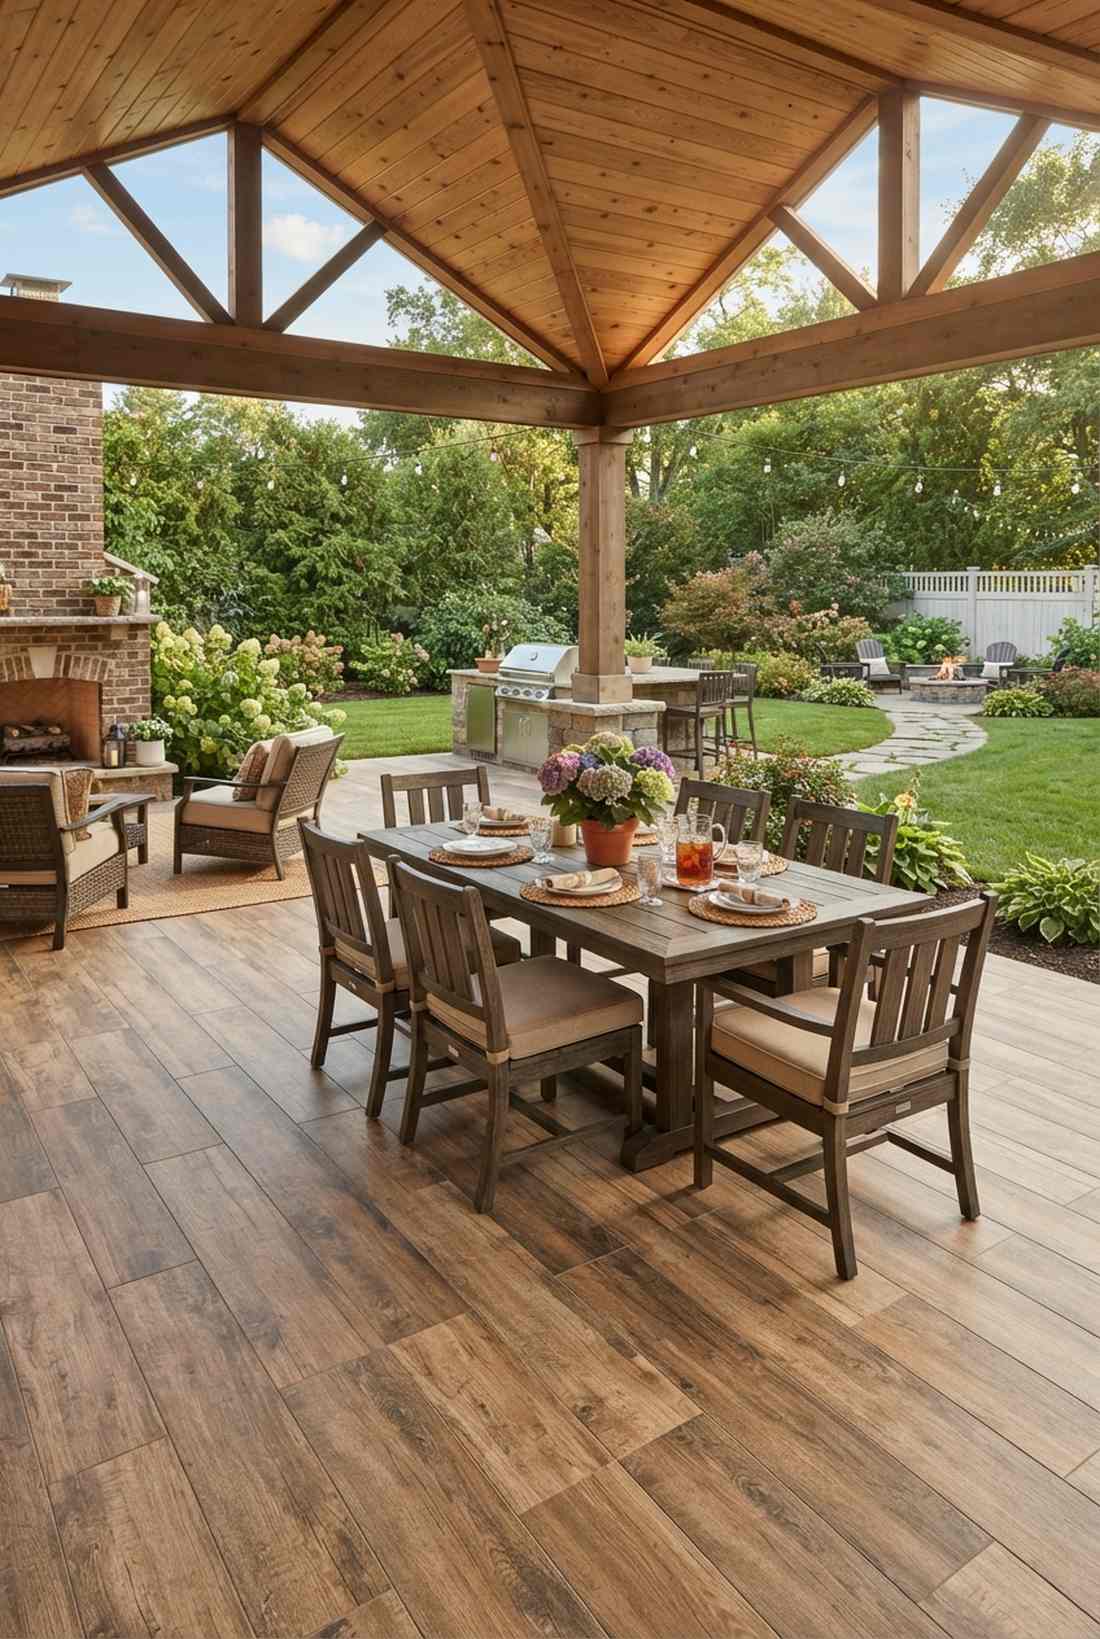
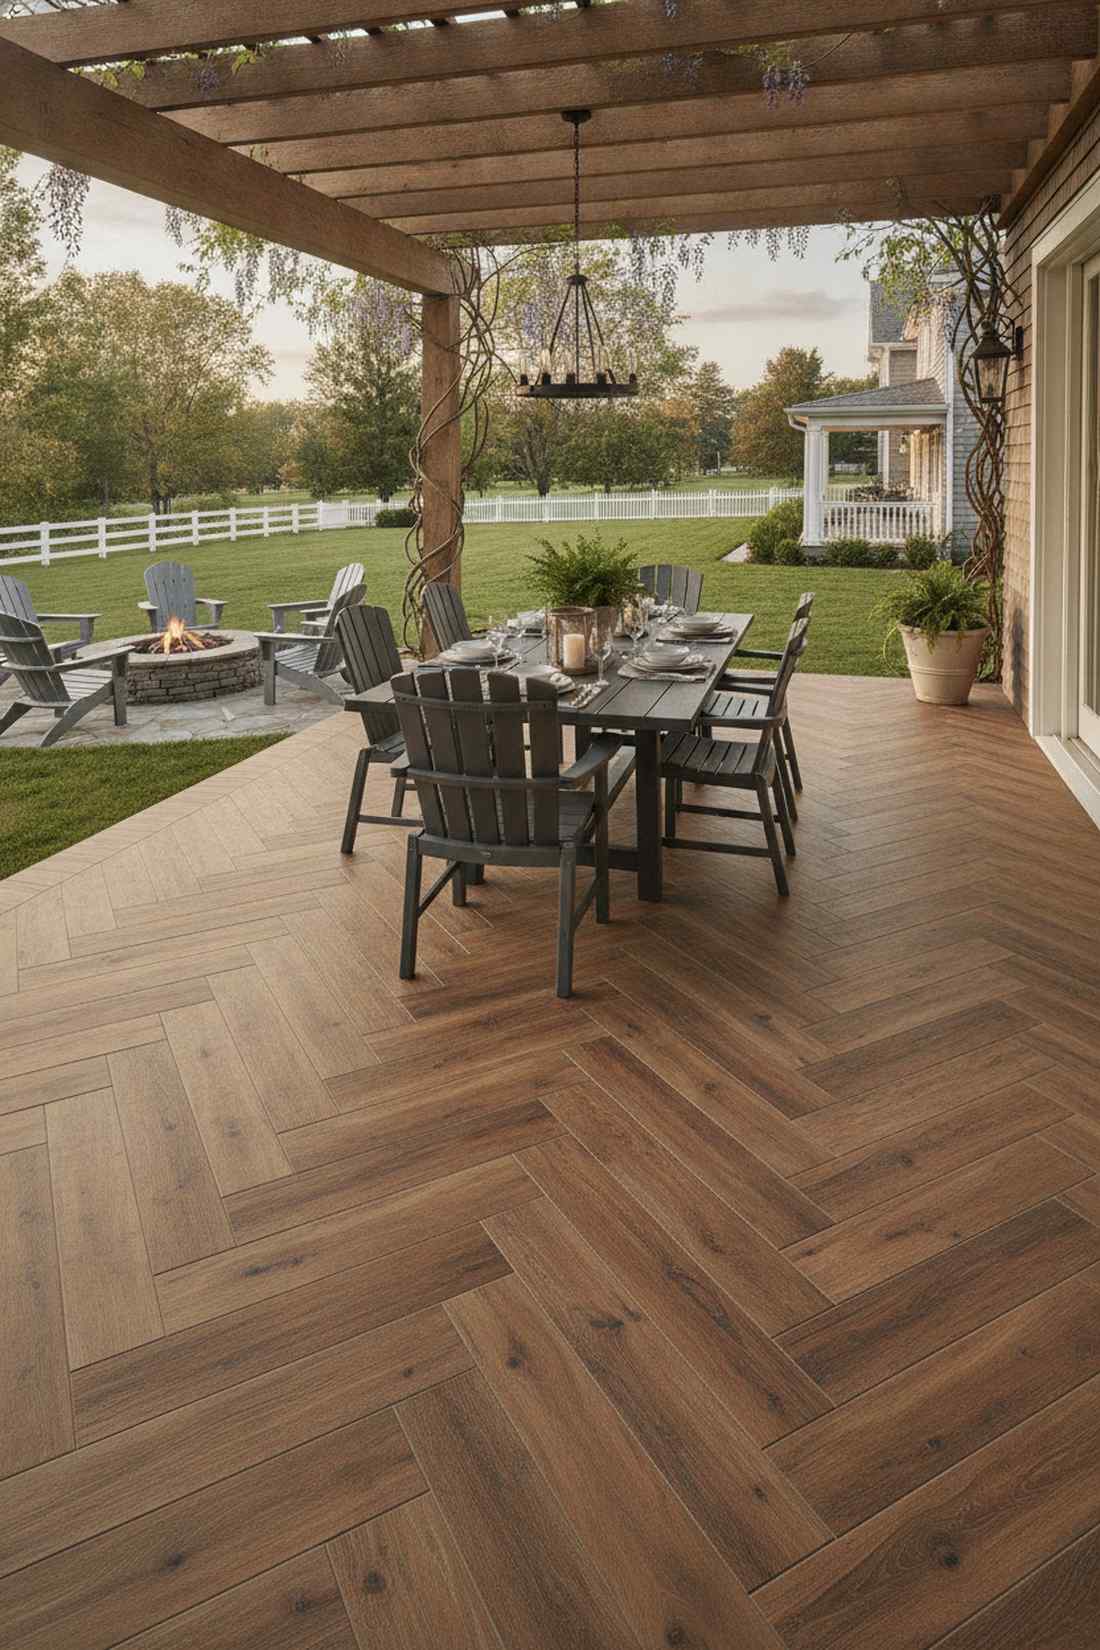
Evokes the cozy warmth of a classic pub without the rot. A wood-look outdoor dining surface is the ultimate solution for shaded gazebos or covered verandas.
People constantly mistake this for real timber, but using large-format tile completely eliminates the nightmare of annual sanding and staining. If you leverage outdoor tile leveling systems, you get a flawlessly flat, puddle-free surface every time.
You can easily pull this off for $80–$120. Highly recommended for a fast weekend upgrade that elevates the entire yard.
- Key Materials: Wood-grain porcelain, exterior thinset, epoxy grout
- Vibe / Style: Rustic transitional
- Difficulty: Beginner-friendly
- Budget Breakdown: Tiles: $60 | Grout & Thinset: $40.
- Creator’s Tip: Always use epoxy grout outside to prevent food stains and freeze-thaw cracking.
- Smart Sourcing: large-format porcelain wood tiles (bulk box) and exterior-grade epoxy grout kits.
This next setup completely changes the game—it’s ridiculously cheap but looks like a $5,000 custom installation…
5. Live-Edge Wood with Epoxy Coating
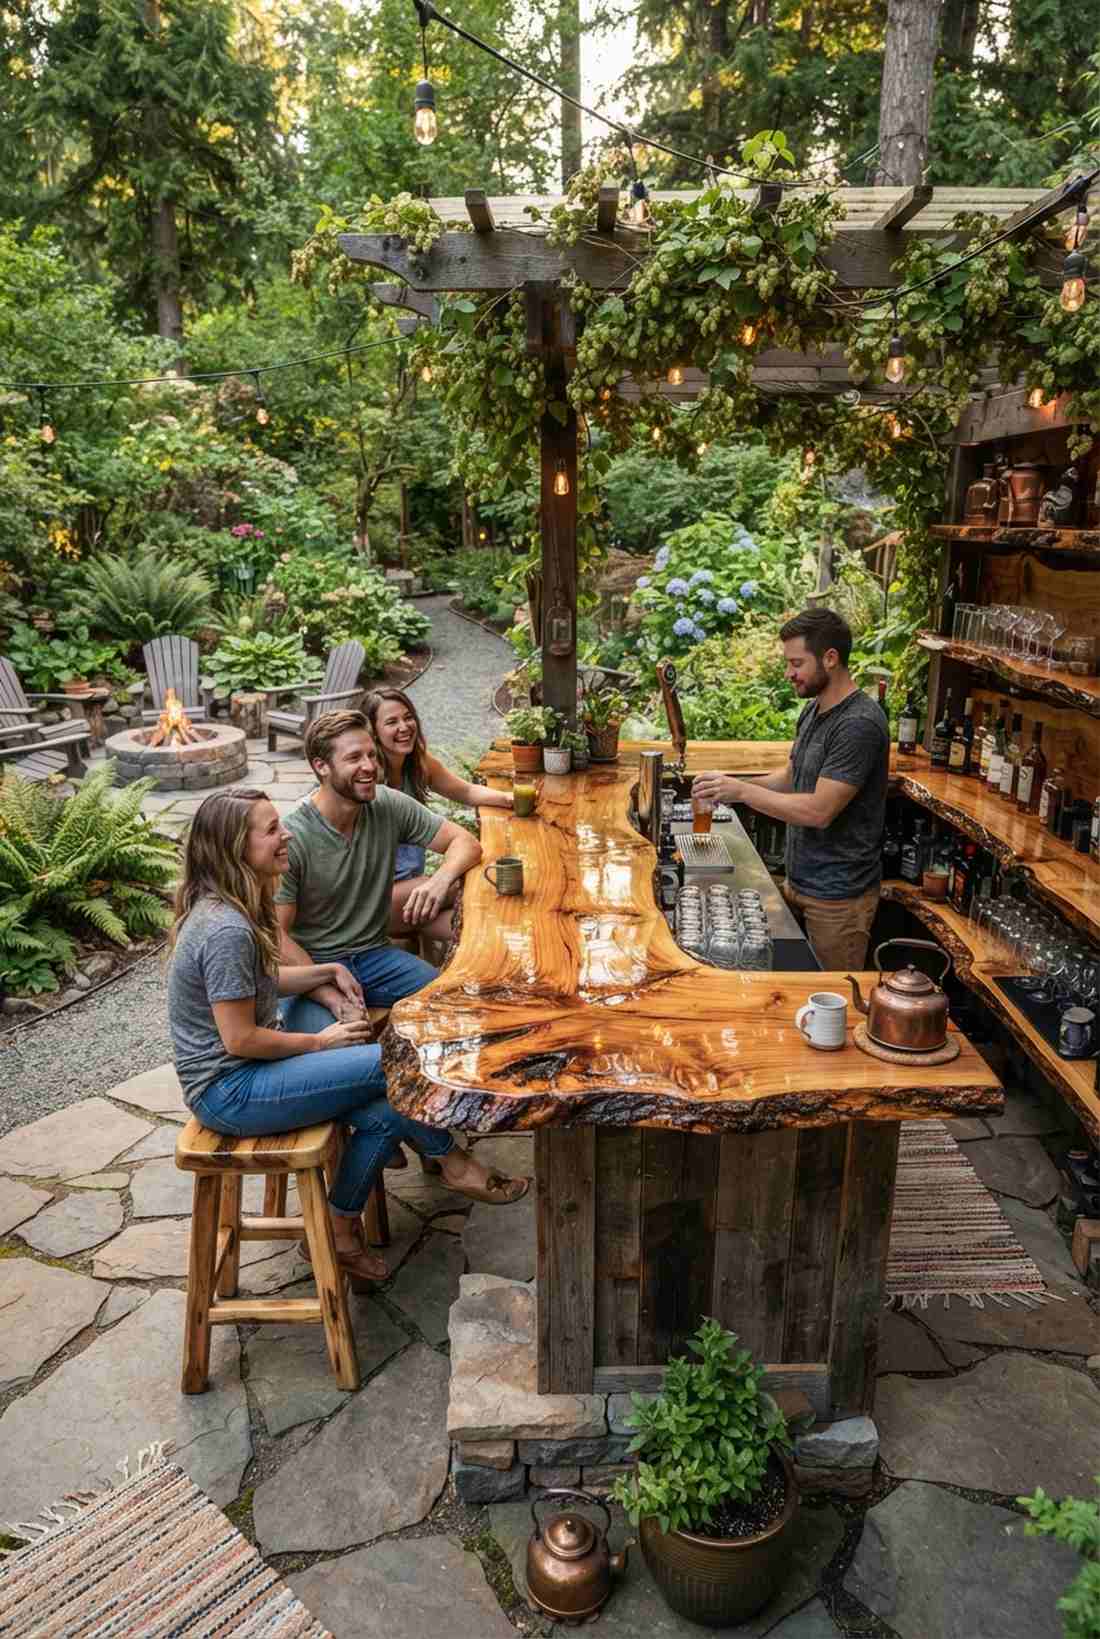
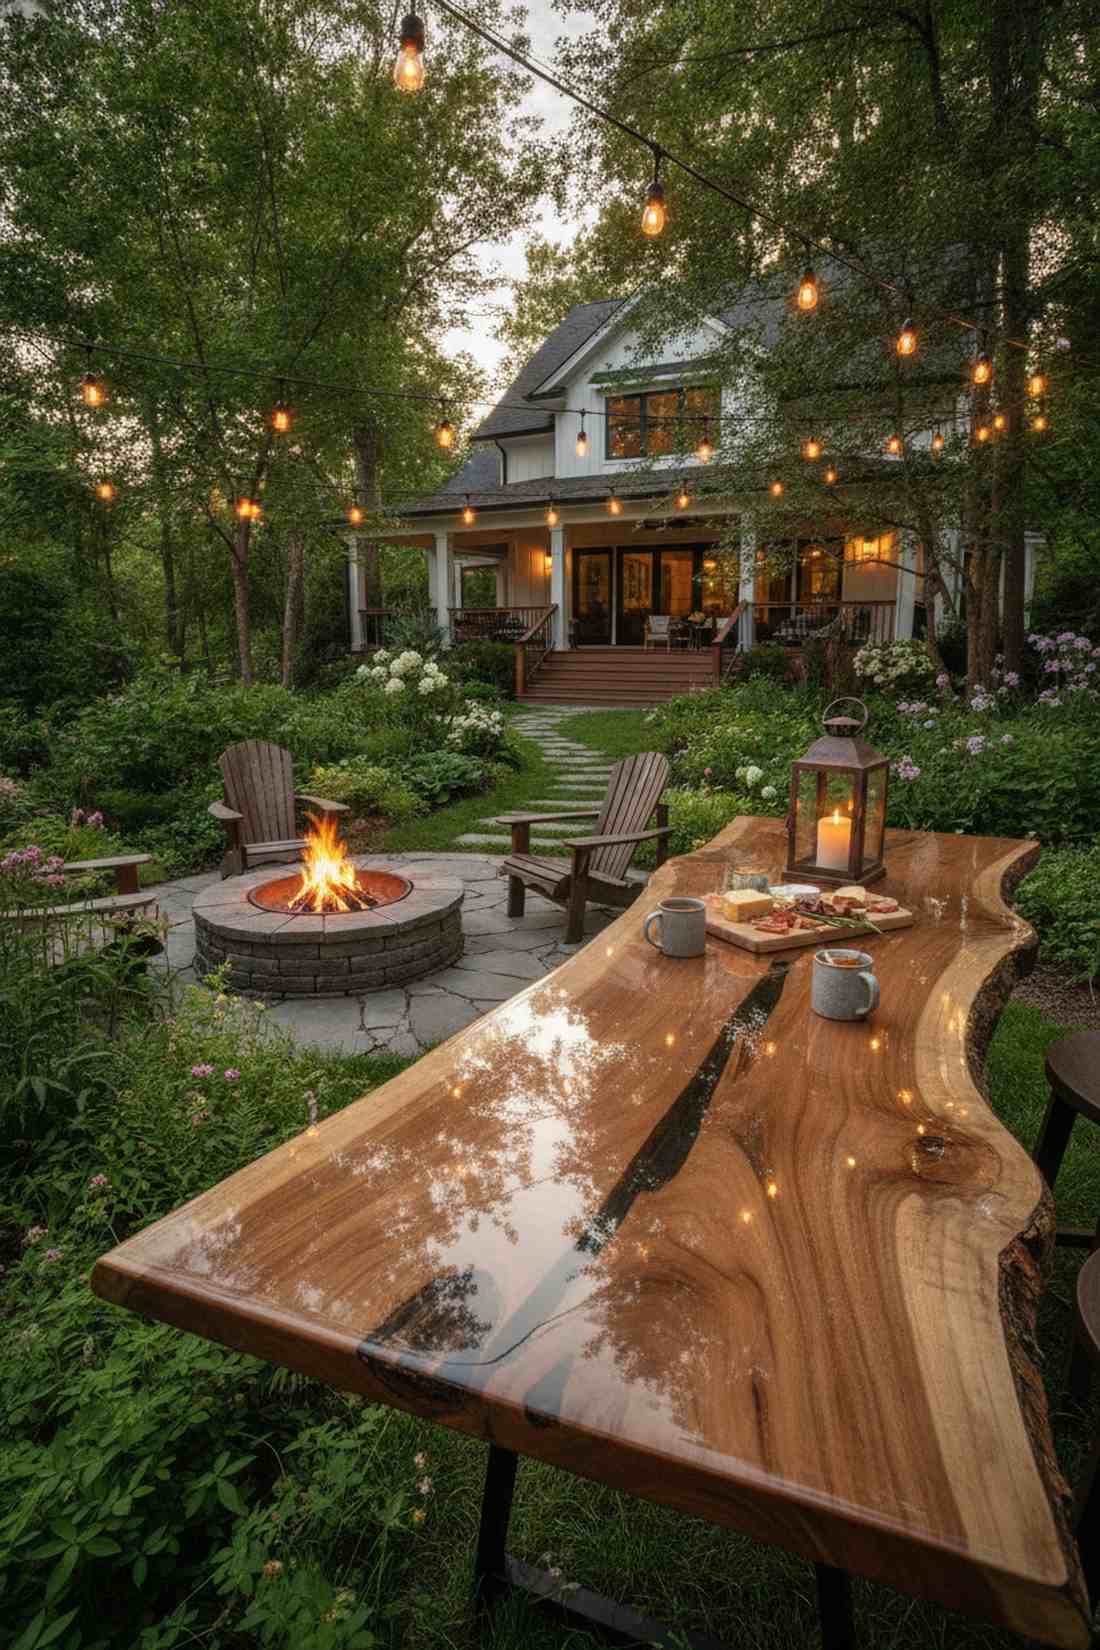
Feels like a hidden forest tavern you accidentally stumbled upon. The rustic organic garden pub aesthetic shines best nestled alongside dense landscaping or outdoor fire pits.
Leaving raw wood exposed is a rookie mistake, but wrapping a cheap slab in high-gloss marine resin delivers a shockingly high-end finish. Seeking out uv-resistant countertop epoxy ensures the bark and grain never gray out in the sun.
The entire build usually runs between $150 and $250. Pin this if you love bringing natural, organic textures into your exterior design.
- Key Materials: Kiln-dried wood slab, marine epoxy
- Vibe / Style: Bohemian woodland
- Difficulty: Patience required
- Budget Breakdown: Raw Slab: $100 | Resin System: $90.
- Creator’s Tip: Apply a thin seal coat of epoxy first to prevent bubbles from rising out of the wood grain during the final pour.
- Smart Sourcing: marine-grade clear epoxy resin (gallon kit) and pre-sanded live edge slabs.
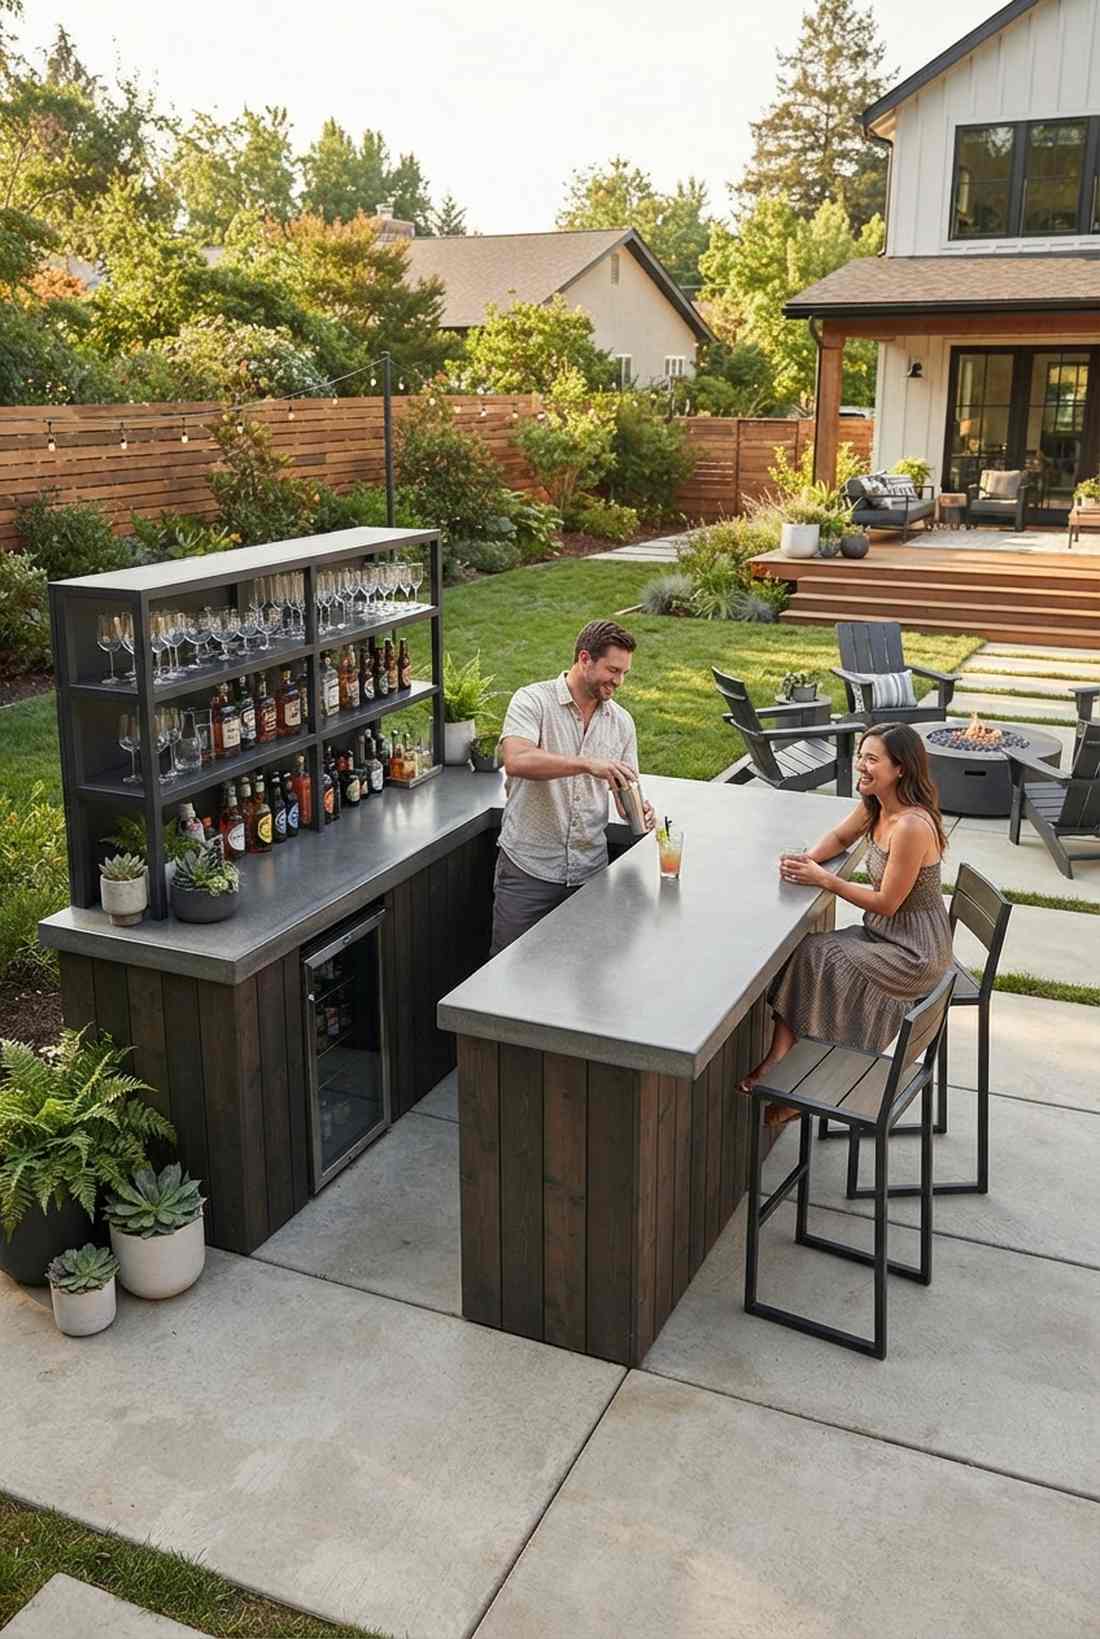
6. Stainless Steel Commercial-Grade Tops
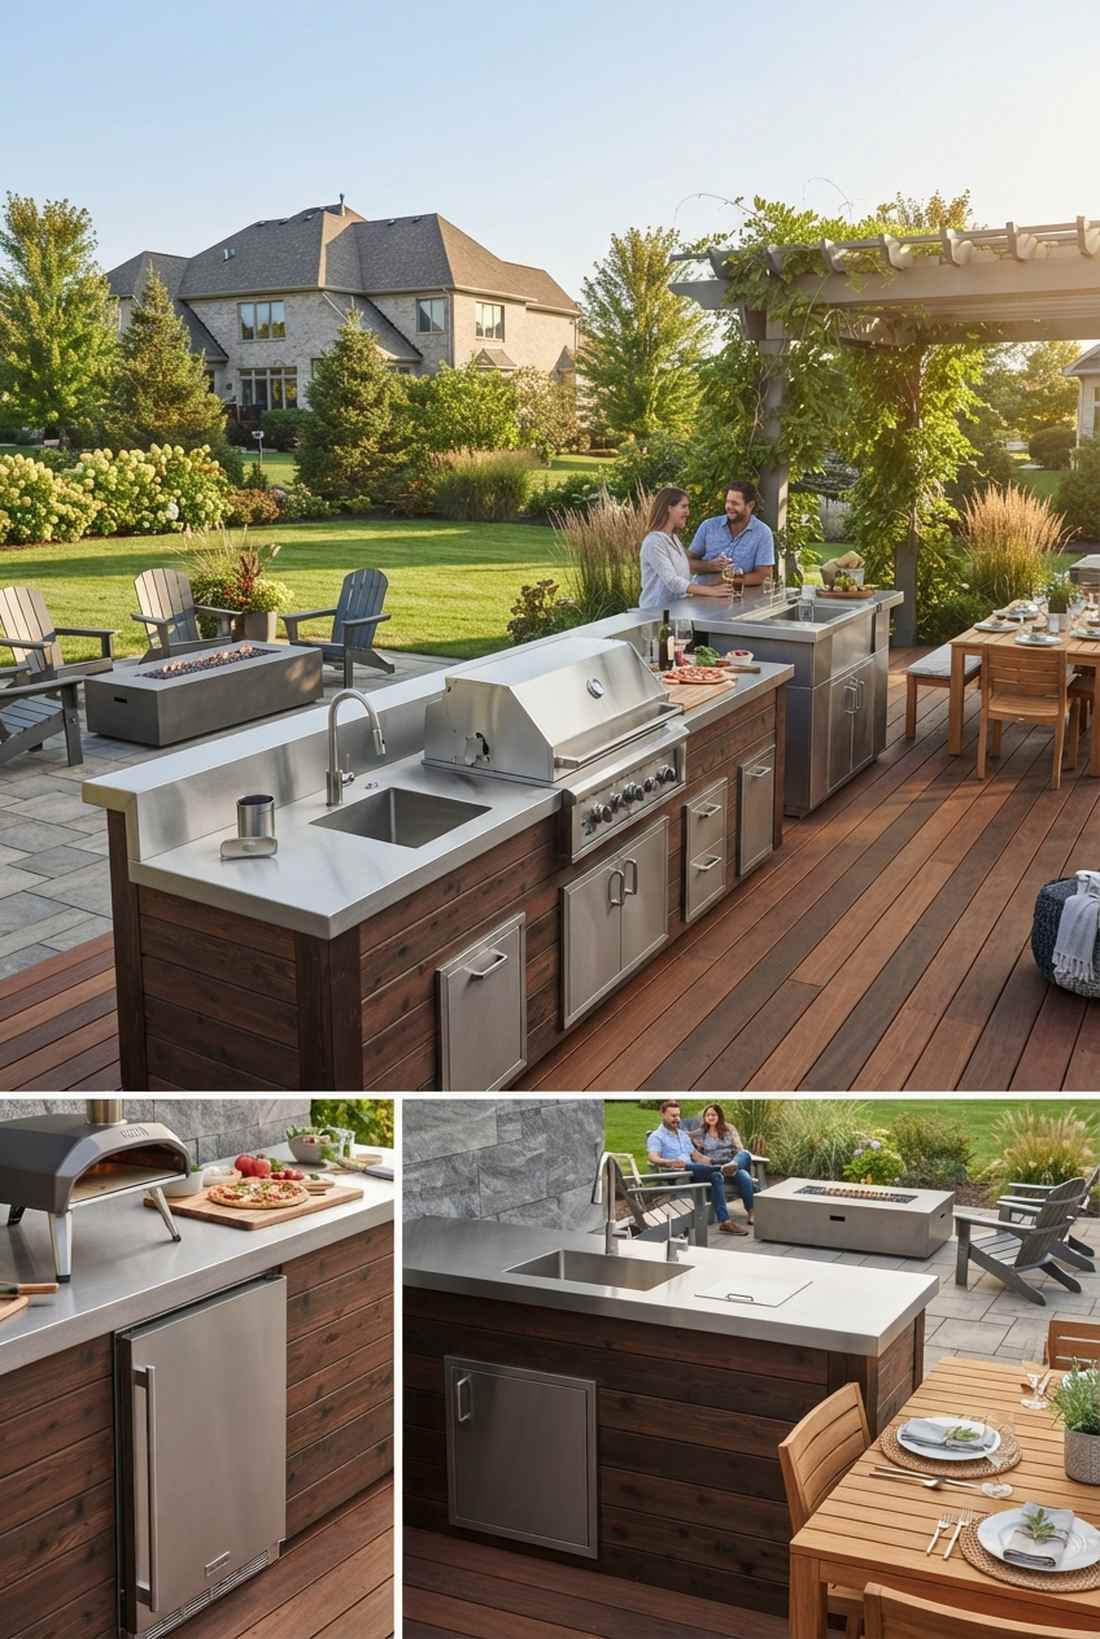
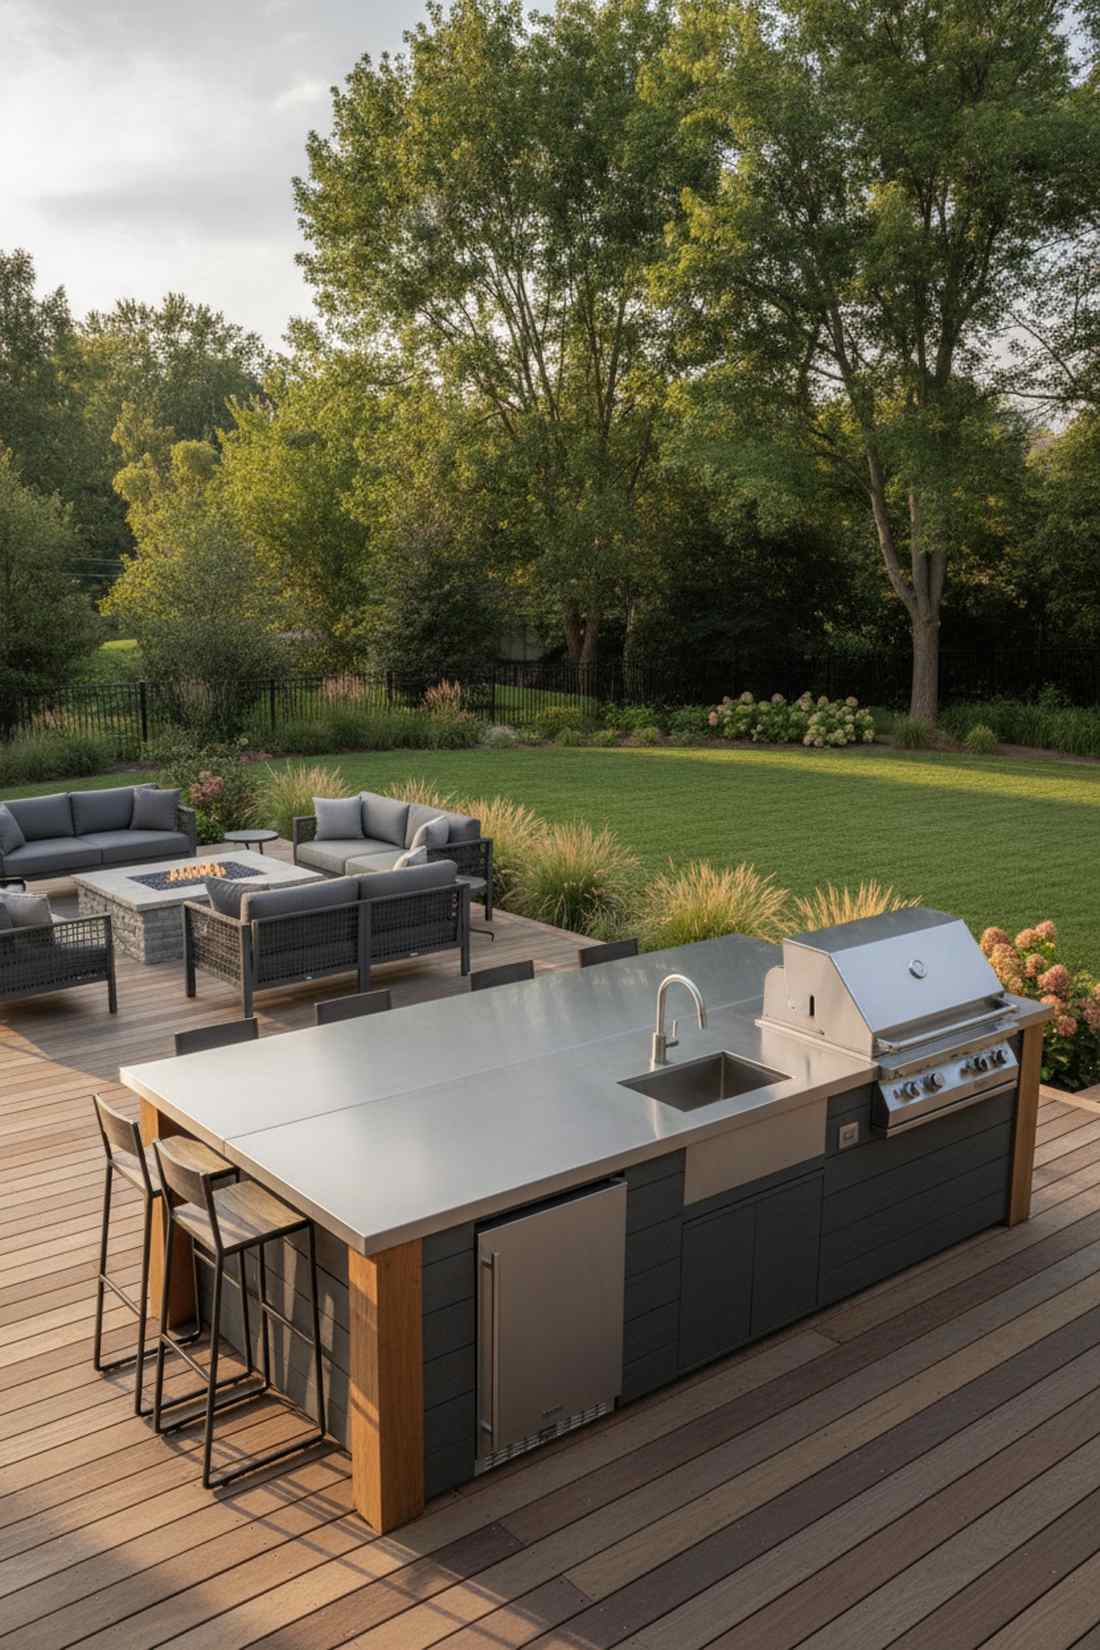
Radiates the sleek energy of an exclusive downtown rooftop. Implementing a modern commercial outdoor kitchen style is unparalleled for active BBQ zones and heavy-prep areas.
Homeowners often default to stone, but wrapping a wooden frame in metal creates an ultra-sanitary, indestructible prep zone. Grabbing commercial outdoor bar kits from restaurant supply overstock sites slashes the price dramatically.
Plan for a $200–$400 investment. It’s a bulletproof addition that practically guarantees zero maintenance for life.
- Key Materials: 304-grade stainless sheet, contact cement
- Vibe / Style: Professional culinary
- Difficulty: Moderate
- Budget Breakdown: Steel Wrap: $250 | Underlayment: $40.
- Creator’s Tip: Always opt for a brushed finish rather than polished to effortlessly hide fingerprints and micro-scratches.
- Smart Sourcing: pre-bent 304 stainless steel caps and heavy-duty metal contact adhesive.
Outdoor Seating Bar Stool Configurations That Maximize Comfort
A stunning counter is useless if nobody wants to sit there. Upgrading your seating geometry directly influences how long guests linger, making intelligent furniture sourcing just as critical as the build itself.
7. Swivel Stools with 360-Degree Rotation
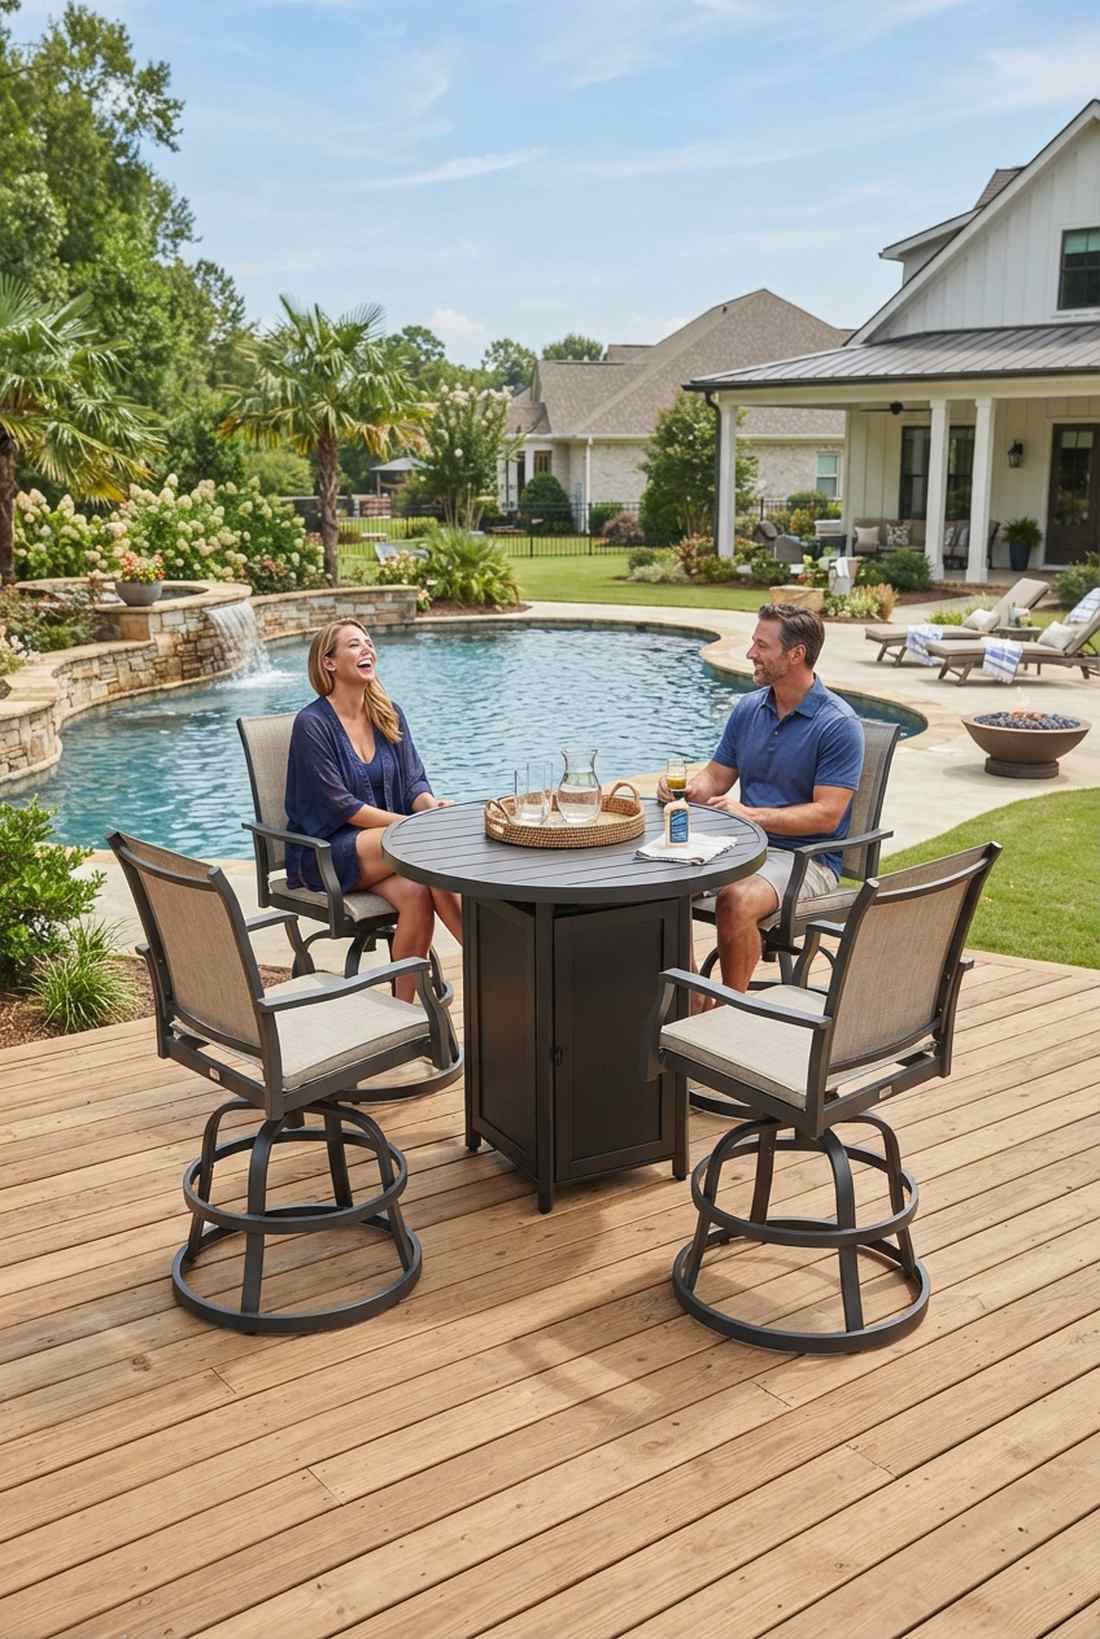

Provides the effortless flow of a bustling beachfront resort. A dynamic poolside seating zone is essential for spaces where the action happens in multiple directions.
Static chairs force awkward twisting, whereas installing smooth 360-degree mounts instantly makes the area feel custom and deliberate. Investing in weatherproof patio seating bundles ensures the swivels don’t rust shut after the first rainstorm.
A solid set of four will run roughly $250–$350. Save this to your deck planning board to remember the exact stool height ratio.
- Key Materials: Aluminum swivel bases, quick-dry cushions
- Vibe / Style: Casual resort
- Difficulty: Ready out of box
- Budget Breakdown: Stool Set: $300 | Fabric Guard: $15.
- Creator’s Tip: Spray the internal ball bearings with marine grease before assembling to double the lifespan of the swivel mechanism.
- Smart Sourcing: rust-proof aluminum swivel stools (set of 4) and marine-grade lubricating spray.
8. Backless Wicker Stools for Minimalist Appeal
Exudes a clean, uncluttered Mediterranean villa aesthetic. These space-saving woven patio stools slide effortlessly under the counter, making them brilliant for narrow walkways.
Bulky furniture ruins small patios, but utilizing backless silhouettes creates an illusion of massive square footage. Choosing high-density synthetic resin over natural rattan ensures a designer-level finish that never unspools.
You can grab a stylish set for around $120–$180. A fast, incredibly effective way to visually open up a cramped deck.
- Key Materials: Synthetic PE wicker, powder-coated steel
- Vibe / Style: Minimalist Mediterranean
- Difficulty: Zero setup
- Budget Breakdown: Seating: $150 | Base Protectors: $10.
- Creator’s Tip: Add heavy-duty rubber foot caps to prevent the metal legs from scratching your expensive deck boards.
- Smart Sourcing: UV-coated synthetic wicker stools (2-pack) and outdoor furniture foot glides.
9. Ergonomic Armrests with Contoured Backs
Feels like stepping into a plush VIP lounge area. Deep comfortable deck lounge chairs are mandatory for dining-focused setups where guests stay for multi-course meals.
Most people prioritize looks over posture, but upgrading to contoured lumbar support keeps family outdoors for hours. Sourcing commercial outdoor seating collections guarantees the mesh fabric won’t sag under daily use.
Expect to invest about $400 for a set of premium loungers. Pin this to your outdoor dining inspiration folder.
- Key Materials: Sling fabric, cast aluminum frames
- Vibe / Style: Upscale dining
- Difficulty: Simple assembly
- Budget Breakdown: Chairs: $380 | Covers: $45.
- Creator’s Tip: Look for textilene mesh fabrics—they dry in minutes after a downpour and don’t require high-maintenance cushions.
- Smart Sourcing: ergonomic textilene bar chairs (set of 2) and breathable outdoor chair covers.
💡 Must-Have Supplies for High-End Setups
To build these setups faster and ensure they last, skip the generic craft aisles and invest in the right foundational kits.
- Base & Support: pre-fab modular bar frame kits
- Setup Tools: heavy-duty concrete anchoring starter kits
- Weather/Durability Protection: commercial-grade UV clear sealants
10. Mixed-Height Seating Zones
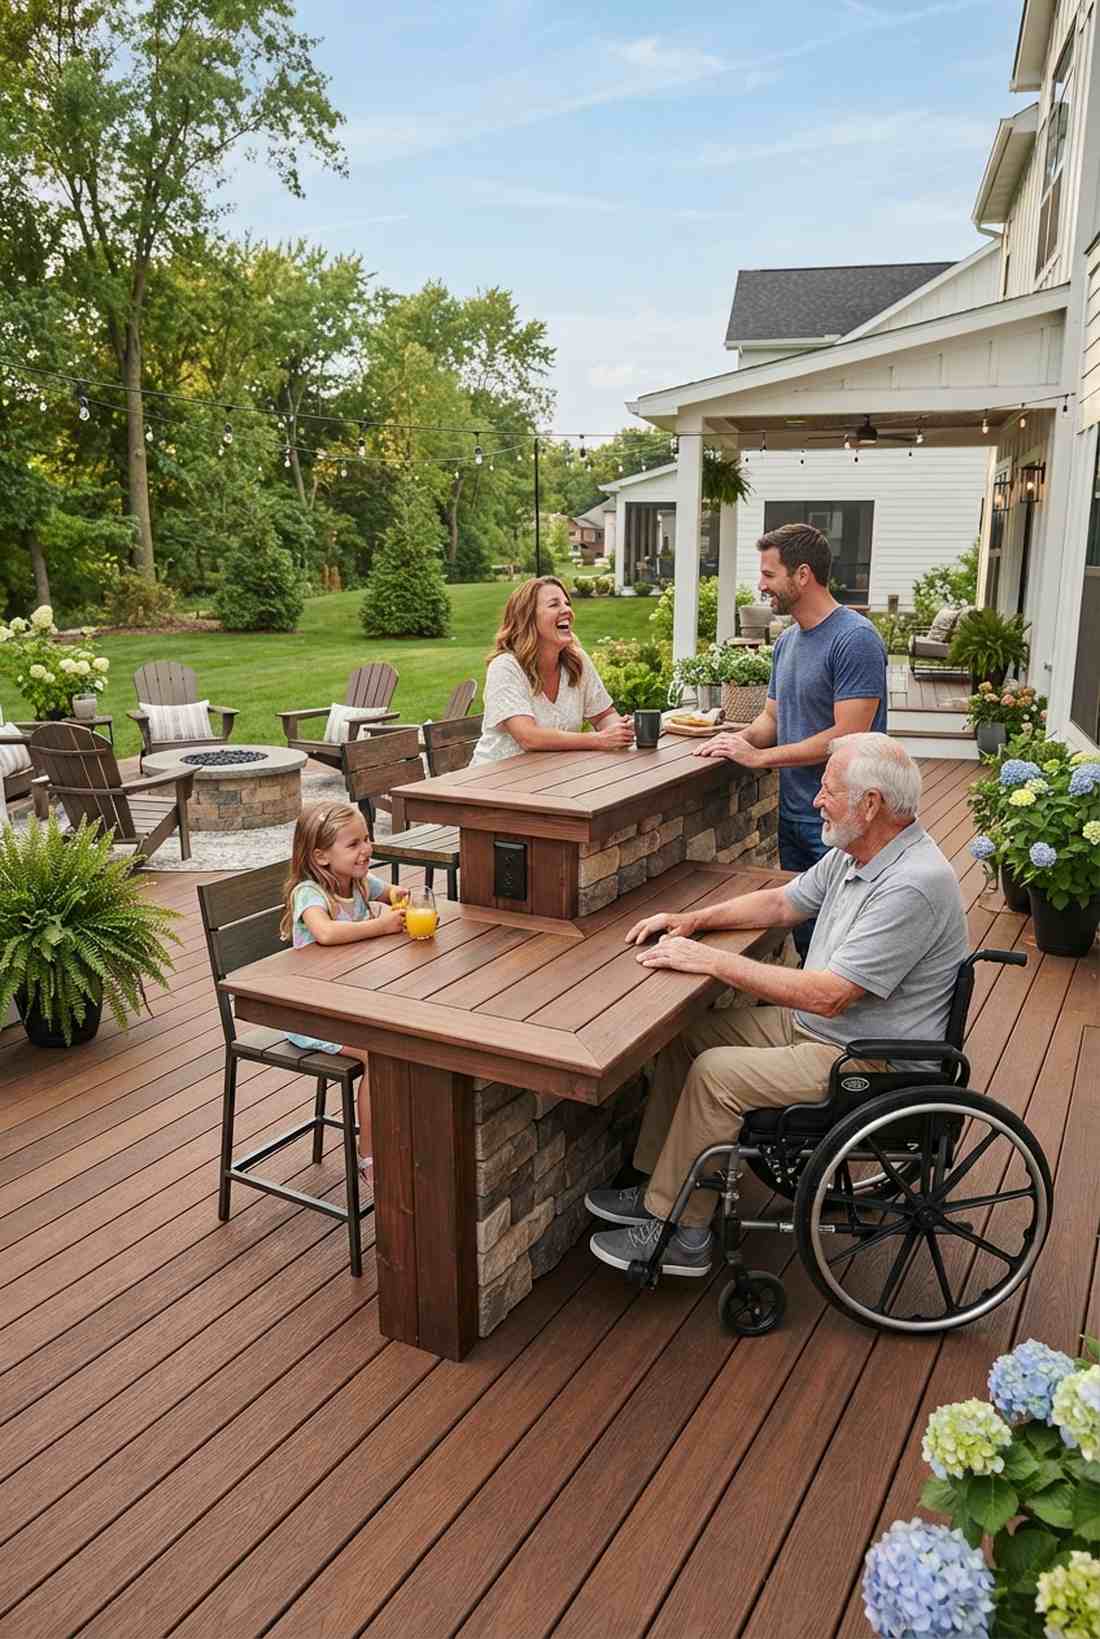
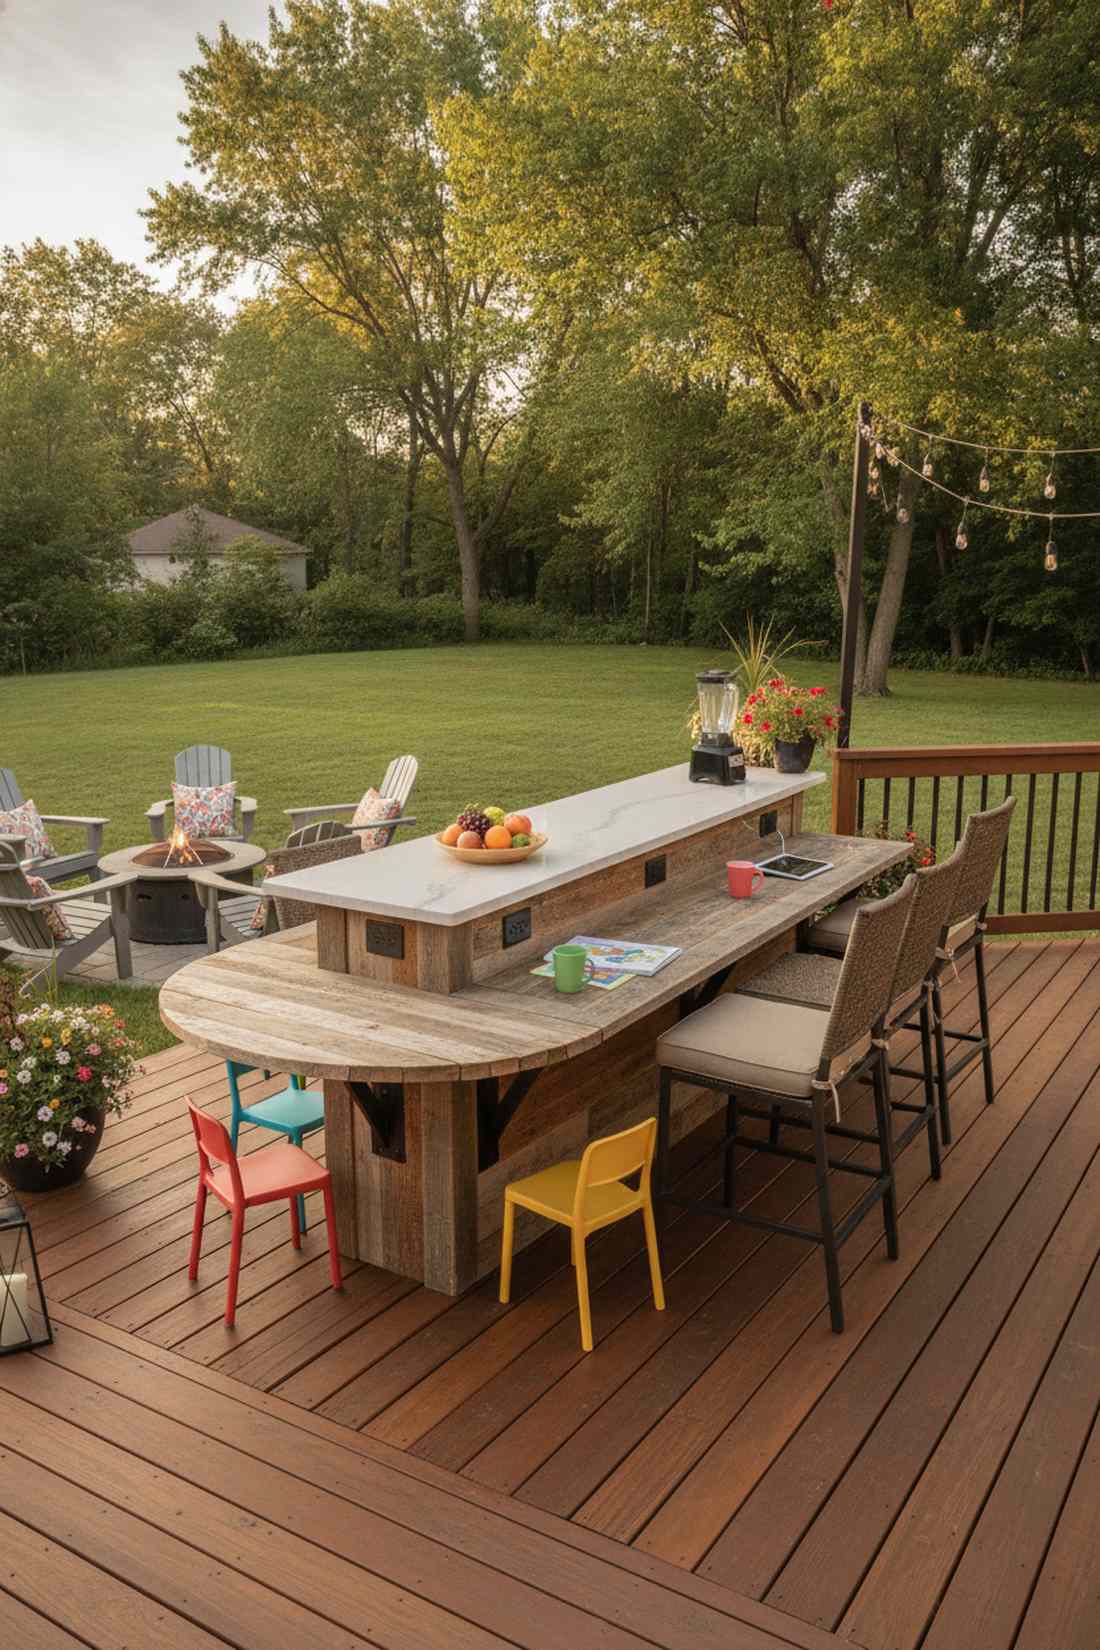
Creates the engaging dynamic of a multi-tiered amphitheater. A multi-level family entertainment bar is incredibly practical for households with varying age groups.
Standard flat counters can feel monotonous, but introducing a bi-level surface looks far more expensive than it is. Dropping one section to a 30-inch table height immediately makes the area wheelchair and toddler friendly.
Structural adjustments add maybe $50 to your lumber bill. It’s a genius architectural tweak that maximizes usability.
- Key Materials: Stepped brackets, dual-height seating
- Vibe / Style: Family-friendly custom
- Difficulty: Moderate framing
- Budget Breakdown: Extra Brackets: $30 | Additional Stools: $100.
- Creator’s Tip: Use the vertical space between the upper and lower tiers to hide weatherproof electrical outlets for blenders or phone chargers.
- Smart Sourcing: heavy-duty dual-tier countertop brackets and weatherproof outdoor GFCI outlet kits.
11. Built-In Bench Seating with Storage
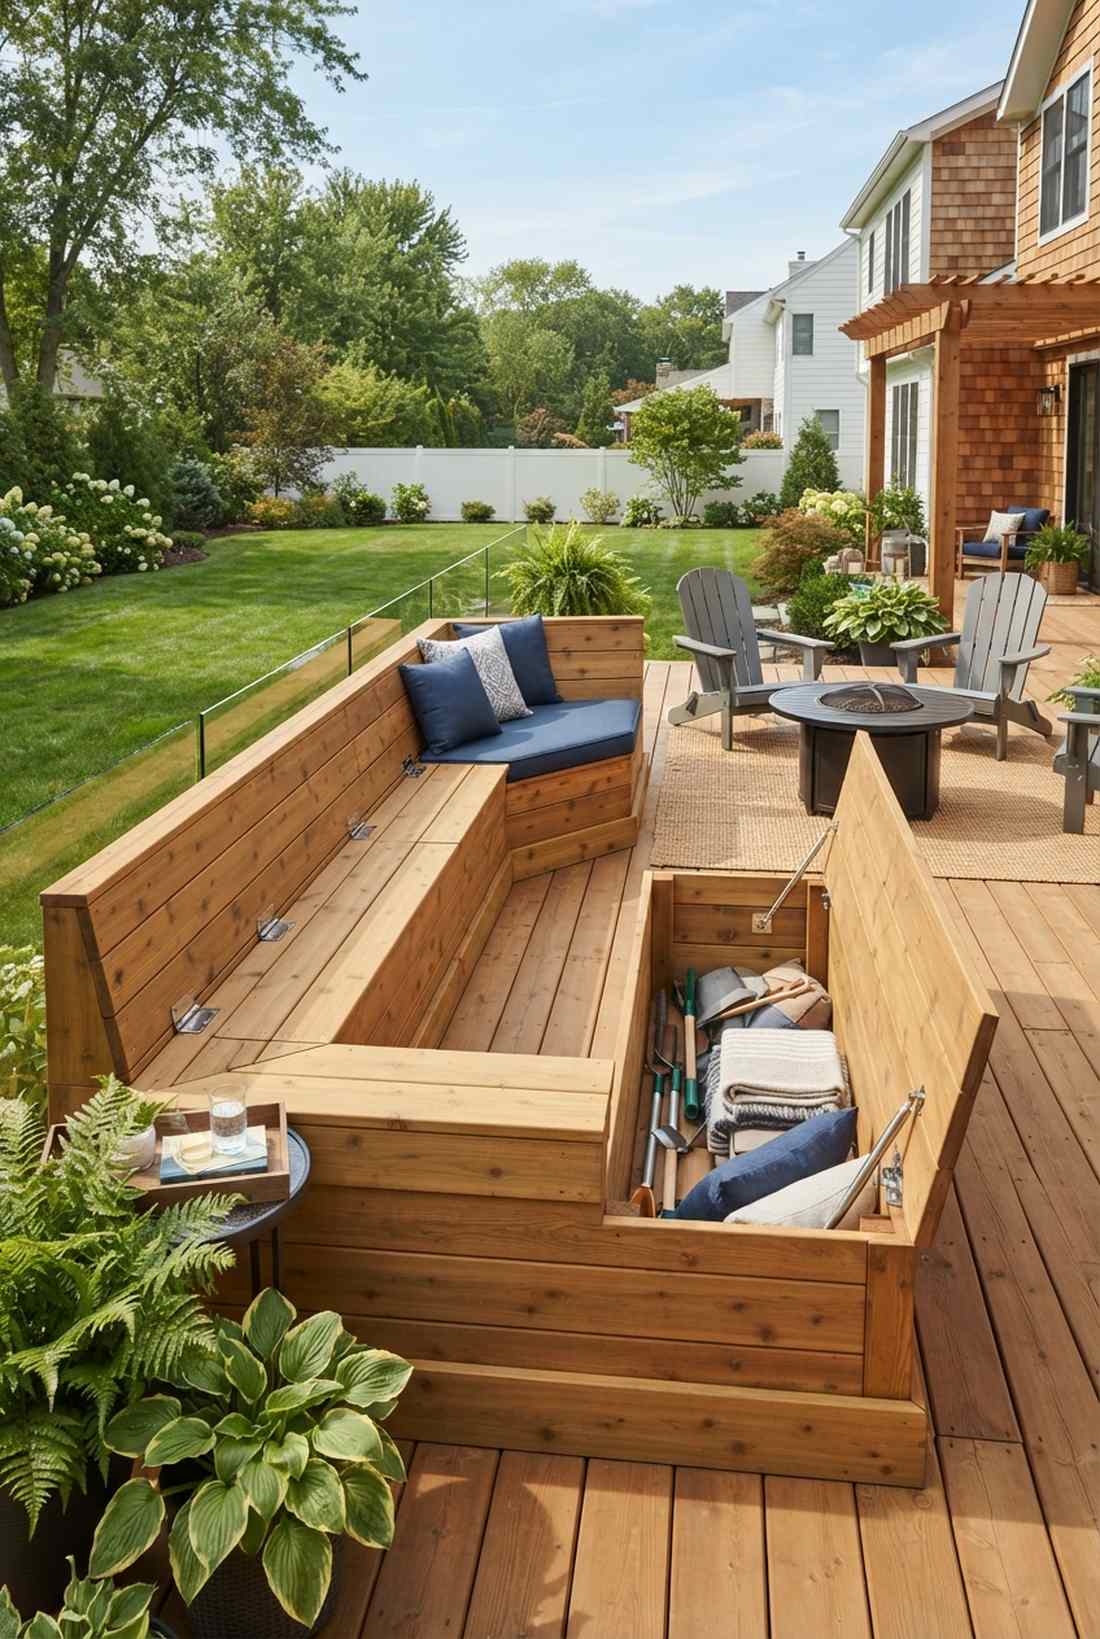
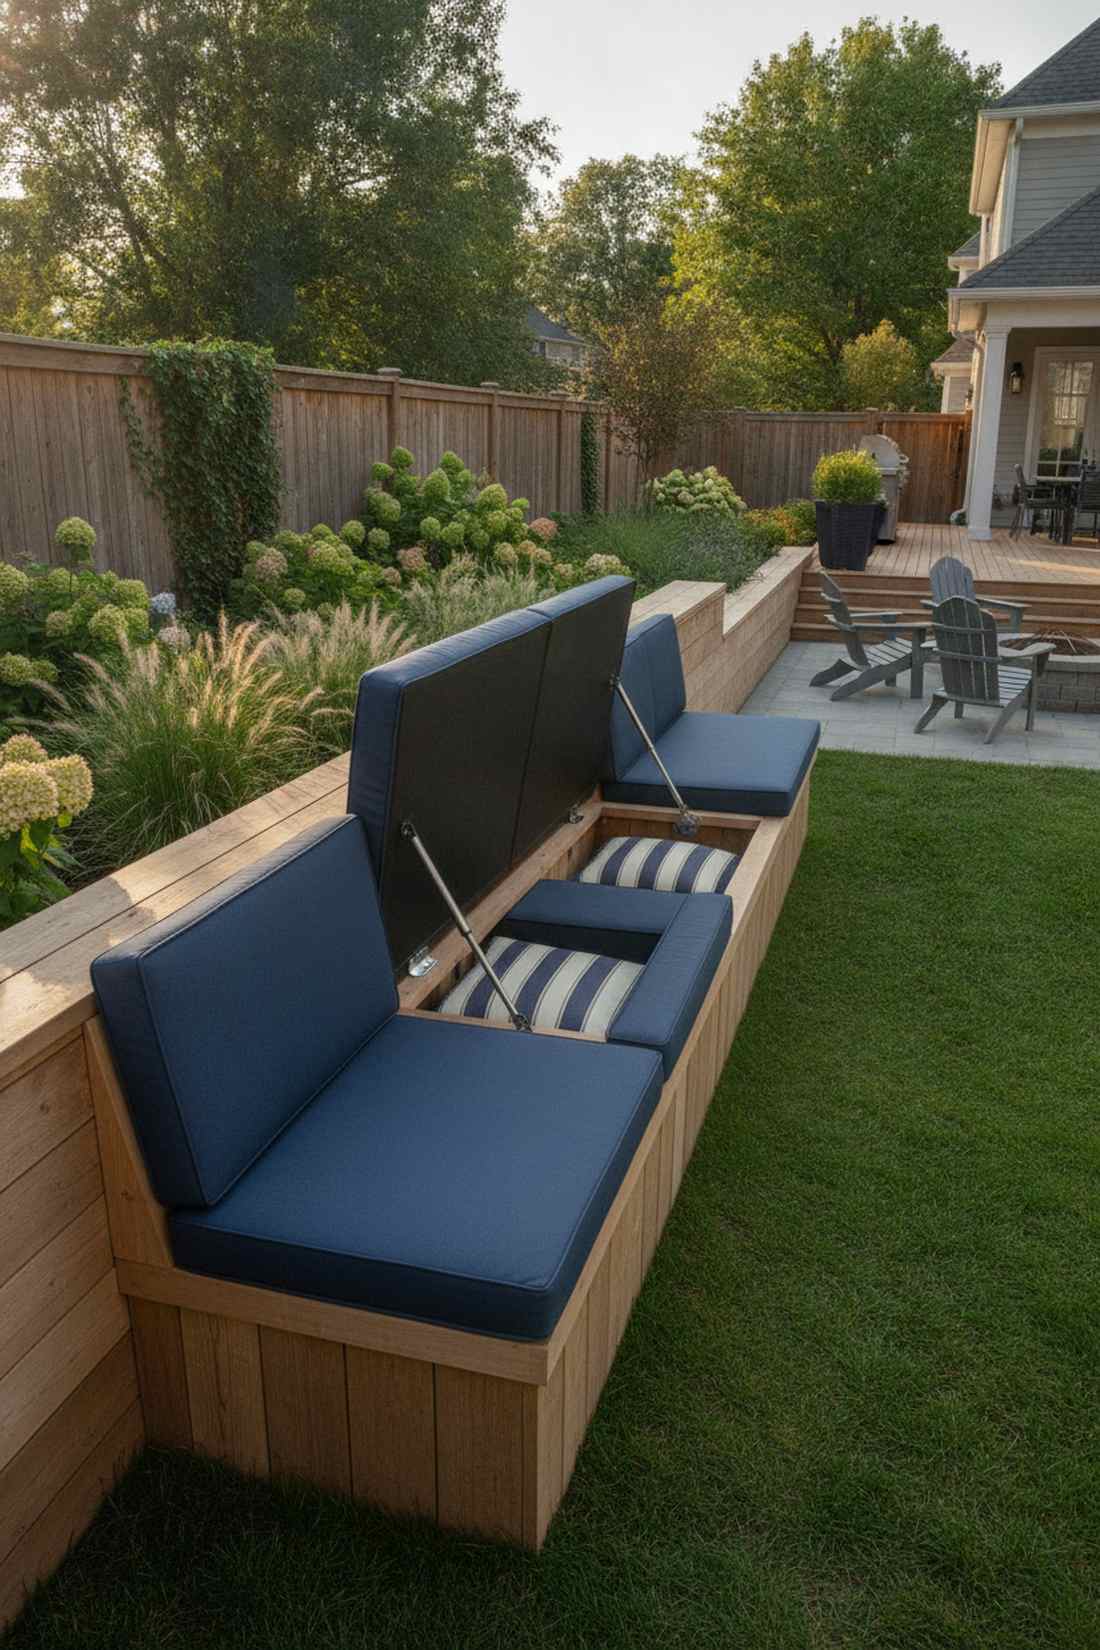
Delivers the ultimate custom-built yacht deck sensation. Implementing hidden storage deck seating works brilliantly along the back of a retaining wall or fence line.
Wasting the space under a seat is a massive missed opportunity when a simple hinge delivers a surprisingly premium look. Integrating waterproof deck box hardware keeps your winter cushions perfectly dry without buying ugly plastic bins.
Lumber and hinges will cost roughly $150–$200. Save this idea if you desperately need to declutter your patio.
- Key Materials: Pressure-treated lumber, marine vinyl, gas struts
- Vibe / Style: Integrated architectural
- Difficulty: Advanced carpentry
- Budget Breakdown: Wood & Hardware: $140 | Custom Cushion: $80.
- Creator’s Tip: Install gas-shock struts on the lid so it stays open safely while you pull out heavy bags of charcoal or cushions.
- Smart Sourcing: soft-close gas strut hinges (bulk pack) and marine-grade vinyl upholstery fabric.
12. Colorful Metal Stools as Accent Pieces
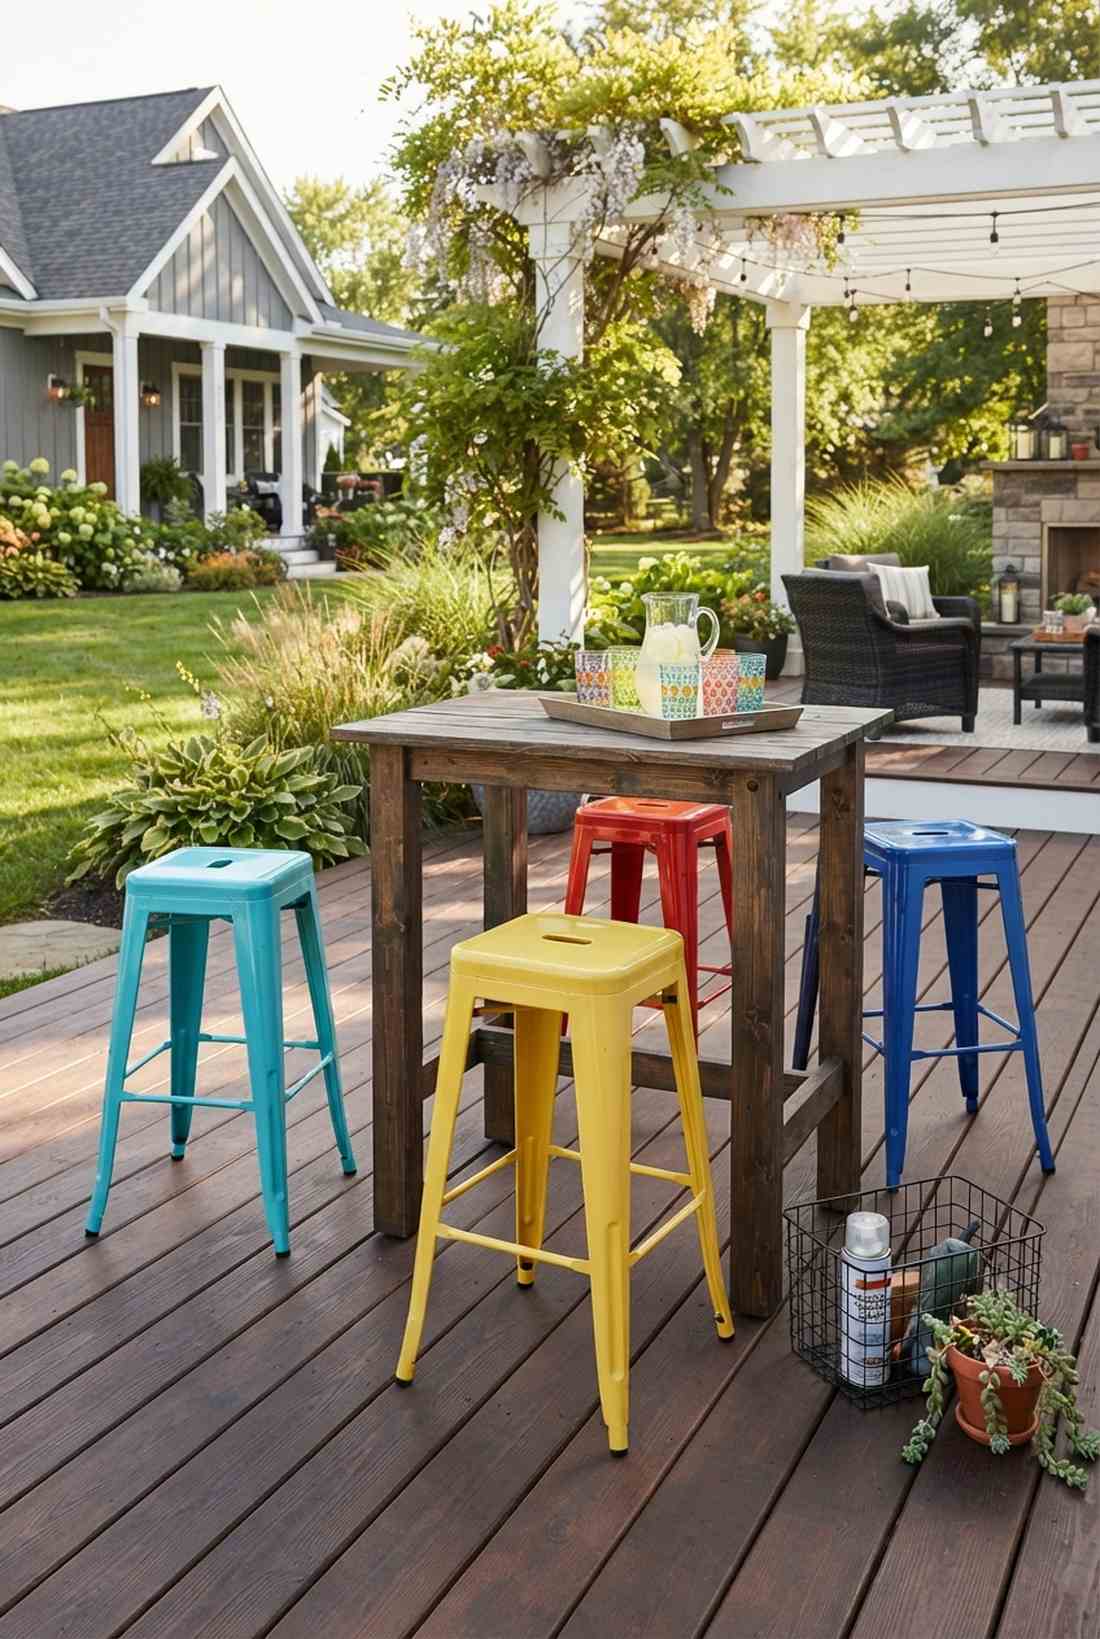
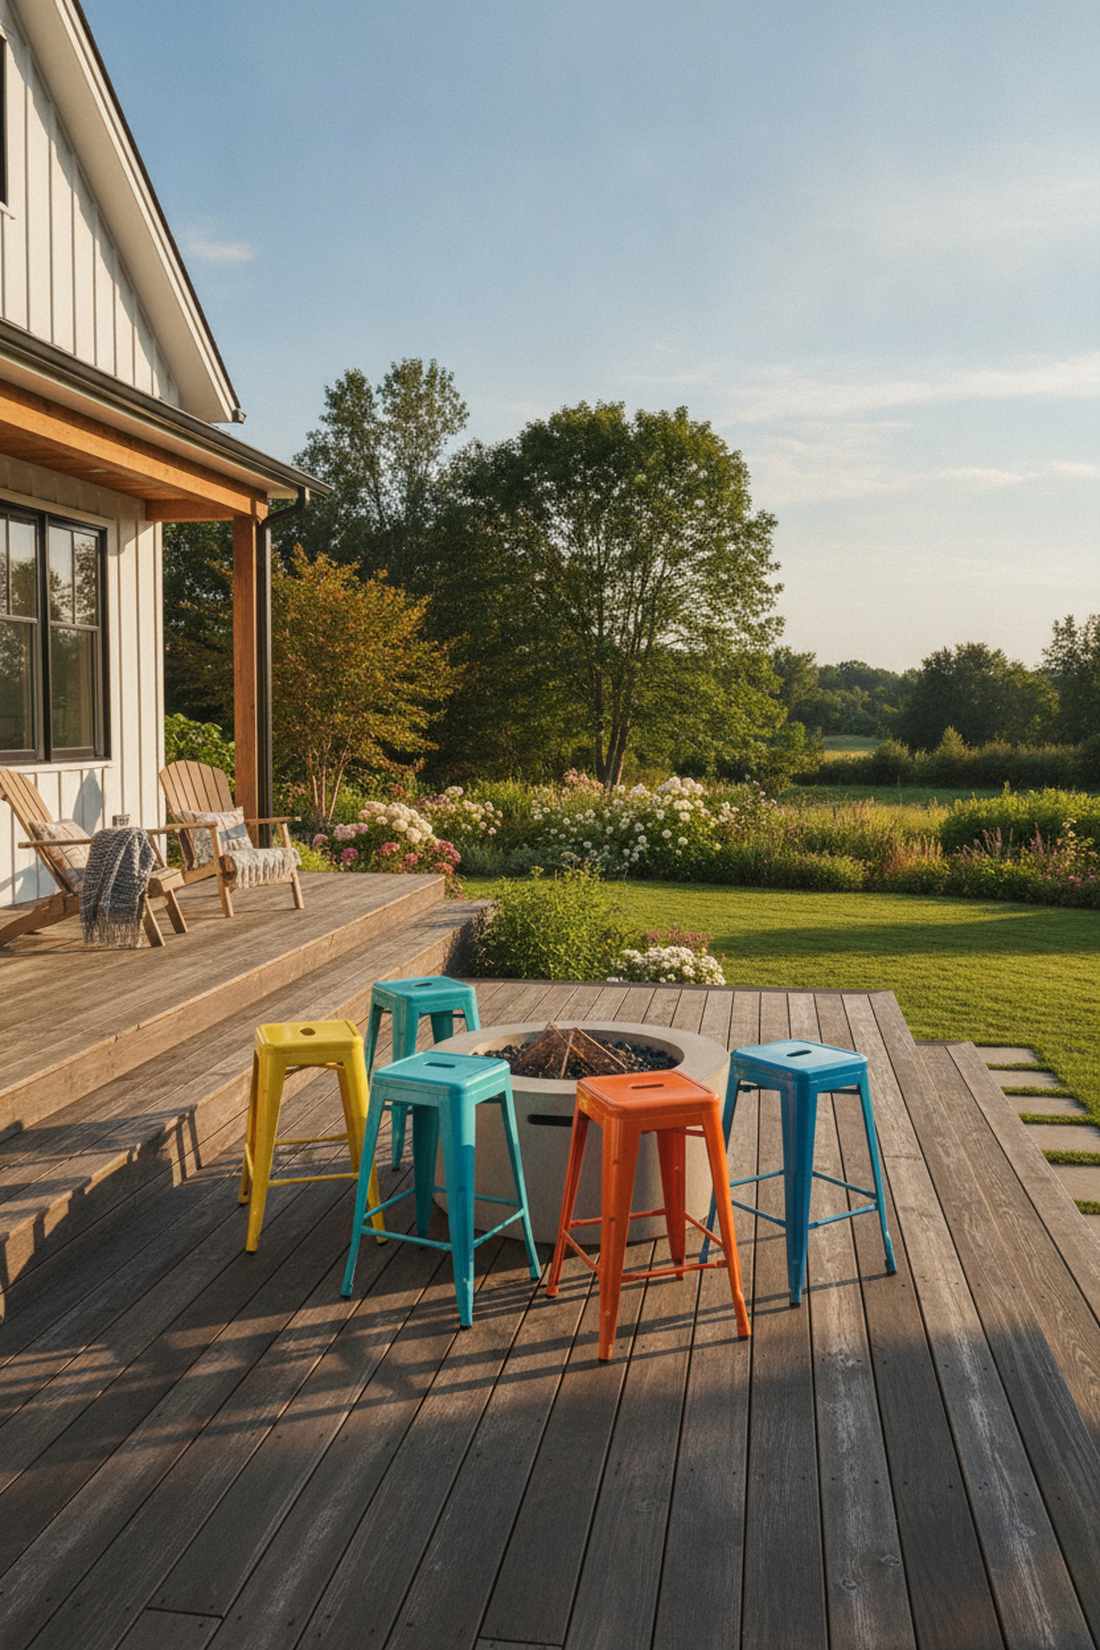
Injects a burst of joyful energy right out of a vintage bistro. These vibrant industrial garden accents look phenomenal popping against dark wood or concrete backdrops.
Neutrals can easily become boring, but throwing in bold powder-coated steel completely changes the vibe instantly. Purchasing bulk cafe seating bundles allows you to color-block your deck on a strict budget.
A bright set of four generally runs about $130. It’s a fast, non-permanent way to bring massive personality to a bland yard.
- Key Materials: Powder-coated galvanized steel
- Vibe / Style: Vintage bistro pop
- Difficulty: Zero setup
- Budget Breakdown: Stools: $120 | Touch-up Paint: $15.
- Creator’s Tip: Coat the undersides with automotive rust-proofing spray if you live in a high-humidity or coastal area.
- Smart Sourcing: stackable metal bar stools (4-pack) and clear rust-preventative enamel spray.
13. Hanging Swing Seats for Playful Energy
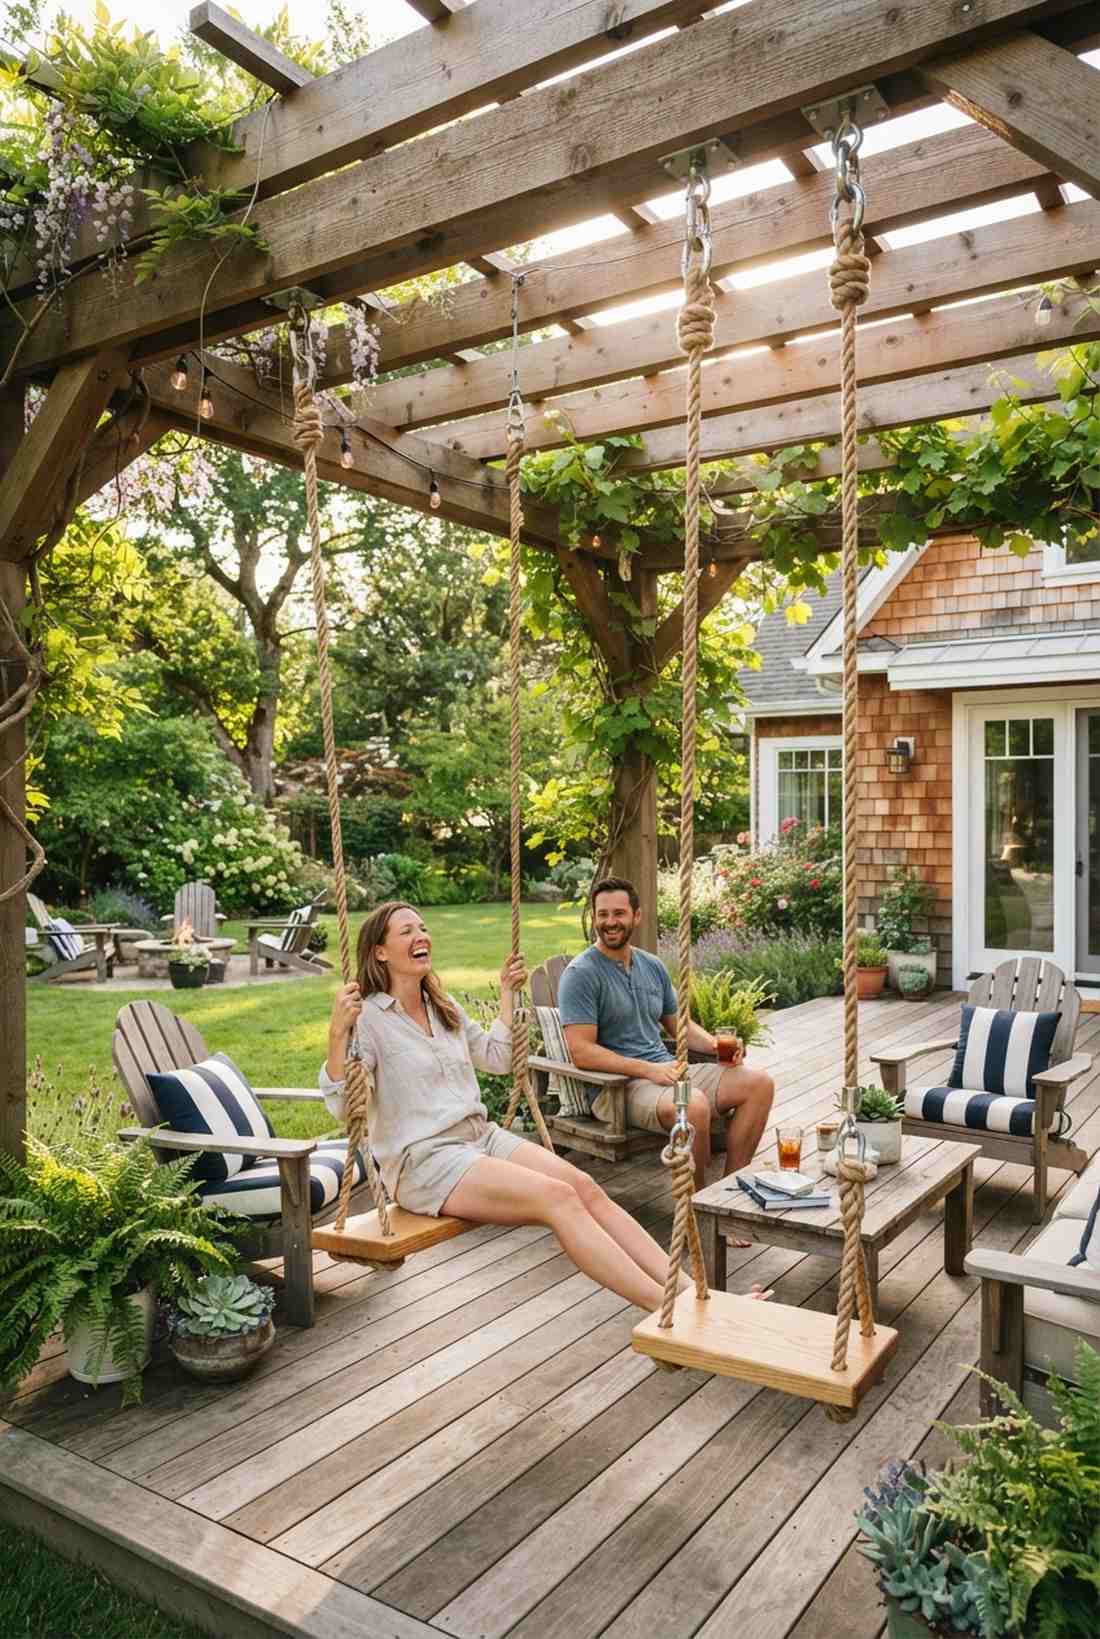
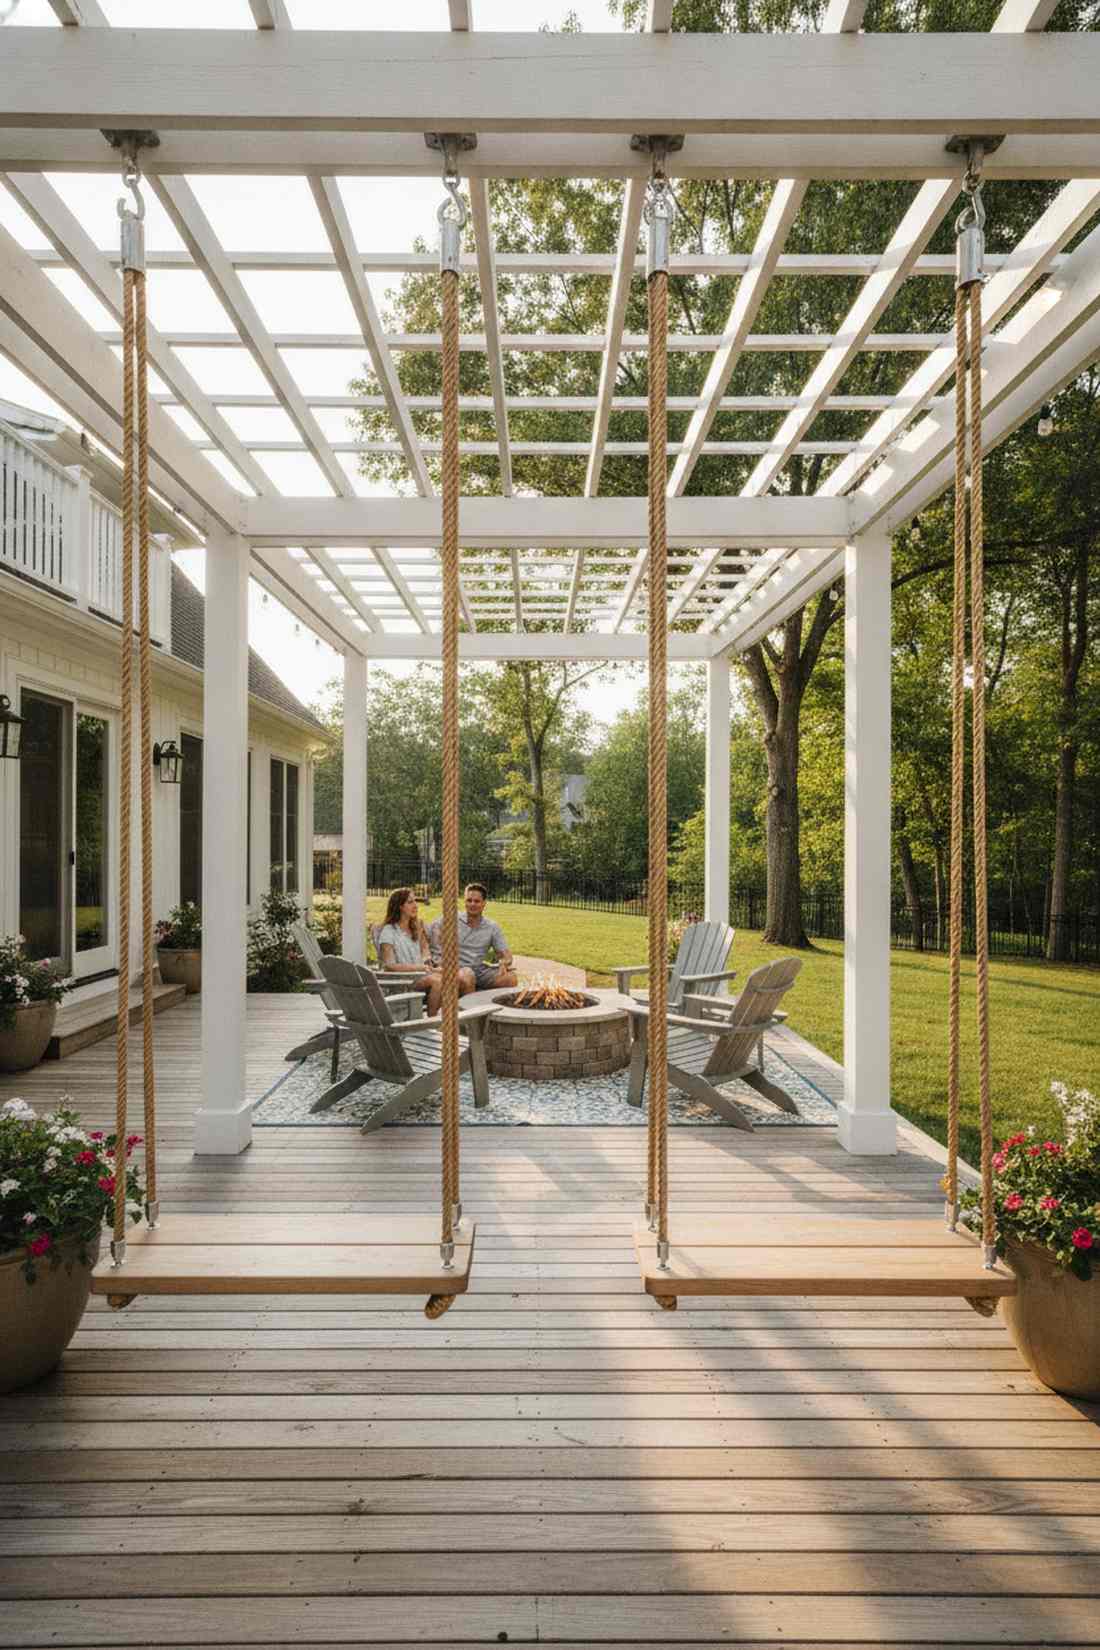
Feels like a whimsical luxury treehouse escape. Integrating playful suspended pergola seats transforms a rigid structure into an interactive conversation piece.
Traditional chairs take up too much footprint, whereas suspending heavy-duty seats from the rafters frees up the floor and looks far more expensive than it is. Using genuine marine rigging hardware guarantees absolute safety and a sleek nautical aesthetic.
Ropes and seats cost around $80–$150 per swing. Pin this if you want an unforgettable feature that guests will fight over.
- Key Materials: Manila rope, ceiling hooks, wooden swing planks
- Vibe / Style: Coastal treehouse
- Difficulty: Structural mounting
- Budget Breakdown: Swings: $100 | Hardware: $40.
- Creator’s Tip: Always mount the eye-bolts directly into the center of a load-bearing 4×6 beam, never just through the aesthetic slats.
- Smart Sourcing: heavy-duty suspension swing kits and stainless steel ceiling anchor brackets.
Most people get this completely wrong… until they try the exact layout coming up next.
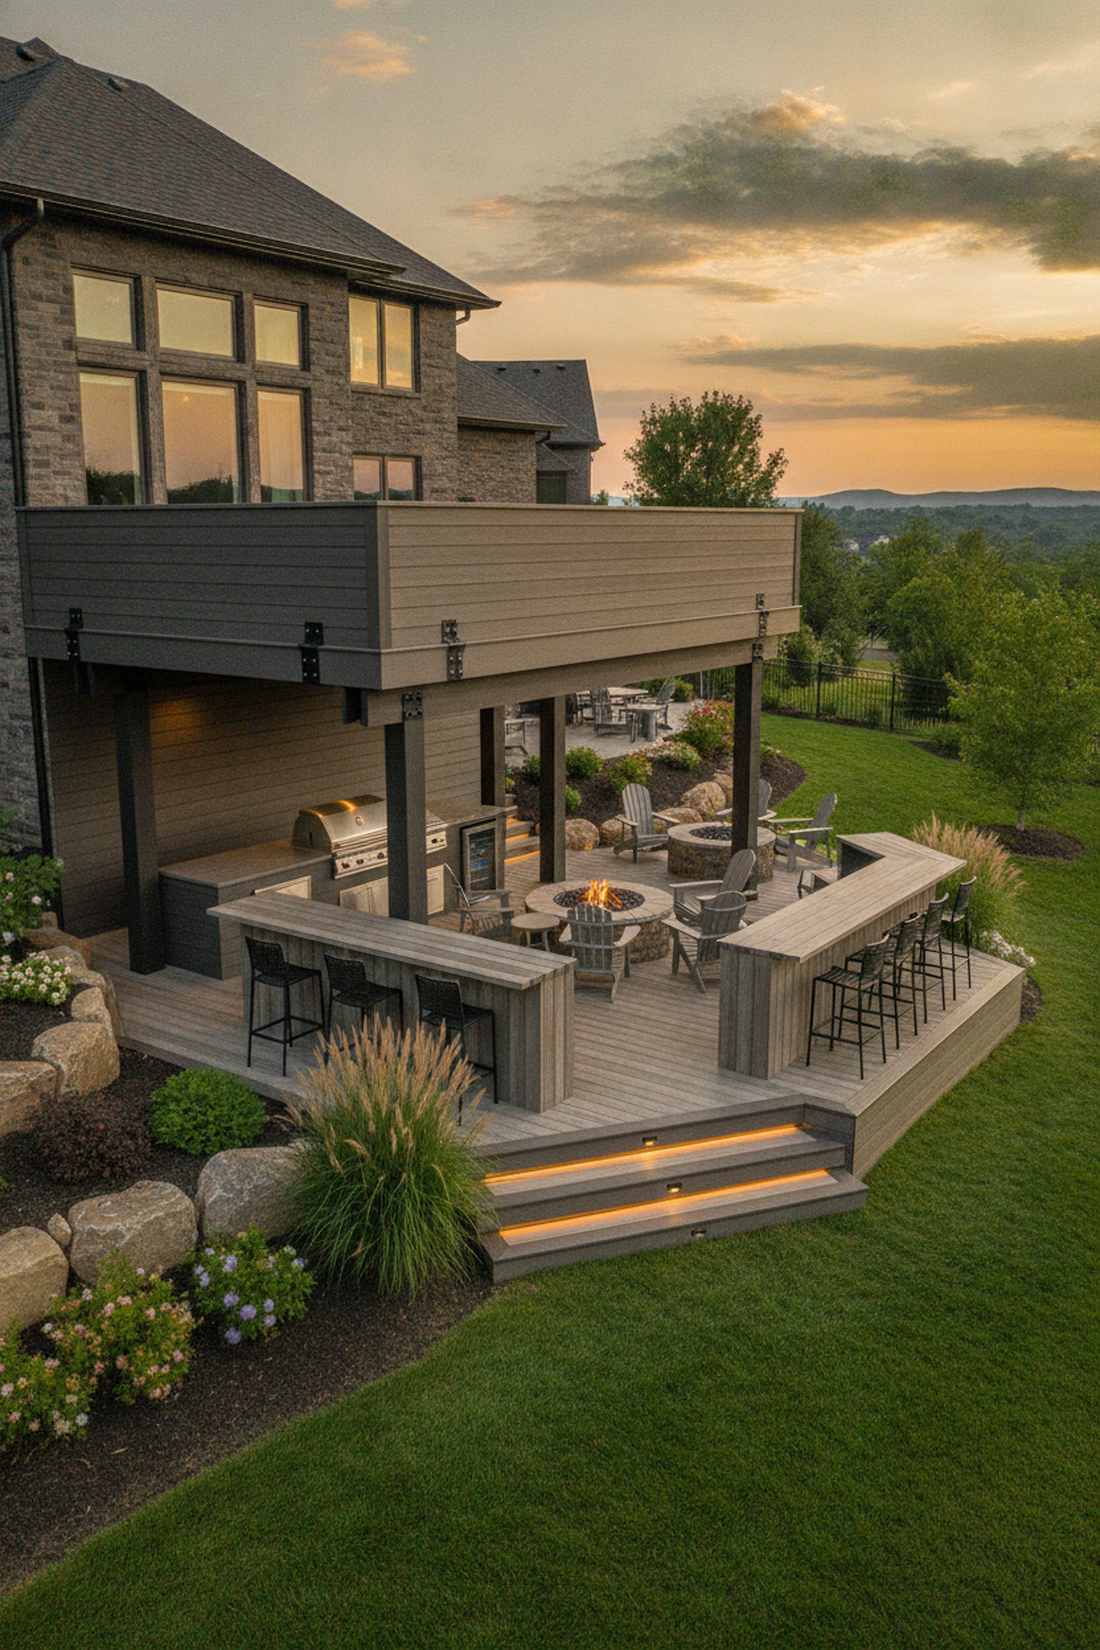
Shade Structures That Define Your Bar Zone
A bar exposed to the blistering afternoon sun quickly becomes an abandoned ghost town. Integrating smart, architectural shade solutions dictates whether your investment gets used all summer or ignored entirely.
14. Retractable Fabric Canopies
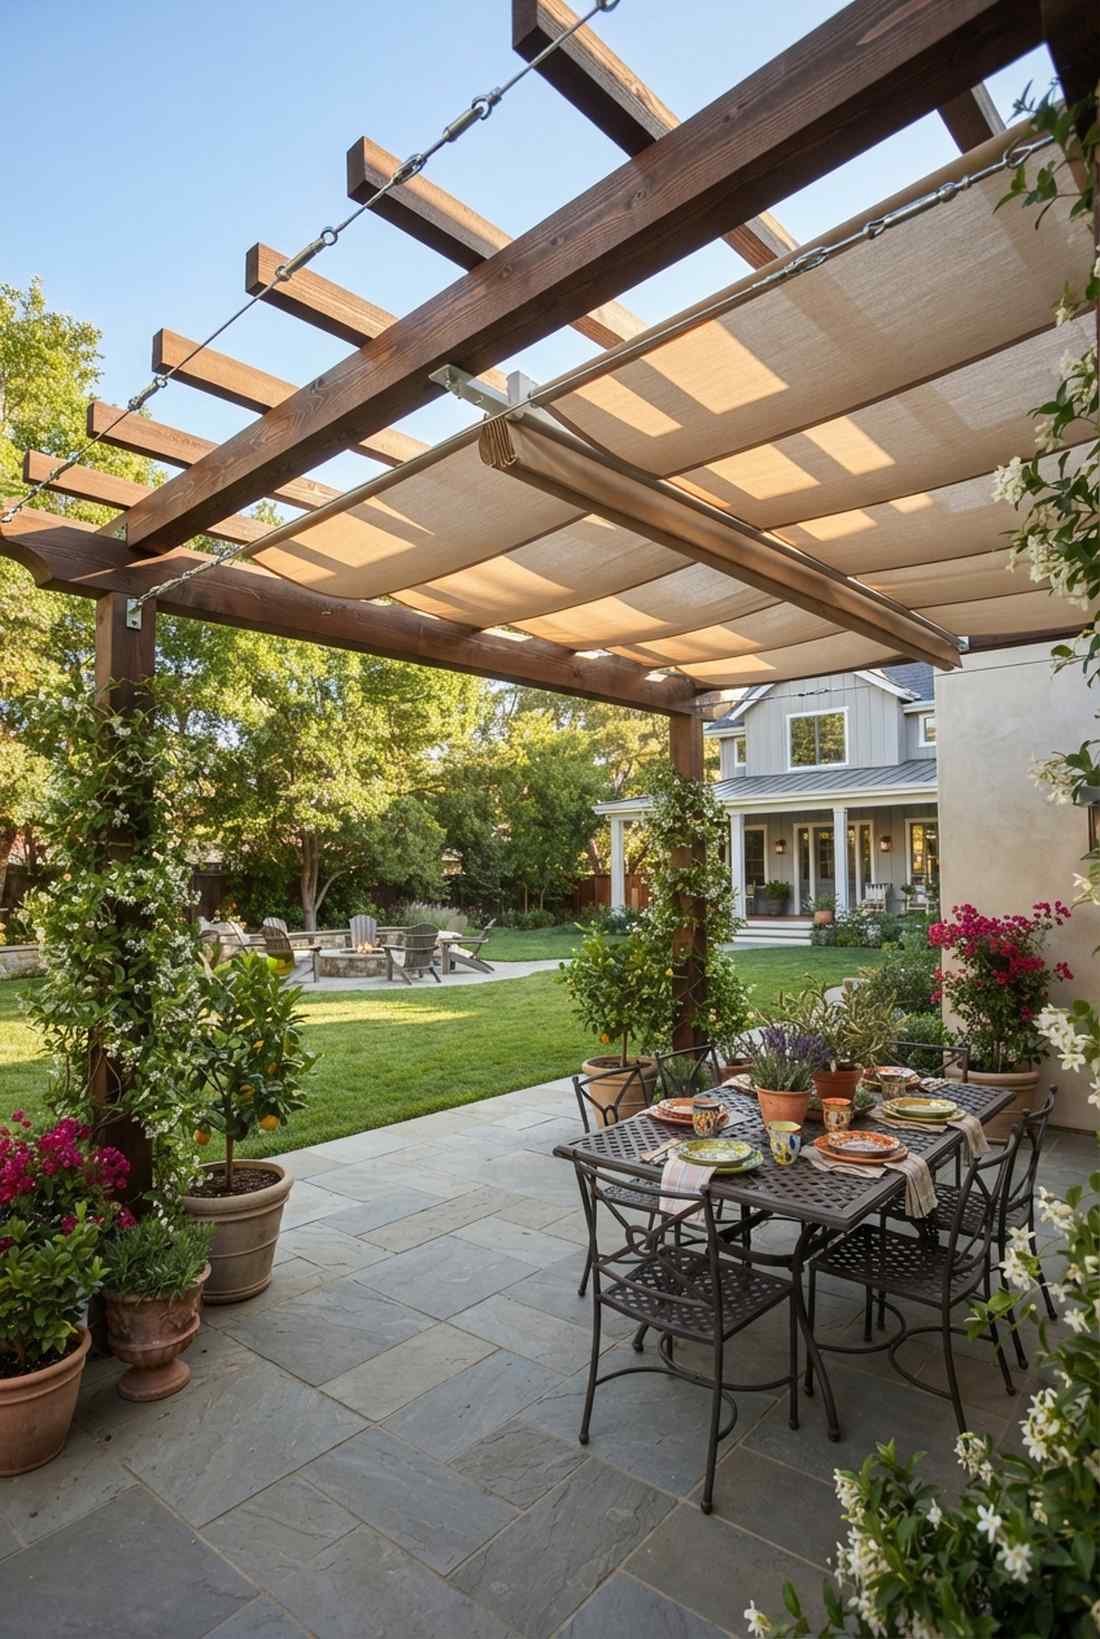
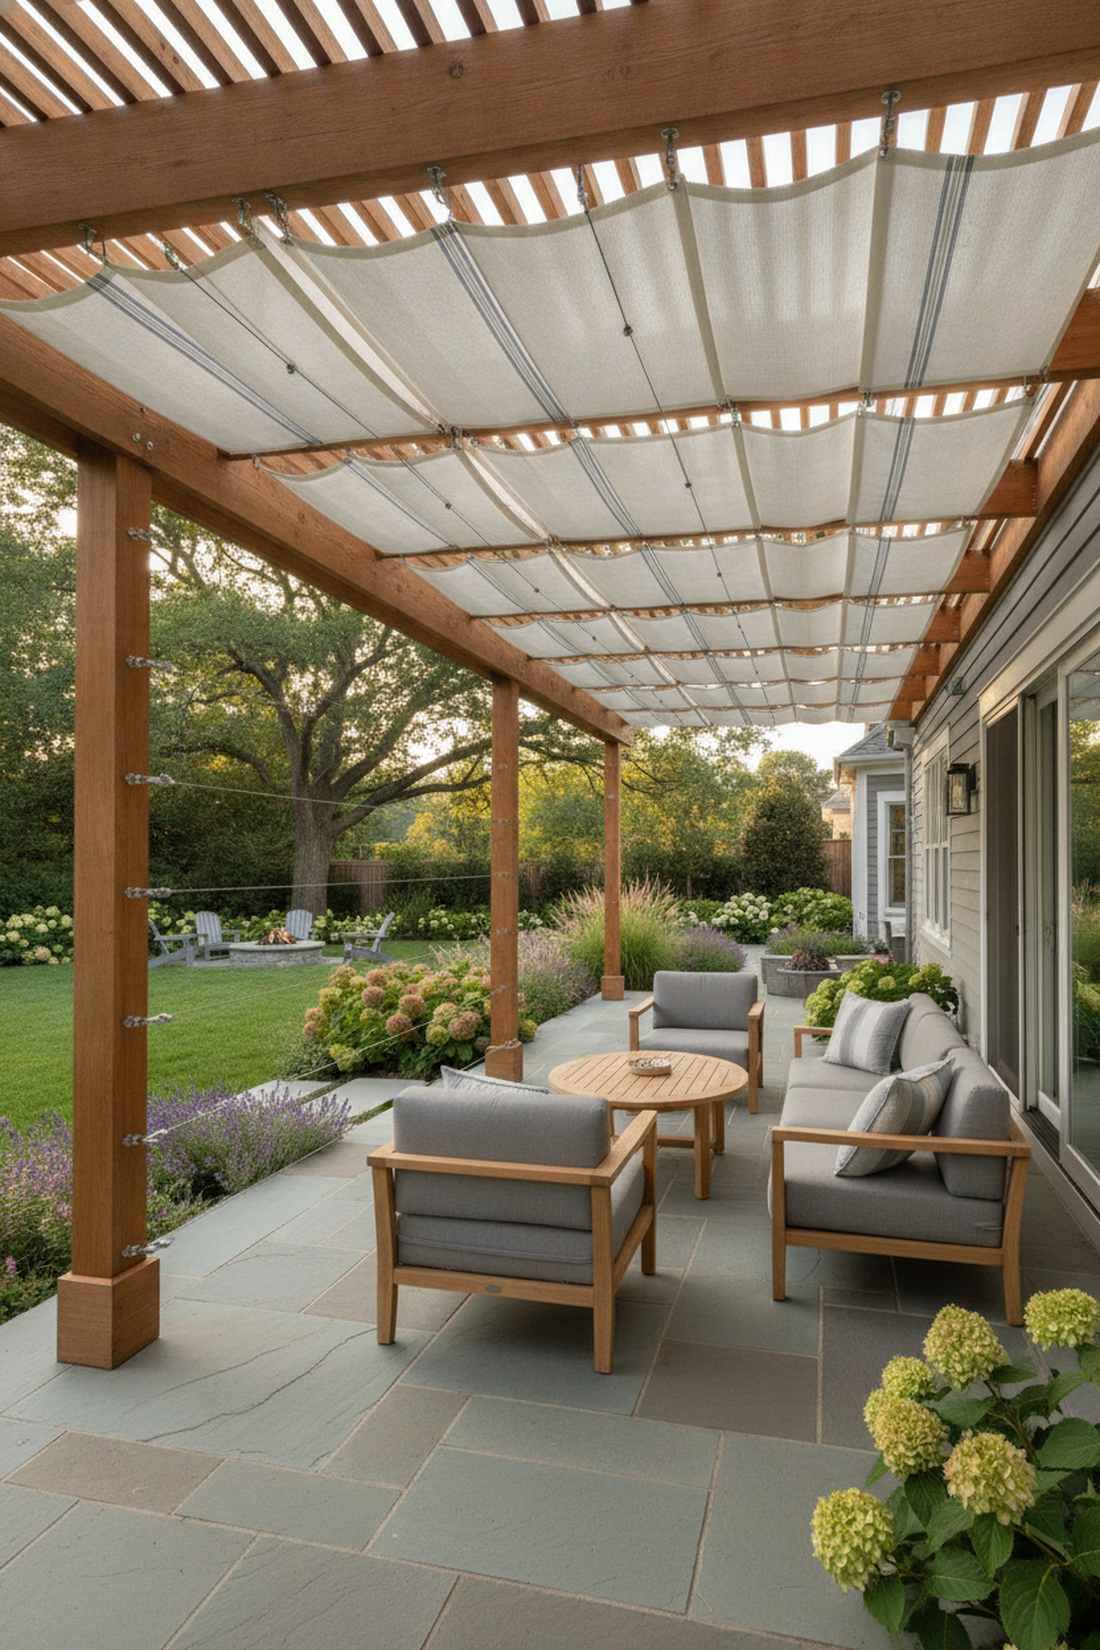
Delivers the breezy flexibility of an upscale café patio. An adjustable patio shade cover is perfectly suited for spaces that want sun in the morning but protection by 2 PM.
Fixed roofs block out too much ambient light, but a wire-slide canopy gives a designer-level finish that adapts to your mood. Investing in bulk pergola shade sails made of UV-blocking acrylic prevents the fabric from deteriorating.
Kits range from $150 to $300 depending on dimensions. Save this if you crave versatility in your outdoor entertaining.
- Key Materials: Sunbrella fabric, wire rope, turnbuckles
- Vibe / Style: European courtyard
- Difficulty: Moderate DIY
- Budget Breakdown: Canopy Kit: $200 | Extra Hardware: $30.
- Creator’s Tip: Angle the wire tracks slightly downward on one side so unexpected rain rolls off instead of pooling and tearing the fabric.
- Smart Sourcing: retractable slide-on wire canopy kits and stainless steel cable tensioners (bulk pack).
15. Polycarbonate Fixed Roof Panels

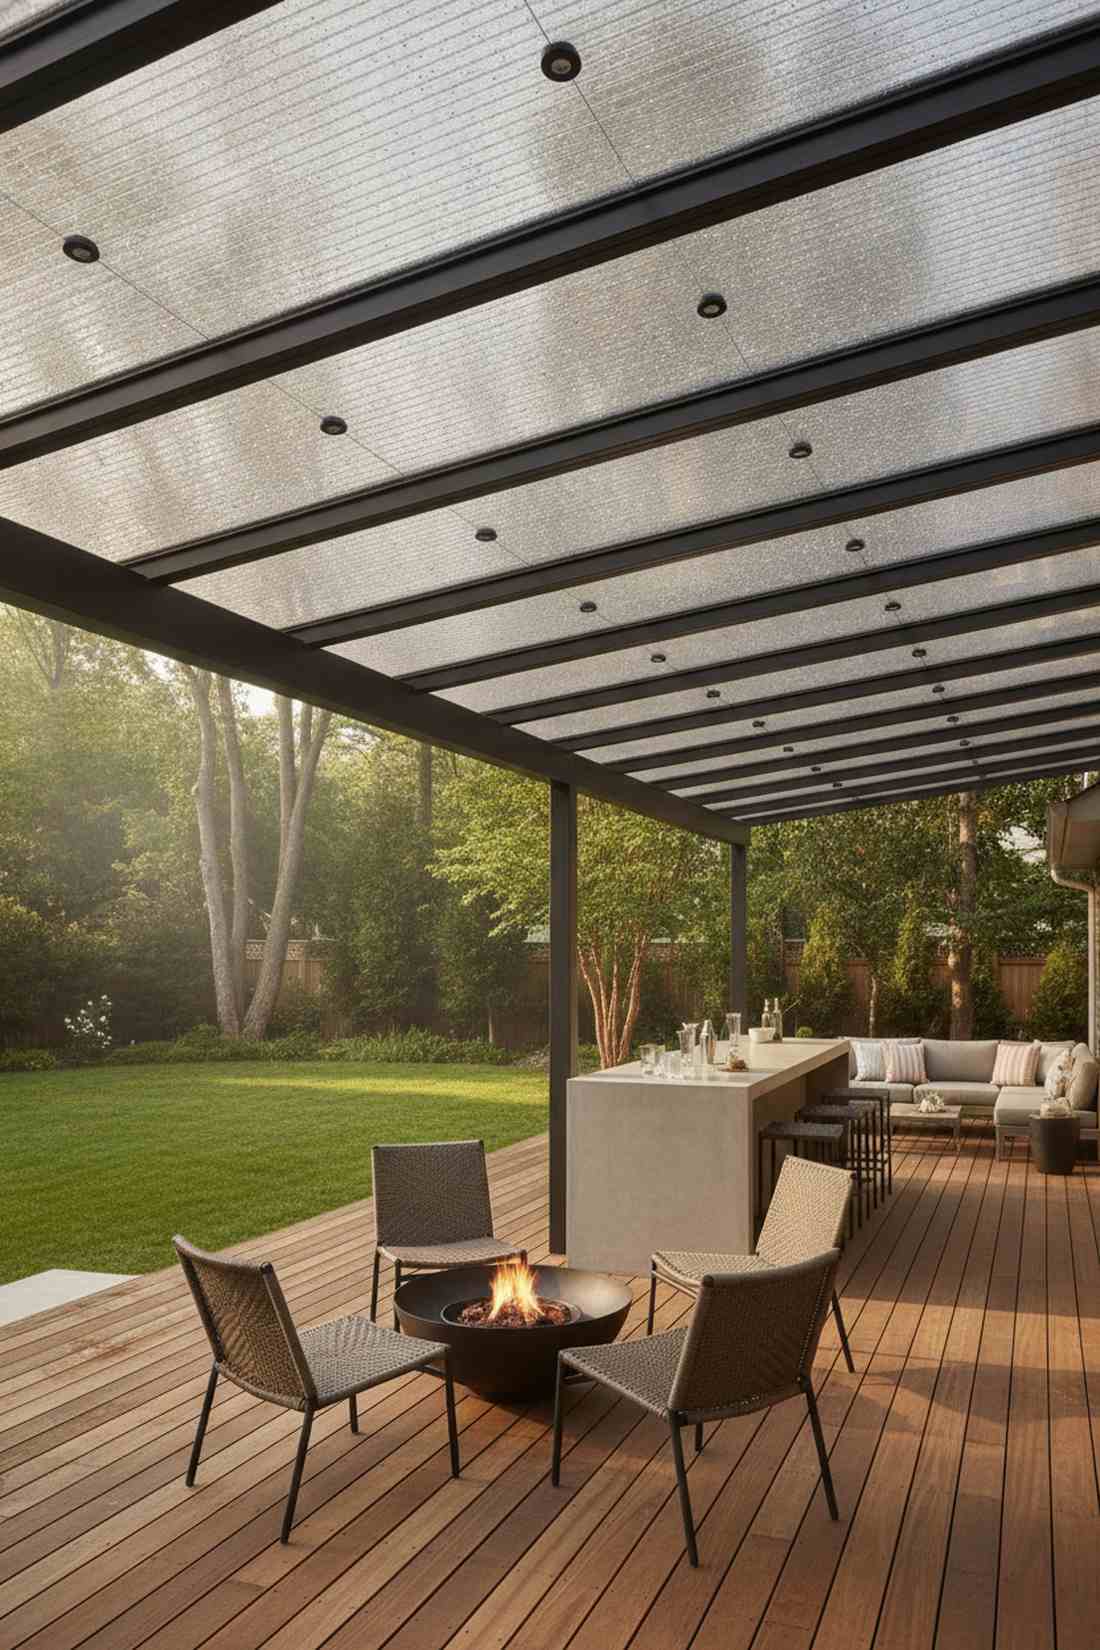
Provides the bright, open feeling of a modern greenhouse. An all-weather transparent bar shelter lets you host cocktail hours even during a sudden torrential downpour.
Solid shingles make a patio feel like a dark cave, whereas tinted structural plastic delivers a surprisingly premium look while blocking 99% of UV rays. Securing premium corrugated roofing bundles ensures impact resistance against heavy hail.
Material costs hover around $200 for a standard bar span. A brilliant way to weatherproof without sacrificing natural daylight.
- Key Materials: Tinted polycarbonate sheets, roofing screws with gaskets
- Vibe / Style: Modern architectural
- Difficulty: Easy installation
- Budget Breakdown: Panels: $150 | Fasteners & Closure Strips: $40.
- Creator’s Tip: Use foam closure strips under the panel edges to prevent wasps and spiders from nesting in the roof ridges.
- Smart Sourcing: UV-coated polycarbonate roof panels (bulk pack) and waterproof roofing screw kits.
16. Climbing Vine Pergola Roofs
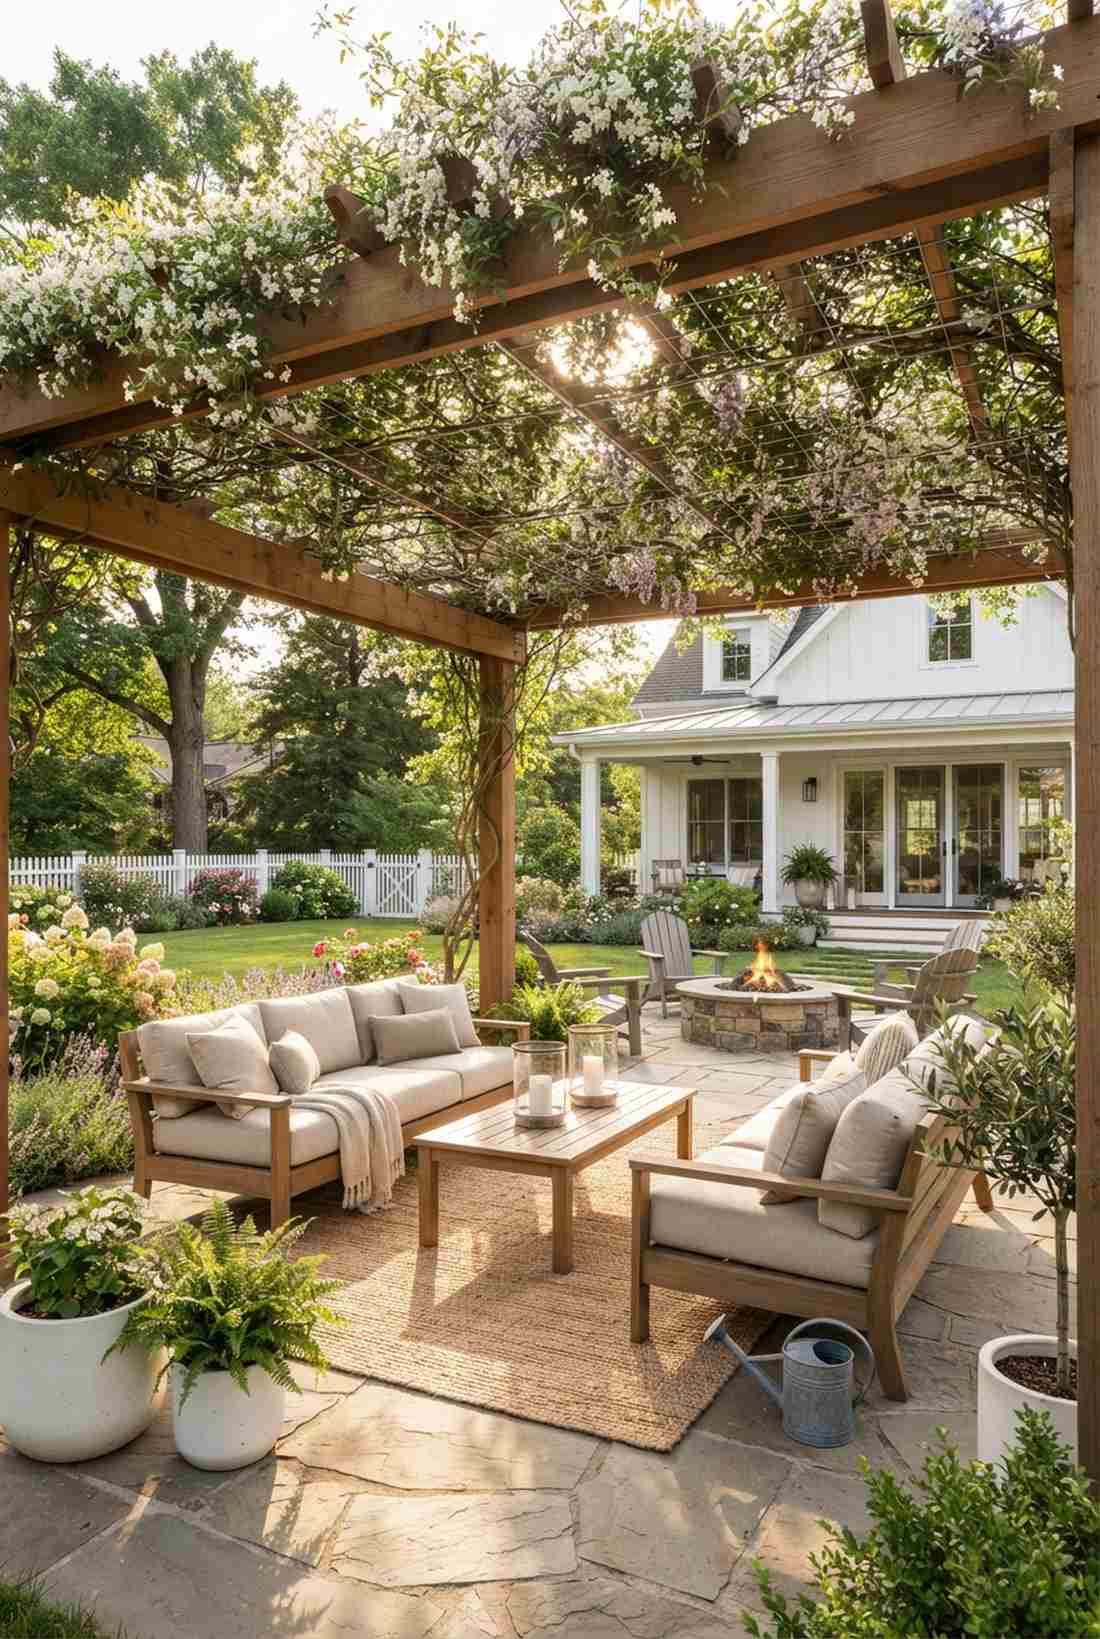
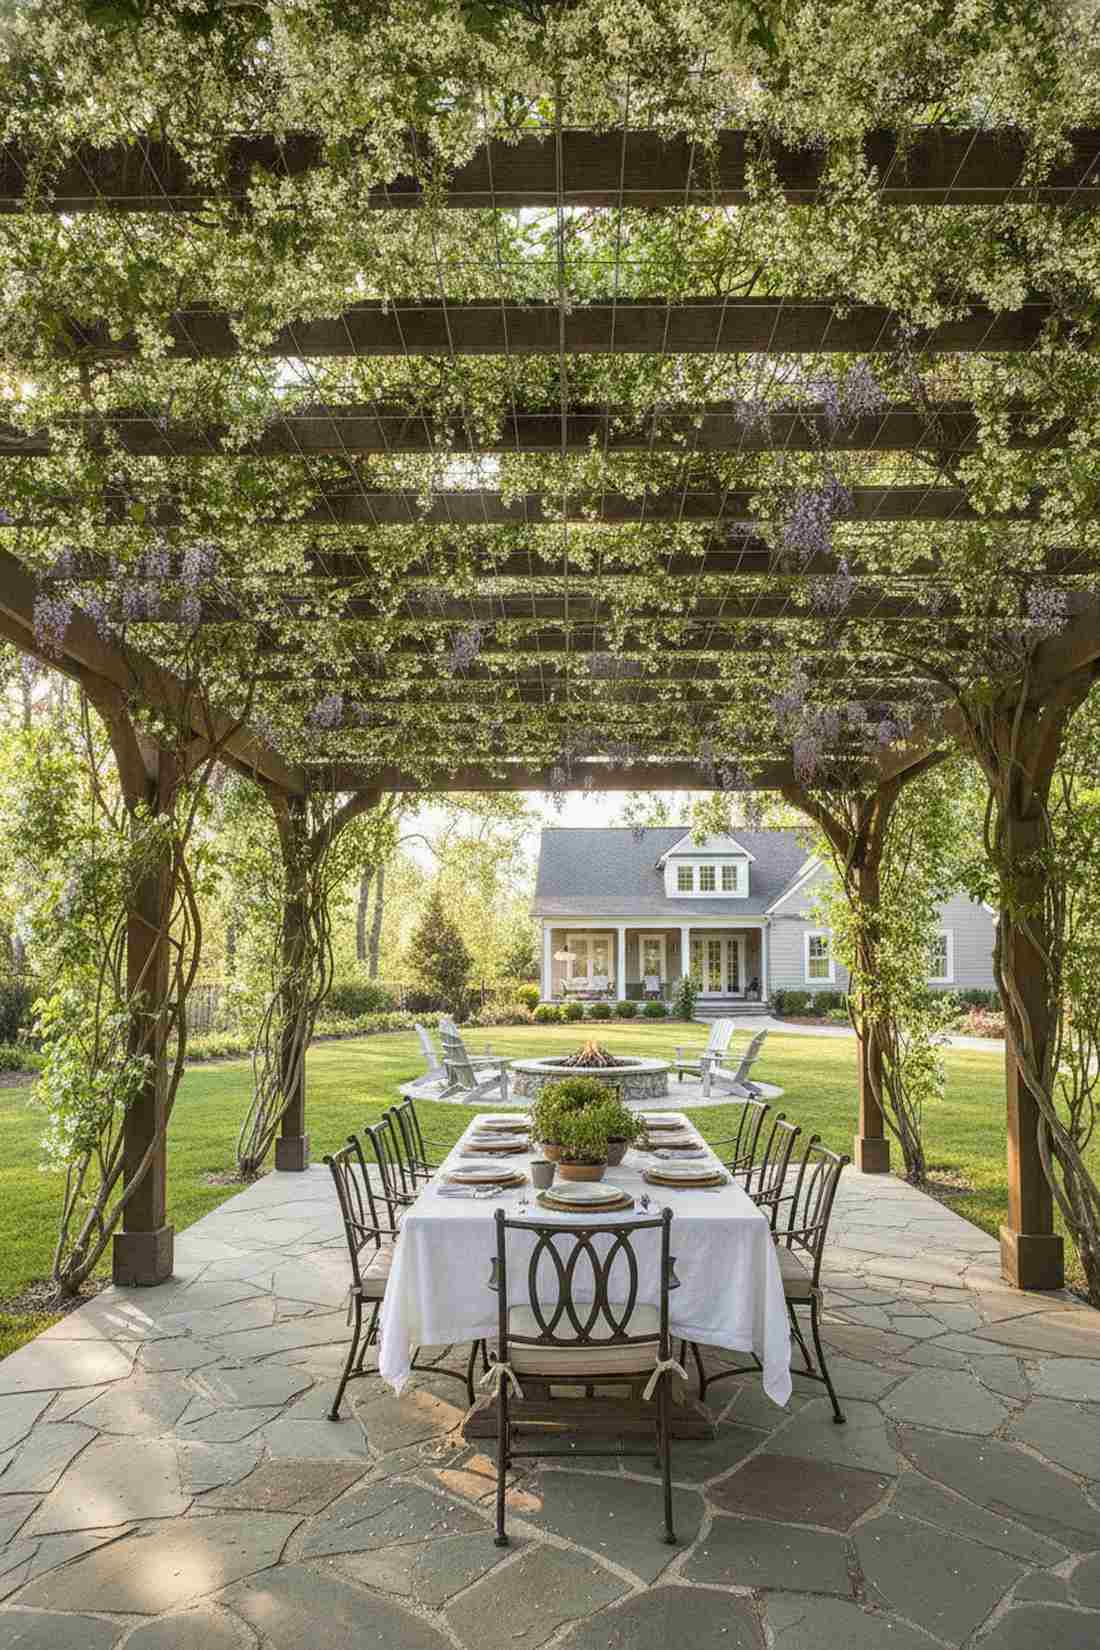
Feels like an ancient, romantic Tuscan vineyard. A living botanical pergola canopy thrives in lush garden settings where merging architecture with nature is the goal.
Artificial shade can feel sterile, but training fast-growing jasmine completely changes the vibe and naturally cools the air beneath it. Installing heavy-duty landscape wire trellises gives the vines the exact grid they need to spread rapidly.
Planting costs are incredibly low, often under $50. Pin this if you have a green thumb and patience for a stunning visual payoff.
- Key Materials: Wisteria or Jasmine vines, stainless training wire
- Vibe / Style: Romantic garden
- Difficulty: Ongoing maintenance
- Budget Breakdown: Plants: $40 | Wire Grid: $35.
- Creator’s Tip: Run the training wire on top of the rafters, not below, to keep the aggressive vine tendrils from creeping down into the seating area.
- Smart Sourcing: stainless steel vine training wire kits and fast-growing outdoor climbing starter plants.
17. Tensioned Shade Sails
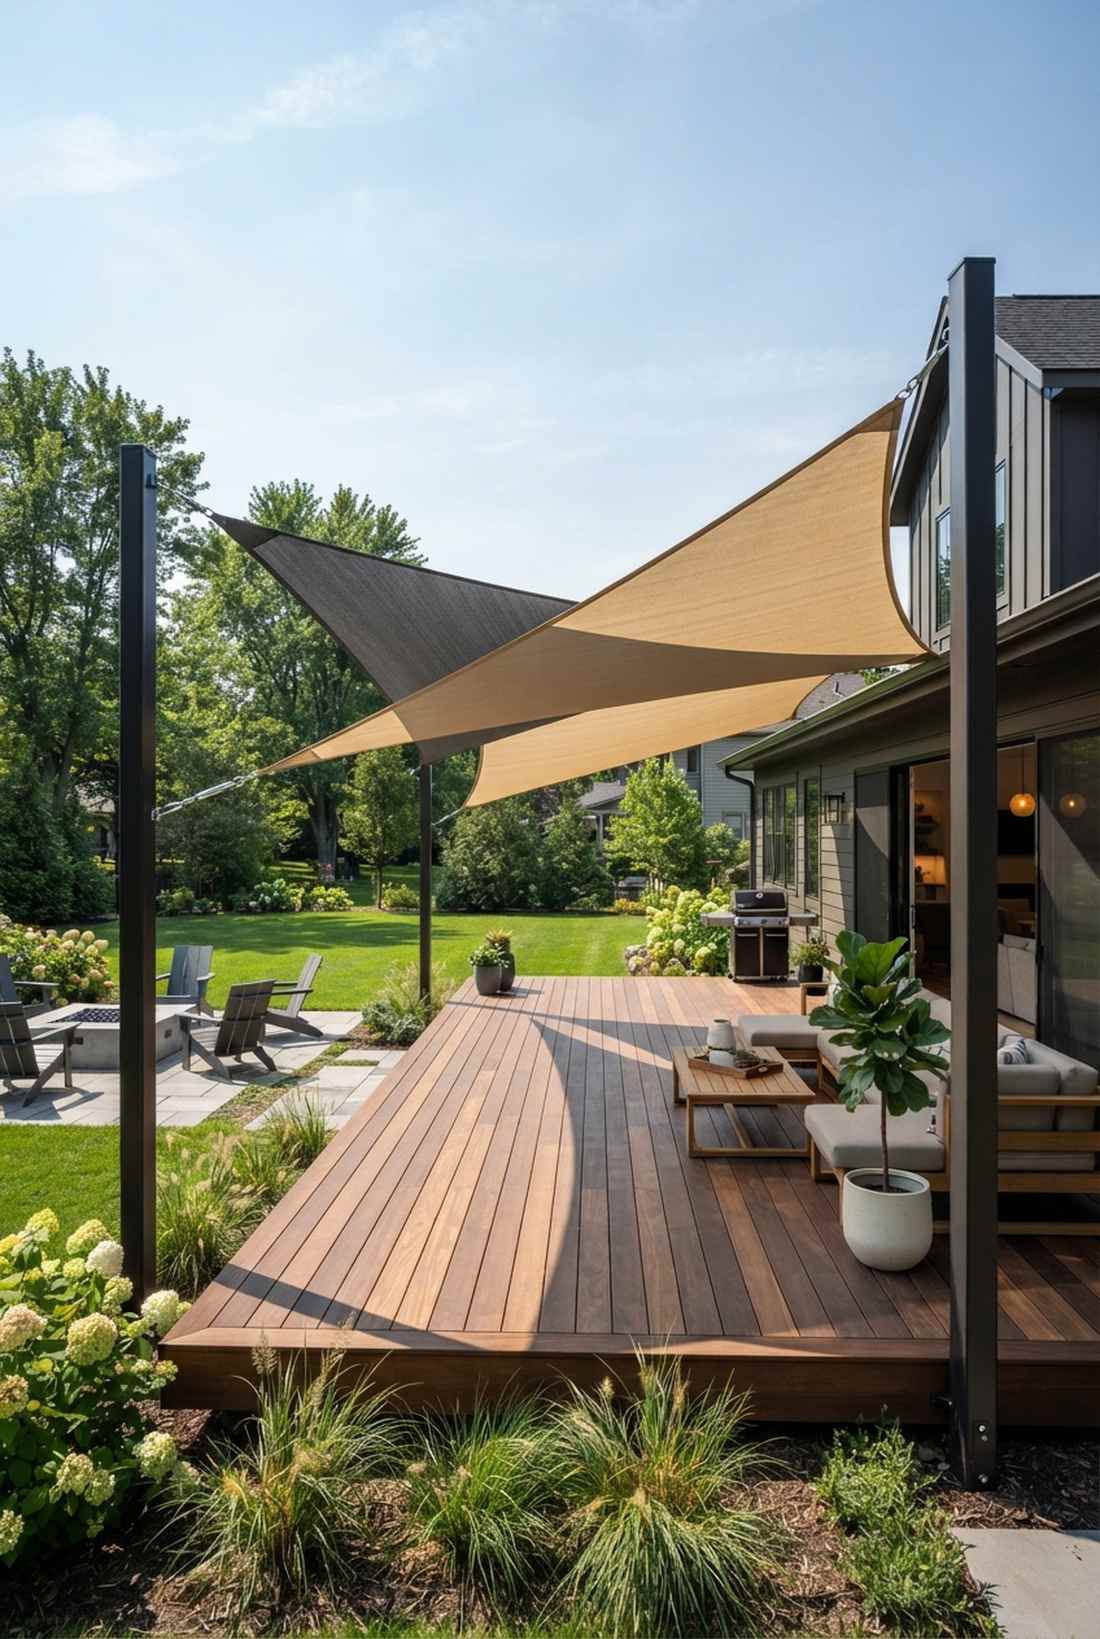

Brings the sharp, dynamic lines of modern architectural design. Modern tensioned deck awnings are ideal for wide-open backyard expanses needing dramatic visual structure.
Traditional umbrellas tip over in the wind, but anchoring overlapping geometric sails delivers a shockingly high-end finish. Sourcing commercial-grade shade sail hardware prevents the canvas from sagging after heavy winds.
A dual-sail setup typically costs between $100 and $180. Highly recommended for adding modern flair on a tight budget.
- Key Materials: HDPE shade fabric, heavy-duty D-rings, steel posts
- Vibe / Style: Contemporary minimalist
- Difficulty: Math-heavy measuring
- Budget Breakdown: Sails: $80 | Hardware & Anchors: $60.
- Creator’s Tip: Always install one corner significantly lower than the others to create a hyperbolic curve that cuts through the wind.
- Smart Sourcing: high-density tension shade sails and marine-grade sail mounting hardware kits.
18. Adjustable Louvered Roofs

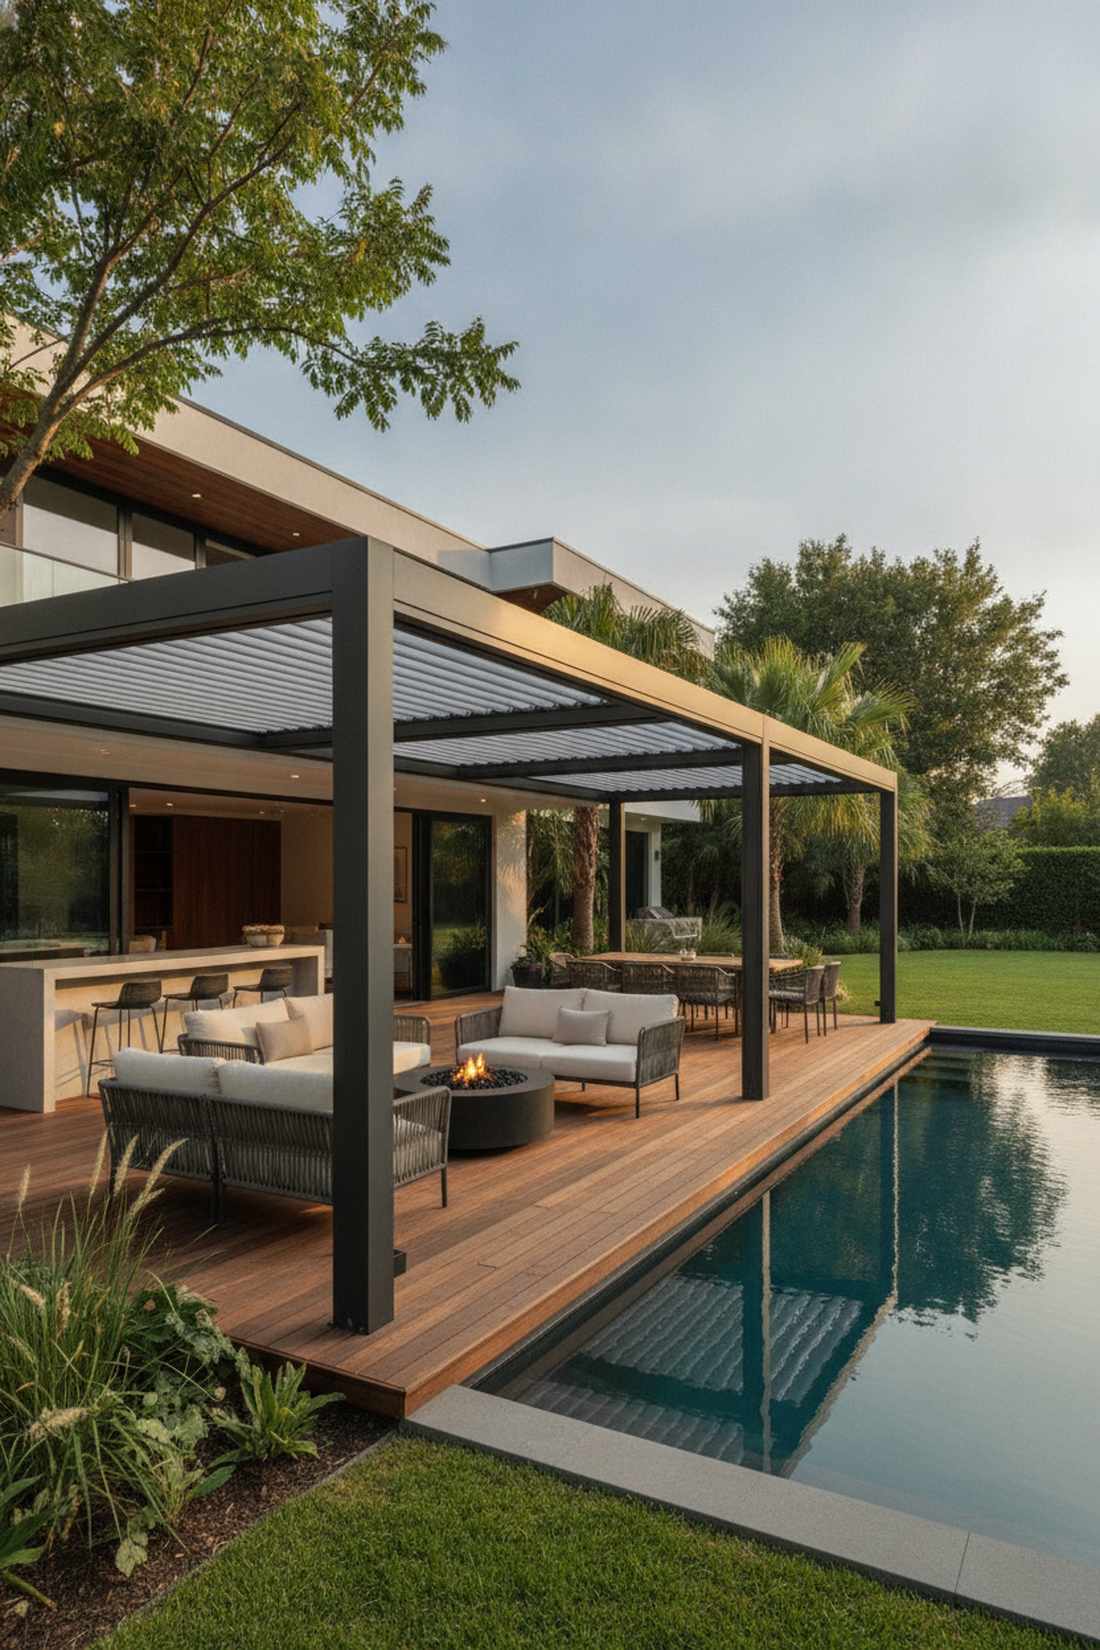
Radiates the opulent exclusivity of a high-end luxury resort. A premium motorized patio roof is the ultimate upgrade for those who refuse to compromise on weather control.
Fixed structures limit your options, whereas a crank-operated slatted roof gives a designer-level finish that switches from sun to rain-proof in seconds. While expensive, grabbing pre-fab aluminum pergola kits saves thousands compared to custom contractor builds.
Expect to invest $1,500+ for this luxury feature. Save this to your absolute dream backyard board.
- Key Materials: Aluminum louver modules, internal gutters
- Vibe / Style: Ultra-luxury modern
- Difficulty: Complex assembly
- Budget Breakdown: Louver Kit: $1800 | Footings: $100.
- Creator’s Tip: Ensure the internal gutter system slopes away from the bar seating so runoff doesn’t splash the stools.
- Smart Sourcing: manual louvered aluminum pergola kits and heavy-duty concrete base anchors.
This next lighting setup is ridiculously cheap but creates an atmosphere that rivals a $100-a-plate restaurant…
Lighting Techniques for Evening Ambiance
The difference between a basic patio and a captivating nighttime destination is entirely dictated by lighting. Layering concealed LEDs and warm overhead fixtures creates an addictive ambiance that extends your entertaining hours.
19. LED Strip Lights Under Counter Edges
Feels like an exclusive neon-lit downtown lounge. A floating illuminated bar counter adds instant modern drama and perfectly highlights textured stone or wood bases.
Harsh overhead floodlights kill the mood, but tucking a diffused glow under the lip delivers a surprisingly premium look. Using bulk outdoor lighting channels ensures the diodes are invisible and protected from spilled drinks.
You can easily install this effect for under $40. It’s a fast upgrade that completely changes the vibe.
- Key Materials: IP65 waterproof LED strips, aluminum diffuser channels
- Vibe / Style: Modern lounge
- Difficulty: Beginner plug-and-play
- Budget Breakdown: LED Reels: $25 | Diffusers: $15.
- Creator’s Tip: Never stick the LEDs directly to the wood; always use an aluminum tracking channel to diffuse the dots and prevent overheating.
- Smart Sourcing: waterproof outdoor LED strip kits and aluminum LED diffuser channels (bulk pack).
20. String Lights Woven Through Pergola Beams
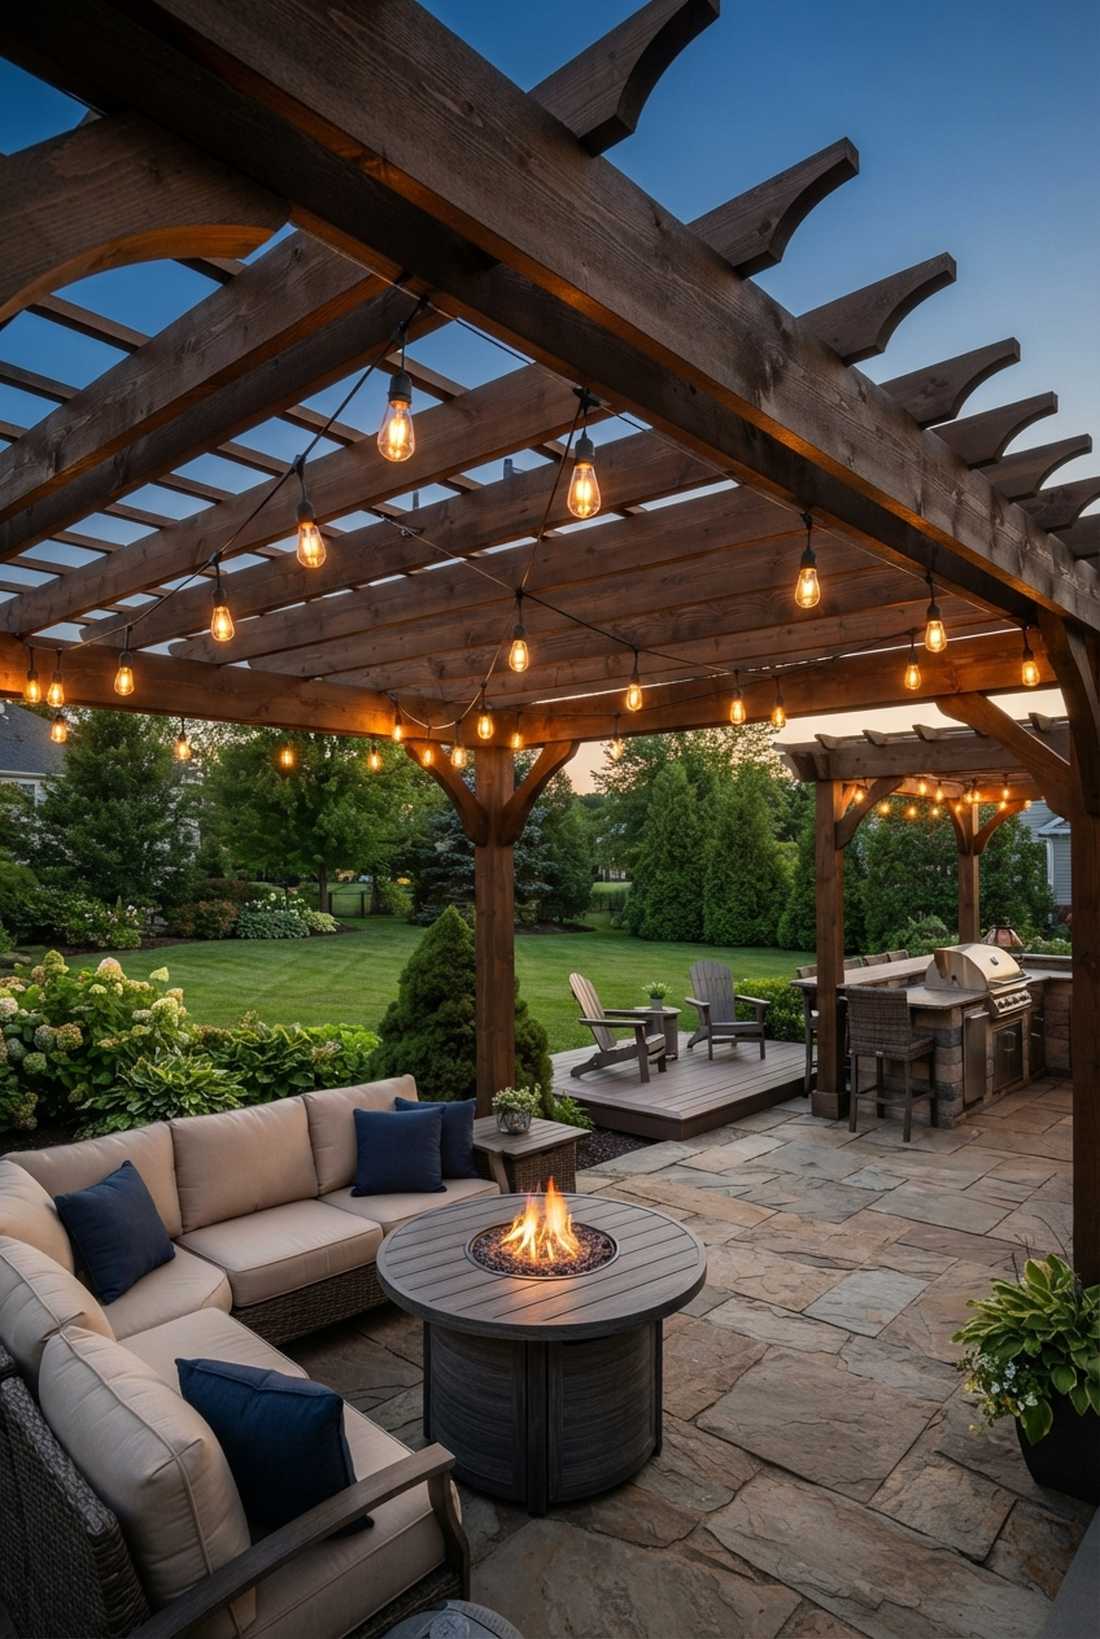
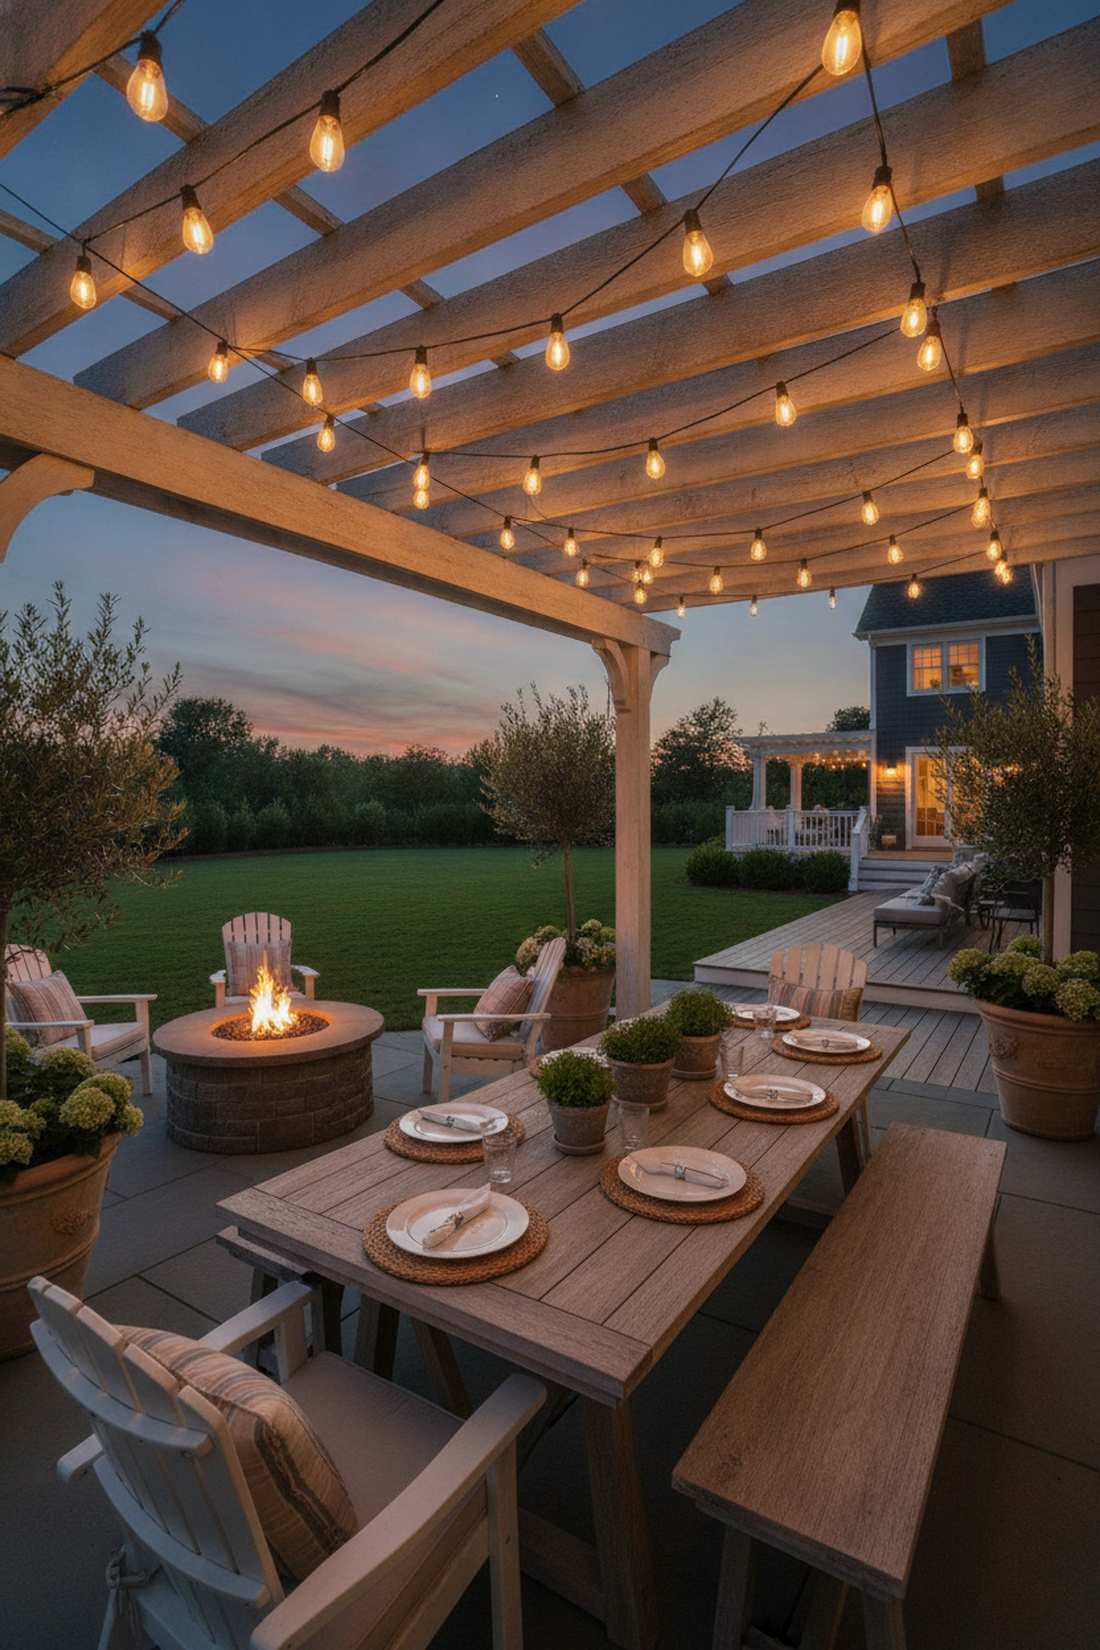
Exudes the nostalgic warmth of a classic neighborhood block party. Warm cafe-style overhead lighting works brilliantly draped across exposed rafters to soften harsh architectural lines.
Flimsy holiday lights snap in the wind, whereas investing in shatterproof Edison bulbs completely changes the game for long-term durability. Sourcing commercial-grade patio light bundles means you can leave them up during blizzards without worry.
Budget around $60 for a heavy-duty strand. Pin this if you want to create instant, foolproof coziness.
- Key Materials: Shatterproof LED string lights, guide wire
- Vibe / Style: Cozy backyard cafe
- Difficulty: Easy hanging
- Budget Breakdown: Lights: $50 | Mounting Hooks: $10.
- Creator’s Tip: Run a steel tension wire first and zip-tie the light cord to it—this prevents the heavy strand from drooping over time.
- Smart Sourcing: shatterproof LED outdoor string lights (bulk length) and string light suspension wire kits.
Material Guide: Cheap vs. Premium Aesthetic
Knowing exactly where to save and where to spend makes all the difference in achieving that “looks expensive but isn’t” vibe.
- Standard vs. UV-Resistant/Premium: Standard paints peel, but using marine-grade epoxies and UV-coated sealants stops fading and cracking entirely, preserving your investment.
- Pre-made Kits vs. Sourcing Locally: Purchasing pre-fab modular bar kits or starter hardware bundles online often saves both time and money compared to hunting down individual pieces at big box stores.
21. Solar Pathway Lights Flanking the Approach
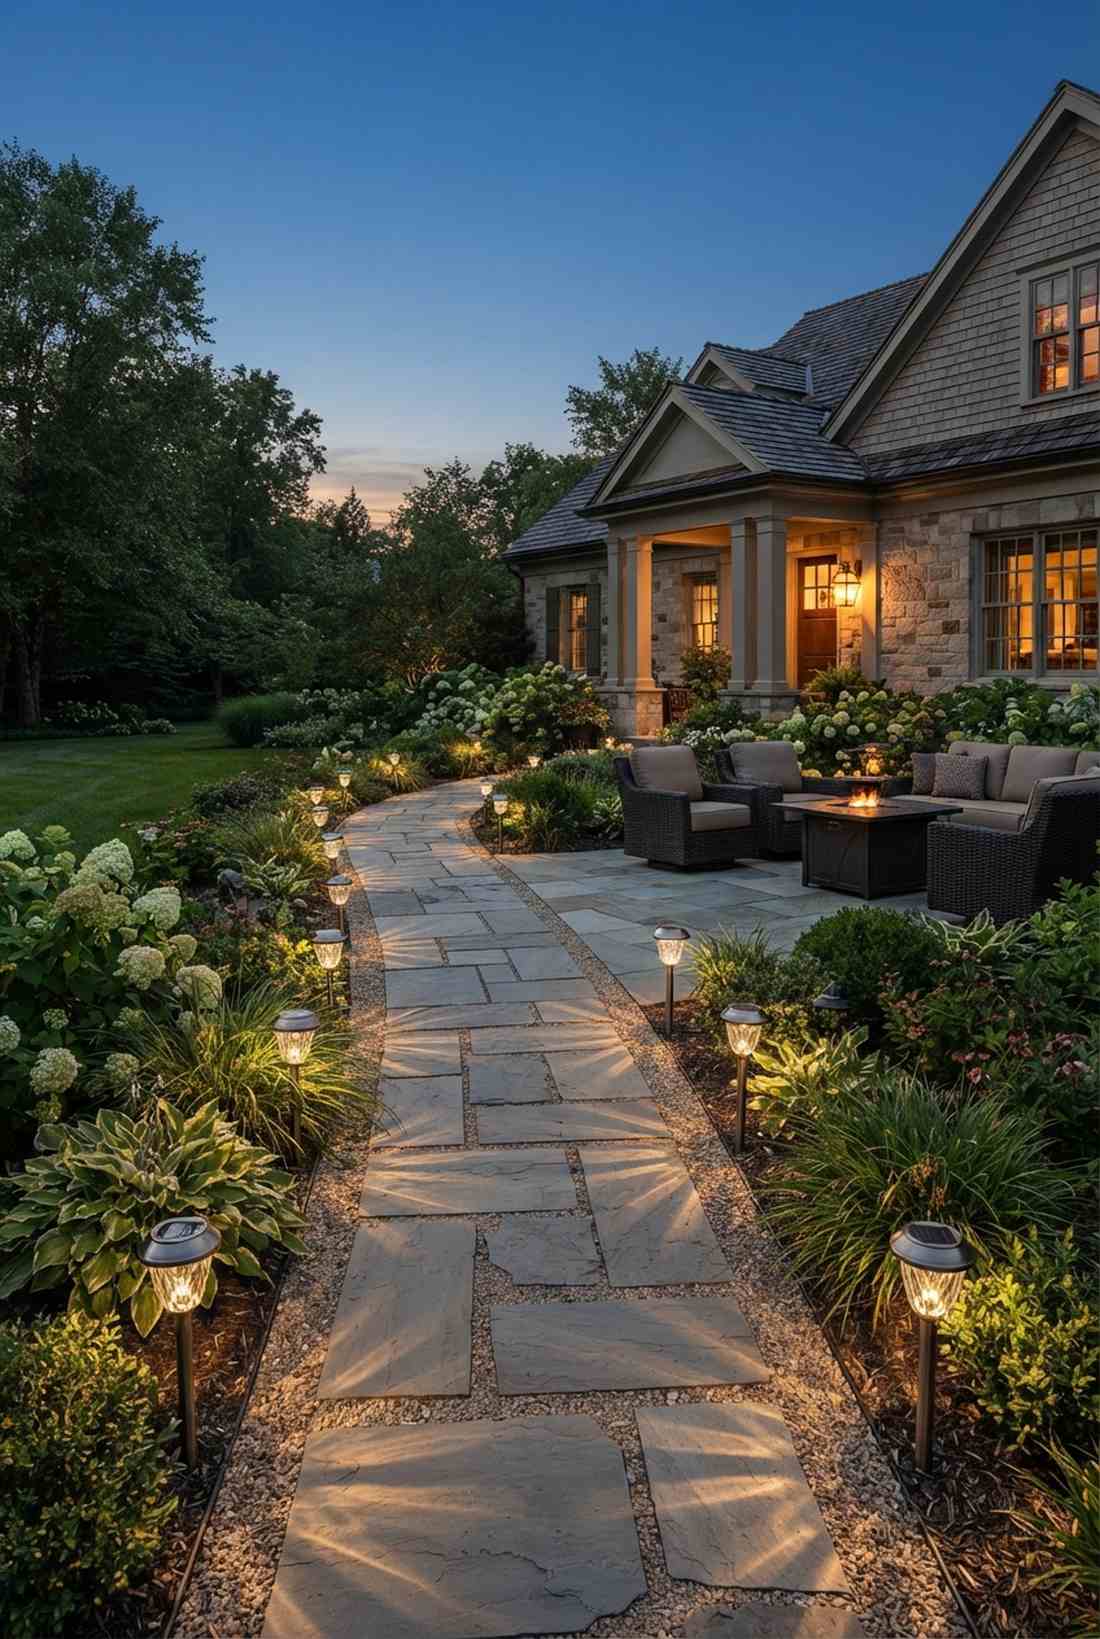

Creates the elegant entrance of a sprawling country estate. An illuminated landscape walkway approach subtly guides guests to the social zone while preventing tripping hazards.
Running hardwired electrical lines trenches your yard, but driving high-output solar fixtures into the dirt gives a designer-level finish with zero electrical work. High-end weatherproof patio seating bundles perfectly complement the metallic finish of premium landscape spikes.
A quality set of six costs about $50. It’s an effortless way to frame the destination.
- Key Materials: High-lumen solar stakes, glass lenses
- Vibe / Style: Classic estate
- Difficulty: Zero setup
- Budget Breakdown: Solar Set: $45 | Base Gravel: $5.
- Creator’s Tip: Avoid cheap plastic lenses that cloud up in the sun; always buy fixtures with real glass housing for maximum brightness.
- Smart Sourcing: high-lumen glass solar pathway lights (bulk pack) and heavy-duty metal ground spikes.
22. Pendant Lights Suspended from Pergola Centers
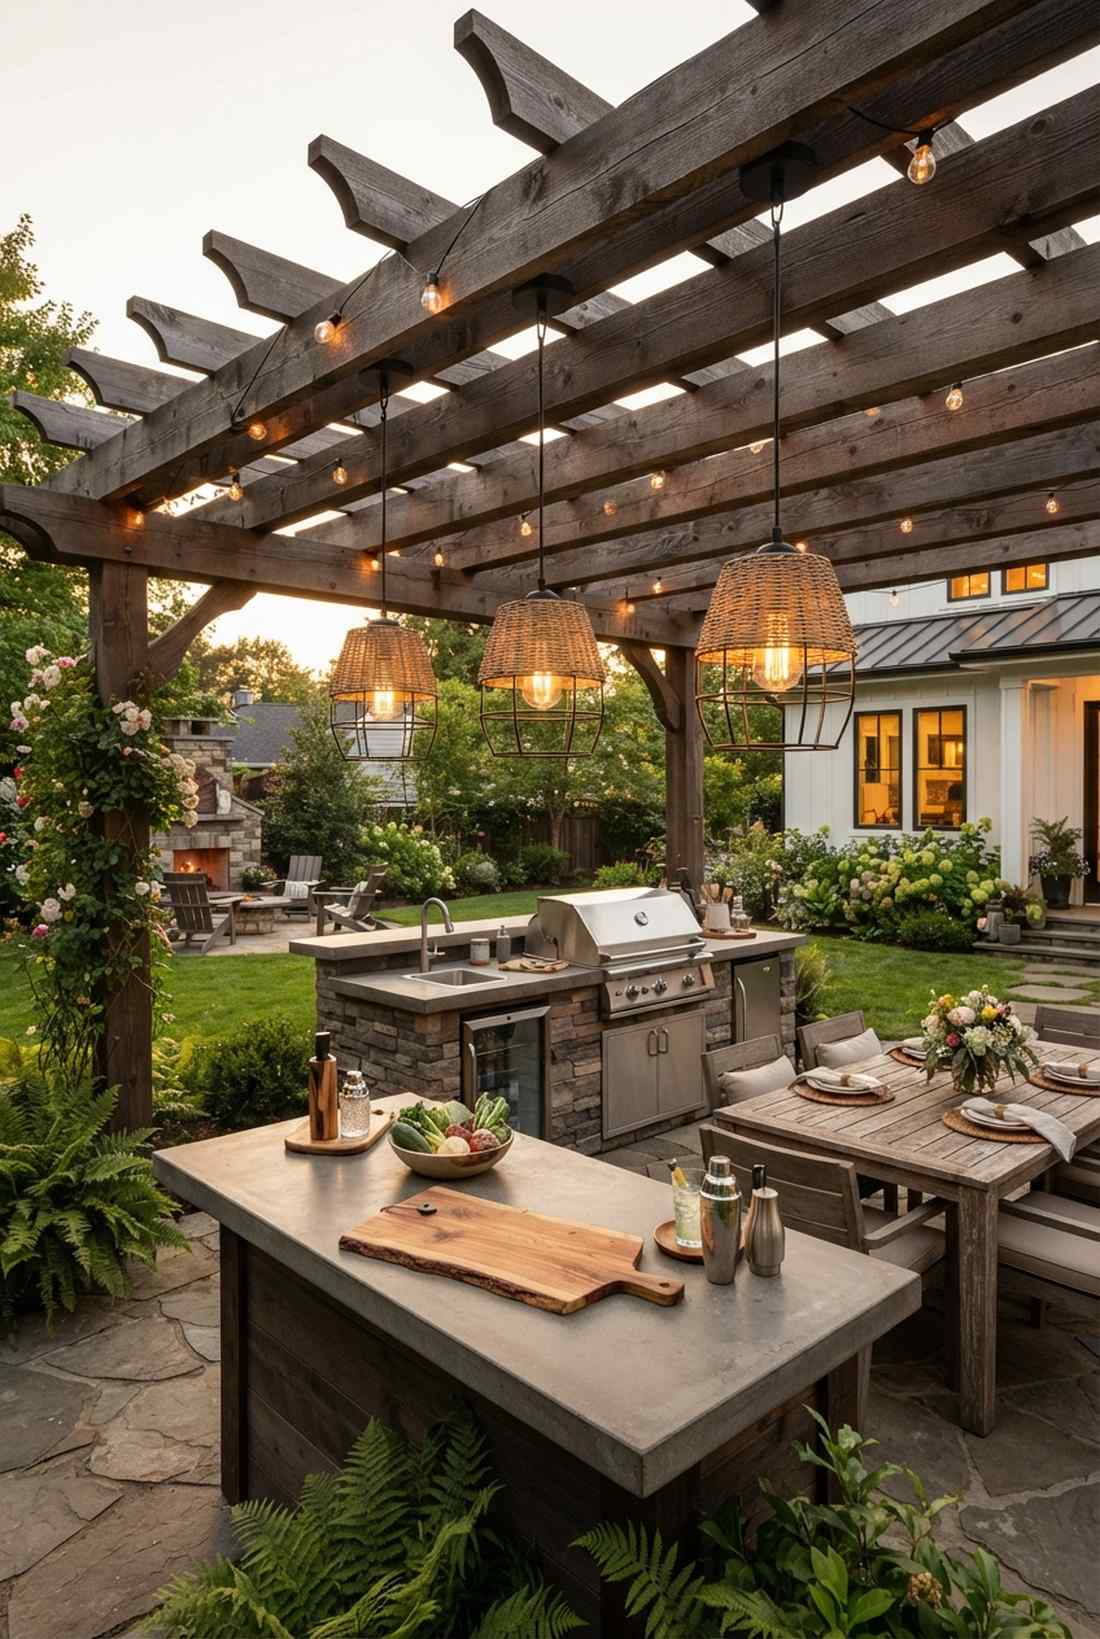
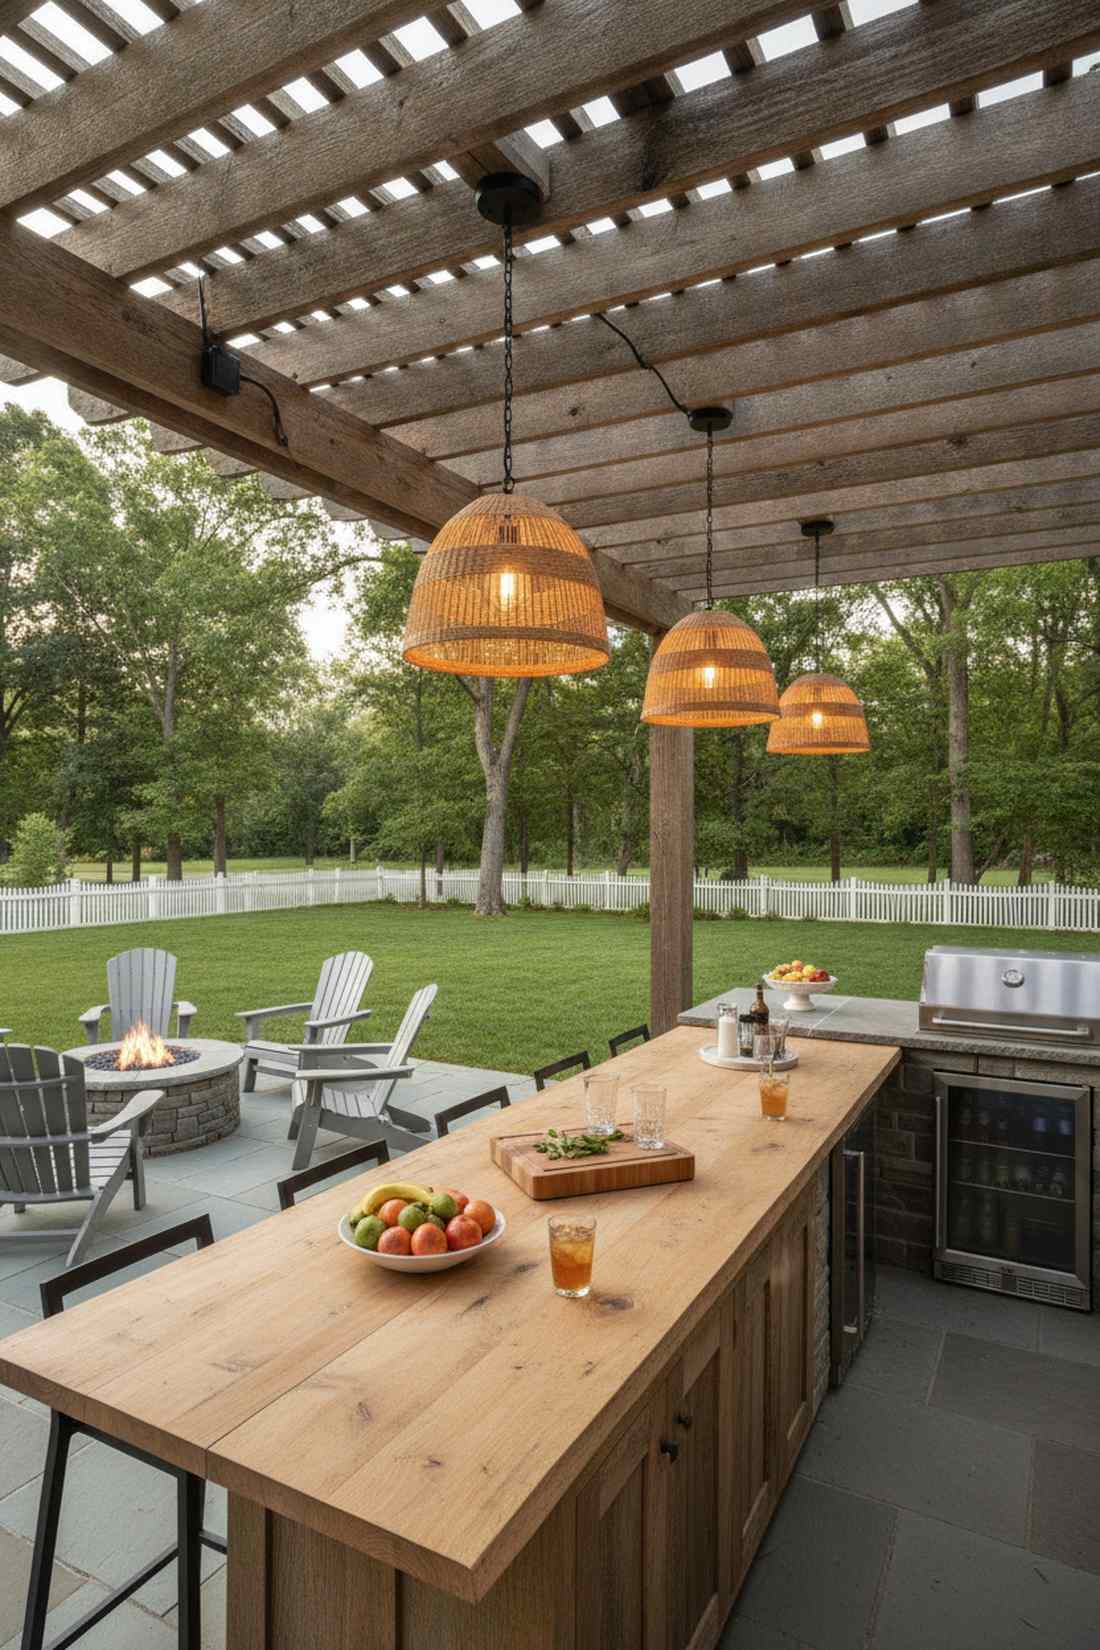
Evokes the intimate charm of a rustic farmhouse kitchen brought outside. Rustic hanging pergola lanterns provide dedicated task lighting directly over the prep and serving areas.
Relying purely on ambient glow leaves your cutting boards in the dark, but dropping a woven fixture down completely changes the visual hierarchy of the space. Picking up premium pre-fab counter accessories like caged pendants anchors the design beautifully.
Hardwired pendants run roughly $80–$120 each. Save this idea if you plan on actually cooking and mixing drinks outside.
- Key Materials: Wet-rated pendant fixtures, waterproof junction boxes
- Vibe / Style: Farmhouse chic
- Difficulty: Moderate electrical
- Budget Breakdown: Pendant: $70 | Wiring & Box: $25.
- Creator’s Tip: Hang the bottom of the pendant exactly 30 to 36 inches above the countertop so it illuminates the surface without hitting guests in the face.
- Smart Sourcing: wet-rated outdoor pendant lights and waterproof electrical junction kits.
23. Recessed Deck Lights in Flooring
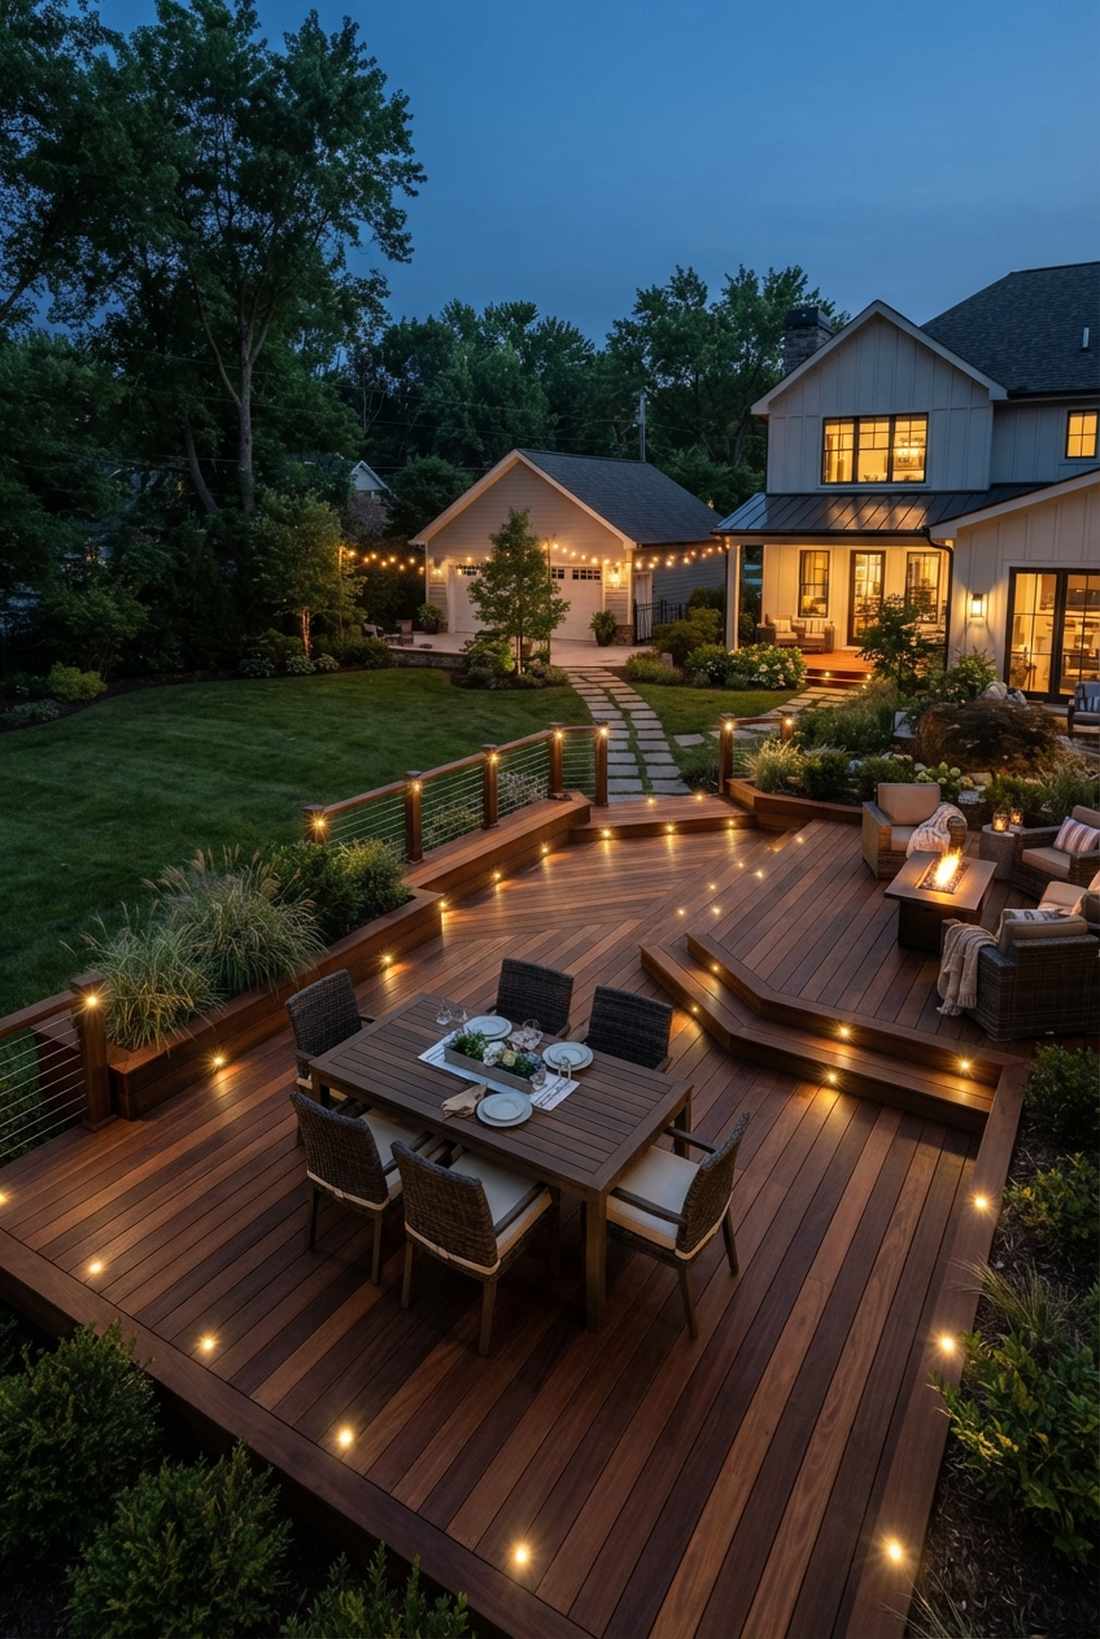
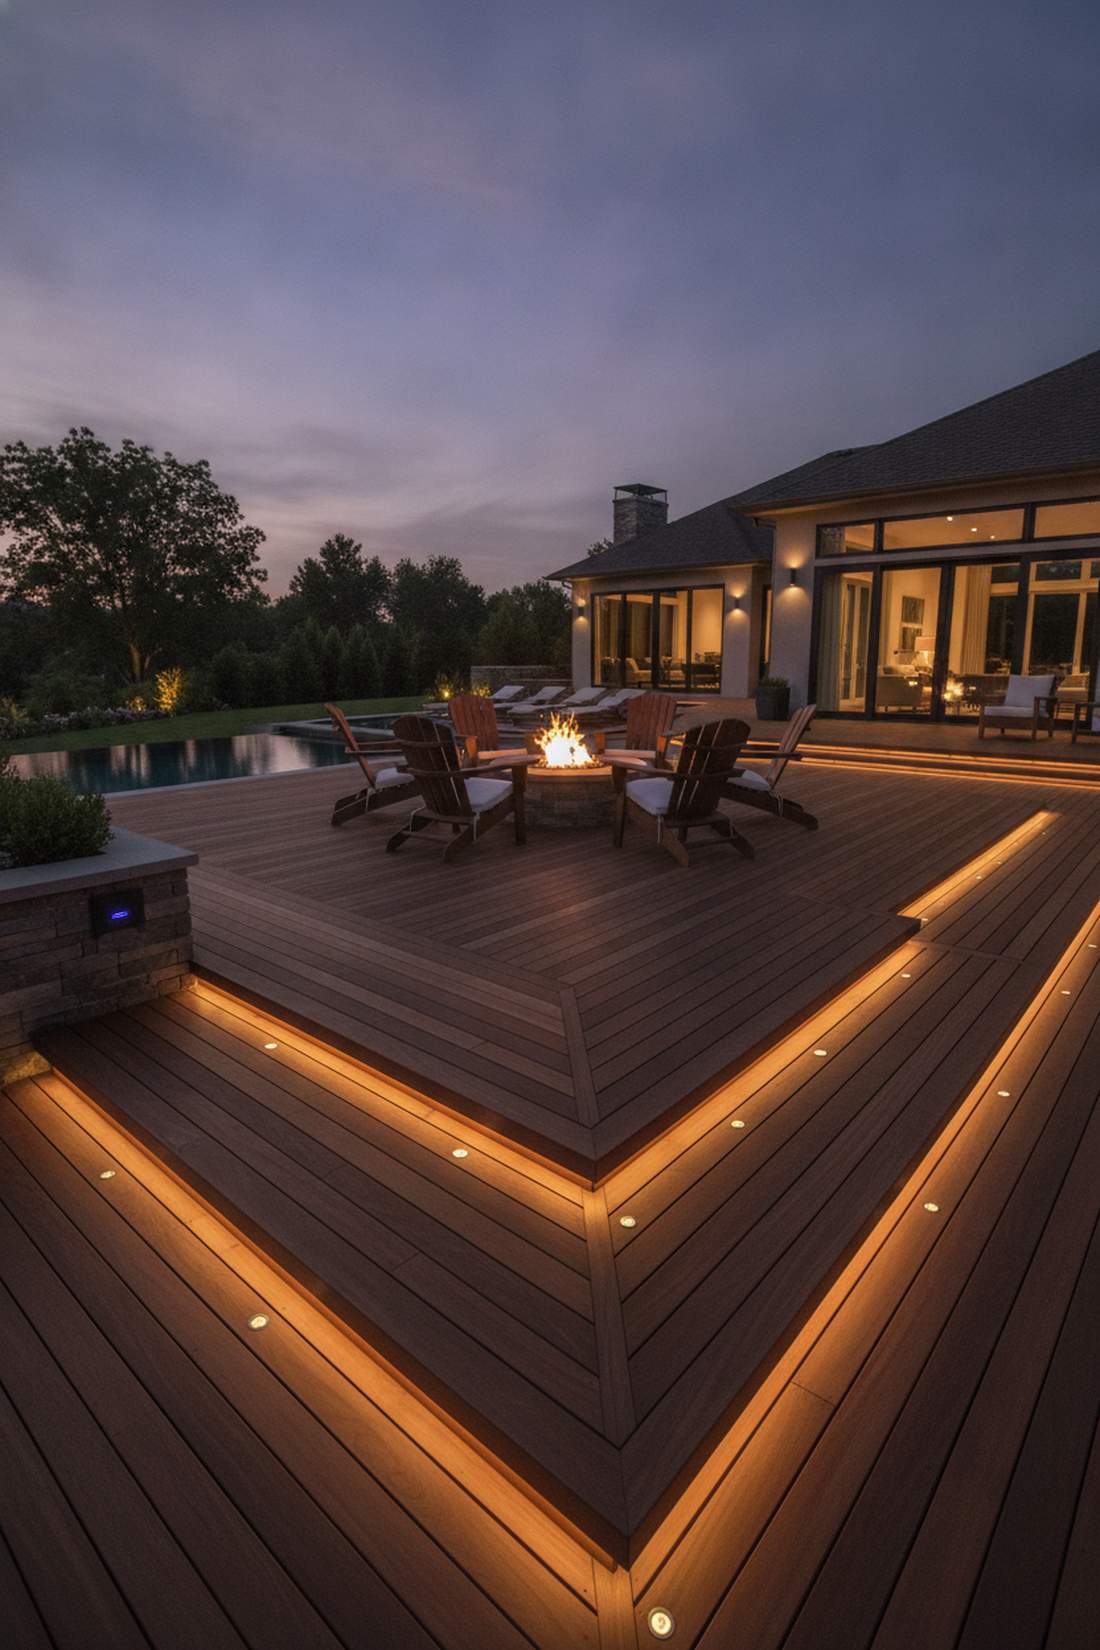
Delivers the sleek, flush aesthetic of a billionaire’s yacht deck. Installing flush-mounted architectural floor lighting around the perimeter defines the boundary line with striking modern geometry.
Stumbling off the edge of a dark patio is a common problem, but integrating low-voltage floor nodes looks far more expensive than it is. Opting for smart outdoor landscape transformers lets you control the deck glow right from your phone.
A 10-pack of deck dots generally costs $60. Highly recommended for tiered or raised wooden platforms.
- Key Materials: Low-voltage LED deck dots, hole saw, transformer
- Vibe / Style: Ultra-modern nautical
- Difficulty: Careful drilling required
- Budget Breakdown: Light Kit: $55 | Forstner Bit: $15.
- Creator’s Tip: Use a Forstner bit rather than a standard paddle bit to cut the holes; it leaves a perfectly clean edge with zero splintering.
- Smart Sourcing: low-voltage recessed deck lighting kits and smart outdoor transformer hubs.
Most people give up on small spaces… until they try the exact space-saving layout coming up next.
Layout Innovations for Small and Large Spaces
A beautiful design fails if the traffic flow is entirely bottlenecked. Optimizing your layout ensures that the bartender has room to work while guests can mingle comfortably without bumping into the grill.
24. L-Shaped Bars for Corner Efficiency
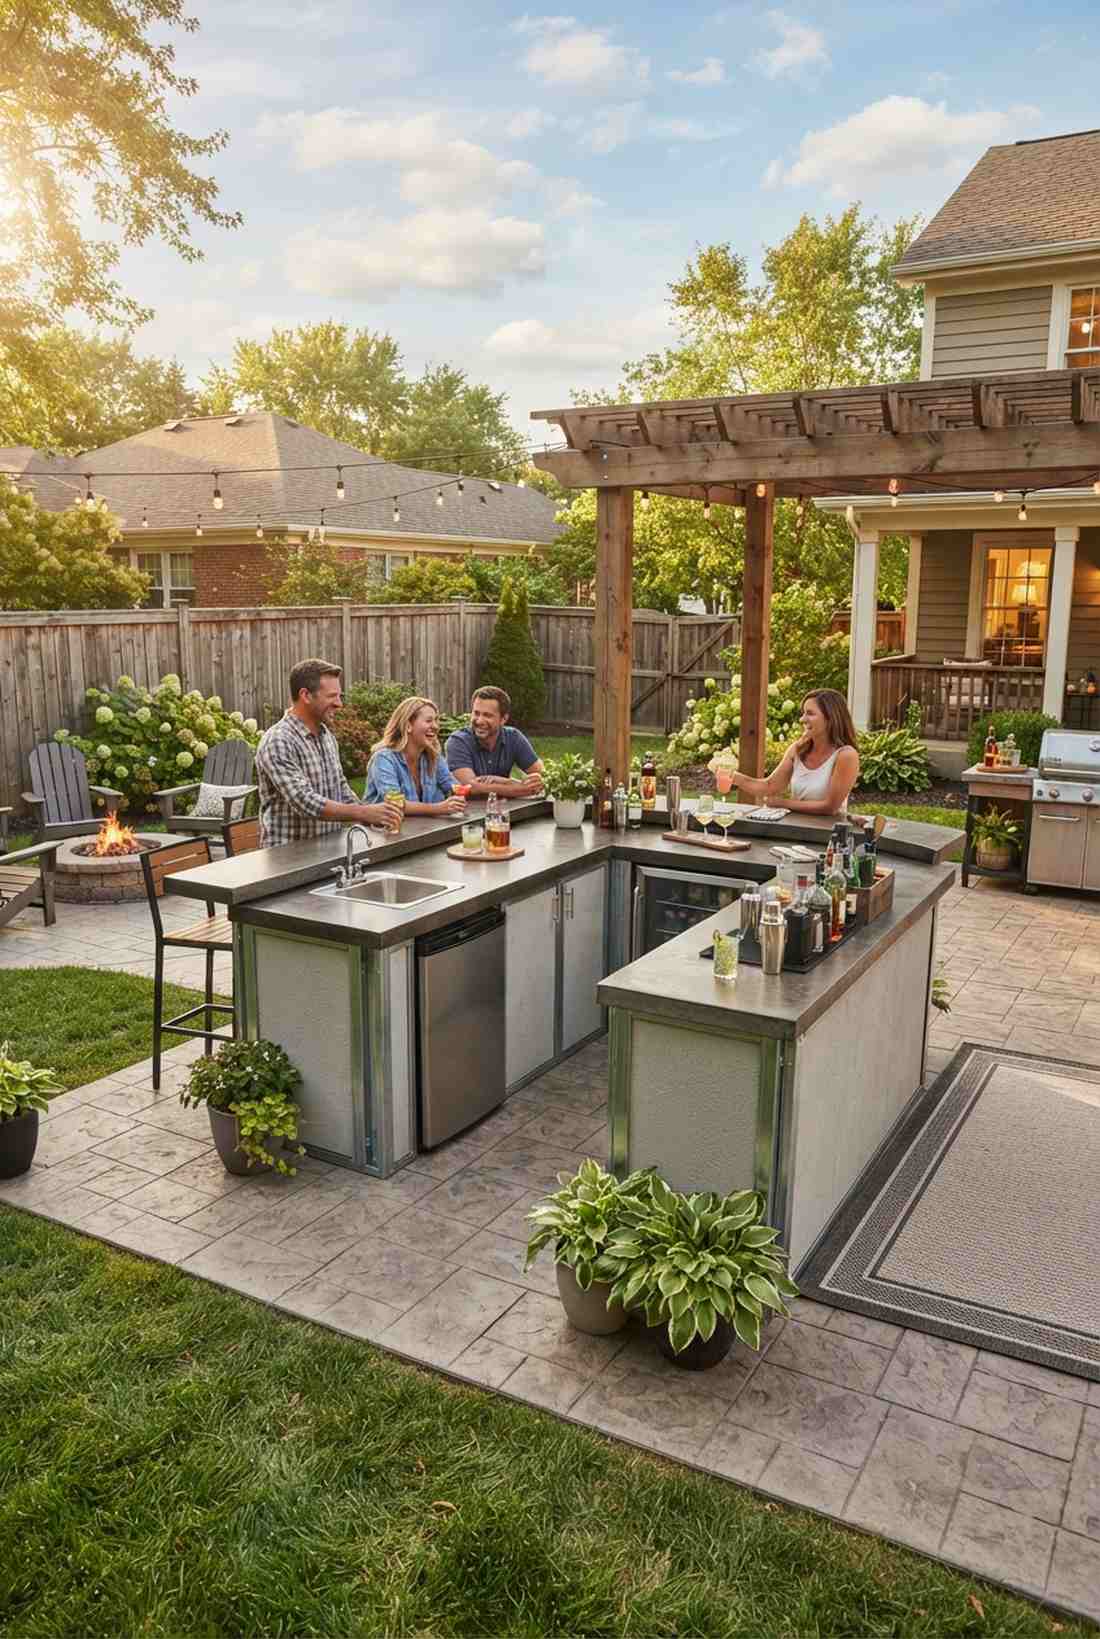
Maximizes spatial geometry like a highly efficient commercial kitchen. The efficient corner patio layout is unparalleled for defining a massive social zone without dominating the center of the yard.
Straight linear setups waste a ton of lateral room, whereas wrapping the counter gives a designer-level finish and doubles your seating capacity. Utilizing pre-fab modular bar kits for the corner joints guarantees a perfectly square frame.
Framing an L-shape adds about $100 in structural costs. Pin this if you have an awkward, unused fence corner.
- Key Materials: 2×4 framing, corner brackets, concrete board
- Vibe / Style: High-capacity functional
- Difficulty: Moderate framing
- Budget Breakdown: Extra Lumber: $60 | Corner Hardware: $30.
- Creator’s Tip: Put the messy prep station (sinks/coolers) on the short leg of the “L” facing away from the main seating to hide the clutter.
- Smart Sourcing: galvanized steel corner framing brackets (bulk pack) and weatherproof cement backer board.
25. Fold-Down Wall-Mounted Bars
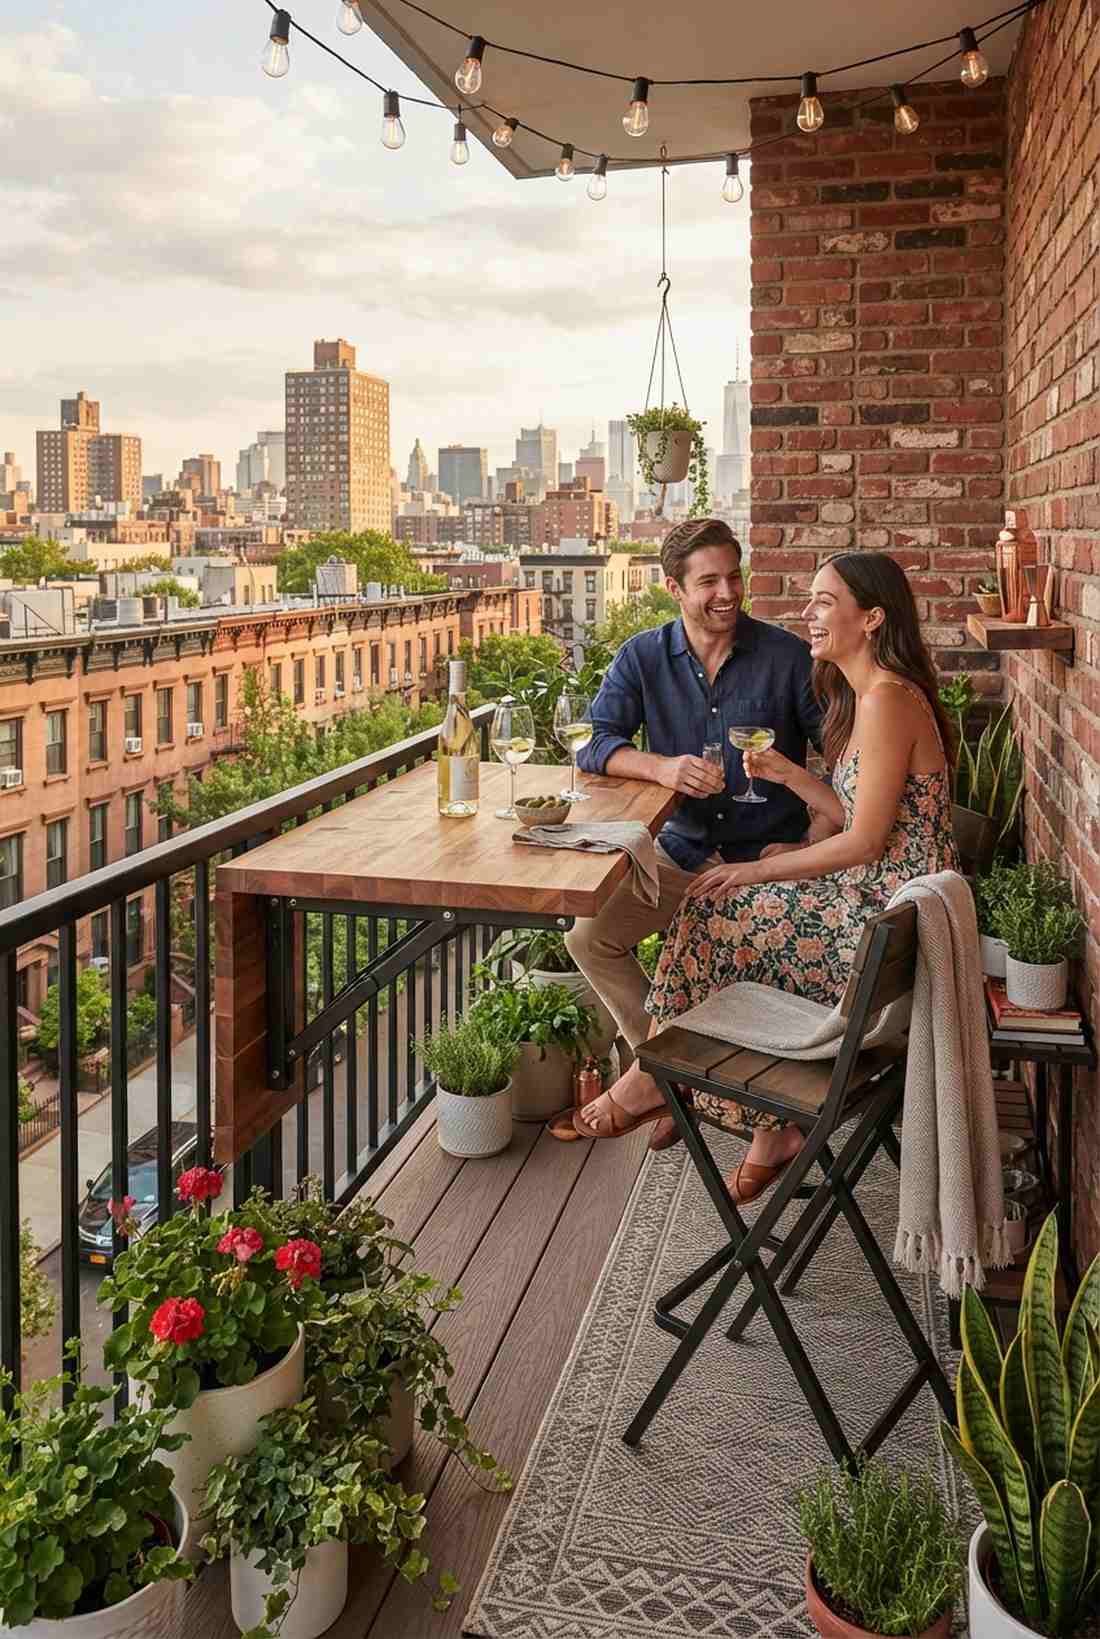
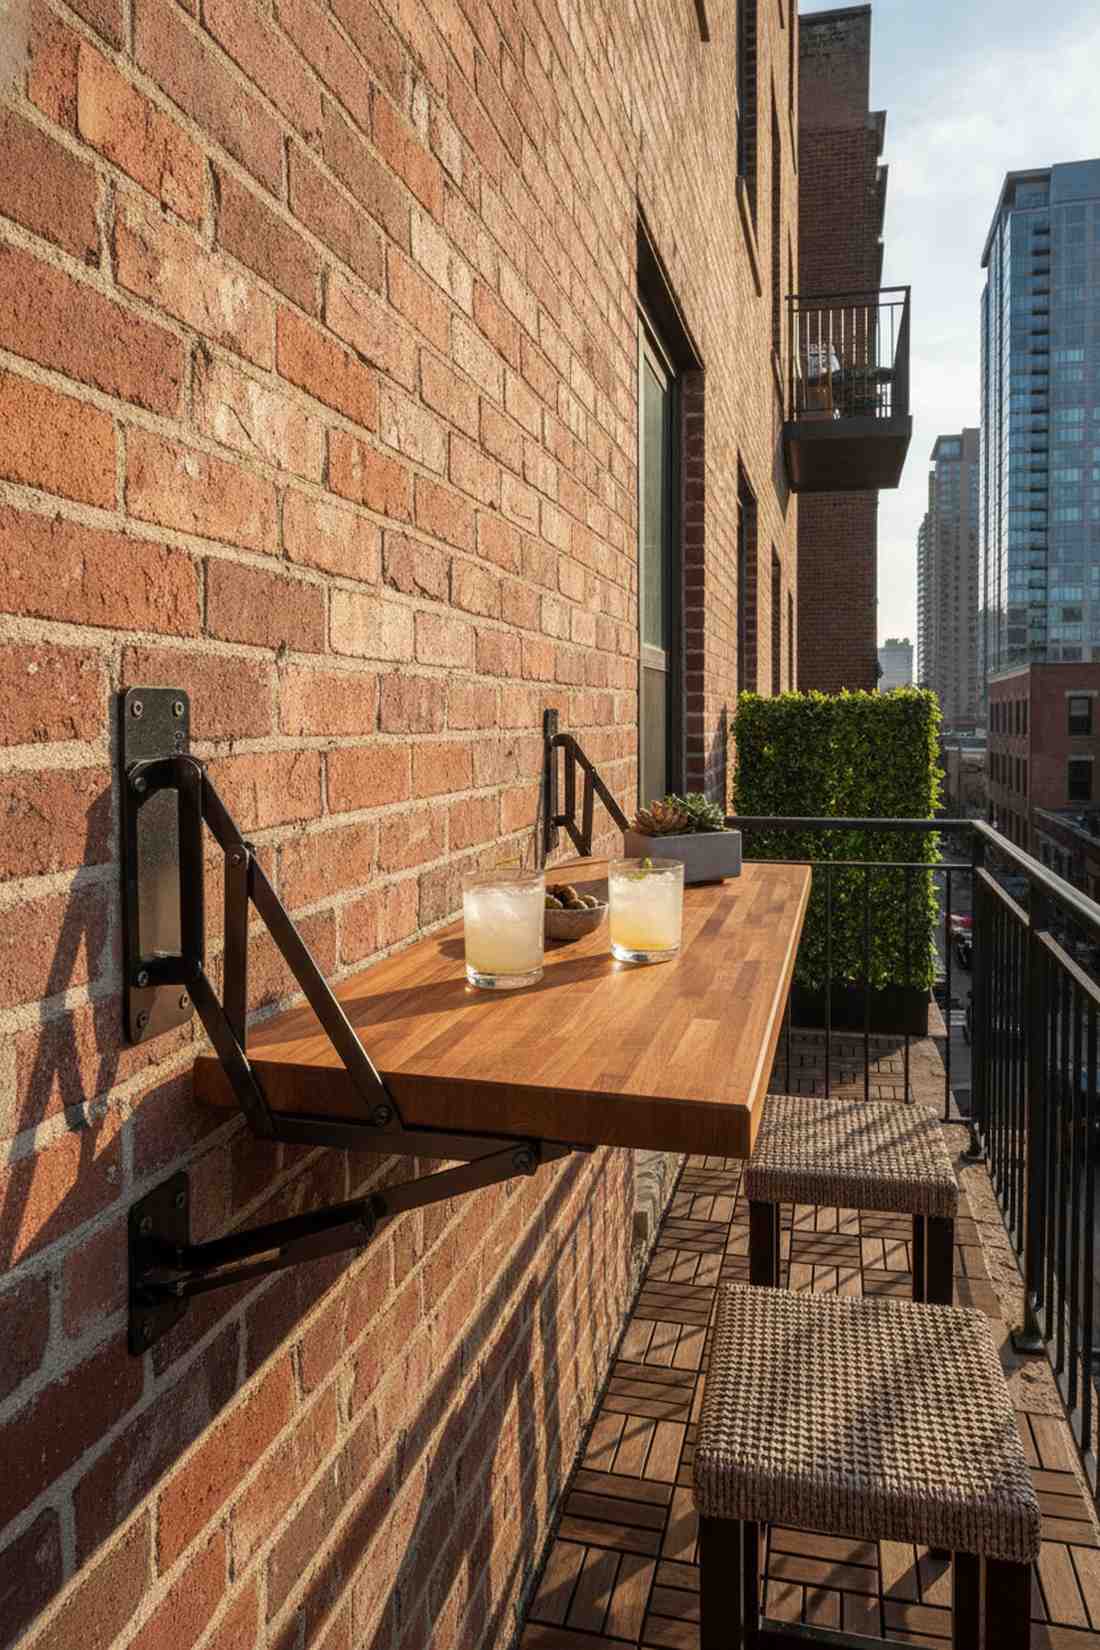
Brings brilliant adaptability to ultra-tight urban balconies. A collapsible balcony drink shelf transforms a blank brick wall into a cocktail station that vanishes when not in use.
Permanent tables ruin tiny spaces, but mounting a heavy-duty drop-leaf completely changes the vibe and reclaims your square footage. Heavy-duty commercial folding shelf brackets ensure the surface won’t collapse when leaned on.
You can build this ingenious hack for under $50. A must-save for apartment dwellers and condo owners.
- Key Materials: Collapsible brackets, finished wood plank, masonry anchors
- Vibe / Style: Urban space-saving
- Difficulty: Beginner mounting
- Budget Breakdown: Brackets: $25 | Wood Top: $20.
- Creator’s Tip: Seal all six sides of the wood shelf (including the hidden back edge) before mounting to prevent moisture swelling.
- Smart Sourcing: heavy-duty folding shelf brackets (2-pack) and weather-sealed butcher block tops.
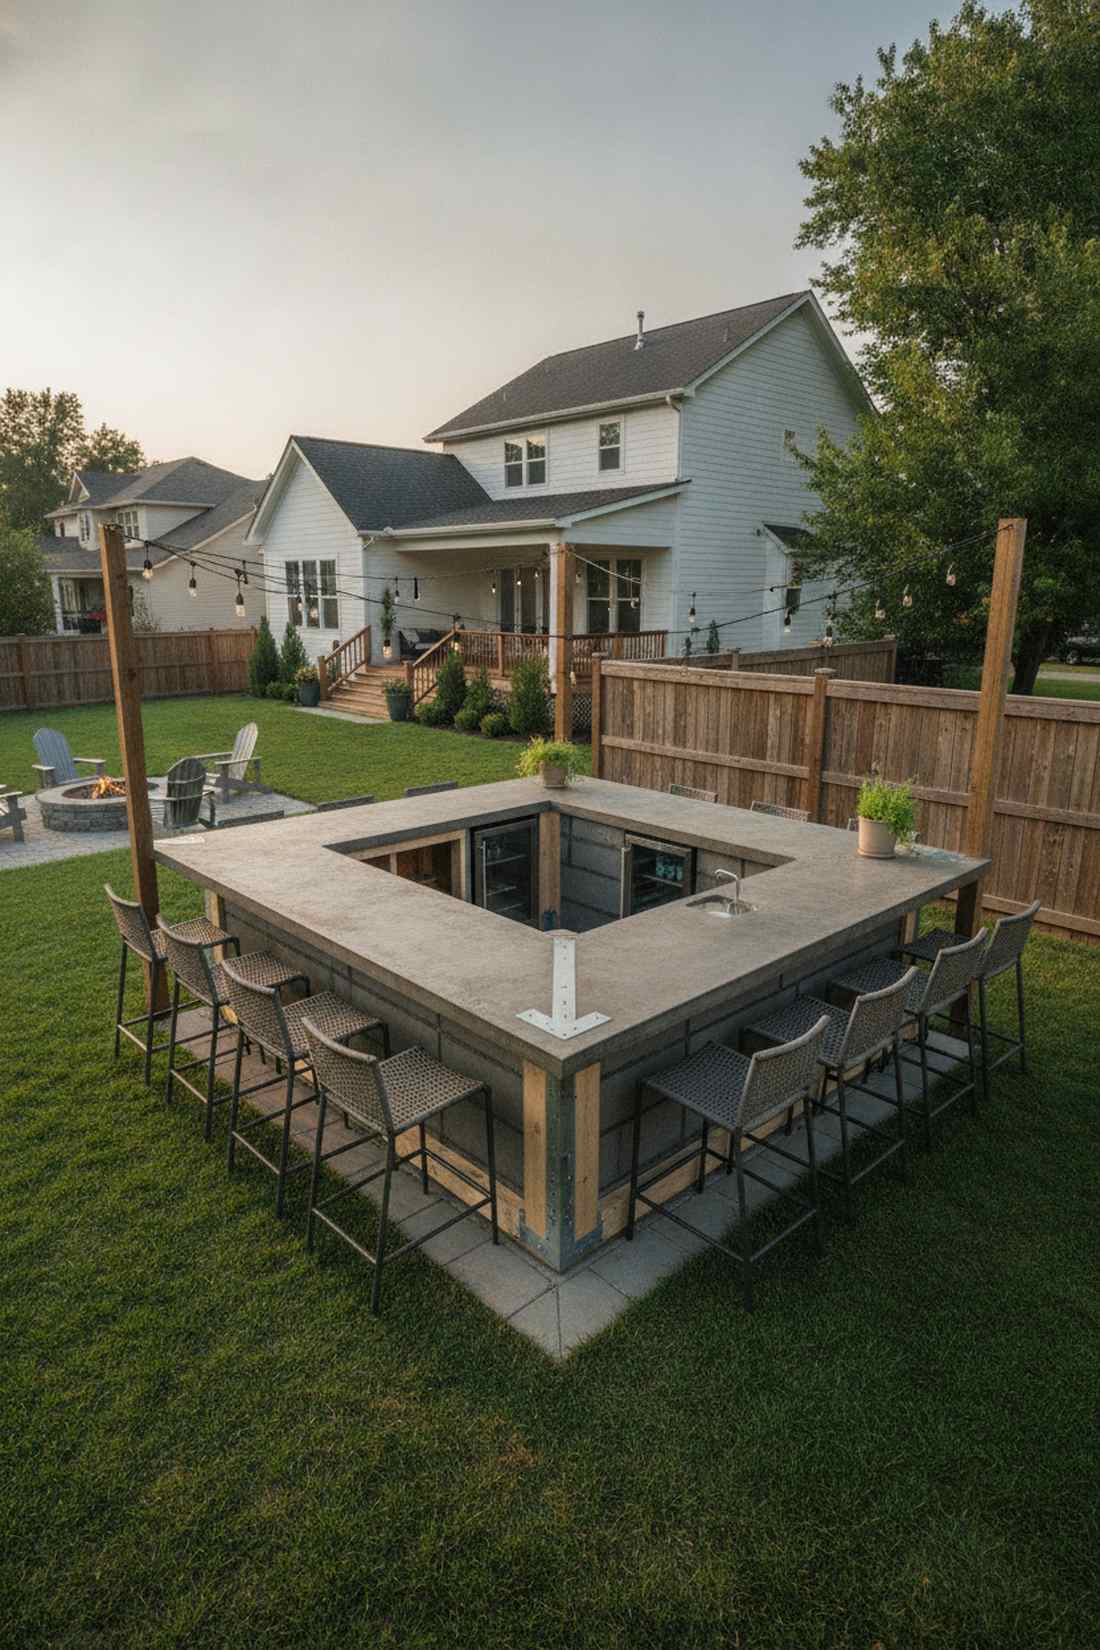
26. Circular Bar Islands for 360-Degree Access
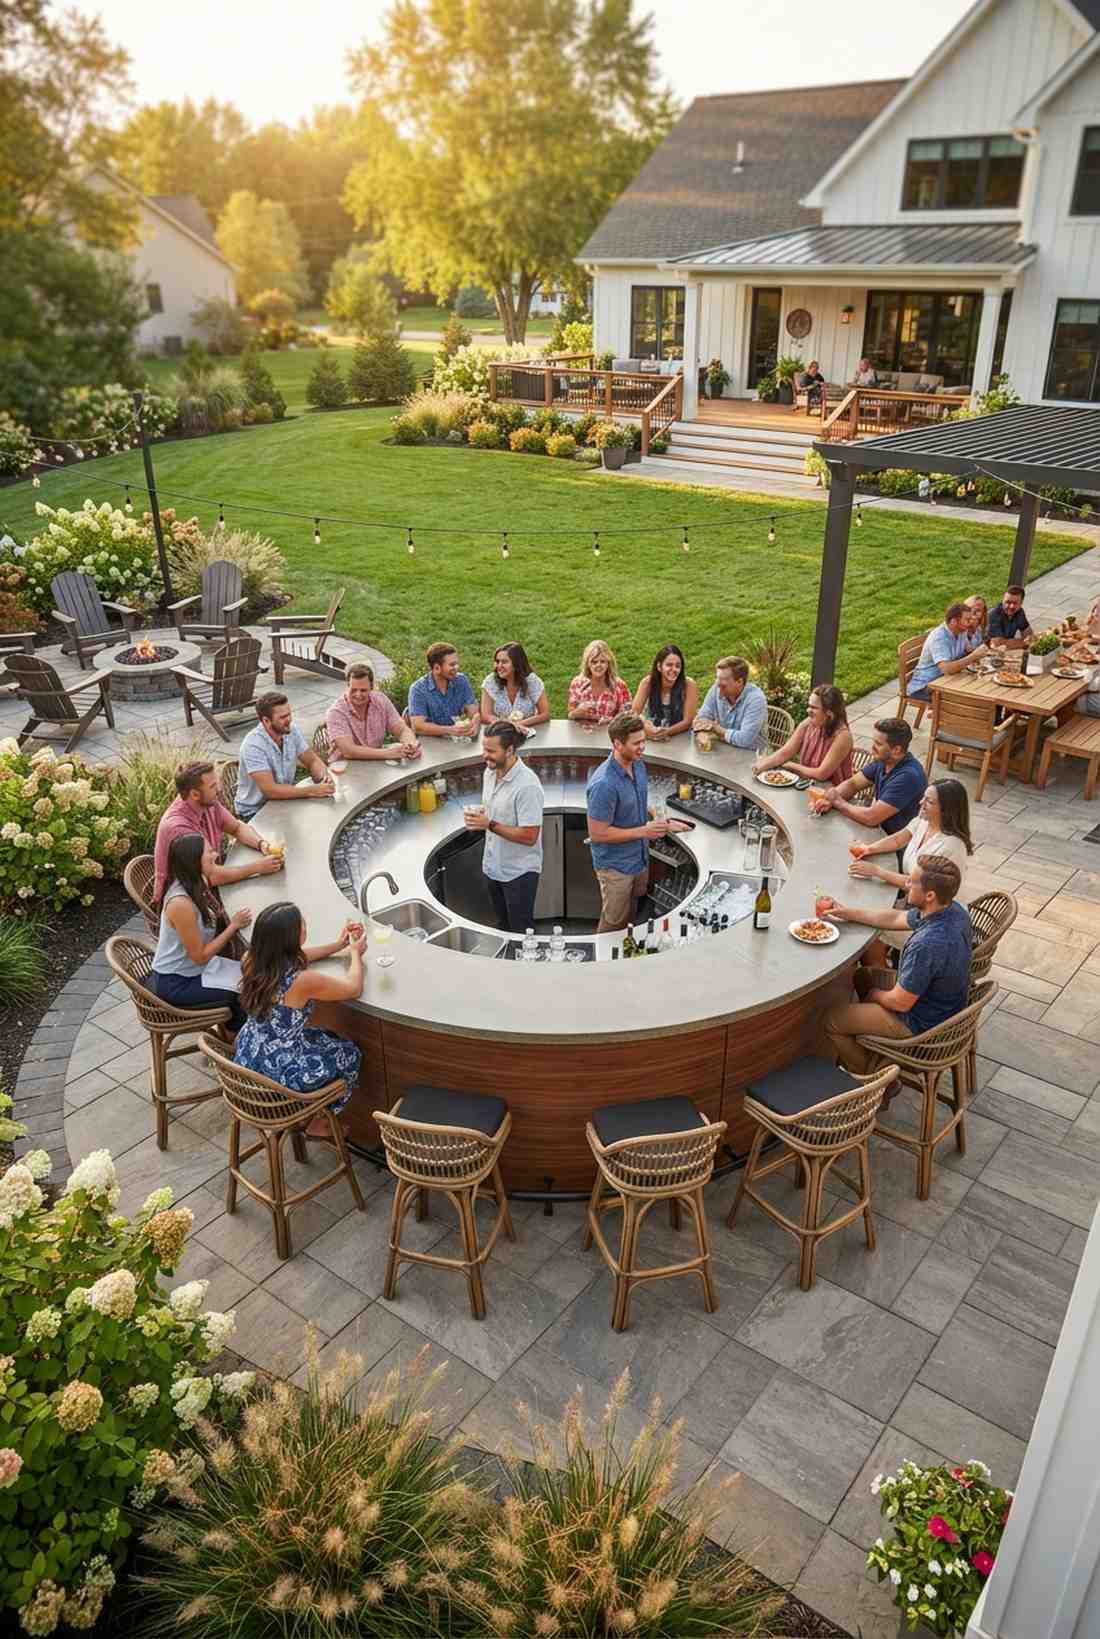

Feels exactly like a vibrant central hub at an exclusive beach club. A freestanding 360-degree backyard hub destroys the barrier between host and guests, making everyone part of the action.
Pushing a bar against a wall limits interaction, whereas pulling it into the center of the lawn looks far more expensive than it is. Sourcing curved premium pre-fab counter accessories simplifies the notoriously difficult rounded framing.
Curved construction adds complexity, budgeting roughly $400 for the base. Highly recommended for massive, open lawns.
- Key Materials: Flexible plywood, curved metal track, veneer
- Vibe / Style: Resort centerpiece
- Difficulty: Advanced curving
- Budget Breakdown: Bendable Ply: $120 | Countertop: $250.
- Creator’s Tip: Use metal drywall track for the top and bottom plates—you can easily snip the edges to bend it into a perfect circle.
- Smart Sourcing: flexible exterior-grade plywood sheets and bendable metal framing track (bulk length).
27. Tiered Deck Bars with Elevation Changes
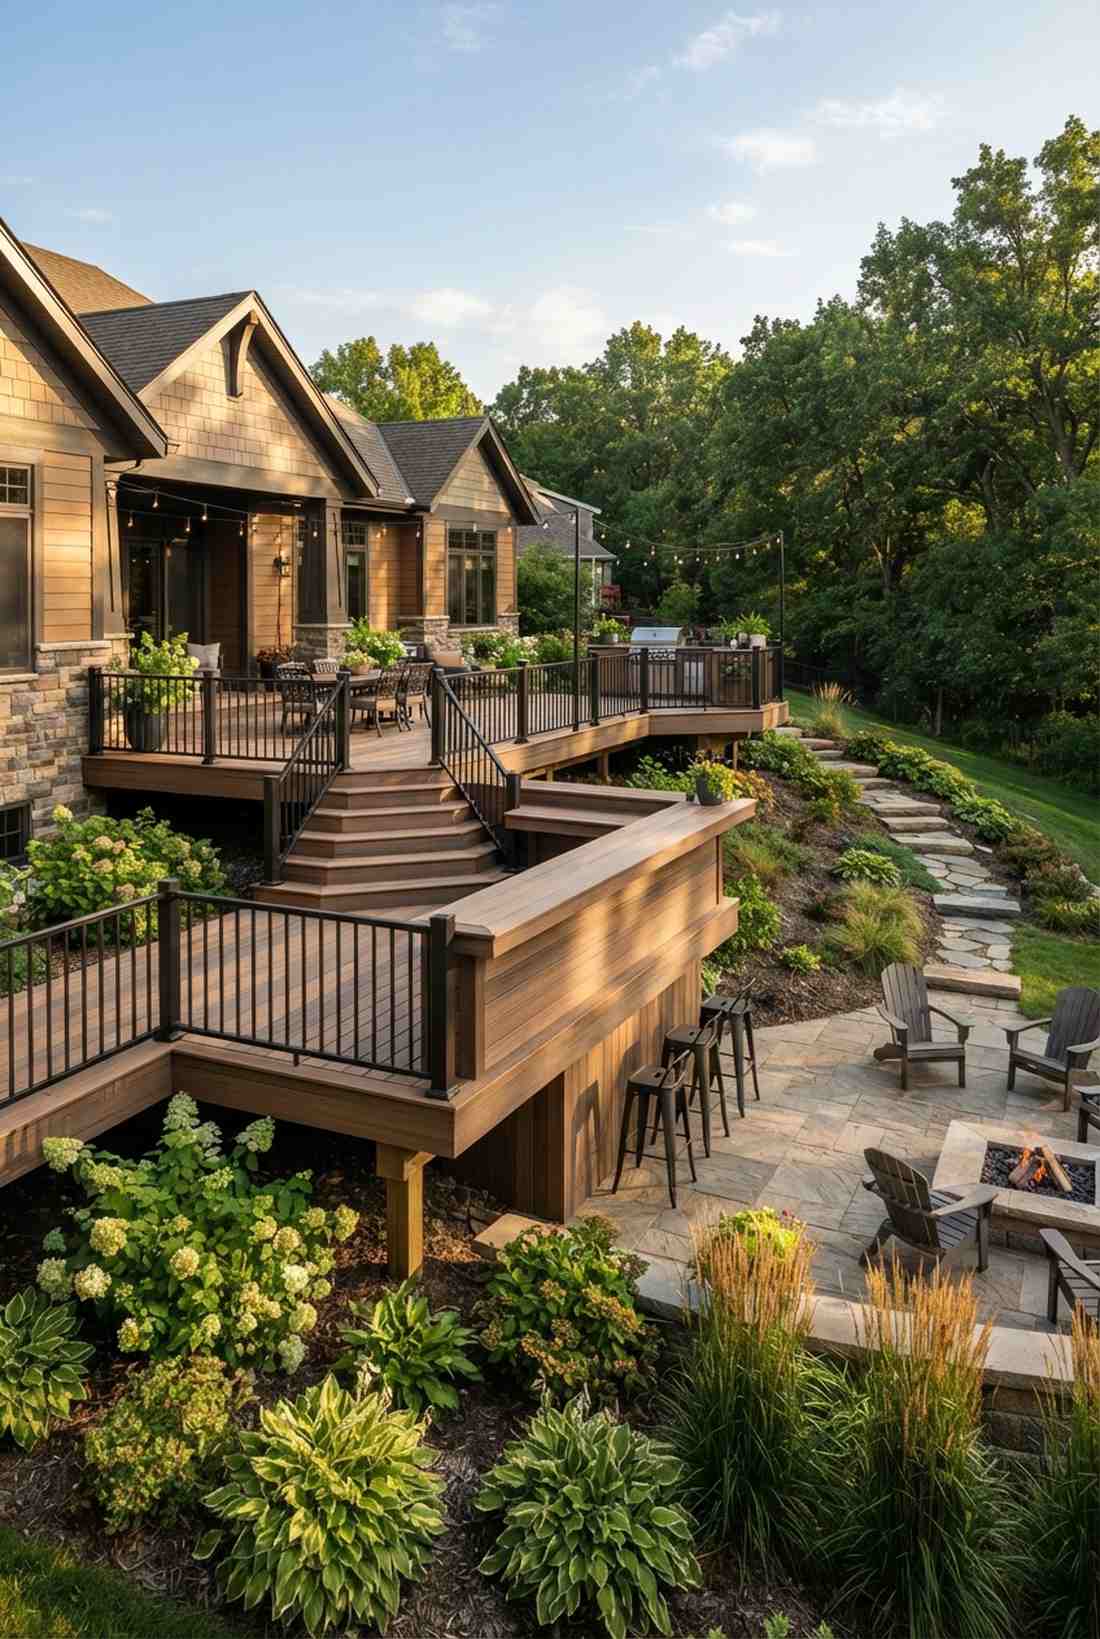
Creates the stunning architectural drama of a hillside amphitheater. A multi-level landscape entertainment zone brilliantly utilizes sloped yards that would otherwise be unusable.
Fighting a slope with massive retaining walls is exhausting, but stepping the deck downward gives a designer-level finish and builds the bar height naturally. Utilizing outdoor kitchen installation supplies directly into the step framing anchors the whole structure.
Factoring in the extra deck posts, budget an additional $300. Save this if your backyard is anything but flat.
- Key Materials: 4×4 posts, joist hangers, composite decking
- Vibe / Style: Architectural dynamic
- Difficulty: Advanced carpentry
- Budget Breakdown: Framing: $150 | Fascia Boards: $100.
- Creator’s Tip: Use the change in elevation to your advantage by building the counter flush with the upper deck, which naturally creates a 42-inch bar height for the lower deck.
- Smart Sourcing: heavy-duty structural joist hangers (bulk pack) and composite deck fascia boards.
28. Galley-Style Bars for Narrow Lots
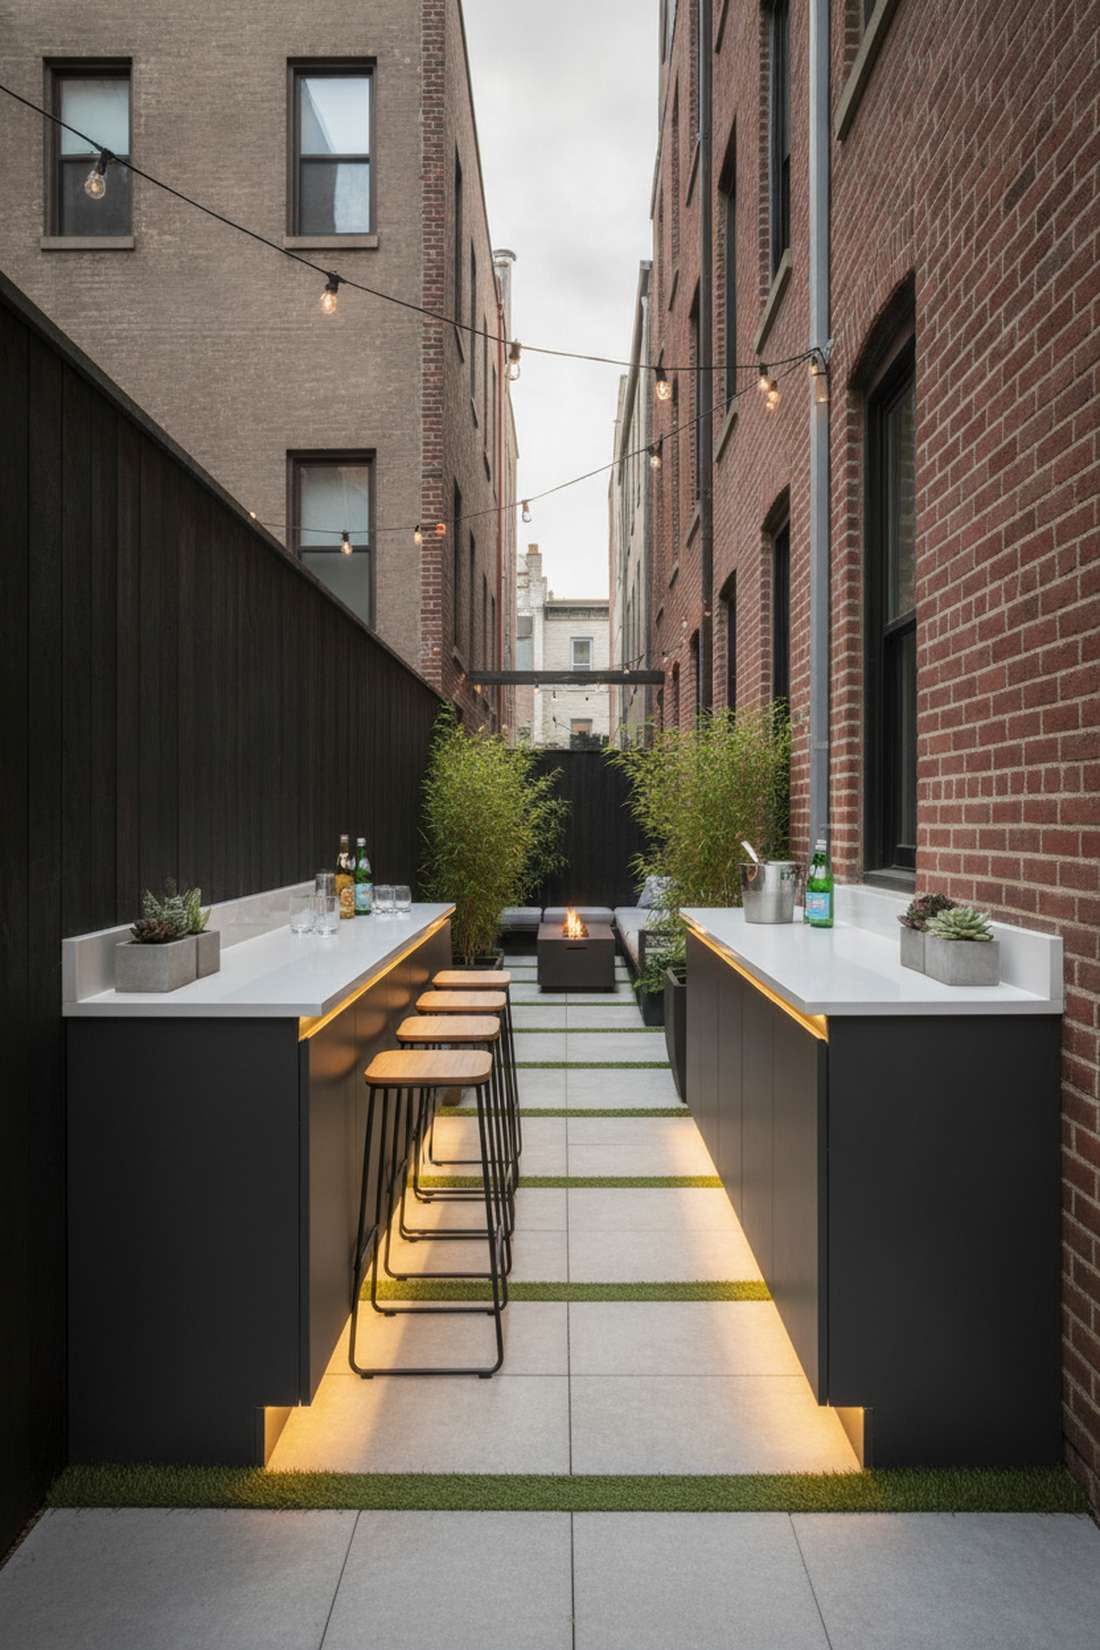
Brings razor-sharp efficiency to cramped side yards. A space-saving narrow yard bar runs parallel to the property line, turning dead transition space into a massive entertainment asset.
Deep counters choke off walkways, but limiting the depth to a sleek 18 inches completely changes the game while maintaining full drink-holding functionality. Grabbing pre-fab modular bar kits in slim profiles ensures you don’t over-build the footprint.
A slender galley build typically costs $200–$300. Pin this to maximize every inch of a tight urban lot.
- Key Materials: Slimline cabinets, narrow profile brackets, stone cap
- Vibe / Style: Urban modern
- Difficulty: Easy modification
- Budget Breakdown: Base Frame: $100 | Slim Counter: $150.
- Creator’s Tip: Ditch the standard stools and use wall-leaning perches or backless sliders to keep the walkway completely clear when not actively in use.
- Smart Sourcing: slim-profile outdoor framing kits and space-saving backless patio stools.
Conclusion
Crafting a truly high-end outdoor seating bar comes down to smart material sourcing and strategic layouts. By implementing these exactly 28 design strategies—from securing commercial-grade UV kits to optimizing multi-level deck seating—you can transform any basic patio into a premium social destination. Start by locking in your weatherproof countertop base, integrate the right protective shade, and layer in brilliant lighting to guarantee a luxury result that looks expensive but respects your DIY budget.
Frequently Asked Questions
What is the ideal height for an outdoor seating bar counter?
Standard bar height sits precisely at 42 inches from the ground, which pairs perfectly with 30-inch stools. If you are integrating premium outdoor kitchen modules, you might opt for a 36-inch counter-height approach instead. This lower tier accommodates 24-inch stools, making it far more comfortable for elderly guests and children while maintaining a high-end dining aesthetic.
How many outdoor seating bar stools fit per linear foot?
For a comfortable, premium feel, allocate exactly 24 to 30 inches of linear counter space per person. Squeezing in too many weatherproof patio seating bundles ruins the luxury vibe and causes elbow-clashing. A standard 8-foot run will elegantly hold 3 to 4 oversized ergonomic chairs, while a 12-foot setup comfortably handles up to 6.
What materials resist fading and weather damage best?
To avoid the cheap, faded look, always source marine-grade stainless steel, thick porcelain tile, or naturally durable granite. If you build with raw wood, it is absolutely critical to coat it with a uv-resistant countertop epoxy or a commercial-grade penetrating sealant. Skipping these premium protection steps guarantees rot, peeling, and expensive rebuilds within two seasons.
Do I need a building permit for an outdoor seating bar?
If you are utilizing freestanding pre-fab modular bar kits under 30 inches without permanent plumbing, you typically bypass permit requirements. However, the moment you trench hardwired electrical lines, pour deep concrete footings, or attach a rigid roof structure to your existing home fascia, local building departments will require formal approval and setback compliance.
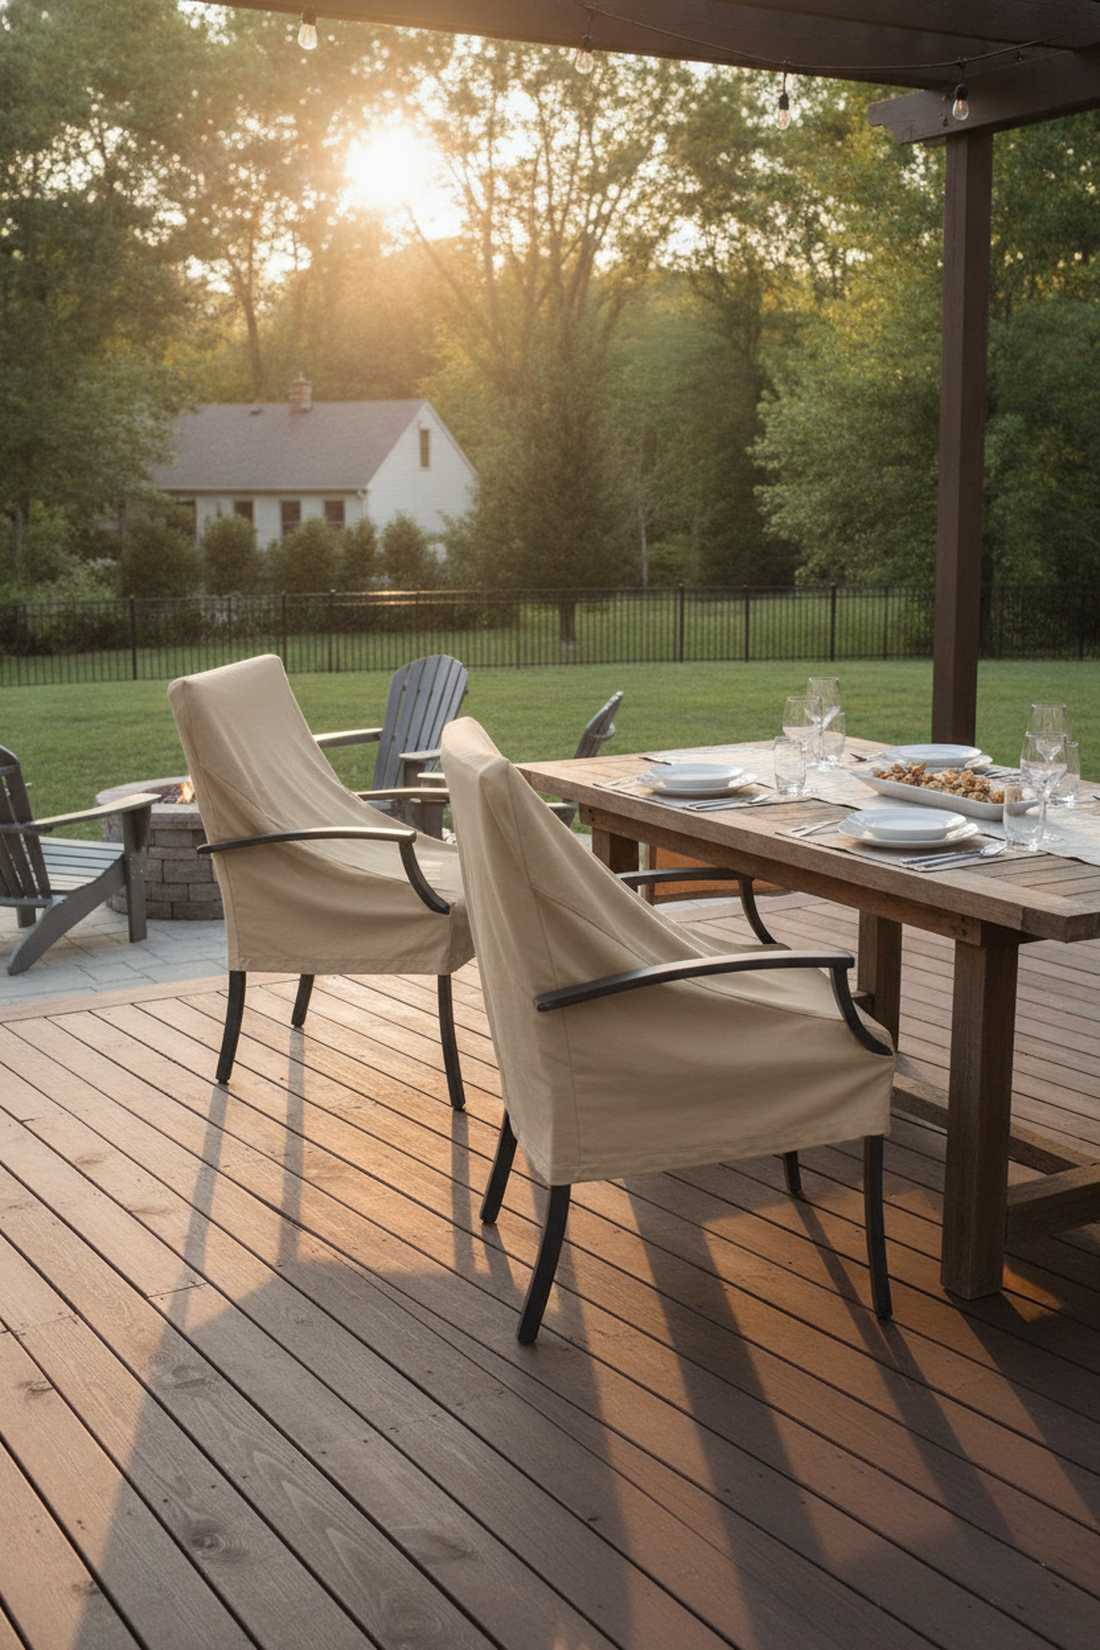
How can I winterize my outdoor seating bar?
Preserving your investment means aggressive weatherproofing before the first deep freeze. Drain all integrated plumbing, pull your cushions indoors, and drape the main structure in bulk heavy-duty winterizing covers tightly secured with bungee cords. Re-seal any exposed concrete or wood surfaces in late autumn so moisture doesn’t penetrate and crack the base over winter.