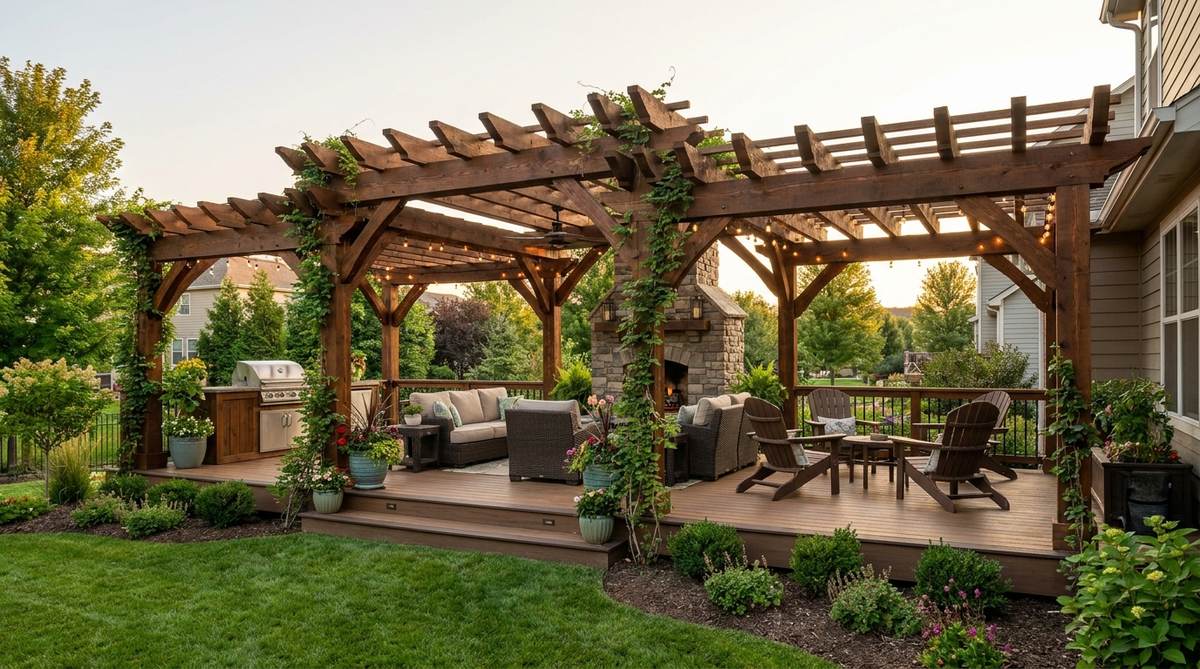
A masterfully designed outdoor living pergola instantly elevates your home’s footprint. Smart material sourcing unlocks designer-level backyard escapes on tight budgets. Learn exact layout blueprints and high-ROI upgrades below.
Design Snapshot Key Principles
- Material Selection: Choose aluminum for modern durability, cedar for warm rustic appeal, or steel for industrial strength
- Roof Functionality: Balance shade control with airflow through louvered systems, solid panels, or open beam designs
- Scale and Proportion: Match structure size to lot dimensions—compact 10×10 footprints suit smaller yards, while expansive pavilions anchor larger properties
- Integration Method: Decide between house-attached designs for seamless transitions or freestanding structures that create distinct outdoor rooms
Modern Pergola Innovations For Smart Outdoor Living
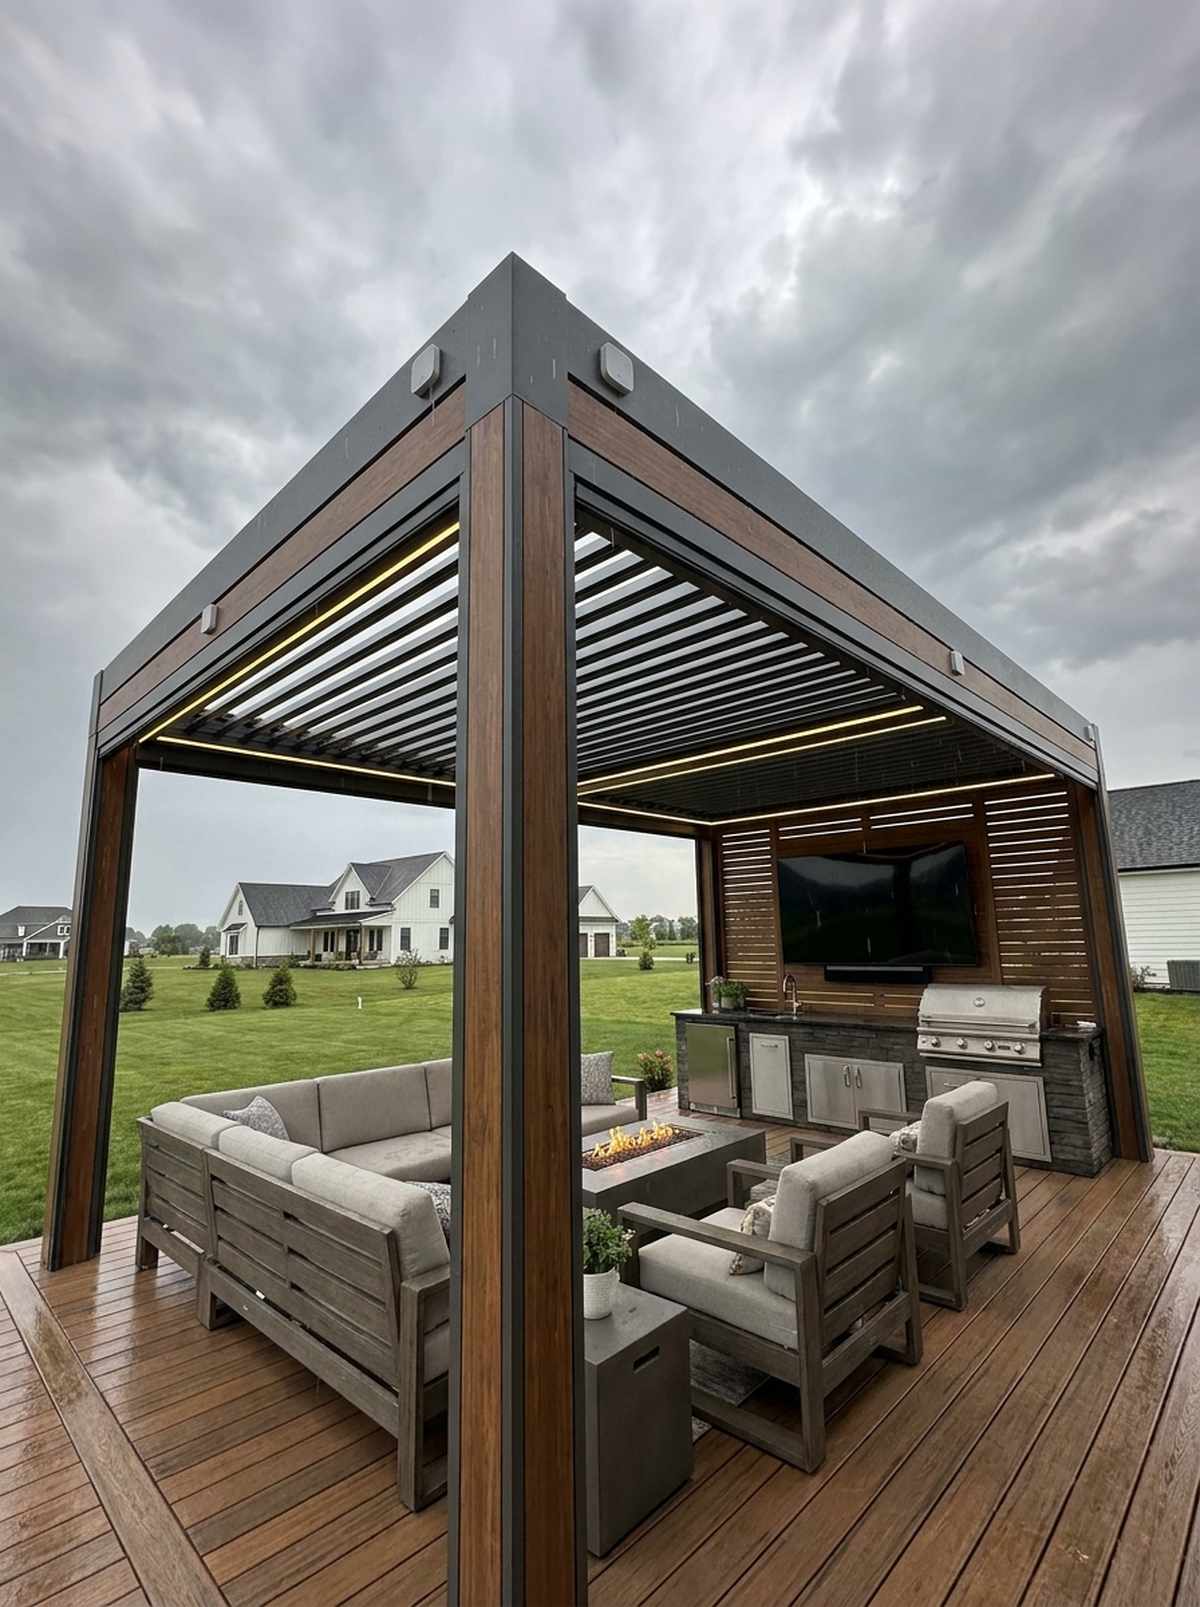
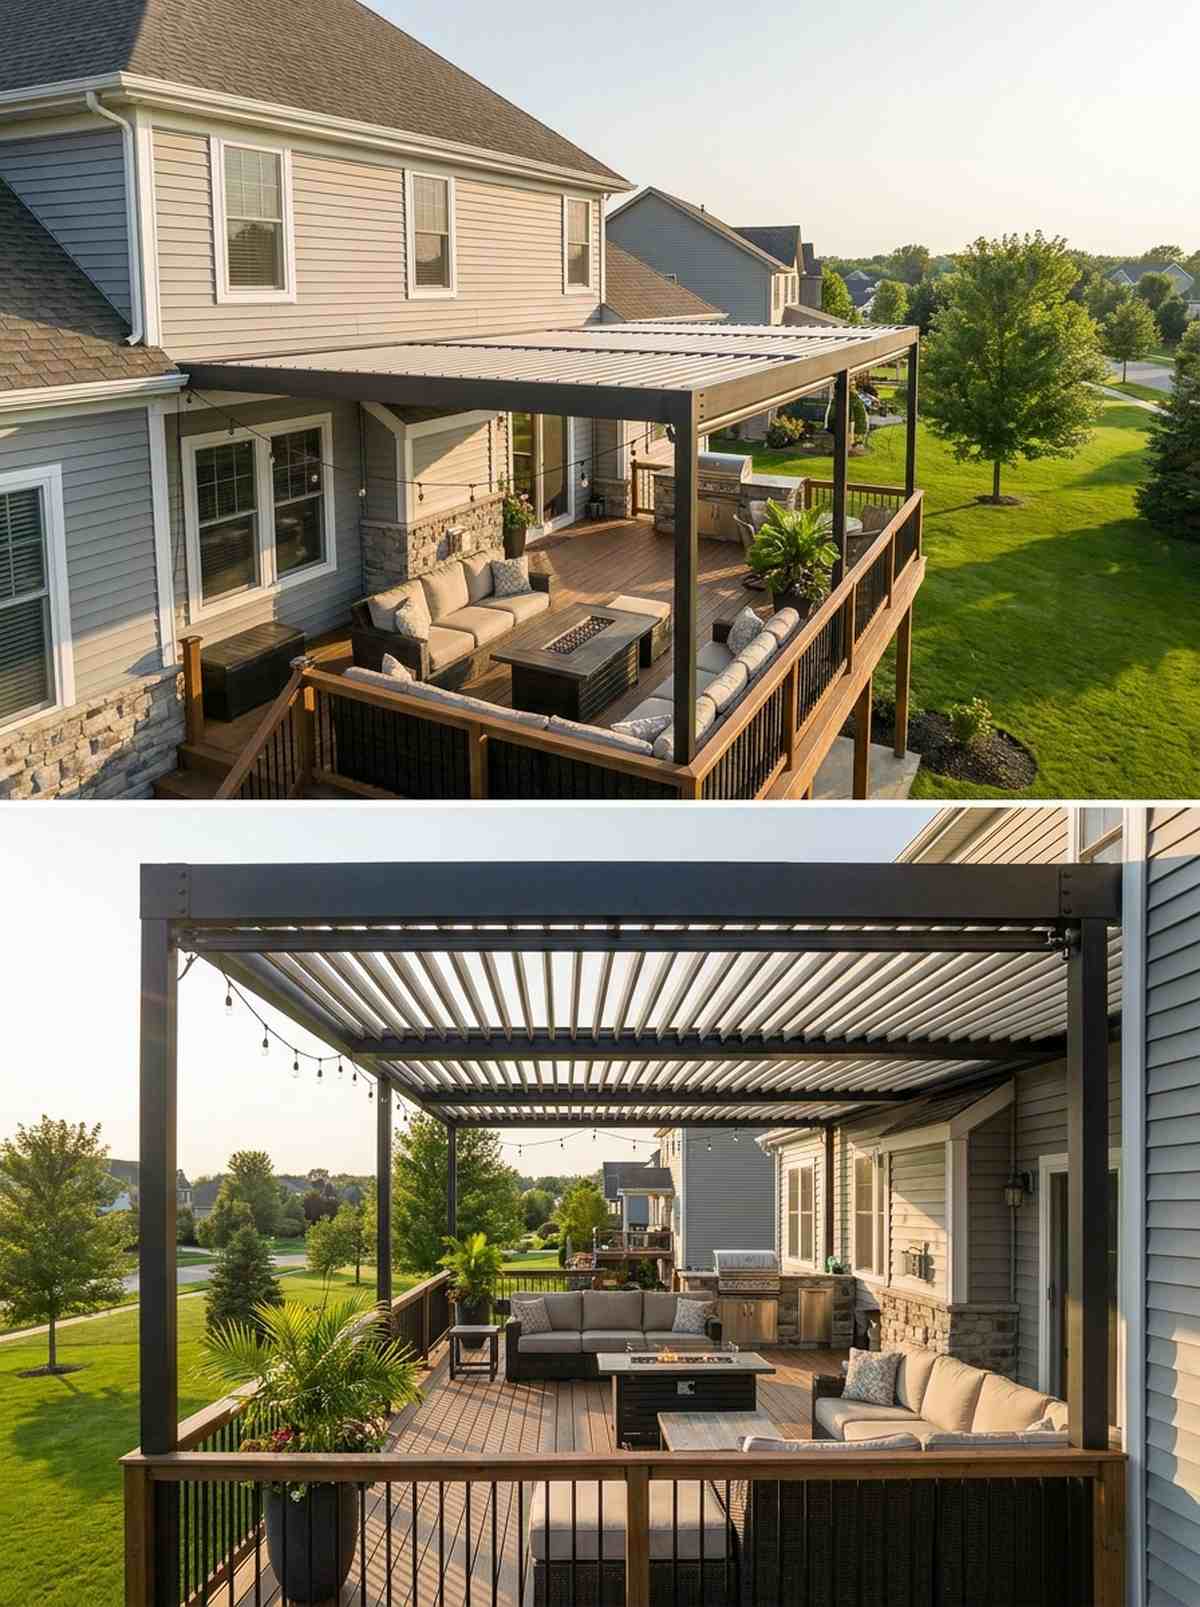
1. Louvered Roof Pergola System
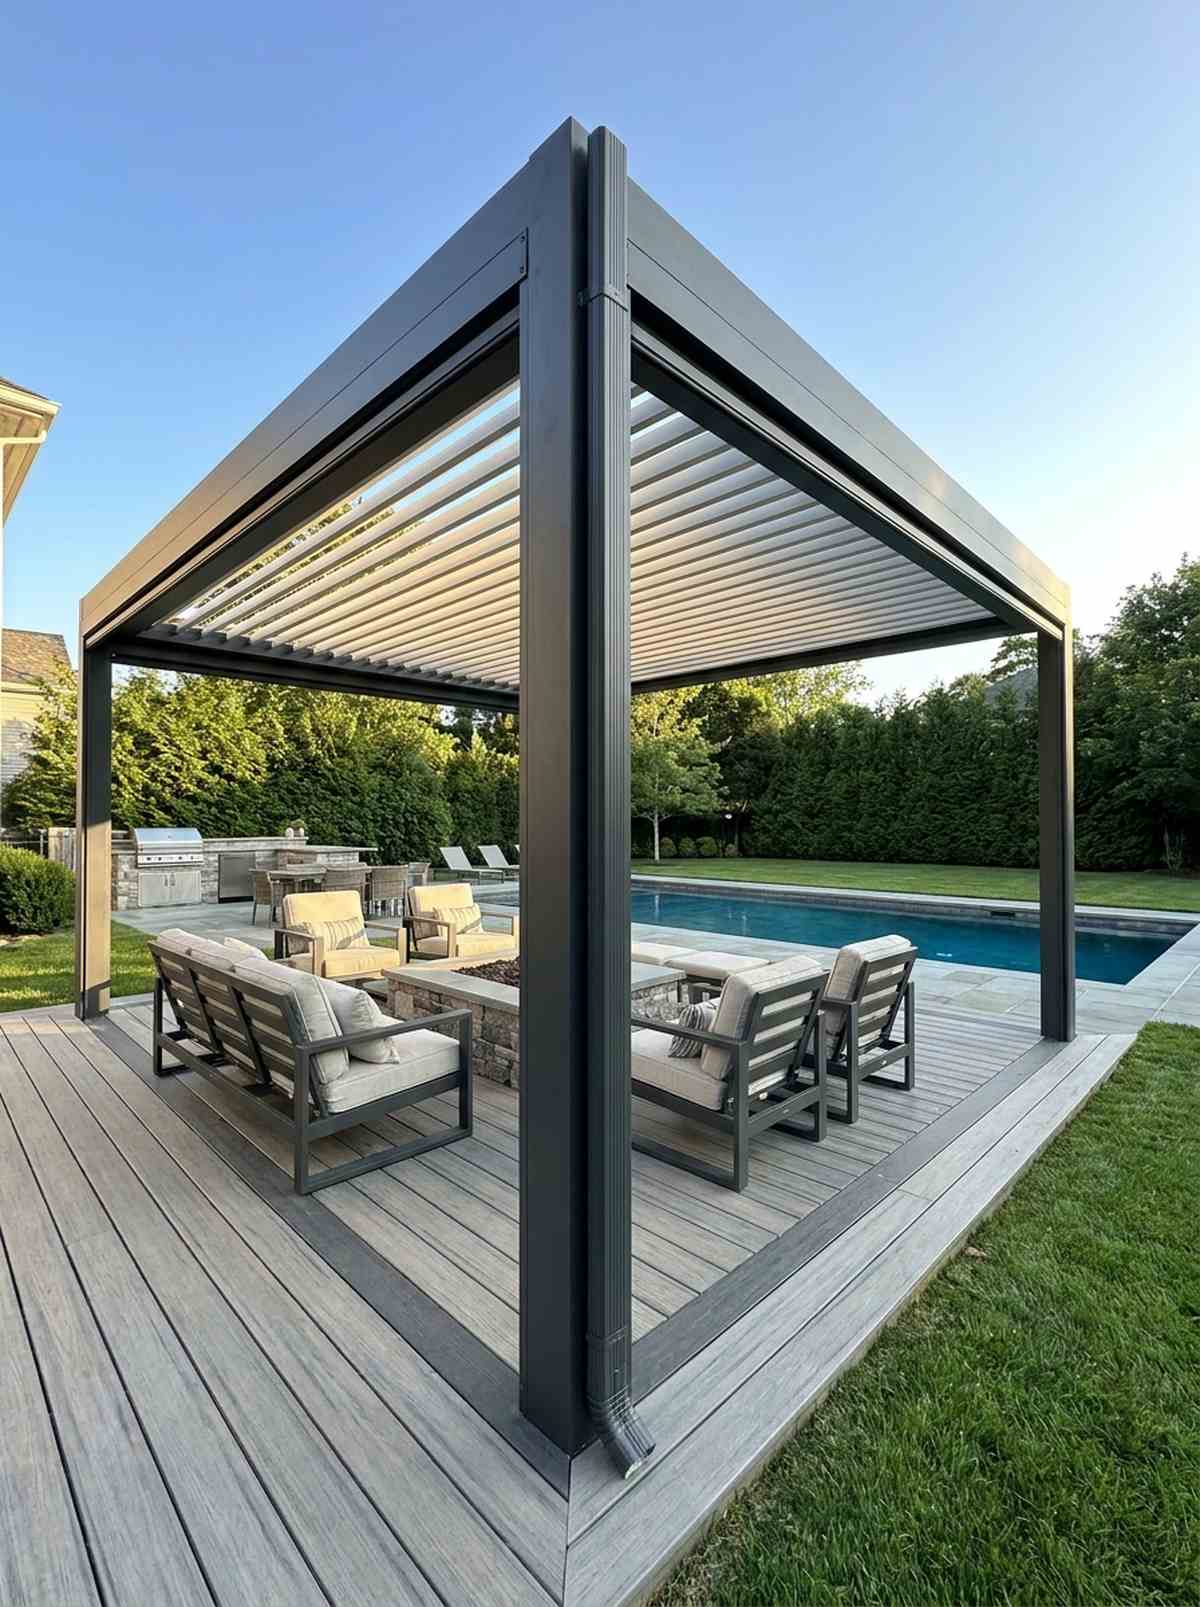
This smart patio cover setup feels like an exclusive resort cabana. It functions brilliantly for shading exposed poolside decks during mid-summer heat.
Contractors rarely mention that automated sun-tracking panels can replace the need for a massive enclosed outdoor living pavilion entirely. The sleek integrated drainage prevents messy post-storm water dumps.
You can achieve this premium automated setup for roughly $3,000–$5,500. Save this to your backyard luxury upgrades board.
- Key Materials: Motorized tracking panels
- Vibe / Style: Futuristic resort luxury
- Difficulty: Advanced installation
- Budget Breakdown: Frame: $2000 | Motors: $1500
- Creator’s Tip: Route all electrical conduits inside the structural beams before final assembly.
- Smart Sourcing: pre-cut aluminum louver kits and weatherproof smart-relay controllers.
2. Minimalist Steel Frame Pergola
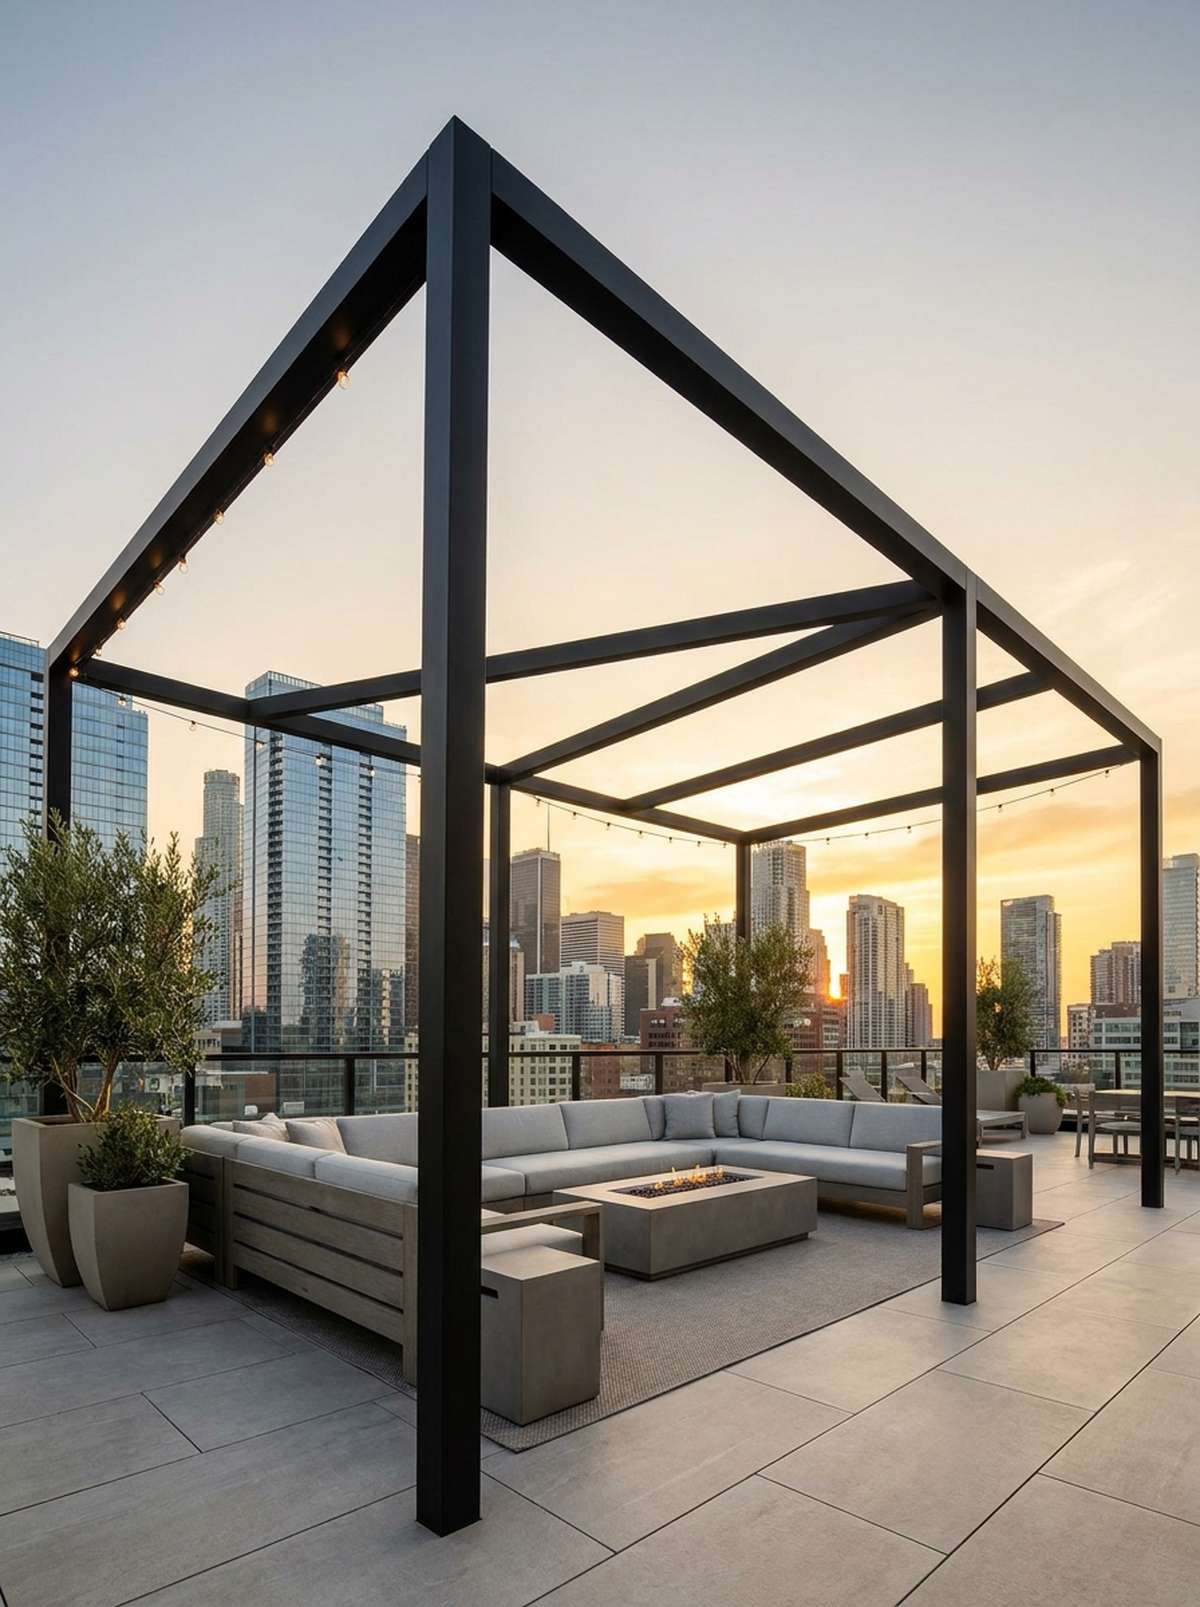
An industrial garden structure that feels incredibly powerful yet invisible. It anchors modern urban rooftop patios exceptionally well.
Defying standard bulky wood designs, ultra-thin metal supports create architectural drama through negative space. It perfectly mimics high-end commercial outdoor living gazebo aesthetics.
Fabrication and finishing will cost around $1,800–$2,500. It’s a fast upgrade that completely changes the vibe.
- Key Materials: Matte powder-coated beams
- Vibe / Style: Sleek urban minimalist
- Difficulty: Heavy lifting required
- Budget Breakdown: Steel: $1200 | Coatings: $600
- Creator’s Tip: Use invisible floating base plates to hide ugly concrete anchors.
- Smart Sourcing: pre-drilled heavy-duty steel corner brackets and industrial-grade anti-rust sealants.
3. Glass Panel Pergola Canopy
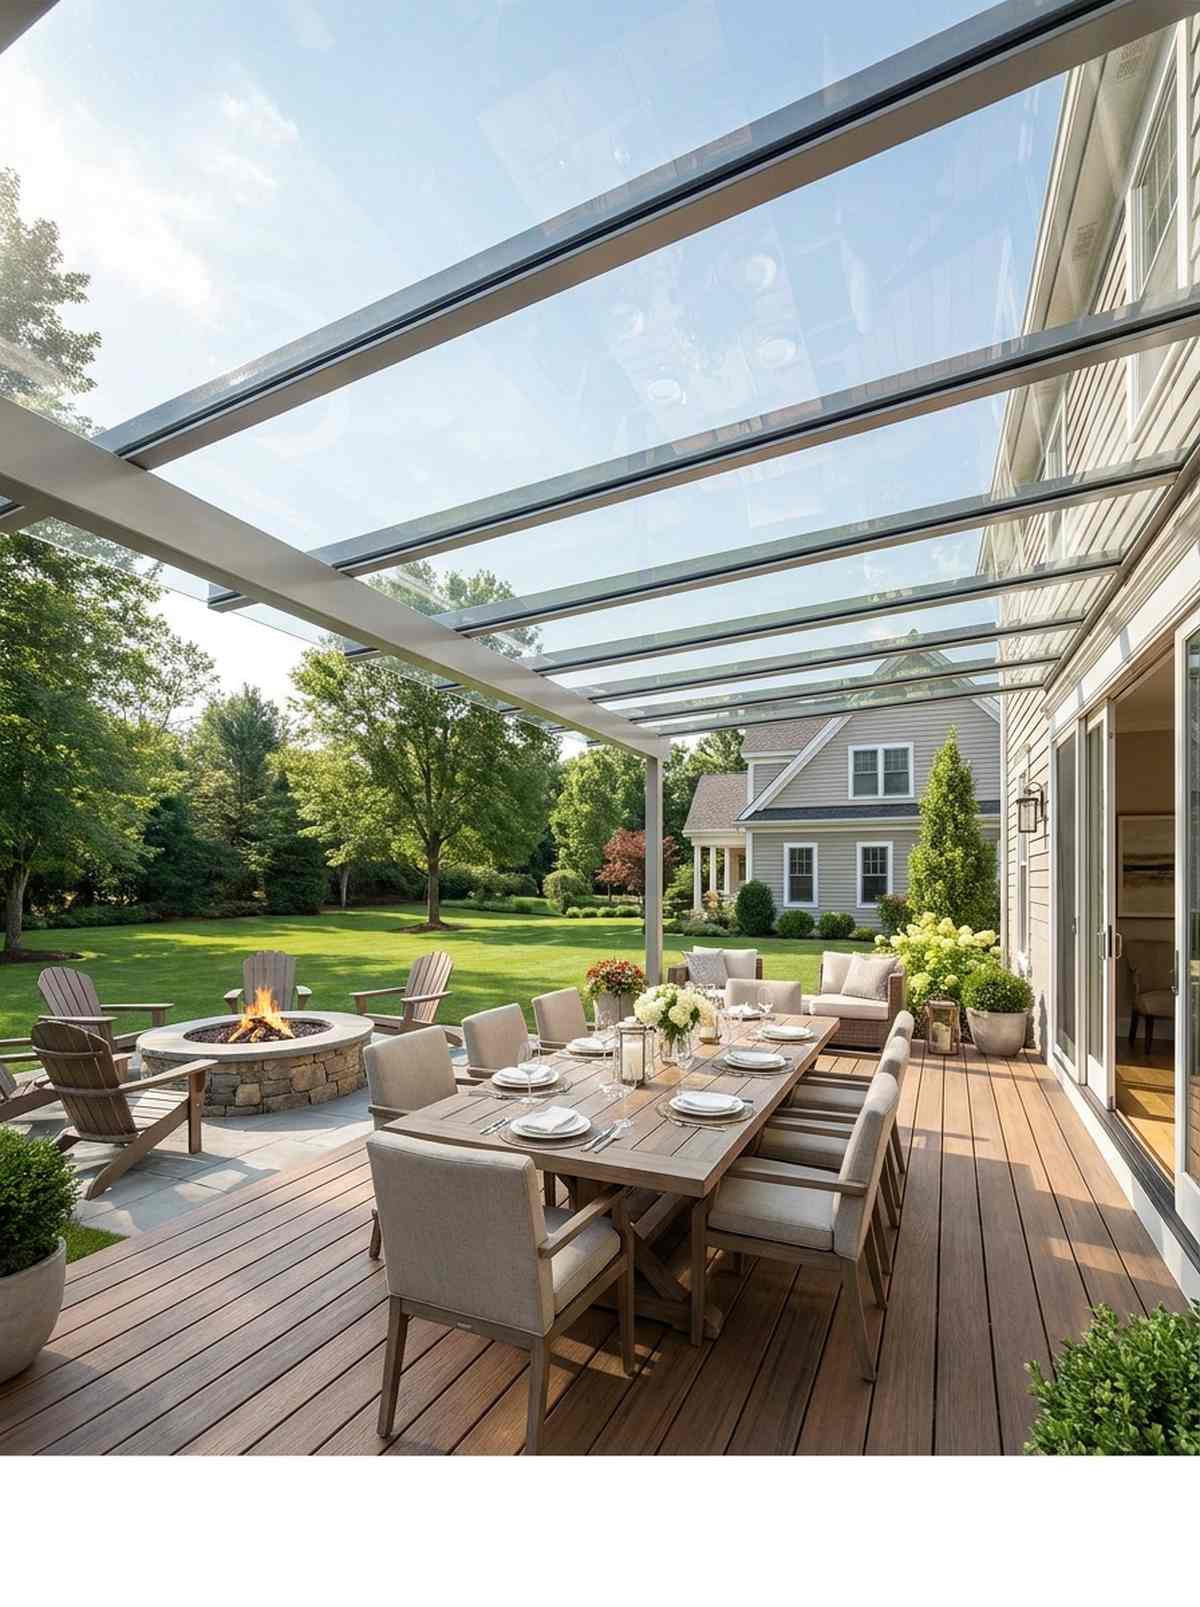
This transparent overhead canopy feels like a floating rain shield. It serves perfectly for dining areas in unpredictable, rainy climates.
Many homeowners mistakenly block natural light with solid roofs, but frameless tempered glazing maintains a bright, airy environment. It gives a designer-level finish that rivals luxury solariums.
Expect to spend around $2,000–$3,500 depending on glass thickness. Pin this if you’re planning an all-weather entertainment zone.
- Key Materials: Frameless tempered glazing
- Vibe / Style: Transparent modern elegance
- Difficulty: Professional handling needed
- Budget Breakdown: Glass: $1500 | Mounts: $500
- Creator’s Tip: Specify low-iron glass to avoid the cheap green tint found in standard panes.
- Smart Sourcing: shatter-resistant polycarbonate roof panels (bulk pack) and UV-stable clear silicone sealants.
4. Bioclimatic Pergola With Sensors
A climate-adaptive backyard frame that feels like a living, breathing smart home. It is flawless for high-tech entertainment decks needing instant weather response.
This surprisingly outsmarts sudden storms by auto-closing when rain hits, saving your expensive patio furniture. This responsive intelligence severely outperforms static outdoor living gazebo structures.
The tech integration pushes costs to $4,000–$6,000. Highly recommended if you hate rushing outside to cover furniture.
- Key Materials: Environmental sensor nodes
- Vibe / Style: Automated high-tech oasis
- Difficulty: Expert wiring required
- Budget Breakdown: Sensors: $800 | Structure: $3500
- Creator’s Tip: Link the wind sensors to your main smart home hub for unified voice controls.
- Smart Sourcing: plug-and-play biometric weather sensors and marine-grade automated actuator kits.
This next setup completely tricks the eye, mixing cheap materials to look like a $15,000 custom resort build…
5. Aluminum And Wood Hybrid Pergola
This mixed-material patio shade feels beautifully balanced and earthy. It works magic bridging the gap for transitional modern farmhouse yards.
Using metal for structural integrity and timber purely for aesthetic warmth cuts maintenance in half. It delivers a surprisingly premium look without the nightmare of sealing endless top beams.
You can execute this hybrid approach for $1,500–$2,800. Save this idea to your modern rustic inspiration board.
- Key Materials: Metal posts, wood rafters
- Vibe / Style: Warm industrial fusion
- Difficulty: Intermediate DIY friendly
- Budget Breakdown: Aluminum: $1000 | Wood: $600
- Creator’s Tip: Pre-stain all wooden crossbeams on the ground before lifting them into place.
- Smart Sourcing: powder-coated structural aluminum posts and pre-finished synthetic wood slats.
6. Flat Roof Contemporary Pergola
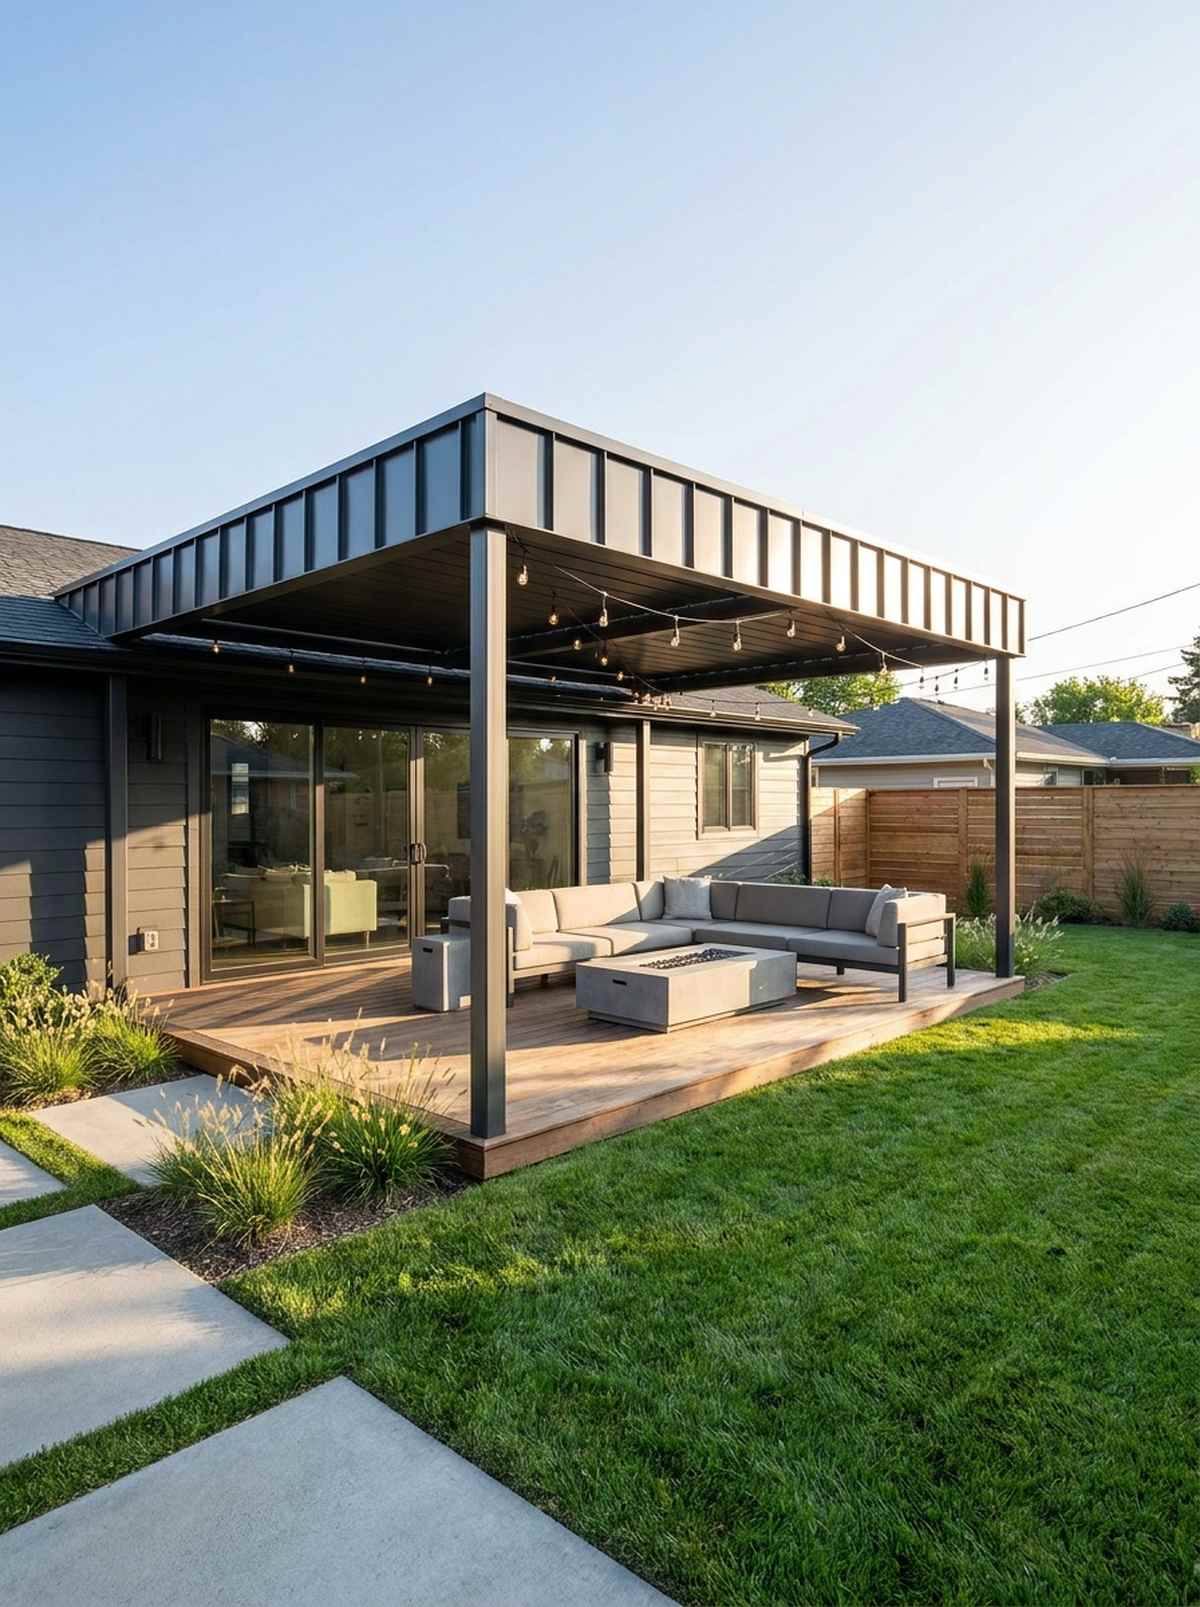
A linear garden shelter that feels like a sharp geometric sanctuary. It flawlessly complements single-story homes with low-slope rooflines.
The industry secret here is hiding all drainage internally within the columns, keeping the outer silhouette incredibly sleek. It functions just like a premium outdoor living pavilion but looks far sharper.
Budget roughly $1,200–$2,200 for clean lines and solid coverage. An incredible weekend architectural win.
- Key Materials: Standing seam metal
- Vibe / Style: Ultra-sharp contemporary
- Difficulty: Moderate carpentry
- Budget Breakdown: Roofing: $800 | Frame: $600
- Creator’s Tip: Add a microscopic 1-degree pitch hidden behind the fascia for invisible water runoff.
- Smart Sourcing: hidden gutter drainage kits and snap-lock metal roofing panels (bulk pack).
7. Retractable Canopy Pergola Frame
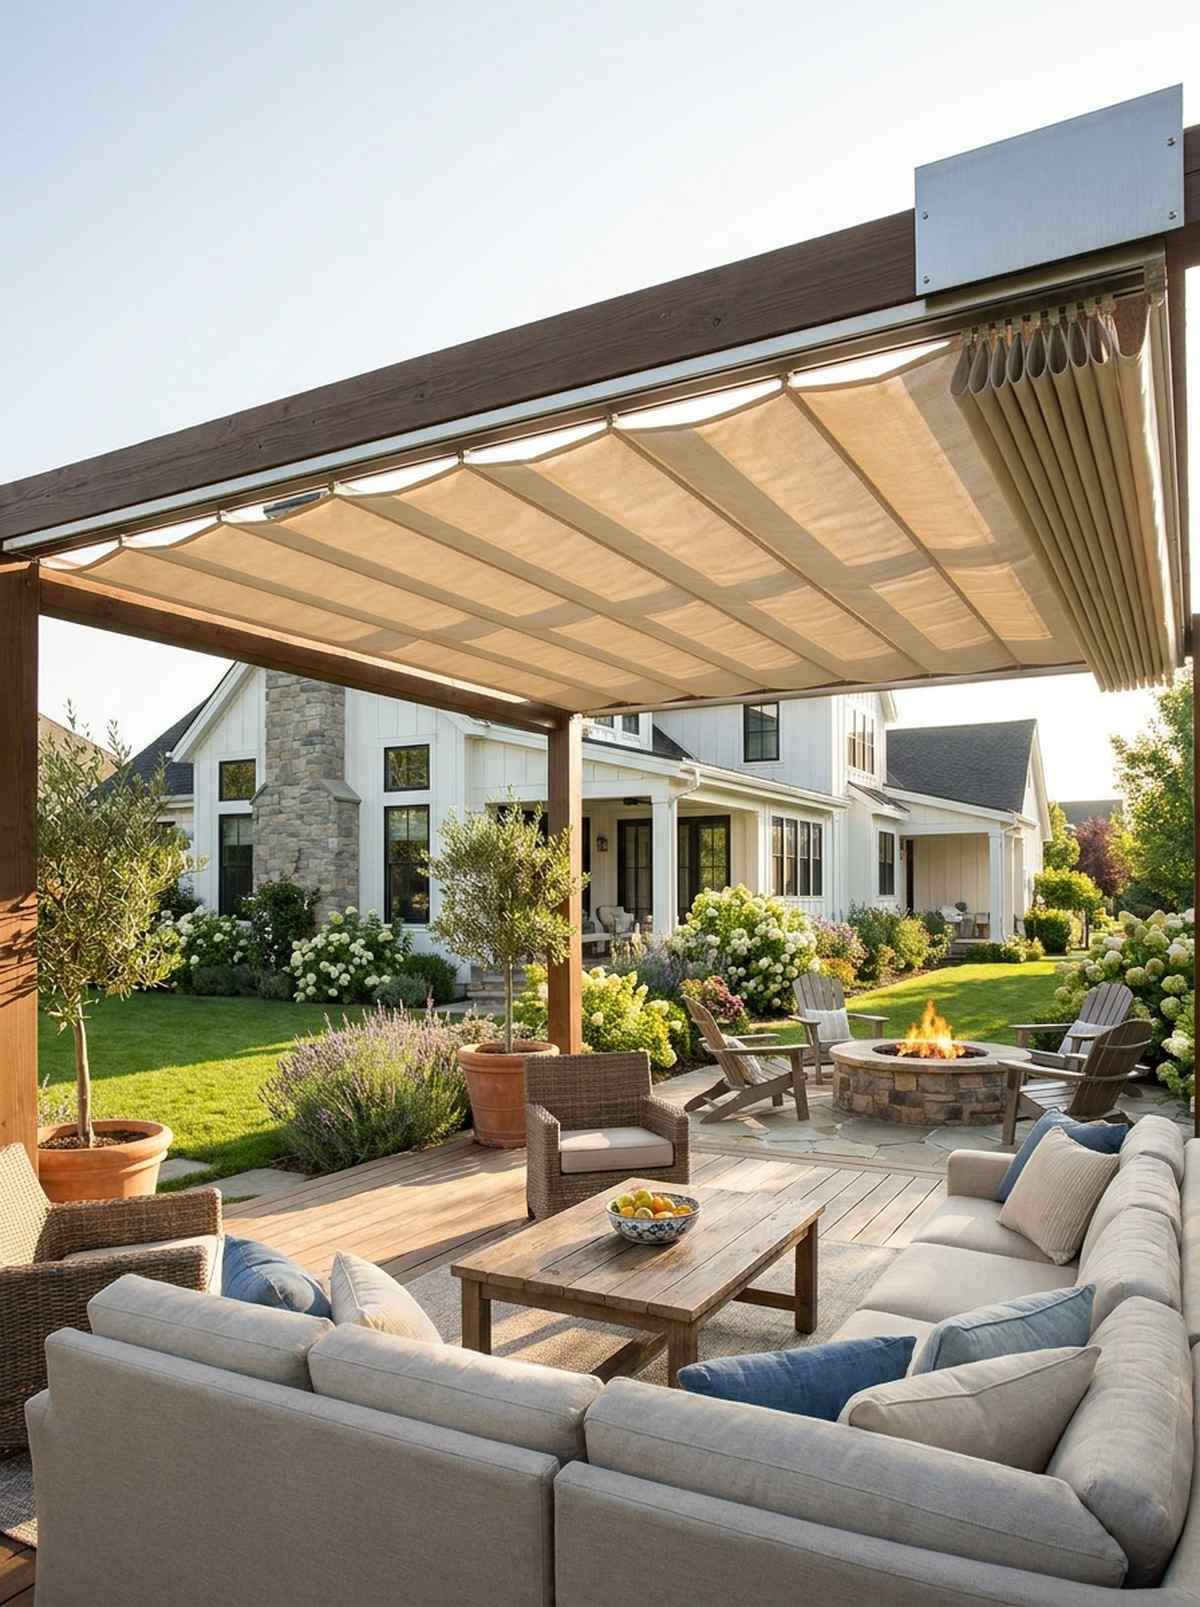
This shape-shifting fabric cover feels like an elegant European cafe. It is spectacular for dual-purpose spaces that need both full sun and deep shade.
Most fixed designs trap heat, but sliding track fabrics let the structure breathe on command. Upgrading to high-performance textiles guarantees it won’t look cheap or fade after one summer.
Fabric and track mechanisms run about $800–$1,500. Pin this if you love flexible outdoor hosting.
- Key Materials: Track-mounted acrylic fabric
- Vibe / Style: Breezy Mediterranean cafe
- Difficulty: Easy track mounting
- Budget Breakdown: Fabric: $500 | Hardware: $400
- Creator’s Tip: Install a protective hood at the retraction end to shield the fabric from winter snow.
- Smart Sourcing: UV-coated fade-resistant canopy shades and stainless steel sliding track kits.
8. LED-Integrated Pergola Beams
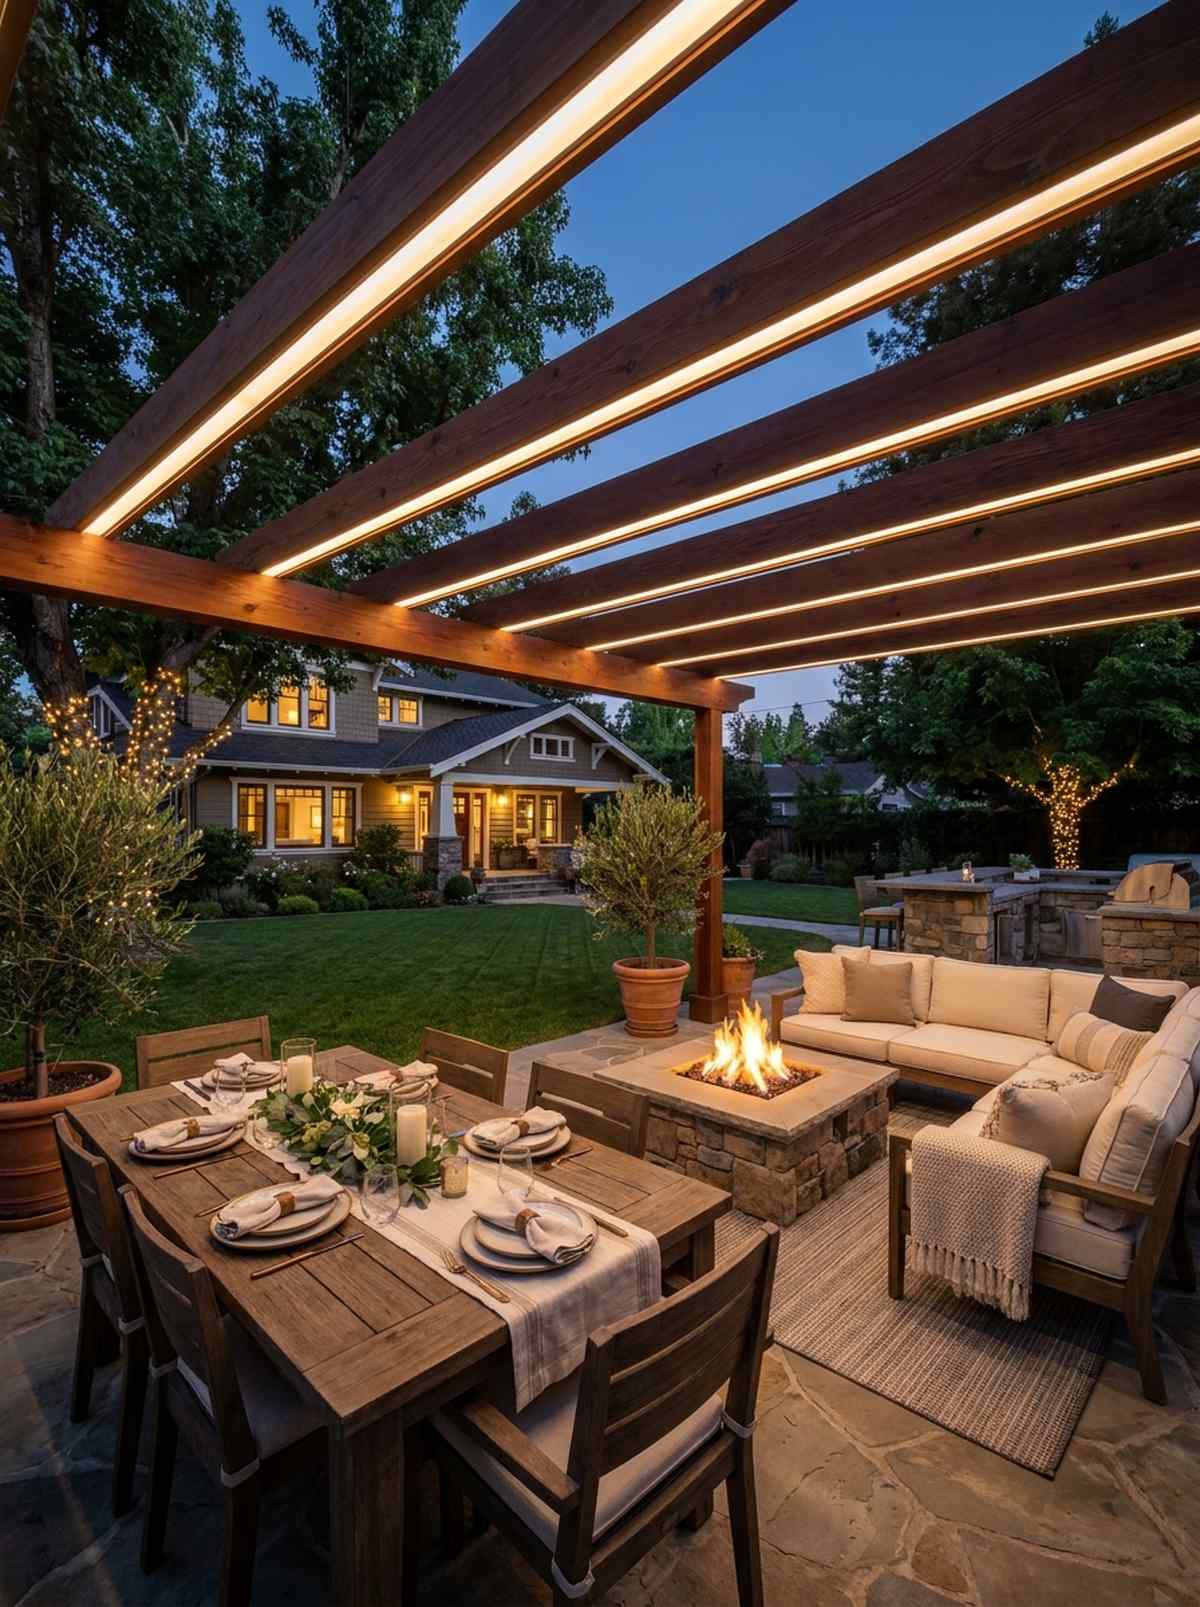
A glowing outdoor sanctuary that feels incredibly cinematic at night. It transforms standard dining spaces into late-night entertainment focal points.
Skip the tacky string lights; routing flush-mount channels directly into the wood grain creates zero-glare, ambient luxury. This lighting trick makes a basic setup look like a high-end designer outdoor living gazebo.
Lighting components add an easy $150–$300 to your build. A brilliant finishing touch for mood setters.
- Key Materials: Diffused light strips
- Vibe / Style: Cinematic evening lounge
- Difficulty: Beginner electrical
- Budget Breakdown: LEDs: $100 | Aluminum Channels: $80
- Creator’s Tip: Always use milky white diffusers over the LEDs to hide the harsh individual bulb dots.
- Smart Sourcing: waterproof IP67 LED strip kits and recessed aluminum lighting channels (bulk pack).
Most backyard DIYers completely ruin their aesthetic here… until they try the exact timber joint layout coming up next.
Traditional Timber Structures With Rustic Appeal
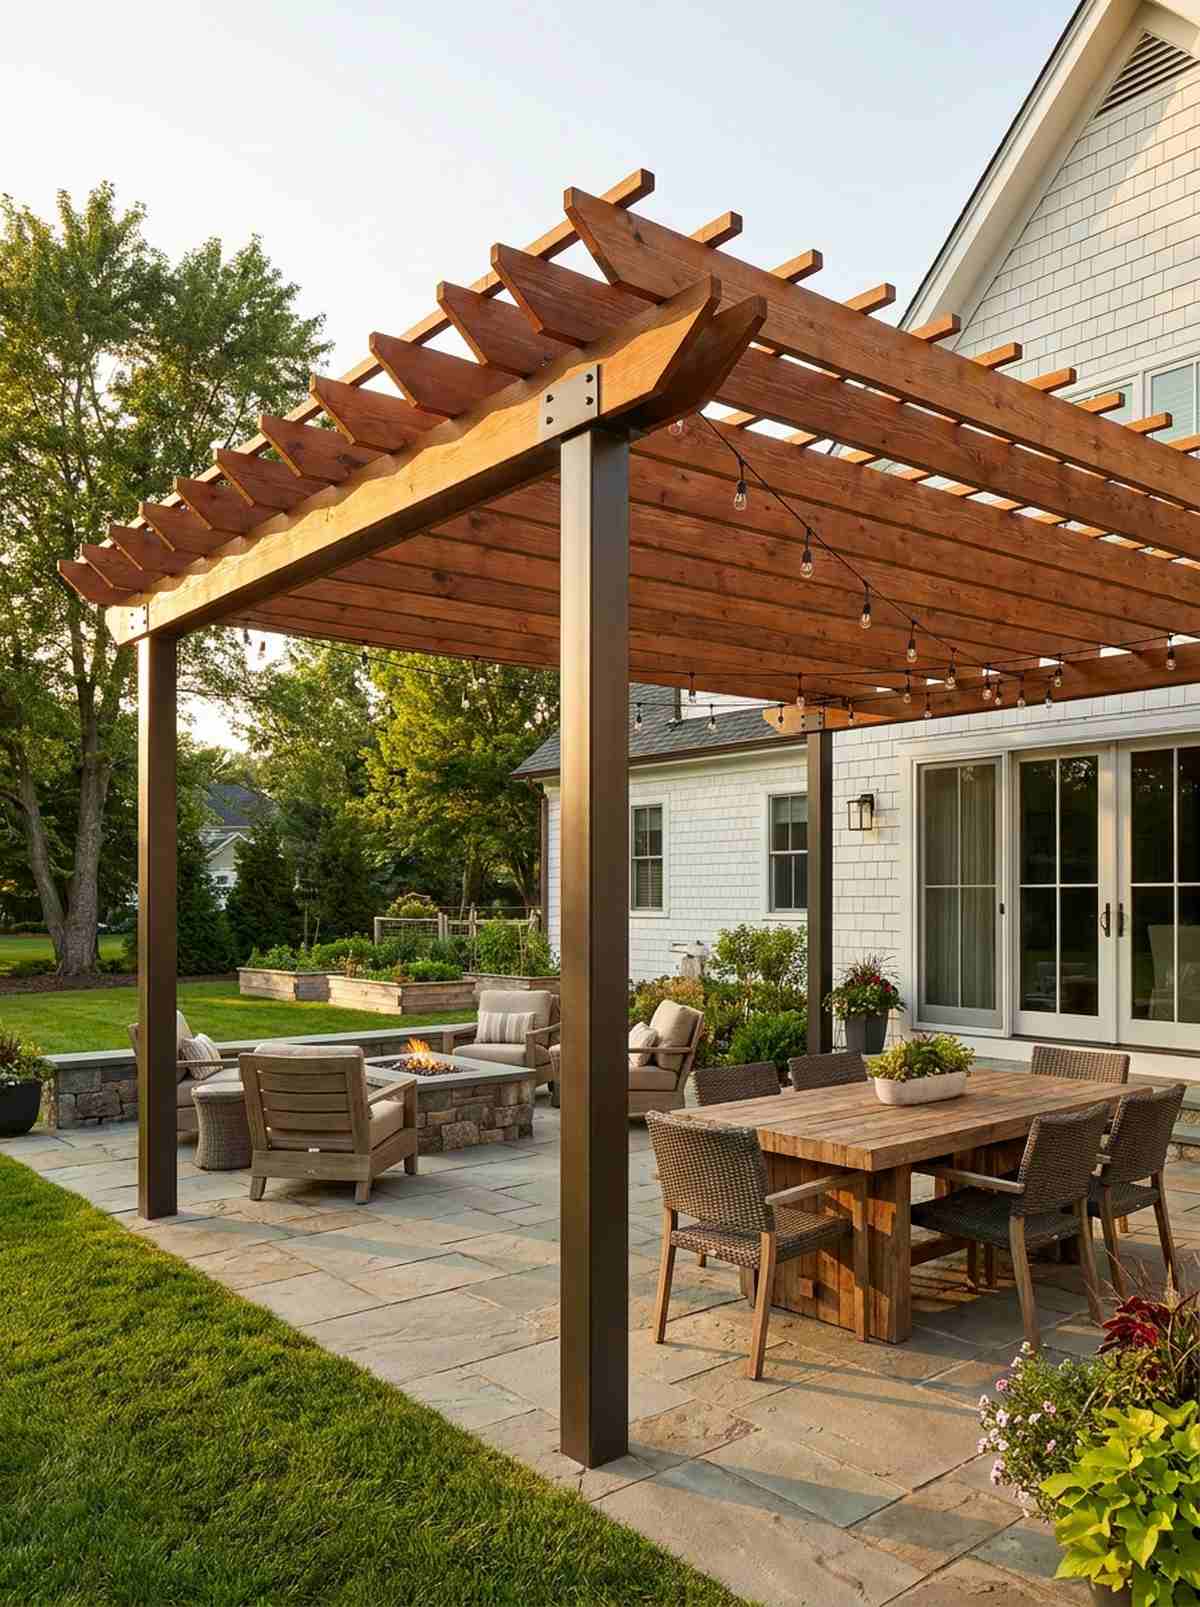
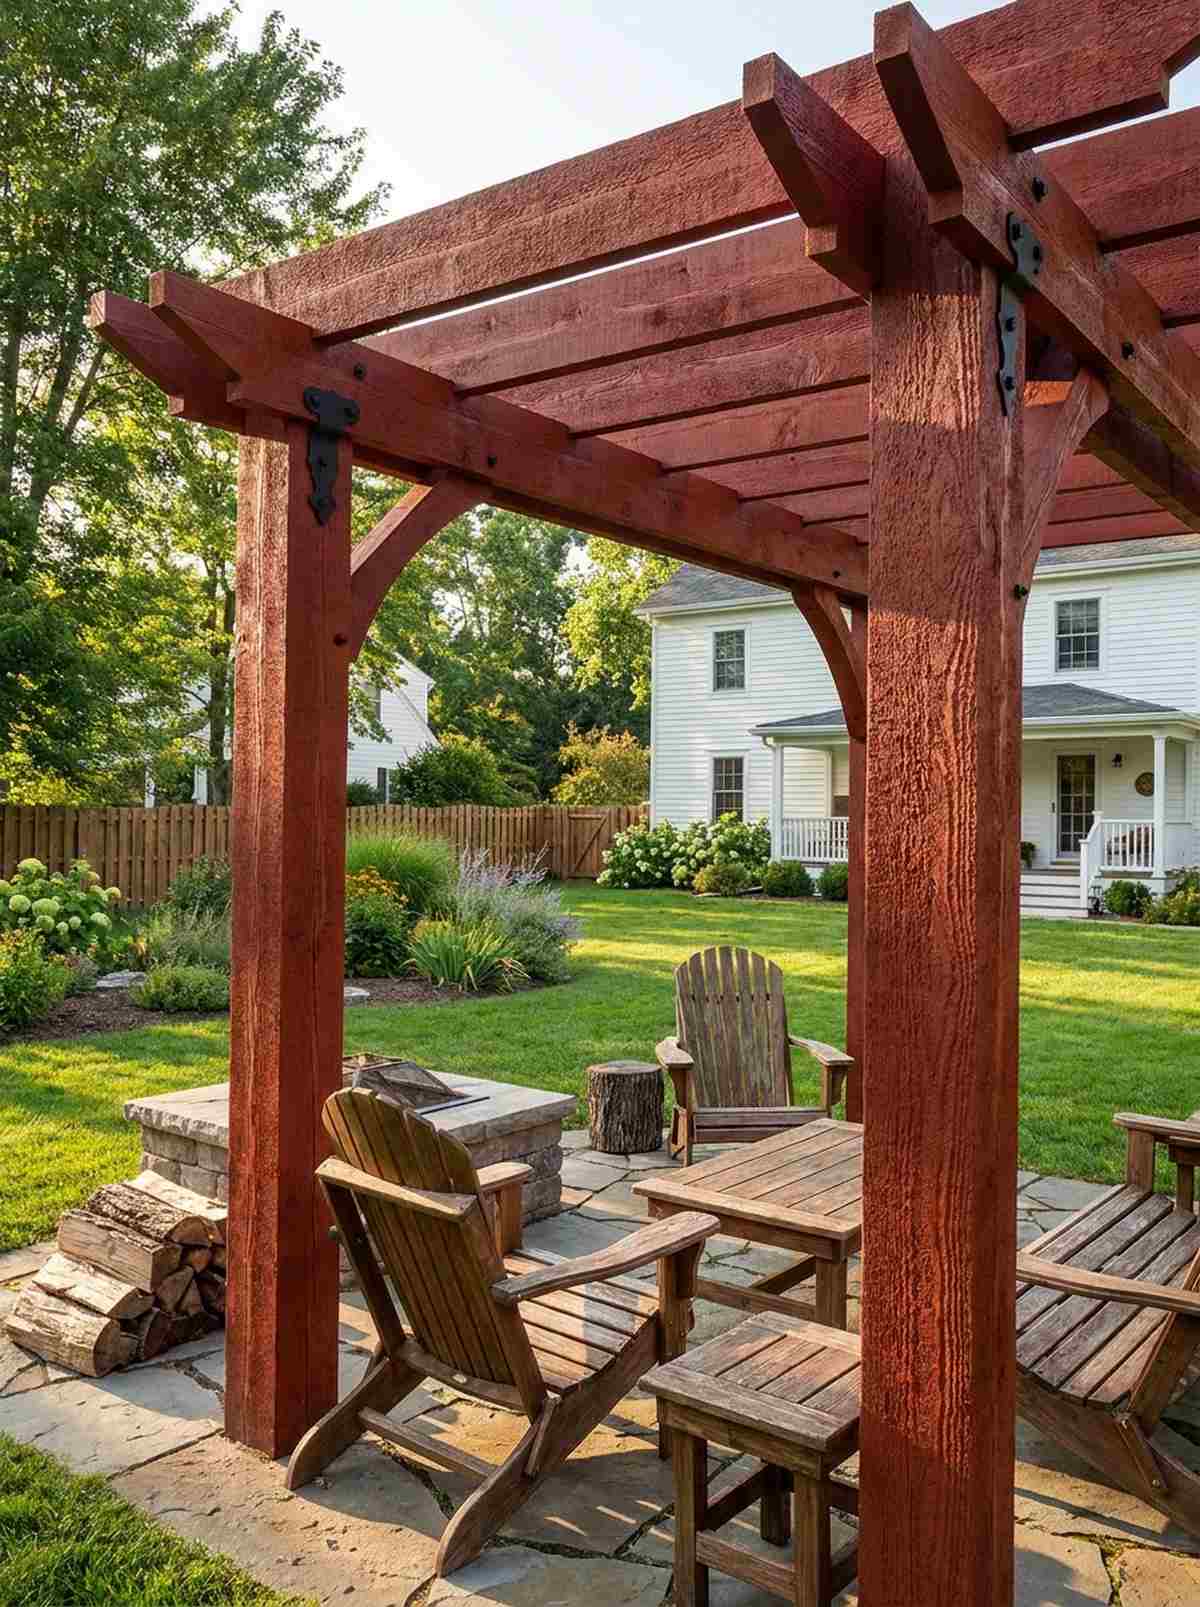
9. Cedar Post And Beam Pergola
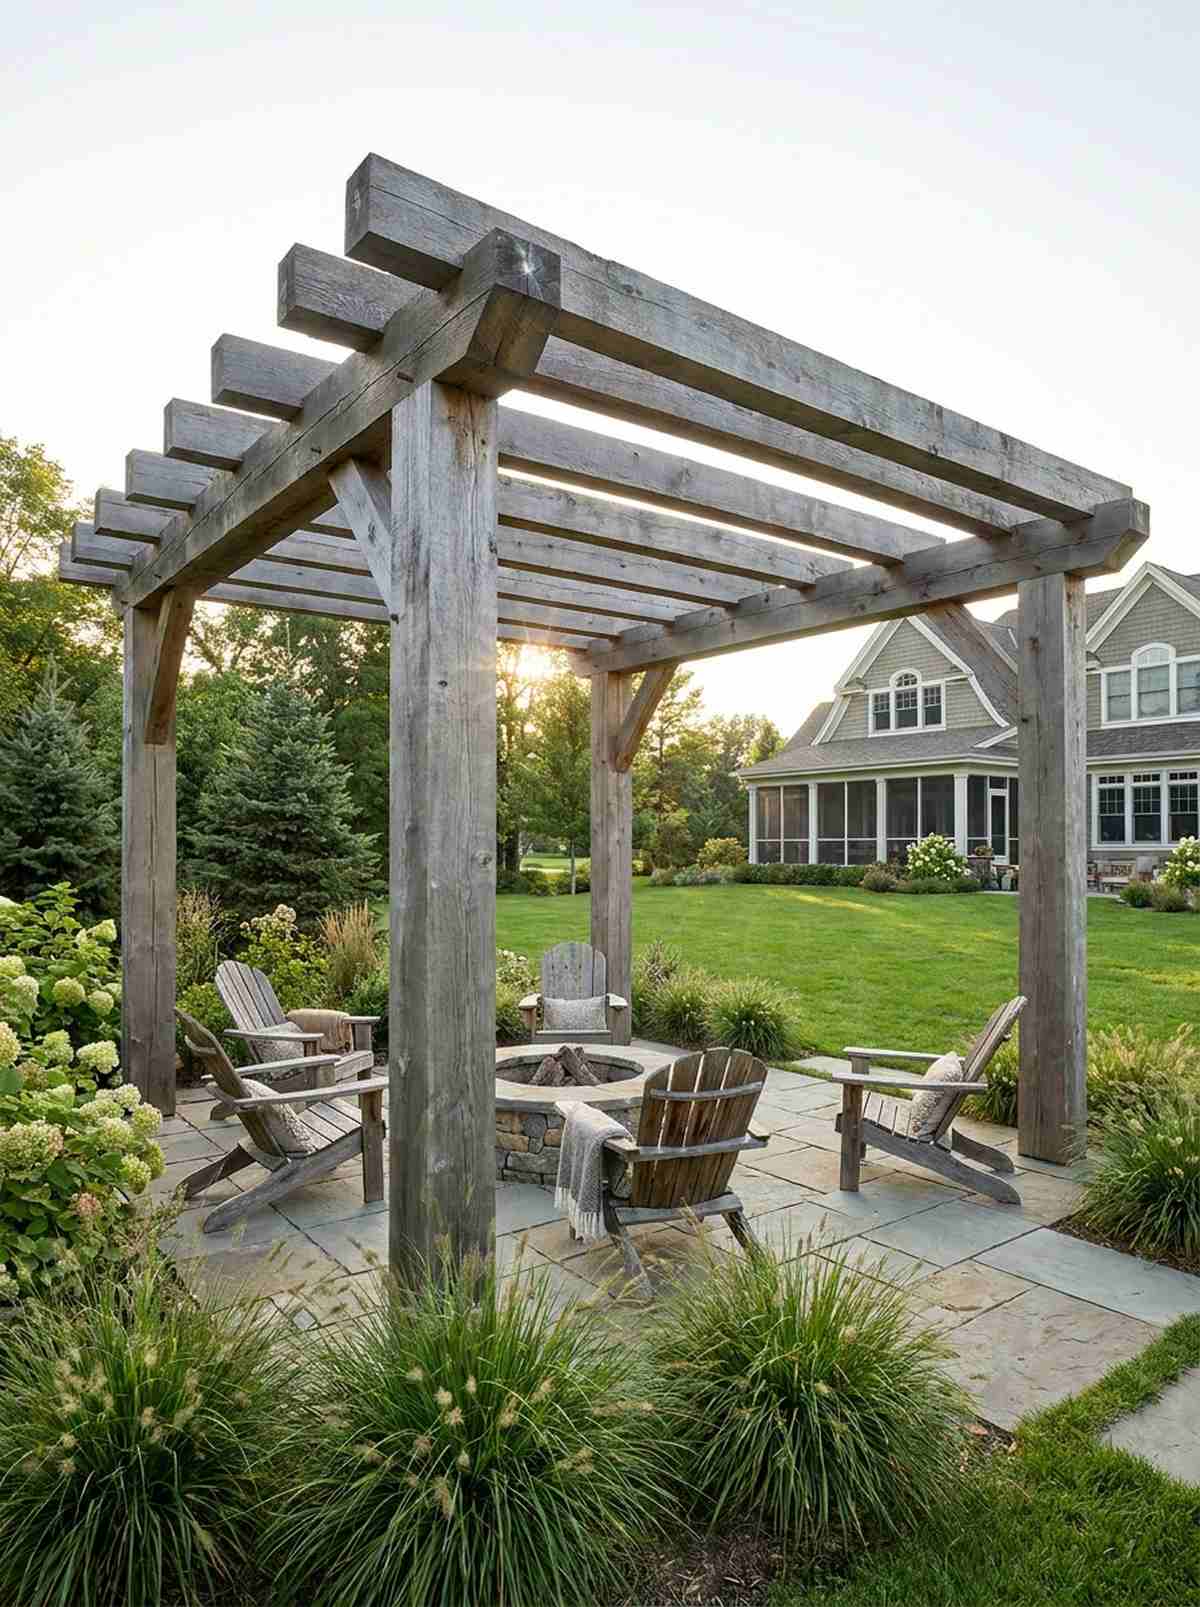
This chunky wood garden arch feels like a timeless alpine lodge retreat. It acts as a massive visual anchor for sprawling, nature-heavy yards.
The controversial move is leaving the wood entirely untreated to achieve that coveted silvery-gray weathering. Massive 8×8 proportions prevent the structure from looking flimsy against large homes.
Heavy cedar beams push the cost to $2,500–$4,000. Save this to your rustic landscaping board.
- Key Materials: Rough-cut cedar posts
- Vibe / Style: Heritage mountain lodge
- Difficulty: Heavy lifting crane/crew
- Budget Breakdown: Lumber: $2000 | Hardware: $400
- Creator’s Tip: Use hidden steel core base plates so the massive wood posts never touch wet ground.
- Smart Sourcing: pre-cut heavy-duty post bases and architectural grade timber fasteners.
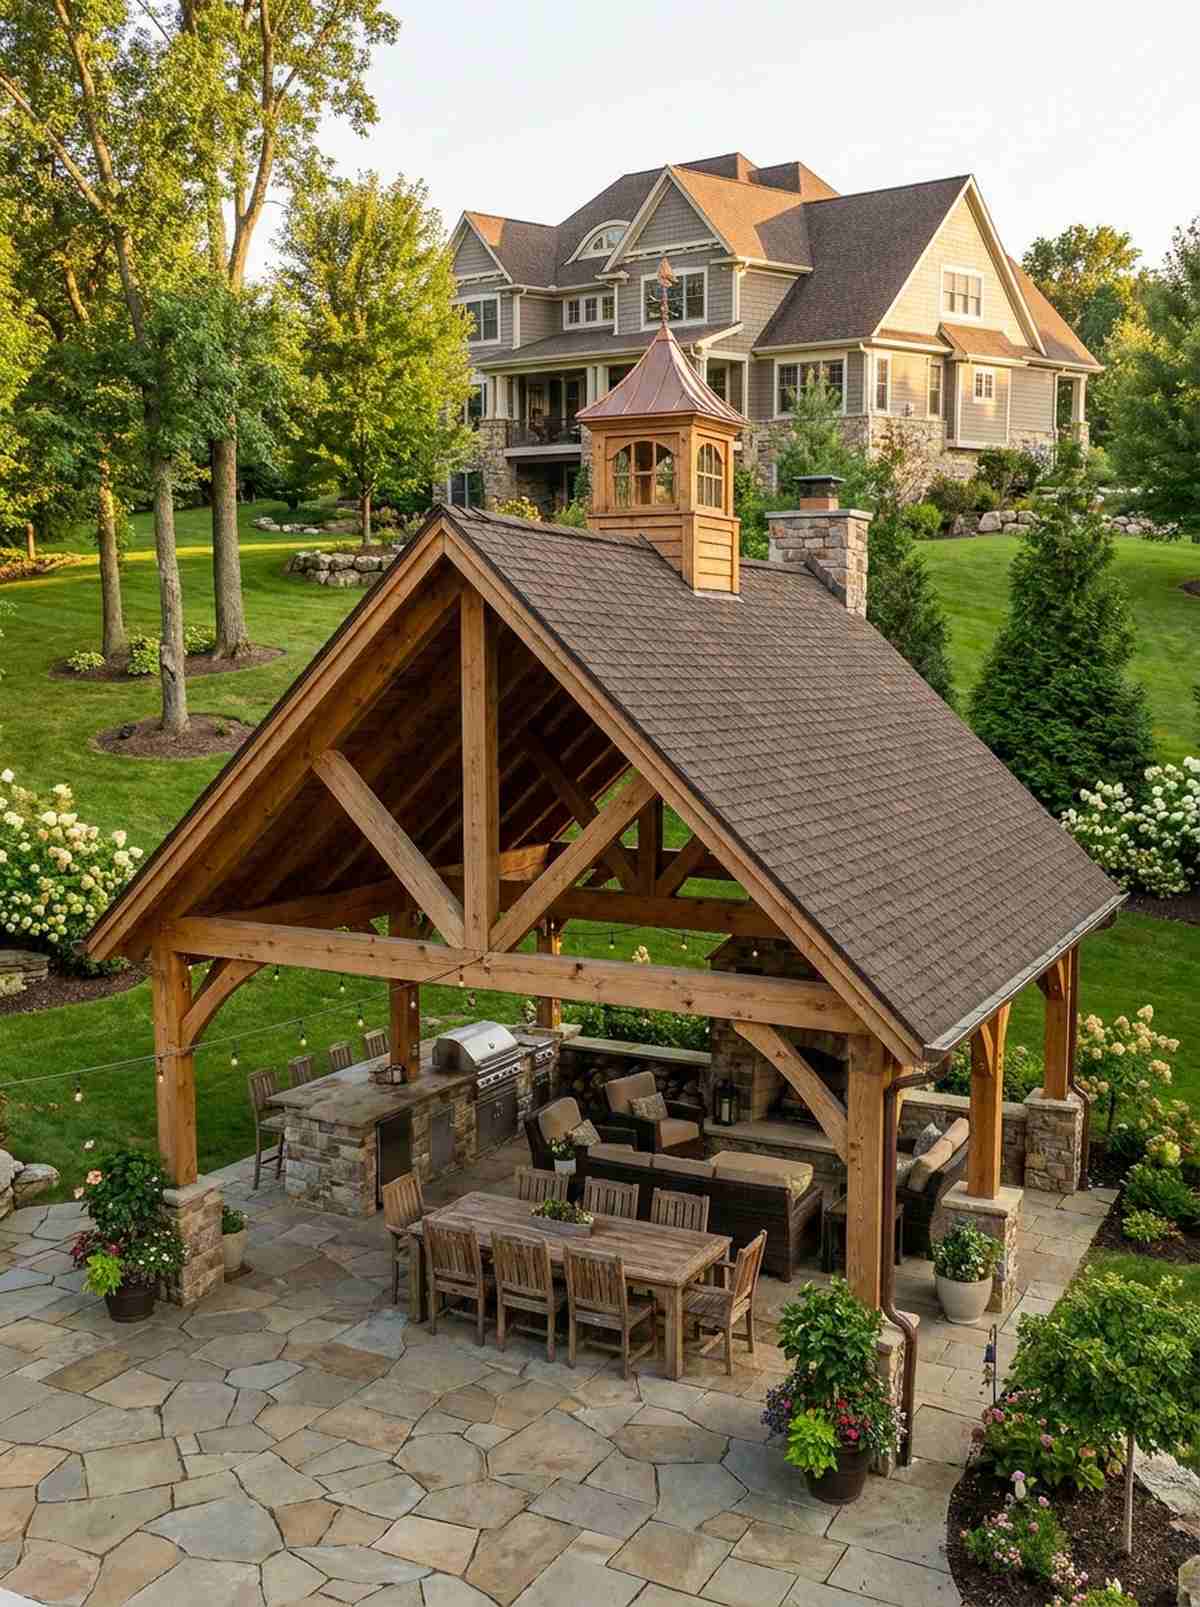
10. Timber Frame Pavilion With Braces
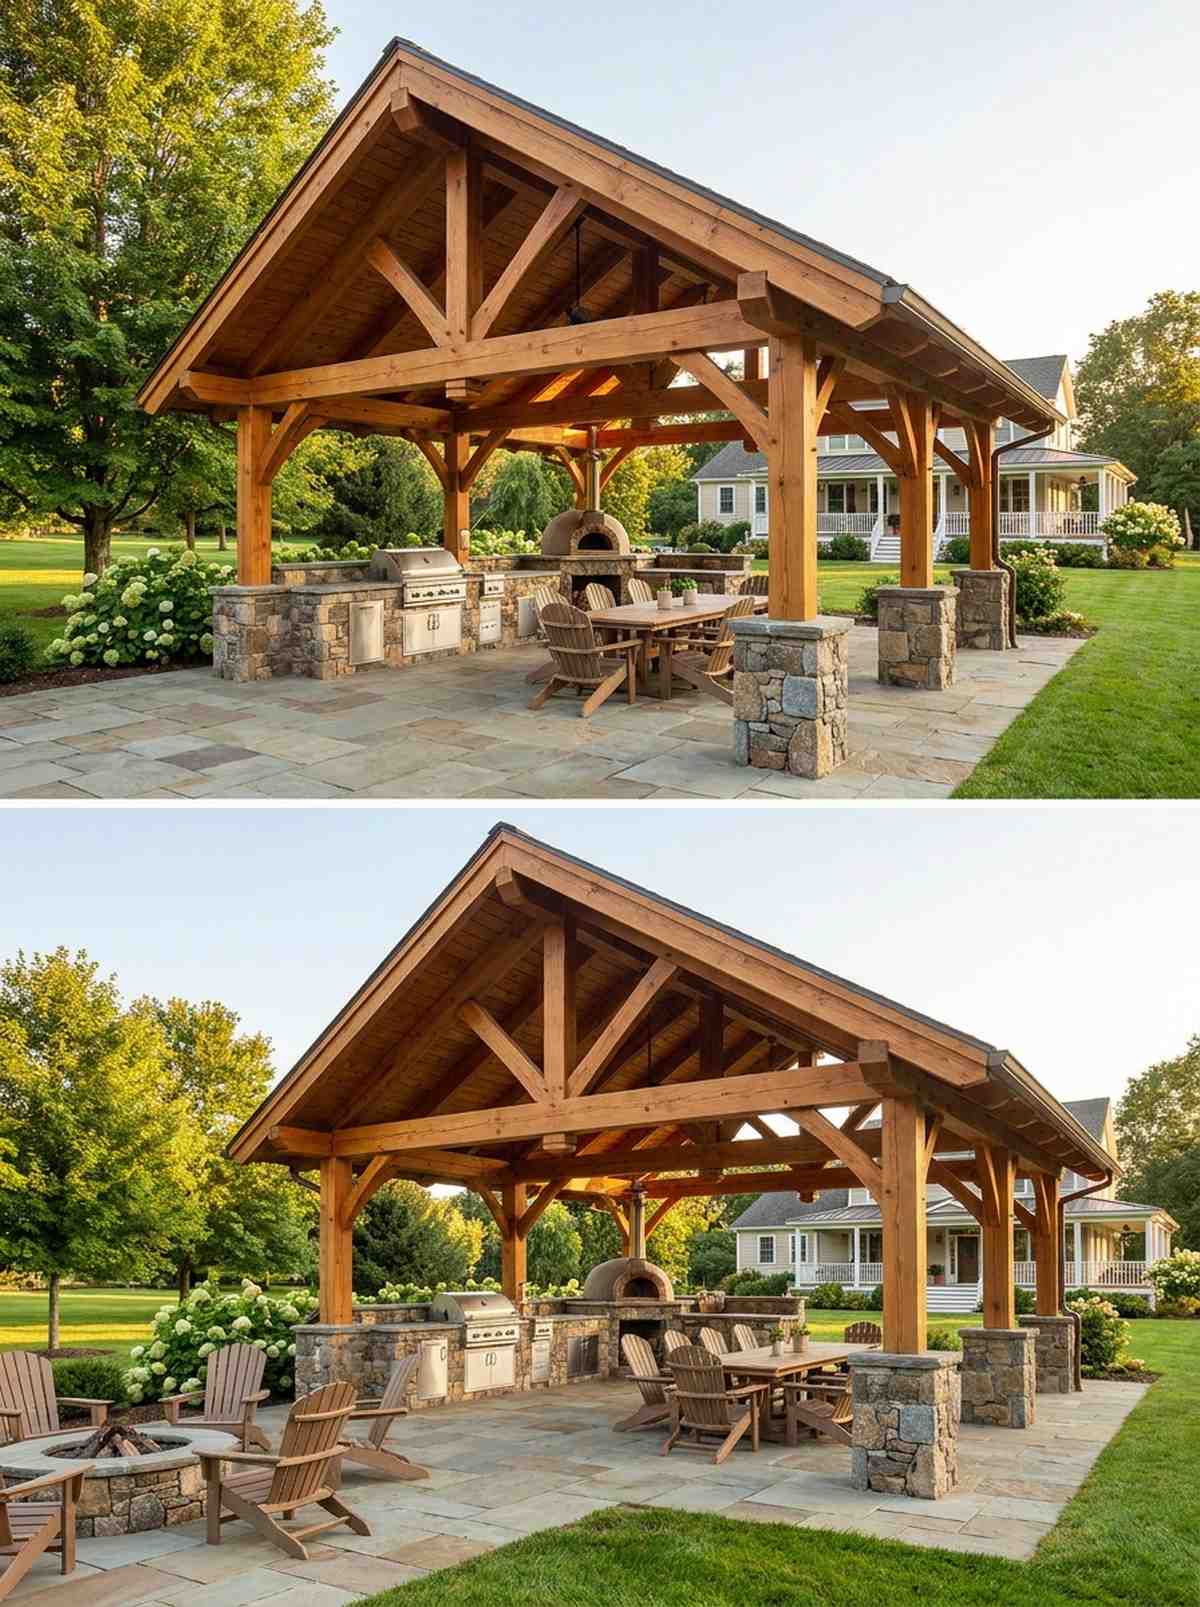
A heavy braced roof shelter that feels incredibly permanent and historically rich. Perfect for covering massive outdoor kitchen setups on large country estates.
Using authentic mortise and tenon joinery instead of cheap metal brackets creates an heirloom-quality structure. It redefines the standard outdoor living pavilion into a true architectural masterpiece.
Expect to invest $5,000+ for authentic craftsmanship. It’s a generational upgrade that skyrockets property value.
- Key Materials: Douglas fir beams, pegs
- Vibe / Style: Classic artisan heritage
- Difficulty: Master carpentry required
- Budget Breakdown: Timber: $3500 | Stone bases: $1000
- Creator’s Tip: Wrap the bottom three feet of the posts in natural stone veneer for immense visual weight.
- Smart Sourcing: hardwood joinery peg kits and faux-stone column wrap kits.
💡 Must-Have Supplies for High-End Setups
To build these setups faster and ensure they last, skip the generic craft aisles and invest in the right foundational kits.
- Base & Support: Heavy-duty concealed post anchors (commercial grade)
- Setup Tools: Pre-drilled structural bracket starter kits
- Weather/Durability Protection: UV-blocking advanced penetrating timber sealants
11. Rustic Log Pergola Structure

This raw bark overhead cover feels like a secluded wilderness hideaway. It blends flawlessly into deep wooded backyards or lakeside cabin properties.
Skipping dimensioned lumber for raw, peeled pine logs gives unparalleled organic asymmetry. It delivers a deeply authentic aesthetic that polished backyard kits completely fail to capture.
Sourcing raw logs keeps material costs low around $800–$1,200. Pin this for off-grid property inspiration.
- Key Materials: Kiln-dried peeled logs
- Vibe / Style: Organic woodland cabin
- Difficulty: Unique scribing needed
- Budget Breakdown: Logs: $600 | Fasteners: $200
- Creator’s Tip: Seal the end-grains immediately with wax to prevent the logs from aggressively splitting as they dry.
- Smart Sourcing: heavy-duty log builder screws (bulk pack) and clear end-grain sealer formulations.
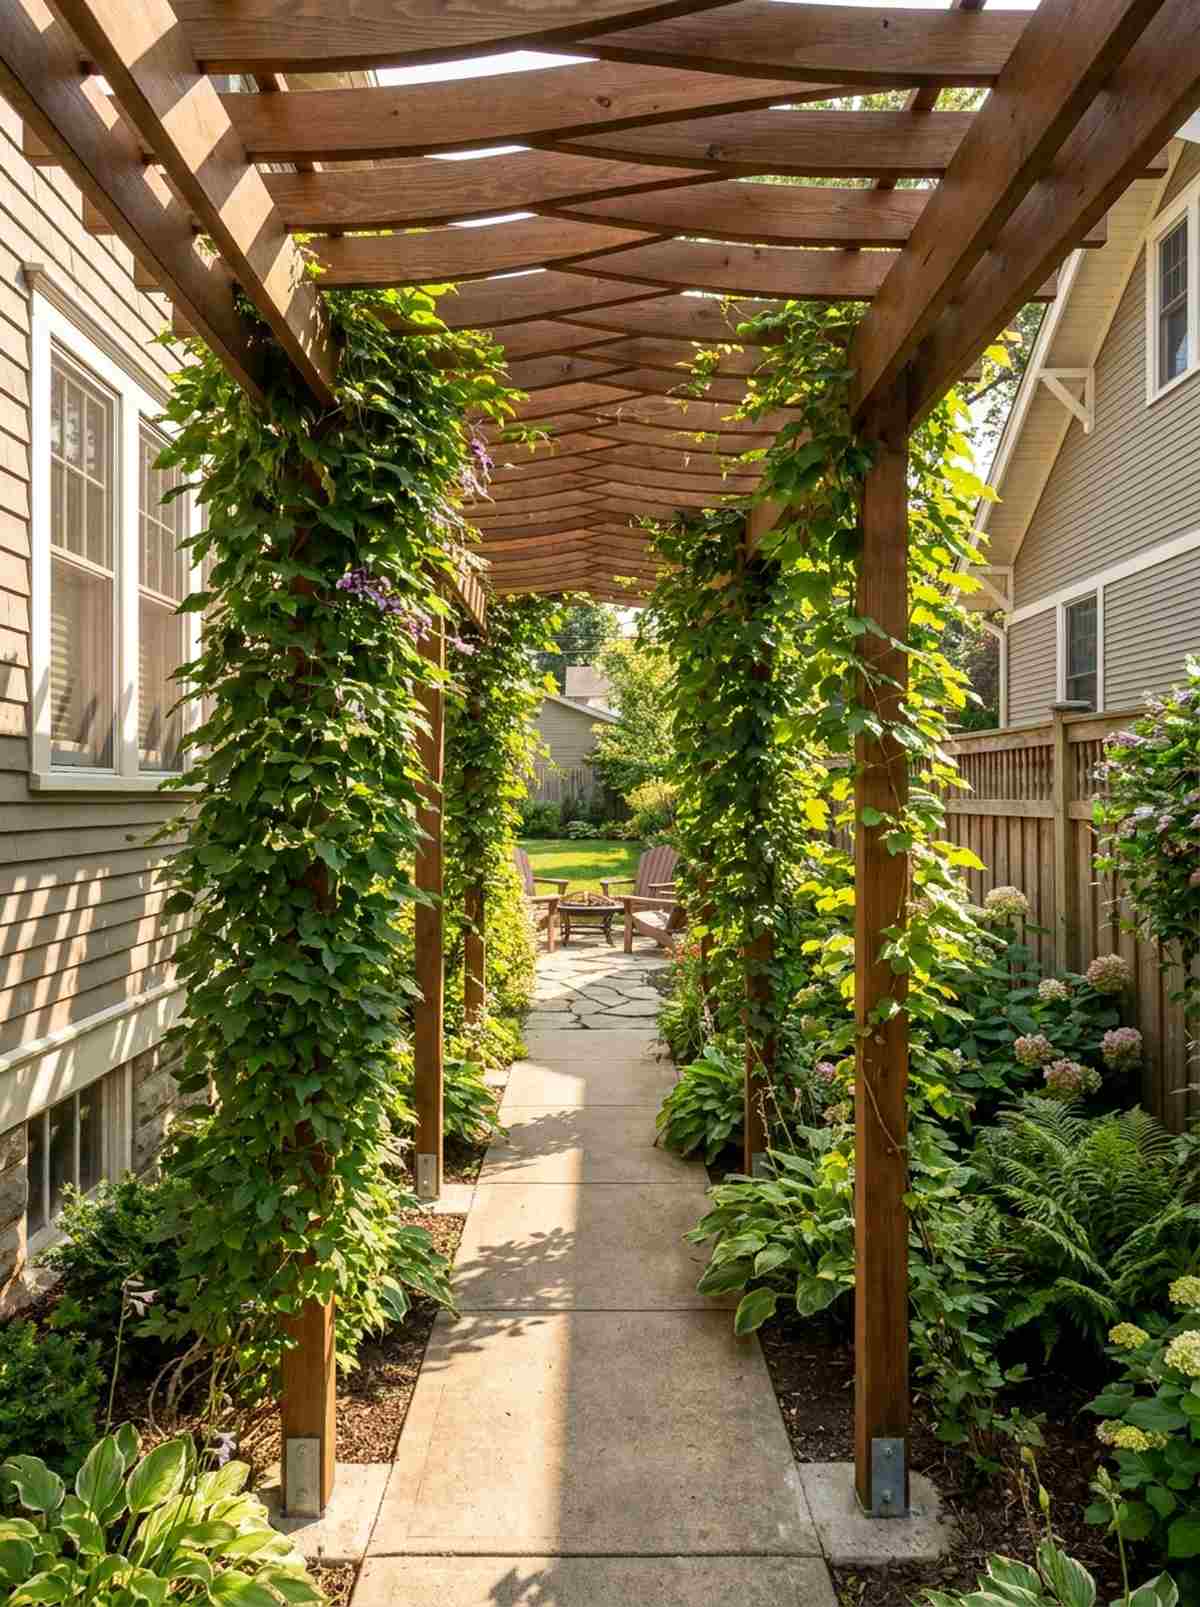
12. Vine-Covered Wood Trellis Pergola
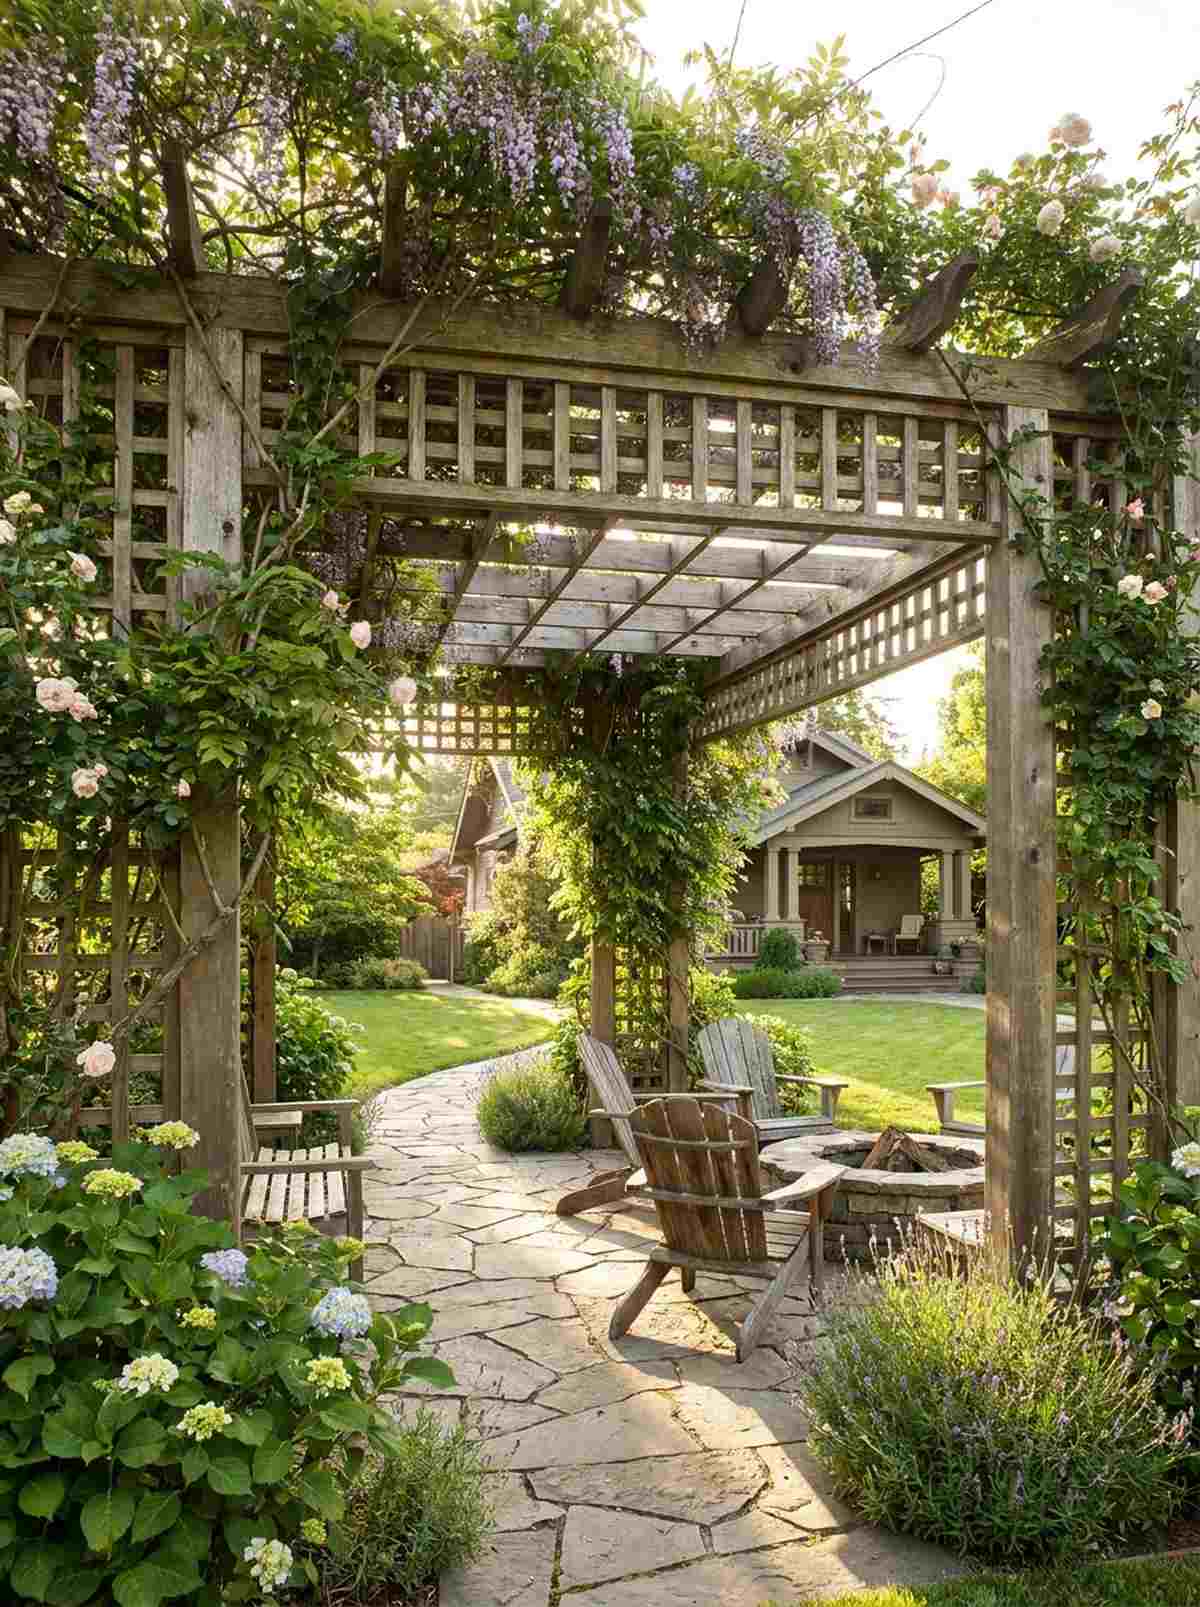
A living botanical canopy that feels like enchanted, overgrown ruins. It creates incredible dappled shade for romantic English cottage garden pathways.
Planting aggressive climbers at the base effectively grows a free, living roof in two seasons. This natural barrier stays significantly cooler underneath than any traditional outdoor living gazebo.
Structure and plants cost around $600–$1,000. A stunning, high-reward project for patient gardeners.
- Key Materials: Open-grid lattice, climbers
- Vibe / Style: Lush botanical romance
- Difficulty: Easy frame assembly
- Budget Breakdown: Trellis: $400 | Vines: $150
- Creator’s Tip: Use tensioned wire between the rafters to give vines invisible climbing paths without adding bulky wood.
- Smart Sourcing: stainless steel vine training wire kits and pre-cut cedar lattice panels.
13. Rough-Sawn Pine Pergola
This textured farmyard shelter feels incredibly grounding and nostalgic. It suits budget-conscious homesteads looking for large-scale shade.
Using un-planed lumber saves massive amounts of money while the fuzzy texture grips exterior stain tenaciously. It looks far more expensive and custom than smooth, generic big-box store wood.
You can easily pull this off for around $500–$900. Save this to your frugal backyard build board.
- Key Materials: Unfinished sawmill pine
- Vibe / Style: Authentic country farm
- Difficulty: Beginner friendly
- Budget Breakdown: Pine: $400 | Stain: $150
- Creator’s Tip: Apply a solid-color barn red or deep black stain; rough wood absorbs pigment beautifully.
- Smart Sourcing: deep-penetrating oil-based timber stains and heavy-duty black decorative hardware kits.
14. Japanese-Inspired Timber Pergola
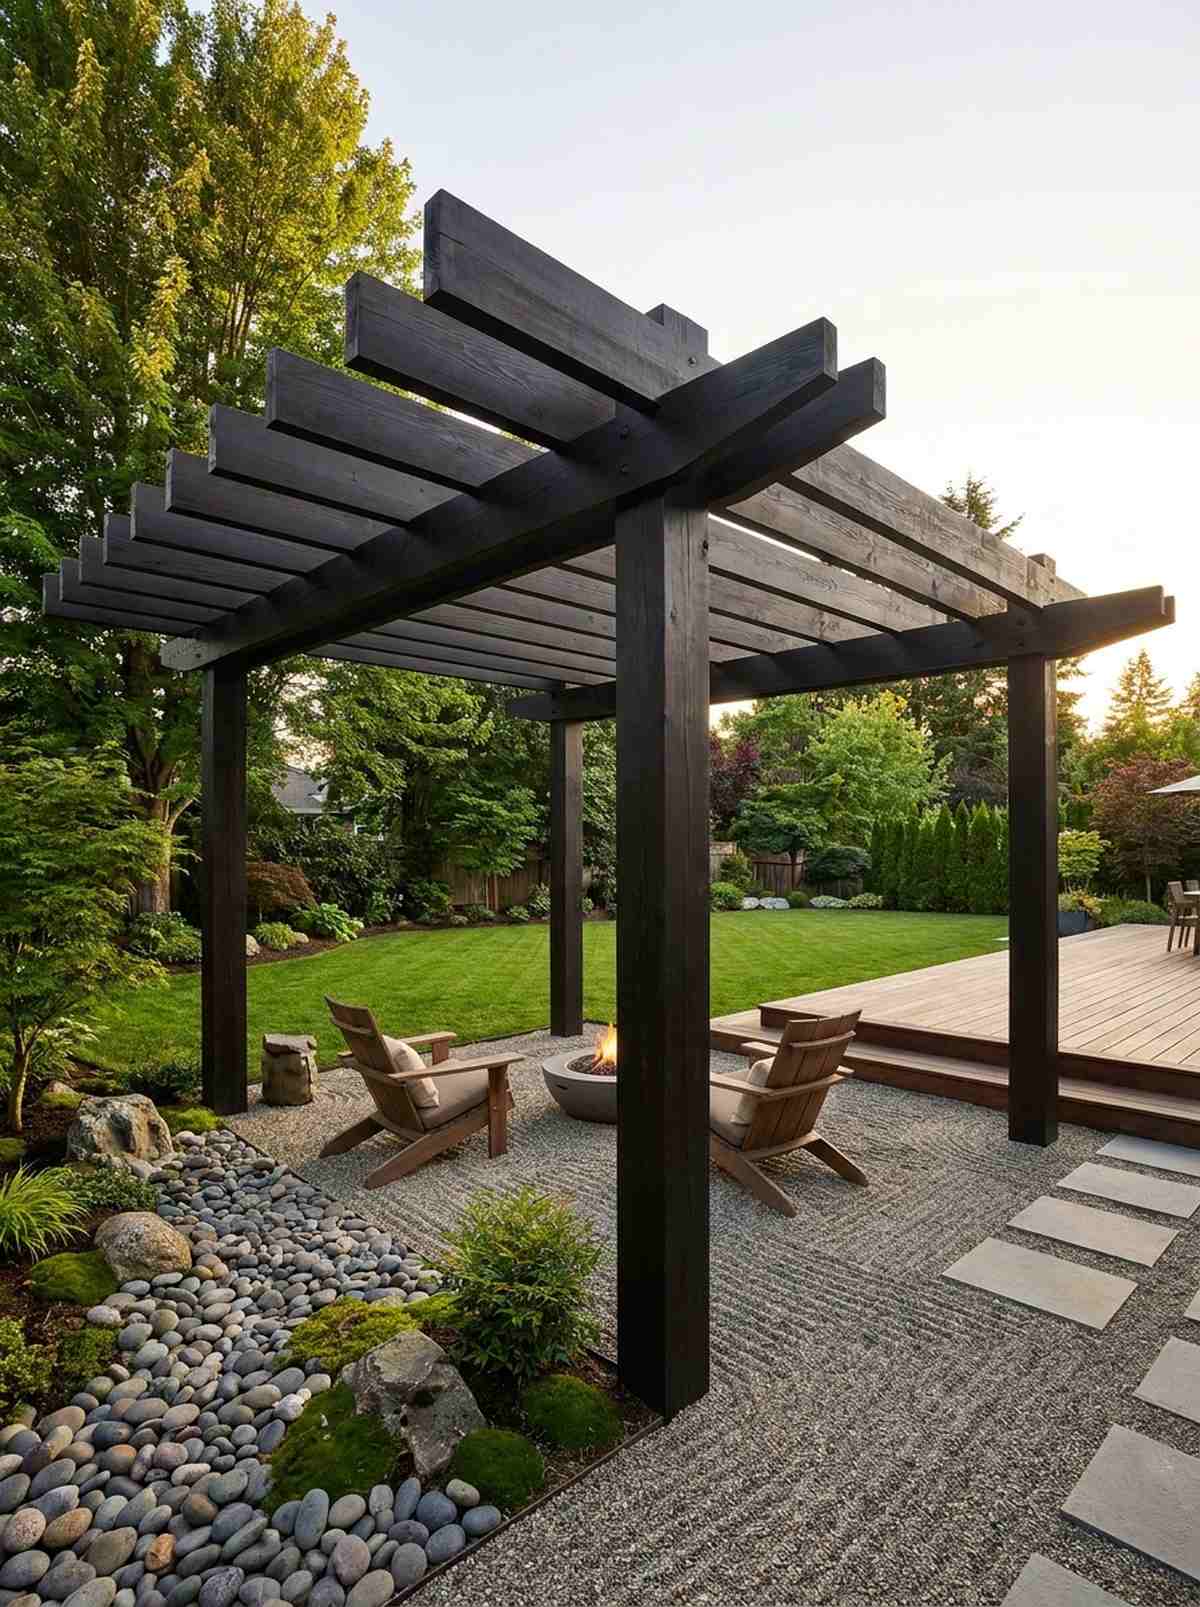
A dark stained horizontal frame that feels like a quiet Zen sanctuary. It anchors minimalist rock gardens and meditation yards perfectly.
Emphasizing wide horizontal beams while reducing vertical clutter creates extreme visual peace. This strict geometric discipline easily outclasses busy, overly-decorated traditional designs.
Minimalist materials keep this around $1,000–$1,500. Highly recommended for creating instant backyard tranquility.
- Key Materials: Ebony-stained beams
- Vibe / Style: Focused minimalist Zen
- Difficulty: Precision cuts required
- Budget Breakdown: Wood: $700 | Ebony Stain: $120
- Creator’s Tip: Use interlocking floating tenon joints to completely eliminate visible metal screws or brackets.
- Smart Sourcing: ultra-dark exterior wood dyes and concealed floating bracket hardware.
If you think small patios can’t have luxury shade, wait until you see this aggressive wall-mounted hack…
Attached Pergola Designs That Extend Your Home
15. Patio Door Overhead Pergola
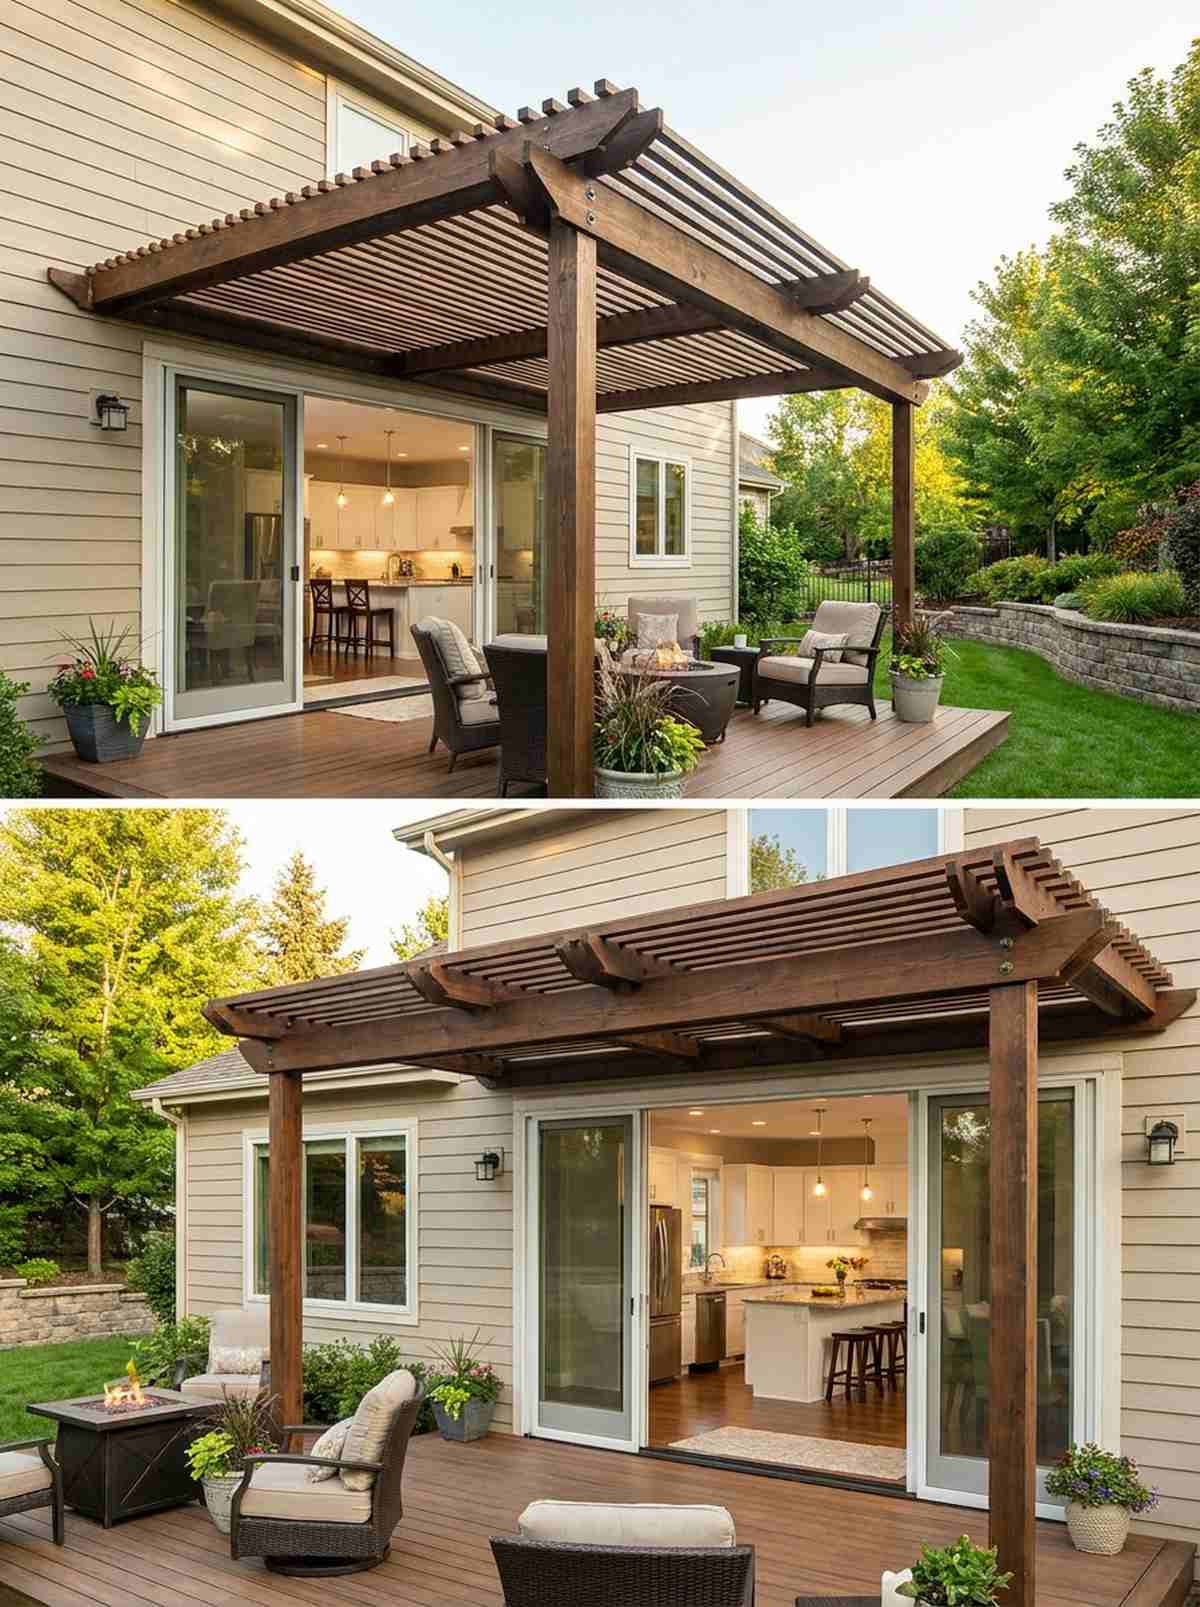
This ledger-mounted transition shade feels like a seamless interior extension. It works brilliantly for extending indoor kitchen flow straight onto the deck.
By bolting directly to the house framing, you completely eliminate the need for obstructing rear posts. This open-concept transition functions beautifully without the heavy footprint of an outdoor living pavilion.
Expect hardware and lumber to run about $800–$1,400. Pin this if you want to blur indoor-outdoor boundaries.
- Key Materials: Ledger boards, lag bolts
- Vibe / Style: Seamless modern flow
- Difficulty: Critical structural bolting
- Budget Breakdown: Ledger/Bolts: $150 | Roof: $800
- Creator’s Tip: Always install proper copper or PVC flashing behind the ledger board to prevent catastrophic home rot.
- Smart Sourcing: galvanized structural lag screw packs and pre-bent Z-flashing rolls.
16. Second-Story Deck Pergola Cover
An elevated balcony canopy that feels like a high-rise penthouse escape. It transforms blistering hot second-floor decks into usable all-day lounges.
Because wind shear at this height is brutal, upgrading to engineered through-bolting is non-negotiable. Defying gravity up here gives a designer-level finish that basic umbrellas can never achieve.
Heavy duty engineering pushes this to $1,500–$2,500. A crucial upgrade for exposed elevated spaces.
- Key Materials: Wind-rated tension ties
- Vibe / Style: Elevated luxury lookout
- Difficulty: Advanced safety rigging
- Budget Breakdown: Anchors: $300 | Frame: $1200
- Creator’s Tip: Opt for louvered or spaced roofs up here; solid roofs act like giant sails in high winds.
- Smart Sourcing: hurricane-rated structural tie-downs and lightweight aluminum beam starter kits.
17. Front Entry Pergola Portico
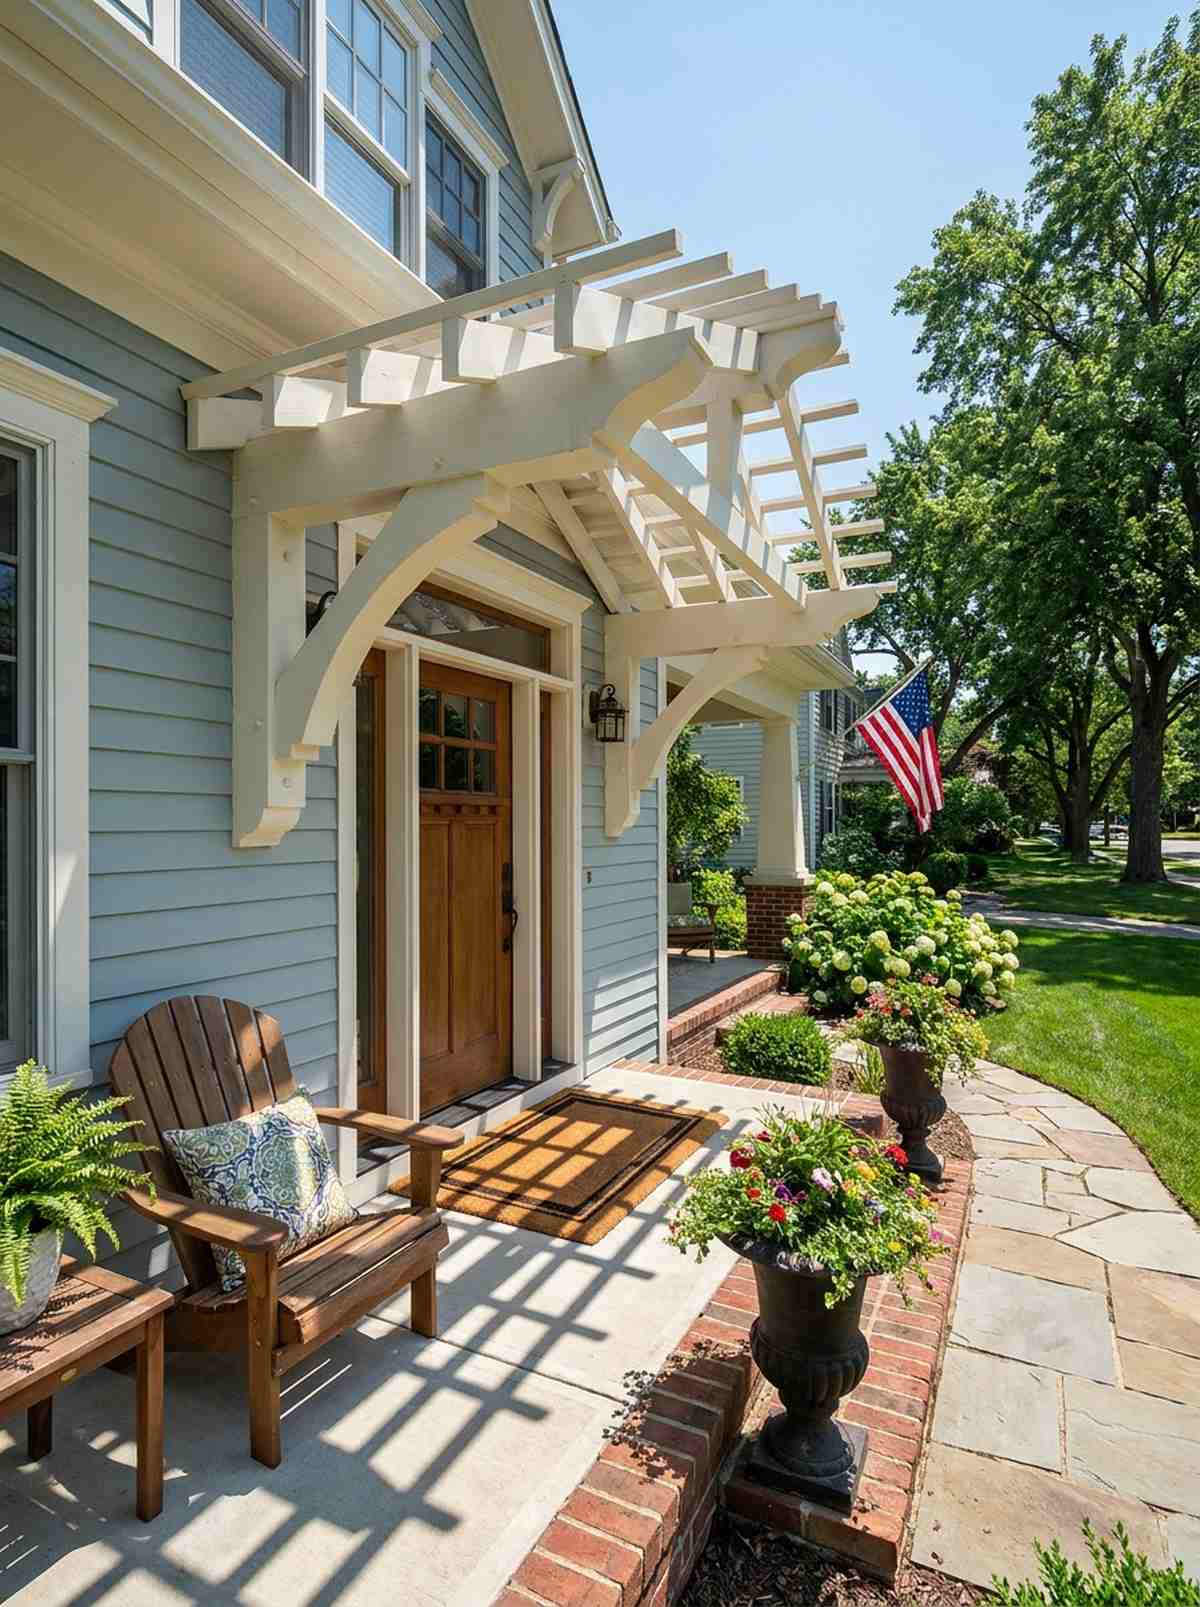
This miniature overhead portico feels incredibly welcoming and structured. It massively upgrades front door curb appeal without taking over small lawns.
Swapping a boring porch roof for an open-rafter design casts beautiful, dynamic shadows across your entryway. It elevates standard home facades instantly with minimal material investment.
You can easily pull this off for $400–$800. Save this to your weekend curb appeal board.
- Key Materials: Decorative corbels, trim
- Vibe / Style: Charming Craftsman welcome
- Difficulty: Easy weekend project
- Budget Breakdown: Rafters: $200 | Corbels: $150
- Creator’s Tip: Match the paint exactly to your home’s trim color to make it look like original architecture.
- Smart Sourcing: pre-cut decorative architectural corbels and exterior-grade architectural finishing kits.
18. Garage Door Attached Pergola
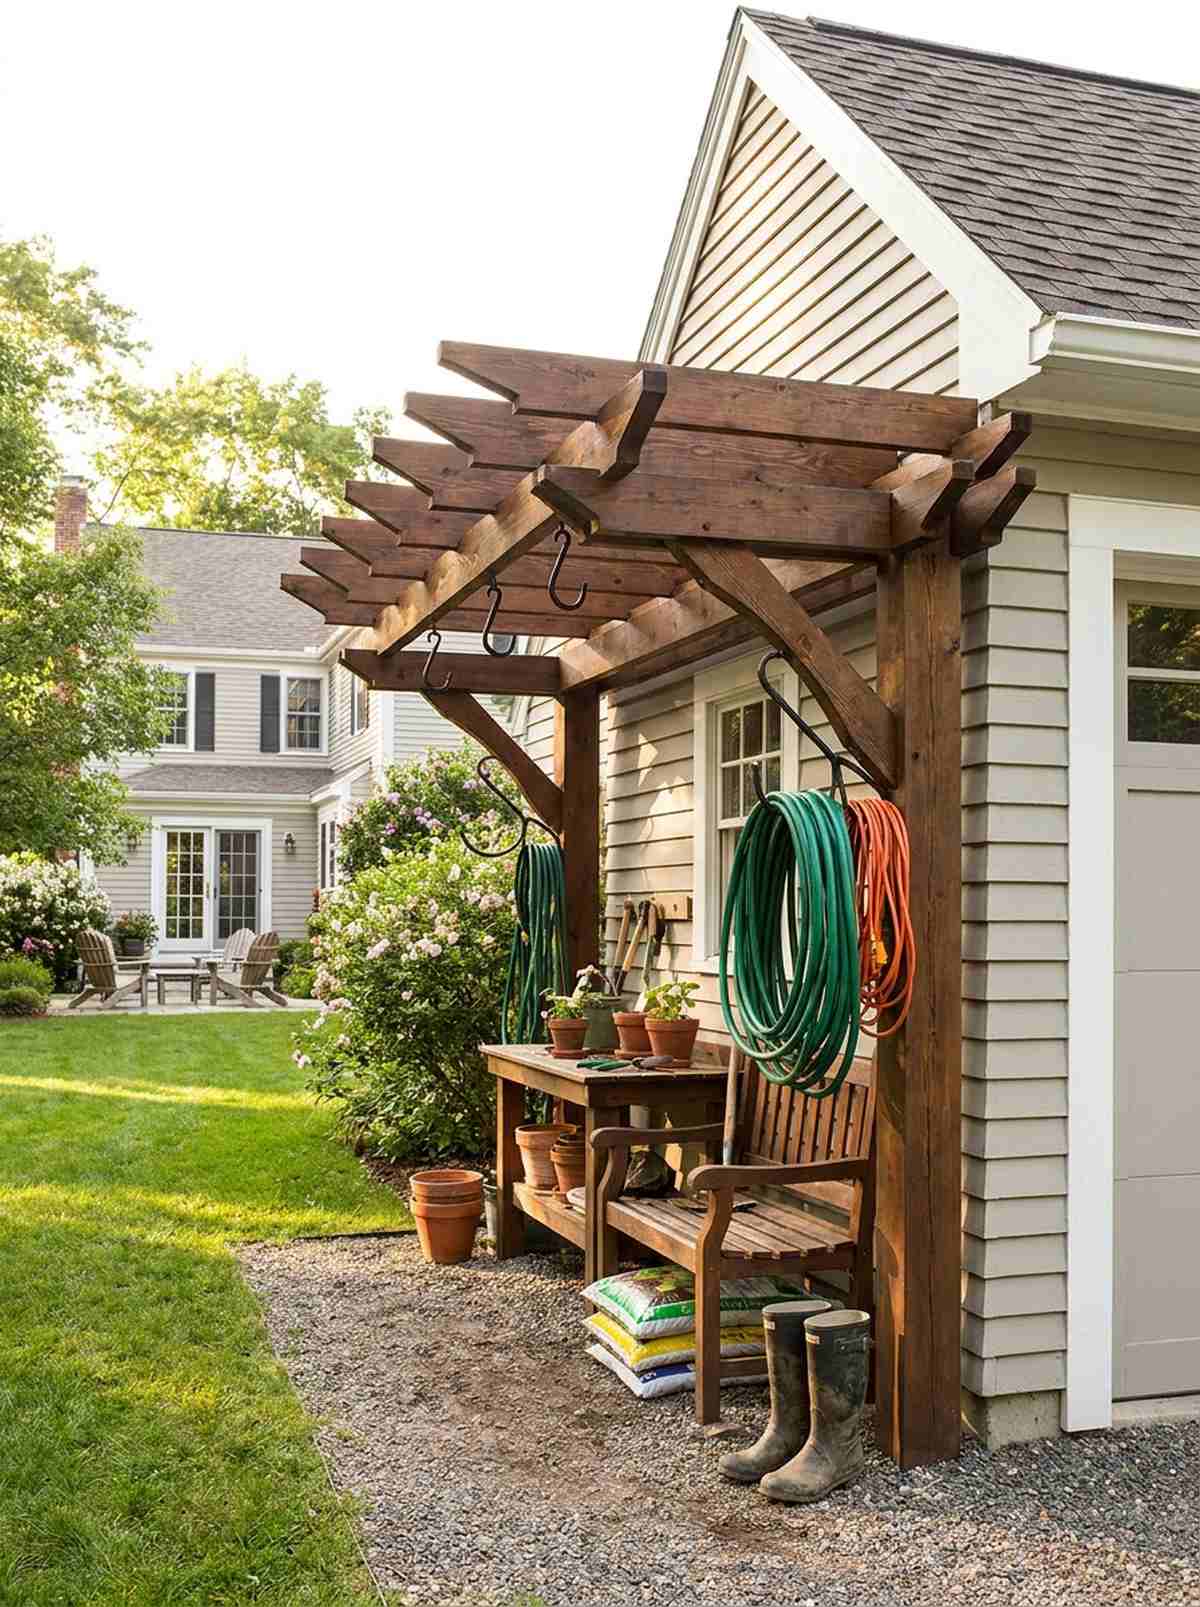
A side-mounted utility canopy that feels incredibly practical yet visually striking. It creates the perfect shaded potting station or muddy-boot transition zone.
Rather than leaving plain garage walls exposed, adding a sheer structural brow breaks up the massive flat facade. This completely transforms a utilitarian wall into a charming architectural feature.
This shallow structure usually costs under $500. Highly recommended for a quick exterior facelift.
- Key Materials: Short cantilevered beams
- Vibe / Style: Functional rustic charm
- Difficulty: Beginner DIY build
- Budget Breakdown: Wood: $250 | Paint: $50
- Creator’s Tip: Hang heavy-duty hooks from the rafters to keep messy garden hoses and extension cords off the ground.
- Smart Sourcing: heavy-duty exterior rafter hooks (bulk pack) and pre-primed exterior fascia boards.
19. Wrap-Around Corner Pergola
This L-shaped continuous shade feels like a massive wrap-around resort deck. It brilliantly connects separated dining and lounging zones on blind corners.
Following the home’s footprint smoothly unifies disjointed patios into one massive, cohesive entertainment space. It easily competes with a fully detached outdoor living gazebo for half the yard footprint.
Extended framing spans push the cost to $2,000–$3,500. Pin this if your patio turns a sharp corner.
- Key Materials: Corner post brackets
- Vibe / Style: Expansive unified estate
- Difficulty: Complex angle cuts
- Budget Breakdown: Lumber: $1800 | Brackets: $400
- Creator’s Tip: Change the direction of the roof slats at the corner to create a stunning herringbone shadow pattern.
- Smart Sourcing: multi-angle structural corner brackets and UV-coated weather-sealed timber kits.
Most pool setups look incredibly basic until they implement this transitional walkway trick…
20. Pool House Pergola Extension
A breezeway transition cover that feels like a luxury spa corridor. It flawlessly links isolated pool houses back to the main swimming deck.
Using water-resistant PVC-coated lumber here completely stops the rot caused by constant splashing and wet towels. This smart material swap guarantees a premium look that survives harsh chlorine exposure.
Moisture-proof materials cost around $1,200–$2,000. Save this to your ultimate pool design board.
- Key Materials: PVC-wrapped structural posts
- Vibe / Style: High-end spa corridor
- Difficulty: Moderate framing
- Budget Breakdown: PVC columns: $600 | Roof: $500
- Creator’s Tip: Plumb a water line up the posts before finishing to install a hidden, rain-style outdoor shower head.
- Smart Sourcing: rot-proof cellular PVC column wraps and marine-grade stainless steel hardware kits.
Freestanding Pavilion Concepts For Backyard Destinations
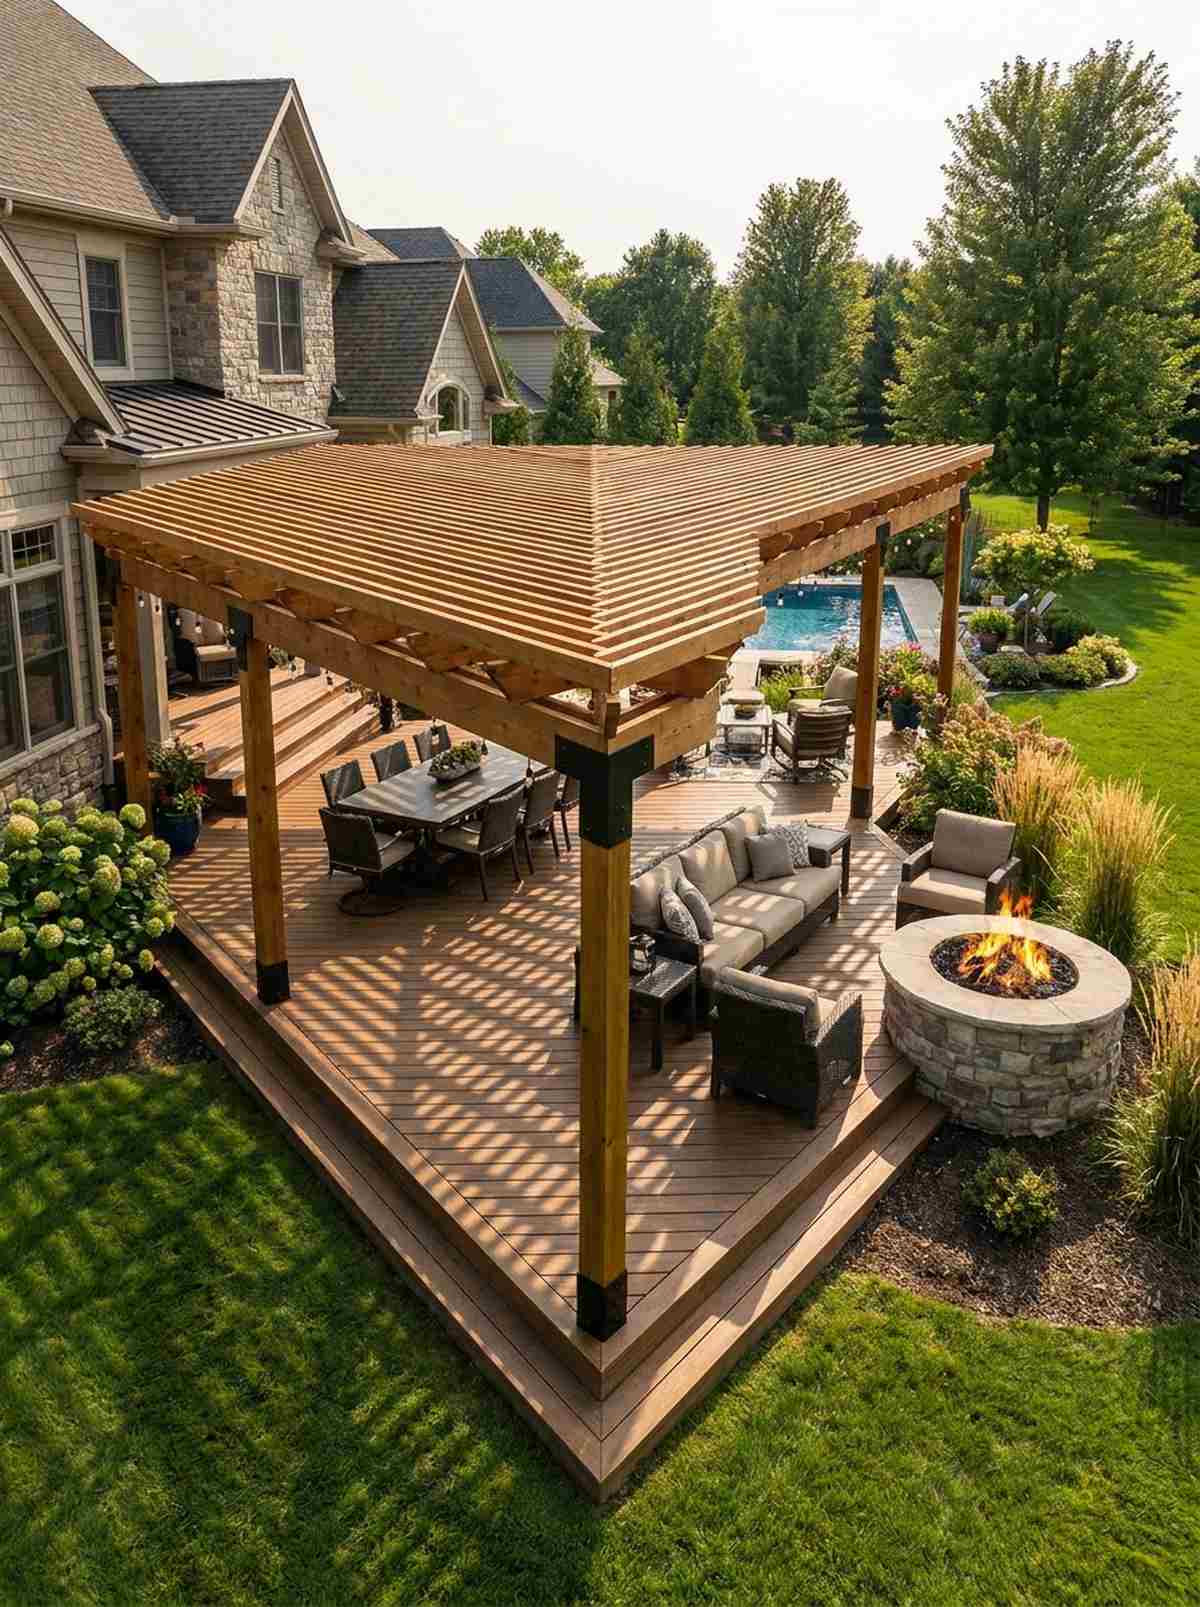
21. Gable Roof Timber Pavilion
This vaulted A-frame structure feels wonderfully massive and airy. It serves as the ultimate weather-proof destination for deep backyard dining.
Matching the roof shingles exactly to the main house makes this outbuilding look like original, expensive architecture. This classic outdoor living pavilion layout sheds heavy snow loads effortlessly.
Full roofing materials bring this to $3,500–$6,000. A majestic build that anchors large properties.
- Key Materials: Asphalt shingles, roof decking
- Vibe / Style: Majestic backyard estate
- Difficulty: Advanced roof framing
- Budget Breakdown: Frame: $2000 | Shingles: $800
- Creator’s Tip: Install an aesthetic cupola at the ridge peak to naturally vent out trapped summer heat.
- Smart Sourcing: pre-built decorative roof cupolas and architectural-grade roofing shingle bundles.
22. Hip Roof Pavilion Structure
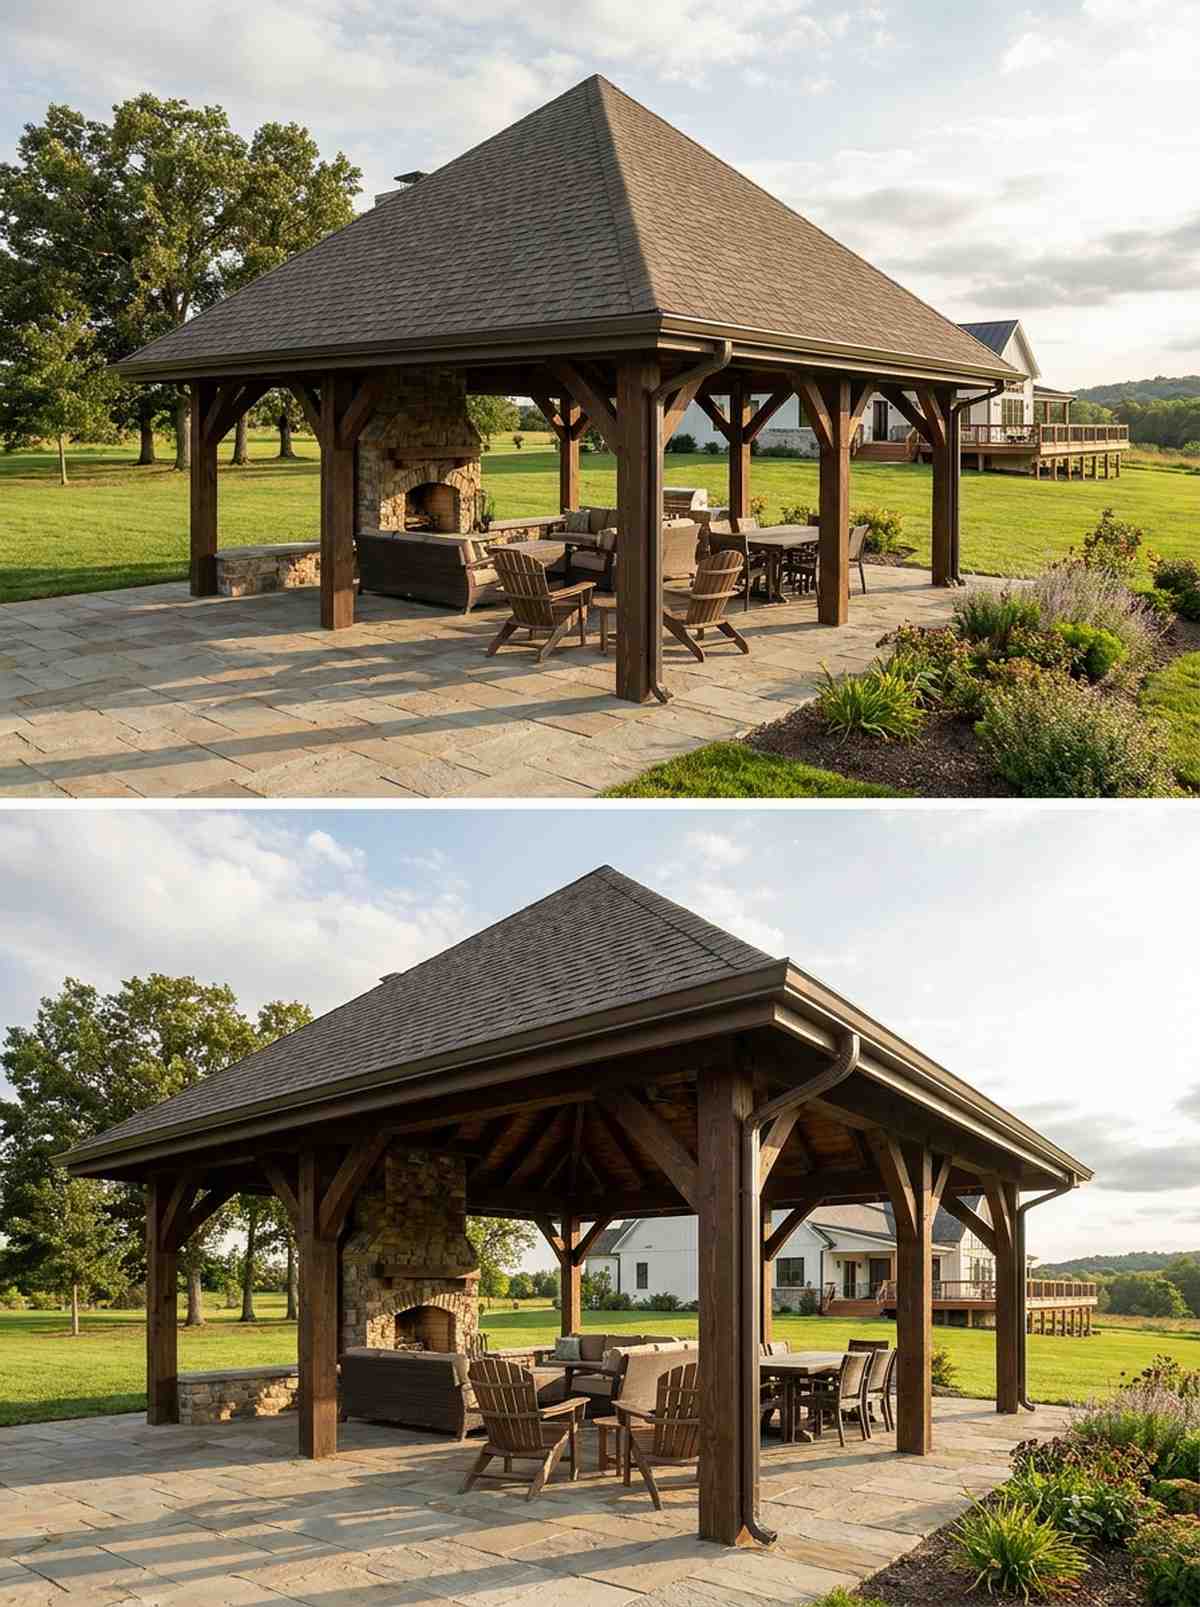
A pyramidal roof shelter that feels incredibly balanced and sturdy from every angle. It dominates exposed, windy locations where other structures shake.
Because the roof slopes evenly on all four sides, it creates a deeply shaded, fortress-like interior. This layout looks far more expensive than standard flat-roofed designs.
Complex roof cuts push costs to $4,000–$7,000. Pin this if you need severe wind resistance.
- Key Materials: Hip rafter framing
- Vibe / Style: Stately architectural anchor
- Difficulty: Expert carpentry angles
- Budget Breakdown: Framing: $2500 | Gutters: $500
- Creator’s Tip: Use a continuous perimeter gutter system painted to match the fascia so it vanishes visually.
- Smart Sourcing: seamless aluminum gutter guard kits and pre-cut hip roof framing brackets.
23. Octagonal Gazebo Pavilion
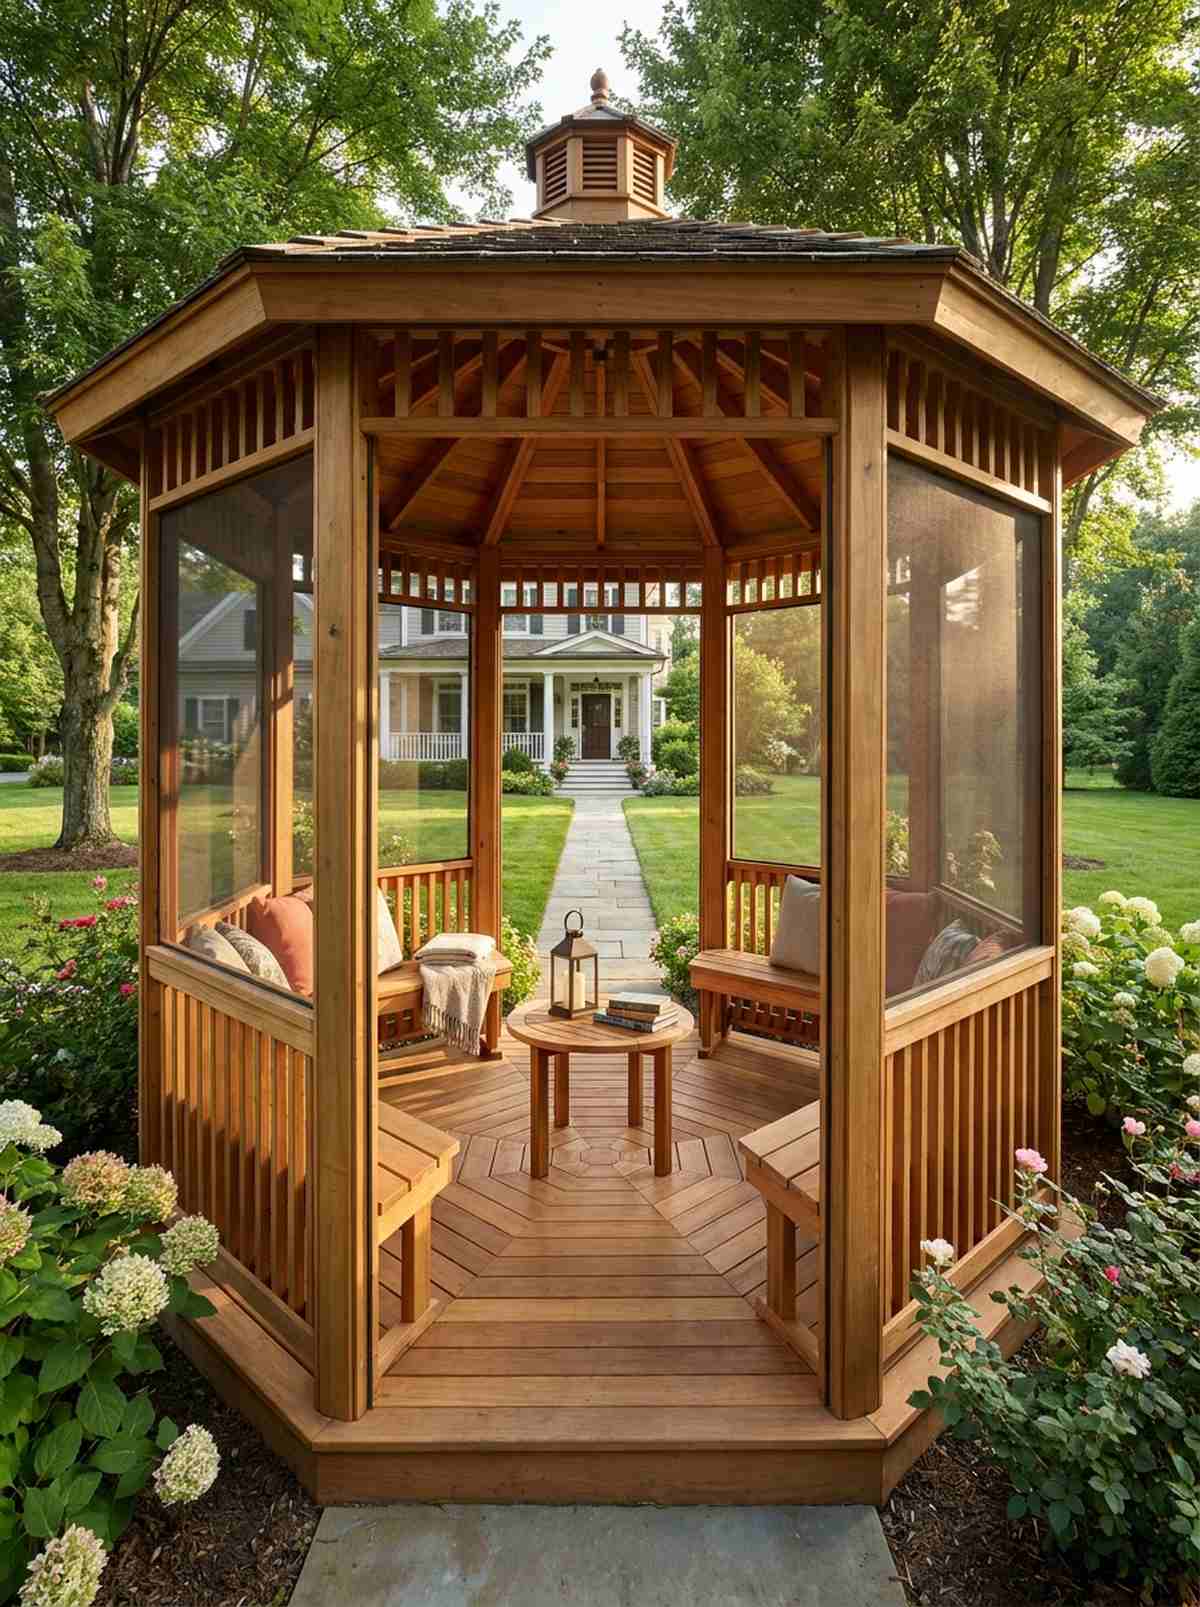
This eight-sided panoramic shelter feels like a nostalgic Victorian park center. It maximizes 360-degree views in the middle of sprawling gardens.
Integrating built-in perimeter benches removes the need to constantly drag heavy furniture in and out. This space-saving trick maximizes seating capacity within a traditional outdoor living gazebo footprint.
Expect to spend $3,000–$5,500 for the complex geometry. An absolutely iconic garden centerpiece.
- Key Materials: Multi-angle deck boards
- Vibe / Style: Classic Victorian romance
- Difficulty: Challenging geometric cuts
- Budget Breakdown: Decking: $1200 | Roof: $1500
- Creator’s Tip: Add tension-mounted bug screens between the pillars to create a fully bite-free evening sanctuary.
- Smart Sourcing: custom-fit gazebo bug screen netting and weather-resistant built-in bench brackets.
24. Outdoor Kitchen Pavilion
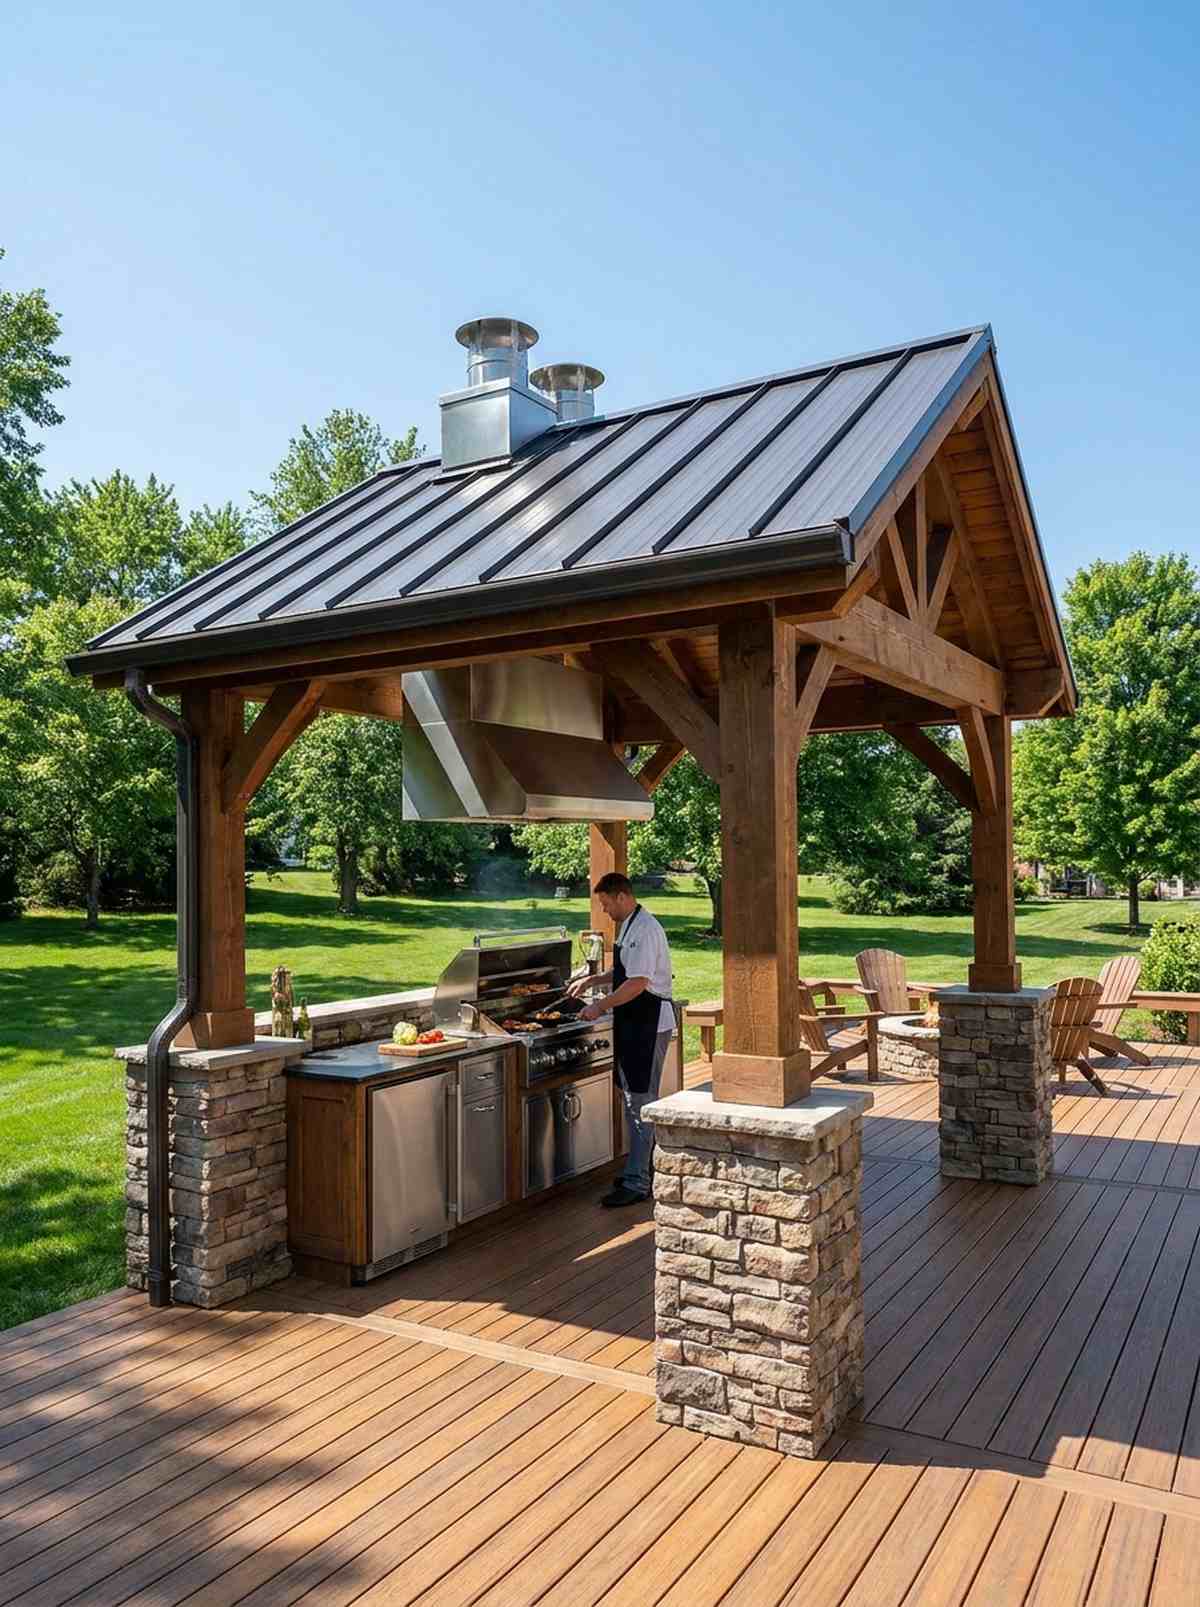
A heavy-duty culinary shelter that feels like a professional chef’s compound. It flawlessly protects expensive grills and fridges from rain rot.
Skipping wood and using heat-resistant metal roof panels directly over the grill prevents terrifying grease fires. This robust layout guarantees your kitchen equipment lasts a decade longer.
Fire-safe roofing and ventilation cost around $4,000–$8,000. Save this to your ultimate outdoor kitchen board.
- Key Materials: Metal roofing, exhaust vents
- Vibe / Style: Professional outdoor culinary
- Difficulty: Requires electrical/gas lines
- Budget Breakdown: Fire-proof roof: $1500 | Vents: $800
- Creator’s Tip: Sink deep conduit pipes into the foundation before pouring concrete to hide all ugly gas lines.
- Smart Sourcing: commercial-grade outdoor range hoods and heat-resistant metal roof panels (bulk pack).
This fire-pit layout is incredibly dangerous if you don’t follow the exact height rules coming up next…
25. Fire Feature Pavilion
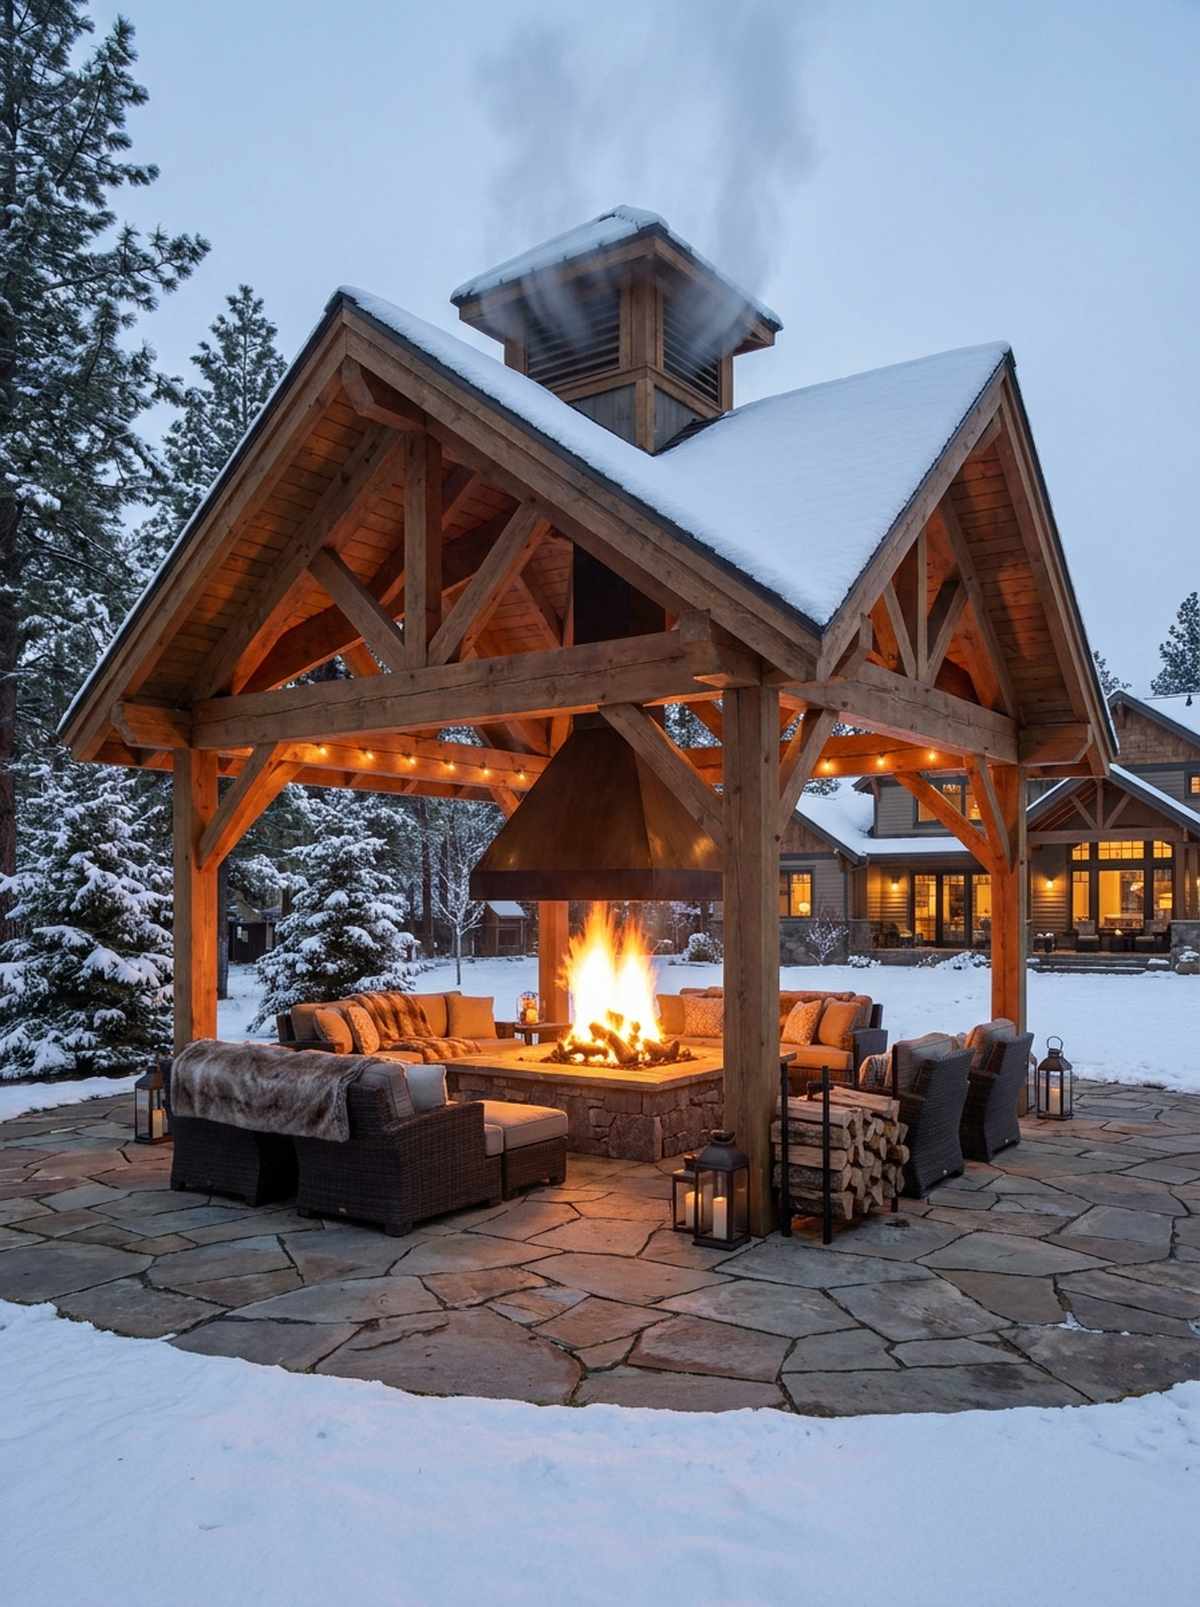
This ventilated lounge cover feels like an exclusive ski resort patio. It perfectly centers a massive fire pit for winter entertaining.
Standard flat roofs will trap toxic smoke and char the wood, but raising the center pitch creates a safe thermal chimney. This ensures a stunning, smoke-free environment inside your outdoor living pavilion.
Heat-resistant finishes and height extensions cost $3,500–$6,000. Pin this for cozy winter patio blueprints.
- Key Materials: Vented cupola, high beams
- Vibe / Style: Cozy winter lodge
- Difficulty: Strict fire-code compliance
- Budget Breakdown: Tall posts: $1000 | Vents: $600
- Creator’s Tip: Treat the entire interior ceiling with clear intumescent paint to massively boost fire resistance without changing the look.
- Smart Sourcing: clear intumescent fire-retardant sprays and high-flow roof exhaust vents.
26. Lakeside Boathouse Pavilion
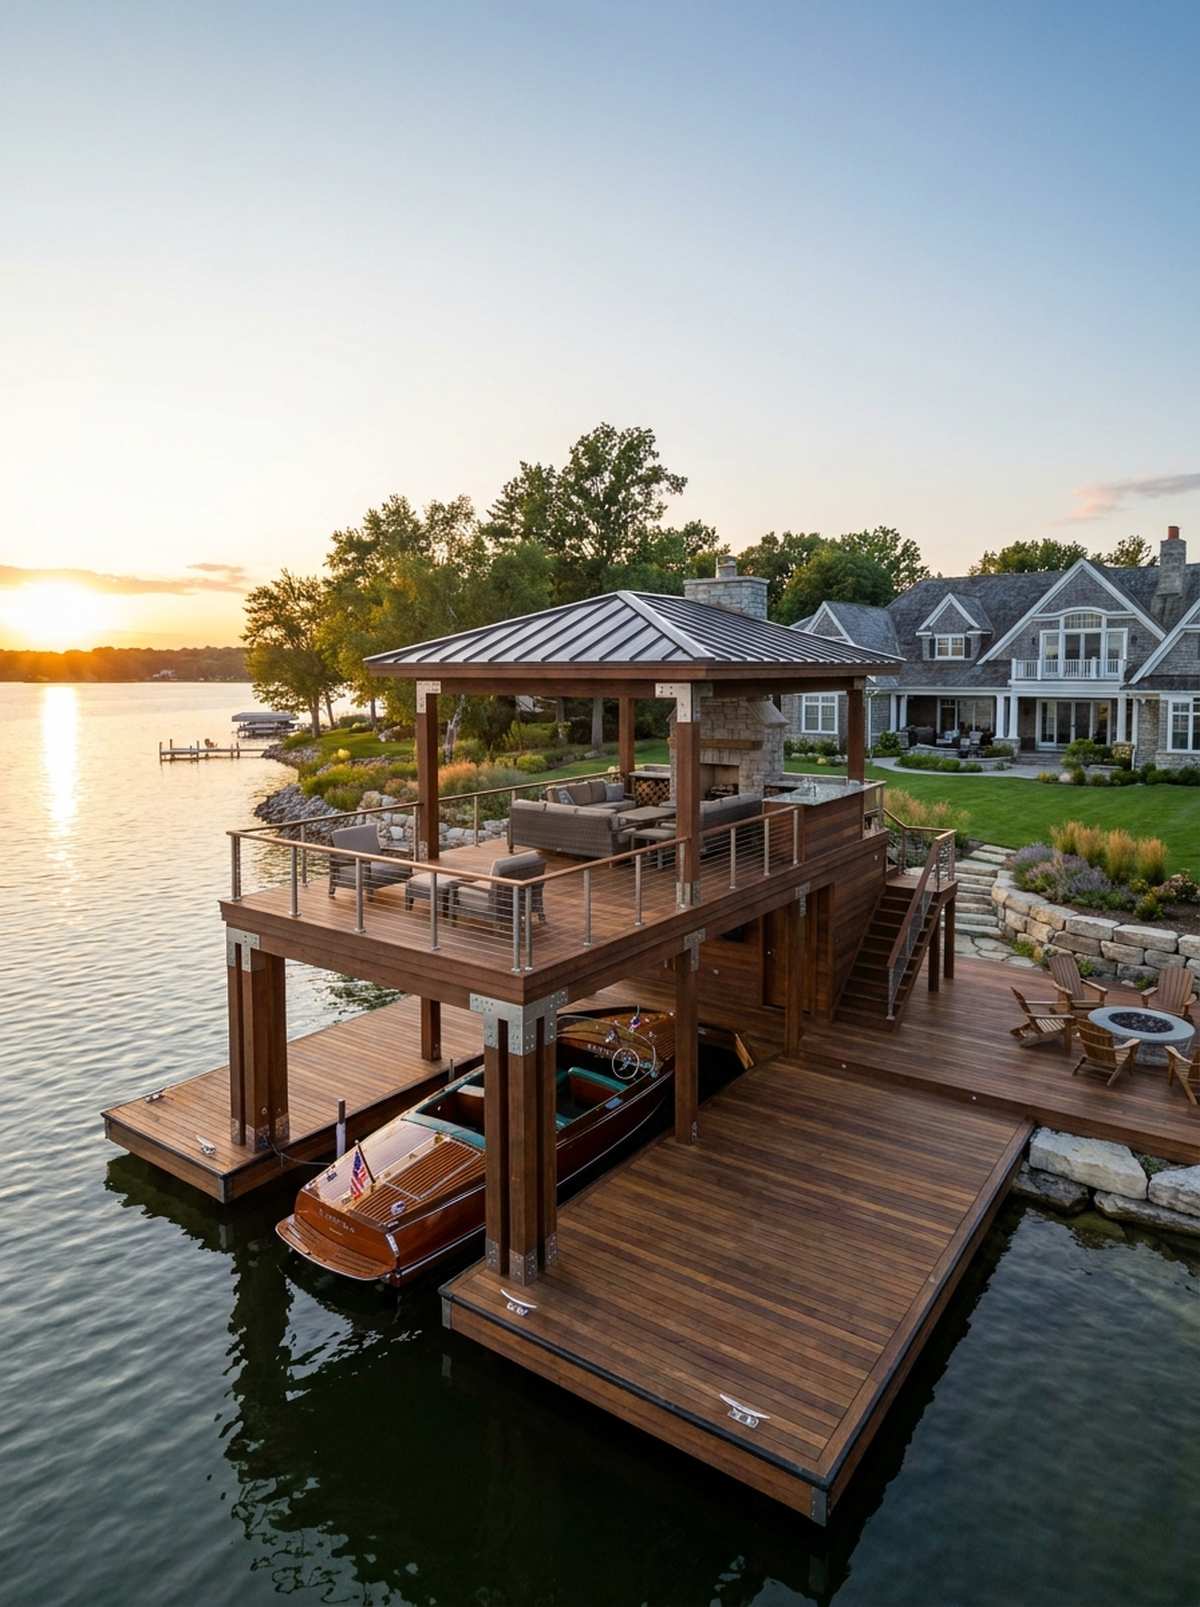
A waterfront observation deck that feels like a private yacht club lounge. It dominates dock edges with multi-level recreational utility.
Using ultra-corrosion-resistant marine hardware stops the terrifying rust failure that destroys cheap lake builds. This guarantees structural safety above the waterline while delivering a highly premium aesthetic.
Marine-grade materials push costs to $5,000–$9,000. Highly recommended for waterfront property owners.
- Key Materials: Marine-grade lumber, stainless brackets
- Vibe / Style: Nautical luxury club
- Difficulty: Over-water construction
- Budget Breakdown: Marine Wood: $3000 | Hardware: $1000
- Creator’s Tip: Integrate heavy-duty tie-off cleats directly into the structural columns to double as boat moorings.
- Smart Sourcing: 316-grade stainless steel structural bolts (bulk pack) and heavy-duty marine dock cleats.
27. Meditation Garden Pavilion
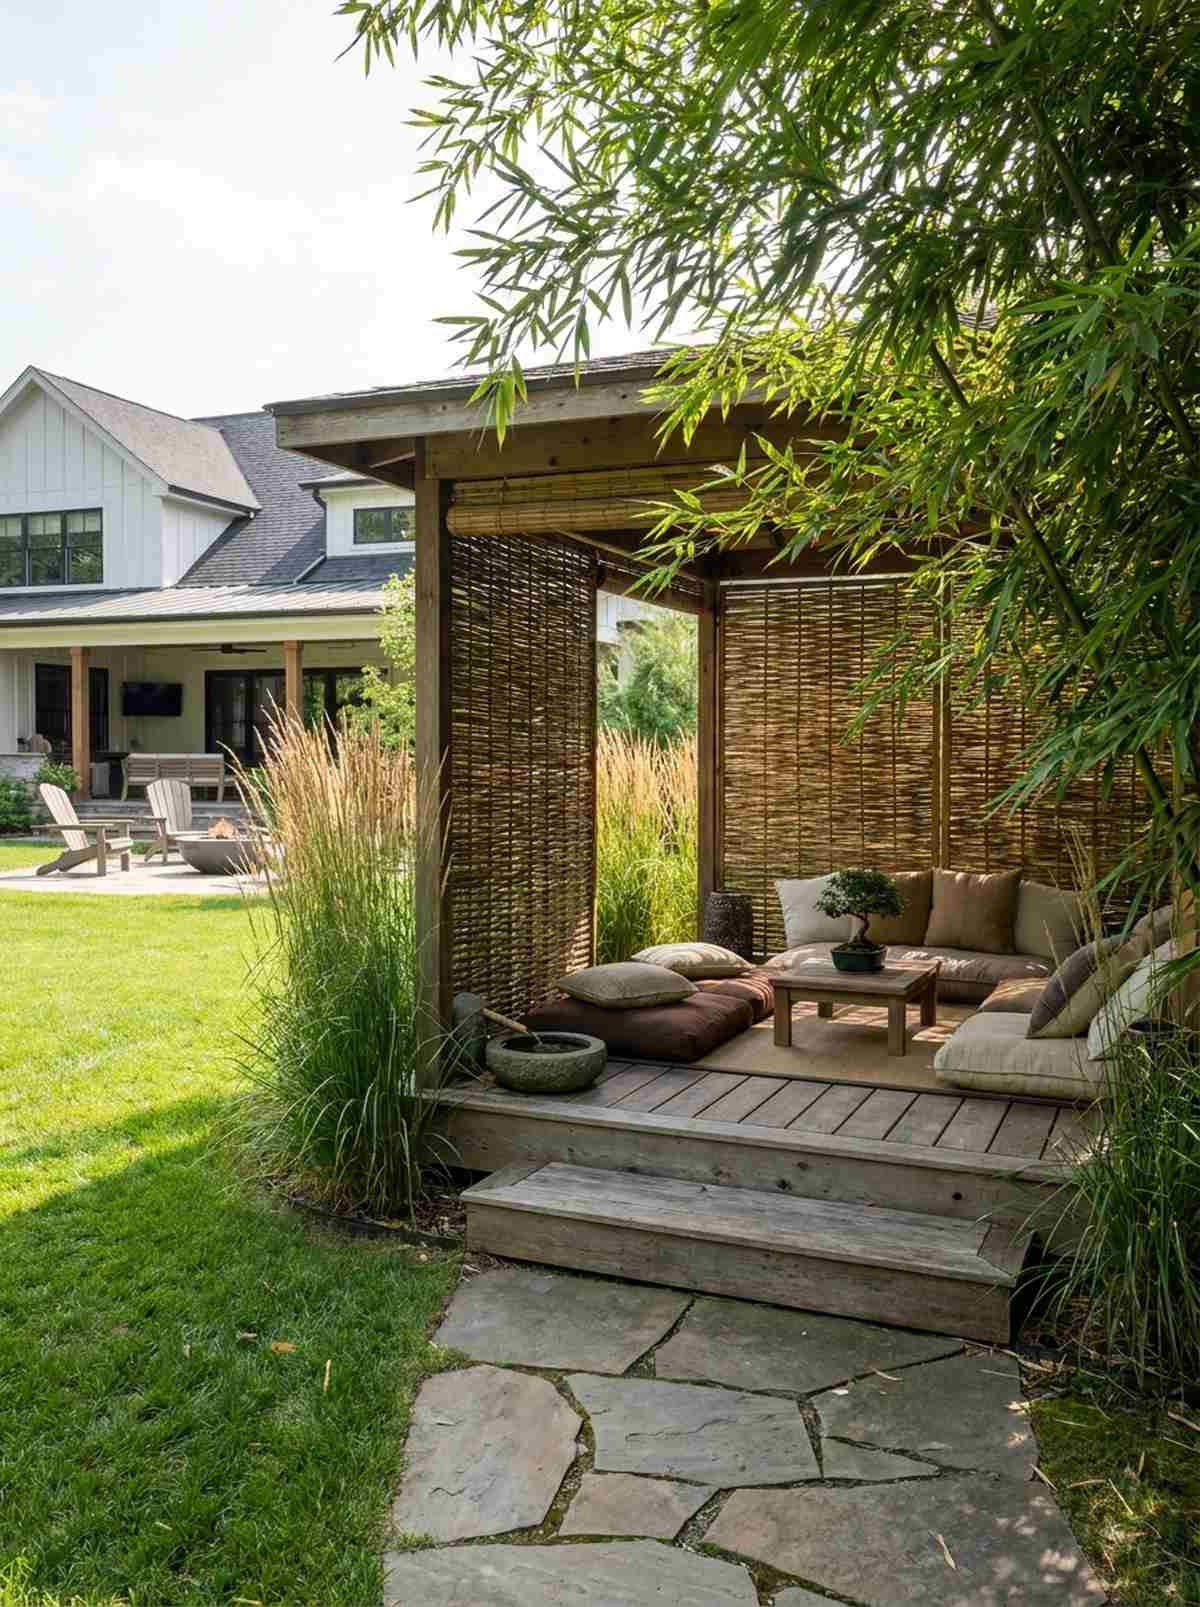
This low-profile privacy shelter feels deeply secluded and spiritually grounding. It acts as the perfect quiet escape tucked behind dense bamboo screens.
Lowering the roofline and dropping the seating to floor-cushion level completely blocks views from noisy neighbors. It creates a deeply intimate, private room rather than an exposed public stage.
You can build this serene escape for just $1,000–$1,800. Save this to your private sanctuary board.
- Key Materials: Low platform decking
- Vibe / Style: Private Zen retreat
- Difficulty: Easy low-level framing
- Budget Breakdown: Decking: $500 | Screens: $300
- Creator’s Tip: Flank the structure with tall ornamental grasses to muffle neighborhood sounds with natural rustling.
- Smart Sourcing: pre-woven bamboo privacy screen rolls and outdoor-rated floor meditation cushions.
28. Poolside Cabana Pavilion
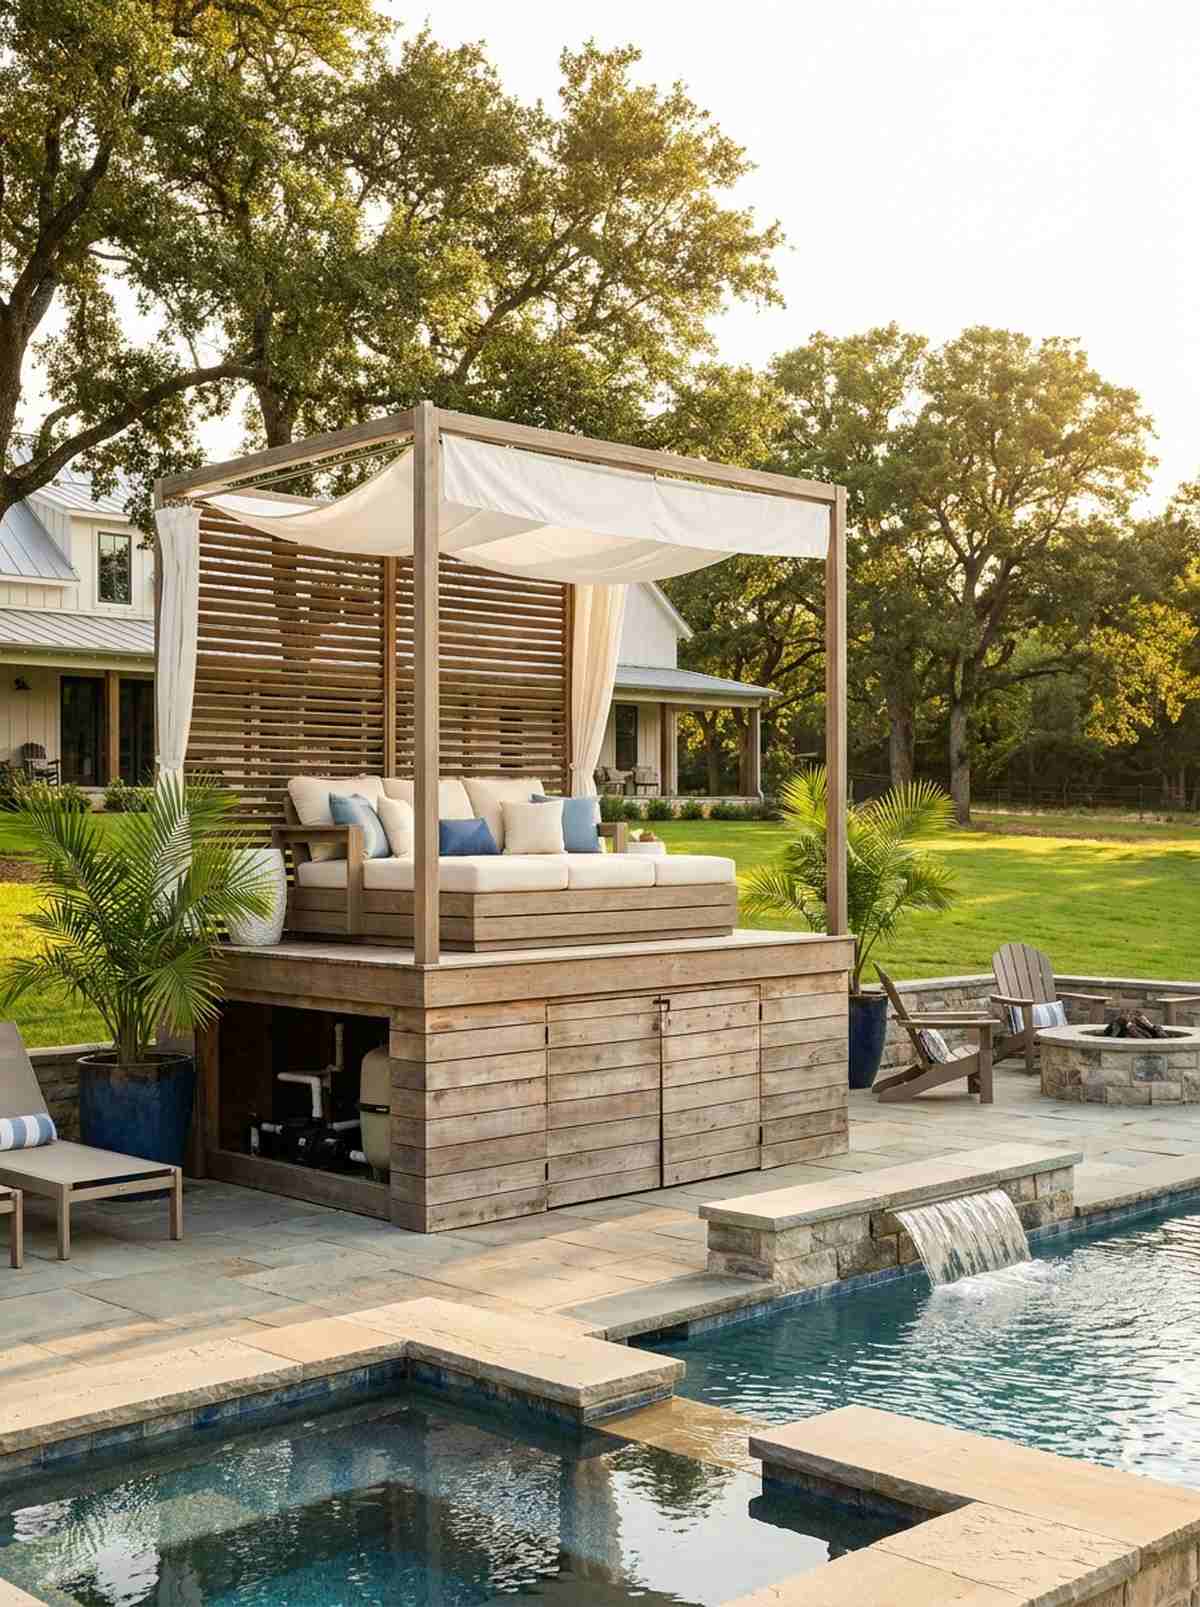
A dual-purpose equipment shelter that feels like a luxury Miami daybed. It brilliantly hides ugly pool pumps underneath a beautiful shaded lounge.
Elevating the deck over the machinery kills two birds with one stone, saving massive yard space. This intelligent layout completely masks the roaring pump noise from your relaxing outdoor living gazebo.
Soundproofing and decking run $2,500–$4,500. A genius layout trick for tight pool decks.
- Key Materials: Acoustic insulation panels
- Vibe / Style: Chic resort daybed
- Difficulty: Framing over equipment
- Budget Breakdown: Soundproofing: $400 | Deck: $1200
- Creator’s Tip: Line the equipment chamber with exterior-grade acoustic foam to kill the motor hum instantly.
- Smart Sourcing: outdoor-rated acoustic barrier panels (bulk pack) and marine-grade waterproof plywood subflooring.
29. 10×10 Corner Pergola
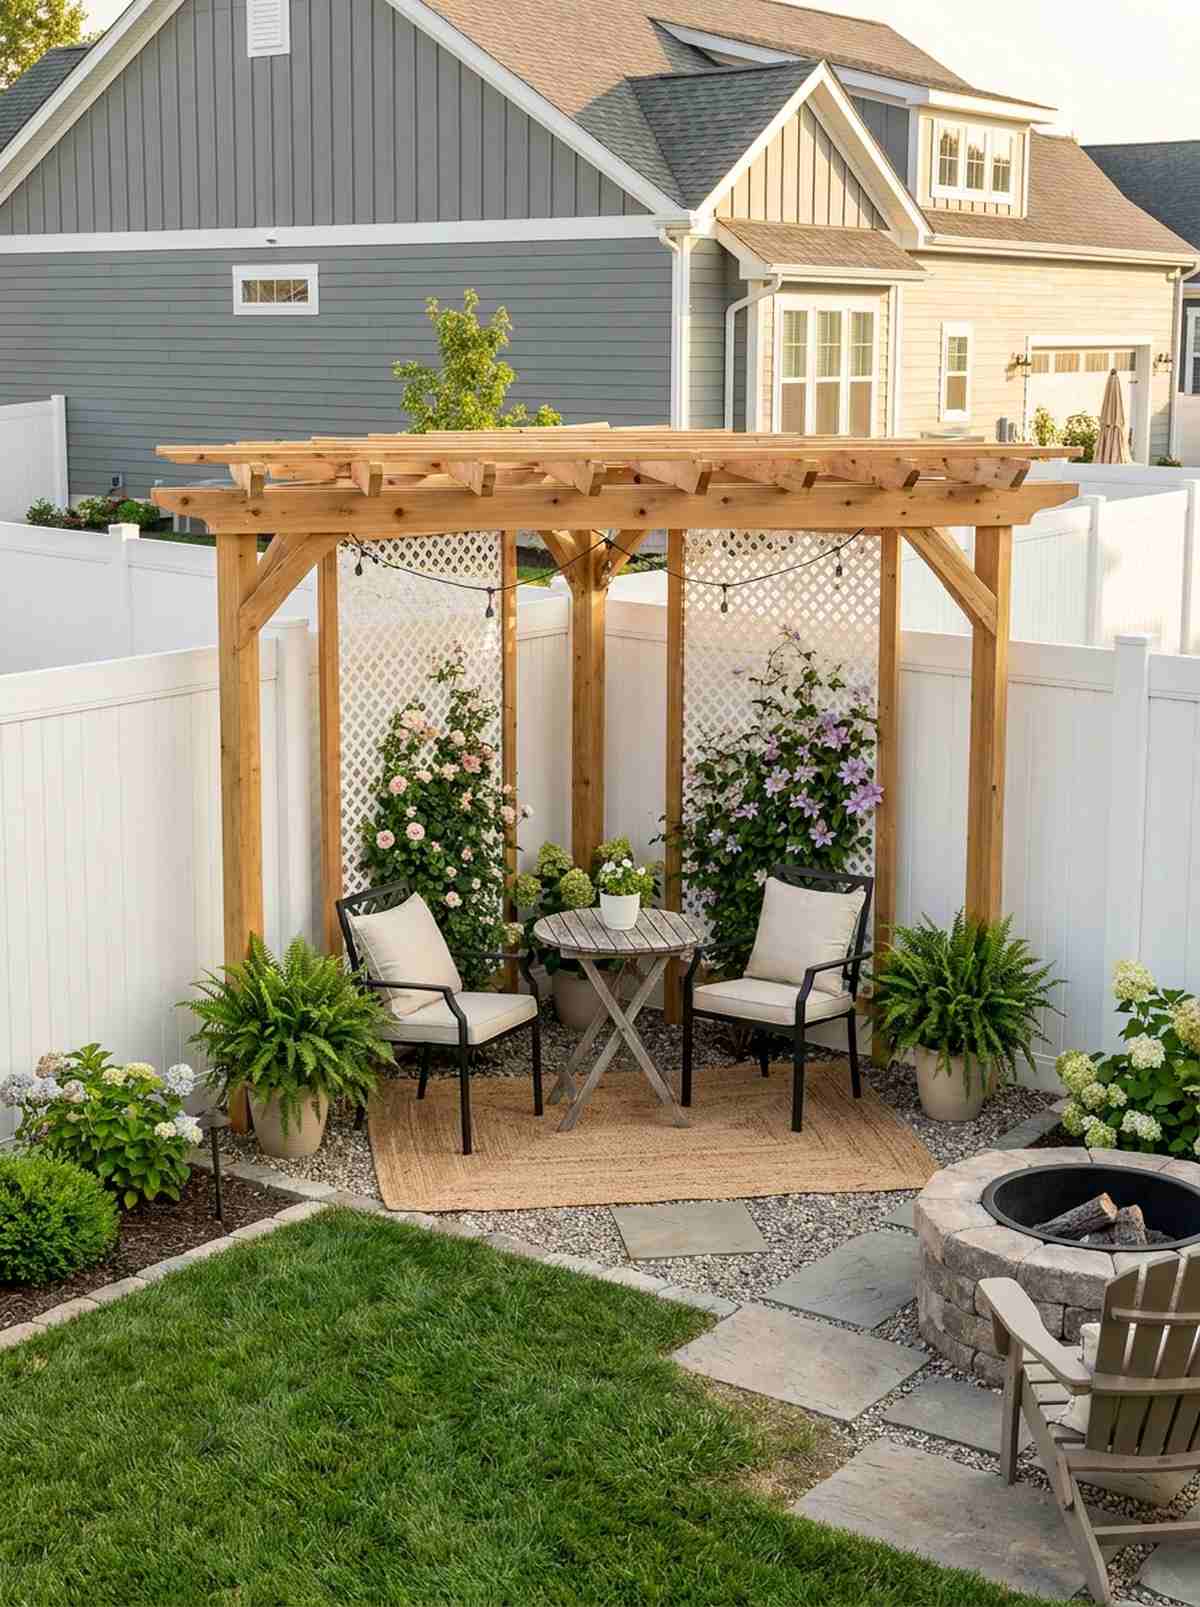
This compact diagonal shade feels like a cozy secret garden nook. It completely maximizes dead corner space in tiny suburban backyards.
Rotating the square footprint 45 degrees into the corner visually widens the yard while capturing unused boundary space. It delivers a designer-level finish without eating up your central lawn.
A basic 10×10 kit setup costs around $800–$1,500. Pin this if you have a tiny, awkward backyard.
- Key Materials: Pre-cut 10×10 kit
- Vibe / Style: Intimate corner cafe
- Difficulty: Fast weekend DIY
- Budget Breakdown: Kit: $1000 | Base plates: $150
- Creator’s Tip: Mount decorative lattice panels on the two fence-facing sides to instantly block nosy neighbors.
- Smart Sourcing: pre-cut 10×10 pergola starter kits and UV-resistant vinyl privacy lattices.
Defying standard sizing, this next ultra-narrow trick transforms dead walkways into stunning features…
Compact Space Solutions For Small Yards
30. Narrow Walkway Pergola
A linear shade tunnel that feels like an aristocratic garden promenade. It turns boring, blazing-hot side-yard concrete strips into lush, shaded pathways.
Squeezing the width to just 4 feet forces dramatic vertical perspective, making short paths feel incredibly long. It completely transforms ignored transition zones into prime architectural real estate.
Narrow lumber requirements keep this cheap at $400–$700. Save this for side-yard landscaping hacks.
- Key Materials: Short rafters, climbing vines
- Vibe / Style: Lush garden promenade
- Difficulty: Easy repetitive framing
- Budget Breakdown: Posts: $200 | Rafters: $150
- Creator’s Tip: Alternate the rafter heights slightly to create a stunning wave effect down the tunnel.
- Smart Sourcing: galvanized structural post bases (bulk pack) and fast-growing evergreen climbing vine seeds.
31. Vertical Wall-Mounted Pergola
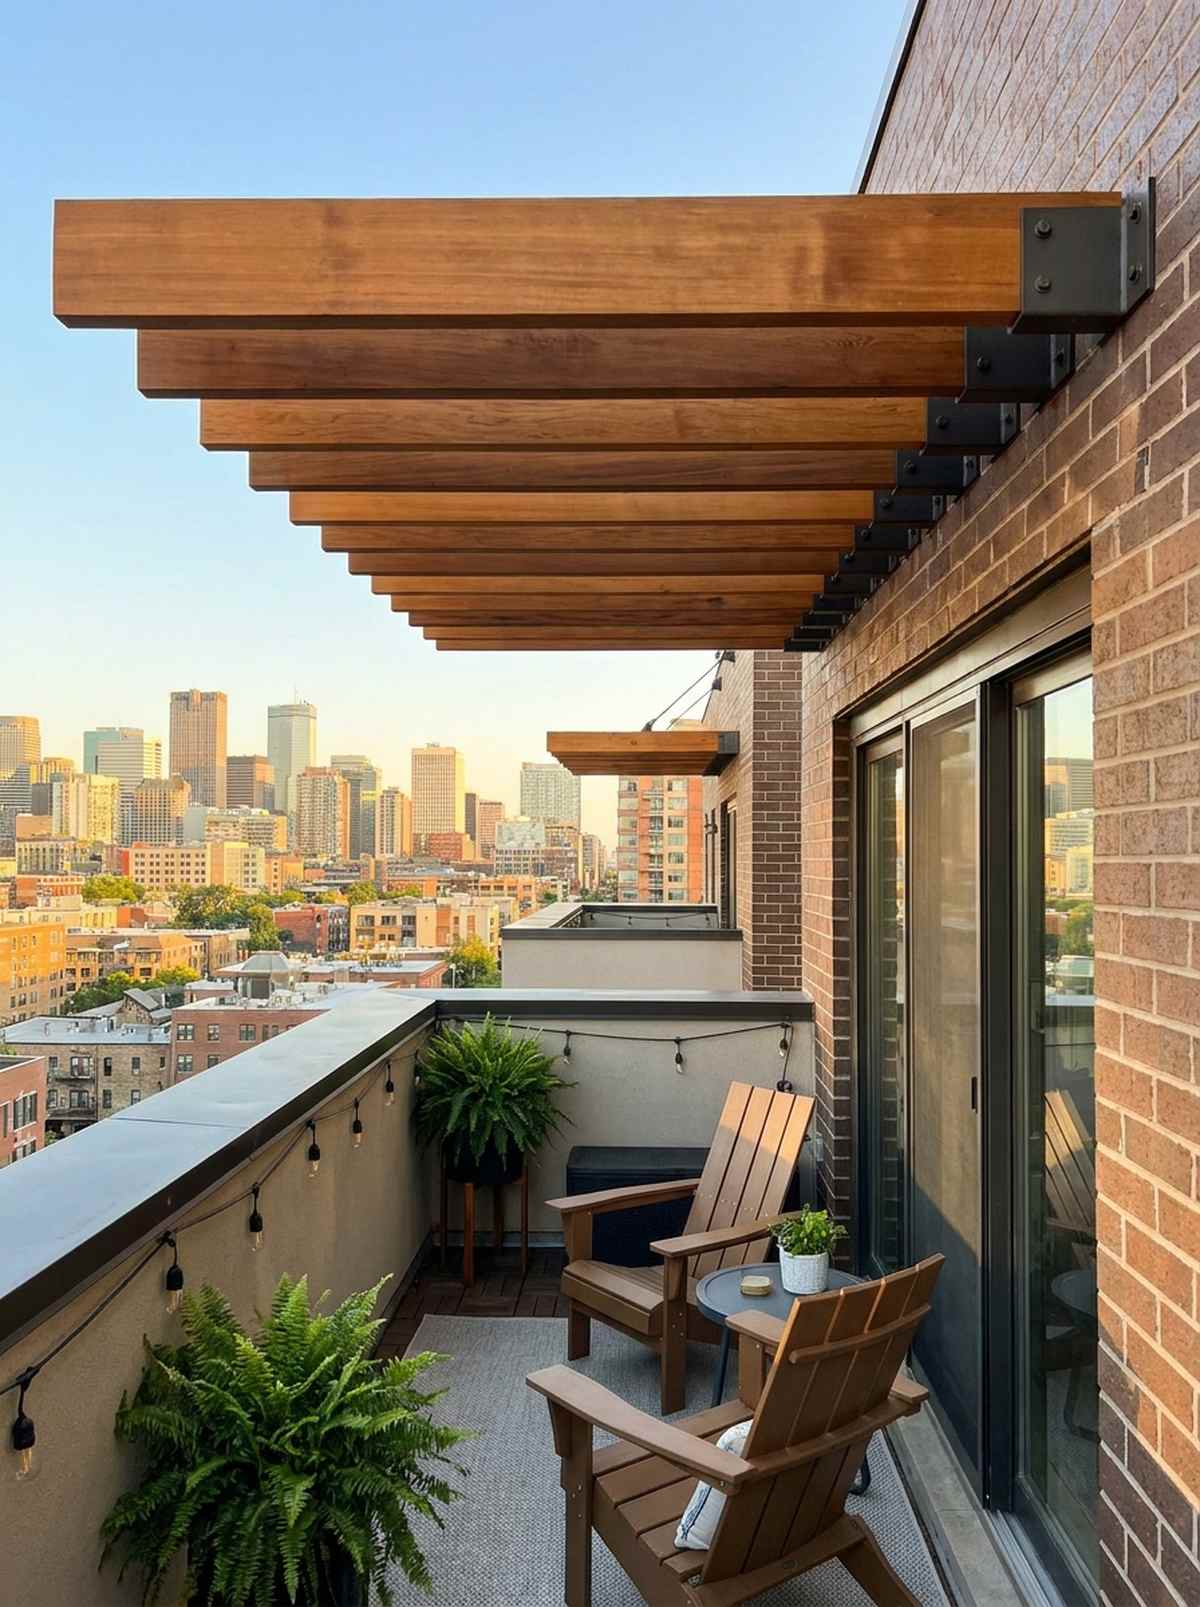
This floating cantilevered awning feels incredibly modern and gravity-defying. It shades tiny urban patios without stealing a single inch of floor space.
By using heavy-duty engineered wall brackets, you completely delete the need for ground posts to trip over. This floating aesthetic hits harder than any bulky outdoor living pavilion in cramped quarters.
Hardware and lumber will run about $500–$900. A must-do upgrade for microscopic city balconies.
- Key Materials: Cantilever support brackets
- Vibe / Style: Minimalist floating shade
- Difficulty: Critical stud finding
- Budget Breakdown: Brackets: $250 | Beams: $200
- Creator’s Tip: Do not exceed an 8-foot outward projection to avoid ripping the brackets out of your wall framing.
- Smart Sourcing: heavy-duty engineered cantilever brackets and lightweight hollow cedar beam wraps.
32. Multi-Level Tiered Pergola
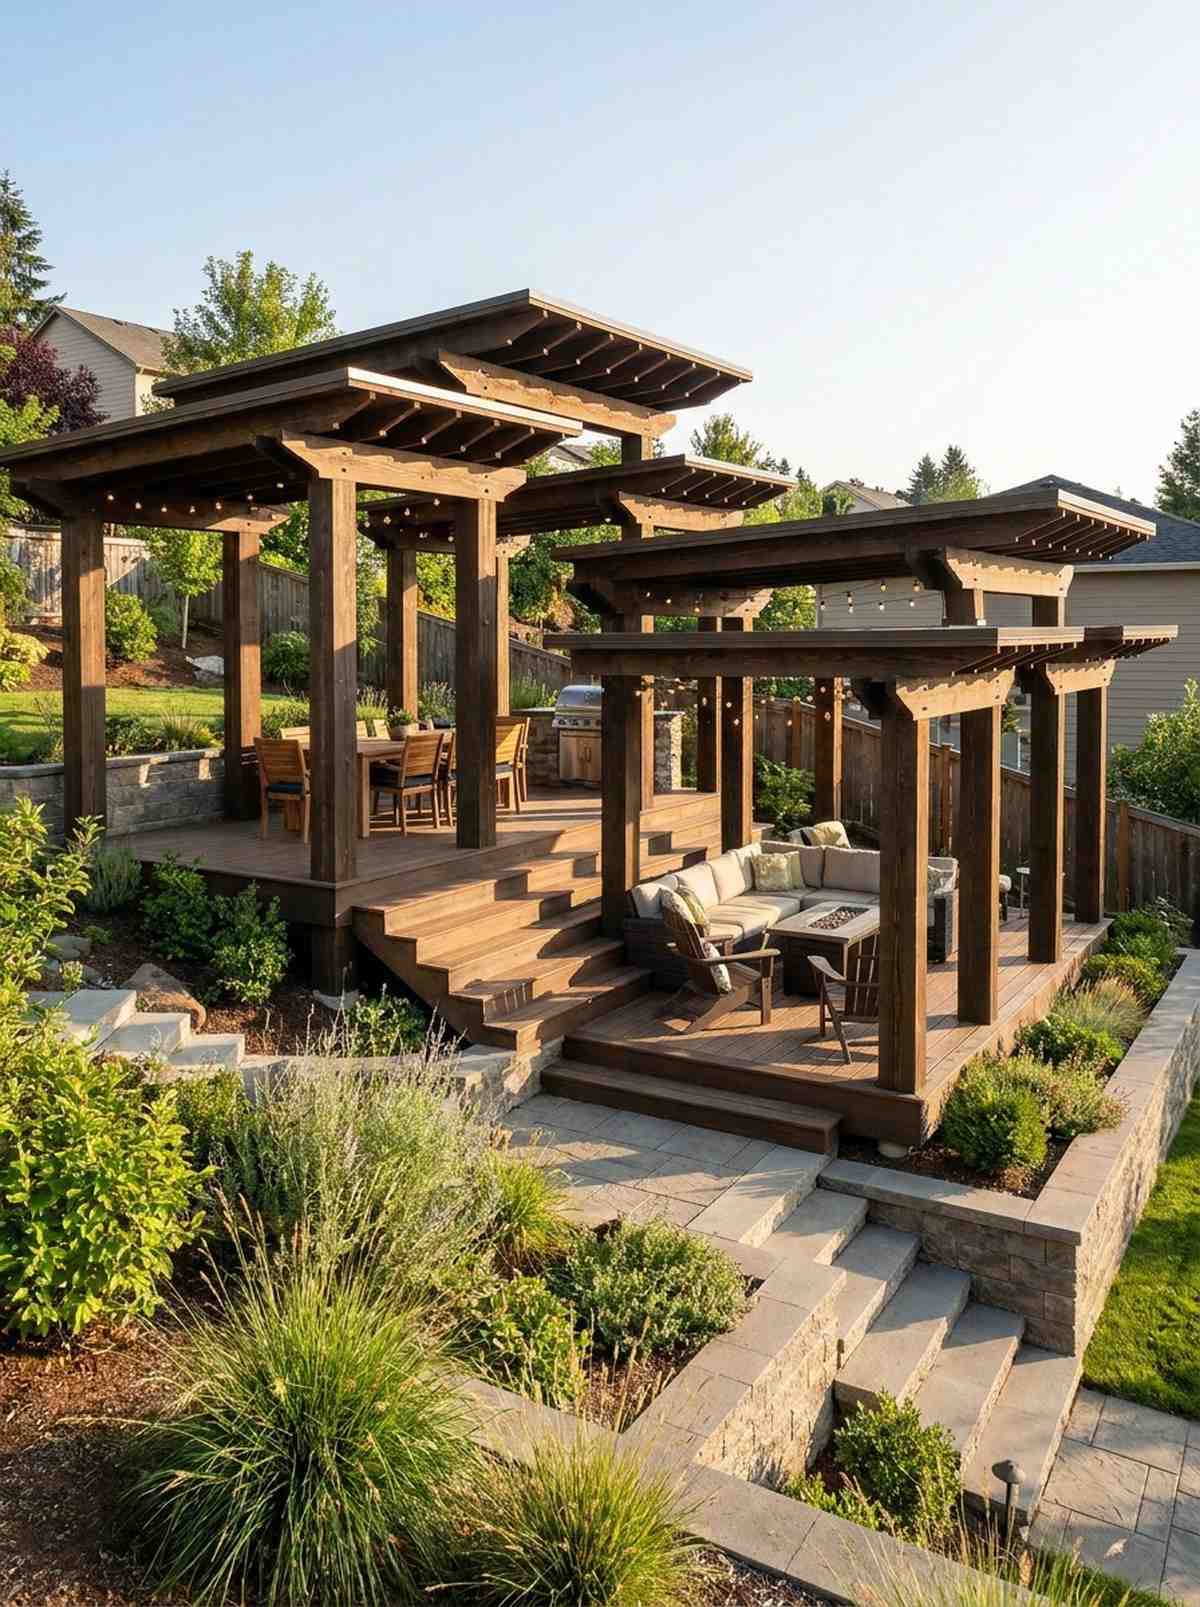
A stepped elevation canopy that feels like an aggressive architectural statement. It brilliantly conquers sloping backyards without requiring expensive dirt excavation.
Breaking the roof into split-level tiers creates distinct, dynamic zones for dining versus lounging. It looks incredibly expensive and custom-built, easily rivaling high-end resort landscapes.
The extra structural posts push costs to $2,500–$4,000. Pin this if your yard is built on a massive hill.
- Key Materials: Varied post heights
- Vibe / Style: Dynamic terraced resort
- Difficulty: Complex leveling math
- Budget Breakdown: Extra posts: $500 | Roofing: $1200
- Creator’s Tip: Overlap the upper tier roof over the lower tier slightly to prevent rain cascading onto the lower deck.
- Smart Sourcing: adjustable-height heavy-duty post bases and pre-cut architectural rafter tails.
33. Murphy Pergola With Folding Furniture
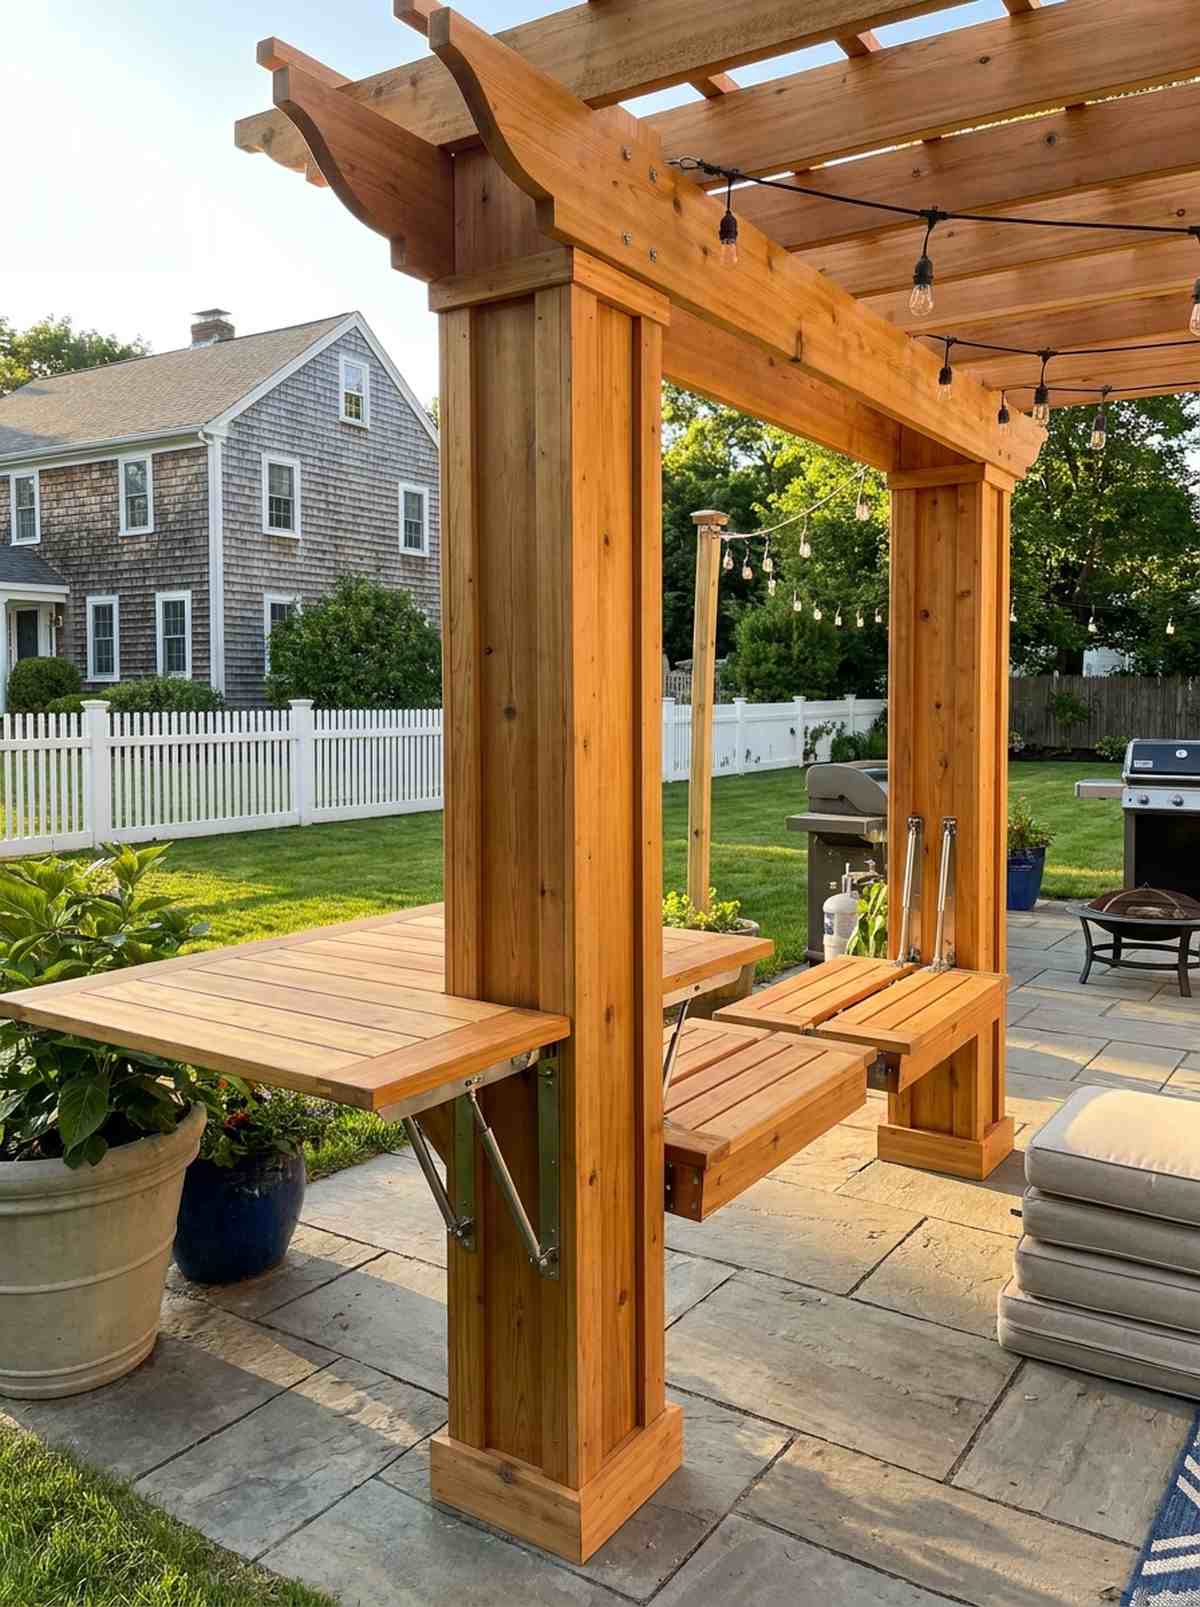
This convertible space-saving hub feels like a Swiss-army knife for tiny patios. It allows a small footprint to transition from dining room to open dance floor.
Integrating fold-down tables and benches directly onto the structural columns eliminates the need for bulky patio furniture. It’s a hyper-efficient twist on the traditional outdoor living gazebo.
Custom hinges and built-ins cost around $1,200–$1,800. Save this to your tiny-living blueprint board.
- Key Materials: Heavy duty folding brackets
- Vibe / Style: Hyper-efficient transformer
- Difficulty: Precision hinge mounting
- Budget Breakdown: Hinges: $200 | Wood: $600
- Creator’s Tip: Install gas struts on the folding table legs so they drop down softly without smashing toes.
- Smart Sourcing: locking heavy-duty folding shelf brackets and stainless steel gas shock struts.
34. Balcony Rail-Mounted Pergola
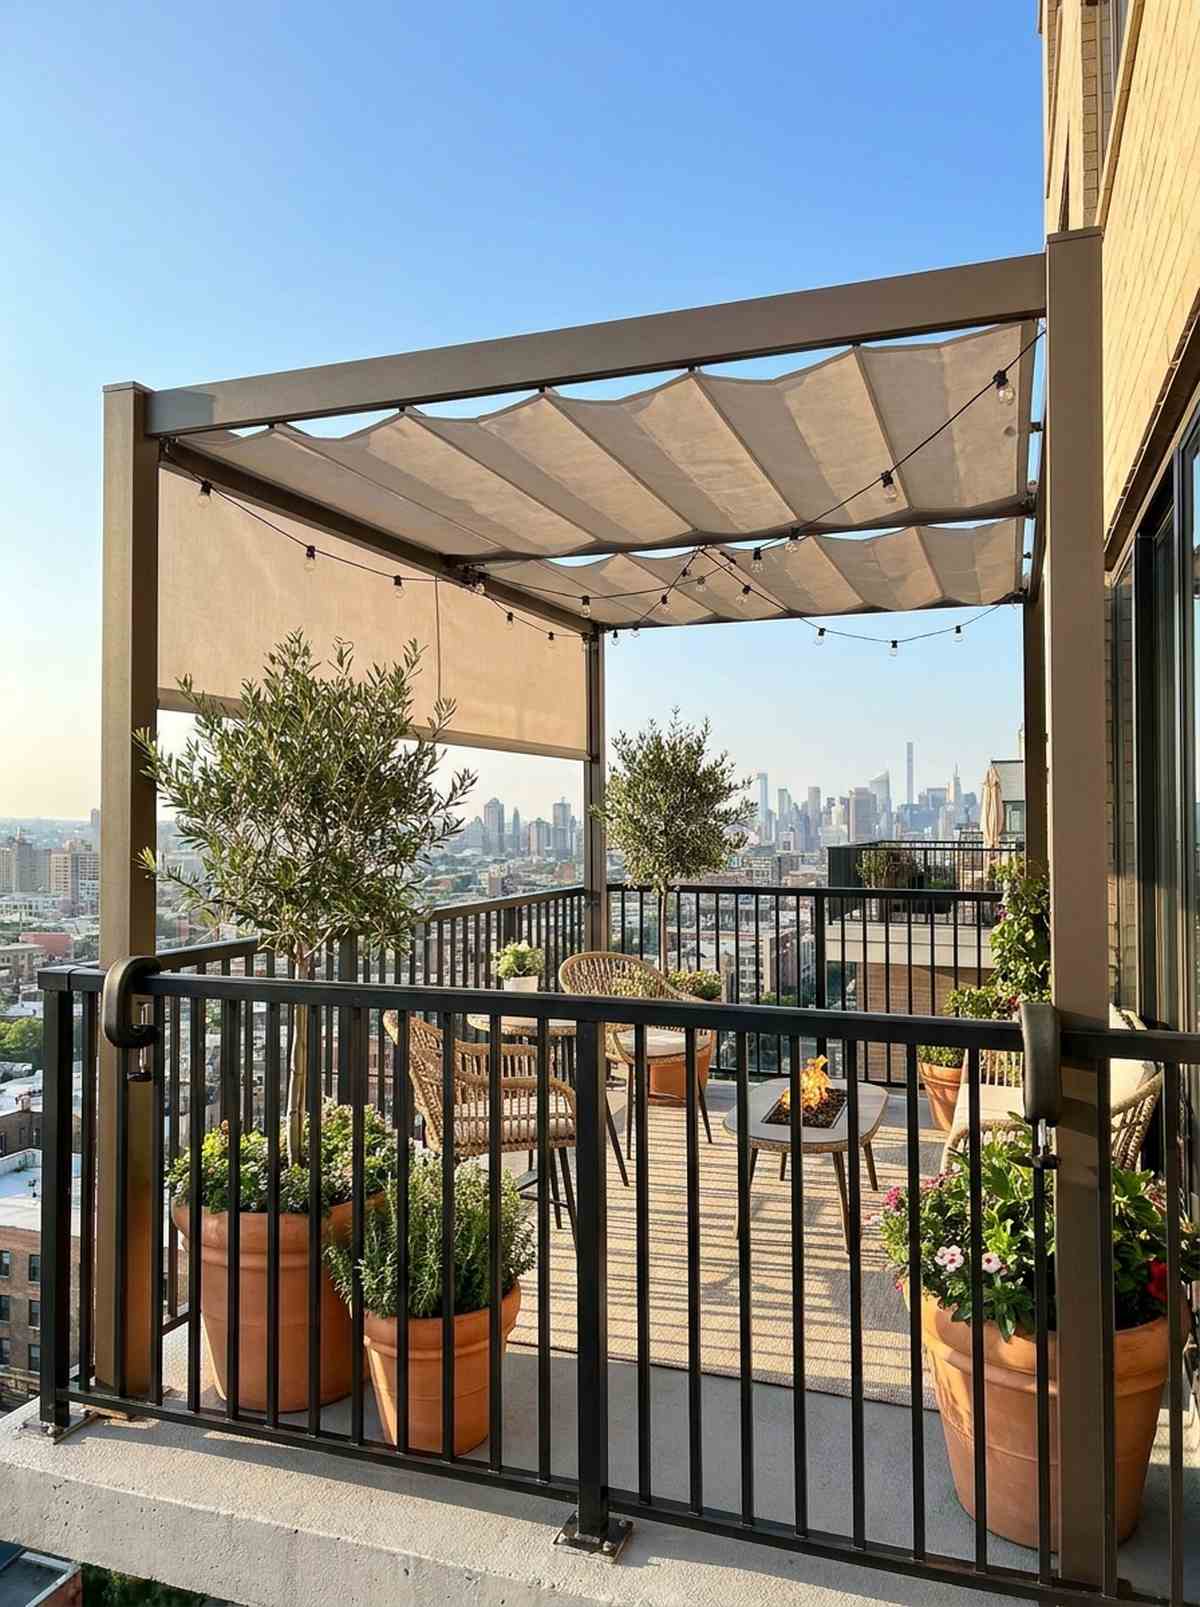
A clamp-on lightweight shade that feels like a chic high-rise cafe. It completely bypasses strict apartment lease rules against drilling into walls.
Using tension clamps on existing metal railings provides a surprisingly rigid structure without permanently damaging the building. This delivers a highly premium aesthetic for renters who refuse to settle for cheap umbrellas.
Aluminum frames and clamps cost roughly $300–$600. An absolute lifesaver for brutal summer balconies.
- Key Materials: Railing tension clamps
- Vibe / Style: Chic renter-friendly cafe
- Difficulty: Zero-drill assembly
- Budget Breakdown: Aluminum frame: $200 | Clamps: $100
- Creator’s Tip: Use rubber padding inside the metal clamps so they don’t scratch the landlord’s balcony paint.
- Smart Sourcing: heavy-duty rubber-lined C-clamps (bulk pack) and lightweight aluminum framing starter kits.
Most solar setups look incredibly ugly… until you seamlessly integrate them into the roofline like this.
Material Guide: Cheap vs. Premium Aesthetic
Knowing exactly where to save and where to spend makes all the difference in achieving that “looks expensive but isn’t” vibe.
- Standard Wood vs. UV-Resistant Aluminum: While raw pine is cheap upfront, powder-coated aluminum kits prevent the cracking, warping, and endless re-staining that ruins standard designs.
- Pre-made Kits vs. Sourcing Locally: Buying pre-cut, pre-drilled hardware starter kits often saves both time and money compared to mis-measuring and wasting raw lumber from the hardware store.
Specialty Outdoor Structures For Unique Functions
35. Solar Panel Pergola Roof
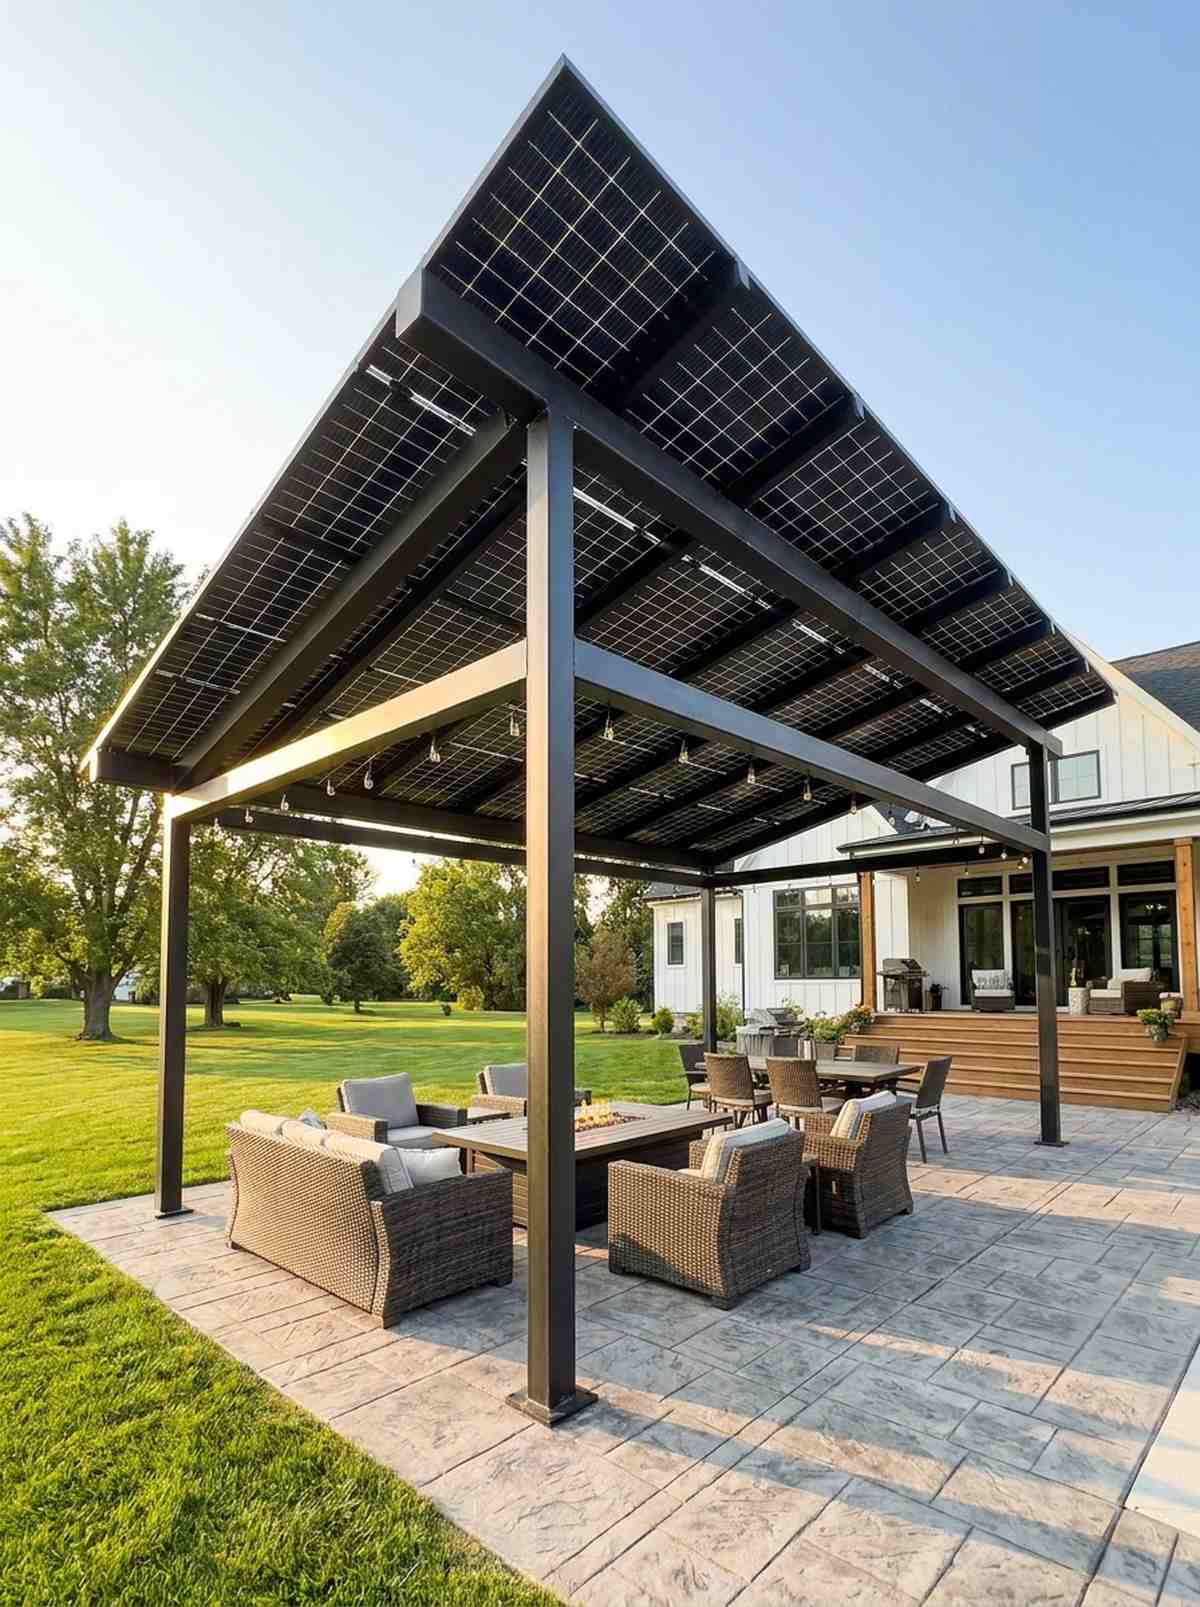
This energy-generating shade cover feels like a hyper-modern eco-fortress. It acts perfectly for offsetting home power bills while shading large driveways or patios.
Tilted photovoltaic panels form a completely solid, rain-proof roof that pays for itself over time. It transforms a standard dead-weight outdoor living pavilion into a literal backyard power plant.
Solar arrays and inverters push this to $8,000–$15,000. Save this if you love high-ROI home investments.
- Key Materials: Solar panels, micro-inverters
- Vibe / Style: High-tech eco modern
- Difficulty: Licensed electrician needed
- Budget Breakdown: Panels: $5000 | Framing: $2000
- Creator’s Tip: Angle the entire roof structure perfectly south at a 30-degree pitch to maximize winter sun harvesting.
- Smart Sourcing: grid-tied solar micro-inverter kits and weatherproof outdoor conduit packs.
36. Greenhouse Pergola Hybrid

A polycarbonate four-season room that feels like a lush botanical conservatory. It completely shields delicate tropical plants during harsh winter freezes.
Installing removable twin-wall panels allows you to switch from an airy summer shade structure to a sealed winter hothouse. This dual utility gives a designer-level finish to serious gardening enthusiasts.
Glazing and vent systems cost around $2,000–$3,500. Pin this to your ultimate winter gardening board.
- Key Materials: Twin-wall polycarbonate
- Vibe / Style: Lush botanical conservatory
- Difficulty: Moderate framing
- Budget Breakdown: Poly panels: $800 | Tracks: $300
- Creator’s Tip: Install automatic heat-activated vent openers on the roof so plants don’t cook on sunny winter days.
- Smart Sourcing: UV-coated twin-wall polycarbonate sheets (bulk pack) and wax-cylinder auto vent openers.
37. Auto Court Carport Pergola
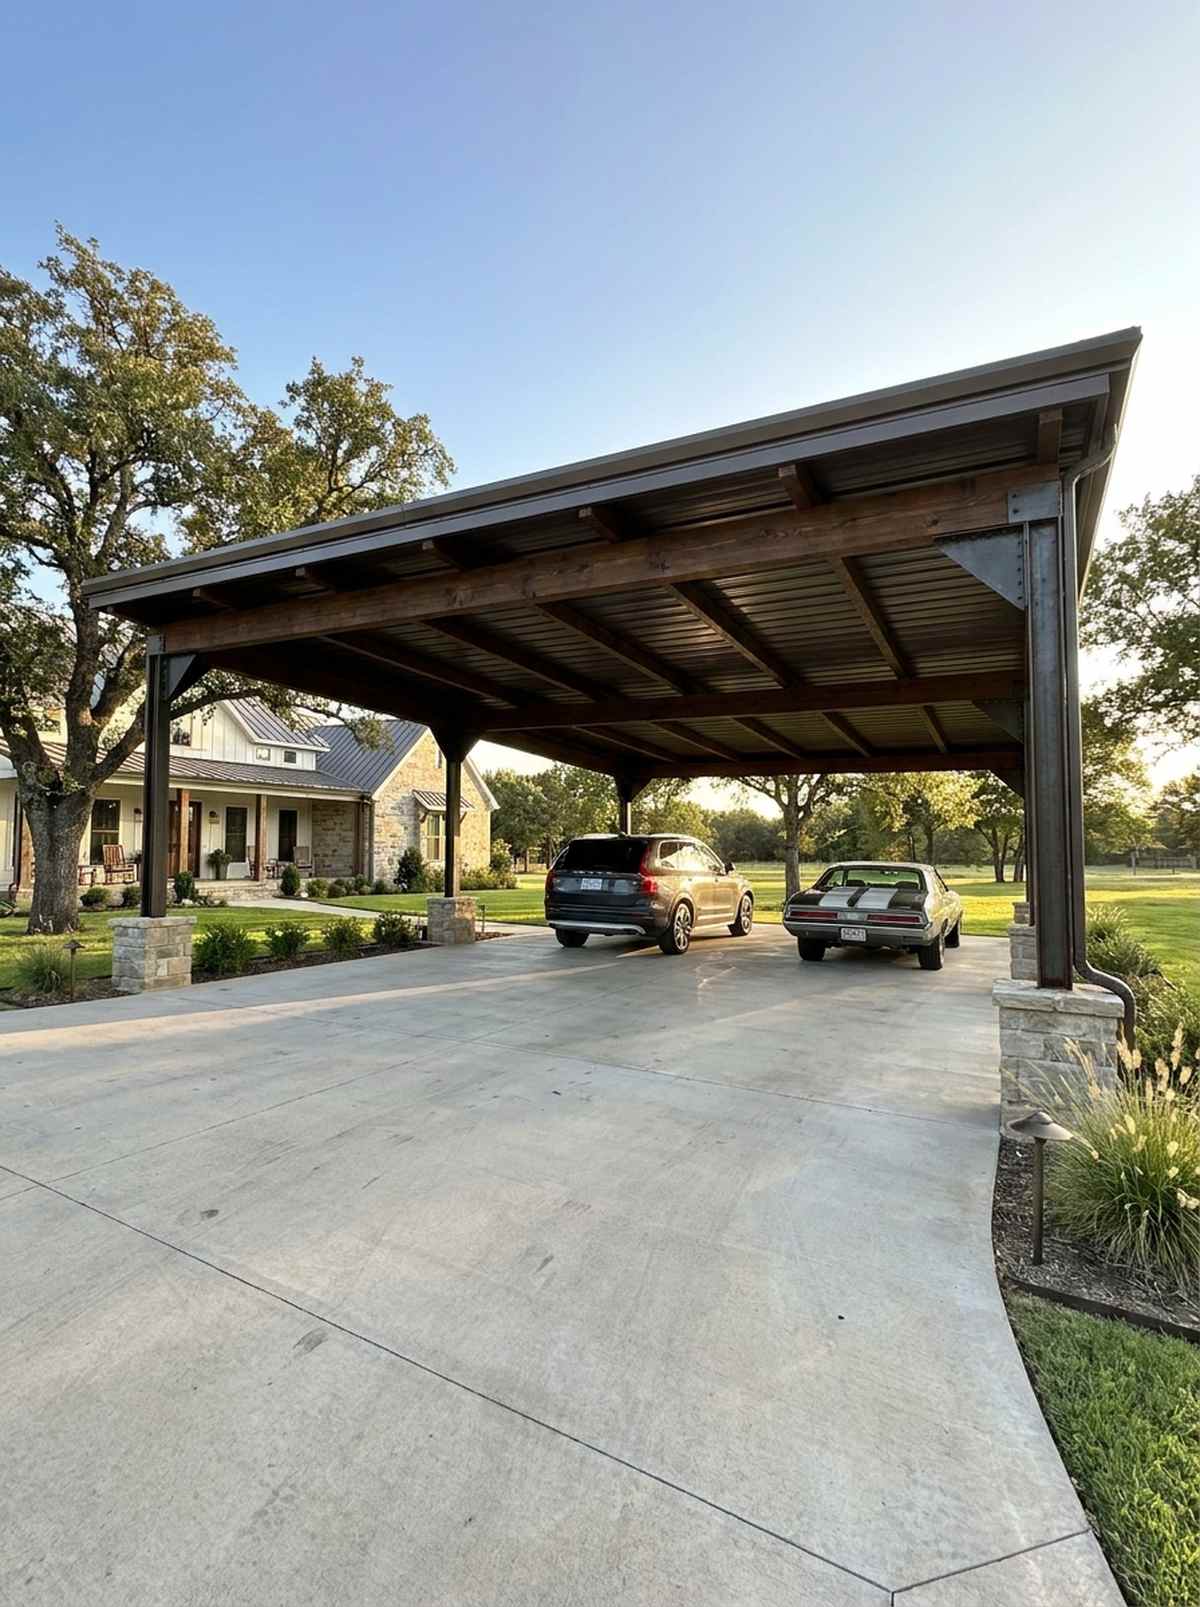
This heavy-duty vehicle shelter feels incredibly robust and deeply architectural. It upgrades boring concrete driveways into high-end automotive display spaces.
Leaving the sides completely open prevents trapped moisture that causes undercarriage rust, while the solid roof blocks brutal UV paint damage. It looks far more expensive than a cheap aluminum carport tent.
Heavy-span engineering costs roughly $3,000–$5,500. Highly recommended to protect expensive vehicle investments.
- Key Materials: Long-span steel/timber
- Vibe / Style: Architectural auto gallery
- Difficulty: Heavy lifting machinery
- Budget Breakdown: Heavy Beams: $2000 | Roofing: $1000
- Creator’s Tip: Ensure a minimum 12-foot clearance width so truck doors don’t smash into the support columns.
- Smart Sourcing: heavy-duty commercial corner gussets and impact-resistant metal roofing panels.
38. Projection Screen Entertainment Pergola
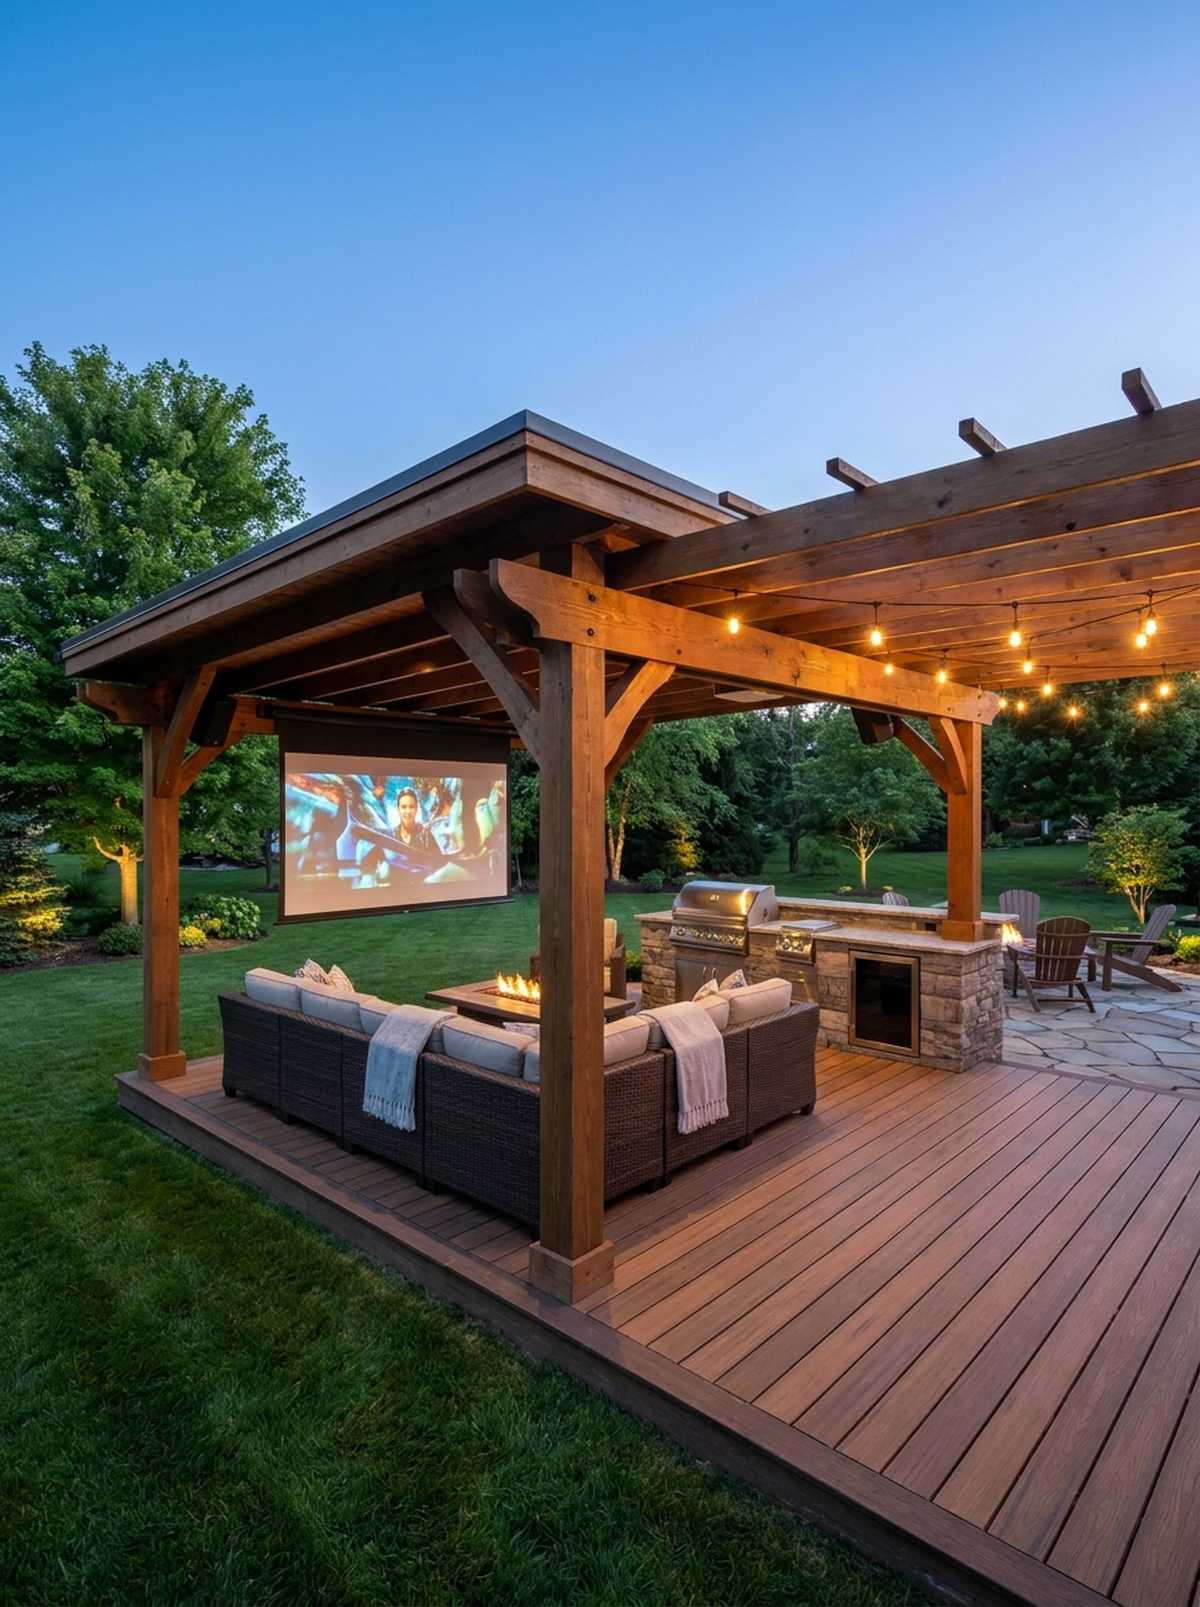
A media-focused backyard theater that feels like a private VIP cinema. It flawlessly transitions dark, empty yards into massive fight-night or movie-night hubs.
Building a solid roof section directly over the seating kills ambient light pollution to keep the projector image crisp. It completely outshines any basic outdoor living gazebo for night-time hosting.
AV equipment and weatherproofing add $1,500–$3,000. Save this for epic summer night parties.
- Key Materials: Retractable screen, outdoor speakers
- Vibe / Style: VIP outdoor cinema
- Difficulty: Advanced AV wiring
- Budget Breakdown: Screen: $300 | AV Box: $200
- Creator’s Tip: Mount a motorized tension screen on the crossbeam to prevent the movie from distorting in the wind.
- Smart Sourcing: motorized outdoor tension projector screens and waterproof locking AV equipment cabinets.
39. Pet-Friendly Shade Pergola
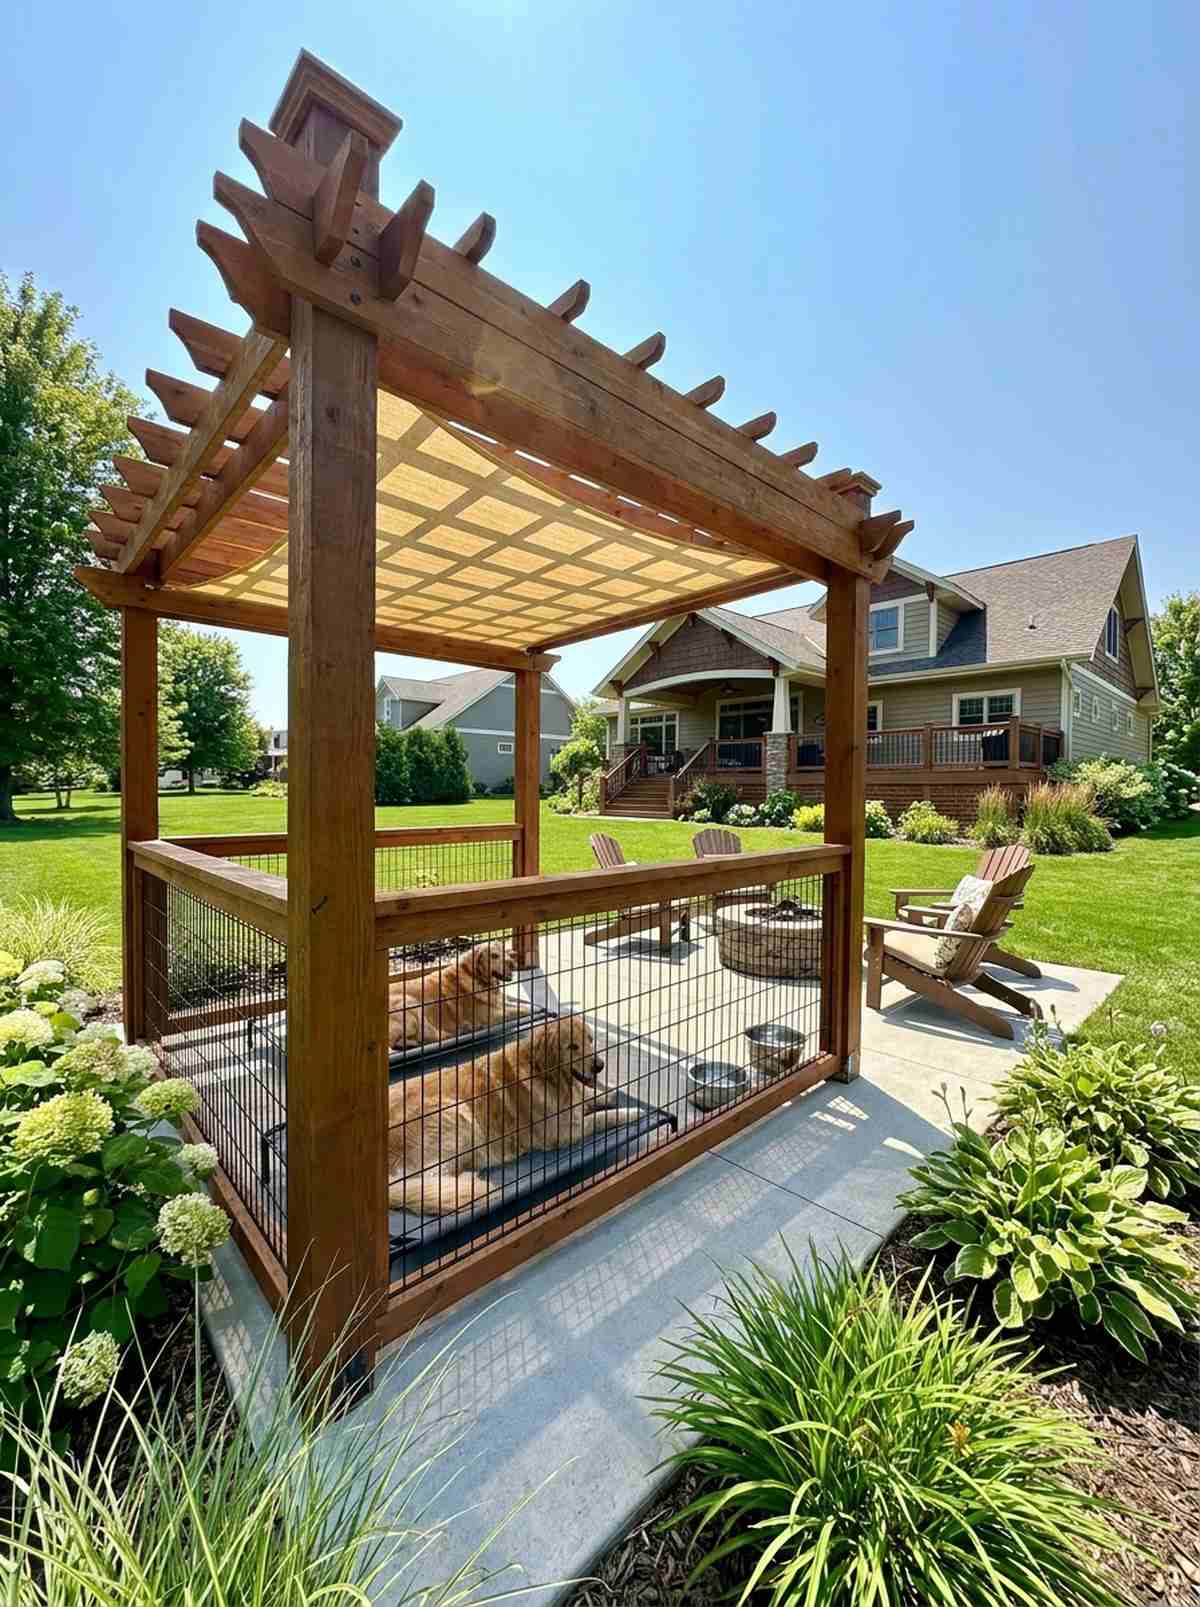
This ventilated animal enclosure feels incredibly safe and comfortably cool. It is the perfect life-hack for keeping large dogs out of the blazing summer sun.
Integrating heavy-duty lower screening blocks escape routes while the slatted roof ensures hot air instantly escapes upward. This dedicated setup gives a much cleaner aesthetic than ugly chain-link dog runs.
Durable pet-safe materials cost around $600–$1,200. Pin this if you want a luxurious spot for your dogs.
- Key Materials: Chew-proof metal mesh
- Vibe / Style: High-end pet resort
- Difficulty: Easy wire mounting
- Budget Breakdown: Mesh: $200 | Shade cloth: $100
- Creator’s Tip: Pour a smooth concrete or paver pad underneath—wood decks absorb odors and are terrible to clean.
- Smart Sourcing: heavy-duty vinyl-coated welded wire rolls and UV-blocking breathable shade sails.
Before you run cheap plastic downspouts, look at this gorgeous kinetic water feature hack…
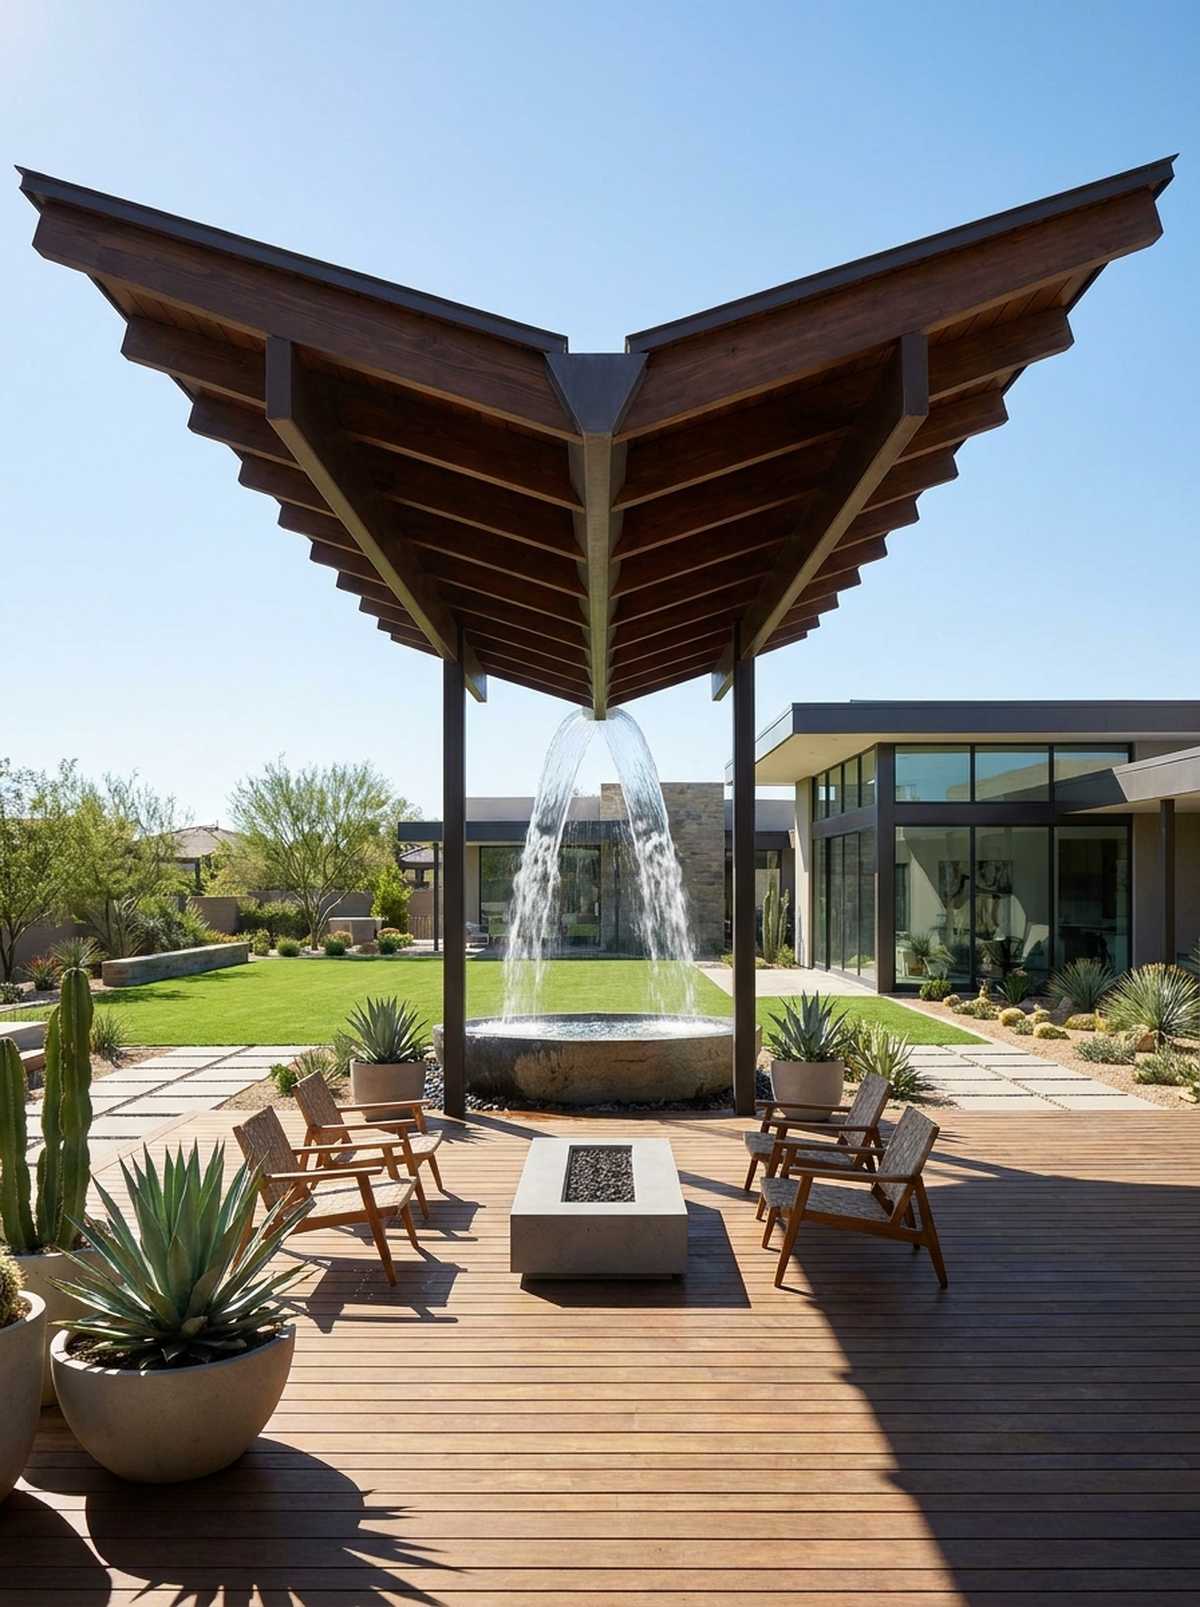
40. Rain Chain Water Feature Pergola
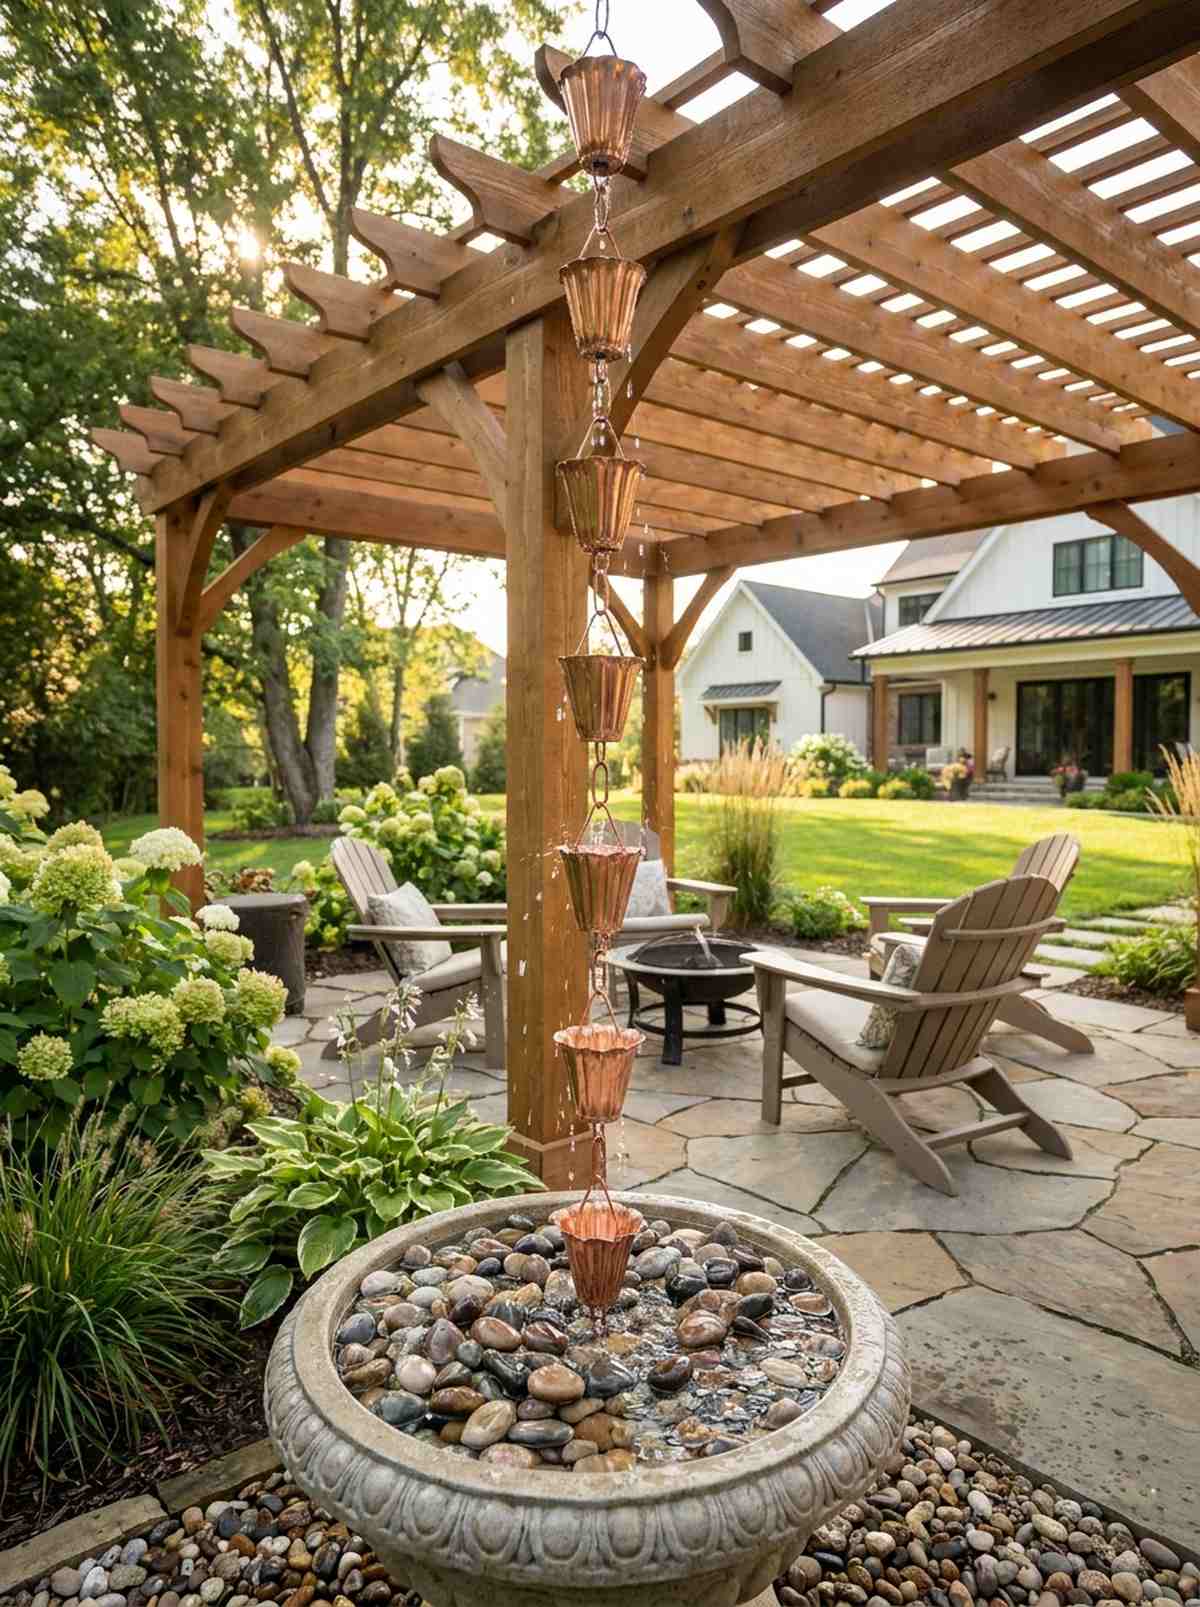
A kinetic stormwater fountain that feels deeply soothing and artistic. It turns heavy, gloomy rainstorms into mesmerizing backyard audio-visual shows.
Ditching ugly PVC downspouts for hanging copper cups guides the water gracefully into a stone basin below. This unexpectedly transforms a standard drainage chore into a premium landscape sculpture.
Copper chains and basins cost $150–$300. An incredibly cheap detail that looks like a million bucks.
- Key Materials: Copper rain chain, gravel basin
- Vibe / Style: Kinetic Zen sculpture
- Difficulty: Very easy DIY
- Budget Breakdown: Chain: $100 | Basin basin: $50
- Creator’s Tip: Anchor the bottom of the chain to a heavy submerged rock so high winds don’t whip it into your posts.
- Smart Sourcing: pure copper cascading rain chains and decorative polished river stones (bulk pack).
Roof Style Variations That Define Character
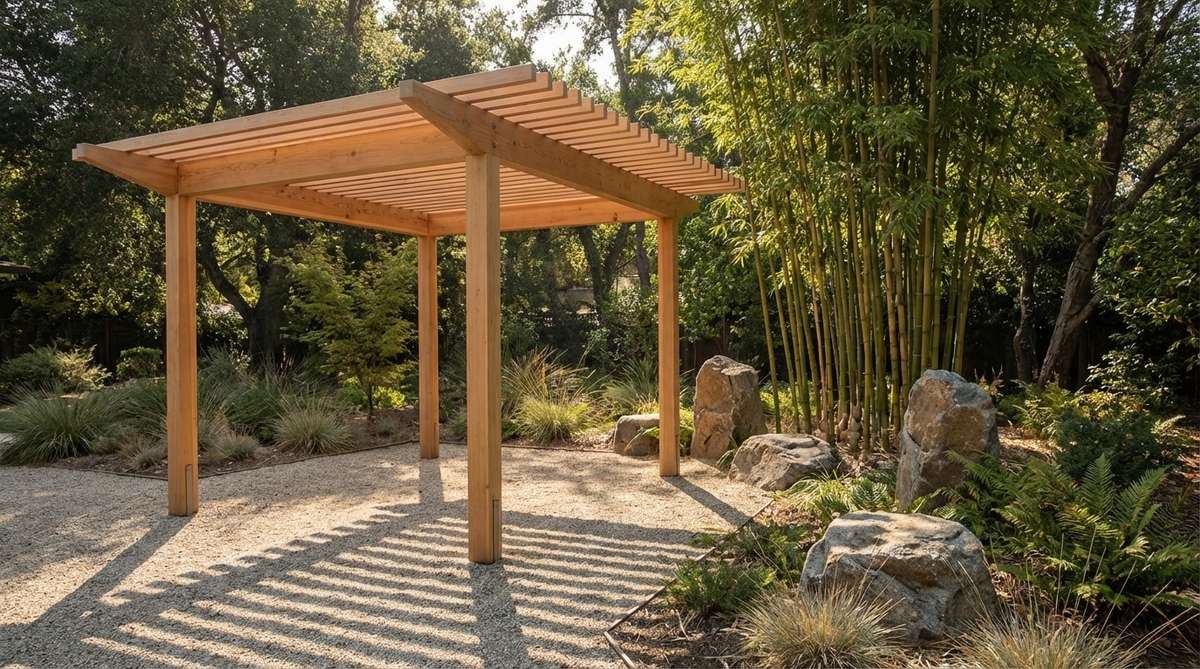
41. Open Rafter Pergola Classic
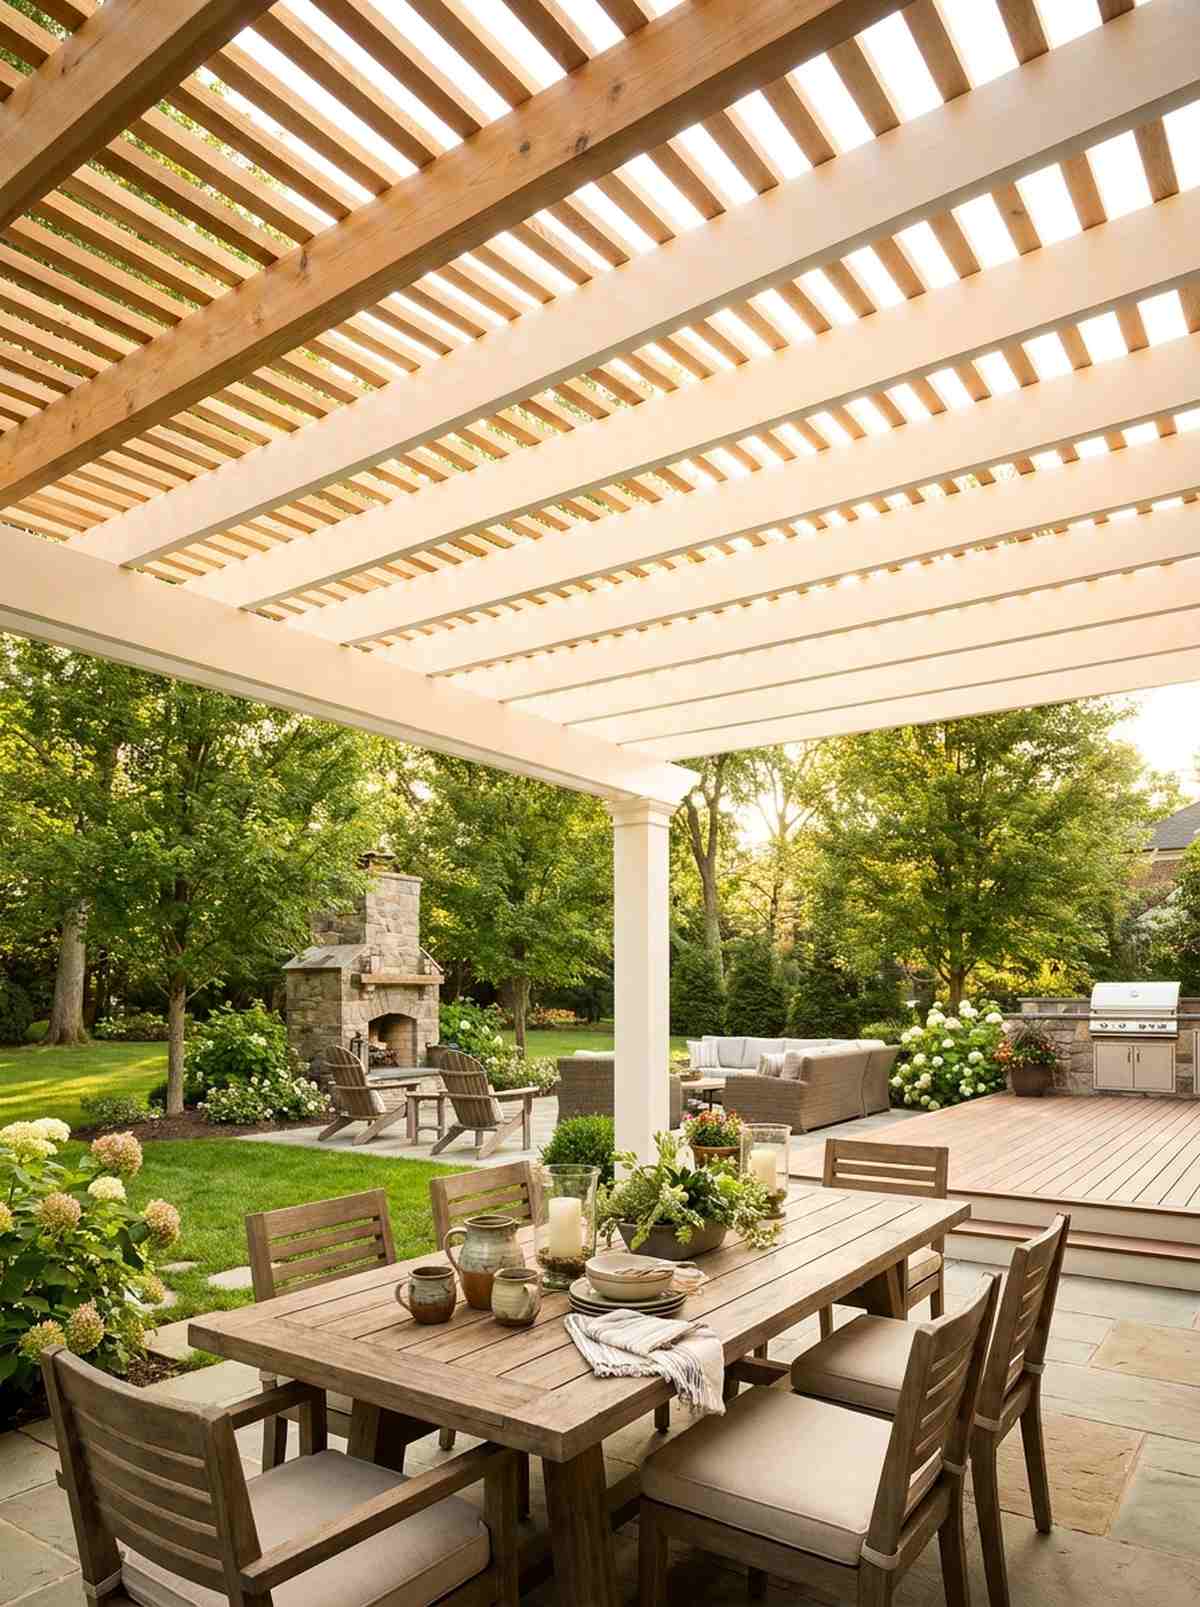
This traditional slatted canopy feels perfectly balanced and timeless. It remains the gold standard for creating dappled, filtered light over dining tables.
The industry secret is calculating the sun’s exact path and angling the slats to block aggressive afternoon heat entirely. This smart orientation makes it just as cool as a fully covered outdoor living pavilion.
Standard rafter designs run about $1,200–$2,000. Save this for foolproof, classic backyard builds.
- Key Materials: Parallel 2×6 top beams
- Vibe / Style: Classic Tuscan terrace
- Difficulty: Straightforward framing
- Budget Breakdown: Wood: $1000 | Hardware: $300
- Creator’s Tip: Paint the undersides of the beams bright white to reflect gorgeous ambient light onto your dinner guests.
- Smart Sourcing: pre-notched cedar rafter kits and high-reflectivity exterior ceiling paints.
42. Lattice Grid Roof Pattern
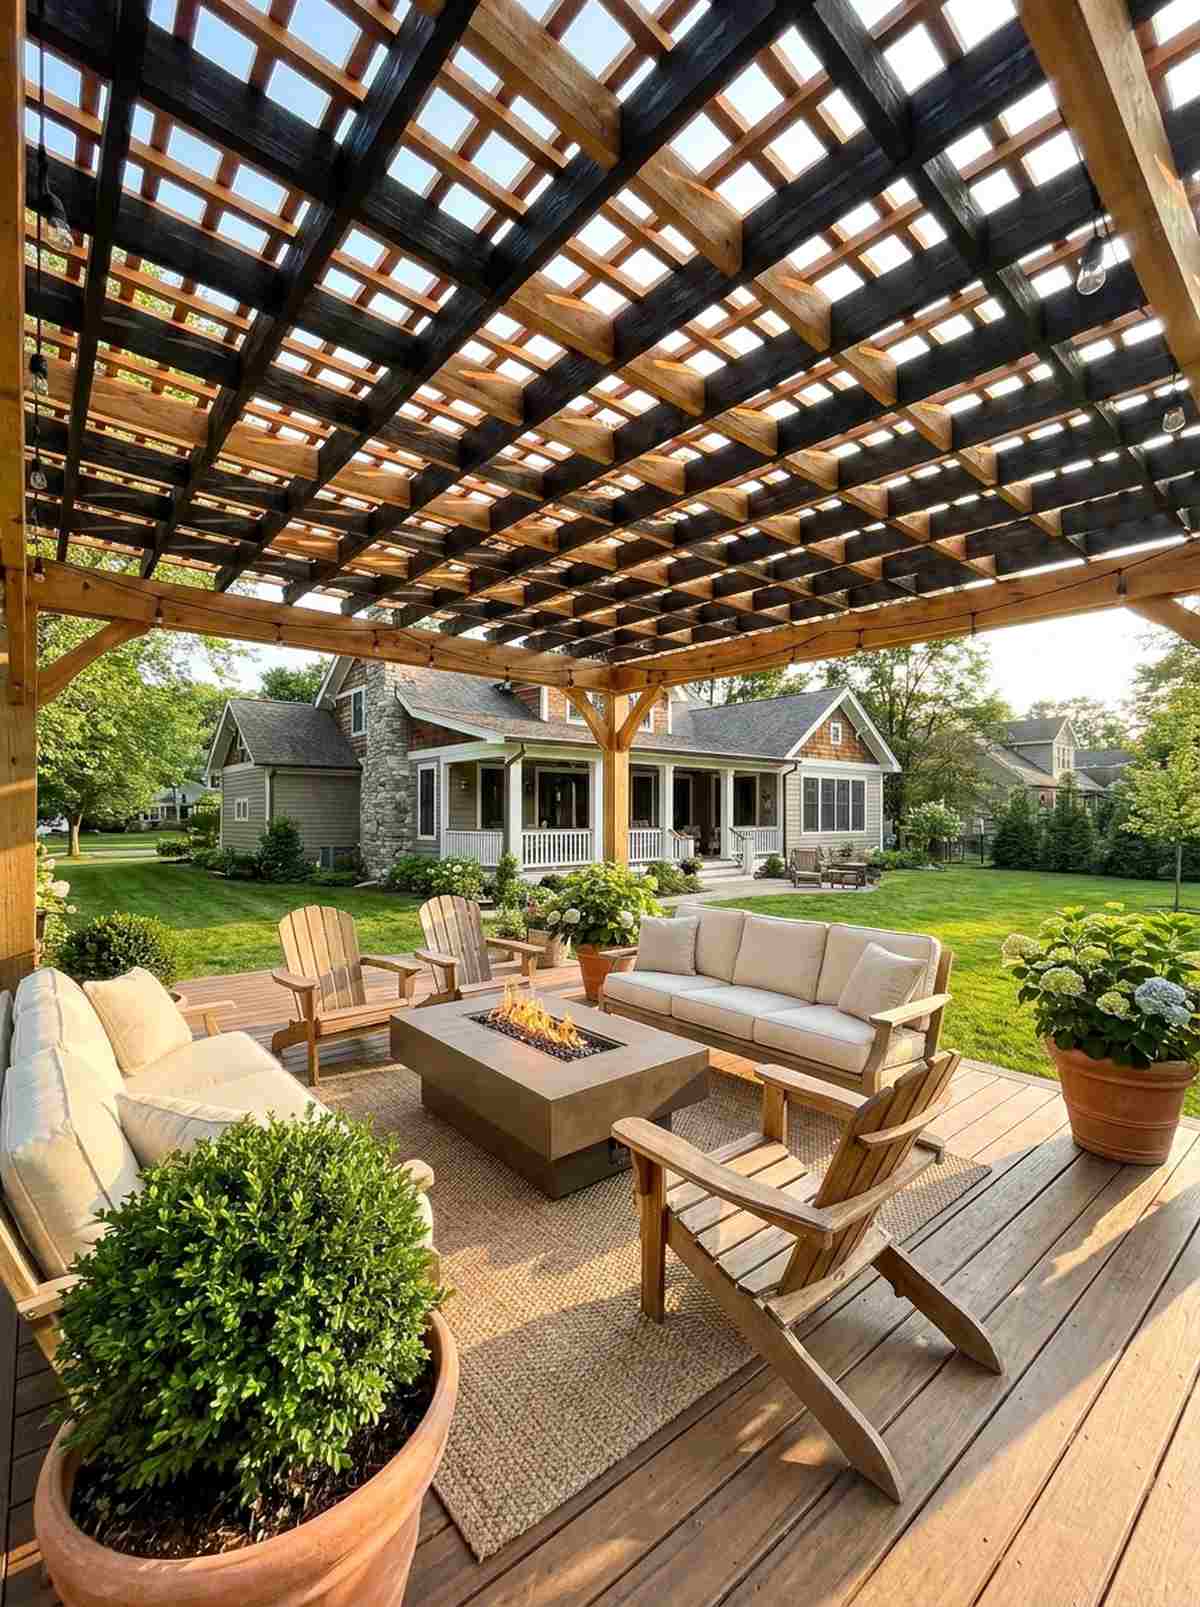
A crosshatched shadow maker that feels incredibly textured and intricate. It beautifully tightens up overhead space for intimate, enclosed seating zones.
Layering perpendicular thin slats creates dense shade blocks without the heavy visual weight of solid wood panels. It delivers a surprisingly premium look that filters light like an expensive privacy screen.
Adding the cross grid pushes costs to $1,500–$2,400. Pin this for highly detailed structural aesthetics.
- Key Materials: 2×2 perpendicular purlins
- Vibe / Style: Intricate woven canopy
- Difficulty: Repetitive measuring
- Budget Breakdown: Purlins: $400 | Screws: $100
- Creator’s Tip: Stain the top layer dark and the bottom layer light to make the geometric grid visually pop.
- Smart Sourcing: pre-cut square cedar purlin packs and weather-resistant deck screw buckets.
43. Curved Barrel Vault Pergola
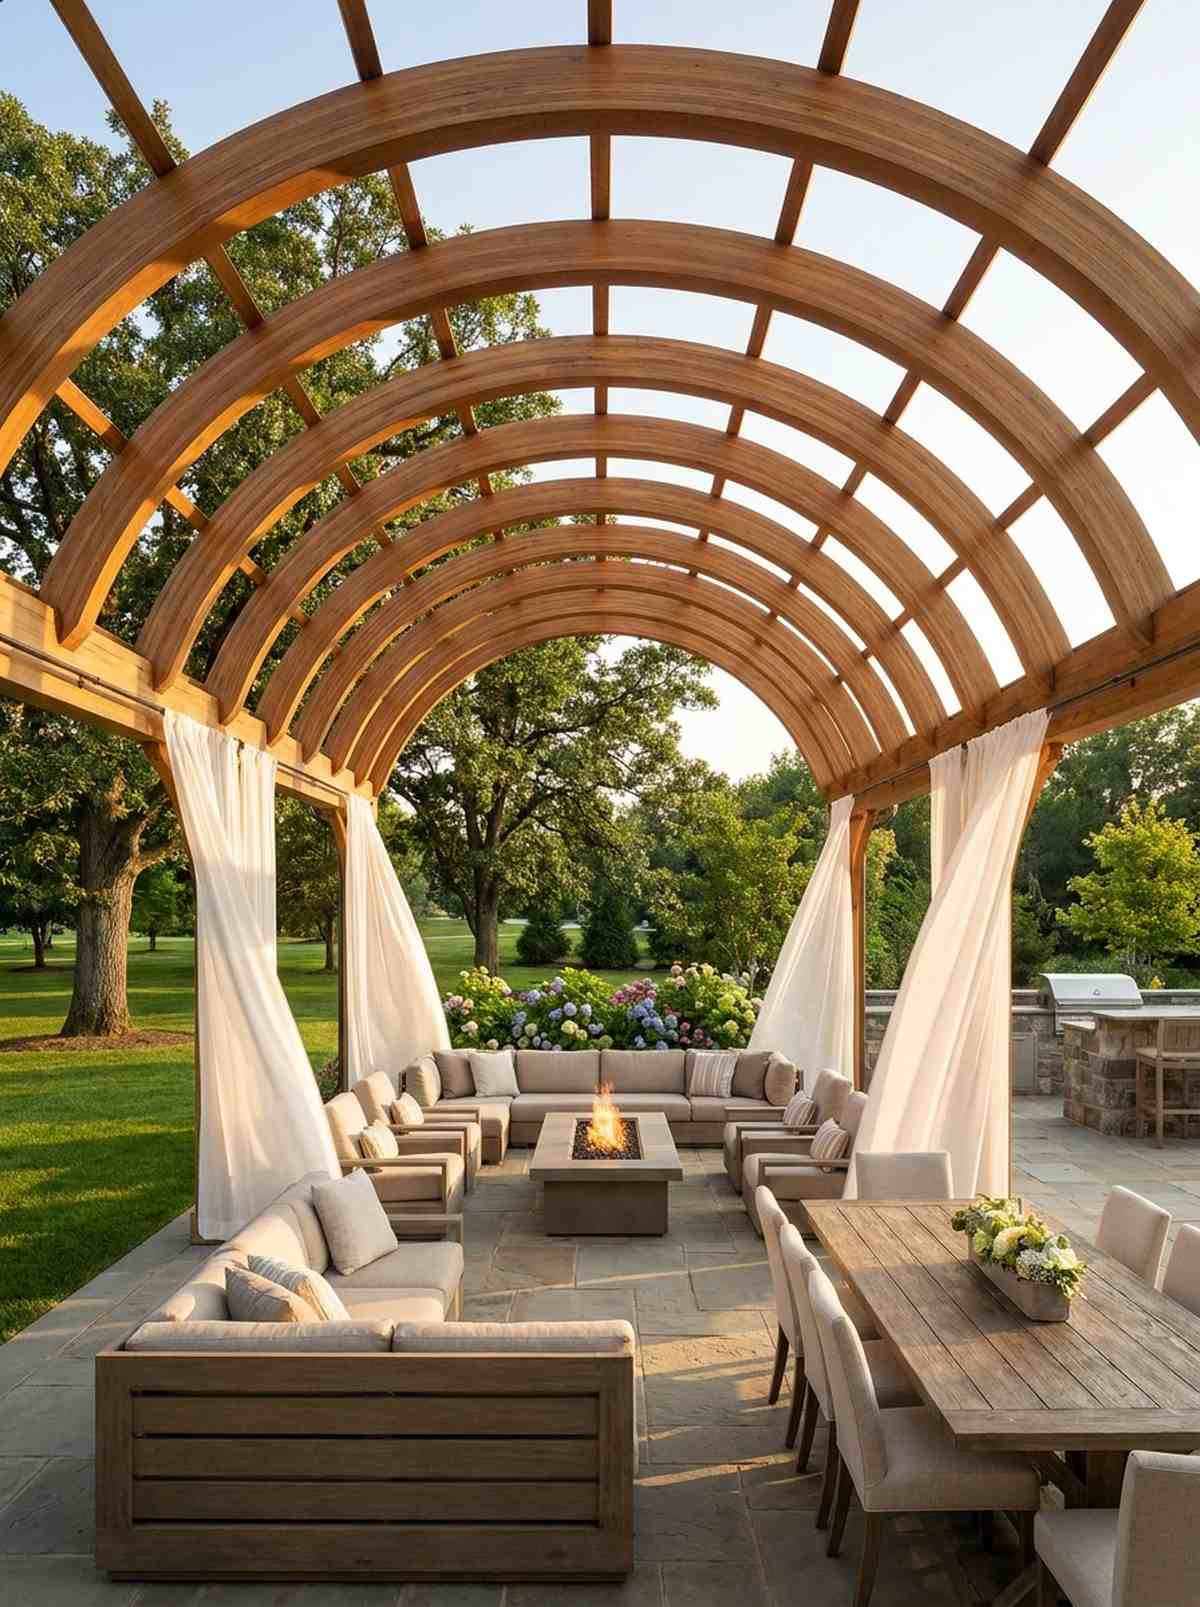
This arched tunnel canopy feels deeply romantic and wonderfully grand. It draws the eye upward, making tight spaces feel massively tall and airy.
Defying rigid straight lines, using bent laminated wood or curved steel sheds rain instantly while creating a sweeping profile. This custom shape easily destroys the boring boxy look of a standard outdoor living gazebo.
Curved materials push the budget to $3,500–$6,000. Save this if you want a breathtaking custom centerpiece.
- Key Materials: Bent-lam wood or rolled steel
- Vibe / Style: Sweeping architectural grandeur
- Difficulty: Advanced custom fabrication
- Budget Breakdown: Arches: $2500 | Rafters: $800
- Creator’s Tip: Drape sheer outdoor curtains from the lower edges to accentuate the dramatic height of the vault.
- Smart Sourcing: custom-rolled hollow steel arch kits and fade-resistant sheer outdoor curtains.
44. Shed Roof Single-Slope Pergola
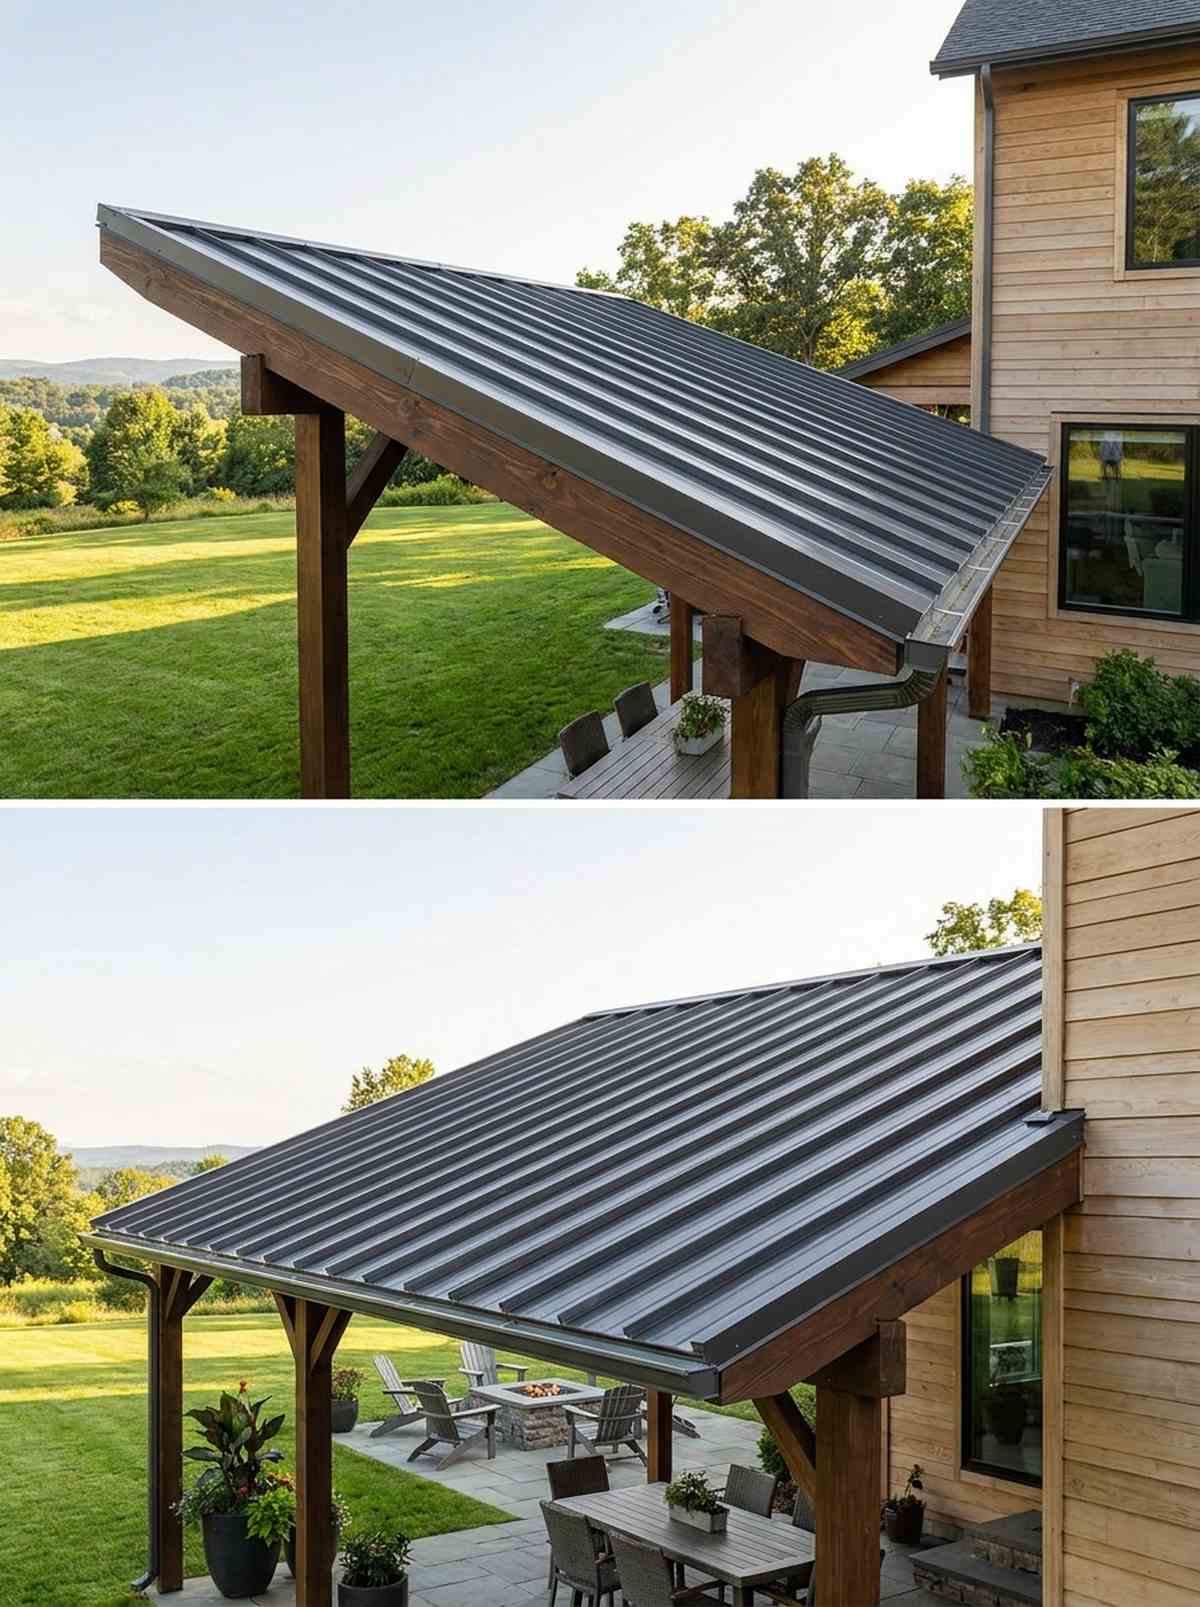
A mono-pitch angled cover that feels incredibly clean, modern, and practical. It flawlessly handles torrential rain by forcing all water to a single backside gutter.
By sloping sharply in one direction, you completely eliminate complex valley joints that are prone to leaking. It gives a designer-level finish while being the absolute easiest waterproof roof to build.
Simple geometry keeps this cheap at $1,000–$1,800. Highly recommended for first-time roof builders.
- Key Materials: Slanted rafters, metal panels
- Vibe / Style: Sleek functional modern
- Difficulty: Easy single-angle framing
- Budget Breakdown: Rafters: $500 | Metal Roof: $600
- Creator’s Tip: Face the high side toward your best view so the roof naturally acts like a giant picture frame.
- Smart Sourcing: pre-painted corrugated metal roofing (bulk pack) and heavy-duty rafter tie brackets.
Most modern builds lack personality… but this inverted roof design forces everyone to look up.
45. Butterfly Roof Contemporary Pavilion
This inverted V-shaped canopy feels like a mid-century modern masterpiece. It turns a boring backyard into a dramatic Palm Springs-style architectural showcase.
Pitching the roof inward to a central valley channels all rainwater into a massive, dramatic single waterfall drop. It looks far more expensive than it is, completely redefining patio geometry.
The aggressive angles cost about $3,000–$5,500. Pin this to your bold mid-century architecture board.
- Key Materials: Central valley beam, scupper
- Vibe / Style: Bold mid-century modern
- Difficulty: Complex valley waterproofing
- Budget Breakdown: Beams: $1500 | Scuppers: $300
- Creator’s Tip: Oversize the central valley drain significantly; leaves will clog a standard gutter instantly here.
- Smart Sourcing: large-diameter architectural metal scuppers and commercial-grade rubber valley flashing rolls.
46. Living Roof Green Pergola
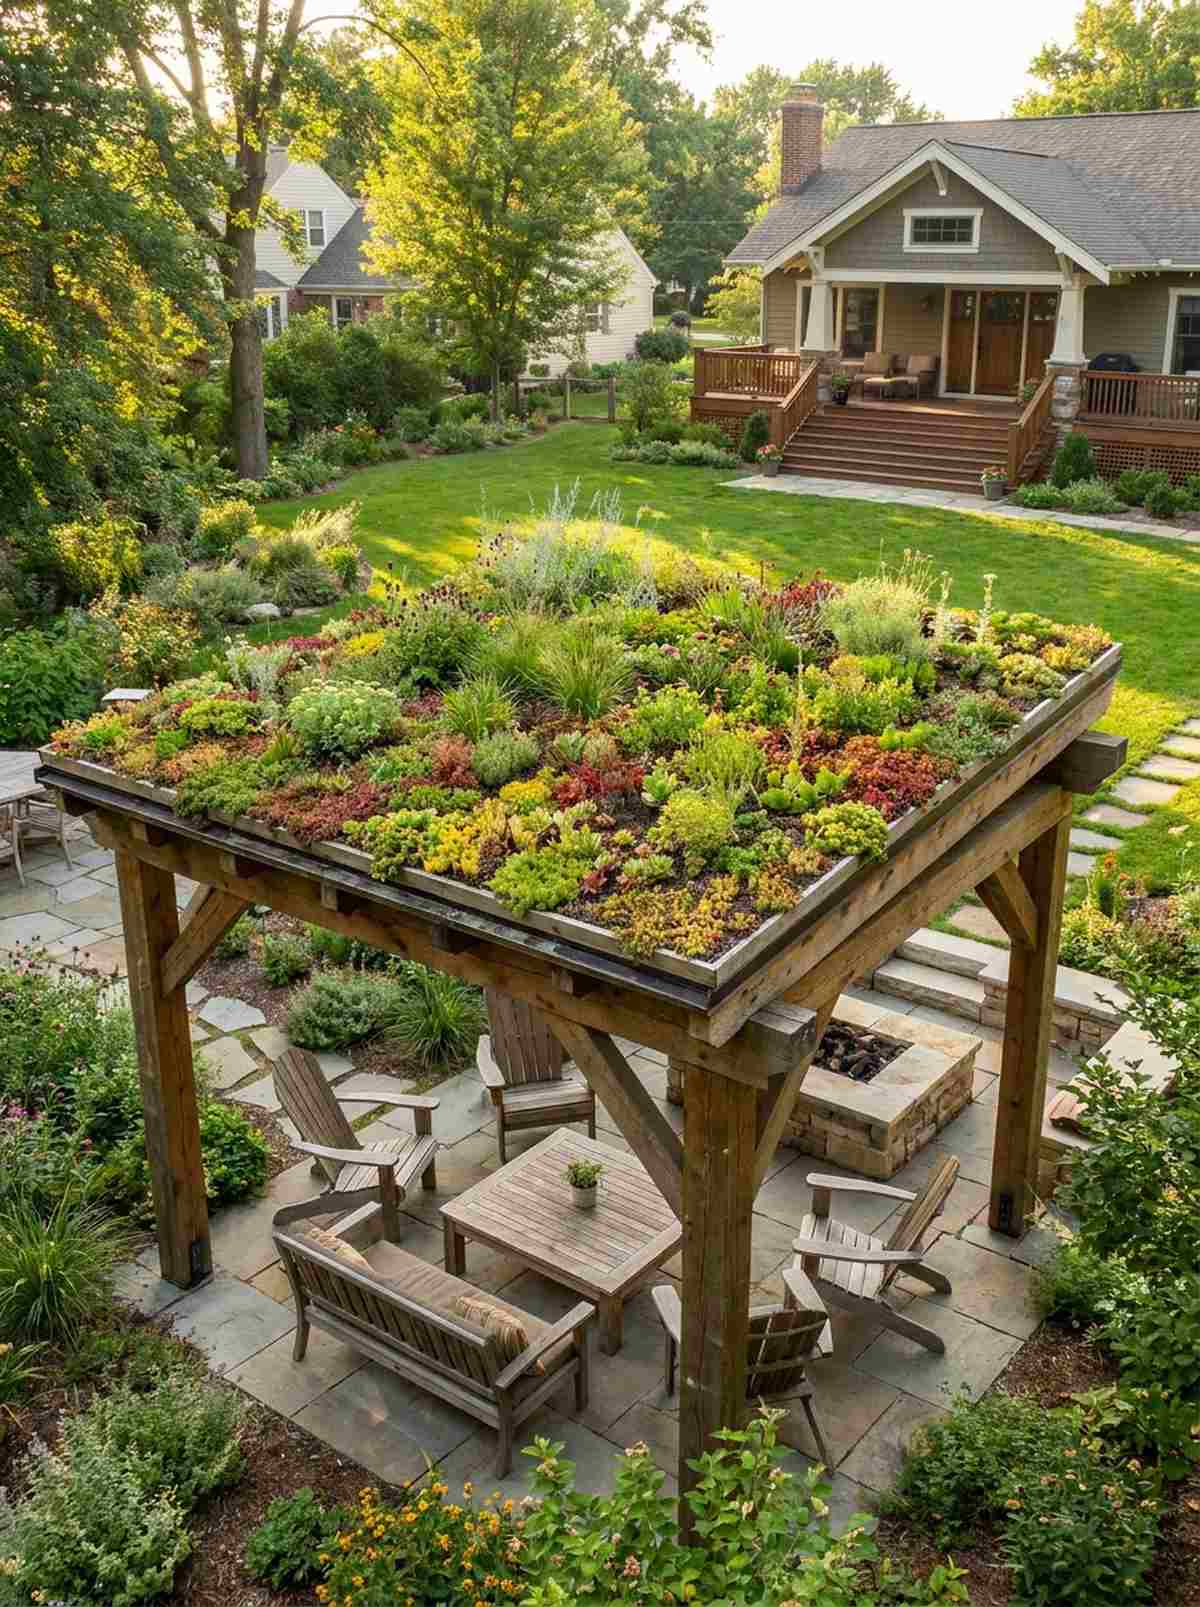
A soil-topped botanical roof that feels like a hidden hobbit sanctuary. It brilliantly absorbs stormwater while creating super-insulated, icy-cool shade below.
Engineering the beams to hold hundreds of pounds of wet dirt is controversial, but the visual payoff is legendary. This organic crown completely dominates any traditional shingled outdoor living pavilion in eco-friendly appeal.
Membranes and structural beef-ups push costs to $4,000–$7,000. Save this for the ultimate eco-build.
- Key Materials: EPDM membrane, sedum trays
- Vibe / Style: Organic eco-sanctuary
- Difficulty: High weight-load engineering
- Budget Breakdown: EPDM: $600 | Sedums: $1000
- Creator’s Tip: Use pre-grown sedum mats instead of loose soil to prevent massive mudslides during the first rainstorm.
- Smart Sourcing: heavy-duty EPDM pond liner membranes and pre-grown drought-tolerant sedum mats (bulk pack).
47. Sailcloth Tension Canopy Pergola
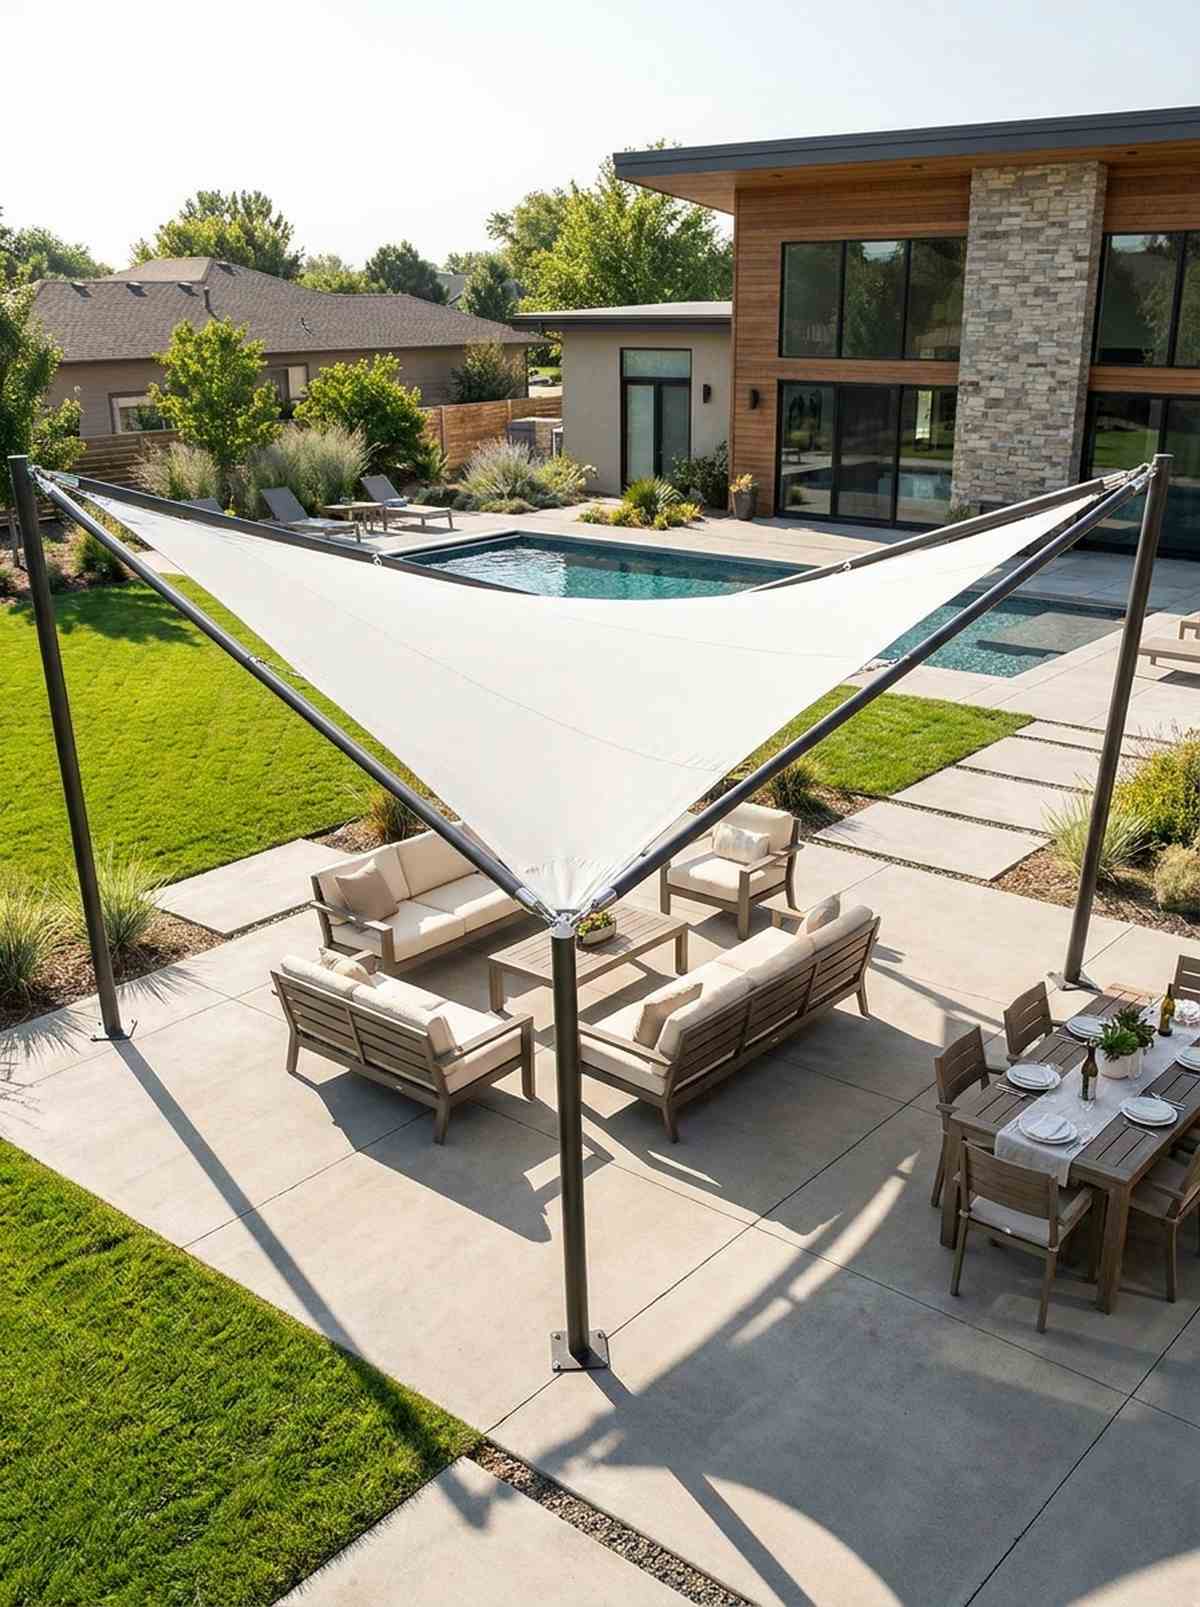
This stretched marine fabric shade feels incredibly sharp, sculptural, and aerodynamic. It casts massive, artistic shadows perfect for blazing hot concrete patios.
Pulling high-performance canvas tight across a minimalist frame entirely eliminates the need for expensive, heavy wood slats. It delivers a surprisingly premium look that screams modern coastal luxury.
Quality fabrics and stainless hardware cost $800–$1,500. A highly efficient upgrade that completely changes the vibe.
- Key Materials: Marine-grade sailcloth, turnbuckles
- Vibe / Style: Crisp coastal modern
- Difficulty: Precise tensioning required
- Budget Breakdown: Canvas: $500 | Hardware: $200
- Creator’s Tip: Mount one corner significantly lower than the others to twist the fabric, forcing rain to shed instantly.
- Smart Sourcing: UV-blocking heavy-duty shade sails and stainless steel tension turnbuckle kits.
Conclusion
Strategic material sourcing and smart layout selection completely transform how you build an outdoor living pergola. By applying these exact 47 blueprints, homeowners can bypass expensive contractors and utilize premium pre-cut kits, UV-resistant coatings, and high-ROI architectural tricks. Whether you implement a sleek motorized louvered frame or a massive heavy-timber structure, mixing budget materials with premium hardware guarantees a result that looks incredibly expensive. Stop settling for basic yard layouts; grab your starter kits, verify local codes, and build a lasting outdoor sanctuary that maximizes both daily enjoyment and serious property value.
Frequently Asked Questions
What is the difference between a pergola and a pavilion?
Pergolas utilize open slats or louvered aluminum systems to provide filtered, dappled sunlight while keeping airflow high. Pavilions feature fully solid, shingled roofs that offer 100% weather protection, making an outdoor living pavilion the superior choice for protecting expensive outdoor kitchens and electronics from rain damage.
How much does an outdoor living pergola typically cost?
Cost varies entirely on material sourcing. You can build a stunning DIY setup for $1,000–$2,500 using pre-cut cedar starter kits. Meanwhile, upgrading to a premium outdoor living gazebo with motorized louvers or heavy mortise-and-tenon timber joints pushes costs between $10,000 and $30,000. Smart sourcing of hardware in bulk can cut these estimates by 20%.
Do I need a building permit for a pergola or pavilion?
Yes, usually for anything attached directly to your home or exceeding 150 square feet. Using heavy-duty freestanding post bases for a detached structure often avoids strict home-attachment codes, but setback lines still apply. Skipping permits on large roofed pavilions will cause massive fines or forced teardowns when selling your home.
What are the best materials for outdoor pergolas?
For zero-maintenance modern designs, always source powder-coated structural aluminum kits. If you want rustic warmth on a budget, rough-sawn pine treated with UV-blocking deep-penetrating sealants offers an expensive look for cheap. Vinyl is maintenance-free but often looks plastic, while authentic western red cedar remains the gold standard for premium rot-resistant timber.
How do I maintain shade in a pergola without a solid roof?
The cheapest method is planting aggressive climbers using stainless steel vine training wire kits to grow a natural canopy. For instant results, mount UV-coated retractable fabric shades on sliding tracks. You can also drape heavy-duty outdoor curtains on the sides to block brutal low-angle evening sun while maintaining a luxury resort aesthetic.