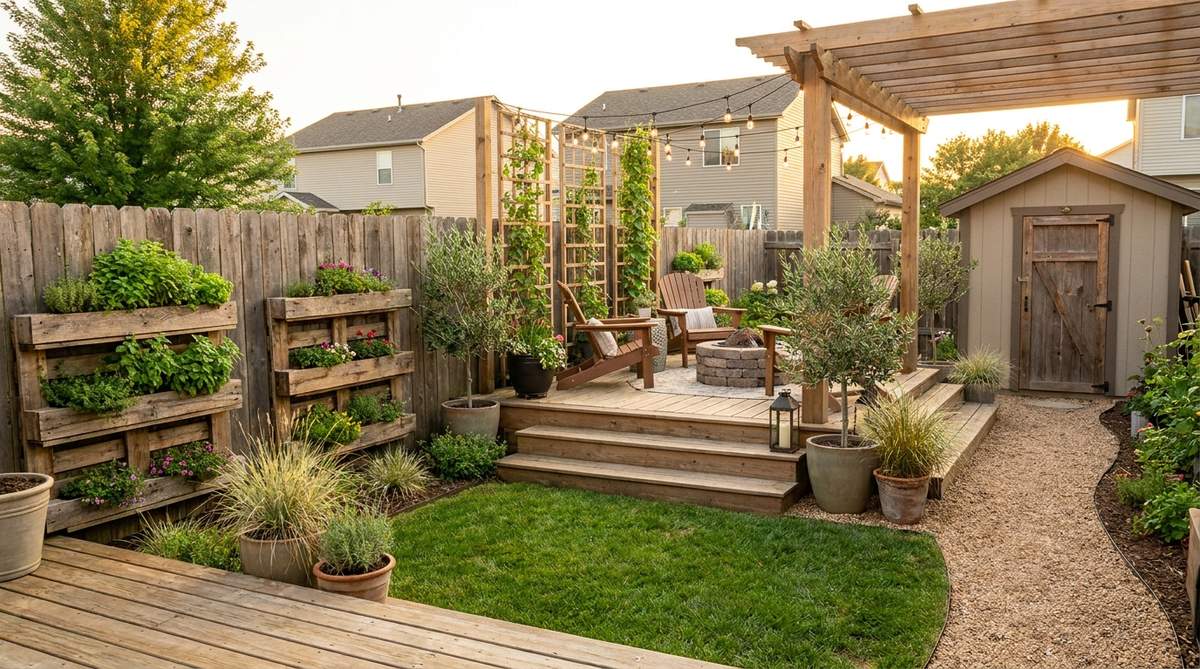
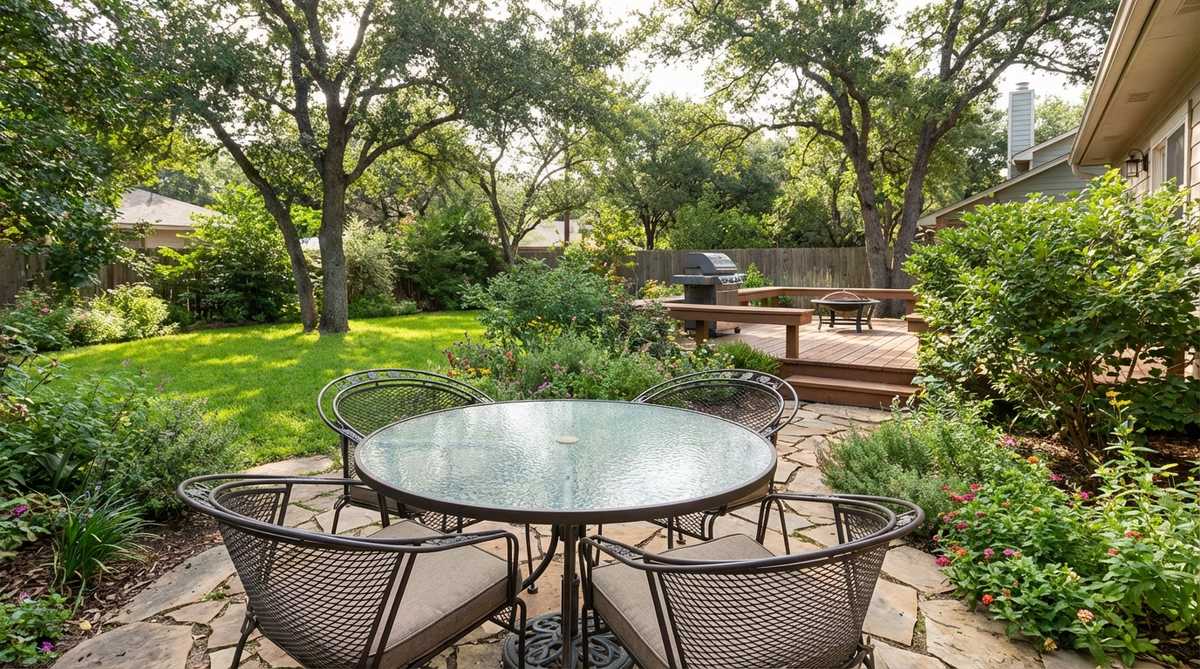
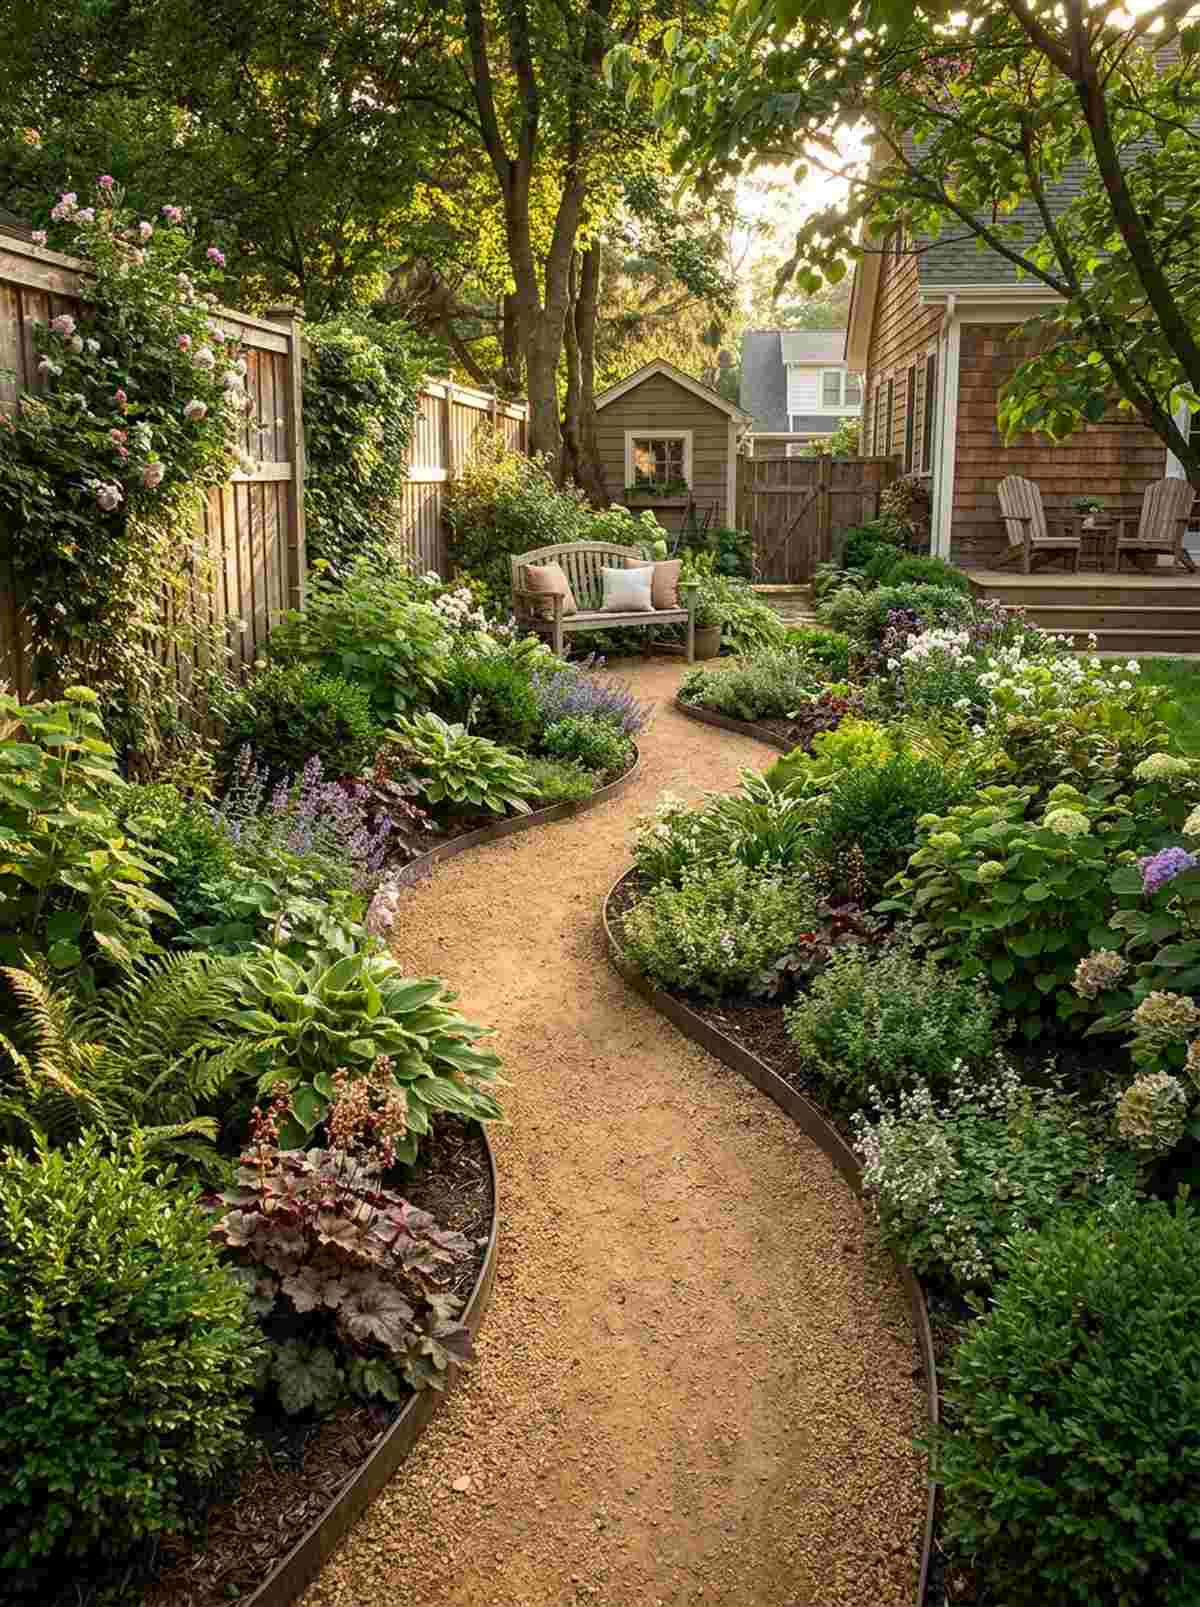
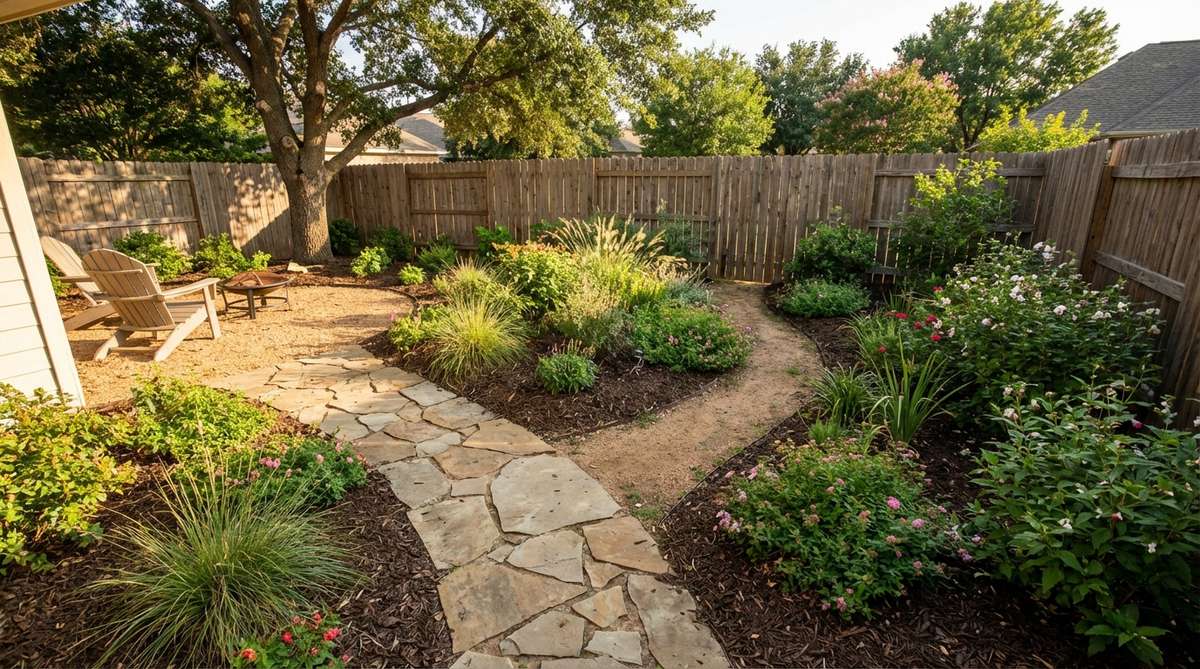
Homeowners routinely waste thousands of dollars pouring concrete and buying oversized furniture for cramped outdoor spaces, mistakenly believing money buys square footage. The reality is that the most breathtaking garden design small backyard setups are built on smart optical illusions and strategic vertical planning. This guide reveals the exact budget breakdowns, underground sourcing secrets, and premium material choices needed to pull off a designer-level aesthetic without the luxury price tag.
Design Snapshot: Key Principles
- Vertical Integration: Expand growing area upward using commercial-grade wall brackets and pre-treated trellises.
- Multi-Functionality: Select dual-purpose furnishings—storage benches and heavy-duty folding outdoor sets.
- Layered Planting: Combine premium ground covers and tall focal points using top-rated planter inserts.
- Strategic Illusion: Apply shatterproof acrylic mirrors and high-lumen low-voltage lighting to multiply perceived space.
Vertical Structures: Growing Upward When Space Runs Out
1. Trellis Arches for Climbing Vegetables
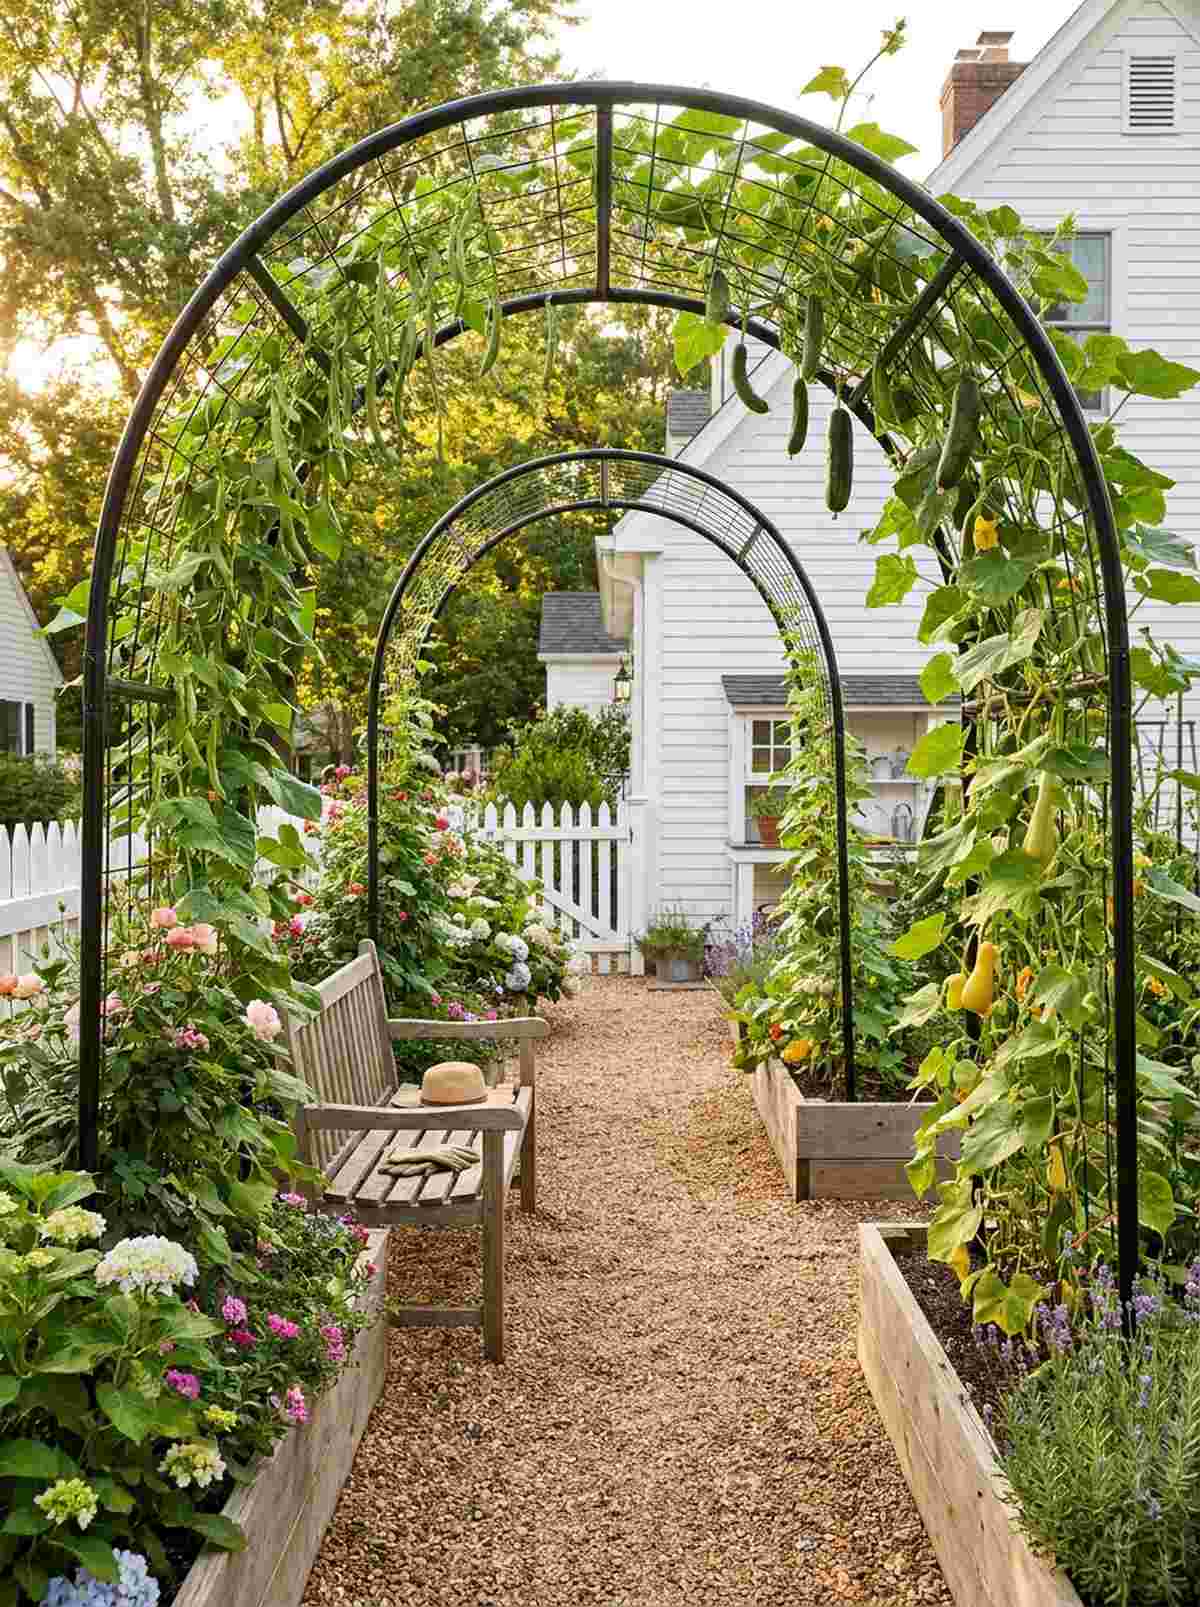
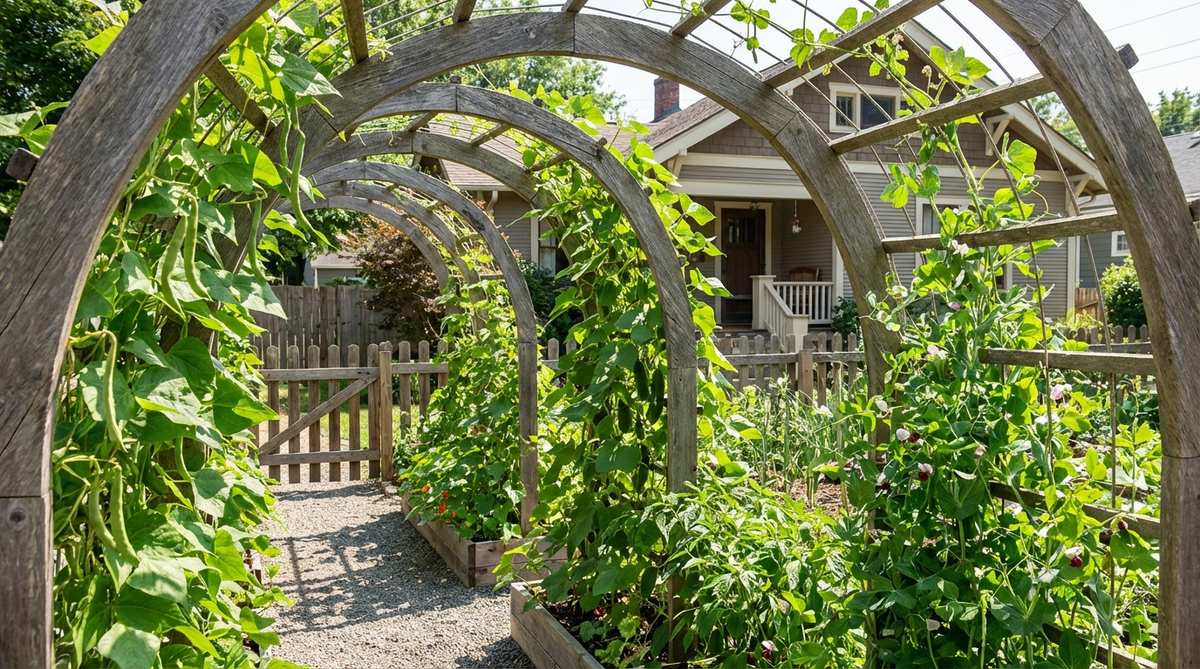
This small garden design ideas approach feels like stepping into a hidden storybook portal. It works exceptionally well for narrow side yards where horizontal space is non-existent.
Most DIYers use flimsy wire that collapses under the weight of summer crops, but using heavy-gauge tubular steel delivers a surprisingly premium look. Seamlessly integrate heavy-duty vine support netting to ensure your plants climb cleanly.
You can easily pull this off for around $40–$60. Pin this to your weekend DIY garden board!
- Key Materials: Powder-coated steel arch kits
- Vibe / Style: English cottage garden
- Difficulty: Easy beginner setup
- Budget Breakdown: Arch Base: $35 | Climbing Seeds: $10
- Creator’s Tip: Sink the legs 8 inches into the ground for severe weather resistance.
- Smart Sourcing: rust-proof metal garden arch kits and bulk pack climbing vegetable seeds.
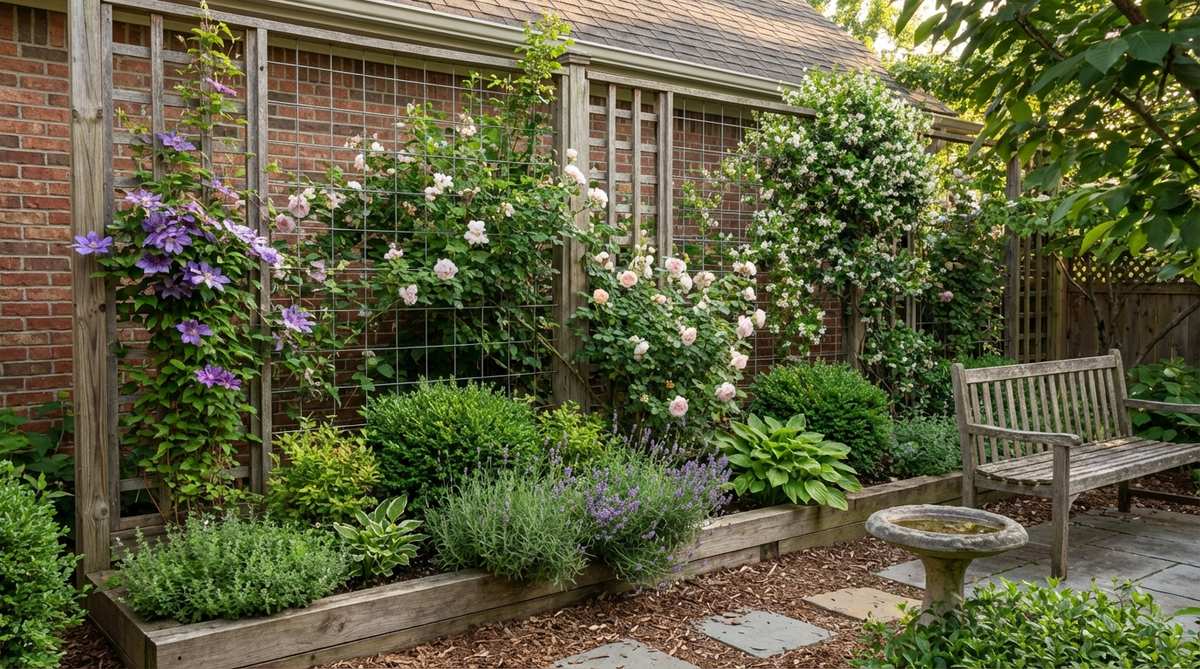
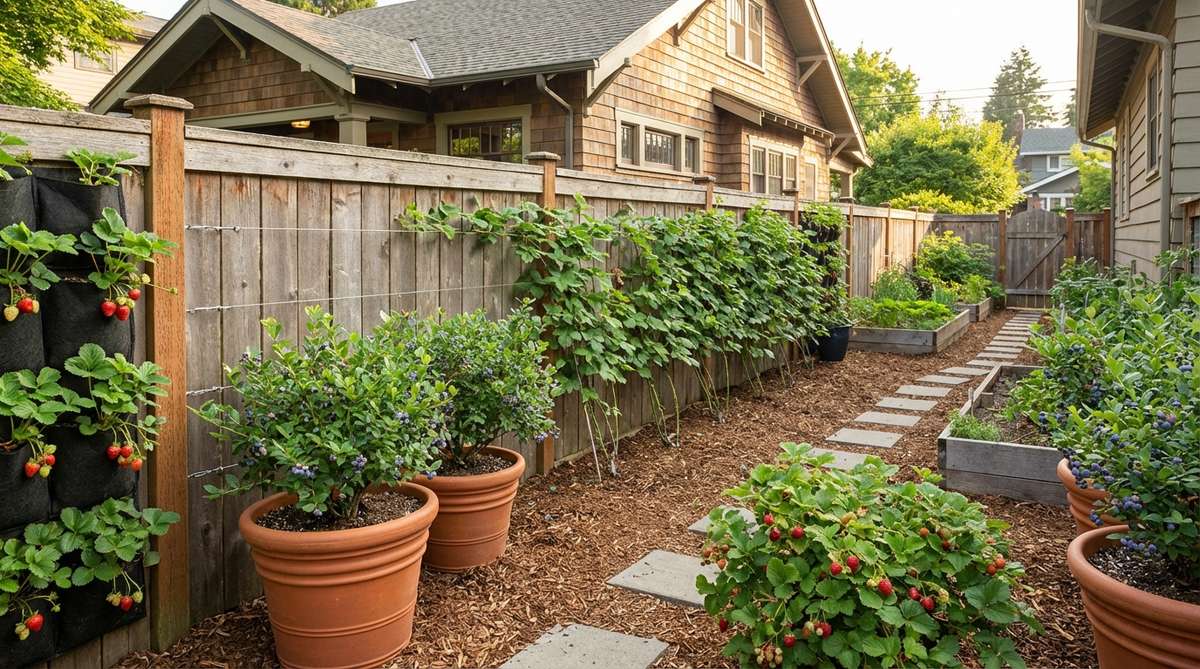
2. Living Walls with Pocket Planters
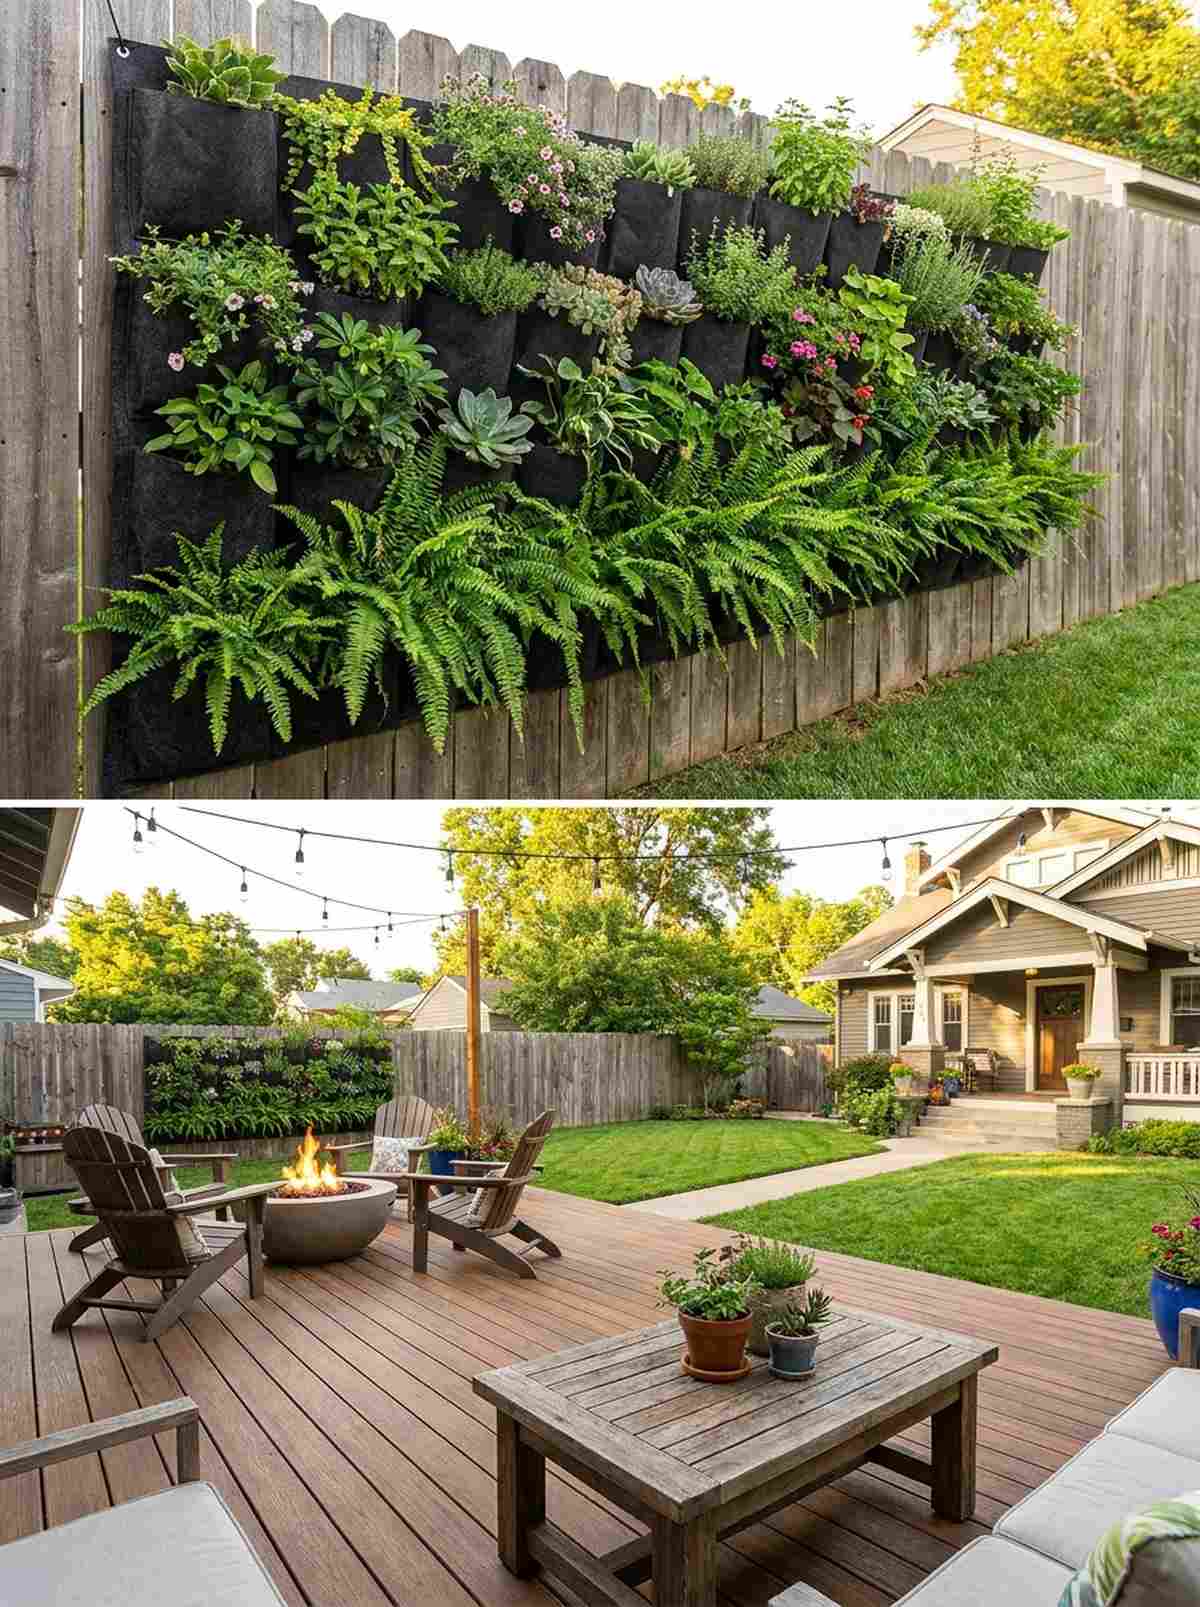

Transforming a boring fence into a lush, breathing canvas feels like a luxury resort upgrade. Perfect for ugly chain-link fences or blank garage walls.
People often ruin this by using cheap plastic that cracks in the sun, but commercial-grade felt pockets look far more expensive than they are. Using proper vertical garden planter kits prevents wall rot and keeps plants hydrated.
Expect to spend around $30–$50 for a stunning focal point. Save this for your patio makeover plans.
- Key Materials: Breathable felt pocket systems
- Vibe / Style: Modern botanical oasis
- Difficulty: Quick afternoon project
- Budget Breakdown: Pockets: $25 | Potting Mix: $15
- Creator’s Tip: Place moisture-loving ferns at the bottom where water naturally drips.
- Smart Sourcing: heavy-duty felt wall planter bags (7-pocket) and moisture-control potting soil mix.
3. Ladder-Style Plant Stands
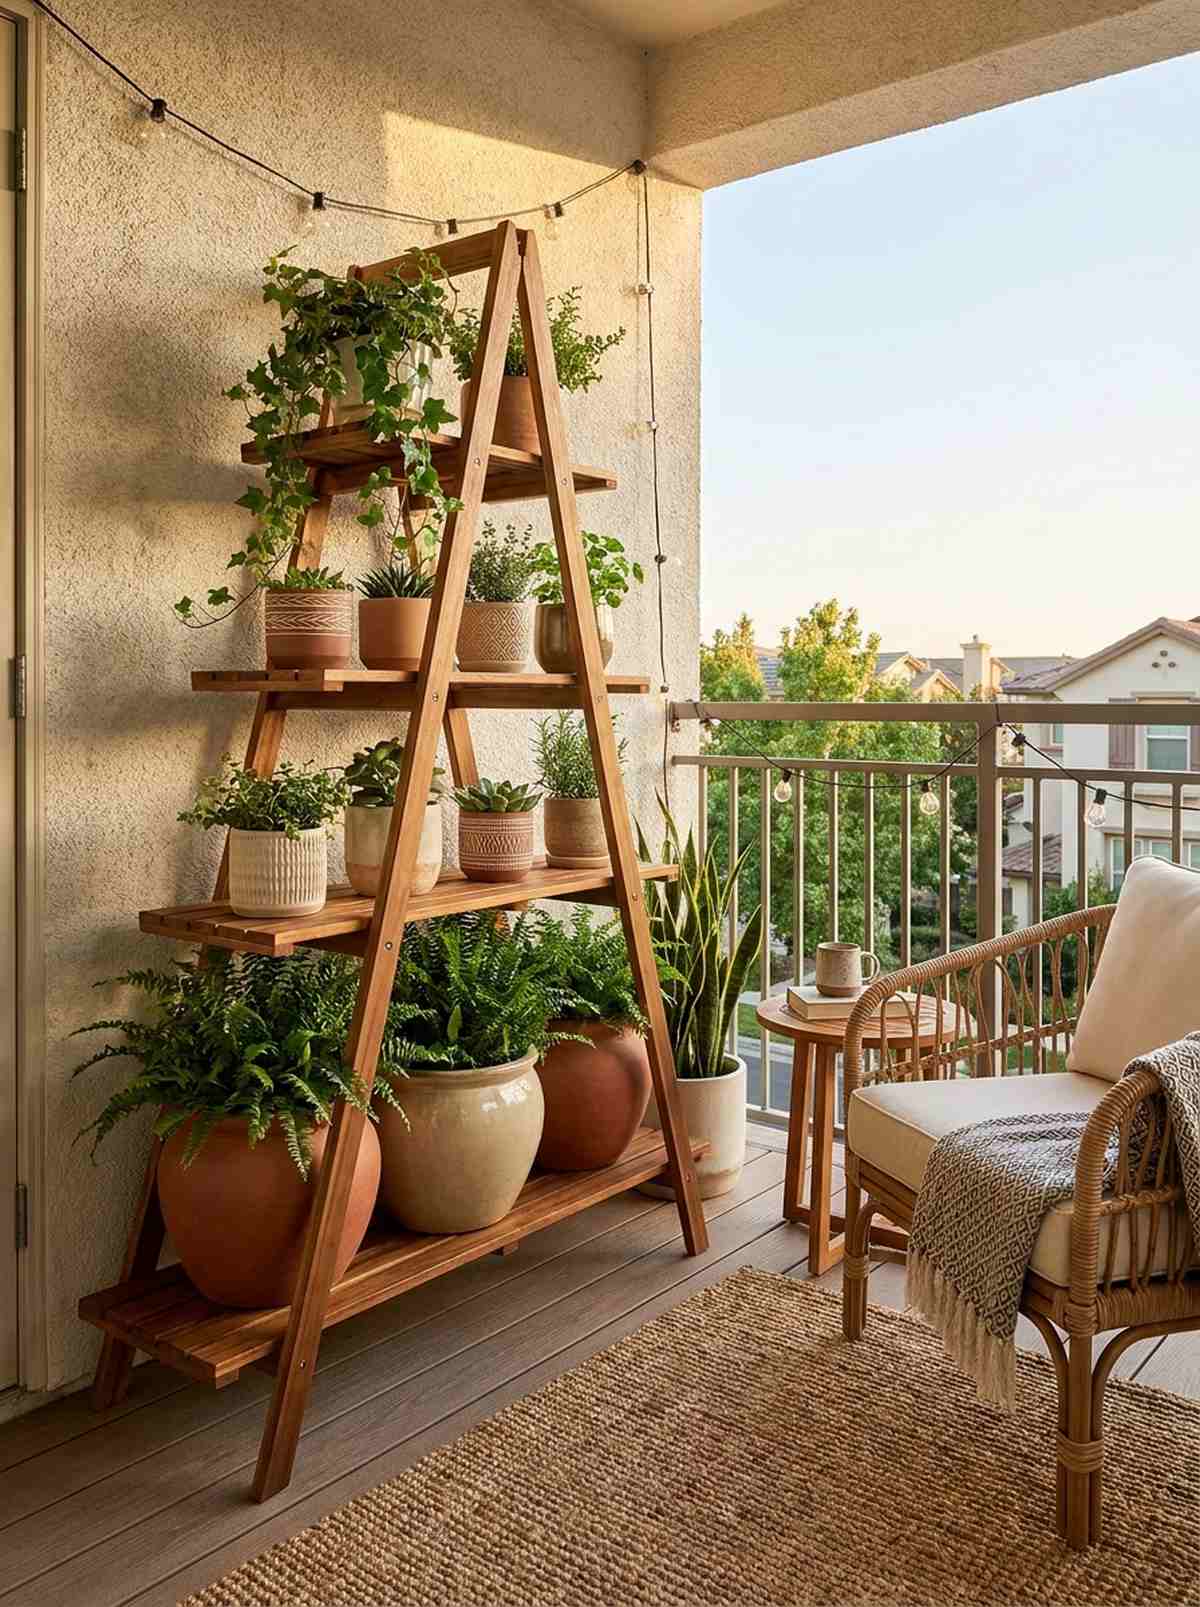
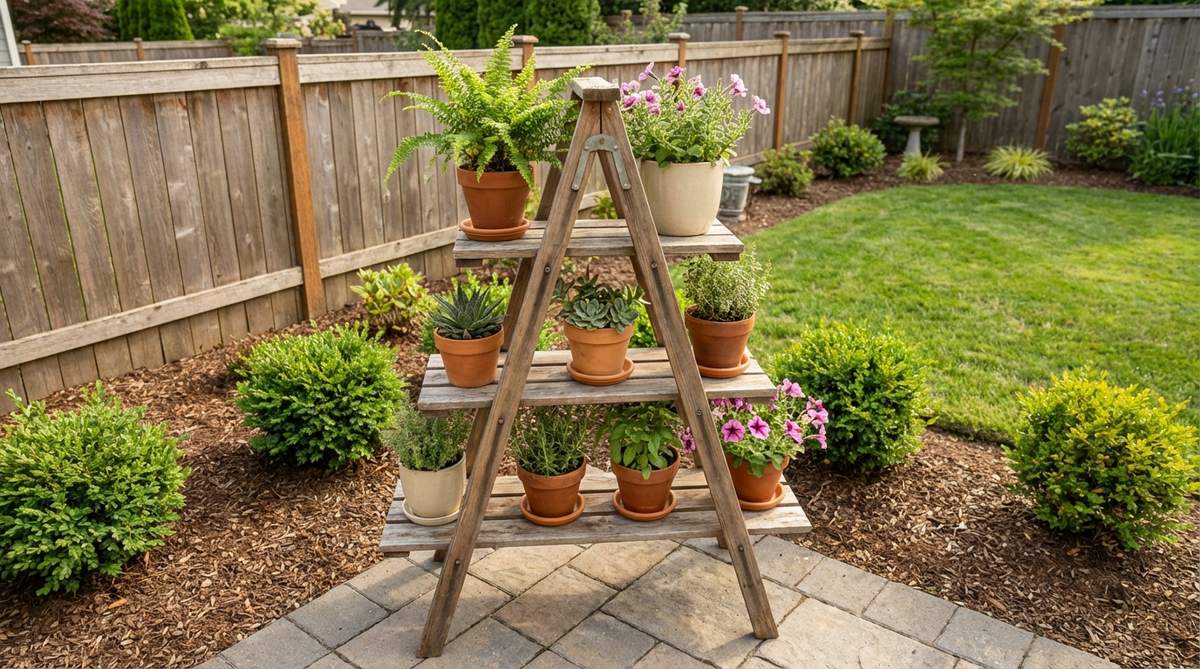
This multi-tier setup brings a cozy, curated coffee-shop aesthetic to your patio. It is the ultimate renter-friendly garden design small space solution for apartment balconies.
Instead of building one from scratch that eventually wobbles, buying a pre-treated modular stand gives a designer-level finish instantly. Add indoor-outdoor decorative pot sets to unify the entire look.
You can set this up for roughly $45–$70. Highly recommended for a fast weekend win.
- Key Materials: Acacia wood folding plant ladders
- Vibe / Style: Boho-chic balcony
- Difficulty: Zero tools required
- Budget Breakdown: Ladder Stand: $50 | Plants: $20
- Creator’s Tip: Keep heavy ceramic pots on the bottom rung to anchor it against wind.
- Smart Sourcing: pre-treated wooden tiered plant stands and shatterproof resin planter multipacks.
4. Wall-Mounted Gutter Gardens
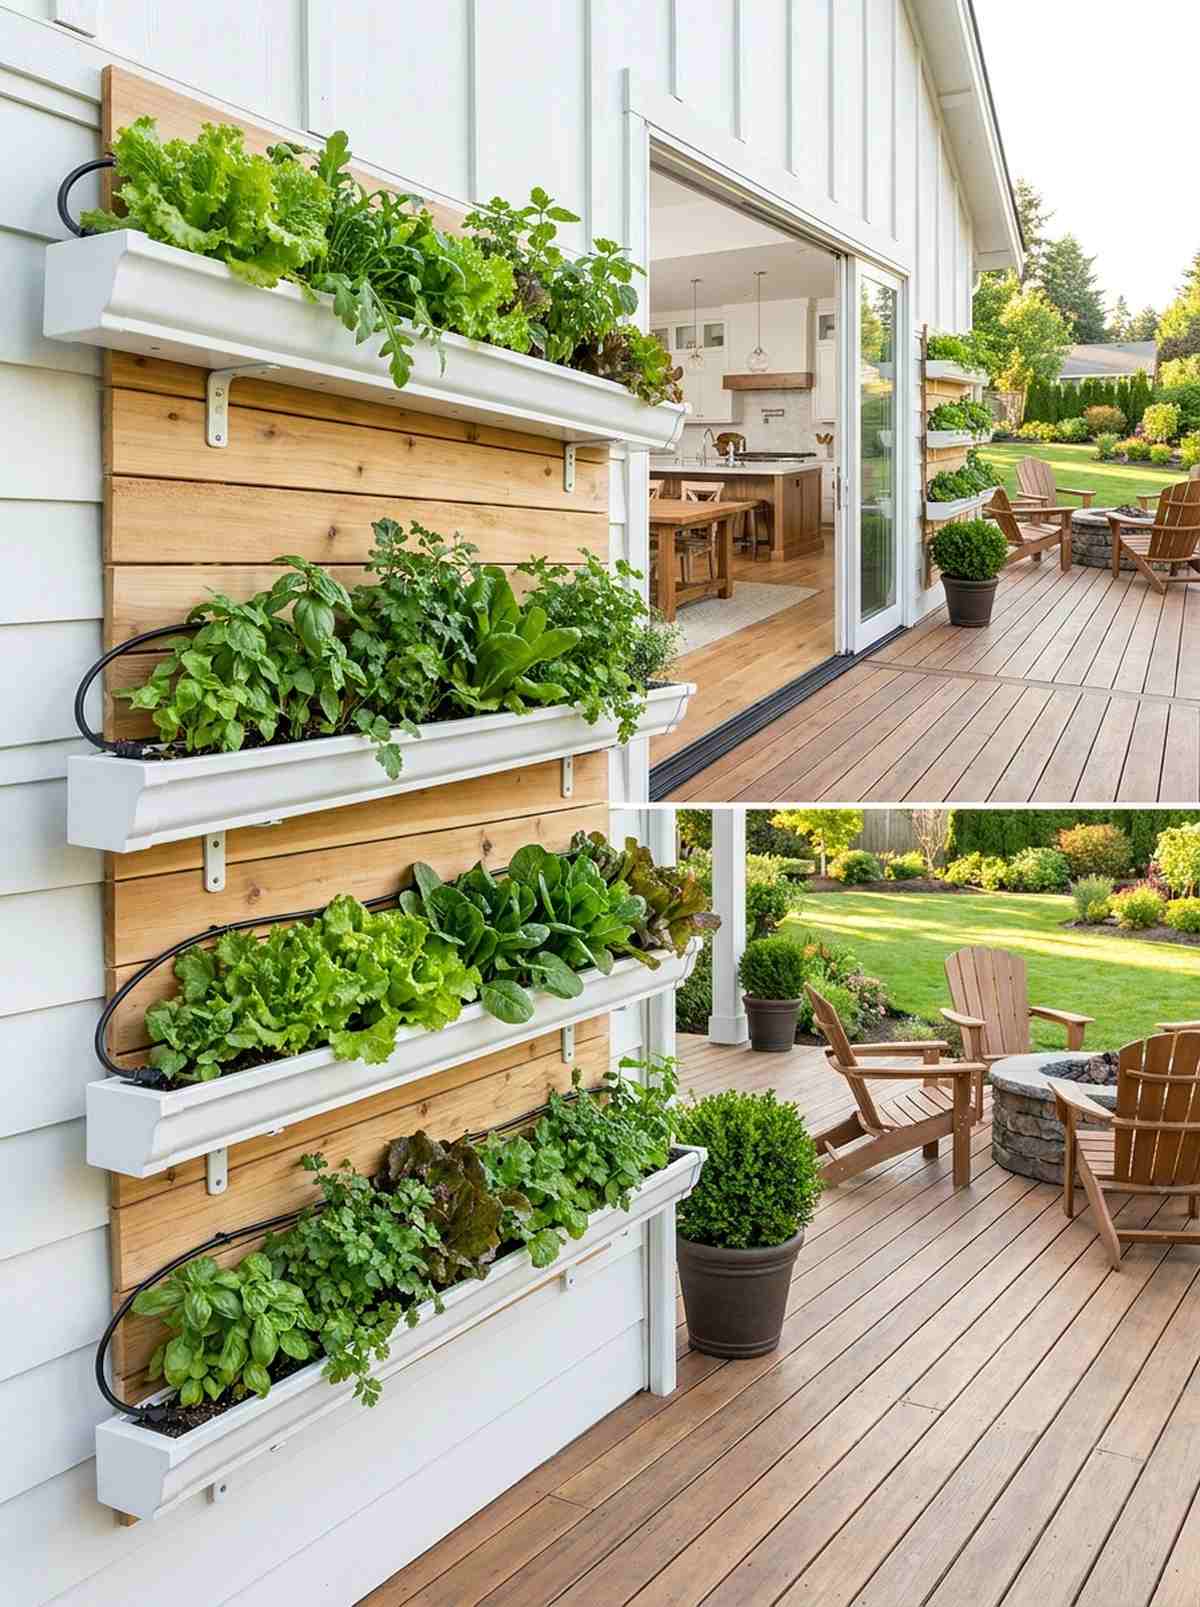
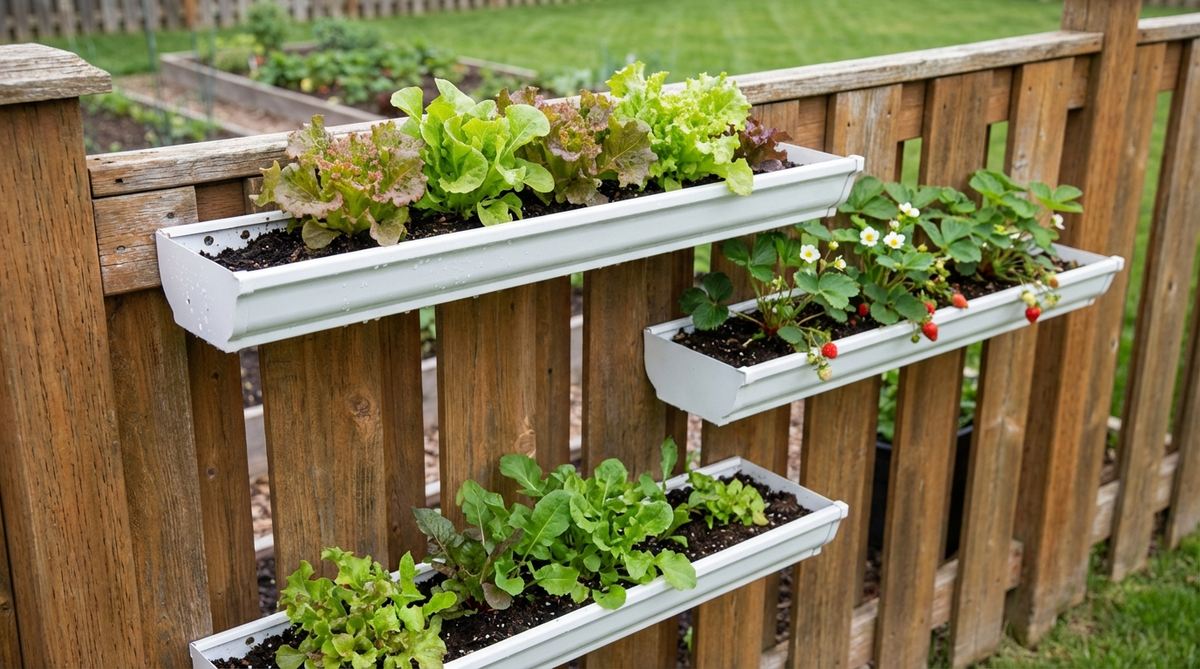
Creates a sleek, floating ribbon of greenery that feels highly architectural. Flawless use-case for growing shallow-rooted salad greens directly outside your kitchen door.
Do not use standard metal gutters that cook plant roots; UV-coated vinyl delivers a professional, clean aesthetic while protecting your crop. A simple drip irrigation micro-tubing kit takes this from amateur to automated.
You can execute this genius hack for just $20–$35. Pin this if you want fresh herbs on demand!
- Key Materials: Vinyl gutter sections and end-caps
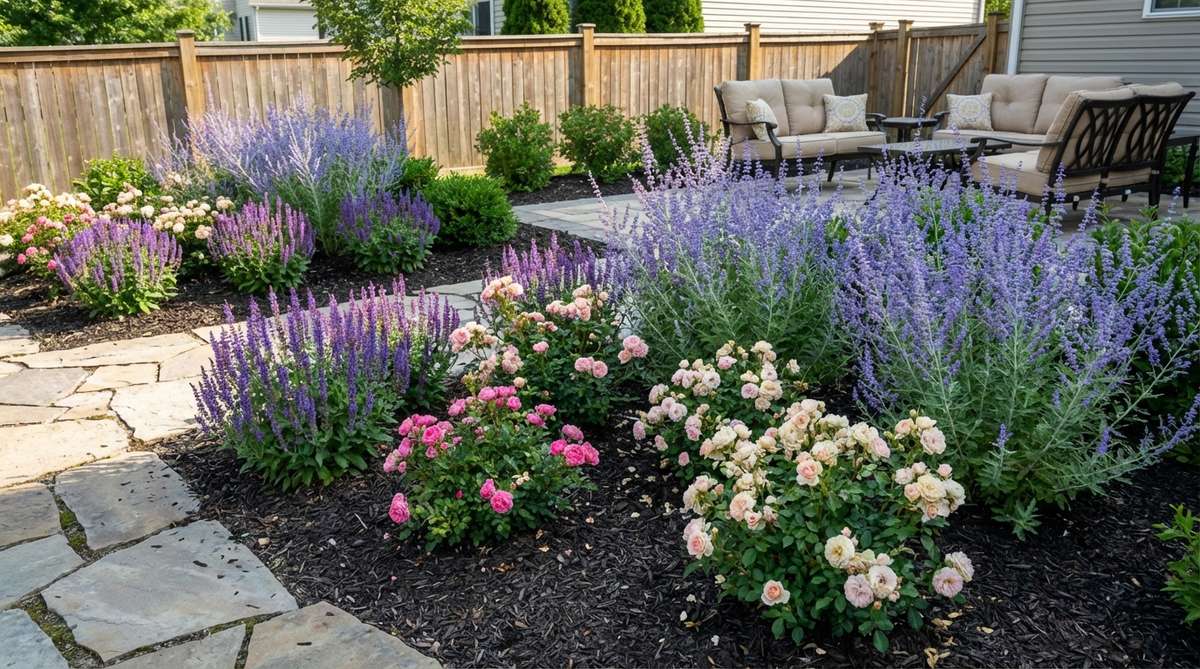
- Vibe / Style: Ultra-modern functional
- Difficulty: Requires basic drilling
- Budget Breakdown: Gutters/Brackets: $20 | Soil: $10
- Creator’s Tip: Drill drainage holes every 6 inches to prevent swampy soil.
- Smart Sourcing: snap-together vinyl gutter sections and heavy-duty exterior mounting brackets.
Most people get this completely wrong and crowd their yards with heavy pots… until they try the genius vertical layout coming up next.
5. Obelisk Structures for Roses and Clematis
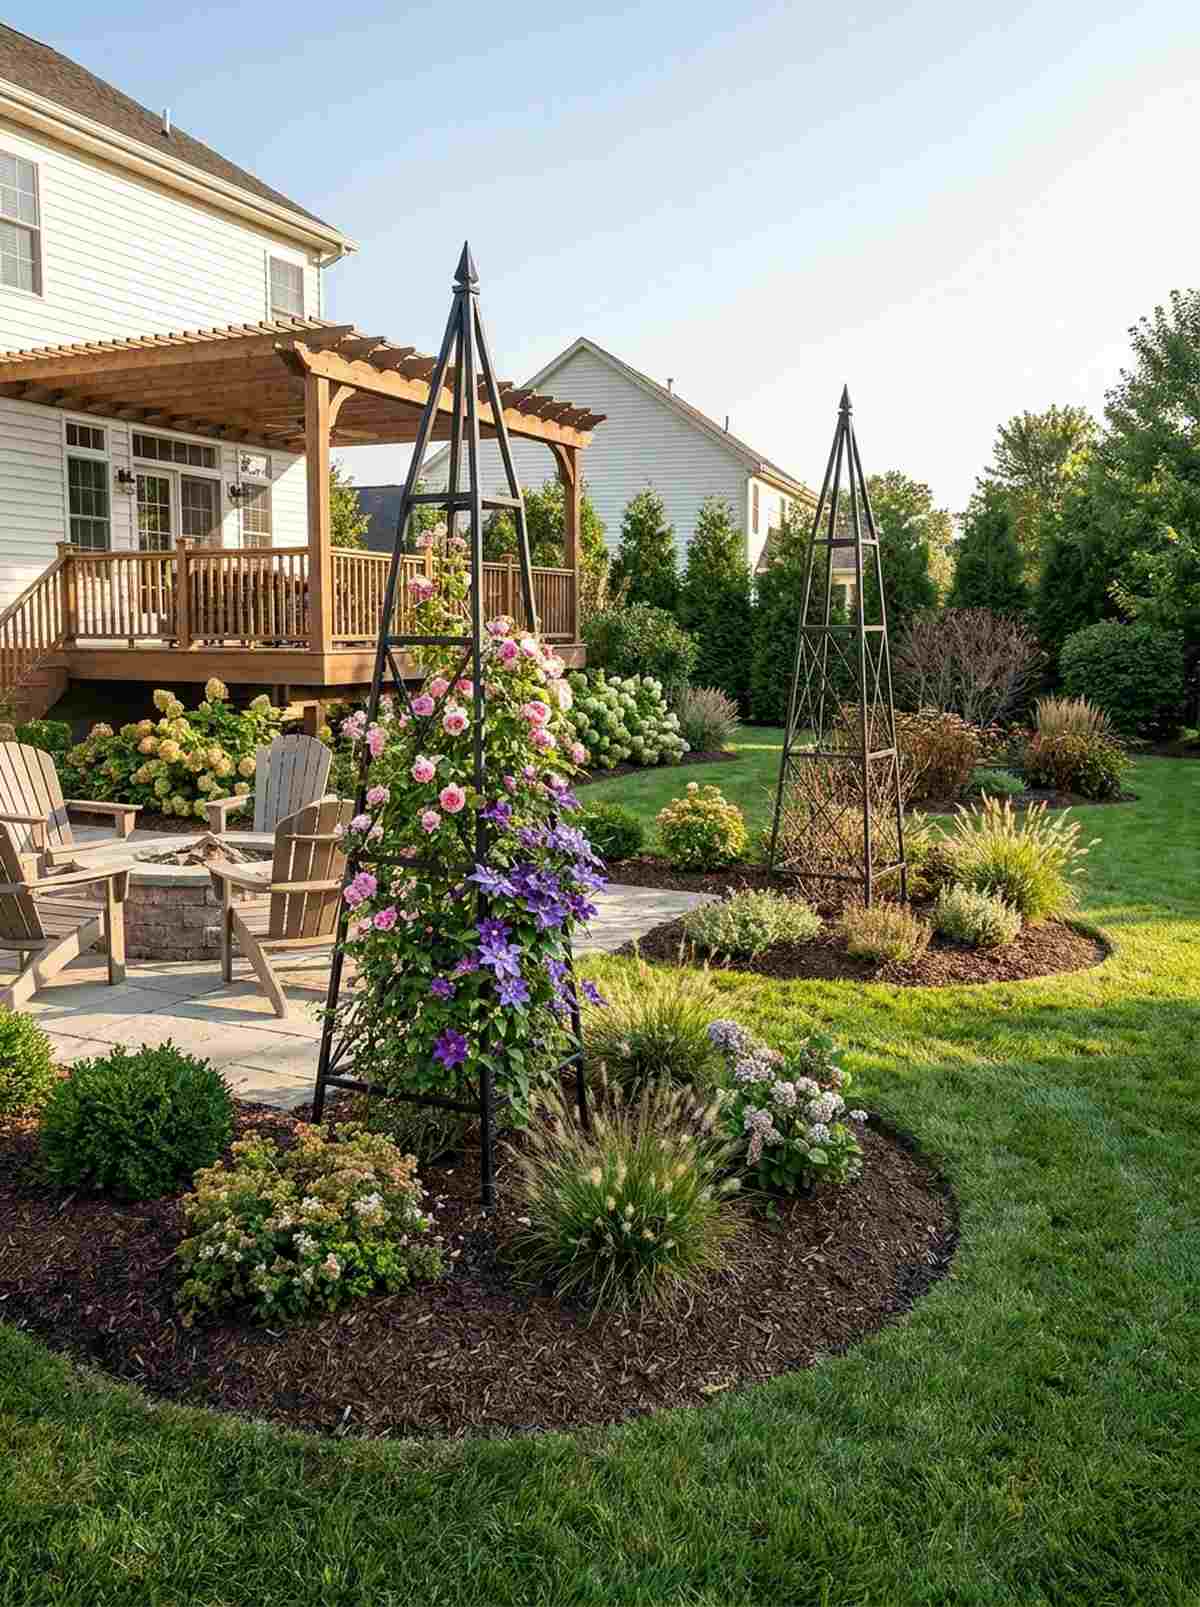
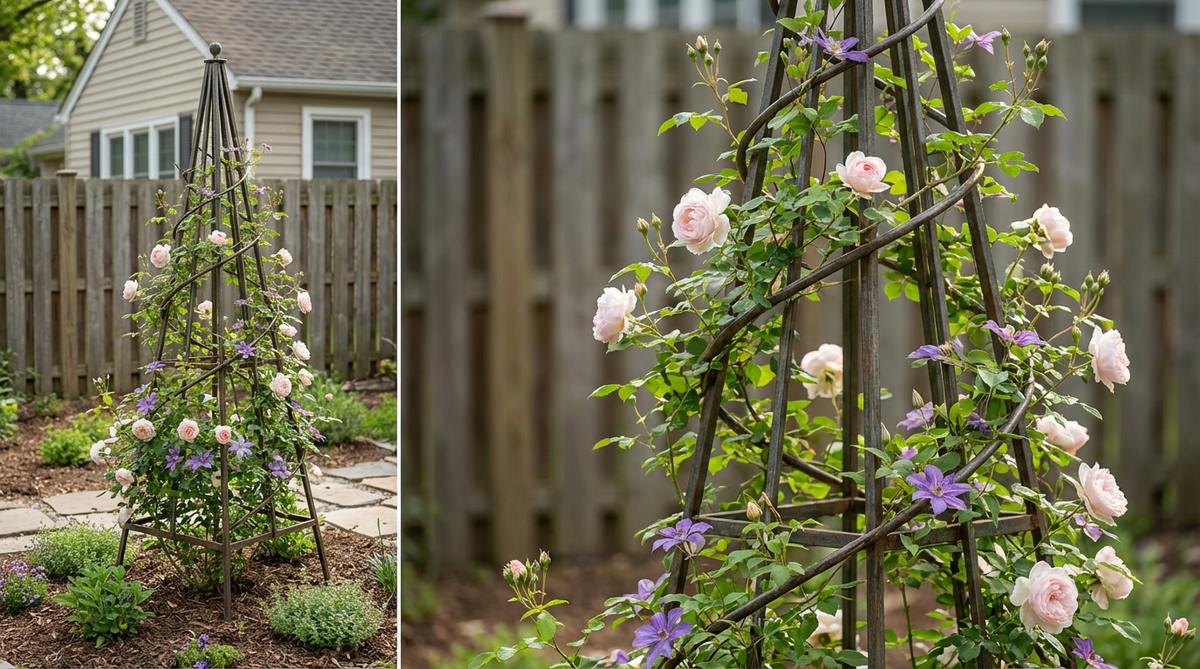
Injects an instant aristocratic, Bridgerton-esque vibe into the tiniest corners. Ideal for adding dramatic vertical height to flat, uninspired flower beds.
Flimsy bamboo teepees look messy, but a rigid geometric tower instantly elevates the space to a high-end estate feel. Investing in powder-coated steel garden obelisks guarantees winter interest even when plants are dormant.
You can grab a premium structure for $40–$75. It is a fast upgrade that completely changes the vibe.
- Key Materials: Metal obelisk towers
- Vibe / Style: Classic formal garden
- Difficulty: Unbox and place
- Budget Breakdown: Metal Obelisk: $60 | Base Mulch: $10
- Creator’s Tip: Plant two different blooming vines at the base for staggered seasonal color.
- Smart Sourcing: rust-resistant metal garden obelisks (tall) and pre-mixed climbing rose fertilizer.
6. Hanging Basket Arrays
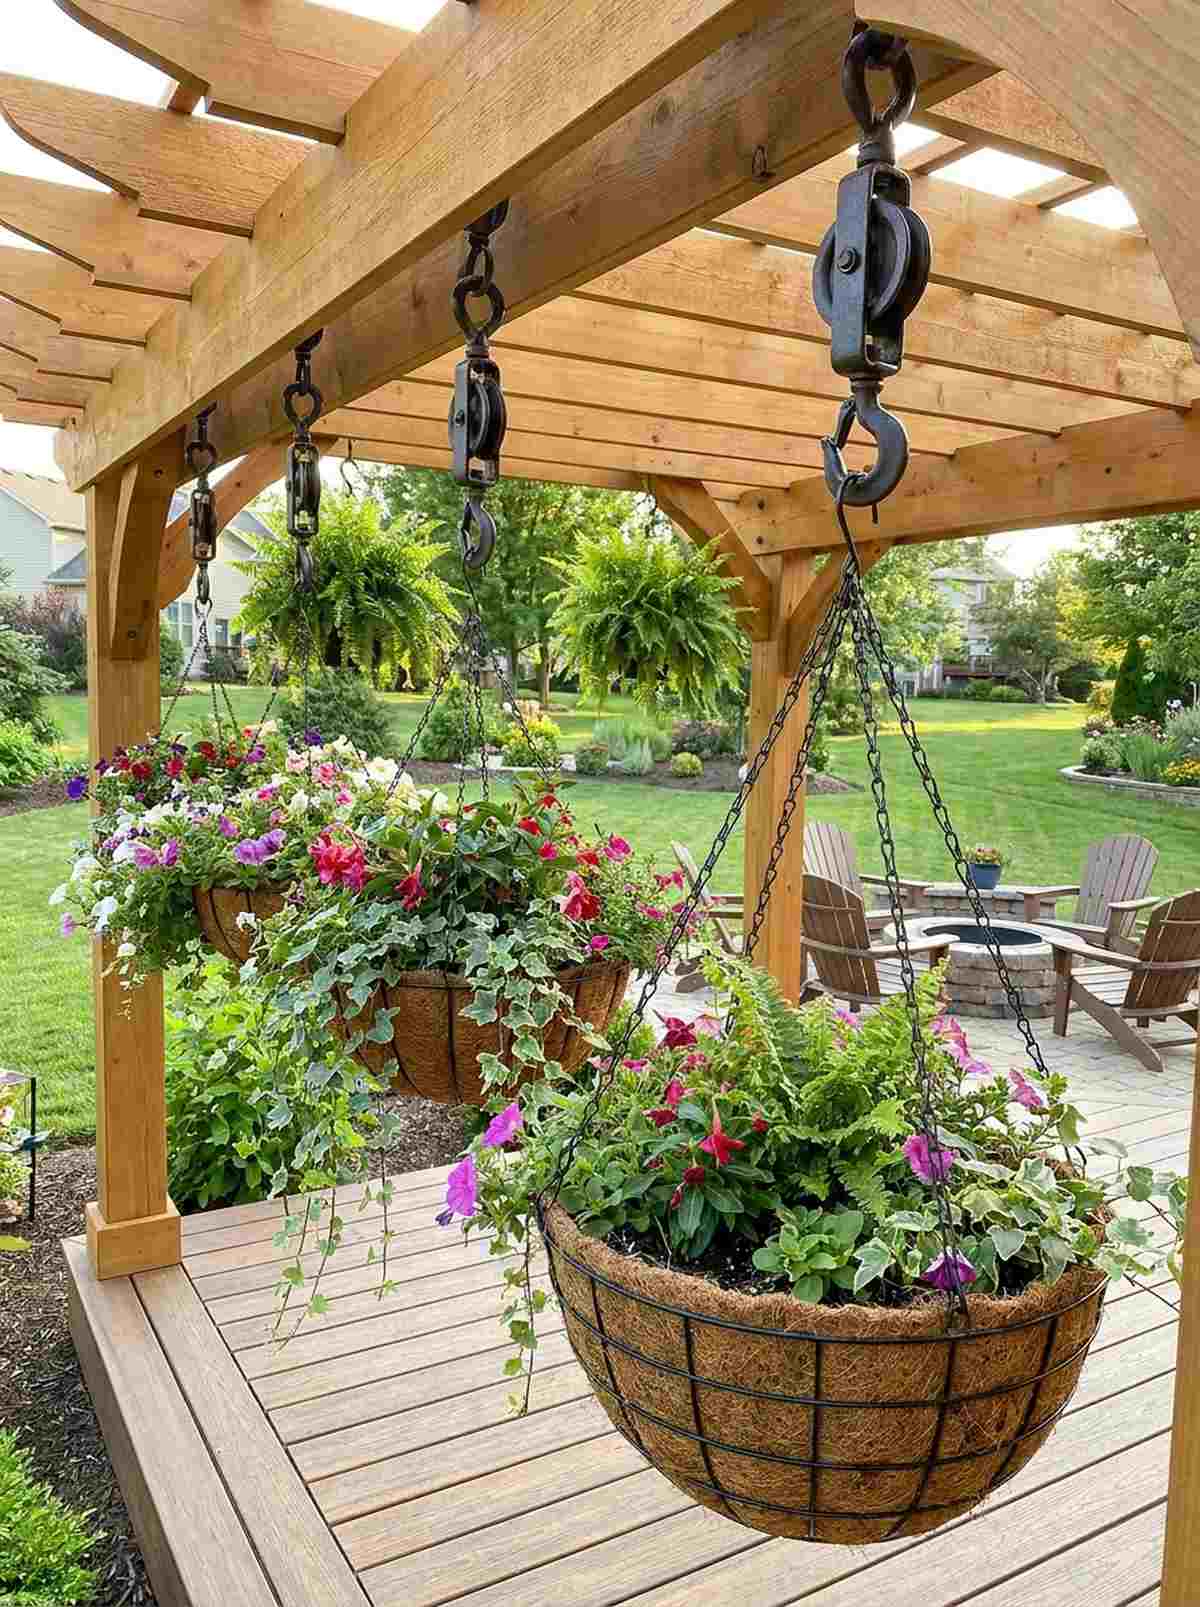
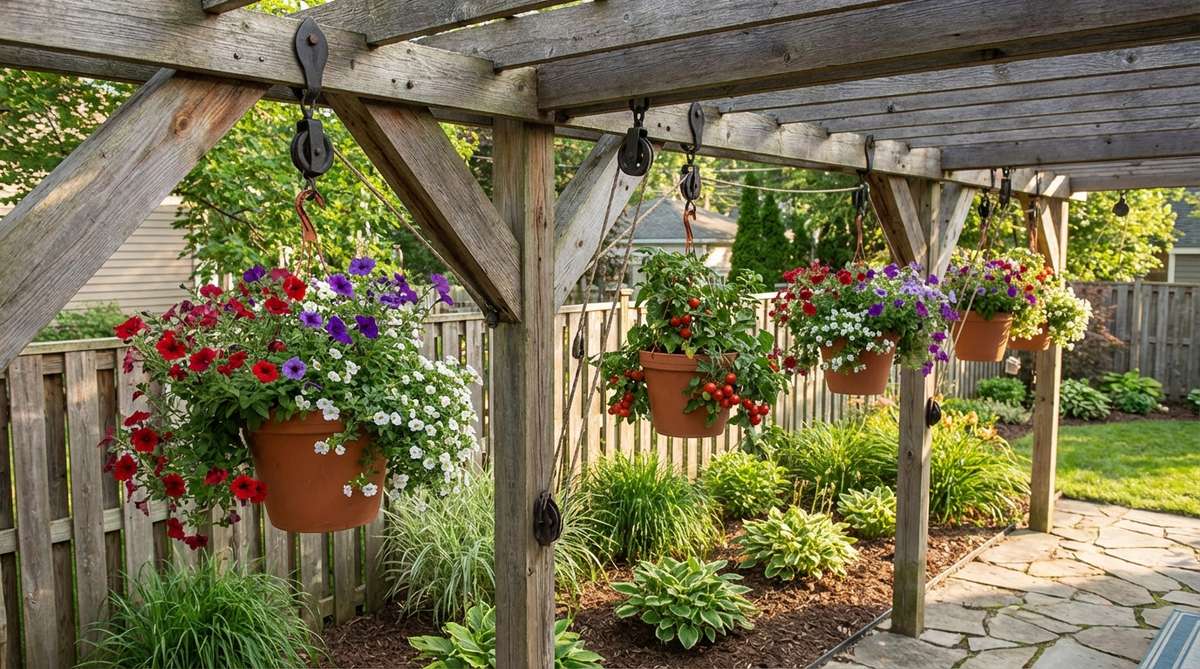
Dangling cascades of color feel like a magical floating garden suspended in mid-air. Perfect for utilizing the dead airspace under pergolas or roof overhangs.
Skip the cheap plastic nursery hooks that snap in high winds; using heavy-duty swivel hooks looks far more intentional and secure. Lining them with premium coco coir replacement liners keeps roots cool and healthy.
Easily achievable for $30–$50. Save this to your patio styling board!
- Key Materials: Wire baskets with coir liners
- Vibe / Style: Lush tropical canopy
- Difficulty: Easy hanging project
- Budget Breakdown: Basket Set: $25 | Plants: $20
- Creator’s Tip: Use a retractable pulley system so you don’t need a stepstool to water them.
- Smart Sourcing: heavy-duty hanging planter pulleys and extra-thick coco liner bulk packs.
7. Vertical Pallet Gardens
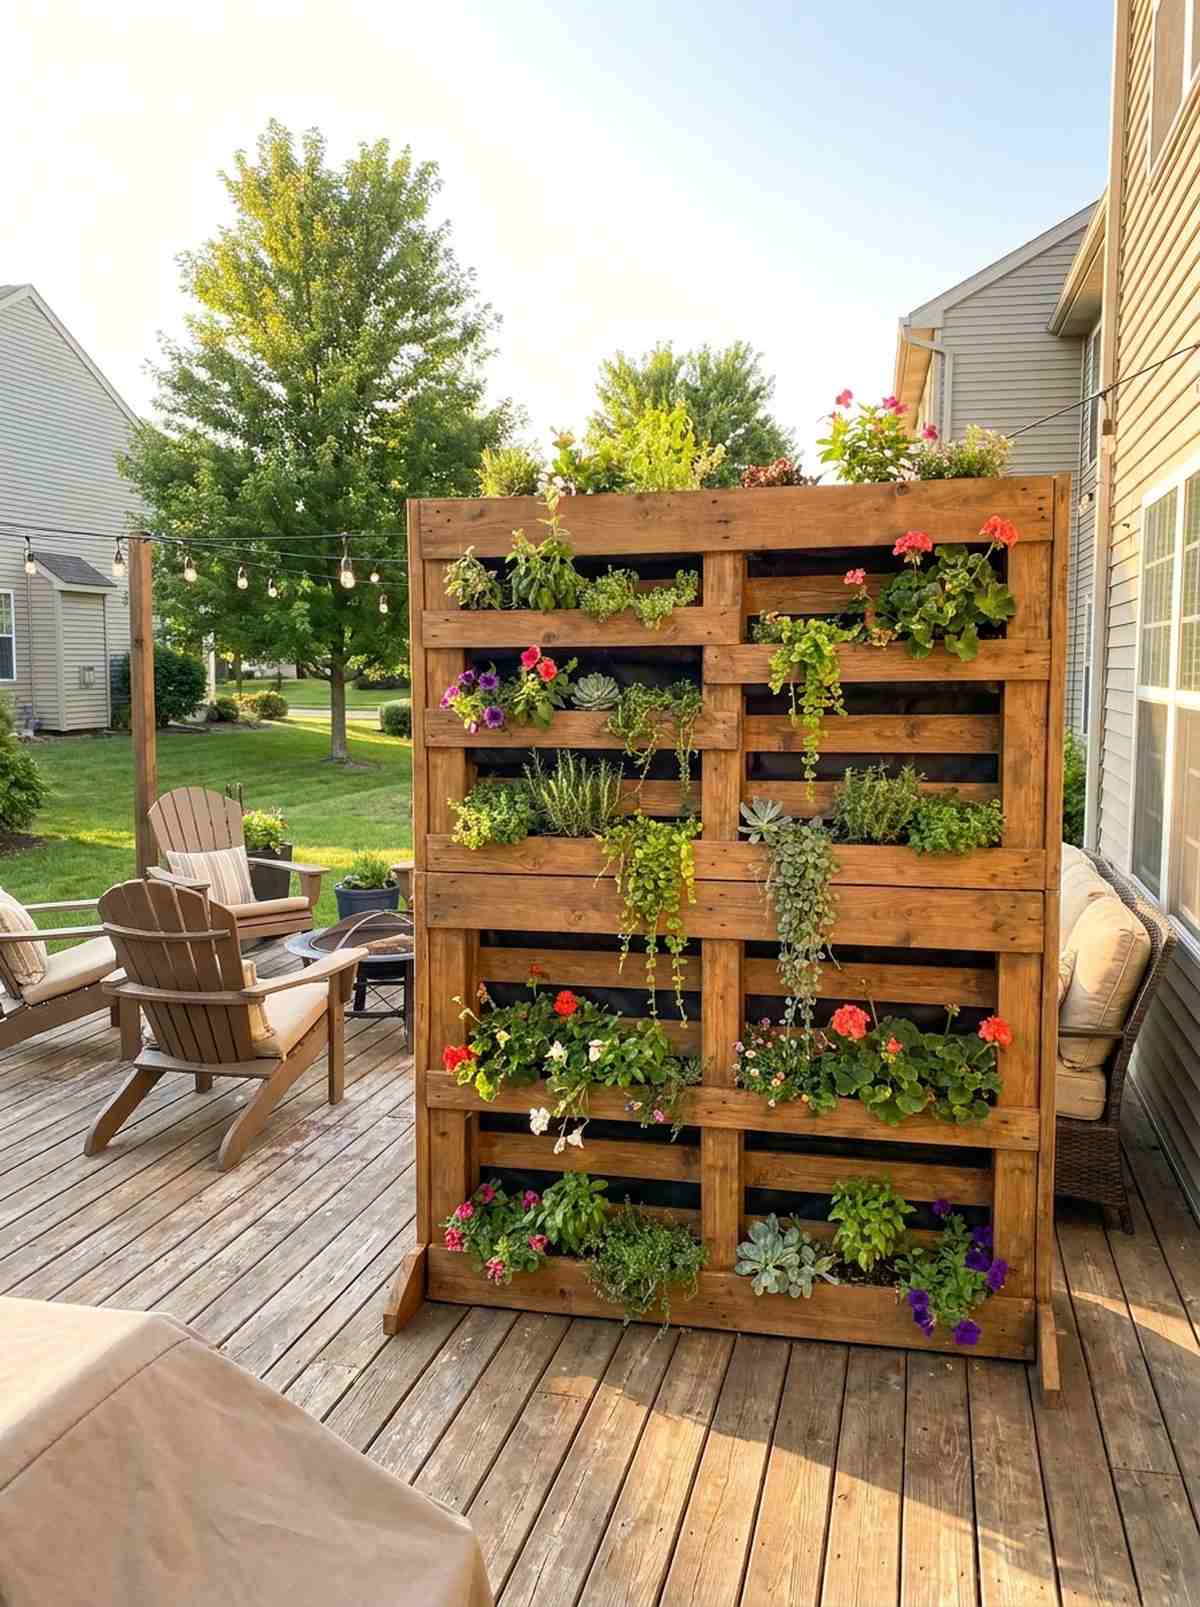
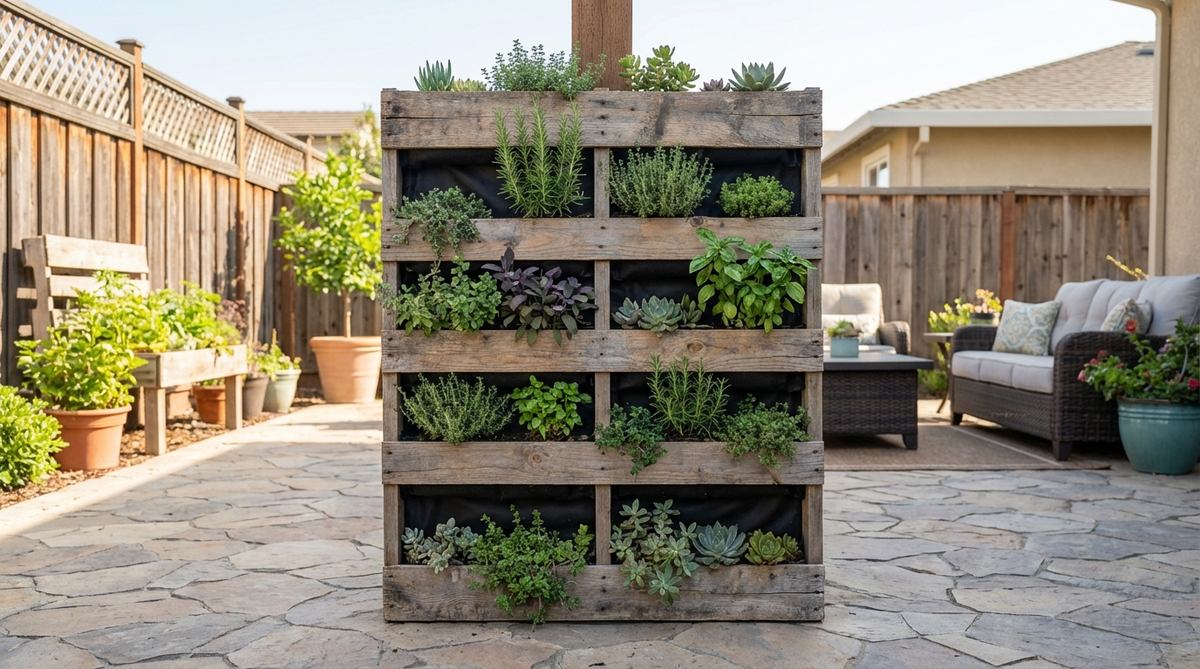
This rustic upcycling hack brings a warm, farmhouse-chic texture to sterile spaces. Works beautifully as a freestanding privacy screen on a shared townhouse patio.
Leaving raw wood exposed guarantees rot, but sealing it with eco-friendly stains delivers a shockingly premium look for pennies. Backing the inside with commercial-grade landscape fabric stops soil from washing out onto your deck.
You can build this for as little as $15–$25. Pin this for your next zero-waste weekend project!
- Key Materials: Heat-treated (HT) wood pallets
- Vibe / Style: Upcycled rustic farmhouse
- Difficulty: Moderate DIY
- Budget Breakdown: Pallet: Free | Fabric & Soil: $20
- Creator’s Tip: Always check for the “HT” stamp on pallets to ensure they are heat-treated, not chemically treated.
- Smart Sourcing: heavy-duty weed barrier landscape fabric (pre-cut) and non-toxic outdoor wood sealer.
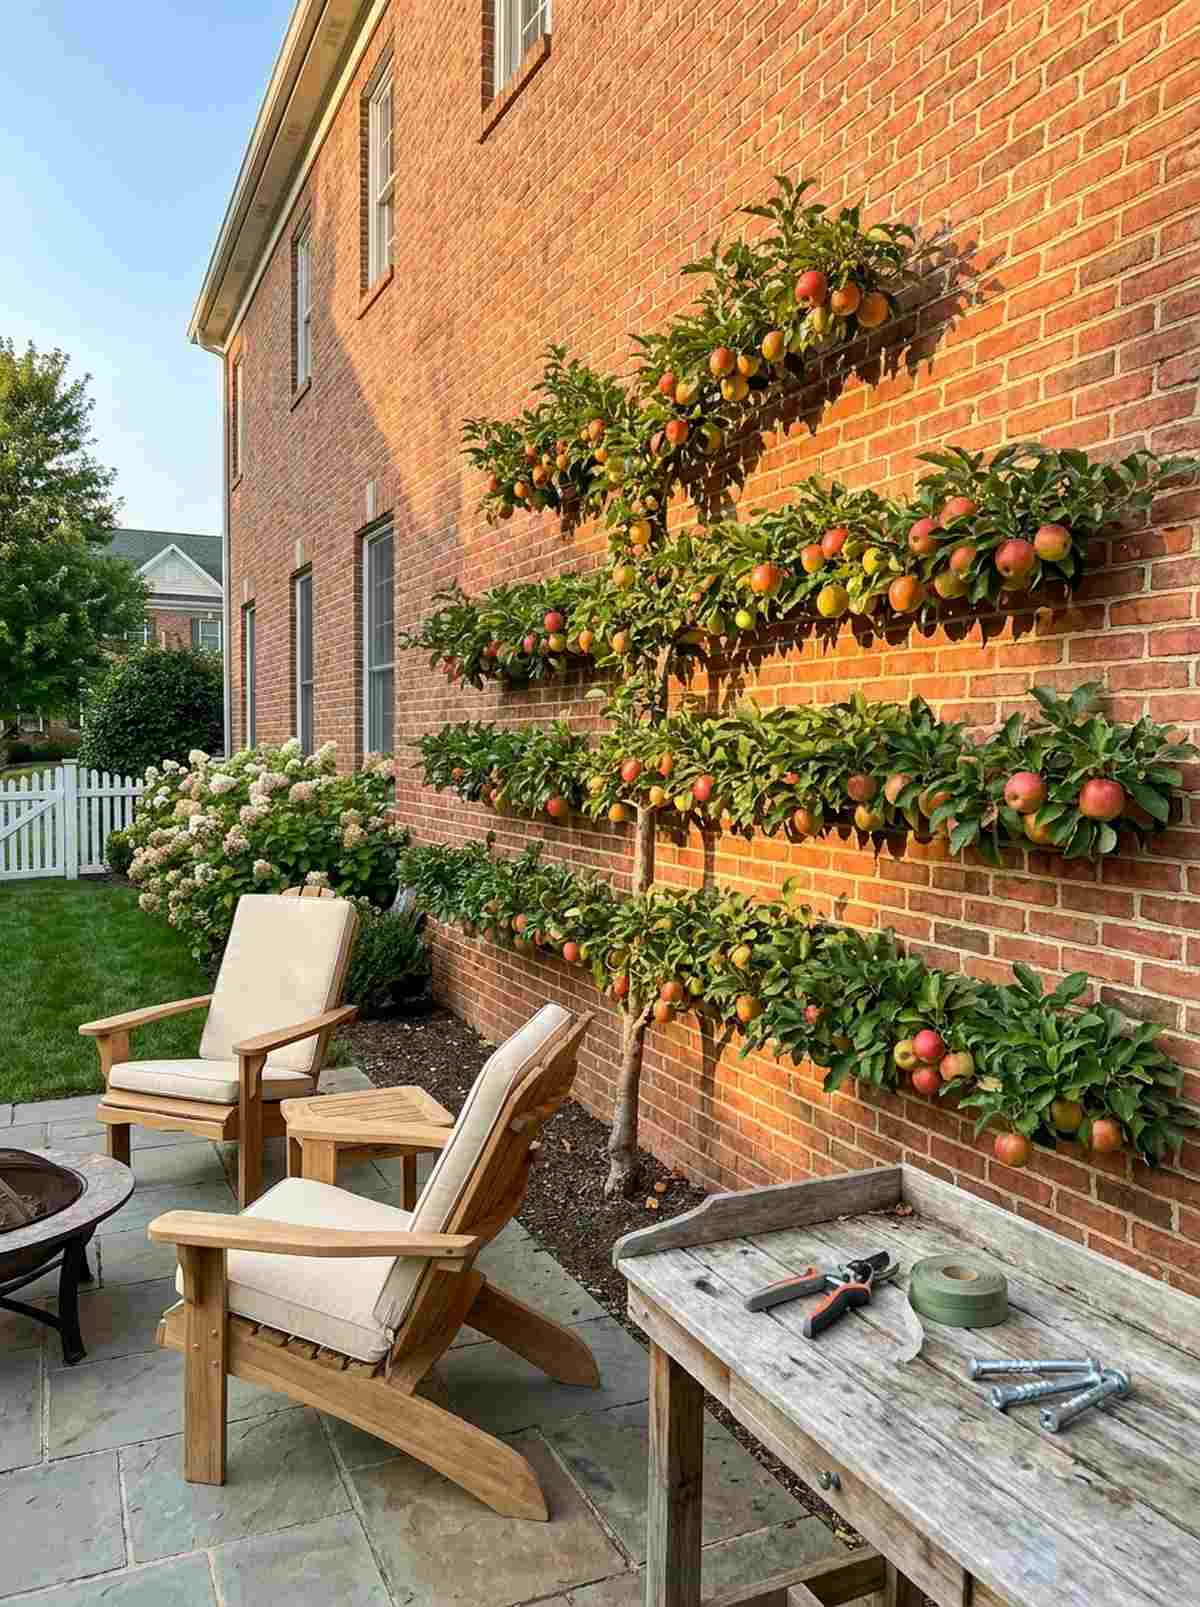
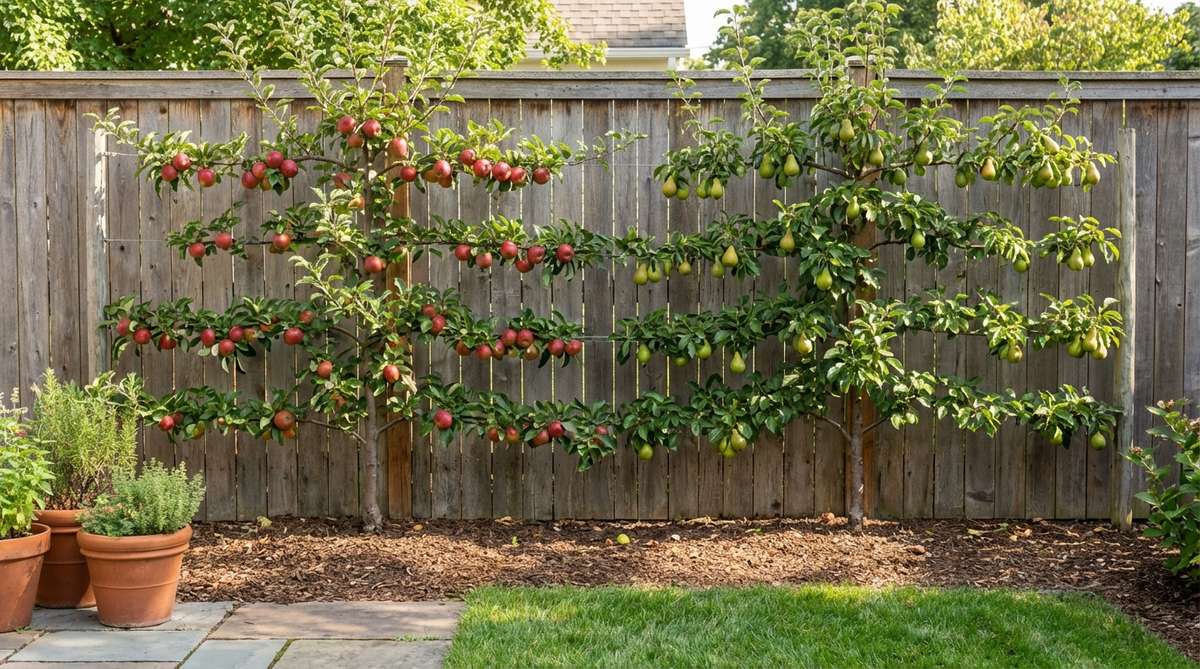
8. Espalier Fruit Trees
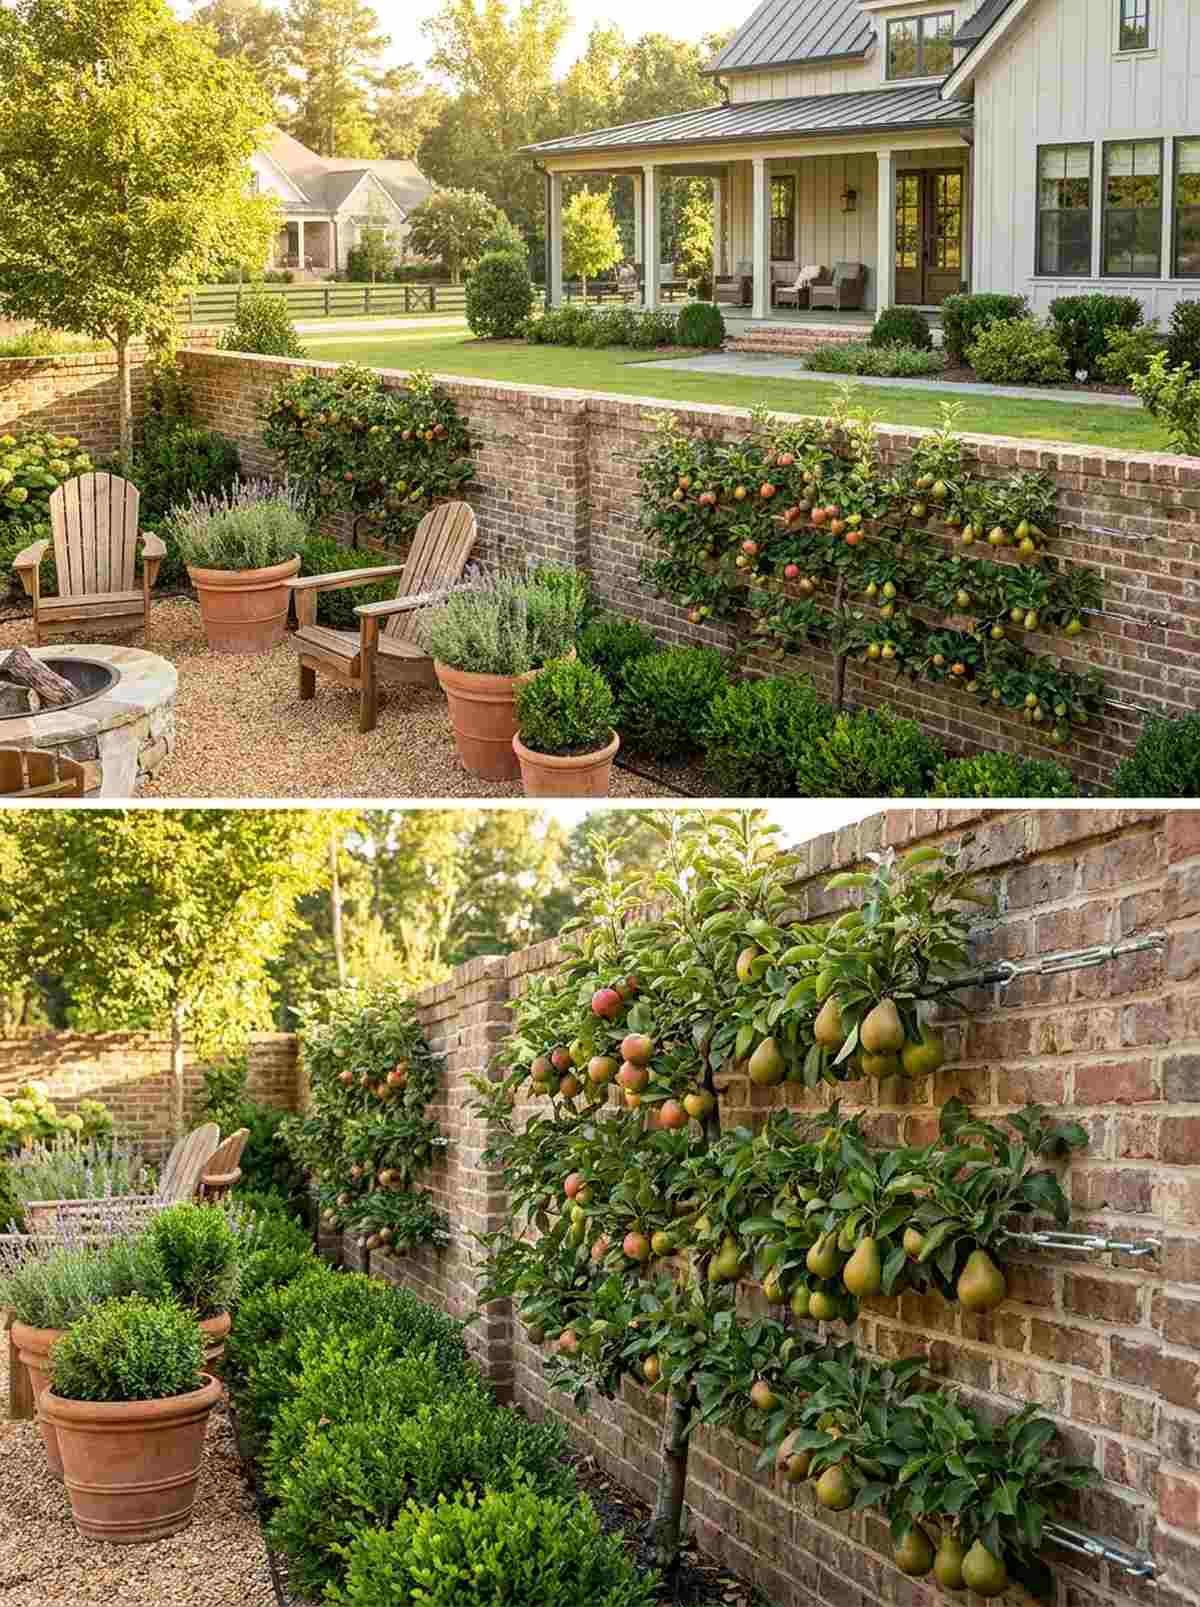
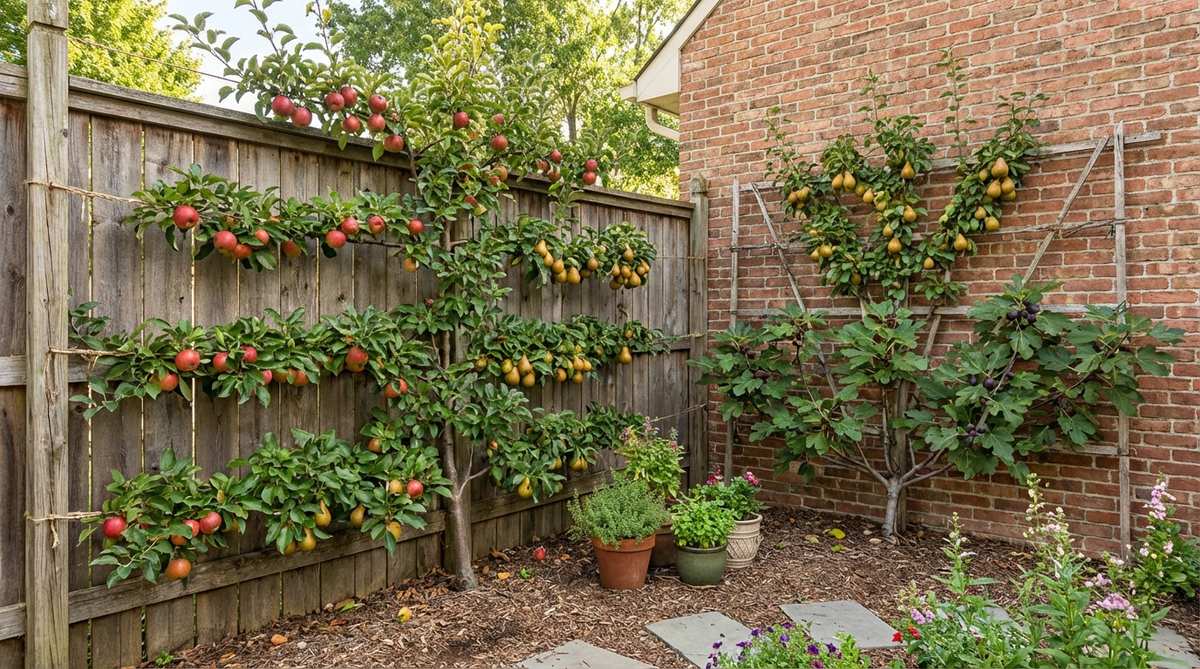
Training a tree flat against a wall feels like an ancient, sophisticated European courtyard secret. The ultimate garden design small backyard flex for side yards that get great sun but lack depth.
Most beginners are intimidated by pruning, but using an established starter kit takes the guesswork out and looks incredibly high-end. Utilizing heavy-duty masonry wire kits ensures the branches train perfectly horizontal.
Expect to invest $70–$120 for a healthy starter tree. An absolute showstopper that pays you back in fruit.
- Key Materials: Dwarf fruit trees, wall anchors, training wire
- Vibe / Style: French chateau courtyard
- Difficulty: Advanced maintenance
- Budget Breakdown: Tree: $80 | Wire Setup: $30
- Creator’s Tip: Use soft rubber ties instead of wire or zip ties to avoid choking the growing branches.
- Smart Sourcing: espalier training wire starter kits and soft-tie garden plant wire (bulk).
9. Tower Gardens (Hydroponic)
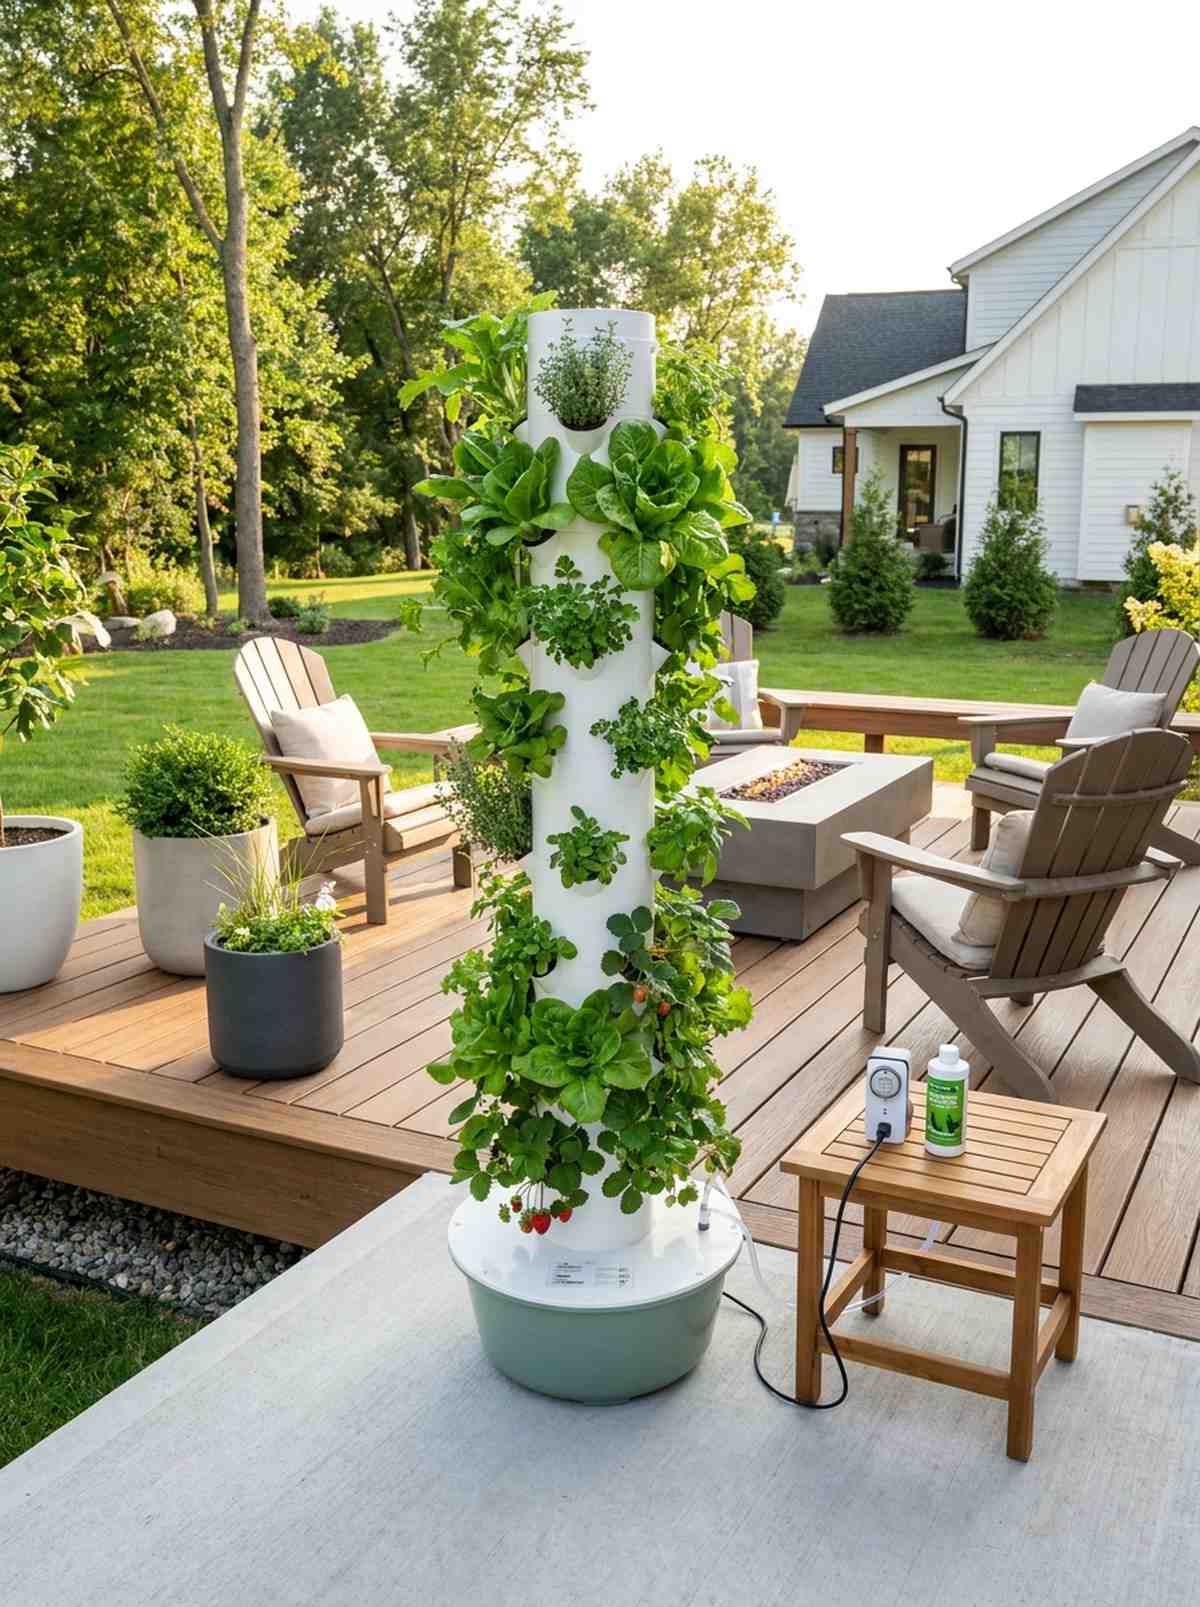
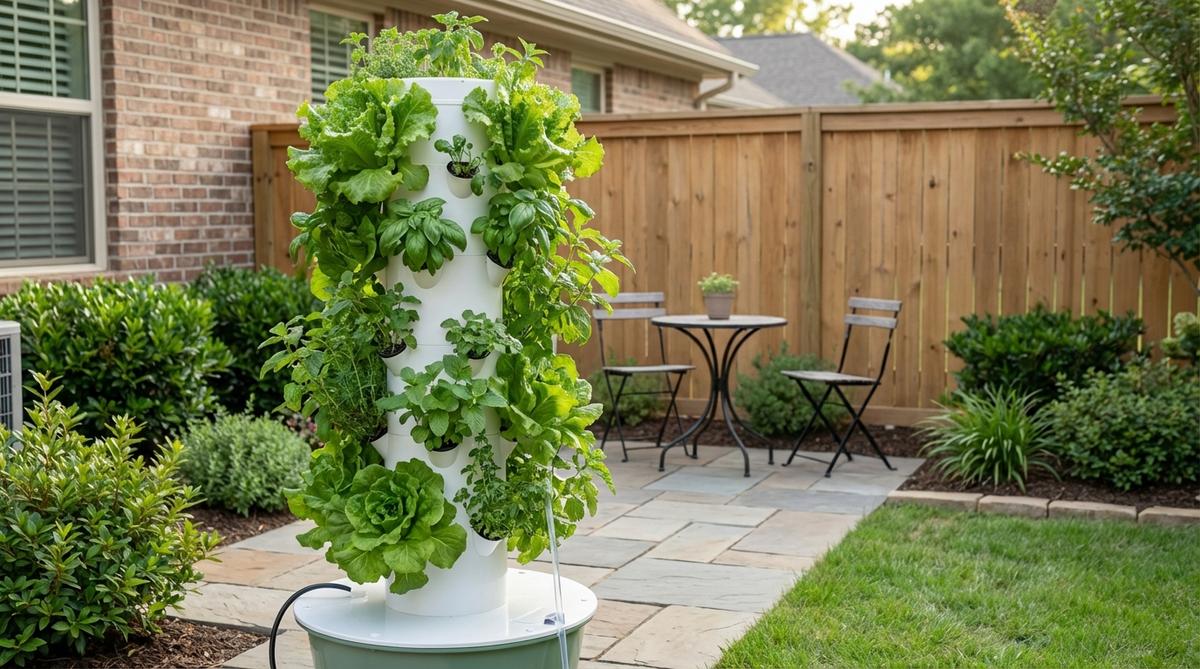
This space-age setup feels like having a pristine, futuristic farm right on your back deck. Highly effective for growing massive amounts of food on a tiny concrete slab.
Soil-based pots create a muddy mess, but a self-contained hydroponic loop delivers a clean, designer-level finish that grows 30% faster. Investing in a true vertical aeroponic tower kit completely eliminates the need for weeding.
Premium kits run $150–$300, but the yield is massive. Save this if you want zero-weed gardening!
- Key Materials: Stackable hydroponic PVC towers
- Vibe / Style: Ultra-modern sustainable
- Difficulty: Plug-and-play assembly
- Budget Breakdown: Tower Kit: $200 | Nutrients: $25
- Creator’s Tip: Plug the pump into a smart outdoor timer to automate the watering cycles completely.
- Smart Sourcing: stackable vertical hydroponic tower kits and liquid hydroponic nutrient starter packs.
💡 Must-Have Supplies for High-End Setups
To build these setups faster and ensure they last, skip the generic craft aisles and invest in the right foundational kits.
- Base & Support: rust-proof adjustable plant stands (heavy-duty)
- Setup Tools: complete drip irrigation starter kits
- Weather/Durability Protection: UV-resistant clear outdoor sealant sprays
10. Pleached Screening Trees
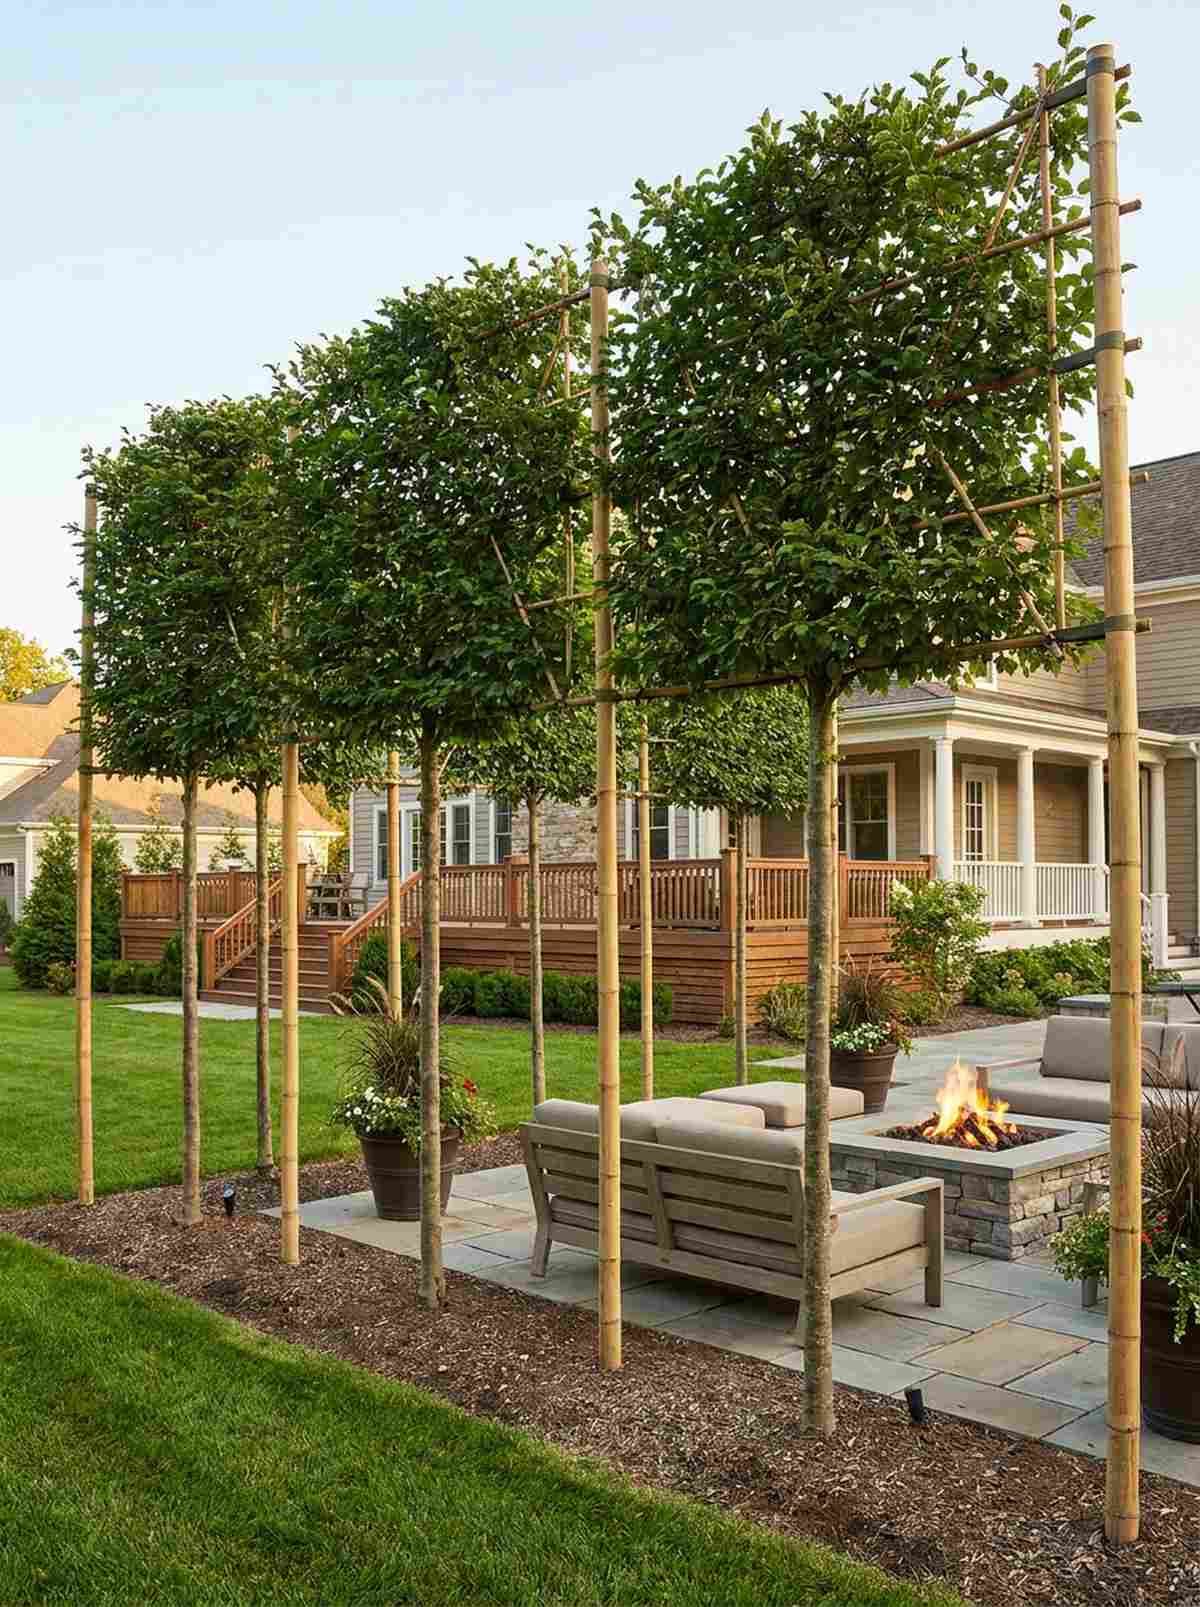
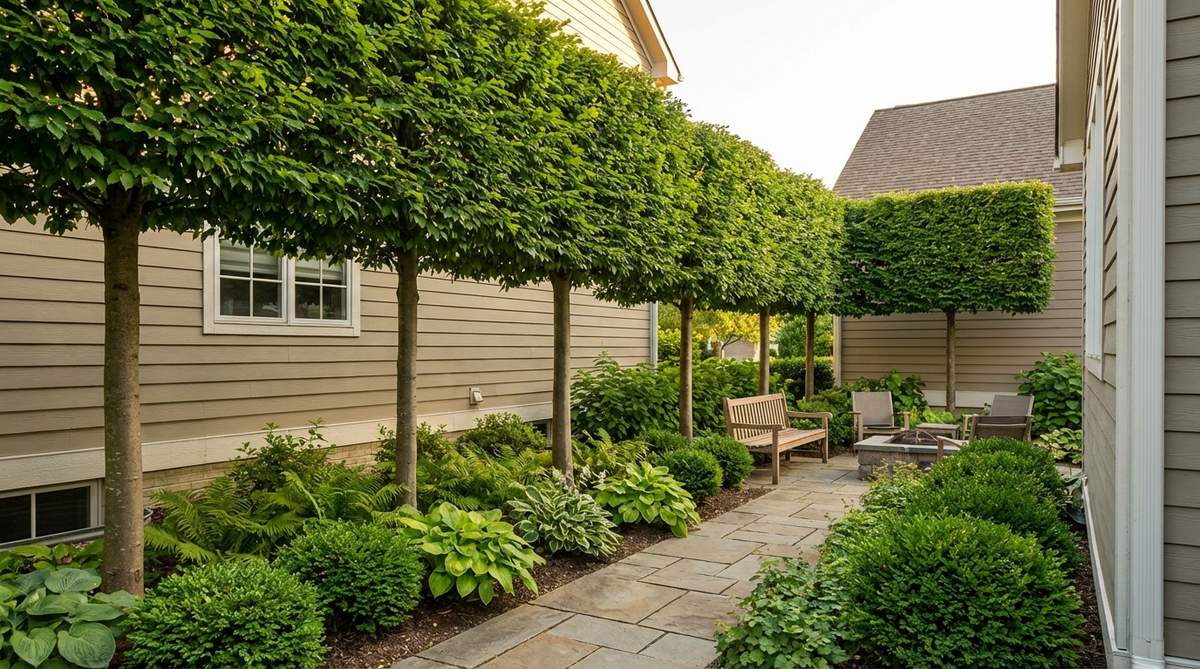
Creating a floating hedge in the sky feels incredibly exclusive and architectural. The absolute best way to block nosy neighbors without sacrificing your ground-level patio space.
Planting massive arborvitaes shrinks your yard instantly, but pleached frames give a far more expensive, manicured look while keeping the ground clear. Using bamboo cane screening support kits helps maintain that perfect rectangular canopy.
This is a premium upgrade costing $150–$300 per tree. Pin this for your ultimate privacy wall inspiration!
- Key Materials: Clear-trunk trees, framework canes
- Vibe / Style: High-end modern estate
- Difficulty: Requires structural planning
- Budget Breakdown: Tree: $150 | Framework: $40
- Creator’s Tip: Tie horizontal bamboo to the trunks to act as a strict training guide for new growth.
- Smart Sourcing: thick bamboo garden poles (bulk pack) and heavy-duty tree tie webbing.
Container Solutions for Maximum Flexibility
11. Wheeled Planter Boxes
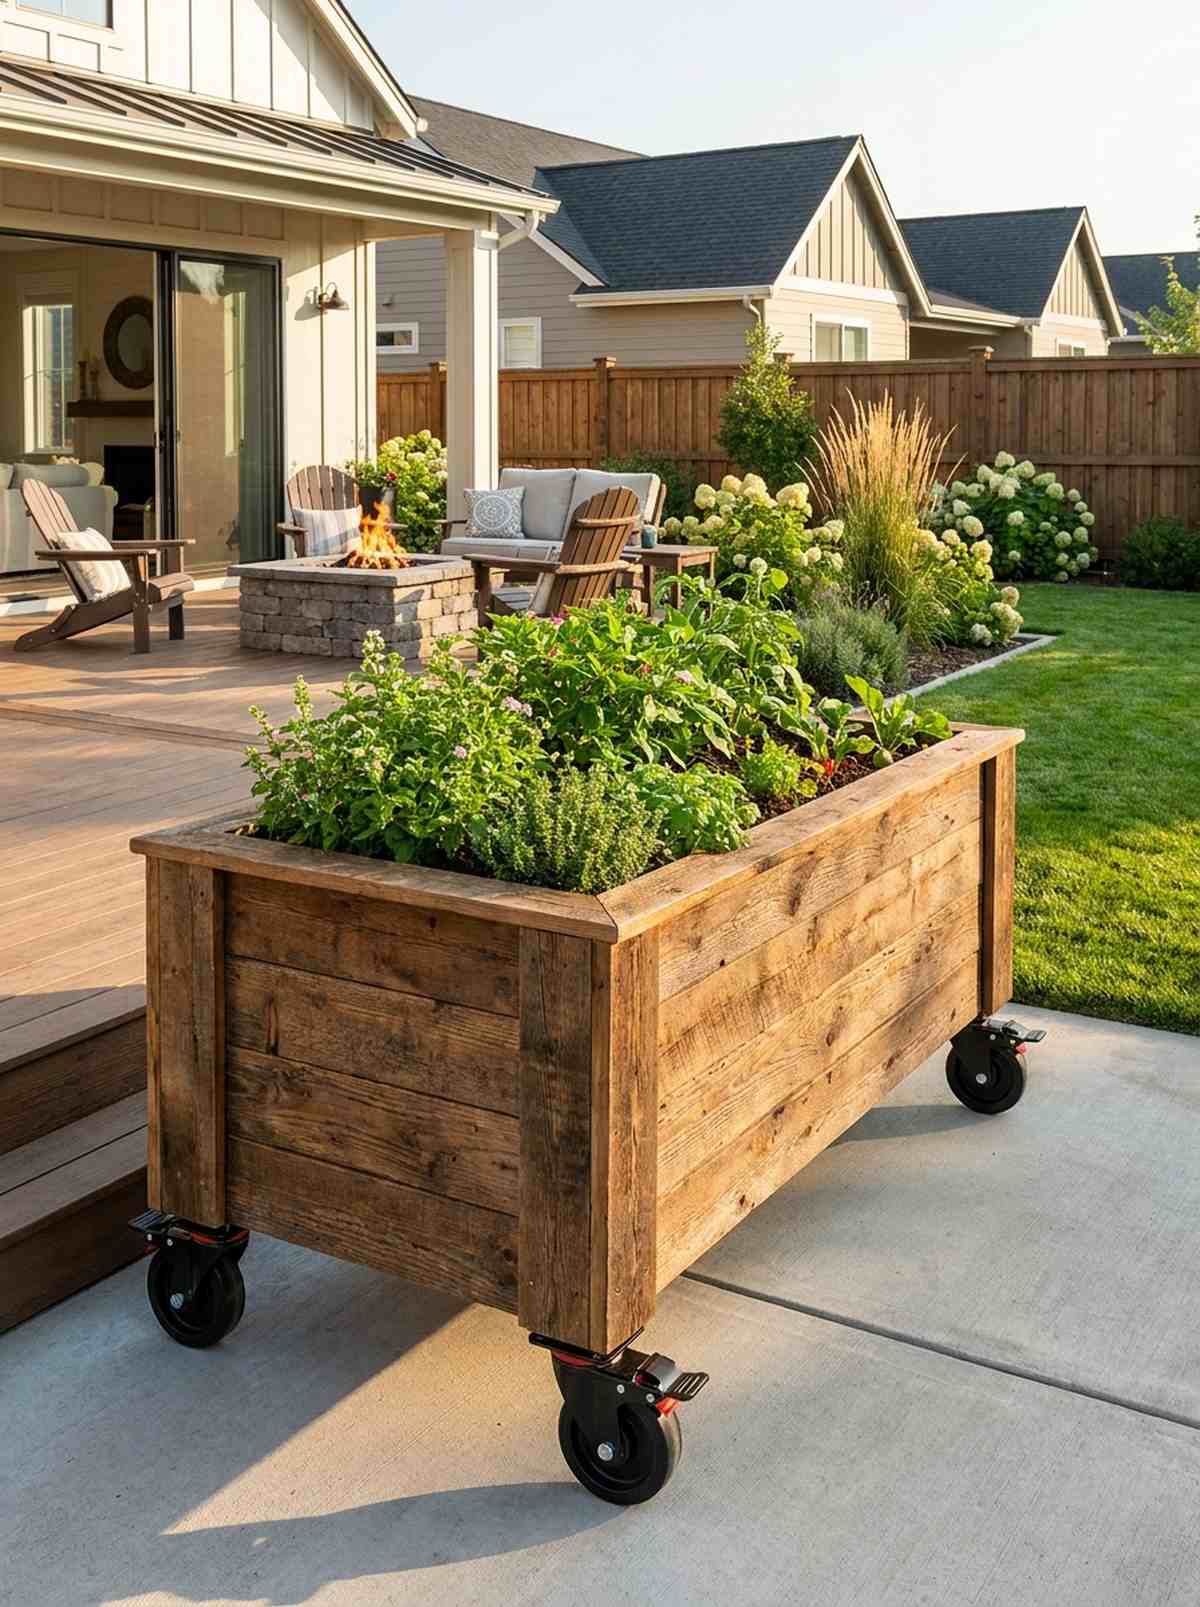
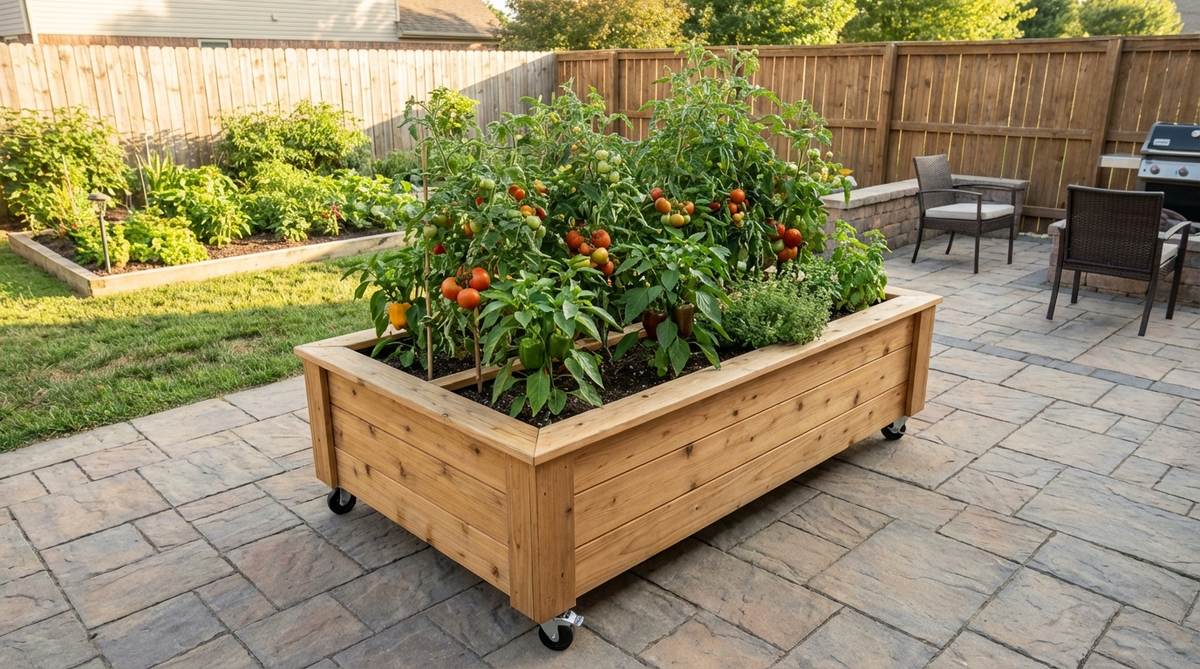
Rolling your garden around feels like the ultimate dynamic, sun-chasing life hack. Perfect for small concrete patios where sunlight shifts dramatically throughout the day.
Dragging heavy pots ruins your back and scratches the deck, but bolting on heavy-duty casters makes a cheap box look and function like custom luxury furniture. Upgrading to industrial locking swivel casters is the non-negotiable secret here.
You can build or modify these for $40–$80. Highly recommended for renters with strict patio rules.
- Key Materials: Wooden planter boxes, heavy-duty casters
- Vibe / Style: Industrial modern flexibility
- Difficulty: Beginner drill project
- Budget Breakdown: Box: $40 | Casters: $25
- Creator’s Tip: Always buy casters rated for double the weight you expect—wet soil is incredibly heavy.
- Smart Sourcing: polyurethane locking swivel casters (4-pack) and heavy-duty plastic planter box liners.
12. Self-Watering Containers
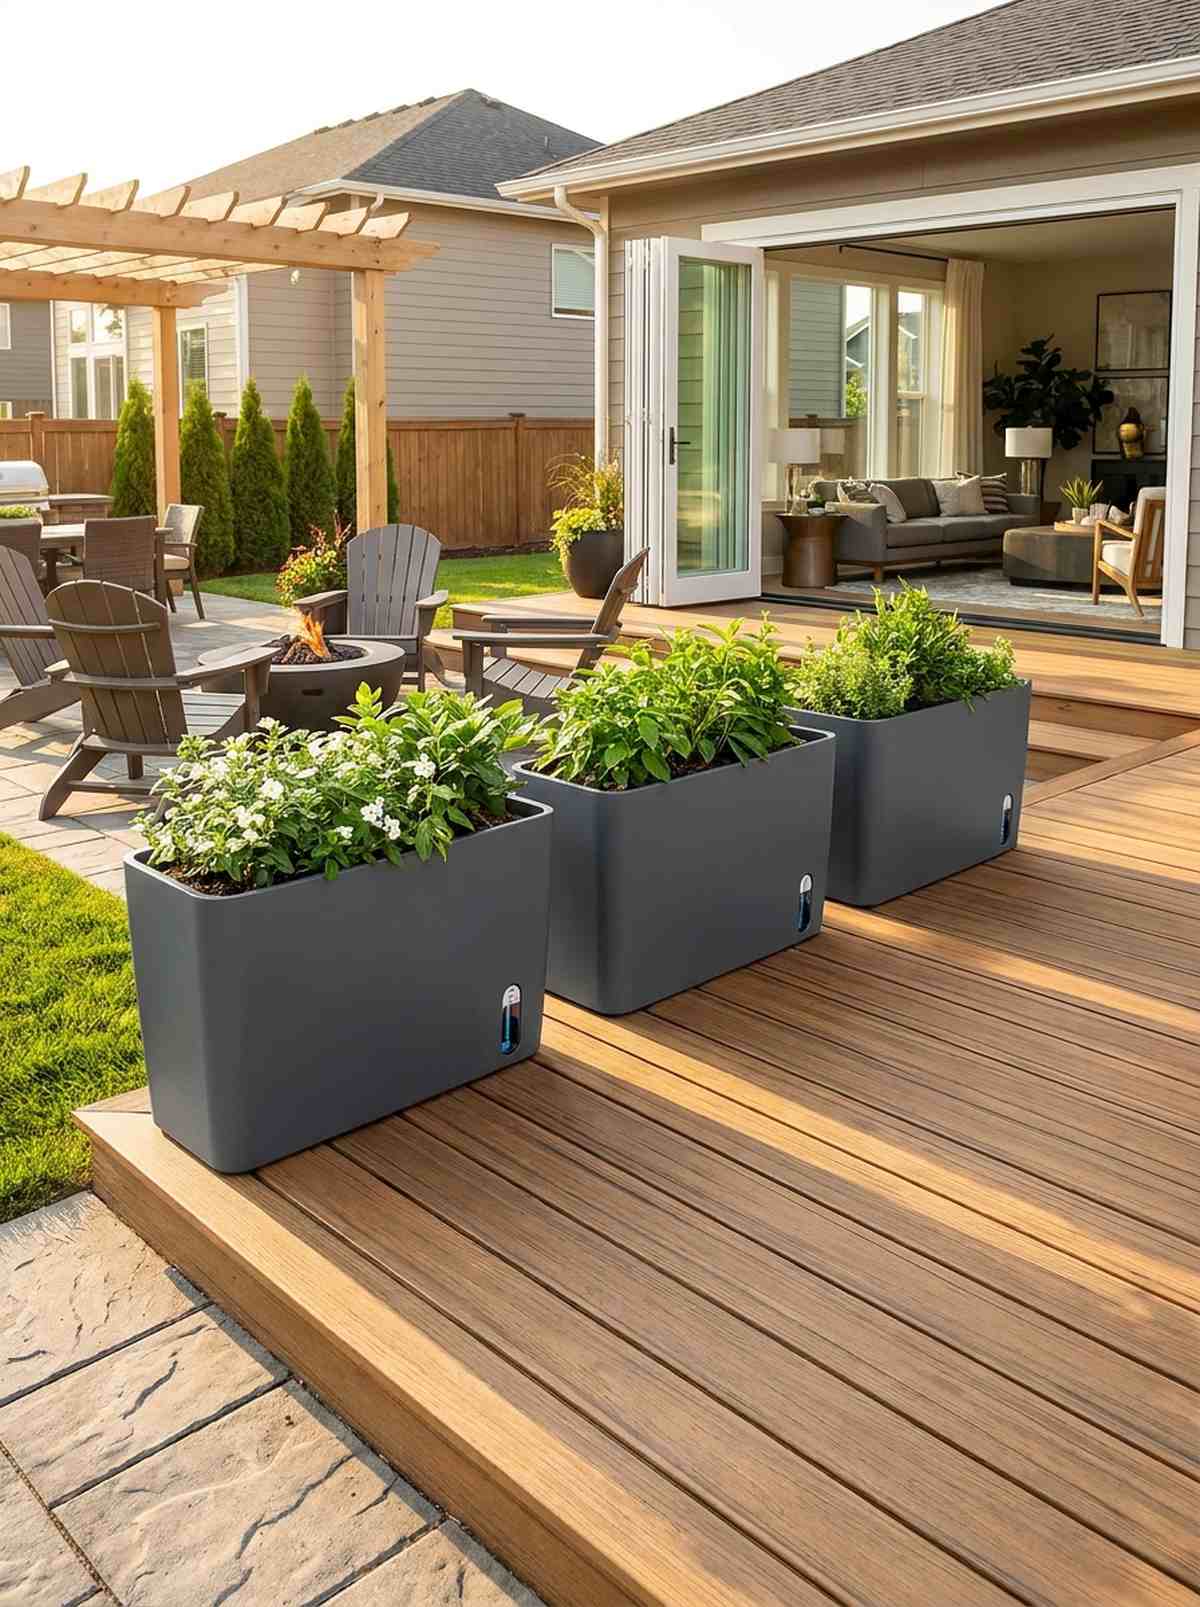

Having a garden that basically babysits itself feels like a total cheat code. Ideal for busy professionals who want lush small garden design ideas without the daily watering chore.
Standard cheap pots dry out by noon, but a sub-irrigated planter gives a designer-level finish while promoting massive root growth. Buying premium self-watering planter inserts converts any decorative pot into a smart garden.
You can grab top-tier self-watering pots for $25–$60. Save this if you constantly accidentally kill your plants!
- Key Materials: Self-watering pots with reservoir gauges
- Vibe / Style: Sleek minimalist
- Difficulty: Effortless setup
- Budget Breakdown: Planter: $35 | Premium Mix: $15
- Creator’s Tip: Use potting soil mixed with perlite—never heavy garden dirt—so the capillary action works properly.
- Smart Sourcing: UV-coated self-watering planters (with indicators) and chunky perlite soil additive (bulk).
13. Tiered Corner Plant Stands
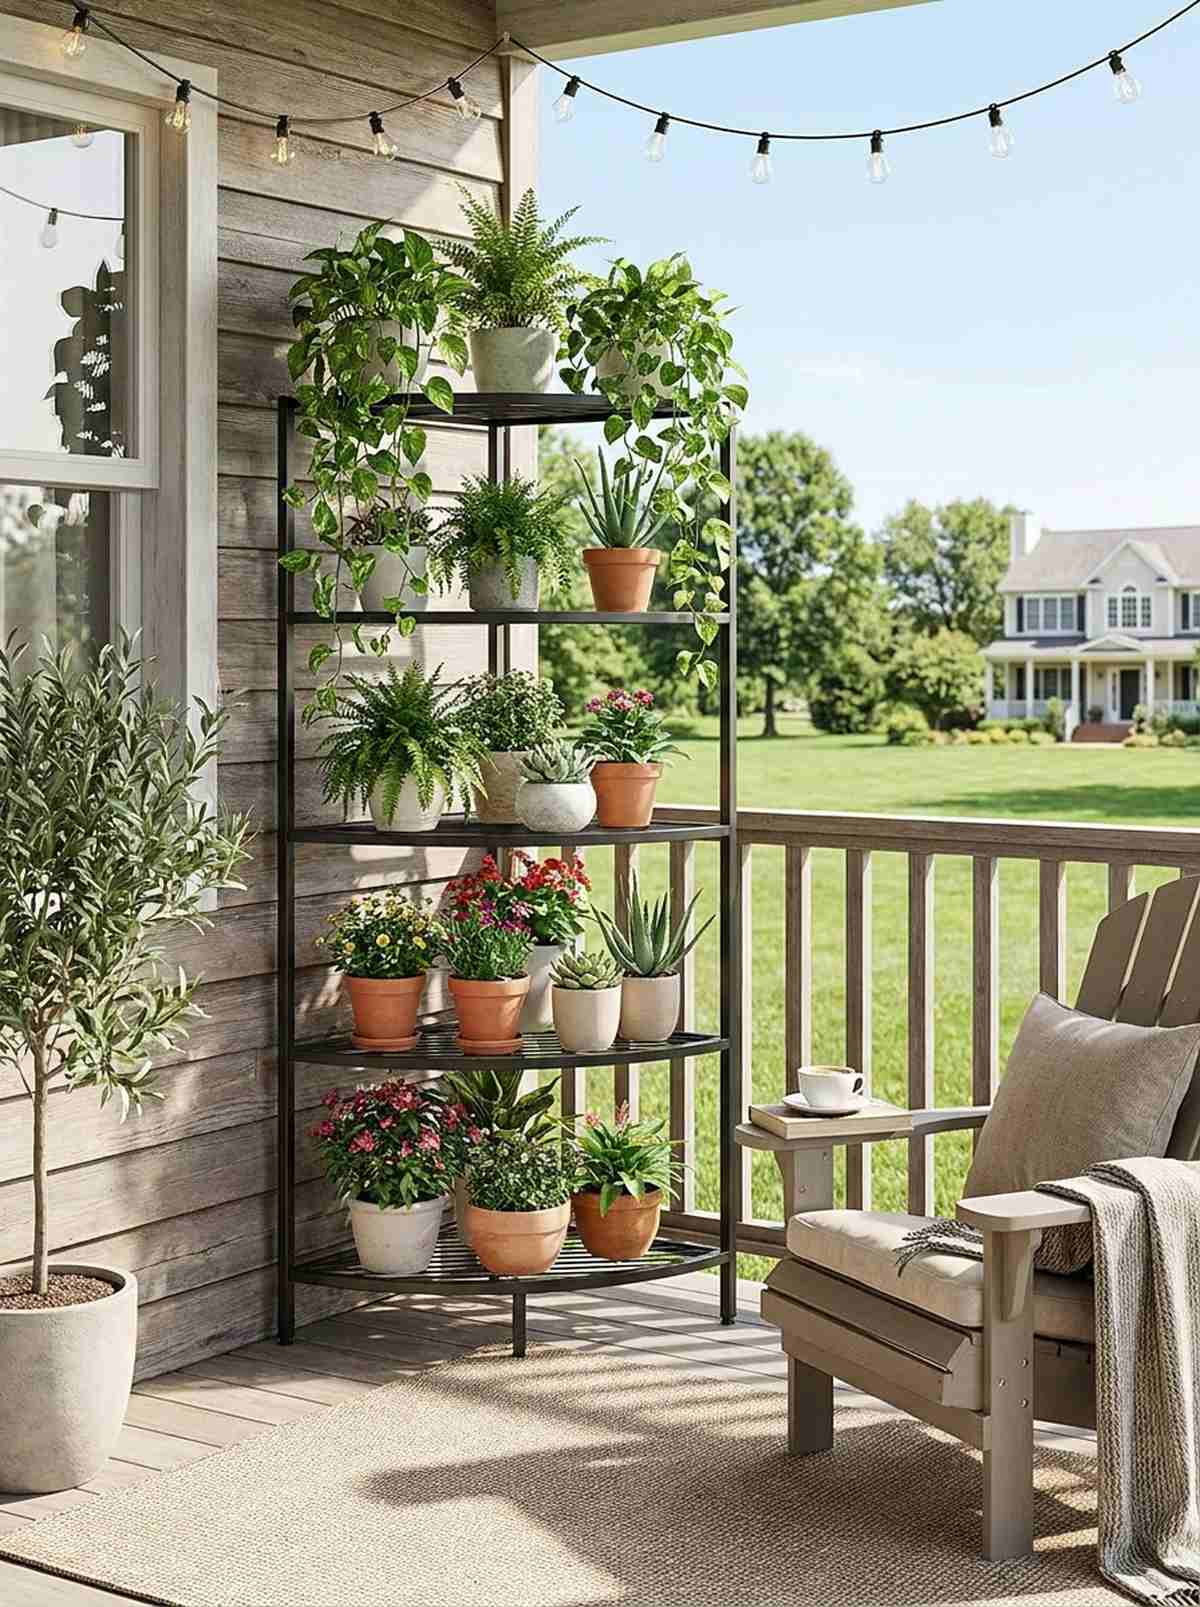
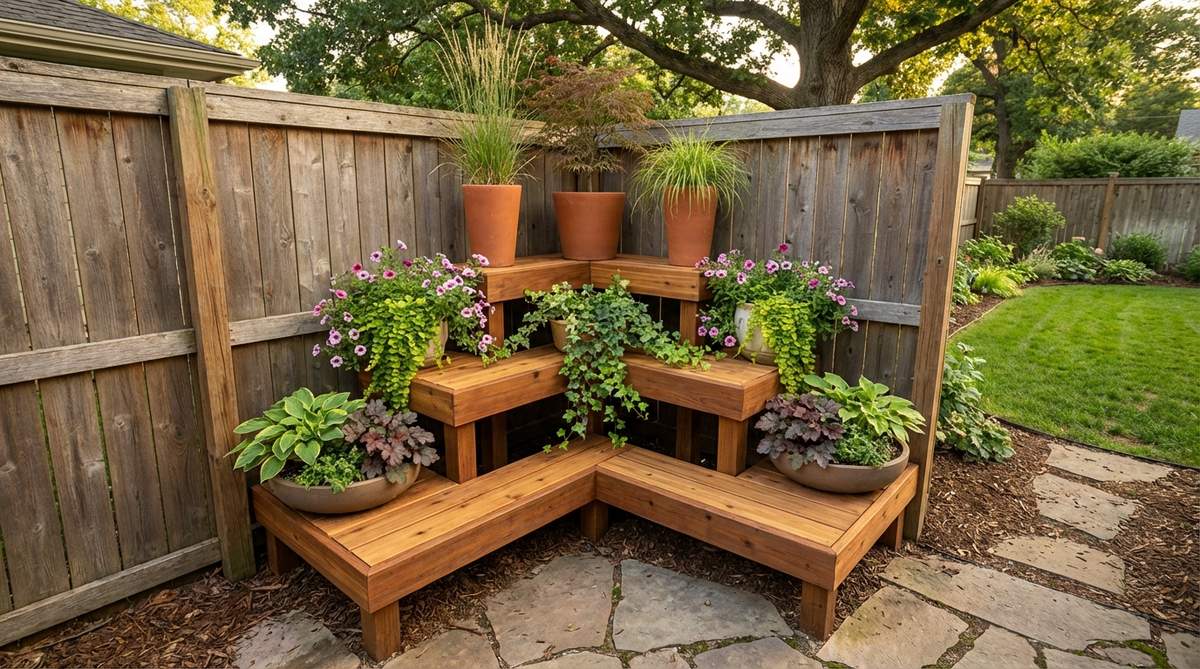
Turning a dead, ignored corner into a cascading waterfall of foliage feels instantly transformative. It is the smartest way to utilize the awkward 90-degree angles on small apartment balconies.
Shoving pots randomly into a corner looks cluttered, but a stepped shelving unit delivers a highly organized, expensive aesthetic. Look for rust-proof metal corner shelving kits to ensure it survives rain and humidity.
You can easily pull this off for around $40–$65. Pin this to your balcony makeover board!
- Key Materials: Quarter-circle tiered stands
- Vibe / Style: Curated urban jungle
- Difficulty: Simple assembly
- Budget Breakdown: Corner Stand: $45 | Pots: $20
- Creator’s Tip: Put trailing vines like Pothos on the top shelf to drape down and hide the metal legs.
- Smart Sourcing: weather-resistant corner plant stands and matching lightweight resin pot sets.
14. Half Barrel Planters
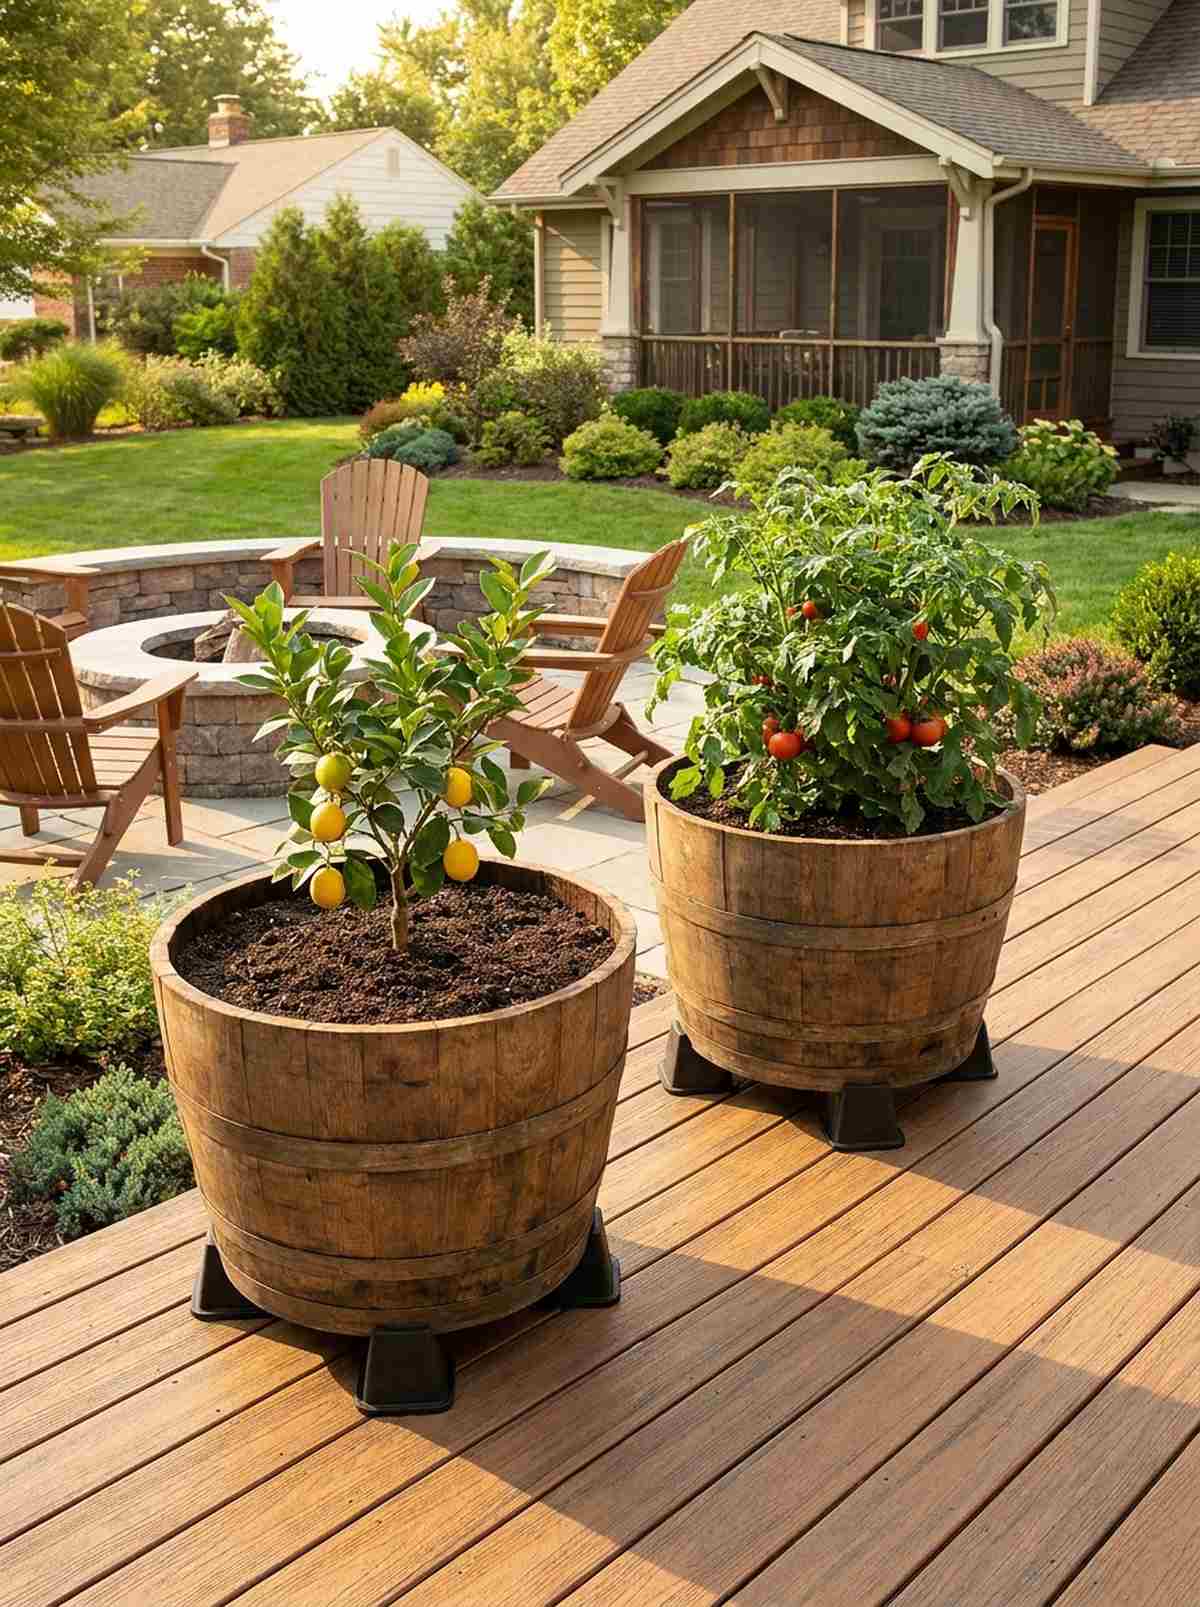
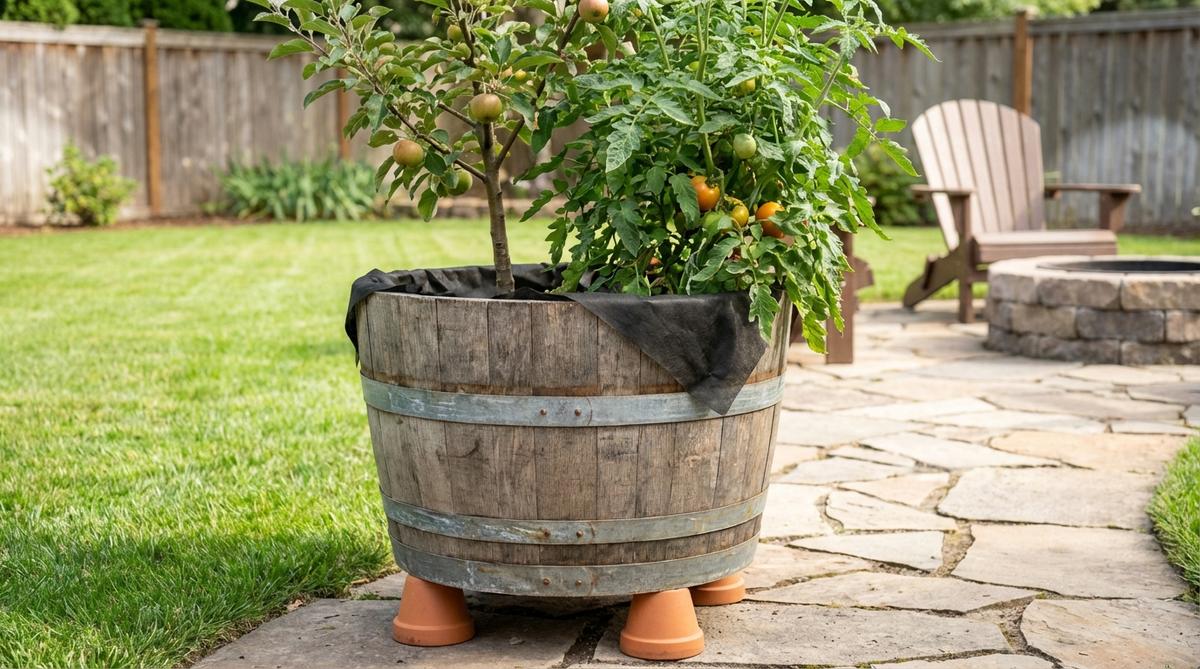
Brings a robust, vineyard-inspired warmth to sterile suburban patios. Flawless for housing dwarf citrus trees or massive tomato plants that need deep, serious soil.
Untreated barrels will rot out from the bottom in a year, but elevating them and lining the inside ensures a permanent, premium look. Utilizing heavy-duty invisible pot feet prevents ground contact and saves your deck from stains.
Expect to spend $50–$75 for the barrel and soil. It’s a fast upgrade that completely changes the vibe.
- Key Materials: Authentic oak half-barrels
- Vibe / Style: Rustic Napa Valley
- Difficulty: Heavy lifting required
- Budget Breakdown: Barrel: $40 | Pot Feet: $15
- Creator’s Tip: Drill at least six 1-inch holes in the bottom, as commercial barrels are completely watertight.
- Smart Sourcing: heavy-duty rubber planter risers (pot feet) and permeable pond liner pre-cuts.
You are probably wasting money on expensive ground-level features. This next setup is ridiculously cheap but looks like a custom architectural display…
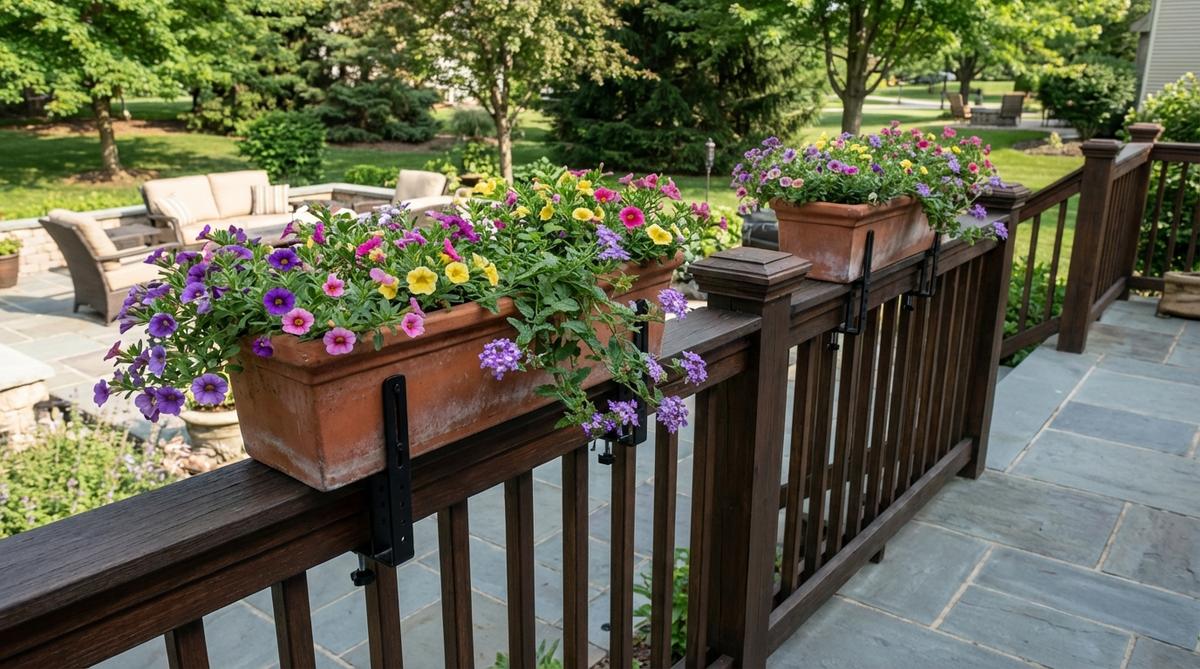
15. Window Box Arrays
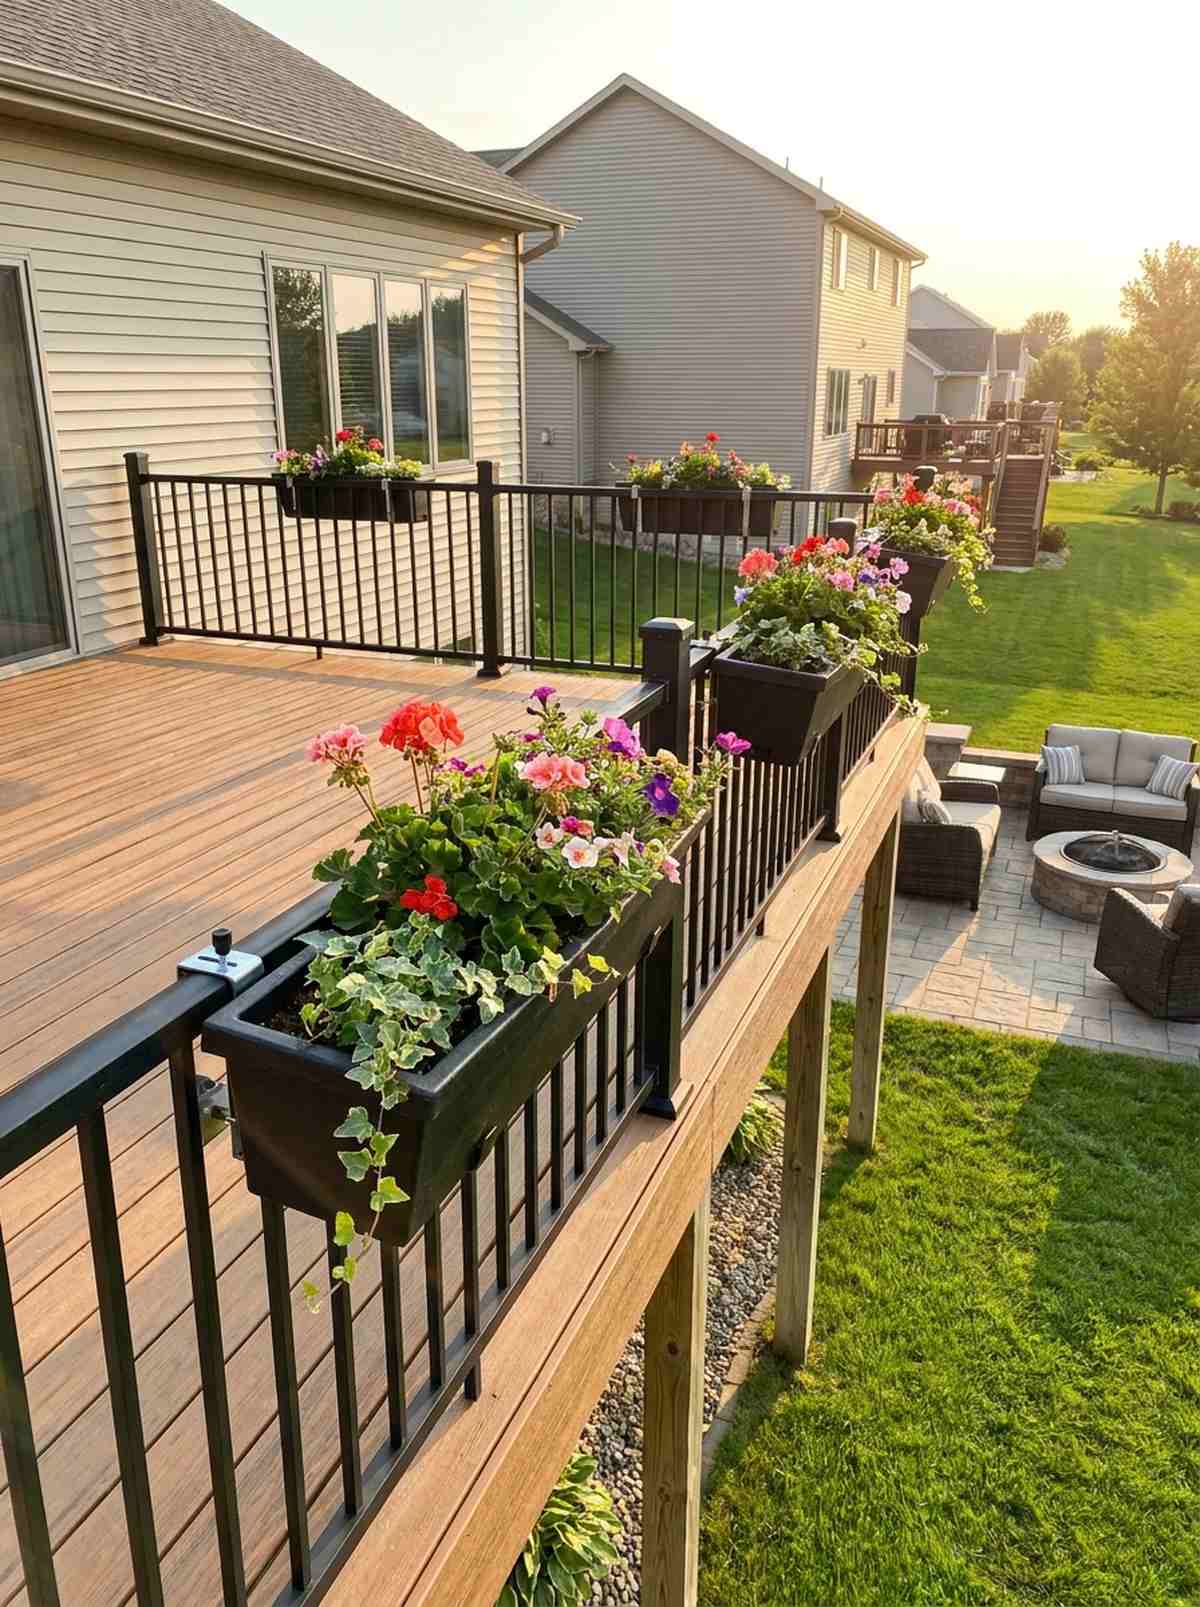
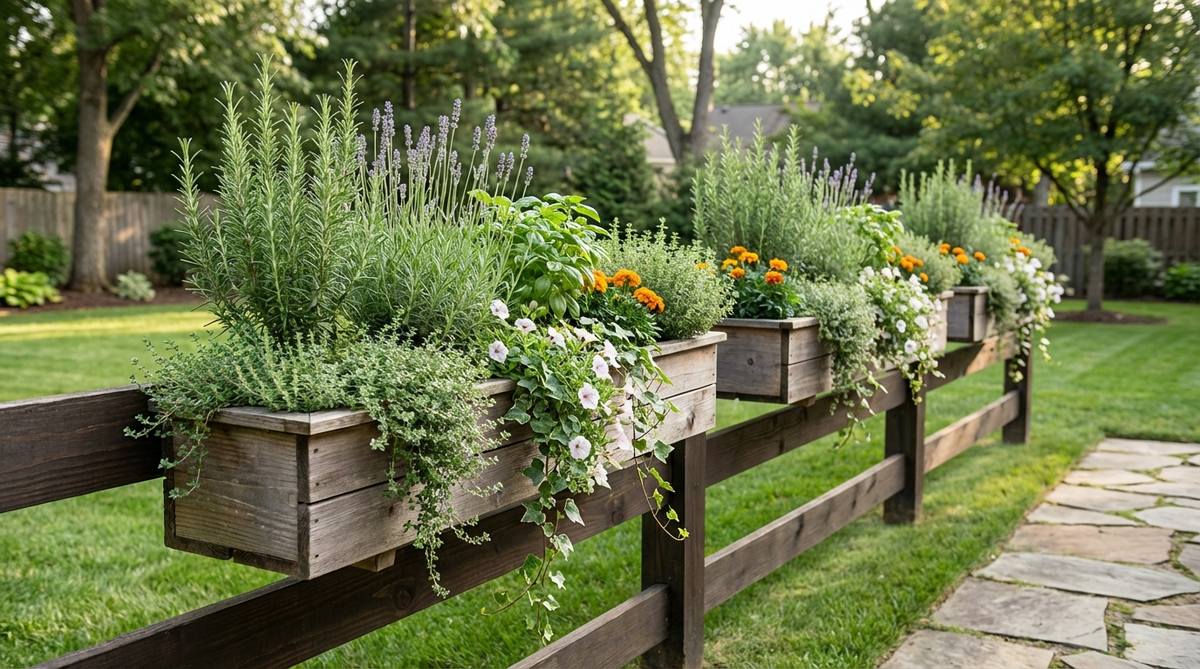
Hanging floating gardens along your railings feels like waking up in a quaint Parisian hotel. This strategy steals zero square footage from your actual walkable deck space.
Flimsy plastic hooks will bend and dump dirt everywhere, but using commercial-grade railing brackets looks far more expensive and secure. Pairing them with self-watering window box liners keeps flowers blooming through brutal summer heat.
You can set up a stunning row for $35–$60. Save this if you want maximum curb appeal on a budget!
- Key Materials: Window boxes and adjustable deck brackets
- Vibe / Style: European romantic
- Difficulty: Easy clamp-on installation
- Budget Breakdown: Box & Brackets: $35 | Flowers: $20
- Creator’s Tip: Always check your railing width before buying; universal adjustable brackets are the safest bet.
- Smart Sourcing: adjustable metal railing planter brackets and UV-coated fiberglass window boxes.
16. Fabric Grow Bags
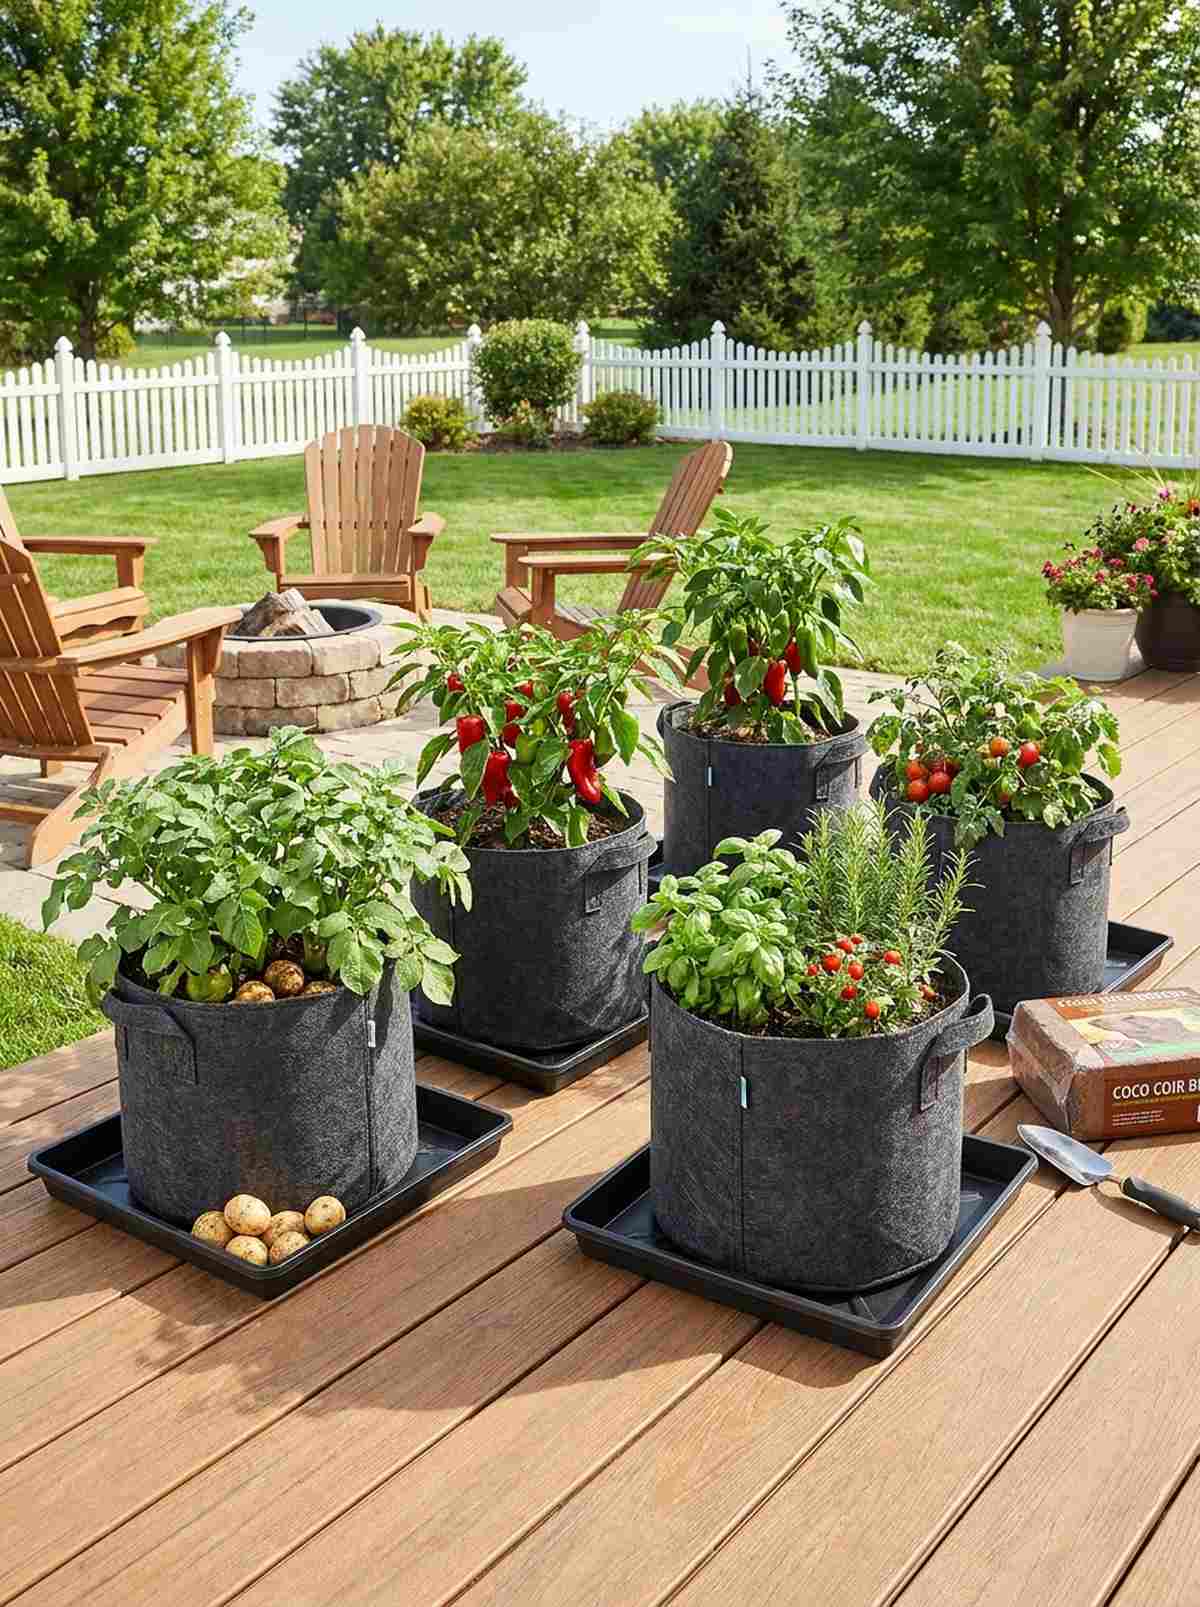
This garden design small space trick feels like having a pop-up farm that you can fold away in winter. Incredible for renters who want to grow potatoes and peppers without building permanent wooden beds.
Hard plastic pots cause root-binding, but breathable fabric air-prunes the roots, giving you a massive yield that rivals expensive raised beds. Investing in heavy-duty fabric grow bags with handles allows you to literally drag your garden into the sun.
You can start a whole garden this way for just $15–$30. Pin this to your budget gardening board!
- Key Materials: Non-woven fabric aeration bags
- Vibe / Style: Functional urban farm
- Difficulty: Just add dirt
- Budget Breakdown: 5-Pack Bags: $20 | Soil: $15
- Creator’s Tip: Fabric bags dry out faster; sit them in a shallow plastic tray to retain bottom moisture.
- Smart Sourcing: heavy-duty non-woven grow bags (bulk pack) and moisture-retaining coco coir bricks.
17. Stacked Pot Towers

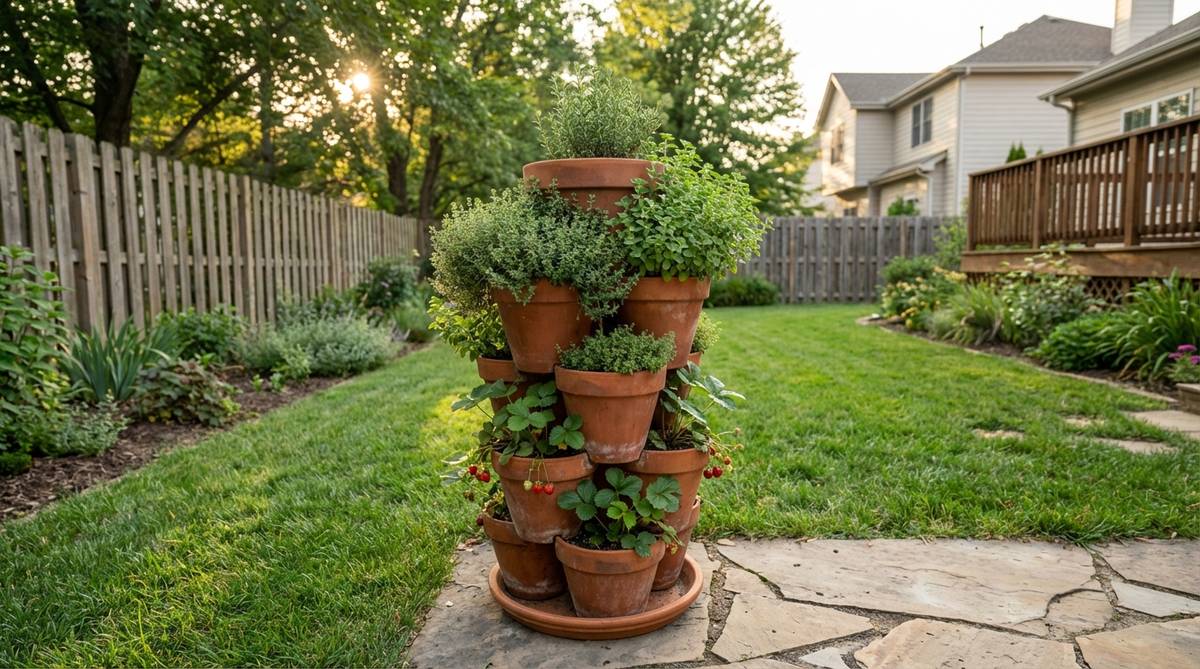
Creates a whimsical, topsy-turvy sculpture that feels straight out of Alice in Wonderland. A brilliant use-case for a high-density strawberry or herb patch right outside the kitchen.
Just balancing pots precariously is a disaster waiting to happen, but driving a hidden steel rebar rod through the drainage holes delivers a surprisingly premium, stable structure. Snag some pre-drilled terracotta stacking kits if you don’t own masonry drill bits.
You can easily pull this off for around $25–$45. Highly recommended for a fun weekend craft.
- Key Materials: Graduated terracotta pots, steel rebar
- Vibe / Style: Playful cottage core
- Difficulty: Moderate balancing act
- Budget Breakdown: Pots: $30 | Rebar Stake: $5
- Creator’s Tip: Sink the rebar at least 12 inches into the ground before threading the pots onto it.
- Smart Sourcing: galvanized steel rebar stakes (pre-cut) and multi-tier vertical planter stacking kits.
18. Railing Planters with Adjustable Brackets
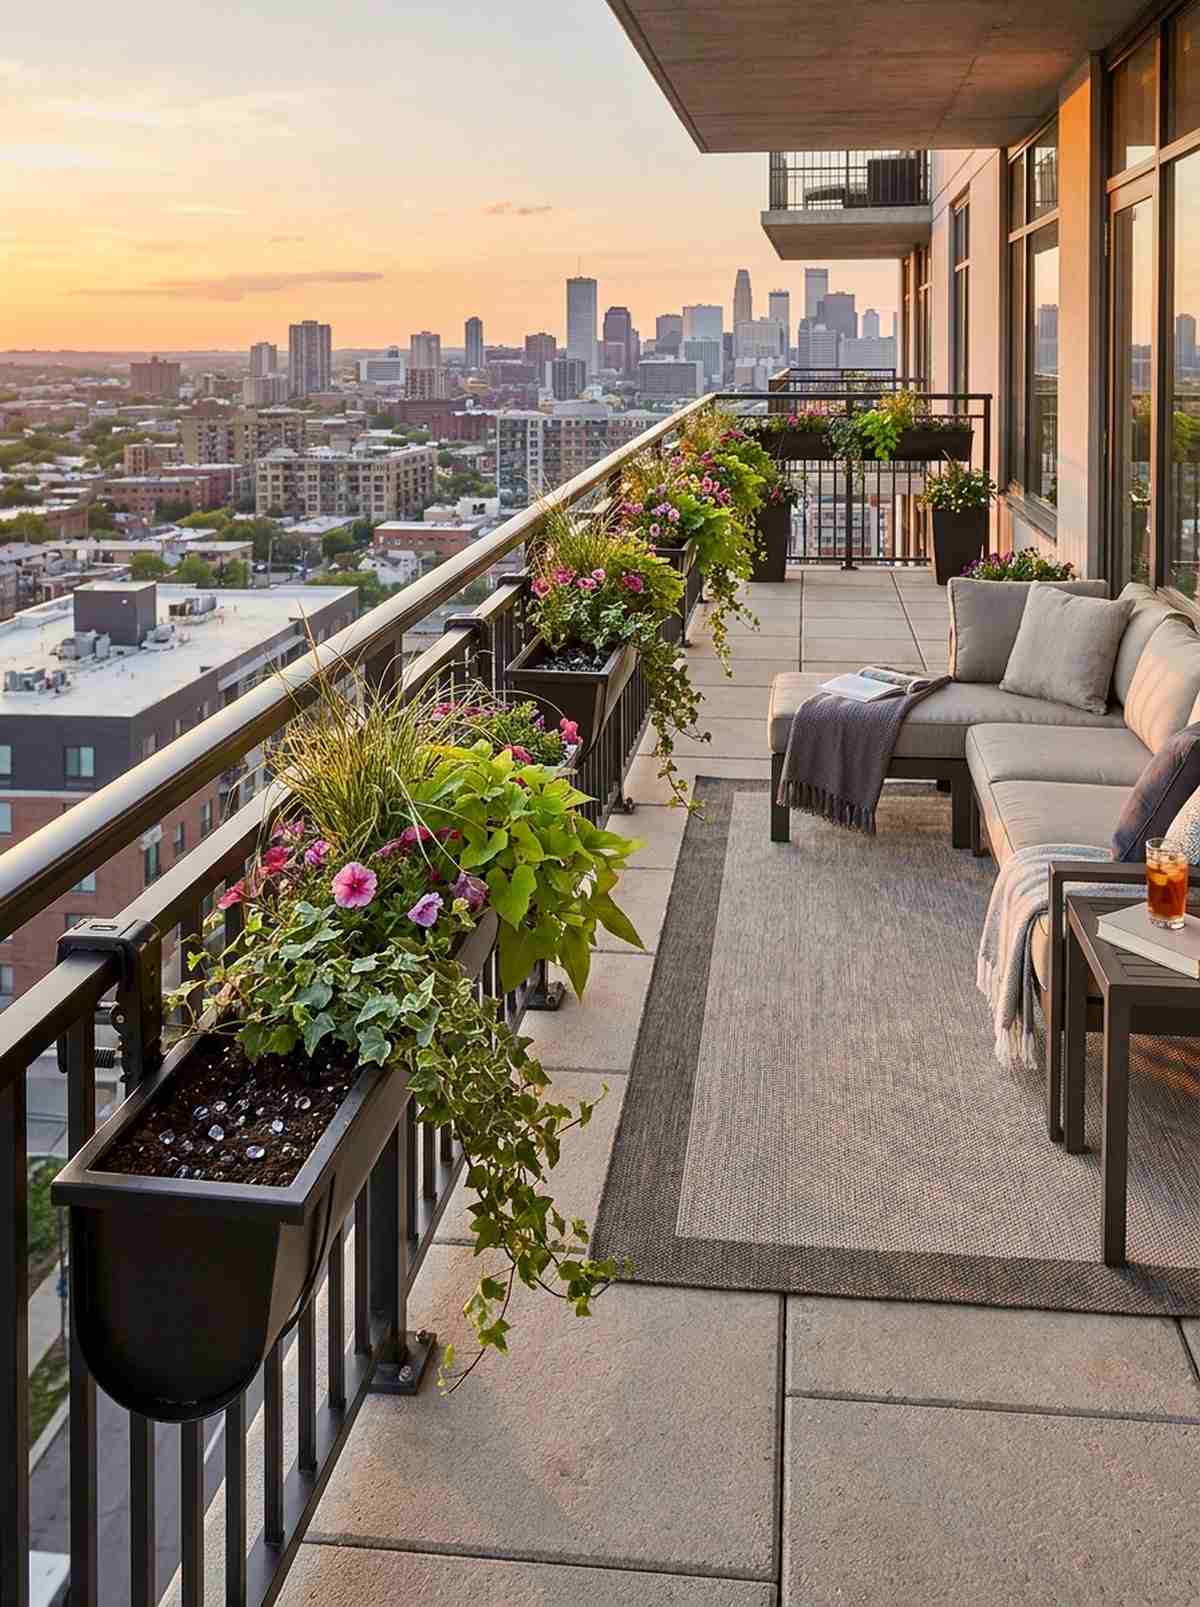
Straddling your fence line with lush greenery feels like creating a living boundary wall. The absolute best way to soften harsh metal balcony railings in city apartments.
Generic over-the-railing pots often tilt and look cheap, but using ratcheting brackets keeps them perfectly level and looks incredibly custom. Adding water-retaining soil crystals is a hard keyword trick to keep them from drying out in the wind.
Expect to spend $20–$40 per planter. Save this clever space-saving hack!
- Key Materials: Saddle planters or adjustable bracket boxes
- Vibe / Style: Clean modern balcony
- Difficulty: Quick snap-on setup
- Budget Breakdown: Planter: $25 | Plants: $15
- Creator’s Tip: Zip-tie the inner bracket to the rail for absolute storm-proof security.
- Smart Sourcing: adjustable locking balcony planter brackets and water-absorbing gel crystals (bulk).
19. Colander and Basket Upcycling
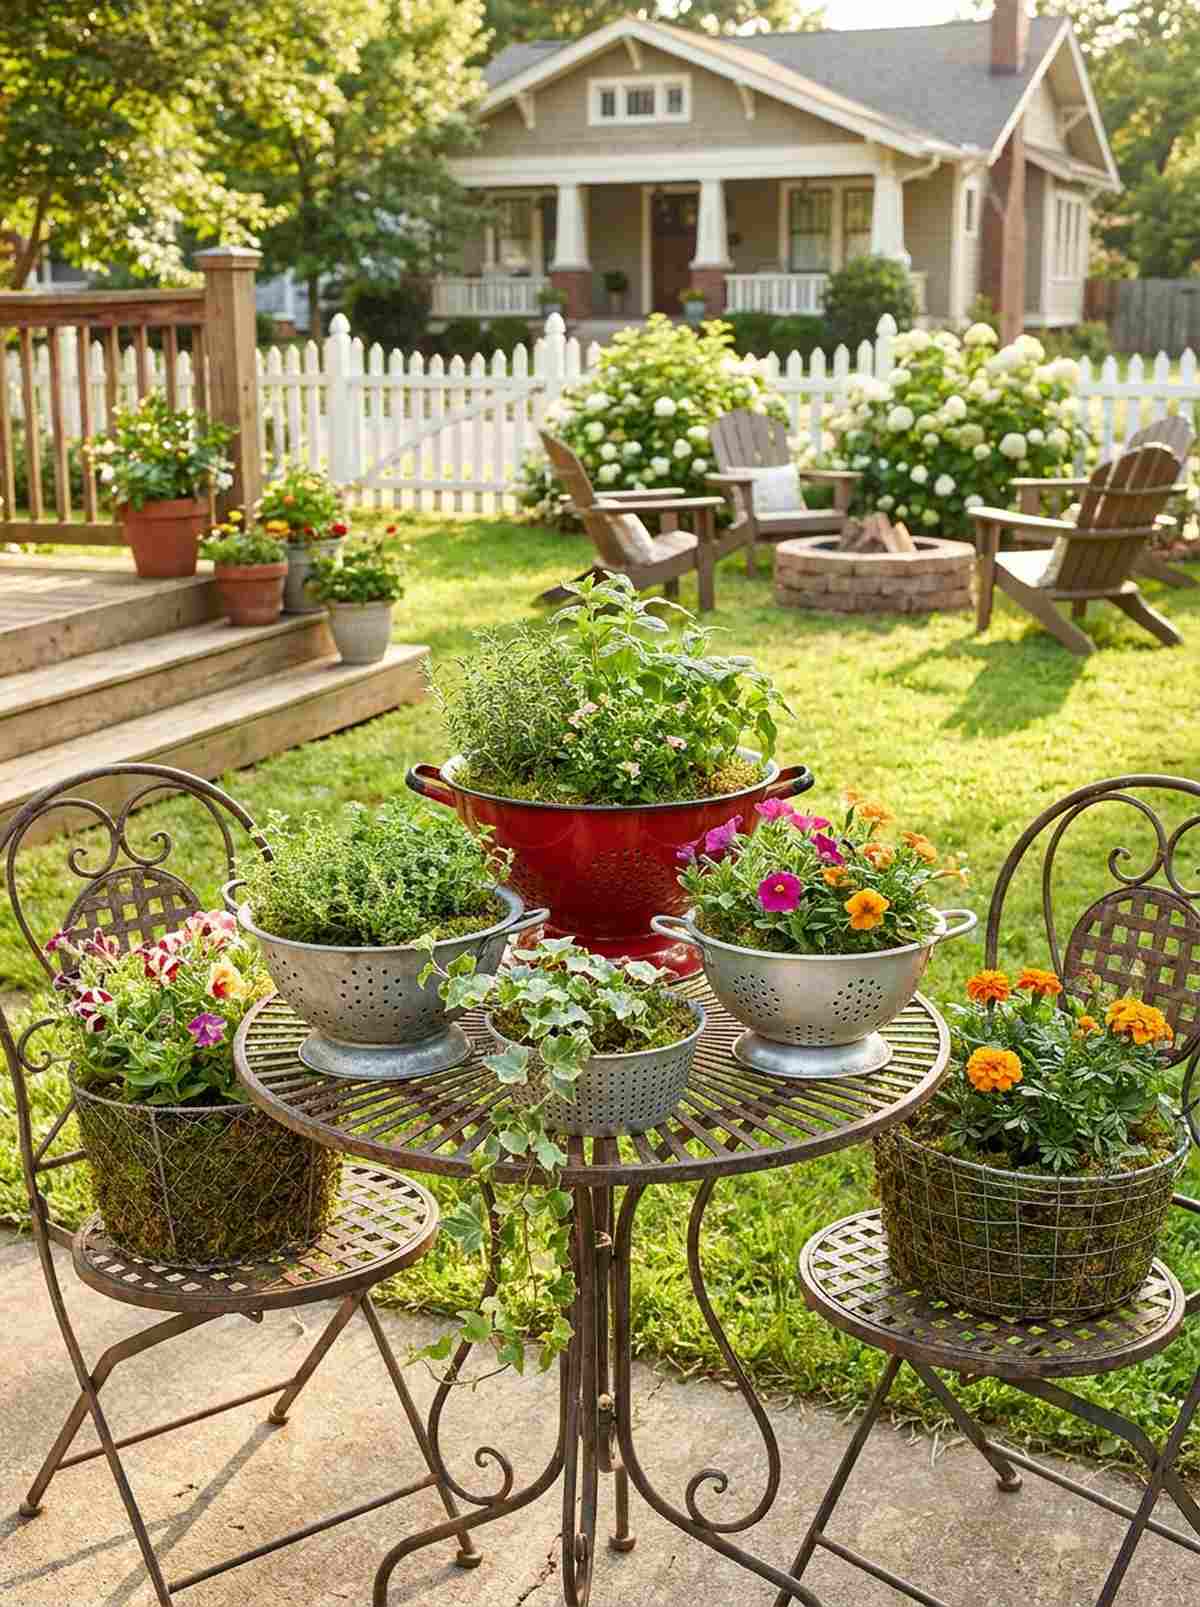
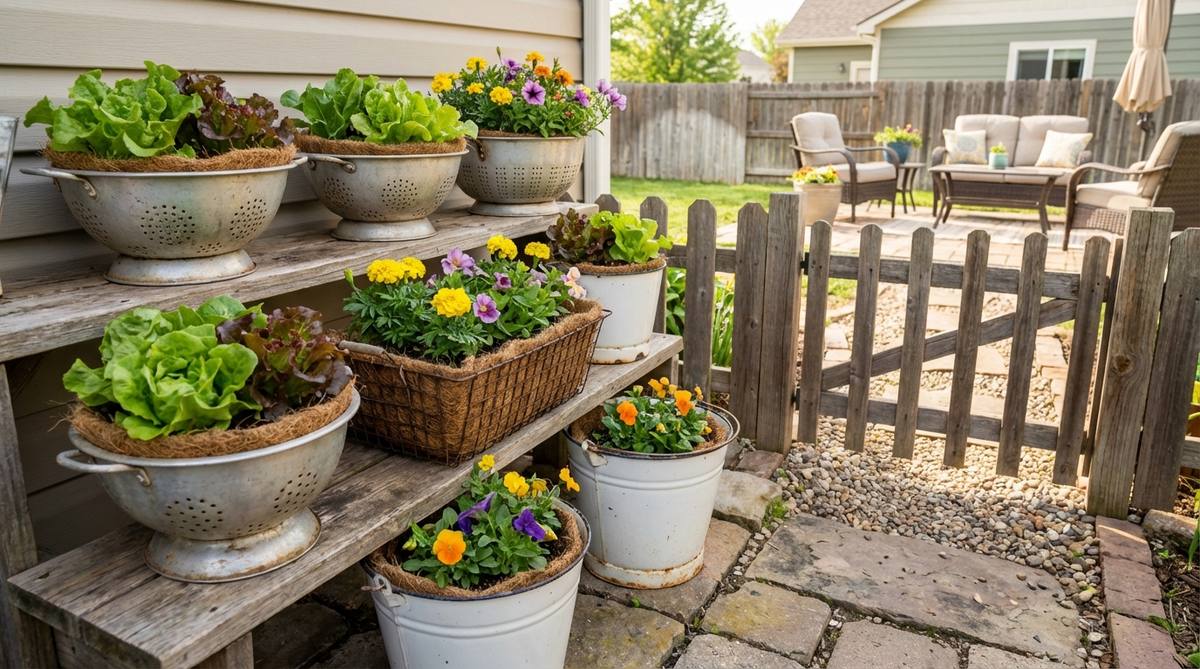
Repurposing vintage kitchenware as planters gives your space a delightful, eclectic cottage vibe. Perfect for creating charming tabletop focal points on small bistro sets.
Leaving raw metal will cause a rusty mess on your table, but sealing them with an enamel spray gives a designer-level finish that lasts for years. Using pre-cut sheet moss liners hides the soil while letting water drain perfectly through the holes.
You can literally do this for under $10 using thrifted items. Pin this for your cheap DIY decor board!
- Key Materials: Metal strainers, moss liners
- Vibe / Style: Vintage eclectic cottage
- Difficulty: Fun and easy
- Budget Breakdown: Thrifted Colander: $5 | Moss: $5
- Creator’s Tip: Spray the inside with a clear rust-preventative coat before adding wet dirt.
- Smart Sourcing: preserved sheet moss (bulk pack) and clear rust-oleum protective enamel spray.
Stop buying flimsy patio furniture right now! The next built-in solution completely eliminates the need for bulky chairs in tiny spaces.
20. Sink and Trough Gardens
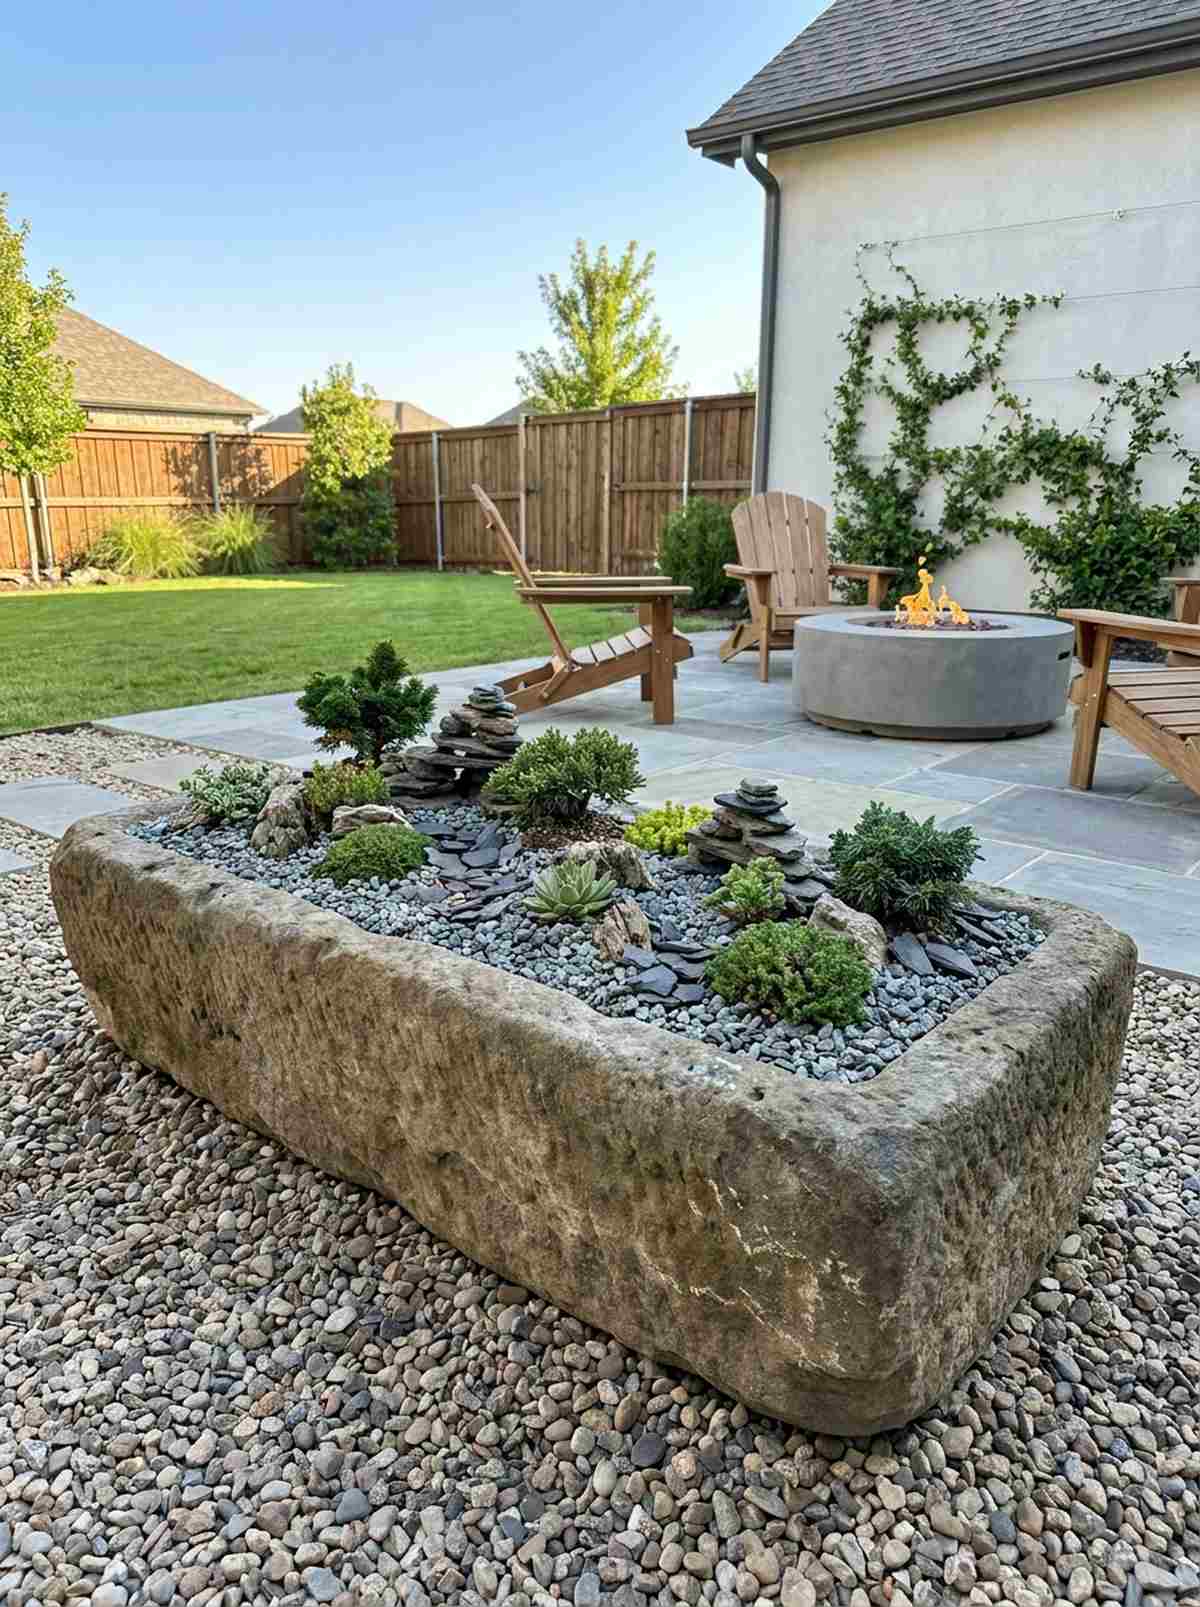
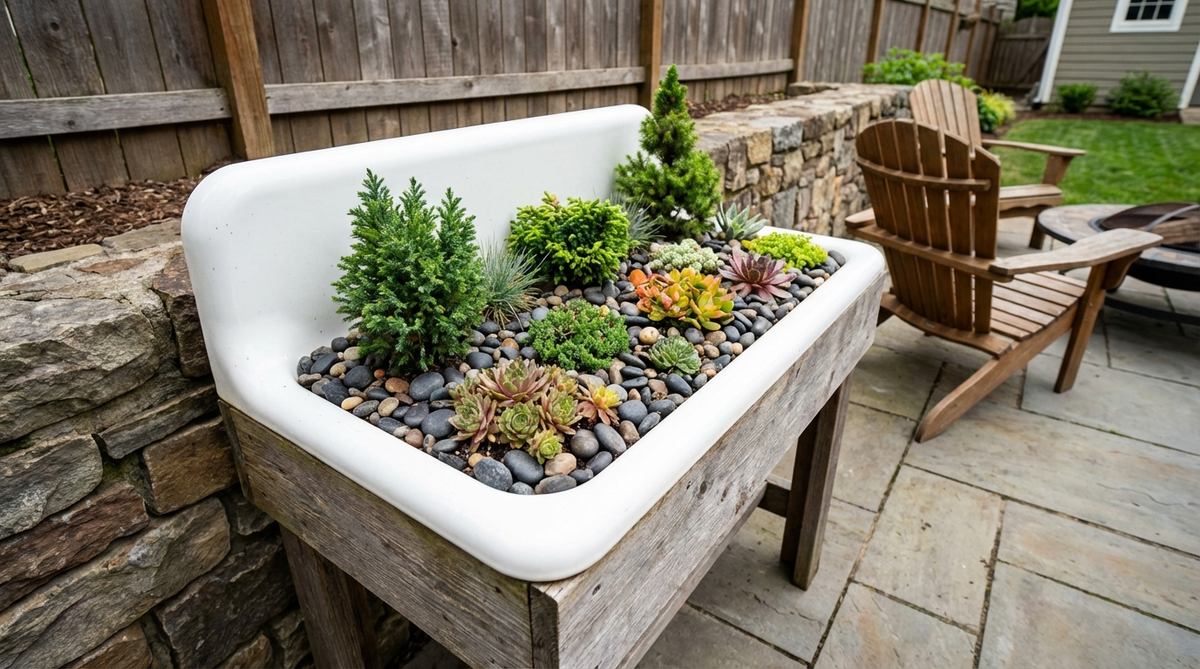
Planting a miniature alpine world inside a salvaged stone trough feels like having a museum exhibit in your yard. The ultimate statement piece for minimalist gravel courtyards.
Using standard potting soil will rot alpine plants instantly, but blending a custom gritty mix mimics a mountain environment perfectly. Securing miniature garden supplies like tiny slate stones turns a basic planter into an expensive-looking bonsai landscape.
You can execute this premium look for $40–$90. It is a striking upgrade that changes the whole patio vibe.
- Key Materials: Hypertufa troughs or salvaged sinks
- Vibe / Style: Zen rock garden
- Difficulty: Requires specialized soil mixing
- Budget Breakdown: Trough/Basin: $50 | Gritty Mix: $20
- Creator’s Tip: Top-dress the finished planter with aquarium gravel to keep the base of the succulents dry.
- Smart Sourcing: pre-mixed succulent and bonsai gritty soil and decorative natural slate chips (bulk).
Raised Bed Systems That Organize Efficiently
21. Keyhole Garden Design
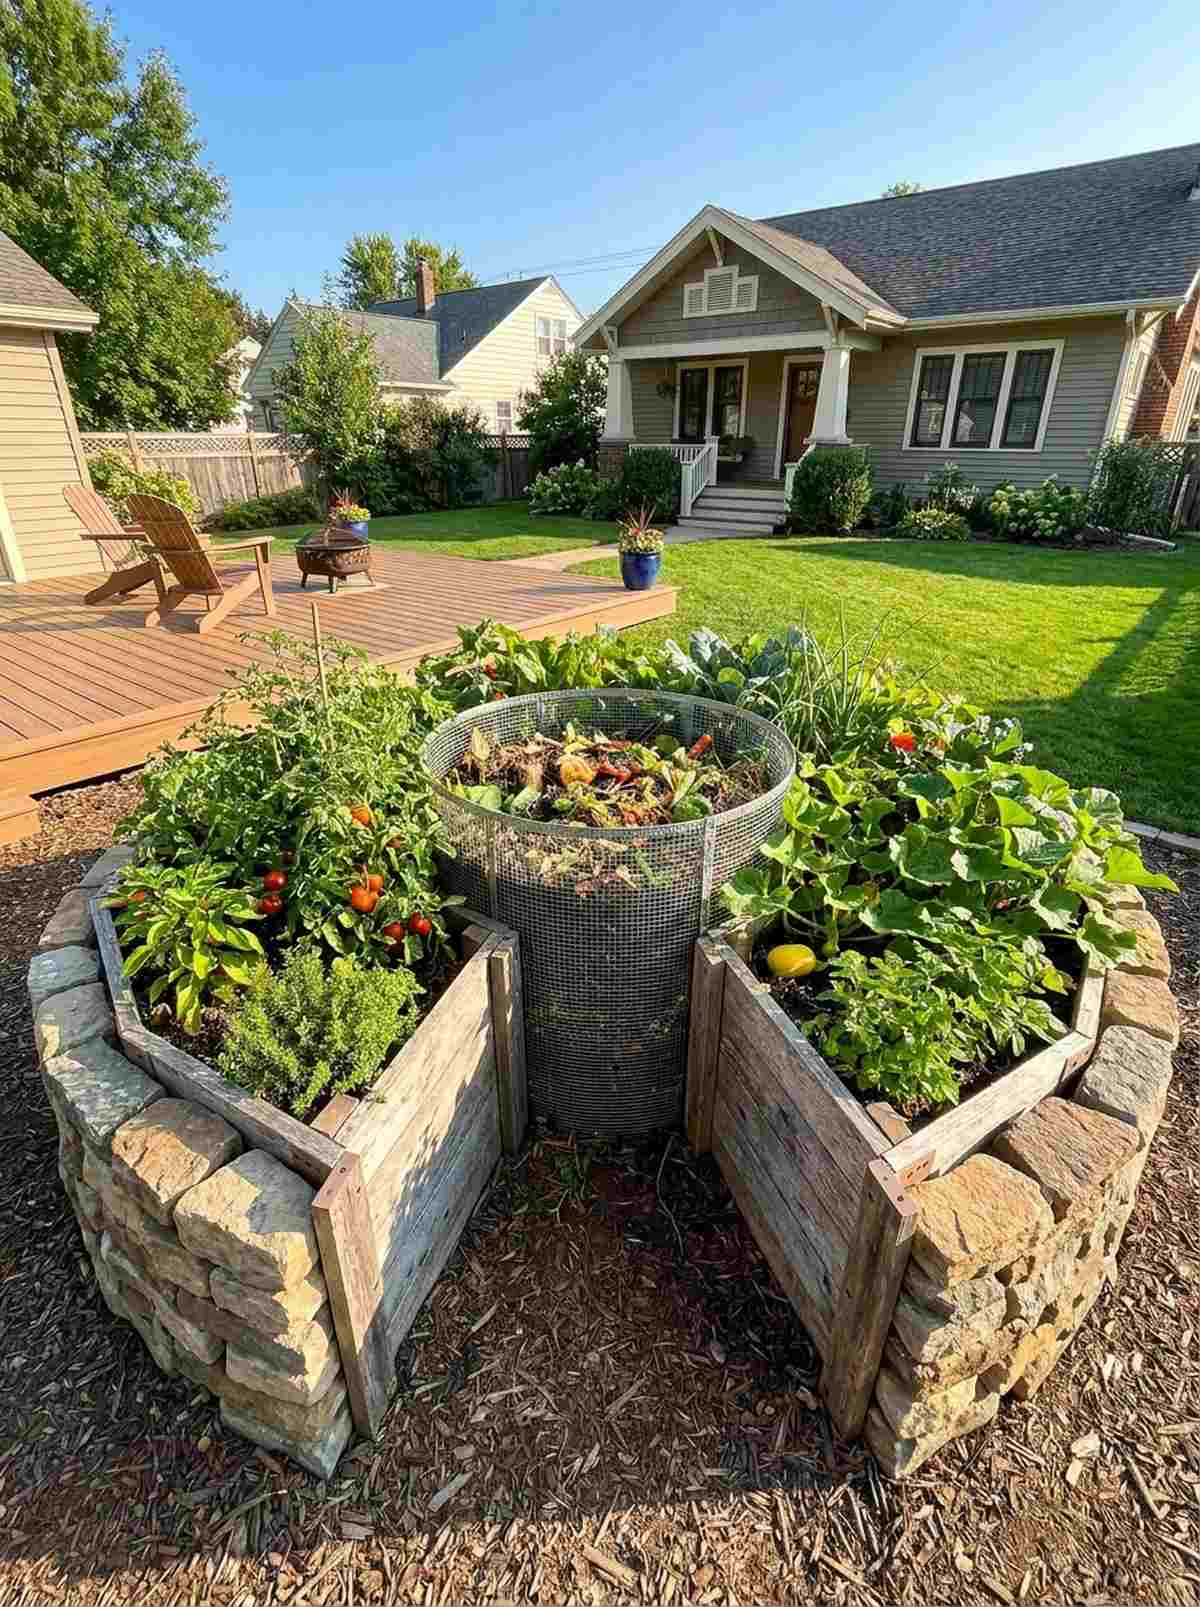
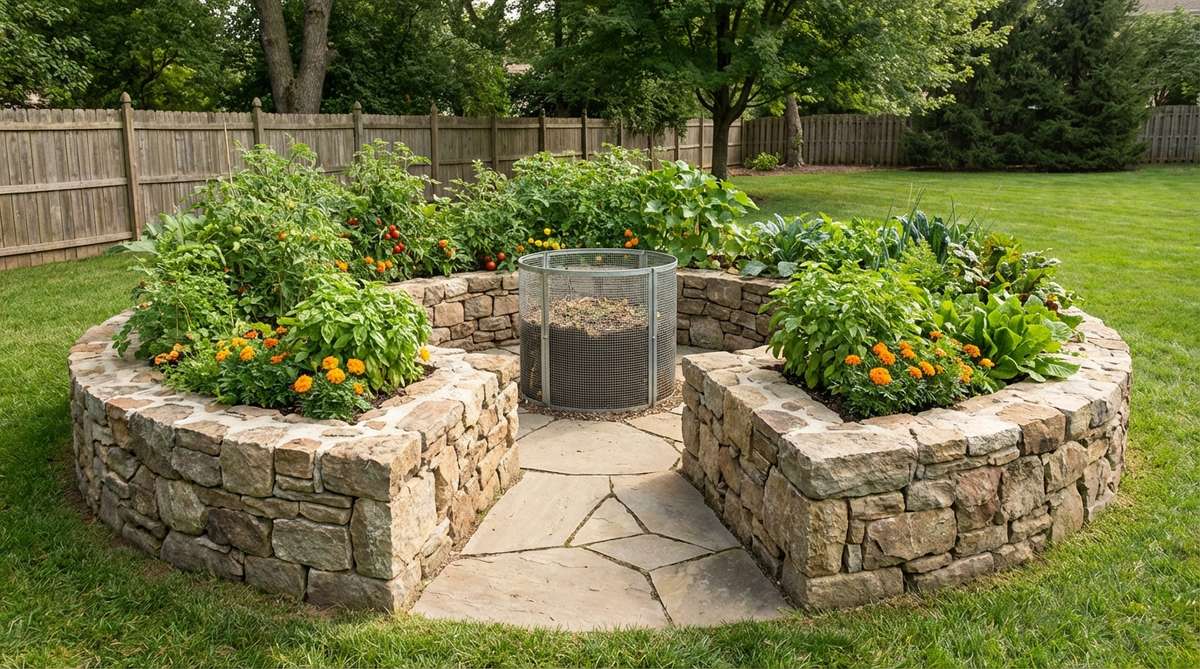
This brilliant African layout feels like discovering the ultimate sustainable cheat code. Incredible for maximizing vegetable yields in a tight 6×6 footprint without ever stepping on the soil.
Basic square beds waste space on walking paths, but a circular bed with a central compost basket delivers a shockingly high-tech, self-feeding ecosystem. Utilizing heavy-duty galvanized compost wire ensures the center column doesn’t collapse.
You can easily pull this off for around $80–$150. Pin this to your homesteading layout board!
- Key Materials: Stone/wood border, wire compost cage
- Vibe / Style: Permaculture powerhouse
- Difficulty: Moderate weekend build
- Budget Breakdown: Border Materials: $100 | Wire Cage: $20
- Creator’s Tip: Layer cardboard and twigs at the base before adding soil to save massive money on dirt.
- Smart Sourcing: heavy-gauge hardware cloth rolls and composite raised bed border brackets.
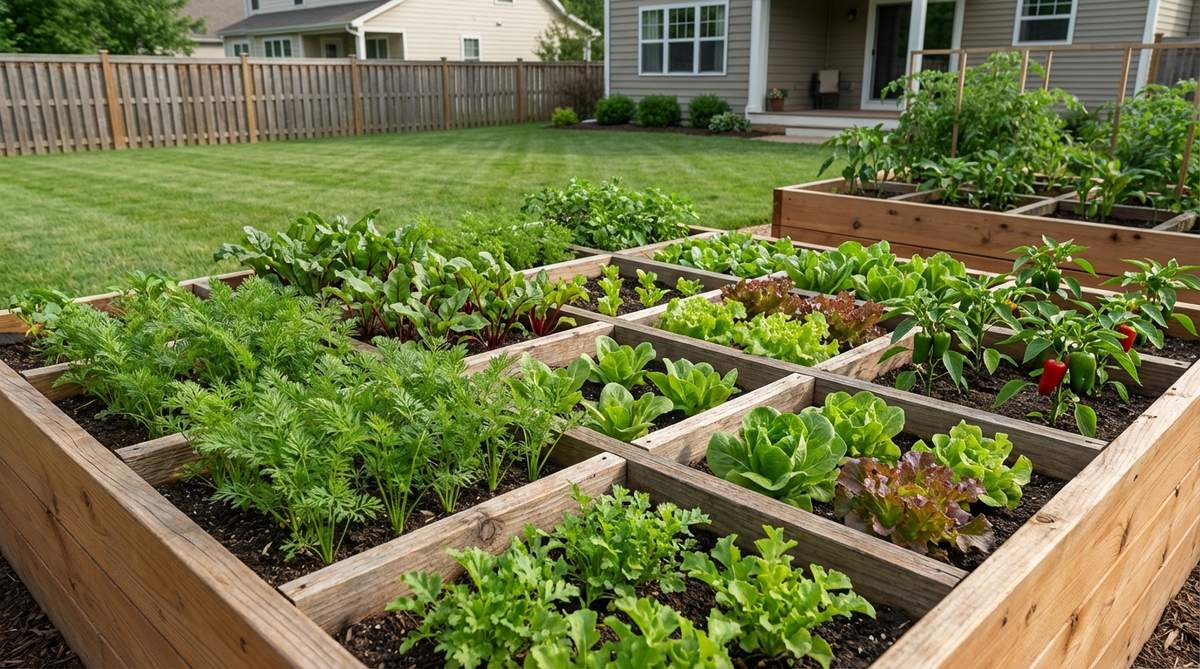
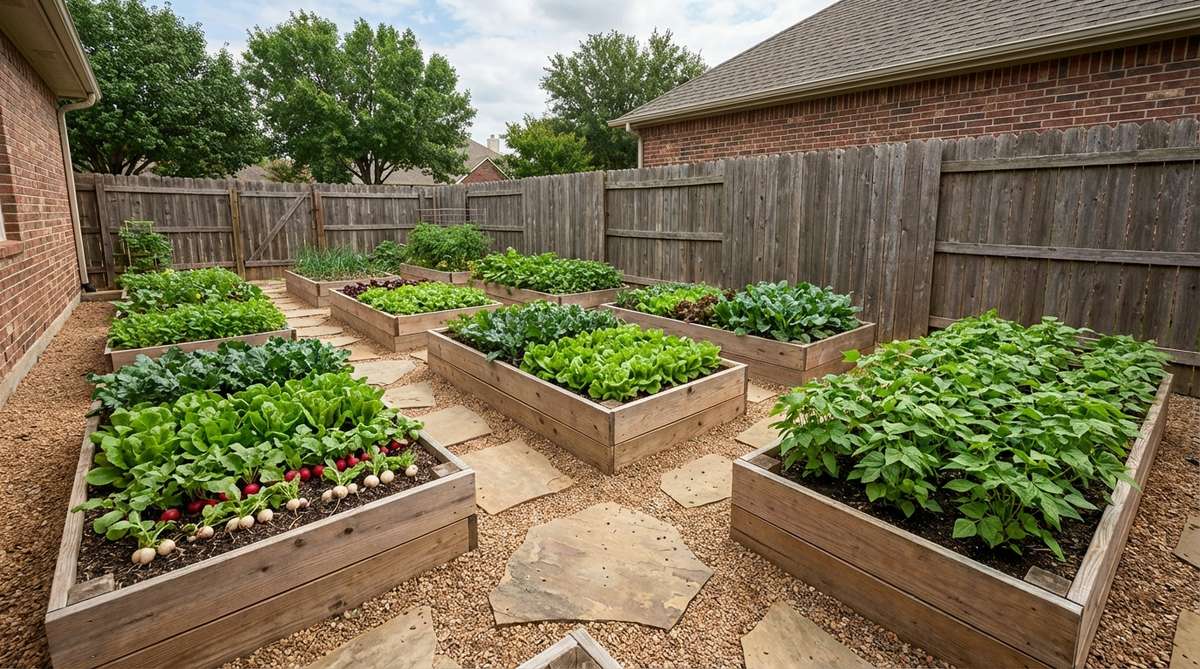
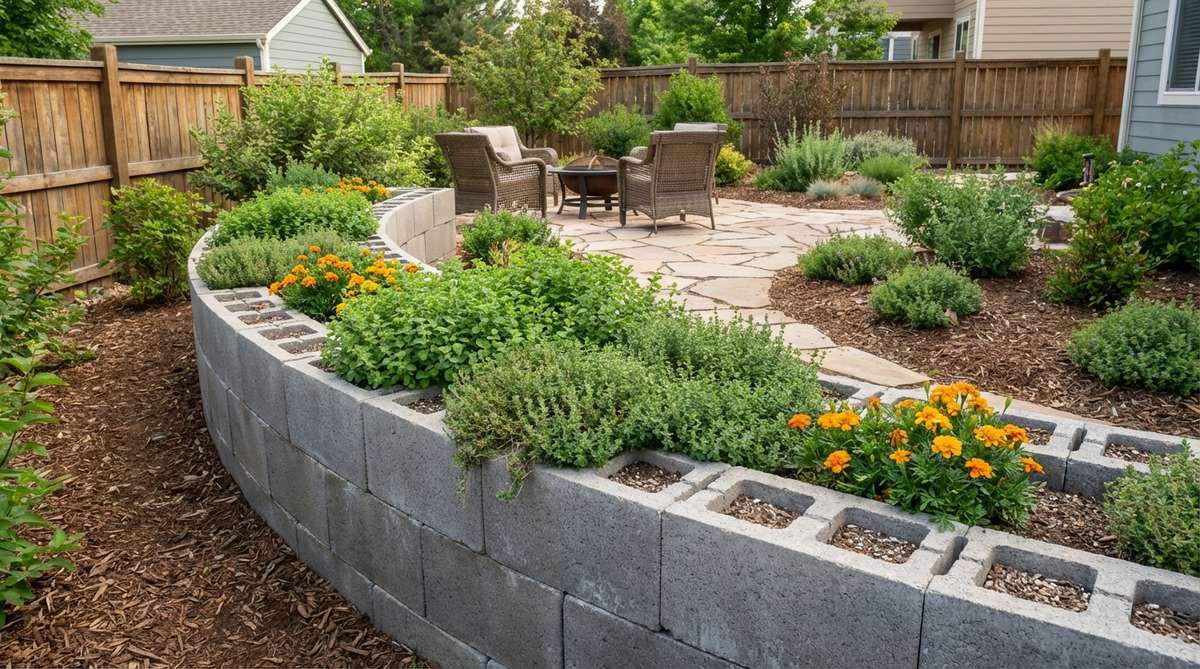
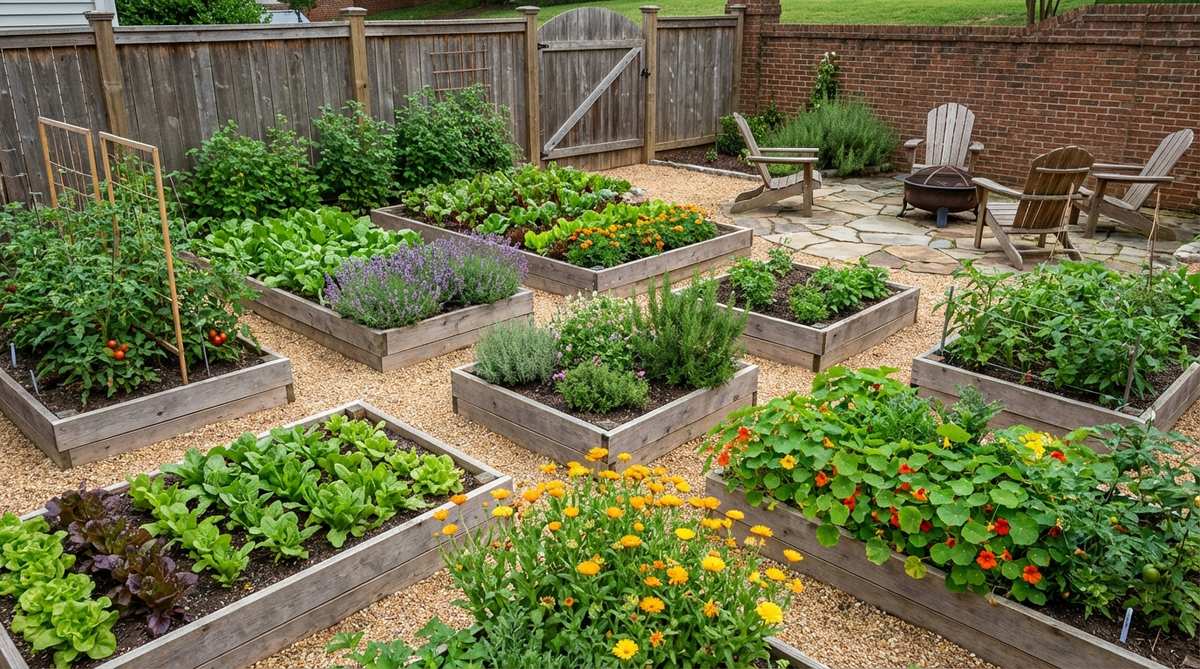
22. L-Shaped Perimeter Beds
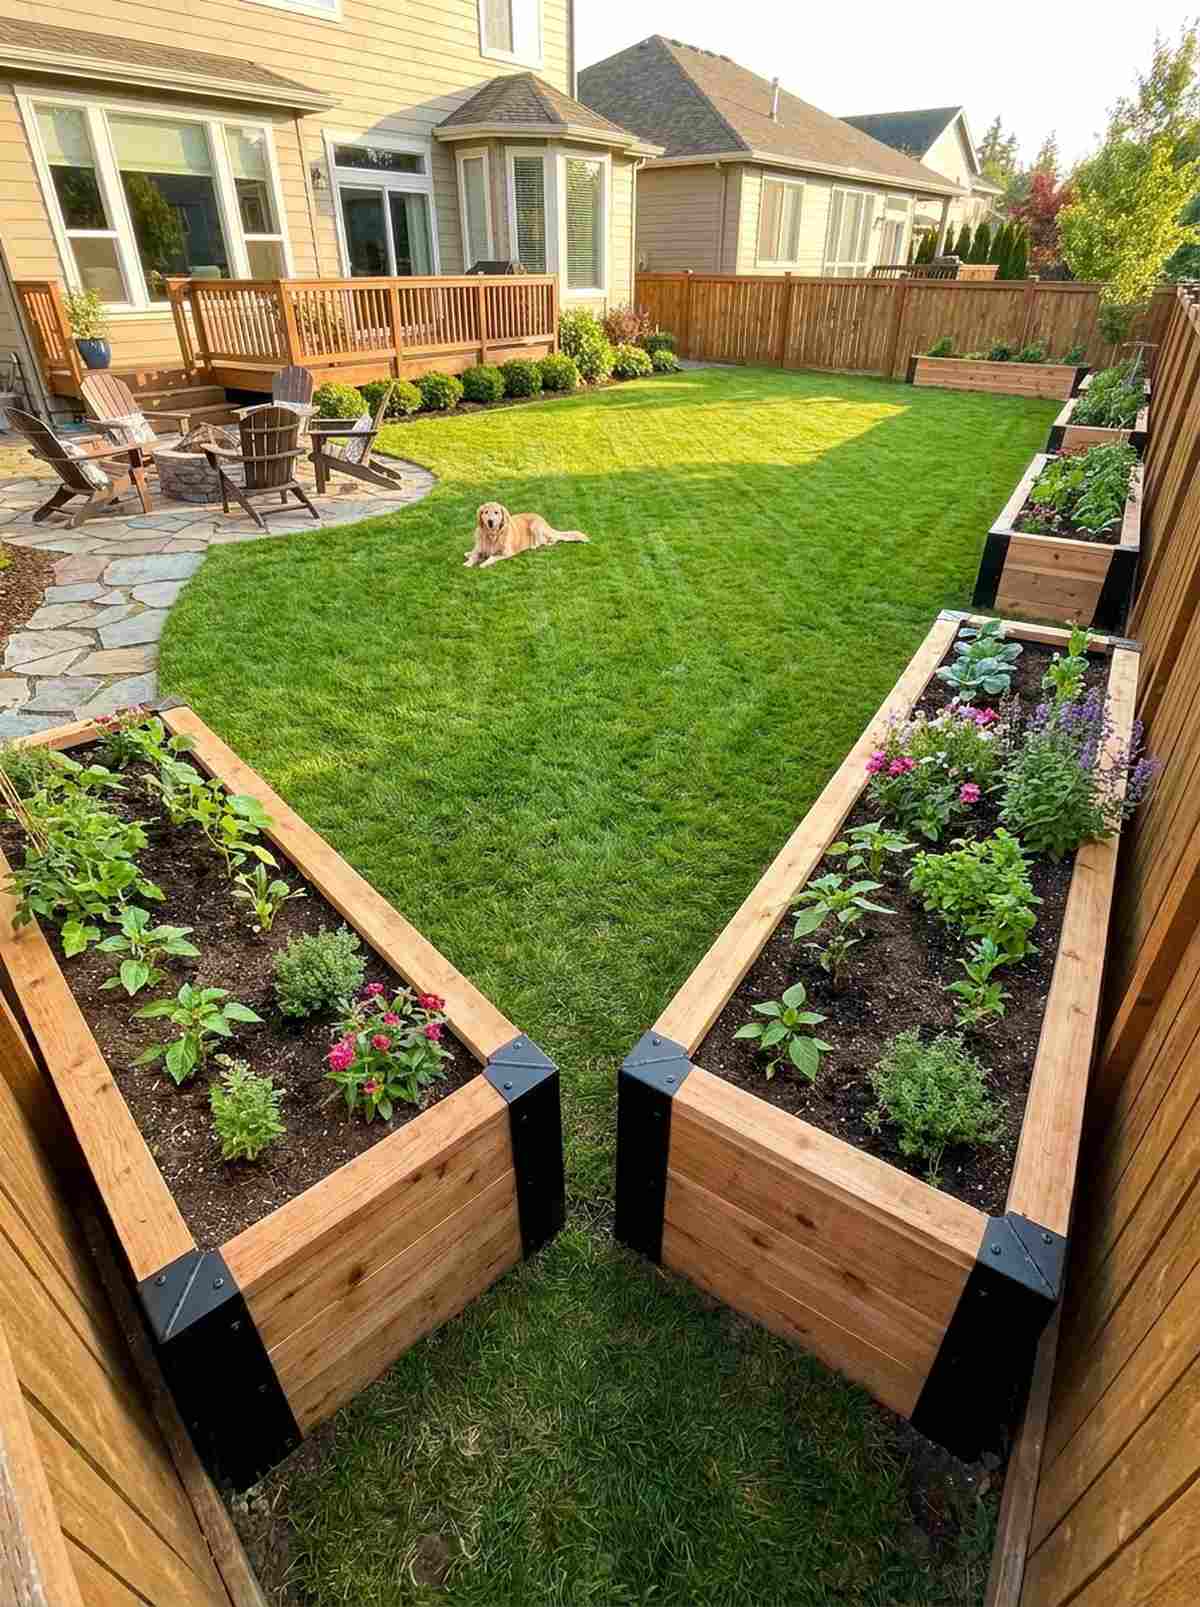
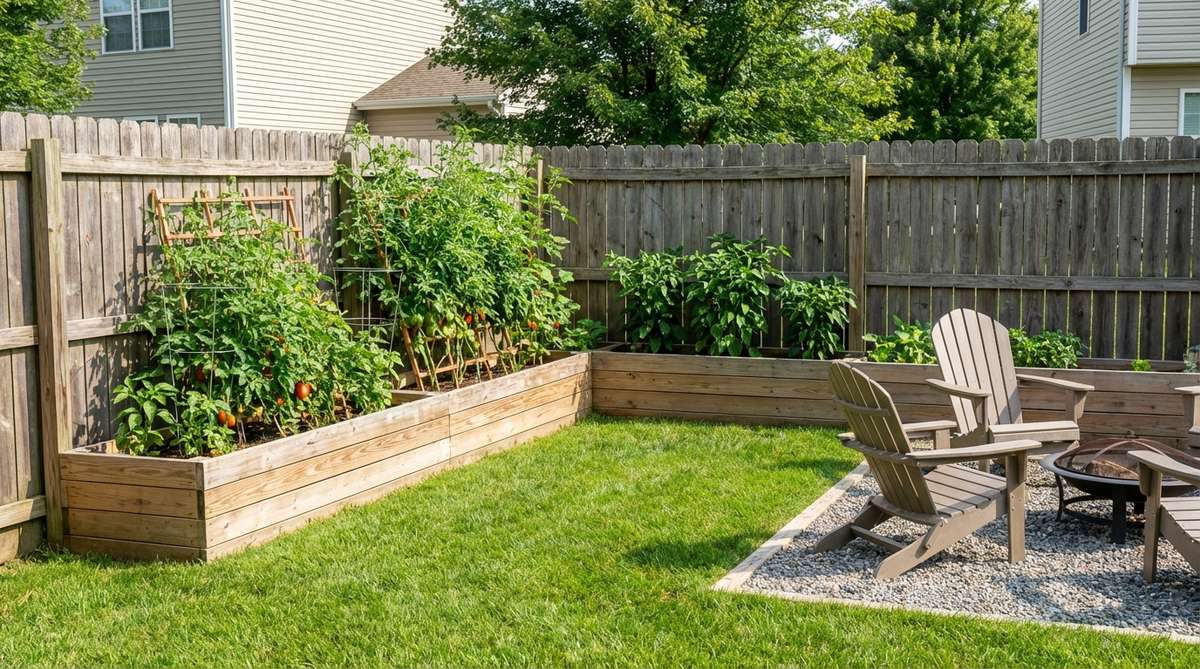
Wrapping your beds around the fence line creates a cozy, sunken-room feeling in the center of your yard. The most efficient small garden design ideas layout for maximizing open grass space for kids or dogs.
Building straight boxes visually chops the yard in half, but hugging the perimeter makes the space look far more expensive and expansive. Snagging heavy-duty corner bracket kits makes building these custom shapes incredibly easy.
Expect to spend $100–$200 on lumber and soil. Highly recommended for a permanent backyard upgrade.
- Key Materials: Cedar lumber, corner brackets
- Vibe / Style: Clean architectural borders
- Difficulty: Basic carpentry required
- Budget Breakdown: Cedar Wood: $120 | Hardware: $40
- Creator’s Tip: Keep the beds no wider than 30 inches so you can easily reach the back without stepping inside.
- Smart Sourcing: raised bed steel corner bracket kits (4-pack) and premium cedar-safe wood weatherproofer.
23. Tiered Terrace Beds

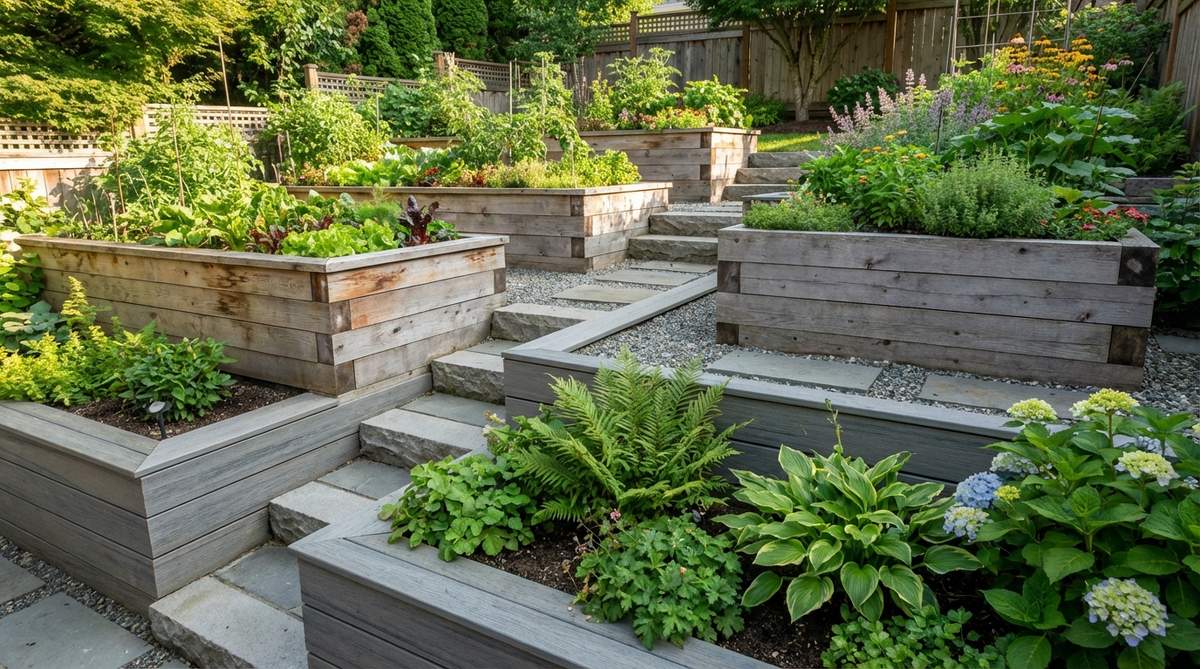
Stepping gardens up a hillside feels like having your own miniature hanging gardens of Babylon. Flawless solution if your tiny backyard has a frustrating, unusable slope.
Trying to plant directly on a slope just washes away in the rain, but installing stepped retaining boxes gives a designer-level finish that conquers erosion. Using commercial-grade geotextile fabric behind the wood prevents soil from pushing through the cracks.
You can execute this genius structural hack for $150–$300. Save this if you have a sloped yard!
- Key Materials: Pressure-treated lumber or composite boards
- Vibe / Style: Structured modern landscape
- Difficulty: Advanced leveling required
- Budget Breakdown: Wood/Block: $200 | Fabric: $30
- Creator’s Tip: Drive rebar stakes through the bottom timbers directly into the hill to prevent the wall from sliding.
- Smart Sourcing: commercial non-woven geotextile fabric (bulk roll) and galvanized landscaping timber spikes.
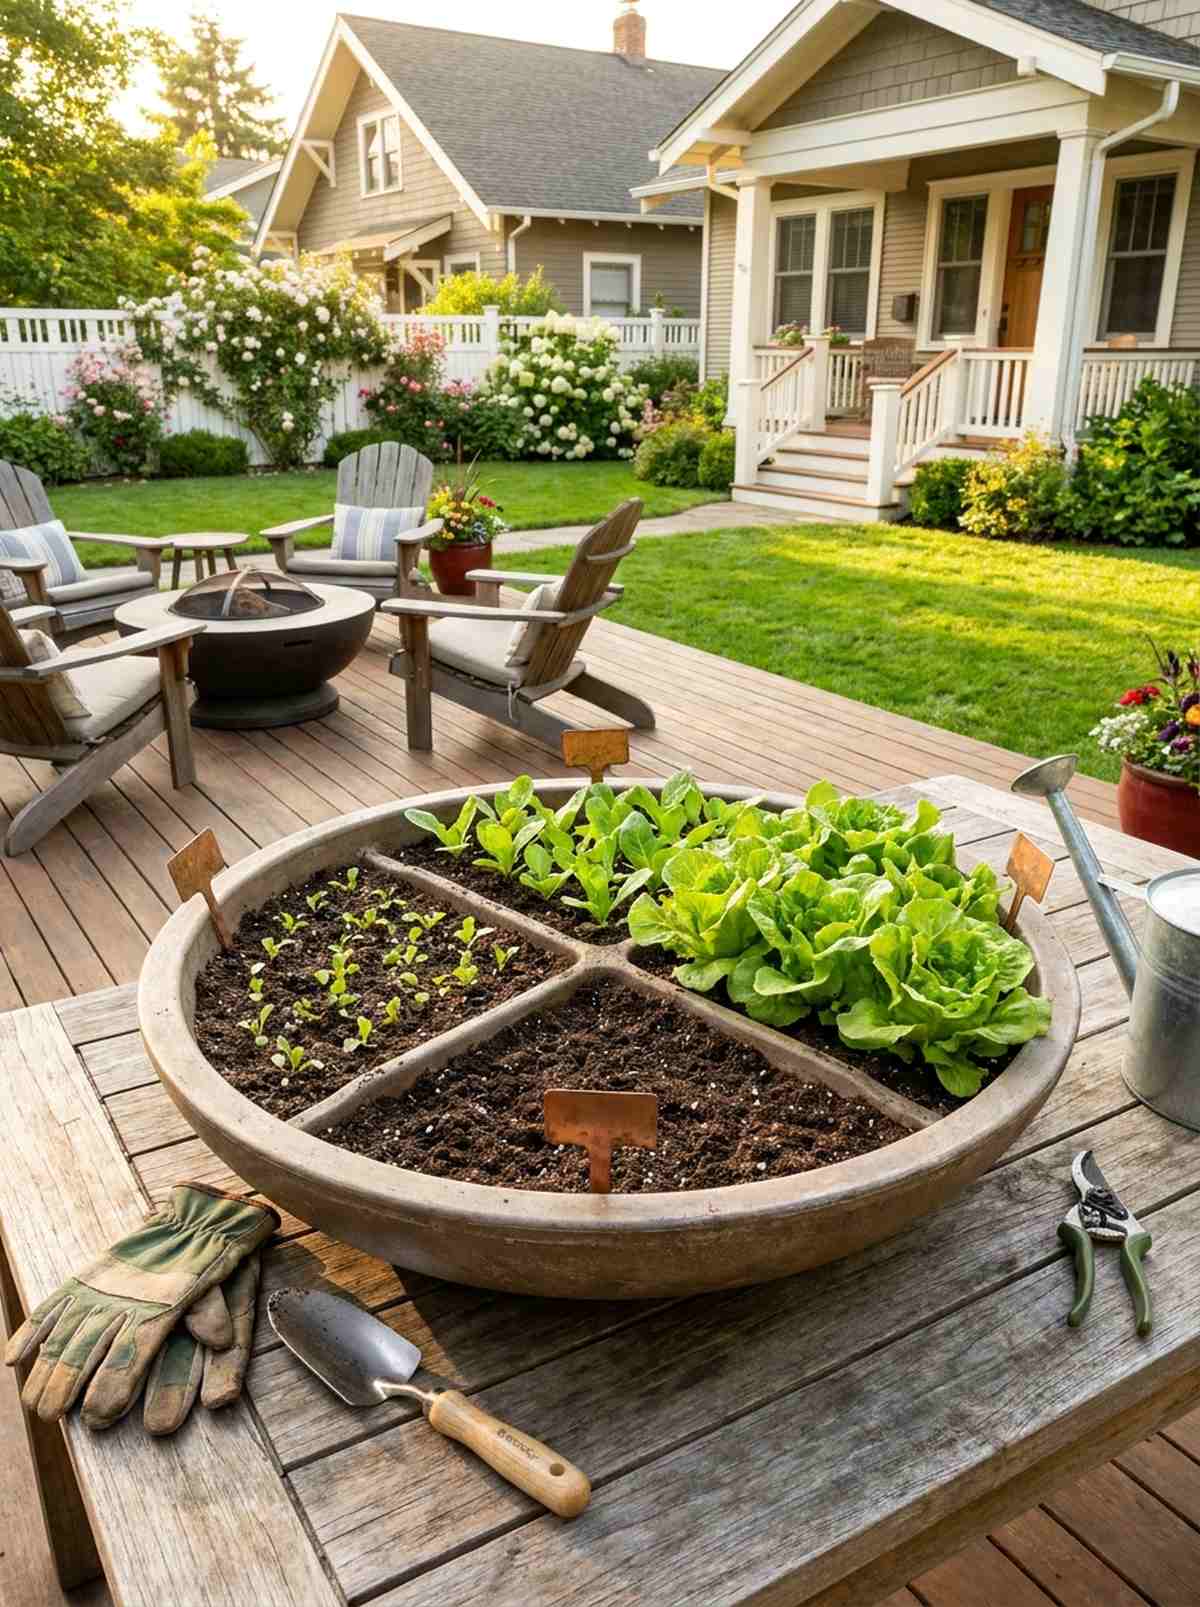
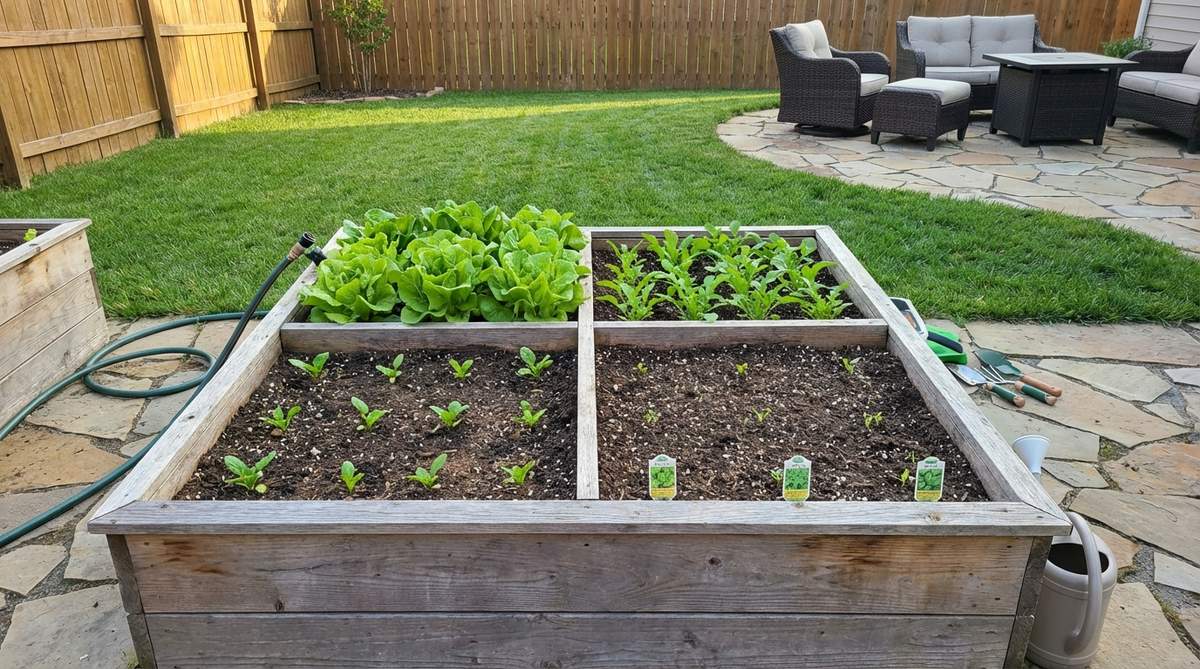
24. Square Foot Gardening Grids
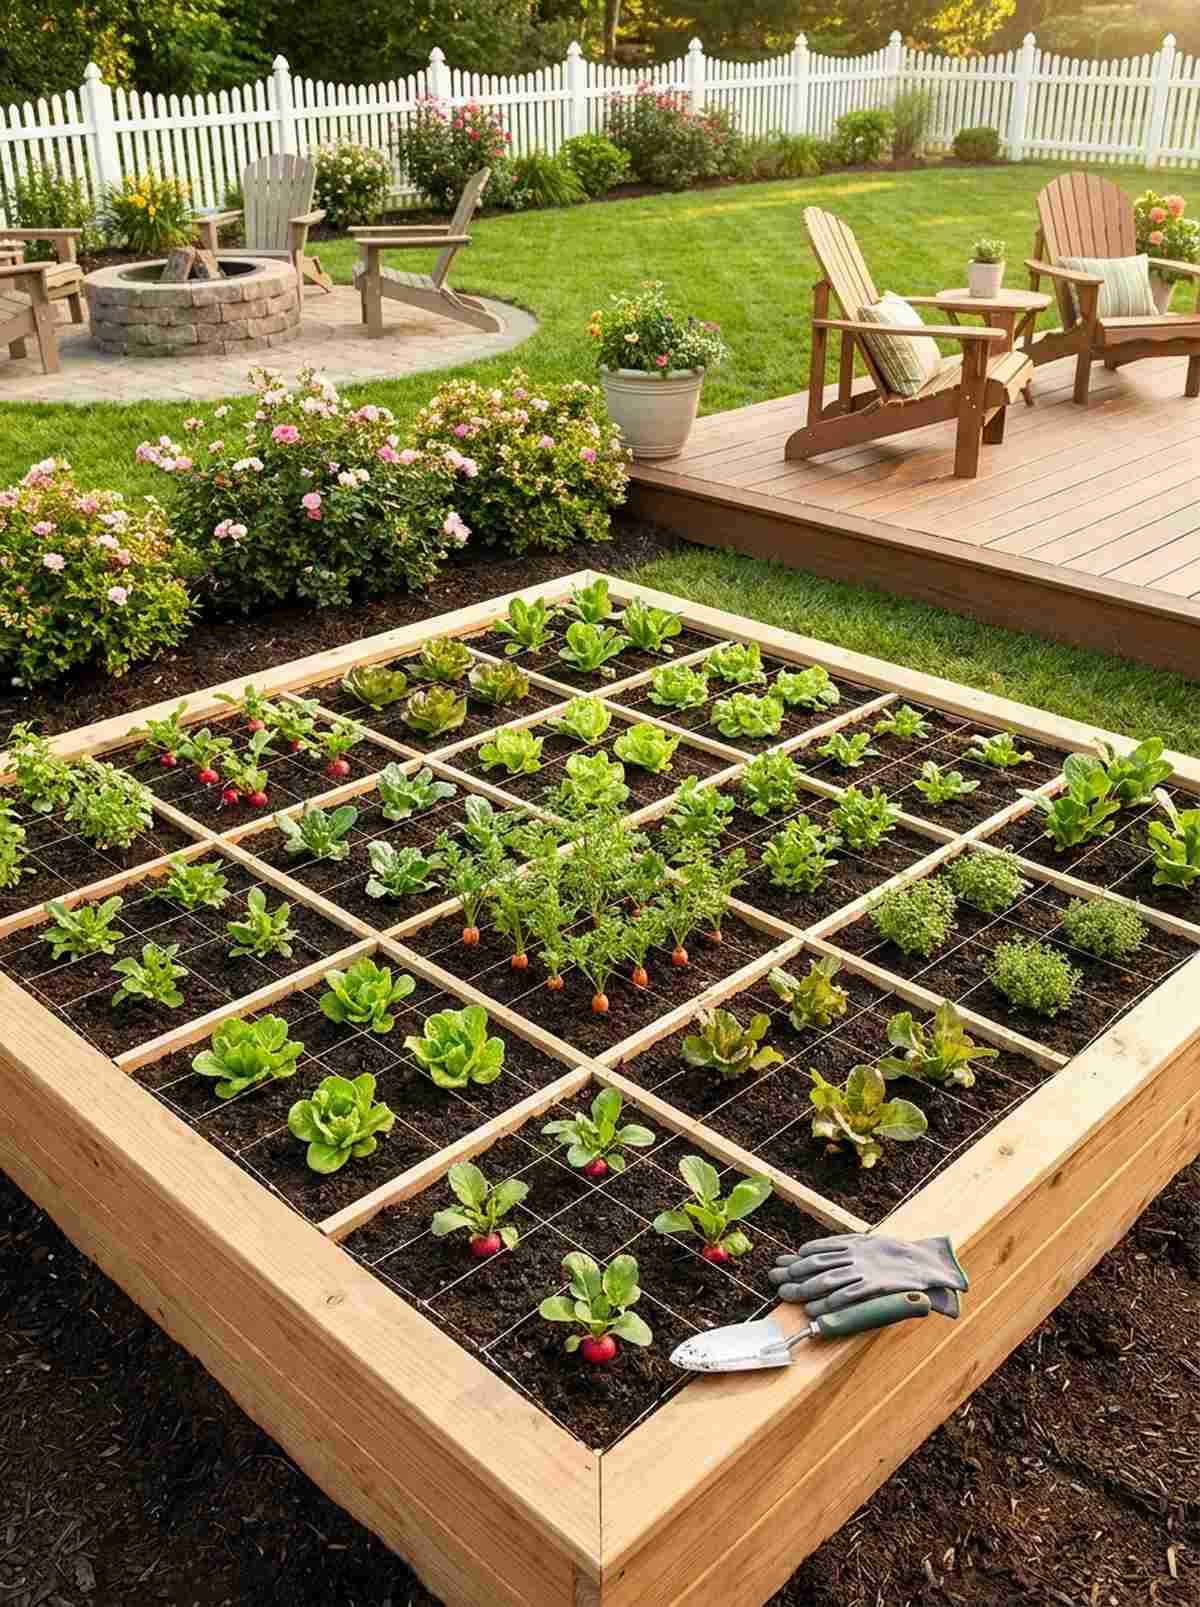
Laying down a precise grid feels like playing an incredibly satisfying, real-life game of Tetris. The ultimate strategy to squeeze 100% more food out of a tiny 4×4 raised box.
Planting in traditional rows wastes massive amounts of dirt, but gridding out exact plant counts looks far more intentional and yields massive harvests. Utilizing pre-made nylon plant trellis netting makes creating the physical grid take literally three minutes.
You can set this up for just $30–$60. Pin this to your high-yield vegetable board!
- Key Materials: 4×4 bed, string/wood grid dividers
- Vibe / Style: Hyper-organized agrarian
- Difficulty: Very easy math
- Budget Breakdown: Bed Kit: $45 | Grid Material: $10
- Creator’s Tip: Use cheap plastic blinds cut to size to lay down your permanent grid lines.
- Smart Sourcing: snap-together 4×4 raised bed kits and heavy-duty nylon garden grid netting.
Most people absolutely ruin their backs pulling weeds… until they install the game-changing accessibility hack coming up next.
25. Waist-High Accessible Beds
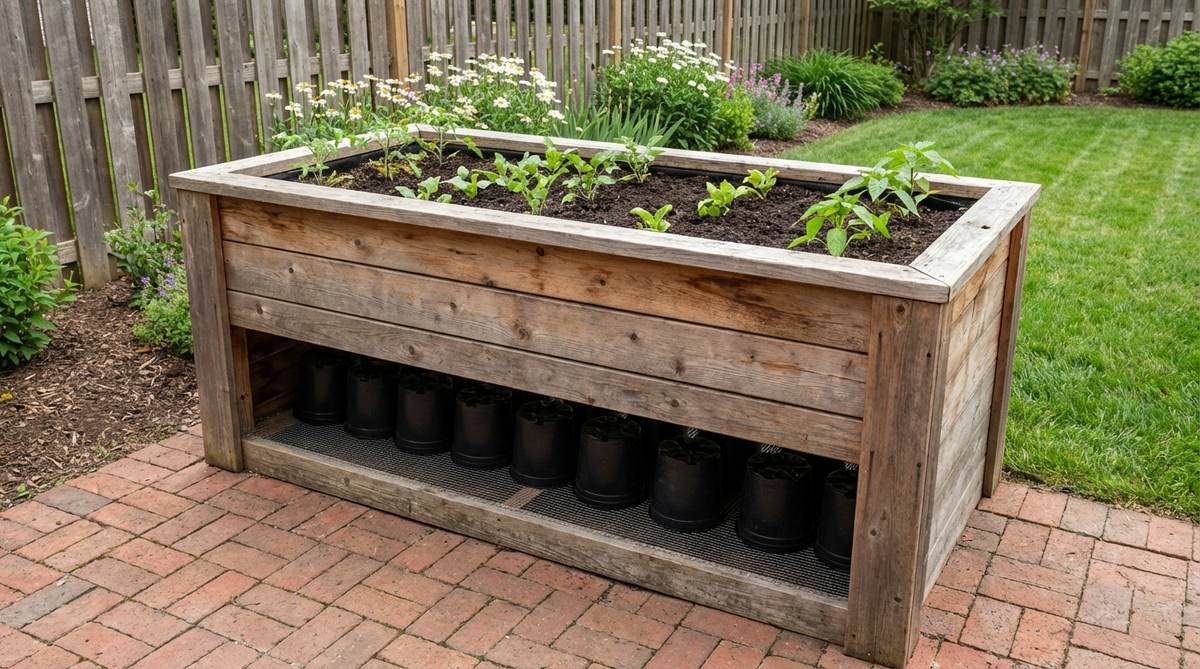
Tending to your tomatoes without ever bending over feels like a VIP gardening experience. Highly recommended for aging gardeners or anyone with back pain.
Flimsy elevated planters warp and dump dirt, but using corrugated metal on a heavy wooden frame delivers a surprisingly premium, industrial-chic look. Adding heavy-duty galvanized raised bed liners prevents the wood from rotting out prematurely.
You can easily pull this off for around $100–$200. Save this for your ergonomic backyard plans!
- Key Materials: Galvanized metal panels, 4×4 posts
- Vibe / Style: Modern industrial farmhouse
- Difficulty: Moderate power tool usage
- Budget Breakdown: Metal/Wood: $150 | Hardware: $30
- Creator’s Tip: Fill the bottom 50% of the deep bed with empty milk jugs or logs so you don’t go broke buying soil.
- Smart Sourcing: corrugated galvanized steel planter kits (tall) and heavy-duty weed barrier liner rolls.
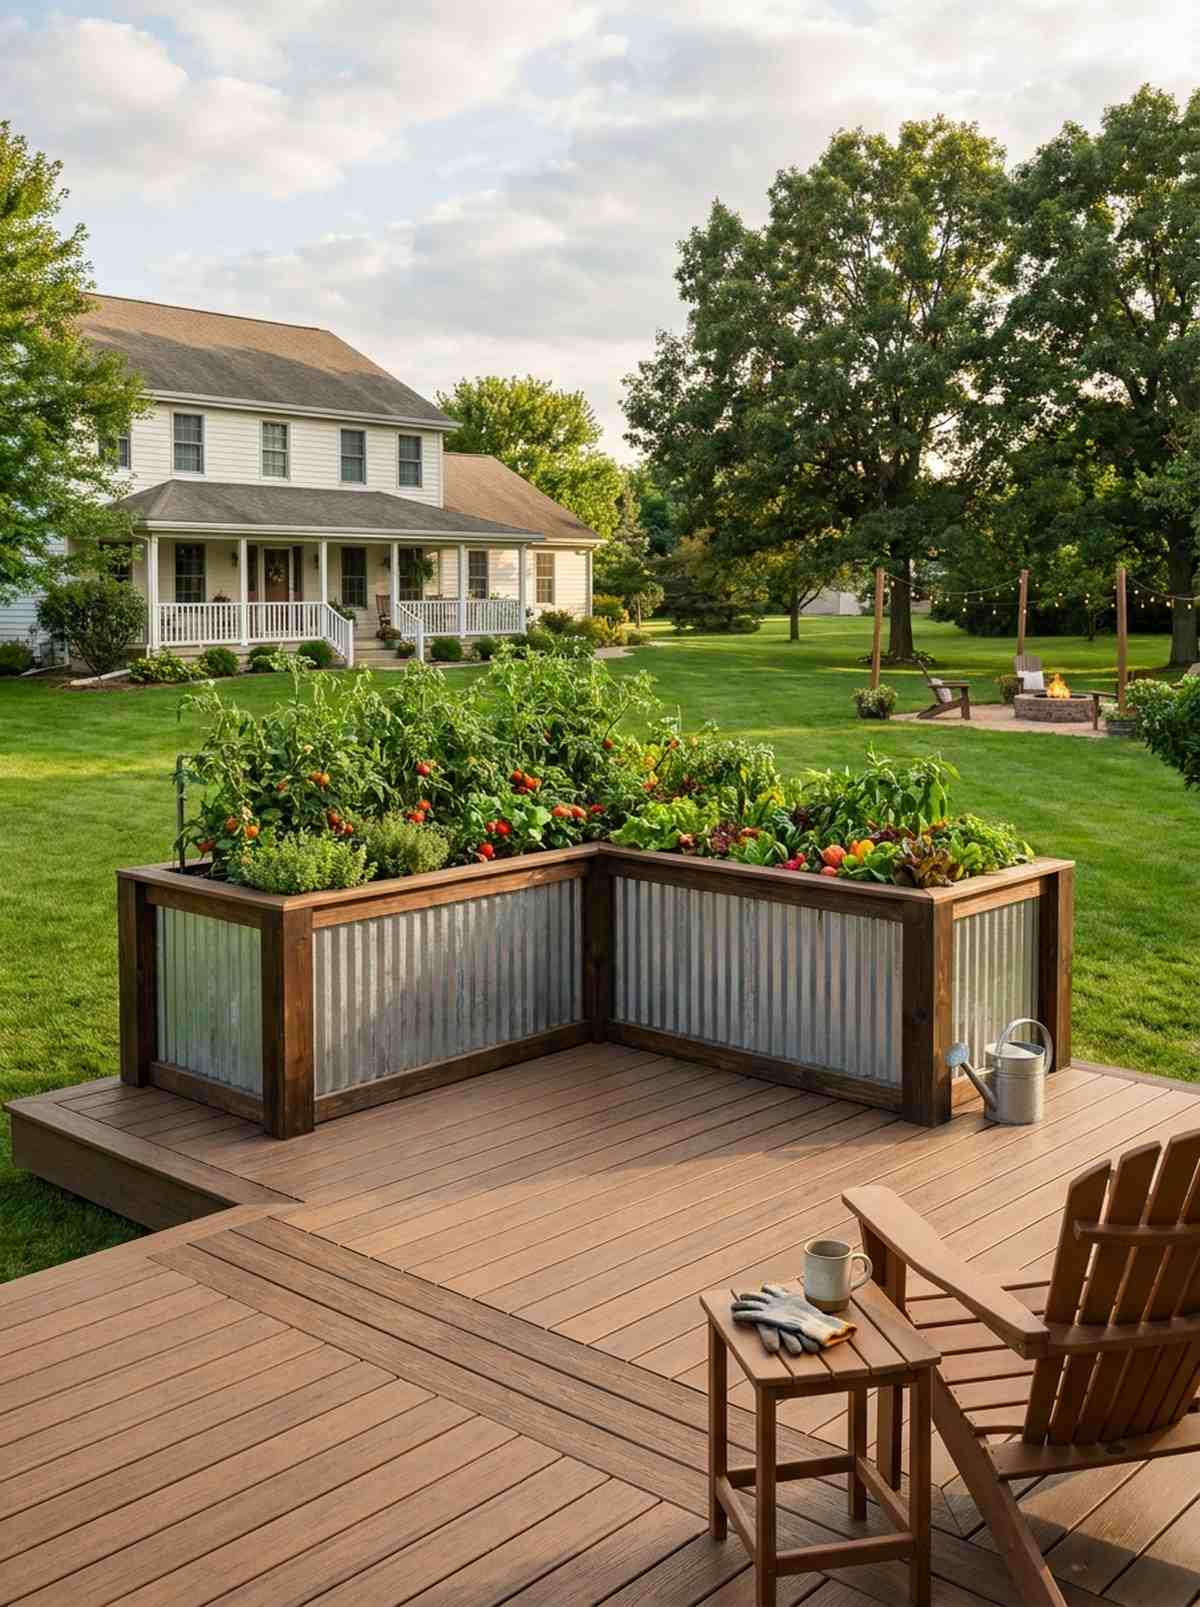
26. U-Shaped Gathering Beds
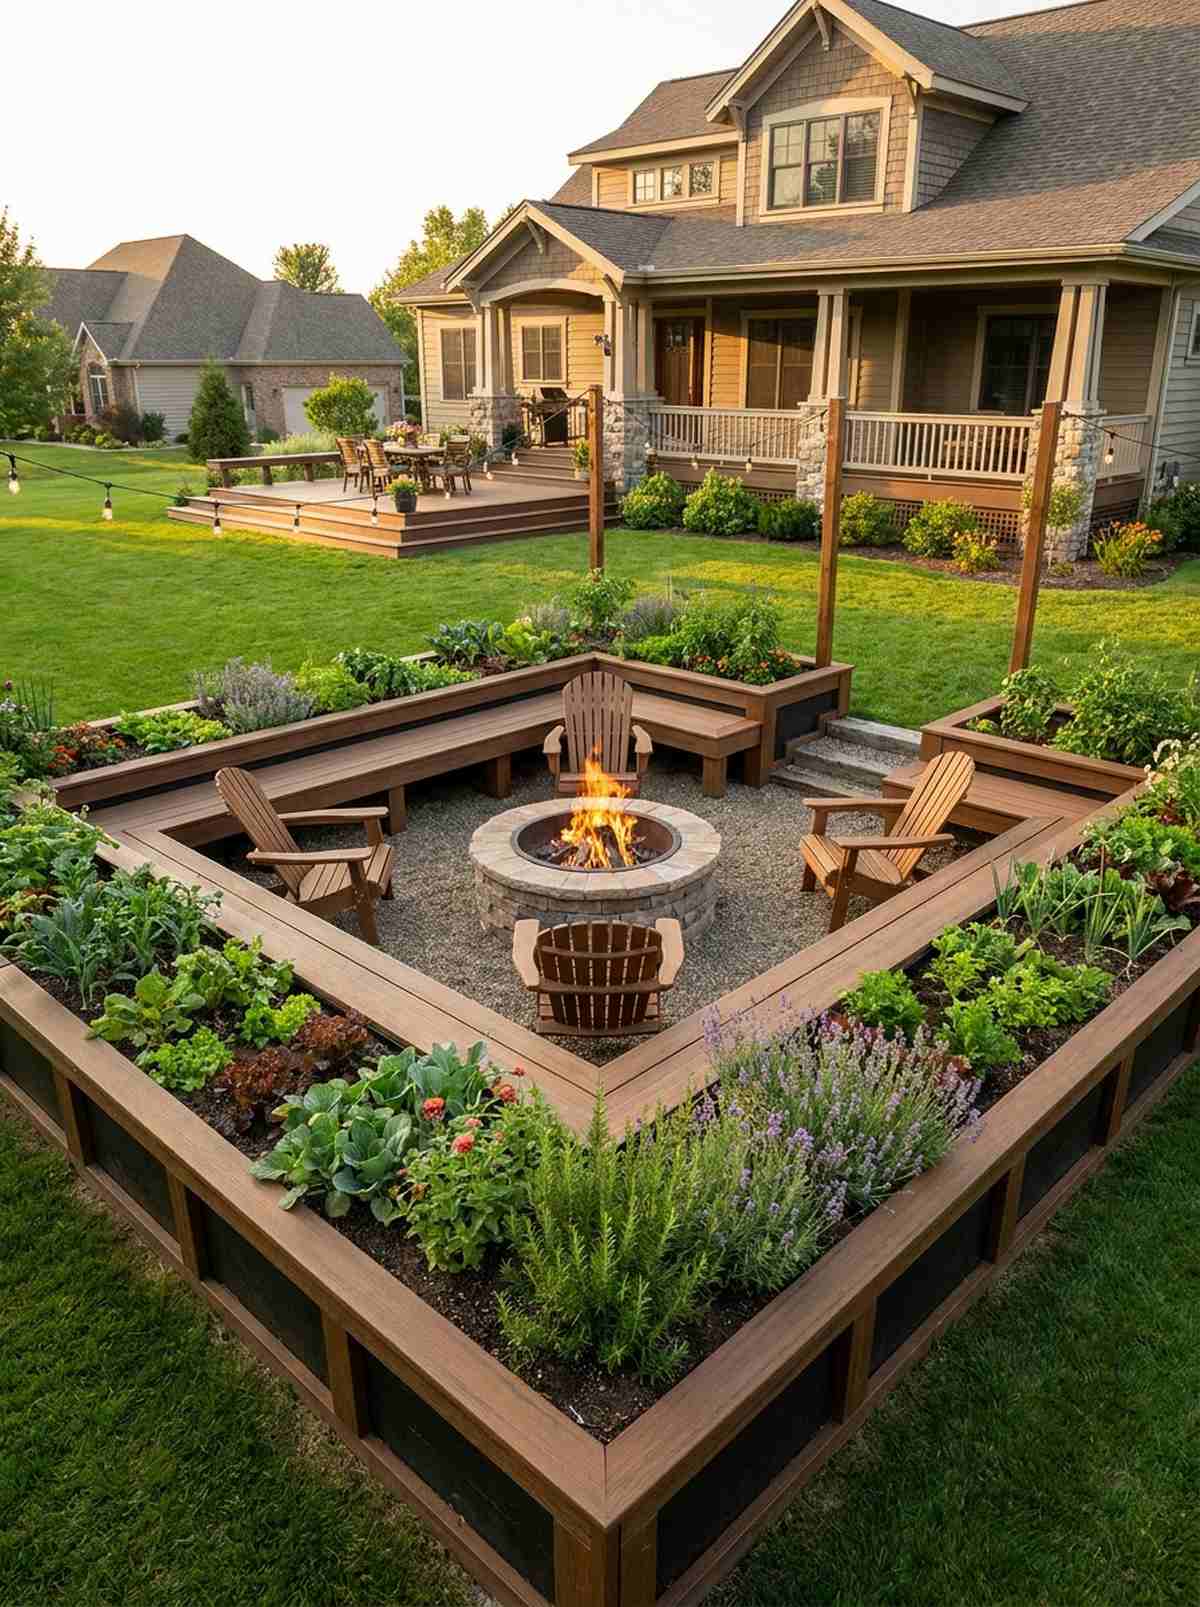
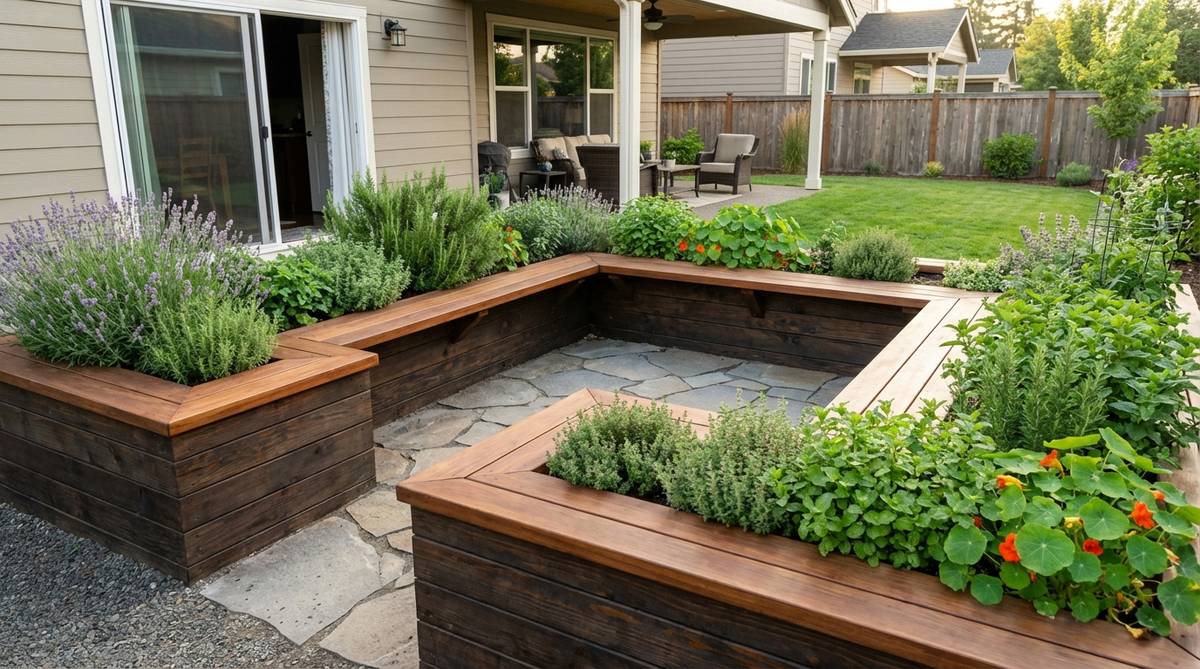
Wrapping your garden around a central fire pit creates an incredibly cozy, enclosed outdoor room. The smartest garden design small backyard way to blend entertaining space seamlessly with growing space.
Scattering beds randomly feels chaotic, but a U-shape layout looks far more expensive and creates a deliberate destination zone. Capping the edges with premium composite decking boards instantly gives you free, built-in party seating.
Expect to invest $200–$400 for this major transformation. Pin this for the ultimate patio layout!
- Key Materials: Raised bed walls, wide cap boards
- Vibe / Style: High-end custom courtyard
- Difficulty: Weekend carpentry project
- Budget Breakdown: Bed framing: $200 | Cap Boards: $100
- Creator’s Tip: Ensure the interior of the ‘U’ is at least 4 feet wide to comfortably accommodate a firepit and legs.
- Smart Sourcing: weather-resistant composite deck boards (for seating caps) and heavy-duty wood construction screws (bulk pack).
27. Narrow Pathway Beds

Squeezing a lush garden into an 18-inch gap feels like pulling off a brilliant real estate heist. Absolutely flawless for utilizing those awkward, useless dirt strips alongside your garage.
Leaving narrow strips as grass is a nightmare to mow, but framing them with crisp edges delivers a designer-level finish that requires zero maintenance. Utilizing flexible steel landscape edging keeps the dirt perfectly contained without eating up an inch of width.
You can execute this sleek upgrade for $40–$80. It’s a fast upgrade that completely changes the vibe.
- Key Materials: Metal edging, premium soil
- Vibe / Style: Sleek architectural lines
- Difficulty: Quick trenching
- Budget Breakdown: Metal Edging: $50 | Plants: $30
- Creator’s Tip: Plant entirely in blocks of the same species to make the narrow space look deliberate, not cluttered.
- Smart Sourcing: flexible galvanized steel landscape edging kits and heavy-duty rubber mallet for installation.
28. Modular Snap-Together Beds
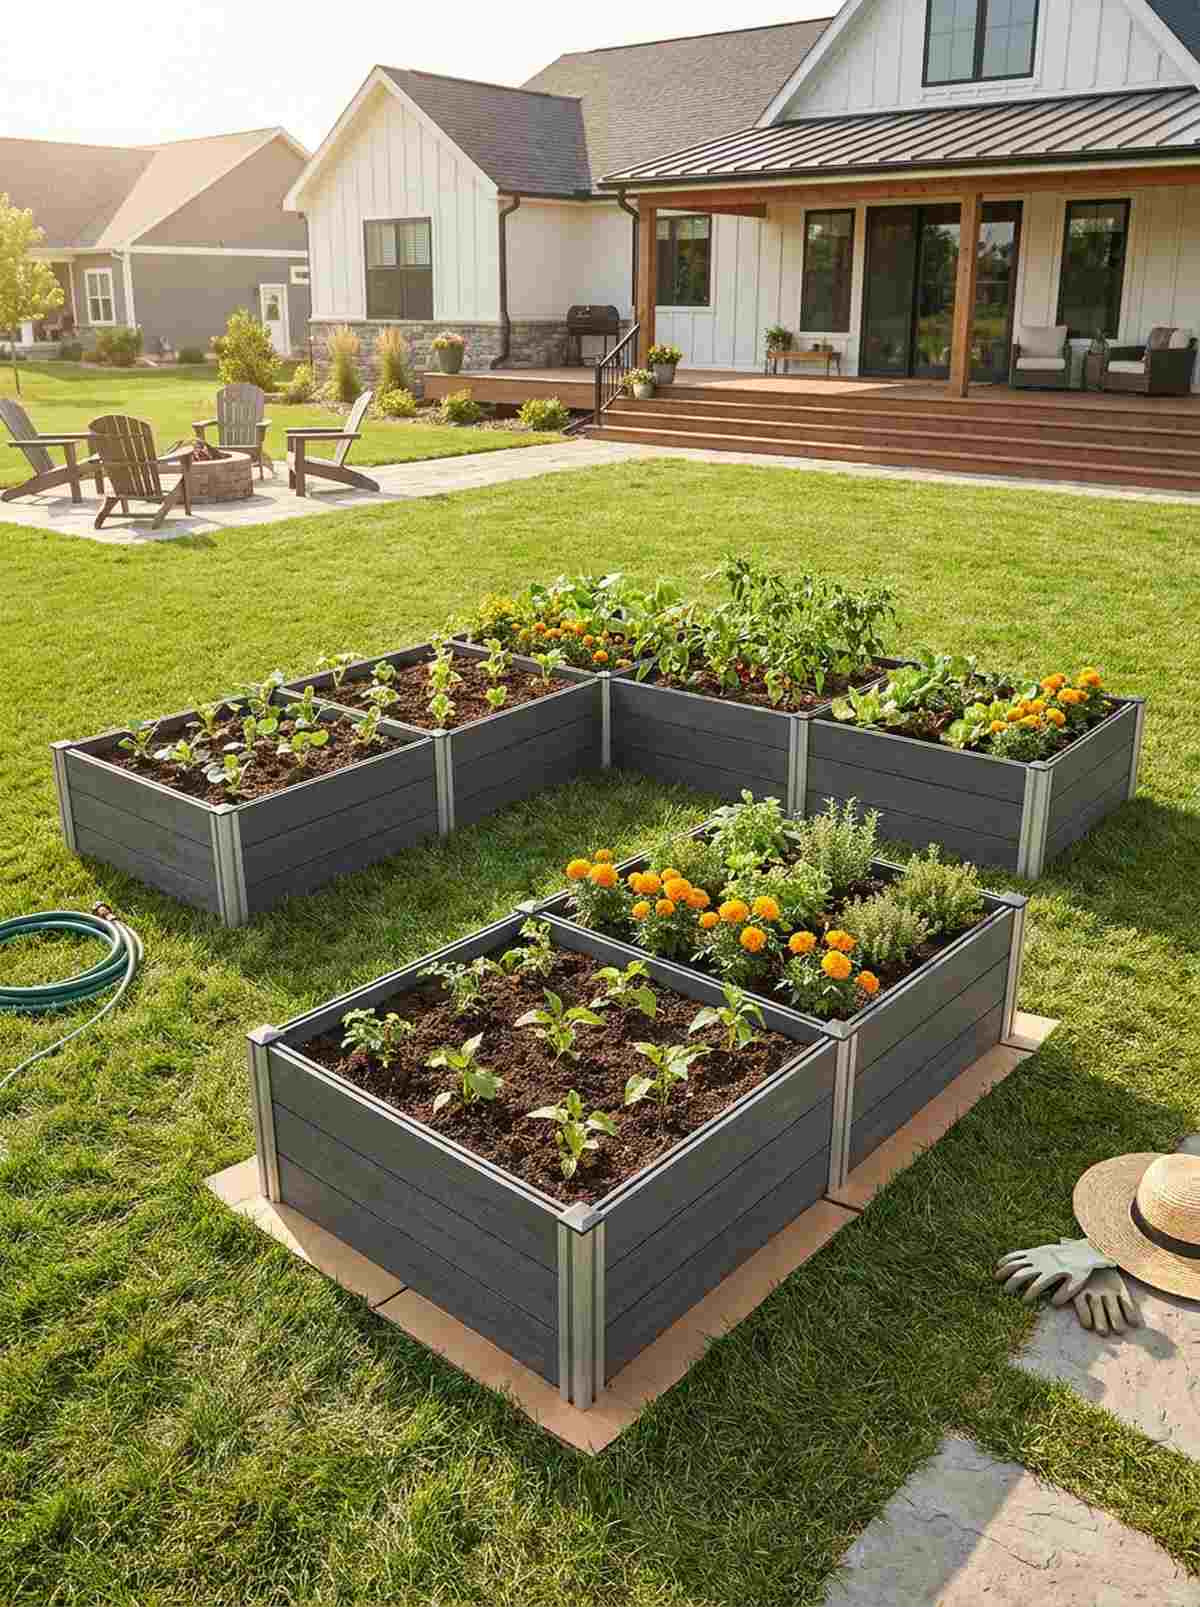

Clicking your garden together like giant Lego blocks feels incredibly modern and satisfying. The holy grail for renters who need a premium-looking bed they can dismantle on moving day.
Flimsy plastic borders fade and crack in one season, but buying composite or aluminum snap-kits looks far more expensive than it is. These premium raised bed brackets allow you to change the shape from a square to an L-shape whenever you want.
You can grab a high-quality kit for $60–$120. Save this if you hate using power tools!
- Key Materials: Composite or aluminum modular kits
- Vibe / Style: Clean modern convenience
- Difficulty: Tool-free assembly
- Budget Breakdown: Modular Kit: $90 | Soil: $30
- Creator’s Tip: Put cardboard underneath the entire frame to kill the grass without having to dig up the sod first.
- Smart Sourcing: tool-free composite raised garden bed kits and corrugated aluminum modular planter panels.
29. Stock Tank Raised Beds
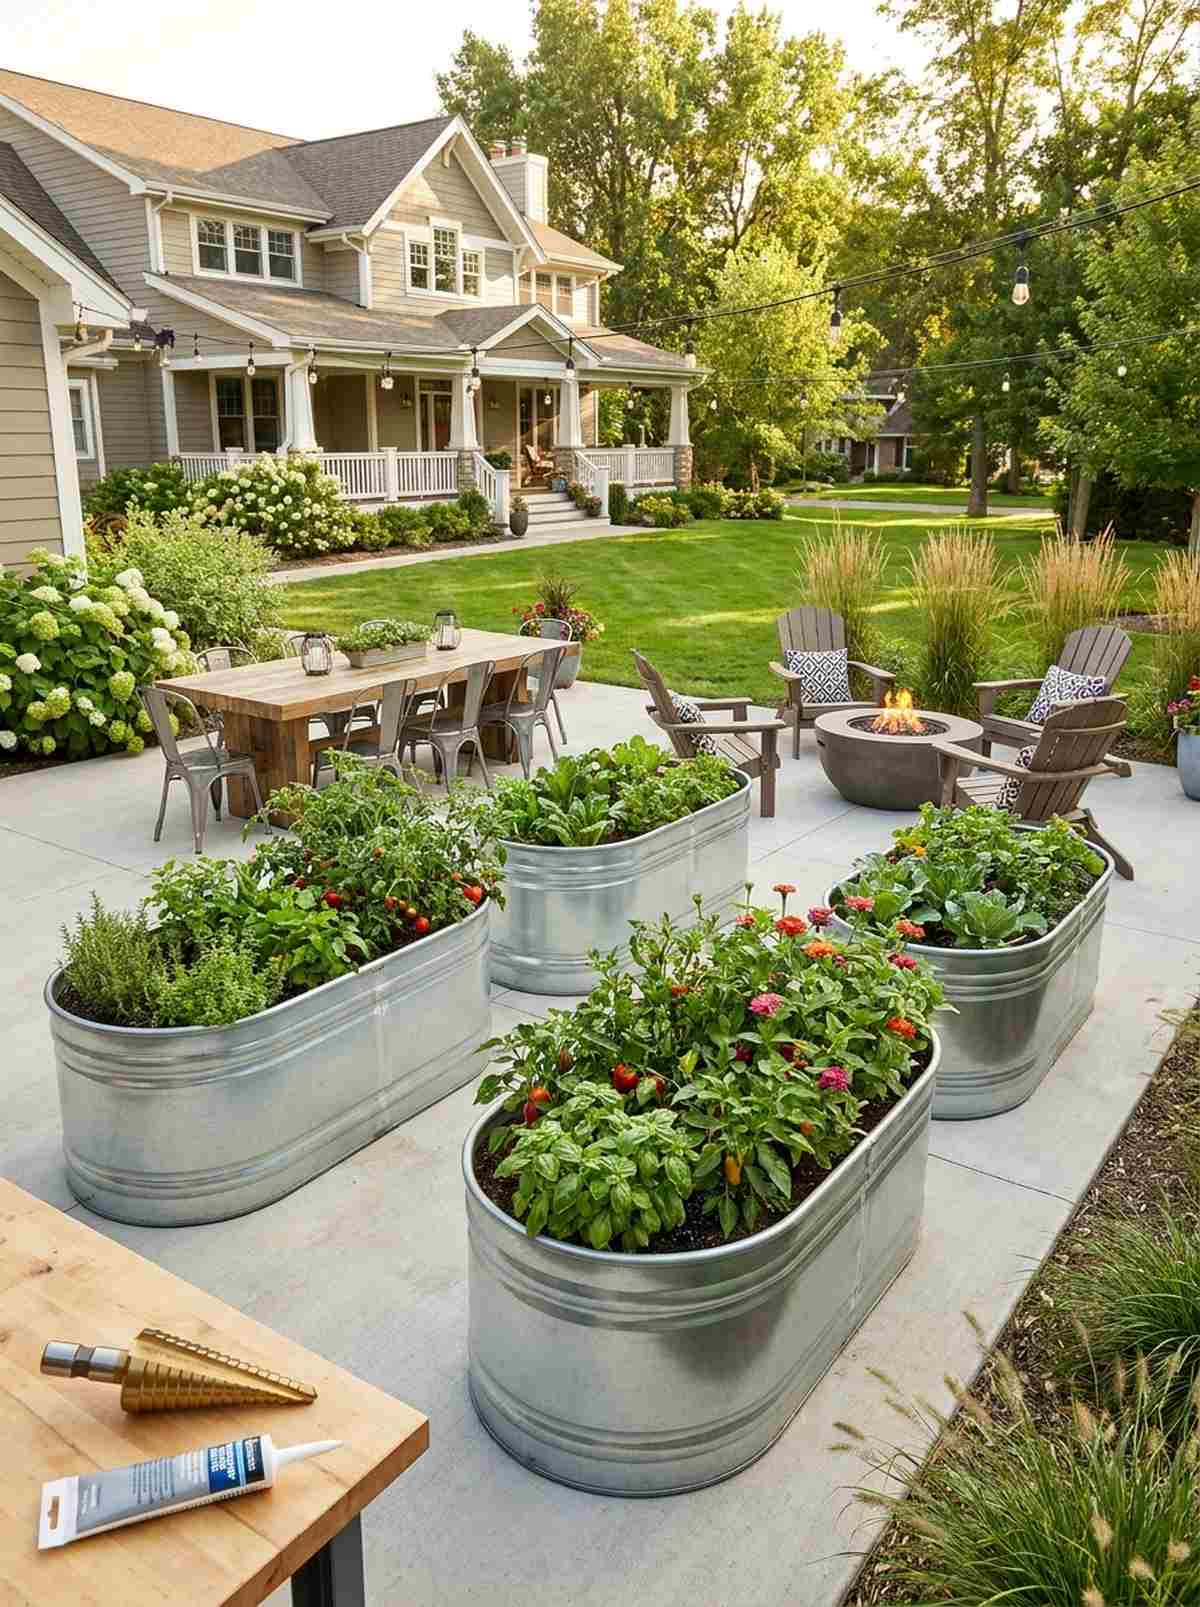

Dropping a massive galvanized tub on your patio instantly brings a trendy, modern-farmhouse energy. Perfect for creating a deep, indestructible vegetable haven on top of solid concrete.
Building wooden beds on concrete causes rot, but elevated steel tanks give a highly sought-after designer-level finish that lasts decades. Picking up waterproof marine silicone to seal any DIY drainage pipes ensures your patio stays pristine.
You can easily pull this off for around $100–$150. Pin this to your modern homestead board!
- Key Materials: Galvanized livestock water tanks
- Vibe / Style: Modern industrial farm
- Difficulty: Drilling metal required
- Budget Breakdown: 3ft Tank: $110 | Drill Bit: $15
- Creator’s Tip: Metal gets hot! Line the inside perimeter with bubble wrap to insulate the roots from baking in July.
- Smart Sourcing: titanium step drill bits (for cutting metal) and heavy-duty galvanized stock tanks.
You are missing out on incredible seating space. The next clever integration hides storage and seating inside your planters…
30. Cinder Block Beds with Pocket Planting
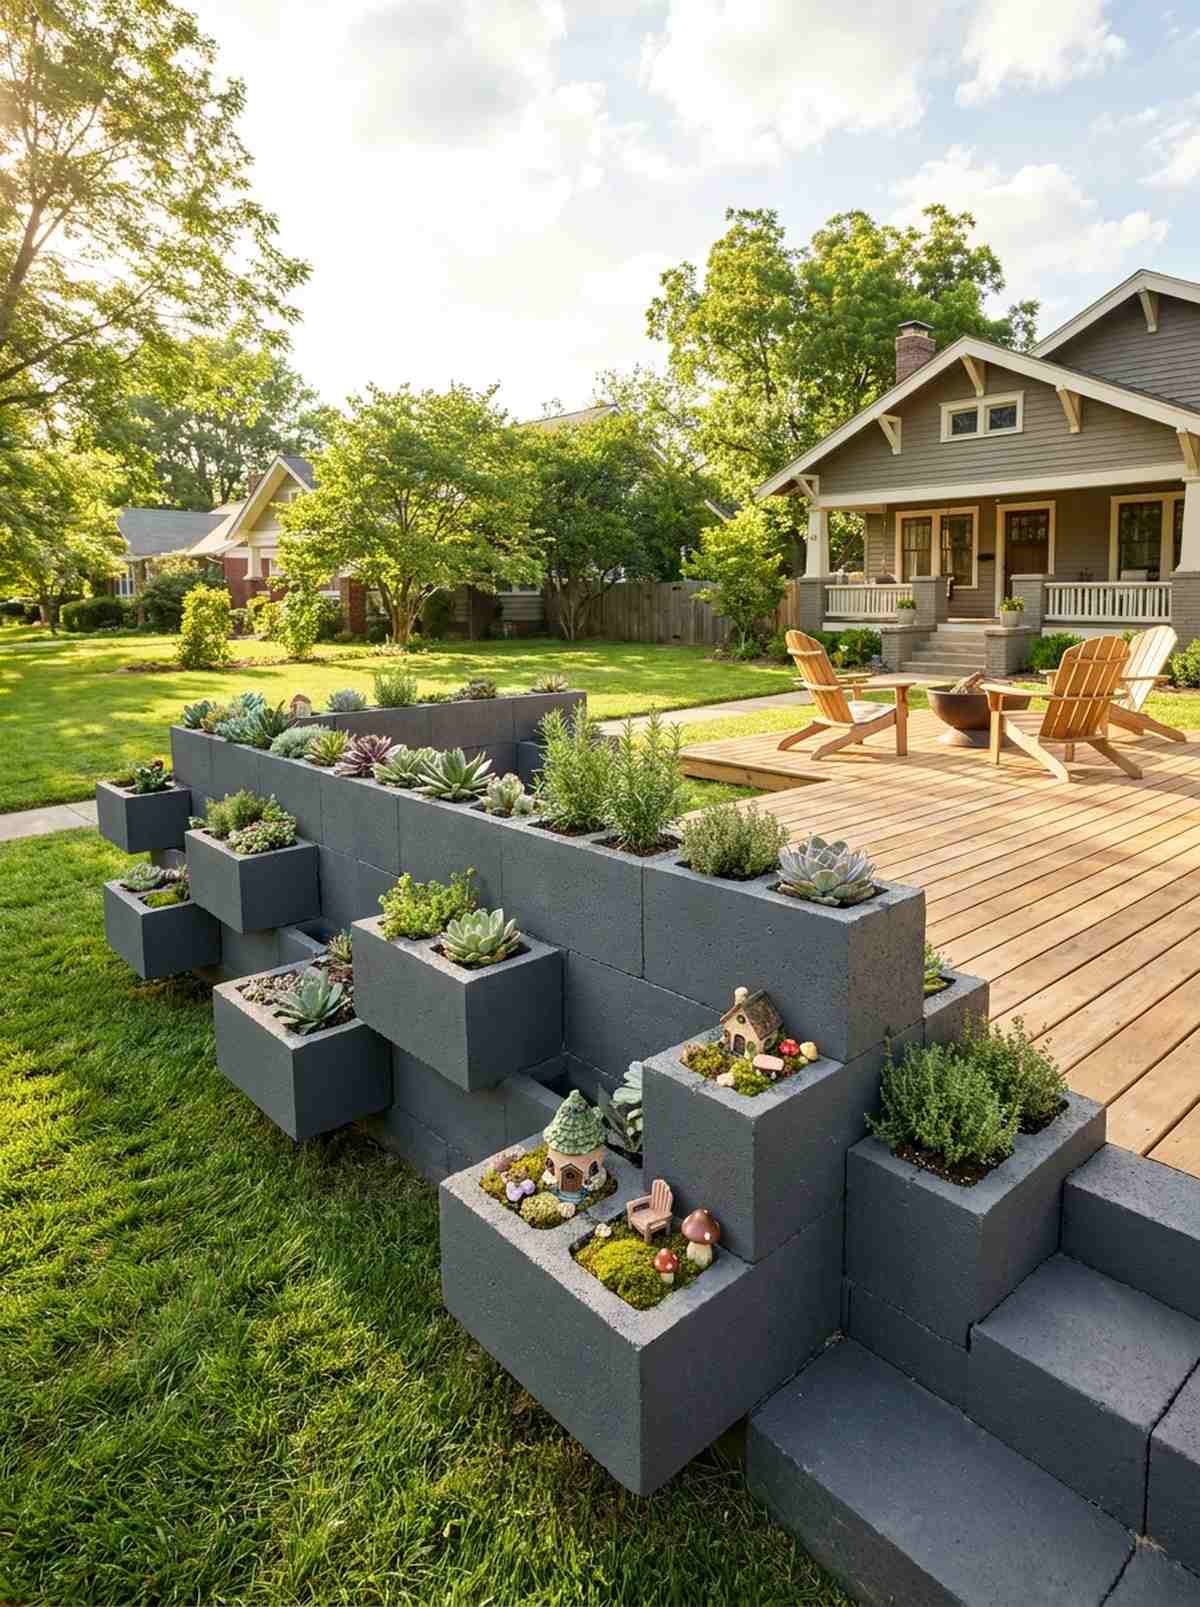
Transforming cheap concrete blocks into a multi-level fortress feels like a brilliant brutalist-chic hack. Highly effective for building cheap, indestructible retaining walls that also grow herbs.
Naked cinder blocks look like a construction site, but painting them charcoal gray and planting succulents in the holes delivers a surprisingly premium look. Slipping in fairy garden kits into random blocks creates adorable micro-focal points.
You can build a massive bed for under $40. Highly recommended for an ultra-cheap weekend win.
- Key Materials: Concrete masonry units (CMU), spray paint
- Vibe / Style: Urban brutalist chic
- Difficulty: Heavy lifting
- Budget Breakdown: Blocks: $30 | Exterior Paint: $15
- Creator’s Tip: Stagger the blocks so the holes face upward on different levels, creating a tiered planting effect.
- Smart Sourcing: exterior masonry waterproof paint and miniature succulent starter multipacks.
Multi-Functional Furniture and Built-In Features
31. Storage Benches with Lift Lids
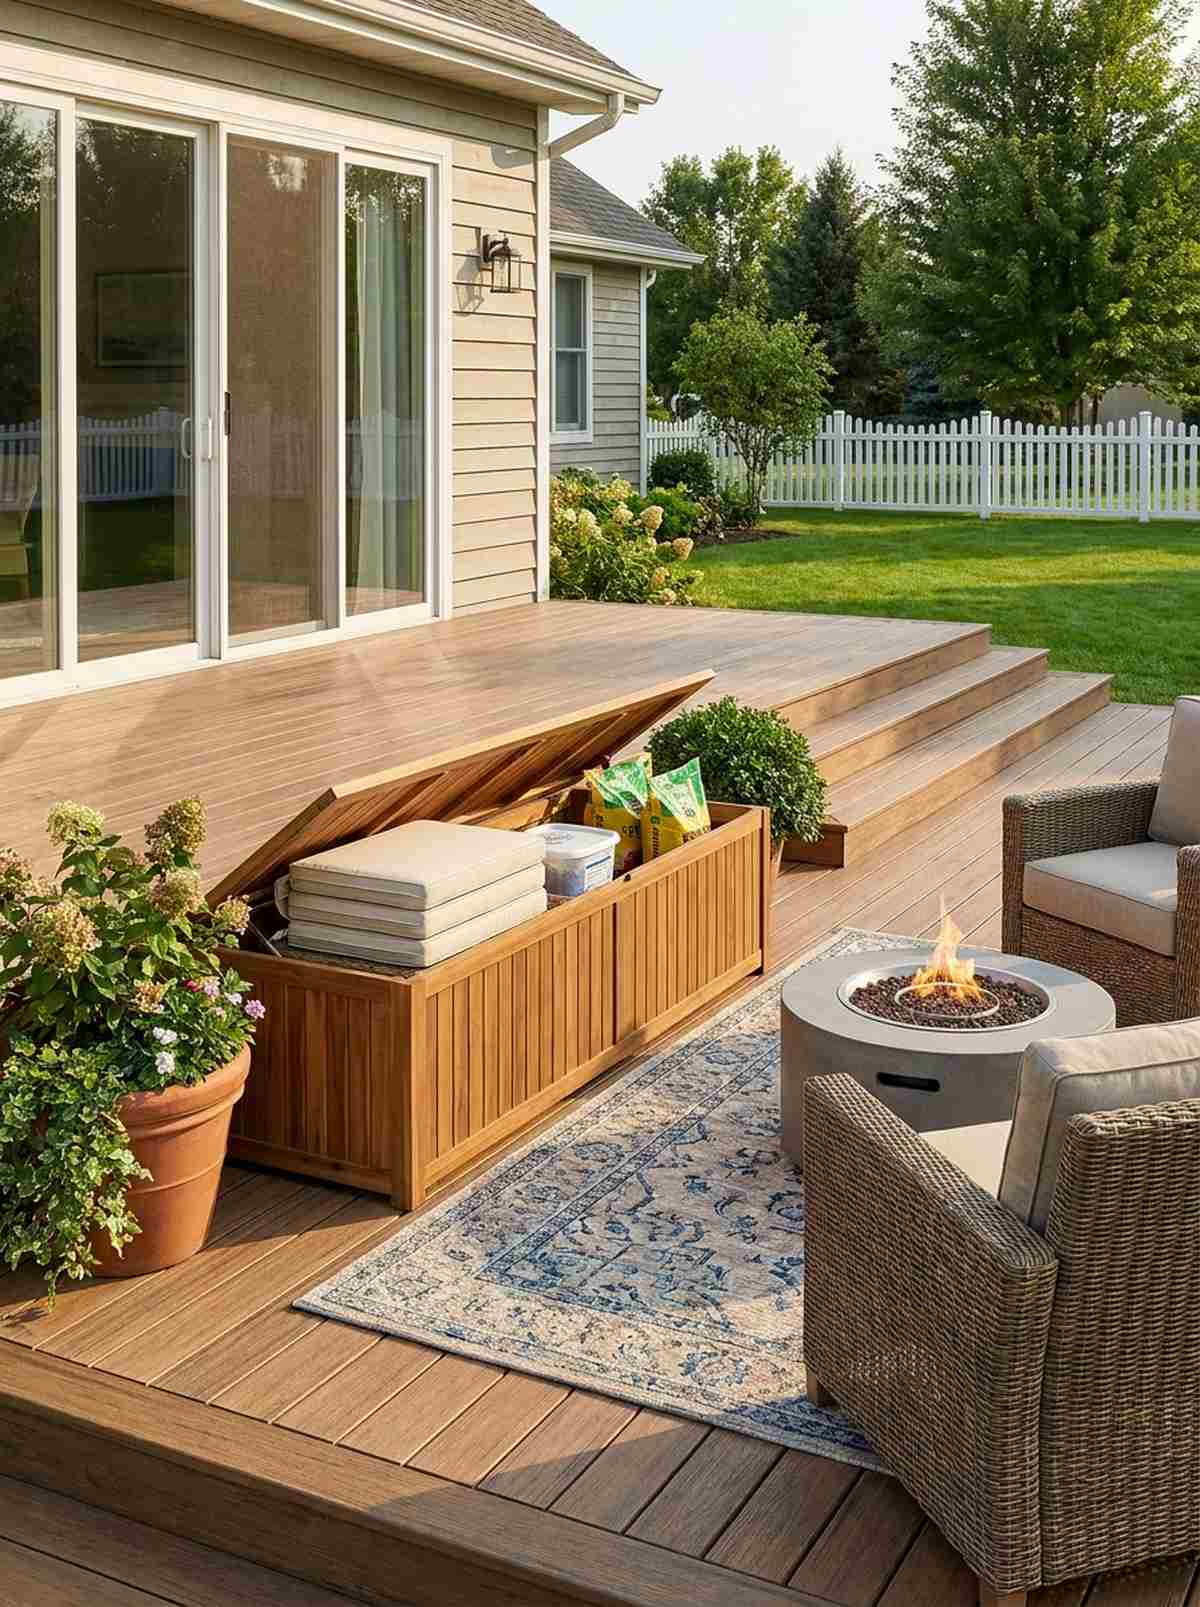
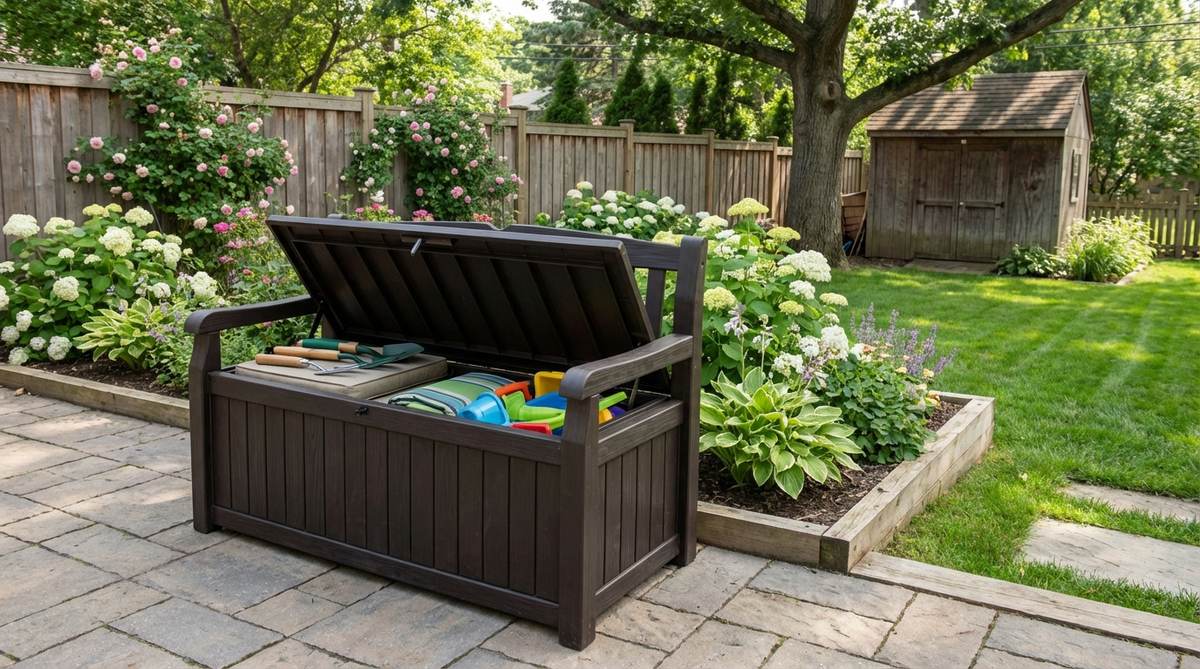
Hiding your messy bags of dirt inside a beautiful seating area feels like a magic trick for your patio. The ultimate clutter-killer for tiny spaces without room for a tool shed.
Standard plastic deck boxes look incredibly cheap, but an acacia wood bench delivers a highly aesthetic, premium look while hiding your junk. Investing in a weatherproof outdoor storage bench ensures your cushions don’t become a moldy mess.
You can grab a stunning dual-purpose bench for $100–$180. Pin this to save your patio from clutter!
- Key Materials: Wooden or resin lift-top bench
- Vibe / Style: Clean minimalist resort
- Difficulty: Unbox and use
- Budget Breakdown: Bench: $150 | Waterproof Liner: $20
- Creator’s Tip: Put a moisture absorber bucket inside the bench to keep stored fabric cushions smelling fresh all year.
- Smart Sourcing: resin waterproof outdoor storage benches and reusable moisture absorber tubs (bulk).
32. Folding Bistro Sets
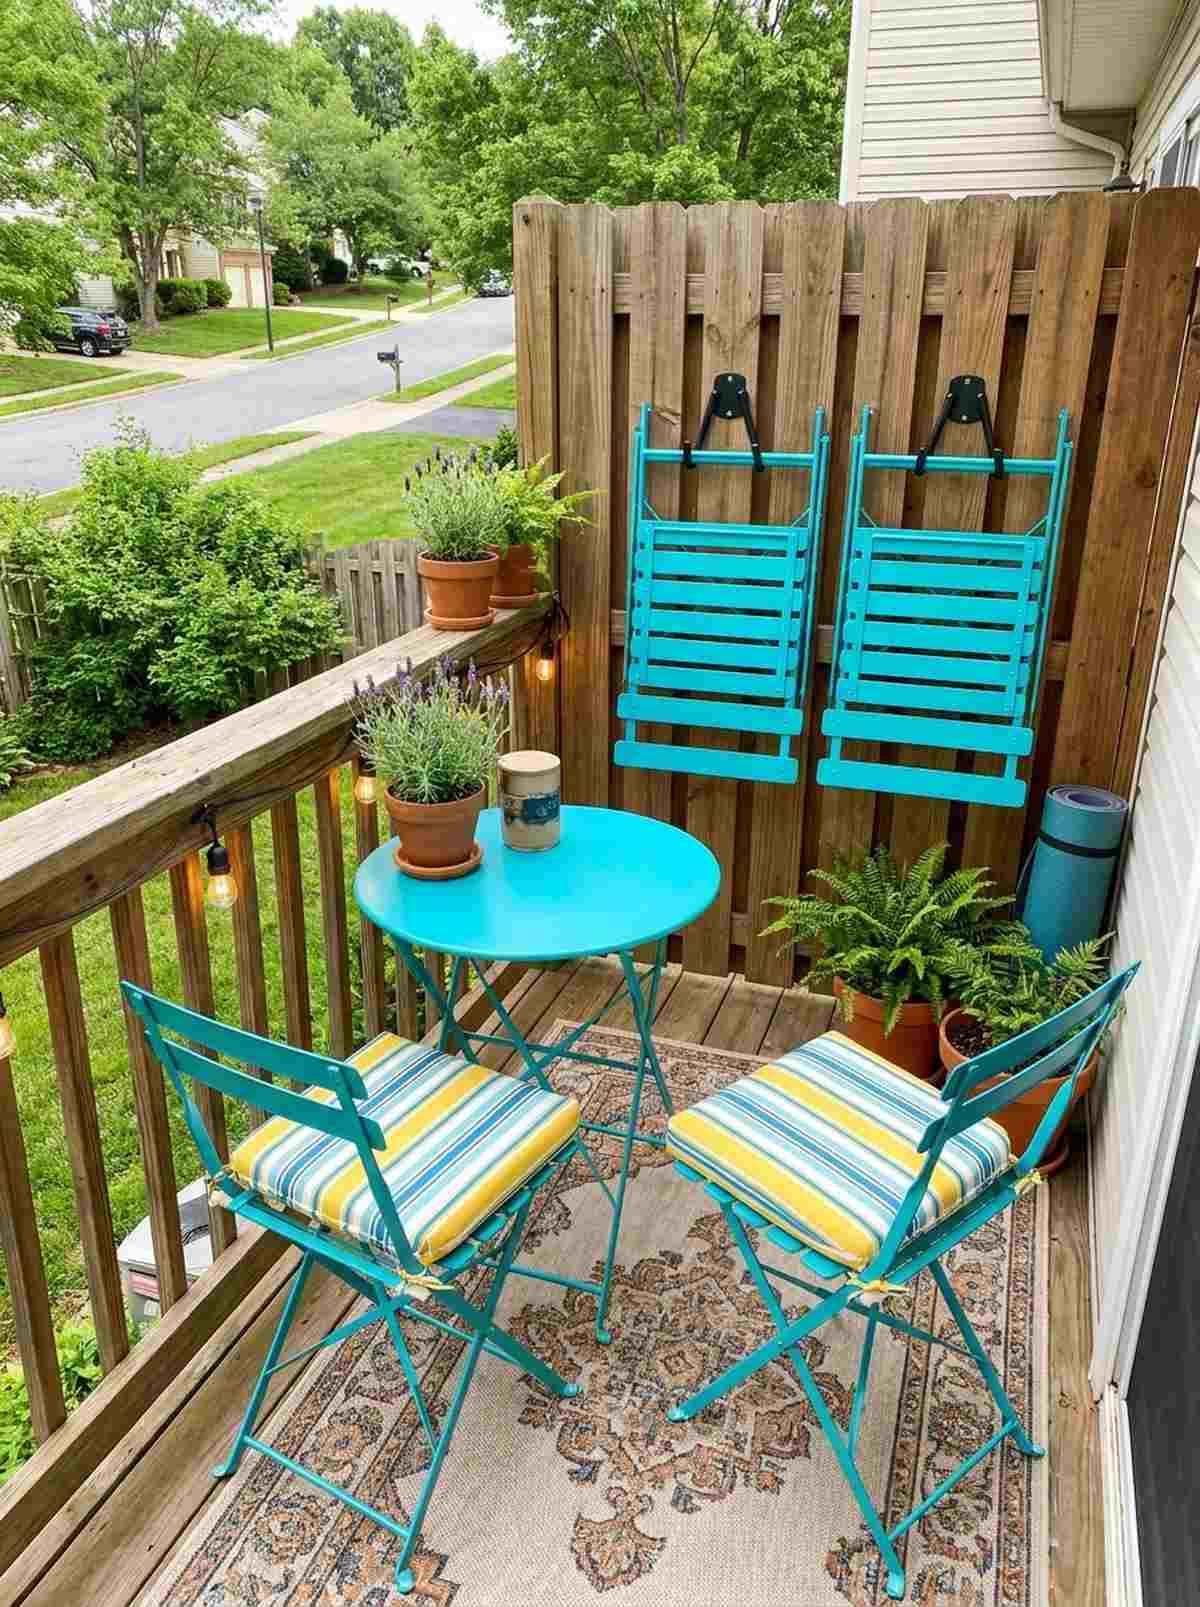
Collapsing your entire dining room and hanging it on a fence feels like an incredible space-saving superpower. Flawless for tiny balconies that need to convert to yoga spaces instantly.
Heavy wrought iron takes up too much permanent room, but a brightly colored steel folding set looks far more expensive and chic. Pairing it with weather-resistant bistro seat cushions makes it comfortable enough for hours of lounging.
You can execute this Parisian vibe for just $60–$120. Save this for your micro-balcony inspiration!
- Key Materials: Powder-coated steel folding tables/chairs
- Vibe / Style: Parisian street cafe
- Difficulty: Zero setup
- Budget Breakdown: Bistro Set: $90 | Cushions: $25
- Creator’s Tip: Mount two heavy-duty bike hooks on your fence to hang the chairs completely out of the way.
- Smart Sourcing: heavy-duty wall mount utility hooks and weather-resistant folding bistro sets.
33. Planter Box Bench Combos
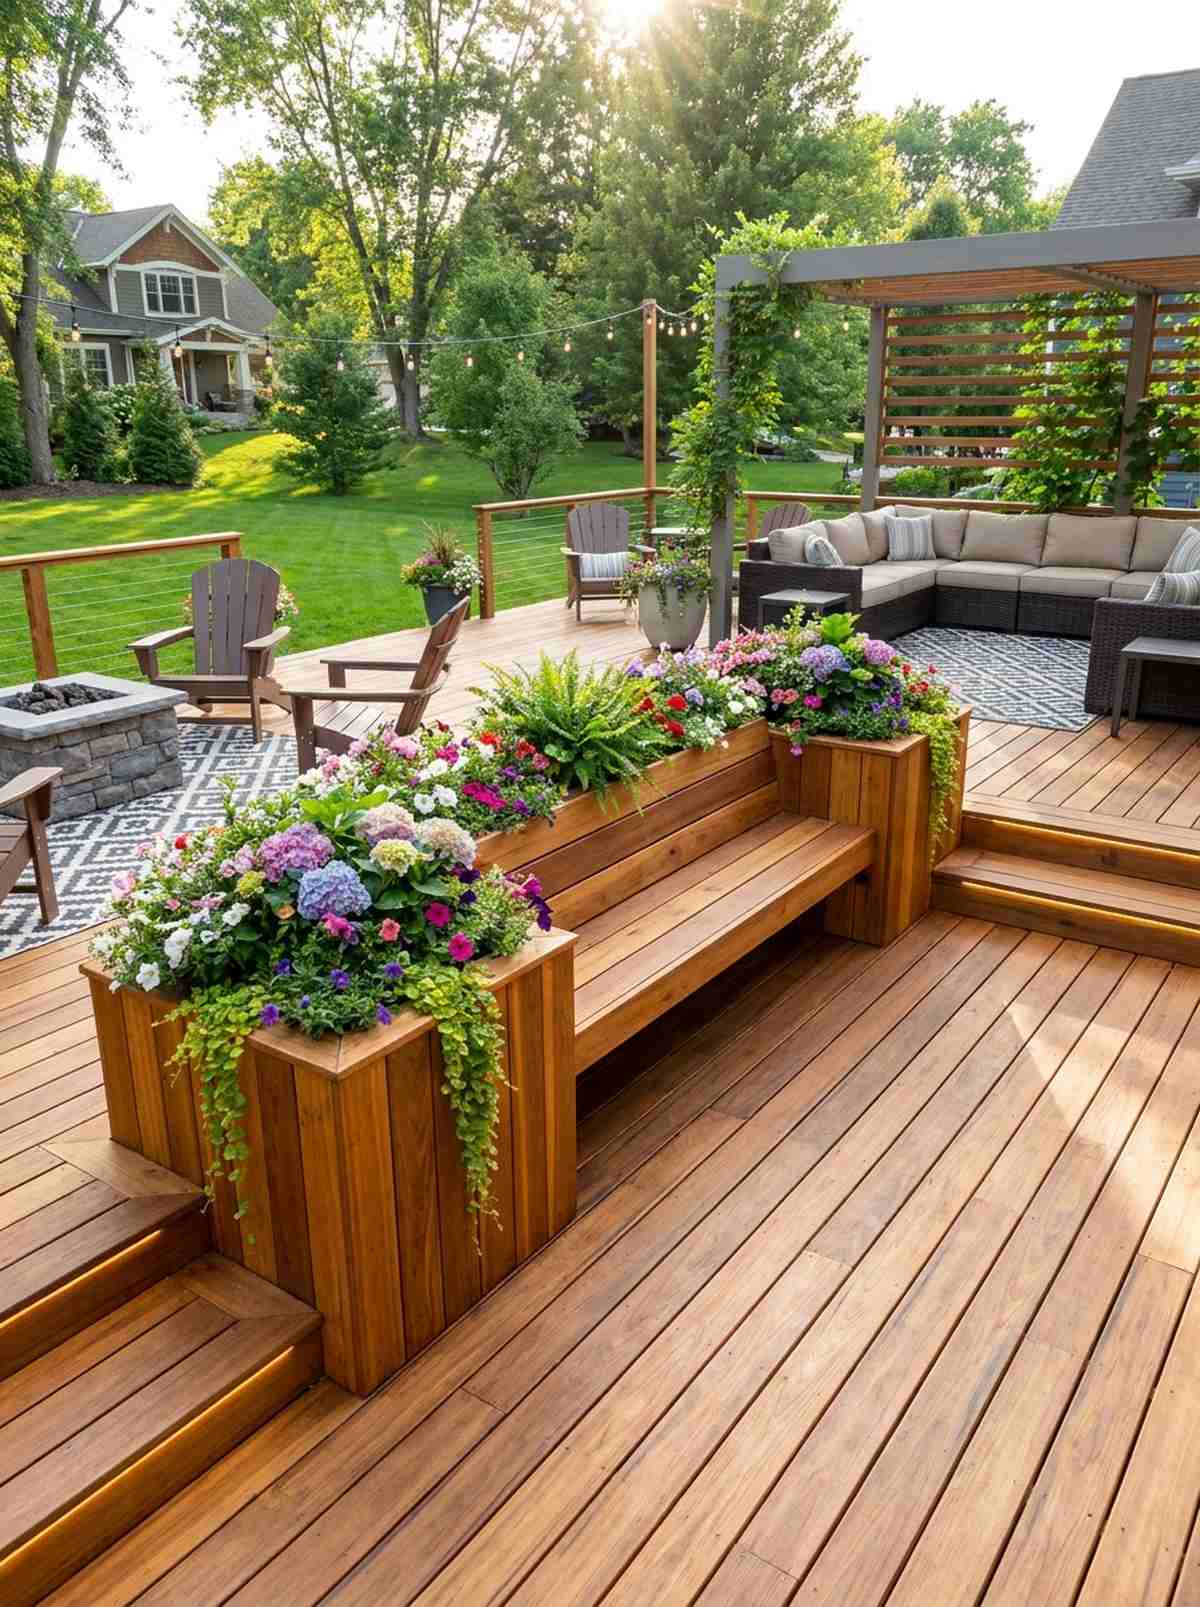
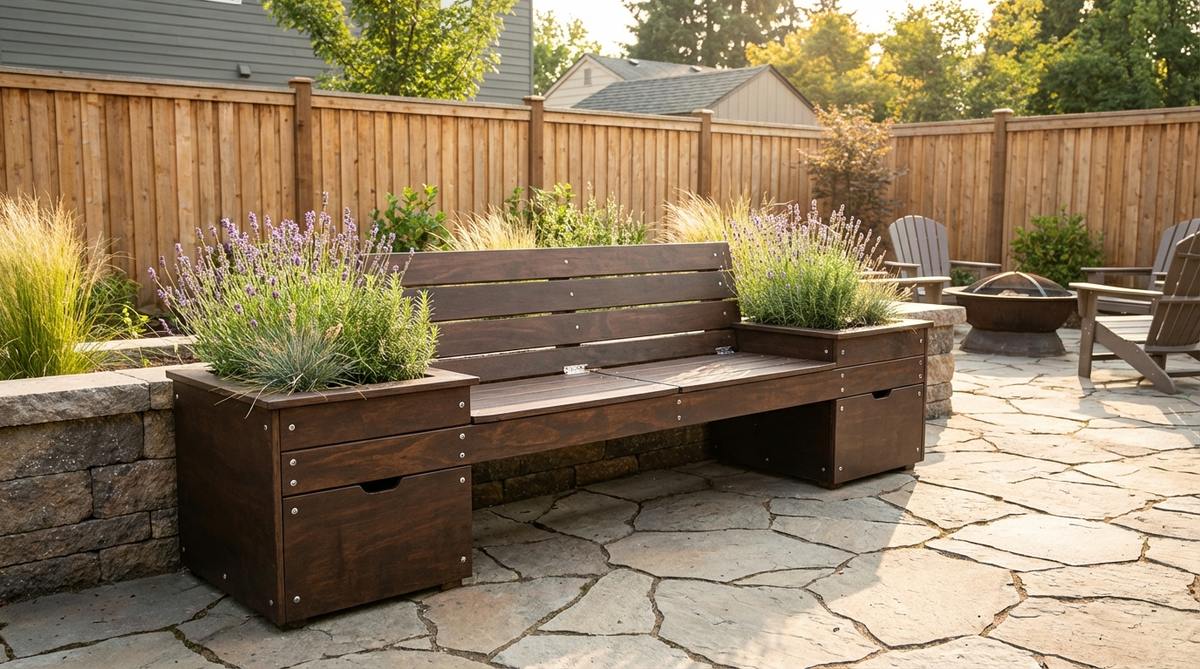
Sitting suspended between two massive blooming planters feels like relaxing in a high-end luxury spa. The smartest way to anchor the corners of a floating wooden deck.
Buying all these pieces separately eats up your budget and space, but building them as one integrated unit gives a designer-level custom finish. Using pre-cut cedar planter bench kits takes the frustrating math out of the DIY process.
Expect to invest $150–$250 for a stunning statement piece. It is a fast upgrade that completely changes the vibe.
- Key Materials: Planter boxes, bridging bench board
- Vibe / Style: Custom luxury deck
- Difficulty: Moderate assembly
- Budget Breakdown: Lumber/Kit: $180 | Hardware: $30
- Creator’s Tip: Don’t fill the entire deep planter with dirt; use the false-bottom trick to save money and weight.
- Smart Sourcing: modular planter box bench kits and heavy-duty structural deck screws.
34. Murphy-Style Fold-Down Tables
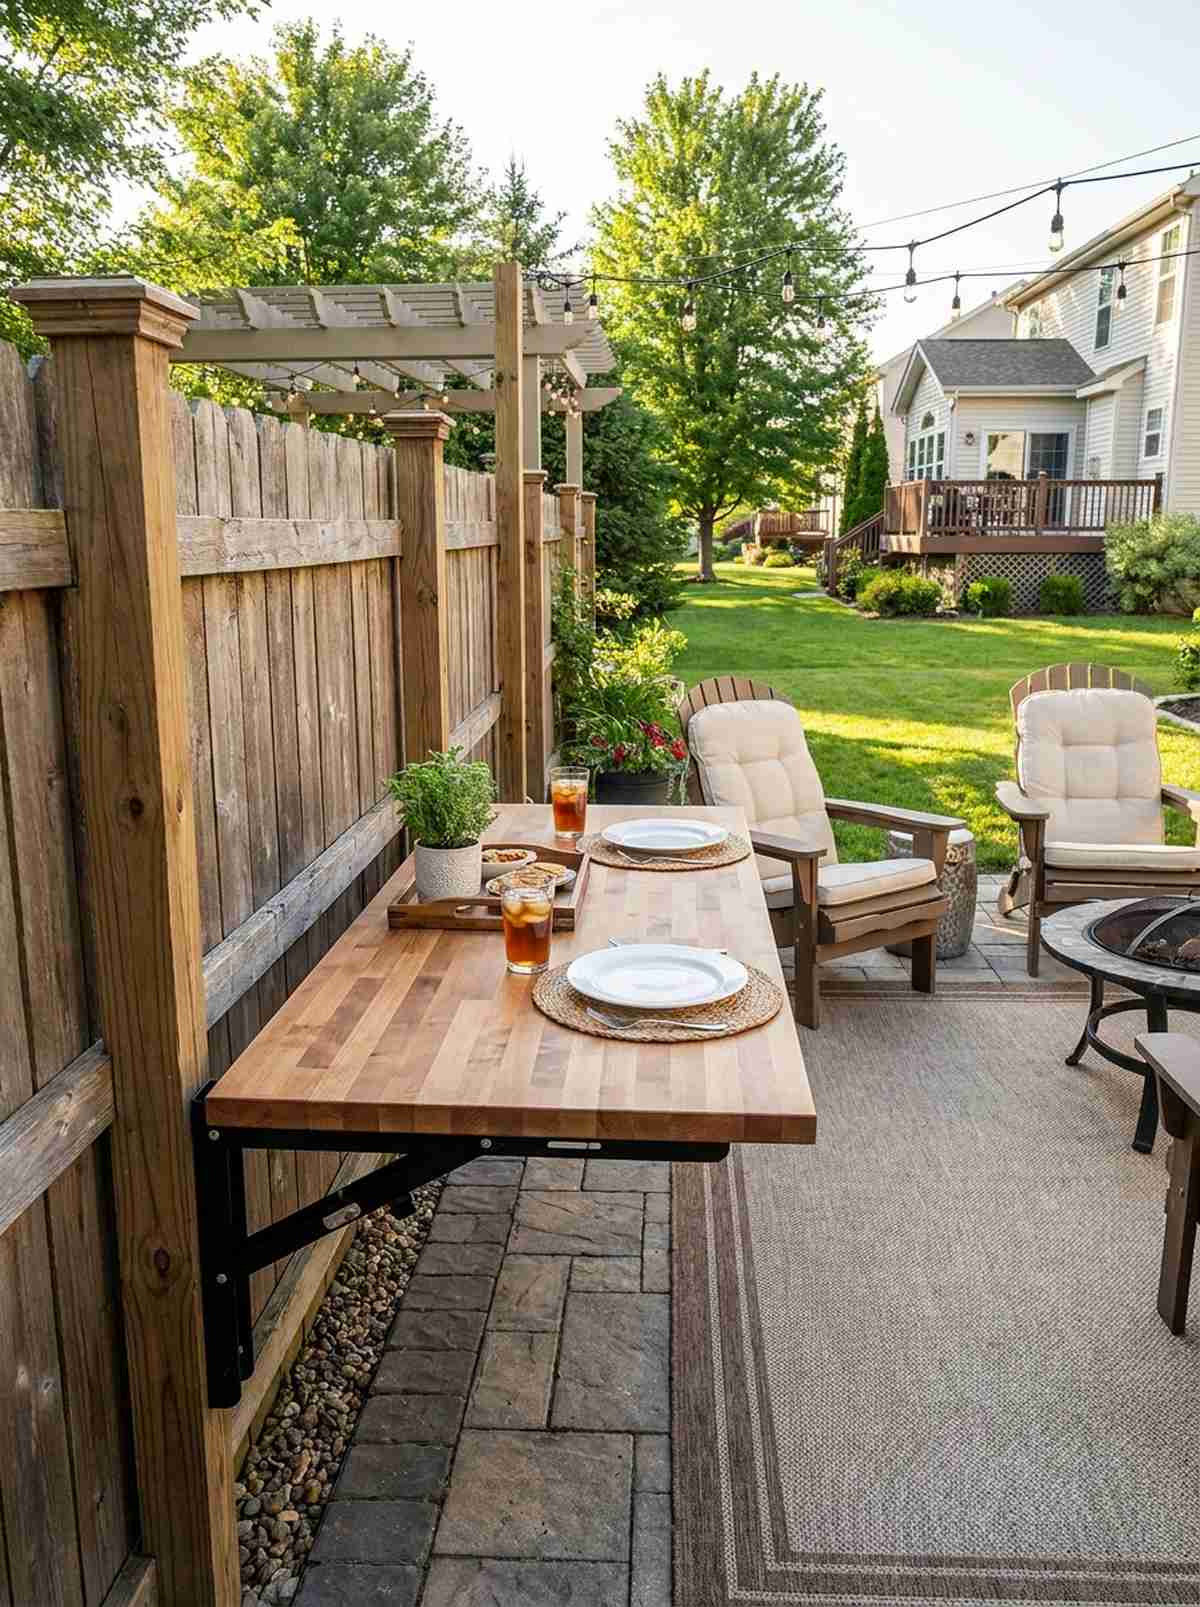
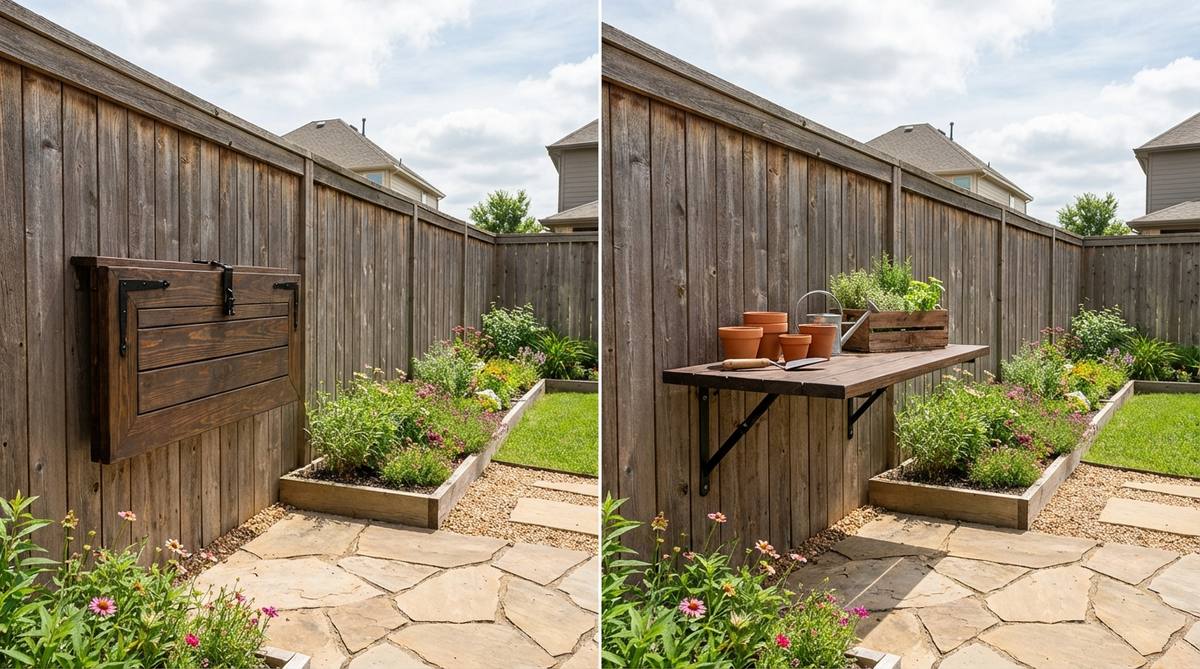
Dropping a dining table straight off your fence feels like uncovering a secret James Bond patio feature. Incredible for serving drinks and then instantly reclaiming 100% of your walking space.
Fixed tables choke small spaces, but a wall-mounted drop-leaf delivers a surprisingly premium look that guests will obsess over. Securing it with heavy-duty folding shelf brackets guarantees it won’t collapse when loaded with food.
You can easily pull this off for around $50–$90. Pin this genius garden design small space hack!
- Key Materials: Treated wood panel, collapsible steel brackets
- Vibe / Style: Ultra-smart tiny home
- Difficulty: Must drill into studs/posts
- Budget Breakdown: Brackets: $35 | Wood Top: $30
- Creator’s Tip: Never mount this to standard fence pickets; you must drill directly into the main 4×4 structural posts.
- Smart Sourcing: heavy-duty collapsible shelf brackets (locking) and pre-finished butcher block project panels.
Stop cluttering your pathways! The next seating trick uses the edges of your garden to create massive amounts of free space.
35. Stackable Resin Chairs
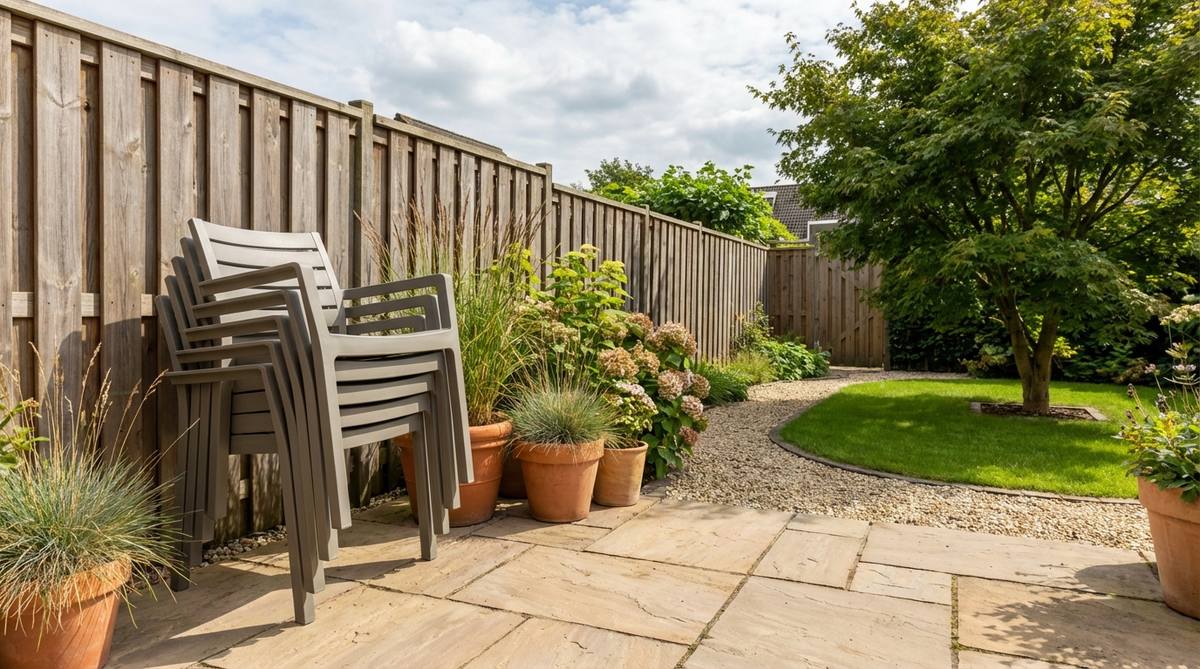
Nesting your seating vertically into a single sleek tower feels like a masterclass in modern minimalism. Perfect for people who love hosting but hate staring at empty chairs all week.
Cheap plastic lawn chairs look tacky, but matte-finish modern resin delivers a high-end designer aesthetic that looks incredibly expensive. Snagging UV-protected stackable modern patio chairs ensures the color won’t chalk out in the sun.
You can grab a chic set for $120–$200. Save this if you need hidden seating solutions!
- Key Materials: Molded UV-resistant resin chairs
- Vibe / Style: Modern Scandinavian
- Difficulty: Zero setup
- Budget Breakdown: 4-Chair Set: $150 | Storage Cover: $25
- Creator’s Tip: Buy a fitted grill cover to throw over the stacked chairs in winter to keep them perfectly clean.
- Smart Sourcing: modern stackable patio chairs (matte finish) and heavy-duty waterproof stacked chair covers.
36. Built-In Perimeter Seating
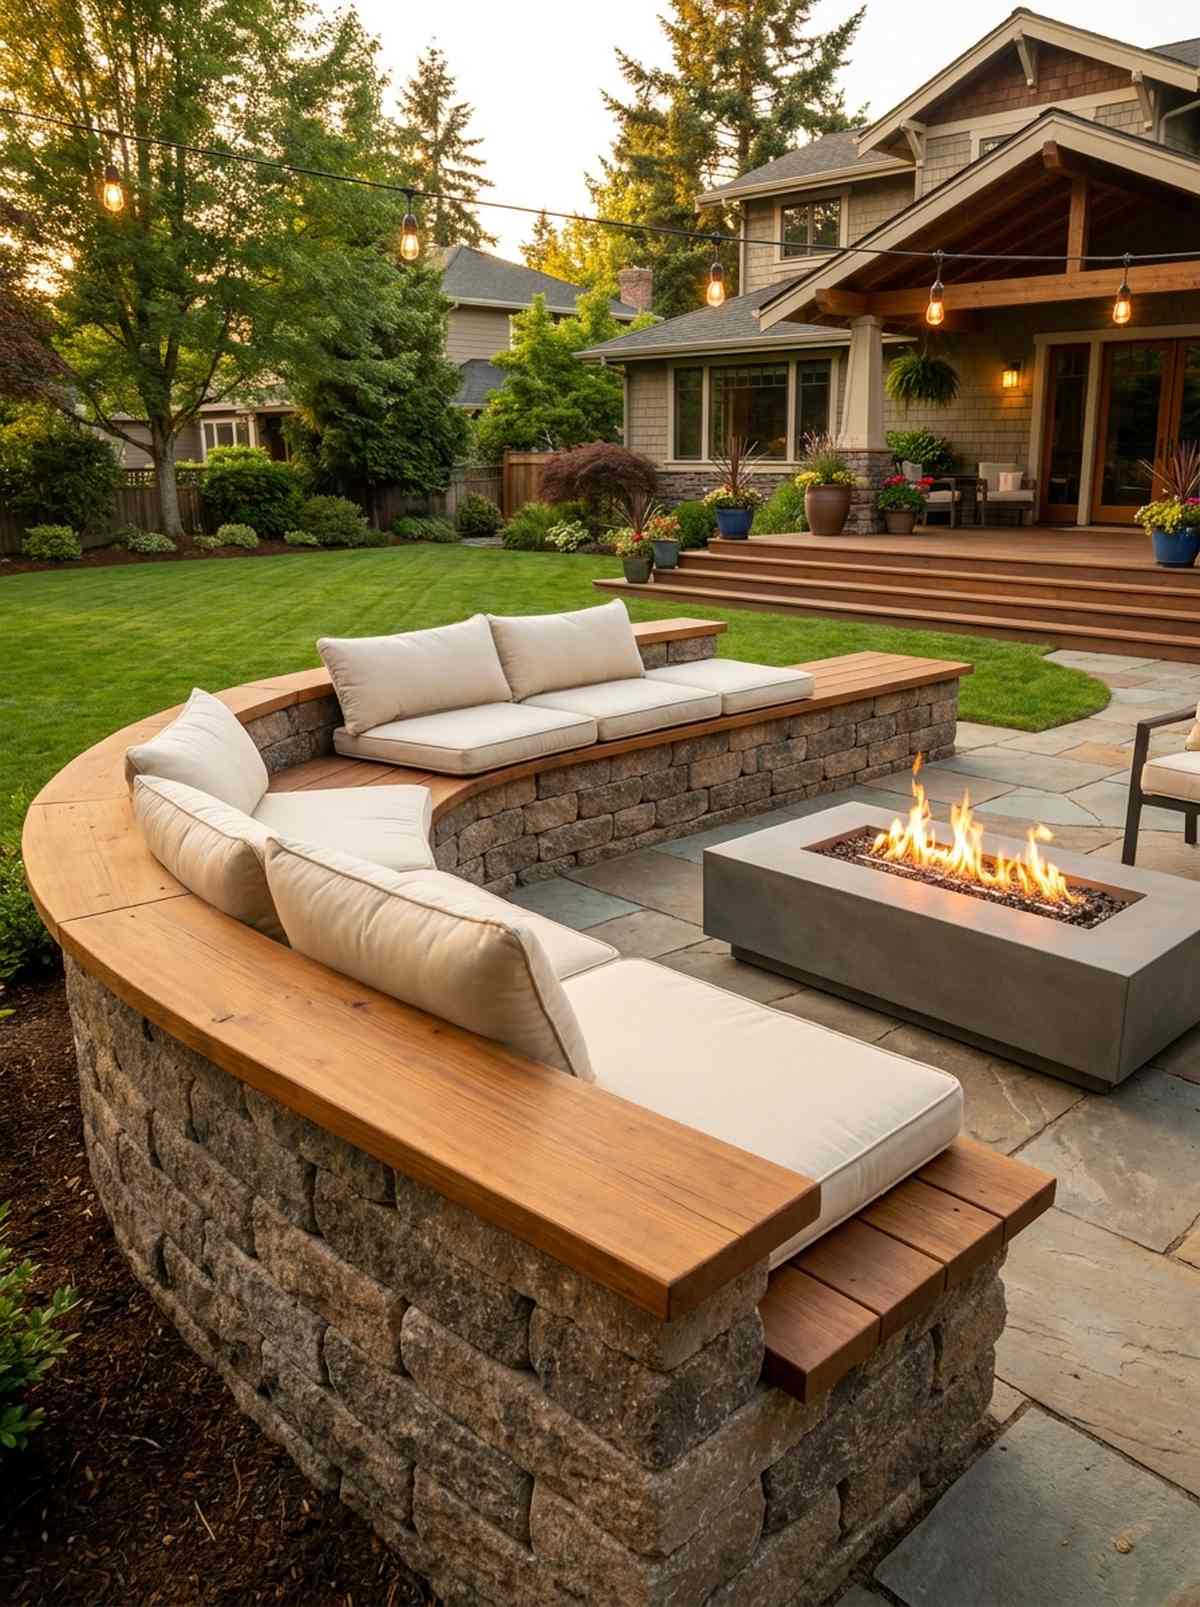
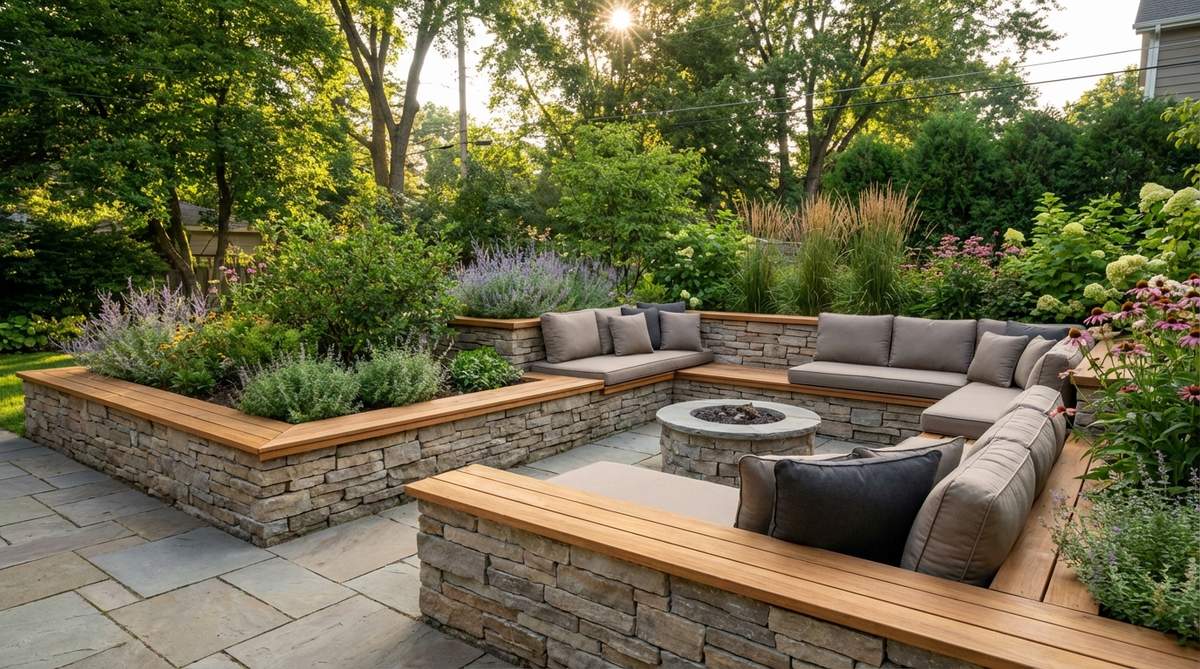
Turning the edge of your retaining wall into a permanent wrap-around bench feels incredibly custom and expensive. The ultimate trick to accommodate 10 guests without buying a single chair.
Standard cinderblock walls are ugly to sit on, but capping them with smooth, cantilevered wood gives a designer-level finish. Securing waterproof outdoor bench cushions transforms hard masonry into a luxury lounge area.
Expect to spend $200–$400 for lumber and hardware. Highly recommended for a permanent backyard upgrade.
- Key Materials: Retaining wall blocks, 2×12 cap boards
- Vibe / Style: High-end custom hardscape
- Difficulty: Advanced weekend build
- Budget Breakdown: Lumber: $150 | Masonry Anchors: $40
- Creator’s Tip: Let the wooden seat overhang the wall by 2 inches so the backs of people’s legs don’t scrape the concrete.
- Smart Sourcing: concrete masonry anchor bolts (bulk) and custom-size waterproof bench cushions.
37. Ottoman Planters
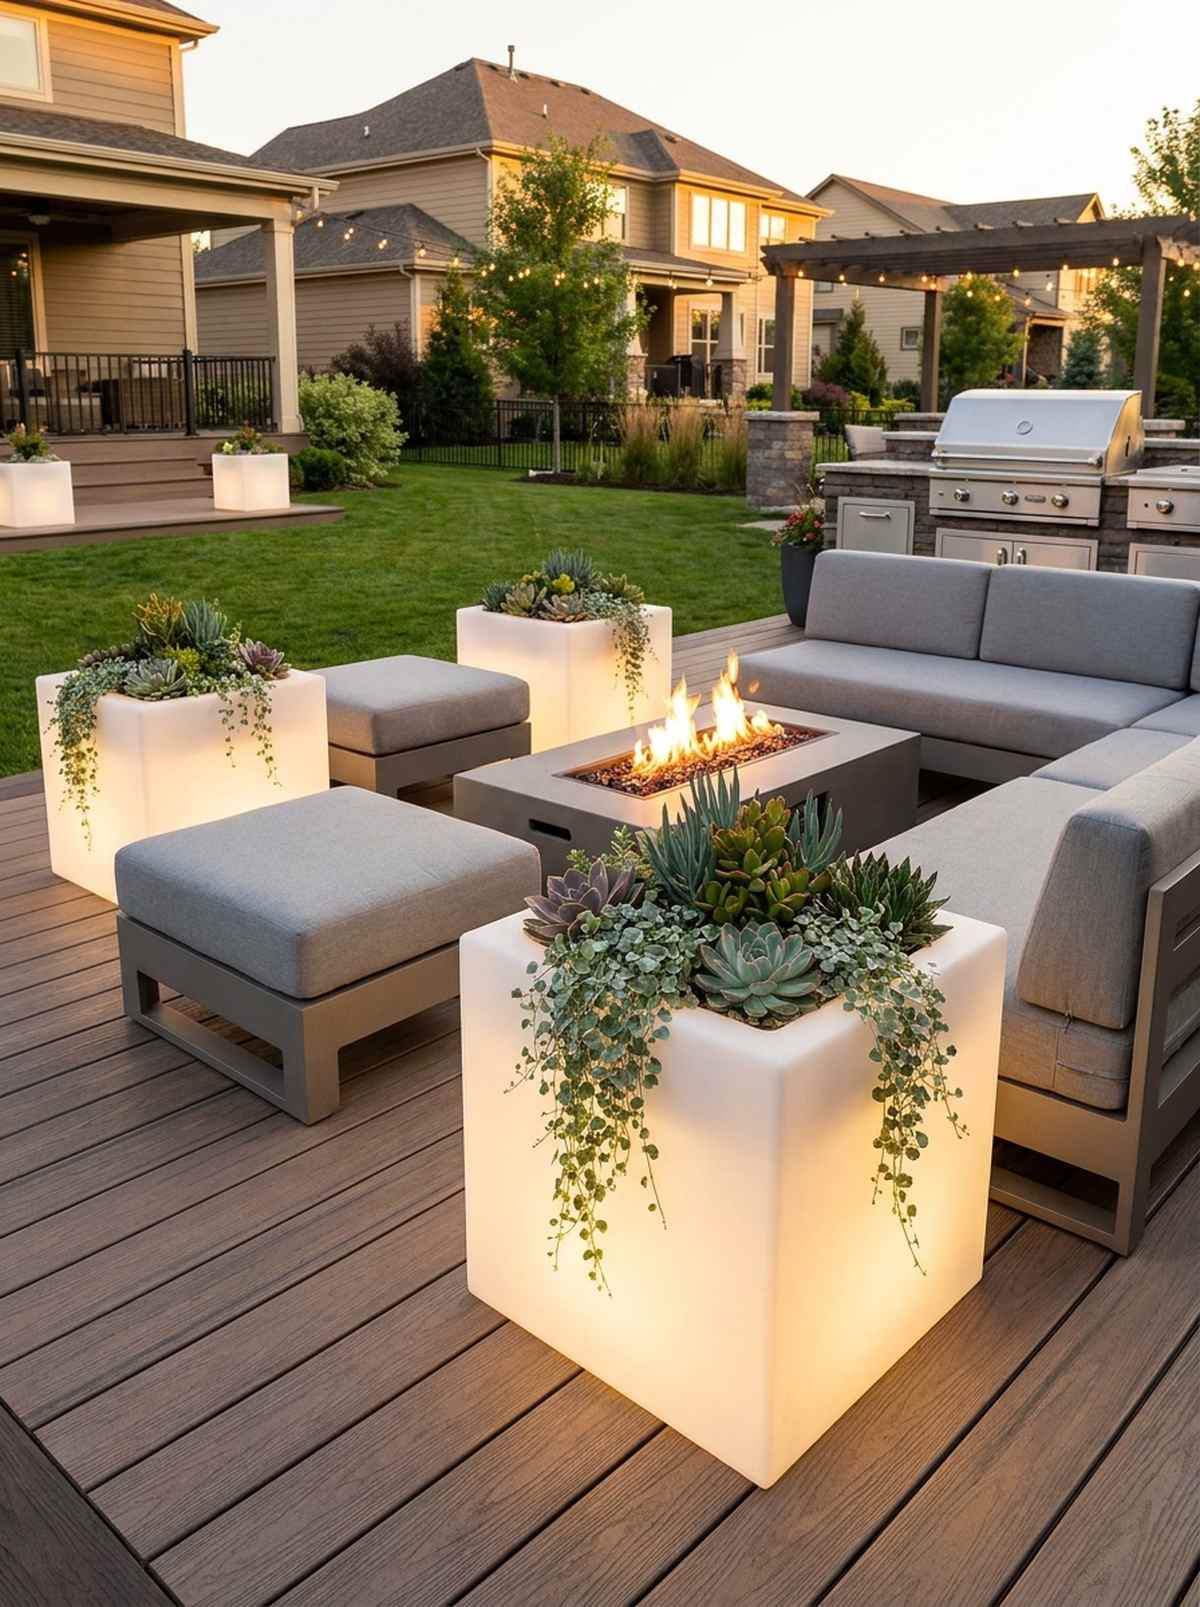
Resting your feet on a glowing cube of greenery feels incredibly futuristic and multi-functional. Flawless for low-slung lounge setups where you want a pop of life without blocking sightlines.
Basic footrests take up space doing nothing, but a planted ottoman looks far more expensive and acts as a stunning conversation piece. Snagging illuminated LED cube planters turns this simple seating into a dramatic night-time lighting feature.
You can execute this premium look for $80–$150. Pin this for modern patio inspiration!
- Key Materials: Heavy-duty cube planters, succulents
- Vibe / Style: Miami night lounge
- Difficulty: Easy planting
- Budget Breakdown: Cube Planter: $90 | Plants: $30
- Creator’s Tip: Plant trailing Dichondra ‘Silver Falls’ around the edge to soften the hard geometric lines of the box.
- Smart Sourcing: heavy-duty modern cube planters (fiberglass) and LED waterproof outdoor seating cubes.
38. Side Table Planters
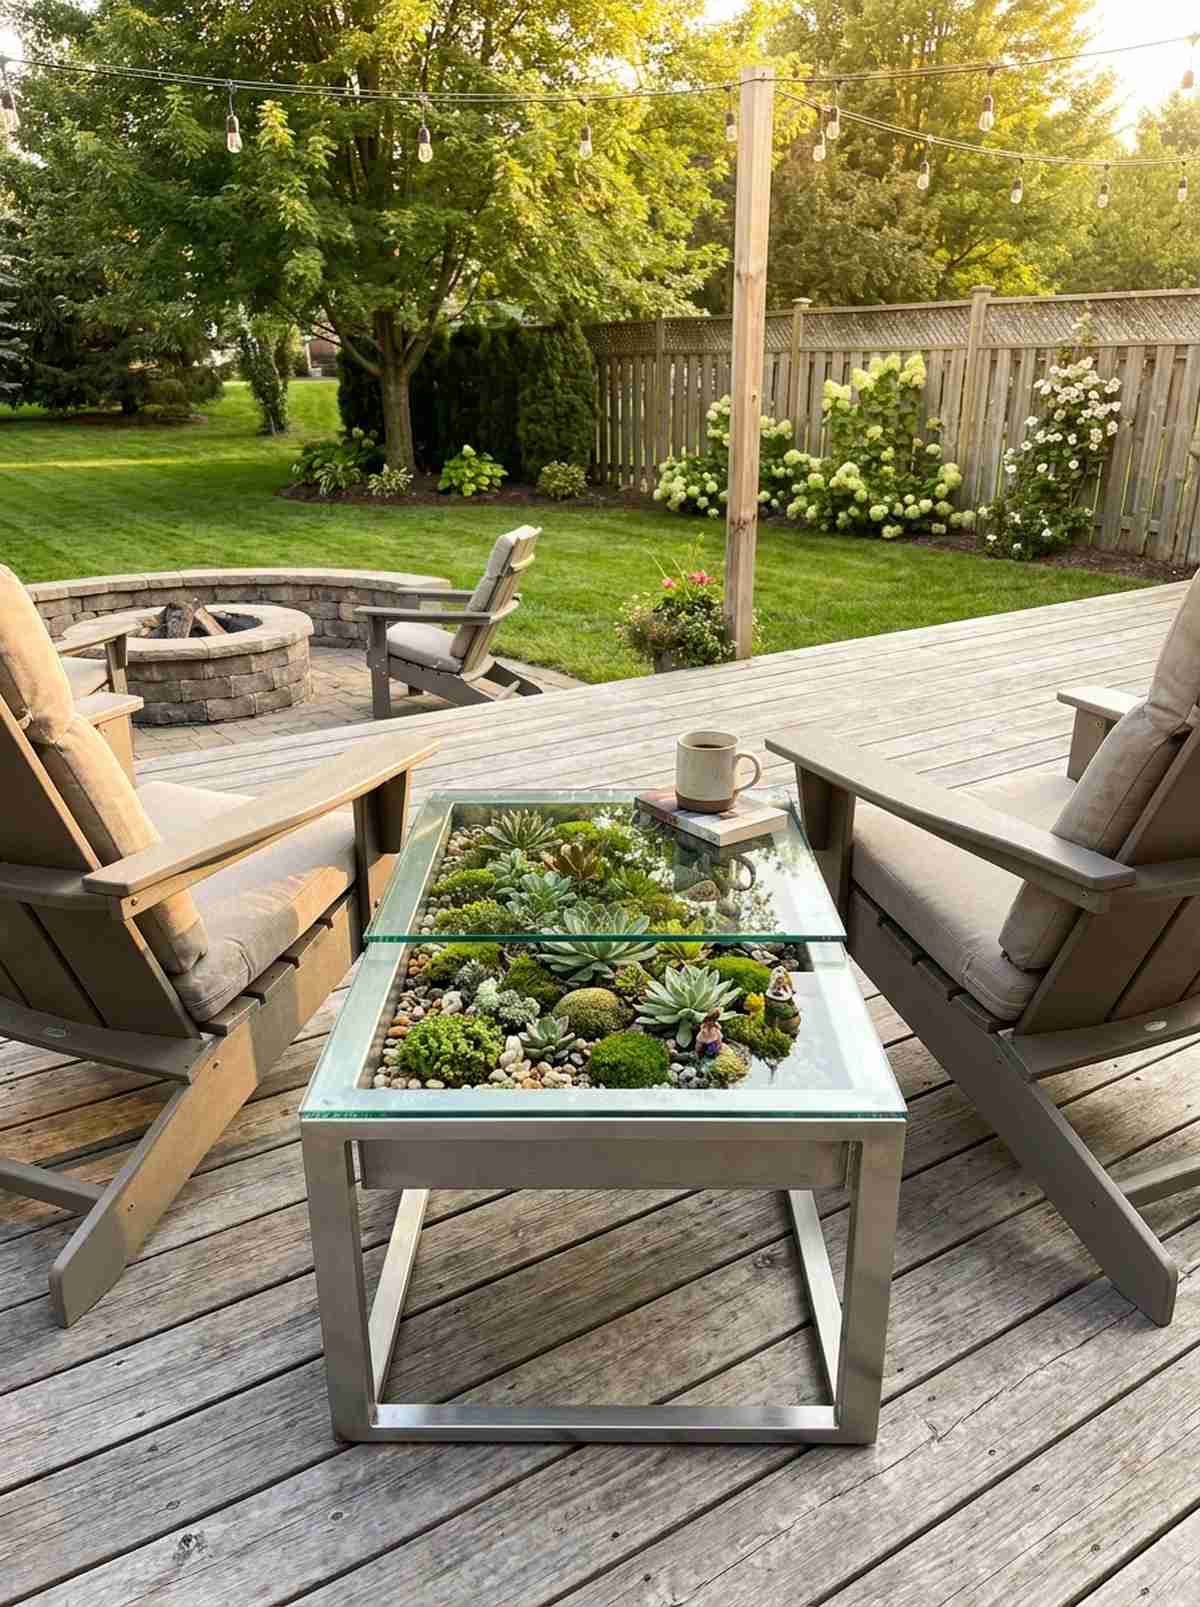
Sipping coffee over a glass top that reveals a miniature jungle inside feels like pure luxury. An incredible garden design small backyard hybrid piece that saves massive floor space.
Putting a pot *on* a table clutters it, but recessing the pot *into* the table delivers a highly custom, high-end finish. Utilizing terrarium accessories inside the table well creates a flawless, captivating micro-landscape.
You can easily pull this off for around $60–$100. It’s a fast upgrade that completely changes the vibe.
- Key Materials: Metal side table with inset basin
- Vibe / Style: High-end modern hybrid
- Difficulty: Simple assembly
- Budget Breakdown: Planter Table: $75 | Succulents: $20
- Creator’s Tip: Only use slow-growing succulents here so they don’t grow up and hit the glass top within a month.
- Smart Sourcing: outdoor metal side table with built-in planter and miniature terrarium supply kits.
39. Pergola with Storage Posts

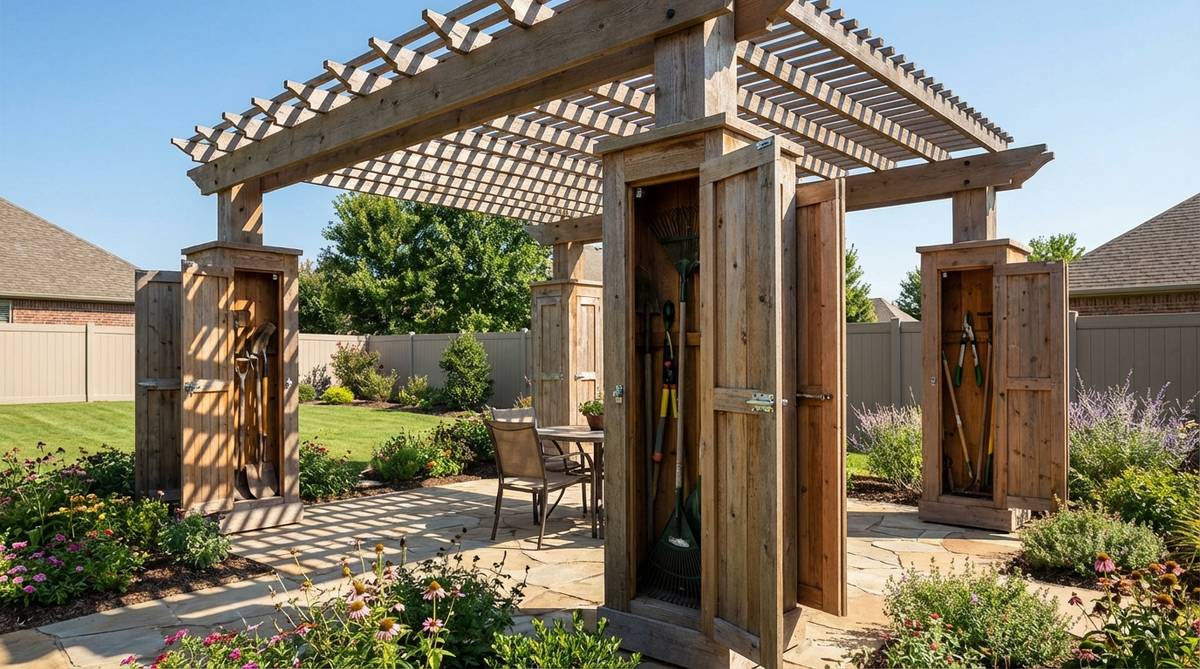
Hiding your rakes inside the actual structural pillars of your shade cover feels like next-level architectural genius. The ultimate stealth-mode storage for yards that absolutely cannot fit a shed.
Standard solid 4×4 posts look fine, but boxing them out into hollow columns gives a surprisingly premium, chunky aesthetic while secretly hiding tools. Installing heavy-duty magnetic door catches ensures the invisible access panels stay firmly shut.
Expect to invest $300+ as part of a larger build. Save this if you are planning a pergola!
- Key Materials: Boxed wooden columns, invisible hinges
- Vibe / Style: Master-planned custom
- Difficulty: Advanced carpentry
- Budget Breakdown: Extra Lumber: $100 | Hardware: $40
- Creator’s Tip: Put a slight angle on the top interior block so rainwater doesn’t pool inside your hollow tool post.
- Smart Sourcing: heavy-duty concealed cabinet hinges (outdoor rated) and magnetic push-to-open door latches.
Most DIY fire pits look like a pile of messy bricks. The layout coming up next fixes that instantly while doubling your seating.
40. Fire Pit with Surrounding Wall Seating
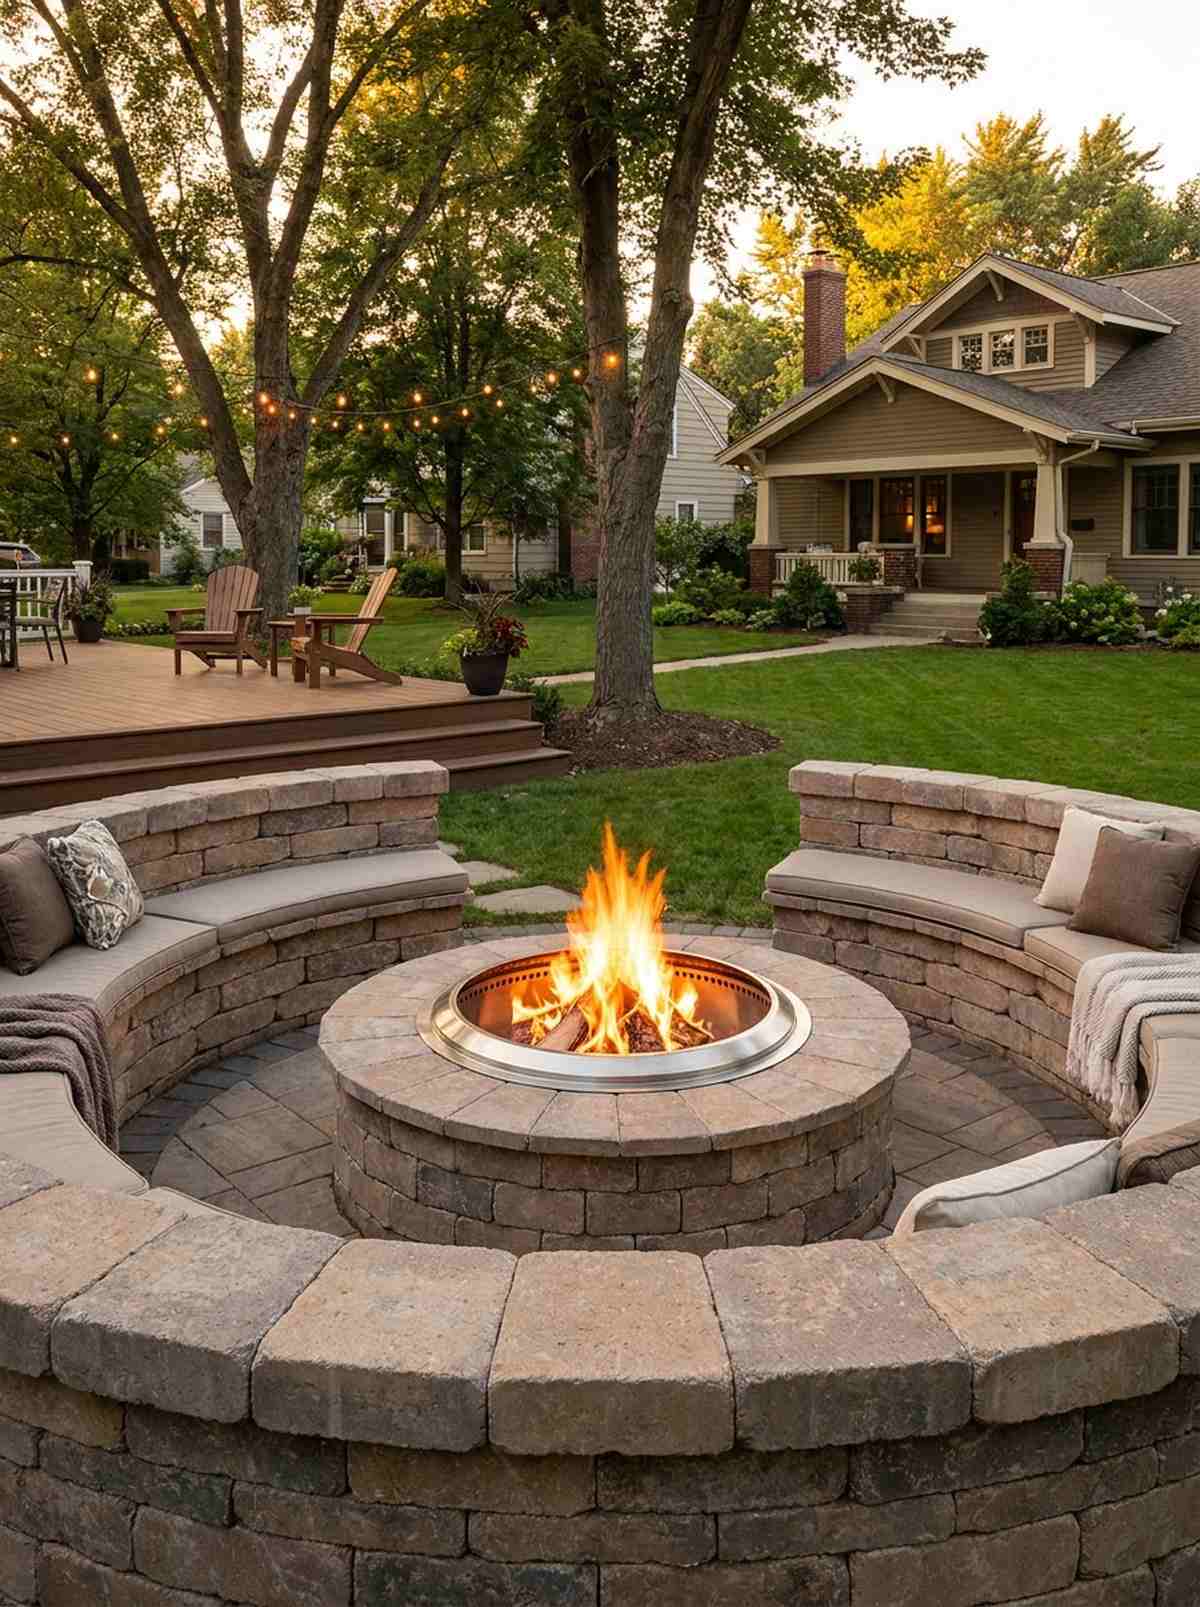
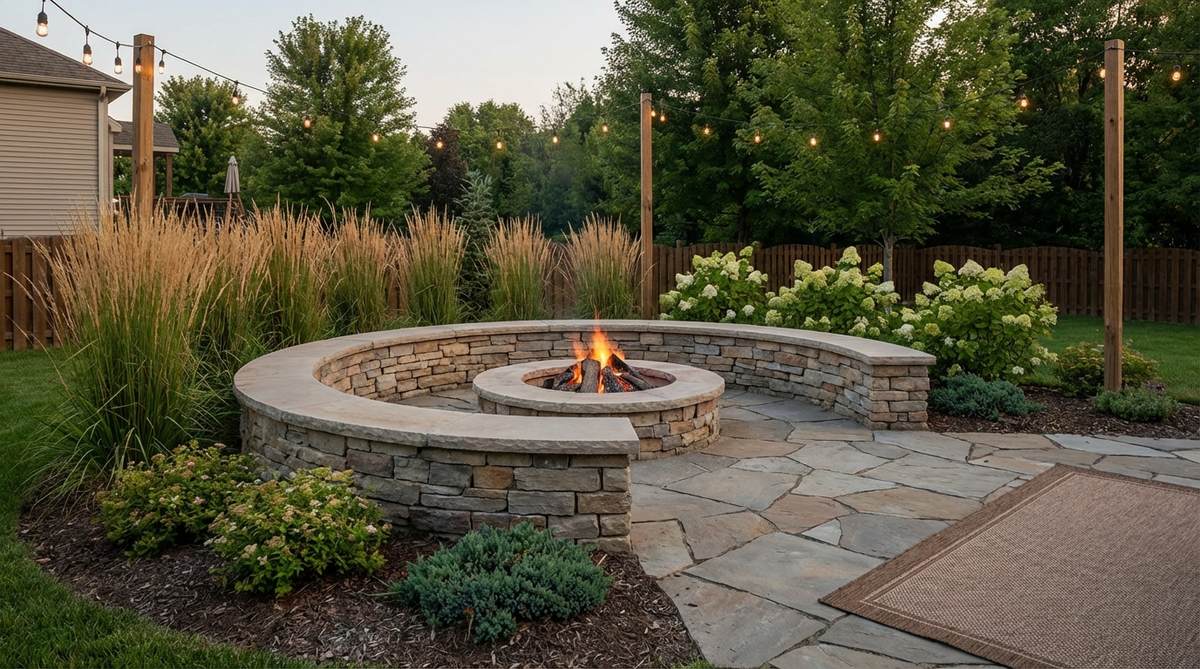
Anchoring your yard with a permanent, glowing circle feels like creating an ancient, magnetic gathering space. Essential for drawing people outside on crisp autumn nights.
Cheap metal fire bowls rust out in a year, but a built-in stone pit with matching curved walls looks incredibly expensive and intentional. Dropping in a smokeless stainless steel fire pit insert prevents your guests from choking on ash.
You can execute this major upgrade for $300–$600. Pin this to your ultimate outdoor living board!
- Key Materials: Curved retaining wall blocks, fire ring
- Vibe / Style: Luxury mountain lodge
- Difficulty: Heavy manual labor
- Budget Breakdown: Stone Blocks: $250 | Fire Insert: $150
- Creator’s Tip: Leave gaps in the bottom course of stones to allow airflow to feed the fire perfectly.
- Smart Sourcing: stainless steel smokeless fire pit inserts and curved concrete retaining wall block kits.
Layered Planting for Visual Depth
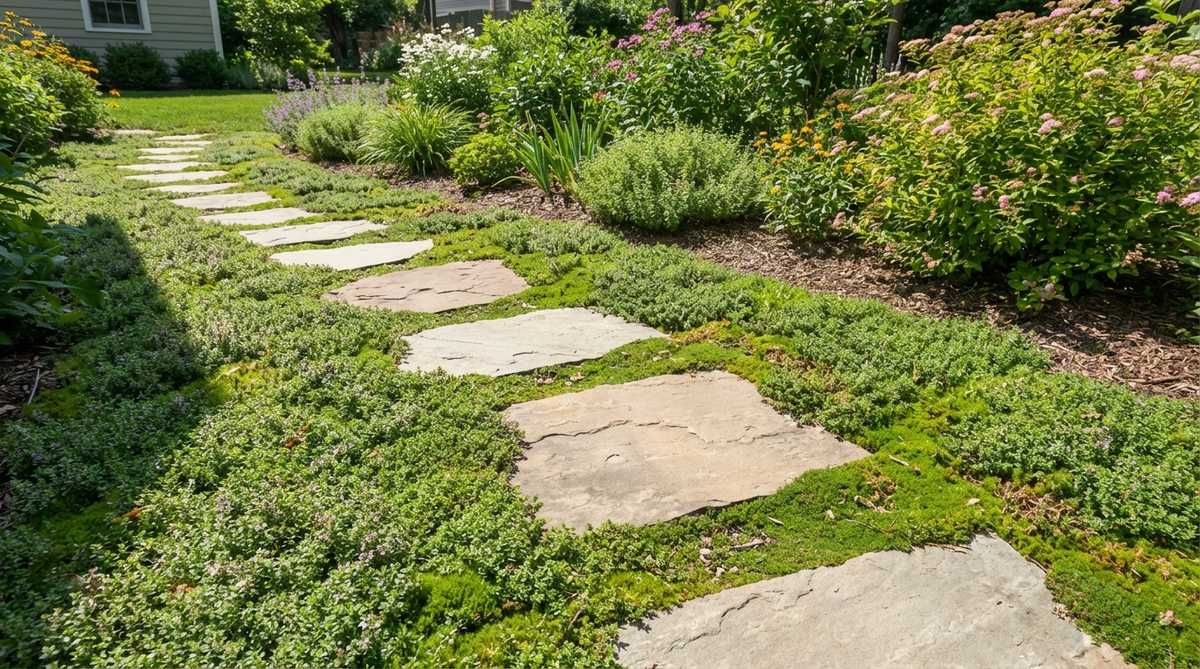
41. Ground Cover Carpet Layer
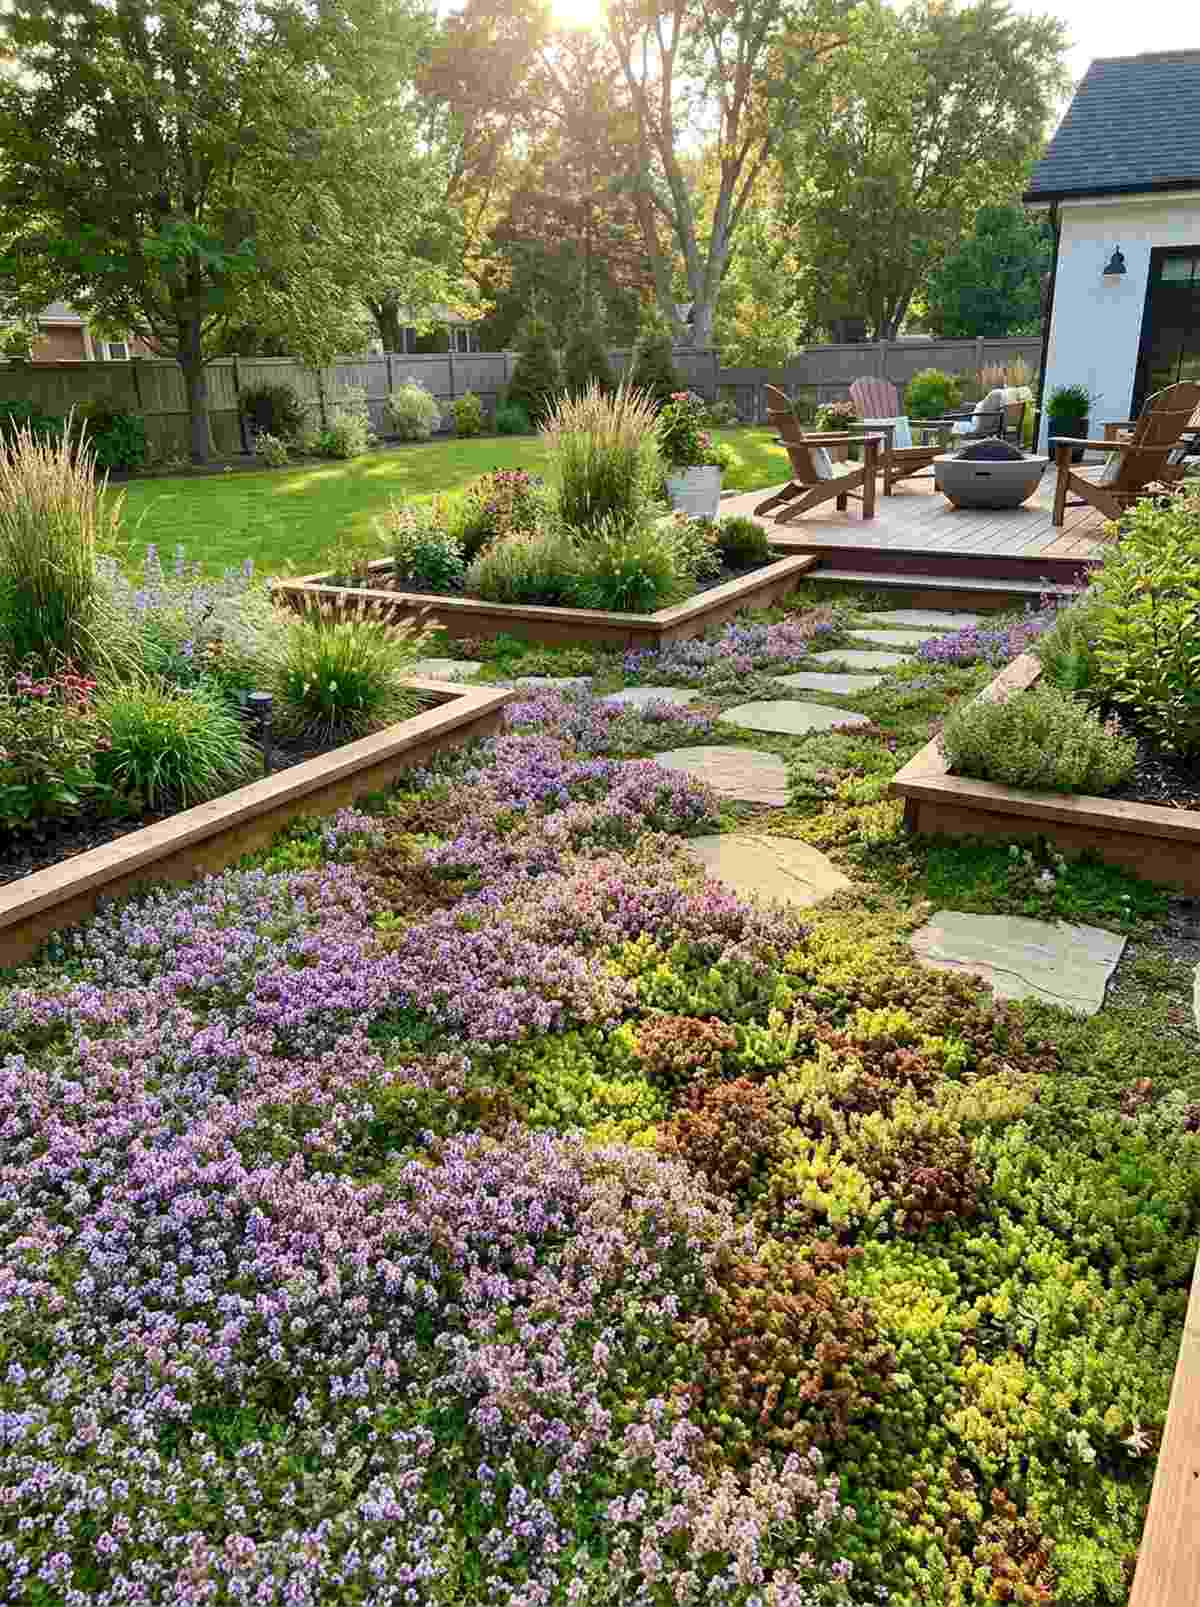
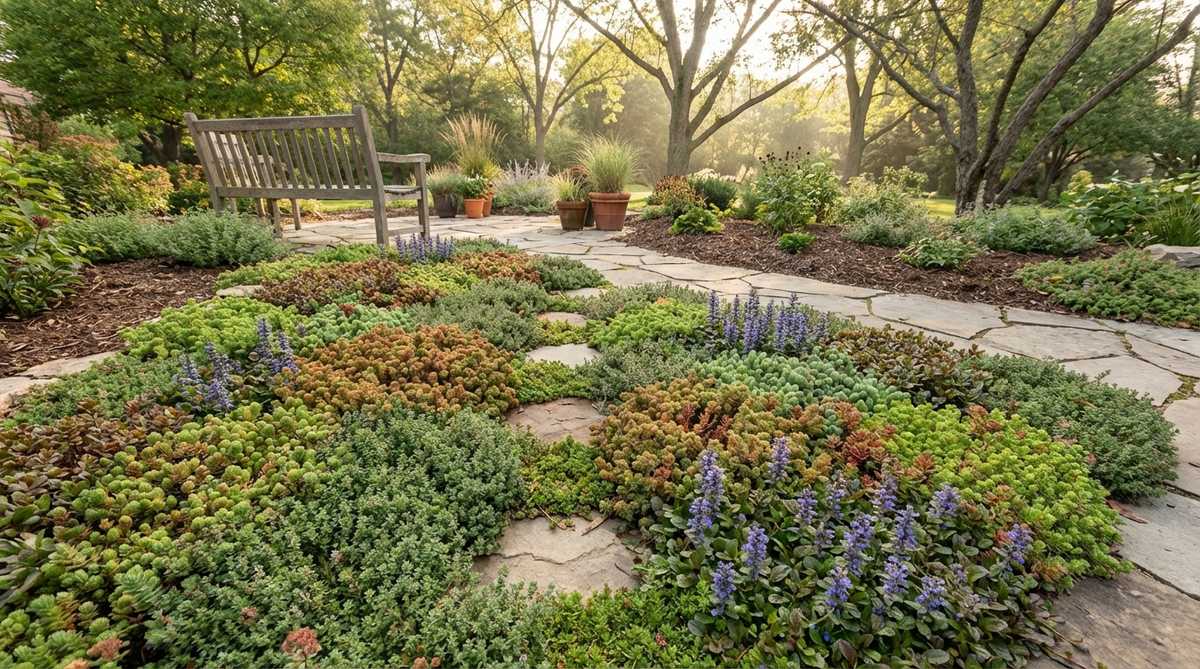
Replacing patchy grass with a dense, blooming carpet feels like walking barefoot through a fairytale glade. Flawless for suppressing weeds while visually connecting disparate planter beds.
Mulch looks utilitarian and dry, but a living carpet of creeping thyme delivers a surprisingly premium look that actually smells amazing when stepped on. Using bulk pack ground cover seed rolls establishes the carpet in half the time of standard planting.
You can easily pull this off for around $30–$60. Highly recommended for a fast weekend win.
- Key Materials: Creeping thyme or sedum plugs
- Vibe / Style: Lush enchanted forest
- Difficulty: Easy planting
- Budget Breakdown: Seed/Plugs: $40 | Starter Fertilizer: $15
- Creator’s Tip: Plant plugs exactly 8 inches apart; they will aggressively merge into a solid mat within one season.
- Smart Sourcing: creeping thyme seeds (bulk pack) and live sedum ground cover tile trays.
42. Mid-Height Perennial Band
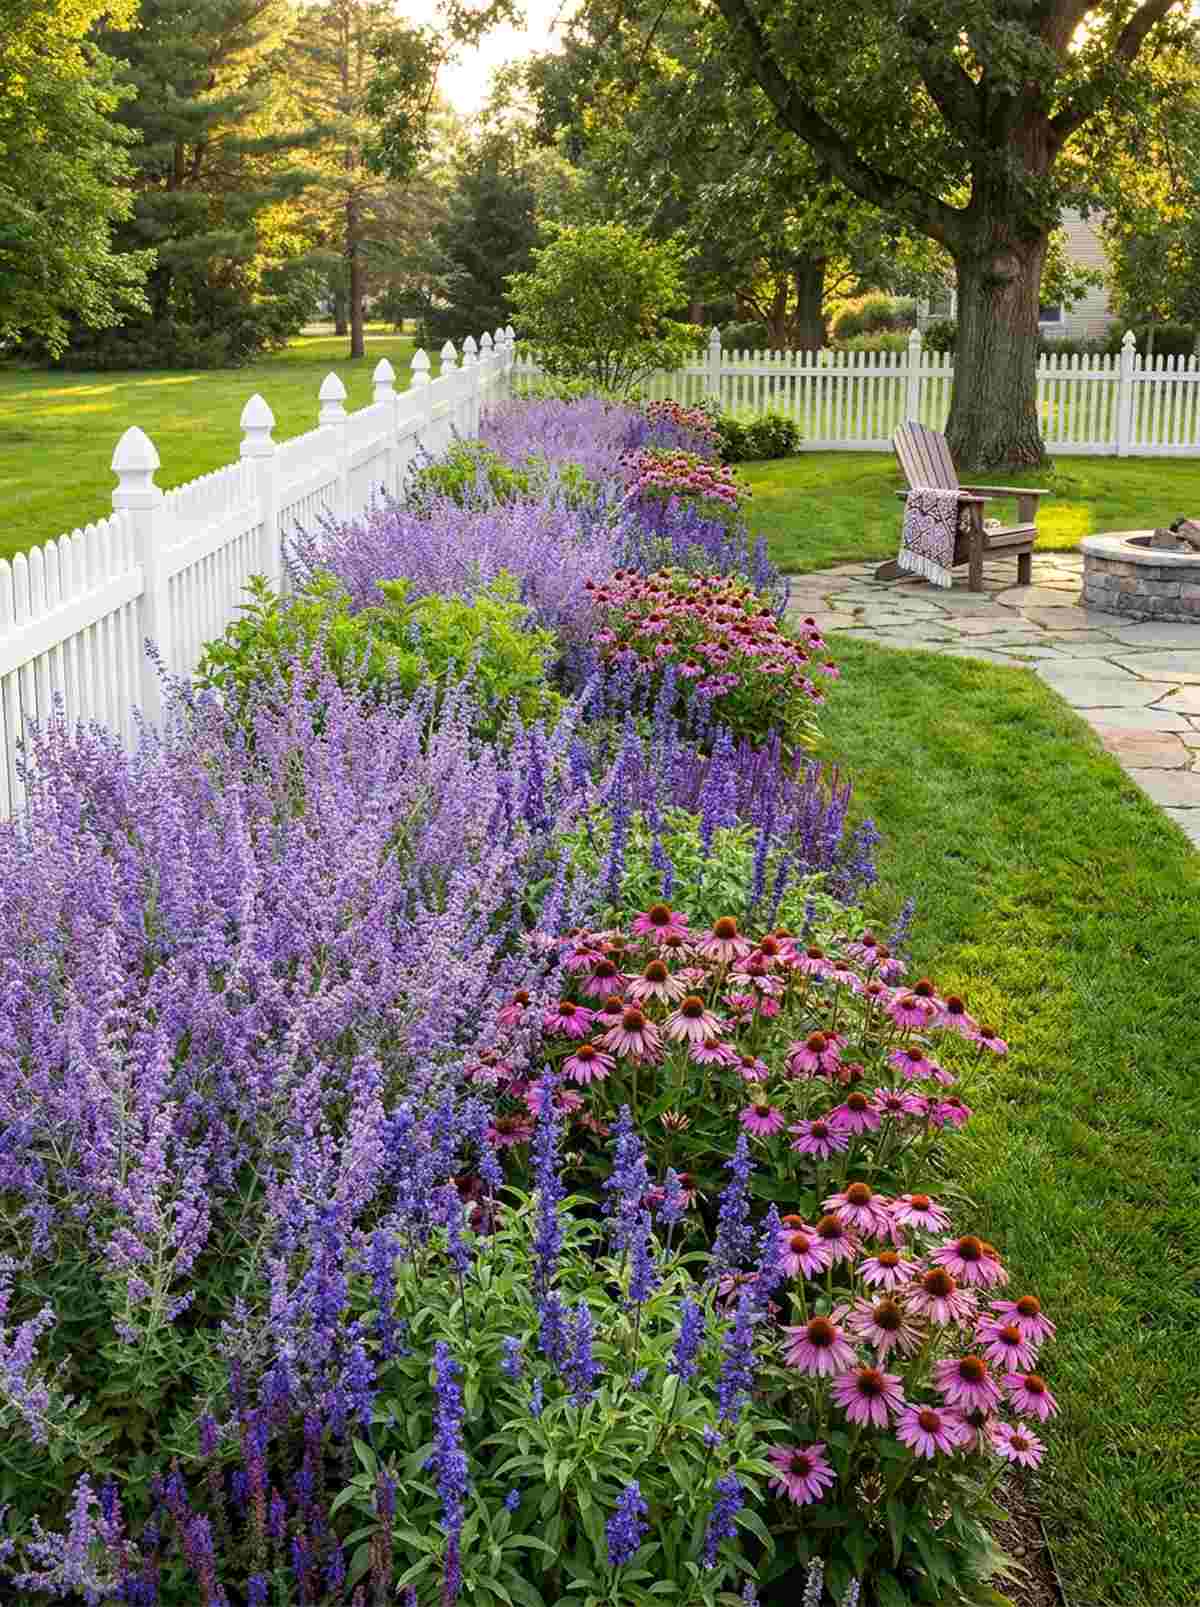
Painting a massive stripe of vibrant color across your fence line feels like a deliberate, professional landscaping stroke. The core engine for delivering consistent small garden design ideas impact.
Scattering single plants looks chaotic, but planting bold masses of three to five identical perennials gives a designer-level finish that draws the eye horizontally. Snagging bulk bare-root perennial kits saves you a fortune compared to buying potted nursery plants.
Expect to spend $50–$100 for a stunning boundary. Save this trick for instant curb appeal!
- Key Materials: Russian Sage, Salvia, Coneflowers
- Vibe / Style: English border garden
- Difficulty: Basic digging
- Budget Breakdown: Bare Roots: $60 | Compost: $20
- Creator’s Tip: Always plant in odd numbers (3, 5, 7) to create a natural, asymmetrical flow that pleases the eye.
- Smart Sourcing: bare-root perennial flower starter kits and organic bloom-boosting compost blends.
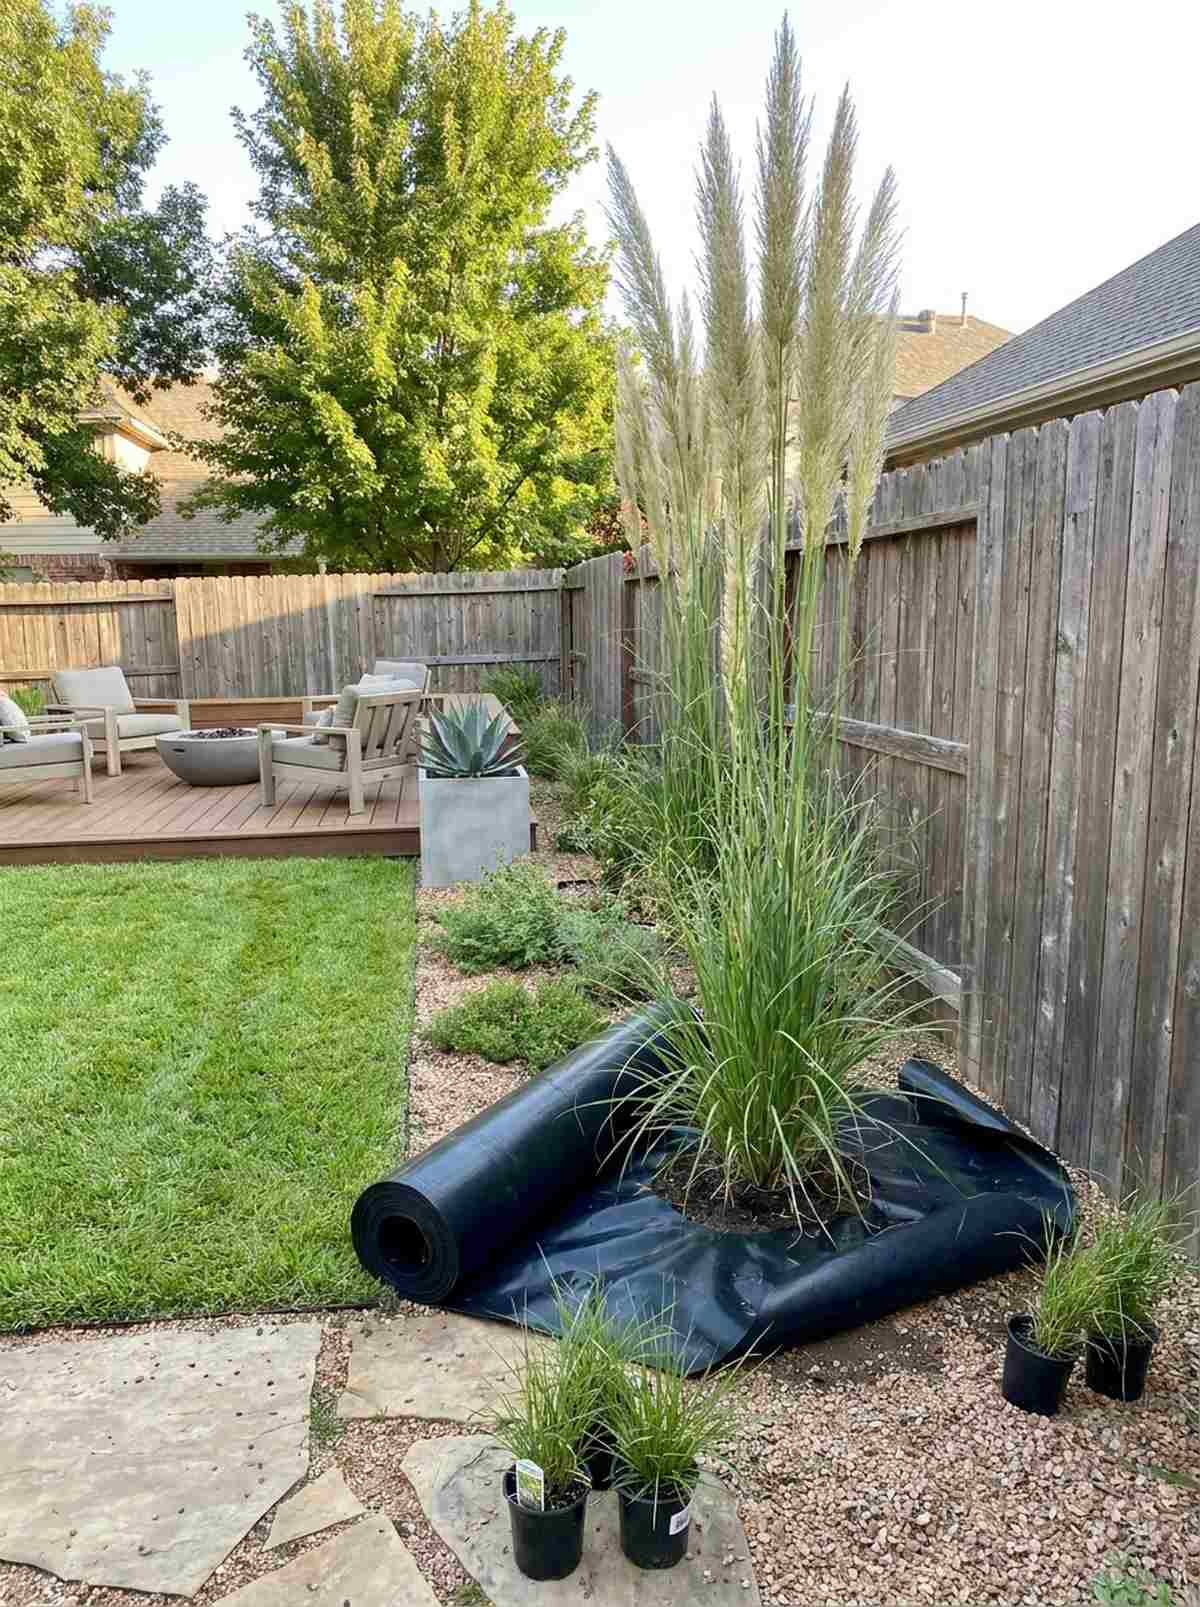
43. Tall Focal Specimens
Thrusting an architectural spire of grass into the sky feels dramatic and fiercely modern. Absolutely crucial for breaking up the boring horizontal line of standard wooden privacy fences.
Flat gardens look incredibly cheap, but adding towering feather reed grass delivers a highly aesthetic, expensive vibe that moves beautifully in the wind. Utilizing heavy-duty root barrier rolls ensures aggressive tall grasses don’t take over your entire yard.
You can execute this dramatic look for $30–$70. Pin this for striking structural inspiration!
- Key Materials: Ornamental tall grasses or Delphiniums
- Vibe / Style: Dramatic modern prairie
- Difficulty: Simple installation
- Budget Breakdown: Tall Specimen: $40 | Root Barrier: $20
- Creator’s Tip: Place tall focal points at the back corners of your yard to force the eye outward, making the space look bigger.
- Smart Sourcing: commercial root barrier plastic rolls and live ornamental grass starter plants.
44. Graduated Color Progression
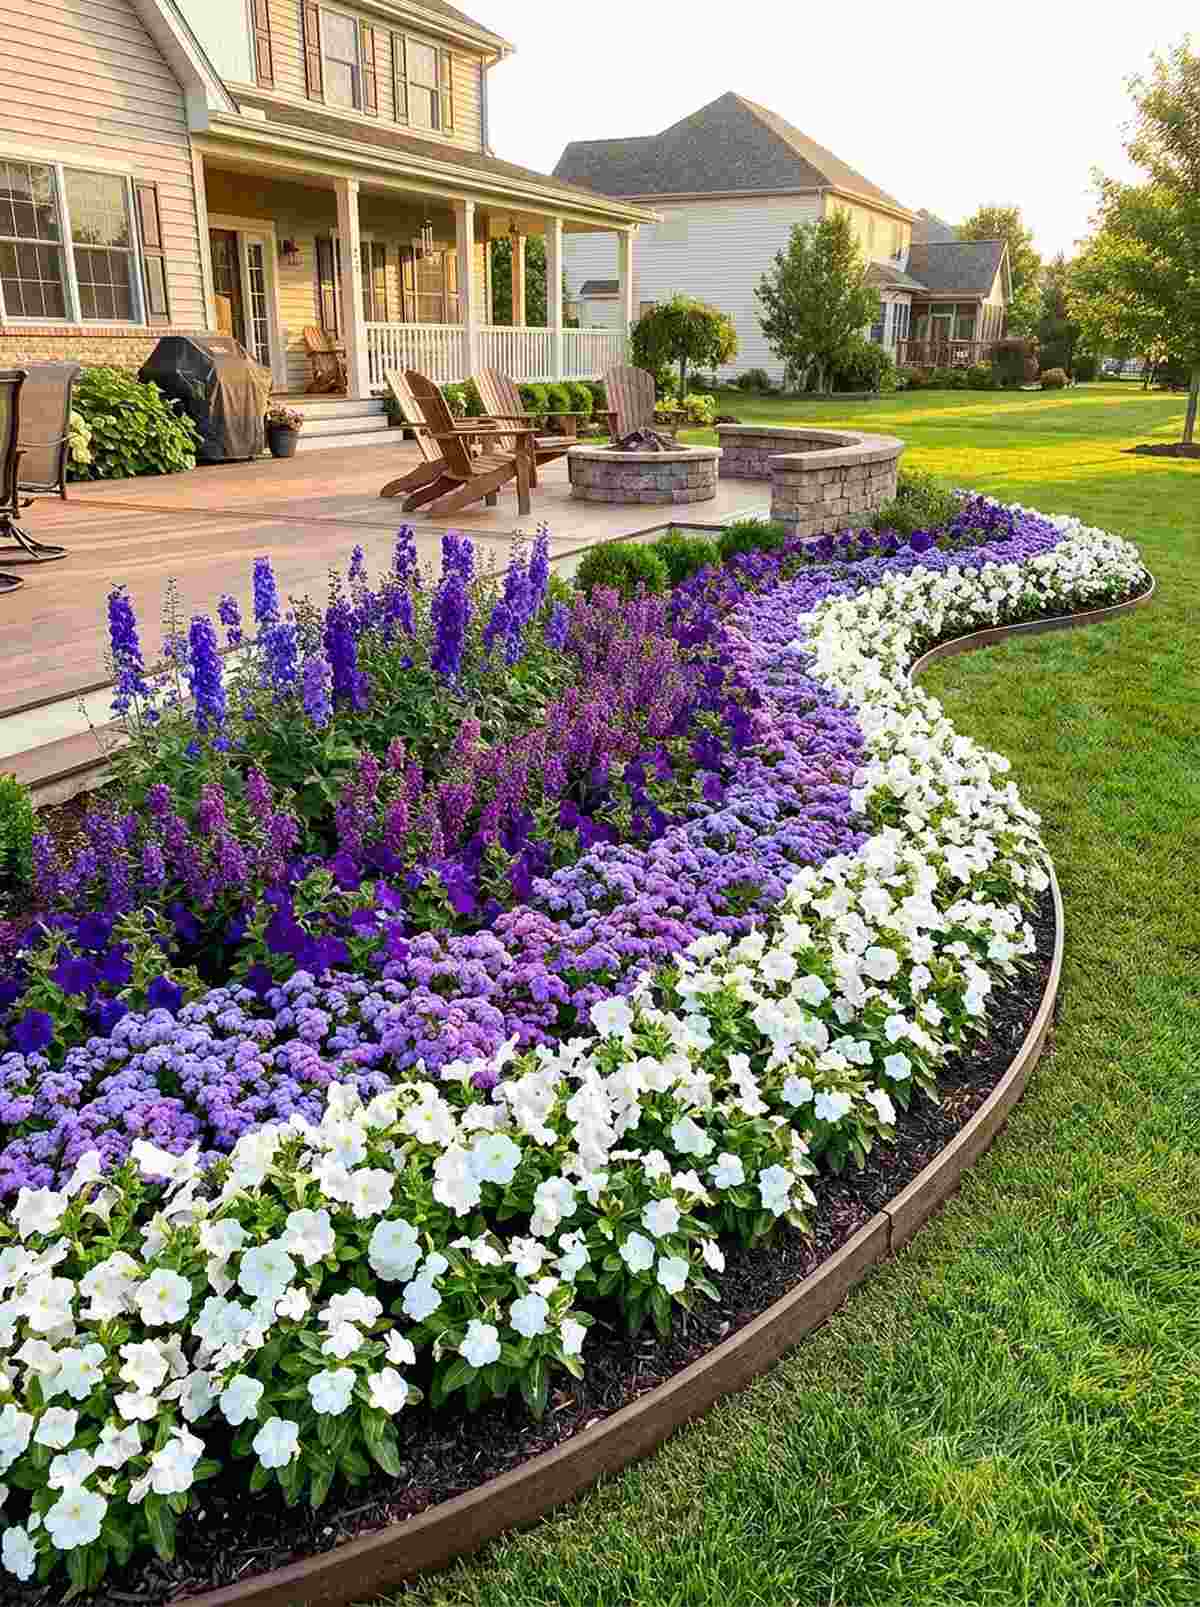
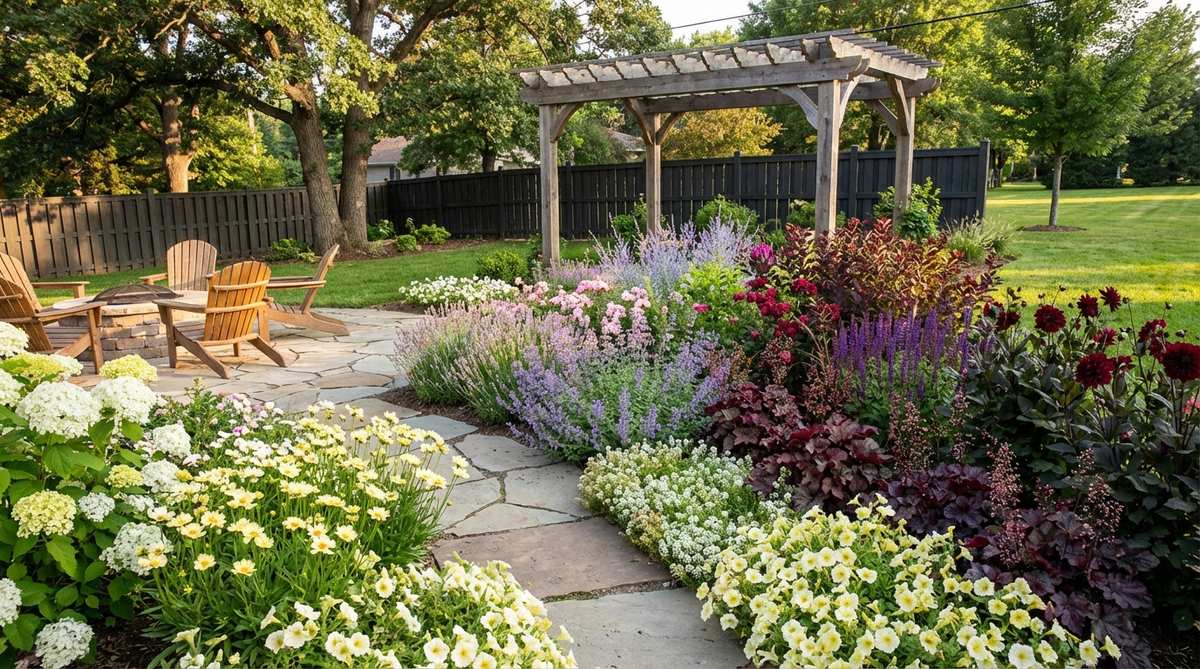
Fading colors from bright white in the front to deep purple in the back feels like an optical illusion engineered by a master painter. This literal trick forces the brain to think your yard is deeper than it is.
Mixing colors randomly visually shrinks the space, but forced color perspective looks far more expensive and strategic. Incorporating premium landscape edging borders keeps the color bands perfectly separated and crisp.
You can map this out for $40–$80 in seasonal flowers. It’s a fast upgrade that completely changes the vibe.
- Key Materials: Specific color-coded annuals
- Vibe / Style: Master-planned optical illusion
- Difficulty: Requires strict planning
- Budget Breakdown: Flat of Whites: $20 | Flat of Purples: $20
- Creator’s Tip: Put warm colors (reds/oranges) up close to make them pop, and cool colors (blues/purples) in the back so they visually recede.
- Smart Sourcing: bulk pack seasonal flower seeds (color-sorted) and crisp plastic landscape edging rolls.
Most beginners have dead, ugly gardens by August. The next succession planting trick guarantees your yard looks like a magazine cover for 9 months straight.
45. Seasonal Succession Planting
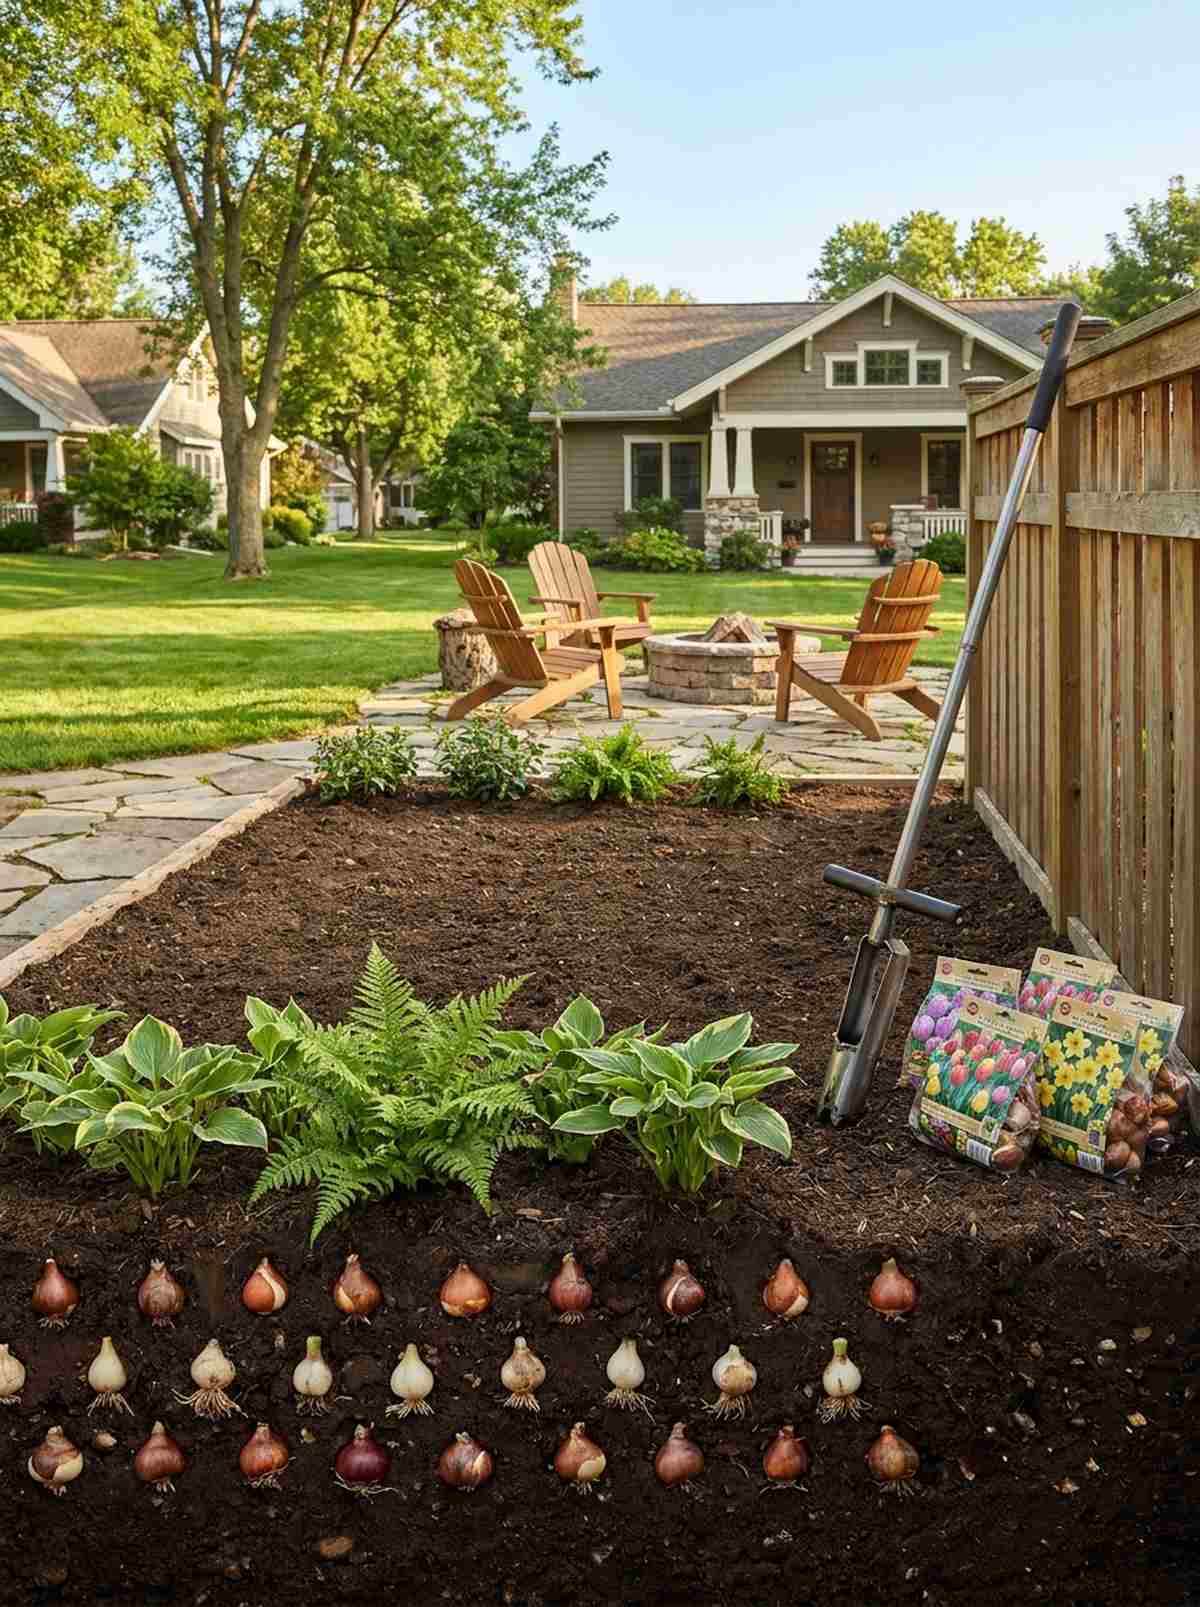
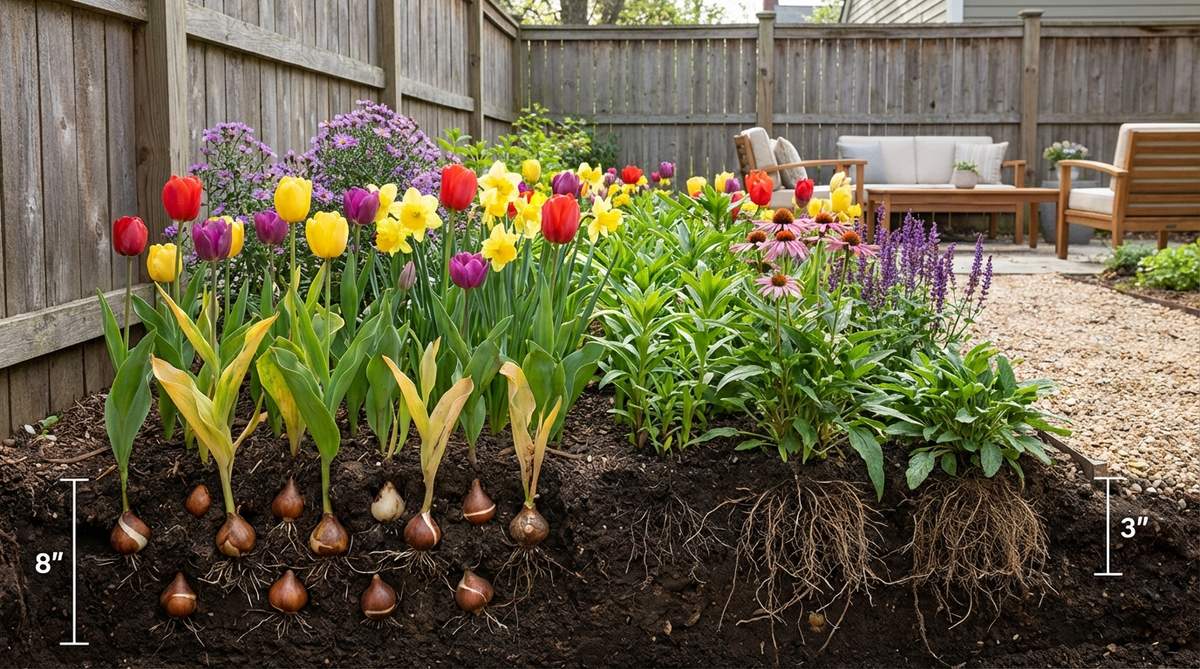
Hiding dormant spring bulbs underneath summer blooming perennials feels like a brilliant magic act. The absolute best way to maximize a tiny 3×3 patch of dirt for year-round color.
Planting only summer flowers leaves you with a barren mud pit in spring, but vertical bulb layering delivers a surprisingly premium look that constantly evolves. Using a heavy-duty steel bulb planter tool cuts the planting time down by 80%.
Expect to invest $50–$90 for multi-season impact. Save this to stop your garden from looking dead!
- Key Materials: Tulips/Daffodils, Hosta/Fern crowns
- Vibe / Style: Ever-changing botanical show
- Difficulty: Deep trenching required
- Budget Breakdown: Bulk Bulbs: $40 | Perennials: $40
- Creator’s Tip: Plant bulbs 8 inches deep, then plant the perennial crowns directly on top at 3 inches deep in the exact same hole.
- Smart Sourcing: long-handle steel bulb planting auger and bulk pack spring-blooming bulb mixes.
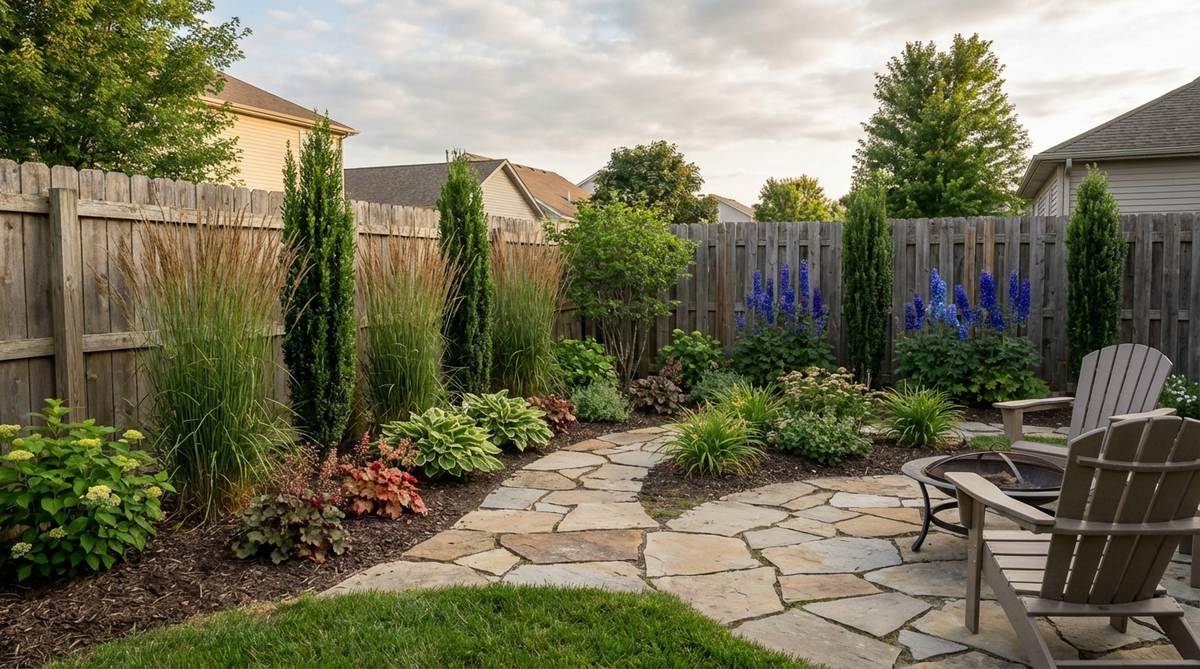
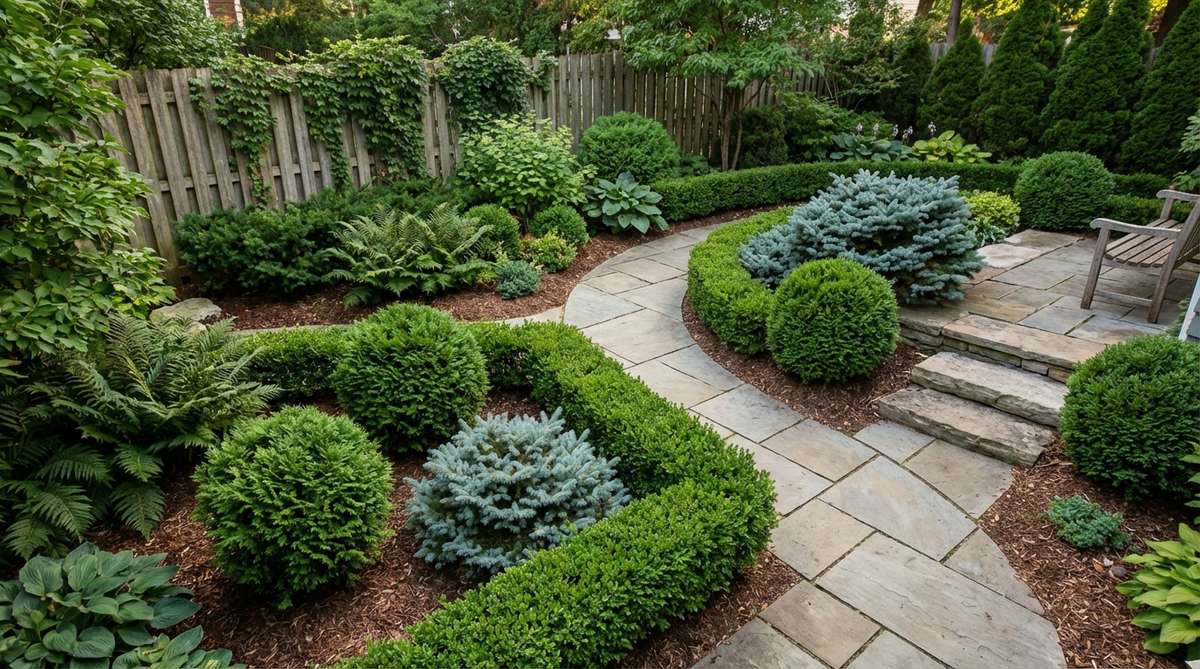
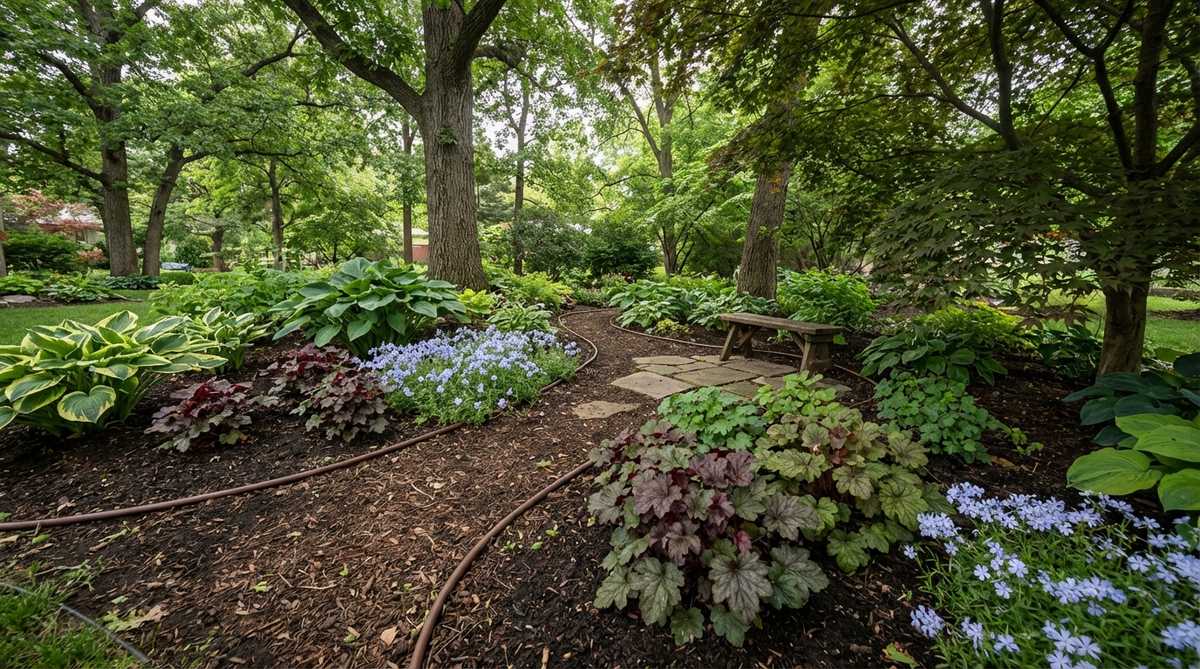
46. Texture Contrast Combinations
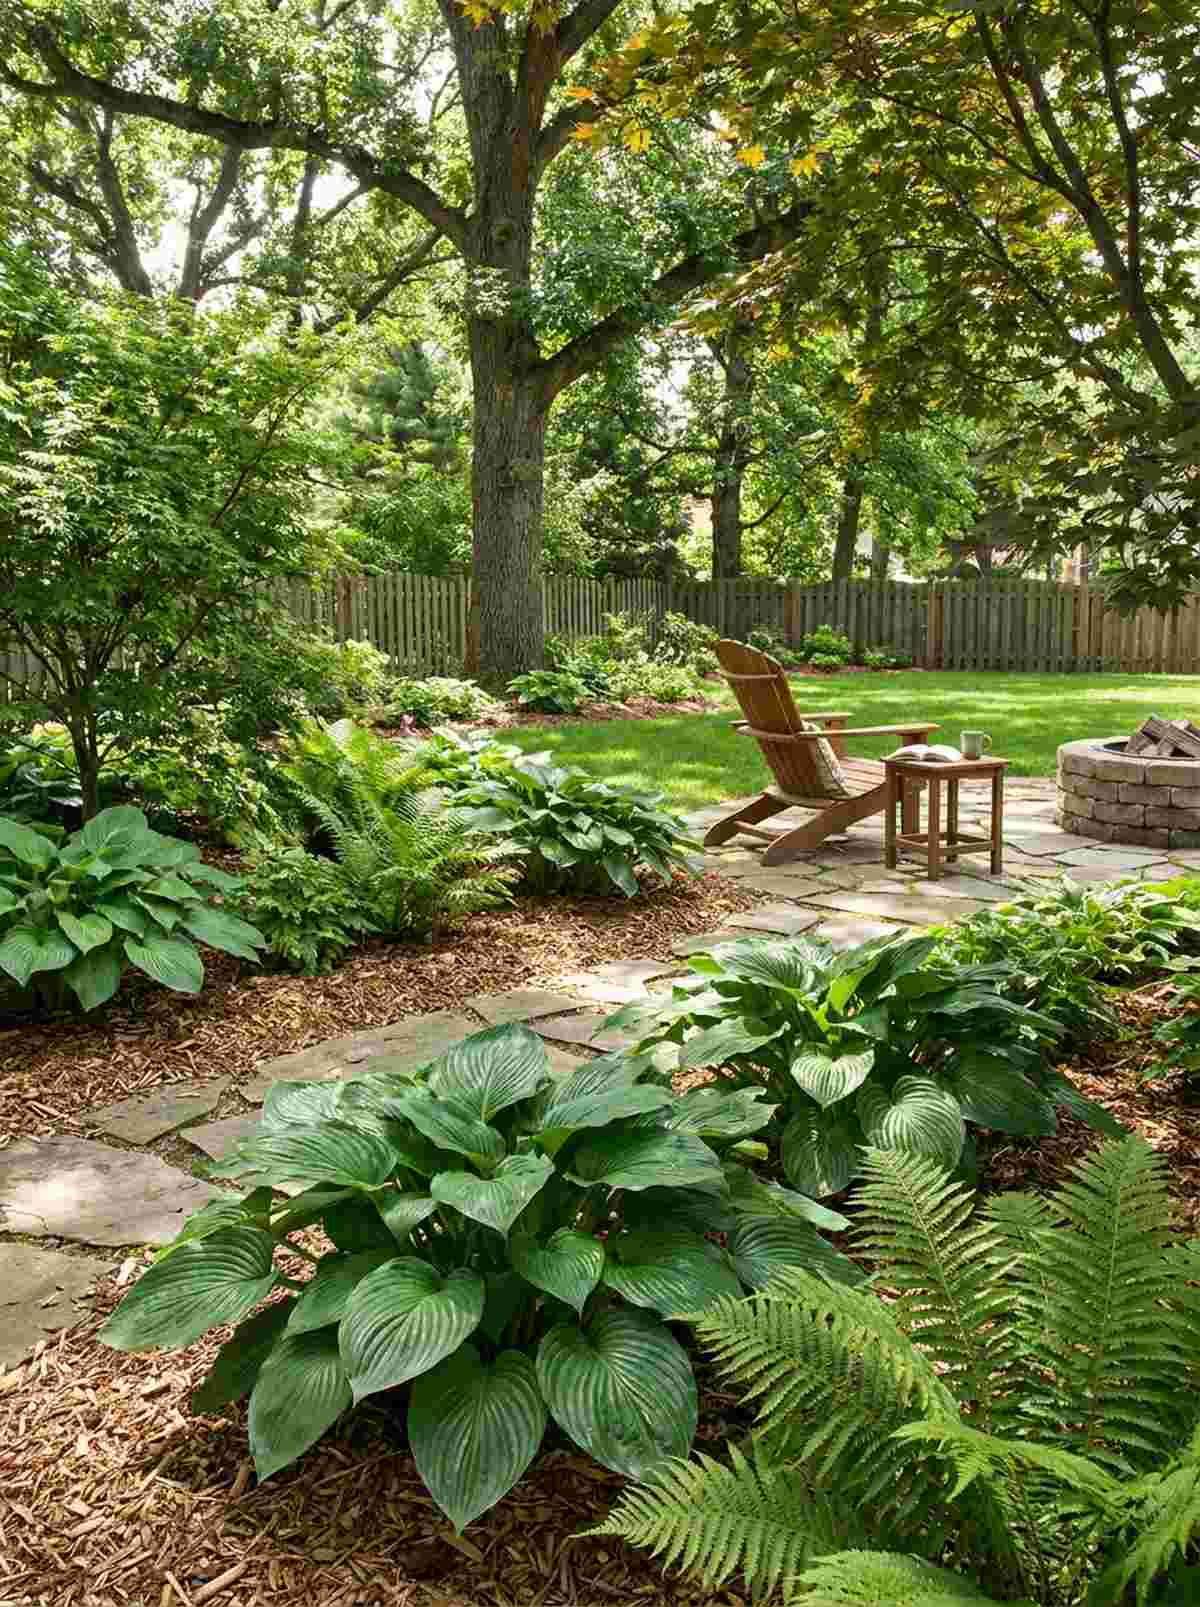
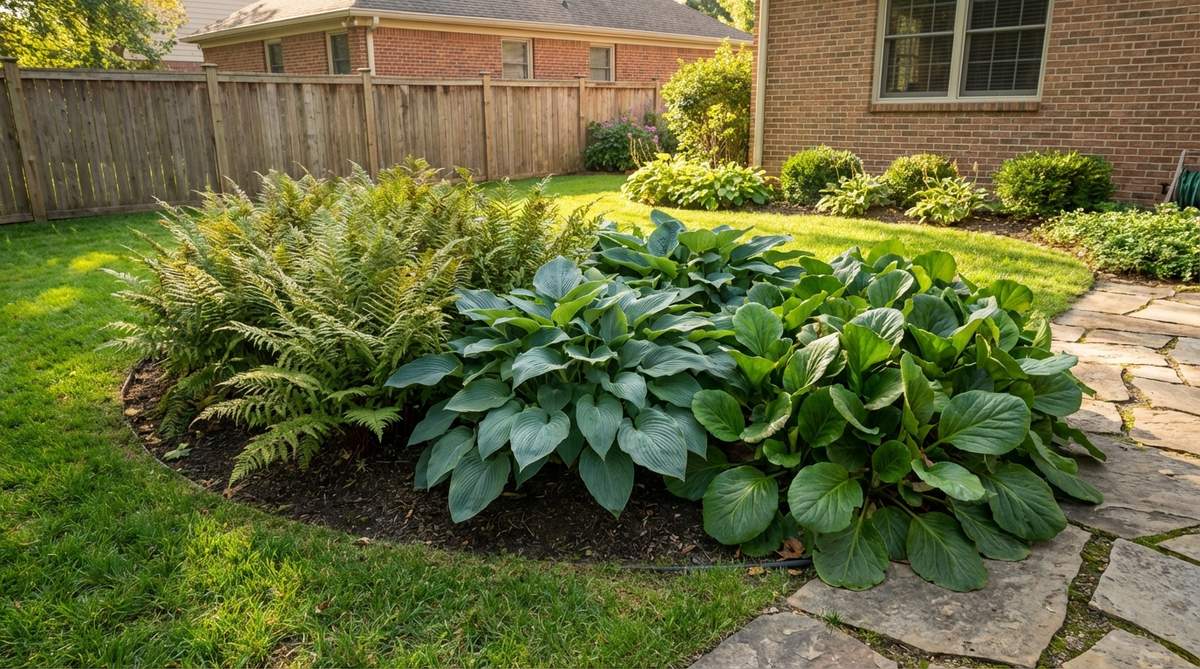
Smashing massive, glossy hosta leaves against delicate, feathery ferns feels incredibly rich and tactile. This technique guarantees your garden looks stunning even when absolutely nothing is blooming.
Relying solely on flowers is an amateur mistake, but designing with foliage texture gives a designer-level finish that luxury landscapers swear by. Snagging shade-loving garden starter kits takes the headache out of pairing the right textures.
You can easily pull this off for around $40–$75. Pin this for the ultimate shade-garden cheat sheet!
- Key Materials: Broadleaf Hostas, fine-lace Ferns
- Vibe / Style: High-end woodland retreat
- Difficulty: Easy placement
- Budget Breakdown: Ferns: $25 | Hostas: $25
- Creator’s Tip: Follow the 1/3 rule: use fine-textured plants for the majority, then punch it up with 1/3 massive, bold leaves for contrast.
- Smart Sourcing: live bare-root hosta multipacks and premium organic leaf mold compost.
47. Evergreen Backbone Structure
Anchoring your yard with permanent green shapes feels like locking in a reliable, architectural skeleton. Completely mandatory so your garden design small backyard doesn’t look like an abandoned wasteland in January.
Skipping evergreens makes a yard look cheap in winter, but planting dwarf conifers delivers a highly aesthetic, premium look 365 days a year. Incorporating miniature garden supplies around the base adds year-round charm.
You can execute this vital structure for $80–$150. Highly recommended for a permanent backyard upgrade.
- Key Materials: Dwarf boxwood or globe junipers
- Vibe / Style: Structured all-season estate
- Difficulty: Digging required
- Budget Breakdown: 3 Dwarf Shrubs: $100 | Pine Mulch: $20
- Creator’s Tip: Allocate exactly 40% of your total planting space to evergreens so the yard holds its shape in the dead of winter.
- Smart Sourcing: live dwarf evergreen starter shrubs and premium slow-release evergreen fertilizer spikes.
48. Filler-Spiller-Thriller Containers
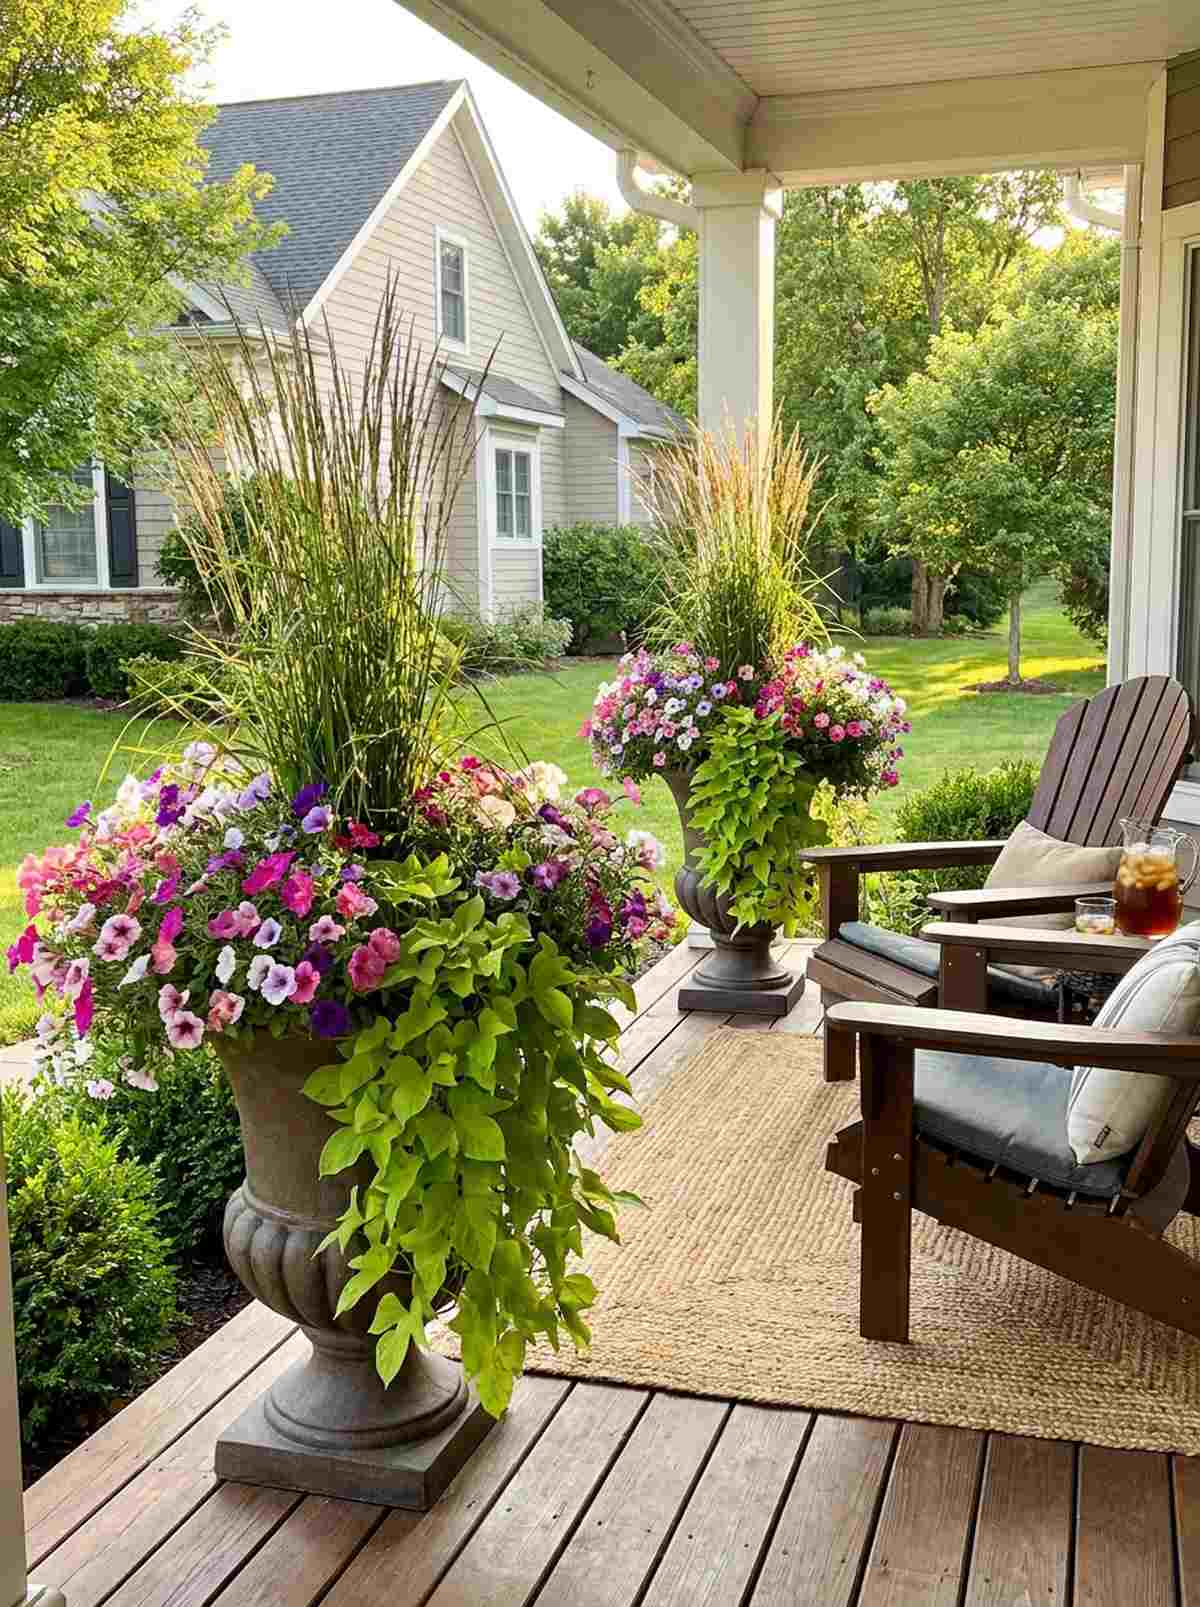

Cramming explosive color, height, and cascading vines into one pot feels like a fireworks display on your patio. The foolproof recipe for creating those massive, magazine-worthy porch planters.
Buying pre-made mixed pots costs a fortune, but building the thriller/filler/spiller formula yourself looks incredibly expensive for a fraction of the cost. Using commercial water-retaining potting soil guarantees the crowded roots won’t dry out by 2 PM.
Expect to spend $30–$50 per massive pot. Save this exact formula for spring planting!
- Key Materials: Tall grass (thriller), petunias (filler), sweet potato vine (spiller)
- Vibe / Style: Lush maximalist porch
- Difficulty: Fun and easy
- Budget Breakdown: Plants: $25 | Premium Soil: $15
- Creator’s Tip: Always place the ‘thriller’ slightly off-center to create a modern, dynamic tension rather than a boring symmetrical look.
- Smart Sourcing: moisture-control potting soil (large bag) and heavy-duty decorative resin urns.
49. Underplanting Trees and Shrubs
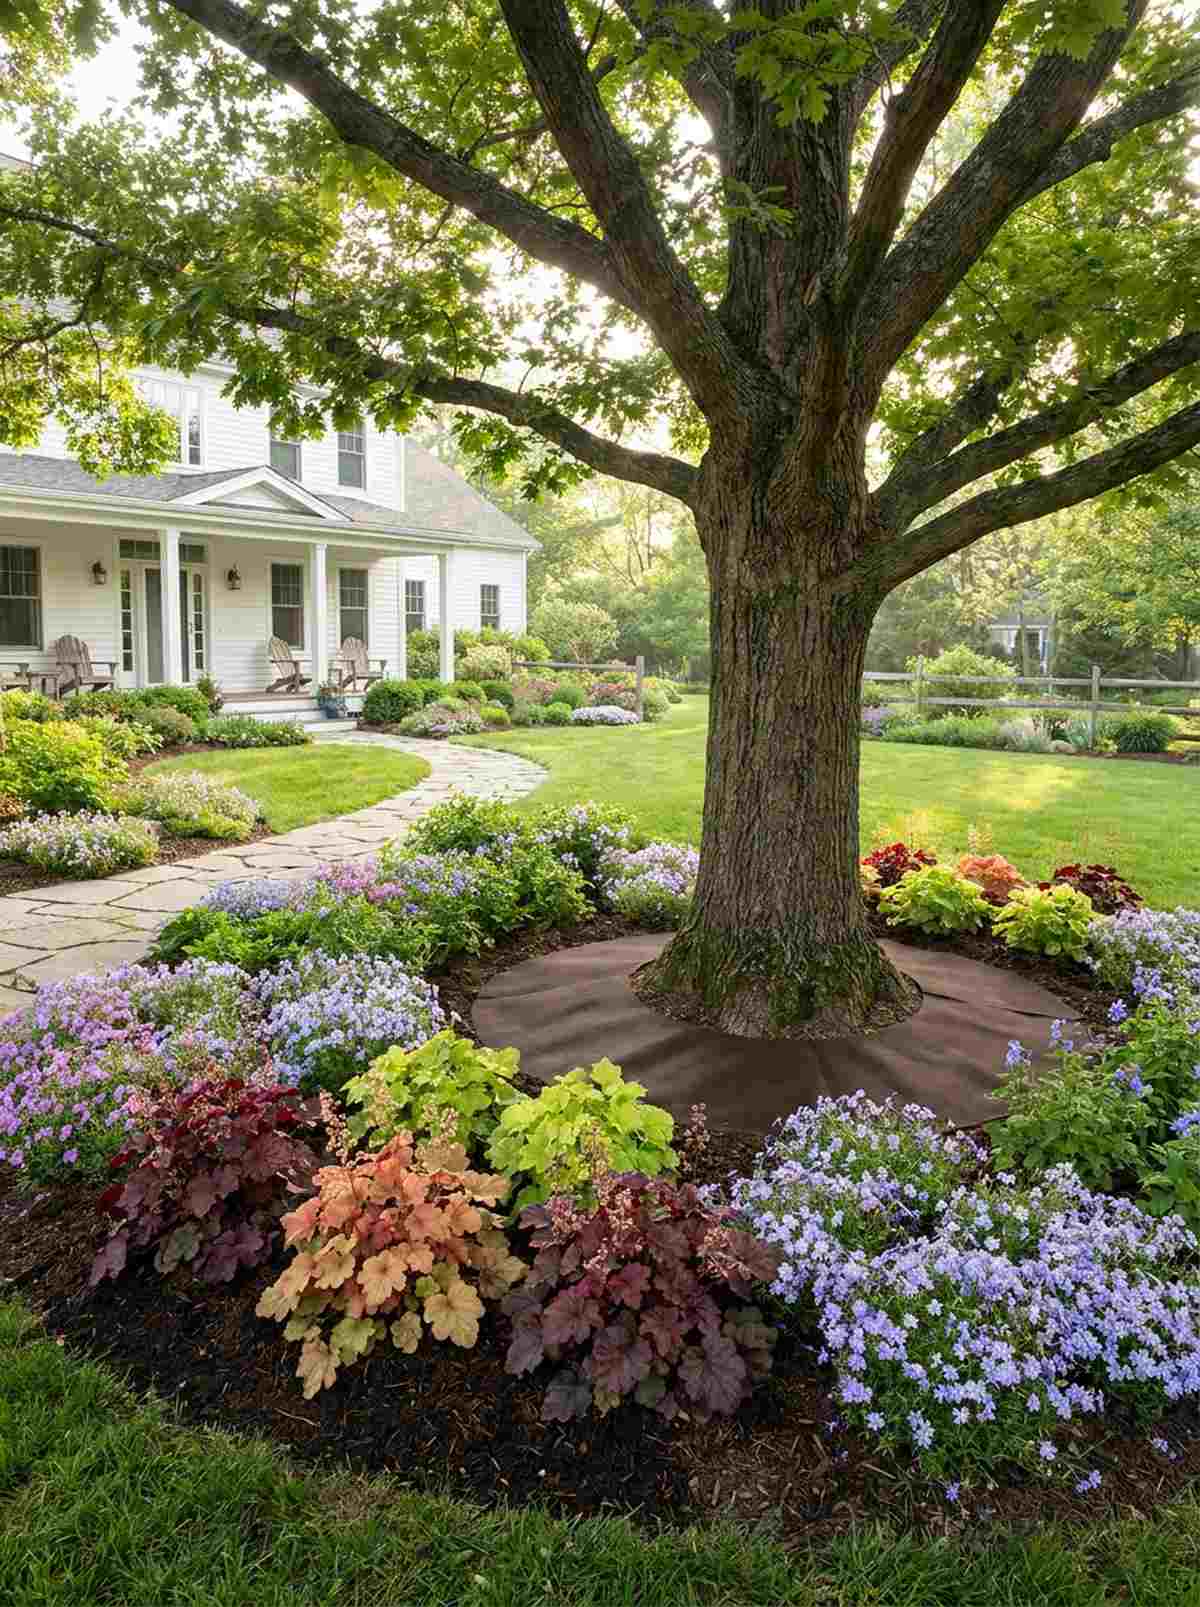
Turning the ugly dirt circle beneath a mature tree into a lush woodland carpet feels like reclaiming stolen territory. A brilliant way to squeeze extra square footage out of dead zones.
Leaving bare roots exposed looks unfinished, but planting shallow-rooted shade lovers gives a designer-level finish that unifies the whole yard. Utilizing tree ring weed barrier mats keeps the area looking pristine while the plants establish.
You can easily pull this off for around $25–$45. Pin this to fix your ugly tree bases!
- Key Materials: Coral bells, woodland phlox, compost
- Vibe / Style: Layered botanical garden
- Difficulty: Careful shallow digging
- Budget Breakdown: Shade Plants: $30 | Compost: $10
- Creator’s Tip: Never add more than 2 inches of soil over the tree roots, or you will accidentally suffocate and kill the mature tree.
- Smart Sourcing: heavy-duty tree ring weed barriers and live shade-tolerant ground cover packs.
If you think your walls are completely full, you’re wrong. This next vertical trick doubles your bloom time without taking up a single extra inch of ground.
50. Vertical Plane Climbing Combinations
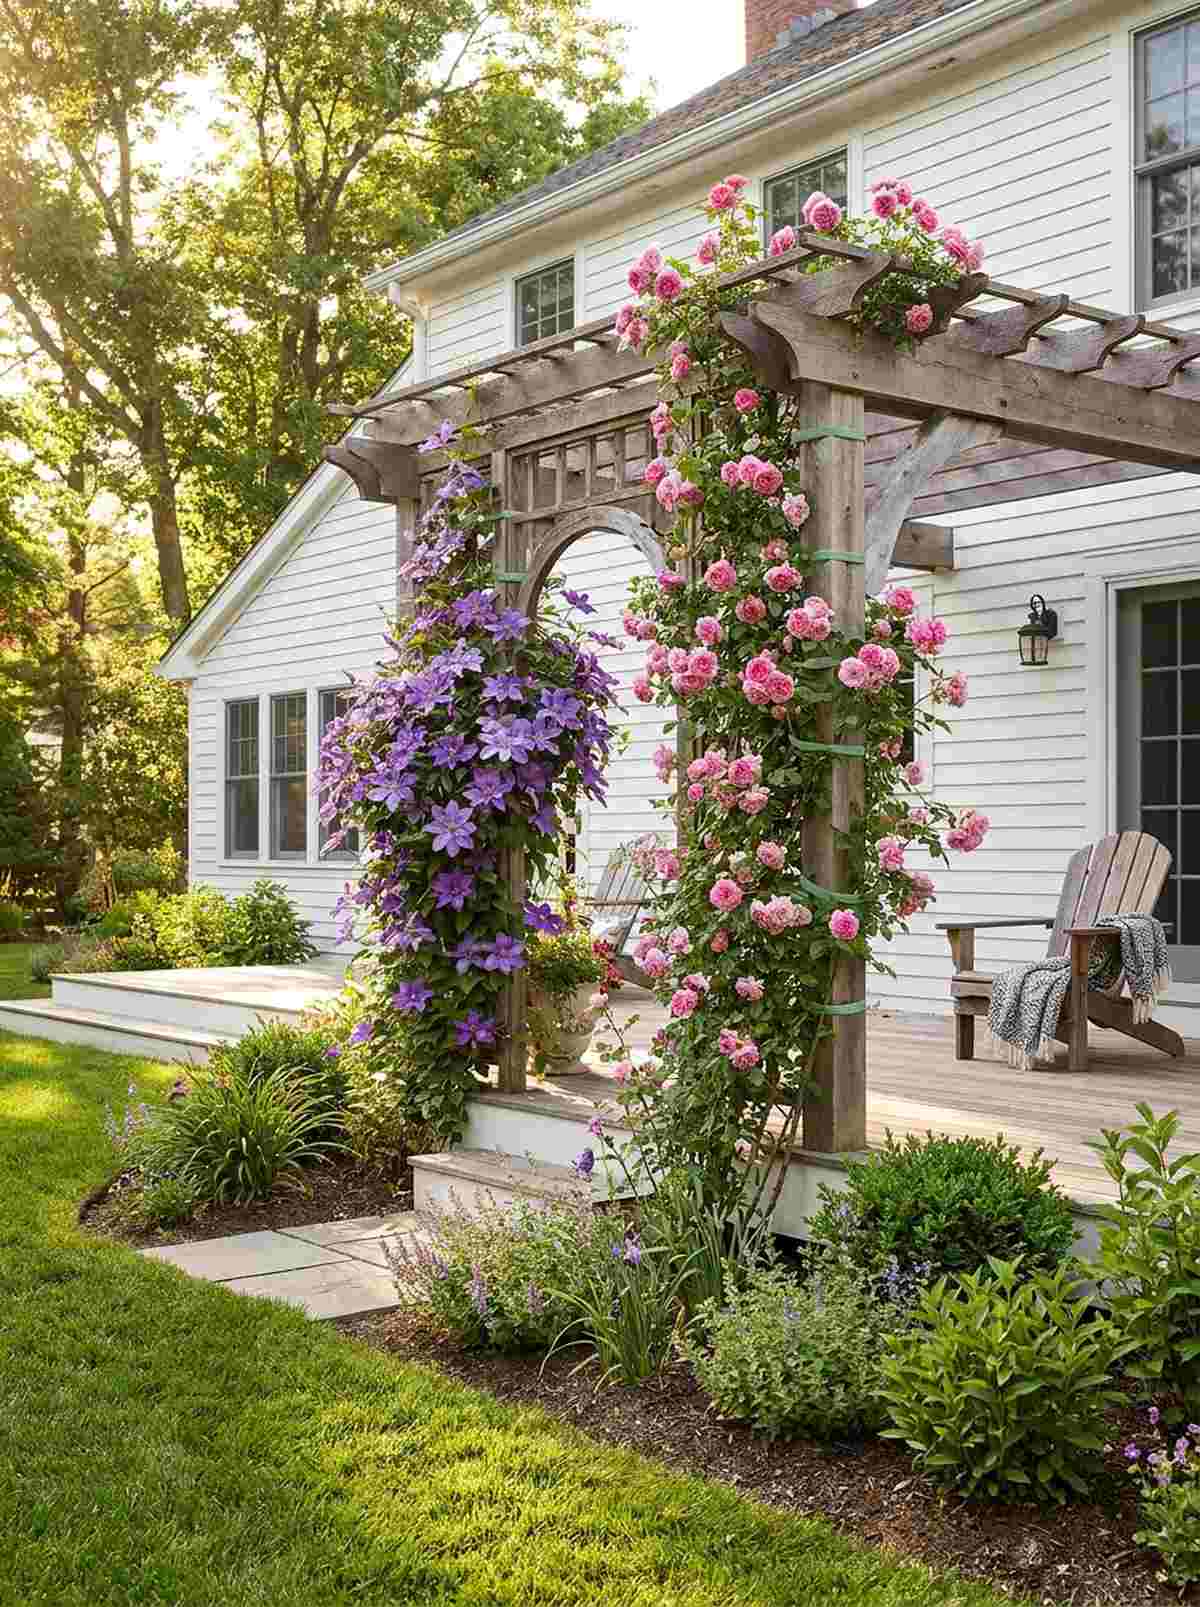
Twisting two different flowering vines up the exact same trellis feels like a genius biological hack. Flawless for maintaining an explosion of color from May through September in the exact same footprint.
Growing just one vine leaves the trellis bare half the year, but pairing a spring clematis with a summer climbing rose looks far more expensive and lush. Securing them with reusable silicone plant ties ensures neither vine strangles the other.
You can execute this premium look for $50–$80. It’s a fast upgrade that completely changes the vibe.
- Key Materials: Two complimentary climbing vines, trellis
- Vibe / Style: Overgrown English romantic
- Difficulty: Careful pruning required
- Budget Breakdown: Rose: $35 | Clematis: $25
- Creator’s Tip: Plant the deeper-rooted rose first, then plant the shallow-rooted clematis slightly in front so their root systems don’t compete.
- Smart Sourcing: soft silicone reusable plant ties and premium climbing plant fertilizer blends.
Material Guide: Cheap vs. Premium Aesthetic
Knowing exactly where to save and where to spend makes all the difference in achieving that “looks expensive but isn’t” vibe.
- Standard vs. UV-Resistant/Premium: Standard plastics crack and fade to an ugly chalky white in one summer. Spending 15% more on UV-coated resins or heavy-duty powder-coated steel guarantees the setup looks brand new for five years.
- Pre-made Kits vs. Sourcing Locally: Scavenging hardware stores for weird brackets wastes hours. Pre-bundled modular brackets and starter kits are mathematically engineered to fit together, saving massive frustration and actually reducing overall project cost.
Space Illusion Techniques
51. Garden Mirrors on Fences
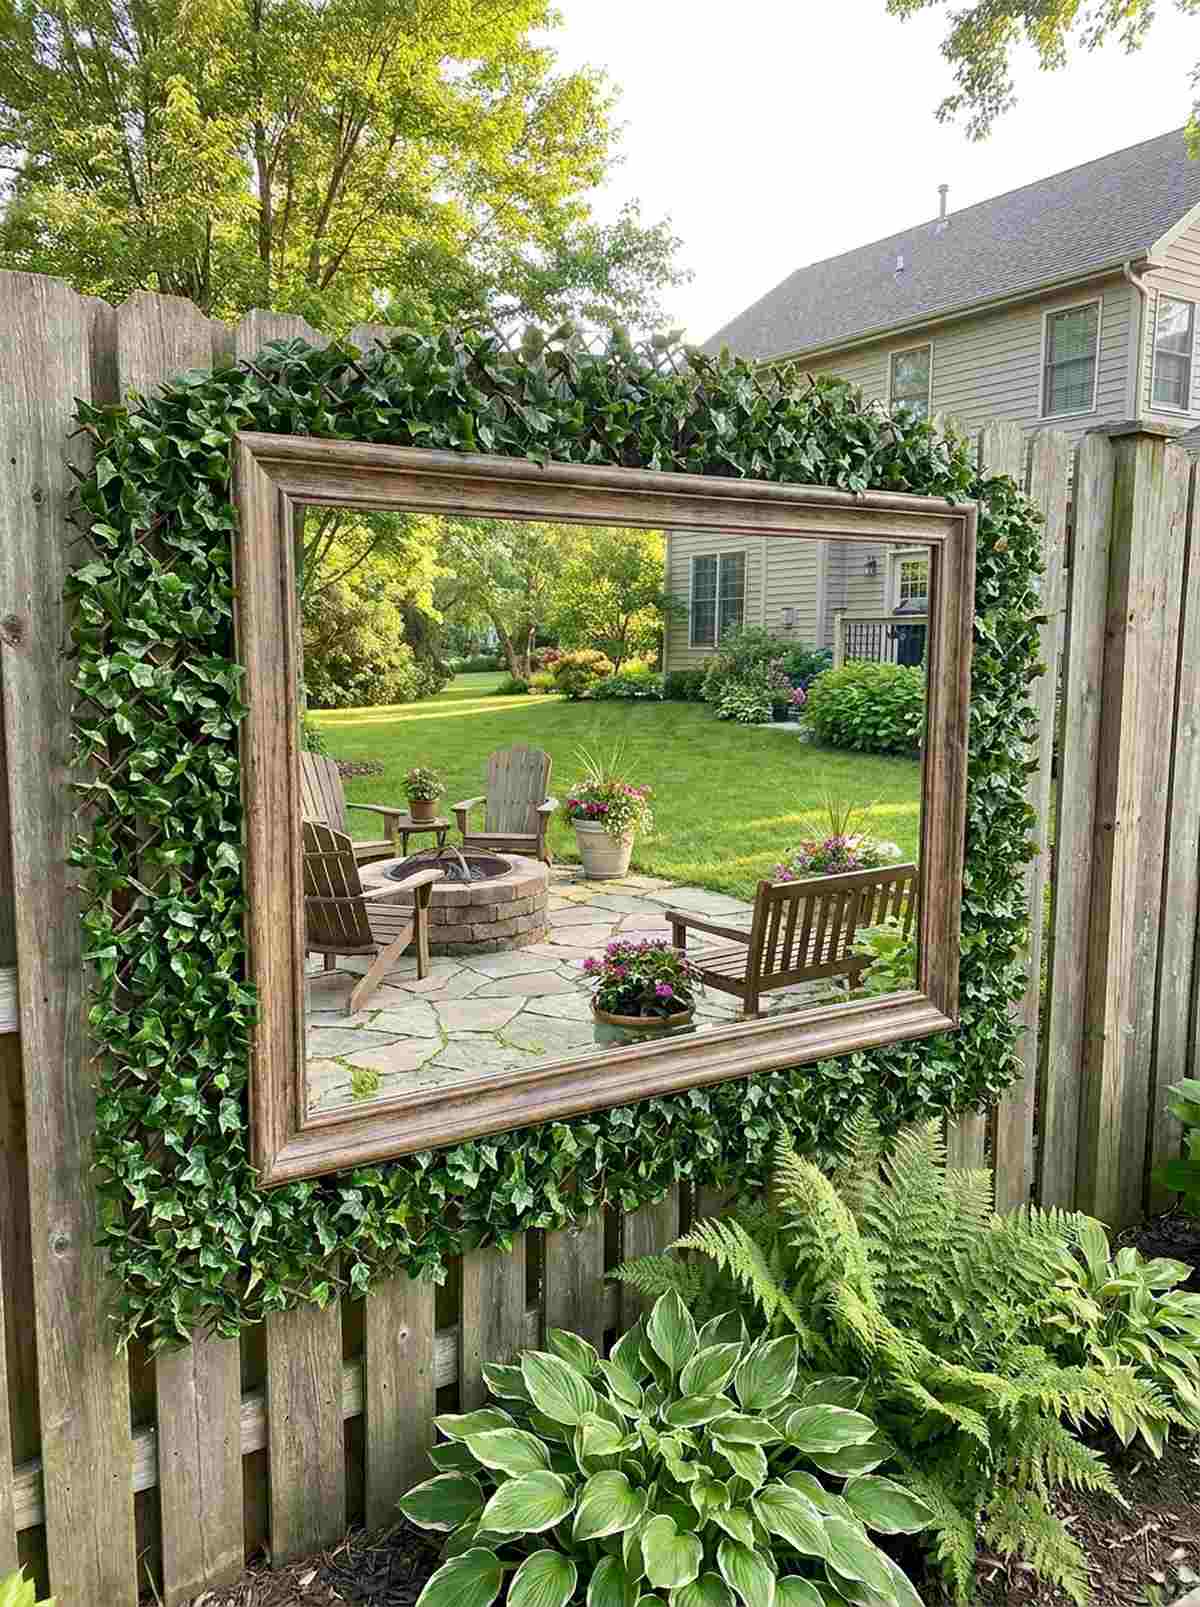
Hanging a vintage mirror on a back fence feels like discovering a secret passageway to another dimension. The absolute strongest optical illusion to instantly double your garden design small space.
Using a real glass mirror outdoors will shatter dangerously, but mounting shatterproof acrylic delivers a surprisingly premium look safely. Framed with weather-resistant faux ivy trellises, it looks exactly like a gateway to a hidden garden.
Expect to invest $50–$120 for convincing depth. Pin this for the ultimate tiny-yard magic trick!
- Key Materials: Acrylic outdoor mirror, frame
- Vibe / Style: Secret garden illusion
- Difficulty: Drill into fence
- Budget Breakdown: Acrylic Mirror: $60 | Frame Wood: $20
- Creator’s Tip: Angle the mirror slightly downward so it reflects the lush ground plants, not your own reflection or the ugly sky.
- Smart Sourcing: shatterproof acrylic mirror sheets (outdoor rated) and expandable faux ivy privacy screens.
52. Diagonal Pathway Layouts
Tipping your entire layout to a 45-degree angle feels incredibly dynamic and expansive. This geometric trick forces the eye to travel the longest possible line, completely fooling the brain.
Grid-aligned paths chop small yards into tiny boxes, but diagonal lines give a designer-level finish that screams expensive landscape architecture. Using commercial grade steel landscape edging keeps those sharp diagonal lines perfectly crisp.
You can map this out with a $15 string line. Highly recommended for a permanent backyard upgrade.
- Key Materials: String line, edging, paving material
- Vibe / Style: Expansive modern geometry
- Difficulty: Requires spatial planning
- Budget Breakdown: Edging: $60 | Pavers: $150
- Creator’s Tip: Run the path from the back-left corner to the front-right corner to maximize the perceived walking distance.
- Smart Sourcing: heavy-duty steel landscape edging kits and high-visibility mason string line.
53. Curved Boundary Plantings
Carving sweeping, liquid curves into your lawn edge feels like softening a harsh, rigid box. Ideal for making a square, boring suburban tract yard feel organic and endless.
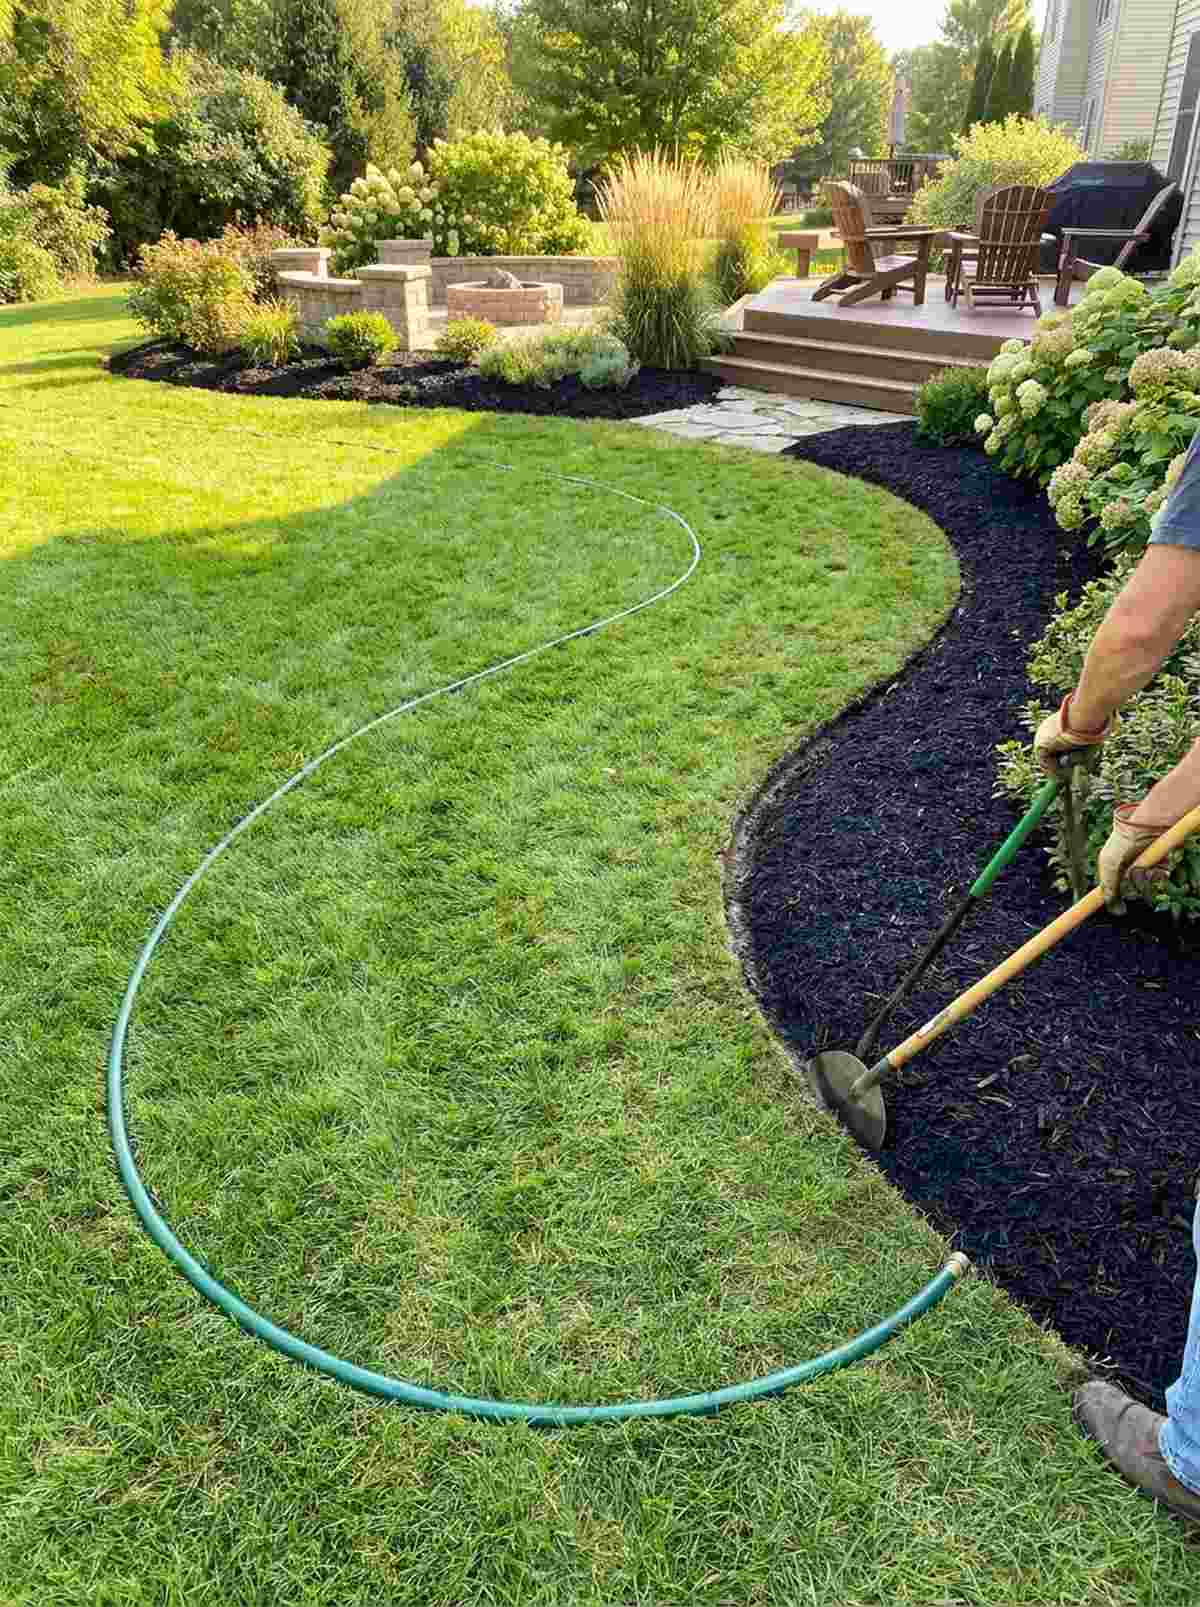
Straight borders scream “fence line”, but exaggerated sweeping beds look far more expensive and mysterious. Utilizing a flexible rubber garden hose allows you to lay out the perfect sweeping curve before ever touching a shovel.
You can execute this visual trick for free with a shovel. Save this for your spring layout overhaul!
- Key Materials: Garden hose, half-moon edger
- Vibe / Style: Flowing organic estate
- Difficulty: Labor intensive digging
- Budget Breakdown: Half-Moon Edger: $35 | Mulch: $40
- Creator’s Tip: Make the curves wide and generous; tight, nervous little wiggles look chaotic and cheap.
- Smart Sourcing: heavy-duty half-moon step edger tools and premium black hardwood mulch.
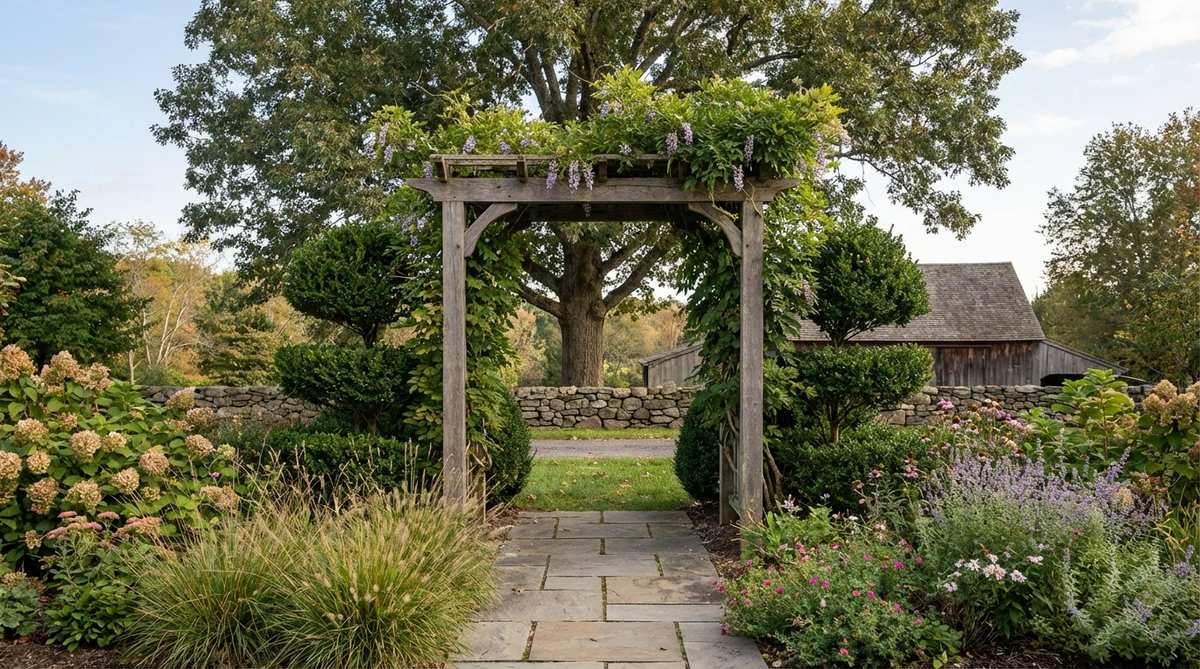
54. Partial Screening with Arches

Obscuring the very back of your yard with a vine-covered screen feels incredibly mysterious and alluring. The brain assumes there is massive space hiding back there, even if it’s just the fence.
Leaving the whole yard visible exposes how small it is, but a “peek-a-boo” arch gives a highly aesthetic, premium look that builds intrigue. Snagging freestanding metal privacy screens allows you to create this effect instantly without digging post holes.
You can easily pull this off for around $80–$150. It is a fast upgrade that completely changes the vibe.
- Key Materials: Metal arch or laser-cut screen
- Vibe / Style: Mysterious romantic estate
- Difficulty: Easy placement
- Budget Breakdown: Screen/Arch: $120 | Vines: $20
- Creator’s Tip: Only block about 40% of the view; the goal is to filter the sightline, not build a solid prison wall.
- Smart Sourcing: laser-cut metal outdoor privacy screens and heavy-duty metal ground anchor hooks.
Stop painting your fences dark colors immediately! The next illusion trick uses paint to literally make your boundaries vanish into thin air.
55. Light-Colored Boundary Treatments
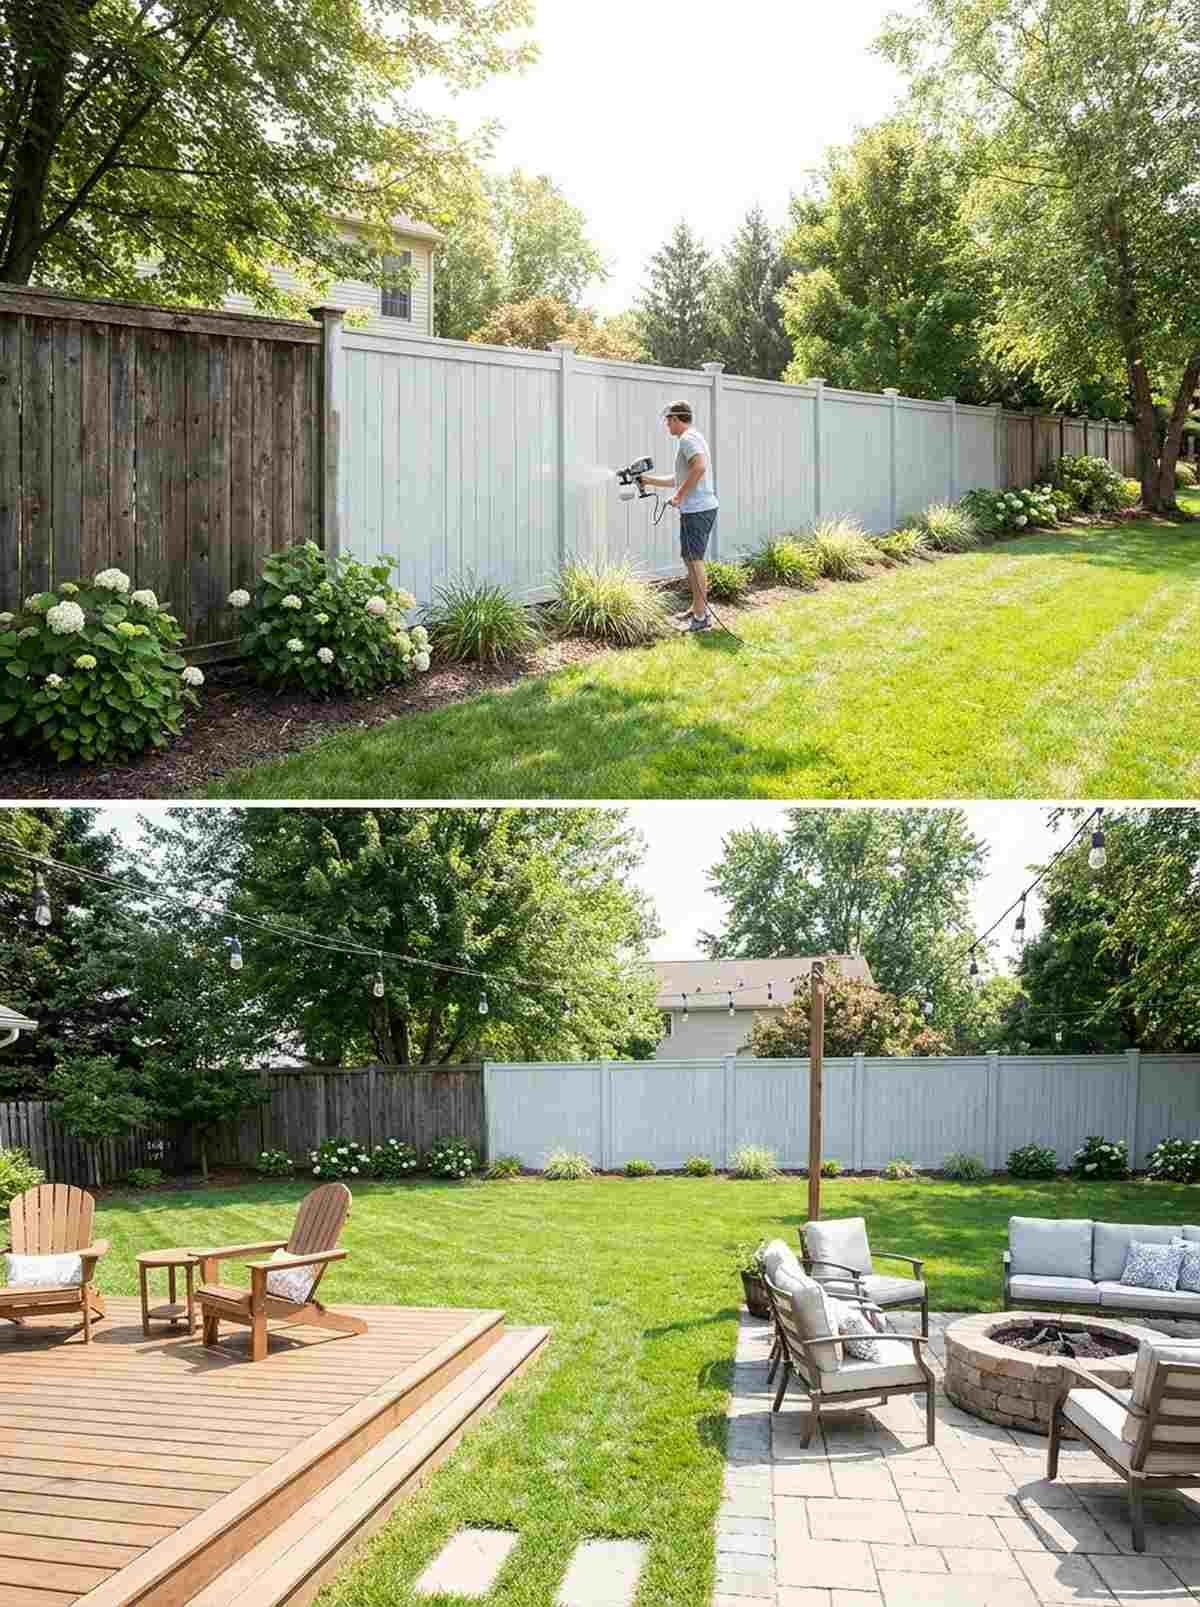
Washing your harsh, ugly wooden fences in soft cloud gray feels like pushing the walls back ten feet. The ultimate cheap hack to make a claustrophobic box feel airy and massive.
Dark stains absorb light and make the yard shrink, but a semi-gloss pale finish delivers a surprisingly premium look that reflects sunlight everywhere. Grabbing a commercial electric paint sprayer turns a grueling weekend chore into a 2-hour breeze.
Expect to spend $50–$100 on quality exterior paint. Pin this trick to double your visual space today!
- Key Materials: Pale exterior paint/stain, sprayer
- Vibe / Style: Bright airy coastal
- Difficulty: Messy prep work
- Budget Breakdown: Paint: $60 | Sprayer Rental: $40
- Creator’s Tip: Don’t use bright hospital white—the glare is terrible. Use “cloud white” or soft sage green to blend with the sky.
- Smart Sourcing: HVLP electric paint sprayer kits and premium exterior weather-defense paint.
56. Forced Perspective with Plant Sizing
Planting giant leaves up close and tiny leaves in the distance feels like weaponizing Disneyland design secrets. This literally breaks the brain’s ability to judge depth correctly.
Planting randomly ruins scale, but artificially shrinking the plants at the back fence looks far more expensive and architecturally planned. Injecting broad fairy garden kits in the background emphasizes the miniature illusion perfectly.
You can orchestrate this for standard nursery prices. Save this genius Disney landscaping secret!
- Key Materials: Large-leaf Hostas (front), fine Ferns (back)
- Vibe / Style: Theme-park depth illusion
- Difficulty: Strategic planning
- Budget Breakdown: Big Plants: $40 | Small Plants: $30
- Creator’s Tip: Combine this with color perspective—put big, bright red flowers in front and tiny, pale blue flowers in the far back.
- Smart Sourcing: live massive elephant ear bulbs and miniature terrarium supply kits.
57. Continuous Flooring Materials
Pouring a single, seamless surface across the entire yard feels like rolling out a massive, expansive carpet. Essential for stopping the eye from visually breaking the space into tiny chunks.
Mixing grass, pavers, and mulch in a 10×10 space looks incredibly cheap and chaotic, but a unified gravel or decking sweep gives a designer-level finish. Utilizing commercial weed barrier fabric under the gravel guarantees a pristine, zero-maintenance floor.
You can execute this sleek base for $200–$400. Highly recommended for a permanent backyard upgrade.
- Key Materials: Pea gravel or unified deck tiles
- Vibe / Style: Seamless modern courtyard
- Difficulty: Heavy material hauling
- Budget Breakdown: Gravel Bulk Delivery: $250 | Fabric: $50
- Creator’s Tip: If you must transition materials, only do it at a physical step or an archway—never randomly in the middle of the flat floor.
- Smart Sourcing: heavy-duty woven landscape fabric (commercial roll) and snap-together acacia wood deck tiles.
58. Uplighting for Evening Expansion
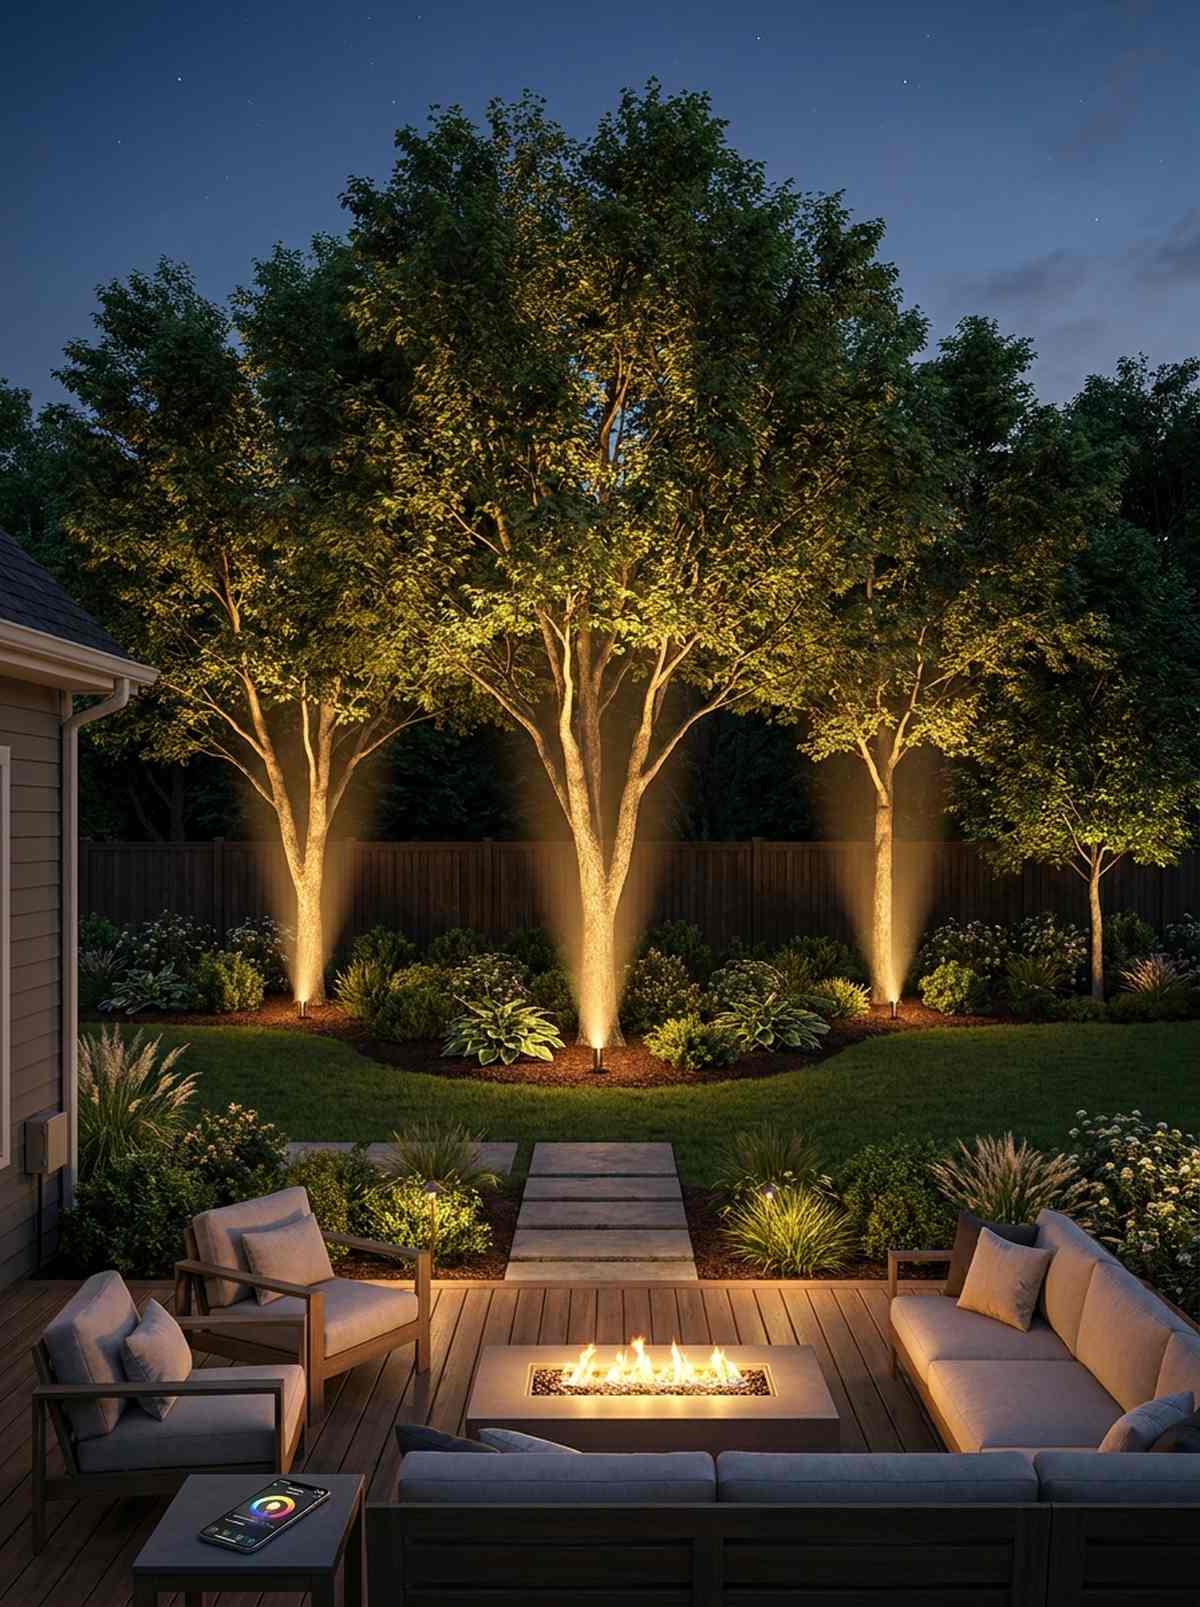
Shooting beams of light up into your trees completely deletes your ugly back fence from existence. The most dramatic way to expand your small garden design ideas vertically once the sun goes down.
Sticking cheap solar lights in the dirt looks amateur, but low-voltage LED uplighting looks incredibly expensive and extends the yard into the canopy. Snagging smart low-voltage outdoor lighting kits allows you to control the mood directly from your phone.
Expect to invest $100–$250 for a professional nightscape. Pin this for the ultimate patio party vibe!
- Key Materials: LED brass uplights, transformer
- Vibe / Style: Luxury resort nightscape
- Difficulty: Basic low-voltage wiring
- Budget Breakdown: Lighting Kit: $150 | Wire: $30
- Creator’s Tip: Cross-light your trees from two different angles to eliminate flat, creepy shadows on the fence.
- Smart Sourcing: low-voltage LED brass landscape lighting kits and smart outdoor transformer boxes (Wi-Fi enabled).
59. See-Through Furniture Selections
Using wire or acrylic furniture feels like placing ghost-objects that provide seating without stealing any visual space. Flawless for tiny balconies where bulky wood blocks the view.
Heavy teak sofas completely choke a small deck, but open-weave metal seating delivers a surprisingly premium look while letting the eye travel right through it. Adding outdoor acrylic side tables provides a place for drinks that literally vanishes into thin air.
You can easily pull this off for around $150–$300. It’s a fast upgrade that completely changes the vibe.
- Key Materials: Acapulco chairs, glass/acrylic tables
- Vibe / Style: Airy modern minimalist
- Difficulty: Unbox and place
- Budget Breakdown: Wire Chair Set: $180 | Acrylic Table: $60
- Creator’s Tip: Avoid any furniture with skirts or solid bases. If you can see the ground underneath it, the space feels larger.
- Smart Sourcing: modern open-weave Acapulco chair sets and clear acrylic outdoor side tables.
Why pay for a view when you can steal one? The next ancient landscaping technique literally borrows the scenery from your neighbors for free.
60. Borrowed Scenery Framing
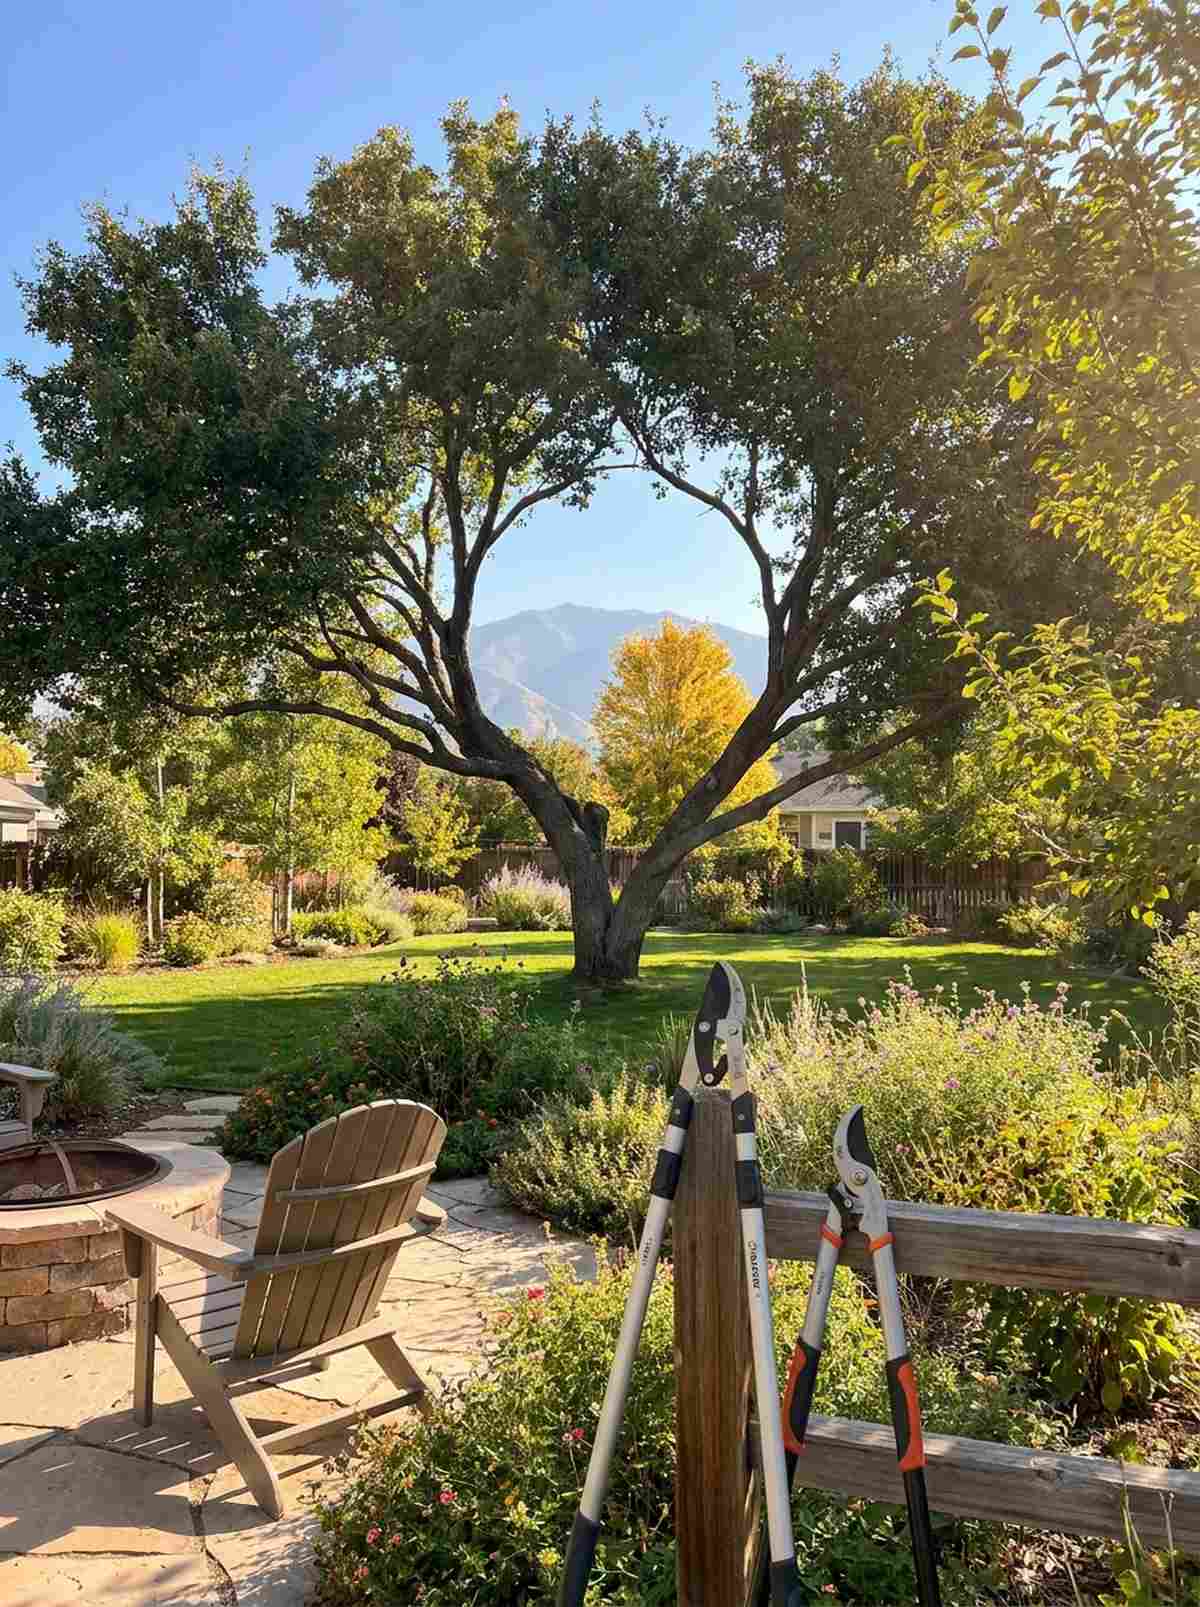
Creating a literal picture frame out of branches to highlight a distant mountain or beautiful neighbor’s tree feels incredibly profound. This ancient Asian design principle expands your property lines infinitely.
Blocking the view with a solid fence wastes free aesthetic value, but deliberately pruning a “window” looks far more expensive and masterful. Installing heavy-duty loppers and pruning gear is the only tool you need to steal a million-dollar view.
You can execute this conceptual masterpiece for $0. Save this genius landscape architecture secret!
- Key Materials: Pruning shears, existing trees
- Vibe / Style: Masterful Zen framing
- Difficulty: Artistic eye required
- Budget Breakdown: Tools: $30 | Cost: Free
- Creator’s Tip: Stand in your primary seating area, find the best thing outside your yard, and prune everything that blocks that exact sightline.
- Smart Sourcing: professional bypass pruning shears and heavy-duty telescoping tree loppers.
Edible Gardens in Compact Footprints
61. Potager-Style Mixed Beds
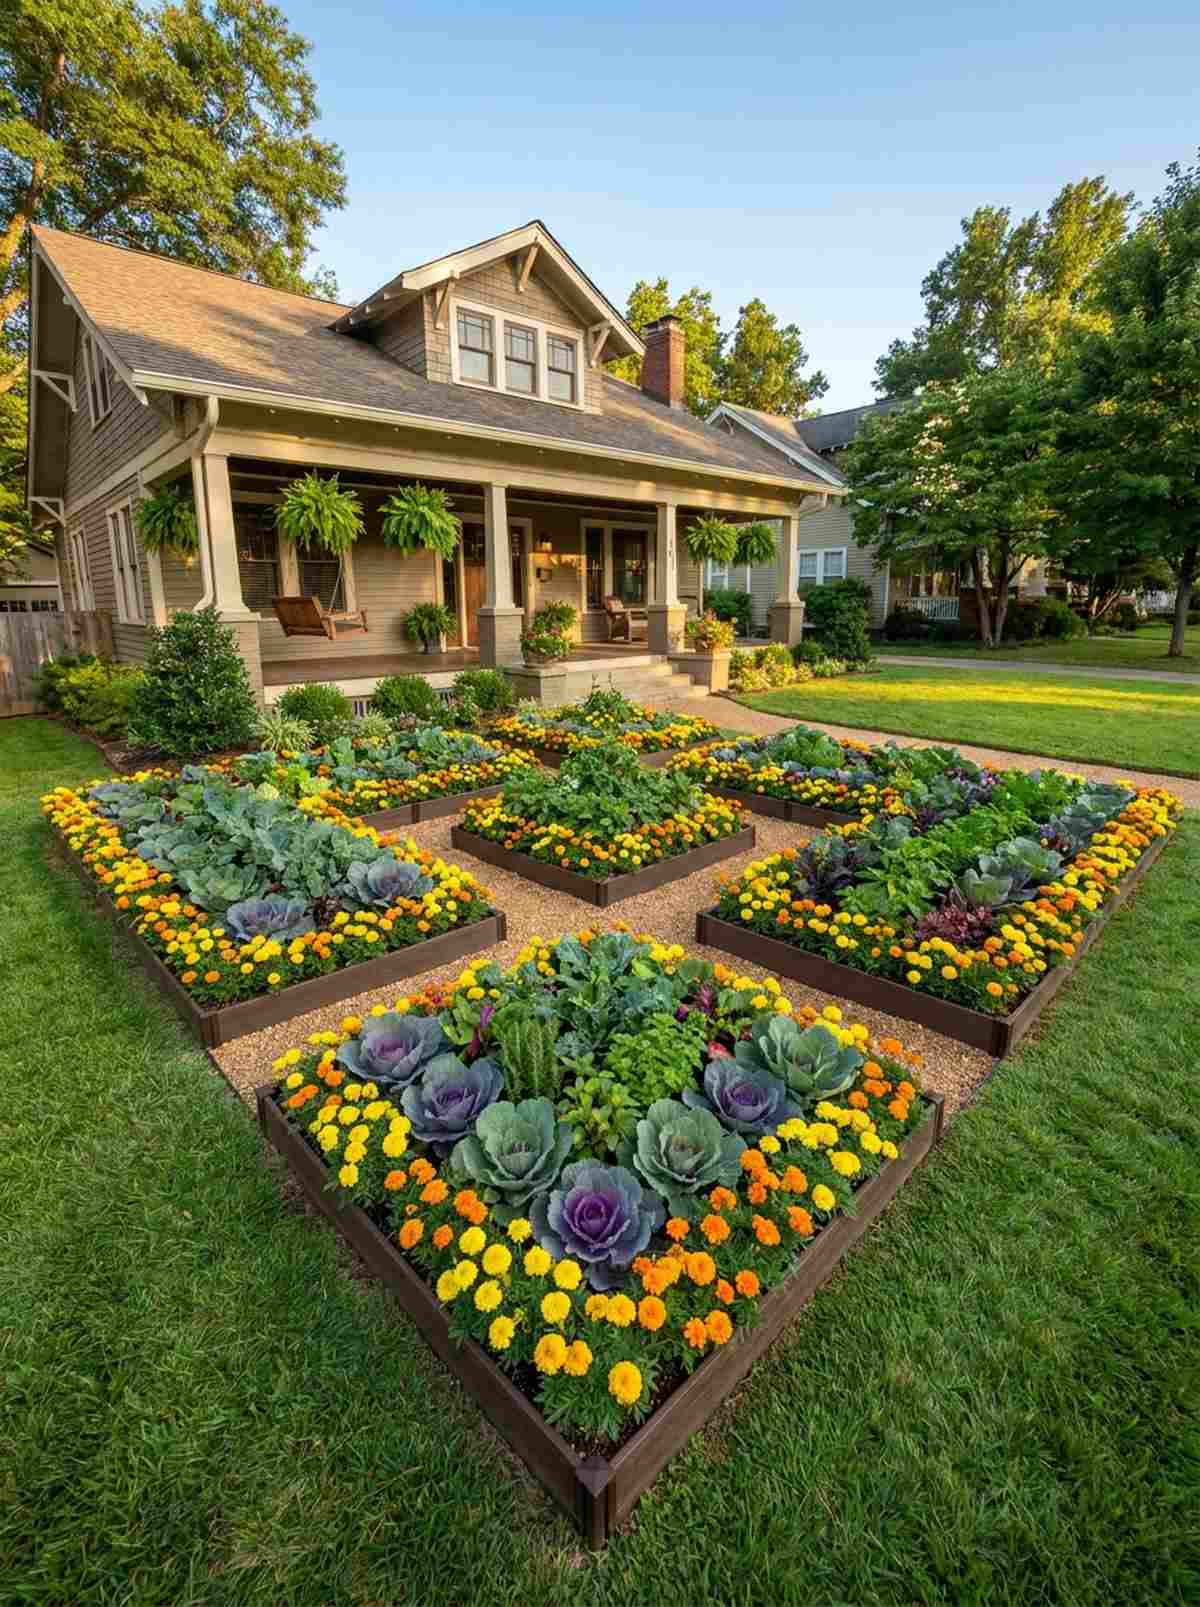
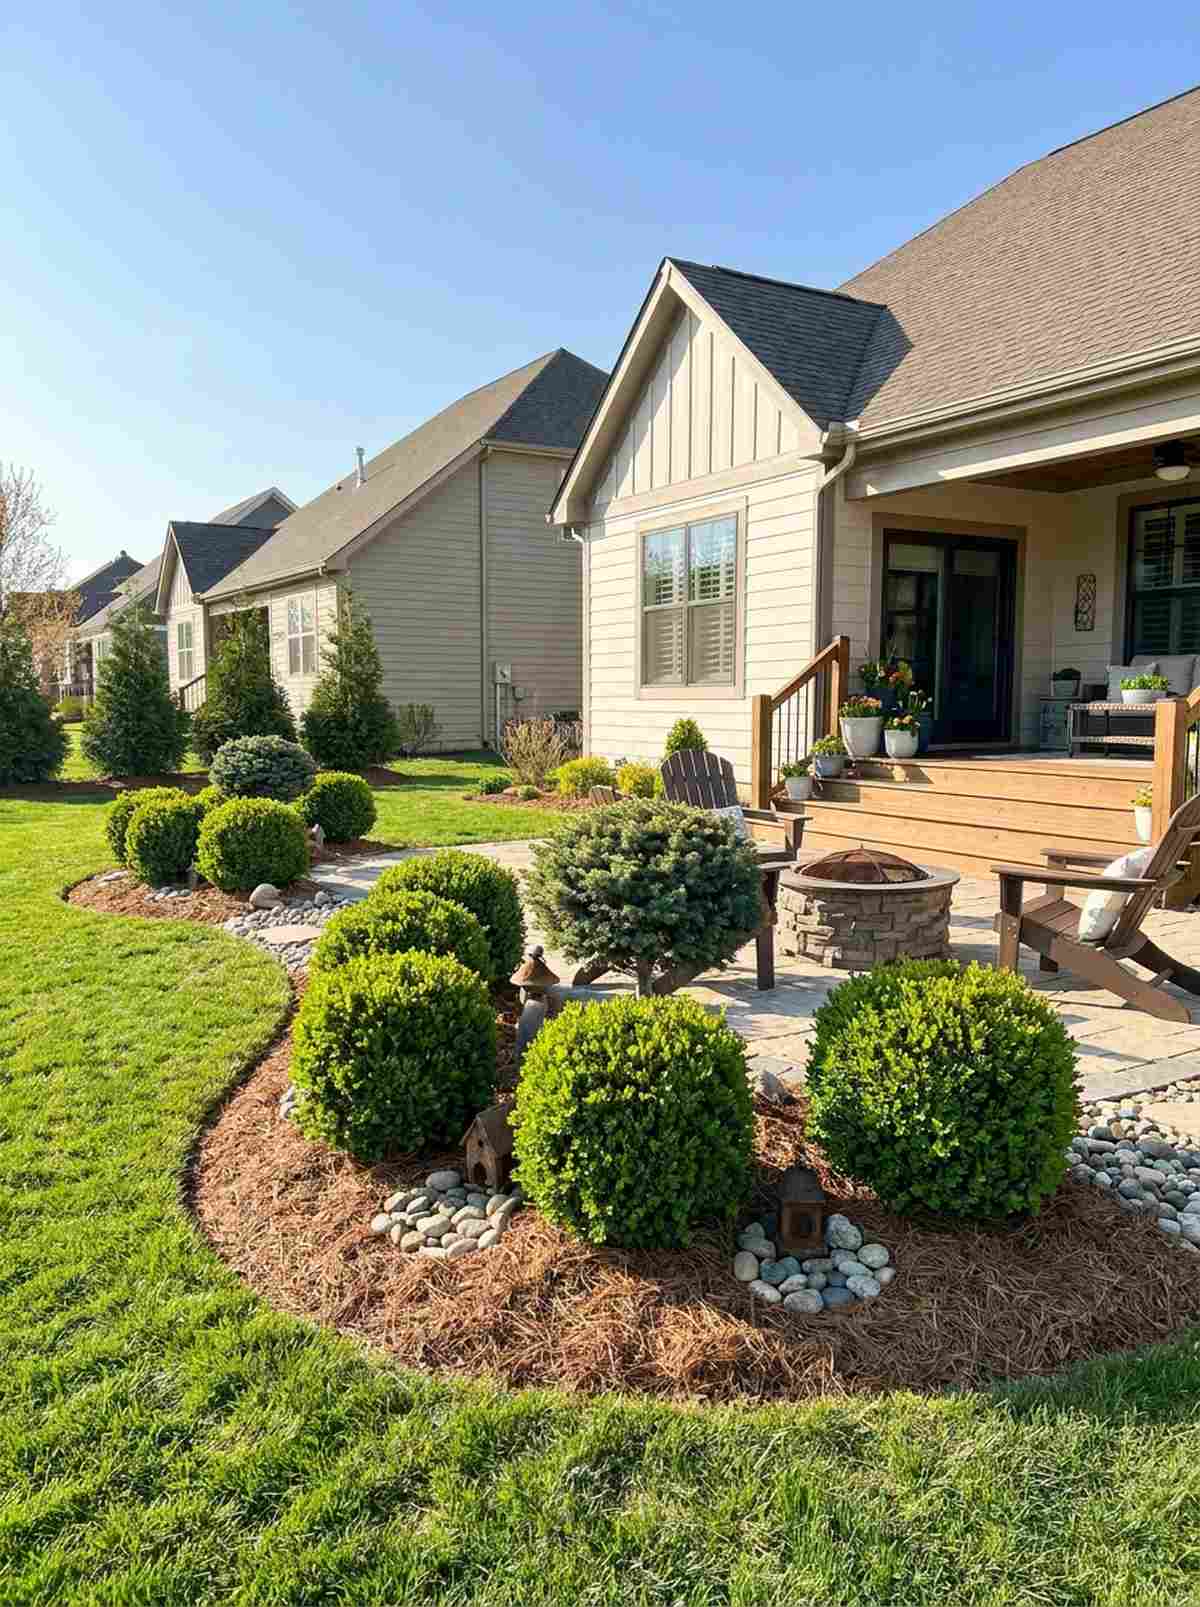
Weaving vegetables and gorgeous flowers into geometric patterns feels like a royal French estate. Perfect for front yards where you want to grow food without upsetting the HOA.
Messy vegetable rows look like a muddy farm, but a structured potager design gives a designer-level finish that disguises cabbage as ornamental art. Incorporating premium raised bed border edging locks those sharp geometric triangles in place.
Expect to spend $60–$100 on mixed seeds and borders. Pin this to make your veggies beautiful!
- Key Materials: Edging, mixed veg/flower seeds
- Vibe / Style: French formal kitchen garden
- Difficulty: Careful layout planning
- Budget Breakdown: Seeds: $30 | Edging: $40
- Creator’s Tip: Border every vegetable triangle with dwarf marigolds—it looks incredibly formal and naturally repels hungry pests.
- Smart Sourcing: bulk pack dwarf French marigold seeds and flexible composite garden border edging.
62. Salad Bowl Succession Planting
Treating one tiny pot like a continuous salad factory feels incredibly rewarding and hyper-efficient. The ultimate garden design small backyard trick to ensure you never have to buy expensive grocery store lettuce again.
Planting all your lettuce on day one results in a rotten mess a month later, but staggered sowing looks far more expensive and guarantees a daily harvest. Using smart outdoor plant labels ensures you don’t accidentally dig up last week’s seeds.
You can easily pull this off for around $15–$25. Highly recommended for a fast weekend win.
- Key Materials: Wide shallow bowl, cut-and-come-again seeds
- Vibe / Style: Practical urban harvest
- Difficulty: Requires calendar tracking
- Budget Breakdown: Wide Bowl: $25 | Seeds: $10
- Creator’s Tip: Divide the bowl into four pie slices. Plant one slice every week. By week 5, slice one is ready to re-cut.
- Smart Sourcing: extra-wide shallow resin planter bowls and weatherproof copper plant marker tags.
63. Dwarf Fruit Tree Espaliers
Growing a miniature apple orchard against a hot brick wall feels like an absolute flex of gardening mastery. Flawless for utilizing the blistering radiant heat of south-facing walls.
Standard trees shade out a small yard completely, but genetic dwarf rootstocks trained flat deliver a surprisingly premium look with full-size fruit. Equipping yourself with professional grafting and pruning tape ensures your cuts heal beautifully.
Expect to invest $80–$140 for this high-yield luxury. Save this for your urban orchard plans!
- Key Materials: Dwarf rootstock trees, masonry anchors
- Vibe / Style: High-end botanical mastery
- Difficulty: Advanced pruning
- Budget Breakdown: Dwarf Tree: $90 | Wall Anchors: $20
- Creator’s Tip: Only buy “spur-bearing” varieties—they fruit close to the main trunk, which is mandatory for the tight espalier shape.
- Smart Sourcing: stretchable nursery grafting tape (bulk) and heavy-duty masonry eye-hook anchors.
64. Herb Spiral Structures
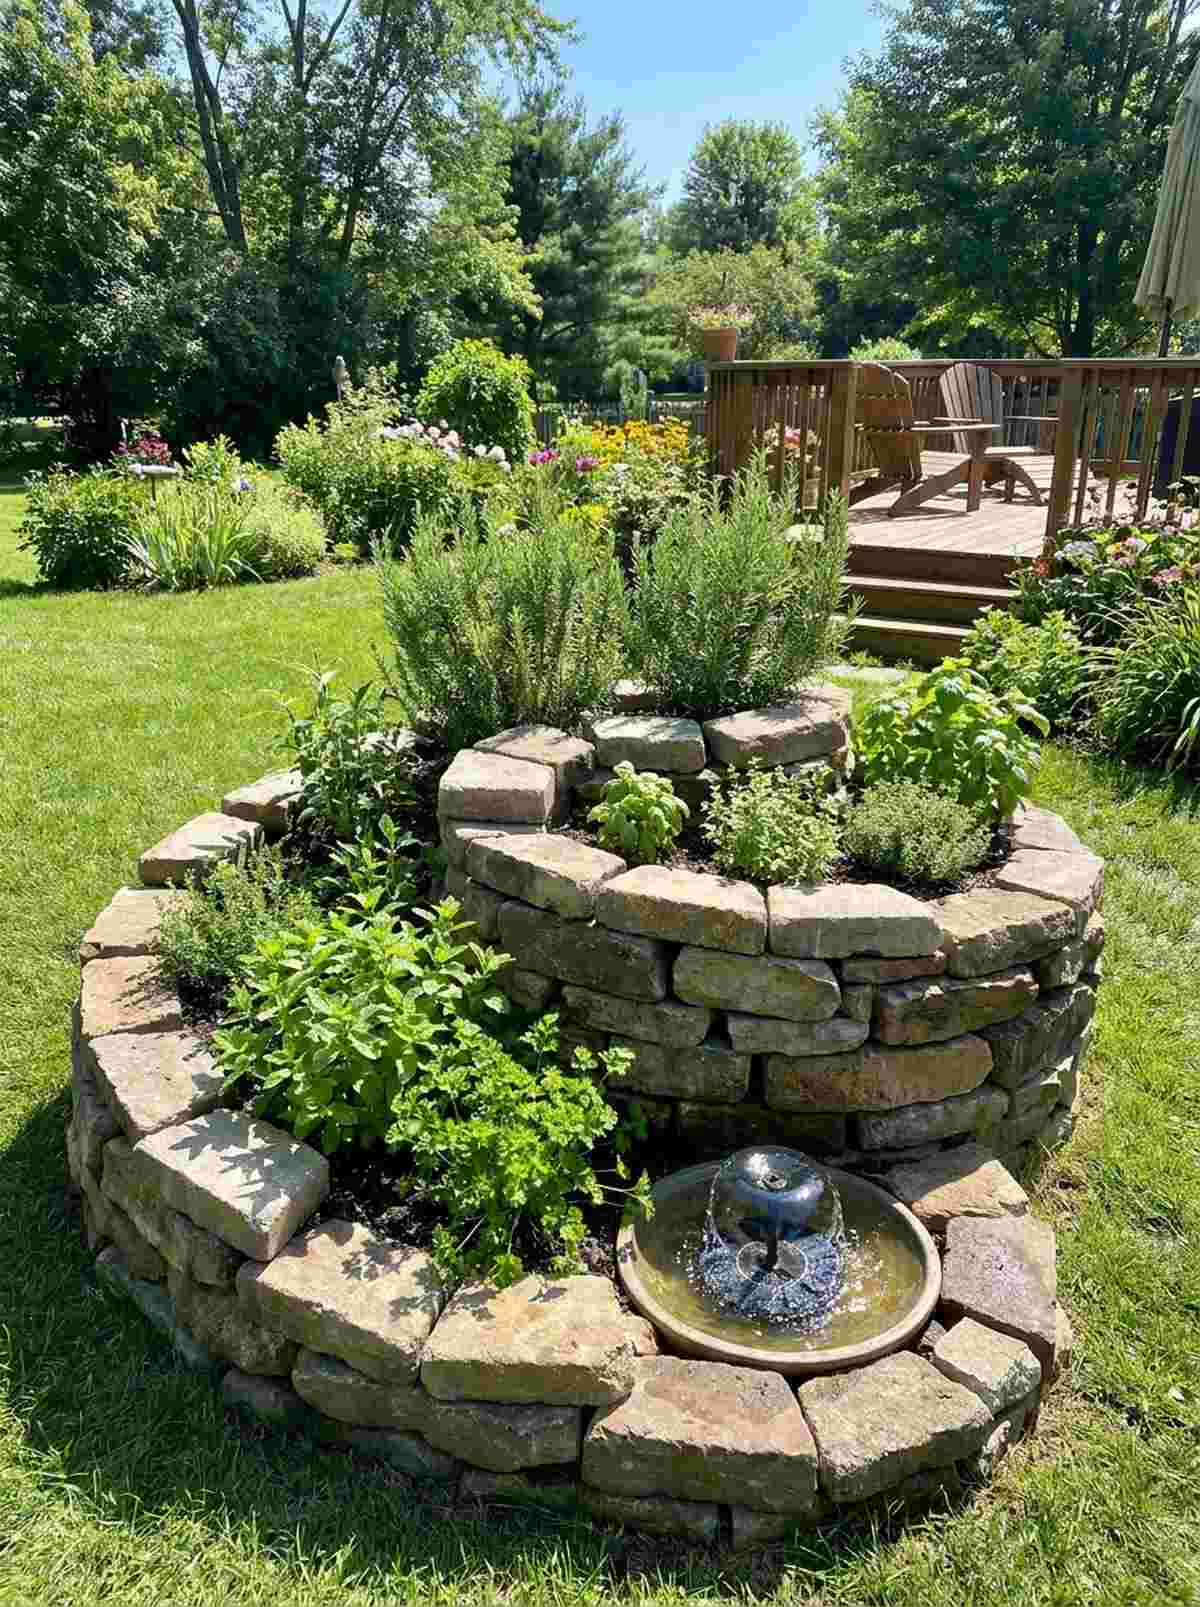
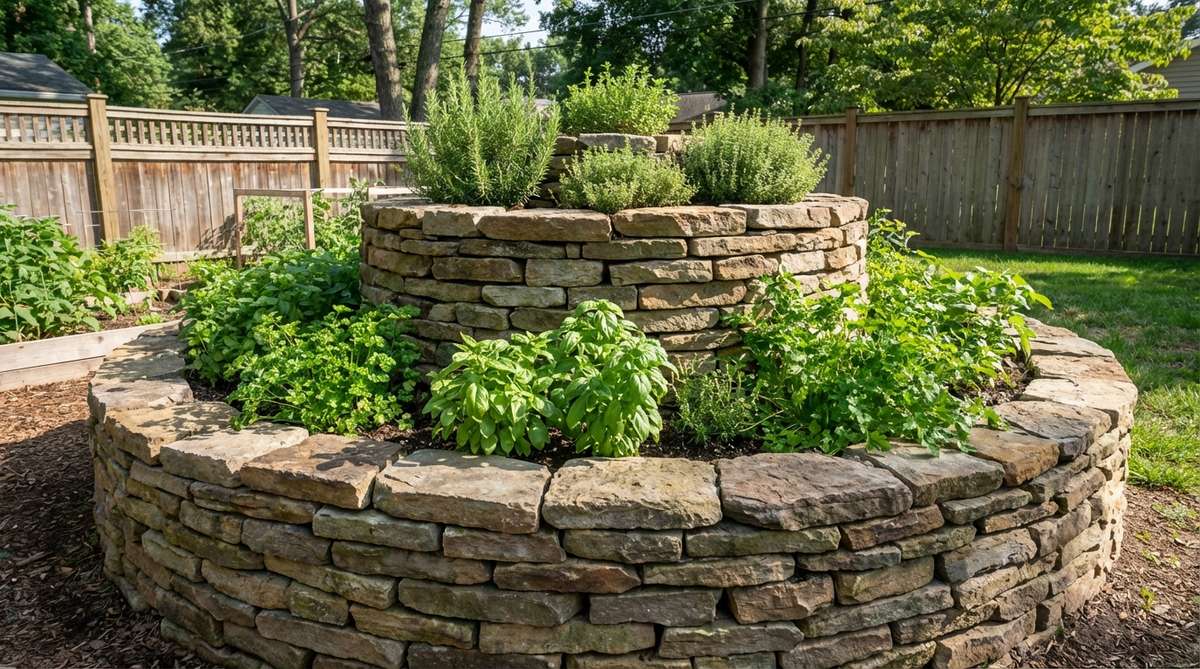
Building a 3D stone snail-shell of herbs feels like crafting an ancient druid monument. This permaculture trick creates four completely different moisture zones in a tiny 4-foot circle.
Flat herb beds cause drought-loving rosemary to rot next to thirsty basil, but a vertical spiral gives a designer-level finish that waters itself perfectly. Adding solar-powered fountain kits at the base turns the water runoff into a beautiful birdbath.
You can execute this brilliant structure for $40–$90. Pin this genius permaculture design!
- Key Materials: Salvaged urbanite/stone, varied herbs
- Vibe / Style: Earthy permaculture
- Difficulty: Fun puzzle-building
- Budget Breakdown: Stone: Free/Salvaged | Herbs: $40
- Creator’s Tip: Put rosemary at the dry, hot top. Put mint and parsley at the wet, shady bottom where the water naturally drains.
- Smart Sourcing: solar-powered mini fountain pumps and premium organic herb seed collections.
You are wasting massive amounts of space on basic concrete paths. The next trick reclaims 70% of your walkway for lush planting.
65. Compact Berry Patches
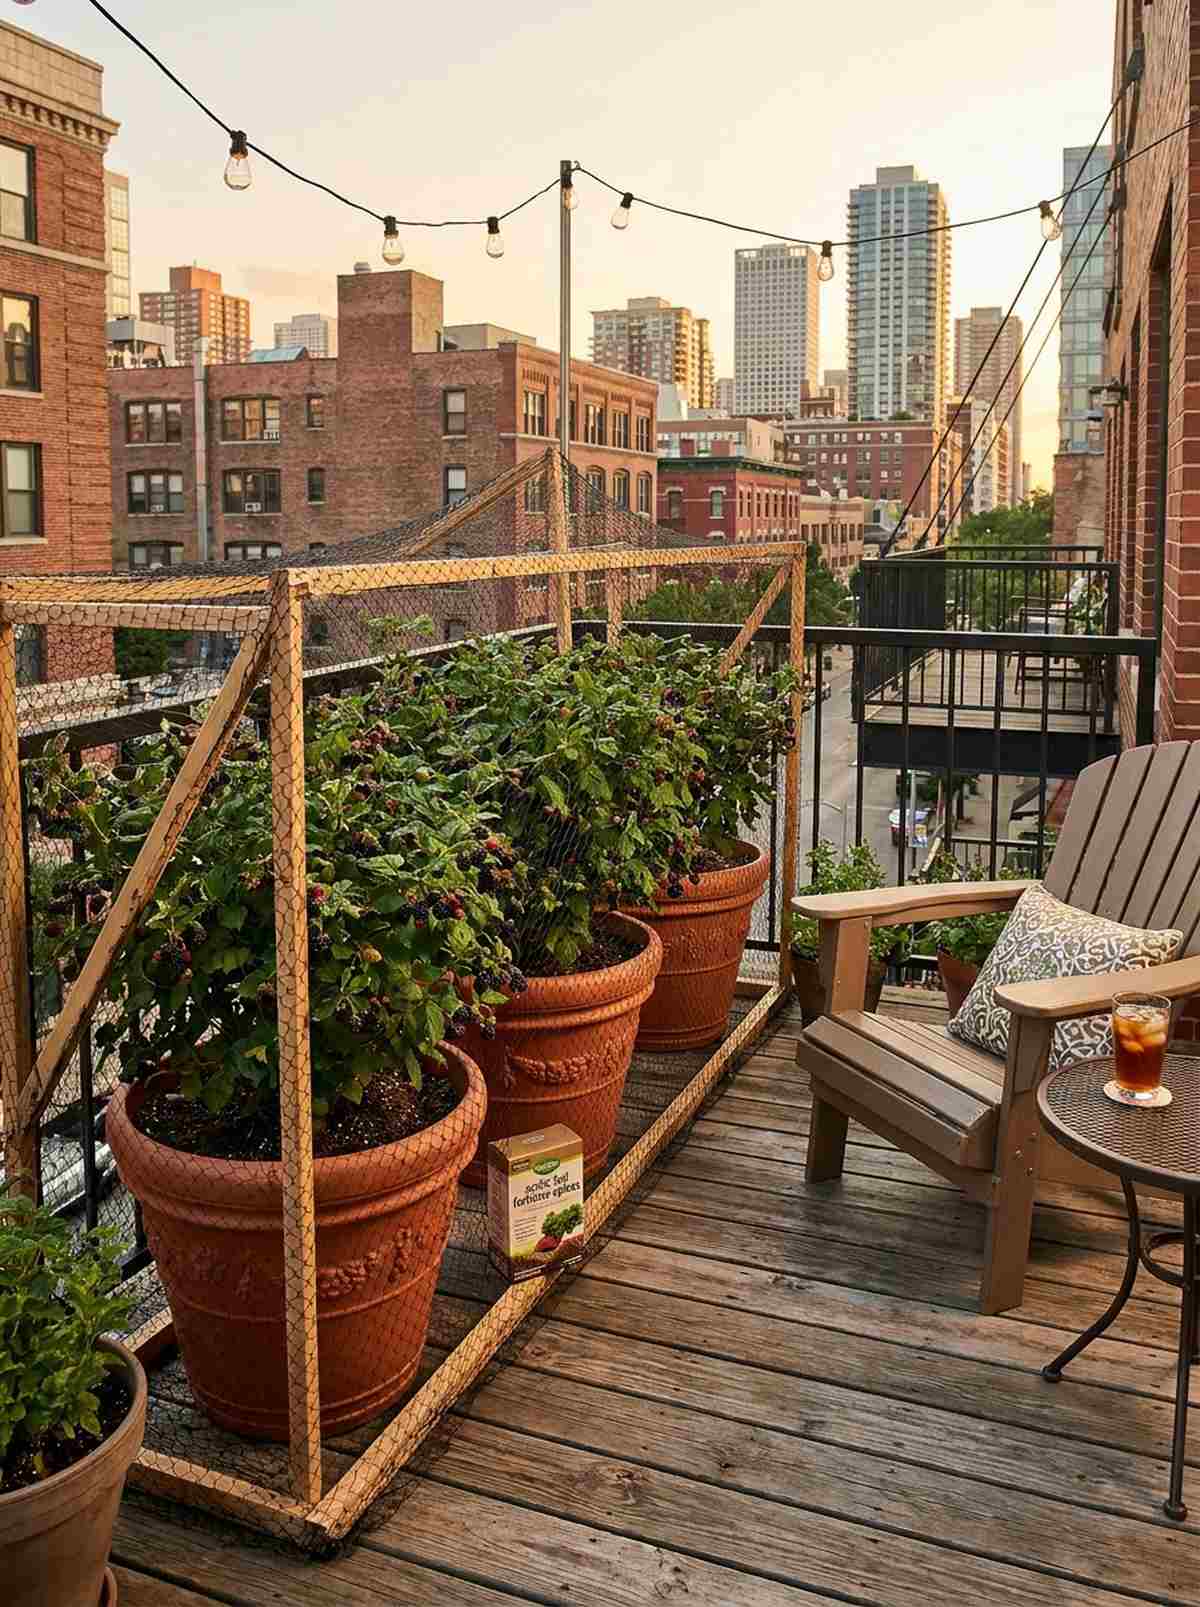
Growing fresh blackberries on a balcony feels like a defiant, incredible urban farming victory. Perfect for getting high-antioxidant fruit without dealing with massive, thorny bramble monsters.
Wild berries will rip your clothes and consume your yard, but genetic dwarf thornless varieties look incredibly custom and fit perfectly in a pot. Using heavy-duty bird netting kits is absolutely mandatory so the birds don’t steal your expensive harvest.
You can easily pull this off for around $40–$70. It’s a fast upgrade that completely changes the vibe.
- Key Materials: Thornless dwarf berry bushes, pots
- Vibe / Style: Urban berry farm
- Difficulty: Easy container growing
- Budget Breakdown: Bush: $35 | Netting: $15
- Creator’s Tip: Look specifically for the ‘Bushel and Berry’ collection—they are genetically engineered to stay under 3 feet tall in pots.
- Smart Sourcing: heavy-duty garden bird netting rolls and acidic soil fertilizer spikes (for berries).
Pathway Solutions That Maximize Flow
66. Stepping Stone Sequences
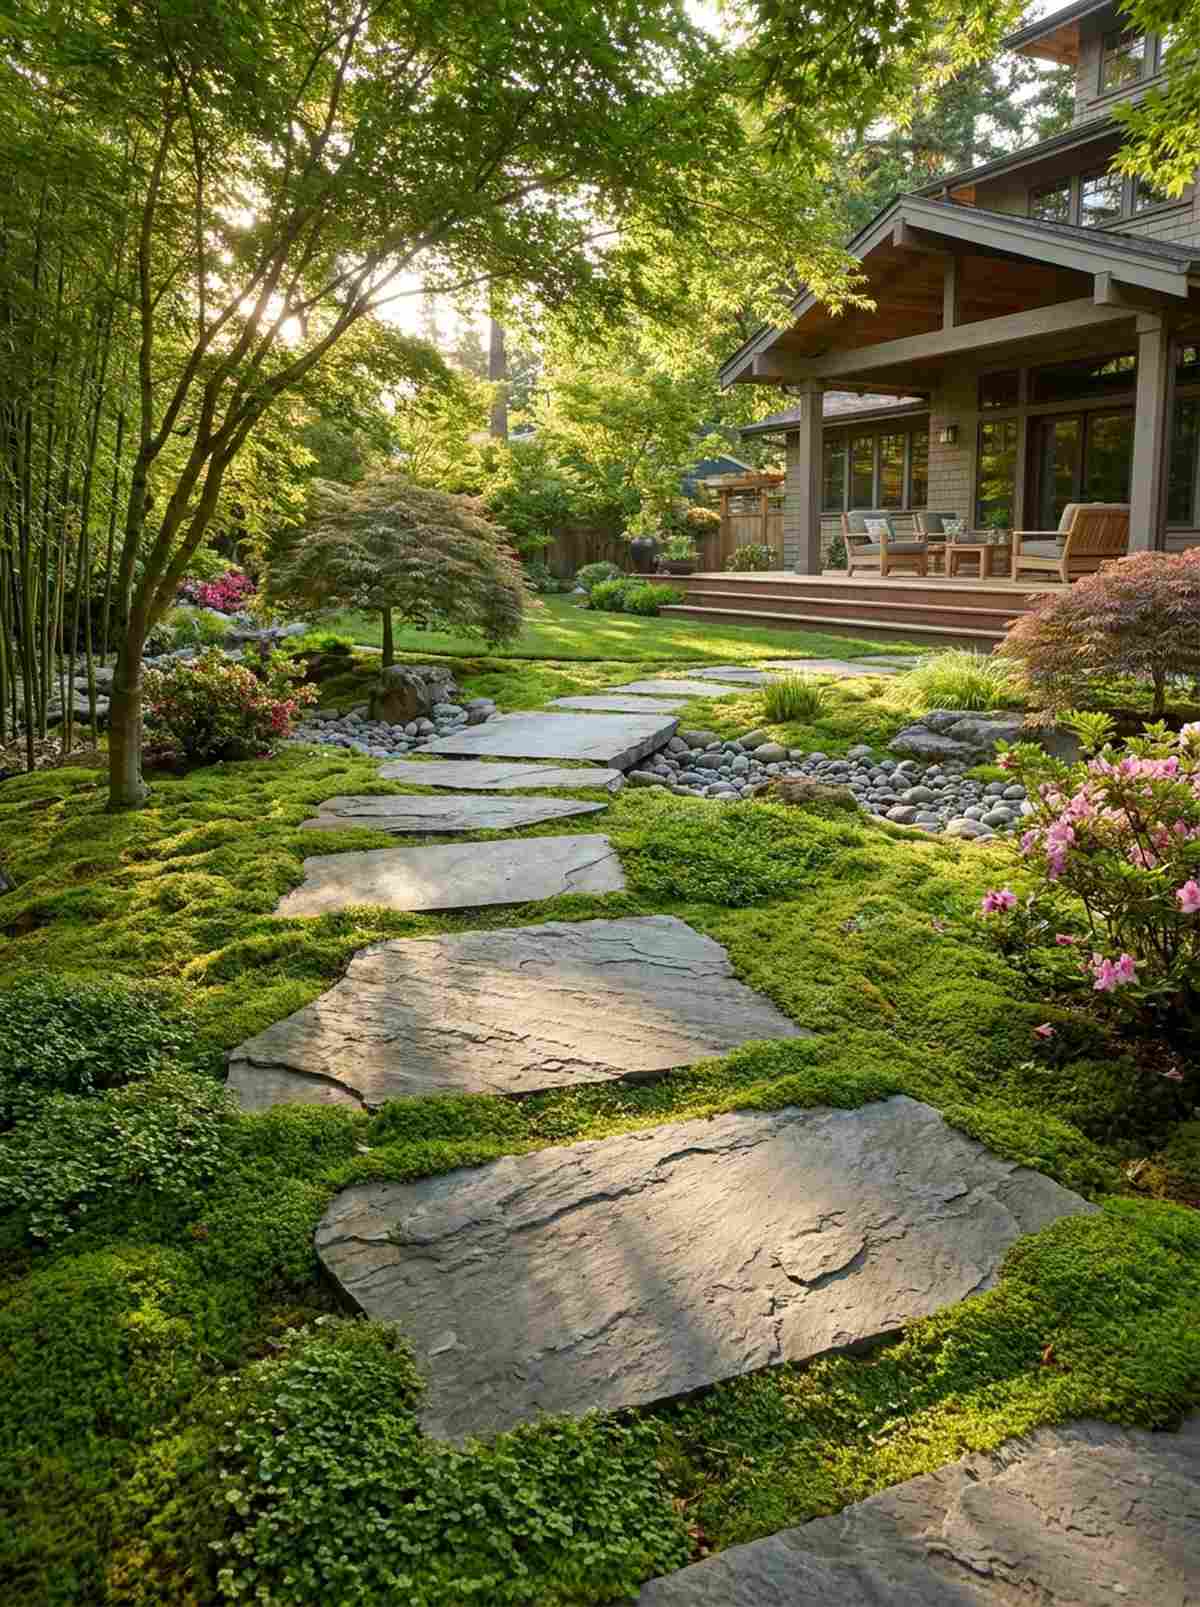
Floating heavy slate slabs directly into creeping moss feels like navigating a serene, ancient Japanese temple. The absolute best way to create a path without paving over your precious green space.
Solid concrete walkways look harsh and shrink the yard, but spaced stepping stones deliver a highly aesthetic, premium look that lets ground cover thrive between the cracks. Utilizing commercial weed barrier fabric precisely under the stones prevents grass from swallowing them.
Expect to spend $80–$150 on natural stone. Save this for your Zen garden makeover!
- Key Materials: Natural flagstone, creeping moss
- Vibe / Style: Serene Zen journey
- Difficulty: Heavy lifting, easy layout
- Budget Breakdown: Stones: $100 | Sand base: $20
- Creator’s Tip: Space the center of each stone exactly 24 inches apart to perfectly match a comfortable, natural human stride.
- Smart Sourcing: heavy-duty non-woven weed barrier fabric and bulk natural slate stepping stones.
67. Minimum-Width Efficiency Paths
Choking your pathways down to a hyper-efficient 18 inches feels like reclaiming stolen real estate. Essential for garden design small space layouts where every single inch of soil matters.
Standard 36-inch paths eat up massive amounts of potential planting area, but a crisp, narrow line gives a designer-level finish that feels intimately enclosed. Installing heavy-duty steel landscape edging is non-negotiable to keep the narrow path from collapsing into the dirt.
You can execute this spatial hack for $50–$100. Pin this to stop wasting space on walkways!
- Key Materials: Steel edging, decomposed granite
- Vibe / Style: Intimate secret garden
- Difficulty: Precise trenching
- Budget Breakdown: Edging: $70 | Gravel: $30
- Creator’s Tip: Use crushed decomposed granite instead of round pea gravel so it locks together and doesn’t spill over the low edges.
- Smart Sourcing: flexible steel landscape edging (rust-proof) and commercial grade landscape staples.
Lighting Strategies for Small Yards
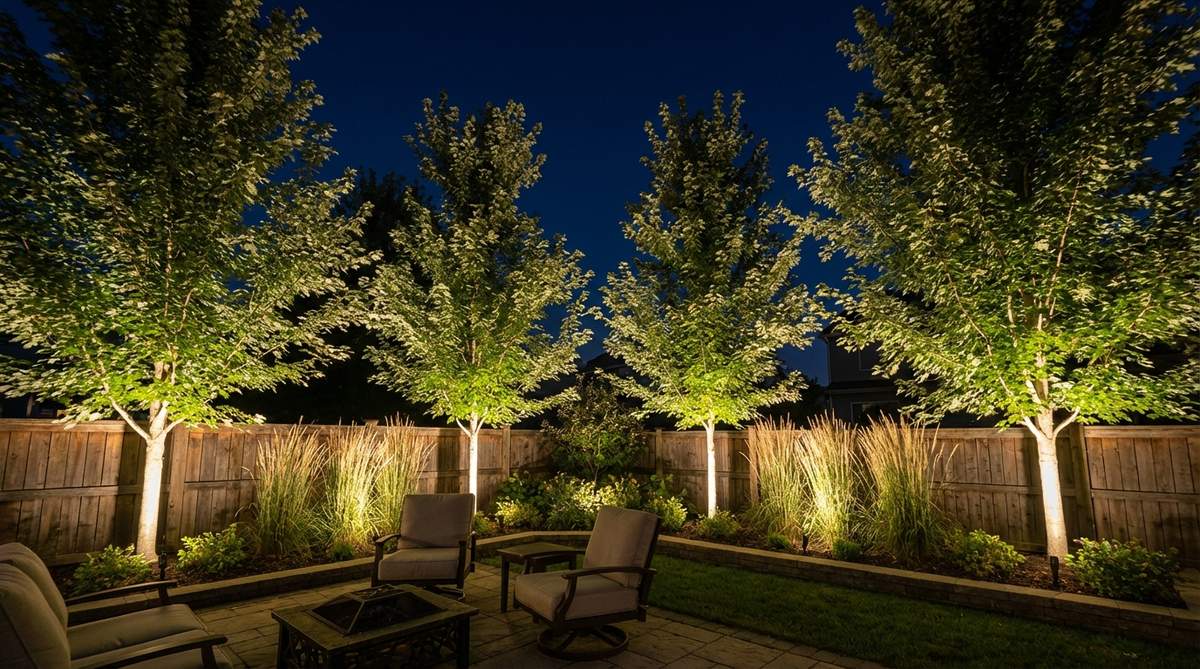
68. Uplighting Specimen Trees
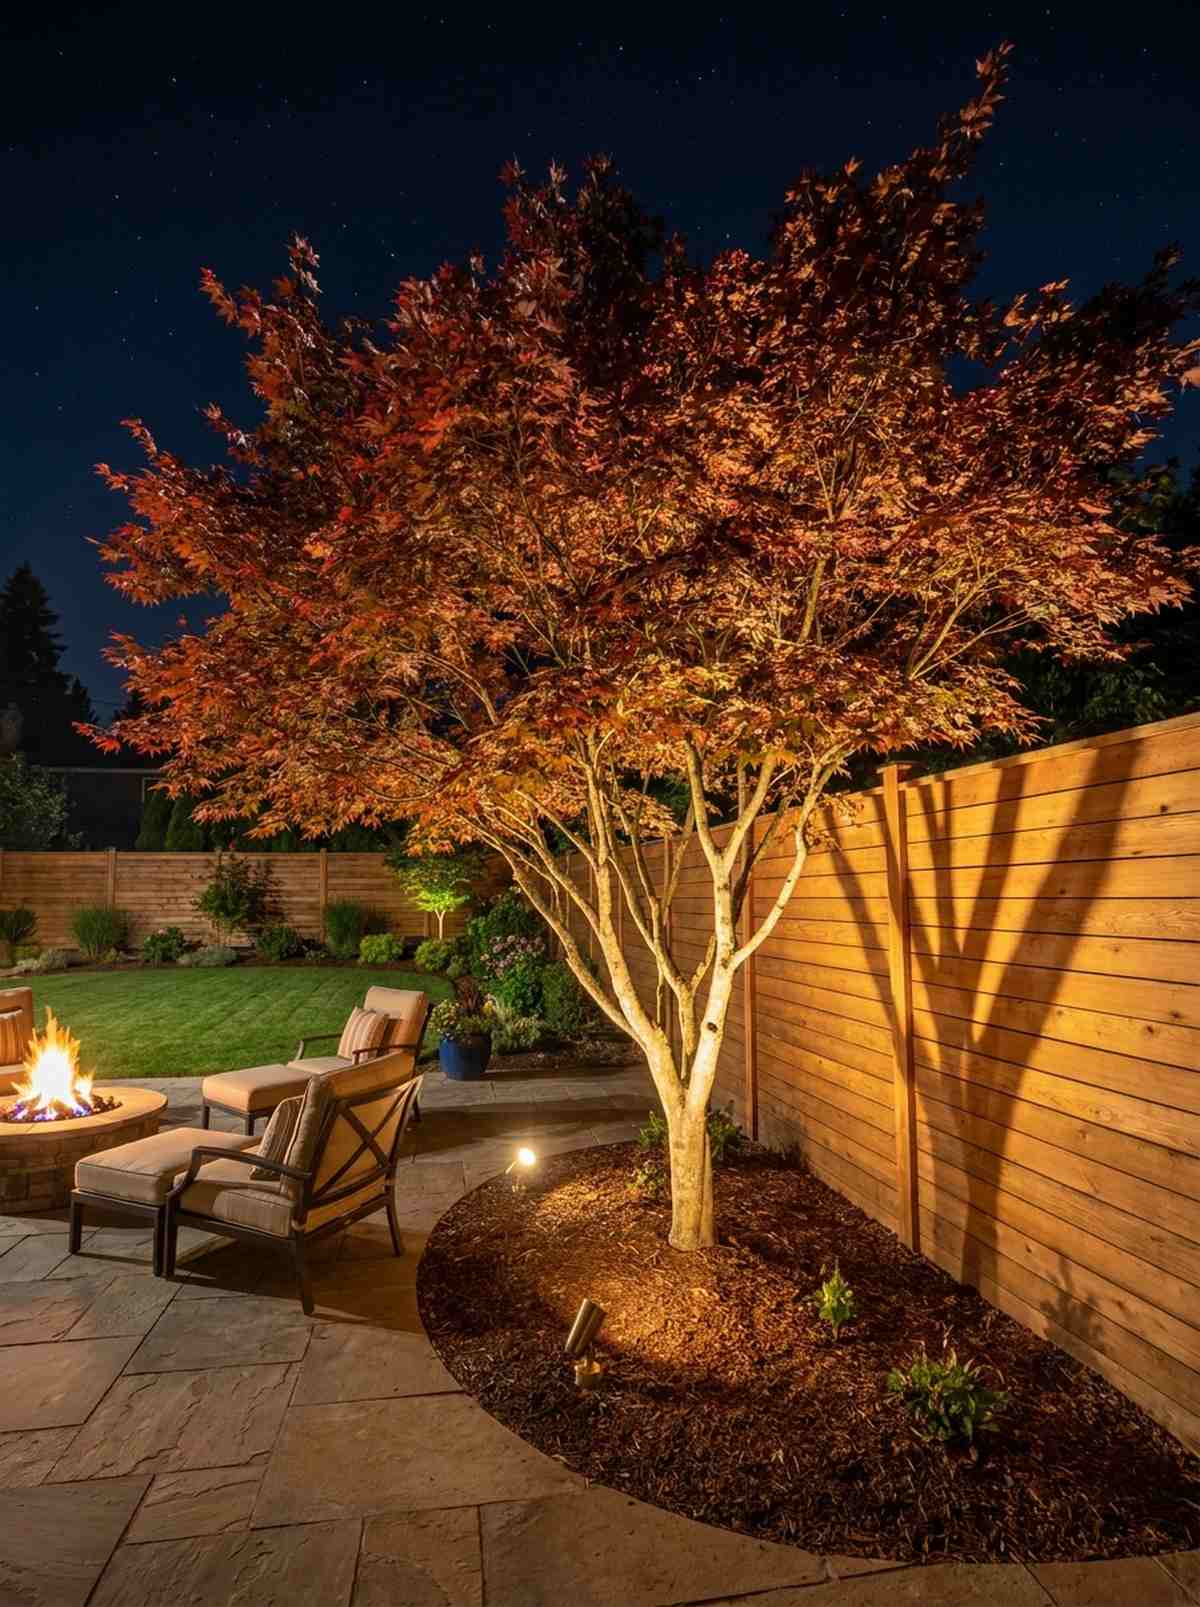
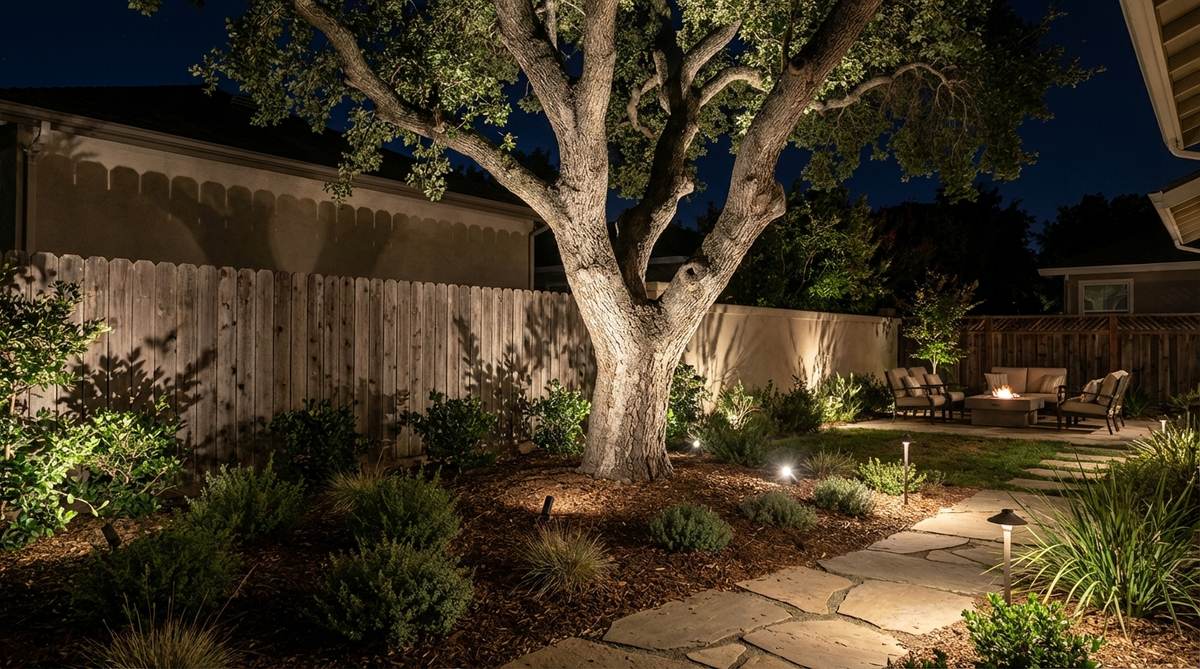
Casting dramatic shadows onto your fence by illuminating a Japanese Maple feels like a $10,000 professional landscape installation. The ultimate trick to make a tiny yard feel like a luxury resort at night.
Harsh floodlights blind your guests and wash out the yard, but focused, warm-white LED uplights look far more expensive and moody. Snagging waterproof brass LED well lights ensures they won’t get destroyed by the lawnmower.
You can easily pull this off for around $100–$200. Highly recommended for a permanent backyard upgrade.
- Key Materials: Low-voltage brass uplights, transformer
- Vibe / Style: Luxury resort evening
- Difficulty: Basic plug-in wiring
- Budget Breakdown: Brass Lights: $120 | Wire: $30
- Creator’s Tip: Always use 2700K warm white bulbs. Cool blue LEDs will make your expensive landscaping look like a cheap gas station.
- Smart Sourcing: heavy-duty brass low-voltage uplights and direct-burial landscape lighting wire (bulk roll).
69. Pathway Step Lights
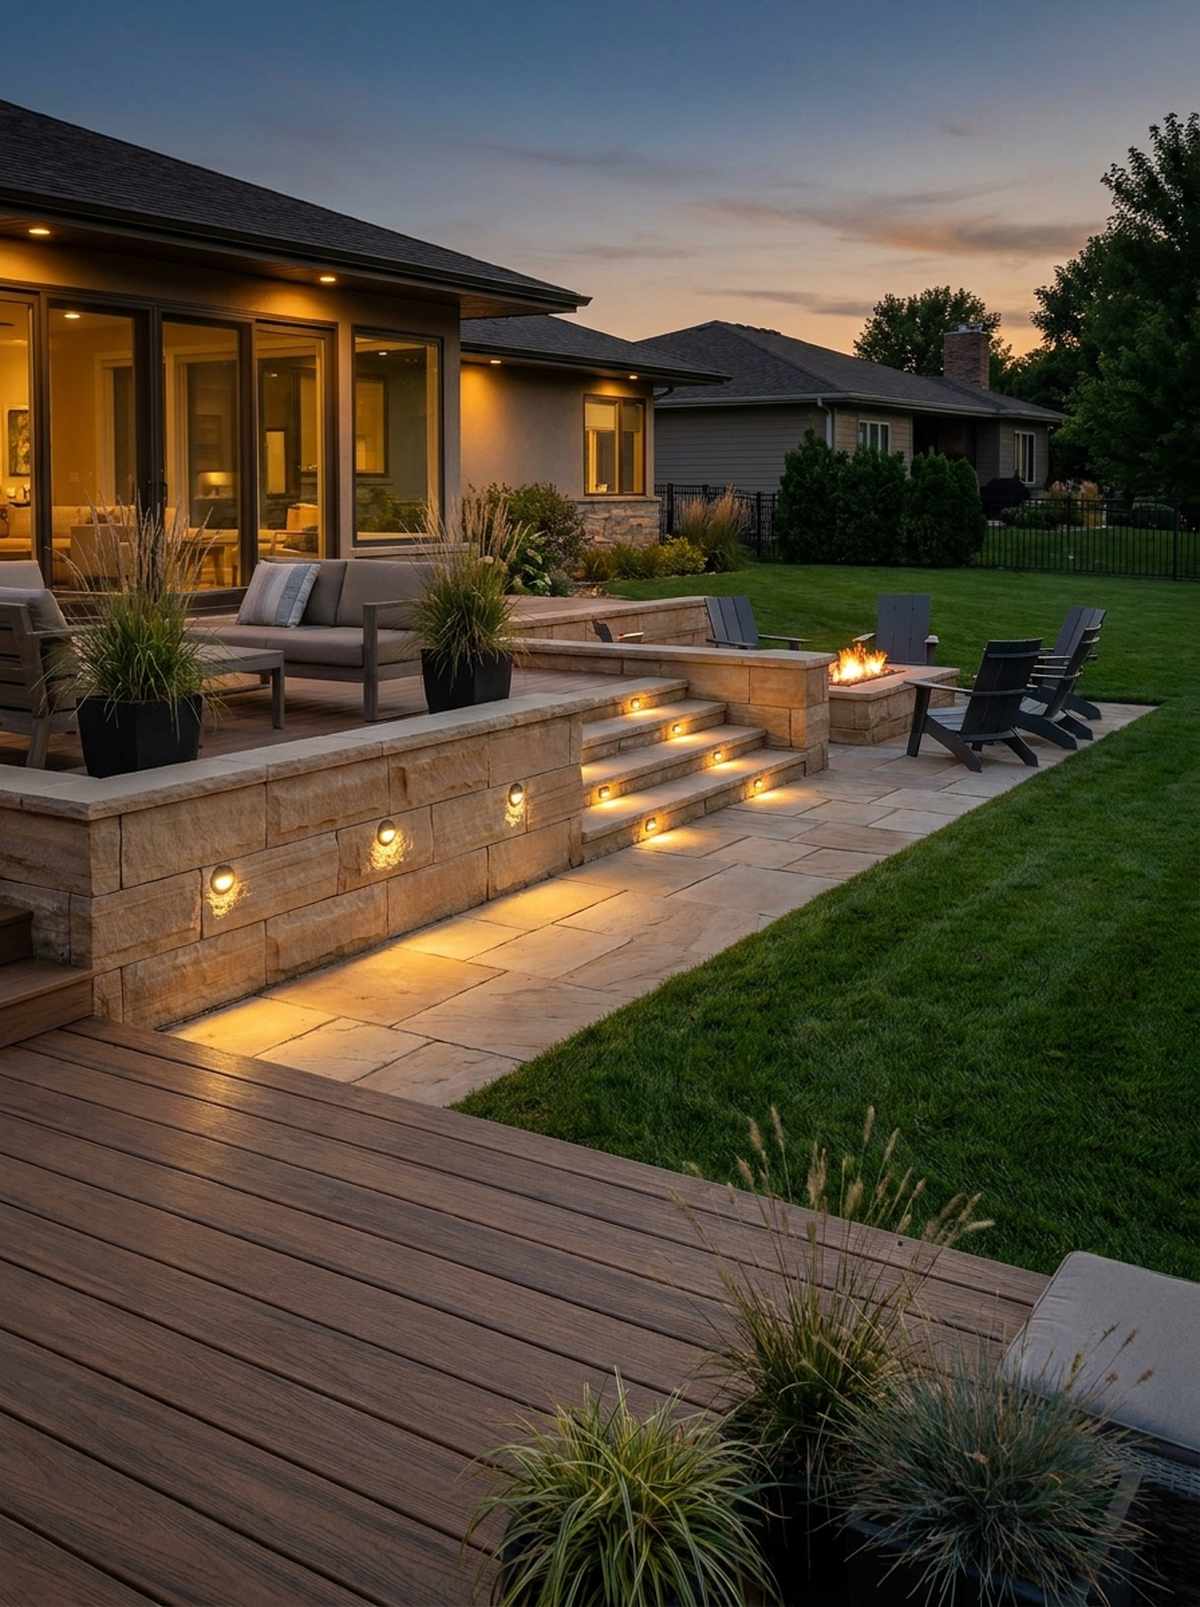
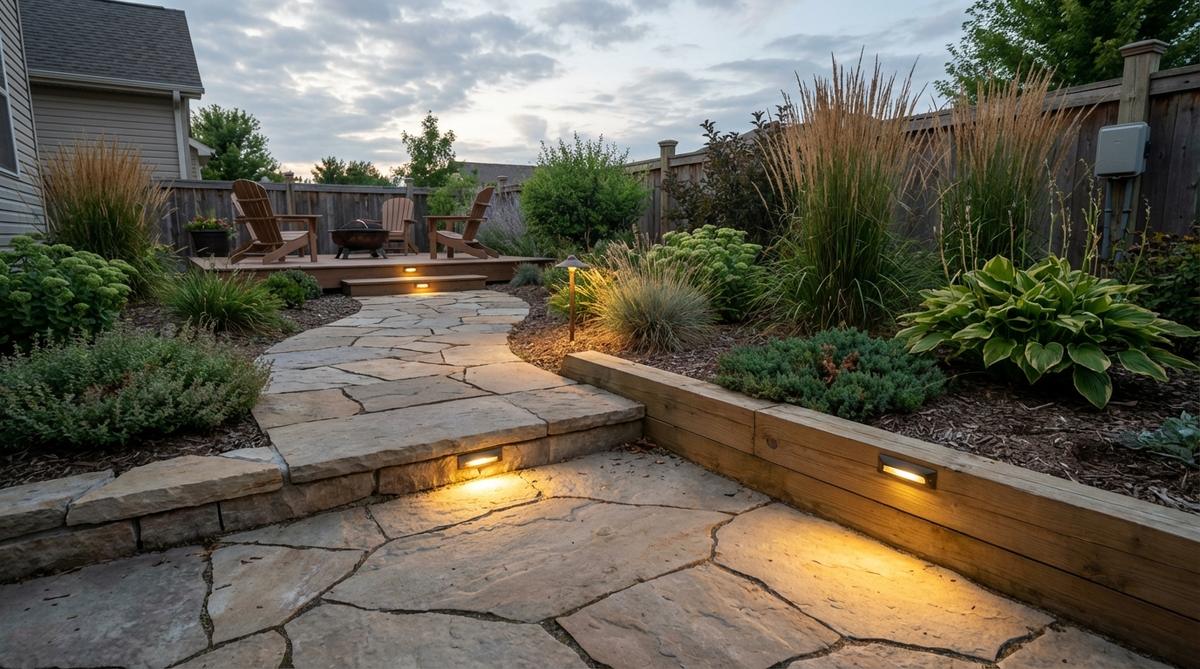
Embedding tiny glowing dots flush into your retaining walls feels incredibly futuristic and clean. Flawless for lighting your paths without tripping over ugly, bulky plastic solar stakes.
Sticking cheap stakes in the dirt looks cluttered, but recessed masonry lights give a designer-level finish that keeps the visual plane completely flat. Utilizing diamond-tipped masonry hole saws allows you to perfectly sink the lights right into the brick.
Expect to invest $80–$150 for sleek safety lighting. Save this for modern hardscape inspiration!
- Key Materials: Recessed LED puck lights, masonry bits
- Vibe / Style: Ultra-modern safety
- Difficulty: Advanced drilling required
- Budget Breakdown: Puck Lights: $90 | Drill Bit: $25
- Creator’s Tip: Mount the lights no higher than 18 inches off the ground to create pools of light rather than glaring eye-level beams.
- Smart Sourcing: diamond hole saw drill bit sets and waterproof recessed LED deck light kits.
You don’t need a massive, expensive pond to get the soothing sound of water. The next trick uses zero ground space.
Water Features Scaled for Limited Space
70. Bubbling Urn Fountains
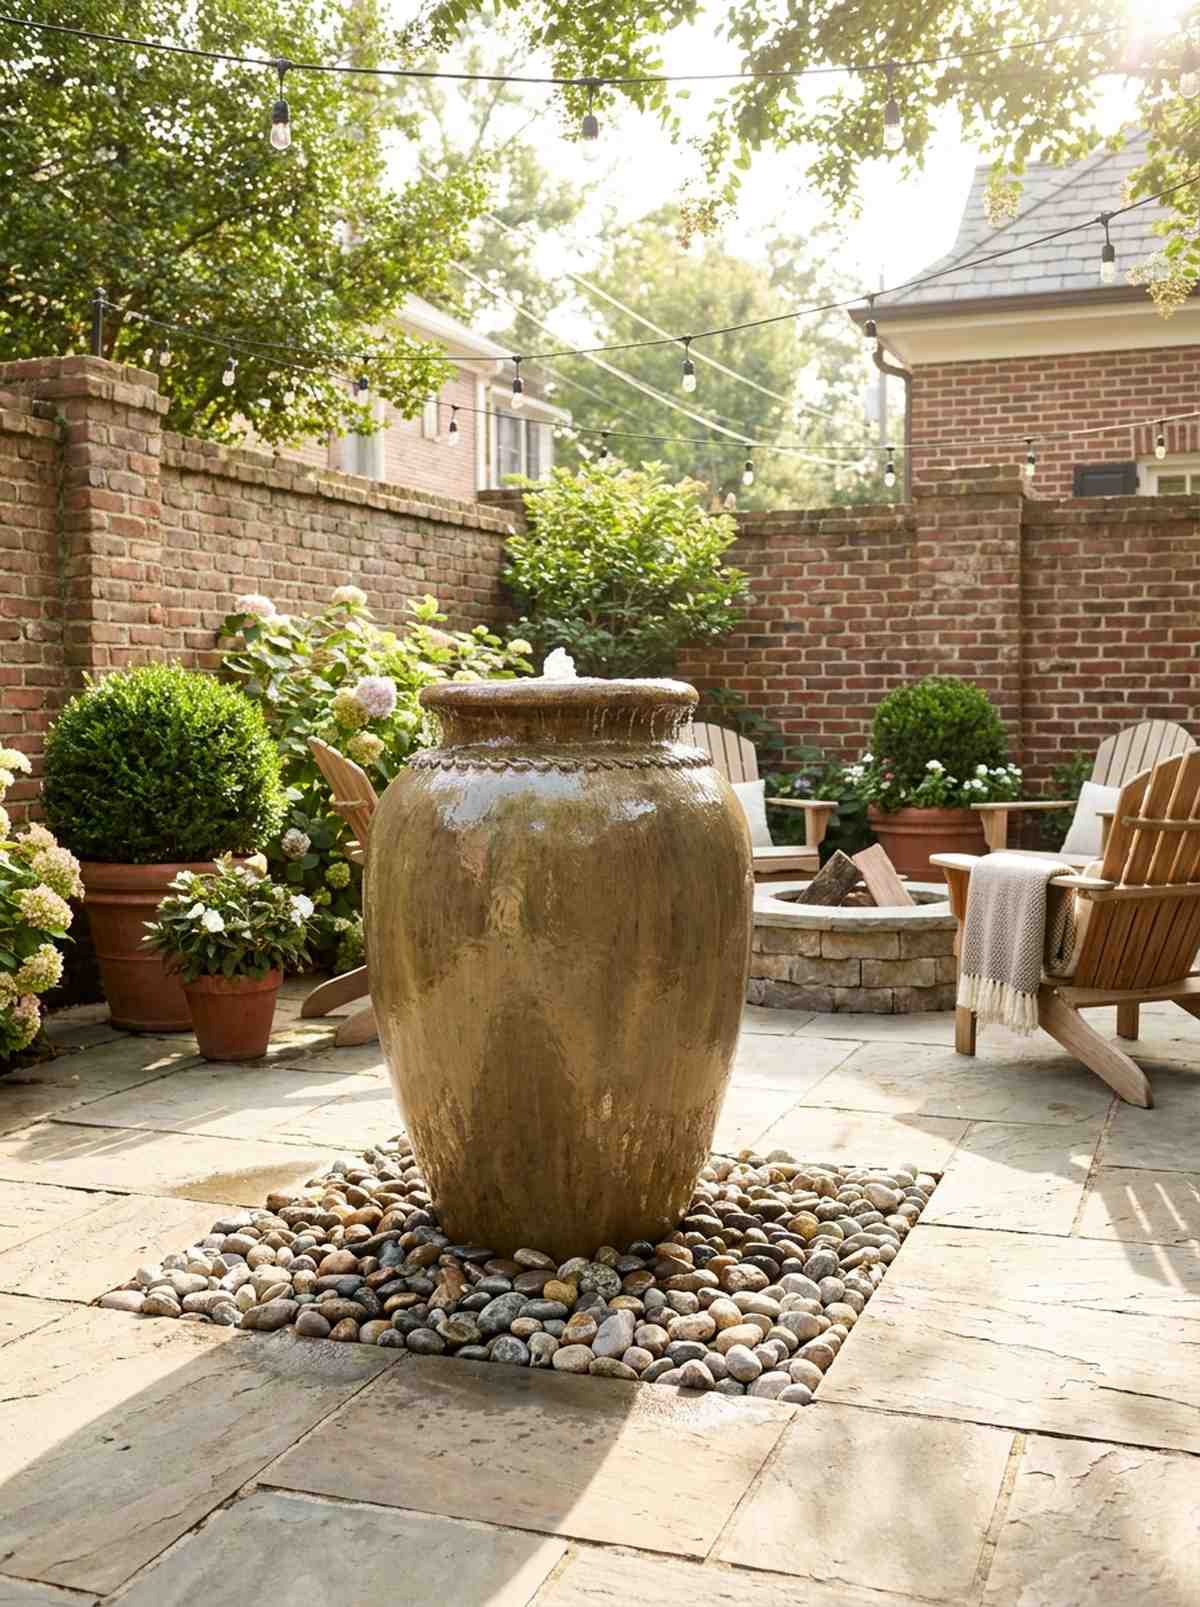
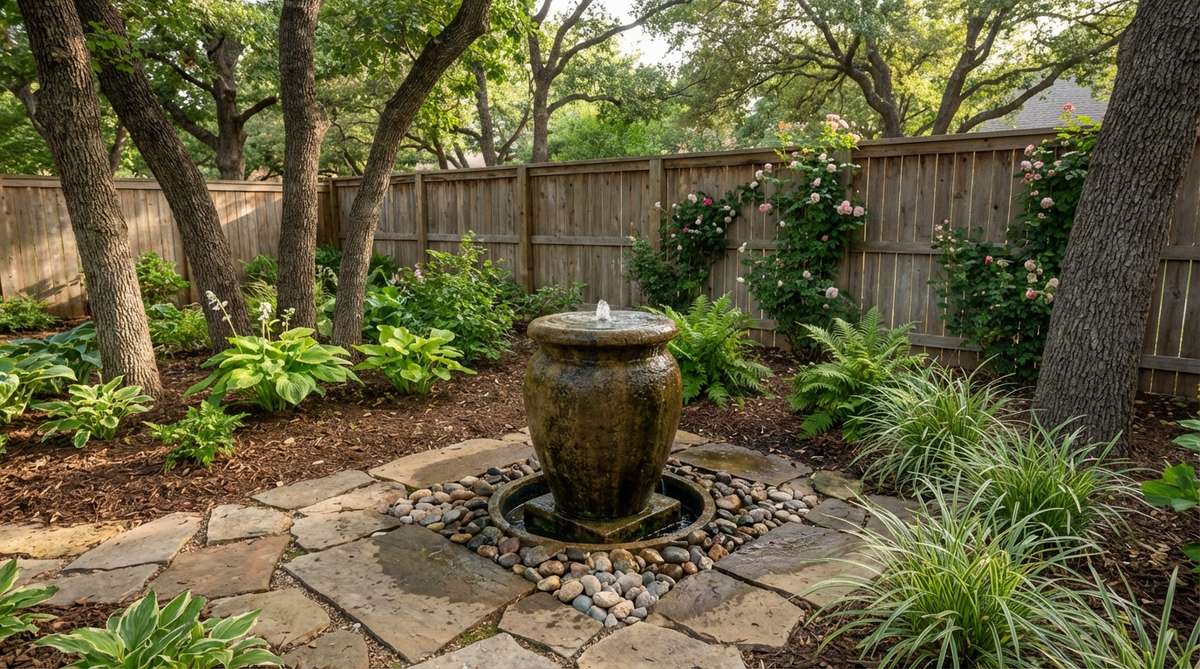
Listening to water ripple over a massive ceramic pot feels incredibly therapeutic and masks annoying neighborhood traffic noise perfectly. The ultimate sensory upgrade for a tiny courtyard.
Open ponds take up too much room and breed mosquitoes, but a self-contained bubbling urn delivers a highly aesthetic, premium look in a 2-foot footprint. Buying a heavy-duty underground fountain basin hides all the ugly plumbing completely out of sight.
You can execute this premium feature for $150–$300. It’s a fast upgrade that completely changes the vibe.
- Key Materials: Glazed urn, hidden basin, pump
- Vibe / Style: High-end spa retreat
- Difficulty: Moderate digging
- Budget Breakdown: Basin Kit: $120 | Urn: $100 | Pump: $40
- Creator’s Tip: Always buy a pump rated for 50% more gallons-per-hour than you think you need; you can turn it down, but you can’t make a weak pump stronger.
- Smart Sourcing: heavy-duty underground fountain reservoir basins and adjustable flow submersible water pumps.
71. Wall-Mounted Water Spouts
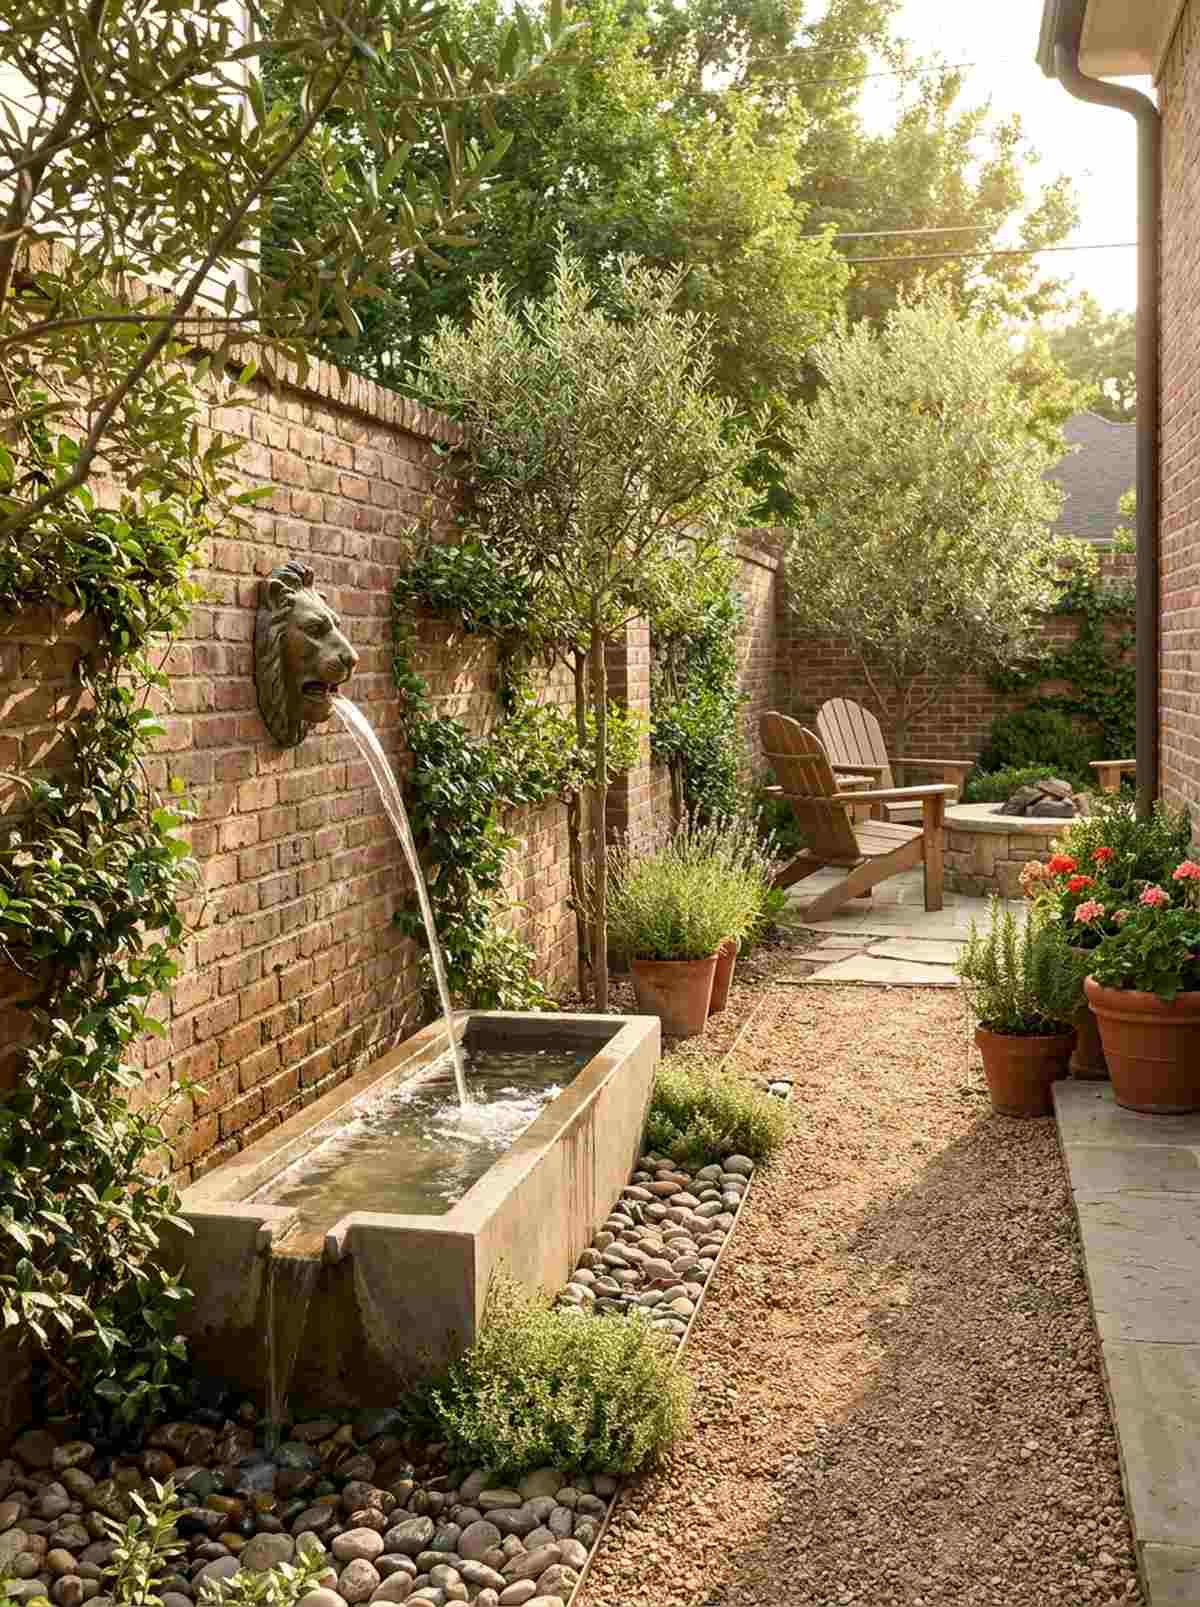
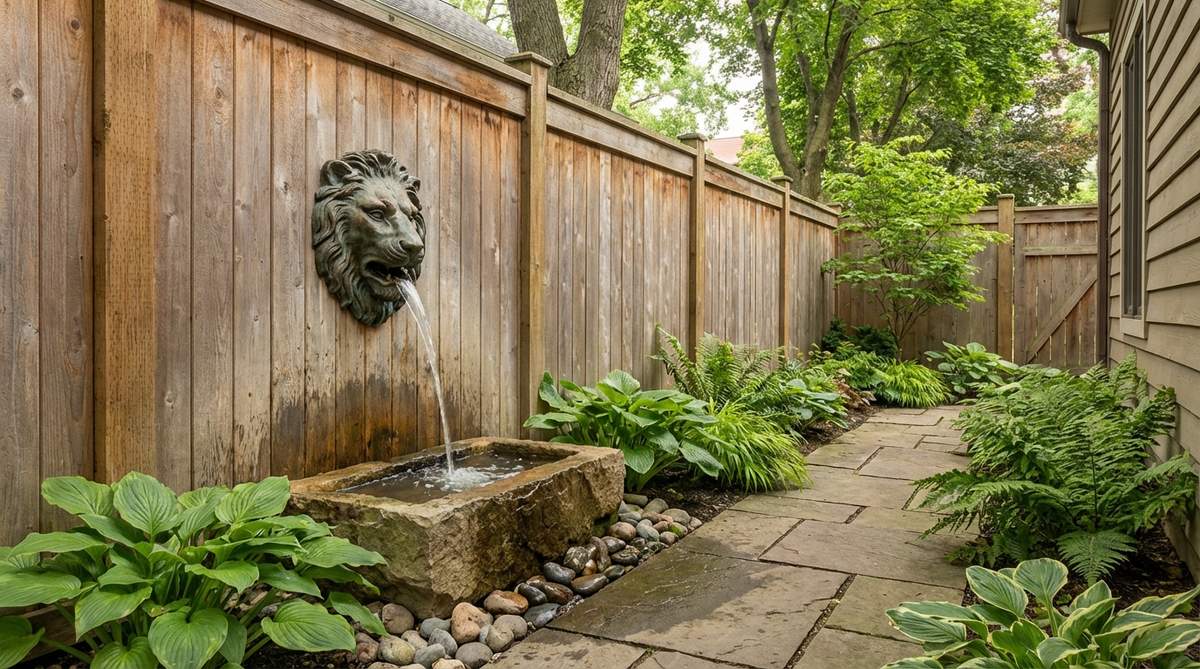
Having a stream of water shoot directly out of your brick fence feels like wandering into a historic Italian plaza. Absolutely brilliant for adding moving water to a narrow side-yard that has literally zero floor space.
Bulky tiered fountains choke the pathway, but a sleek wall-scupper gives a designer-level finish that hangs completely out of the way. Integrating compact submersible pump kits inside a tiny base trough makes this a flawless closed-loop system.
You can easily pull this off for around $100–$200. Pin this to your ultimate outdoor sanctuary board!
- Key Materials: Brass wall scupper, slim trough, pump
- Vibe / Style: Historic Tuscan courtyard
- Difficulty: Plumbing through masonry
- Budget Breakdown: Brass Scupper: $80 | Trough & Pump: $90
- Creator’s Tip: Place the scupper exactly 24 inches above the water level—any higher and it splashes out of the trough; any lower and you lose the sound.
- Smart Sourcing: solid brass outdoor wall fountain scuppers and compact ultra-quiet submersible pumps.
Conclusion
Achieving a high-end garden design small backyard isn’t about having massive acreage; it’s about leveraging vertical space, multi-functional furniture, and optical illusions to outsmart your square footage. By implementing these exactly 71 solutions, you can completely bypass the generic, cluttered look of most small yards. Skip the cheap plastic fixes and invest smartly in the bulk packs, premium raised bed brackets, and UV-coated structural pieces recommended above. A small space demands higher-quality materials because every single inch is visible. Start with the lighting or a vertical trellis this weekend, and watch how quickly your compact patio transforms into a luxury outdoor retreat.
Frequently Asked Questions
What is the minimum size backyard that can support a functional garden?
You can build a highly productive setup in as little as 50 square feet by utilizing stackable vertical hydroponic tower kits and heavy-duty railing planters. A tiny 5×10 footprint easily fits two modular composite raised beds or a dozen UV-coated self-watering containers, yielding enough premium salad greens and herbs to feed a family all summer without taking up your entire patio.
How do I make my small backyard garden look larger?
You must manipulate the sightlines by running heavy-duty steel landscape edging on a sharp diagonal to force the eye to travel further. Combine this with shatterproof acrylic outdoor mirrors mounted on fences and bright, pale exterior paints. Unifying the floor with premium weed barrier fabric and a single type of gravel visually expands the perceived area by up to 40%.
What are the best plants for small backyard gardens?
Stop buying sprawling bushes and invest in vertical climbers using rust-proof metal garden arch kits. Look for specific compact modifiers like dwarf espalier fruit trees or ‘Bushel and Berry’ thornless blackberry starter plants. Lock in your year-round structure by buying live dwarf evergreen starter shrubs so the yard doesn’t look like an empty dirt patch in January.
How much does it cost to design a small backyard garden?
A fast, high-end visual upgrade costs between $300-$800 if you buy smartly using bulk pack climbing vegetable seeds and repurposed containers. Mid-range setups using tool-free composite raised garden bed kits and commercial-grade soils run $1,200-$2,500. Professional-looking setups featuring low-voltage LED brass landscape lighting kits and custom bench builds easily hit $3,000-$7,000, but sourcing the materials yourself cuts that in half.
Can I grow vegetables in a small backyard with partial shade?
Absolutely, but you must strategically place your plants. Use live shade-tolerant ground cover packs and leafy greens like spinach and arugula in the dark corners, as they only need 4 hours of sun. Save your prime, sunny spots for high-yield tomatoes planted in heavy-duty non-woven grow bags, which you can physically drag into the sunlines as the seasons change.
How do I maintain privacy in a small backyard garden?
Avoid planting massive, yard-swallowing hedges. Instead, build a floating canopy using thick bamboo garden poles to train pleached screening trees that block upper-story windows while leaving the ground open. For a faster fix, install laser-cut metal outdoor privacy screens or expandable faux ivy panels—they deliver instant, zero-maintenance privacy without eating a single foot of your yard depth.