Skip expensive landscapers with these architect-grade gravel gardens. We reveal exact bulk materials and budget layouts for instant curb appeal. Transform dead lawns into high-end xeric focal points effortlessly.
Design SnapshotKey Principles
- Material Selection: Choose angular crushed stone over rounded pebbles for better interlocking and reduced migration
- Depth Matters: Apply gravel at 3-4 inches minimum to suppress weeds effectively and conserve soil moisture
- Drainage Foundation: Install landscape fabric or weed barrier before gravel application to prevent soil mixing
- Plant Compatibility: Select drought-adapted species with deep root systems that penetrate through gravel layers
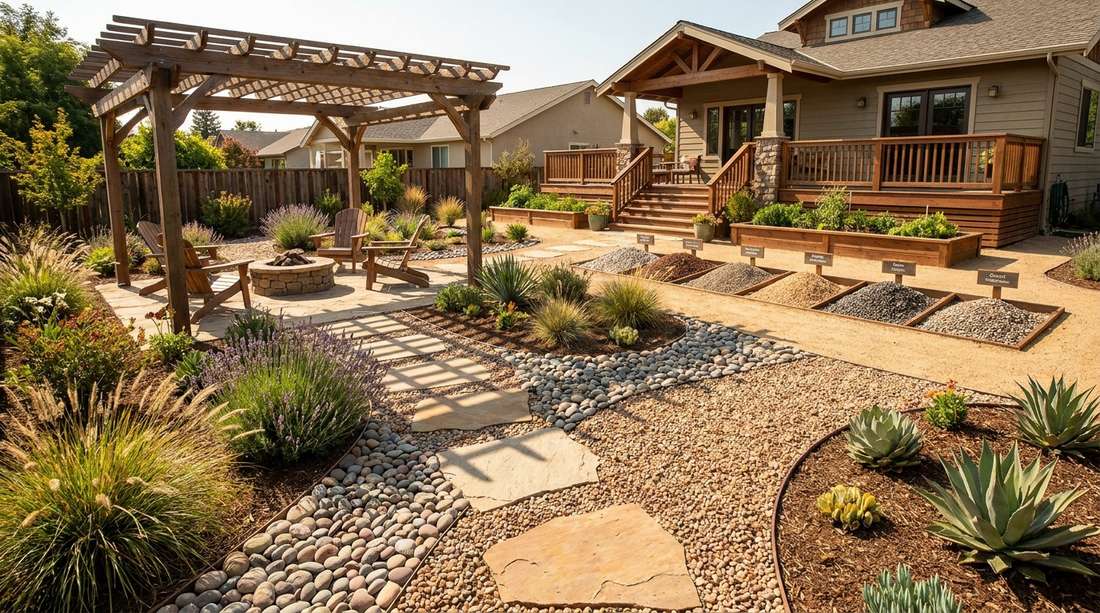
Minimalist Modern Gravel Layouts
1. Monochromatic White Gravel Courtyard
This layout feels like an exclusive modern art gallery right in your front yard. A crisp white marble courtyard design works exceptionally well for an urban entryway or shaded front porch.
A designer-level finish emerges when contrasting sculptural agave against bright limestone chips. Instead of buying standard landscape fabric, utilizing commercial-grade weed barrier rolls prevents the bright stones from sinking into the mud.
You can easily pull this off for around $150–$300 depending on stone grade. Save this to your ultra-modern landscaping board!
- Key Materials: UV-coated white marble chips, heavy-duty weed barrier
- Vibe / Style: High-end minimalist gallery
- Difficulty: Easy weekend project
- Budget Breakdown: Stone: $120 | Sculptural Plants: $80
- Creator’s Tip: Wash the gravel post-installation to reveal the true bright white finish.
- Smart Sourcing: Bulk pack white marble chips and pre-cut heavy-duty weed barrier rolls.
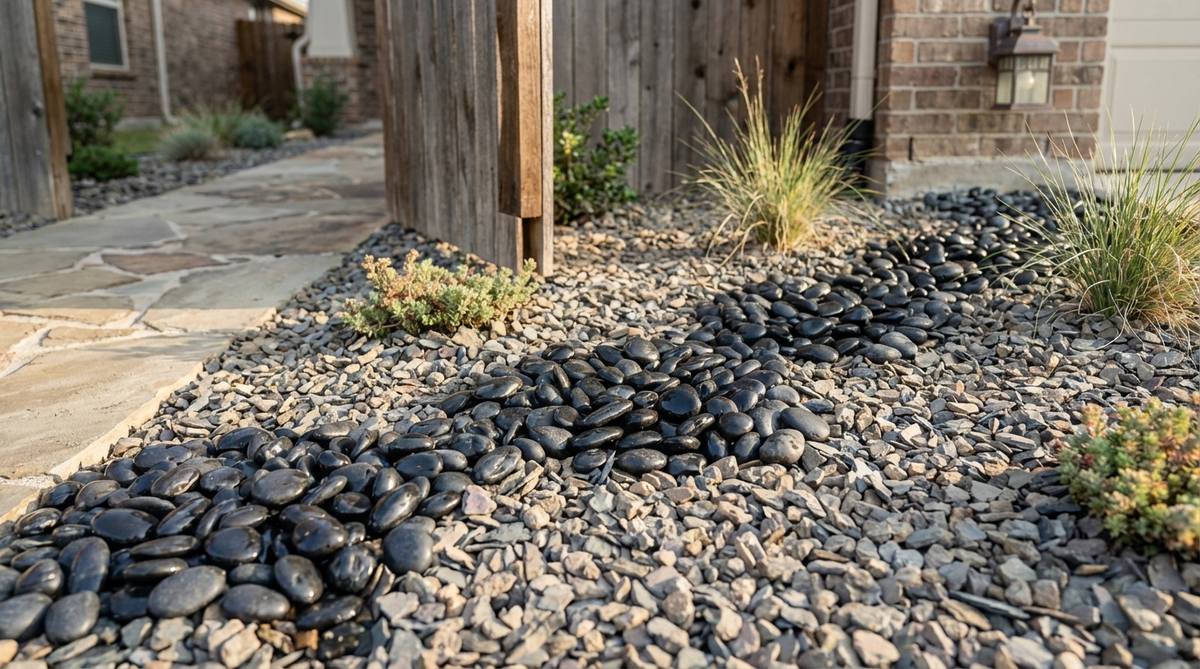
2. Black Basalt Chipping Garden
Stepping into this space feels like visiting a luxury boutique hotel. The dark basalt minimalist border is perfect for framing concrete driveways or sleek metal planters.
Using dark volcanic rock completely transforms standard concrete, delivering a surprisingly premium look. Seamlessly integrate miniature garden supplies like dark steel edging to maintain that pristine, ultra-modern boundary.
Expect to spend about $200 for a medium-sized border area. It’s a fast upgrade that completely changes the vibe.
- Key Materials: Black basalt gravel, industrial steel edging
- Vibe / Style: Moody contemporary chic
- Difficulty: Moderate (heavy materials)
- Budget Breakdown: Basalt: $150 | Edging: $50
- Creator’s Tip: Use a leaf blower on low power to keep dark stones free of bright debris.
- Smart Sourcing: UV-resistant flexible steel edging and bulk bag black basalt.
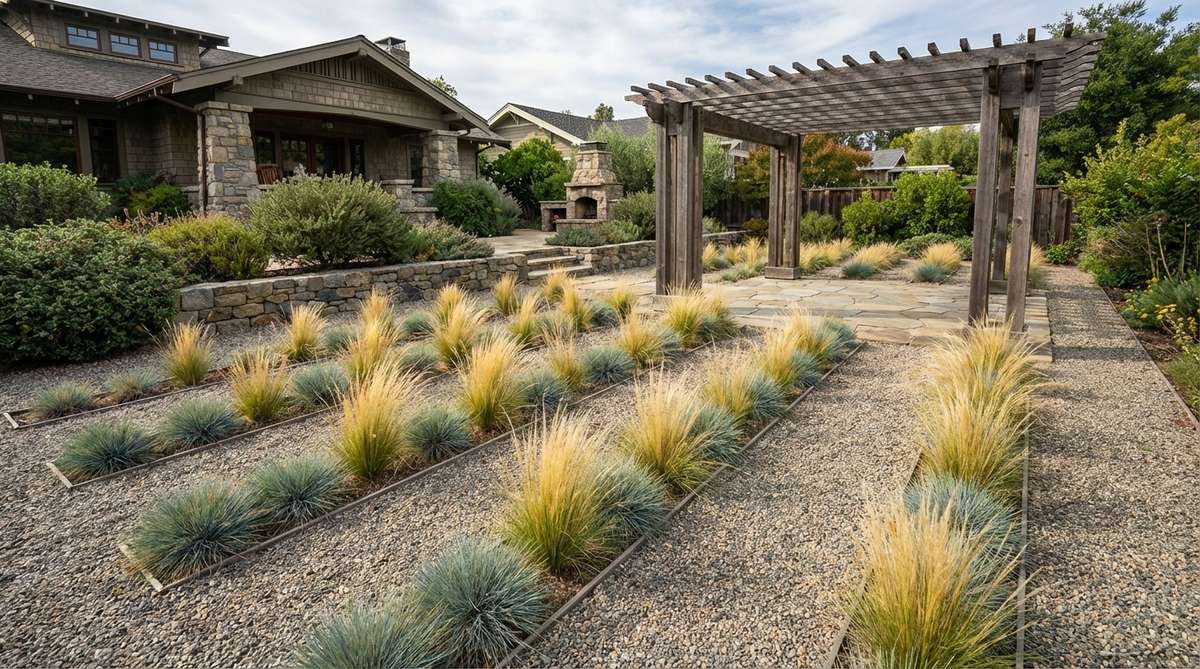
3. Geometric Grid Pattern Layout
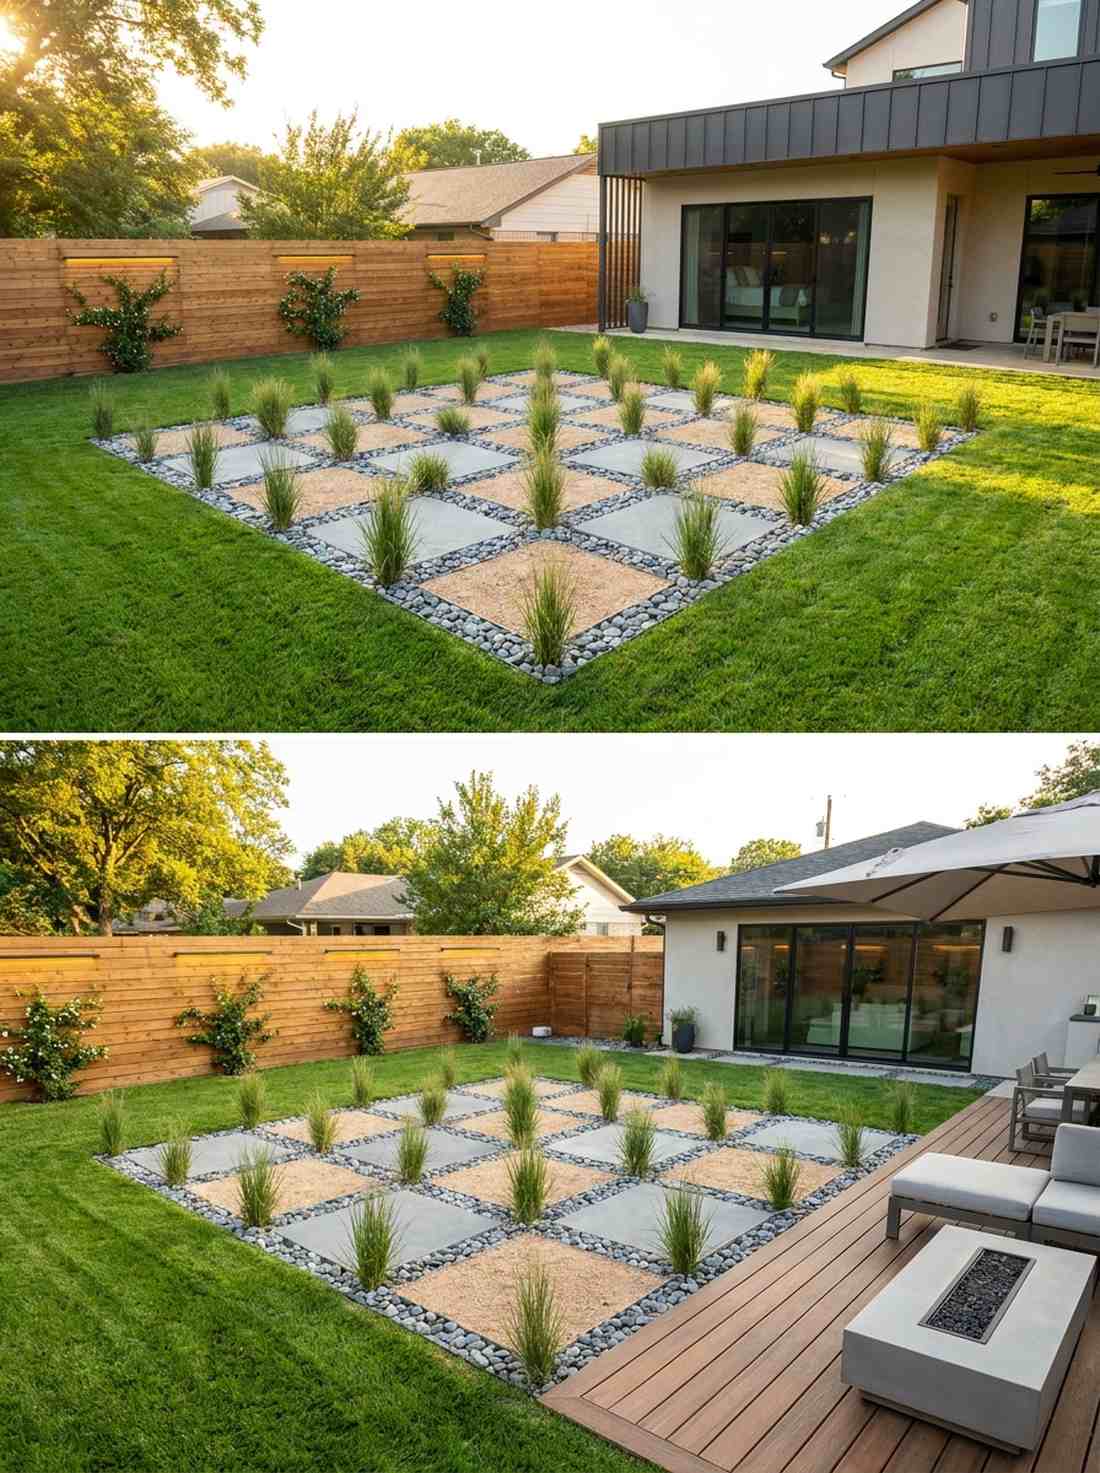
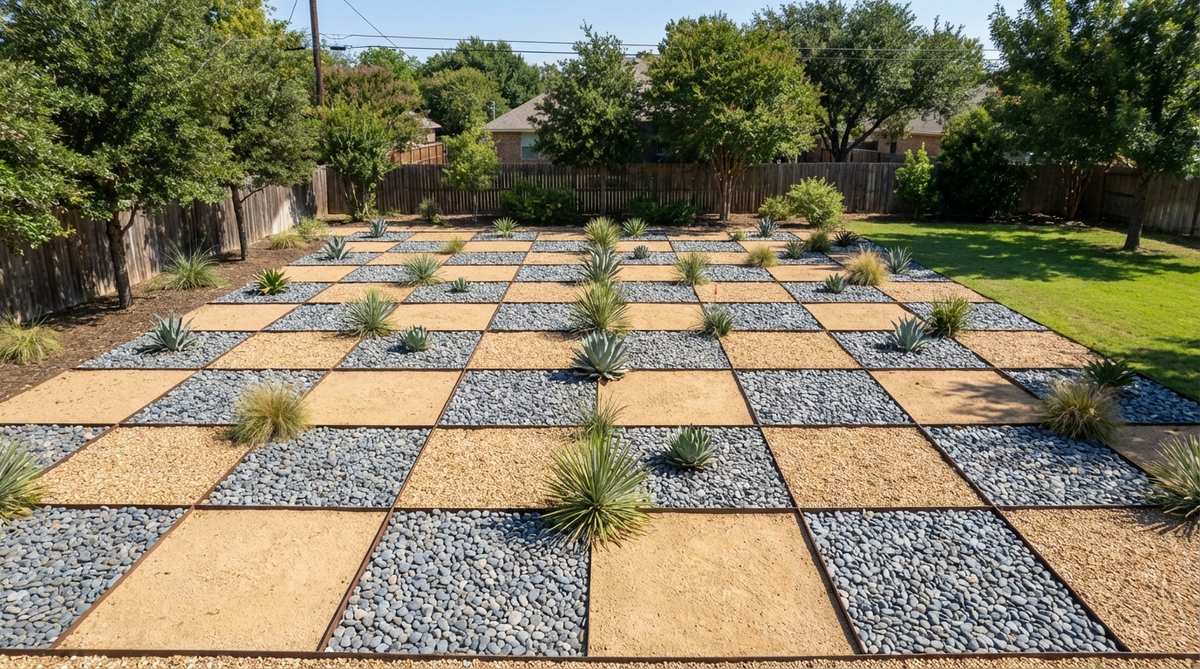
This geometric masterpiece feels satisfyingly precise and endlessly organized. A grid pattern stone layout works beautifully for large, unused flat spaces or modern backyards.
Most beginners avoid complex patterns, but using pre-formed grid inserts guarantees a flawless result. Alternating buff-colored granite and gray river stone creates a visual rhythm that looks far more expensive than it is.
Set this up for around $250 with the right grid tools. Pin this if you’re planning a structured small space upgrade!
- Key Materials: Gravel stabilizer grids, multi-color crushed rock
- Vibe / Style: Architectural precision
- Difficulty: Intermediate
- Budget Breakdown: Stabilizer Grids: $100 | Mixed Stone: $150
- Creator’s Tip: Plant identical architectural grasses at every grid intersection for perfect symmetry.
- Smart Sourcing: Pre-cut gravel stabilizer mats and acrylic grid dividers.
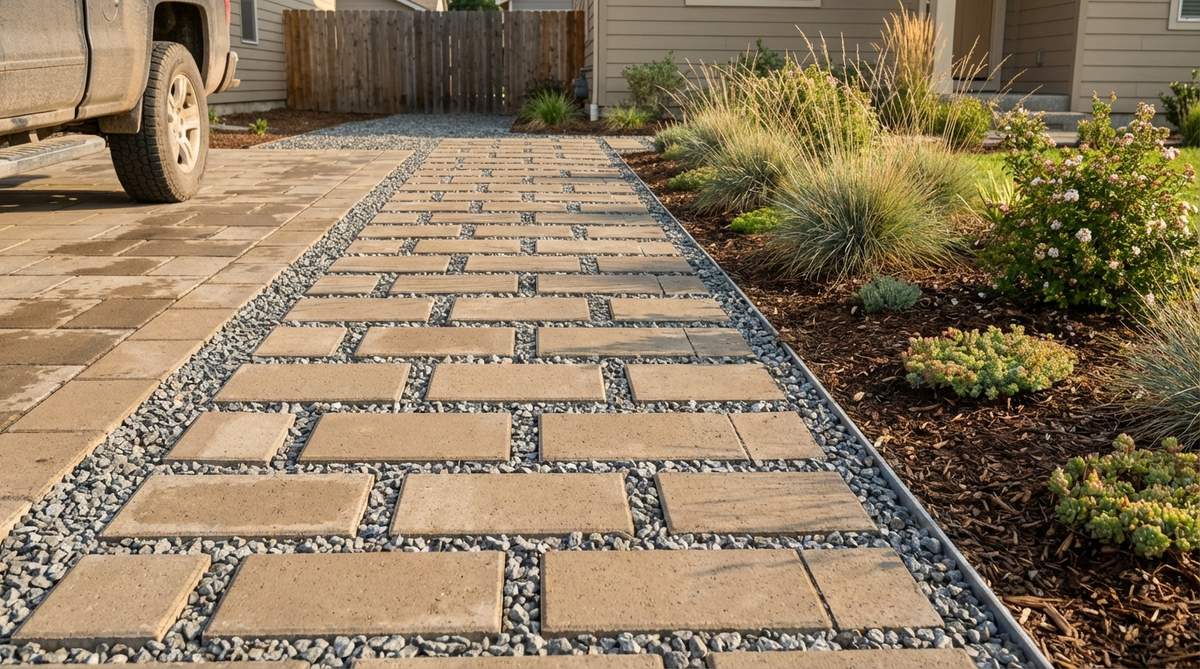
4. Concrete Paver and Gravel Integration
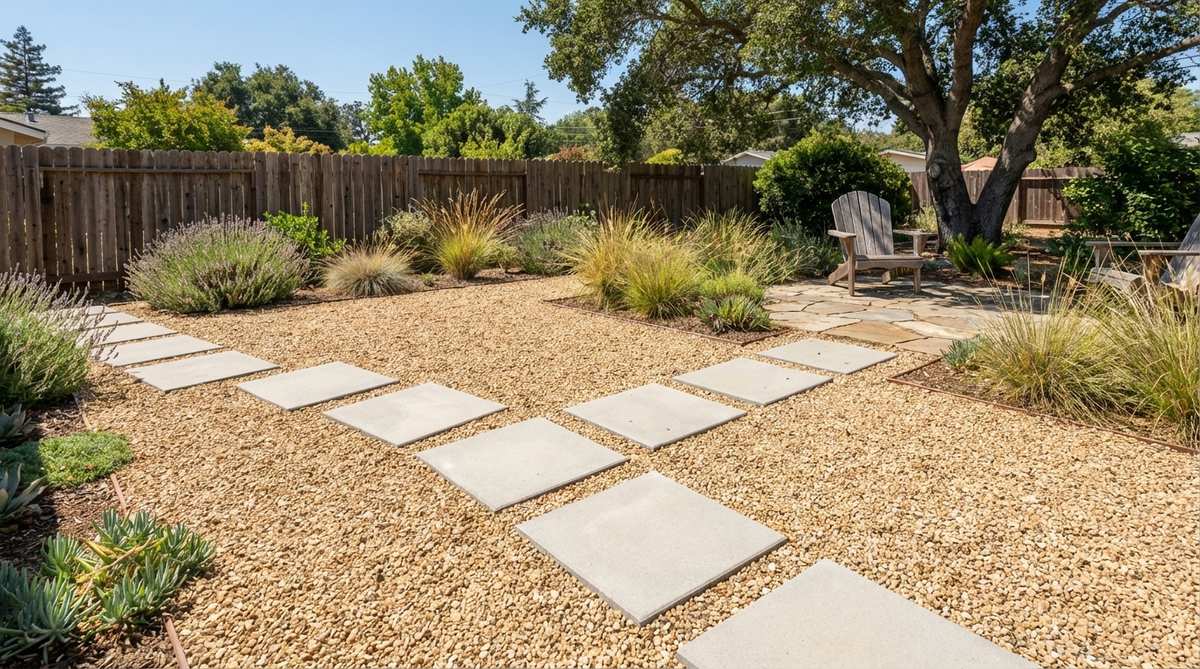
Floating over these stones feels like walking on air in a zen retreat. This paver and gravel fusion is the ultimate solution for side yards or high-traffic walking paths.
Combining large-format concrete with loose fill gives a designer-level finish at a fraction of full-paving costs. Drop in some high-end terrarium accessories or solar path lights along the edges to elevate the path at night.
You can execute this pathway for just $80–$150. Save this idea for your next weekend DIY marathon.
- Key Materials: 24×24 concrete pavers, tan pea gravel
- Vibe / Style: Transitional modern
- Difficulty: Easy to intermediate
- Budget Breakdown: Pavers: $60 | Pea Gravel: $50
- Creator’s Tip: Set the pavers exactly 18 inches apart for a natural, comfortable walking stride.
- Smart Sourcing: Non-slip concrete step stones and bulk bag pea gravel.
This next setup is ridiculously cheap but looks like a $100 custom display…
5. Linear Strip Planting Beds
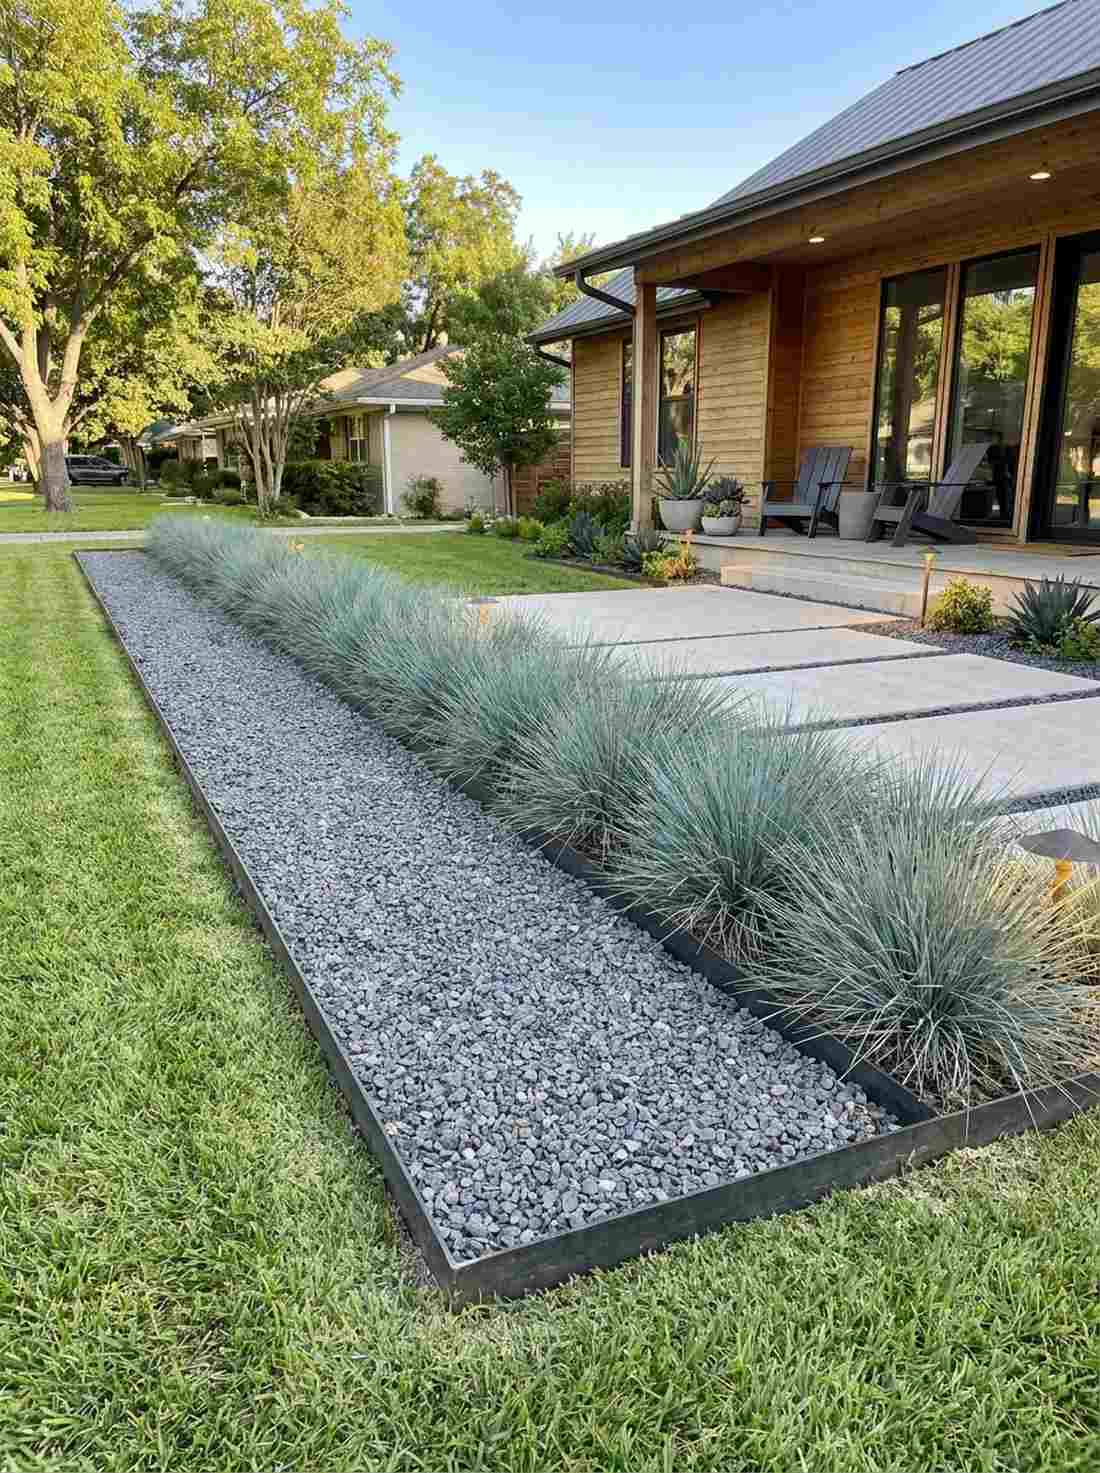
This layout mimics the soothing repetition of ocean waves. A linear strip gravel bed acts as a perfect property line divider or striking front yard focal point.
While many overcomplicate planting, sticking to a single ornamental grass species yields a shockingly sophisticated aesthetic. Using weather-resistant metal borders keeps the lines razor-sharp, ensuring the gravel never bleeds into the soil.
Recreate this look for roughly $100–$200. Highly recommended for a quick weekend win.
- Key Materials: Blue fescue grass plugs, gray crushed gravel
- Vibe / Style: Clean horizontal modernism
- Difficulty: Easy
- Budget Breakdown: Grass Plugs: $60 | Gravel: $90
- Creator’s Tip: Plant the grasses densely within the narrow strips to create a solid visual wall of green.
- Smart Sourcing: Live ornamental grass starter kits and pre-cut metal lawn edging.
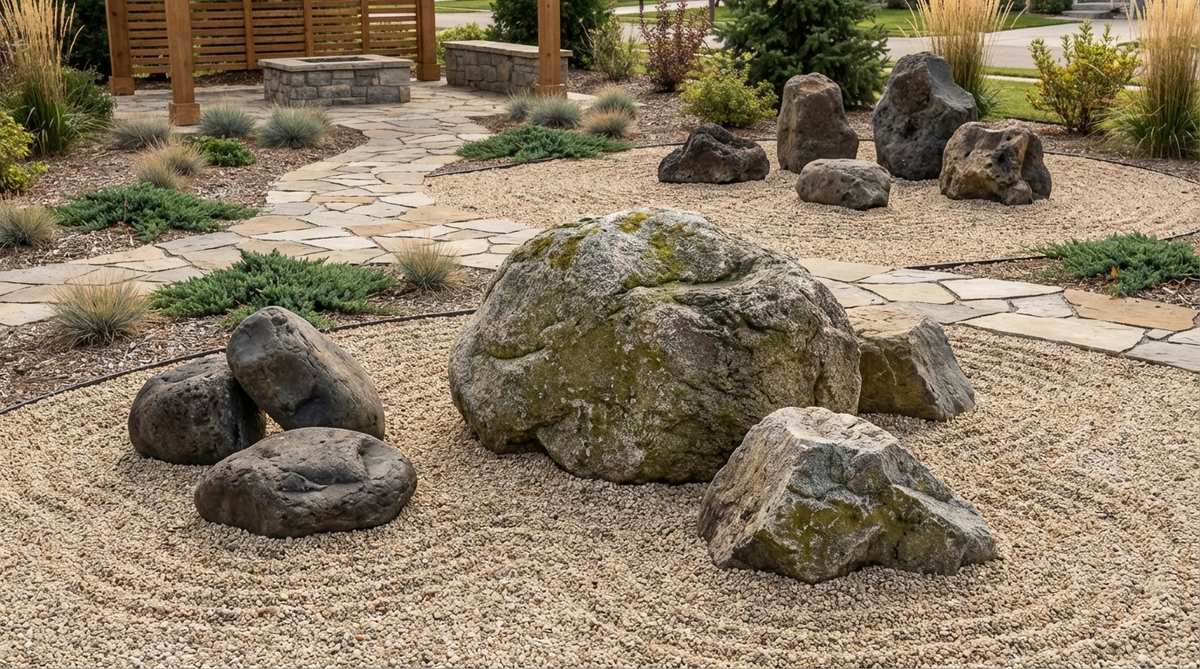
6. Sculptural Boulder Anchors
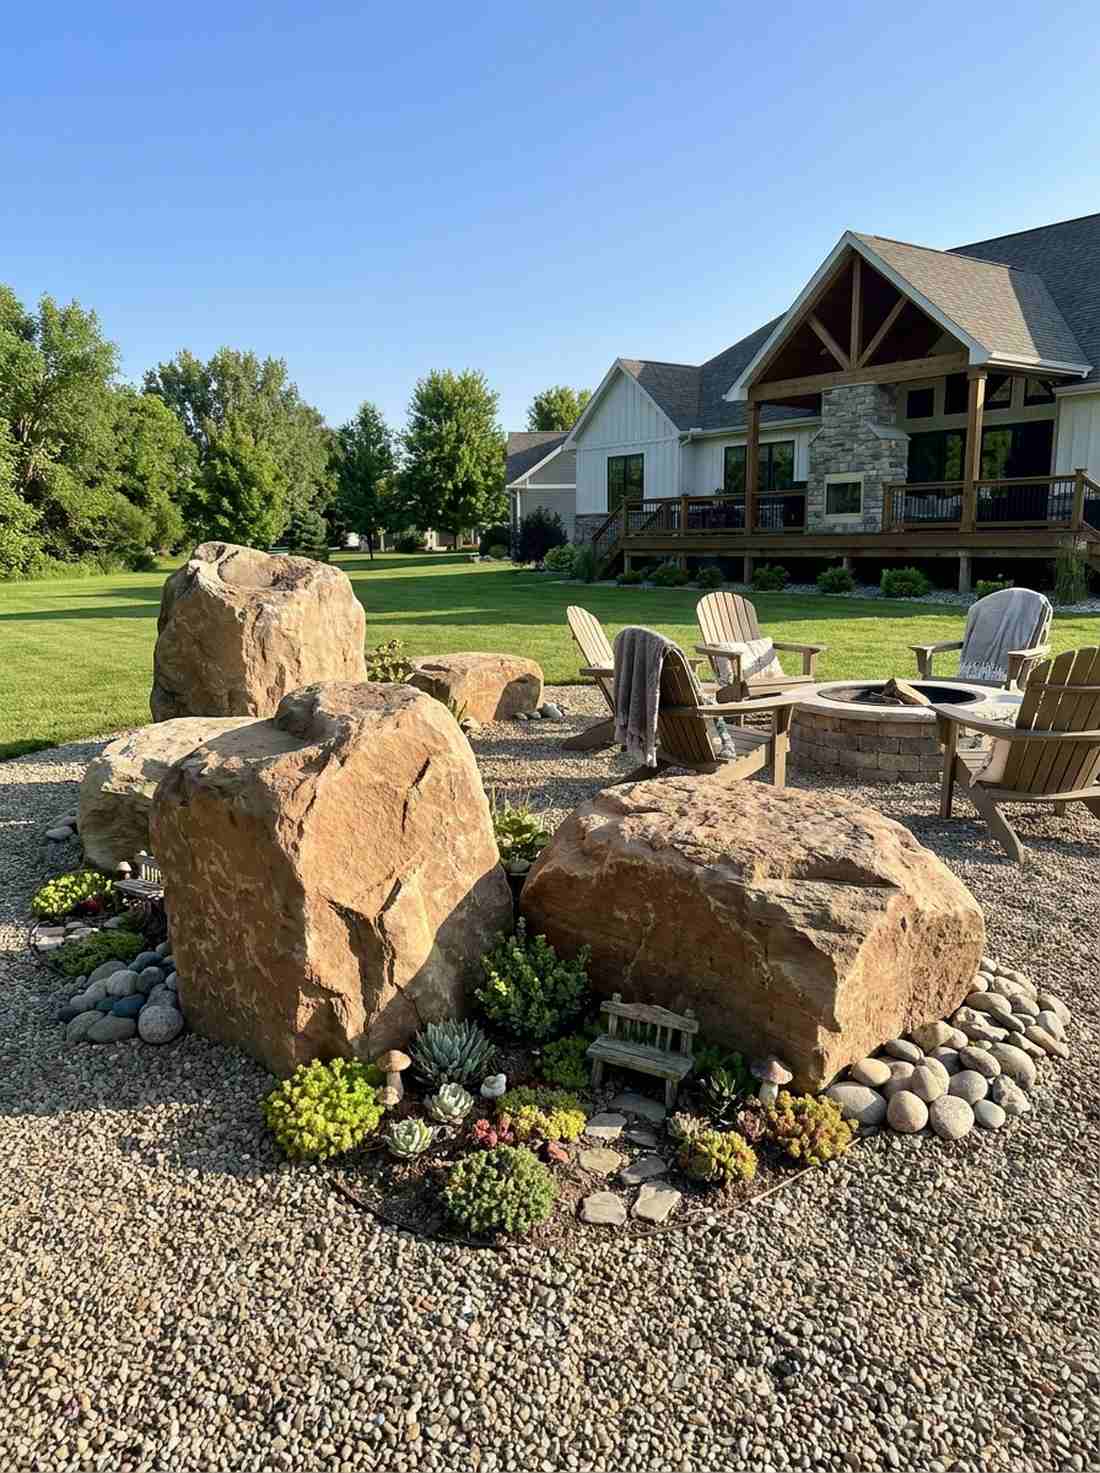
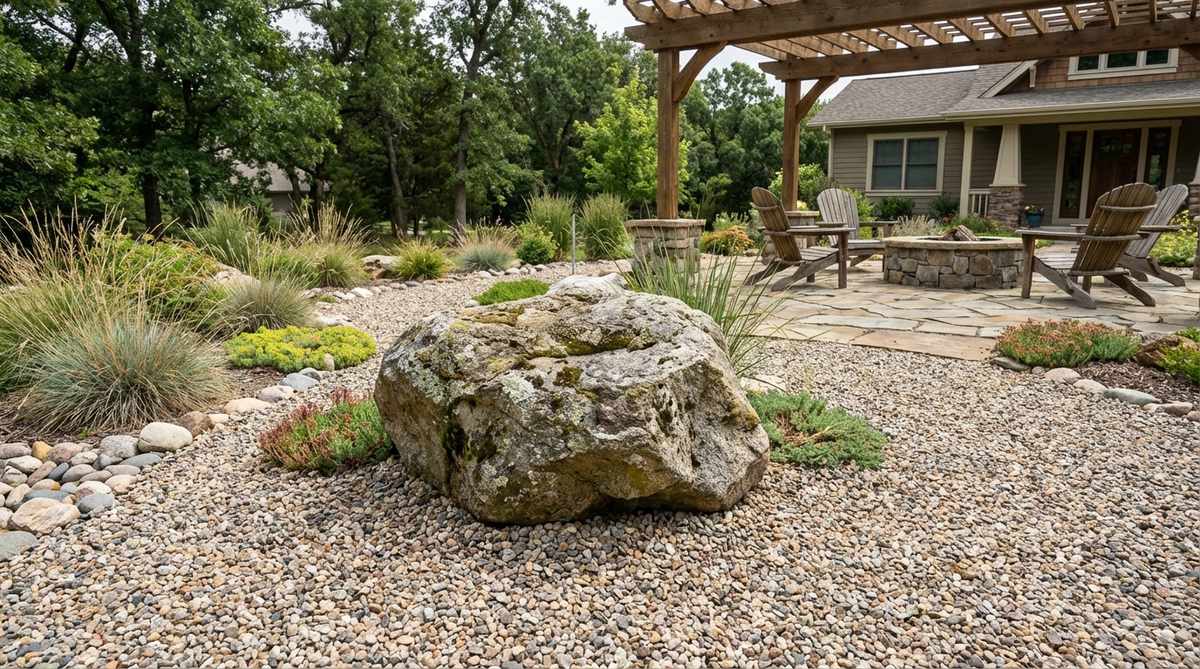
Standing next to these giants feels incredibly grounding and majestic. Using statement boulder landscaping is a flawless strategy for anchoring a massive, empty gravel expanse.
Strategically placing heavy asymmetrical stones breaks up monotony and provides a high-impact, zero-maintenance centerpiece. Securing quality fairy garden kits or mini succulent clusters near the boulder base softens the harsh mineral tones.
Sourcing and delivery usually run around $300–$500 per boulder. Save this to your heavy landscaping inspiration board.
- Key Materials: 500lb+ sandstone boulders, neutral base gravel
- Vibe / Style: Bold organic minimalism
- Difficulty: Hard (requires machinery)
- Budget Breakdown: Boulder Delivery: $350 | Base Rock: $100
- Creator’s Tip: Bury the bottom third of the boulder so it looks naturally emerged from the earth.
- Smart Sourcing: Faux landscape boulders (lightweight) and bulk decorative river rock.
Gravel Garden Ideas Inspired by Mediterranean Landscapes
7. Terracotta Pot Collection
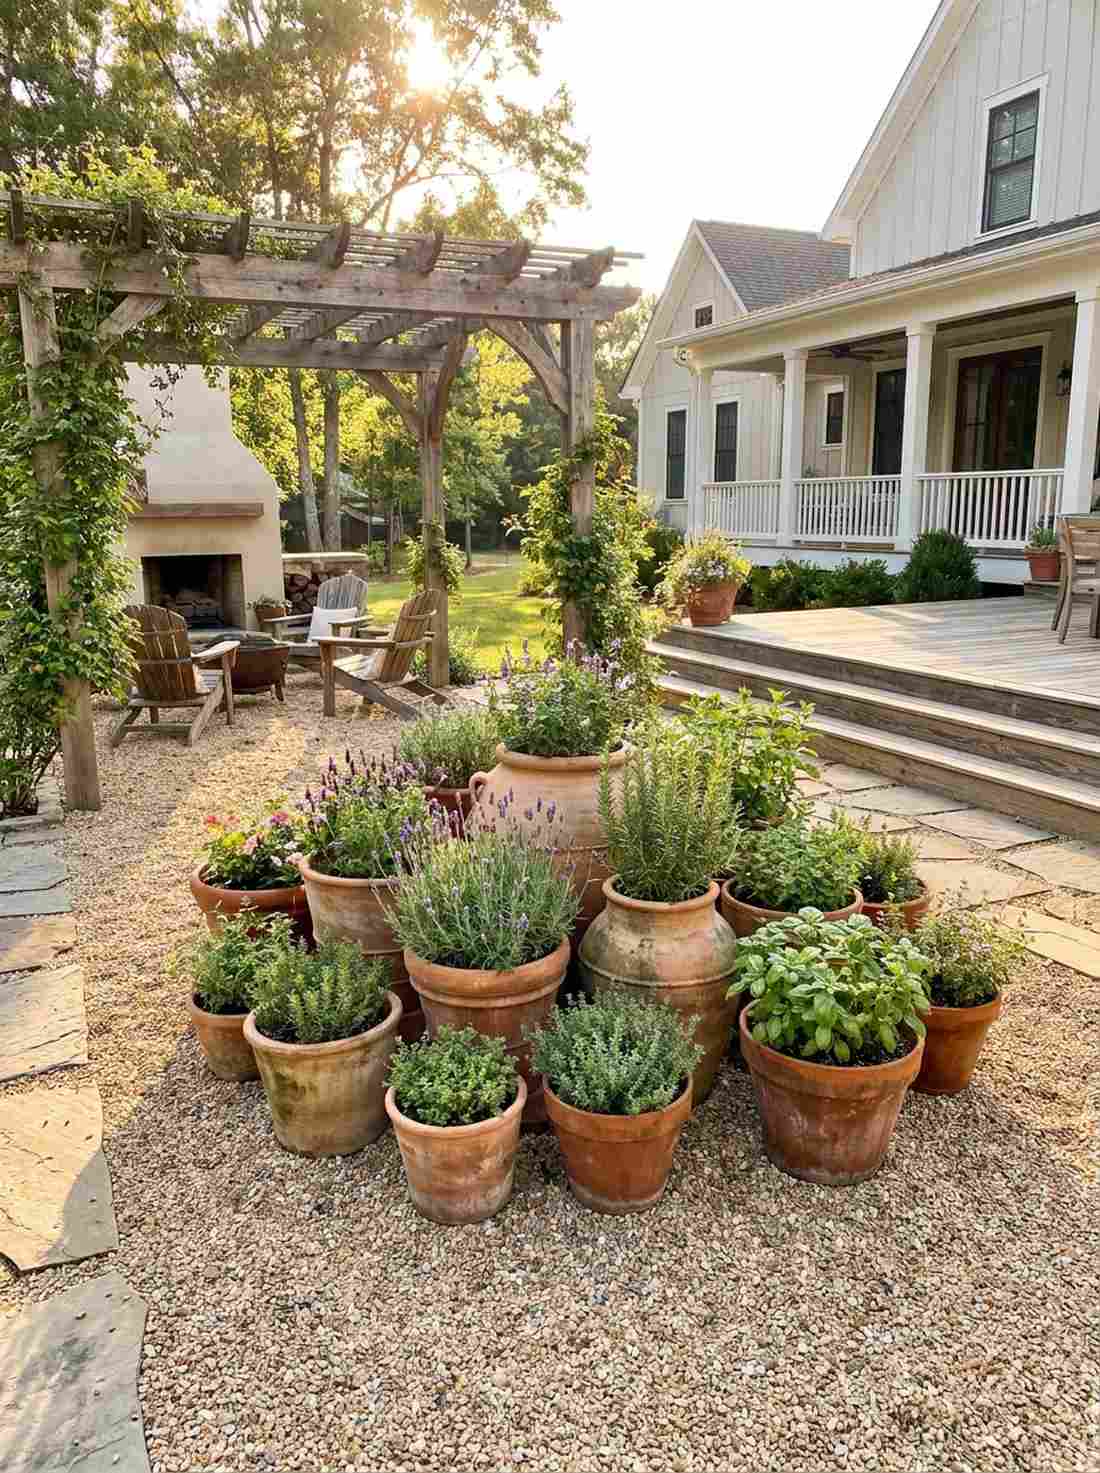

This space feels like a sun-drenched afternoon on an Italian terrace. A clustered terracotta pot display breathes life into any dull, flat gravel courtyard.
Elevating plants above the gravel plane solves poor soil drainage while giving a designer-level finish. Invest in UV-coated clay sealants to prevent the pots from cracking during winter freezes.
You can effortlessly build this vignette for $75–$150. Pin this if you love rustic, warm-toned aesthetics!
- Key Materials: Assorted terracotta pots, fragrant herb starters
- Vibe / Style: Tuscan countryside
- Difficulty: Beginner-friendly
- Budget Breakdown: Pots: $80 | Herbs & Soil: $40
- Creator’s Tip: Arrange pots in odd numbers (3, 5, or 7) to make the grouping look organic.
- Smart Sourcing: Bulk pack terracotta planters and UV-resistant clay sealant sprays.
8. Olive Tree Grove Effect
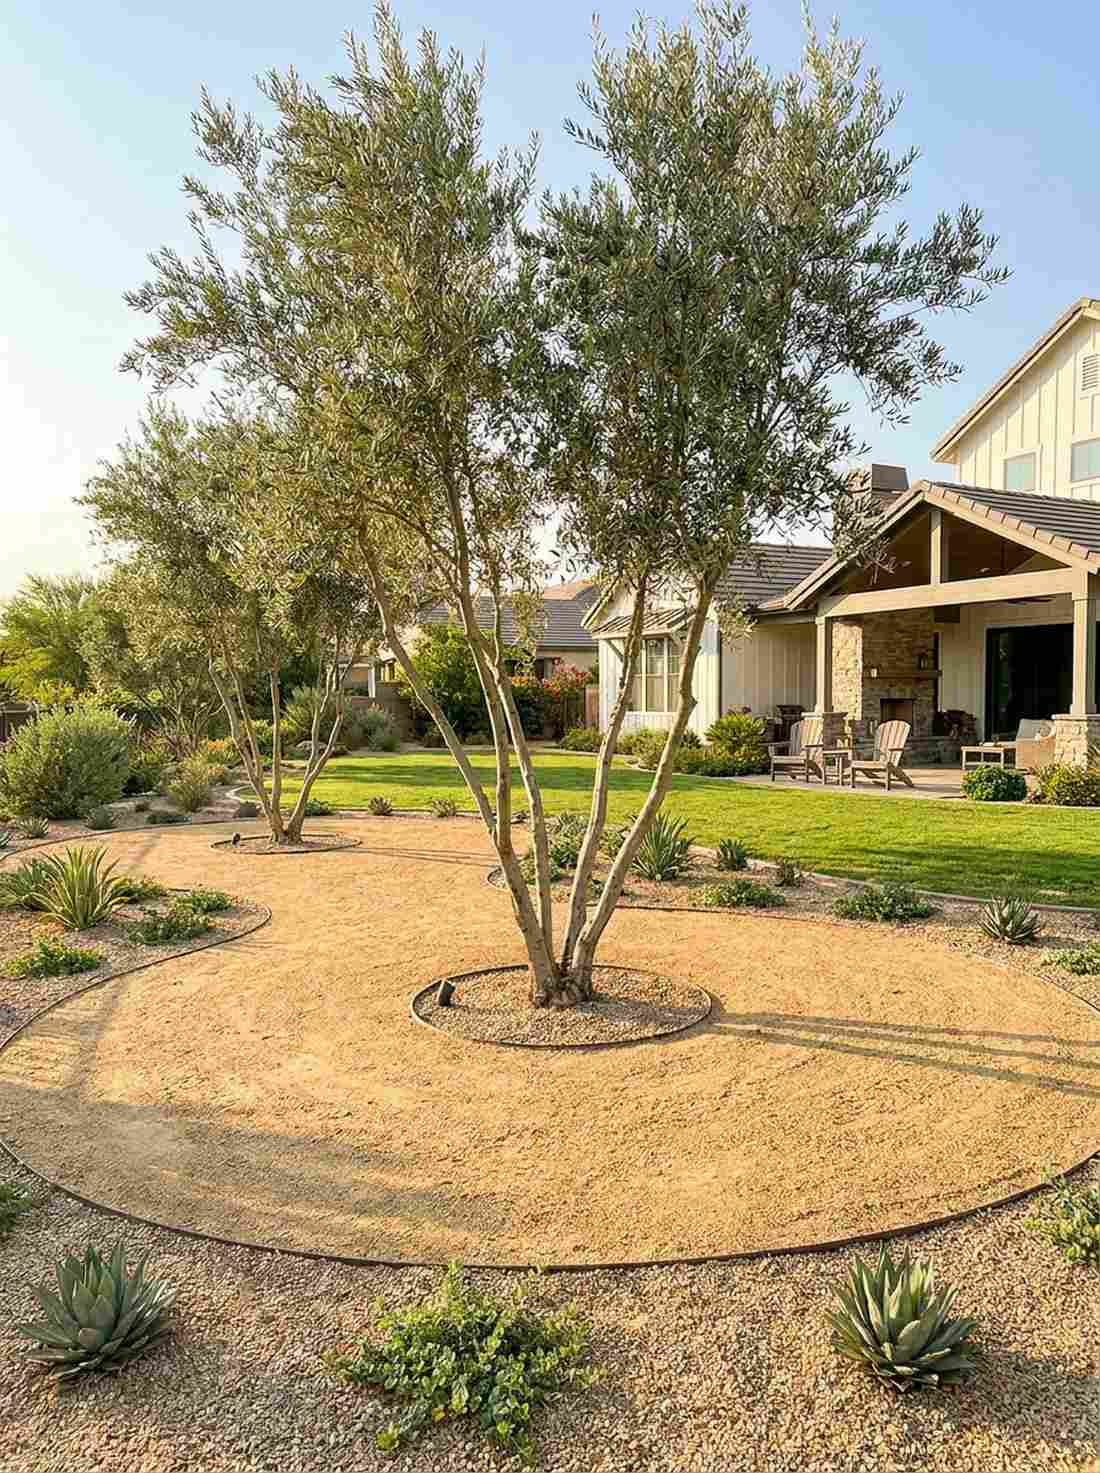
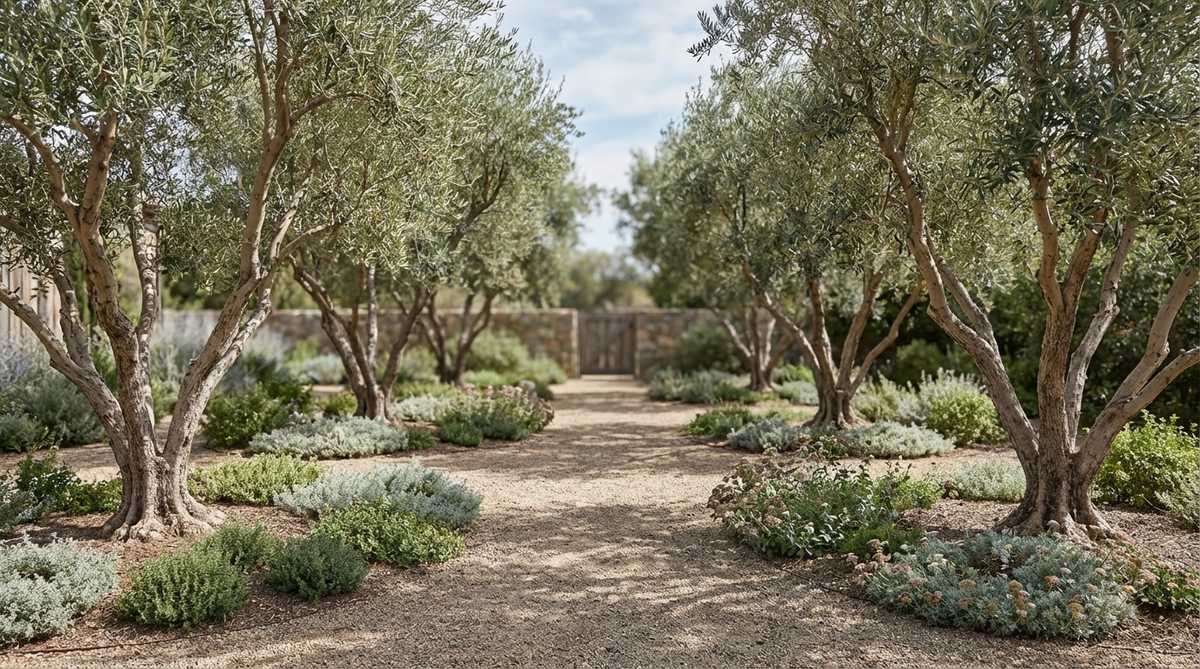
Walking beneath these silver leaves feels like a secluded Mediterranean escape. An olive tree gravel grove is the absolute perfect centerpiece for a large, sun-baked backyard.
While establishing an orchard sounds expensive, planting young multi-trunk specimens directly into decomposed granite guarantees a rugged, authentic look. Enhance the base with hardy succulents or premium groundcover seed mats for rapid fill-in.
A starter grove typically costs $200–$400 to install. It’s a long-term investment that ages beautifully.
- Key Materials: Young olive trees, decomposed granite (DG)
- Vibe / Style: Rustic agricultural elegance
- Difficulty: Intermediate
- Budget Breakdown: Trees: $250 | DG Base: $100
- Creator’s Tip: Keep the gravel layer strictly at 3 inches so roots can firmly grasp the soil beneath.
- Smart Sourcing: Live olive tree saplings and pre-mixed decomposed granite bags.
9. Rustic Stone Wall Backdrop
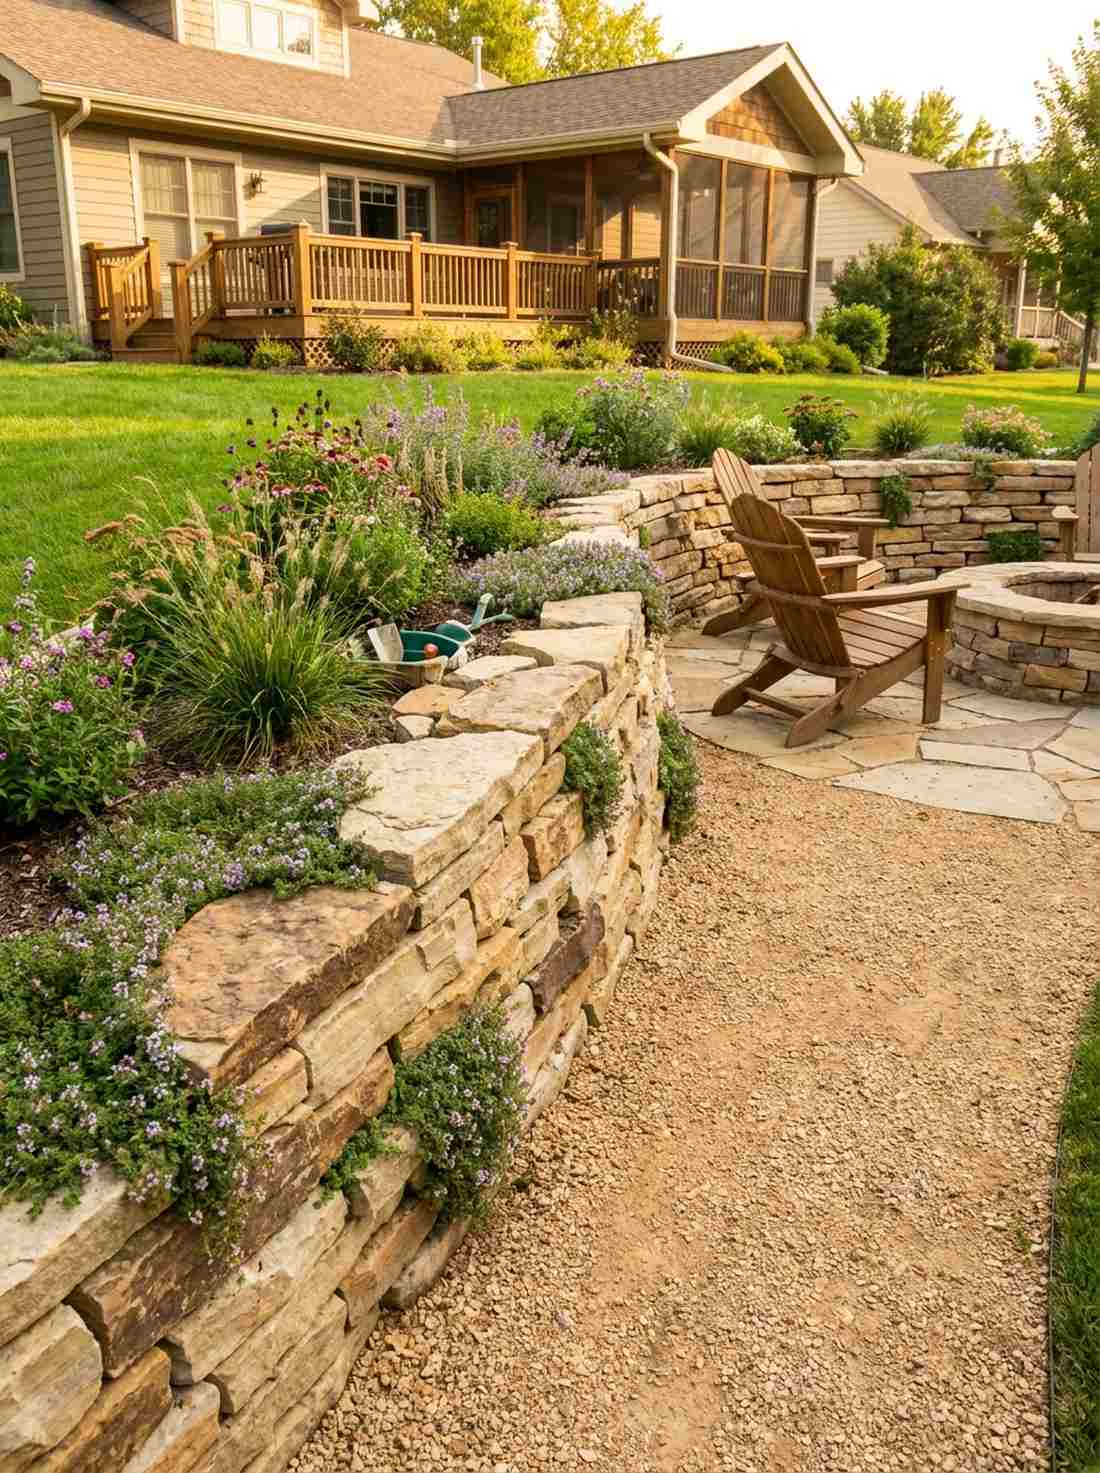
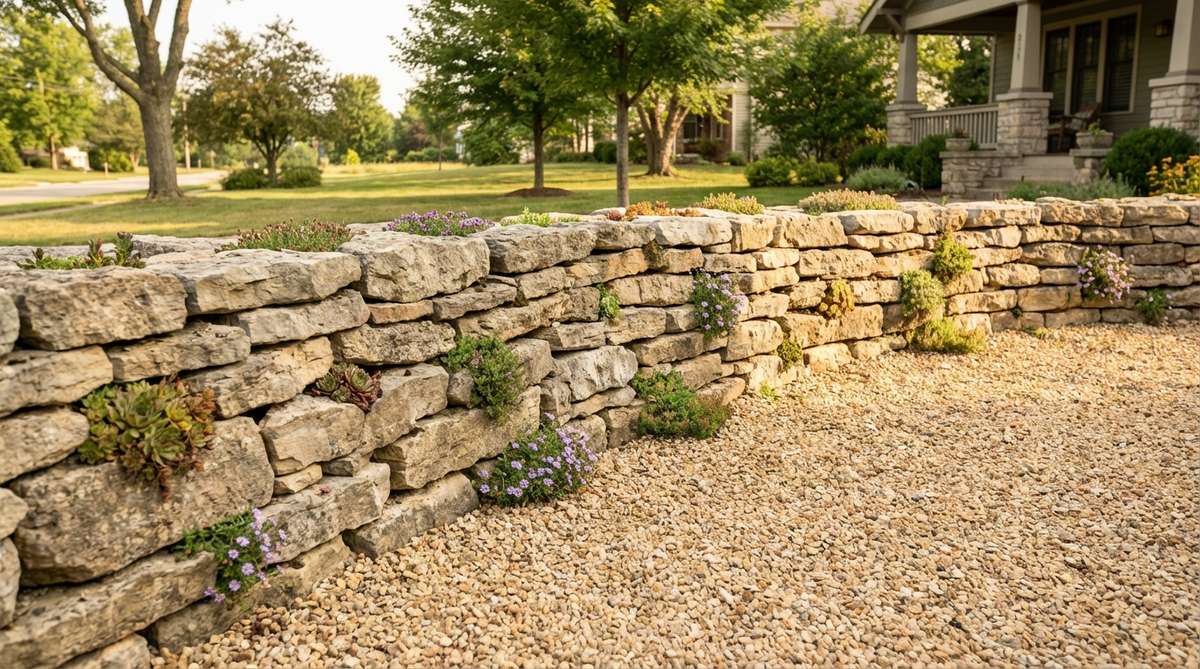
Running your hands along this wall feels like touching centuries of history. A dry-stacked stone garden border is brilliant for retaining slight slopes or framing outdoor seating.
Stacking stones without mortar creates brilliant micro-habitats that look far more expensive than standard block walls. Tucking miniature garden supplies or creeping thyme into the crevices forces a beautifully weathered, ancient aesthetic.
Materials for a low wall will cost roughly $200–$400. Pin this for your ultimate backyard makeover!
- Key Materials: Flat limestone or sandstone blocks, buff crushed stone
- Vibe / Style: Historic ruin aesthetic
- Difficulty: Hard (labor intensive)
- Budget Breakdown: Wall Stone: $300 | Base Gravel: $80
- Creator’s Tip: Lean the wall slightly backward into the soil (a “batter”) to prevent it from toppling.
- Smart Sourcing: Palletized dry-stack natural stone and creeping thyme seed bulk packs.
💡 Must-Have Supplies for High-End Setups
To build these setups faster and ensure they last, skip the generic craft aisles and invest in the right foundational kits.
- Base & Support: Commercial-grade 5oz landscape fabric rolls
- Setup Tools: Heavy-duty steel tamper and edging starter kits
- Weather/Durability Protection: UV-resistant clear stone sealant (prevents color fading)
Most people get this completely wrong… until they try the exact layout coming up next.
10. Lavender Border Rows
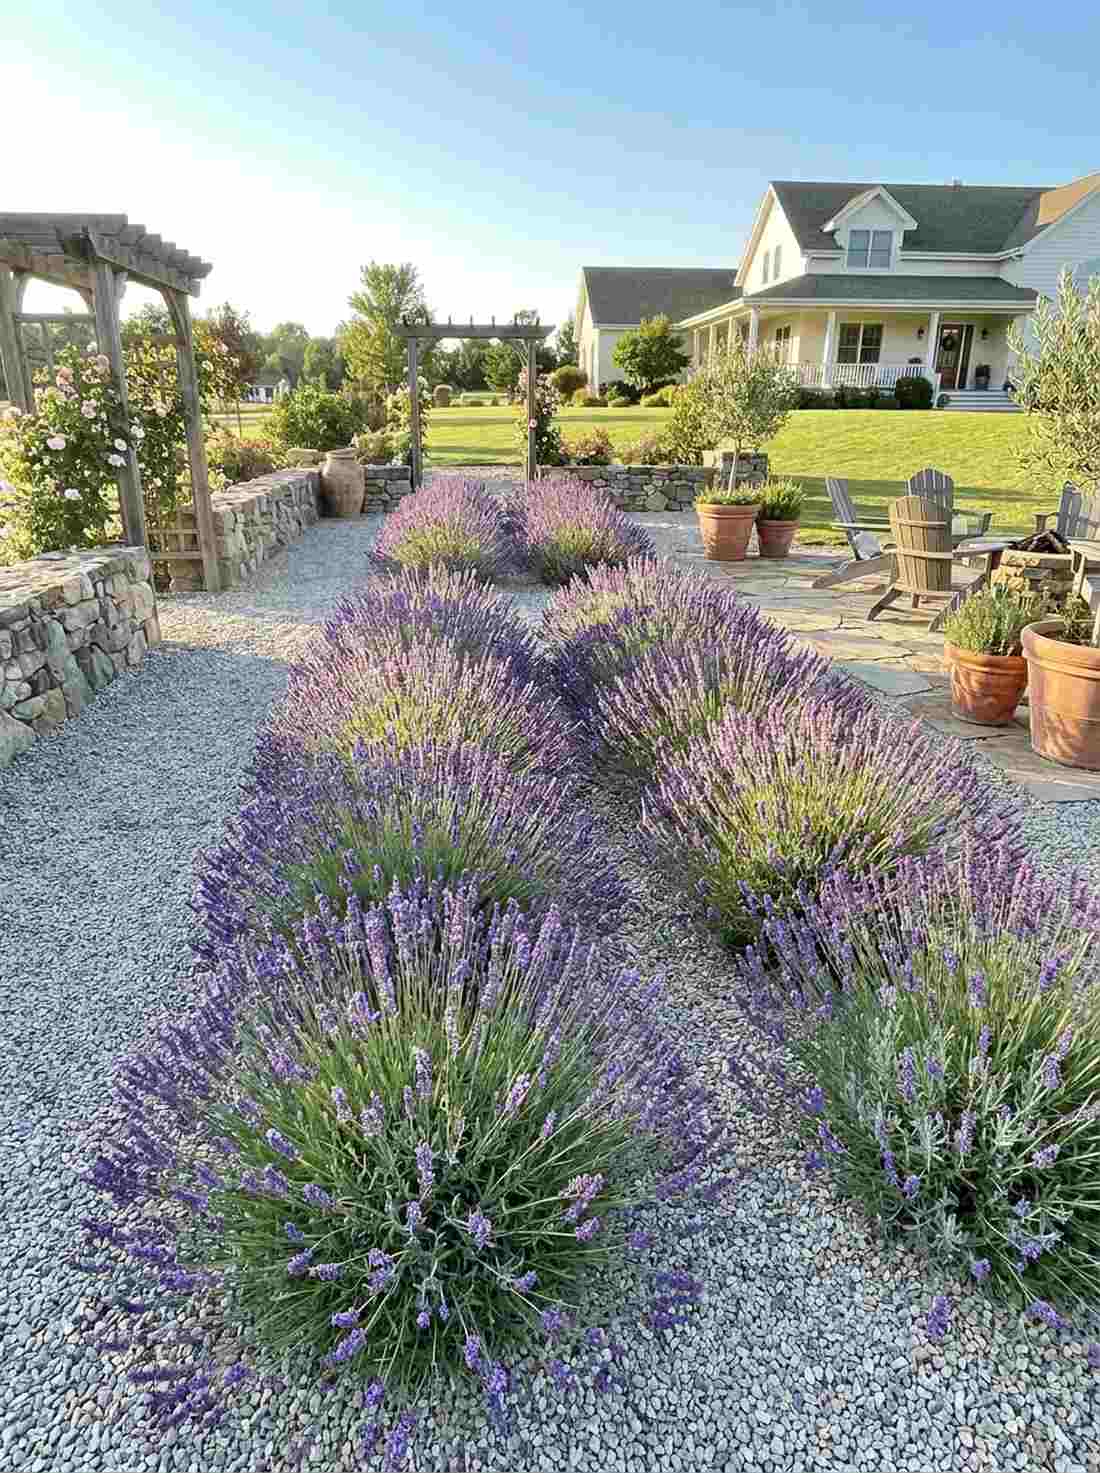
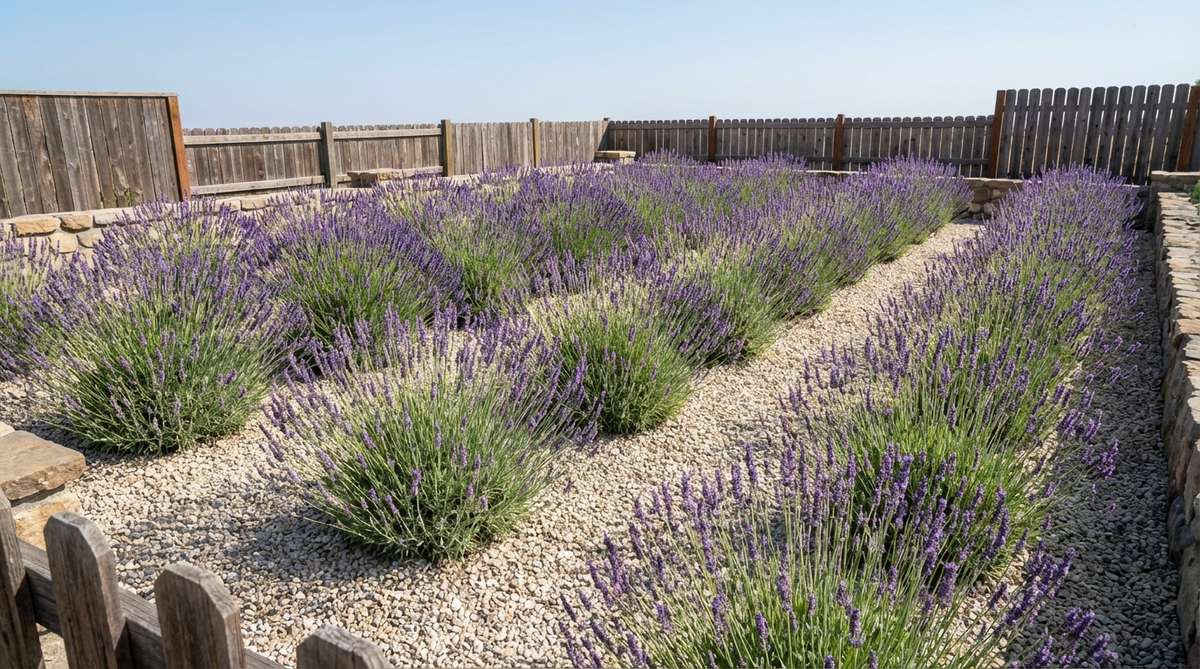
Brushing past these purple blooms feels like stepping into a French perfume field. Using parallel lavender planting rows perfectly delineates pathways without using harsh fences.
Many struggle with lavender rot, but planting them directly into deep gravel solves the drainage issue instantly. This fragrant barrier delivers a surprisingly premium look while thriving on total neglect.
A 10-foot border costs about $60–$90 to establish. Save this to your drought-tolerant plant board!
- Key Materials: English lavender starters, light gray gravel
- Vibe / Style: French provincial charm
- Difficulty: Easy
- Budget Breakdown: Lavender Plugs: $50 | Gravel: $30
- Creator’s Tip: Space plants exactly 24 inches apart to ensure proper airflow and prevent fungal issues.
- Smart Sourcing: Bulk live lavender plug trays and organic root stimulator powder.
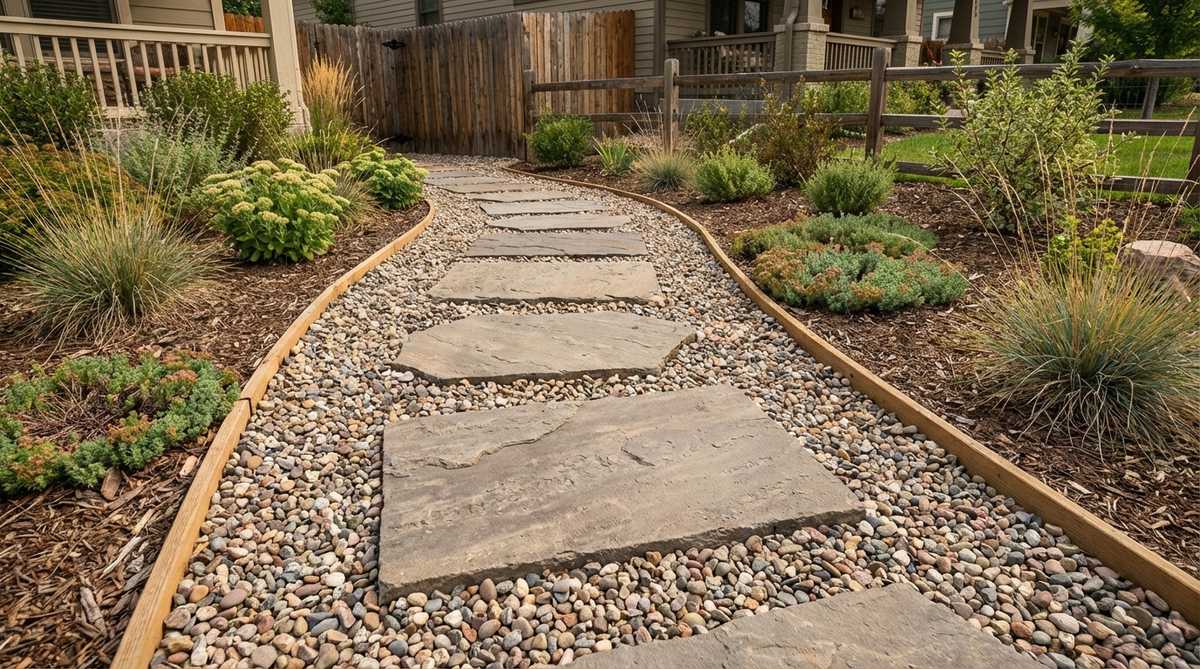
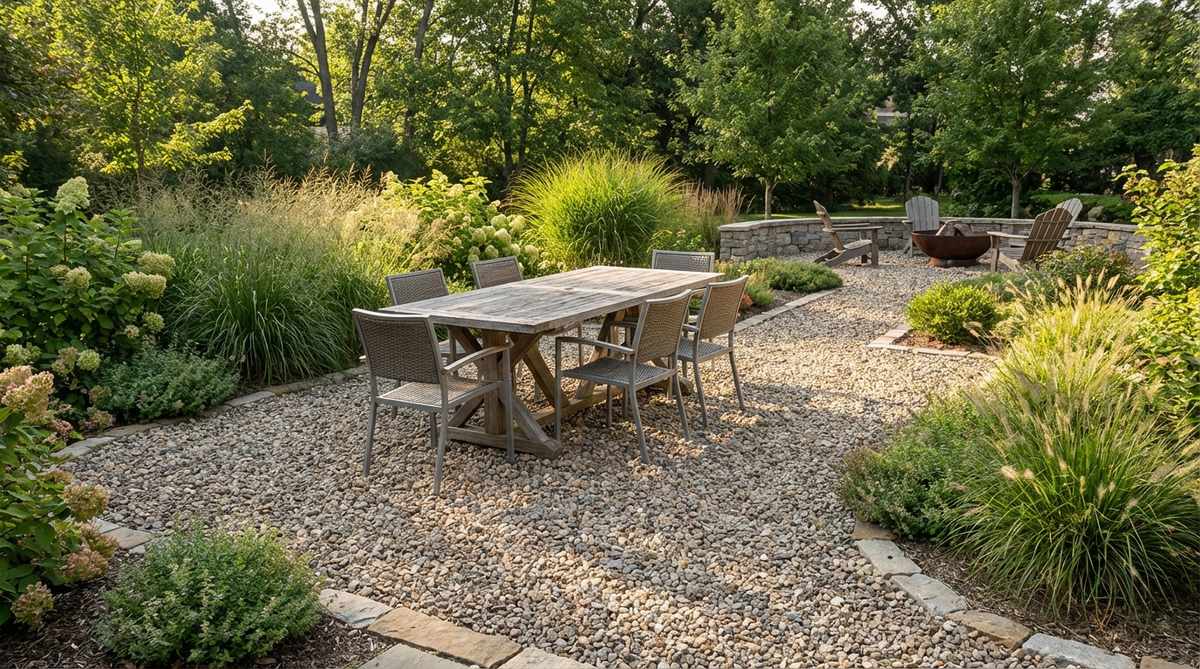
11. Gravel and Flagstone Patio

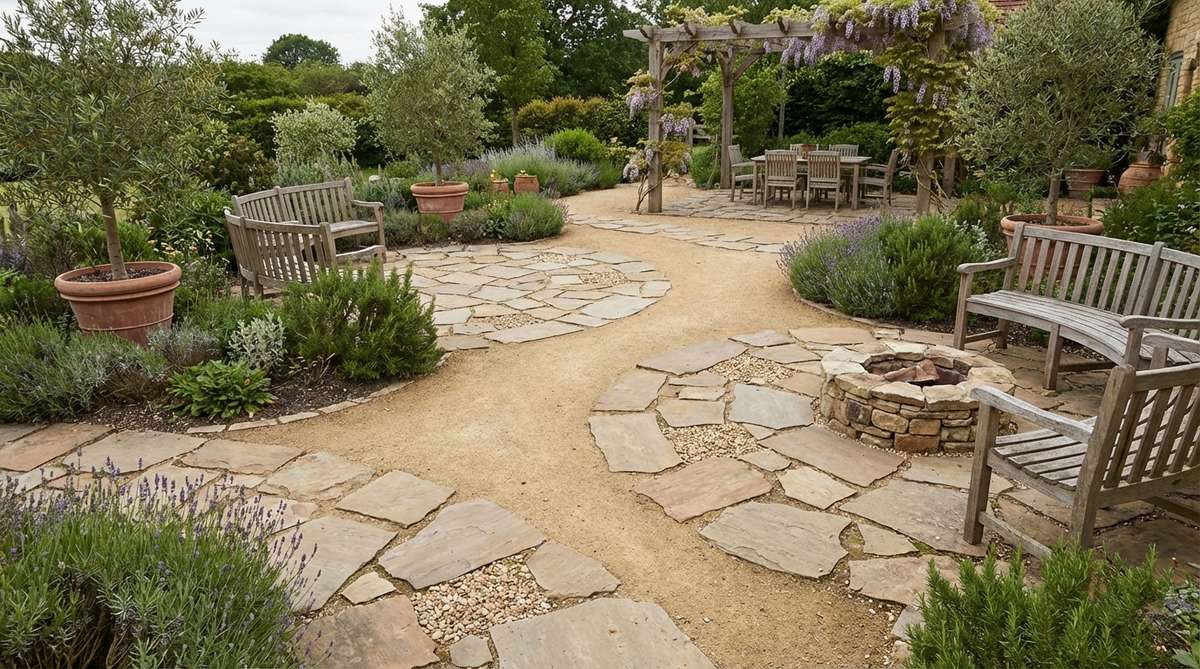
Sitting here with morning coffee feels incredibly organic and grounded. An informal flagstone gravel patio is an excellent low-cost alternative to poured concrete pads.
Nesting thick flagstone pieces loosely into crushed rock completely eliminates the need for messy mortar while providing excellent drainage. Upgrading the gaps with fine, locking joint sand ensures the stones never wobble underfoot.
You can build a small seating area for $150–$250. Highly recommended for a functional DIY space.
- Key Materials: 2-inch thick flagstone, buff gravel, joint sand
- Vibe / Style: Relaxed outdoor living
- Difficulty: Intermediate
- Budget Breakdown: Flagstone: $180 | Gravel Base: $50
- Creator’s Tip: Tamp the base gravel aggressively before laying stones to prevent future sinking.
- Smart Sourcing: Pre-cut patio flagstone sets and polymeric locking sand bags.
12. Citrus Container Accent
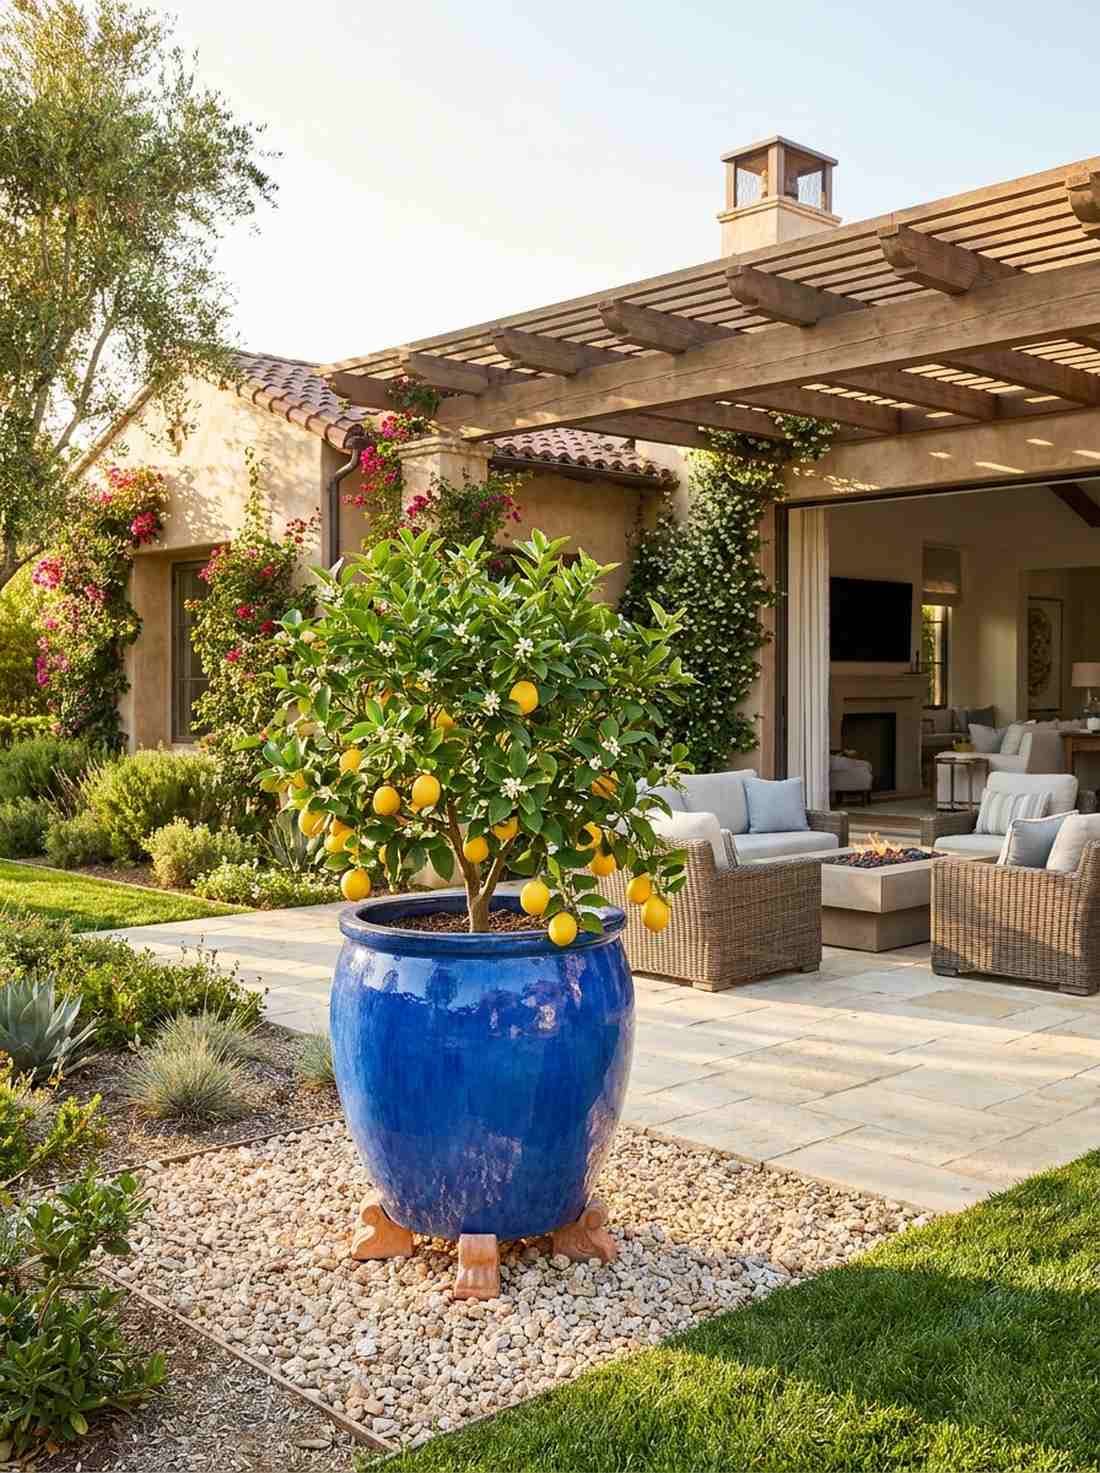
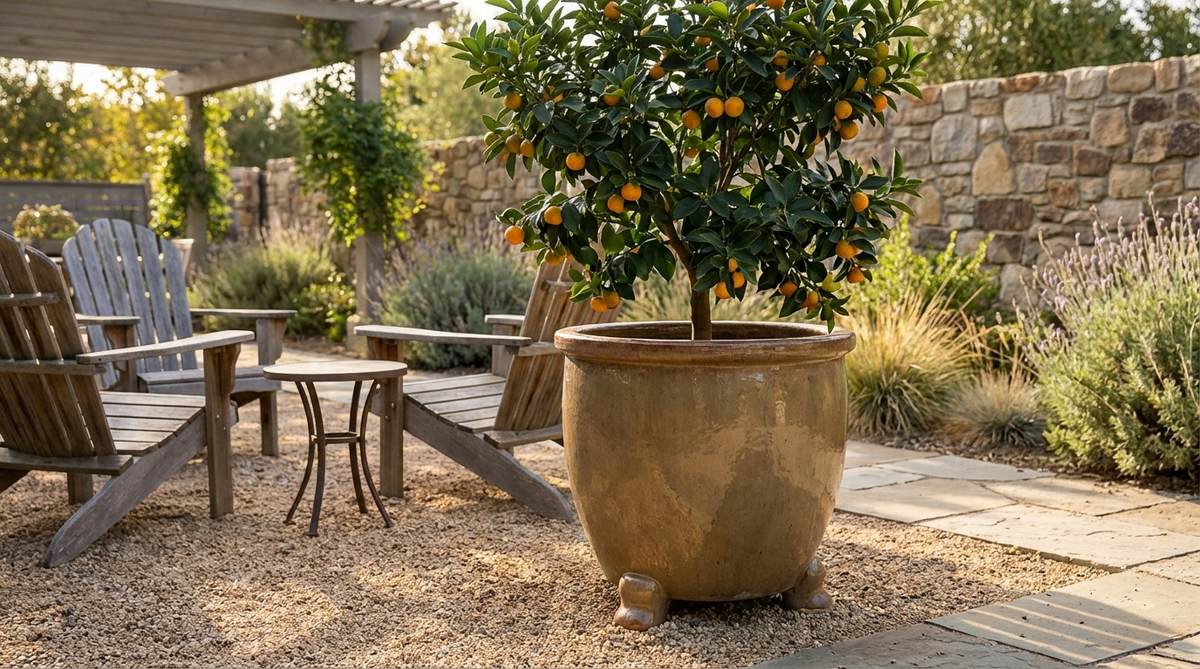
The scent of these blossoms feels like a tropical vacation right at home. A potted citrus courtyard accent is ideal for adding height and glossy color to pale stone beds.
Growing lemons in massive glazed ceramics prevents the roots from touching the cold winter ground. Elevating the pots on decorative feet or utilizing smart drainage mesh ensures the citrus thrives in its contained micro-climate.
Setting up one premium citrus station costs about $100–$150. Pin this if you love edible landscaping!
- Key Materials: Glazed ceramic pots, dwarf citrus tree
- Vibe / Style: Vibrant Mediterranean courtyard
- Difficulty: Easy
- Budget Breakdown: Glazed Pot: $70 | Dwarf Citrus: $60
- Creator’s Tip: Use pot feet to keep the drainage hole completely clear of the gravel surface.
- Smart Sourcing: Dwarf Meyer lemon tree starter kits and heavy-duty invisible pot risers.
Desert Xeriscape Gardens Using Gravel
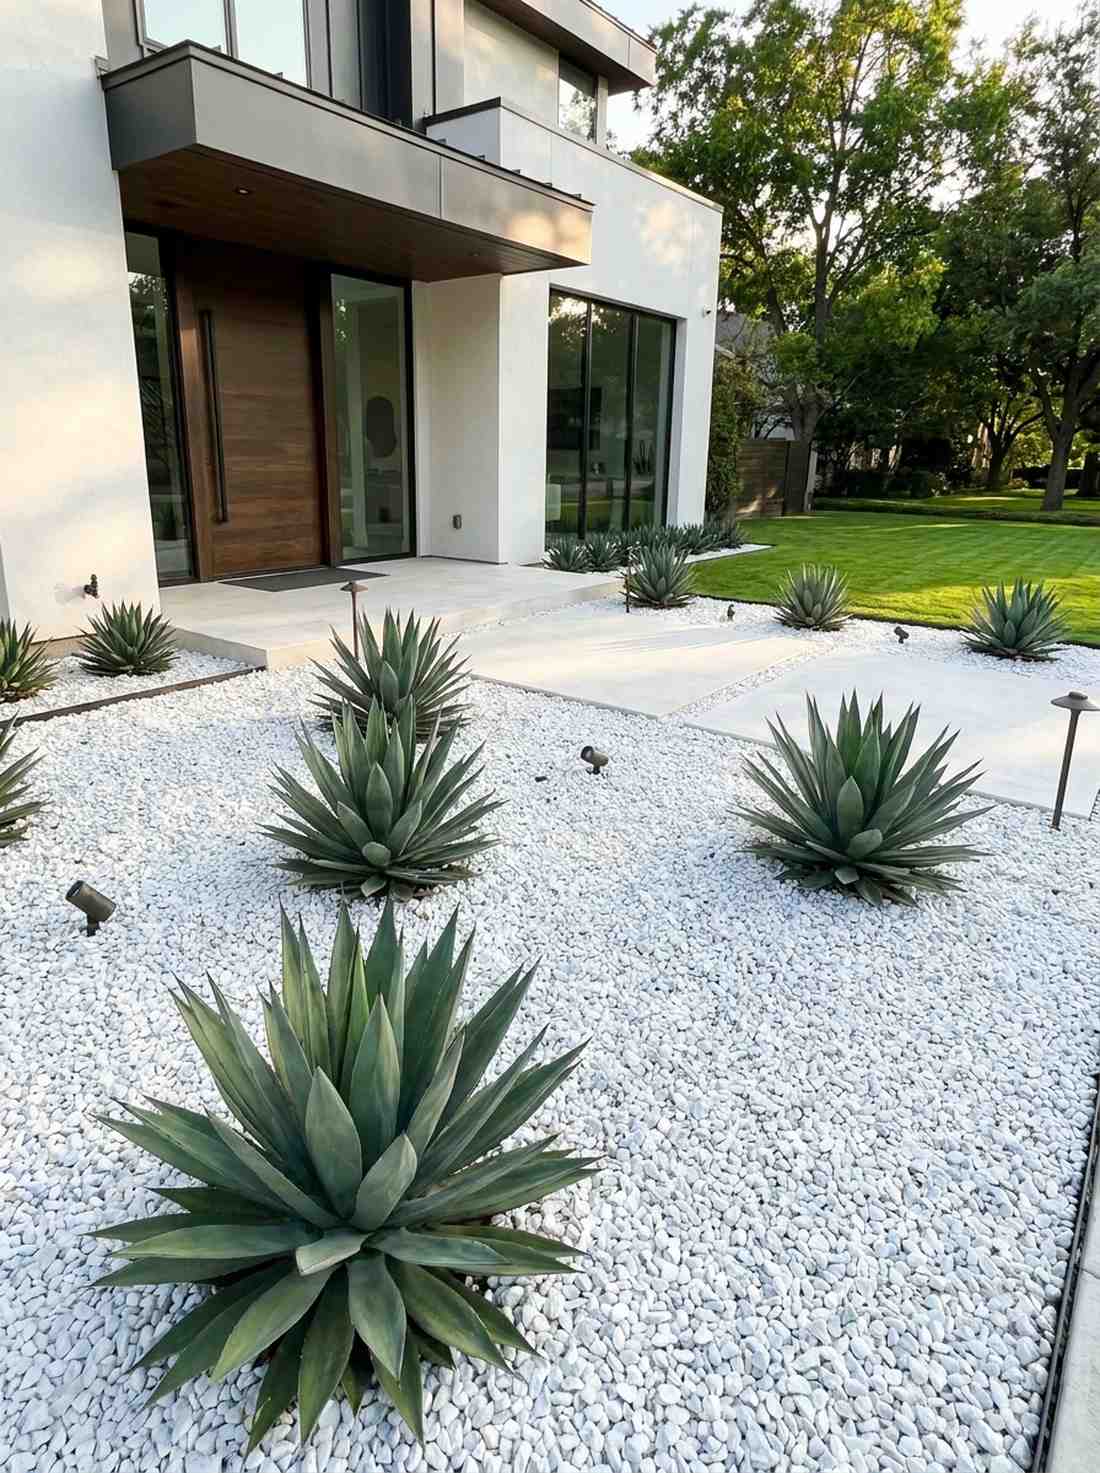
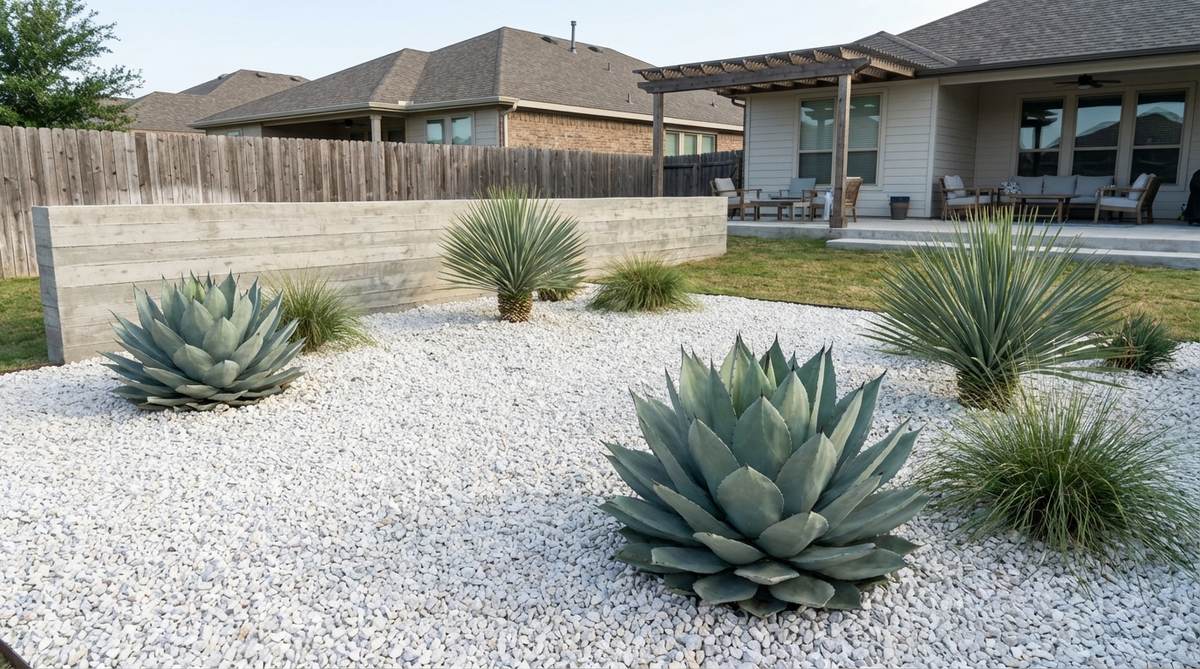
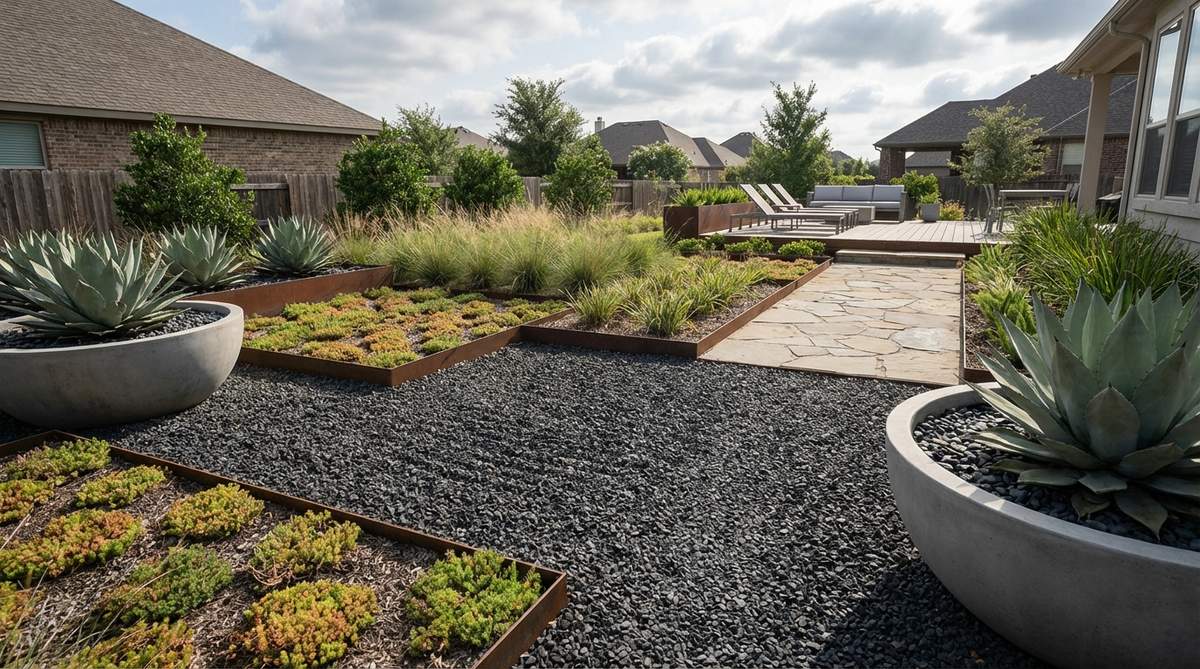
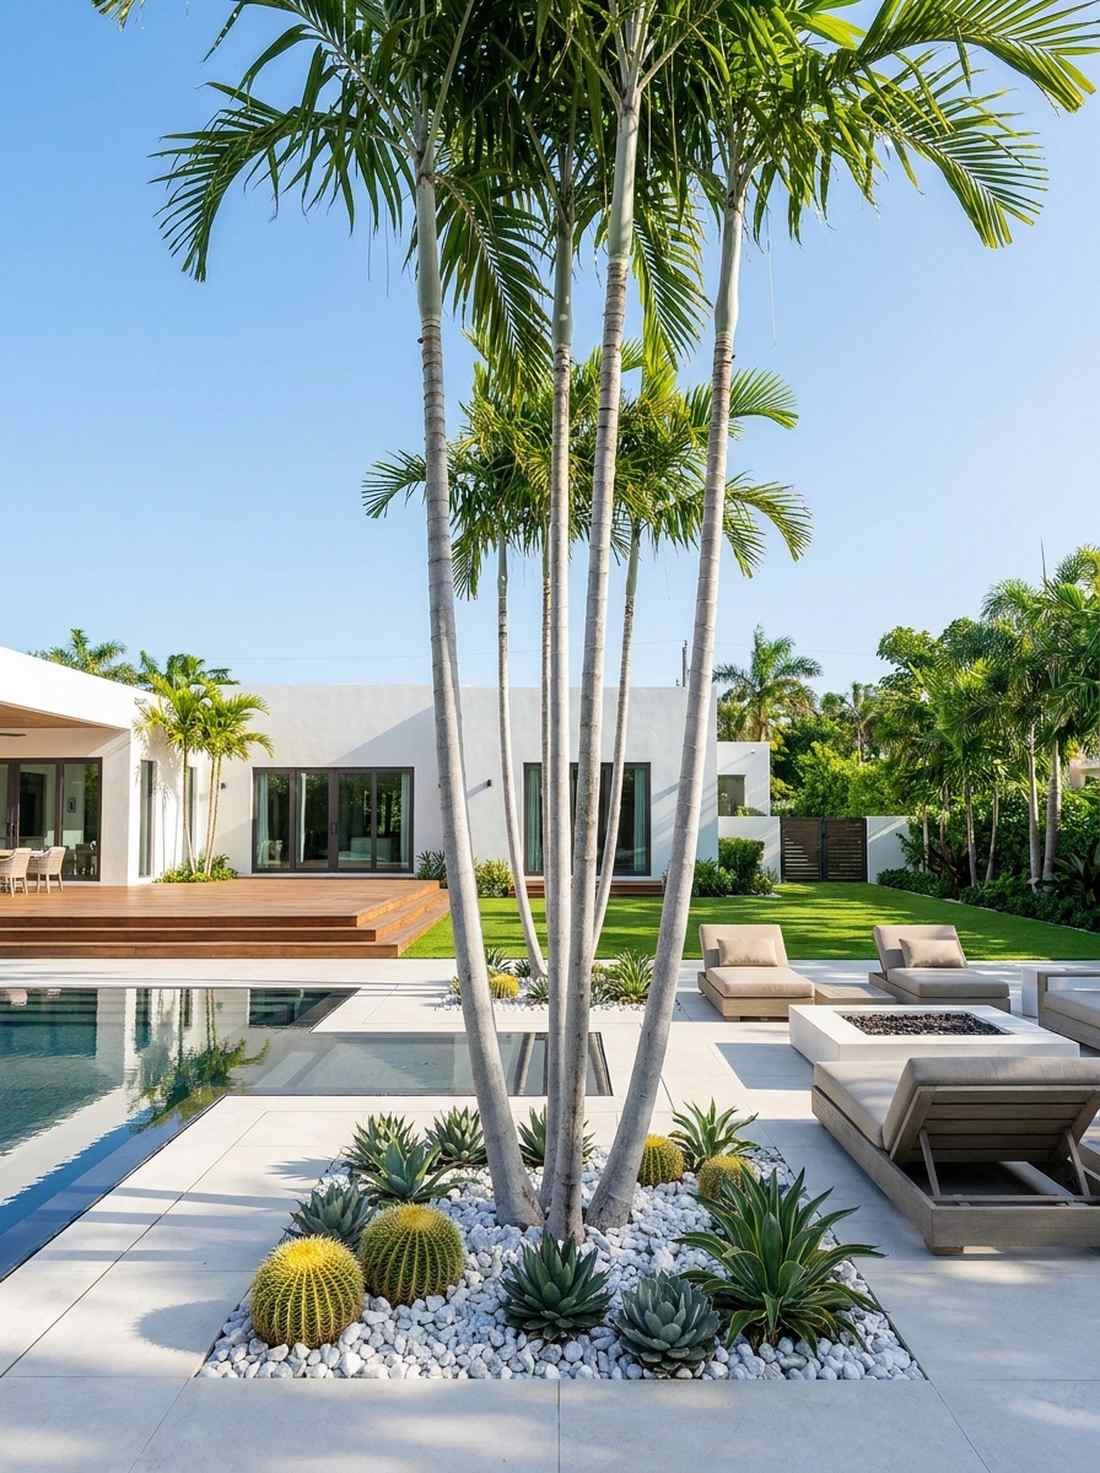
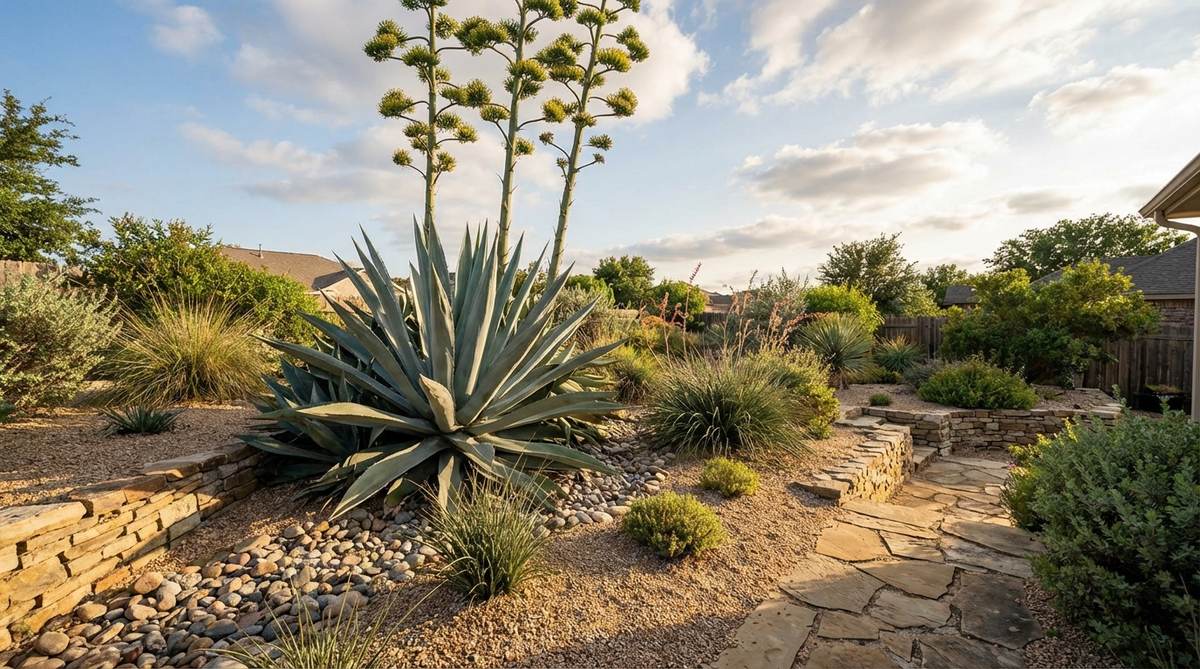
13. Agave and Aloe Showcase

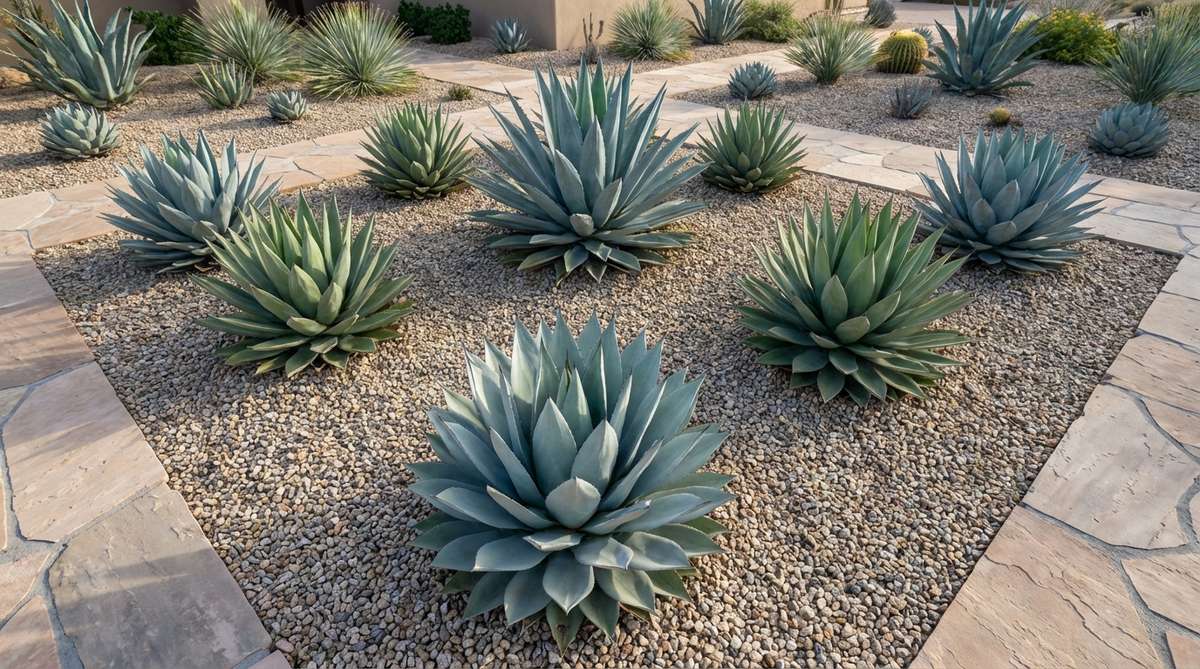
Looking at these sharp silhouettes feels like exploring an alien landscape. A sculptural agave rock garden is a breathtaking focal point for hot, south-facing property lines.
Pairing these massive rosettes with simple mineral substrates creates a vibe that looks far more expensive than it is. Using specialized cactus soil mixes beneath the gravel layer ensures these beauties never suffer from root rot.
You can craft this striking vignette for $80–$150. Save this for your ultimate low-water landscaping plans.
- Key Materials: Mixed agave species, tan decomposed granite
- Vibe / Style: Striking Southwestern modern
- Difficulty: Easy (wear thick gloves)
- Budget Breakdown: Agave Plants: $90 | Granite Base: $40
- Creator’s Tip: Plant them at least 4 feet away from walkways to protect guests from the terminal spines.
- Smart Sourcing: Live agave plant assortments and premium fast-draining cactus soil bulk bags.
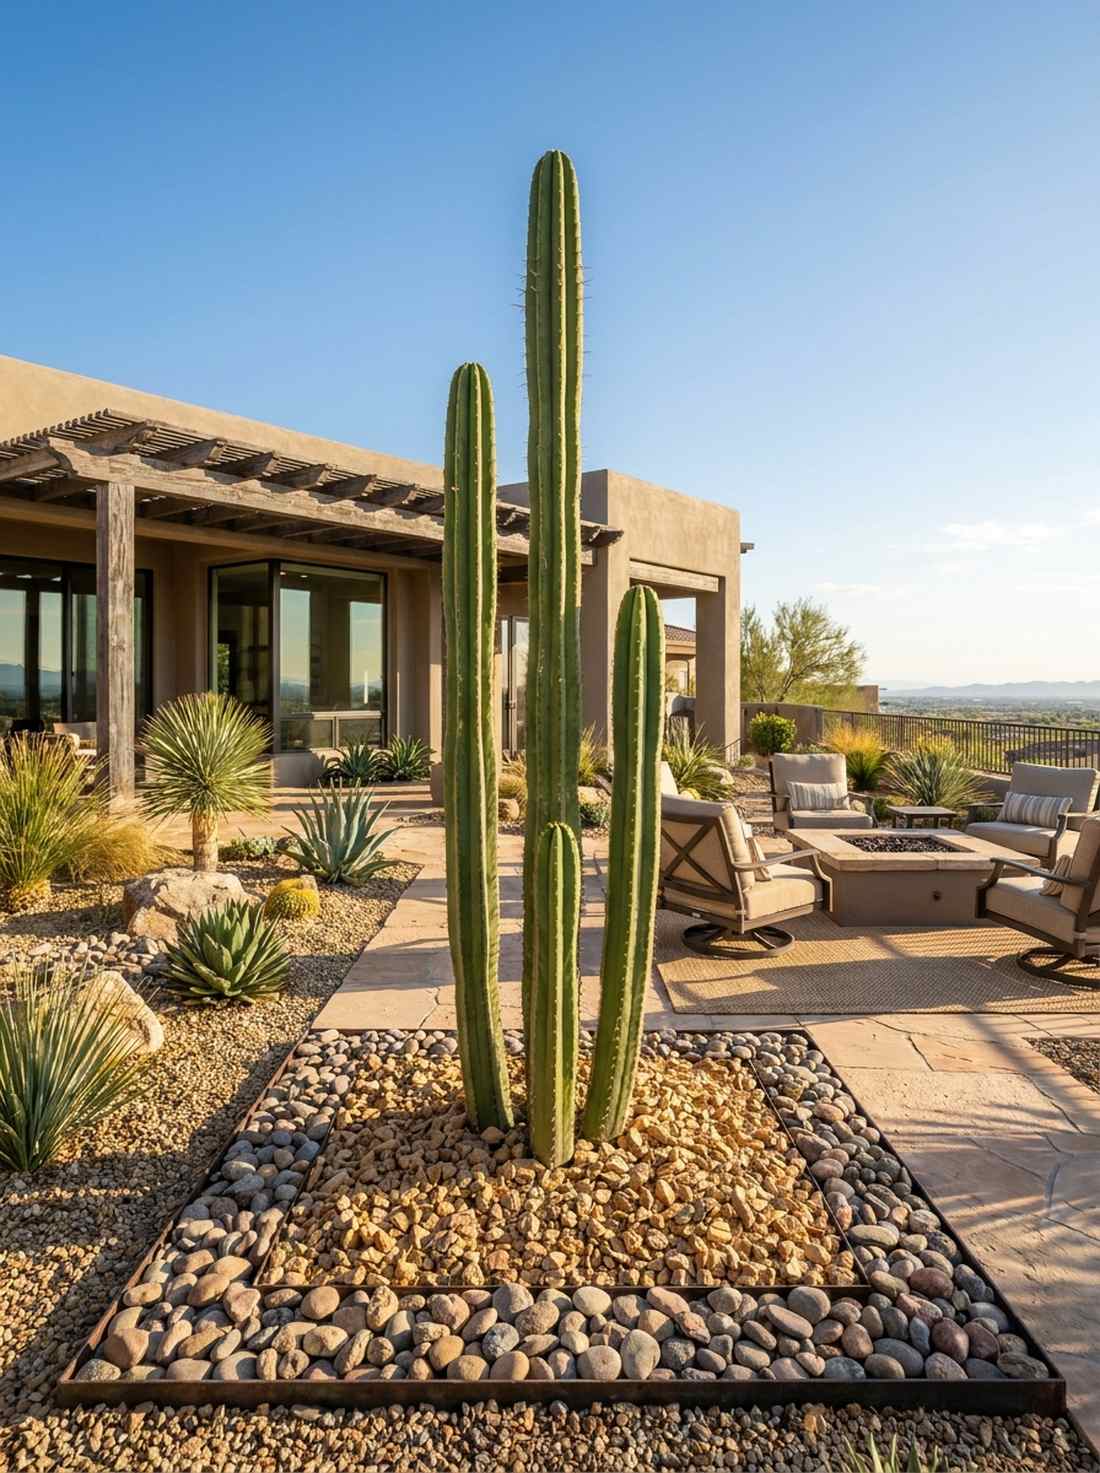
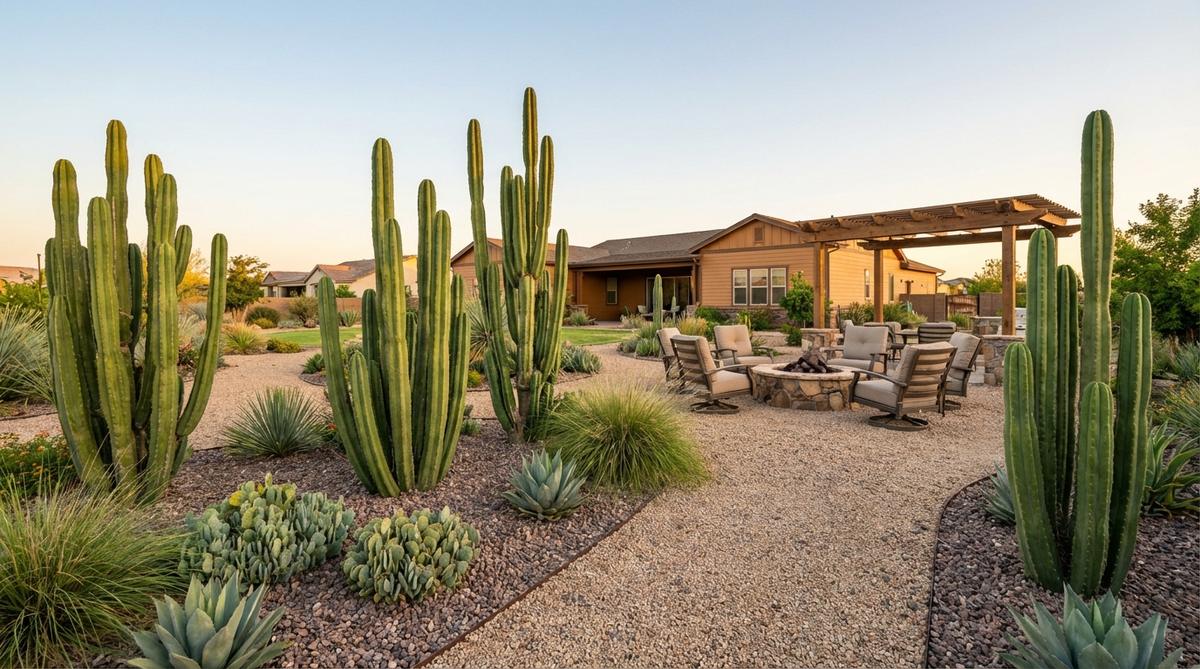
14. Saguaro Cactus Composition
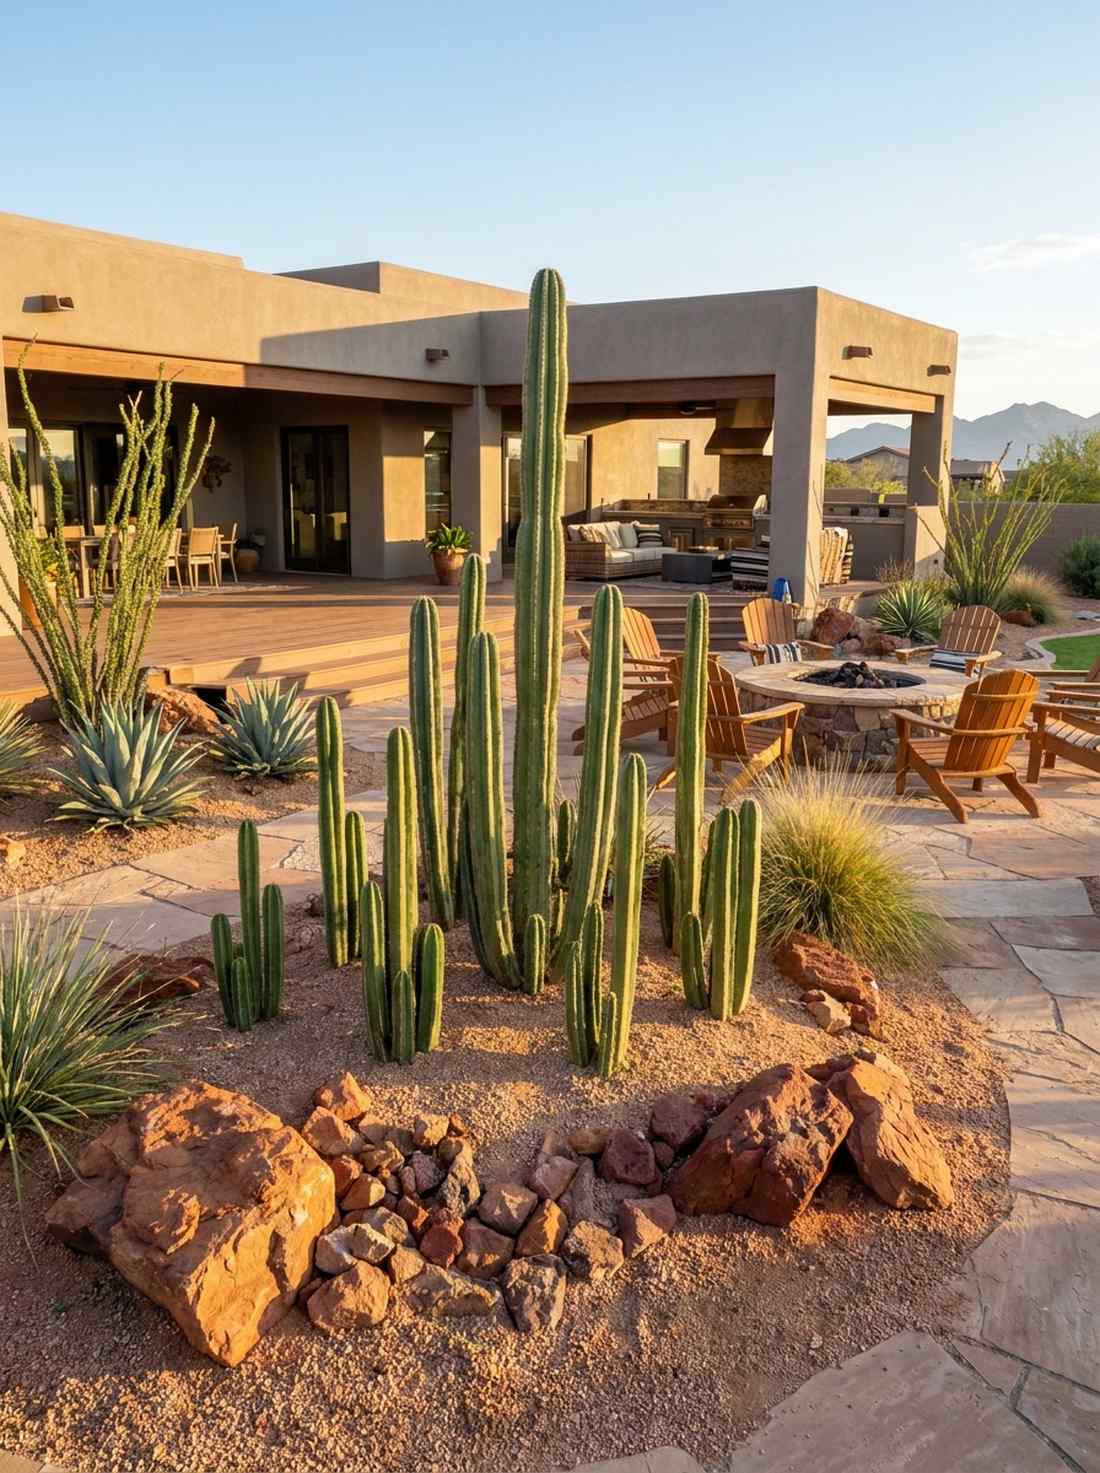
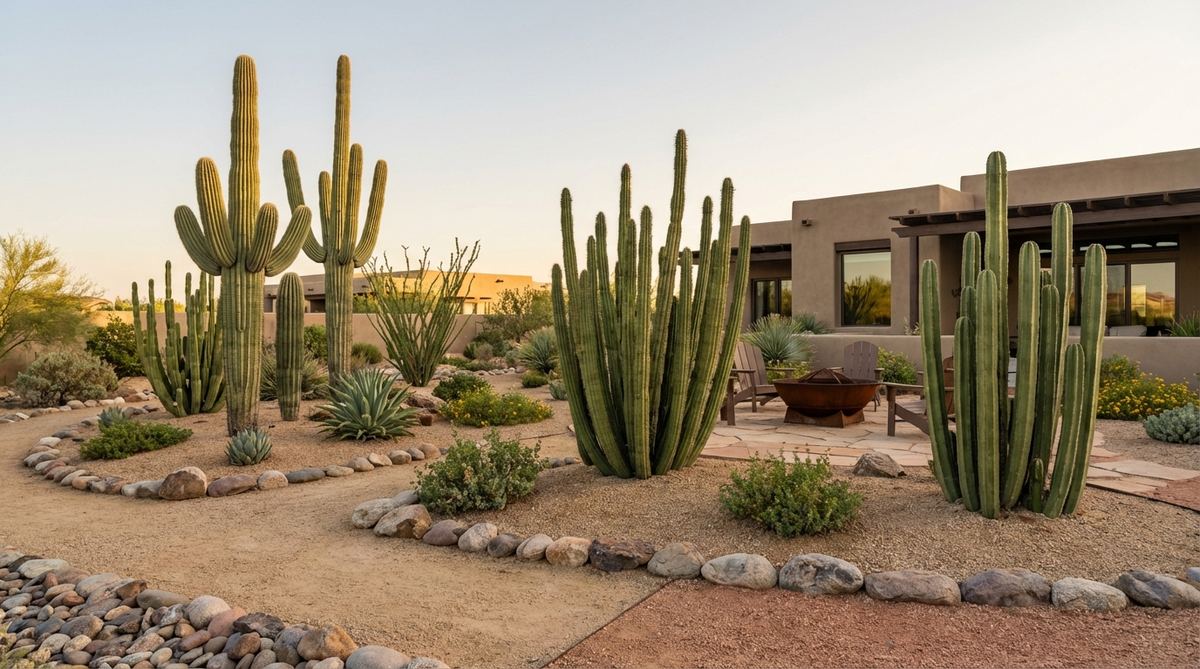
These towering green pillars feel like ancient guardians of the yard. A columnar cactus desert display works perfectly in USDA zones 9-11 as a dramatic architectural background.
While true Saguaros are costly, grouping smaller Mexican fence post cacti yields a shockingly sophisticated aesthetic much faster. Complement the base with reddish rock to authentically mimic the native Sonoran Desert floor.
Expect to invest $300+ for decent-sized columnar cacti. It’s a permanent upgrade that defines the entire property.
- Key Materials: Columnar cacti, red/tan desert gravel
- Vibe / Style: Authentic Sonoran Desert
- Difficulty: Moderate
- Budget Breakdown: Cacti: $250 | Red Gravel: $60
- Creator’s Tip: Always buy nursery-grown specimens to ensure you aren’t supporting illegal desert harvesting.
- Smart Sourcing: Nursery-grown columnar cactus starters and iron-rich decorative red rock.
This next setup is ridiculously cheap but looks like a $100 custom display…
15. Red Rock and Yucca Pairing
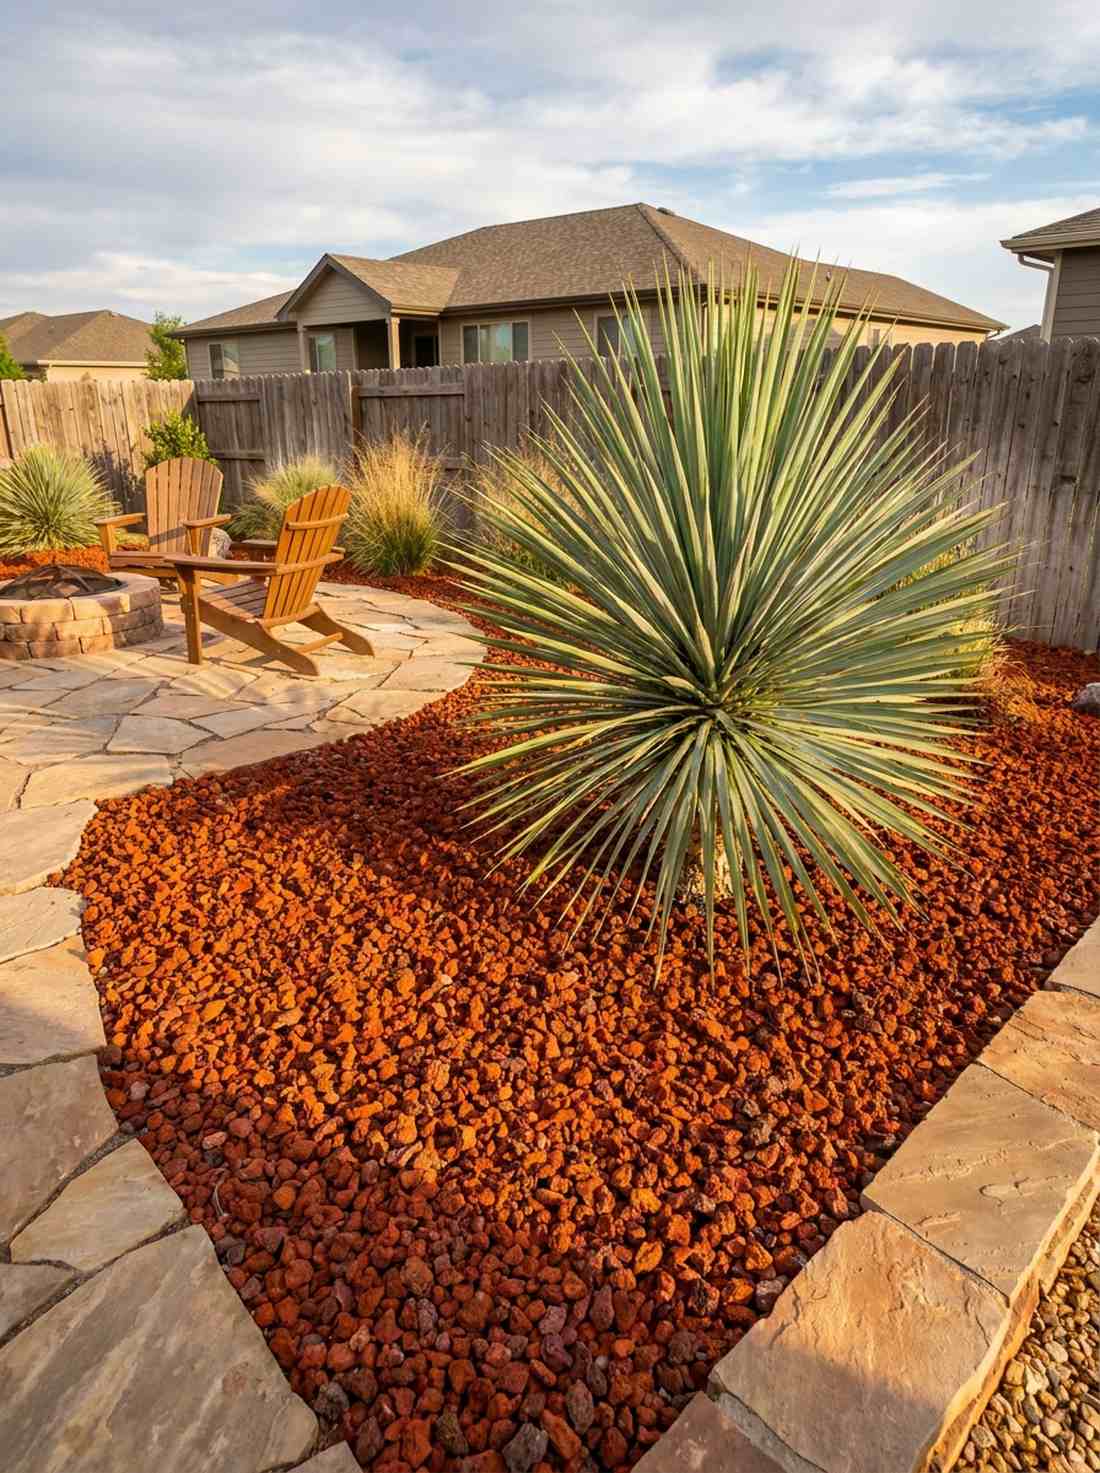
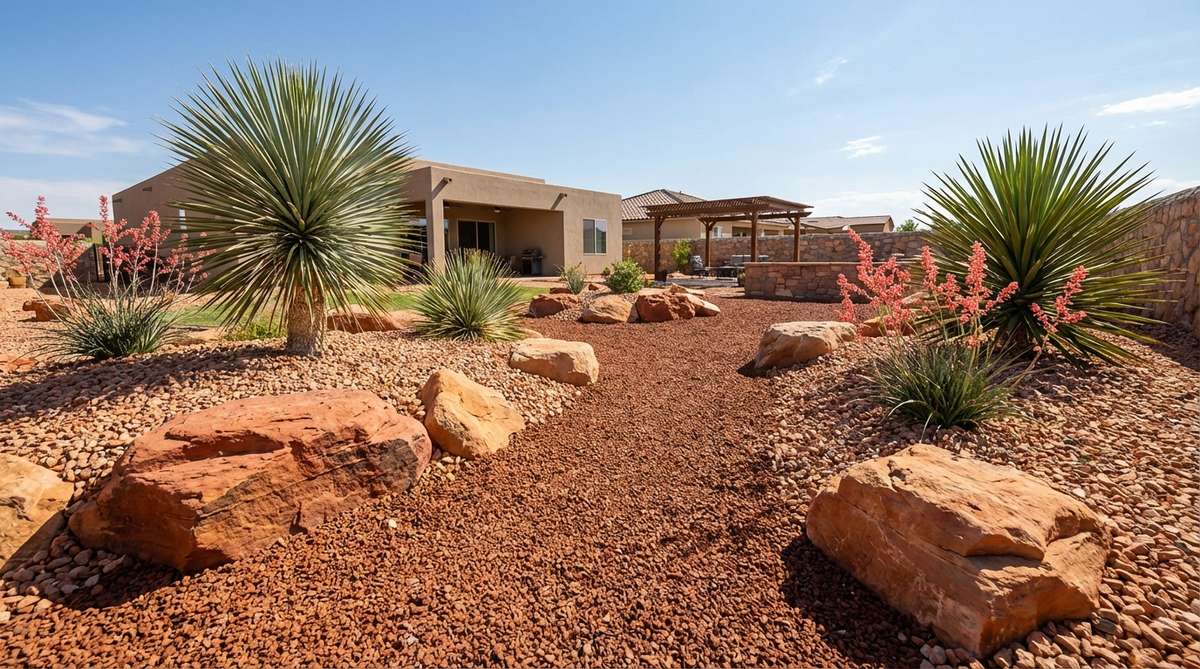
The intense warm tones here feel like a glowing canyon sunset. This red rock and yucca layout completely revitalizes washed-out, sun-bleached yard corners.
Ditching standard gray gravel for iron-rich rust stones delivers a surprisingly premium look that amplifies the blue-green yucca leaves. Make sure to source UV-resistant artificial succulents if your climate won’t support live desert plants.
You can execute this vibrant contrast for just $100–$180. Pin this to add massive curb appeal color!
- Key Materials: Yucca rostrata, rust-colored crushed stone
- Vibe / Style: Vibrant canyon oasis
- Difficulty: Easy
- Budget Breakdown: Yucca: $70 | Rust Stone: $80
- Creator’s Tip: Red gravel absorbs and radiates heat; only plant extreme heat-loving species in this zone.
- Smart Sourcing: Live Yucca plant plugs and bulk rust-colored lava rock.
16. Ocotillo Living Fence
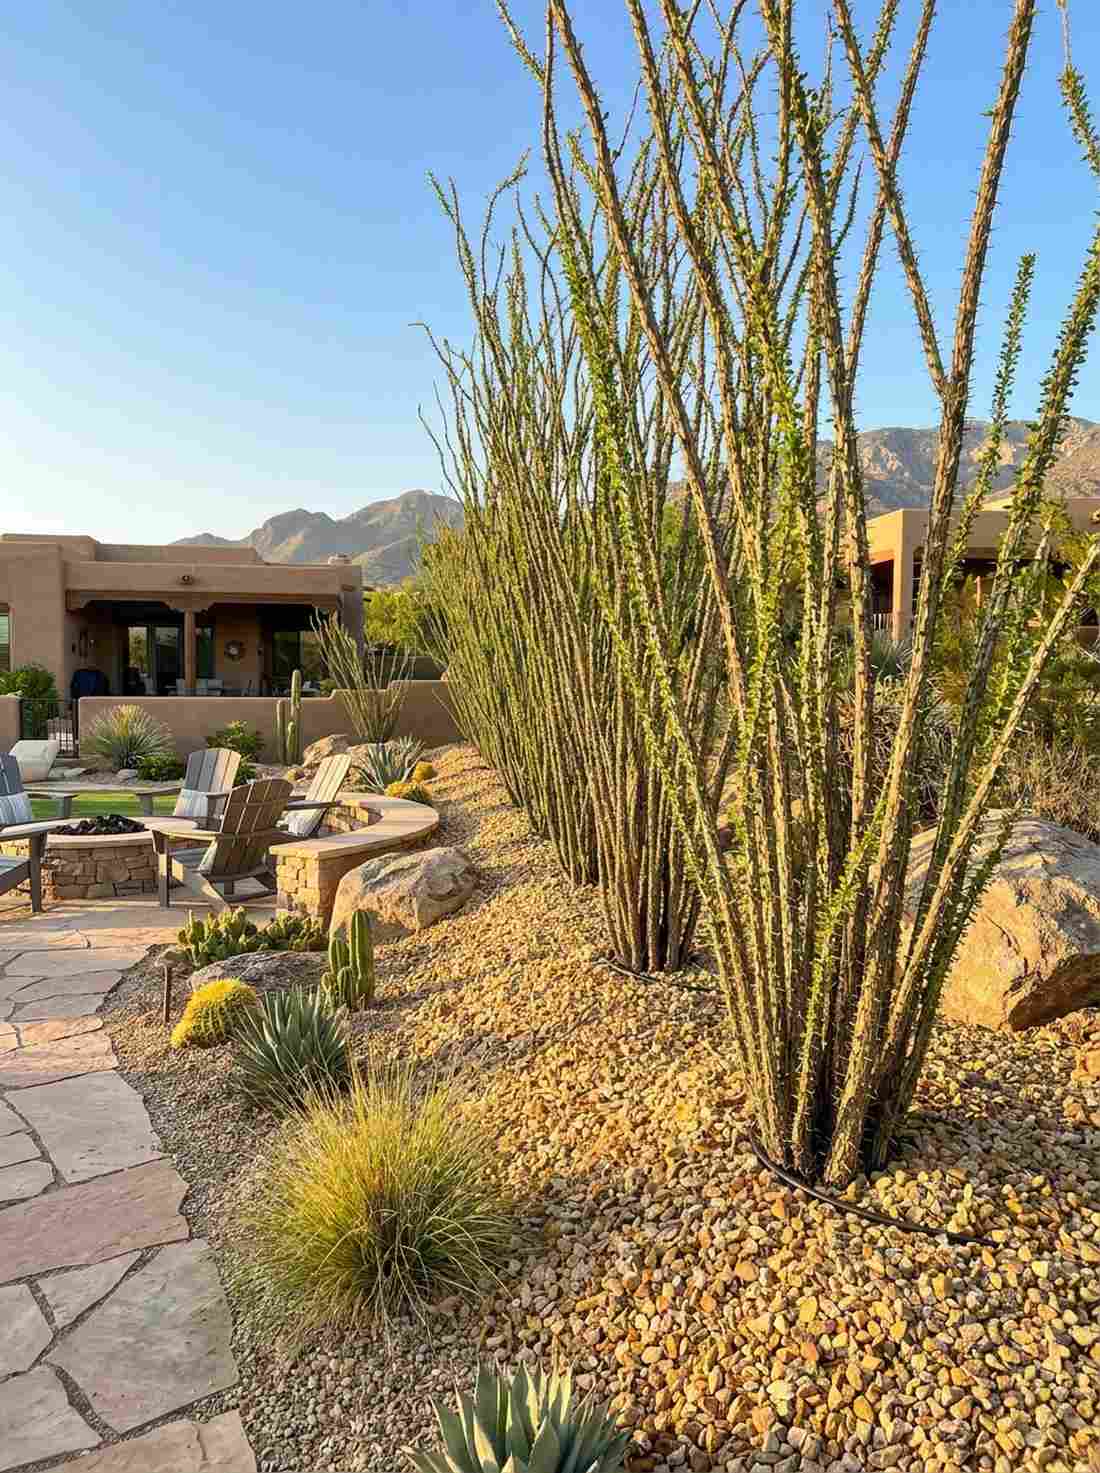
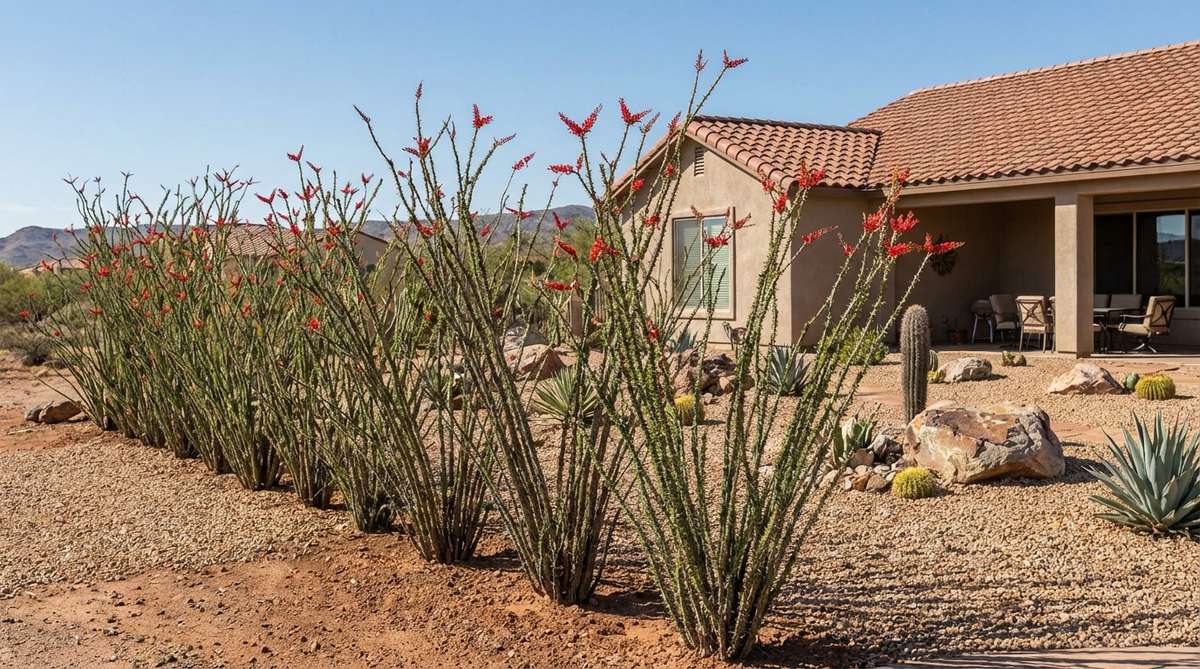
Watching these barren sticks burst into green leaves feels like pure desert magic. An ocotillo living barrier is the ultimate permeable property line for an arid landscape.
Planting these thorny wands tightly in a trench creates a security feature that looks far more expensive than traditional wood fencing. Adding a thick base layer of matching gravel hides the irrigation drip line required for establishment.
A 20-foot living fence costs roughly $200–$400. It’s a conversation starter that naturally deters intruders.
- Key Materials: Bare-root ocotillo stems, native soil, top gravel
- Vibe / Style: Wild desert boundary
- Difficulty: Intermediate
- Budget Breakdown: Ocotillo Stems: $250 | Gravel: $50
- Creator’s Tip: Spray the stems with water twice a week during the first month to encourage rapid leafing.
- Smart Sourcing: Bare-root Ocotillo fencing bundles and heavy-duty drip irrigation kits.
17. Prickly Pear Groundcover
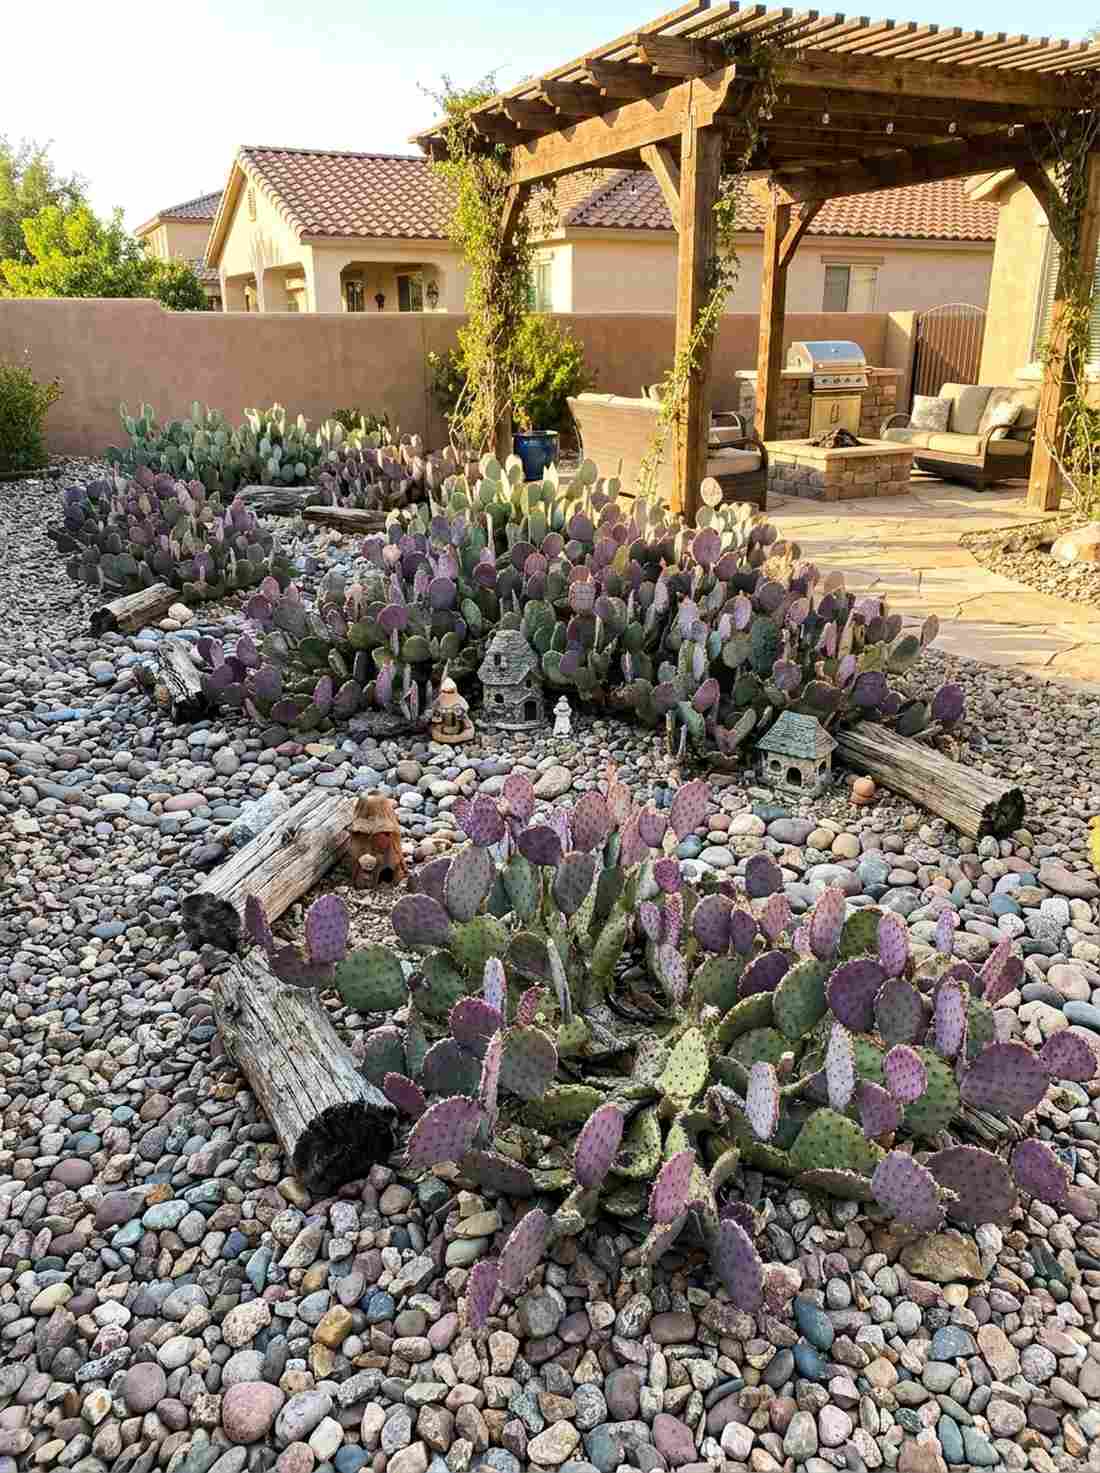
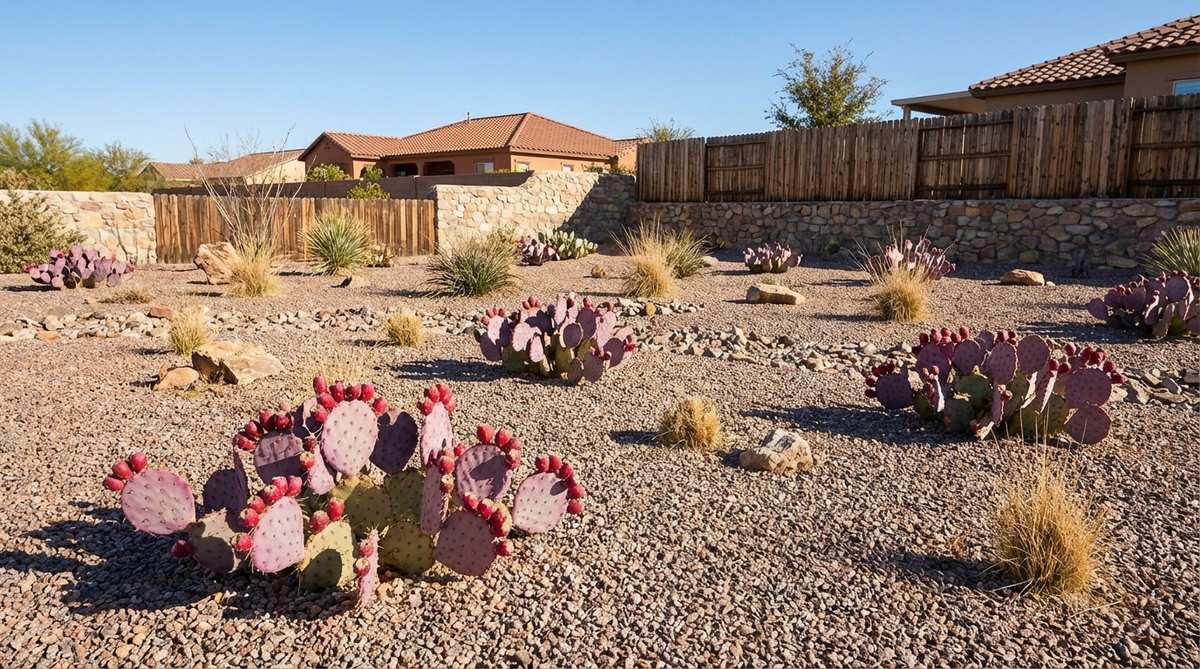
The sprawling purple and green pads feel wonderfully wild and untamed. A spreading prickly pear bed is a genius low-maintenance cover for large, difficult terrain.
Allowing these resilient pads to creep across a thick stone layer completely eliminates the weed pulling associated with bare soil. Just scatter some premium fairy garden kits or rustic wood chunks to break up the dense thorny mass.
Establish a massive patch for merely $40–$80. Pin this if you want an indestructible green space!
- Key Materials: Santa Rita prickly pear cuttings, chunky gravel
- Vibe / Style: Rugged desert floor
- Difficulty: Easy (handle with extreme care)
- Budget Breakdown: Cuttings: $30 | Gravel: $40
- Creator’s Tip: Always use heavy kitchen tongs to handle the pads—leather gloves won’t stop the micro-spines.
- Smart Sourcing: Live Santa Rita prickly pear pads and extra-thick puncture-resistant garden gloves.
18. Desert Marigold Color Bursts
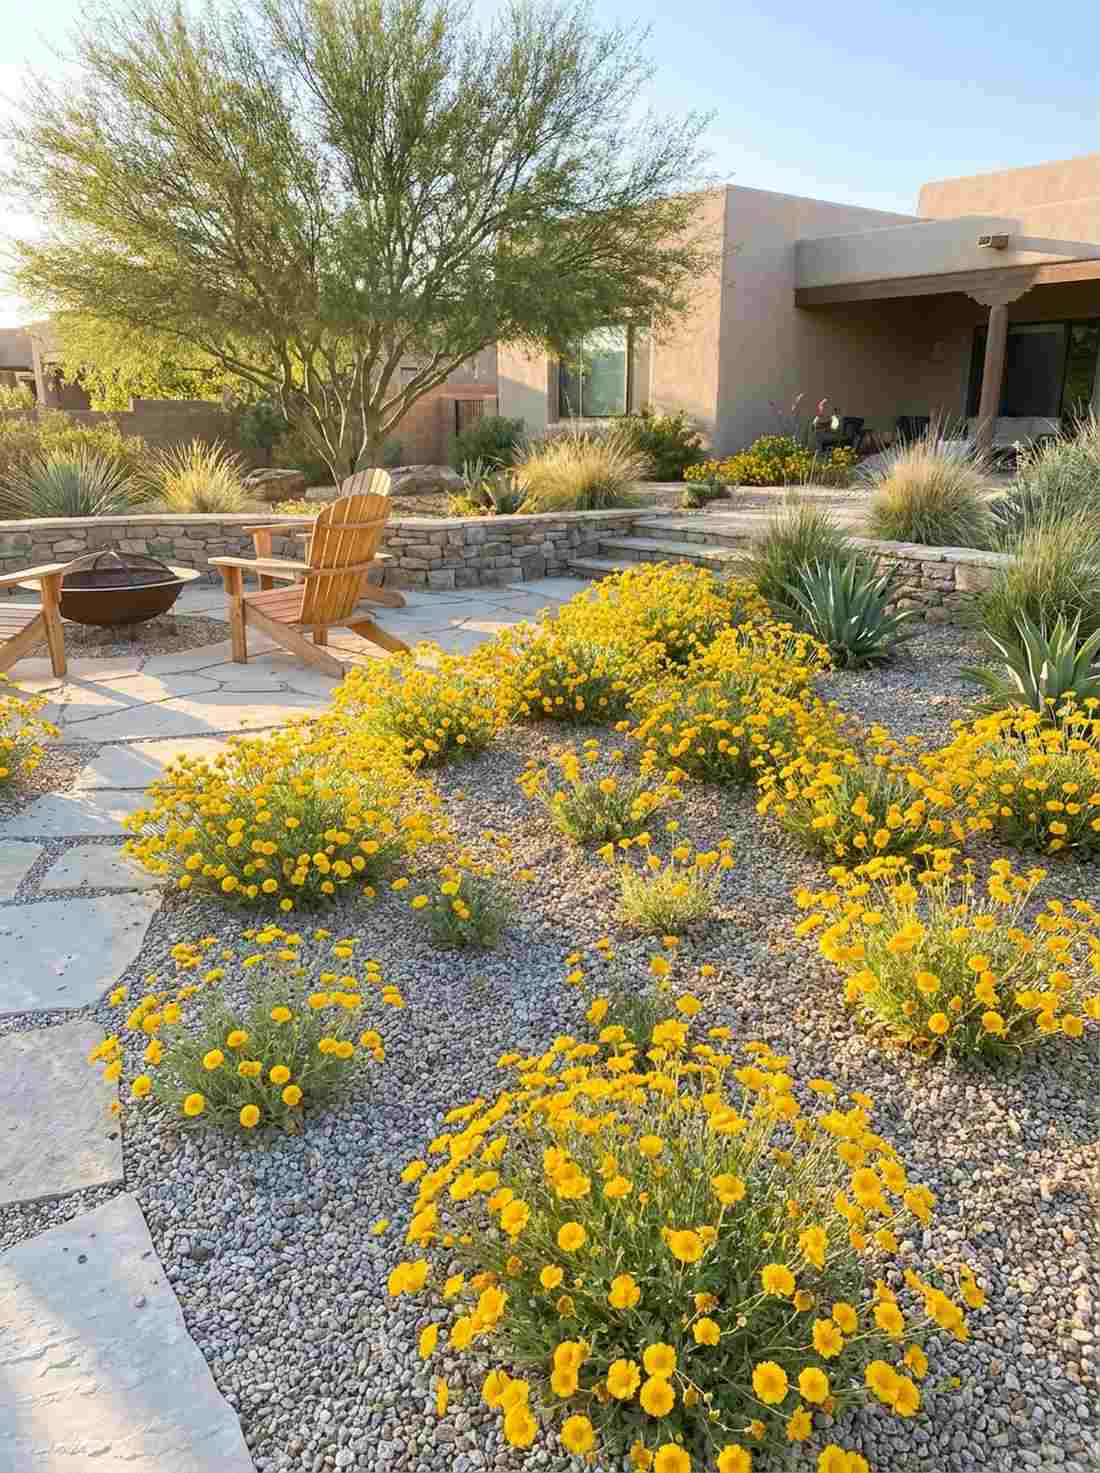
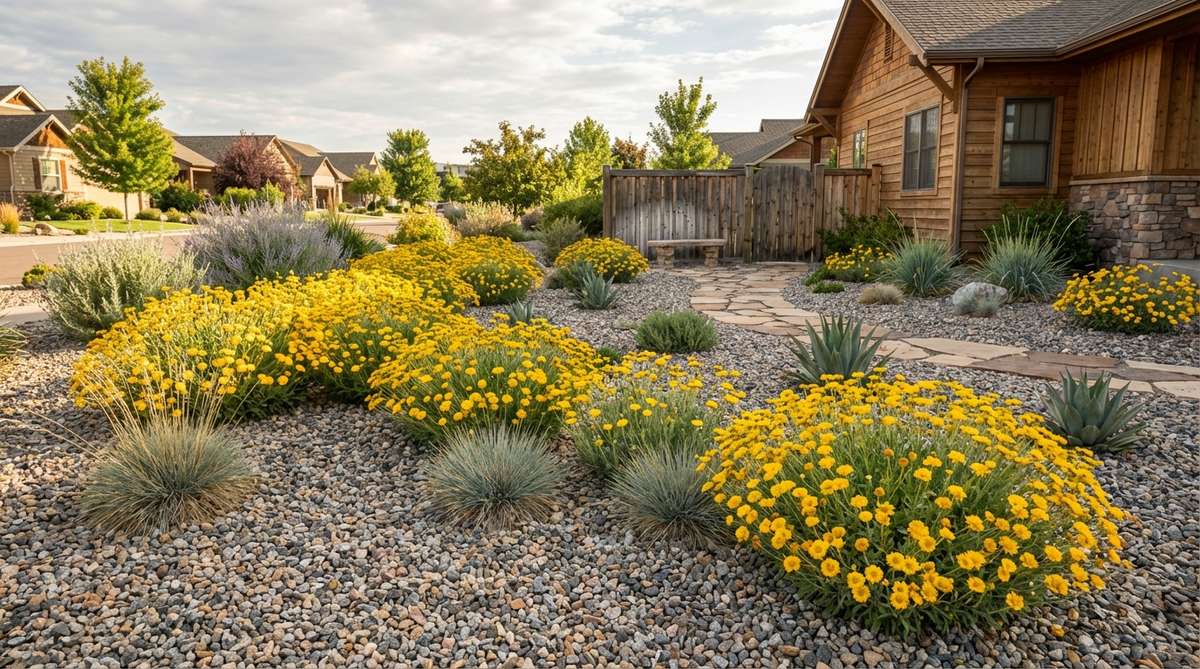
Seeing these bright yellow blooms pop against gray stone feels incredibly cheerful. A scattered desert wildflower installation softens the harshness of an all-mineral yard.
Many homeowners overpay for mature plants, but broadcasting cheap seed directly into gravel crevices yields a shockingly sophisticated aesthetic. The seeds naturally lodge in the stones, germinating rapidly with the first spring rains.
You can blanket your yard in color for under $20. Highly recommended for instant seasonal beauty.
- Key Materials: Desert marigold seed mix, light gravel base
- Vibe / Style: Blooming desert spring
- Difficulty: Beginner (zero effort)
- Budget Breakdown: Seed Mix: $15 | Gravel: Existing
- Creator’s Tip: Do not use weed block fabric where you want the flowers; seeds need soil contact to root.
- Smart Sourcing: Bulk desert wildflower seed mixes and hand-crank seed spreaders.
Garden Ideas Using Gravel for Pathways
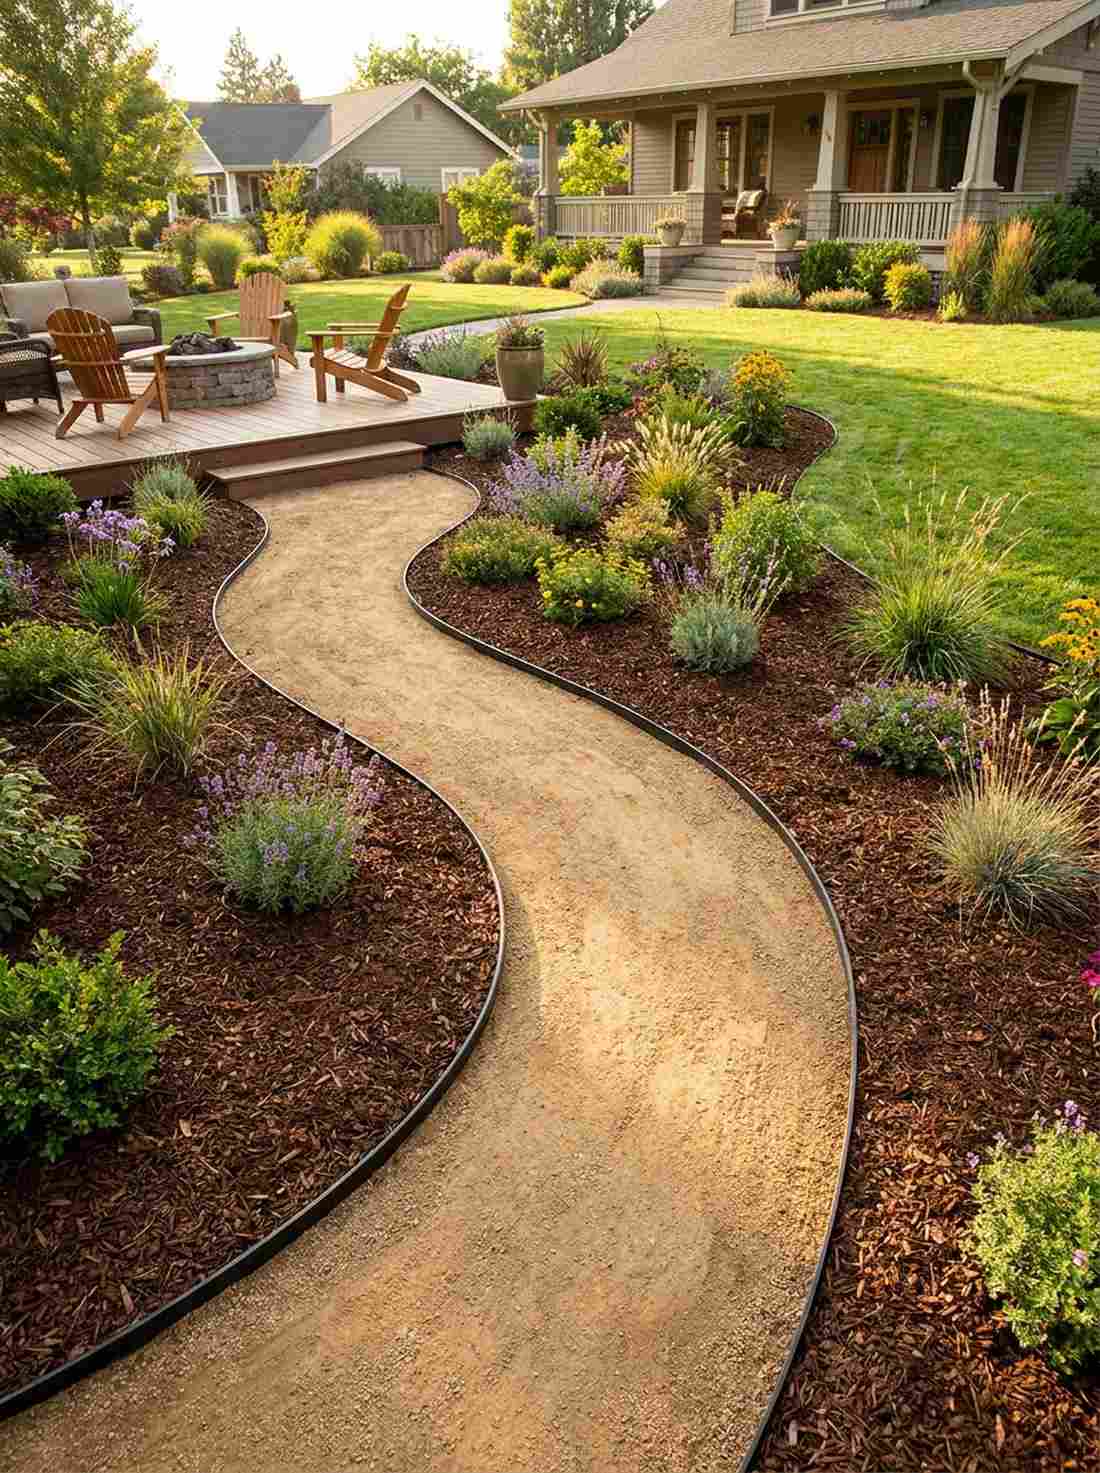
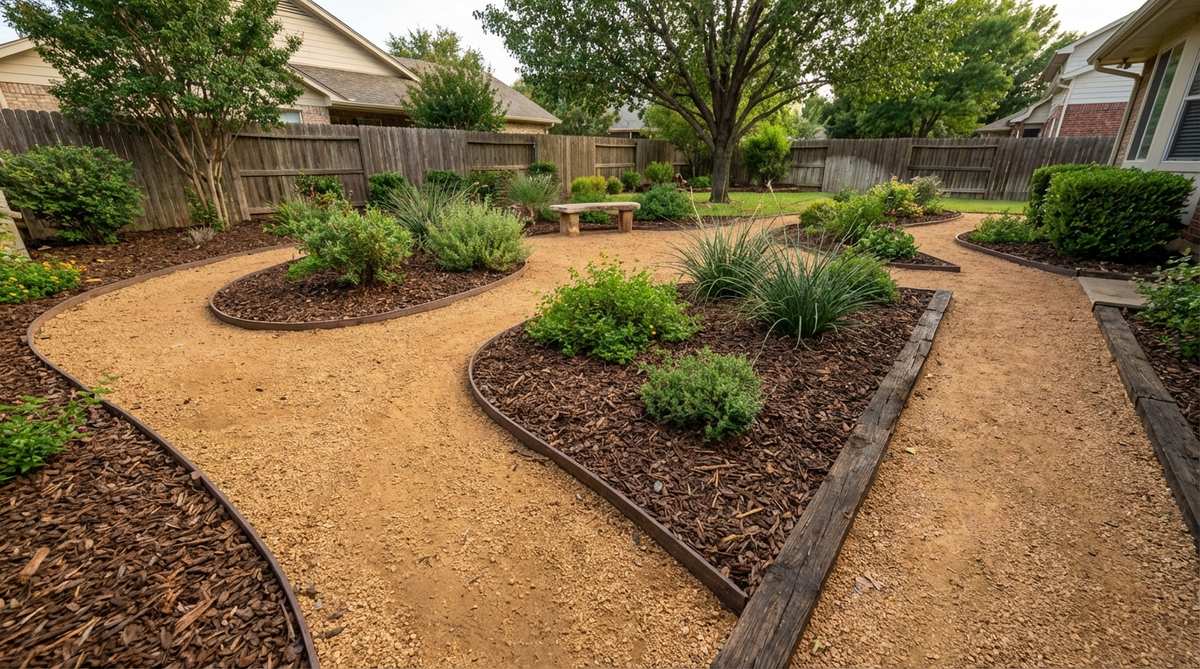
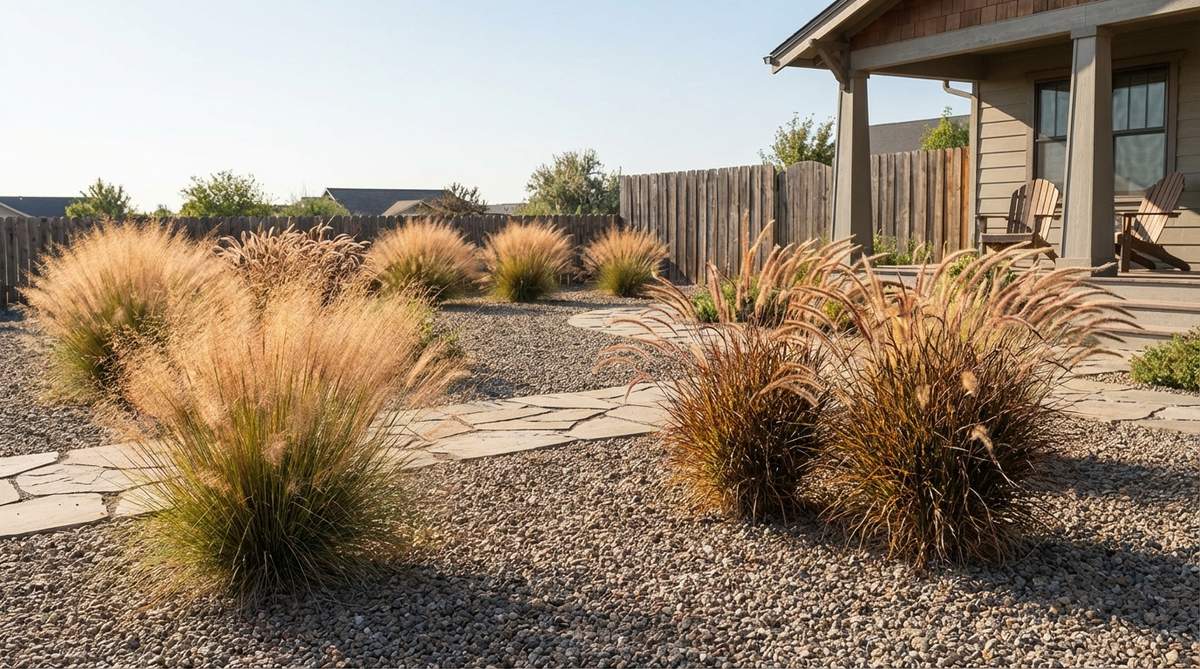
19. Meandering Crushed Stone Trail
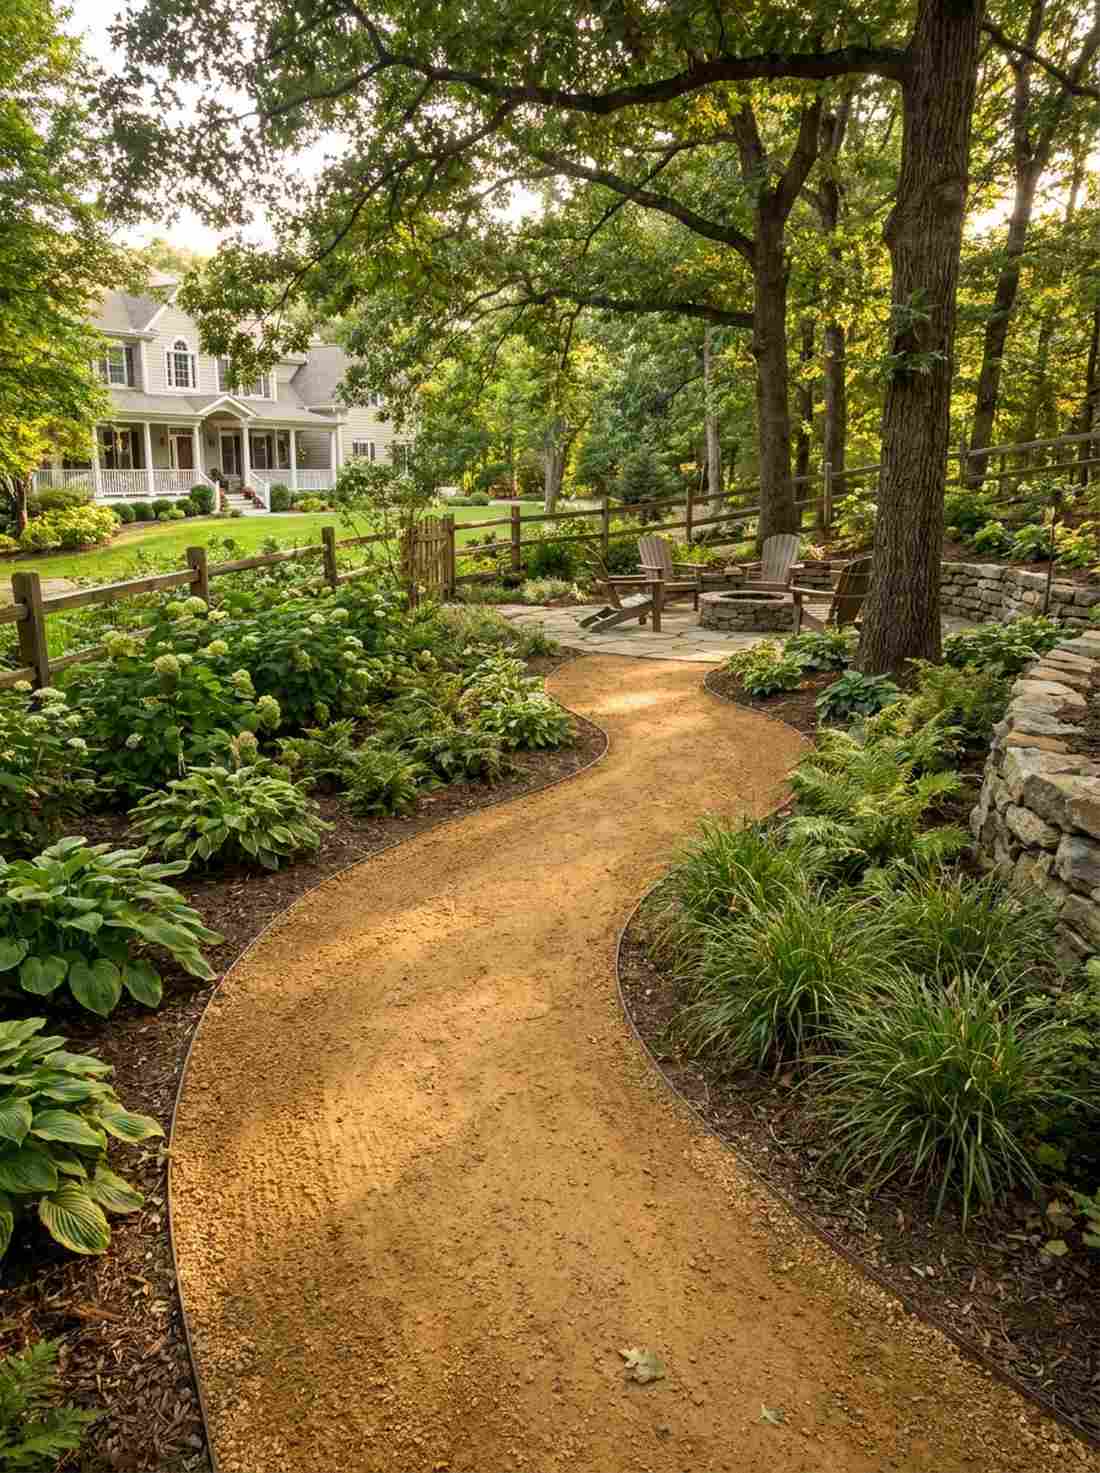
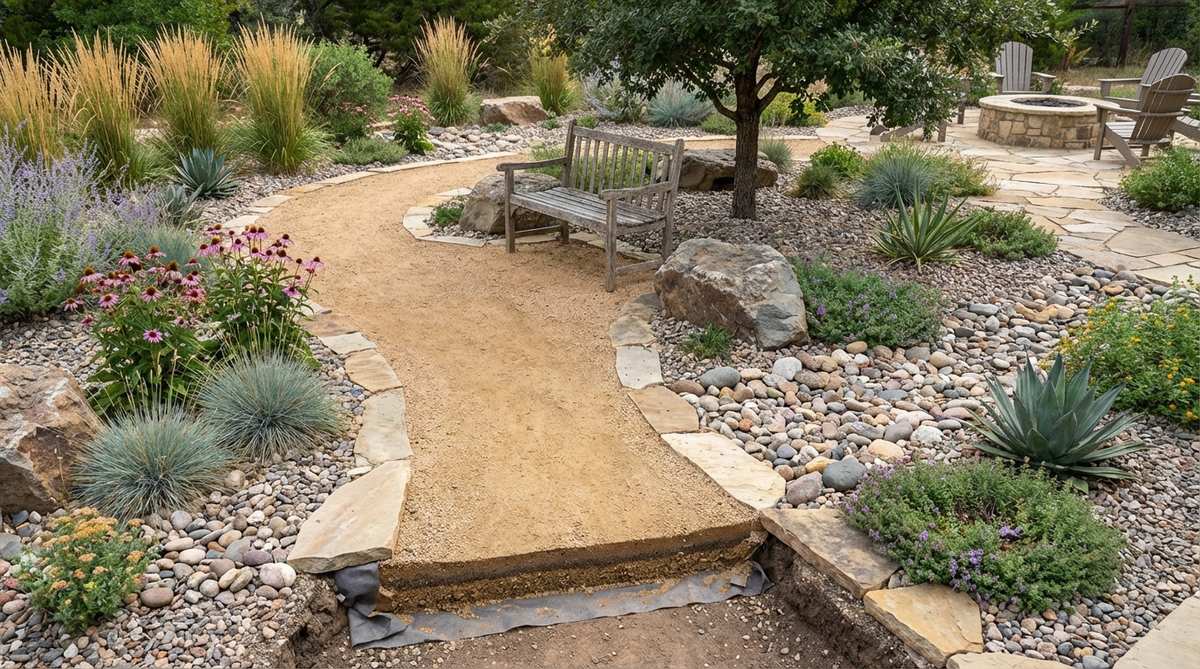
Walking this curved path feels like wandering through a secret botanical garden. A winding decomposed granite walkway perfectly connects front yards to hidden backyard patios.
Foregoing straight, rigid lines for sweeping curves creates a vibe that looks far more expensive than it is. Renting a vibratory plate compactor ensures the granite locks together like concrete, preventing messy shoe tracking.
Install a 30-foot path for around $150–$250. Save this to your weekend pathway inspiration board!
- Key Materials: Decomposed granite (DG), commercial weed barrier
- Vibe / Style: Natural woodland trail
- Difficulty: Intermediate (requires compacting)
- Budget Breakdown: DG Base: $120 | Fabric: $40
- Creator’s Tip: Add a 1-inch layer of loose granite on top of the compacted base for a pleasing crunch underfoot.
- Smart Sourcing: Pre-mixed decomposed granite bags and heavy-duty landscape fabric rolls.
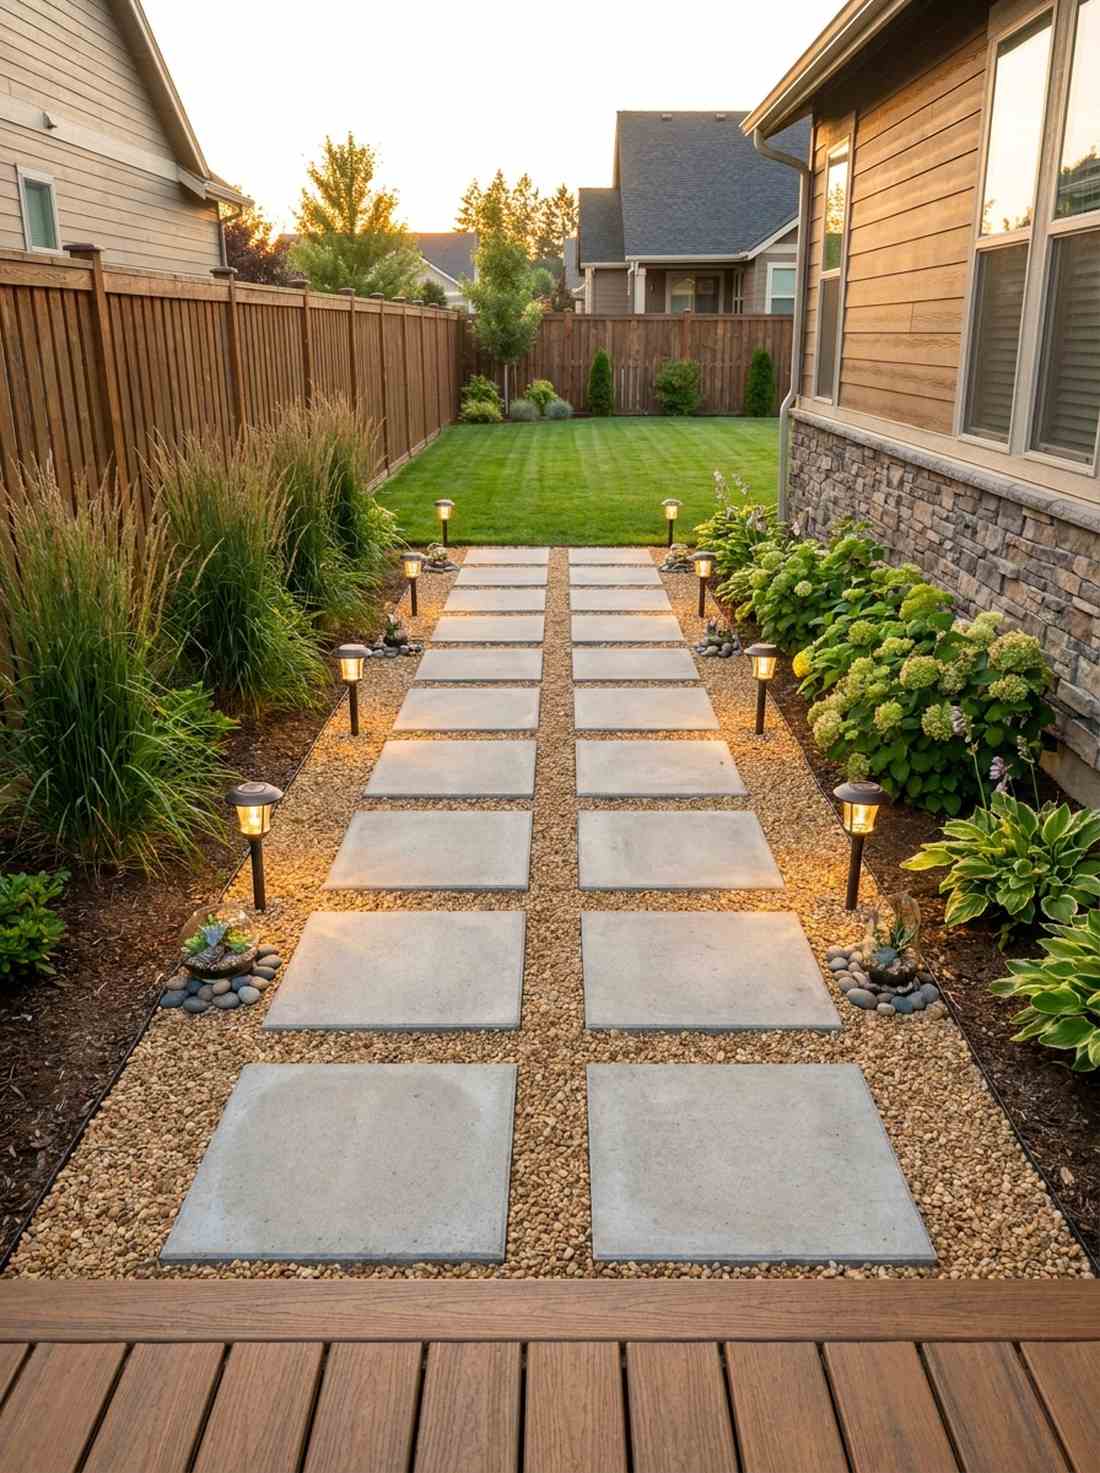
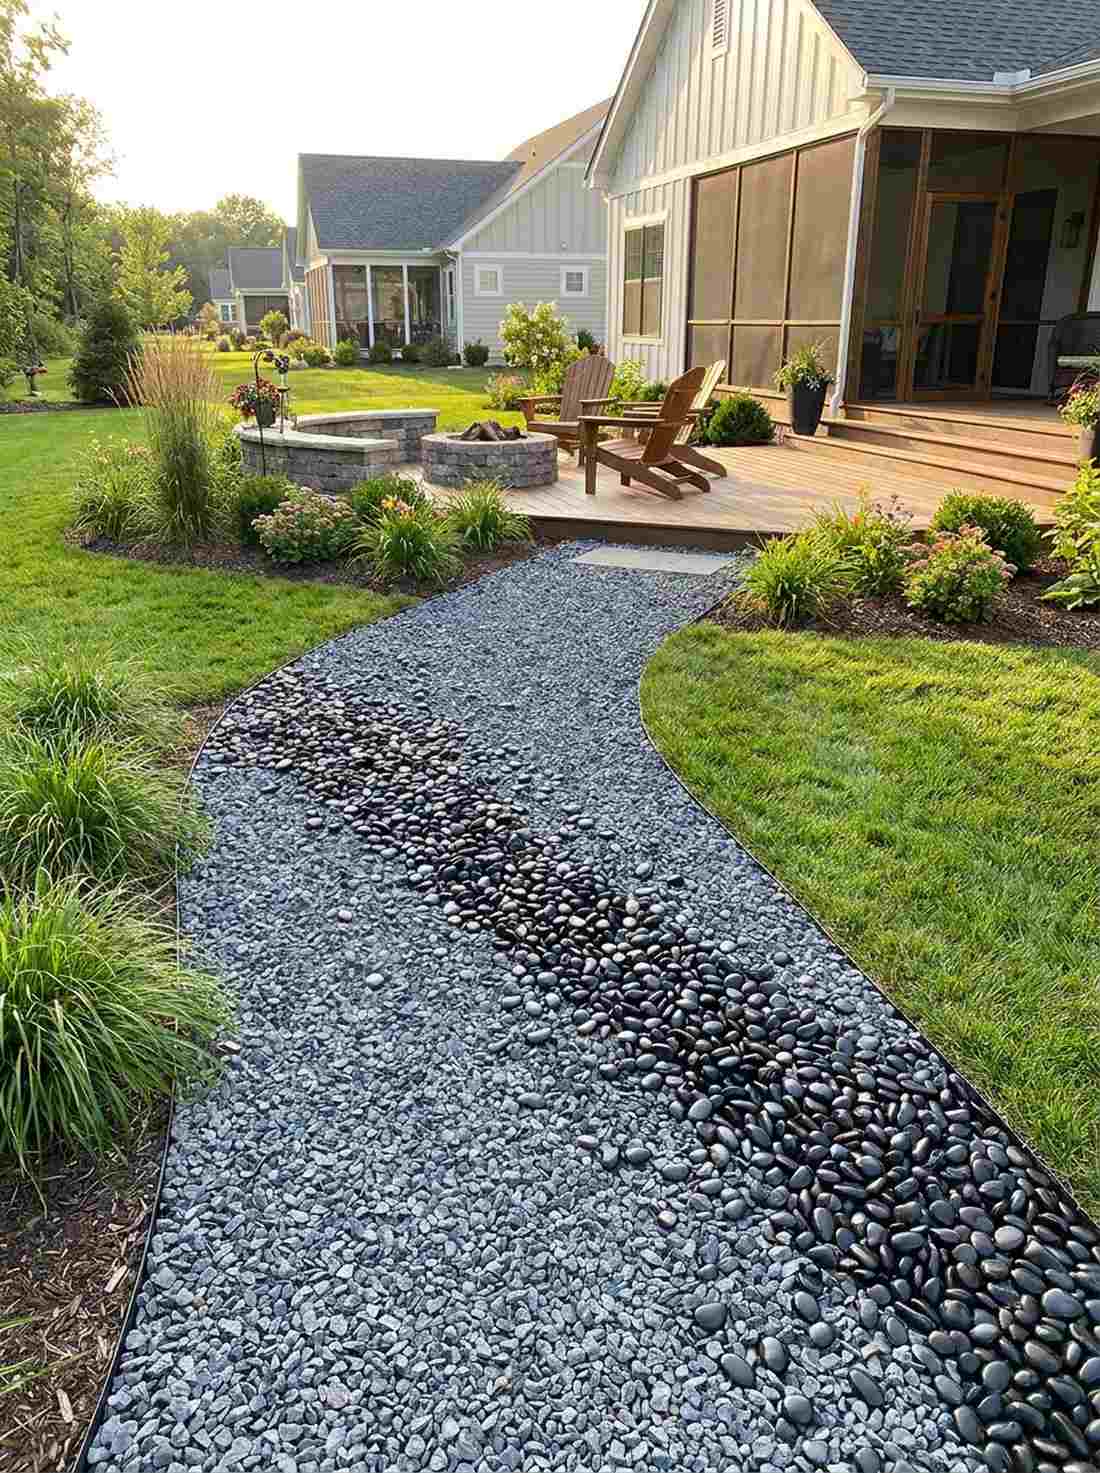
20. Stepping Stone Gravel Combination
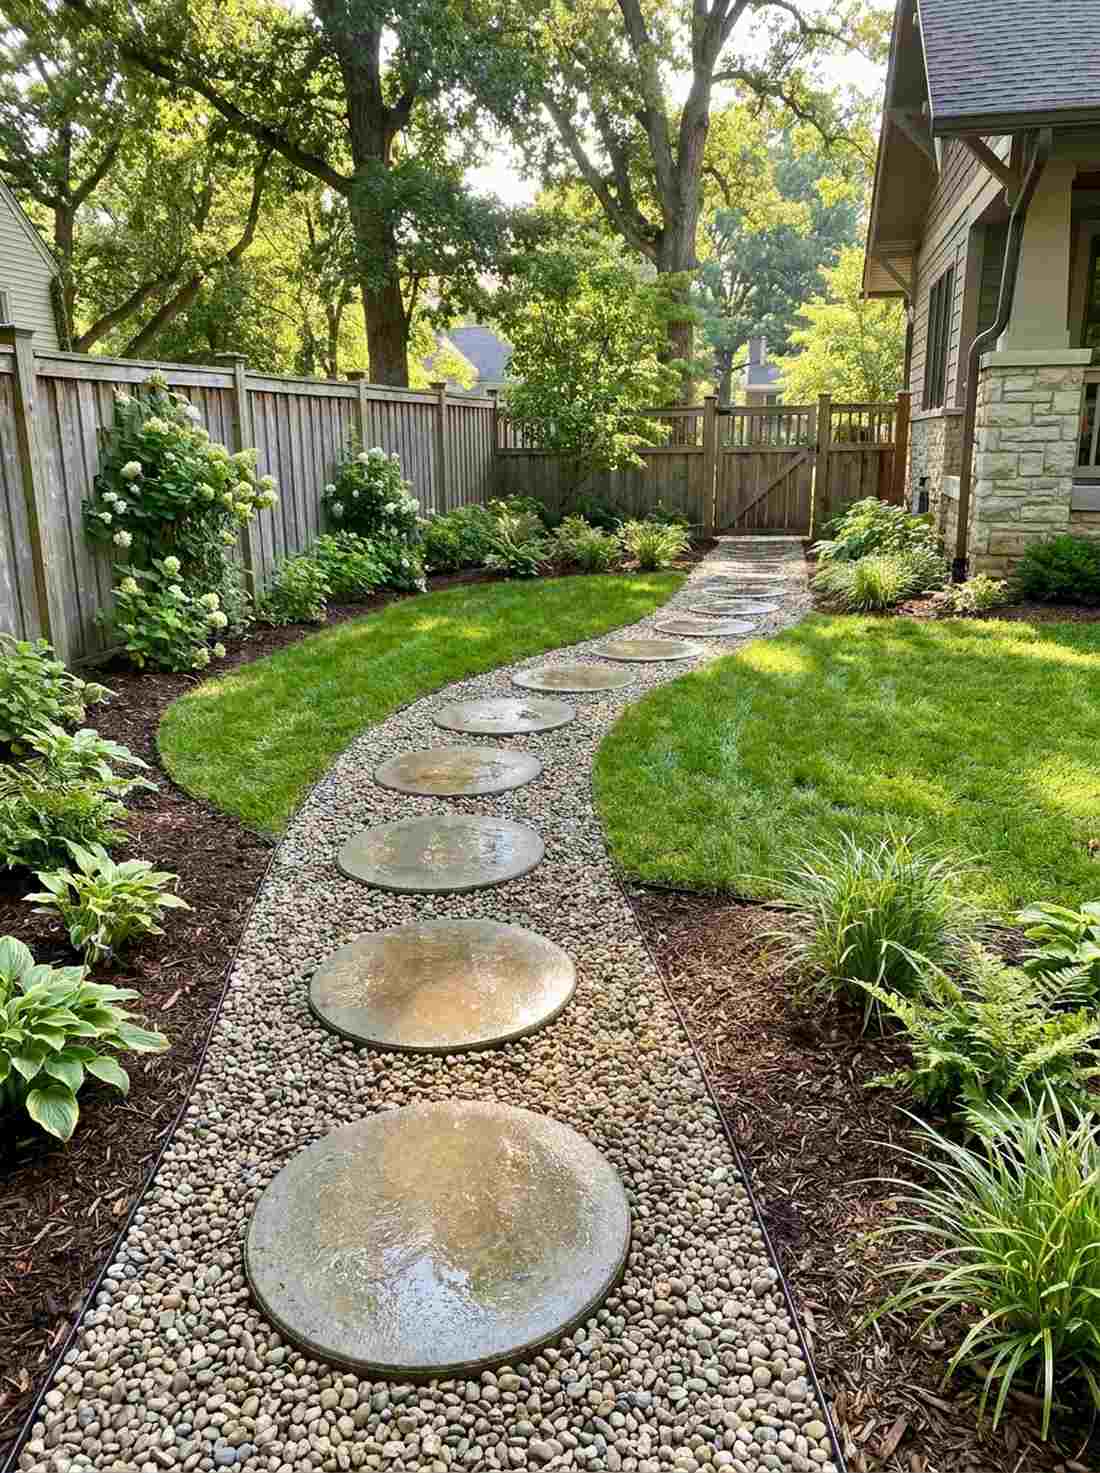
Hopping from stone to stone feels playful yet elegantly structured. The stone and gravel hybrid path is an absolute must-have for damp side yards prone to mud.
Setting solid rounds into loose fill completely solves drainage problems while delivering a surprisingly premium look. Utilizing a heavy-duty acrylic stone sealant on the pavers makes the colors pop brilliantly against the neutral pebbles.
You can build this functional walkway for about $100–$180. Pin this for a quick mud-busting DIY!
- Key Materials: 18-inch step stones, 3/8-inch pea gravel
- Vibe / Style: Zen garden approach
- Difficulty: Easy
- Budget Breakdown: Stones: $80 | Pea Gravel: $60
- Creator’s Tip: Keep the stone surfaces exactly 1 inch above the gravel line so pebbles don’t wash over them.
- Smart Sourcing: Round concrete stepping stones and wet-look stone sealant sprays.
Most people get this completely wrong… until they try the exact layout coming up next.
21. Bordered Pea Gravel Walk
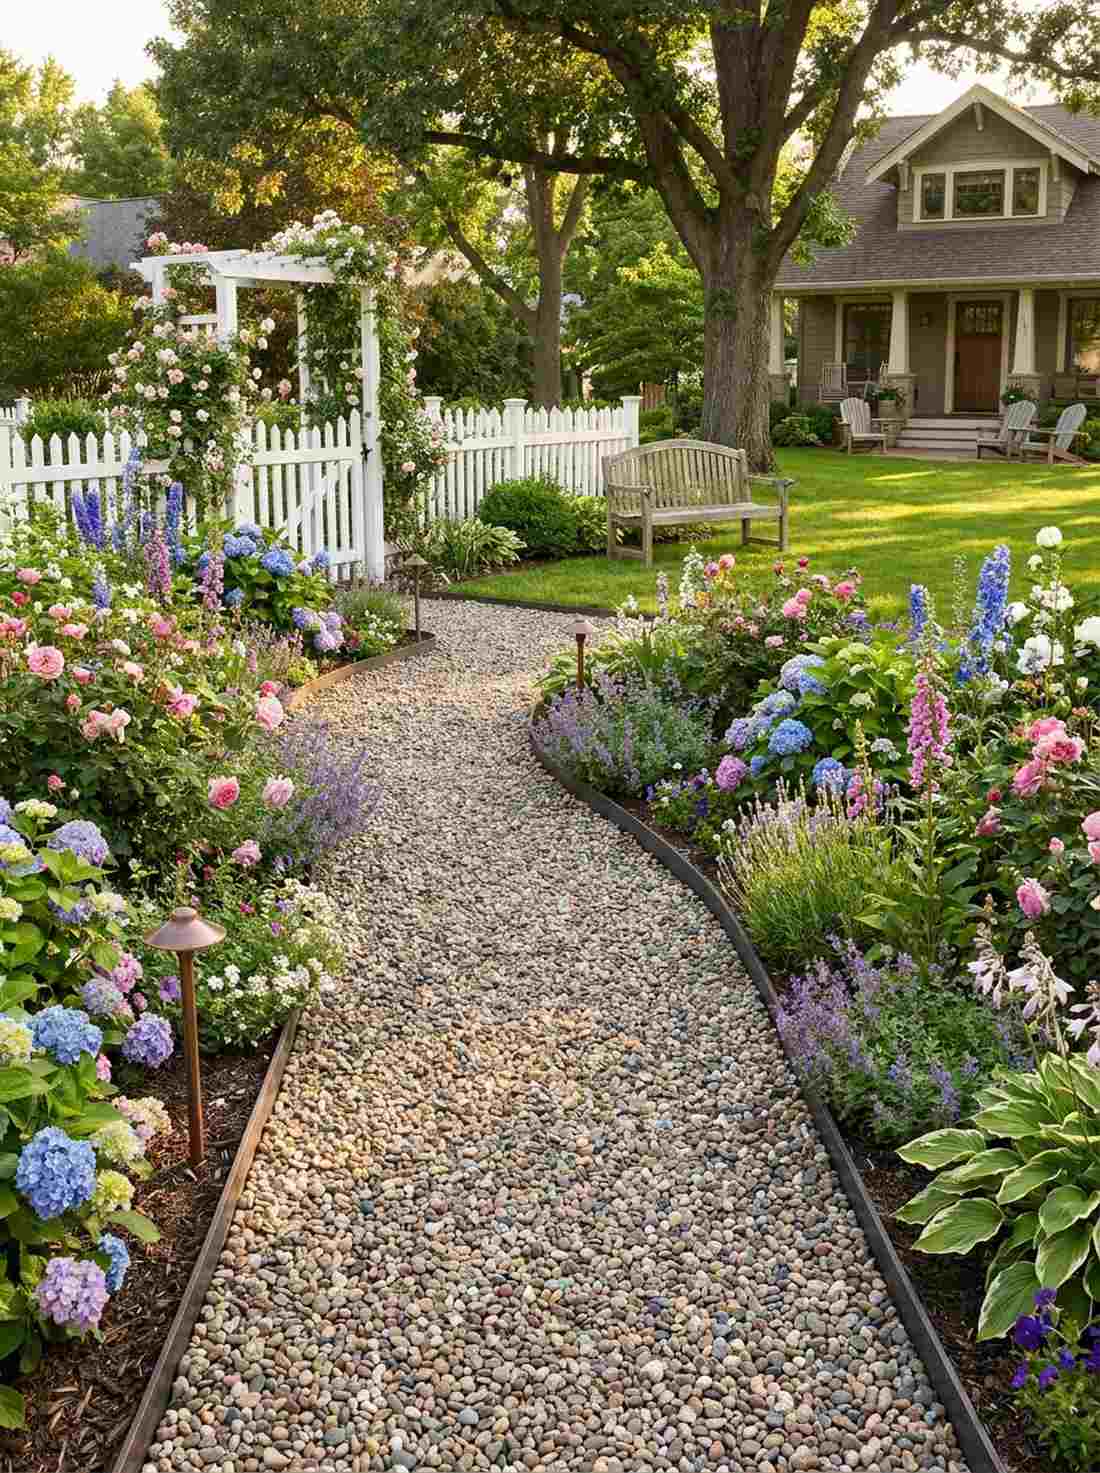
The soft crunch underfoot feels like strolling through a classic English estate. A defined pea gravel garden walk cleanly separates lush flower beds from foot traffic zones.
Without borders, round stones spill everywhere, but using crisp steel edging forces a beautifully contained, architectural aesthetic. Add some premium miniature garden supplies like low-voltage border lights to illuminate the boundary at night.
Achieve this clean look for roughly $150. It’s a fast upgrade that completely changes the yard’s geometry.
- Key Materials: Smooth pea gravel, rigid steel or composite edging
- Vibe / Style: Traditional cottage garden
- Difficulty: Easy
- Budget Breakdown: Gravel: $70 | Edging: $80
- Creator’s Tip: Set the edging deep enough so it protrudes only 1 inch above the final gravel height.
- Smart Sourcing: Flexible composite lawn edging rolls and bulk washed pea gravel.
22. Herringbone Brick and Gravel
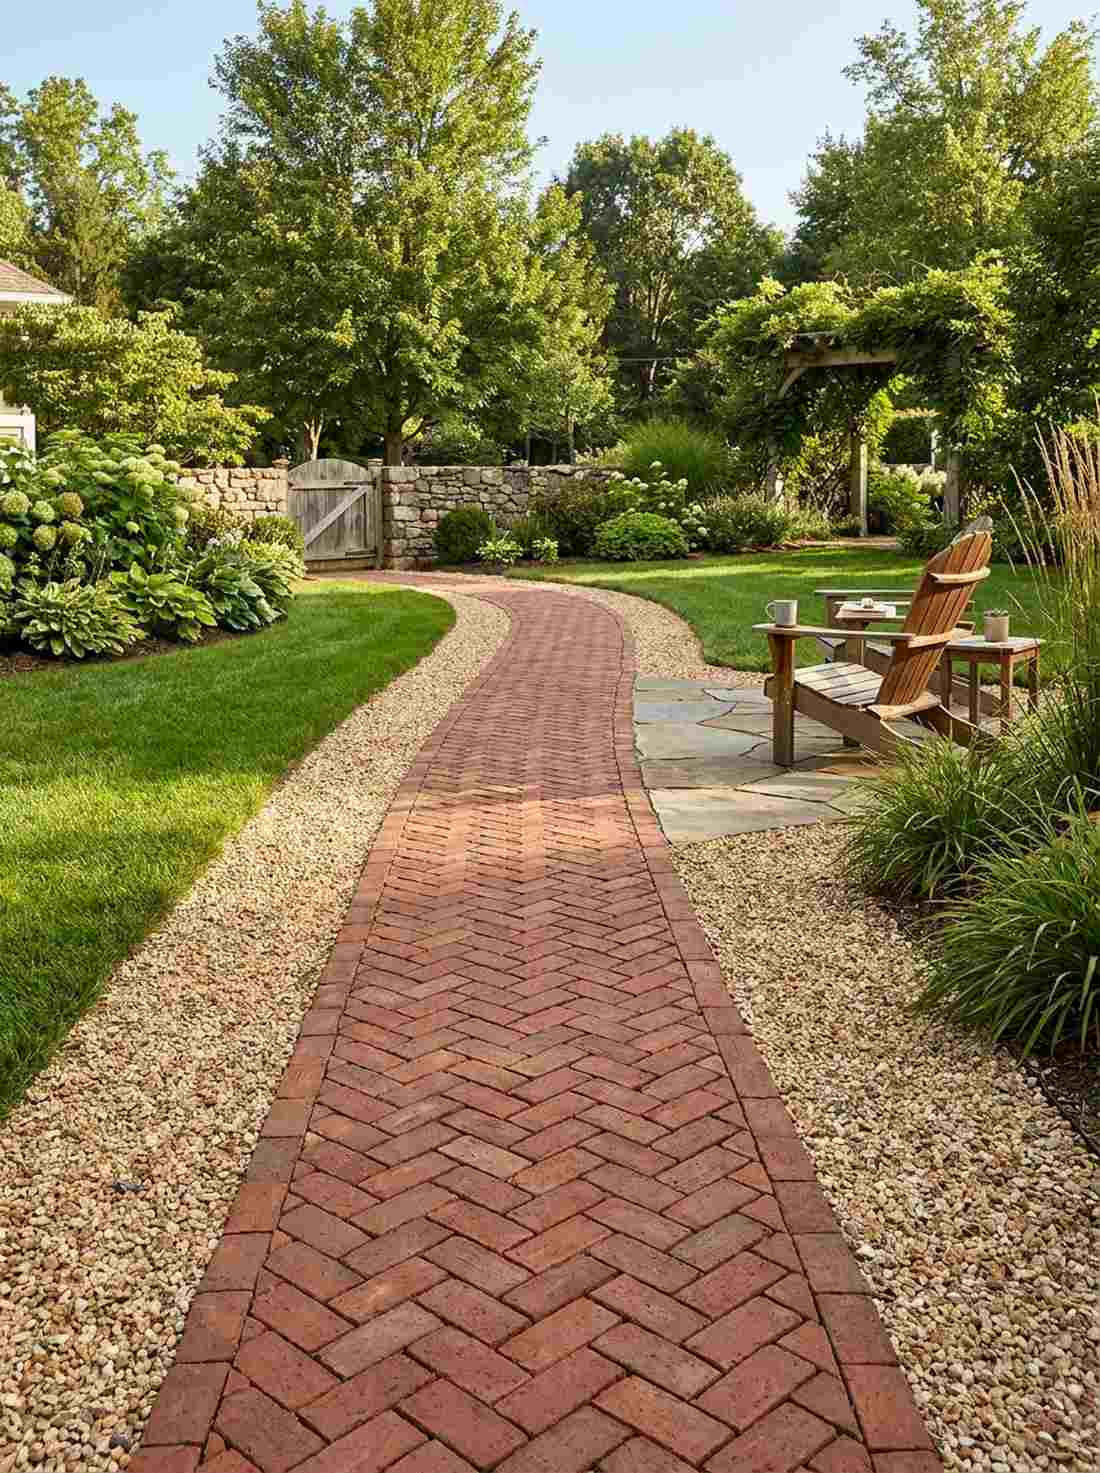

This intricate pattern feels like a hidden courtyard in an old European city. A brick spine with gravel shoulders creates a breathtaking central axis for long gardens.
Laying a narrow strip of complex herringbone brick surrounded by cheap stone yields a shockingly sophisticated aesthetic for half the cost of a full brick patio. Skipping the mortar and dry-laying the bricks keeps the entire system eco-friendly and permeable.
Expect to spend $200–$350 for the hybrid materials. Save this to your high-end hardscaping board!
- Key Materials: Clay paving bricks, buff crushed stone
- Vibe / Style: Classic European courtyard
- Difficulty: Advanced (pattern cutting)
- Budget Breakdown: Bricks: $150 | Gravel/Base: $100
- Creator’s Tip: Use a taut string line to ensure your central herringbone pattern stays perfectly straight.
- Smart Sourcing: Classic clay paving bricks and masonry wet saw rental tools.
23. Color Transition Pathway
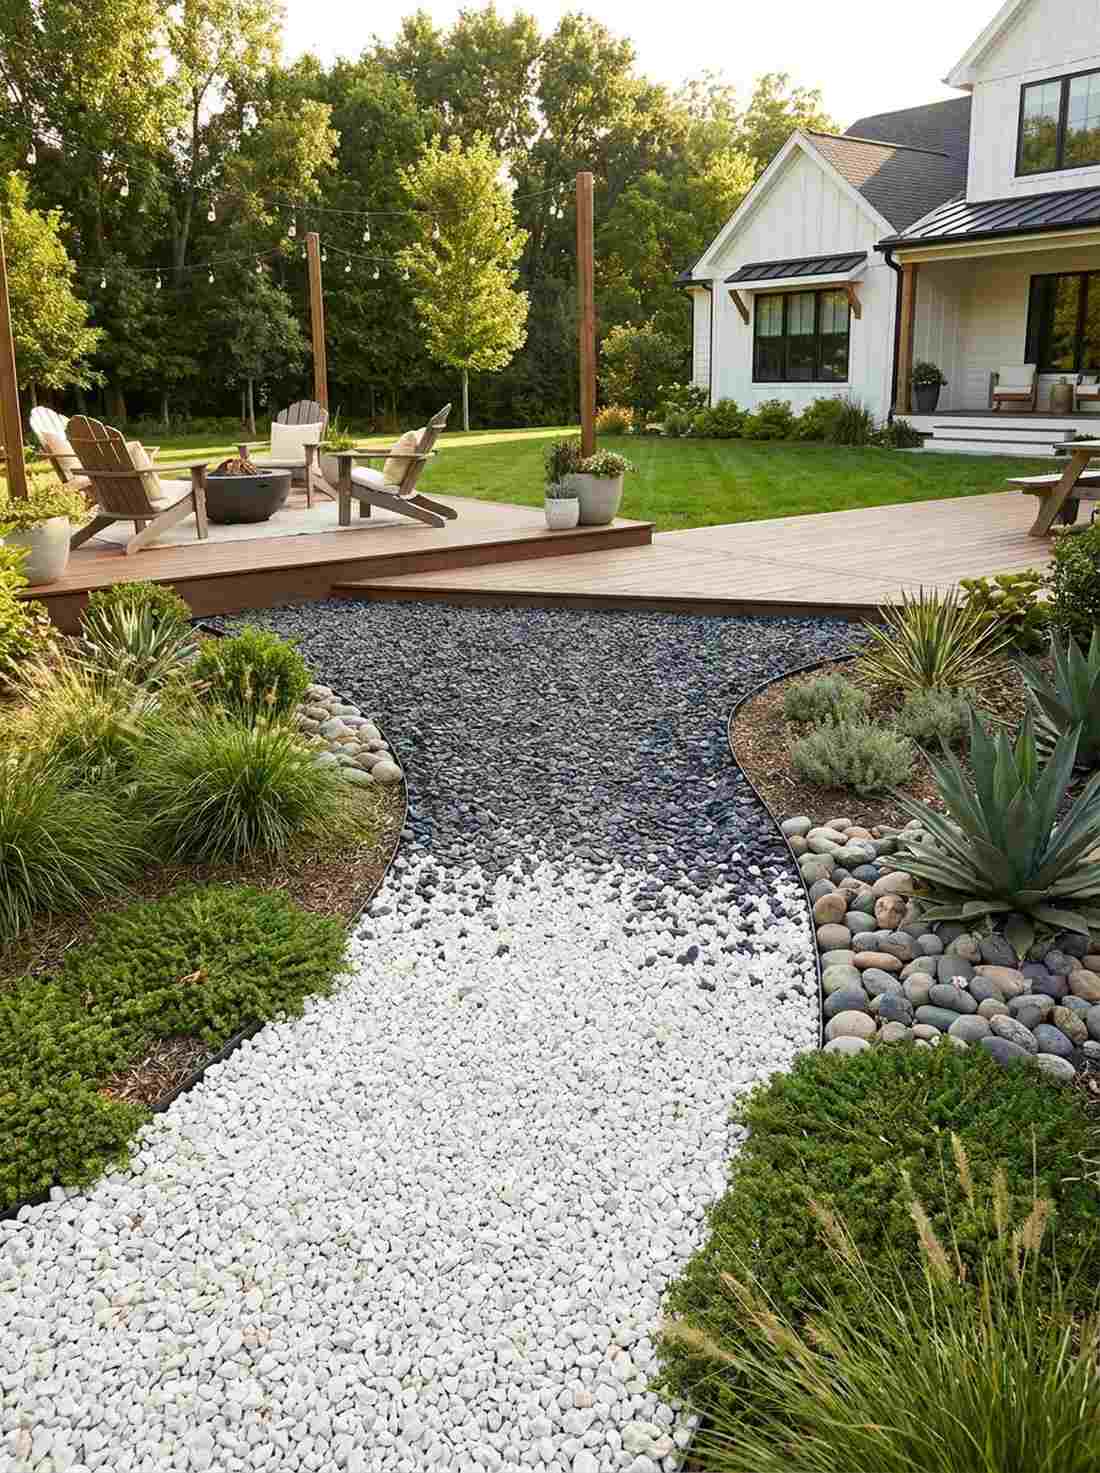
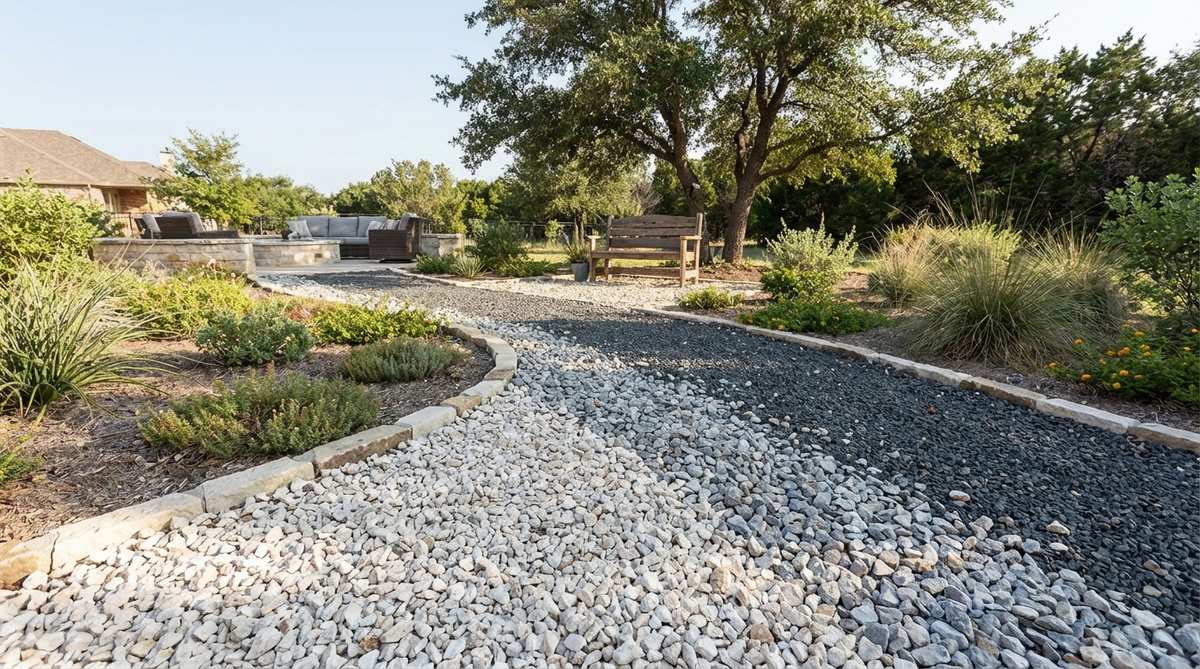
Walking this path feels like moving through a living gradient of earth tones. A blended color gravel transition is a genius trick to visually lengthen a short garden space.
Fading smoothly from bright white limestone into dark charcoal slate creates a vibe that looks far more expensive than it is. It requires precise hand-mixing at the transition zones, but the artistic payoff is massive.
You can create this illusion for about $150–$250 depending on stone types. Pin this if you love unique visual tricks!
- Key Materials: Two contrasting gravel colors (e.g., white and charcoal)
- Vibe / Style: Contemporary landscape art
- Difficulty: Intermediate (requires careful blending)
- Budget Breakdown: Light Stone: $80 | Dark Stone: $80
- Creator’s Tip: Use a steel rake to gently feather the two colors together over a 3-foot transition zone.
- Smart Sourcing: Bulk bright white limestone chips and bulk black slate chips.
24. Stabilized Gravel Surface
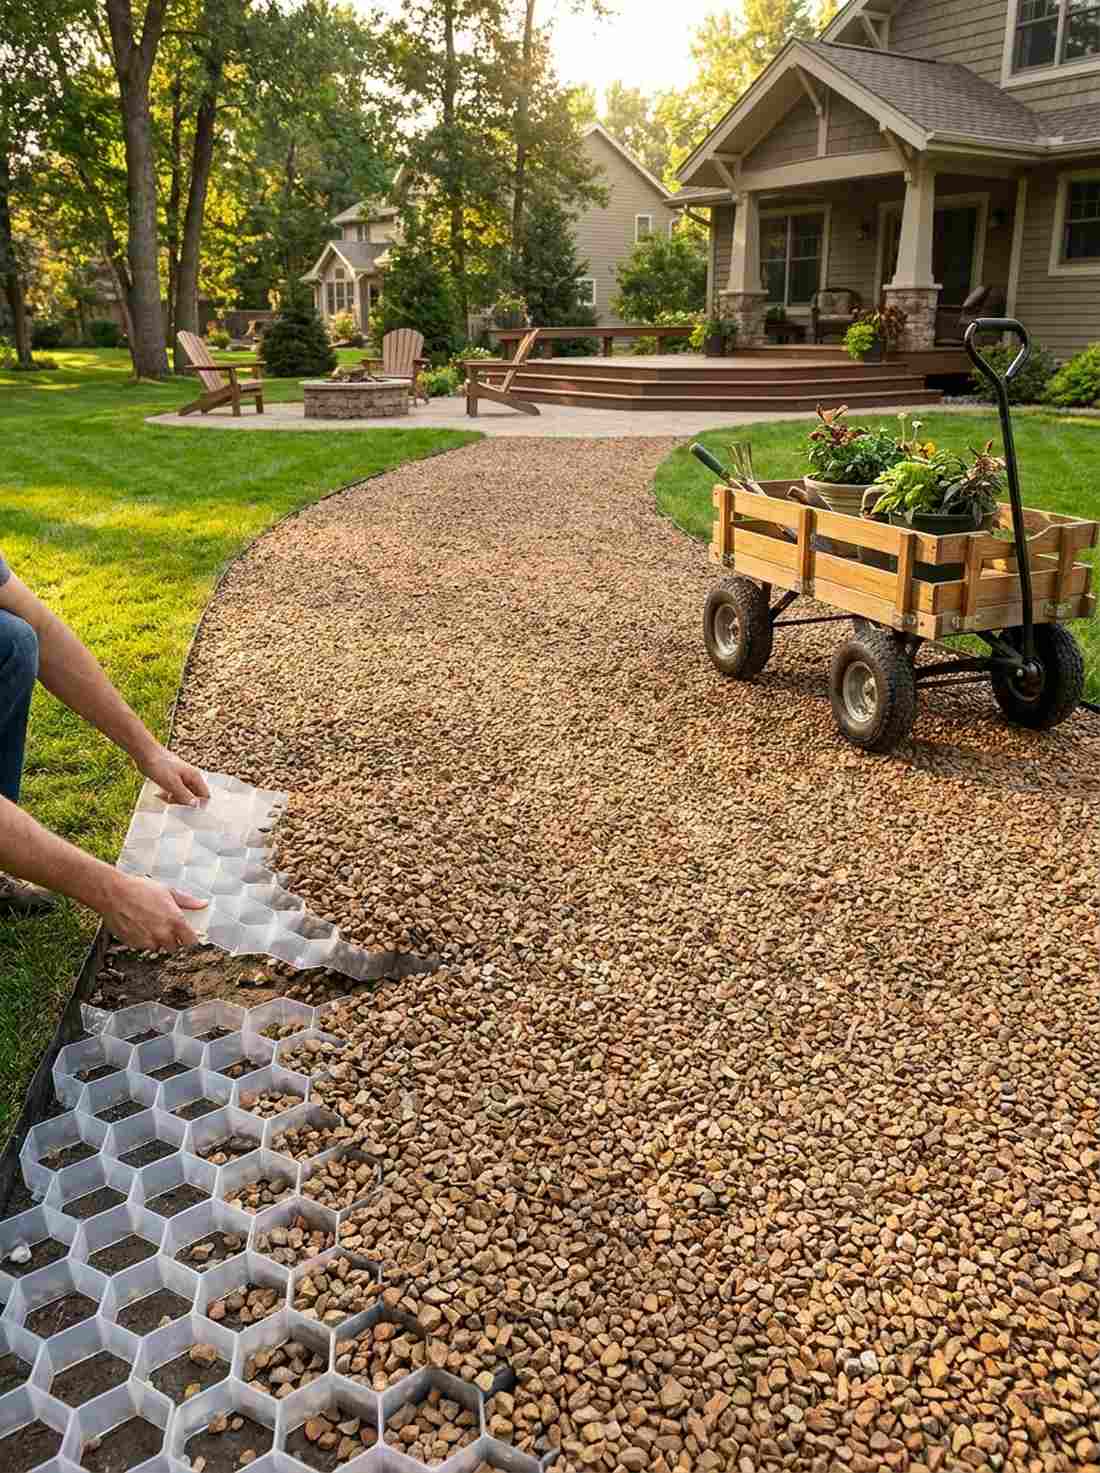
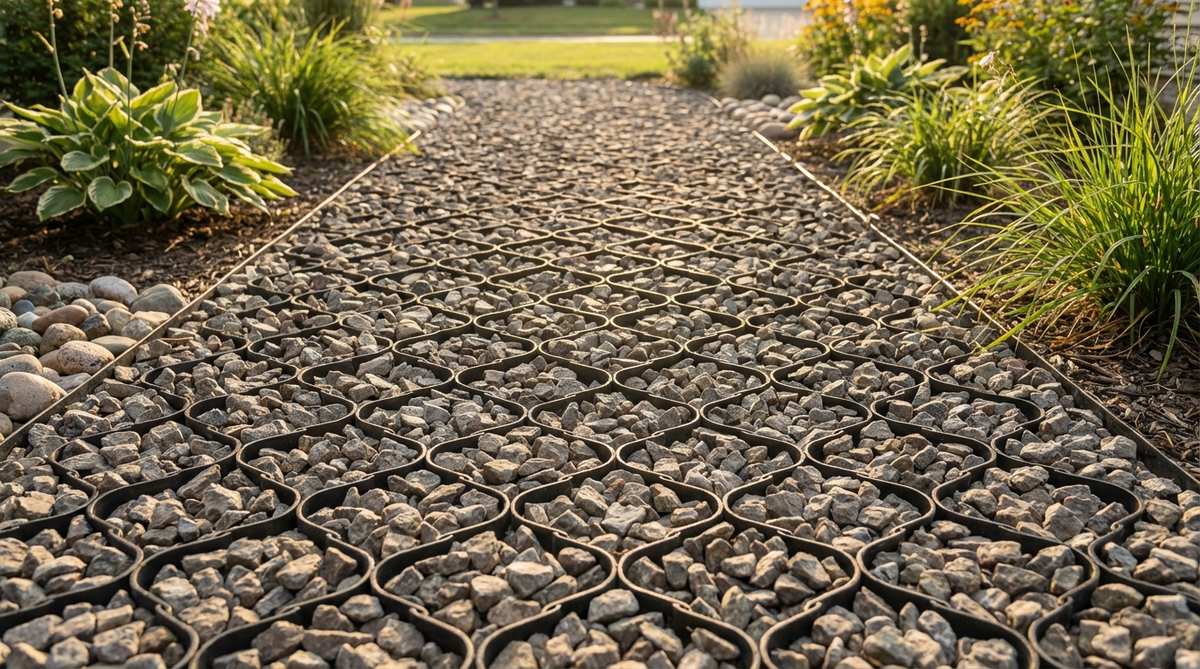
Rolling a cart over this surface feels as smooth as solid concrete. The honeycomb gravel grid system is absolutely mandatory for ADA accessibility or heavy wheelbarrow routes.
Most loose paths become un-walkable over time, but snapping together invisible plastic grids delivers a surprisingly premium look that never ruts or sinks. It’s the ultimate secret weapon of high-end landscape architects.
The grid base will cost an extra $1.50 per square foot. Highly recommended for permanent, high-traffic paths.
- Key Materials: Plastic cellular paving grids, 3/8-inch angular rock
- Vibe / Style: Invisible high-tech utility
- Difficulty: Intermediate
- Budget Breakdown: Grids: $150 | Stone: $80
- Creator’s Tip: Always use angular crushed stone—smooth pea gravel will pop out of the grid cells.
- Smart Sourcing: Snap-together gravel stabilizer mats and heavy-duty ground anchor pins.
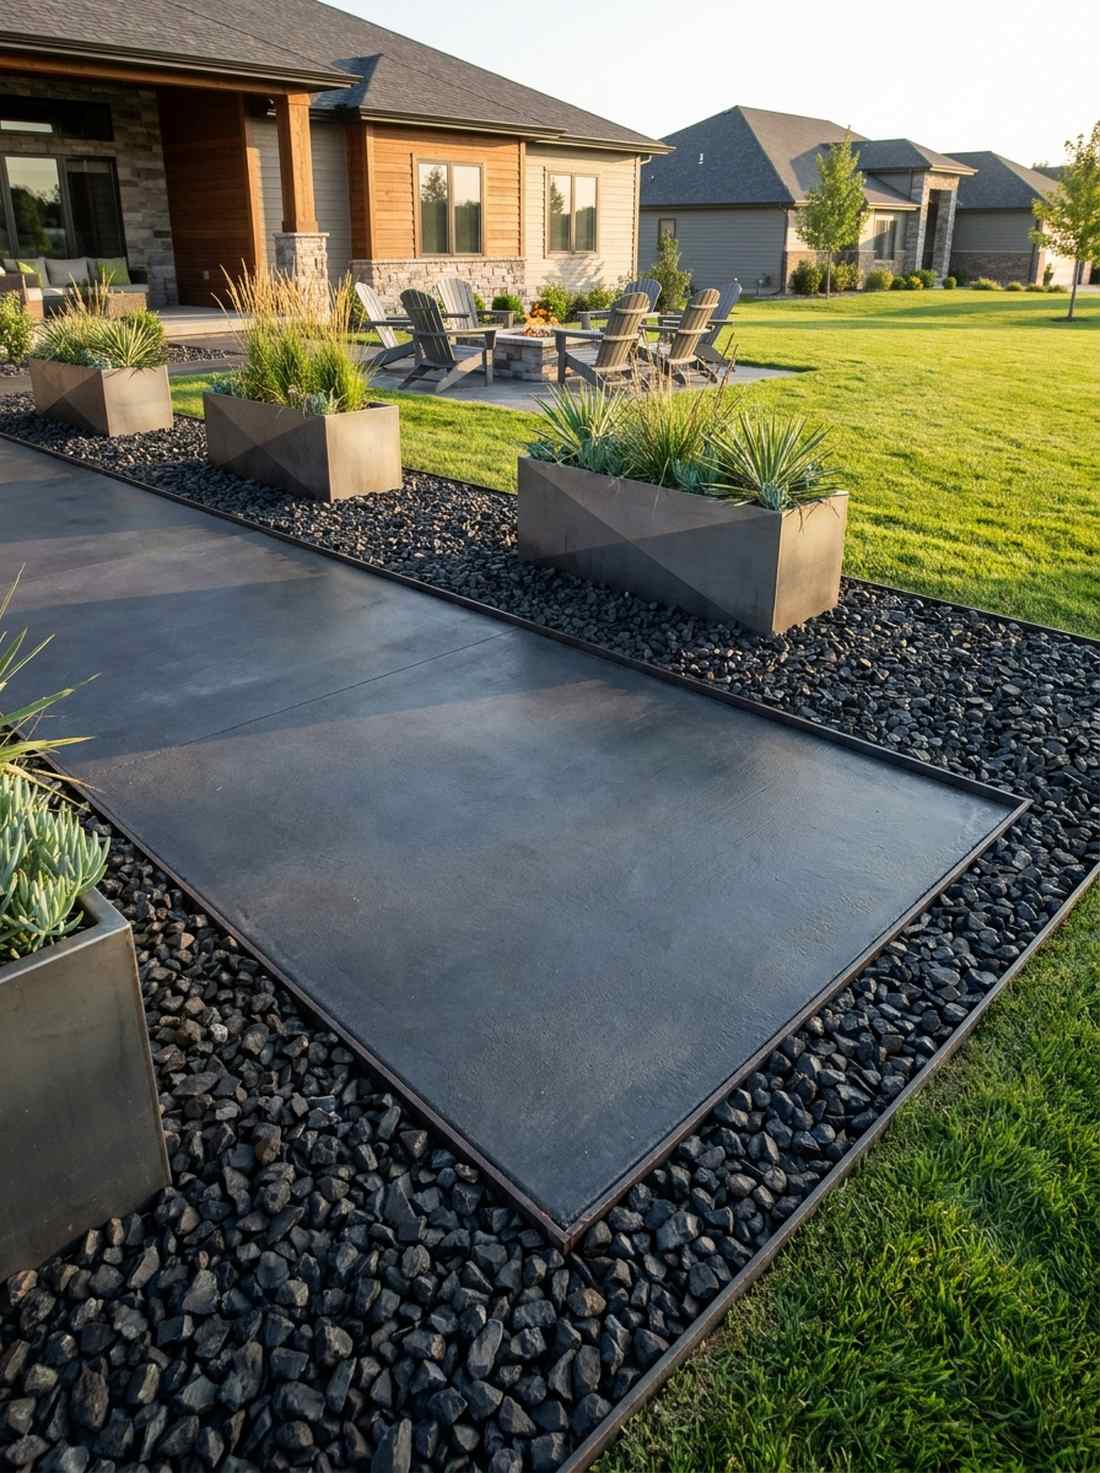
Textural Contrast Gravel Garden Designs
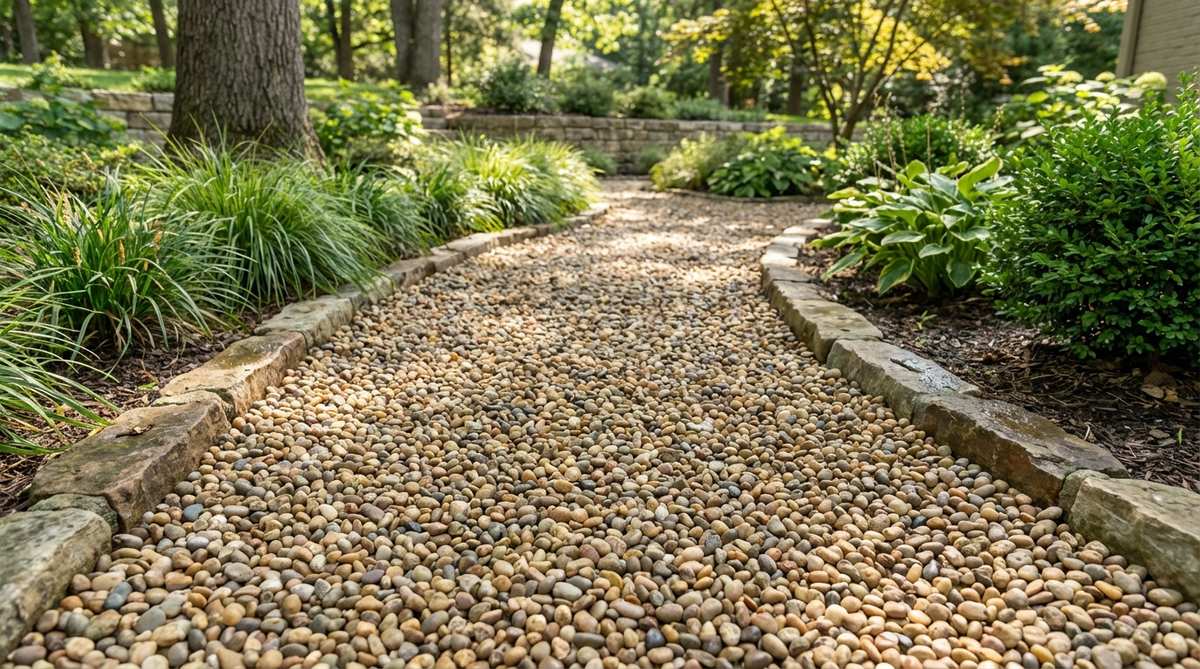
25. Multi-Size River Rock Mosaic
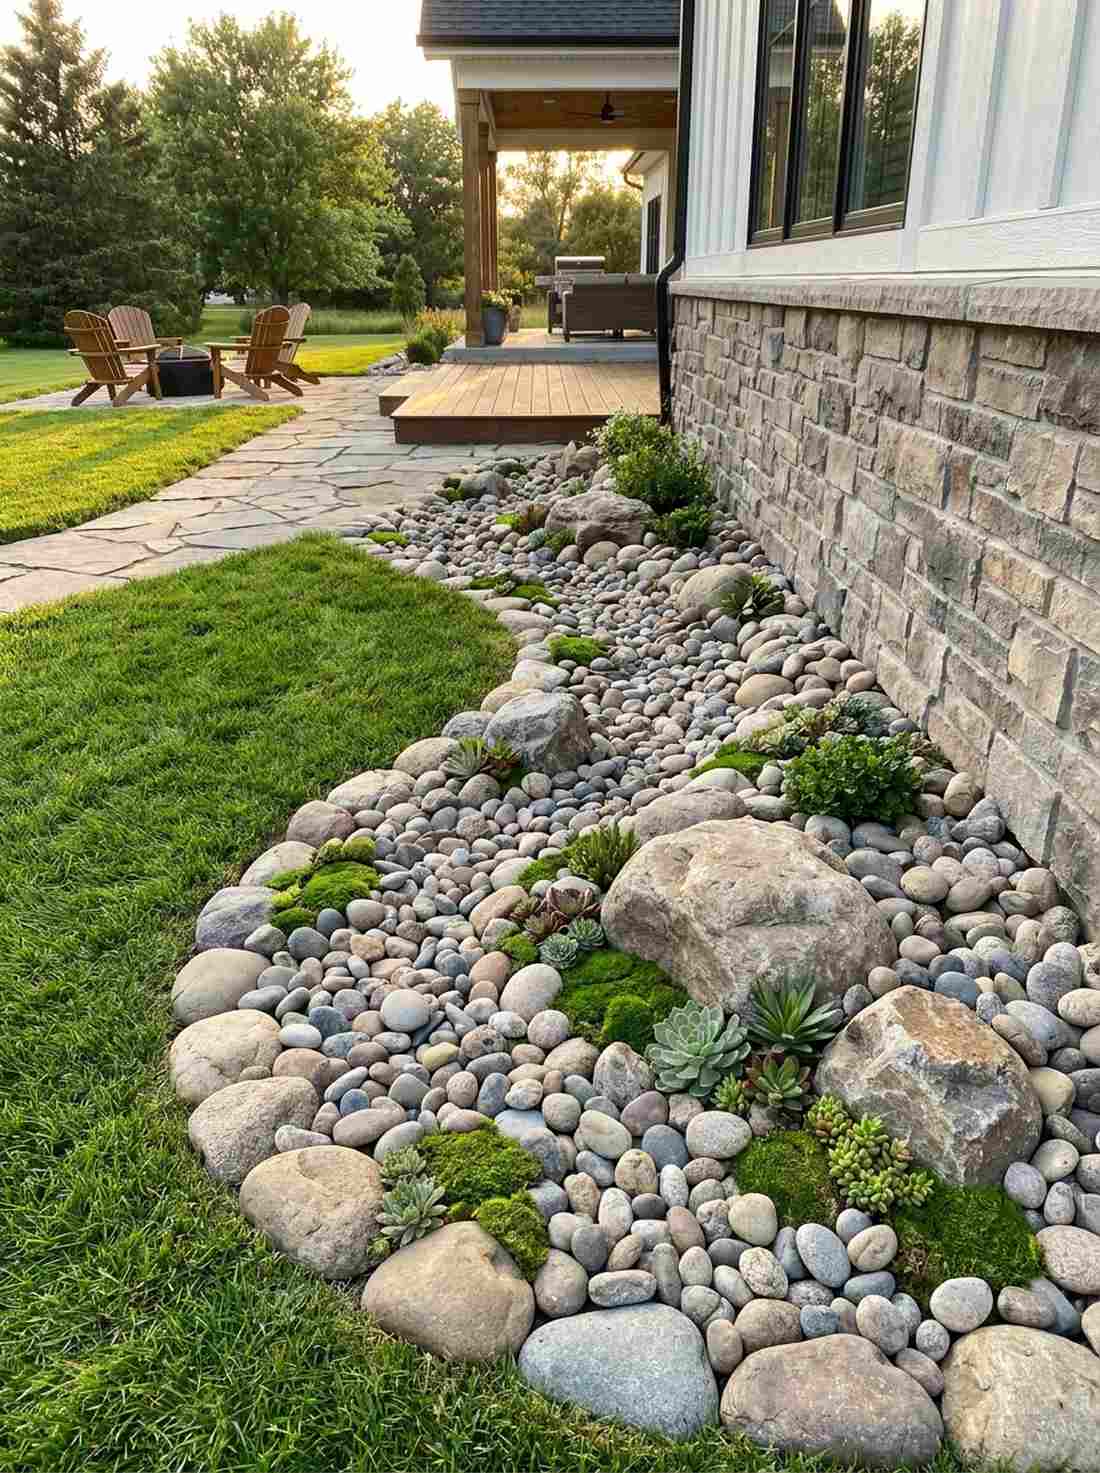
This sweeping stone bed feels exactly like a dried mountain river. A mixed-scale river rock layout works exceptionally well as a decorative border against house foundations.
Ditching uniform pebbles for a wild mix of massive cobbles and tiny stones yields a shockingly sophisticated aesthetic that mimics nature flawlessly. Integrating UV-resistant faux succulents or moss patches between the larger rocks enhances the organic forest floor illusion.
You can build this textured mosaic for $120–$200. Save this to your natural landscaping board!
- Key Materials: 1-inch to 6-inch mixed river rock
- Vibe / Style: Natural mountain stream bed
- Difficulty: Easy
- Budget Breakdown: Mixed Cobble: $150 | Weed Barrier: $30
- Creator’s Tip: Place the largest anchor rocks first, then fill the voids with progressively smaller stones.
- Smart Sourcing: Pre-mixed multi-size river rock bags and artificial outdoor moss rocks.
This next setup is ridiculously cheap but looks like a $100 custom display…
26. Fine Versus Coarse Juxtaposition
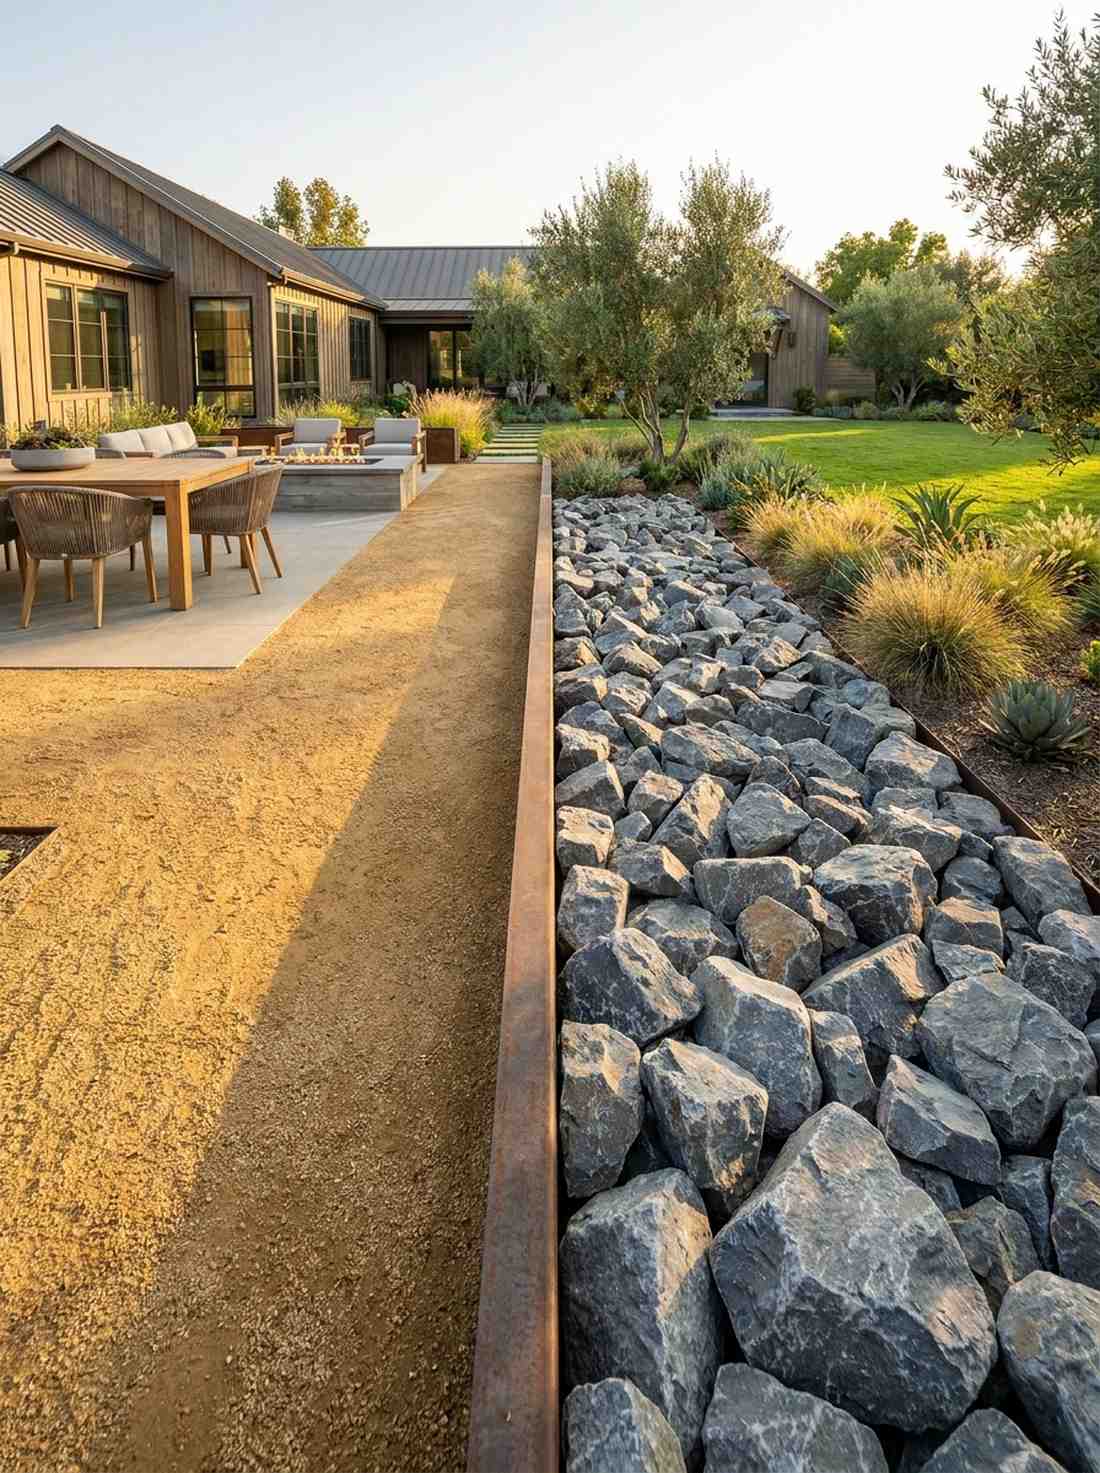
The harsh contrast here feels like a modern art installation. A split-texture stone design is perfect for separating a smooth patio dining area from rugged plant beds.
Slamming fine decomposed granite right up against massive jagged boulders creates a vibe that looks far more expensive than it is. Using a heavy steel divider ensures the tiny grains never wash into the chunky rocks during heavy rainstorms.
Recreate this high-contrast look for around $180–$250. Pin this if you love bold, architectural yard designs!
- Key Materials: Fine decomposed granite, large angular rip-rap stone
- Vibe / Style: Bold architectural contrast
- Difficulty: Intermediate
- Budget Breakdown: Fine DG: $80 | Chunky Rock: $100
- Creator’s Tip: Install a flush metal edge completely hidden beneath the stone line to maintain the sharp division.
- Smart Sourcing: Heavy-duty aluminum landscape edging and bulk rip-rap border stones.
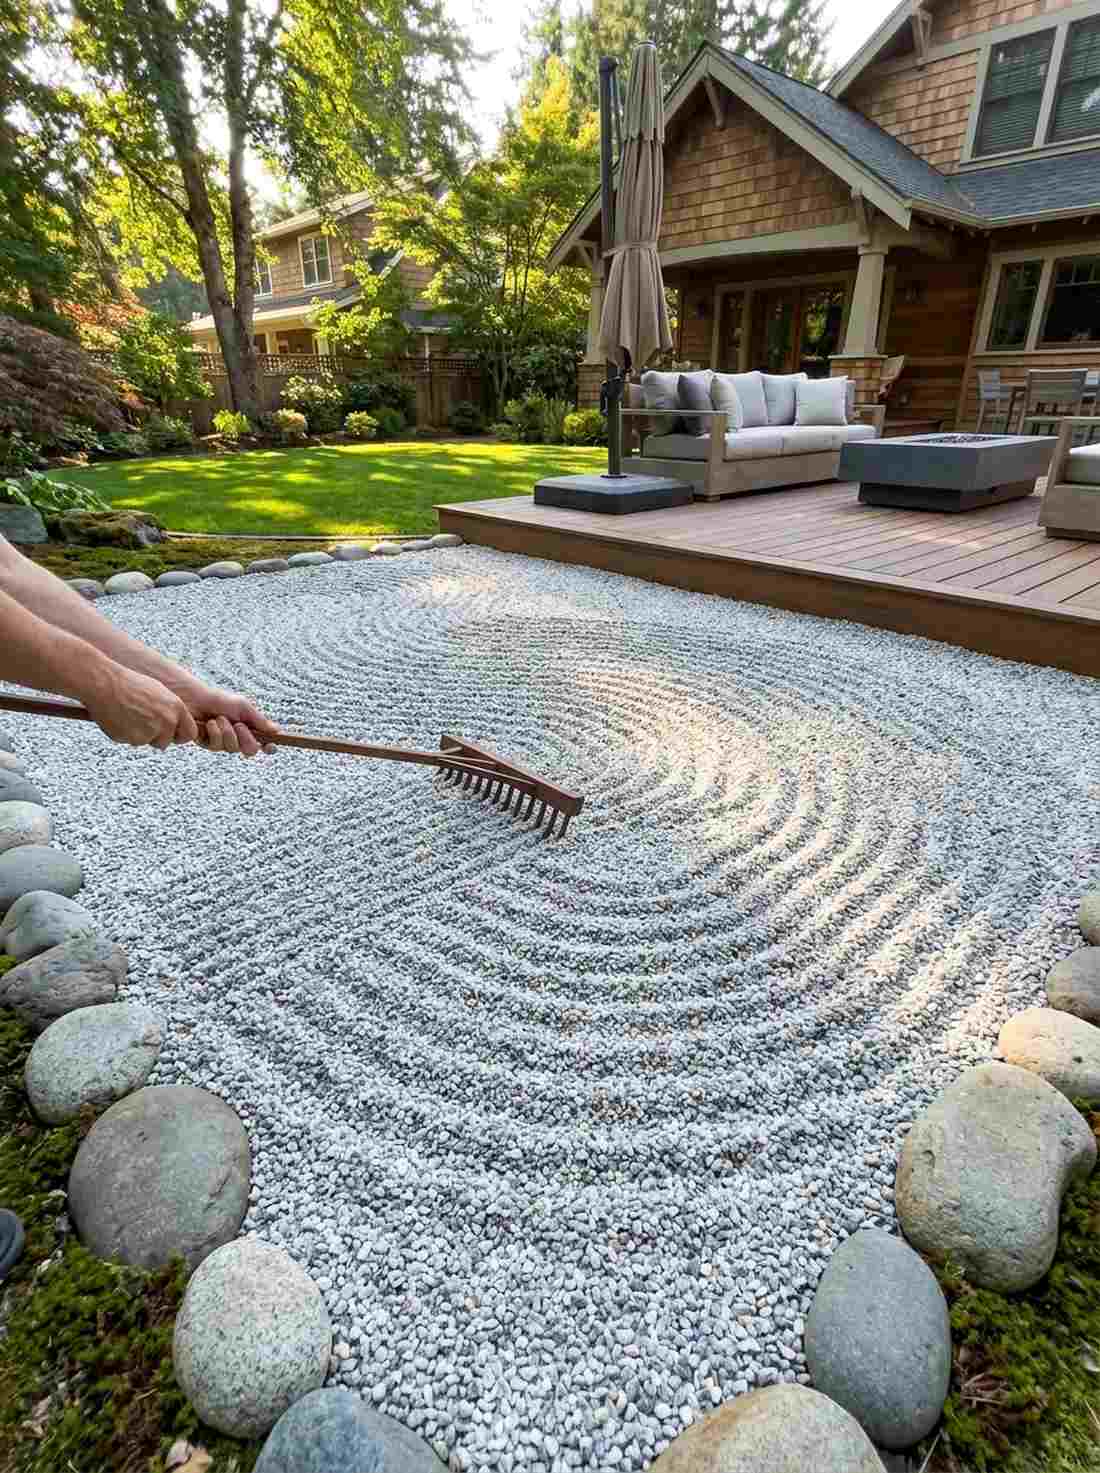
27. Raked Versus Loose Gravel
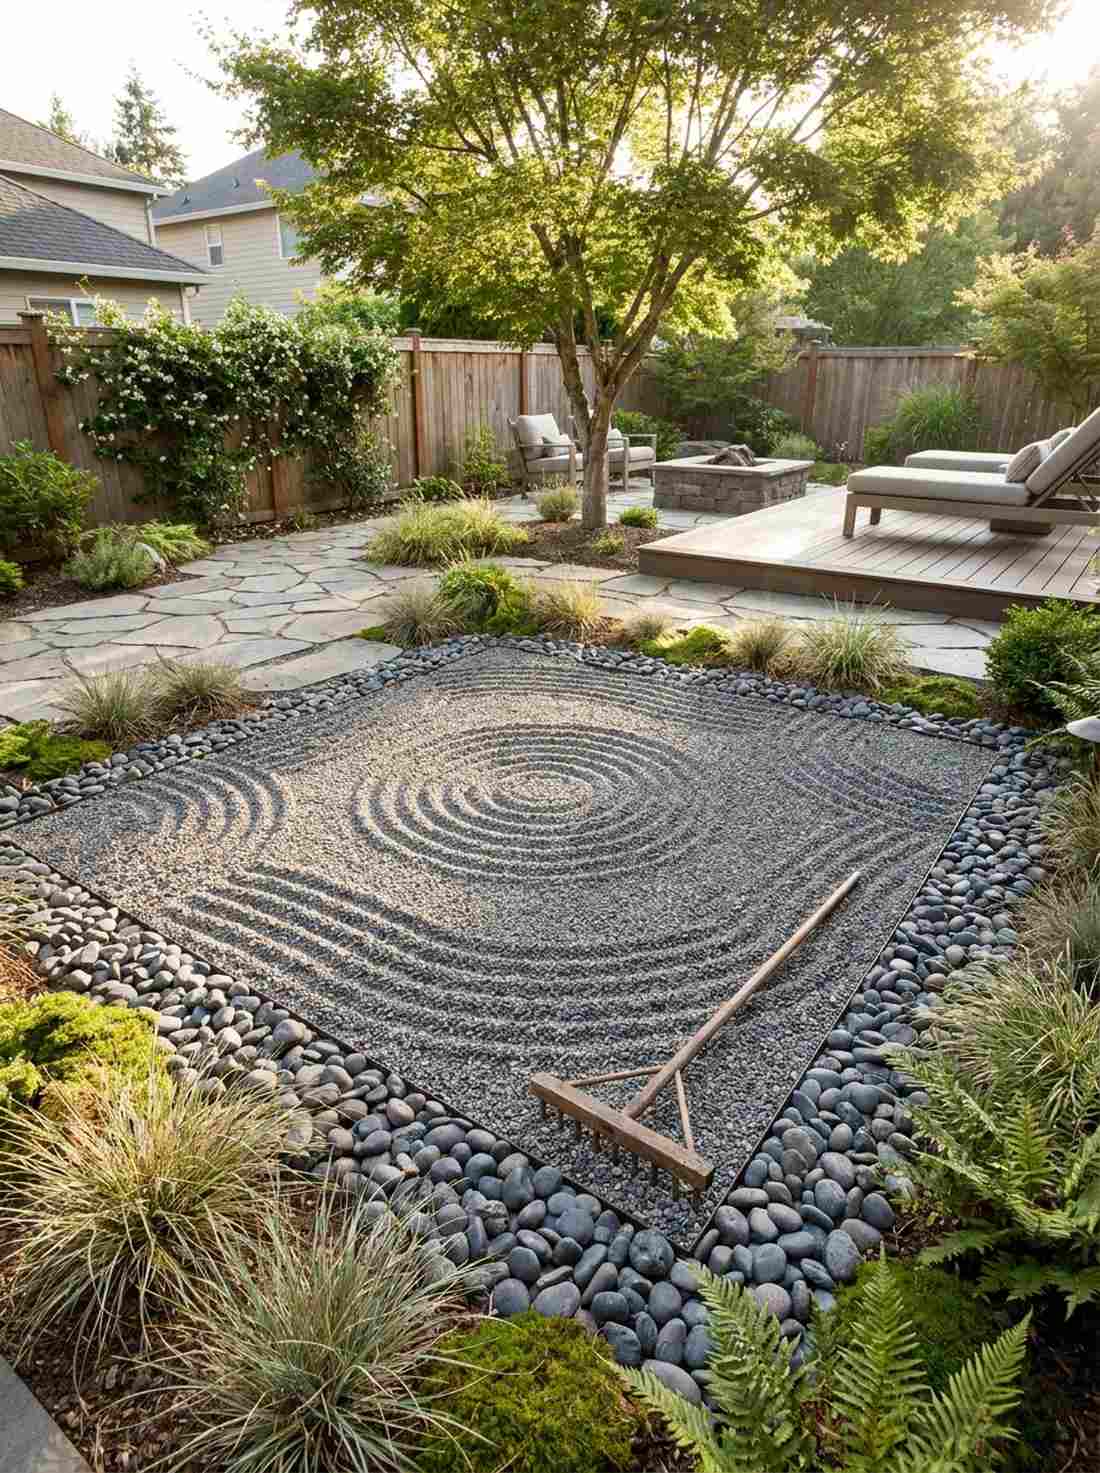
Stepping into this courtyard feels like finding a quiet temple in Kyoto. The patterned zen and loose gravel mix turns any dead yard corner into a contemplative retreat.
Leaving the edges wild while meticulously grooming the center completely transforms standard gravel, delivering a surprisingly premium look. Make sure to use highly angular crushed granite, as smooth round stones will never hold the rake lines.
You can set up this mindfulness space for under $100. It’s a fast upgrade that completely changes the yard’s energy.
- Key Materials: 1/4-inch crushed granite, traditional wooden zen rake
- Vibe / Style: Contemplative Japanese Zen
- Difficulty: Easy to setup, requires daily upkeep
- Budget Breakdown: Fine Granite: $60 | Zen Rake: $30
- Creator’s Tip: Only use 1/4-inch angular screenings; anything larger will look clunky when raked.
- Smart Sourcing: Authentic wooden Zen garden rakes and fine crushed granite bags.
28. Polished Versus Rough Stone
The glossy sheen of these dark stones feels like scattered black diamonds. Utilizing a polished pebble accent strip brings serious luxury to boring matte walkways.
Sprinkling expensive, wax-coated river stones sparingly through cheap crushed rock yields a shockingly sophisticated aesthetic. It’s the ultimate budget hack—getting the high-end resort look without paying for a full ton of premium stone.
A few accent bags will cost around $40–$60. Save this to your luxury backyard on a budget board!
- Key Materials: High-gloss polished black pebbles, matte gray base rock
- Vibe / Style: High-end luxury spa
- Difficulty: Very Easy
- Budget Breakdown: Polished Pebbles (2 bags): $50 | Matte Base: $30
- Creator’s Tip: Hose down the polished stones weekly to keep dust from ruining their glossy finish.
- Smart Sourcing: Bulk polished black river pebbles and high-gloss stone sealer.
29. Angular Versus Rounded Gravel

The functional shift here feels incredibly intuitive and smart. Combining locking angular paths with soft round beds solves both stability and aesthetic issues instantly.
Restricting shifting pea pebbles to visual garden beds while packing sharp stones into walkways creates a vibe that looks far more expensive than it is. This mechanical understanding of rock shapes prevents the classic nightmare of sinking into your own pathways.
You can divide and conquer your yard for around $200. Pin this for smart, functional hardscaping tips!
- Key Materials: Sharp crushed trap rock (paths), smooth river pebbles (beds)
- Vibe / Style: Highly functional transitional
- Difficulty: Intermediate
- Budget Breakdown: Crushed Rock: $100 | Smooth Pebble: $100
- Creator’s Tip: Always compact the angular path stone with water and a heavy tamper before applying the final top layer.
- Smart Sourcing: Bulk sharp crushed trap rock and heavy-duty hand tampers.
30. Layered Color Bands
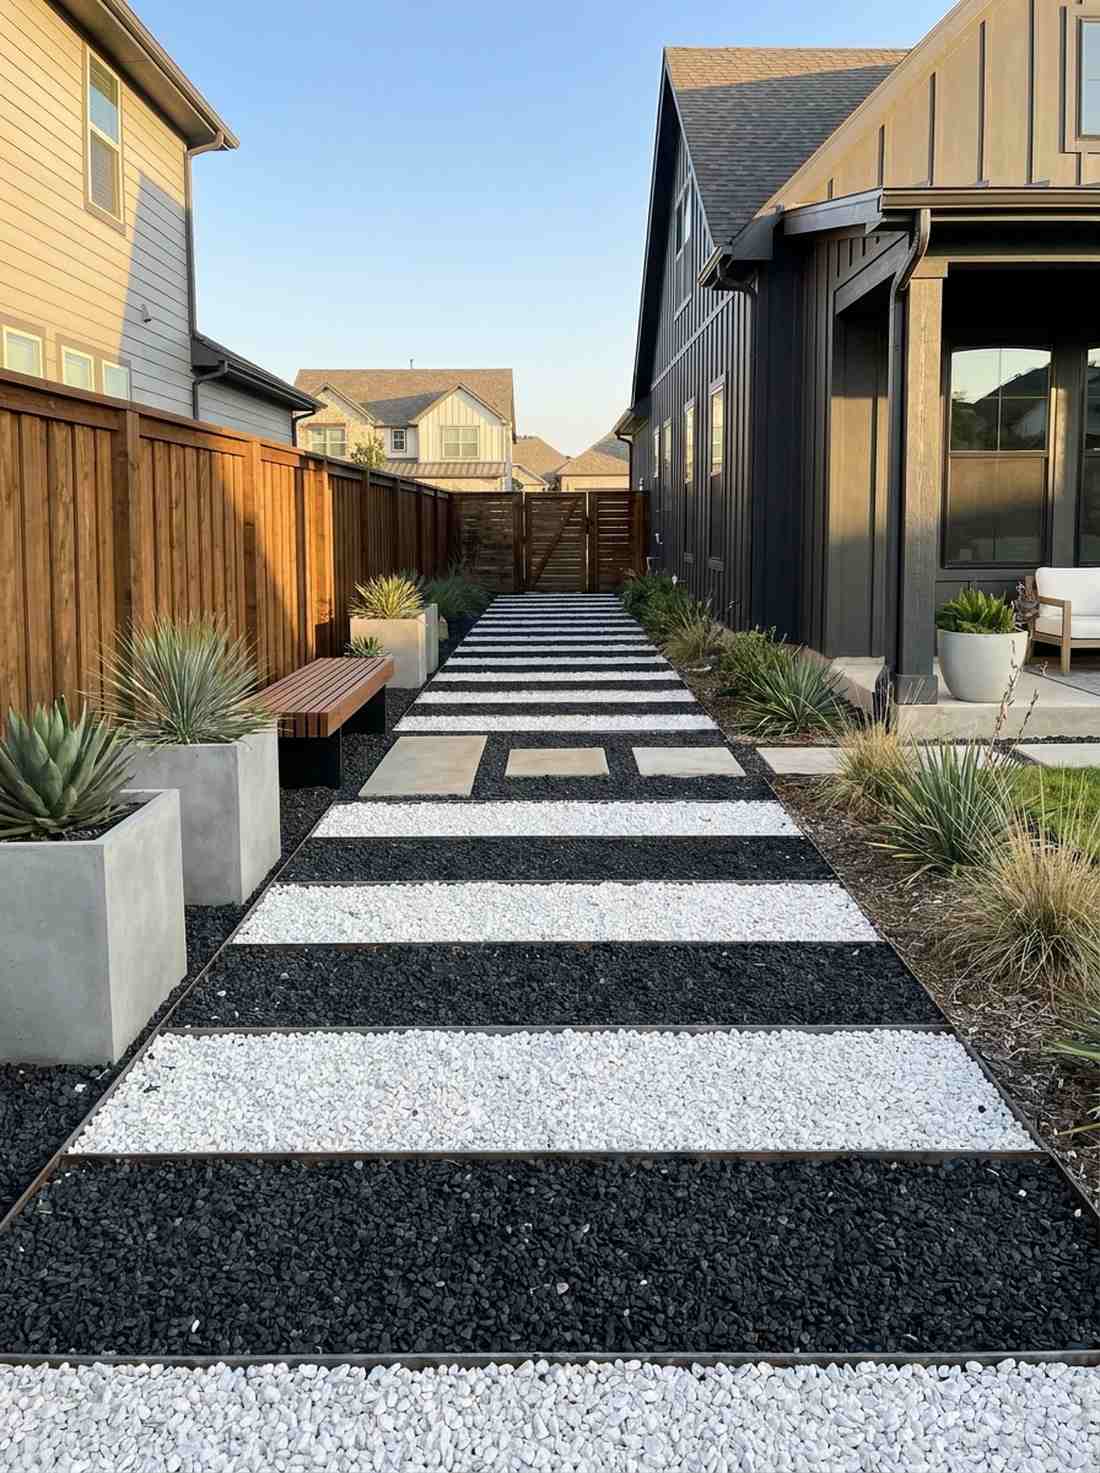
Viewing this space from above feels like looking at a bold modern painting. The striped gravel color banding is a phenomenal way to make a narrow side yard feel much wider.
Laying alternating thick stripes of contrasting stone delivers a surprisingly premium look that feels highly customized. You must bury stiff metal dividers between each color, otherwise foot traffic will blend them into a messy gray soup within weeks.
Achieve this graphic look for roughly $200–$300. Highly recommended for a striking contemporary upgrade.
- Key Materials: Black and white contrasting gravel, rigid metal dividers
- Vibe / Style: Graphic contemporary
- Difficulty: Advanced (requires perfect leveling)
- Budget Breakdown: Contrasting Stones: $160 | Metal Dividers: $90
- Creator’s Tip: Run the stripes horizontally across narrow spaces to trick the eye into seeing more width.
- Smart Sourcing: Rigid steel landscaping strips and contrasting bulk rock bags.
Most people get this completely wrong… until they try the exact layout coming up next.
Functional Outdoor Living Spaces with Gravel
31. Gravel Dining Terrace
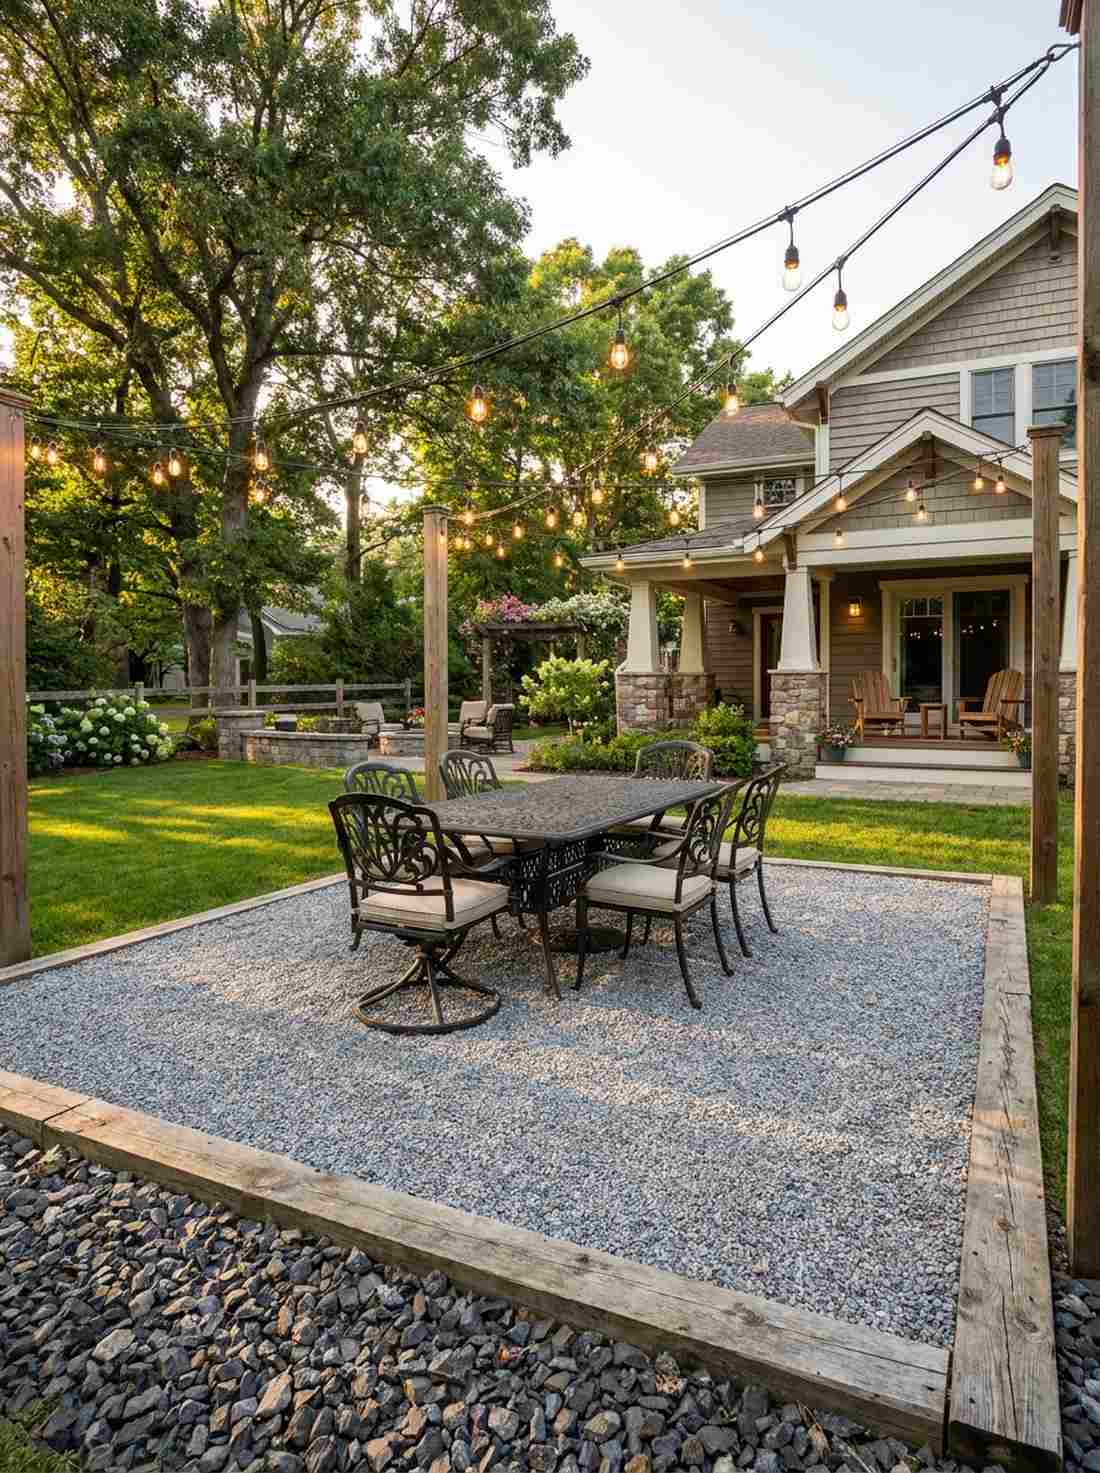
Dining out here feels like eating at a rustic vineyard café in Tuscany. A crushed stone outdoor dining floor handles heavy cast-iron furniture without the cost of a concrete slab.
Packing down four inches of jagged base rock topped with fine granite yields a shockingly sophisticated aesthetic that won’t let chair legs sink. Toss up some commercial-grade outdoor string lights above the table to seal the cozy evening vibe.
You can build this dining foundation for $150–$250. Save this to your outdoor entertaining board!
- Key Materials: 3/4-inch crushed base rock, fine top granite
- Vibe / Style: Casual vineyard dining
- Difficulty: Intermediate (heavy digging/tamping)
- Budget Breakdown: Base Rock: $80 | Top Granite: $90
- Creator’s Tip: Use a plate compactor—hand tamping won’t make the surface hard enough for thin chair legs.
- Smart Sourcing: Vibratory plate compactor rentals and commercial outdoor string lights.
32. Fire Pit Gathering Area
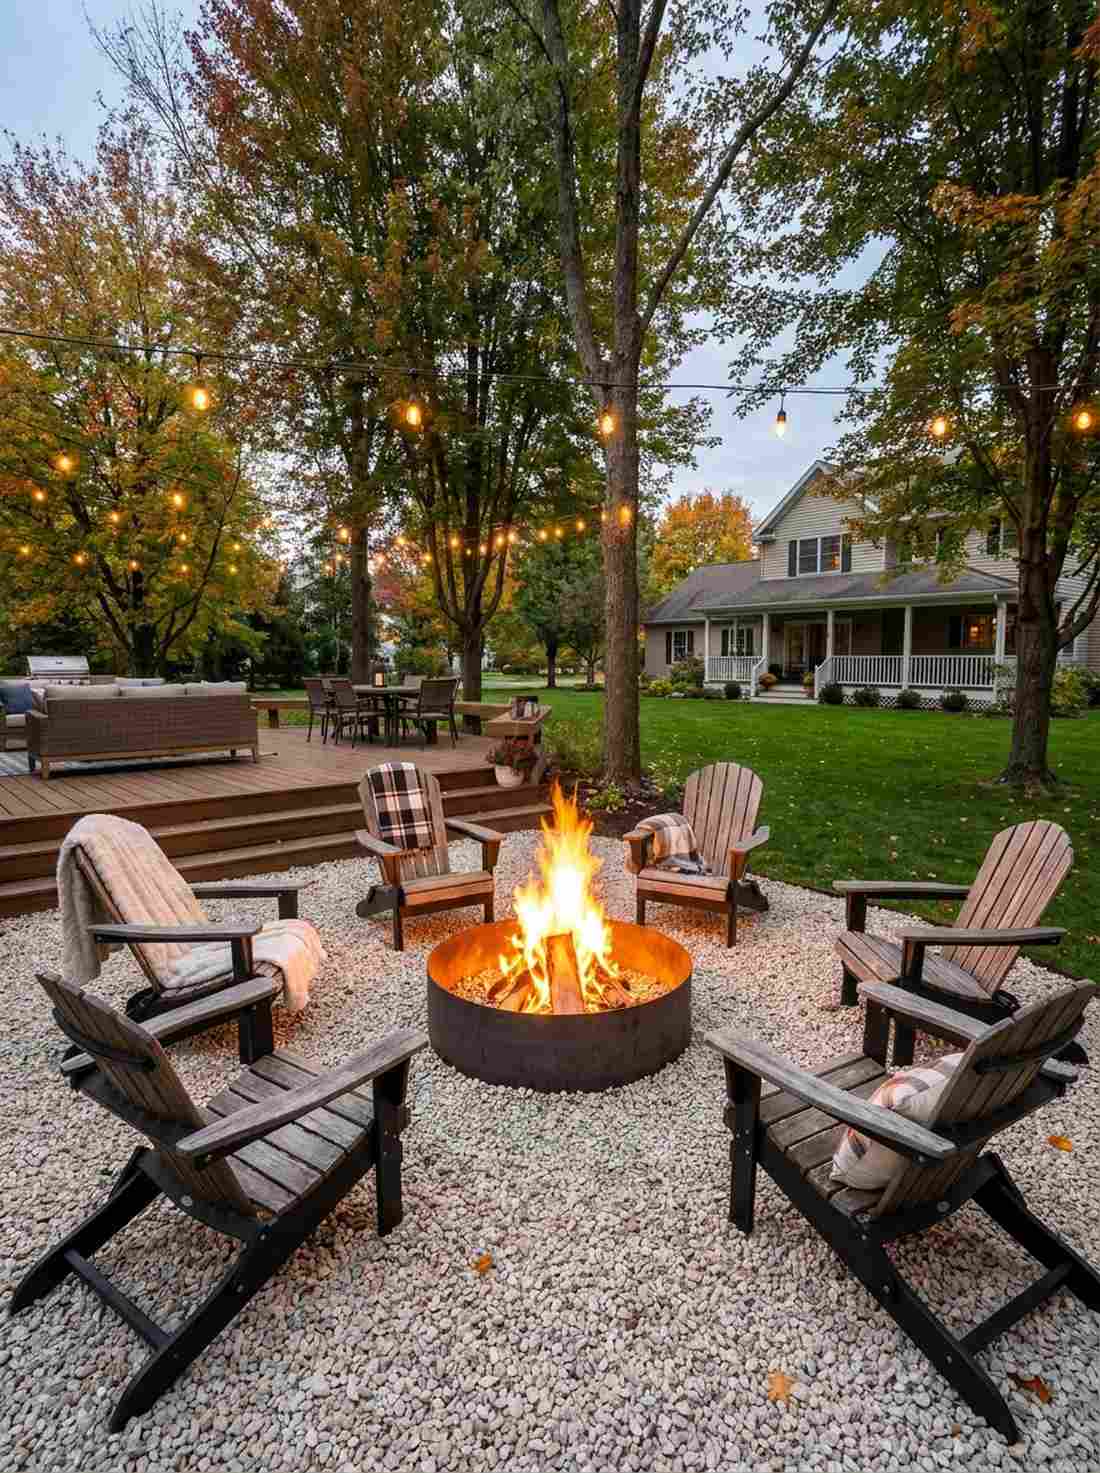
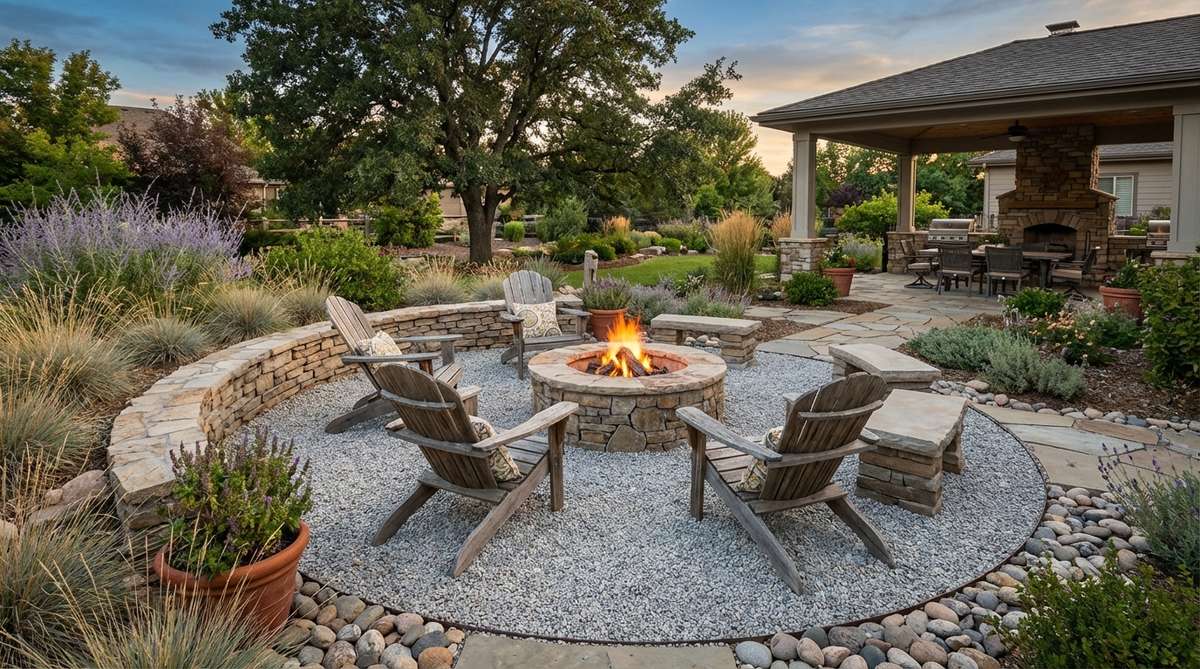
Sitting around this roaring fire feels safe, cozy, and effortlessly stylish. A circular gravel fire pit zone is the absolute best fire-safe flooring for a backyard lounge.
Using non-combustible pale stones completely eliminates the hazard of flying sparks, creating a vibe that looks far more expensive than it is. Ensure you lay heavy weed fabric down first to keep the lounge area free of messy overgrowth.
Build out a massive 15-foot circle for about $200. Pin this for the ultimate fall backyard project!
- Key Materials: Pale crushed limestone, metal fire pit ring
- Vibe / Style: Modern campfire lounge
- Difficulty: Easy
- Budget Breakdown: Limestone: $120 | Fire Ring: $80
- Creator’s Tip: Use bright, light-colored gravel so the seating area reflects the fire’s glow and remains visible at night.
- Smart Sourcing: Heavy-duty steel fire pit rings and bulk pale limestone gravel.
33. Outdoor Kitchen Foundation
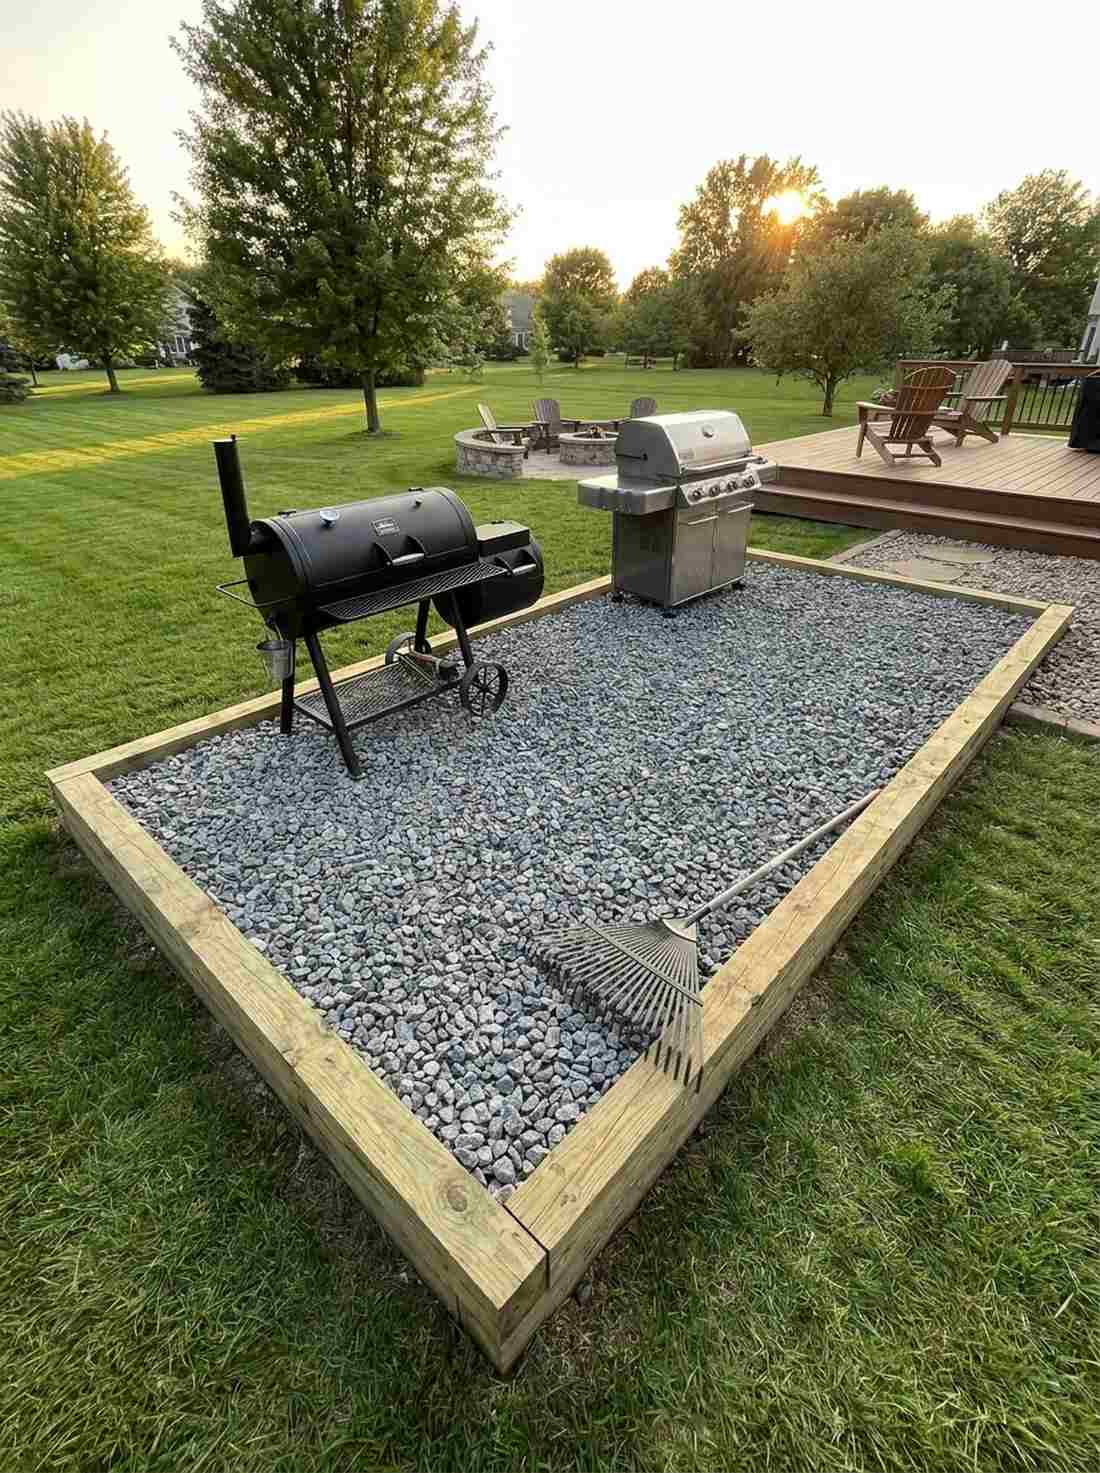
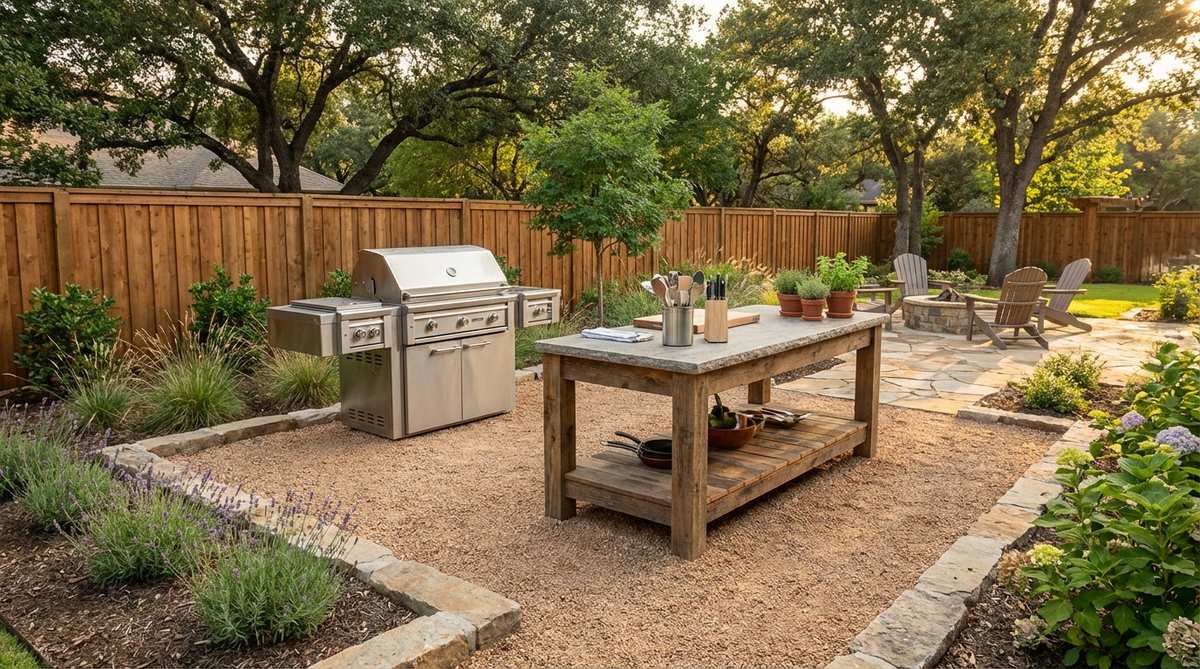
Flipping burgers here feels like cooking in a professional outdoor test kitchen. The heavy-duty gravel grill pad easily absorbs grease splatters that would permanently ruin expensive pavers.
Boxing out a cooking zone with thick landscape timbers and filling it with angular rock delivers a surprisingly premium look while providing massive weight-bearing capacity for heavy smokers. It is incredibly easy to level, ensuring your grill grease traps work perfectly.
Setup this kitchen base for under $100. It’s a fast upgrade that completely changes your BBQ game.
- Key Materials: Pressure-treated timbers, chunky utility gravel
- Vibe / Style: Rugged pitmaster station
- Difficulty: Easy
- Budget Breakdown: Timbers: $40 | Utility Rock: $50
- Creator’s Tip: Keep a wide metal rake nearby to quickly flip the top layer of stones if a major grease spill occurs.
- Smart Sourcing: Heavy-duty landscape timbers and steel bow rakes.
34. Meditation Sitting Circle
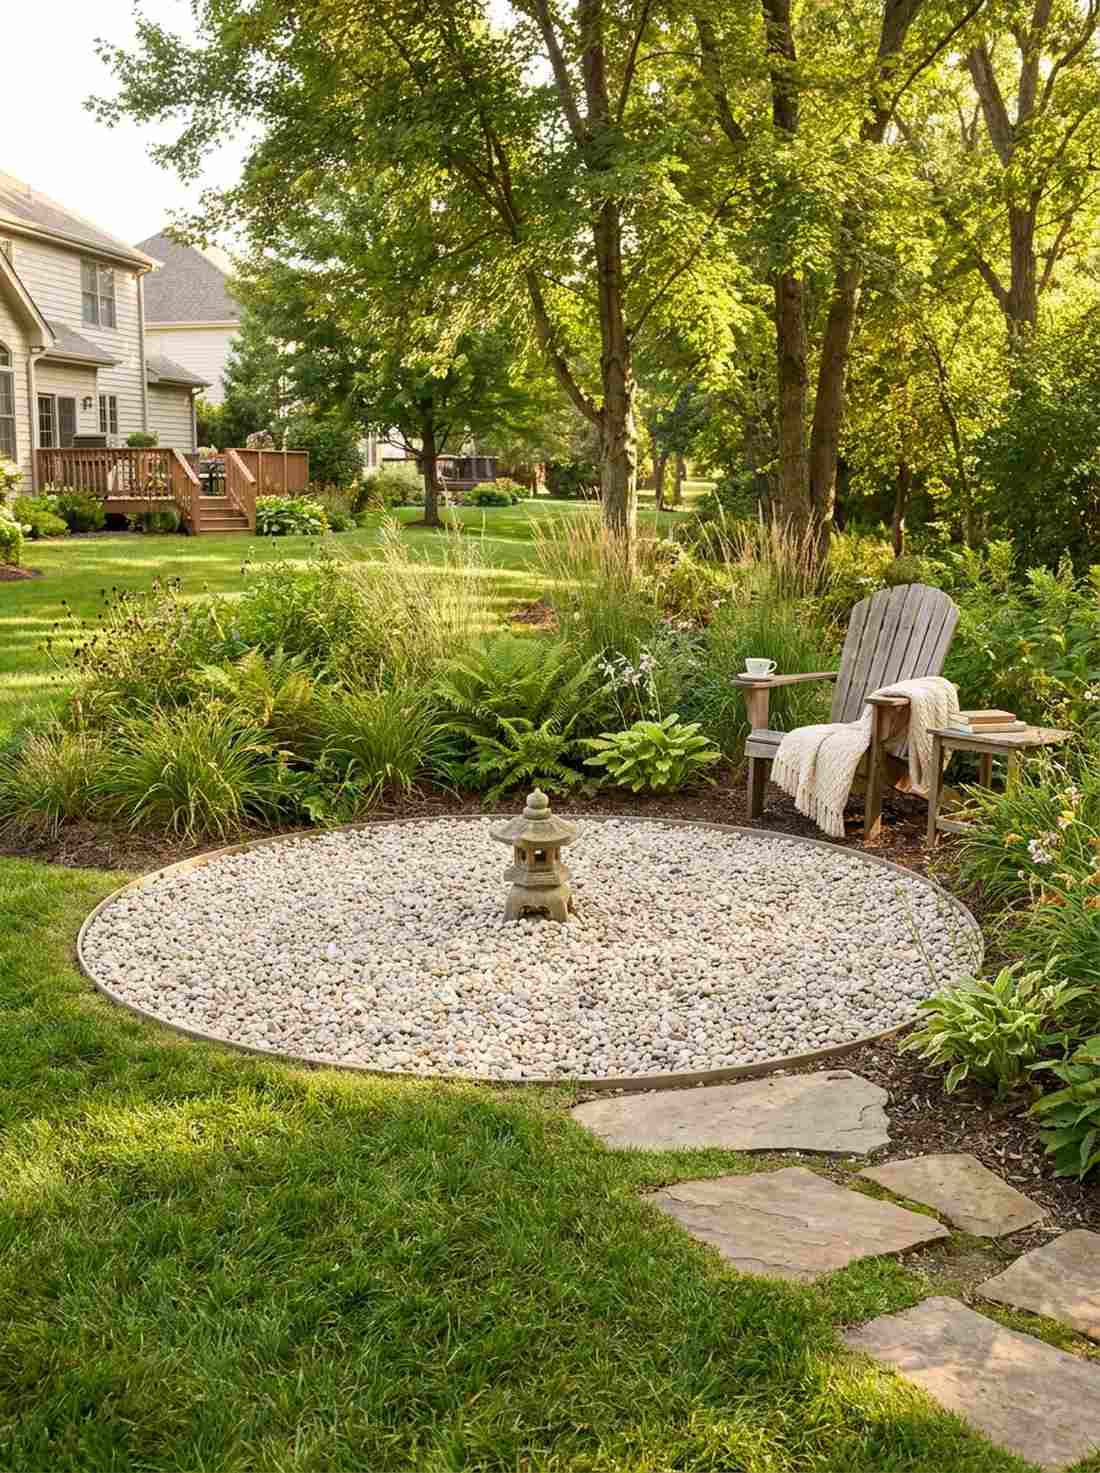
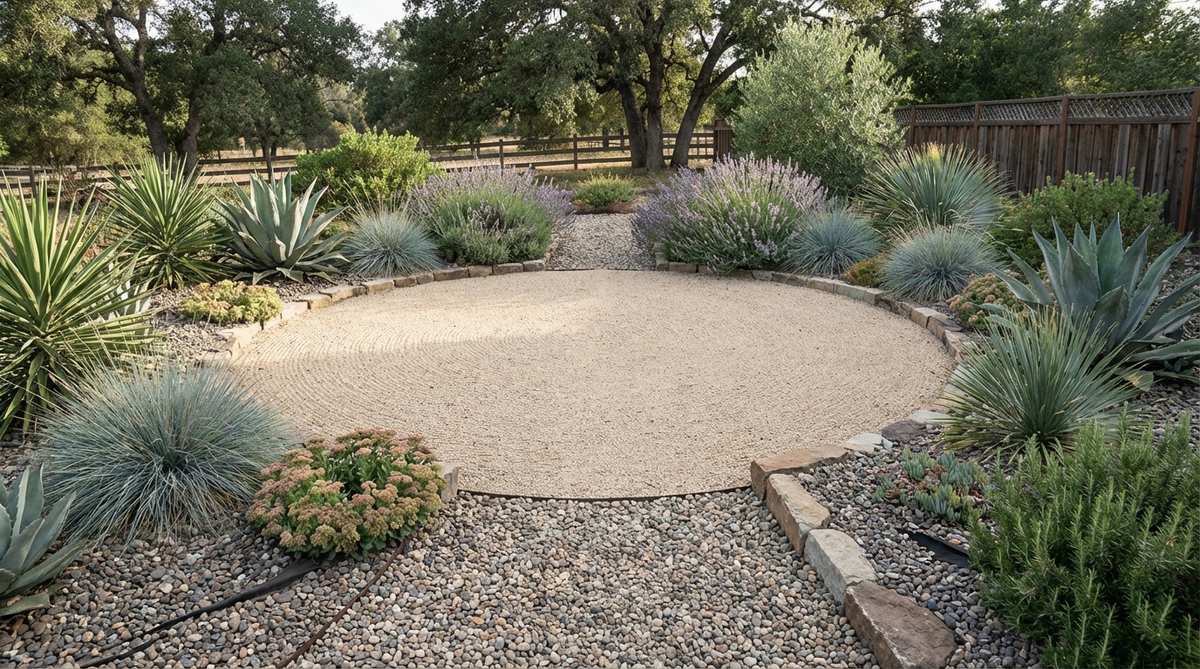
Breathing in this space feels like the world has completely slowed down. A minimalist gravel meditation ring carved into a wild garden creates instant psychological calm.
Stripping away grass to expose a perfect circle of smooth, pale pebbles yields a shockingly sophisticated aesthetic that requires zero water. Adding a single premium fairy garden kit focal point, like a tiny stone pagoda, anchors the energy of the circle.
You can construct this peaceful zone for $50–$80. Save this for your mental health sanctuary board!
- Key Materials: Fine pale river pebbles, circular lawn edging
- Vibe / Style: Tranquil woodland retreat
- Difficulty: Very Easy
- Budget Breakdown: Edging: $20 | Pebbles: $40
- Creator’s Tip: Mark a perfect circle by tying a string to a center stake and using spray paint on the other end to draw the perimeter.
- Smart Sourcing: Miniature stone pagoda lanterns and flexible circular garden edging.
35. Children Play Zone
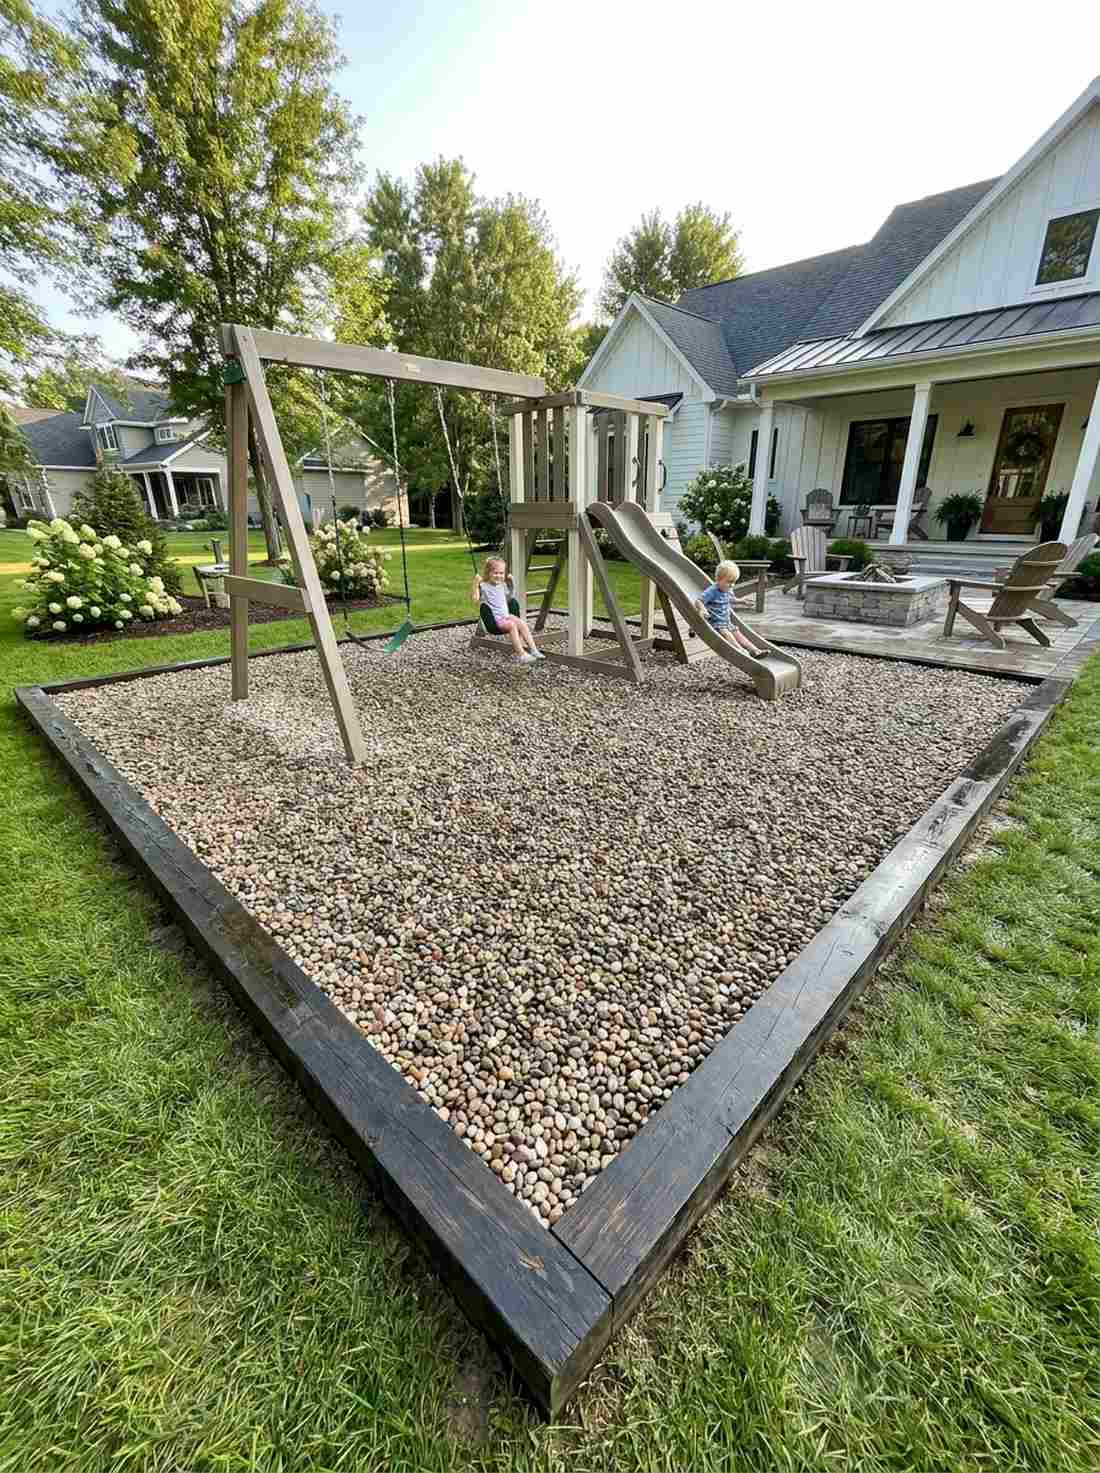
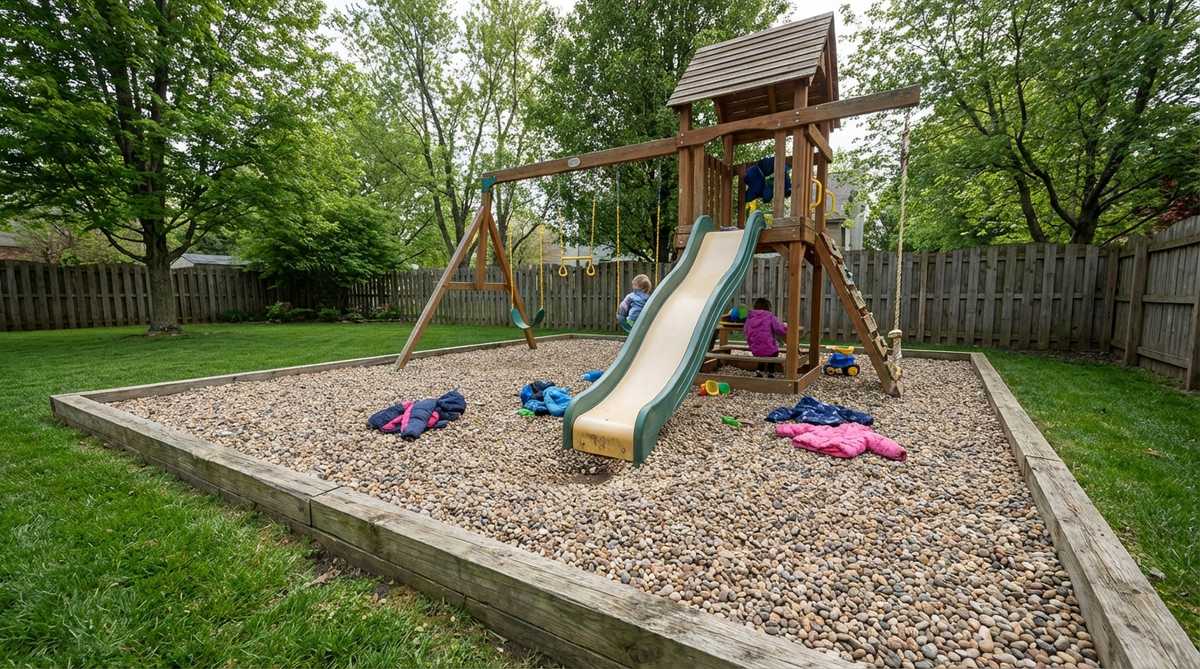
Watching kids play here feels incredibly safe and practically mud-free. The deep pea gravel play surface offers fantastic shock absorption beneath swings and slides.
While wood mulch rots and splinters, a thick 8-inch layer of rounded pebbles creates a vibe that looks far more expensive than it is and lasts forever. It drains instantly after rainstorms, meaning playtime isn’t delayed by massive mud puddles.
A large play area will cost roughly $200–$350 in bulk stone. Highly recommended for busy families.
- Key Materials: 3/8-inch smooth pea gravel, deep timber borders
- Vibe / Style: Clean modern playground
- Difficulty: Moderate (moving a lot of stone)
- Budget Breakdown: Bulk Pea Gravel: $200 | Border Timbers: $80
- Creator’s Tip: You absolutely must install at least 6-8 inches of depth to get the proper safety cushioning effect.
- Smart Sourcing: Bulk smooth washed pea gravel and heavy-duty playground border timbers.
Material Guide: Cheap vs. Premium Aesthetic
Knowing exactly where to save and where to spend makes all the difference in achieving that “looks expensive but isn’t” vibe.
- Standard vs. UV-Resistant/Premium: Cheap plastic edging warps and fades in the sun. Upgrading to UV-coated flexible steel keeps borders razor-sharp for decades.
- Pre-made Kits vs. Sourcing Locally: While local rock yards save you money on heavy gravel, using premium starter kits for grids, borders, and weed barriers prevents the entire project from sinking into the mud.
This next setup is ridiculously cheap but looks like a $100 custom display…
36. Dog Run Surfacing
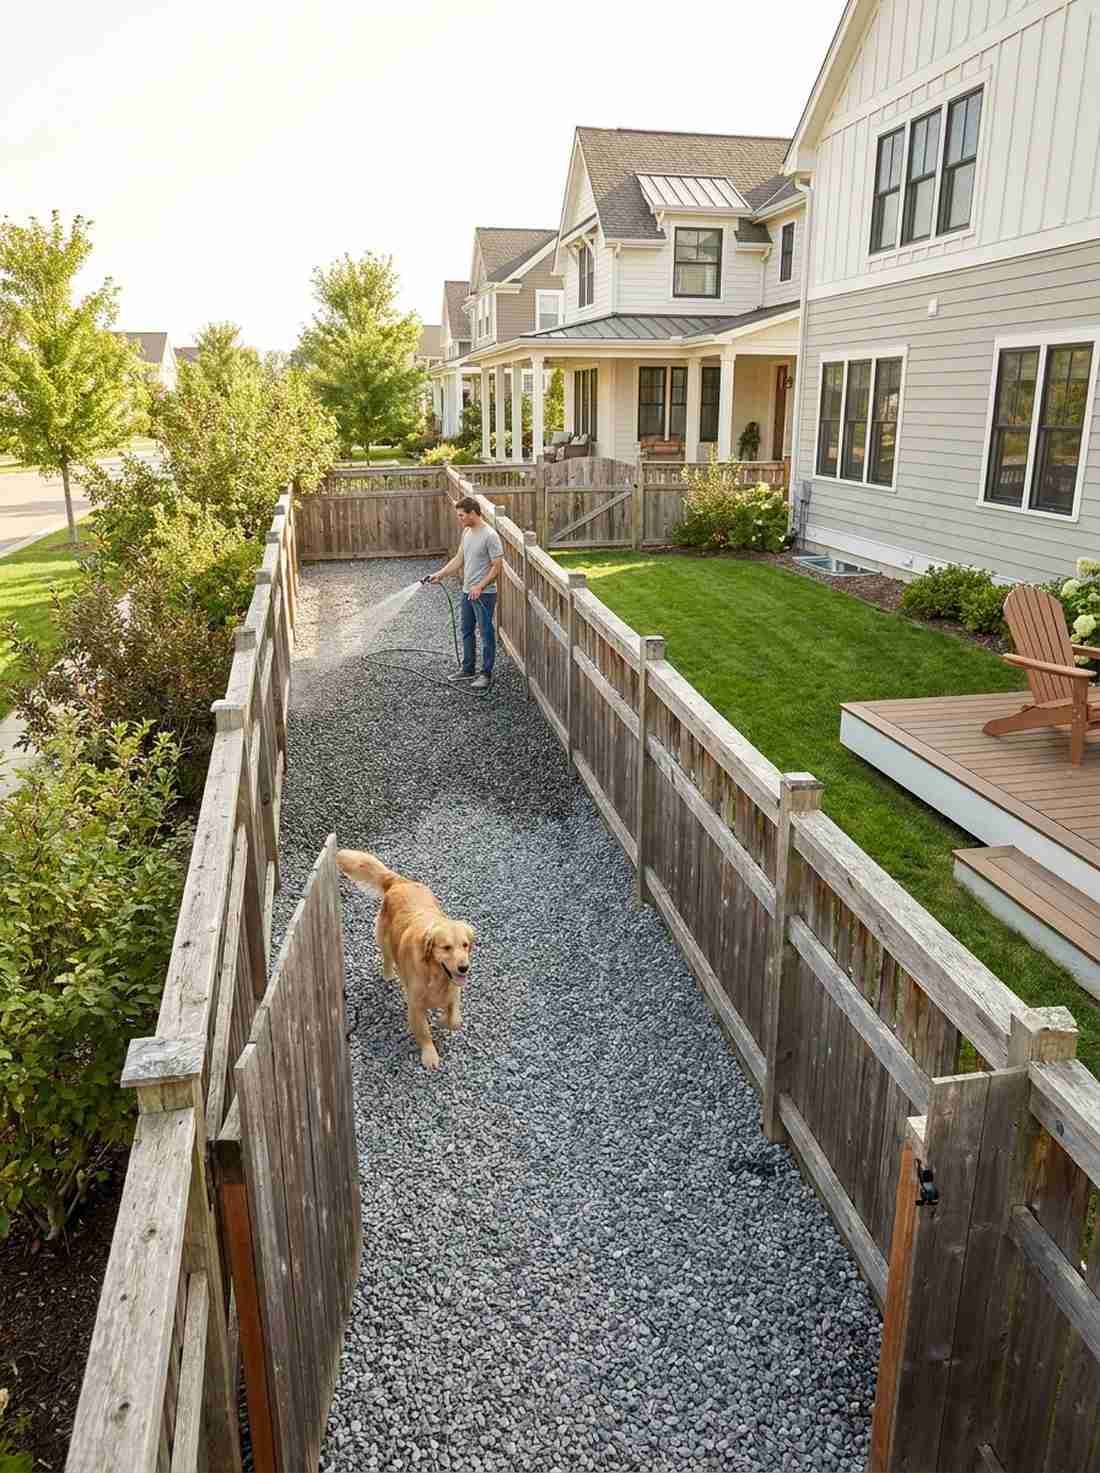
Letting the dogs out here feels sanitary, clean, and completely odor-free. A crushed stone pet exercise run is the ultimate hack for eliminating muddy paw prints in the house.
Ditching patchy, urine-burned grass for draining utility stone yields a shockingly sophisticated aesthetic that is ridiculously easy to hose down. Just ensure you use 3/4-inch rock—anything smaller gets stuck between sensitive paw pads.
You can floor a side-yard dog run for about $100–$150. Pin this to your pet-friendly home hacks board!
- Key Materials: 3/4-inch crushed draining stone, odor-neutralizing spray
- Vibe / Style: Utilitarian pet resort
- Difficulty: Easy
- Budget Breakdown: Utility Rock: $100 | Yard Deodorizer: $20
- Creator’s Tip: Slope the dirt grade slightly away from the house before laying the stone so urine washes away quickly during rain.
- Smart Sourcing: Bulk 3/4-inch utility drainage stone and outdoor pet yard odor eliminators.
Asian-Inspired Gravel Garden Features
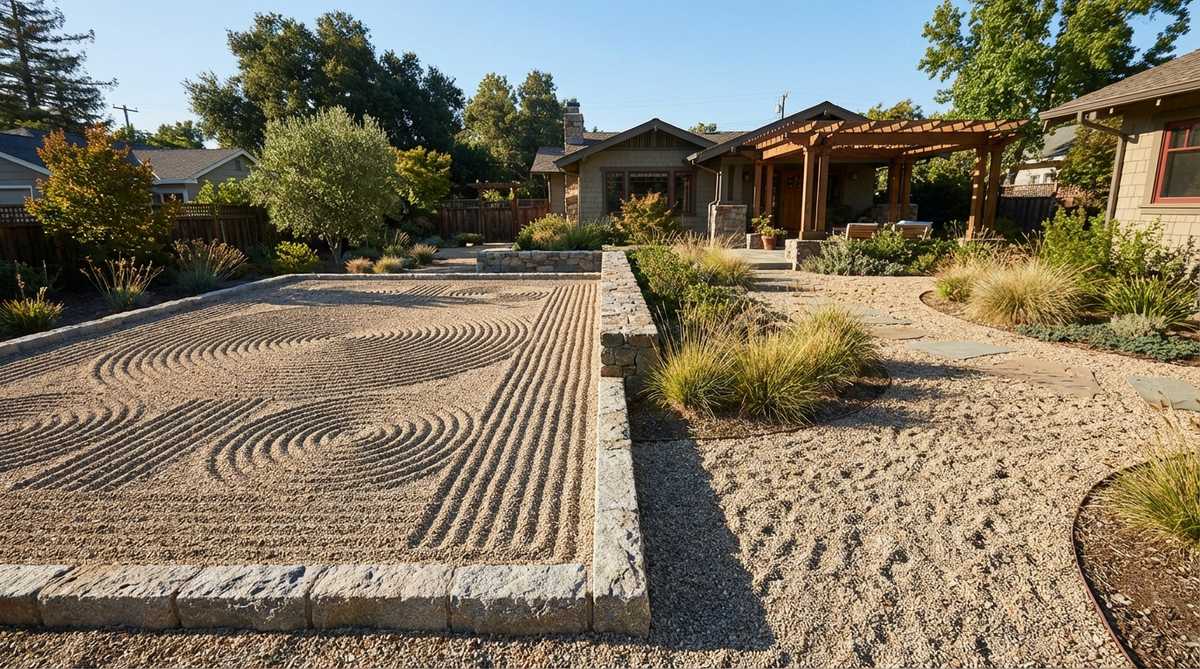
37. Zen Raked Gravel Court
Pulling the rake through these stones feels like washing away all your daily stress. A dry landscape zen ripple bed turns an unused patio corner into a striking piece of interactive art.
Using highly angular granite screenings perfectly captures crisp shadow lines, delivering a surprisingly premium look that soft sand simply cannot hold. Keep this area strictly protected from falling leaves to maintain the illusion of flowing water.
Create this interactive feature for around $60. It’s a fast upgrade that completely changes the vibe.
- Key Materials: Fine white/gray granite screenings, specialized wooden rake
- Vibe / Style: Authentic Kyoto courtyard
- Difficulty: Easy to build, high maintenance to keep pristine
- Budget Breakdown: Fine Granite: $40 | Zen Rake: $20
- Creator’s Tip: Rake in continuous, unbroken lines to mimic the calm, continuous flow of ocean waves.
- Smart Sourcing: Authentic deep-tine Zen rakes and fine granite screenings bags.
38. Moss and Gravel Integration
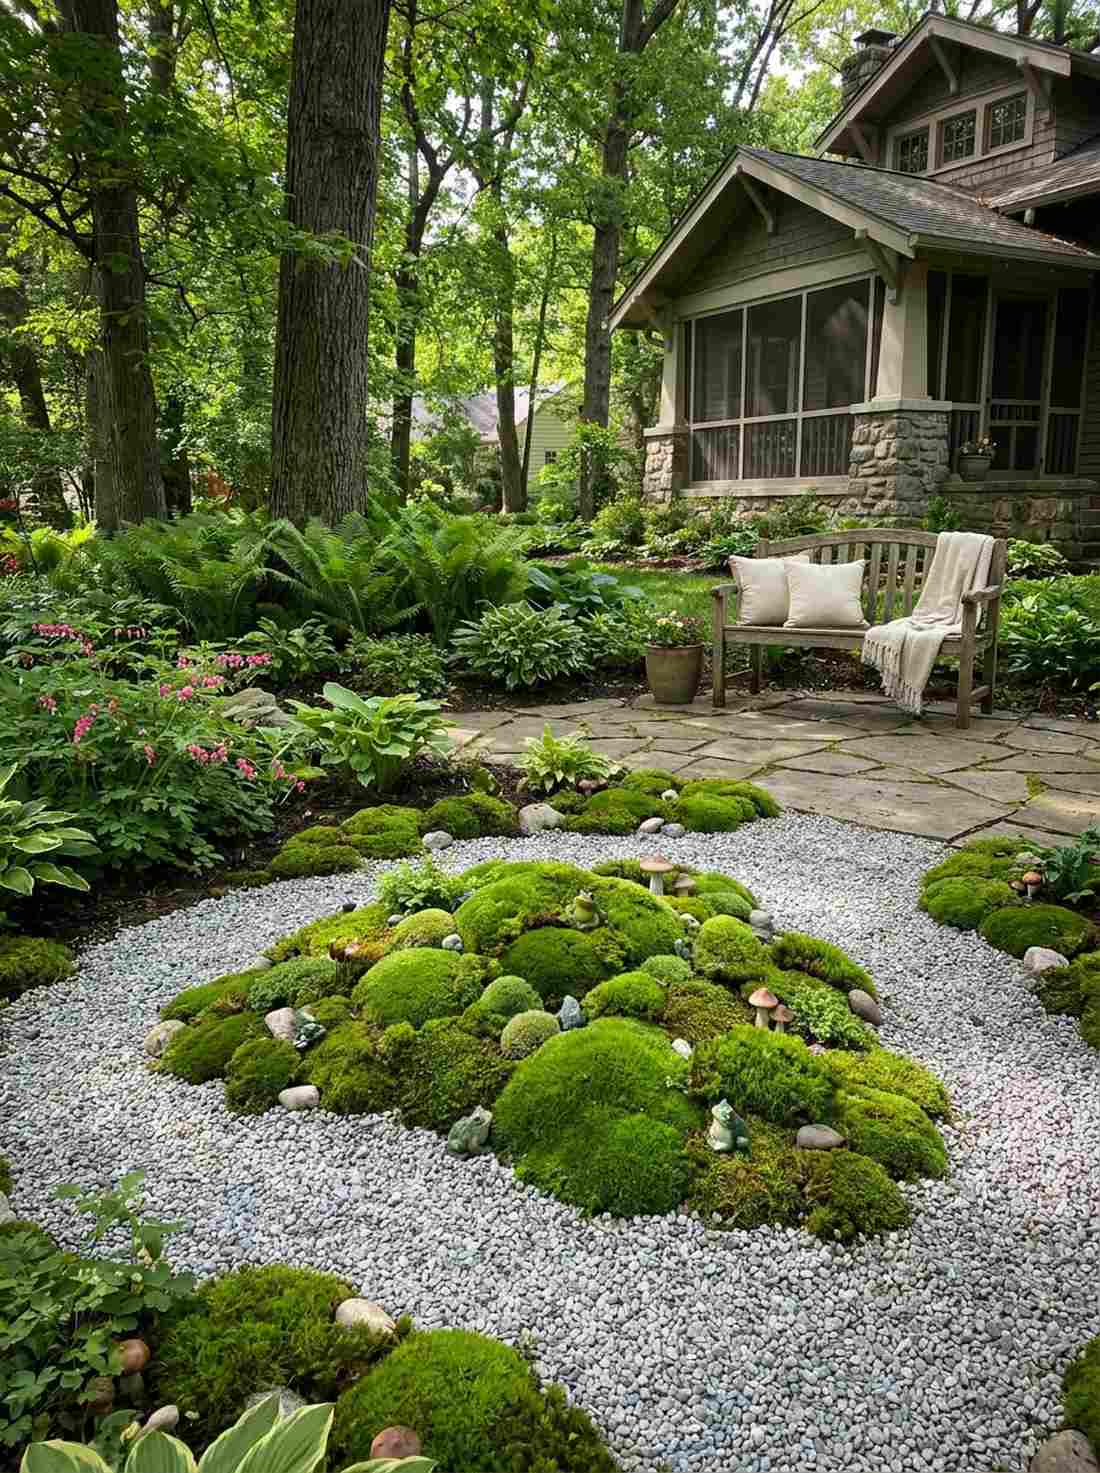
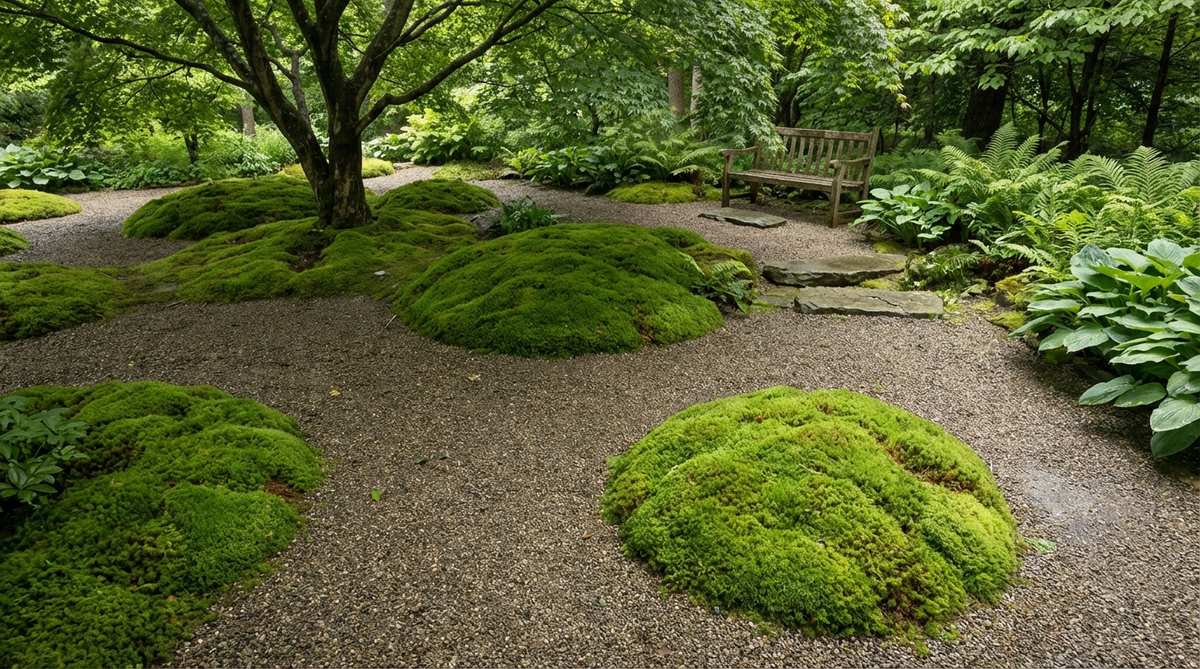
This lush green contrast feels like a miniature enchanted forest floor. A moss island gravel display is the absolute perfect centerpiece for a damp, heavy-shade garden.
Encouraging soft moss to push up through rigid stone yields a shockingly sophisticated aesthetic that bridges the gap between mineral and organic. Mixing in high-end terrarium accessories or tiny ceramic frogs amplifies the magical, woodland aesthetic.
You can establish these living mounds for $40–$70. Pin this if you love mystical, shaded garden corners!
- Key Materials: Live moss slurries/patches, 1-inch fine gravel layer
- Vibe / Style: Mystical ancient woodland
- Difficulty: Advanced (requires perfect moisture control)
- Budget Breakdown: Moss Starters: $40 | Fine Gravel: $20
- Creator’s Tip: Keep the gravel layer extremely thin (under 1 inch) so the moss spores can easily reach the damp soil below.
- Smart Sourcing: Live shade moss starter kits and miniature terrarium animal figurines.
39. Boulder Grouping Arrangements

Sitting across from these stones feels like admiring mountains rising from a sea of fog. A triangular boulder focal arrangement completely anchors the visual weight of a flat yard.
Applying the Japanese rule of odd-numbered groupings (3, 5, or 7) creates a vibe that looks far more expensive than scattered, random rocks. Burying the base of each stone makes them look ancient, heavy, and permanently rooted to the earth.
Sourcing quality accent boulders costs about $150–$300. Save this to your high-end landscape architecture board!
- Key Materials: 3 distinctly sized boulders, contrasting gravel sea
- Vibe / Style: Structural Japanese minimalism
- Difficulty: Moderate (heavy lifting)
- Budget Breakdown: Boulders: $200 | Base Gravel: $50
- Creator’s Tip: Place the largest “Father” stone first, then arrange the smaller support stones looking inward toward it.
- Smart Sourcing: Faux lightweight landscape boulders and heavy-duty steel pry bars.
40. Bamboo and Gravel Pairing
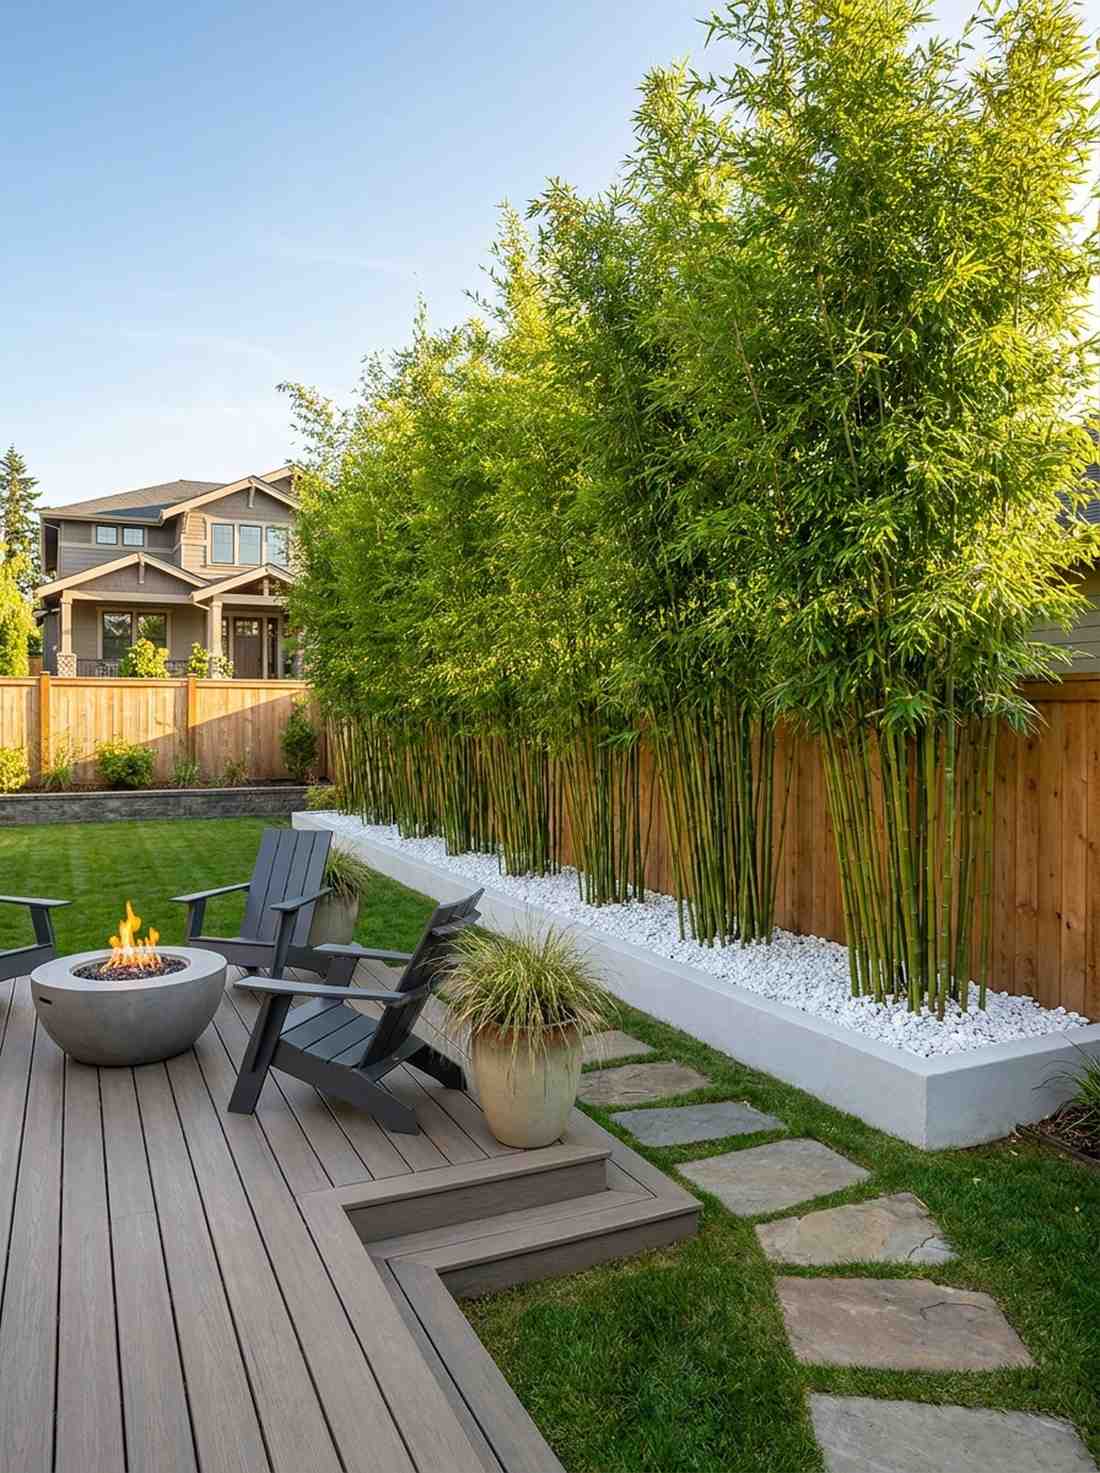
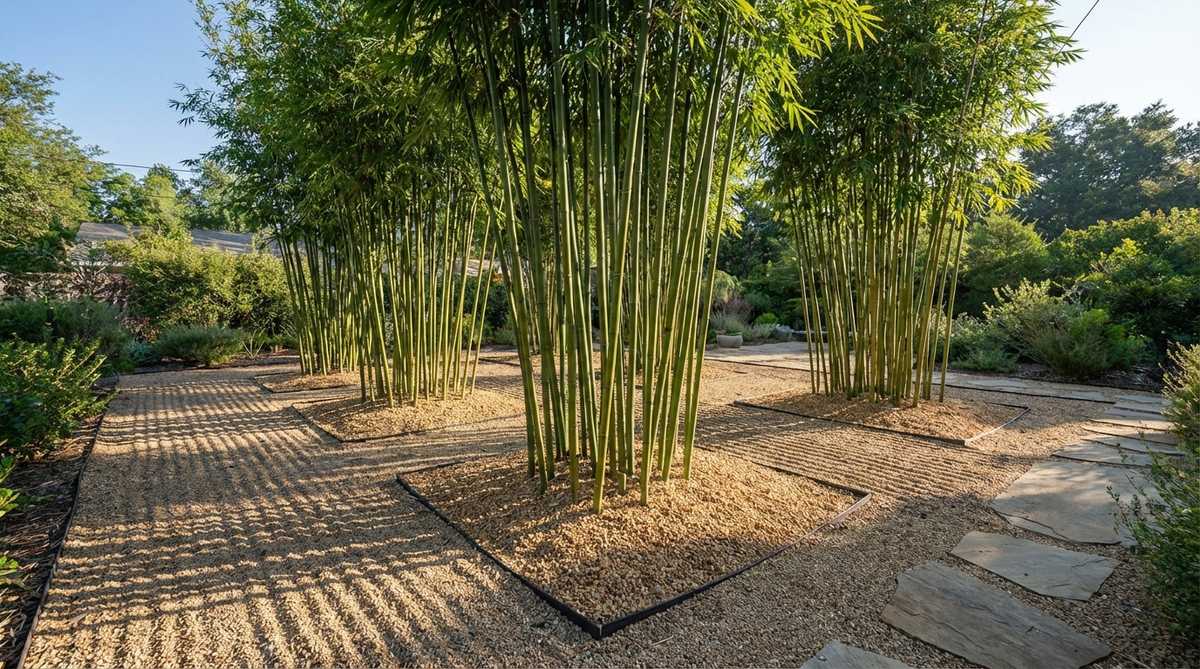
Hearing the wind rustle these stalks feels like finding peace in a secluded bamboo forest. A clumping bamboo and gravel screen provides massive vertical privacy in incredibly narrow spaces.
Planting lush, upright bamboo against a stark white stone base delivers a surprisingly premium look that screams modern Asian fusion. You absolutely must use impenetrable root barriers, or this beautiful screen will quickly destroy your entire yard.
Establish a 10-foot privacy screen for $200–$350. Highly recommended for blocking out nosy neighbors.
- Key Materials: Clumping bamboo varieties, deep root barrier plastic
- Vibe / Style: Modern Asian privacy screen
- Difficulty: Intermediate (requires deep trenching)
- Budget Breakdown: Bamboo Clumps: $150 | Root Barrier: $80
- Creator’s Tip: Only buy “clumping” bamboo varieties; “running” bamboo will aggressively spread under the gravel.
- Smart Sourcing: Heavy-duty HDPE bamboo root barriers and live clumping bamboo starters.
41. Stone Lantern Placement
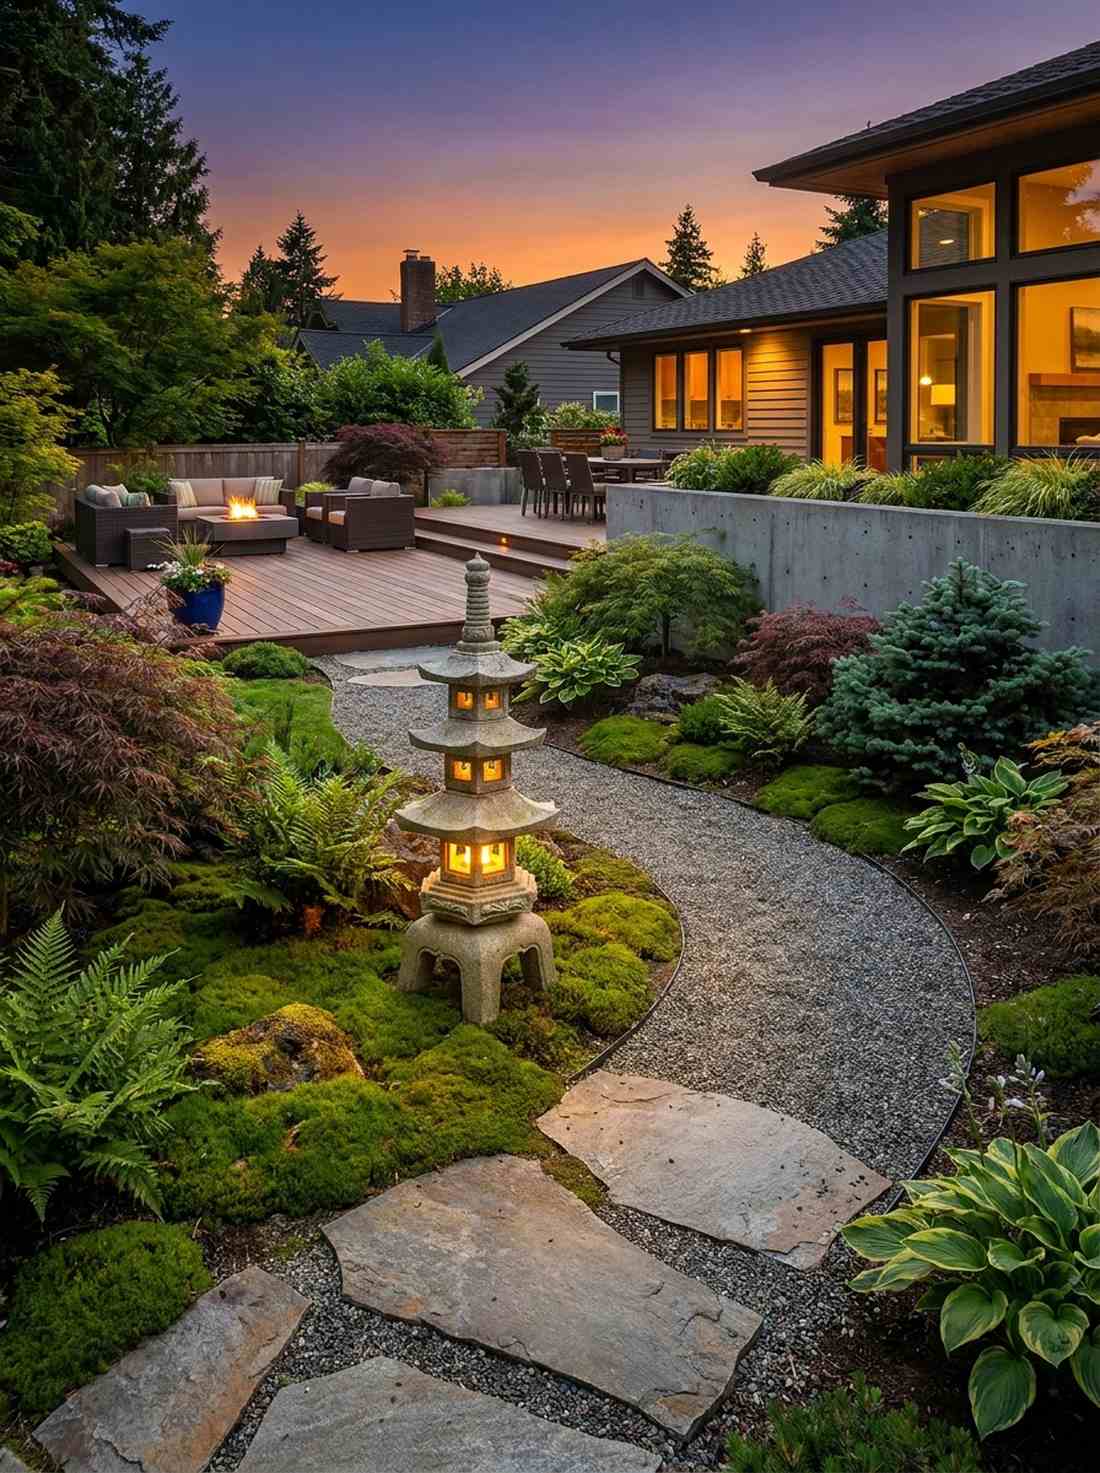
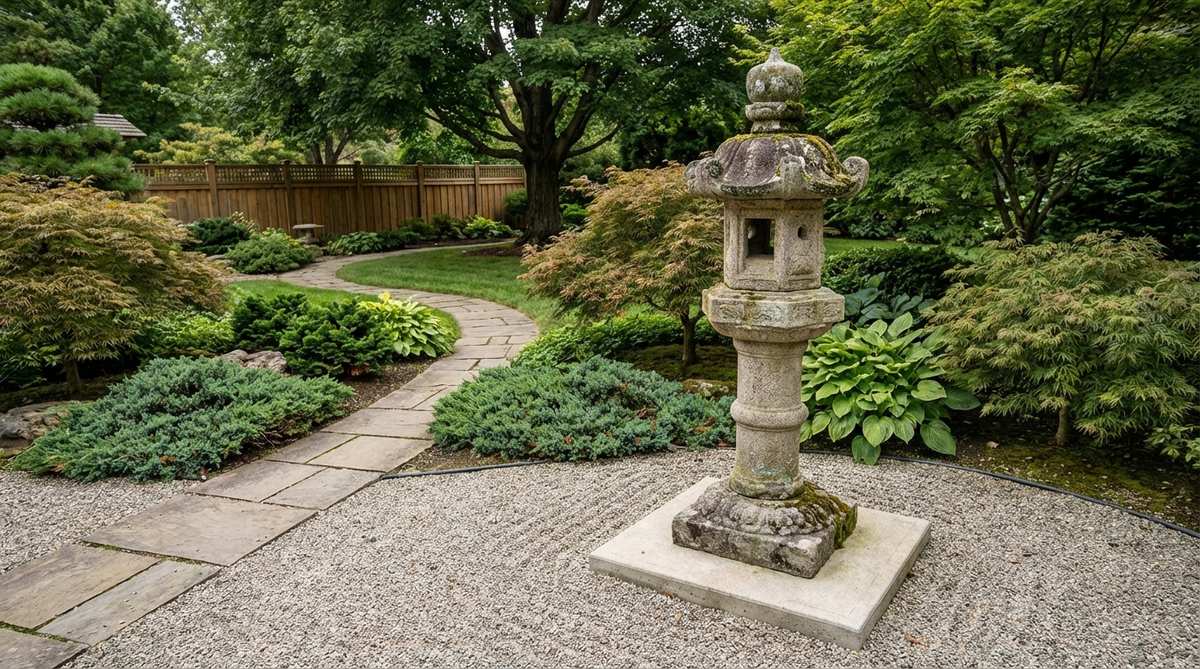
Lighting this lantern at dusk feels like illuminating an ancient pathway. A carved stone pagoda lantern serves as the ultimate high-status focal point for any gravel courtyard.
Nesting a heavy granite sculpture at the bend of a stone path yields a shockingly sophisticated aesthetic that commands attention day and night. Swap traditional candles for smart LED solar pucks to keep it glowing effortlessly every single evening.
Quality reproduction lanterns run about $150–$300. Pin this to add immediate sculptural elegance to your yard!
- Key Materials: Cast stone or granite lantern, solar LED light
- Vibe / Style: Classic Zen garden elegance
- Difficulty: Easy
- Budget Breakdown: Stone Lantern: $200 | LED Light: $20
- Creator’s Tip: Set the lantern on a hidden concrete paver buried under the gravel so it never leans or sinks.
- Smart Sourcing: Cast stone Japanese pagoda lanterns and waterproof outdoor solar LED pucks.
Most people get this completely wrong… until they try the exact layout coming up next.
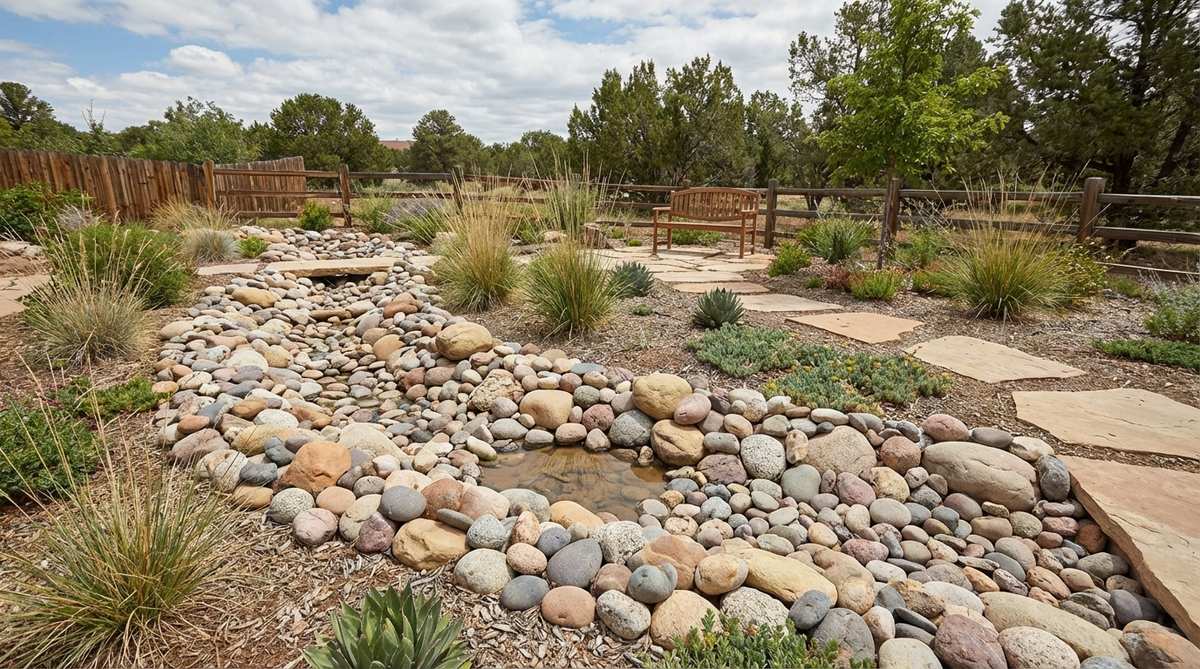
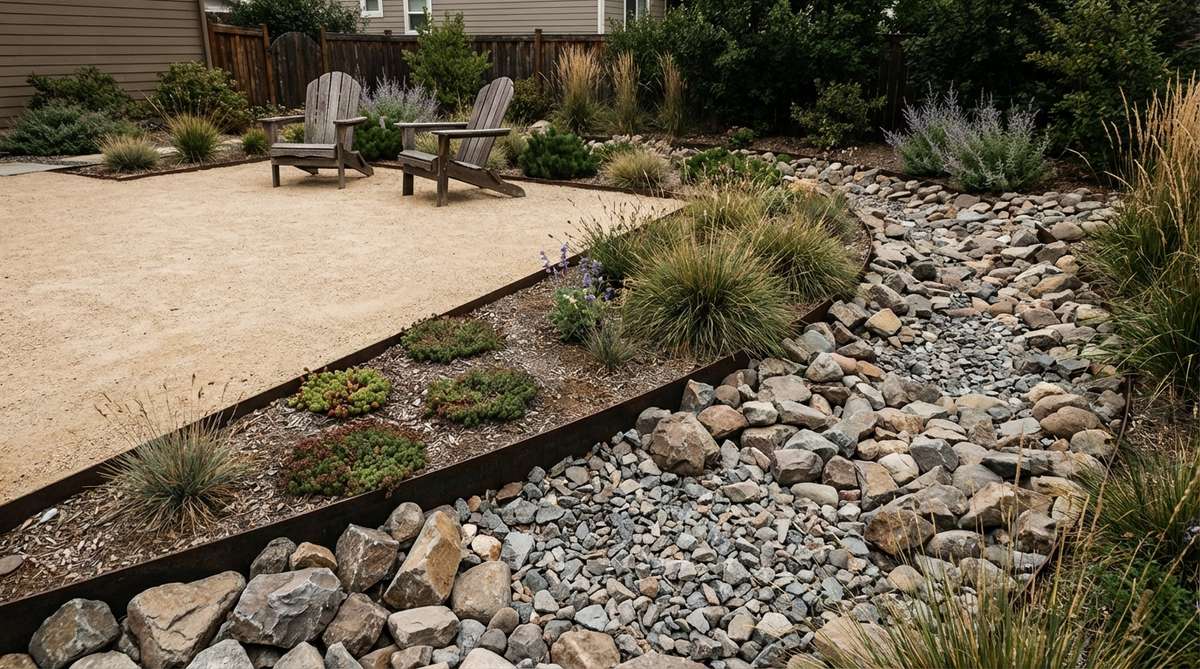
42. Gravel Stream Bed Simulation
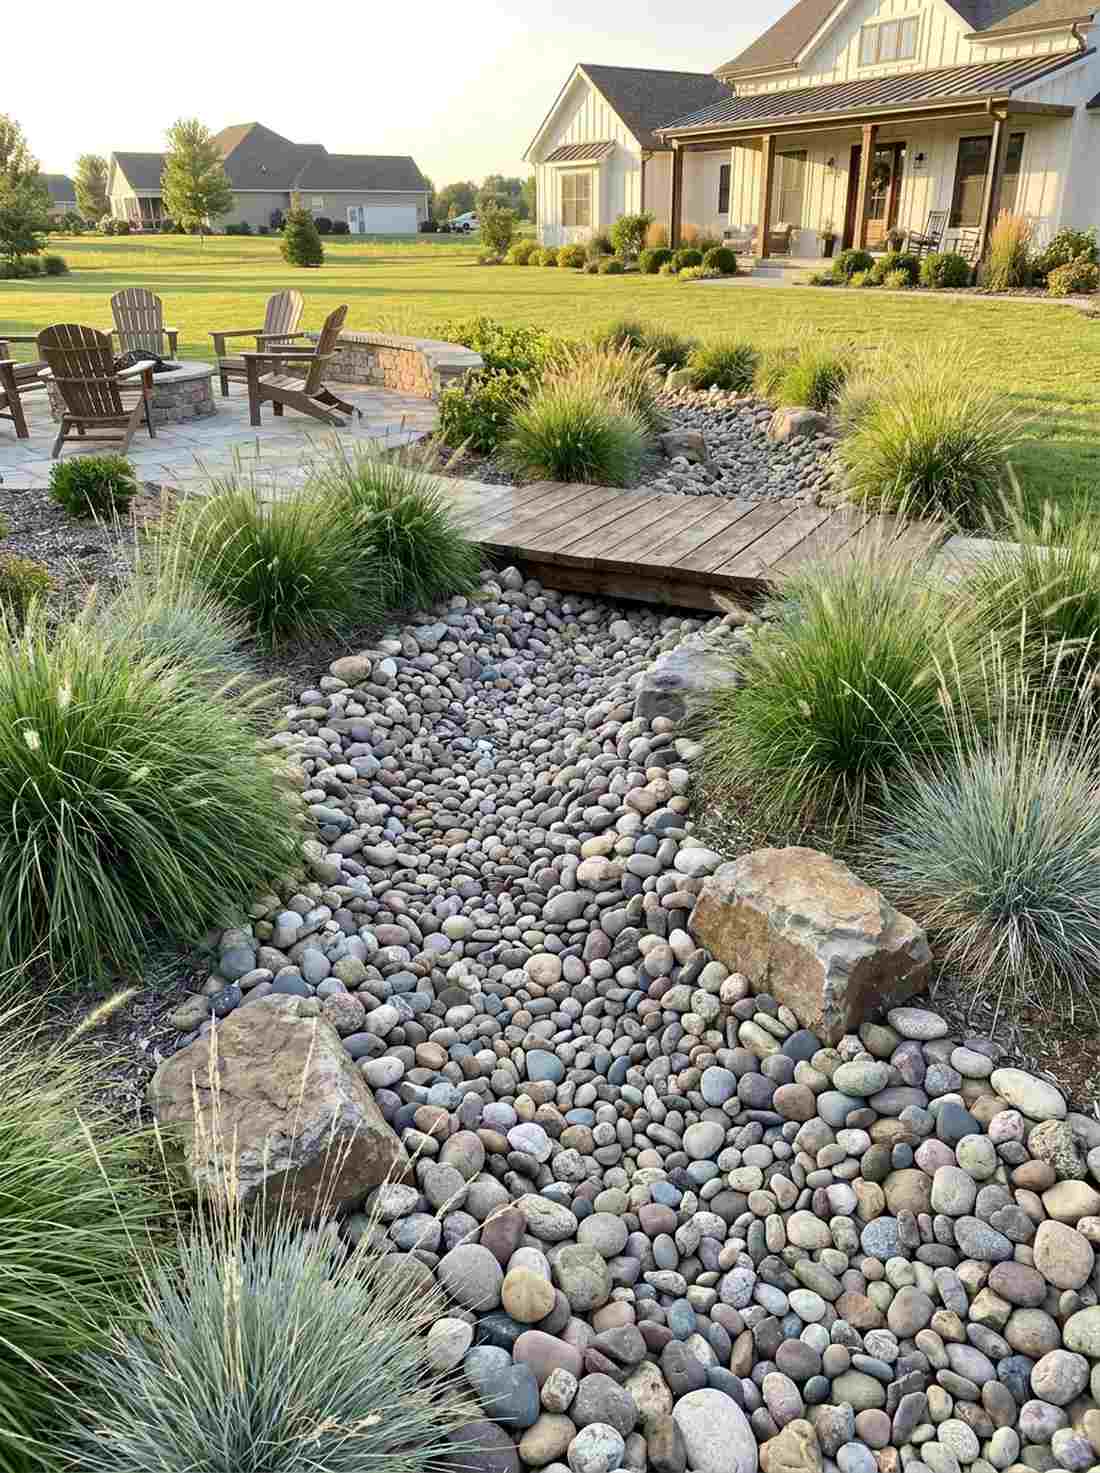
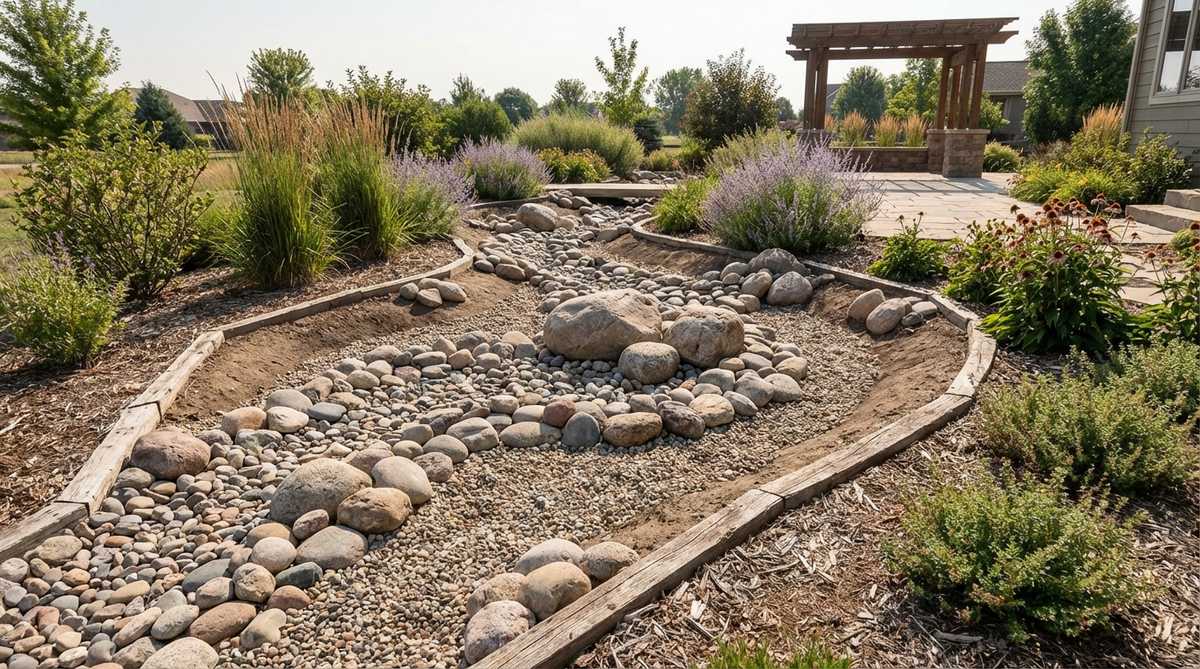
Tracing the curves of this dry creek feels like mapping the flow of a wild river. A simulated dry rock stream bed is a genius hack for disguising ugly yard drainage swales.
Grading a shallow trench and lining it with smoothly polished river cobbles creates a vibe that looks far more expensive than standard French drains. Flank the banks with ornamental grasses to completely sell the illusion of a natural waterway.
You can carve out this beautiful drainage feature for $150–$300. Save this if your yard floods during heavy rains!
- Key Materials: Mixed river cobbles, heavy-duty weed barrier, shovel
- Vibe / Style: Naturalistic water feature simulation
- Difficulty: Hard (trench excavation)
- Budget Breakdown: River Rock: $180 | Fabric: $40
- Creator’s Tip: Place the largest boulders on the outside of the curves where “water” would naturally erode the bank.
- Smart Sourcing: Bulk mixed river cobbles and heavy-duty woven landscape fabric.
Mixed Material Combinations with Gravel
43. Wood Deck Gravel Transition
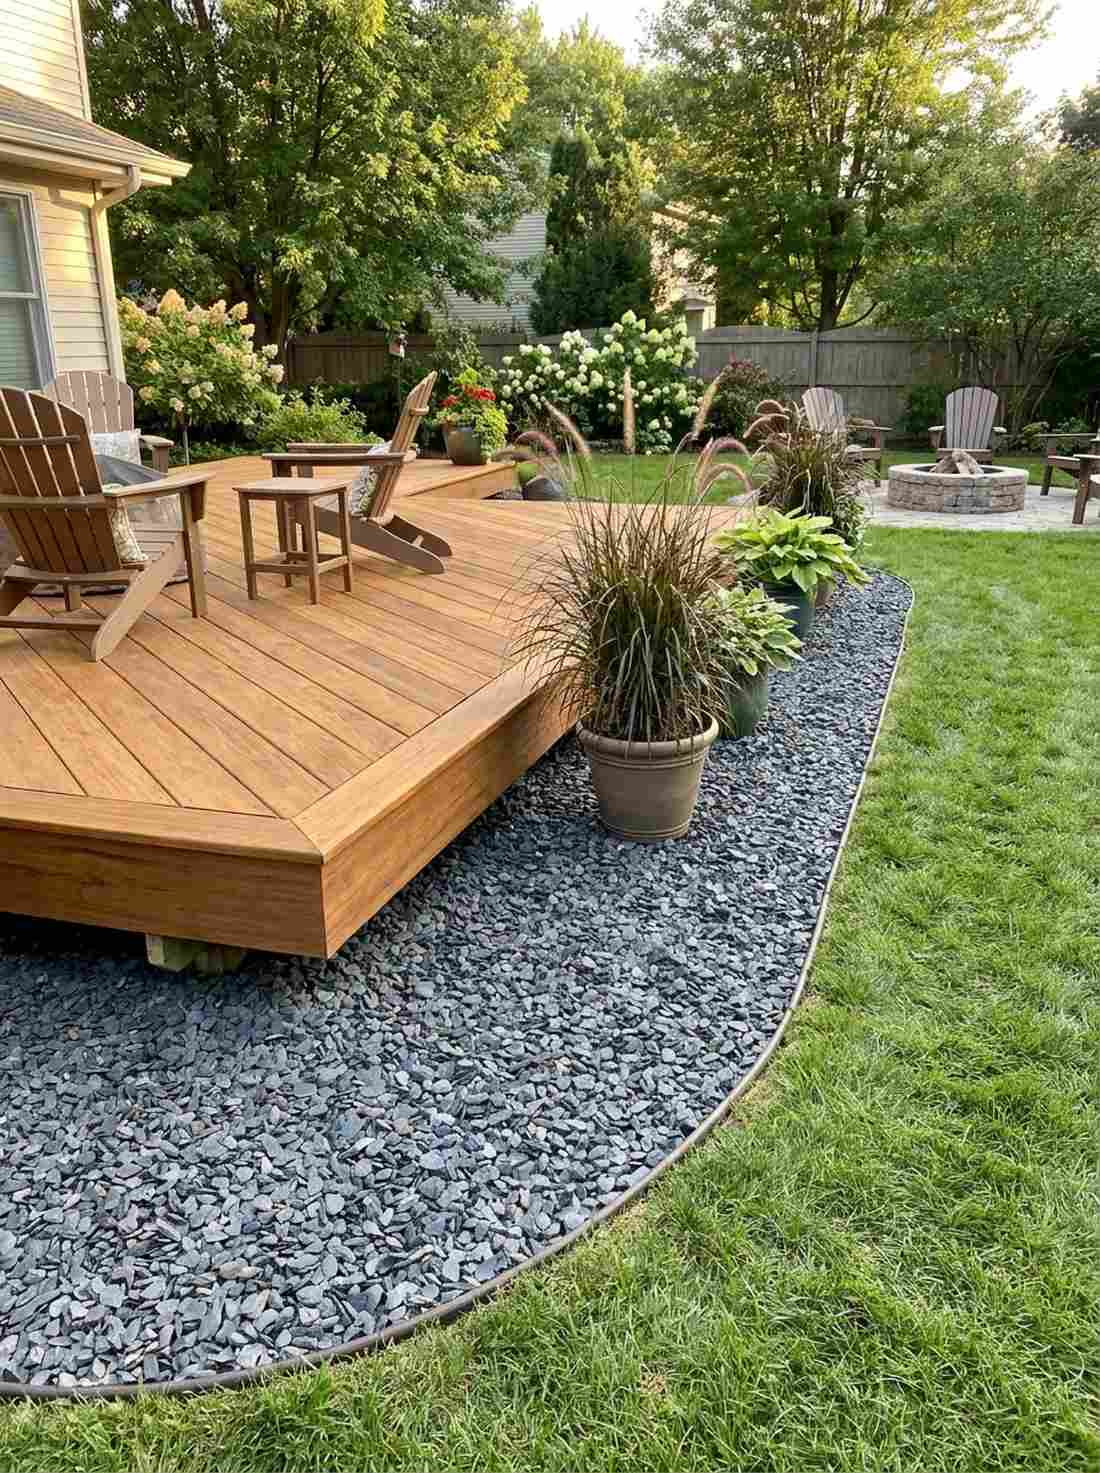
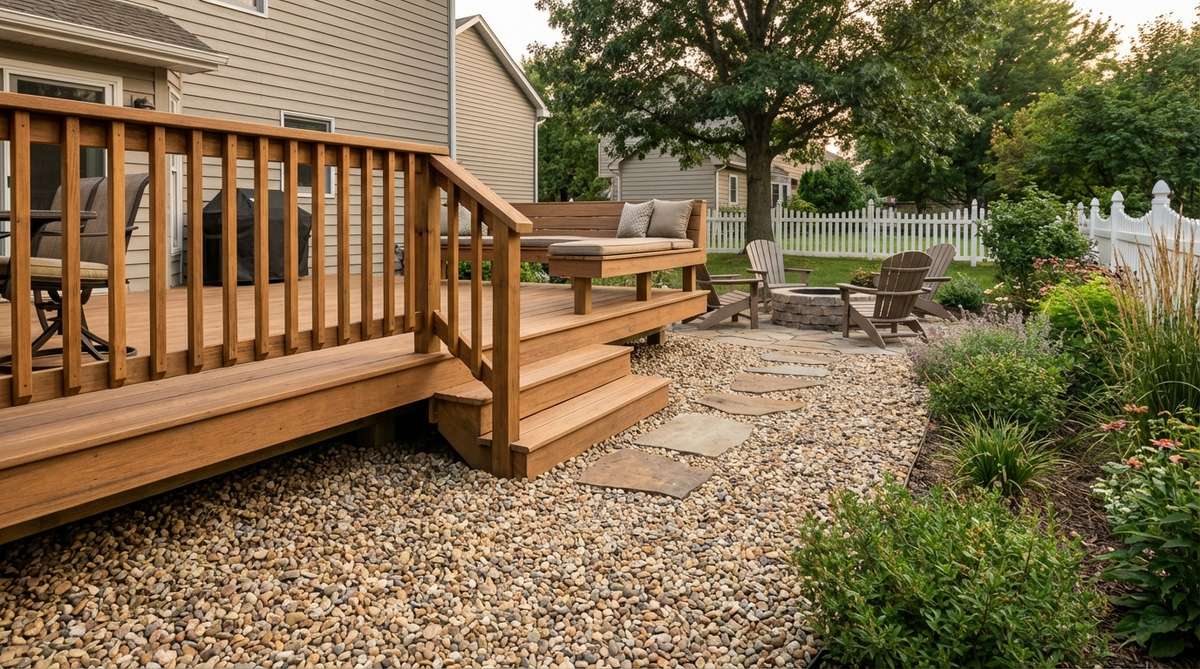
Stepping off the warm wood onto cool stones feels like the perfect architectural transition. A deck-to-gravel border zone smoothly connects rigid house structures to the wild garden.
Sweeping a wide band of matching stone directly under the deck’s lip delivers a surprisingly premium look while stopping weeds from growing in the unreachable shadows. This hardscaping trick makes small backyard patios feel intentionally designed rather than abruptly finished.
Add this finishing touch for roughly $80–$120. Pin this for a flawless backyard finish!
- Key Materials: Pea gravel or slate chips, deck fascia boards
- Vibe / Style: Seamless modern transition
- Difficulty: Easy
- Budget Breakdown: Gravel Band: $70 | Edging: $30
- Creator’s Tip: Extend the gravel at least 2 feet beneath the deck edge to prevent annoying weed-whacker damage to the wood.
- Smart Sourcing: Bulk slate chips and commercial weed block rolls.
44. Concrete and Gravel Mosaic
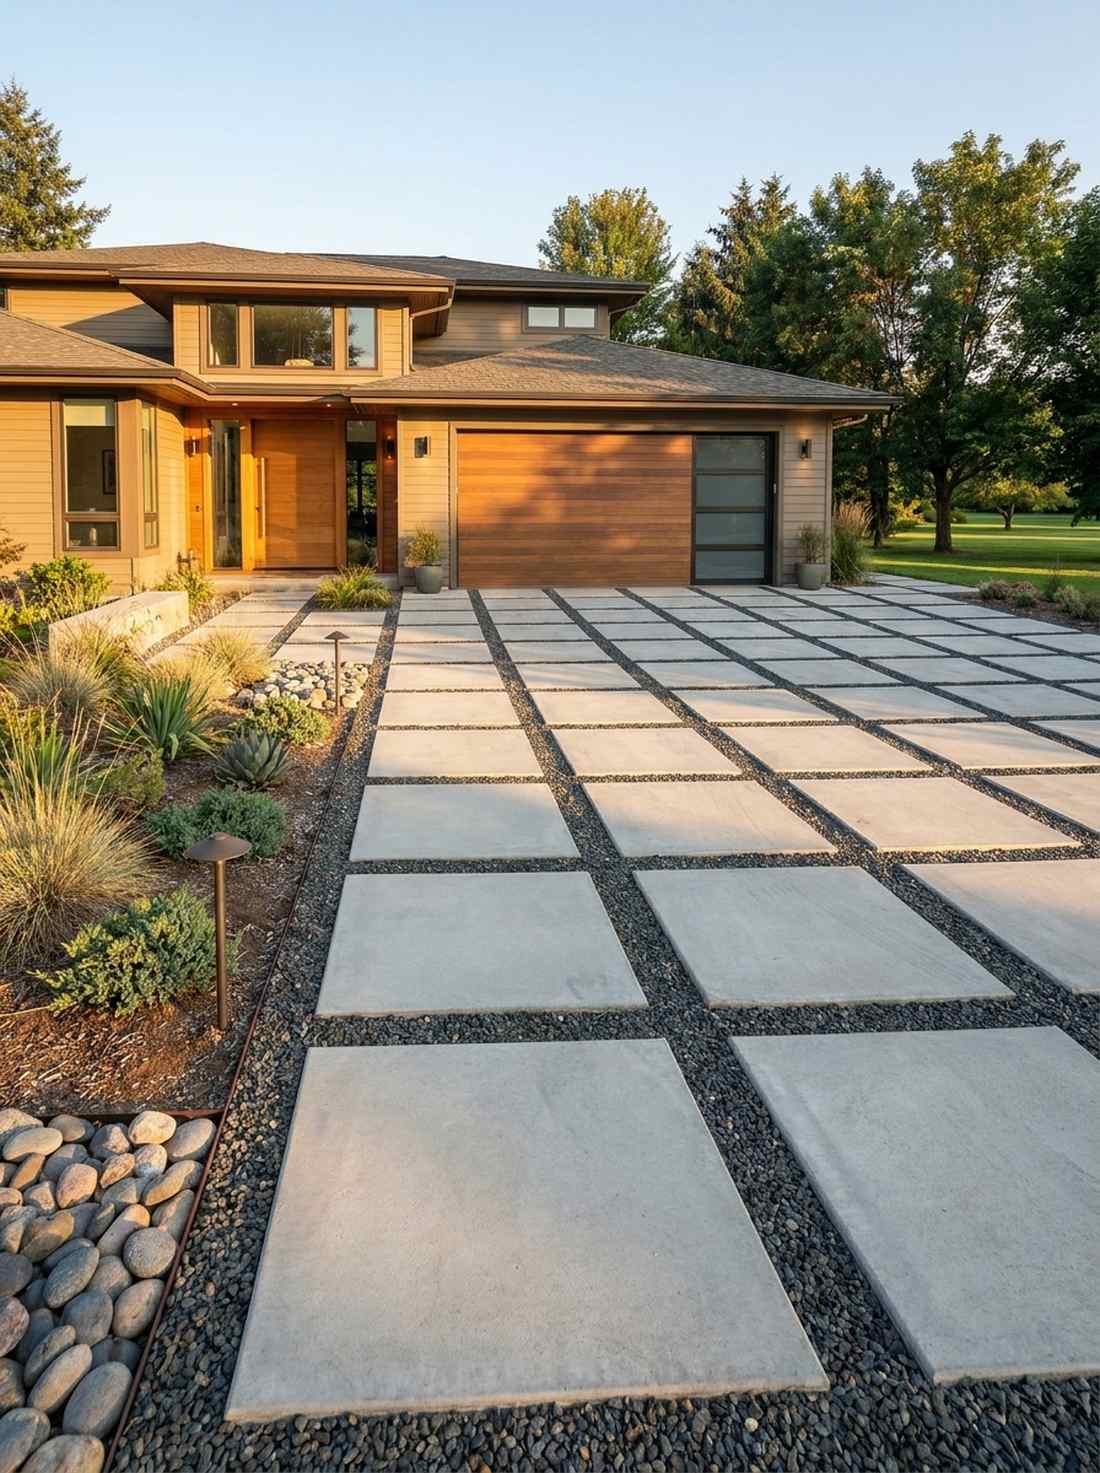
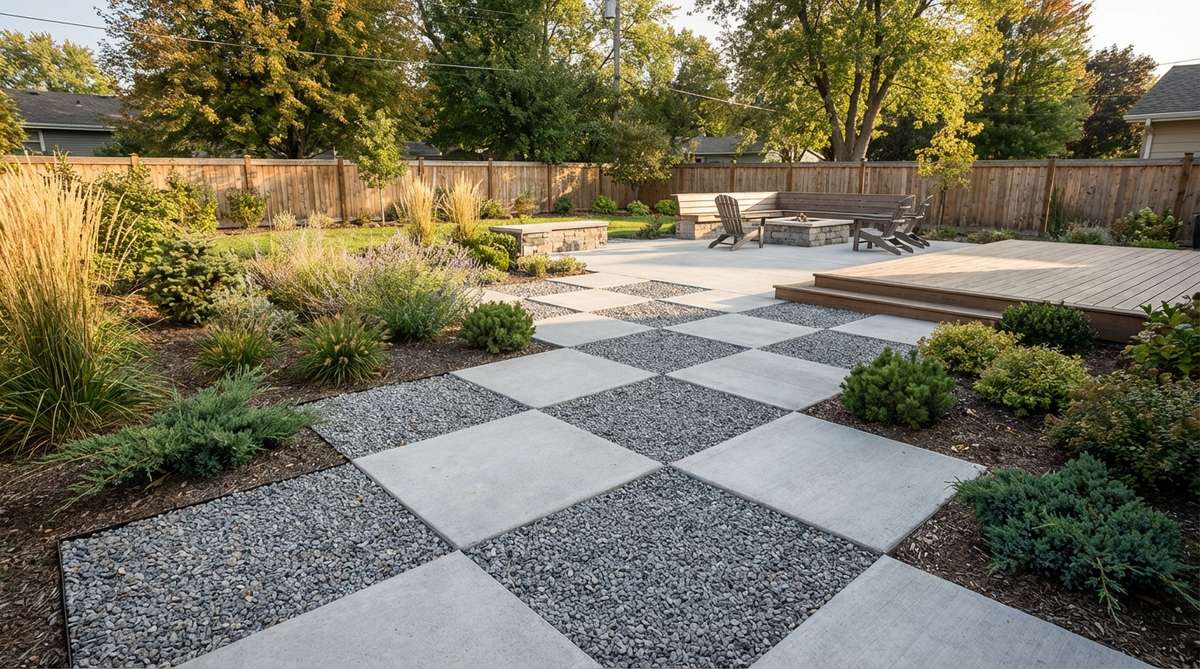
Walking across these floating slabs feels incredibly futuristic and industrial-chic. A cast-in-place concrete and gravel grid offers massive visual impact for modern driveways or entryways.
Pouring perfectly square concrete islands inside a sea of dark crushed stone yields a shockingly sophisticated aesthetic at a fraction of the cost of a full concrete pour. Using pre-cut lumber forms ensures every slab is razor-sharp and perfectly aligned.
You can DIY a small grid section for $200–$400. It’s a fast upgrade that completely changes the curb appeal.
- Key Materials: High-strength concrete mix, dark basalt gravel
- Vibe / Style: Brutalist contemporary chic
- Difficulty: Advanced (concrete mixing and forming)
- Budget Breakdown: Concrete Bags: $120 | Basalt Base: $100
- Creator’s Tip: Use a concrete edger tool on the wet slabs to prevent the corners from chipping under foot traffic later.
- Smart Sourcing: High-strength quick-setting concrete bags and magnesium concrete hand floats.
45. Decomposed Granite and Mulch
The earthy contrast of soft bark and hard stone feels incredibly balanced. Mixing granite pathways with organic mulch beds provides the absolute best of both hardscaping and gardening worlds.
Confining expensive, nutrient-rich bark to plant beds while using cheap, stable granite for walking routes creates a vibe that looks far more expensive than it is. Burying a rigid steel border between them is non-negotiable to stop the messy materials from blending.
Split your yard materials for around $150–$250. Save this to your master garden layout board!
- Key Materials: Decomposed granite, cedar bark mulch, metal edging
- Vibe / Style: Practical professional landscaping
- Difficulty: Intermediate
- Budget Breakdown: DG Base: $100 | Mulch: $50 | Edging: $80
- Creator’s Tip: Keep the mulch level slightly lower than the granite path so it doesn’t spill over during heavy rain.
- Smart Sourcing: Bulk cedar bark mulch and flexible aluminum landscape borders.
46. Steel Plate Gravel Accents
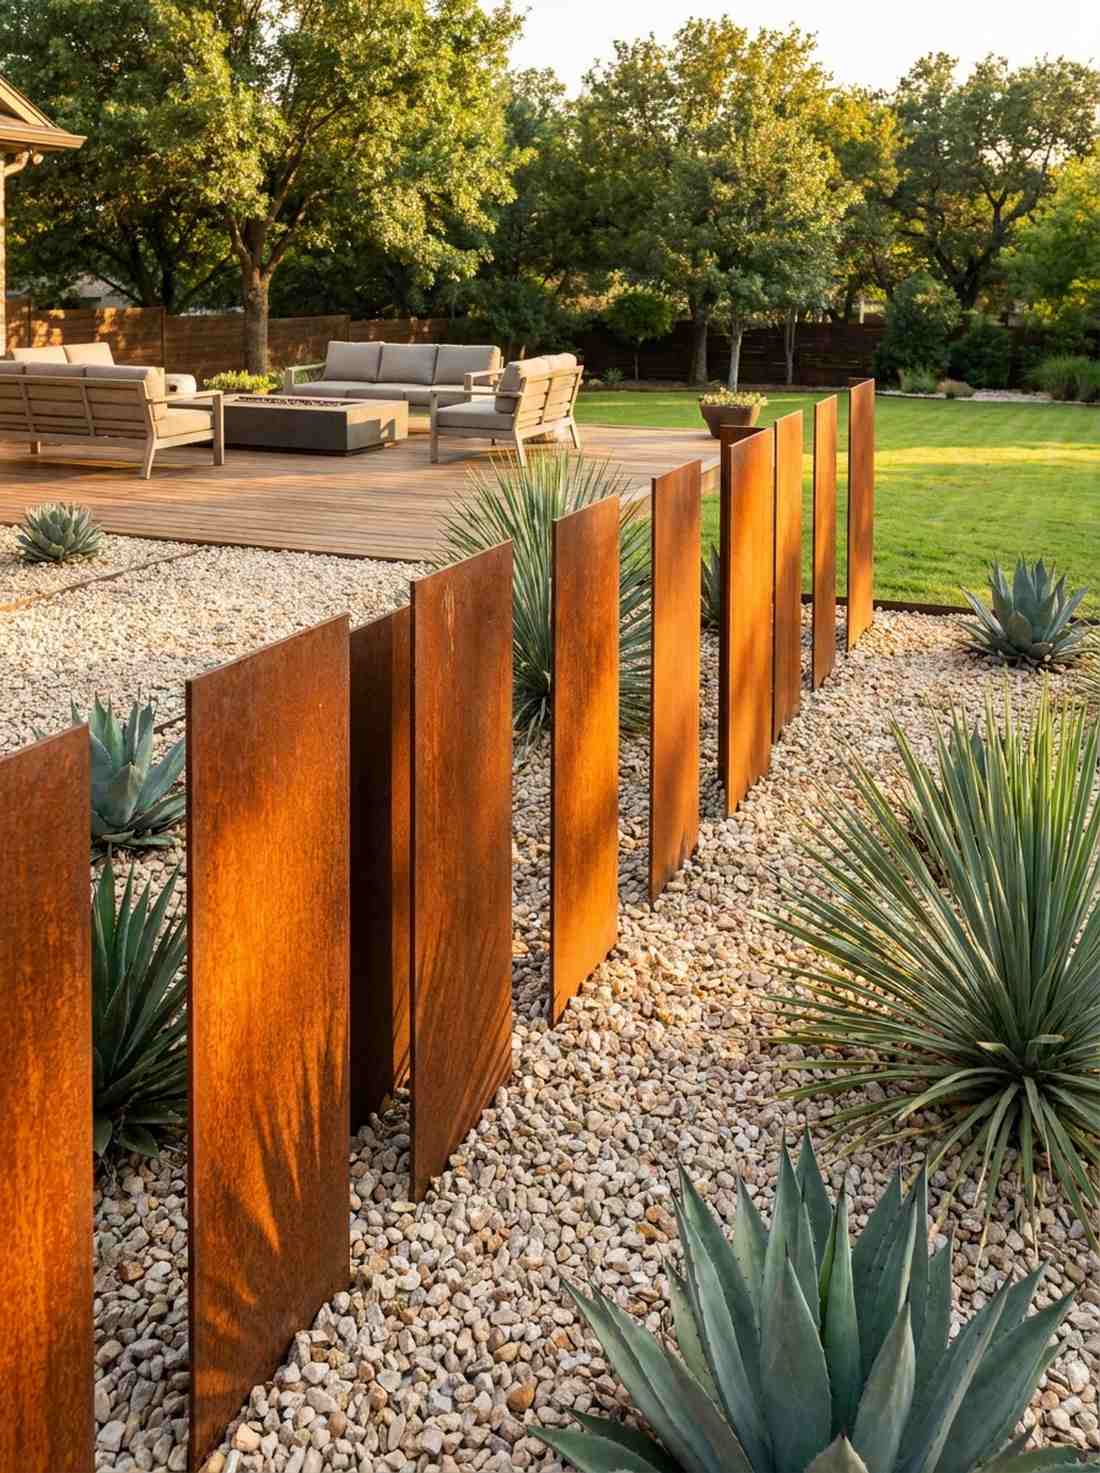
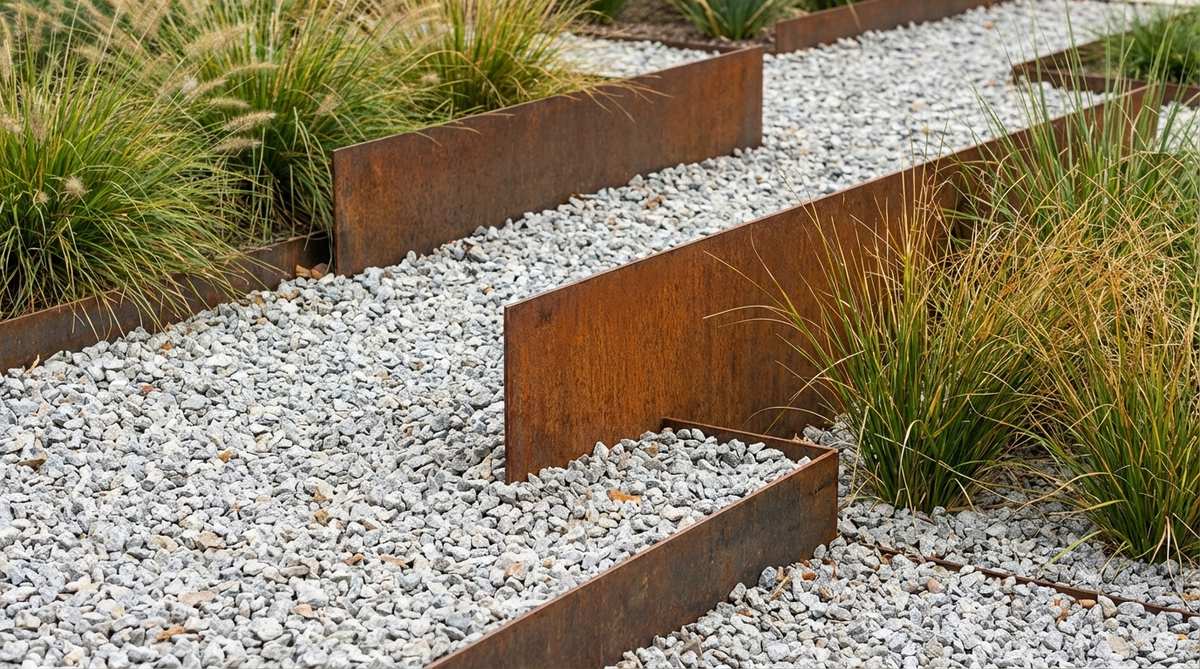
Watching this steel rust into a fiery orange feels like viewing an evolving sculpture. Using weathered corten steel accents brings a hardcore industrial edge to soft, pale stone beds.
Driving thick, rusted metal plates vertically into the gravel delivers a surprisingly premium look that contrasts brilliantly with spiky desert plants. The heavy iron patina only gets better and richer as it faces decades of outdoor rain and snow.
Incorporate custom steel plates for $200–$400. Pin this if you love edgy, industrial landscape architecture!
- Key Materials: Corten steel sheets/edging, neutral base gravel
- Vibe / Style: Rusted industrial modernism
- Difficulty: Moderate (handling sharp/heavy metal)
- Budget Breakdown: Corten Steel: $250 | Base Rock: $60
- Creator’s Tip: Spray brand new corten steel with a mixture of hydrogen peroxide, salt, and vinegar to force an instant rust patina in hours.
- Smart Sourcing: Pre-rusted Corten steel edging strips and heavy-duty work gloves.
This next setup is ridiculously cheap but looks like a $100 custom display…
47. Glass Mulch Highlights
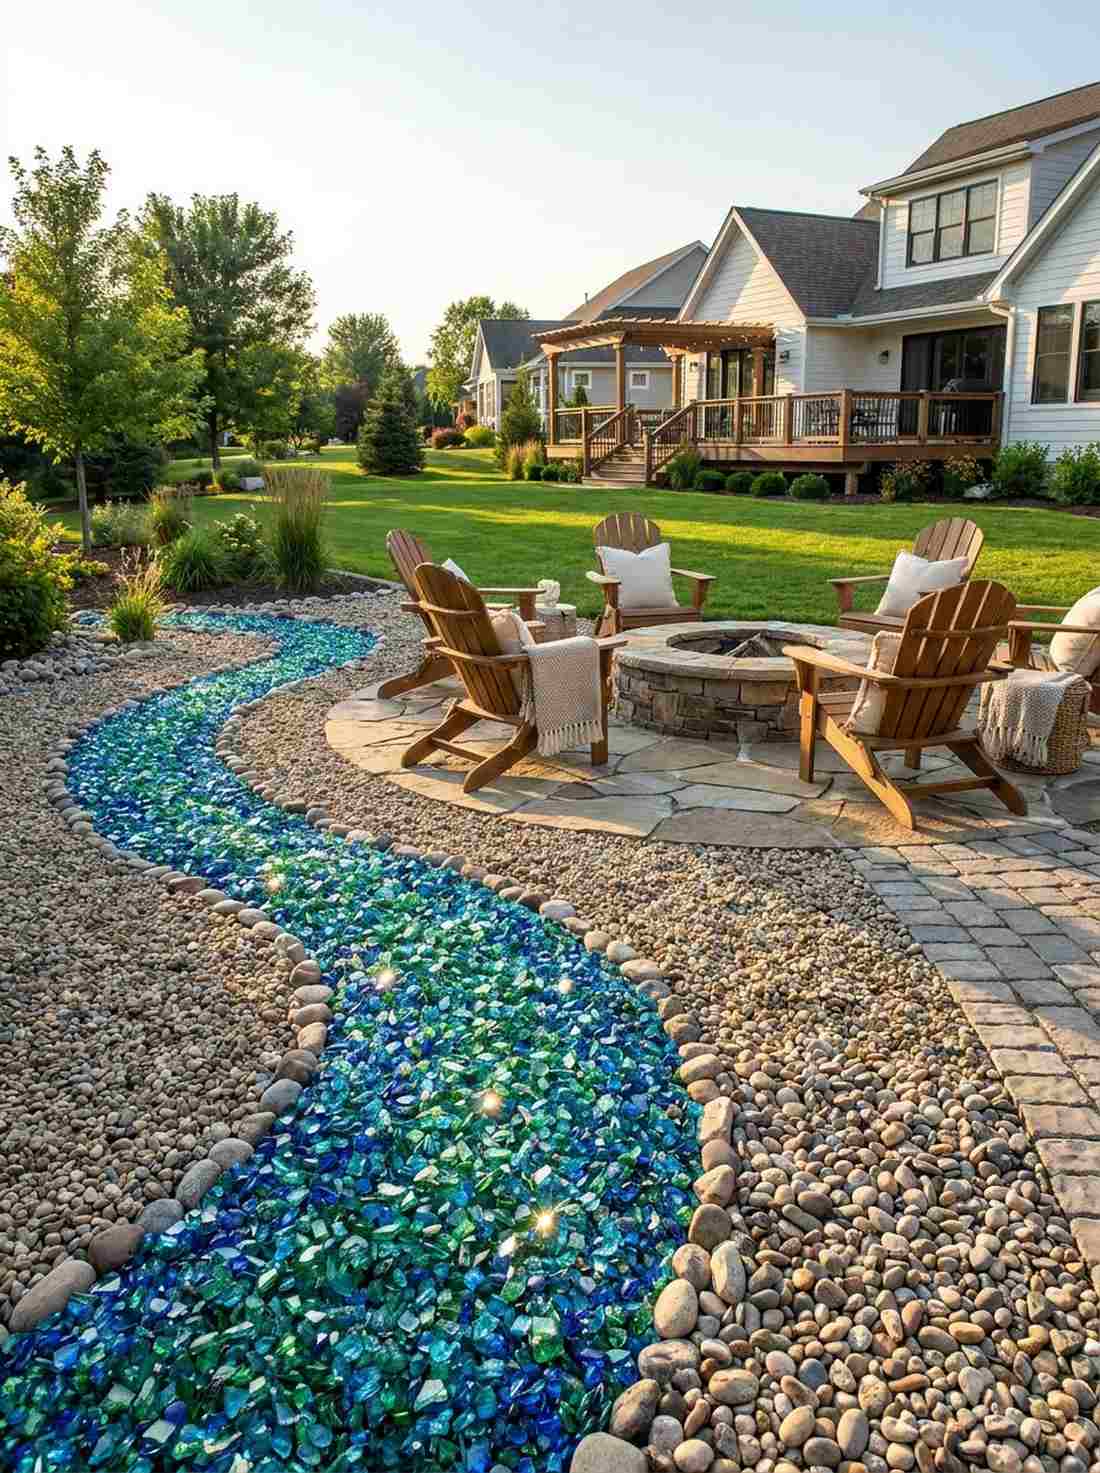
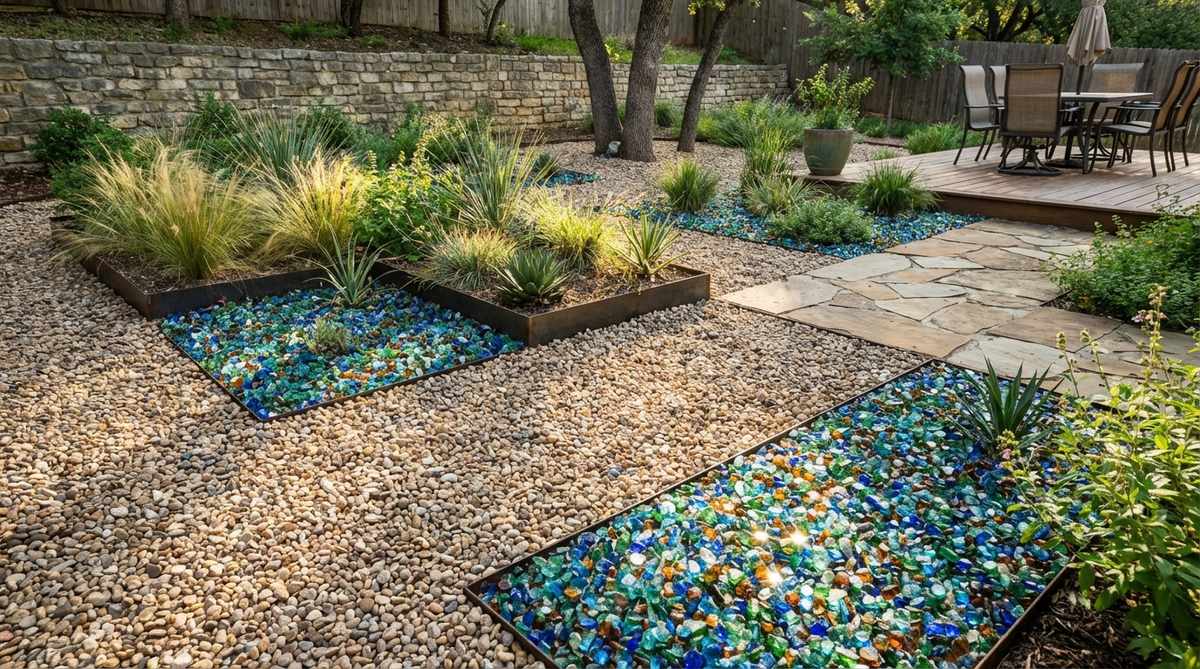
Catching the sunlight off these bright shards feels like discovering a bed of jewels. Adding tumbled recycled glass highlights creates an explosive pop of color in otherwise dreary, gray yards.
Swapping out standard rock for a small stream of bright blue or green glass chunks yields a shockingly sophisticated aesthetic that never fades or rots. Use it sparingly around key focal points or fire pits so it doesn’t overwhelm the natural vibe.
A few highlight bags will cost about $50–$100. It’s a fast upgrade that completely changes the texture of the space.
- Key Materials: Tumbled landscape glass, contrasting neutral gravel
- Vibe / Style: Eclectic artistic flare
- Difficulty: Very Easy
- Budget Breakdown: Glass Mulch: $70 | Base Stone: Existing
- Creator’s Tip: Always buy “tumbled” glass; the sharp edges have been mechanically rounded off so it’s perfectly safe to handle.
- Smart Sourcing: Bulk tumbled blue landscape glass and UV-resistant clear weed barrier.
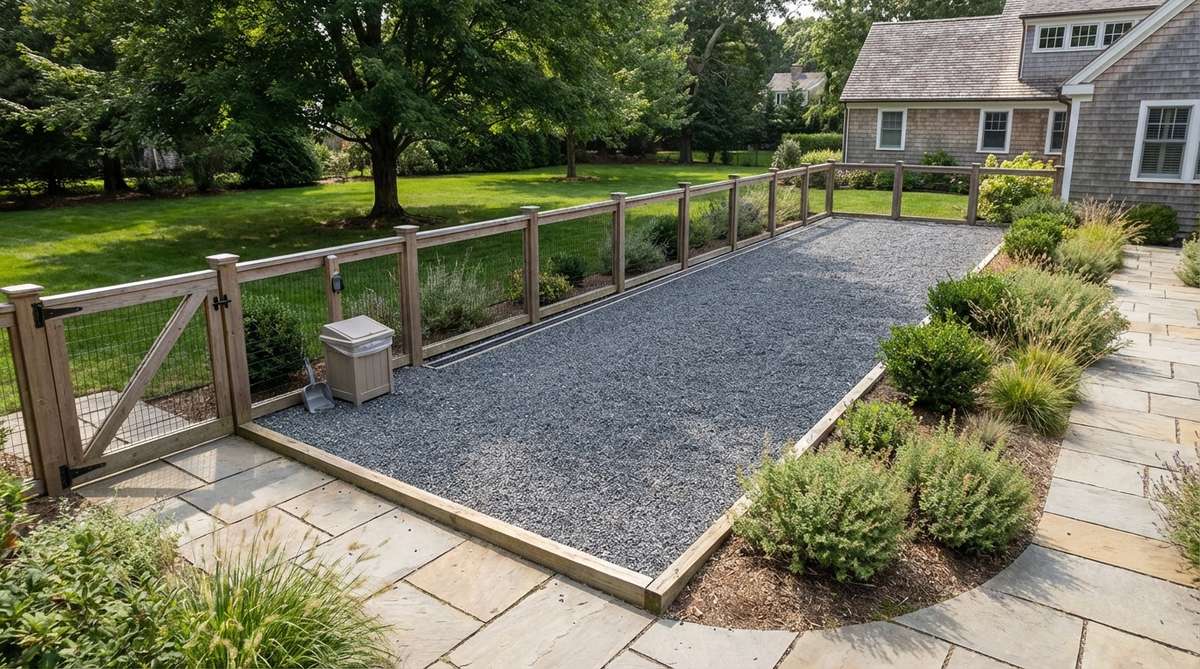
48. Permeable Pavers Gravel Joints

Driving over this grid feels incredibly stable yet brilliantly eco-friendly. The wide-joint permeable paver system is the absolute best solution for muddy overflow parking spots.
Locking angular crushed rock between heavy concrete blocks creates a vibe that looks far more expensive than a standard poured driveway, while allowing massive rainstorms to drain instantly. It prevents puddles, stops runoff, and easily supports the weight of a truck.
Install a parking pad for $300–$600 depending on size. Save this for a high-utility driveway upgrade!
- Key Materials: Permeable concrete block pavers, 1/2-inch crushed angular stone
- Vibe / Style: Eco-friendly modern utility
- Difficulty: Advanced (heavy base prep required)
- Budget Breakdown: Permeable Blocks: $350 | Angular Stone: $100
- Creator’s Tip: Never use sand or rounded pebbles in the joints; only sharp, angular rock will lock the heavy pavers together under tire weight.
- Smart Sourcing: Heavy-duty driveway paver grids and bulk sharp crushed trap rock.
Vertical Dimension Additions to Gravel Gardens
49. Ornamental Grass Accents
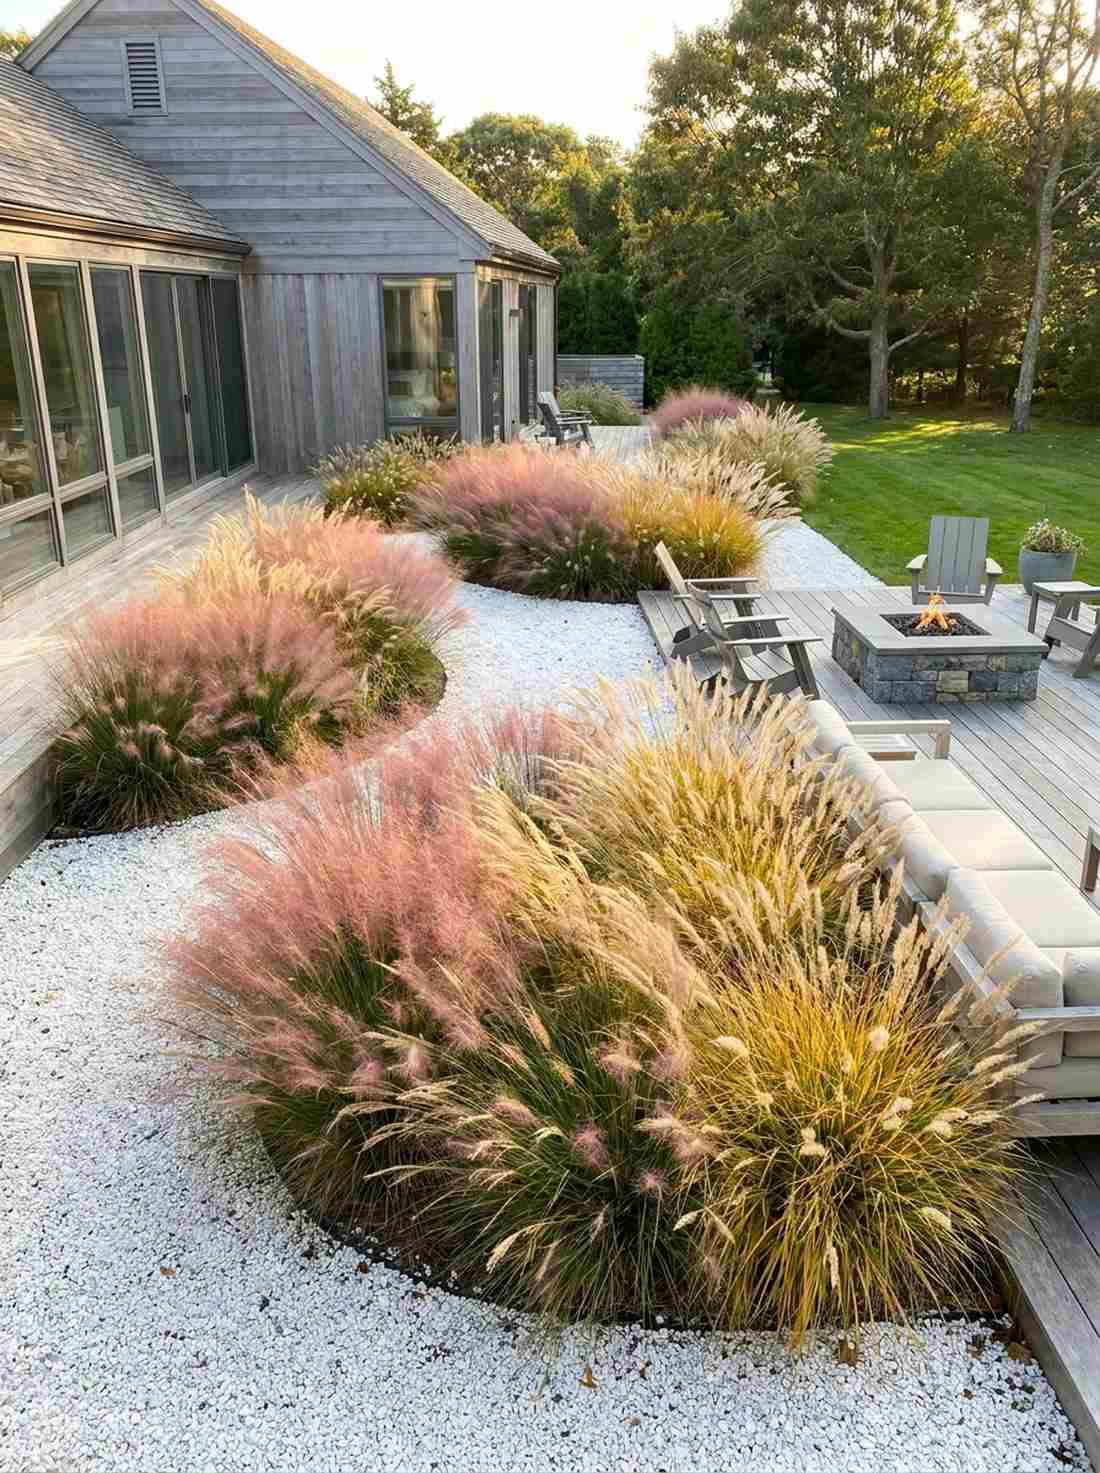
Watching these feathery plumes sway in the breeze feels deeply mesmerizing and calming. Tall ornamental fountain grasses bring much-needed vertical movement to flat, static stone yards.
Planting massive clumps of Maiden or Muhly grass through a stark white gravel bed delivers a surprisingly premium look that thrives on total neglect. These massive bursts of texture soften hard architectural lines and turn glowing pink or gold during the autumn months.
You can add these towering accents for just $40–$80. Pin this to add massive height on a tiny budget!
- Key Materials: Large ornamental grass gallons (Pink Muhly, Maiden), gravel mulch
- Vibe / Style: Soft coastal modernism
- Difficulty: Easy
- Budget Breakdown: Grass Gallons: $60 | Mulch: $20
- Creator’s Tip: Cut the dead stalks down to a 6-inch nub every single late winter to ensure a massive, perfect dome of fresh green in the spring.
- Smart Sourcing: Live Pink Muhly grass plants and heavy-duty bypass pruning shears.
50. Columnar Cactus Sentinels
Standing next to these towering green spikes feels like admiring living desert skyscrapers. Using tall San Pedro cactus sentinels forces an immediate, striking vertical axis in flat xeric layouts.
Grouping three distinct heights together in a simple tan stone bed yields a shockingly sophisticated aesthetic that stays brilliantly green all year round. Their extremely slow growth rate means you never have to prune or adjust the composition.
A trio of decent-sized sentinels costs about $150–$300. It’s a permanent upgrade that completely defines the space.
- Key Materials: San Pedro or Totem Pole cacti, tan desert rock
- Vibe / Style: Architectural Southwestern
- Difficulty: Moderate (heavy, spiky handling)
- Budget Breakdown: Cactus Trio: $200 | Base Rock: $40
- Creator’s Tip: Wrap the cactus tightly in carpet scraps or thick cardboard when planting to completely avoid the heavy spines.
- Smart Sourcing: Live columnar cactus starters and thick protective leather gauntlets.
Most people get this completely wrong… until they try the exact layout coming up next.
51. Vertical Steel Sculptures

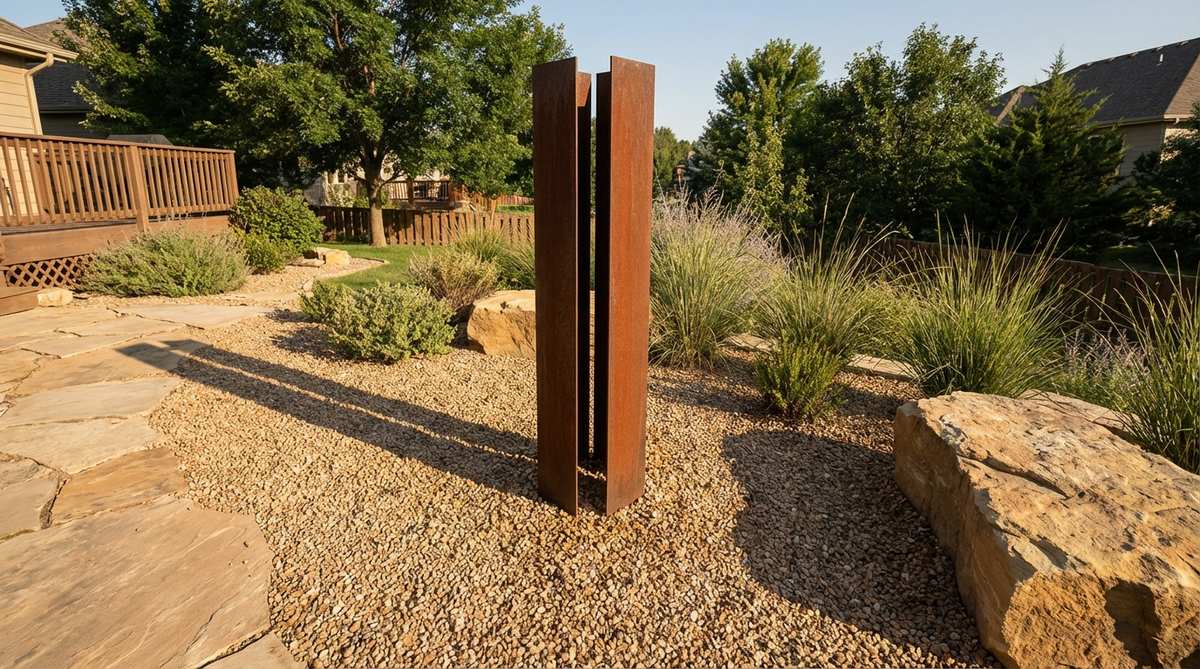
The rusted angles cutting into the sky feel like an exclusive museum exhibit. Introducing custom vertical metal yard art completely shatters the monotony of an endless flat gravel sea.
Placing a towering corten steel obelisk at the end of a pathway creates a vibe that looks far more expensive than it is. As the sun sets, these towering metal structures cast dramatic, long shadows across the textured stones.
You can score amazing steel art pieces for $150–$500. Save this to your high-end landscape architecture board!
- Key Materials: Rusted steel yard sculptures, concrete anchor footings
- Vibe / Style: Contemporary museum courtyard
- Difficulty: Moderate (requires secure anchoring)
- Budget Breakdown: Steel Sculpture: $250 | Concrete Anchor: $20
- Creator’s Tip: Always sink a small concrete footing and bolt the sculpture down to prevent it from blowing over in high winds.
- Smart Sourcing: Corten steel garden obelisks and quick-set anchoring cement.
52. Espalier Wall Plantings
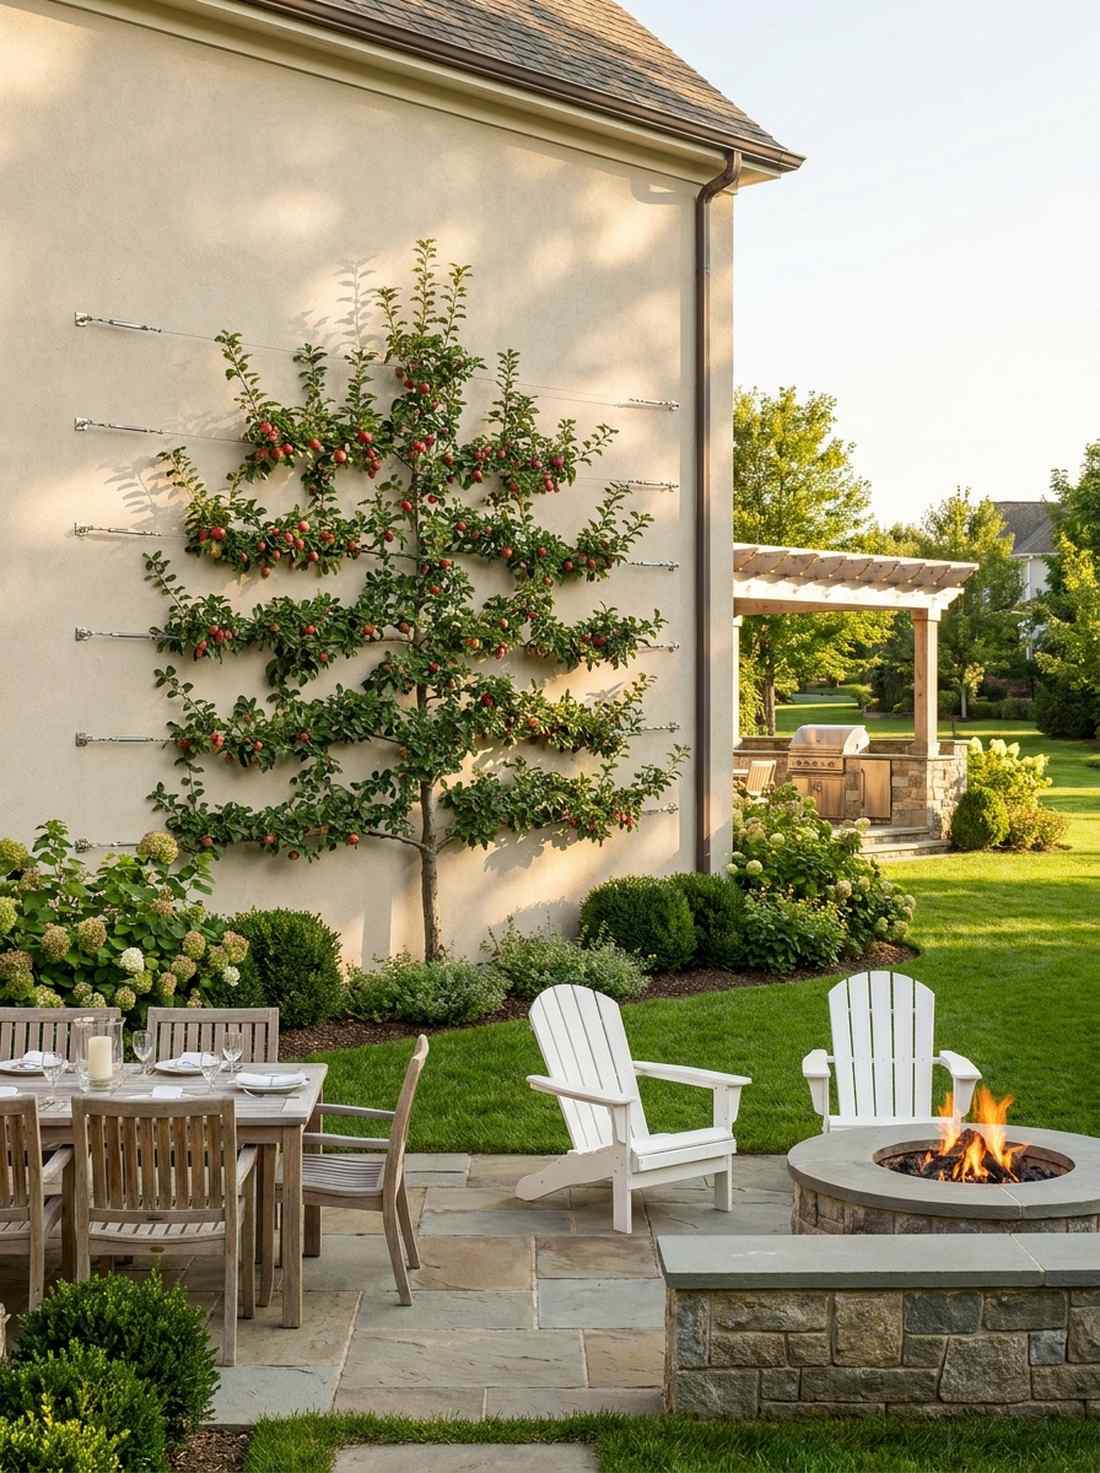
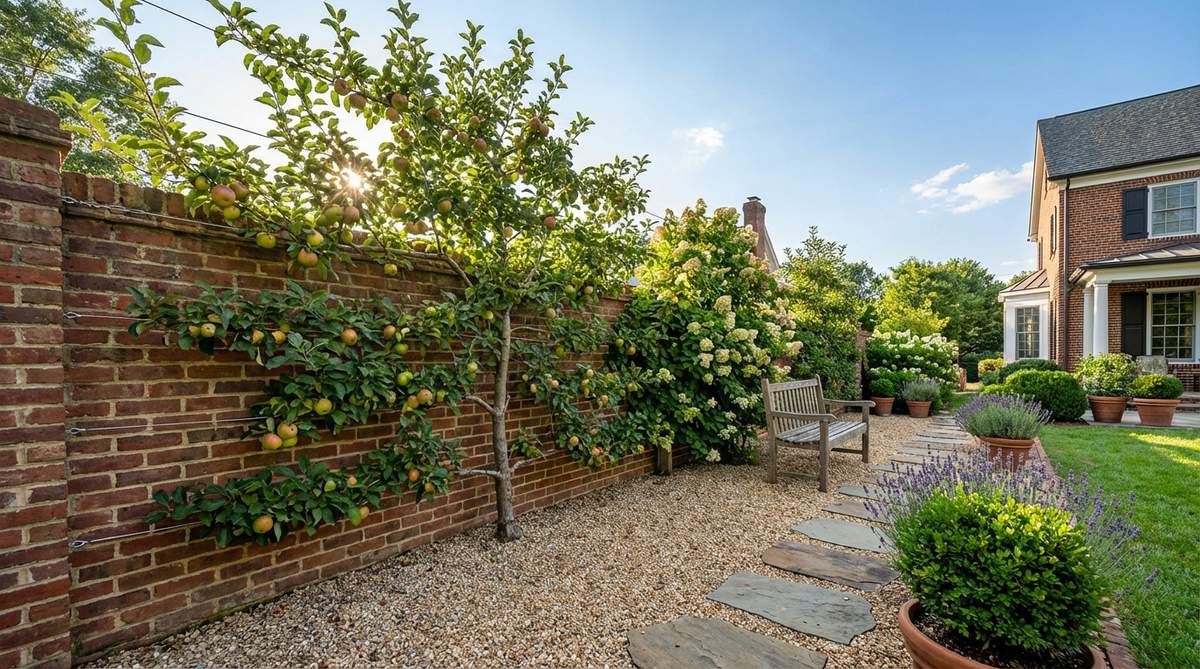
Seeing branches trained perfectly flat against a wall feels like witnessing incredible botanical discipline. The two-dimensional espalier tree technique injects massive vertical greenery without eating up precious ground space.
Wiring an apple tree or ornamental shrub flat against a stark stucco wall delivers a surprisingly premium look usually reserved for historic French chateaus. Using heavy-duty stainless steel wire kits ensures the branches grow exactly where you command them.
Setup the wire frame and tree for about $100–$200. Pin this if you have narrow side yards that need life!
- Key Materials: Espalier-suitable fruit tree, stainless steel wire trellis kit
- Vibe / Style: Historic French formal garden
- Difficulty: Advanced (requires precision pruning)
- Budget Breakdown: Tree Starter: $80 | Trellis Kit: $50
- Creator’s Tip: Install horizontal support wires exactly 12 inches apart to maintain the classic, rigid geometric growth pattern.
- Smart Sourcing: Stainless steel espalier wire kits and live apple tree saplings.
53. Flagpole Palm Grouping
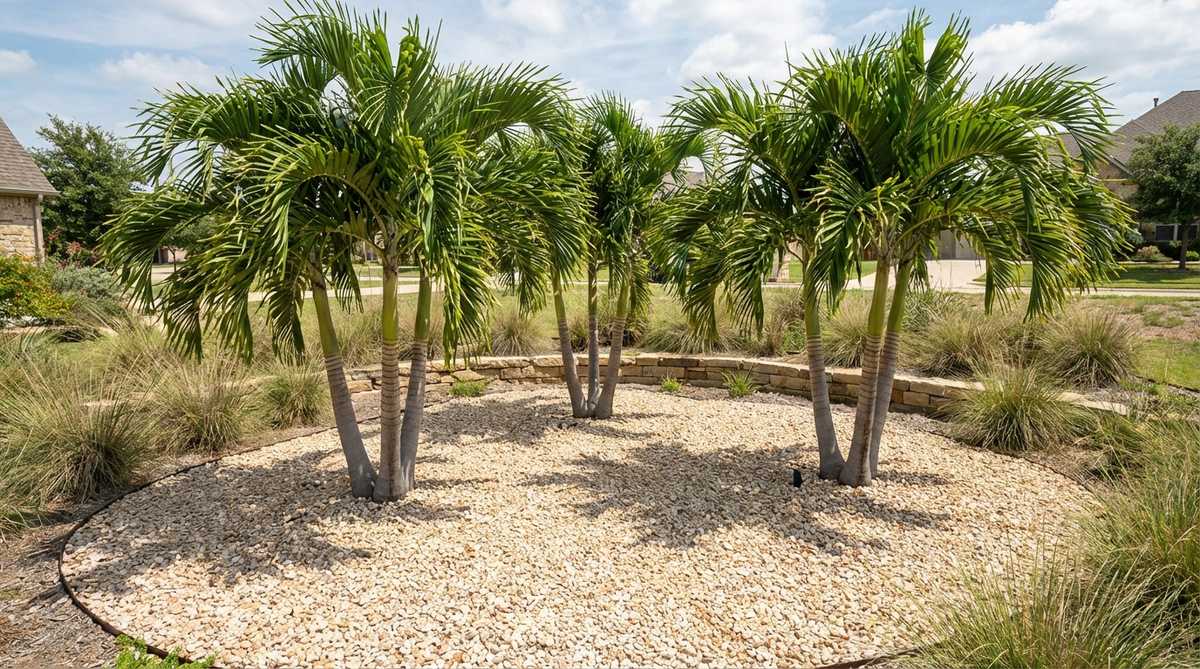
Looking up at these slender swaying trunks feels like a VIP resort in Miami. A flagpole palm vertical grouping bursts out of stark white gravel to create an instant tropical punch.
Planting a cluster of incredibly skinny, tall palms together yields a shockingly sophisticated aesthetic that casts almost zero shade on the sun-loving succulents below. Their smooth gray trunks provide amazing architectural lines against the sky.
You can establish a small palm cluster for $250–$400 in frost-free zones. Highly recommended for a sleek, modern tropical vibe.
- Key Materials: Multi-trunk flagpole/solitaire palms, white marble base rock
- Vibe / Style: Ultra-modern tropical resort
- Difficulty: Moderate (deep planting hole required)
- Budget Breakdown: Palm Cluster: $280 | Marble Rock: $60
- Creator’s Tip: Group trunks of varying heights (e.g., 8ft, 12ft, 16ft) to make the installation look like a natural jungle grove.
- Smart Sourcing: Live Solitaire palm tree starters and premium palm nutritional fertilizer.
54. Tall Agave Stalks
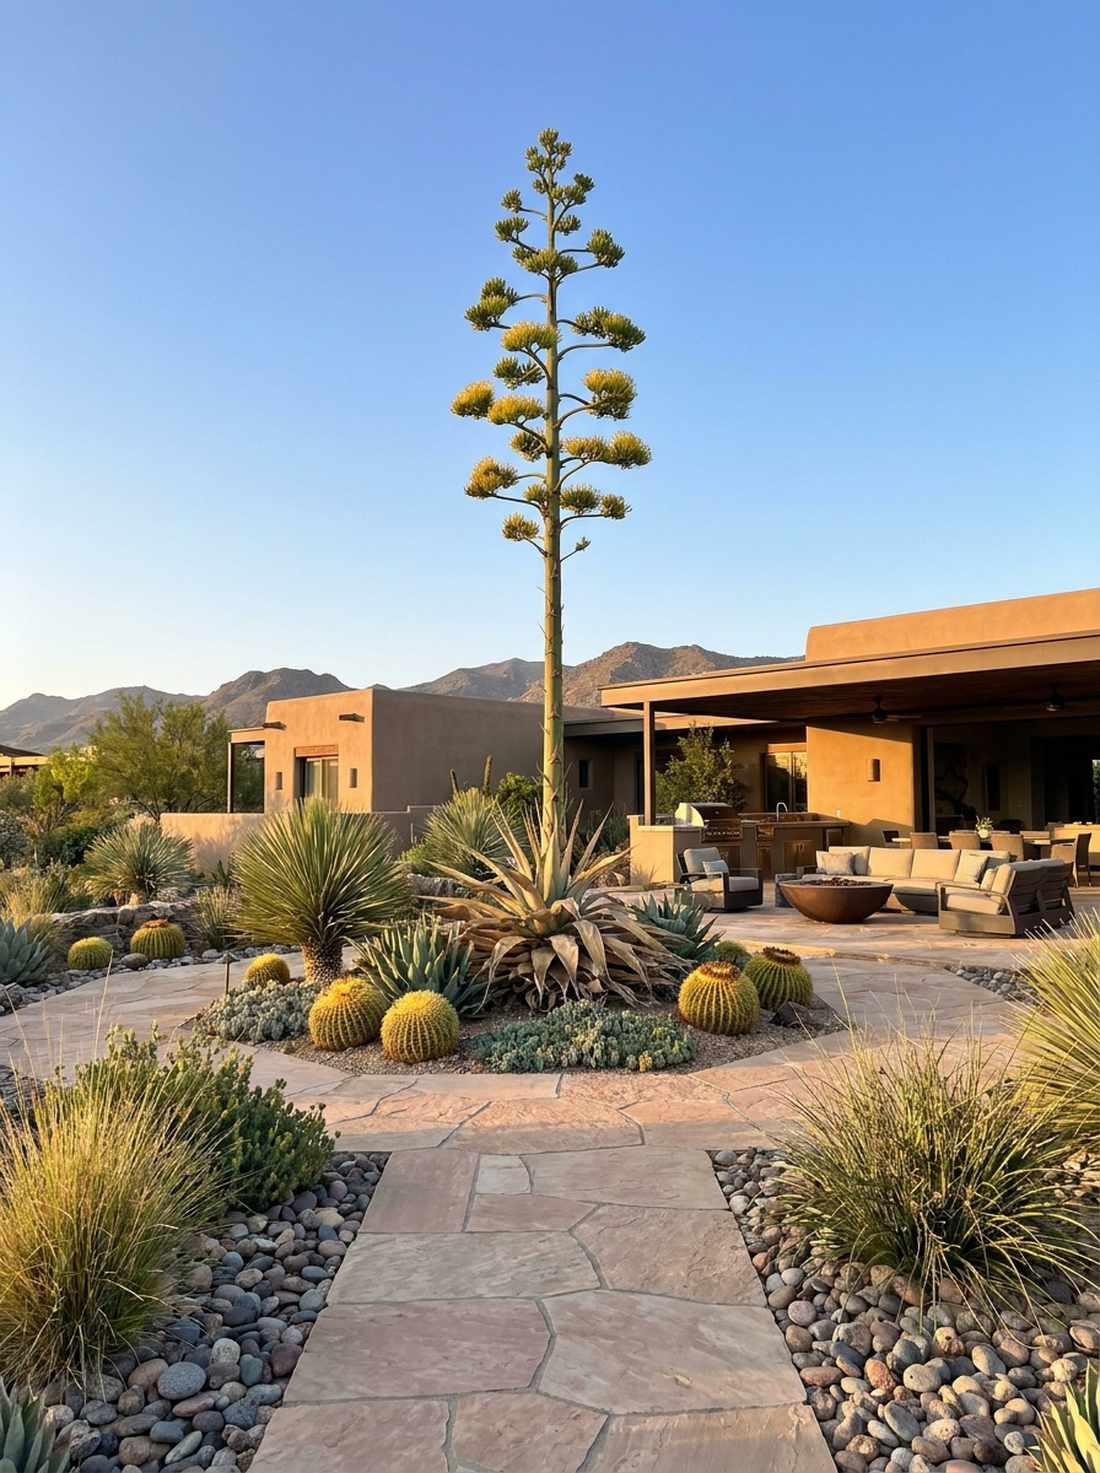
Watching this massive stalk shoot 20 feet into the air feels like witnessing a rare botanical fireworks show. Planning around towering agave death blooms adds a wild, temporary skyscraper to your yard.
While the mother plant dies after this spectacular event, positioning these giants near pathways creates a vibe that looks far more expensive than static landscaping. The massive stalk persists for months, serving as a towering alien centerpiece for your entire stone garden.
This natural phenomenon is free if you already have mature agaves! Save this to remember the incredible lifecycle of desert plants.
- Key Materials: Mature flowering-age agave, open overhead airspace
- Vibe / Style: Dramatic desert phenomenon
- Difficulty: Easy (nature does the work)
- Budget Breakdown: Mature Agave: $0 (Time) | Airspace: Free
- Creator’s Tip: Never plant a large agave directly under power lines; the final bloom stalk can easily reach 25 feet and cause a hazard.
- Smart Sourcing: Live Century Plant (Agave) starters and heavy-duty telescoping pole saws (for eventual removal).
Building Your Premium Gravel Garden
Achieving that highly coveted “looks expensive but isn’t” aesthetic relies entirely on smart material sourcing, commercial-grade weed barriers, and strategic layout choices. The exactly 54 high-end blueprints detailed above prove that you don’t need a massive budget to create a stunning, zero-maintenance xeric retreat. By utilizing premium starter kits, bulk pack supplies, and the right structural borders, you can bypass the expensive landscaping fees entirely. We highly recommend picking 3 to 5 of your favorite architectural concepts, investing in UV-coated materials, and transforming your outdoor space into a resilient, high-RPM masterpiece that outlasts the harshest seasons.
Frequently Asked Questions
What type of gravel works best for low-maintenance xeriscaping gardens?
To avoid the dreaded sinking effect, always source high-end decomposed granite and crushed angular stone between 1/4-inch to 3/4-inch. Angular crushed materials bite into each other, creating a locked, stable surface that resists foot traffic displacement beautifully. Skip the cheap rounded pea gravel for paths, as it rolls endlessly underfoot—though it’s a fantastic, budget-friendly option for decorative beds. Buying bulk pack crushed trap rock or regionally native stone will give you that premium, integrated aesthetic for a fraction of the cost.
How deep should gravel be applied for effective weed suppression?
The industry standard for achieving a true zero-maintenance setup is a strict 3-4 inch depth laid over heavy-duty weed barriers. Anything less than 3 inches allows dormant weed seeds to catch sunlight and aggressively root through your expensive stone layer. Skip the cheap paper barriers and invest in commercial-grade 5oz landscape fabric rolls, overlapping the seams heavily. This blocks out invasive roots entirely while still allowing massive rain downpours to drain safely into the soil beneath.
Can plants grow directly in gravel without underlying soil?
Despite the minimalist aesthetic, true xeriscape plants absolutely require their root balls to be anchored in the nutrient-rich soil beneath your rock layer. The stone acts strictly as a high-end, moisture-locking mulch, shielding the dirt from the scorching sun. When planting, slice a tight “X” through your weed barrier, dig into the earth, and then backfill the premium fast-draining cactus soil before pushing the gravel neatly back around the stem to hide the cut.
How do gravel gardens compare to traditional mulched beds for water conservation?
Stone gardens offer a vastly superior return on investment because, unlike organic wood chips, rocks never decompose, blow away, or require expensive annual top-offs. Both effectively trap soil moisture, but heavy mineral layers provide a permanent structural upgrade that looks far more expensive. Keep in mind that stones absorb heat, creating a brilliant micro-climate for high-end desert agaves, but you must pair this setup with UV-resistant clear stone sealants to stop the rocks from looking dusty or faded over the years.
What maintenance does a gravel garden require throughout the year?
The beauty of this setup is the near-zero maintenance required, dropping your weekend yard chores by 90%. Keep your high-end design pristine by spending 10 minutes a month with a lightweight leaf blower to remove organic debris before it breaks down into dirt. Invest in heavy-duty steel edging starter kits to ensure the borders never drift into the lawn. A quick yearly rake to level out footprints and a fast application of pre-emergent weed spray is all it takes to keep the yard looking like a luxury resort.