
A premium stone garden obelisk instantly shifts a basic yard into a curated landscape. Smart sourcing of pre-cut stone kits delivers high-end architecture without extreme contractor markups. Strategic placement secures incredible visual depth while optimizing limited outdoor space.
Design SnapshotKey Principles
- Scale Matters: Match obelisk height to surrounding plantings—taller structures (6-8 feet) for mature gardens, shorter versions (3-4 feet) for intimate spaces
- Material Selection: Choose limestone for classical elegance, granite for durability in harsh climates, or cast stone for budget-friendly versatility
- Strategic Placement: Position obelisks at garden entrances, path intersections, or bed terminals to create focal points that guide movement through space
- Proportion Balance: Base width should equal roughly one-quarter of total height for visual stability; wider bases suit exposed locations
Classical Limestone Designs for Timeless Gardens
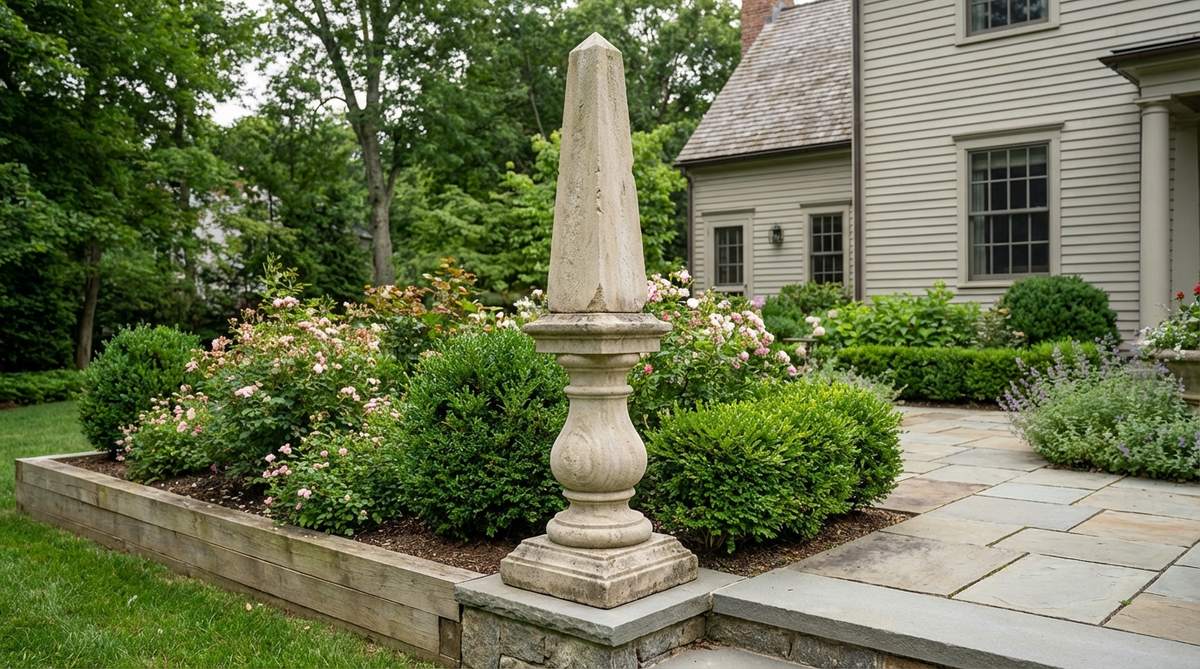
1. Ball-Topped Square Limestone Obelisk
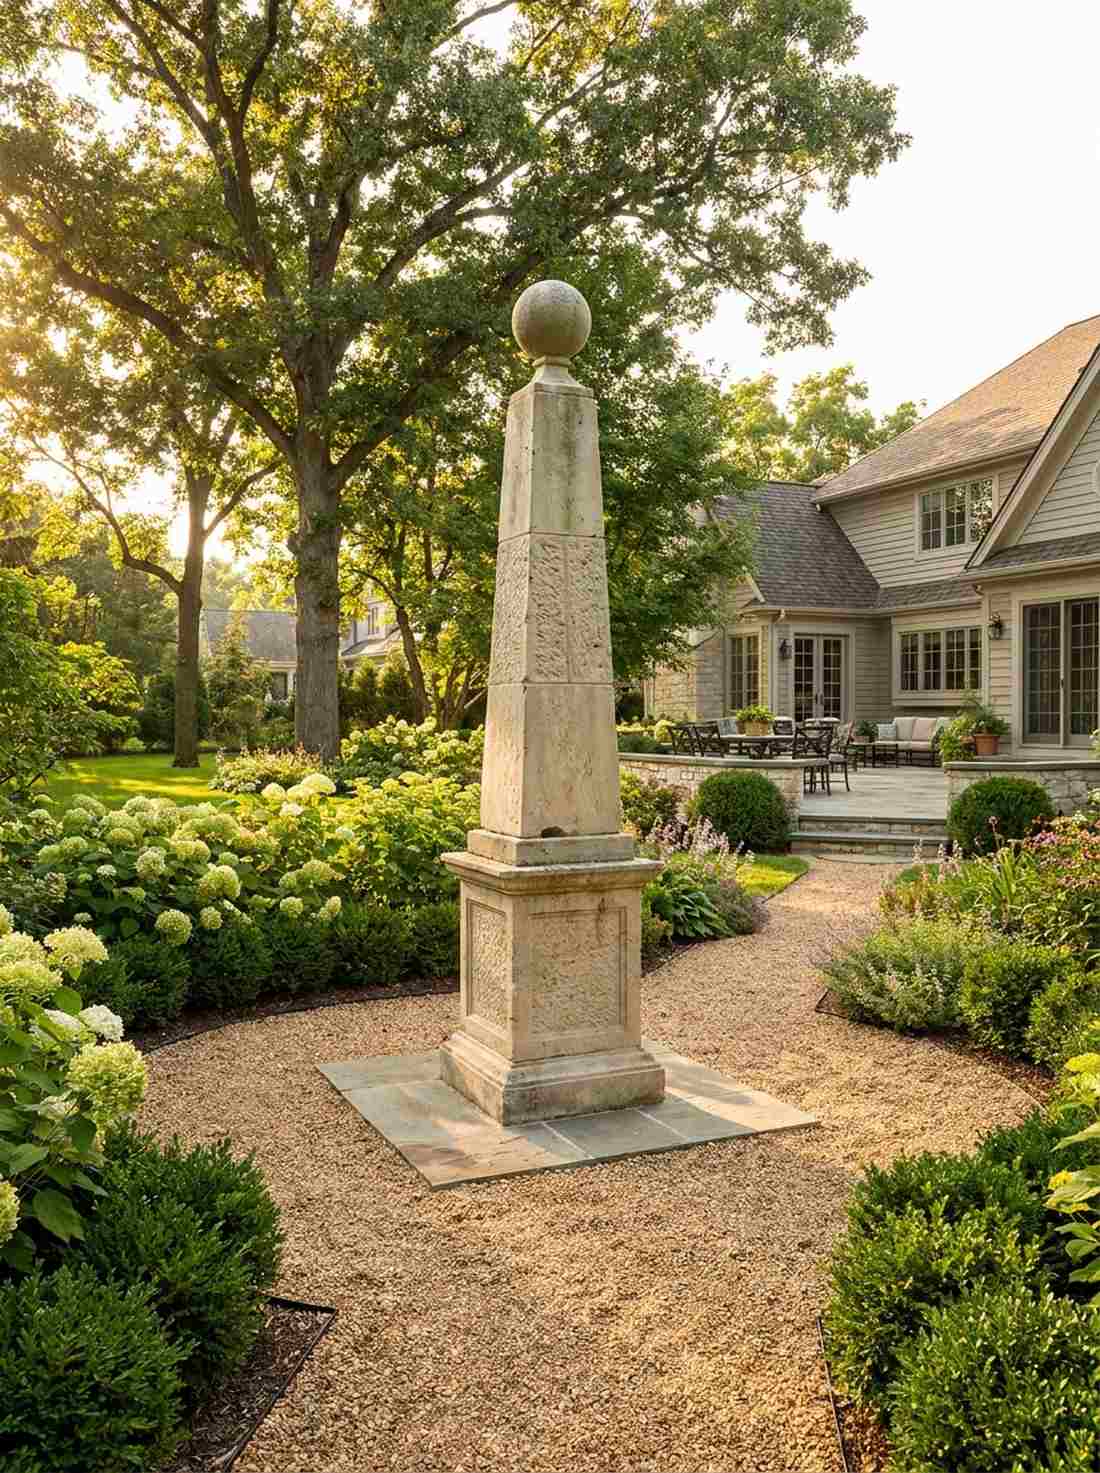
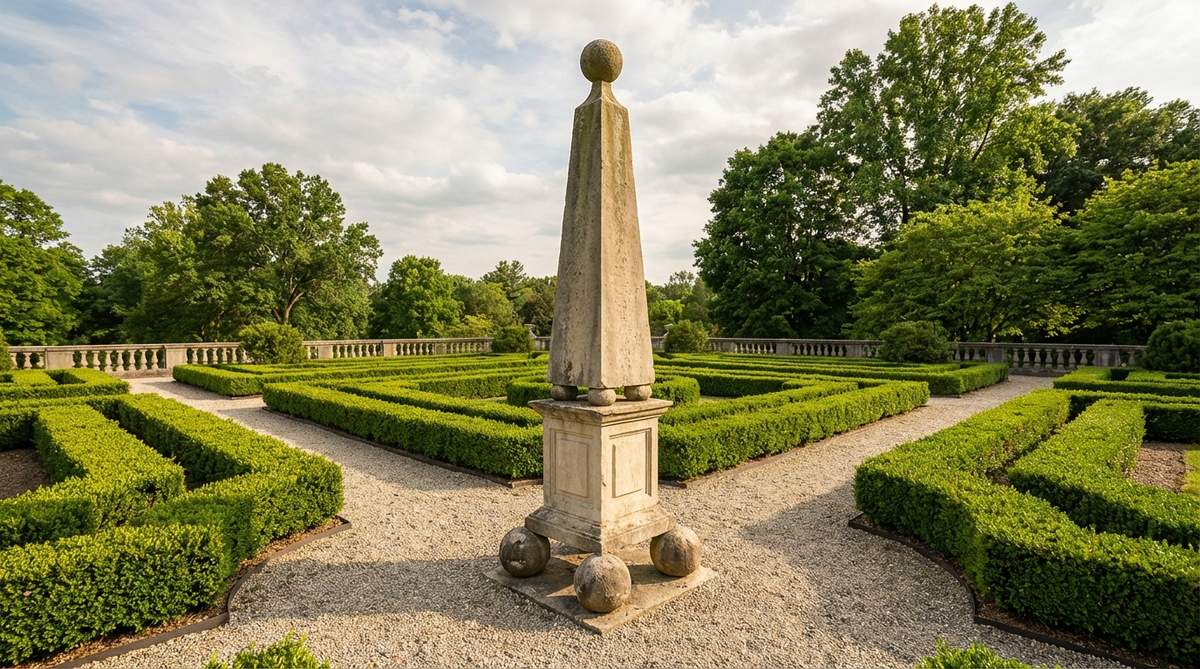
Feels like stepping into an old-world English estate right in your own backyard. This formal limestone patio decor perfectly anchors the end of a winding gravel path.
Basic flat yards often lack destination points, but this carved pillar commands instant architectural authority. Securing a dense, pre-drilled limestone base block guarantees a designer-level finish that effortlessly outlasts harsh winter freezes.
You can expect to invest around $250–$400 for a solid foundational kit.
- Key Materials: Pre-drilled limestone blocks, heavy-duty masonry epoxy
- Vibe / Style: Classic Georgian formal garden
- Difficulty: Moderate weekend build
- Budget Breakdown: Stone components: $280 | Base foundation: $45.
- Creator’s Tip: Set the base spheres on a mortared flagstone pad to prevent uneven settling over time.
- Smart Sourcing: pre-cut architectural limestone kits (pallet shipped) or weather-resistant structural epoxy (bulk tube).
2. Gothic Pointed Arch Limestone Pillar
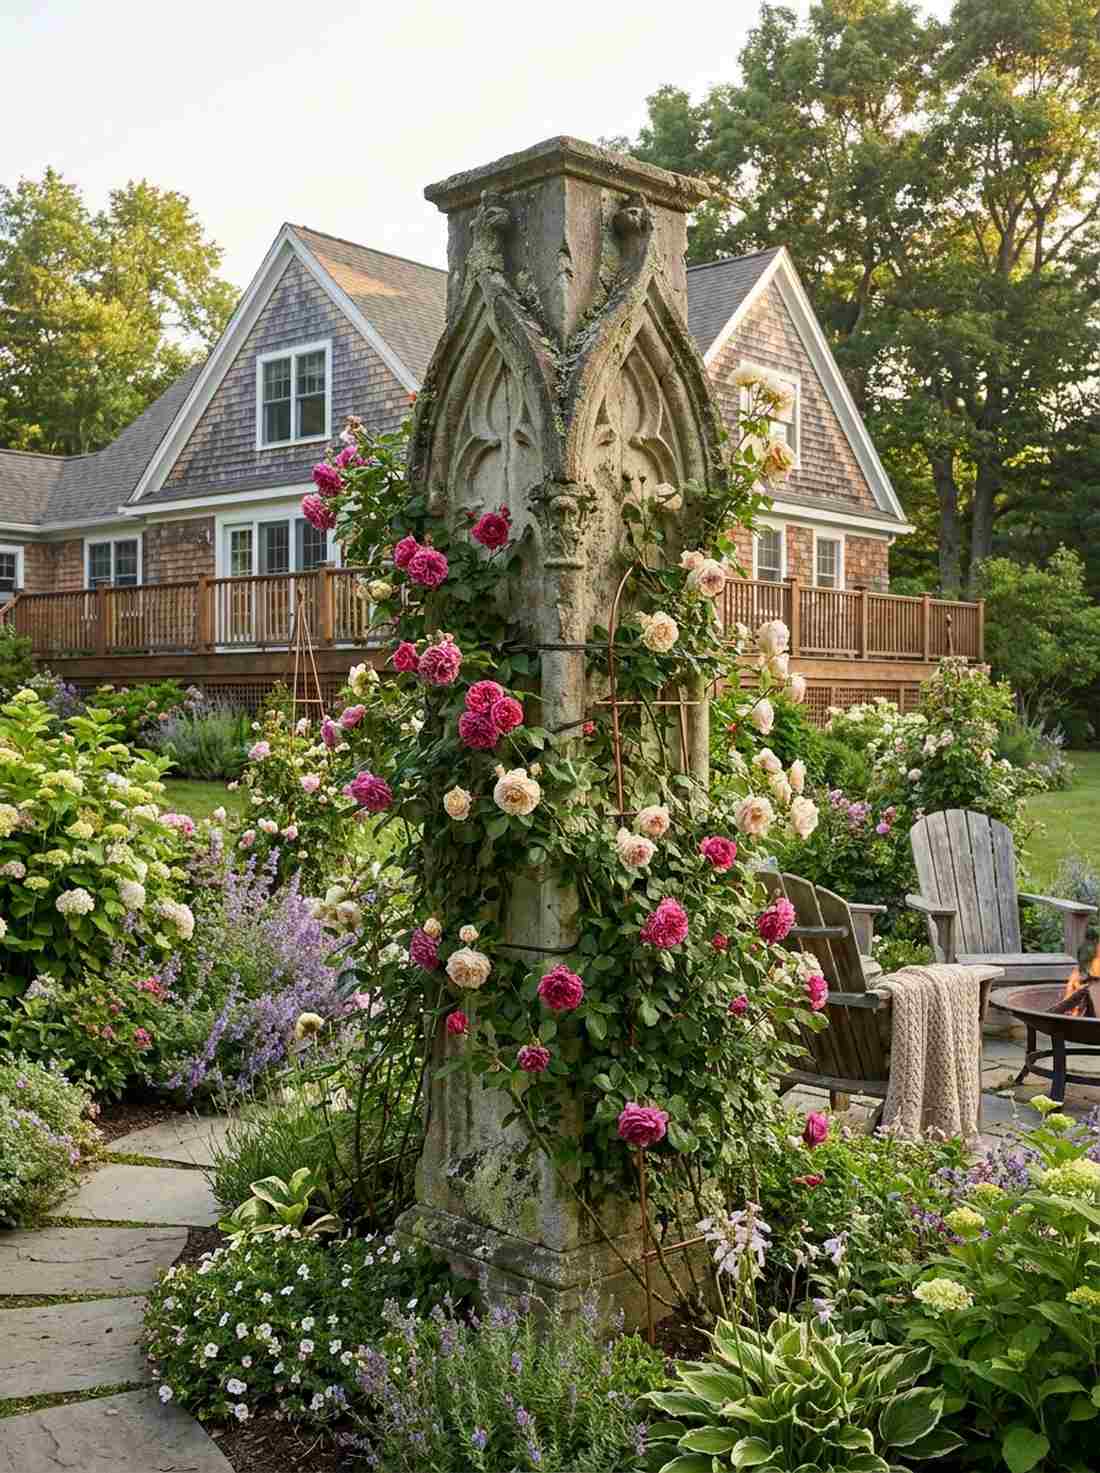
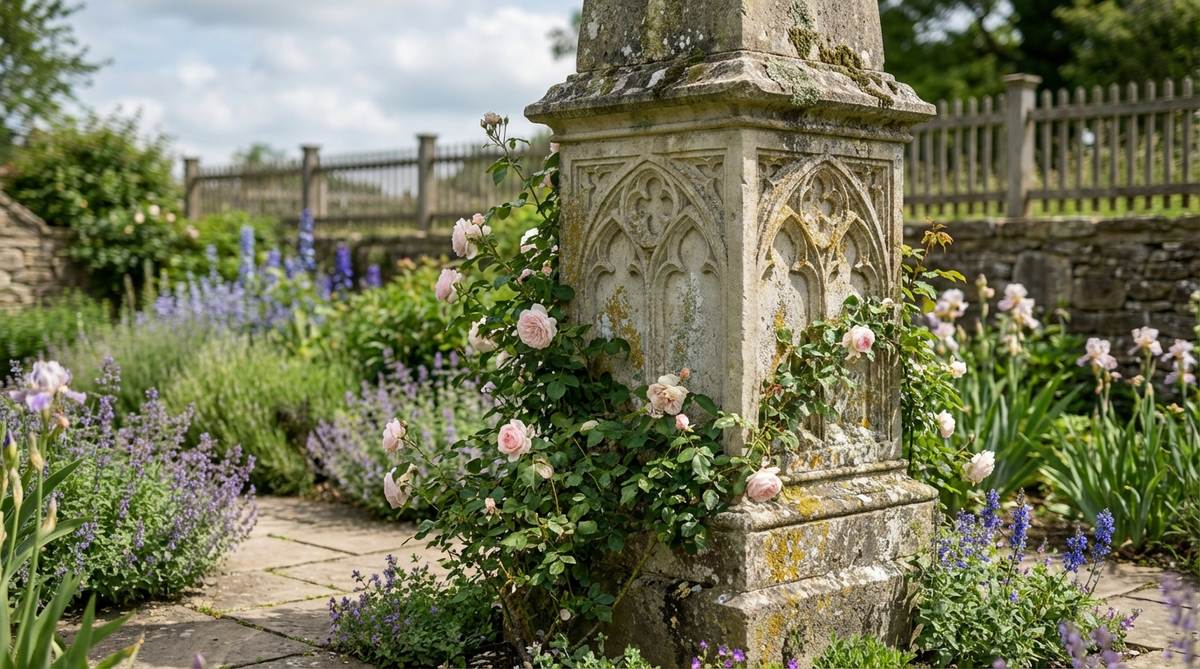
Straight out of a forgotten romantic abbey you accidentally discovered. These vintage cottage garden structures serve as a stunning focal point for a lush, overgrown climbing rose bed.
People constantly underestimate the shadow play created by deep relief carving, which delivers a surprisingly premium look at dawn. Training heavy vines with heavy-duty weather-coated garden wire transforms raw masonry into living, breathing art.
Pulling this historical look together costs roughly $300–$500. Save this to your historical garden board for spring inspiration.
- Key Materials: Cast Gothic-relief panels, copper trellis wire
- Vibe / Style: Moody romantic cottage
- Difficulty: Intermediate setup
- Budget Breakdown: Relief pillar: $350 | Wire supports: $20.
- Creator’s Tip: Leave the stone unsealed so beneficial lichen can naturally colonize the deep carved grooves.
- Smart Sourcing: cast-stone Gothic pillar columns (hollow core) or heavy-gauge copper gardening wire (bulk spool).
3. Fluted Column Limestone Obelisk
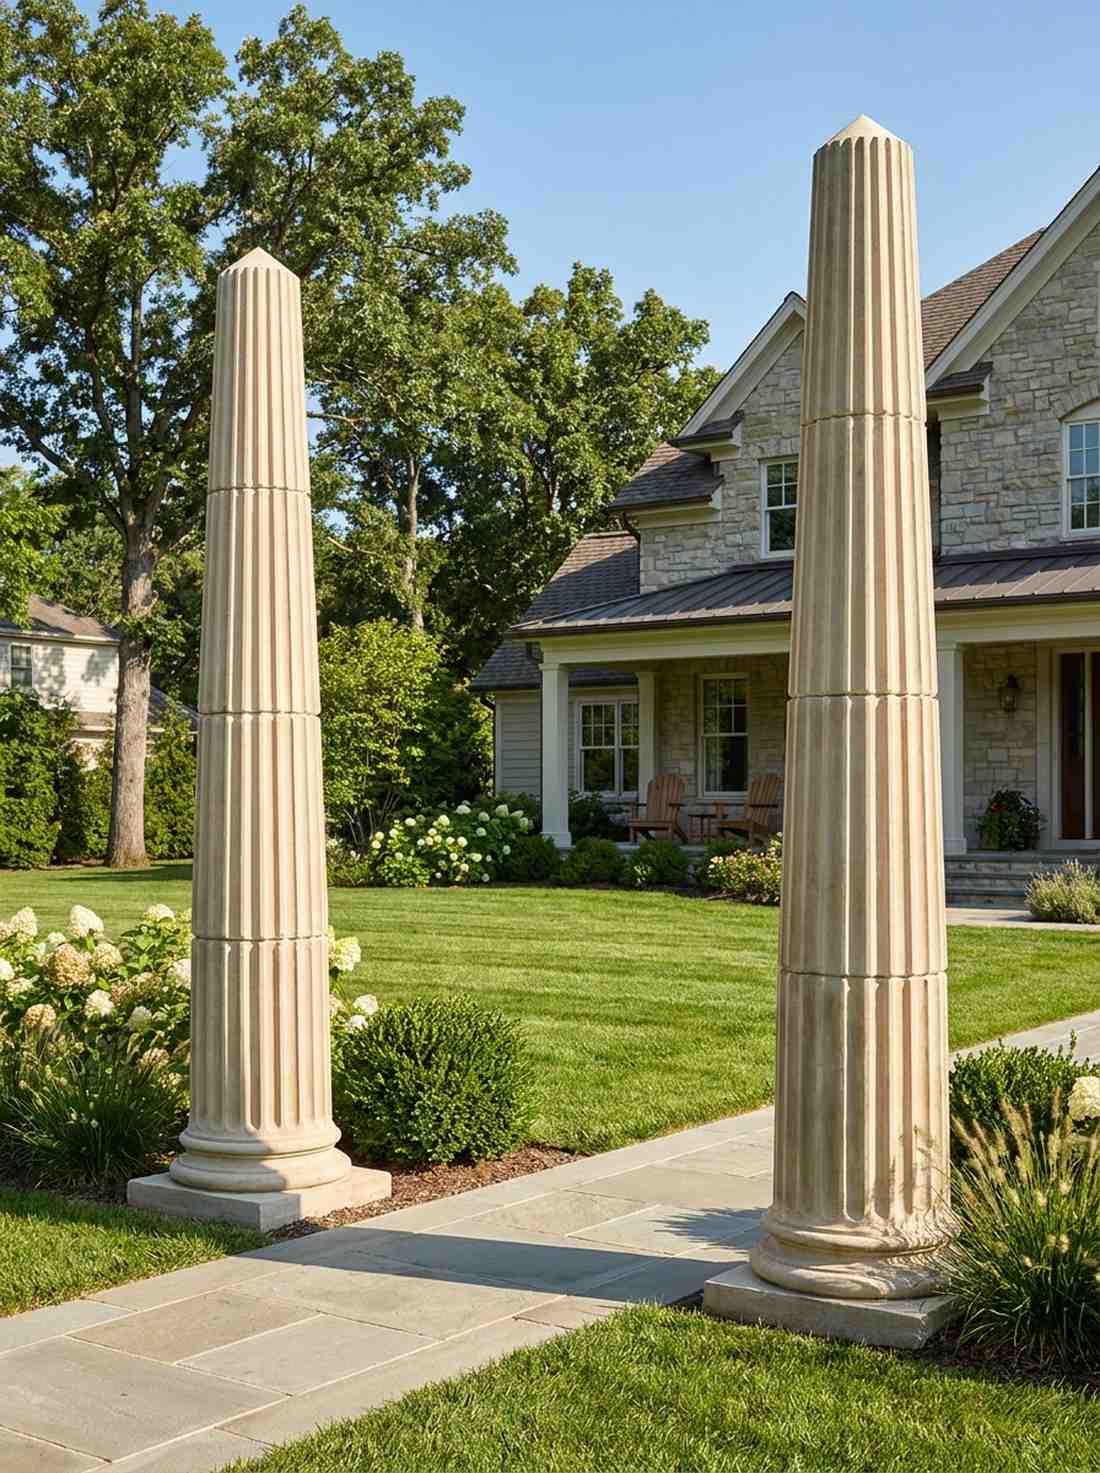
Exudes the quiet luxury of a sun-drenched Roman courtyard. This classical vertical landscape feature is ideal for flanking a formal entrance or framing a pristine lawn.
Skipping fluted details is a huge mistake if you want true vertical illusion in tight, compressed spaces. Utilizing commercial-grade hardscape adhesives anchors the grooved tiers seamlessly without exposing ugly, messy mortar joints.
Sourcing pre-grooved column sections runs about $180–$350.
- Key Materials: Fluted stone drums, landscape construction adhesive
- Vibe / Style: Refined Mediterranean elegance
- Difficulty: Easy stacking project
- Budget Breakdown: Column sections: $220 | Adhesives: $30.
- Creator’s Tip: Install these in full sun; deep shade flattens out the carved flutes and ruins the visual depth.
- Smart Sourcing: pre-fluted cast limestone drums (stackable kits) or polyurethane landscape block adhesive (pro-pack).
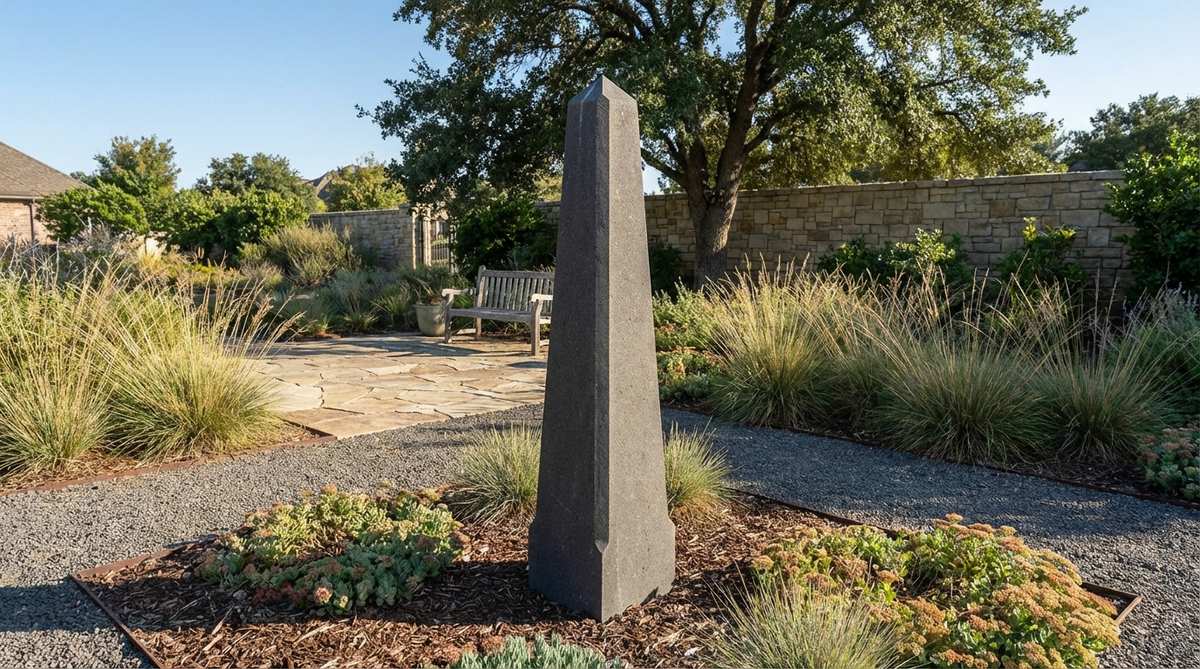
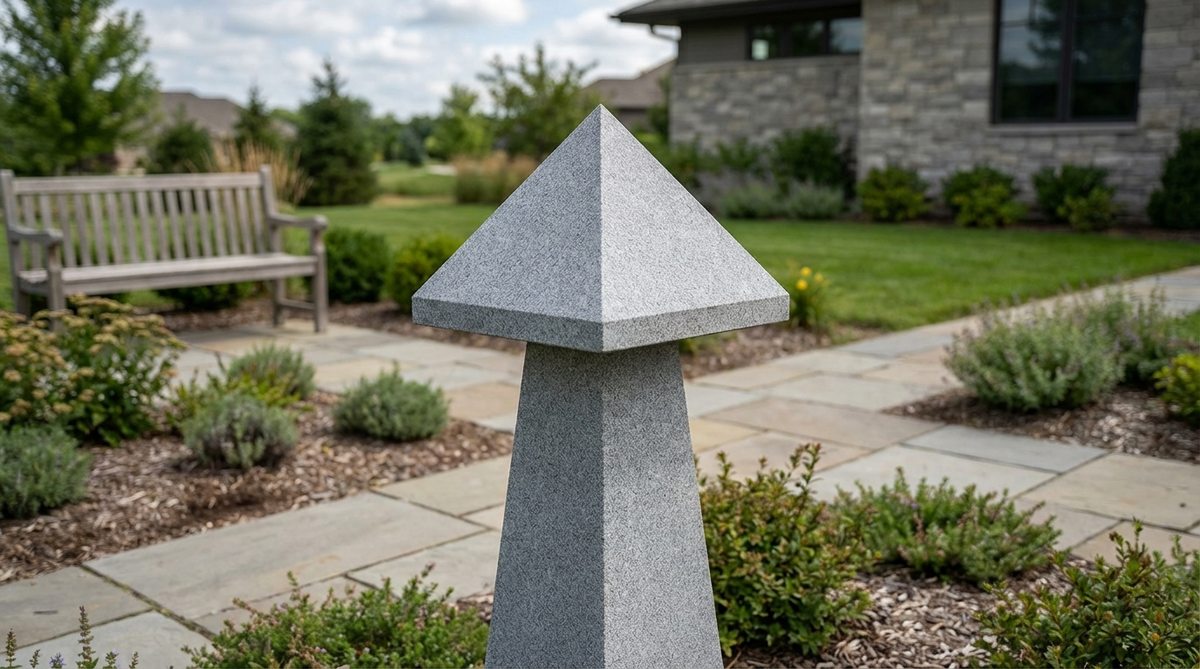
4. Pyramidion Cap Limestone Monument
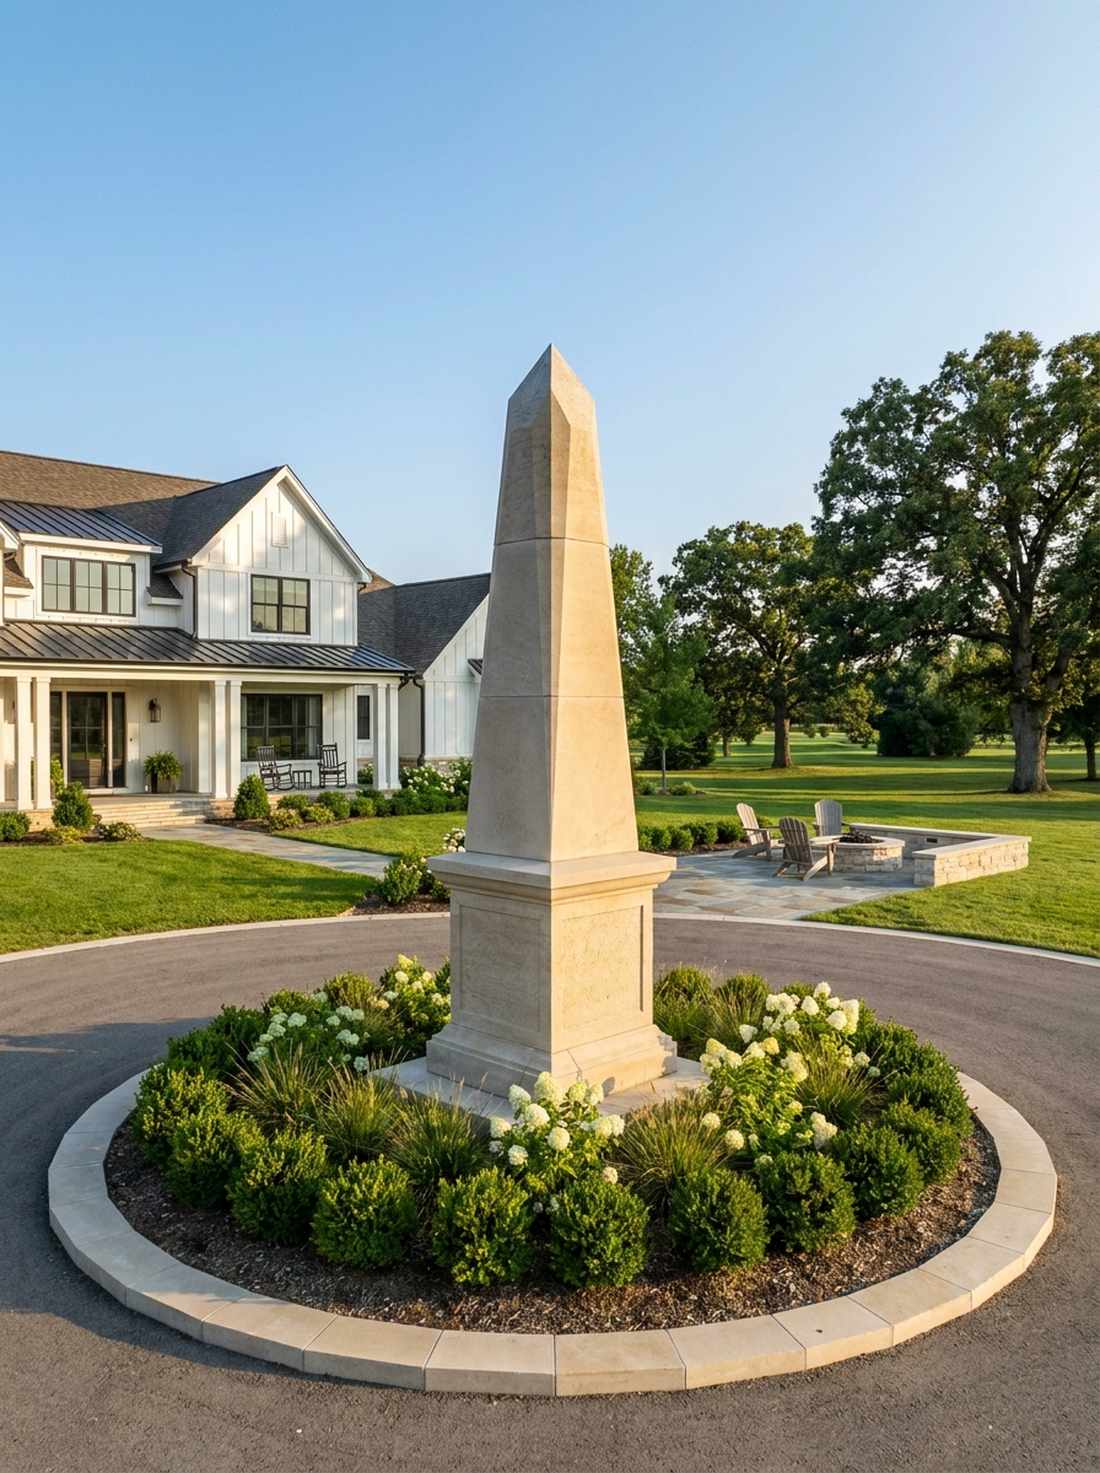
Carries an air of ancient mystery paired with sharp modern lines. A flawless geometric garden focal point that acts as the ultimate centerpiece for circular driveway planters.
Flat-topped pillars simply do not catch the afternoon light the way a razor-sharp pyramidion does. Incorporating heavy-duty masonry dowels during assembly prevents seasonal shifting and keeps those crisp edges perfectly aligned year-round.
Expect premium structural materials to total around $200–$400.
- Key Materials: Faceted limestone cap, steel connecting dowels
- Vibe / Style: Structured botanical symmetry
- Difficulty: Requires precision alignment
- Budget Breakdown: Main shaft: $180 | Pyramidion cap: $90.
- Creator’s Tip: Ensure the slope angle of the cap exactly matches the taper of the main shaft for a monolithic look.
- Smart Sourcing: pre-cut pyramid stone caps (beveled edges) or stainless steel masonry dowel kits.
This next setup completely changes the game—most DIYers ignore this hybrid material approach, but it ends up looking like a $2,000 custom installation…
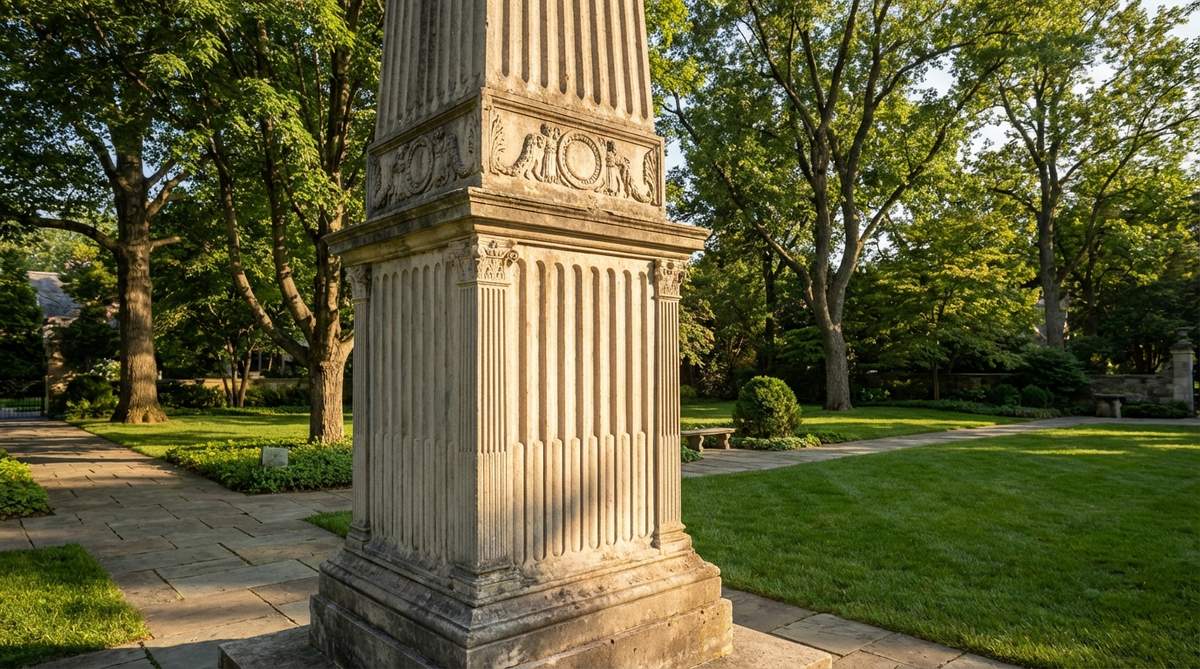
5. Balustrade-Integrated Limestone Obelisk
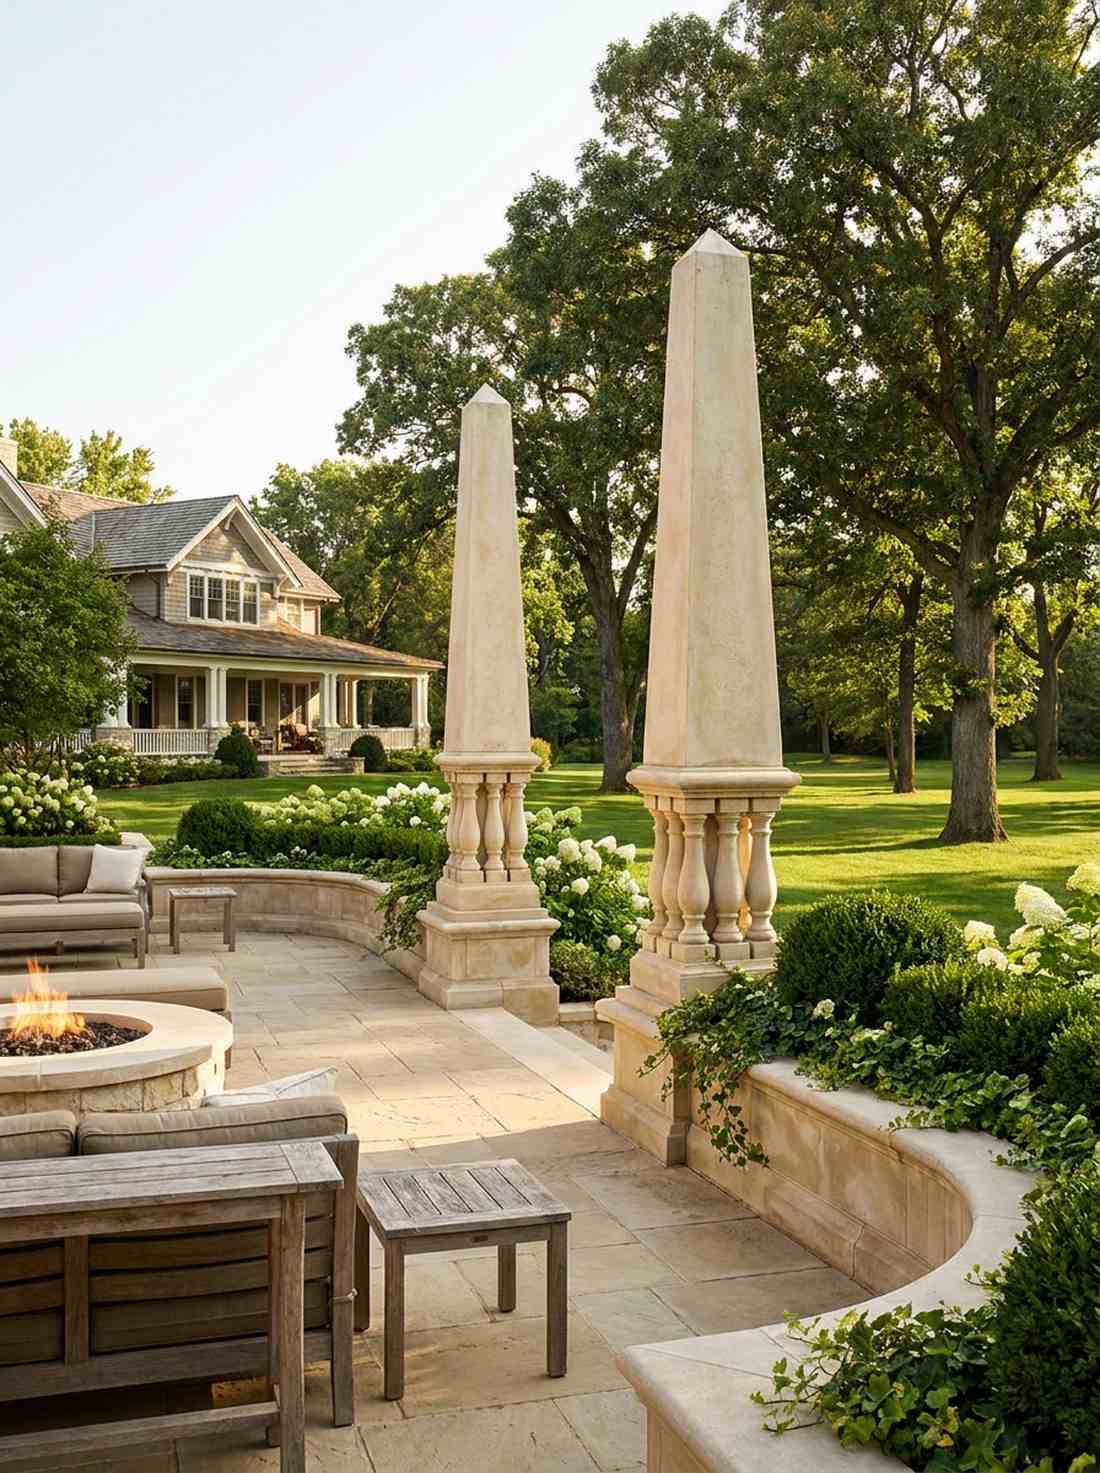
Echoes the sweeping grandeur of European terrace overlooks. This is the ultimate elevated stone garden border to transform basic raised beds into architectural masterpieces.
Failing to blend the lower baluster smoothly with the upper taper is why so many cheap knockoffs look incredibly awkward. Upgrading to reinforced cast-stone baluster segments gives that heavy, expensive aesthetic at a mere fraction of custom carving costs.
You can assemble this stunning hybrid piece for $150–$300. Pin this if you’re planning a massive patio terrace upgrade this summer.
- Key Materials: Turned baluster bases, tapered upper shafts
- Vibe / Style: High-end estate terrace
- Difficulty: Intermediate leveling required
- Budget Breakdown: Baluster base: $120 | Tapered top: $110.
- Creator’s Tip: The baluster section should occupy exactly the lower third of the total height for perfect visual proportion.
- Smart Sourcing: reinforced cast-stone balusters (pre-drilled) or architectural mounting plinths (heavy-duty).
Contemporary Stone Pillars with Clean Lines
6. Polished Granite Monolith
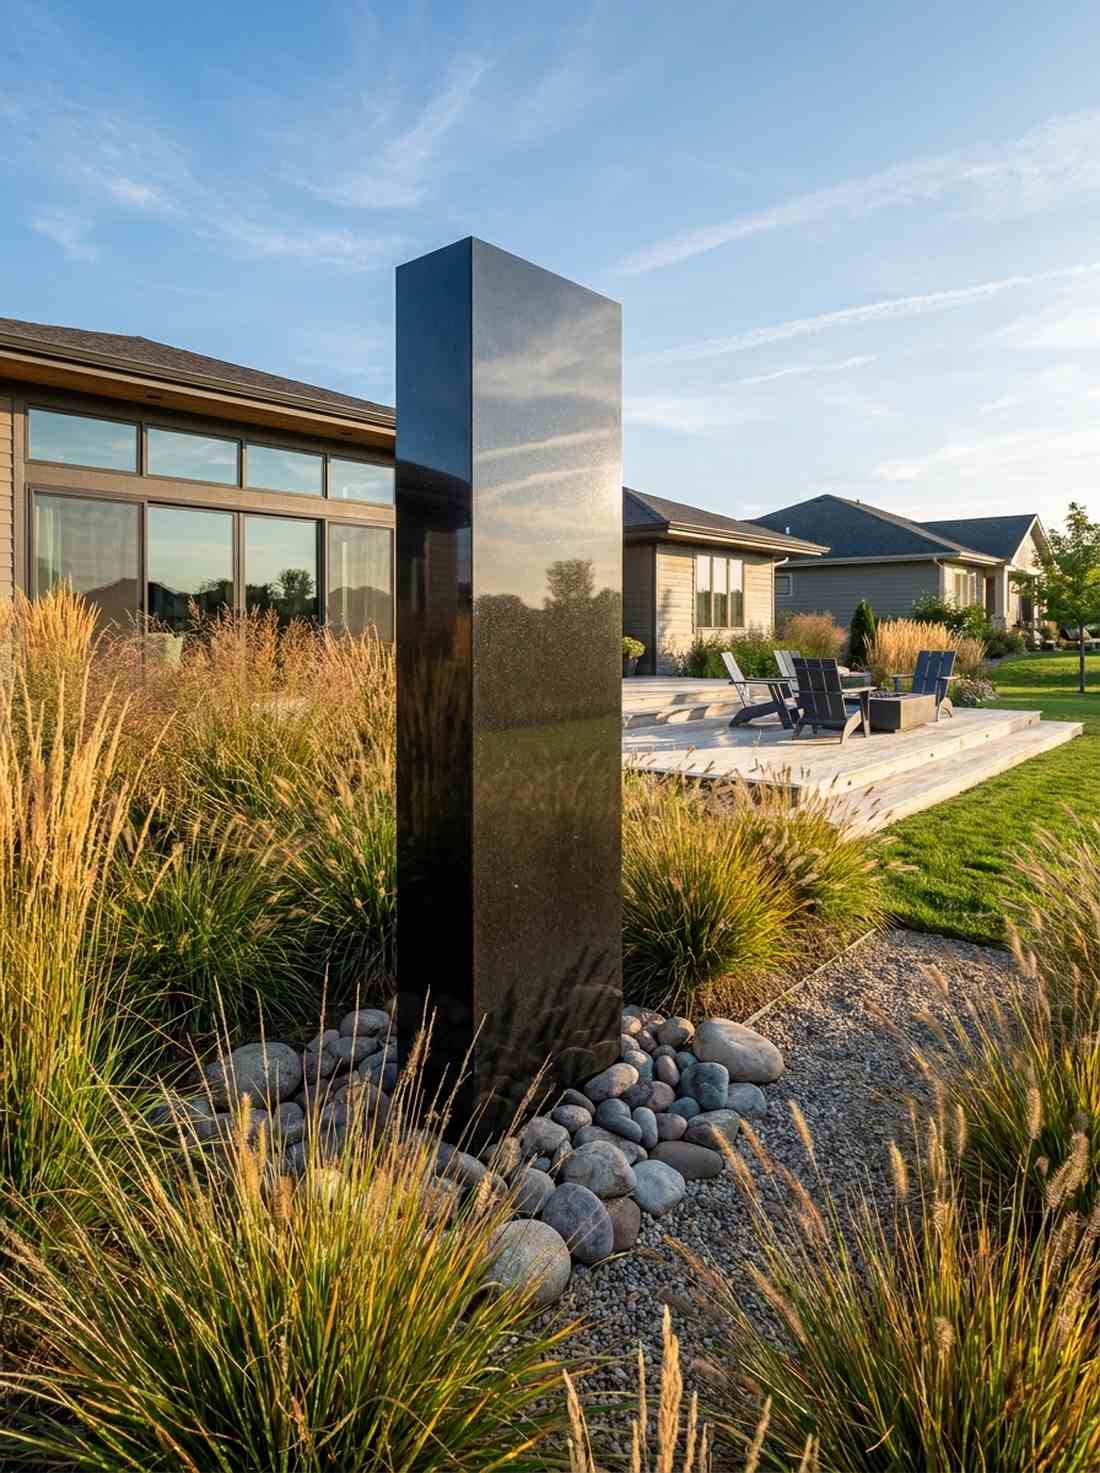
Brings a stark, modern drama that feels almost cinematic in its execution. Striking contemporary minimalist yard art that looks unbelievable when surrounded by swaying ornamental prairie grasses.
Using matte porous stone in an ultra-modern setting often falls flat, but this mirror-polished surface reflects the shifting sky brilliantly. Investing in specialized stone sealing compounds keeps mineral water spots from ruining the high-end reflective facade.
Professional monolithic slabs start around $600–$900 depending on total height.
- Key Materials: Mirror-polished granite pillar, specialized stone polish
- Vibe / Style: Sleek urban architectural
- Difficulty: Professional placement recommended
- Budget Breakdown: Granite monolith: $750 | Delivery/Placement: $150.
- Creator’s Tip: Position this strictly away from irrigation sprinkler heads to avoid daily hard-water stain buildup.
- Smart Sourcing: polished black granite pillars (solid core) or UV-resistant granite sealer sprays.
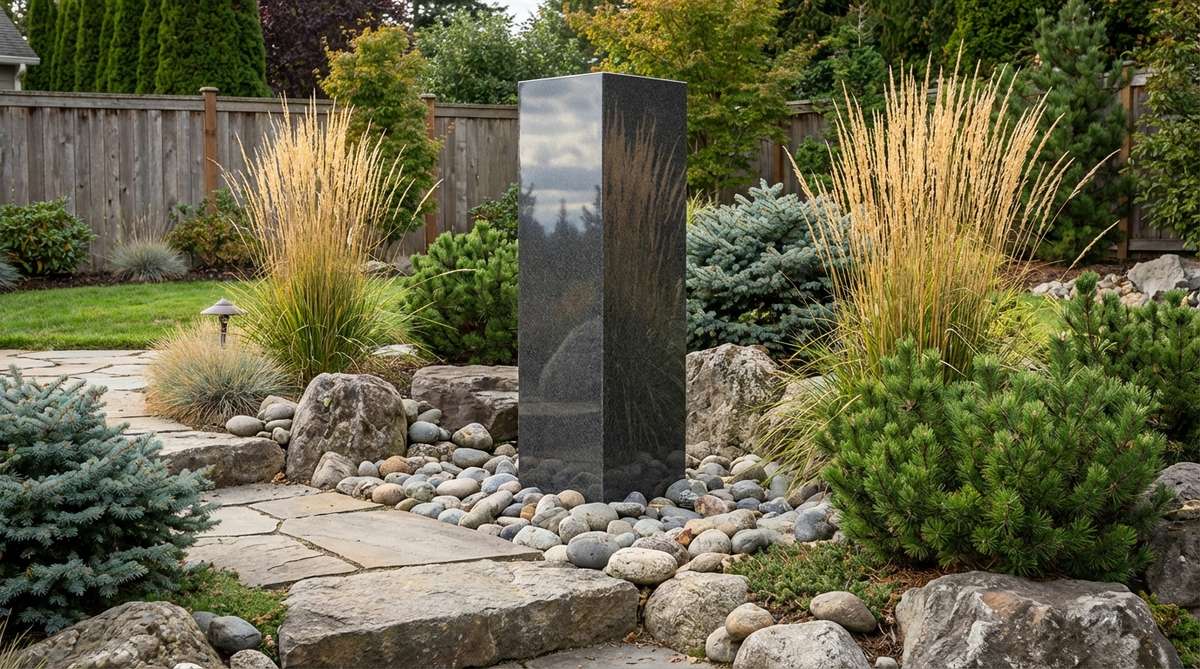
7. Beveled Edge Basalt Column
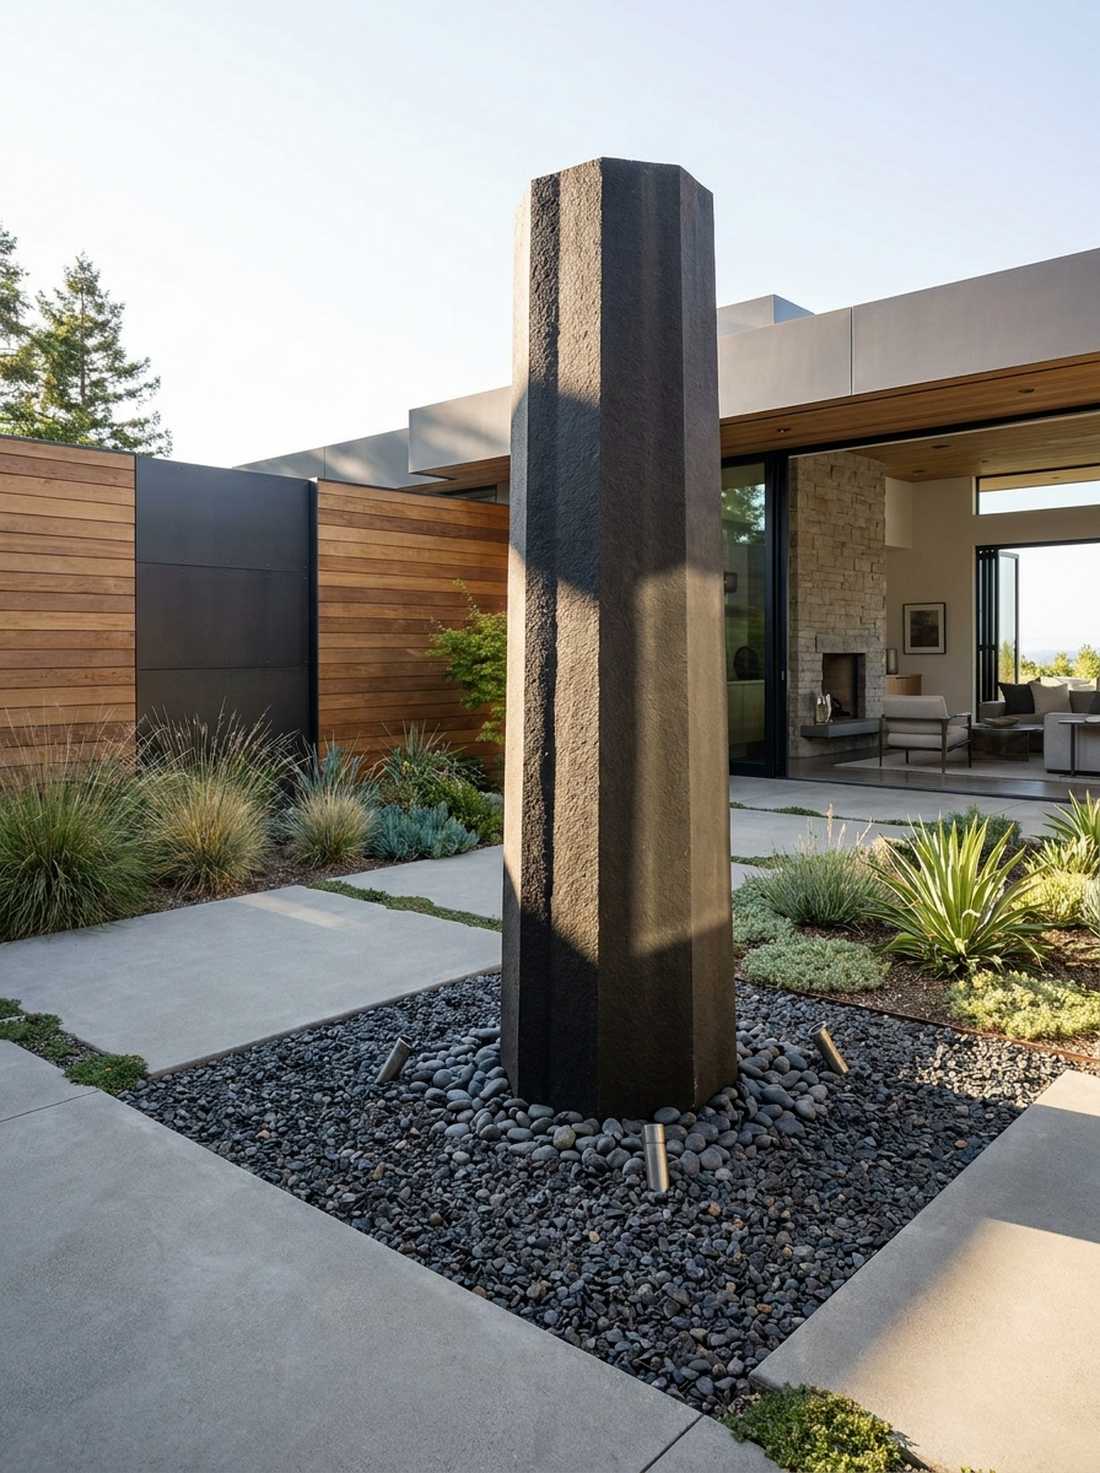
Commands attention like a natural volcanic spire piercing the ground. Anchors dark modern landscape pillars beautifully within stark, gravel-heavy minimalist courtyard gardens.
Square corners look incredibly harsh on dark stone, whereas a 45-degree bevel creates a vertical shadow line that screams custom fabrication. Securing these heavy monolithic pieces with commercial-grade ground stakes prevents terrifying leaning in wet, shifting soil.
Sourcing pre-chamfered basalt typically costs $300–$550.
- Key Materials: Chamfered basalt column, deep gravel footer
- Vibe / Style: Zen industrial fusion
- Difficulty: Heavy lifting involved
- Budget Breakdown: Basalt column: $380 | Foundation gravel: $30.
- Creator’s Tip: Sink at least 20% of the column’s total height below grade into compacted gravel to prevent tipping.
- Smart Sourcing: pre-chamfered basalt landscaping columns or heavy-duty tamped base gravel (bulk bags).
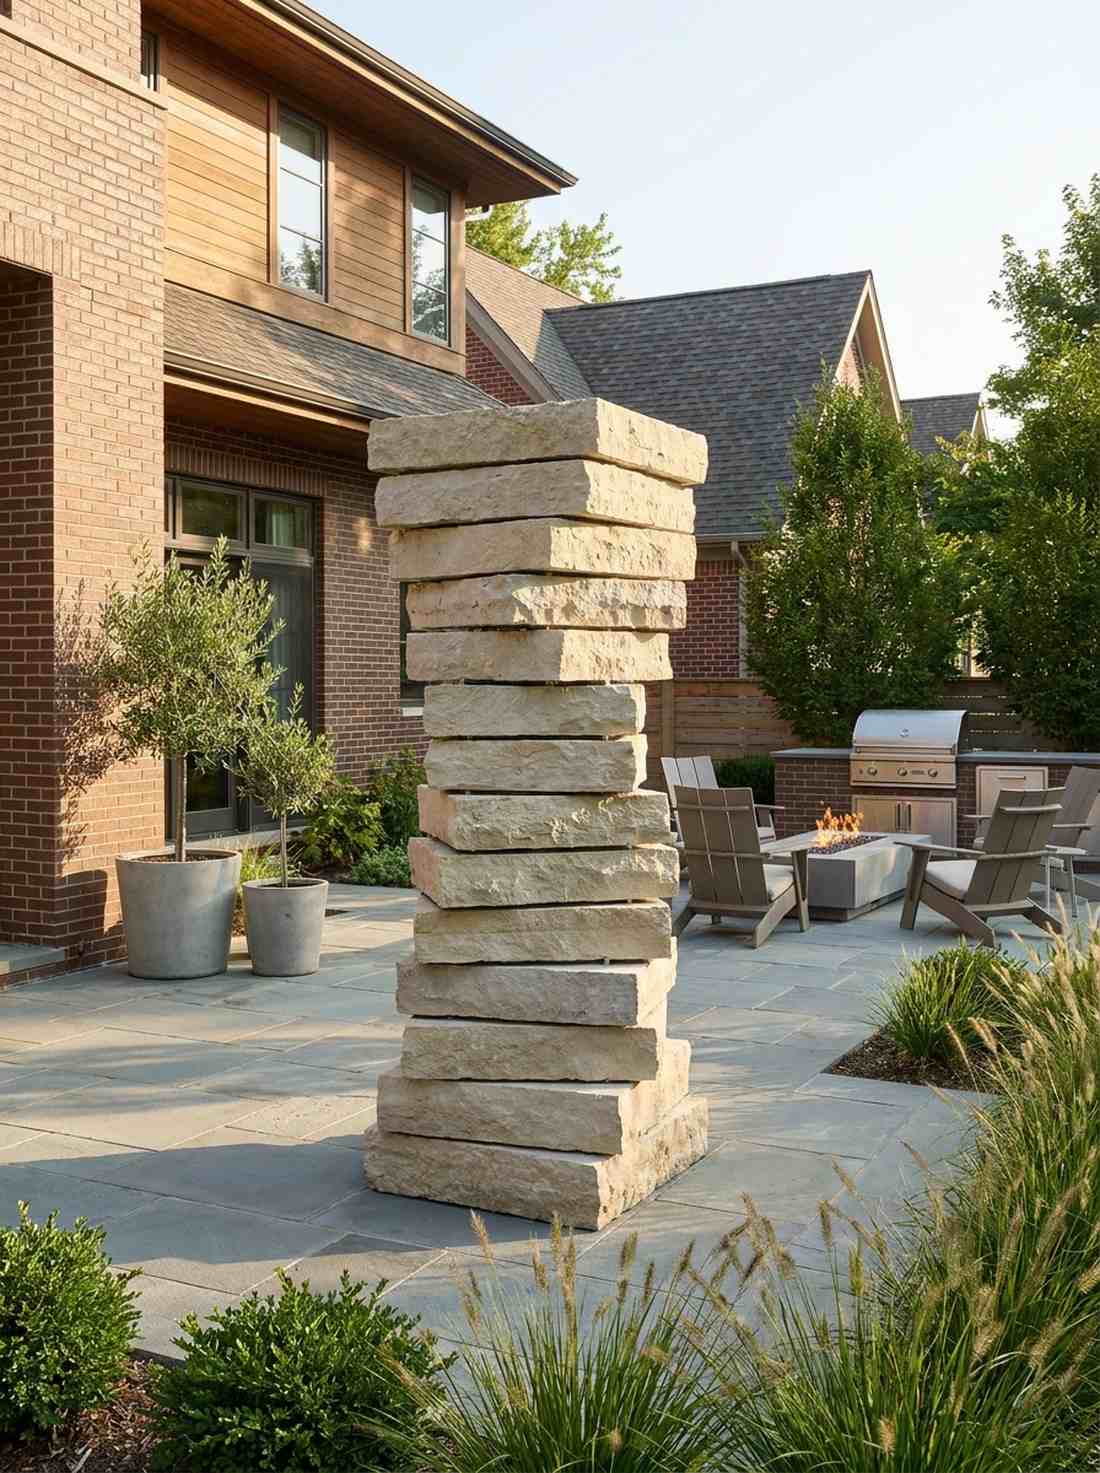
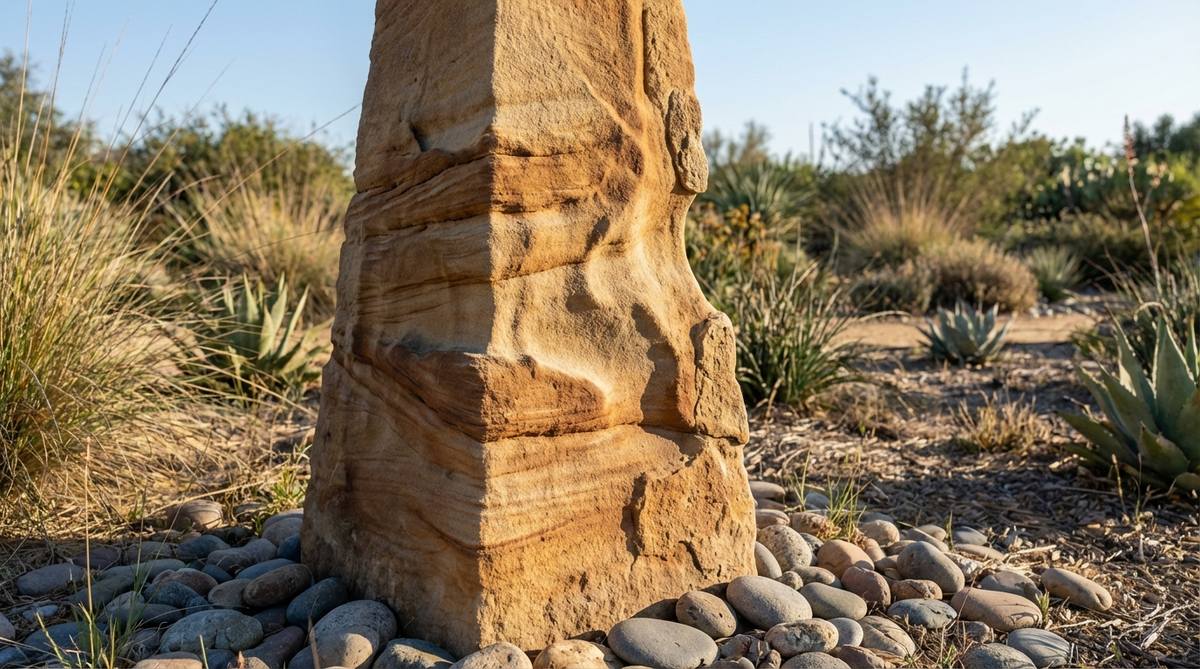
8. Split-Face Sandstone Tower
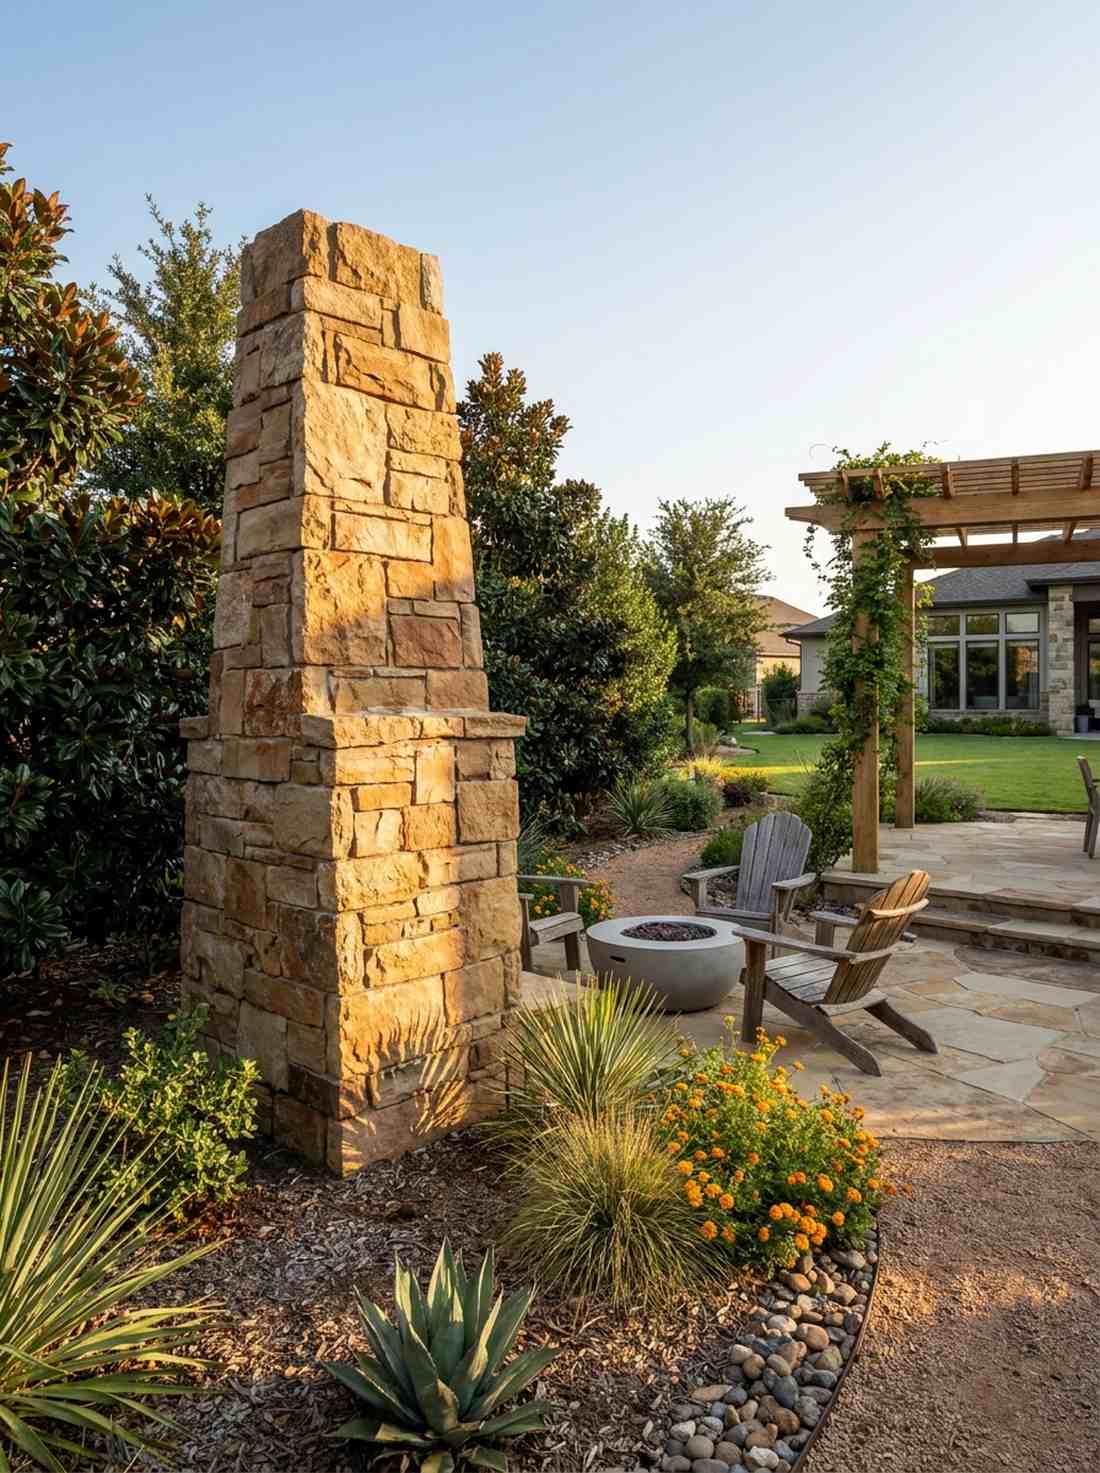
Radiates rugged desert warmth that catches every single ray of golden hour light. These rustic textured garden monuments pop spectacularly against a backdrop of dark, broad-leafed evergreens.
Smooth, polished stones look completely artificial next to organic foliage, but raw cleft surfaces bring instant, undeniable authenticity. Selecting bulk crates of natural sandstone blocks lets you hand-pick the most dramatic, textured faces for outward display.
You can stack an impressive natural tower for around $120–$250. Save this genius idea to your xeriscape layout board.
- Key Materials: Split-face sandstone blocks, structural bonding agent
- Vibe / Style: Organic desert modernism
- Difficulty: Fun puzzle-like assembly
- Budget Breakdown: Sandstone blocks: $160 | Bonding adhesive: $25.
- Creator’s Tip: Orient the deepest textures toward the west to catch dramatic long shadows during sunset.
- Smart Sourcing: split-face sandstone masonry blocks (pallet) or high-strength exterior stone glue.
9. Cube-Stacked Limestone Sculpture
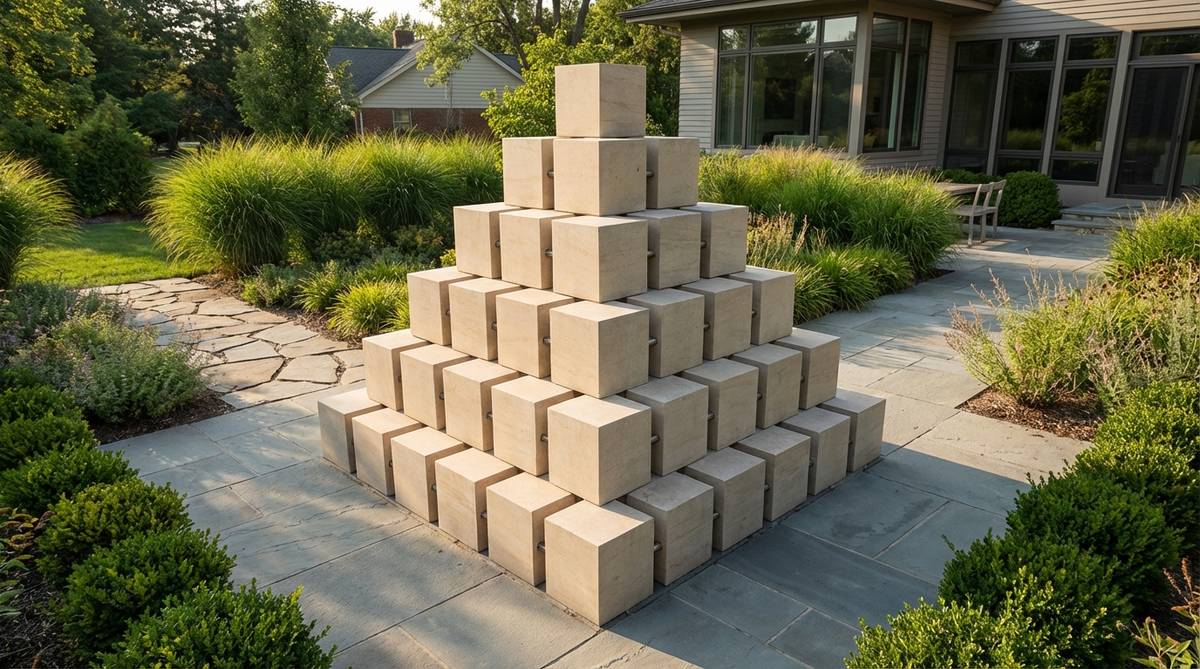
Feels like an interactive modern art gallery installation right on your patio. These stepped stone garden structures work absolute wonders in hardscape-heavy urban courtyards.
Stacking perfectly square blocks without pinning them together is a major safety hazard waiting to happen. Driving galvanized steel rebar through pre-drilled central holes ensures this staggered masterpiece survives high winds and curious, climbing pets.
This graduated geometric setup runs roughly $200–$400 in raw cut blocks.
- Key Materials: Graduated limestone cubes, galvanized steel rods
- Vibe / Style: Abstract geometric contemporary
- Difficulty: Precise drilling needed
- Budget Breakdown: Stone cubes: $280 | Steel rods & epoxy: $40.
- Creator’s Tip: Stagger the blocks slightly off-center to create a dynamic, twisting optical illusion.
- Smart Sourcing: graduated dimensional limestone cubes (pre-drilled) or galvanized steel rebar stakes (multi-pack).
If you think new stone looks a bit too clinical, wait until you see the wildly atmospheric weathered trick coming up next. It literally tricks visitors into thinking your garden is 100 years old…
💡 Must-Have Supplies for High-End Setups
To build these setups faster and ensure they last, skip the generic craft aisles and invest in the right foundational kits.
- Base & Support: heavy-duty commercial masonry adhesives (bulk tubes)
- Setup Tools: stainless steel stone doweling starter kits
- Weather/Durability Protection: UV-resistant clear breathable stone sealants
Aged Stone Obelisks with Natural Patina
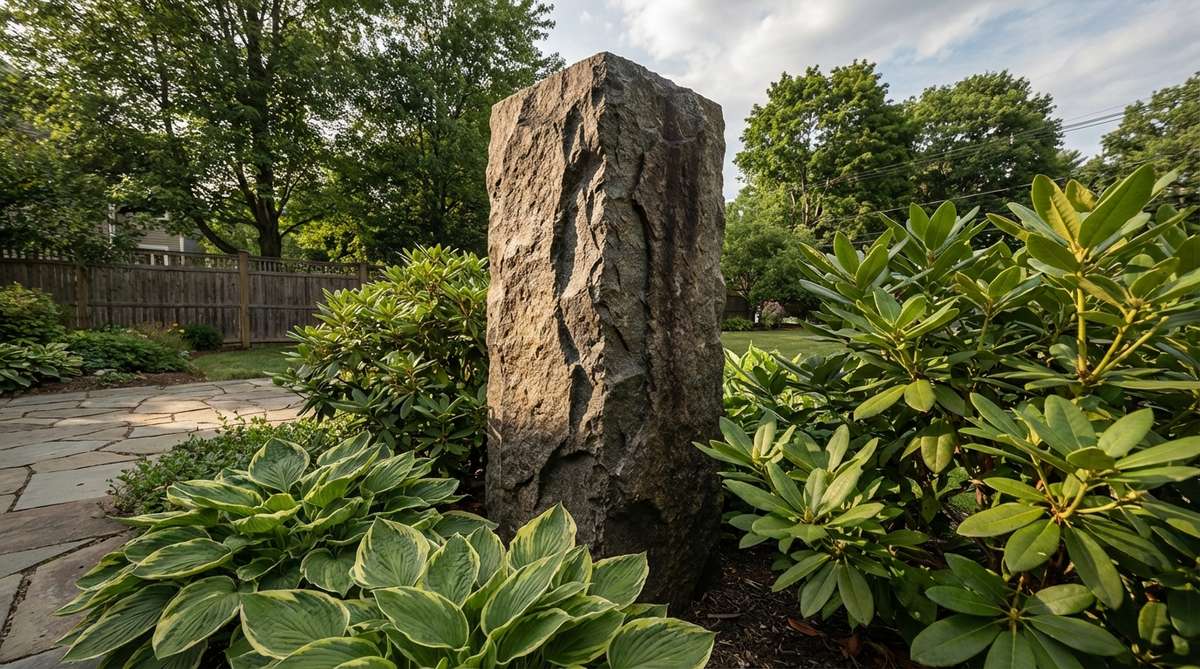
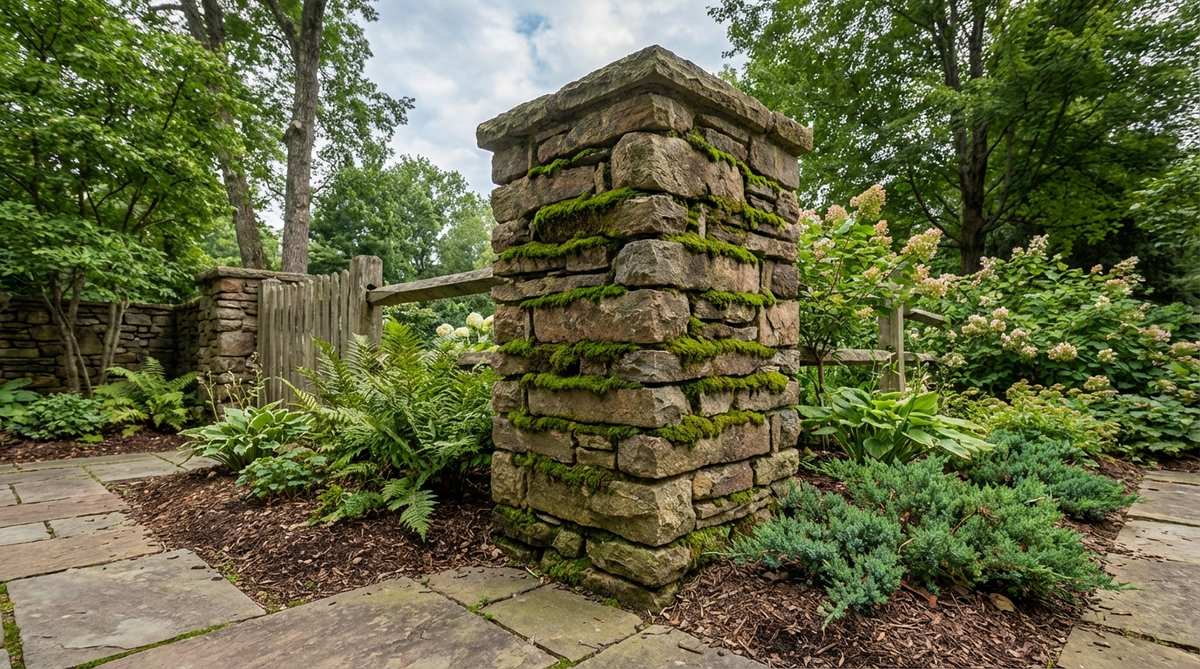
10. Lichen-Covered Granite Pillar
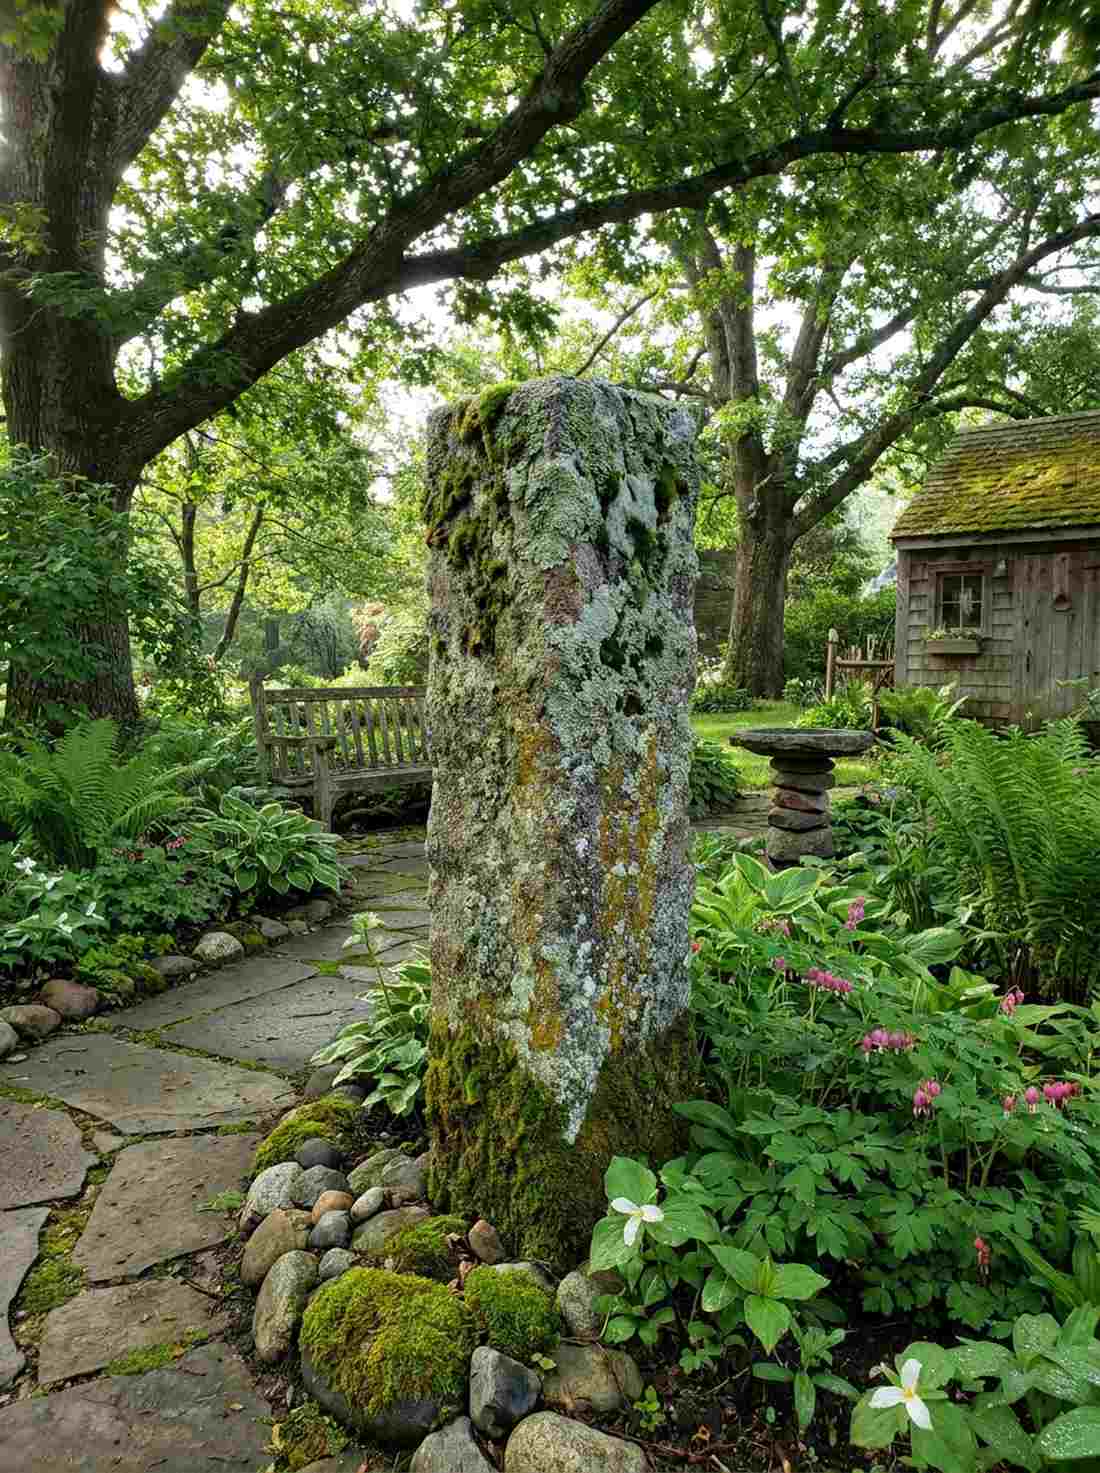

Looks exactly like a mystical forest relic slowly reclaimed by nature. Exceptional aged cottage garden features designed specifically for deep shade beds under heavy oak tree canopies.
Waiting an entire decade for natural aging to happen is ridiculous when you can easily jumpstart the biological process. Utilizing a simple buttermilk moss slurry on porous granite surfaces forces organic colonization in mere weeks instead of years.
Sourcing reclaimed or pre-colonized landscape stone ranges from $250–$600.
- Key Materials: Reclaimed rough granite, buttermilk moss starter
- Vibe / Style: Enchanted woodland retreat
- Difficulty: Easy naturalization
- Budget Breakdown: Salvaged granite: $300 | Moss slurry supplies: $15.
- Creator’s Tip: Keep the stone consistently misted for the first 3 weeks to ensure the lichen spores properly anchor.
- Smart Sourcing: salvaged rough-cut granite pillars or live moss garden starter kits.
11. Eroded Sandstone Tapering Column
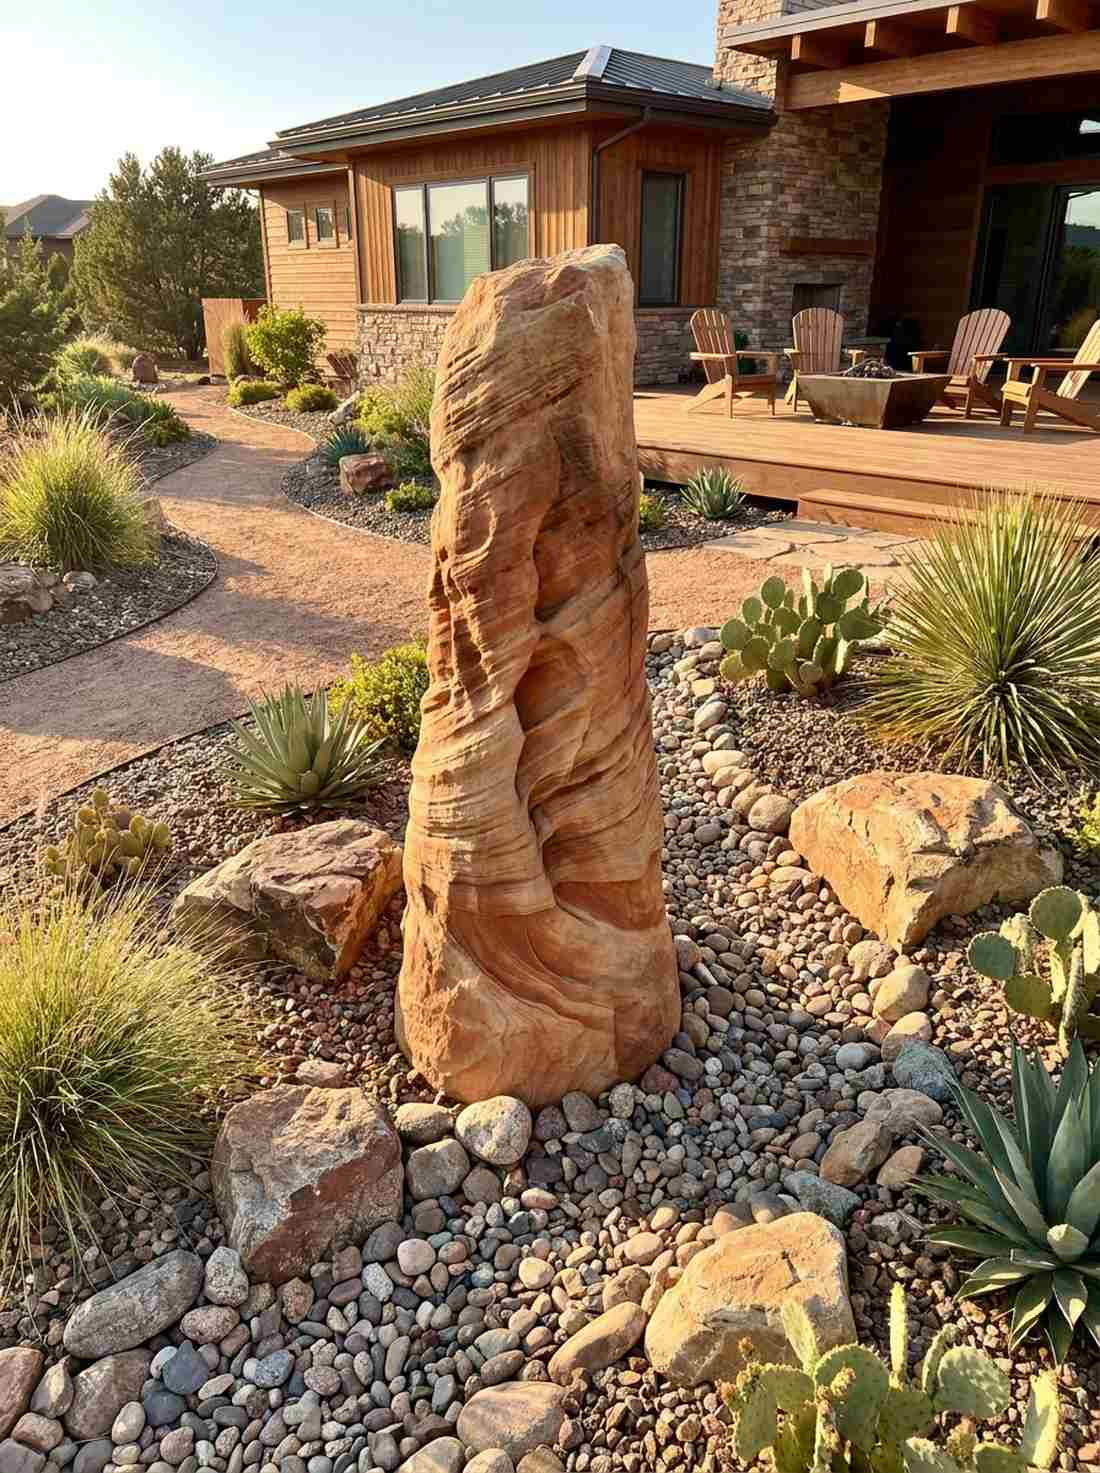
Captures the sweeping, breathtaking erosion of a deep desert canyon. Beautifully anchors naturalistic rock garden decor alongside water-wise landscapes and dry river beds.
Machine-tumbled stone looks painfully fake up close, but authentic water-carved sandstone brings genuine, unmatched geological drama. Sealing the hidden base with a heavy-duty breathable masonry sealant prevents ground moisture from causing unwanted structural rot.
Authentic eroded pillars cost between $150 and $450. Pin this for your upcoming drought-tolerant yard makeover.
- Key Materials: Water-eroded sandstone, breathable stone sealer
- Vibe / Style: Southwest naturalistic
- Difficulty: Simple base installation
- Budget Breakdown: Eroded column: $250 | Base sealant: $25.
- Creator’s Tip: Bury the bottom 3 inches in coarse river rock to seamlessly blend the pillar into the landscape.
- Smart Sourcing: authentic eroded landscaping boulders or below-grade waterproofing masonry sealers.
12. Moss-Filled Joint Stacked Pillar
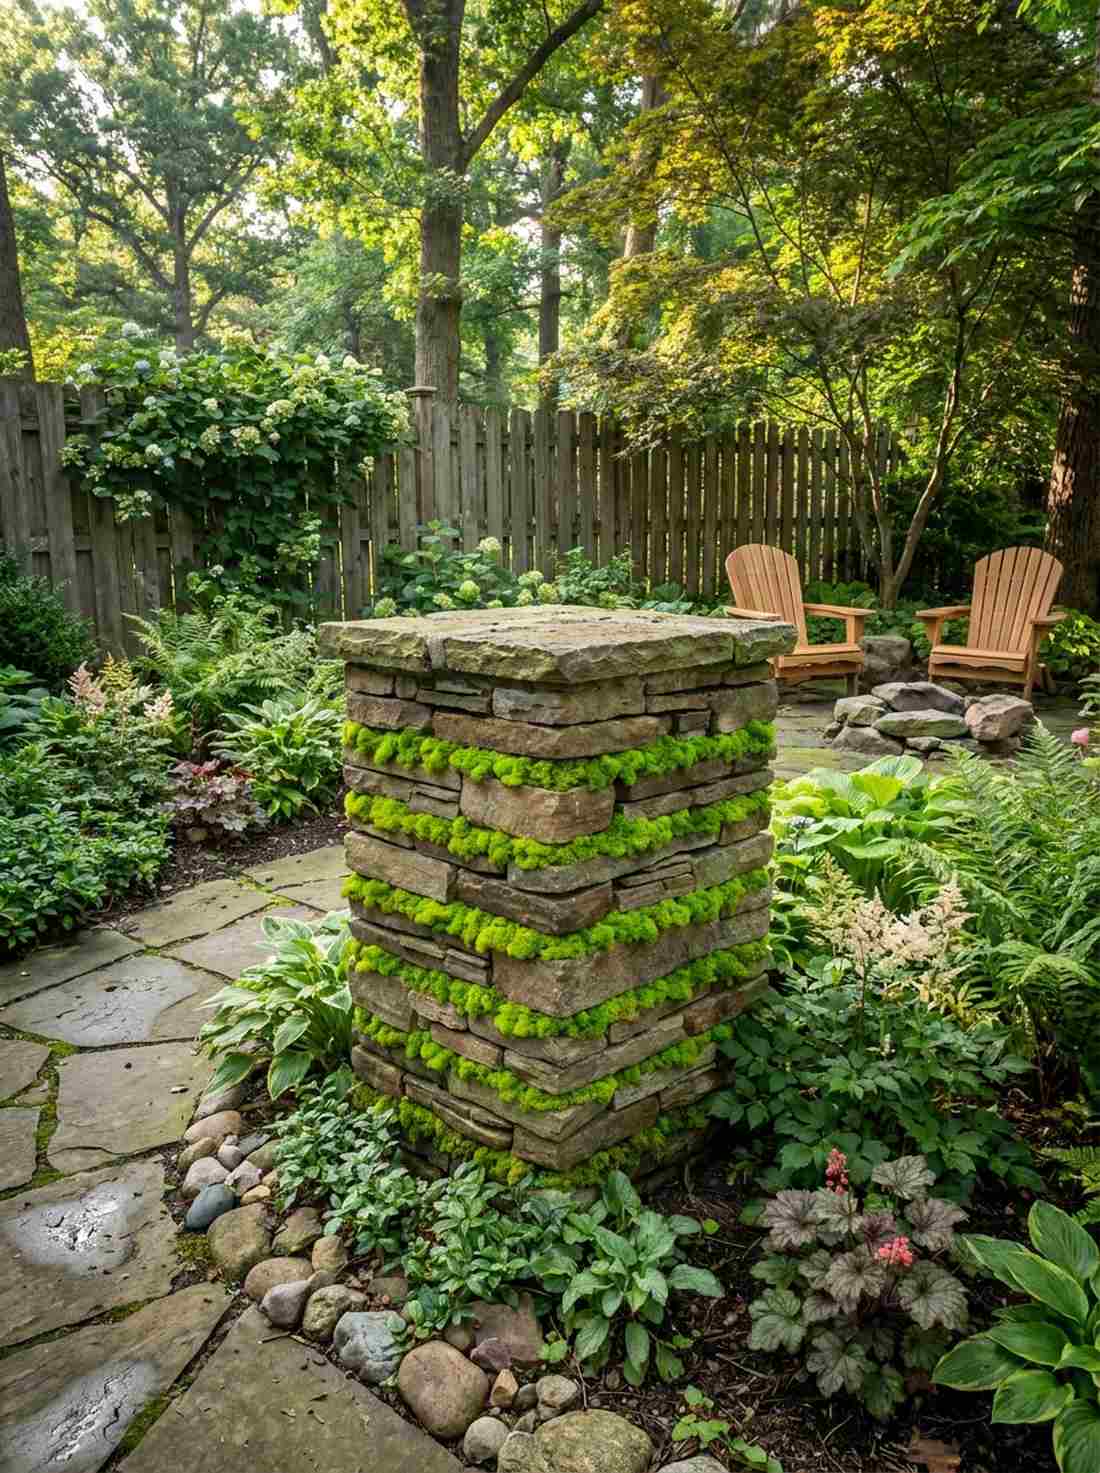
Breathes vibrant life into static masonry with striking, electric green horizontal bands. Perfect living stone pillar designs for damp, heavily shaded corners desperate for vertical interest.
Tight, perfectly flush joints suffocate plant life, so spacing blocks with deliberate, generous gaps is the real secret here. Adding moisture-retaining sphagnum moss tightly into the crevices ensures your living mortar survives hot, dry summer afternoons.
Materials for this dynamic living tower hover around a very affordable $90–$180.
- Key Materials: Flat stacking stones, preserved sphagnum moss
- Vibe / Style: Organic fairy-tale garden
- Difficulty: Beginner-friendly stacking
- Budget Breakdown: Stacking stones: $85 | Moss & soil mix: $30.
- Creator’s Tip: Use small stone shims between the main blocks to keep the weight from crushing the delicate moss layers.
- Smart Sourcing: flat-stacking natural landscaping stones (pallet) or premium preserved sphagnum moss (bulk pack).
13. Antique Reclaimed Estate Obelisk

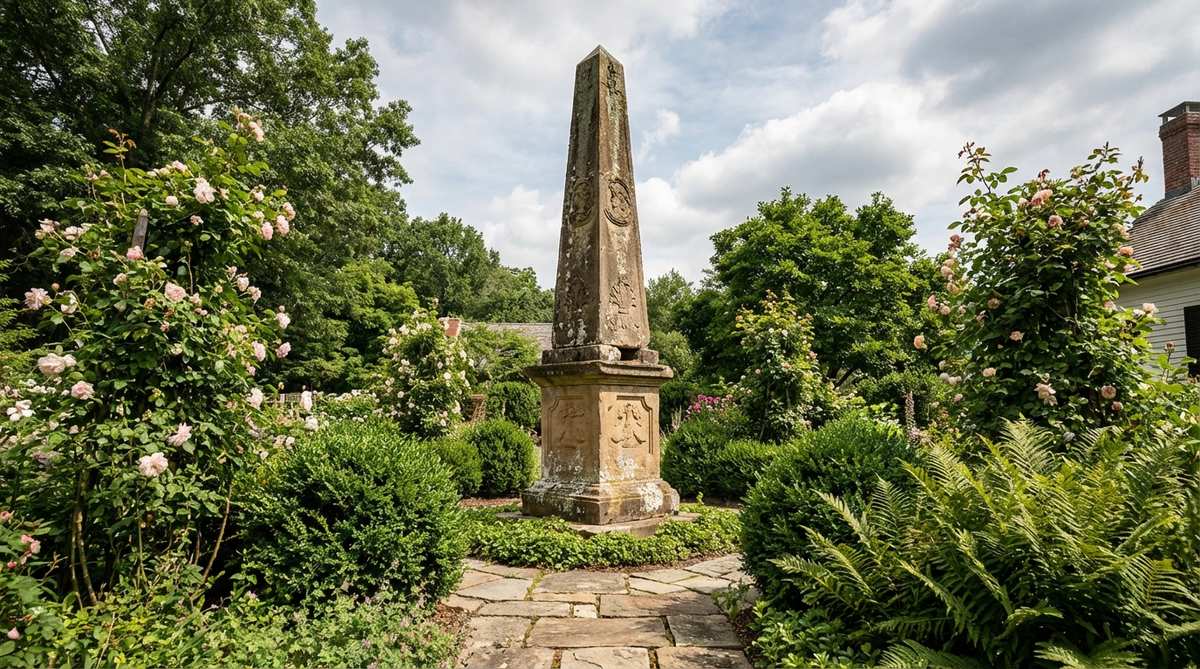
Carries the undeniable, heavy gravity of genuine architectural history. A solitary, jaw-dropping showpiece for salvaged estate garden antiques at a heritage property entrance.
Faking centuries of authentic wear always looks terribly cheap, making genuine architectural salvage worth every single penny. Mounting this treasure on a structurally reinforced concrete plinth ensures a multi-ton antique won’t sink unevenly into muddy turf over time.
True authenticated antique specimens command anywhere from $800 to well over $2,000.
- Key Materials: Authenticated antique obelisk, concrete footer
- Vibe / Style: Historic European manor
- Difficulty: Requires heavy machinery
- Budget Breakdown: Salvaged obelisk: $1,200 | Concrete base: $150.
- Creator’s Tip: Always ask salvage dealers for the provenance or source property history to verify its authentic age.
- Smart Sourcing: reclaimed architectural stone elements or high-strength concrete footer mixes (fast-setting).
Matched Stone Pillars for Formal Compositions
14. Gateway Flanking Limestone Pair
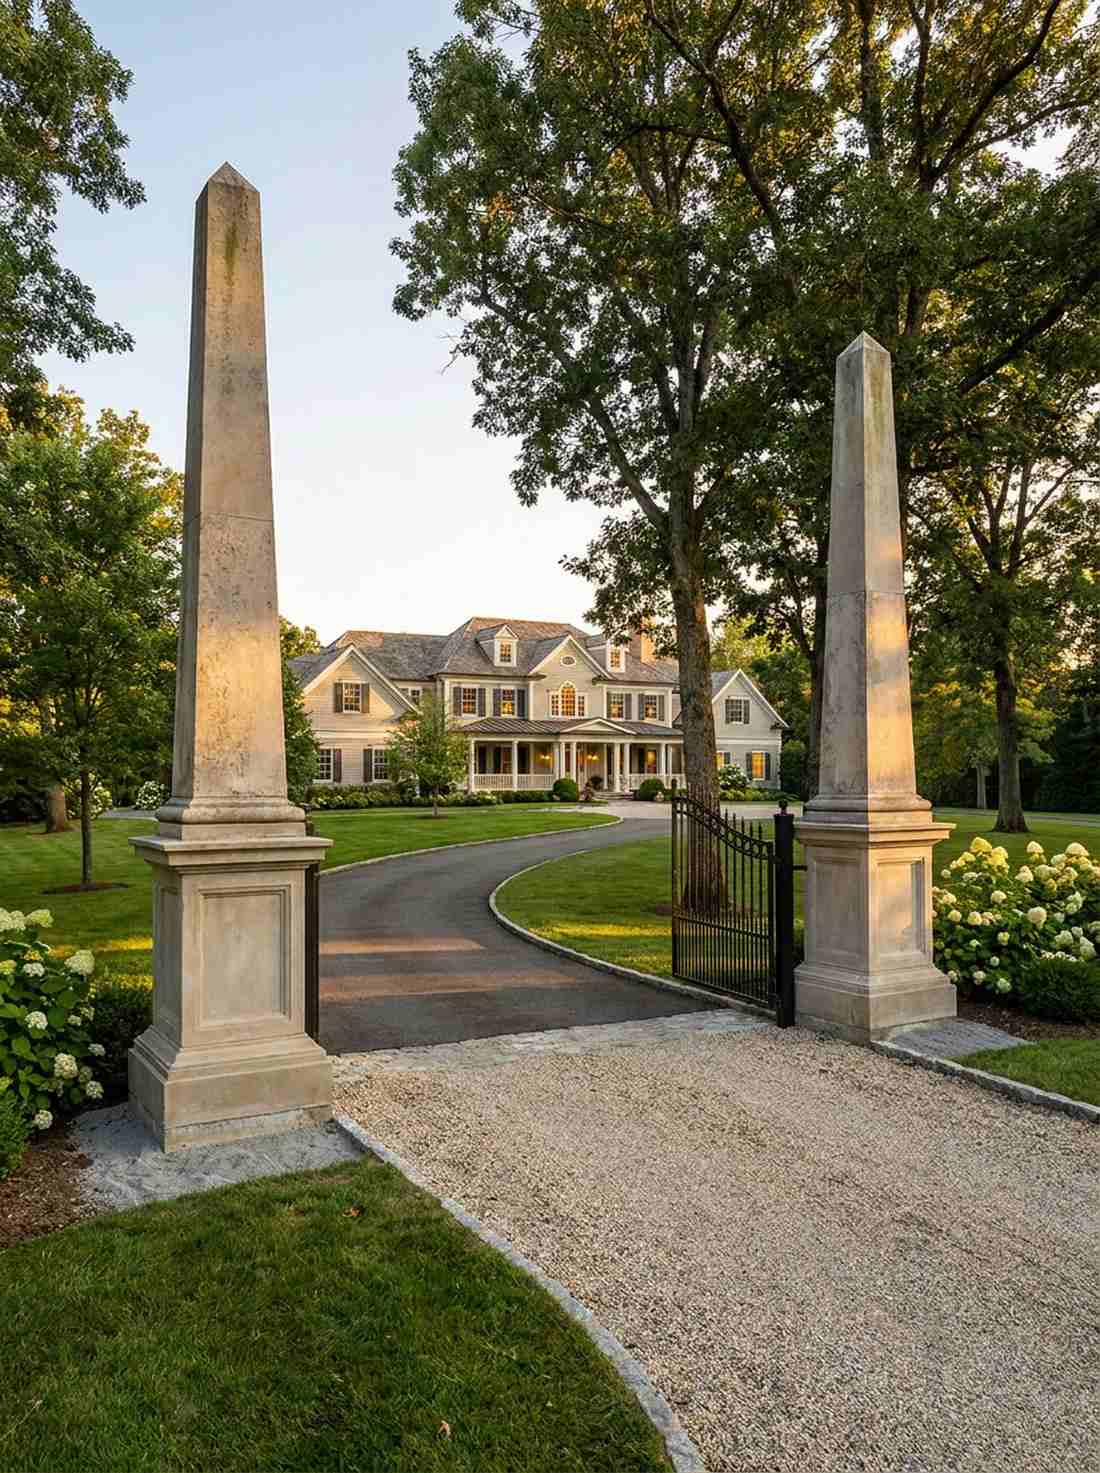

Establishes a grand, unforgettable ceremonial threshold right into your private sanctuary. Flawless formal entrance driveway markers that instantly define the boundary between wild nature and cultivated grounds.
A single pillar looks entirely lost at a wide entrance, but perfectly matched pairs instantly dictate high-end order and luxury symmetry. Using commercial-grade leveling sand beneath identical cast-stone plinths guarantees perfect vertical alignment without pouring massive concrete footers.
A matched set of premium limestone obelisks typically runs $600–$1,200. Save this if you’re designing an elegant front yard approach.
- Key Materials: Matched limestone obelisks, leveling sand
- Vibe / Style: Grand estate entrance
- Difficulty: Precise measuring required
- Budget Breakdown: Matched pair: $850 | Base prep: $60.
- Creator’s Tip: Spacing between the pairs should equal exactly 1.5 to 2 times their total height for proper visual framing.
- Smart Sourcing: matching cast-limestone garden pillars (set of 2) or commercial-grade paver leveling sand (bulk bags).
Most people completely fail at formal symmetry because they don’t understand architectural scale. The next layout fixes that exact spacing problem instantly…
15. Terrace Corner Granite Sentinels
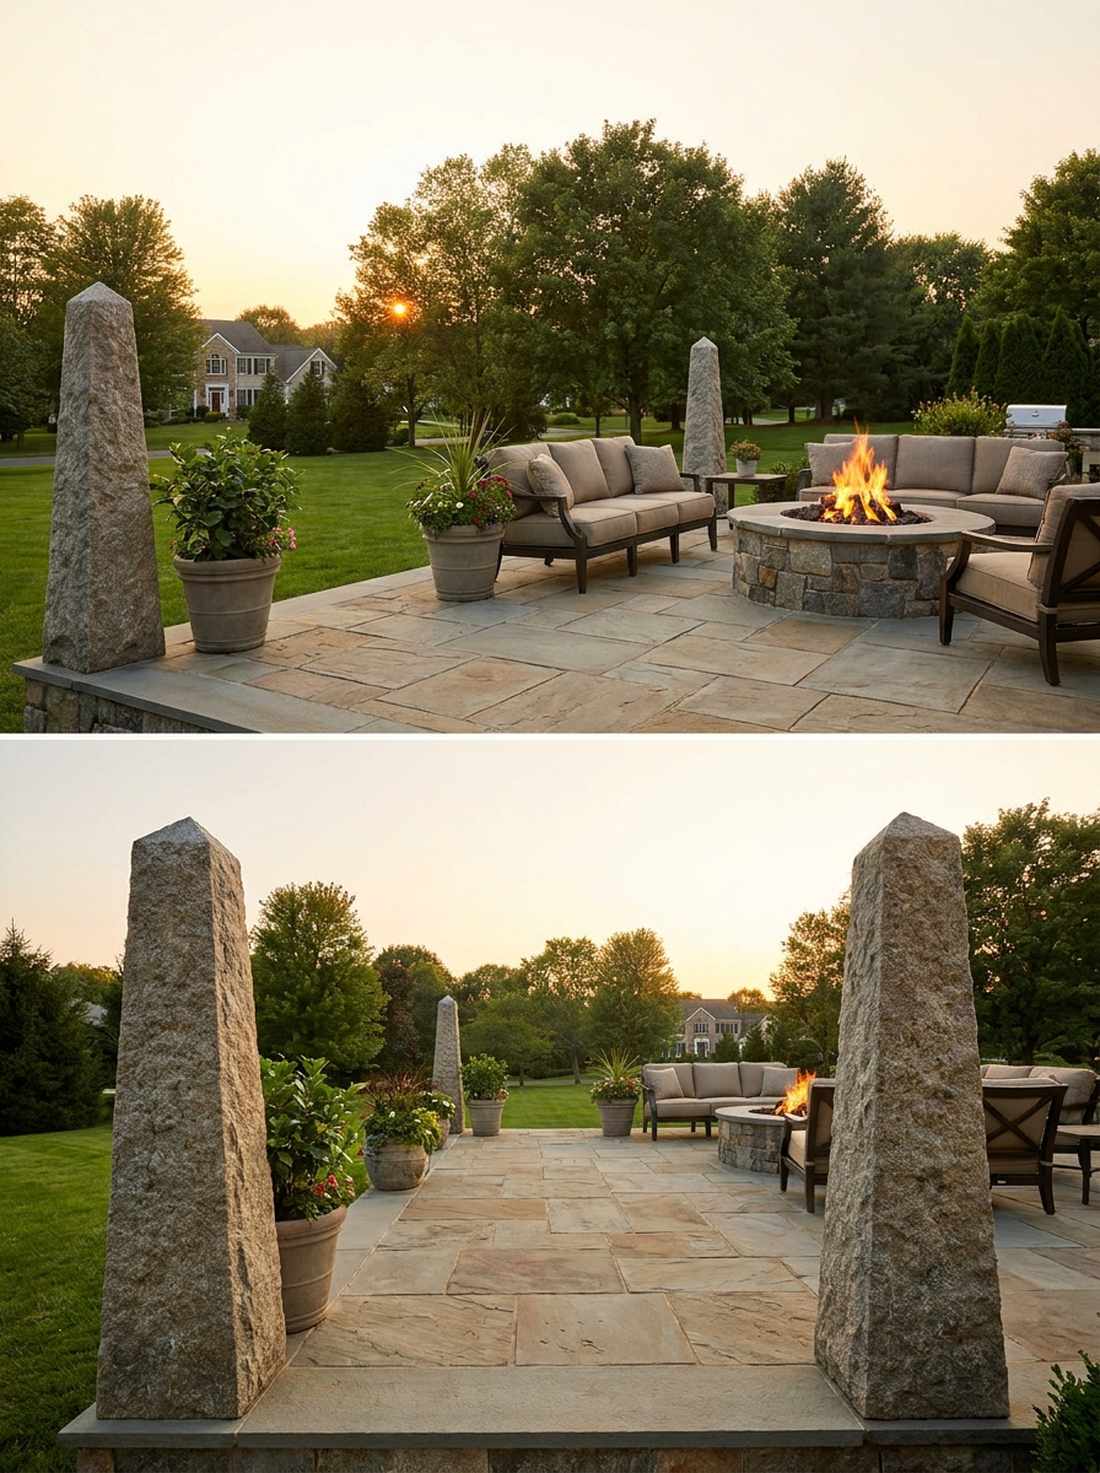
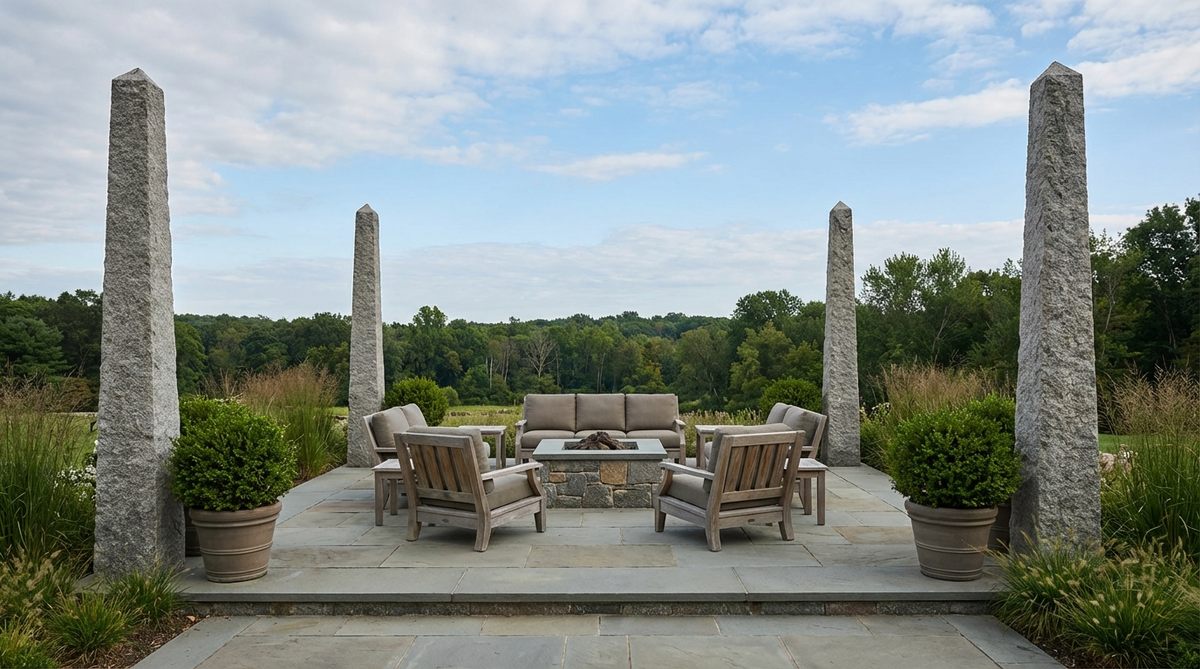
Frames gorgeous outdoor living rooms without blocking a single inch of the sunset view. The absolute best open-air patio boundary markers for defining the edges of a sprawling raised flagstone terrace.
Using solid privacy walls makes patios feel claustrophobic, whereas corner sentinels provide strict structure with total visual permeability. Selecting frost-proof solid granite ensures these crucial anchors survive harsh, freezing winters without terrifying surface spalling.
Four matching granite corner pieces require a $1,000–$2,000 investment.
- Key Materials: Four matching granite obelisks, epoxy mounting pins
- Vibe / Style: Luxury resort patio
- Difficulty: Moderate alignment task
- Budget Breakdown: 4 Granite obelisks: $1,400 | Mounting hardware: $80.
- Creator’s Tip: Select robust specimens measuring at least 4 feet tall so they still register visually when guests are seated.
- Smart Sourcing: solid granite landscape sentinels (multi-pack) or heavy-duty stone mounting pin kits.
16. Parterre Quadrant Dividers
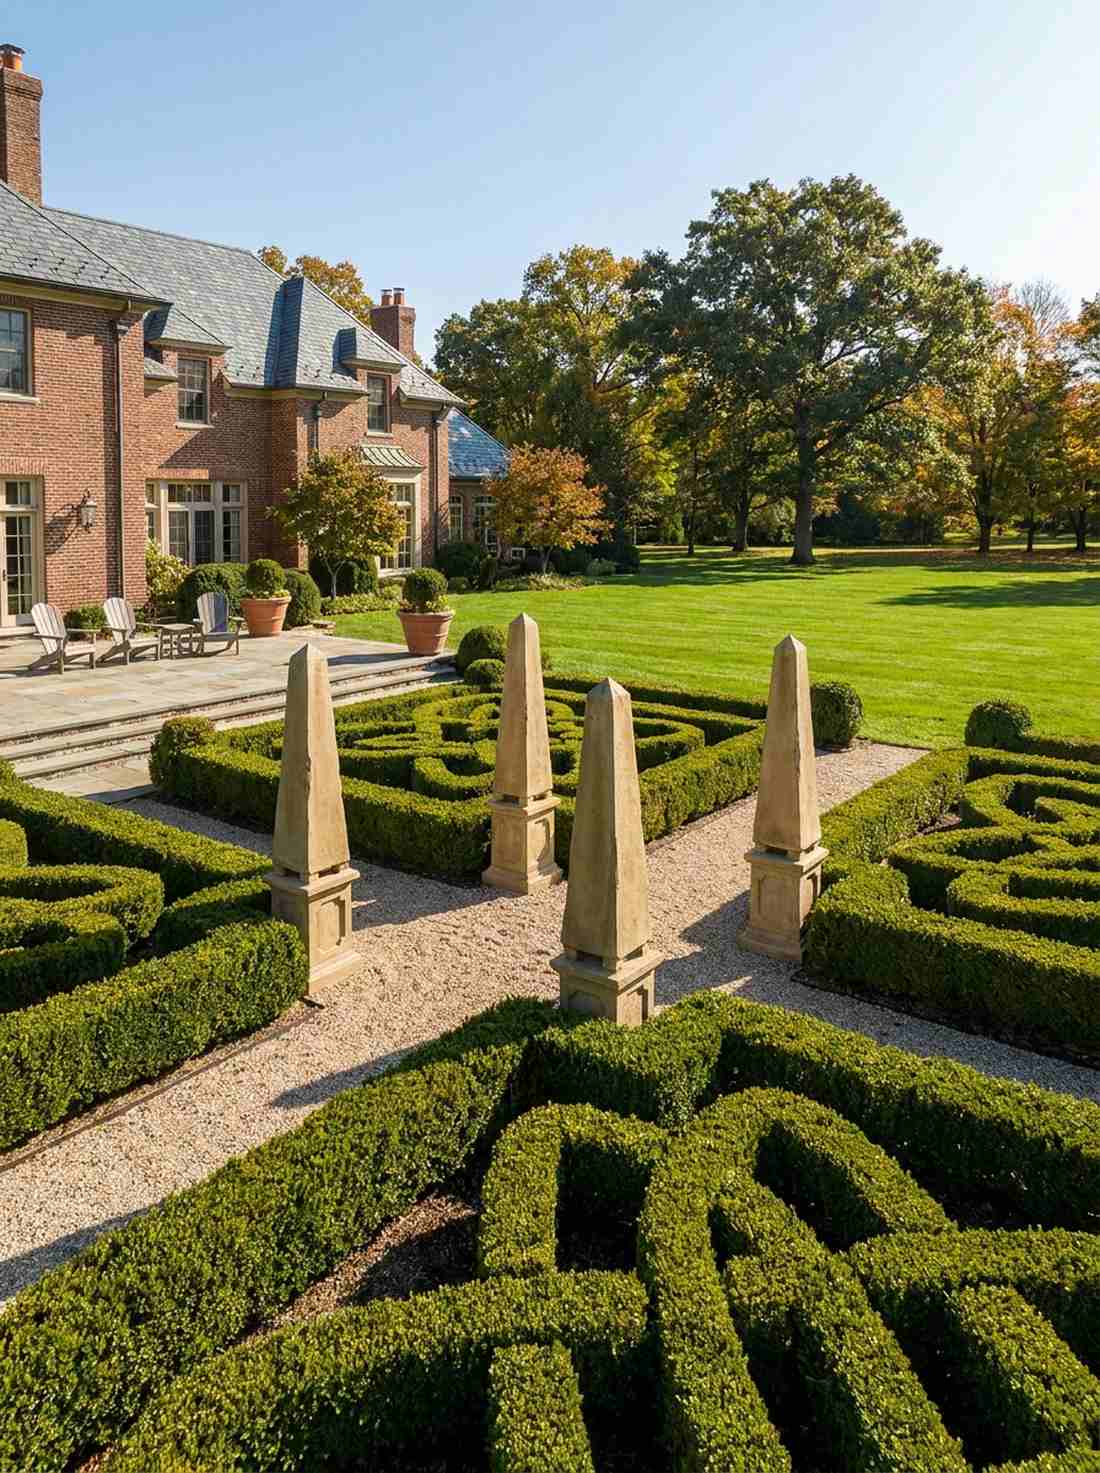
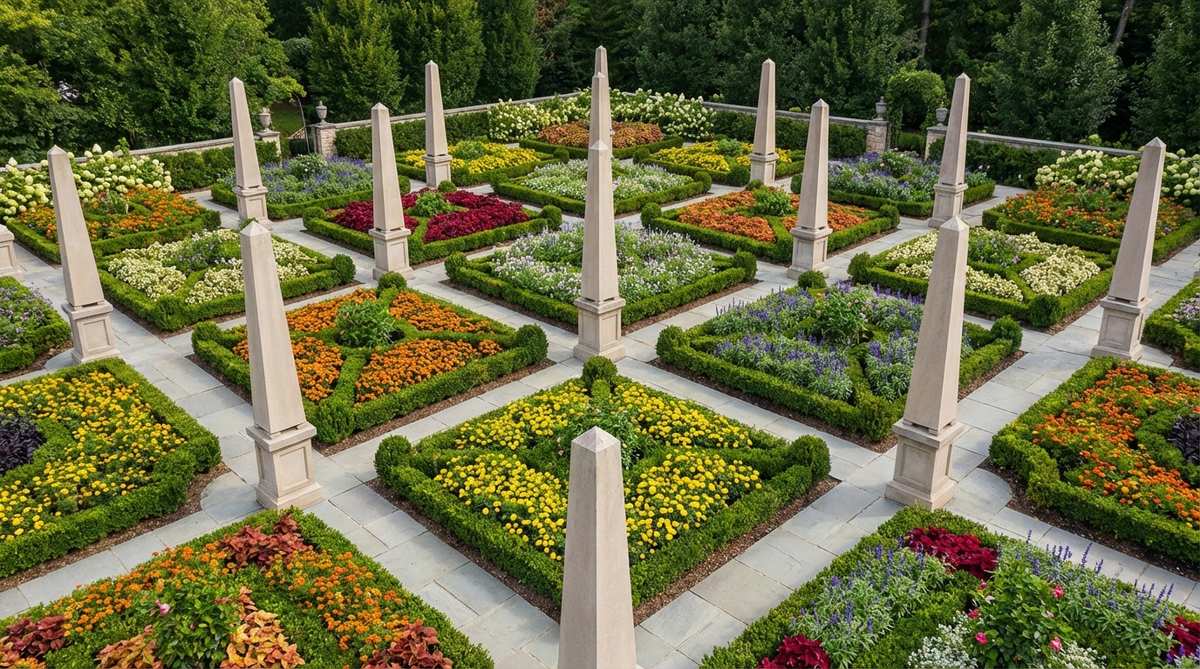
Imposes sharp, rhythmic geometry onto sprawling, chaotic garden beds. Vital geometric hedge garden accents for distinctly marking path intersections in classic, manicured knot gardens.
Relying on fragile plants alone to hold your geometry is a rookie mistake; stone provides the permanent, unshakeable winter skeleton. Opting for weather-resistant fiberglass composite models mimics heavy hand-carved stone while allowing surprisingly easy repositioning as your beds evolve.
A set of four quadrant dividers averages $300–$800 depending on the core material.
- Key Materials: Cast stone or composite obelisks, ground anchors
- Vibe / Style: French formal parterre
- Difficulty: Easy layout project
- Budget Breakdown: 4 Composite pillars: $450 | Ground stakes: $40.
- Creator’s Tip: Maintain identical height across all specimens—even a 2-inch variation destroys the formal parterre illusion.
- Smart Sourcing: lightweight composite stone garden obelisks or hidden landscape anchoring stake kits.
17. Allee Progression Markers
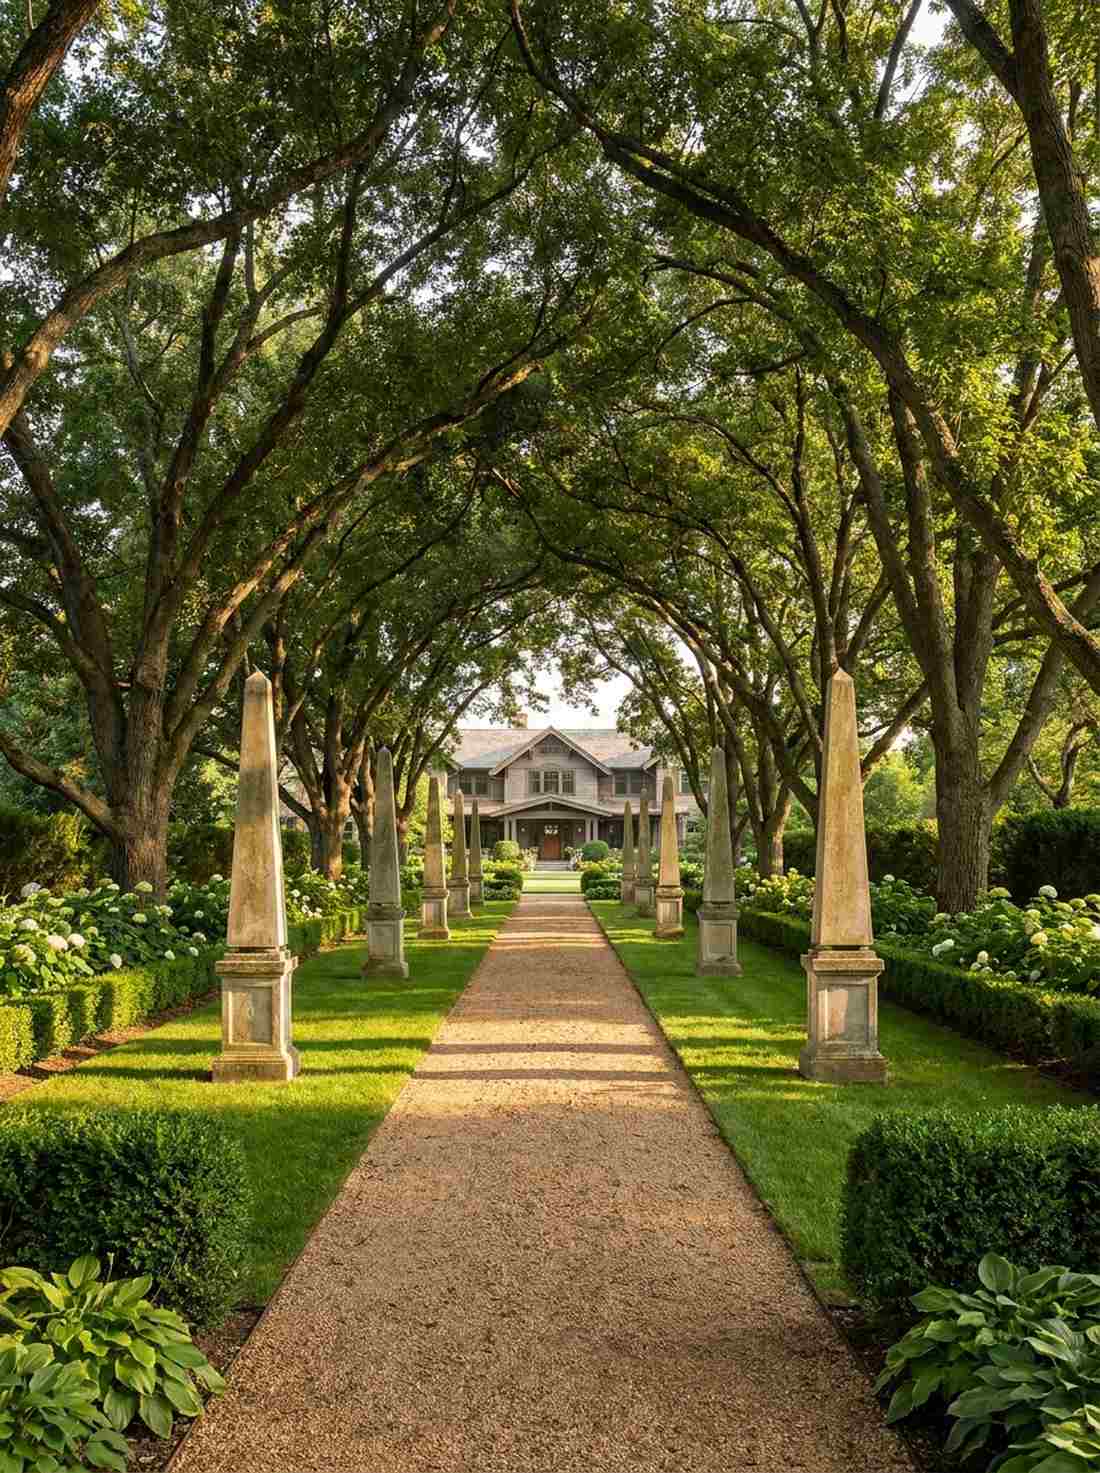

Draws the eye down a breathtaking, cinematic corridor of mature canopy trees. Powerfully reinforces dramatic perspective using tree-lined pathway focal points in long, narrow estate lots.
Without mid-point markers, exceptionally long pathways visually collapse into a flat, boring blur. Installing identical cast-stone obelisks at measured intervals creates a rhythmic pulse that makes the entire property look twice as expansive and expensive.
You can establish this hypnotic rhythm for about $150 per marker. Pin this to your ultimate dream backyard vision board.
- Key Materials: Sequential cast-stone markers, measuring transit
- Vibe / Style: Grand horticultural allee
- Difficulty: High precision spacing
- Budget Breakdown: 6 Markers: $900 | Transit rental: $50.
- Creator’s Tip: Marker height should remain strictly subordinate to the mature tree canopy to avoid awkward visual competition.
- Smart Sourcing: cast-stone landscape progression markers (bulk sets) or laser measuring transit tools (pro-grade).
Material Guide: Cheap vs. Premium Aesthetic
Knowing exactly where to save and where to spend makes all the difference in achieving that highly-coveted luxury vibe on a reasonable DIY budget.
- Standard vs. UV-Resistant/Premium: Standard porous stone absorbs water and cracks in winter. Upgrading to UV-sealed kits or pre-treated dense granite stops fading and structural blowing out.
- Pre-made Kits vs. Sourcing Locally: While local rock yards seem cheaper, pre-drilled pre-cut starter kits save you hundreds in specialized masonry tools and ruined, mis-cut materials.
Stone Obelisk Finial Styles and Cap Designs
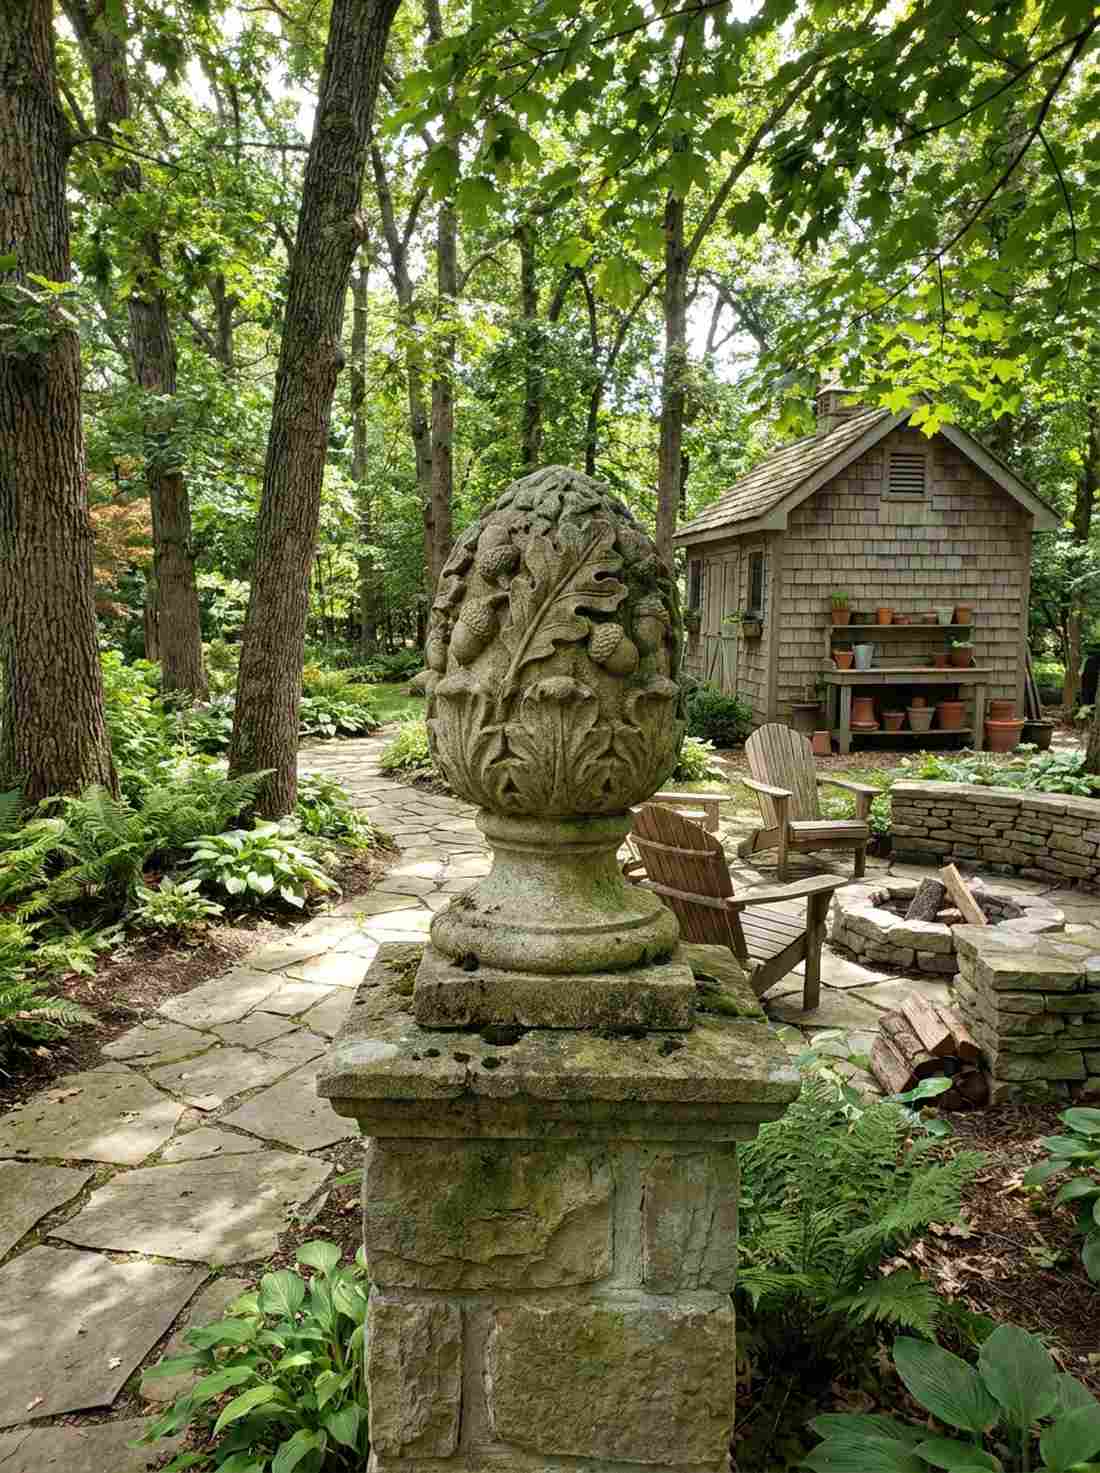
18. Orb and Spike Limestone Finial
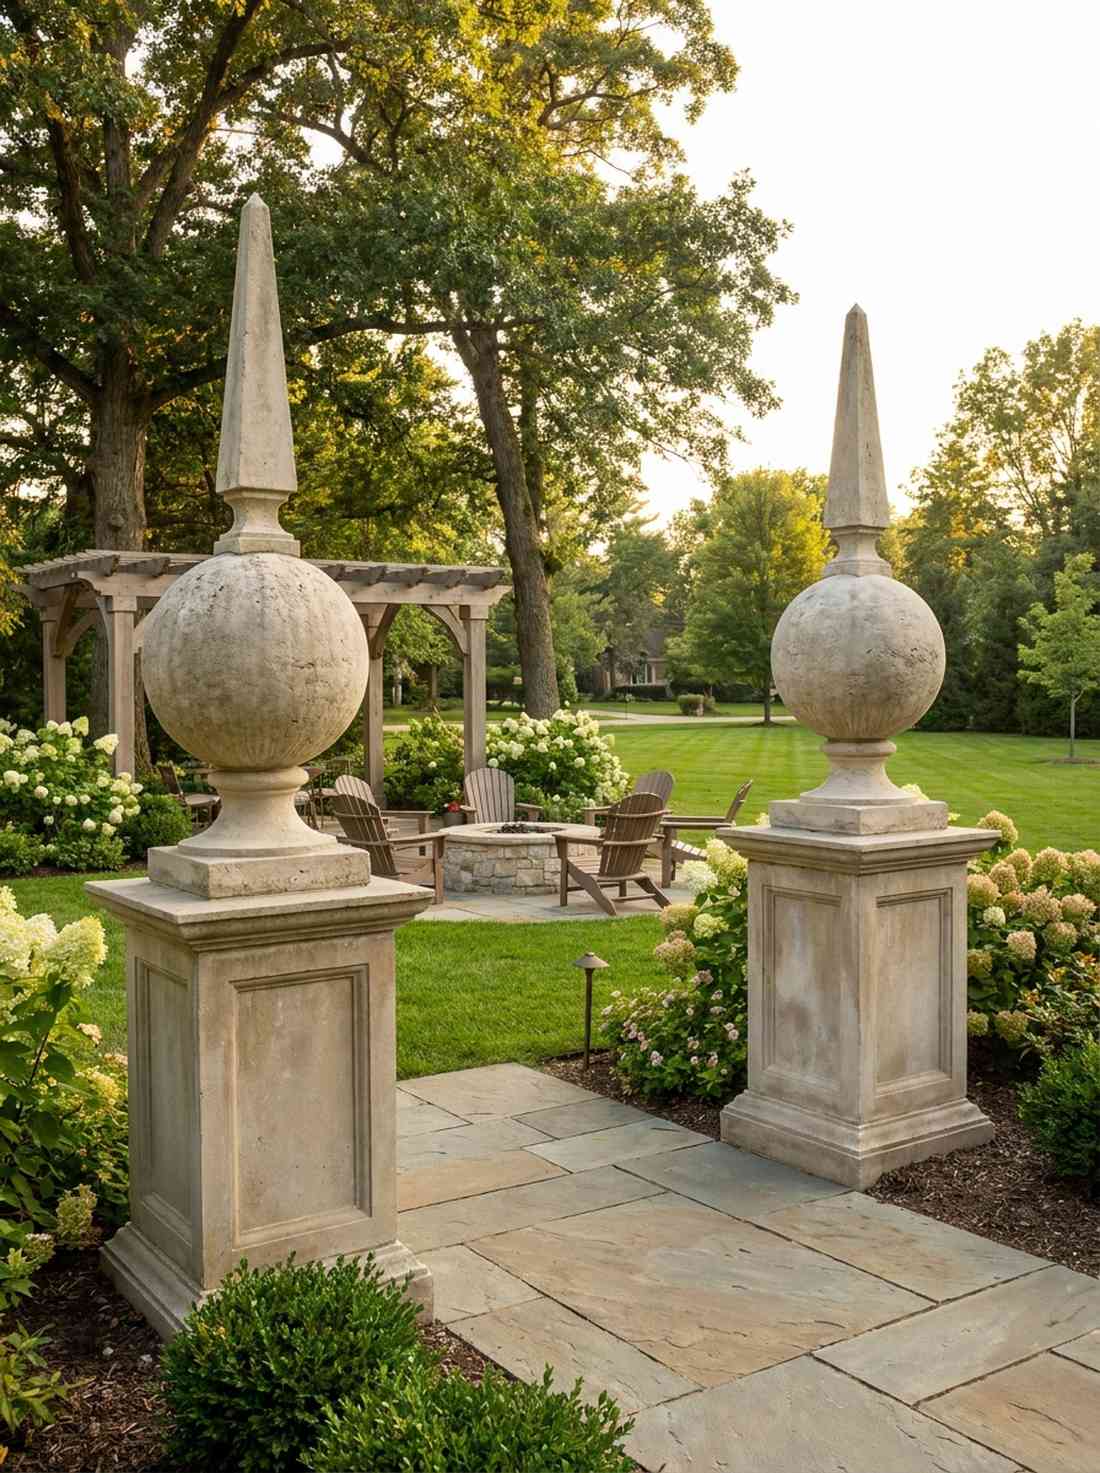

Reaches for the sky with elegant, Baroque-inspired dramatic flair. These classic obelisk stone toppers provide a graceful, sweeping completion to heavy, grounded masonry bases.
Leaving a pillar completely flat on top invites pooling water and severe winter cracking. Pinning a carved sphere and spike using marine-grade stainless steel dowels prevents annoying bird damage while actively shedding heavy rainfall.
Upgrading to a beautifully carved finial adds roughly $80–$150 to the project.
- Key Materials: Carved orb finial, stainless steel dowel
- Vibe / Style: Traditional ornate estate
- Difficulty: Easy top-mount
- Budget Breakdown: Carved finial: $110 | Marine dowel/epoxy: $25.
- Creator’s Tip: The orb diameter should measure exactly 1.5 times the obelisk’s top width to prevent it from looking top-heavy.
- Smart Sourcing: pre-carved limestone orb finials (drilled) or marine-grade stainless masonry pins.
19. Flame-Carved Sandstone Cap
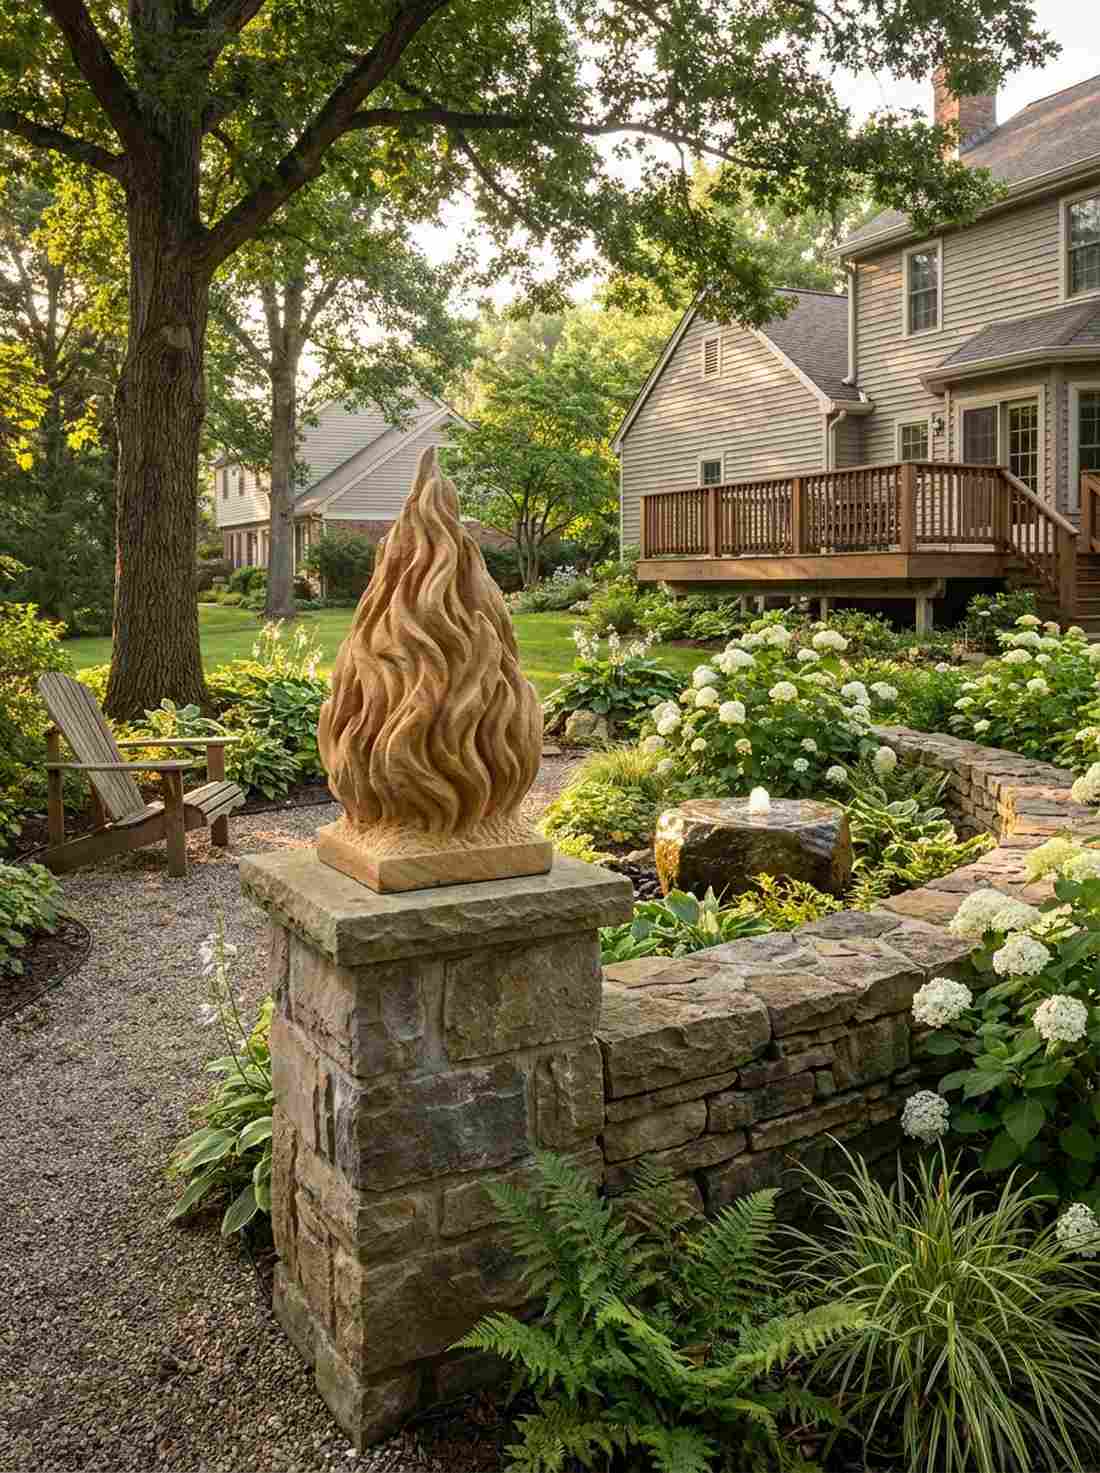

Flickers with upward energy, effortlessly blending classical symbolism with organic, carved texture. A beautiful ornamental garden monument cap perfect for capping a peaceful, contemplative memorial garden.
Standard geometric caps can often feel far too rigid, but these stylized carved flames soften the harsh vertical lines beautifully. Coating intricate sandstone carvings with a breathable siloxane sealer prevents winter frost from blowing out the delicate, expensive details.
Custom or pre-cast carved sandstone tops range from $120–$250.
- Key Materials: Flame motif finial, breathable masonry sealer
- Vibe / Style: Contemplative sculptural
- Difficulty: Simple adhesive mount
- Budget Breakdown: Flame finial: $160 | Siloxane sealer: $35.
- Creator’s Tip: Sandstone accepts detailed carving beautifully but requires bi-annual sealing in cold climates to prevent flaking.
- Smart Sourcing: cast-stone flame finial toppers or breathable siloxane masonry sealers (spray-on).
Stop spending hundreds on custom stone carving until you see this ridiculously smart dual-purpose setup coming up that literally tracks time…
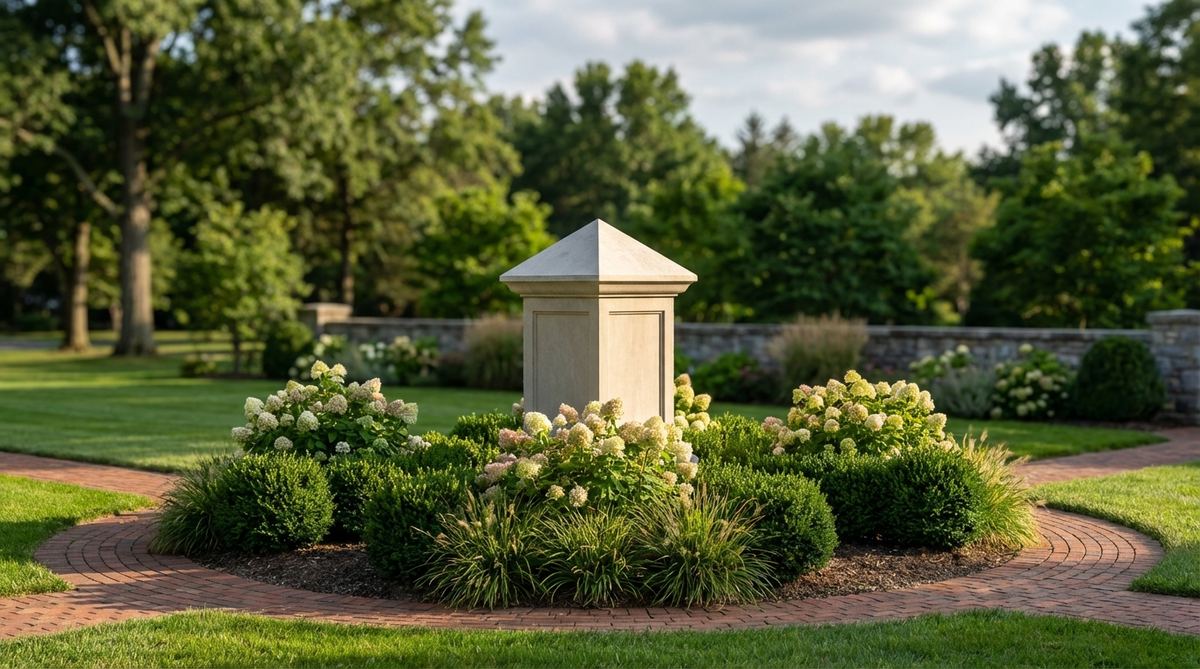
20. Simple Pyramid Cap Granite

Offers razor-sharp architectural completion without any fussy, overwhelming ornamentation. These minimalist stone pillar tops flawlessly tie together a sleek, modern outdoor kitchen space.
Mismatched taper angles between the main shaft and the cap absolutely destroy the illusion of a solid monolithic structure. Securing a precision-cut granite pyramid cap gives that flawless, heavy-duty aesthetic while aggressively deflecting heavy snow loads.
This incredibly clean geometric finish costs around $60–$120. Save this if you love no-nonsense, highly durable modern design.
- Key Materials: Geometric granite cap, outdoor construction adhesive
- Vibe / Style: Ultra-clean contemporary
- Difficulty: Very easy
- Budget Breakdown: Granite cap: $85 | Adhesive: $15.
- Creator’s Tip: Polish the cap to a mirror finish to create a striking textural contrast against a rough-honed main shaft.
- Smart Sourcing: precision-cut granite pyramid caps (various sizes) or heavy-duty outdoor construction adhesive.
21. Acorn and Oak Leaf Relief Cap
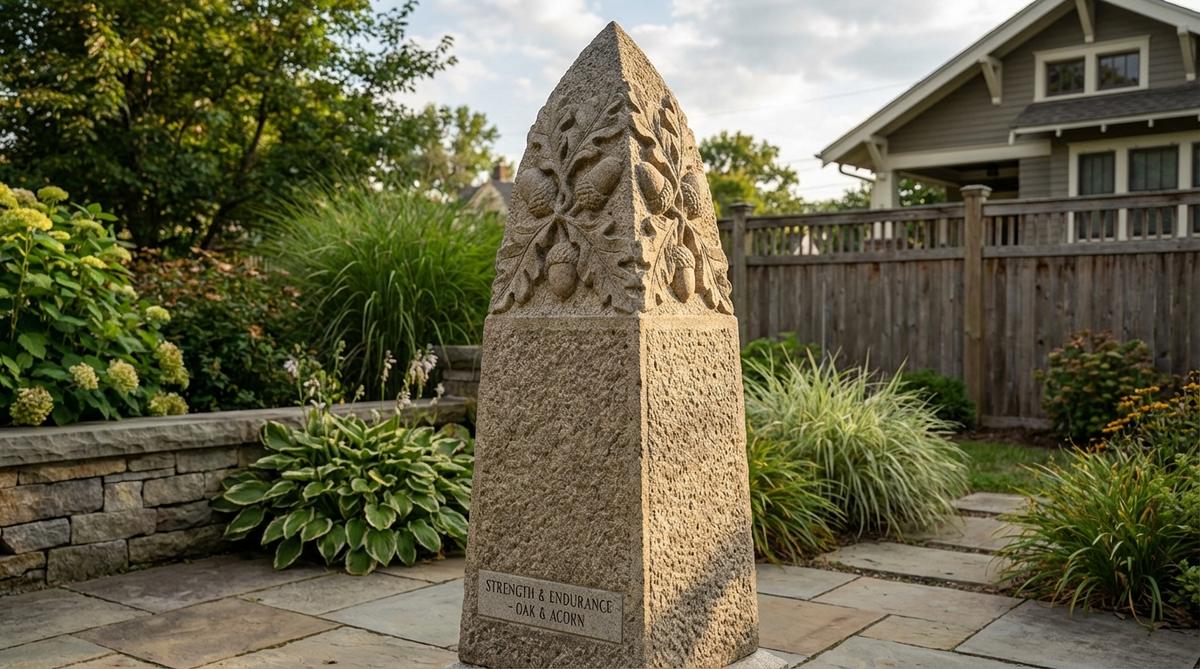
Celebrates woodland endurance with stunning, localized botanical details. A flawless, charming addition for nature-inspired stone carvings tucked along a rustic, shaded woodland pathway.
Generic plain finials lack distinct personality, whereas deep botanical relief carving ties the structure directly to its native environment. Sourcing weather-treated cast stone alternatives provides the incredibly intricate look of hand-carved limestone at a massive, budget-friendly discount.
A beautiful cast botanical cap usually runs an affordable $50–$90.
- Key Materials: Cast botanical finial, outdoor mounting putty
- Vibe / Style: Whimsical woodland
- Difficulty: Beginner friendly
- Budget Breakdown: Cast acorn finial: $65 | Putty: $10.
- Creator’s Tip: Keep relief depth between 1 and 2 inches; deeper carving risks retaining water which leads to freeze-thaw cracking.
- Smart Sourcing: cast-stone botanical finial caps (acorn motif) or weatherproof stone mounting putty.
22. Sundial-Integrated Granite Cap
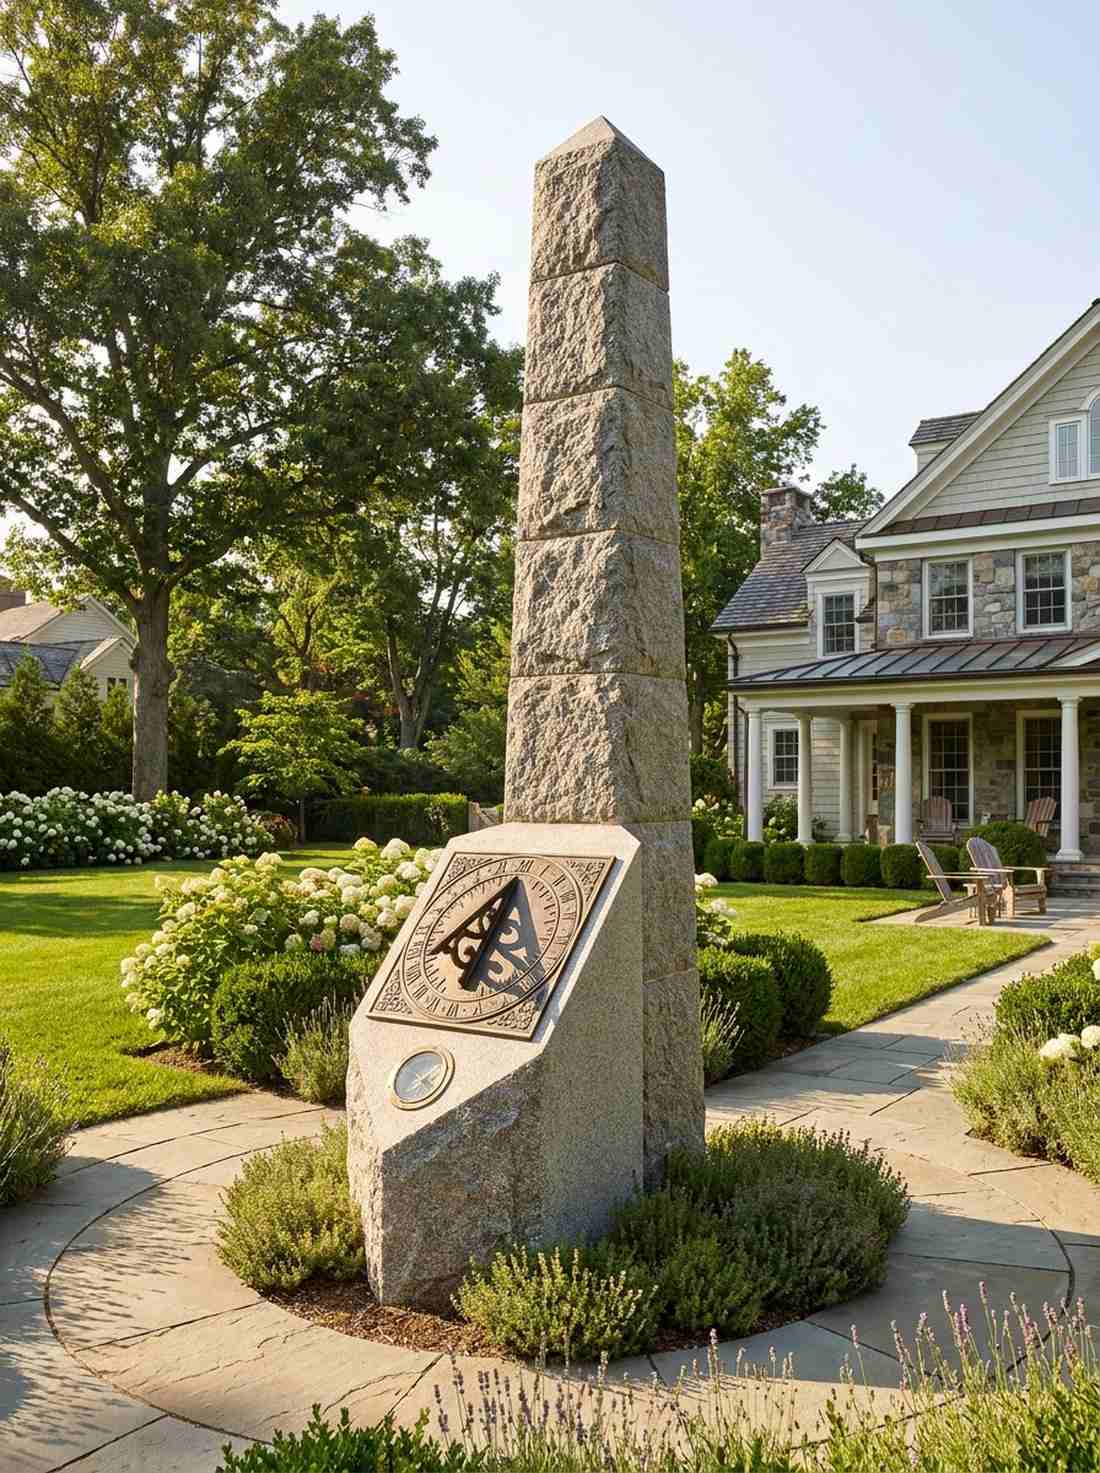

Merges ancient, fascinating timekeeping with bold vertical landscape architecture. An incredible interactive centerpiece featuring functional garden obelisk sundials for a sun-drenched central courtyard.
Just placing a massive obelisk in a sunny spot wastes its sheer potential as a massive solar timekeeper. Using a brass sundial face plate mounted on an angled granite base turns a static, boring pillar into a wildly interactive garden feature.
Integrating a genuine bronze sundial element adds $150–$300 to the overall build.
- Key Materials: Angled stone cap, bronze sundial plate, compass
- Vibe / Style: Classic interactive estate
- Difficulty: Requires directional calibration
- Budget Breakdown: Bronze sundial: $180 | Stone mount: $80.
- Creator’s Tip: Precise north-south alignment is mandatory. Use a transit-level compass to establish true orientation within a 1-degree tolerance.
- Smart Sourcing: solid bronze garden sundial plates or angled stone sundial mounting pedestals.
23. Flat Platform Cap for Planters
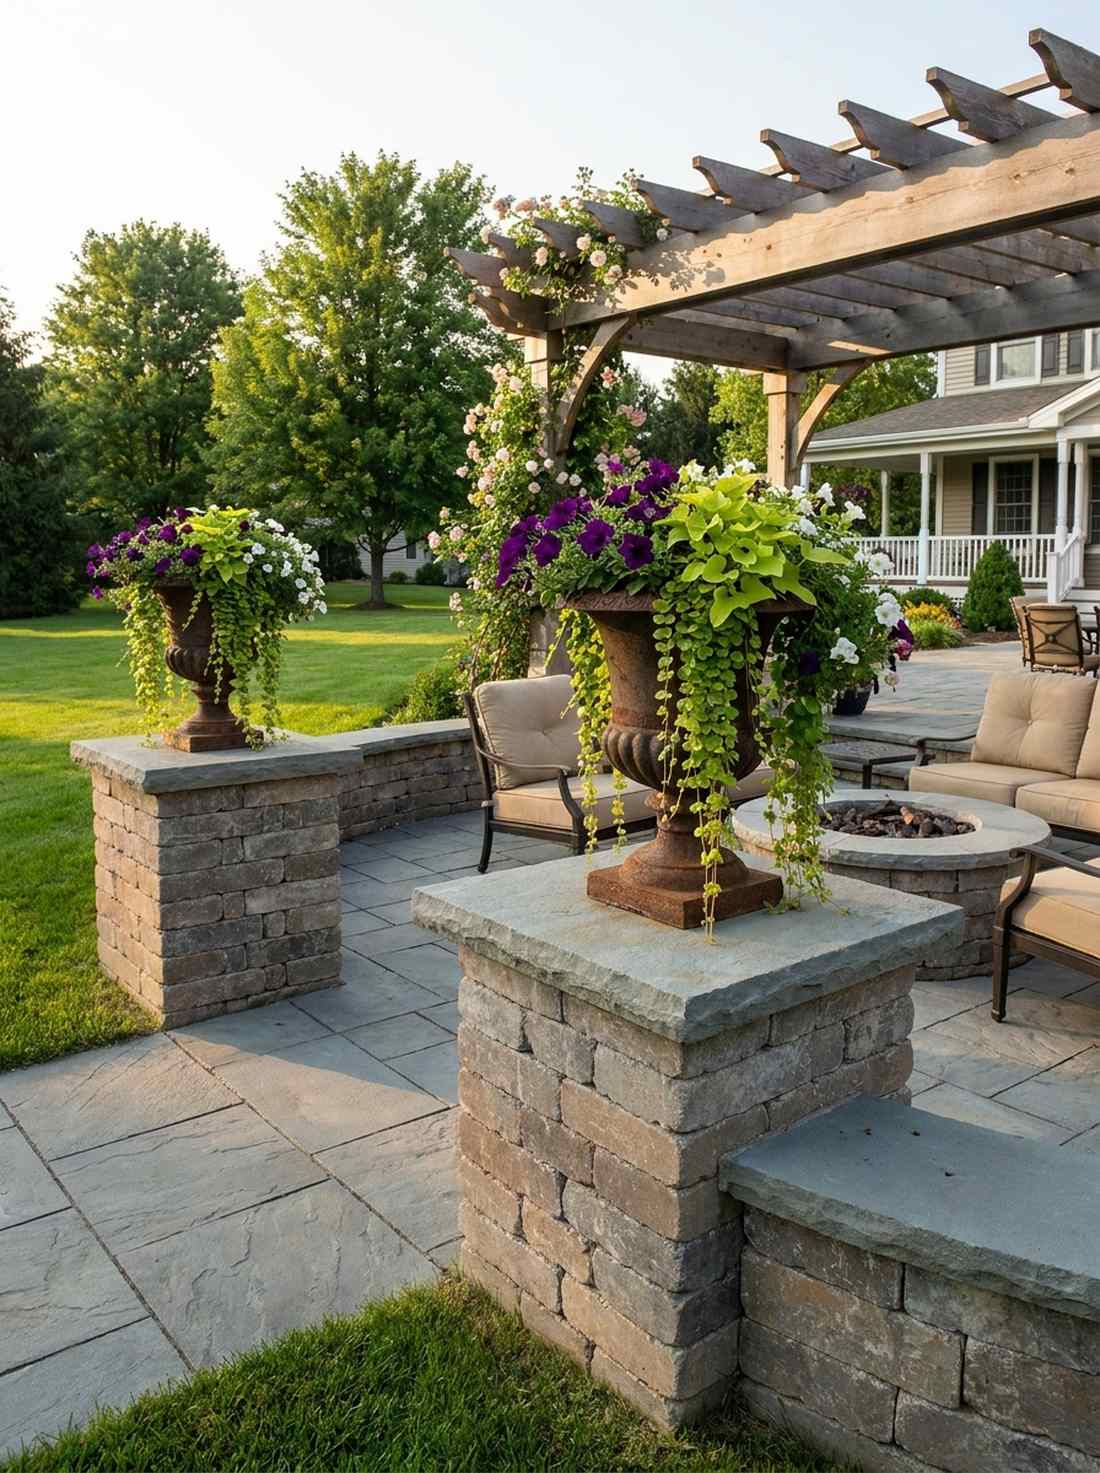
Elevates sprawling, vibrant greenery perfectly to eye-level for maximum patio impact. Incredible stone pedestal planter bases specifically designed for showcasing seasonal trailing vines or heavy cast-iron urns.
A pointed top locks you into one rigid look forever, but a wide flat capital transforms the entire obelisk into a highly versatile stage. Securing a wide, load-bearing stone slab on top provides the massive footprint necessary for heavy, water-logged display pots.
You can adapt any sturdy pillar into a display pedestal for about $40–$80. Pin this brilliant multi-use idea for your next seasonal layout.
- Key Materials: Flat oversized stone slab, heavy-duty epoxy
- Vibe / Style: Versatile seasonal display
- Difficulty: Easy modification
- Budget Breakdown: Flat stone cap: $55 | Heavy-duty epoxy: $15.
- Creator’s Tip: The cap width must exceed the obelisk’s base width by at least 4-6 inches on all sides for visual and physical stability.
- Smart Sourcing: flat pre-cut architectural stone caps (load-bearing) or heavy-duty structural stone epoxy (pro-grade).
Building Vertical Interest with Stone Garden Obelisks
Strategic placement of a high-end stone garden obelisk transforms flat, boring landscapes into magnificent compositions packed with architectural depth. By utilizing these 23 meticulously planned designs and smart material sourcing, you can bypass massive contractor fees and install premium vertical structures yourself. Whether you opt for a sleek UV-coated modern granite monolith or a rustic, pre-cast limestone kit, starting with just one strategically placed pillar will completely redefine your yard’s spatial hierarchy. The investment in commercial-grade masonry supplies delivers decades of flawless service, ensuring your landscape looks expensive and perfectly curated year-round.
Frequently Asked Questions
What height stone garden obelisk works best for typical residential gardens?
Obelisks measuring 4-6 feet tall suit most residential gardens perfectly, providing striking scale that registers from indoor windows without swallowing your surrounding plants. If you are ordering pre-cast stone pillar kits, ensure the obelisk extends at least 18 inches above your mature plantings. Compact urban gardens look best with 3-4 foot premium cast-stone models, while expensive estate properties demand the heavy-duty 6-8 foot architectural salvage pieces.
How deep should stone obelisk foundations extend for stability?
Foundation depth is highly dependent on obelisk weight and local frost lines, but skipping this step will ruin your premium materials. Lightweight cast stone pieces under 200 pounds require a 12-inch commercial-grade tamped gravel base in frost-free zones. For solid, heavy-duty granite monuments exceeding 500 pounds, you must pour an 18-24 inch concrete frost footing. Always use high-strength concrete footer mixes to guarantee your beautiful vertical focal point doesn’t lean after a heavy rainstorm.
Which stone type offers the best durability for outdoor obelisks?
Granite delivers the absolute highest weather resistance, making it the ultimate premium stone garden supply for freezing climates. Limestone looks gorgeously historical but requires UV-resistant stone sealers to stop acid rain erosion. Sandstone brings warmth but breaks down rapidly without heavy-duty outdoor sealants. If you want luxury on a budget, high-density cast stone kits provide incredible versatility—just be sure to apply a breathable siloxane waterproof coating annually.
Should stone obelisks be positioned in sun or shade for longevity?
Stone obelisks tolerate both sun and shade brilliantly as long as they are treated with commercial-grade hardscape sealants. Full sun placements dramatically highlight the expensive deep-relief carvings and shadow lines throughout the afternoon. Conversely, shaded spots naturally encourage moss growth for that highly coveted antique estate look. Just avoid placing premium stone directly under massive deciduous trees where falling branches could chip the finials.
Can stone garden obelisks support climbing plants effectively?
Raw masonry landscape kits are generally too smooth to support climbing vines on their own without smart modifications. You must wrap heavy-gauge copper gardening wire around the shaft to give vines like clematis or sweet peas a place to grip. For massive climbing roses, do not rely on the stone itself; install a heavy-duty wrought iron trellis directly behind the obelisk. This keeps the expensive stone visible as a clean architectural focal point while the plants frame it beautifully.