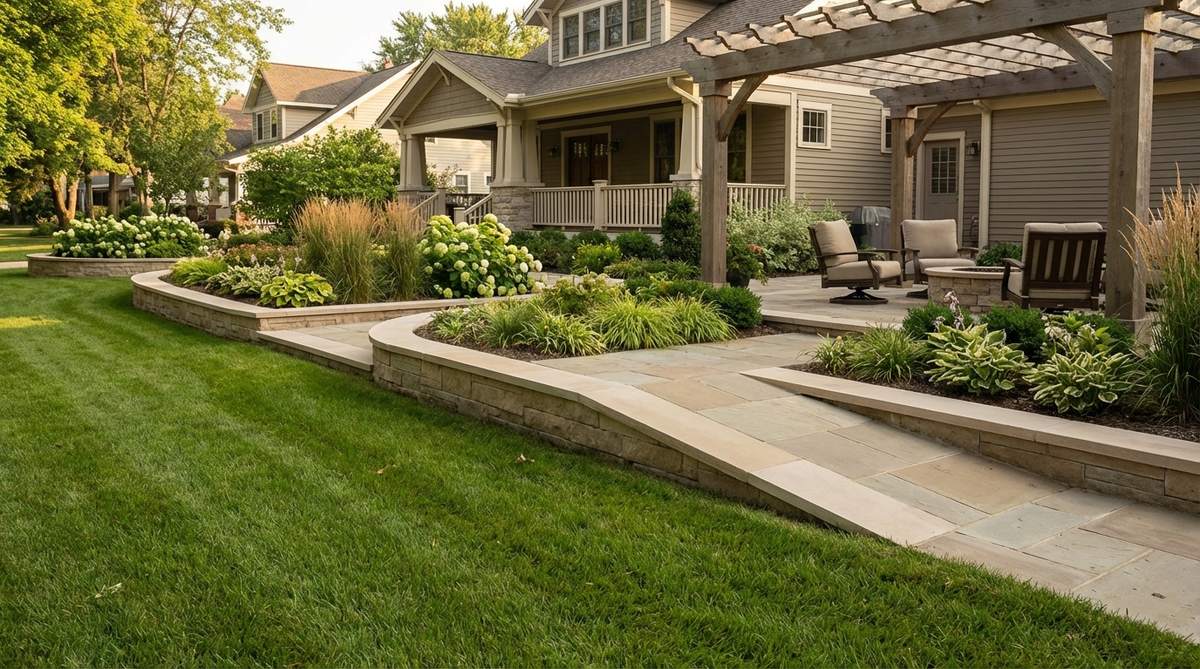
Sharp architectural lines elevate standard yards into curated landscape masterworks instantly. Discover professional stone garden edging blueprints that combine premium materials with smart budget hacks. This structural framework guarantees a high-end finish designed for permanent curb appeal.
Classic Stone Edging Foundations
1. Upright Soldier Brick Edging
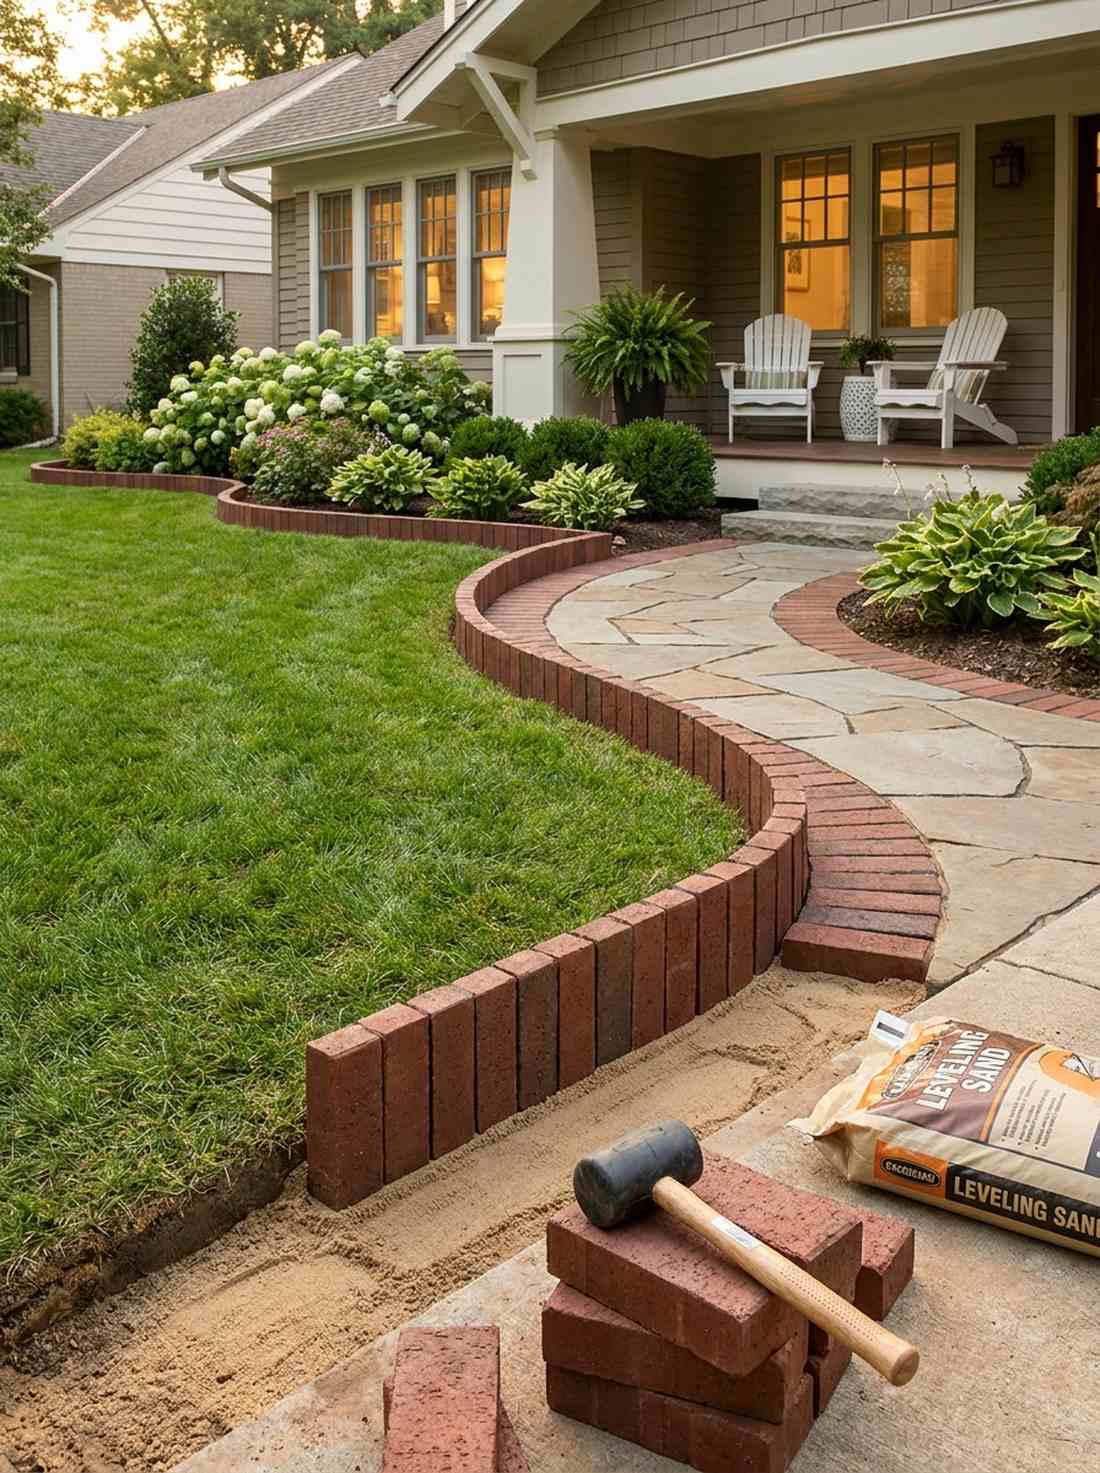
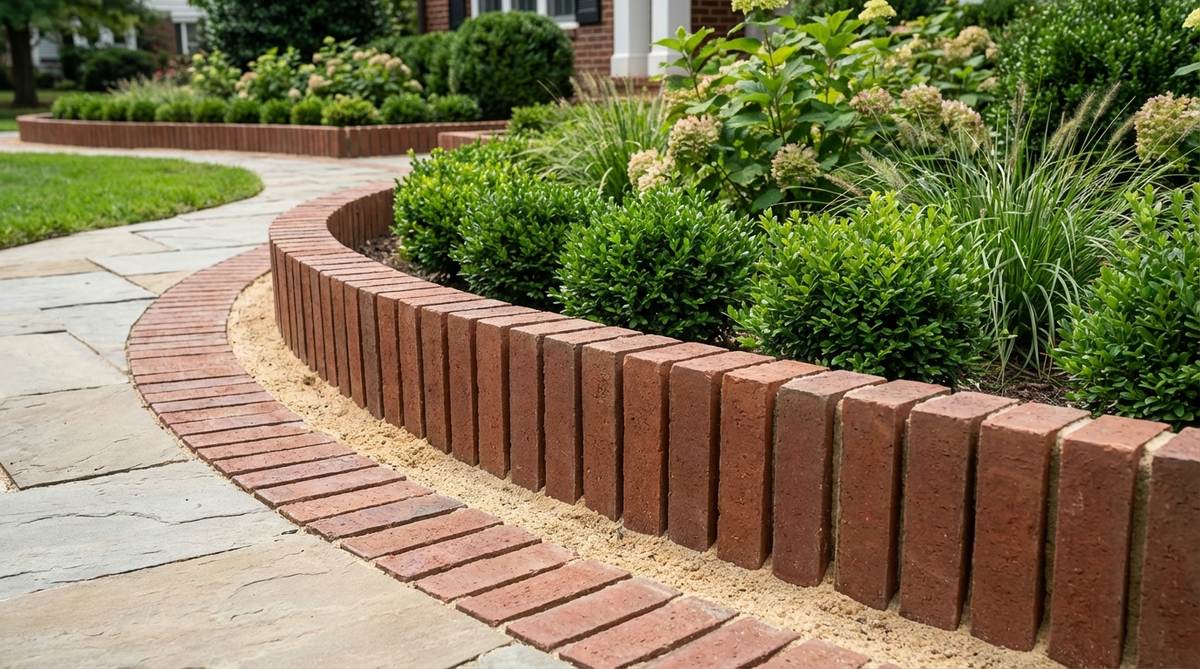
Feels like walking through a historic European courtyard. A formal upright brick lawn border works exceptionally well for defining manicured front yard walkways.
Executing this profile delivers a surprisingly premium look with minimal digging required. Locking these units tightly into a commercial-grade base outperforms cheap plastic alternatives every single time.
You can effortlessly pull this off for about $20–$35 per pathway section. Save this to your weekend hardscaping board!
- Key Materials: Kiln-fired clay landscaping bricks
- Vibe / Style: Traditional architectural elegance
- Difficulty: Very accessible for beginners
- Budget Breakdown: Materials: $25 | Base Sand: $10
- Creator’s Tip: Tamp the backfill aggressively to prevent any winter leaning or frost heave.
- Smart Sourcing: Pre-bagged leveling sand (bulk pack) and a heavy-duty rubber deadblow mallet.
2. Tilted Soldier Brick Pattern
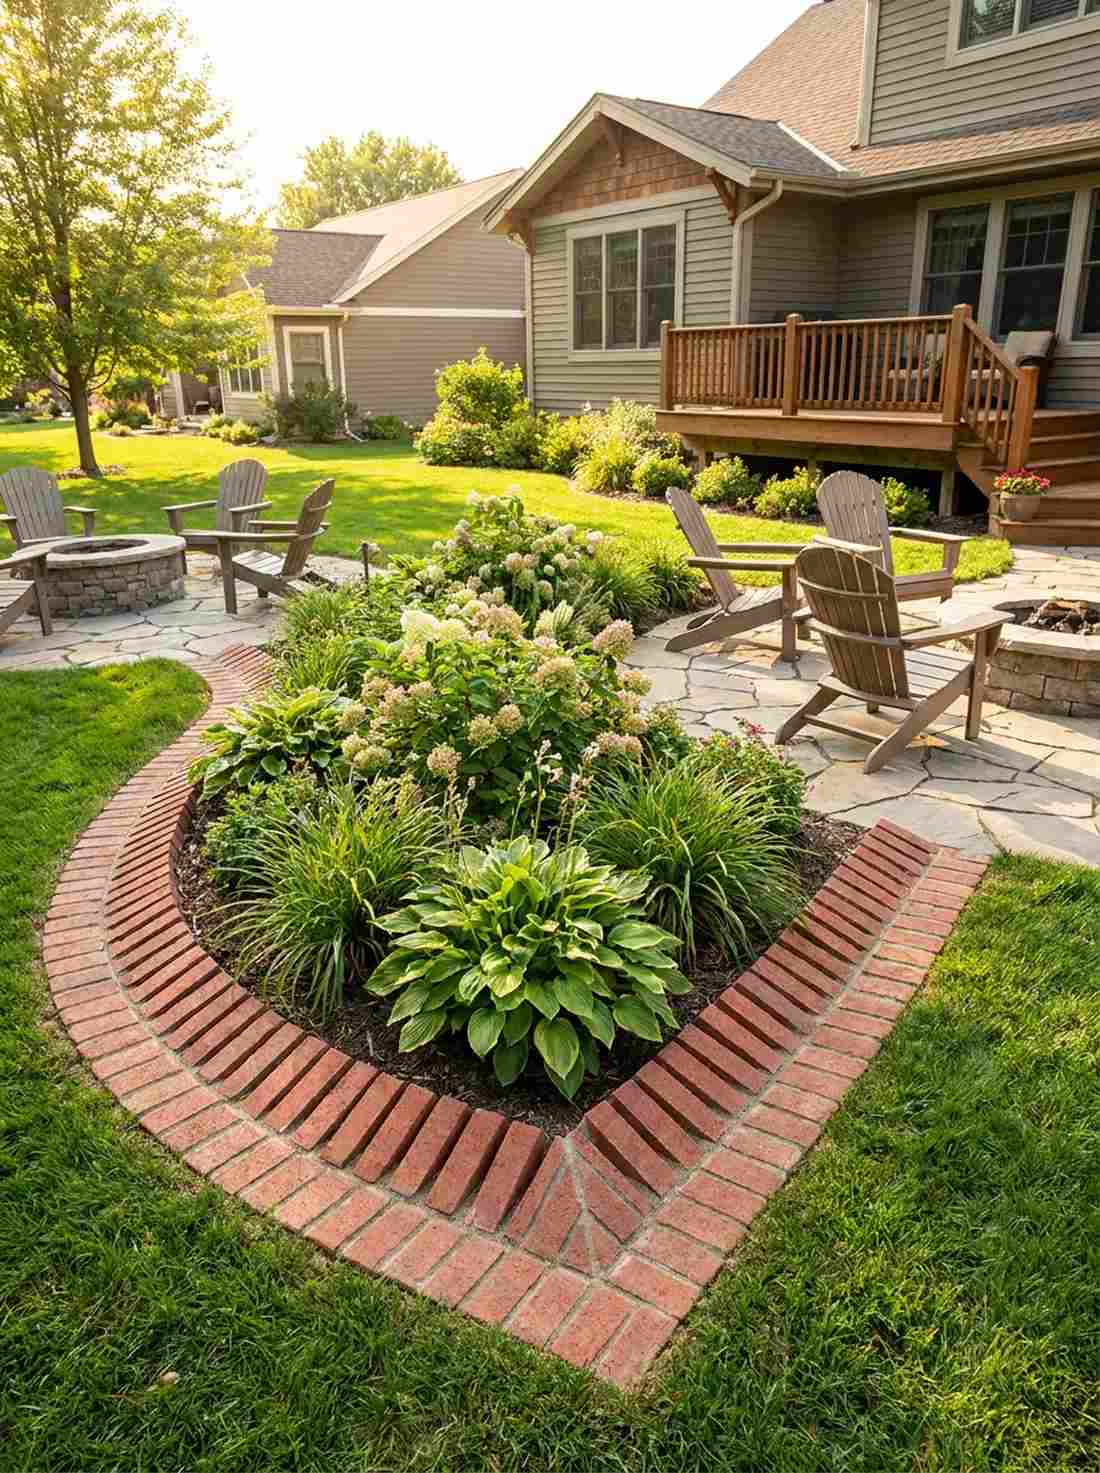
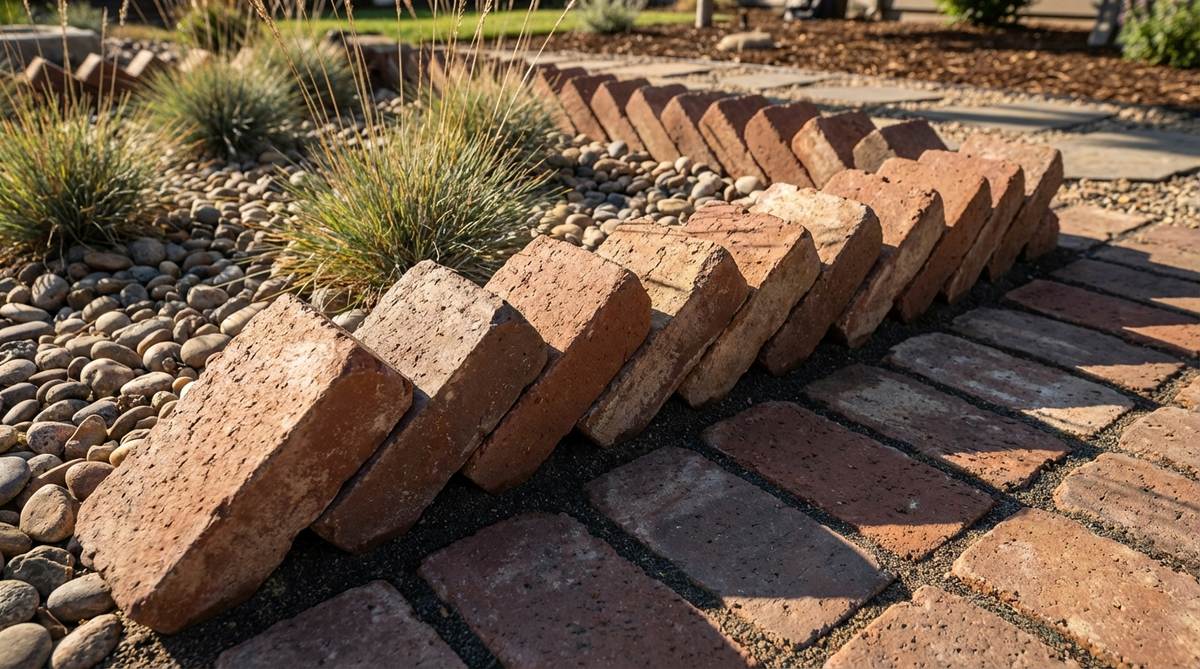
Brings a playful, kinetic energy straight out of an art exhibit. An angled sawtooth brick margin looks incredible framing curved flowerbeds or modern patio spaces.
This clever alignment sneaks a designer-level finish into your space without needing complex mortar mixing. The entire structure relies simply on gravity and a high-friction substrate to stay rigidly intact.
Expect materials to run close to $30 for a small garden section. It’s a fast transformation that completely changes the yard’s vibe.
- Key Materials: Standard masonry bricks
- Vibe / Style: Dynamic geometric texture
- Difficulty: Quick afternoon project
- Budget Breakdown: Bricks: $20 | Finishing Sand: $10
- Creator’s Tip: Keep a universal angle by cutting a small wooden template block before starting.
- Smart Sourcing: Polymeric jointing sand (weatherproof) and professional alignment stakes.
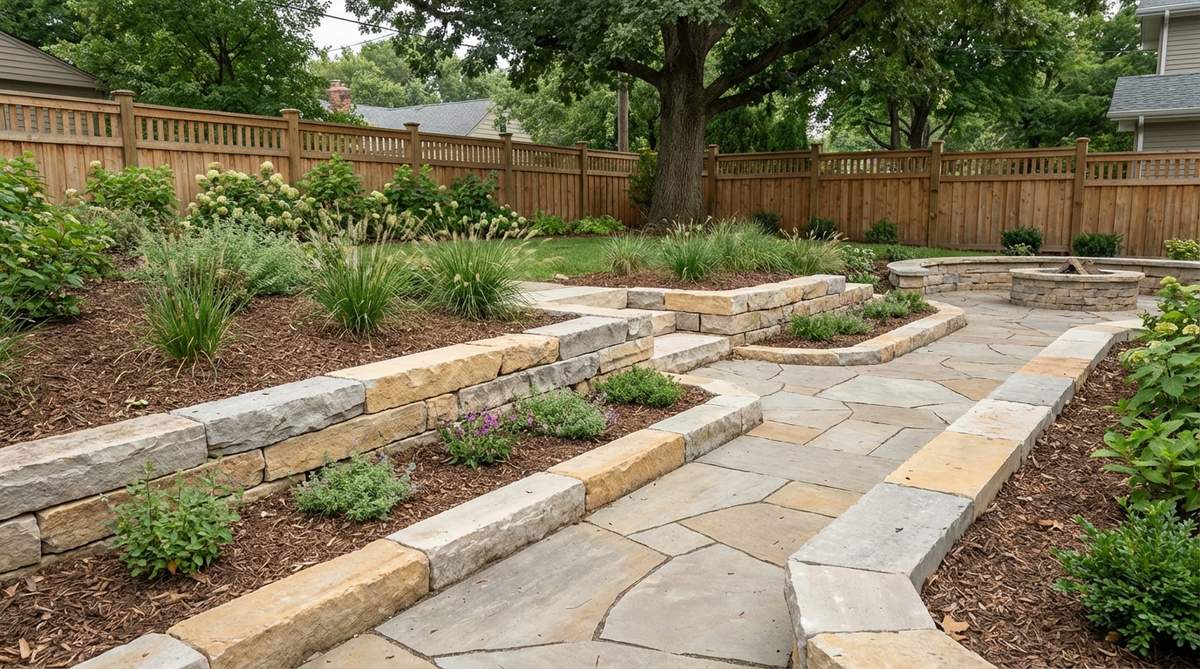
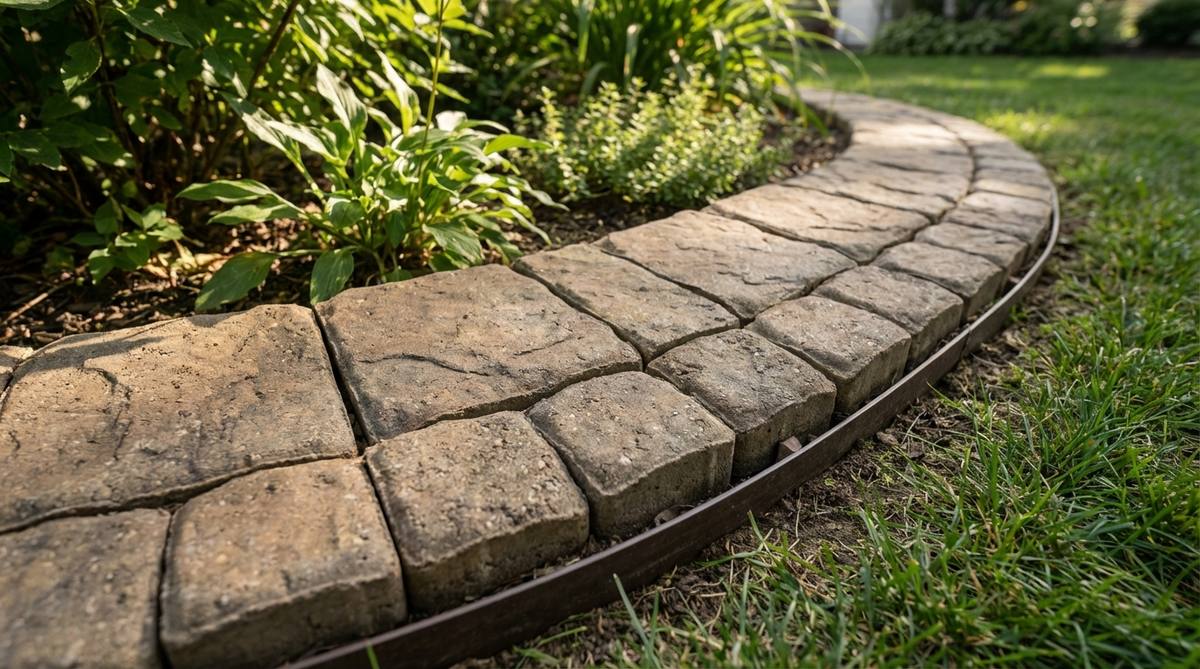
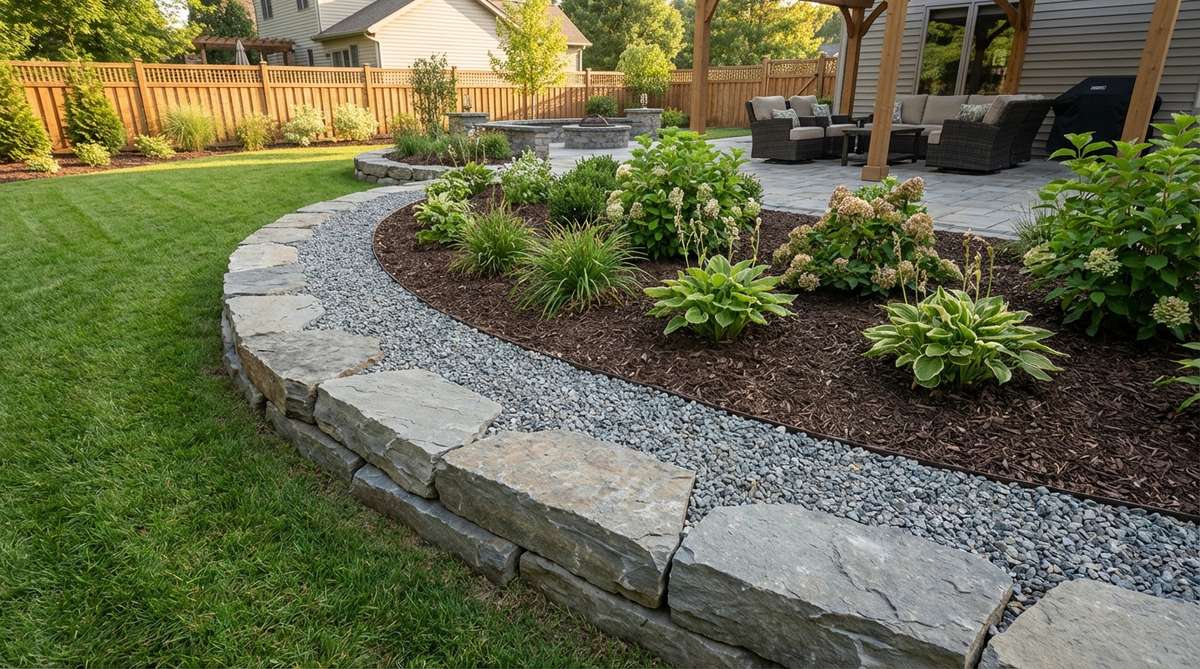
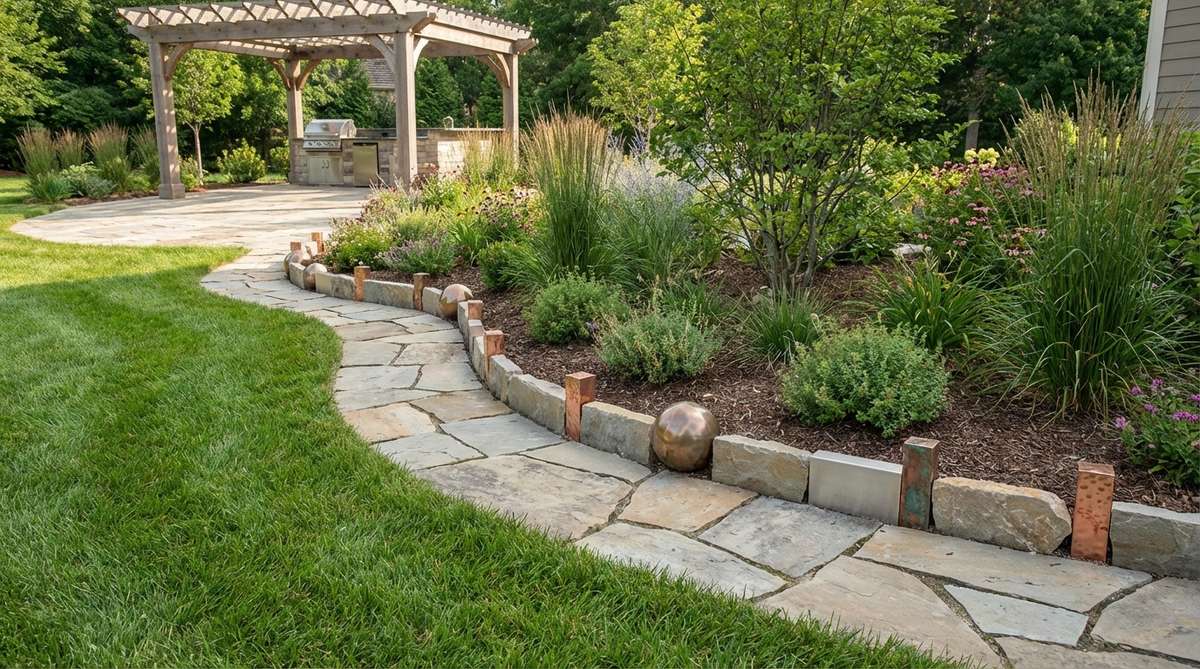
3. Flat Flagstone Border
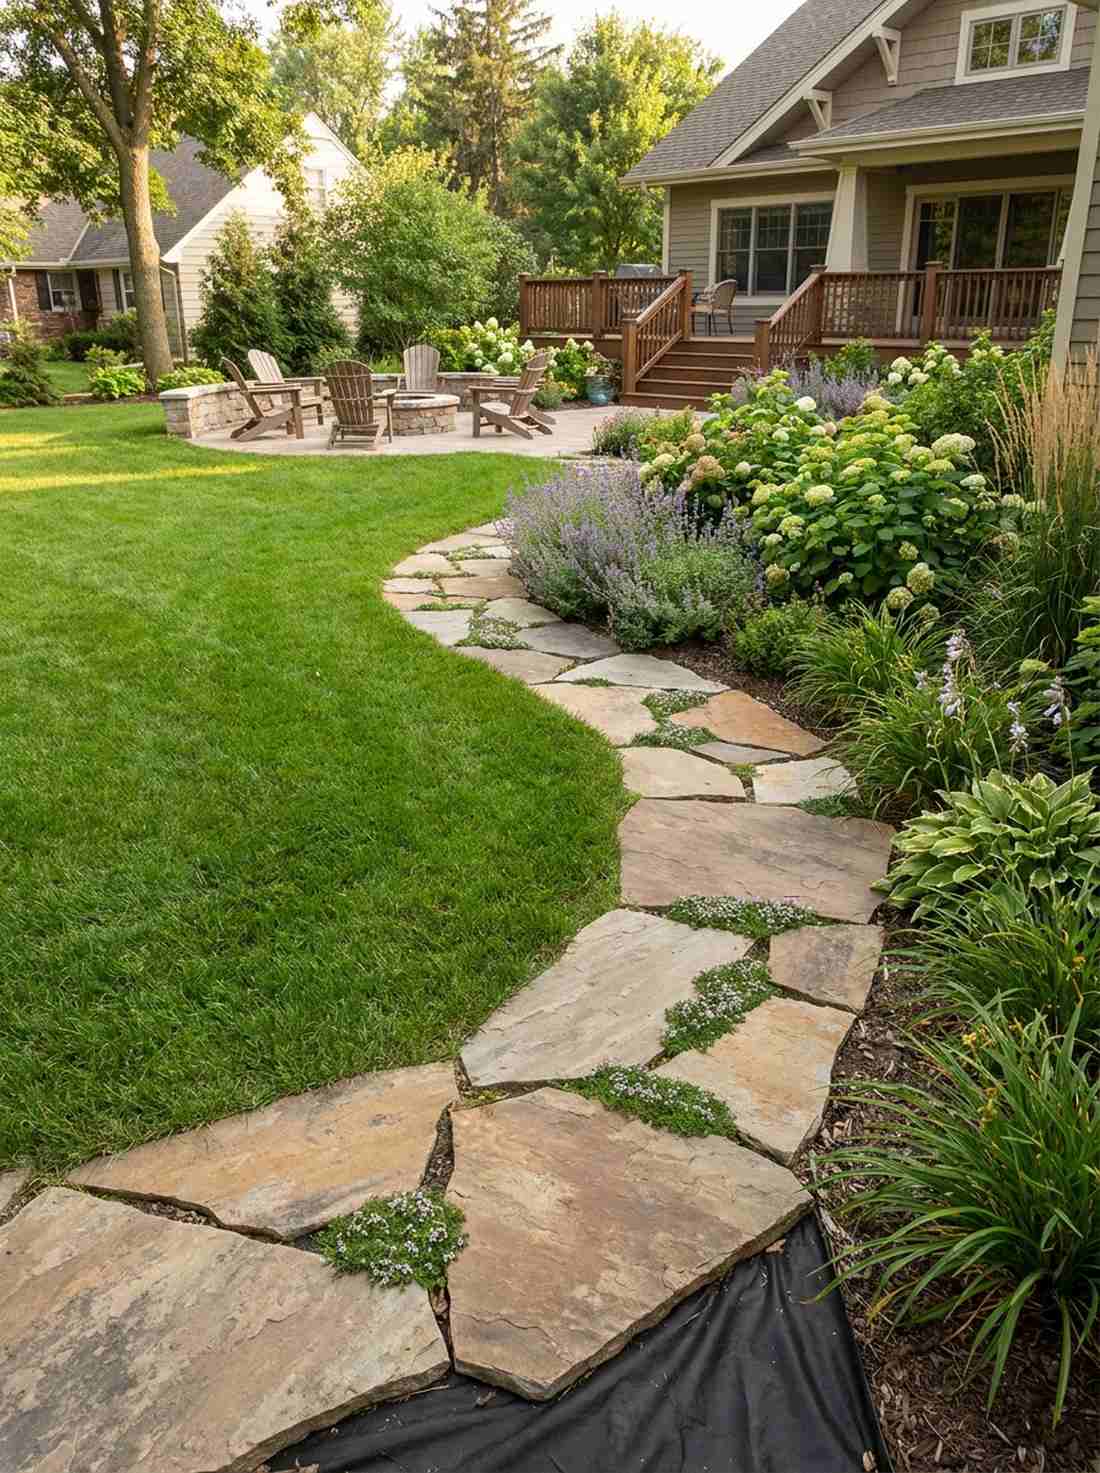
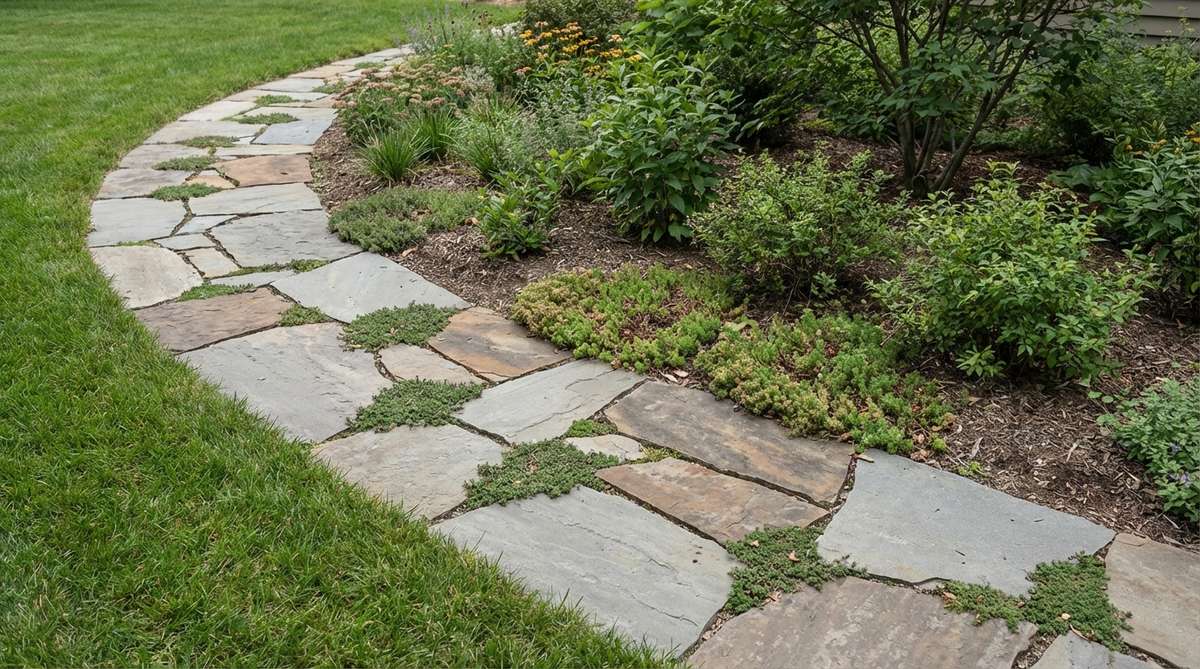
Radiates the quiet charm of a hidden cottage retreat. A horizontal natural flagstone boundary is perfect for transitioning between lush grass and dense perennial gardens.
Ditching perfectly straight lines for irregular shapes instantly gives a bespoke, expensive feel. Using proper landscape fabric underneath guarantees these heavy slabs won’t sink into the mud after heavy rainfall.
Set aside roughly $40–$60 for authentic stone sourcing. Pin this if you’re planning a rustic landscape upgrade!
- Key Materials: 1-2 inch thick natural flagstone pieces
- Vibe / Style: Organic and beautifully muted
- Difficulty: Moderate heavy lifting required
- Budget Breakdown: Stone: $45 | Underlayment: $15
- Creator’s Tip: Leave deliberate 1-inch gaps between stones to plant creeping thyme for a softer edge.
- Smart Sourcing: Commercial weed barrier fabric (heavy duty) and creeping groundcover starter kits.
4. Cut Bluestone Linear Edging
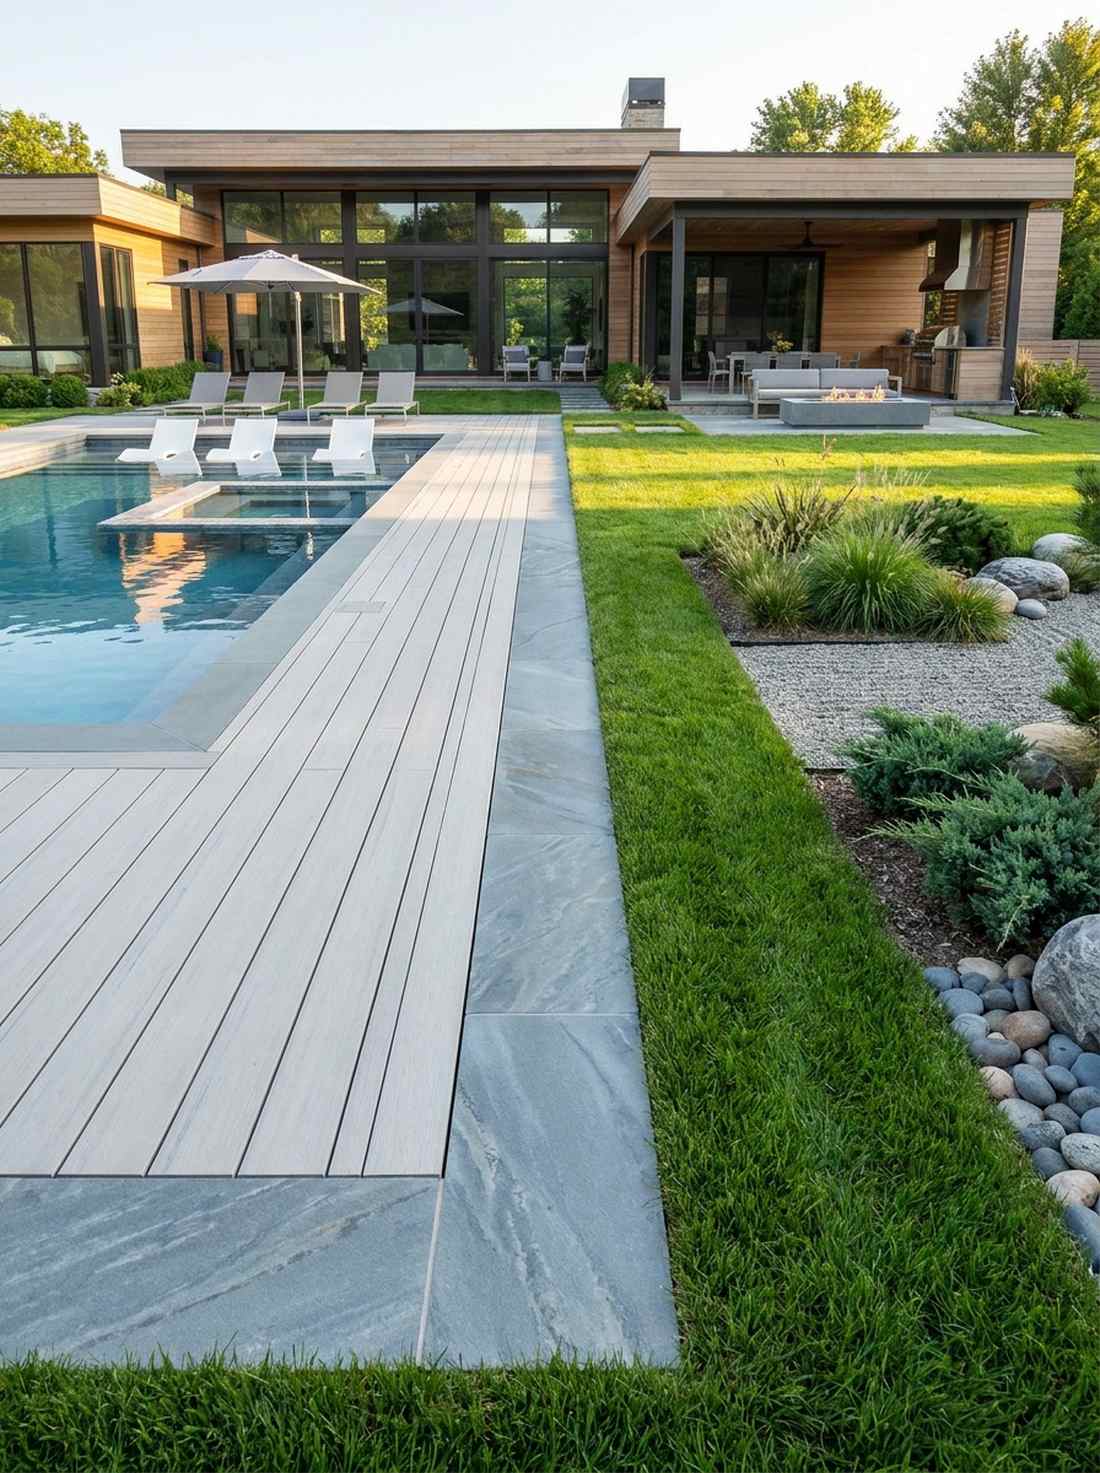
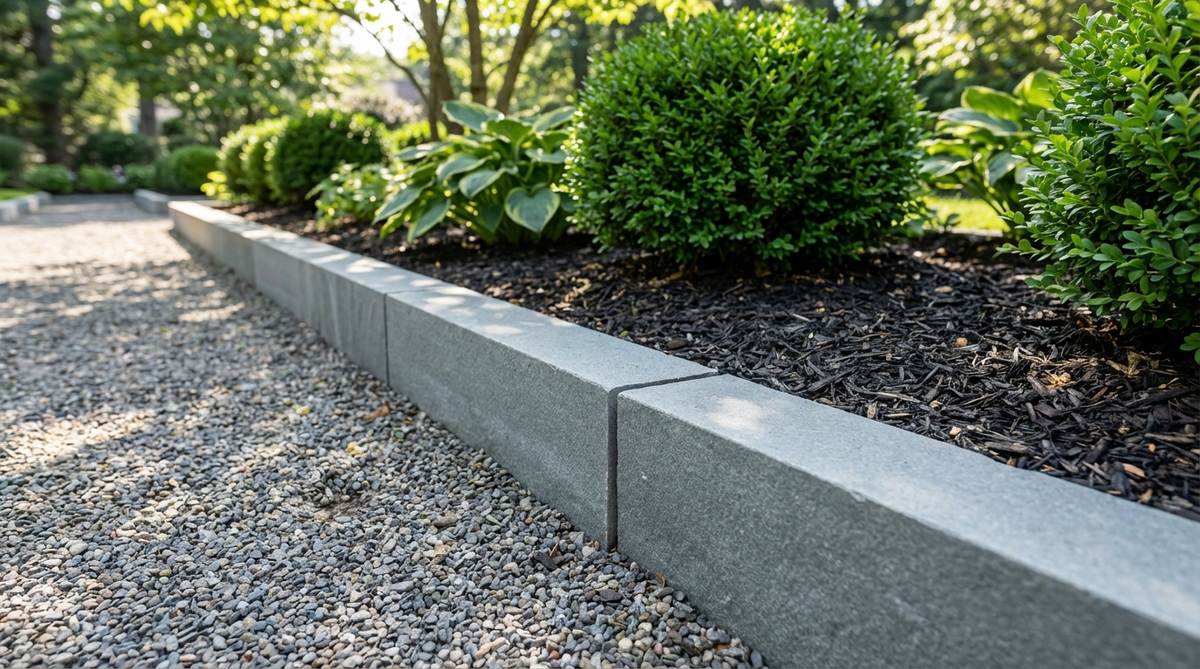
Feels flawlessly tailored, like a high-end modern resort. The precision-cut bluestone linear strip acts as an immaculate separator for contemporary pool decks or Zen spaces.
Most people settle for poured concrete, but machine-cut natural stone elevates the entire property value. The dense mineral composition completely resists chipping even against aggressive weed whackers.
This premium approach usually costs around $70–$100 depending on stone thickness. Highly recommended for a permanent, flawless finish.
- Key Materials: 4×12 inch sawn bluestone strips
- Vibe / Style: Ultra-modern and hyper-clean
- Difficulty: Requires precise ground leveling
- Budget Breakdown: Bluestone: $75 | Gravel Base: $15
- Creator’s Tip: Use a taut string line and a torpedo level to ensure absolutely zero dipping.
- Smart Sourcing: Pre-washed drainage gravel (bulk bags) and high-visibility string line reels.
This next layout totally flips the script—it looks incredibly expensive but requires zero mortar…
5. Granite Cobblestone Border
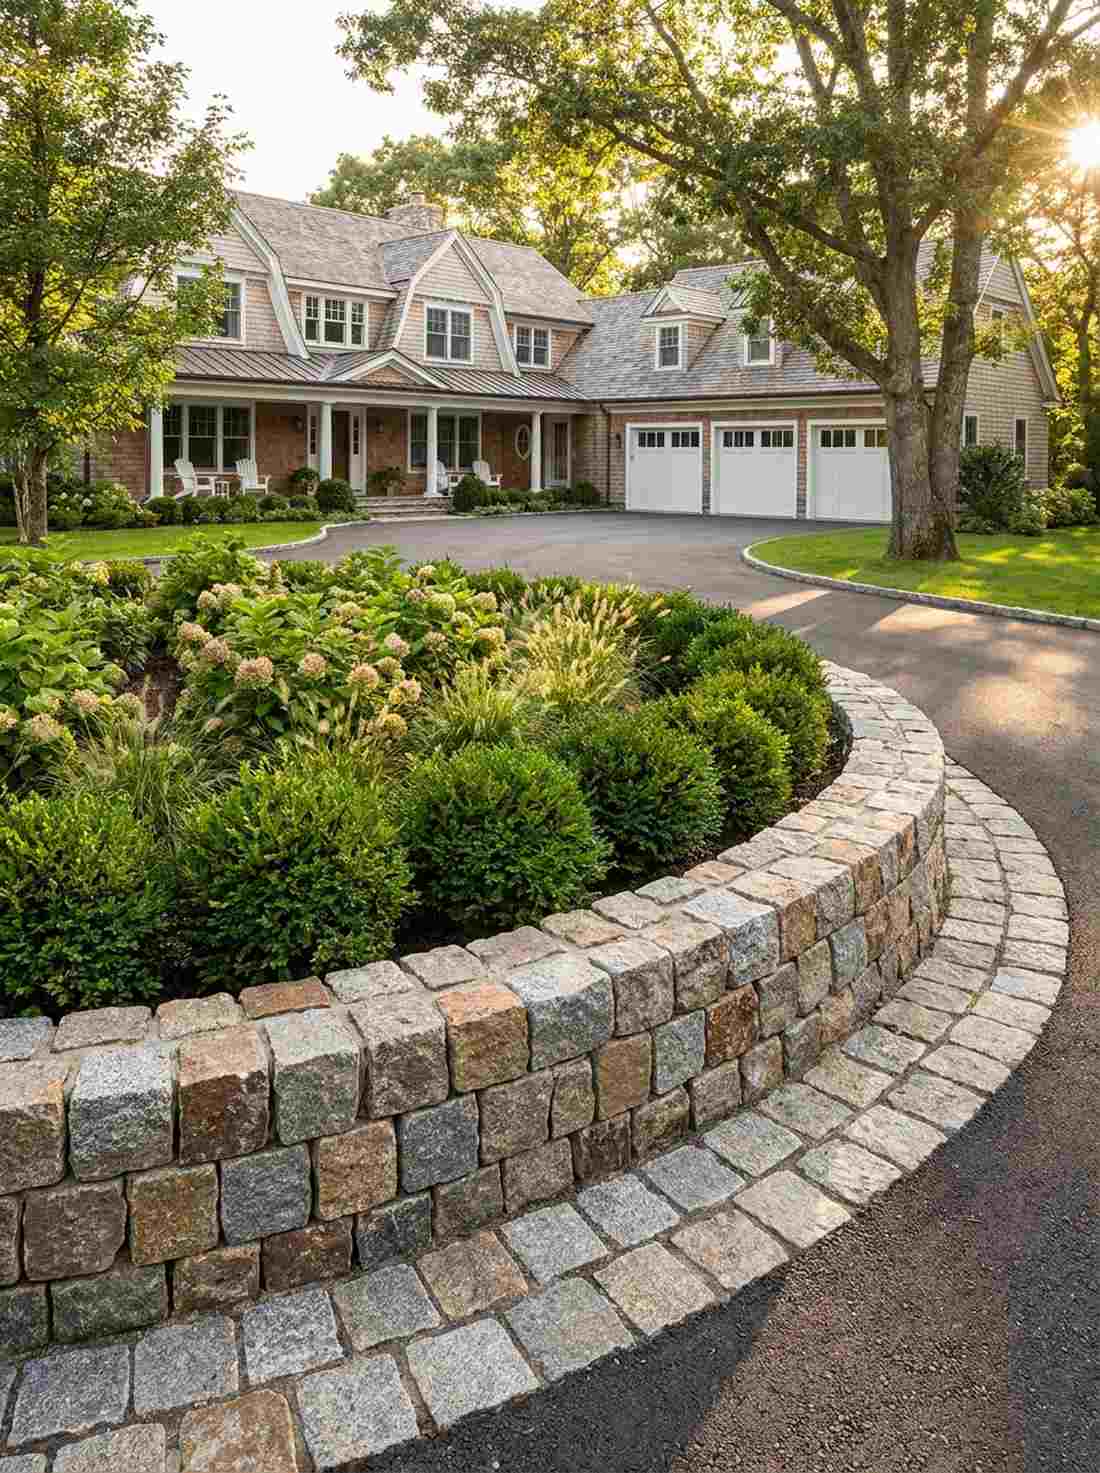
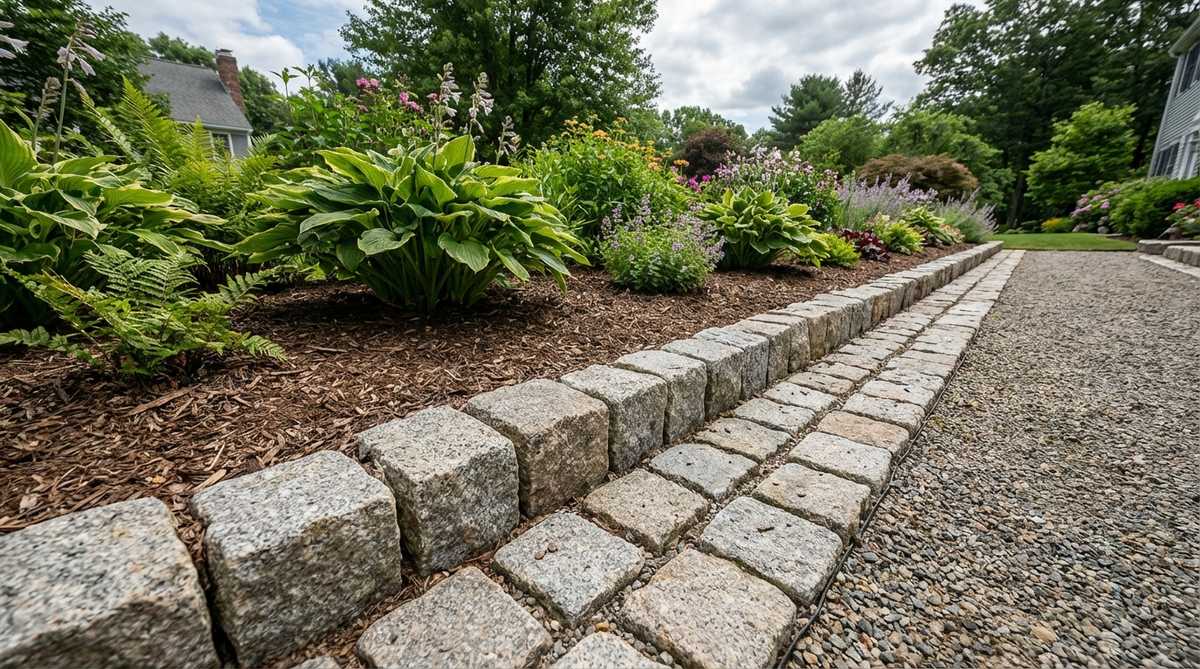
Carries the heavy, historic weight of a 19th-century streetscape. A cubic granite cobble margin beautifully anchors circular driveway islands or grand entryways.
Skipping uniform pavers for raw granite gives your landscape an untouchable, custom-built aura. They look phenomenal dry-stacked, adapting flawlessly to ground settling over the years.
You can snag reclaimed cobbles for about $50–$80 per small zone. Save this to your high-end driveway inspiration board!
- Key Materials: 4×4 inch granite cobblestone cubes
- Vibe / Style: Old-world heritage
- Difficulty: Physically demanding but straightforward
- Budget Breakdown: Cobbles: $60 | Base Grit: $20
- Creator’s Tip: Set them slightly deeper than you think; they naturally shift upward over winter.
- Smart Sourcing: Coarse setting grit (pre-mixed) and masonry knee pads (gel core).
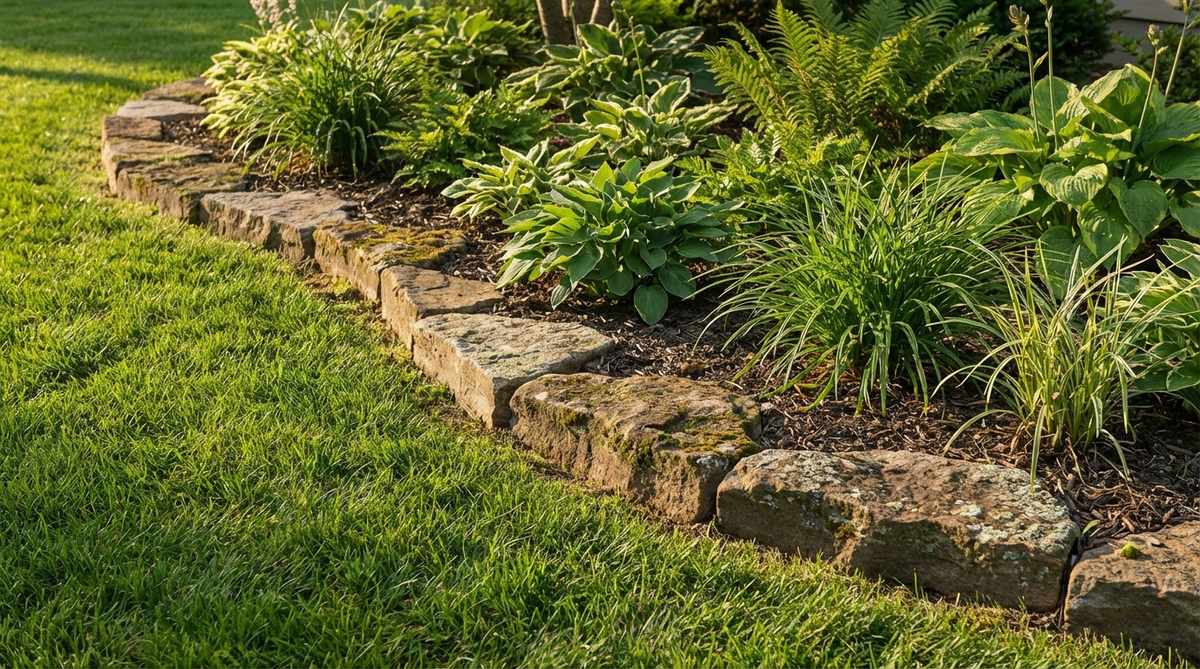
6. Limestone Block Edging
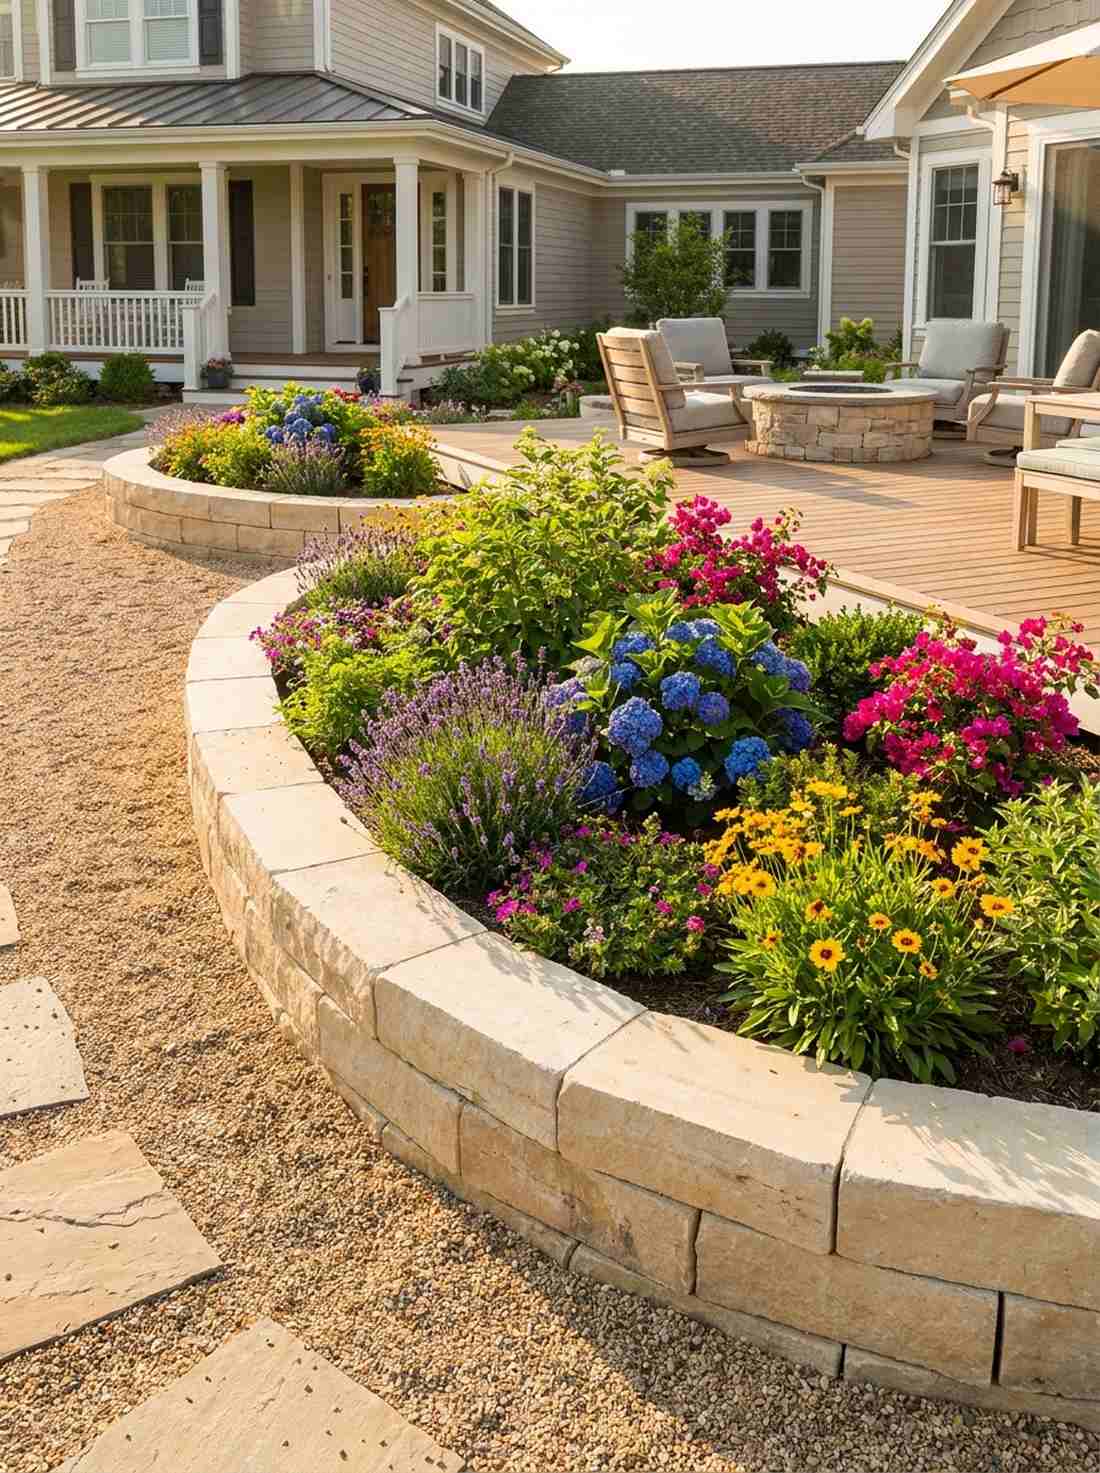
Looks like a sun-drenched Mediterranean villa courtyard. The sawn limestone block perimeter offers a warm, neutral backdrop for highly colorful botanical displays.
Using bright buff tones instantly makes smaller yards feel twice as large and incredibly airy. As the minerals weather, they develop a gorgeous, expensive-looking patina that synthetic materials can’t fake.
Expect to invest around $60–$90 for true quarried blocks. It’s a striking investment that ages perfectly over time.
- Key Materials: 4-inch sawn limestone blocks
- Vibe / Style: Bright, warm, and sophisticated
- Difficulty: Moderate leveling required
- Budget Breakdown: Limestone: $70 | Tamping Base: $15
- Creator’s Tip: Avoid placing these under dense oak trees, as the tannins will stain the light stone.
- Smart Sourcing: Stone sealant spray (matte finish) and heavy-duty steel hand tampers.
7. Sandstone Natural Edge Border
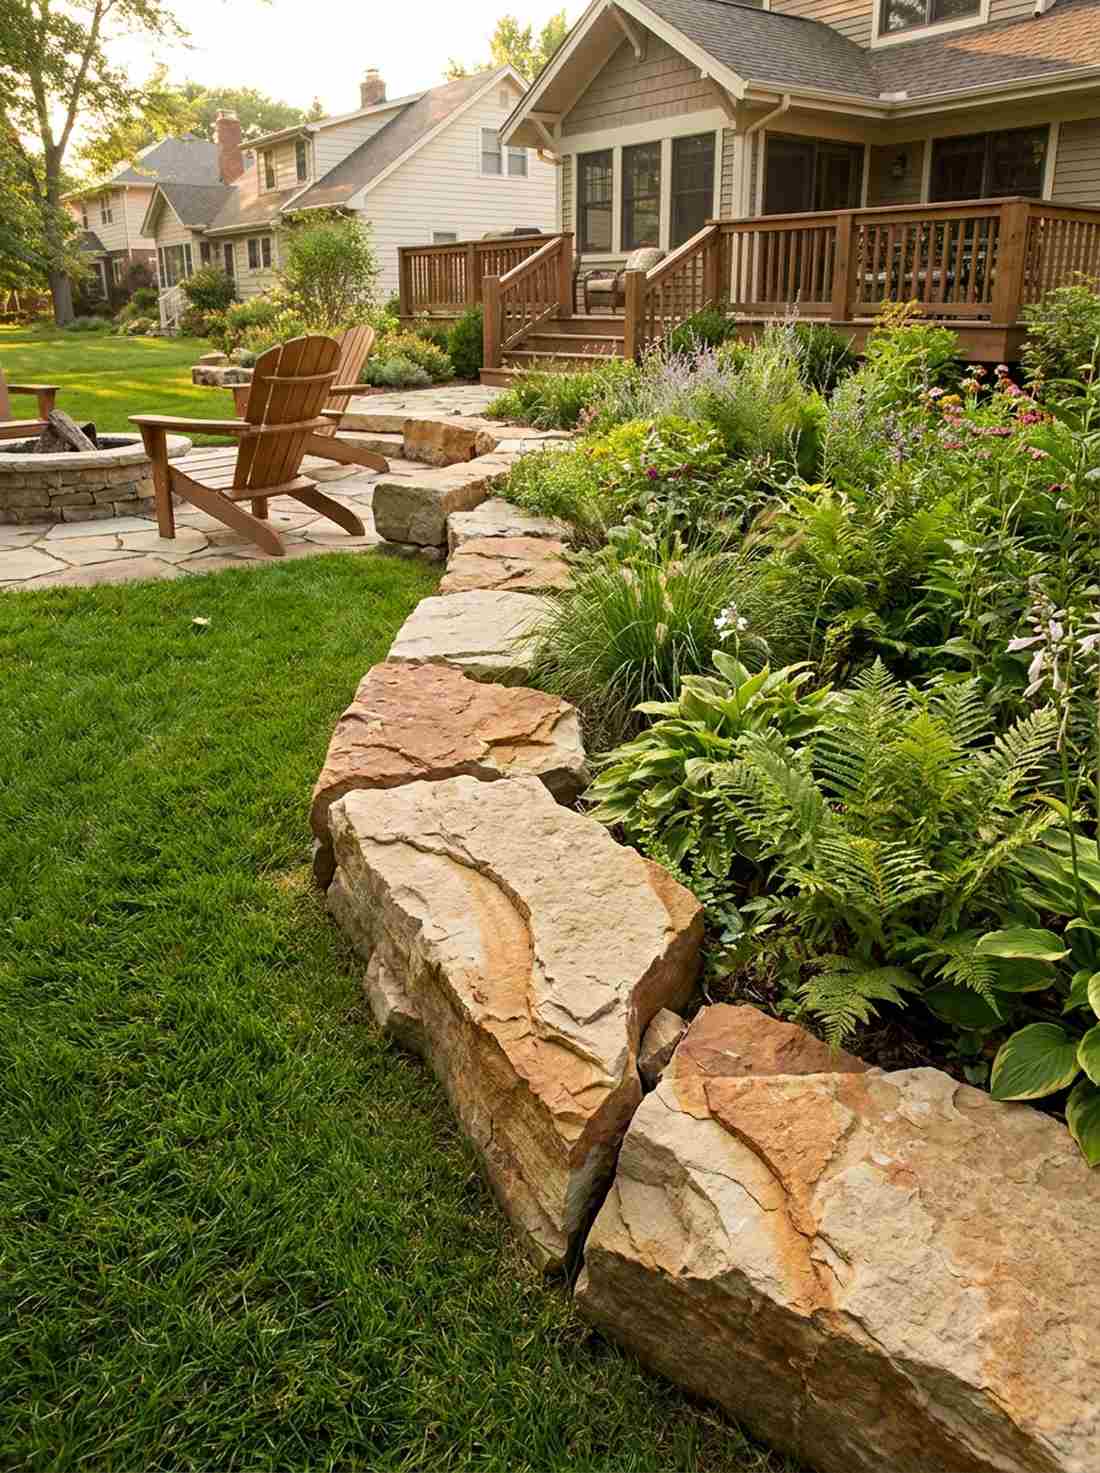
Feels like a rugged trail you accidentally discovered in the mountains. A rough-split sandstone edge seamlessly bridges the gap between manicured lawns and wild, native gardens.
Hiding the geometric cuts and exposing only the natural fracture line creates a brilliant optical illusion of natural rock outcroppings. It brings massive visual weight without the cost of importing giant boulders.
This setup easily falls into the $40–$60 range for a weekend DIY. Pin this if you love a slightly untamed aesthetic!
- Key Materials: Irregular rough-split sandstone chunks
- Vibe / Style: Organic and woodsy
- Difficulty: Like a fun, heavy puzzle
- Budget Breakdown: Stone: $50 | Soil prep: $10
- Creator’s Tip: Bury at least two inches of the flat side facing the bed to lock it firmly against the soil.
- Smart Sourcing: Heavy-duty landscaping gloves (reinforced) and organic compost starter bags.
8. Concrete Paver Stone Edging
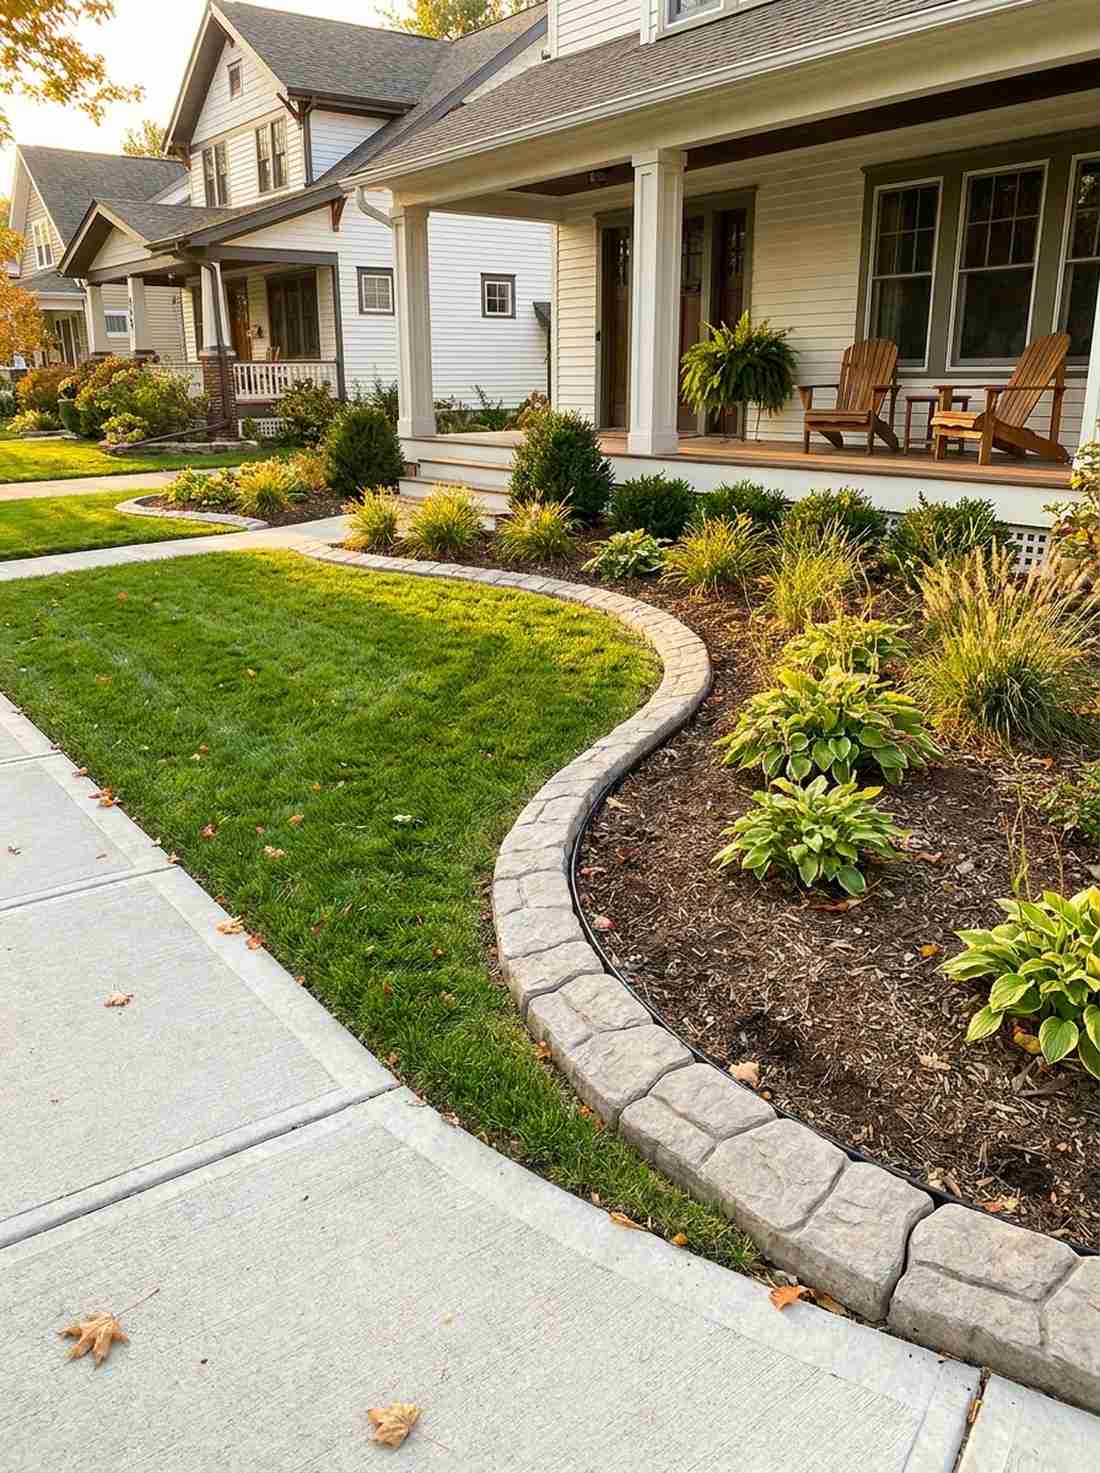
Delivers the crisp satisfaction of a freshly vacuumed room. The interlocking concrete faux-stone border is the ultimate problem-solver for high-traffic suburban sidewalks.
Opting for modern manufactured pavers tricks the eye into seeing natural stone at a fraction of the cost. Utilizing hidden composite edge restraints completely stops the frustrating lateral shifting seen in older patios.
You can execute this flawless line for roughly $25–$45. A remarkably smart choice for budget-conscious homeowners.
- Key Materials: Textured concrete paving units
- Vibe / Style: Neat, orderly, and highly functional
- Difficulty: Very beginner-friendly
- Budget Breakdown: Pavers: $30 | Restraints: $15
- Creator’s Tip: Always install an invisible plastic edge rail behind the blocks to lock them tight.
- Smart Sourcing: Flexible paver edging kits (with spikes) and UV-resistant paver sealers.
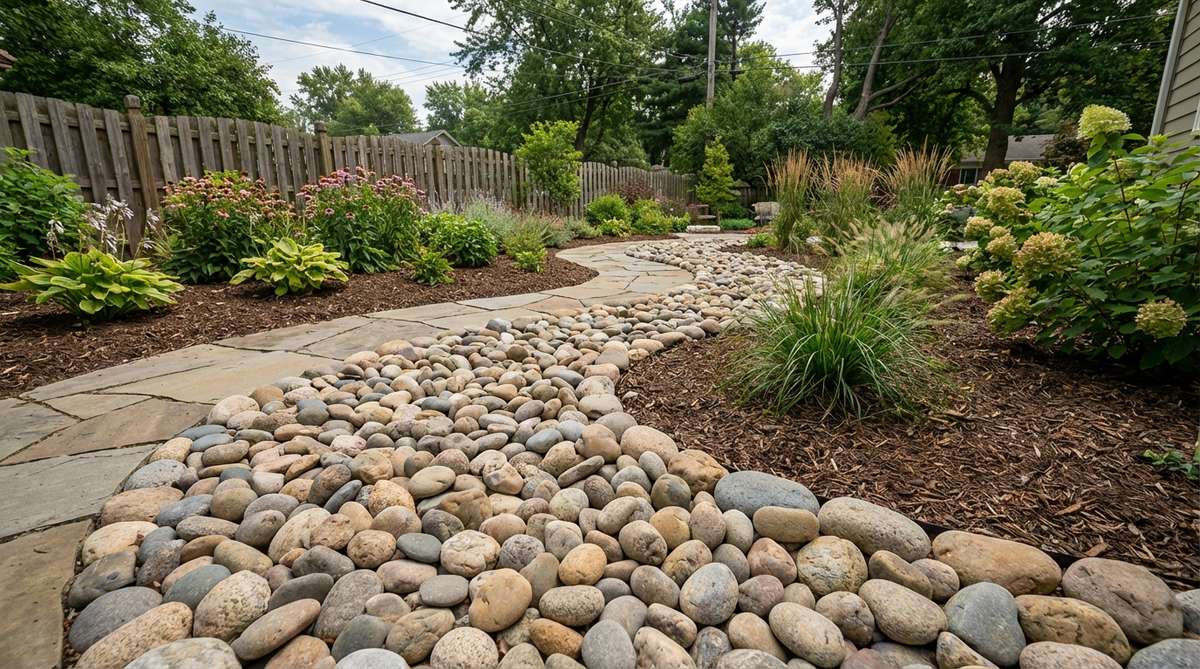
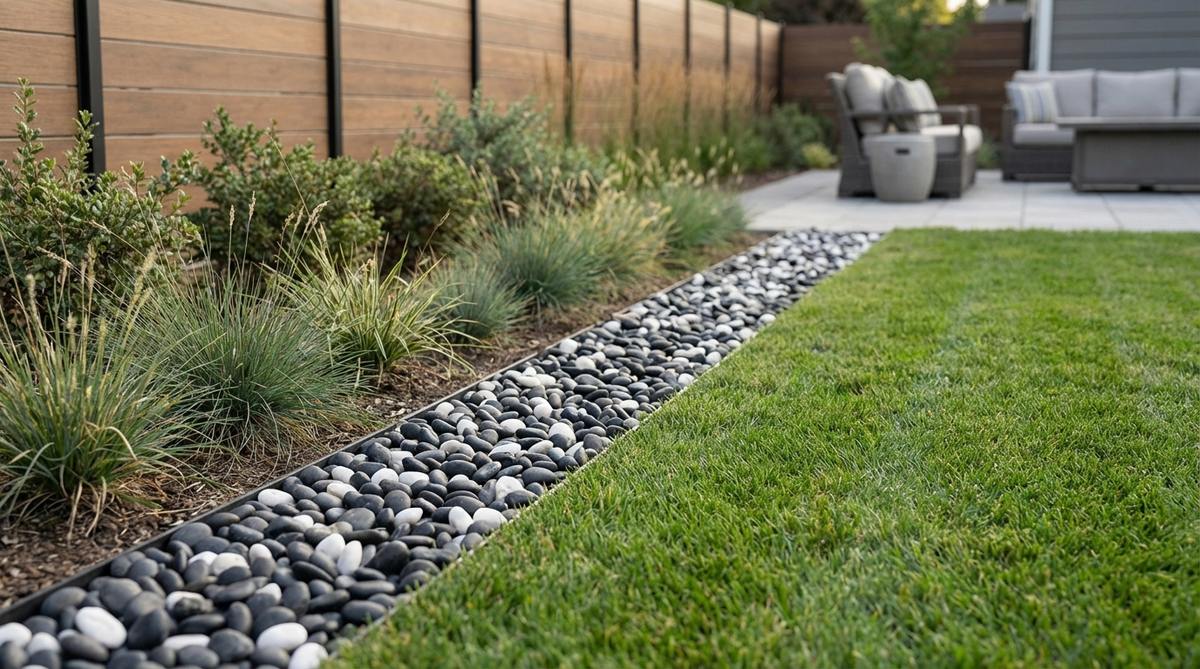
9. Graded River Rock Band
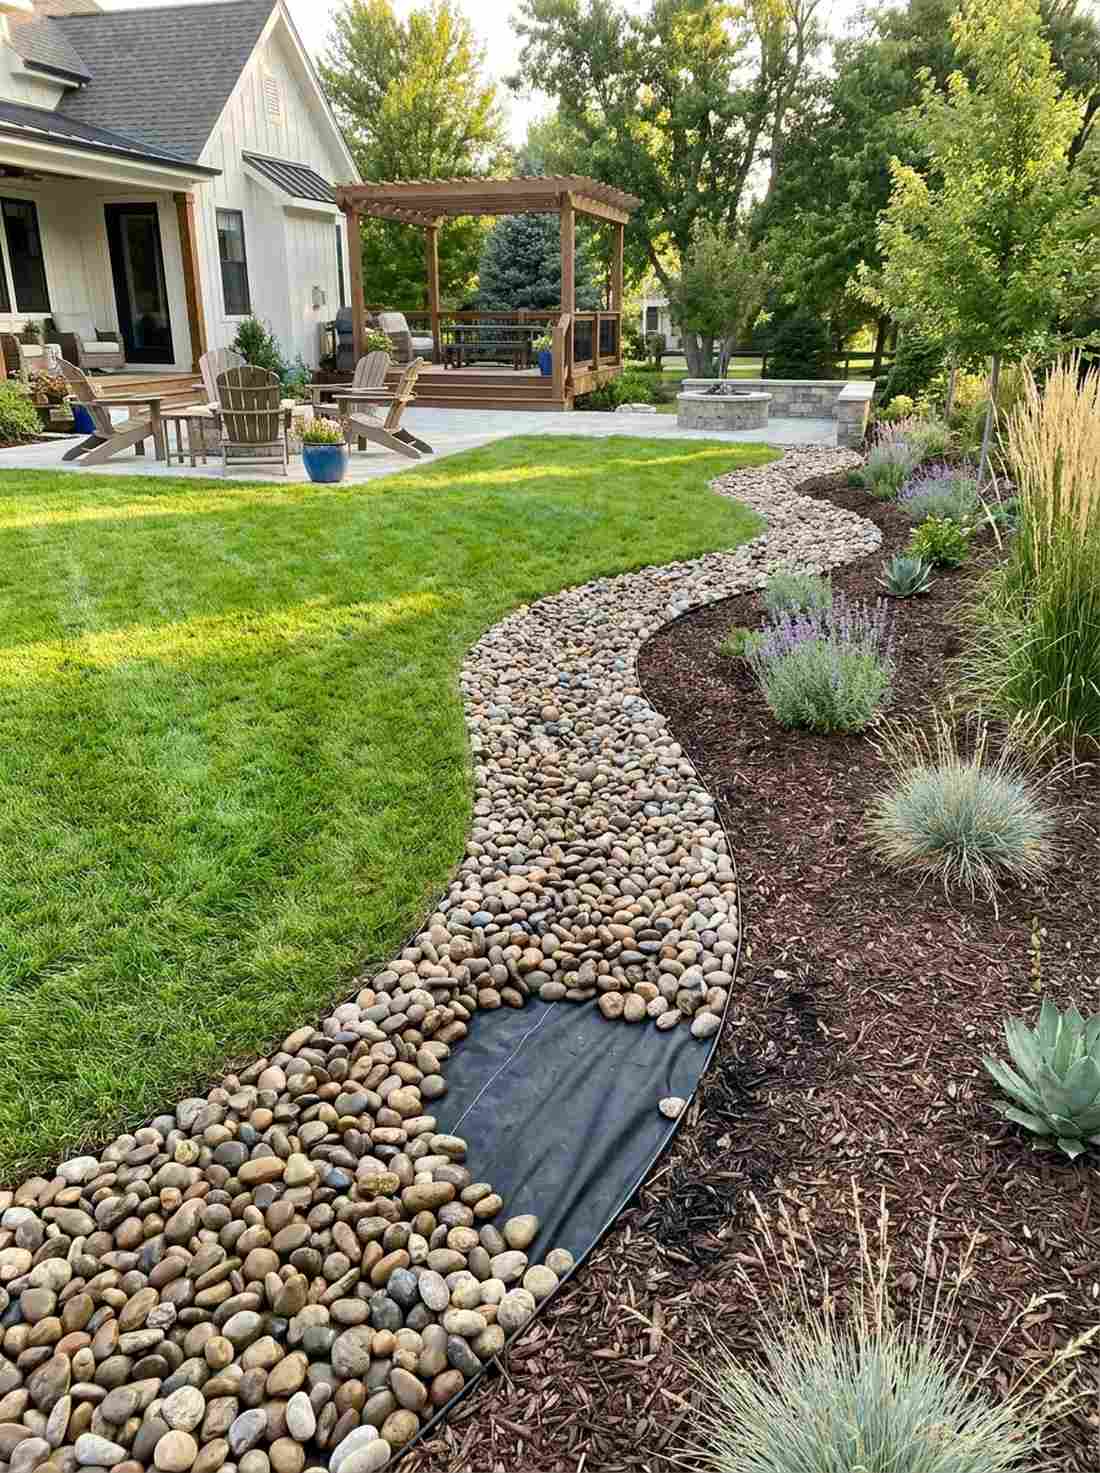
Feels like a serene, dried-up riverbed running through your yard. A smooth water-worn pebble trench beautifully softens the harsh transition from bright green lawns to dark mulch.
Most DIYers ruin this look by skipping the underlayment, resulting in a muddy mess by spring. Installing a premium weed barrier first ensures this flowing feature stays pristine and maintenance-free for years.
Grab enough materials to do this right for around $35–$55. Save this to your xeriscape or low-water landscaping board!
- Key Materials: 2-4 inch polished river stones
- Vibe / Style: Flowing, relaxed, and natural
- Difficulty: Fast and requires minimal skill
- Budget Breakdown: River Rock: $40 | Fabric: $15
- Creator’s Tip: Dig the trench slightly deeper than the rock diameter so the mower glides right over.
- Smart Sourcing: Pre-washed river rock (bulk bags) and commercial weed barrier fabric.
💡 Must-Have Supplies for High-End Setups
To build these setups faster and ensure they last, skip the generic craft aisles and invest in the right foundational kits.
- Base & Support: Commercial-grade woven landscape fabric (heavy duty)
- Setup Tools: Professional deadblow masonry mallet kits
- Weather/Durability Protection: UV-resistant polymeric locking sand
Wait until you see the next technique… it solves the most annoying landscape problem instantly.
10. Multi-Layered Rock Gradation

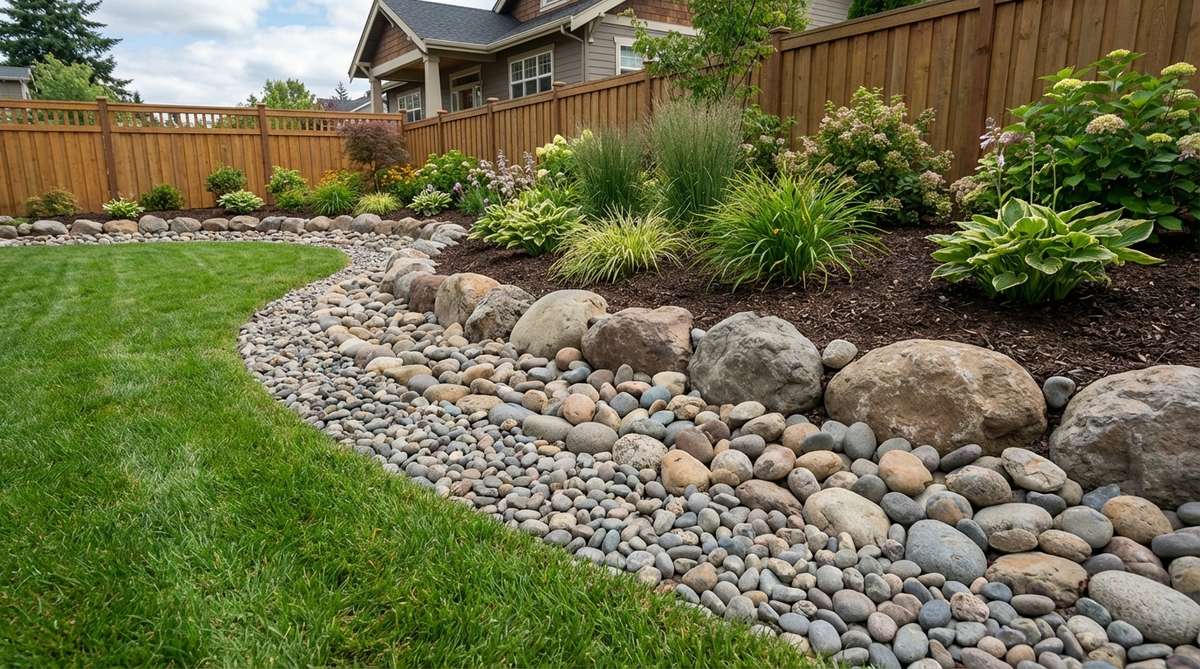
Evokes the rugged beauty of a natural alpine stream. This multi-sized stone stratification looks breathtaking cascading down sloped suburban side-yards.
Combining three distinct size grades completely stops erosion while looking like an expensive architectural feature. The interlocking nature of mixed rocks acts like a natural net against heavy rainwater runoff.
It usually runs around $50–$75 to source multiple grades. It’s a visually stunning upgrade that literally protects your soil.
- Key Materials: 1-inch, 3-inch, and 6-inch river rocks
- Vibe / Style: Rugged, dimensional, and wild
- Difficulty: Moderate (requires careful sorting)
- Budget Breakdown: Mixed Rocks: $60 | Trenching: $0
- Creator’s Tip: Always place the largest boulders in the back against the soil to create a visual anchor.
- Smart Sourcing: Assorted polished stone packs and heavy-duty landscaping shovels.
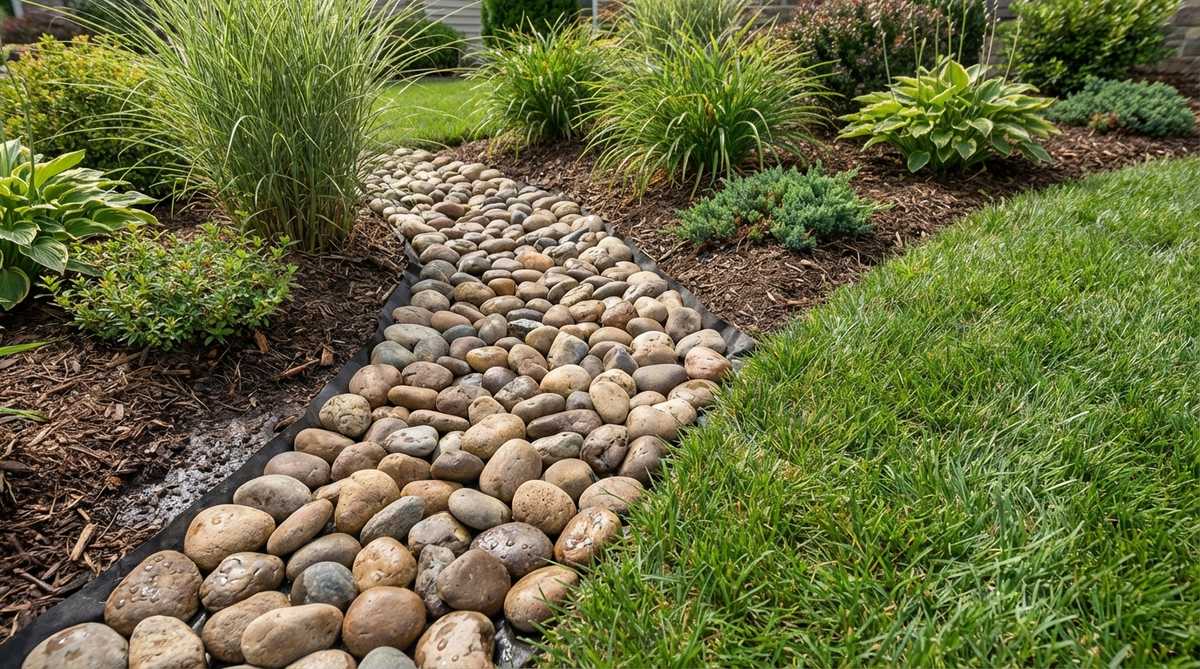
11. River Rock and Mulch Transition


Delivers the ultimate clean-girl aesthetic for your exterior. A bold rock and woodchip divider serves as an absolute lifesaver for keeping pristine boundaries around foundation plants.
This layout aggressively blocks organic mulch from washing onto your sidewalks during summer storms. By combining high-contrast textures, you automatically get that sought-after contemporary suburban look.
You can execute this brilliant border for roughly $30–$50. Pin this if you hate sweeping mulch off your walkways!
- Key Materials: Medium river rocks and premium dark mulch
- Vibe / Style: High-contrast and impeccably tidy
- Difficulty: Easy weekend task
- Budget Breakdown: Rocks: $25 | Premium Mulch: $15
- Creator’s Tip: Use a flat-edged spade to cut a sharp 90-degree trench before dropping the stones.
- Smart Sourcing: Color-locked black mulch (fading-resistant) and steel edging spades.
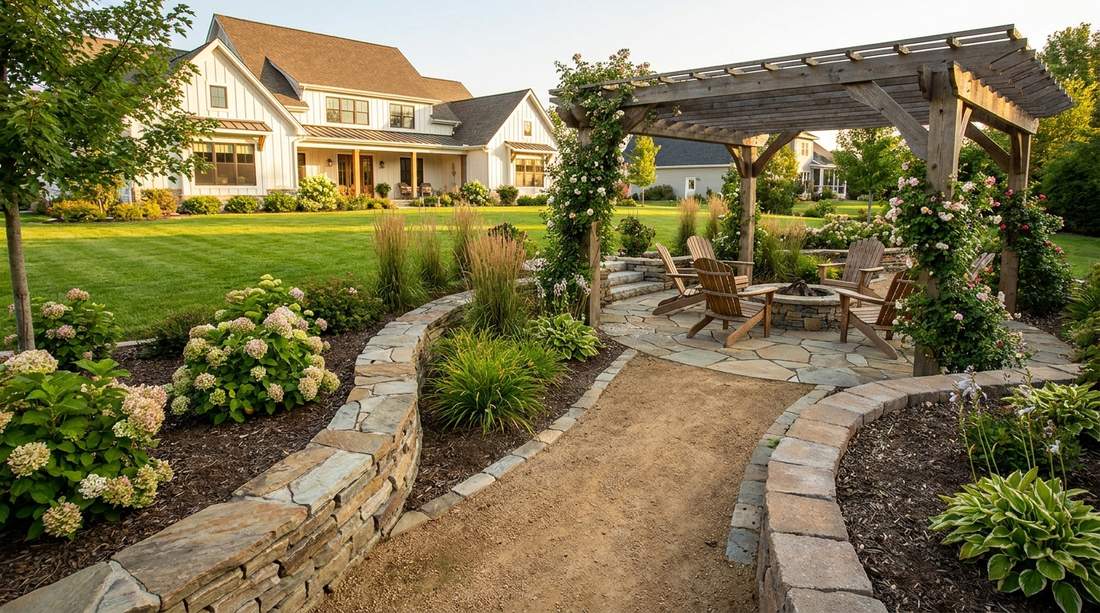
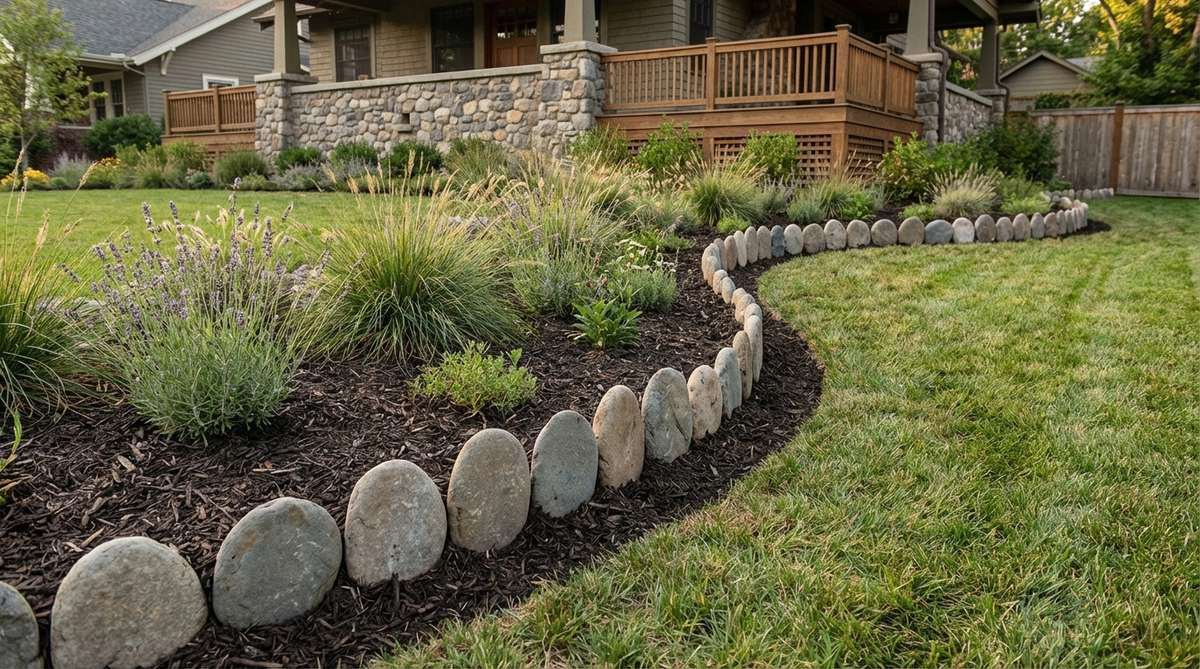
12. Serpentine River Rock Pathway Edge
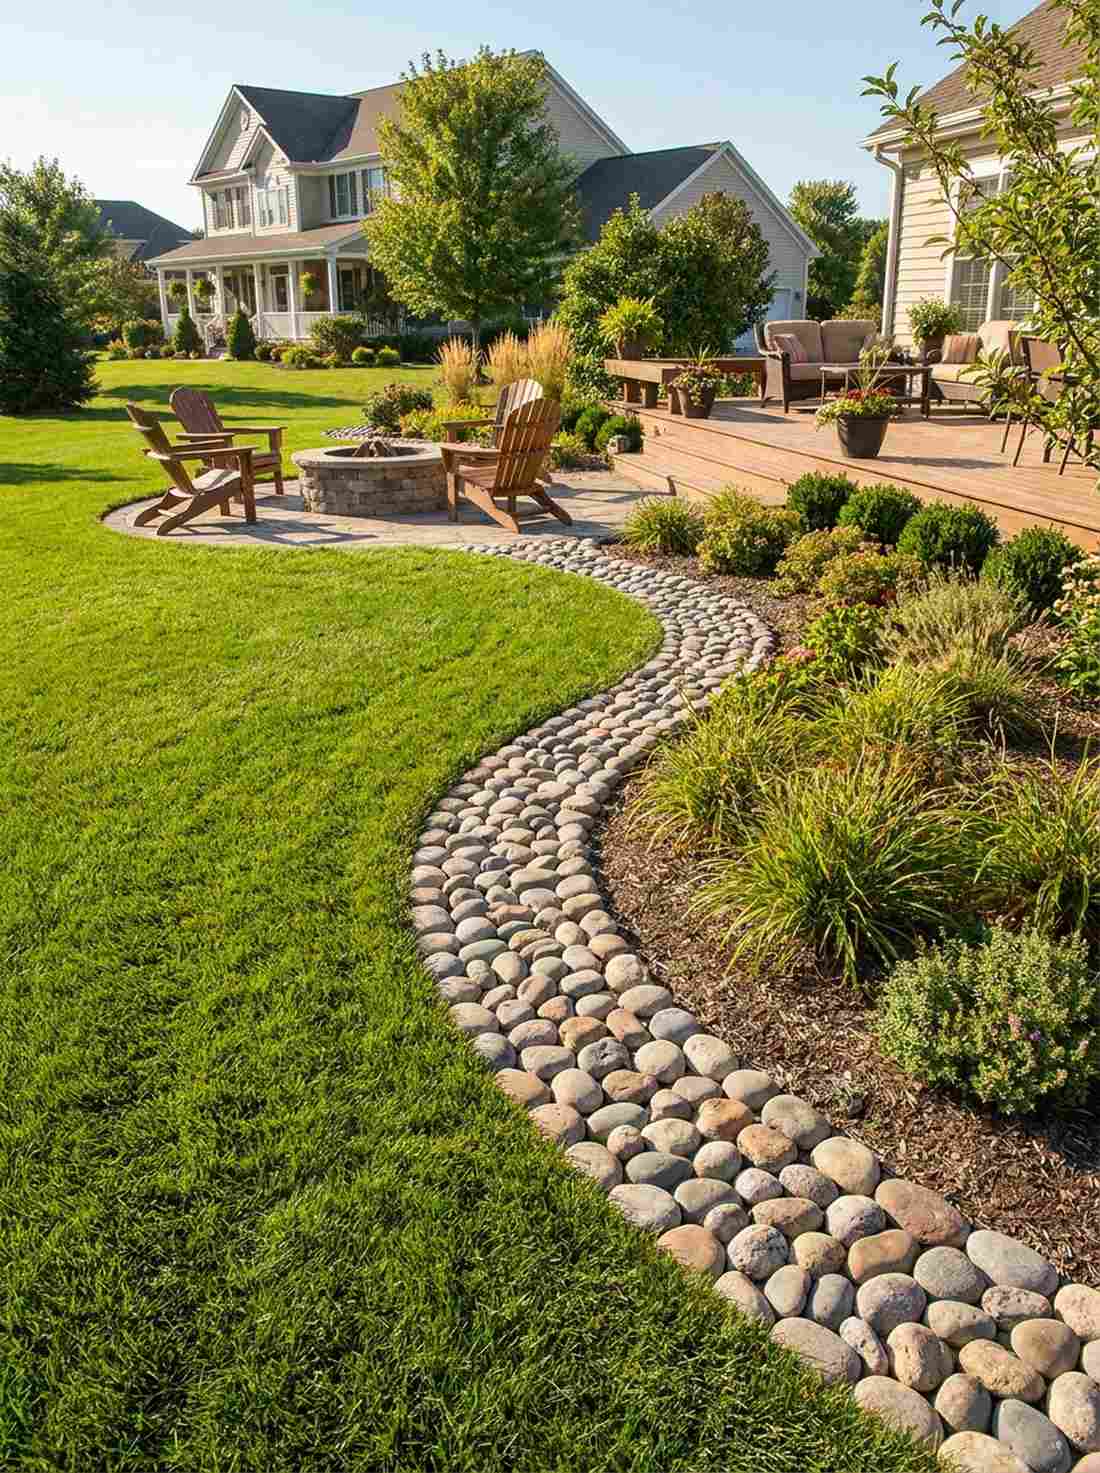
Feels like a whimsical path straight out of a storybook. The curving rounded stone border is magnificent for guiding guests naturally toward a backyard fire pit.
Angular bricks fight against organic curves, but water-worn pebbles embrace sinuous, sweeping lines flawlessly. This layout creates an irresistible visual flow that makes rectangular yards feel instantly more dynamic.
This curving beauty costs about $35–$55 to set up correctly. Highly recommended for breaking up boring, straight property lines.
- Key Materials: Uniformly rounded river cobbles
- Vibe / Style: Fluid, organic, and inviting
- Difficulty: Requires a good eye for curves
- Budget Breakdown: Stones: $40 | Marking Paint: $5
- Creator’s Tip: Lay out an ordinary garden hose in the sun to warm up, then use it as a perfect curving stencil.
- Smart Sourcing: Neon landscape marking paint and heavy-duty flexible garden hoses.
13. Polished Pebble Mosaic Border
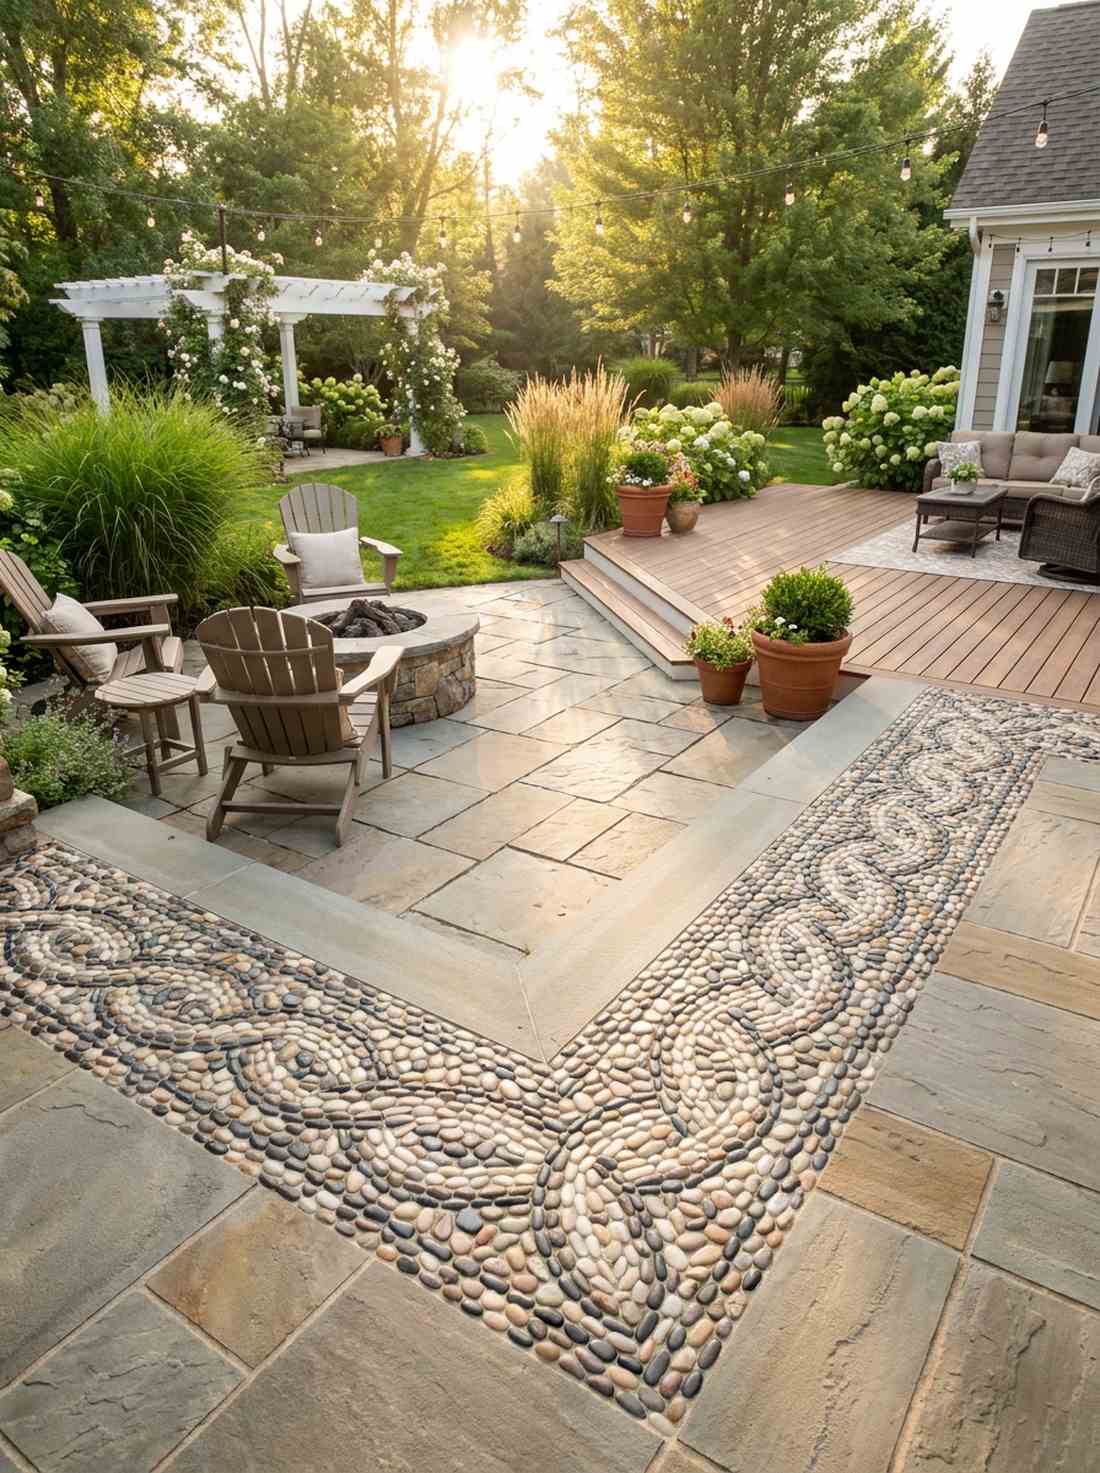
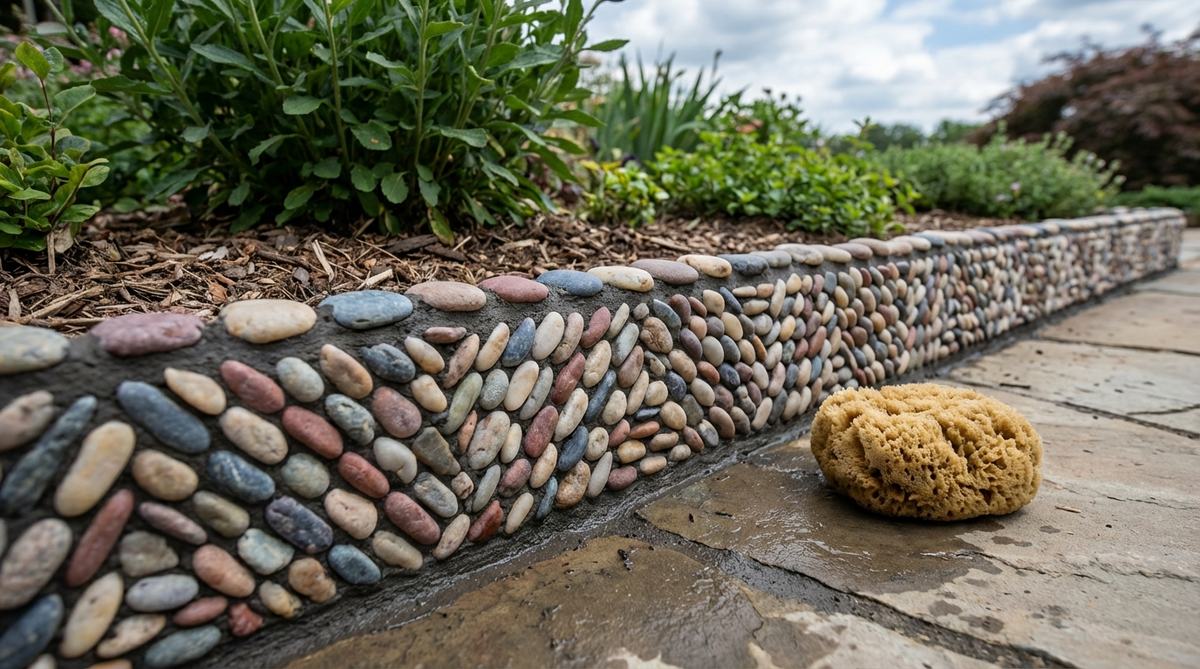
Radiates the intricate detail of an ancient Roman bathhouse. A hand-laid polished stone mosaic becomes a literal piece of art framing a small, intimate courtyard.
Taking the time to sort and mortar tiny stones by color yields a masterpiece that looks like it cost thousands. Injecting this miniature garden supplies technique into a modern patio adds unmatched artisanal luxury.
You can build this artistic strip for around $40–$70 in materials. Save this if you want a truly unique patio focal point!
- Key Materials: 1-inch polished ornamental pebbles
- Vibe / Style: Highly artistic and detailed
- Difficulty: Tedious but highly rewarding
- Budget Breakdown: Pebbles: $45 | Mortar: $15
- Creator’s Tip: Keep a wet sponge handy to wipe the mortar haze off the rocks before it cures completely.
- Smart Sourcing: High-gloss polished mosaic pebbles (bulk pack) and fast-setting outdoor mortar.
14. Beach Stone Coastal Edging
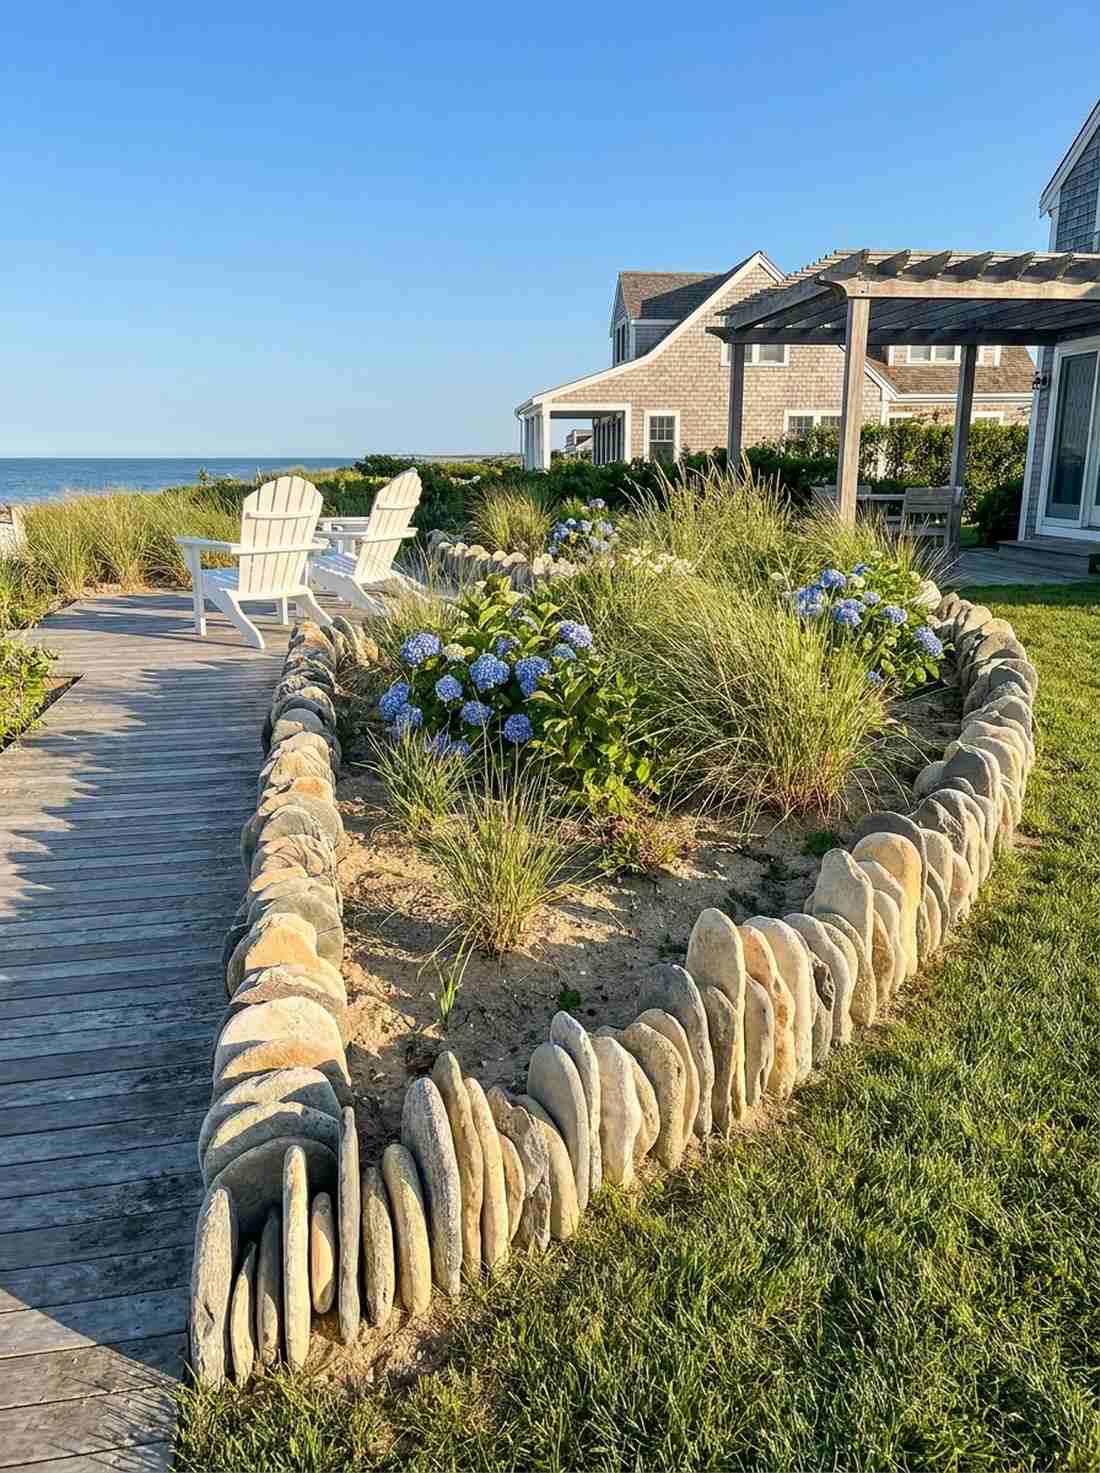
Instantly transports your yard to a breezy Nantucket coastline. The vertical flat beach stone border works exceptionally well for retaining sandy soils around coastal-themed flower beds.
Burying these disc-shaped rocks upright completely defies the standard horizontal laying technique. It creates a striking, jagged profile that looks beautifully weathered and intentionally rustic.
Depending on local sourcing, this runs about $30–$60. A fantastic upgrade that completely changes the visual rhythm.
- Key Materials: 3-8 inch flat skip-stones or beach rocks
- Vibe / Style: Breezy, maritime, and weathered
- Difficulty: Requires deep, narrow trenching
- Budget Breakdown: Beach Stones: $45 | Sand base: $10
- Creator’s Tip: Alternate the height and tilt of each stone to make it look like a natural geological formation.
- Smart Sourcing: Flat coastal skipping stones (bulk) and narrow trenching trowels.
Most beginners completely ignore this upcoming aesthetic, yet it’s the exact secret to a $5,000 look.
15. Mexican Beach Pebble Band
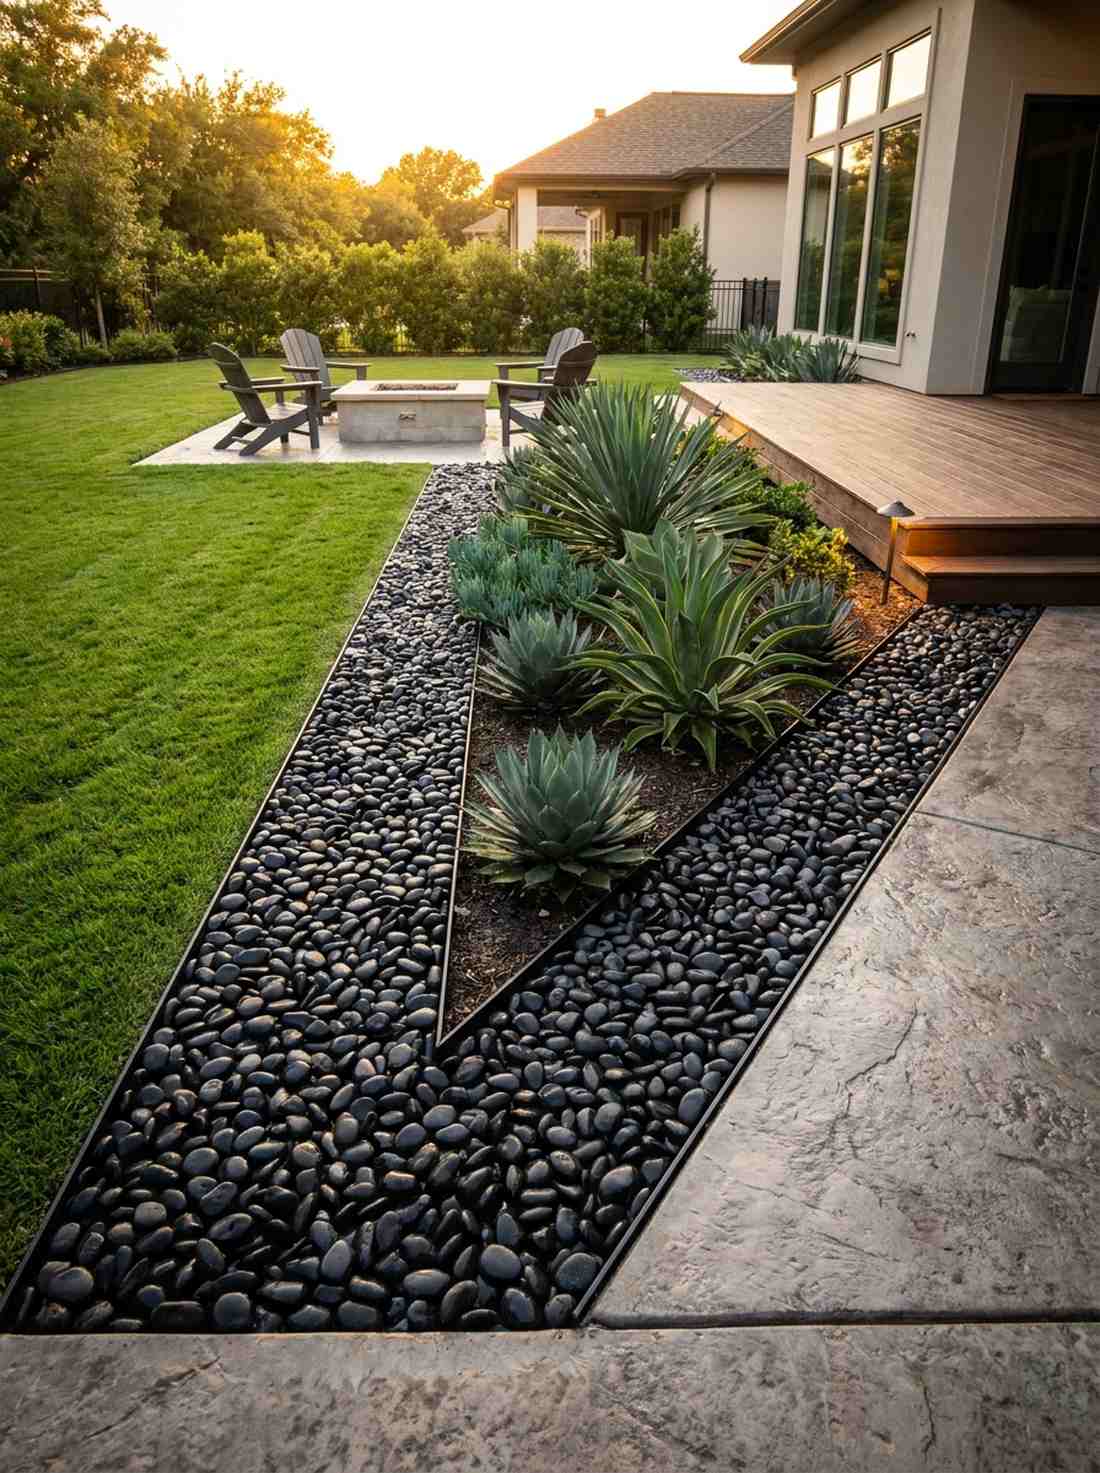
Exudes the moody, ultra-sleek vibe of a luxury boutique hotel. A uniform black pebble perimeter is the ultimate power move for framing minimalist agave or succulent beds.
Using purely monochromatic black stones immediately elevates generic foliage into high-end architectural focal points. Containing them with a hidden metal strip ensures that crisp, magazine-ready line never wavers.
You’ll likely spend $60–$90 for these premium imports. Pin this if you are obsessed with modern, high-contrast design!
- Key Materials: 2-3 inch smooth Mexican black beach pebbles
- Vibe / Style: Monochromatic, moody, and chic
- Difficulty: Simple, just requires a rigid edge frame
- Budget Breakdown: Pebbles: $70 | Steel Edge: $20
- Creator’s Tip: Wash the rocks with a hose after installation; they ship covered in a dull gray dust.
- Smart Sourcing: Premium Mexican beach pebbles (bulk pack) and rust-proof aluminum edging strips.
16. Tree Base River Rock Ring

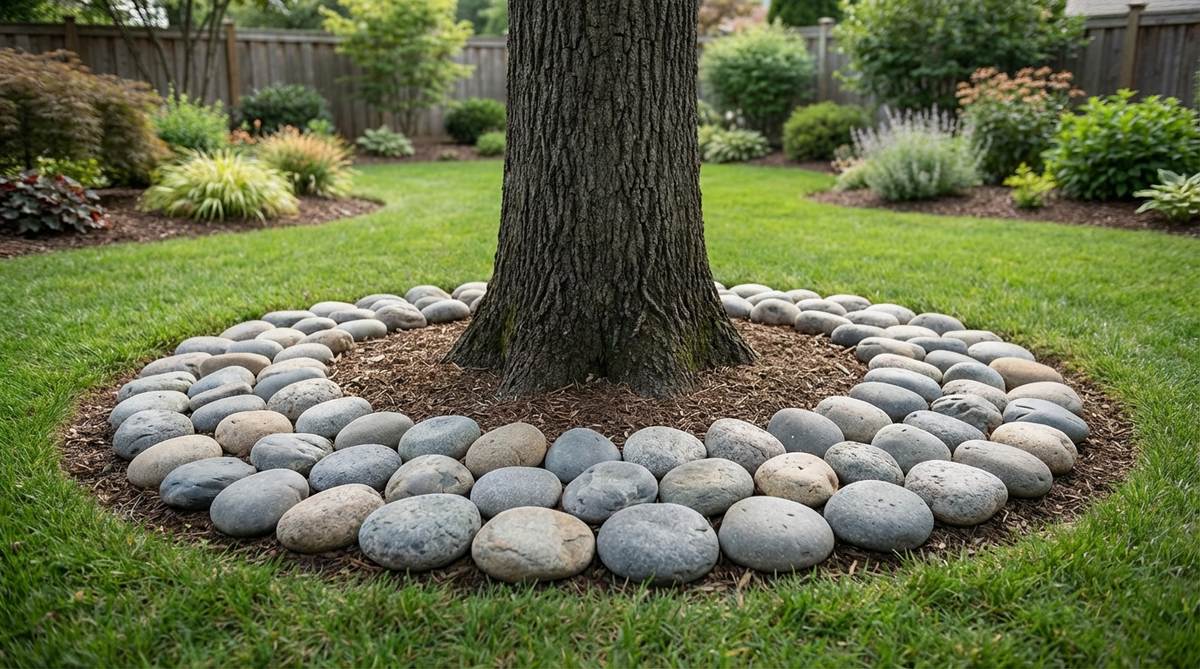
Looks perfectly manicured like a PGA golf course landscape. A circular stone tree protector ring is an absolute necessity for highlighting mature oaks while stopping mower damage.
Creating a permanent stone buffer eliminates the weekly nightmare of string-trimming around delicate tree bark. This clean circle instantly gives your yard a structured, professionally maintained appearance.
A standard 3-foot ring costs about $25–$40 to complete. It’s a fast weekend win that protects your landscape investments.
- Key Materials: Medium river stones and flexible edging
- Vibe / Style: Neat, protective, and symmetrical
- Difficulty: Very easy for beginners
- Budget Breakdown: Rocks: $25 | Plastic Edge: $10
- Creator’s Tip: Never pile rocks directly against the trunk; leave a 3-inch breathing gap to prevent rot.
- Smart Sourcing: Flexible no-dig landscape edging kits and heavy-duty anchoring spikes.
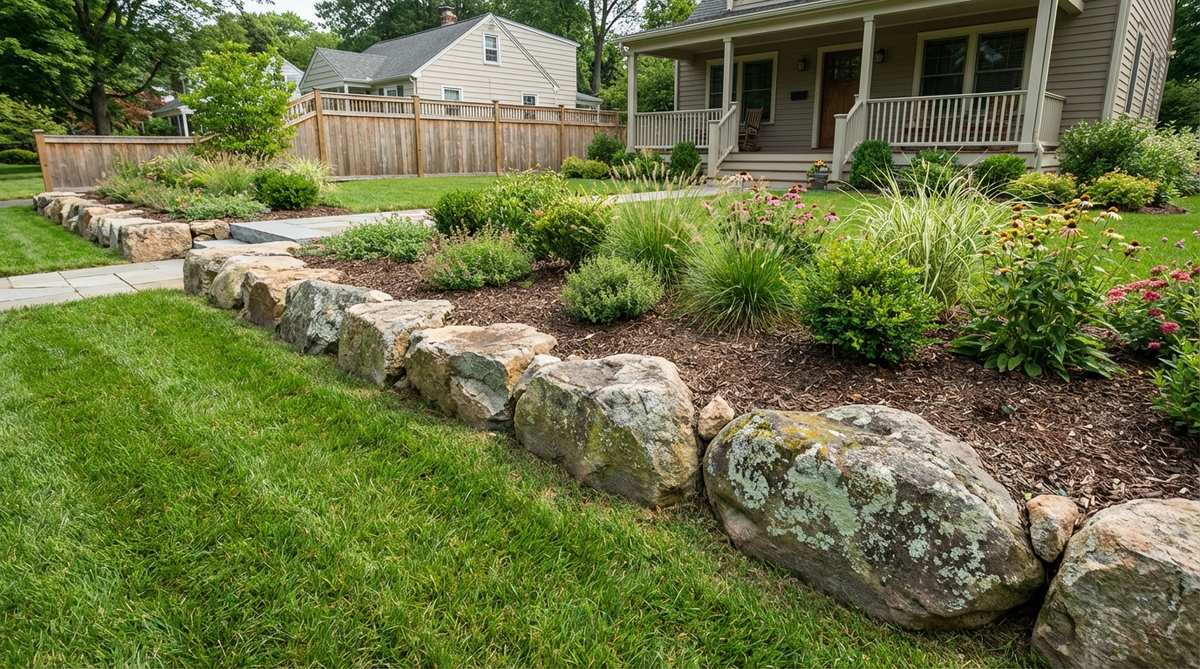
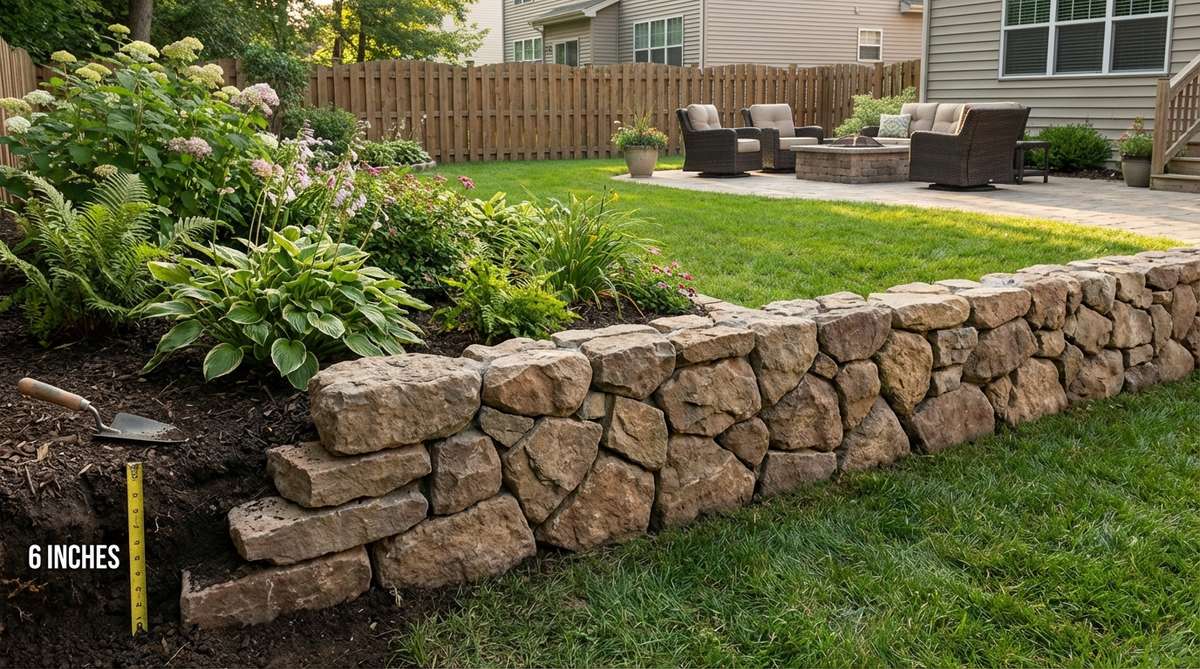
17. Dry-Stacked Fieldstone Wall
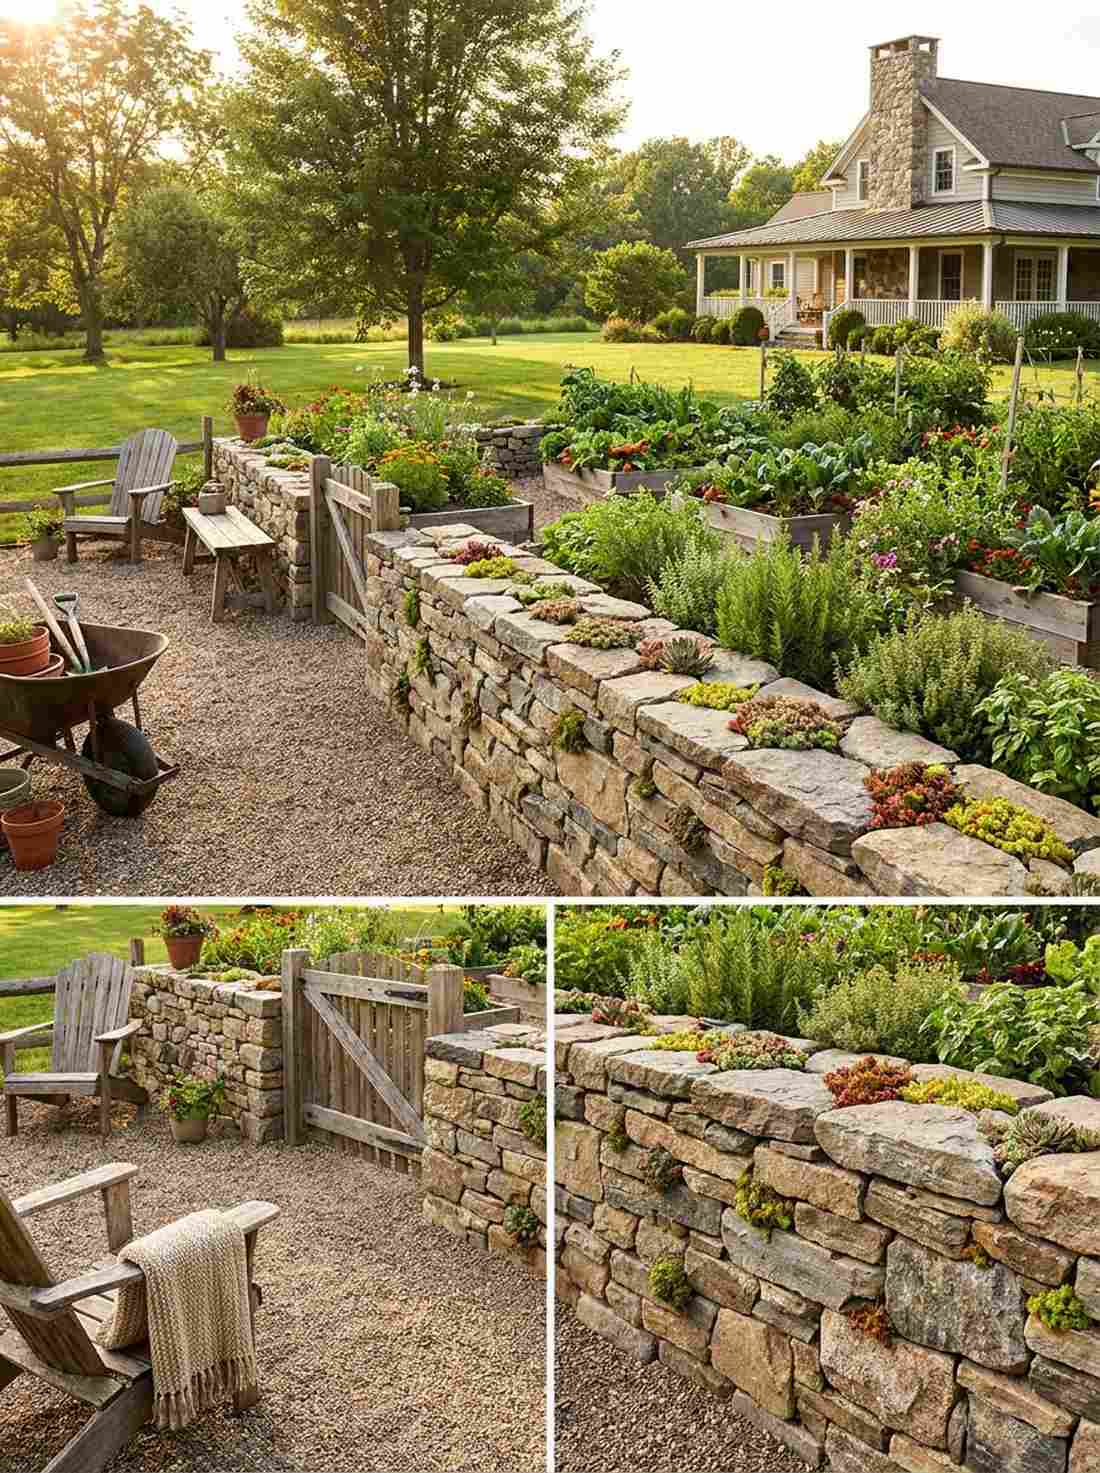
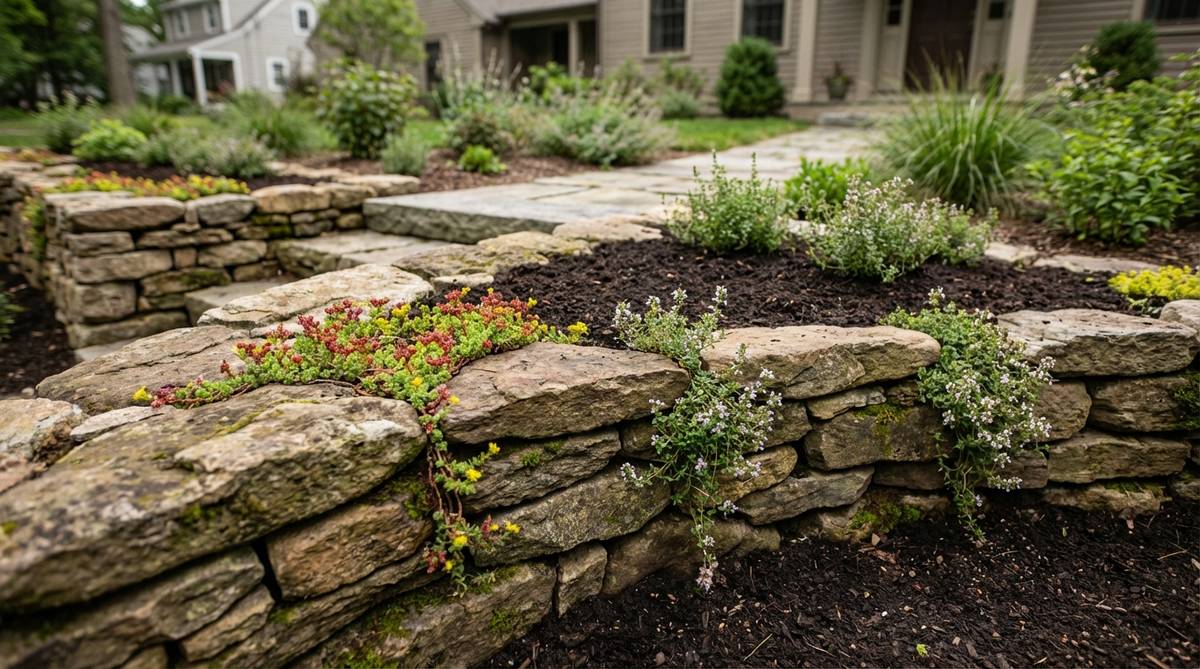
Feels exactly like stumbling upon a ruined cottage in the Irish countryside. A low-profile dry-stacked rock wall is breathtaking when used to elevate rustic vegetable or herb gardens.
Skipping the cement allows this structure to shift naturally with winter freezes without cracking. Tucking tiny succulents into the crevices perfectly utilizes fairy garden kits styling to soften the heavy masonry.
You can assemble a stunning low border for around $50–$80. Save this to your homesteader DIY board!
- Key Materials: Native irregular fieldstone pieces
- Vibe / Style: Rustic, ancient, and charming
- Difficulty: Like a 3D jigsaw puzzle
- Budget Breakdown: Stone: $70 | Soil fill: $10
- Creator’s Tip: Always angle the stones slightly backward into the hill so gravity keeps them locked.
- Smart Sourcing: Creeping sedum starter trays and heavy leather masonry gloves.
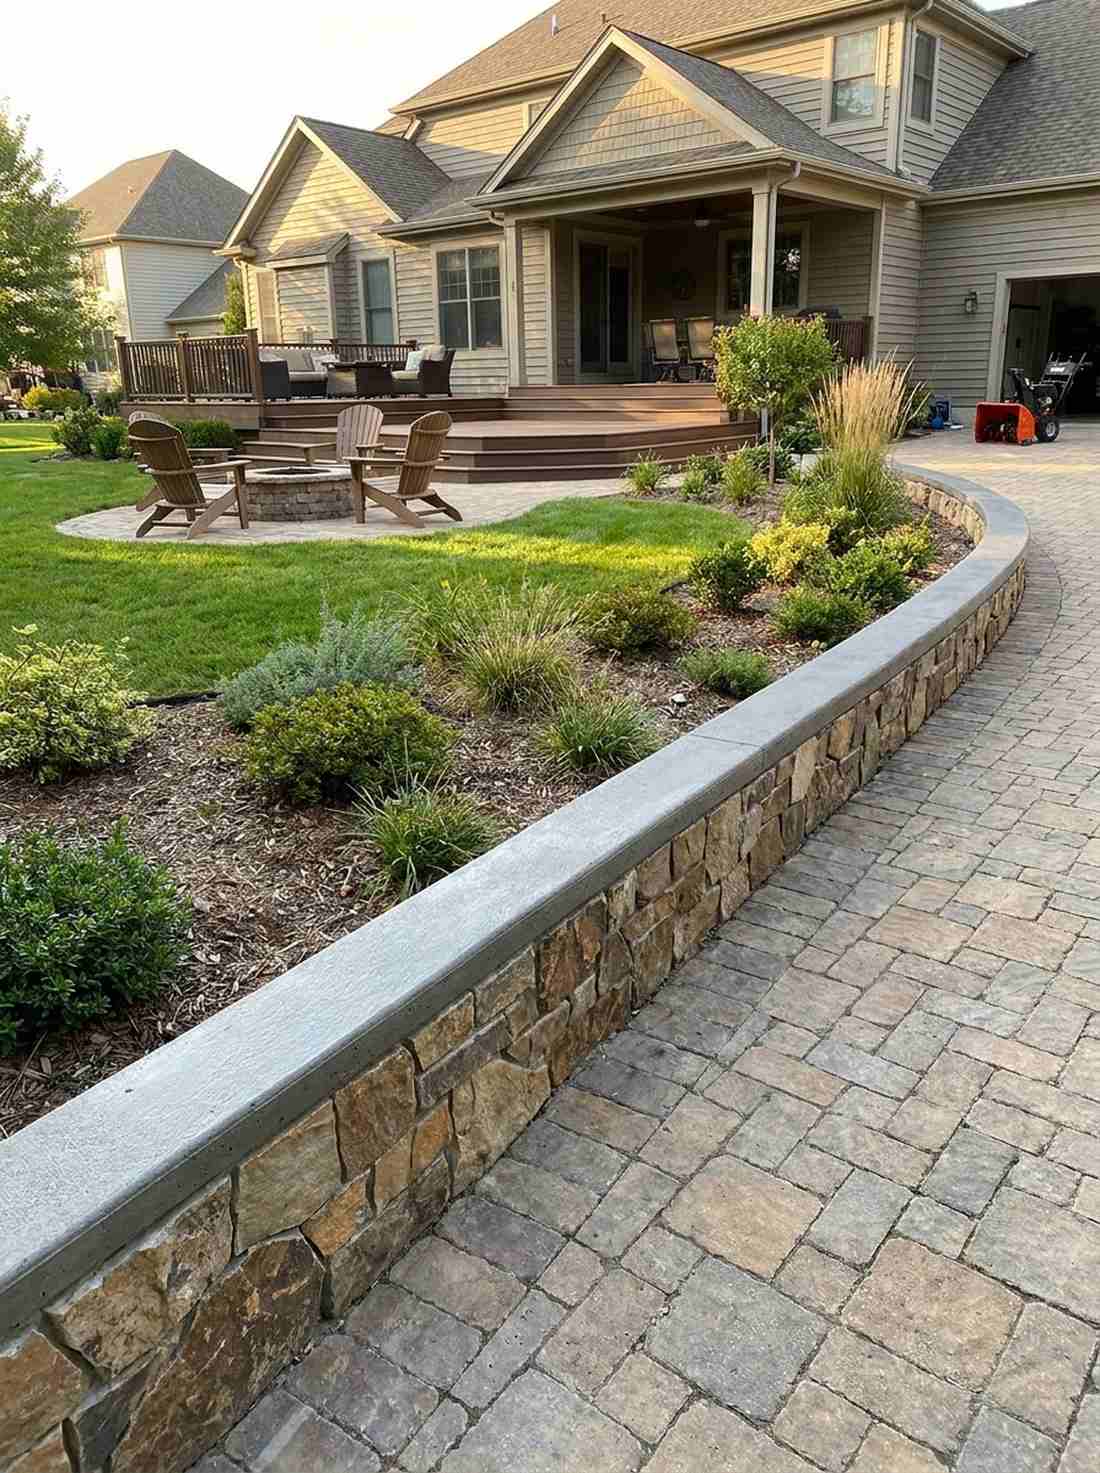
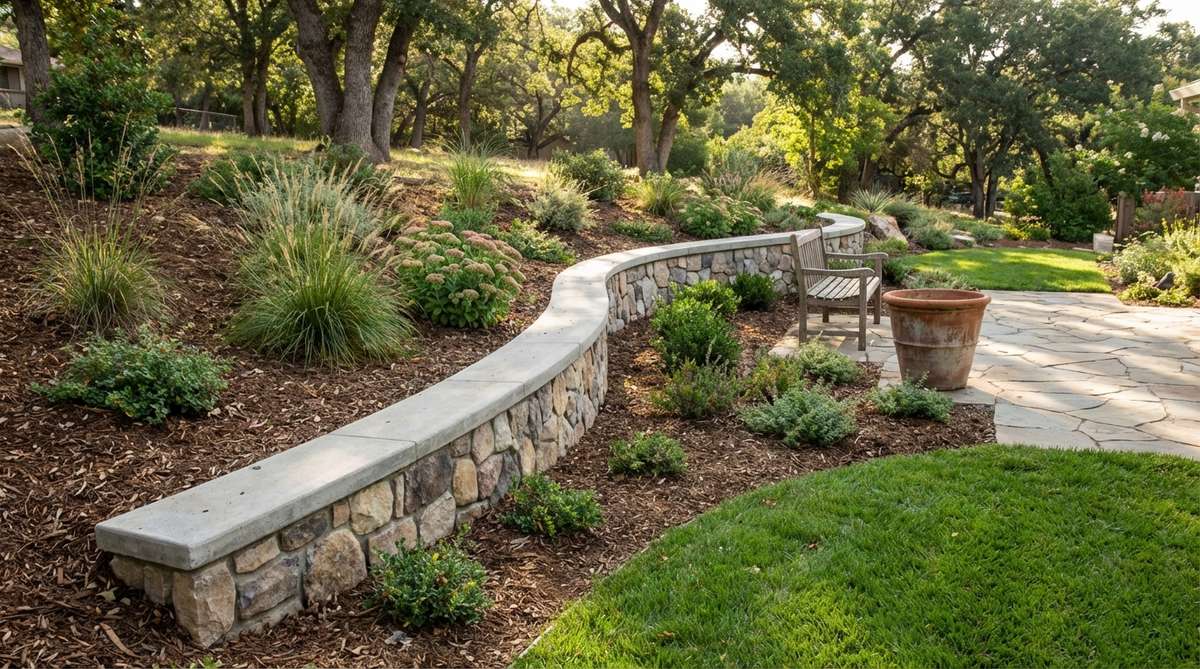
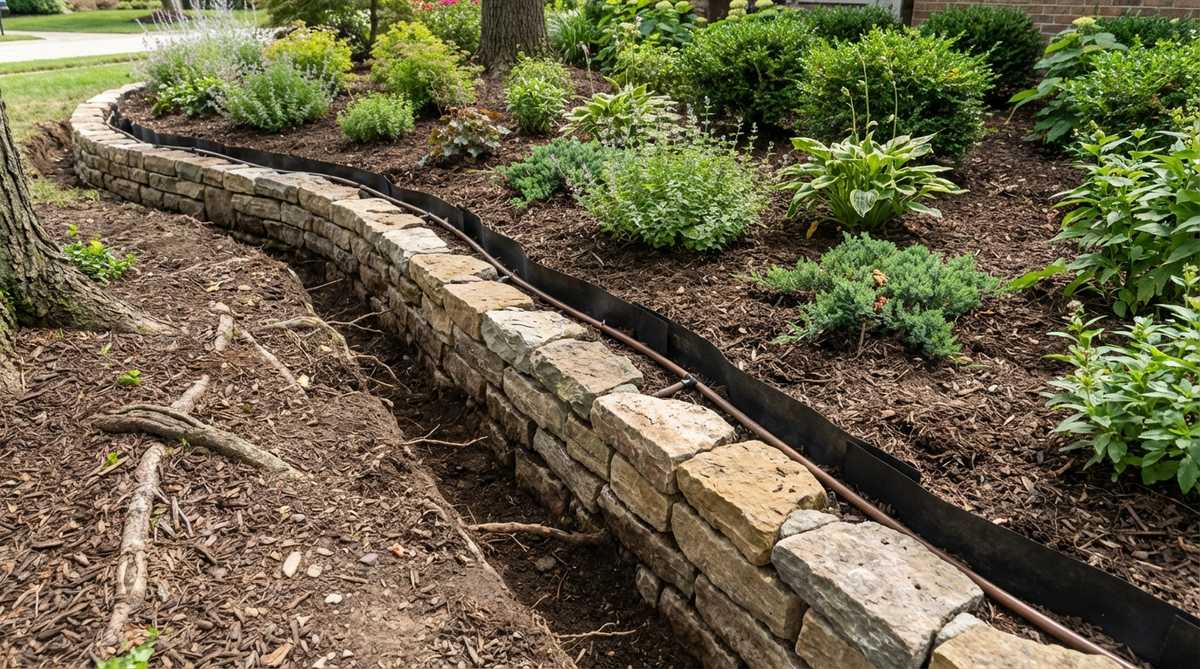
18. Mortared Flagstone Retaining Edge

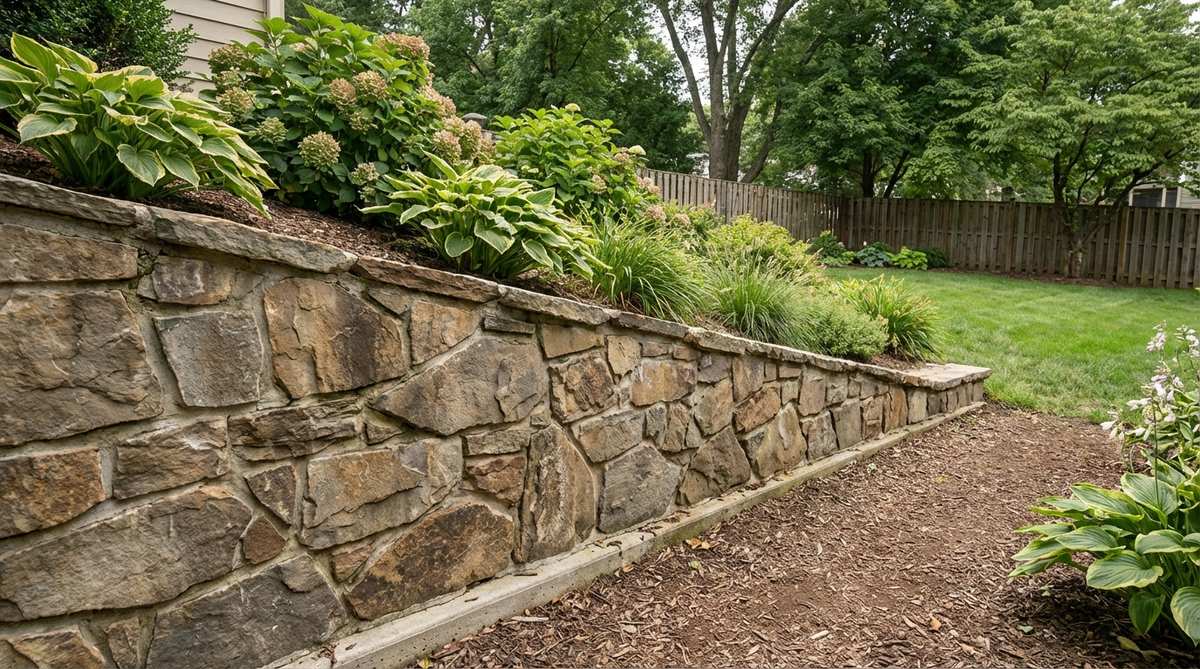
Brings the robust permanence of a classical estate courtyard. A cemented flagstone step-wall effortlessly conquers aggressive slopes that constantly wash away during heavy rains.
Upgrading to a mortared joint transforms loose rocks into an impenetrable fortress against soil pressure. While it requires mixing concrete, the resulting designer-level finish outlasts timber walls by decades.
This heavy-duty setup generally costs $80–$120 for the raw supplies. Highly recommended for taming difficult, sloped yards.
- Key Materials: Thick flagstone and type-S mortar
- Vibe / Style: Immovable, solid, and historic
- Difficulty: Requires basic masonry skills
- Budget Breakdown: Flagstone: $90 | Mortar: $20
- Creator’s Tip: Pour a proper 6-inch concrete trench footing first, or your beautiful wall will crack by spring.
- Smart Sourcing: High-strength Type S mortar mix and professional masonry trowel kits.
19. Stacked Slate Vertical Edging
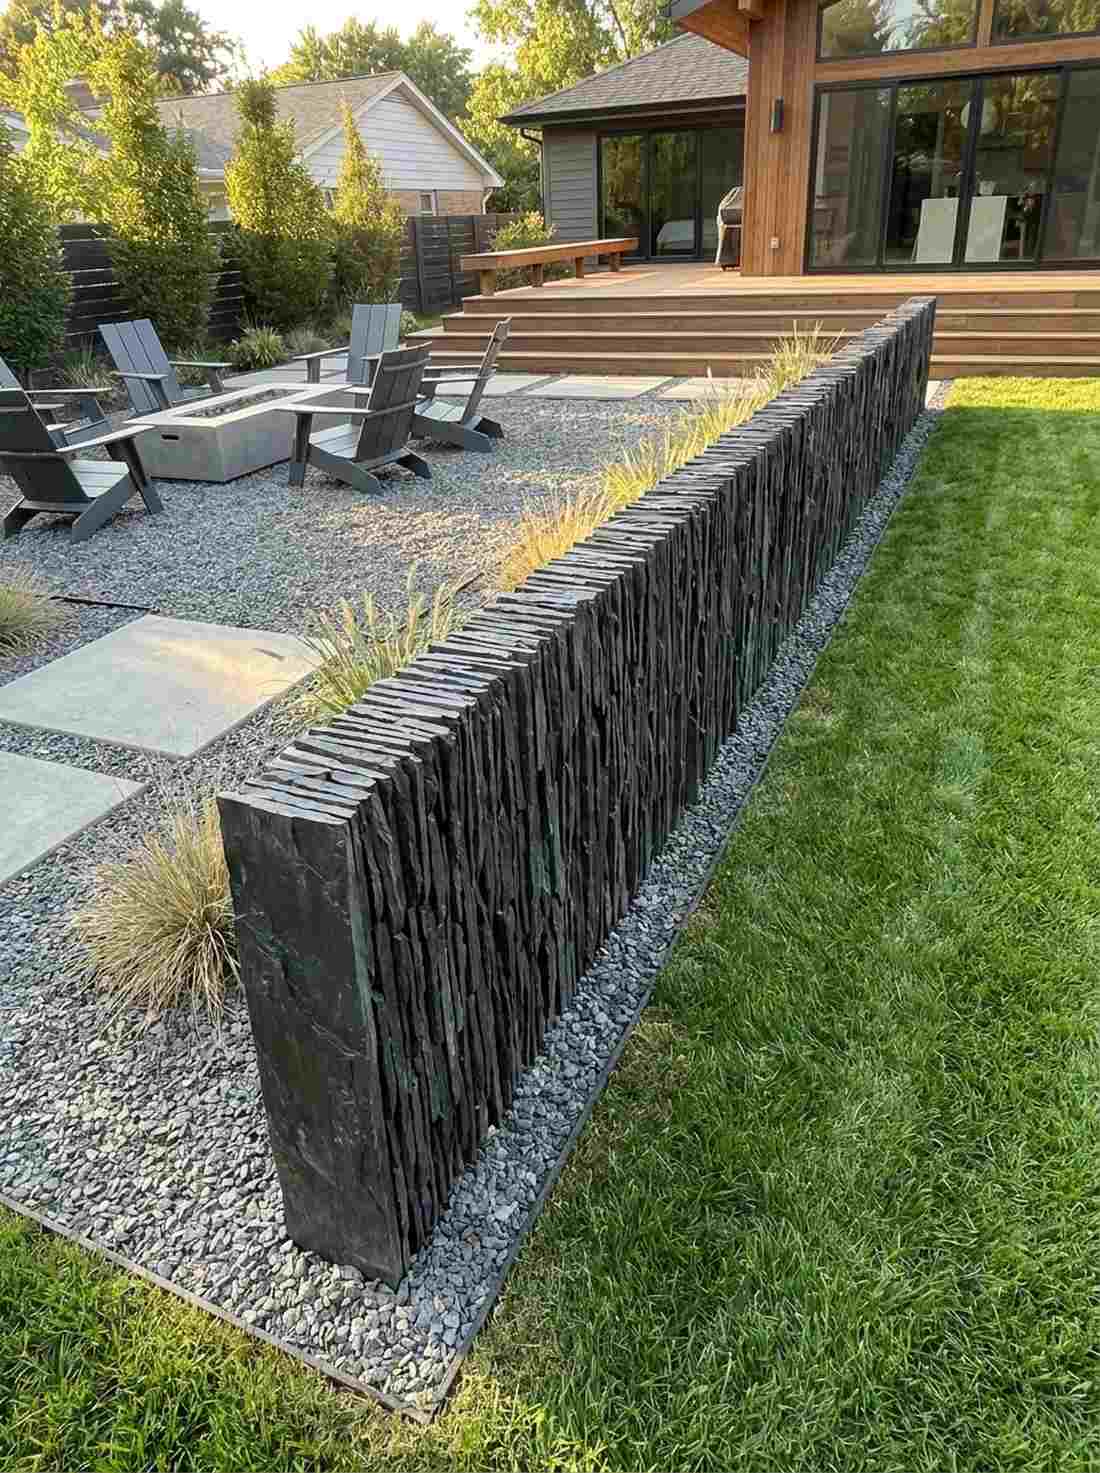
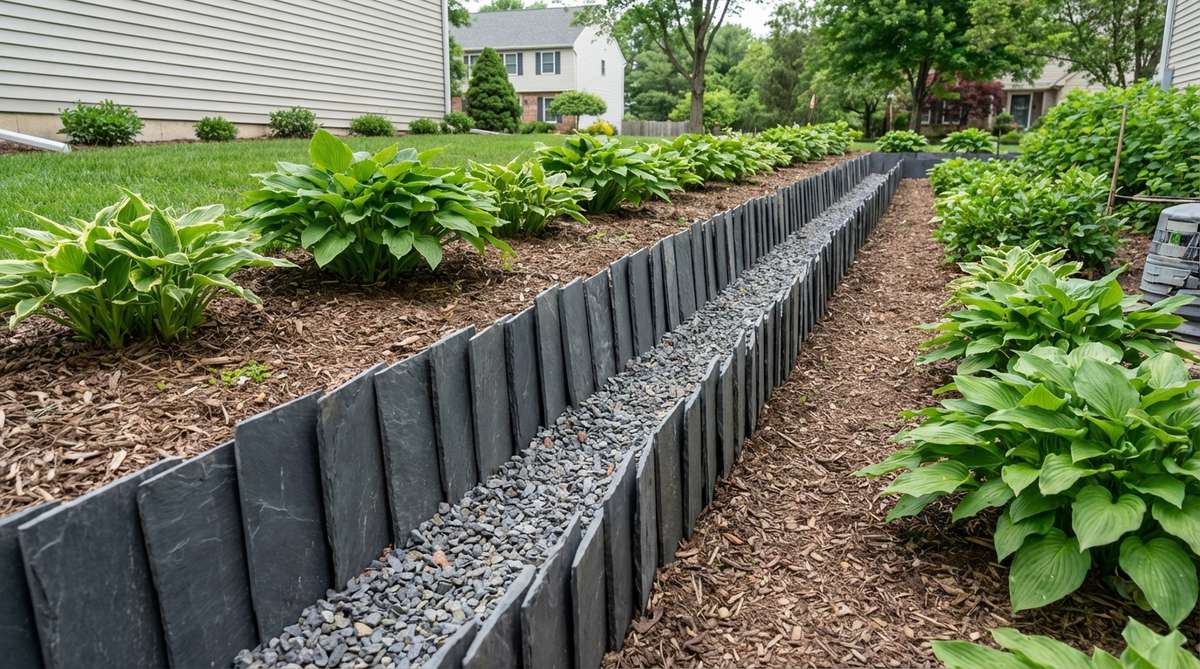
Delivers the dark, sleek geometry of a modern art museum exterior. A vertical stacked slate fence looks remarkably striking when outlining minimalist gravel courtyards.
Flipping standard patio slabs on their sides completely reinvents how we use traditional materials. This incredibly narrow footprint gives maximum boundary definition without eating up precious planting space.
Expect to spend around $60–$90 to achieve this dramatic look. Pin this if you love dark, moody hardscaping elements!
- Key Materials: Thin slate tiles or raw slate shingles
- Vibe / Style: Dark, edgy, and ultra-modern
- Difficulty: Moderate trench digging required
- Budget Breakdown: Slate: $75 | Backfill gravel: $15
- Creator’s Tip: Bury exactly two-thirds of the slate piece underground to ensure it never topples over.
- Smart Sourcing: Pre-cut natural slate tiles (bulk pack) and trenching mattocks.
This next setup might be controversial, but landscapers secretly use it to double curb appeal overnight.
20. Layered Ledgestone Outcropping
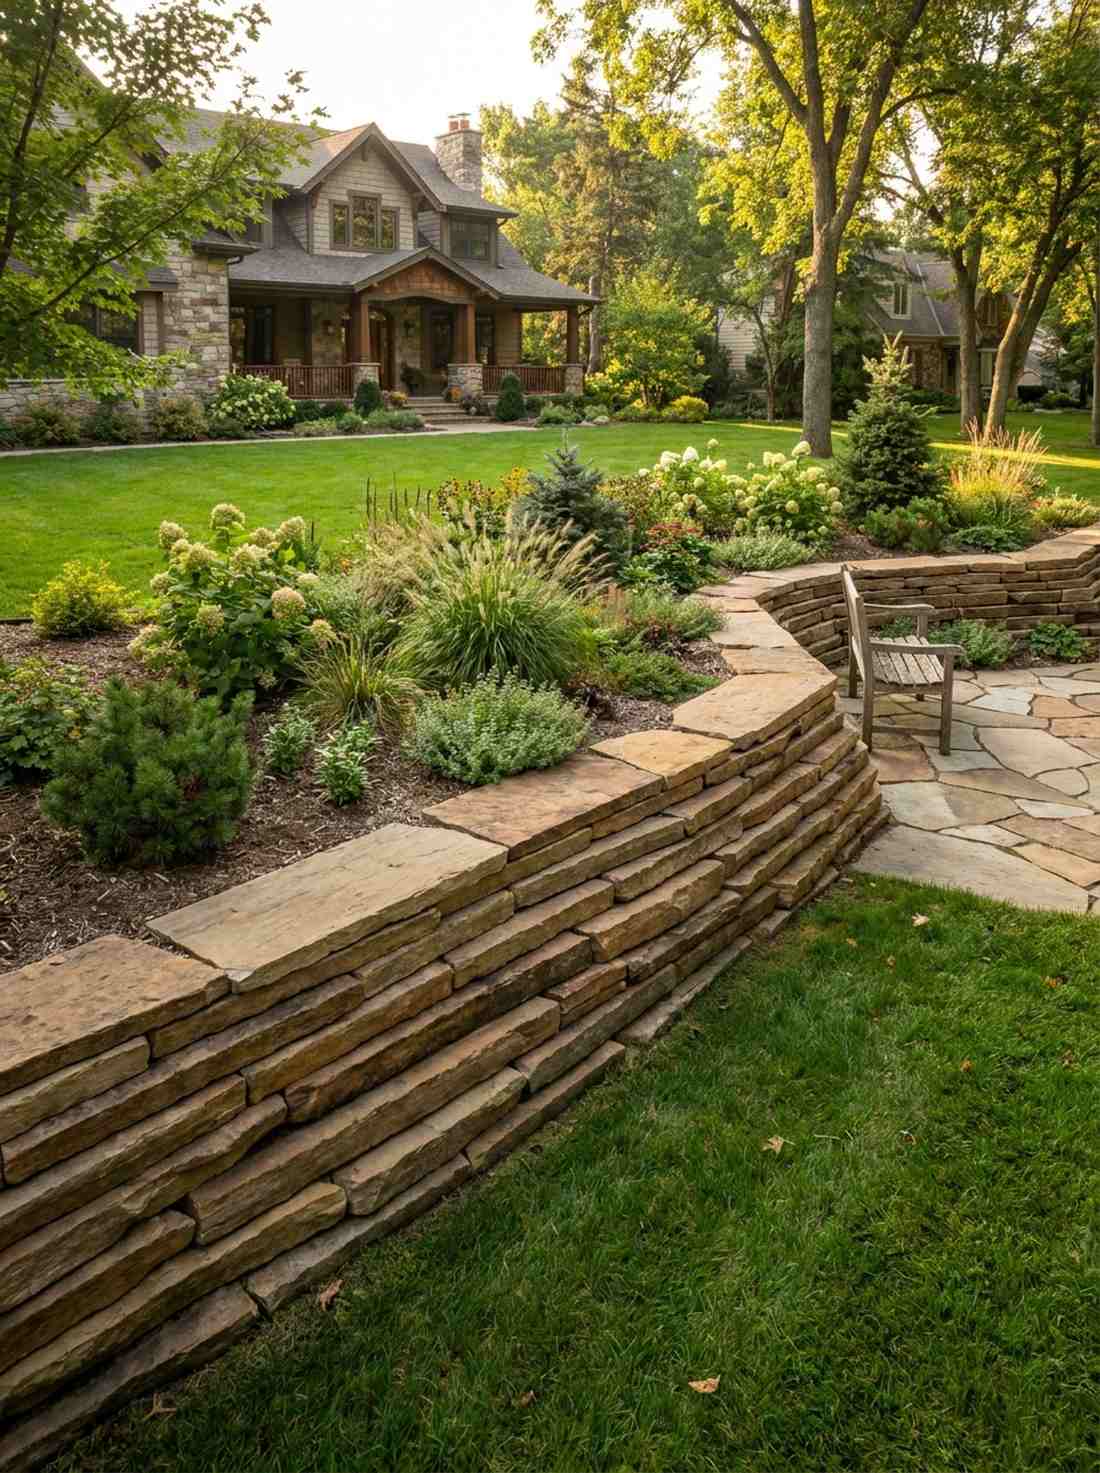
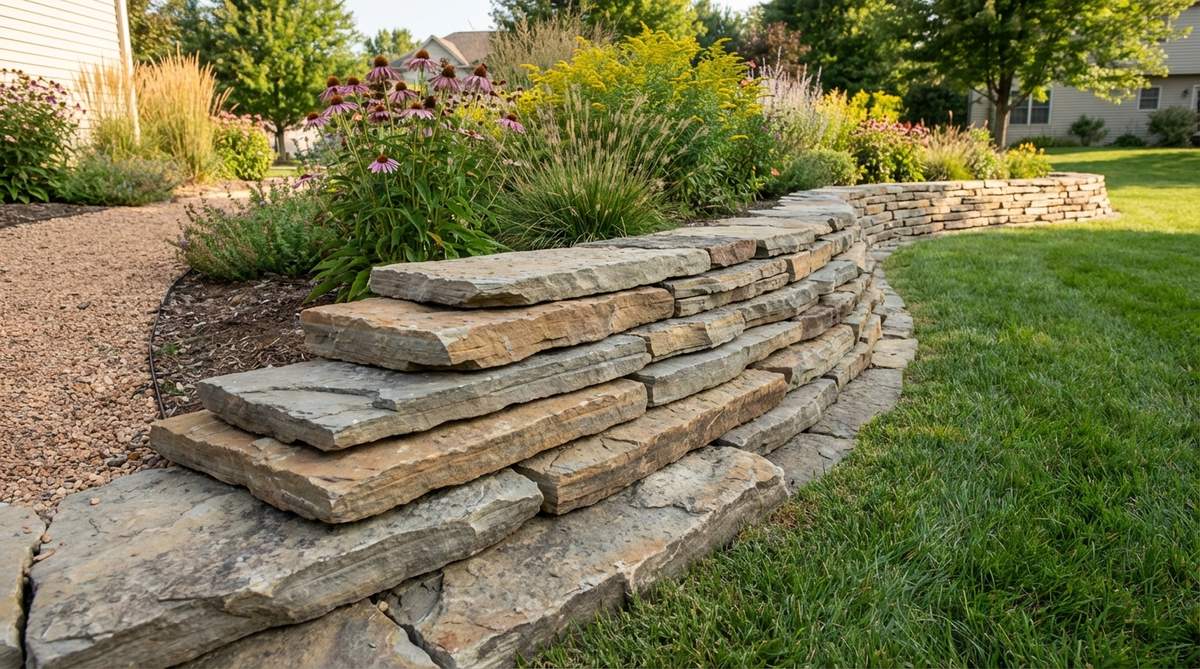
Mimics the breathtaking majesty of natural canyon rock strata. The horizontal stepped ledgestone border is absolutely perfect for transitioning terraced front-yard garden beds.
Stepping each layer slightly backward creates heavy shadow lines that make the garden look deeply multidimensional. It delivers a surprisingly premium look that makes flat suburban lots look organically hilly.
This architectural technique will cost roughly $70–$110. A stunning choice that adds massive perceived property value.
- Key Materials: Flat, elongated ledgestone pieces
- Vibe / Style: Majestic, geological, and structured
- Difficulty: Requires careful balancing and selection
- Budget Breakdown: Ledgestone: $90 | Gravel Base: $15
- Creator’s Tip: Always place your largest, widest stones at the very bottom to anchor the visual weight.
- Smart Sourcing: Natural stacked ledgestone veneer (boxes) and stone masonry chisels.
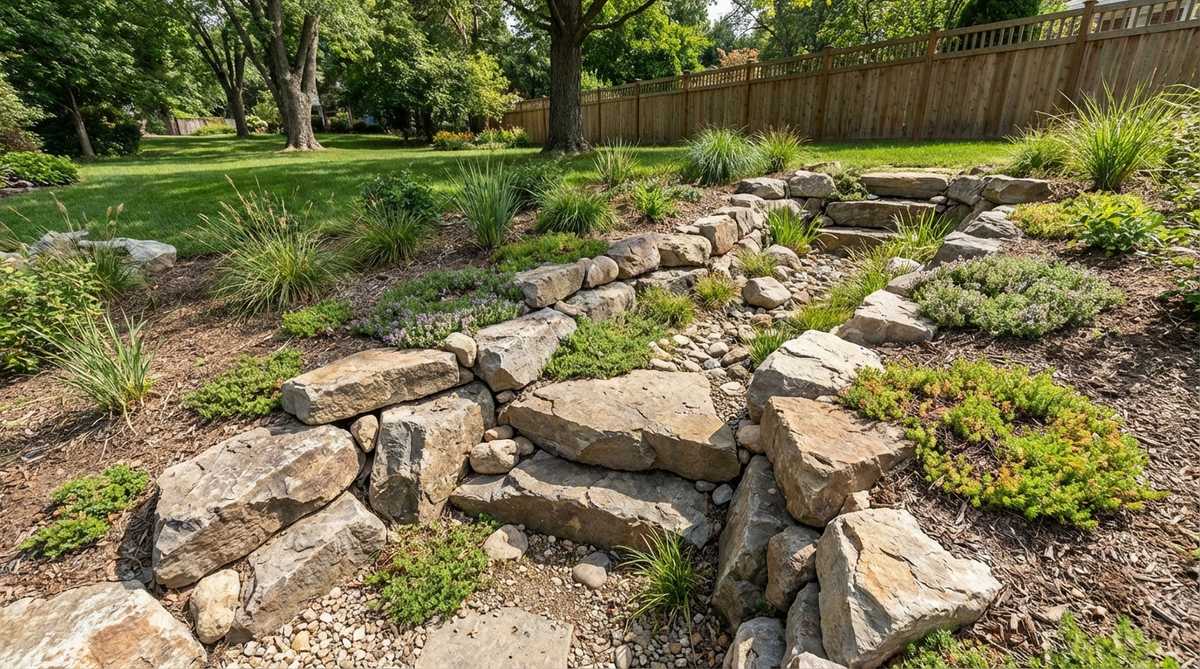
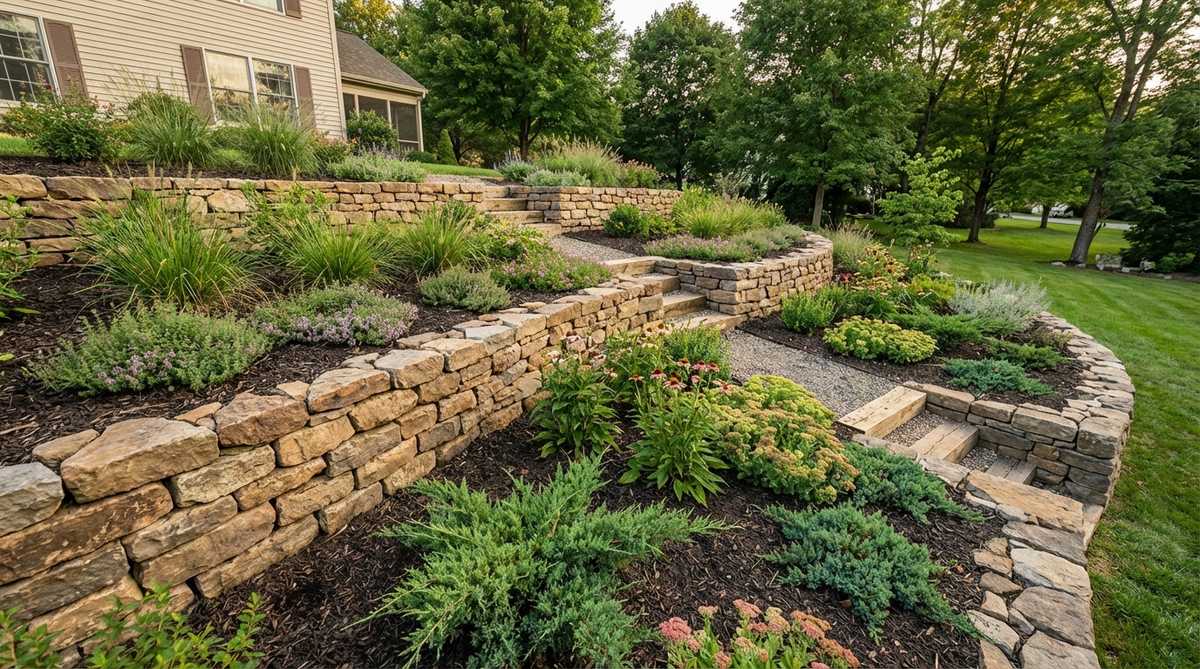
21. Terraced Stone Step Edging
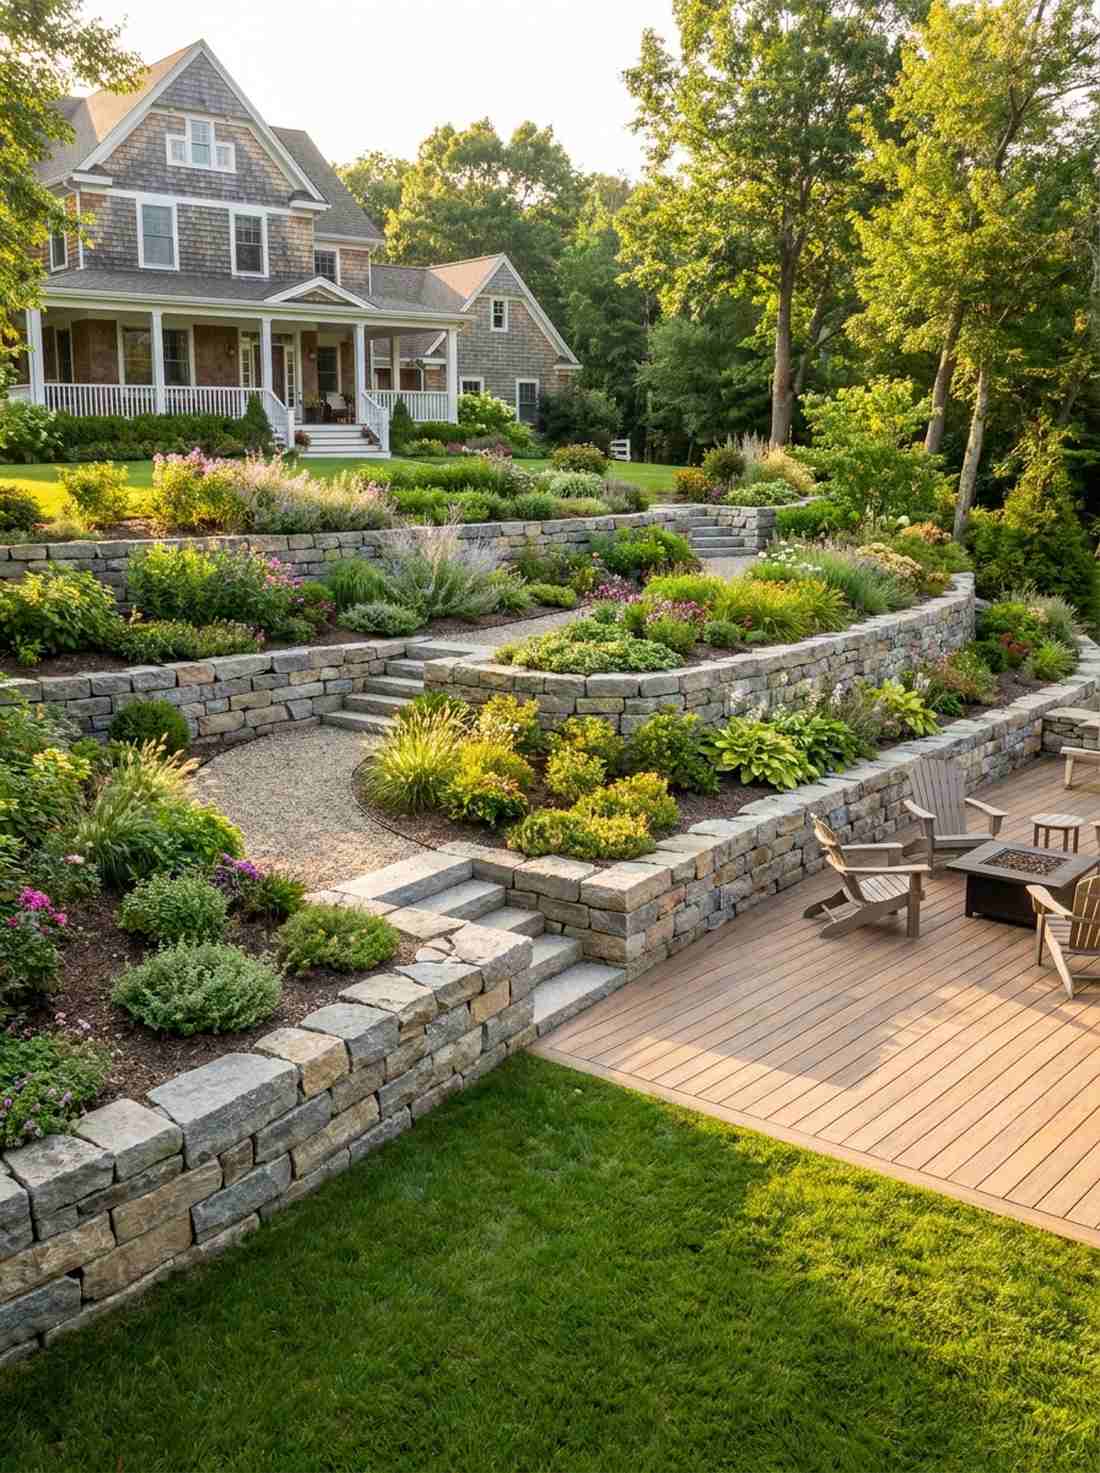
Feels like discovering ancient agricultural ruins on a mountainside. A multi-tiered rock retaining border brilliantly converts unusable steep slopes into lush planting pockets.
Instead of building one massive, expensive wall, breaking it into smaller steps completely halts brutal soil erosion. This cascading layout looks far more expensive than it is while providing incredible drainage.
You can execute these mini-walls for about $80–$130 total. Save this to your difficult-yard-solutions board!
- Key Materials: 6-8 inch blocky wall stones
- Vibe / Style: Layered, practical, and lush
- Difficulty: Labor intensive but straightforward
- Budget Breakdown: Stones: $100 | Drainage rock: $25
- Creator’s Tip: Keep each tier exactly level; water will violently wash out any section that dips lower than the rest.
- Smart Sourcing: Heavy-duty magnetic torpedo levels and perforated drainage pipe kits.
22. Gabion Basket Stone Wall
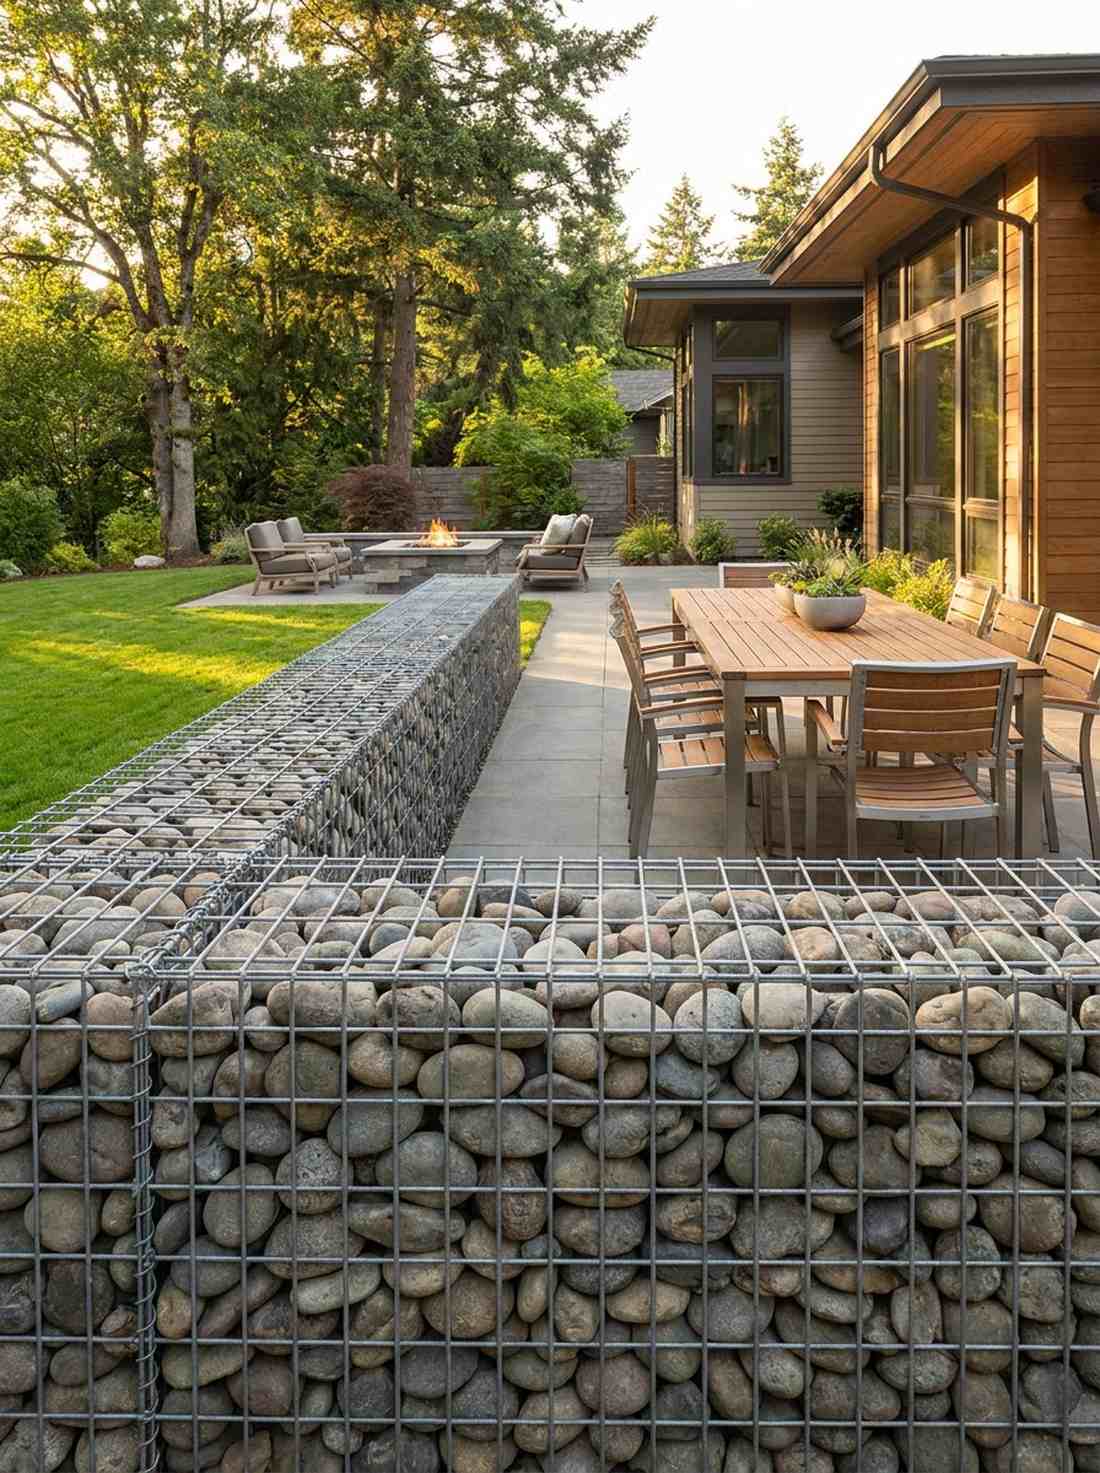
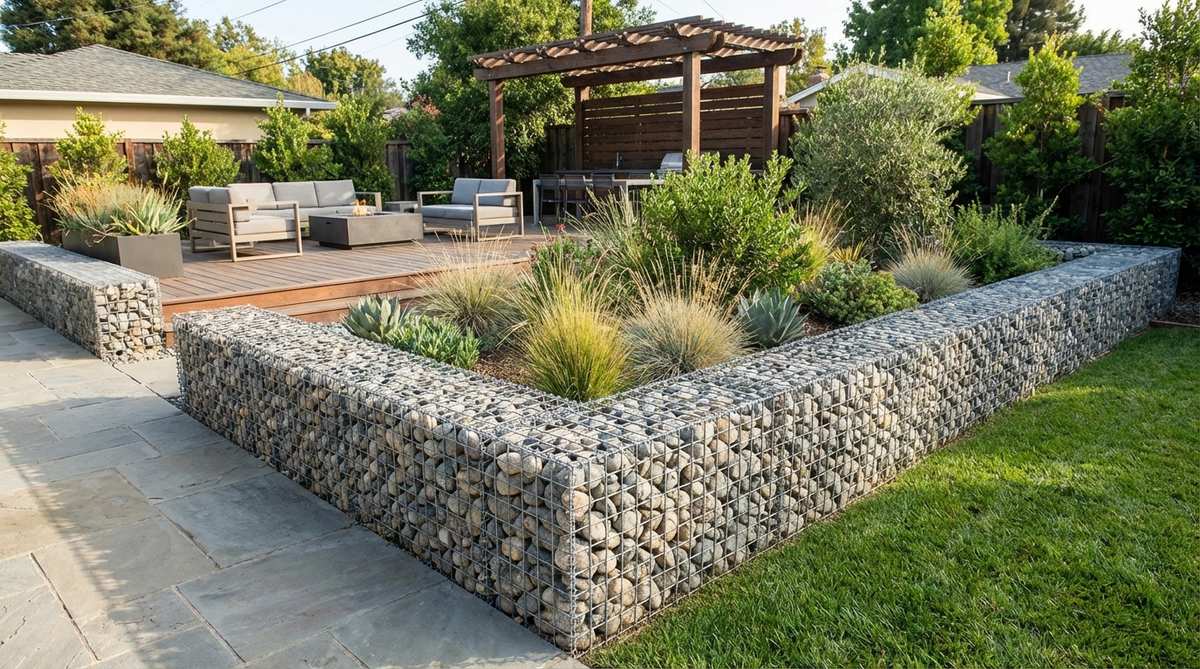
Brings a heavy industrial-chic energy usually reserved for trendy downtown lofts. The wire-caged rock retaining boundary looks incredible defining modern outdoor dining spaces.
Packing uniform river rocks into steel cages delivers brutalist architectural beauty with absolutely zero mortar required. The wire framework ensures incredible structural integrity while allowing floodwaters to pass right through.
You can easily pull this off for around $90–$140 depending on rock choice. Pin this if you crave an industrial aesthetic!
- Key Materials: Galvanized steel gabion cages and large stones
- Vibe / Style: Industrial, modern, and indestructible
- Difficulty: Fast setup, heavy filling
- Budget Breakdown: Wire Cages: $60 | Rock Fill: $60
- Creator’s Tip: Hand-pack the stones on the visible front face so it looks intentional, then dump the rest in the middle.
- Smart Sourcing: Galvanized gabion basket kits (heavy gauge) and bulk oversized river cobbles.
23. Boulder Wall Low Profile
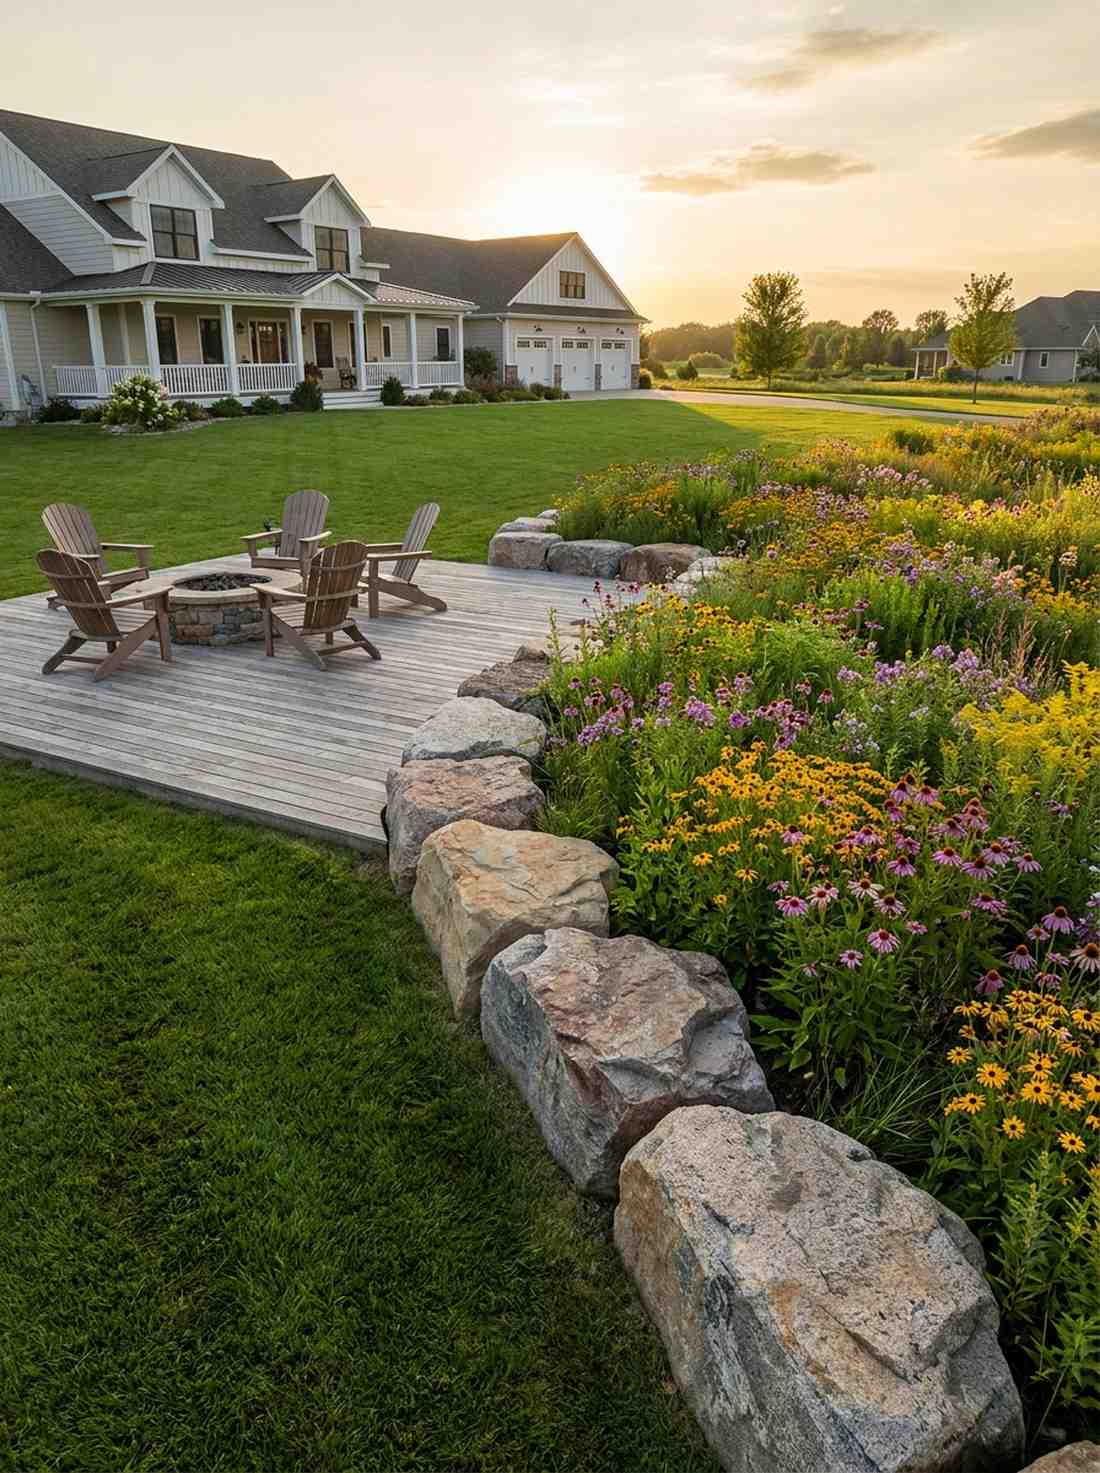
Radiates the raw, unbothered power of an untouched national park. A single-course massive boulder line acts as a spectacular rugged perimeter for native wildflower fields.
Using sheer mass instead of intricate stacking saves hours of labor while making a colossal visual impact. You completely bypass digging deep footings because a 300-pound rock isn’t going anywhere.
If sourced locally, expect to pay around $100–$150 for delivery. It’s an imposing, zero-maintenance boundary.
- Key Materials: 200-500 pound landscape boulders
- Vibe / Style: Massive, wild, and permanent
- Difficulty: Requires machinery or several strong helpers
- Budget Breakdown: Boulders: $100 | Delivery Fee: $50
- Creator’s Tip: Bury the bottom third of the boulder so it looks like it grew out of the earth naturally.
- Smart Sourcing: Heavy-duty steel pry bars and commercial lifting straps.
24. Stacked Stone Raised Bed Corners
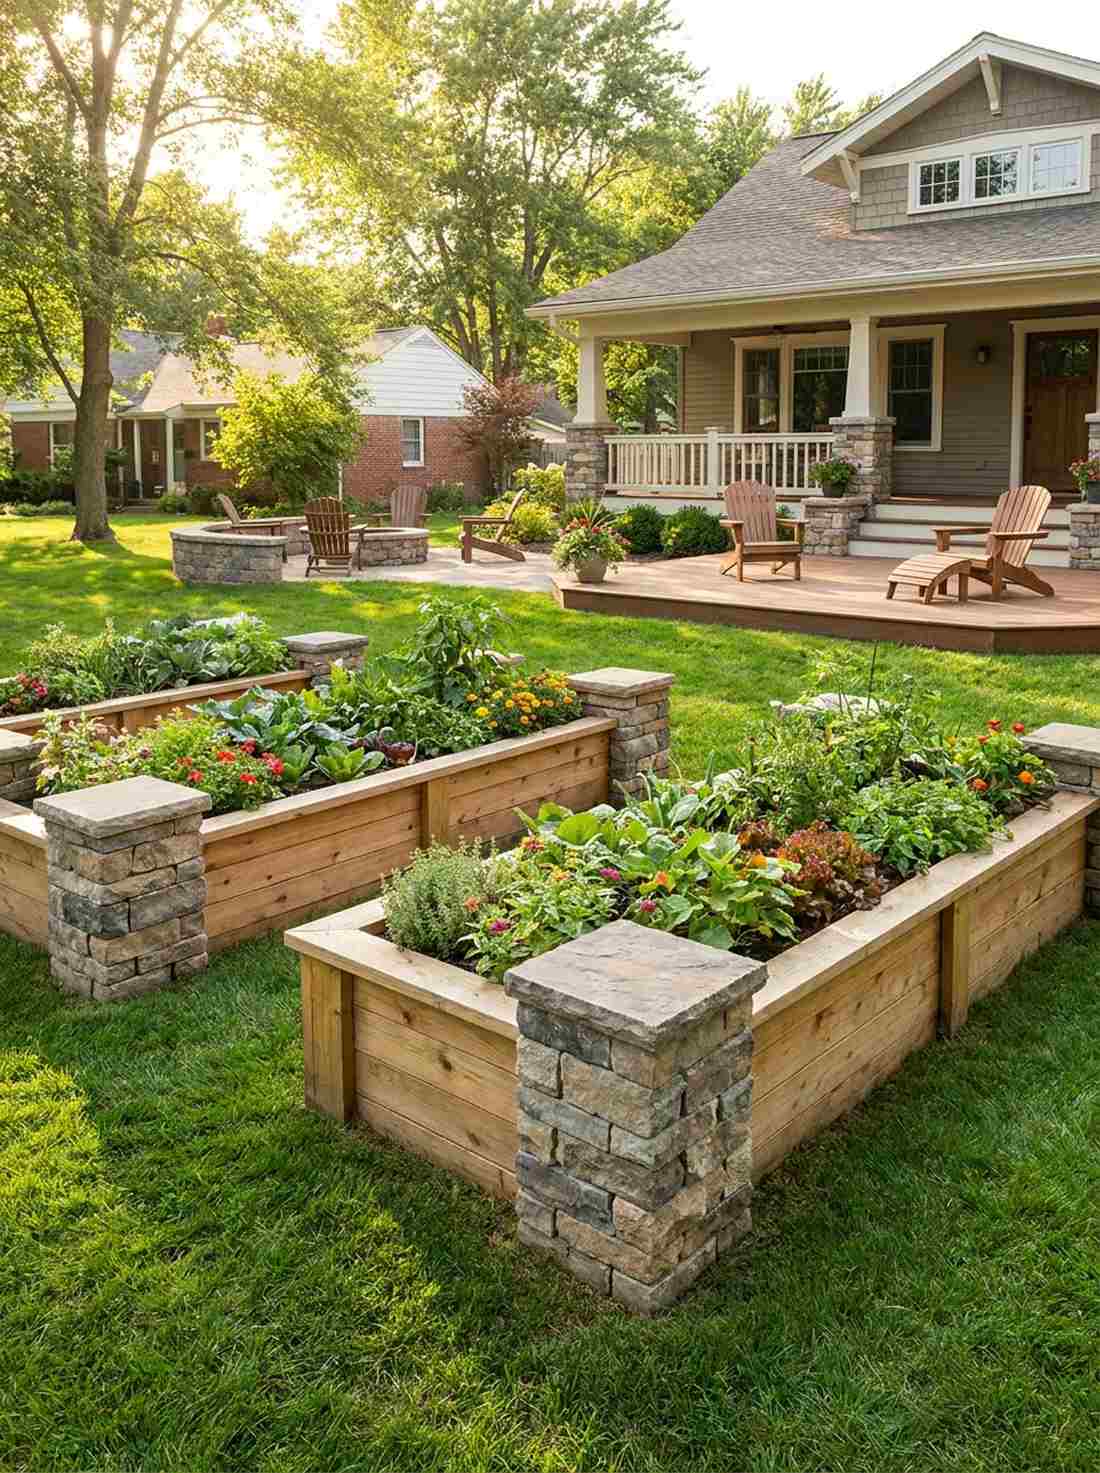
Feels like a masterclass in clever architectural budgeting. Building solid rock accent pillars at the corners of timber beds instantly elevates a basic garden into a premium feature.
Concentrating your expensive materials only on the corners gives a designer-level finish while letting cheap lumber handle the straight runs. It is the ultimate visual hack to make a $100 bed look like a $1,000 installation.
This brilliant hybrid approach costs roughly $50–$80 per bed. Pin this if you want maximum impact on a tight budget!
- Key Materials: Ashlar stone veneer and structural posts
- Vibe / Style: Smart, tailored, and upscale
- Difficulty: Moderate DIY carpentry and masonry
- Budget Breakdown: Corner Stones: $40 | Timber: $20
- Creator’s Tip: Use construction adhesive to glue the stones to a hidden treated wood post for instant stability.
- Smart Sourcing: Premium polyurethane construction adhesive and pre-cut stone corner veneers.
If you think stone walls are too pricey, the upcoming trick will completely change your weekend plans…
25. Brick and Stone Alternating Pattern
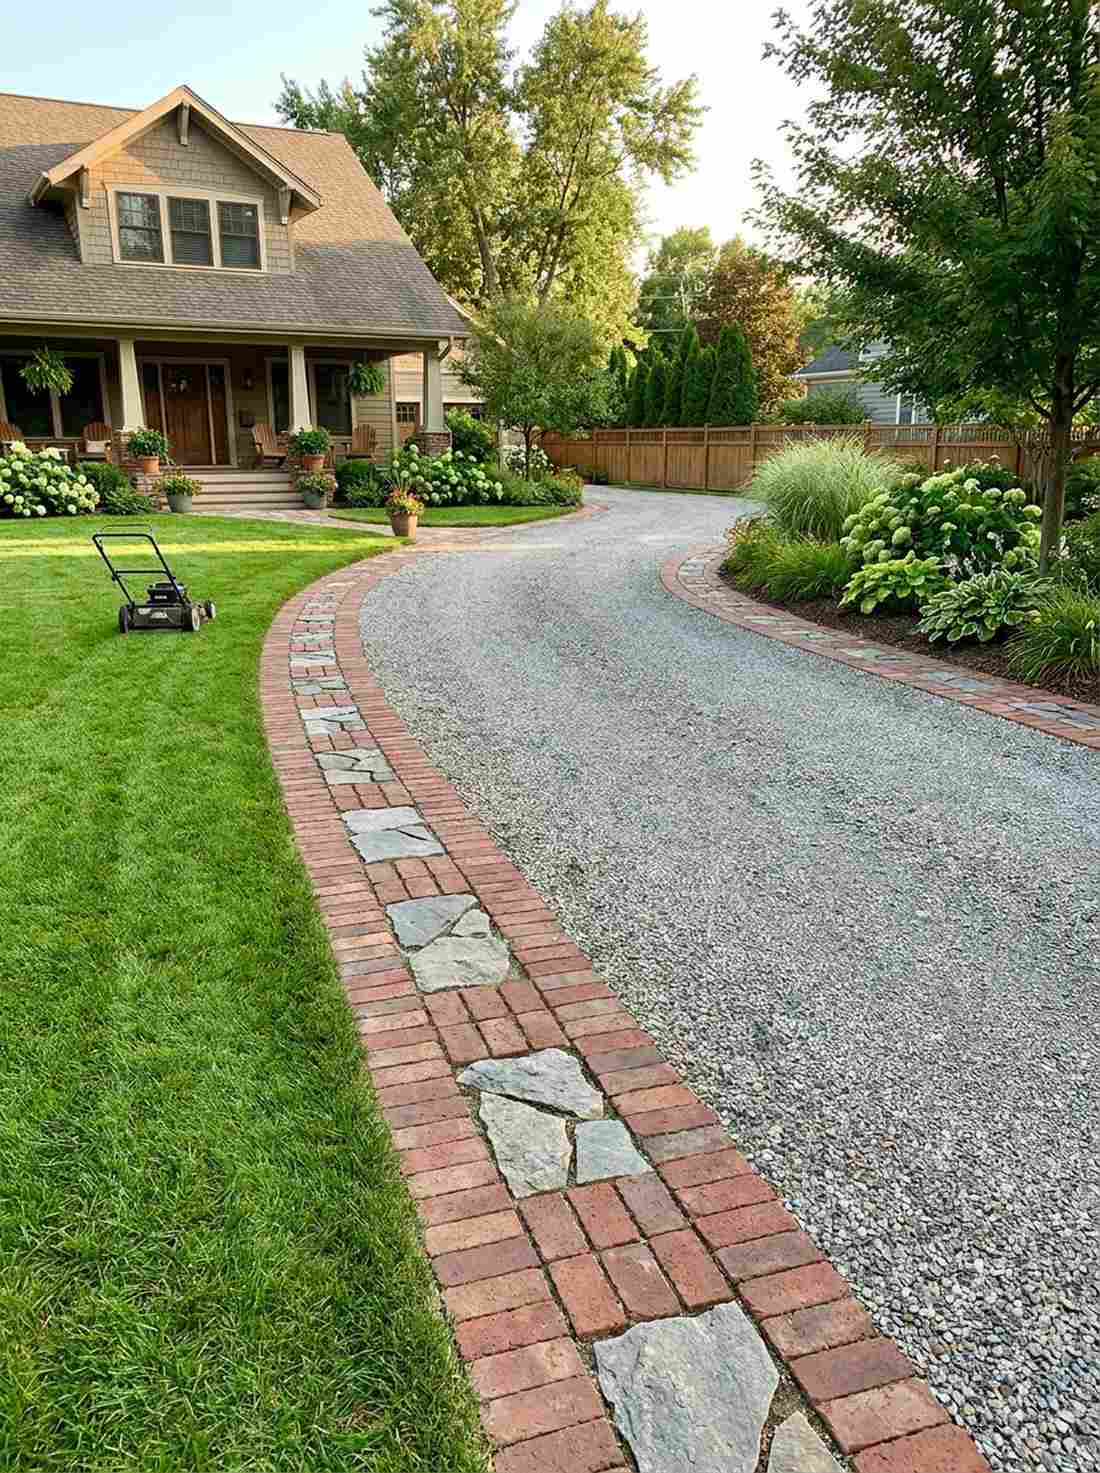
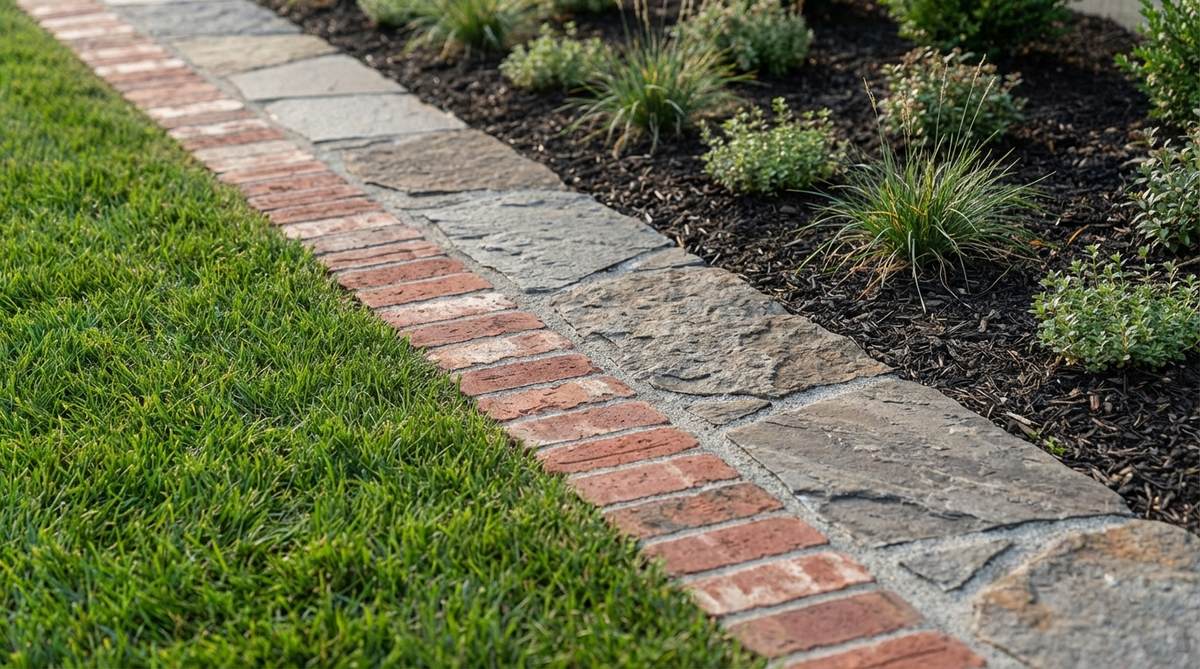
Evokes the rhythmic, curated beauty of a manicured botanical garden. An alternating block and flagstone layout works exceptionally well for long, otherwise monotonous driveway borders.
Mixing a rigid clay grid with chaotic natural rock completely disrupts boring, predictable landscape designs. This hybrid technique delivers a surprisingly premium look that forces visitors to stop and admire the texture.
You can execute this textured run for about $40–$65. Save this to your creative hardscaping board immediately!
- Key Materials: Red clay bricks and gray flagstone chunks
- Vibe / Style: Eclectic, rhythmic, and highly detailed
- Difficulty: Fun and creatively engaging
- Budget Breakdown: Bricks: $25 | Flagstone: $25
- Creator’s Tip: Set all top edges perfectly flush so a lawnmower wheel can roll smoothly across the entire pattern.
- Smart Sourcing: High-density leveling sand bags and premium brick trowels.
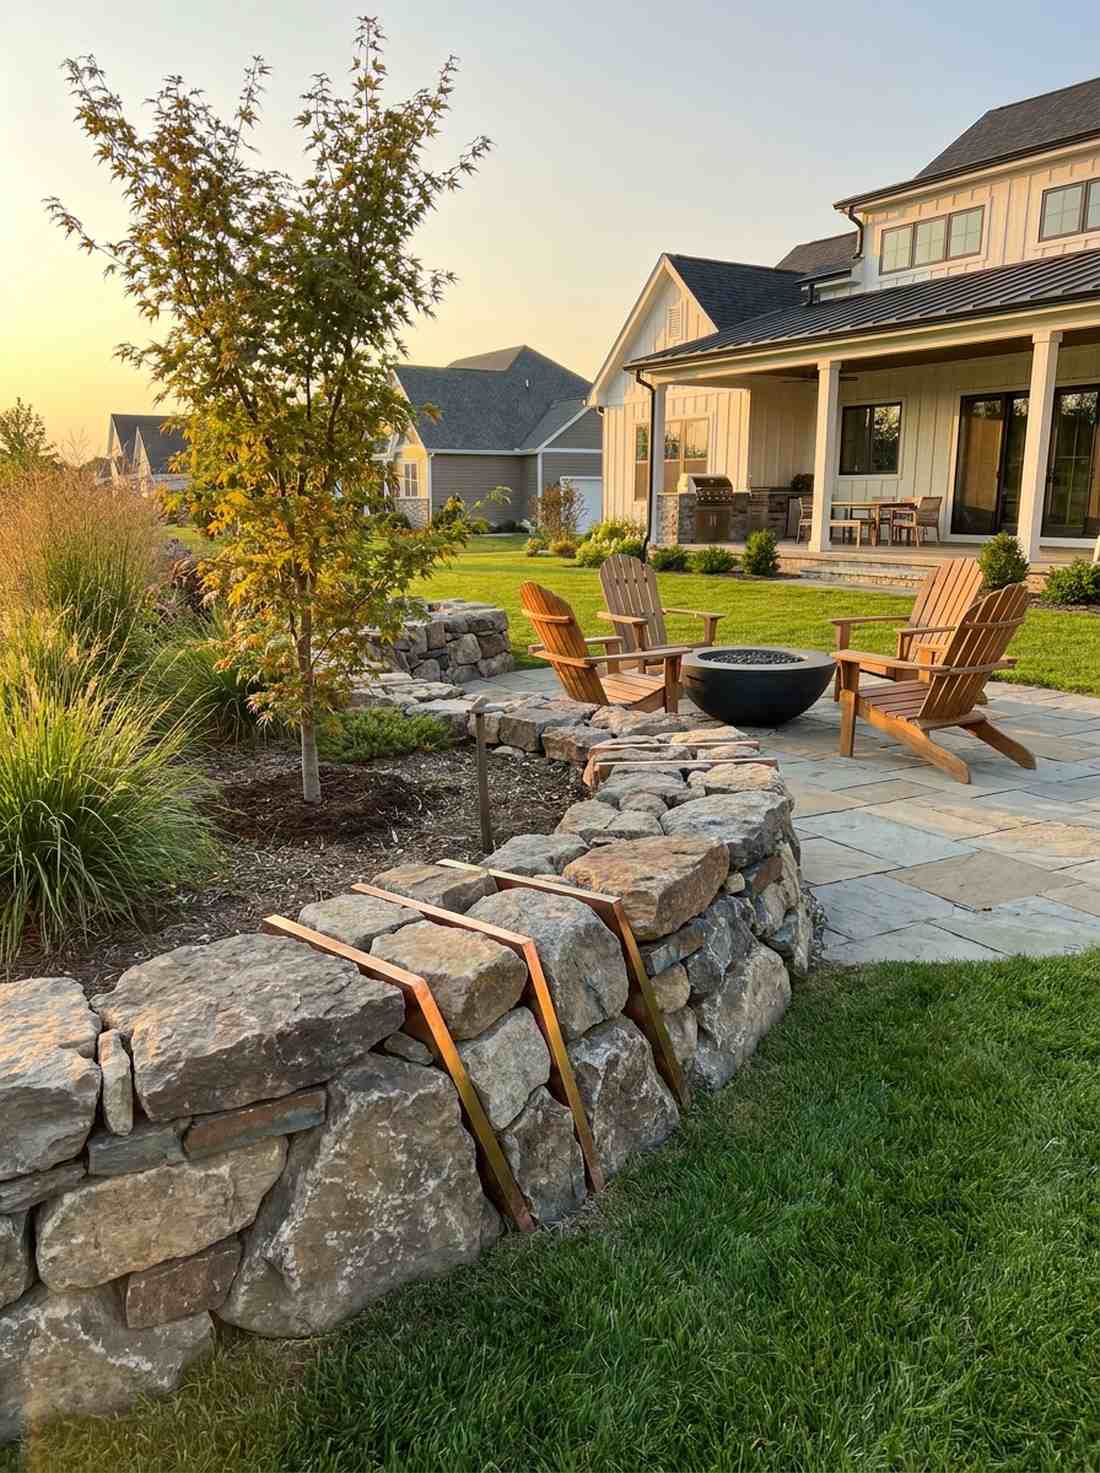
26. Stone and Steel Edging Combination
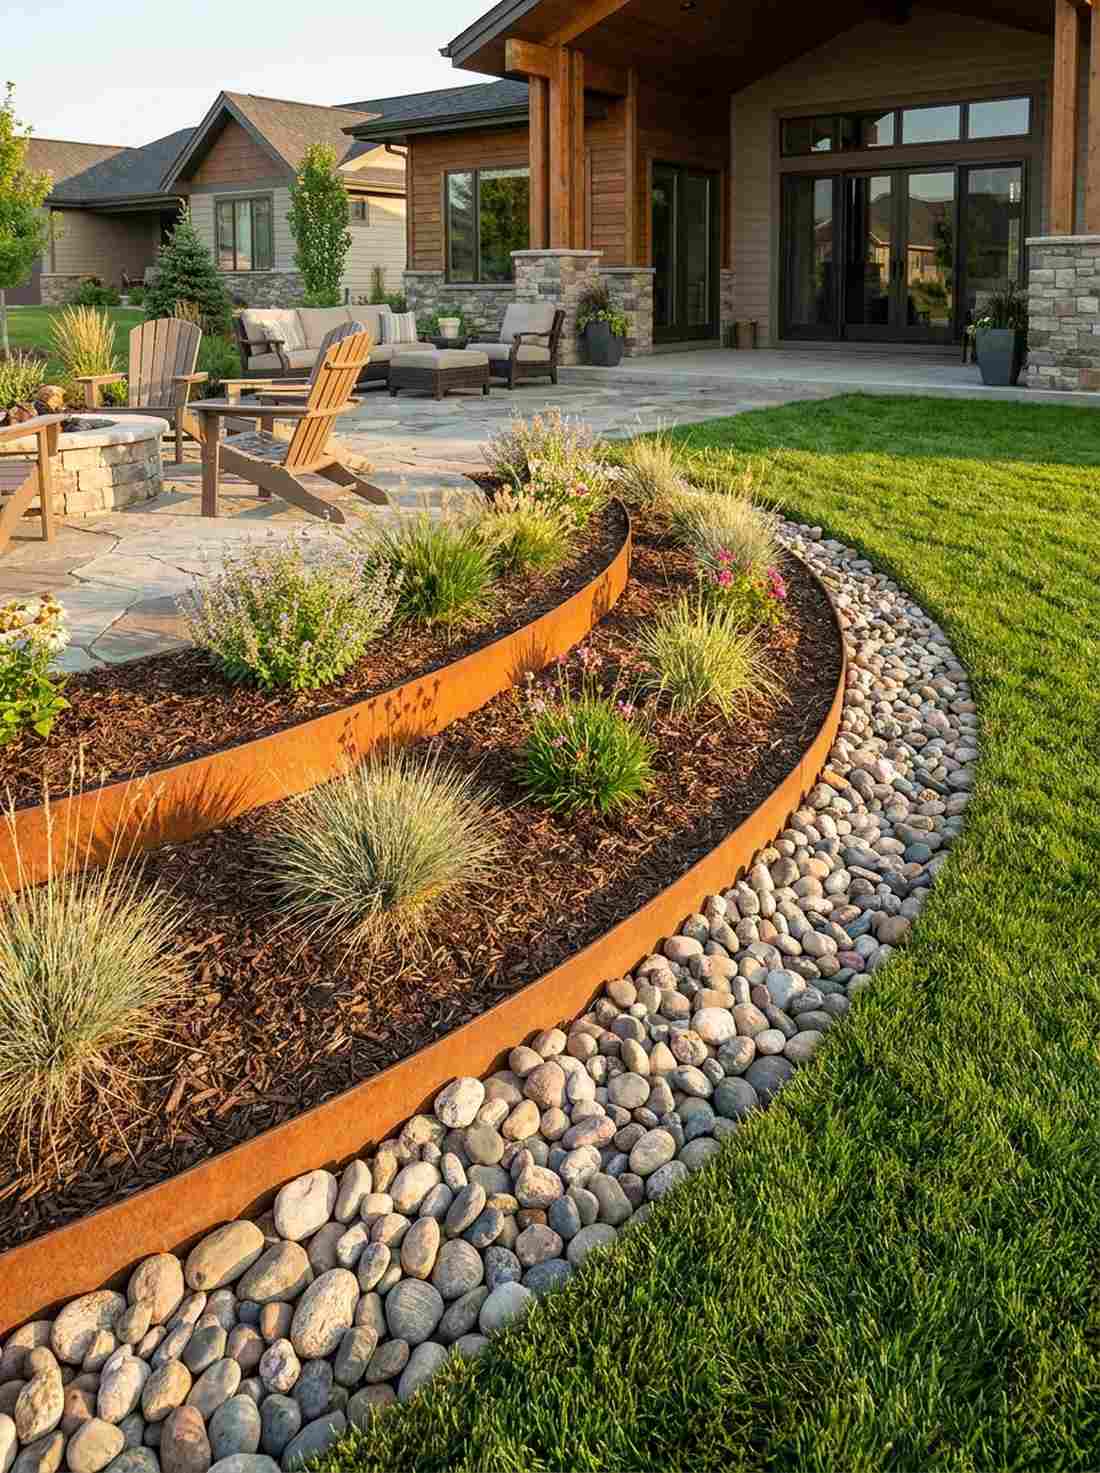
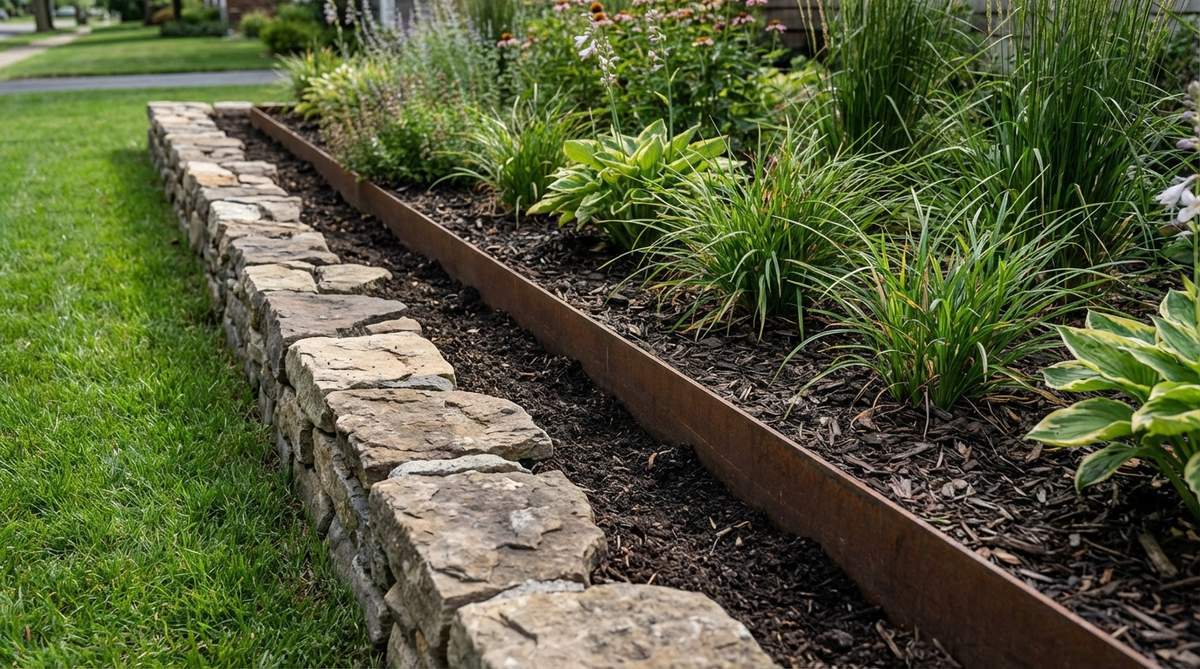
Delivers the ultimate fusion of rustic warmth and sharp modernism. The weathered corten steel and stone combo is the undisputed king of retaining clean mulch lines in contemporary yards.
Letting the invisible steel plate handle the heavy dirt-blocking duties allows the rocks to sit purely as a decorative highlight. This setup completely eliminates the annoying problem of soil spilling over low rock walls.
Expect to spend around $50–$80 for this highly functional pairing. A brilliant choice for hyper-clean modern gardens.
- Key Materials: Cor-ten rusting steel strips and natural cobbles
- Vibe / Style: Crisp, industrial, and failsafe
- Difficulty: Very easy installation
- Budget Breakdown: Steel edging: $40 | Accent stones: $25
- Creator’s Tip: Leave a 4-inch gap between the metal and the stone to create a shadow line that makes the rocks pop.
- Smart Sourcing: Cor-ten steel landscape edging kits and heavy-duty metal snips.
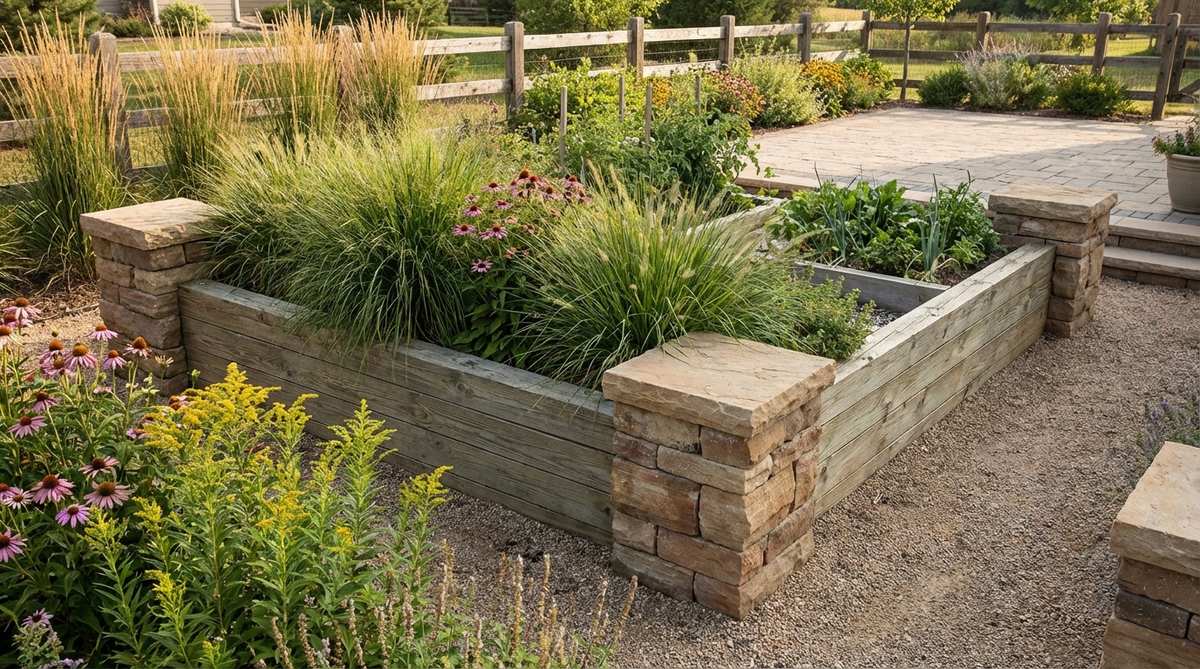
27. Stone and Timber Raised Edge
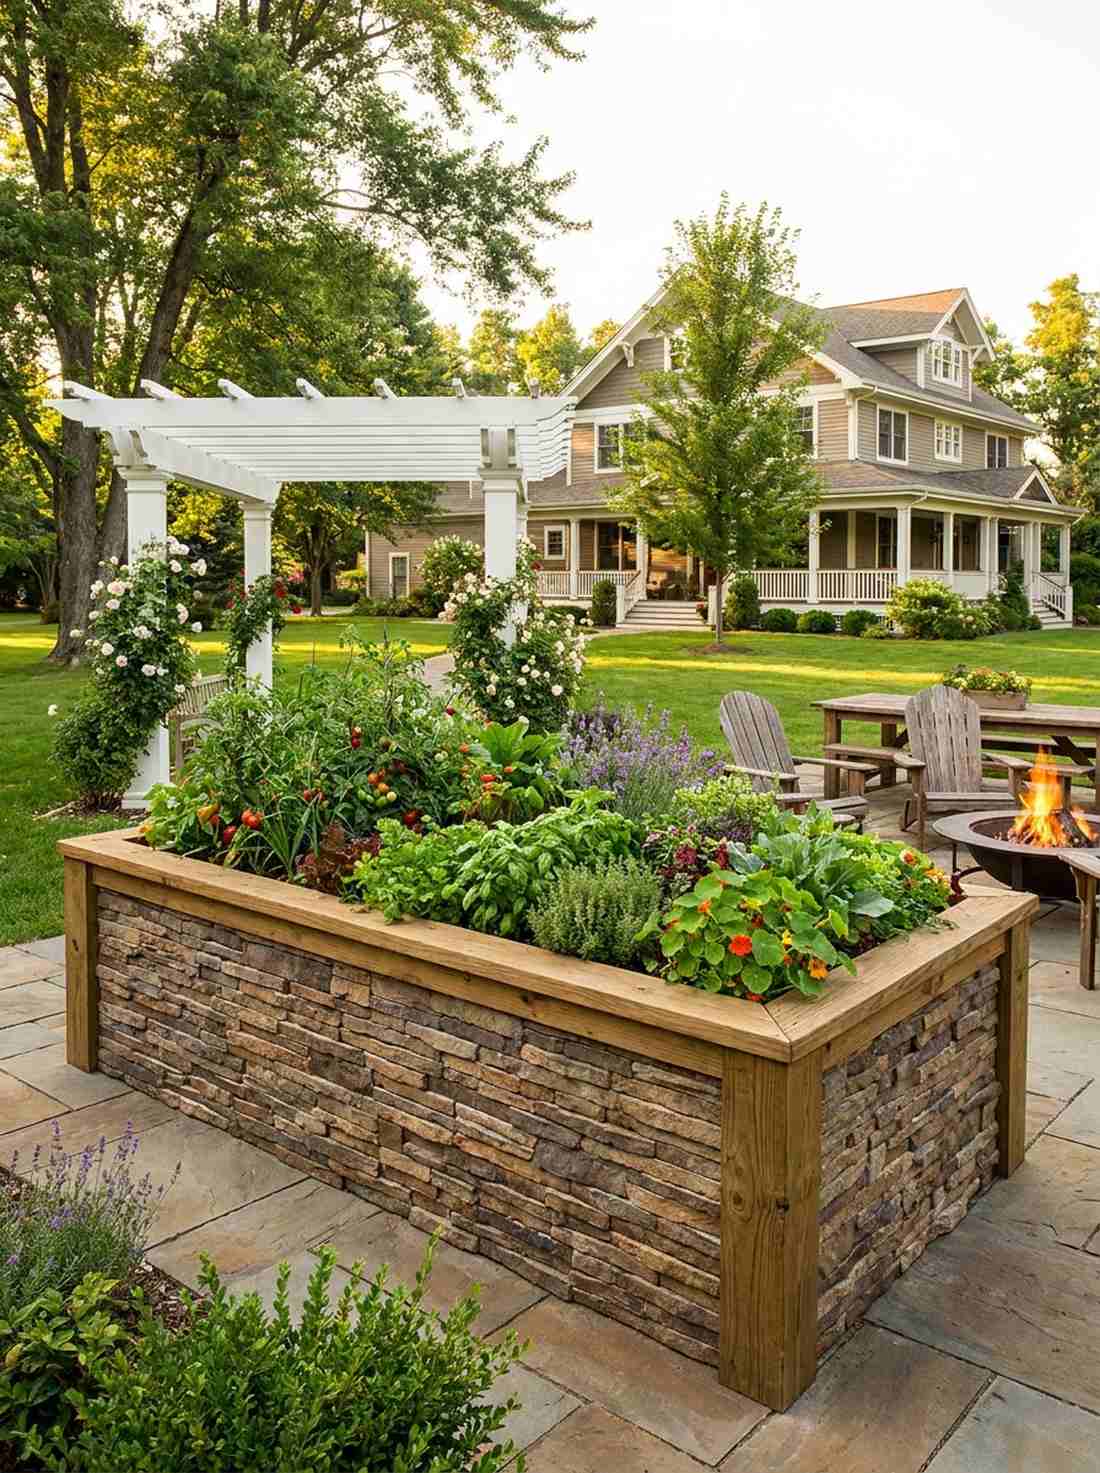
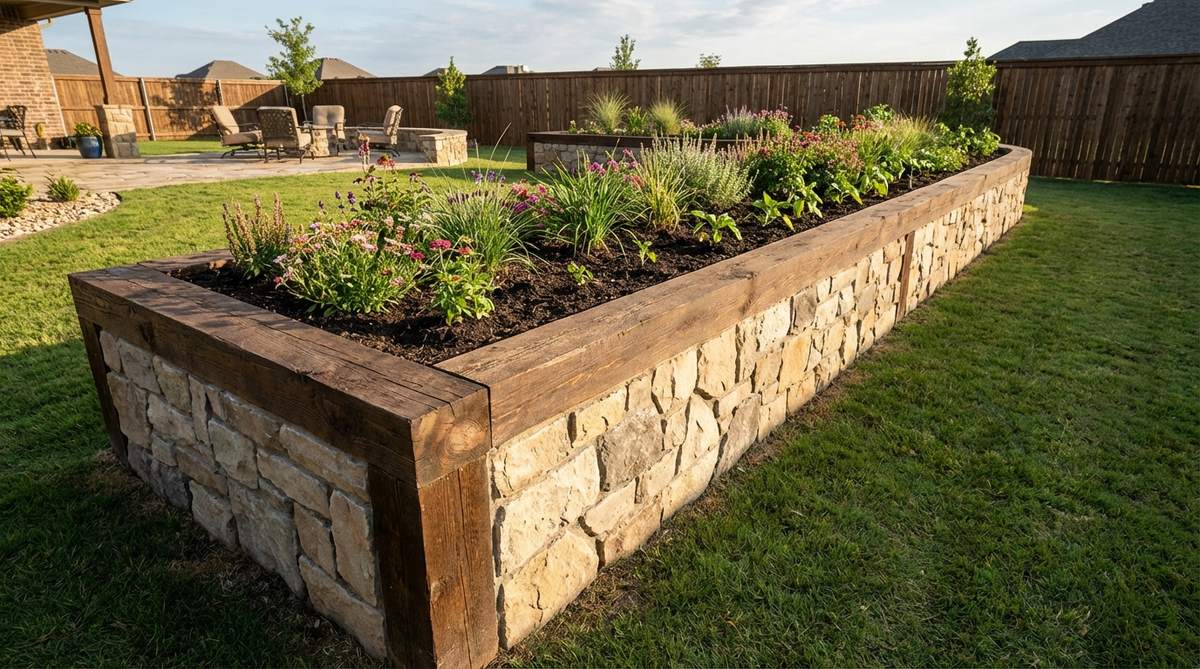
Feels like a luxurious raised planter at an upscale farm-to-table restaurant. A wood-framed stone veneer barrier provides massive structural strength without the crushing weight of solid rock.
Hiding a cheap lumber skeleton behind a gorgeous rock face looks far more expensive than it is. You get the pristine aesthetic of a custom masonry wall while spending a fraction of the time and money.
You can effortlessly pull this off for about $60–$90. Pin this to your ultimate raised garden bed board!
- Key Materials: Treated landscape timbers and flat stone veneer
- Vibe / Style: Substantial, rich, and clever
- Difficulty: Requires basic drilling and gluing
- Budget Breakdown: Wood core: $30 | Stone facing: $45
- Creator’s Tip: Use outdoor-rated screws to lock the wood frame, then heavily mortar the stones to hide the joints.
- Smart Sourcing: Exterior-grade landscape timber screws and stone veneer panels (pre-cut).
28. Concrete Curb with Stone Facing
Brings the immovable, commercial-grade strength of a city plaza to your home. A stone-wrapped concrete footer is completely unmatched for high-traffic zones that get abused by snowblowers.
Pouring a rock-solid cement core completely stops frost heaving, while the rock facade keeps it looking organic. Landscapers secretly use this to guarantee their work survives decades of brutal winter weather.
This permanent solution runs roughly $70–$110 in raw materials. Highly recommended for properties with harsh climates.
- Key Materials: Poured concrete mix and natural stone tiles
- Vibe / Style: Indestructible and professionally finished
- Difficulty: Requires building wooden cement forms
- Budget Breakdown: Concrete: $40 | Stone: $50
- Creator’s Tip: Scuff the wet concrete with a stiff broom before it dries so the stone adhesive grips it like a vice.
- Smart Sourcing: High-strength ready-mix concrete and premium masonry bonding agents.
29. Stone-Gravel Transition Band

Evokes the sharp, satisfying geometry of a modern desert oasis. The large rock and fine gravel buffer zone creates an incredibly stark, beautiful contrast for succulent gardens.
Pairing jagged boulders with a smooth runway of pea gravel completely stops weeds while looking like a magazine cover. It perfectly highlights the miniature garden supplies and plants without overwhelming them visually.
You can execute this chic look for about $35–$60. Save this if you love pristine, zero-maintenance borders!
- Key Materials: Feature stones and complementary pea gravel
- Vibe / Style: Sleek, arid, and highly textured
- Difficulty: Very quick and rewarding
- Budget Breakdown: Boulders: $30 | Pea Gravel: $20
- Creator’s Tip: Always match the temperature of the stones—use gray gravel with cool bluestone, and tan gravel with warm sandstone.
- Smart Sourcing: Premium washed pea gravel (bulk bags) and commercial weed barrier fabric.
Stop scrolling for a second—this next combination completely breaks all the traditional rules in the best way possible.
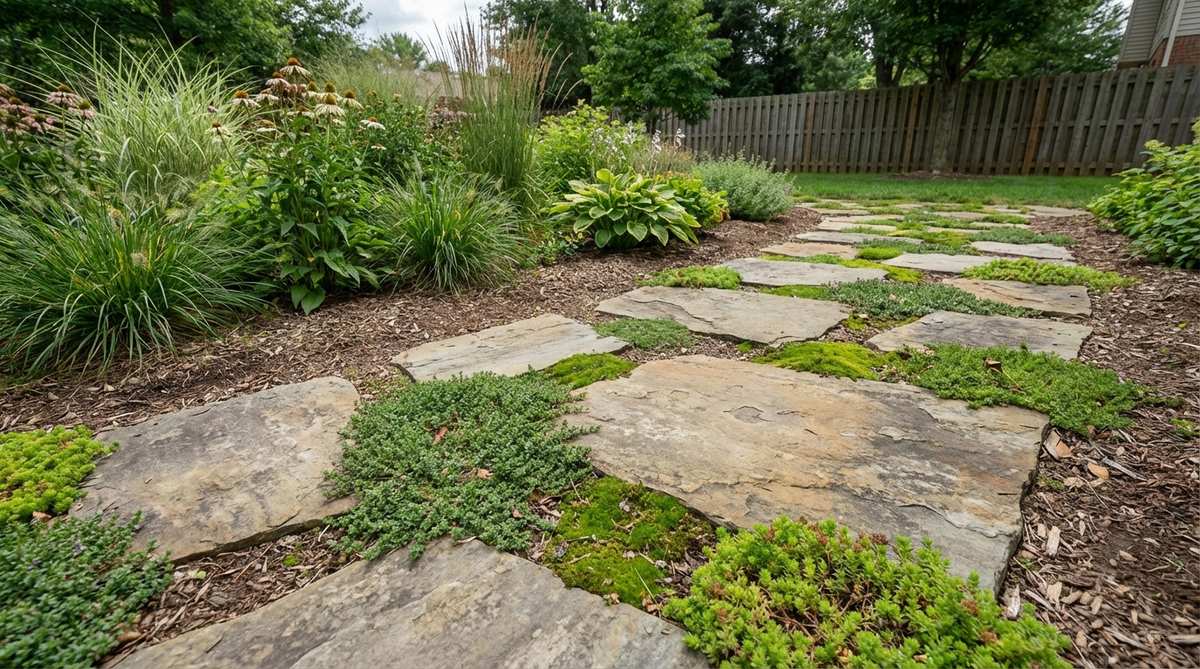
30. Stone and Ground Cover Integration

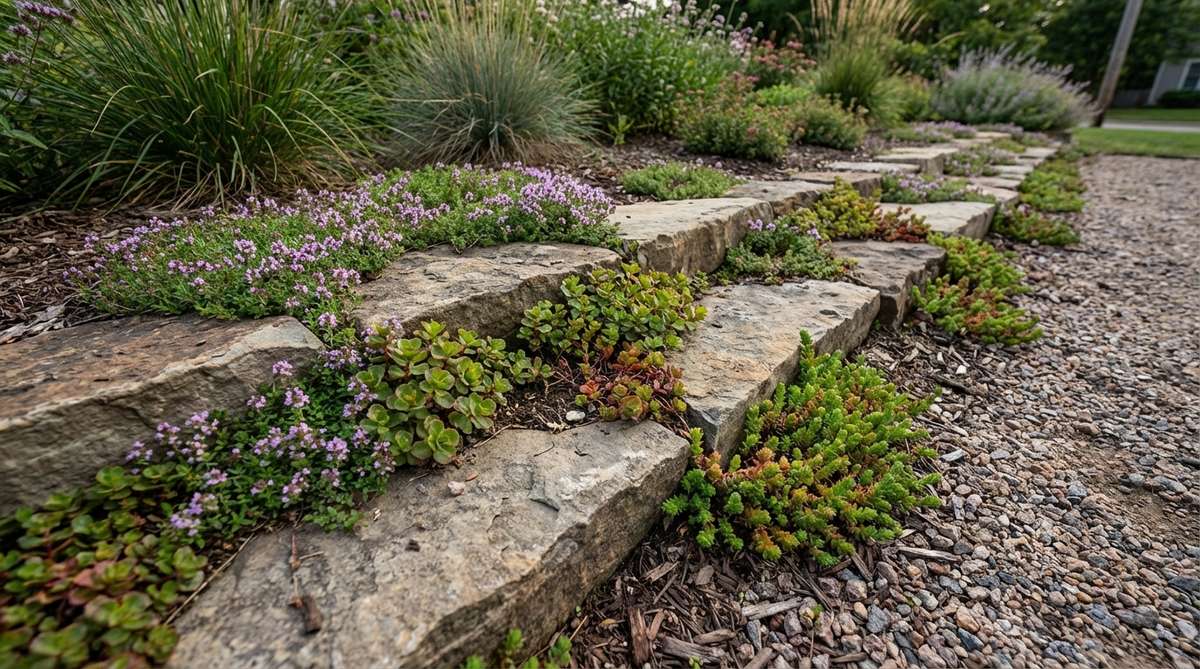
Feels like stepping into a lush, ancient fairy tale forest. A living stone and moss perimeter is absolutely breathtaking when wrapping around shaded backyard patios.
Leaving deliberate spaces for greenery softens harsh rocky edges and gives a designer-level finish that feels centuries old. Crushing creeping thyme underfoot releases an incredible fragrance every time you walk past.
Expect to spend around $40–$65 for the rocks and plant plugs. Pin this if you want a garden that feels magically alive!
- Key Materials: Spaced flagstone and creeping ground cover plugs
- Vibe / Style: Romantic, fragrant, and lush
- Difficulty: Easy hardscaping, requires watering
- Budget Breakdown: Stones: $35 | Plant Plugs: $25
- Creator’s Tip: Mix a handful of sand into the soil between the rocks to ensure the tiny plants don’t rot from overwatering.
- Smart Sourcing: Live creeping thyme starter trays and premium terrarium accessories kits.
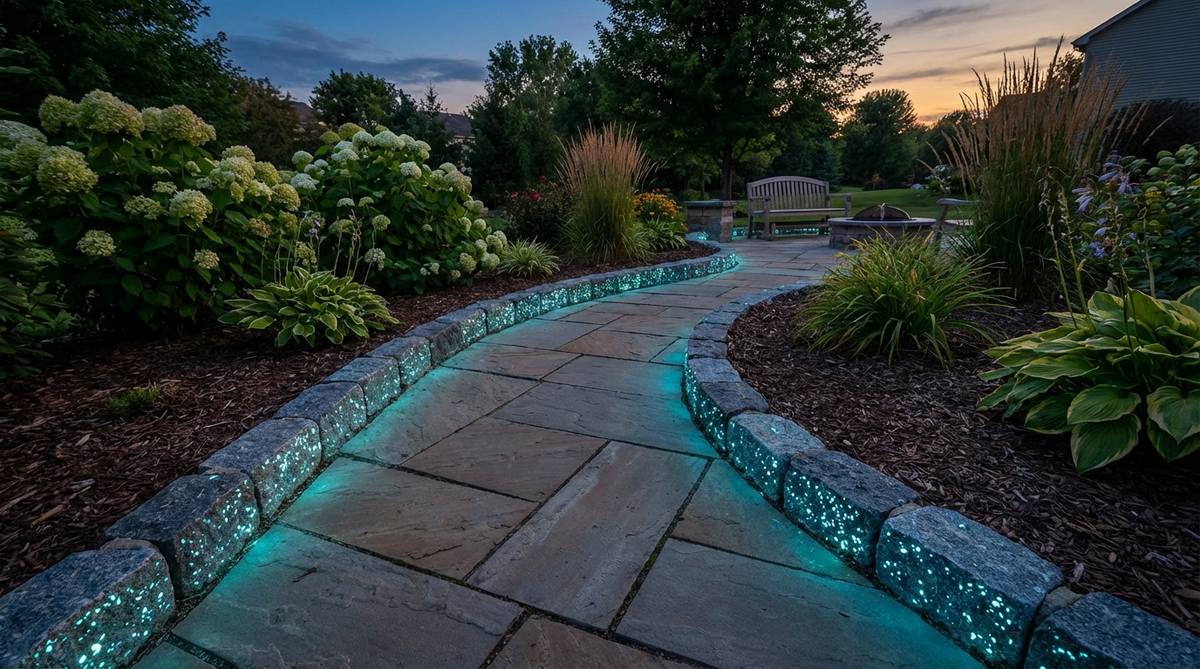
31. Stone Border with Integrated Lighting

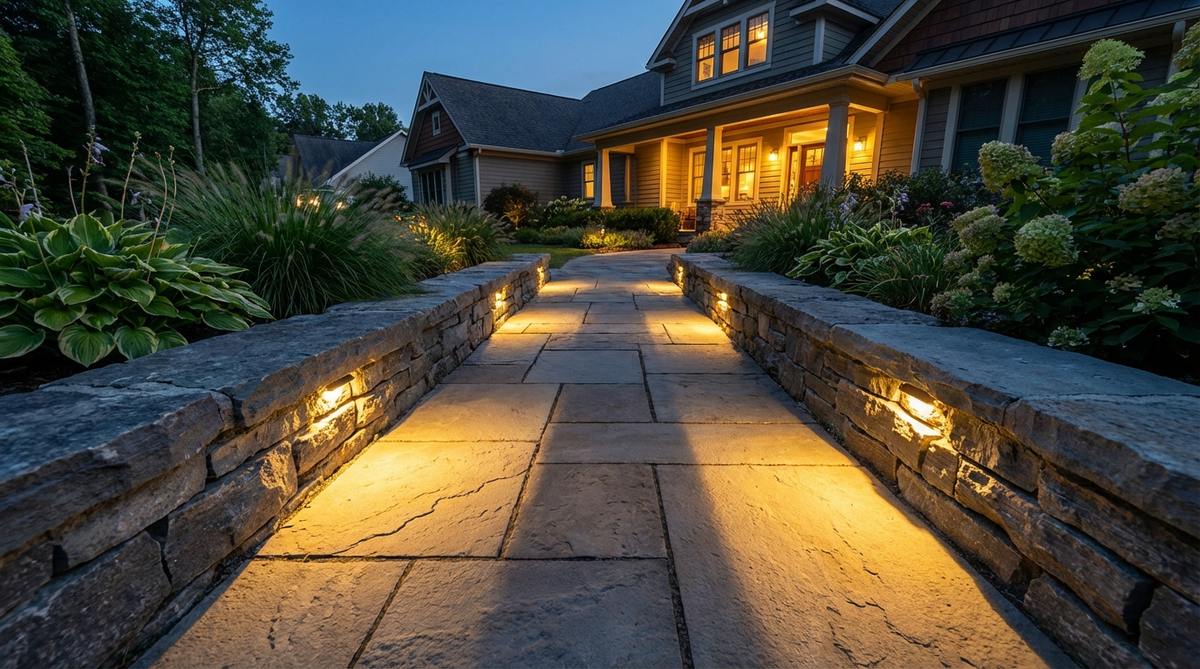
Radiates the glamorous, moody ambiance of a 5-star outdoor lounge. A rock boundary with hidden LED nodes completely transforms dark walkways into dramatic nighttime features.
Tucking low-voltage fixtures directly into the rock crevices hides the ugly plastic housings during the day. It delivers a surprisingly premium look that safely guides guests without blinding them with harsh spotlights.
You can easily pull this off for about $80–$130 including the lights. An absolute must-have for evening entertaining.
- Key Materials: Accent rocks and low-voltage LED hardscape lights
- Vibe / Style: Dramatic, safe, and luxurious
- Difficulty: Basic outdoor wiring required
- Budget Breakdown: Stones: $40 | LED Kit: $70
- Creator’s Tip: Always choose warm white (2700K) bulbs; cool blue lights make the rocks look artificial and eerie.
- Smart Sourcing: Waterproof low-voltage LED landscape kits and outdoor wire burying tools.
32. Stone and Metal Decorative Accent
Looks like a bespoke installation from a high-end landscape architect. Inserting copper or bronze accent plates between heavy rocks brings a shocking flash of contemporary brilliance to the yard.
Slipping bright metallic elements into an organic rock line looks far more expensive than it is. As the metal oxidizes and turns green over the seasons, it blends flawlessly with the natural surroundings.
This artistic injection usually costs $60–$90. Save this to your modern landscape detailing board!
- Key Materials: Heavy fieldstones and copper/bronze strips
- Vibe / Style: Artistic, elemental, and bespoke
- Difficulty: Fun and highly creative
- Budget Breakdown: Stone: $40 | Metal Accents: $35
- Creator’s Tip: Keep the metal to less than 15% of the total layout so it remains a subtle accent, not an eyesore.
- Smart Sourcing: Pre-cut copper garden accent strips and metal oxidation spray kits.
Material Guide: Cheap vs. Premium Aesthetic
Knowing exactly where to save and where to spend makes all the difference in achieving that “looks expensive but isn’t” vibe.
- Standard vs. UV-Resistant/Premium: Upgrading to UV-coated border stakes and fade-resistant polymeric sand prevents that dull, washed-out look after one harsh summer.
- Pre-made Kits vs. Sourcing Locally: Commercial border starter kits often save both time and money by perfectly calculating the required interlocking pins and base layers.
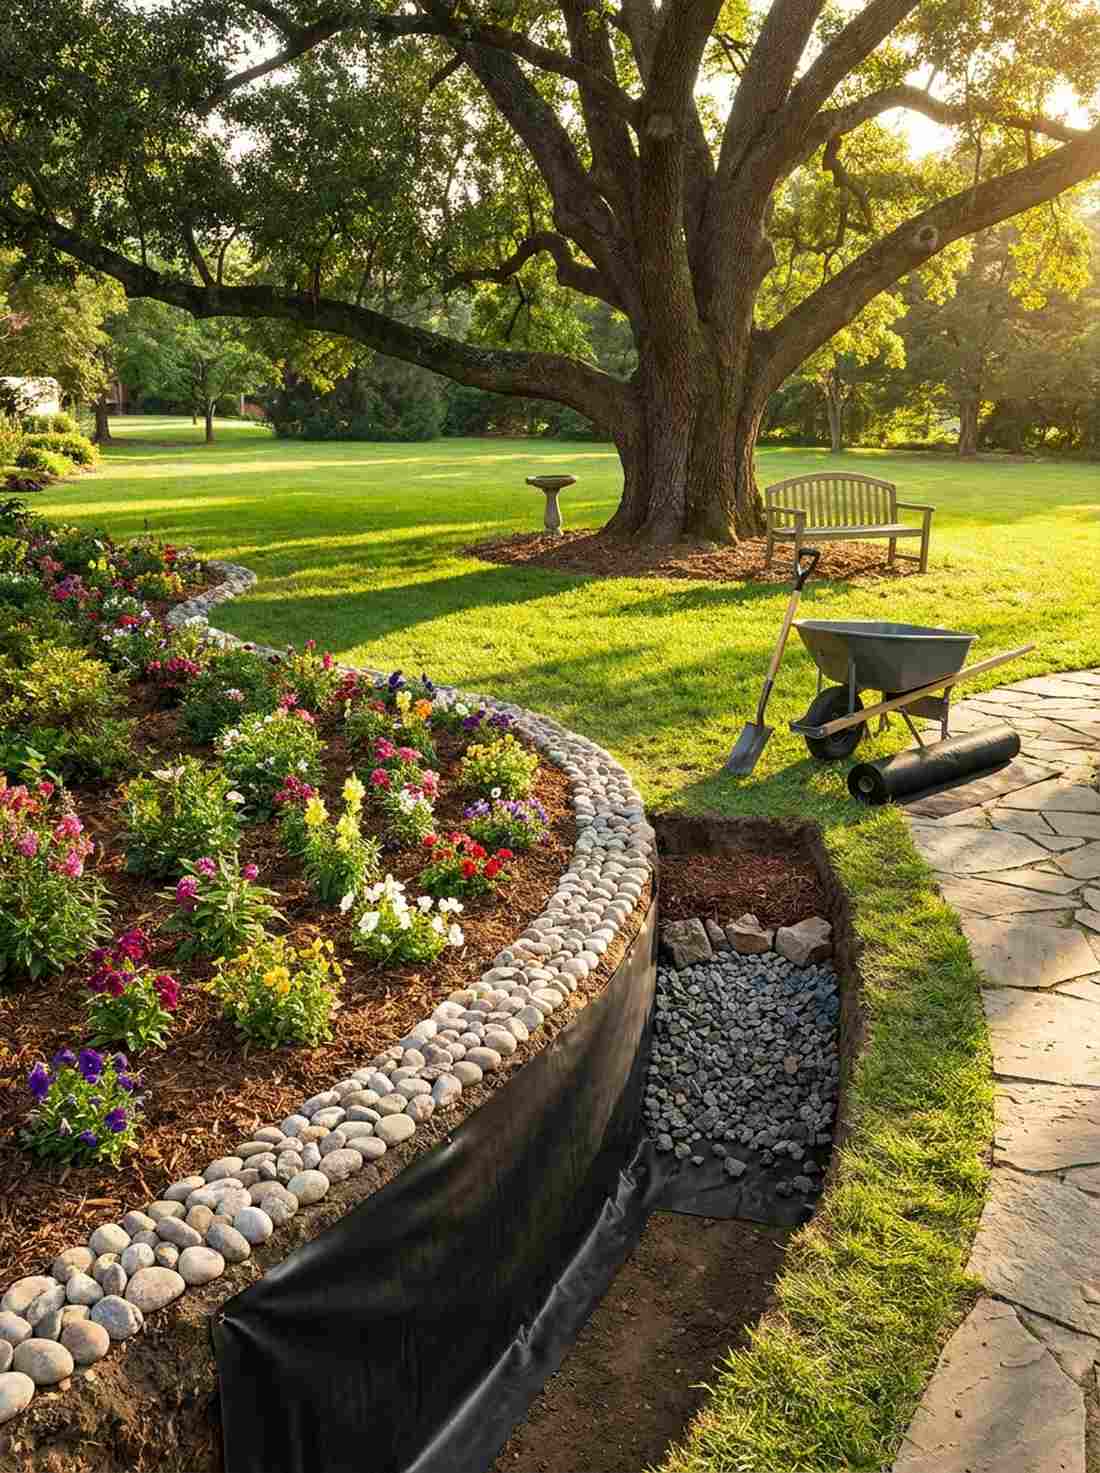
33. French Drain Stone Edging
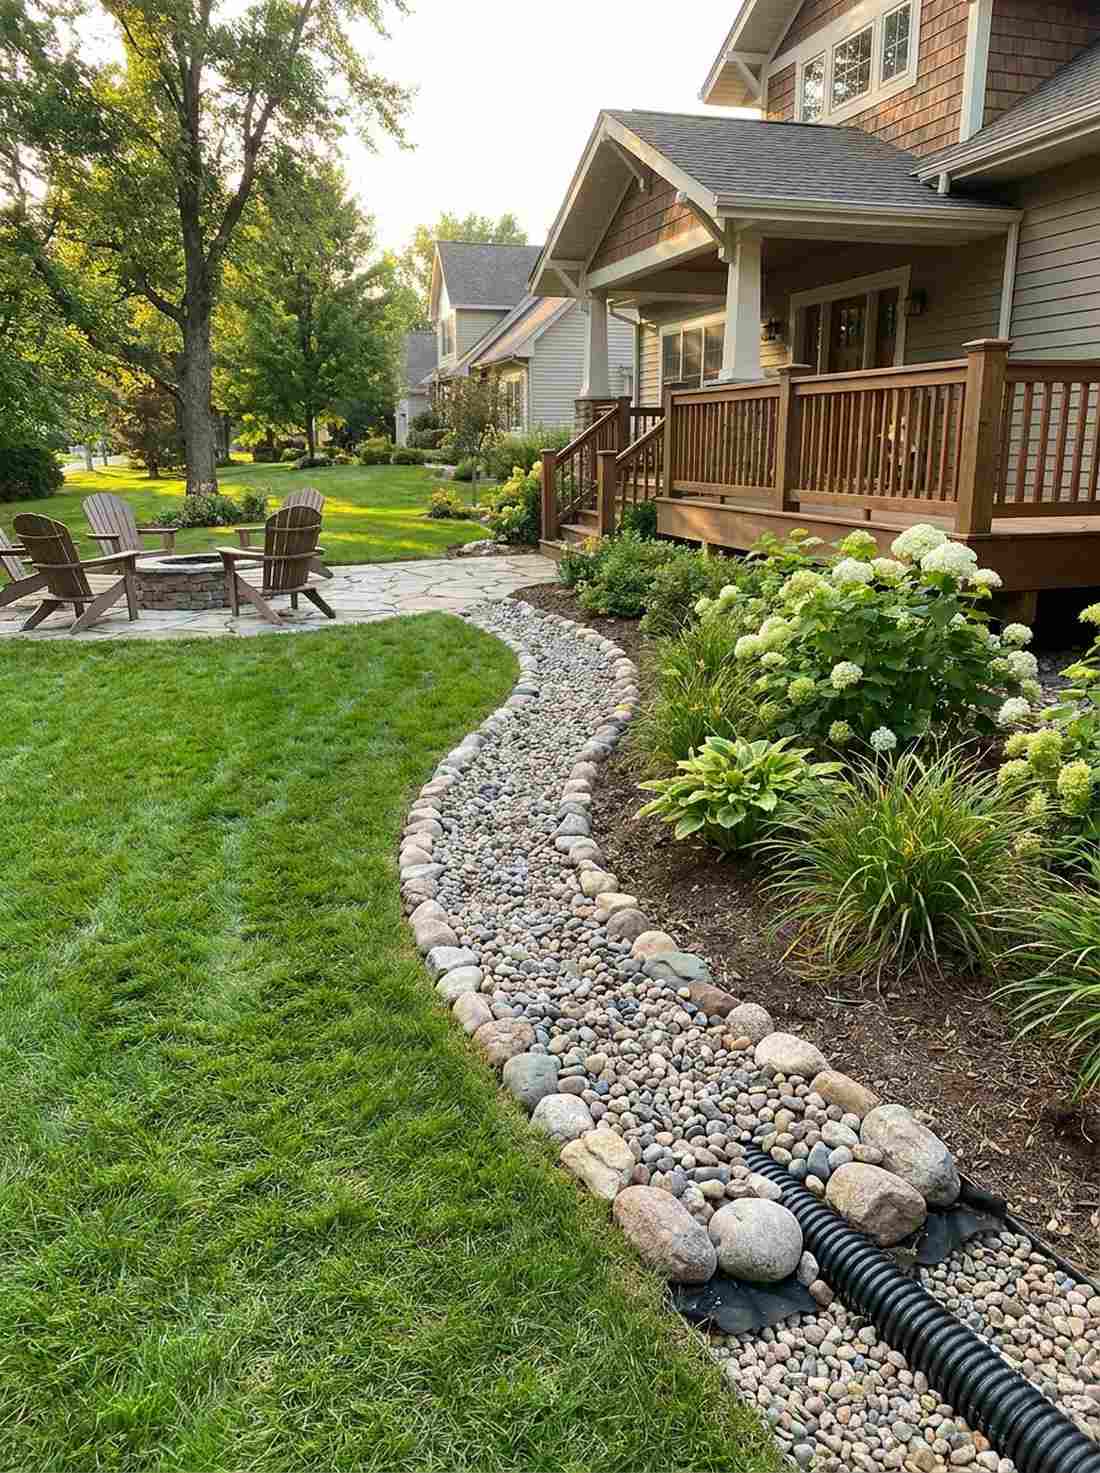

Performs like a hidden feat of engineering while looking like a decorative rock feature. A river rock drainage boundary is the ultimate weapon against soggy, flooded garden beds.
Burying a perforated pipe under a beautiful pebble trench solves the most annoying landscape problem instantly. It completely redirects destructive storm water while appearing to be nothing more than a high-end stylistic choice.
You can build this dual-purpose lifesaver for about $70–$110. Pin this if your yard turns into a swamp every spring!
- Key Materials: Drain pipe, landscape fabric, and washed gravel
- Vibe / Style: Highly functional and cleanly hidden
- Difficulty: Requires significant digging and sloping
- Budget Breakdown: Pipe/Fabric: $40 | Rocks: $50
- Creator’s Tip: You must ensure the trench drops at least 1 inch for every 10 feet of length so water actually flows away.
- Smart Sourcing: Corrugated French drain pipe kits (with sock) and heavy-duty trenching spades.
34. Mow Strip Stone Edging
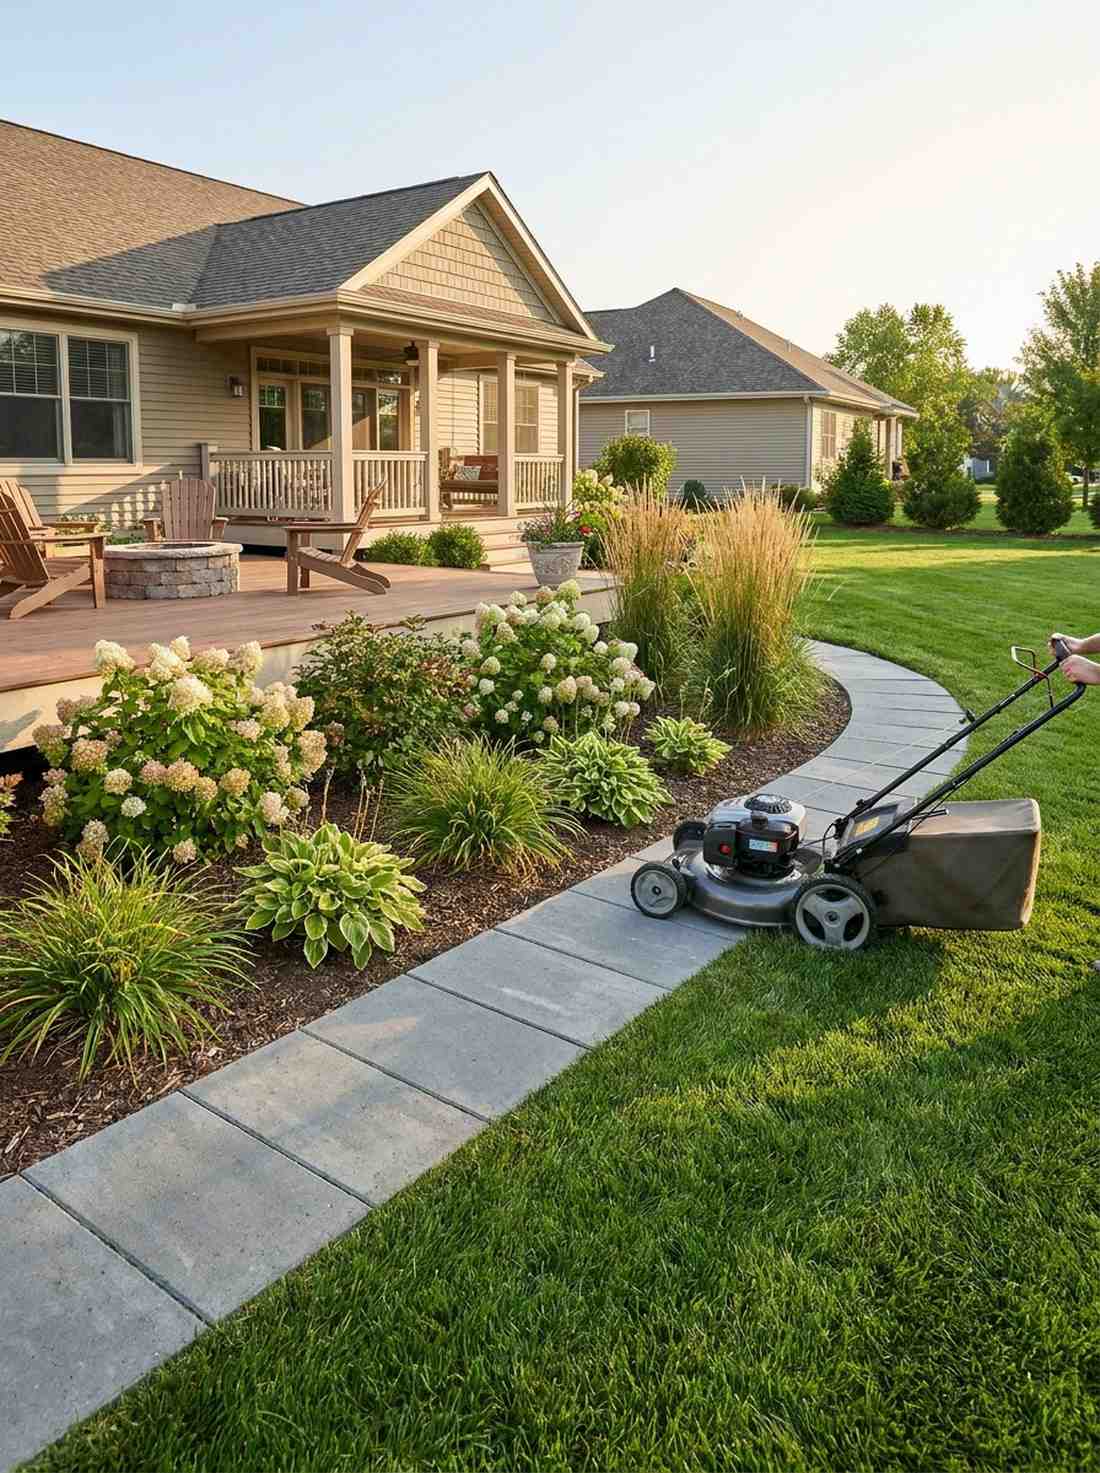
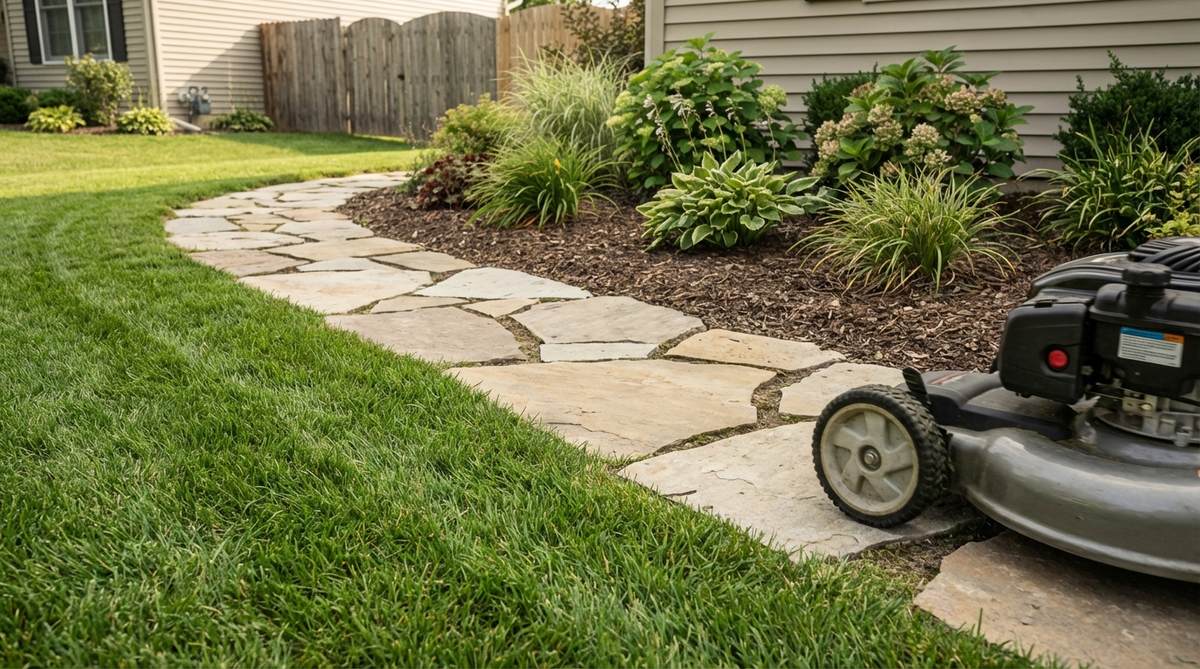
Feels like unlocking a cheat code for Saturday chores. A flush-mounted flat rock mow strip completely eliminates the need to ever use a string trimmer around your flower beds again.
Sinking the stones level with the dirt allows the lawnmower wheels to glide right over them. This layout sneaks a designer-level finish into your space while saving you dozens of hours of tedious yard work.
Expect to invest around $40–$65 to reclaim your weekends. An absolute must-have for low-maintenance homeowners.
- Key Materials: 12-inch wide flat paving stones
- Vibe / Style: Utilitarian, flat, and ultra-neat
- Difficulty: Requires precise depth leveling
- Budget Breakdown: Pavers: $45 | Sand base: $10
- Creator’s Tip: Set the stone exactly 1/4 inch below the grass root line so the spinning mower blade never strikes it.
- Smart Sourcing: Flat concrete step stones (bulk pack) and short-handled edging shears.
People pay contractors thousands for this next drainage secret, but you can build it yourself before noon…
35. Wheelchair-Accessible Stone Border
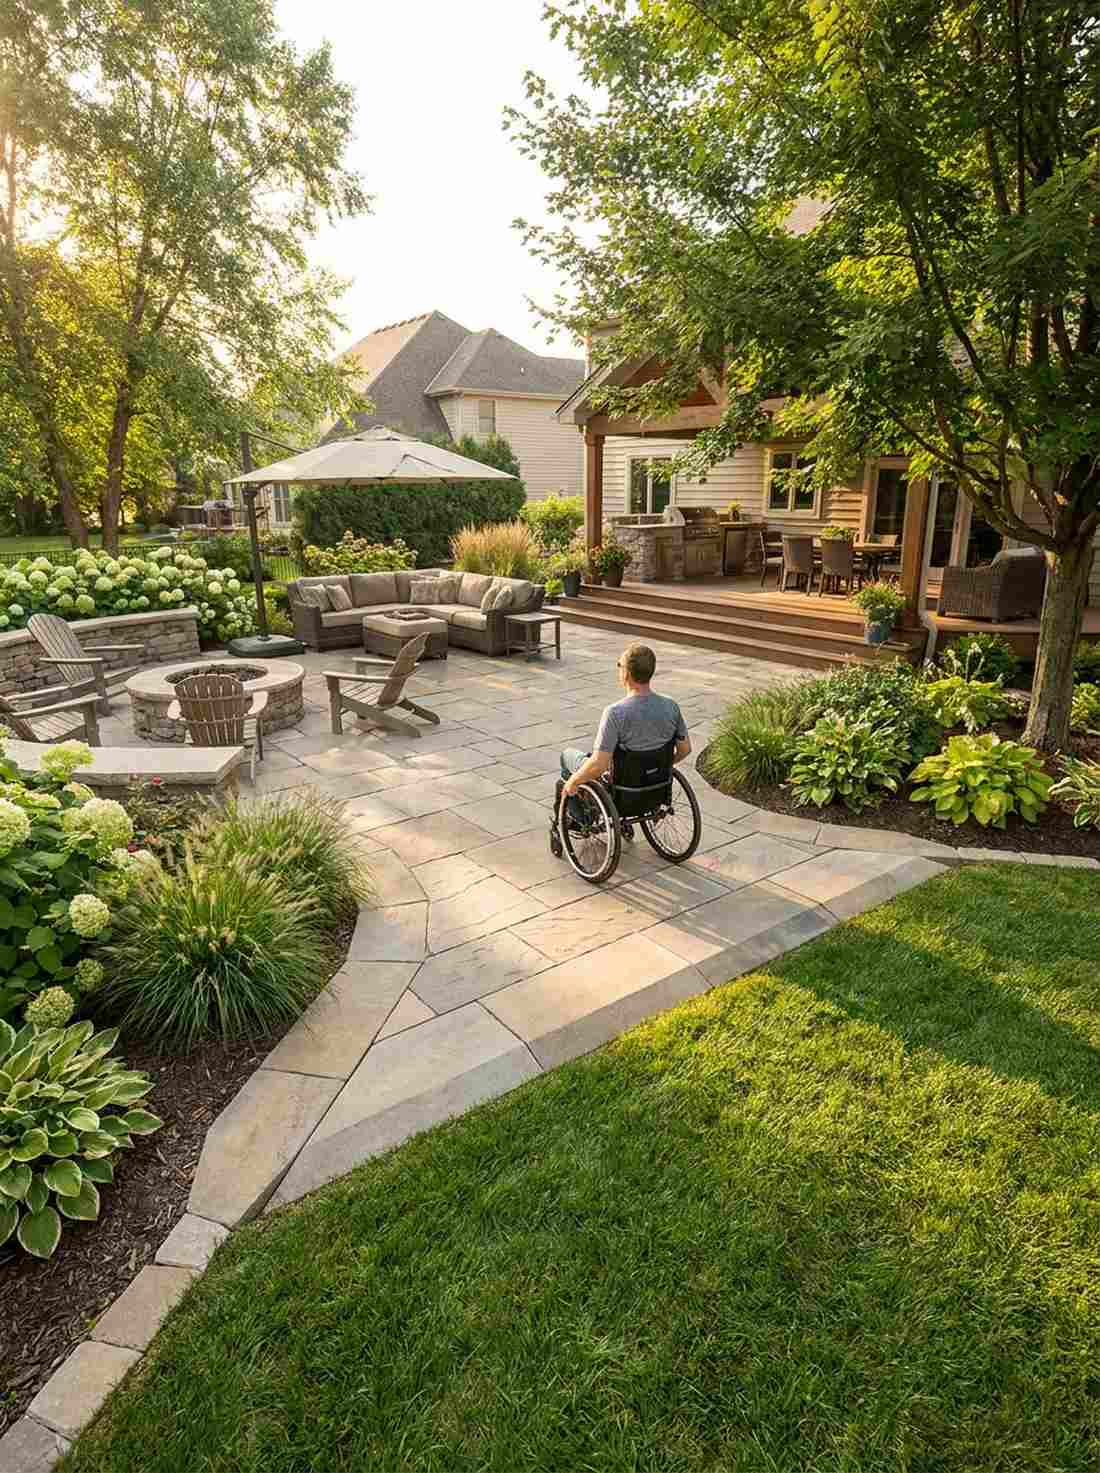
Radiates brilliant, inclusive design without sacrificing an ounce of style. A beveled flush-mount rock perimeter is absolutely perfect for ensuring smooth transitions across courtyard patios.
Using smoothly angled stones instead of sharp blocks completely removes tripping hazards and barrier frustrations. It delivers a surprisingly premium look that makes the entire outdoor space feel deeply welcoming to everyone.
You can effortlessly pull this off for about $50–$75. Save this to your universal garden design board!
- Key Materials: Chamfered or beveled concrete/stone units
- Vibe / Style: Seamless, inclusive, and smooth
- Difficulty: Very easy leveling required
- Budget Breakdown: Beveled Stones: $60 | Leveling Sand: $10
- Creator’s Tip: Keep the transition lip under 1/2 inch at all crossing points to maintain strict ADA-compliant smoothness.
- Smart Sourcing: Chamfered edge paver kits and high-visibility rubber transition ramps.
36. Anti-Erosion Riprap Edging
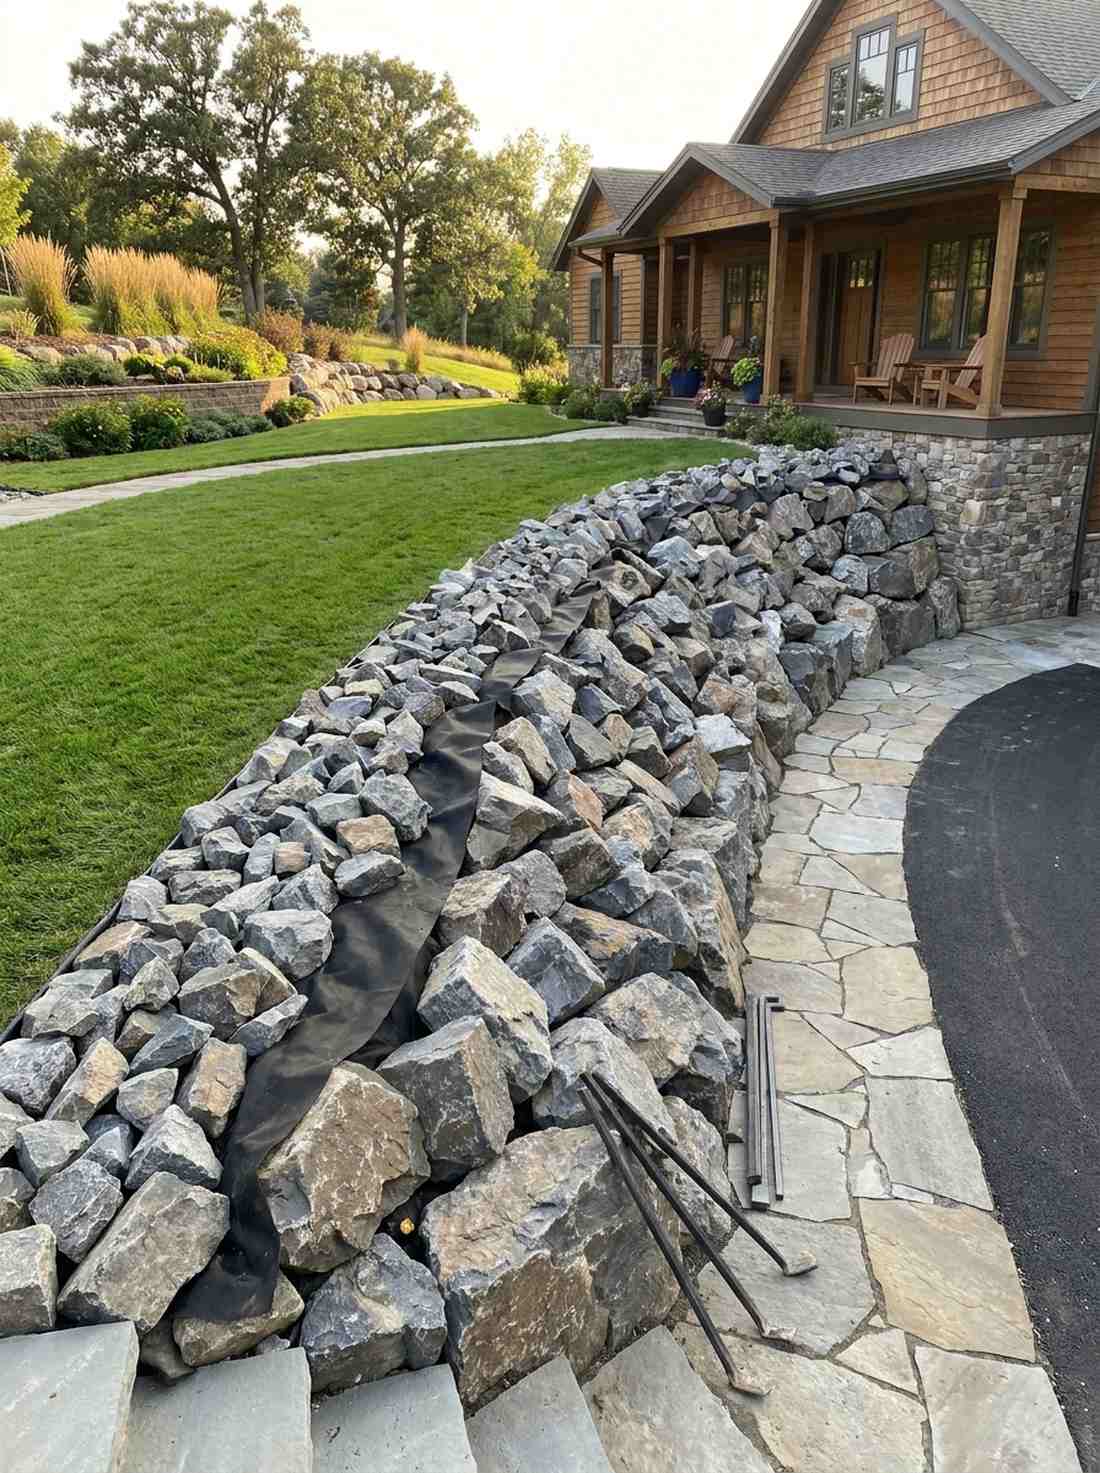
Looks like a rugged coastal breakwater fortifying your property. A heavy angular riprap boundary is the most aggressive and effective way to stop steep hills from washing into the street.
Tossing jagged, irregular boulders together creates a chaotic friction web that aggressively kills the velocity of rushing water. While it lacks formal symmetry, it completely stops soil loss where delicate bricks would instantly fail.
This heavy-duty barricade costs roughly $80–$130. Pin this to protect your sloped yard investments!
- Key Materials: 6-12 inch sharp angular quarry stones
- Vibe / Style: Brutalist, highly functional, and jagged
- Difficulty: Heavy lifting and tossing required
- Budget Breakdown: Riprap Stone: $90 | Base Fabric: $20
- Creator’s Tip: Dig a deep trench at the very bottom of the hill to lock the first row of stones, preventing a landslide.
- Smart Sourcing: Heavy-weight non-woven geotextile fabric and professional steel rock bars.
37. Pet Barrier Stone Border
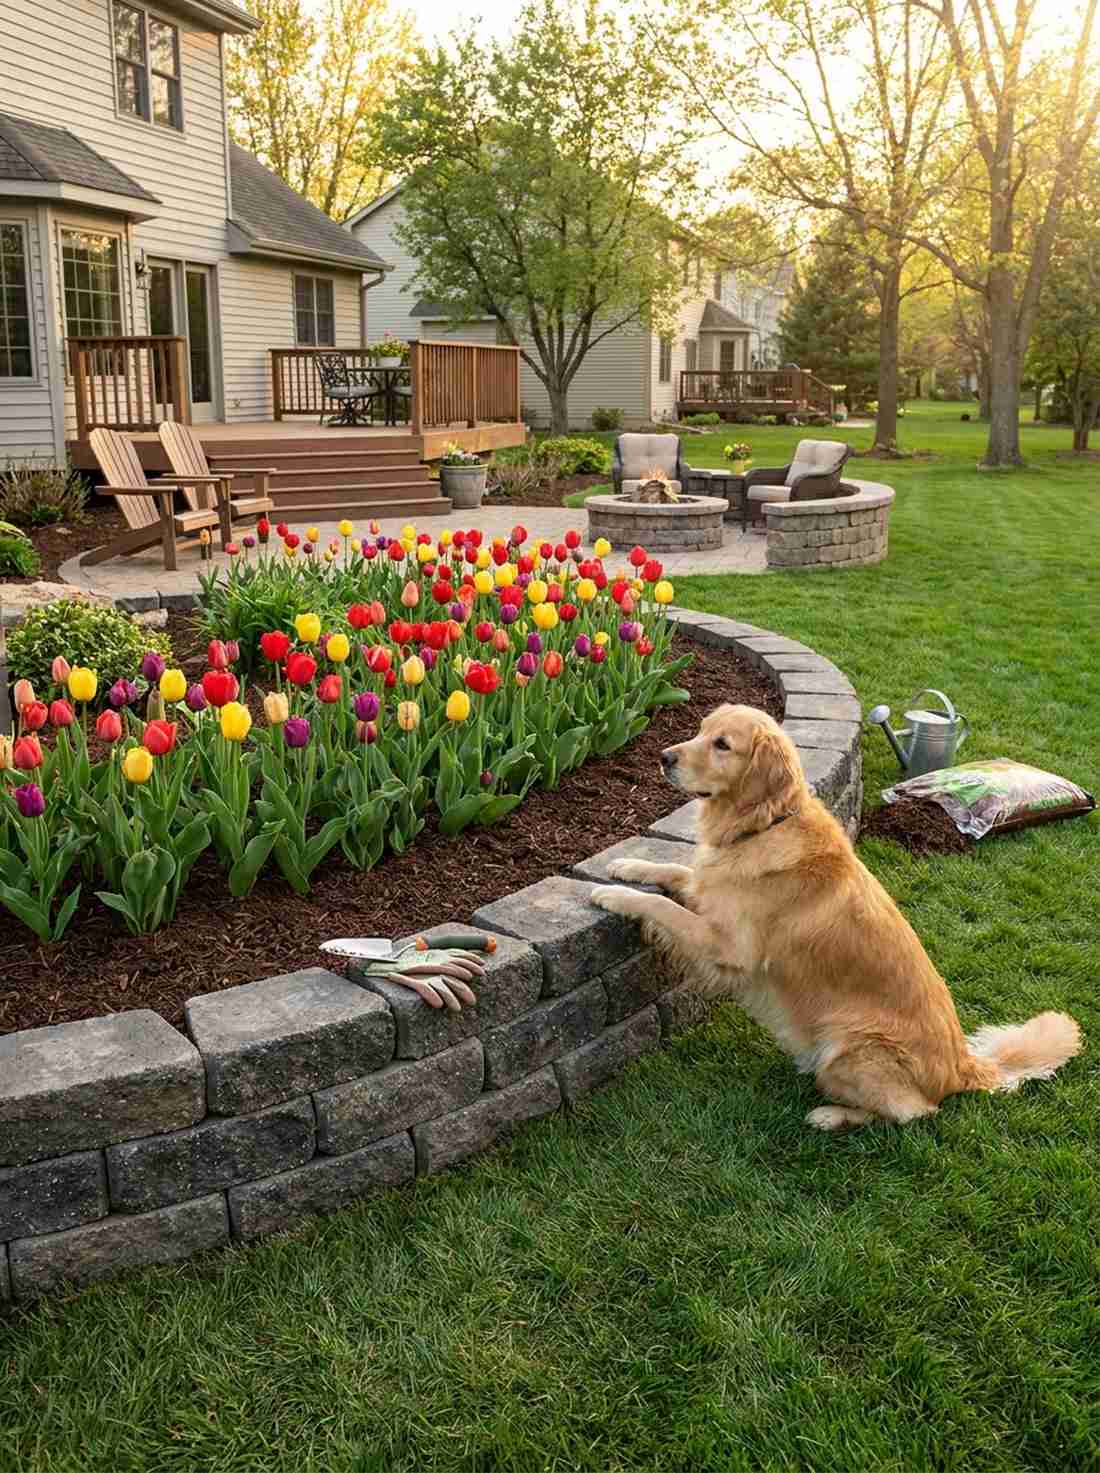
Acts like a handsome, silent security guard for your prize-winning tulips. A deep-set tight stone barricade is magnificent for keeping digging dogs and curious cats out of fresh mulch.
Burying a solid rock wall six inches deep completely ruins a dog’s attempt to tunnel under the fence line. It looks far more expensive than cheap chicken wire while effectively redirecting pet traffic away from delicate roots.
Expect to spend around $50–$80 to fortify your beds. A brilliant, aesthetic solution for frustrated pet owners.
- Key Materials: Heavy block stones buried tightly together
- Vibe / Style: Solid, clean, and impenetrable
- Difficulty: Requires deep, narrow trenching
- Budget Breakdown: Block Stones: $65 | Backfill: $5
- Creator’s Tip: Ensure absolutely zero gaps exist between the rocks underground, or a determined terrier will find the weak spot.
- Smart Sourcing: Solid concrete retaining blocks (bulk) and pet-safe outdoor deterrent sprays.
38. Snow Plow Resistant Boulder Edge

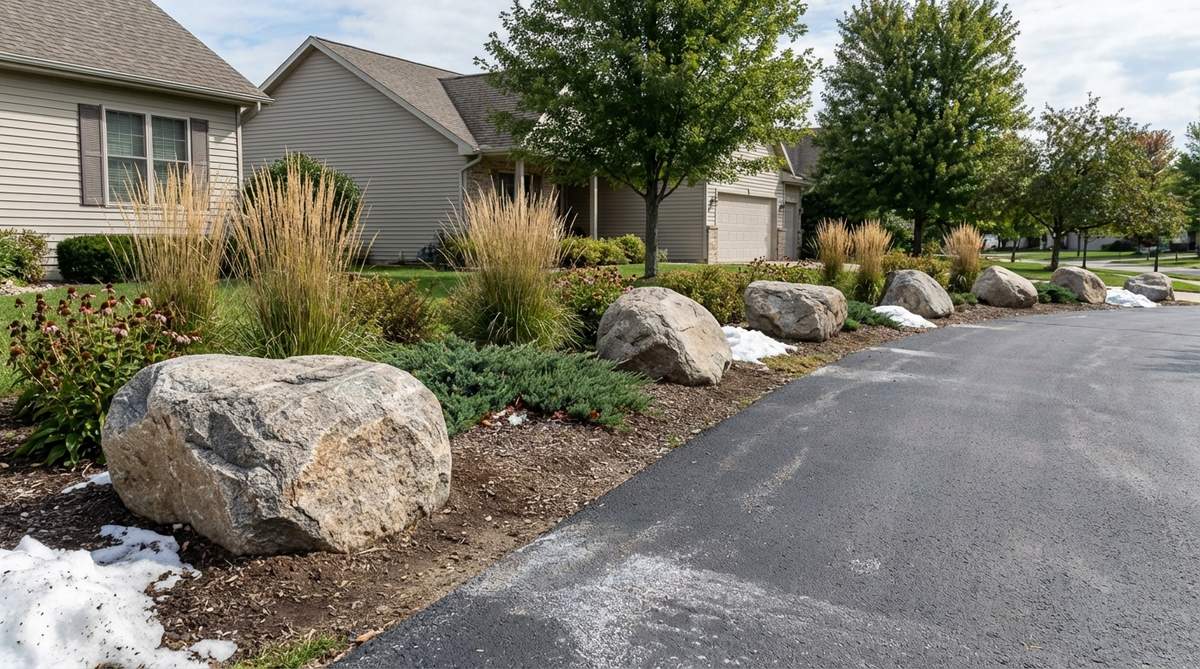
Carries the immovable defiance of an alpine mountain peak. A massive roadside boulder perimeter works exceptionally well for shielding driveway gardens from aggressive winter plows.
Using 300-pound rocks completely destroys the notion that winter maintenance has to ruin your front yard. These giants absorb brutal impacts and salt spray without flinching, protecting the delicate perennials sleeping behind them.
Sourcing these beasts will run about $120–$180. Save this if you are tired of replanting your driveway border every spring!
- Key Materials: 300+ pound granite or fieldstone boulders
- Vibe / Style: Indestructible, bold, and protective
- Difficulty: Requires machinery for placement
- Budget Breakdown: Boulders: $130 | Delivery: $40
- Creator’s Tip: Space them exactly 6 feet apart to create a highly visible barrier that tired plow drivers can easily spot at night.
- Smart Sourcing: Highly reflective driveway marker poles and heavy-duty boulder lifting slings.
39. Root Barrier Stone Installation
Operates like an invisible fortress defending your expensive irrigation lines. A deep-trench rock and plastic shield is absolutely essential when planting flower beds near massive oak trees.
Combining heavy rocks with a subsurface plastic wall completely stops aggressive tree roots from stealing water from your delicate flowers. This layout sneaks a designer-level finish onto the surface while fighting a hidden underground war.
You can execute this protective barrier for about $60–$95. Pin this to save your perennial beds from root invasion!
- Key Materials: Decorative surface rocks and deep root barrier plastic
- Vibe / Style: Clean up top, tactical underneath
- Difficulty: Deep trenching required
- Budget Breakdown: Root Fabric: $40 | Surface Stone: $35
- Creator’s Tip: Install the plastic barrier vertically at least 18 inches down before dropping the decorative rocks on top.
- Smart Sourcing: Commercial-grade tree root barrier rolls and narrow trenching shovels.
You’ll probably want to steal this upcoming idea immediately—it’s the ultimate low-maintenance cheat code.
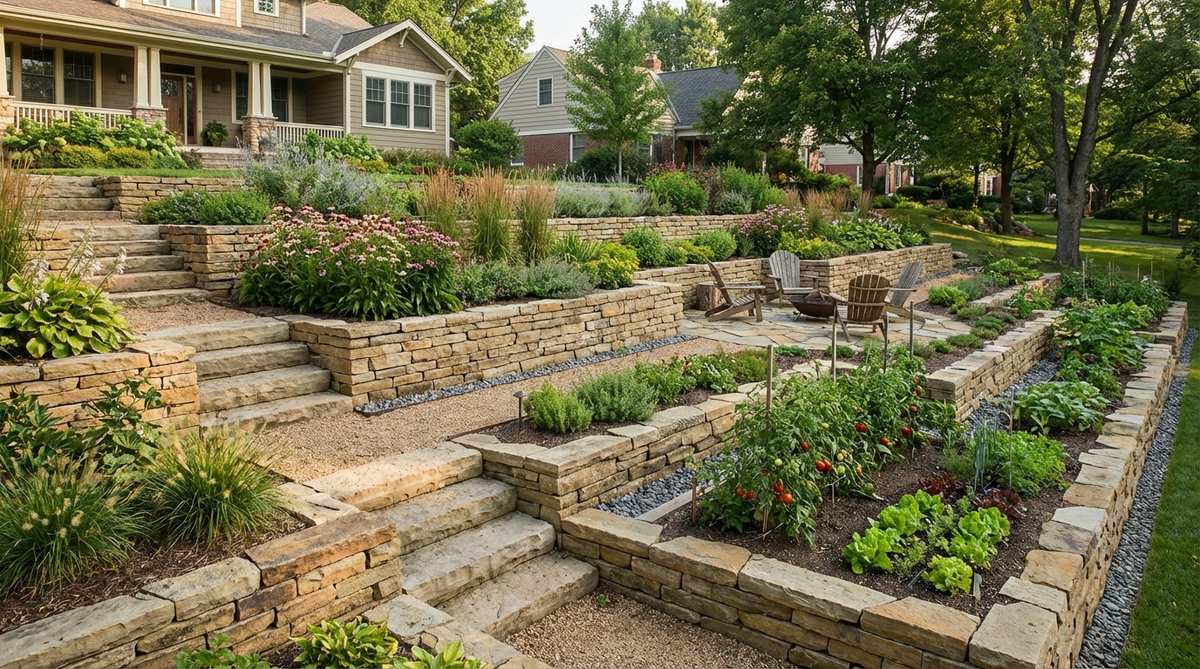
40. Slope Stabilization Stone Terracing
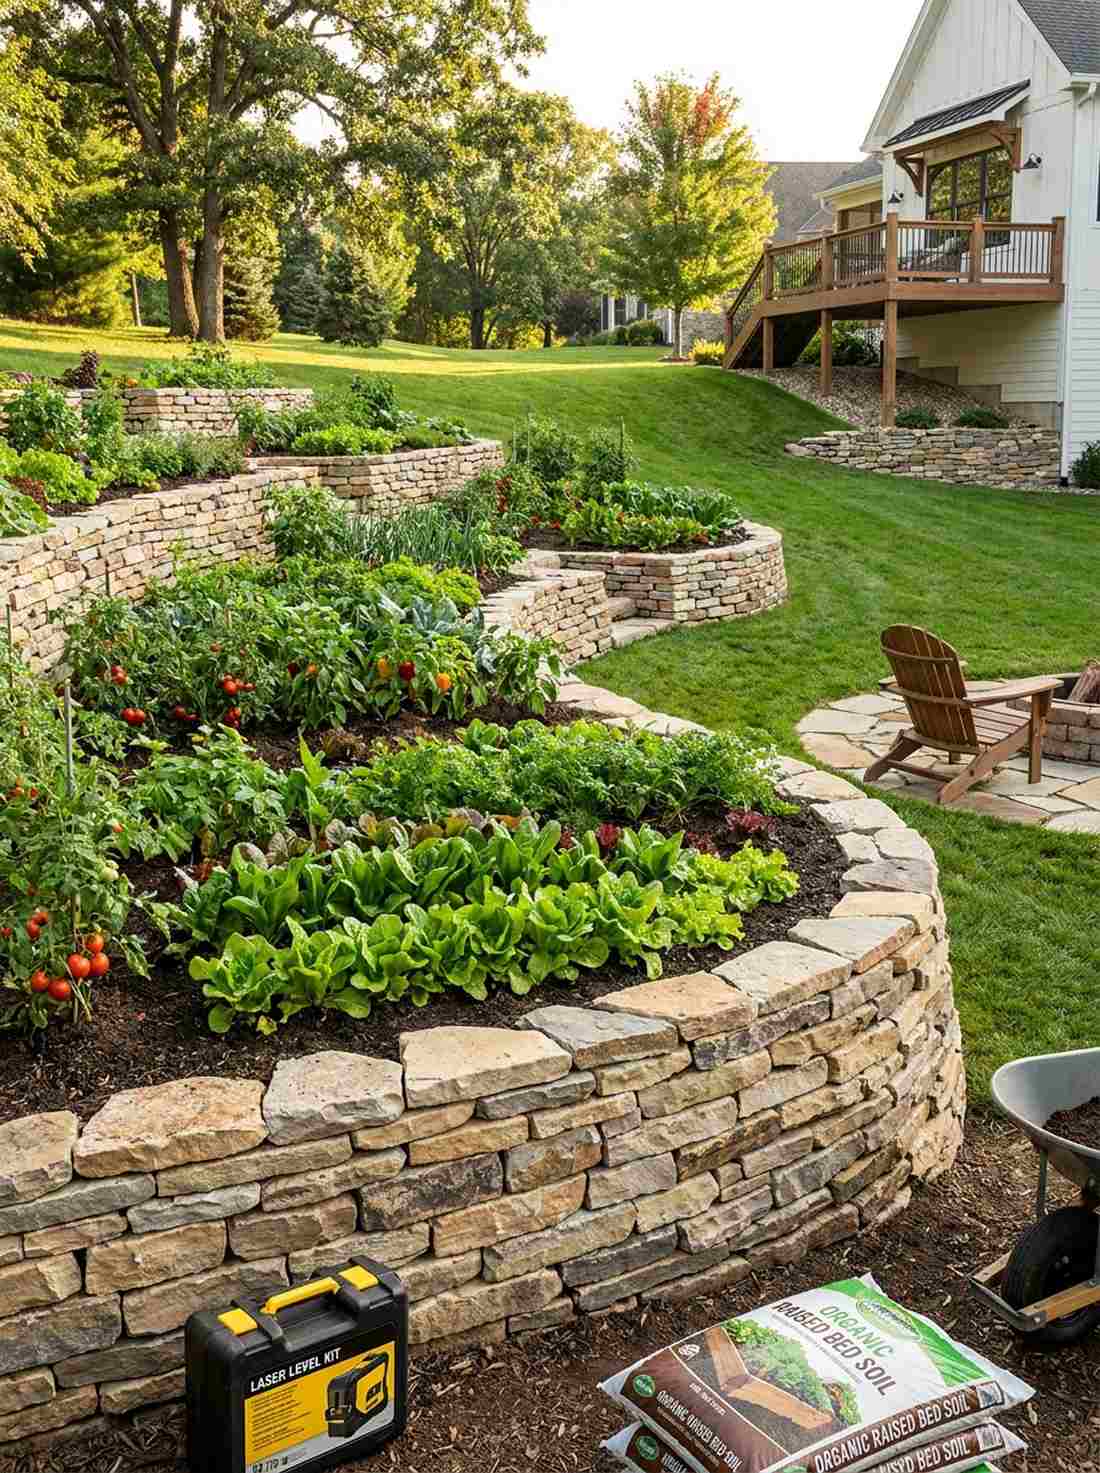
Feels like wandering through the ancient stepped farms of the Andes. A series of staggered low rock walls beautifully tames steep backyards into highly productive vegetable plots.
Breaking a harsh hill into tiny flat ribbons completely stops mudslides while creating perfect micro-climates for growing food. It delivers a surprisingly premium look that maximizes every single inch of unusable vertical real estate.
Expect materials to run close to $100–$150 for a multi-tiered setup. A stunning transformation for aggressive hillsides.
- Key Materials: Flat stacking stones and nutrient-rich backfill
- Vibe / Style: Productive, layered, and architecturally stunning
- Difficulty: Labor-intensive but incredibly rewarding
- Budget Breakdown: Stacking Stones: $110 | Topsoil: $30
- Creator’s Tip: Follow the natural contour line of the hill exactly, rather than trying to force perfectly straight geometric boxes.
- Smart Sourcing: Organic raised bed soil bags (bulk pack) and laser level kits for landscaping.
41. Zen Garden Raked Stone Border
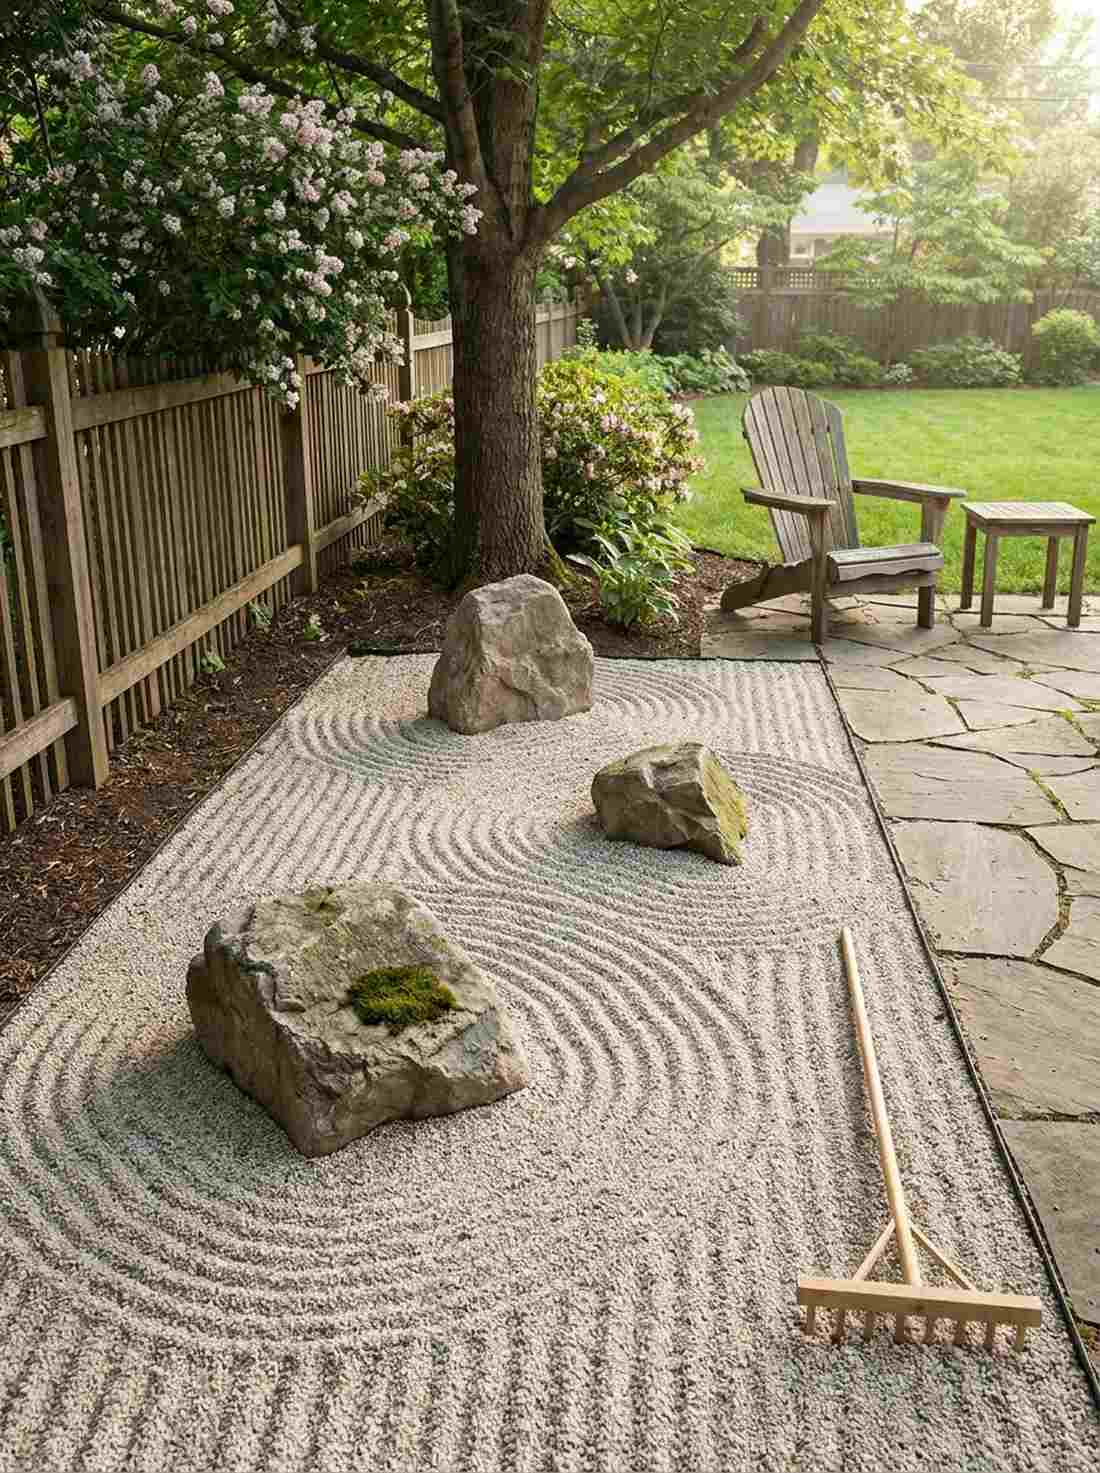

Radiates the absolute stillness of a Japanese temple courtyard. A minimalist raked gravel and boulder margin acts as a stunning meditative focal point for shaded side yards.
Using negative space and precise raking lines creates a breathtaking visual rhythm that busy floral gardens simply cannot achieve. Injecting fairy garden kits elements like tiny moss patches elevates this aesthetic to pure artistry.
You can effortlessly pull this off for about $50–$80. Pin this to your ultimate outdoor relaxation board!
- Key Materials: Fine decomposed granite and 3 feature boulders
- Vibe / Style: Serene, intentional, and perfectly balanced
- Difficulty: Easy setup, requires weekly raking
- Budget Breakdown: Fine Gravel: $40 | Feature Rocks: $30
- Creator’s Tip: Keep the feature boulders in odd numbers (3 or 5) and place them asymmetrically for true Zen balance.
- Smart Sourcing: Authentic wooden Zen garden rakes and premium decomposed granite bags.
42. Alpine Crevice Garden Edge
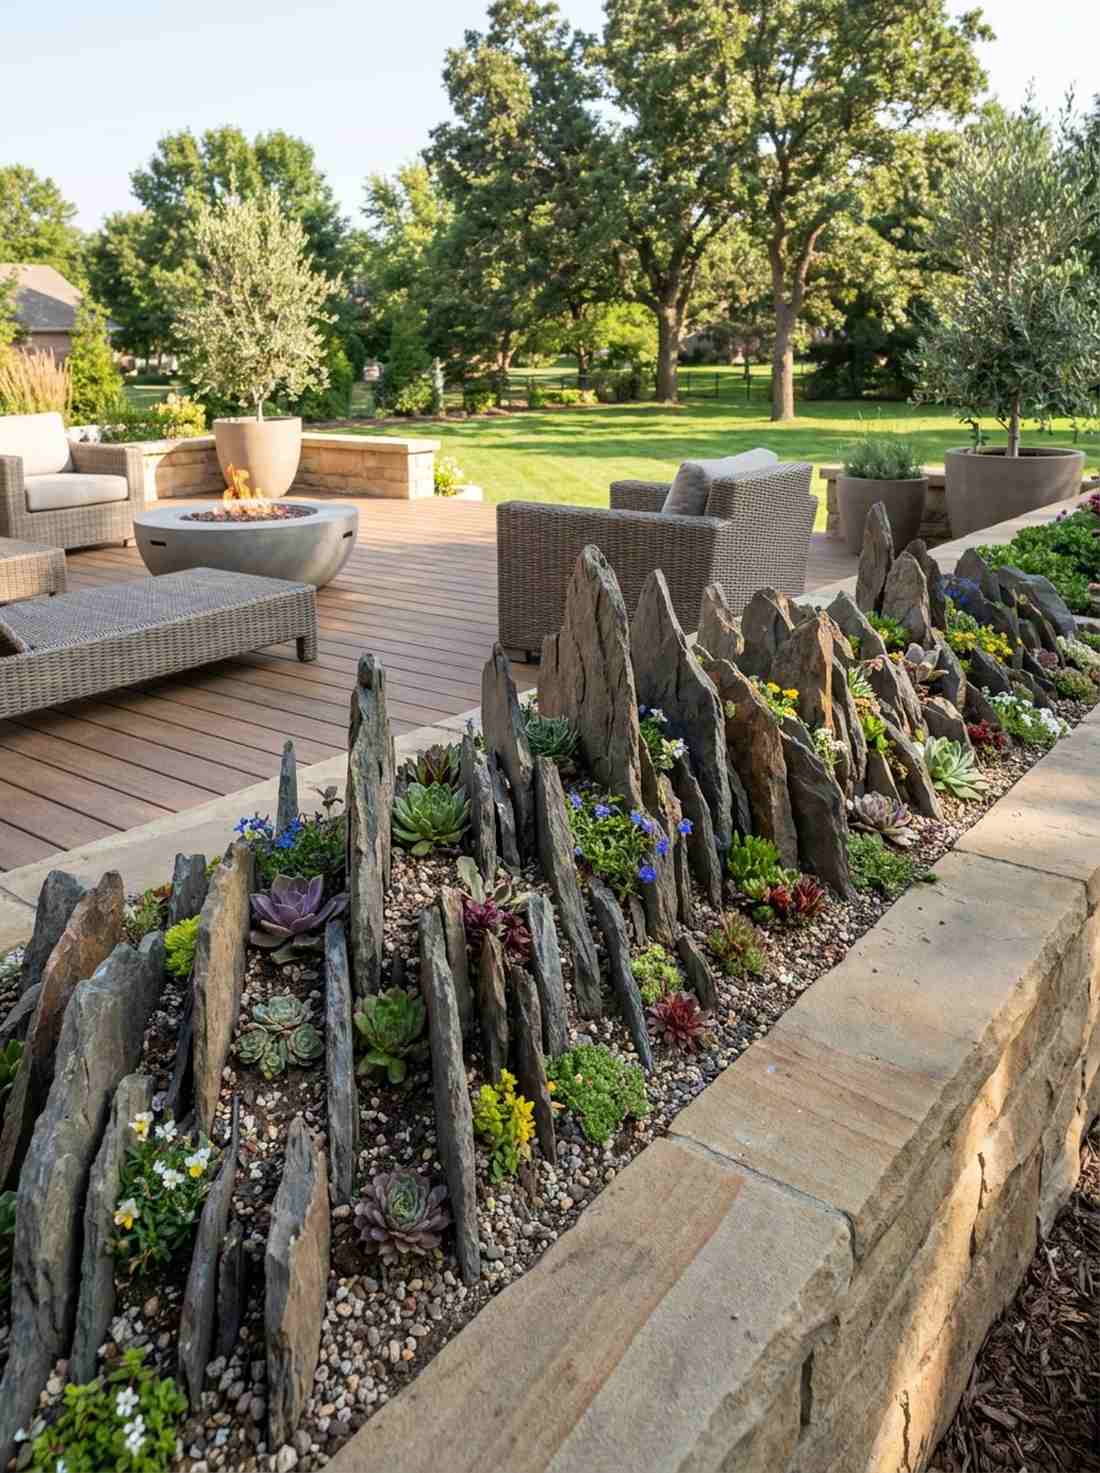
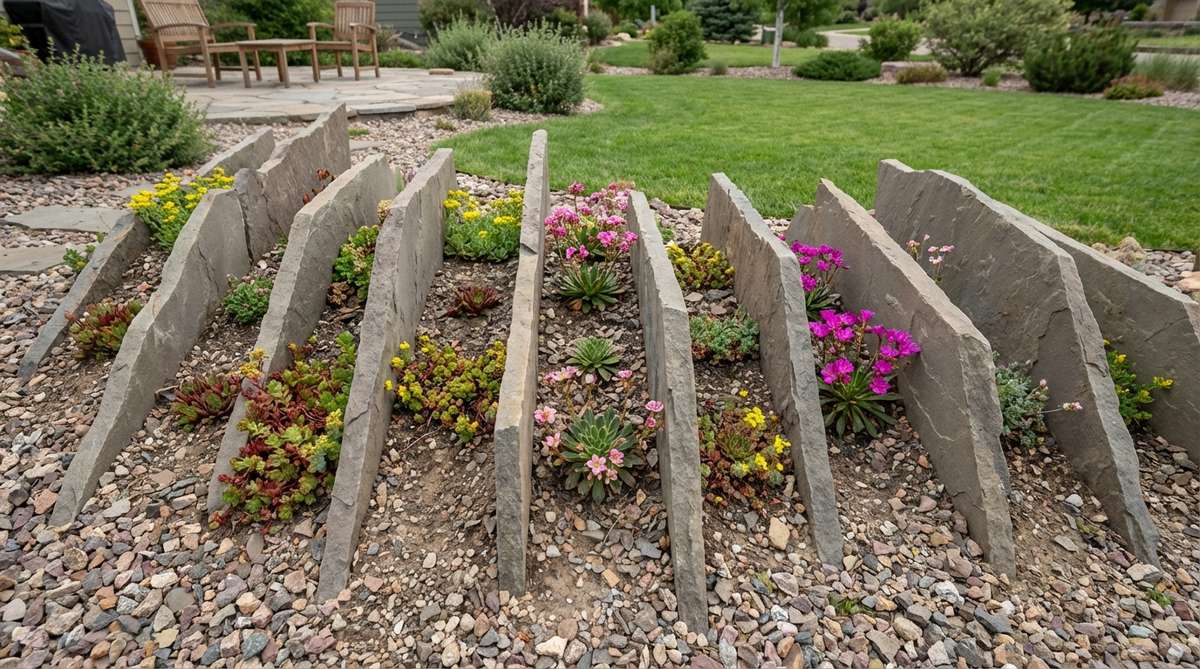
Looks exactly like a micro-mountain range scaling your patio border. A vertical crevice rock display is magnificent for showcasing rare succulents and tiny alpine blossoms.
Sinking thin slabs vertically right next to each other perfectly mimics the harsh, beautiful scree habitats found above the tree line. This layout sneaks a designer-level finish into tiny spaces by creating extreme vertical drama.
Expect to spend around $45–$70 to build this miniature cliff face. A phenomenal choice for small urban balconies.
- Key Materials: Thin vertical shale pieces and gritty soil mix
- Vibe / Style: Vertical, stark, and highly detailed
- Difficulty: Fiddly and requires specialized soil
- Budget Breakdown: Shale slabs: $40 | Gritty Soil: $15
- Creator’s Tip: Use a heavily gravel-based soil mix between the rocks; regular potting soil will hold too much water and kill alpine plants.
- Smart Sourcing: Pre-mixed gritty bonsai/alpine soil (bulk) and miniature garden supplies kits.
43. Stepping Stone Playful Border
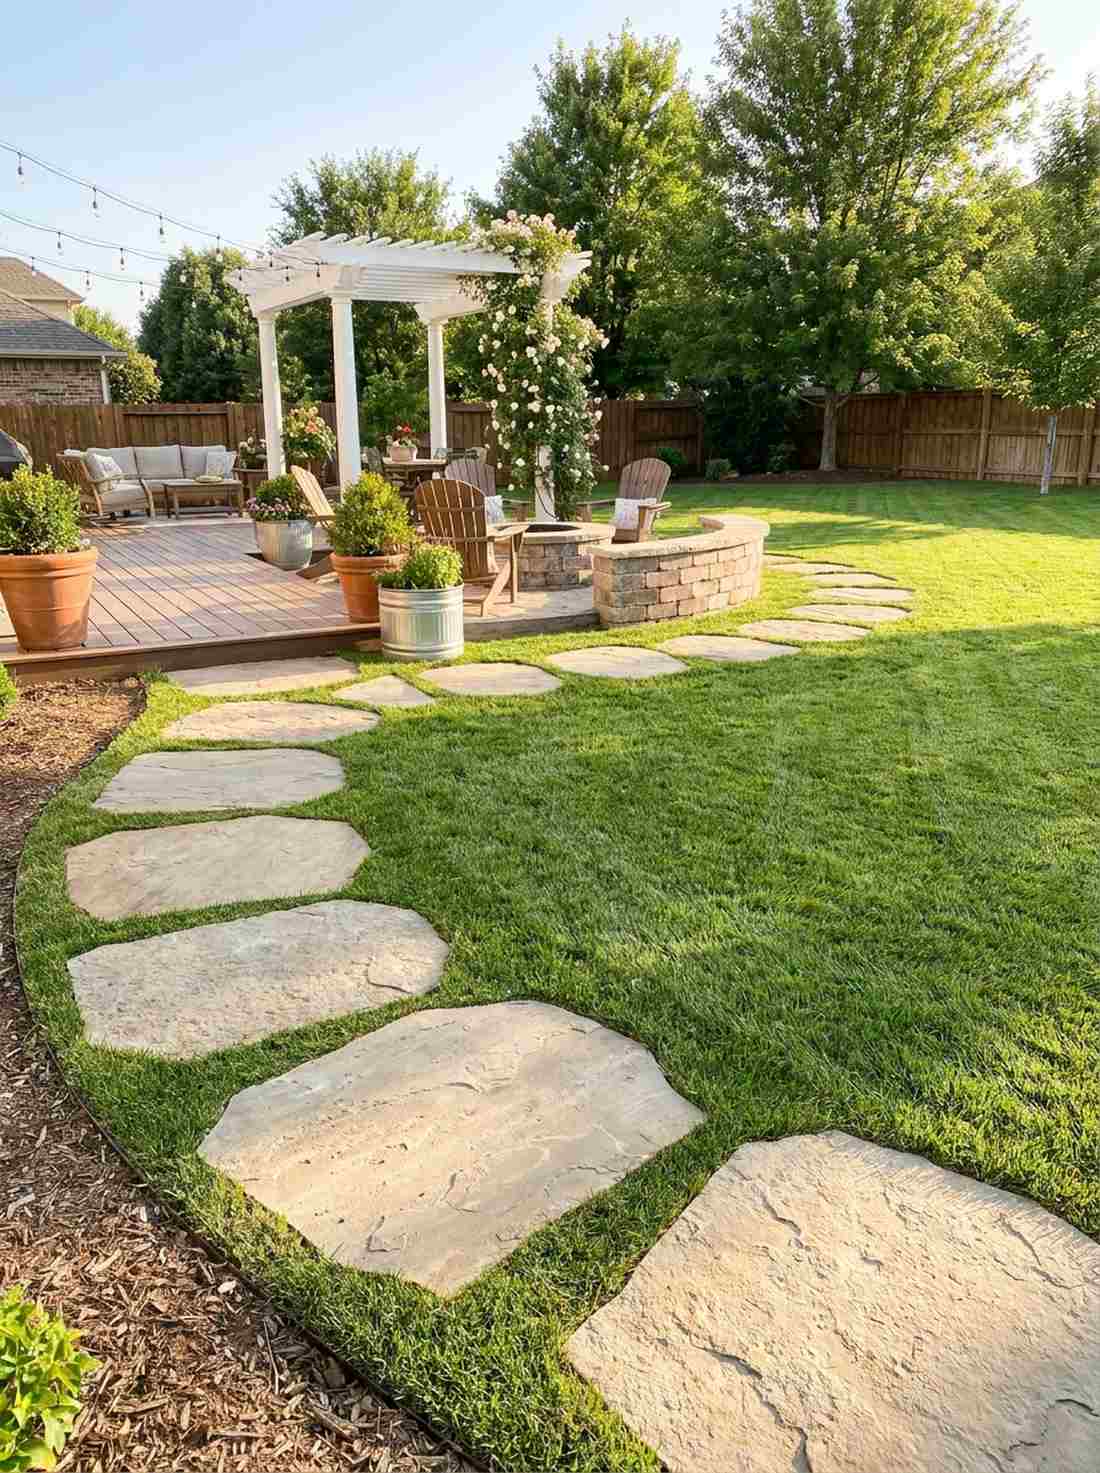
Brings a joyful, interactive energy to a boring flat lawn. A spaced stepping stone perimeter works incredibly well as both a visual boundary and a fun pathway for kids.
Placing oversized slabs exactly one stride apart encourages visitors to literally interact with the landscape instead of just looking at it. It looks far more expensive than a solid concrete walkway while allowing the grass to breathe.
This dual-purpose feature costs roughly $60–$90. Save this if you want to add a playful touch to your backyard!
- Key Materials: 24-inch wide flat paving slabs
- Vibe / Style: Interactive, airy, and inviting
- Difficulty: Requires digging precise shallow holes
- Budget Breakdown: Slabs: $70 | Base Sand: $15
- Creator’s Tip: Have your tallest and shortest family members walk the path normally, then set the stones at the average stride length.
- Smart Sourcing: Large irregular flagstone steppers (pre-cut) and heavy-duty edging trowels.
44. Colored Quartz Stone Accent
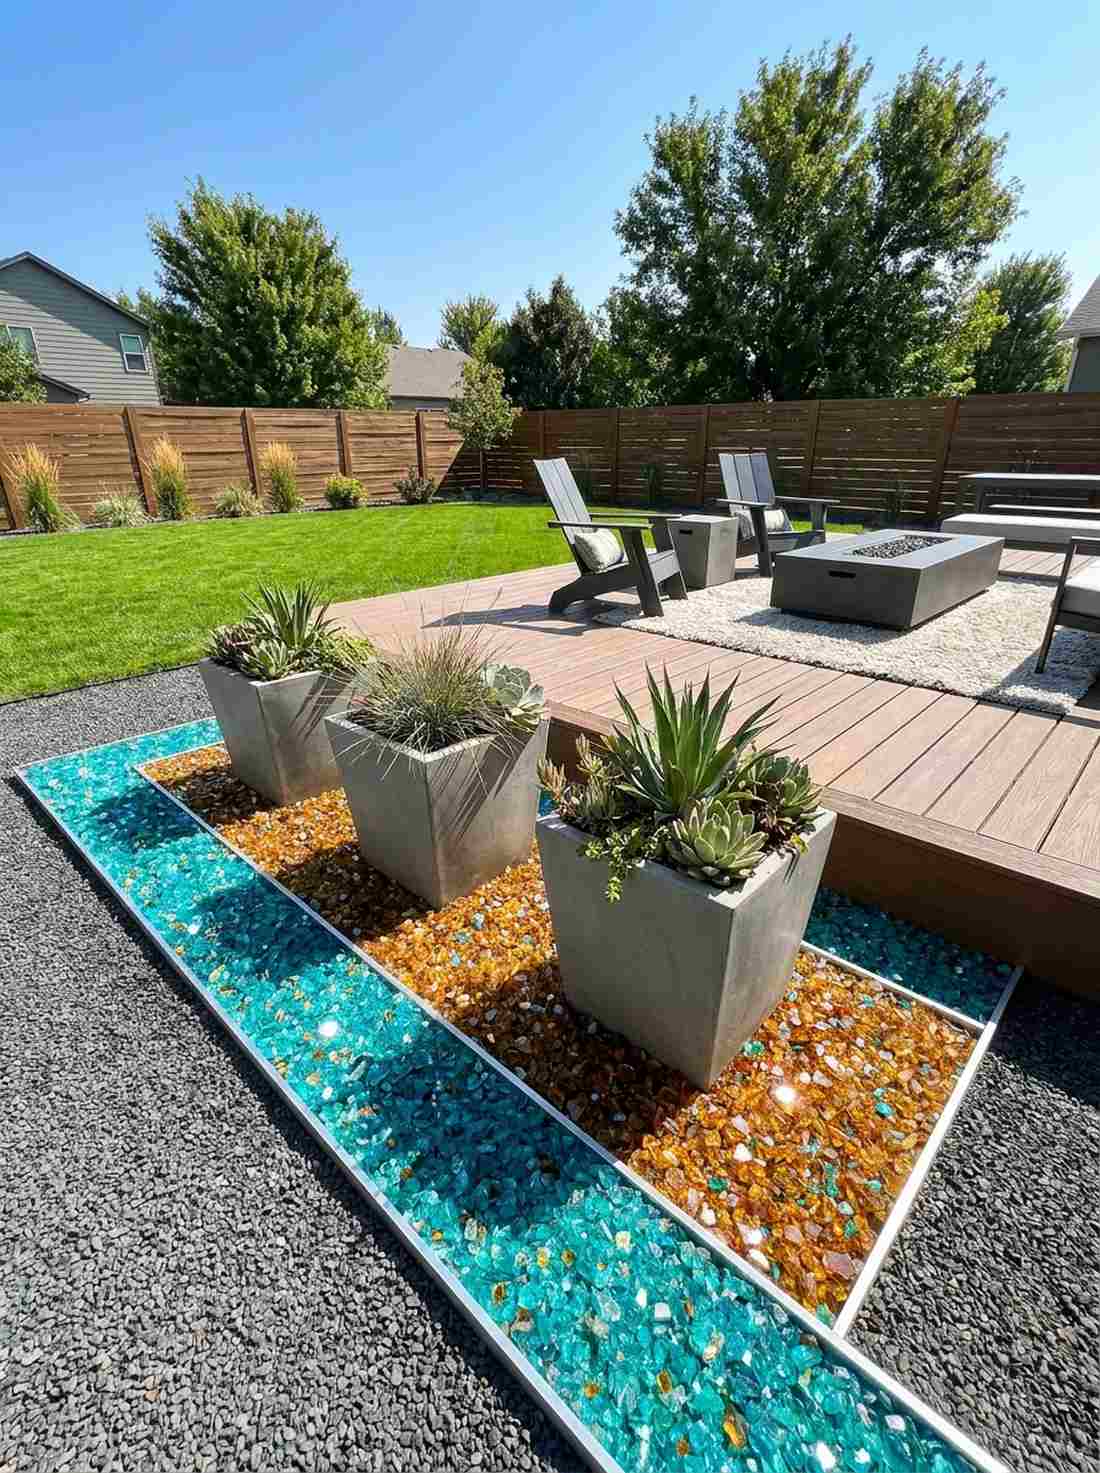
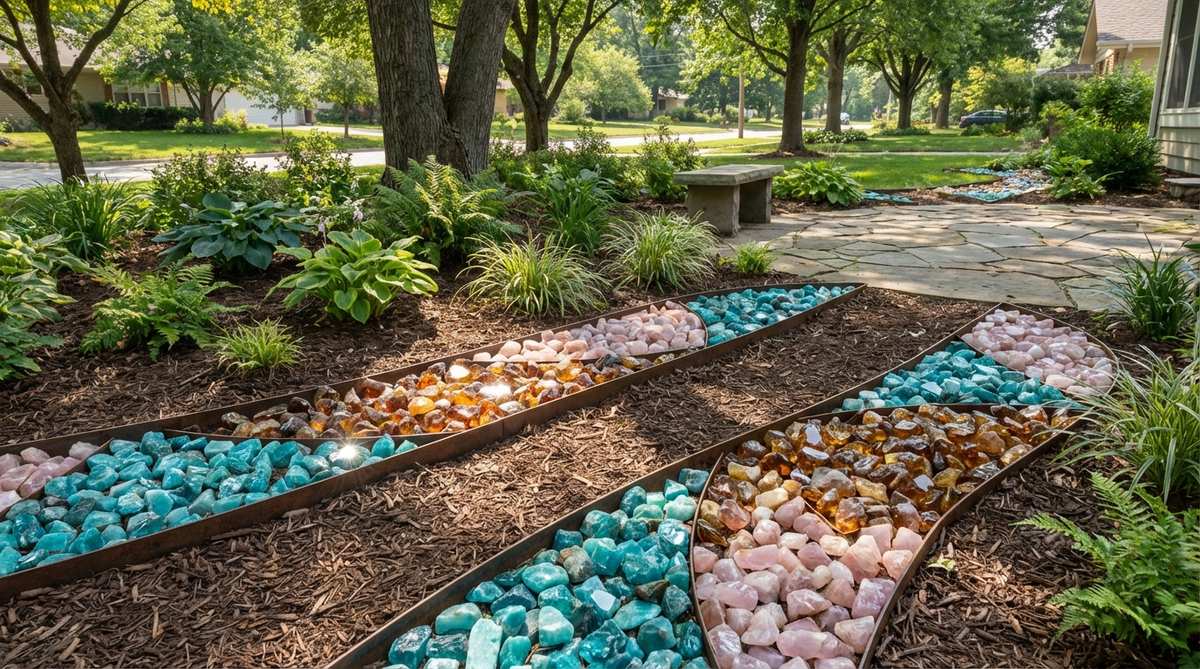
Delivers a brilliant, unexpected flash of jewelry-box color to a muted yard. A vibrant crushed quartz highlight strip is absolutely perfect for framing modern geometric planters.
Replacing boring gray gravel with striking turquoise or amber polished stones completely transforms a dull corner into a vivid focal point. Contained within rigid metal edging, the glossy surface catches the sunlight like broken glass.
You can execute this vibrant upgrade for about $50–$85. Pin this if you are obsessed with high-color modern decor!
- Key Materials: Dyed/polished crushed quartz and rigid edging
- Vibe / Style: Glossy, vibrant, and highly contemporary
- Difficulty: Fast and simple pouring
- Budget Breakdown: Quartz: $60 | Edging: $20
- Creator’s Tip: Only use colored quartz as a 4-inch accent band; using it everywhere looks chaotic and overwhelming.
- Smart Sourcing: UV-coated colored landscaping glass/quartz (bulk) and rigid aluminum border kits.
The final few designs are absolute showstoppers… including one that literally glows after sunset.
45. Fossil Stone Educational Border
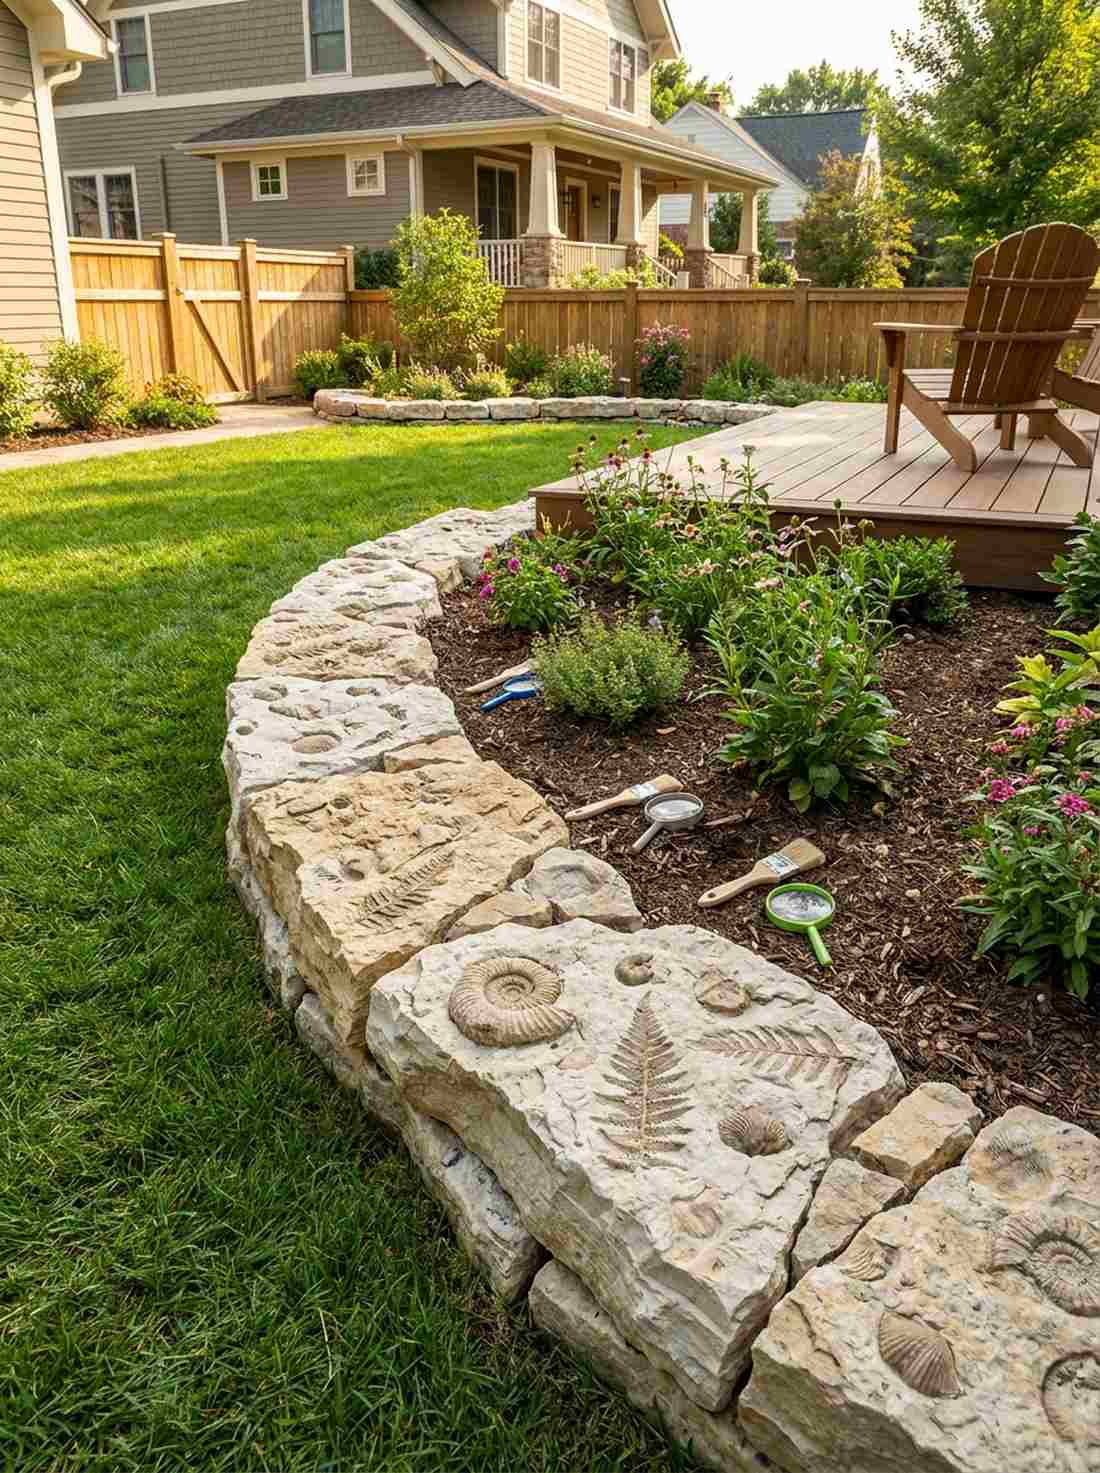
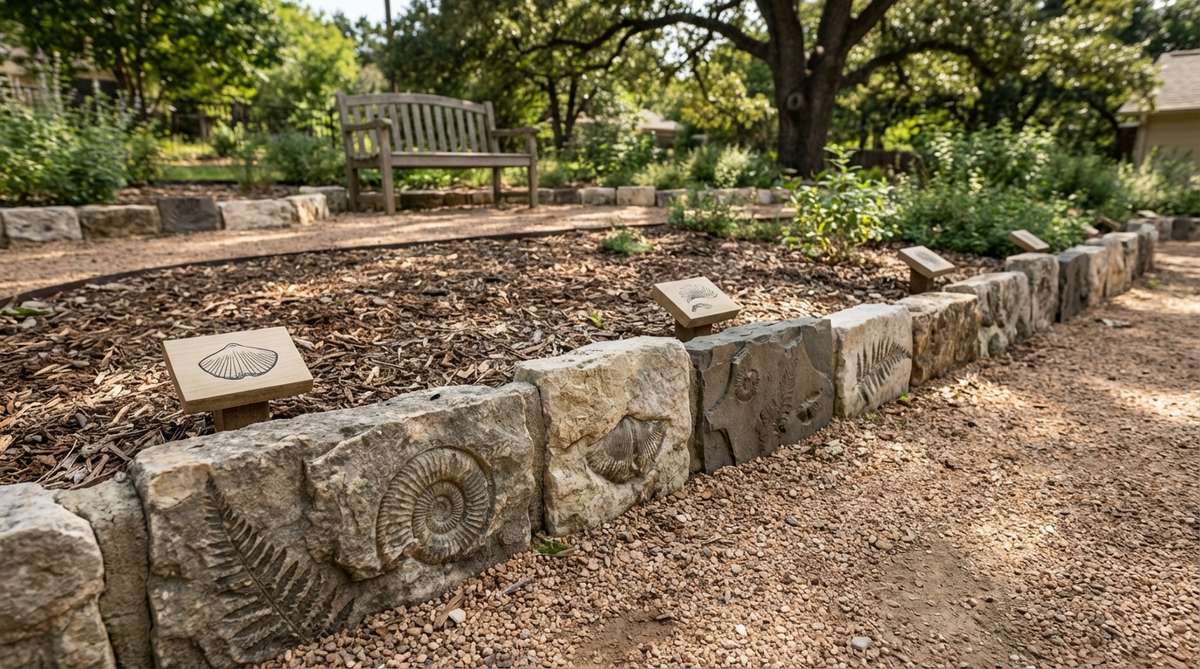
Feels like having a private natural history museum right in your backyard. A limestone border rich with ancient fossils is magnificent for bordering a children’s discovery garden.
Sourcing sedimentary rocks that feature visible fern or shell imprints completely turns a basic landscaping chore into a magical learning experience. It delivers a surprisingly premium look while hiding centuries of geological secrets.
This specialty rock will run about $75–$120 depending on your local quarry. A truly unforgettable yard feature.
- Key Materials: Fossil-bearing limestone or shale chunks
- Vibe / Style: Educational, ancient, and highly unique
- Difficulty: Standard stone laying
- Budget Breakdown: Specialty Stone: $90 | Sand base: $10
- Creator’s Tip: Wash the stones thoroughly with a stiff brush and water to make the hidden fossil imprints pop visually.
- Smart Sourcing: Natural fossilized shale accent stones and stiff-bristled masonry brushes.
46. Glow-in-Dark Stone Pathway Edge

Radiates a magical, bioluminescent glow straight out of a sci-fi movie. A photoluminescent pebble boundary is absolutely stunning for outlining walkways without needing a single electrical wire.
Mixing glowing resin rocks into standard gravel absorbs UV rays all day and violently beams blue or green light all night. This clever trick sneaks a designer-level finish into your nightscape while acting as a brilliant safety feature.
Expect to spend around $40–$70 for a solid glowing run. Pin this to your ultimate patio party inspiration board!
- Key Materials: Phosphorescent resin pebbles mixed with white gravel
- Vibe / Style: Magical, futuristic, and highly practical
- Difficulty: Just scatter and enjoy
- Budget Breakdown: Glow Pebbles: $45 | White Gravel: $15
- Creator’s Tip: Stick to blue or green glowing rocks; the purple and red variants fade completely after only two hours.
- Smart Sourcing: Premium glow-in-the-dark resin pebbles (bulk pack) and bright white marble chips.
47. Petrified Wood Stone Border
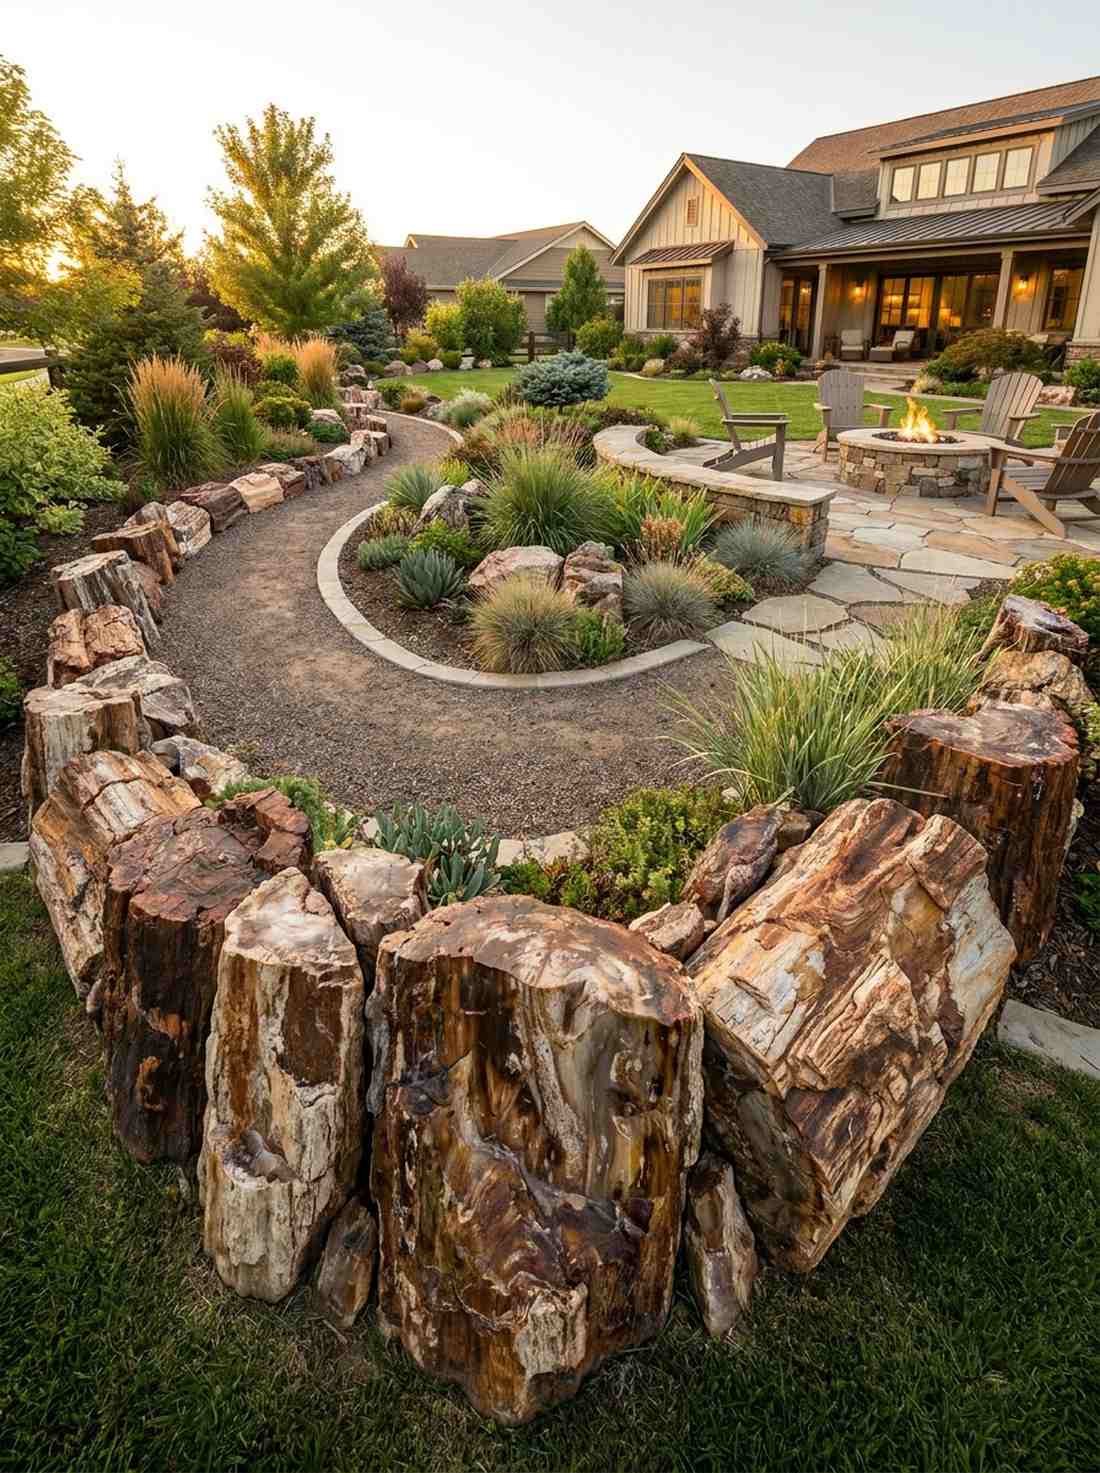
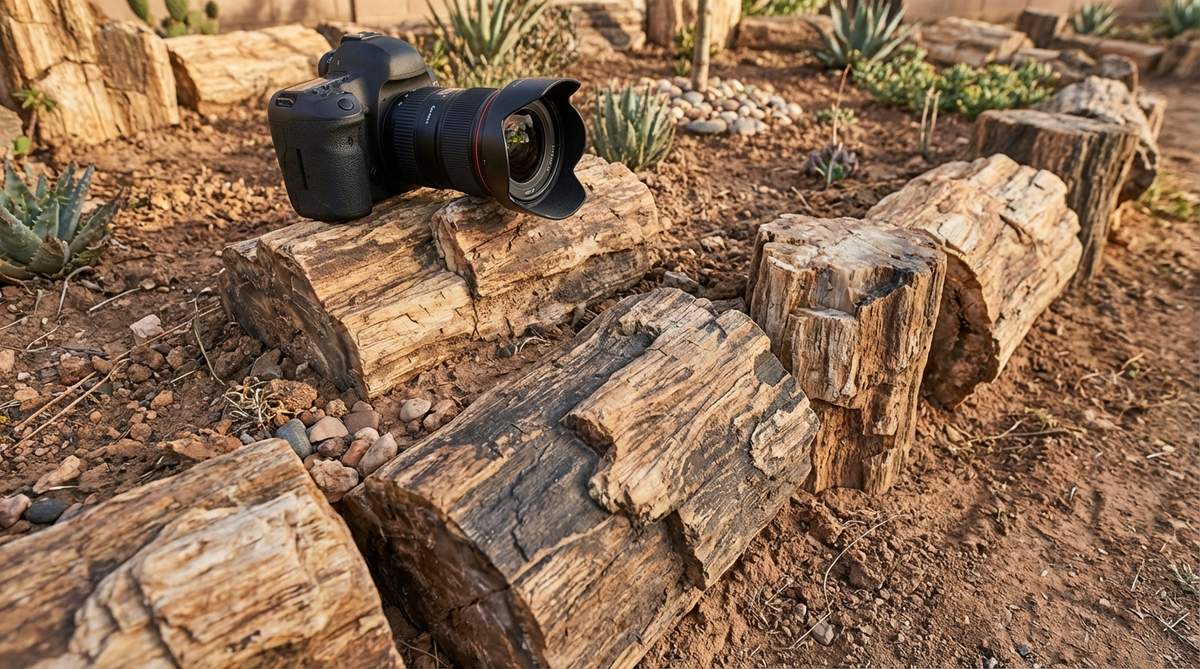
Looks like a surreal blend of a deep forest and a rocky desert. A fossilized wood chunk perimeter is breathtaking when used as an accent feature in high-end rock gardens.
Using millions-of-years-old mineralized wood gives you the stunning organic grain of a tree with the indestructible durability of solid quartz. This layout completely elevates terrarium accessories aesthetics to a massive outdoor scale.
Sourcing real petrified pieces will cost roughly $90–$150 for a small section. A luxurious, conversation-starting masterpiece.
- Key Materials: Authentic petrified wood fragments
- Vibe / Style: Rare, museum-quality, and deeply textured
- Difficulty: Simple placement, expensive sourcing
- Budget Breakdown: Petrified Wood: $120 | Weed Fabric: $10
- Creator’s Tip: Use these only at high-visibility corners or entranceways to maximize visual impact without bankrupting your budget.
- Smart Sourcing: Authentic petrified wood landscape accents and high-grade terrarium accessories kits.
Transform Your Landscape with Strategic Stone Selection
Executing professional stone garden edging completely redefines the boundaries of your outdoor space. Whether you are using budget-friendly bulk gravel or investing in premium UV-coated paver kits, these 47 distinct techniques guarantee a high-end, designer-level finish. Skip the flimsy plastic alternatives, grab your professional hardscaping tools, and use these exact material breakdowns to build a permanent, beautiful perimeter that will elevate your property’s value for decades to come.
Frequently Asked Questions
How deep should I dig for stone garden edging?
To achieve a professional finish that won’t ruin your hard work by spring, you must excavate 3-6 inches deep. Small stones need a 3-inch trench, while heavy boulders require 6 inches to survive frost heave. Always invest in commercial-grade leveling sand (bulk bags) for the base layer to guarantee perfect drainage and absolute structural stability.
What prevents weeds from growing between edging stones?
Blocking weeds starts from the bottom up. You absolutely must lay down heavy-duty woven landscape fabric before dropping a single stone. For the top gaps, skipping cheap dirt and tightly packing the joints with UV-resistant polymeric locking sand completely suffocates weed seeds while cementing the rocks together permanently.
Can I install stone edging on slopes without mortar?
Yes, dry-stacking works beautifully on slopes up to a 10% grade if you strategically tilt the stones backward into the hill. For anything steeper, you’ll save money in the long run by using professional pre-mixed outdoor mortar to lock the wall together, completely eliminating the risk of a dangerous and expensive muddy collapse.
How much stone do I need for garden edging projects?
Calculate your linear footage and multiply by the stone’s width. Always over-order by at least 10% because cutting mistakes happen. To keep costs low, buy pre-palletized stone border kits or bulk bags rather than individual rocks from a big-box store, which usually slashes your overall material budget by 30%.
What stone types last longest in freeze-thaw climates?
If you live in a harsh winter zone, absolutely avoid soft limestone or sandstone, which will crack and shatter. You must upgrade to ultra-dense granite, quartzite, or premium machine-cut bluestone strips. Using dense, non-porous materials combined with flexible border spikes ensures your edging survives decades of brutal ice expansion.
Should stone edging sit above or flush with lawn level?
Installing flush borders is the ultimate time-saving hack. Sinking flat concrete step stones exactly 1/4 inch below the grass lets your mower wheels glide right over, totally eliminating the need to use a string trimmer. Raised borders look fantastic but require more maintenance, so choose based on how much you value your weekend free time!