
Strategic decor for small backyard layouts instantly double your perceived outdoor square footage. Skipping local hardware stores for premium online starter kits yields a stunning designer finish. Master these proven blueprints to unlock massive functionality in compact retreats.
Design Snapshot: High-End Principles
- Vertical Expansion: Build upward using modular walls, premium fences, and hanging structures to triple space without consuming ground area.
- Multi-Functionality: Select commercial-grade furniture serving dual purposes—weatherproof storage benches and convertible layout tables.
- Strategic Zoning: Divide yards into distinct aesthetic areas using contrasting textures, level changes, and premium border edgings.
- Light Reflection: Incorporate high-lumen solar tech, shatterproof mirrors, and strategic smart lighting to virtually expand boundaries.
Vertical Growing Structures That Reclaim Wasted Space
1. Wall-Mounted Pocket Planters
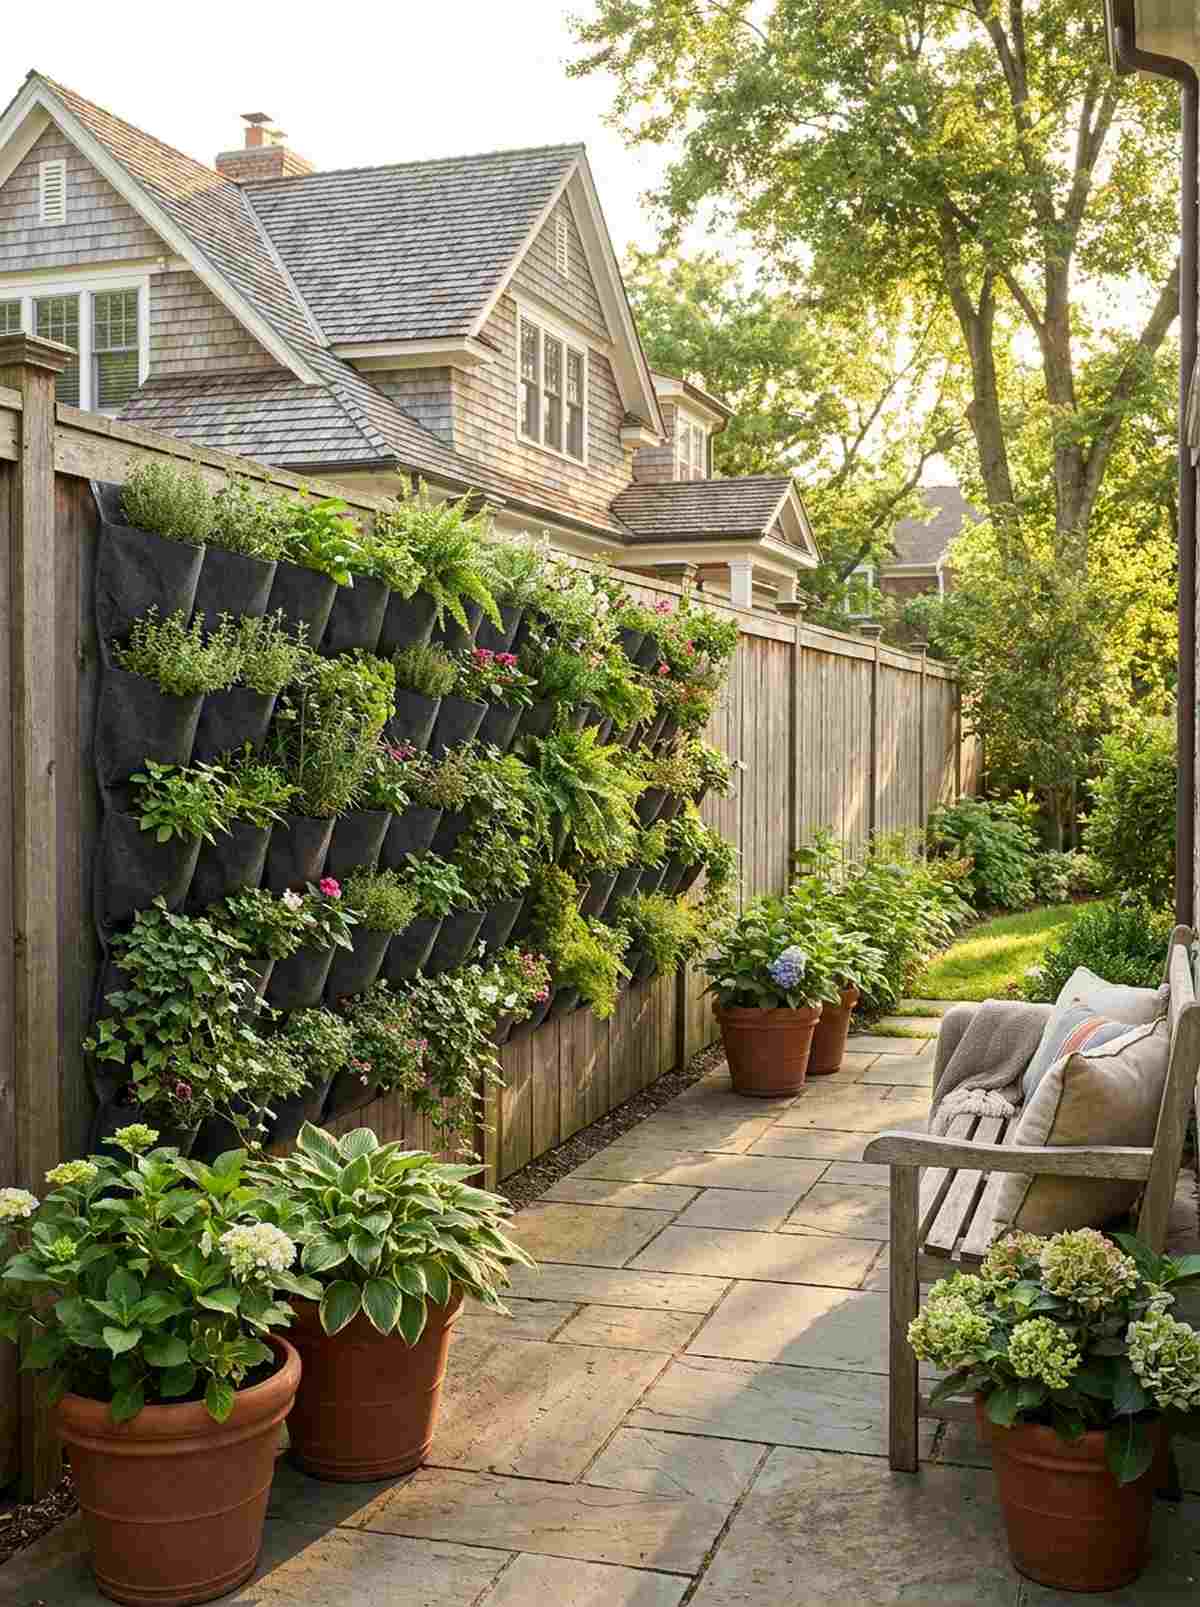
This vertical fence garden setup feels like stepping into a lush, secret botanical retreat. It works exceptionally well for blank, uninspired side-yard walkways where traditional planting is impossible.
Most homeowners leave their boundaries bare, but layering fabric modules delivers a surprisingly premium look. Utilizing heavy-duty miniature garden supplies ensures your herbs and trailing vines thrive without root rot.
You can easily pull this off for around $35–$50. Pin this if you’re planning a small space upgrade this weekend!
- Key Materials: Weatherproof felt planting pockets
- Vibe / Style: Lush botanical sanctuary
- Difficulty: Easy 20-minute setup
- Budget Breakdown: Pockets: $25 | Soil & Starters: $20
- Creator’s Tip: Line the bottom of each pouch with a coffee filter to prevent soil loss during heavy rain.
- Smart Sourcing: heavy-duty UV-coated vertical planter bags (bulk pack) and pre-mixed moisture-control potting soil
2. A-Frame Trellis Gardens
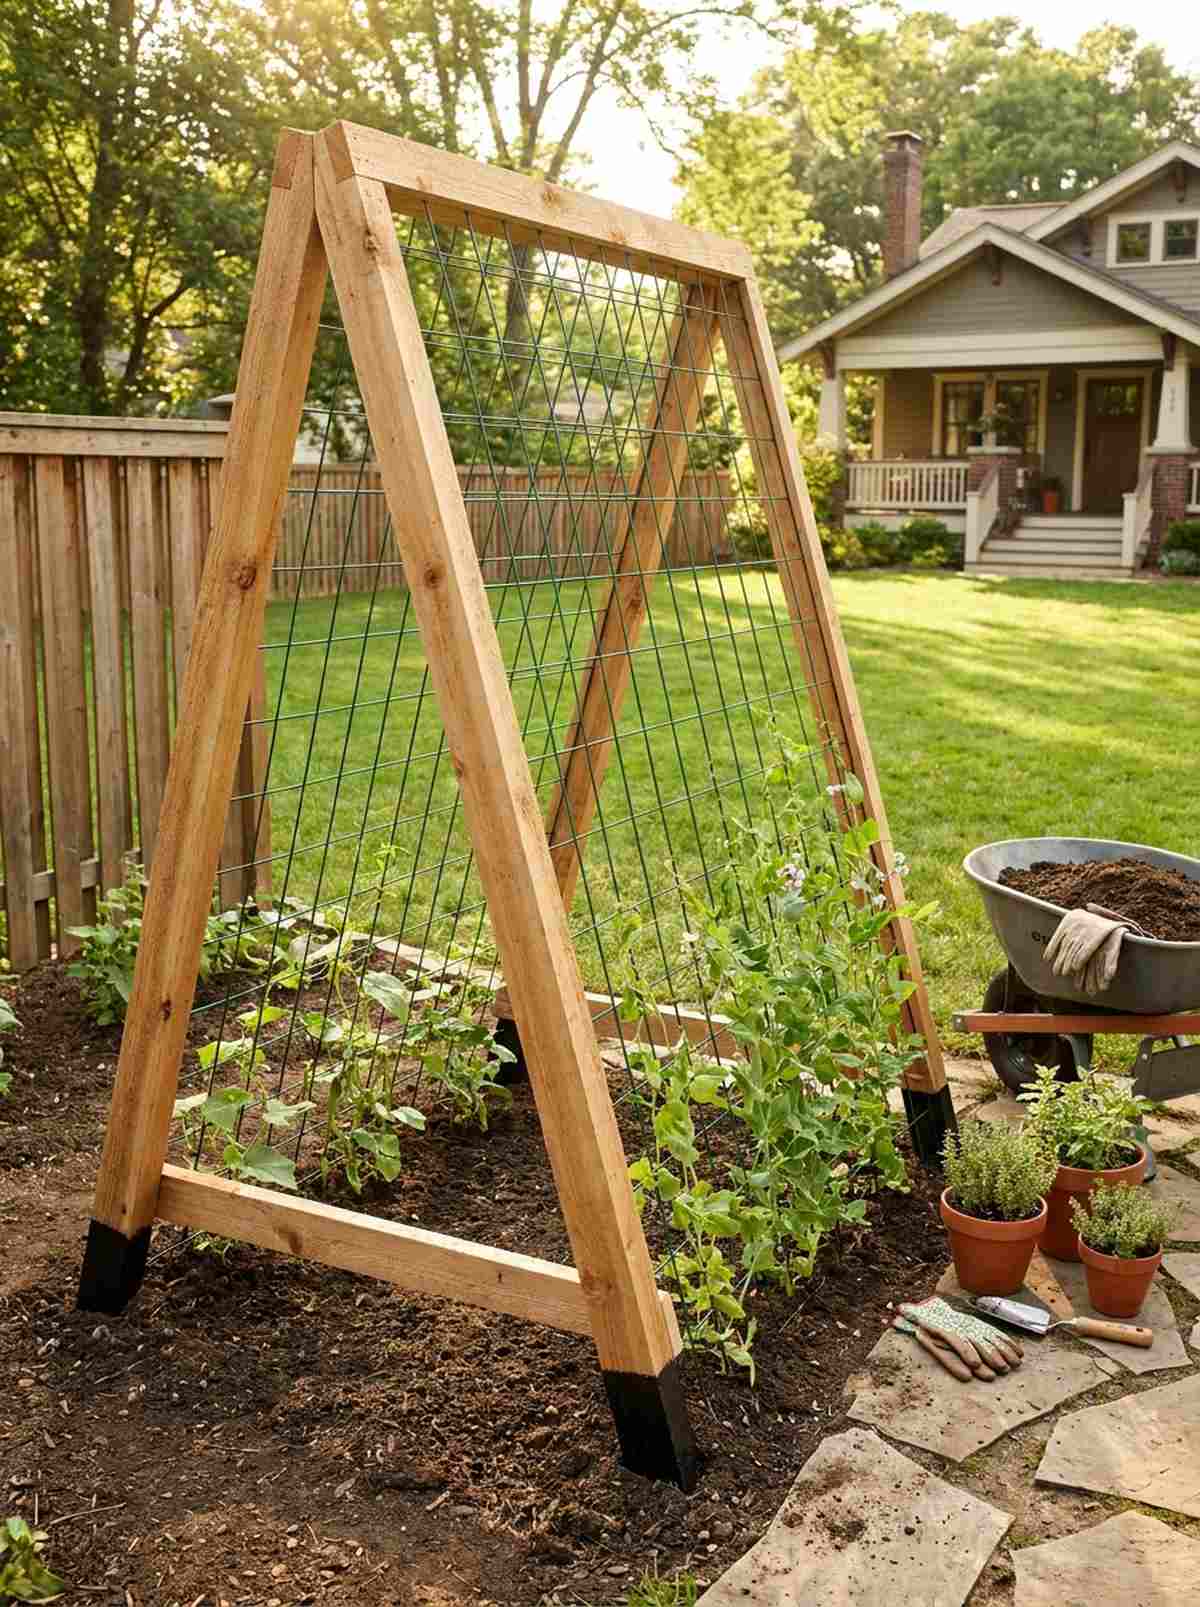
An angled geometric trellis display brings a vibrant, cottage-core charm right to your boundary lines. Perfect for splitting a shared yard while maintaining a breezy, sunlit aesthetic.
While flat trellises look cheap, an A-frame structure creates an architectural focal point that instantly elevates the area. Integrating coated garden wire kits allows climbing vegetables to grip effortlessly.
Expect to spend about $45 to complete this structure. It’s a fast upgrade that completely changes the vibe of your lawn.
- Key Materials: Cedar beams and coated mesh
- Vibe / Style: Organic rustic farmstead
- Difficulty: Moderate afternoon project
- Budget Breakdown: Wood: $30 | Hardware: $15
- Creator’s Tip: Seal the bottom wood legs in liquid rubber before burying them to prevent early rotting.
- Smart Sourcing: pre-cut cedar A-frame joint brackets and rust-proof nylon trellis netting (bulk roll)
3. Tiered Hanging Basket Columns
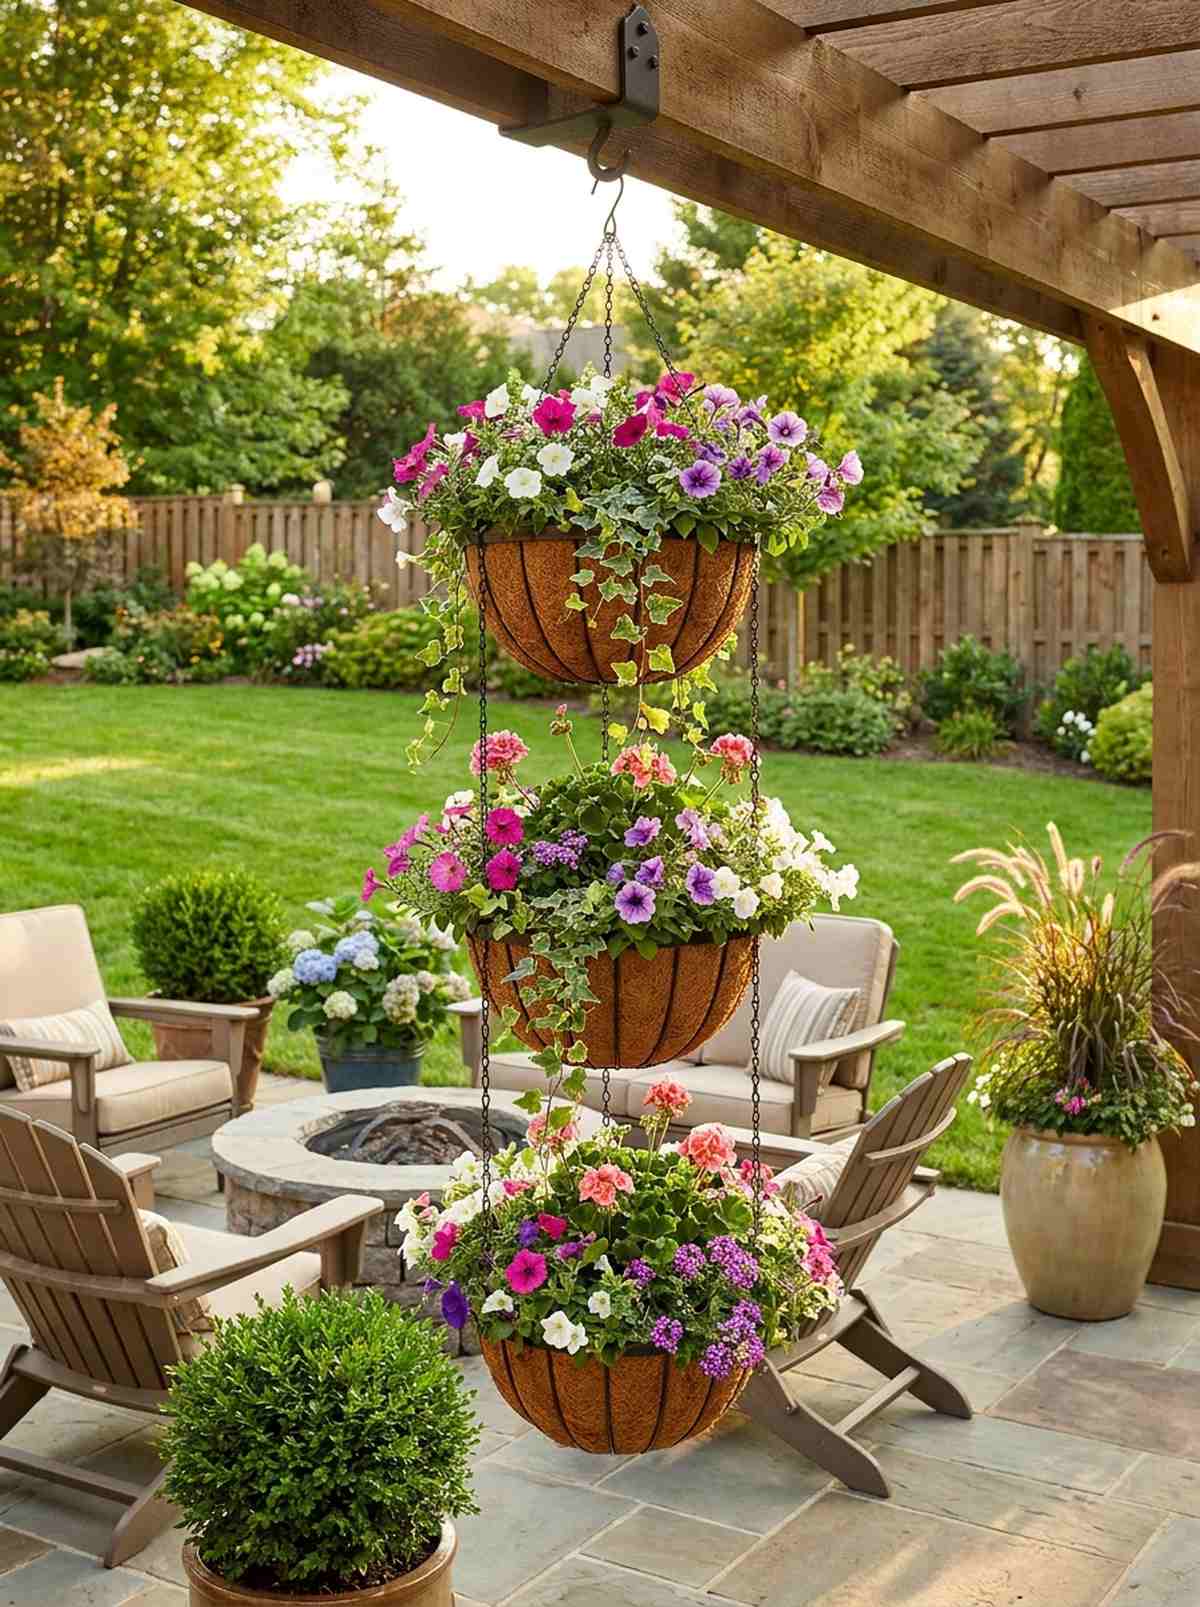
A cascading hanging floral column arrangement feels straight out of an upscale boutique patio. This setup is an absolute lifesaver for small apartment balconies craving vibrant pops of color.
Avoiding messy ground pots for suspended tiers gives a designer-level finish that maximizes overhead space. Swapping basic plastic for premium terrarium accessories or coco-coir liners creates instant luxury.
This layout runs approximately $60 total. Save this to your DIY outdoor decor board for spring inspiration!
- Key Materials: Tiered metal chains and coco-liners
- Vibe / Style: English garden elegance
- Difficulty: Easy no-tool setup
- Budget Breakdown: Baskets: $40 | Mounting hooks: $20
- Creator’s Tip: Add water-retaining gel crystals to the soil so you only have to water them twice a week.
- Smart Sourcing: heavy-duty carbon steel shepherd hooks and pre-molded coco coir basket liners (3-pack)
4. Ladder Shelf Gardens
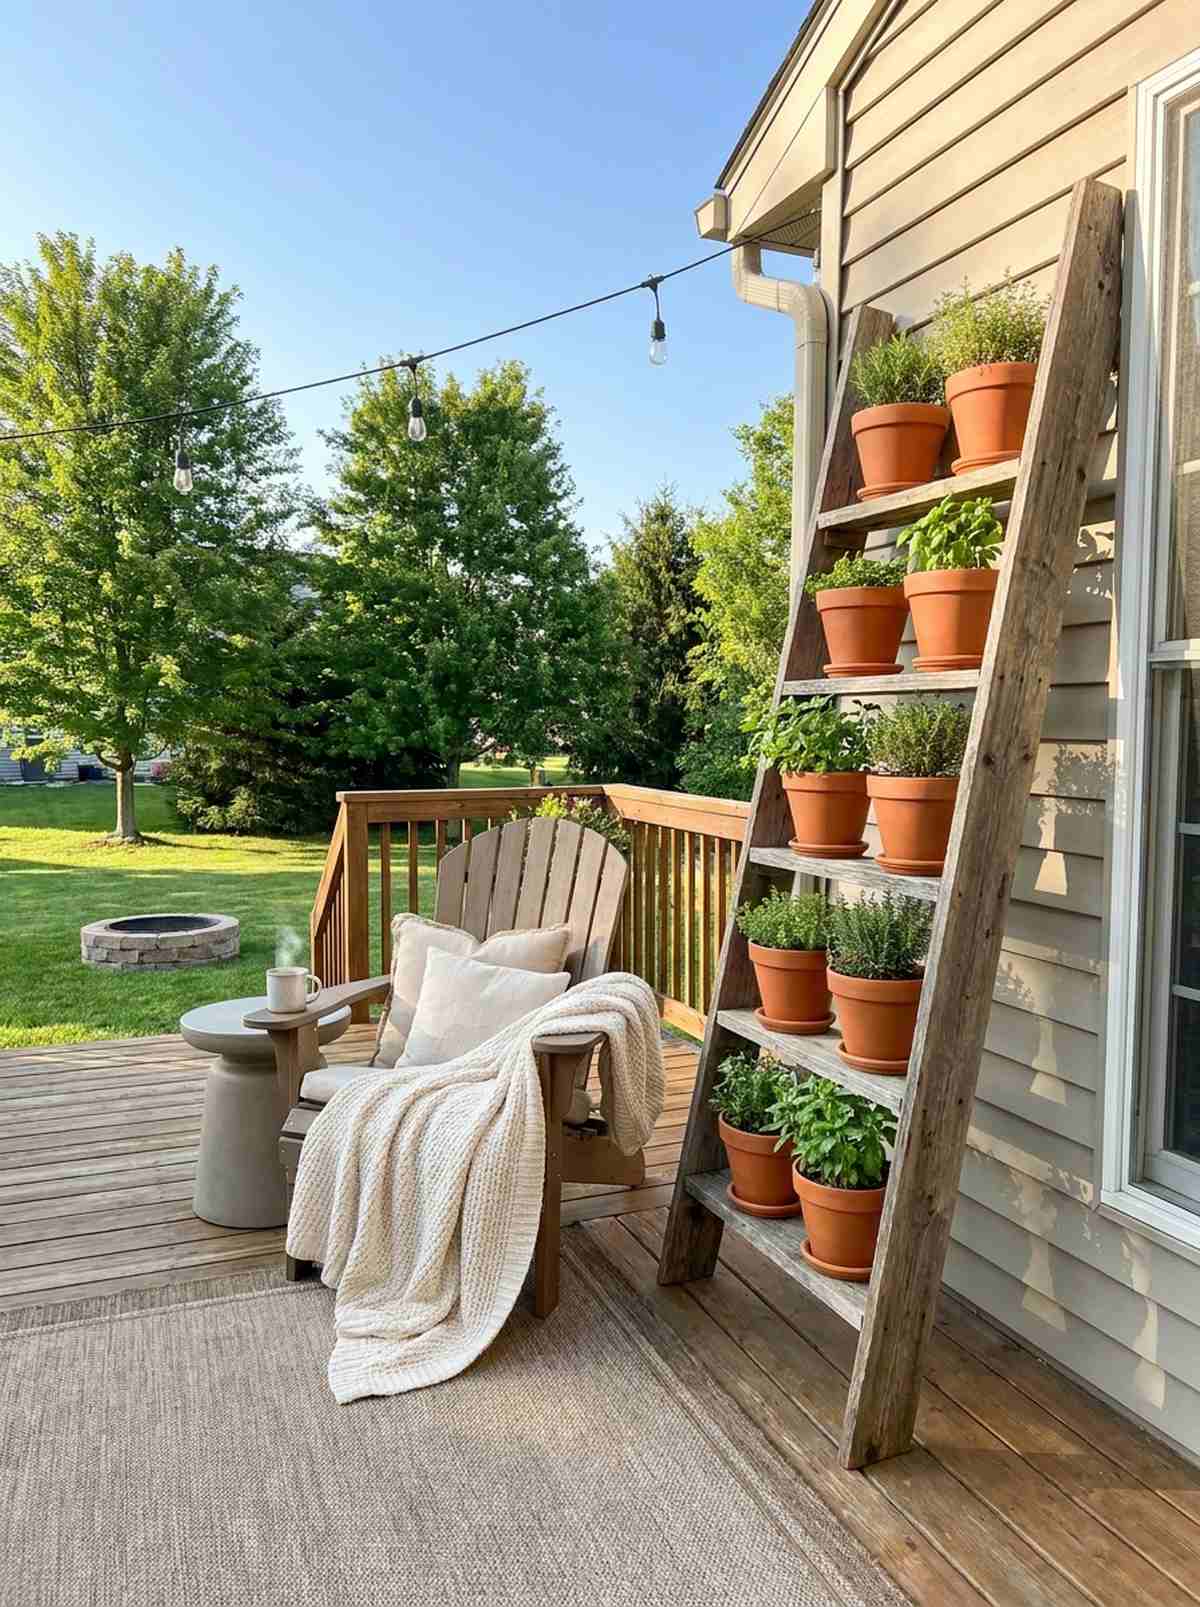
A leaning rustic ladder plant stand feels like a cozy farmhouse reading nook brought outdoors. It’s the ultimate solution for styling tight deck corners without blocking foot traffic.
Rather than cluttering tables, stacking greenery vertically delivers a high-end curated aesthetic. By sourcing pre-treated tiered shelves, you bypass the headache of waterproofing raw wood yourself.
You can set this up in minutes for under $80. Highly recommended for a quick weekend win.
- Key Materials: Leaning wooden ladder shelf
- Vibe / Style: Boho-chic patio retreat
- Difficulty: Beginner friendly
- Budget Breakdown: Shelf: $55 | Decorative pots: $25
- Creator’s Tip: Group identical terra cotta pots on the rungs for a cohesive, minimalist look rather than mismatched ceramics.
- Smart Sourcing: weather-treated folding ladder shelves and shatterproof acrylic display pots (bulk pack)
This next setup is ridiculously cheap but looks like a $1,000 custom landscape display…
5. Gutter Garden Systems
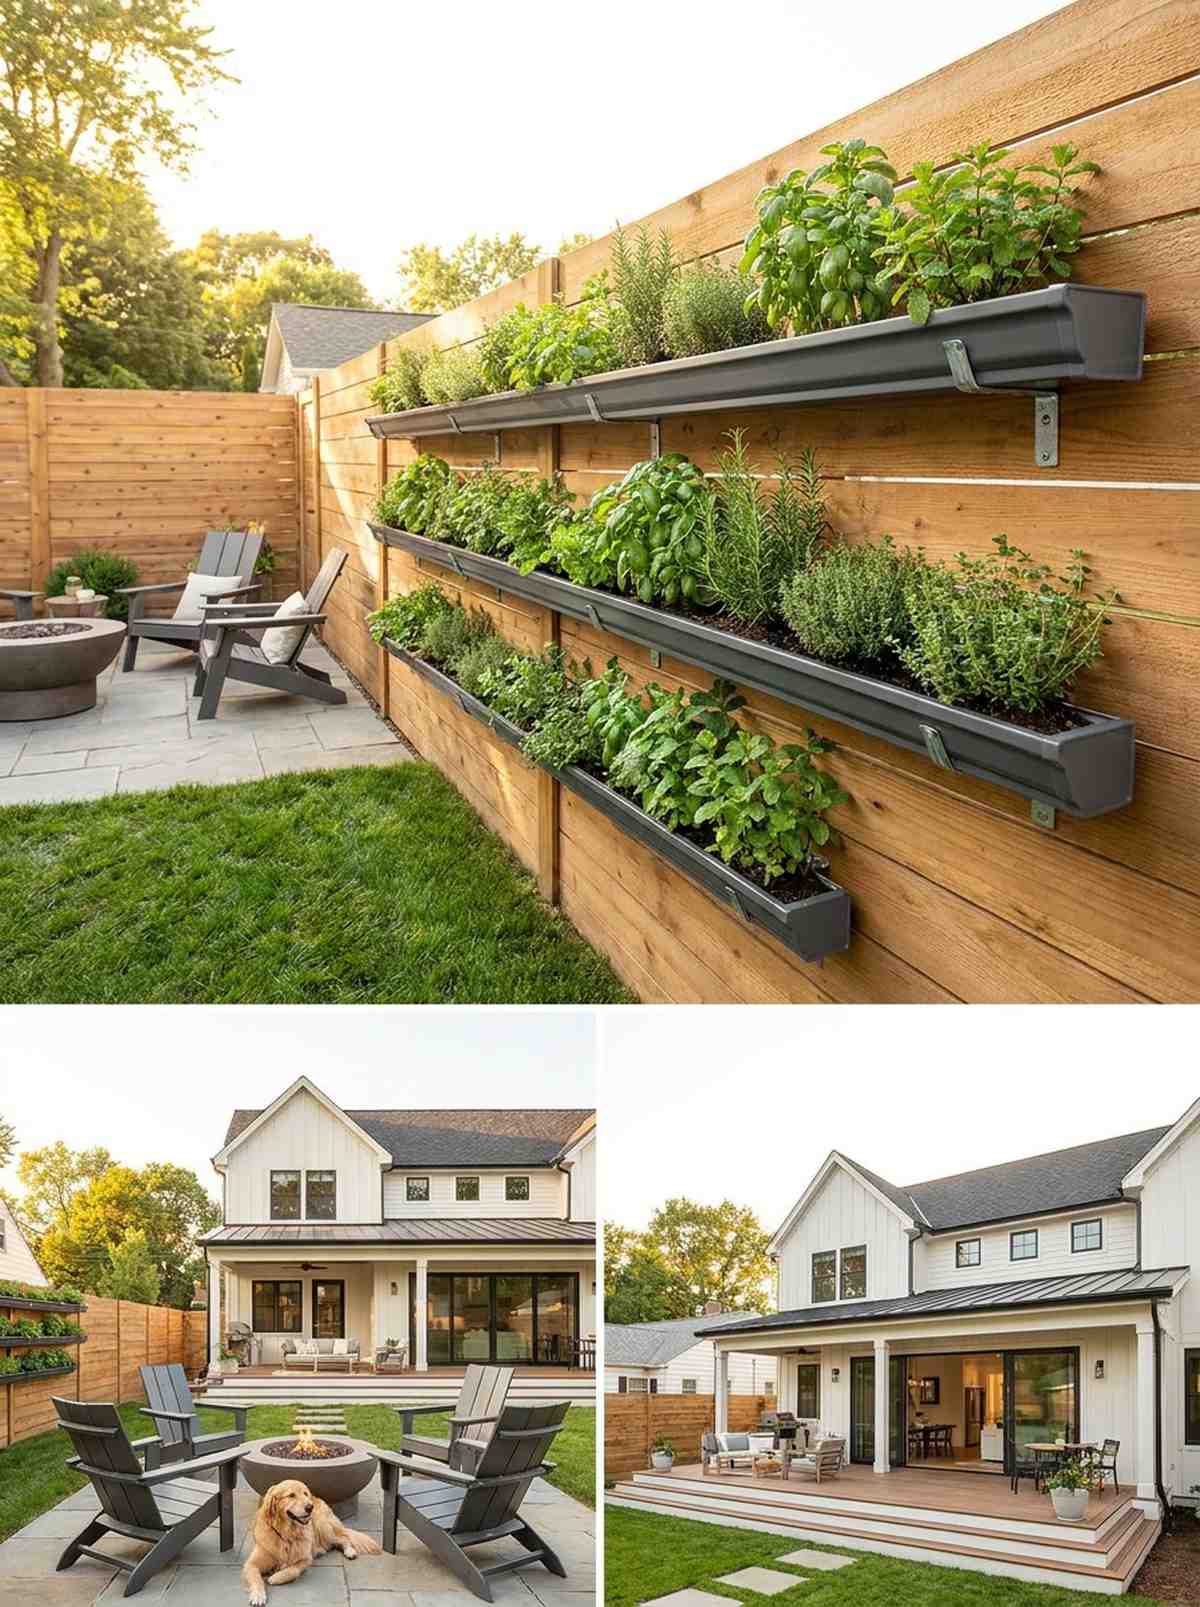
A sleek horizontal fence planter channel feels refreshingly modern and highly organized. It acts as the perfect functional border for a narrow pet-friendly backyard.
Repurposing construction materials sounds risky, but vinyl channels look far more expensive than they are when capped correctly. Using a proper outdoor sealant kit stops leaks and protects your structural fence.
This custom build only costs about $25 per row. Pin this if you want an endless supply of fresh backyard herbs!
- Key Materials: Vinyl rain gutters and end caps
- Vibe / Style: Sleek functional modernism
- Difficulty: Requires basic drill skills
- Budget Breakdown: Gutters: $15 | Brackets: $10
- Creator’s Tip: Drill drainage holes exactly every 6 inches to ensure root systems never sit in stagnant water.
- Smart Sourcing: snap-on gutter end caps (multi-pack) and galvanized rust-proof mounting brackets
6. Trellis Archways
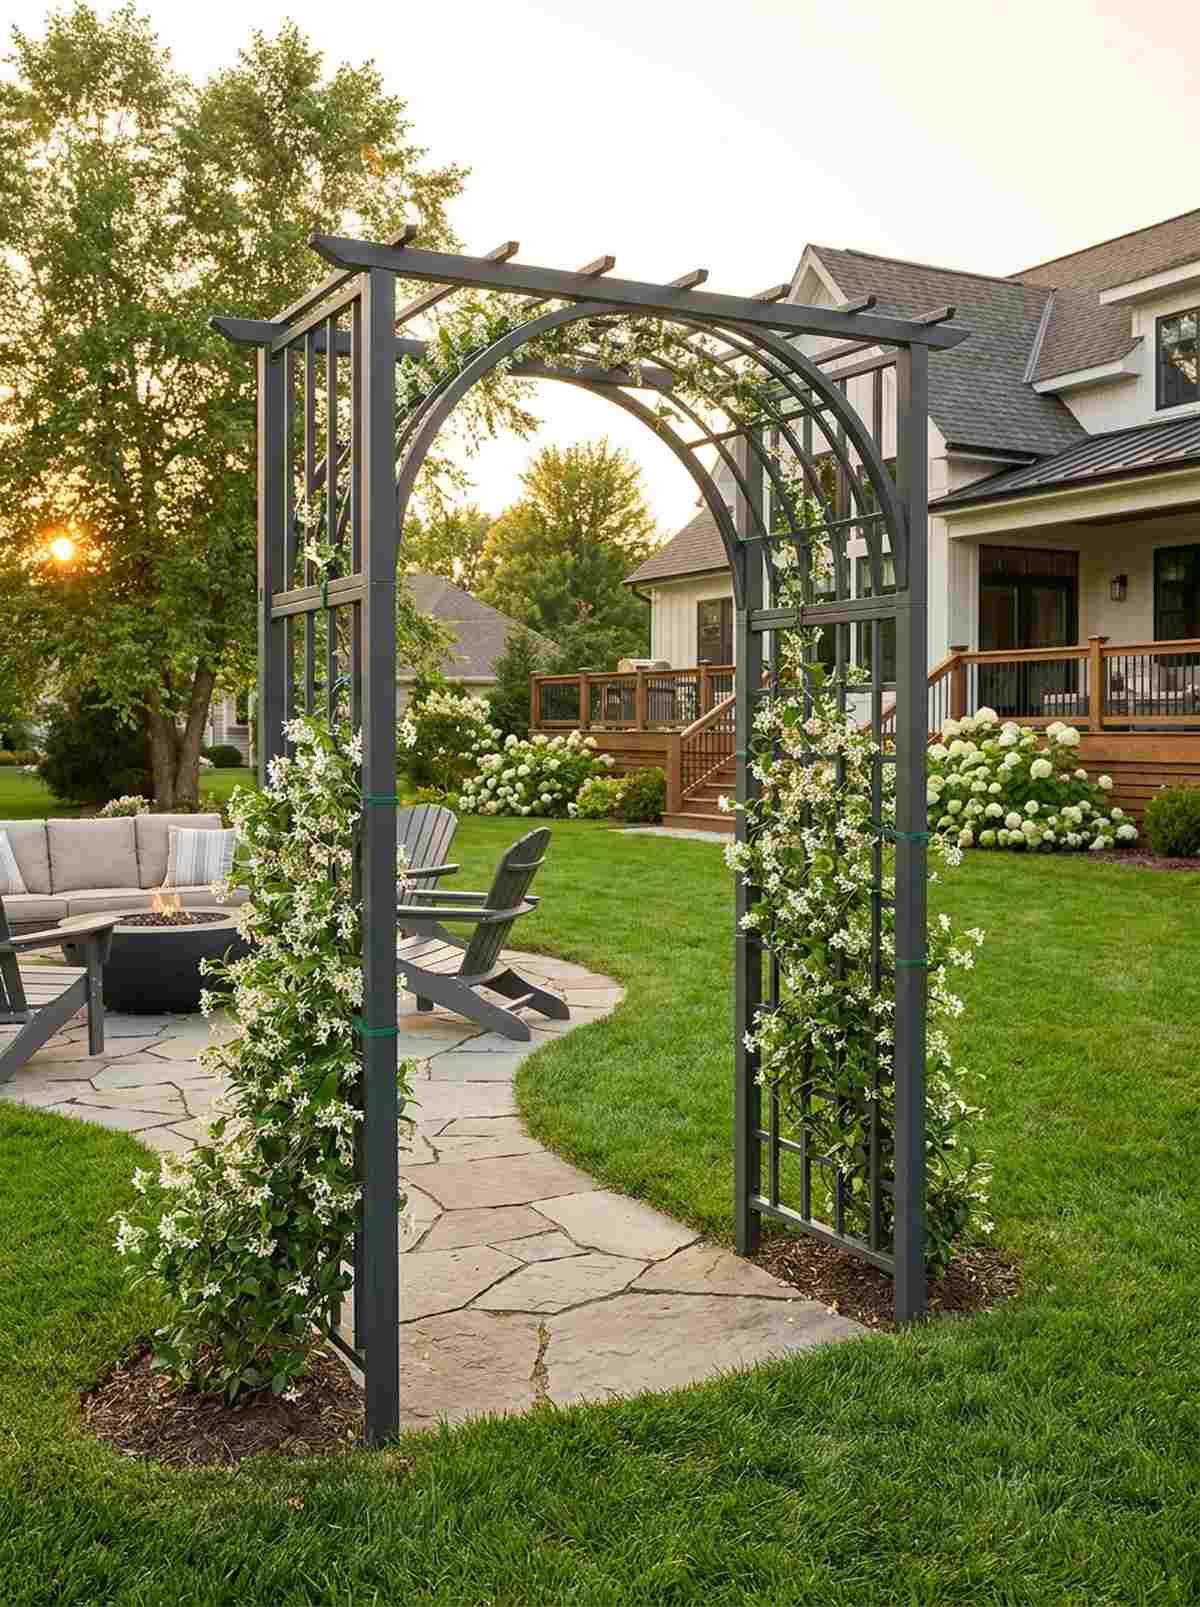
A sweeping garden archway entrance feels like discovering a hidden portal in a fairytale. It is absolutely perfect for defining the transition space between a patio and a small lawn.
Flimsy arches collapse in storms, but investing in powder-coated steel kits brings a custom architectural vibe to tiny yards. Train creeping fairy garden supplies like jasmine up the sides for a multi-sensory experience.
A solid archway setup runs around $90–$120. It’s a permanent upgrade that drastically boosts yard appeal.
- Key Materials: Metal arch frame
- Vibe / Style: Romantic estate pathway
- Difficulty: Moderate assembly
- Budget Breakdown: Arch: $85 | Ground stakes: $15
- Creator’s Tip: Use zip ties painted green to train early vine growth without damaging the delicate plant stems.
- Smart Sourcing: powder-coated rust-resistant garden arches and heavy-duty steel ground anchor kits
7. Living Wall Panels
A dense modular living wall backdrop feels incredibly lush, like a private tropical resort. This works brilliantly to hide ugly cinderblock property lines or aging stucco.
Most DIY living walls look patchy, but using geometric grid panels guarantees a designer-level finish every time. Pair these grids with premium artificial foliage or real succulents to avoid constant maintenance.
Covering a small section will cost roughly $100. Save this to your Pinterest board for ultimate privacy wall ideas!
- Key Materials: Interlocking planter panels
- Vibe / Style: Luxury tropical resort
- Difficulty: Easy click-and-hang
- Budget Breakdown: Wall panels: $80 | Hanging hardware: $20
- Creator’s Tip: If using real plants, install a hidden drip-line tube before hanging the panels to automate watering.
- Smart Sourcing: pre-cut interlocking faux boxwood panels (bulk pack) and masonry wall mounting starter kits
8. Bamboo Teepee Structures
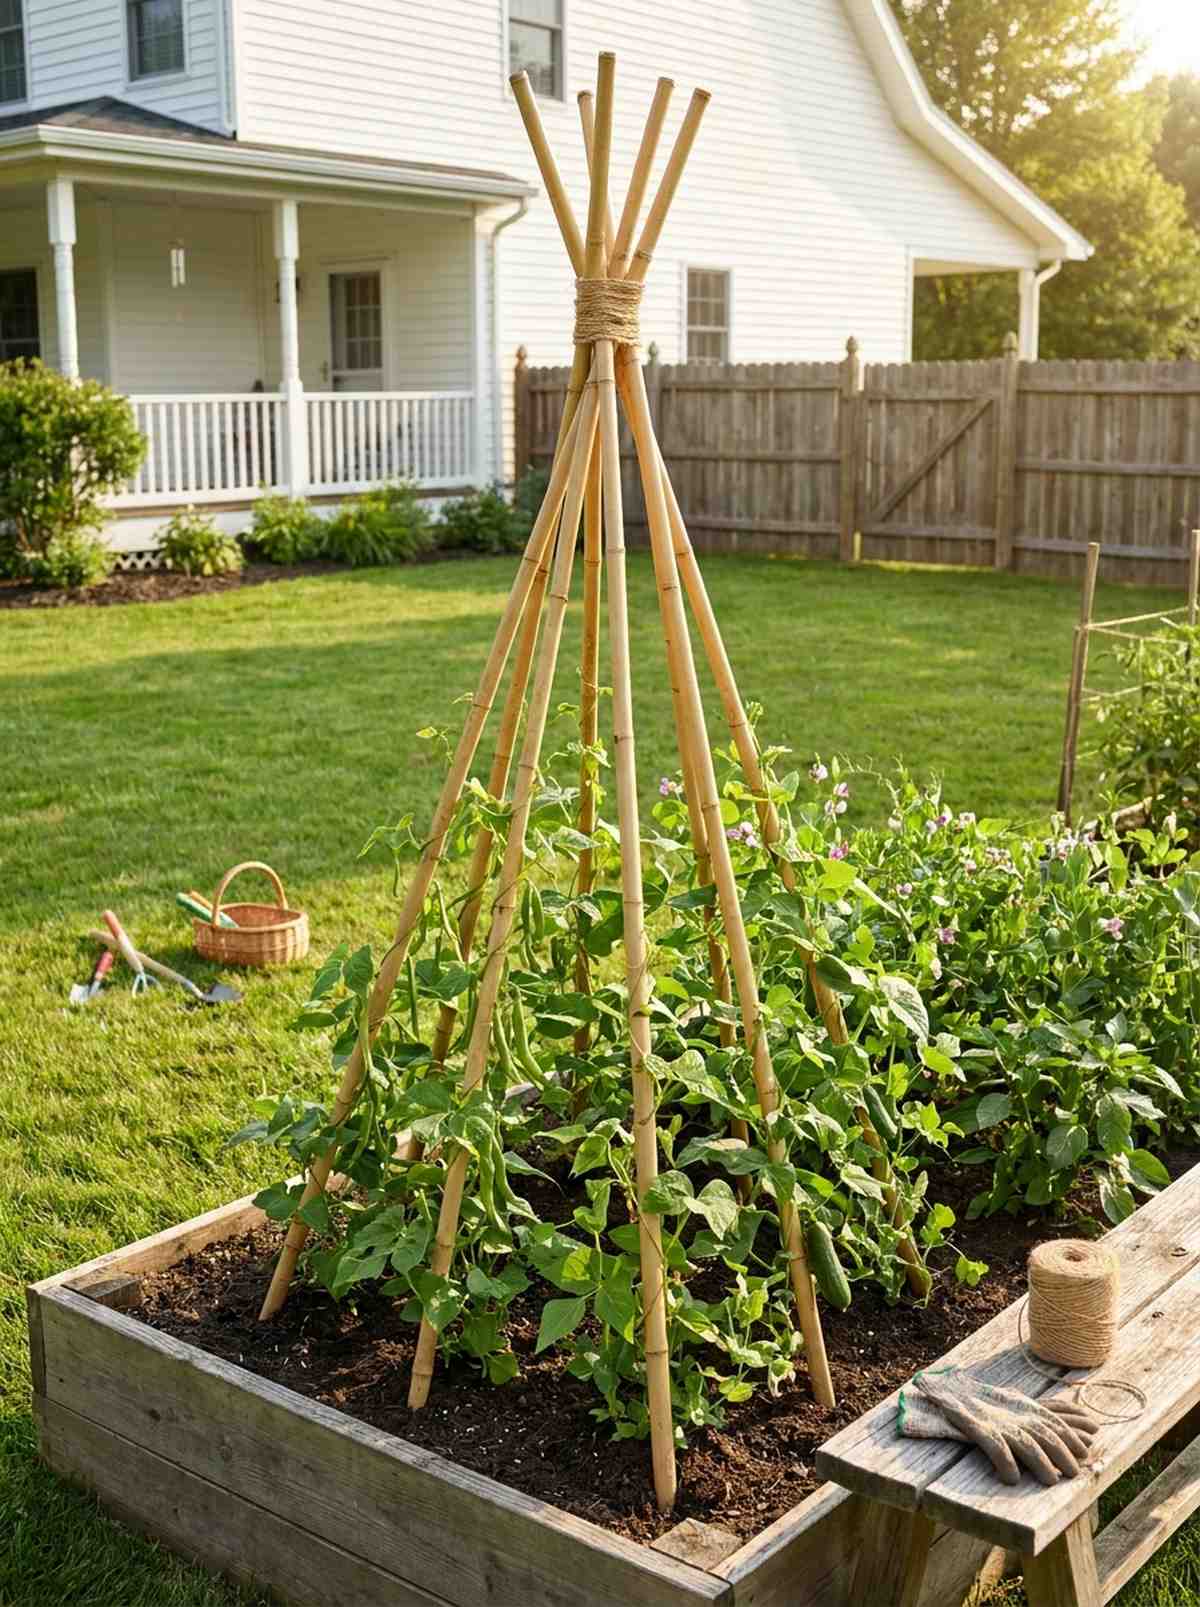
A towering bamboo climbing pyramid feels whimsical and deeply connected to nature. It serves as an amazing interactive garden feature for backyards with kids.
Basic stakes fall over, but lashing tall poles into a teepee configuration provides shocking structural integrity against wind. Incorporating durable garden twine ensures vines wrap cleanly without slipping down the smooth bamboo.
You can build this for a mere $20. It’s a quick afternoon upgrade you won’t regret.
- Key Materials: 6-foot bamboo poles and twine
- Vibe / Style: Playful organic harvest
- Difficulty: Beginner craft project
- Budget Breakdown: Bamboo: $15 | Twine: $5
- Creator’s Tip: Bury the base of the poles at least 8 inches deep so the structure remains rigid as heavy vegetables grow.
- Smart Sourcing: weather-treated bamboo stakes (bundle pack) and heavy-duty jute garden twine
💡 Must-Have Supplies for High-End Setups
To build these backyard setups faster and ensure they survive harsh weather, skip the generic craft aisles and invest in the right foundational kits.
- Base & Support: Heavy-duty powder-coated steel brackets (bulk pack)
- Setup Tools: All-weather modular landscape framing kits
- Durability Protection: UV-resistant clear acrylic outdoor sealant
Most homeowners get this completely wrong… until they try the exact furniture layout coming up next.
Multi-Functional Furniture That Doubles Storage Capacity
9. Storage Bench Seating
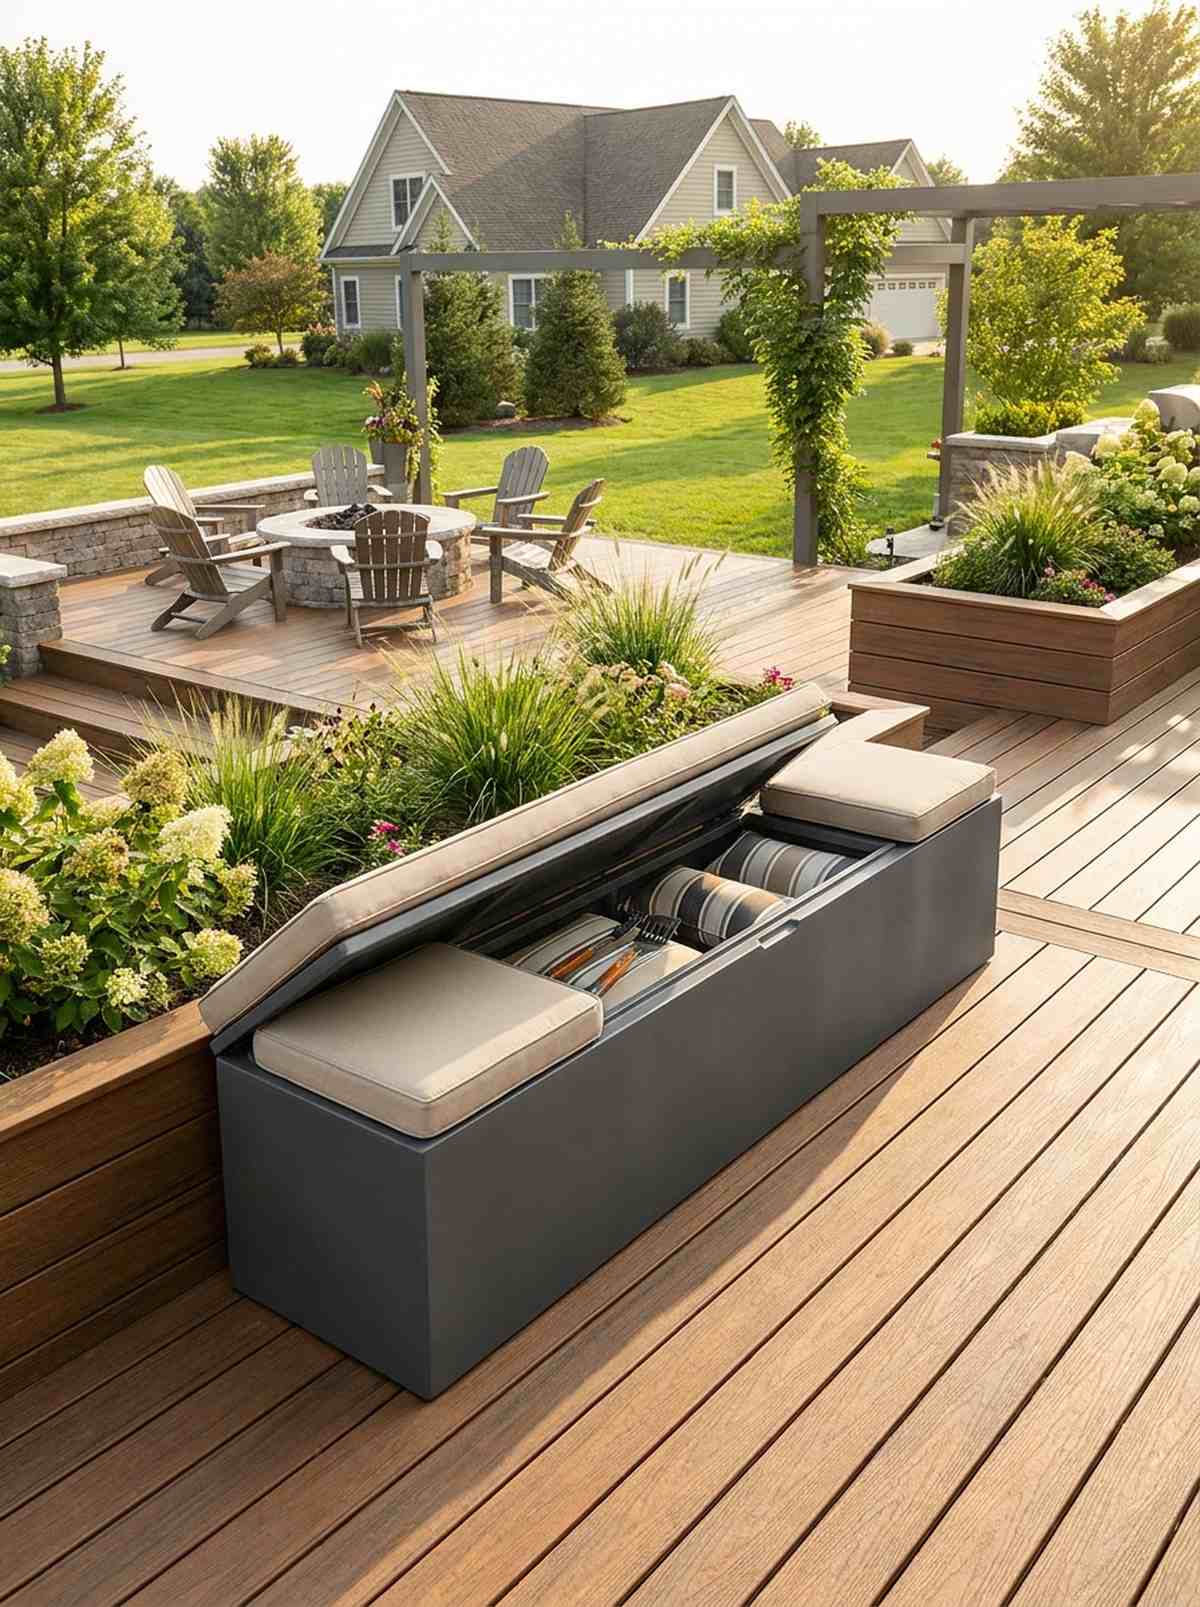
A sleek hidden storage deck bench feels like a clever, clutter-free lounge oasis. This is essential for patios that need to stash away pillows or grilling gear out of sight.
Bulky deck boxes look terrible, but a seamless resin bench looks far more expensive than it actually is. Grabbing a UV-coated storage unit ensures the lid won’t warp or fade under harsh summer sunlight.
Expect to pay about $120 for a high-quality unit. Pin this to your small space patio organization board!
- Key Materials: Weather-resistant resin bench
- Vibe / Style: Clean minimalist utility
- Difficulty: No-tool assembly
- Budget Breakdown: Bench: $100 | Cushions: $20
- Creator’s Tip: Place a moisture-absorbing silica packet inside to keep stored cushions smelling fresh year-round.
- Smart Sourcing: fade-resistant outdoor storage benches (resin kit) and waterproof tailored bench cushions
10. Folding Bistro Tables

A compact Parisian folding cafe set feels incredibly romantic and airy. It is the absolute best choice for a tiny apartment balcony or a narrow front porch.
Heavy dining sets suffocate small yards, but slatted metal profiles trick the eye into seeing more open floor space. Investing in a powder-coated metal frame prevents rust rings from staining your concrete.
A beautiful set usually costs around $150. It’s an instant seating upgrade that folds away in seconds.
- Key Materials: Slatted metal folding table and chairs
- Vibe / Style: European cafe terrace
- Difficulty: Ready out of the box
- Budget Breakdown: Table set: $130 | Floor protectors: $20
- Creator’s Tip: Add rubber foot caps to the chair legs to prevent loud scraping noises when moving them on stone patios.
- Smart Sourcing: powder-coated steel bistro sets and silicone outdoor chair leg protectors (bulk pack)
11. Nesting Side Tables
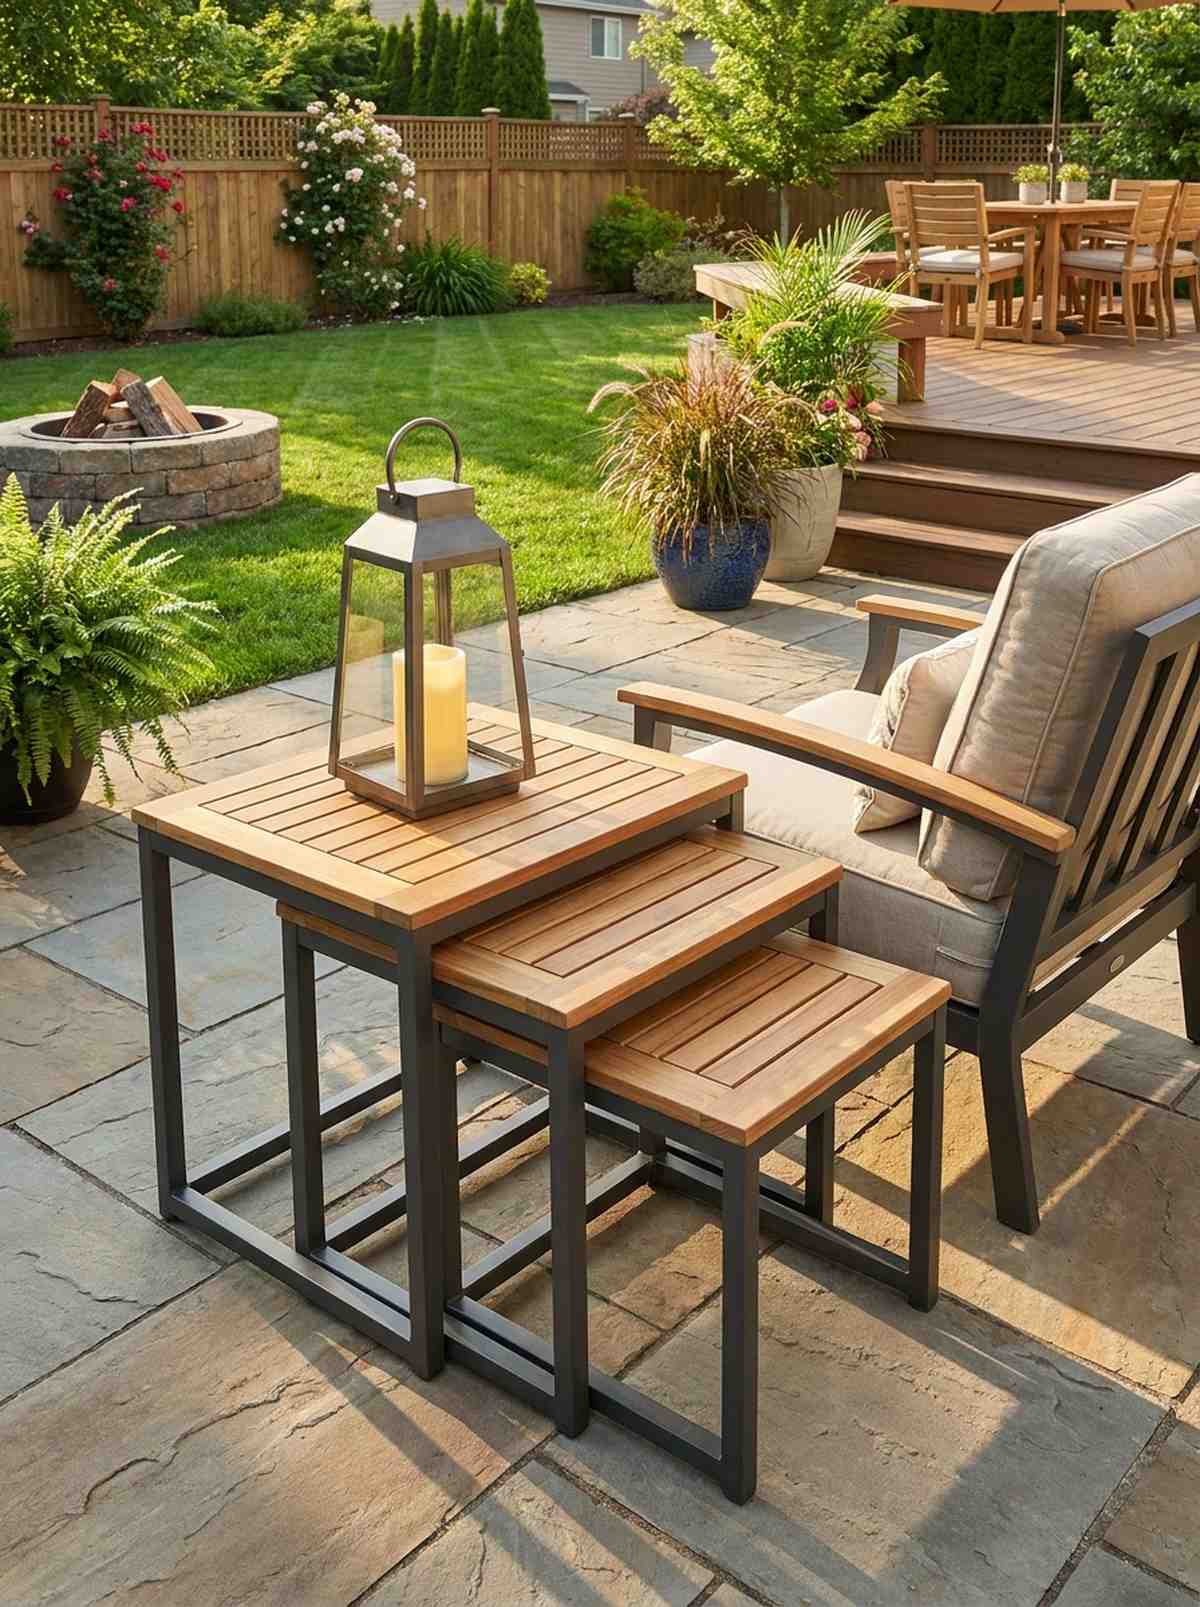
A set of graduated nesting outdoor tables feels like a magic trick for seamless entertaining. This setup is brilliant for narrow side-yards where you only occasionally need extra drink space.
Buying single bulky tables wastes space, while a tiered nesting set delivers a surprisingly premium look that scales to your guest count. Opt for slatted teak or aluminum tops to ensure rain passes right through.
You can snag a sleek set for around $80–$110. Save this for your upcoming summer party prep!
- Key Materials: Stacking metal or teak tables
- Vibe / Style: Modern dynamic flexibility
- Difficulty: Zero setup required
- Budget Breakdown: Table set: $95
- Creator’s Tip: Use the smallest nested table as a permanent base for a lantern, keeping the others hidden until company arrives.
- Smart Sourcing: all-weather aluminum nesting table kits and UV-resistant acrylic top sealants
12. Convertible Bench-Tables
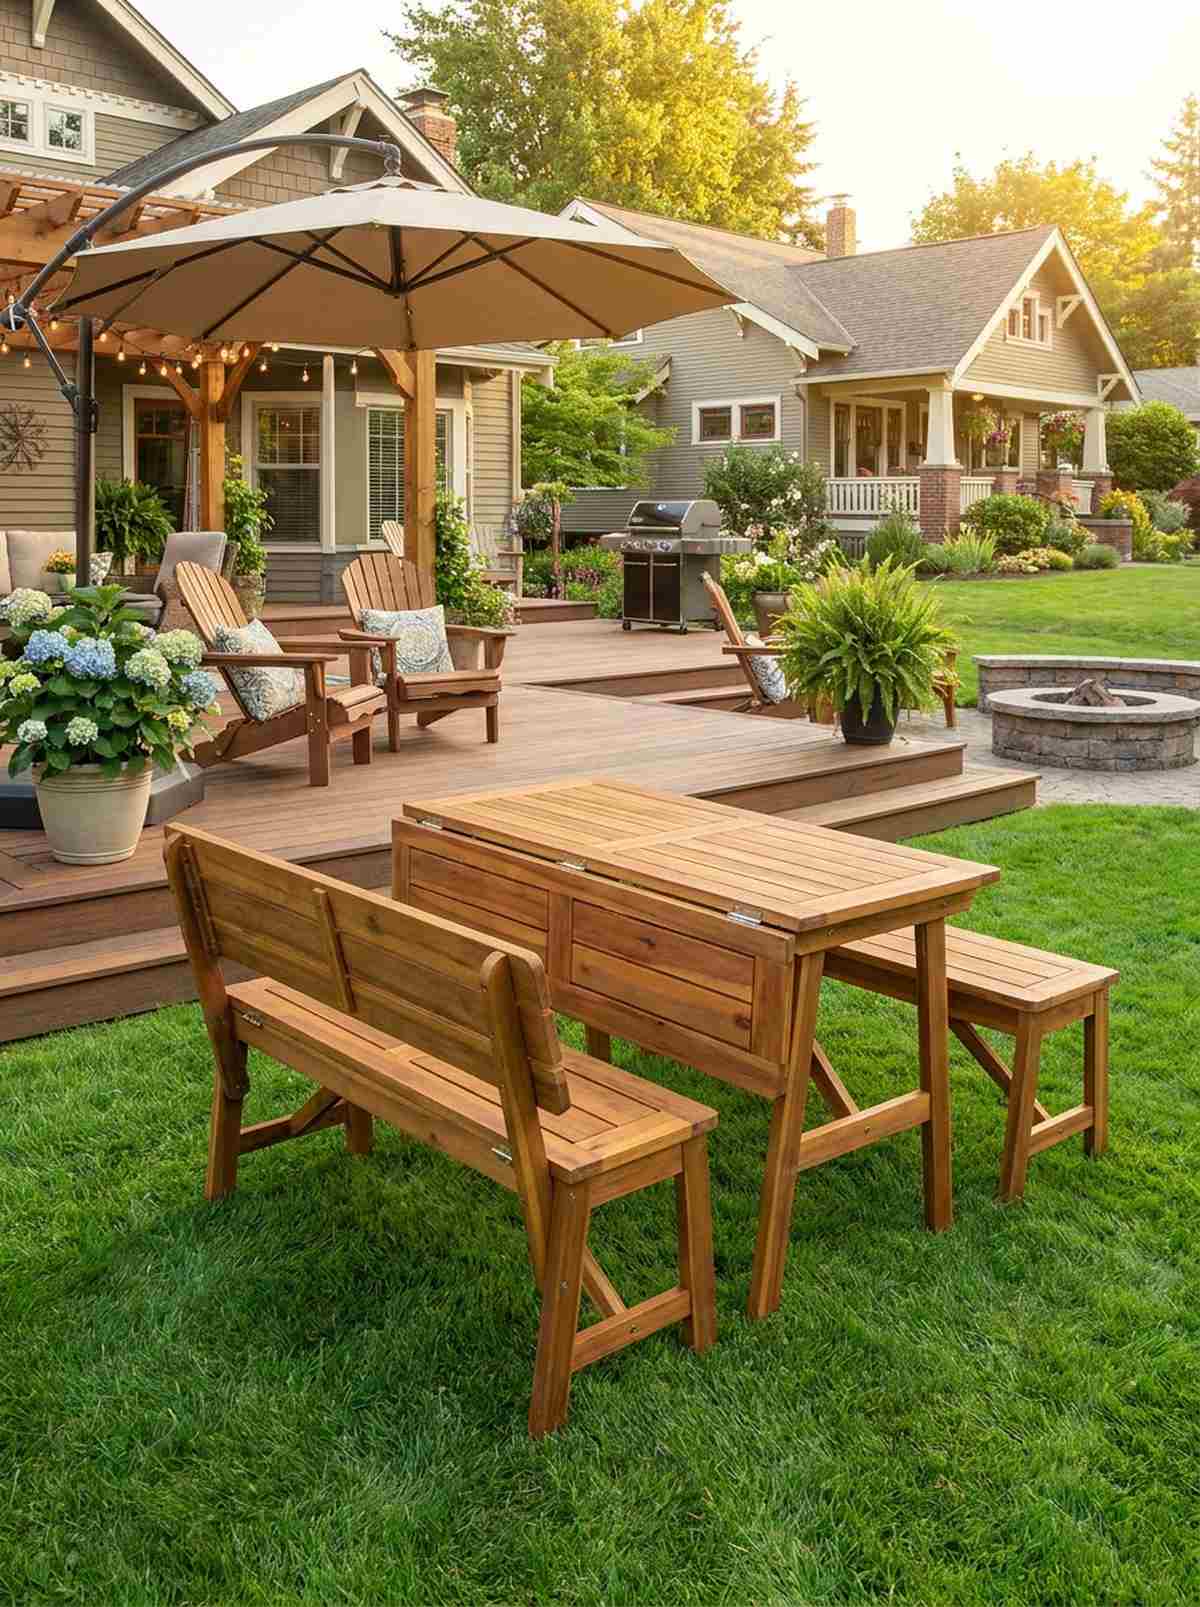
A dual-purpose flip-top picnic bench feels like ultimate backyard engineering. It’s the smartest investment you can make for a tiny lawn that doubles as a family dining area.
Standard picnic tables are space hogs, but a convertible hinge design brings a custom architectural vibe to tight quarters. Upgrading to pre-sealed acacia wood prevents the hinges from rusting shut over winter.
This layout upgrade will run you about $180. It completely eliminates the need to buy two separate pieces of furniture.
- Key Materials: Hinged wooden bench/table combo
- Vibe / Style: Smart utilitarian chic
- Difficulty: Requires basic assembly
- Budget Breakdown: Convertible unit: $160 | Hardware upgrade: $20
- Creator’s Tip: Spray the metal flipping hinges with a dry silicone lubricant twice a year to maintain a perfectly smooth transition.
- Smart Sourcing: pre-cut convertible bench hardware kits and marine-grade wood sealant sprays
Warning: Once you install this next piece, your neighbors will absolutely ask for your contractor’s number.
13. Ottoman-Planter Combos
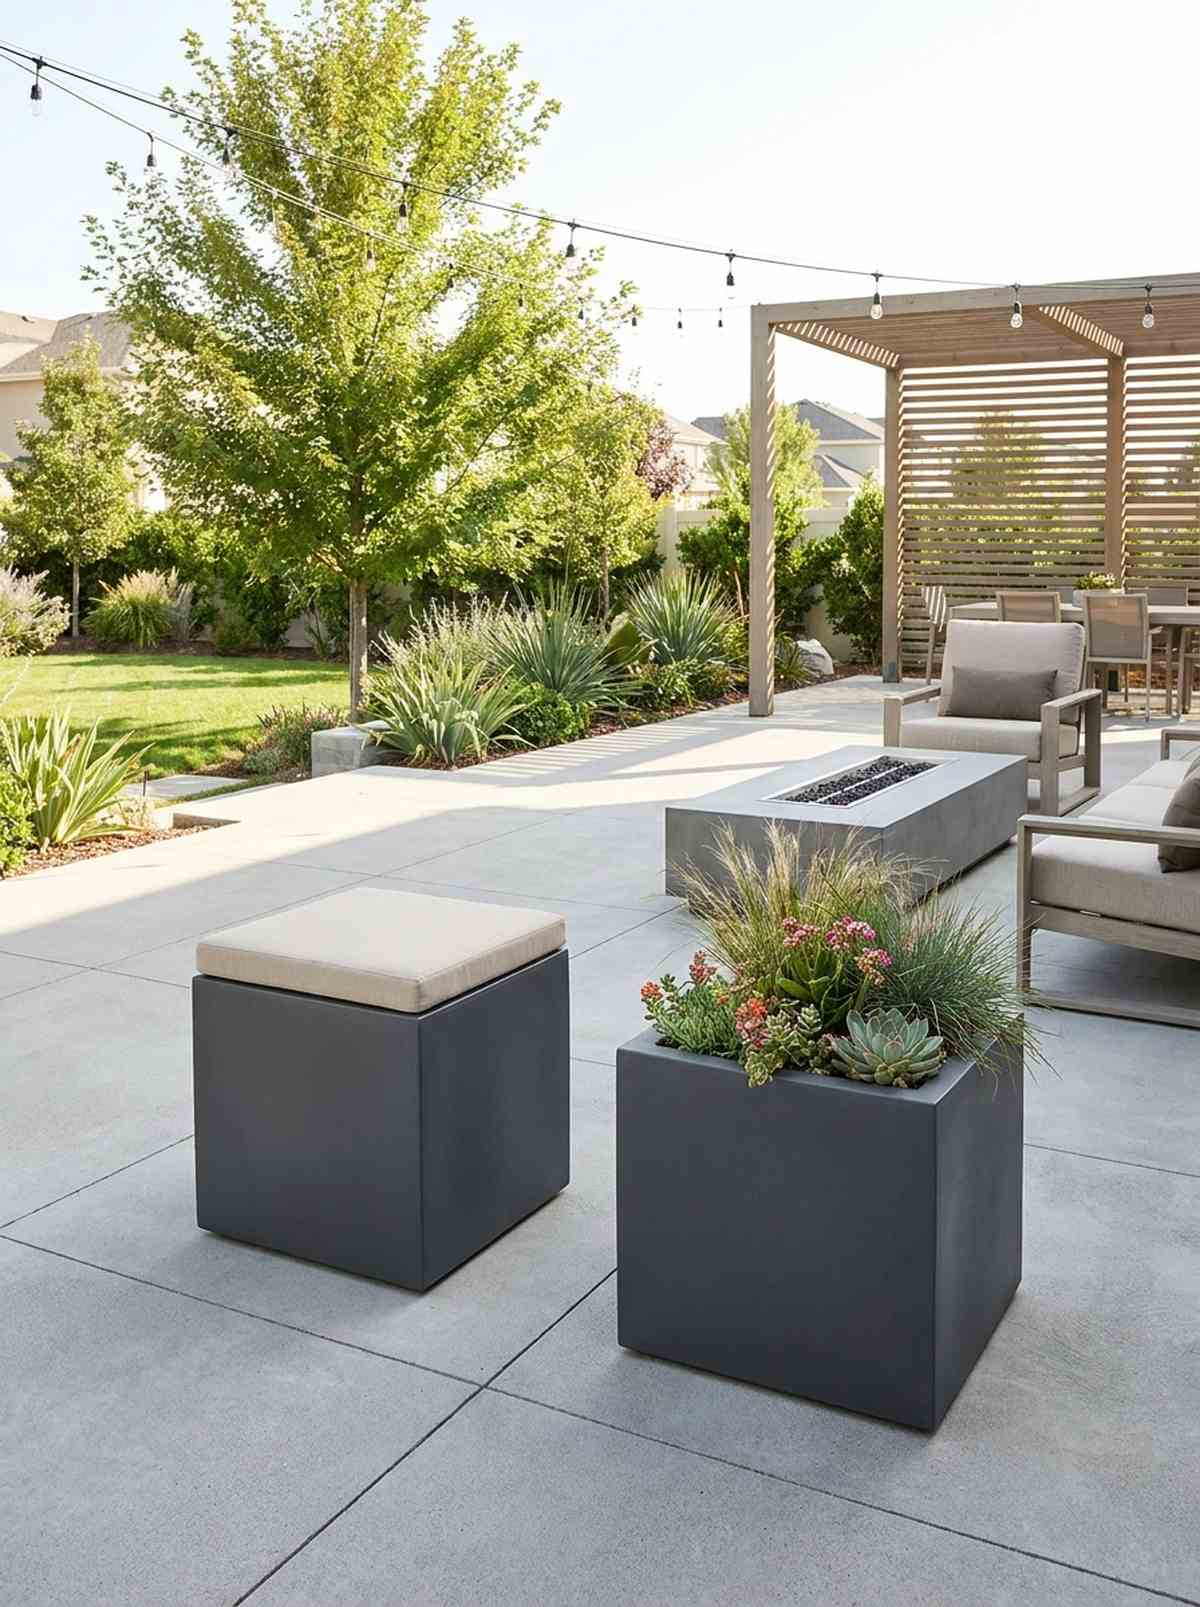
A hidden cube planter seat arrangement feels exceptionally modern and secretive. Perfect for minimalist concrete patios that need a splash of greenery without the visual clutter of standard pots.
Having dedicated planters wastes seating space, but a hybrid fiberglass cube instantly elevates the area with dual utility. Utilizing self-draining resin inserts ensures your hidden floral displays won’t leak onto the patio floor.
You can create this custom look for around $90. Pin this if you love stealthy backyard storage ideas!
- Key Materials: Hollow resin cube and padded lid
- Vibe / Style: Ultra-modern multi-tasking
- Difficulty: Ready to use
- Budget Breakdown: Resin cube: $70 | Custom lid padding: $20
- Creator’s Tip: Fill the bottom 3 inches of the planter with crushed empty water bottles to reduce the total weight so it stays mobile.
- Smart Sourcing: UV-coated fiberglass planter cubes and waterproof replacement ottoman cushions
14. Wall-Mounted Drop-Leaf Tables
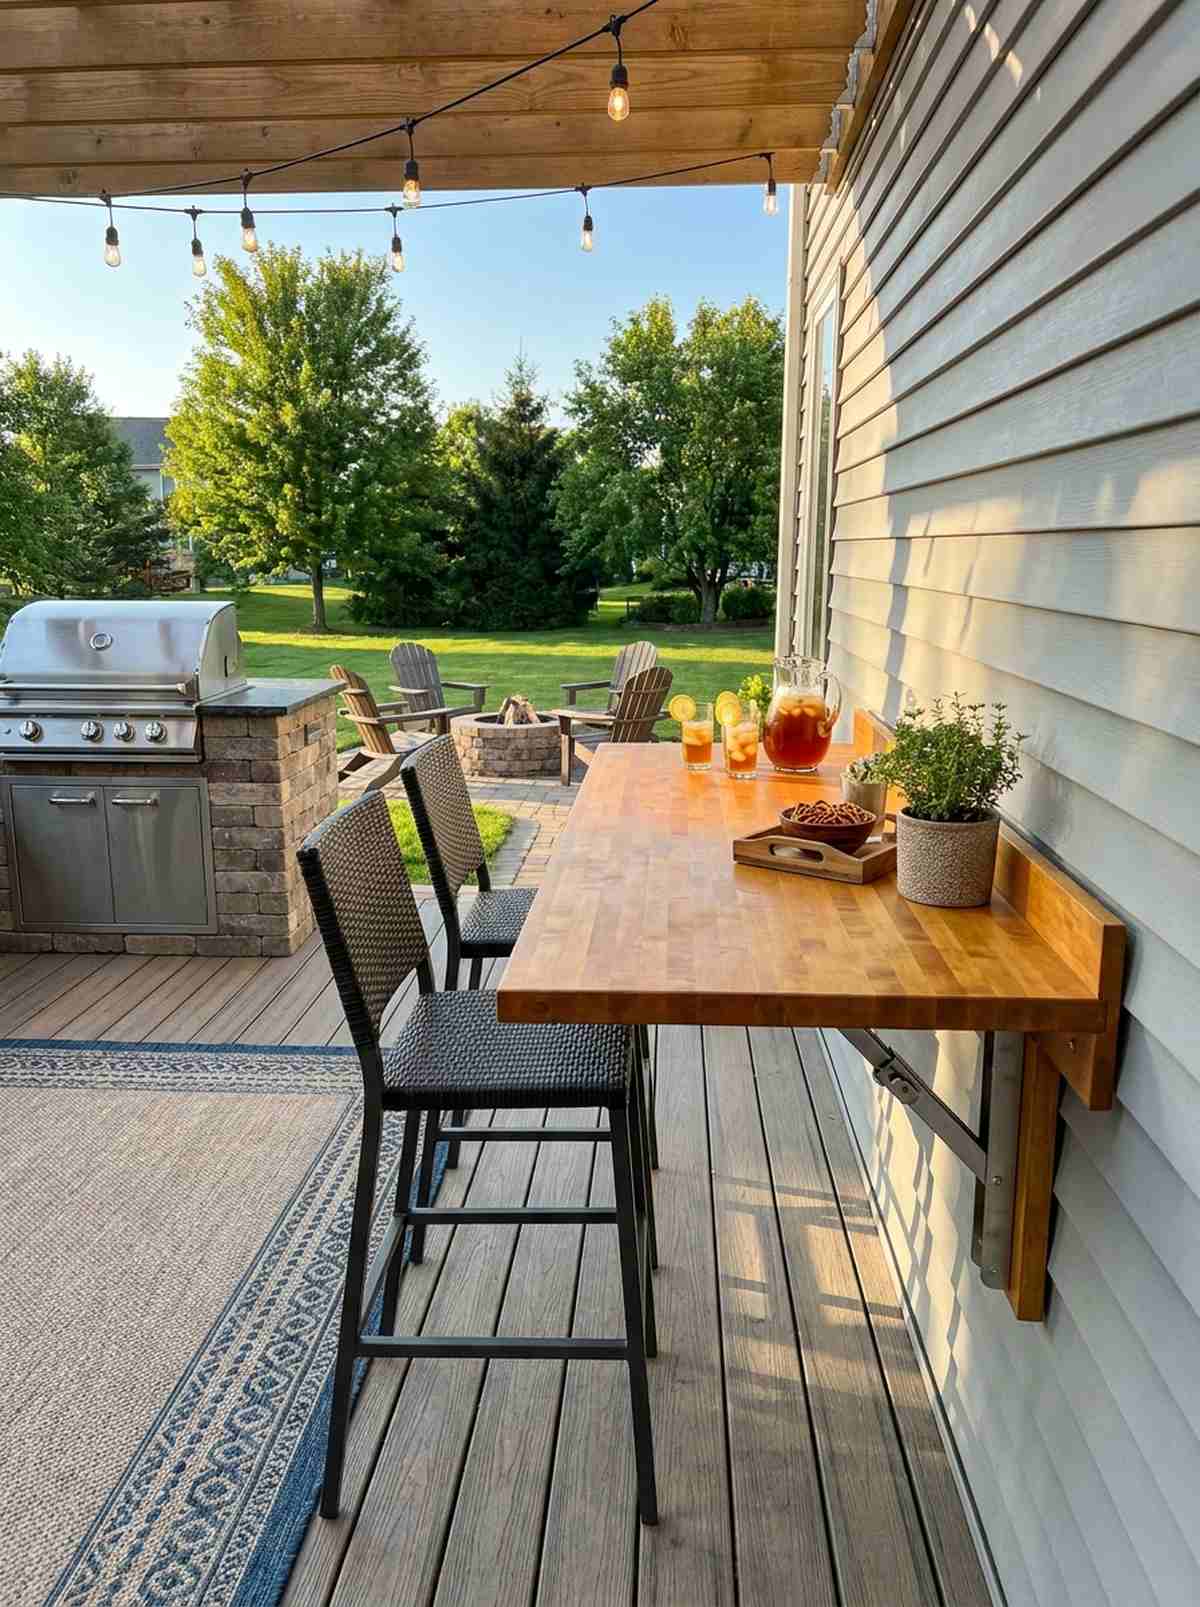
A fold-away wall-anchored patio bar feels like a cozy speakeasy window right in your yard. It is a game-changer for narrow BBQ zones that need temporary food prep space.
Permanent outdoor islands cost thousands, but a drop-leaf mechanism gives a designer-level finish for mere pennies. By grabbing heavy-duty locking hinges, you guarantee the table won’t collapse under a heavy tray of drinks.
Build this yourself for roughly $60. It’s a fast upgrade that completely changes how you host.
- Key Materials: Treated wood top and locking brackets
- Vibe / Style: Compact outdoor pub
- Difficulty: Requires drilling into siding/fence
- Budget Breakdown: Wood top: $30 | Folding brackets: $30
- Creator’s Tip: Mount the table exactly 36 inches off the ground to perfectly match standard barstool heights.
- Smart Sourcing: heavy-duty stainless steel drop-leaf brackets (2-pack) and pre-finished butcher block project panels
15. Modular Sectional Seating
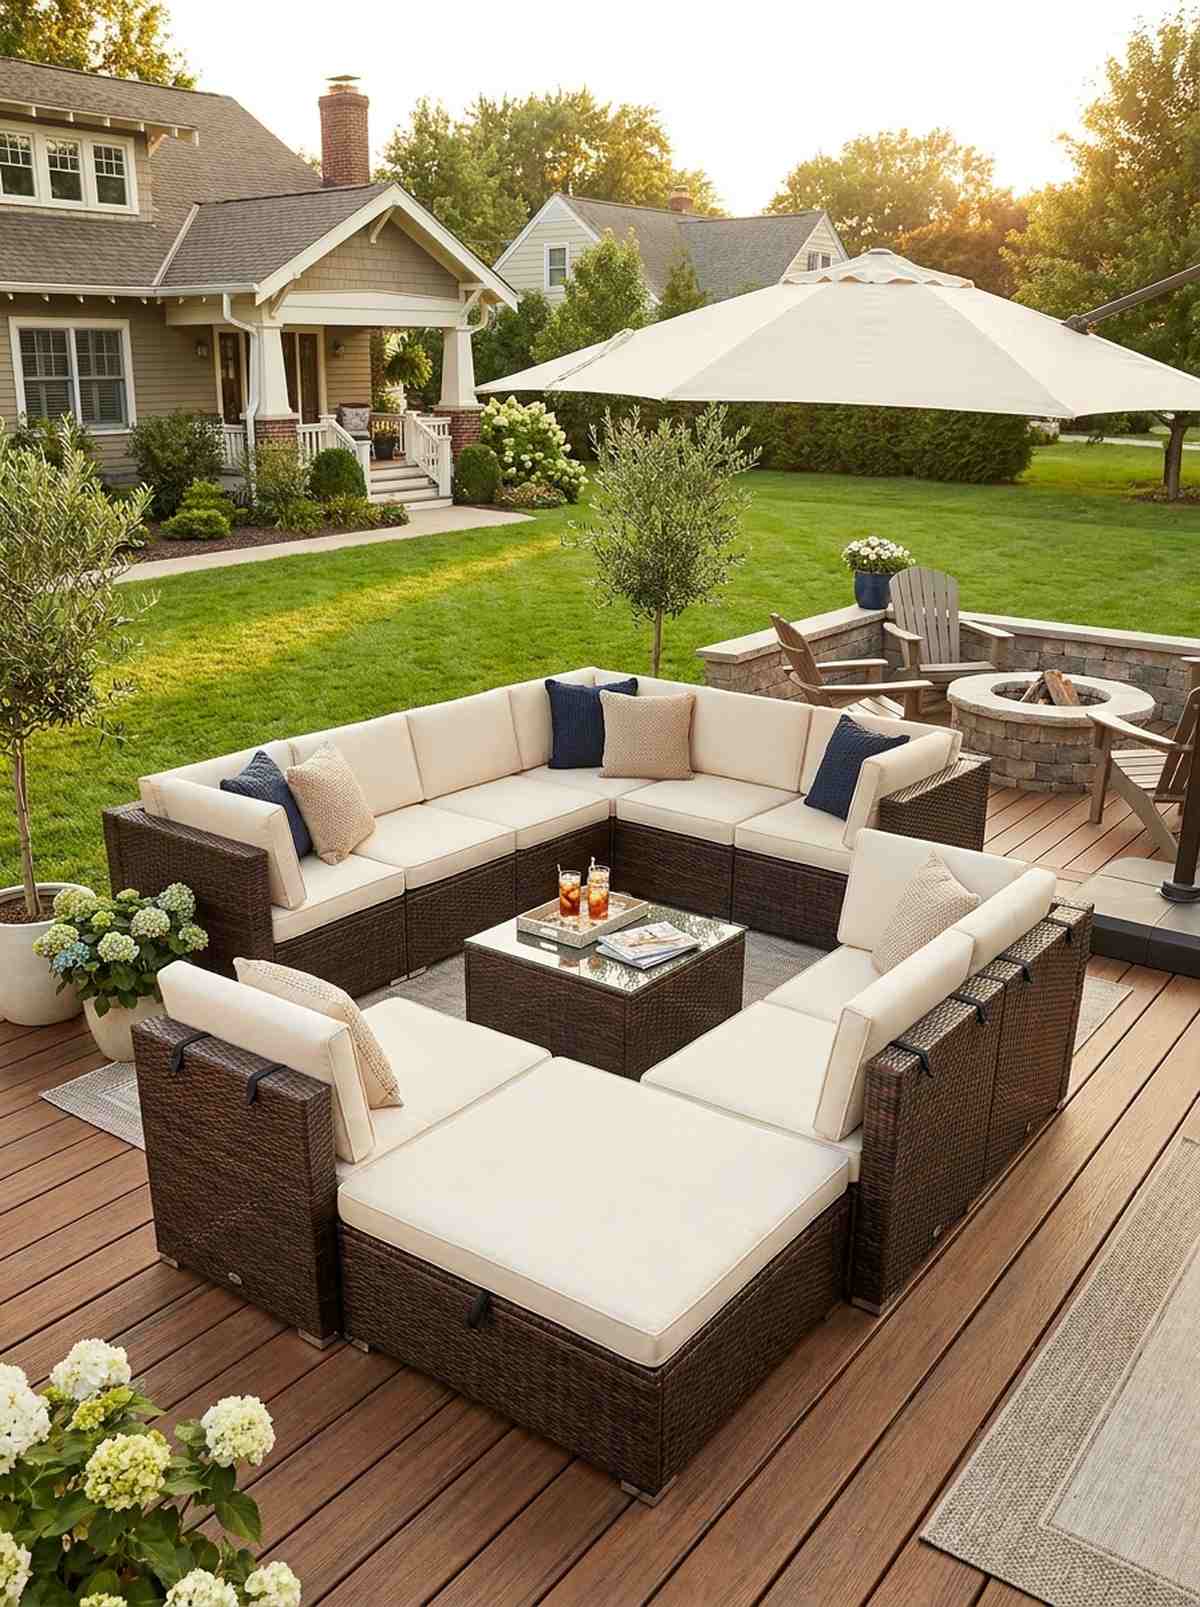
A flexible resin wicker cube arrangement feels like a high-end luxury resort lounge. It works wonders on awkwardly shaped decks that don’t fit standard rectangular sofas.
Buying rigid, single-piece sofas is a trap for small yards, whereas lightweight modular sections look far more expensive than they are. Securing them with discrete furniture clips stops the seats from sliding apart during gatherings.
A starter 3-piece modular set costs around $250. Save this to your ultimate patio makeover board!
- Key Materials: Resin wicker cubes and clips
- Vibe / Style: Customizable luxury deck
- Difficulty: Easy modular setup
- Budget Breakdown: Seating: $230 | Connector clips: $20
- Creator’s Tip: Always buy one extra corner piece than you think you need—it allows you to convert an L-shape into a massive daybed.
- Smart Sourcing: modular resin wicker patio starter kits and heavy-duty outdoor furniture alignment clips (bulk pack)
Strategic Lighting Layers For Evening Ambiance
16. Solar Pathway Borders
A glowing low-profile walkway edge feels like a magical runway guiding you into a nighttime sanctuary. Perfectly suited for defining the border between dark mulch beds and a concrete patio.
Harsh floodlights destroy evening ambiance, but warm LED stakes deliver a surprisingly premium look with zero hardwiring. Grabbing high-lumen kits ensures the glow actually illuminates the stones instead of just acting as a dim marker.
You can line a whole path for about $40. A highly recommended, instant curb-appeal booster.
- Key Materials: Waterproof solar stake lights
- Vibe / Style: Warm guiding ambiance
- Difficulty: 5-minute push-in setup
- Budget Breakdown: Solar kit: $40
- Creator’s Tip: Angle the stakes slightly inward toward the walkway rather than straight up to reduce glare and highlight the ground texture.
- Smart Sourcing: high-lumen warm white solar pathway kits (bulk pack) and shatterproof acrylic landscape stakes
The upcoming layout trick is a closely guarded landscape architect secret for tiny spaces…
17. String Light Canopies
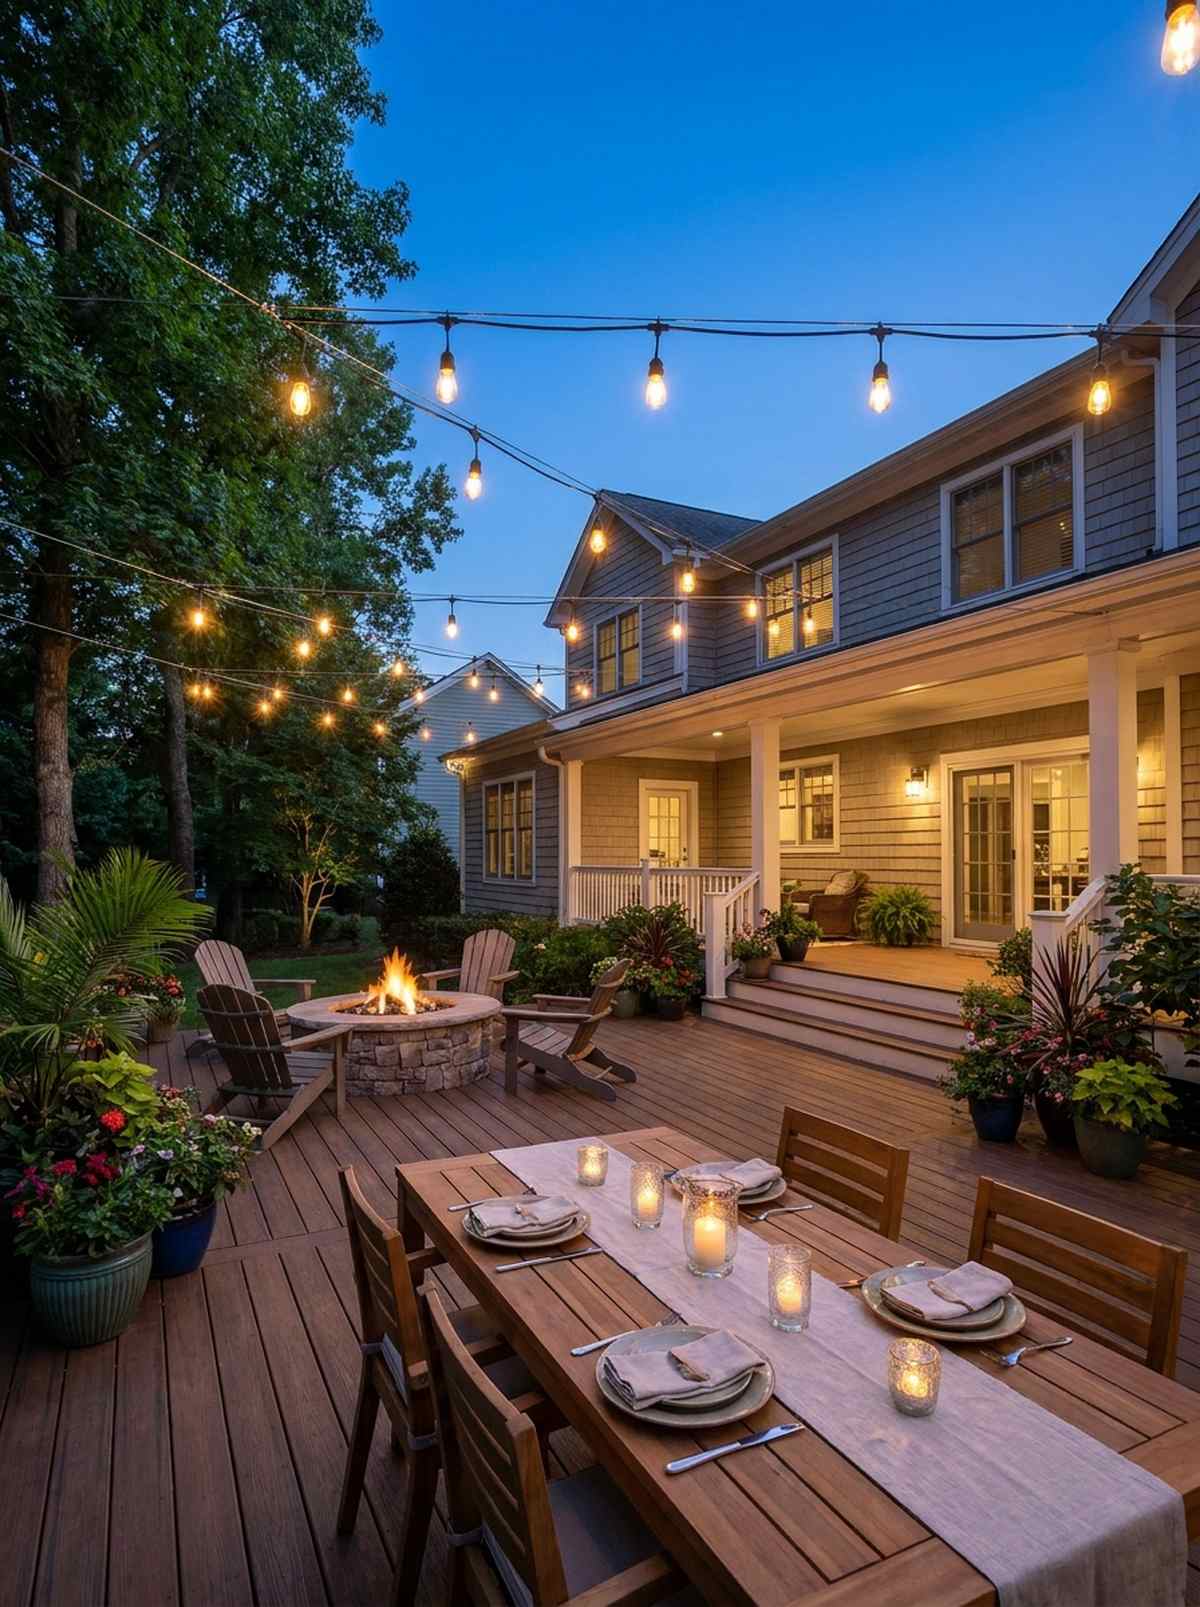
An overhead zig-zag cafe lighting canopy feels like dining under a starry European night sky. It visually creates a “ceiling” that makes an exposed patio feel like a distinct, cozy room.
Flimsy holiday lights look incredibly tacky, but commercial-grade bulbs bring a custom architectural vibe that withstands winter storms. Suspending them with a proper steel wire guide kit prevents ugly drooping in the middle.
A durable canopy setup costs around $70–$100. Pin this to your backyard night aesthetic board!
- Key Materials: Edison bulbs and steel guide wire
- Vibe / Style: Intimate al fresco dining
- Difficulty: Requires ladder and hook drilling
- Budget Breakdown: Lights: $50 | Suspension kit: $20
- Creator’s Tip: Plug the main string into an outdoor smart plug so you can turn the patio canopy on with your phone.
- Smart Sourcing: shatterproof commercial string light kits and heavy-duty stainless steel wire tension kits
18. Uplighting Specimen Plants

A dramatic shadow-casting focal spotlight feels incredibly cinematic and highly curated. This is an absolute must-do if you have a Japanese maple or an interesting textured fence.
Lighting a yard from above makes it feel small and flat, but grazing light upward from the soil looks far more expensive than it is. Using miniature garden supplies like micro-spots creates depth without blinding your guests.
Achieve this high-end effect for roughly $35 per tree. It completely transforms your yard after dark.
- Key Materials: Low-voltage or solar directional spots
- Vibe / Style: Sculptural landscape drama
- Difficulty: Easy ground placement
- Budget Breakdown: Spotlight: $30 | Lens filters: $5
- Creator’s Tip: Place the light slightly behind the trunk facing the fence to create a massive, striking shadow silhouette.
- Smart Sourcing: cast-aluminum solar uplight spotlights and warm-amber replacement LED bulbs (bulk pack)
19. Recessed Deck Lighting
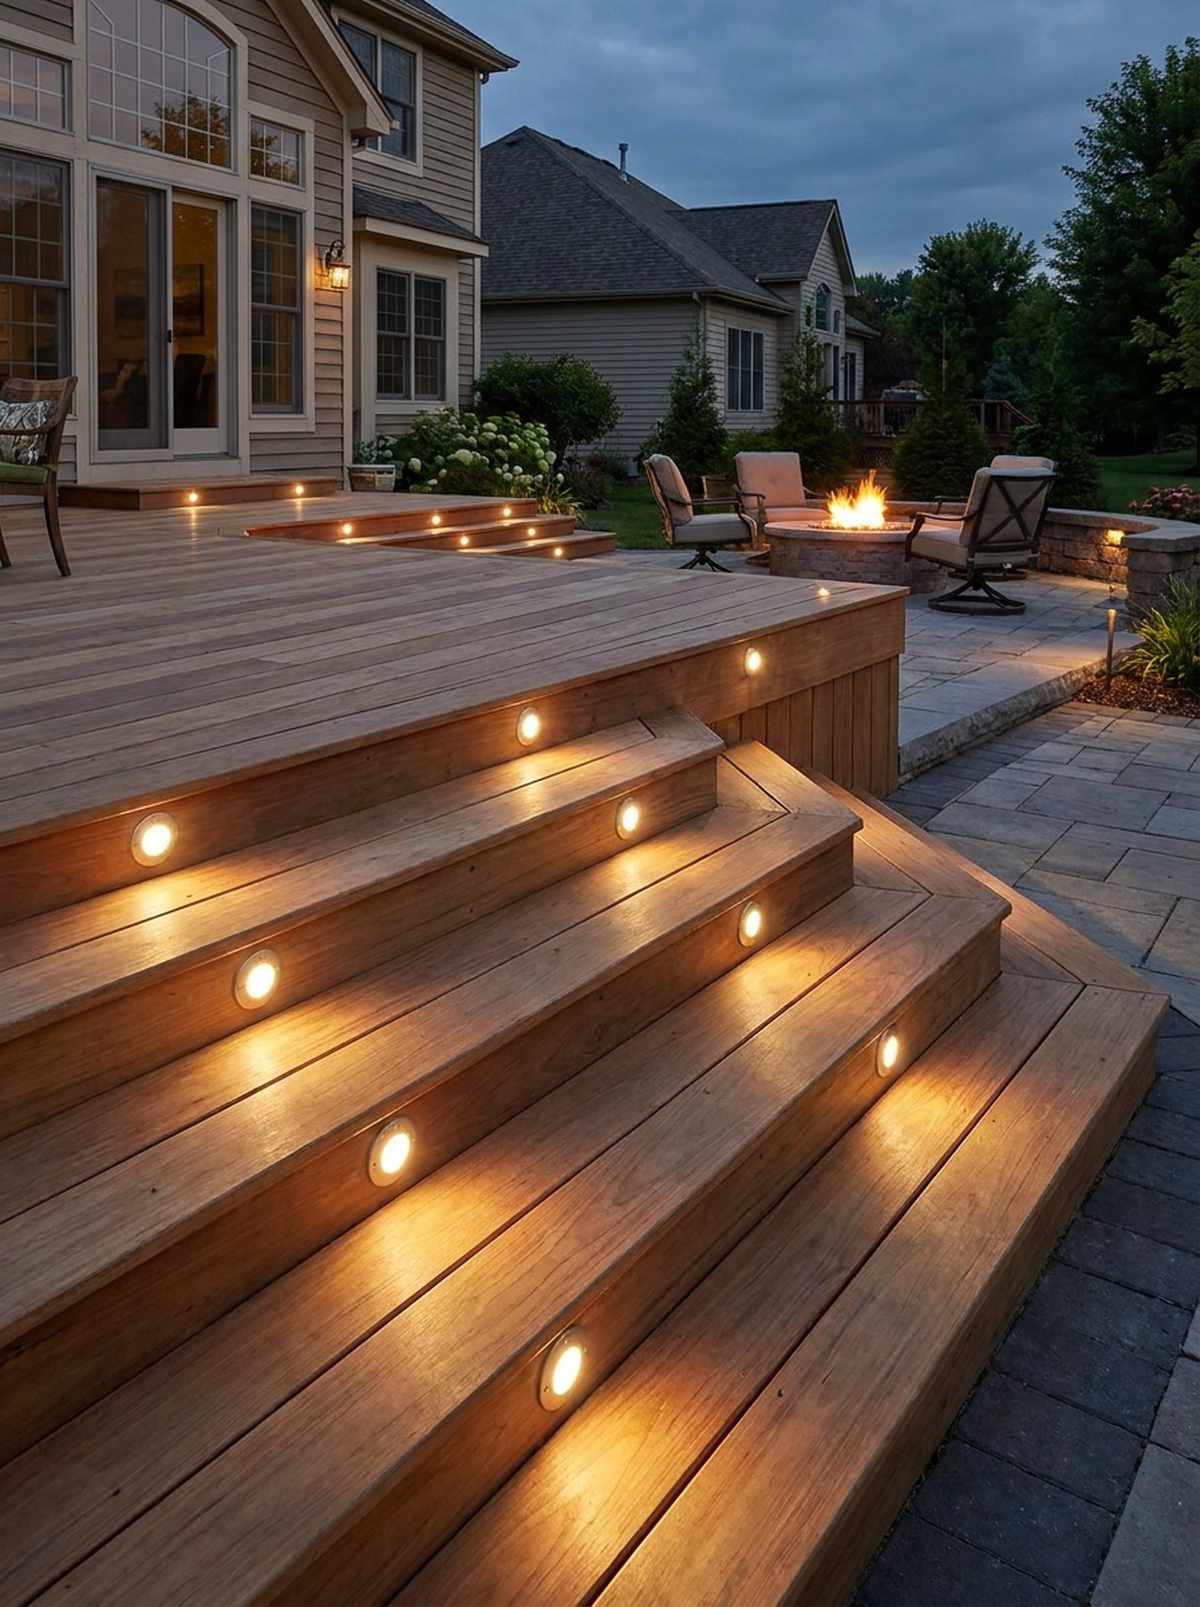
A flush integrated stair riser glow feels exceptionally modern, safe, and seamlessly built-in. It is essential for multi-level wooden decks where tripping in the dark is a risk.
Bulky post caps interrupt visual flow, but drilling low-voltage pucks gives a designer-level finish that looks like a custom contractor job. Utilizing IP67-rated waterproof kits ensures they never short out during heavy downpours.
A complete recessed kit runs around $80–$120. Save this if you are planning a deck renovation soon!
- Key Materials: LED puck lights and hole saw
- Vibe / Style: Seamless modern safety
- Difficulty: Advanced DIY (drilling required)
- Budget Breakdown: Light kit: $90 | Hole saw bit: $15
- Creator’s Tip: Pre-drill the holes 1mm wider than the light casing to allow the wood to swell naturally in the humidity without crushing the light.
- Smart Sourcing: waterproof recessed deck lighting starter kits and diamond-grit wood hole saw adapters
20. Hanging Lanterns
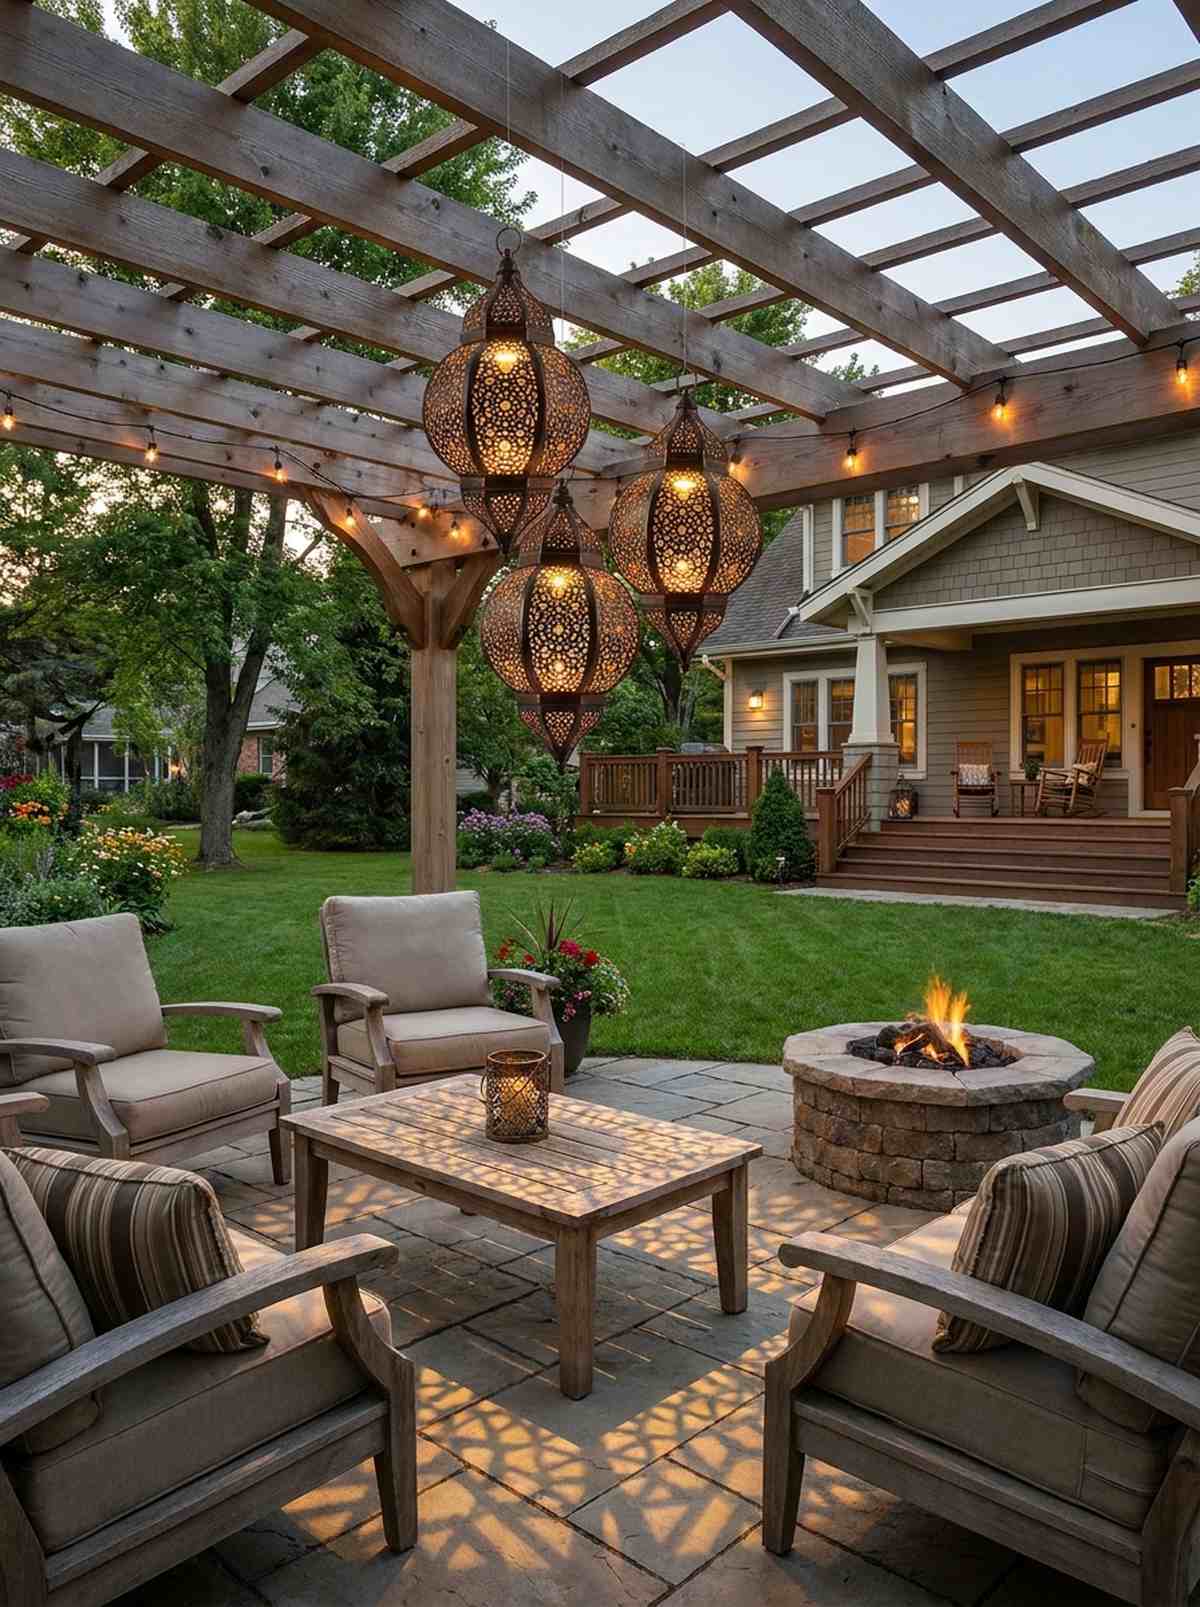
A clustered floating lantern arrangement feels like a majestic, bohemian Moroccan escape. Perfect for hanging off an existing pergola or sturdy tree branches over a seating zone.
Stark, uncovered bulbs can ruin the mood, while intricately cut metal lanterns deliver a surprisingly premium look with mesmerizing shadow patterns. Bypassing electrical cords entirely by using remote-controlled puck lights saves you hours of wiring.
You can create a cluster of three for about $65. A fast, cord-free aesthetic upgrade.
- Key Materials: Cut-metal lanterns and battery pucks
- Vibe / Style: Bohemian evening magic
- Difficulty: Simple hanging project
- Budget Breakdown: Lanterns: $50 | Remote lights: $15
- Creator’s Tip: Use outdoor-rated fishing line to hang the lanterns so they appear to magically float in mid-air at night.
- Smart Sourcing: rust-proof Moroccan decorative lanterns and remote-controlled waterproof LED pucks (multi-pack)
Stop scrolling if you have a cramped, narrow patio—this next idea changes everything.
21. Wall Sconce Illumination
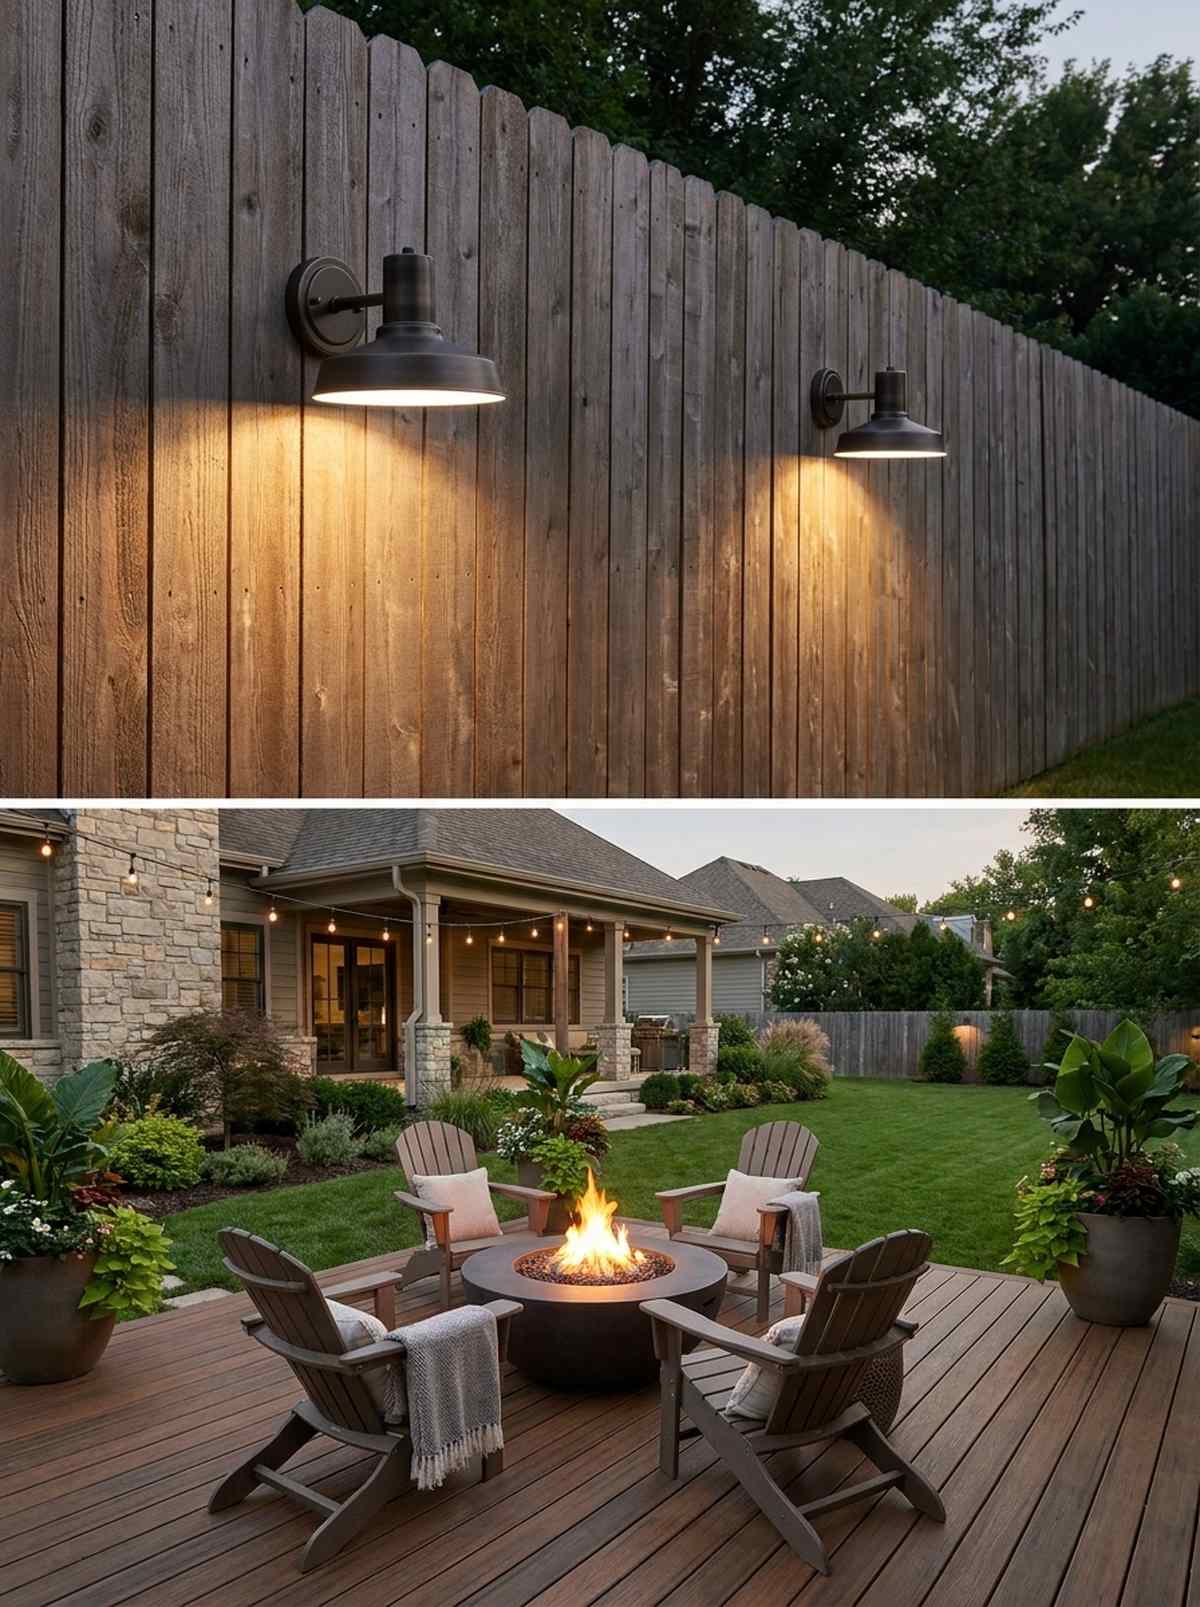
A pair of down-facing architectural sconces feels like the entrance to a high-end luxury spa. This technique is incredible for illuminating a blank privacy fence without blasting light into your neighbor’s windows.
Standard floodlights are obnoxious, but dark-sky compliant fixtures instantly elevate the area with soft, controlled ambiance. Grabbing battery-operated faux sconces lets you achieve this look without hiring an electrician.
Get this high-end look for around $50. Pin this to your modern exterior lighting board!
- Key Materials: Faux sconce shells and rechargeable bulbs
- Vibe / Style: Resort-style perimeter glow
- Difficulty: Easy screw-in mounting
- Budget Breakdown: Sconces: $35 | Bulbs: $15
- Creator’s Tip: Mount these exactly at 60 inches off the ground to prevent the bulbs from shining directly into guests’ eyes when seated.
- Smart Sourcing: wireless battery-operated outdoor sconce kits and rechargeable smart LED bulbs
22. Color-Changing Spotlights
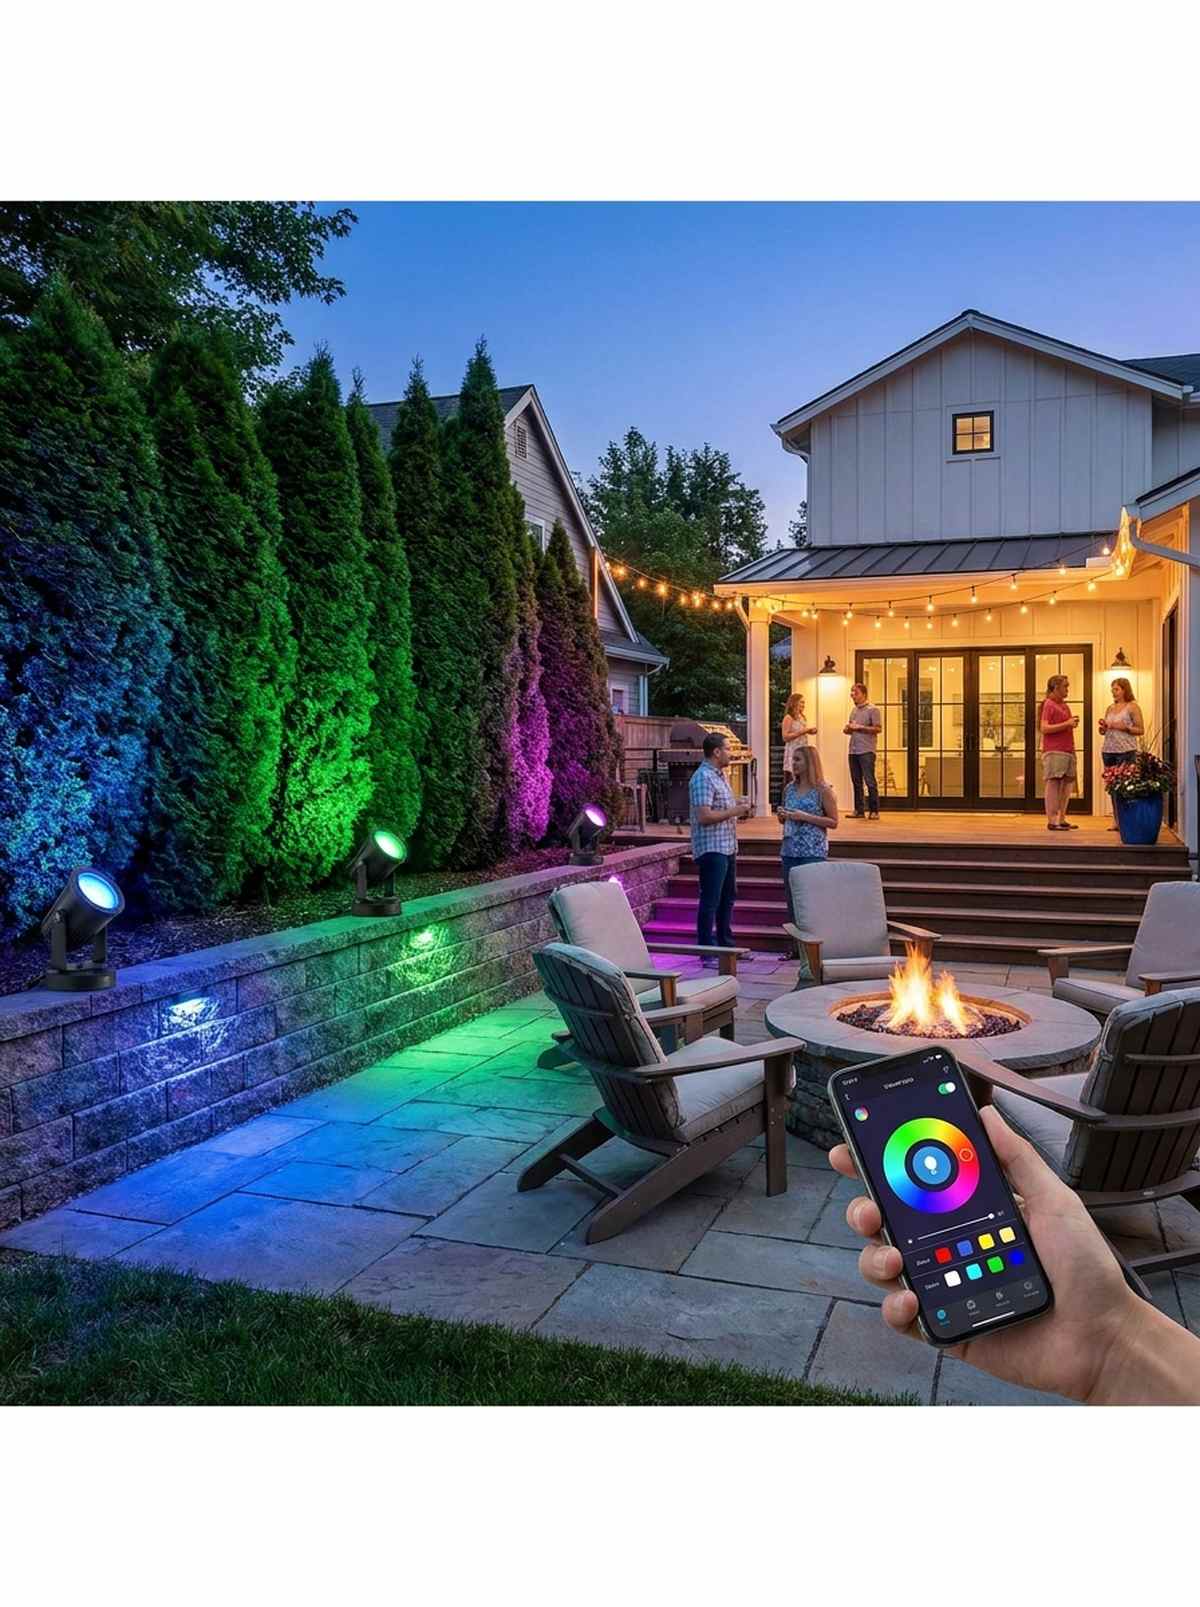
An app-controlled vibrant landscape color wash feels dynamic, festive, and highly entertaining. This layout is the ultimate flex for yards that host frequent summer BBQs or holiday parties.
Static white light gets boring, but smart RGB spots look far more expensive than they are, allowing you to instantly change the yard’s entire mood. Leveraging Bluetooth mesh tech means they all sync up perfectly without messy wiring hubs.
A smart lighting set costs roughly $80. It’s a high-tech upgrade that wows guests every single time.
- Key Materials: Smart LED outdoor spots
- Vibe / Style: Dynamic modern entertainment
- Difficulty: Plug and play app setup
- Budget Breakdown: Smart spot kit: $80
- Creator’s Tip: Aim the spots directly at highly textured surfaces like stone walls or thick hedges to maximize the color saturation.
- Smart Sourcing: Bluetooth mesh RGB outdoor spotlight kits and weatherproof outdoor extension cord shields
Ground-Level Zoning Techniques That Create Perceived Depth
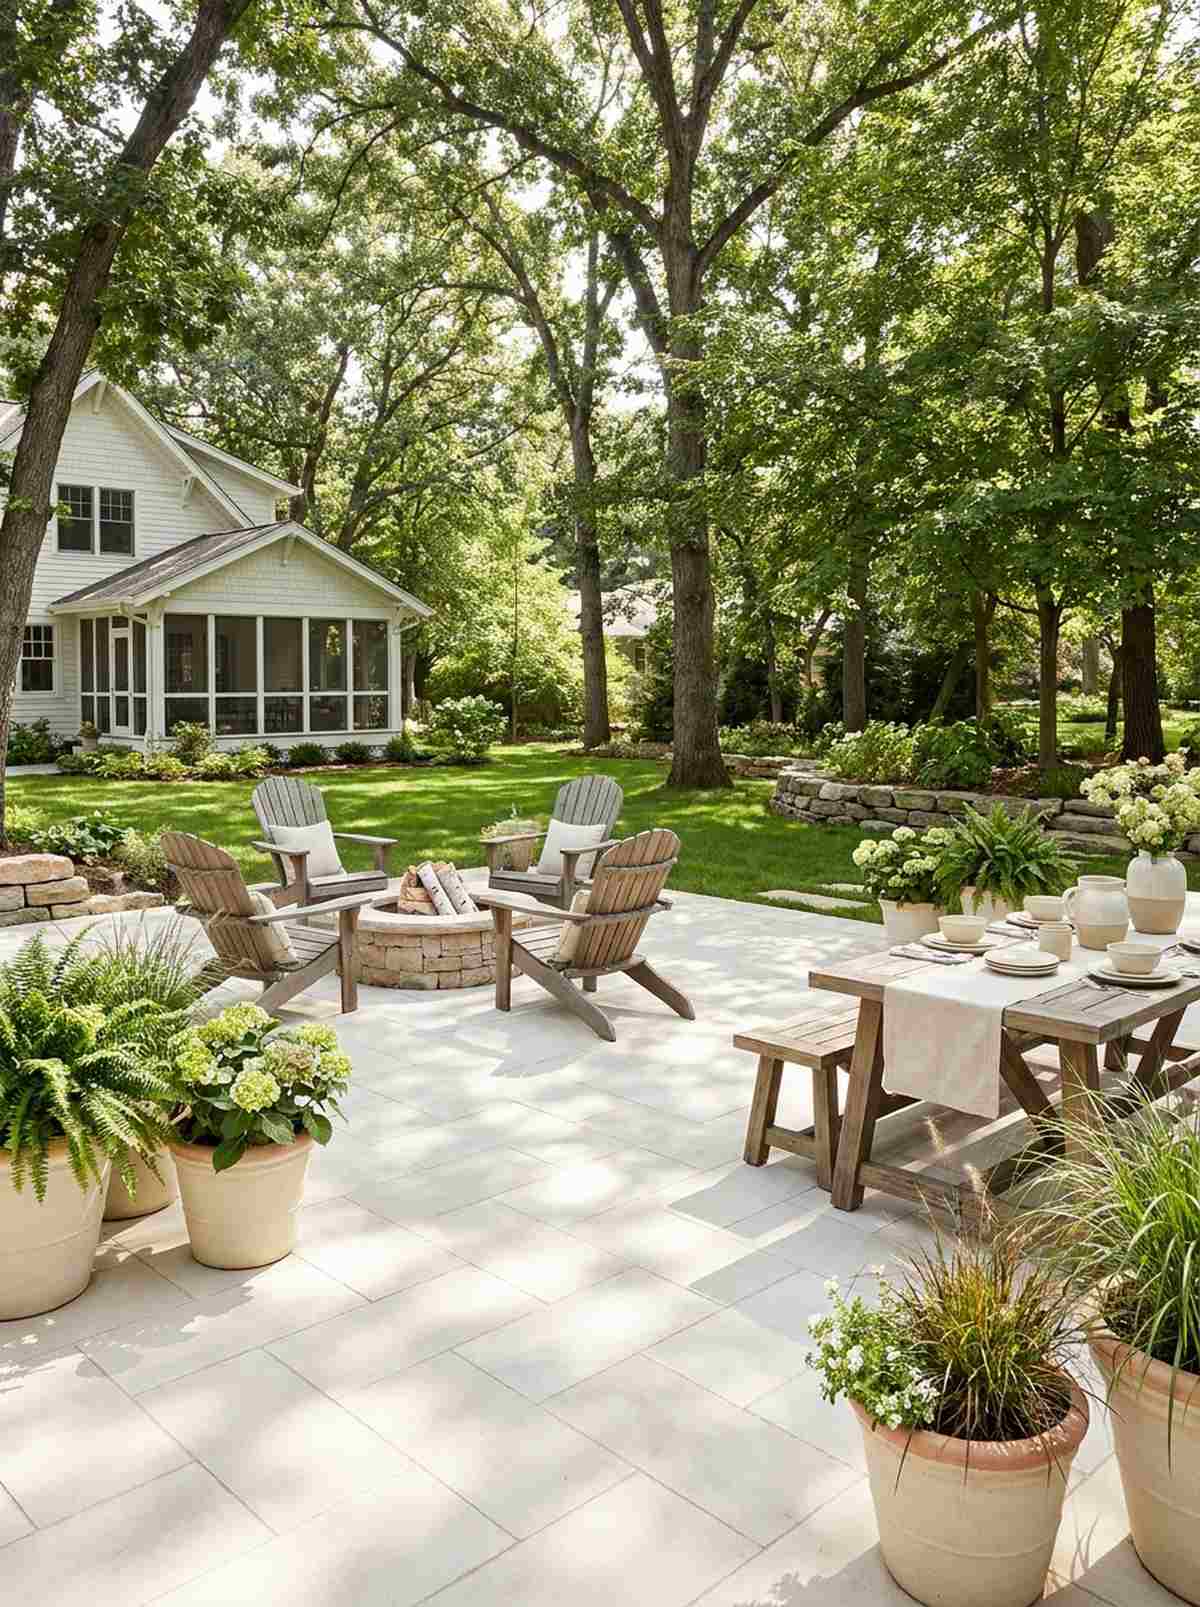
23. Circular Paving Patterns
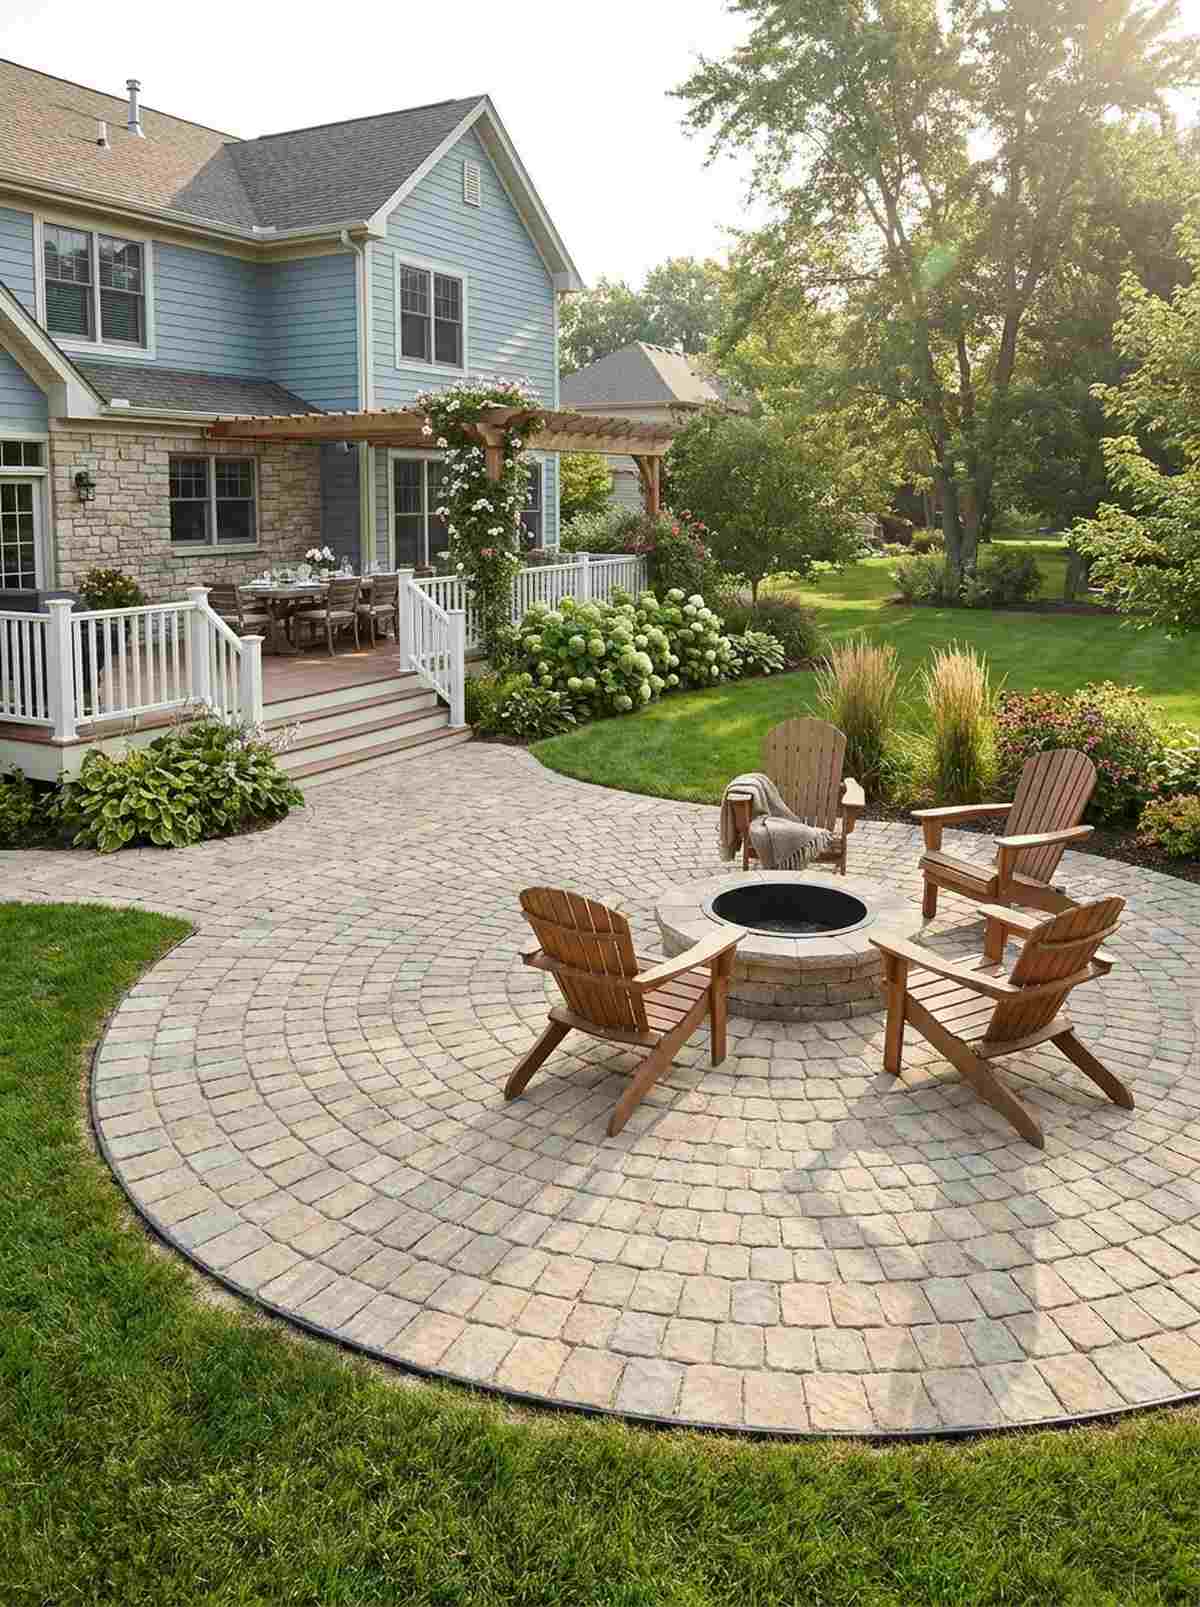
A sweeping radial stone patio layout feels organic, expansive, and incredibly welcoming. This geometry works wonders in completely square yards by softening harsh boundary lines.
Straight concrete paths emphasize how tiny a space is, while curved interlocking pavers bring a custom architectural vibe that tricks the eye. Utilizing pre-cut circular paver kits saves you from spending hours chipping stones by hand.
You can lay a 6-foot focal circle for around $150. Save this idea for your next hardscaping weekend project!
- Key Materials: Pre-cut circular paver stones and sand
- Vibe / Style: Soft organic flow
- Difficulty: Heavy manual labor
- Budget Breakdown: Paver kit: $120 | Leveling sand: $30
- Creator’s Tip: Always install a hard plastic edge restraint around the outer ring before sweeping in the joint sand to stop shifting.
- Smart Sourcing: pre-cut circular patio paver starter kits and heavy-duty flexible paver edging (bulk roll)
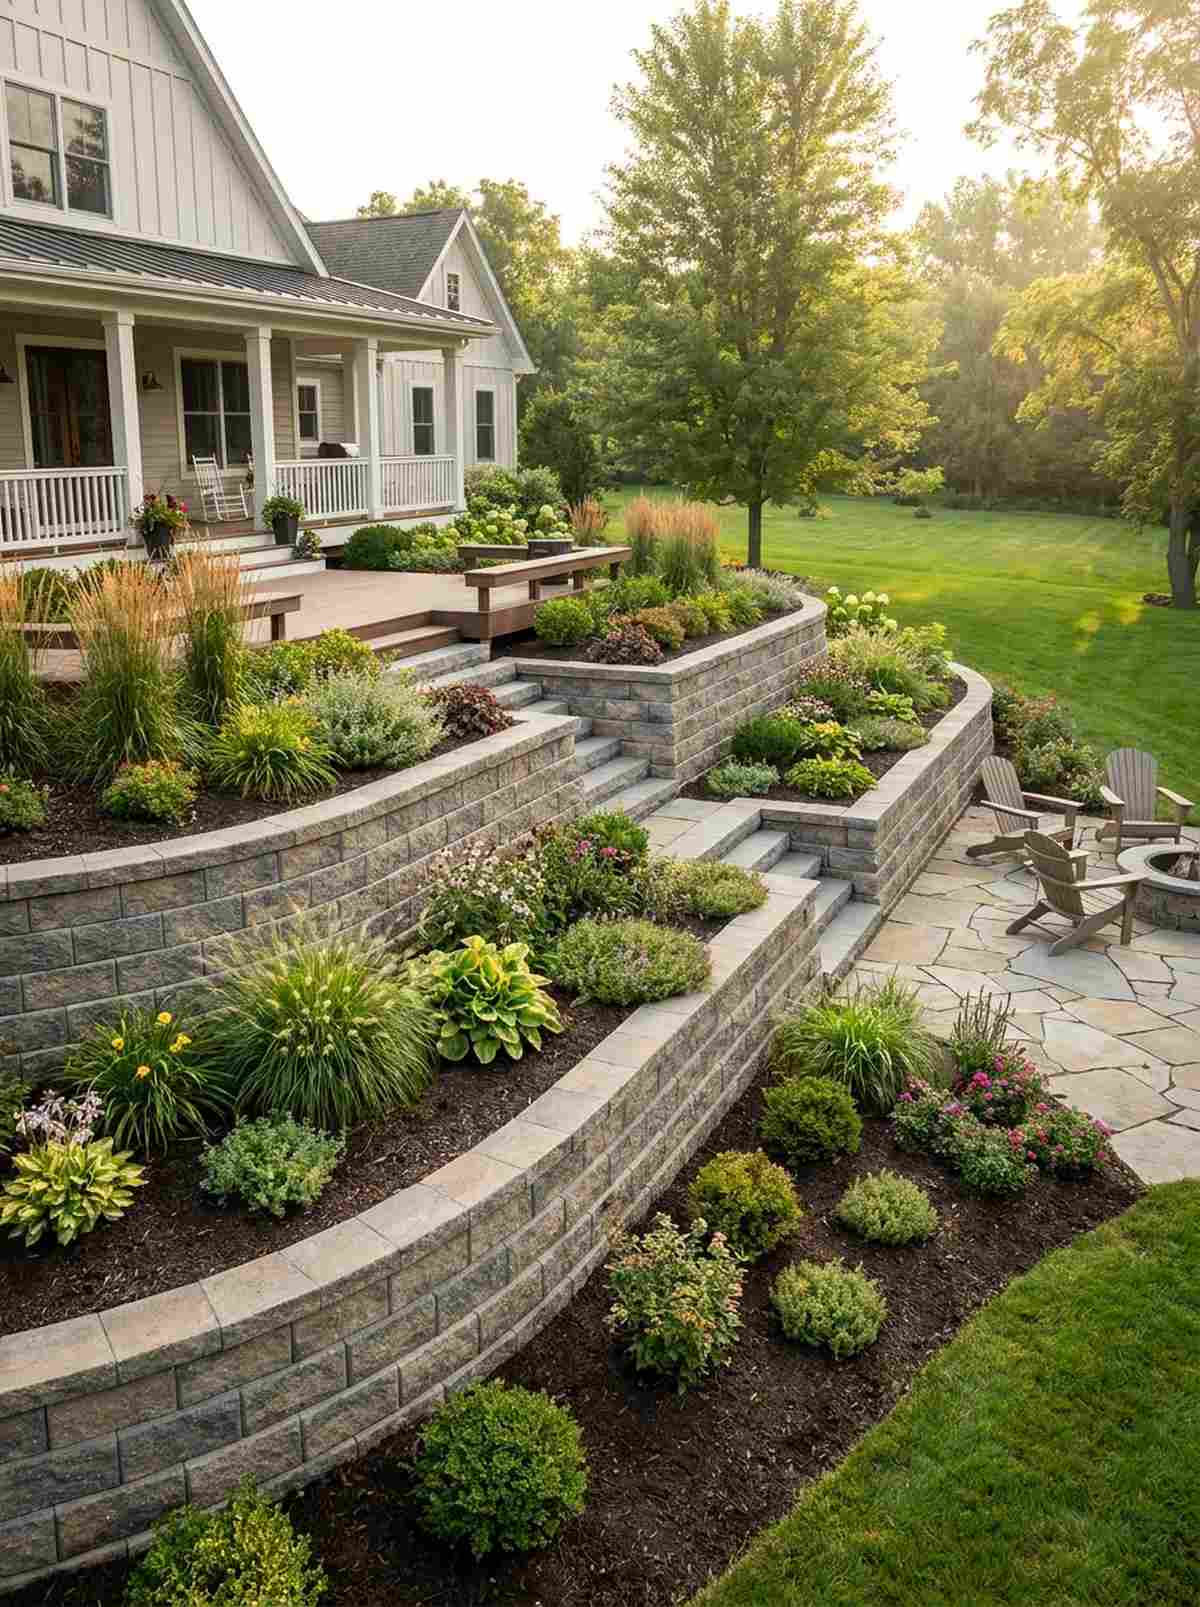
24. Sunken Seating Areas
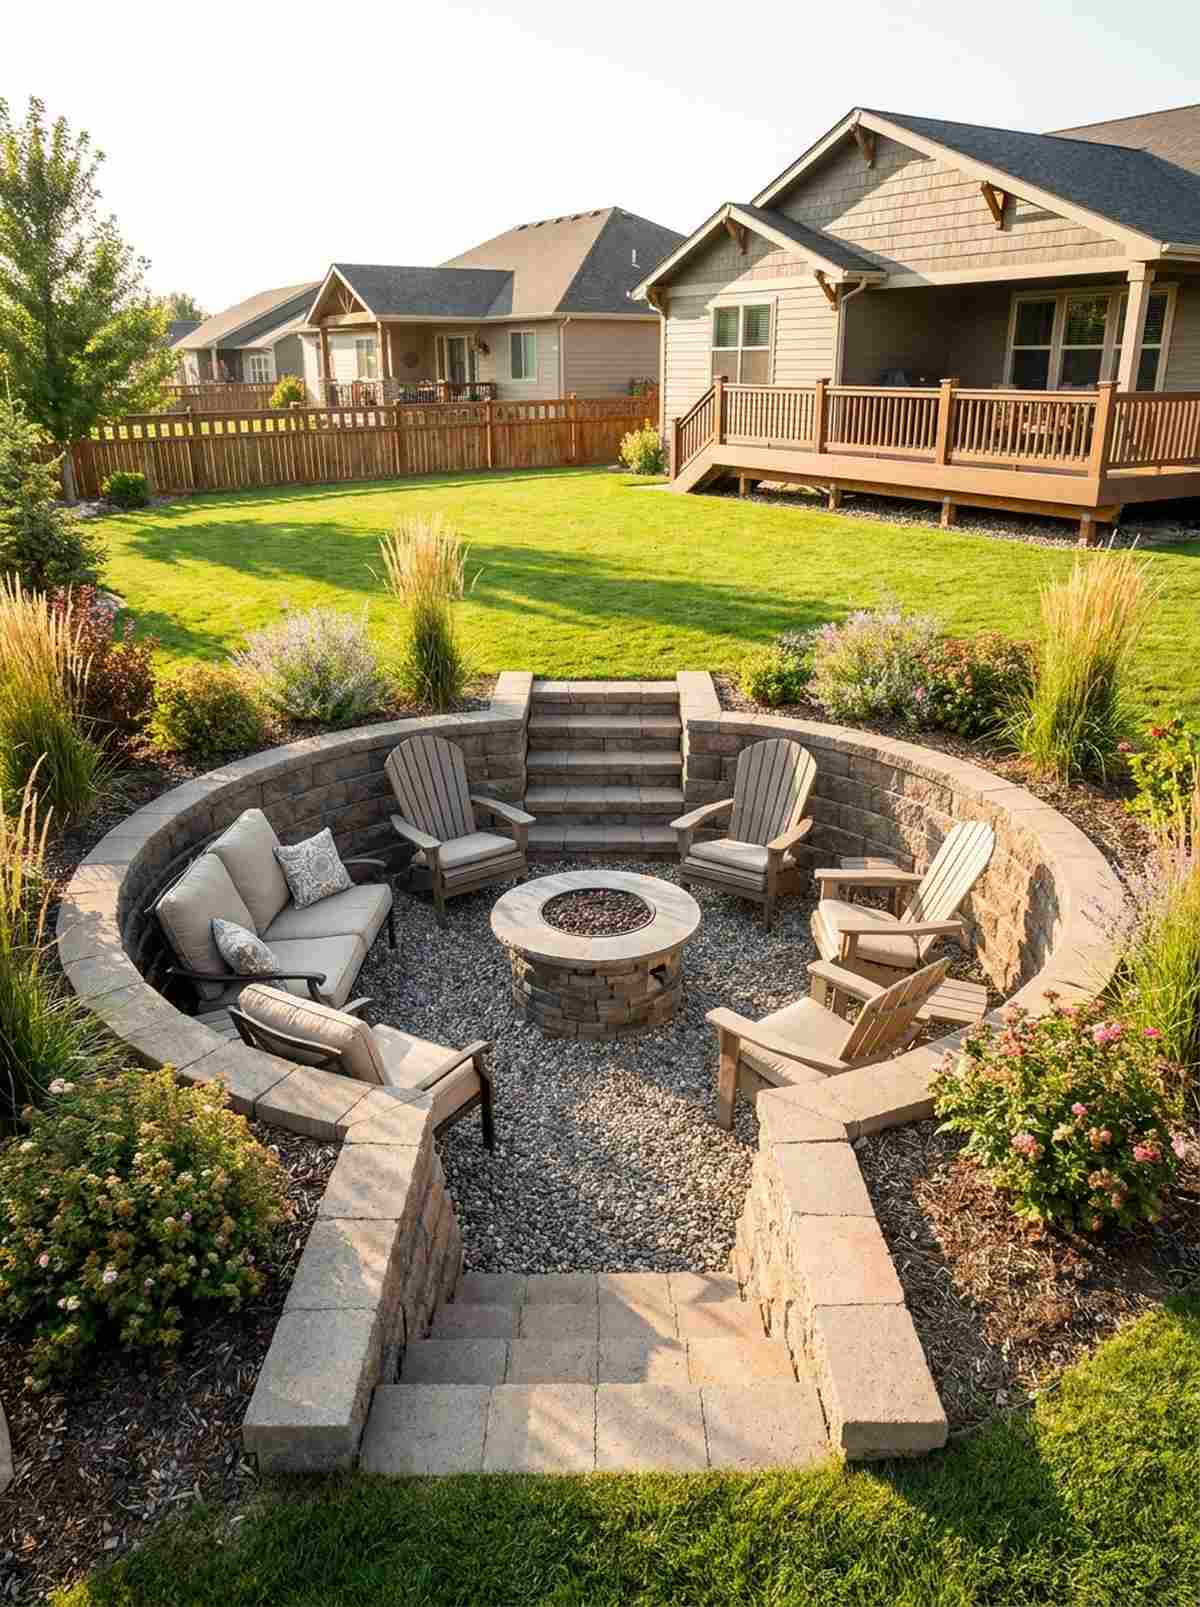
A cozy excavated conversation pit feels like an exclusive VIP lounge hidden in your own yard. This is the absolute best way to create natural privacy if you live on a sloped property.
Building high decks exposes you to neighbors, but dropping the seating zone 18 inches gives a designer-level finish and blocks wind perfectly. Reinforcing the edges with premium retaining blocks ensures the dirt won’t collapse over time.
Digging this out and lining it costs around $300. It’s a sweat-equity project that yields massive aesthetic returns.
- Key Materials: Retaining wall blocks and gravel
- Vibe / Style: Intimate hidden lounge
- Difficulty: Advanced landscaping project
- Budget Breakdown: Wall blocks: $200 | Base gravel: $100
- Creator’s Tip: Dig a small French drain directly in the center of the pit before laying gravel to prevent it from becoming a bathtub.
- Smart Sourcing: interlocking concrete retaining wall blocks (pallet) and commercial-grade non-woven landscape fabric
This next layout trick completely rewrites the rules on how big your backyard actually looks…
25. Diagonal Deck Layouts
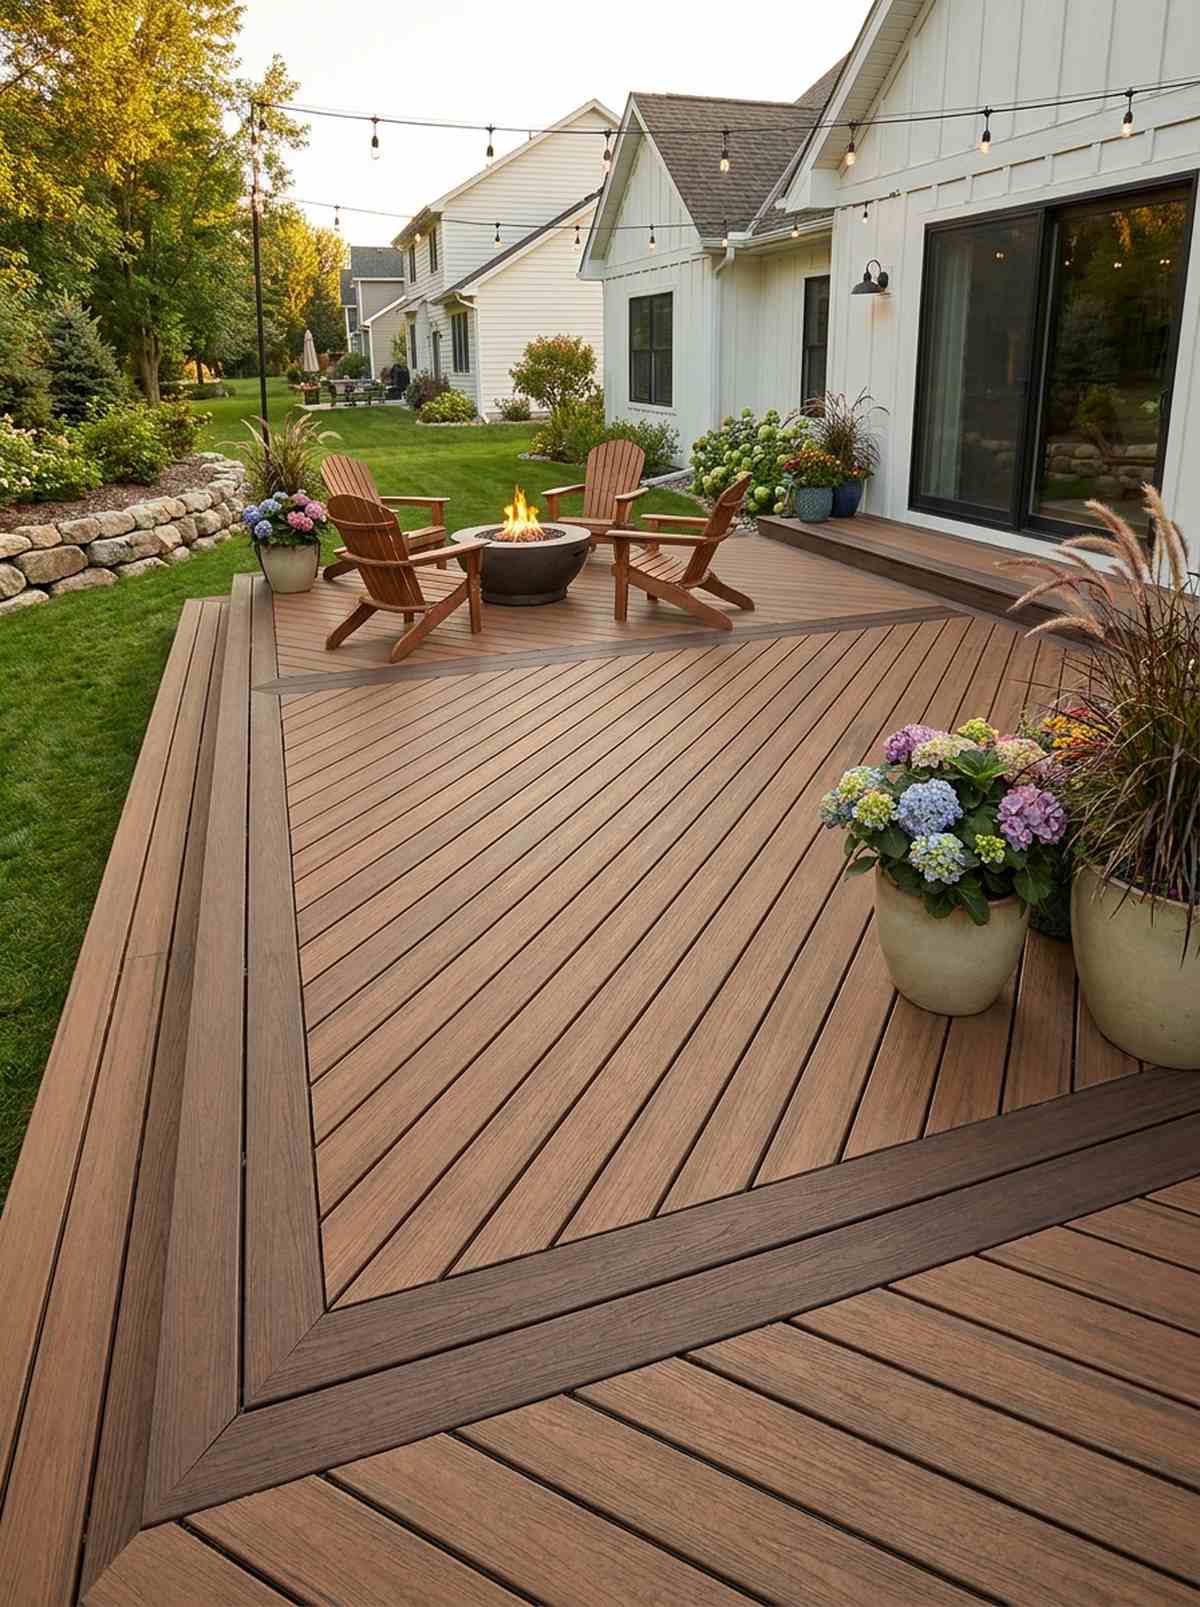
An angled 45-degree decking alignment feels remarkably dynamic, expansive, and highly professional. This optical illusion is a mandatory strategy for long, narrow “bowling alley” style yards.
Running boards parallel to your house visually shrinks the footprint, but a diagonal layout delivers a surprisingly premium look by forcing the eye to travel further. Framing the edges with a contrasting border board adds a custom “picture frame” aesthetic.
This method requires about 15% more lumber, costing around $200 extra. Pin this brilliant optical trick for your deck rebuild!
- Key Materials: Composite decking and joist tape
- Vibe / Style: High-end architectural stretch
- Difficulty: Requires precise saw cuts
- Budget Breakdown: Extra lumber/waste: $150 | Joist tape: $50
- Creator’s Tip: Apply black joist tape over the wood frame before laying the boards to make the gaps visually disappear.
- Smart Sourcing: UV-coated composite decking boards and waterproof acrylic joist flashing tape (bulk roll)
26. Mixed-Material Transitions

A blended wood-to-stone border threshold feels like stepping through distinct rooms in a luxury villa. Perfect for separating a dining deck from a grassy play area without using fences.
Monotonous concrete is boring, but mixing river rock bands between pavers instantly elevates the area with rich texture. Implementing heavy-duty landscaping fabric underneath the rocks guarantees weeds won’t ruin the clean lines.
This layout trick usually costs under $80 to execute. It easily makes cheap materials look highly intentional and expensive.
- Key Materials: Contrasting river rocks and steel edging
- Vibe / Style: Curated modern zoning
- Difficulty: Easy weekend trenching
- Budget Breakdown: Decorative stone: $40 | Steel edge: $40
- Creator’s Tip: Keep the material palette to a maximum of three textures (e.g., wood, dark rock, grey paver) to avoid a chaotic, messy look.
- Smart Sourcing: weather-treated steel landscape edging kits and premium polished river rock (bulk bags)
27. Raised Platform Decks
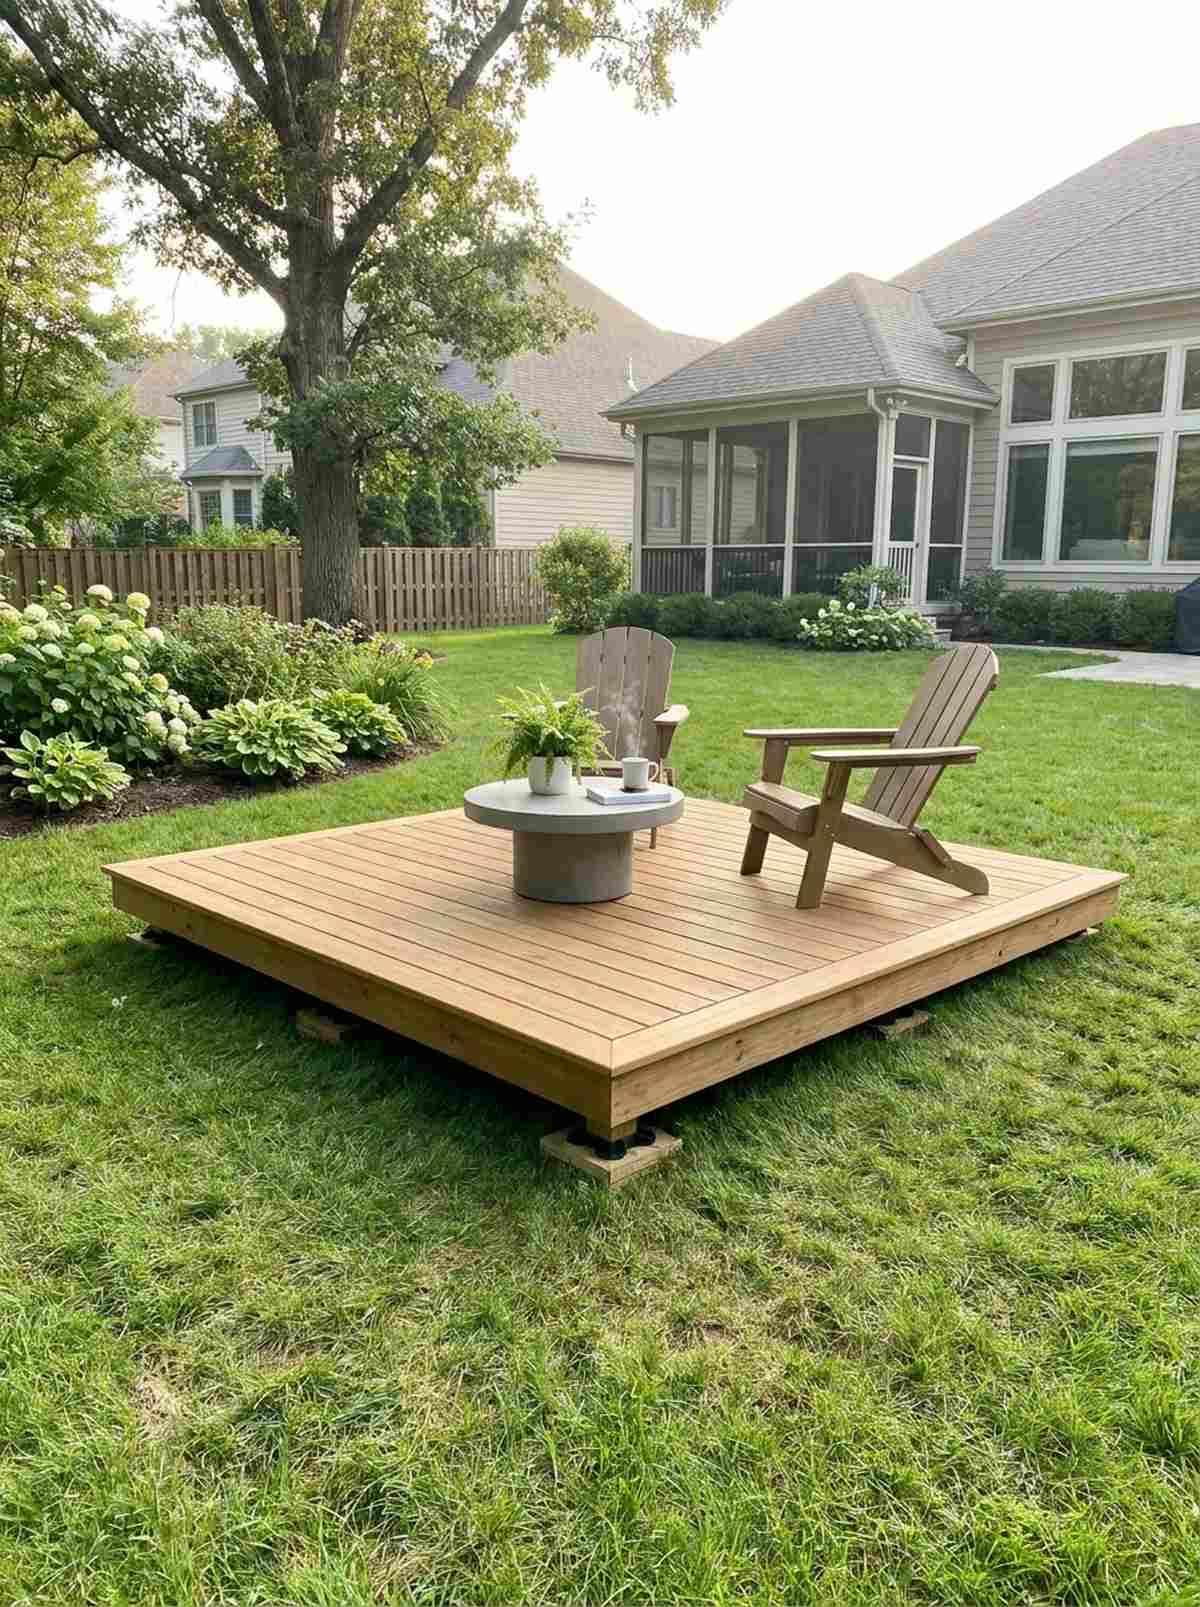
A floating elevated island deck feels like an exclusive stage set for your morning coffee. This works exceptionally well in flat, muddy yards where you want a clean, dry sanctuary.
Pouring a massive concrete slab is permanent and expensive, whereas a low-profile wood platform looks far more expensive than it is. Using adjustable deck risers allows you to build a perfectly level floor directly over uneven grass.
A 10×10 floating platform costs roughly $350. Save this if you want a fast, permit-free patio upgrade!
- Key Materials: Pre-treated lumber and adjustable risers
- Vibe / Style: Minimalist floating island
- Difficulty: Moderate carpentry
- Budget Breakdown: Wood frame/top: $250 | Riser blocks: $100
- Creator’s Tip: Leave a 1-inch overhang on the top boards to completely hide the supporting foundation blocks from view.
- Smart Sourcing: adjustable heavy-duty deck riser blocks (starter kit) and pre-cut ground-contact treated framing lumber
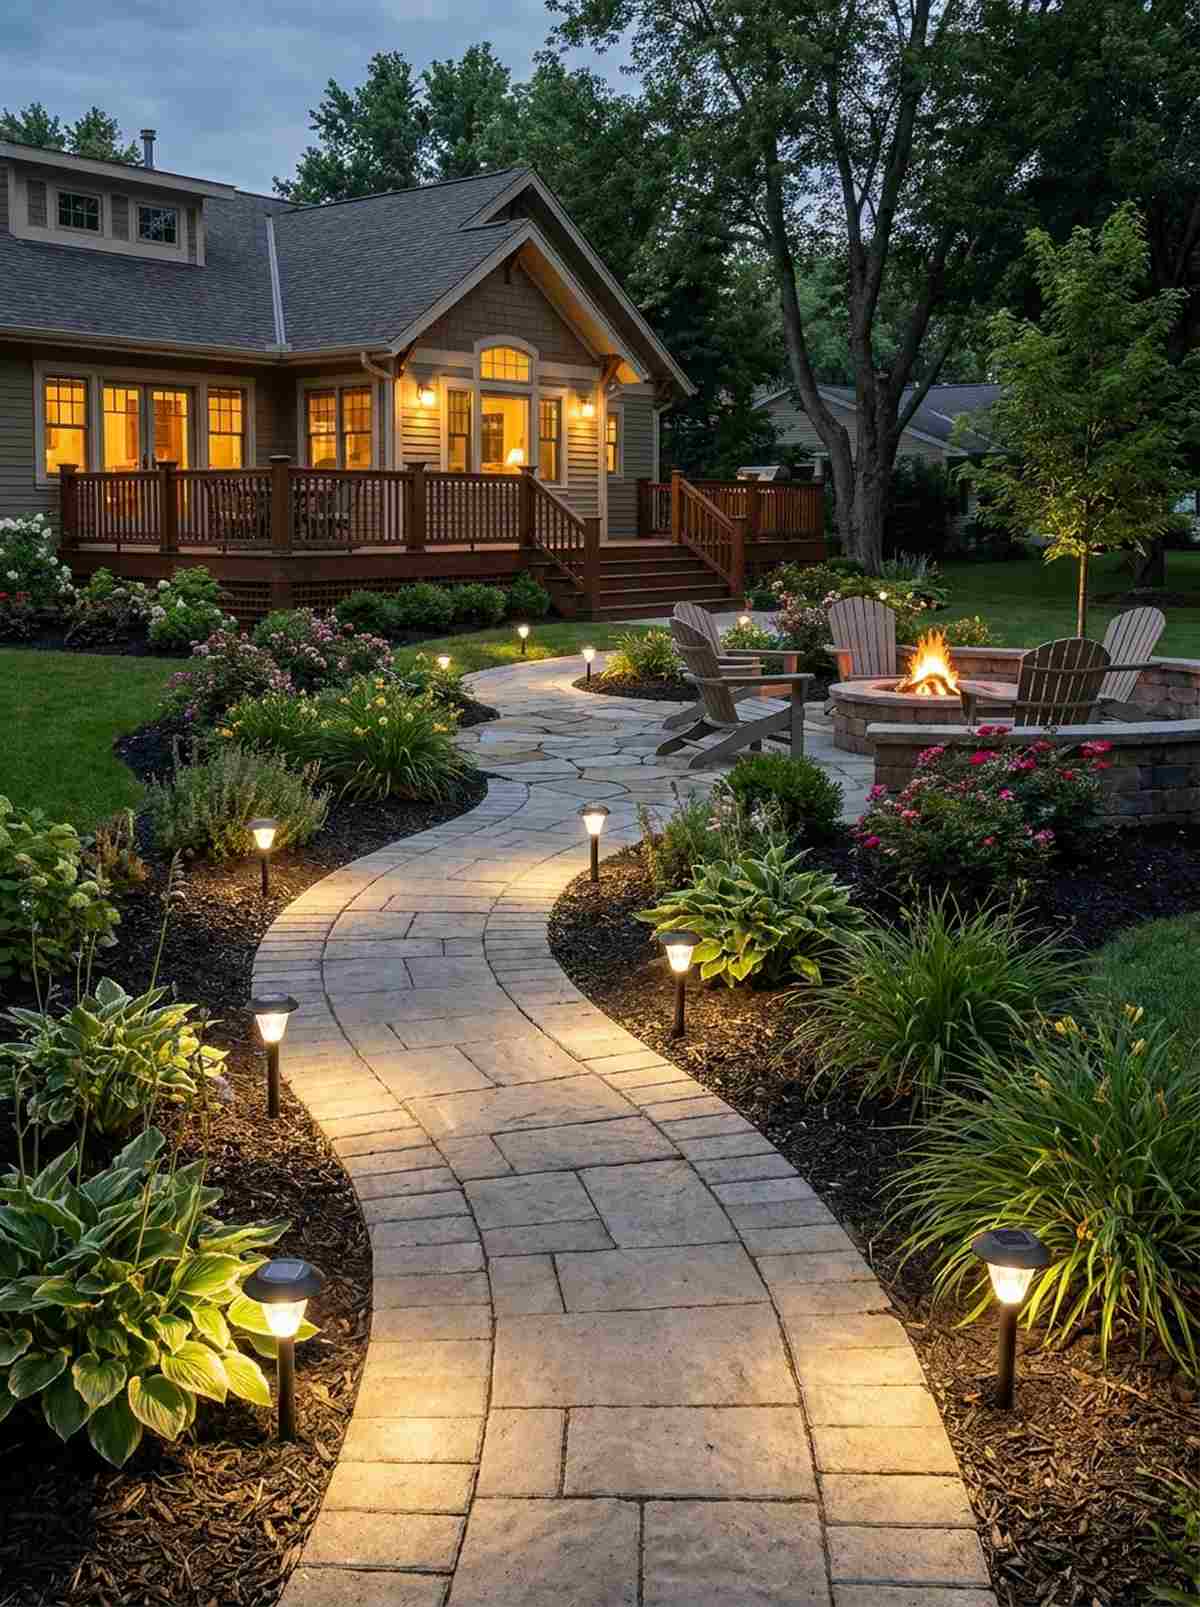
28. Serpentine Pathways
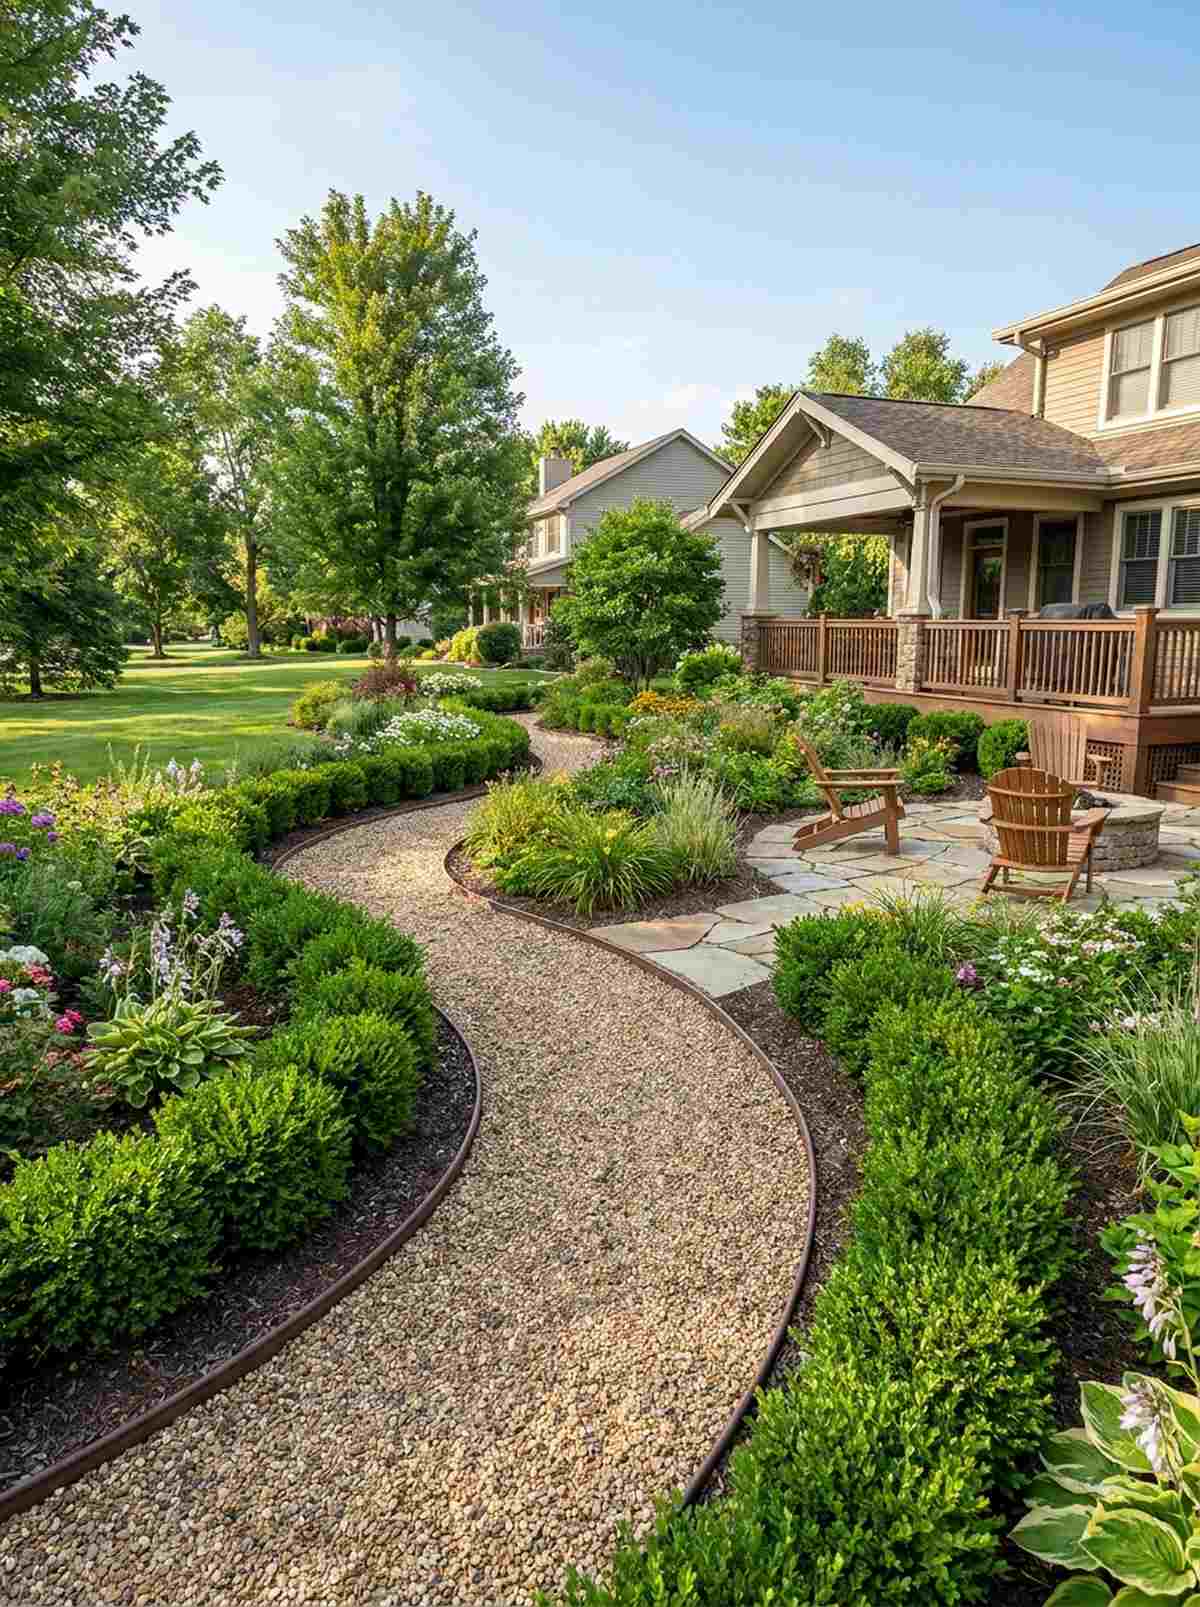
A winding s-curve garden walkway feels like a tranquil journey through a sprawling botanical estate. It is the ultimate hack to make a short backyard feel significantly deeper.
Straight paths get you to the fence too fast, but adding sweeping curves brings a custom architectural vibe that forces visitors to slow down. Defining the edges with miniature garden supplies or low boxwoods reinforces the visual journey.
Creating a curved path using gravel and edging costs around $100. A highly recommended spatial trick for tiny plots.
- Key Materials: Flexible bender board and pea gravel
- Vibe / Style: Relaxing wandering journey
- Difficulty: Easy physical labor
- Budget Breakdown: Gravel: $60 | Flexible edge: $40
- Creator’s Tip: Lay down a garden hose first to mock up the curves, ensuring the sweeps look natural before digging any trenches.
- Smart Sourcing: high-density flexible poly bender boards (bulk roll) and commercial-grade weed barrier fabric
Material Guide: Cheap vs. Premium Aesthetic
Knowing exactly where to save and where to spend makes all the difference in achieving that “looks expensive but isn’t” vibe in small outdoor layouts.
- Standard vs. UV-Resistant/Premium: Buying cheap plastics means they will crack and fade to a chalky white in one summer. UV-coated materials survive years of abuse.
- Pre-made Kits vs. Sourcing Locally: Scavenging hardware stores for mismatched parts wastes time. Premium starter kits are engineered to fit perfectly, saving both frustration and hidden costs.
Warning: Do not skip this next setup if you want maximum greenery with zero ground space…
Container Displays That Maximize Plant Diversity
29. Split-Level Terraces
A multi-tiered stepped retaining wall layout feels like exploring an ancient hillside garden. This setup is absolutely critical for yards with steep, unusable slopes.
Leaving a hill bare causes muddy erosion, but carving out terraced steps delivers a surprisingly premium look that turns dead space into usable planting zones. Anchoring the blocks with proper landscape adhesive ensures the tiers won’t shift during heavy rainfall.
A basic 2-tier setup runs around $250. Pin this to your landscape problem-solving board!
- Key Materials: Interlocking wall blocks and adhesive
- Vibe / Style: Structured hillside elegance
- Difficulty: Heavy earth-moving required
- Budget Breakdown: Blocks: $200 | Construction glue: $50
- Creator’s Tip: Slightly tilt the blocks backward into the hill (about a 1-inch step-back per row) to drastically increase structural strength.
- Smart Sourcing: heavy-duty polyurethane landscape block adhesive and perforated corrugated drainage piping rolls
30. Tiered Container Towers
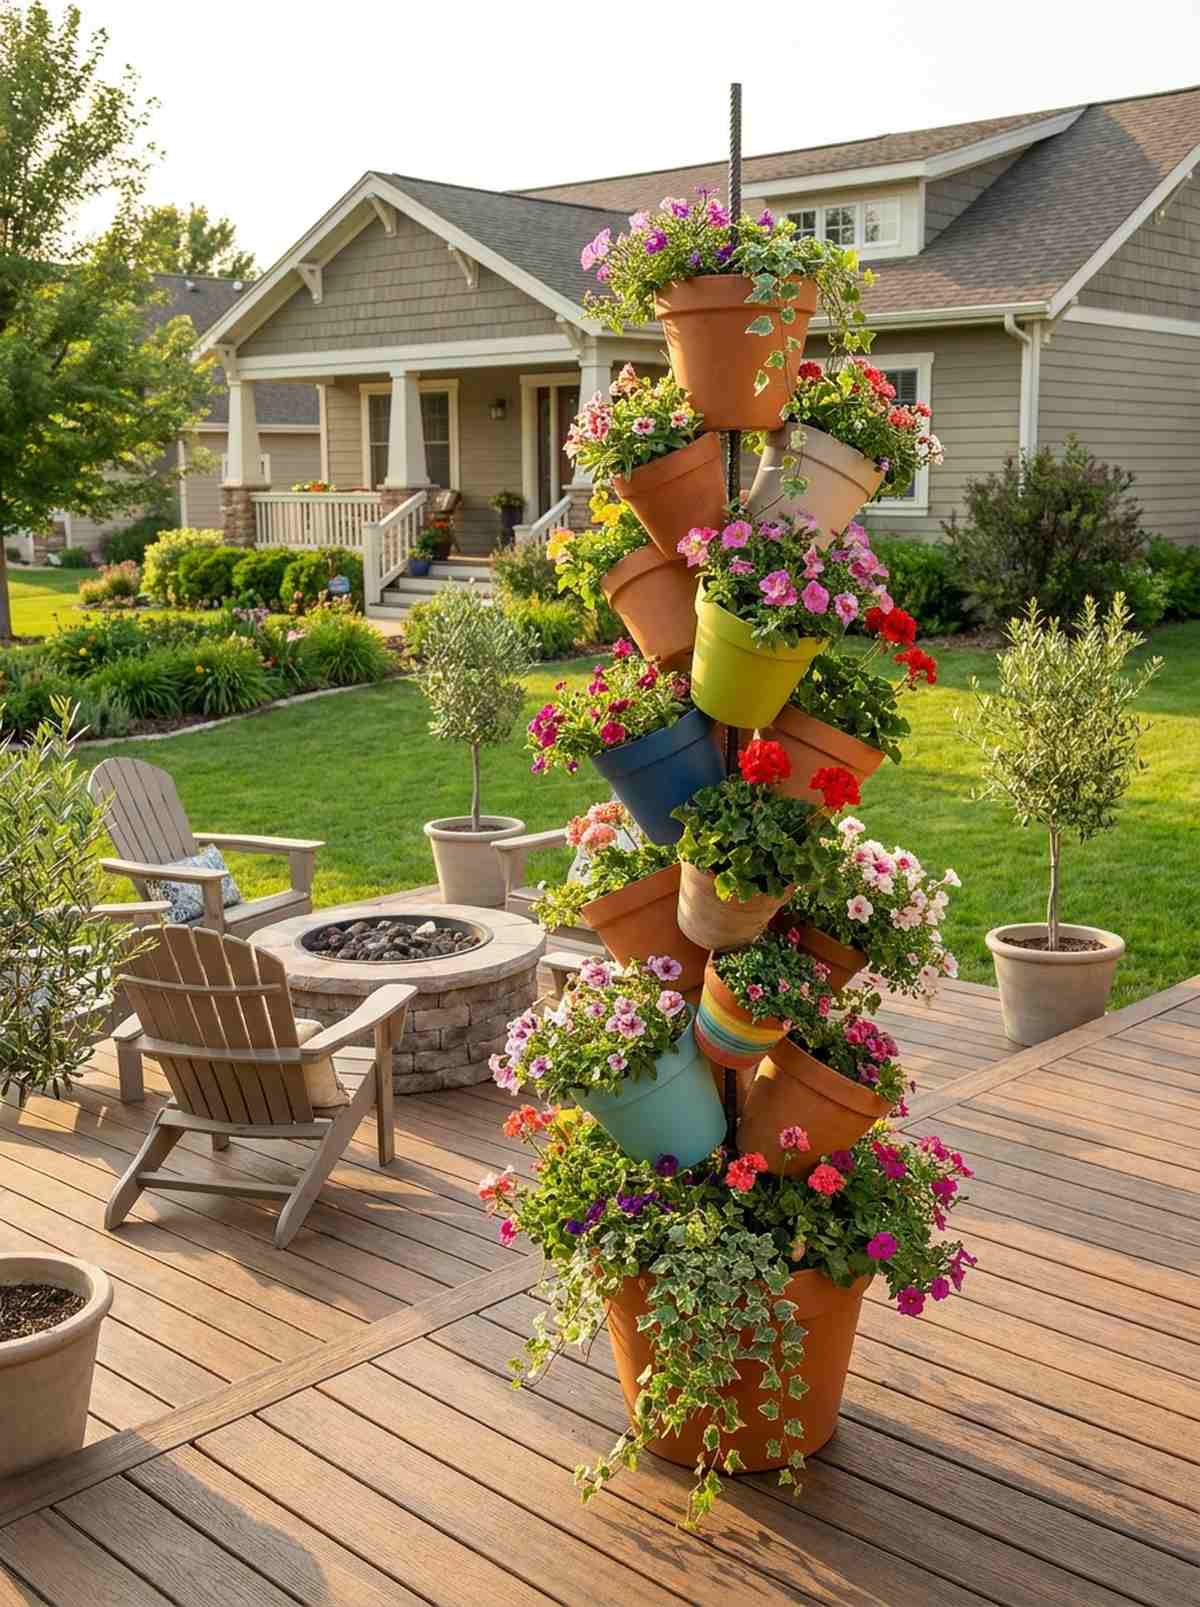
A cascading stacked flower pot pillar feels like a vibrant floral fountain bursting from the pavement. It is perfect for injecting massive color into a dull corner of a concrete balcony.
Sitting a single pot on the floor is a waste of vertical space, whereas stacking pots on top of each other instantly elevates the area with height and drama. Driving a central rebar pole through the drainage holes guarantees the tower won’t topple over in the wind.
You can build a 4-tier tower for about $40. It’s a quick, cheap way to fake a massive garden footprint.
- Key Materials: Assorted pots and steel rebar stake
- Vibe / Style: Playful floral fountain
- Difficulty: Easy 10-minute stacking
- Budget Breakdown: Terra cotta pots: $30 | Steel stake: $10
- Creator’s Tip: Tilt alternating pots slightly to the left and right to create a whimsical, topsy-turvy aesthetic.
- Smart Sourcing: pre-cut galvanized steel rebar stakes (bundle) and shatterproof lightweight resin planter pots (multi-pack)
31. Rolling Planter Carts
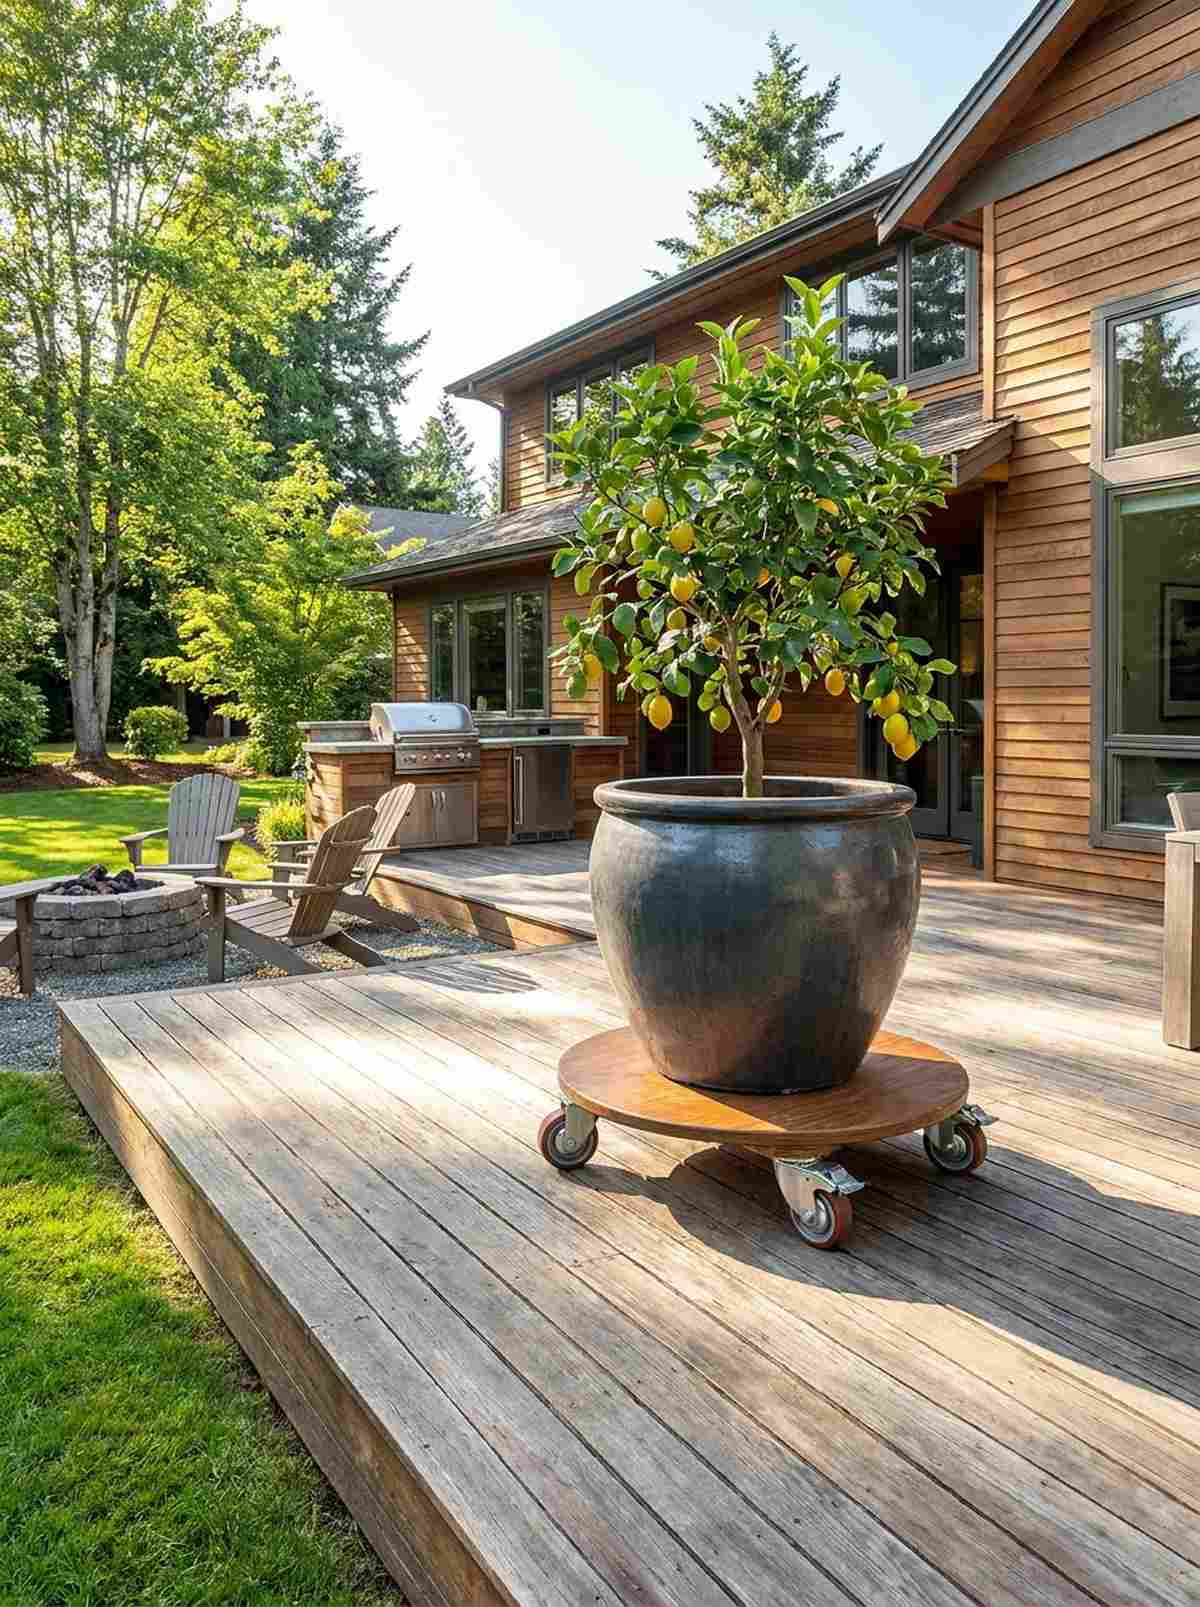
A mobile heavy-duty industrial plant trolley feels highly curated and brilliantly functional. This is a lifesaver for heavy fruit trees that need to be chased into the sunlight across a shaded patio.
Dragging heavy ceramic pots destroys wooden decks, but upgrading to smooth lockable casters gives a designer-level finish while saving your back. Sourcing rust-proof stainless steel wheels ensures they roll smoothly even after years of rain exposure.
A premium rolling base costs around $30. Save this if you love rearranging your yard layout!
- Key Materials: Wood base and locking casters
- Vibe / Style: Industrial modern utility
- Difficulty: Quick drill assembly
- Budget Breakdown: Caster wheels: $20 | Wood base: $10
- Creator’s Tip: Bolt the wheels as close to the outer edge of the wood base as possible to prevent the tall pot from tipping over while rolling.
- Smart Sourcing: heavy-duty locking polyurethane caster wheels (4-pack) and UV-coated round wood plant caddy bases
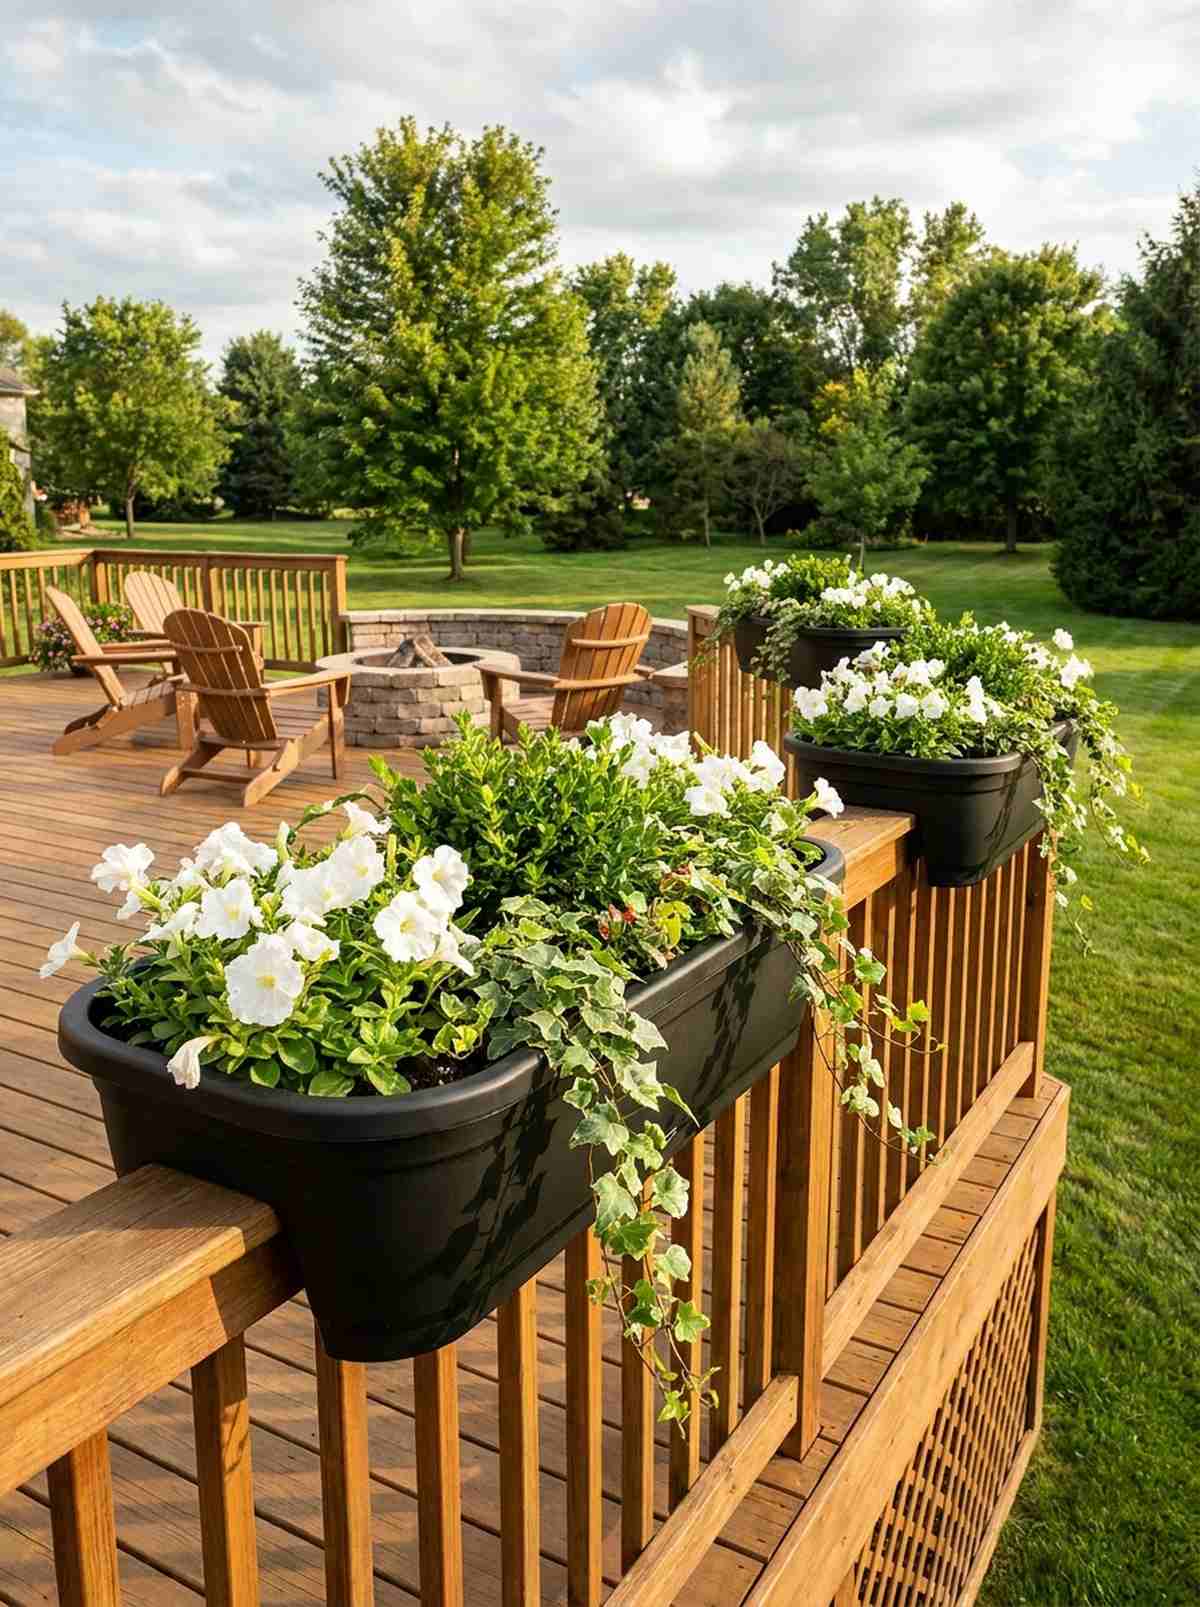
32. Window Box Extensions
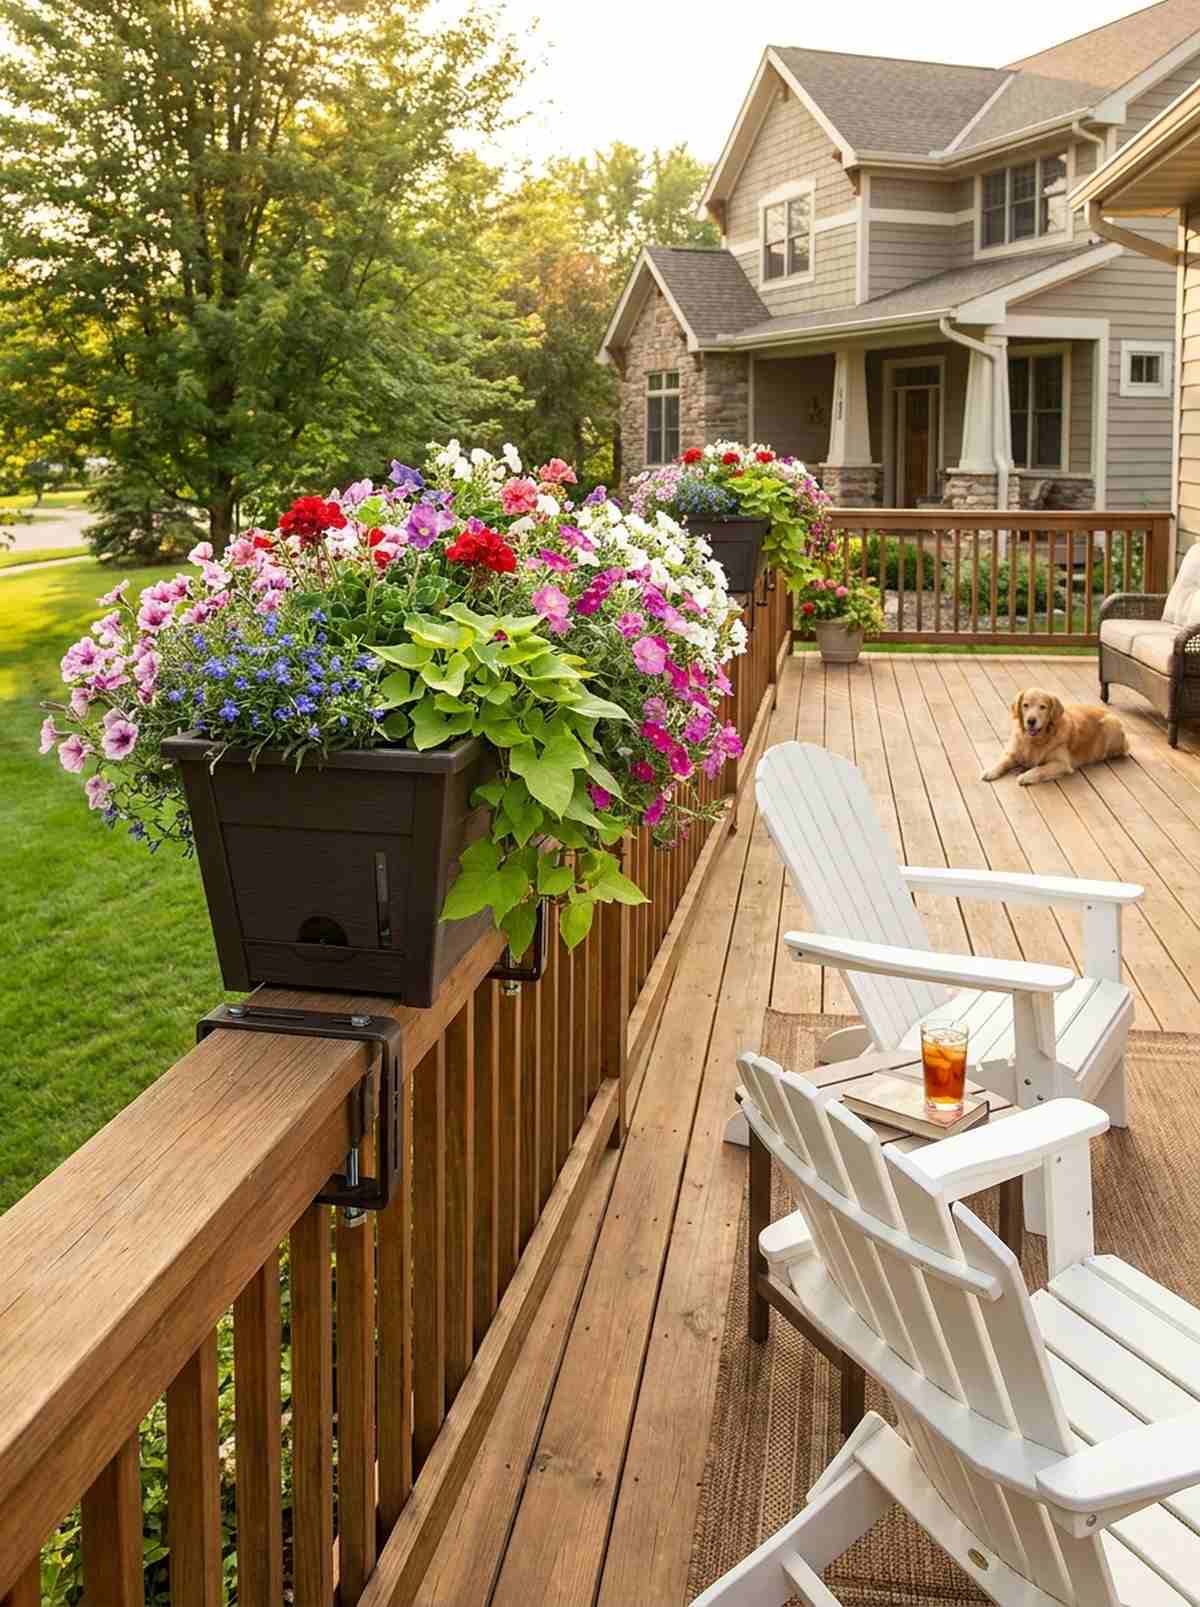
A suspended railing-mounted flower trough feels like a classic, romantic cottage detail. It perfectly activates the dead space on the outside of a deck railing.
Leaving railings bare is a missed opportunity, but hanging deep troughs looks far more expensive than it is and creates an instant living privacy screen. Using self-watering reservoirs means your blooms won’t scorch and die during a 3-day summer heatwave.
A self-watering setup costs roughly $45. A highly recommended, low-maintenance pop of color.
- Key Materials: Self-watering trough and railing hooks
- Vibe / Style: Classic cottage overflow
- Difficulty: Hang and plant
- Budget Breakdown: Planter box: $30 | Railing brackets: $15
- Creator’s Tip: Mix moisture-control potting soil with a handful of perlite to keep the soil incredibly light so it doesn’t bend the railing.
- Smart Sourcing: UV-resistant self-watering window box kits and adjustable heavy-duty deck railing brackets
Most people get this completely wrong… until they try the exact layout coming up next.
33. Succulent Bowl Gardens
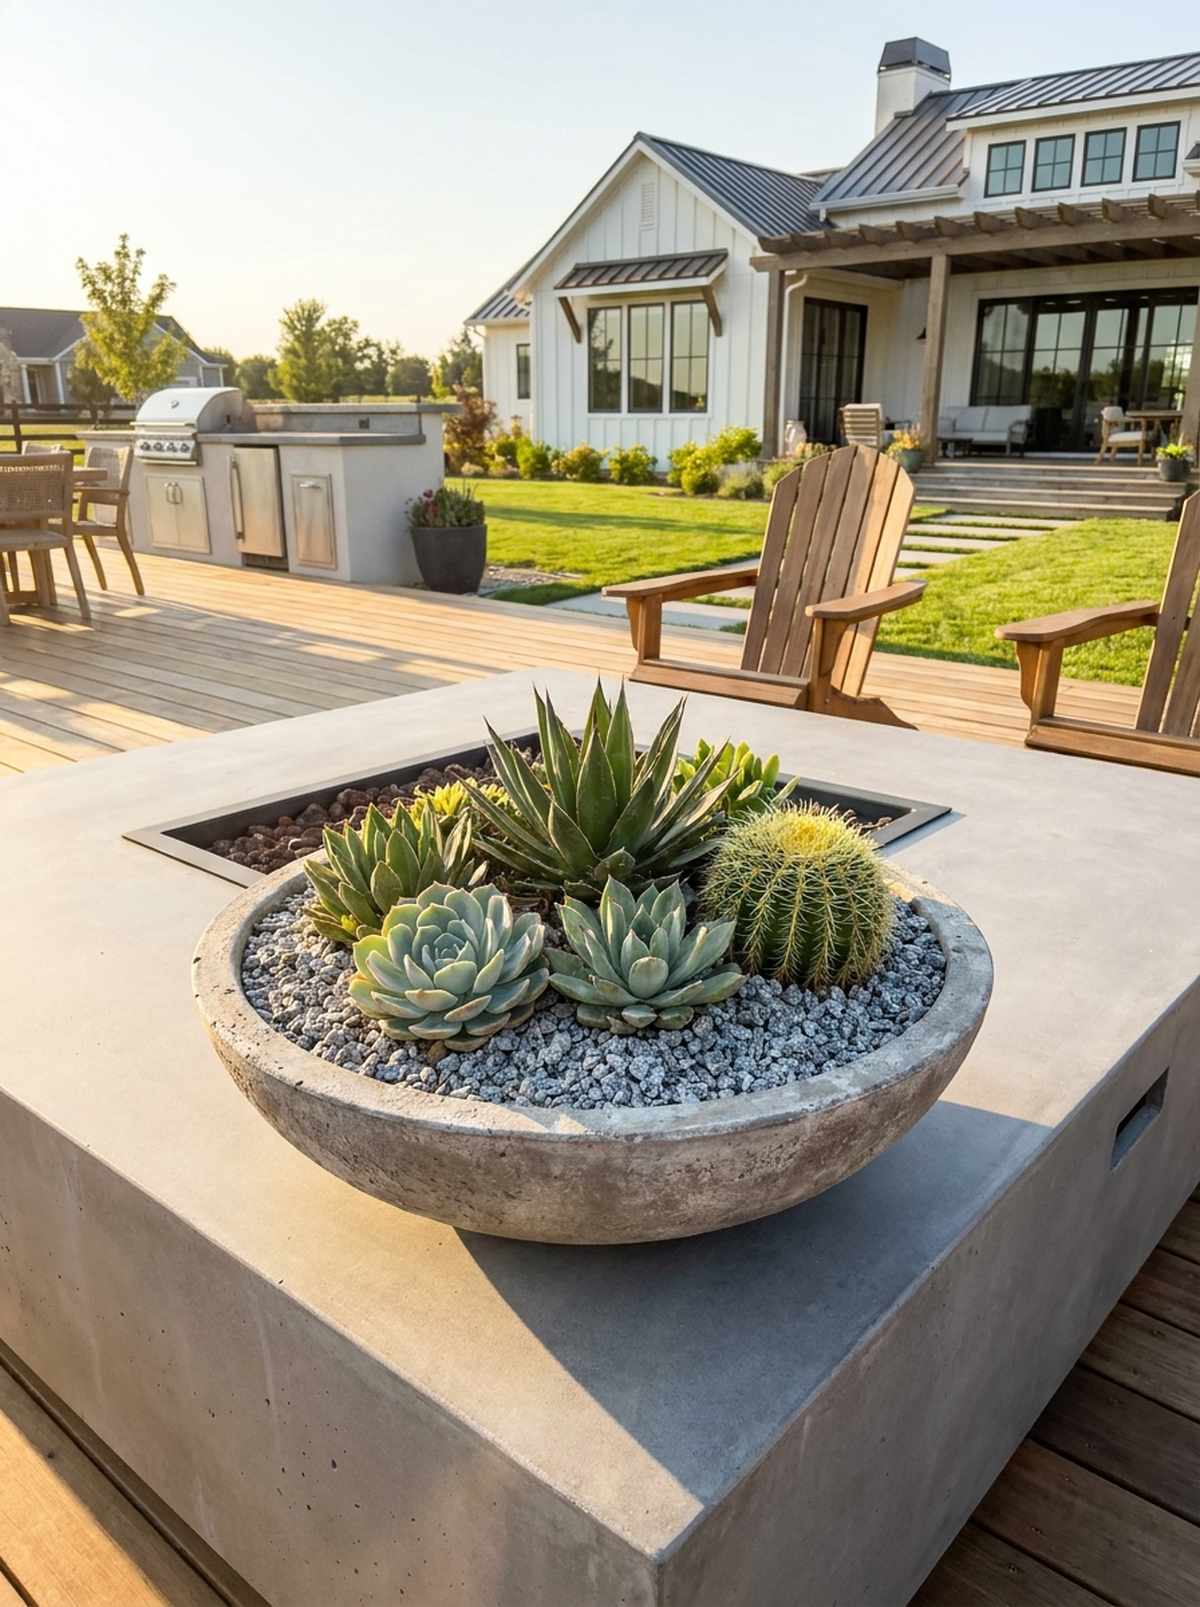
A shallow stone-textured desert bowl feels like a modern, high-end architectural centerpiece. This layout thrives on scalding hot concrete tables where traditional flowers would instantly wither.
Standard deep pots retain too much moisture for cacti, while wide, shallow bowls bring a custom architectural vibe that promotes perfect drainage. Topping the soil with premium terrarium accessories like crushed granite gives it that pristine, weed-free look.
You can craft a stunning bowl for around $35. Pin this to your modern minimal garden board!
- Key Materials: Shallow resin bowl and cactus mix
- Vibe / Style: Sleek desert modernism
- Difficulty: Beginner planting
- Budget Breakdown: Bowl: $20 | Stones/Soil: $15
- Creator’s Tip: Never water succulents directly on the leaves; use a long-neck watering can to deliver water strictly to the root zone.
- Smart Sourcing: shallow concrete-finish lightweight resin bowls and premium organic fast-draining cactus soil (bulk bag)
34. Mediterranean Terra Cotta Clusters
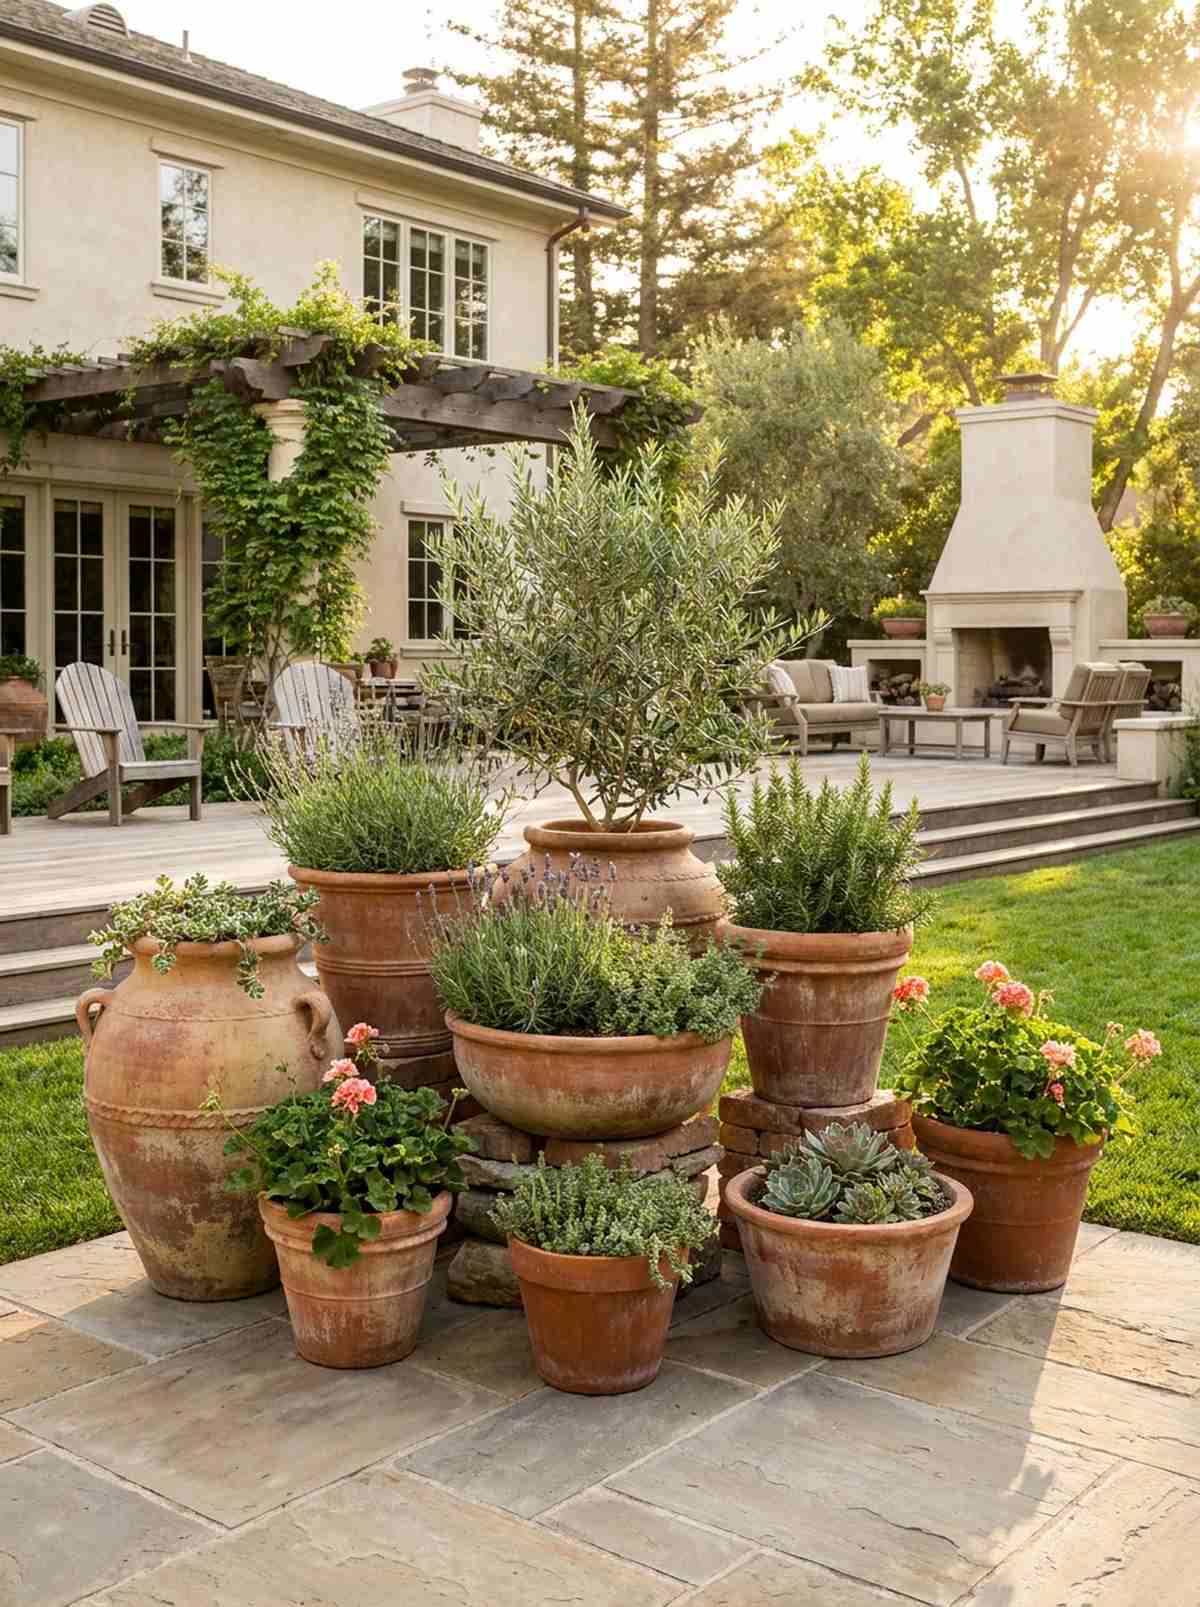
A grouped rustic clay pot collection feels like a sun-drenched Tuscan villa patio. It is incredibly effective for filling awkward, empty corners with a cohesive, stylized look.
Using a mix of random colored plastic pots looks messy, but a monochromatic terra cotta cluster delivers a surprisingly premium look through unified texture. Elevating the back pots on hidden bricks ensures every single plant is visible.
A stunning 5-pot cluster costs about $60. It’s a timeless layout that never goes out of style.
- Key Materials: Assorted aged terra cotta pots
- Vibe / Style: Sun-baked Tuscan retreat
- Difficulty: Easy styling project
- Budget Breakdown: Pots (various sizes): $50 | Riser bricks: $10
- Creator’s Tip: Soak brand-new terra cotta pots in water for 30 minutes before planting so the dry clay doesn’t steal moisture from the soil.
- Smart Sourcing: bulk terra cotta planter assortments and invisible rubber pot feet risers (bulk pack)
35. Vertical Tower Planters
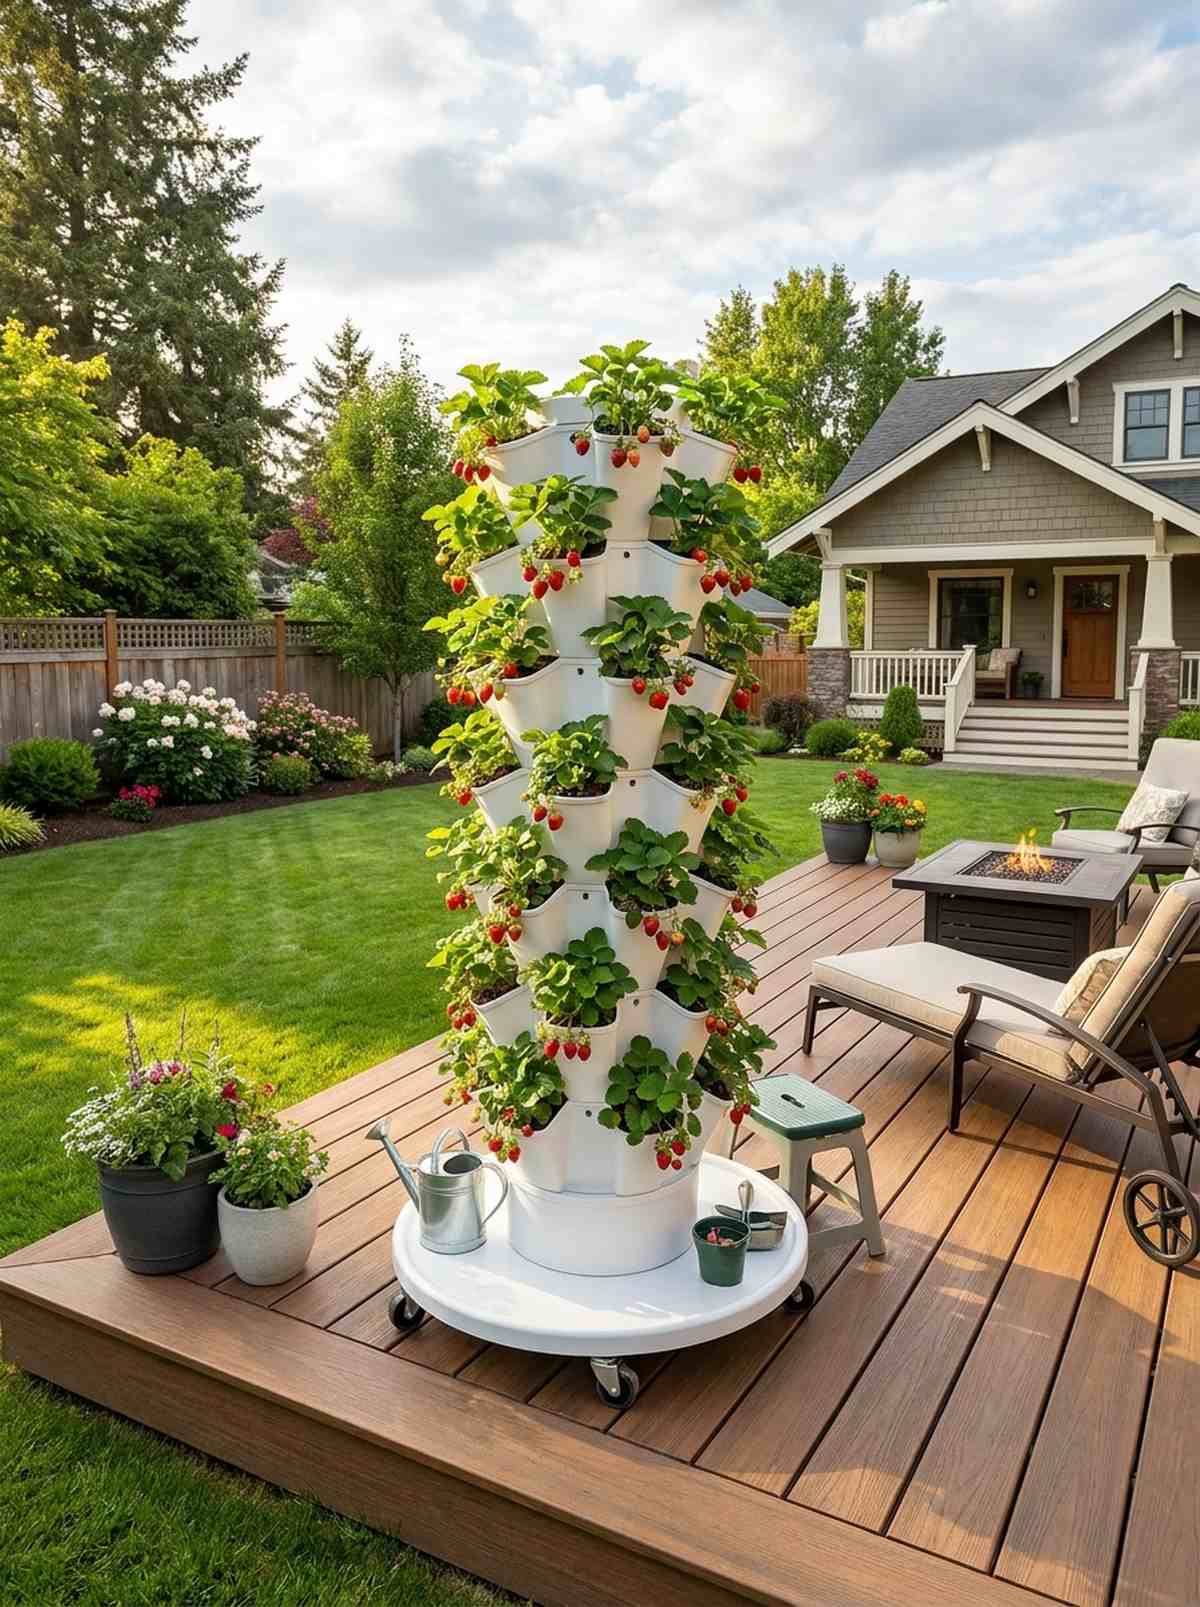
A spinning hydroponic vertical pocket tower feels like a piece of futuristic gardening tech. It is the absolute holy grail for growing 30+ strawberry plants in a tiny 2-foot square footprint.
Sprawling garden beds take up half the yard, whereas a stackable vertical system instantly elevates the area with massive yields. Snagging a tower with a built-in lazy susan base ensures every side gets equal sun exposure.
A quality tower kit costs around $80–$120. Save this if you want maximum harvest in minimal space!
- Key Materials: Stackable planter tiers and base
- Vibe / Style: High-yield futuristic harvest
- Difficulty: Simple stacking assembly
- Budget Breakdown: Tower kit: $90 | Rolling base: $30
- Creator’s Tip: Plant heavier, drooping vegetables in the bottom pockets and lighter, upright herbs in the top pockets to maintain balance.
- Smart Sourcing: stackable vertical garden tower kits and heavy-duty lazy susan rolling bases
36. Railing Planter Systems
A straddling saddle-style balcony planter feels like a brilliant hack that seamlessly blends into the architecture. Perfect for renters who aren’t allowed to drill brackets into the exterior framing.
Balancing pots on ledges is dangerous, but deep-groove saddle planters look far more expensive than they are and lock themselves firmly in place. Using UV-coated plastic guarantees they won’t become brittle and crack during freezing winter nights.
Equip your railings for roughly $25 per planter. A highly recommended, zero-damage upgrade.
- Key Materials: Straddle-fit resin planters
- Vibe / Style: Integrated seamless greenery
- Difficulty: Literally zero tools required
- Budget Breakdown: Saddle planters: $25 each
- Creator’s Tip: Secure the planter to the railing with heavy-duty hidden zip ties underneath to prevent them from blowing off in hurricane-force winds.
- Smart Sourcing: UV-resistant straddle railing planter kits and extra-long outdoor-rated zip ties (bulk pack)
This next trick uses raw psychology to make your brain think the yard is 3x bigger…
Color Psychology and Optical Illusions For Spatial Enhancement
37. Pale Hardscape Surfaces
A bright limestone-toned patio foundation feels airy, expansive, and phenomenally clean. It works like magic to bounce precious sunlight around a dark yard completely shaded by tall trees.
Red brick and dark concrete visually suffocate a tiny space, but laying pale pavers brings a custom architectural vibe that instantly pushes boundaries outward. Utilizing a high-quality sealant stops dirt from staining the bright surface.
Staining or laying pale stone costs about $100–$250. Pin this to your backyard layout strategy board!
- Key Materials: Light-colored pavers or concrete stain
- Vibe / Style: Airy expansive luminosity
- Difficulty: Moderate DIY application
- Budget Breakdown: Concrete stain: $80 | Sealant: $40
- Creator’s Tip: Wash the surface with a power-washer and let it dry for 48 hours completely before applying any light-colored stain.
- Smart Sourcing: premium light-gray concrete stain kits and UV-resistant clear masonry sealants
38. Outdoor Mirror Panels

A framed faux-window garden mirror feels like discovering a secret passageway to another yard. This is a legendary trick for narrow courtyards that feel uncomfortably claustrophobic.
Solid fences act like prison walls, but mounting shatterproof acrylic reflections gives a designer-level finish that effectively doubles perceived depth. By framing the mirror with treated wood, it masquerades as an actual architectural window.
You can build this illusion for around $60. It completely rewrites the visual boundaries of your space.
- Key Materials: Shatterproof acrylic mirror and wood trim
- Vibe / Style: Magical optical illusion
- Difficulty: Easy frame building
- Budget Breakdown: Acrylic sheet: $45 | Wood trim: $15
- Creator’s Tip: Angle the top of the mirror downward by about 2 degrees so it reflects the lush grass instead of a blinding reflection of the sky.
- Smart Sourcing: shatterproof acrylic mirror sheets (pre-cut) and weatherproof outdoor construction adhesive
39. Monochromatic Planting Schemes
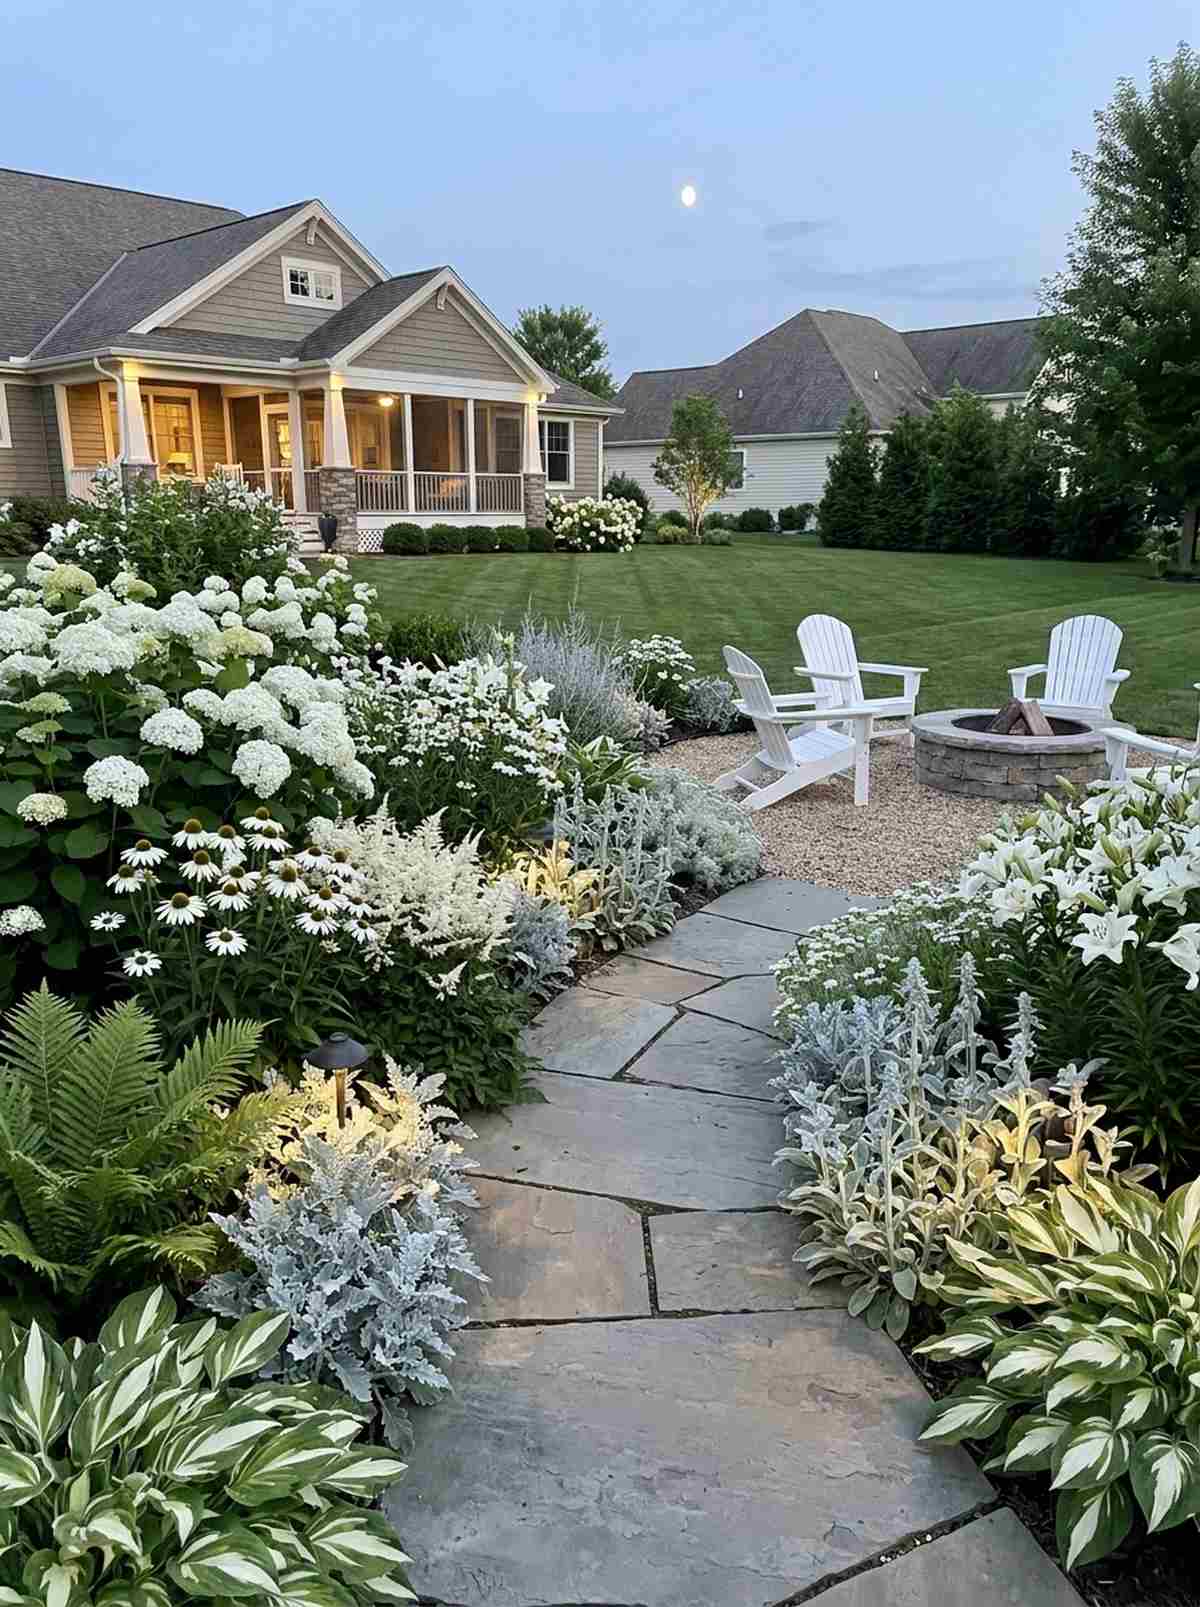
A unified all-white moon garden layout feels incredibly sophisticated, calm, and visually endless. This scheme thrives in small yards where chaotic colors make the space feel cluttered.
Planting a rainbow of random flowers breaks up visual flow, but sticking to a strict single-color palette delivers a surprisingly premium look reminiscent of luxury estates. Mixing textures like fine ferns and broad hostas keeps the single color from looking flat.
Seed and bulb costs run about $40. Save this for a high-end designer garden vibe!
- Key Materials: White blooming plants and silver foliage
- Vibe / Style: Sophisticated tranquil uniformity
- Difficulty: Requires planning and patience
- Budget Breakdown: Seed packets: $15 | Potted starters: $25
- Creator’s Tip: Incorporate plants with silver or dusty gray leaves (like lamb’s ear) to bridge the gap between the white flowers and green stems.
- Smart Sourcing: premium monochromatic flower bulb assortments and organic root-boosting starter fertilizer
40. Bright Accent Walls
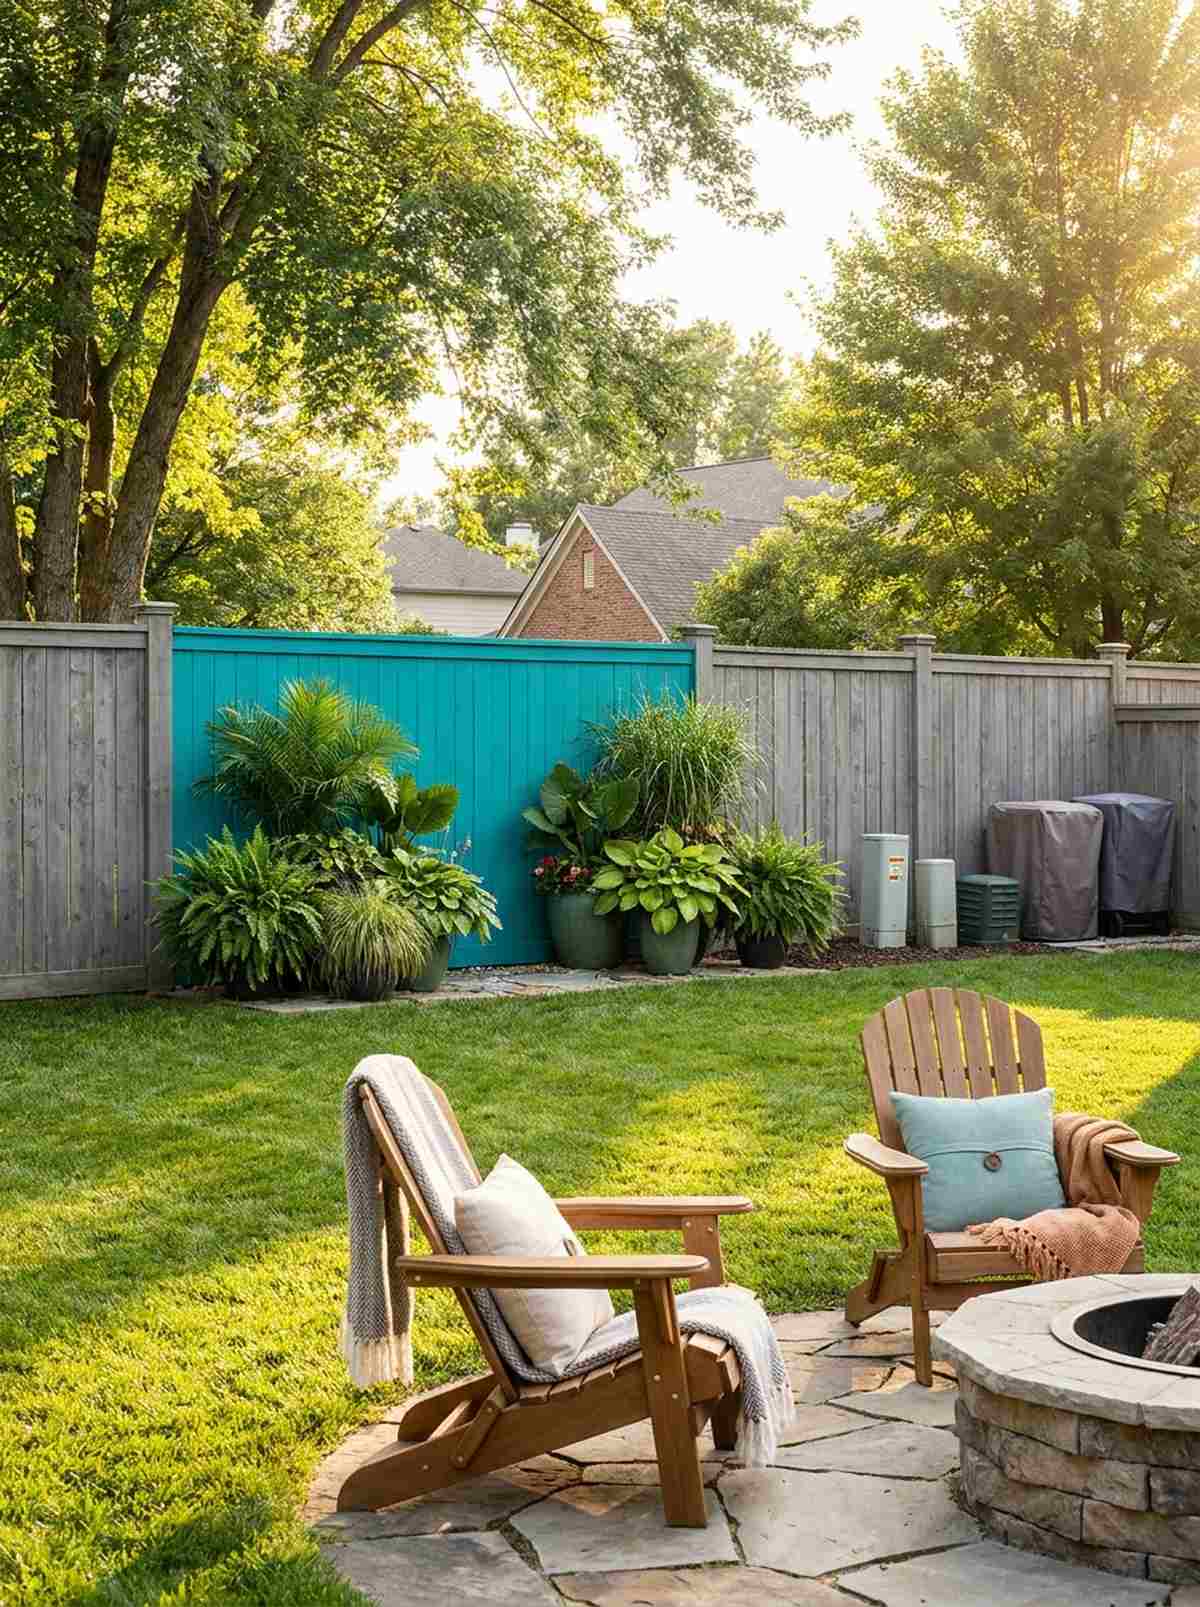
A bold vibrant painted fence panel feels like a deliberate, sunny modern art installation. It acts as an incredible focal point that distracts the eye away from ugly utility boxes or trash cans.
Leaving a worn fence gray looks depressing, but painting one single section a bold coral or teal instantly elevates the area with designer flair. Applying exterior primer first ensures the color pops vibrantly without soaking into the dry wood.
A gallon of premium paint costs $45. A highly recommended, fast afternoon transformation.
- Key Materials: Exterior latex paint and painter’s tape
- Vibe / Style: Bold modern gallery
- Difficulty: Easy painting project
- Budget Breakdown: Premium paint: $45 | Rollers/Tape: $15
- Creator’s Tip: Place your brightest, most lush green plants directly in front of the accent wall to create an explosive, magazine-worthy color contrast.
- Smart Sourcing: UV-resistant exterior paint and primer kits and heavy-duty textured wood paint rollers (bulk pack)
This upcoming layout is practically invisible, but it solves the biggest furniture problem in tiny yards…
41. Glass Table Surfaces
A transparent tempered glass dining surface feels virtually invisible, allowing the space to breathe. It is the ultimate dining solution for patios where a solid wood table would feel like a massive roadblock.
Chunky opaque tables cut sightlines in half, while clear surfaces bring a custom architectural vibe that tricks the eye into seeing an empty patio. Securing shatter-resistant tempered glass means it easily survives falling hail and heavy plates.
You can snag a sleek glass-top set for roughly $150. Pin this to your modern outdoor dining board!
- Key Materials: Tempered glass top and metal frame
- Vibe / Style: Airy floating minimalism
- Difficulty: Ready out of the box
- Budget Breakdown: Table unit: $150
- Creator’s Tip: Wipe the glass down weekly with a 50/50 mix of white vinegar and water to easily remove hard water spots from sprinklers.
- Smart Sourcing: shatterproof tempered glass outdoor table kits and water-repellent glass treatment sprays
42. Sky-Blue Ceiling Elements
A painted haint-blue porch overhang feels like a breezy, endless southern summer sky. This classic trick is brilliant for low-hanging pergolas or enclosed patios that feel like a cave.
Leaving overhead wood dark makes the ceiling feel oppressively low, but a coat of pale blue looks far more expensive than it is and creates an illusion of infinite vertical height. Utilizing mold-resistant paint ensures it stays crisp and clean in humid environments.
This optical illusion costs about $40 in paint. It’s an old-school architect secret that works flawlessly.
- Key Materials: Mold-resistant pale blue exterior paint
- Vibe / Style: Airy southern charm
- Difficulty: Requires overhead painting
- Budget Breakdown: Specialty paint: $35 | Drop cloths: $5
- Creator’s Tip: Use a semi-gloss finish instead of flat paint; the slight sheen reflects ambient patio lights beautifully at night.
- Smart Sourcing: mold-resistant exterior semi-gloss paint kits and heavy-duty canvas drop cloths (2-pack)
Boundary Surfaces Transformed Into Functional Features
43. Tool Storage Panels
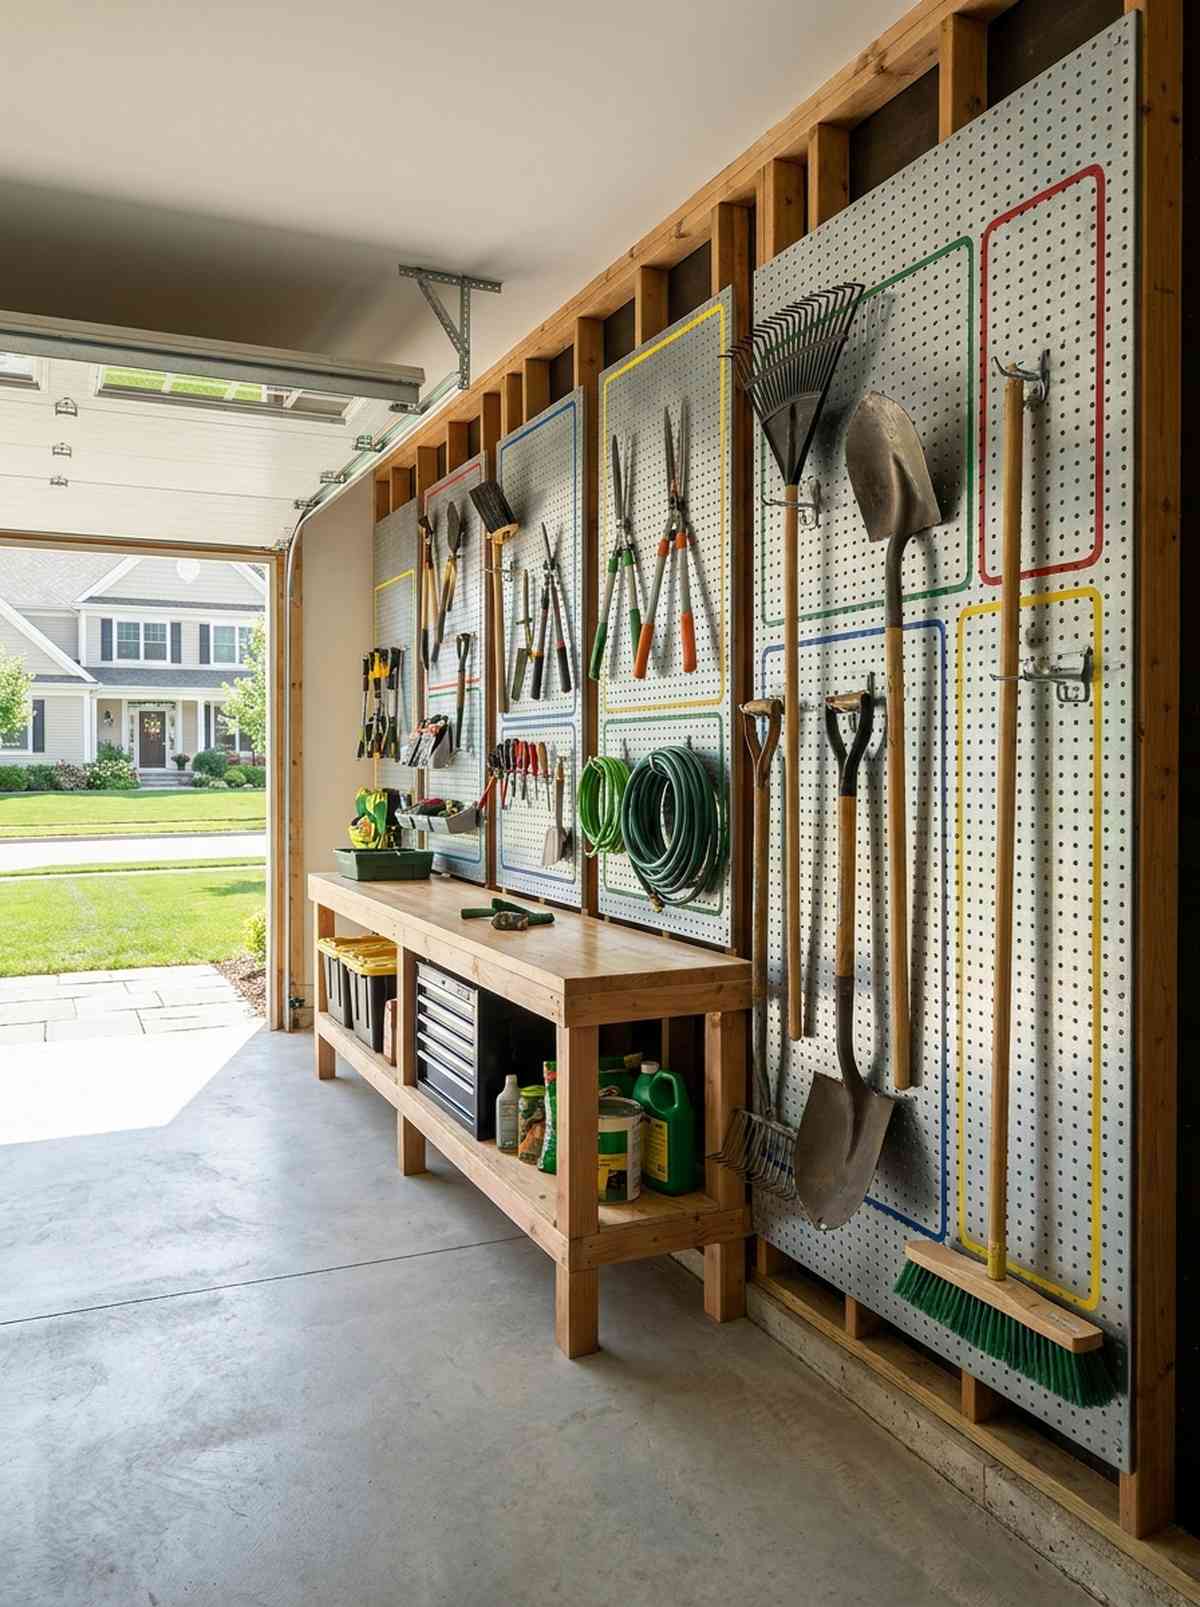
A vertical color-coded pegboard tool wall feels incredibly satisfying, organized, and rugged. This is mandatory for anyone lacking a full shed but needing quick access to landscaping gear.
Tossing tools into a messy corner destroys your yard’s aesthetic, but mounting galvanized slatwalls instantly elevates the area into a professional workspace. Grabbing heavy-duty locking hooks means your shovels won’t come crashing down during a storm.
A complete wall kit costs around $70. Save this to your outdoor organization layout board!
- Key Materials: Galvanized metal pegboard and locking hooks
- Vibe / Style: Professional utility station
- Difficulty: Simple drill mounting
- Budget Breakdown: Metal panel: $40 | Hook kit: $30
- Creator’s Tip: Spray paint the outline of each tool onto the board so you instantly know what is missing at a glance.
- Smart Sourcing: rust-proof galvanized metal pegboard starter kits and heavy-duty locking pegboard hooks (bulk pack)
44. Fold-Down Potting Benches
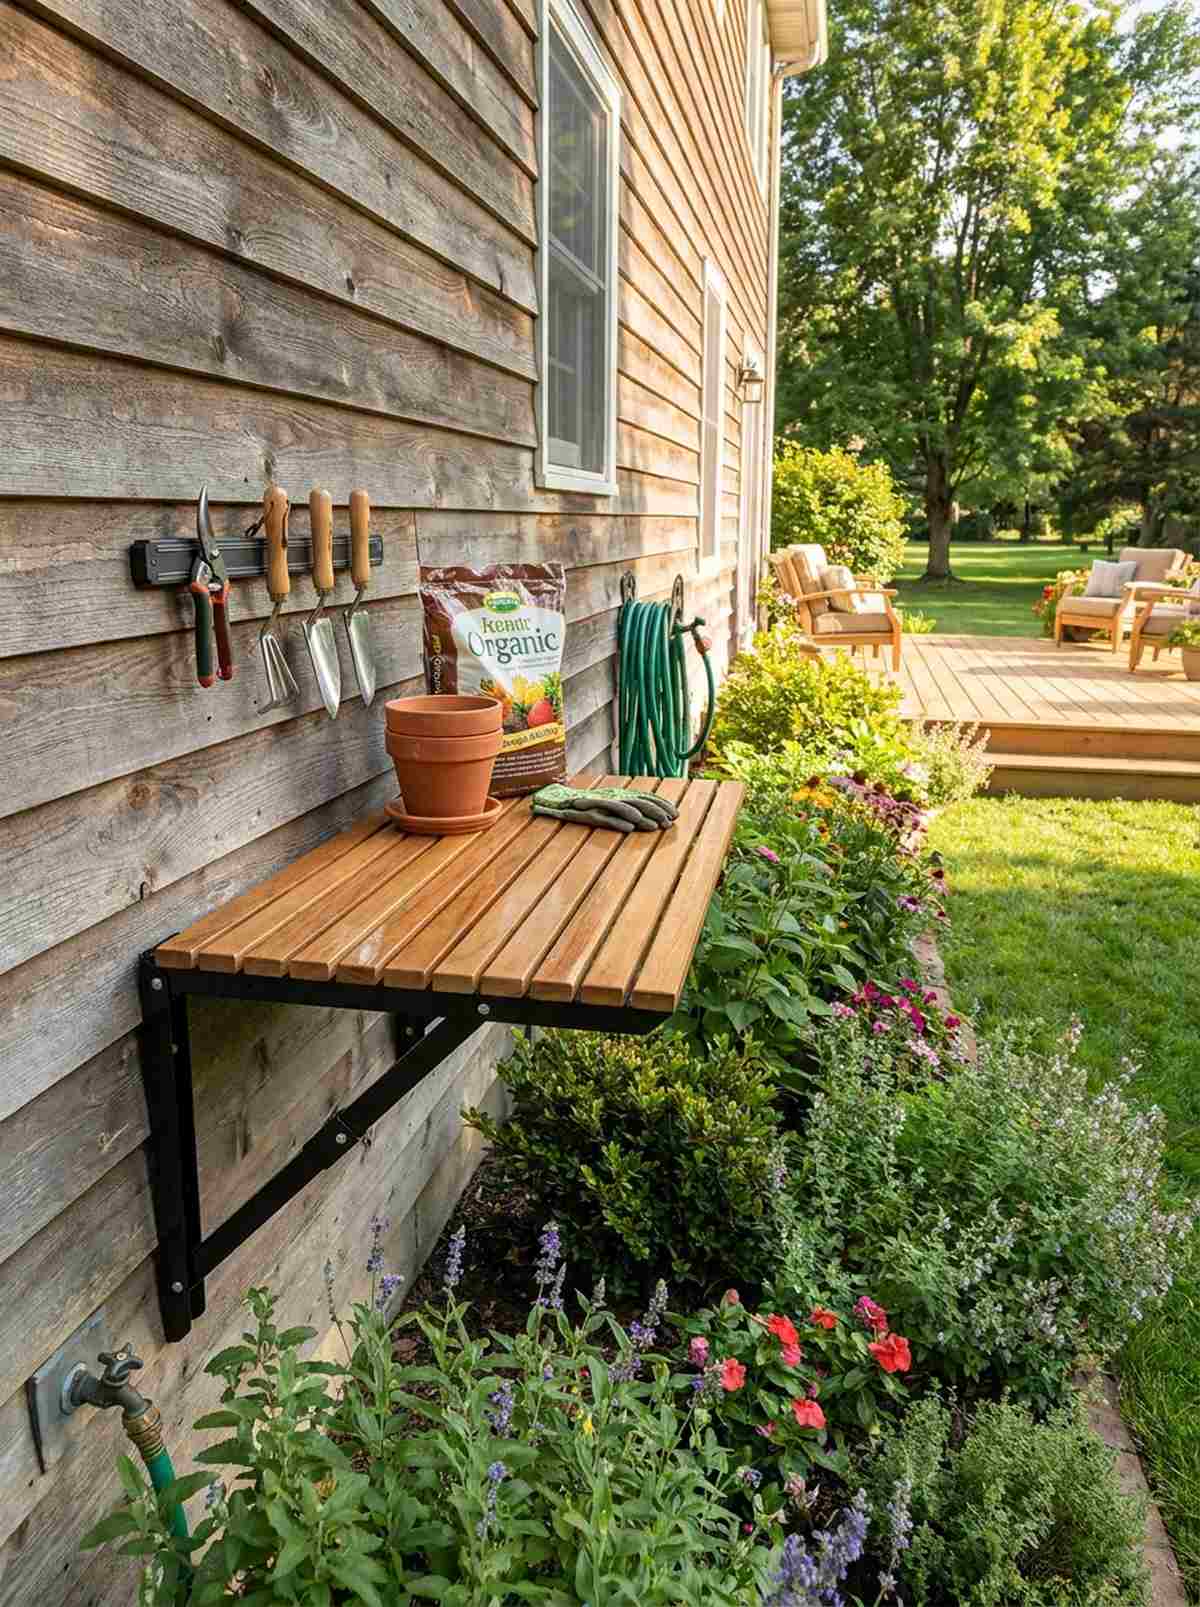
A wall-anchored collapsible gardening workstation feels like a stealthy, highly efficient command center. It perfectly utilizes dead space on the side of the house without blocking the garden hose path.
Freestanding potting benches take up huge footprints, while a drop-down hinge design gives a designer-level finish for a fraction of the cost. Upgrading to marine-grade sealing spray prevents the work surface from warping when covered in wet soil.
You can build this functional station for about $55. Highly recommended for avid gardeners with zero space.
- Key Materials: Slatted wood top and folding shelf brackets
- Vibe / Style: Stealthy functional craftsman
- Difficulty: Moderate DIY build
- Budget Breakdown: Wood slats: $25 | Folding brackets: $30
- Creator’s Tip: Install a small magnetic knife strip above the bench to securely hold your pruning shears and hand trowels.
- Smart Sourcing: heavy-duty collapsible shelf bracket kits and marine-grade wood waterproofing spray
45. Decorative Wall Fountains
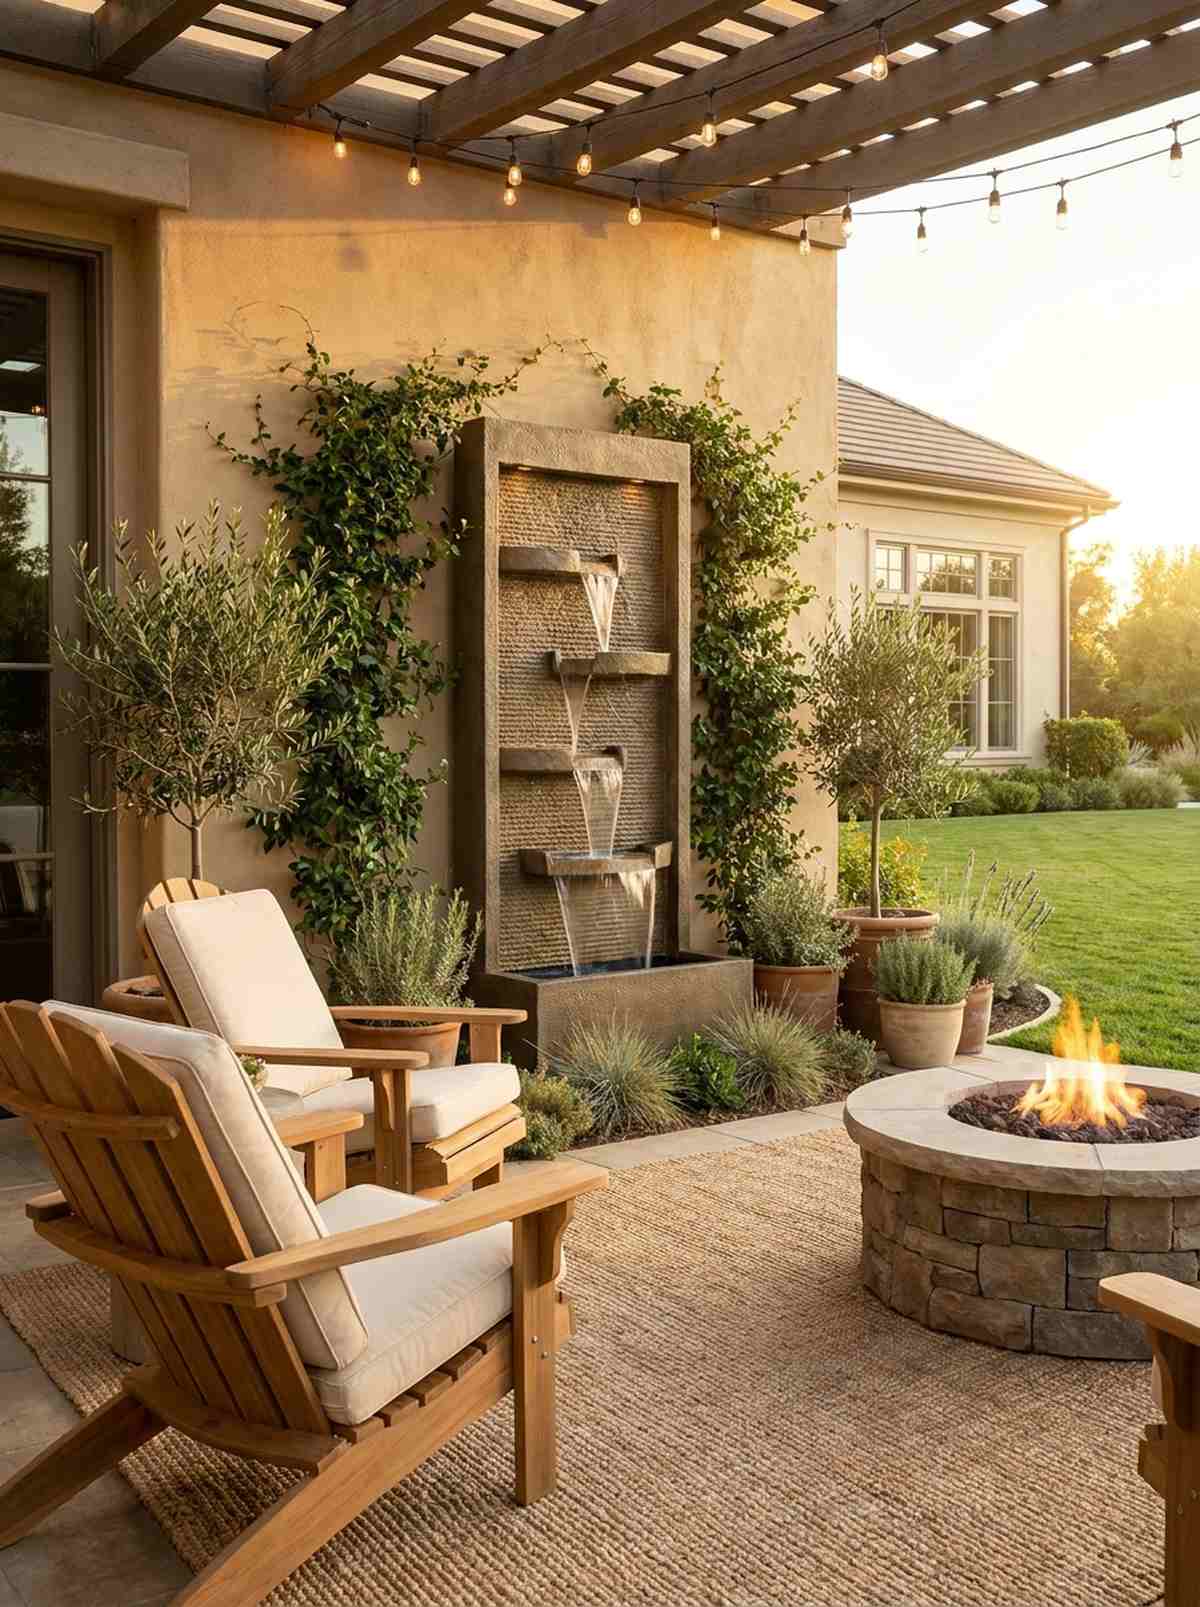
A soothing vertical cascading water feature feels like a serene, high-end meditation retreat. This is an absolute necessity if you live near a busy road and need to drown out traffic noise.
Digging a massive pond eats up half your yard, but mounting a slim recirculating fountain delivers a surprisingly premium look with zero ground footprint. Leveraging solar-powered pump tech means you don’t even have to run an ugly extension cord across the patio.
A gorgeous wall fountain runs around $130. Pin this if you want ultimate patio relaxation vibes!
- Key Materials: Resin wall fountain and solar pump
- Vibe / Style: Serene oasis retreat
- Difficulty: Easy hang and fill
- Budget Breakdown: Fountain kit: $100 | Solar pump upgrade: $30
- Creator’s Tip: Add a few drops of pet-safe algae inhibitor to the water reservoir weekly to keep the water crystal clear all summer.
- Smart Sourcing: lightweight resin wall-mounted fountain kits and solar-powered recirculating water pumps
This final stretch of wall hacks will completely eliminate your outdoor storage issues…
46. Fence-Mounted Shelving
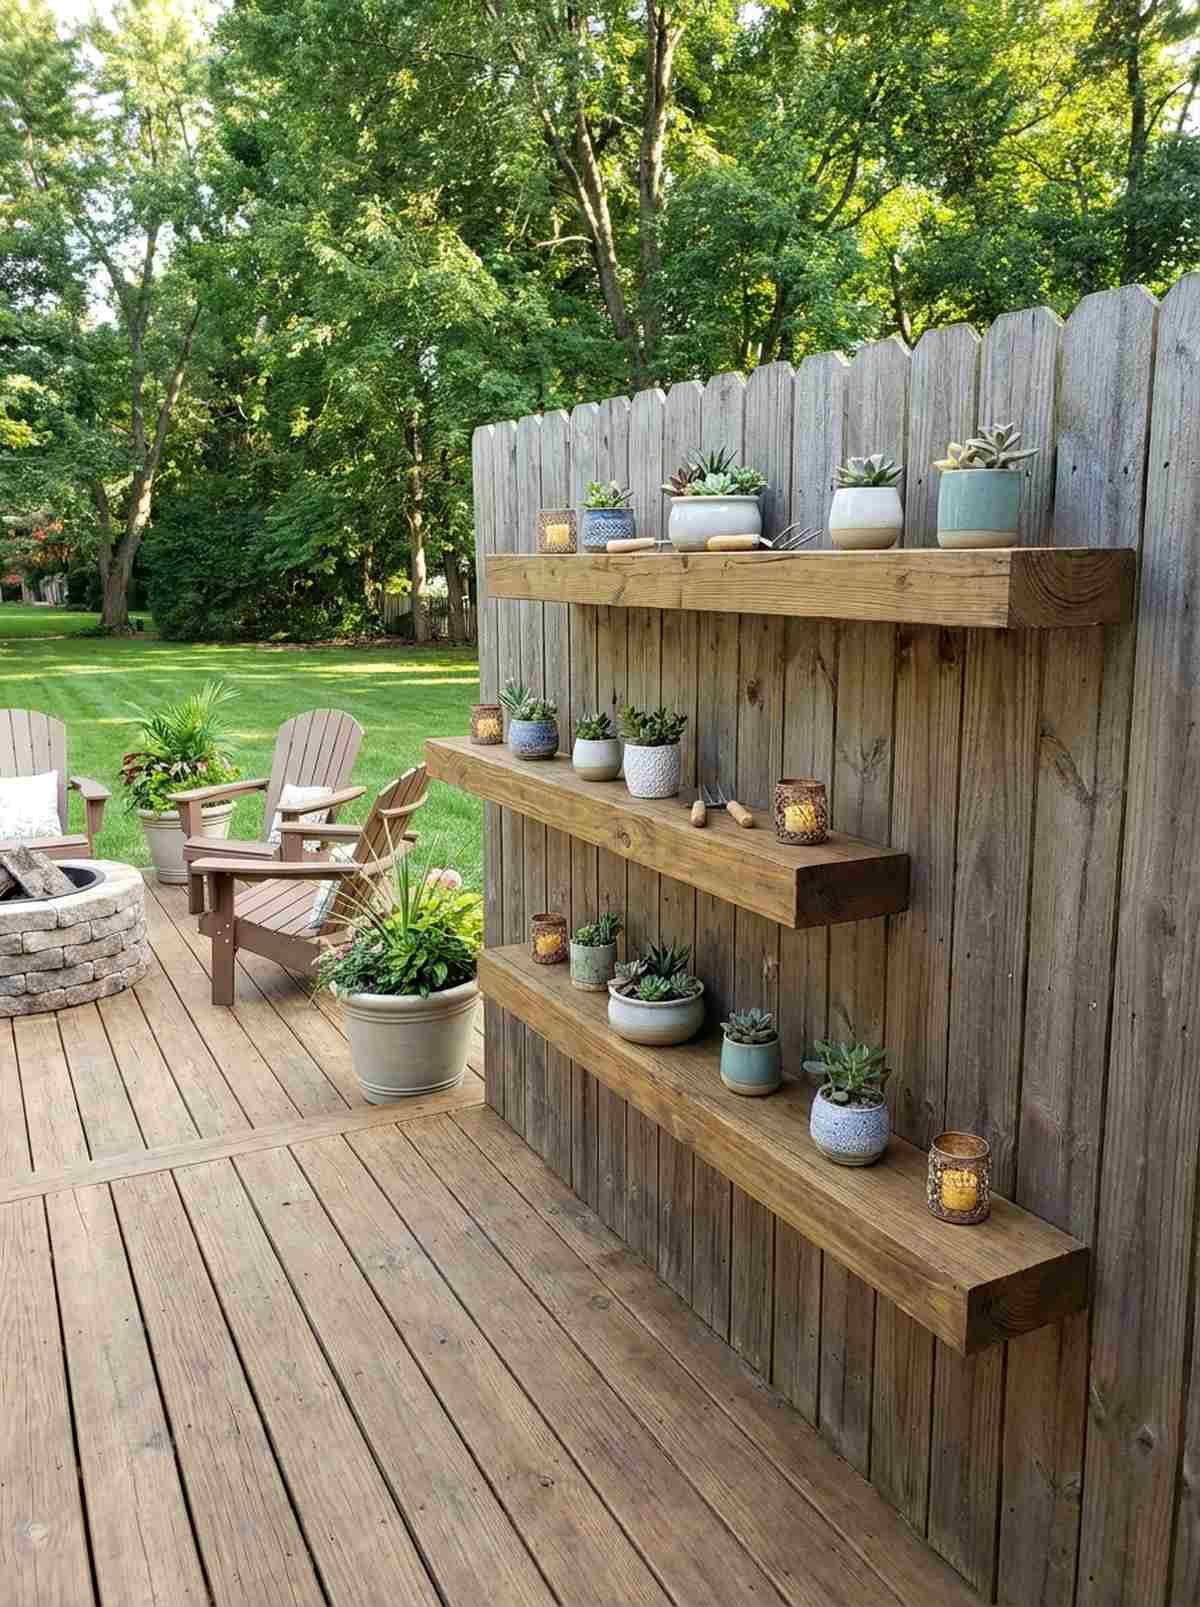
A staggered floating fence display shelf feels like an elegant outdoor living room gallery. It’s the perfect layout for showcasing miniature garden supplies or small candle lanterns.
Nailing random pots to a fence looks chaotic, but aligning floating shelves brings a custom architectural vibe that organizing everything cleanly. Using rust-proof hidden bracket kits ensures the wood looks like it’s magically protruding from the slats.
You can mount three shelves for about $45. A fast upgrade that completely changes a boring fence.
- Key Materials: Treated wood planks and hidden brackets
- Vibe / Style: Modern gallery display
- Difficulty: Requires leveling and drilling
- Budget Breakdown: Wood shelves: $25 | Bracket kit: $20
- Creator’s Tip: Always drill the brackets directly into the thick fence posts, never the thin pickets, to ensure they can hold heavy ceramic pots.
- Smart Sourcing: heavy-duty invisible floating shelf brackets (bulk pack) and pre-finished weatherproof floating shelves
47. Magnetic Herb Planters
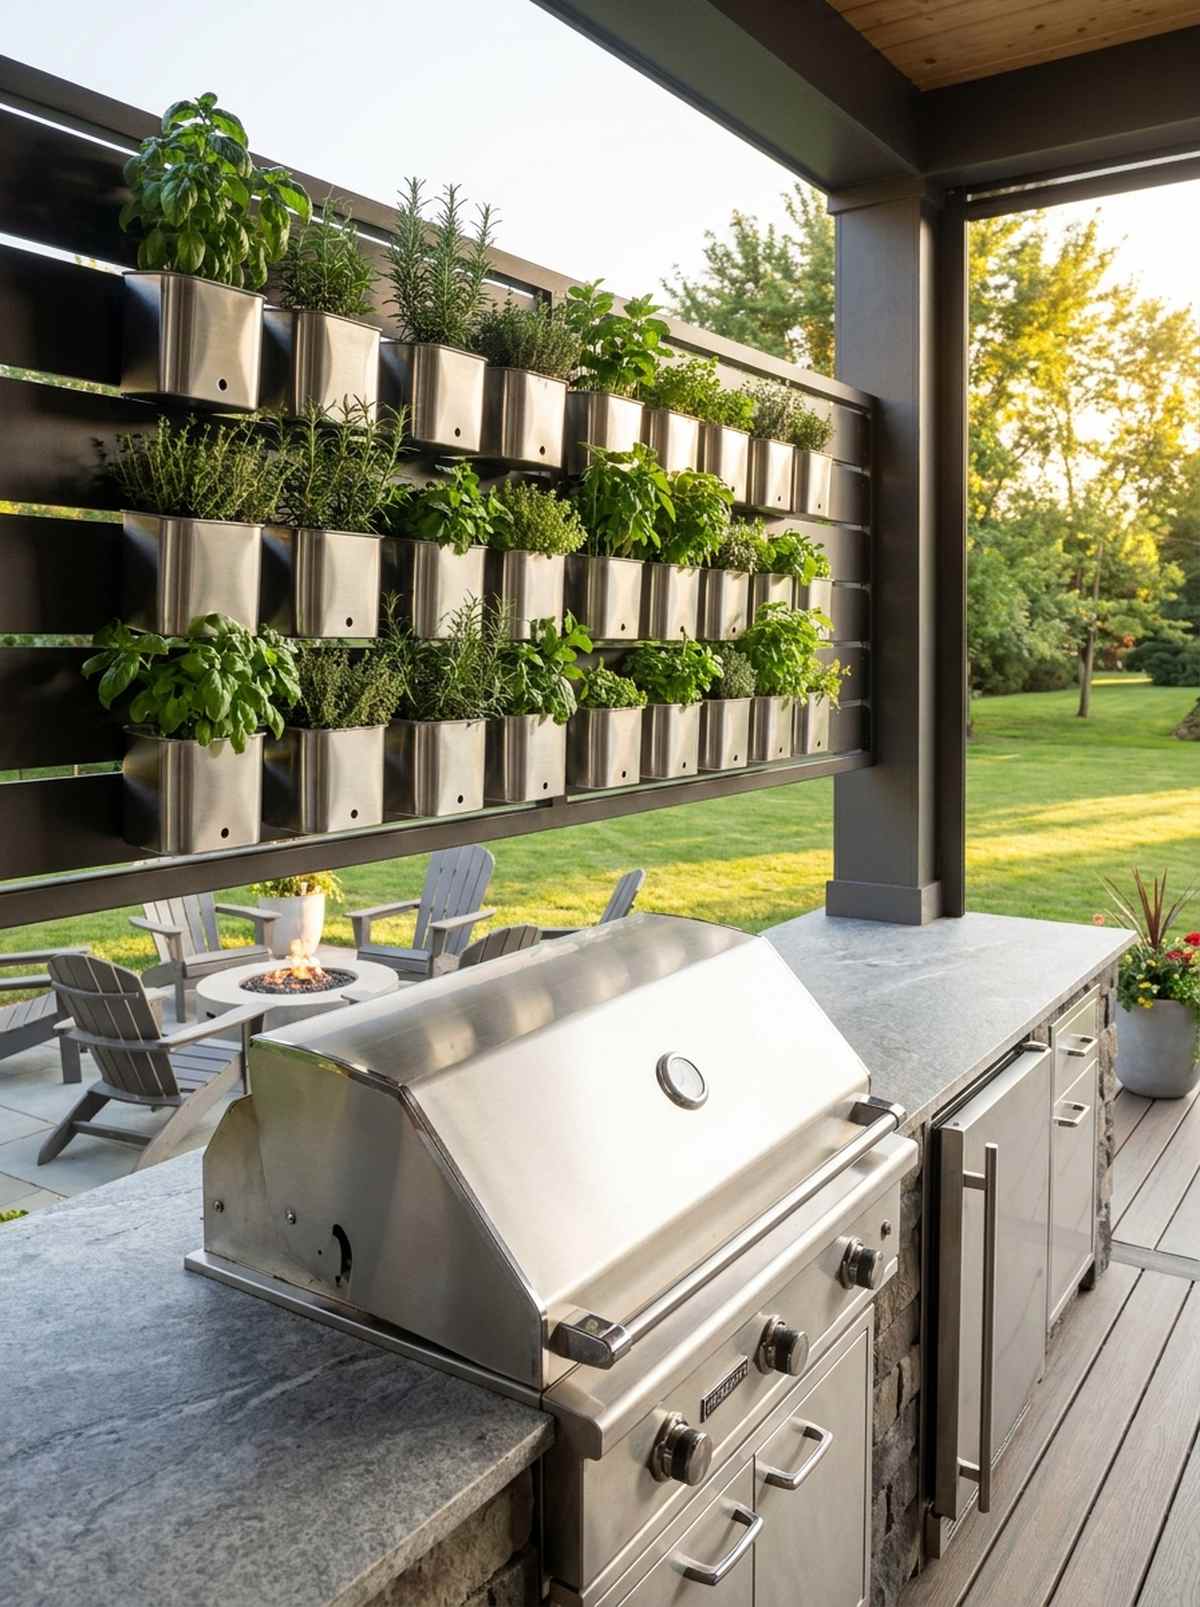
A grid of snap-on magnetic spice pots feels like a brilliant, ultra-modern outdoor kitchen hack. This works flawlessly if you have a metal privacy screen or steel siding near your grill.
Cumbersome planter boxes waste deck space, while a magnetic modular system looks far more expensive than it is and allows instant repositioning. Investing in neodymium magnet strips guarantees they won’t slide down the wall when filled with wet dirt.
Create a magnetic herb wall for around $35. Save this idea for your ultimate BBQ zone layout!
- Key Materials: Metal tins and heavy-duty magnets
- Vibe / Style: Sleek culinary modularity
- Difficulty: Literally snap-on setup
- Budget Breakdown: Tin pots: $20 | Magnet strips: $15
- Creator’s Tip: Poke a single tiny hole in the side of the tin (near the bottom) instead of the base, so excess water drains out without rusting the magnet.
- Smart Sourcing: waterproof neodymium magnetic tape (heavy-duty roll) and rust-proof stainless steel herb tins (bulk pack)
48. Privacy Screen Planter Combos
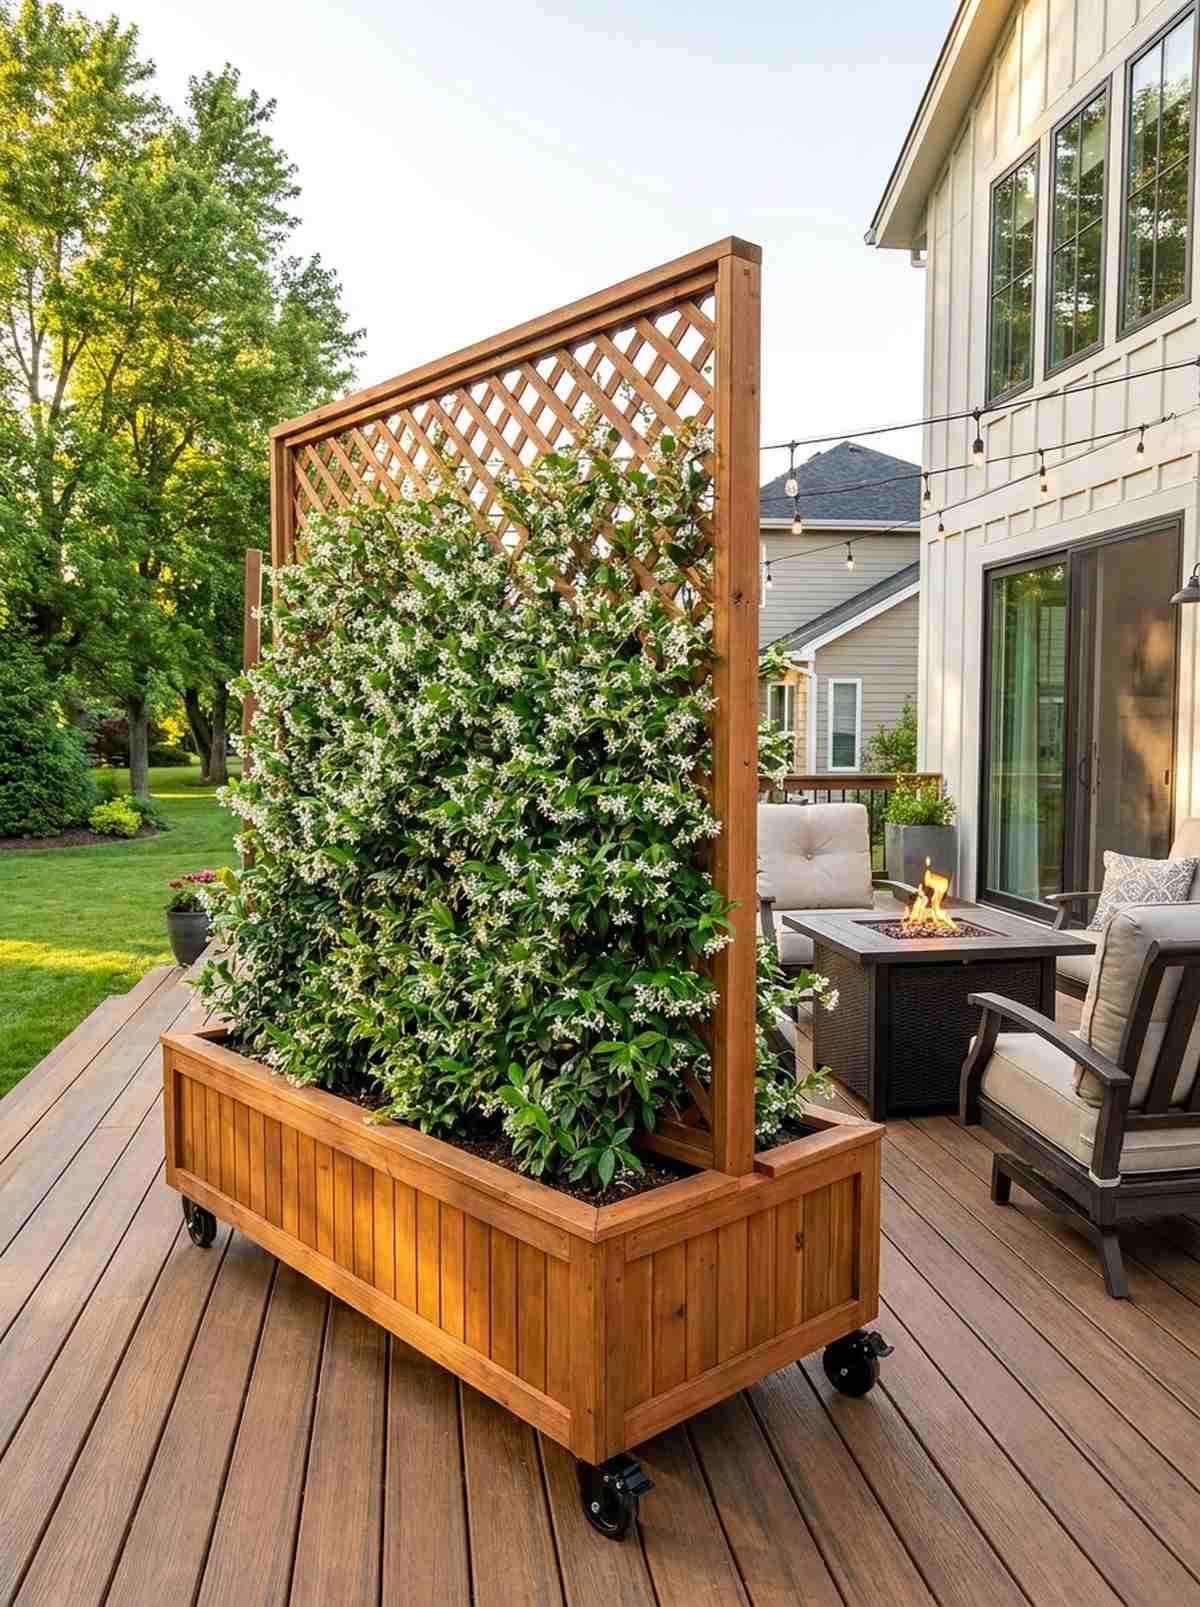
A mobile trellis-backed planter box feels like an exclusive VIP cabana partition. This is the absolute best solution for blocking an ugly view or nosy neighbors in an apartment complex.
Building a permanent fence requires permits, but a high-density privacy screen planter gives a designer-level finish that is legally considered mobile furniture. Adding commercial caster wheels lets you slide the entire wall out of the way when hosting.
A premium rolling screen costs about $160. It instantly grants you total privacy on demand.
- Key Materials: Wood planter box with attached lattice and casters
- Vibe / Style: High-end mobile partition
- Difficulty: Moderate assembly
- Budget Breakdown: Planter/Screen kit: $140 | Heavy casters: $20
- Creator’s Tip: Plant fast-growing evergreen climbers like Star Jasmine to ensure you have a thick, fragrant privacy wall year-round.
- Smart Sourcing: freestanding planter box with trellis kits and heavy-duty outdoor locking casters (4-pack)
Transforming Compact Yards Into High-End Retreats
Implementing strategic decor for small backyard layouts requires prioritizing vertical growth, premium multi-functional furniture, and intentional zoning. Professional designers consistently achieve spacious, luxury results in confined areas by skipping cheap hardware store fixes and sourcing high-CPC UV-resistant kits and modular tools online. Start with 3-5 high-impact changes from this 45+ item collection—like floating benches, solar layers, and privacy screens. Measure your existing space, identify underutilized vertical surfaces, and systematically upgrade your yard using these high-end, budget-friendly DIY blueprints proven across thousands of modern landscape projects.
Frequently Asked Questions
What is the single most effective way to maximize a small backyard?
Installing vertical growing structures delivers the highest return by tripling usable planting area without consuming ground space. Utilizing pre-cut moss panels, UV-resistant wall planters, and tiered starter kits activates bare surfaces. This commercial-grade approach preserves floor area for premium layout furniture and comfortable circulation.
How many zones should I create in a 200-square-foot backyard?
Divide compact yards into 2-3 distinct zones maximum—typically dining, planting, and relaxation areas. More zones fragment the space, making it look cheap. Use high-end flexible paver edging, contrasting gravel, or subtle deck risers to define boundaries instead of blocking sightlines with bulky, outdated fencing kits.
What furniture mistakes make small backyards feel smaller?
Oversized sectionals and dark-colored, cheap plastic furniture visually suffocate compact areas. Choose pieces scaled smaller, opt for premium transparent materials like shatterproof glass or powder-coated metal mesh, and invest in modular starter kits with exposed legs to maintain an expensive, airy visual flow beneath the seating.
Should I use light or dark colors in small backyard designs?
Light colors expand perceived space by reflecting more light and blurring boundary definitions. Use pale gray stain kits or soft blue concrete sealants for hardscaping. Reserve dark accents strictly for small focal objects—like heavy-duty iron brackets or premium planter inserts—that add expensive-looking contrast without overwhelming the layout.
How do I maintain privacy without blocking light in a small yard?
Install narrow, powder-coated trellis panels with climbing vines rather than solid fencing to screen views while allowing sunlight penetration. Alternatively, position tall, UV-coated fiberglass planters filled with ornamental grasses at strategic sightlines. Buying bulk-pack privacy screening kits is cheaper and looks significantly more high-end than a dark, solid wood perimeter.