Building raised beds in small garden layouts delivers massive harvests without eating up your entire lawn. You’ll discover high-end design blueprints, exact material costs, and smart sourcing tricks to maximize every square foot. Upgrade your home’s curb appeal instantly with these proven configurations.
Design Snapshot: Key Principles for Raised Bed Success
- Accessibility First: Keep beds no wider than 4 feet to reach the center from either side without stepping on soil
- Height Optimization: Build beds 12-32 inches high depending on root depth requirements and ergonomic preferences
- Strategic Spacing: Allow 2-3 feet between beds for comfortable movement and maintenance access
- Modular Thinking: Design beds as components that work independently or connect into unified systems
Compact Layouts for Tight Spaces
Small gardens demand efficient use of every available inch. These compact raised bed configurations deliver maximum productivity without overwhelming limited square footage.
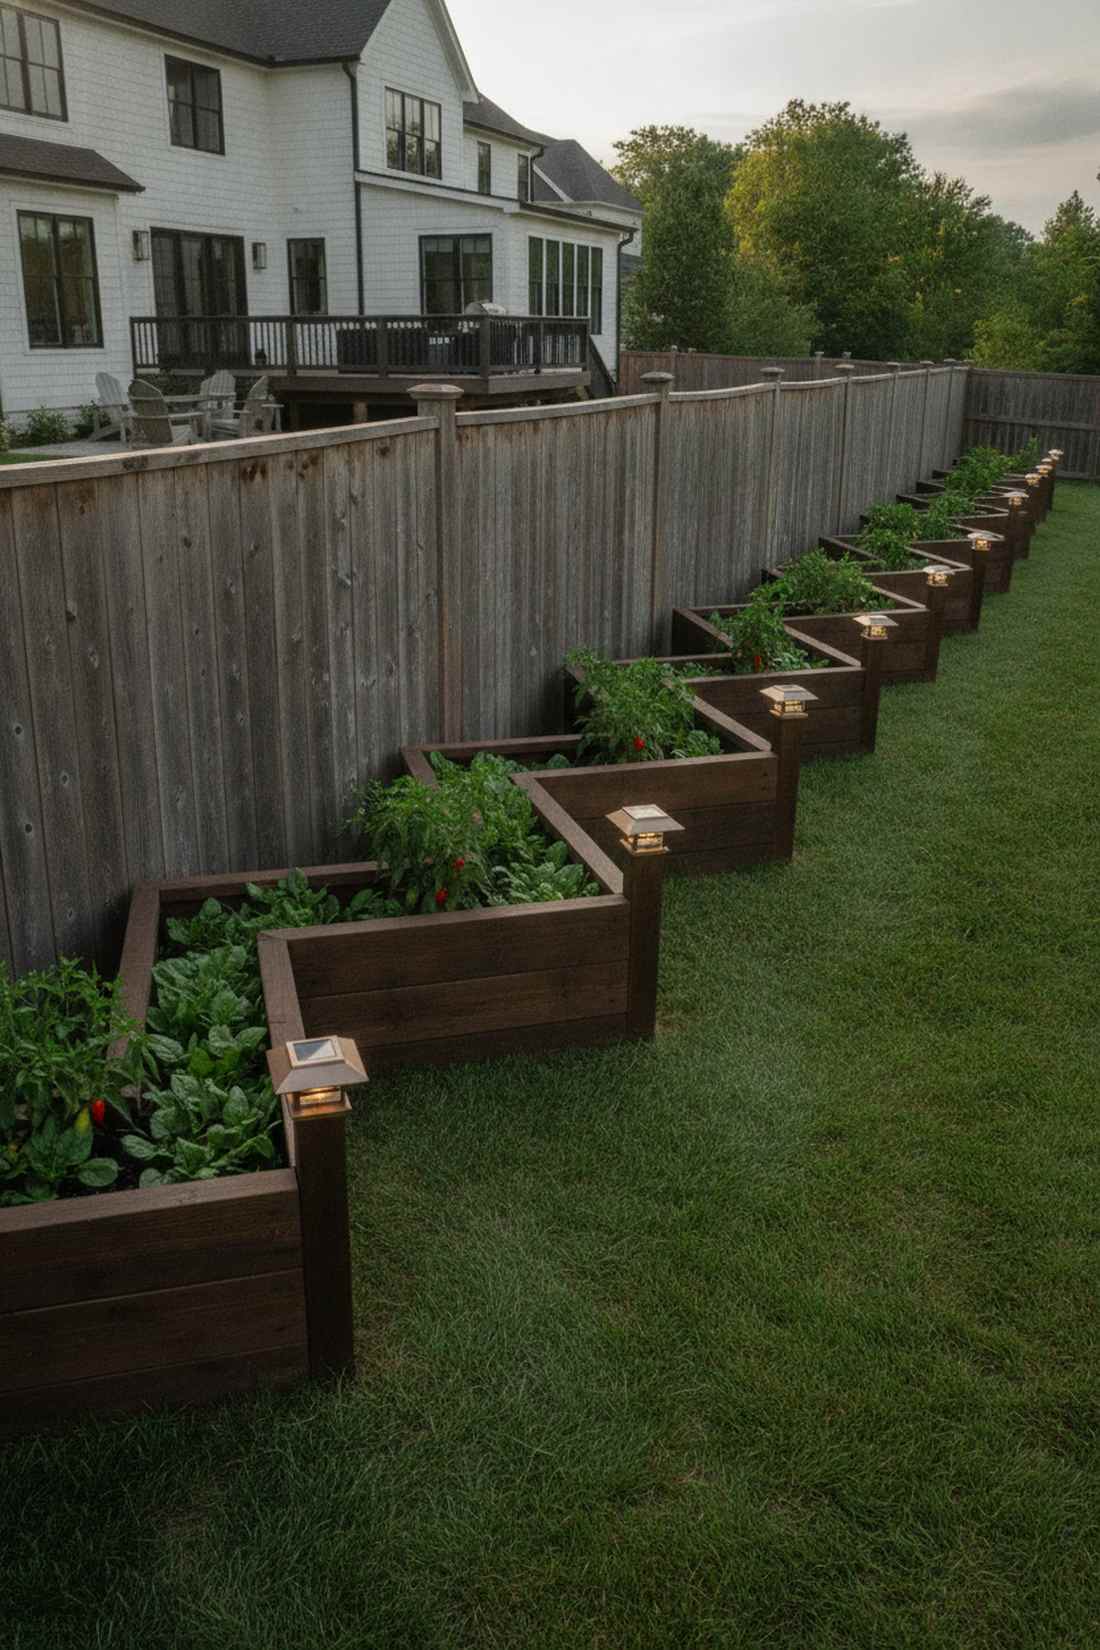
1. Single Border Bed Along Fence Line
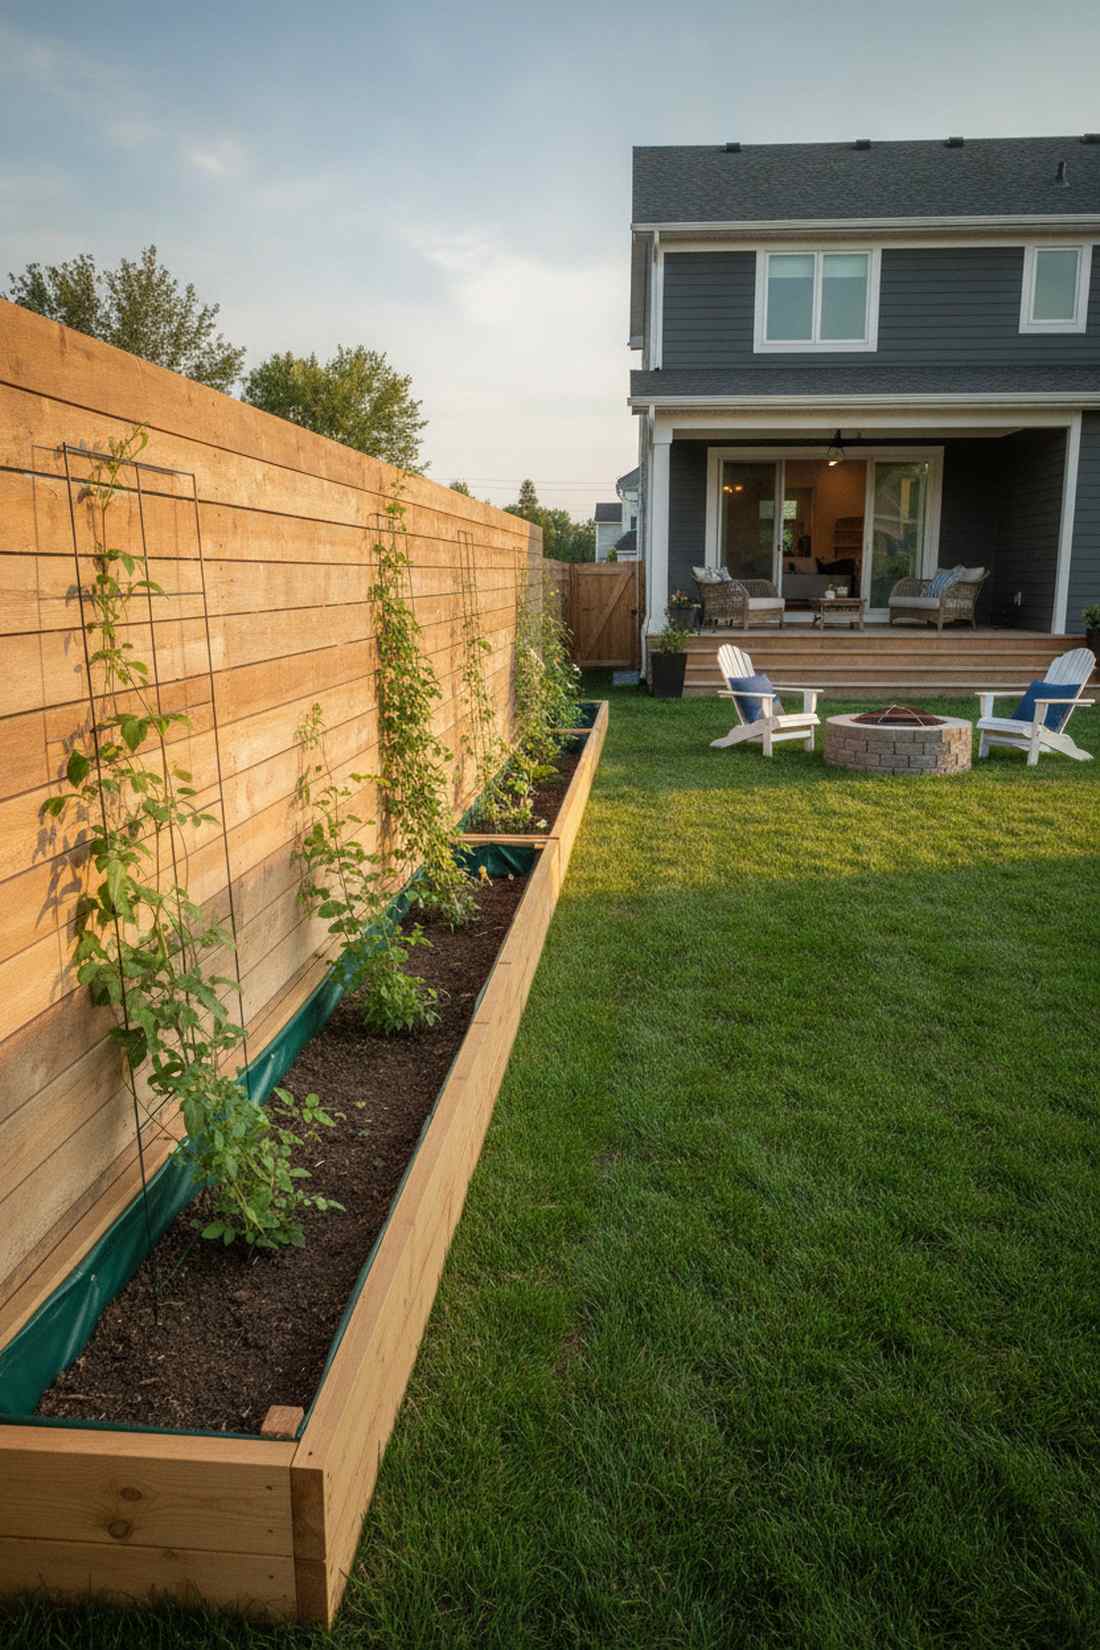
This layout feels straight out of a storybook with its sleek lines drawing the eye outward. A narrow perimeter border garden works exceptionally well for tight property lines or flanking a dull wooden fence.
While amateur gardeners crowd the center of their yard, this strategic placement delivers a surprisingly premium look by hugging the boundary. By installing a heavy-duty cedar raised planter frame just six inches from the fence, you create massive vertical climbing potential without suffocating your lawn.
You can easily pull this off for around $40–$75 depending on your lumber choices. Pin this to your weekend DIY yard board if you want an immediate backyard facelift.
- Key Materials: Pre-cut cedar planks, exterior decking screws
- Vibe / Style: Clean suburban modern
- Difficulty: Beginner weekend project
- Budget Breakdown: Timber: $45 | Soil Blend: $20.
- Creator’s Tip: Staple landscape fabric to the inside walls before adding soil to dramatically increase the wood’s lifespan.
- Smart Sourcing: Use pre-cut untreated cedar boards (bulk pack) and a UV-coated plastic garden liner roll.
2. Compact Twin Beds with Central Path
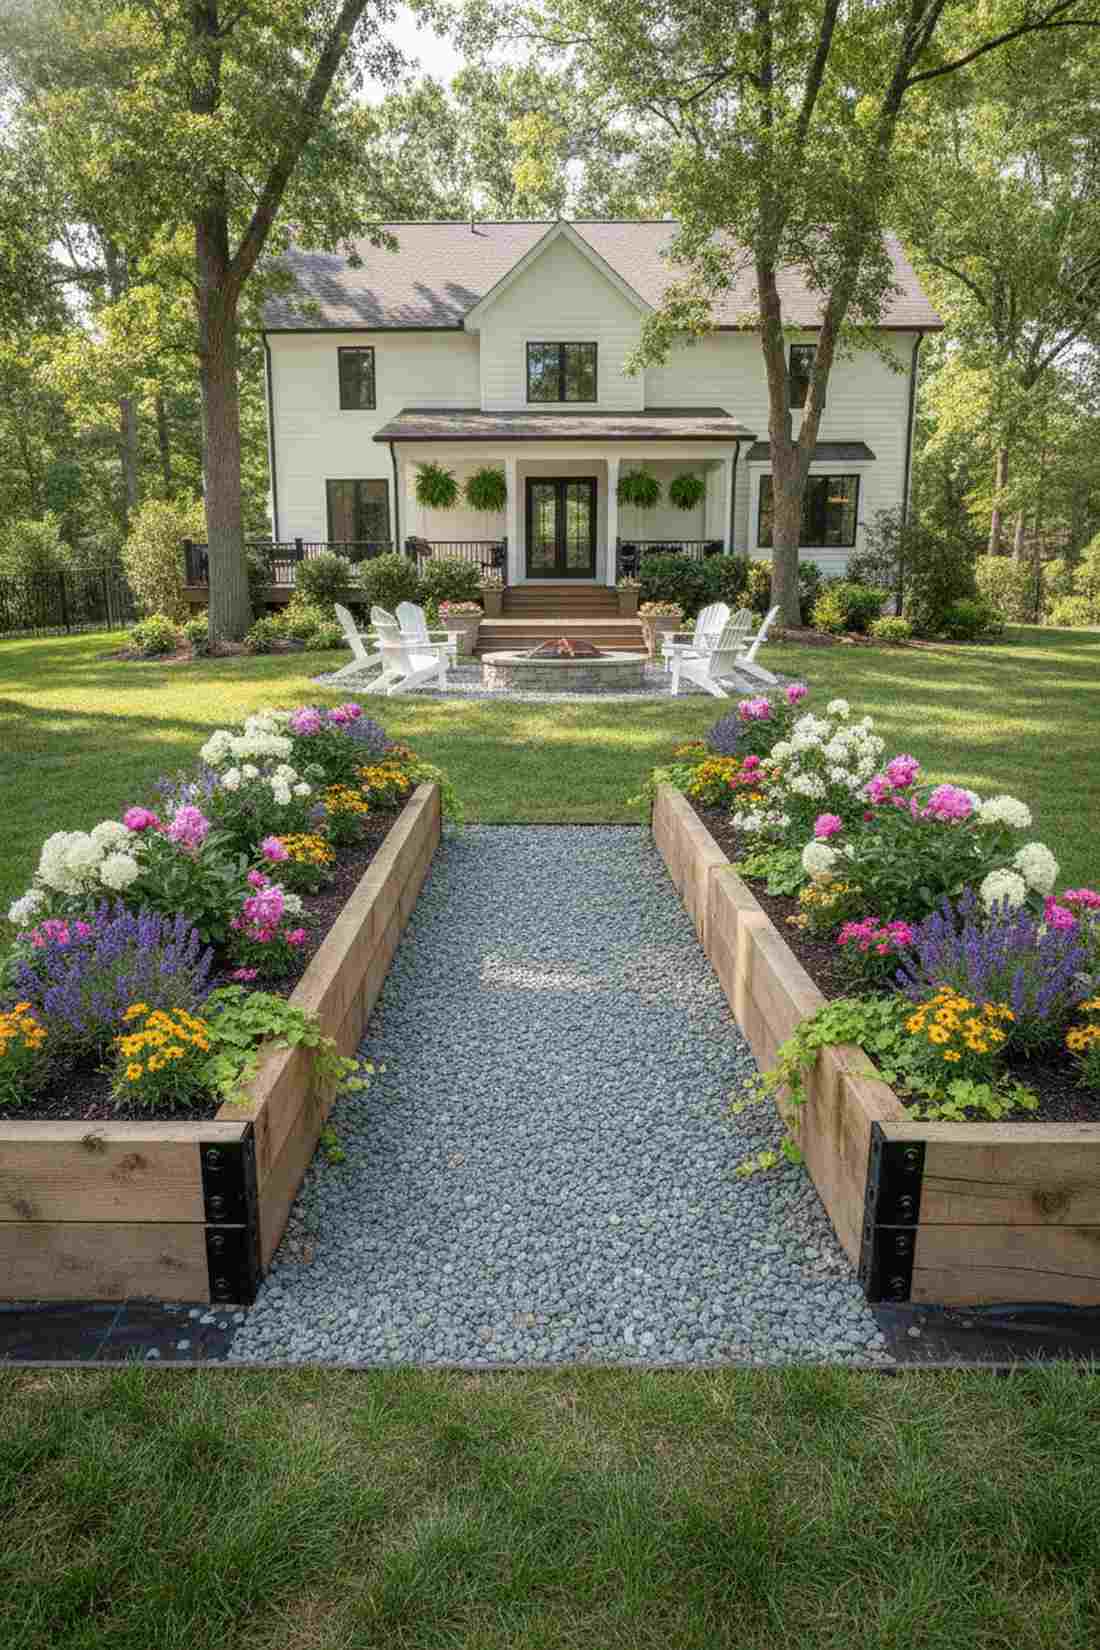
There is something incredibly calming about perfect symmetry that feels like a Zen sanctuary. A parallel twin planter setup works exceptionally well for creating a dedicated walking zone in the middle of a muddy yard.
Most beginners just throw down a massive square box, but dividing the space into twin beds gives a designer-level finish. Upgrading the central pathway with bulk river rock pebbles adds a professional hardscaping element that screams luxury.
Expect to spend roughly $80–$120 for the dual frames and pathway materials. It’s a fast upgrade that completely changes the vibe of your outdoor space.
- Key Materials: Timber kits, weed barrier, pathway gravel
- Vibe / Style: Symmetrical cottagecore
- Difficulty: Easy to intermediate
- Budget Breakdown: Framing: $60 | Gravel/Barrier: $30 | Soil: $30.
- Creator’s Tip: Dig the central path out by 2 inches so your gravel sits flush with the base of the beds.
- Smart Sourcing: Grab a pre-drilled metal corner bracket set and heavy-duty commercial weed barrier (contractor roll).
3. Keyhole Garden Bed
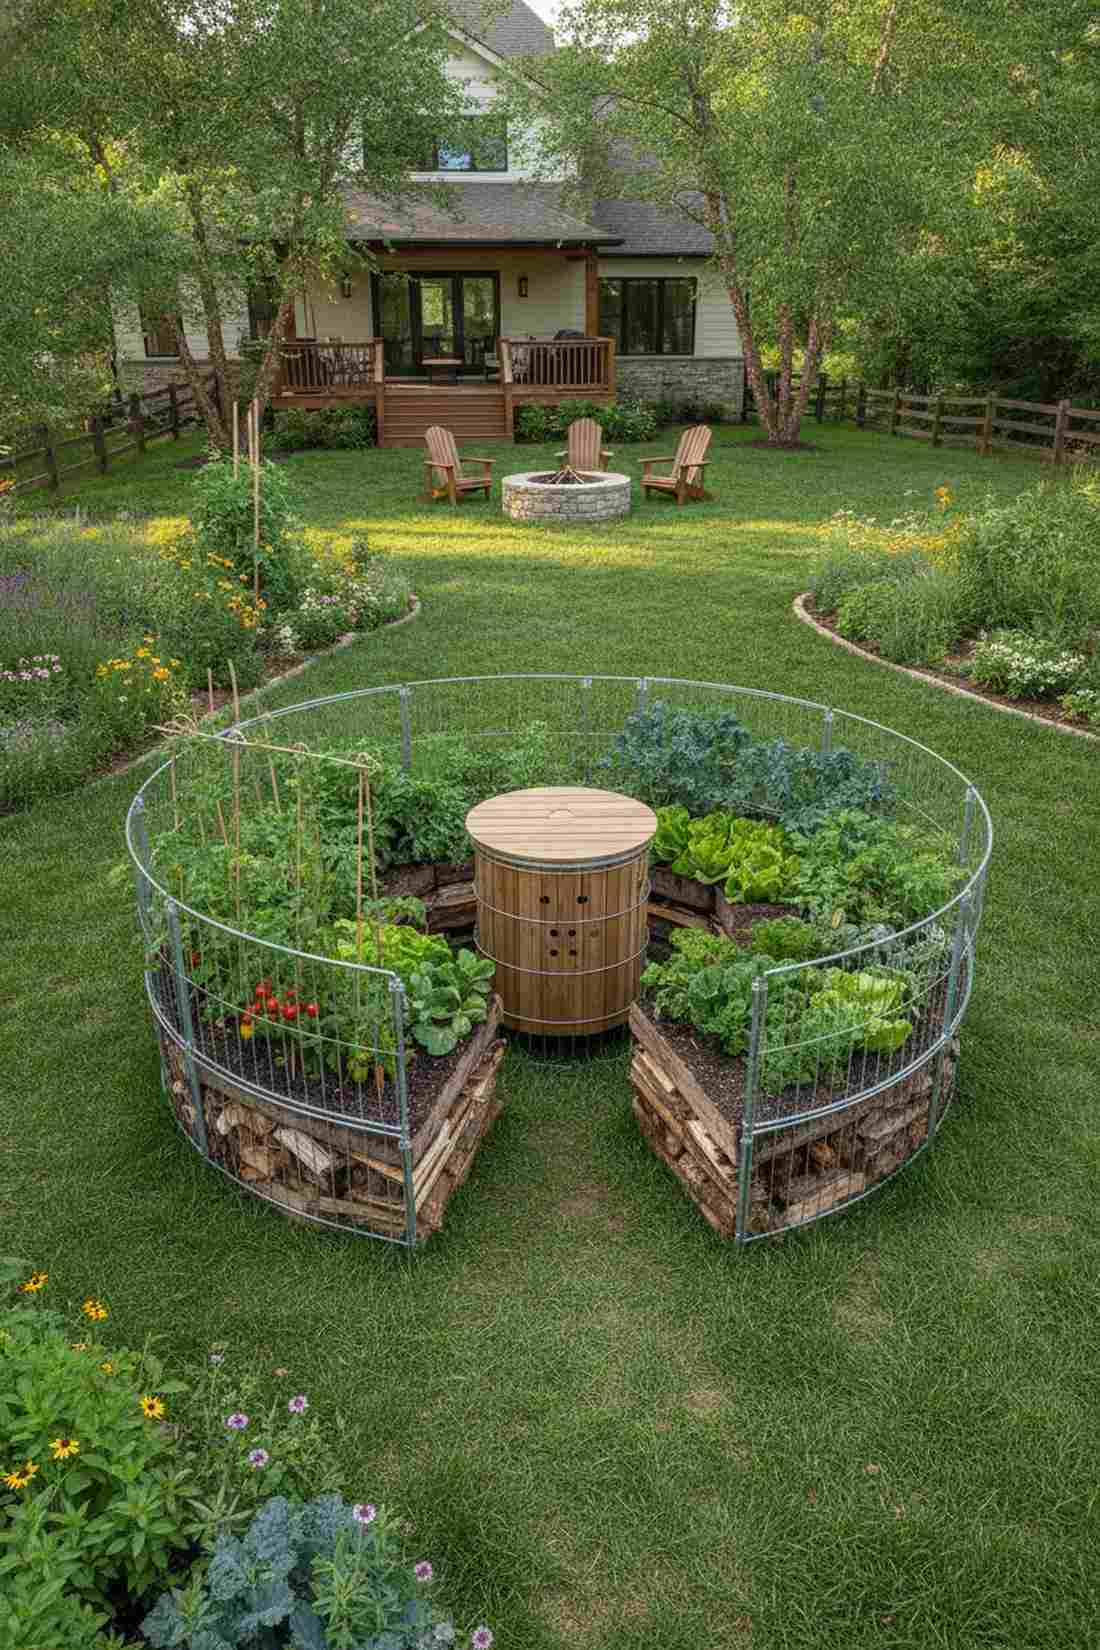
This mesmerizing circular design feels like a magical well hidden in a lush landscape. The circular keyhole garden kit works exceptionally well for sustainable off-grid setups or eco-conscious urban backyards.
People often overcomplicate compost, but this ingenious layout makes cheap materials look custom-built by hiding the composting basket right in the center. Dropping premium compost activator bins into the notch feeds the surrounding roots perfectly while keeping pests away.
Building this from scratch runs about $60–$90 using corrugated metal or stacked stone. Save this layout if you’re looking for the ultimate lazy-gardener harvest hack.
- Key Materials: Flexible garden edging, central wire basket
- Vibe / Style: Eco-village organic
- Difficulty: Intermediate plotting
- Budget Breakdown: Border materials: $50 | Compost core: $15.
- Creator’s Tip: Layer the bottom of the bed with thick cardboard and rotting logs (hugelkultur style) to slash your soil costs by 50%.
- Smart Sourcing: Opt for rust-resistant galvanized mesh tubing and modular curved garden border kits.
4. Corner Wedge Bed
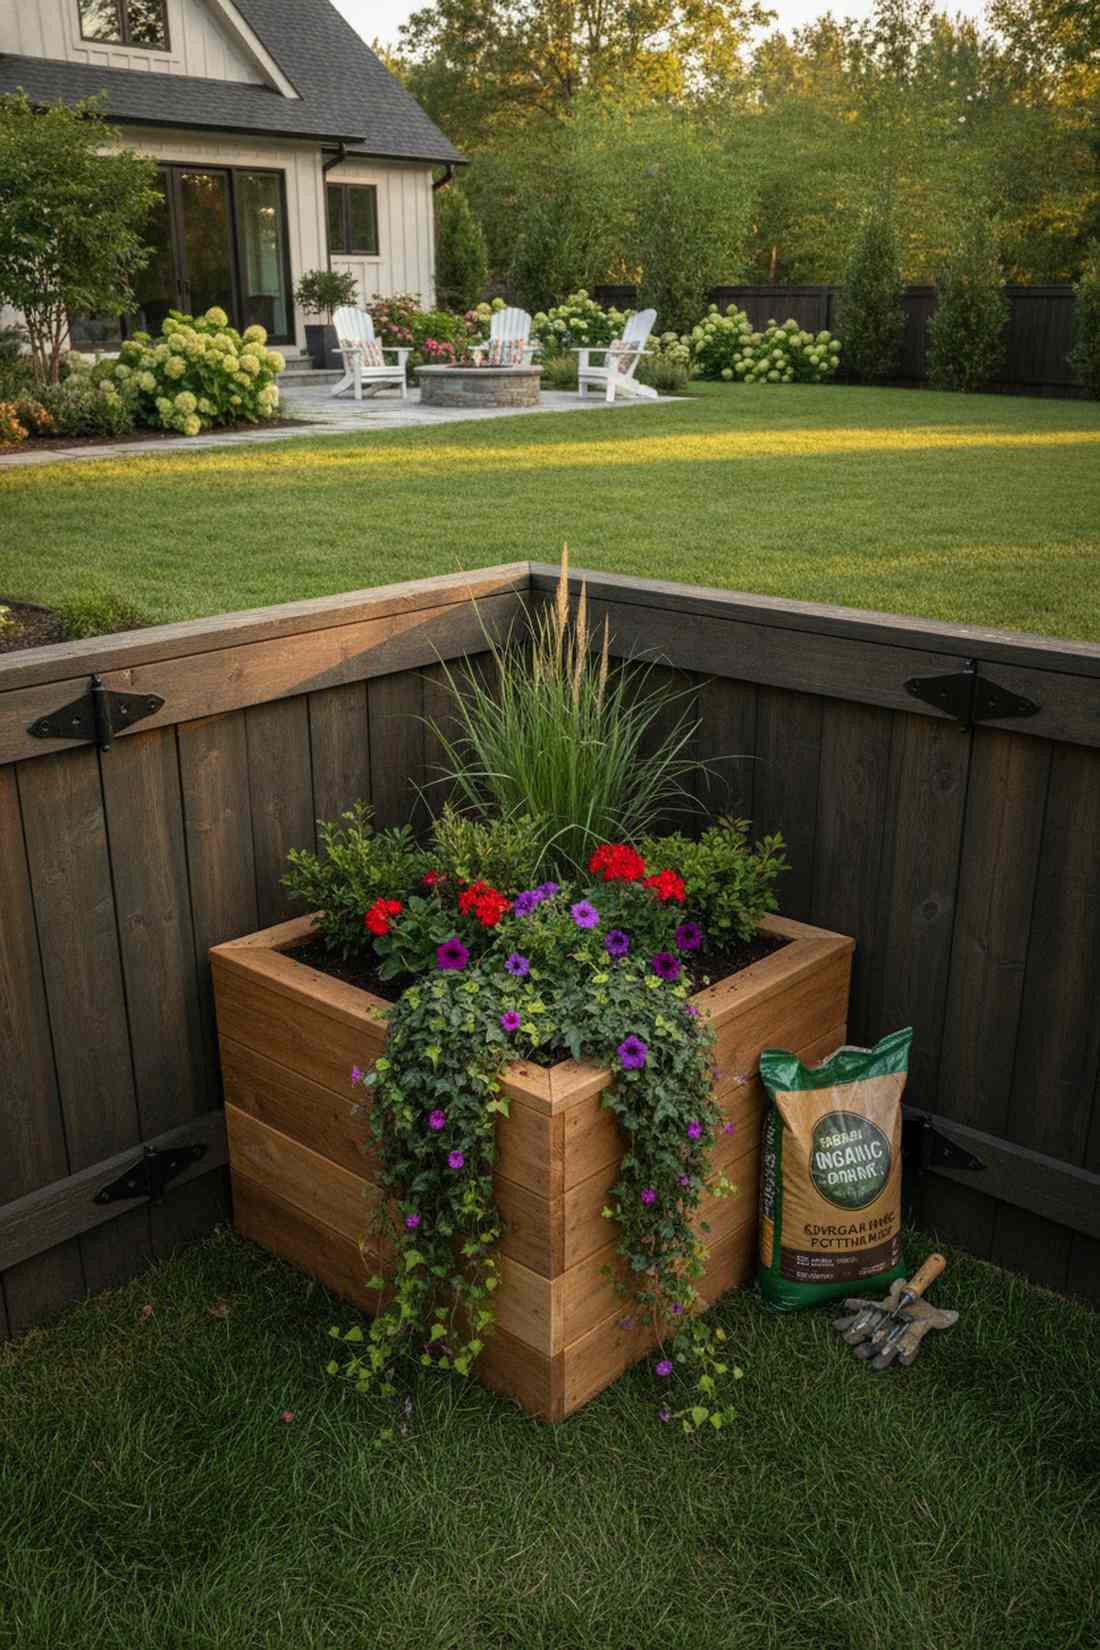
Transforming a dead corner feels like unlocking a secret level in your own backyard. A triangular corner wedge planter works exceptionally well for hiding ugly fence intersections or awkward property lines.
The biggest mistake homeowners make is ignoring sharp corners, but a custom wedge shape looks far more expensive than it actually is. Utilizing weather-treated corner brackets ensures the 90-degree angle stays perfectly flush against your boundary.
You can throw this together for under $35 if you catch a lumber sale. Highly recommended for a quick weekend win that instantly adds square footage to your planting zones.
- Key Materials: Custom-cut lumber, 90-degree braces
- Vibe / Style: Sharp geometric modern
- Difficulty: Requires basic saw skills
- Budget Breakdown: Wood: $20 | Hardware: $10.
- Creator’s Tip: Plant trailing vines at the front edge of the wedge to soften the hard wooden lines.
- Smart Sourcing: Pick up powder-coated steel 90-degree structural ties and a premium organic potting mix (bulk bag).
This next setup is ridiculously cheap but looks like a $100 custom display…
5. Narrow Galley Bed
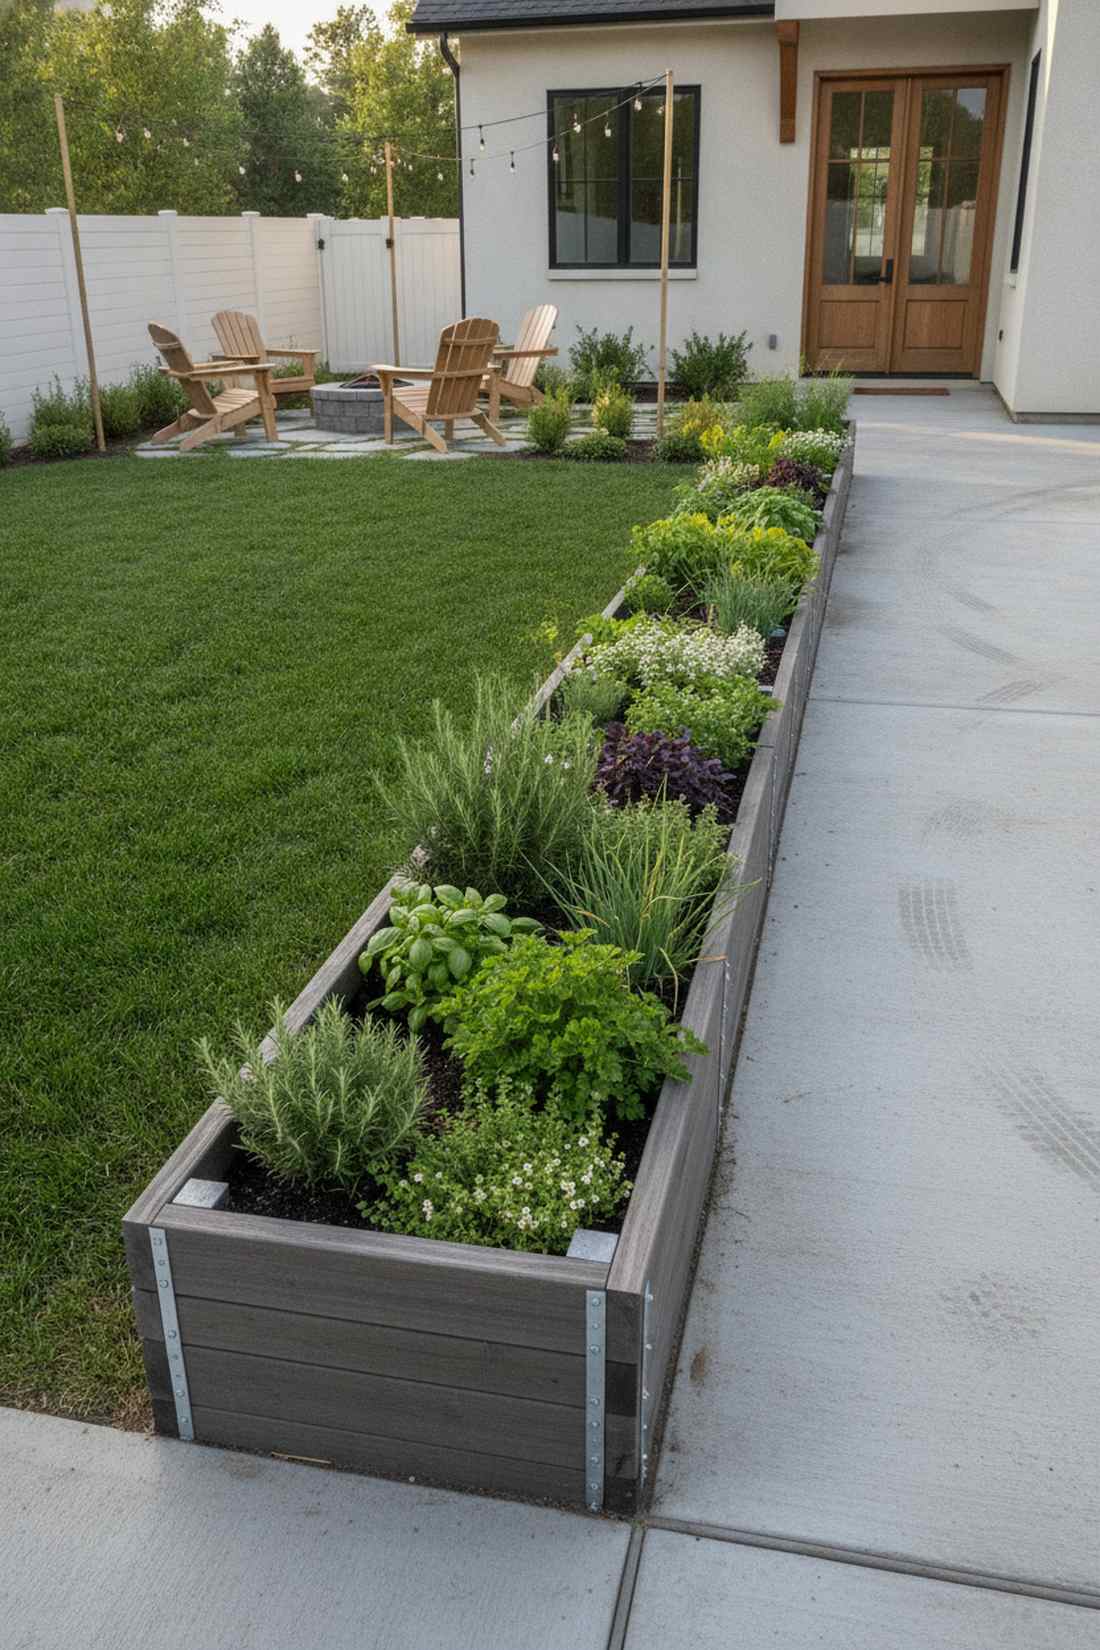
This layout gives off the vibe of a high-end chef’s private herb alley. A slim corridor planter box works exceptionally well for neglected side-yards or the dead space right next to a concrete driveway.
While traditional garden wisdom dictates wide plots, this extra-narrow approach elevates a cramped corridor into a premium landscape asset. Securing waterproof composite fascia boards instead of thick lumber keeps the profile ultra-slim while resisting driveway runoff.
A 10-foot stretch will only set you back about $50–$70. Pin this immediately if you have a useless strip of grass you hate mowing.
- Key Materials: Slim composite planks, rebar stakes
- Vibe / Style: Urban alleyway chic
- Difficulty: Extremely easy
- Budget Breakdown: Composite wood: $45 | Stakes: $10.
- Creator’s Tip: Drive rebar flush with the outside of the boards instead of using bulky corner posts to save 4 inches of width.
- Smart Sourcing: Use heavy-duty galvanized rebar stakes (10-pack) and UV-stabilized composite garden lumber.
Front Yard Raised Bed Configurations That Boost Curb Appeal
Raised beds in front of house landscapes blend edible gardening with ornamental design principles. These configurations prioritize aesthetics while maintaining productive growing capacity.
6. Symmetrical Foundation Beds
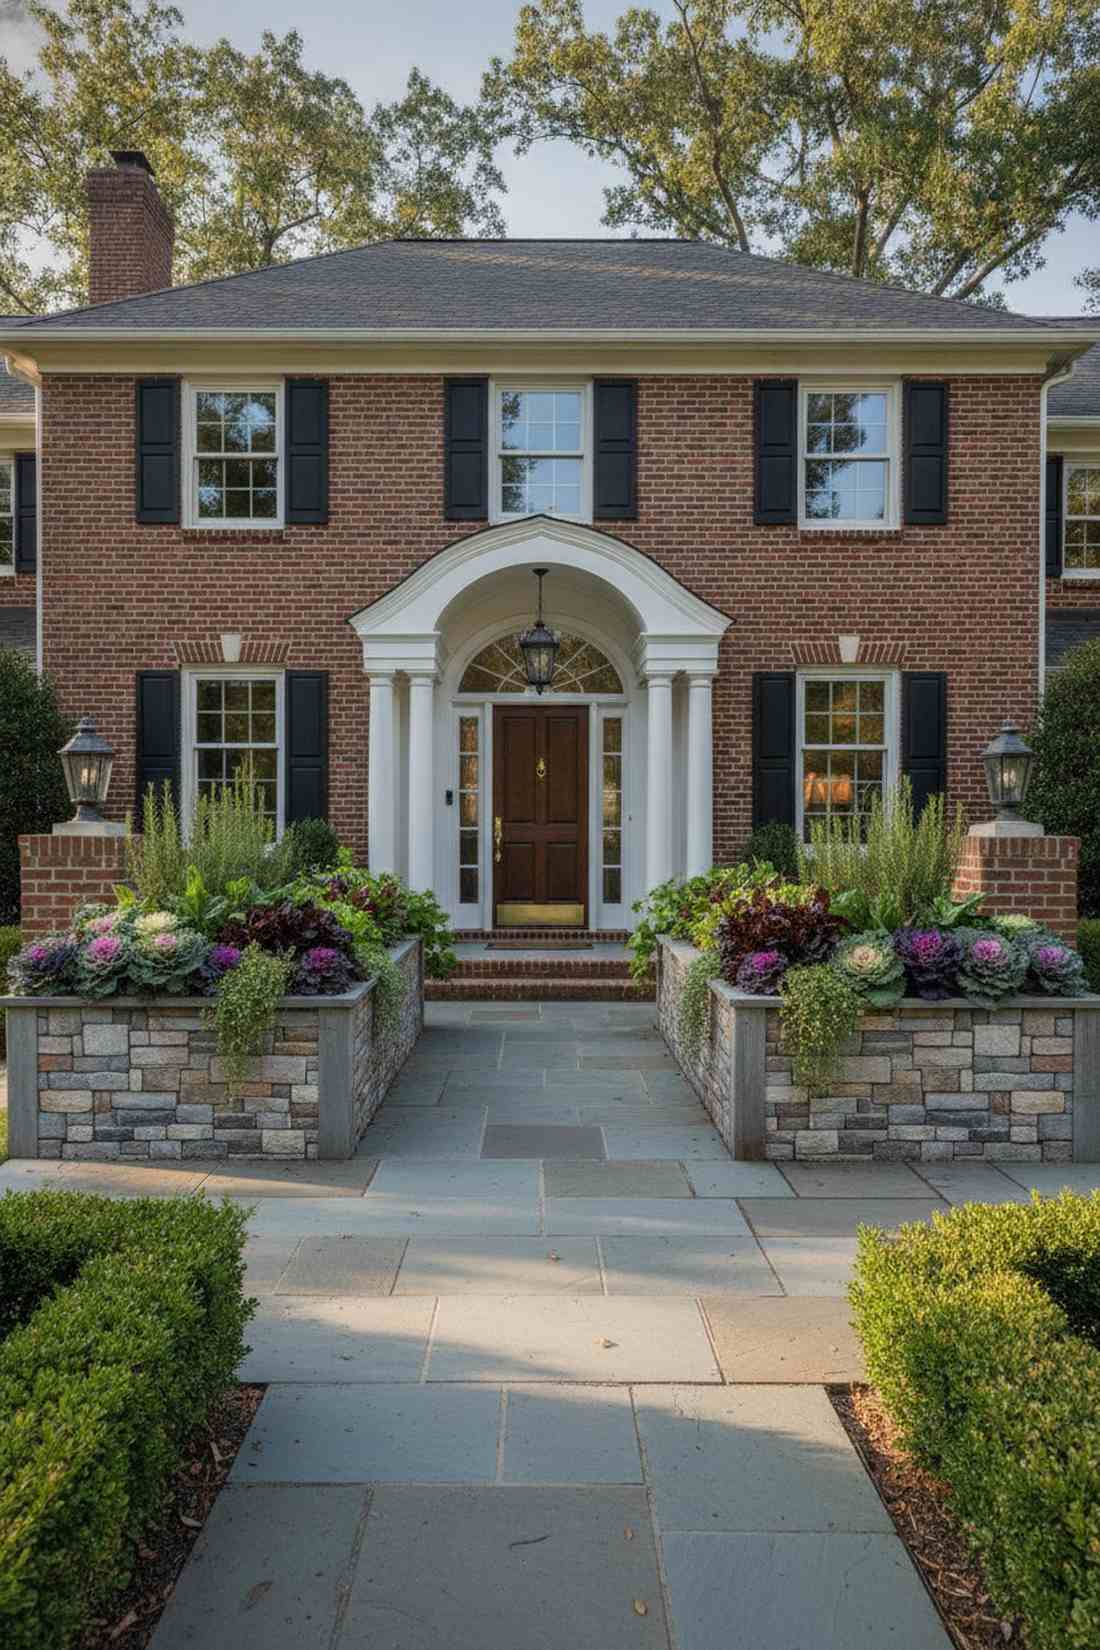
Walking up to a home with this setup feels like entering a luxurious boutique bed and breakfast. Utilizing raised beds front yard style works exceptionally well for framing a front door or breaking up a boring brick facade.
It’s a common misconception that veggies look messy in the front yard, but matching foundation boxes deliver a shockingly upscale presentation. Sourcing architectural-grade stone veneer kits to wrap the wooden frames fools neighbors into thinking you hired a $5,000 masonry team.
The materials run about $150–$250 depending on the exterior wrap. Save this to your curb appeal mood board for spring planning.
- Key Materials: Structural lumber, stone veneer peel-and-stick
- Vibe / Style: High-end suburban estate
- Difficulty: Intermediate
- Budget Breakdown: Base frame: $60 | Veneer wrap: $120.
- Creator’s Tip: Plant ornamental kale and purple basil along the borders to keep the HOA happy while still growing edibles.
- Smart Sourcing: Invest in weather-proof faux stone veneer panels and industrial-strength outdoor construction adhesive.
7. Curved Front Bed with Raised Sections
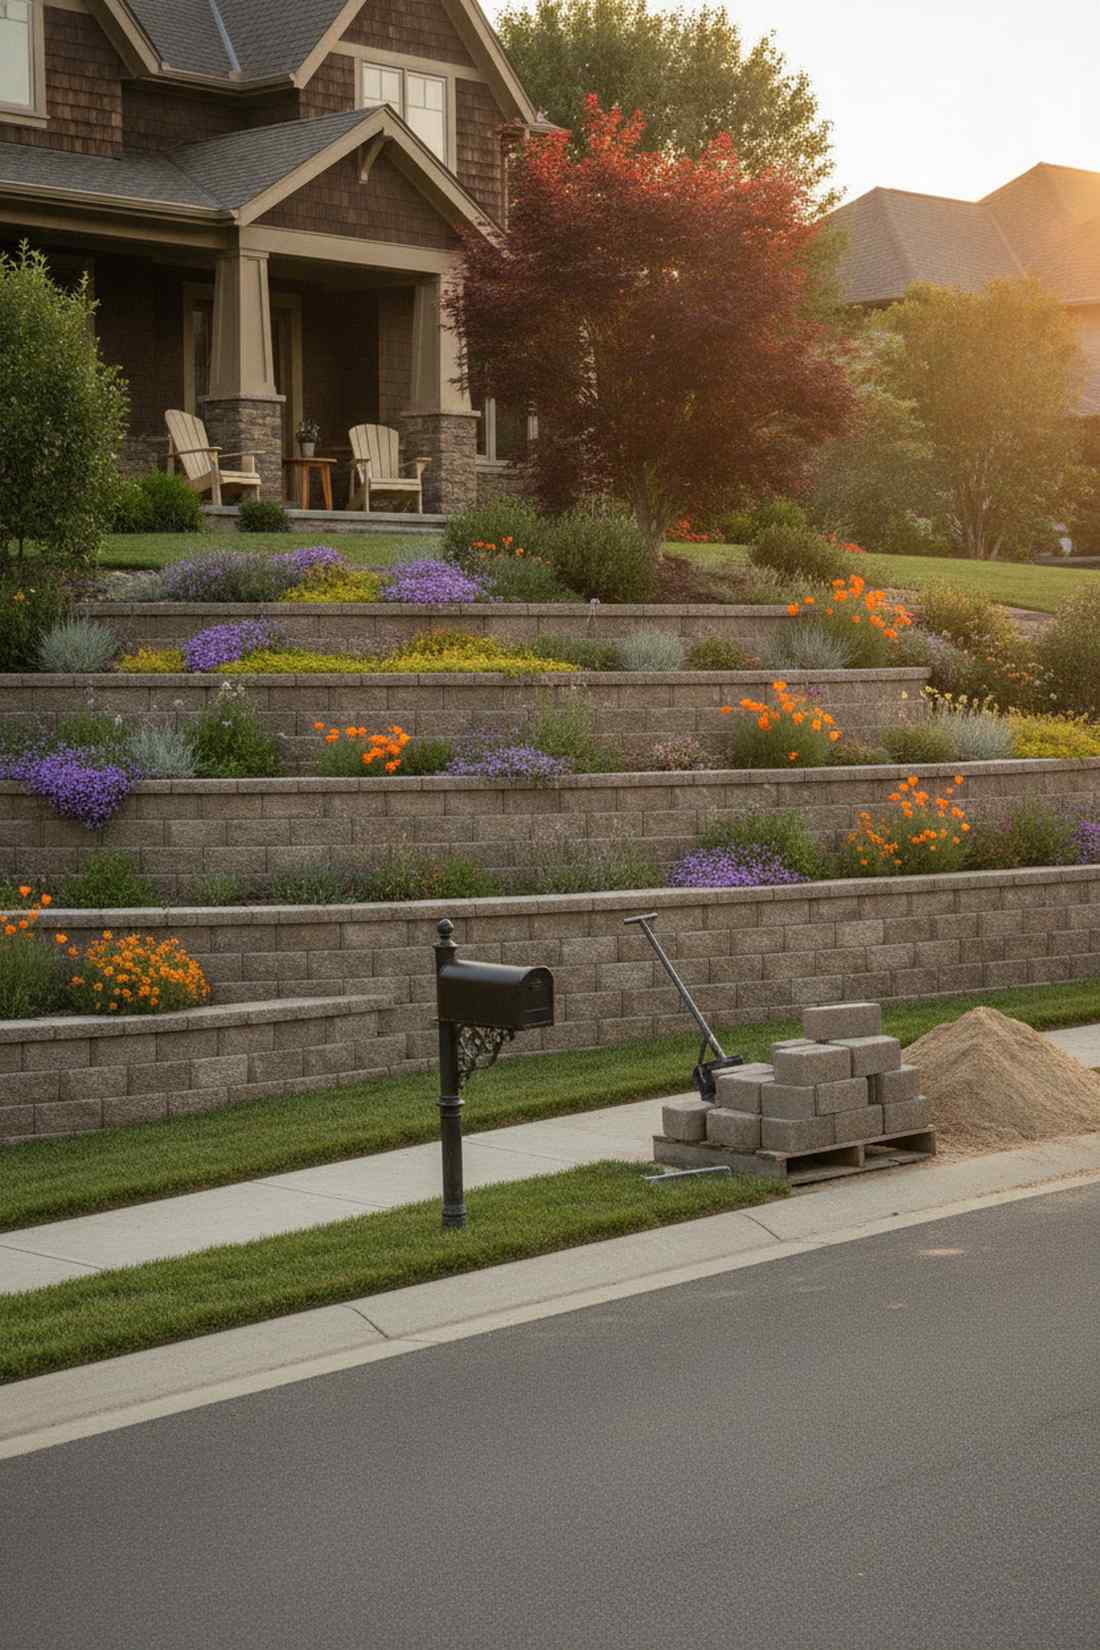
This sweeping landscape feature feels like a professionally designed botanical garden entrance. A terraced curved retaining border works exceptionally well for properties that slope down toward the street.
Instead of battling uneven grass, this tiered approach creates a jaw-dropping visual hierarchy that instantly boosts property value. Stacking pre-cast concrete retaining blocks naturally handles the curve while providing impenetrable support for heavy wet soil.
Expect a budget of $200–$300 for heavy stone materials, but the permanence is unmatched. It’s an elite front yard transformation that outlasts any wooden alternative.
- Key Materials: Curved retaining wall blocks, leveling sand
- Vibe / Style: Professional landscape architecture
- Difficulty: Requires heavy lifting
- Budget Breakdown: Stone blocks: $180 | Base sand: $30.
- Creator’s Tip: Always compact a 2-inch layer of leveling sand beneath your first row of stones to prevent winter heaving.
- Smart Sourcing: Order palleted landscape retaining wall blocks and a heavy-duty steel hand tamper.
8. Raised Flower Beds with Vegetable Integration
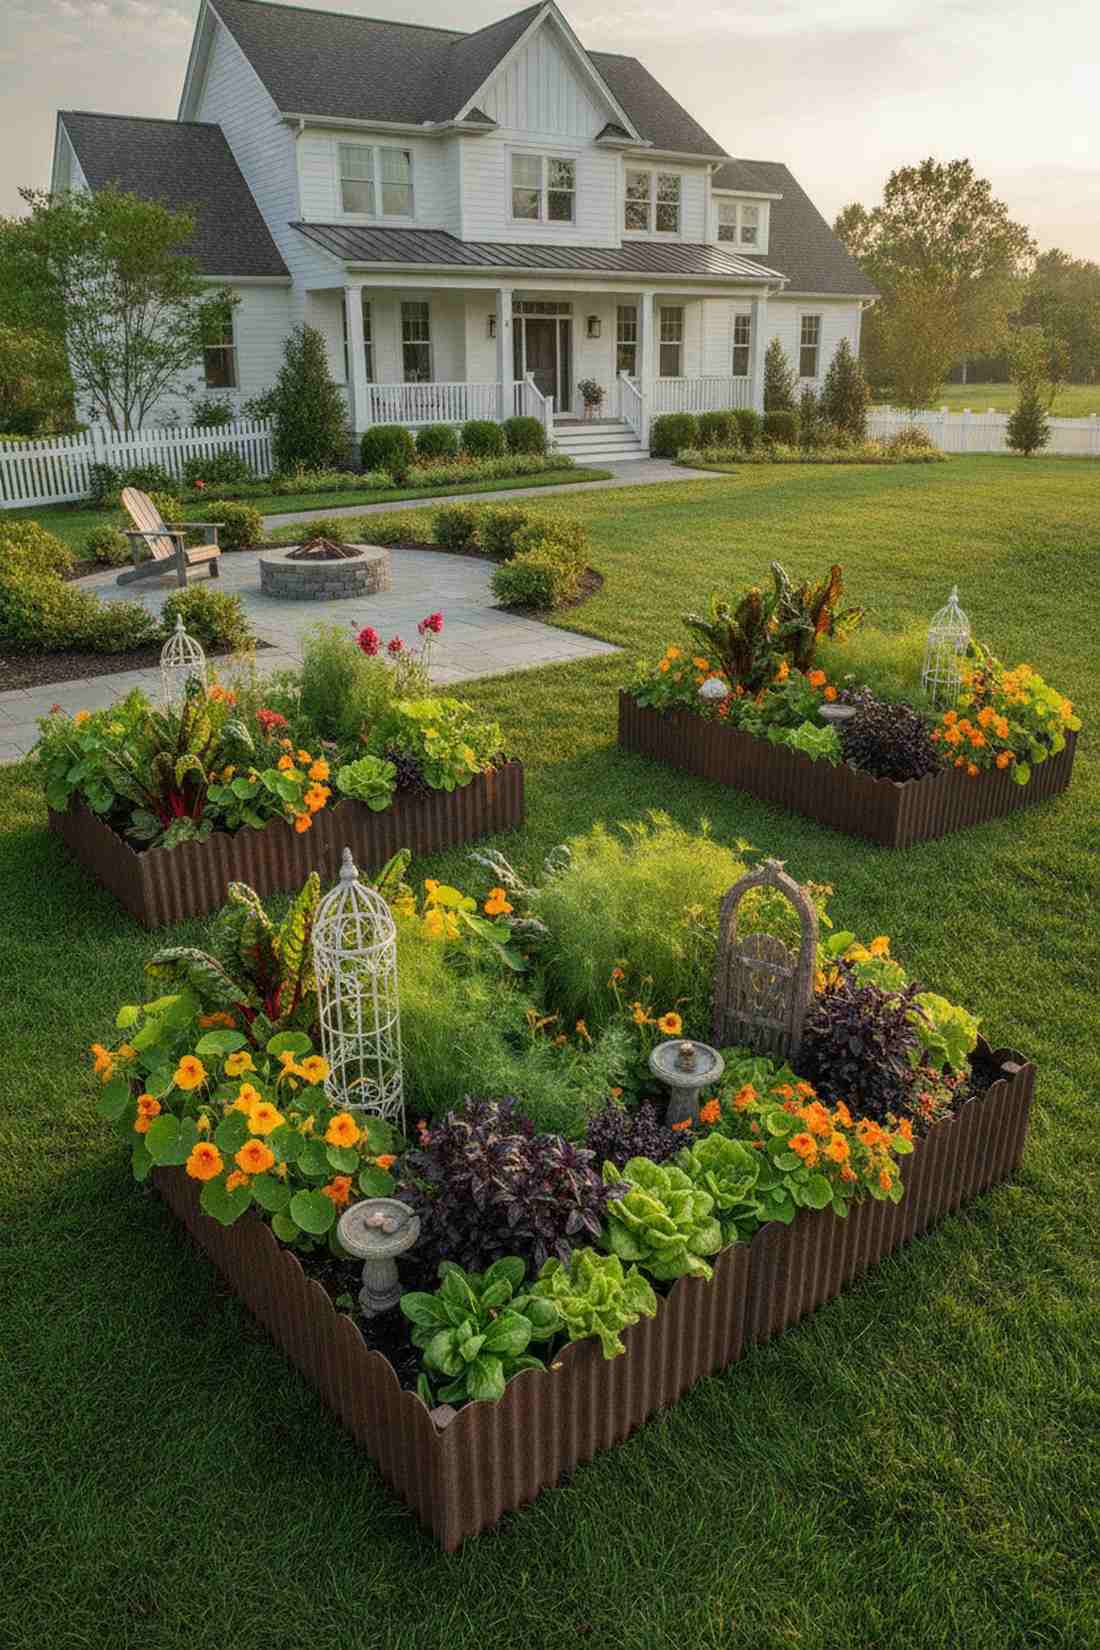
Blending these elements feels like strolling through an opulent English countryside manor. Designing raised flower beds in front of house settings works exceptionally well for strict HOA neighborhoods that frown upon traditional agriculture.
Most people separate their florals from their food, but this covert integration delivers a surprisingly premium look bursting with wild textures. Weaving premium fairy garden kits or ornate miniature obelisks among the lettuce tricks the eye into seeing purely ornamental decor.
You can execute this stealth garden for around $60 in seeds and border edging. Pin this if you want to secretly grow a massive grocery haul in plain sight.
- Key Materials: Scalloped metal edging, mixed seed packets
- Vibe / Style: Whimsical English cottage
- Difficulty: Easy planting
- Budget Breakdown: Decorative edging: $40 | Mixed seeds: $20.
- Creator’s Tip: Use vibrant Swiss Chard and Nasturtium—they look like expensive exotic ornamentals but are completely edible.
- Smart Sourcing: Purchase rust-proof hammered metal border edging (bulk roll) and weather-resistant miniature garden supplies.
Most people get this completely wrong… until they try the exact layout coming up next.
💡 Must-Have Supplies for High-End Setups
To build these setups faster and ensure they last, skip the generic craft aisles and invest in the right foundational kits.
- Base & Support: Pre-drilled galvanized steel corner brackets (4-pack)
- Setup Tools: Heavy-duty staple gun starter kits for weed barriers
- Weather/Durability Protection: Non-toxic cedar wood sealer (UV-resistant gallon)
9. Tiered Elevation Beds
This staircase of greenery feels like a modern art installation made of living plants. A multi-level stepped planter box works exceptionally well for adding dramatic height to completely flat, boring front lawns.
Building a flat box is expected, but stacking overlapping elevations makes cheap materials look custom-built by a boutique design firm. Using pre-cut corrugated roofing panels for the side walls adds a stunning industrial-chic contrast against the organic soil.
This architectural piece costs around $120–$160 depending on the tier heights. Save this to your modern landscaping board for the ultimate dimensional upgrade.
- Key Materials: Stepped wood frames, corrugated metal siding
- Vibe / Style: Contemporary architectural
- Difficulty: Intermediate carpentry
- Budget Breakdown: Framing: $70 | Metal panels: $50 | Fasteners: $15.
- Creator’s Tip: Don’t fill the entire back column with dirt; use empty plastic jugs at the very bottom to save money on premium soil.
- Smart Sourcing: Get pre-cut galvanized steel corrugated sheets and self-tapping metal roofing screws with rubber washers.
10. L-Shaped Corner Showcase
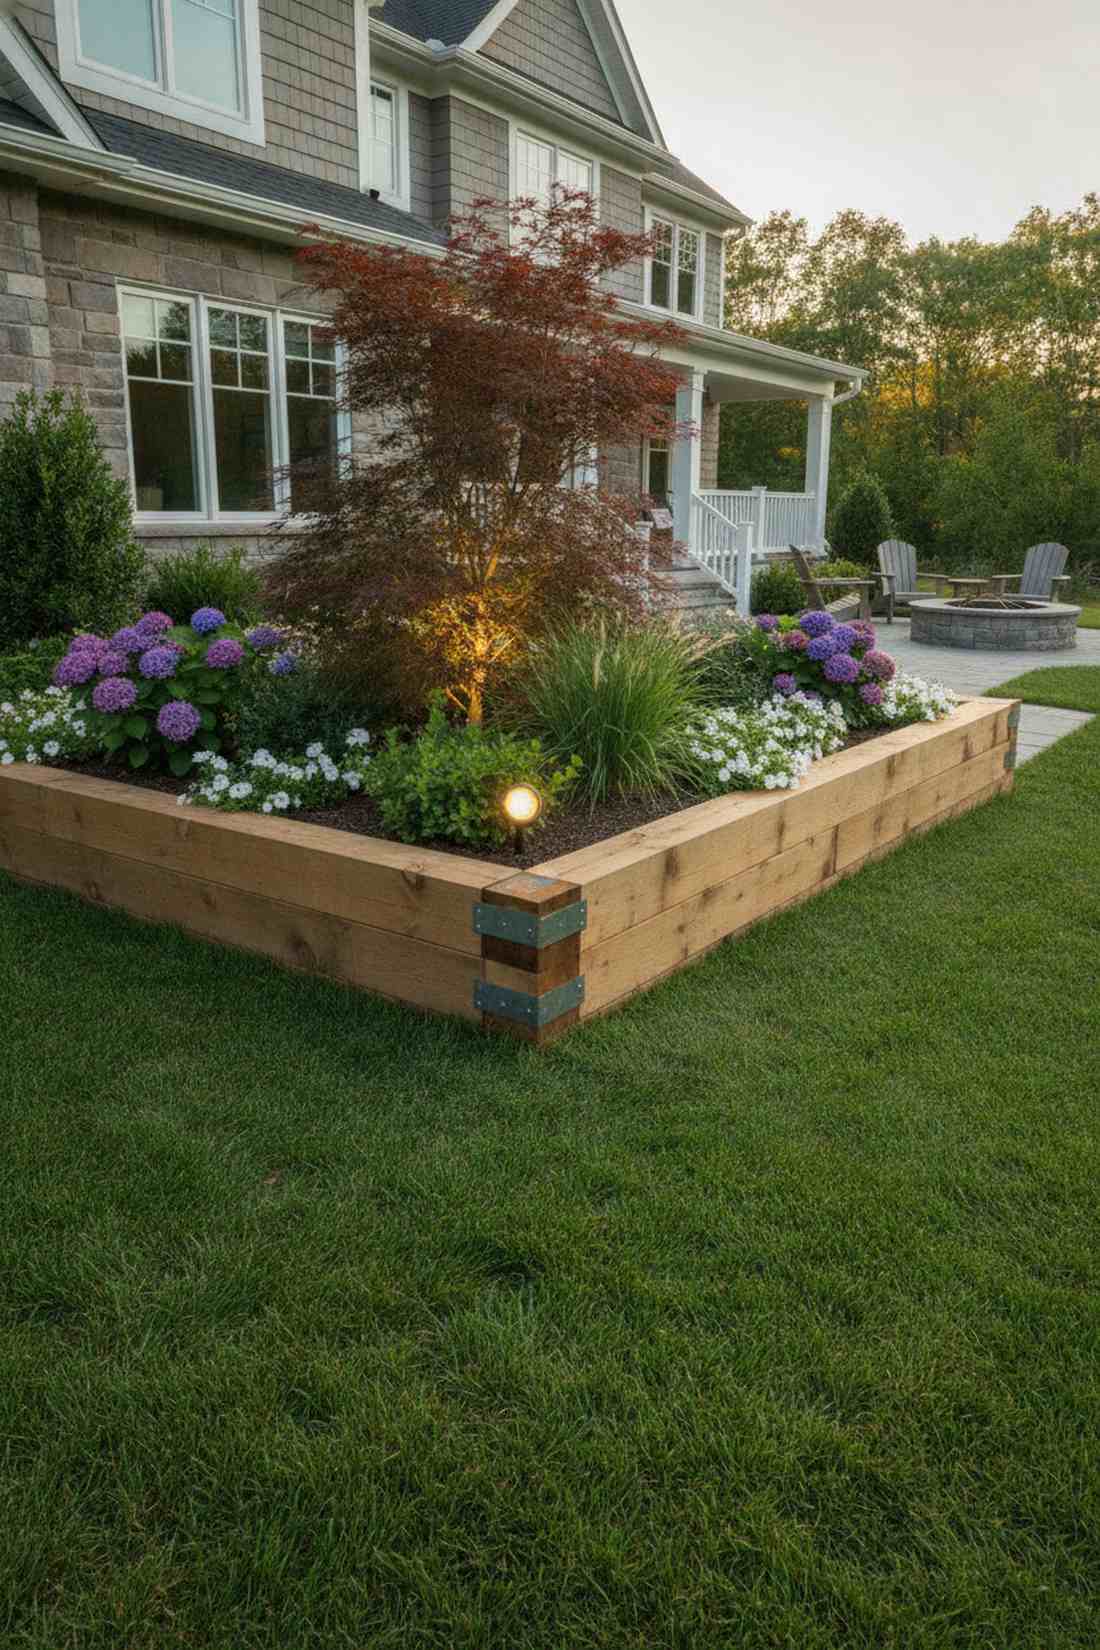
Wrapping around your foundation like a protective hug, this layout feels incredibly grand and welcoming. Using raised beds for front yard corners works exceptionally well to visually anchor the sharp edges of your home’s architecture.
Instead of two disjointed boxes, connecting them into a seamless “L” transforms basic dirt into an architectural feature. Dropping a weatherproof solar spotlight kit right at the inner corner junction highlights your best specimen plant perfectly at night.
Materials for a sturdy corner wrap usually land between $90–$130. It’s a brilliant way to capture both morning and afternoon sun in one unified system.
- Key Materials: Long lumber cuts, steel mending plates
- Vibe / Style: Polished wraparound estate
- Difficulty: Beginner friendly
- Budget Breakdown: Timber: $80 | Brackets/Screws: $25.
- Creator’s Tip: Overlap the corner joints (log-cabin style) for massive structural integrity against outward soil pressure.
- Smart Sourcing: Use heavy-duty flat steel mending plates (bulk pack) and a premium waterproof LED landscape spotlight kit.
Vertical and Space-Saving Designs
When horizontal space limits production, vertical growing strategies multiply capacity. These designs use height to expand planting area within small garden footprints.
11. Raised Bed with Arch Trellis
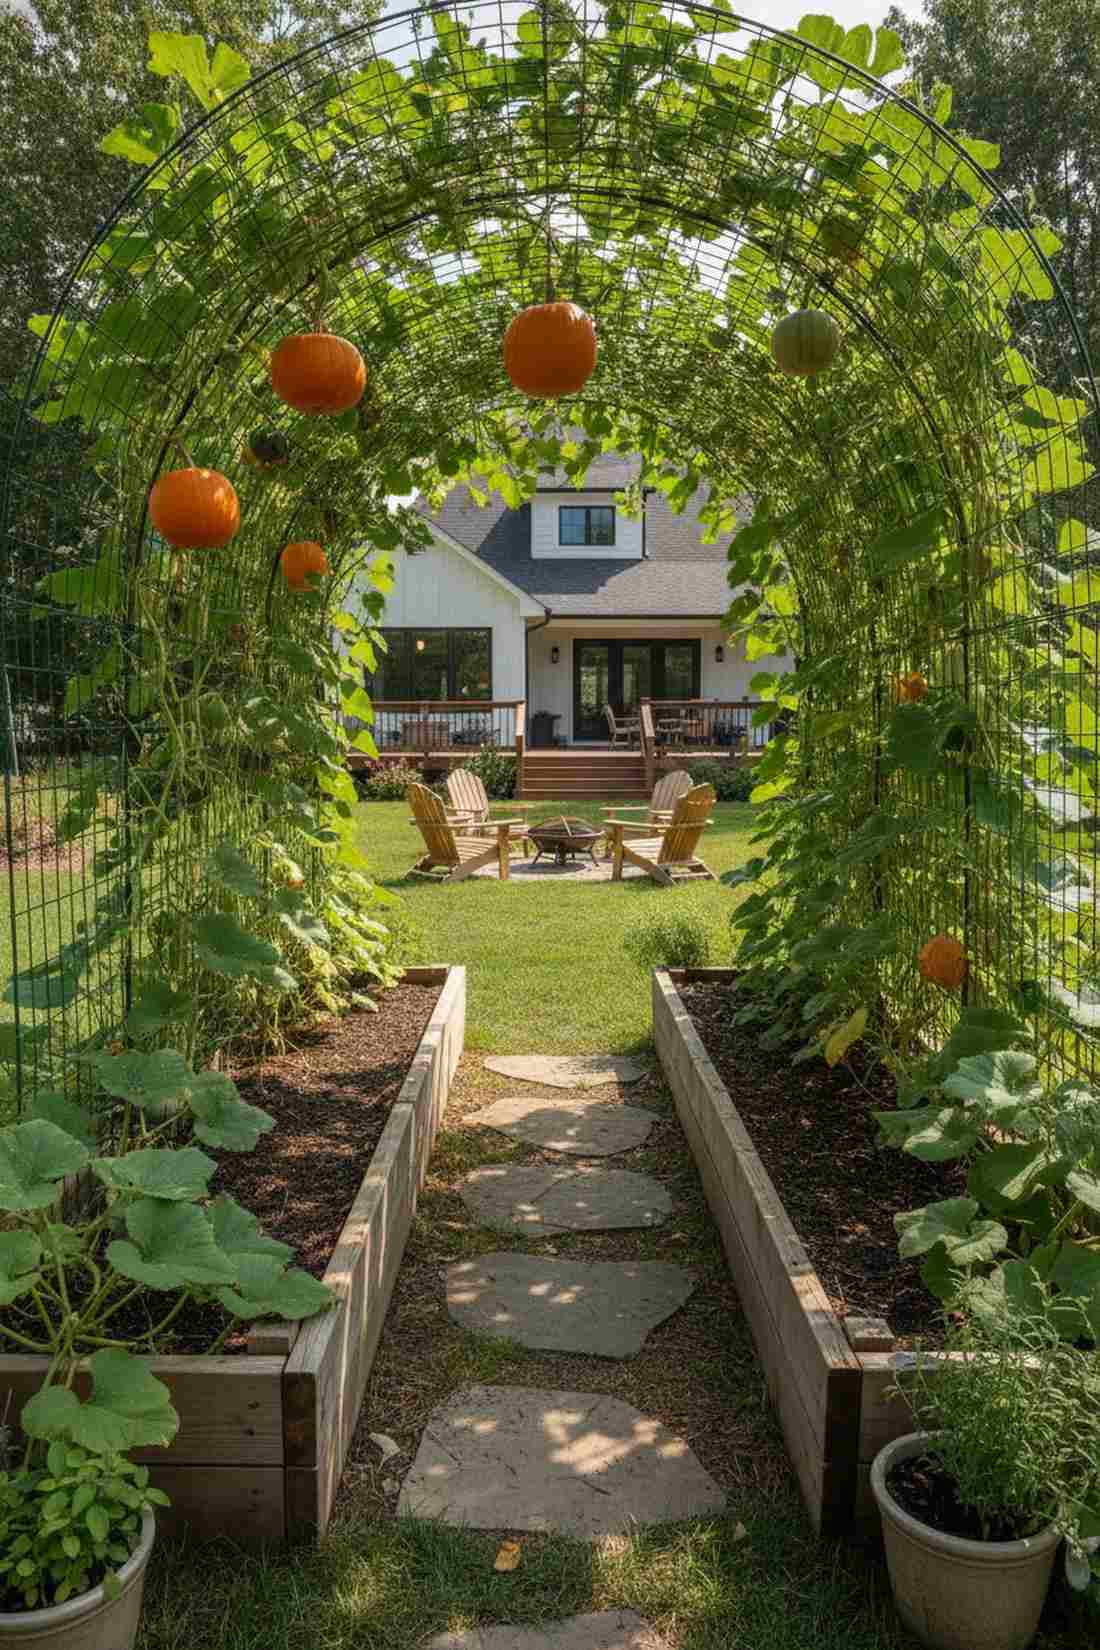
Walking under this canopy feels like stepping through a portal into a lush, green wonderland. A wire cattle panel archway works exceptionally well for bridging two separate beds and creating a shaded walkway underneath.
Many struggle with sprawling squash vines, but bending heavy-gauge wire between boxes gives a designer-level finish that defies gravity. Upgrading to a vinyl-coated livestock panel prevents rust and ensures your arch supports hundreds of pounds of hanging produce.
You can construct this magical arch setup for around $45–$60. Pin this immediately if you want to grow massive pumpkins or melons in a tiny footprint.
- Key Materials: Cattle panels, U-nails
- Vibe / Style: Magical living tunnel
- Difficulty: Requires two people to bend
- Budget Breakdown: Wire panel: $30 | Fasteners: $10.
- Creator’s Tip: Secure the arch to the INSIDE walls of the raised beds, allowing the soil weight to hold the tension naturally.
- Smart Sourcing: Source heavy-gauge galvanized cattle panels and heavy-duty steel U-fencing staples.
12. Raised Bed with Vertical Panel Trellis
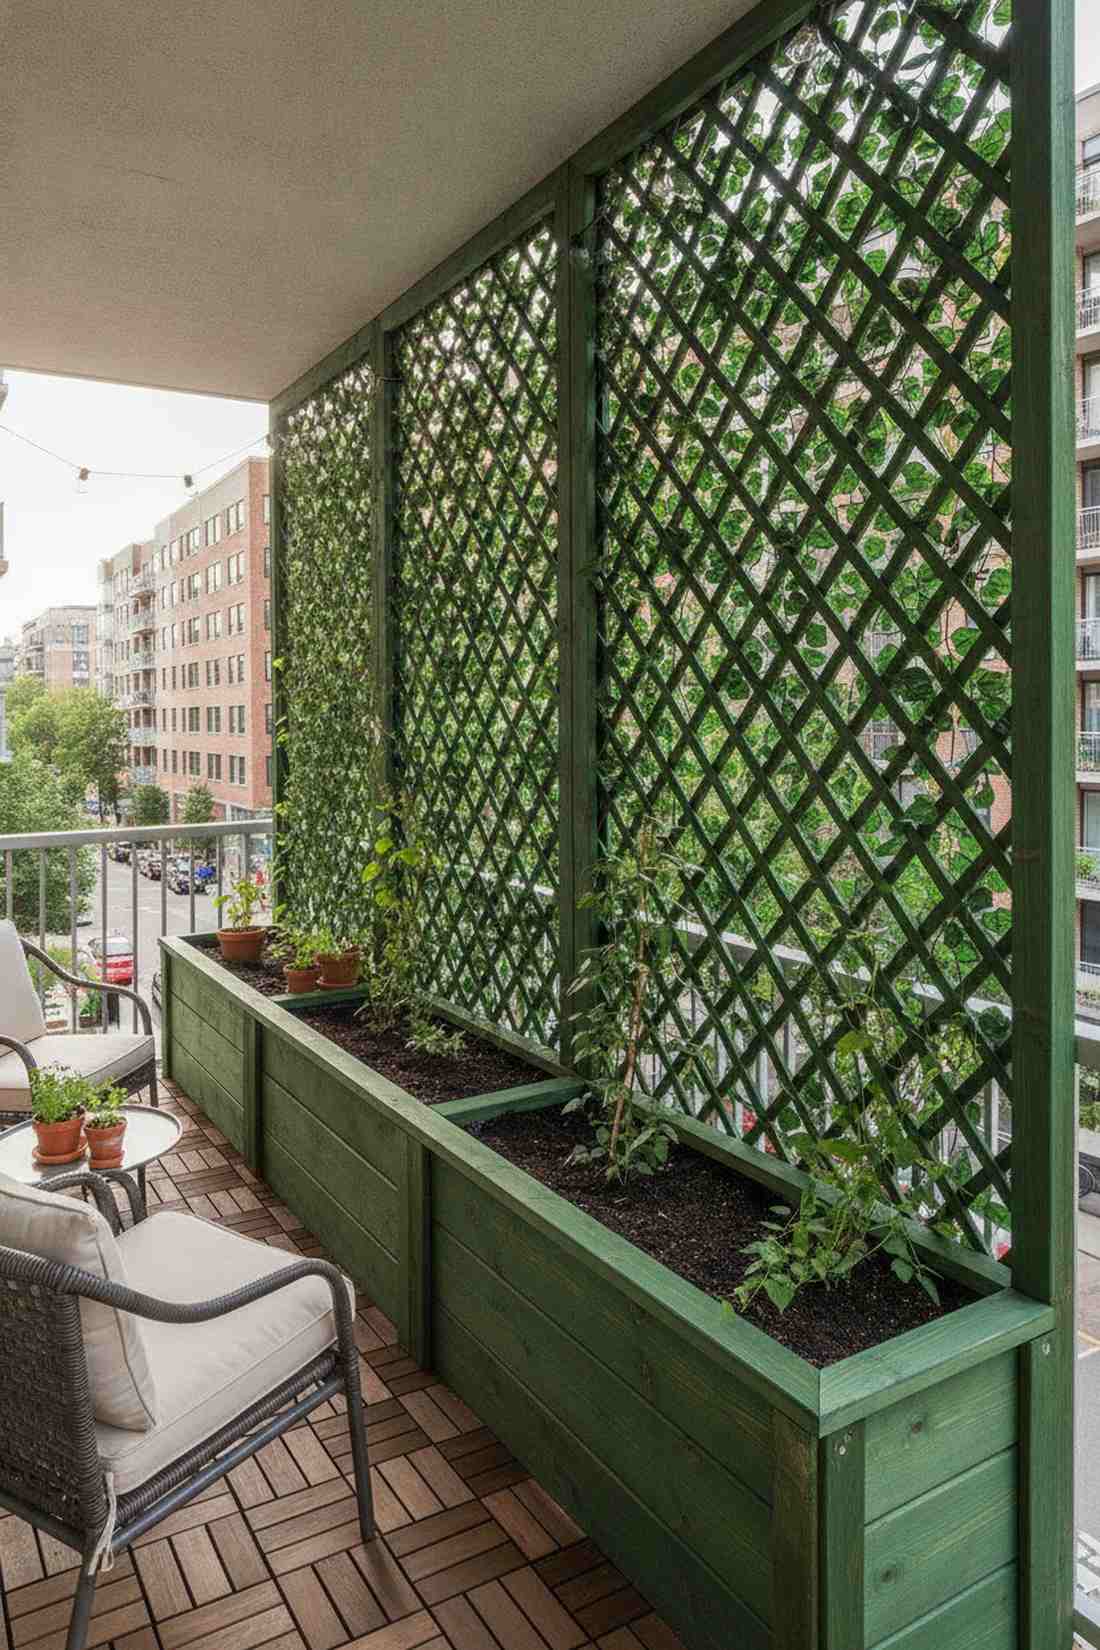
This striking green wall feels like a living tapestry that blocks out nosy neighbors instantly. A rear-mounted privacy trellis box works exceptionally well for balconies or yards that border busy sidewalks.
While standard privacy fences look hostile, a living wall layout looks far more expensive than it is while providing incredible sound dampening. Attaching UV-resistant artificial ivy screens as a base layer ensures the wall looks lush even before your real seeds sprout.
You can build the frame and trellis combo for roughly $75–$110. Highly recommended for urban dwellers craving a private sanctuary.
- Key Materials: Tall wooden stakes, lattice panels
- Vibe / Style: Urban oasis screen
- Difficulty: Beginner DIY
- Budget Breakdown: Box frame: $40 | Lattice: $45.
- Creator’s Tip: Leave a 1-inch gap between the dirt line and the bottom of the wood lattice so it doesn’t rot from soil contact.
- Smart Sourcing: Pick up pre-painted pressure-treated wood lattice panels and exterior-grade structural timber screws.
Stop scrolling! If you are on a tight budget, the next configuration is a total game-changer…
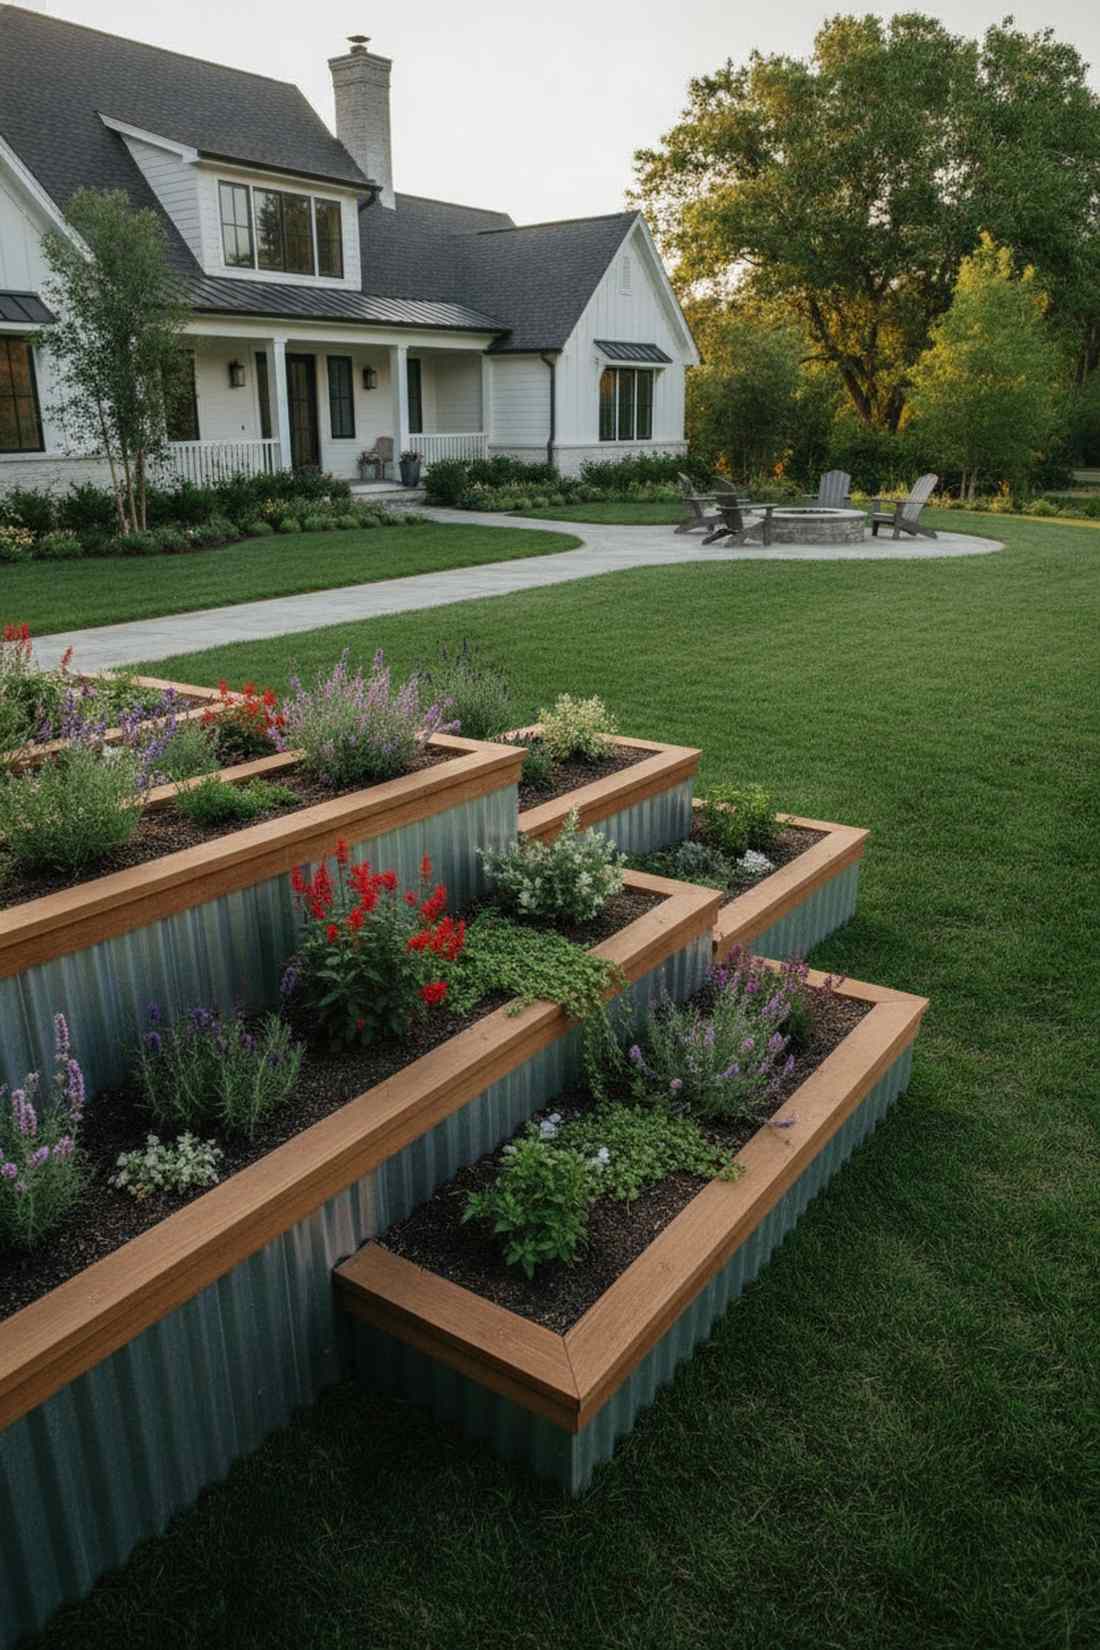
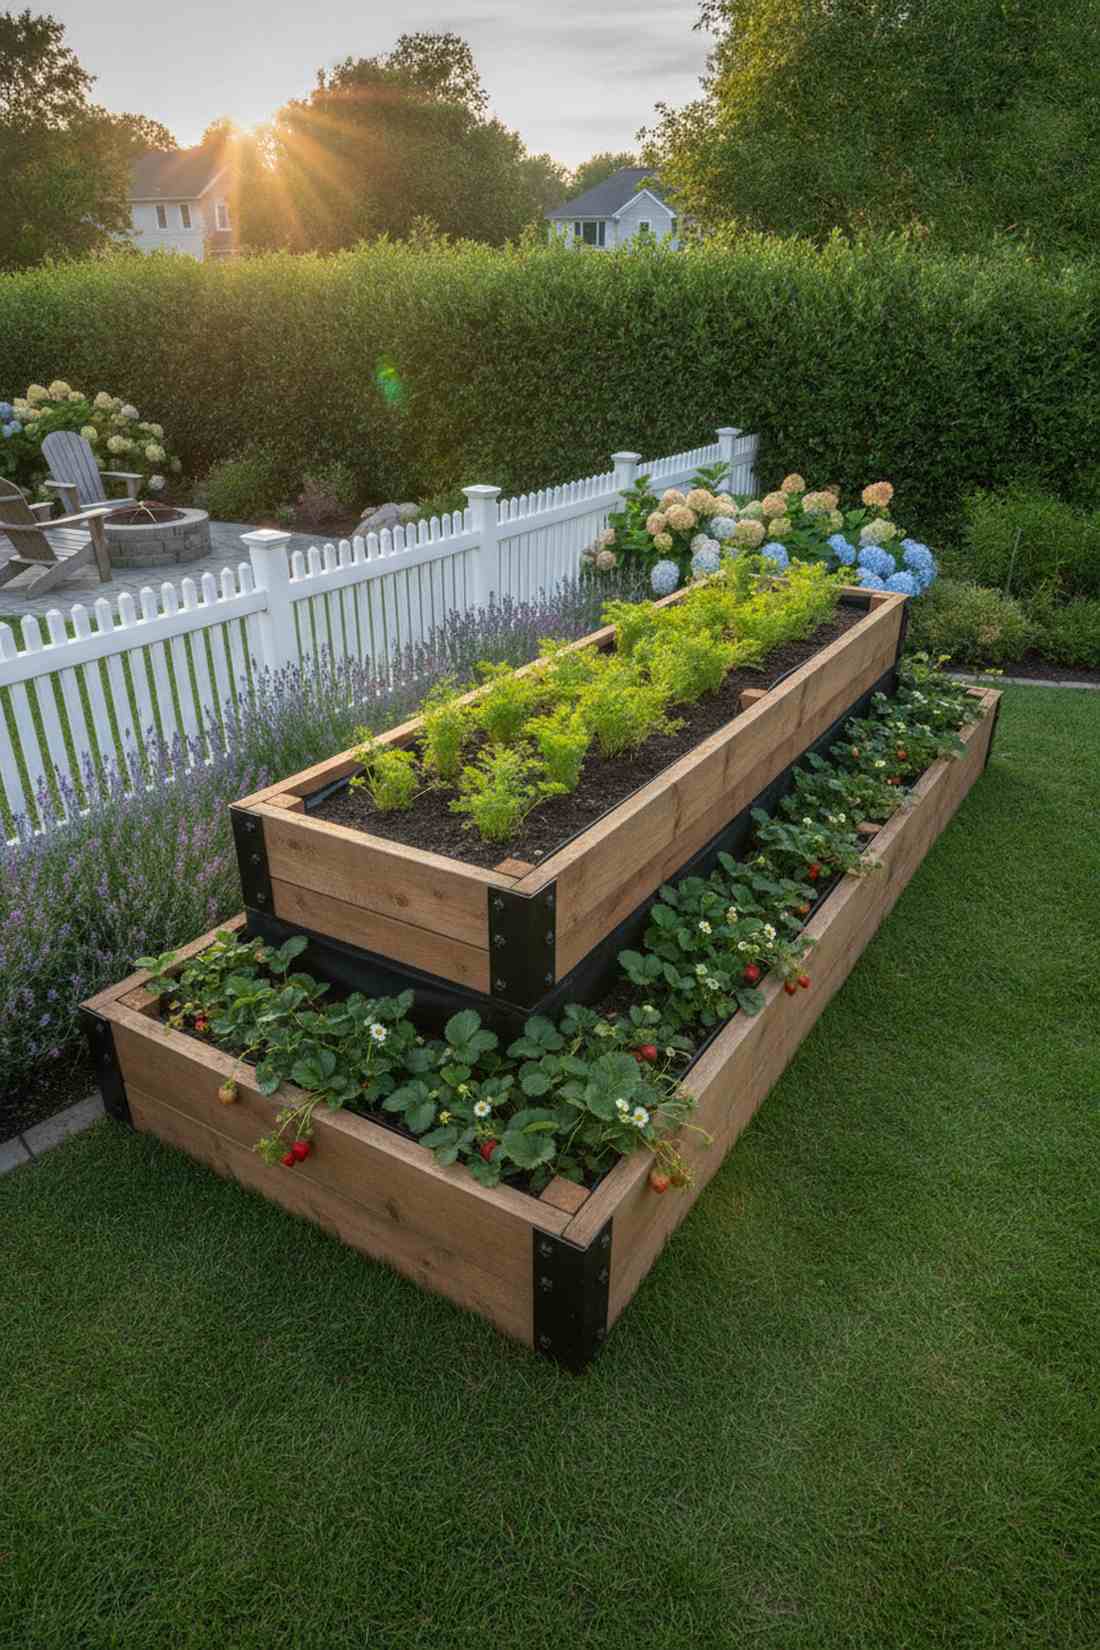
13. Tiered Stair-Step Beds
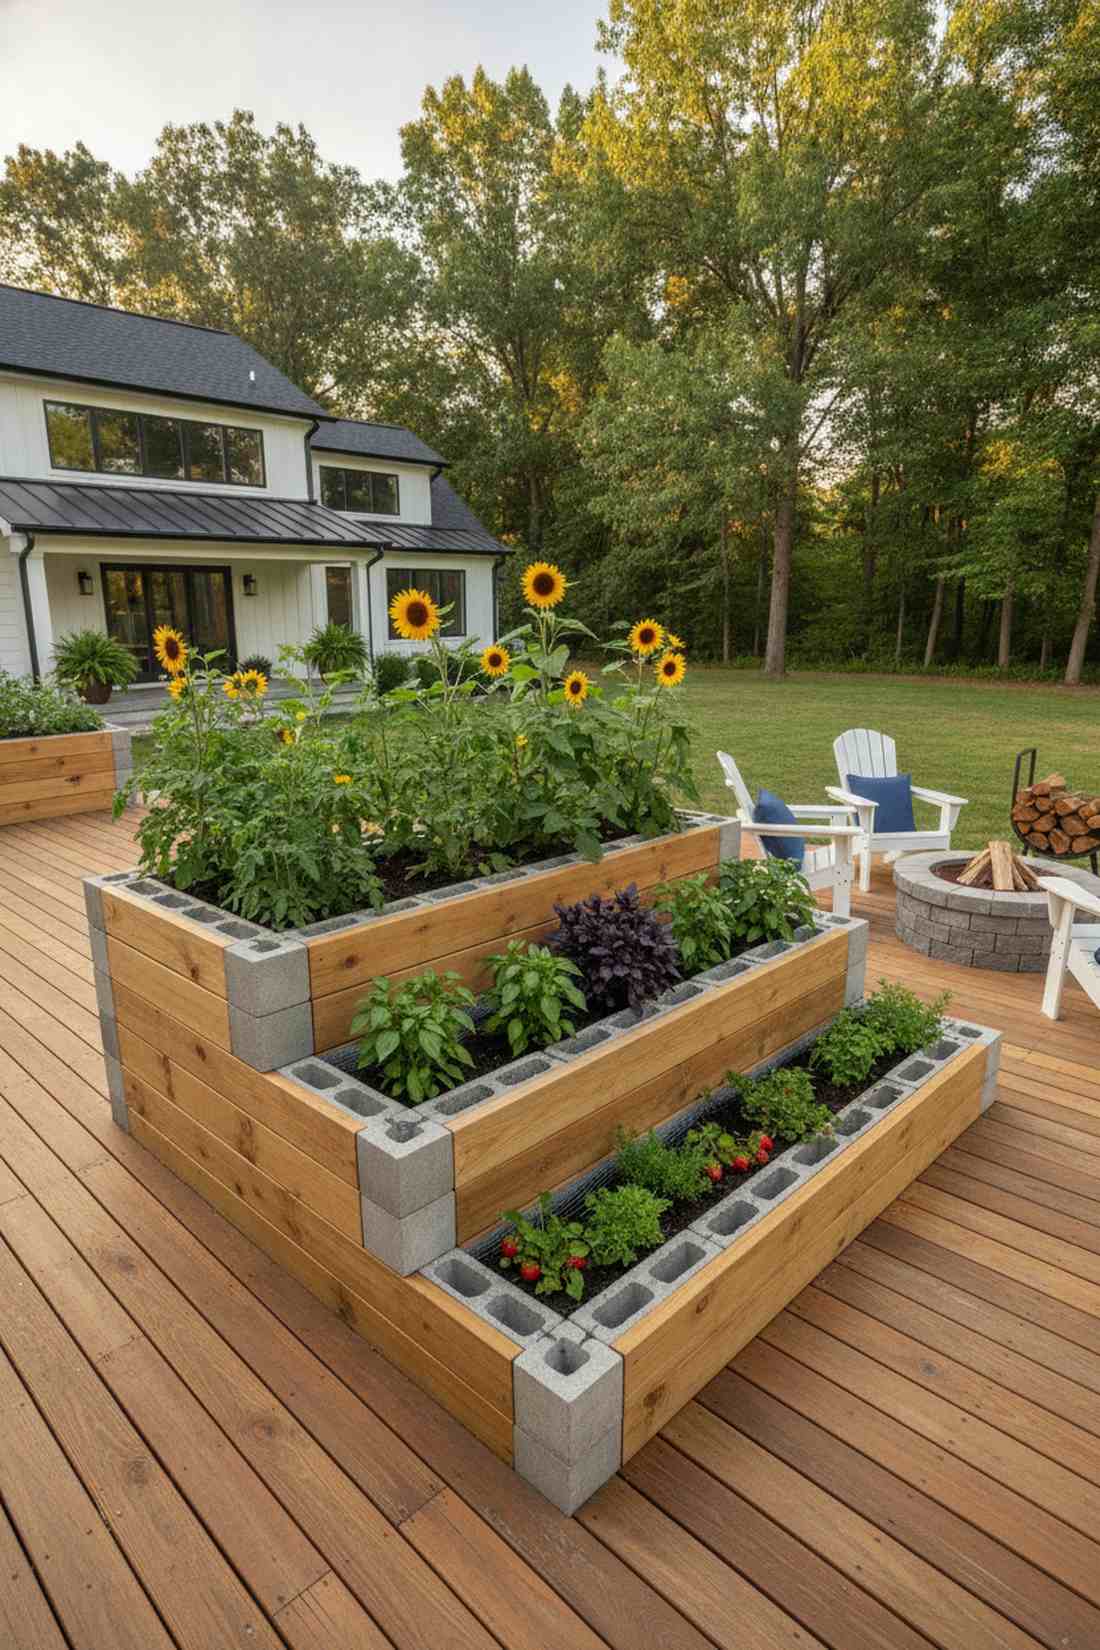
This cascading waterfall of foliage feels like an ancient terraced mountainside in miniature. A three-tier cascading planter box works exceptionally well for deep-rooted plants in the back and shallow herbs up front.
Instead of mixing aggressive plants with delicate ones, this separated tier method delivers a surprisingly premium look while perfectly organizing your harvest. Utilizing modular interlocking corner blocks allows you to stack the tiers perfectly without using a single power tool.
The materials will run you about $90–$140 depending on the depth. Save this layout to your spring project board to completely rethink your patio.
- Key Materials: Slotted planter blocks, standard 2×6 boards
- Vibe / Style: Neat and highly organized
- Difficulty: Zero-tool assembly
- Budget Breakdown: Wood: $60 | Corner blocks: $40.
- Creator’s Tip: Line the bottom of the upper tiers with hardware cloth to stop moles from digging up through the levels.
- Smart Sourcing: Order pre-slotted concrete planter block kits and a heavy-duty galvanized hardware cloth roll.
14. Vertical Wall-Mounted Boxes
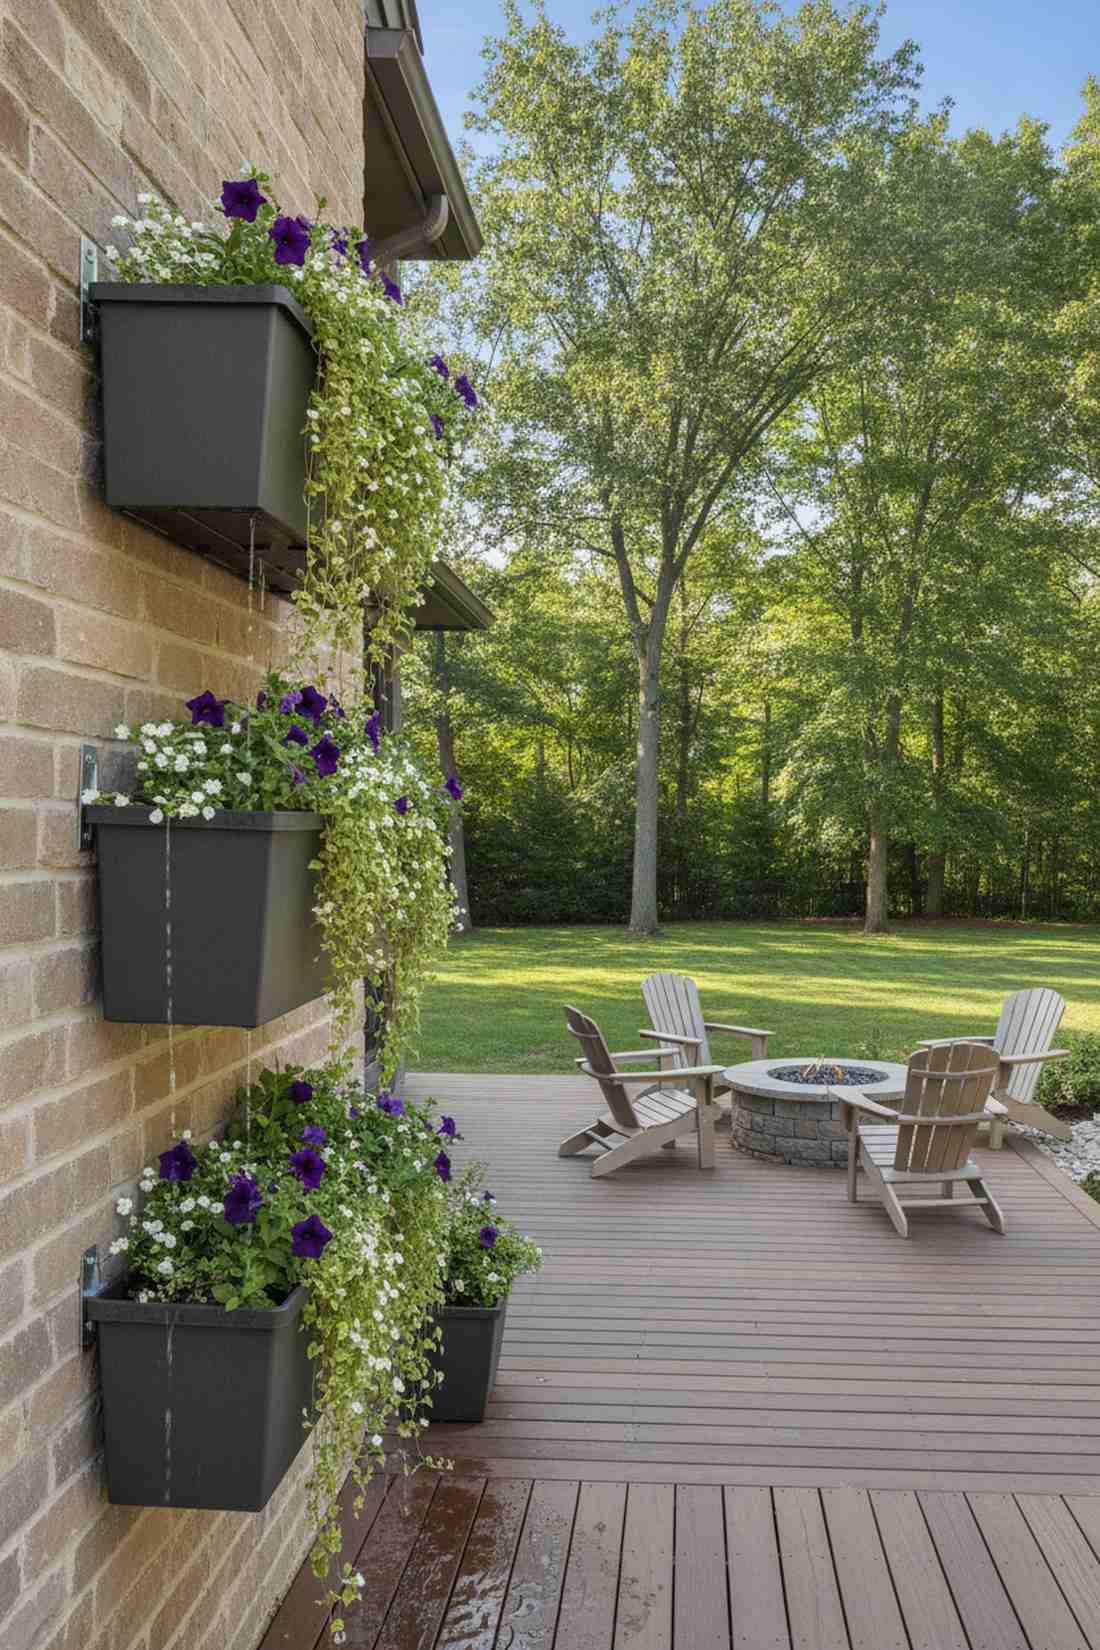
Hanging your garden like a piece of fine art feels incredibly modern and frees up massive floor space. A floating wall-planter system works exceptionally well for sun-drenched masonry walls or boring wooden privacy fences.
Most hanging baskets drip everywhere and die quickly, but installing slim, staggered boxes gives a designer-level finish with proper soil volume. Using commercial-grade French cleat brackets ensures the heavy wet soil won’t rip your fence boards down during a storm.
You can mount three beautiful boxes for under $50. Pin this if you literally have zero ground space left to plant!
- Key Materials: Small window boxes, heavy-duty mounting hardware
- Vibe / Style: Sleek floating gallery
- Difficulty: Requires a drill and level
- Budget Breakdown: Boxes: $30 | Hardware: $15.
- Creator’s Tip: Drill your drainage holes near the front edge of the bottom panel so water drips clear of the wall below it.
- Smart Sourcing: Find heavy-duty aluminum French cleat hangers (multi-pack) and UV-coated rectangular resin window boxes.
15. Raised Bed with Obelisk Centerpiece
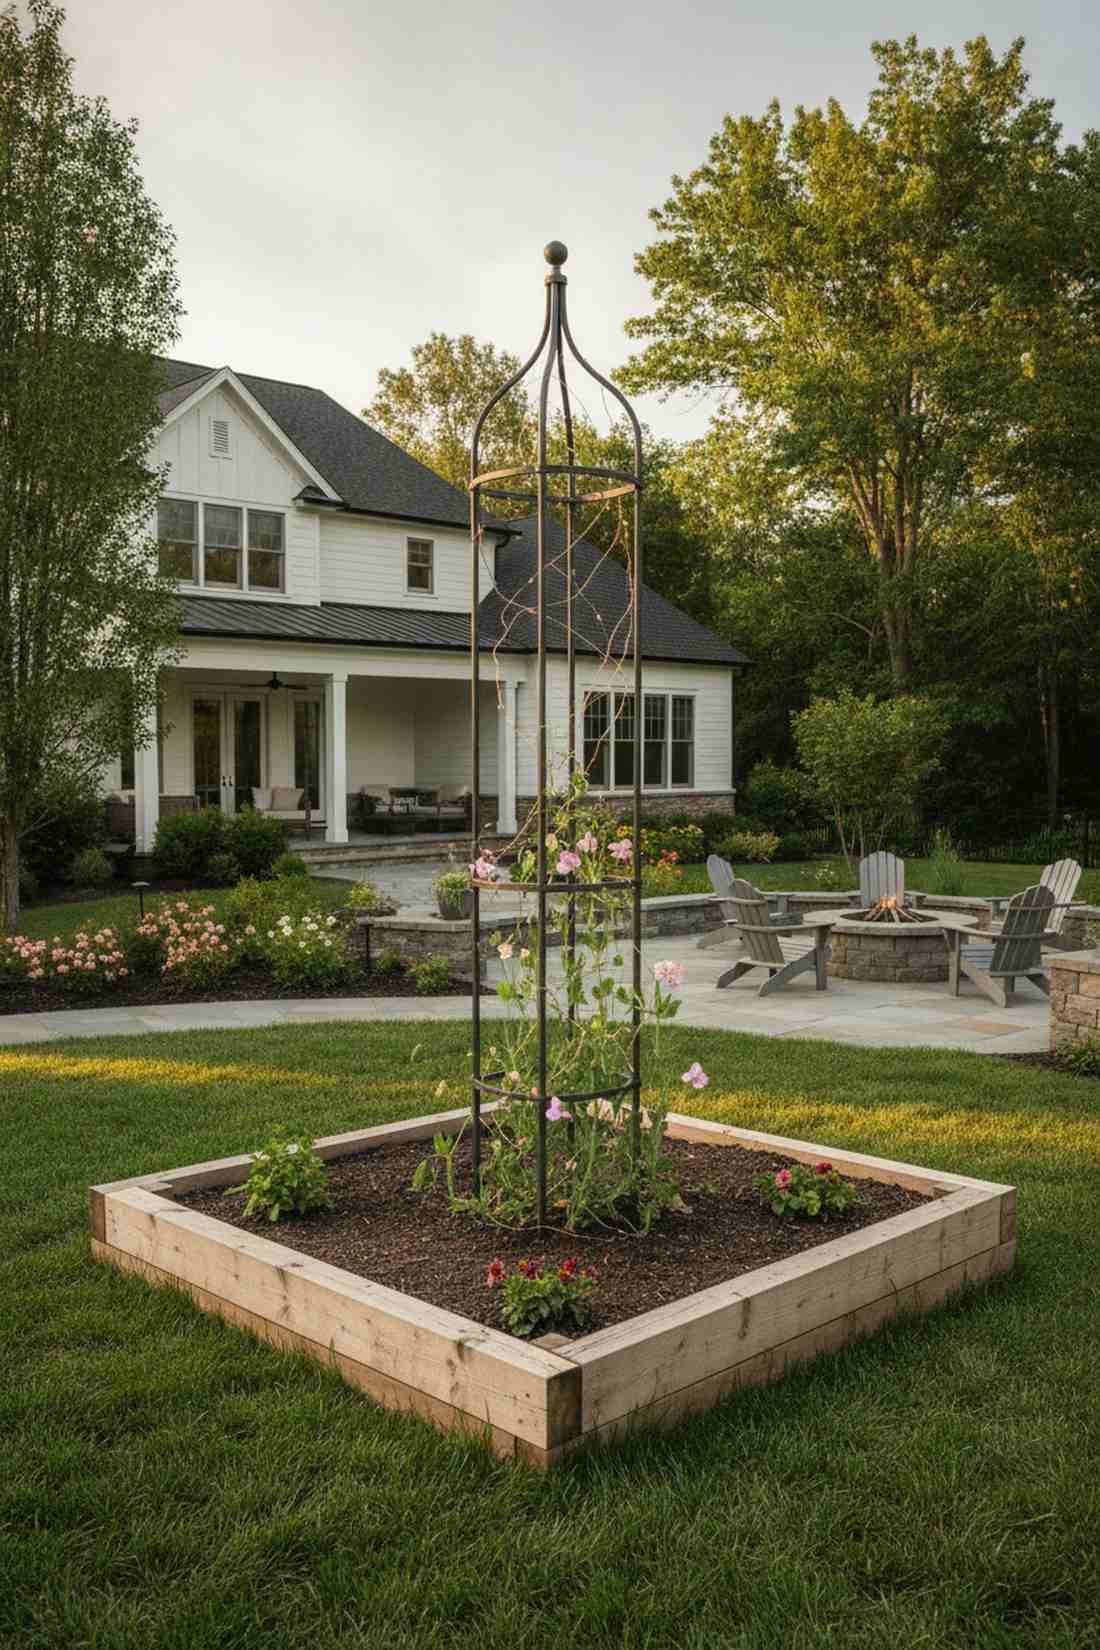
This majestic arrangement feels like a historic centerpiece in a royal botanical courtyard. A square box with a central obelisk tower works exceptionally well to draw the eye upward in flat, one-dimensional backyards.
A plain square box is easily overlooked, but dropping a tall focal point in the middle makes cheap materials look custom-built for an estate. Incorporating premium terrarium accessories or solar fairy lights up the metal tower creates a breathtaking nighttime glow.
Sourcing an elegant metal obelisk and lumber costs roughly $80–$130. It’s a fast upgrade that completely changes the vibe of your standard square bed.
- Key Materials: 4×4 bed frame, tall metal or wood obelisk
- Vibe / Style: Formal courtyard elegance
- Difficulty: Very easy
- Budget Breakdown: Wood frame: $40 | Obelisk tower: $60.
- Creator’s Tip: Plant sweet peas or flowering climbing beans around the base; they will naturally grip the obelisk within weeks.
- Smart Sourcing: Buy a rust-resistant powder-coated steel garden obelisk and outdoor-rated waterproof copper fairy lights.
Multiple Bed Arrangements for Organized Gardens
Coordinated raised bed systems organize garden spaces into functional zones. These multi-bed layouts optimize workflow and create cohesive visual compositions.
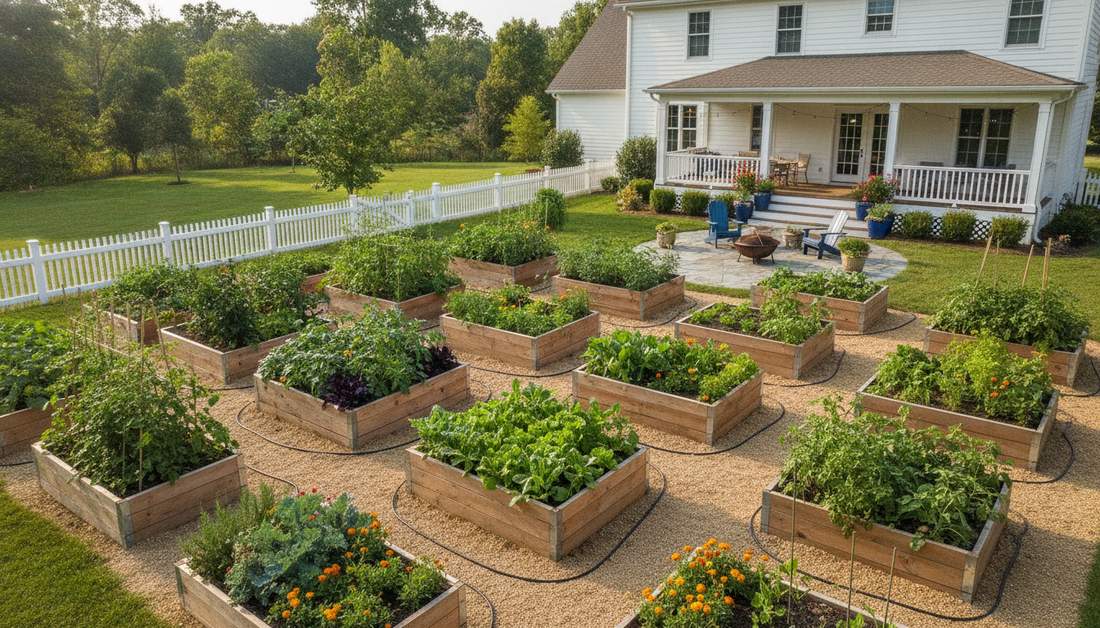
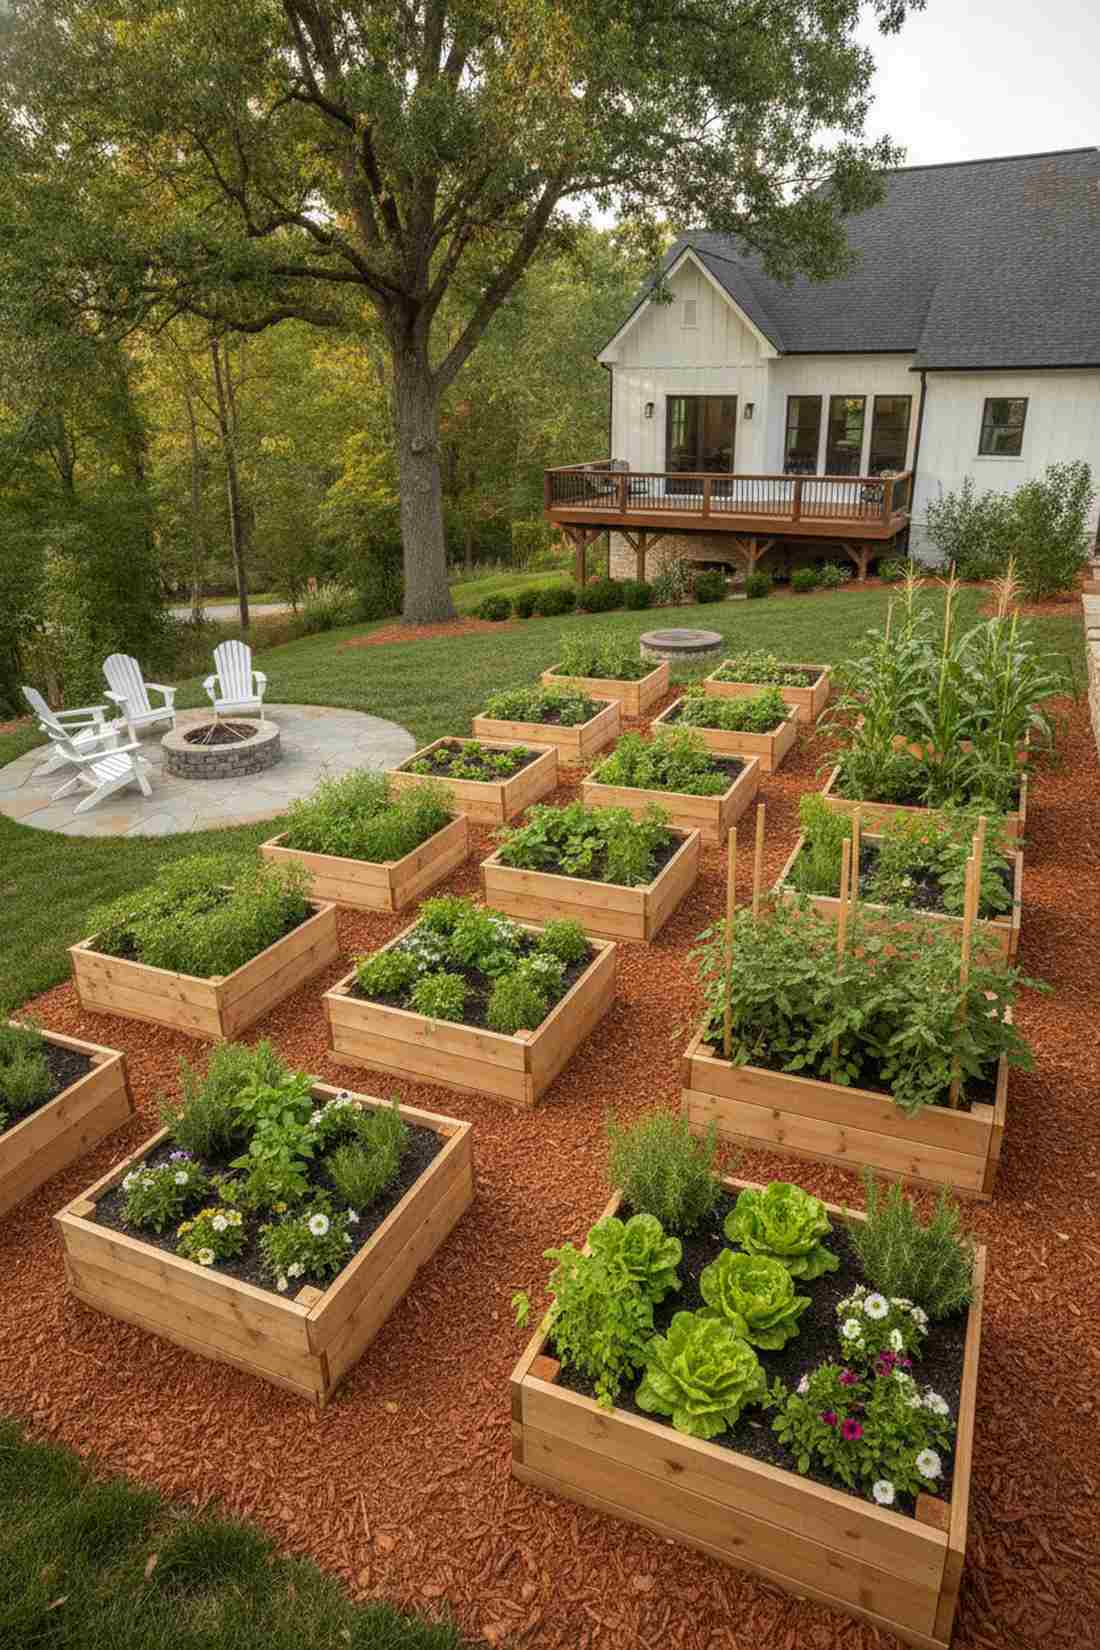
16. Classic Four-Bed Square
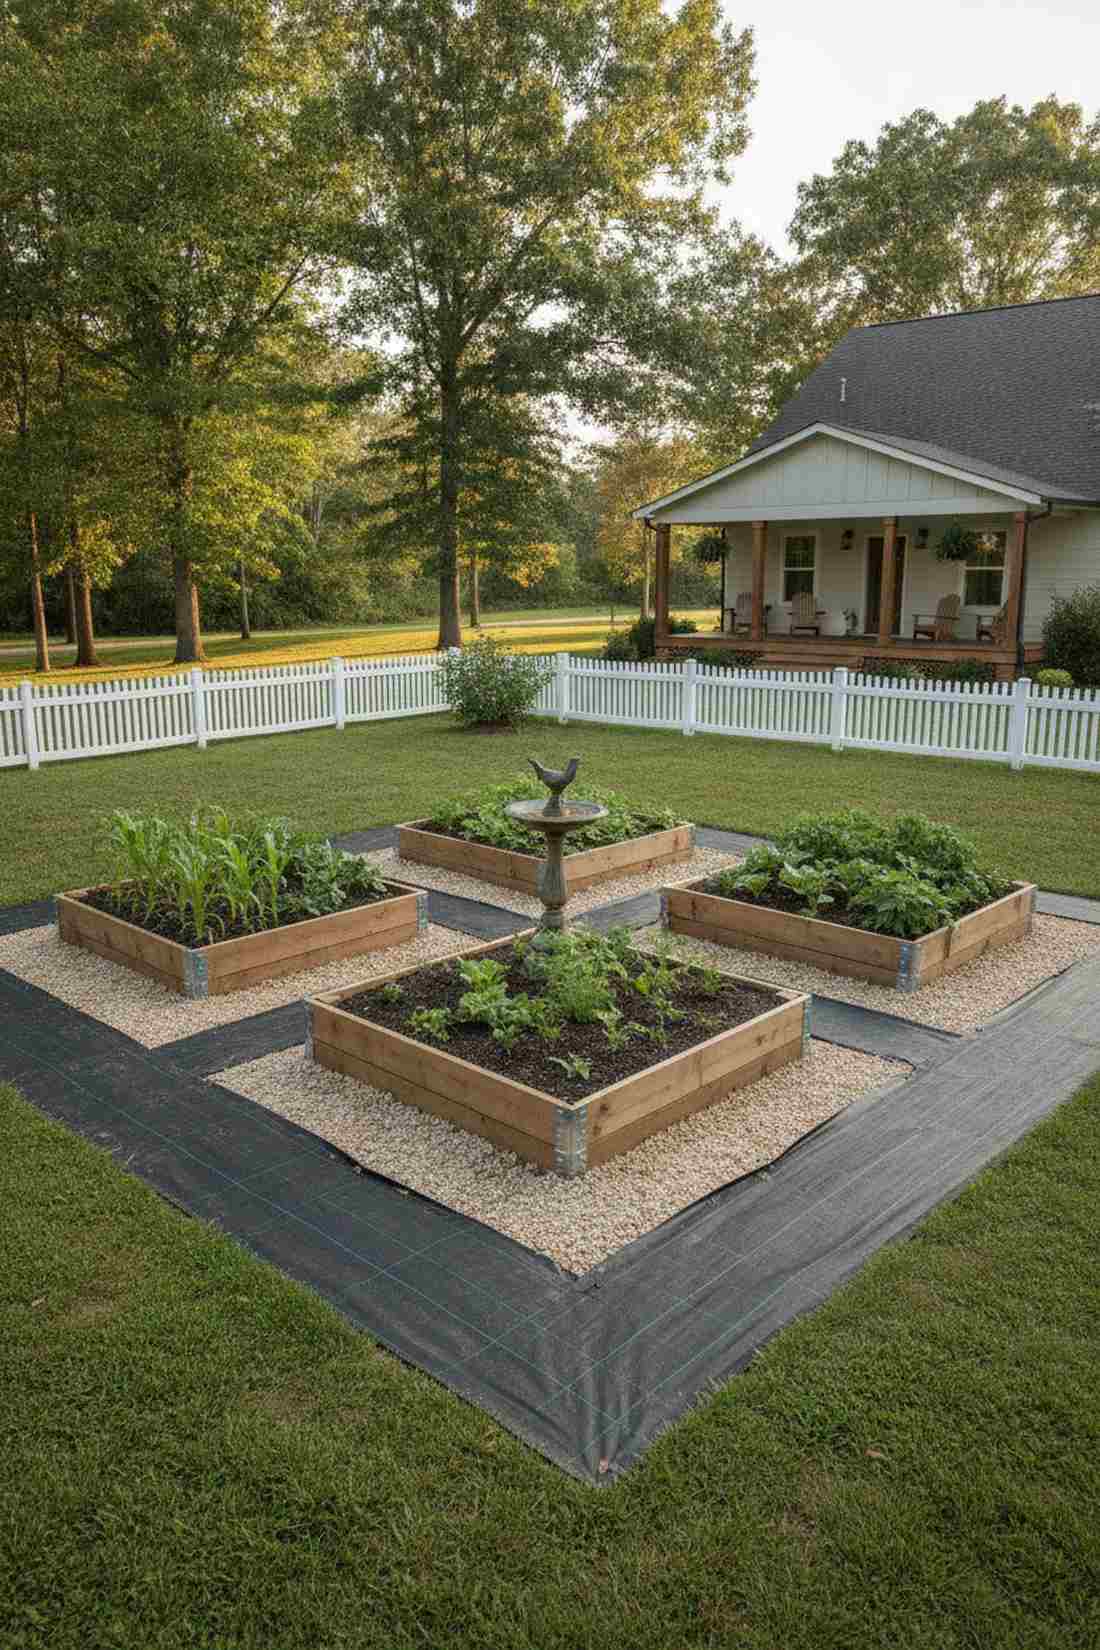
Standing in the center intersection feels like you are the master of a highly efficient farm grid. The quadrant garden plot system works exceptionally well for serious food producers who need strict crop rotation zones.
Randomly placed boxes look messy, but this rigid geometric layout delivers a surprisingly premium look that instantly organizes chaotic yards. Laying down heavy-duty commercial landscape fabric across the entire square before building prevents walkway weeds from ruining the aesthetic.
Building four standard beds runs about $160–$220. Save this to your homesteader blueprint board for ultimate backyard organization.
- Key Materials: Mass lumber, bulk pathway material
- Vibe / Style: Homesteader grid
- Difficulty: Labor intensive but simple
- Budget Breakdown: 4x Lumber sets: $150 | Weed barrier: $40.
- Creator’s Tip: Place a gorgeous birdbath or sundial right in the cross-path center to serve as a stunning visual anchor.
- Smart Sourcing: Invest in a contractor-grade woven weed barrier roll and pre-cut galvanized steel raised bed corner brackets (16-pack).
Wait until you see how this next design completely fixes the “awkward narrow yard” problem…
17. Garden Trio Layout
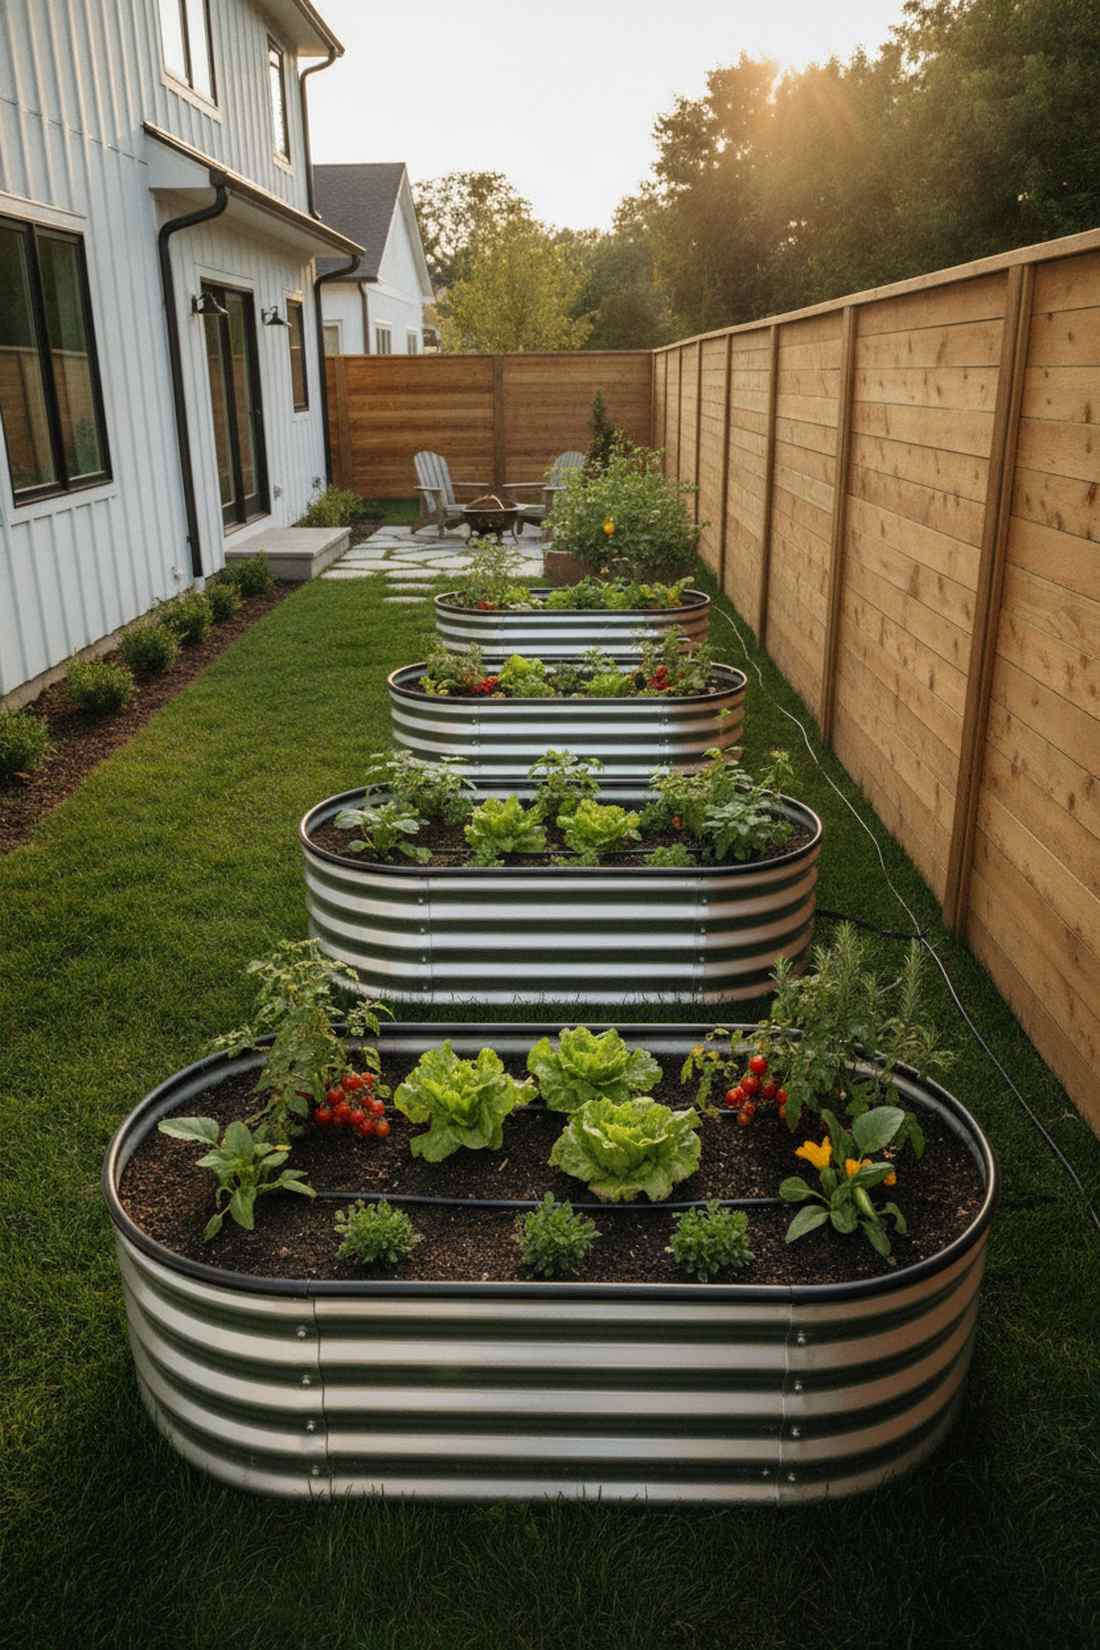
This sequential alignment feels like an elegant runway of fresh produce leading through your property. The linear triple-box sequence works exceptionally well for those awkwardly long, bowling-alley-style side yards.
Most side yards end up as junk storage, but this uniform row transforms basic dirt into an architectural feature with zero wasted space. Using pre-fabricated corrugated steel bed kits means you can assemble all three perfectly matching boxes in under an hour.
A trio of metal beds usually costs $120–$180 total. Highly recommended for streamlining your watering routine into one straight path.
- Key Materials: Metal or wood bed kits, drip irrigation line
- Vibe / Style: Streamlined modern runway
- Difficulty: Beginner setup
- Budget Breakdown: 3x Bed kits: $135 | Hoses: $25.
- Creator’s Tip: Run a single, straight 1/2-inch drip irrigation mainline right through the back of all three beds to automate your watering.
- Smart Sourcing: Snag pre-fabricated galvanized oval raised bed kits (3-pack) and a beginner drip irrigation starter kit.
18. U-Shaped Bed Arrangement
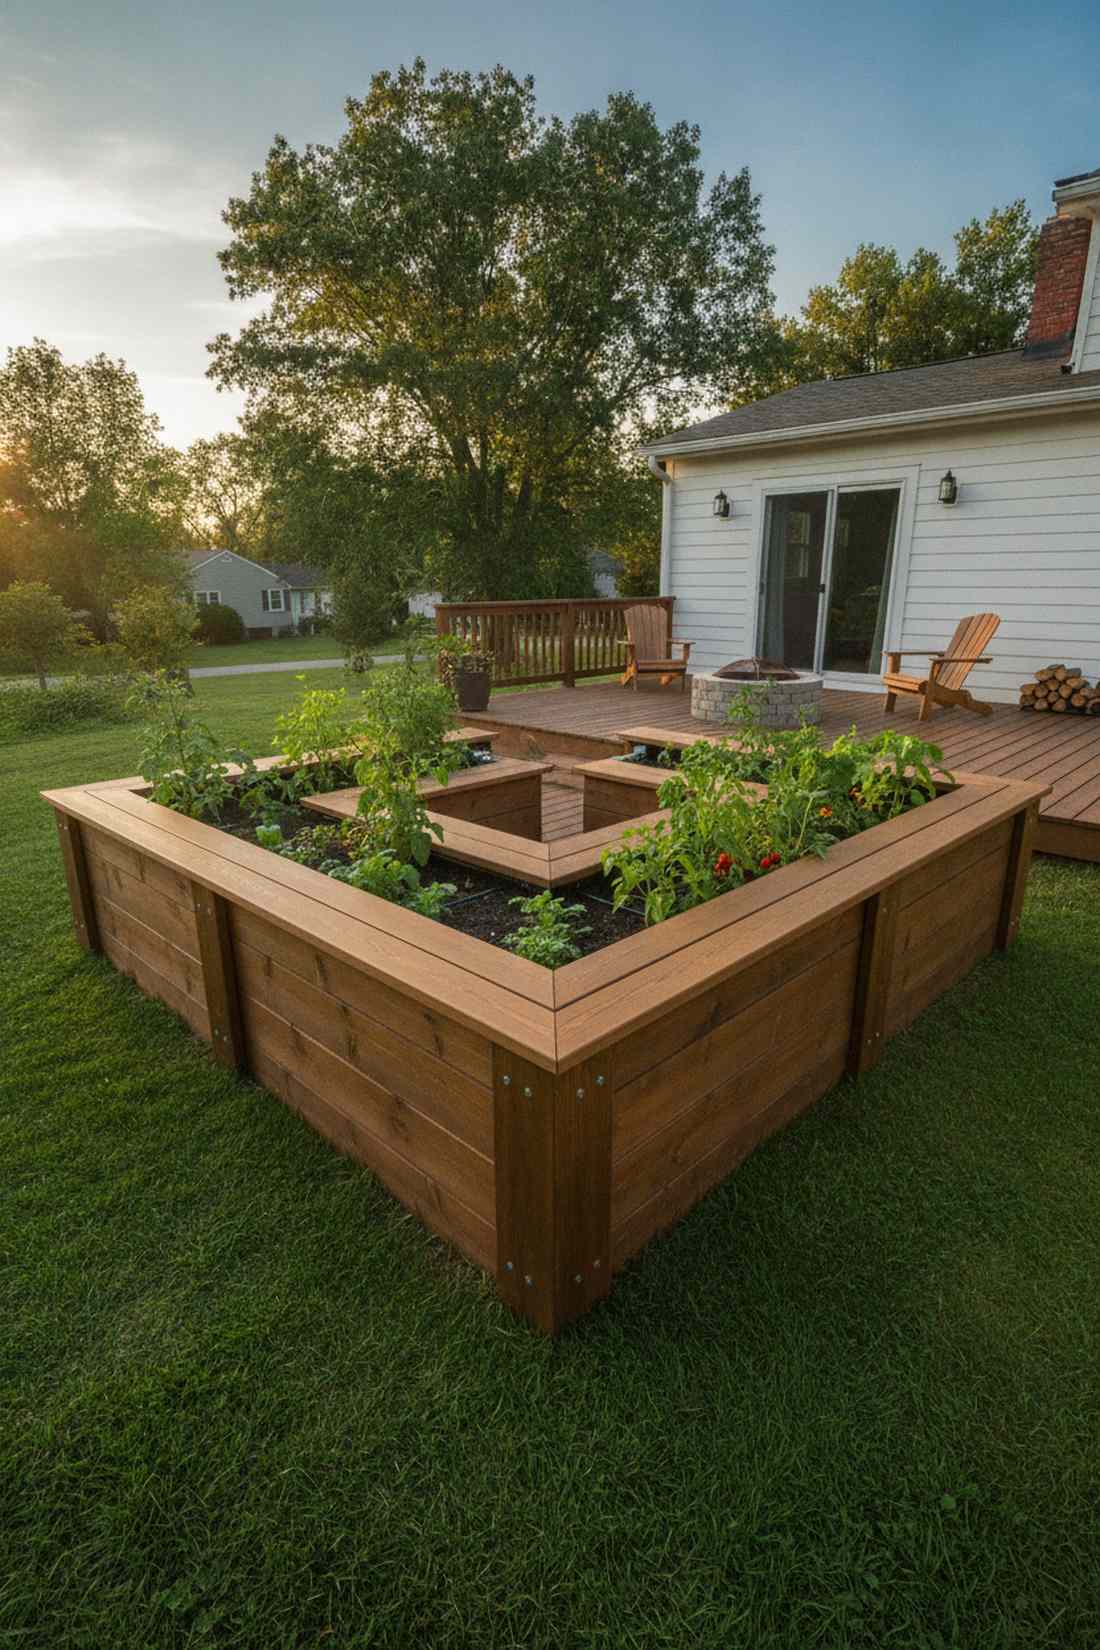
Tucking yourself into this pocket feels like stepping behind a private outdoor bartender’s counter. The wrap-around U-shaped enclosure works exceptionally well for creating a cozy, immersive harvesting nook right off your back patio.
Standard rows require constant walking, but a U-shape looks far more expensive than it is by putting 80% of your plants within an arm’s reach from the center. Installing heavy-duty cap rails along the top edges provides a perfect built-in seat while you prune.
Expect to spend $150–$250 to frame this custom enclosure. Pin this if you want the ultimate ergonomic harvesting experience.
- Key Materials: Thick framing lumber, wide capping boards
- Vibe / Style: Immersive garden workstation
- Difficulty: Intermediate carpentry
- Budget Breakdown: Wall framing: $120 | Top seating rails: $60.
- Creator’s Tip: Make the inner walking area exactly 3 feet wide—just enough room to squat comfortably but close enough to reach every corner.
- Smart Sourcing: Use premium weather-resistant decking boards for the seat caps and countersinking exterior wood screws (bulk bucket).
19. Radial Spoke Design
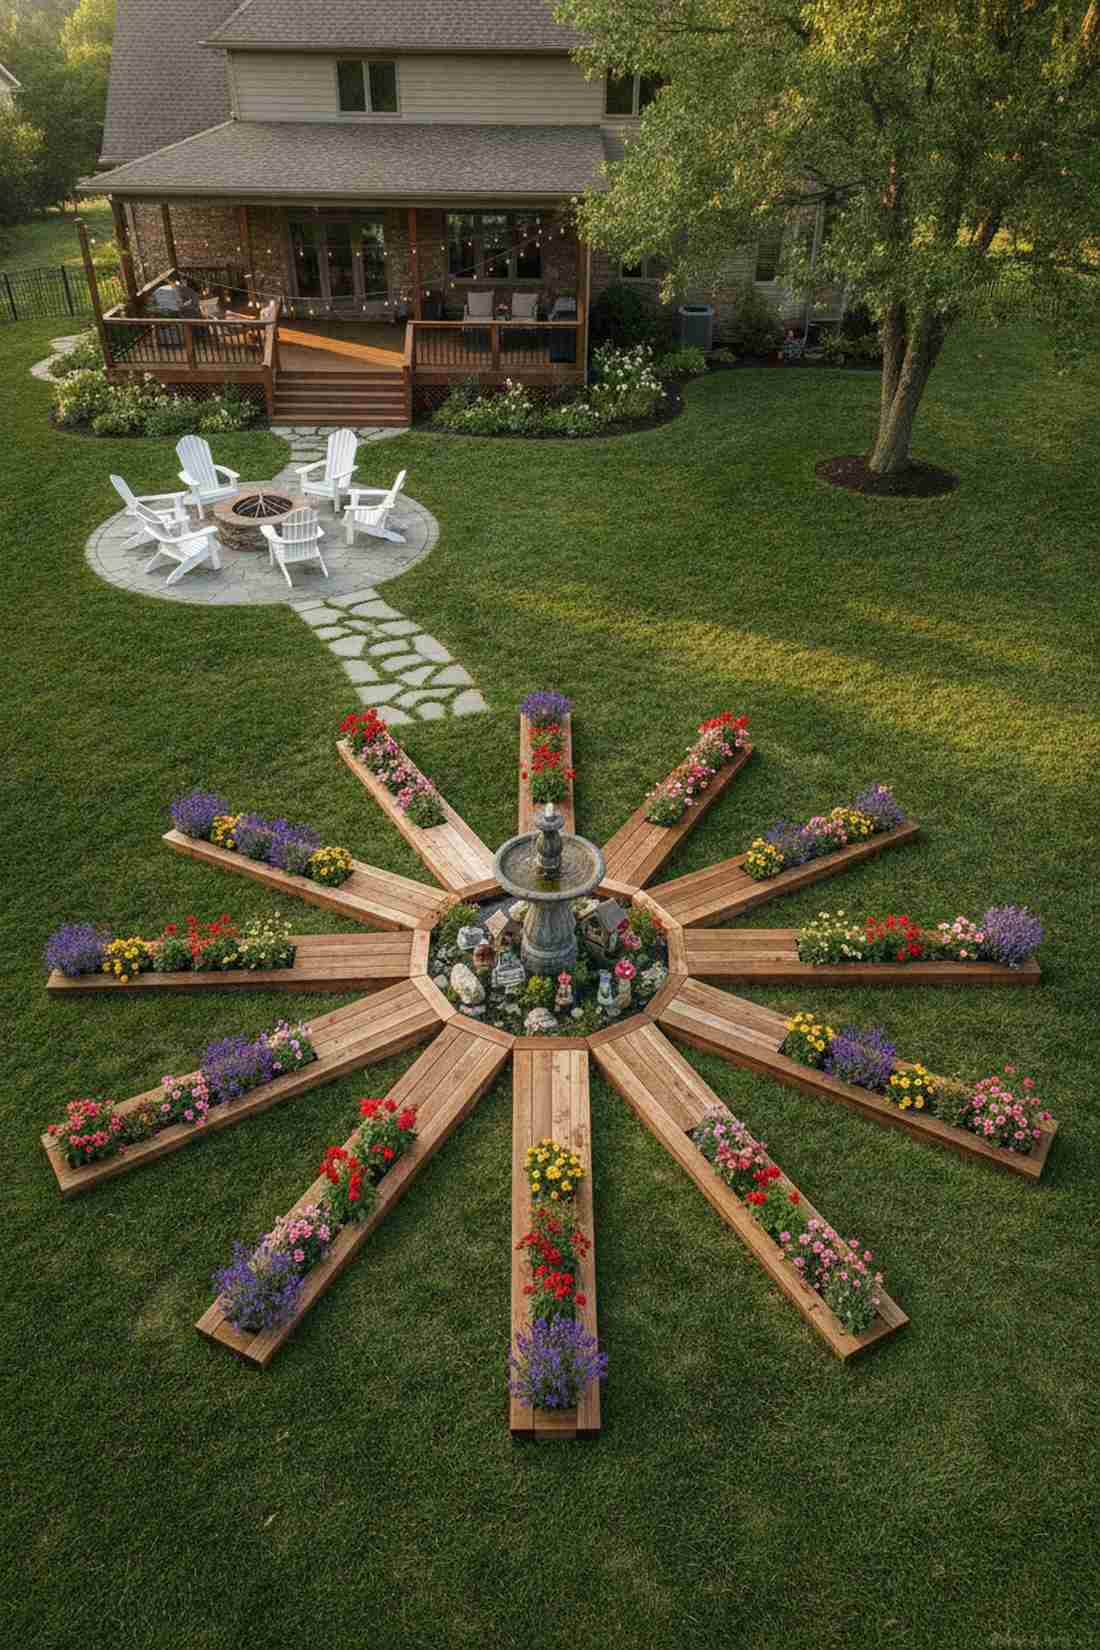
Viewing this layout from above feels like discovering an ancient, sacred geometric compass. A sunburst radial planter system works exceptionally well as a jaw-dropping focal point in the middle of an expansive, boring lawn.
Standard squares are functional, but this radiating pattern delivers a surprisingly premium look that screams high-end botanical garden. Filling the central hub with fairy garden accessories or a bubbling solar fountain creates an enchanting destination spot.
Custom cutting angled beds requires a $200–$350 material budget. Save this to your dream landscape board if you want a garden that doubles as art.
- Key Materials: Precision-cut wood, central water feature
- Vibe / Style: Sacred geometry estate
- Difficulty: Advanced measuring & cutting
- Budget Breakdown: Lumber: $180 | Central fountain: $80.
- Creator’s Tip: Build the center ring first, then pull a string line outward to perfectly align your spoke beds.
- Smart Sourcing: Grab a freestanding solar-powered birdbath fountain and an adjustable digital angle finder tool for the custom cuts.
20. Offset Stagger Pattern
Navigating through this layout feels like exploring a dynamic, organic maze of greenery. The staggered checkerboard box layout works exceptionally well for sloped yards or dodging existing trees and utility covers.
Rigid grids can feel sterile, but this offset approach makes cheap materials look custom-built by creating fascinating diagonal sightlines. Sourcing bulk cedar planter boxes in slightly different sizes enhances the eclectic, relaxed aesthetic.
You can mix and match boxes for $100–$200. It’s a fast upgrade that completely changes the vibe of a rigidly square yard.
- Key Materials: Various sized pre-made boxes
- Vibe / Style: Eclectic organic flow
- Difficulty: Very easy
- Budget Breakdown: Mixed bed kits: $150 | Path mulch: $30.
- Creator’s Tip: Plant taller crops (like corn or indeterminate tomatoes) in the rear offset beds so they don’t cast shadows on the front beds.
- Smart Sourcing: Look for pre-cut cedar raised garden box kits (multi-size packs) and premium organic cedar pathway mulch.
This next boundary hack will save you hundreds on privacy fencing…
Corner and Boundary Solutions
Strategic placement along property edges and corners maximizes usable space. These designs transform boundary areas into productive zones while maintaining clean property lines.
21. Split-Level Corner Unit
This clever corner trick feels like a custom piece of outdoor furniture perfectly wedged into your yard. A dual-height 90-degree planter works exceptionally well for growing deep-rooted carrots in the back and shallow strawberries right up front.
Most corners end up as dead weed zones, but a split-elevation design looks far more expensive than it is by adding instant 3D architecture. Using heavy-duty structural timber screws guarantees the lower bed won’t blow out from the pressure of the taller back tier.
Materials for this custom fit run about $75–$110. Pin this if you want to maximize a tight, awkward fence corner.
- Key Materials: 2×10 lumber, internal bracing brackets
- Vibe / Style: Modern multi-level custom
- Difficulty: Intermediate
- Budget Breakdown: Wood: $60 | Brackets/Screws: $25.
- Creator’s Tip: Build the tall L-shape first, line the front with waterproof plastic, then attach the lower box so moisture doesn’t rot the shared wall.
- Smart Sourcing: Purchase heavy-duty star-drive exterior wood screws and pre-cut waterproof membrane rolls.
22. Boundary Line Beds
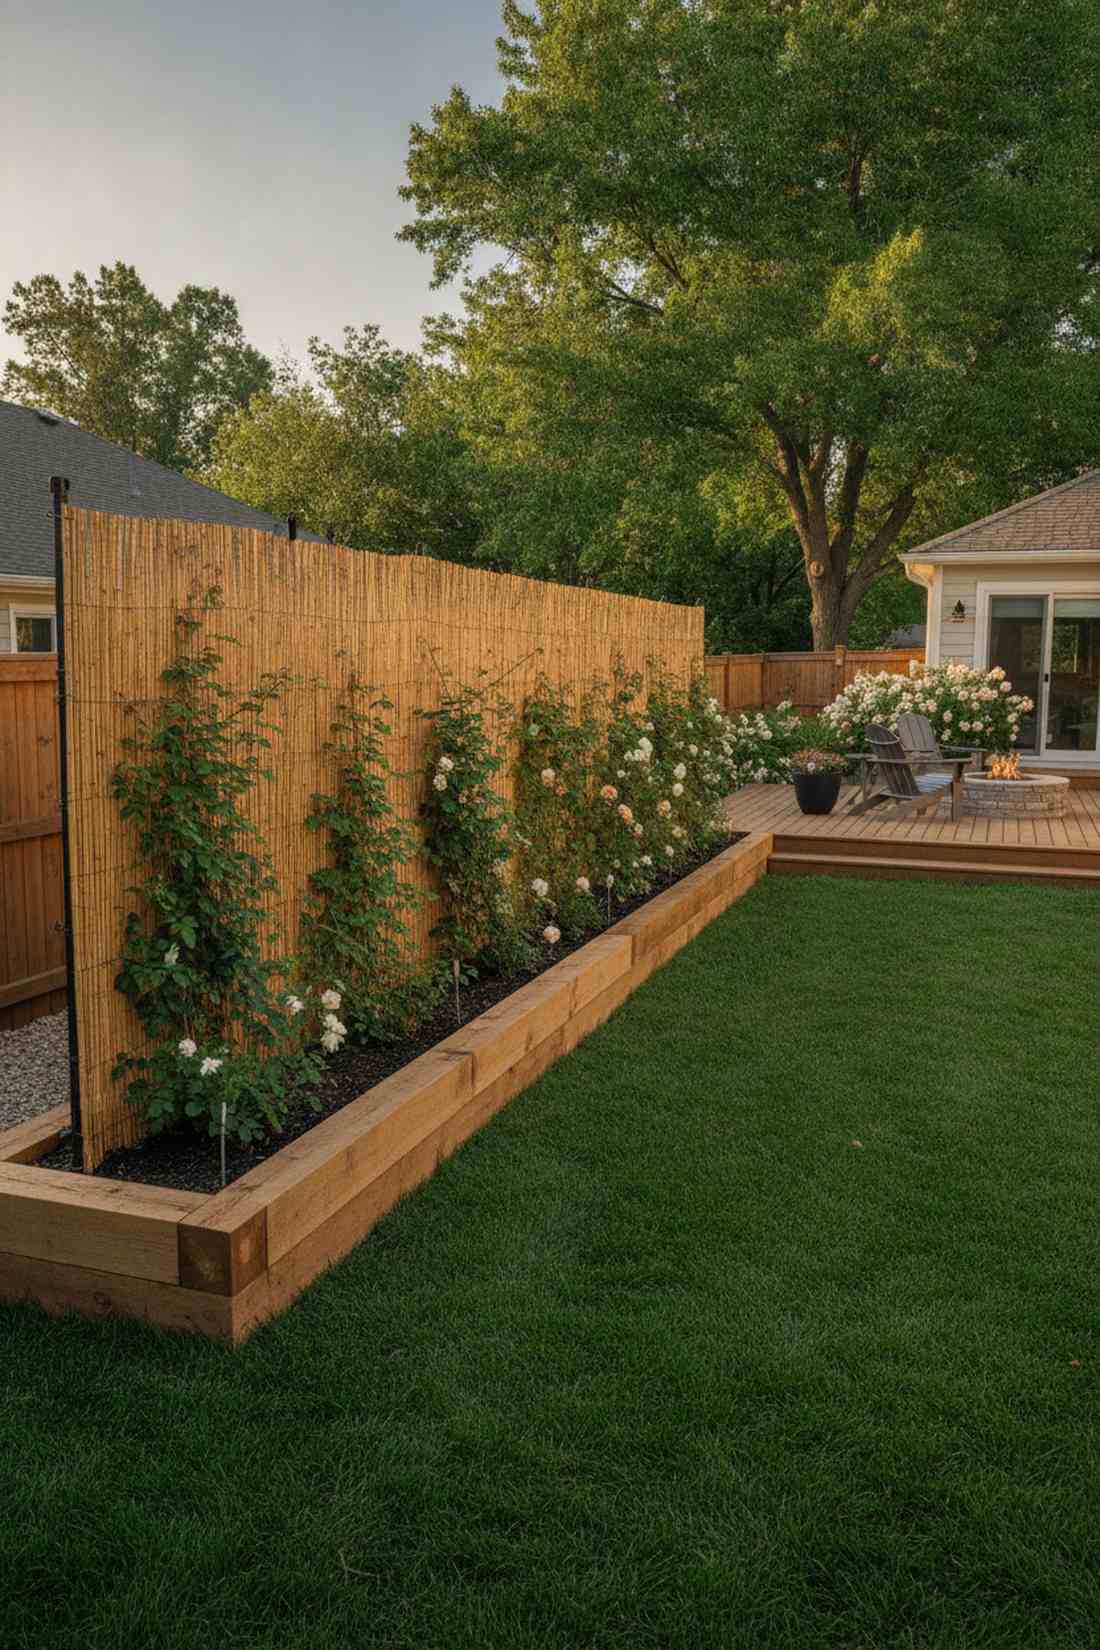
Creating this living wall feels like drawing a lush, green boundary line without offending the neighbors. A continuous perimeter border box works exceptionally well as a friendly property divider instead of a harsh privacy fence.
While solid fences block the breeze and cast dark shadows, this layout gives a designer-level finish that naturally defines your space. Integrating UV-coated bamboo screening rolls behind the bed gives your tall vining plants an instant, beautiful surface to climb.
A long 20-foot run will cost about $120–$180 in lumber and stakes. Save this to your property landscaping board for a friendly fence alternative.
- Key Materials: Long timber cuts, rear support stakes
- Vibe / Style: Friendly living border
- Difficulty: Easy but repetitive
- Budget Breakdown: Base lumber: $100 | Bamboo screen: $50.
- Creator’s Tip: Leave a 12-inch gap between the back of your bed and the actual property line so you can walk behind it to weed and paint.
- Smart Sourcing: Pick up UV-coated natural bamboo privacy screening (bulk roll) and heavy-duty ground anchor stakes.
23. Wrapped Corner L-Beds
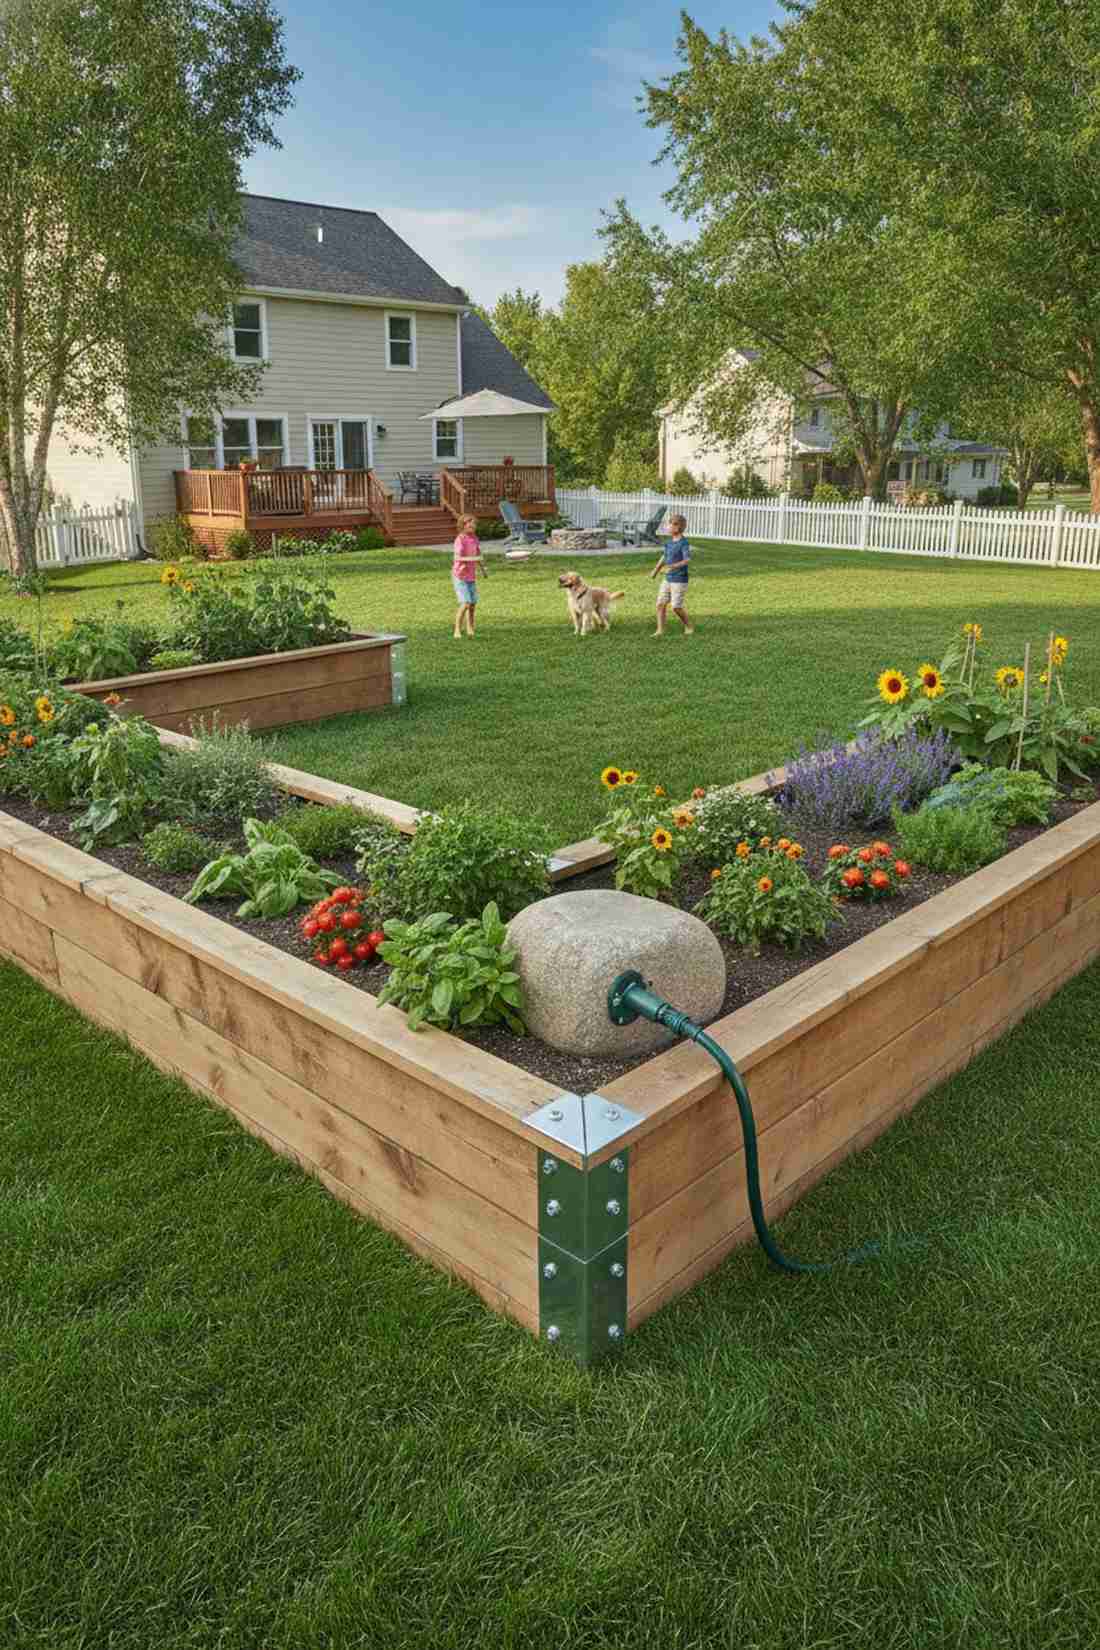
Tucking a garden neatly into the edges feels like opening up the center of your yard for a massive dance floor. The perimeter-hugging L-shaped planter works exceptionally well for families who need the central lawn for kids and dogs to play.
Putting beds in the middle chops a small yard in half, but wrapping the borders transforms basic dirt into an architectural feature while preserving open space. Utilizing pre-fabricated corner joint kits makes locking the awkward 90-degree angles together completely foolproof.
You can frame a large wrapped corner for around $100–$140. Highly recommended for busy backyards that need multiple functional zones.
- Key Materials: Wide planks, metal corner joints
- Vibe / Style: Space-saving perimeter trim
- Difficulty: Beginner DIY
- Budget Breakdown: Wood: $80 | Joint brackets: $35.
- Creator’s Tip: Install a small decorative boulder or a heavy ceramic pot directly in the crook of the ‘L’ to prevent garden hoses from crushing your corner plants.
- Smart Sourcing: Use heavy-duty galvanized raised bed corner brackets (4-pack) and commercial-grade rubber hose guides.
Material Guide: Cheap vs. Premium Aesthetic
Knowing exactly where to save and where to spend makes all the difference in achieving that “looks expensive but isn’t” vibe.
- Standard Wood vs. UV-Resistant Composites: Raw pine rots in two years. Spending 20% more on cedar or composite decking completely stops warping and fading.
- Pre-made Kits vs. Sourcing Locally: While local lumber seems cheaper, pre-fabricated galvanized steel kits often save money because they require zero brackets, screws, or toxic sealants.
24. Zigzag Fence-Line Beds
This jagged layout feels like a striking modern art gallery installation right against your property line. The angular chevron planter series works exceptionally well for breaking up the monotonous, boring visual of a long wooden privacy fence.
Straight lines are predictable, but this zigzag approach delivers a surprisingly premium look by creating unique micro-climates in every triangular fold. Upgrading the front points with weatherproof decorative finials or solar post caps adds a massive punch of evening curb appeal.
Building this custom geometry costs roughly $140–$190. Pin this if you want a bold, architectural statement that stops guests in their tracks.
- Key Materials: Miter-cut lumber, post caps
- Vibe / Style: Avant-garde geometric
- Difficulty: Advanced miter saw cuts
- Budget Breakdown: Lumber: $110 | Solar caps: $40.
- Creator’s Tip: Plant sun-loving peppers on the outward-facing points, and shade-tolerant spinach in the recessed inward folds.
- Smart Sourcing: Source solar-powered LED post cap lights (multi-pack) and a precision magnetic angle finder for perfect cuts.
If you hate weeding and bending over, these next ergonomic designs will save your back…
25. Raised Berm Perimeter
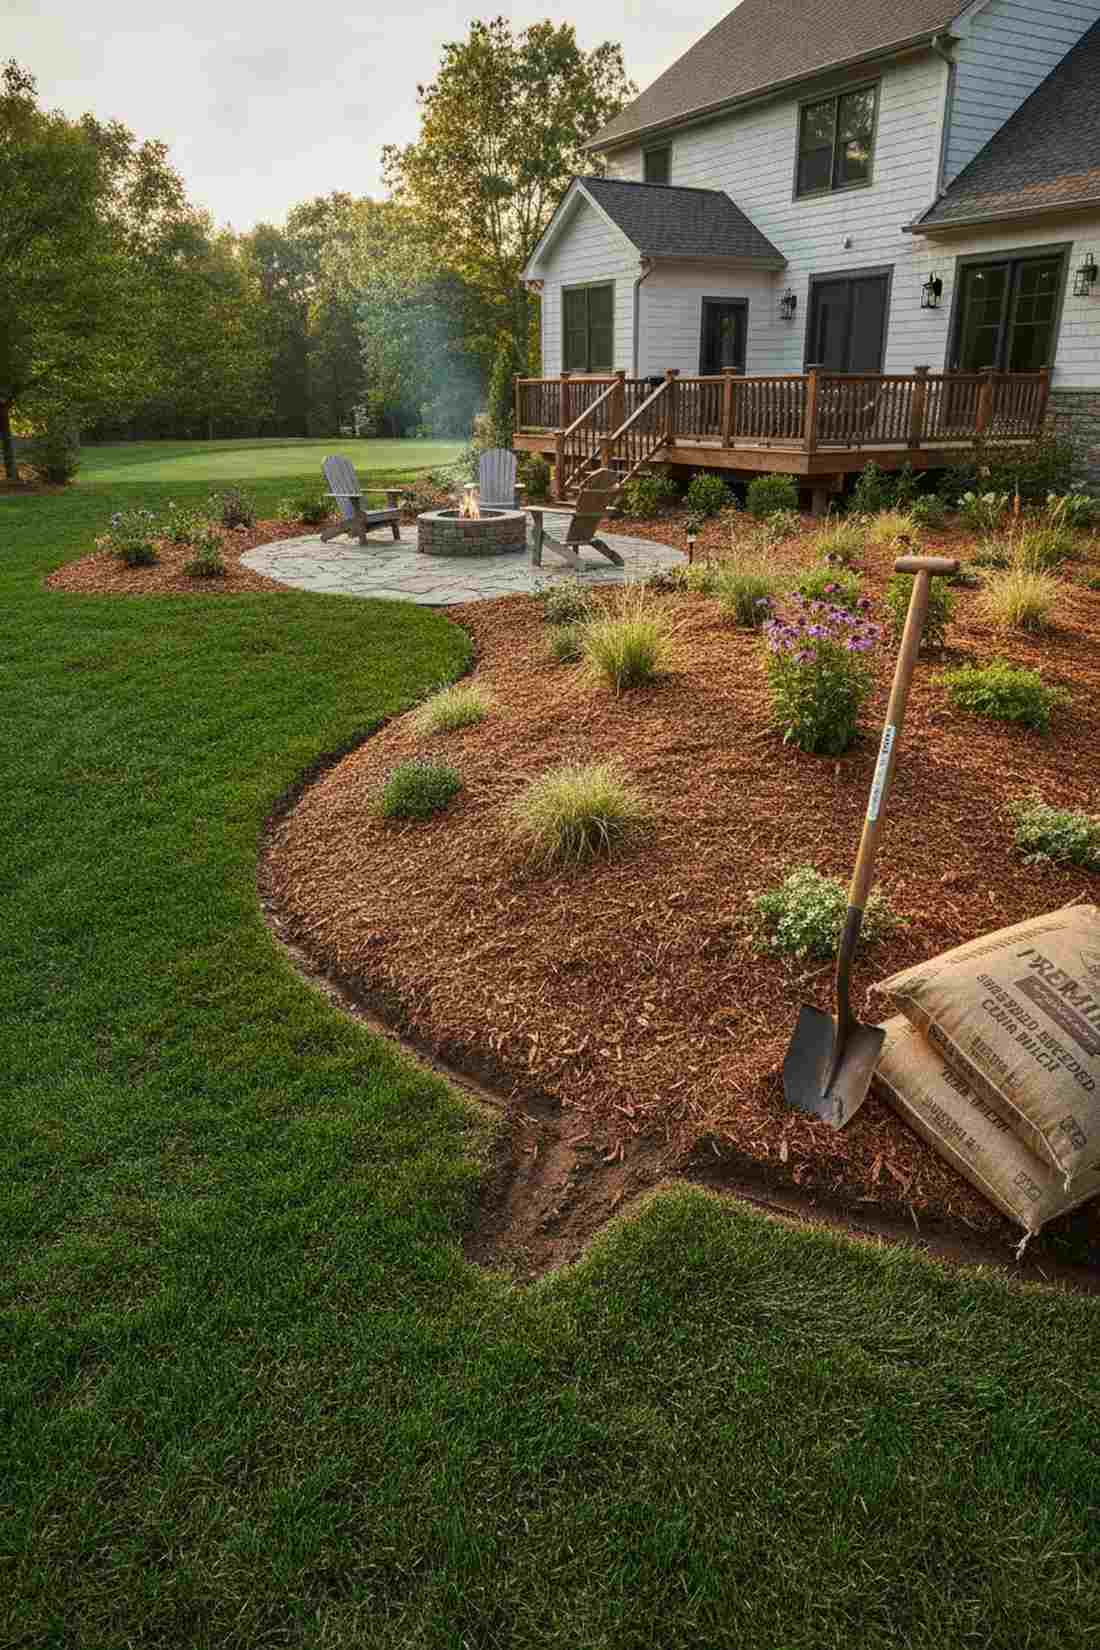
This mounded boundary feels like an organic, lush fortress hugging your outdoor living space. A soil-mounded perimeter berm works exceptionally well if you have terrible native dirt and don’t want the harsh, rigid look of wooden boxes.
Most people think a raised bed requires walls, but a contoured berm makes cheap materials look custom-built by seamlessly blending into the lawn. Laying a thick layer of premium shredded cedar mulch directly over the mound locks in moisture and prevents heavy rains from washing the soil away.
This wall-less option is incredibly cheap, costing only $40–$60 for the soil and mulch. Save this to your natural landscaping board for an effortless boundary.
- Key Materials: Topsoil bulk delivery, thick mulch layer
- Vibe / Style: Sweeping organic golf-course
- Difficulty: Shovel-heavy labor
- Budget Breakdown: Bulk soil: $40 | Premium mulch: $20.
- Creator’s Tip: Dig a shallow V-shaped trench at the base of the berm to naturally catch water run-off and keep the mulch from bleeding into the grass.
- Smart Sourcing: Use heavy-duty landscaping trenching shovels and premium shredded cedar mulch (bulk bags).
Elevated and Ergonomic Options
Raised beds built at comfortable working heights eliminate bending and kneeling. These ergonomic designs improve accessibility while creating distinctive architectural elements.
26. Waist-High Standing Beds
Gardening here feels like prepping food at a luxurious outdoor kitchen island. The tall ergonomic standing planter works exceptionally well for anyone dealing with knee pain, back strain, or wheelchair accessibility needs.
Squatting in the mud is overrated, and this elevated layout looks far more expensive than it is by bringing the foliage right up to eye level. Installing a heavy-duty corrugated steel false-bottom halfway down ensures you don’t waste $100 filling the hidden base with expensive potting soil.
A sturdy waist-high bed costs around $130–$180 in reinforced framing materials. Pin this if you want a pain-free, luxurious gardening experience.
- Key Materials: Thick 4×4 posts, reinforced bottom slats
- Vibe / Style: Premium outdoor workstation
- Difficulty: Requires strong structural joints
- Budget Breakdown: Heavy timber: $100 | False bottom: $40.
- Creator’s Tip: Use empty crushed aluminum cans or inverted plastic nursery pots under the false bottom to keep the overall weight low while maintaining structure.
- Smart Sourcing: Pick up heavy-duty structural corner brackets (industrial grade) and pre-cut corrugated steel base panels.
27. Table-Height Beds
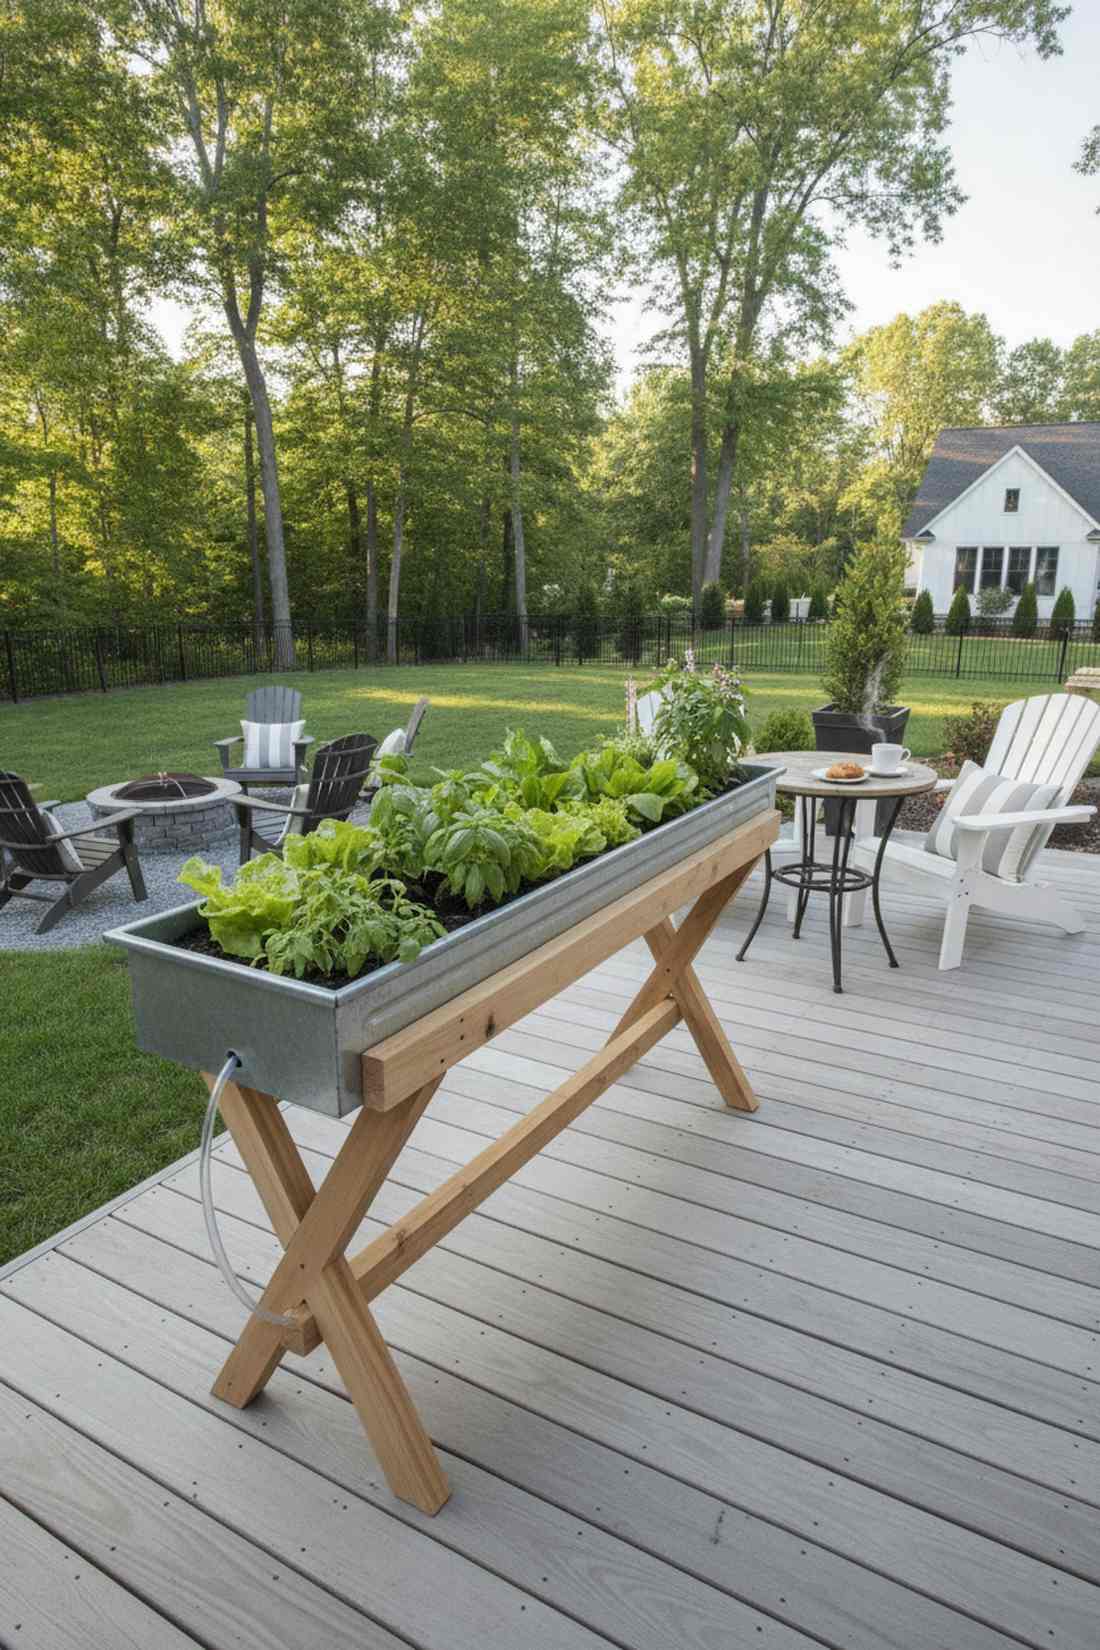
Pulling up a stool to this setup feels like enjoying coffee at a botanical cafe table. A shallow table-style planter box works exceptionally well for apartment balconies, wooden decks, or small concrete patios.
Bulky dirt boxes rot expensive decking, but this leg-elevated approach delivers a surprisingly premium look while allowing rain to dry perfectly underneath. Utilizing pre-fabricated galvanized steel trough planters mounted on wooden legs creates a bulletproof, leak-free basin for shallow herbs.
You can build or buy one of these for about $80–$120. Highly recommended for growing lettuce and basil right outside your kitchen door.
- Key Materials: Shallow tub, sturdy wooden leg frame
- Vibe / Style: Chic balcony bistro
- Difficulty: Easy assembly
- Budget Breakdown: Metal trough: $50 | Leg lumber: $35.
- Creator’s Tip: Drill a single large drain hole in the lowest point of the table and attach a clear vinyl tube to direct muddy water off the side of your deck.
- Smart Sourcing: Use a rust-proof galvanized shallow trough planter and a clear vinyl drainage tubing kit.
28. Tiered Platform System
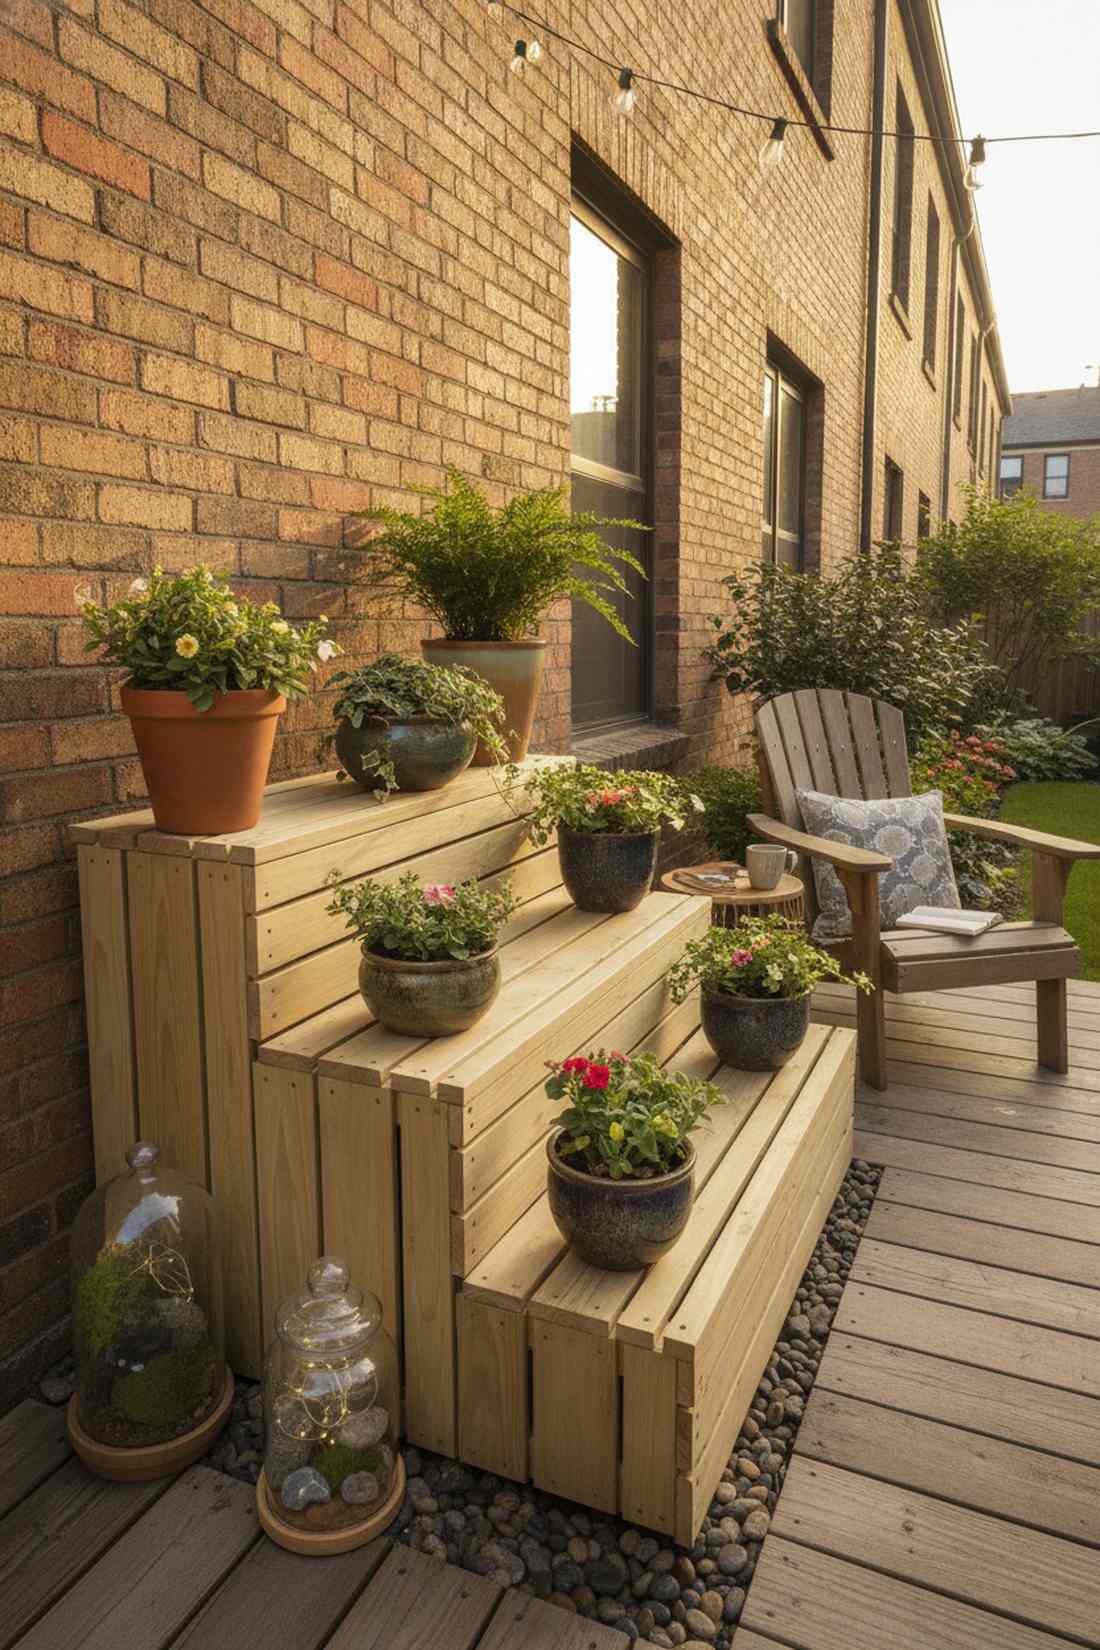
This stepped display feels like an upscale retail plant nursery right on your back porch. The vertical stair-step potted platform works exceptionally well to maximize the tiny footprint of a townhouse patio.
Cramming pots on the floor looks cluttered, but giving each row its own stage transforms basic dirt into an architectural feature. Coating the wood platforms with marine-grade waterproof sealant ensures dripping water won’t rot the steps over the humid summer.
Building a robust 3-tier stand costs about $60–$90. Save this to your small-space garden board for instant organizational magic.
- Key Materials: Decking boards, waterproof stain
- Vibe / Style: Boutique patio display
- Difficulty: Intermediate measuring
- Budget Breakdown: Lumber: $50 | Sealant: $25.
- Creator’s Tip: Space the slats on the platforms exactly half an inch apart so water passes straight through instead of pooling under your pots.
- Smart Sourcing: Get premium marine-grade clear wood sealant and weather-resistant terrarium accessories to decorate the gaps.
This next trick is the ultimate hack for renters or people who change their minds constantly…
29. Rolling Mobile Beds
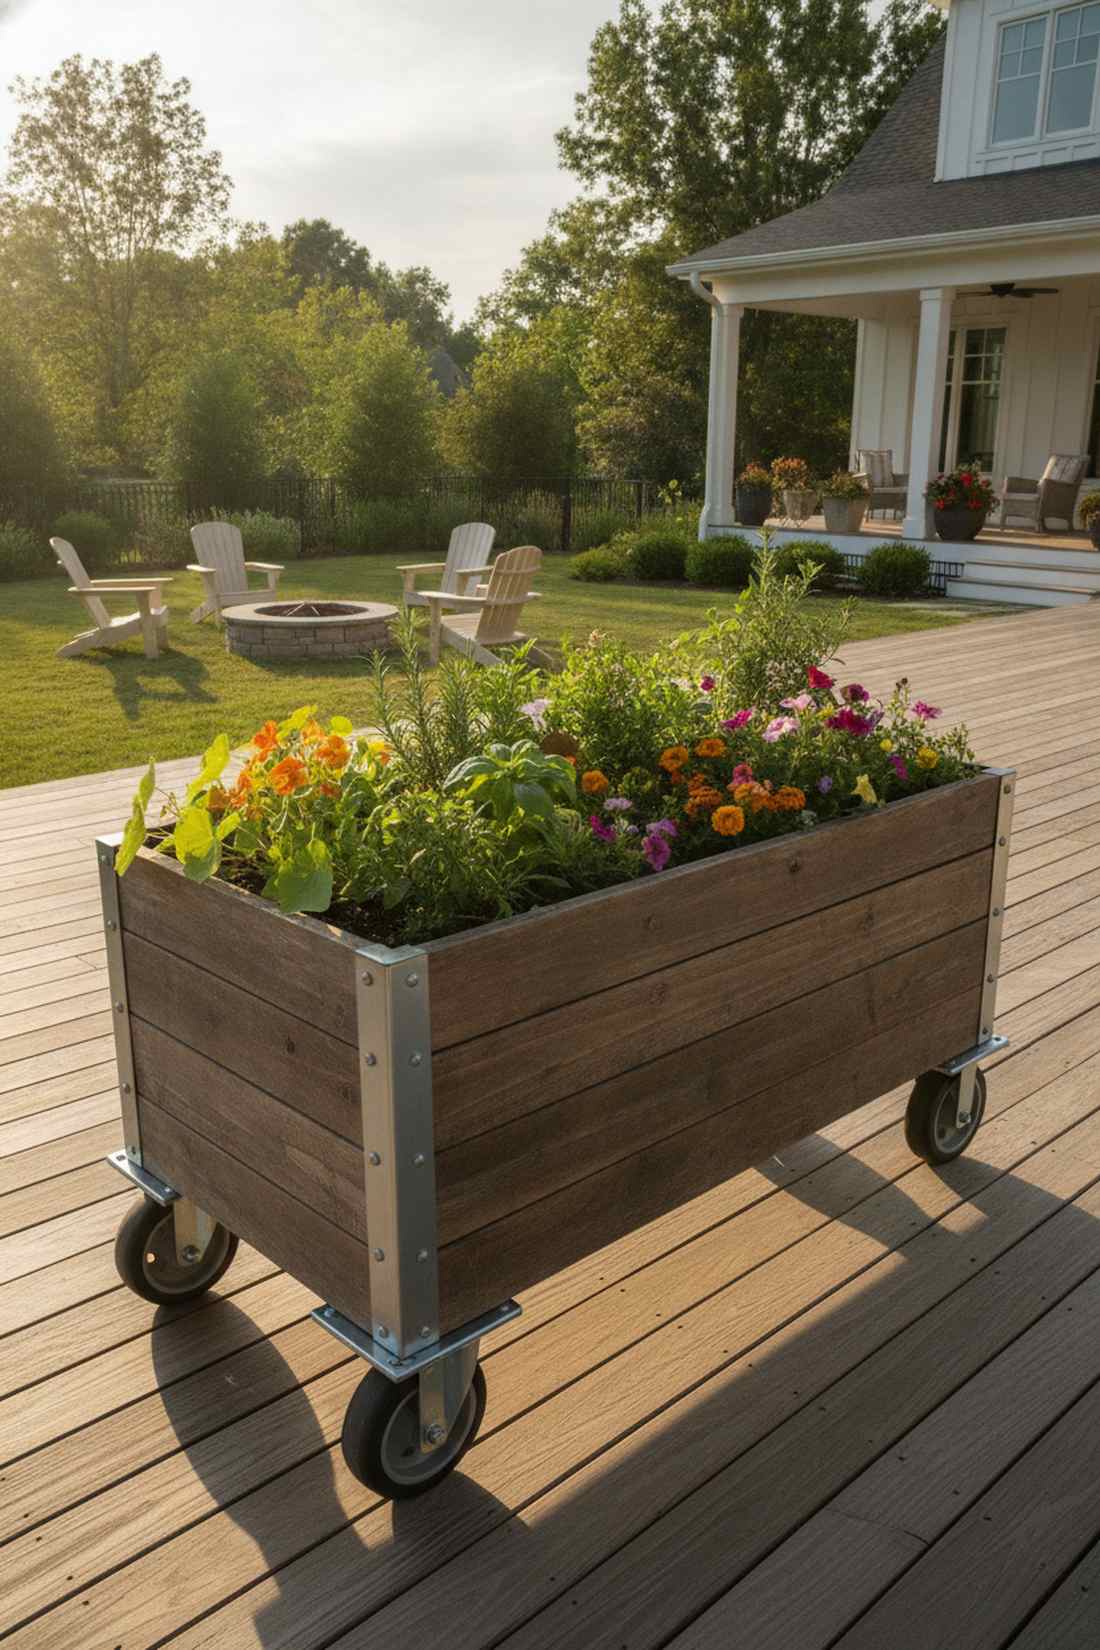
Chasing the afternoon sun with this setup feels like having a magic garden that follows your every command. A heavy-duty caster-mounted planter box works exceptionally well for renters, shaded patios, or areas that need to be cleared for parties.
Permanent installations scare off beginners, but a mobile layout gives a designer-level finish with zero long-term commitment. Bolting on industrial locking polyurethane casters guarantees the massive weight of wet soil won’t crush the wheels when you push it.
Expect to spend $90–$130, with the wheels being the most crucial investment. Pin this immediately if you struggle with tricky shadows across your yard!
- Key Materials: Reinforced baseplate, heavy-duty wheels
- Vibe / Style: Ultra-functional modular
- Difficulty: Easy
- Budget Breakdown: Box frame: $50 | Caster wheels: $60.
- Creator’s Tip: Always buy wheels rated for at least 300 lbs EACH (1,200 lbs total) because wet soil and mature plants are deceptively heavy.
- Smart Sourcing: Invest in industrial-grade locking polyurethane casters (4-pack) and heavy-duty galvanized carriage bolts.
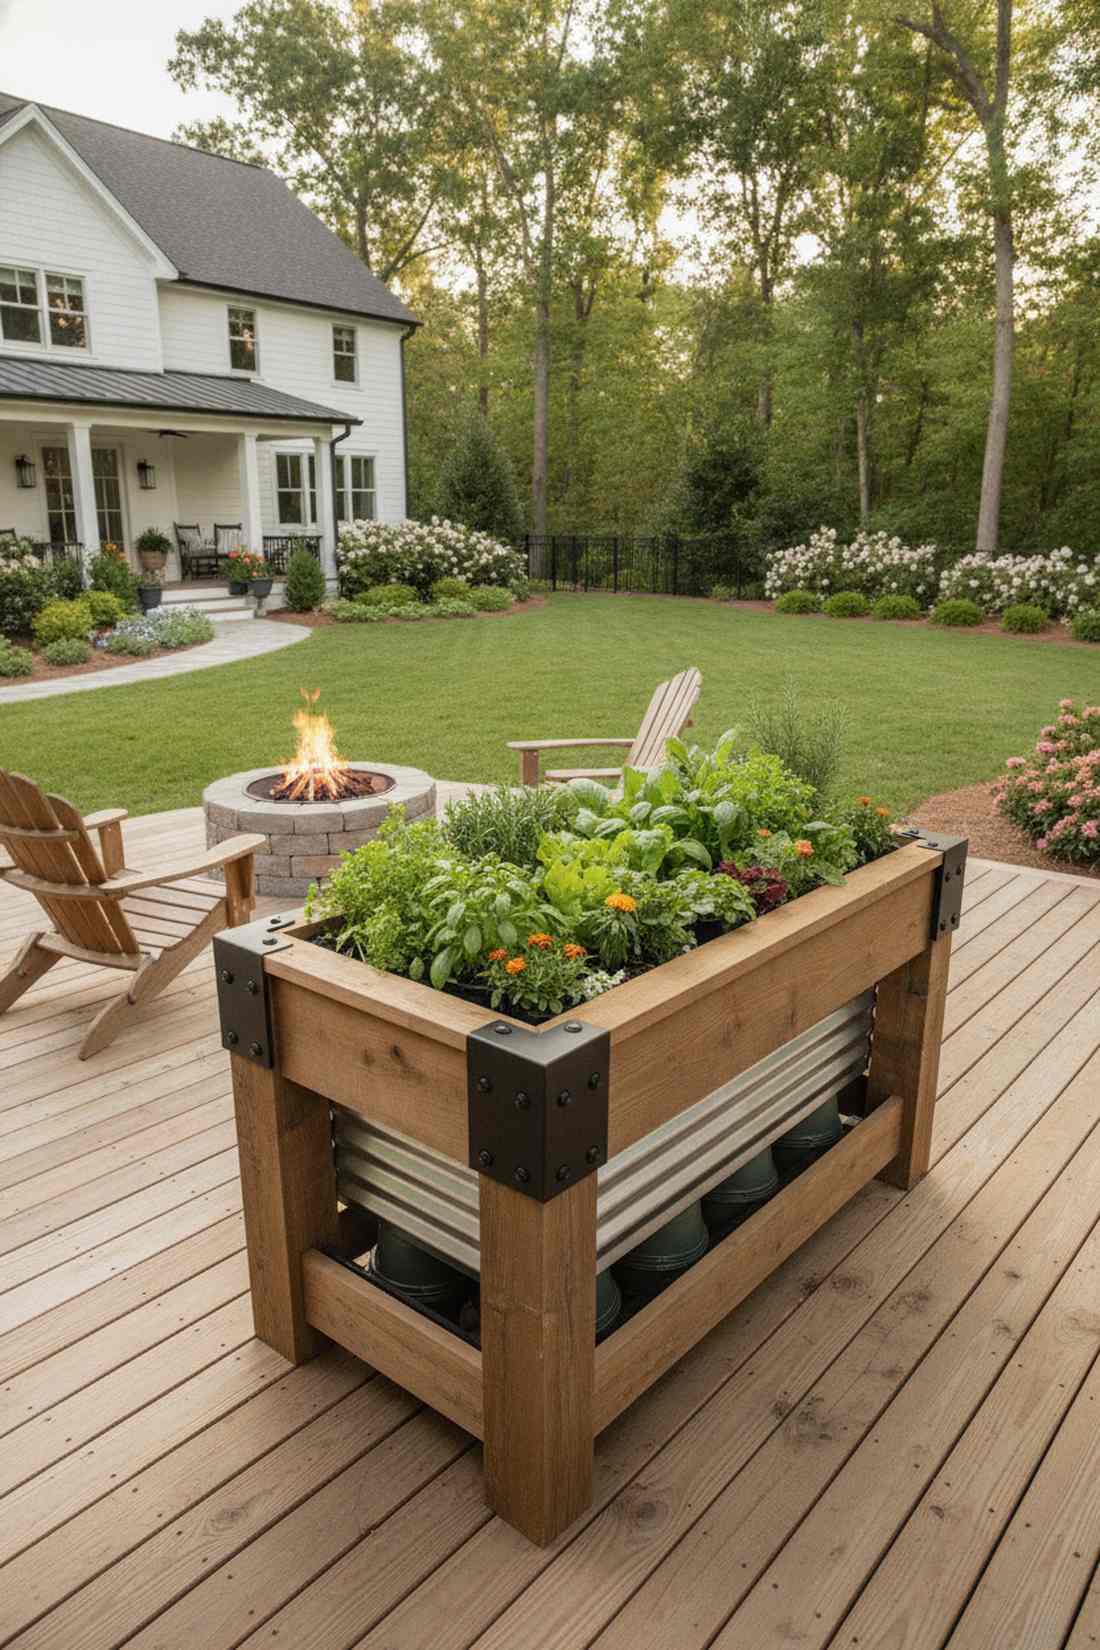
30. Bench-Integrated Raised Bed
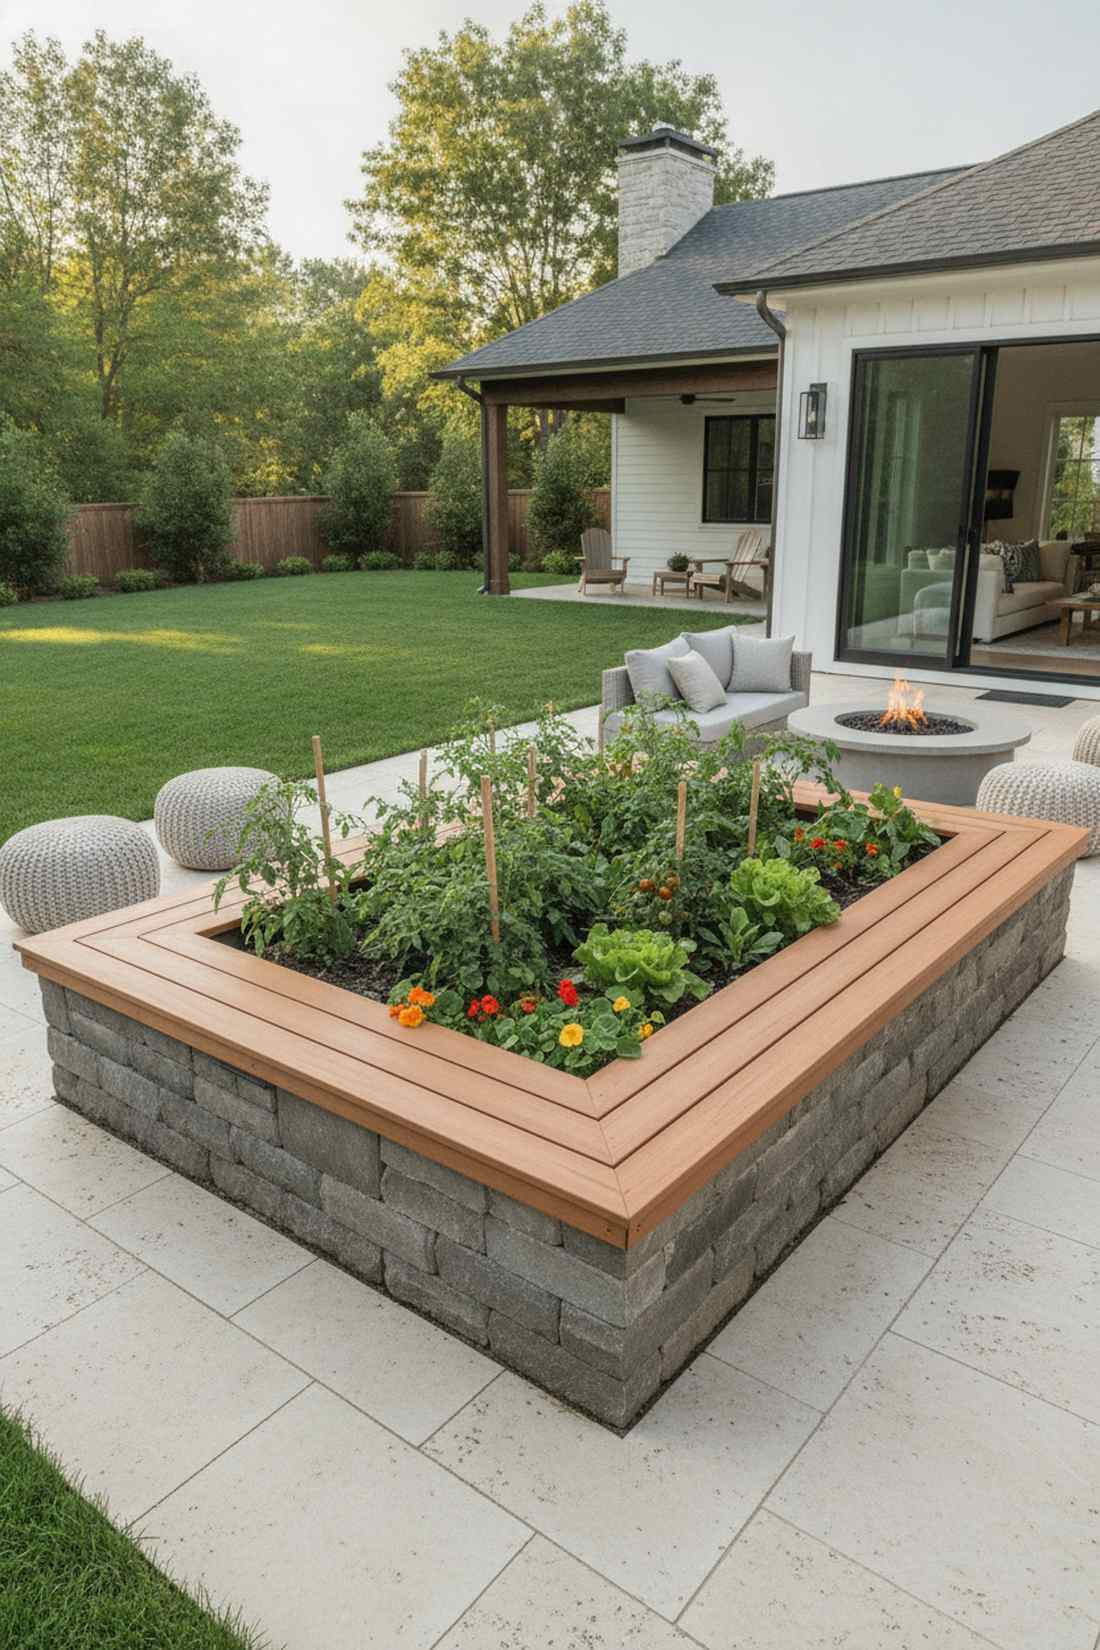
Sitting on the edge of this planter feels like relaxing in a high-end luxury resort courtyard. An integrated seating cap garden box works exceptionally well for fire pit areas or front yards where you want to chat with neighbors.
Most beds are purely utilitarian, but adding an oversized wooden lip makes cheap materials look custom-built by a high-end carpenter. Using sanded composite decking boards for the seating ledge means you will never get a splinter while admiring your tomatoes.
Adding the seating ledge increases the build cost to roughly $120–$170. Highly recommended to instantly add both food production and patio seating in one footprint.
- Key Materials: Standard framing, wide composite caps
- Vibe / Style: Resort-style lounge
- Difficulty: Intermediate finishing
- Budget Breakdown: Base walls: $70 | Composite caps: $75.
- Creator’s Tip: Extend the seating cap outward, not inward, so you don’t rob your plants of vital top-down sunlight.
- Smart Sourcing: Snag splinter-free composite decking boards (pre-cut) and hidden deck fastener clips for a screw-free seat.
Material and Style Variations
Construction materials and finishing details define the aesthetic character of raised bed installations. These variations demonstrate how material choices affect both appearance and function.
31. Cedar or Redwood Timber Beds
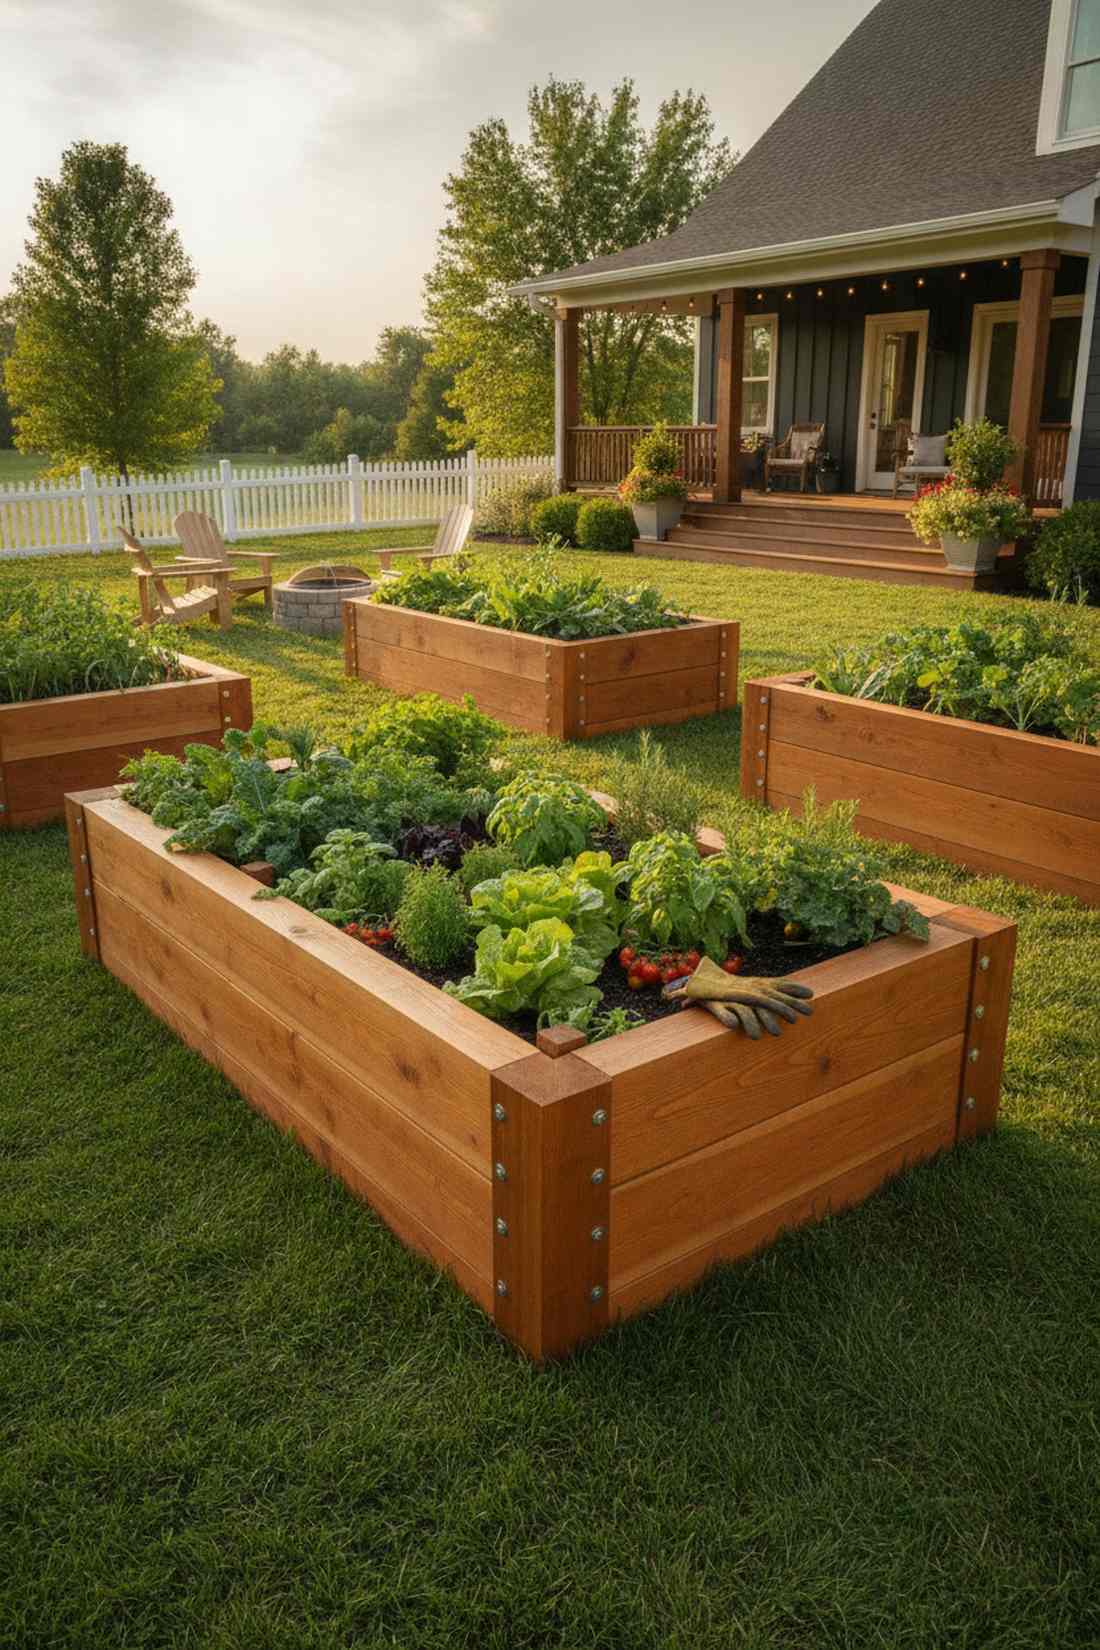
Running your hands across this grain feels like bringing the majestic Pacific Northwest straight into your backyard. A premium thick-cut cedar planter works exceptionally well for organic purists who refuse to use chemical-treated woods near their food.
Standard pine rots in a blink, but investing in natural rot-resistant timber delivers a surprisingly premium look that silvers beautifully over decades. Applying a coat of 100% pure raw linseed oil makes the natural reddish grain pop like high-end indoor furniture.
Premium lumber like this will run you $150–$250 per bed, but it is a lifetime investment. Save this to your luxury garden board if you value natural, toxic-free materials.
- Key Materials: 2×8 Cedar or Redwood planks
- Vibe / Style: Timeless organic luxury
- Difficulty: Simple carpentry
- Budget Breakdown: Premium lumber: $180 | Oil finish: $30.
- Creator’s Tip: Never paint cedar. Let it breathe, or use a natural oil, otherwise moisture gets trapped under the paint and accelerates rotting.
- Smart Sourcing: Use 100% pure raw linseed oil (food safe) and stainless steel decking screws (rust-proof bulk pack).
32. Corrugated Metal Beds

This sleek installation gives off the vibe of a modern, eco-industrial loft space. A galvanized steel corrugated oval kit works exceptionally well for contemporary homes or extremely hot climates where wood splits easily.
While wood is traditional, a gleaming metal layout looks far more expensive than it is and literally takes 15 minutes to bolt together. Adding heavy-duty rubber edge trim along the top rim ensures the sharp metal won’t cut your arms while harvesting.
A large 6-foot metal kit costs about $80–$130 online. It’s a fast upgrade that completely changes the vibe and outlasts wood by 20 years.
- Key Materials: Metal roofing panels or pre-made kits
- Vibe / Style: Sleek industrial modern
- Difficulty: Extremely fast assembly
- Budget Breakdown: Metal kit: $100 | Edge trim: $15.
- Creator’s Tip: Metal heats up soil fast in the spring, allowing you to plant seeds two weeks earlier than your neighbors!
- Smart Sourcing: Order pre-fabricated rust-proof galvanized garden beds and a heavy-duty rubber U-channel edge trim roll.
This final pair of materials separates the amateurs from the permanent estates…
33. Stone or Brick Raised Beds
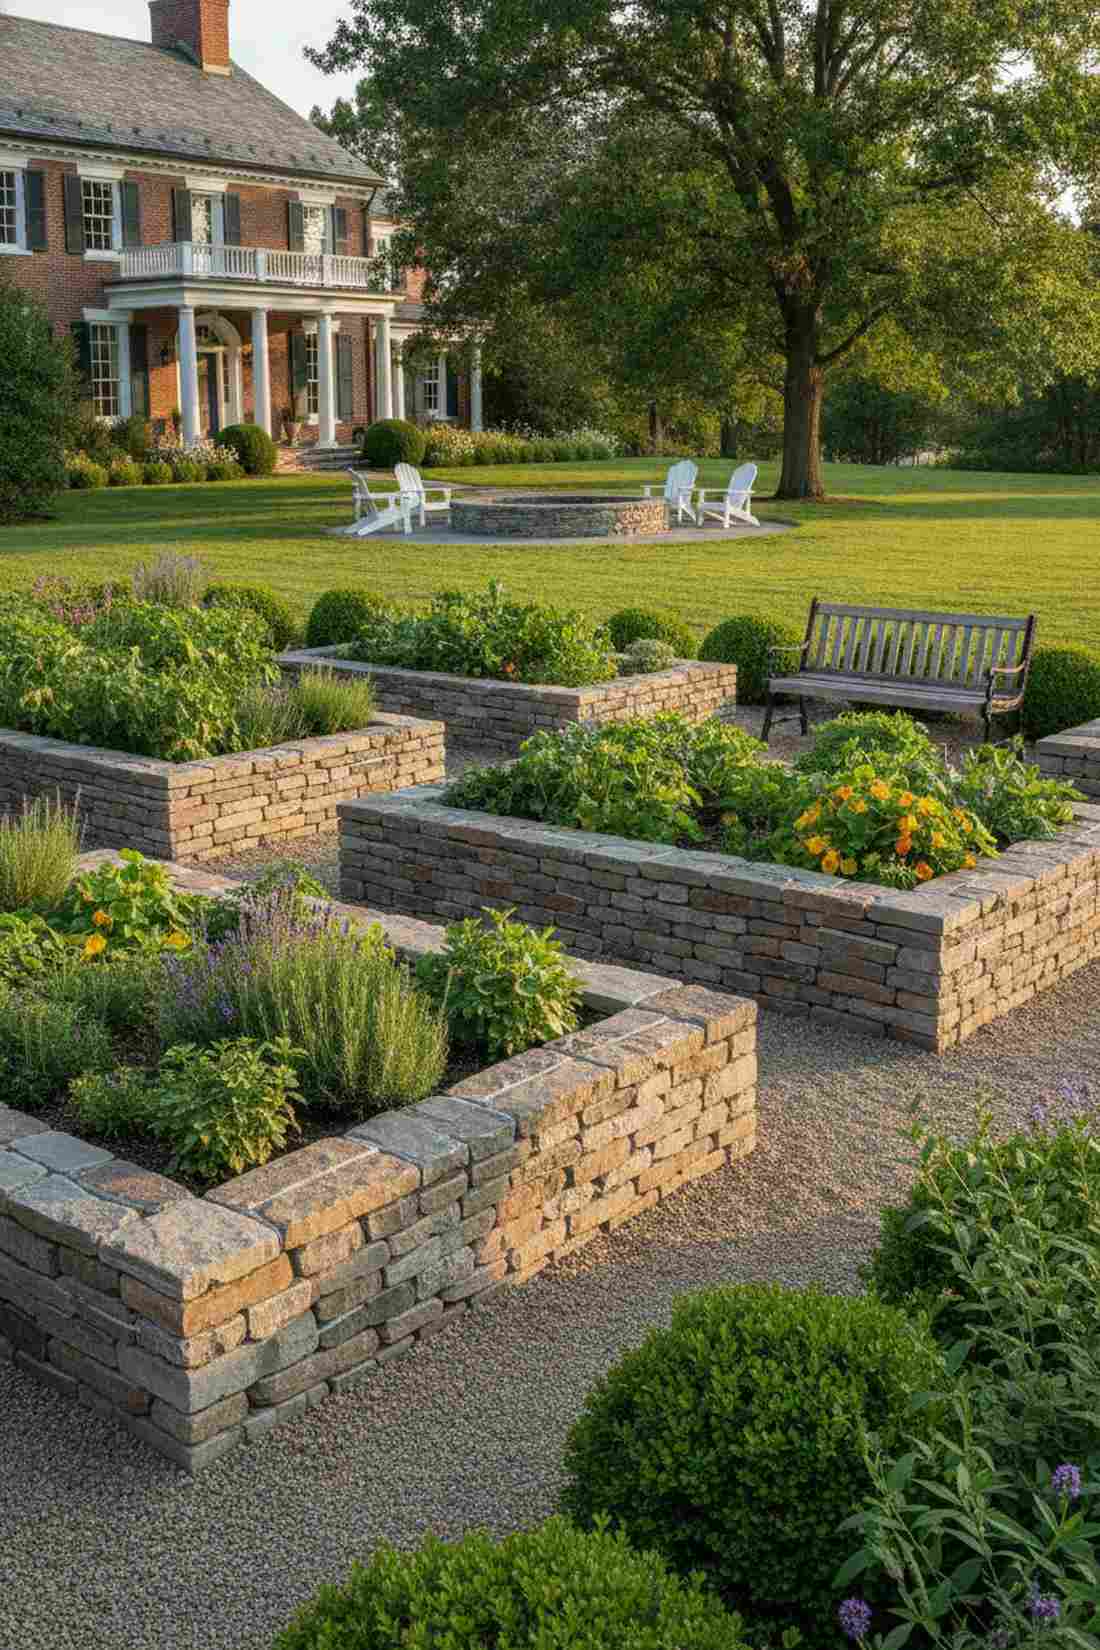
Tracing the mortar lines on this setup feels like you are walking through the grounds of a century-old European estate. A dry-stacked stone or mortared brick perimeter works exceptionally well for historic homes where wooden boxes look cheap and out of place.
Wood requires replacing, but a heavy masonry layout transforms basic dirt into an architectural feature that will literally outlive you. Utilizing premium construction landscape adhesive instead of messy mortar allows beginners to dry-stack stones with professional-level strength.
Stone is heavy on the wallet, costing $250–$400 per bed, but the zero-maintenance payoff is massive. Pin this if you are building your forever home.
- Key Materials: Tumbled landscape stone, masonry glue
- Vibe / Style: Eternal historic estate
- Difficulty: Heavy lifting required
- Budget Breakdown: Pallet of stone: $300 | Adhesive: $40.
- Creator’s Tip: Always stagger your vertical joints (like a brick wall) so the soil pressure doesn’t push the wall outward over time.
- Smart Sourcing: Get palleted tumbled retaining wall stones and extreme-duty polyurethane construction adhesive.
34. Composite Lumber Beds
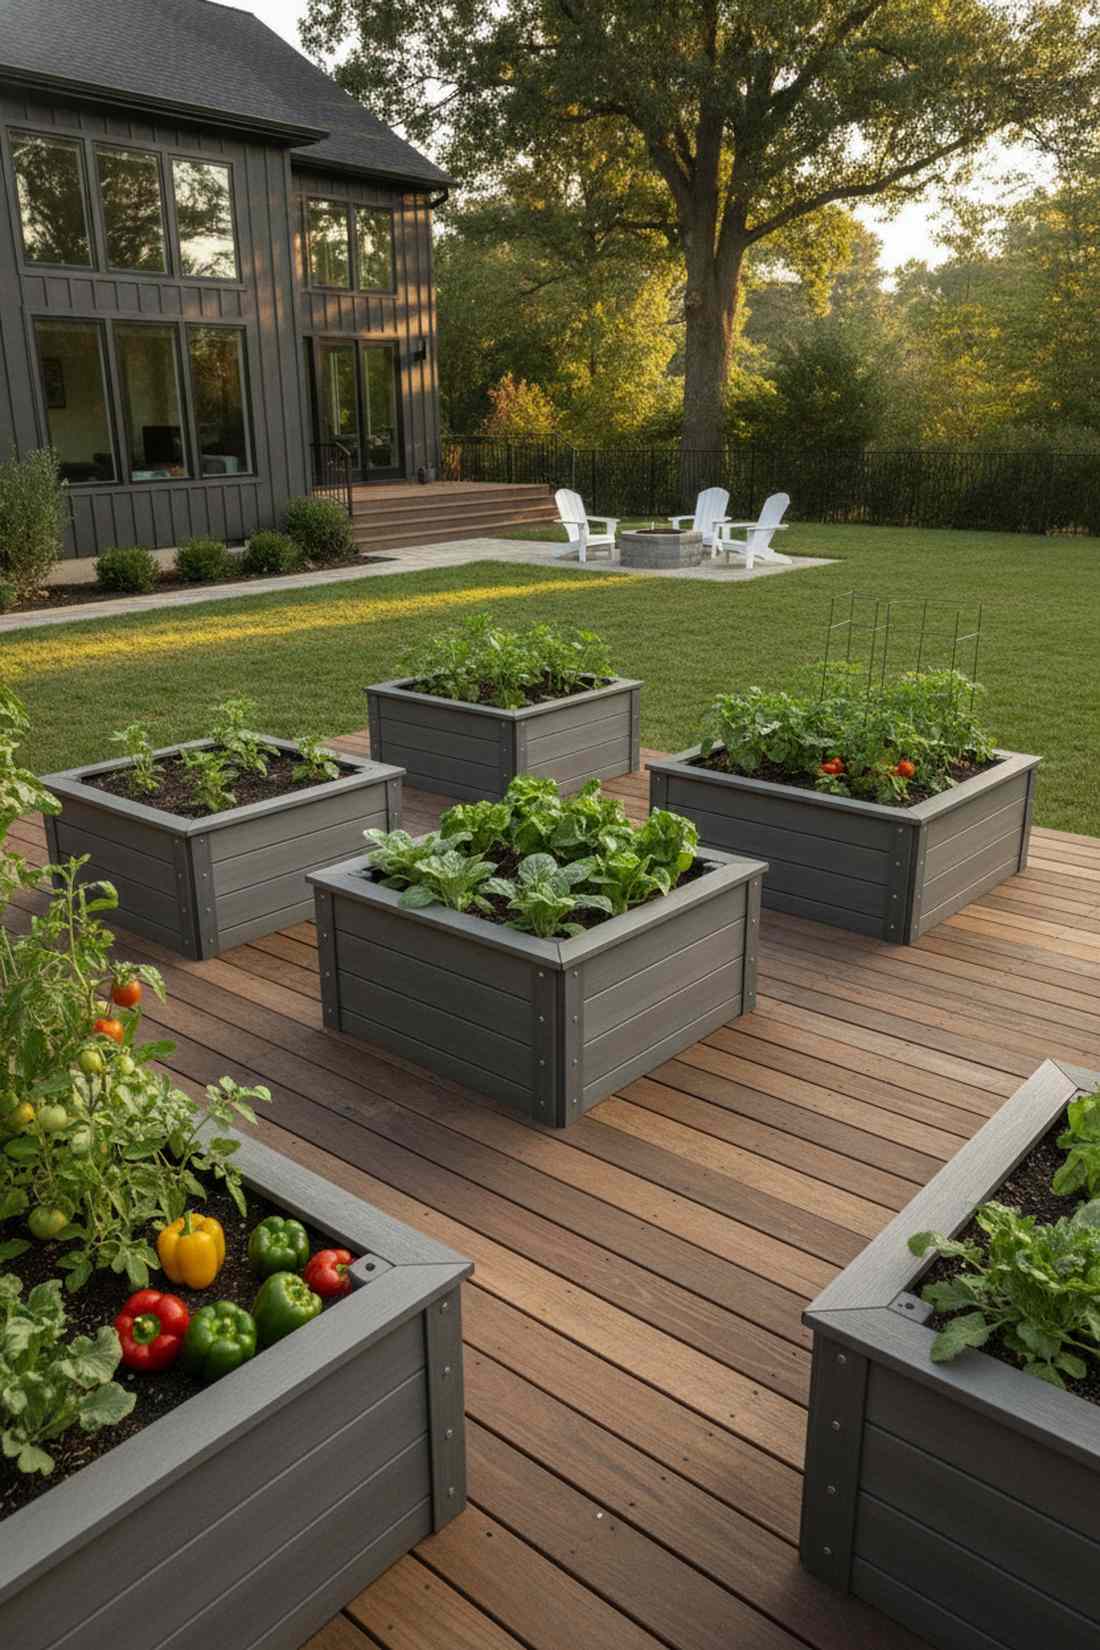
This flawlessly smooth finish feels like the high-tech, futuristic evolution of traditional backyard farming. A recycled composite decking board layout works exceptionally well for perfectionists who hate splinters, fading, and wood rot.
Real wood inevitably warps, but this engineered layout gives a designer-level finish that looks identical on day one and day one-thousand. Sourcing pre-cut composite snap-together planter kits eliminates the need for power saws and hides all the ugly screw heads.
Expect to spend $150–$220 for the high-end material. Highly recommended for a sleek, zero-maintenance yard that survives brutal winters and scorching summers.
- Key Materials: Composite decking boards, hidden corner brackets
- Vibe / Style: Flawless modern zero-maintenance
- Difficulty: Easy to intermediate
- Budget Breakdown: Composite lumber: $160 | Corner brackets: $40.
- Creator’s Tip: Composite bends more easily than wood under heat; place vertical stakes every 3 feet on the inside to prevent bowing outward.
- Smart Sourcing: Invest in UV-protected composite raised bed kits (snap-assembly) and heavy-duty internal steel support stakes.
Conclusion
Implementing raised beds in small garden spaces completely revolutionizes how you interact with your outdoor living area. The 34 premium blueprints detailed above prove that you don’t need a massive farm to achieve a high-end, heavy-yielding landscape. Whether you are using raised beds for front yard curb appeal, integrating secret veggies into ornamental plots, or stacking vertical planters on a tiny balcony, smart sourcing makes all the difference. Ditch the cheap pine, invest in high-quality UV-coated kits and heavy-duty hardware, and watch your property transform. Pick just one layout to start this weekend, and experience the designer-level aesthetic and massive harvests for yourself!
Frequently Asked Questions
What is the best size for raised beds in small gardens?
The sweet spot for raised beds in small garden layouts is strictly 3 to 4 feet wide by 6 to 8 feet long. Anything wider, and you will compress the soil trying to reach the center. For the absolute best results without breaking the bank, buy pre-cut galvanized steel 3×6 kits. They fit perfectly into tight side yards and give you a high-end, uniform look without the hassle of custom carpentry.
Can I install raised beds in my front yard without violating neighborhood standards?
Absolutely, as long as you focus on aesthetics over pure utility. Raised flower beds in front of house settings pass HOA inspections when you use premium materials like stone veneer, composite lumber, or sleek powder-coated metal. To blend in seamlessly, integrate ornamental edibles like vibrant rainbow chard alongside traditional flowers, and finish the surface with a thick layer of premium shredded cedar mulch to maintain a professional, manicured appearance.
How much space should I leave between raised beds?
Never leave less than 24 inches between boxes; ideally, you want 36 inches to comfortably fit a wheelbarrow. A major mistake beginners make is ignoring the pathways, turning the garden into a muddy mess. Upgrading your pathways by laying down a heavy-duty commercial weed barrier (contractor roll) and topping it with bulk river rock or crushed gravel instantly elevates the area from a basic vegetable patch to a luxury courtyard.
What materials work best for raised bed construction?
If you want a setup that looks expensive but lasts decades, skip standard pine. Go for pre-fabricated rust-proof galvanized metal kits or untreated Cedar/Redwood. If you want a flawless, zero-maintenance modern look, invest in UV-protected composite decking boards. Never use old chemically-treated railroad ties near your food. Securing your corners with heavy-duty galvanized brackets is the secret to beds that never warp or blow out.
How deep should raised beds be for vegetables?
A depth of 12 to 18 inches is perfect for 90% of garden crops, including heavy feeders like tomatoes and peppers. If you are building a waist-high ergonomic bed (30+ inches tall), do not waste money filling the entire column with expensive dirt! Use a pre-cut corrugated steel false base halfway down, or fill the bottom half with old logs and twigs to save hundreds of dollars on premium organic potting mix.
Do raised beds work on slopes?
Yes, and they are actually the ultimate solution for fixing an unusable, angled yard. By creating tiered, terraced steps, you prevent massive soil erosion and create a jaw-dropping architectural feature. To ensure the downhill side doesn’t collapse under the weight of wet soil, anchor the front wall using heavy-duty galvanized rebar stakes driven deep into the subsoil, and always start with a level base trench.