Building a stunning vertical garden balcony requires smart material sourcing, not massive budgets. Discover how UV-coated planters and commercial brackets completely transform tight outdoor spaces. Elevate your urban oasis today.
Design Snapshot: Key Principles
- Vertical Space Efficiency: Utilize walls, railings, and vertical planes to multiply planting capacity without consuming floor area
- Weight Distribution: Select lightweight containers and mounting systems that respect balcony load limits while providing adequate root volume
- Microclimatic Awareness: Position shade-tolerant species in lower tiers and sun-lovers at upper levels to match light gradients
- Integrated Irrigation: Design watering strategies that prevent runoff to neighboring units while maintaining consistent moisture levels
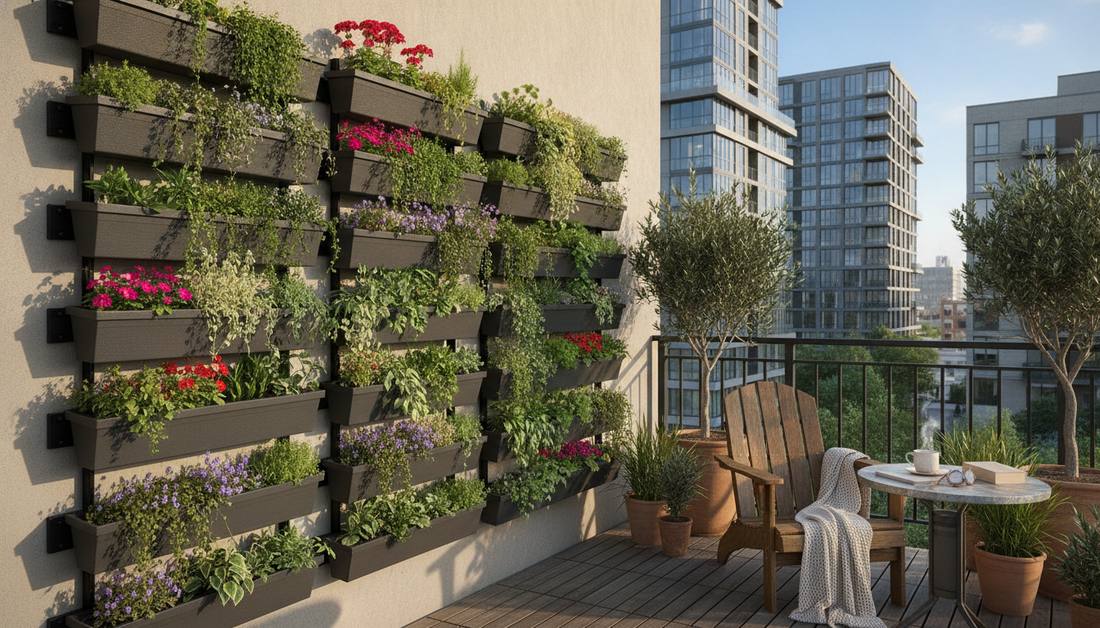
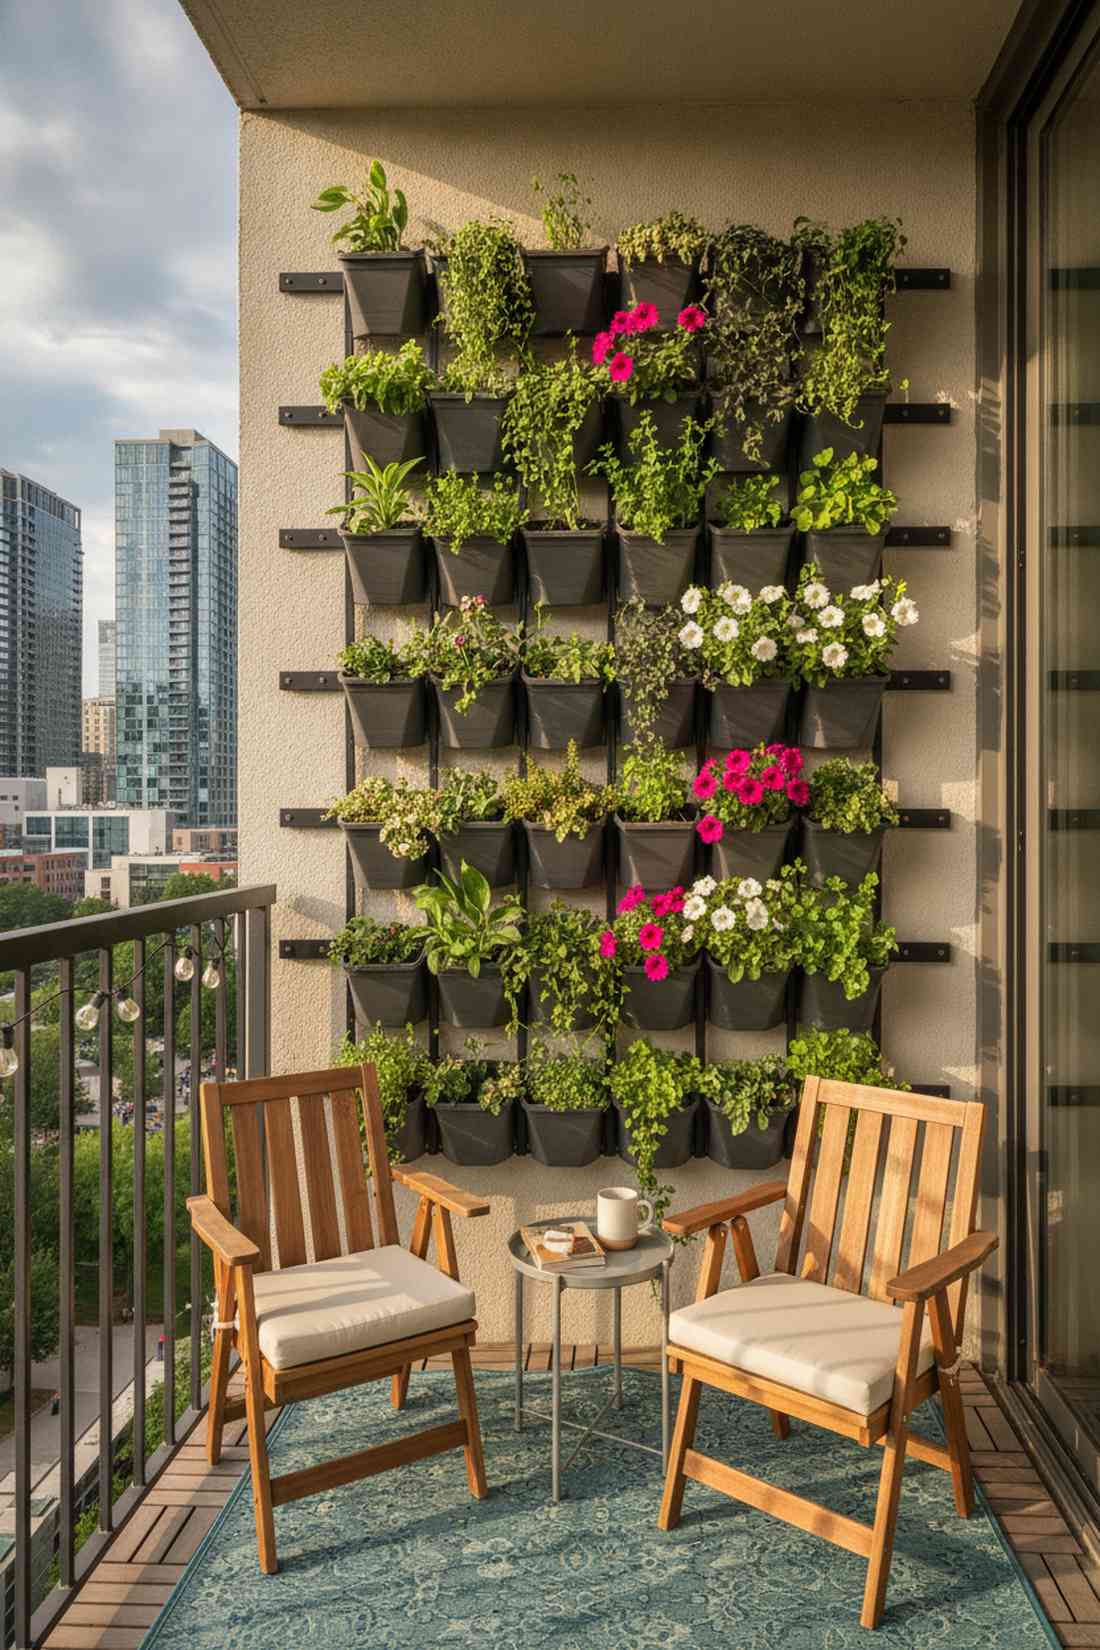
Wall-Mounted Systems for Maximum Vertical Impact
Wall-mounted solutions anchor directly to balcony walls or railings, creating living facades that maximize vertical real estate. These systems range from simple pocket planters to sophisticated modular panels with integrated irrigation. Designers favor wall-mounted configurations for apartments where floor space remains at a premium.
1. Modular Living Wall Panels
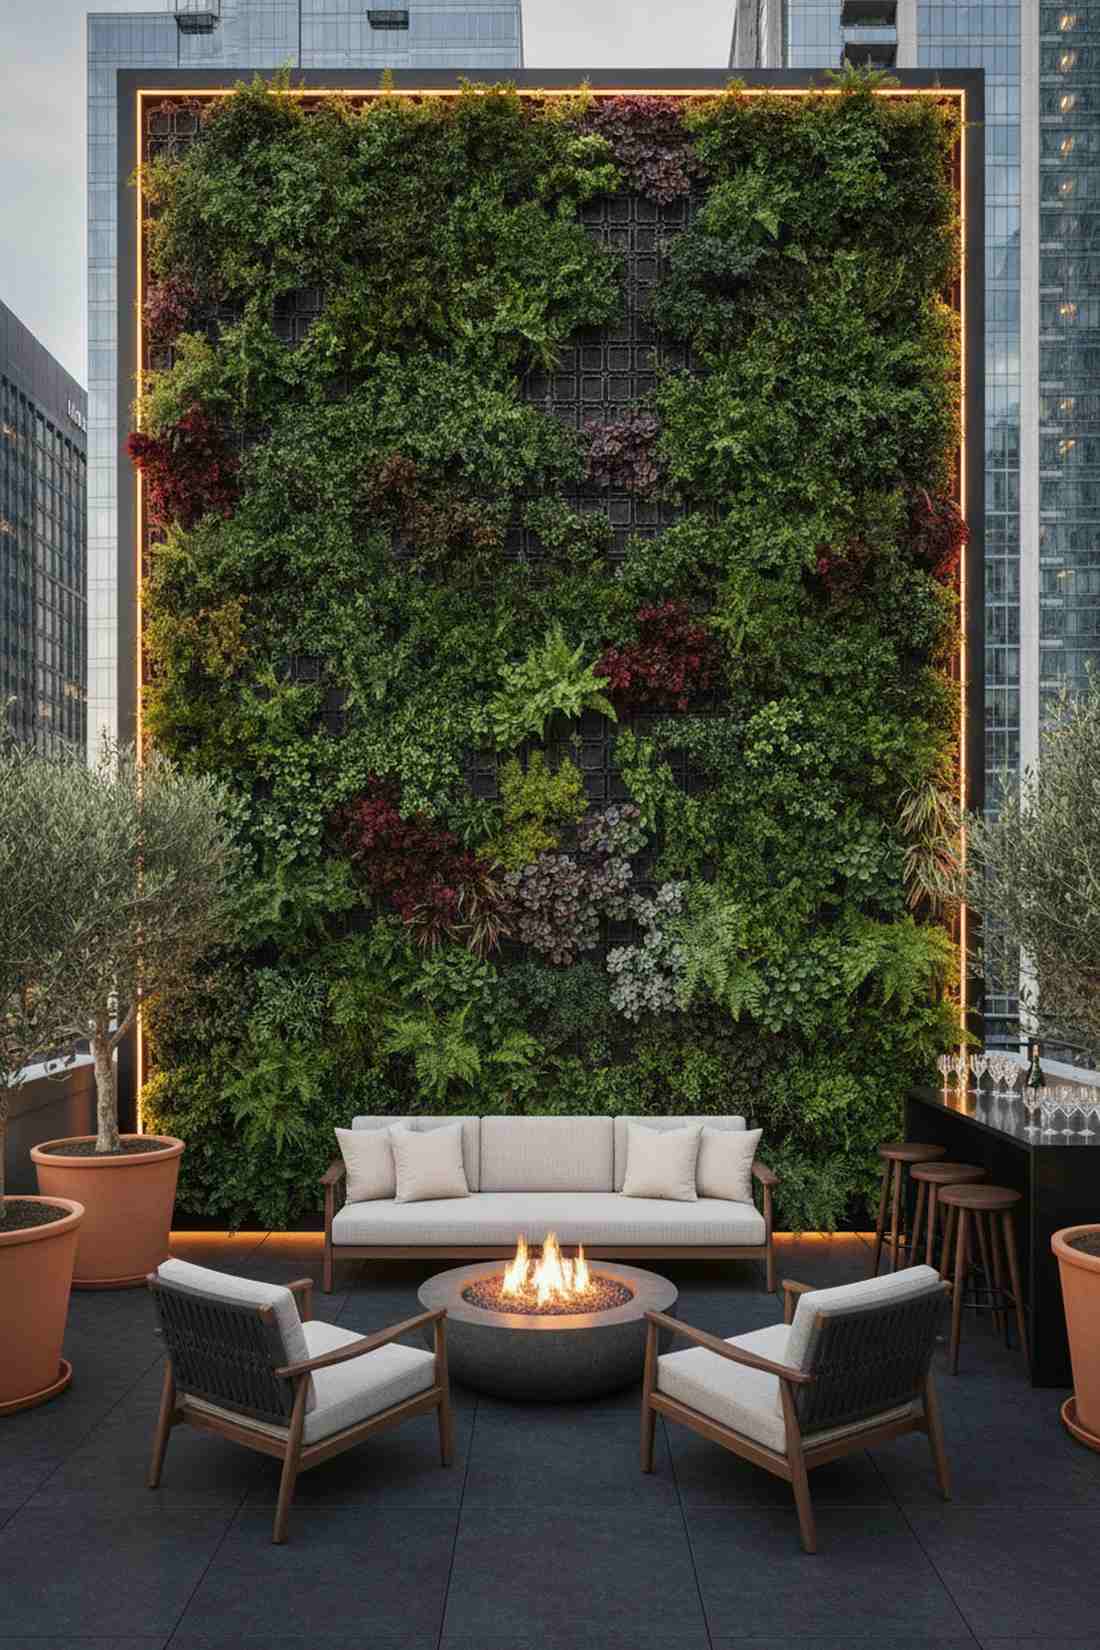
This design feels like an elite five-star resort lounge dropped straight into the city. Lush modular green wall panels create a seamless architectural statement piece. Works exceptionally well for a modern vertical garden apartment setup needing instant privacy.
Skip the flimsy plastics; locking grid systems deliver a surprisingly premium look that fools the eye. Simply snap the high-density polymer frames together and layer in drought-resistant foliage. Throwing in top-tier botanical accessories immediately elevates the final presentation.
You can achieve this high-end aesthetic for around $40–$75 per square foot. Pin this if you’re planning a sophisticated small space upgrade!
- Key Materials: Interlocking wall grid panels, premium soil mix
- Vibe / Style: Luxury hotel terrace
- Difficulty: Moderate weekend build
- Budget Breakdown: Base Grids: $40 | Botanicals & Soil: $35
- Creator’s Tip: Paint the wall behind the grid black before mounting to give the illusion of infinite depth.
- Smart Sourcing: Pre-cut interlocking wall grids (bulk pack) and UV-resistant artificial ferns (starter set).
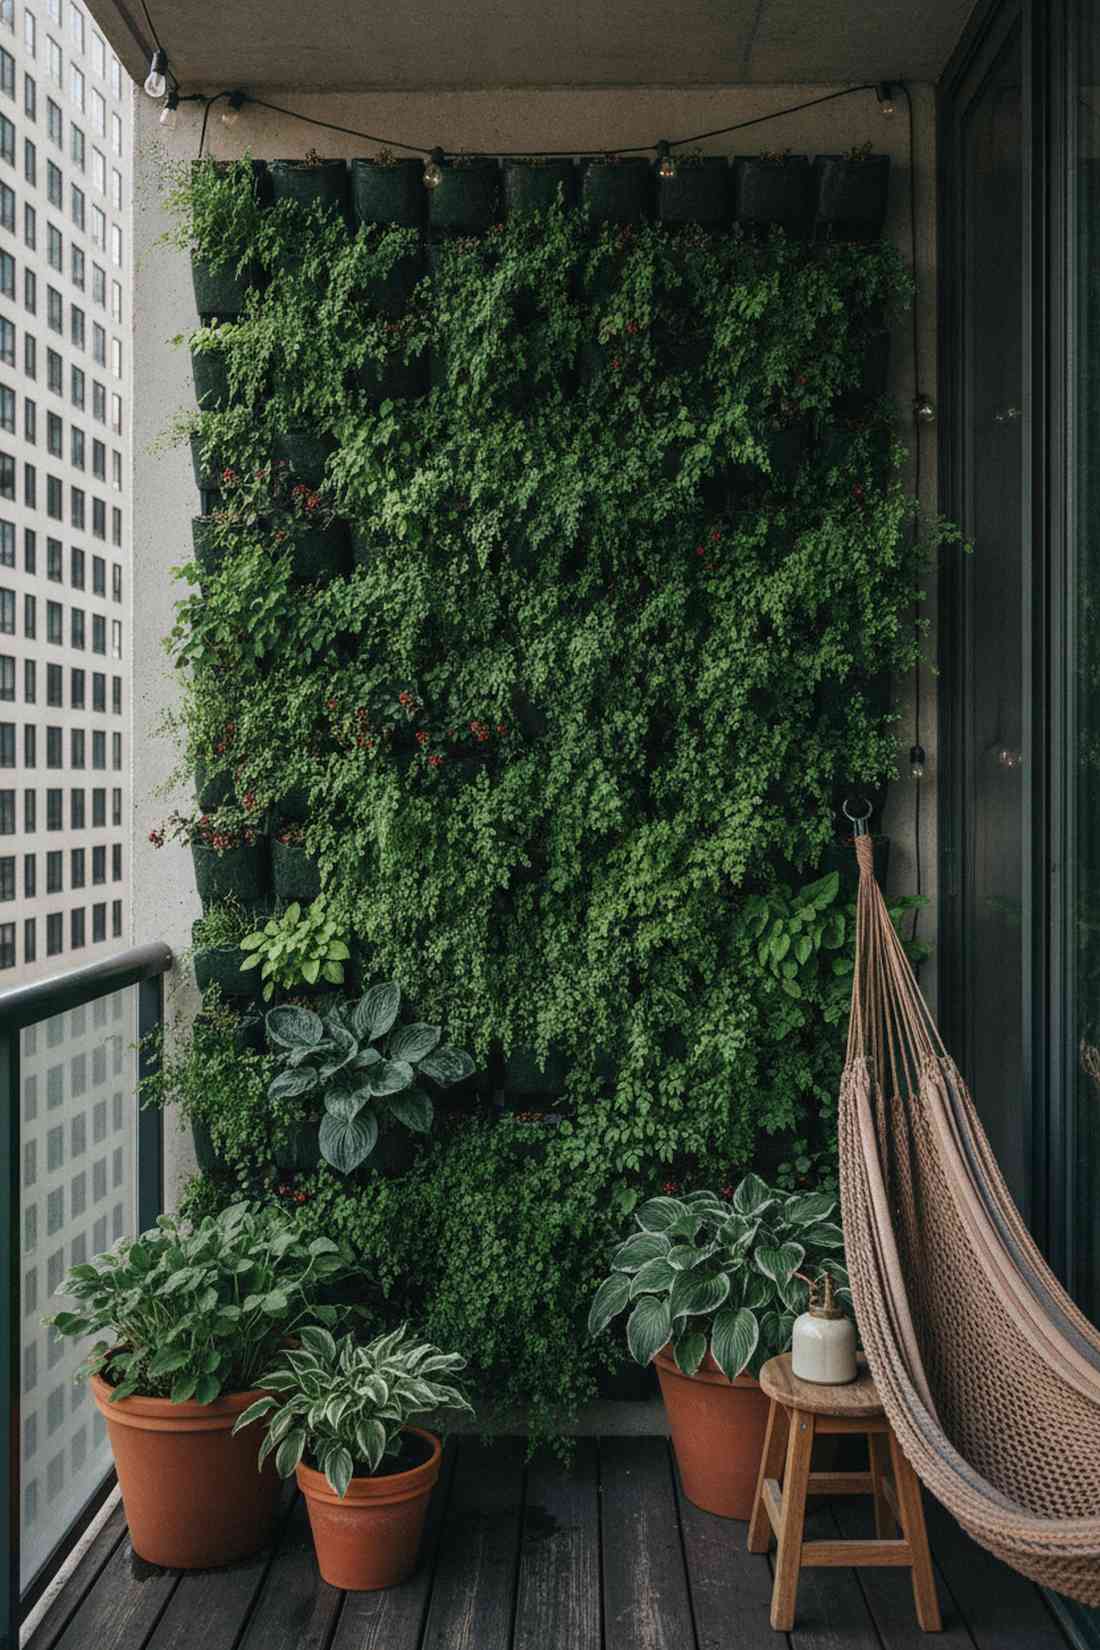
2. Felt Pocket Planter Walls
There is something incredibly cozy about a soft, overflowing wall of greenery that feels like a hidden sanctuary. A breathable felt pocket planter turns cold concrete walls into a dynamic living tapestry. It serves perfectly as a vertical garden for small balcony culinary herb stations.
Many beginners ruin their walls with cheap fabric that bleeds water everywhere, but industrial-grade moisture barriers fix this instantly. The woven texture air-prunes roots automatically, preventing root-bound plants from dying mid-season. Securing these with heavy-duty grommets ensures your miniature garden supplies stay perfectly intact.
Expect to spend roughly $25–$45 for a complete wall transformation. Highly recommended for a quick Saturday morning win.
- Key Materials: Industrial felt pocket sheets, zip ties
- Vibe / Style: Urban bohemian loft
- Difficulty: Easy beginner setup
- Budget Breakdown: Pocket Planter: $20 | Seeds & Soil: $15
- Creator’s Tip: Layer water-loving plants at the bottom pockets since gravity pulls the moisture downward naturally.
- Smart Sourcing: Waterproof-backed felt pocket planters (multi-tier) and organic herb seed starter kits.
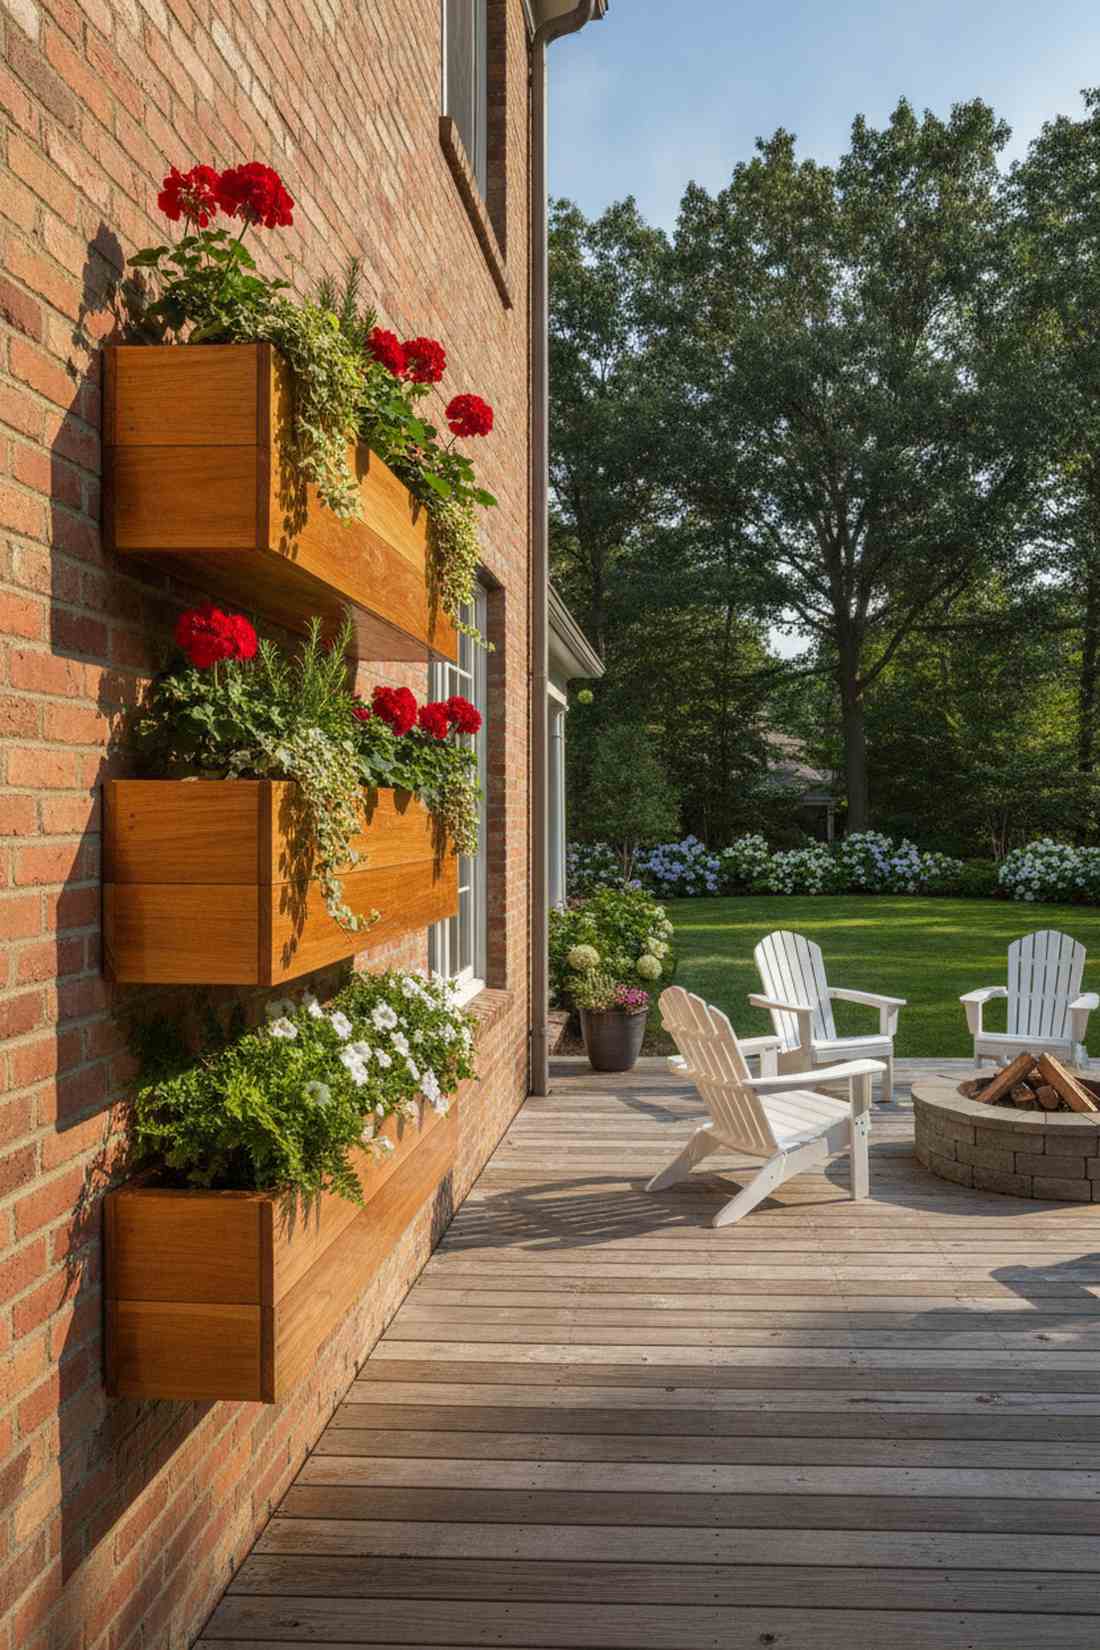
3. Wall-Mounted Planter Boxes

This staggered layout feels like walking through a private European courtyard. Floating cedar planter boxes cast gorgeous shadows and provide deep root space for substantial growth. Ideal for renters wanting a custom-built look without permanent construction.
Instead of basic terra cotta, mounting weather-treated wood boxes looks far more expensive than it is. Using hidden cleat systems gives the containers a magical floating effect against the brickwork. Treating the exterior with marine-grade sealant locks in that rich, warm wood tone all year long.
You can pull off a three-tier floating display for roughly $60–$90. Save this to your outdoor woodworking board!
- Key Materials: Cedar window boxes, hidden mounting cleats
- Vibe / Style: Contemporary architectural
- Difficulty: Intermediate DIY project
- Budget Breakdown: Wood & Hardware: $55 | Waterproofing: $20
- Creator’s Tip: Line the inside of the wooden boxes with thick plastic sheeting (poke drainage holes) to prevent wood rot.
- Smart Sourcing: Pre-cut cedar planter box kits and marine-grade clear wood sealant (spray on).
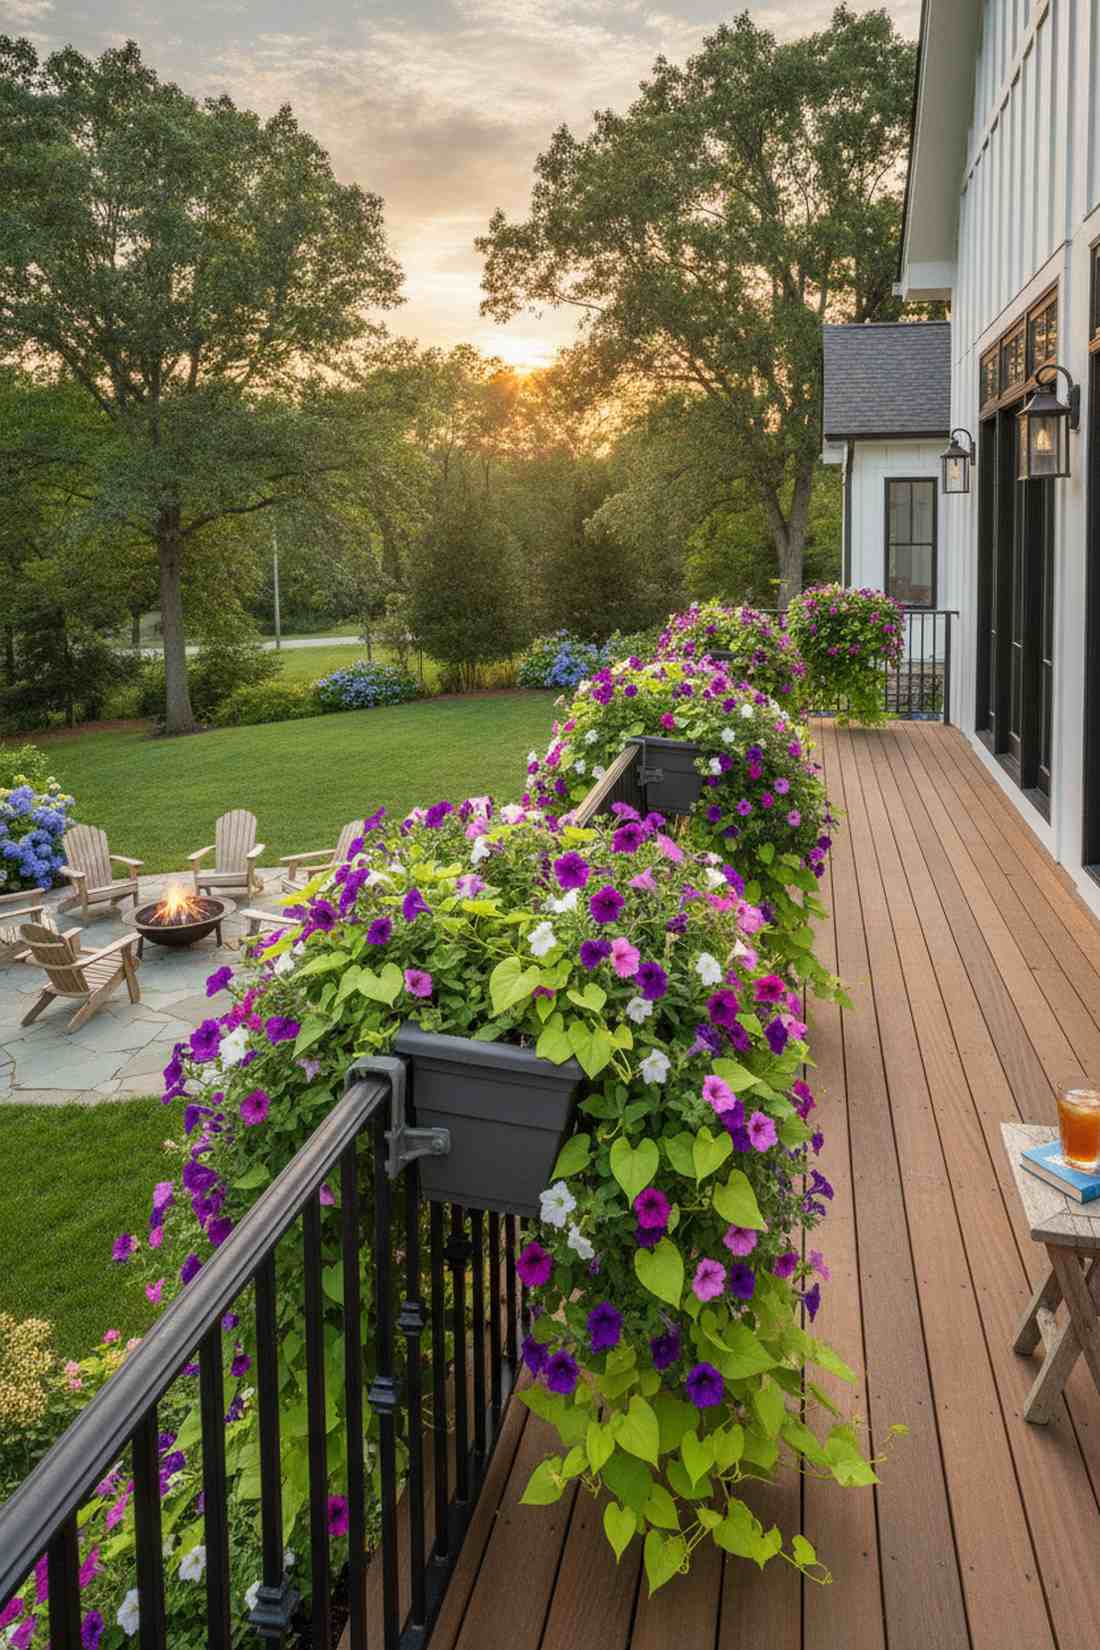
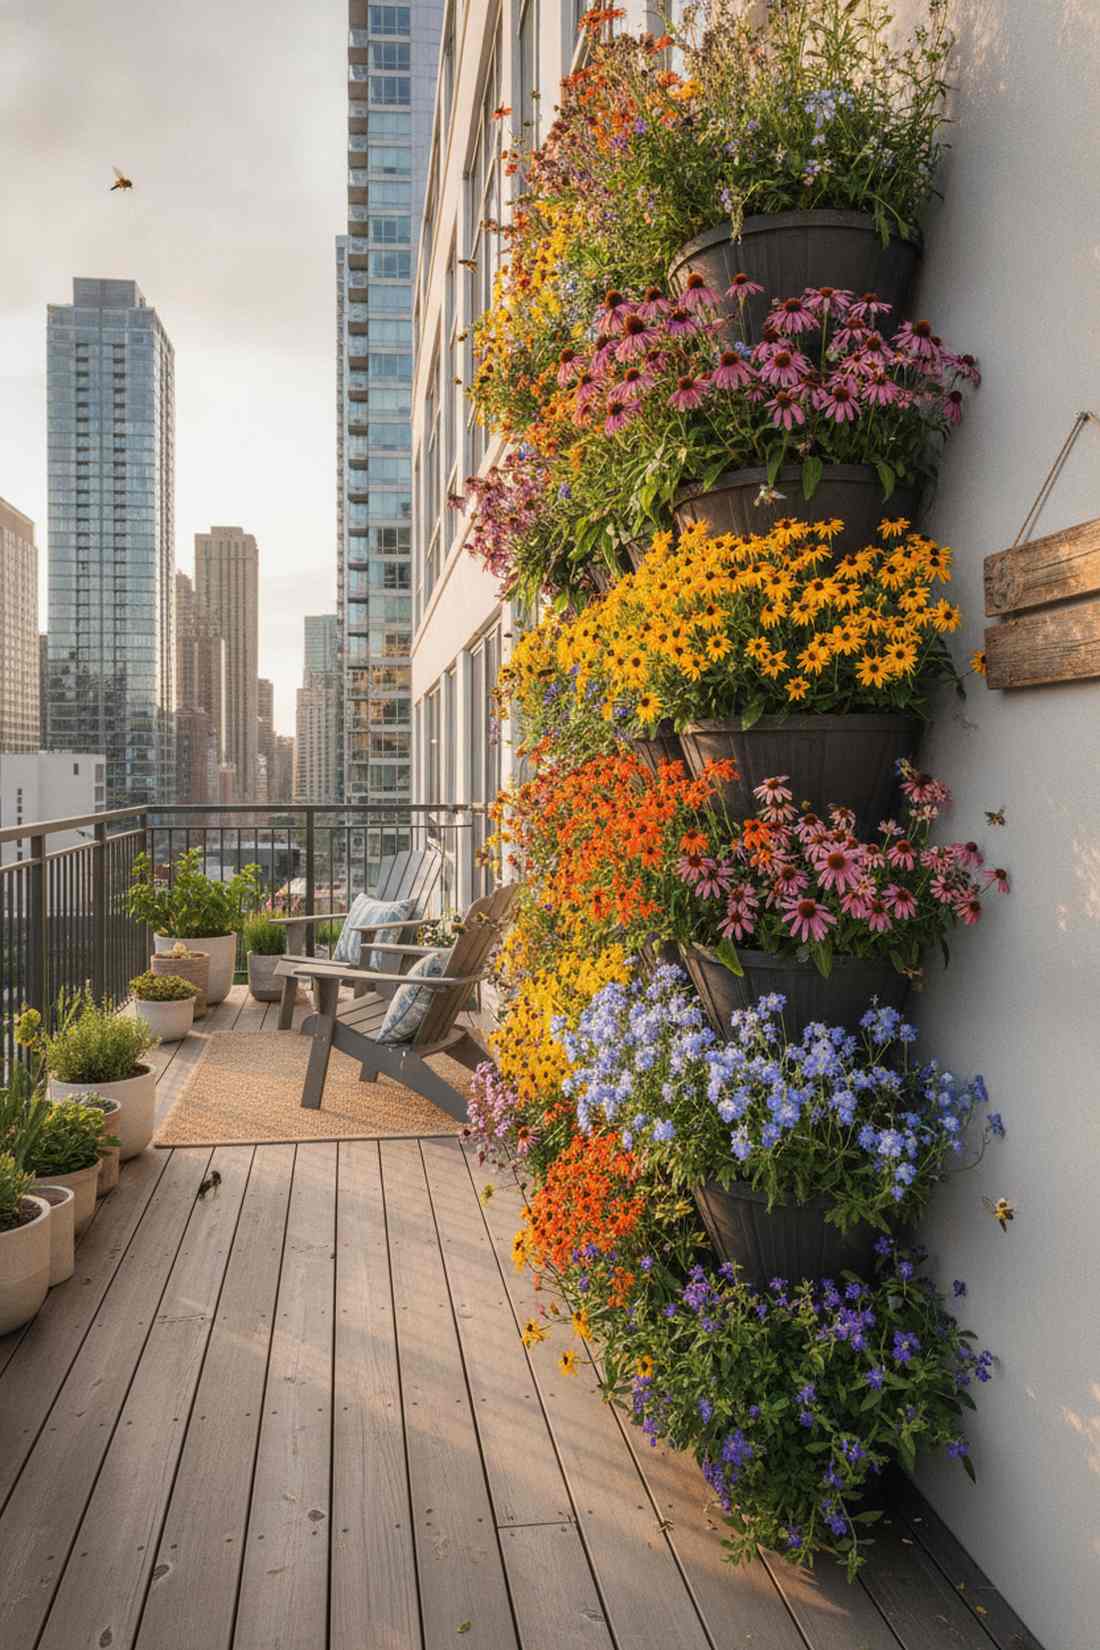
4. Railing-Mounted Planter Systems
Nothing screams Parisian romance quite like flowers cascading aggressively over an iron rail. Saddle-style railing planters consume absolutely zero walkable space while maximizing your visual perimeter. It is the ultimate flex for a sunny vertical garden patio.
Balancing traditional pots on a ledge is a disaster waiting to happen, but deep-groove saddle pots eliminate the risk entirely. The customized brackets lock the containers in place, delivering a designer-level finish. Upgrading to self-watering reservoirs means you can leave for a weekend without your petunias crisping up.
This perimeter hack typically costs around $30–$50 per railing section. It’s a rapid upgrade that dramatically boosts curb appeal.
- Key Materials: UV-treated saddle planters, adjustable rail brackets
- Vibe / Style: Classic European terrace
- Difficulty: Ten-minute installation
- Budget Breakdown: Planters: $35 | Trailing Florals: $15
- Creator’s Tip: Mix sweet potato vine with trailing petunias for an ultra-dense, neon-green spill effect.
- Smart Sourcing: Adjustable heavy-duty railing brackets (set of 4) and UV-coated self-watering saddle pots.
This next setup is ridiculously cheap but looks like a $500 custom landscape designer display…
5. Hydroponic Wall Systems
Stepping onto this balcony feels like catching a glimpse of a futuristic eco-habitat. A vertical hydroponic flow wall produces rapid growth without a single speck of dirt. Brilliant for tech-savvy gardeners who want maximum harvest yields in minimal square footage.
Traditional soil gardening gets messy on upper floors, but a closed-loop water system solves the dirt problem permanently. Routing clean PVC tubes along the wall creates a sleek, industrial aesthetic that turns heads. Investing in premium hydroponic starter kits guarantees your pump won’t fail during a heatwave.
Building a basic automated drip wall will run you approximately $100–$150. Pin this if you want an endless supply of fresh lettuce!
- Key Materials: Food-grade PVC pipes, submersible water pump
- Vibe / Style: Modern eco-tech
- Difficulty: Advanced weekend build
- Budget Breakdown: Tubing & Pump: $90 | Nutrients & Net Pots: $30
- Creator’s Tip: Paint the exterior of your PVC pipes matte black or forest green to disguise the plumbing aspect.
- Smart Sourcing: Commercial-grade hydroponic nutrient blends (starter pack) and submersible quiet-flow pumps (outdoor rated).
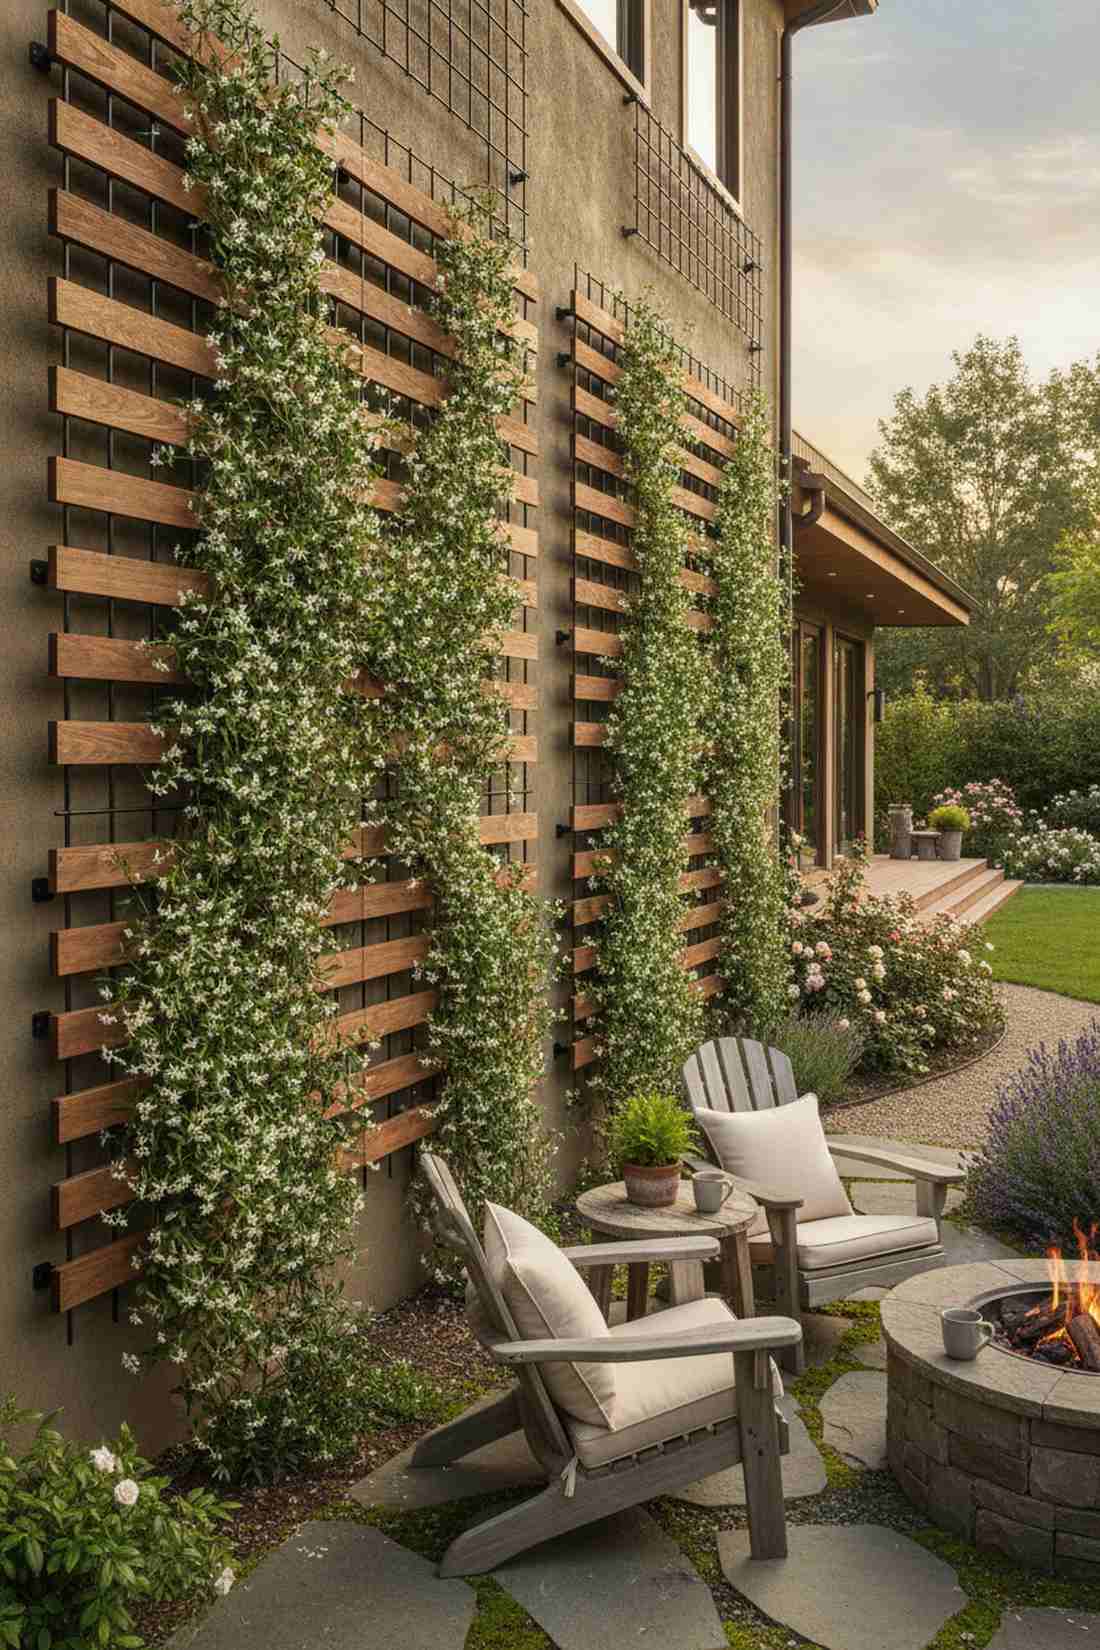
6. Trellis Panel Systems

A climbing wall of vines feels like a secret garden straight out of a storybook. Modern slatted wood trellises offer robust structural support while acting as elegant outdoor artwork. Works beautifully for masking ugly stucco or providing wind protection.
Most big-box lattice panels warp within a year, but heavy-gauge wire or thick timber framing stands the test of time. Training aggressive climbers like jasmine gives a designer-level finish while perfuming the entire seating area. Securing these panels tightly prevents heavy wind gusts from snapping your prized vines.
A high-quality trellis installation generally sets you back about $40–$70. A fantastic, long-lasting investment for serious plant lovers.
- Key Materials: Heavy-duty wood or wire panels, masonry anchors
- Vibe / Style: Romantic English courtyard
- Difficulty: Moderate power-tool required
- Budget Breakdown: Panel Kit: $50 | Anchors: $10
- Creator’s Tip: Keep the trellis at least 2 inches away from the wall so vining plants have space to wrap their tendrils.
- Smart Sourcing: Rust-proof wire trellis grid kits and heavy-duty masonry anchor sets (bulk pack).
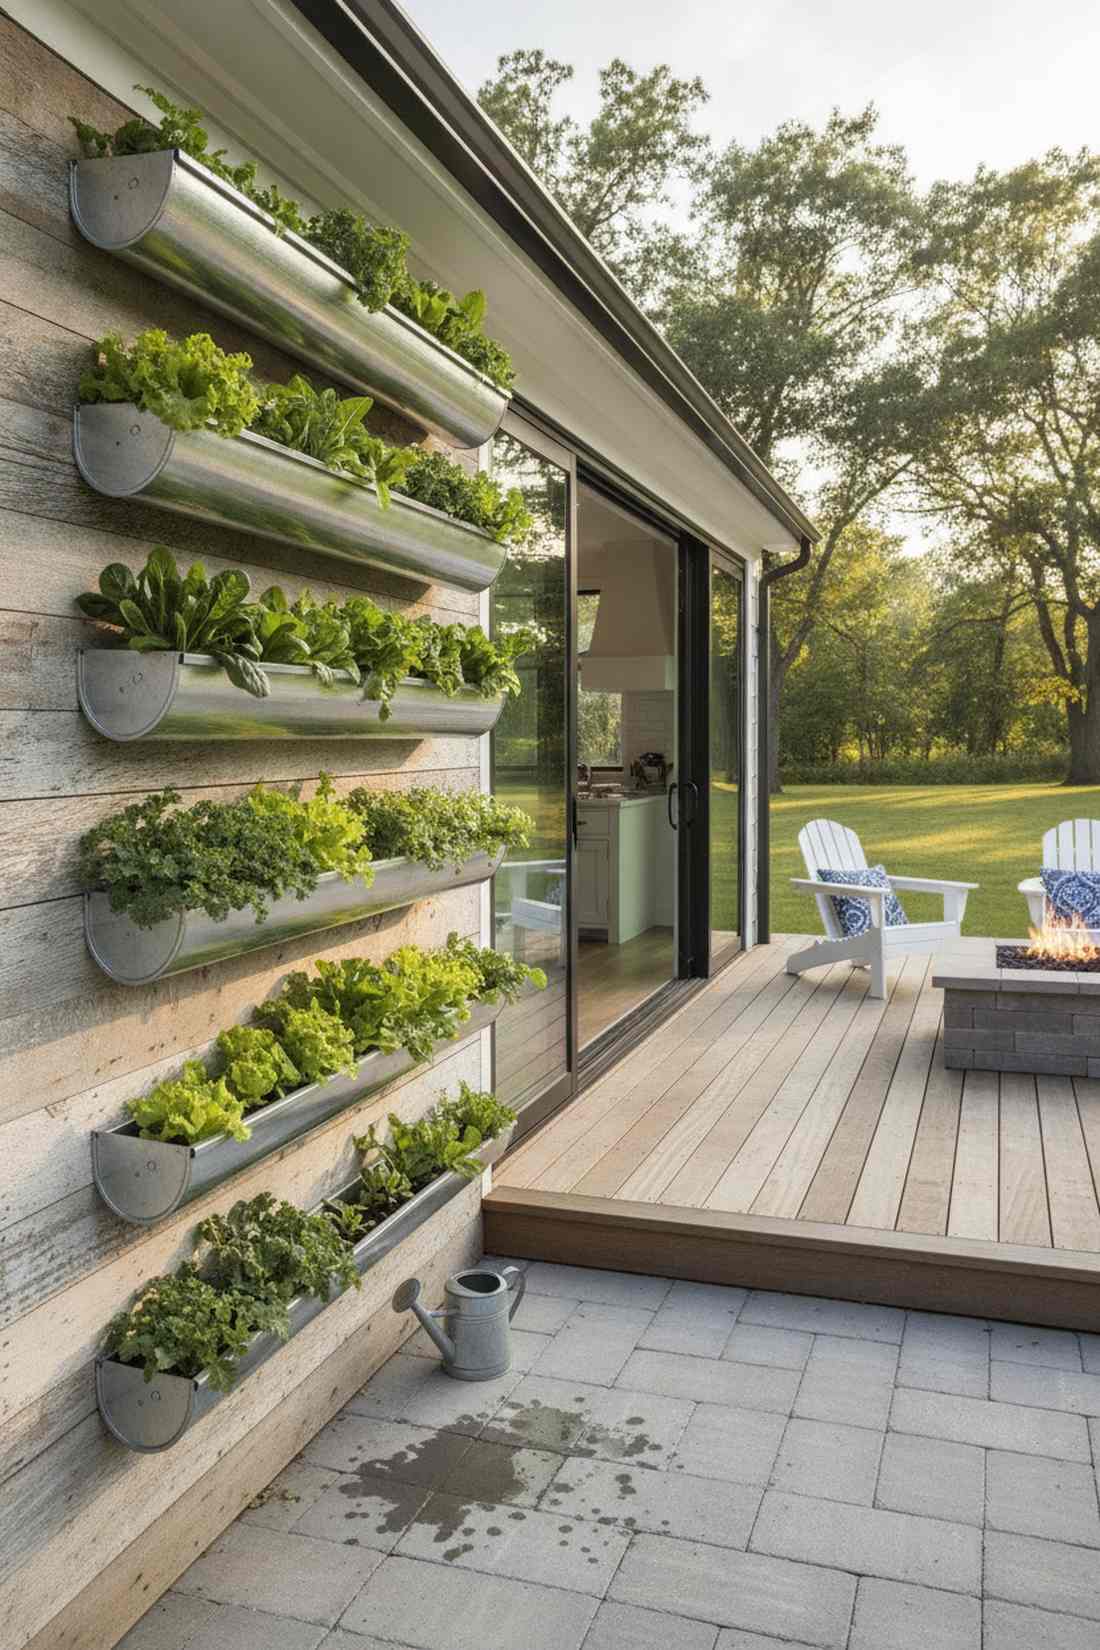
7. Vertical Gutter Gardens
This layout channels pure modern farmhouse charm into a tiny urban footprint. Repurposed rain gutter tiers create incredibly efficient rows of shallow-rooted greens. Perfect for cultivating a massive salad bar right outside your sliding glass door.
Standard pots waste tons of horizontal space, but linear aluminum runs maximize every single inch of available sunlight. Bolting sleek metal channels to a backdrop looks far more expensive than it actually is. Adding end-caps and precision drainage holes ensures your leafy greens never drown after a storm.
You can easily put together a four-tier gutter setup for around $35–$50. Save this genius hack to your budget gardening board!
- Key Materials: Aluminum gutter sections, end caps
- Vibe / Style: Industrial farmhouse
- Difficulty: Easy measuring and drilling
- Budget Breakdown: Gutters: $30 | Mounting Brackets: $15
- Creator’s Tip: Angle the gutters very slightly (about 1 degree) toward one side to channel excess rain out a single drip hole.
- Smart Sourcing: Pre-cut aluminum gutter sets and snap-on gutter end caps (multi-pack).
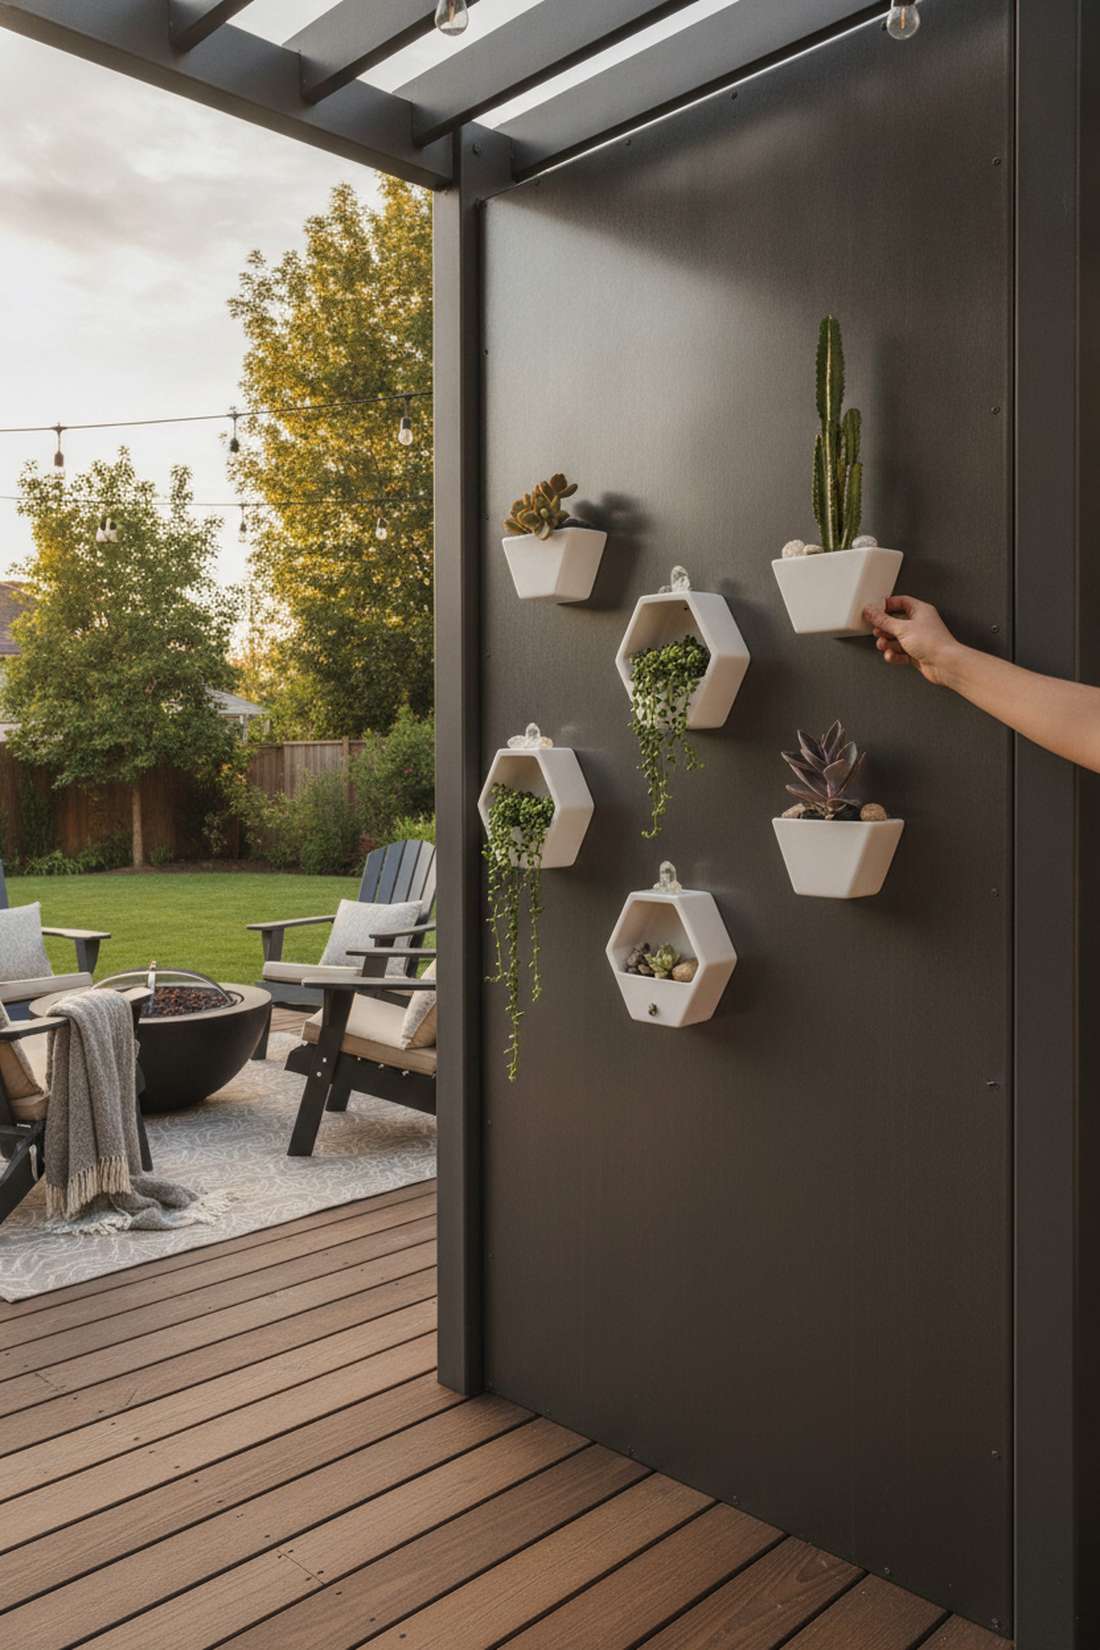
8. Magnetic Modular Planters
There is something intensely satisfying about rearranging your garden with a satisfying “click.” Magnetic-backed hexagonal planters turn a bland metal privacy screen into a dynamic, interactive art installation. Exceptional for renters who are strictly forbidden from wielding a drill.
Suction cups inevitably fail and shatter your pots, but rare-earth neodymium magnets boast incredible grip strength. Shifting your layout instantly to chase the afternoon sun delivers a surprisingly premium, customized experience. It is the perfect excuse to collect tiny terrarium accessories and rare succulents.
A starter pack of magnetic vessels costs between $25–$45. Highly recommended for a sleek, zero-damage patio makeover.
- Key Materials: Neodymium magnetic pods, metal backer board
- Vibe / Style: Ultra-modern minimalist
- Difficulty: Zero-tool instant setup
- Budget Breakdown: Magnetic Pods: $30 | Succulents: $15
- Creator’s Tip: If you don’t have a metal railing, buy a cheap galvanized steel drip pan from an auto store and mount it as a canvas.
- Smart Sourcing: Heavy-duty magnetic planter pods (set of 6) and premium indoor terrarium accessories.
💡 Must-Have Supplies for High-End Setups
To build these setups faster and ensure they last, skip the generic craft aisles and invest in the right foundational kits.
- Base & Support: Commercial-grade waterproof wall-mounting brackets
- Setup Tools: High-torque masonry drill bit starter kits
- Weather/Durability Protection: UV-resistant clear acrylic sealant spray
Most renters get their balcony layout completely wrong… until they try the genius space-saving setup coming up next.
Freestanding & Modular Vertical Garden Solutions
Freestanding structures provide vertical growing capacity without permanent wall attachment, ideal for rental apartments or balconies where drilling is prohibited. These mobile systems range from simple tiered stands to sophisticated rotating towers. Landscape architects specify freestanding solutions when clients require flexibility to reconfigure layouts seasonally.
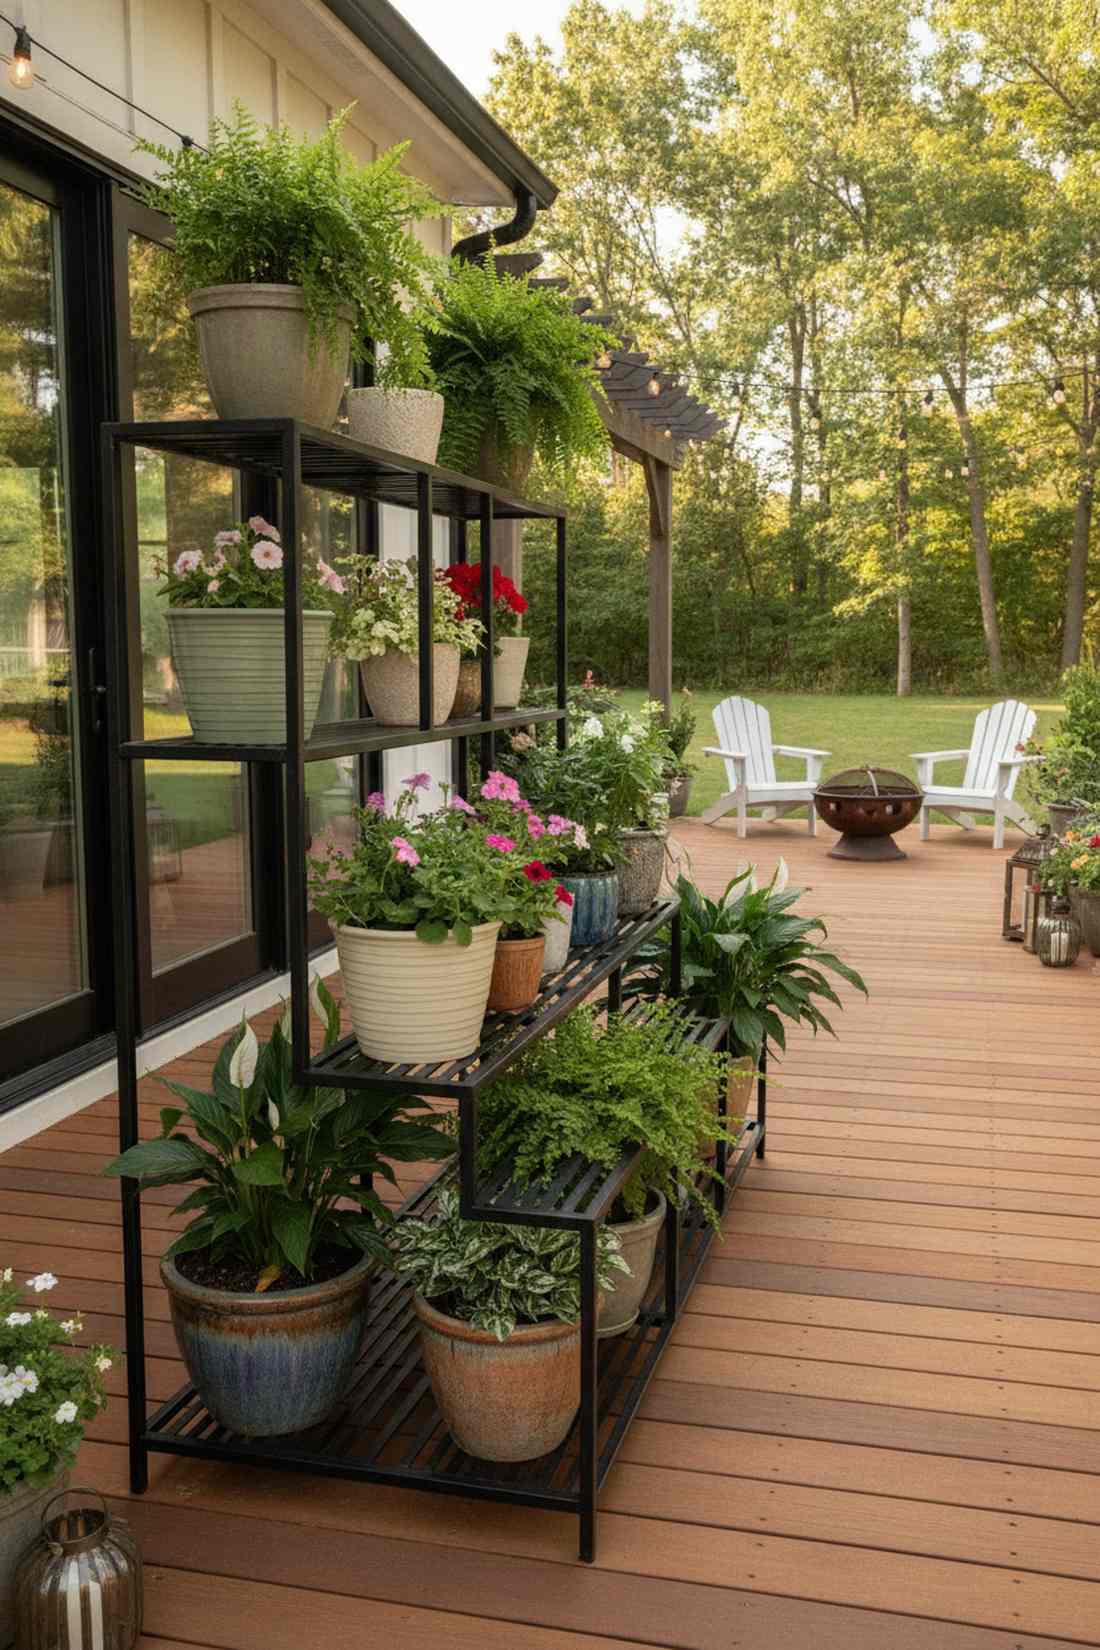
9. Tiered Plant Stands
Stepping out to a beautifully organized plant theater feels incredibly grounding and peaceful. Multi-level metal plant stands allow you to display a massive collection without eating up your seating area. A flawless solution for a compact vertical garden patio looking to showcase varied pot sizes.
Tossing pots randomly on the floor looks cluttered, but staggered shelving instantly gives a designer-level finish. Positioning heavy ceramic bases on the bottom anchors the stand, while delicate ferns gracefully occupy the upper rings. Investing in rust-proof, powder-coated steel means you won’t be scrubbing orange stains off your concrete next spring.
A sturdy, weather-resistant tiered stand usually runs about $40–$70. Pin this to remember how to perfectly layer your foliage heights!
- Key Materials: Powder-coated steel plant stand, varied ceramic pots
- Vibe / Style: Classic conservatory
- Difficulty: Quick assembly
- Budget Breakdown: Metal Stand: $50 | Base Weights: $10
- Creator’s Tip: Put your most sun-hungry plants on the top tier and let their leaves naturally shade the delicate plants below.
- Smart Sourcing: Rust-proof multi-tier metal plant stands and UV-coated lightweight resin pots (bulk pack).
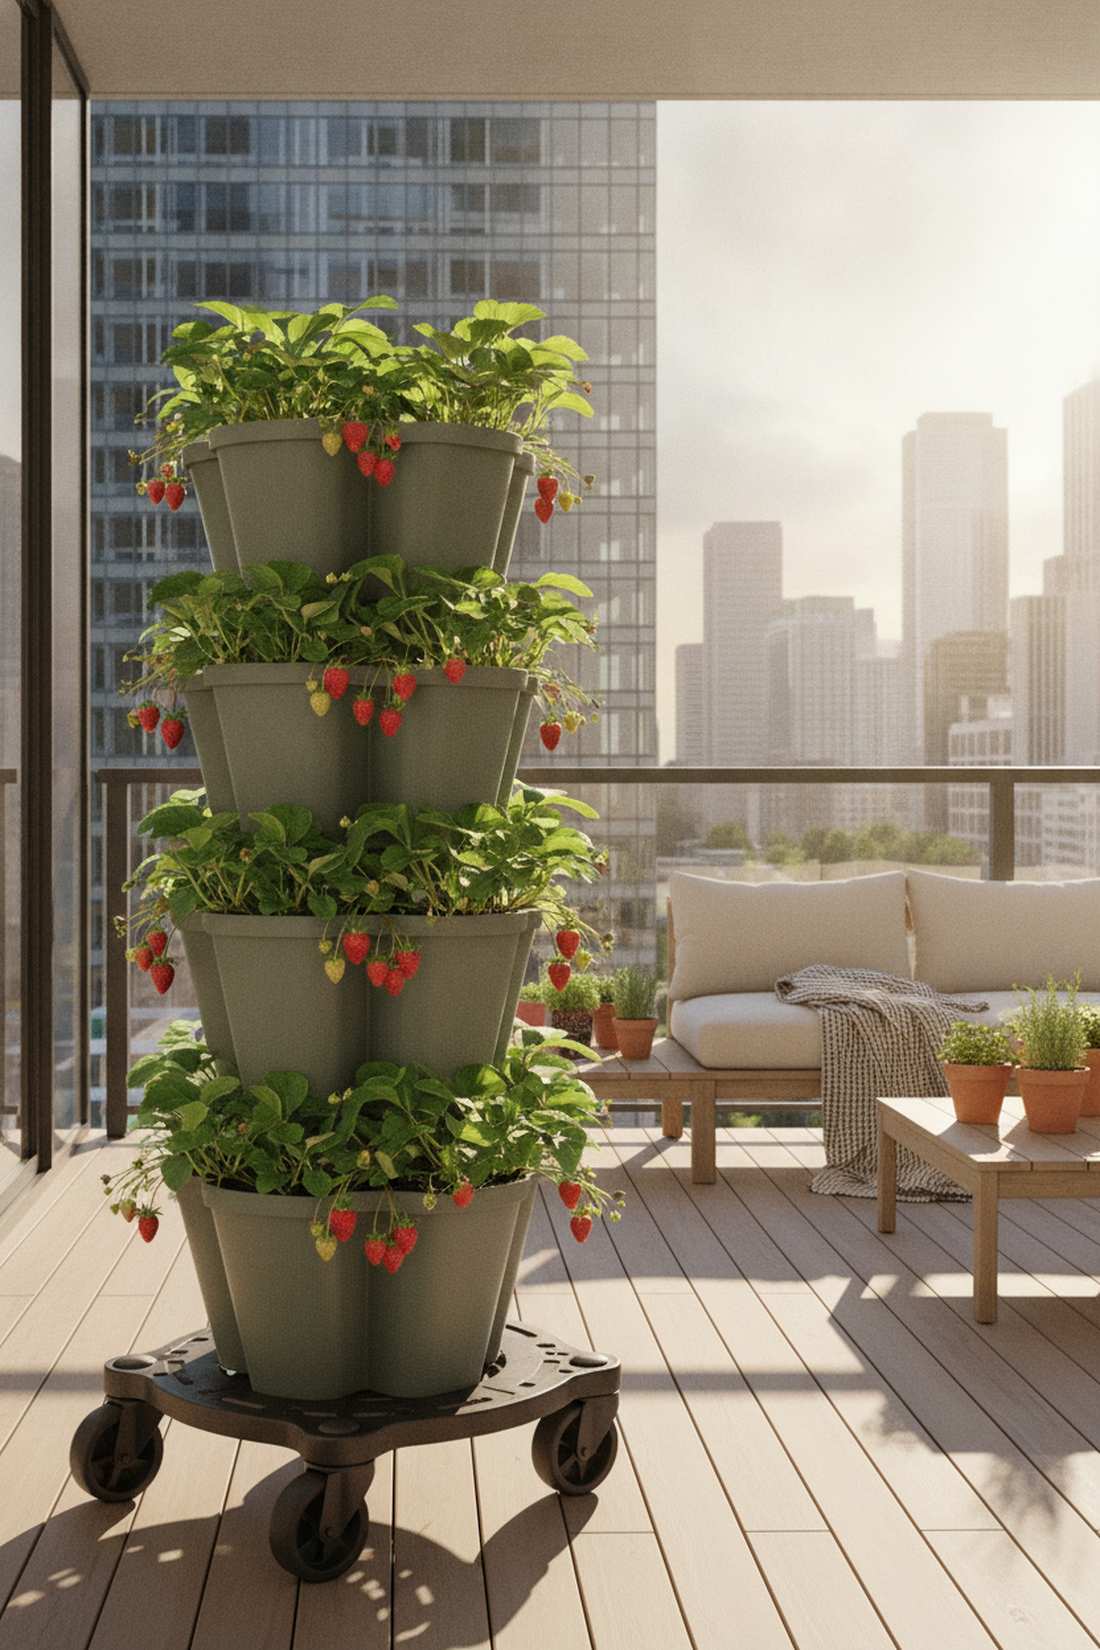
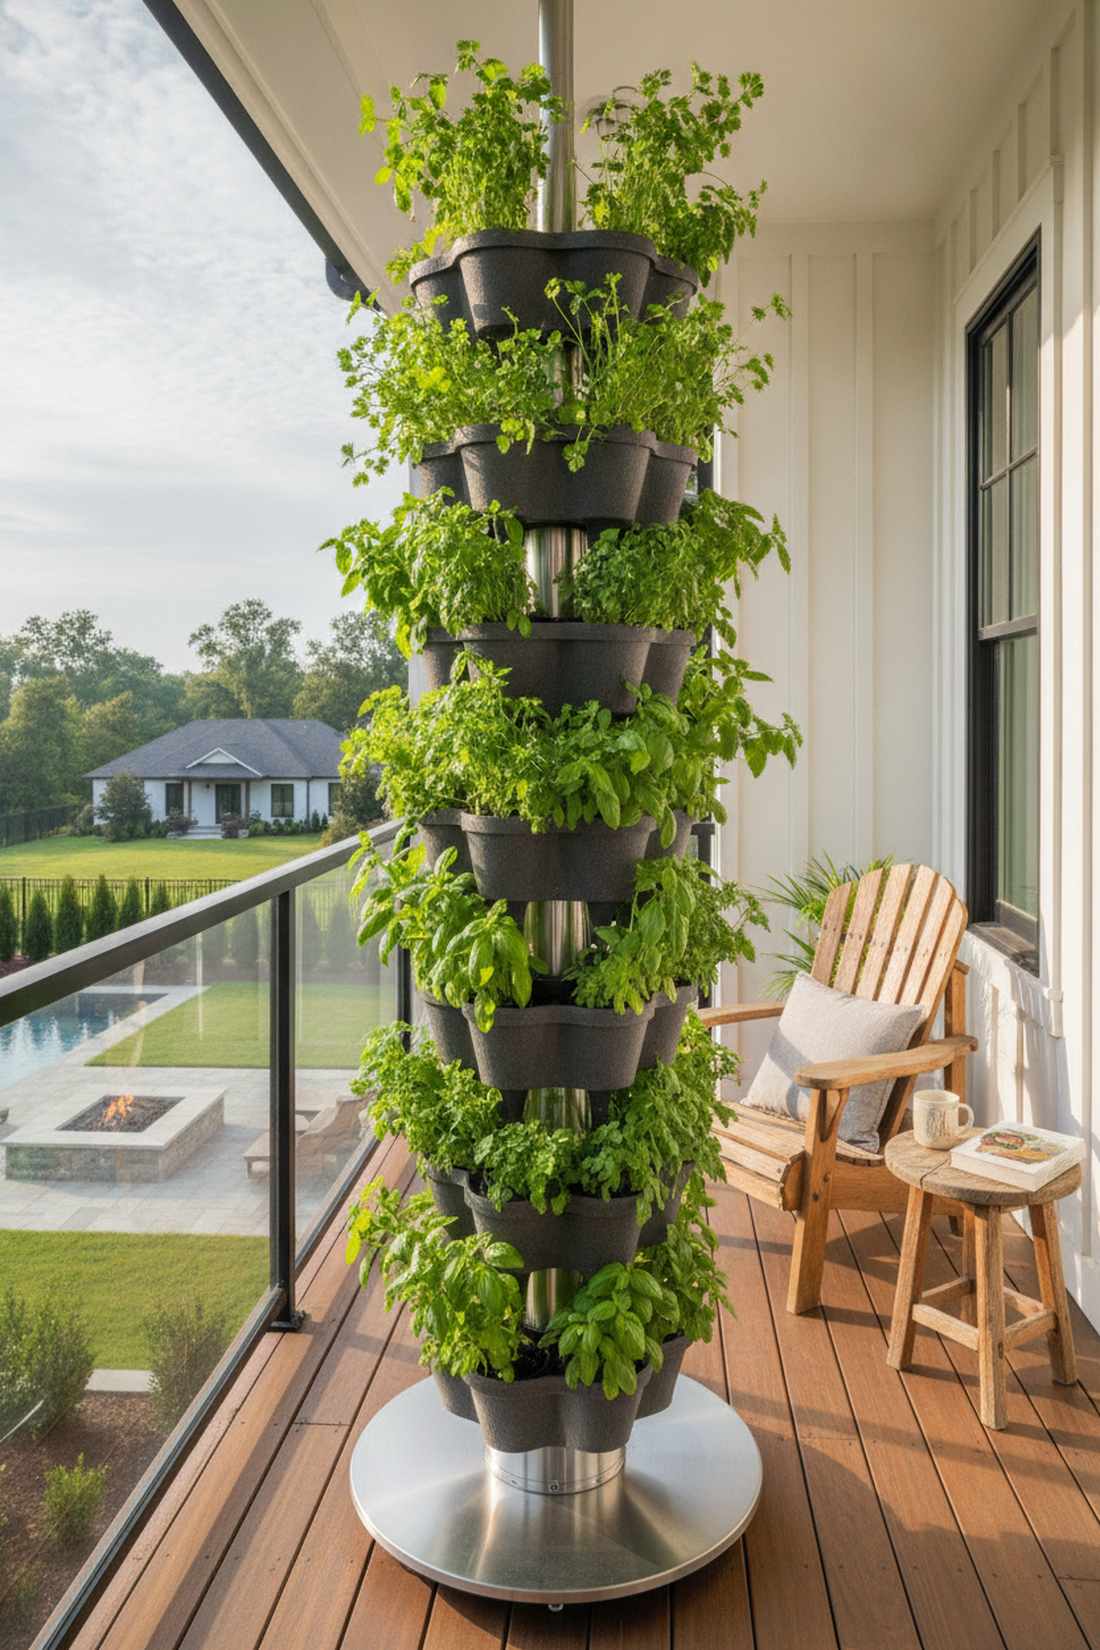
10. Vertical Tower Planters
A towering pillar of bursting strawberries feels like a magical cornucopia right in the city. Stackable self-watering towers maximize vertical airspace to deliver incredible harvest volumes. Ideal for families wanting to grow food safely on a high-rise balcony.
Standard floor pots dry out rapidly in the wind, but internal wicking towers maintain perfect soil moisture for weeks. Stacking interlocking clover-shaped tiers creates a robust column that looks far more expensive than it is. Adding a heavy-duty rolling caster base allows you to effortlessly spin the entire harvest into the sun.
These modular towers range from $45 to $85 depending on height. It’s a fantastic way to slash your summer grocery bill.
- Key Materials: Stackable resin tiers, internal wicking mats
- Vibe / Style: Abundant harvest column
- Difficulty: Snap-together easy
- Budget Breakdown: Tower Kit: $60 | Premium Compost: $20
- Creator’s Tip: Mix a handful of perlite into your soil to keep the vertical column lightweight and prevent the bottom tiers from compressing.
- Smart Sourcing: Stackable self-watering planter towers (5-tier) and heavy-duty rolling planter caddies.
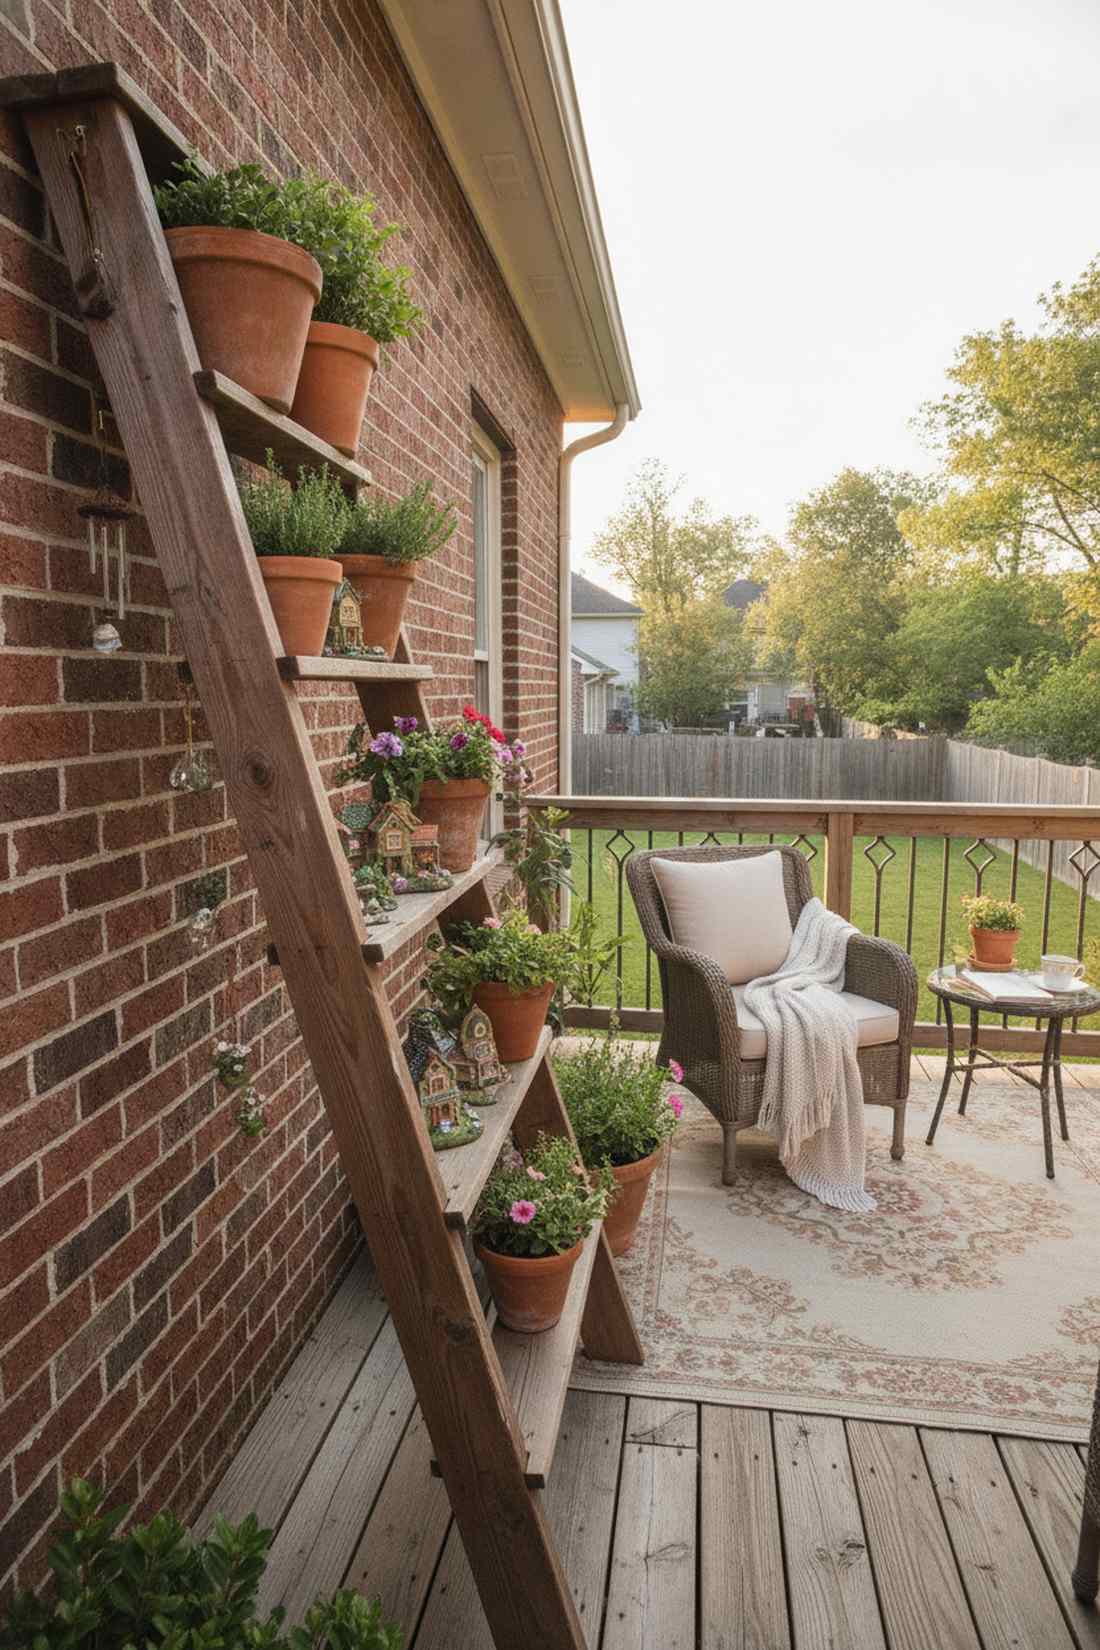
11. Ladder-Style Gardens
The rustic charm of weathered wood leaning casually against the brick feels warmly nostalgic. Angled wooden ladder shelves offer deep treads perfect for holding hefty terra cotta pots. This is a brilliant vertical garden for small balcony spaces needing a cozy, vintage aesthetic.
Flimsy wire racks often blow over, but the geometric lean of a ladder shelf delivers a surprisingly premium, stable footprint. Repurposing an actual antique orchard ladder or buying a reinforced A-frame adds instant architectural weight. Treating the rungs with anti-slip grip tape ensures your delicate fairy garden kits won’t slide off during a storm.
You can thrift or build this cozy setup for roughly $30–$60. Save this if you love that effortless shabby-chic style!
- Key Materials: Wooden leaning ladder, clear sealant
- Vibe / Style: Vintage cottage core
- Difficulty: Minimal effort
- Budget Breakdown: Ladder Shelf: $45 | Wood Sealant: $15
- Creator’s Tip: Screw a small brass hook under each ladder rung to hang tiny trailing plants or wind chimes.
- Smart Sourcing: Pre-assembled wooden leaning plant ladders and premium fairy garden cottage kits.
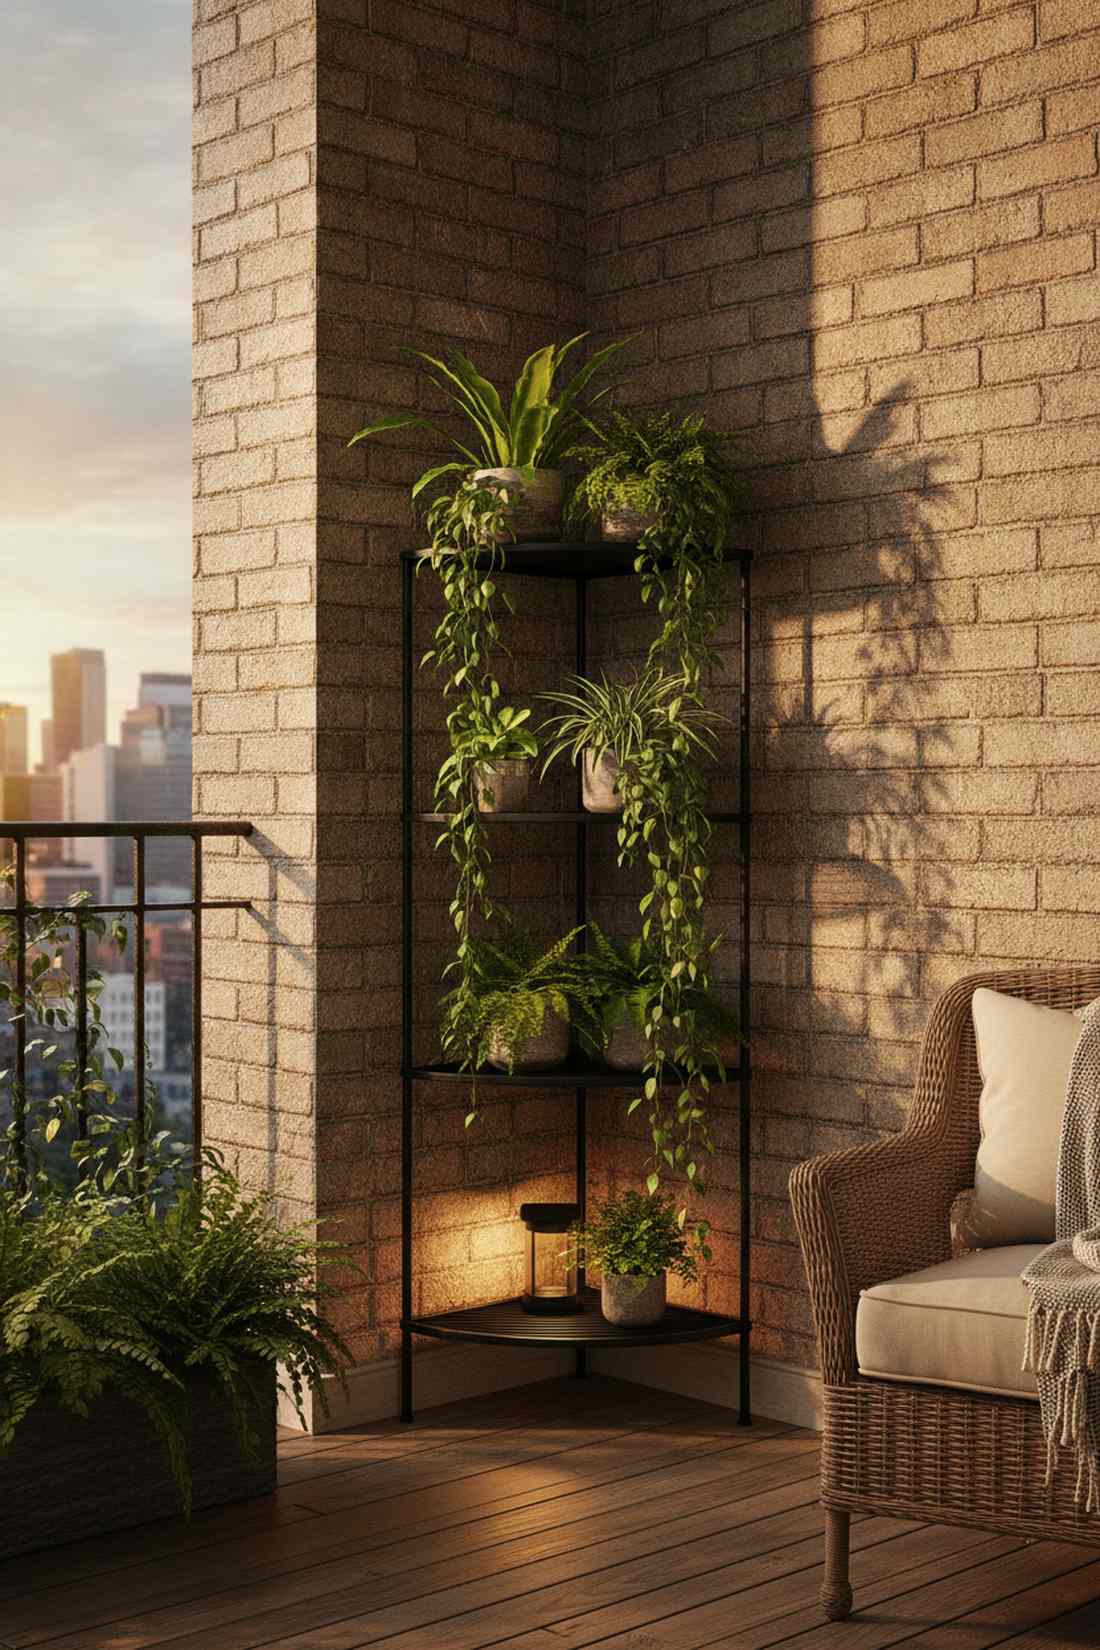
12. Corner Shelf Units
Transforming a dark, forgotten corner into a towering display of lush greens feels incredibly rewarding. Quarter-round corner shelving units perfectly hug the 90-degree angles of your balcony perimeter. Excellent for squeezing every last drop of square footage out of tiny apartment layouts.
Leaving corners empty is a massive waste of real estate, and tailored geometric shelving fixes the issue beautifully. Utilizing tiered quarter-circle racks naturally draws the eye upward, giving a designer-level finish to an otherwise awkward dead space. Stocking the shelves with low-light tolerant ferns ensures the display stays vibrant even in the shadows.
A solid outdoor corner rack usually costs around $45–$80. A must-do upgrade that completely changes the vibe.
- Key Materials: Wrought iron corner rack, shade plants
- Vibe / Style: Hidden Victorian alcove
- Difficulty: Easy out-of-box setup
- Budget Breakdown: Corner Rack: $55 | Foliage: $25
- Creator’s Tip: Place a small LED uplight on the bottom shelf pointing upward to cast dramatic shadows on the wall at night.
- Smart Sourcing: Rust-resistant metal corner plant stands and solar-powered outdoor up-lights (2-pack).
13. Rotating Vertical Planters
Watching a towering cylinder of herbs gracefully spin to catch the morning rays is pure gardening luxury. Lazy-Susan style rotating planters solve the dreaded “dark side” problem of balcony growing. Perfect for cultivating perfectly symmetrical, sun-drenched basil and cilantro.
Static towers always leave one side of your plants reaching awkwardly for the light, but a simple swivel mechanism prevents lopsided growth. Mounting a high-capacity column onto a marine-grade bearing delivers a surprisingly premium, effortless rotation. This elegant motion ensures your miniature garden supplies get perfectly even UV exposure without lifting heavy pots.
Building or buying a spinning planter tower runs about $60–$95. Save this brilliant sun-chasing hack to your DIY board!
- Key Materials: Cylindrical tower planter, heavy-duty swivel base
- Vibe / Style: High-end culinary studio
- Difficulty: Moderate assembly
- Budget Breakdown: Tower Kit: $50 | Swivel Base: $20
- Creator’s Tip: Give the tower a quarter turn every time you water to guarantee perfectly symmetrical, bushy plant growth.
- Smart Sourcing: Heavy-duty stainless steel lazy susan hardware and stackable cylindrical planter pods.
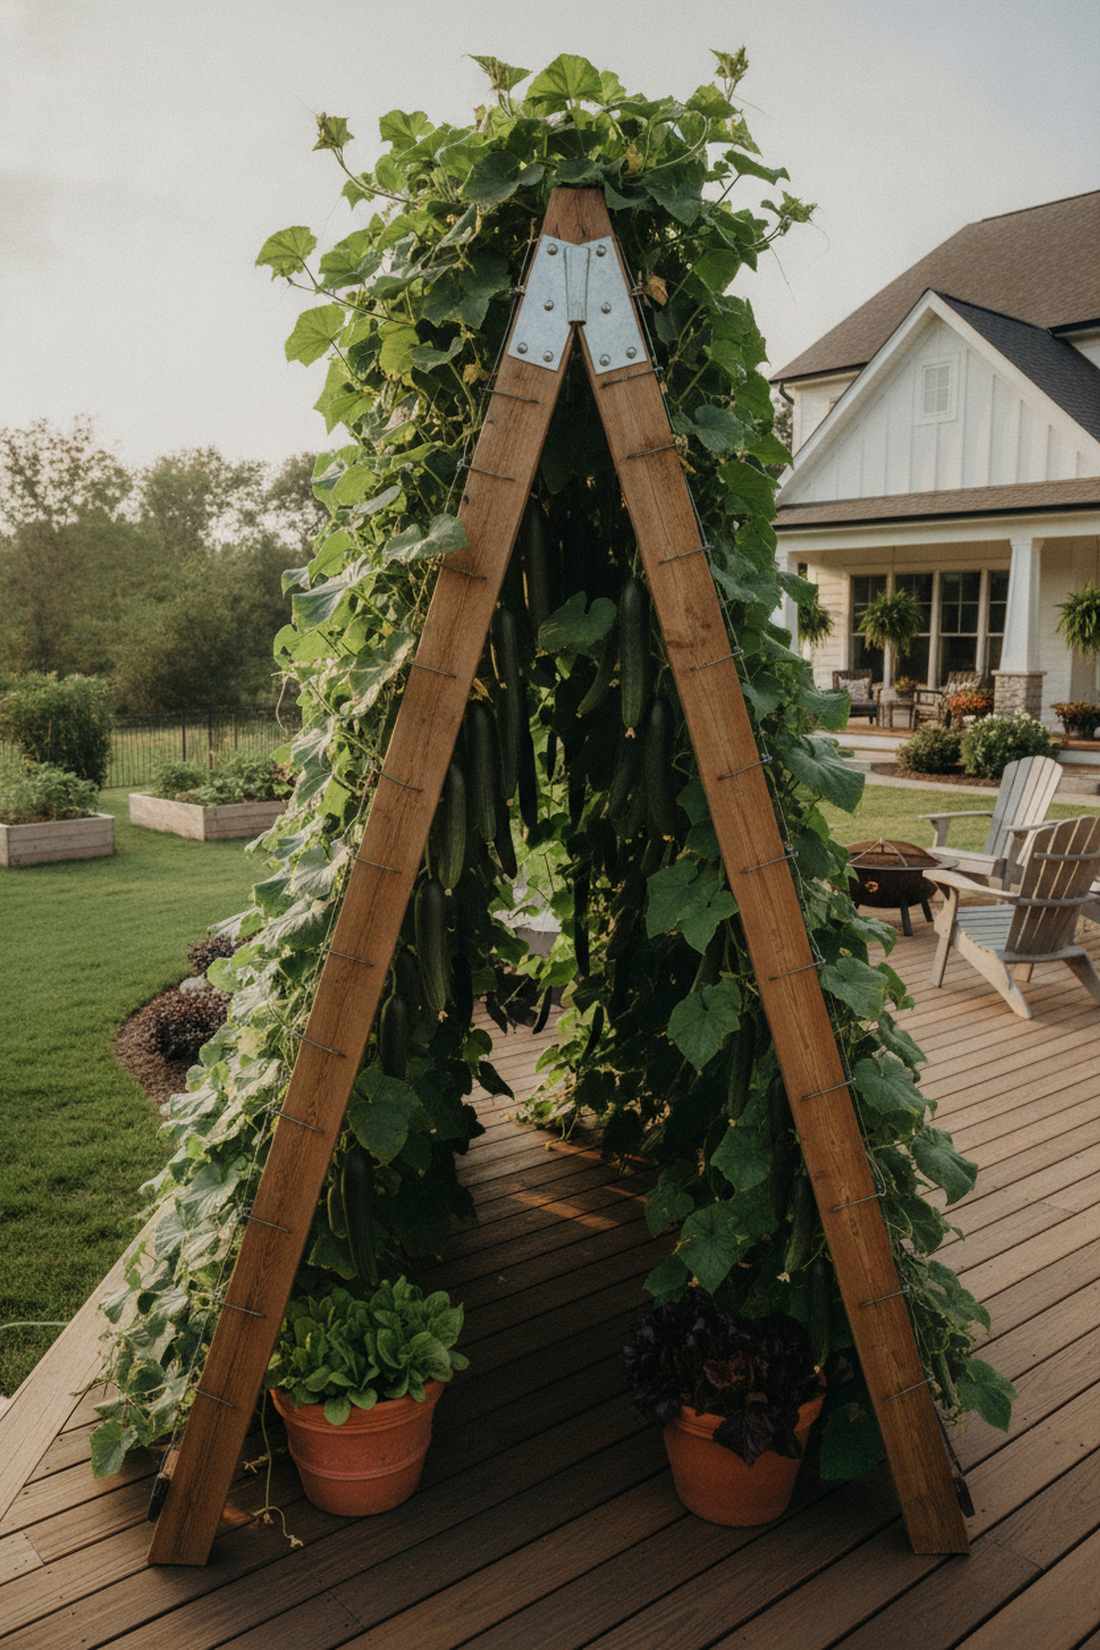
14. A-Frame Trellis Structures
A lush, green tent bursting with hanging cucumbers feels like a magical living fort on your deck. Freestanding A-frame trellises offer massive dual-sided growing capacity without needing a wall to lean on. Ideal for renters who want heavy vegetable yields without property damage.
Flimsy stakes fall over in strong winds, but a wide-stance geometric A-frame remains virtually tip-proof. Running heavy jute twine or welded wire over a wooden spine looks far more expensive than it is. The open canopy underneath creates a cool, shaded microclimate perfect for stashing delicate leafy greens.
You can construct a rugged cedar A-frame for roughly $40–$65. Pin this if you’re dreaming of a massive summer harvest!
- Key Materials: Cedar lumber strips, galvanized hinges
- Vibe / Style: Bountiful urban farm
- Difficulty: Intermediate woodworking
- Budget Breakdown: Wood & Hinges: $35 | Wire Mesh: $20
- Creator’s Tip: Use galvanized door hinges at the top peak so you can easily fold the trellis flat and store it during the winter.
- Smart Sourcing: Heavy-duty galvanized strap hinges (bulk pack) and UV-coated nylon trellis netting.
Skip the expensive nurseries. The blueprint below shows exactly how to fake a high-end luxury aesthetic for under $40.
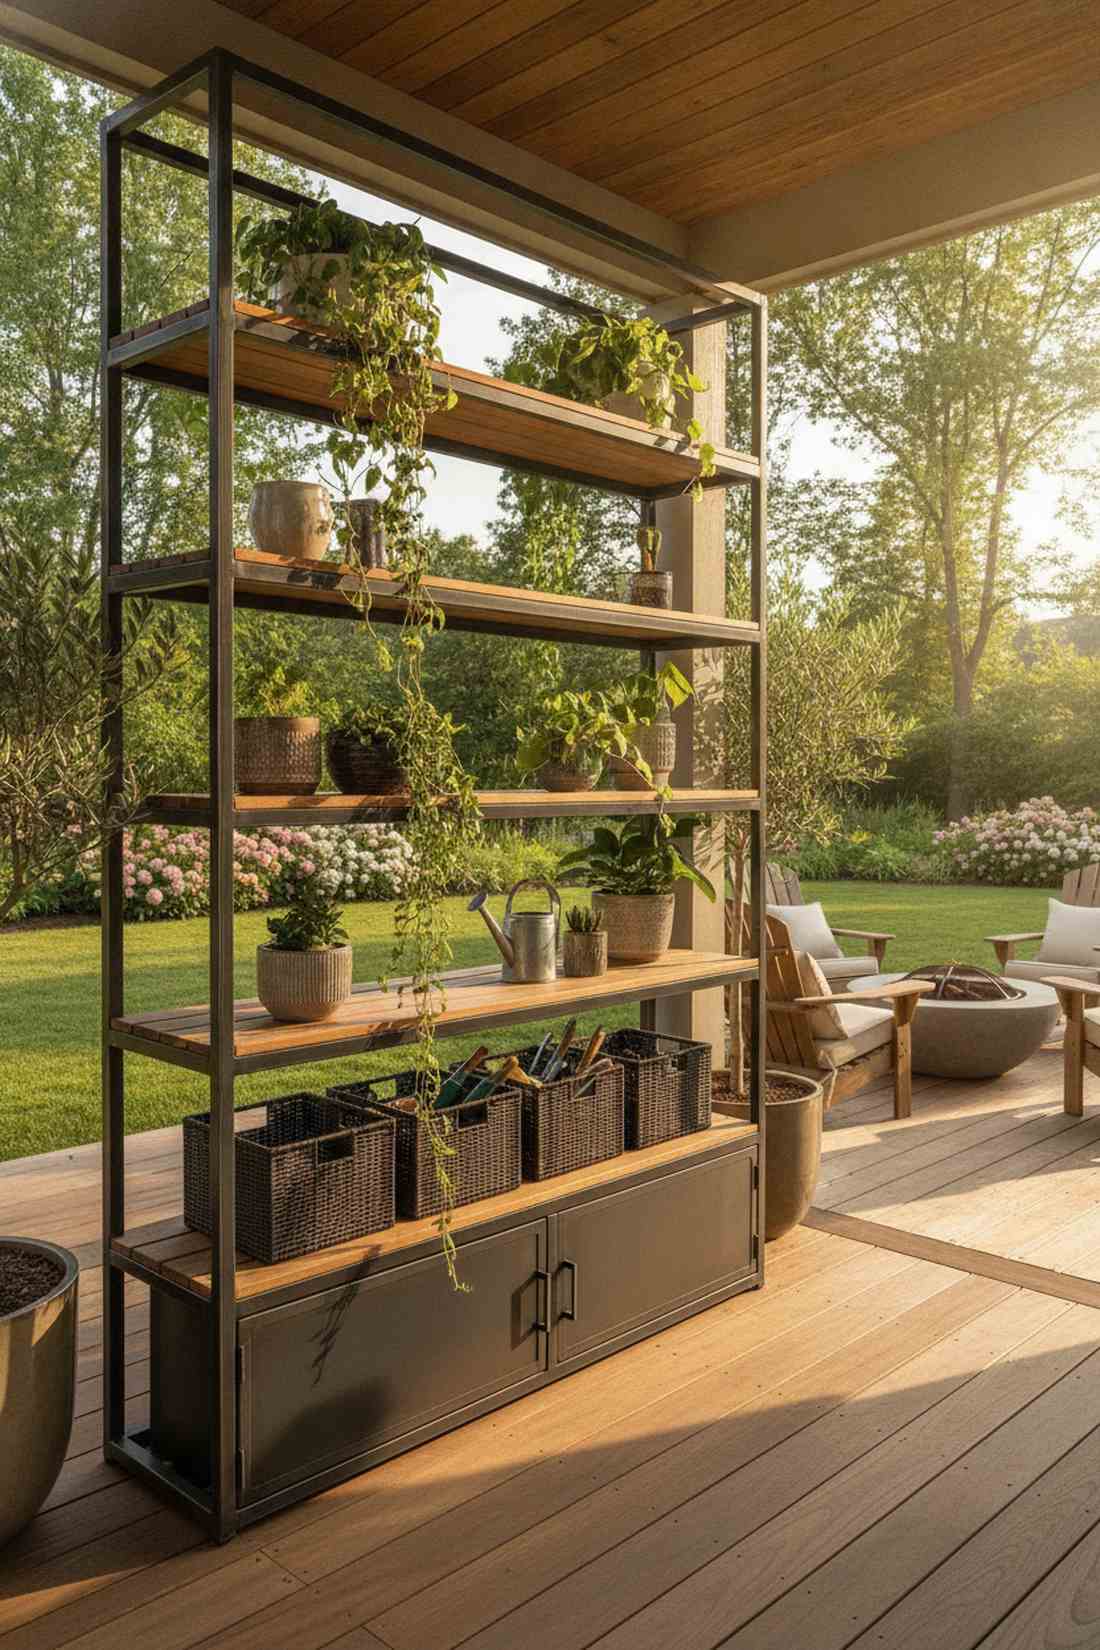
15. Bookshelf-Style Plant Racks
Organizing trailing vines like a curated library brings a deep sense of order and calm to the outdoors. Industrial outdoor bookshelf racks offer vast horizontal staging areas for diverse container collections. It operates beautifully as an elevated display for a chic vertical garden apartment.
Tucking ugly bags of fertilizer into a corner ruins the vibe, but integrated shelving with bottom cabinet doors hides the mess perfectly. Using galvanized steel framing combined with slatted wood gives a designer-level finish that rivals high-end furniture stores. Coating the entire unit in clear weatherproofing stops rust before it can even start.
A stylish outdoor bookshelf unit generally costs between $75–$120. Highly recommended for keeping your patio flawlessly organized.
- Key Materials: Galvanized steel shelving, wooden slat inserts
- Vibe / Style: Modern botanical library
- Difficulty: Easy flat-pack assembly
- Budget Breakdown: Shelf Unit: $85 | Weatherproofing: $15
- Creator’s Tip: Store your watering can, pruners, and soil scoops in matching woven baskets on the lowest shelf for hidden functionality.
- Smart Sourcing: Rust-resistant galvanized shelving units (3-tier) and weatherproof woven storage baskets (set of 3).
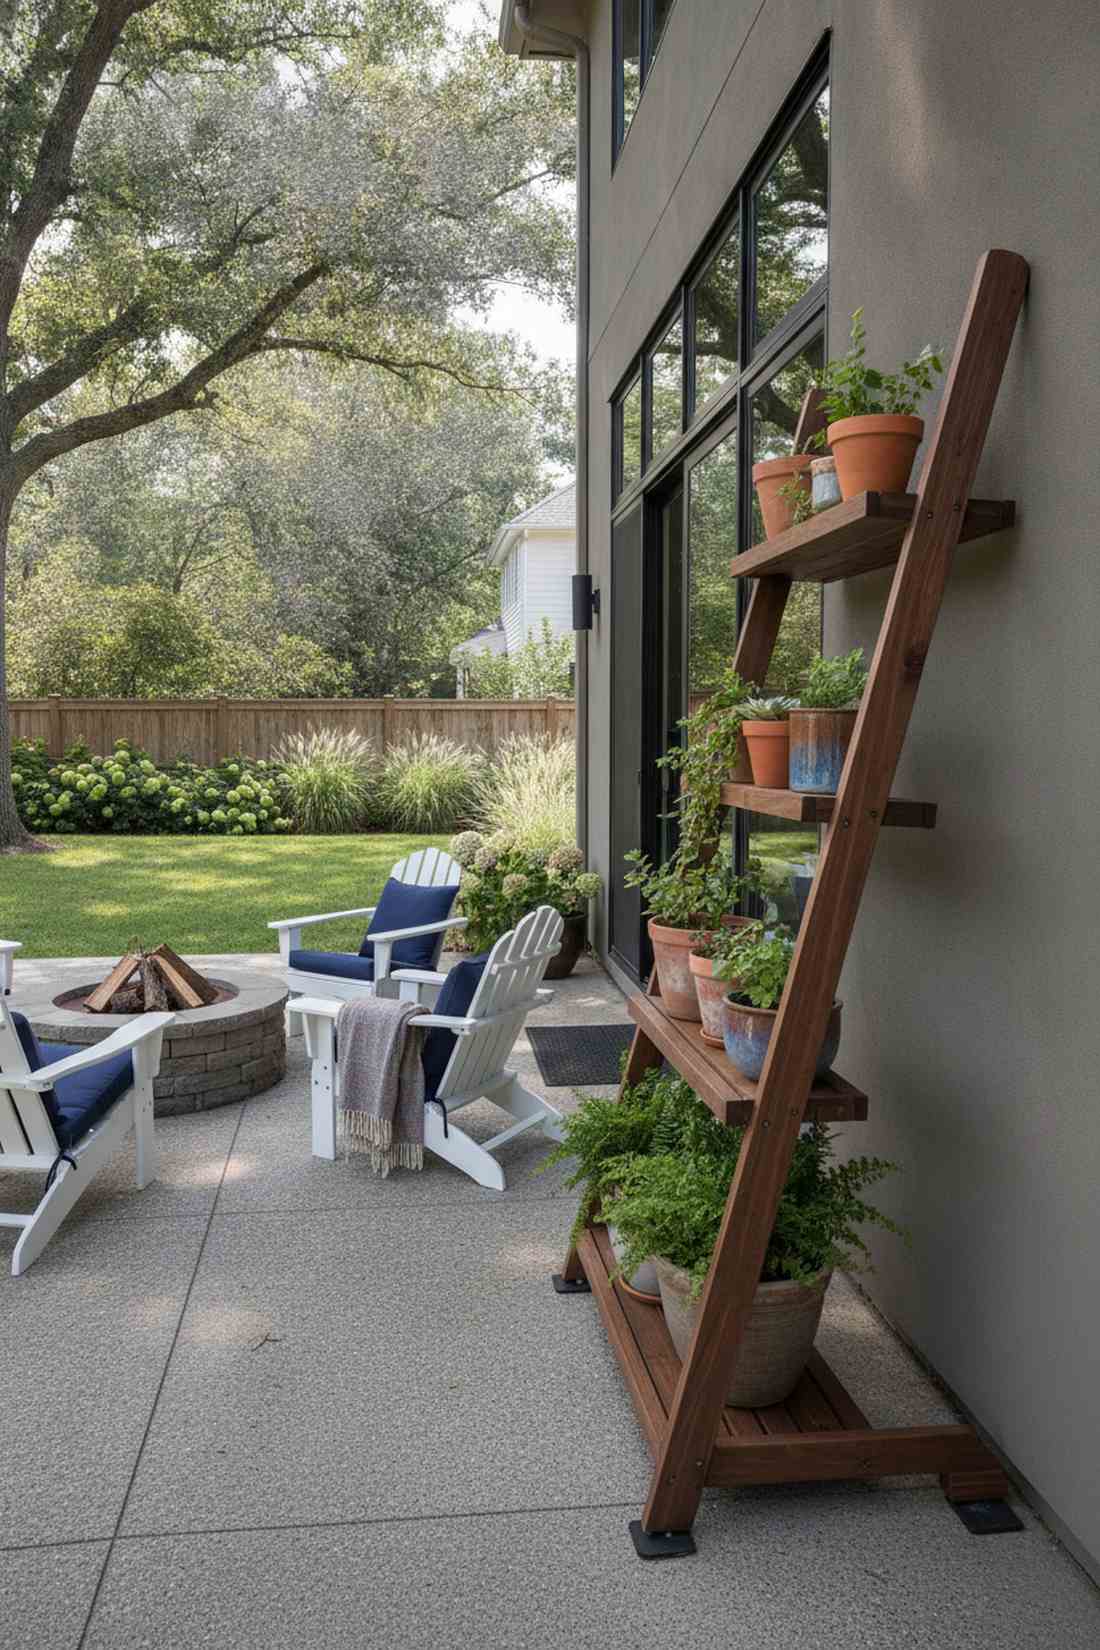
16. Wall-Leaning Planter Frames
This layout feels impossibly sleek, appearing to balance by pure magic against your exterior wall. Angled leaning planter frames provide staggered vertical shelves without drilling a single hole. Perfect for strict lease agreements that penalize any permanent patio modifications.
Wobbly DIY shelves often end in shattered clay pots, but an engineered, wide-base leaning frame locks firmly against the architecture. Staining the wood frame a deep walnut tone delivers a surprisingly premium look that anchors the space. Adding subtle anti-slip rubber pads to the feet guarantees it won’t slide on wet concrete.
You can buy or build this secure leaning frame for around $50–$80. Save this to your renter-friendly home upgrade board!
- Key Materials: Angled wood frame, rubber anti-slip feet
- Vibe / Style: Sleek Scandinavian design
- Difficulty: Quick setup
- Budget Breakdown: Leaning Frame: $60 | Rubber Feet: $5
- Creator’s Tip: Keep the heaviest, widest pots on the lowest shelf to significantly lower the center of gravity and increase stability.
- Smart Sourcing: Pre-assembled leaning ladder planters and heavy-duty rubber anti-slip adhesive pads (bulk pack).
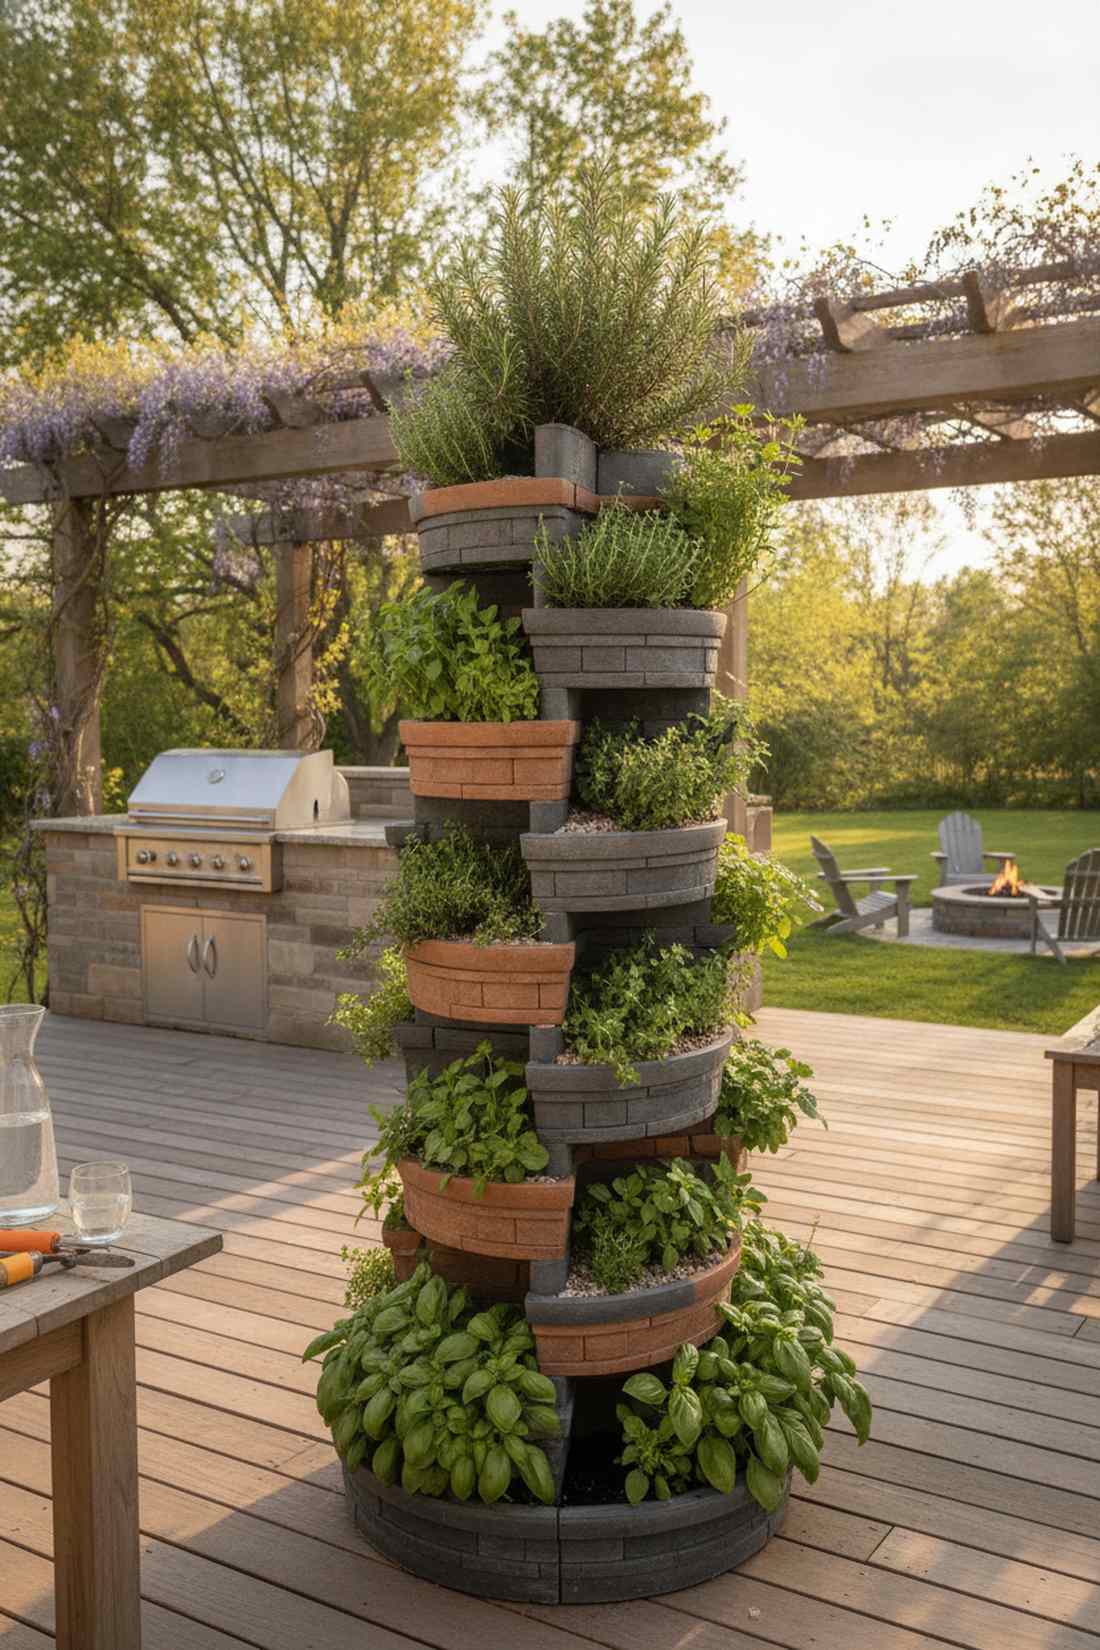
17. Vertical Herb Spiral Towers
There is something mesmerizing about a twisting, living sculpture overflowing with aromatic greens. Helical herb spiral towers create varying micro-climates that perfectly cater to different culinary plants. A brilliant, striking centerpiece for any sun-drenched outdoor cooking zone.
Flat boxes waste water, but a spiraling descent naturally channels excess moisture down to the thirsty plants at the base. Utilizing UV-resistant architectural plastics or stacked stone looks far more expensive than it actually is. Positioning drought-hardy rosemary at the top and basil at the bottom creates an incredibly efficient ecosystem.
Building a striking spiral herb tower costs roughly $55–$90. It’s a fast upgrade that completely changes the vibe of your dinners.
- Key Materials: Spiral tower kit, diverse herb seedlings
- Vibe / Style: Avant-garde culinary garden
- Difficulty: Fun afternoon project
- Budget Breakdown: Spiral Base: $65 | Herb Starts: $25
- Creator’s Tip: Pack the core of the spiral with small gravel before adding soil to ensure flawless drainage from top to bottom.
- Smart Sourcing: Pre-formed vertical herb spiral planter kits and organic culinary herb seed starter packs.
18. Pallet Gardens
Reclaiming industrial timber to build a lush green wall feels like the ultimate eco-friendly flex. Upcycled shipping pallet planters offer massive planting volume within a rugged, weathered frame. Works beautifully for cultivating a dense, textured succulent display.
Leaving raw wood exposed leads to rapid rotting, but lining the internal slats with landscape fabric completely solves the moisture issue. Sanding down the splinters and sealing the wood delivers a surprisingly premium, boutique-nursery aesthetic. Stapling thick plastic backing ensures no dirty water stains the wall behind it.
You can execute this heavy-duty upcycle project for under $25! Pin this genius budget layout to your weekend DIY board.
- Key Materials: Heat-treated pallet, heavy landscape fabric
- Vibe / Style: Urban industrial chic
- Difficulty: Moderate DIY labor
- Budget Breakdown: Wood Pallet: $0 | Fabric & Staples: $20
- Creator’s Tip: Only use pallets stamped with ‘HT’ (Heat Treated). Avoid pallets marked ‘MB’, as they are treated with toxic chemicals.
- Smart Sourcing: Heavy-duty non-woven landscape fabric (bulk roll) and commercial-grade heavy duty staple guns.
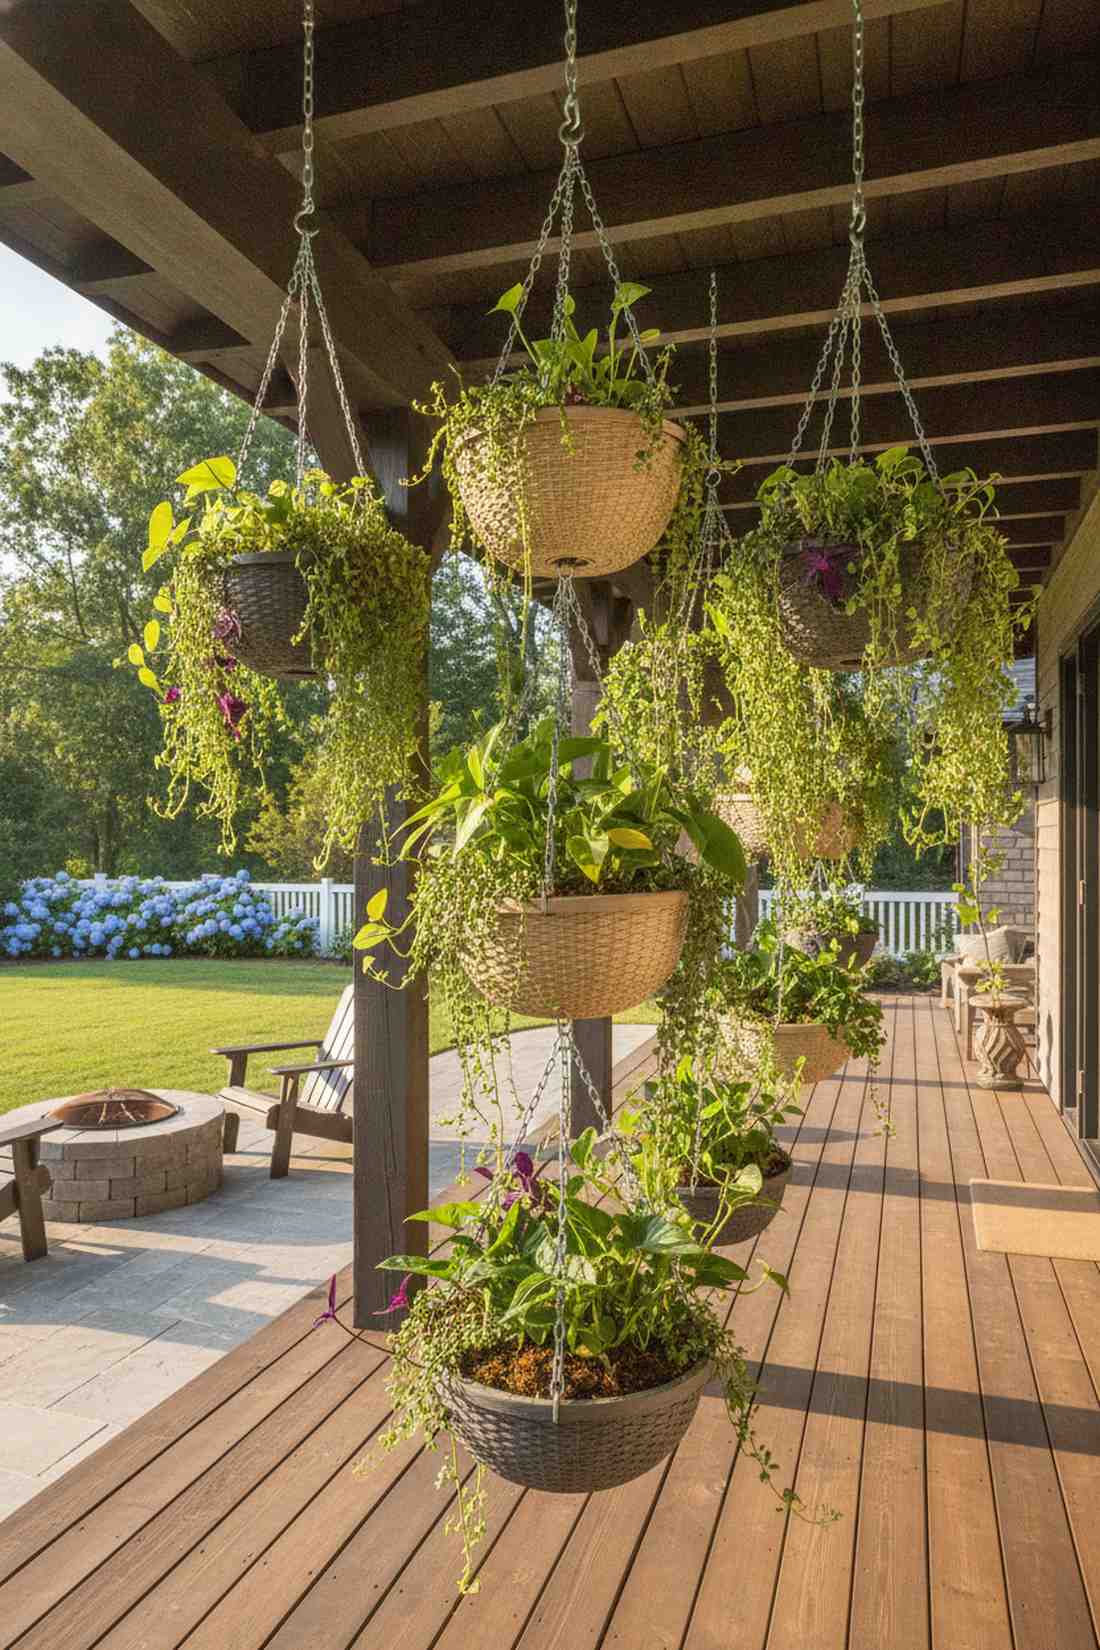
19. Hanging Basket Walls
A cascading curtain of greenery suspended in mid-air transforms an ordinary patio into a floating jungle. Multi-tier hanging basket systems utilize empty ceiling space to create a dense canopy of trailing leaves. Flawless for balconies with sturdy overhead overhangs or exposed beams.
Using cheap plastic hooks is a recipe for disaster, but heavy-duty macramé or galvanized steel chains lock everything securely in place. Staggering the drop lengths of your woven baskets gives a designer-level finish and prevents the plants from shading each other. Incorporating deep-dish drip trays means you won’t soak your downstairs neighbor.
A stunning three-tier hanging display typically costs around $35–$60. Highly recommended for creating an immersive, shaded retreat.
- Key Materials: Steel hanging chains, woven resin baskets
- Vibe / Style: Tropical floating oasis
- Difficulty: Easy overhead mounting
- Budget Breakdown: Baskets & Chains: $40 | Ceiling Hooks: $10
- Creator’s Tip: Line wire baskets with real sphagnum moss before adding soil; it holds moisture incredibly well and looks extremely high-end.
- Smart Sourcing: Pre-cut preserved moss sheets (bulk pack) and heavy-duty ceiling swivel hooks (weatherproof).
Most Pinterest boards hide the actual cost of their setups… until you see the genius budget breakdown coming up next.
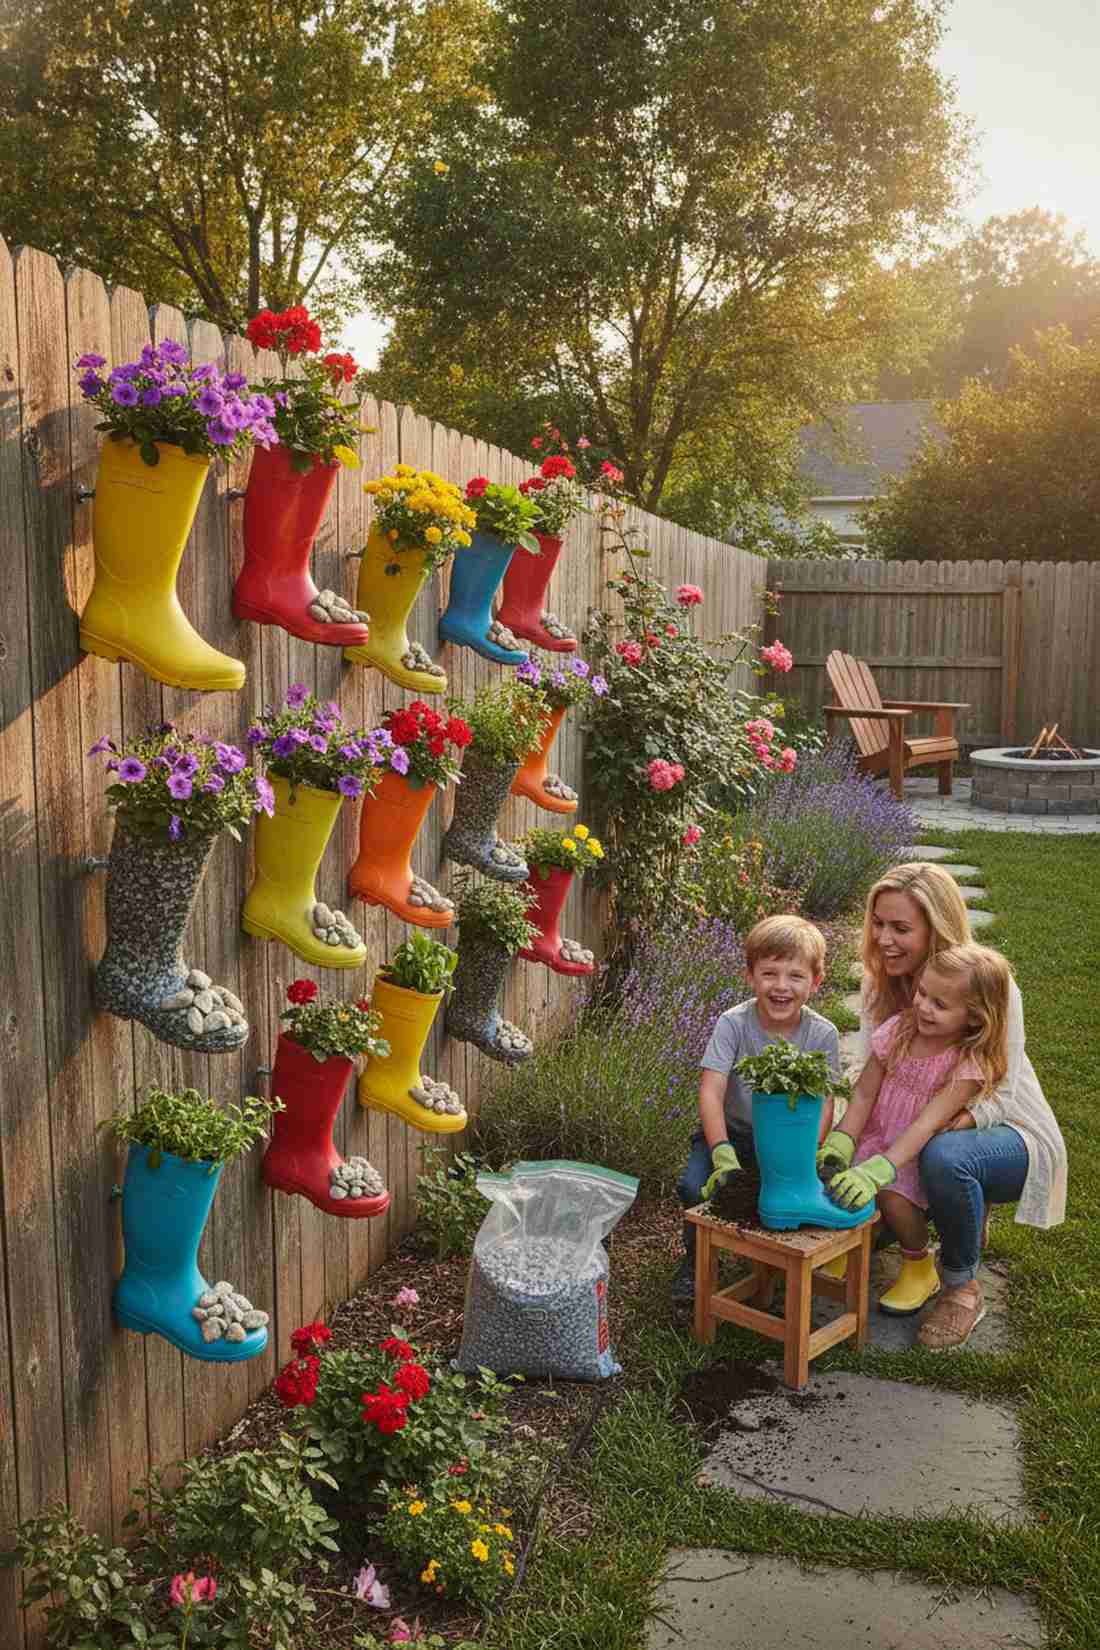
20. Rain Boot Planters
This quirky layout brings a massive pop of playful color and feels straight out of a children’s fairy tale. Repurposed colorful rain boot planters securely anchored to a fence add instant, whimsical charm. A fantastic, engaging project to get kids excited about balcony gardening.
Leaving the soles intact will drown your flowers, but drilling aggressive drainage holes turns them into perfect deep-root containers. Bolting neon yellow or cherry-red boots in a staggered pattern looks far more expensive and artistic than generic plastic pots. Filling the toe space with gravel keeps the center of gravity extremely low.
You can thrift these materials and build the whole display for under $15. Save this adorable idea for your next family craft day!
- Key Materials: Old rubber boots, gravel, screws
- Vibe / Style: Playful cottage garden
- Difficulty: Fun beginner upcycle
- Budget Breakdown: Thrifted Boots: $10 | Hardware: $5
- Creator’s Tip: Place a heavy rock or a handful of coarse gravel in the toe of the boot before adding soil to prevent wind blow-overs.
- Smart Sourcing: Coarse drainage gravel stones (bulk bag) and rust-proof outdoor mounting screws.
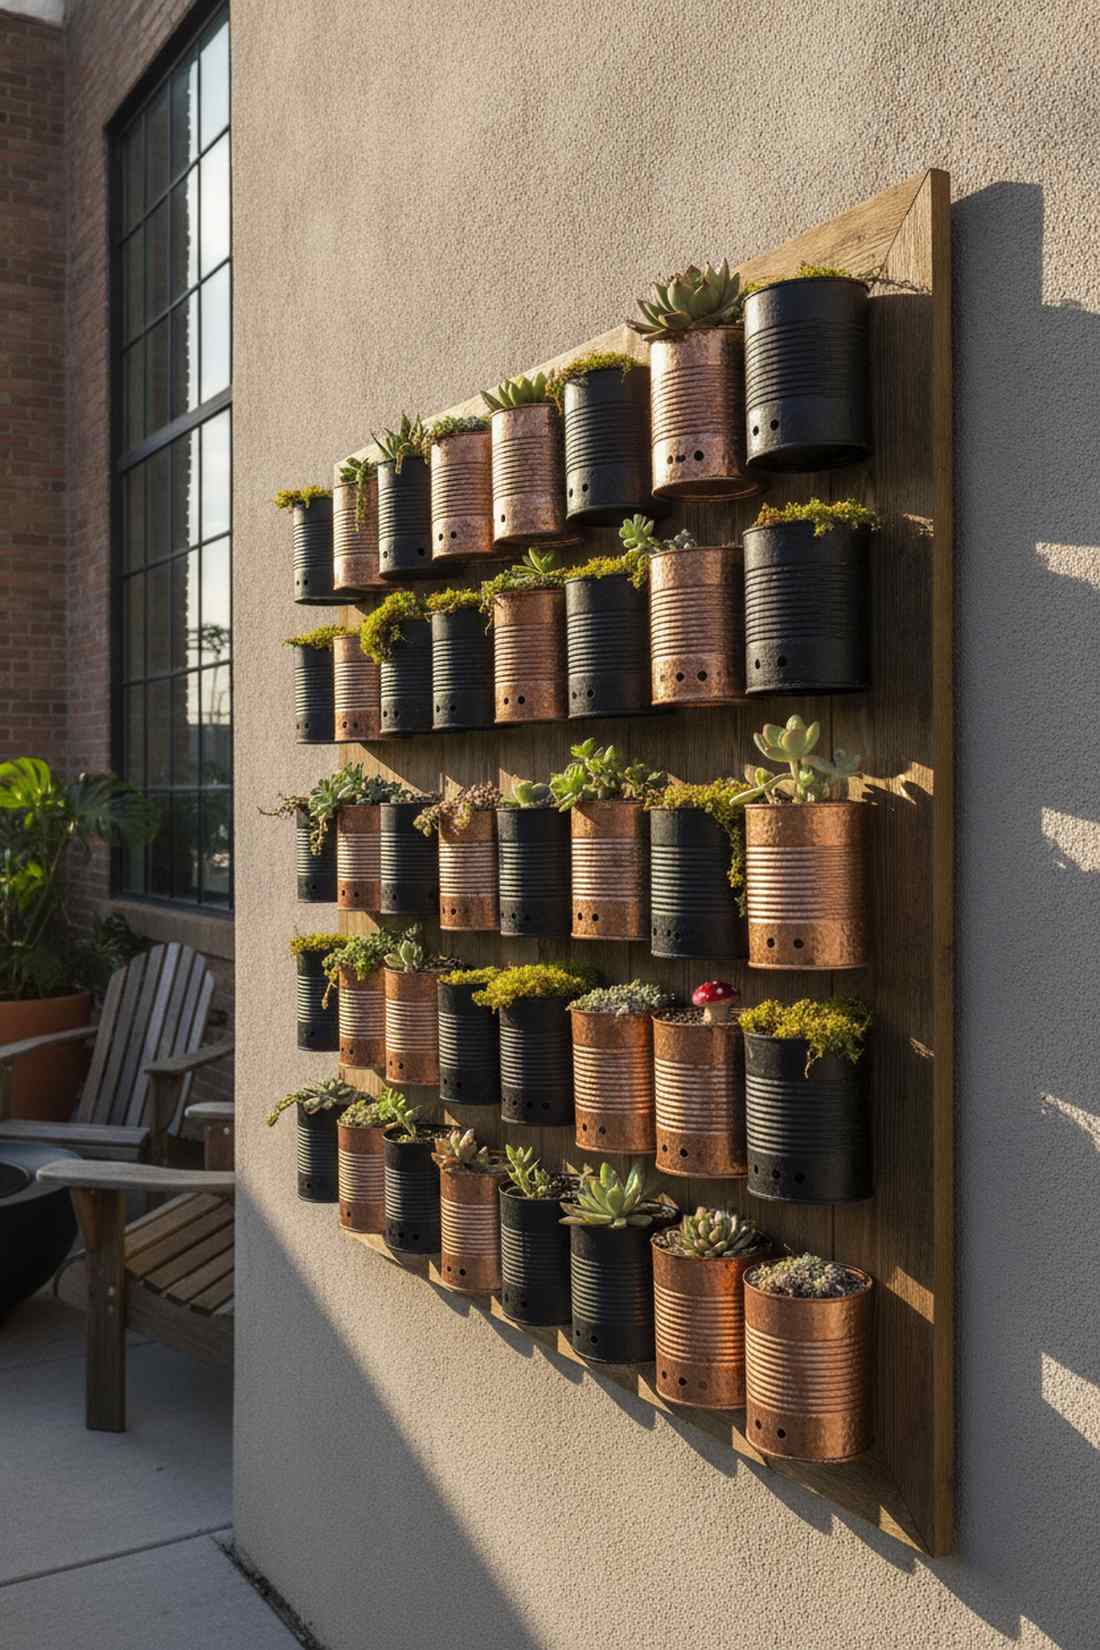
21. Tin Can Wall Gardens
Turning trash into a glowing, metallic art display feels like the ultimate urban gardening victory. Upcycled tin can wall arrays create an eye-catching, highly organized grid for shallow-rooted succulents and herbs. Brilliant for achieving a gritty, industrial aesthetic on a near-zero budget.
Raw cans rust out in weeks, but coating them in striking matte black or hammered-copper spray paint delivers a surprisingly premium look. Punching sharp drainage holes and mounting them flush against a treated wood plank ensures the metals won’t scratch your stucco. This is the perfect staging area for tiny terrarium accessories and vibrant mosses.
This entire upcycled grid can easily be executed for $10–$20. It’s a fast upgrade that completely changes the vibe.
- Key Materials: Cleaned metal cans, rust-preventive spray paint
- Vibe / Style: Gritty urban loft
- Difficulty: Easy crafting
- Budget Breakdown: Cans: $0 | Paint & Screws: $15
- Creator’s Tip: Use a standard nail and hammer to punch three holes in the bottom of each can from the inside out so the sharp metal edges point safely downward.
- Smart Sourcing: Rust-inhibiting outdoor spray paint (matte finish) and premium indoor terrarium accessories.
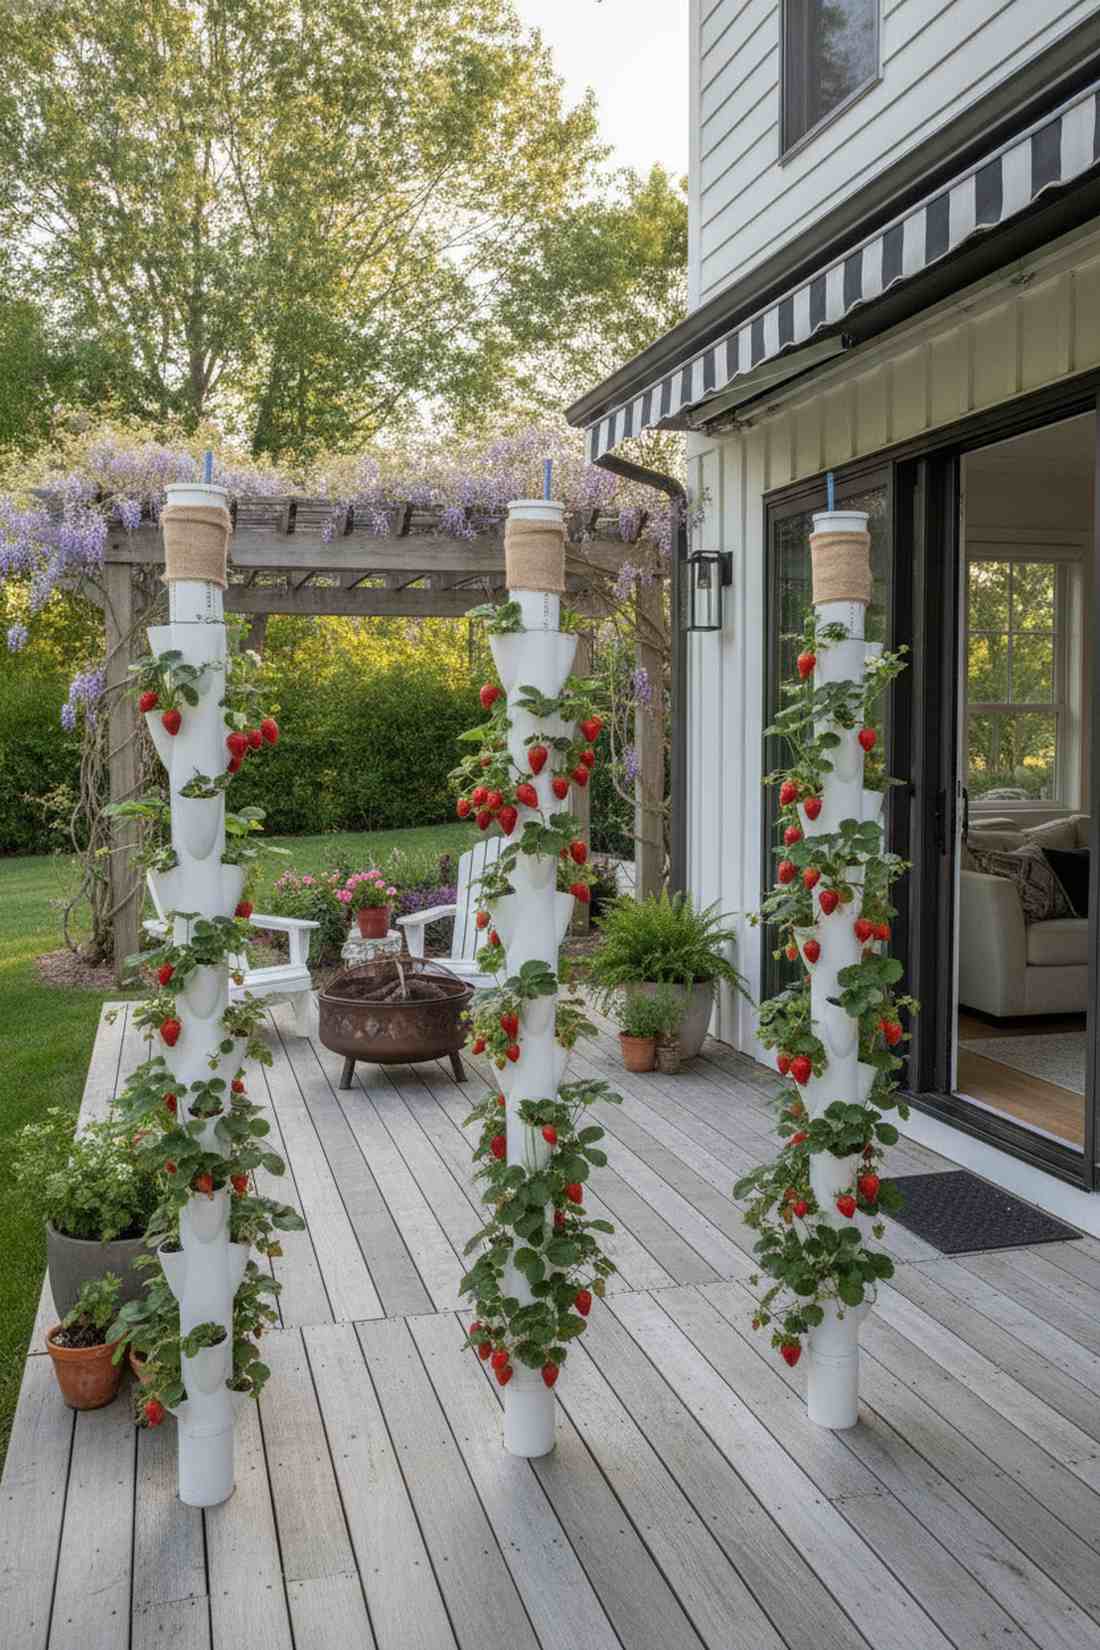
22. PVC Pipe Towers
This sleek white pillar of bursting strawberries feels like a high-tech agricultural marvel right on your patio. Drilled PVC pipe vertical towers maximize a tiny footprint to hold dozens of thriving plants. Exceptional for renters craving high-volume berry production.
Standard pots limit your harvest, but an engineered 4-inch plumbing pipe looks far more expensive than it is when densely planted. Slicing strategic heat-bent pockets into the plastic creates perfect, secure nesting spots for fragile root systems. Adding a central drip-line tube down the middle guarantees perfectly even watering from top to bottom.
Building a high-yield pipe tower usually runs about $25–$40. Pin this genius layout if you want to maximize your crop yields!
- Key Materials: 4-inch PVC pipe, heat gun, central watering tube
- Vibe / Style: Streamlined modern farm
- Difficulty: Intermediate DIY fabrication
- Budget Breakdown: PVC & Caps: $20 | Soil & Plants: $15
- Creator’s Tip: Wrap the central 1-inch watering tube in burlap or shade cloth before inserting it, which stops the drainage holes from clogging with soil.
- Smart Sourcing: Pre-drilled PVC vertical garden tower kits and commercial-grade drip irrigation starter kits.
23. Picture Frame Succulent Walls
A framed mosaic of living succulents feels like stepping into an exclusive modern art gallery. Deep shadow-box succulent frames turn low-maintenance desert plants into breathtaking, vibrant wall art. Flawless for a hot, sunny patio that bakes delicate flowers.
Without support, dirt and plants fall out immediately, but rigid wire mesh backed by landscaping fabric holds everything flawlessly in place. Packing the dense geometric grid with premium miniature garden supplies gives a designer-level finish. Allowing the plants to root flat for three weeks before hanging ensures a zero-mess vertical display.
You can craft a stunning living picture for around $30–$55. Highly recommended for a high-impact, low-maintenance showpiece.
- Key Materials: Wooden shadow box, wire mesh, sphagnum moss
- Vibe / Style: High-end botanical gallery
- Difficulty: Patient crafting required
- Budget Breakdown: Frame & Mesh: $25 | Succulent Cuttings: $20
- Creator’s Tip: Pack the frame tightly with pre-moistened sphagnum moss rather than traditional soil to keep the wall art incredibly lightweight and secure.
- Smart Sourcing: Pre-cut shadow box succulent frame kits and premium miniature garden supplies (succulent food).
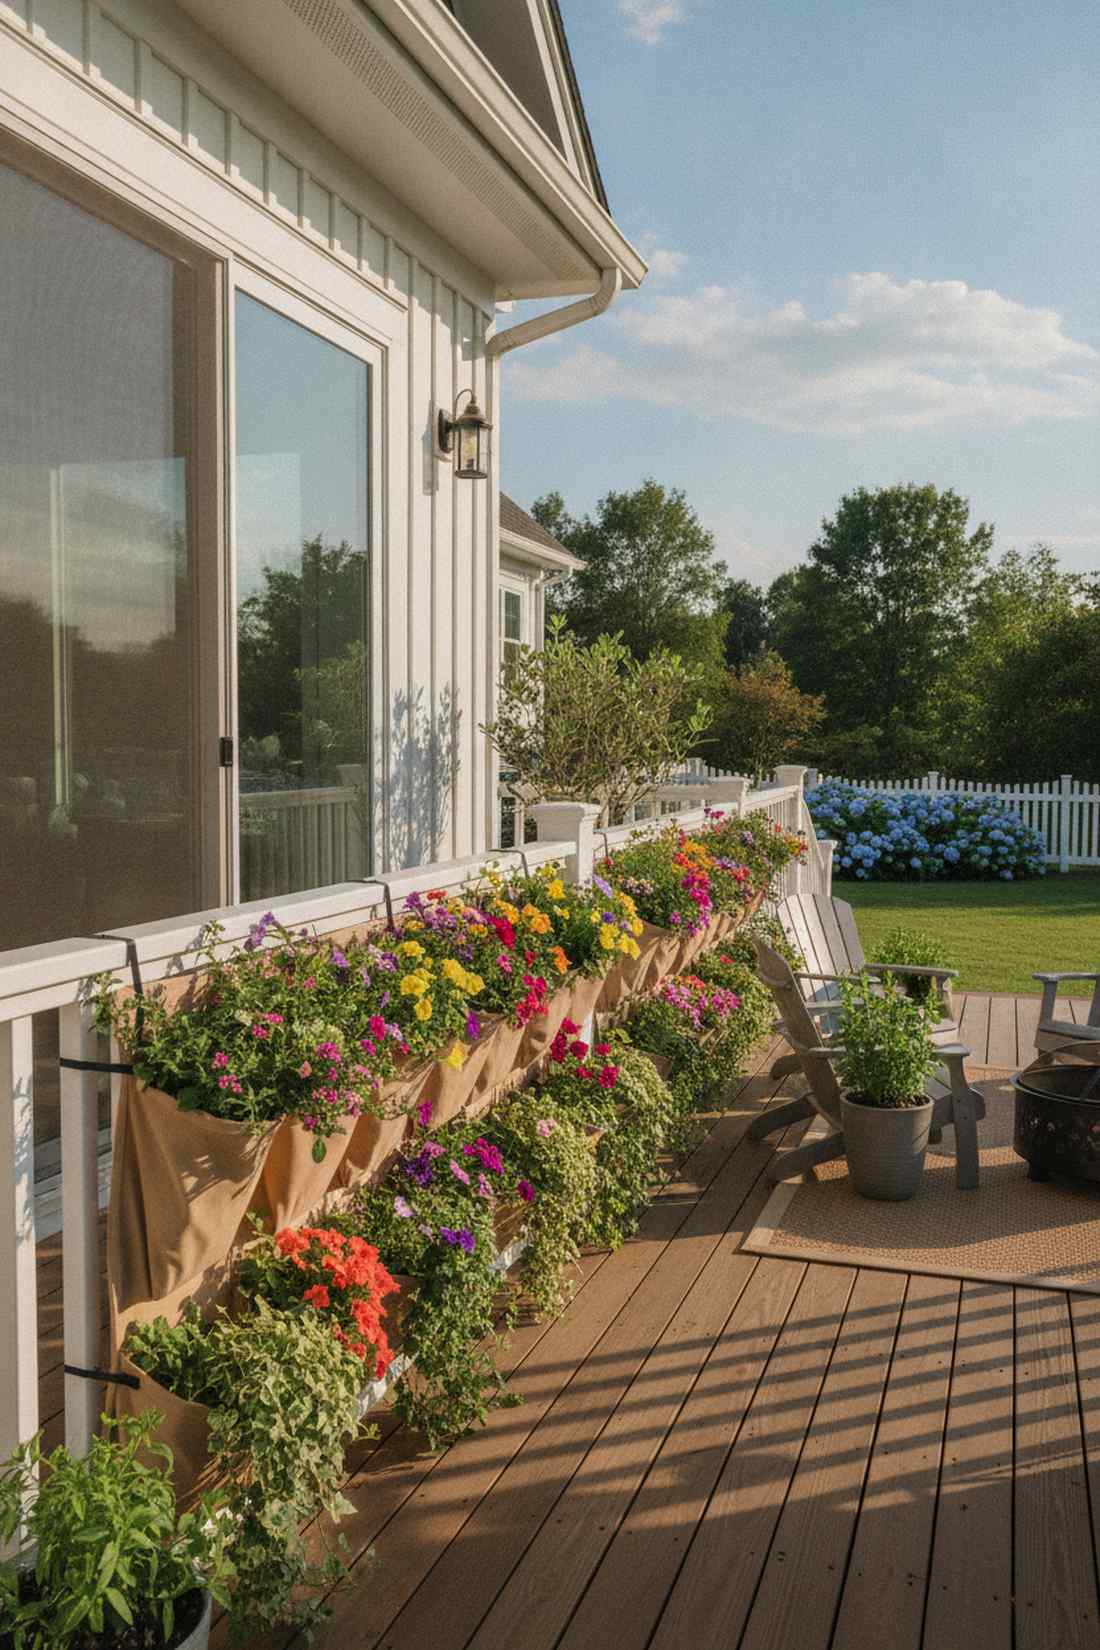
24. Shoe Organizer Planters
This layout feels like a vibrant living tapestry right outside your sliding glass door. A repurposed hanging pocket canvas transforms dead railing space into a cascading floral display. Works exceptionally well for a vertical garden patio craving an explosion of color.
Don’t settle for cheap clear plastics that rot in the sun; an outdoor-grade breathable canvas elevates the entire aesthetic. Simply load the pouches with moisture-retaining potting mix and vibrant trailing annuals. Grabbing heavy-duty zip ties ensures the fabric wall stays secure during severe wind gusts.
You can execute this ultra-fast weekend project for roughly $20–$35. It’s a rapid upgrade that completely changes the vibe.
- Key Materials: Heavy canvas shoe organizer, zip ties
- Vibe / Style: Lush cascading canopy
- Difficulty: Zero-tool instant hang
- Budget Breakdown: Canvas Organizer: $15 | Seeds & Soil: $15
- Creator’s Tip: Pierce two tiny drainage holes at the bottom of every fabric pouch using a hot nail to prevent root rot.
- Smart Sourcing: UV-resistant canvas pocket organizers (heavy duty) and moisture-control potting soil mix (bulk pack).
Stop scrolling if you want a zero-maintenance layout—this upcoming trick changes the entire urban gardening game.
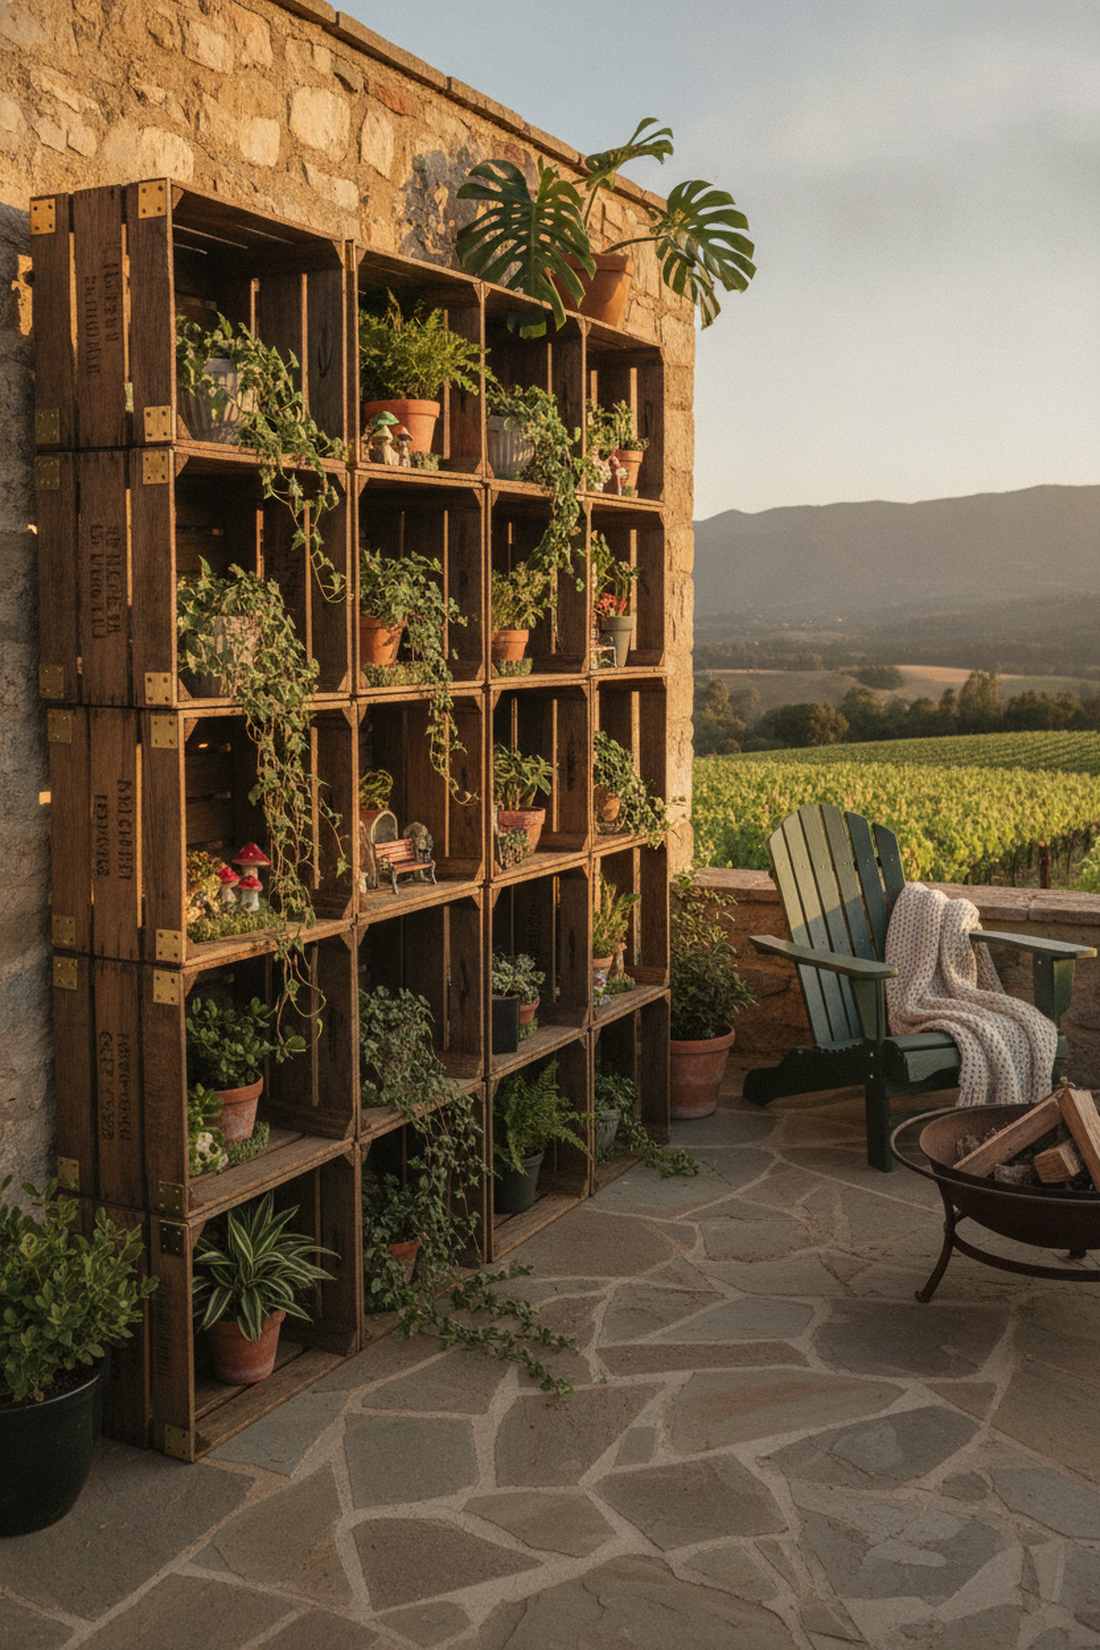
25. Wine Crate Shelving
Stacking branded, weathered wood boxes feels deeply grounded and effortlessly chic. Repurposed vintage wine crate shelving creates natural, deep compartments for organizing a massive plant collection. A beautiful staging ground for an eclectic, relaxed patio setup.
Flimsy cardboard or cheap balsa wood won’t survive a storm, but solid oak wine crates deliver a surprisingly premium, indestructible frame. Securing the boxes together with brass brackets looks far more expensive than it is while preventing accidental tip-overs. The varied compartment sizes naturally frame different fairy garden kits and trailing vines.
Sourcing and securing a crate wall typically runs about $30–$60. Save this idea if you love raw, textured wood aesthetics!
- Key Materials: Solid wood wine crates, brass mending plates
- Vibe / Style: Rustic vineyard terrace
- Difficulty: Easy stacking and screwing
- Budget Breakdown: Crates: $40 | Brass Hardware: $10
- Creator’s Tip: Treat the crates with boiled linseed oil to pop the wood grain and protect against rain damage without using toxic sealants.
- Smart Sourcing: Authentic wooden wine crates (bulk pack) and solid brass mending bracket kits.
Material Guide: Cheap vs. Premium Aesthetic
Knowing exactly where to save and where to spend makes all the difference in achieving that “looks expensive but isn’t” vibe on your balcony.
- Standard Plastics vs. UV-Resistant/Premium Resins: UV coatings prevent your containers from fading to a chalky white or cracking under intense summer heat, ensuring longevity.
- DIY Patchwork vs. Pre-made Starter Kits: Buying an all-in-one hydroponic or modular wall grid starter kit often saves money by eliminating the need to buy oversized bulk hardware you’ll never finish using.
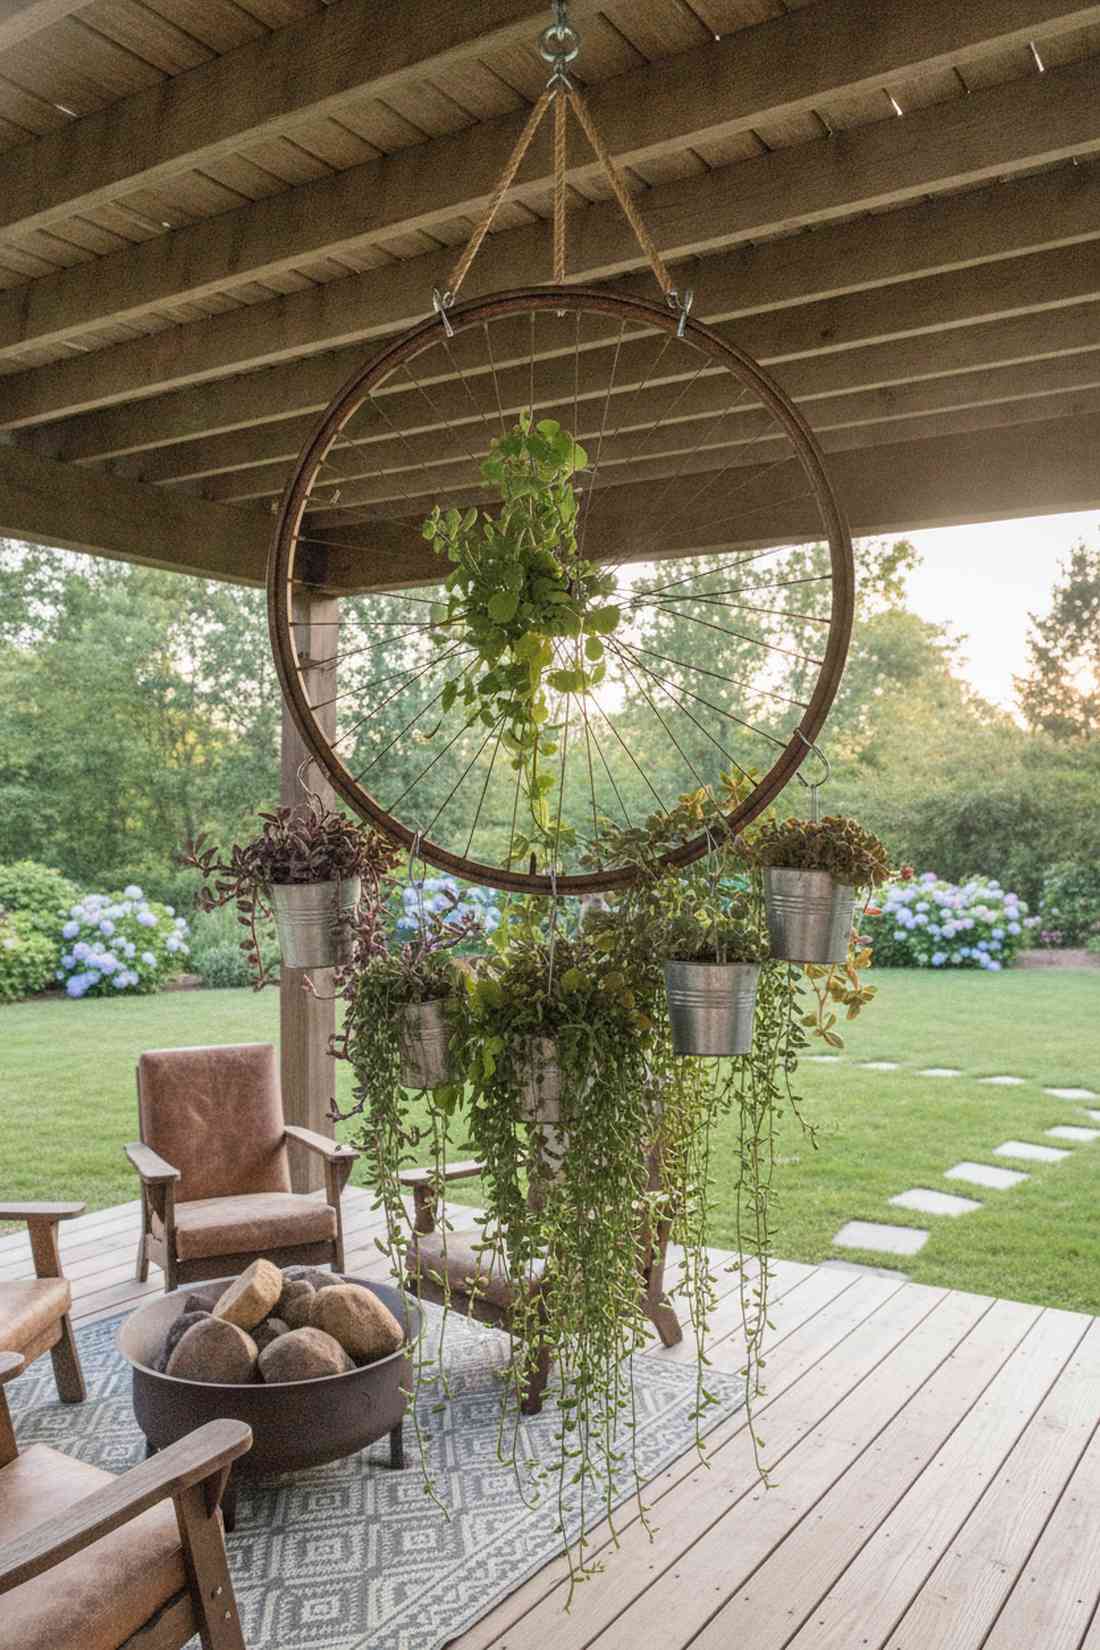
26. Bicycle Wheel Hanging Gardens
A suspended metallic wheel dripping with greenery feels like an edgy, brilliant piece of kinetic sculpture. Upcycled bicycle wheel hanging racks provide a striking, 360-degree overhead garden frame. Perfect for injecting an industrial, steampunk energy into your outdoor space.
Hanging individual pots from the ceiling requires too many holes, but suspending a single spoked rim creates a massive, unified hanging system. Zip-tying lightweight aluminum or tin pots to the spokes looks far more expensive and artistic than standard plastic baskets. Giving it a gentle spin ensures every single succulent gets its required sunlight.
You can thrift the parts and build this floating masterpiece for under $25. Pin this incredibly unique upcycle idea!
- Key Materials: Salvaged bike wheel, S-hooks, tin buckets
- Vibe / Style: Industrial steampunk kinetic
- Difficulty: Moderate hanging project
- Budget Breakdown: Thrifted Wheel: $10 | Hardware & Pots: $15
- Creator’s Tip: Use a heavy-duty swivel carabiner at the main ceiling anchor so the wheel can spin freely in the breeze without twisting the rope.
- Smart Sourcing: Heavy-duty stainless steel S-hooks (multi-pack) and galvanized tin planter buckets (starter set).
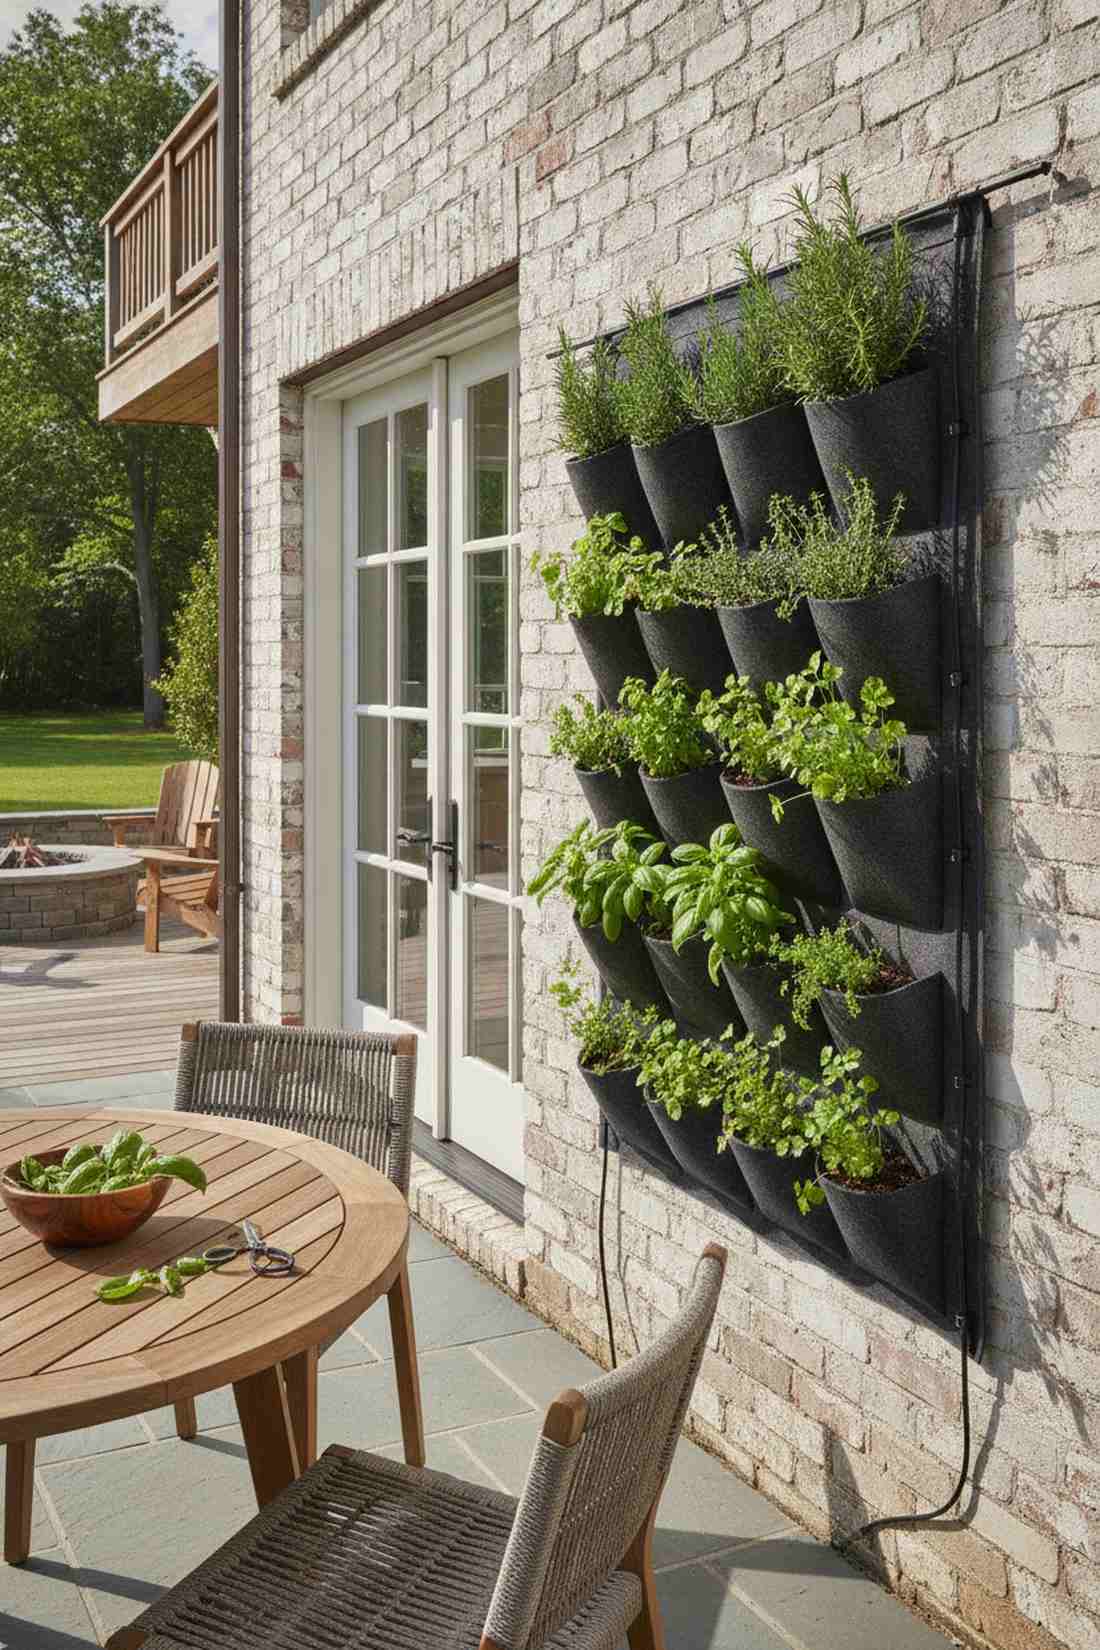
27. Vertical Herb Garden Walls
Stepping right out of your kitchen to harvest fresh basil feels like an absolute culinary dream. Dedicated vertical herb pocket walls concentrate intense aromas and flavors into a hyper-efficient footprint. An absolute must-have for the home chef operating in a tight space.
Mixing aggressive herbs like mint with delicate ones in the same pot is a mistake, but individual grid pockets keep aggressive roots isolated. Planting these directly near your door delivers a surprisingly premium, farm-to-table lifestyle aesthetic. Implementing an automated drip line ensures your expensive culinary starters never wilt while you are at work.
Setting up a professional-grade herb wall costs roughly $40–$75. Highly recommended for a massive boost to your cooking game.
- Key Materials: Multi-pocket wall planter, organic herb soil
- Vibe / Style: Elite chef’s patio
- Difficulty: Quick afternoon setup
- Budget Breakdown: Pocket Wall: $30 | Organic Soil & Seeds: $25
- Creator’s Tip: Plant drought-tolerant herbs like rosemary and thyme at the top, and thirsty herbs like basil and cilantro at the bottom.
- Smart Sourcing: Vertical wall planter pockets (UV-resistant) and organic culinary herb seed starter kits.
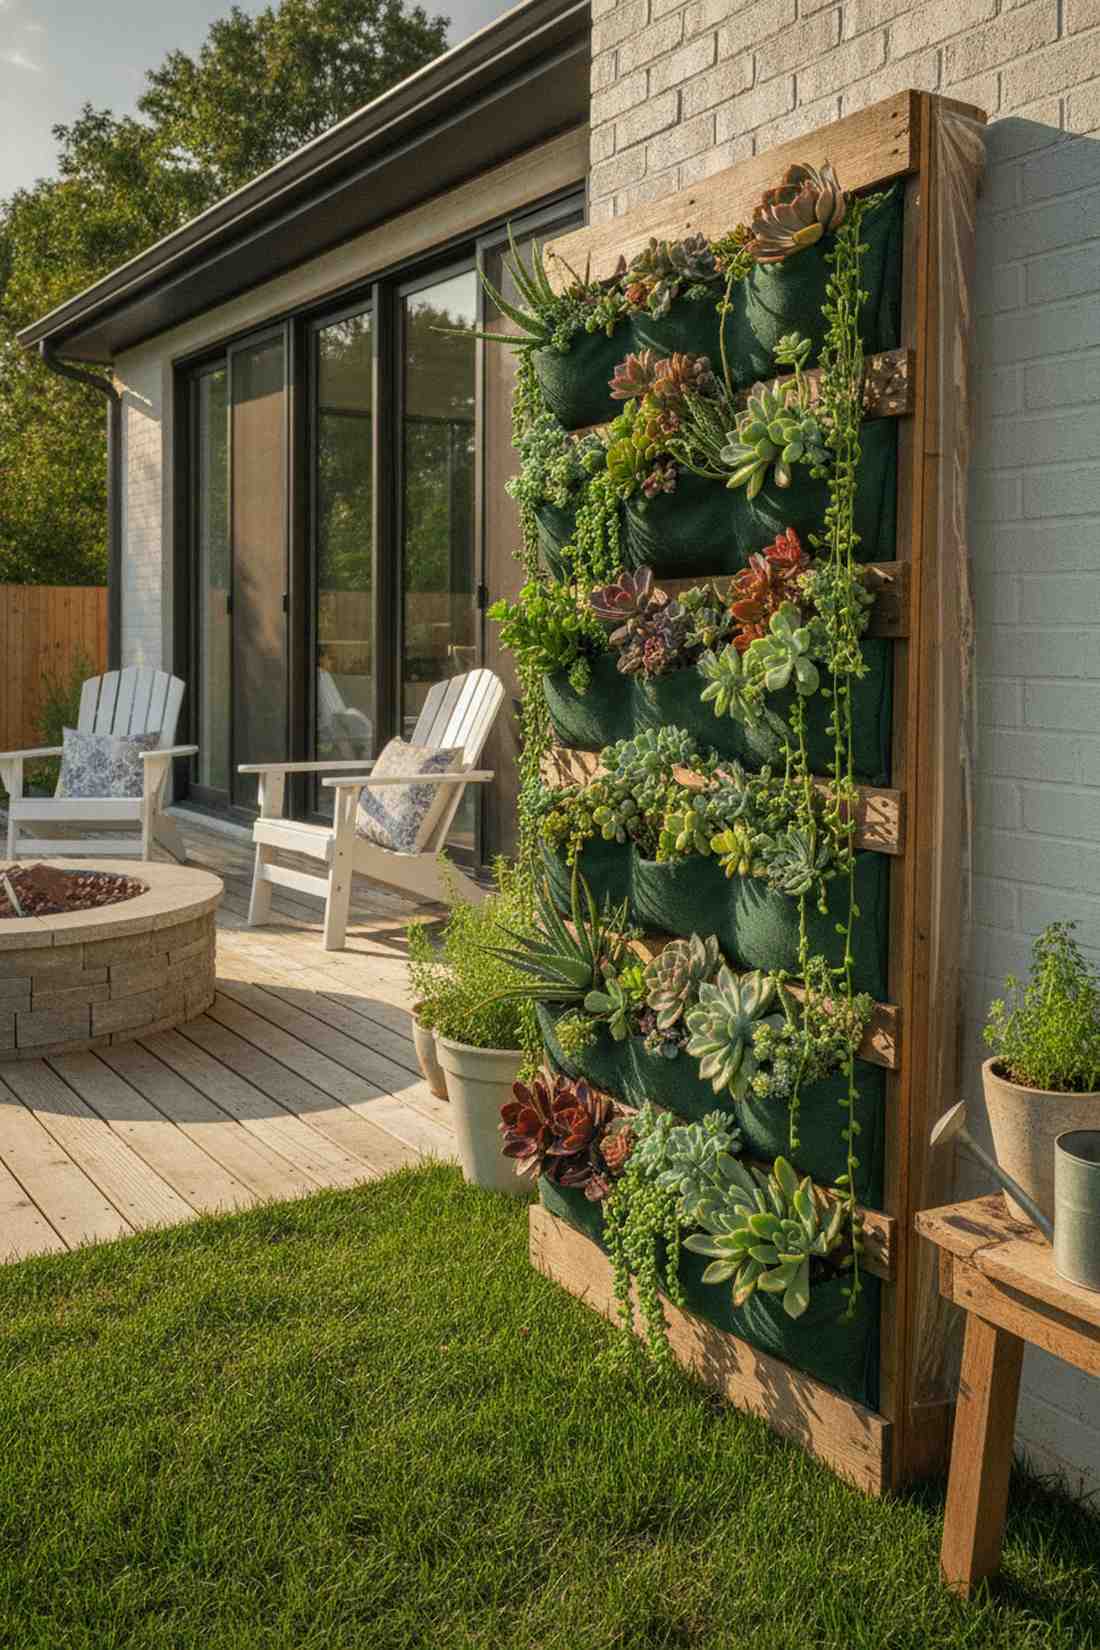
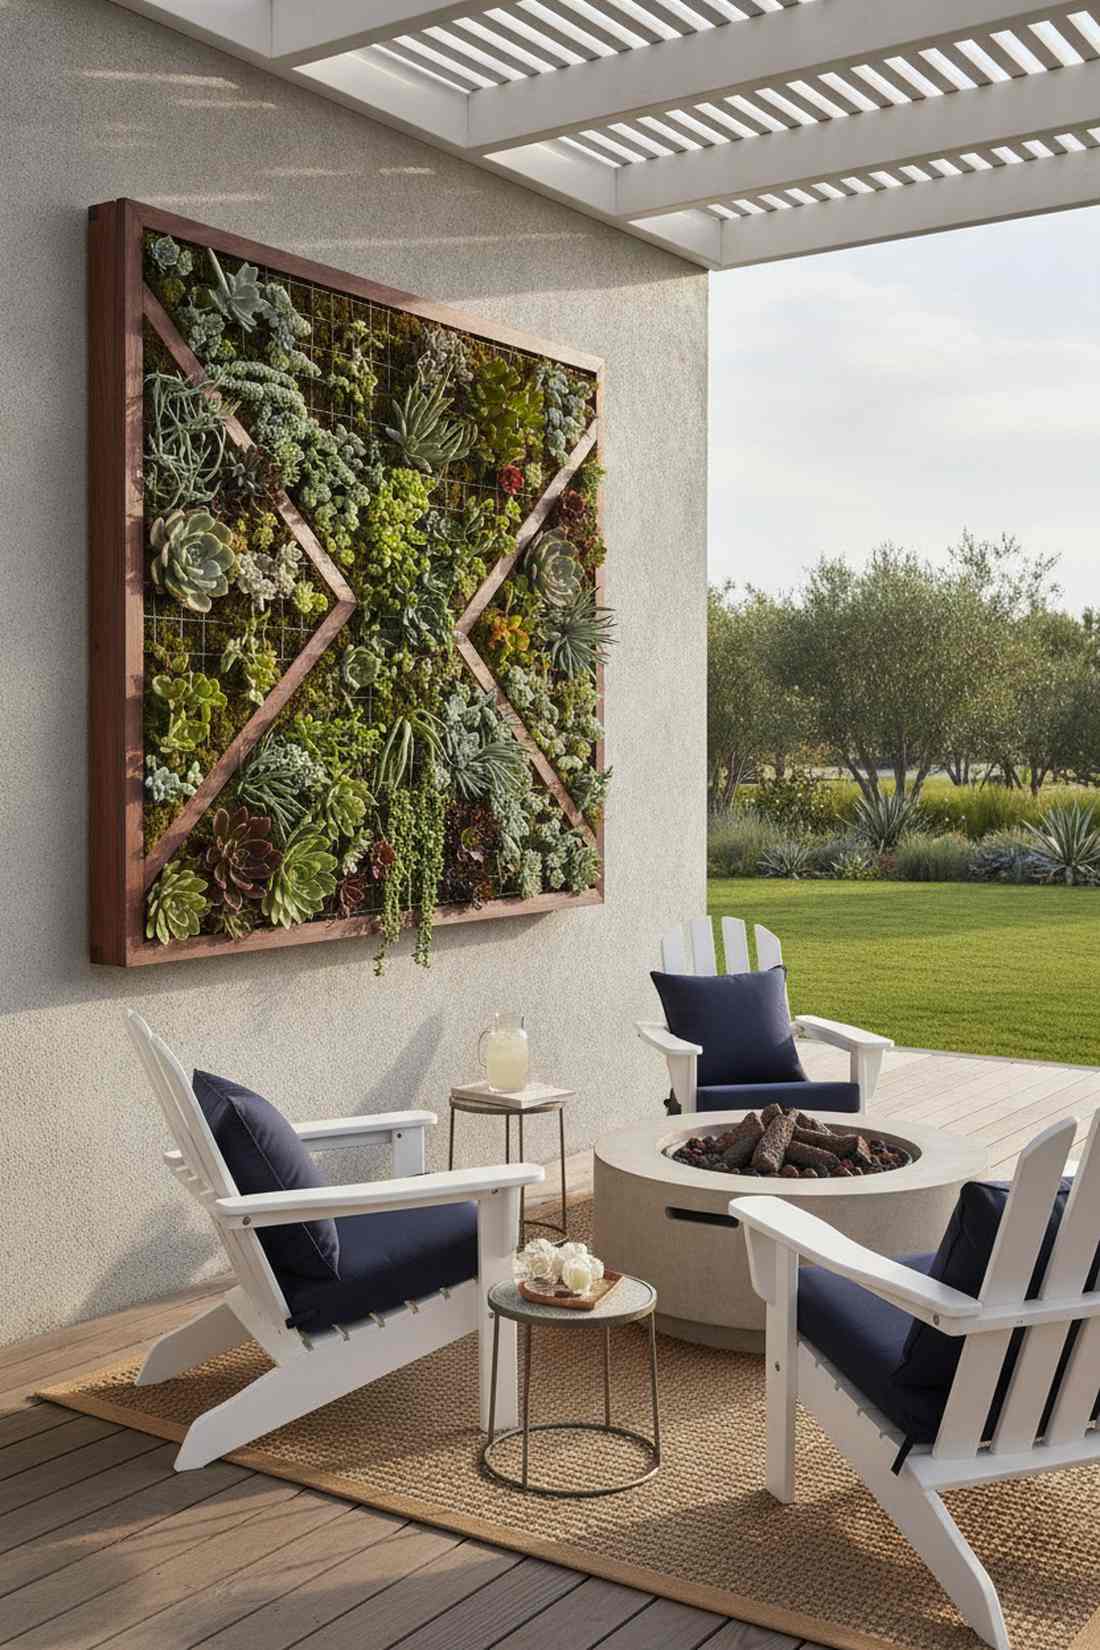
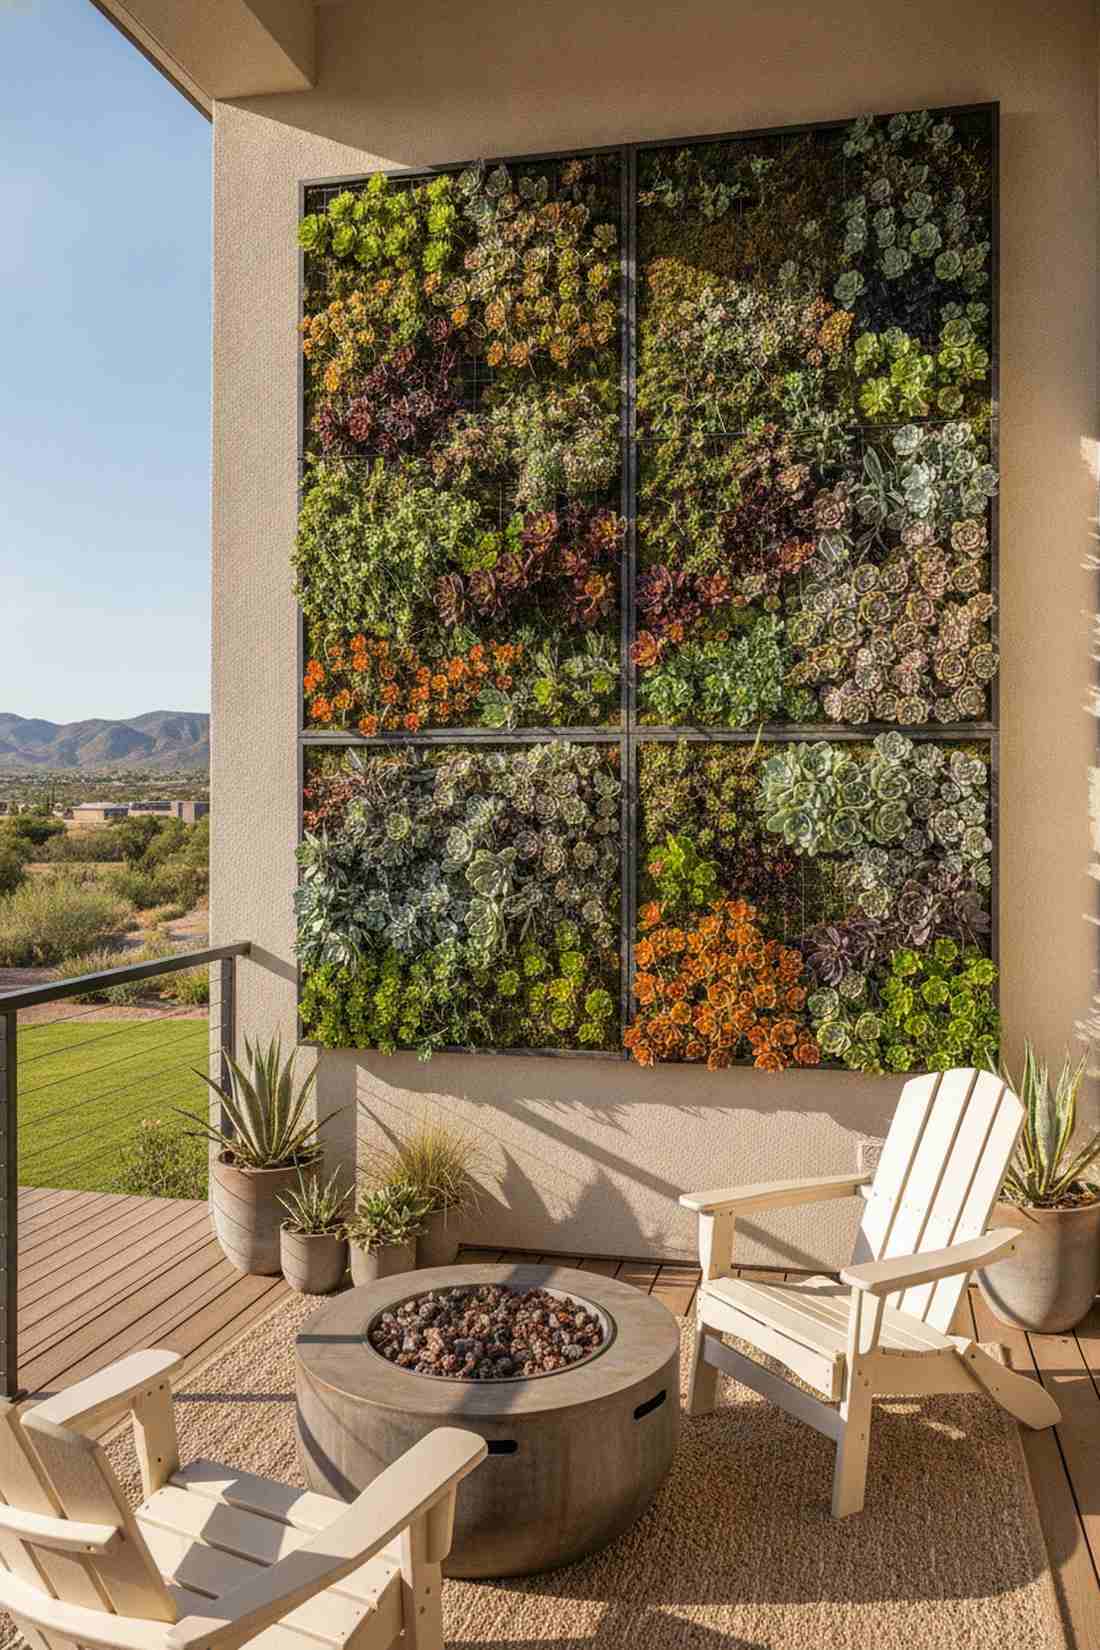
28. Succulent Living Walls
A dense carpet of geometric, fleshy plants feels like an exotic desert oasis right on your wall. Drought-proof succulent grid panels offer breathtaking texture with virtually zero maintenance. Exceptional for south-facing balconies that endure punishing, all-day summer sun.
Using standard potting soil will rot desert plants instantly, but packing the wall with a high-drainage cactus mix keeps roots flawlessly healthy. Utilizing tight wire-mesh panels gives a designer-level finish that holds the heavy, water-filled leaves securely in place. The best part is you can forget to water them for a week and they still look immaculate.
A vibrant, living desert wall usually runs between $50–$90 depending on plant size. Save this if you notoriously kill high-maintenance flowers!
- Key Materials: Shallow wall grid, cactus soil, moss backing
- Vibe / Style: Modern desert botanical
- Difficulty: Patient assembly
- Budget Breakdown: Wall Grid: $35 | Succulents & Soil: $40
- Creator’s Tip: Take cuttings from existing succulents, let the stems callous over for three days, and plug them directly into the wall to root.
- Smart Sourcing: Pre-formulated fast-draining cactus soil (bulk bag) and live succulent cuttings (assorted bulk pack).
29. Climbing Vegetable Trellises
Watching a towering wall of green beans and cherry tomatoes climb skyward feels intensely rewarding. Heavy-duty vegetable netting trellises turn thin air into massive, edible harvest zones. Ideal for an urban homesteader wanting maximum food production without a yard.
Weak string snaps under the weight of mature tomatoes, but commercial-grade nylon netting delivers a surprisingly premium, indestructible support system. Anchoring the netting tightly to the balcony railing creates a dense privacy screen that looks far more expensive than it is. The improved airflow naturally prevents the devastating powdery mildew that ruins cramped ground crops.
You can set up a massive climbing vegetable wall for under $30. Pin this to slash your produce grocery bills!
- Key Materials: Heavy-duty nylon trellis netting, deep base planter
- Vibe / Style: Lush urban homestead
- Difficulty: Fast tie-and-grow setup
- Budget Breakdown: Netting: $10 | Deep Planter & Soil: $20
- Creator’s Tip: Gently weave the leading vine of the plant back and forth through the netting every few days to train it horizontally, maximizing coverage.
- Smart Sourcing: Commercial-grade nylon trellis netting (heavy duty) and deep-root rolling vegetable planters.
You probably already own the materials for this next idea, making it the ultimate free patio upgrade.
30. Pollinator Vertical Gardens

Welcoming buzzing bees and hummingbirds to a high-rise feels like a beautiful act of urban conservation. A vertical pollinator flower tower acts as a critical, nectar-rich landing pad in a concrete jungle. Perfect for bringing vibrant wildlife energy and movement to a sterile patio.
Planting random flowers often yields nothing, but stacking native, high-nectar blooms delivers a surprisingly premium, wildly active ecosystem. Utilizing tiered pockets ensures that different colored blooms cascade beautifully, giving a designer-level finish that constantly shifts. Avoiding toxic pesticides means you are actively protecting the fragile urban pollinator corridor.
A thriving pollinator tower costs about $35–$60. Save this idea to help support local urban wildlife!
- Key Materials: Tiered planter pockets, native wildflower seeds
- Vibe / Style: Wild meadow sanctuary
- Difficulty: Easy seed scattering
- Budget Breakdown: Planter Pockets: $25 | Wildflower Mix: $15
- Creator’s Tip: Stick to large swaths of a single color in each pocket. Bees are more attracted to large blocks of color rather than mixed, scattered dots.
- Smart Sourcing: Regional native wildflower seed mixes (bulk pack) and UV-coated multi-tier hanging planters.
31. Shade-Tolerant Vertical Gardens
Turning a gloomy, north-facing concrete wall into a lush woodland retreat feels incredibly serene. Shade-loving fern and hosta walls thrive perfectly in spots where traditional flowers just shrivel up and die. A phenomenal solution for deep-city balconies blocked by tall neighboring buildings.
Most beginners try forcing sun-loving petunias in the dark, but embracing deep-shade foliage looks far more expensive and lush. Layering different textures—like broad-leaf hostas against feathery maidenhair ferns—gives a designer-level finish without needing bright blooms. Since the sun isn’t baking the dirt, your water bill drops dramatically.
A gorgeous, texture-heavy shade wall runs roughly $45–$75. Highly recommended for transforming awkward, sunless corners.
- Key Materials: Wall planter grids, moisture-control soil, ferns
- Vibe / Style: Deep forest grotto
- Difficulty: Beginner-friendly
- Budget Breakdown: Wall Grids: $35 | Shade Plants: $30
- Creator’s Tip: Spray the foliage lightly with a water mister in the morning. Ferns care more about high air humidity than they do about soaked roots.
- Smart Sourcing: Pre-cut modular wall planter grids and premium indoor terrarium accessories (misters).
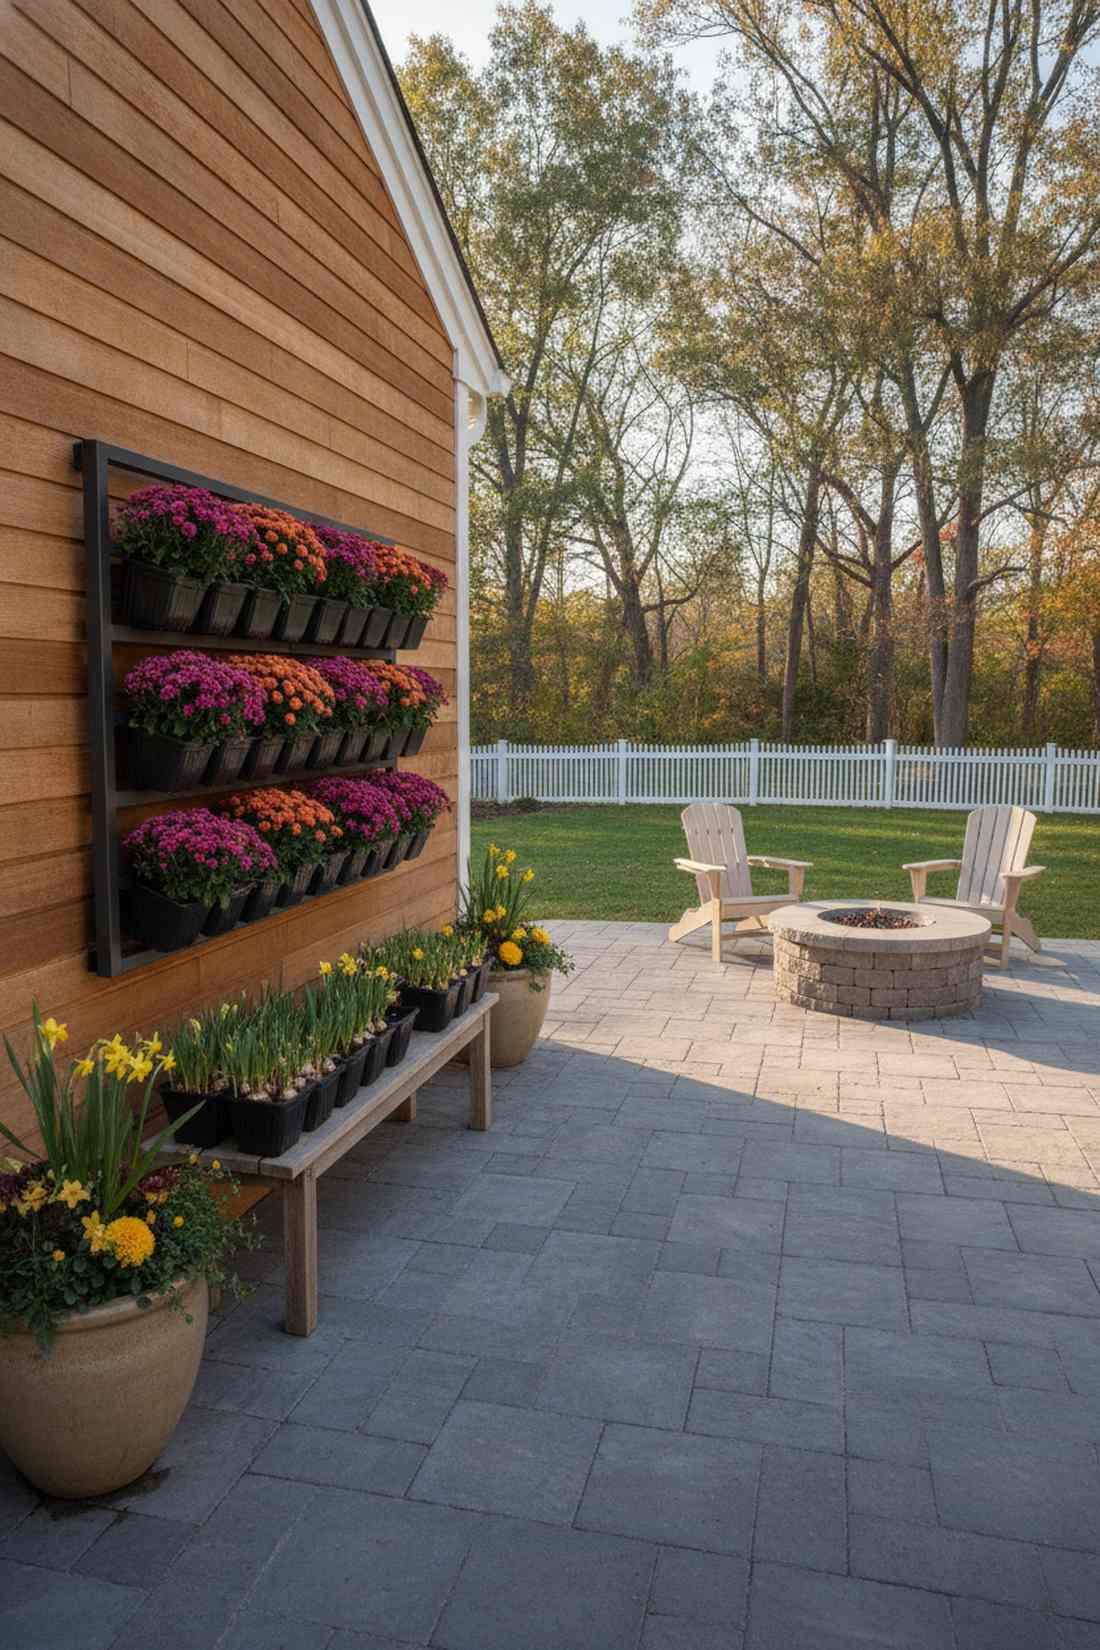
32. Seasonal Color Rotation Systems
Swapping out your entire balcony’s color palette every three months feels like living in a luxury botanical garden. Removable modular planter pods allow you to instantly switch from spring bulbs to fall mums. Ideal for the design-obsessed gardener who demands continuous, flawless curb appeal.
Ripping plants directly out of dirt shocks the root system, but dropping pre-potted inserts into a master frame delivers a surprisingly premium, zero-mess transition. Keeping backup pots growing off to the side means your main display never looks dead or straggly. This plug-and-play architecture mimics the exact techniques used by commercial landscape crews.
A solid modular frame with extra insert pots costs about $60–$95. Pin this hack to maintain an immaculate patio year-round!
- Key Materials: Master wall frame, interchangeable drop-in pots
- Vibe / Style: Immaculate commercial landscape
- Difficulty: Setup once, easy swaps
- Budget Breakdown: Frame: $50 | Extra Inserts: $20
- Creator’s Tip: Keep your off-season inserts in a sunny windowsill indoors, so they are blooming and ready to drop into the wall frame the exact day the weather shifts.
- Smart Sourcing: Interchangeable modular wall planter kits and heavy-duty drop-in nursery pots (bulk pack).
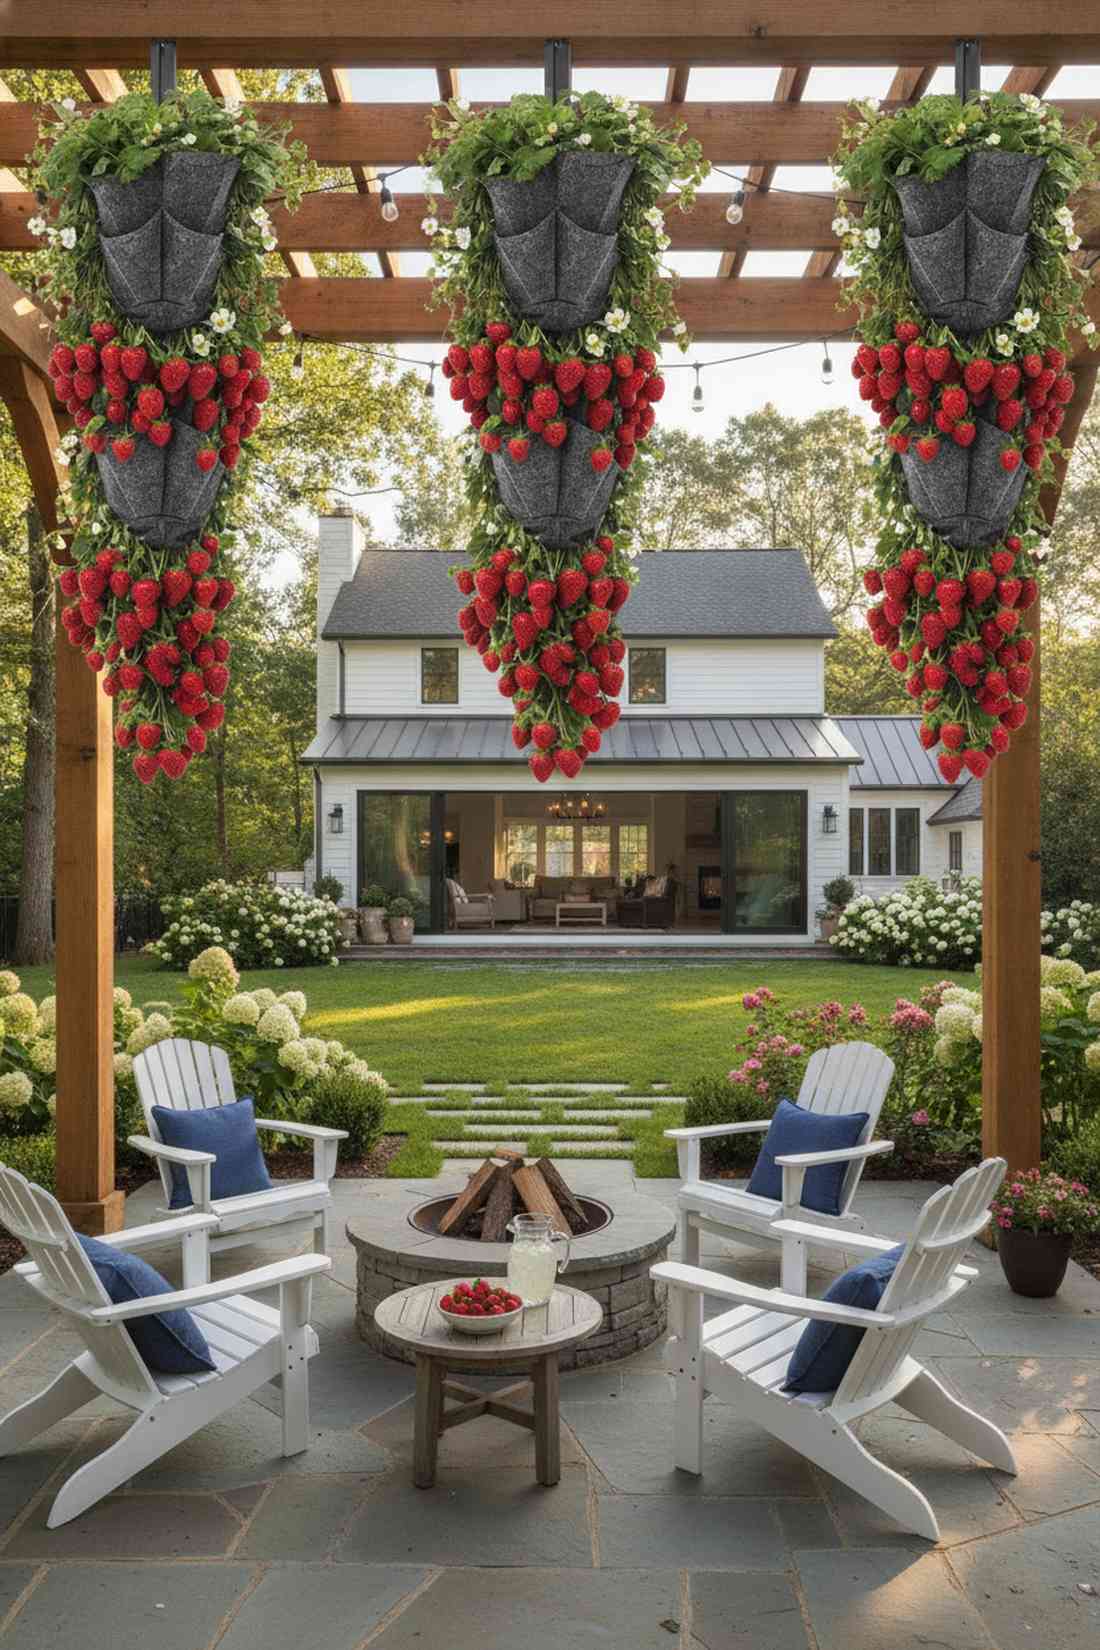
33. Vertical Strawberry Planters
Plucking bright red, sun-warmed berries from a towering column feels like an absolute summer luxury. Cascading strawberry pocket planters lift the fruit safely off the ground, maximizing yield in a tiny footprint. Perfect for keeping expensive berries away from ground pests and rot.
Growing strawberries flat wastes massive patio space, but a stacked pocket system looks far more expensive while tripling your harvest. Utilizing a specialized wicking felt bag ensures the roots stay cool and hydrated during brutal July heatwaves. The cascading runners create a gorgeous, weeping aesthetic that is highly productive.
A hanging berry system can be set up for just $20–$40. It’s a fast upgrade that completely changes your summer snacking.
- Key Materials: Breathable fabric hanging tower, bare-root berries
- Vibe / Style: Bountiful fruit cascade
- Difficulty: Easy planting
- Budget Breakdown: Hanging Tower: $15 | Strawberry Crowns: $20
- Creator’s Tip: Pinch off the first round of white flowers the plant produces; this forces it to grow stronger roots, resulting in a massive berry explosion later.
- Smart Sourcing: UV-coated breathable strawberry planter bags and everbearing bare-root strawberry plants (starter pack).
34. Air Plant Vertical Displays
A floating array of exotic, soil-less spikes feels like a high-end modern art installation. Tillandsia wire grid displays require absolutely zero dirt, making them the cleanest garden possible. A flawless solution for an ultra-minimalist balcony that cannot accommodate messy potting soil.
Heavy pots clutter sleek spaces, but mounting lightweight air plants onto raw driftwood or copper wire gives a designer-level finish. Since they absorb moisture entirely through the air, you can mount them upside down, sideways, or suspended in clear glass orbs. It’s the ultimate zero-mess layout for miniature garden supplies and rare botanical finds.
A stunning, soil-free air plant gallery runs roughly $30–$55. Save this to your sleek interior/exterior decor board!
- Key Materials: Copper wire grid, assorted Tillandsia plants
- Vibe / Style: Sleek minimalist modern
- Difficulty: Zero-tool instant display
- Budget Breakdown: Wire Grid: $15 | Air Plants: $30
- Creator’s Tip: Instead of misting, take the plants off the wall once a week and submerge them entirely in a bowl of room-temperature water for 20 minutes.
- Smart Sourcing: Assorted live air plants (bulk starter pack) and rust-proof copper wire display grids.
Conclusion
Urban balconies instantly transform into high-end, productive green sanctuaries through strategic vertical garden blueprints. The 30+ upgrades presented demonstrate exactly how to maximize tight vertical spaces while keeping your budget entirely under control. By leveraging premium UV-resistant starter kits and smart material sourcing, you can bypass the cheap, flimsy look and achieve a luxury aesthetic without the designer price tag. Whether you are installing heavy-duty commercial grid panels, setting up automated hydroponics, or just leaning a rustic wooden ladder against the brick, success comes down to matching the right hardware to your specific sun exposure. Start with a single high-impact piece—like a self-watering tower or a magnetic pod system—and scale up your balcony oasis as your confidence grows.
Frequently Asked Questions
What is the best vertical garden system for a small apartment balcony?
The highest-rated setup for a small apartment is a combination of breathable felt pocket planter walls and heavy-duty railing-mounted saddle pots. These zero-footprint systems deliver maximum growing capacity without eating up your seating area. Upgrading to a UV-resistant pocket organizer kit costs less than $40 but looks incredibly premium while supporting dozens of herbs. Always ensure you source kits with built-in waterproof backing to protect the stucco and prevent messy water runoff to the neighbors below.
How much weight can a typical apartment balcony support for vertical gardens?
Most standard residential balconies are engineered to support roughly 50 to 100 pounds per square foot, but dense, wet soil gets heavy fast. To achieve a high-end look without the dangerous weight, avoid massive concrete pots and invest in lightweight resin grids or premium hydroponic starter kits. Distributing the load across multiple wall anchors rather than concentrating it in one corner keeps you safely within limits. Buying pre-formulated, perlite-heavy lightweight soil blends is a cheap way to drastically reduce the structural strain on the patio.
What vegetables grow best in vertical garden balcony spaces?
Vining and climbing crops yield the highest volume in tight vertical garden spaces. Utilizing commercial-grade nylon trellis netting is the smartest way to support heavy producers like cherry tomatoes, cucumbers, and pole beans. For shaded or lower tiers, shallow-rooted leafy greens—such as spinach, kale, and lettuce—explode with growth when planted in aluminum gutter tiers or modular pods. Skip deep-root crops like carrots and heavy sprawlers like pumpkins, which demand far too much horizontal real estate to look aesthetic.
How do I water a vertical garden without making a mess?
The secret to a flawless, zero-mess patio is ditching the watering can and installing an automated commercial-grade drip irrigation starter kit. These cheap, easily hidden tubes deliver precise micro-doses of water directly to the root zone, completely eliminating muddy runoff. For freestanding setups, investing in stackable self-watering towers with hidden bottom reservoirs keeps the soil perfectly hydrated without overflowing. Always place UV-coated drainage collection trays beneath your hanging planters to protect your expensive decking and keep the area looking pristine.
Can vertical gardens survive winter on outdoor balconies?
Yes, but surviving a harsh winter requires smart material sourcing and the right plant selection. Frost-hardy evergreens and dormant perennials easily survive mild winters, provided you used freeze-resistant, premium resin containers rather than cheap plastics that shatter in the cold. In colder zones, the best strategy is using interchangeable modular planter inserts; simply pop the pods out of the frame and move them indoors. If you run an automated hydroponic wall, you must completely drain the PVC tubing and the submersible pumps to prevent catastrophic ice expansion.
Do I need permission from my landlord to install a vertical garden on my apartment patio?
If you plan to drill masonry anchors into the brick or stucco, you absolutely must get written permission to avoid losing your security deposit. However, you can bypass the landlord entirely by using damage-free, heavy-duty leaning ladder frames or high-strength tension poles. Premium adjustable railing brackets and over-the-door canvas pocket organizers offer massive planting capacity with zero permanent modification. Always double-check your lease regarding water runoff rules, and invest in deep drip trays to ensure your setup doesn’t accidentally flood the units below you.