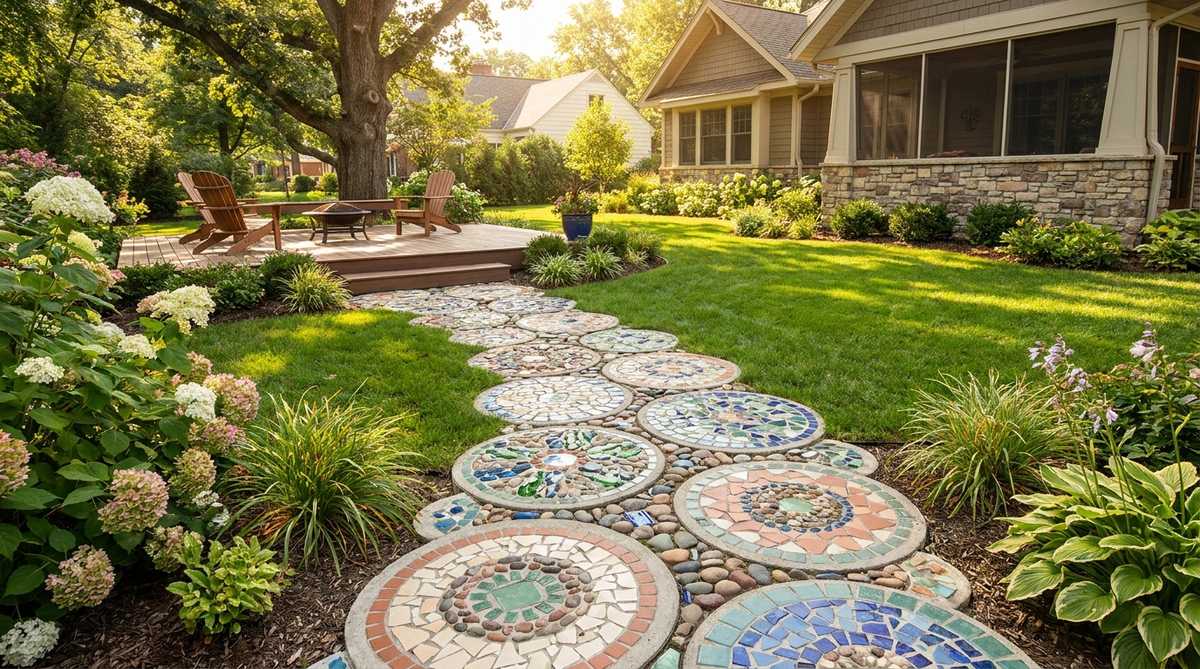
Elevate your garden pathways using stepping stones mosaic designs that demand attention. We’re breaking down material sourcing and budget tips for a flawless outdoor setup. Achieve that designer landscape aesthetic for a fraction of the cost.
Design Snapshot: Key Principles
- Color Harmony: Select tiles that complement existing landscape elements while creating intentional focal points along pathways
- Scale Balance: Match pattern complexity to stone size—intricate designs work best on 12-inch or larger surfaces
- Weather Resistance: Use outdoor-rated materials with proper adhesive and sealant to withstand freeze-thaw cycles and UV exposure
- Visual Flow: Arrange stones to create rhythm along the path, alternating bold and subtle patterns for dynamic movement
Geometric & Modern Patterns for Contemporary Spaces
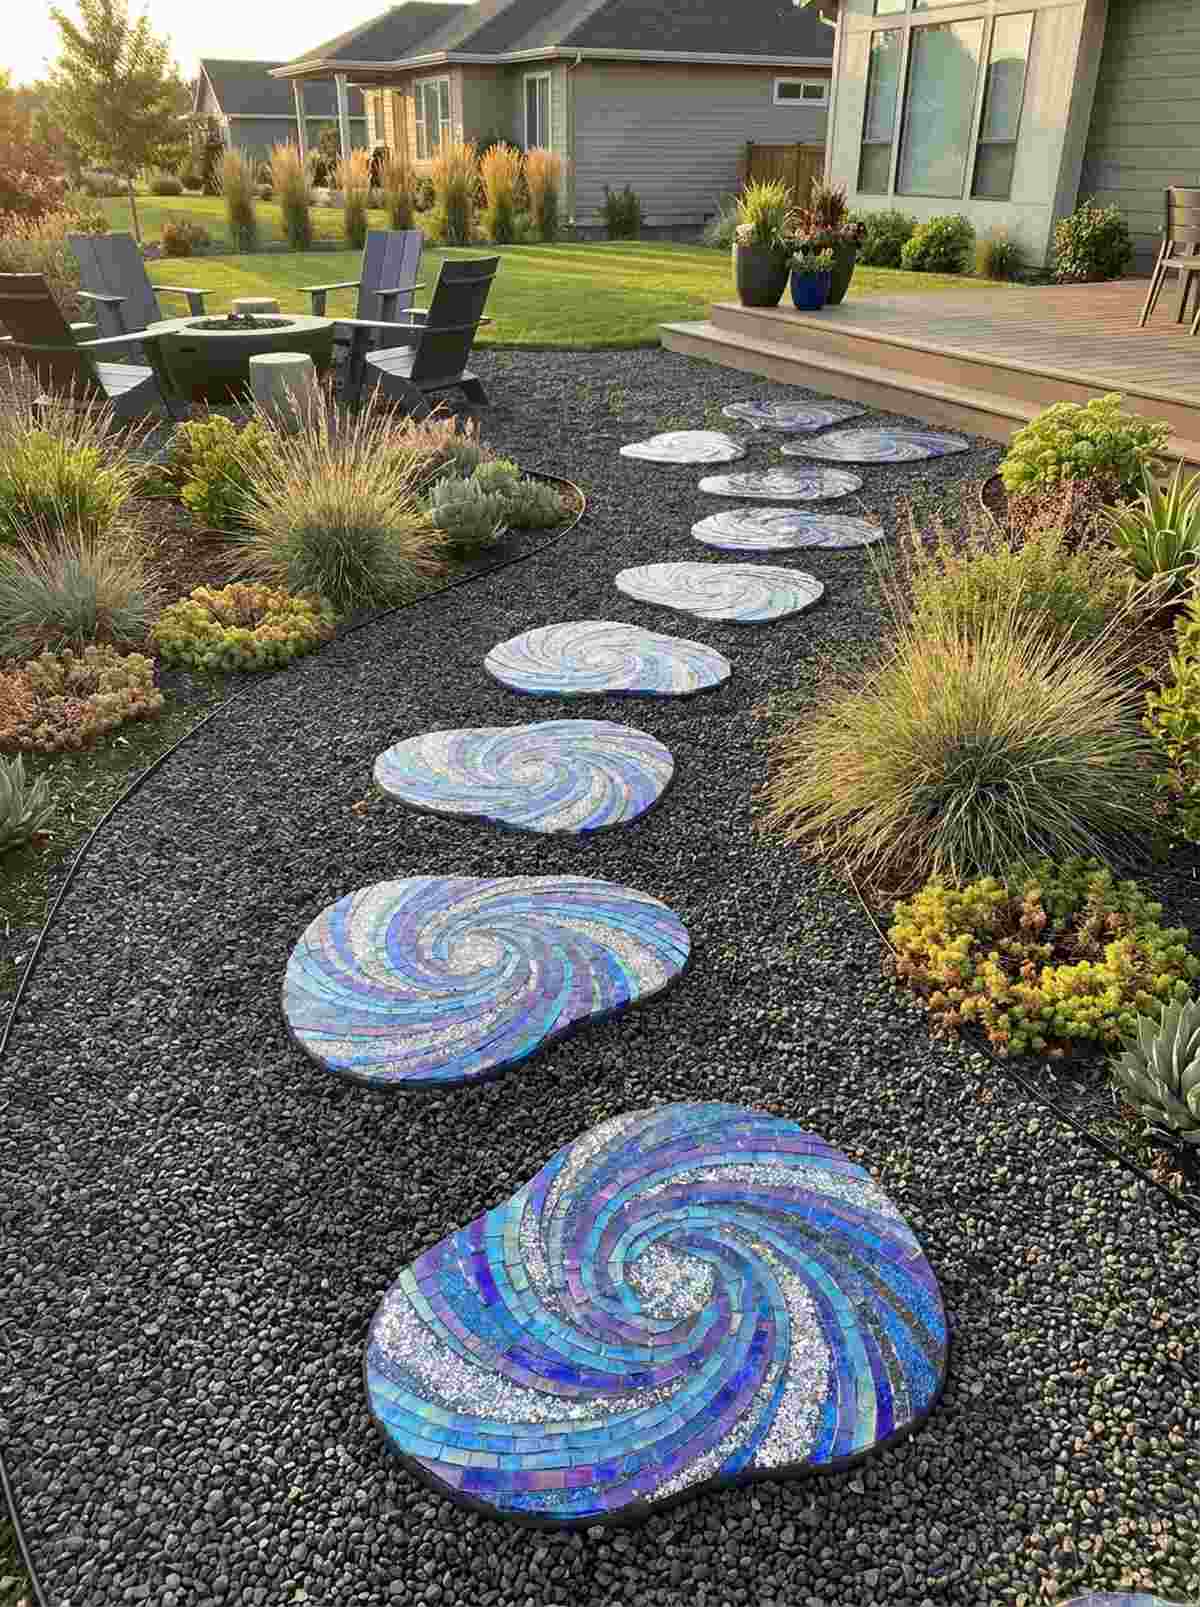
1. Spiral Circles Mandala
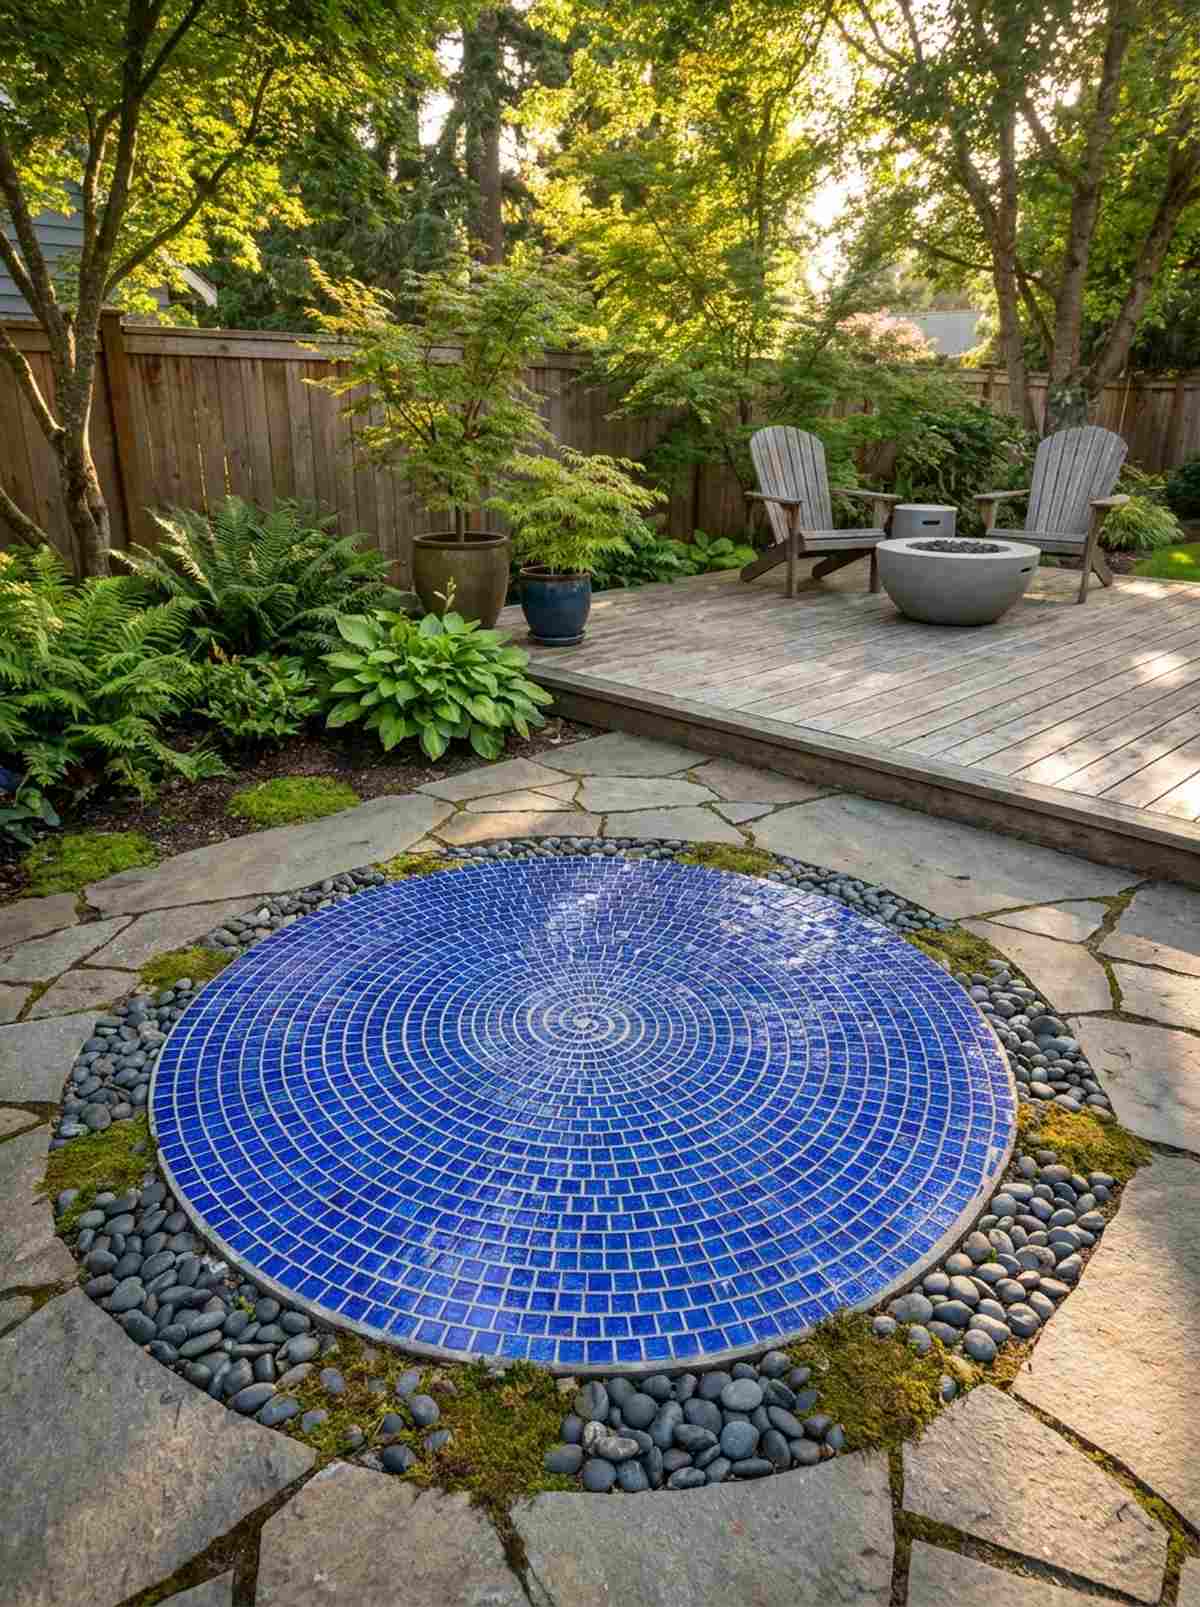
This mesmerizing arrangement feels like a tranquil meditation retreat right in your backyard. Modern landscape hardscaping relies on strong focal points, and this hypnotic circular flow works exceptionally well for pathway intersections or a shaded balcony corner.
The secret to this designer-level finish lies in the precise concentric layout. While amateurs use basic chipped plates, incorporating specialized stepping stones mosaic patterns with contrasting grout delivers a surprisingly premium look that grounds the entire space.
You can easily pull this off for around $18–$35 depending on your tile choices. Save this to your DIY weekend garden board so you don’t lose the inspiration!
- Key Materials: Cobalt blue glass tiles, polymer-modified sanded grout
- Vibe / Style: Zen garden tranquility
- Difficulty: Moderate precision required
- Budget Breakdown: Materials: $20 | Mold & Concrete: $15
- Creator’s Tip: Start from the exact center point and work outward to keep the mandala perfectly symmetrical.
- Smart Sourcing: pre-cut stained glass variety packs and heavy-duty reusable stepping stone molds.
2. Hexagonal Honeycomb Grid
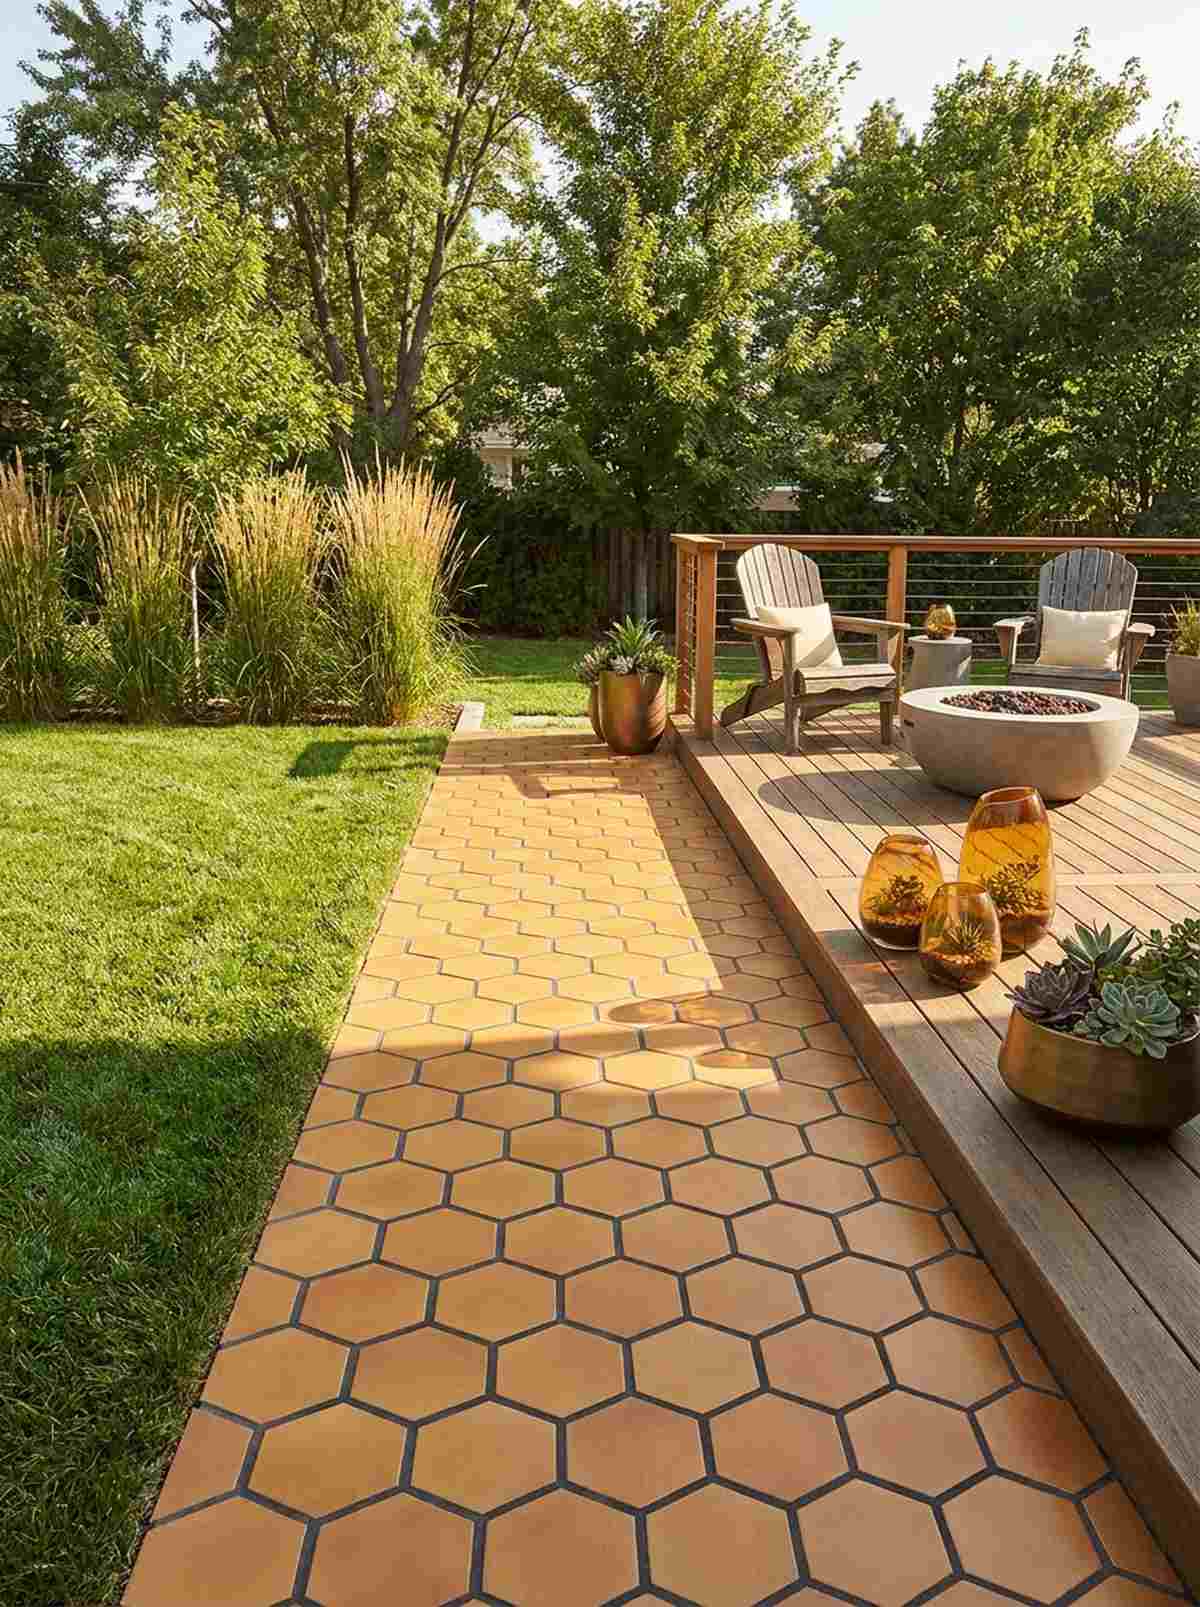
Capturing the raw beauty of nature, this design feels like an organic extension of the earth itself. Contemporary patio accents thrive on geometric repetition, making this honeycomb layout perfect for high-traffic transitional walkways bridging your lawn and deck.
This layout looks far more expensive than it actually is when executed with minimal grout lines. Upgrading your materials with amber and bronze terrarium accessories or high-end glass cuts completely transforms cheap concrete into luxury outdoor decor.
Expect to spend roughly $25 to achieve this seamless tessellation effect. It’s a fast upgrade that completely changes the vibe of your outdoor living area.
- Key Materials: Hexagonal amber tiles, dark charcoal grout
- Vibe / Style: Mid-century organic modern
- Difficulty: Easy beginner setup
- Budget Breakdown: Tiles: $15 | Adhesive & Base: $10
- Creator’s Tip: Use tile spacers even on outdoor stones to ensure the honeycomb grid doesn’t warp during setting.
- Smart Sourcing: bulk pack ceramic hexagon tiles and UV-resistant clear concrete sealer.
3. Angular Chevron Stripes
Sharp, energetic, and impossibly chic, this visual dynamic feels like a runway for your garden. Sleek outdoor pathway designs demand directional movement, and this chevron concept is an absolute game-changer for guiding guests toward a fire pit or pool area.
Most basic gardens lack architectural edge, but locking in a crisp 45-degree angle delivers a striking, high-contrast aesthetic. Integrating weather-proof miniature garden supplies or crisp black-and-white ceramics ensures the bold stripes never lose their punch.
This high-impact weekend project usually runs around $20–$40. Pin this if you’re planning a small space upgrade that needs an immediate wow factor!
- Key Materials: Rectangular ceramic tiles (black and white), angle-measuring square
- Vibe / Style: Edgy contemporary chic
- Difficulty: Advanced layout planning
- Budget Breakdown: Ceramic Tiles: $25 | Mortar: $15
- Creator’s Tip: Map the centerline with painter’s tape before applying any thin-set mortar.
- Smart Sourcing: pre-scored subway tile sheets and outdoor-rated waterproof thin-set.
4. Moroccan Quatrefoil
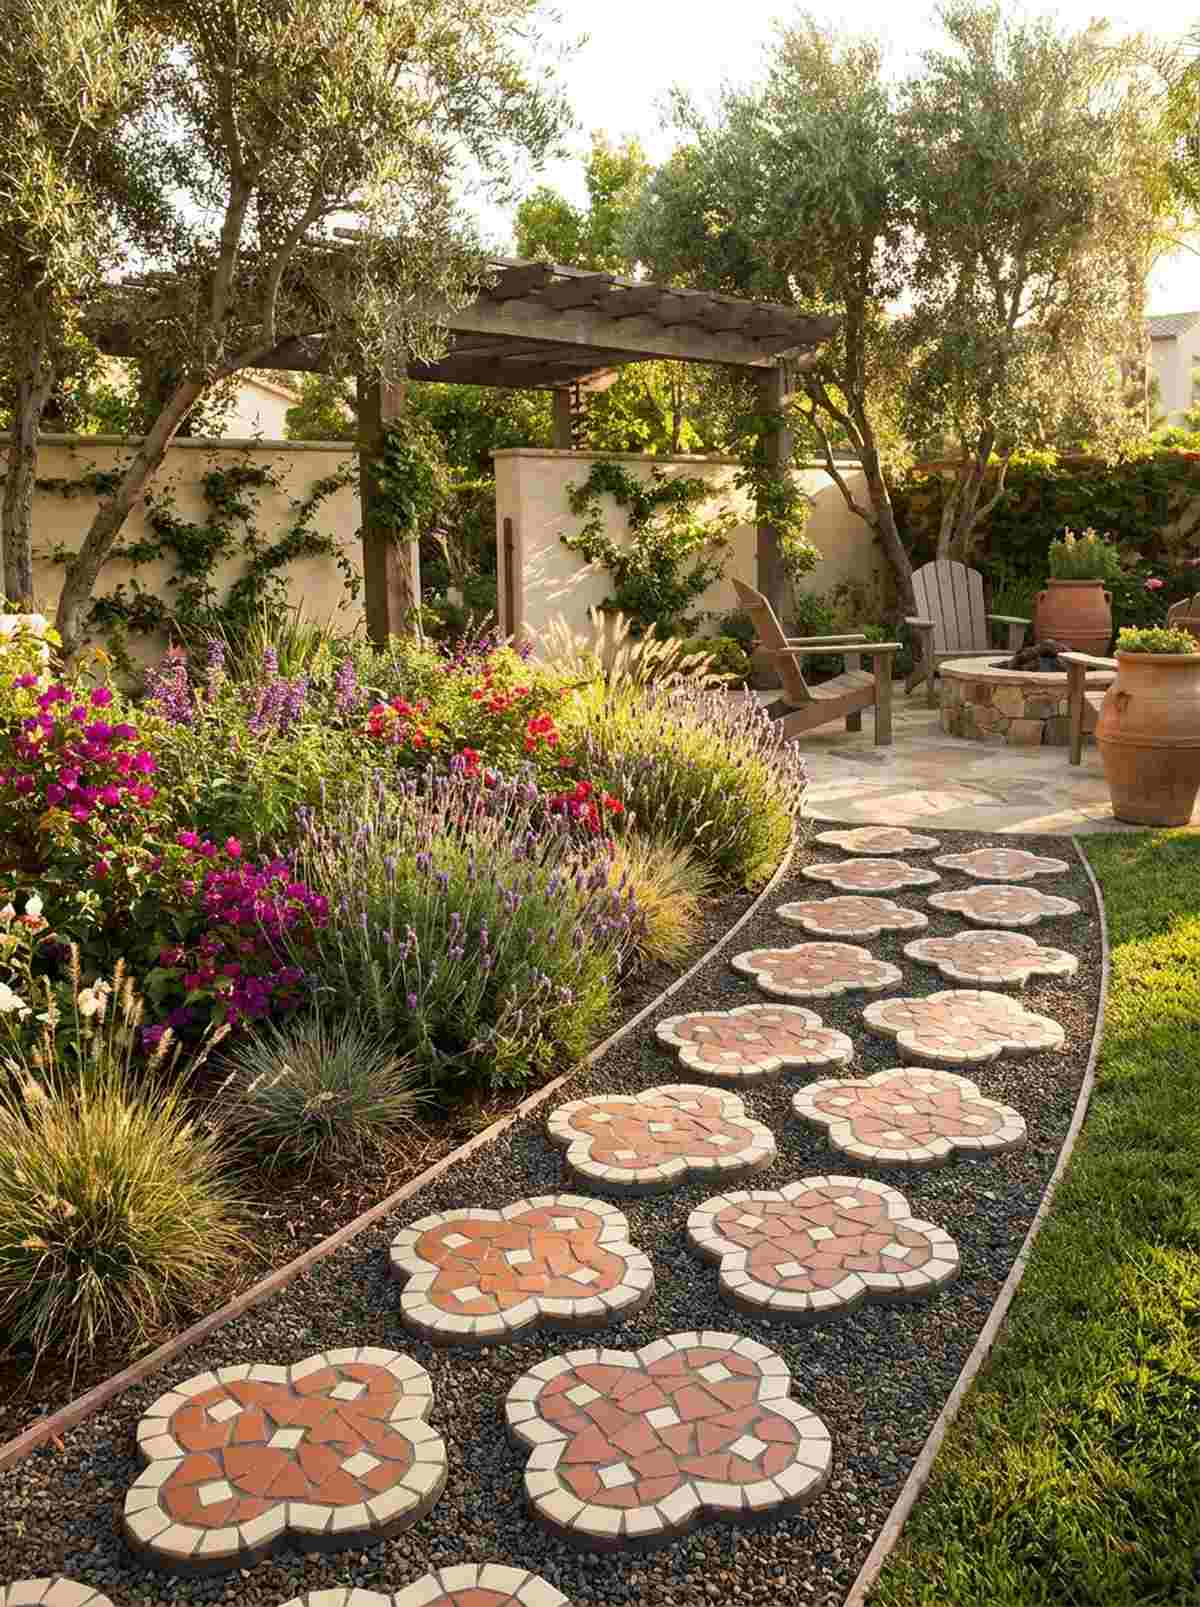
Bringing Mediterranean resort energy home, this aesthetic feels like a hidden villa courtyard in Marrakech. Global-inspired garden decor leans heavily on repeating curves, making this layout the ultimate accent for eclectic flower bed borders.
Achieving this interlocking silhouette usually costs hundreds at a garden center, but DIYing it gives a custom, designer-level finish. Utilizing precise templates and contrasting terracotta tones instantly makes the stone look like an imported artifact.
You can create this exotic focal point for under $30 per stone. Highly recommended for injecting vibrant personality into a dull lawn.
- Key Materials: Terracotta shards, cream ceramic accents
- Vibe / Style: Mediterranean courtyard
- Difficulty: Moderate shaping skills
- Budget Breakdown: Colored Tiles: $20 | Grout/Sealer: $10
- Creator’s Tip: Master the negative space; the background color is just as critical as the quatrefoil outline itself.
- Smart Sourcing: shatter-resistant Moroccan style tile decals and bulk mosaic nipper tools.
This next setup is ridiculously cheap but looks like a $100 custom display straight out of a boutique nursery…
5. Triangular Kaleidoscope
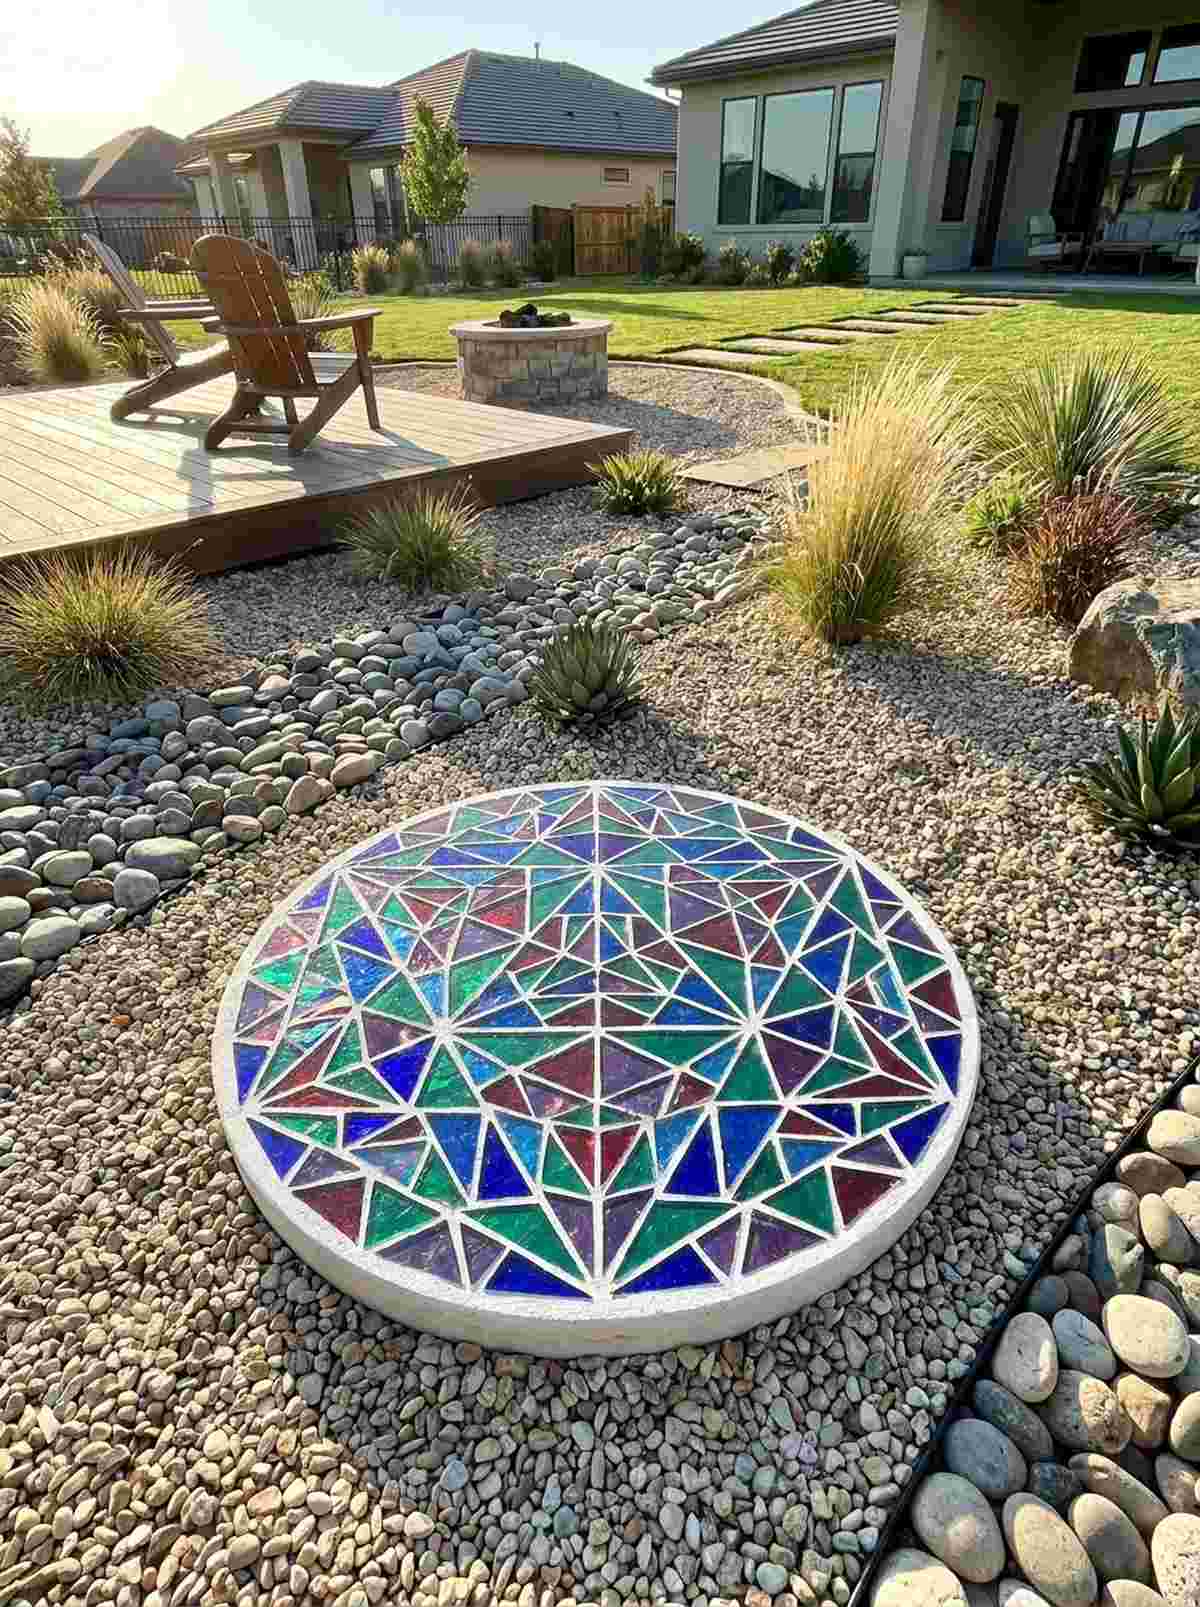
Bursting with optical depth, this radiant stone feels like an interactive art exhibit in your own yard. Reflective garden accents catch the afternoon sun beautifully, making this the perfect standalone statement piece for a minimalist rock garden.
While standard layouts can feel flat, establishing a mirror-image symmetrical wedge tricks the eye and adds massive perceived value. Sourcing premium jewel-tone glass alongside your stepping stones mosaic blueprints ensures the kaleidoscope effect truly pops.
This dazzling optical illusion requires about $30 in specialized glass. Pin this to your outdoor project board before your next hardware store run!
- Key Materials: Jewel-toned triangle glass cuts, white reflective grout
- Vibe / Style: Optical modern art
- Difficulty: Moderate to advanced
- Budget Breakdown: Glass Cuts: $20 | Stone Base: $10
- Creator’s Tip: Dry-fit the entire kaleidoscope pattern on a piece of cardboard before transferring to the wet cement.
- Smart Sourcing: pre-cut triangular stained glass assortments and high-gloss penetrating sealants.
Stepping Stones Flower & Botanical Mosaics
6. Vibrant Sunflower Bloom
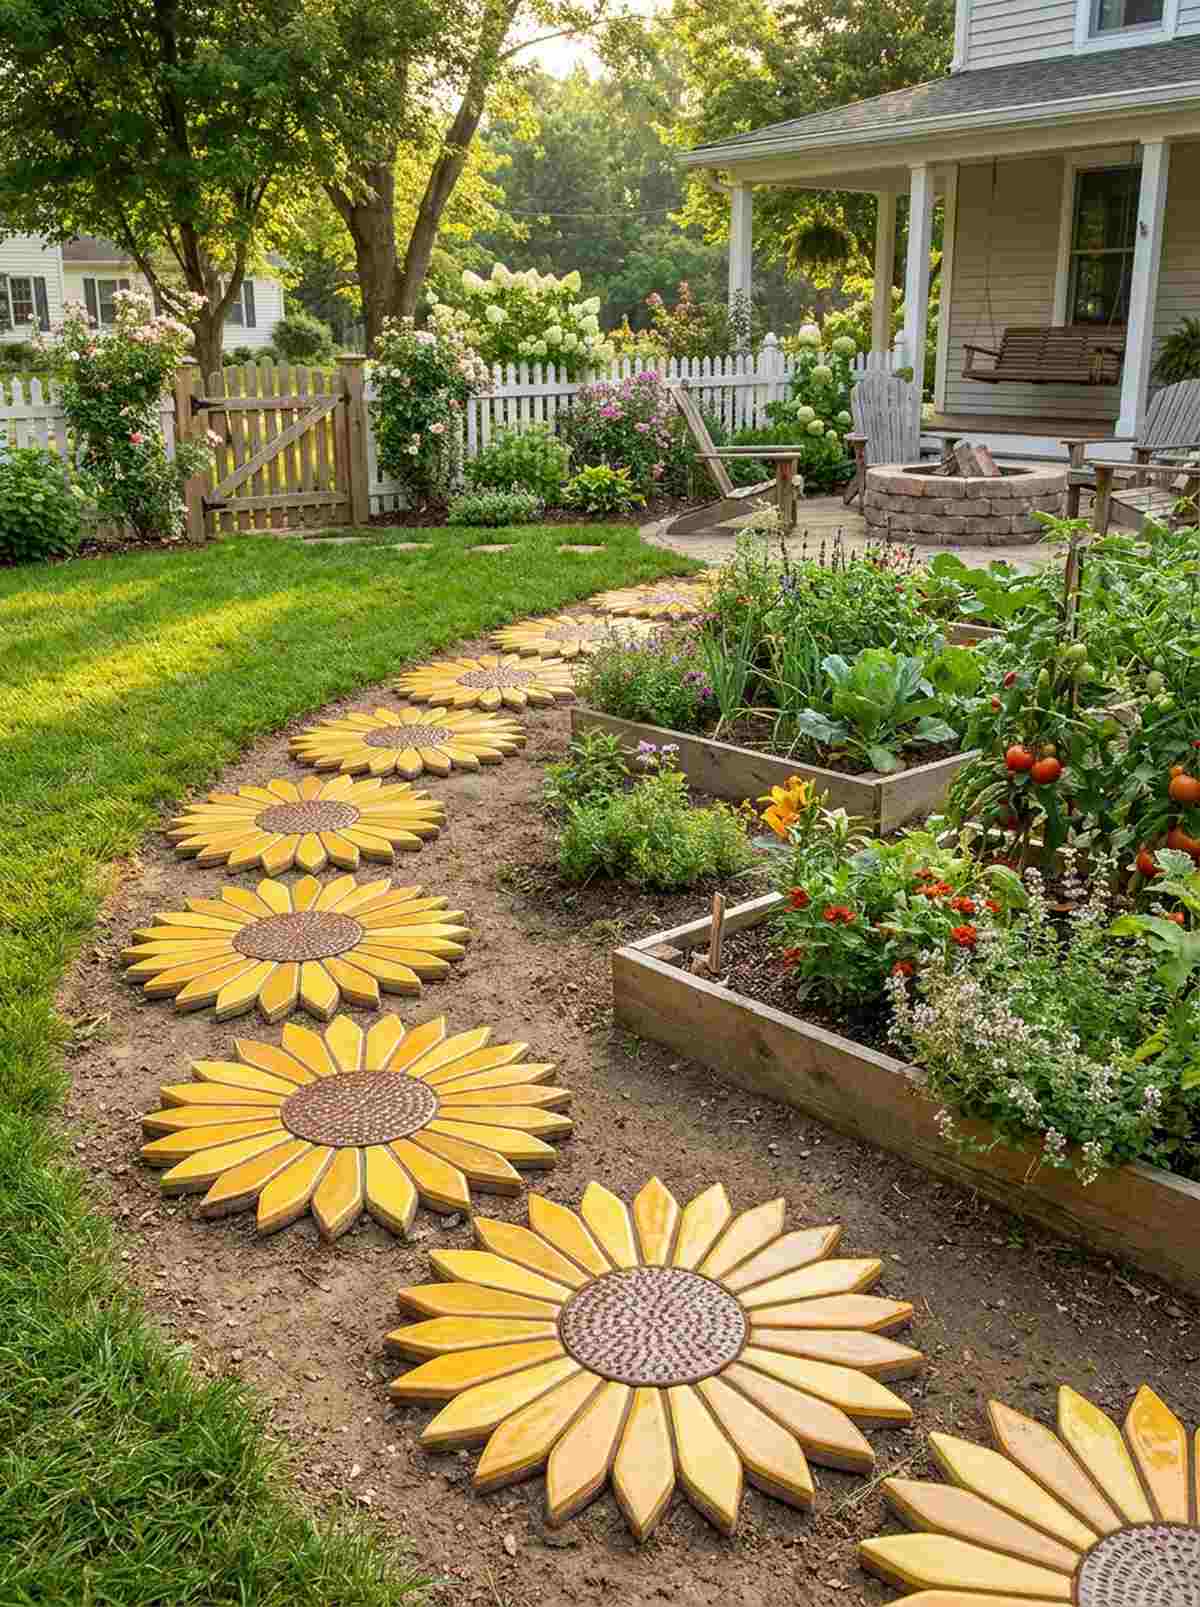
Radiating pure joy, this golden botanical layout feels like capturing summer permanently in stone. Cottage garden pathway ideas are all about welcoming warmth, making this stepping stones flower concept an ideal gateway to your vegetable patch.
Generic flower designs often look cartoonish, but varying the shades of golden-yellow petals provides a lush, hyper-realistic depth. By incorporating textured brown center tiles, you upgrade standard materials into a masterclass in backyard hardscaping.
Recreating this cheerful bloom usually costs right around $20. It’s a fantastic, low-stress project that delivers massive curb appeal.
- Key Materials: Elongated yellow tiles, textured brown center pieces
- Vibe / Style: Cheerful rustic farmhouse
- Difficulty: Easy beginner friendly
- Budget Breakdown: Petal Tiles: $12 | Base Materials: $8
- Creator’s Tip: Angle the yellow petals slightly upward during setting to give the sunflower a dynamic, 3D texture.
- Smart Sourcing: pre-shaped ceramic petal tiles (bulk pack) and all-weather outdoor grout.
7. Delicate Cherry Blossom
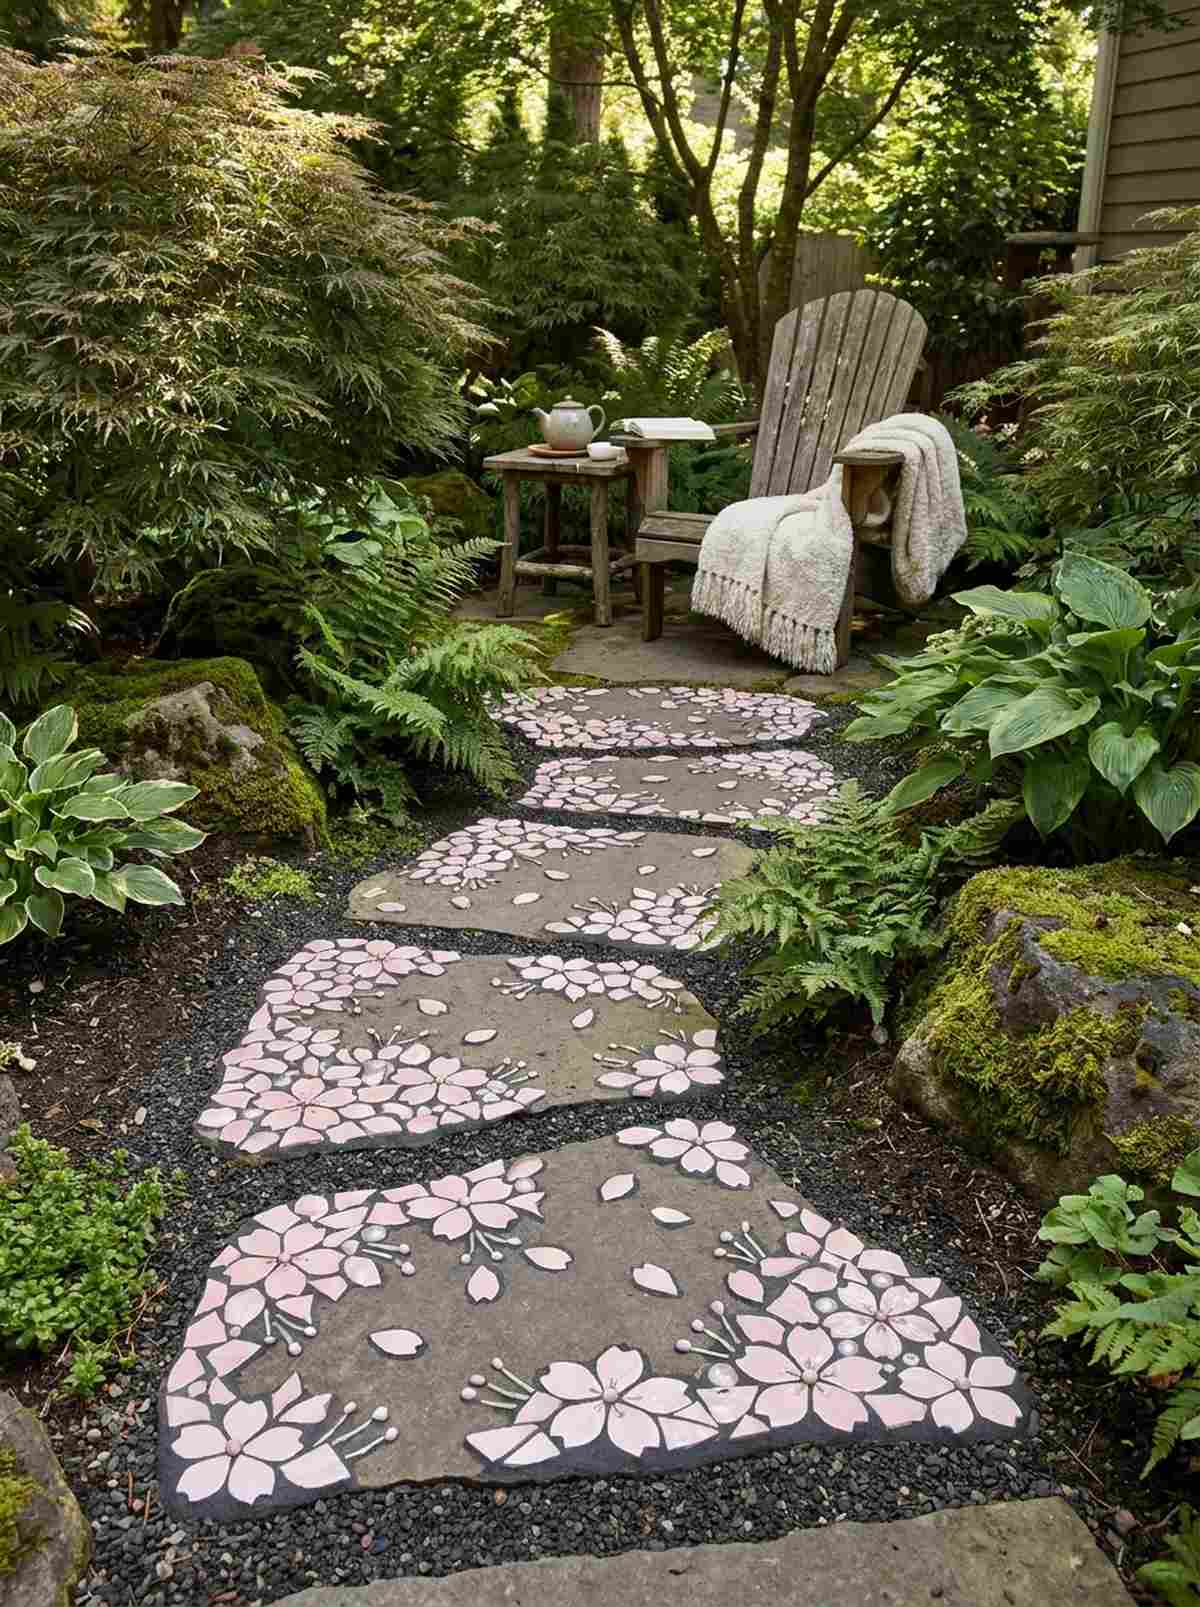
Whispering quiet elegance, this scattered petal design feels like a serene stroll through Kyoto. Zen meditation garden decor requires subtlety, making this the ultimate pathway guide for a quiet, shaded backyard reading nook.
Creating negative space is where most DIYers fail, but spacing these pink blooms against a dark background looks far more expensive than it is. Using premium fairy garden kits or pale glass beads for the stamens elevates the piece from basic craft to garden art.
You can execute this delicate aesthetic for just $15 to $25. Save this to your spring garden prep board to capture that tranquil aesthetic!
- Key Materials: Soft pink porcelain shards, dark charcoal background grout
- Vibe / Style: Serene Japanese garden
- Difficulty: Moderate
- Budget Breakdown: Pink Tiles: $10 | Dark Grout: $15
- Creator’s Tip: Don’t center the blossoms; an asymmetrical scatter makes the petals look like they naturally fell onto the stone.
- Smart Sourcing: tumbled sea glass (blush pink) and commercial-grade black grout.
8. Bold Rose Spiral
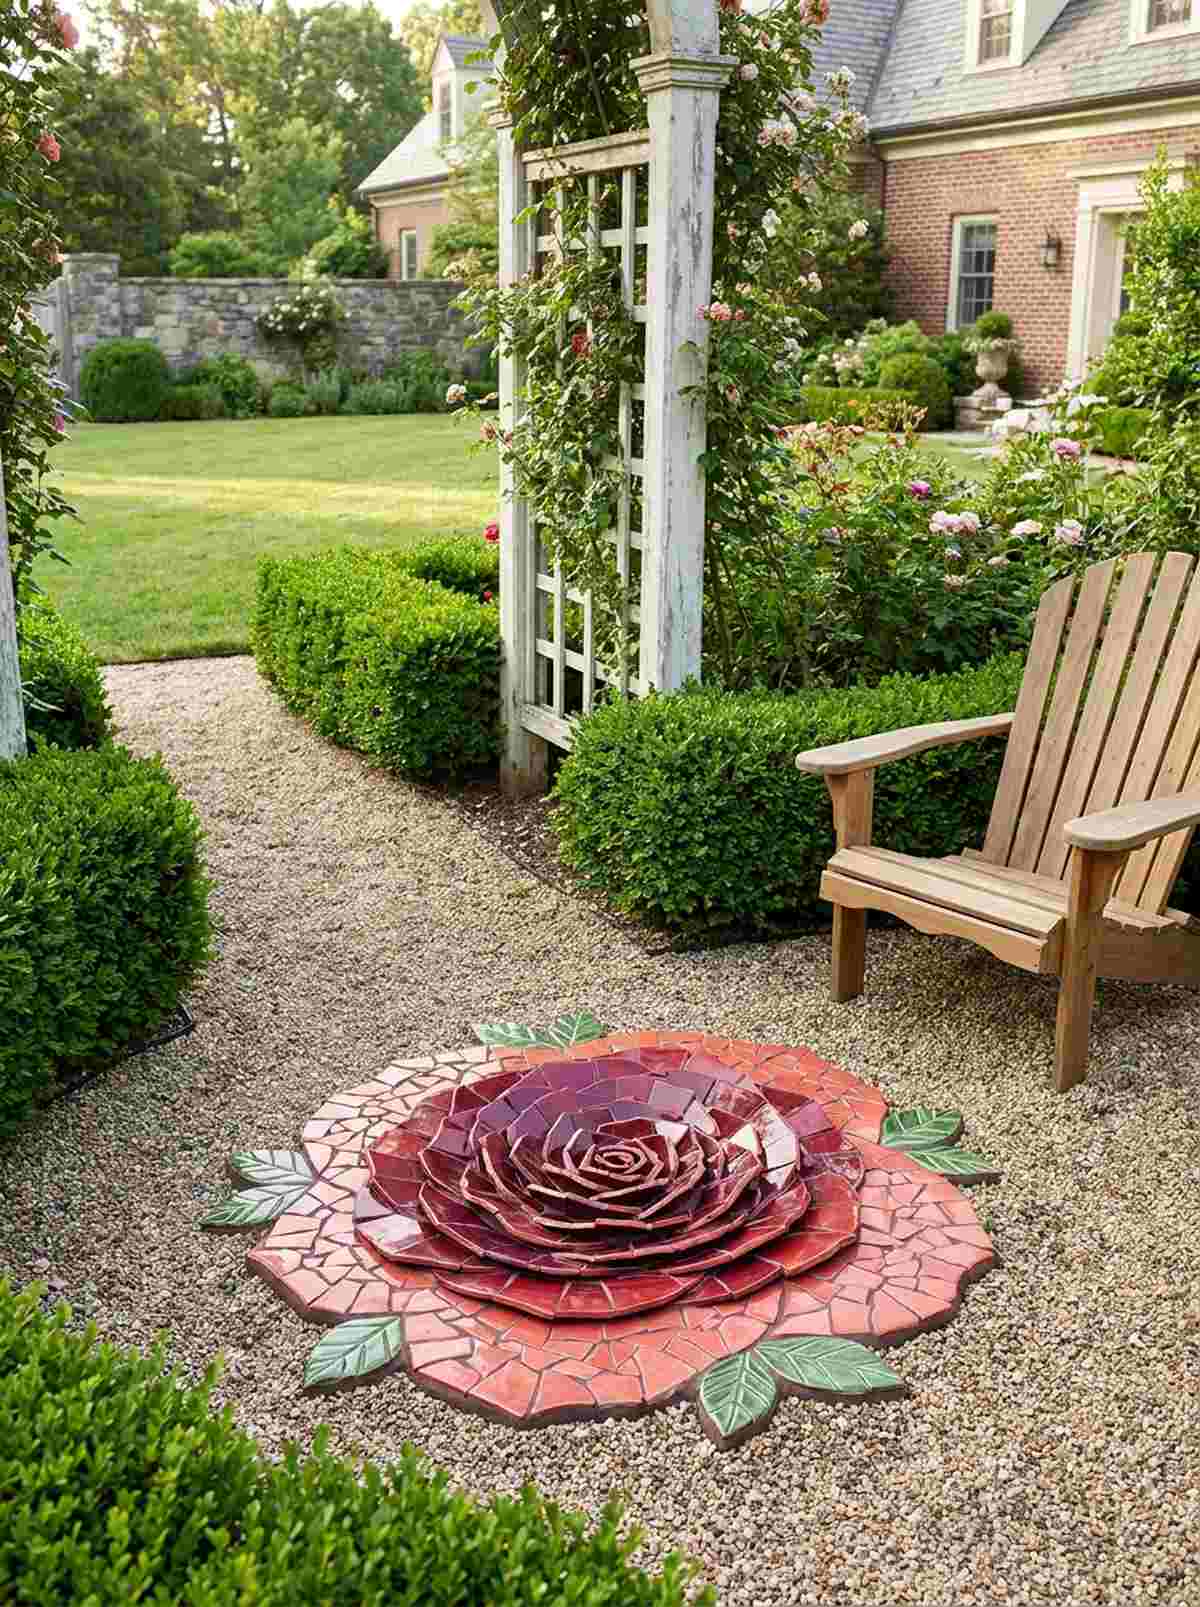
Deep, romantic, and heavily textured, this rich crimson layout feels straight out of an English manor estate. Formal landscape focal points thrive on classic motifs, positioning this design perfectly alongside manicured boxwoods or a trellis.
The trick to avoiding a flat-looking flower is color gradation; blending burgundy into coral delivers a surprisingly premium look. This stepping stones flower method transforms inexpensive broken ceramics into a breathtaking, multi-dimensional masterpiece.
A sophisticated bloom like this will set you back roughly $25 in materials. It’s a stunning weekend win that outlasts the actual flowers.
- Key Materials: Crimson and coral ceramic fragments, green leaf accents
- Vibe / Style: Romantic English garden
- Difficulty: Advanced color blending
- Budget Breakdown: Red Ceramics: $18 | Sealer: $7
- Creator’s Tip: Overlap your tile pieces slightly at the center to mimic the tight, unfurling petals of a real rose.
- Smart Sourcing: gradient red mosaic tile kits and heavy-duty tile nippers.
9. Wildflower Meadow Mix
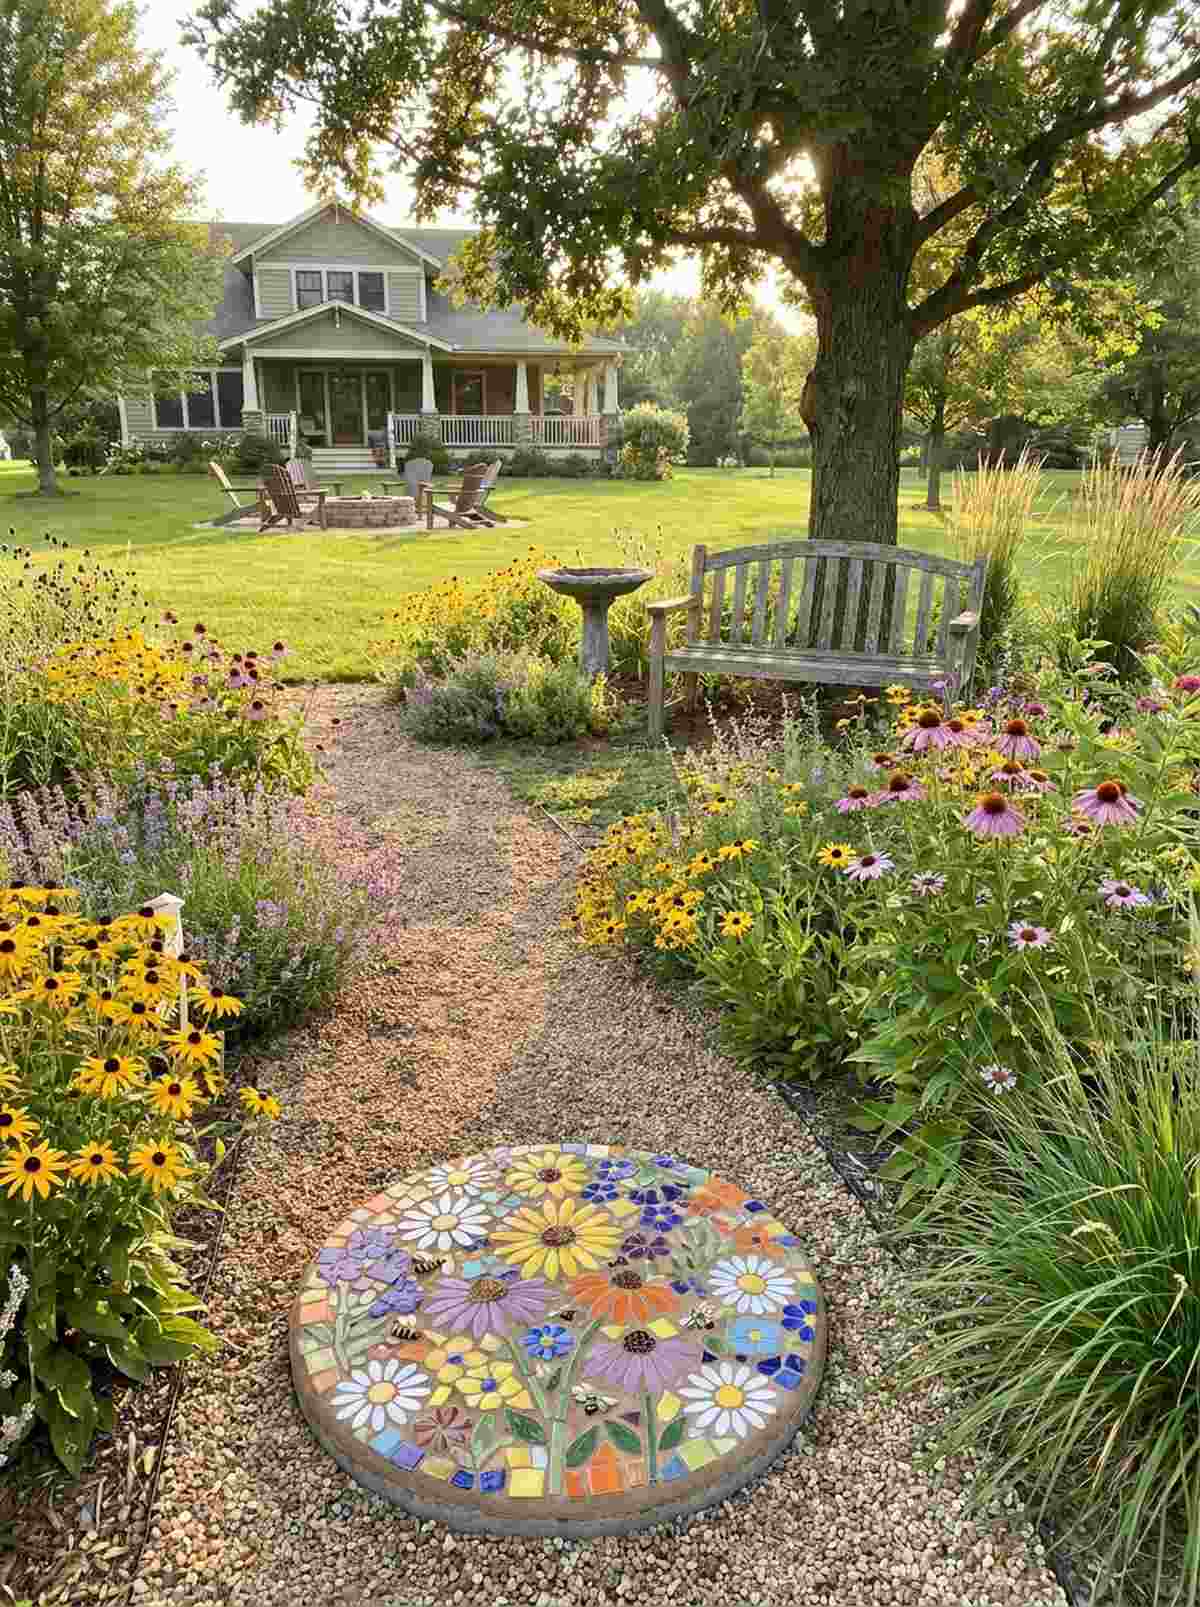
Carefree and bursting with color, this scattered composition feels like a tiny patch of untamed prairie. Naturalistic landscaping accents benefit from intentional chaos, making this mixed floral stone a brilliant addition to a pollinator garden perimeter.
Instead of forcing symmetry, leaning into an eclectic mix of daisies and coneflowers gives a designer-level finish that looks effortlessly chic. You can easily sneak in miniature garden supplies like small resin bees to make the scene pop even harder.
This whimsical scrap-buster project is incredibly budget-friendly at around $10–$15. Pin this idea to remind yourself that perfection isn’t required for beauty!
- Key Materials: Assorted colorful scrap tiles, earth-toned background filler
- Vibe / Style: Whimsical prairie core
- Difficulty: Easy and forgiving
- Budget Breakdown: Scrap Tiles: $5 | Base Concrete: $10
- Creator’s Tip: Use leftover broken tiles from other projects to keep this completely zero-waste and budget-friendly.
- Smart Sourcing: mixed glass mosaic pebble assortments and rapid-set concrete mix.
Most people get this next detail completely wrong… until they try the exact layout coming up.
💡 Must-Have Supplies for High-End Setups
To build these setups faster and ensure they last, skip the generic craft aisles and invest in the right foundational kits.
- Base & Support: commercial-grade silicone stepping stone molds
- Setup Tools: professional mosaic starter kits with wheeled nippers
- Weather/Durability Protection: UV-resistant penetrating concrete sealer (gallon jug)
10. Tropical Hibiscus Display
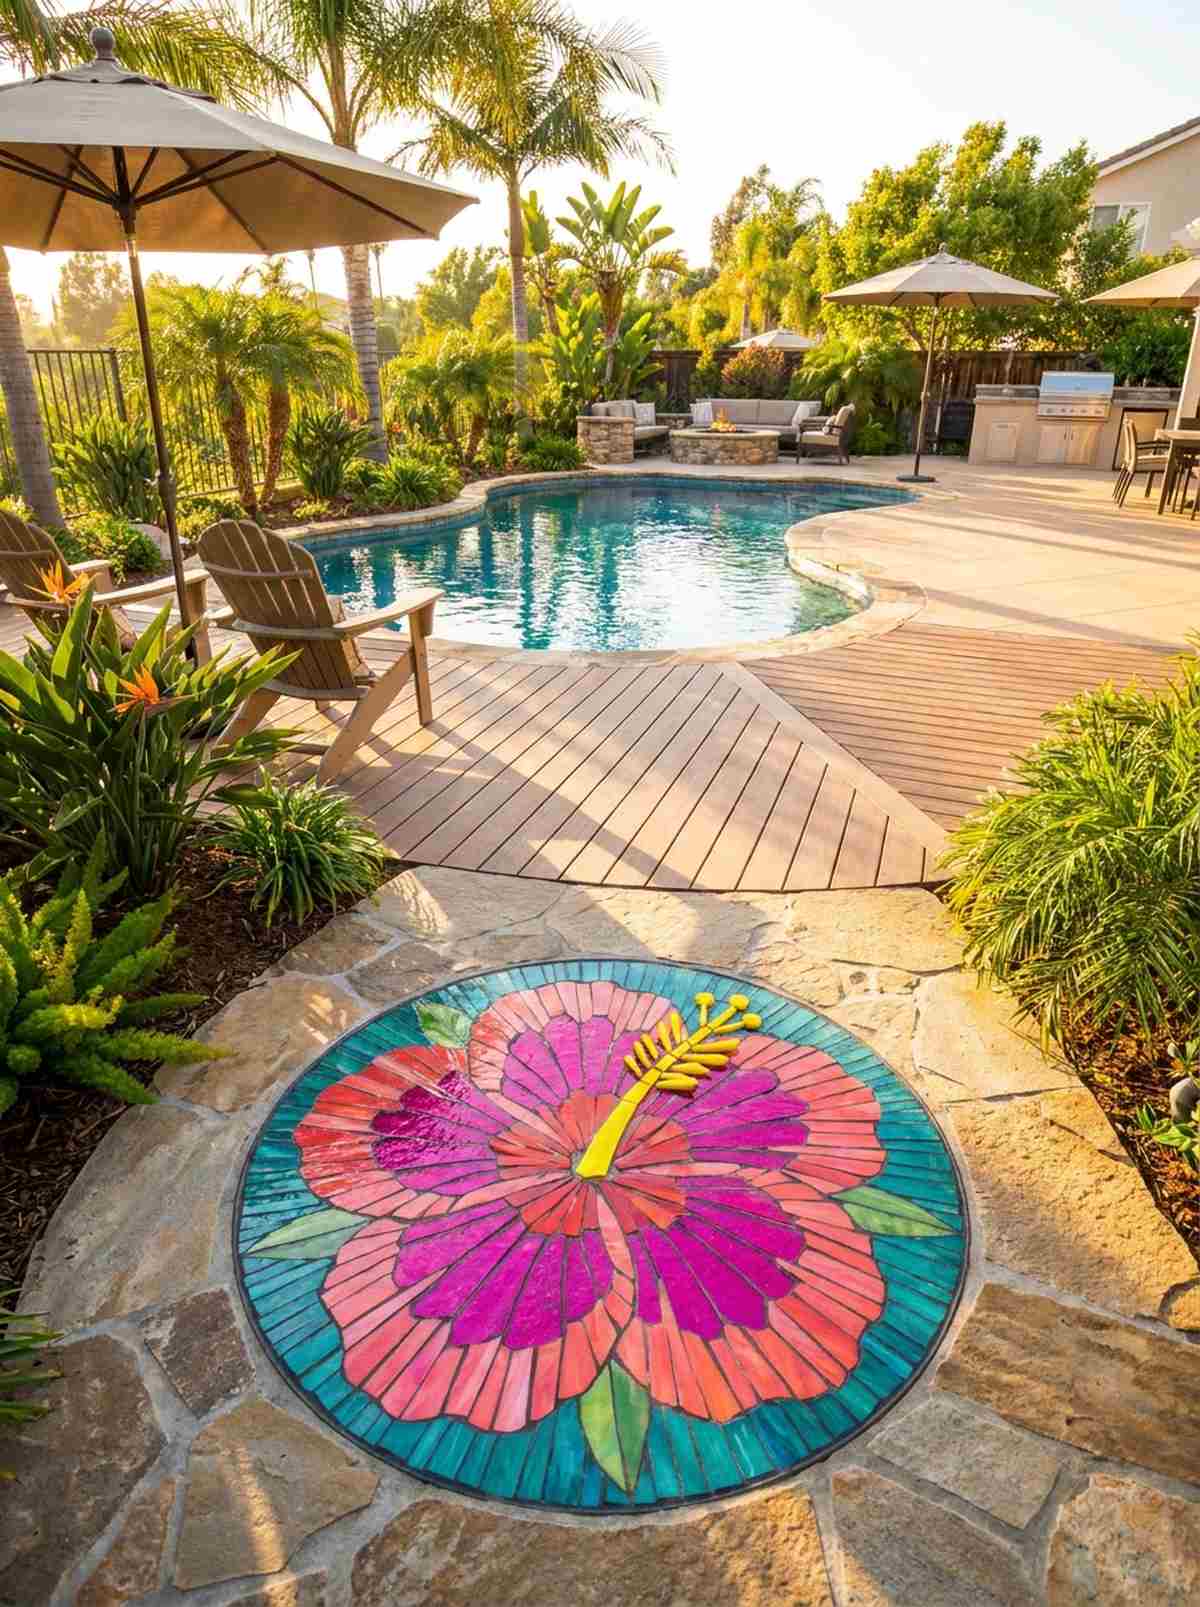
Loud, lush, and unapologetically bold, this oversized bloom feels like a permanent vacation. Poolside oasis decor demands vibrant, high-contrast colors, and this magenta and coral masterpiece is exactly what a tropical patio needs.
While subtle paths fade away, committing to oversized floral anatomy guarantees your stepping stones mosaic patterns become the main attraction. Utilizing UV-coated outdoor materials ensures that blistering summer sun won’t fade your expensive-looking handiwork.
Creating this tropical punch costs approximately $25–$35. It’s an aggressive pop of color that totally transforms dull decking.
- Key Materials: Magenta glass tiles, bright yellow stamen shards
- Vibe / Style: Bright tropical resort
- Difficulty: Moderate
- Budget Breakdown: Bright Tiles: $20 | Weatherproofing: $15
- Creator’s Tip: Make the yellow stamens physically protrude slightly higher than the petals for a dramatic 3D effect.
- Smart Sourcing: UV-coated stained glass sheets and premium exterior thin-set mortar.
11. Ivy Vine Border
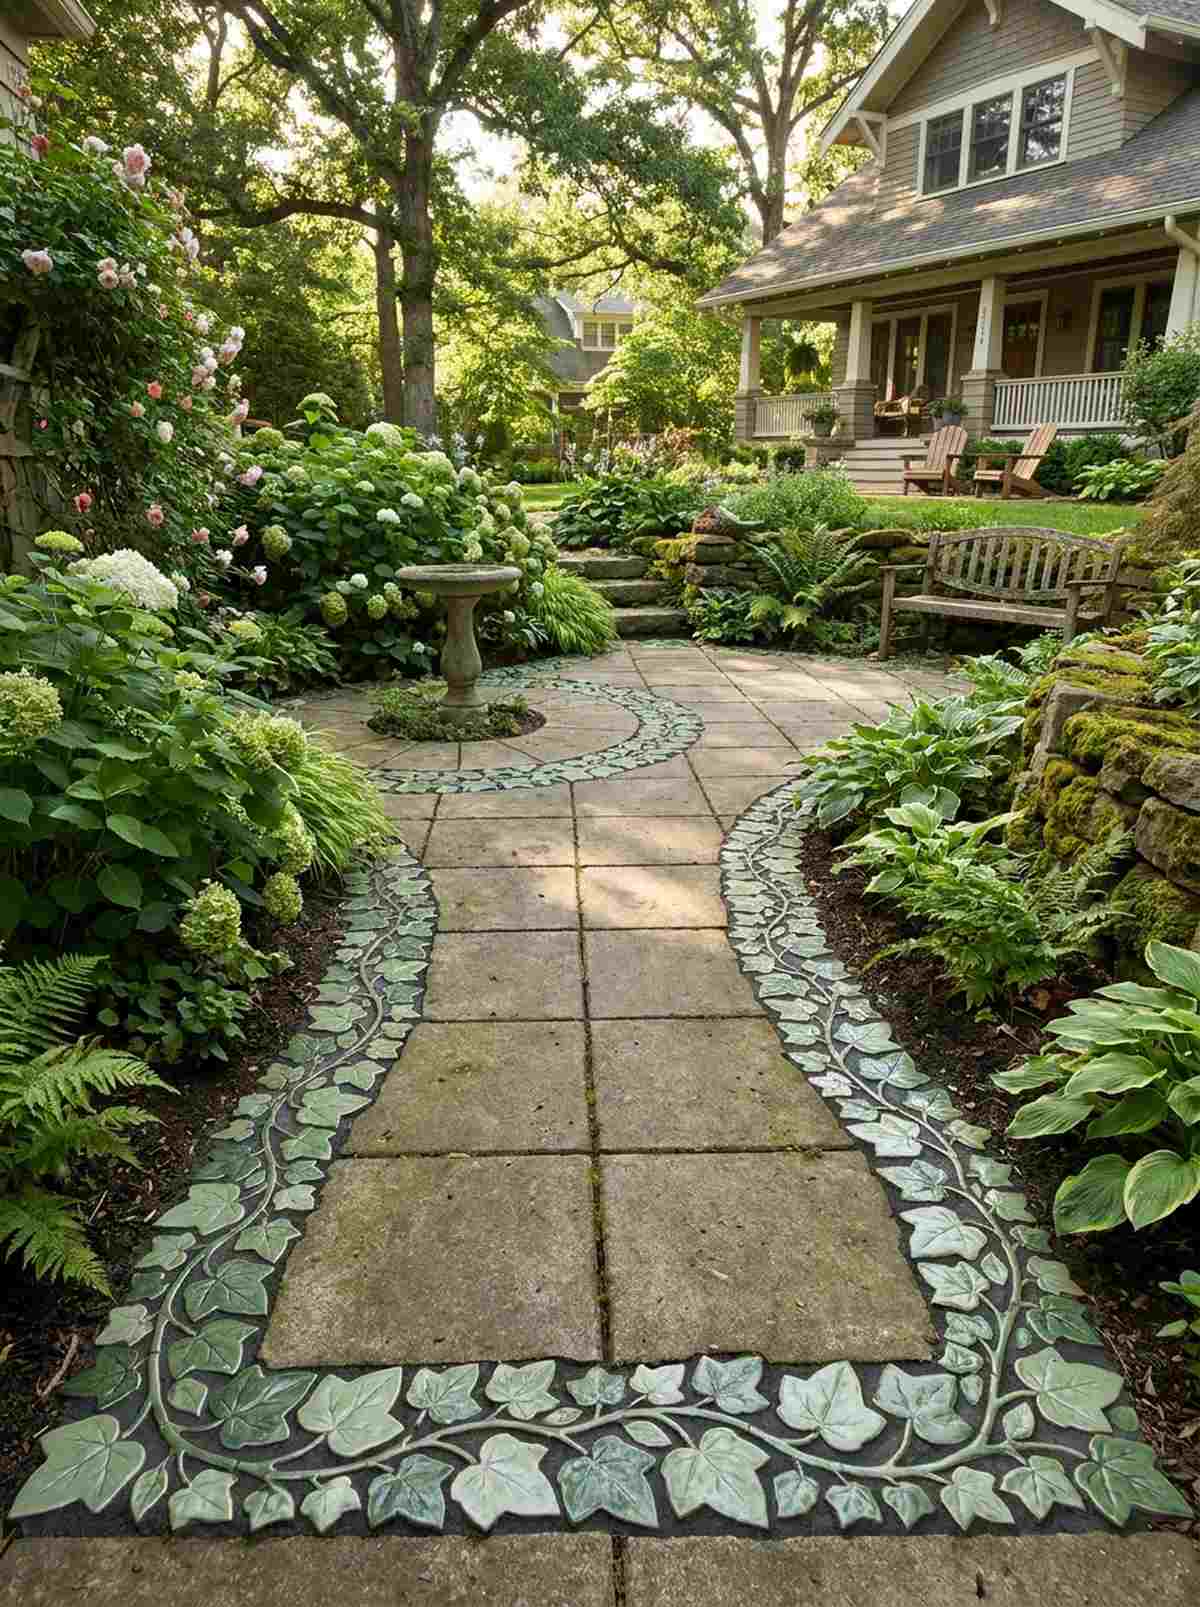
Winding elegantly around the edges, this framing technique feels like a garden ruin reclaimed by nature. Organic pathway borders soften harsh concrete lines beautifully, offering the perfect border wrap for a fairy garden pathway.
Don’t settle for a plain edge; trailing varying shades of green forest tiles along the rim delivers a surprisingly premium look. This framing trick anchors the stone visually to the grass, making cheap pavers look like high-end heritage masonry.
You can execute this elegant framing technique for just $15. Save this pin if you need a reliable way to make basic concrete blocks look spectacular!
- Key Materials: Sage and forest green tiles, curved vine layout templates
- Vibe / Style: Secret garden ruins
- Difficulty: Moderate shaping
- Budget Breakdown: Greenery Tiles: $10 | Base Stone: $5
- Creator’s Tip: Use dark grout around the ivy leaves to create artificial shadows, making the vines pop off the stone.
- Smart Sourcing: pre-cut ceramic leaf tiles (bulk pack) and flexible grout sealant.
Ladybug Stepping Stones & Wildlife Characters
12. Classic Ladybug Charm
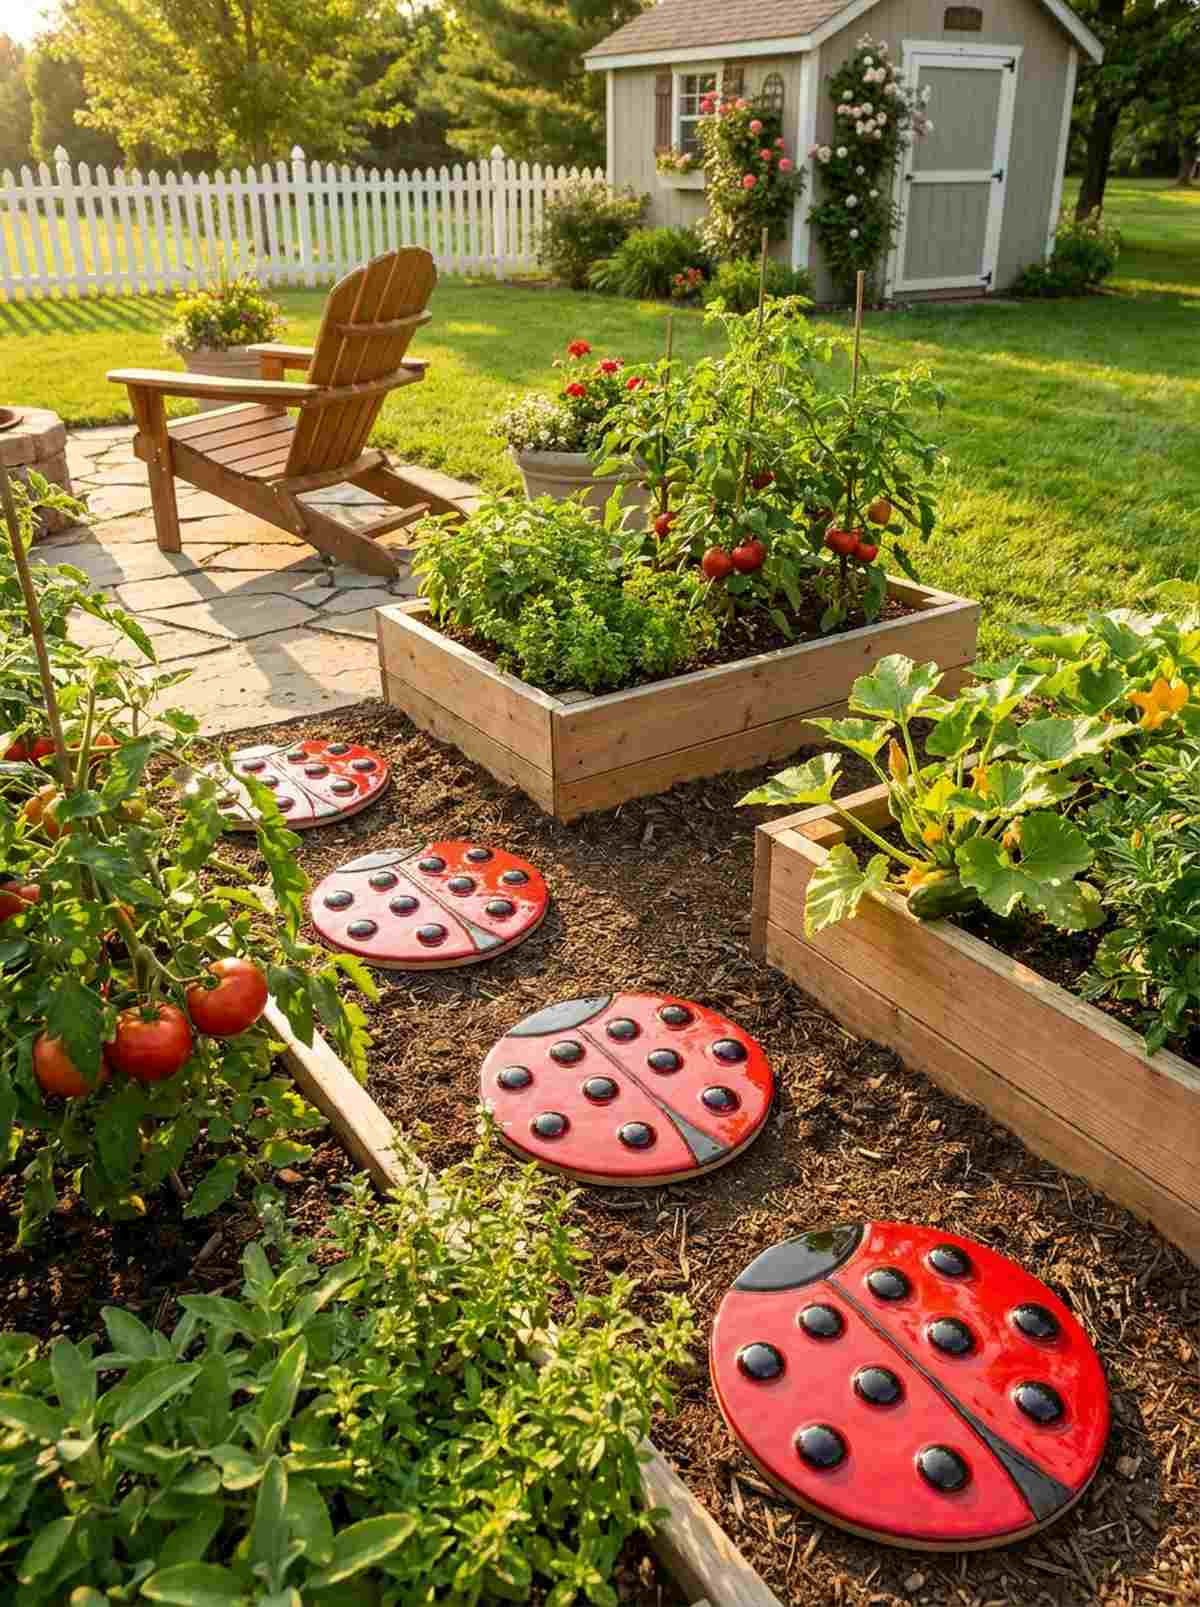
Instantly recognizable and overwhelmingly cheerful, this spotted design feels like a storybook illustration come to life. Whimsical vegetable garden decor thrives on playful motifs, making ladybug stepping stones the ultimate companion for your tomato rows.
It’s incredibly easy for animal designs to look messy, but strictly adhering to bold red and jet-black geometries looks far more expensive than it is. Sourcing high-gloss acrylic accents ensures the shell retains that wet, premium shine all season long.
You can build this garden guardian for under $20. Pin this to your family DIY board for a foolproof weekend craft!
- Key Materials: Bright red ceramics, black circular glass drops
- Vibe / Style: Playful family garden
- Difficulty: Very easy
- Budget Breakdown: Red Base: $12 | Black Accents: $8
- Creator’s Tip: Use domed black glass gems for the spots instead of flat tiles to give the ladybug realistic, tactile bumps.
- Smart Sourcing: flat-backed black glass marbles (bulk pack) and cherry red outdoor ceramic pieces.
13. Butterfly Transformation
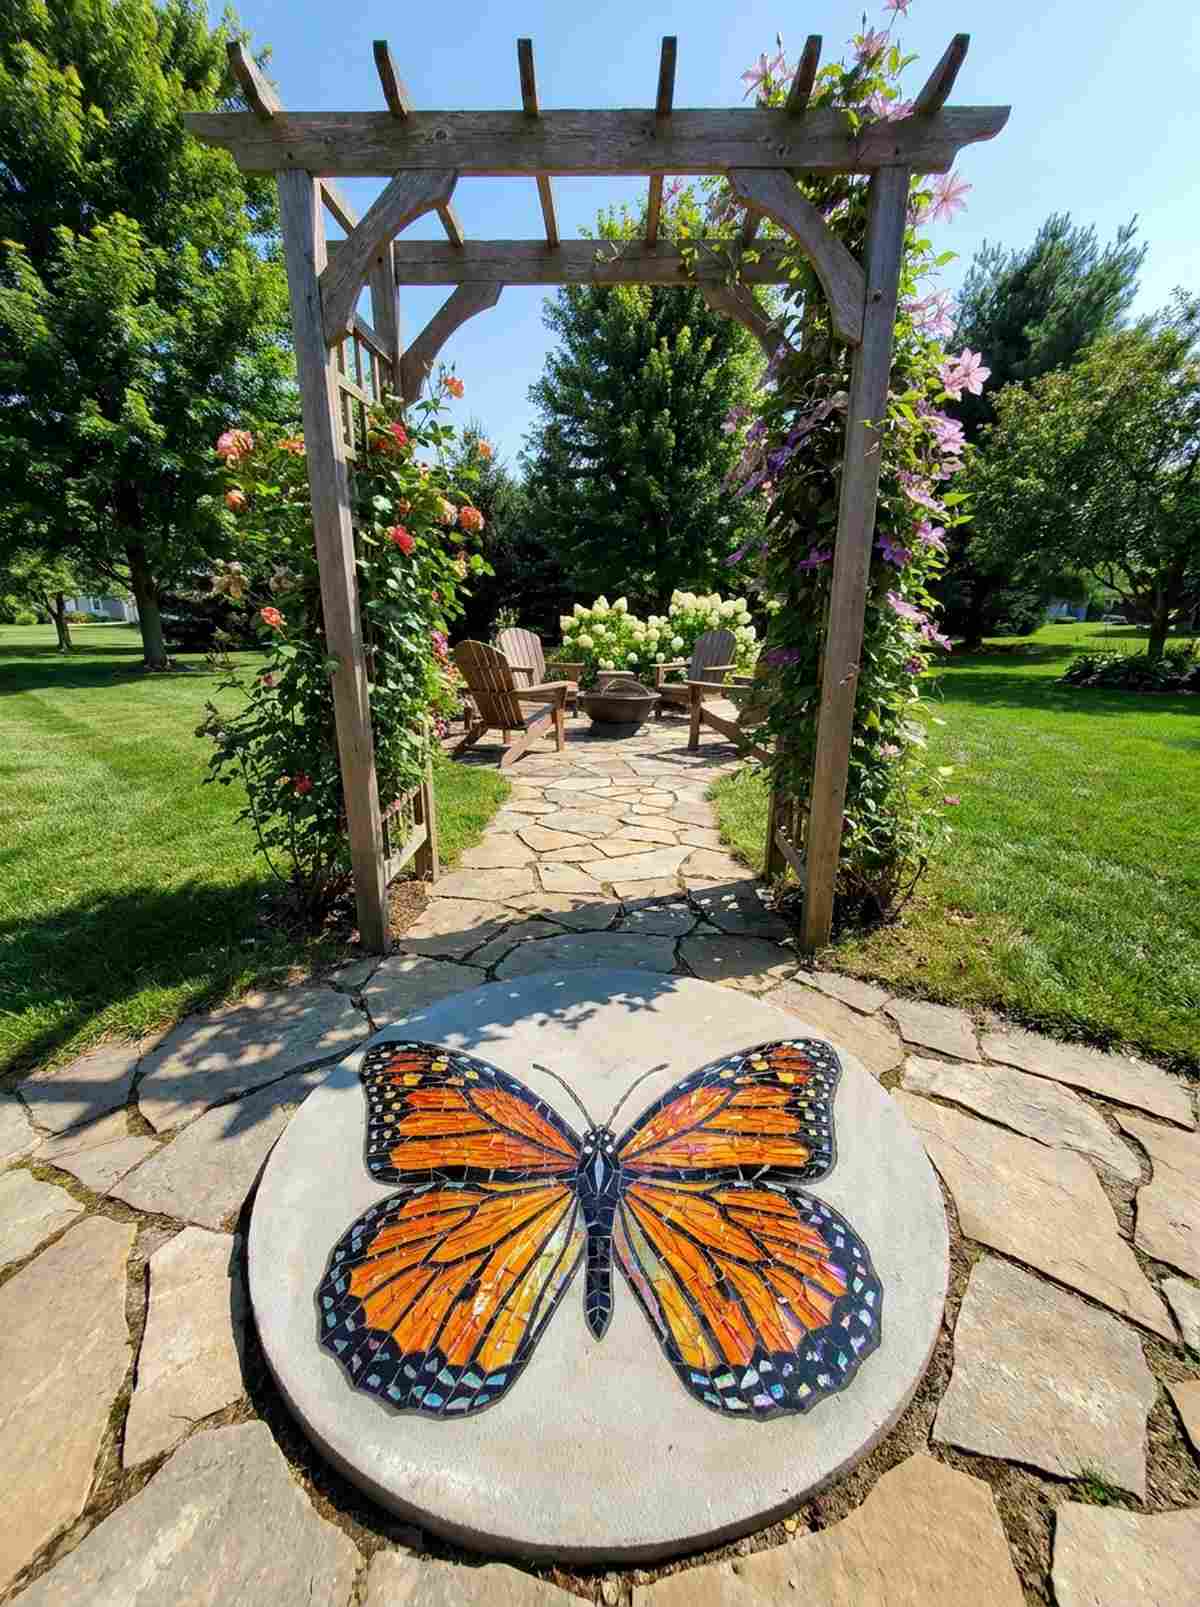
Spanning the entire stone with brilliant symmetry, this winged display feels like a moment of magic frozen in time. Pollinator-friendly yard enhancements call for graceful artistry, placing this monarch design perfectly at the entrance of a floral archway.
Bilateral symmetry instantly elevates a craft project into art; dividing the stone flawlessly down the middle gives a designer-level finish. Integrating premium fairy garden kits or iridescent glass allows the wings to literally shimmer as you walk past.
Expect to invest about $25 to capture this graceful layout. Highly recommended for adding a sense of movement to static landscapes.
- Key Materials: Orange and black glass shards, fine detail nippers
- Vibe / Style: Graceful nature sanctuary
- Difficulty: Moderate symmetry matching
- Budget Breakdown: Wing Glass: $15 | Grout: $10
- Creator’s Tip: Build one complete wing first, then use it as a strict visual template for the opposite side to ensure perfect balance.
- Smart Sourcing: iridescent mosaic tile squares and precision glass cutting pliers.
14. Dragonfly Elegance
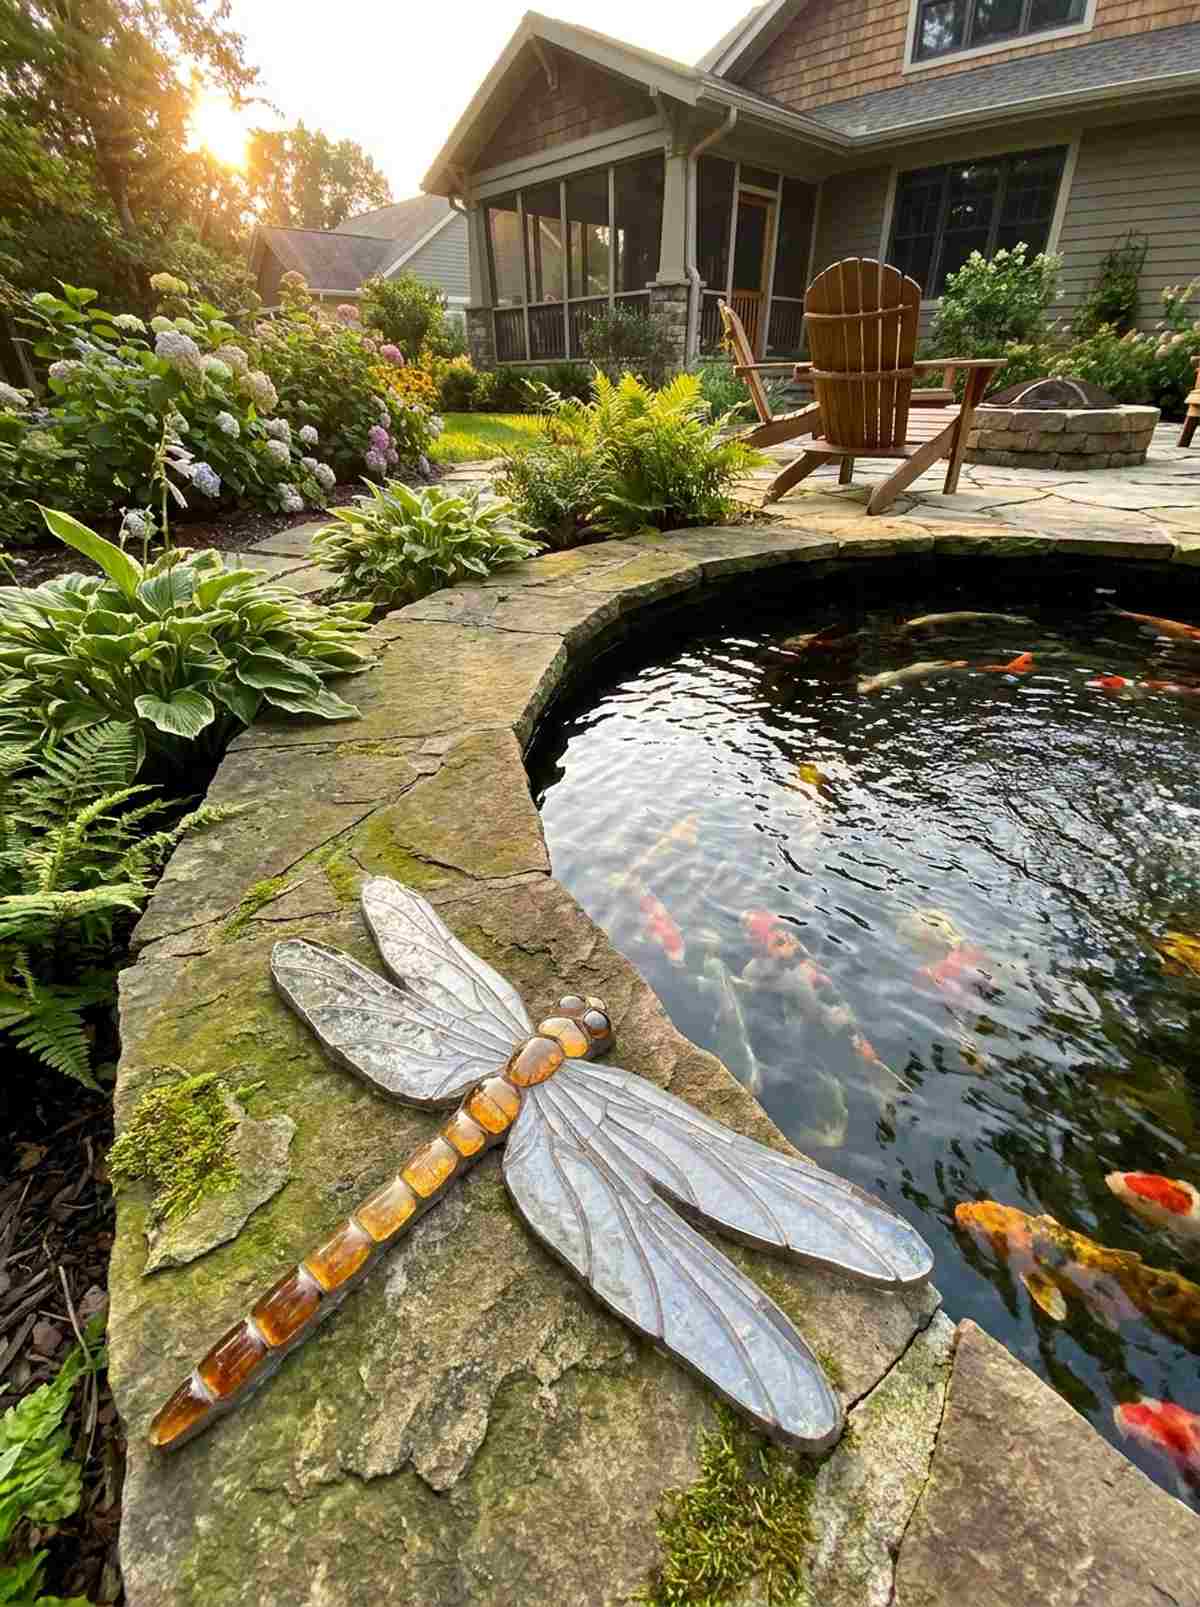
Sleek, delicate, and beautifully elongated, this insect portrait feels like a delicate vintage brooch resting on the ground. Water feature edge decor demands elegant inhabitants, and this translucent dragonfly layout pairs phenomenally next to a backyard koi pond.
Thick, clunky tiles ruin the illusion of wings, but using clear, UV-resistant glass delivers a surprisingly premium look of transparency. Utilizing graduated tile sizes for the body creates an anatomical realism that upgrades cheap materials into luxury.
This sophisticated pond-side piece will cost roughly $20–$30. Save this idea before you start your next backyard water feature overhaul!
- Key Materials: Clear translucent glass, amber body tiles
- Vibe / Style: Elegant pond-side tranquility
- Difficulty: Advanced detail work
- Budget Breakdown: Clear Glass: $15 | Base: $10
- Creator’s Tip: Paint the concrete base white *only* underneath the clear wing tiles to make the transparent glass pop brightly.
- Smart Sourcing: transparent stained glass sheets and waterproof epoxy resin kits.
Wait until you see this next approach—it completely changes how you view pathway budget decor.
15. Honey Bee Garden Helper

Fuzzy, striped, and incredibly endearing, this buzzing motif feels like an ode to the hardest workers in your yard. Eco-friendly landscaping accents love a good theme, making this bee block an ideal marker for your newly planted wildflower beds.
Alternating yellow and black can sometimes blur together, but separating the stripes with a crisp grout line looks far more expensive than it is. Sneaking in durable miniature garden supplies for the antennae gives the piece a professional 3D pop.
You can create a whole swarm of these for about $15 per stone. It’s a fantastic conversation starter that honors local ecology.
- Key Materials: Yellow and black ceramics, white wing tiles
- Vibe / Style: Rustic apiary charm
- Difficulty: Easy
- Budget Breakdown: Colored Tiles: $10 | Adhesives: $5
- Creator’s Tip: Keep the bee’s body chubby and rounded rather than harsh and angular to maximize the cute, welcoming factor.
- Smart Sourcing: sunflower yellow ceramic shards (bulk pack) and fine-tipped grout sealers.
16. Turtle Shell Pattern
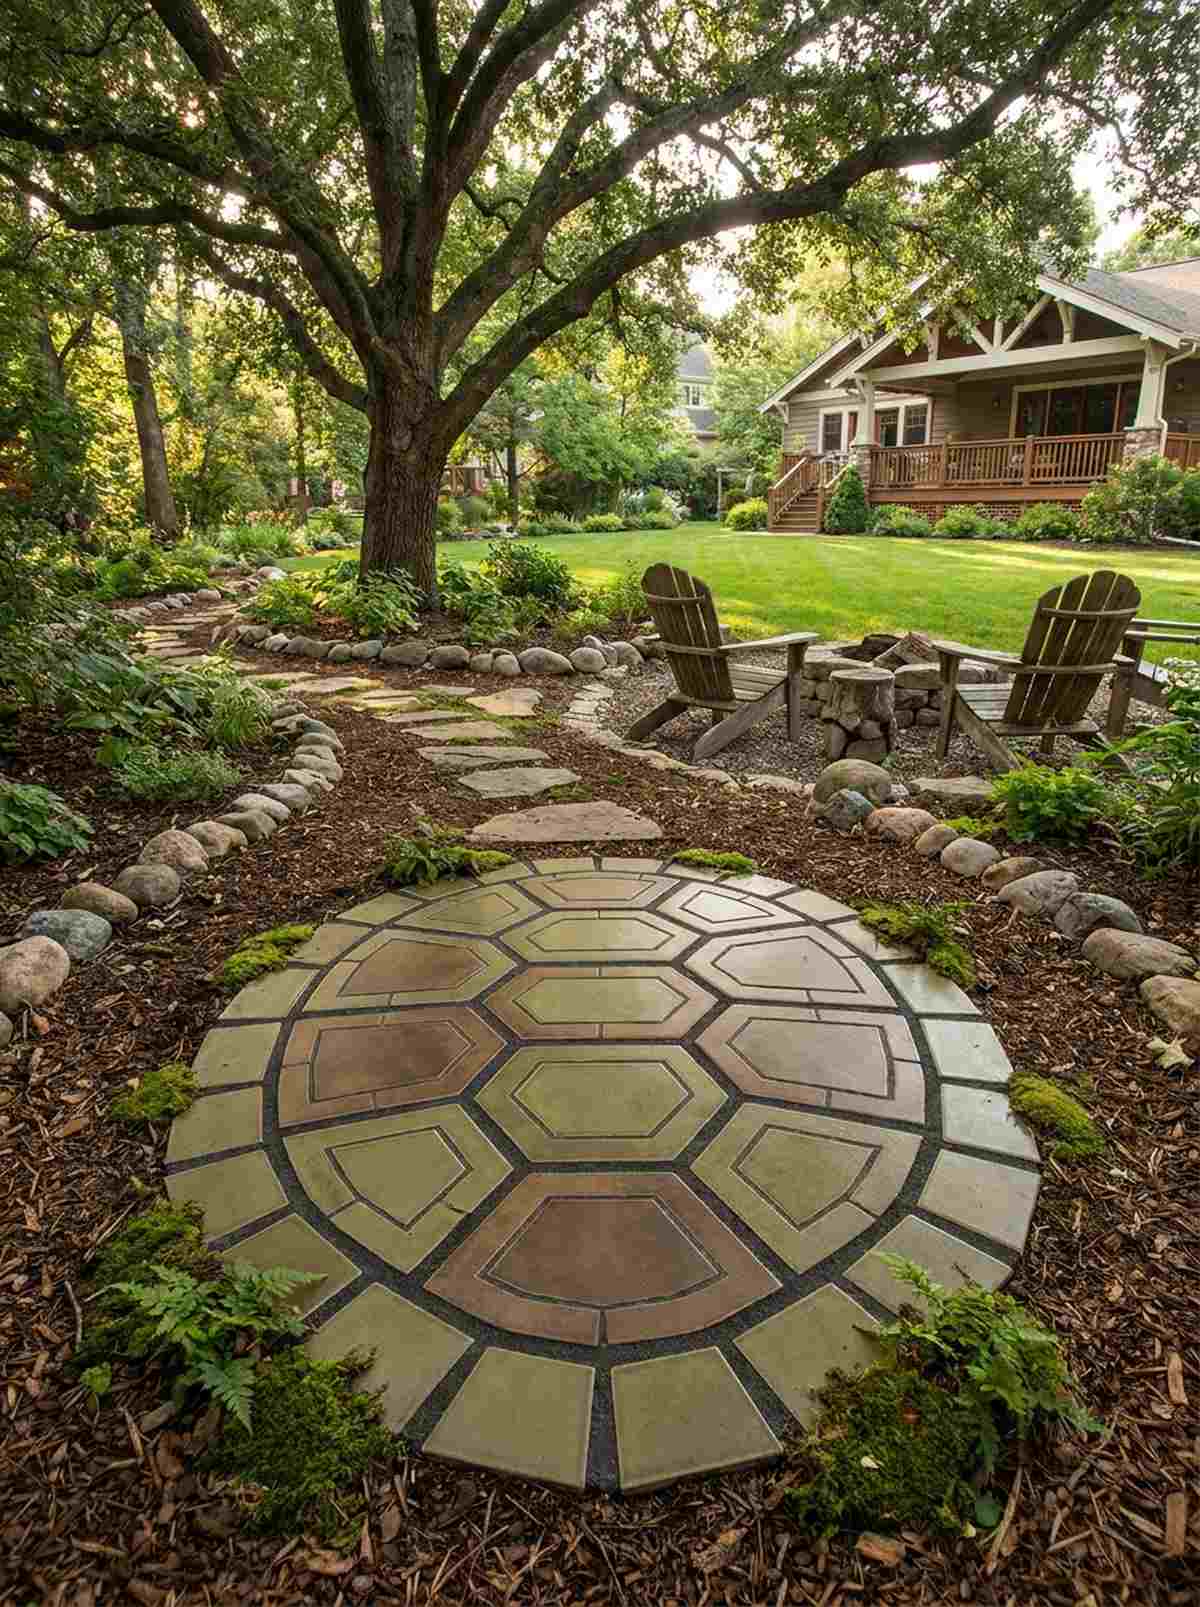
Grounded, geometric, and texturally fascinating, this reptilian layout feels like discovering an ancient forest guardian. Woodland pathway ideas require earthy, subtle tones, positioning this mossy turtle perfectly beneath a shaded oak tree.
The natural segmentation of a turtle shell provides a foolproof cheat code; filling those boundaries with varied terrarium accessories gives a designer-level finish. It transforms standard stepping stones mosaic blueprints into a tactile, reptilian masterpiece.
This earthy, geometric build typically costs around $25. Pin this if you want a subtle, naturalistic design that blends seamlessly into the landscape!
- Key Materials: Olive green and brown tiles, hexagonal center pieces
- Vibe / Style: Earthy woodland creature
- Difficulty: Moderate to easy
- Budget Breakdown: Earth Tone Tiles: $15 | Concrete Base: $10
- Creator’s Tip: Use a slightly thicker grout line between the shell segments to emphasize the distinct, armor-like quality of the shell.
- Smart Sourcing: earth-toned porcelain tile bundles and sanded polymer exterior grout.
17. Frog Prince Character
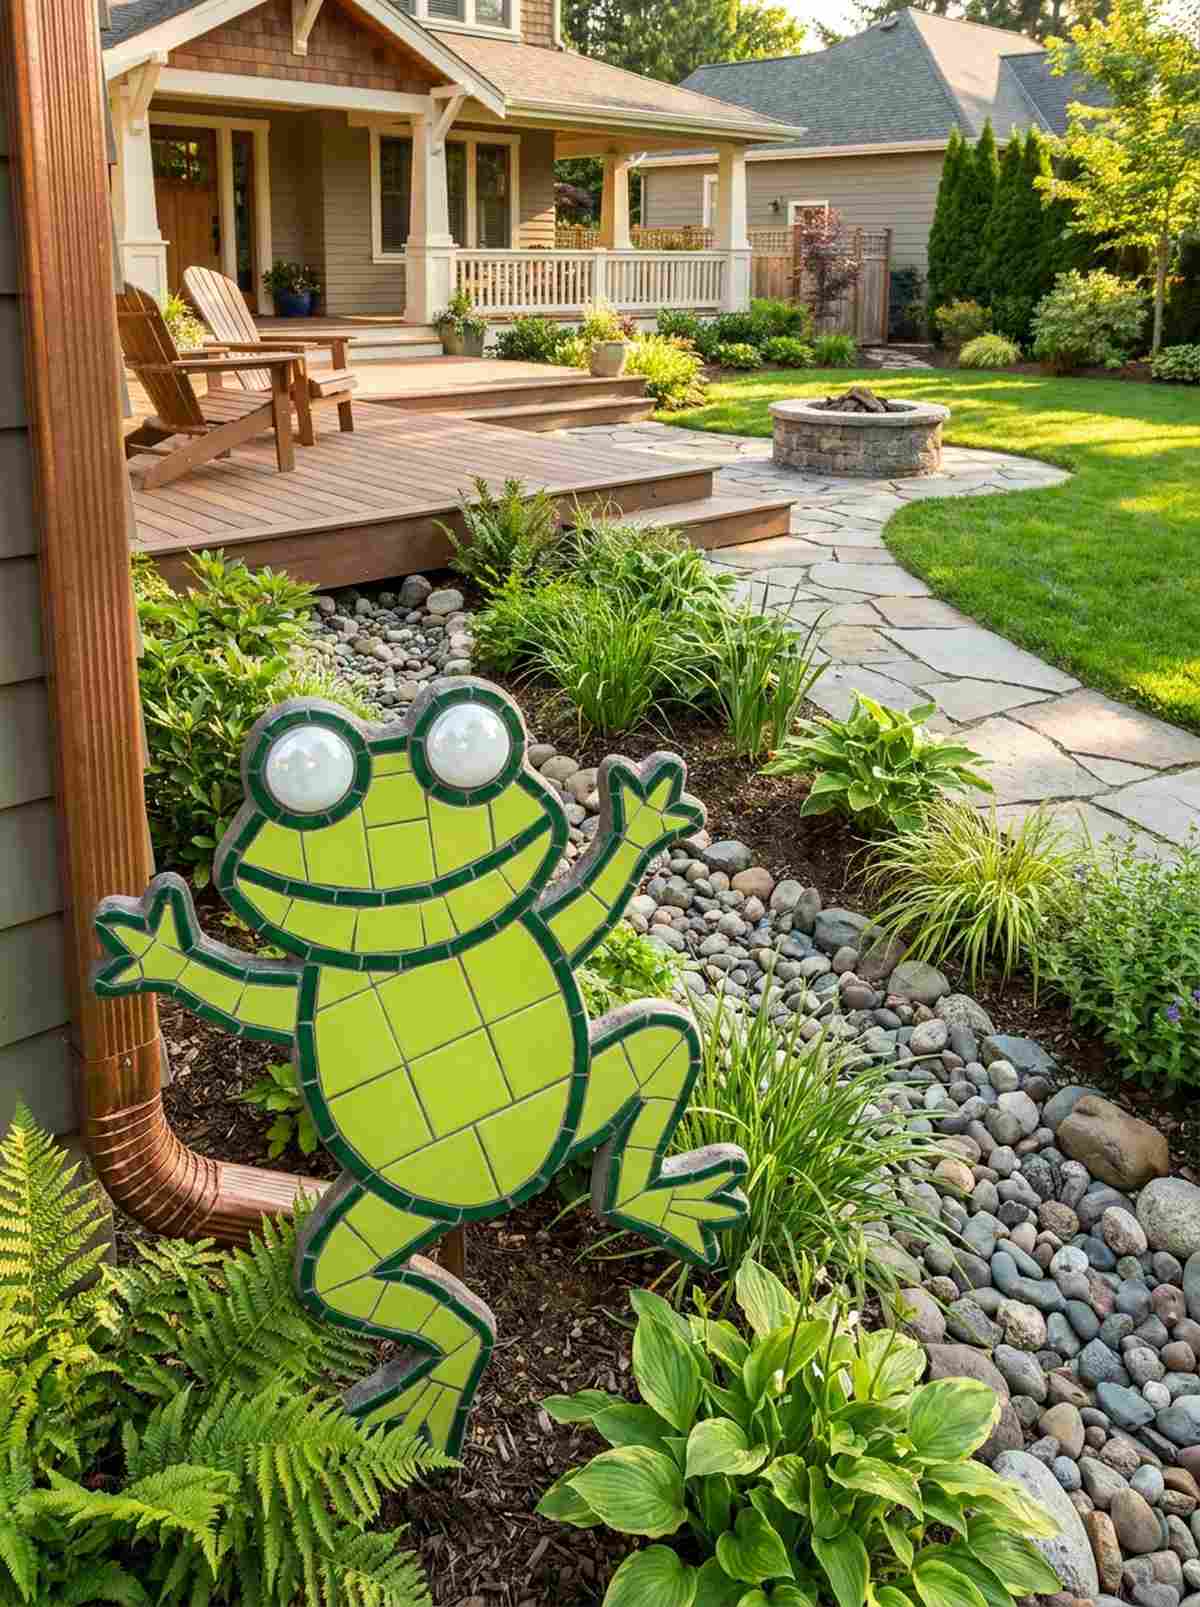
Cheeky, vibrant, and full of character, this leaping amphibian feels like a pop of cartoon joy in the underbrush. Rain garden drainage decor can be visually boring, but dropping this bright lime frog near a downspout changes the whole dynamic.
A poorly outlined frog gets lost in the grass, but outlining the silhouette in dark green delivers a surprisingly premium look that demands attention. You can easily upgrade the aesthetic by utilizing high-end polished glass for the oversized eyes.
This playful wetland character will run you about $18 to $22. Highly recommended for bioswales and water-conscious yards.
- Key Materials: Lime green ceramics, large white glass marbles
- Vibe / Style: Playful wetland whimsy
- Difficulty: Moderate
- Budget Breakdown: Green Tiles: $12 | Eye Accents: $6
- Creator’s Tip: Exaggerate the size of the frog’s toes—it adds instant whimsical personality and makes the shape easily recognizable.
- Smart Sourcing: lime green glass mosaic squares and water-resistant landscape adhesive.
18. Crescent Moon & Stars
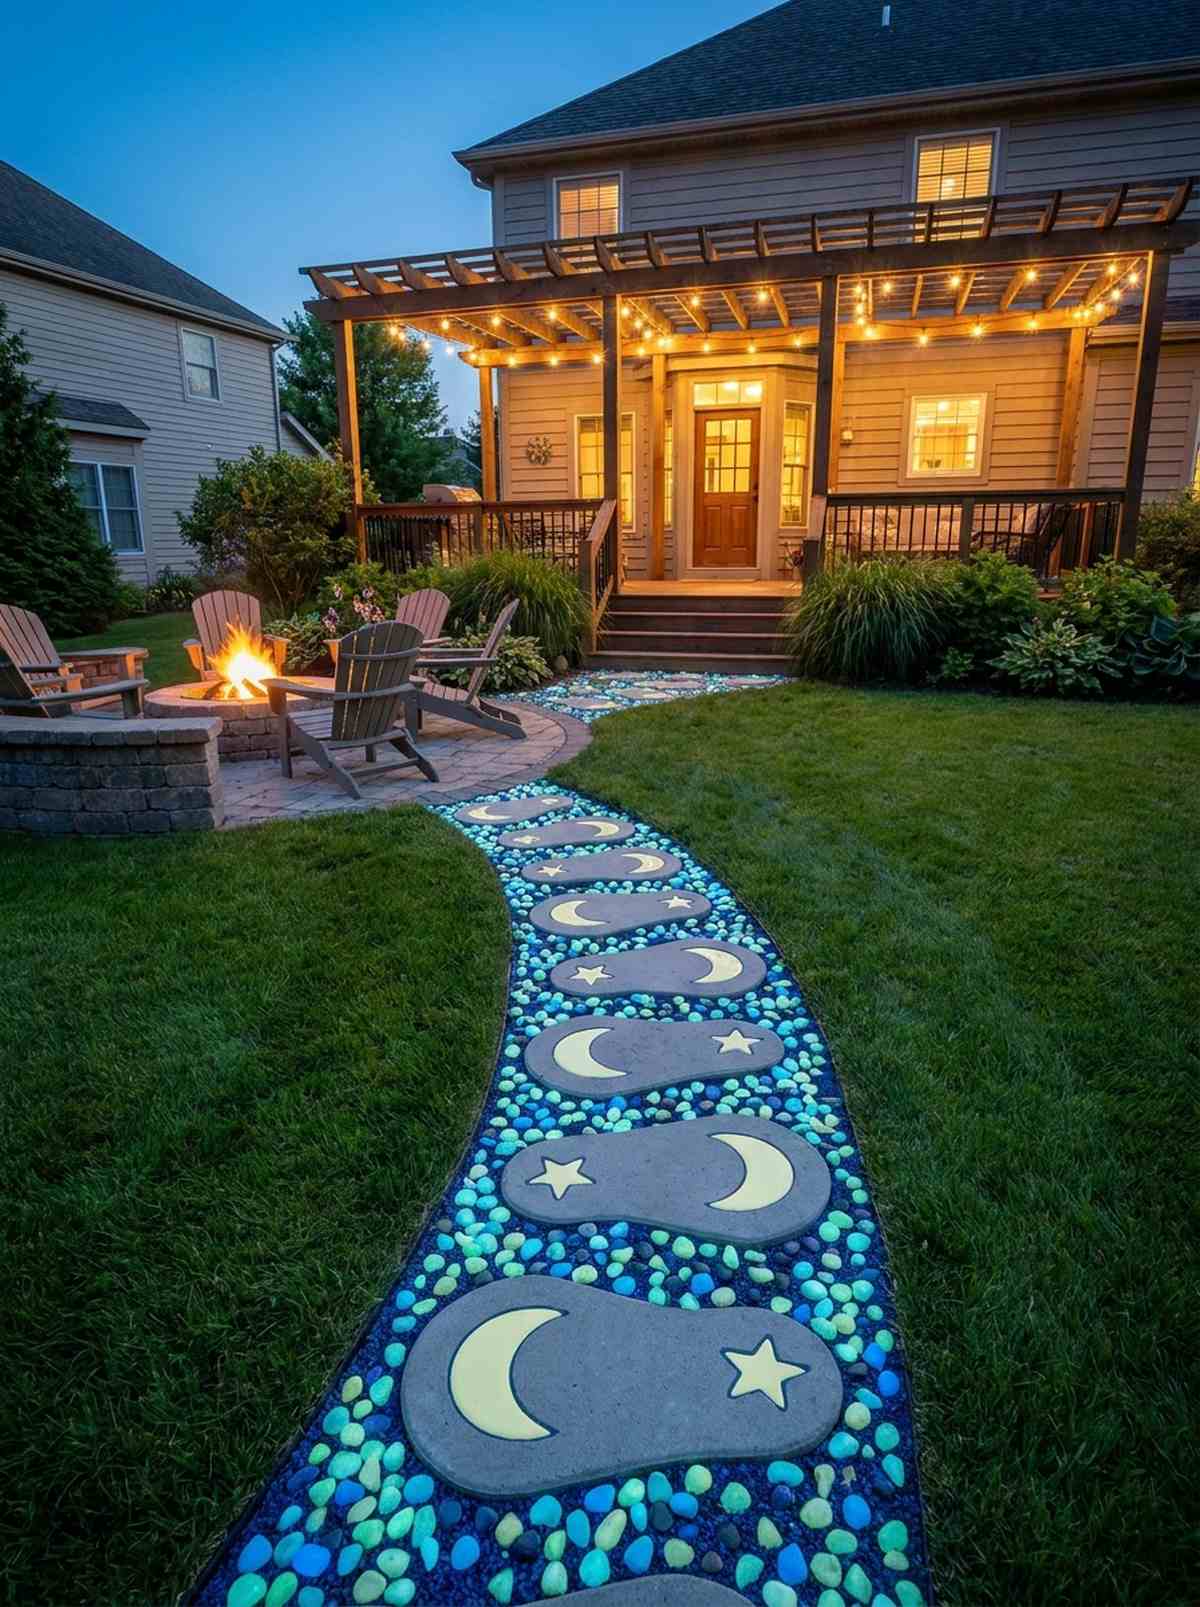
Softly glowing and deeply mystical, this celestial layout feels like a midnight spell cast over your walkway. Evening patio lighting setups require subtle navigation, and this astral theme works flawlessly to guide guests from the fire pit to the back door.
While standard white tiles disappear at dusk, embedding high-quality photoluminescent stones looks far more expensive than it is. This nocturnal stepping stones mosaic trick ensures your pathway remains a striking visual focal point long after the sun sets.
You can achieve this magical nightscape for around $25–$35. Save this to your backyard entertaining board for the ultimate twilight upgrade!
- Key Materials: Pale yellow ceramics, glow-in-the-dark aggregate
- Vibe / Style: Mystical twilight garden
- Difficulty: Moderate
- Budget Breakdown: Glow Aggregate: $20 | Base: $10
- Creator’s Tip: Charge the glow materials under a harsh UV work light before installation to test their maximum luminosity.
- Smart Sourcing: bulk pack photoluminescent resin pebbles and high-contrast midnight blue grout.
Material Guide: Cheap vs. Premium Aesthetic
Knowing exactly where to save and where to spend makes all the difference in achieving that “looks expensive but isn’t” vibe.
- Standard vs. UV-Resistant/Premium: Standard indoor craft tiles will crack and fade within a season; upgrading to UV-coated exterior ceramics stops color bleaching and withstands freeze-thaw cycles effortlessly.
- Pre-made Kits vs. Sourcing Locally: While smashing old plates is cheap, leveraging professional starter kits with pre-cut shapes saves hours of agonizing nipping and guarantees crisp, professional edges.
19. Radiating Sun Burst

Blazing with intense, fiery energy, this explosive geometry feels like harnessing solar power in your pathway. Drought-tolerant xeriscaping thrives on warm desert palettes, positioning this sunburst beautifully among succulents and crushed gravel.
A sloppy sun ray looks like a child’s drawing, but alternating wavy and straight geometric cuts gives a designer-level finish. Integrating premium amber and crimson glass transforms a basic circular mold into an aggressive, high-end centerpiece.
This striking solar flare design will set you back roughly $25. It’s an incredibly warm addition to heavily shaded landscape zones.
- Key Materials: Orange, red, and yellow shards, precision layout tools
- Vibe / Style: Bold desert warmth
- Difficulty: Advanced layout planning
- Budget Breakdown: Warm Tone Glass: $18 | Mortar: $7
- Creator’s Tip: Build the blazing center ring first, then pull the triangular rays outward to maintain perfect circular symmetry.
- Smart Sourcing: warm-toned stained glass variety bundles and exterior heavy-traffic sealer.
If you think those were impressive, the upcoming luminescent design is going to blow your mind.
Celestial Themes & Glow-in-the-Dark Accents
20. Constellation Map
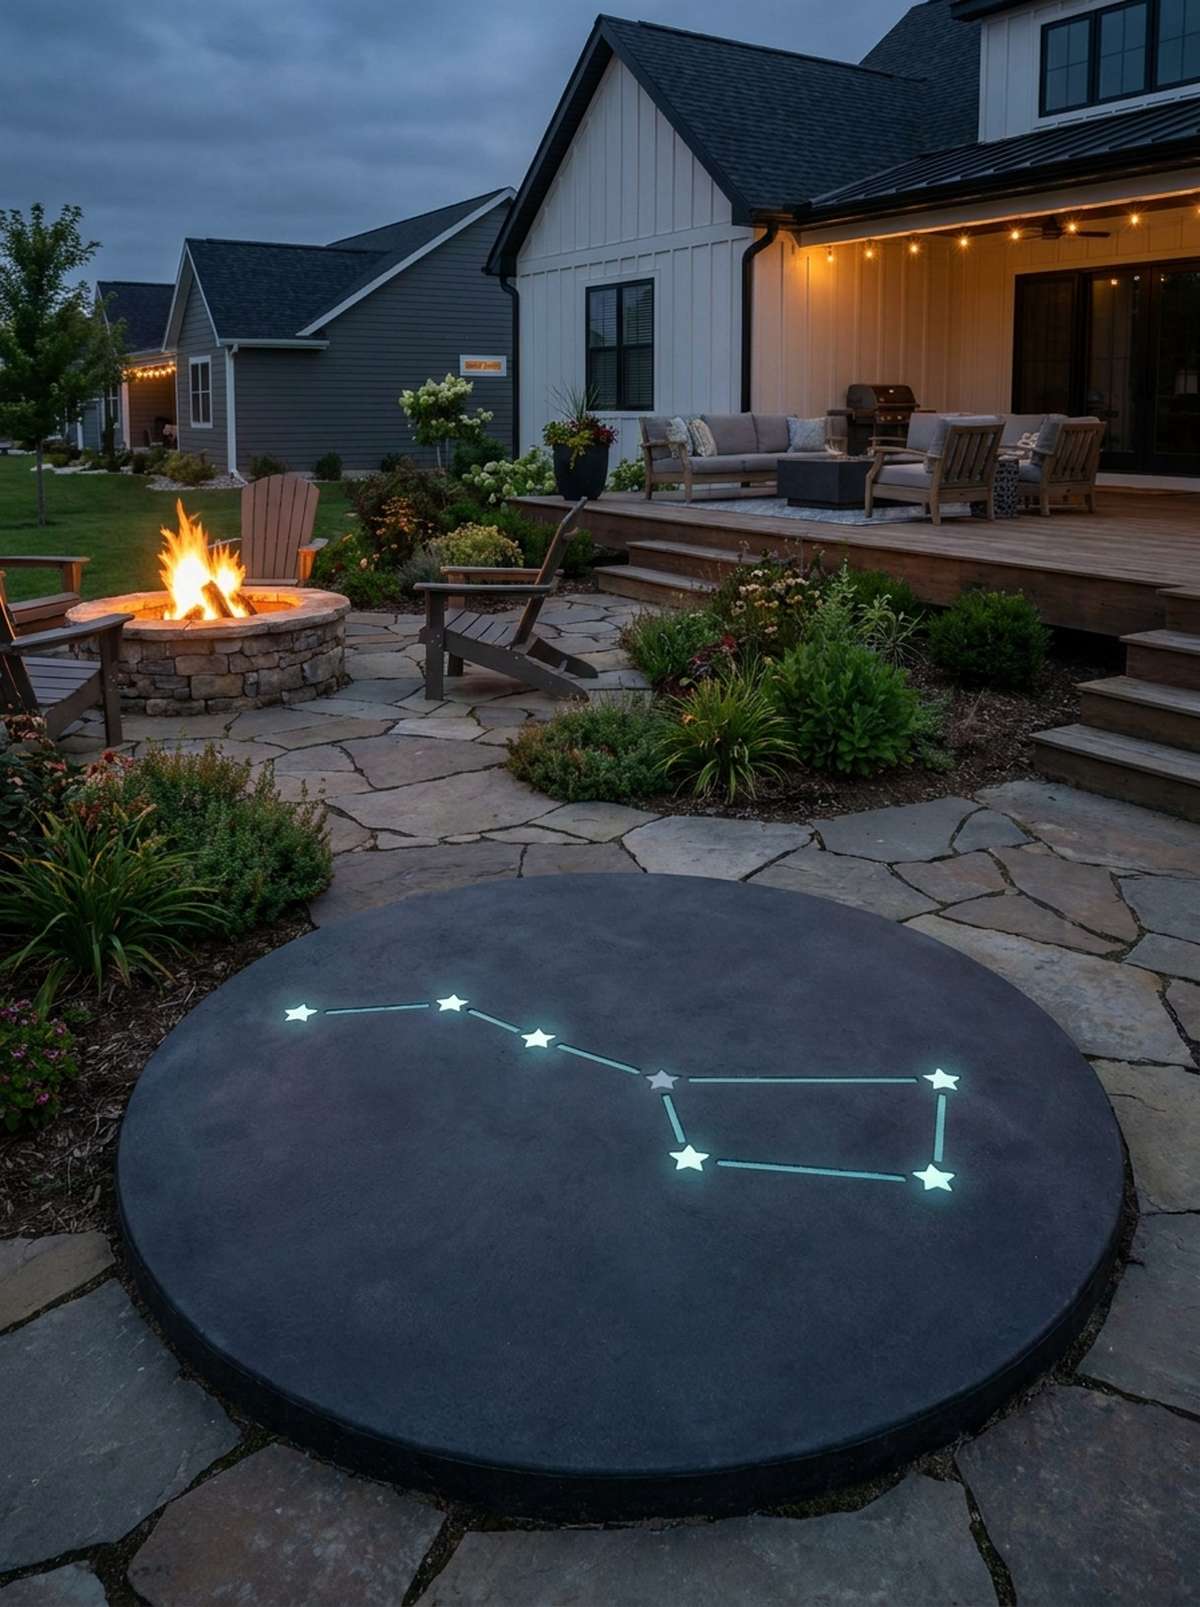
Scientific yet breathtakingly artistic, this exact celestial plotting feels like having a private planetarium beneath your feet. Educational garden spaces benefit immensely from interactive art, making this star map the ultimate conversation starter for patio parties.
Painting stars fades away fast, but carving exact grout channels to connect luminescent nodes delivers a surprisingly premium look. Using high-grade terrarium accessories and glow stones strictly on the constellation points ensures the Big Dipper shines brilliantly.
Mapping out the heavens costs about $20 to $30 per stone. Pin this idea if you want a subtle daytime look that dominates at night!
- Key Materials: White glow tiles, thin channel grout lines
- Vibe / Style: Sophisticated astronomy
- Difficulty: Moderate mapping skills
- Budget Breakdown: Glow Nodes: $15 | Dark Base: $15
- Creator’s Tip: Print out an actual star map to scale, lay it over the wet concrete, and poke holes to mark perfect star placement.
- Smart Sourcing: strontium aluminate glow-in-the-dark powder (bulk pack) and charcoal concrete dye.
21. Galaxy Spiral Nebula
Swirling with cosmic chaos, this deep-space abstraction feels like staring directly into a Hubble telescope image. Modern abstract yard features demand fluid, rule-breaking layouts, placing this swirling vortex perfectly in a minimalist gravel garden.
Rigid patterns kill the space vibe, but blending metallic purples with iridescent blues looks far more expensive than it is. Dropping strict stepping stones mosaic blueprints for organic, flowing lines upgrades standard materials into pure, fluid art.
You can craft this cosmic anomaly for roughly $35 due to the specialty glass. It’s an abstract masterpiece that ensures no two stones are ever alike.
- Key Materials: Iridescent purple/blue tiles, silver metallic flakes
- Vibe / Style: Abstract cosmic wonder
- Difficulty: Advanced color blending
- Budget Breakdown: Iridescent Glass: $25 | Epoxy/Base: $10
- Creator’s Tip: Swirl silver glitter or metallic flakes directly into the dark grout before it cures for a stardust effect.
- Smart Sourcing: iridescent glass mosaic tile mix and metallic additive grout powder.
22. Glow Path Border
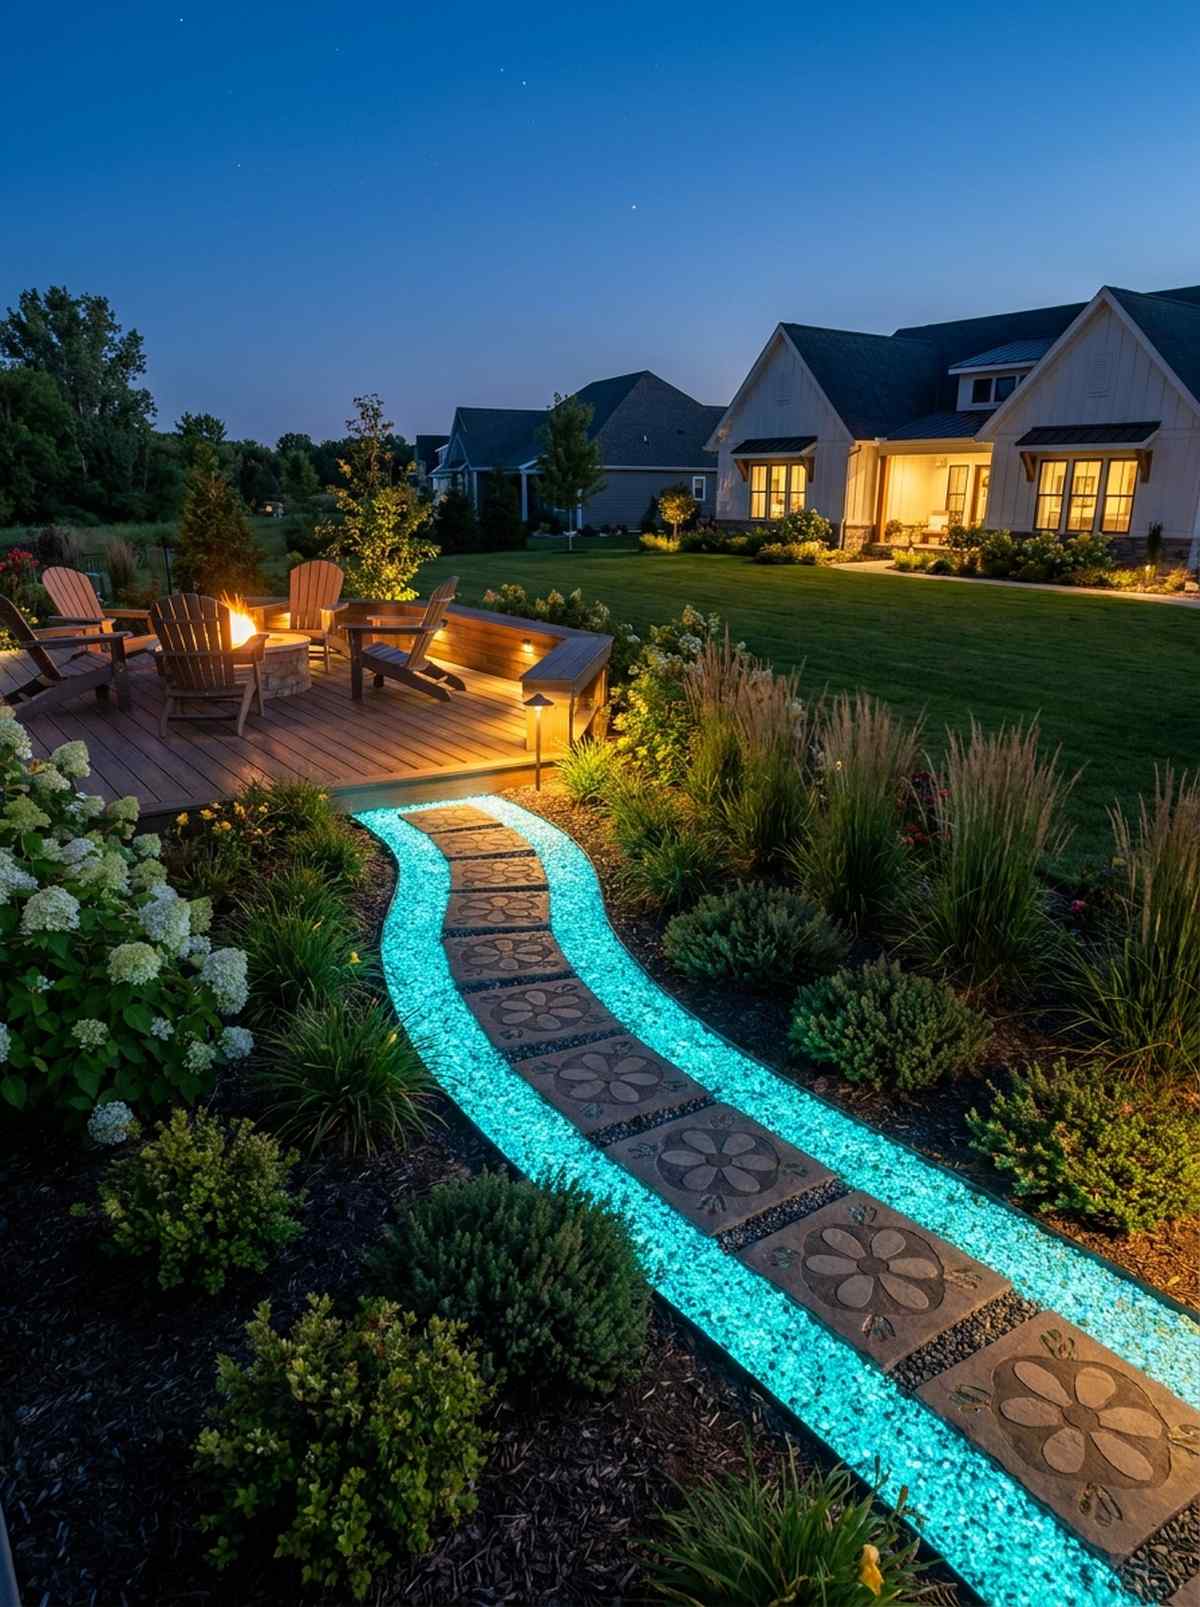
Subtle during the day but aggressively functional at night, this illuminated rim feels like an airport runway for your backyard. Functional nighttime landscaping requires clear boundaries, making this glowing border the smartest way to outline a steep pathway.
Instead of relying on clunky solar stakes that break, outlining the perimeter with luminescent aggregate gives a designer-level finish. This dual-action approach means you can keep your beautiful daytime stepping stones flower design while ensuring complete safety after dark.
Adding this high-tech border usually adds just $10–$15 to your project cost. Save this brilliant safety hack to your DIY home improvement board!
- Key Materials: Crushed glow aggregate, clear epoxy sealant
- Vibe / Style: Ultra-modern functional
- Difficulty: Easy
- Budget Breakdown: Glow Sand: $10 | Clear Resin: $5
- Creator’s Tip: Leave a 1-inch trench around the edge of your wet concrete mold specifically to pack full of the glowing aggregate.
- Smart Sourcing: crushed luminescent quartz (bulk pack) and marine-grade clear epoxy resin.
Stepping Stones Footprints & Personal Touches
23. Baby Handprint & Footprint
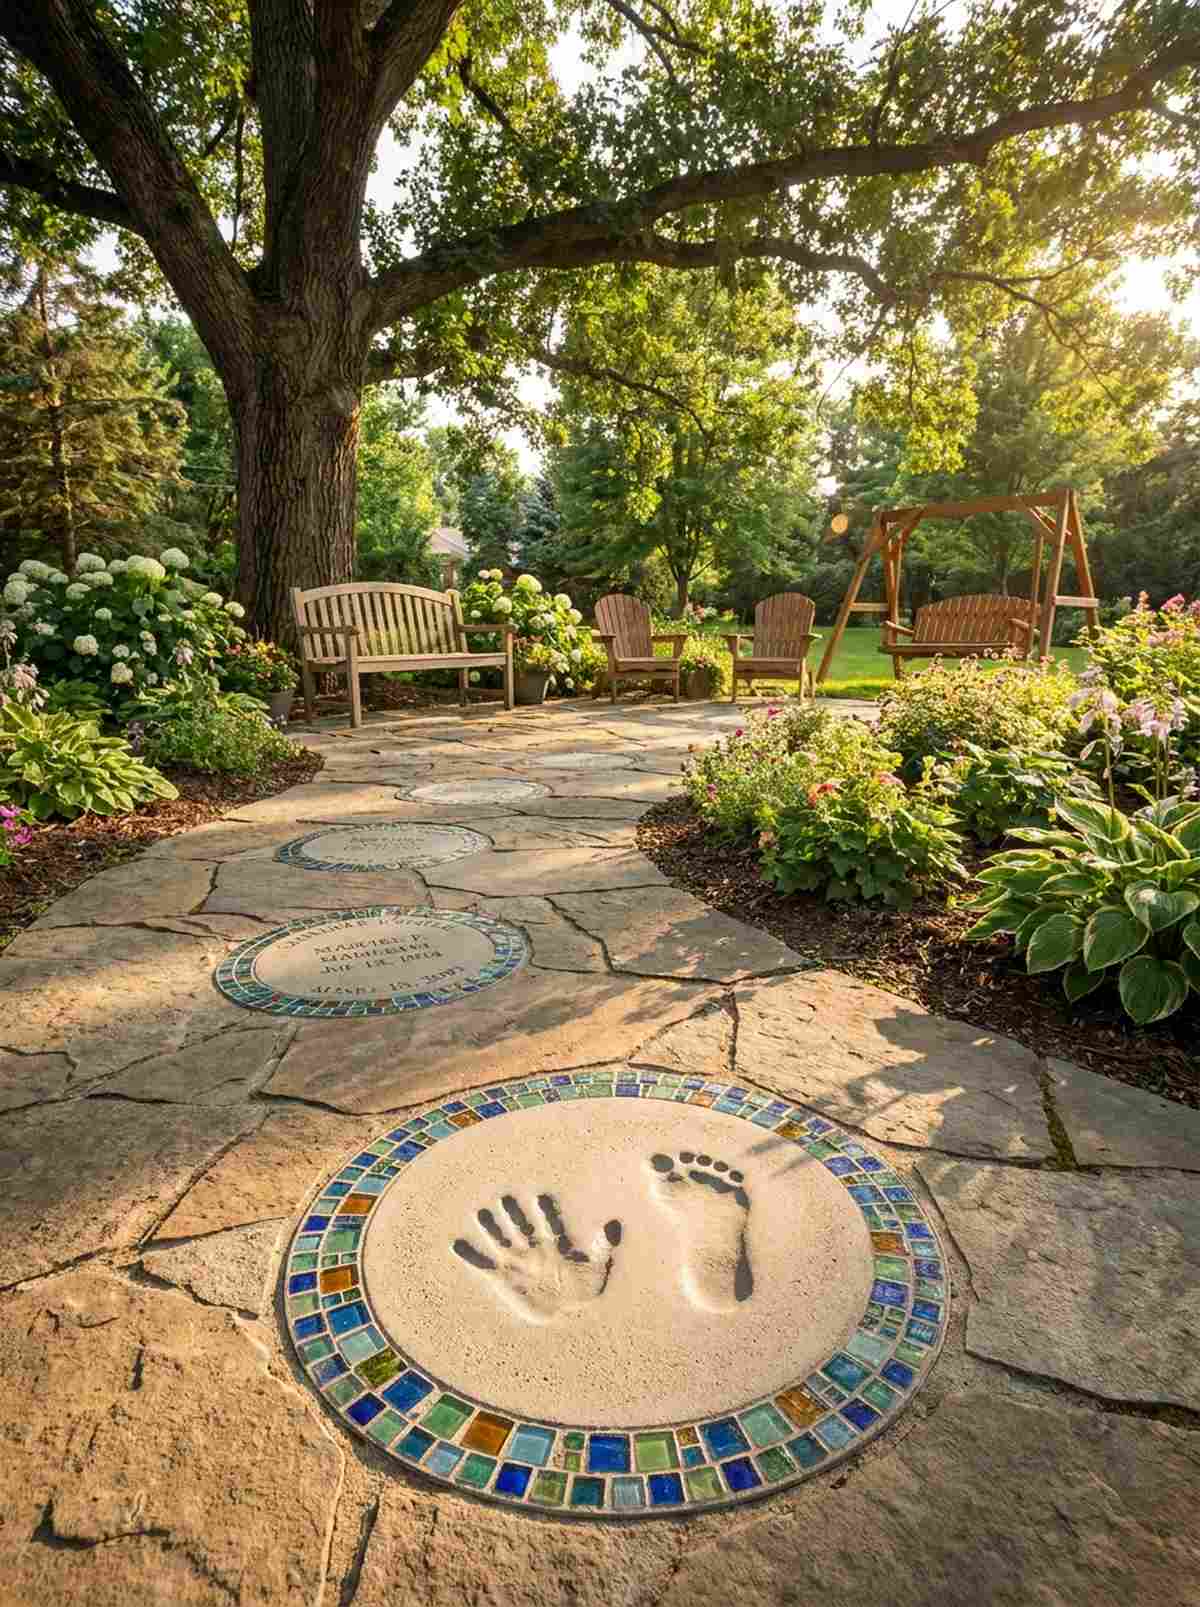
Deeply sentimental and frozen in time, this permanent cast feels like a family time capsule embedded in your yard. Generational garden layouts capture memories perfectly, making stepping stones footprints an absolute must-have beneath a favorite climbing tree.
A bare concrete print looks unfinished, but bordering the impression with custom colored glass delivers a surprisingly premium look. Foregoing generic kits and using personalized mosaic frames ensures the keepsake withstands decades of weather.
Preserving this childhood memory costs barely $15. It’s an emotional, high-value craft that grows more precious every single year.
- Key Materials: Fine-grain concrete, colorful framing tiles
- Vibe / Style: Sentimental family heirloom
- Difficulty: Easy timing-based
- Budget Breakdown: Concrete: $5 | Framing Tiles: $10
- Creator’s Tip: Wait until the concrete is firm but still pliable (like thick clay) before pressing the hand to get a clean, deep print.
- Smart Sourcing: ultra-smooth stepping stone casting mix and pre-cut glass alphabet tiles.
You’ll absolutely want to copy this next idea before your neighbors steal the aesthetic…
24. Pet Paw Print Memorial
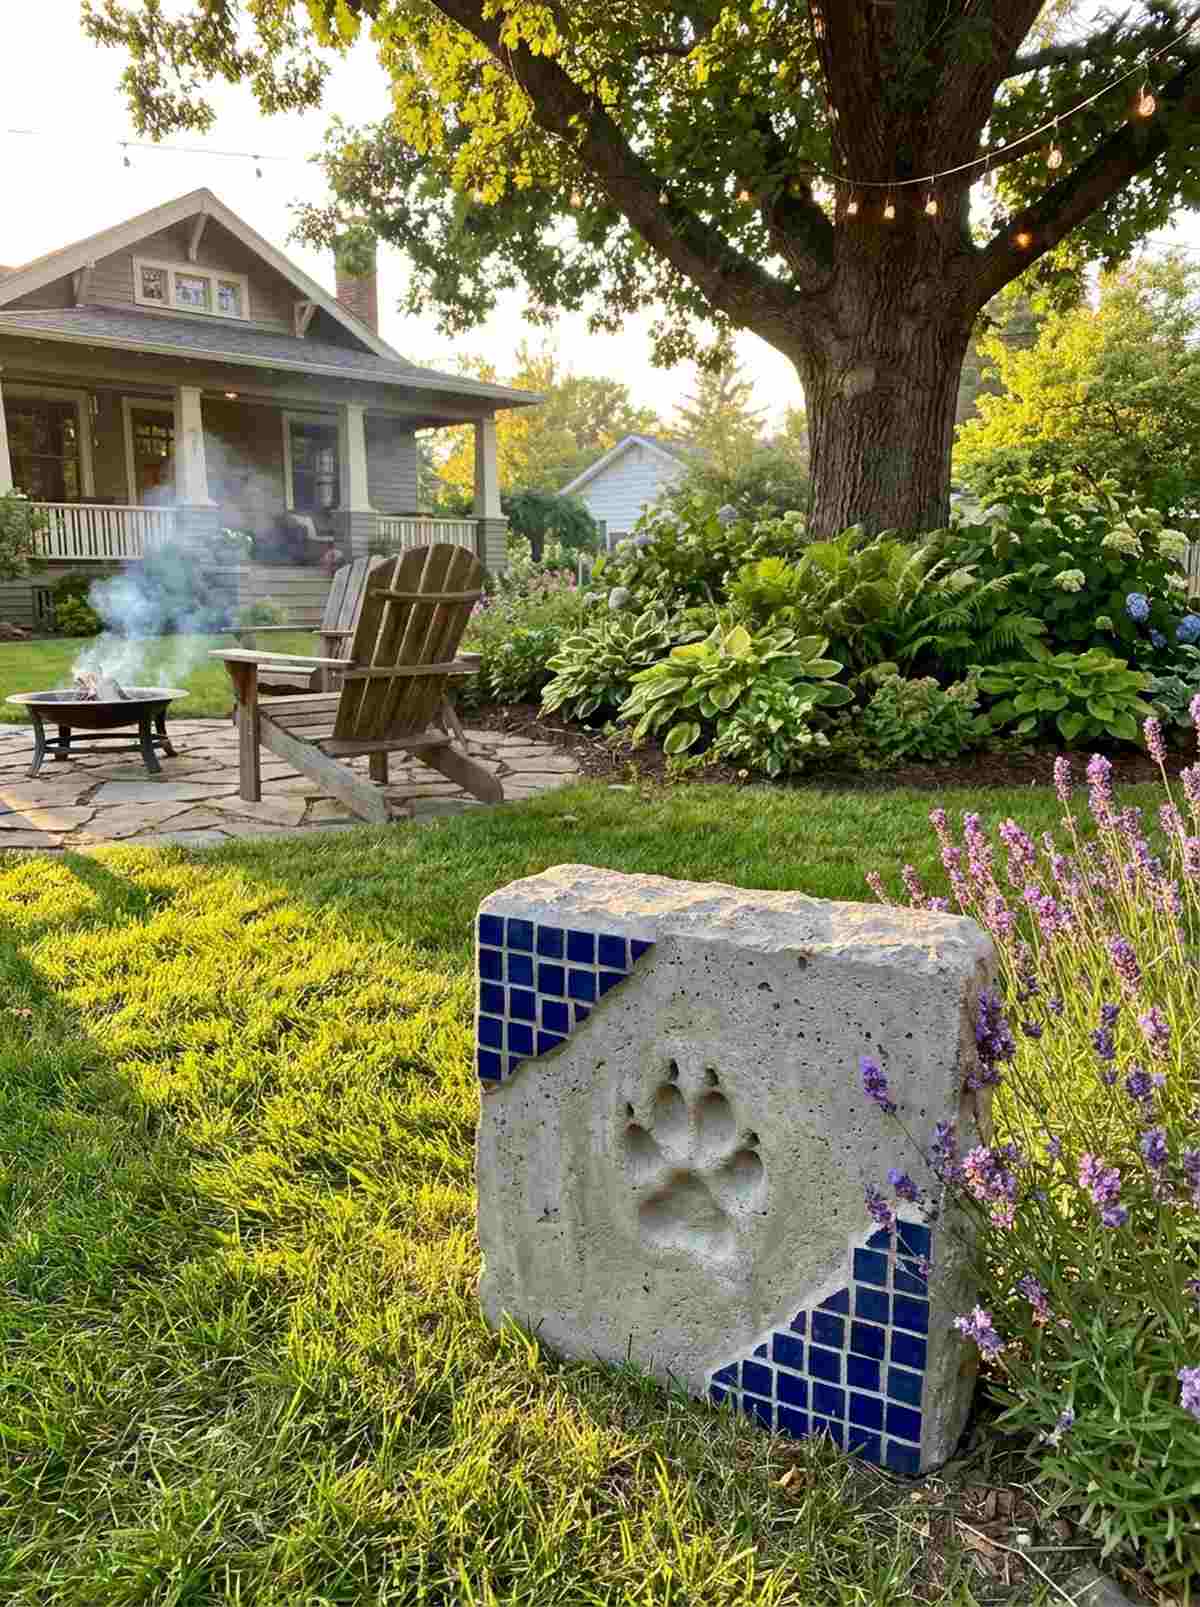
Quiet, honoring, and deeply personal, this tribute stone feels like a beautiful resting place for a loyal friend. Memorial garden aesthetics require peaceful focal points, placing this customized paw print beautifully beside their favorite sunbathing spot.
While plastic memorial plaques fade and crack, a heavy concrete and tile tribute looks far more expensive than it is. Integrating durable miniature garden supplies or tiles matching your pet’s collar color upgrades this from a simple craft to a lasting monument.
Crafting this permanent tribute costs around $20. Pin this to remember a beautiful way to honor your furry family members.
- Key Materials: Deep paw impression, custom collar-color tiles
- Vibe / Style: Respectful loving tribute
- Difficulty: Easy
- Budget Breakdown: Plaster Base: $10 | Decorative Glass: $10
- Creator’s Tip: If you can’t get a live print, carve the paw shape out of high-density foam and press it into the wet cement.
- Smart Sourcing: outdoor-grade pet memorial stone kits and weatherproof mosaic sealant spray.
25. Family Name Monogram
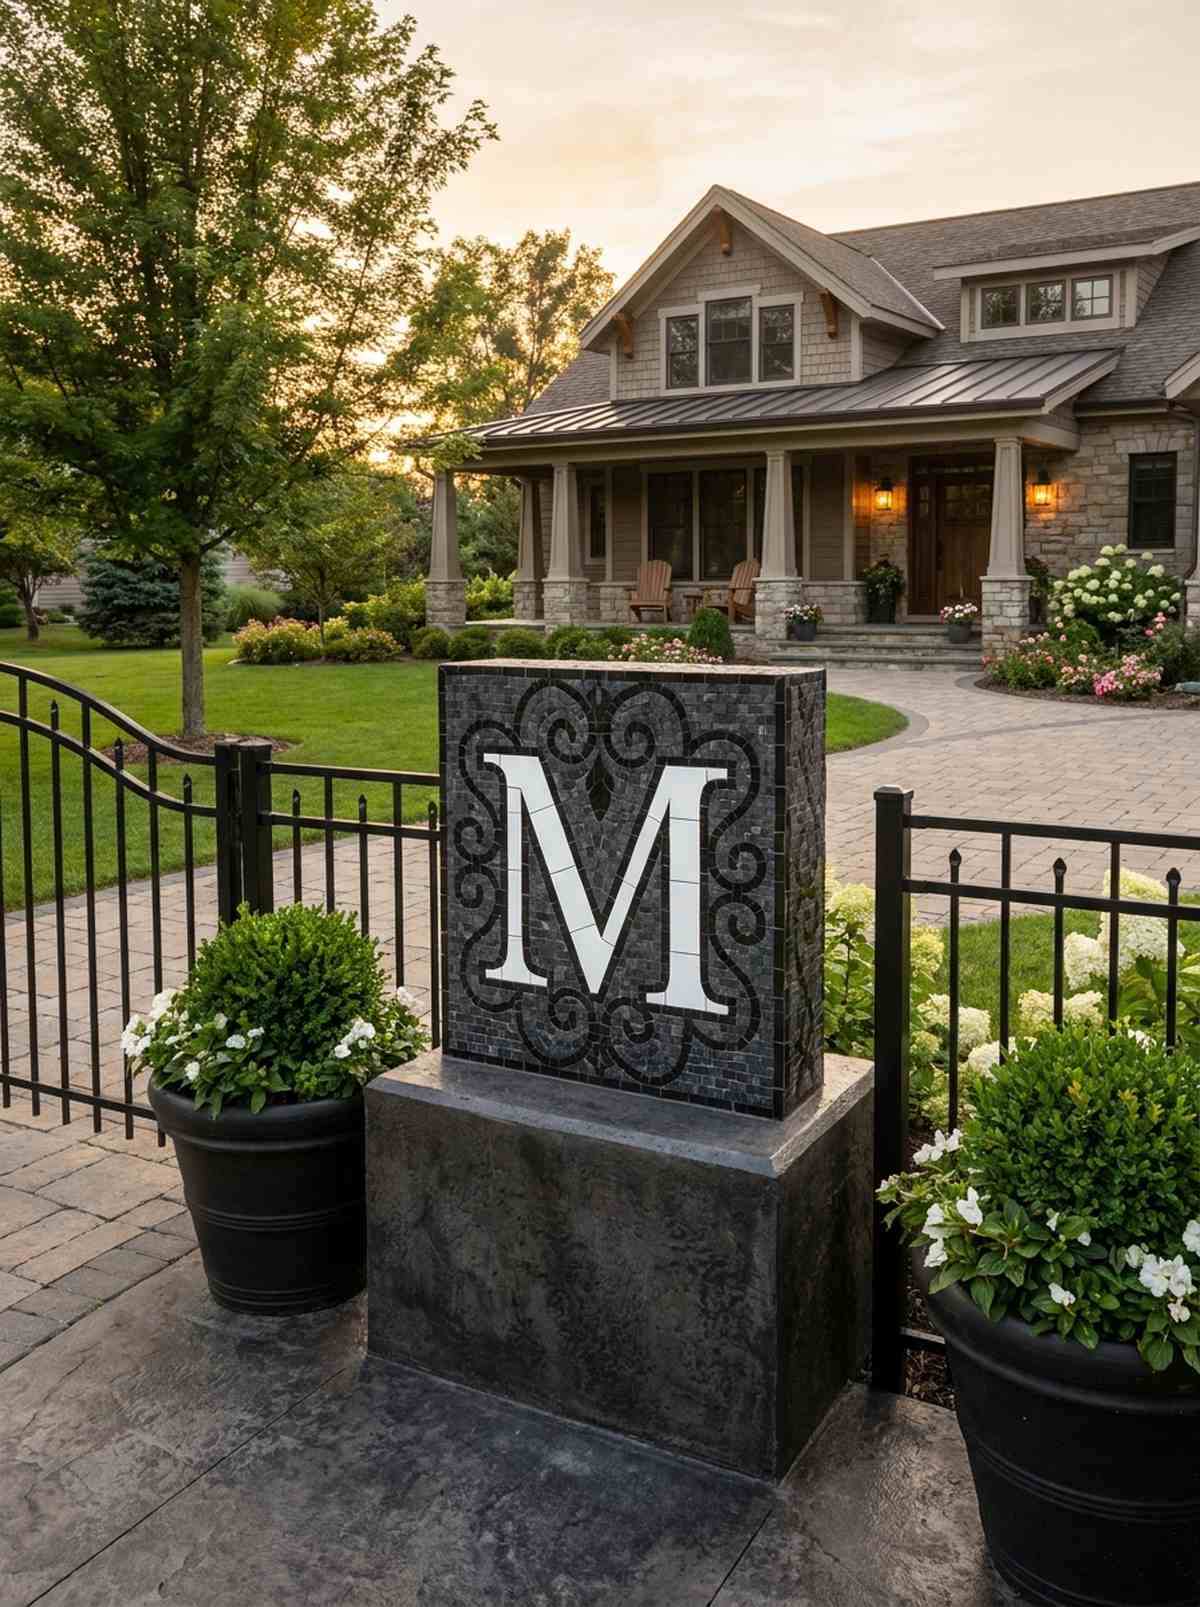
Bold, authoritative, and incredibly welcoming, this initialed block feels like a custom crest for your estate. Front yard entry enhancements rely on curb appeal, making this oversized monogram the perfect greeting right at your front gate.
Flimsy wooden signs rot away, but a heavy-duty mosaic letter gives a designer-level finish that rivals high-end masonry. Contrasting a stark white letter against a dark, intricate background transforms cheap materials into luxury property identification.
This custom estate marker runs roughly $25–$35. Highly recommended for establishing instant, high-end curb appeal on a tight budget.
- Key Materials: High-contrast letter tiles, dark background mosaic
- Vibe / Style: Stately traditional elegance
- Difficulty: Moderate drafting required
- Budget Breakdown: Lettering: $15 | Background Tiles: $15
- Creator’s Tip: Print out the monogram in a thick, bold font to use as a literal stencil underneath your tile layout.
- Smart Sourcing: pre-cut ceramic lettering bundles and heavy-duty concrete base molds.
26. Inspirational Quote Text
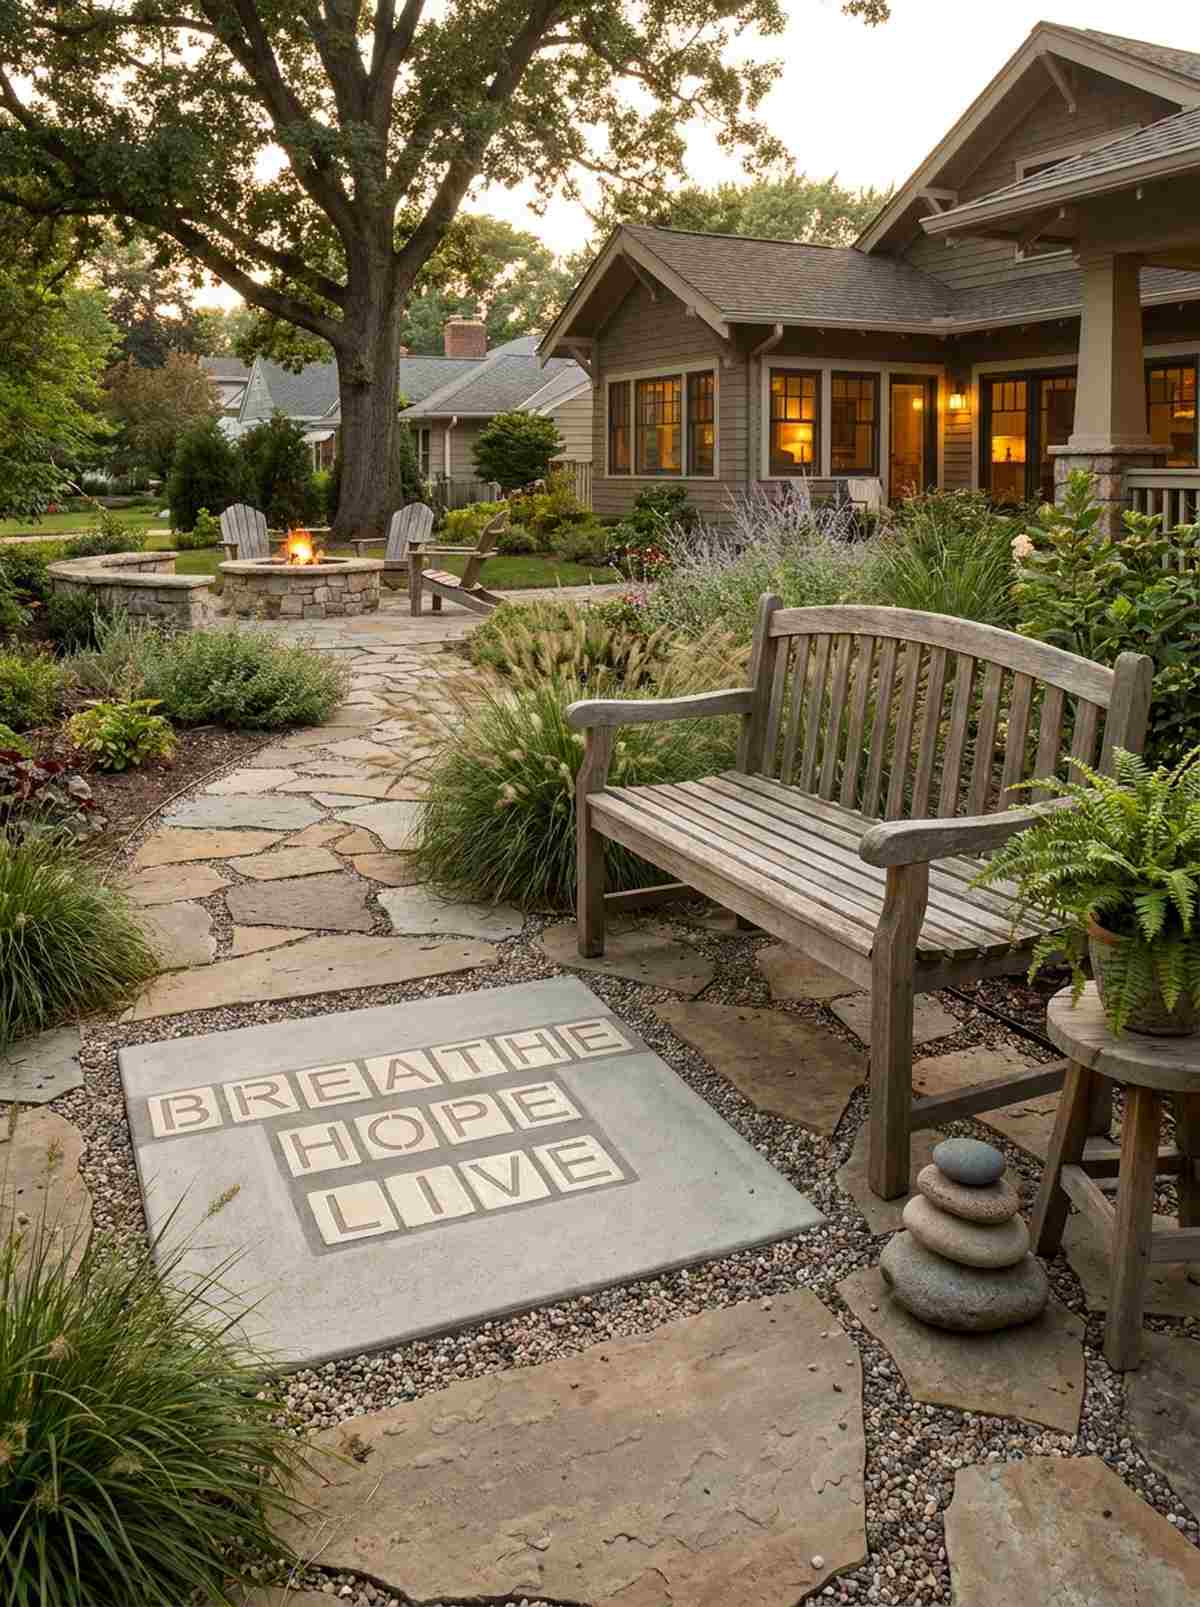
Reflective and quietly motivating, this embedded text feels like discovering hidden wisdom along your daily walk. Contemplative landscape pathways demand moments of pause, positioning this stone perfectly next to a garden bench or resting spot.
Cramming too many words looks cluttered, but executing a crisp 3-word mantra delivers a surprisingly premium look. Ditching standard paints for embedded ceramic typography ensures your stepping stones mosaic blueprints survive brutal winter freezes.
You can spell out your outdoor mantra for about $20. Save this to your landscaping board for an easy way to inject personality into your yard!
- Key Materials: Uniform alphabet tiles, neutral background filler
- Vibe / Style: Mindful contemplative retreat
- Difficulty: Advanced spacing/kerning
- Budget Breakdown: Alphabet Tiles: $12 | Filler/Grout: $8
- Creator’s Tip: Layout the phrase perfectly straight by pressing a ruler lightly into the wet cement as a baseline guide.
- Smart Sourcing: bulk pack ceramic alphabet squares and high-adhesion thin-set mortar.
Bringing Your Mosaic Vision to Life
Selecting the right stepping stones mosaic pattern transforms functional pathways into high-end artistic expressions. Whether you choose geometric precision, a stepping stones flower design, whimsical ladybug stepping stones, or deeply personal stepping stones footprints, these exactly 26 premium blueprints provide everything you need. Skip the generic craft materials, source UV-coated and bulk supplies intelligently, and you’ll easily create a designer-level landscape. Start with a single statement piece, master the layout, and watch as your budget-friendly stones upgrade your garden for decades to come.
Frequently Asked Questions
What materials work best for outdoor stepping stone mosaics?
For a setup that looks expensive but survives brutal weather, skip thin indoor crafts and invest in UV-coated ceramic tiles, thick stained glass, and heavy-duty glass gems. Using commercial-grade waterproof thin-set mortar as your adhesive and a polymer-modified sanded grout is non-negotiable for longevity. Always seal the final piece with a premium penetrating concrete sealer (gallon jug) to lock out moisture and prevent freeze-thaw shattering.
How do I create stepping stones mosaic patterns with glow-in-the-dark effects?
The secret to high-end nighttime visibility is integrating bulk pack strontium aluminate glow-in-the-dark pebbles directly into the wet concrete or grout lines. These specialized photoluminescent materials absorb heavy daylight and project a massive, expensive-looking ambient glow for hours. Avoid cheap glow paints that chip away; embedded aggregates or specialized luminescent glass pieces offer permanent, functional wayfinding.
Can I make ladybug stepping stones without artistic experience?
Absolutely. Ladybug designs are perfect for beginners because the bold red and black geometries do all the heavy lifting visually. By sourcing pre-cut cherry red ceramic bundles and large black glass drops, you bypass difficult tile nipping entirely. You can even find complete starter kits designed specifically for insect motifs, allowing you to achieve a flawless, premium aesthetic on your very first try.
How do I preserve footprint impressions in mosaic stepping stones?
The trick is timing the concrete perfectly; press hands or feet into ultra-smooth stepping stone casting mix when it feels like thick putty, not wet soup. Let the deep impression cure completely for 48 hours to prevent cracking. Afterward, use a high-adhesion mortar to apply your custom mosaic borders around the print, ensuring the sentimental centerpiece remains the star while looking incredibly high-end.
What spacing should I maintain between mosaic tiles on stepping stones?
To achieve a designer-level finish, maintain a strict 1/8 to 1/4 inch gap between all mosaic pieces. Consistent spacing allows your exterior flexible sanded grout to fully anchor the tiles, preventing them from grinding together and shattering during temperature shifts. Using professional tile spacers, even for organic designs, instantly elevates the project from a messy DIY to a luxury landscape feature.
How long do stepping stones mosaic patterns last outdoors?
When built with premium supplies, a custom stone will easily last 15-20+ years. The difference between a stone that crumbles in one winter and one that lasts decades comes down to smart sourcing: always use outdoor-rated exterior adhesives, apply a heavy coat of UV-resistant clear concrete sealer every two years, and seat the stone on a proper gravel drainage base so water never pools underneath.