Mastering outdoor living requires strategic material choices, not just throwing furniture on a patio. Budget-friendly blueprints and UV-resistant materials deliver a designer aesthetic without the premium price tag. Execute these 63 architectural setups for a true backyard transformation.
Design Snapshot: Key Principles
- Architecture-First Planning: Master plans that shape movement, sightlines, and functional zones before adding individual features.
- Climate Adaptation: Bioclimatic systems, retractable elements, and four-season materials extend usability across weather conditions.
- Multi-Zone Strategy: Distinct areas for cooking, dining, lounging, wellness, and entertainment create versatile spaces.
- Seamless Transitions: Continuous flooring, retractable walls, and integrated design language blur indoor-outdoor boundaries.
Structural Foundations for Outdoor Living Spaces
Architecture-driven frameworks establish the bones of successful spaces. These structural elements provide shelter, define zones, and enable year-round use through thoughtful engineering and material selection.
1. Bioclimatic Pergolas with Motorized Louvers
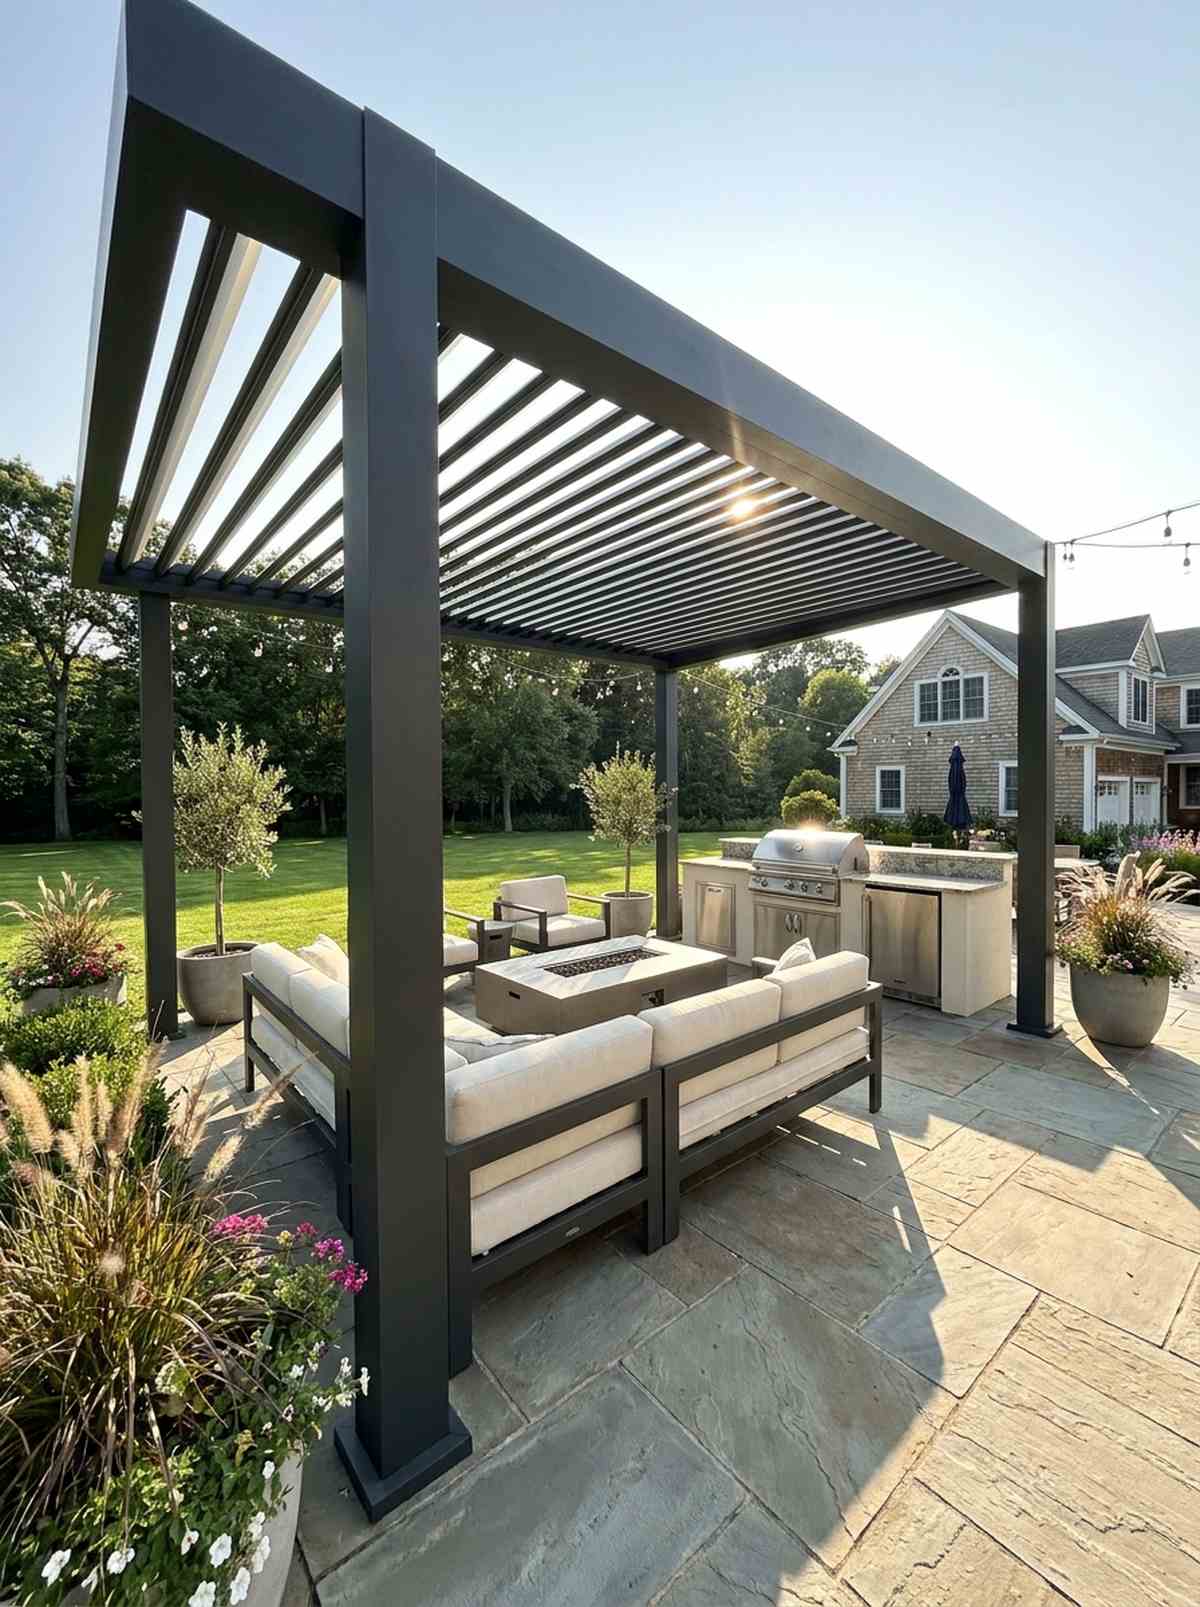
Feels like an exclusive rooftop resort you’d pay a premium to visit. Motorized louvered pergolas work exceptionally well for uncovered suburban patios facing harsh afternoon sun.
Most homeowners waste money on flimsy umbrellas when structural aluminum frames offer true four-season weather adaptation. This layout completely destroys the myth that you need a huge budget, delivering a designer-level finish for your outdoor living space.
You can easily pull this off for around $1,500–$3,500 depending on the frame kit. Pin this if you’re planning a massive backyard upgrade.
- Key Materials: Weather-sealed aluminum beams, remote-controlled louvers.
- Vibe / Style: Modern luxury resort.
- Difficulty: Advanced weekend project.
- Budget Breakdown: Frame: $2,000 | Motors: $500.
- Creator’s Tip: Ensure your concrete footings are perfectly leveled before assembling the top grid.
- Smart Sourcing: UV-coated aluminum pergola kits and heavy-duty mounting brackets (bulk pack).
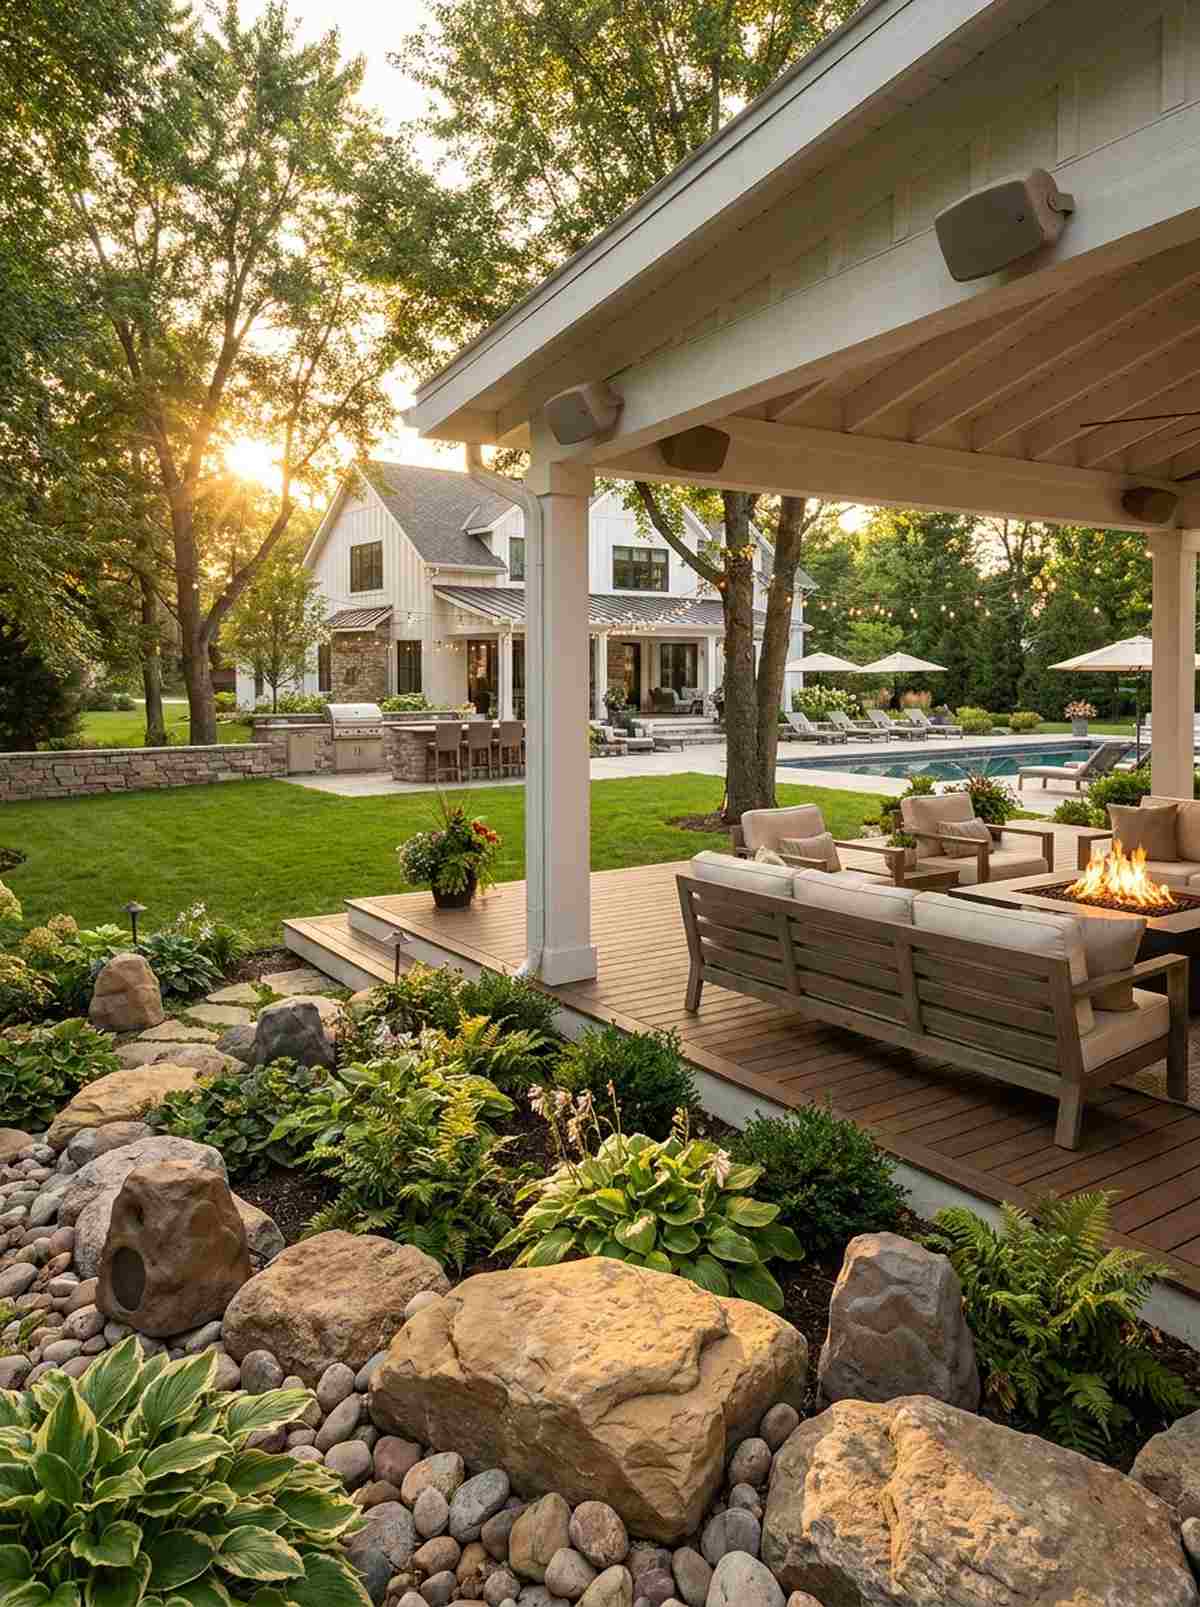
2. Covered Patio with Solid Roof System
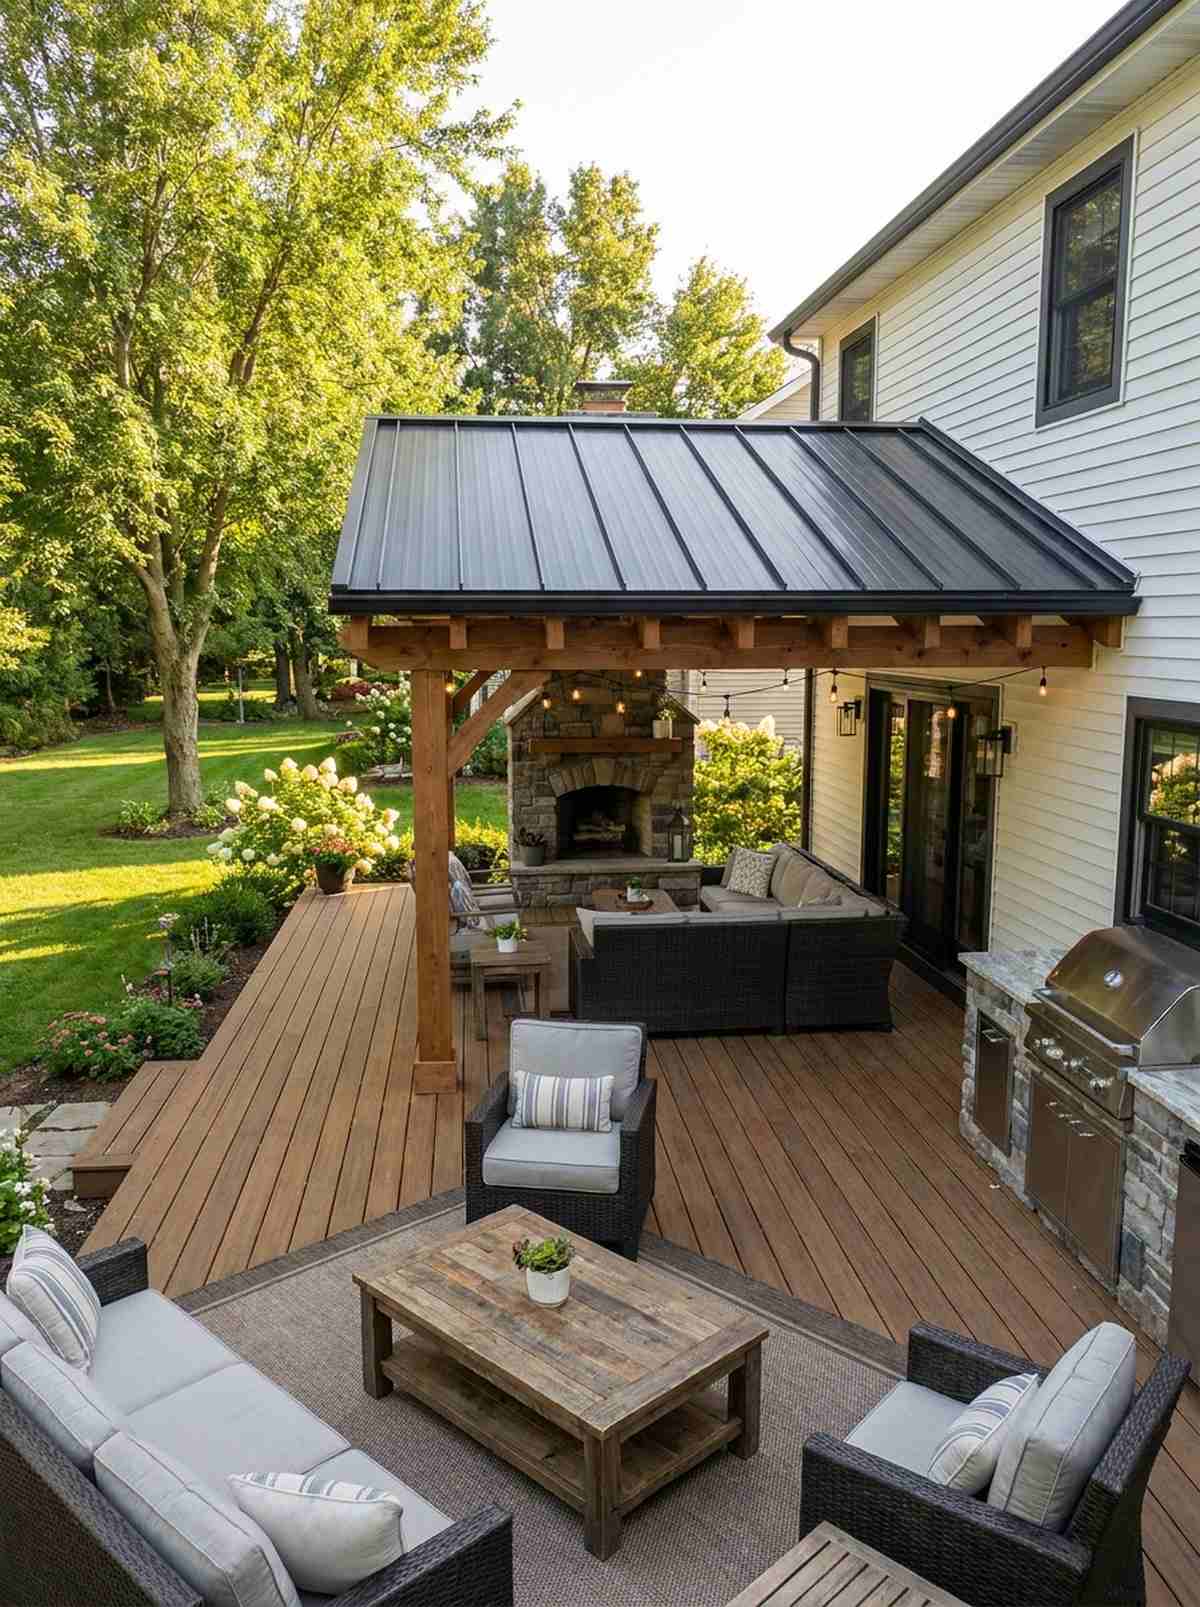
Straight out of an architectural digest magazine feature. Solid roof patio extensions are perfect for regions dealing with heavy rain or intense snow loads.
While your neighbors install temporary pop-ups, a permanent roof adds undeniable property value. This setup gives a surprisingly premium look that seamlessly extends the primary home architecture.
Expect materials to run around $2,000 for a DIY timber frame. Highly recommended for a permanent real estate boost.
- Key Materials: Timber posts, standing seam metal roofing.
- Vibe / Style: Transitional farmhouse elegance.
- Difficulty: Professional or advanced DIY.
- Budget Breakdown: Timber: $1,200 | Roofing: $800.
- Creator’s Tip: Pre-stain all wooden rafters on the ground before lifting them into place.
- Smart Sourcing: Pre-cut structural timber kits and weatherproof roofing sealant.
3. Retractable Shade Sail Arrays
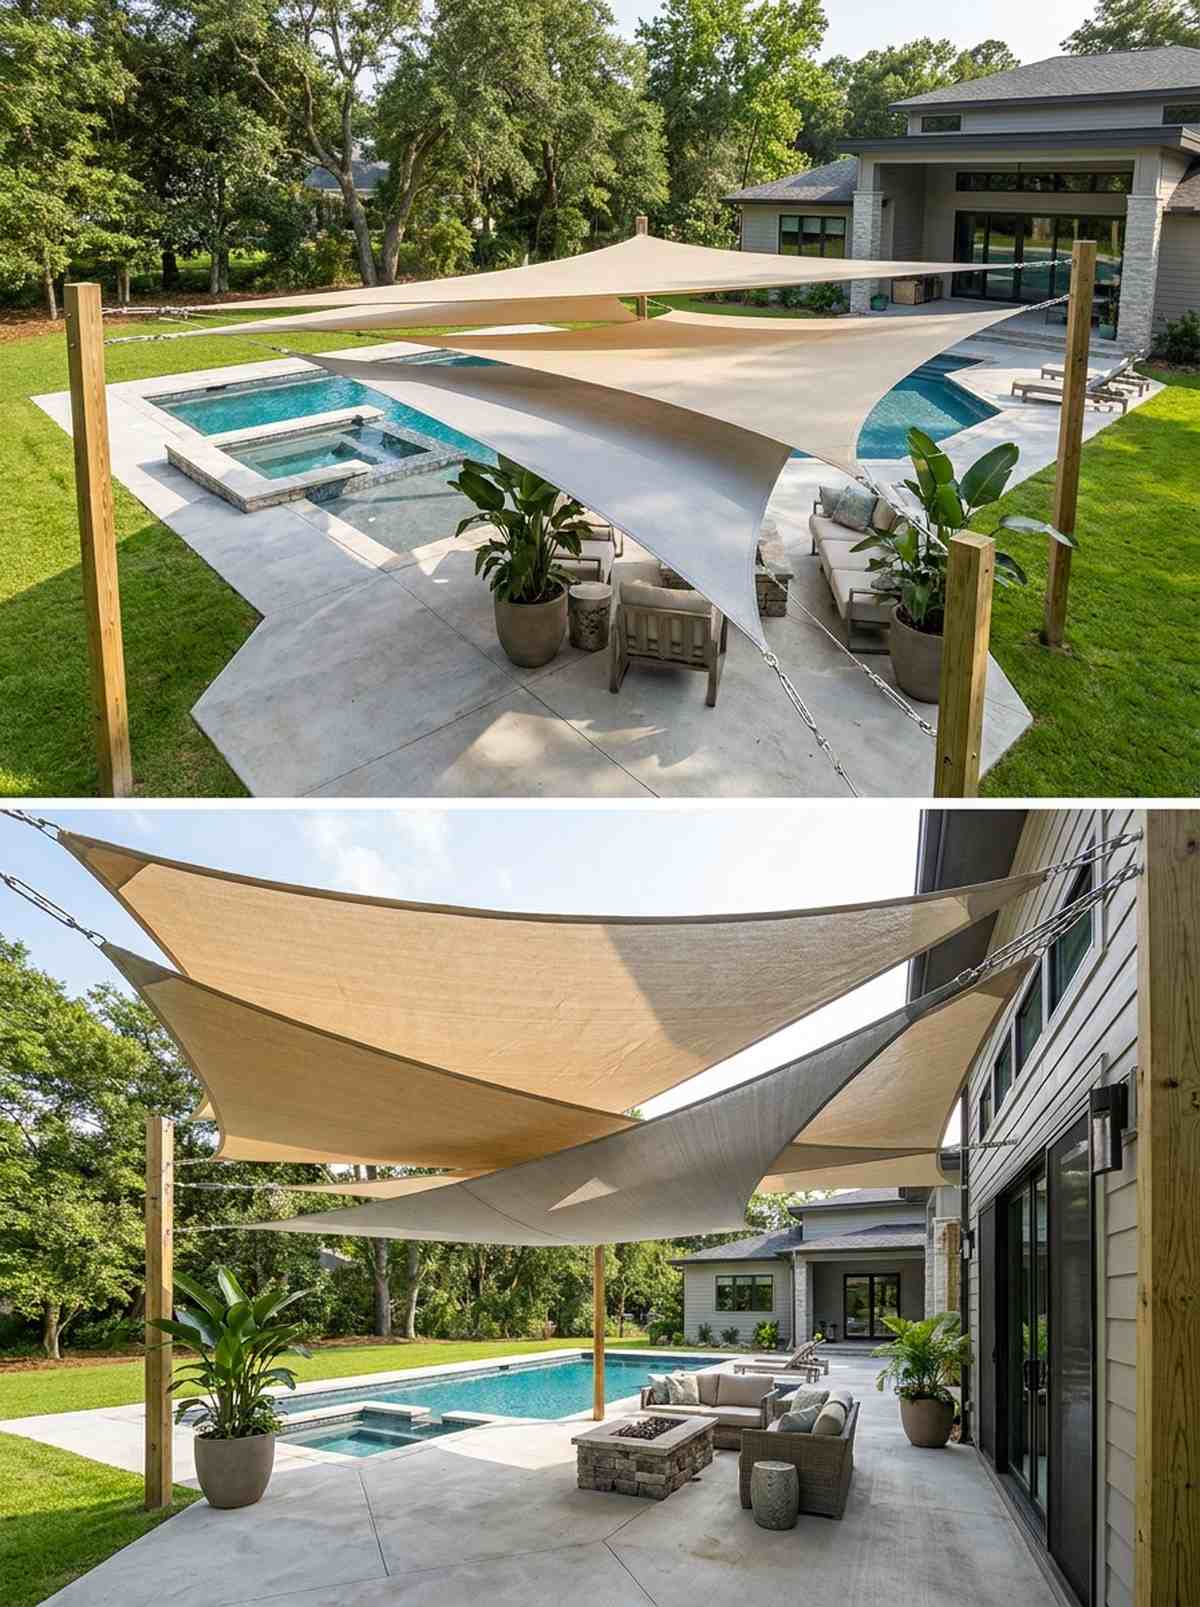
Creates a floating canopy that feels like a modern coastal oasis. Layered tension shade sails work beautifully over irregular pool decks or angular concrete patios.
Amateurs often ruin this by using cheap fabric that tears in a week. Sourcing marine-grade cloth ensures your outdoor living ideas stay intact and look far more expensive than they are.
You can set this up for roughly $150–$300 using proper anchor points. Save this to your summer DIY prep board.
- Key Materials: Marine-grade triangular sails, stainless steel turnbuckles.
- Vibe / Style: Breezy coastal contemporary.
- Difficulty: Moderate afternoon setup.
- Budget Breakdown: Sails: $120 | Hardware: $80.
- Creator’s Tip: Always install one corner significantly lower than the others for rapid rain runoff.
- Smart Sourcing: Commercial-grade UV block shade sails and stainless steel tensioner kits.
4. Glass-Walled Cabana Structures
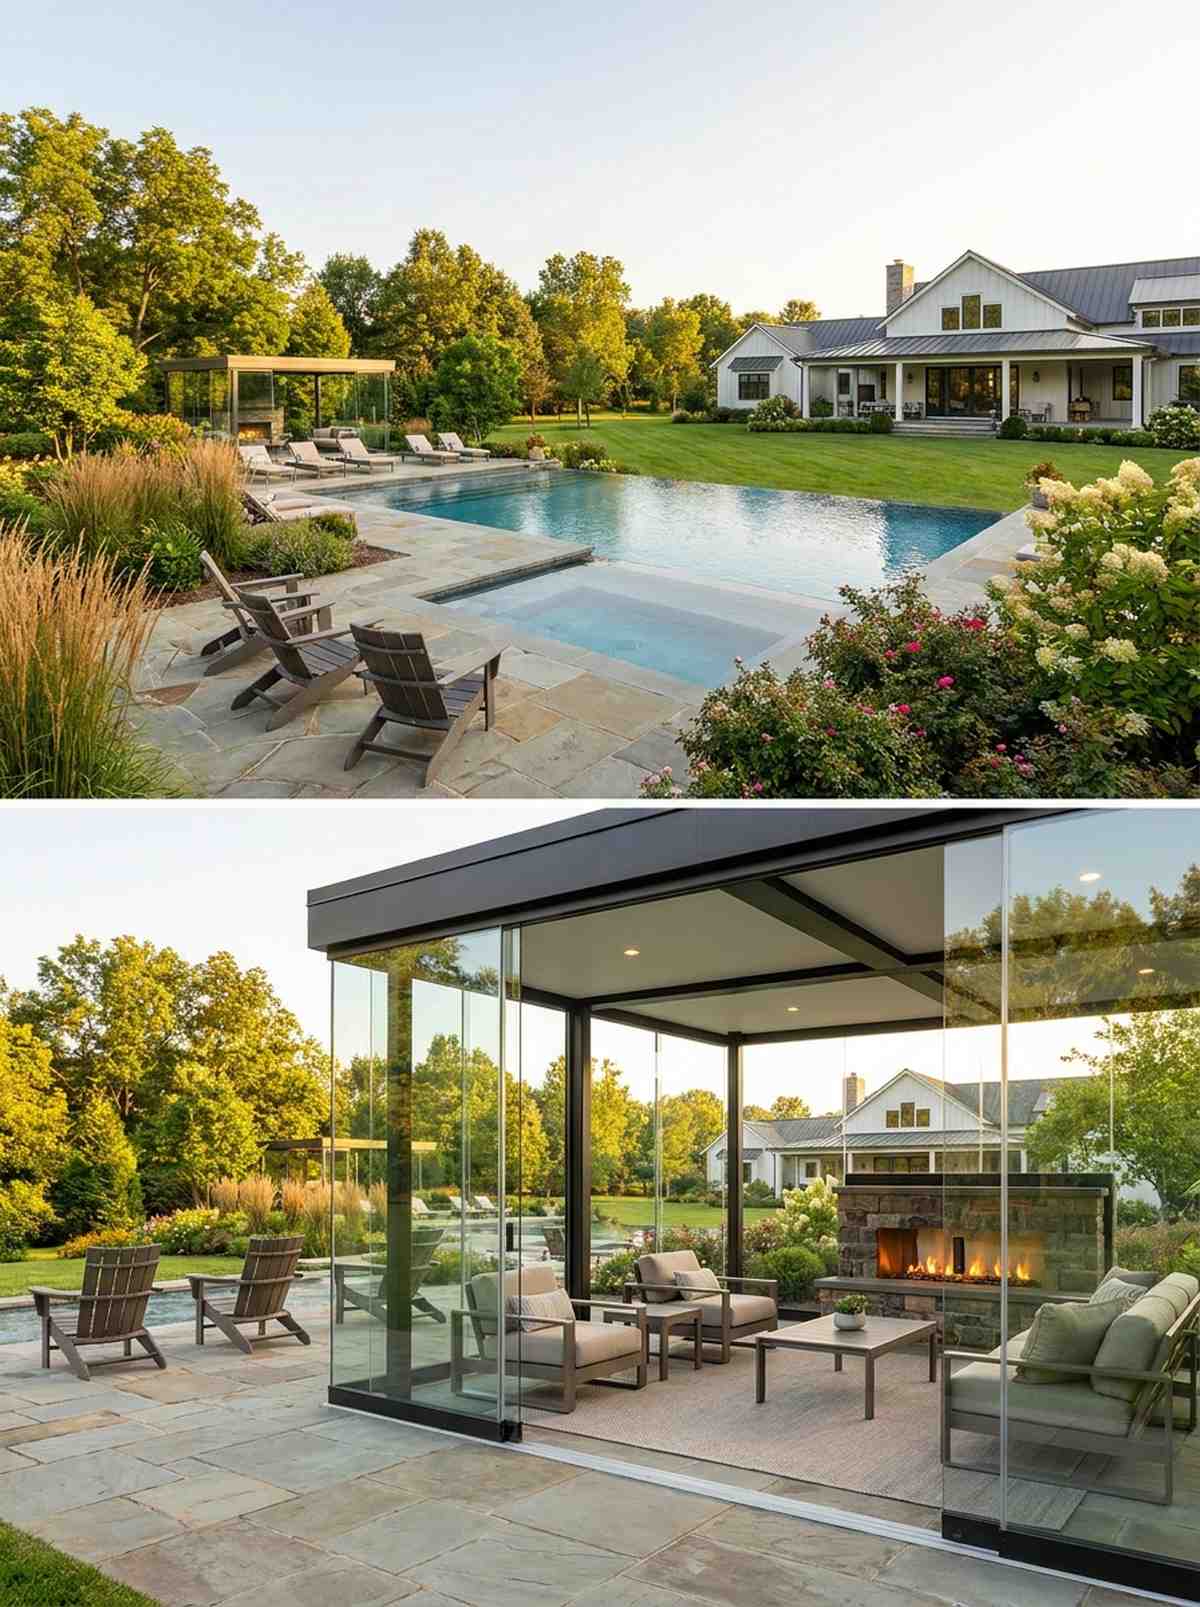
Gives the sensation of sitting in an invisible forest bubble. Frameless glass cabanas are the ultimate flex for poolside lounging in cooler microclimates.
Ignore the outdated advice about glass being too fragile for backyards. Using tempered safety tracks completely flips the traditional script, creating brilliant outdoor living rooms that resist heavy winds.
This is an investment piece typically starting at $4,000. It completely changes the dynamic of your property.
- Key Materials: Tempered sliding panels, recessed track systems.
- Vibe / Style: Ultra-modern minimalist.
- Difficulty: Professional installation required.
- Budget Breakdown: Glass: $3,000 | Tracks: $1,000.
- Creator’s Tip: Treat the exterior glass with a hydrophobic spray to prevent hard water stains from sprinklers.
- Smart Sourcing: Hydrophobic glass treatment spray and heavy-duty pocket door tracks.
This next setup is ridiculously cheap but looks like a $100 custom display…
5. Multi-Level Deck Platforms
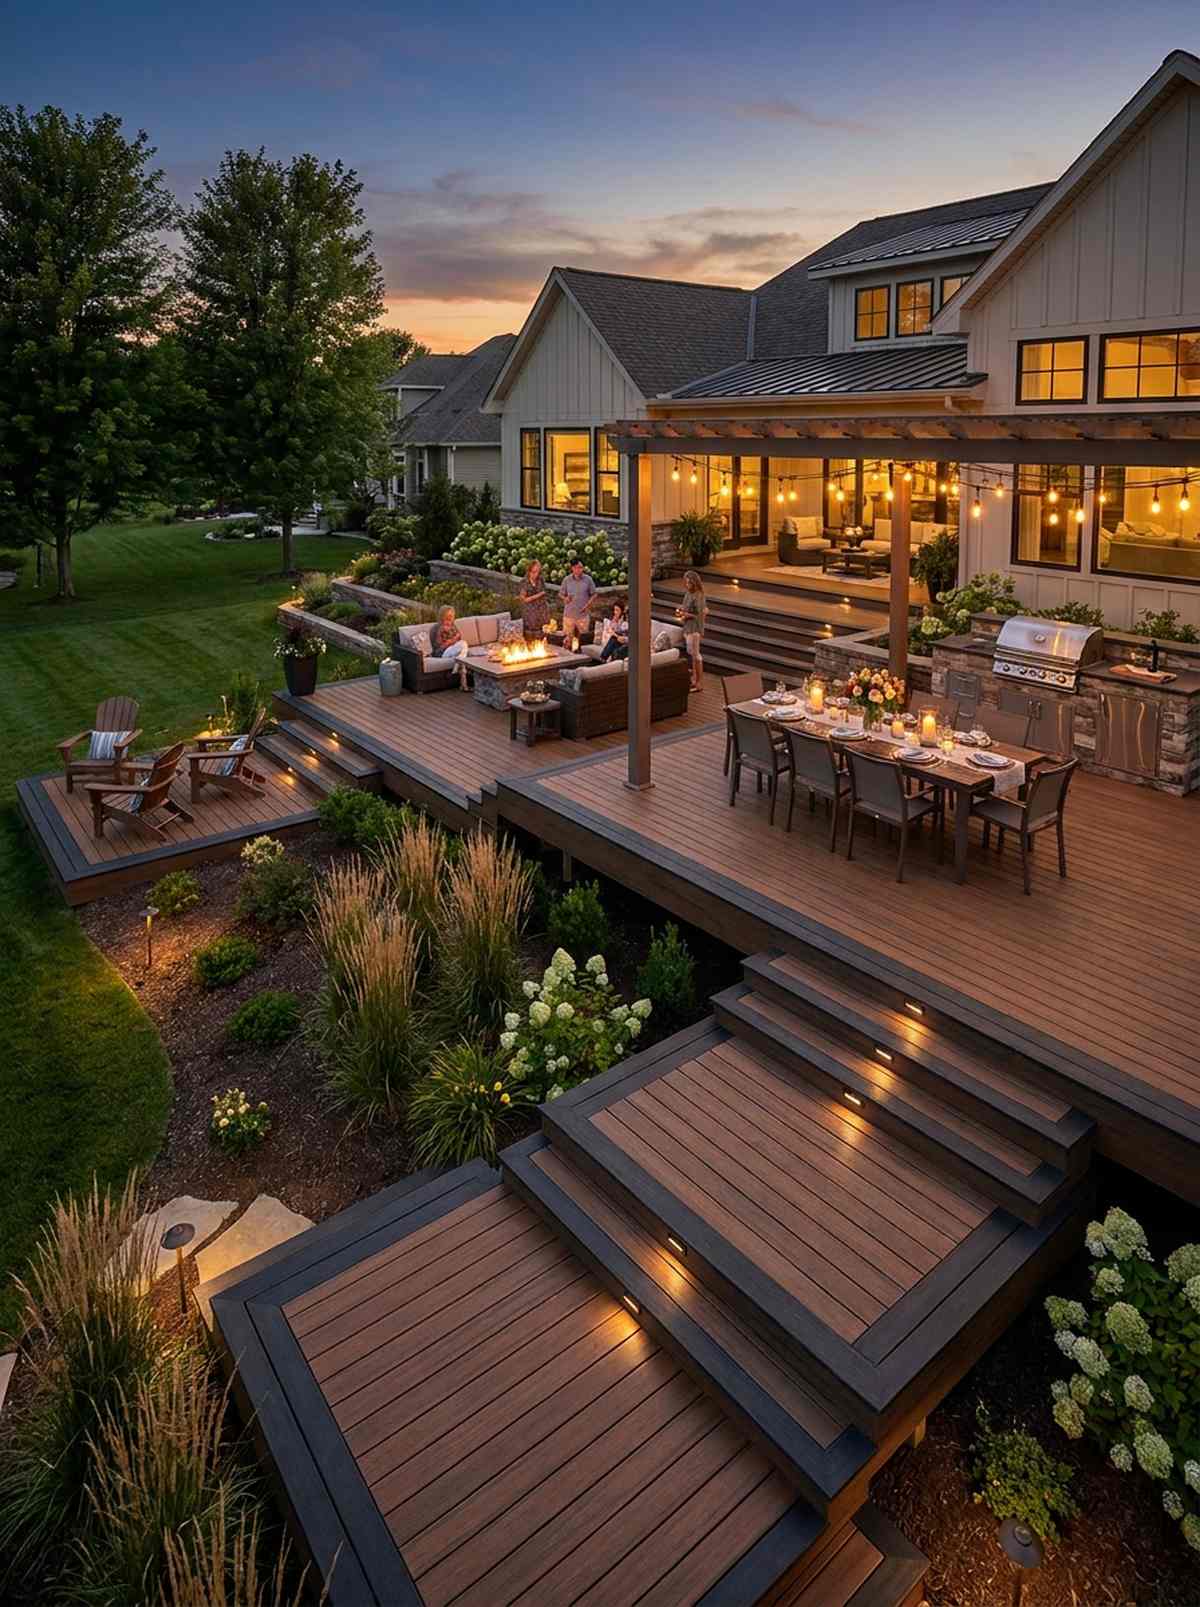
Feels like an interactive terrain that practically begs for a twilight dinner party. Staggered composite decking is ideal for sloping yards that need distinct functional zones.
Professional designers gatekeep this specific technique: using hidden fastener systems instead of top-down screws. This trick delivers a seamless, high-end finish that elevates your entire outdoor living area.
Expect composite materials to cost roughly $8–$12 per square foot. Pin this if you’re battling an uneven backyard.
- Key Materials: Composite deck boards, hidden fastening clips.
- Vibe / Style: Structured architectural zen.
- Difficulty: Moderate to advanced DIY.
- Budget Breakdown: Decking: $1,500 | Framing: $600.
- Creator’s Tip: Use contrasting border colors on the stair edges for a striking visual pop and added safety.
- Smart Sourcing: UV-resistant composite decking boards and bulk hidden deck fastener kits.
6. Pergola with Retractable Canopy Panels
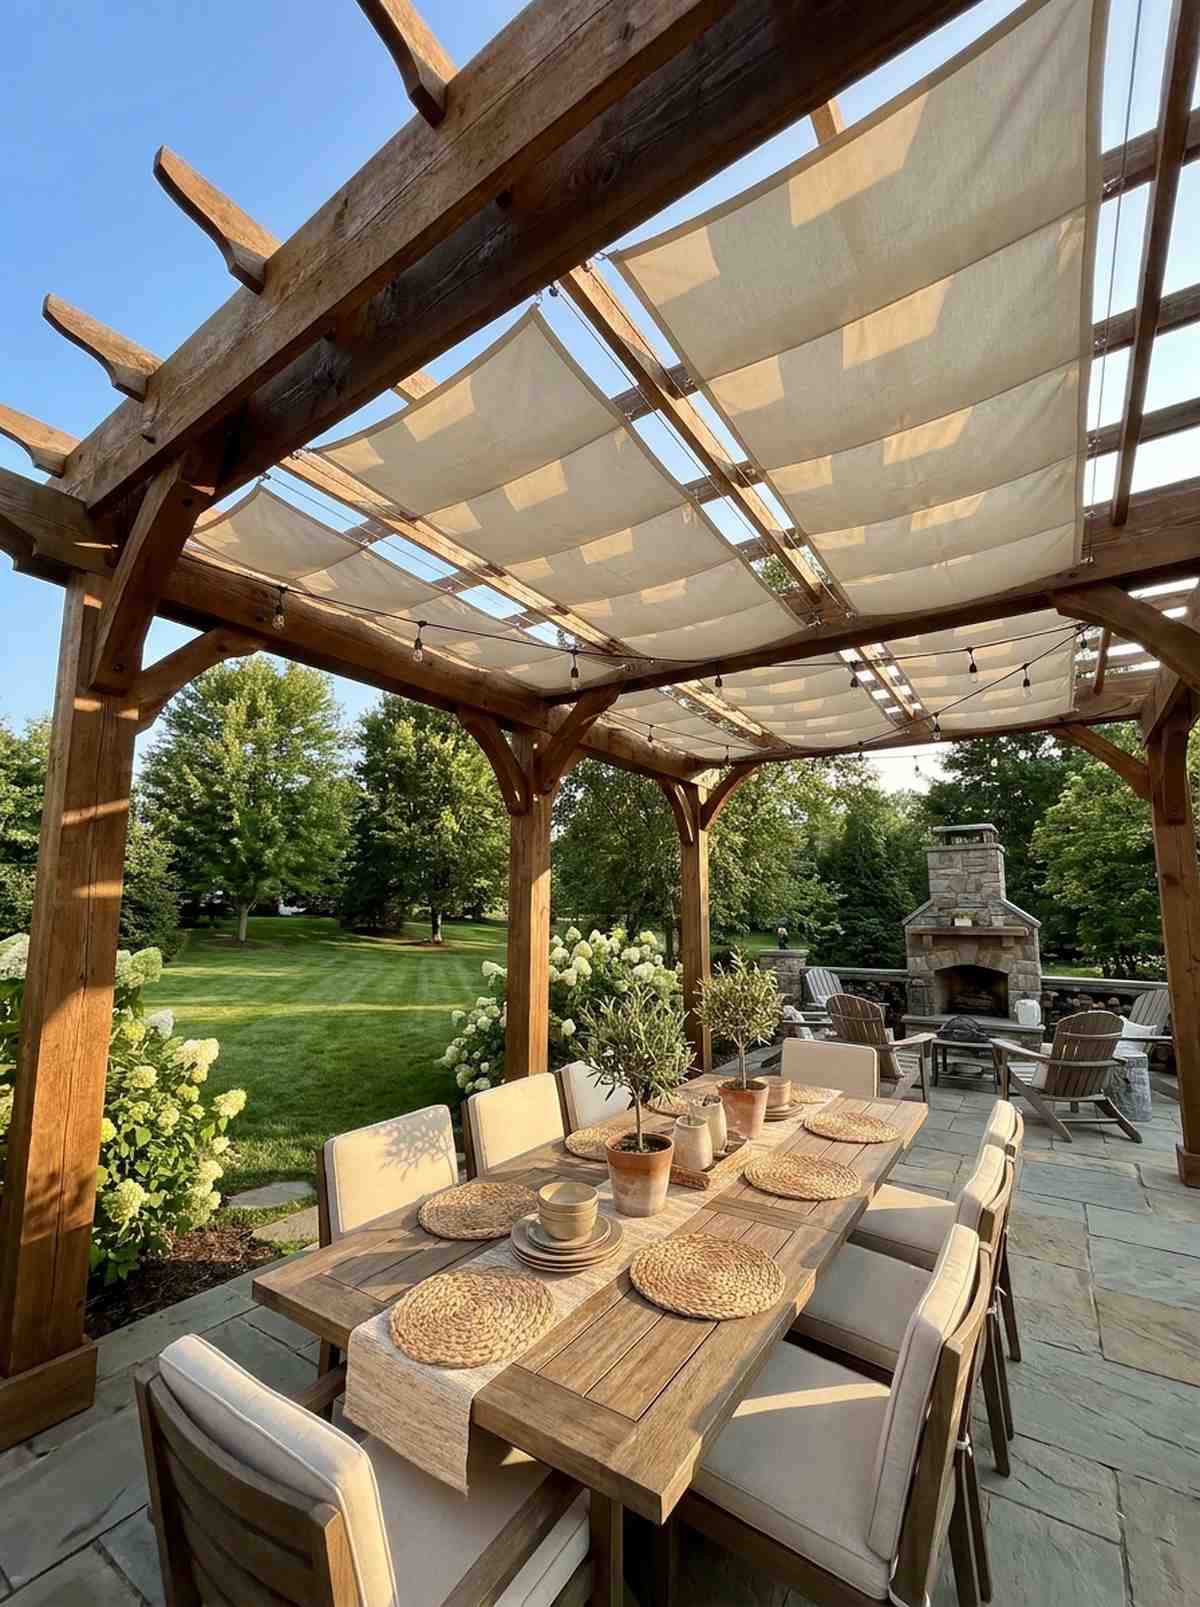
Evokes the relaxed charm of an Italian vineyard terrace. Track-mounted fabric canopies are perfect for timber pergolas that need adaptable midday shading.
Most contractors push static roofs, but retractable panels offer superior climate control. This setup yields a premium aesthetic while providing total flexibility over your outdoor living design.
You can retrofit an existing pergola for just $200–$400.
- Key Materials: Waterproof acrylic fabric, wire cable tracks.
- Vibe / Style: Romantic European countryside.
- Difficulty: Easy weekend project.
- Budget Breakdown: Fabric: $150 | Cable System: $100.
- Creator’s Tip: Spray the tracks with dry silicone lubricant twice a year for buttery smooth sliding.
- Smart Sourcing: Pre-sewn retractable canopy kits and stainless steel wire rope tension kits.
7. Floating Deck Amidst Landscaping
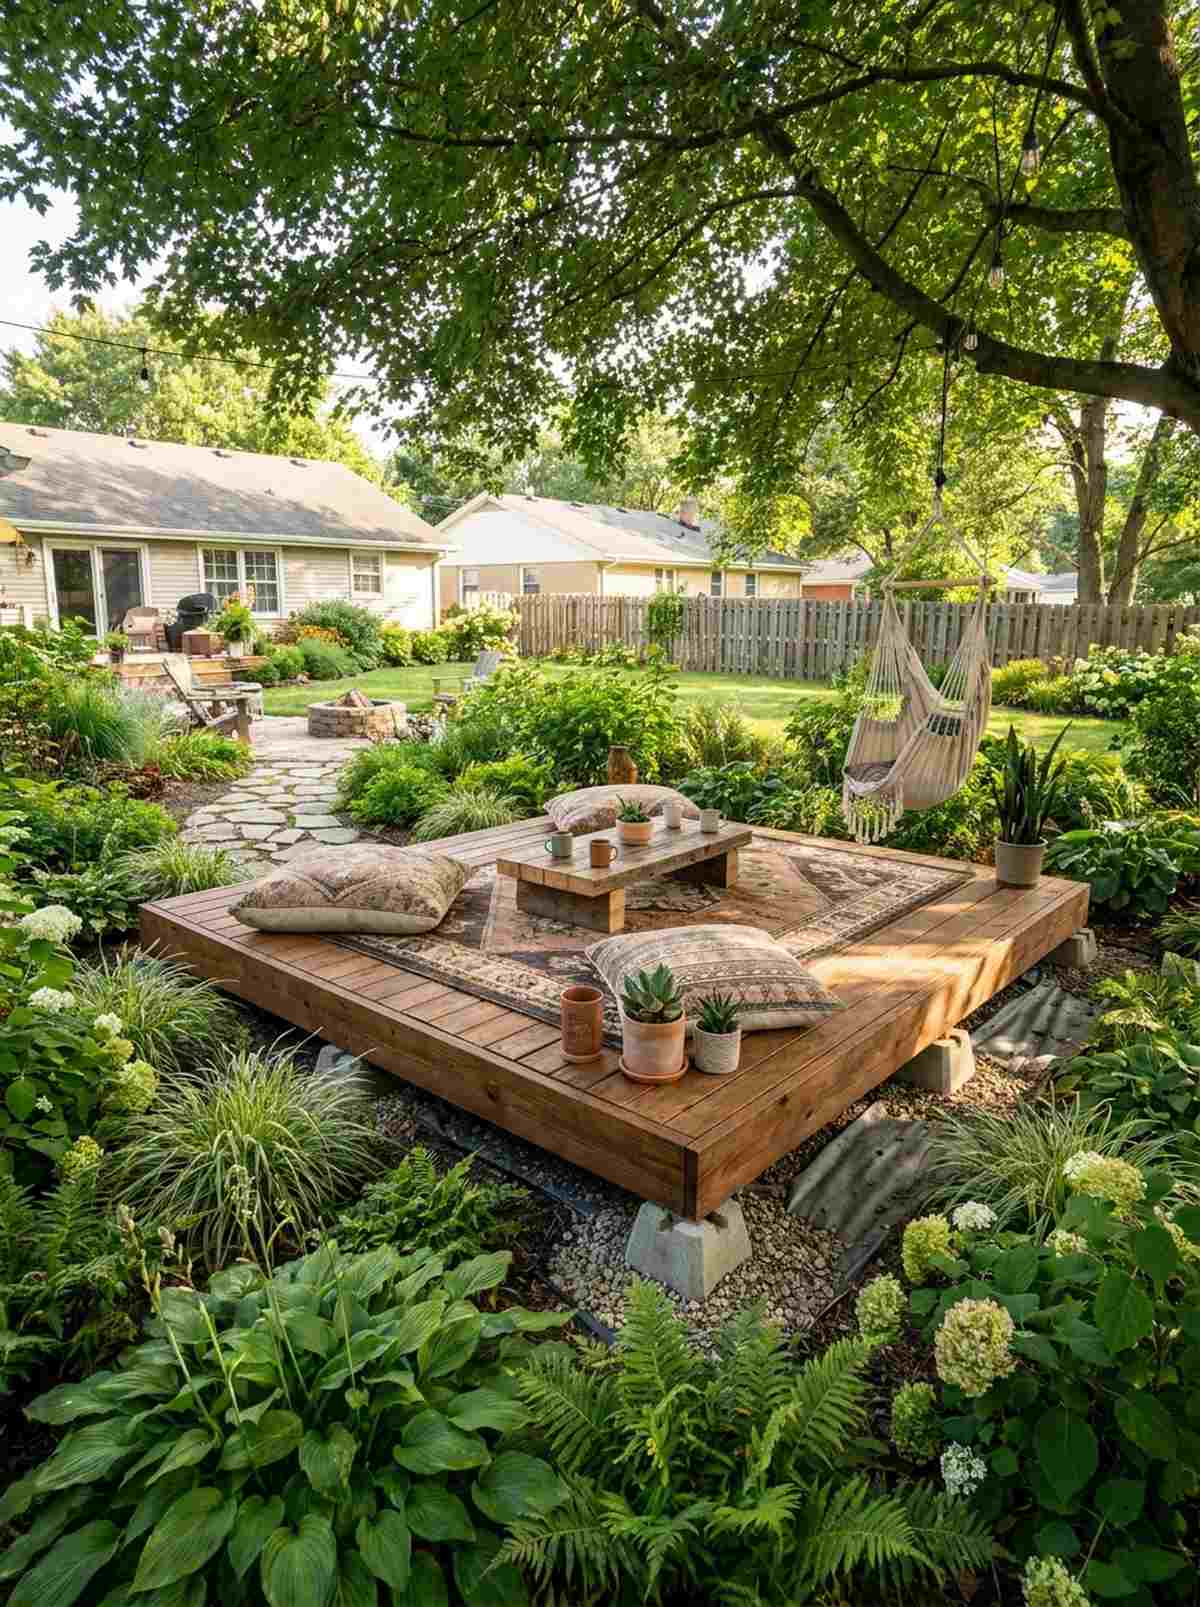
Looks like a magical wooden island hovering above a sea of lush greenery. Low-profile floating decks work wonders in the center of dense garden beds or under large shade trees.
The biggest mistake homeowners make is attaching decks directly to the house. Building a freestanding floating platform completely avoids complex permit issues while delivering a designer-level finish.
You can easily assemble a 10×10 platform for under $500. Save this to your weekend warrior DIY board.
- Key Materials: Concrete deck blocks, pressure-treated joists.
- Vibe / Style: Hidden bohemian sanctuary.
- Difficulty: Beginner-friendly structural project.
- Budget Breakdown: Lumber: $300 | Pier Blocks: $50.
- Creator’s Tip: Lay heavy-duty weed barrier under the entire structure before dropping your frame to prevent overgrowth.
- Smart Sourcing: Pre-cast concrete deck pier blocks and heavy-duty landscape fabric rolls.
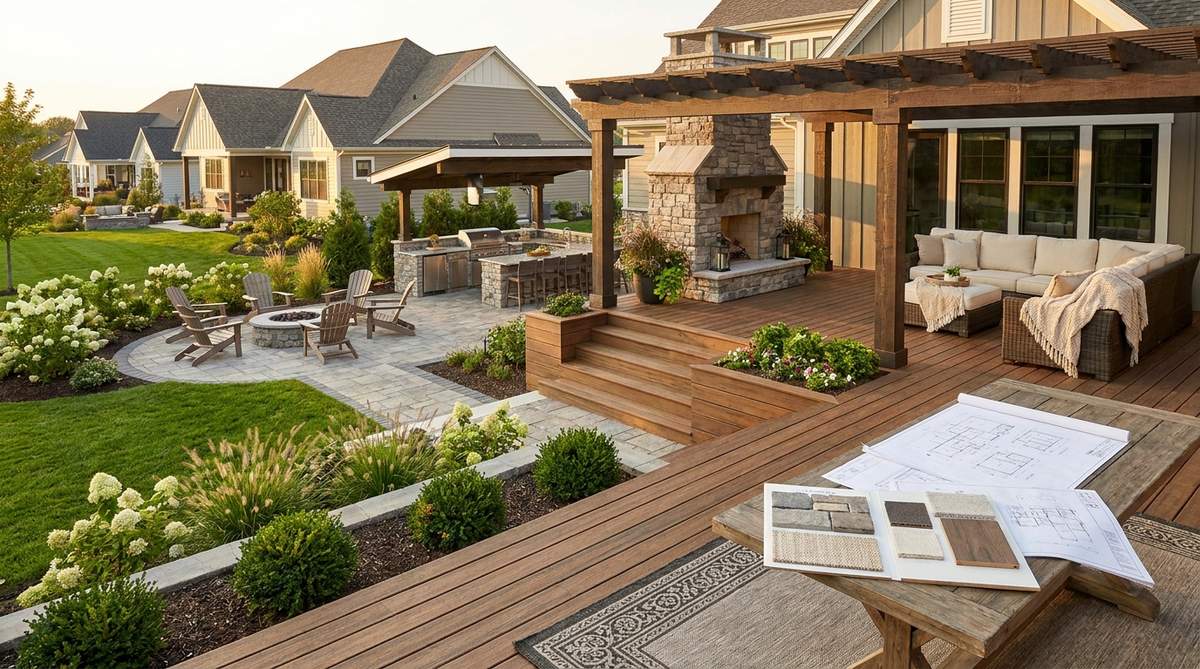
8. Pavilion with Vaulted Ceiling

Breathtakingly grand, making your yard feel like a private country club. Freestanding vaulted pavilions serve as the ultimate anchor for outdoor kitchens and giant dining tables.
Skip the generic hardware store gazebos that collapse in the first winter storm. Custom exposed rafters look far more expensive than they are, cementing your space as a luxury outdoor living area.
Material costs typically range from $3,000–$6,000 depending on lumber quality.
- Key Materials: Cedar beams, metal roofing panels.
- Vibe / Style: Majestic rustic lodge.
- Difficulty: Professional construction recommended.
- Budget Breakdown: Cedar: $2,500 | Hardware: $800.
- Creator’s Tip: Hide all electrical wiring for ceiling fans and lights within the ridge beam during the initial build phase.
- Smart Sourcing: Decorative heavy-duty timber brackets and pre-cut cedar rafter tails.
Most people get this completely wrong… until they try the exact layout coming up next.
💡 Must-Have Supplies for High-End Setups
To build these setups faster and ensure they last, skip the generic craft aisles and invest in the right foundational kits.
- Base & Support: Commercial-grade leveling risers and deck blocks
- Setup Tools: Laser level layout starter kits
- Weather/Durability Protection: Marine-grade clear epoxy sealants (bulk pack)
Outdoor Living Rooms: Seating and Layout
Furniture selection and spatial arrangement transform patios into functional rooms. Professional designers prioritize weather-resistant materials, modular flexibility, and scale.
9. Modular Sectional with Low Profile

Feels like a chic, sunken lounge straight out of a Hollywood Hills mansion. Low-profile modular sectionals are ideal for maintaining uninterrupted sightlines across expansive backyards.
Amateurs often ruin their patio aesthetic with clunky, oversized couches. A sleek, horizontal design delivers a surprisingly premium look that instantly elevates outdoor living room designs.
You can score a quality modular set for roughly $800–$1,500. Pin this if you love minimalist outdoor seating.
- Key Materials: Powder-coated aluminum frames, solution-dyed acrylic cushions.
- Vibe / Style: Sleek contemporary lounge.
- Difficulty: Easy to configure.
- Budget Breakdown: Furniture Set: $1,200 | Cushion Covers: $150.
- Creator’s Tip: Buy extra corner modules; they offer the most flexibility when you want to split the sofa into two love seats.
- Smart Sourcing: Modular aluminum outdoor sofa kits and waterproof universal furniture covers.
10. Built-in Concrete Bench Seating
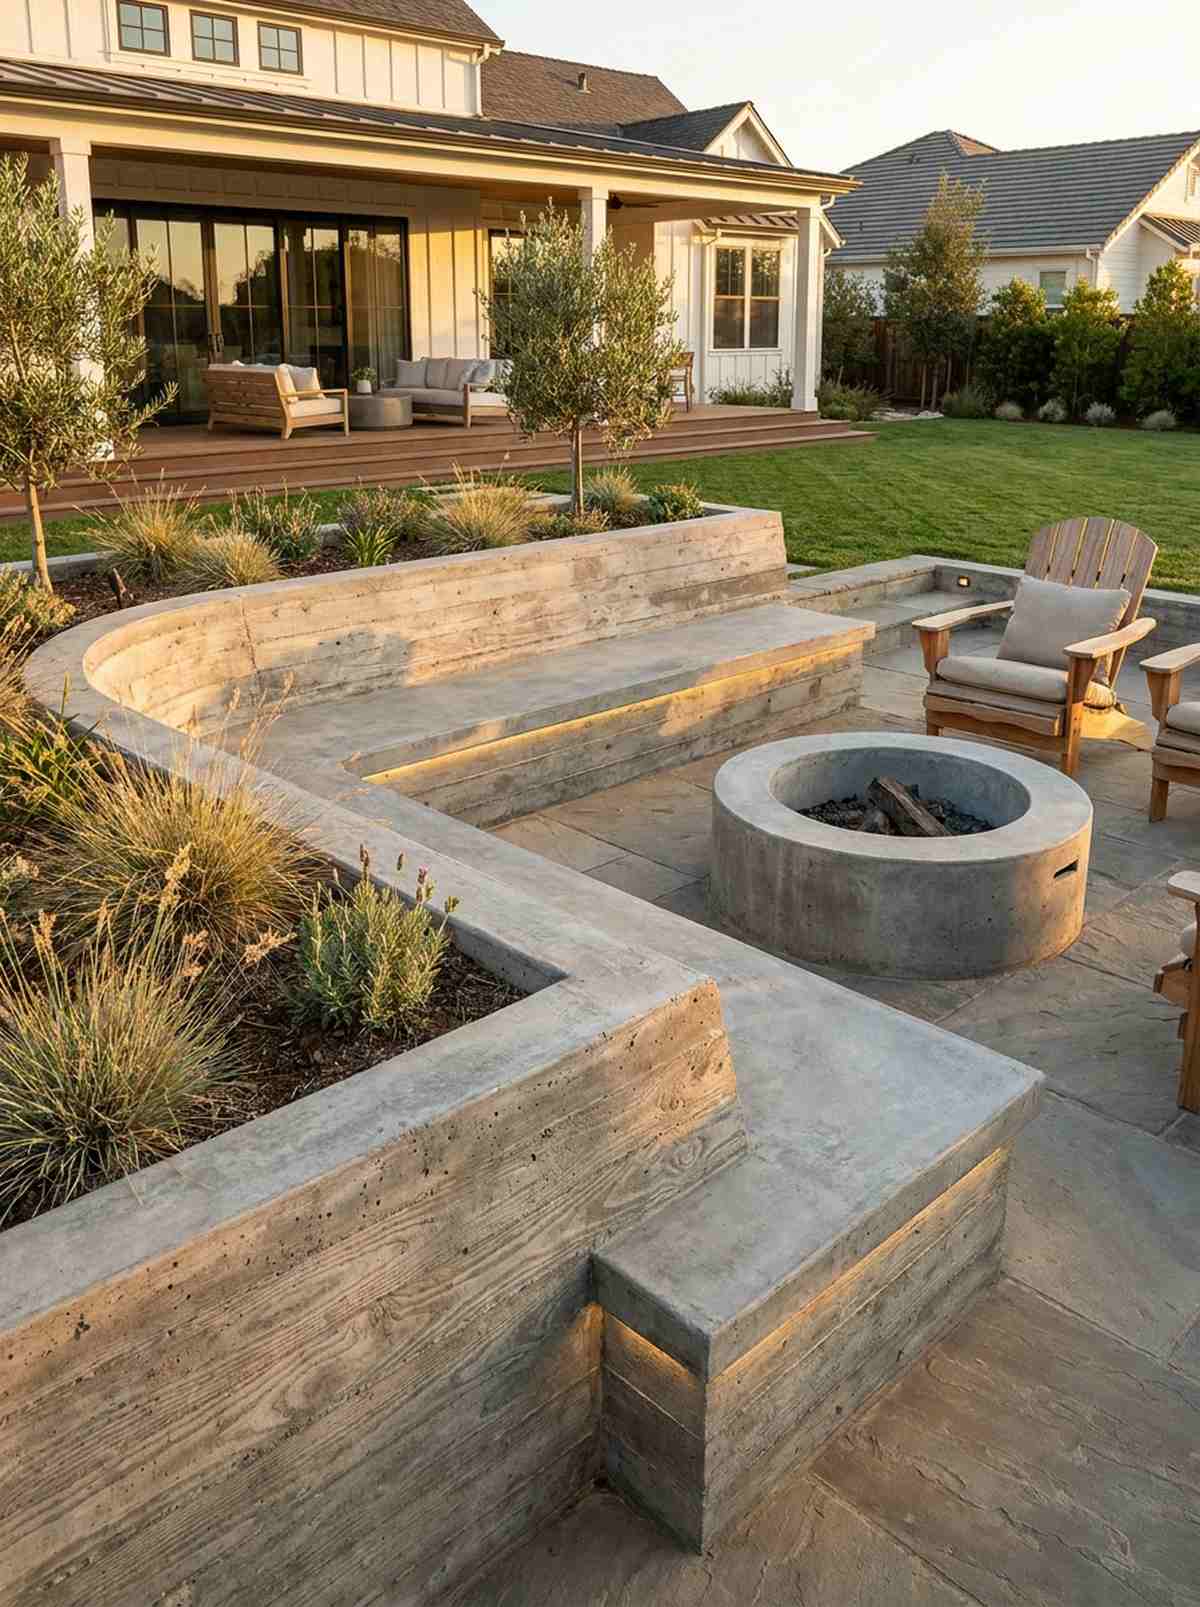
Radiates a raw, brutalist elegance that feels permanently grounded. Poured concrete bench walls double as retaining structures for elevated planter beds around fire pits.
This layout completely destroys the myth that you need to constantly buy and replace patio furniture. Board-formed concrete looks far more expensive than it is and creates an indestructible perimeter.
Materials for a custom bench run about $300–$600 in concrete and rebar.
- Key Materials: High-strength concrete mix, wooden forms.
- Vibe / Style: Industrial modern chic.
- Difficulty: Heavy labor DIY.
- Budget Breakdown: Concrete: $250 | Lumber for forms: $150.
- Creator’s Tip: Vibrate the exterior of the wooden forms aggressively with a hammer to eliminate ugly air bubbles on the surface.
- Smart Sourcing: High-strength countertop concrete mix and concrete form release agents.
11. Woven Rattan Armchair Cluster
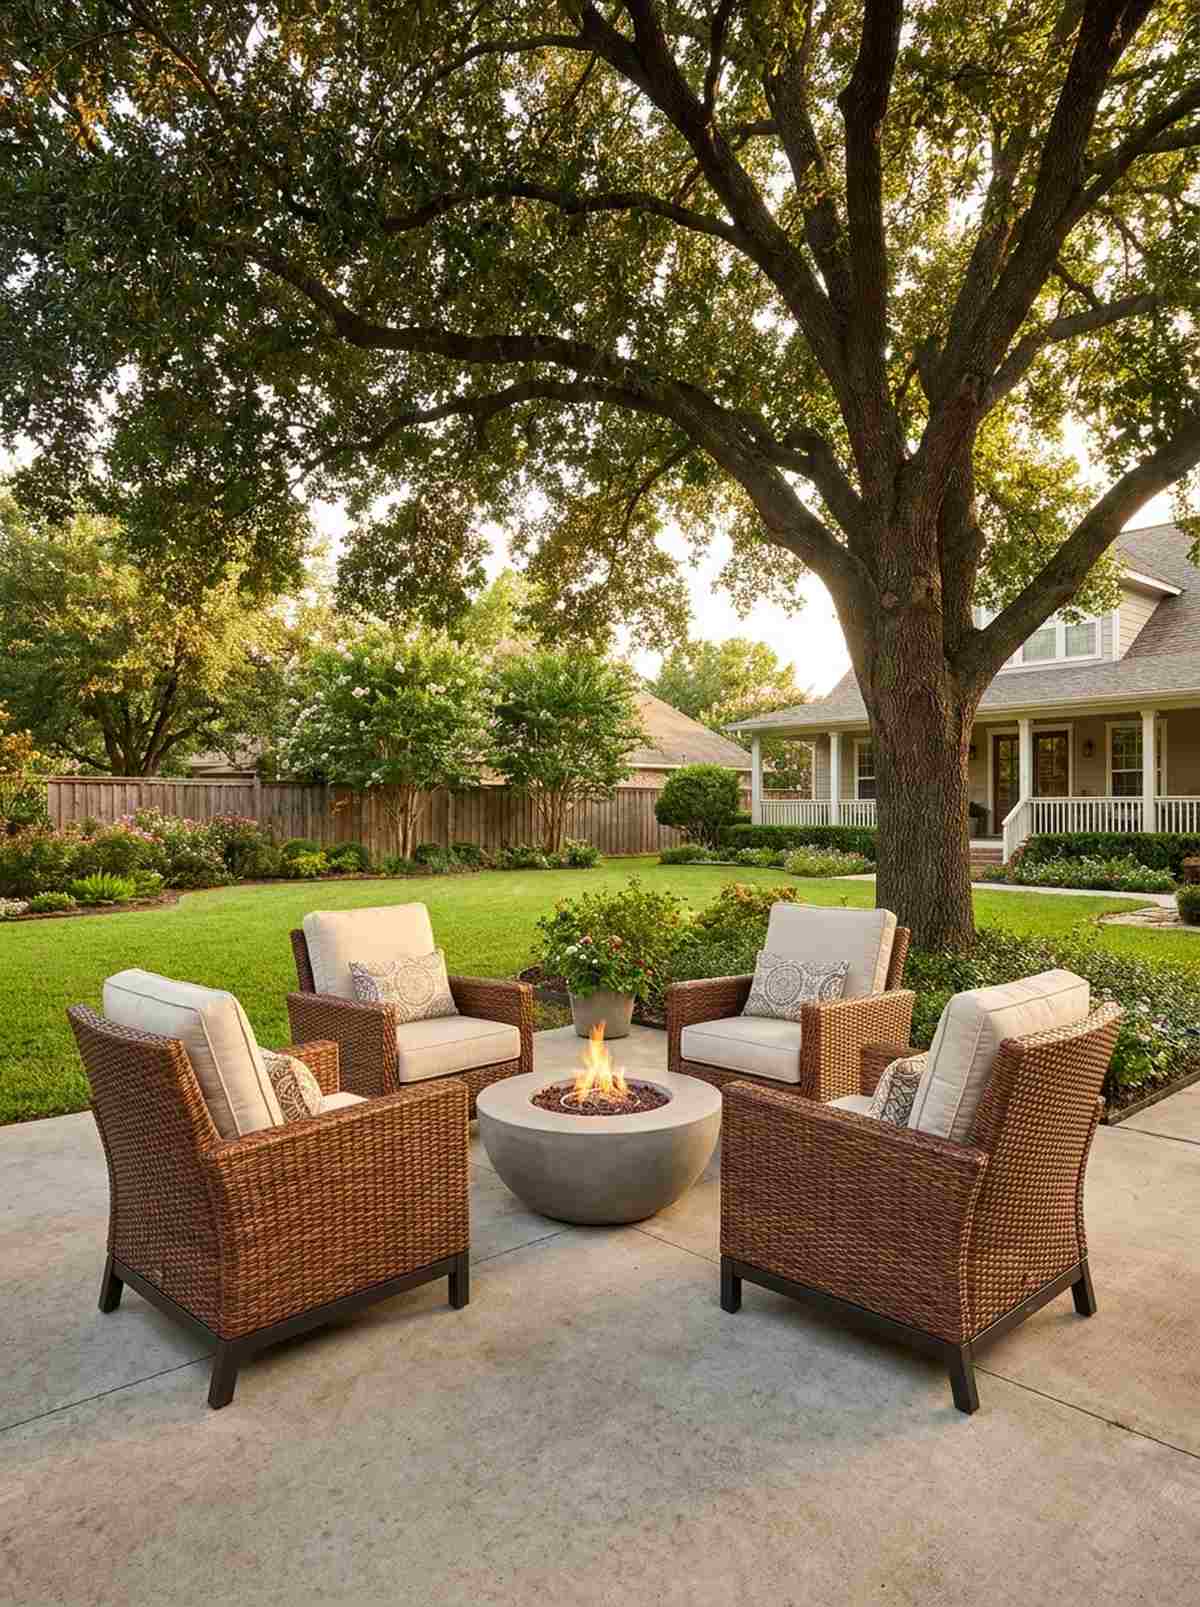
Brings a warm, textural embrace that softens harsh concrete patios. Clusters of synthetic rattan chairs create intimate, circular conversation nooks under large shade trees.
Ignore the outdated advice that wicker belongs in the 90s. Modern resin rattan gives a designer-level finish while completely shrugging off rain and intense UV rays.
A cluster of four premium chairs costs around $400–$800. Save this for a quick, impactful seating upgrade.
- Key Materials: All-weather synthetic rattan, aluminum sub-frames.
- Vibe / Style: Organic bohemian resort.
- Difficulty: Zero setup required.
- Budget Breakdown: Chairs: $600 | Accent pillows: $80.
- Creator’s Tip: Use a low, round fire bowl in the center instead of a coffee table to force the conversation inward.
- Smart Sourcing: All-weather resin wicker armchair sets and UV-resistant outdoor throw pillows.
12. Hammock Nook with Structural Posts
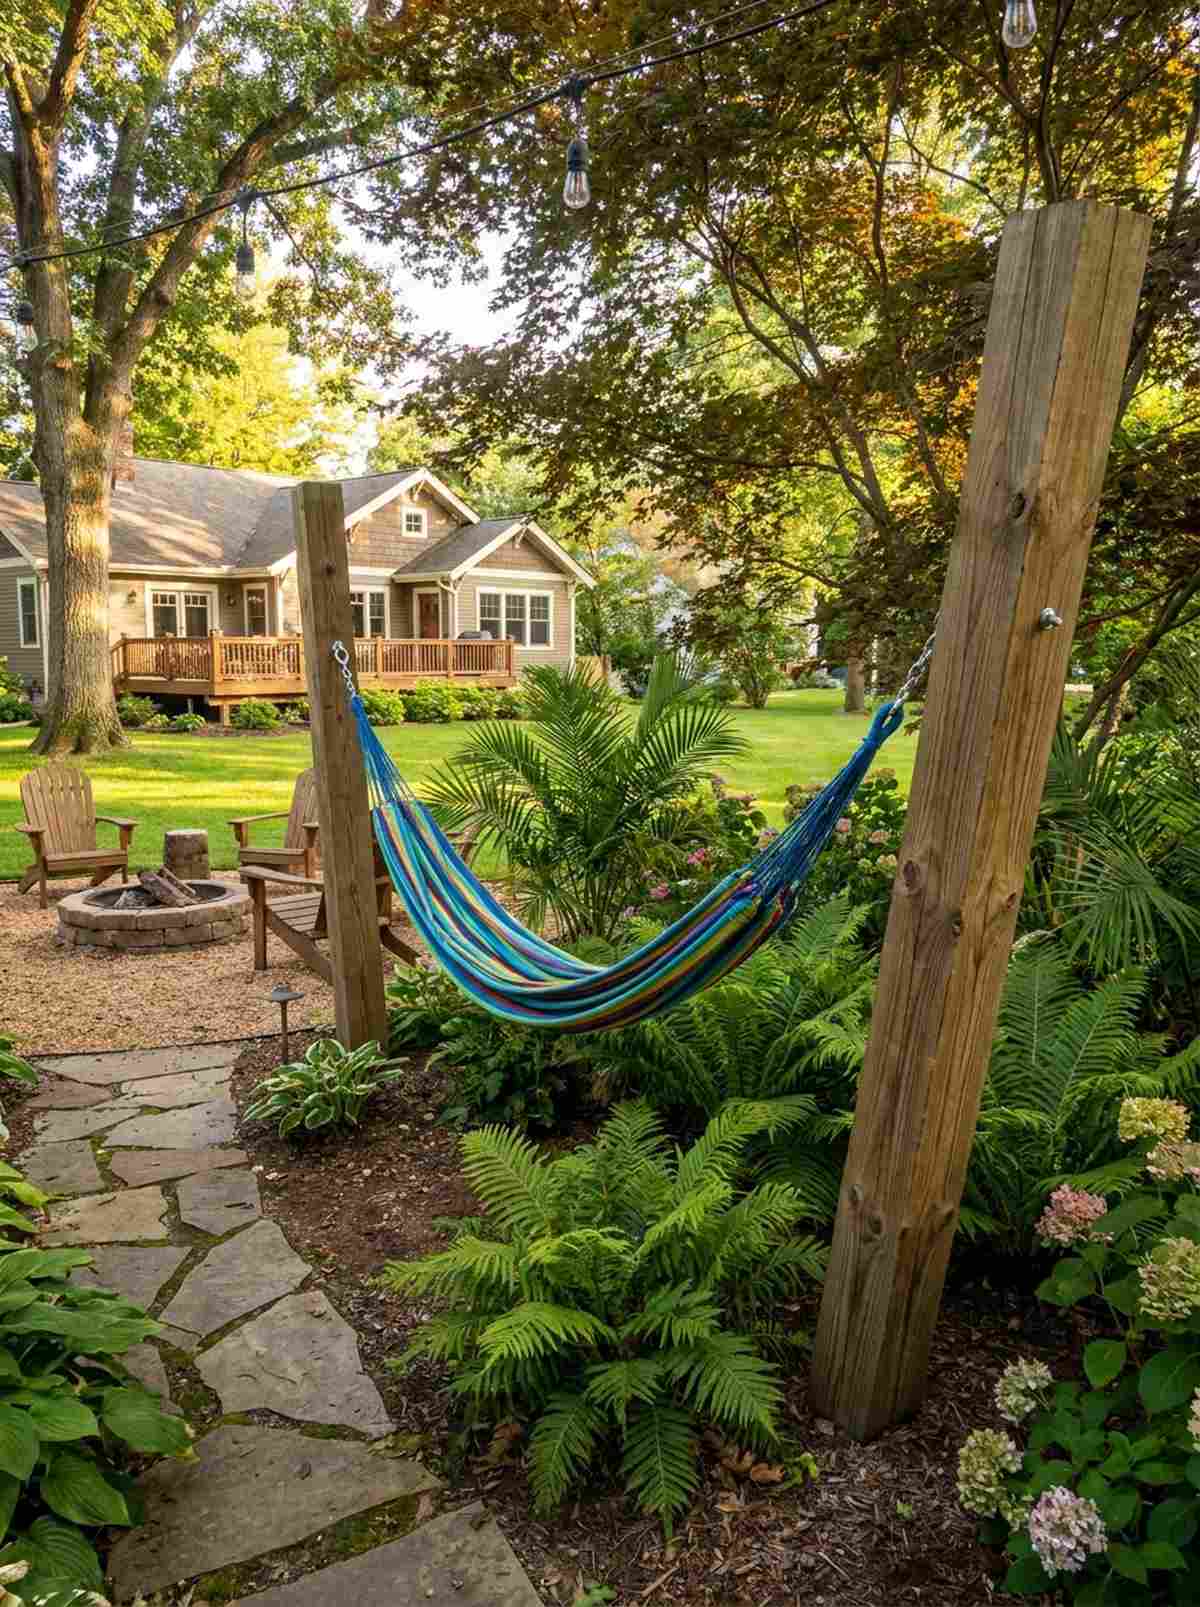
Feels like a secluded tropical hideaway nestled right in the suburbs. Dedicated hammock posts are the ultimate addition to a quiet, shaded corner of your property.
While your neighbors struggle with flimsy metal stands, sinking dedicated timber posts provides a surprisingly premium look. This simple layout adds massive relaxation value to your outdoor living ideas.
You can execute this weekend project for under $100.
- Key Materials: 6×6 pressure-treated posts, heavy-duty eye hooks.
- Vibe / Style: Laid-back tropical escape.
- Difficulty: Beginner DIY.
- Budget Breakdown: Timber: $40 | Hardware/Hammock: $60.
- Creator’s Tip: Angle the posts slightly away from each other (about 5 degrees) to counter the extreme tension of a loaded hammock.
- Smart Sourcing: Brazilian-style cotton hammocks and heavy-duty suspension hook kits.
13. Swing Chair Suspended from Pergola
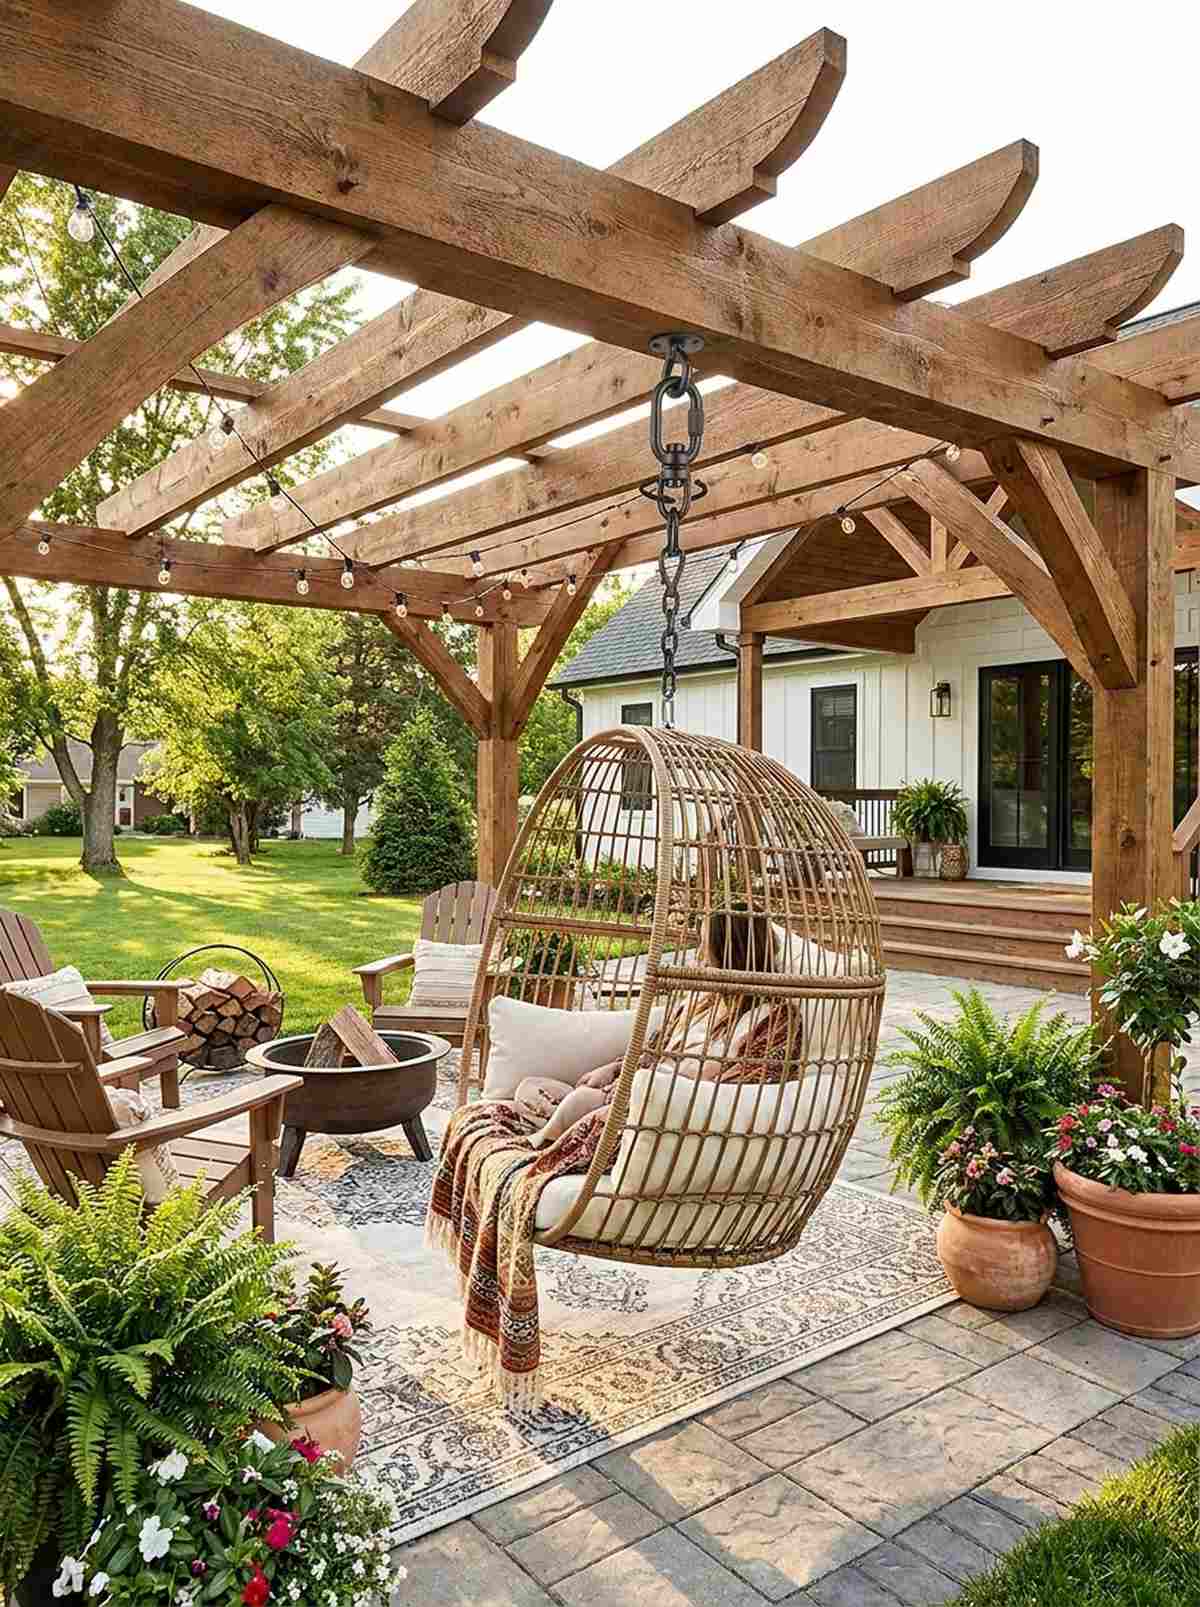
Adds a whimsical, floating dynamic that immediately catches the eye. Suspended cocoon chairs are perfect for breaking up the hard angles of a structural pergola.
Most people get this completely wrong by hanging chairs from weak decorative slats. Tying directly into the main load-bearing beam ensures safety and looks far more expensive than it is.
A high-quality swing chair setup costs roughly $150–$300. Pin this if you love playful patio elements.
- Key Materials: Steel reinforced swing chair, 360-degree rotation bearing.
- Vibe / Style: Playful modern bohemian.
- Difficulty: Easy drill-and-mount setup.
- Budget Breakdown: Chair: $200 | Bearing hardware: $30.
- Creator’s Tip: Use a specialized rotation bearing so the chair can spin freely without unscrewing the mounting hardware.
- Smart Sourcing: Egg-style outdoor swing chairs and 360-degree heavy-duty swivel hooks.
Wait until you see this next approach—it completely changes how you use small spaces.
14. Outdoor Sectional with Built-in Storage
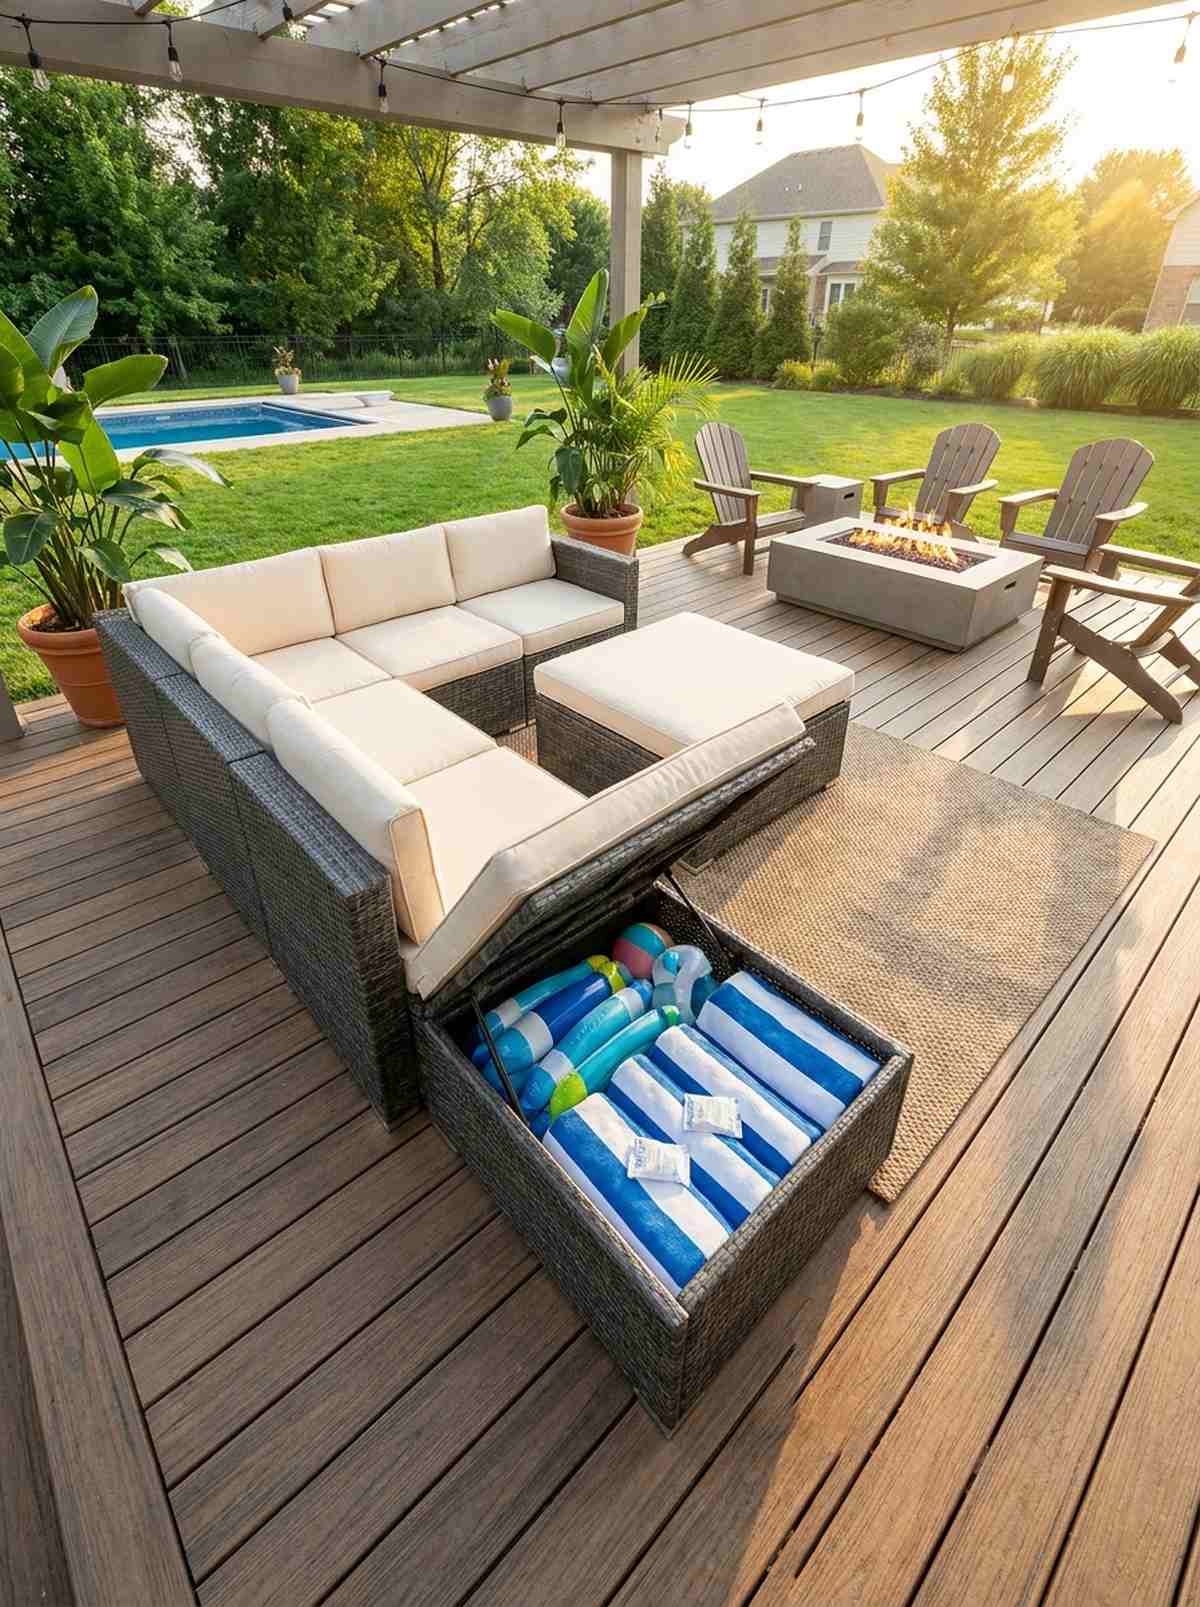
Feels like a life-hack materialized into a piece of gorgeous furniture. Storage-integrated sectionals are mandatory for tight urban balconies or cluttered pool decks.
Professional designers gatekeep this specific technique: hiding pool toys and winter covers inside your daily seating. It delivers a designer-level finish by keeping the surrounding space completely devoid of visual clutter.
You can find smart storage sets ranging from $600–$1,200.
- Key Materials: Resin wicker, waterproof hinged deck bases.
- Vibe / Style: Clutter-free contemporary.
- Difficulty: Easy assembly.
- Budget Breakdown: Sectional: $800 | Waterproof liners: $50.
- Creator’s Tip: Toss a few moisture-absorbing silica packets into the storage bins to prevent mildew on stored cushions.
- Smart Sourcing: Outdoor sectionals with hidden storage and bulk silica gel moisture absorbers.
15. Daybed Platform for Lounging
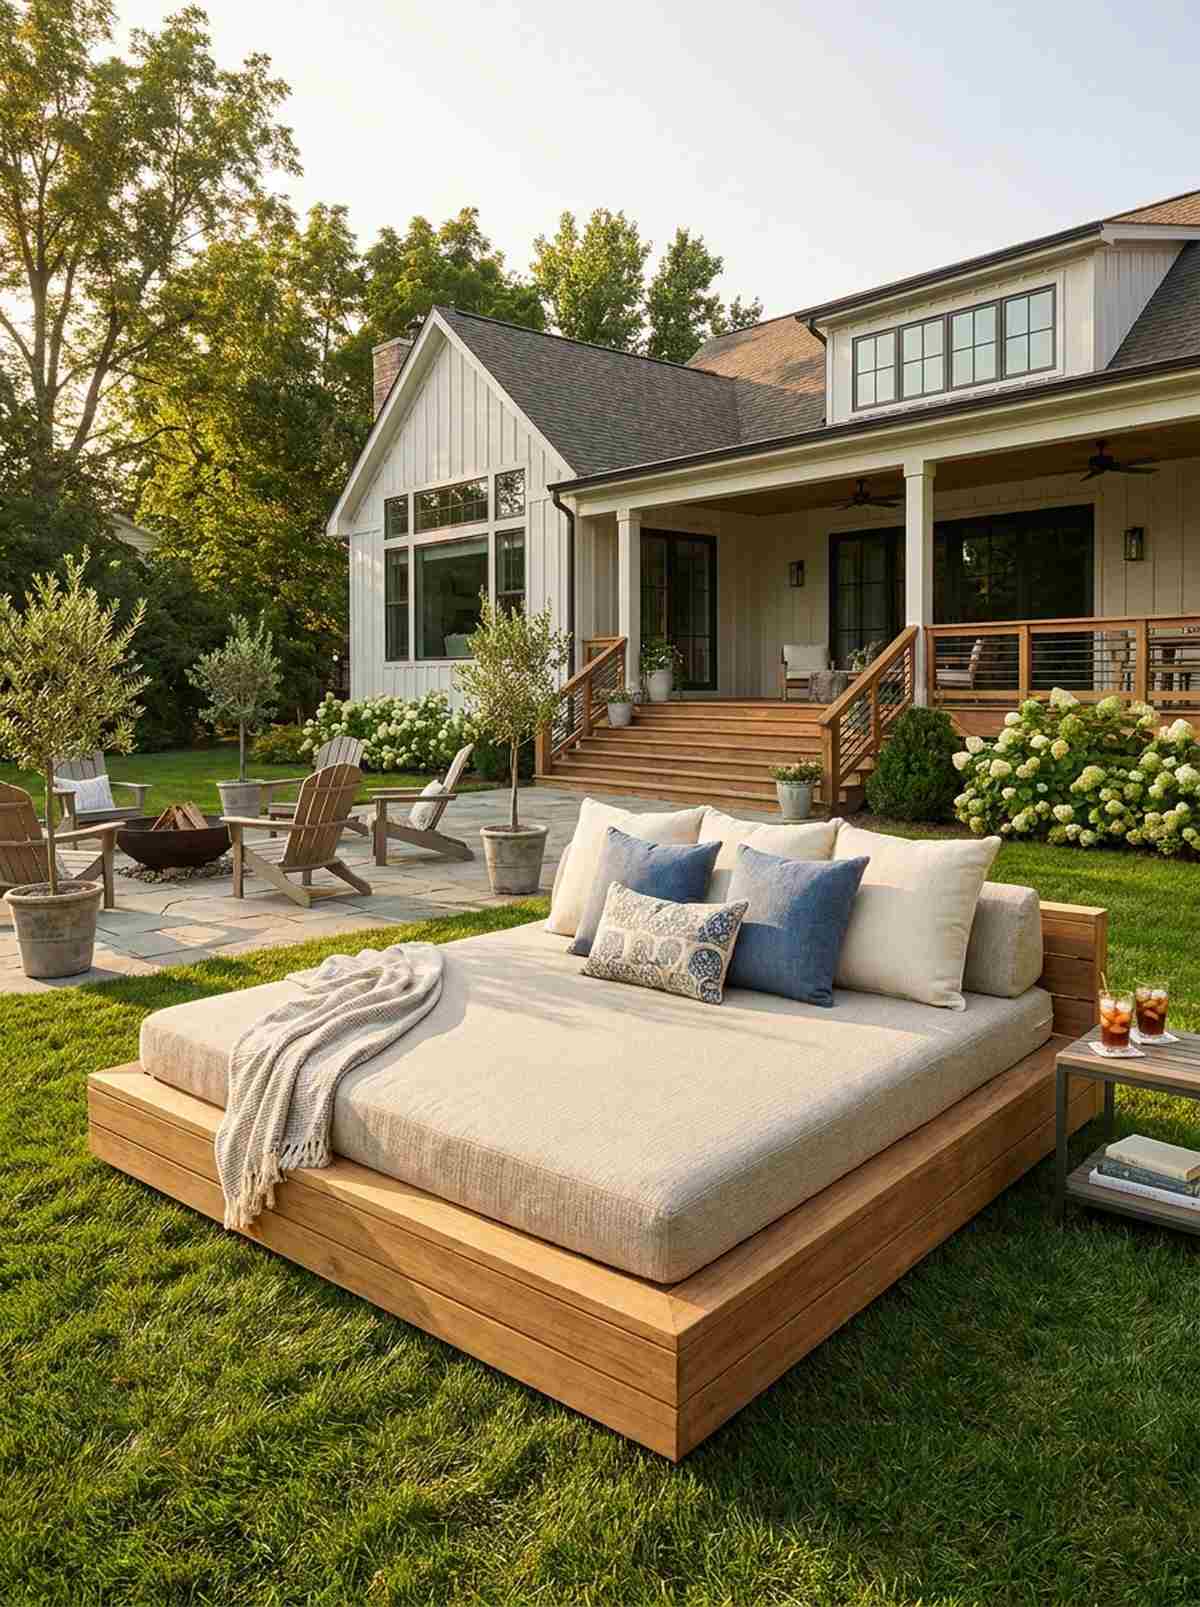
Emanates the undeniable energy of a high-end beach club cabana. Oversized outdoor daybeds transform an empty patch of grass into a luxurious reading and napping destination.
This layout completely destroys the myth that outdoor furniture has to be stiff and formal. A massive, flat platform looks far more expensive than standard loungers and elevates the whole outdoor living design.
Building a custom base costs about $200, while buying a pre-made mattress adds $300. Save this for your dream backyard vision board.
- Key Materials: Marine-grade foam, teak or composite base.
- Vibe / Style: Luxury resort relaxation.
- Difficulty: Moderate DIY build.
- Budget Breakdown: Wood frame: $150 | Mattress/Fabric: $350.
- Creator’s Tip: Wrap standard foam in heavy-duty trash bags before putting on the decorative cover to make it 100% waterproof.
- Smart Sourcing: Quick-dry marine grade foam sheets and solution-dyed acrylic fabric by the yard.
16. Adirondack Chair Semi-Circle Arrangement
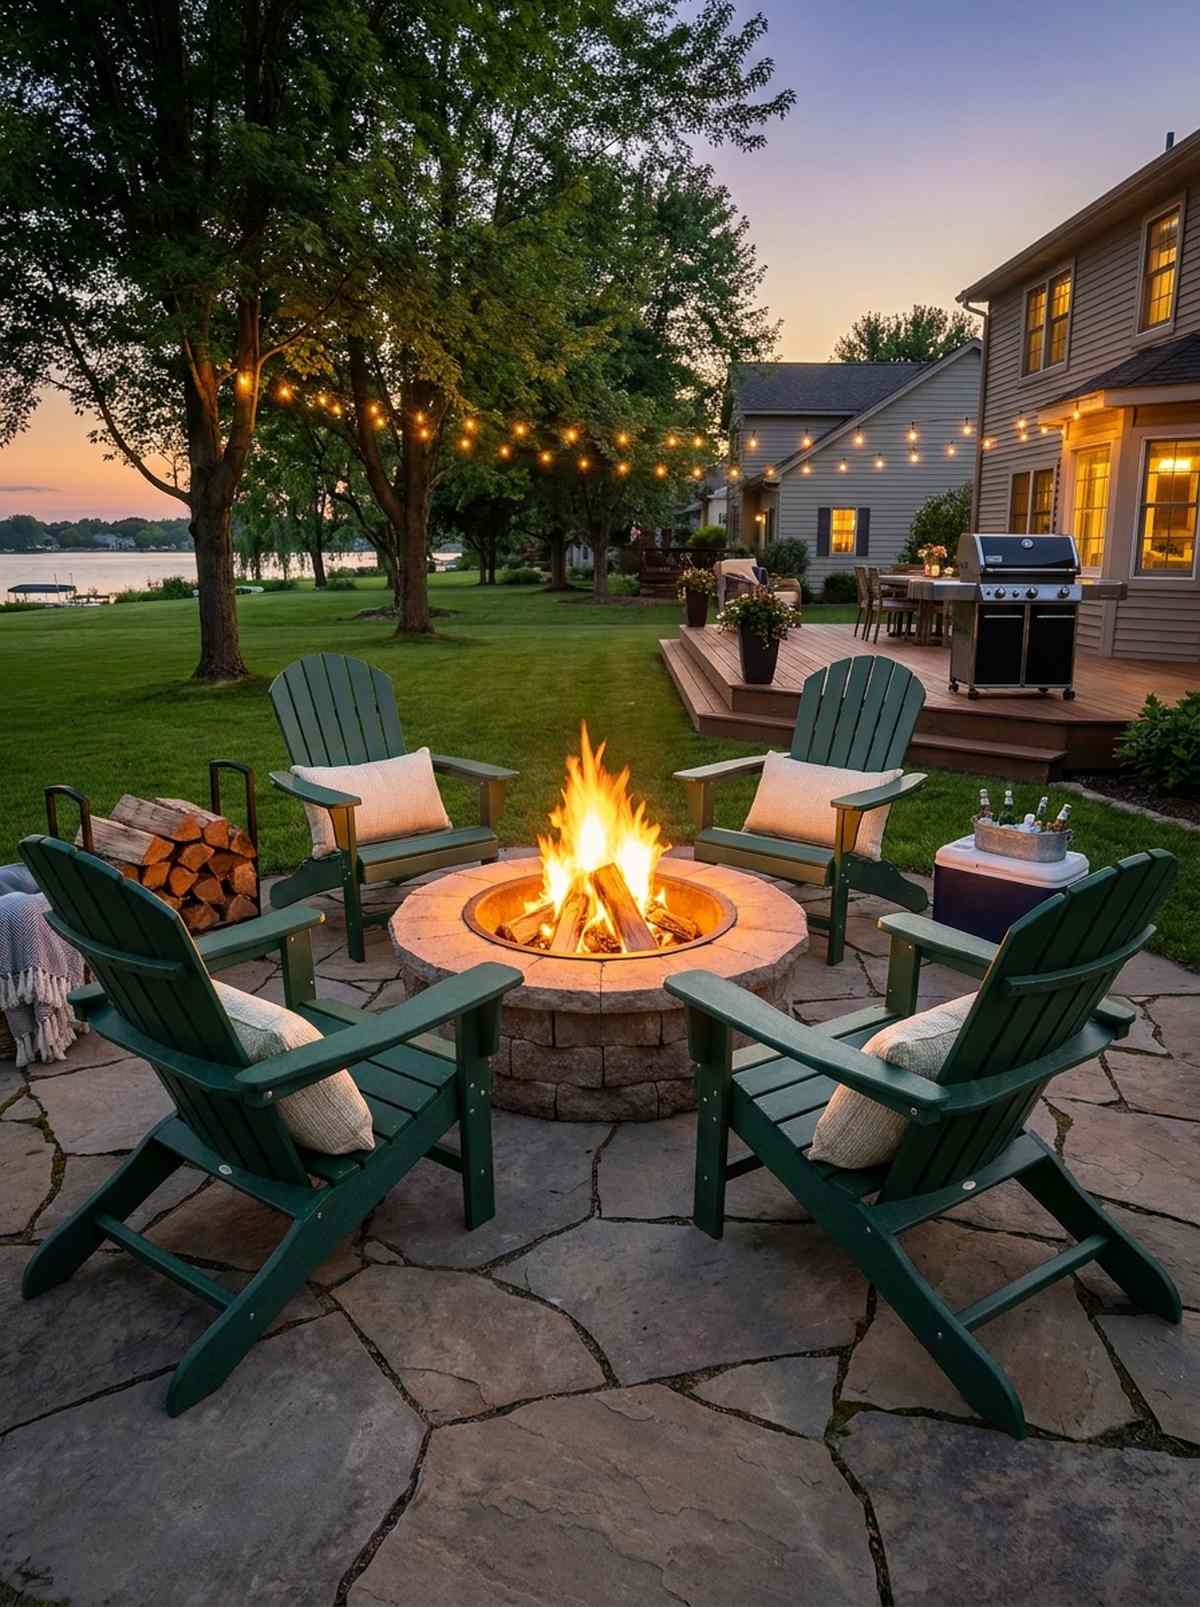
Feels like a nostalgic evening at a summer lake house. A curved Adirondack layout is the undisputed champion of fire pit seating arrangements.
Skip the generic hardware store wood that rots in two seasons. Investing in heavy HDPE plastic delivers a surprisingly premium look that literally lasts a lifetime without a drop of paint.
Expect to spend around $150–$250 per high-quality poly chair.
- Key Materials: HDPE poly-lumber, stainless steel hardware.
- Vibe / Style: Classic American campfire.
- Difficulty: Simple bolt-together assembly.
- Budget Breakdown: 4 Chairs: $800.
- Creator’s Tip: Buy them in a bold accent color like navy or forest green to make the seating area pop against dull concrete.
- Smart Sourcing: HDPE all-weather Adirondack chairs and outdoor lumbar support pillows.
Outdoor Living Area: Culinary Zones
Outdoor kitchens and dining spaces expand entertaining capacity while keeping heat outside. Professional-grade appliances ensure long-term performance.
17. Built-in Grill Island with Storage
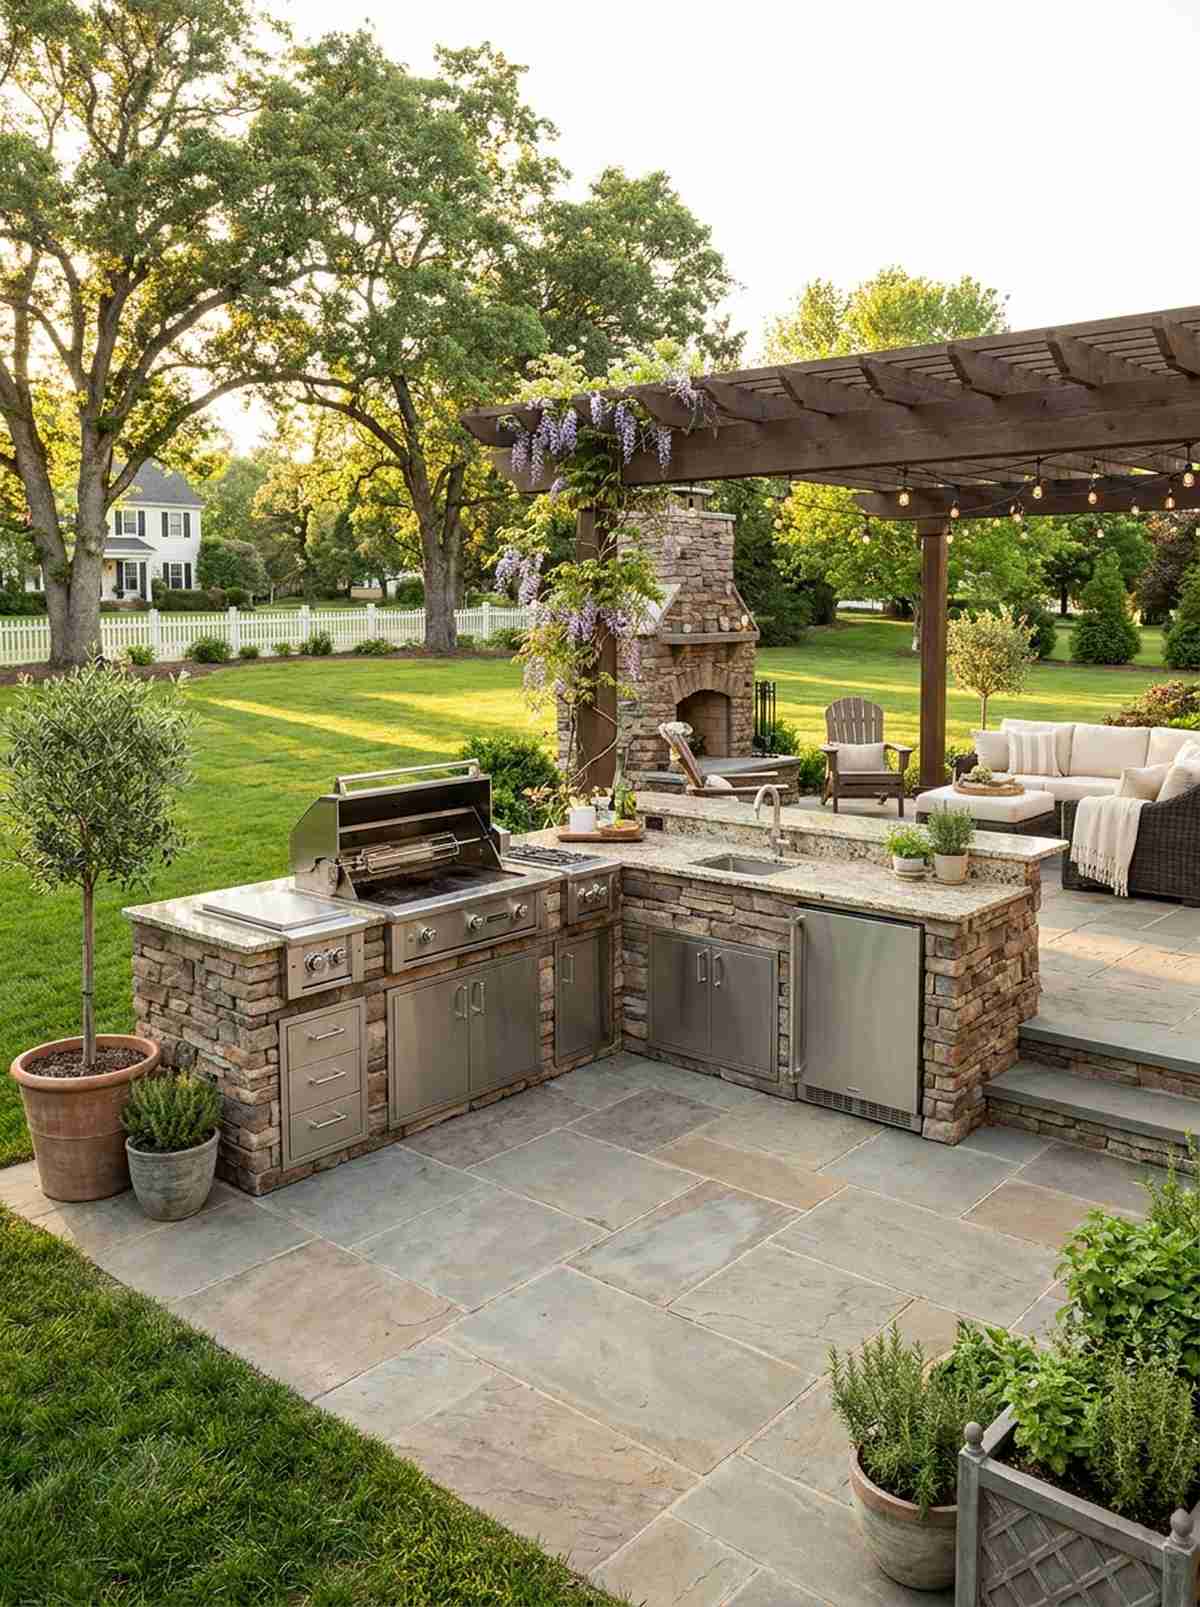
Commands the patio like a master chef’s private stage. Stone-clad grill islands are the absolute centerpiece of any serious backyard entertainment zone.
Most contractors push cheap stucco, but wrapping the island in real stone veneer yields a premium aesthetic. This strategy completely anchors your outdoor living space with functional, heavy-duty architecture.
A DIY cinderblock and veneer build costs around $1,000–$2,000 plus the grill. Pin this for your ultimate backyard kitchen blueprint.
- Key Materials: Concrete blocks, natural stone veneer, stainless doors.
- Vibe / Style: Professional culinary powerhouse.
- Difficulty: Advanced masonry DIY.
- Budget Breakdown: Masonry: $600 | Veneer: $800 | Stainless Doors: $300.
- Creator’s Tip: Always install metal venting grates near the bottom to prevent trapped gas explosions.
- Smart Sourcing: Stainless steel outdoor kitchen access doors and natural stone ledger panels (bulk pack).
18. Modular Outdoor Kitchen System
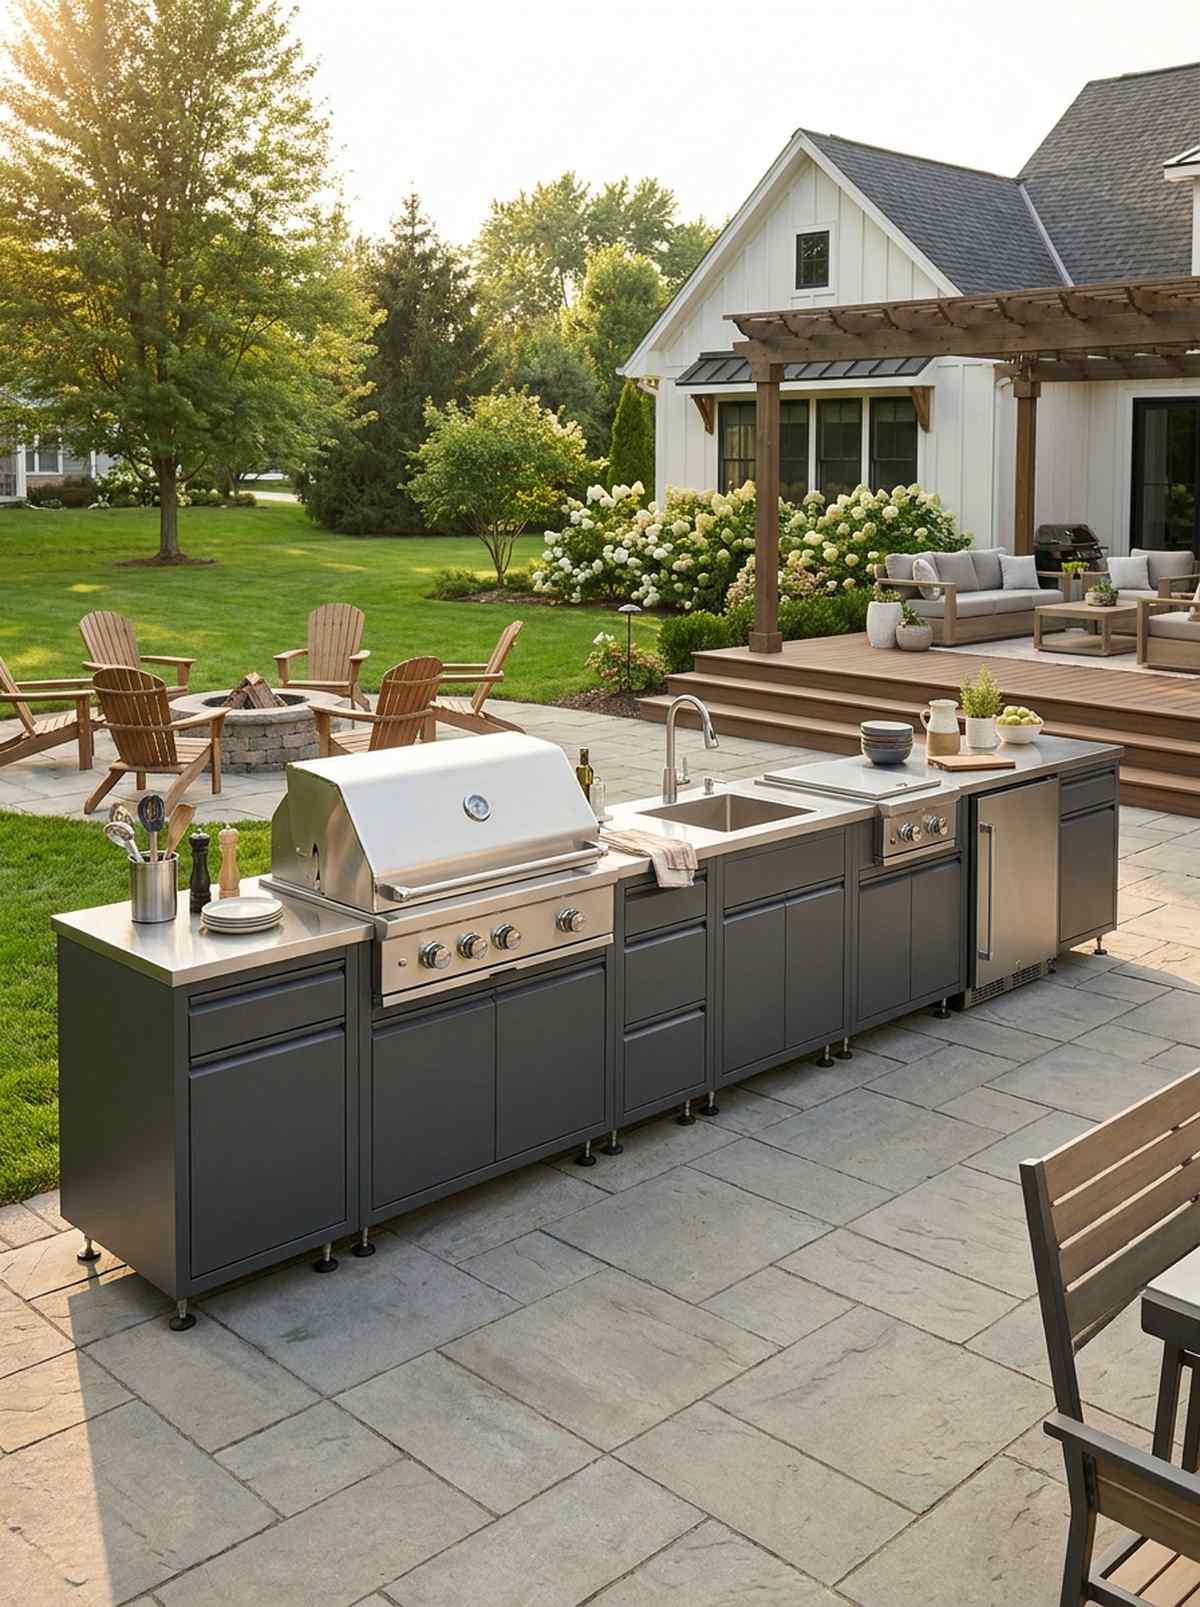
Looks like a bespoke custom build but snaps together in hours. Pre-fabricated stainless steel modules are perfect for flat patios where you want instant gratification.
Amateurs often ruin their budgets with custom masonry when pre-built cabinets offer a designer-level finish for half the price. This completely flips the traditional script on expensive kitchen installations.
You can assemble a massive cooking lineup for $2,500–$5,000.
- Key Materials: Powder-coated steel cabinets, drop-in appliances.
- Vibe / Style: Sleek industrial chef space.
- Difficulty: Easy bolt-together assembly.
- Budget Breakdown: Base units: $2,000 | Countertops: $800.
- Creator’s Tip: Use adjustable leveling feet to ensure the countertop seams match perfectly on slightly sloped patios.
- Smart Sourcing: Modular outdoor kitchen cabinet starter kits and heavy-duty leveling feet mounts.
If you think the last idea was good, this upcoming strategy is a literal game-changer for budget aesthetics…
19. Outdoor Kitchen with Pizza Oven
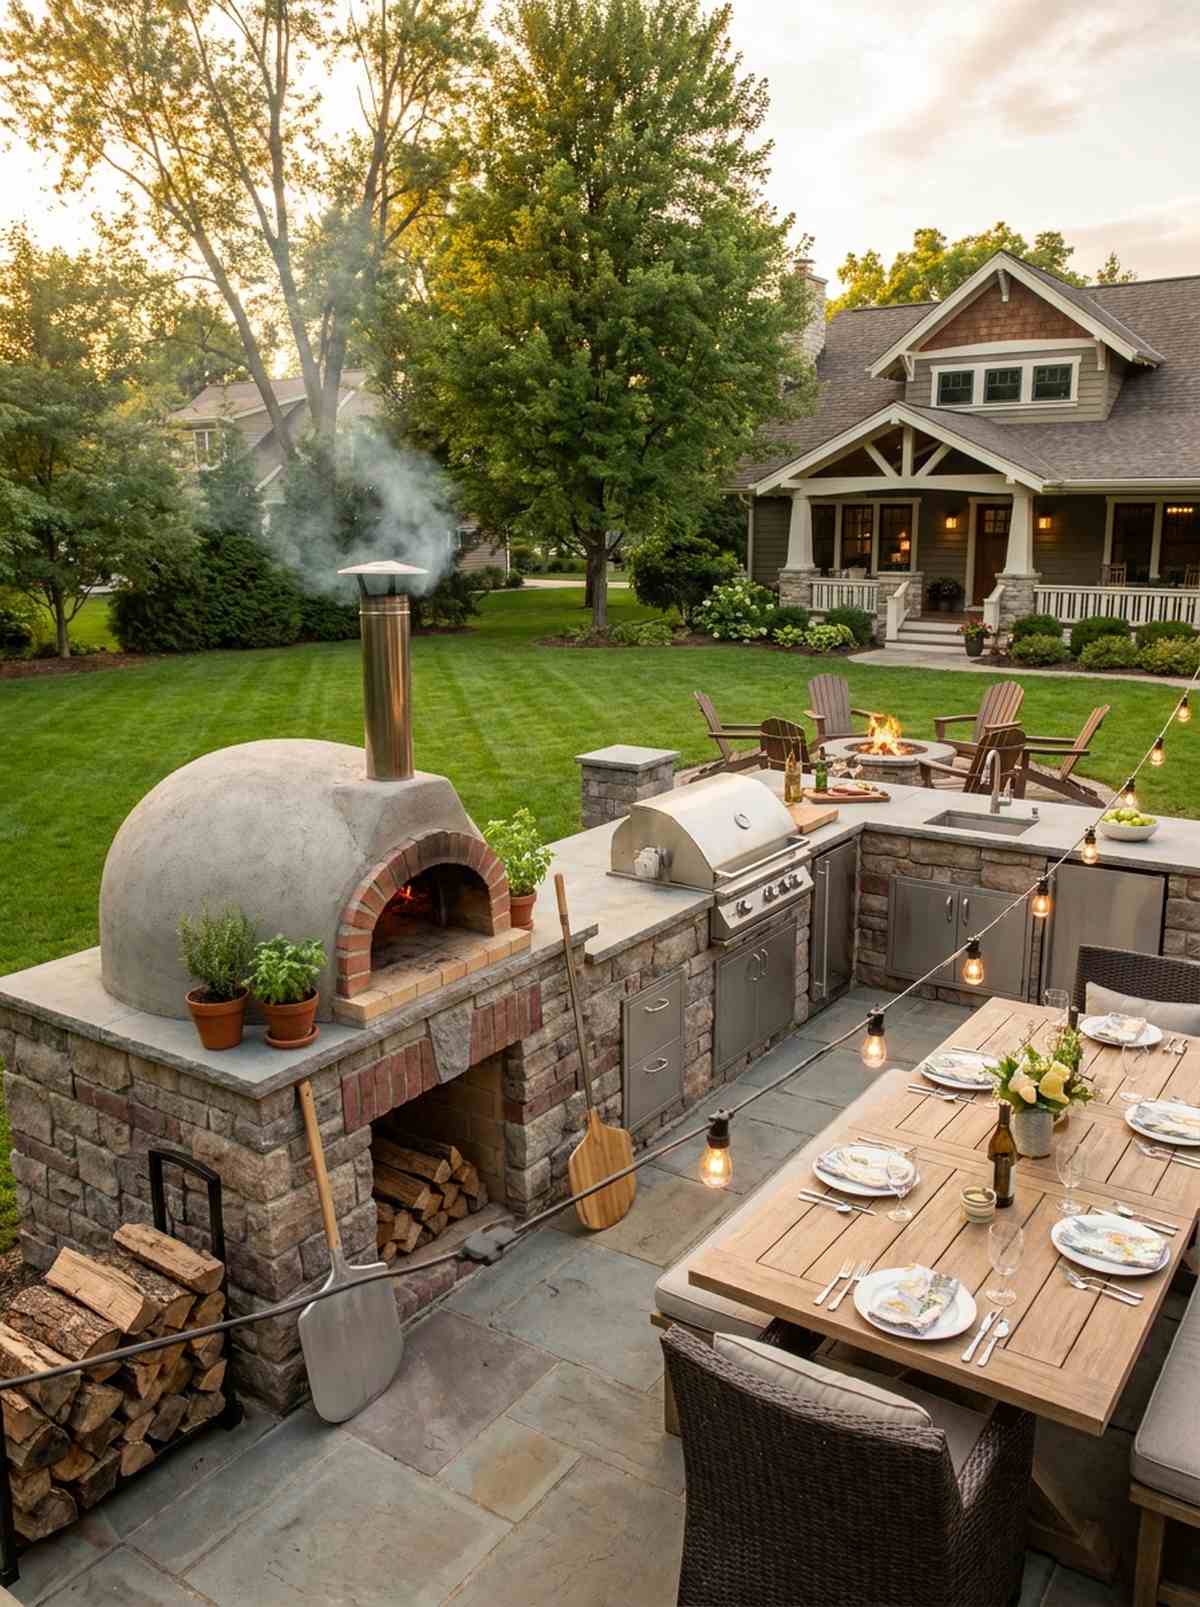
Smells like a bustling pizzeria in the heart of Naples. Wood-fired dome ovens are the ultimate status symbol for gourmet outdoor living room ideas.
Ignore the outdated advice that you need a master mason. Dropping a pre-cast ceramic dome onto a solid base looks far more expensive than it is and delivers genuine 900-degree heat.
Pre-cast oven kits run roughly $1,200–$2,500. Save this to your gourmet backyard board.
- Key Materials: Refractory cement dome, ceramic insulation blankets.
- Vibe / Style: Authentic artisan rustic.
- Difficulty: Moderate heavy-lifting DIY.
- Budget Breakdown: Oven Kit: $1,500 | Base structure: $400.
- Creator’s Tip: Cure the oven slowly with small fires over five days; rushing it will crack the expensive ceramic dome.
- Smart Sourcing: Pre-cast refractory pizza oven kits and ceramic fiber insulation rolls.
20. Covered Outdoor Grilling Station
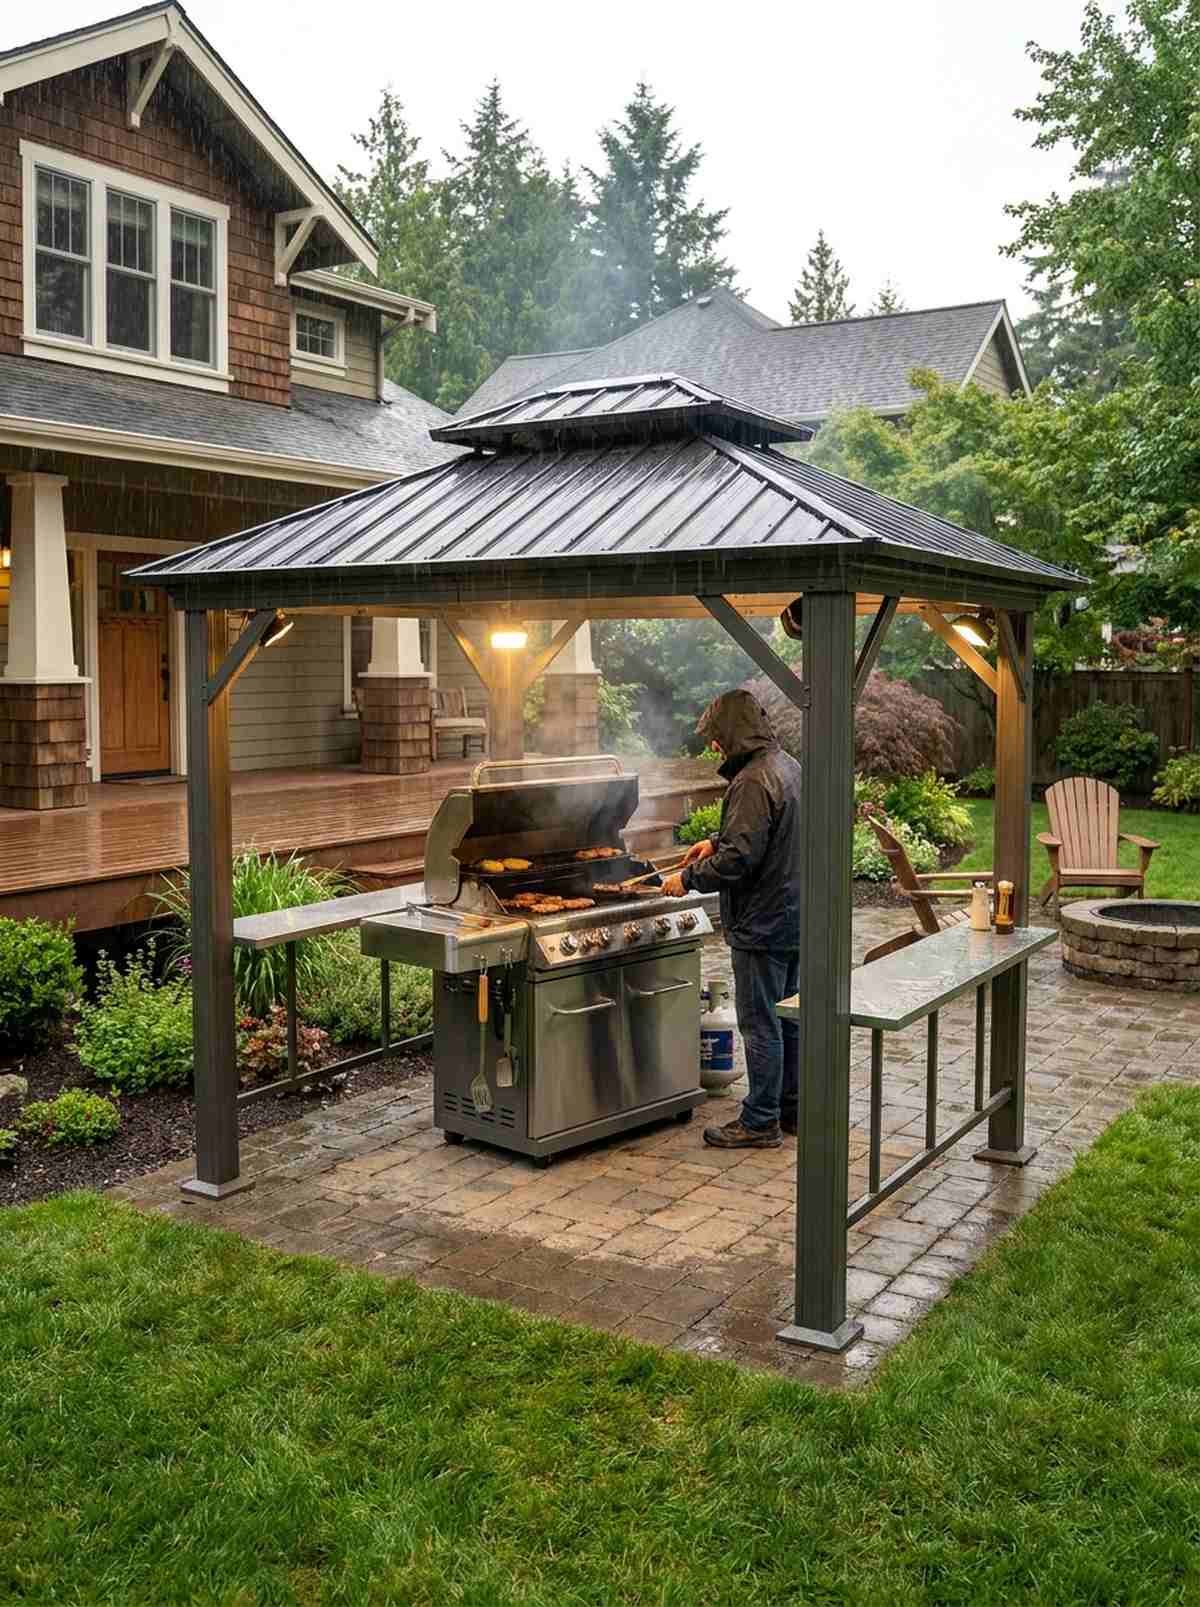
Feels like a protective culinary sanctuary during a summer downpour. A dedicated grill gazebo ensures you never have to cancel a barbecue due to weather.
The biggest mistake homeowners make is grilling under their primary patio roof without ventilation. Setting up a detached, ventilated station gives a surprisingly premium look while saving your house from smoke damage.
You can buy and assemble a metal grill gazebo for $300–$600.
- Key Materials: Steel hardtop gazebo, built-in side shelves.
- Vibe / Style: Utilitarian pitmaster chic.
- Difficulty: Easy afternoon assembly.
- Budget Breakdown: Gazebo kit: $400 | Lighting: $50.
- Creator’s Tip: Mount magnetic LED grill lights directly to the metal roof frame for perfect nighttime searing.
- Smart Sourcing: Steel hardtop grill gazebo kits and magnetic LED BBQ task lights.
21. Outdoor Sink with Hot and Cold Water
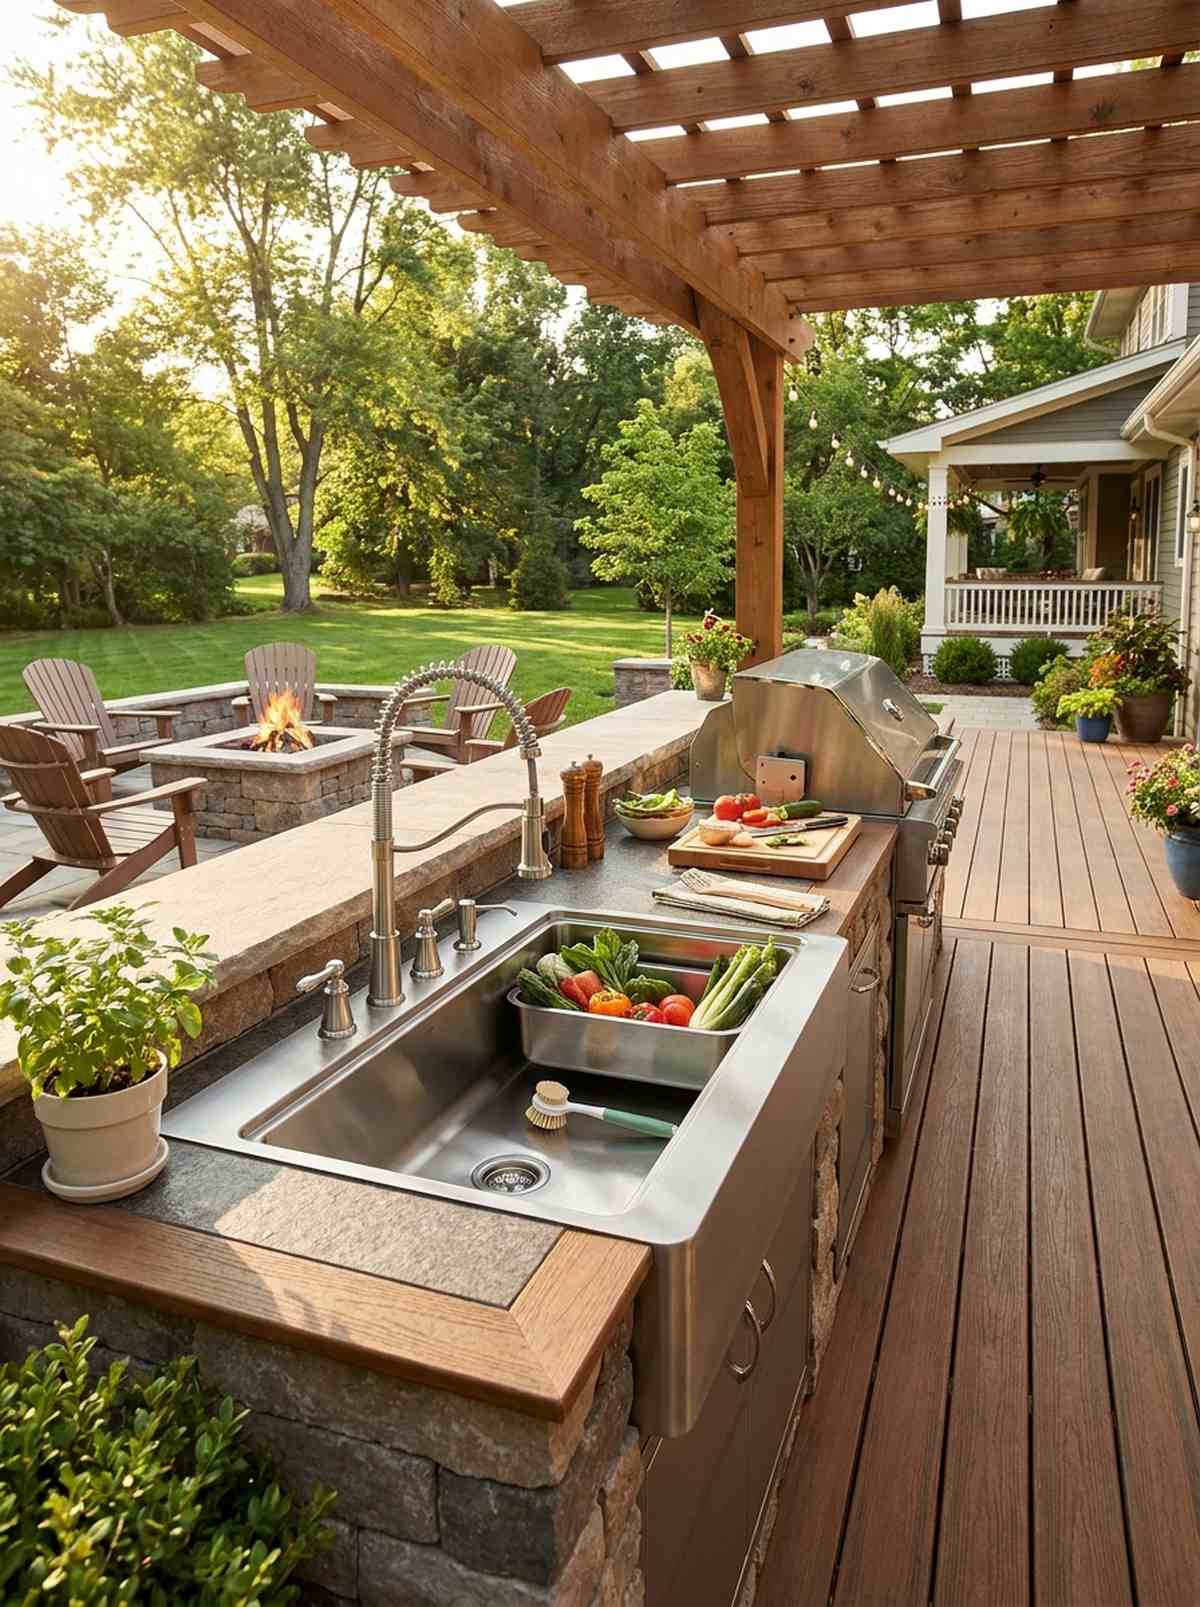
Delivers the ultimate convenience that instantly makes you wonder how you lived without it. An integrated stainless sink station is vital for food prep and immediate cleanup.
While your neighbors run inside with dripping marinades, a plumbed sink completely flips the traditional script. Sourcing commercial-grade fixtures delivers a designer-level finish that elevates the whole cooking zone.
Plumbing lines and a deep basin typically cost around $400–$800. Pin this if you hate messy patio cleanups.
- Key Materials: 304 stainless steel undermount sink, pull-down faucet.
- Vibe / Style: Streamlined professional prep.
- Difficulty: Advanced plumbing DIY.
- Budget Breakdown: Sink/Faucet: $250 | PEX lines/Fittings: $150.
- Creator’s Tip: Install a simple quick-connect hose bib under the sink to easily attach a pressure washer for patio cleaning.
- Smart Sourcing: Deep drop-in stainless steel outdoor sinks and weatherproof commercial pull-down faucets.
22. Outdoor Refrigerator and Ice Maker
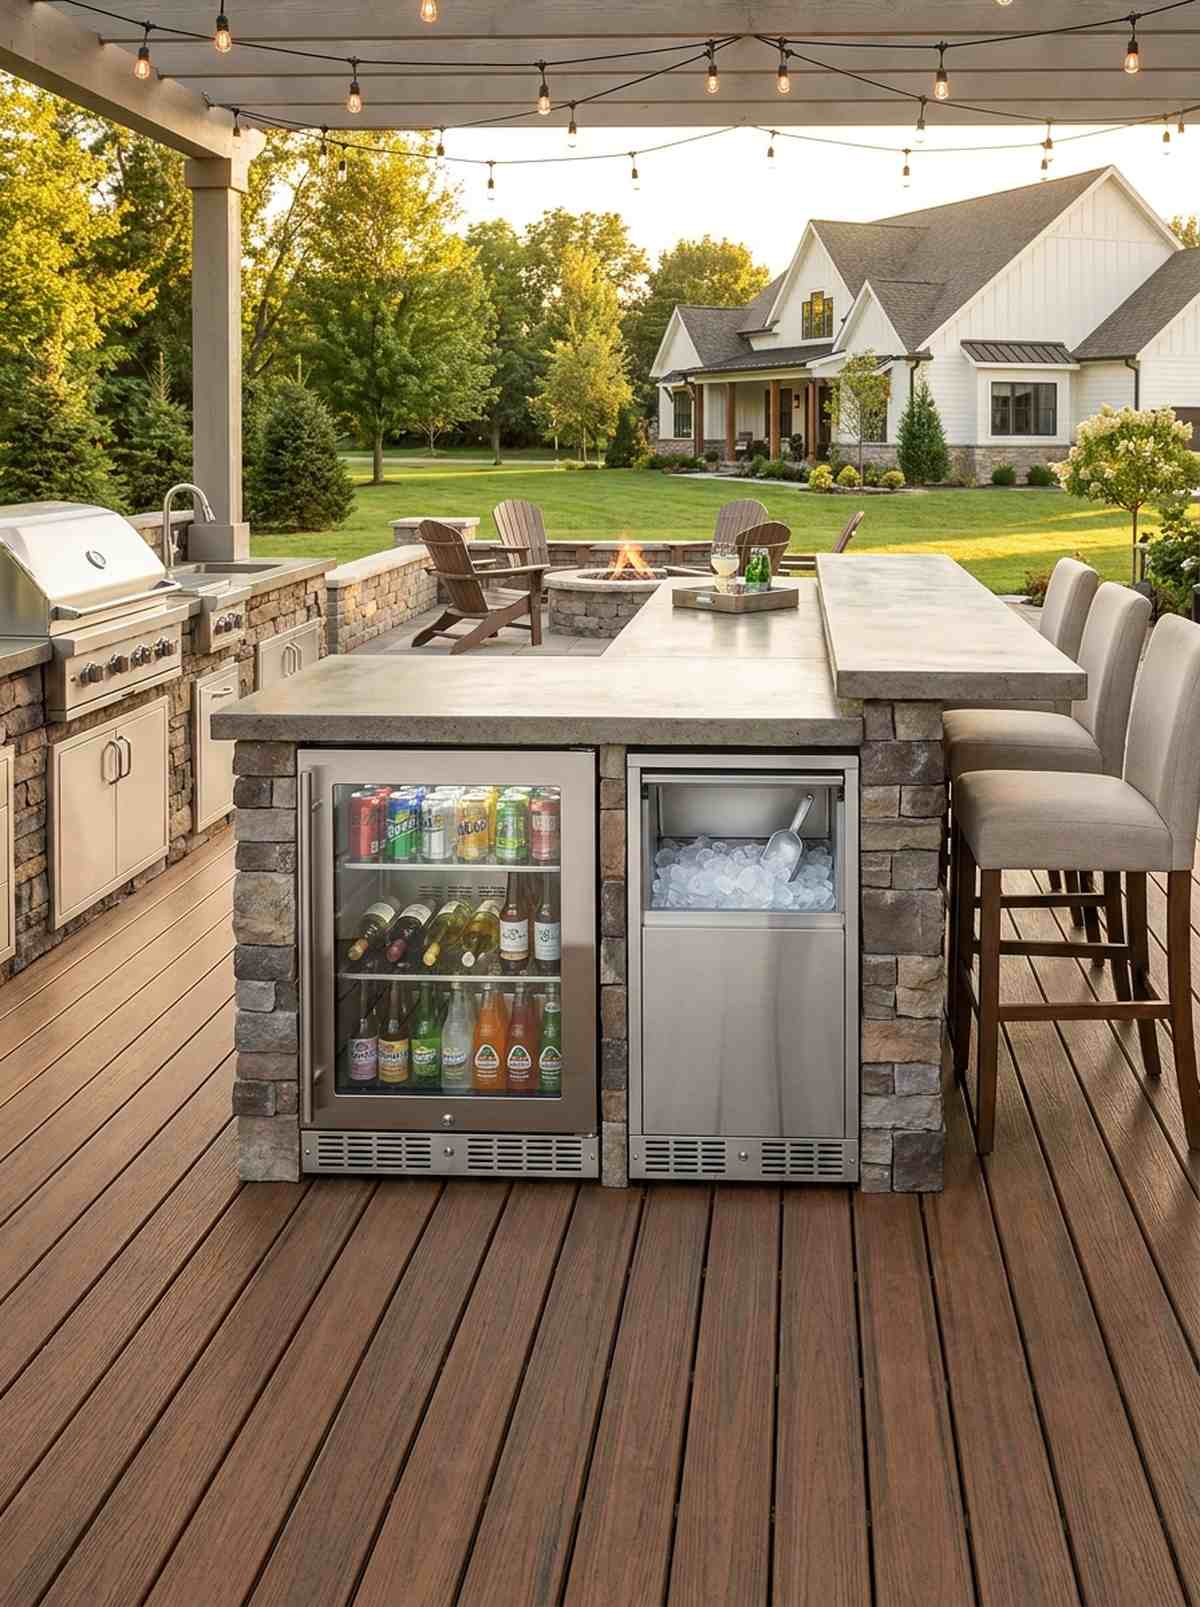
Emanates the cold, refreshing luxury of a high-end hotel bar. Under-counter weather-sealed refrigeration is the final piece of the ultimate hosting puzzle.
Most people get this completely wrong by dragging cheap dorm fridges outside that die in a month. Investing in true UL-rated outdoor compressors looks far more expensive than it is and guarantees ice-cold drinks in July.
A quality outdoor-rated fridge runs about $800–$1,500.
- Key Materials: 304 stainless steel exterior, front-venting compressor.
- Vibe / Style: Luxury VIP bottle service.
- Difficulty: Plug and play (requires GCFI outlet).
- Budget Breakdown: Fridge unit: $1,100.
- Creator’s Tip: Never position your fridge facing direct afternoon sun; it forces the compressor to run 24/7 and cuts the lifespan in half.
- Smart Sourcing: UL-rated outdoor under-counter refrigerators and heavy-duty outdoor appliance covers.
23. Bar Island with Counter Seating
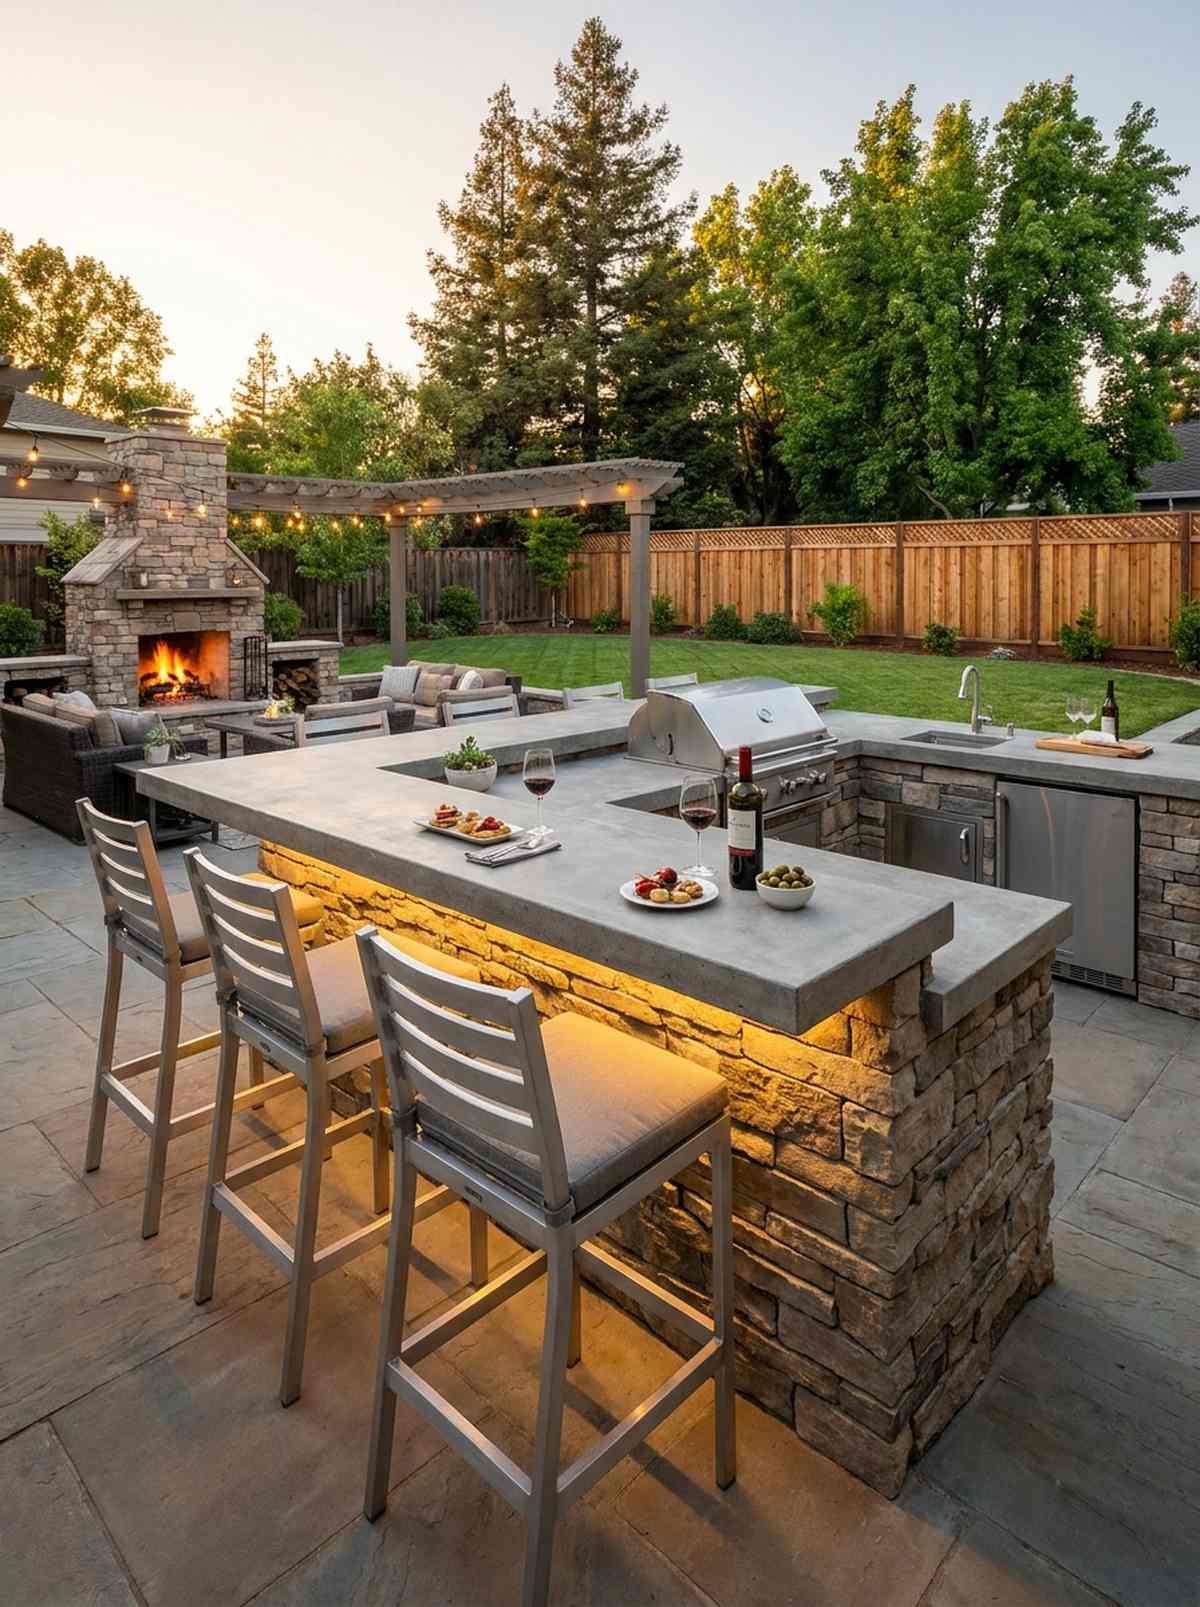
Creates a buzzing, interactive hub where everyone gravitates naturally. An overhang bar counter transforms a simple cooking station into a social dining destination.
Skip the generic hardware store bar stools that rust instantly. Using heavy aluminum seating around a concrete counter yields a premium aesthetic, blending hospitality and high-end outdoor living ideas.
Extending a countertop costs an extra $200–$400 in materials. Save this to your entertaining layout board.
- Key Materials: Poured concrete countertops, aluminum bar stools.
- Vibe / Style: Lively tapas bar.
- Difficulty: Moderate DIY upgrade.
- Budget Breakdown: Concrete mix/forms: $250 | Stools (x3): $450.
- Creator’s Tip: Embed a hidden LED strip just under the counter overhang to illuminate the stools at night.
- Smart Sourcing: Weatherproof aluminum outdoor bar stools and waterproof exterior LED strip kits.
Don’t skip the next concept; it’s the exact blueprint high-end designers charge thousands to reveal.
24. Pergola-Covered Outdoor Dining Area
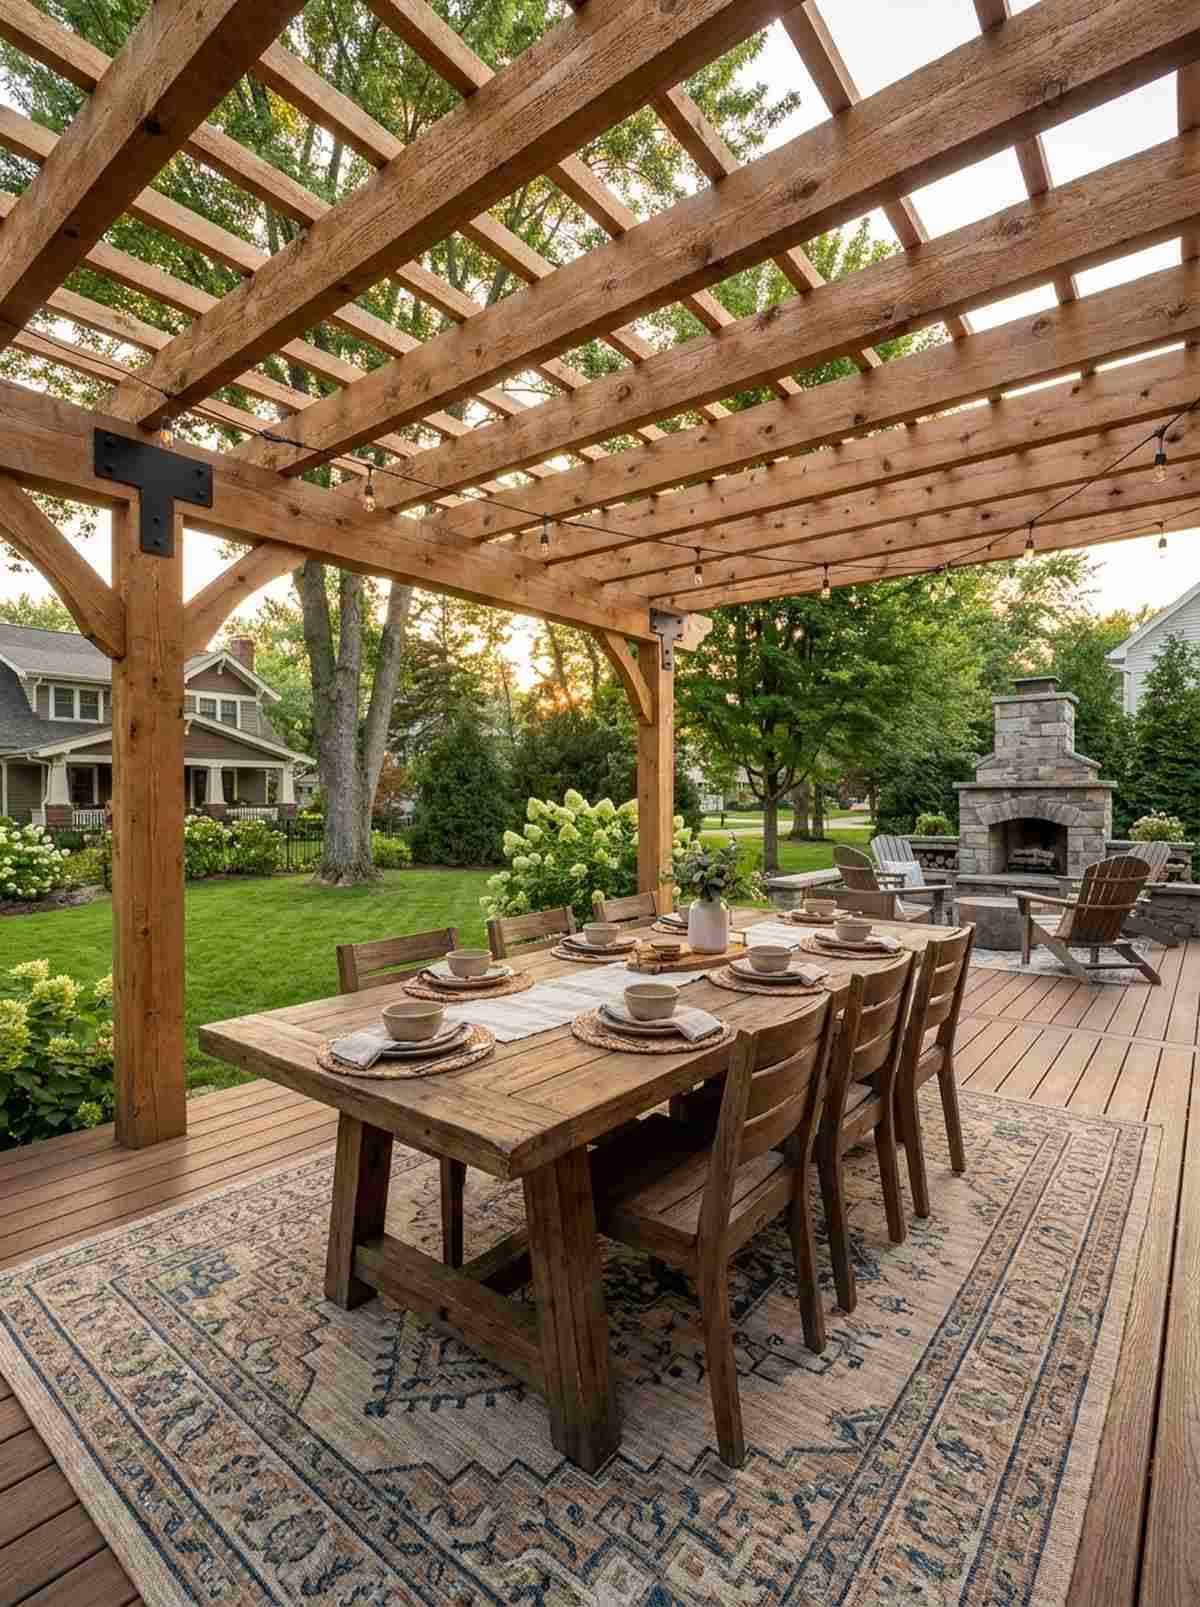
Feels like dining under the stars in a chic, rustic chateau. A timber-framed dining zone provides beautiful dappled shade over massive family-style tables.
Professional designers gatekeep this specific technique: sizing the pergola exactly two feet wider than the table on all sides. This layout completely destroys the cramped feeling, creating spacious and luxurious outdoor living room designs.
You can build a large timber frame cover for around $1,500–$2,500.
- Key Materials: Rough-sawn cedar timber, heavy structural brackets.
- Vibe / Style: Expansive family estate.
- Difficulty: Advanced weekend build.
- Budget Breakdown: Timber: $1,200 | Hardware: $400.
- Creator’s Tip: Run a massive outdoor rug beneath the table to ground the space and stop chair legs from scraping the deck.
- Smart Sourcing: UV-resistant large outdoor patio rugs and heavy-duty black timber brackets.
25. Small Bistro Set for Intimate Dining

Brings the charm of a hidden Parisian café right to your balcony. A compact folding bistro set is the undisputed king of maximizing tiny square footage.
Amateurs often ruin small spaces with oversized, bulky couches. A brightly colored metal table set gives a surprisingly premium look while keeping traffic flow completely open.
You can easily pull this off for just $100–$200. Pin this if you’re upgrading an apartment balcony.
- Key Materials: Powder-coated steel, mosaic tile accents.
- Vibe / Style: Quaint European balcony.
- Difficulty: Zero setup required.
- Budget Breakdown: Bistro Set: $150.
- Creator’s Tip: Spray the hinges with a clear rust-inhibitor before putting them outside to ensure they fold smoothly for years.
- Smart Sourcing: Folding metal outdoor bistro sets and clear rust-preventative enamel spray.
26. Outdoor Wine Refrigerator
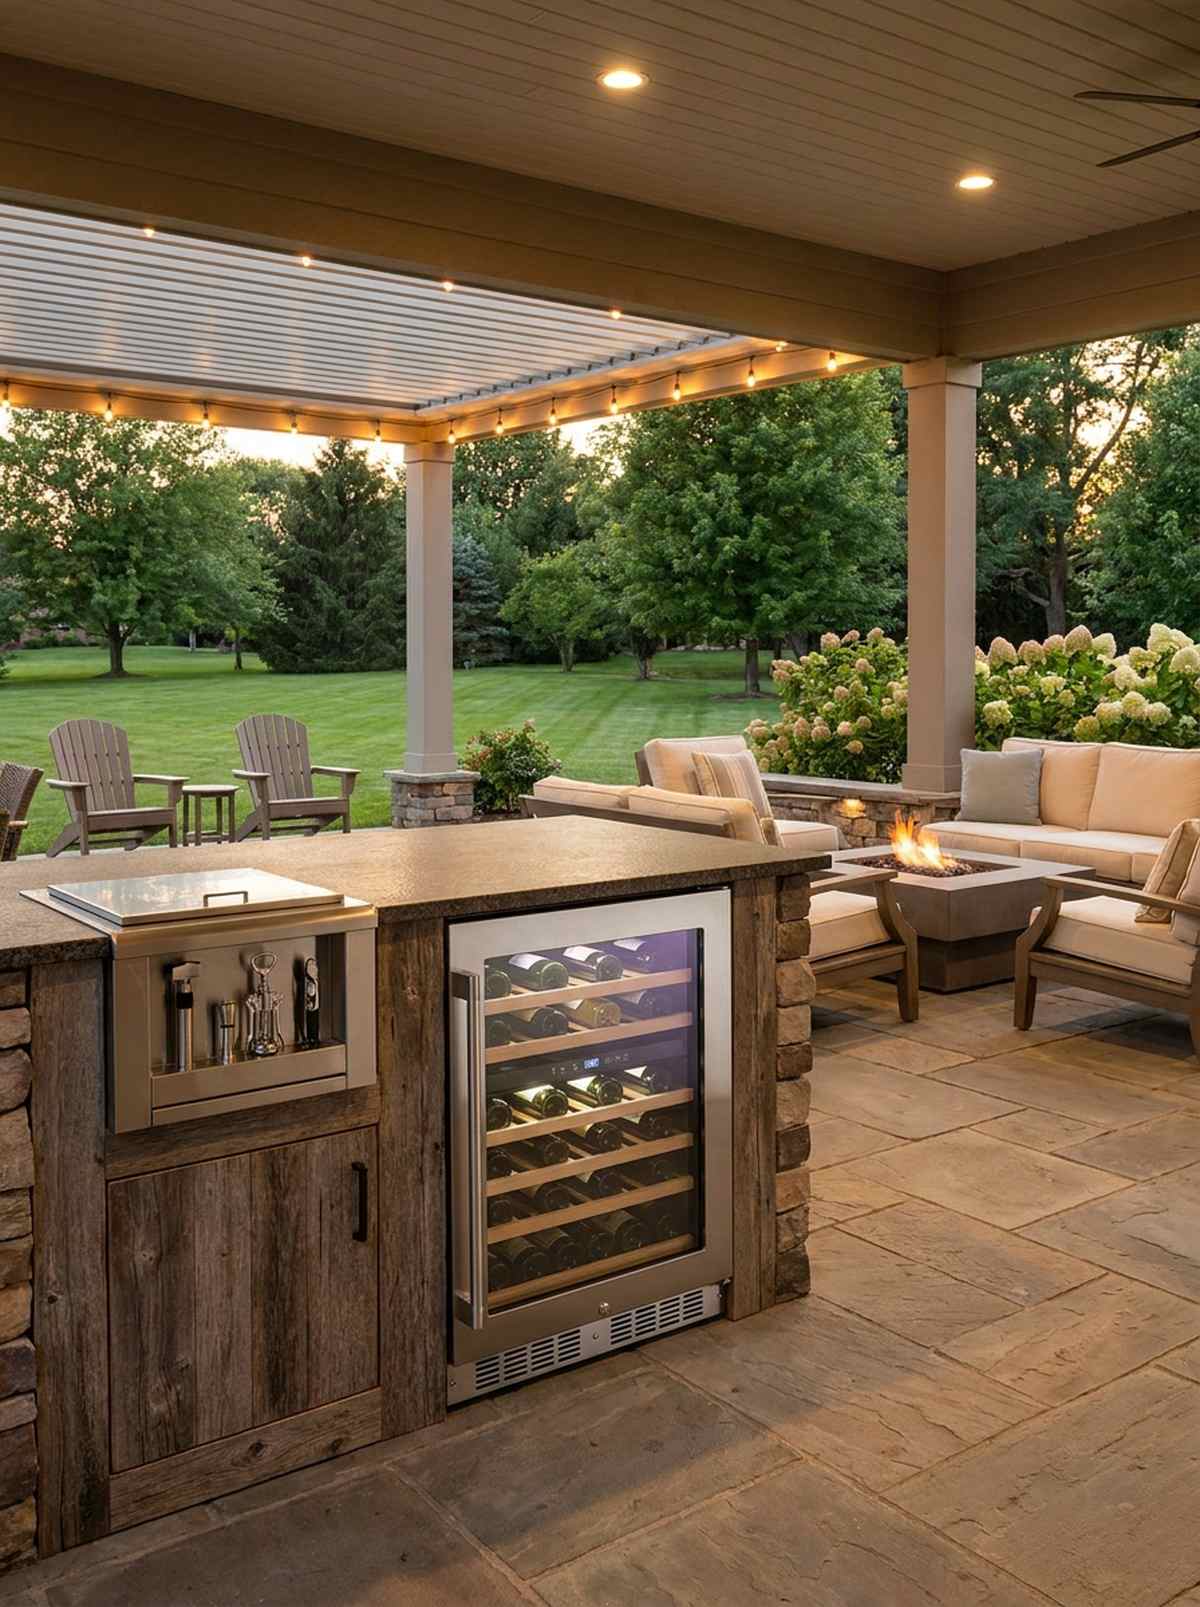
Exudes an air of effortless luxury for spontaneous evening toasts. A dual-zone glass front cooler elevates any basic patio into an upscale tasting room.
This completely flips the traditional script of running inside for a bottle opener. Sourcing a proper UV-tinted glass model looks far more expensive than it is and protects your vintage collection.
A high-quality dual-zone outdoor cooler runs about $700–$1,200.
- Key Materials: UV-coated glass door, vibration-dampening shelving.
- Vibe / Style: High-end vineyard terrace.
- Difficulty: Plug and play.
- Budget Breakdown: Cooler Unit: $900.
- Creator’s Tip: Build it into a shaded cabinet; direct sunlight hitting the glass door will overheat the unit regardless of its rating.
- Smart Sourcing: Outdoor-rated dual-zone wine coolers and stainless steel wine opener station kits.
Fire Features for Outdoor Living Ideas
Fire elements extend outdoor season into cool evenings while creating natural gathering focal points.
27. Concrete or Natural Stone Fire Pit
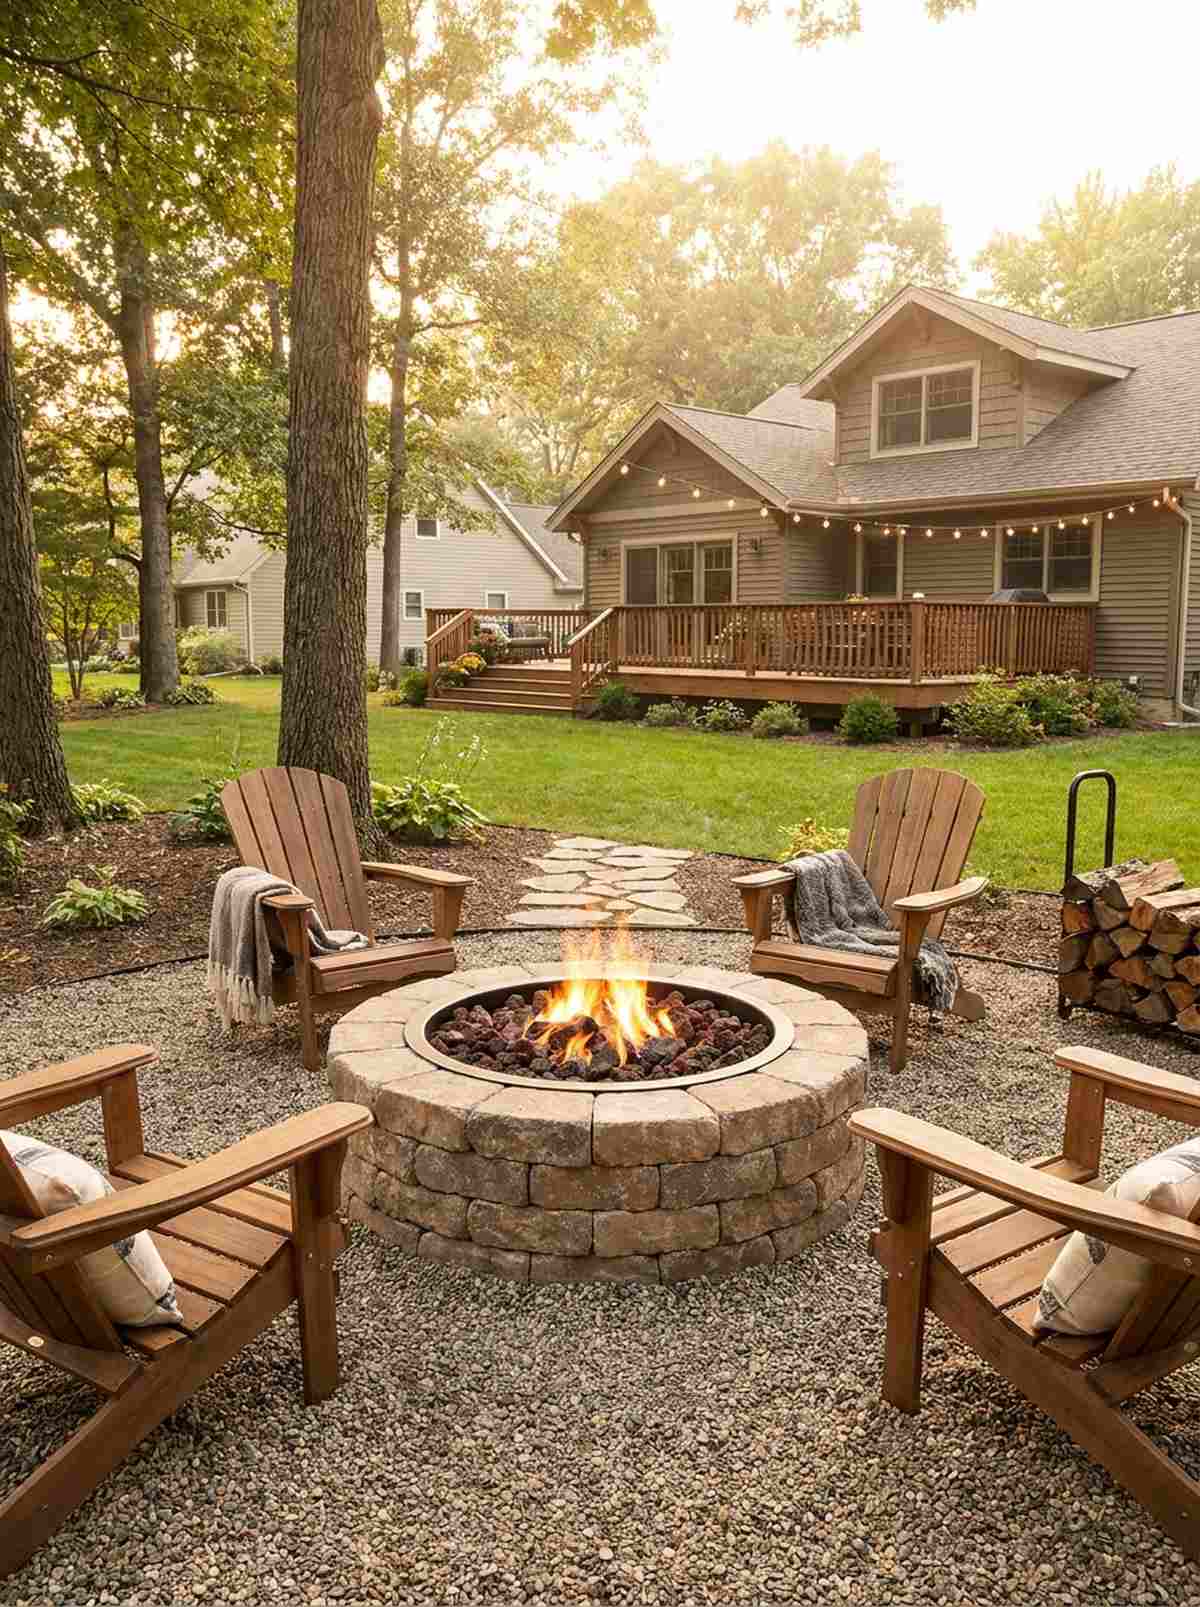
Radiates the primal, comforting energy of a permanent hearth. A stacked stone fire ring is the ultimate anchor for late-night backyard storytelling.
While your neighbors buy cheap metal bowls that rust out in months, a masonry build yields a premium aesthetic. This layout completely destroys the myth that permanent hardscaping has to be expensive.
You can easily construct a professional-looking pit for $150–$300 using landscape blocks. Save this to your DIY weekend board.
- Key Materials: Tumbled retaining wall blocks, steel fire ring insert.
- Vibe / Style: Rugged woodland retreat.
- Difficulty: Easy beginner masonry.
- Budget Breakdown: Stone blocks: $100 | Steel Insert: $80 | Lava Rock: $40.
- Creator’s Tip: Always use a steel insert ring; direct fire will cause standard concrete retaining blocks to crack and explode.
- Smart Sourcing: Heavy-duty steel fire pit insert rings and high-heat fireplace construction adhesive.
28. Gas Fire Pit with Lava Rock
Ignites instantly with the push of a button, creating a sleek, smoke-free lounge. Propane-fueled fire bowls are mandatory for tight patios where wood smoke is an absolute nuisance.
Most contractors push messy wood pits, but hidden gas lines deliver a designer-level finish. Upgrading to crushed reflective fire glass instead of basic rocks looks far more expensive than it is.
Expect a quality gas drop-in burner and pan to cost around $250–$500.
- Key Materials: Stainless steel burner pan, electronic ignition kit.
- Vibe / Style: Modern luxury hotel lounge.
- Difficulty: Moderate DIY (requires safe gas plumbing).
- Budget Breakdown: Burner kit: $200 | Fire glass: $80.
- Creator’s Tip: Drill weep holes in the bottom of your concrete enclosure to let rainwater drain, preventing the burner from rusting out.
- Smart Sourcing: Stainless steel drop-in gas burner pans and reflective tempered fire glass (bulk pack).
29. Portable Propane Fire Table
Functions as a stunning coffee table by day and a cozy hearth by night. A freestanding aluminum fire table is the ultimate cheat code for instant patio ambiance.
Ignore the outdated advice that you need a permanent masonry pit. A sleek, portable unit completely flips the traditional script, giving you massive aesthetic flexibility for your outdoor living space.
You can grab a high-quality table online for around $200–$400. Pin this for a zero-labor patio upgrade.
- Key Materials: Powder-coated aluminum, tempered glass wind guard.
- Vibe / Style: Chic contemporary terrace.
- Difficulty: Easy assembly.
- Budget Breakdown: Table unit: $300.
- Creator’s Tip: Buy a unit with a tempered glass wind guard; it stops light breezes from blowing the flame out and saves massive amounts of propane.
- Smart Sourcing: Aluminum propane fire table kits and tempered glass fire table wind guards.
This next visual trick fools almost everyone into thinking you hired a luxury landscaping firm…
30. Outdoor Fireplace with Chimney
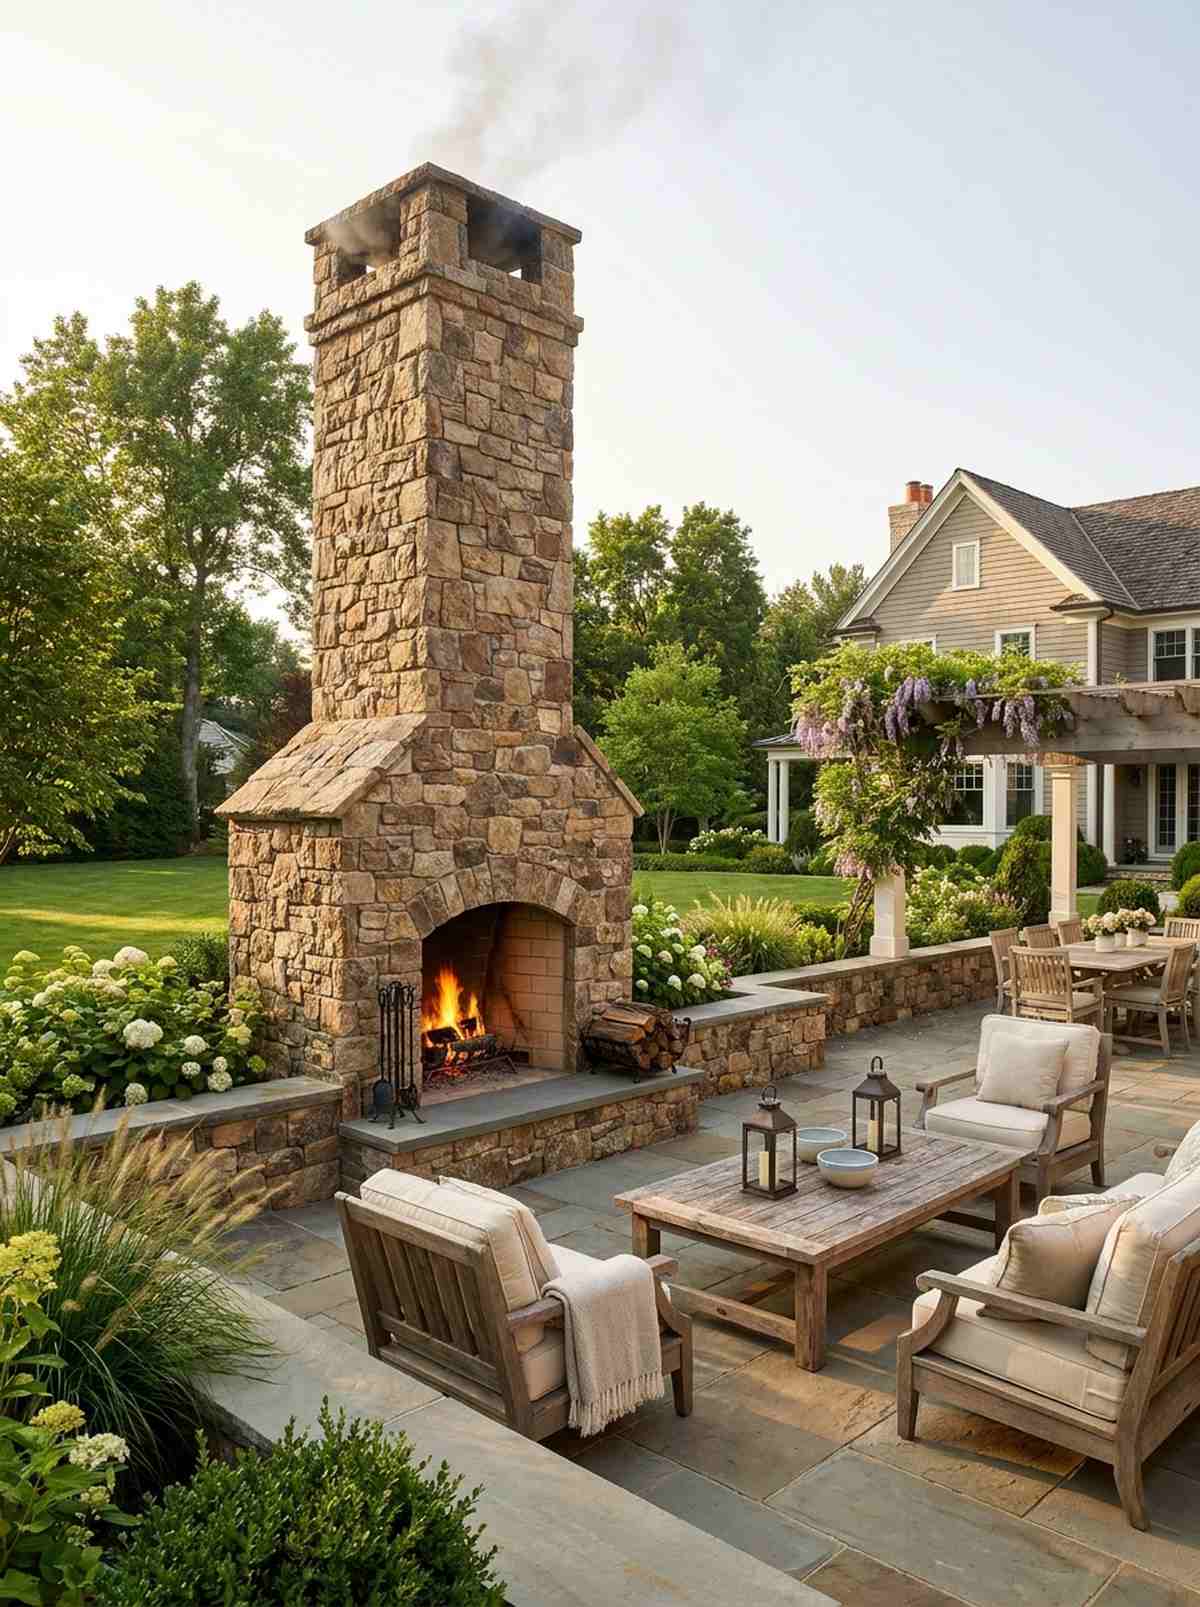
Towers over the patio like an ancient, majestic monument. A full-scale masonry fireplace acts as the ultimate property line focal point.
Professional designers gatekeep this specific technique: building a tall, drafting chimney naturally pulls smoke up and entirely away from your guests. It delivers a surprisingly premium look that skyrockets property value.
This is a major installation costing $3,000–$8,000. Save this for your high-end blueprint.
- Key Materials: Cinder blocks, firebrick, stucco or stone veneer.
- Vibe / Style: Stately traditional estate.
- Difficulty: Advanced professional masonry.
- Budget Breakdown: Base materials: $2,000 | Veneer finish: $1,500.
- Creator’s Tip: Use real firebrick and high-heat mortar for the firebox; standard mortar will crumble under intense heat.
- Smart Sourcing: Heavy-duty refractory firebricks (bulk pack) and high-heat refractory mortar mix.
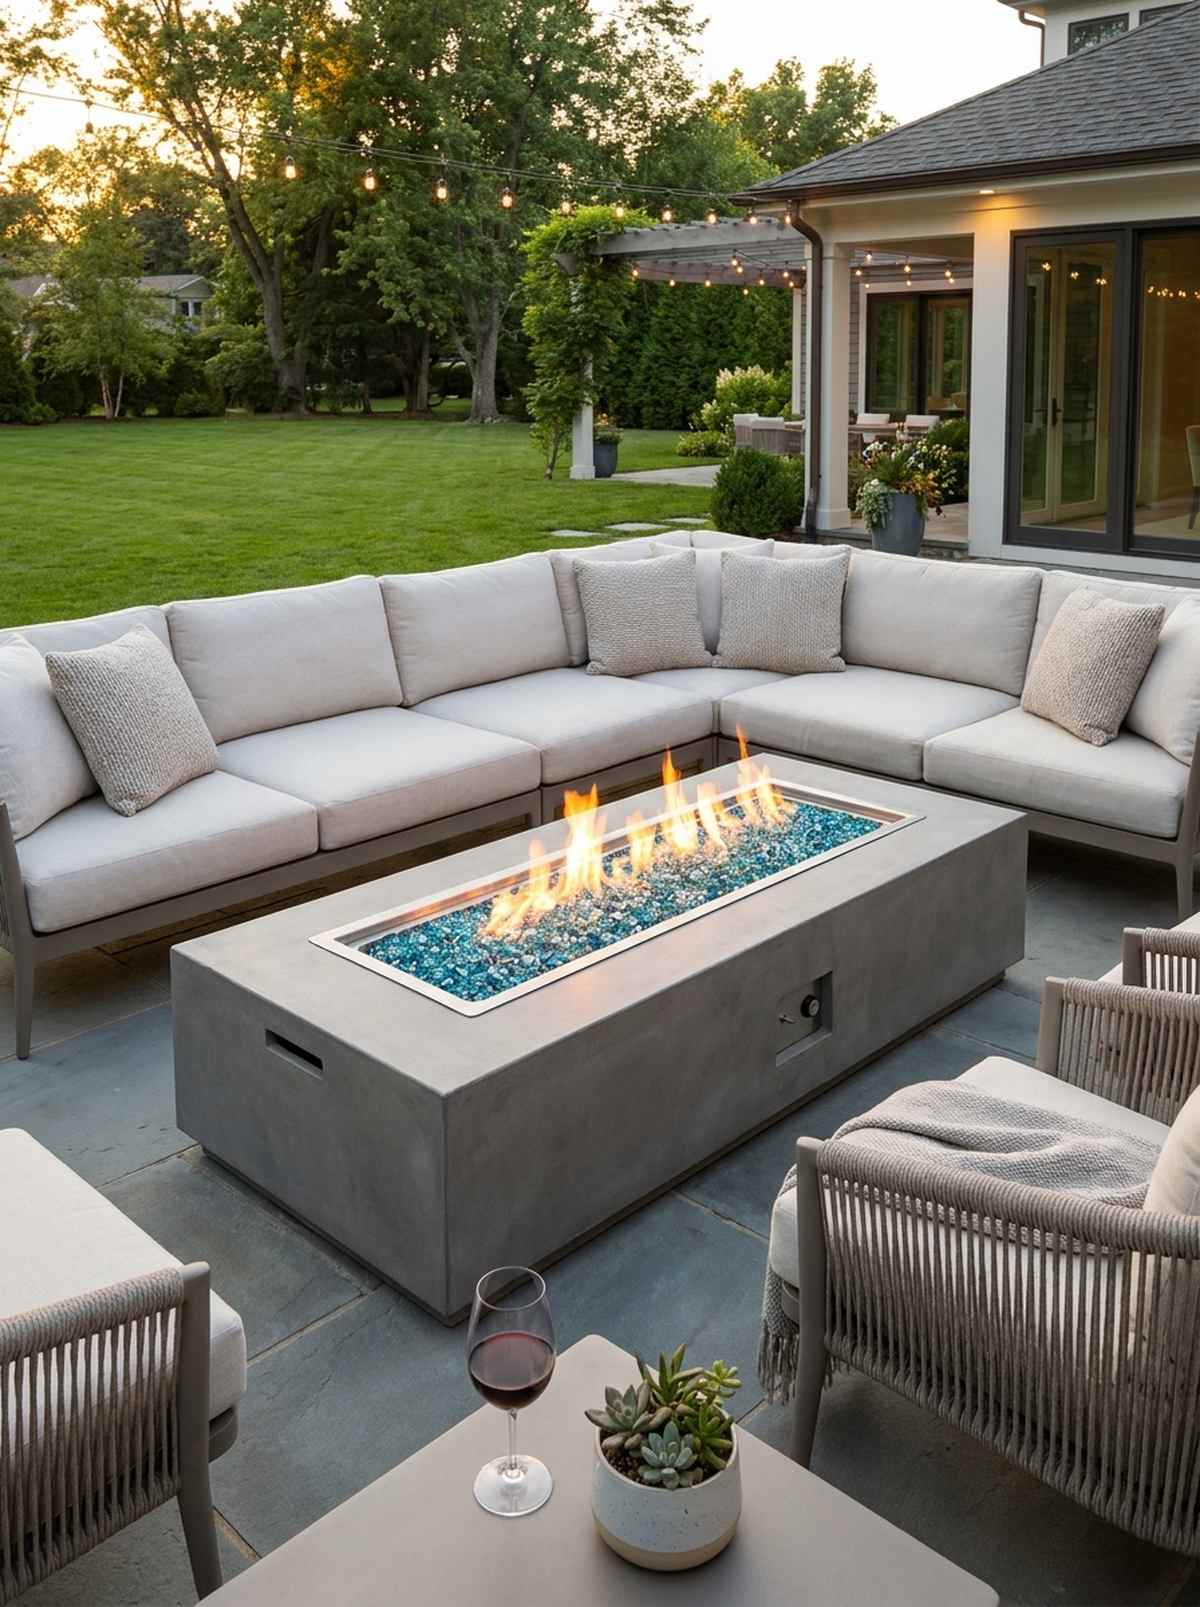
31. Linear Gas Fire Feature
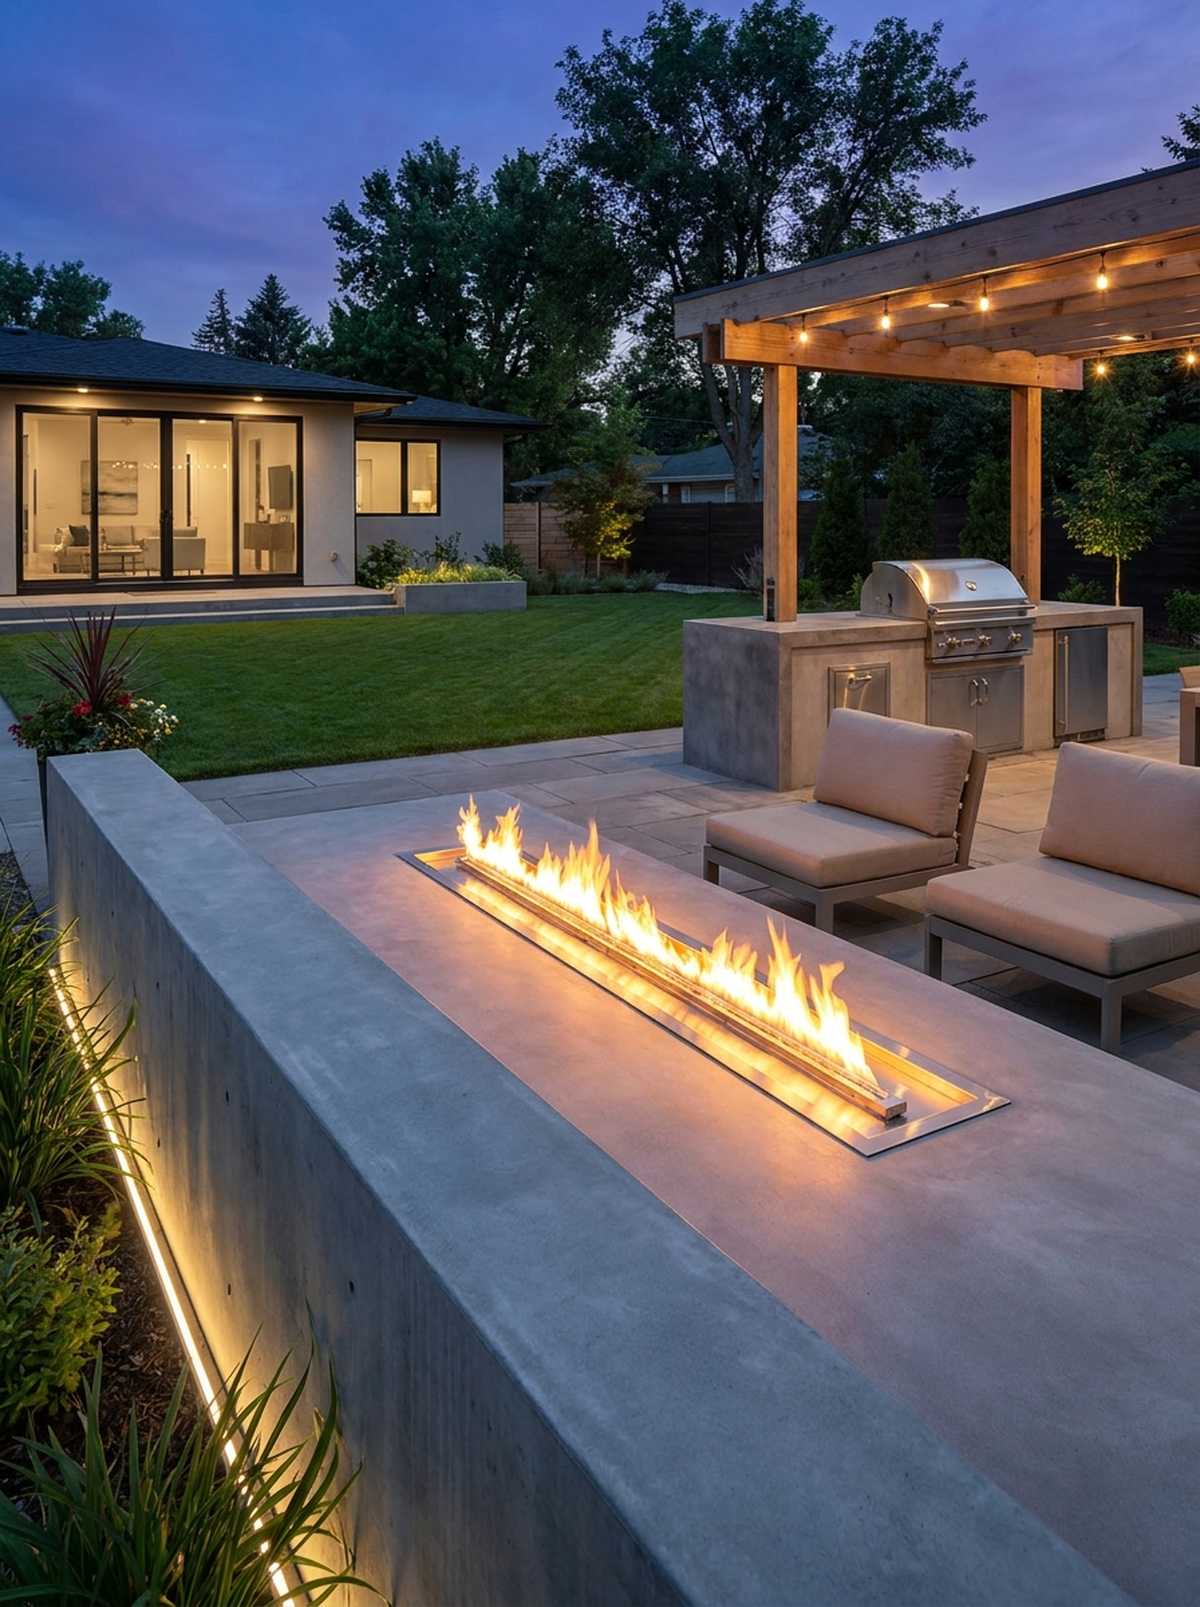
Slices through the night with a razor-sharp ribbon of flame. Long rectangular fire trays are the absolute pinnacle of ultra-modern landscape design.
Amateurs often ruin contemporary spaces with clunky round pits. Embedding a 6-foot linear burner into a sleek concrete retaining wall yields a premium aesthetic and incredible outdoor living room designs.
A massive linear burner kit runs about $400–$900.
- Key Materials: T-burner stainless pipe, massive rectangular drop-in pan.
- Vibe / Style: Ultra-sleek minimalist architecture.
- Difficulty: Advanced custom build.
- Budget Breakdown: Linear burner kit: $500 | Concrete surround: $300.
- Creator’s Tip: Make sure your gas line diameter is thick enough; long linear burners require massive gas volume to maintain a high flame.
- Smart Sourcing: Linear stainless steel drop-in fire pans and high-capacity gas regulator kits.
32. Corten Steel Fire Bowl
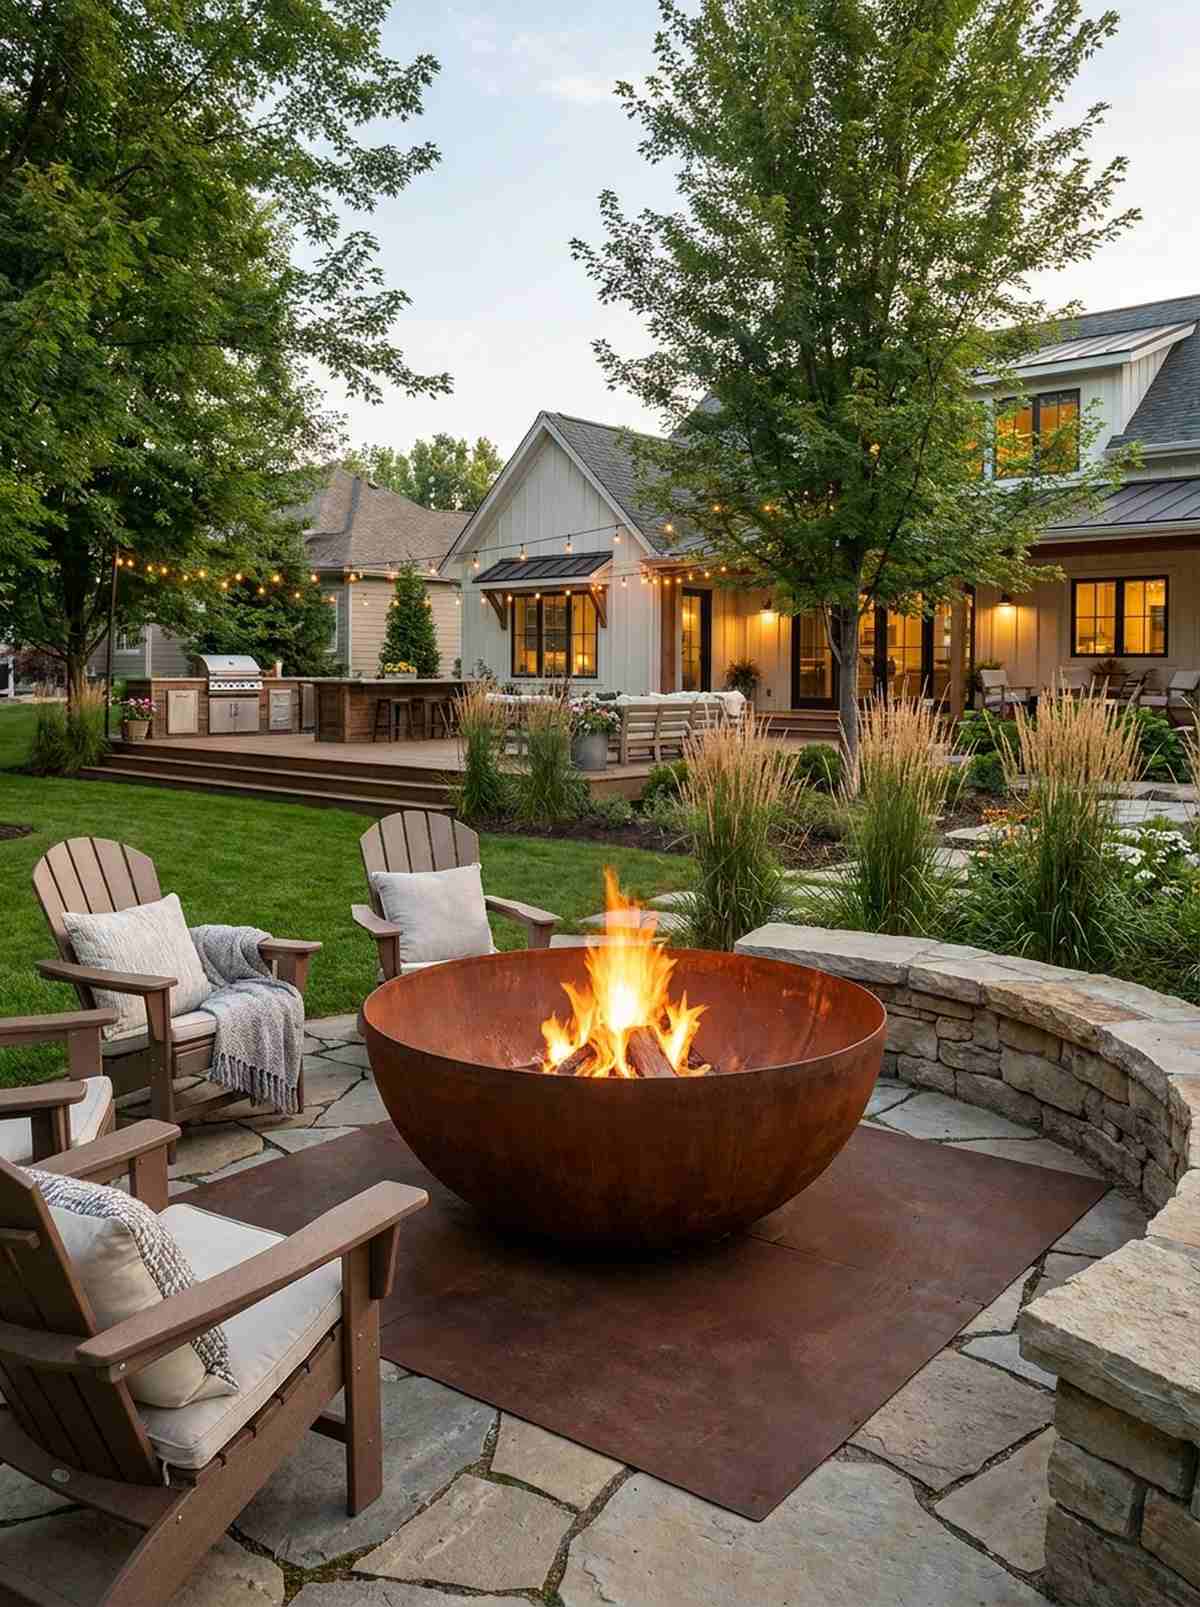
Glows with a rich, rusted patina that feels completely organic. A heavy-gauge weathering steel bowl looks like a piece of industrial modern art in the center of your yard.
Most people get this completely wrong by buying cheap painted steel that flakes off. Authentic Corten steel looks far more expensive than it is and forms a protective rust shield that lasts decades.
You can buy a massive 3-foot Corten bowl for $250–$500. Pin this for a striking visual centerpiece.
- Key Materials: Authentic Corten (weathering) steel plate.
- Vibe / Style: Rugged industrial organic.
- Difficulty: Zero setup (just place it).
- Budget Breakdown: Steel bowl: $350.
- Creator’s Tip: Don’t place it directly on porous stone patios; the initial rusting process will bleed orange stains onto the ground underneath.
- Smart Sourcing: Authentic Corten steel fire bowls and heavy-duty fire pit heat shield mats.
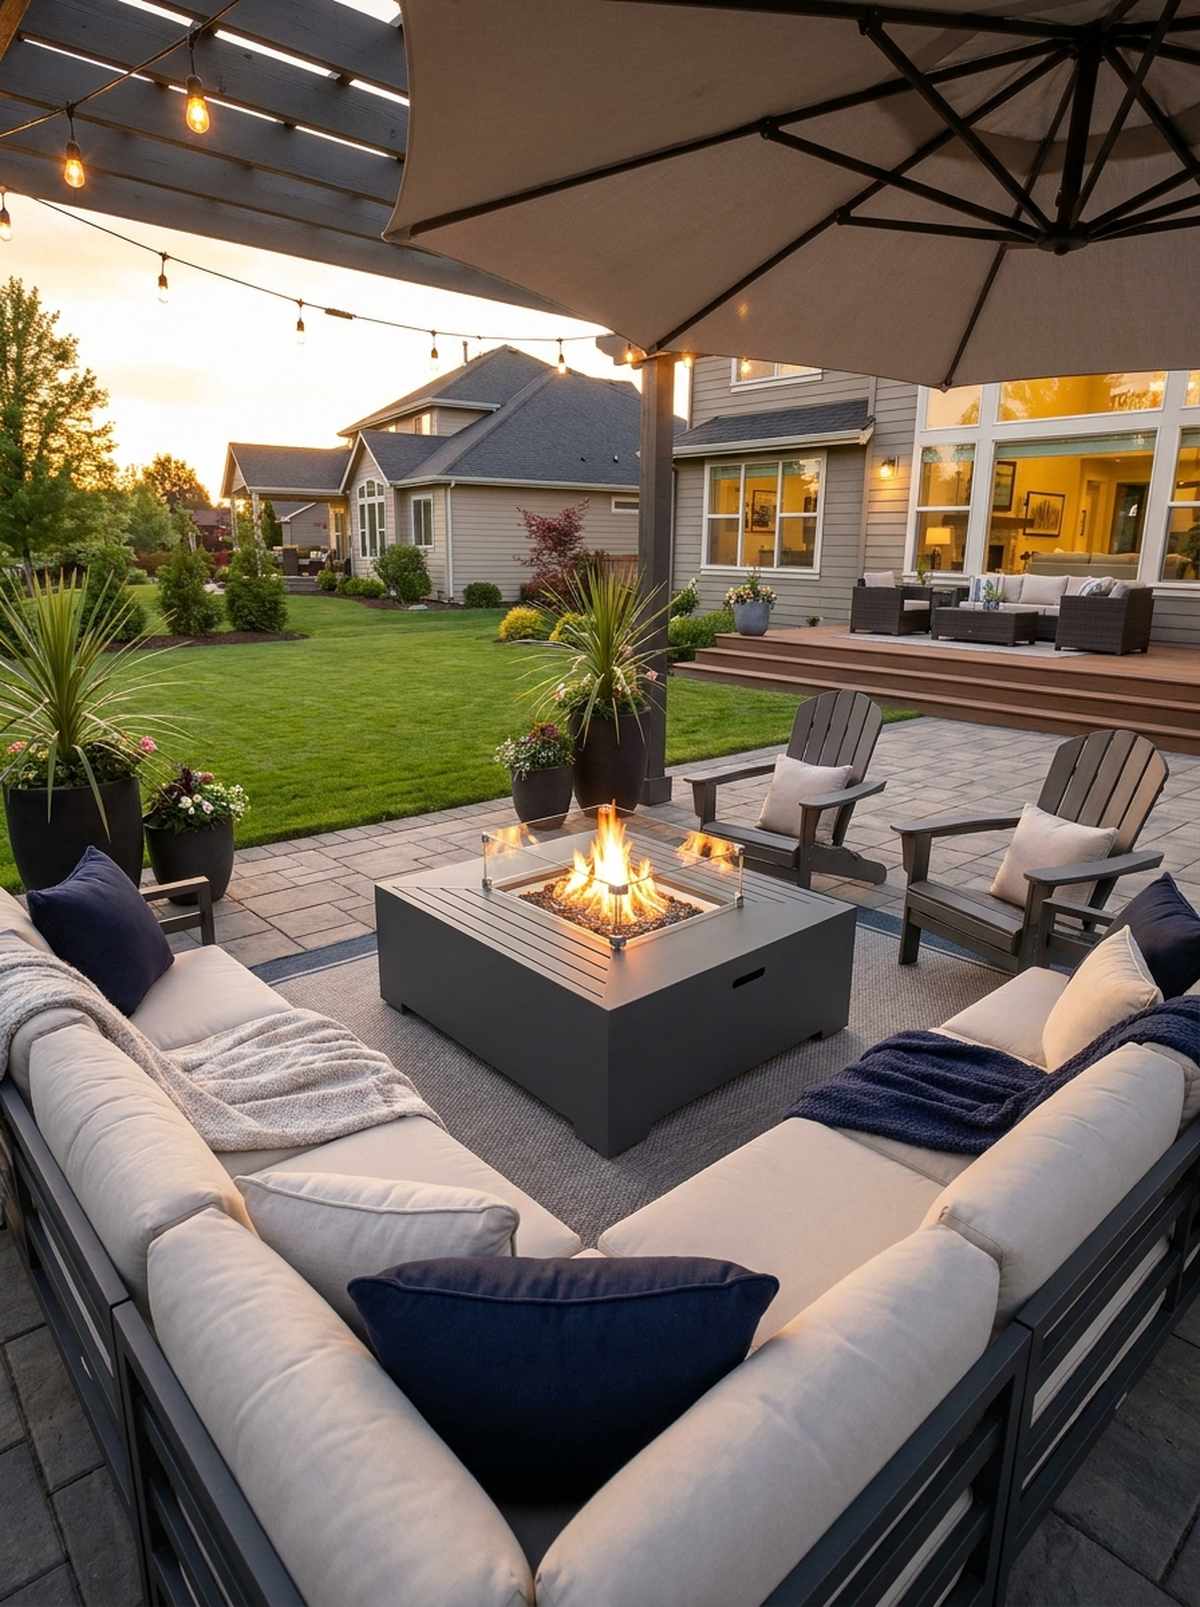
33. Fire Pit Under Pergola with Clearance
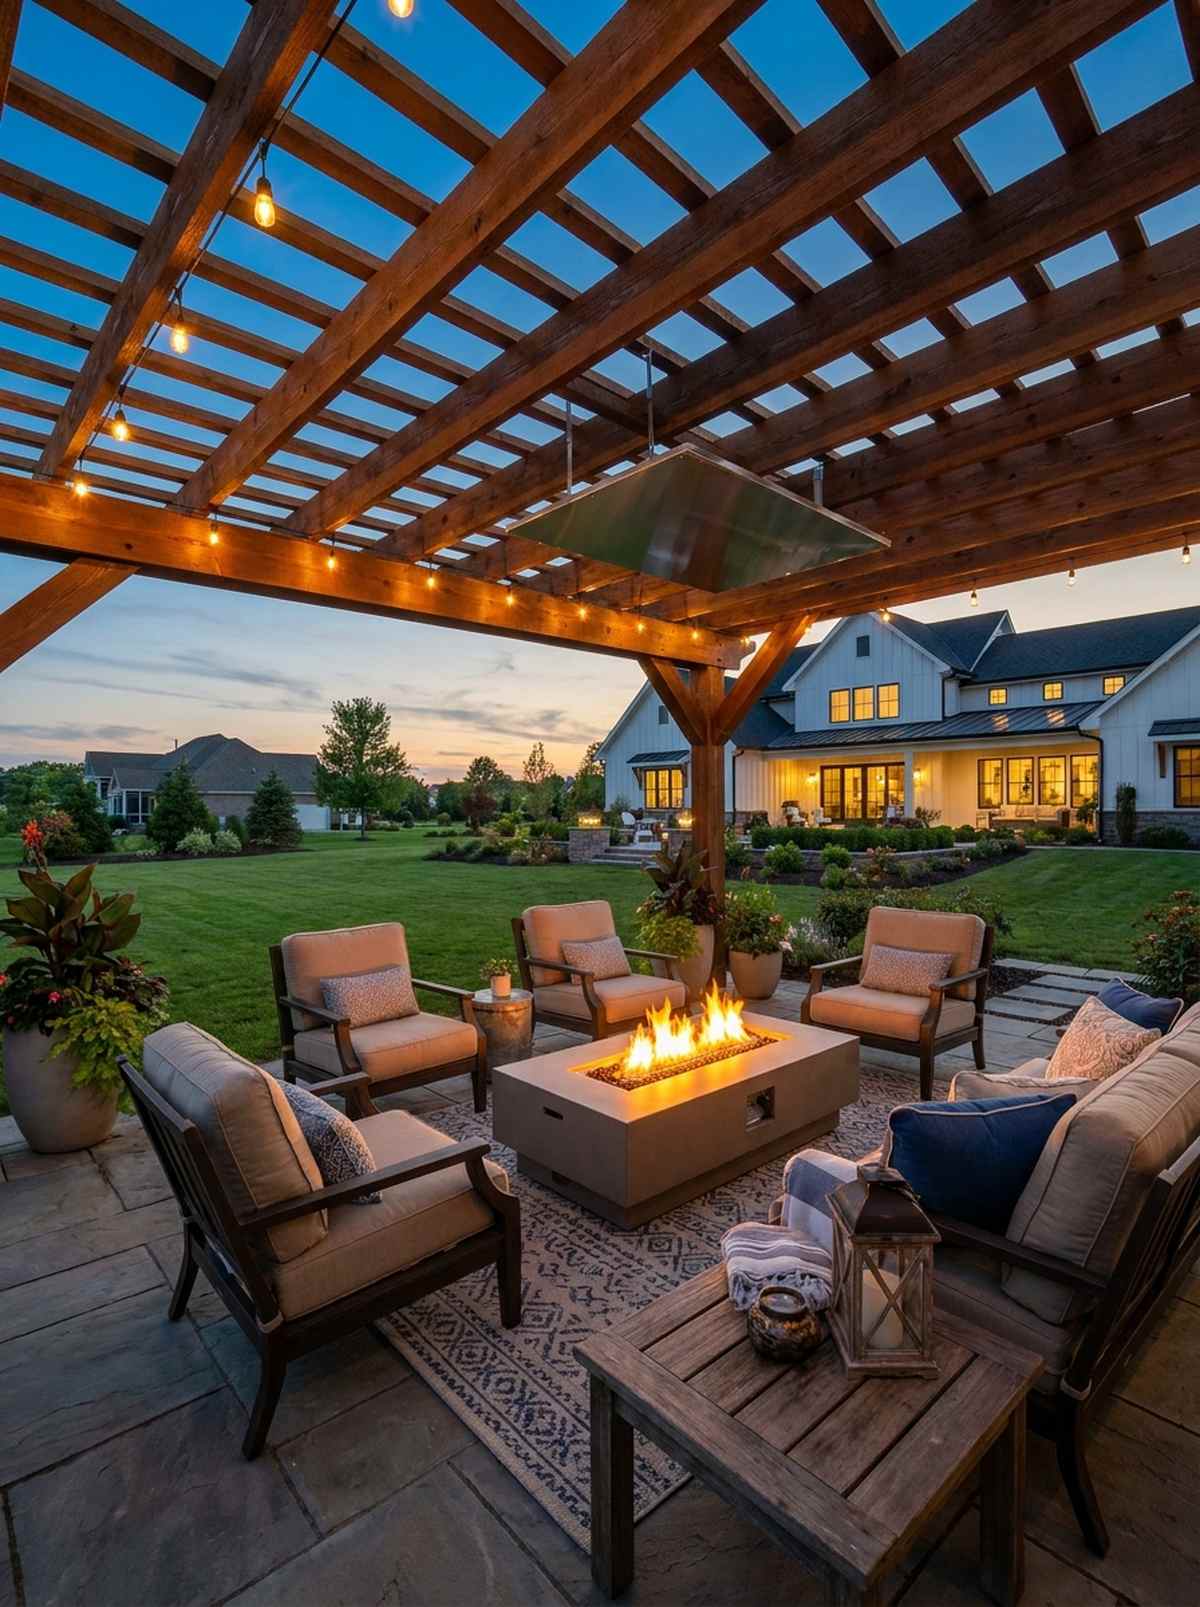
Combines the shelter of a roof with the hypnotic draw of a flame. A strategically placed gas pit beneath an open-slat structure creates a stunning four-season room.
This layout completely destroys the myth that you can’t have fire under a roof. Using a controlled gas line (no flying embers) and strict clearance rules delivers a designer-level finish safely.
Adapting an existing space for safe fire use costs roughly $400–$800.
- Key Materials: Gas fire table, high-clearance overhead framing.
- Vibe / Style: Sheltered twilight lounge.
- Difficulty: Moderate DIY (safety checks required).
- Budget Breakdown: Gas table: $400 | Heat deflector (if needed): $150.
- Creator’s Tip: Never attempt this with a wood-burning fire; the unpredictable sparks and intense heat column will inevitably scorch the pergola beams.
- Smart Sourcing: Low-clearance propane fire tables and aluminum patio heat deflector shields.
34. Tabletop Fire Bowl for Dining Tables
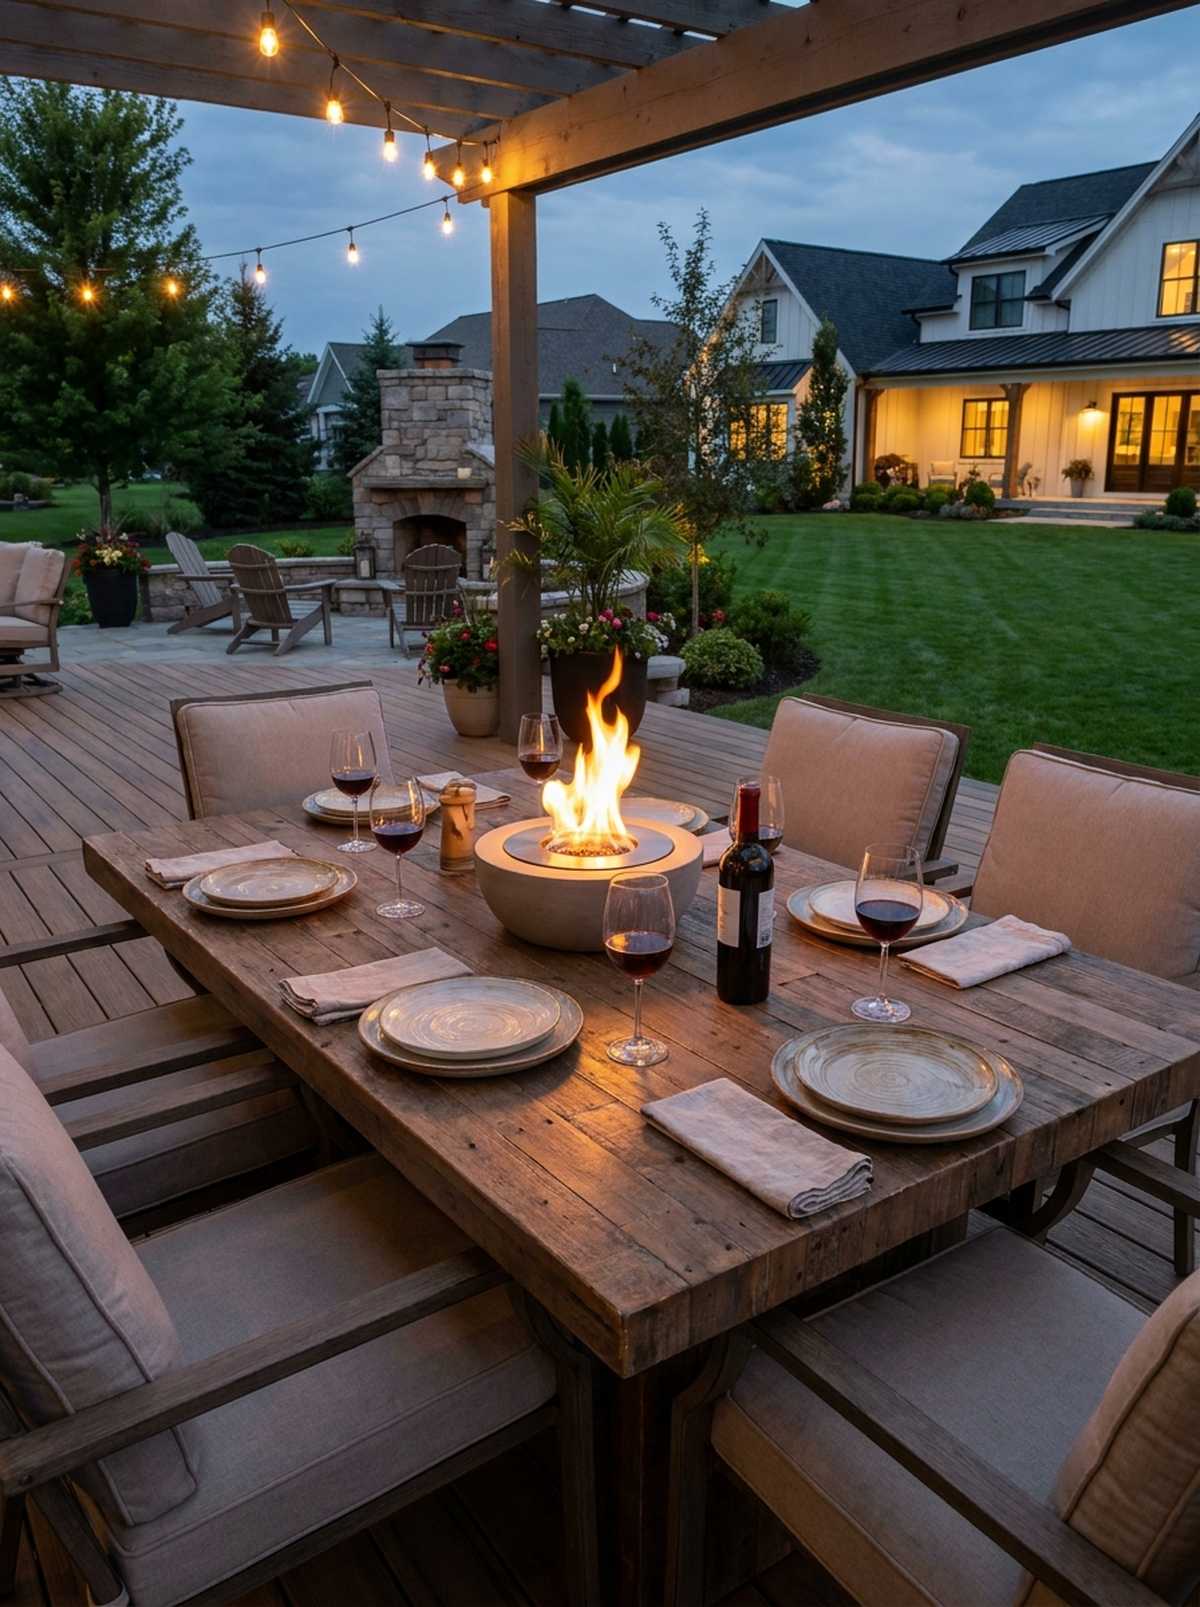
Dances gently in the center of the table, perfectly illuminating your dinner guests. Miniature bioethanol fire bowls bring massive ambiance to the smallest of spaces.
Skip the generic hardware store candles that blow out in two seconds. A smokeless tabletop unit gives a surprisingly premium look and instantly elevates basic outdoor living ideas.
You can grab a stunning tabletop unit for just $40–$80. Save this for an instant mood booster.
- Key Materials: Ceramic or concrete bowl, bioethanol fuel.
- Vibe / Style: Intimate luxury dining.
- Difficulty: Zero setup required.
- Budget Breakdown: Tabletop bowl: $50 | Fuel pack: $30.
- Creator’s Tip: Use a long-reach grill lighter; bioethanol burns almost invisibly at first, making it tricky to tell if it caught.
- Smart Sourcing: Concrete tabletop bioethanol fire bowls and clean-burning bioethanol fuel (bulk pack).
Almost everyone overlooks this next detail, but it’s the secret to a Pinterest-viral backyard.
Wellness-Focused Outdoor Living Design
Outdoor spaces designed for physical and mental wellness encourage regular use and healthy lifestyle habits. Private zones support contemplative activities.
35. Yoga Deck Platform in Garden
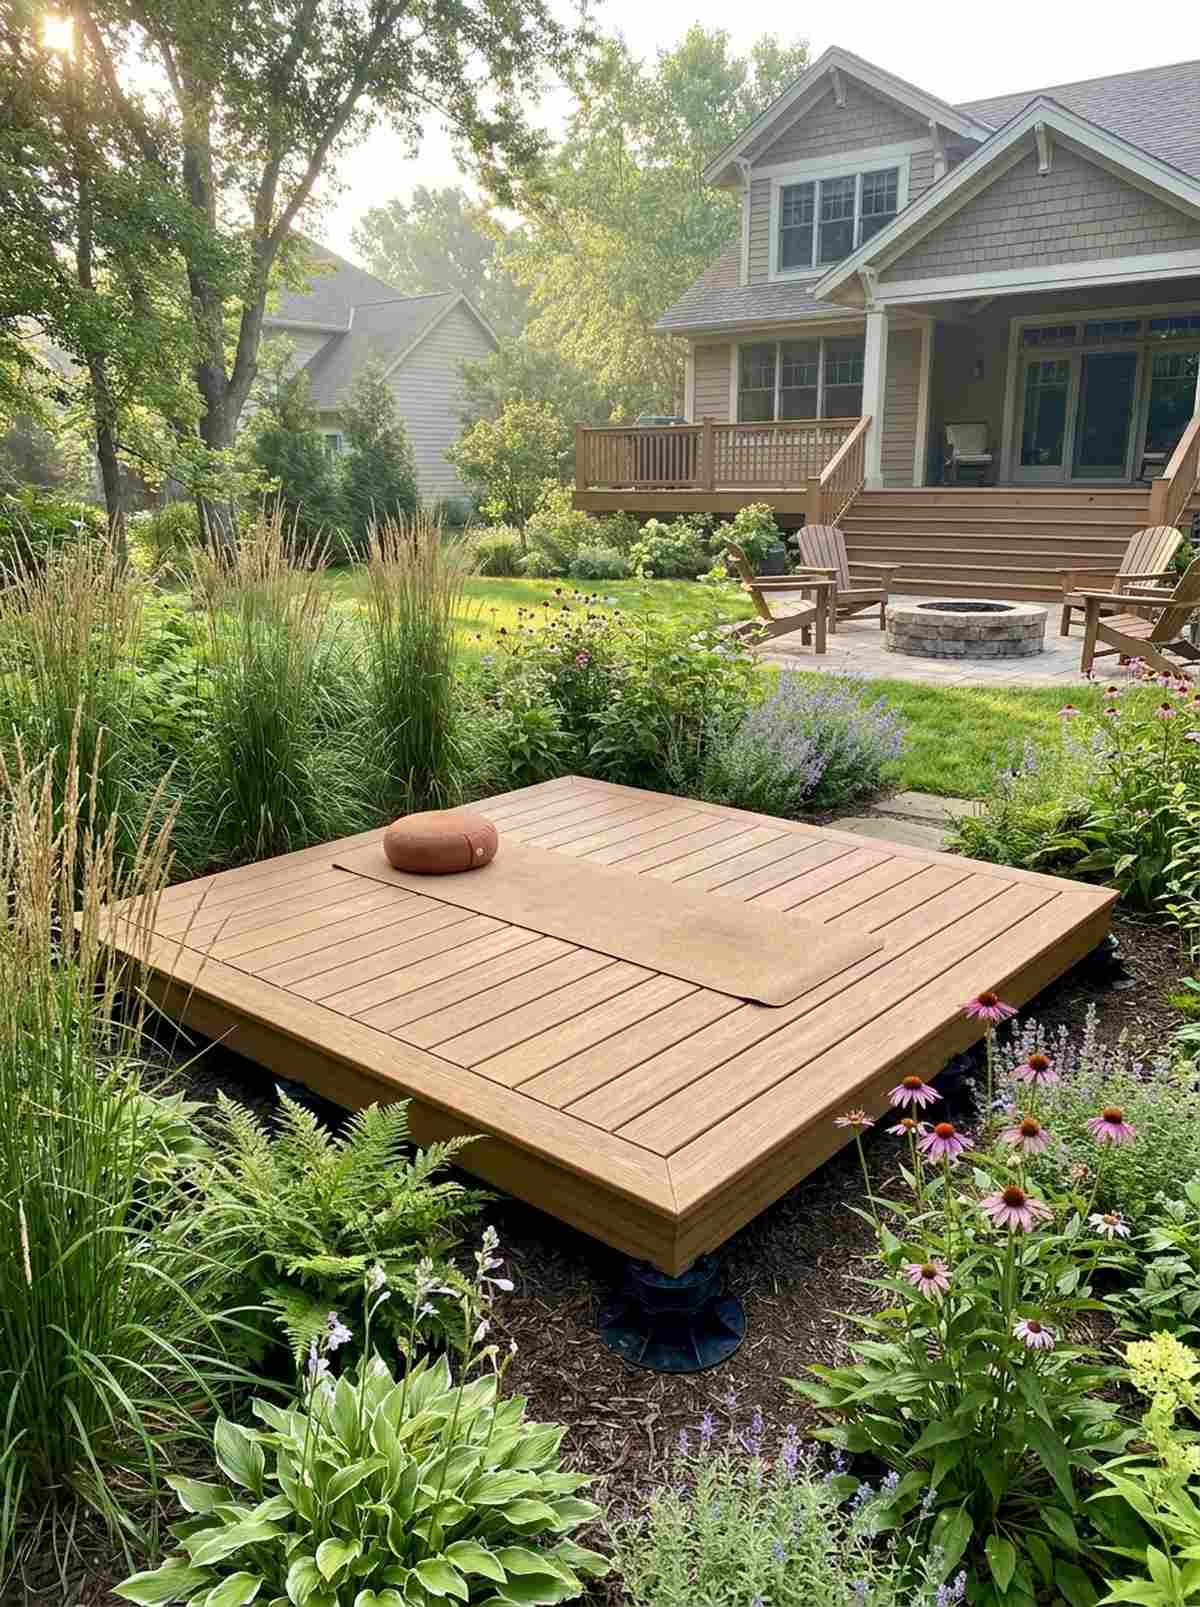
Feels like a hidden forest sanctuary dedicated entirely to your peace of mind. A low-profile wooden meditation platform surrounded by tall grasses is the ultimate morning escape.
While your neighbors exercise in a stuffy garage, building a dedicated outdoor floor yields a premium aesthetic. This layout completely transforms wasted yard corners into high-value outdoor living space.
You can build a perfectly level 8×8 platform for around $200–$400.
- Key Materials: Smooth composite decking, leveling feet.
- Vibe / Style: Tranquil zen retreat.
- Difficulty: Easy weekend carpentry.
- Budget Breakdown: Deck boards: $200 | Base frame: $100.
- Creator’s Tip: Use sanded cedar or high-end composite; cheap treated pine will eventually splinter and ruin your barefoot practice.
- Smart Sourcing: Smooth finish composite deck boards and adjustable deck leveling pedestals.
36. Meditation Garden with Water Feature
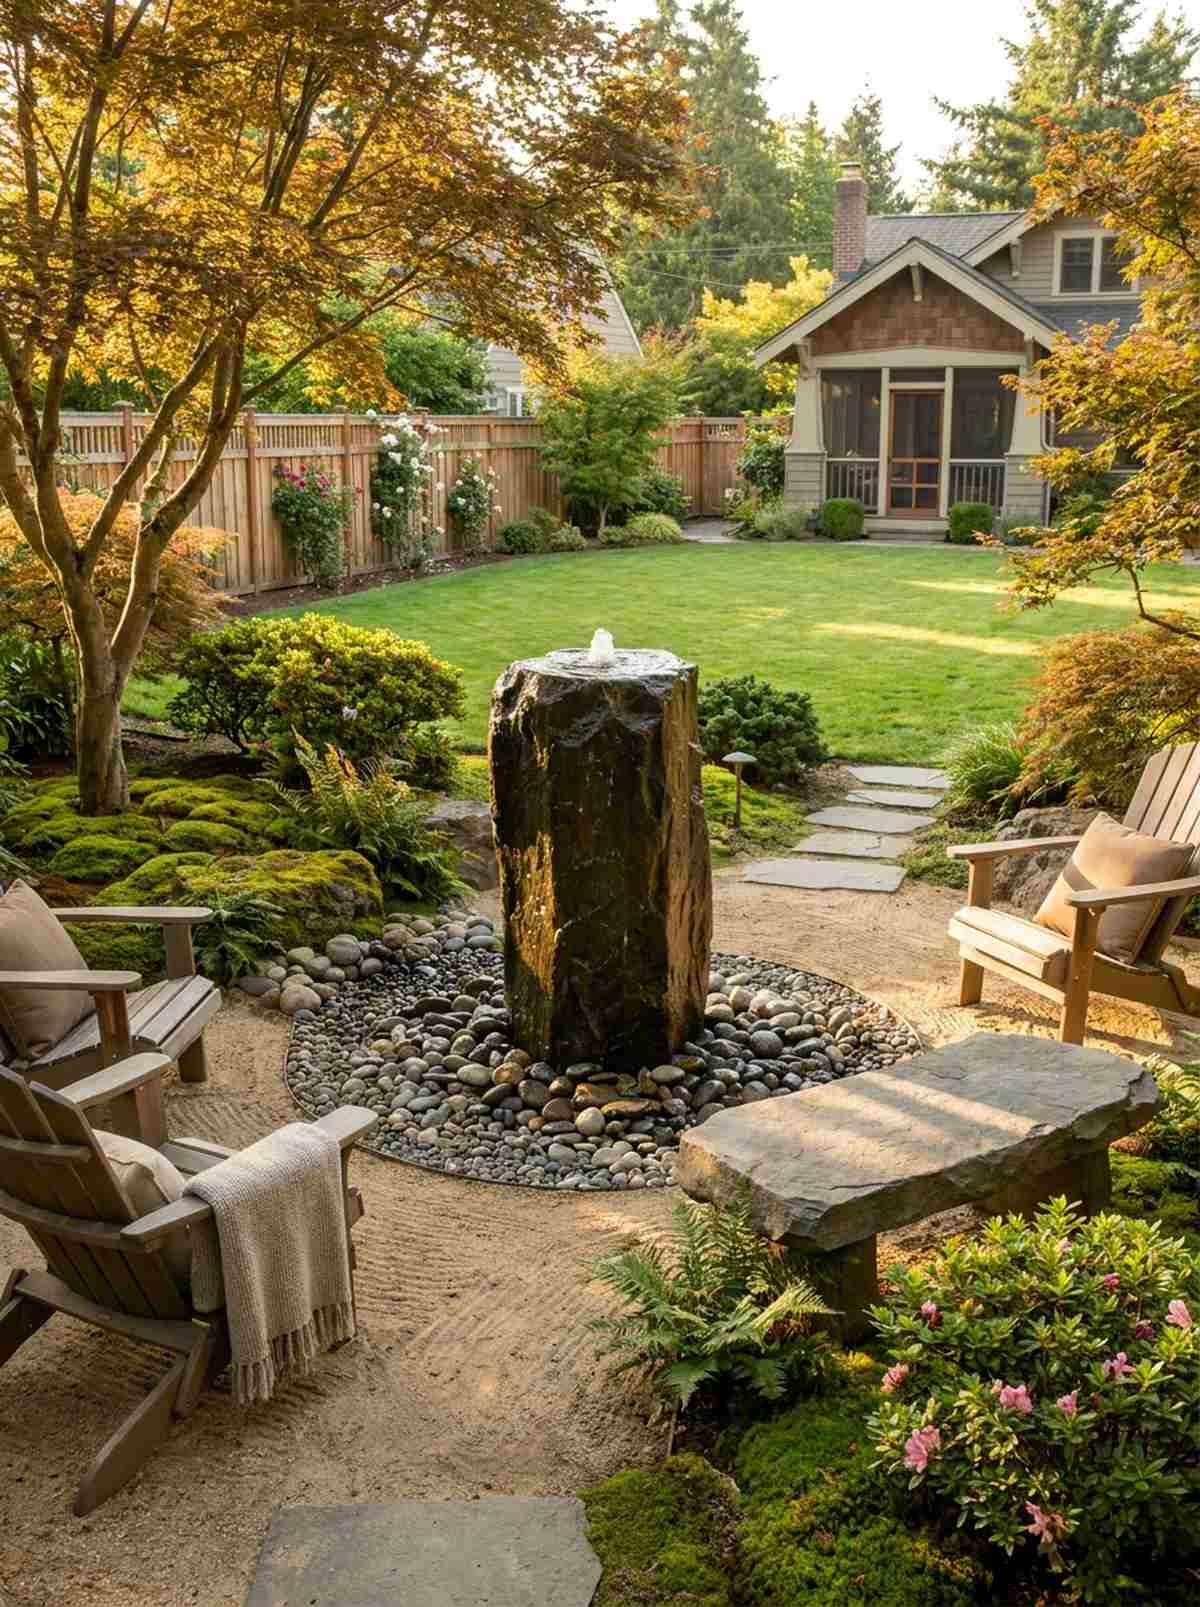
Masks the chaotic sounds of the neighborhood with a continuous, soothing babble. A recirculating stone fountain instantly creates an acoustic forcefield around your seating area.
Amateurs often ruin their zen spaces with loud, splashing plastic waterfalls. A subtle basalt column fountain looks far more expensive than it is and delivers a designer-level finish.
A complete fountain kit and basin runs about $300–$600. Pin this if you need an acoustic upgrade.
- Key Materials: Basalt stone column, hidden underground reservoir basin.
- Vibe / Style: Contemplative Japanese garden.
- Difficulty: Moderate digging DIY.
- Budget Breakdown: Stone/Pump Kit: $400 | Decorative gravel: $50.
- Creator’s Tip: Bury the water basin slightly lower than the surrounding grade so spilled water flows back in, reducing how often you have to refill it.
- Smart Sourcing: Complete basalt column fountain kits and heavy-duty underground water basins.
37. Outdoor Shower Enclosure
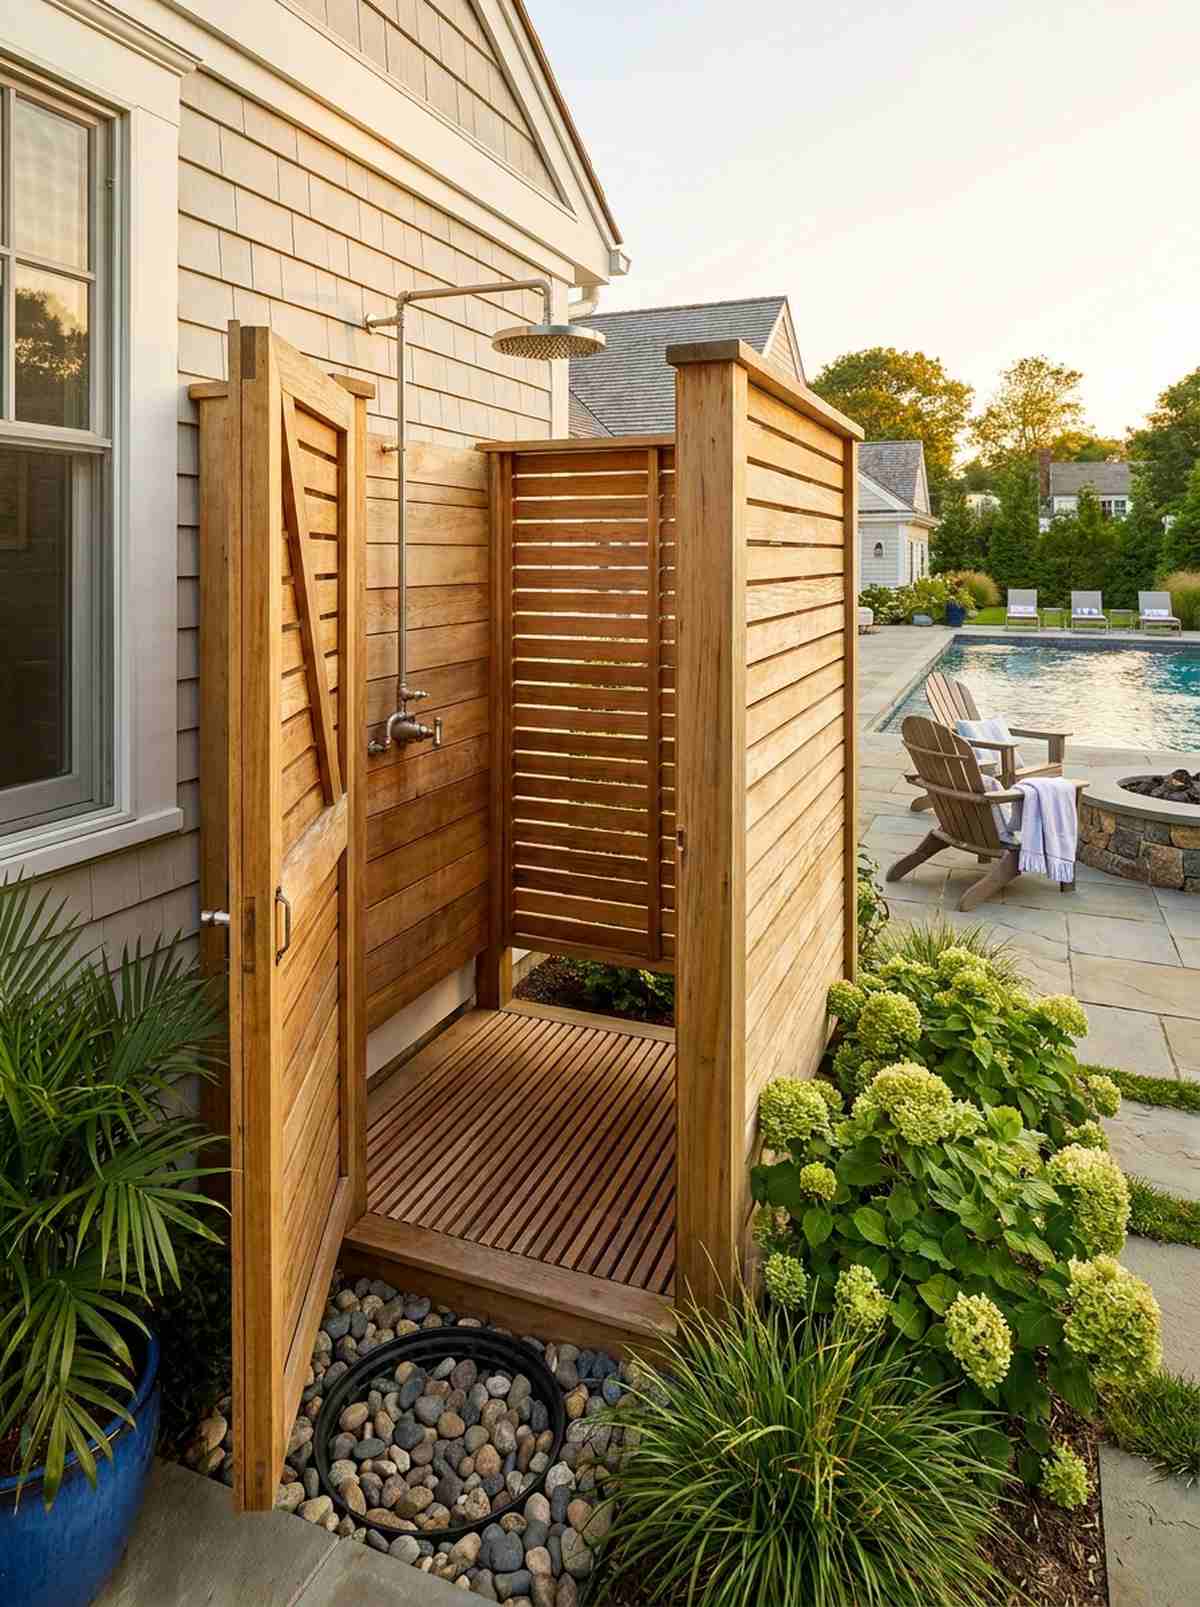
Invokes the liberating feeling of washing off the ocean salt at a private beach house. A slatted cedar shower enclosure is the ultimate flex for pool owners.
Professional designers gatekeep this specific technique: plumbing a tankless heater directly to the exterior wall. It completely flips the traditional script, bringing luxury hotel amenities into your backyard blueprints.
A DIY enclosure and basic plumbing will cost around $400–$800.
- Key Materials: Cedar privacy slats, stainless steel rain shower head.
- Vibe / Style: Coastal luxury surf shack.
- Difficulty: Advanced DIY (plumbing required).
- Budget Breakdown: Cedar lumber: $300 | Shower fixture/plumbing: $250.
- Creator’s Tip: Dig a deep French drain filled with river rock directly beneath the floor grate to prevent the area from turning into a mud pit.
- Smart Sourcing: Stainless steel outdoor rain shower fixtures and pre-cut cedar privacy slats (bulk pack).
38. Cold Plunge Tub Installation
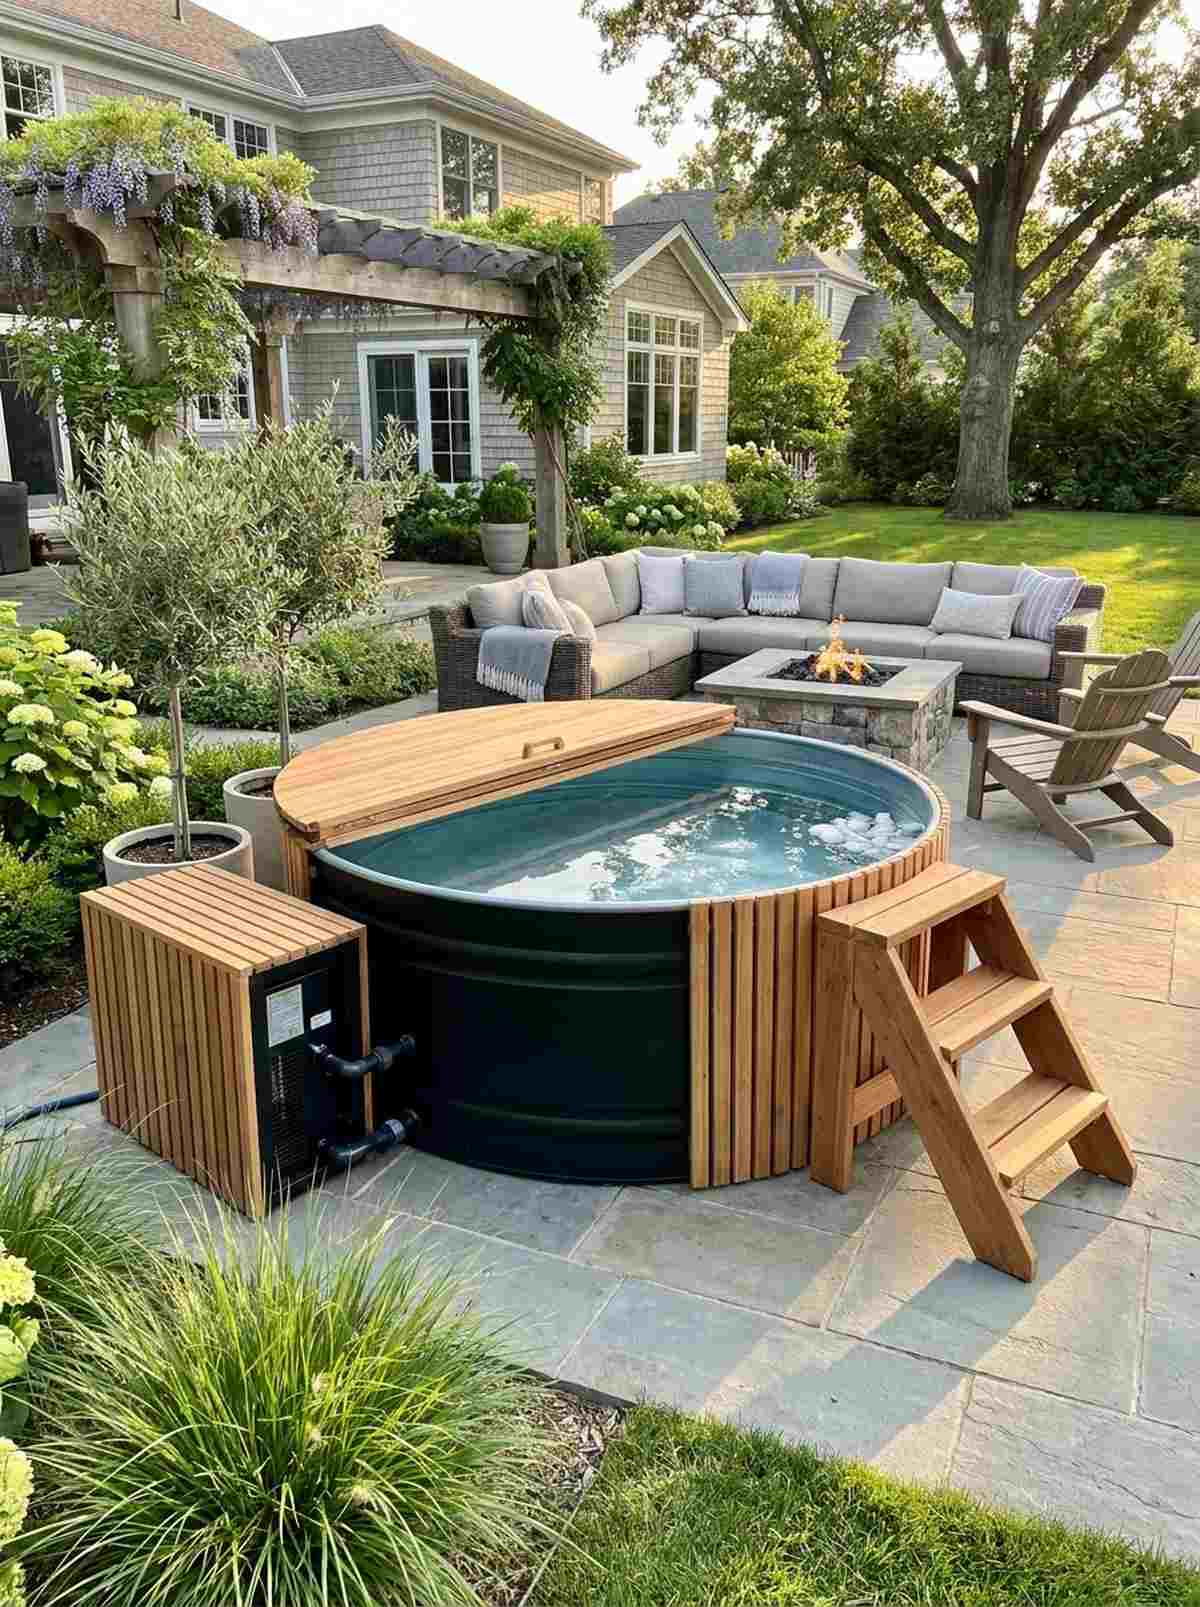
Delivers a massive jolt of adrenaline and recovery right in your backyard. A chilled steel stock tank has become the absolute must-have wellness trend for modern patios.
Ignore the outdated advice that you need to spend $5,000 on a commercial unit. Retrofitting a simple galvanized tank gives a surprisingly premium look and works just as well.
You can DIY a fully functional plunge setup for about $500–$1,200. Save this to your biohacking board.
- Key Materials: Galvanized stock tank, external water chiller.
- Vibe / Style: High-performance athletic recovery.
- Difficulty: Moderate DIY setup.
- Budget Breakdown: Tank: $200 | Chiller/Filter: $600.
- Creator’s Tip: Paint the exterior of the tank matte black and wrap it with slatted wood to make it look like a high-end spa feature.
- Smart Sourcing: Galvanized steel stock tanks and cold plunge water chiller units.
39. Outdoor Sauna Structure
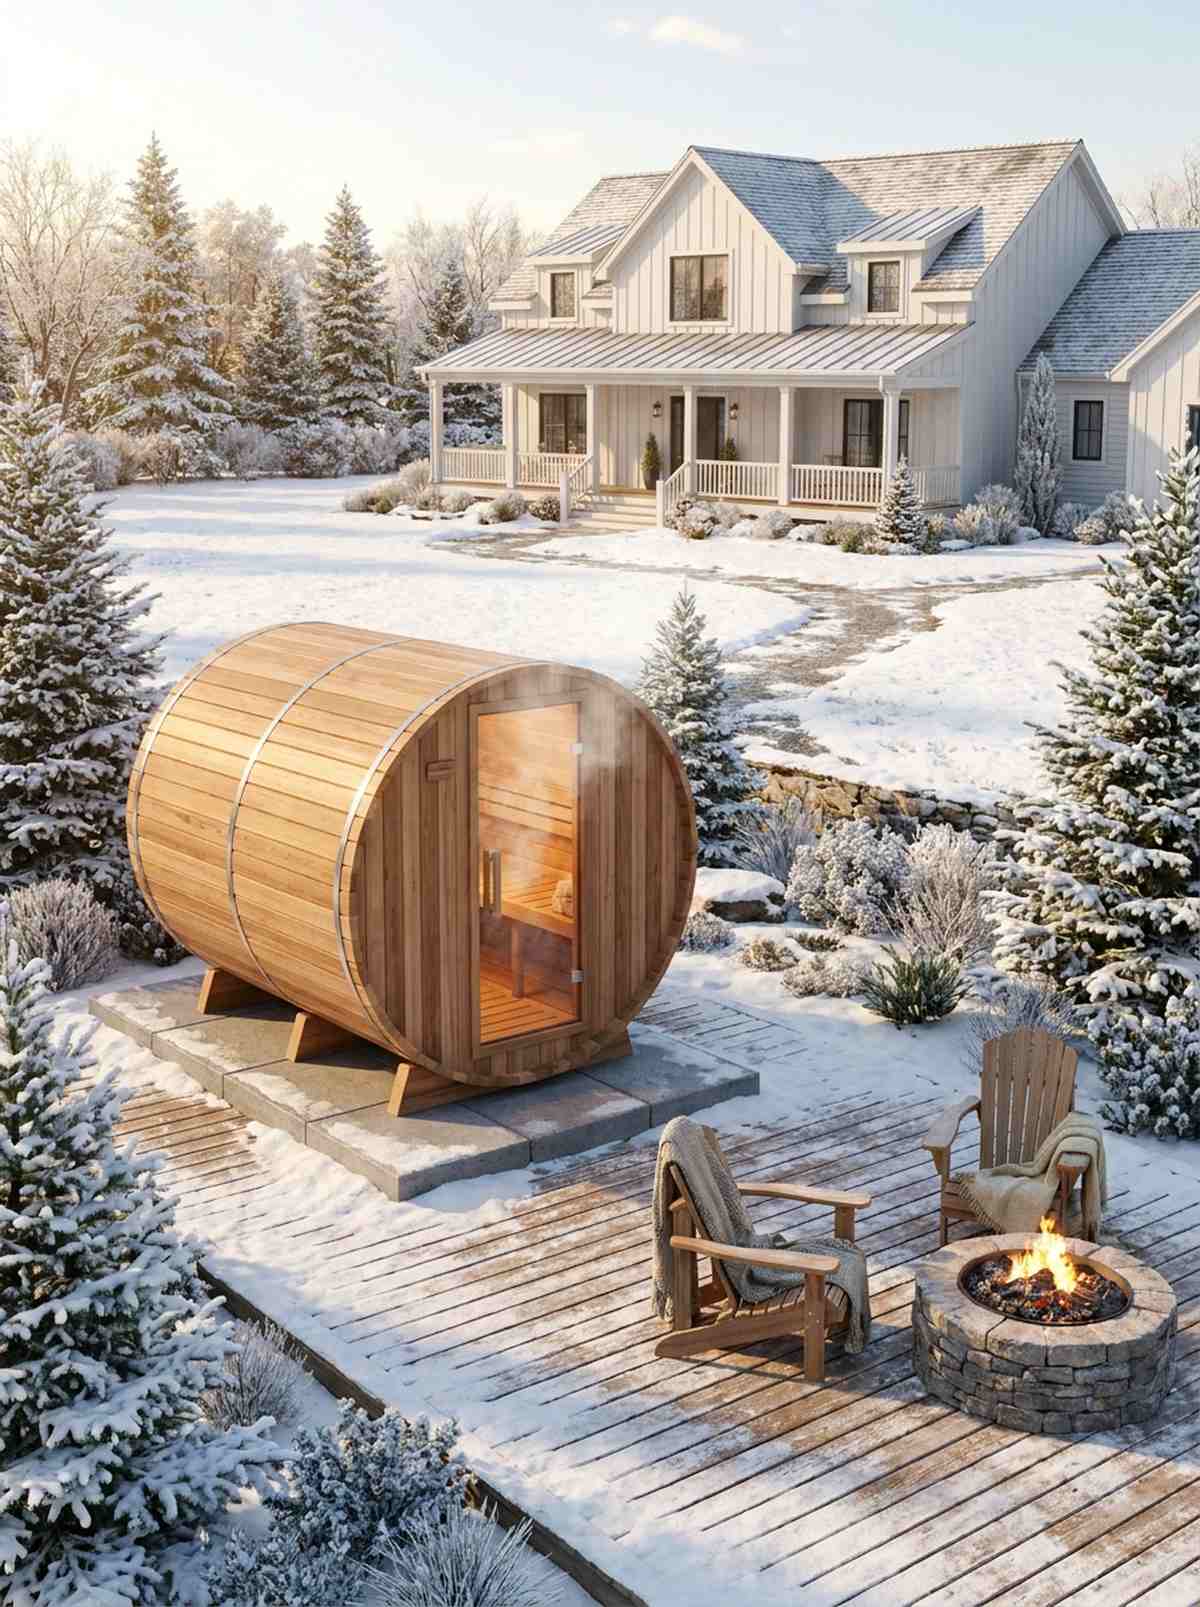
Smells like toasted cedar and melts away absolute every ounce of daily stress. A barrel-style backyard sauna turns a dreary winter landscape into a Scandinavian retreat.
This layout completely destroys the myth that saunas belong indoors. Sourcing a pre-cut cedar barrel kit looks far more expensive than it is and elevates your outdoor living room designs to luxury status.
A quality DIY barrel sauna kit ranges from $3,000–$6,000.
- Key Materials: Interlocking cedar staves, electric or wood heater.
- Vibe / Style: Nordic winter spa.
- Difficulty: Advanced weekend assembly.
- Budget Breakdown: Sauna Kit: $3,500 | Heater/Rocks: $800.
- Creator’s Tip: Rest the sauna on concrete pavers or a treated wood frame; never let the cedar directly touch the damp earth.
- Smart Sourcing: Pre-cut cedar barrel sauna kits and high-efficiency sauna heater units.
This upcoming wellness integration is surprisingly affordable, yet it completely elevates the entire property vibe…
40. Outdoor Gym Equipment Zone
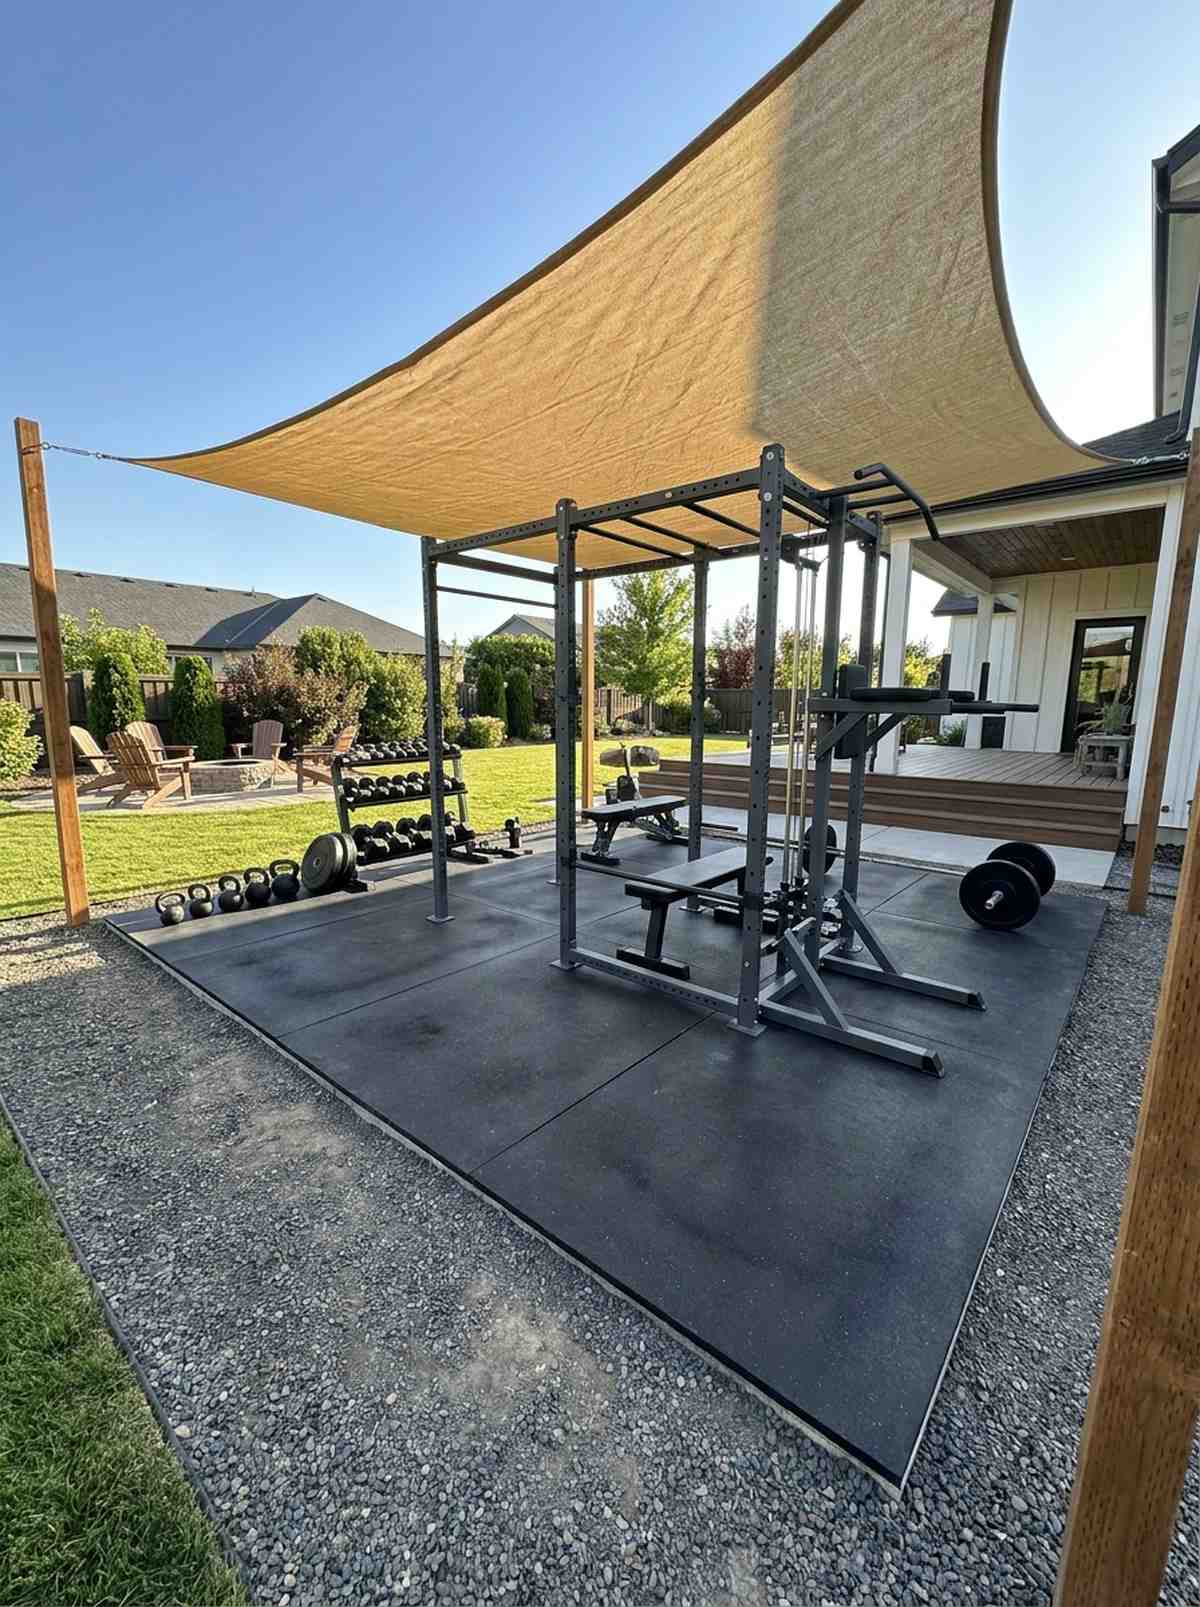
Brings the energy of a professional training facility out into the fresh air. A rubber-matted functional fitness zone covered by a shade sail is the ultimate home gym upgrade.
Most people get this completely wrong by leaving iron weights in the grass to rust. Building a proper shock-absorbing foundation yields a premium aesthetic and protects your joints during heavy lifts.
You can build a rugged 10×10 platform for $300–$500.
- Key Materials: 3/4-inch horse stall mats, weather-resistant rig.
- Vibe / Style: Hardcore functional fitness.
- Difficulty: Easy heavy-lifting setup.
- Budget Breakdown: Rubber mats: $200 | Rig/Bars: $300.
- Creator’s Tip: Use agricultural horse stall mats instead of standard gym flooring; they are completely weatherproof and indestructible.
- Smart Sourcing: Heavy-duty rubber stall mats (bulk pack) and weatherproof outdoor pull-up rigs.
Lighting Systems: Outdoor Living Room Designs
Strategic illumination extends usable hours after sunset while enhancing safety and atmosphere.
41. Integrated Pergola LED Lighting
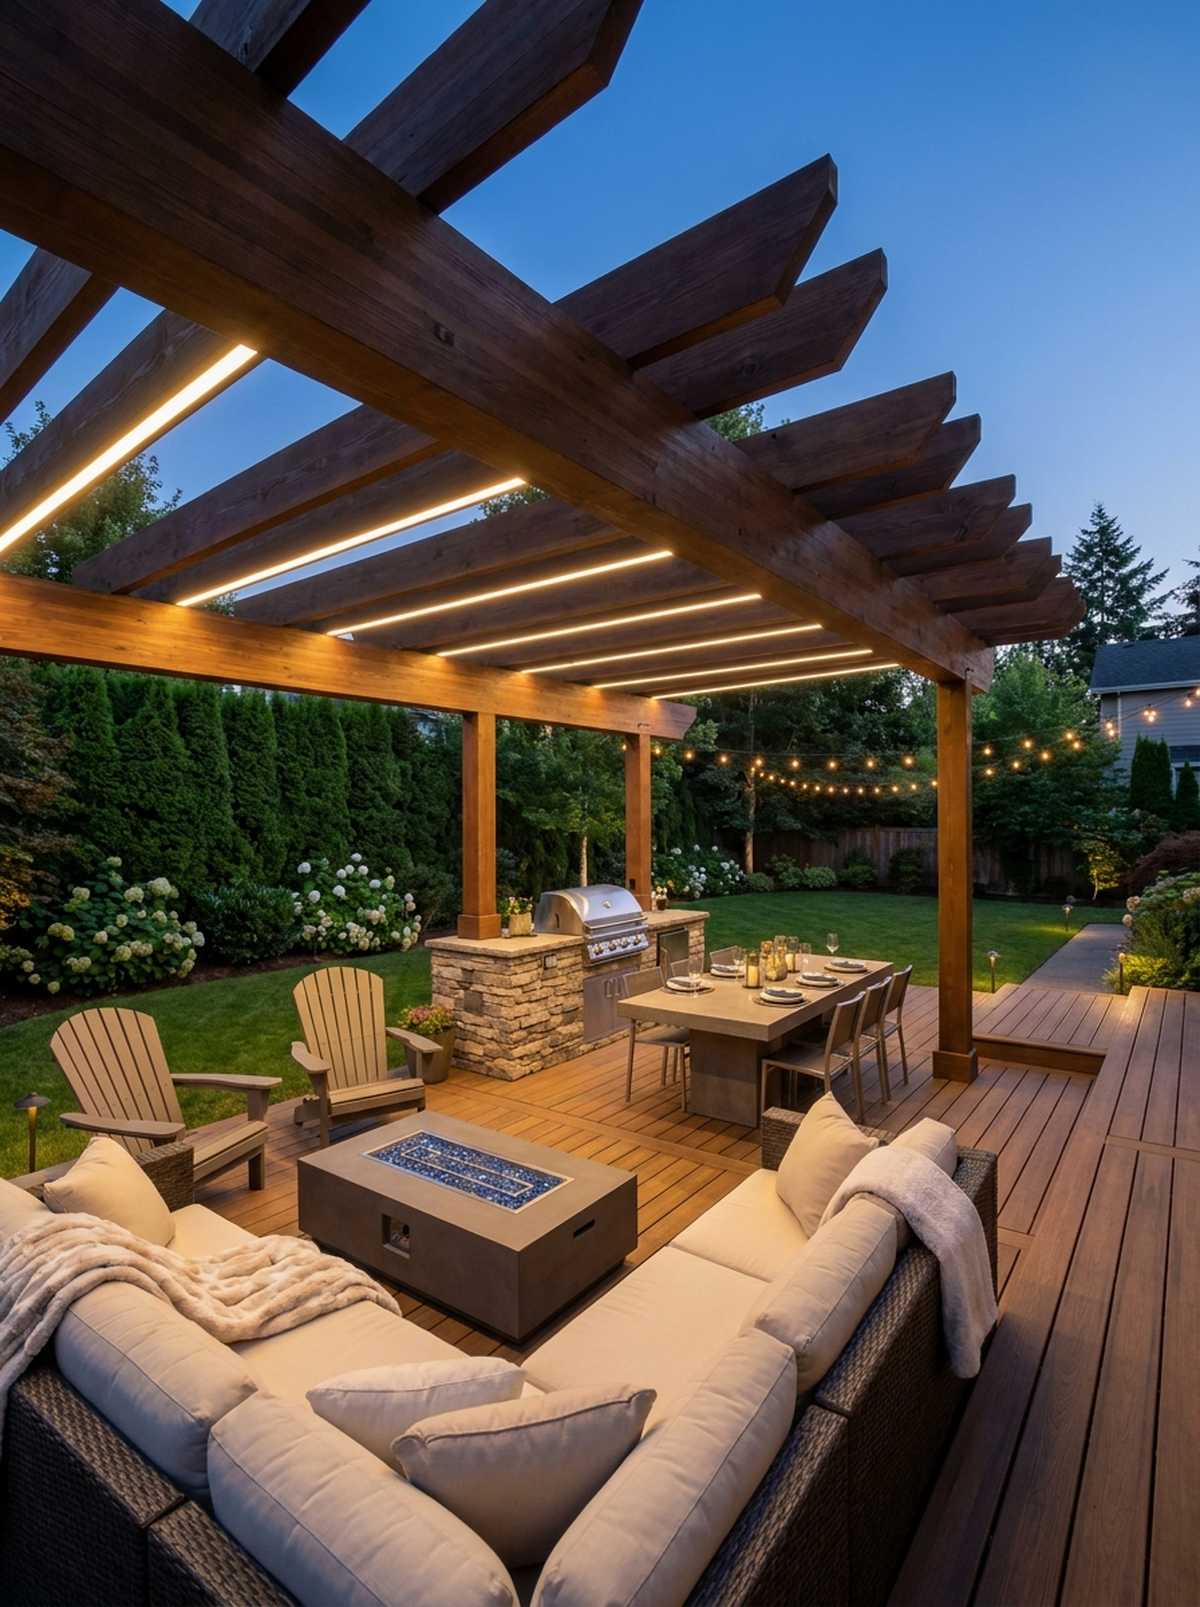
Casts a gorgeous, warm glow that makes the architecture look like it’s floating. Recessed LED channels routed directly into timber beams provide flawless, invisible illumination.
While your neighbors staple ugly extension cords everywhere, routing hidden wires delivers a designer-level finish. This completely flips the traditional script on backyard lighting, looking far more expensive than it is.
You can install a full low-voltage LED system for roughly $150–$300. Pin this for your twilight mood board.
- Key Materials: Aluminum LED channels with diffusers, waterproof LED strips.
- Vibe / Style: High-end architectural modern.
- Difficulty: Moderate DIY (requires routing/wiring).
- Budget Breakdown: Channels: $50 | LEDs/Transformer: $150.
- Creator’s Tip: Always use milky-white plastic diffusers over the LED strips to eliminate the cheap “dotted” look and create a smooth neon bar effect.
- Smart Sourcing: Aluminum LED channel diffuser kits and IP68 waterproof LED strip lights.
42. String Lights Overhead Canopy
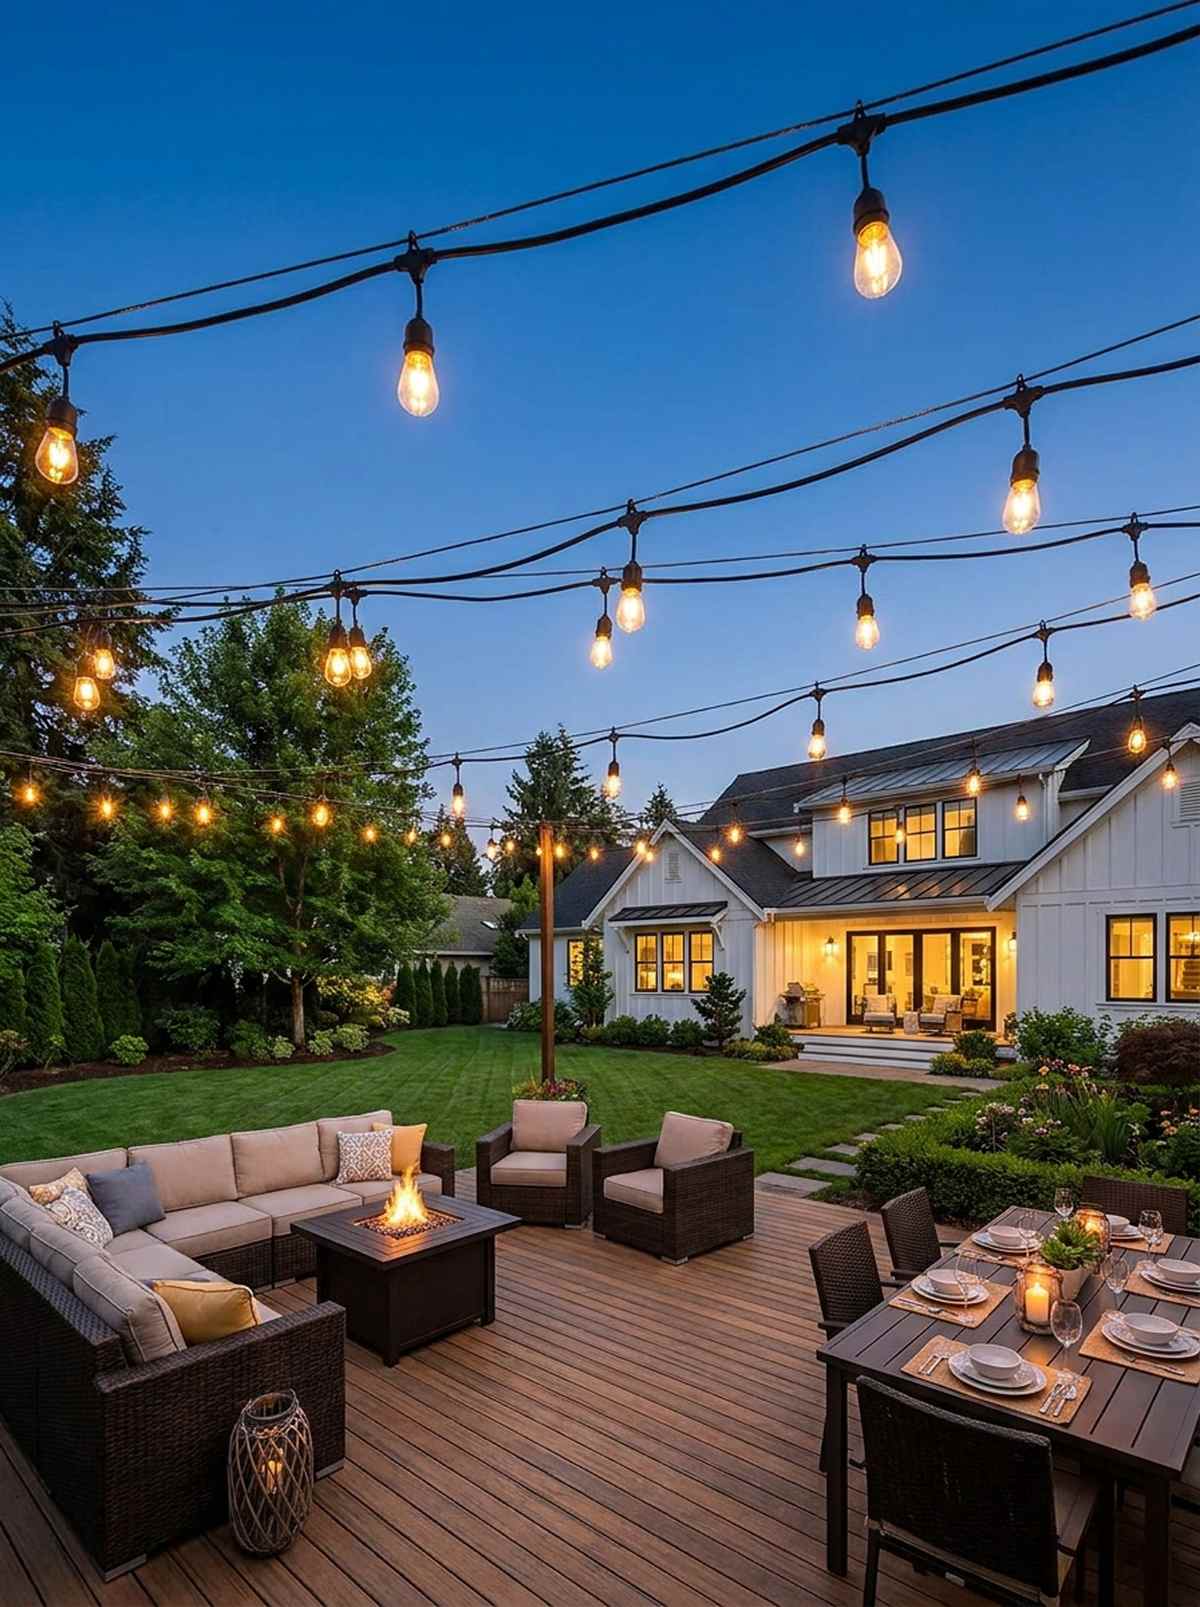
Instantly transforms a boring patio into a buzzing downtown festival scene. Heavy-duty Edison bulb string lights suspended in a zigzag pattern create the ultimate party atmosphere.
Amateurs often ruin this by using thin Christmas lights that snap in the wind. Sourcing commercial-grade rubberized cables gives a surprisingly premium look and ensures your outdoor living ideas survive the winter.
A robust canopy setup costs around $100–$200.
- Key Materials: Commercial-grade string lights, steel suspension wire.
- Vibe / Style: Festive downtown bistro.
- Difficulty: Easy ladder work.
- Budget Breakdown: Lights: $80 | Suspension kit: $40.
- Creator’s Tip: Never hang the lights by their own electrical wire; always zip-tie them to a taut steel guide-wire to prevent sagging and snapping.
- Smart Sourcing: Commercial-grade outdoor string lights and steel cable suspension guide kits.
43. Recessed Deck Lighting in Risers
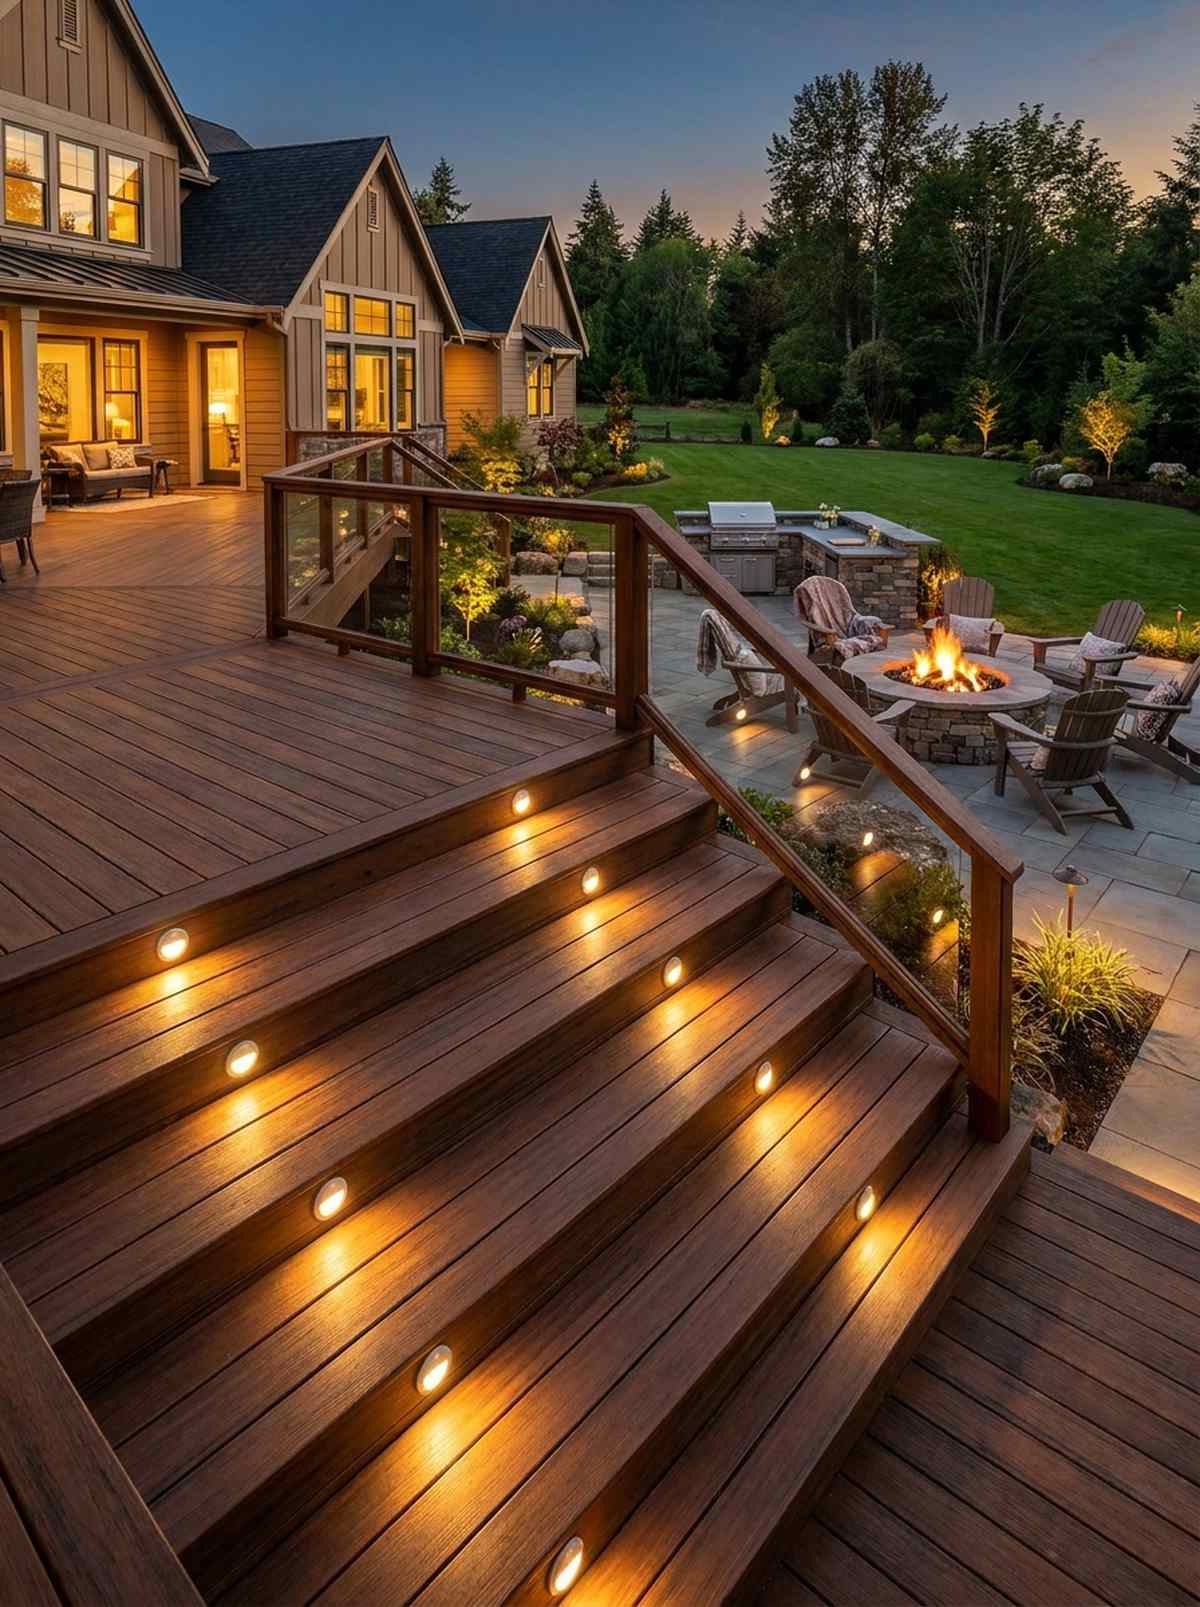
Looks like glowing stepping stones guiding you through a luxury resort. Low-voltage riser lights punched directly into the face of your deck stairs provide massive safety and aesthetic appeal.
Ignore the outdated advice about relying on harsh floodlights. Subtle, low-angle illumination completely destroys the myth that bright means better, offering a sleek, premium aesthetic.
Expect a kit with 10 lights and a transformer to cost $150–$250. Save this for your deck upgrade plan.
- Key Materials: LED riser puck lights, low-voltage wire.
- Vibe / Style: Safe, sophisticated resort.
- Difficulty: Moderate DIY (requires hole-saw drilling).
- Budget Breakdown: Light kit: $120 | Extra wiring: $40.
- Creator’s Tip: Daisy-chain the wiring underneath the deck before securing the top boards to make the installation ten times easier.
- Smart Sourcing: Recessed LED deck stair lighting kits and low-voltage landscape transformers.
44. Smart Pathway Lights with App Control
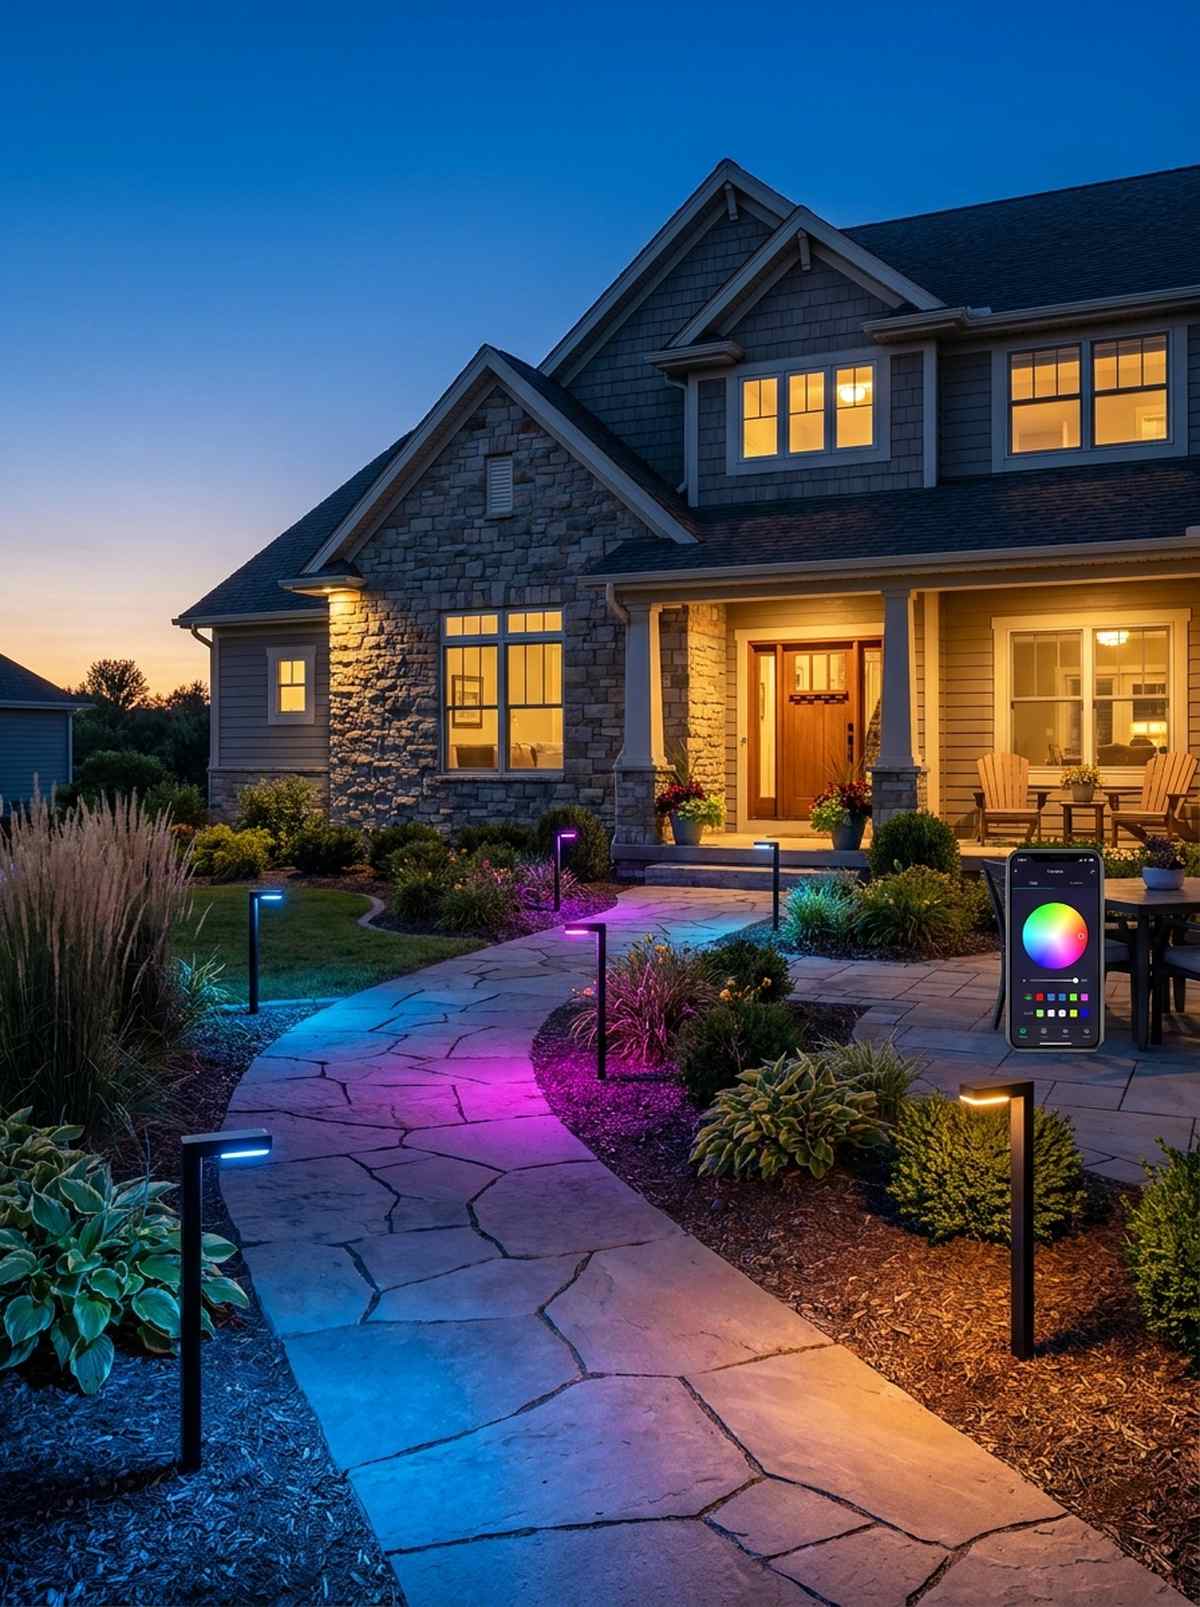
Paints your walkways with vivid, shifting colors at the tap of a screen. App-controlled RGB pathway spikes bring high-tech curb appeal to your evening landscape.
Most contractors push static yellow bulbs, but smart lighting delivers a designer-level finish. Upgrading to color-changing LEDs looks far more expensive than it is and perfectly accents your outdoor living design.
You can outfit a whole front walk for $150–$300.
- Key Materials: Smart LED pathway fixtures, Wi-Fi bridge hub.
- Vibe / Style: High-tech modern estate.
- Difficulty: Easy plug-and-play.
- Budget Breakdown: 6-pack smart lights: $200.
- Creator’s Tip: Sync the lights to a smart home routine so they automatically turn warm white at sunset and switch to dim blue at midnight.
- Smart Sourcing: App-controlled smart pathway light kits and heavy-duty low voltage burial wire.
Before you finalize your layout, you absolutely need to see the genius trick coming up next.
45. Uplighting for Trees and Architecture
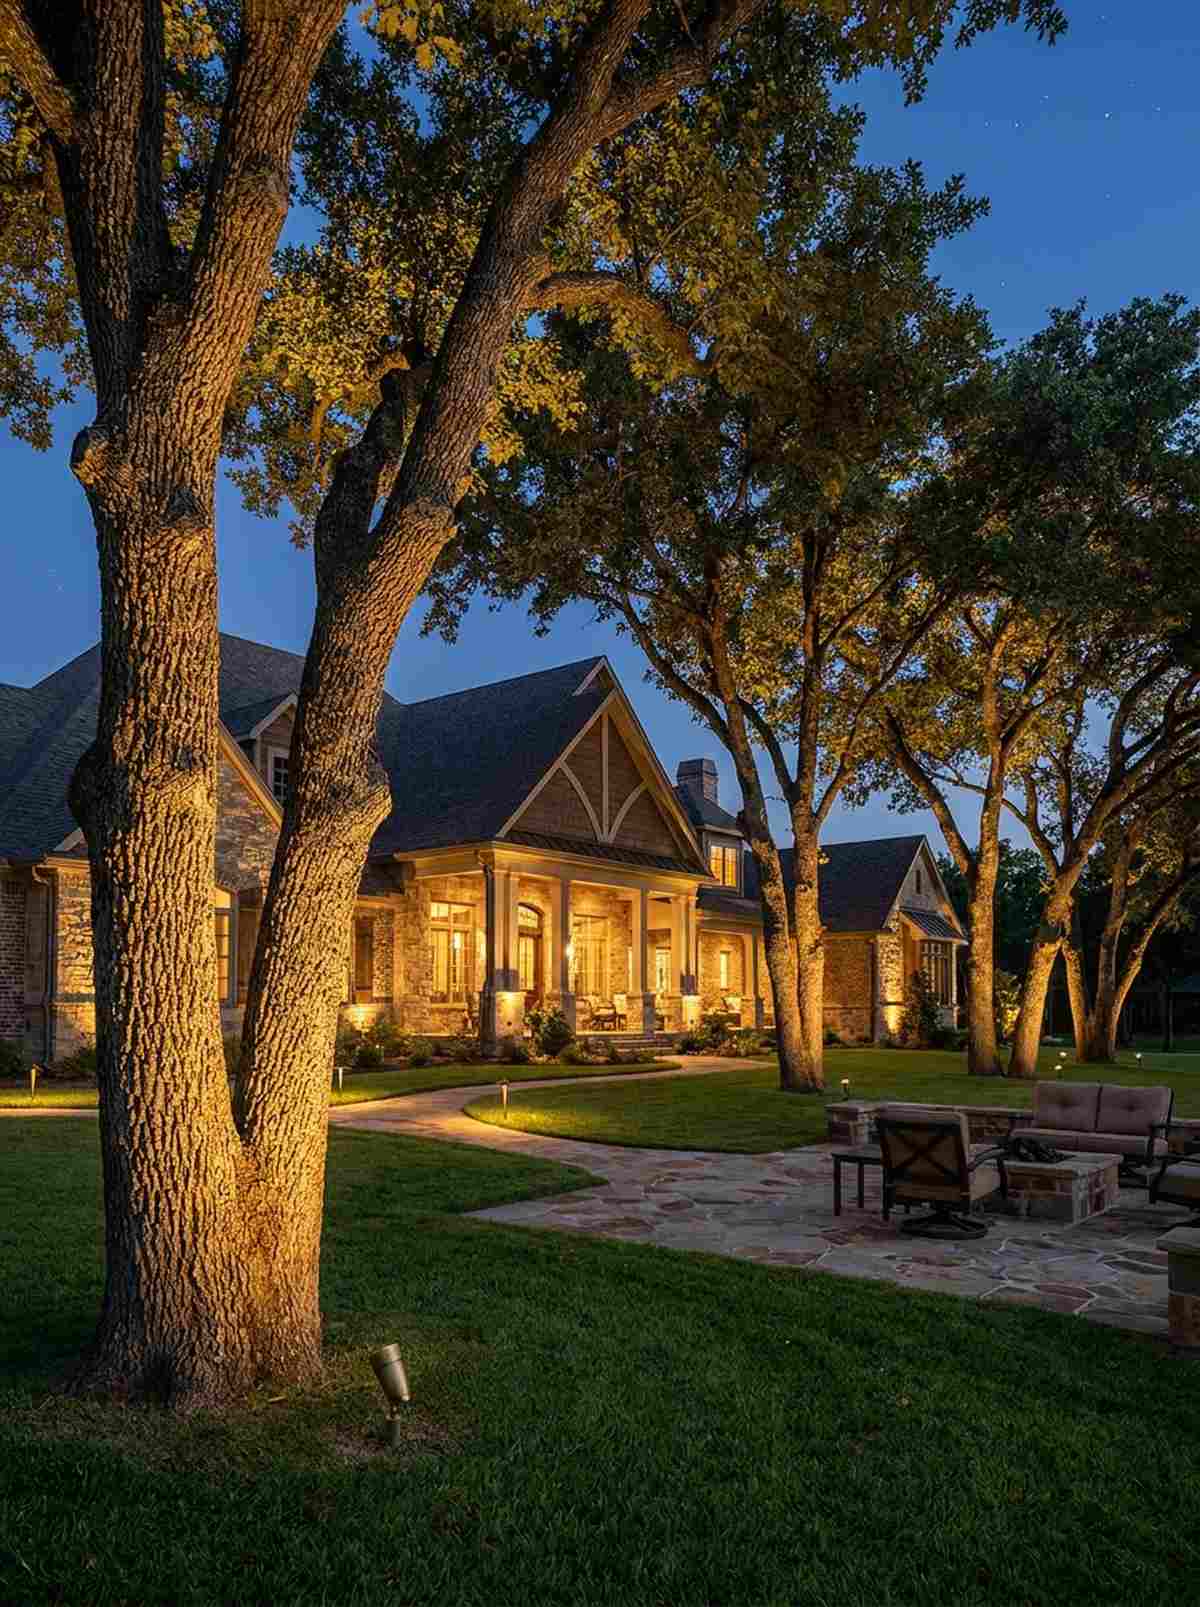
Casts dramatic, towering shadows that make your home look twice as large. Directional brass uplights placed at the base of mature trees completely change the nightscape.
Professional designers gatekeep this specific technique: grazing the textured bark of a tree rather than blasting the leaves. It yields a premium aesthetic that defines luxury landscaping.
A starter kit of brass spots runs about $200–$400. Pin this to instantly boost your curb appeal.
- Key Materials: Brass directional spotlights, 12V transformer.
- Vibe / Style: Dramatic luxury mansion.
- Difficulty: Easy weekend trenching.
- Budget Breakdown: Brass fixtures (x4): $200 | Transformer: $80.
- Creator’s Tip: Bury the wire under 2 inches of mulch, not dirt, so you can easily move the lights as the tree canopy grows over the years.
- Smart Sourcing: Heavy-duty brass landscape uplights and waterproof wire connector nuts (bulk pack).
Material Guide: Cheap vs. Premium Aesthetic
Knowing exactly where to save and where to spend makes all the difference in achieving that “looks expensive but isn’t” vibe.
- Standard vs. UV-Resistant/Premium: Standard fabrics bleach out in a single summer. Investing slightly more in solution-dyed acrylics stops fading and prevents fabric rot.
- Pre-made Kits vs. Sourcing Locally: Sourcing raw materials locally often leads to mismatched hardware. Pre-made starter kits save time, eliminate guesswork, and guarantee a cohesive designer finish.
46. Pendant Lights Over Outdoor Dining

Hangs elegantly over the table like a floating centerpiece. Weather-sealed rattan or metal pendants bring indoor dining room sophistication out into the wild.
This layout completely destroys the myth that patios only need floodlights. Sourcing a bold, oversized pendant gives a surprisingly premium look and acts as a massive visual anchor for your outdoor living ideas.
You can hang a stunning outdoor pendant for $100–$250.
- Key Materials: Wet-rated pendant fixture, outdoor electrical box.
- Vibe / Style: Sophisticated al fresco dining.
- Difficulty: Moderate electrical DIY.
- Budget Breakdown: Fixture: $150 | Conduit/Box: $30.
- Creator’s Tip: Ensure the fixture is specifically “Wet-Rated” (not just Damp-Rated) if it will be exposed to blowing rain.
- Smart Sourcing: Wet-rated outdoor pendant lights and weatherproof round electrical boxes.
47. Fire Feature as Primary Light Source
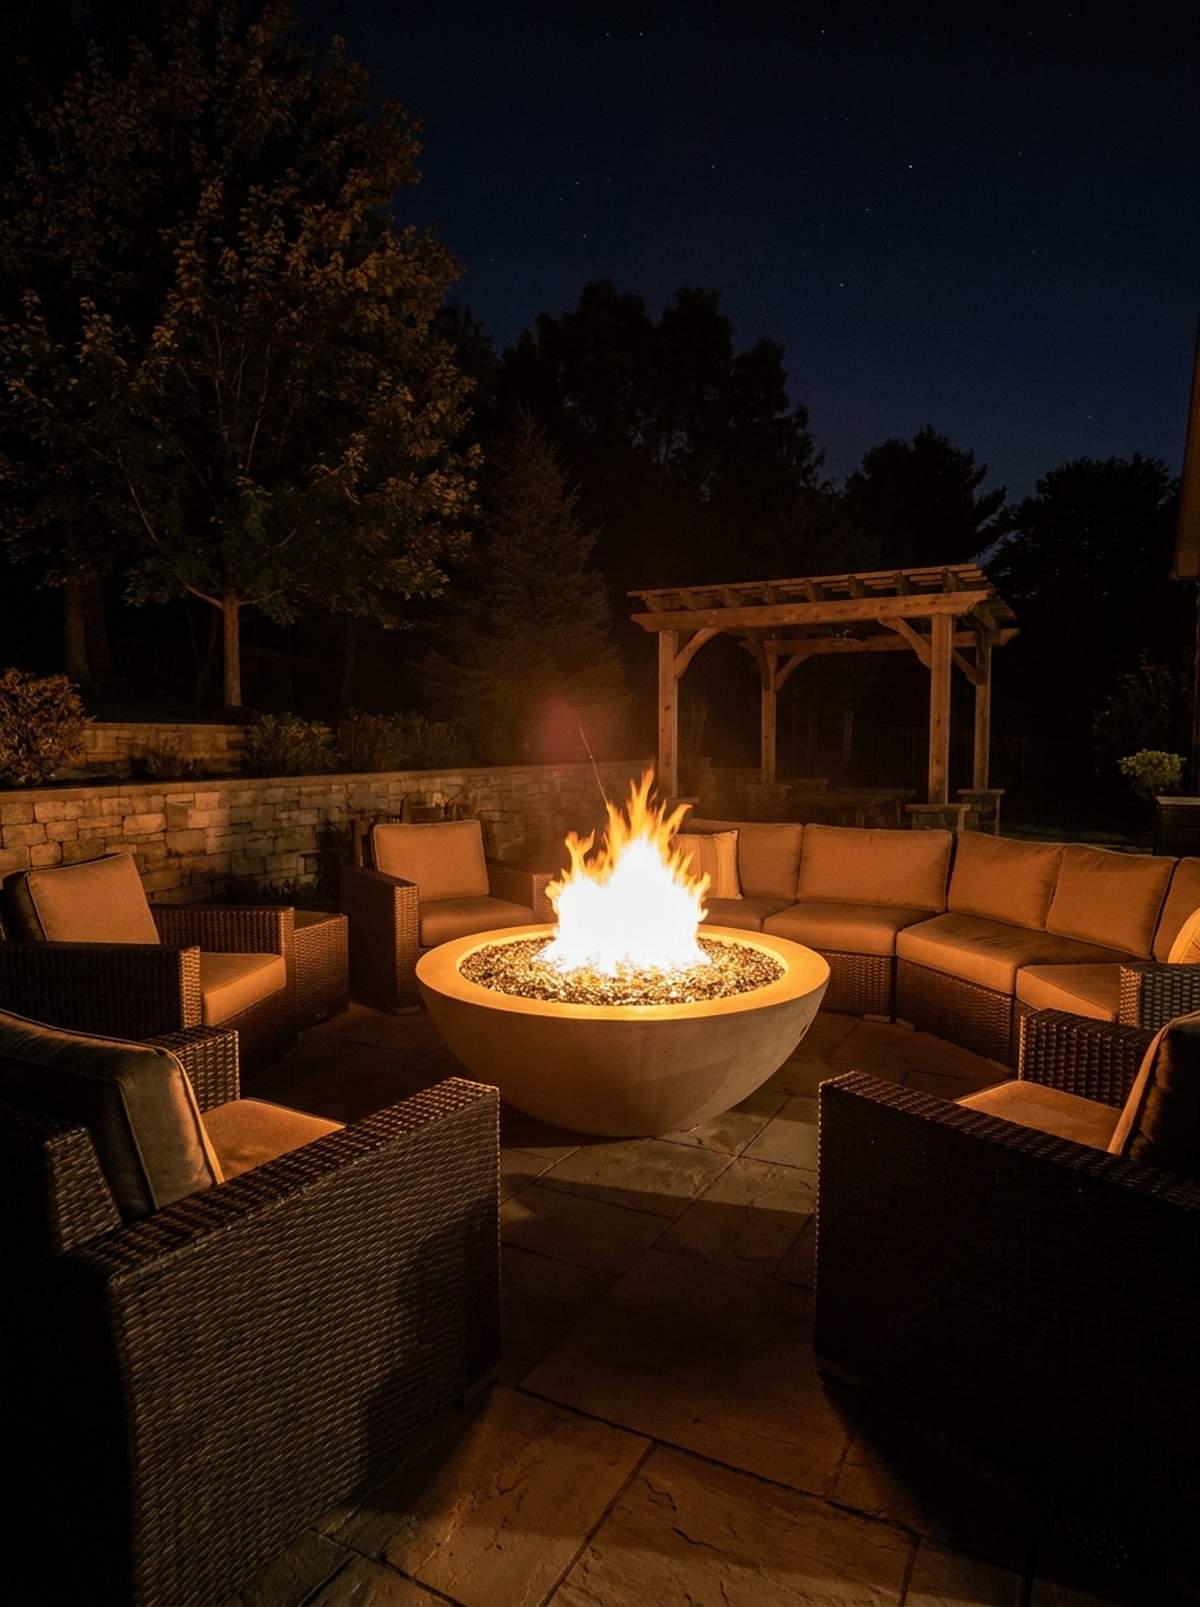
Bathes the entire seating area in a primal, dancing orange glow. Using massive fire bowls as the sole illumination creates an insanely intimate, cave-like atmosphere.
Amateurs often ruin their fire pits by blasting the area with bright white security lights. Turning off all overheads and letting the flame do the work delivers a designer-level finish that costs absolutely zero extra dollars.
This lighting strategy is effectively free once the pit is built. Save this mood-lighting secret.
- Key Materials: High-BTU gas fire pit, crushed reflective glass.
- Vibe / Style: Intimate midnight lounge.
- Difficulty: Zero setup.
- Budget Breakdown: Free (utilizes existing fire feature).
- Creator’s Tip: Use crushed mirrored fire glass instead of lava rock; the glass reflects the flame and doubles the ambient light output.
- Smart Sourcing: Reflective mirrored fire glass (bulk pack) and high-output gas burner rings.
Biophilic Outdoor Living Room Ideas
Integrating living plants and natural materials strengthens connections between built environments and nature.
48. Living Wall Vertical Garden
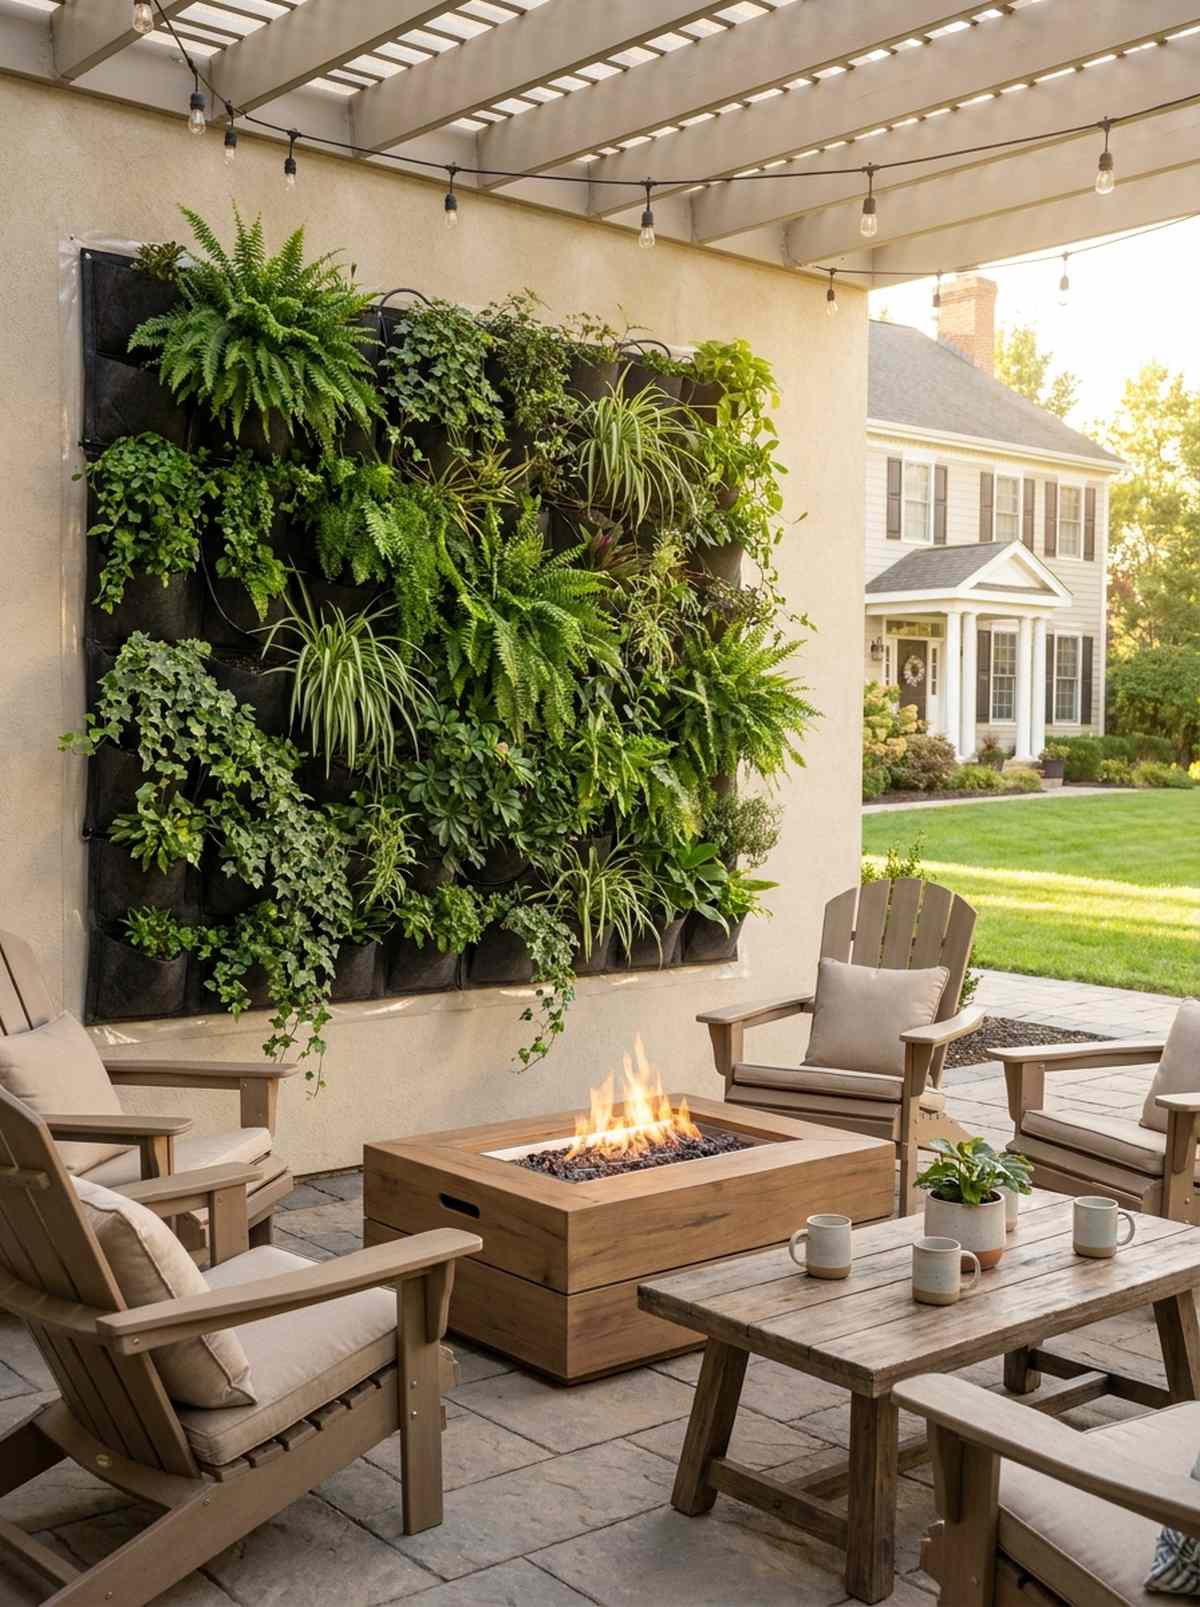
Feels like a lush, breathing piece of living artwork on your patio wall. Modular vertical planter grids are the ultimate space-saving hack for tiny concrete balconies.
While your neighbors use cheap plastic pots, a dense wall of ferns and trailing vines yields a premium aesthetic. This strategy completely flips the traditional script, turning blank stucco into vibrant outdoor living room designs.
You can build a stunning 4×4 living wall for $150–$300.
- Key Materials: Felt pocket planters, automated drip tubing.
- Vibe / Style: Lush botanical oasis.
- Difficulty: Moderate DIY (irrigation needed).
- Budget Breakdown: Planter pockets: $80 | Drip Kit/Timer: $60.
- Creator’s Tip: Mount a waterproof plastic sheet behind the felt pockets to prevent constant moisture from rotting your home’s siding.
- Smart Sourcing: Vertical felt pocket planter grids and automated micro-drip irrigation kits.
49. Pergola with Climbing Vines
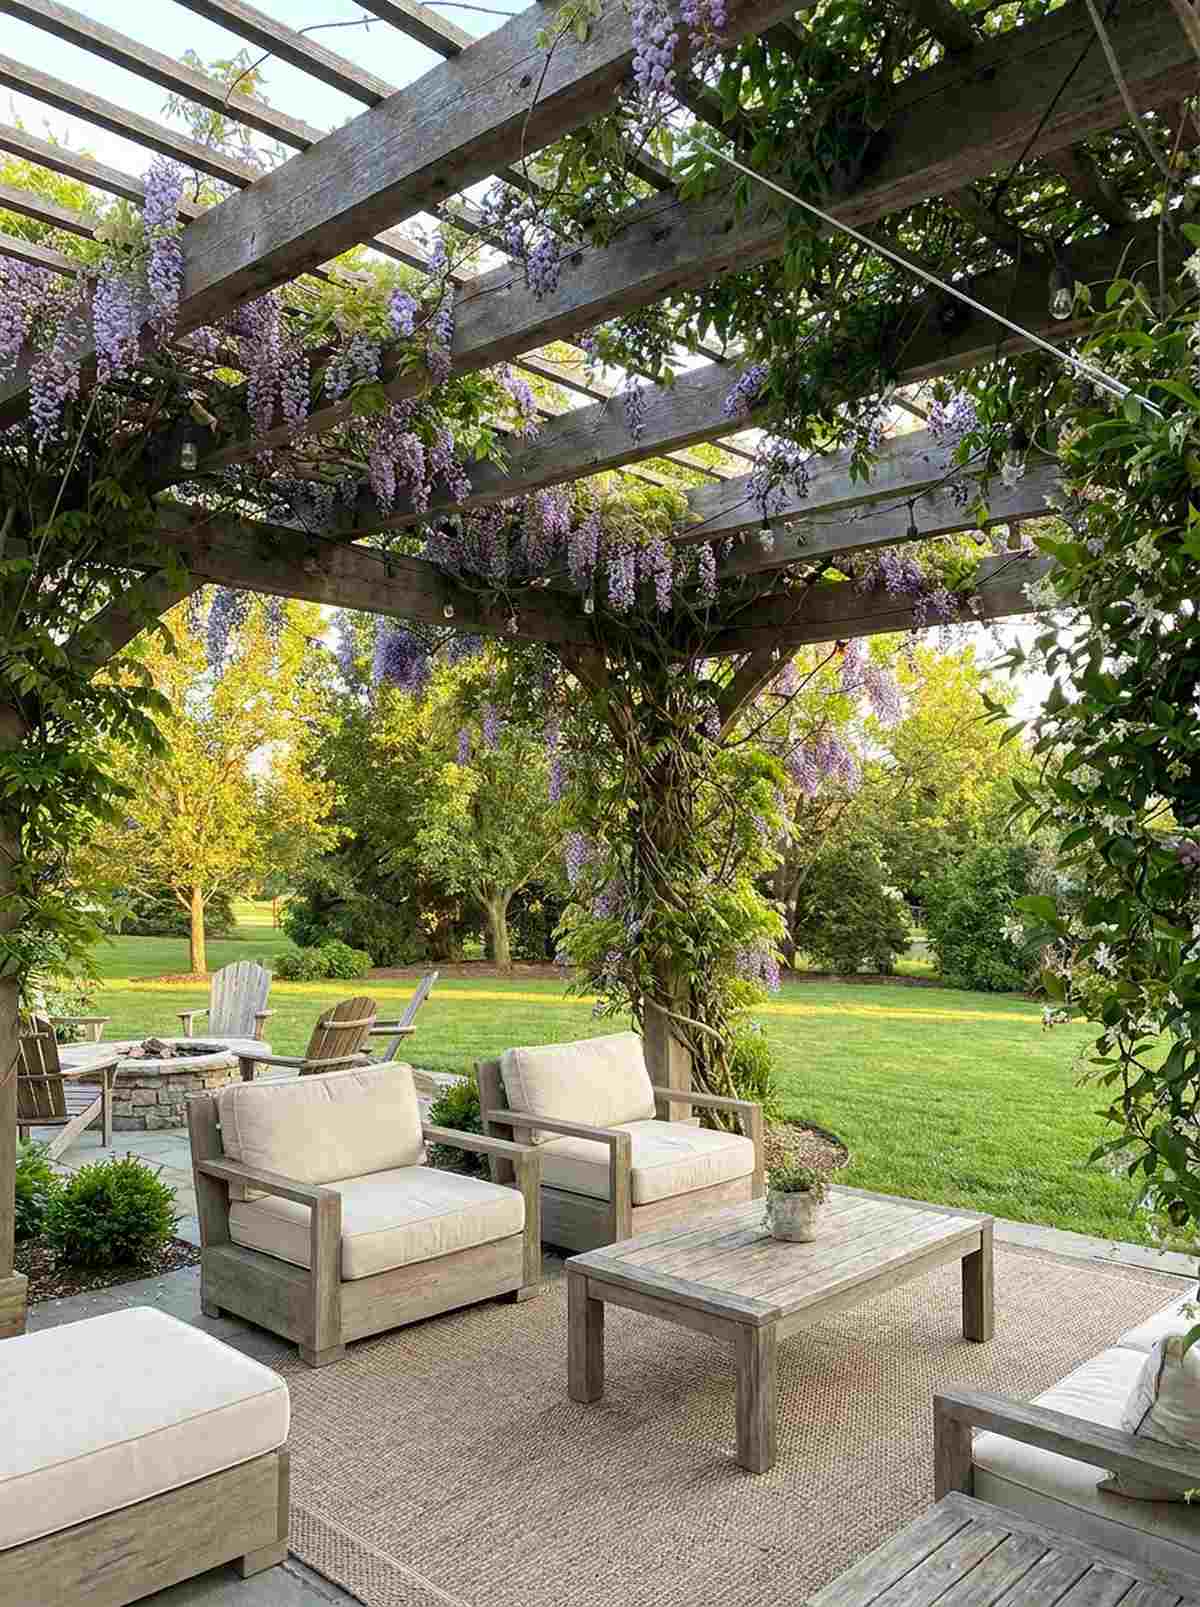
Drapes your seating area in a fragrant, dappled green canopy. Training aggressive climbers like Wisteria or Jasmine over timber beams creates the most romantic shade possible.
Most contractors push expensive fabric shades, but organic vines look far more expensive than they are. This approach delivers a designer-level finish that literally gets more beautiful every single year.
A few starter vines and guide wire cost less than $50. Pin this for a gorgeous, cheap upgrade.
- Key Materials: Fast-growing climbing vines, stainless guide wire.
- Vibe / Style: Overgrown Tuscan villa.
- Difficulty: Easy planting, requires patience.
- Budget Breakdown: Plants: $40 | Wire/Hooks: $20.
- Creator’s Tip: Run taut steel wires parallel to your wooden posts; vines wrap around the wire much faster and won’t rot the wood as quickly.
- Smart Sourcing: Stainless steel trellis wire guide kits and heavy-duty vine training clips.
This next organic layer transforms standard yards into lush, multi-dimensional retreats in a single weekend.
50. Container Garden Layering
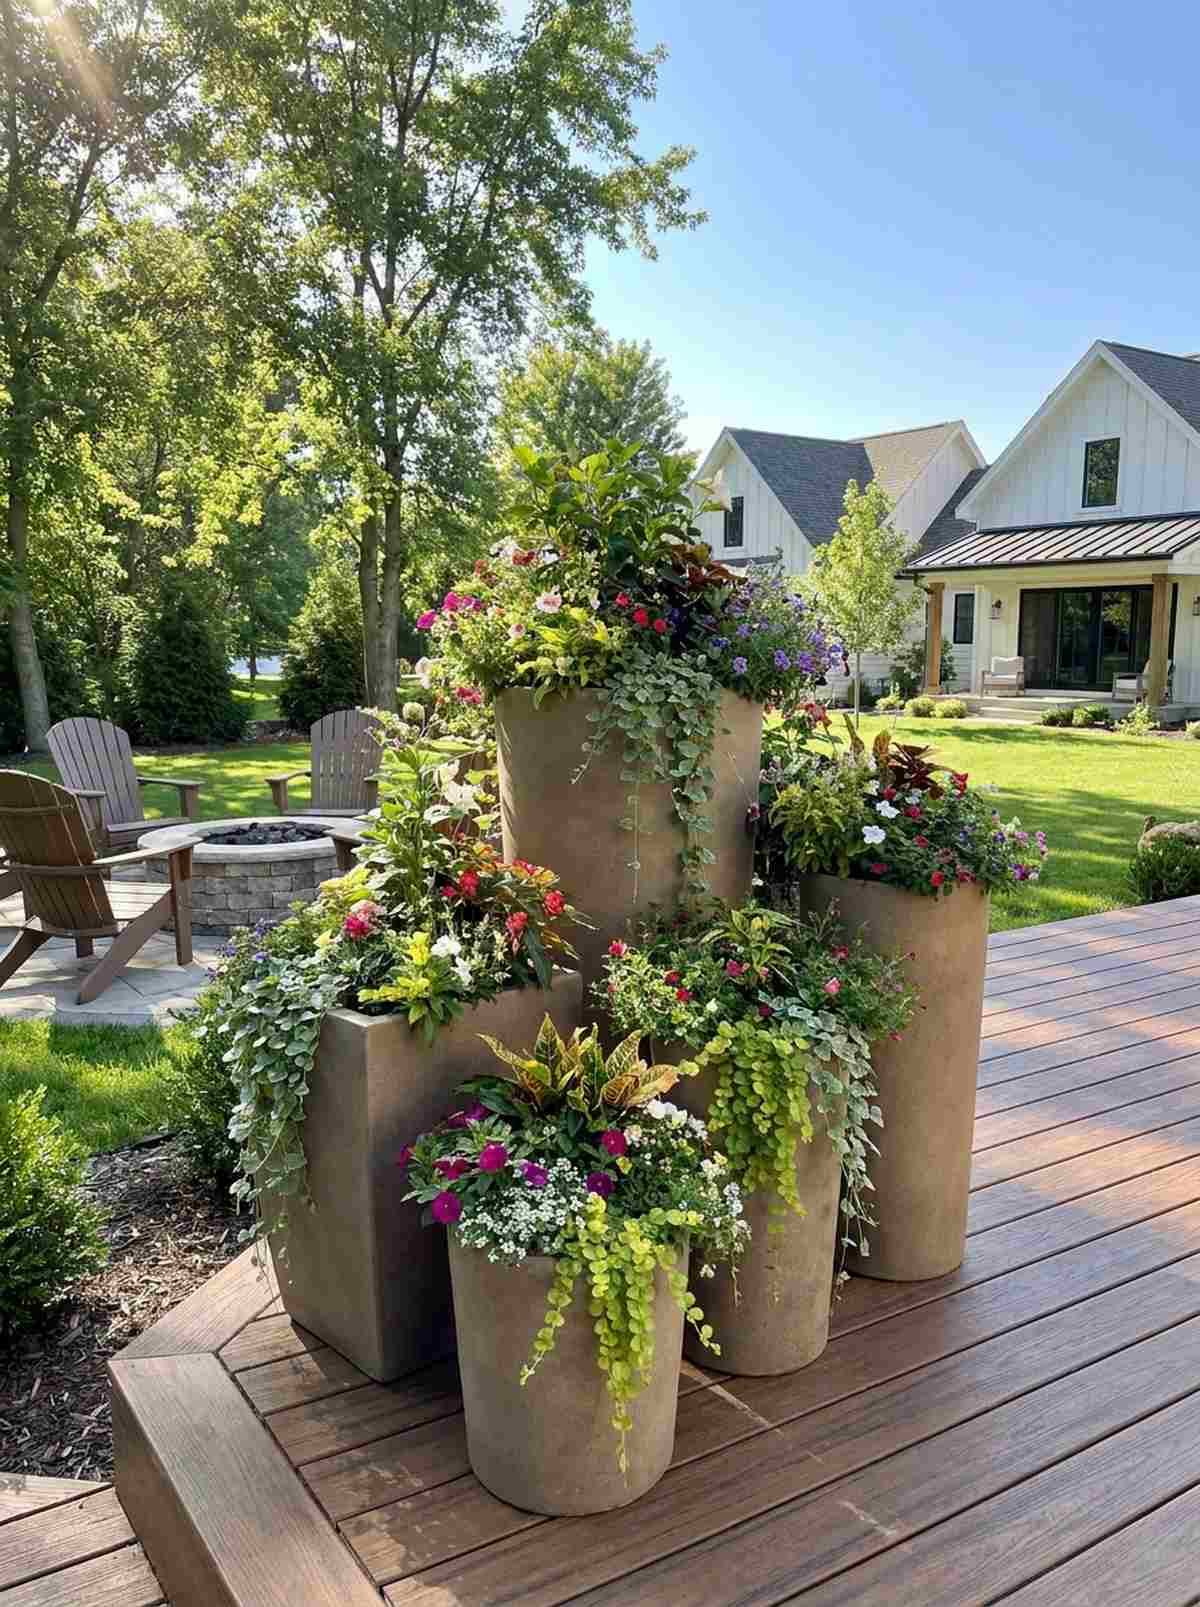
Creates a massive, cascading waterfall of colors and textures in an empty corner. Clustering oversized pots of varying heights is the best way to fake a mature landscape.
Ignore the outdated advice that you need to tear up your patio to plant trees. Using giant, lightweight resin planters gives a surprisingly premium look and provides massive visual impact.
You can execute a premium cluster for $200–$400.
- Key Materials: Fiberglass/resin planters, premium potting soil.
- Vibe / Style: Curated resort courtyard.
- Difficulty: Easy weekend potting.
- Budget Breakdown: 3 Large Planters: $250 | Plants/Soil: $100.
- Creator’s Tip: Fill the bottom half of massive planters with empty plastic water bottles before adding soil to save money and keep them lightweight.
- Smart Sourcing: Lightweight faux-stone resin planters and premium moisture-control potting mix.
51. Integrated Planter Boxes in Seating Walls
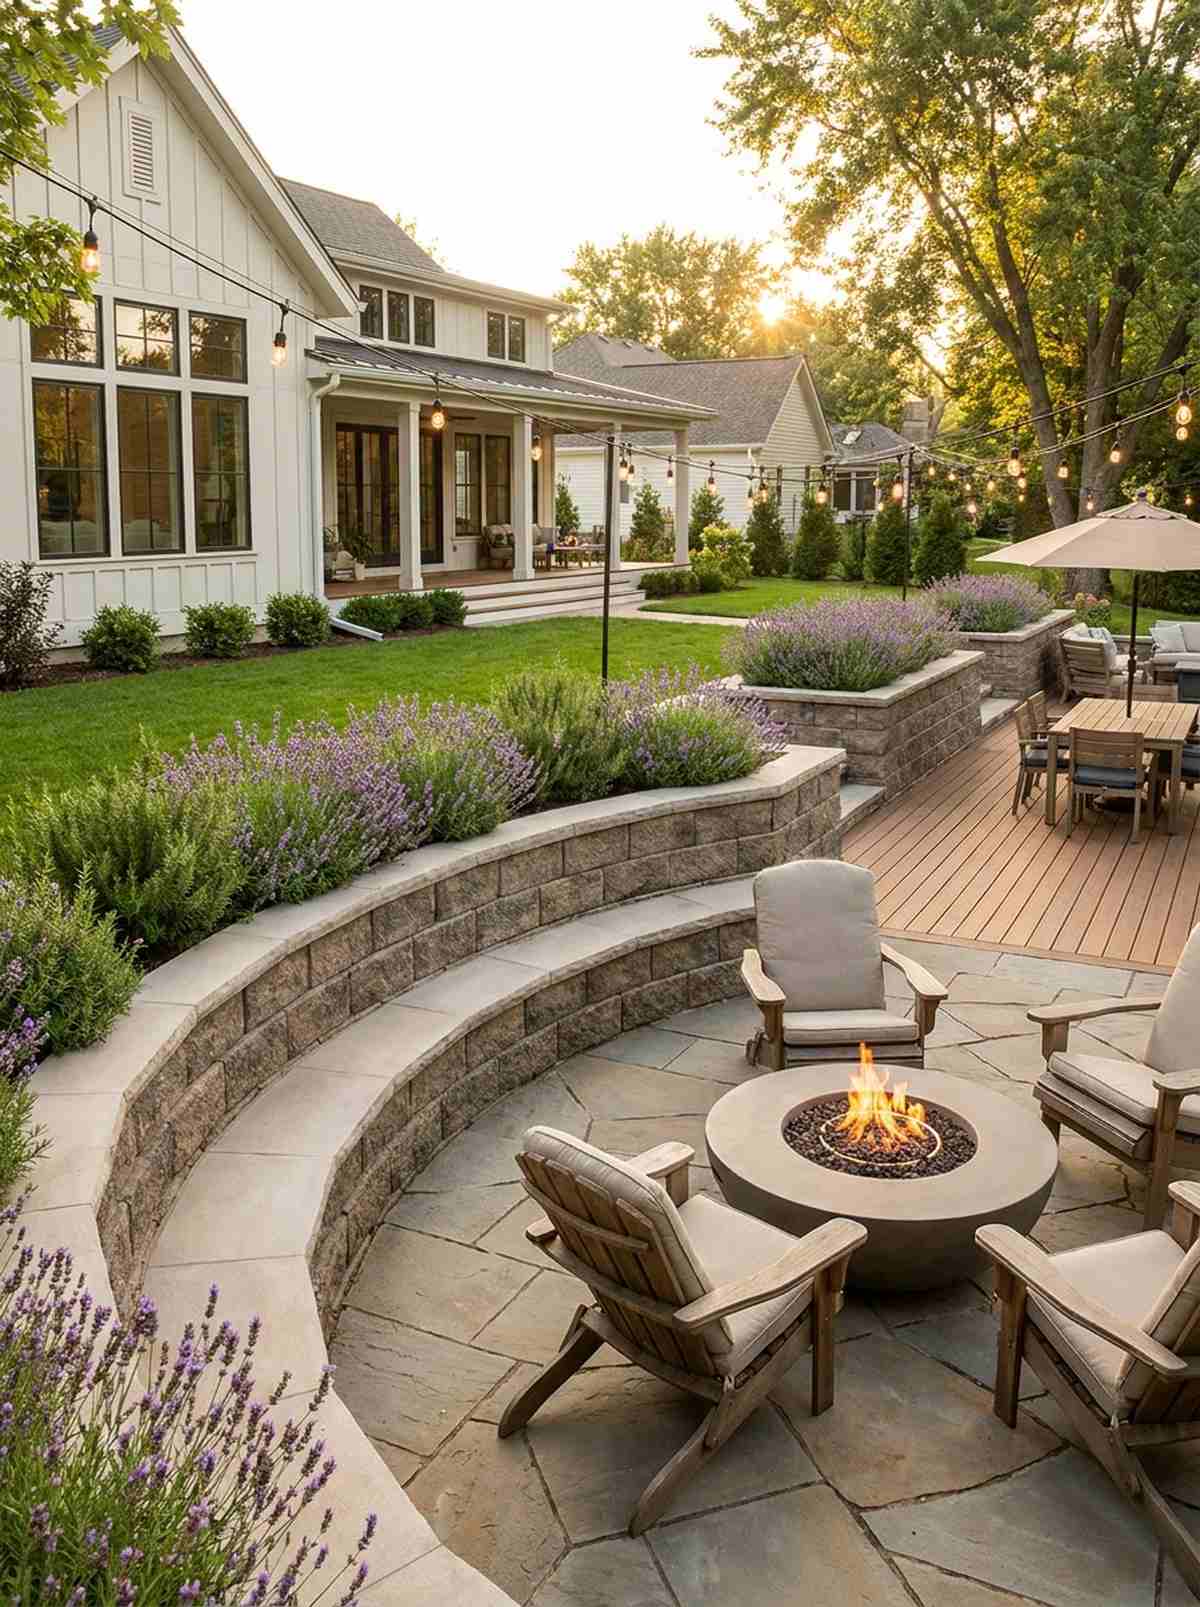
Surrounds your guests with fragrant rosemary and lavender right at shoulder height. Hollow concrete block retaining walls capped with soil are the ultimate dual-purpose architecture.
Professional designers gatekeep this specific technique: embedding the greenery directly into the hardscape. It completely destroys the myth that concrete has to feel cold, elevating your outdoor living area effortlessly.
Adding planters to a wall build costs an extra $100 in liners and soil. Save this to your patio design board.
- Key Materials: Masonry blocks, heavy plastic liners, drain pipes.
- Vibe / Style: Integrated modern organic.
- Difficulty: Moderate masonry DIY.
- Budget Breakdown: Liners: $40 | Soil/Plants: $80.
- Creator’s Tip: Drill 1-inch weep holes at the base of the planter section and insert PVC pipe so excess water drains out the back, not onto the seating area.
- Smart Sourcing: Heavy-duty plastic planter box liners and perforated drainage pipe kits.
52. Vertical Herb Garden Near Kitchen
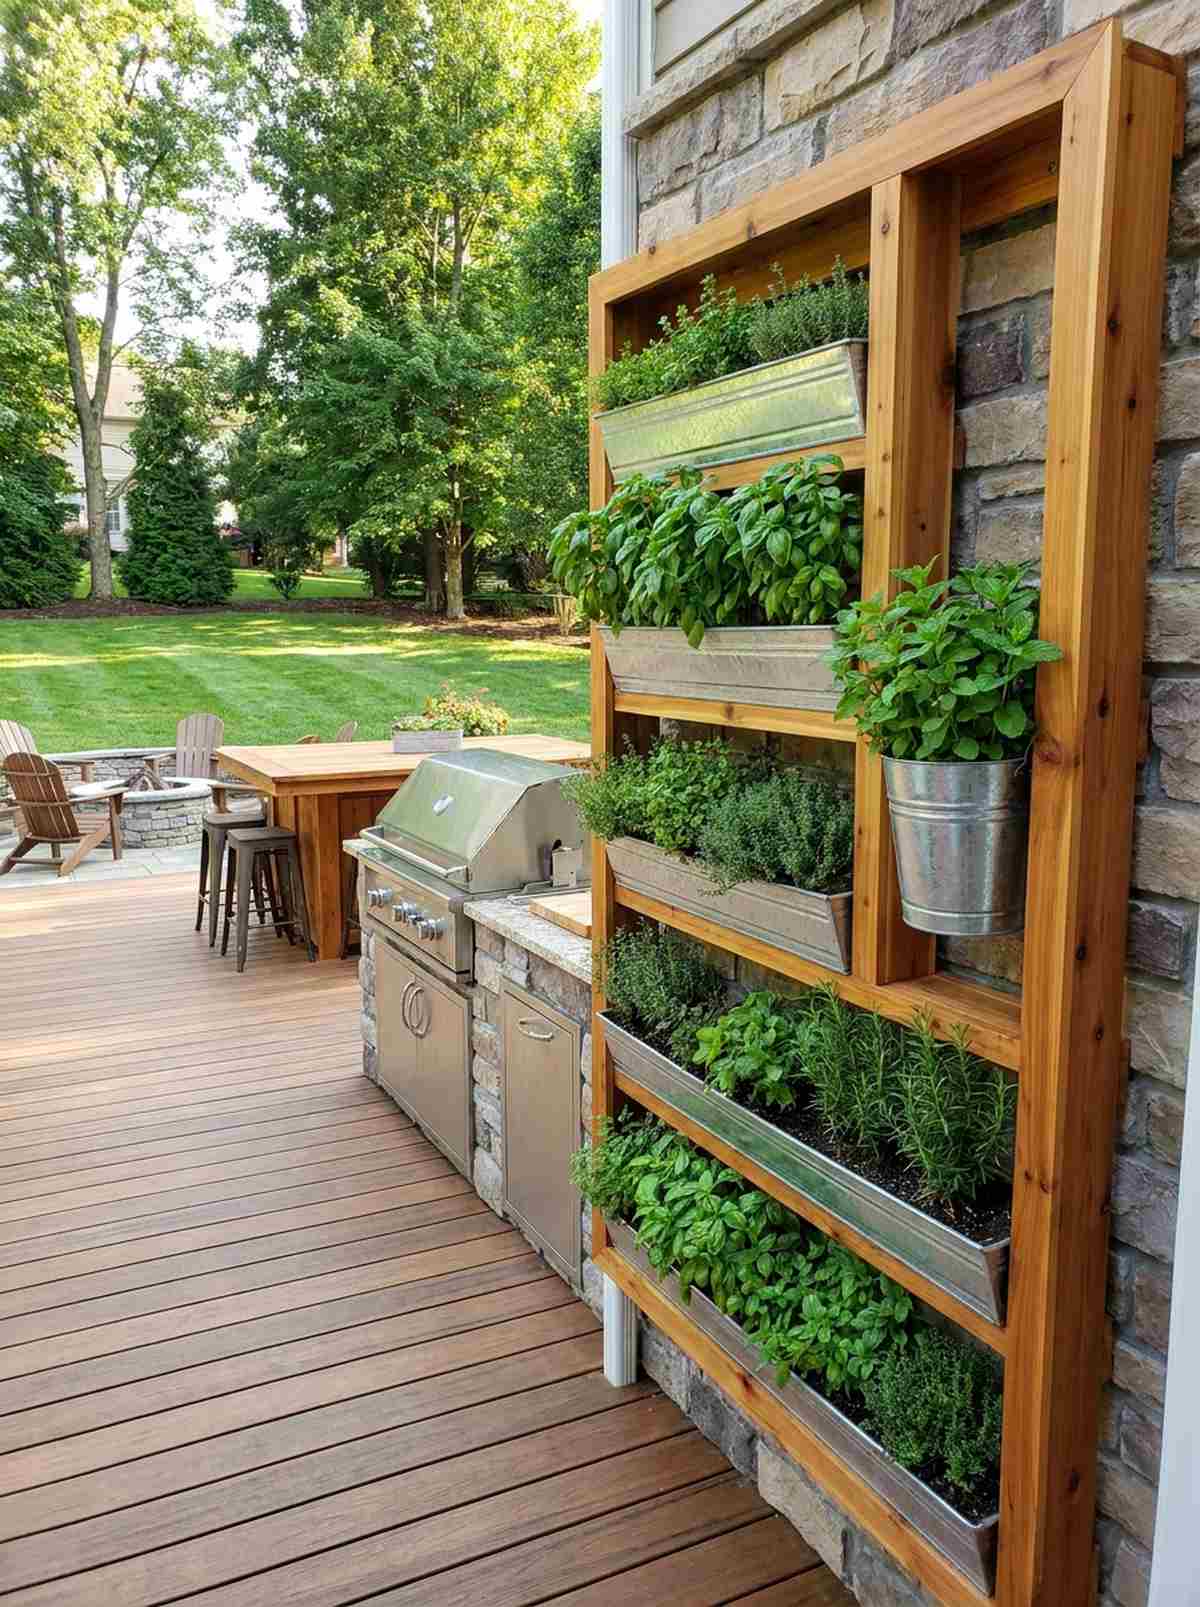
Puts fresh basil and thyme literally arm’s length from your grill station. A wall-mounted tiered herb rack is the ultimate functional aesthetic for backyard chefs.
Amateurs often ruin their herbs by leaving them in tiny plastic store pots on the ground. Sourcing a sleek cedar wall rack yields a premium aesthetic and keeps pests entirely away from your food.
You can build or buy a beautiful cedar rack for $50–$100.
- Key Materials: Cedar framing, galvanized metal troughs.
- Vibe / Style: Farm-to-table culinary prep.
- Difficulty: Easy wall-mount setup.
- Budget Breakdown: Wall rack: $60 | Herbs: $20.
- Creator’s Tip: Plant mint in its own isolated galvanized bucket; if you plant it with other herbs, its aggressive roots will choke everything else out.
- Smart Sourcing: Wall-mounted cedar vertical planters and galvanized metal herb trough starter kits.
53. Green Roof on Pergola or Shed
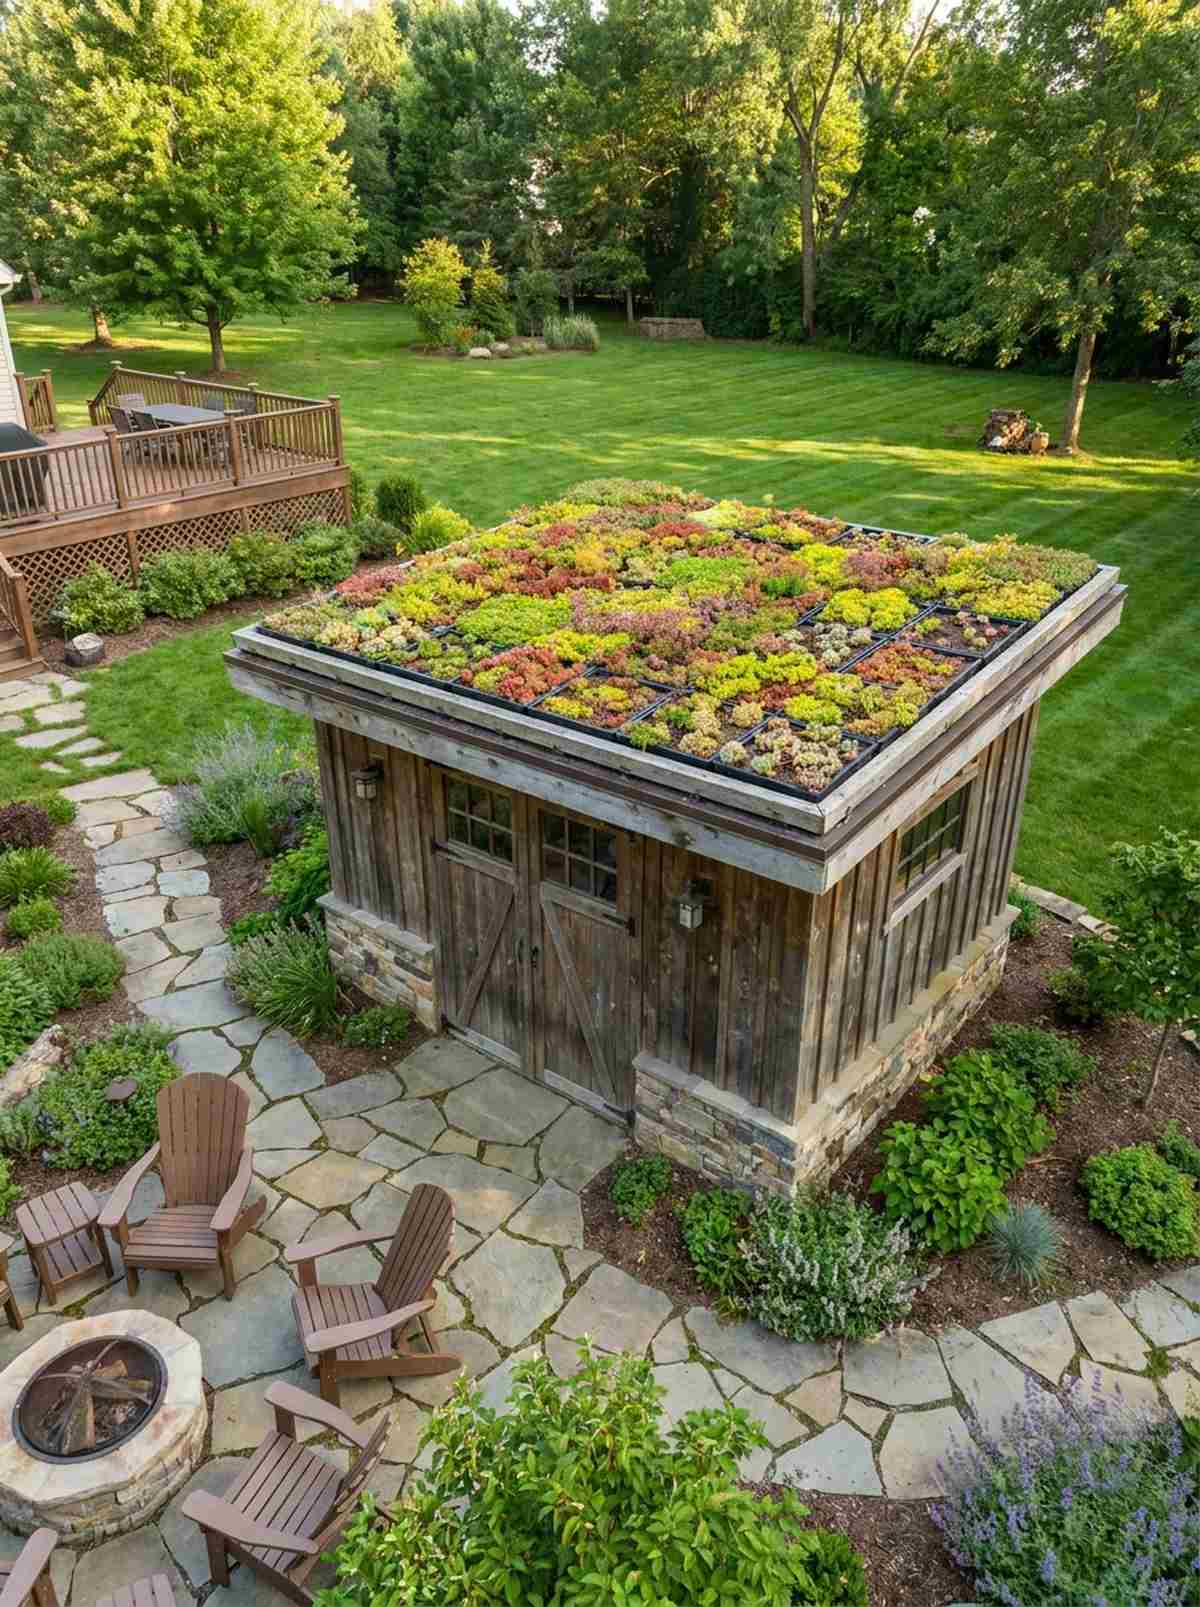
Looks like a hobbit house seamlessly blending into the surrounding environment. Shallow sedum trays placed over a sturdy roof create an unbelievable focal point.
This completely flips the traditional script of ugly asphalt shed roofs. Installing a living roof looks far more expensive than it is and instantly drops the temperature inside the structure.
A DIY green roof tray system costs about $10–$15 per square foot. Pin this for a massive aesthetic flex.
- Key Materials: EPDM rubber membrane, modular sedum plant trays.
- Vibe / Style: Eco-friendly modern landscape.
- Difficulty: Advanced DIY (requires heavy structural load capacity).
- Budget Breakdown: Membrane: $150 | Plant trays: $400.
- Creator’s Tip: Never attempt this without consulting a structural load chart; wet dirt weighs an insane amount and will crush standard shed framing.
- Smart Sourcing: Modular pre-grown sedum green roof trays and heavy-duty EPDM waterproof membrane rolls.
54. Natural Stone and Wood Material Palette
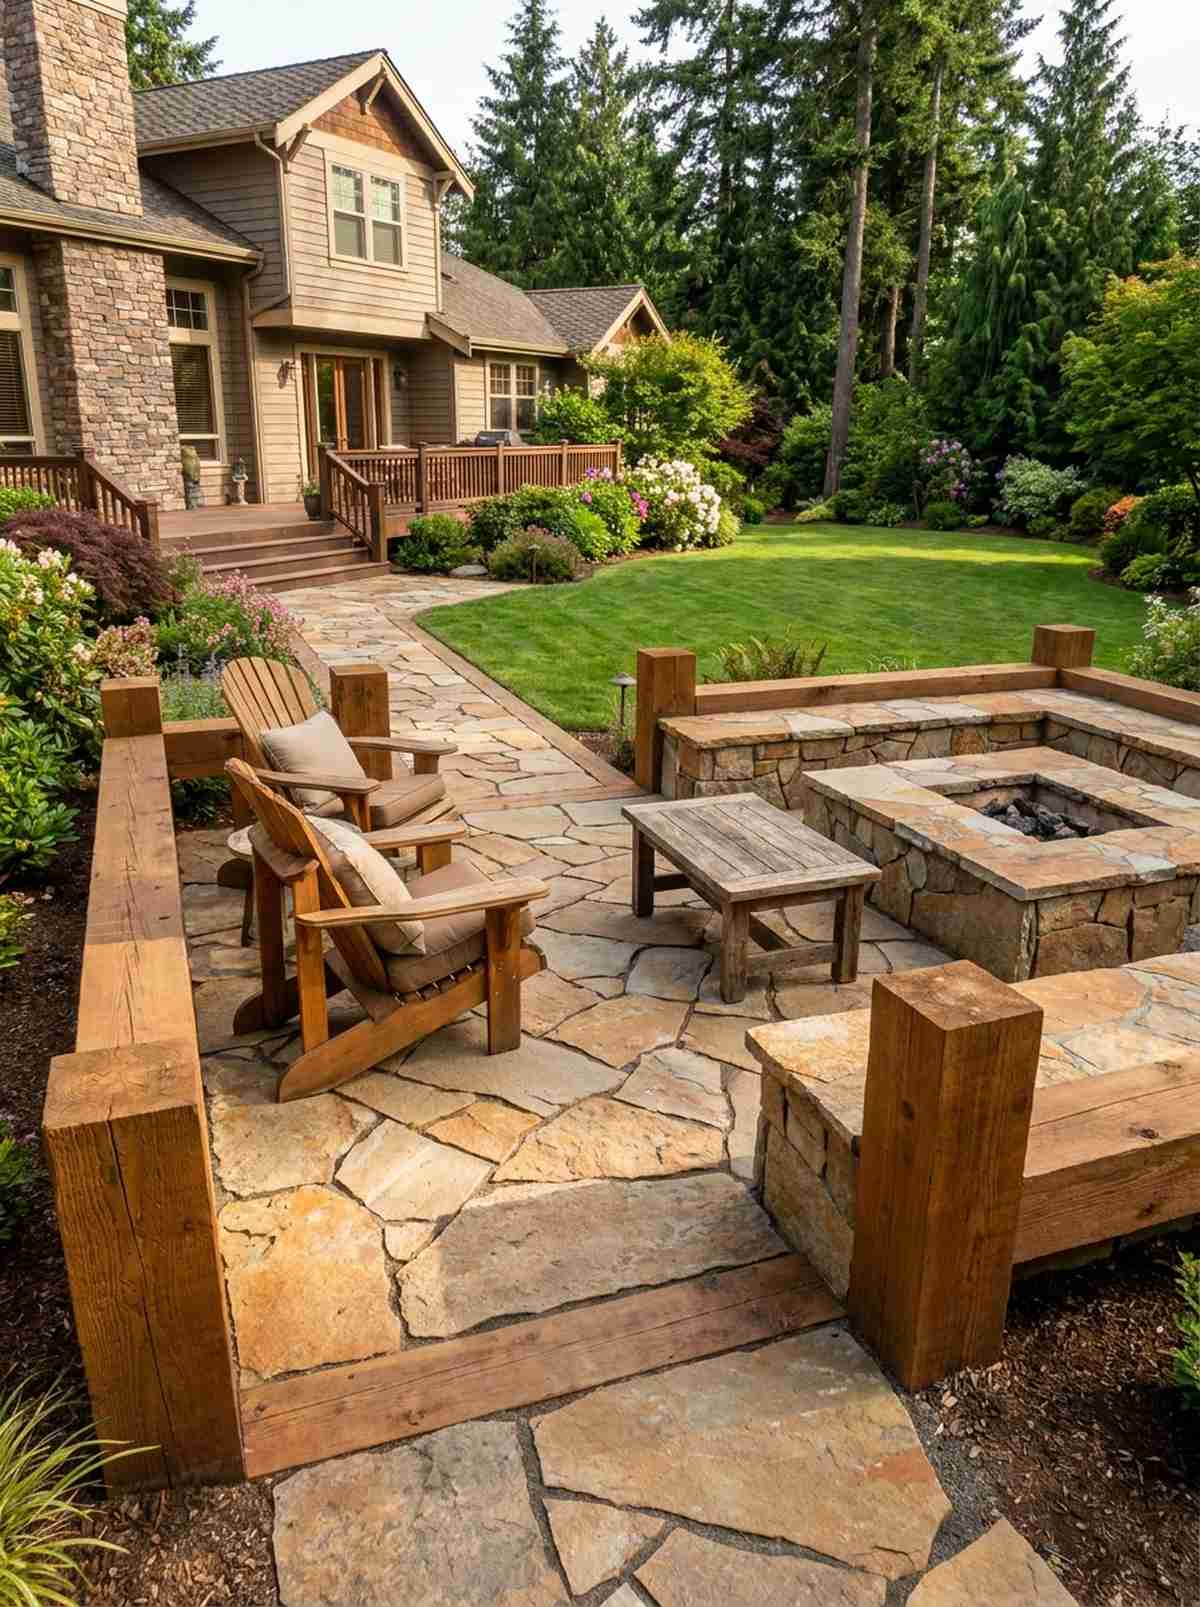
Emanates a rugged, timeless beauty that synthetic materials can never match. Combining rough-cut flagstone with thick cedar timbers is the holy grail of biophilic design.
Most contractors push stamped concrete, but authentic stone gives a surprisingly premium look. This layout completely destroys the myth that modern spaces have to look sterile.
Investing in natural stone pallets usually runs $500–$1,500 depending on the square footage.
- Key Materials: Irregular flagstone, thick timber accents.
- Vibe / Style: Authentic mountain lodge.
- Difficulty: Heavy manual labor.
- Budget Breakdown: Stone pallet: $800 | Stone dust base: $150.
- Creator’s Tip: Sweep polymeric sand into the flagstone joints and wet it down; it hardens like concrete and stops weeds from ruining the aesthetic.
- Smart Sourcing: Premium polymeric jointing sand (bulk pack) and heavy-duty steel landscape tampers.
If you love smart setups, the next concept is about to blow your mind with its simplicity…
Technology-Integrated Outdoor Spaces
Smart home integration, automated systems, and audio-visual technology enhance outdoor living functionality.
55. Smart Hub Controlled Lighting System
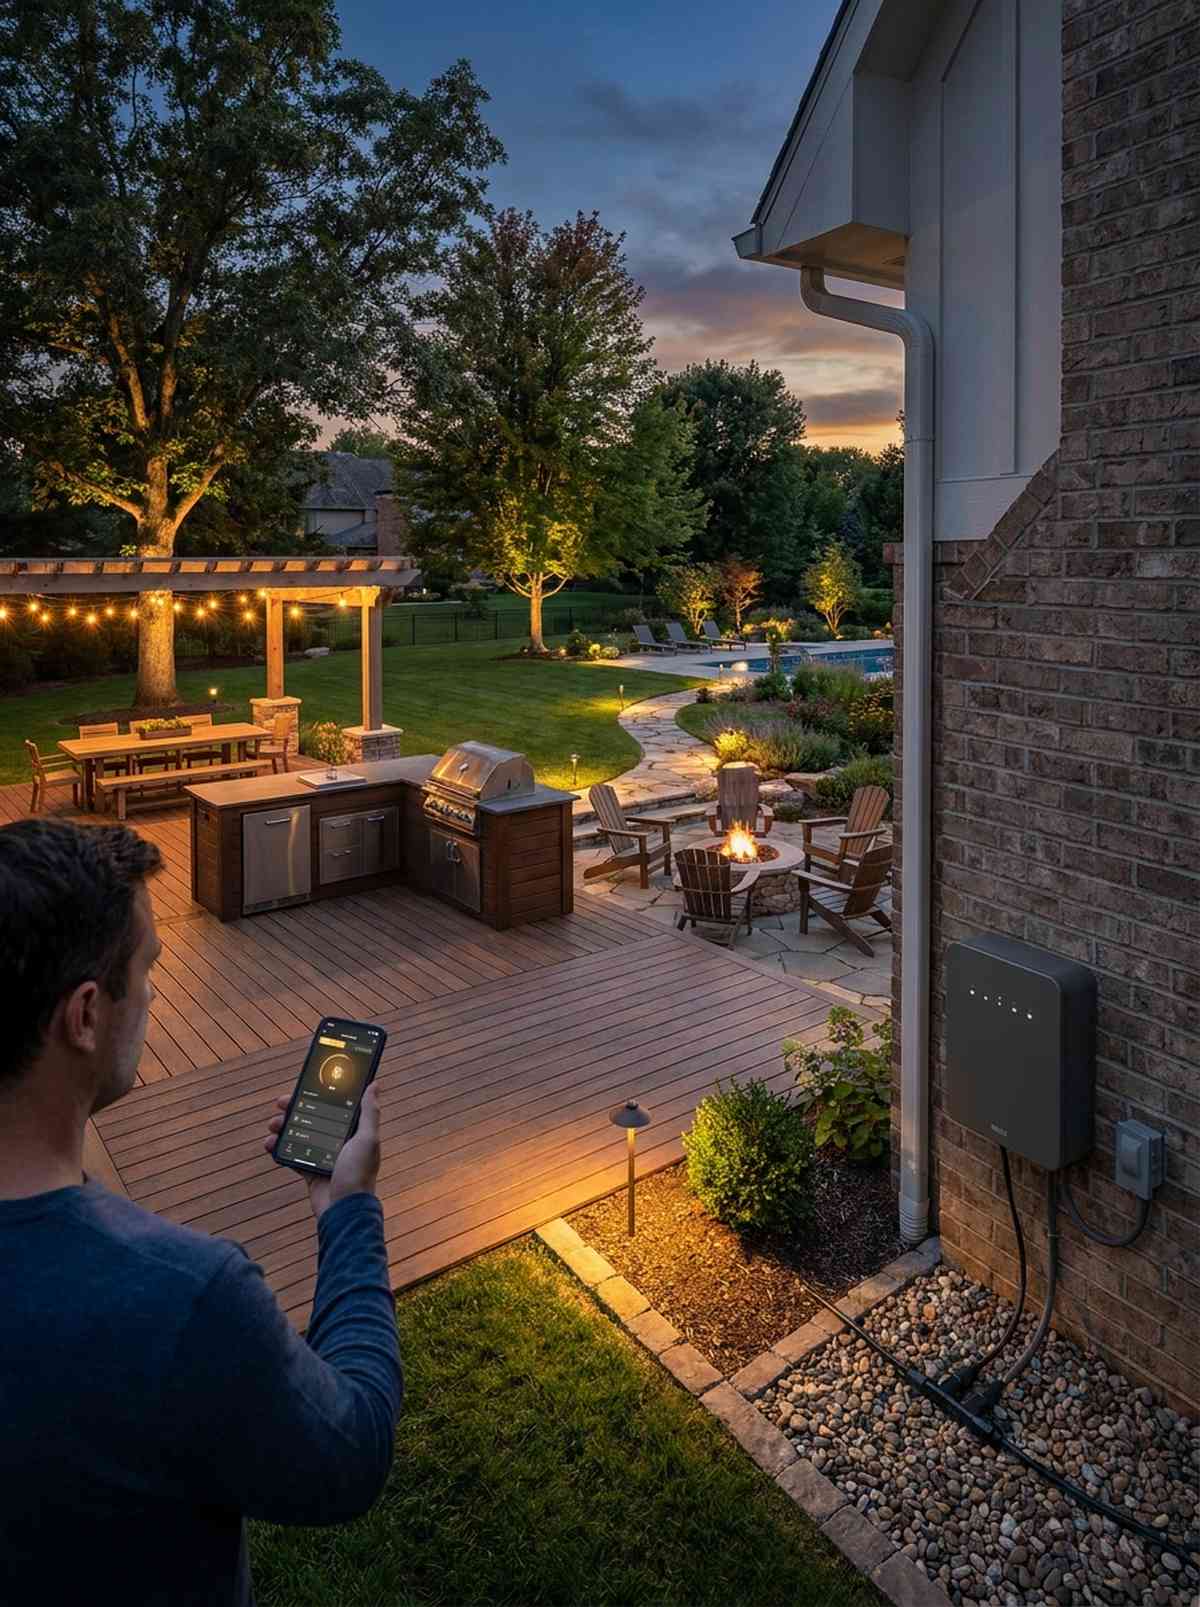
Turns your entire backyard on with a single voice command as you step outside. Wi-Fi enabled low-voltage transformers are the central brain of a high-tech patio.
Ignore the outdated advice about manual timer dials that break every season. Upgrading to a smart hub delivers a designer-level finish, looking far more expensive than it is and perfectly orchestrating your outdoor living ideas.
A smart transformer upgrade costs roughly $100–$250. Save this for your smart home integration.
- Key Materials: Smart Wi-Fi transformer hub, smartphone app.
- Vibe / Style: Automated luxury estate.
- Difficulty: Easy plug-and-play wiring.
- Budget Breakdown: Smart Transformer: $180.
- Creator’s Tip: Separate your lighting into “Zones” (e.g., Dining, Walkway, Trees) so you can dim the eating area while keeping the pathways bright.
- Smart Sourcing: Wi-Fi enabled low-voltage landscape transformers and waterproof direct burial wire splices.
56. Weather-Rated Outdoor Speakers
Fills the air with rich, booming bass that completely masks traffic noise. Landscape speakers disguised as rocks or mounted under eaves are mandatory for serious entertaining.
Amateurs often ruin parties with tiny, tinny Bluetooth speakers on a table. Sourcing dedicated marine-grade audio yields a premium aesthetic and envelops the entire yard in perfect sound.
A solid 4-speaker system with an amp costs about $300–$600.
- Key Materials: Marine-grade speakers, outdoor speaker wire.
- Vibe / Style: High-end beach club audio.
- Difficulty: Moderate wiring DIY.
- Budget Breakdown: Speakers (x4): $250 | Amp/Wire: $150.
- Creator’s Tip: Point the speakers back toward the house from the perimeter of the yard; this keeps the music loud for you but quiet for the neighbors.
- Smart Sourcing: Weatherproof rock landscape speaker kits and direct burial outdoor speaker wire (bulk spool).
57. Motorized Screens and Shades
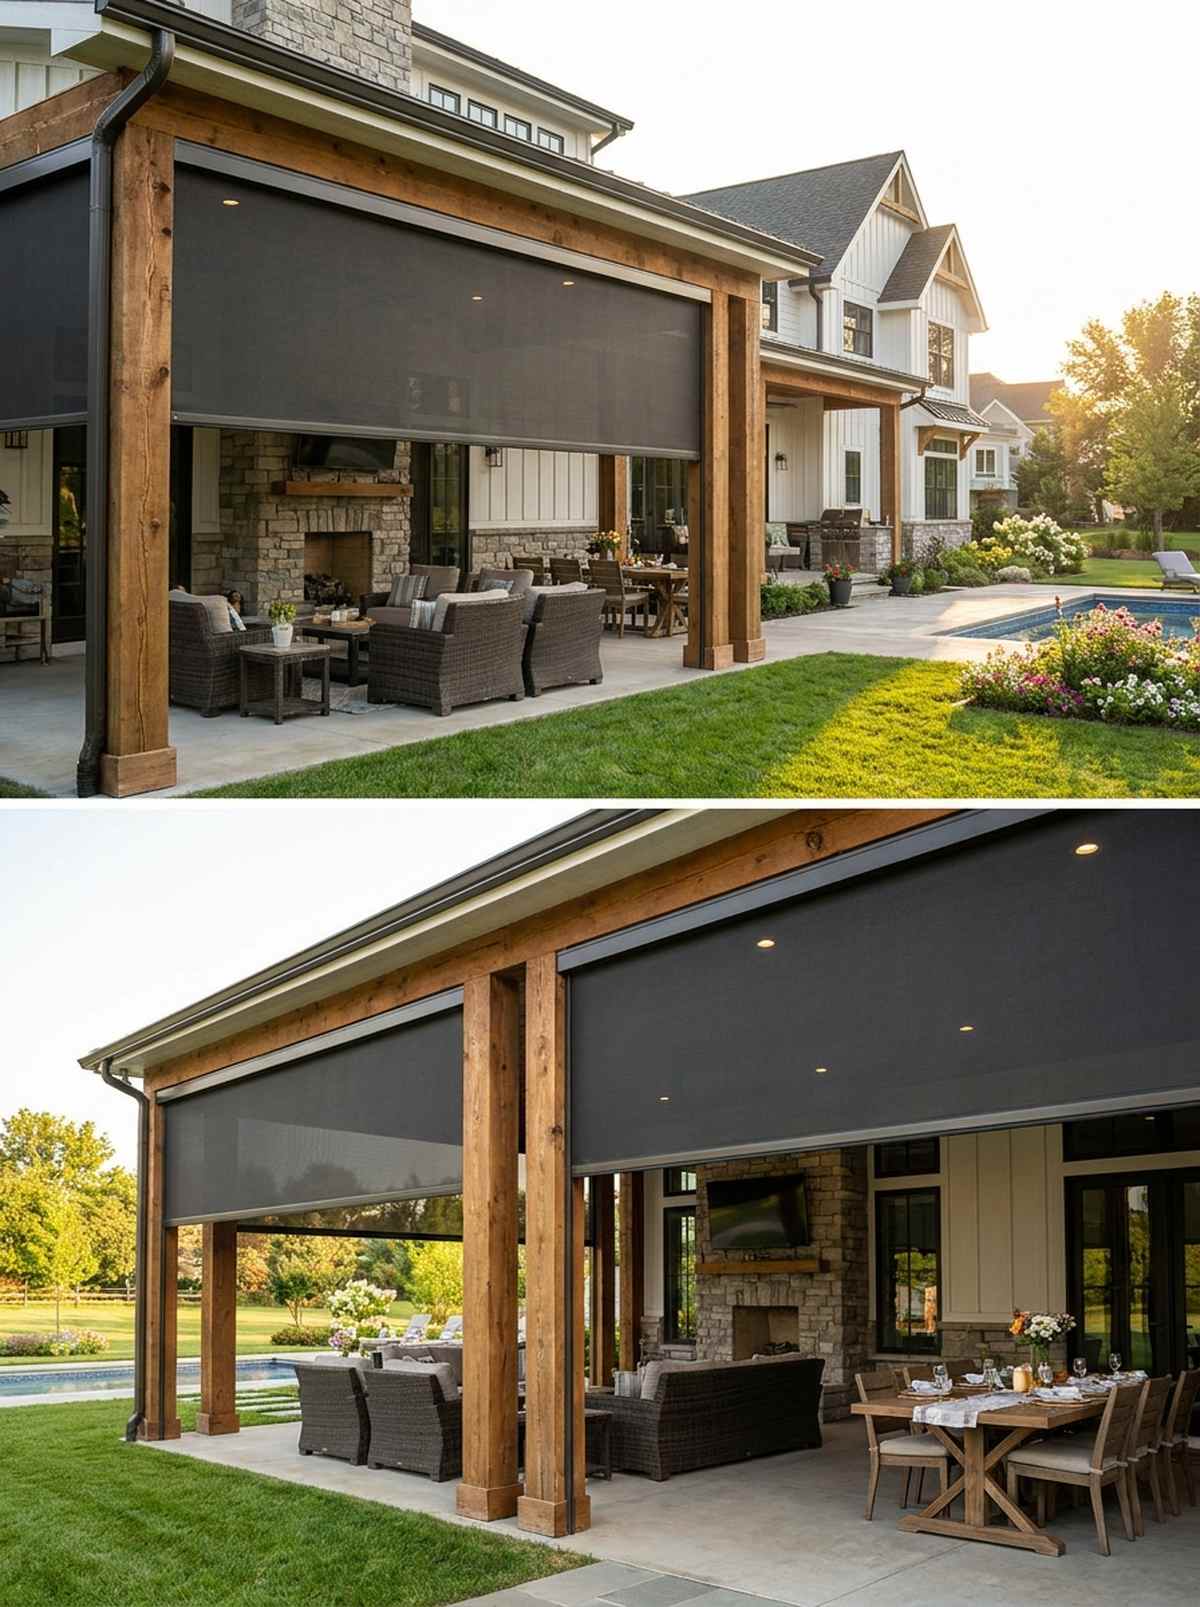
Drops down like a magic shield, instantly blocking glaring sun and ravenous mosquitoes. Track-guided motorized screens transform an open patio into a bug-free screened porch at the push of a button.
Professional designers gatekeep this specific technique: embedding the tracks directly into the timber columns so they are completely invisible when rolled up. This completely flips the traditional script on clunky screens.
Custom motorized screens range from $1,500–$3,500 per opening. Pin this if you hate bugs but love open air.
- Key Materials: Heavy-duty mesh, aluminum housing, tubular motors.
- Vibe / Style: Seamless automated luxury.
- Difficulty: Professional installation recommended.
- Budget Breakdown: Motor/Screen kit: $2,000.
- Creator’s Tip: Upgrade to a “solar mesh” which not only stops bugs but also blocks 90% of UV rays, dropping the patio temperature by 15 degrees.
- Smart Sourcing: Motorized outdoor solar screen kits and heavy-duty aluminum screen track channels.
58. Outdoor Television Installation
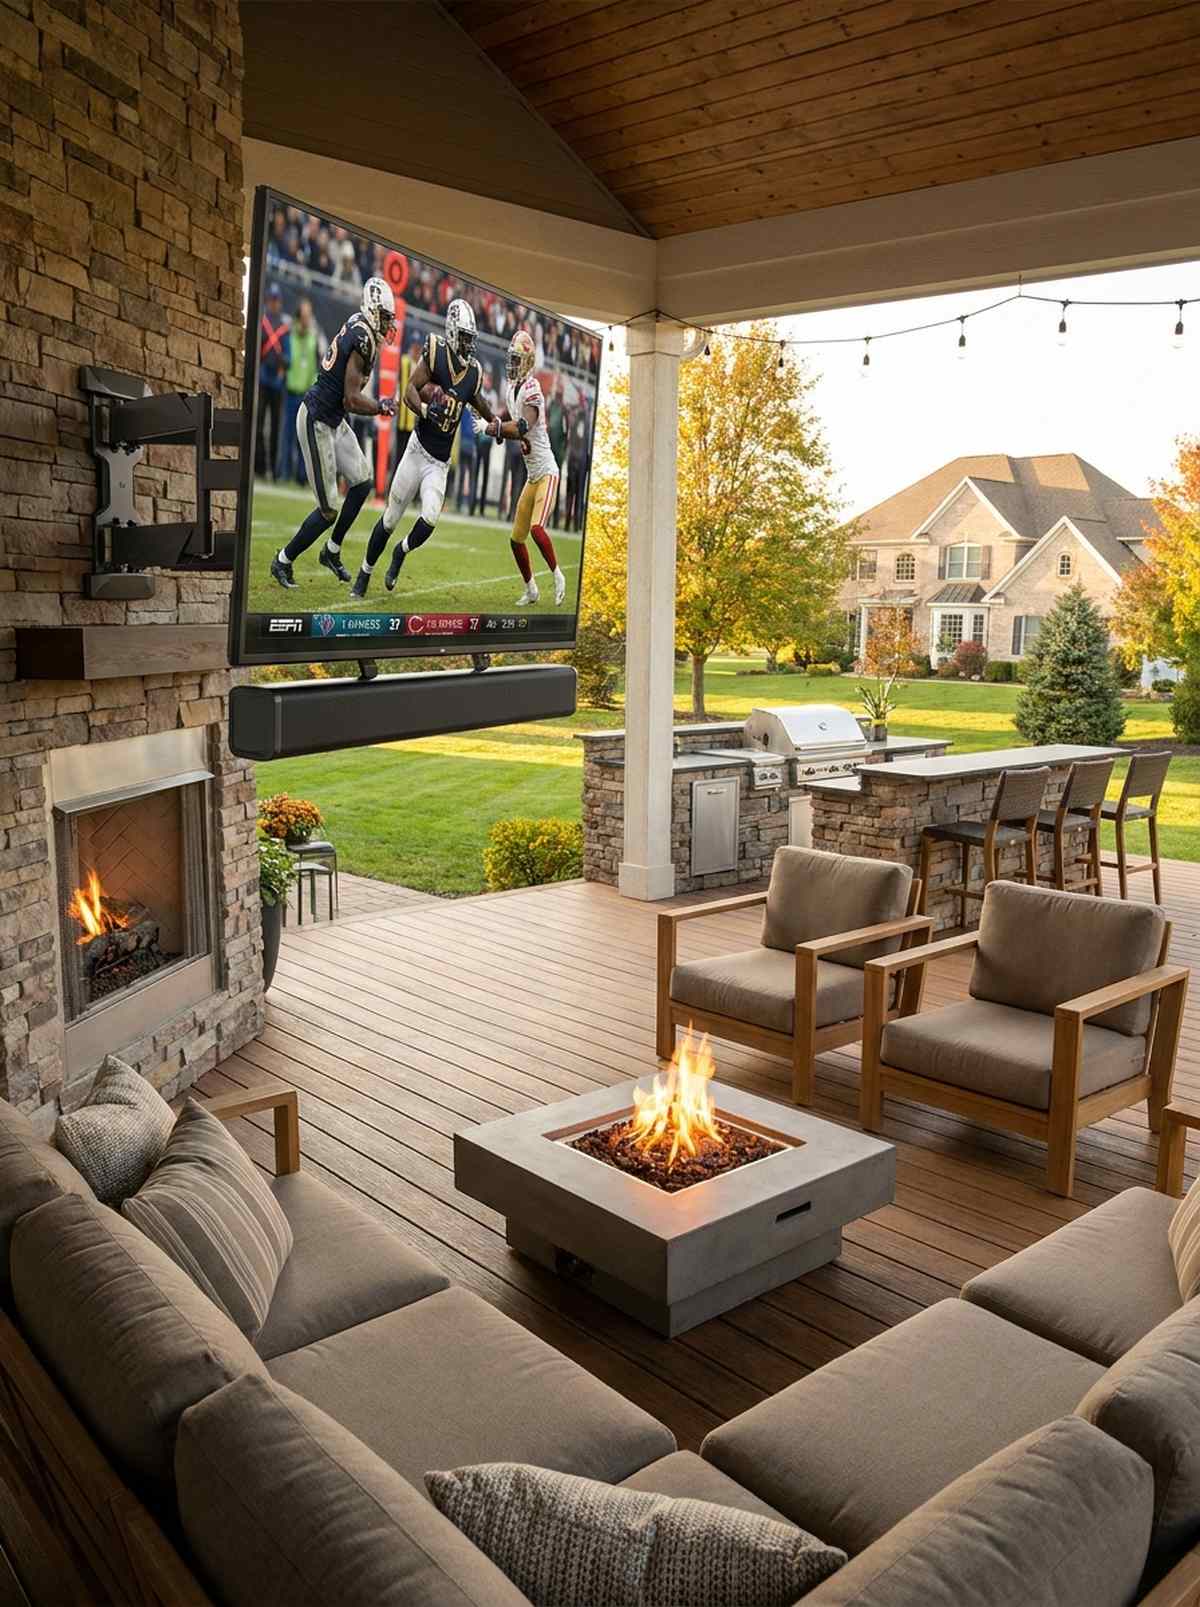
Creates the ultimate open-air sports bar right on your deck. Weatherproof TVs mounted on articulating arms are the holy grail of fall football season.
Most people get this completely wrong by hanging cheap indoor TVs outside that fry in the first humid week. Investing in a sealed, anti-glare unit gives a surprisingly premium look and survives freezing winters.
A true outdoor-rated TV costs between $1,200–$3,000.
- Key Materials: IP-rated outdoor television, rust-proof articulating mount.
- Vibe / Style: VIP luxury sports lounge.
- Difficulty: Moderate mounting DIY.
- Budget Breakdown: Outdoor TV: $1,500 | Mount: $150.
- Creator’s Tip: Buy a high-quality weatherproof soundbar to mount directly under the TV; flat screen speakers sound terrible in open outdoor air.
- Smart Sourcing: Full-sun outdoor-rated televisions and weatherproof outdoor TV soundbar kits.
This final stretch features the absolute best ROI upgrades you can possibly make this season.
Seasonal Extension Strategies
Four-season outdoor living requires heating, cooling, and weather protection systems that adapt to temperature extremes.
59. Outdoor Infrared Heaters
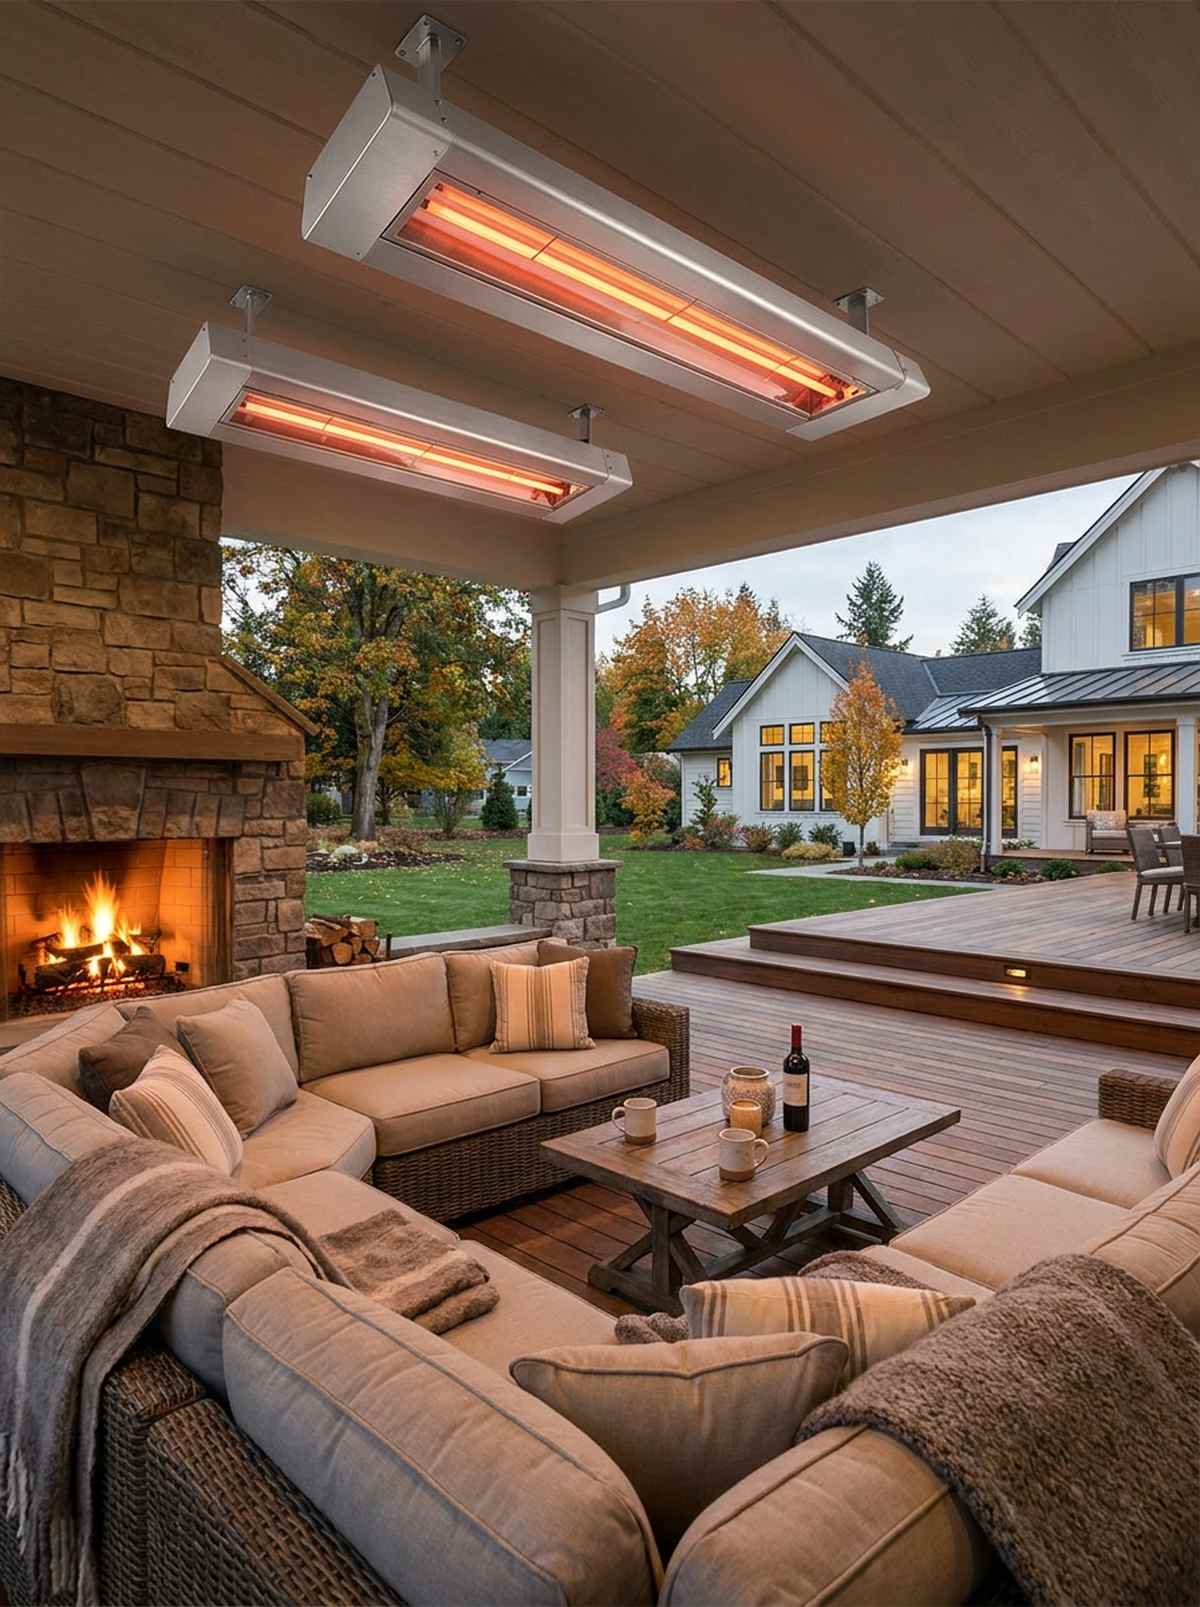
Radiates a deep, penetrating warmth that feels exactly like standing in direct sunlight. Ceiling-mounted infrared heaters are the absolute secret weapon for freezing autumn nights.
While your neighbors huddle around smoky fire pits, electric infrared heaters look far more expensive than they are. This strategy yields a premium aesthetic, allowing you to use your outdoor living area comfortably in December.
A high-quality 240V heater unit runs about $300–$600. Save this to extend your patio season.
- Key Materials: Infrared heating elements, aluminum housing.
- Vibe / Style: Five-star winter resort terrace.
- Difficulty: Advanced (requires 240V electrical wiring).
- Budget Breakdown: Heater unit: $400 | Wiring/Breaker: $100.
- Creator’s Tip: Mount them directly over the seating area pointing straight down; infrared heats objects (people and furniture), not the air.
- Smart Sourcing: Commercial-grade outdoor infrared heaters and heavy-duty flush mount heater brackets.
60. Ceiling Fans for Air Circulation
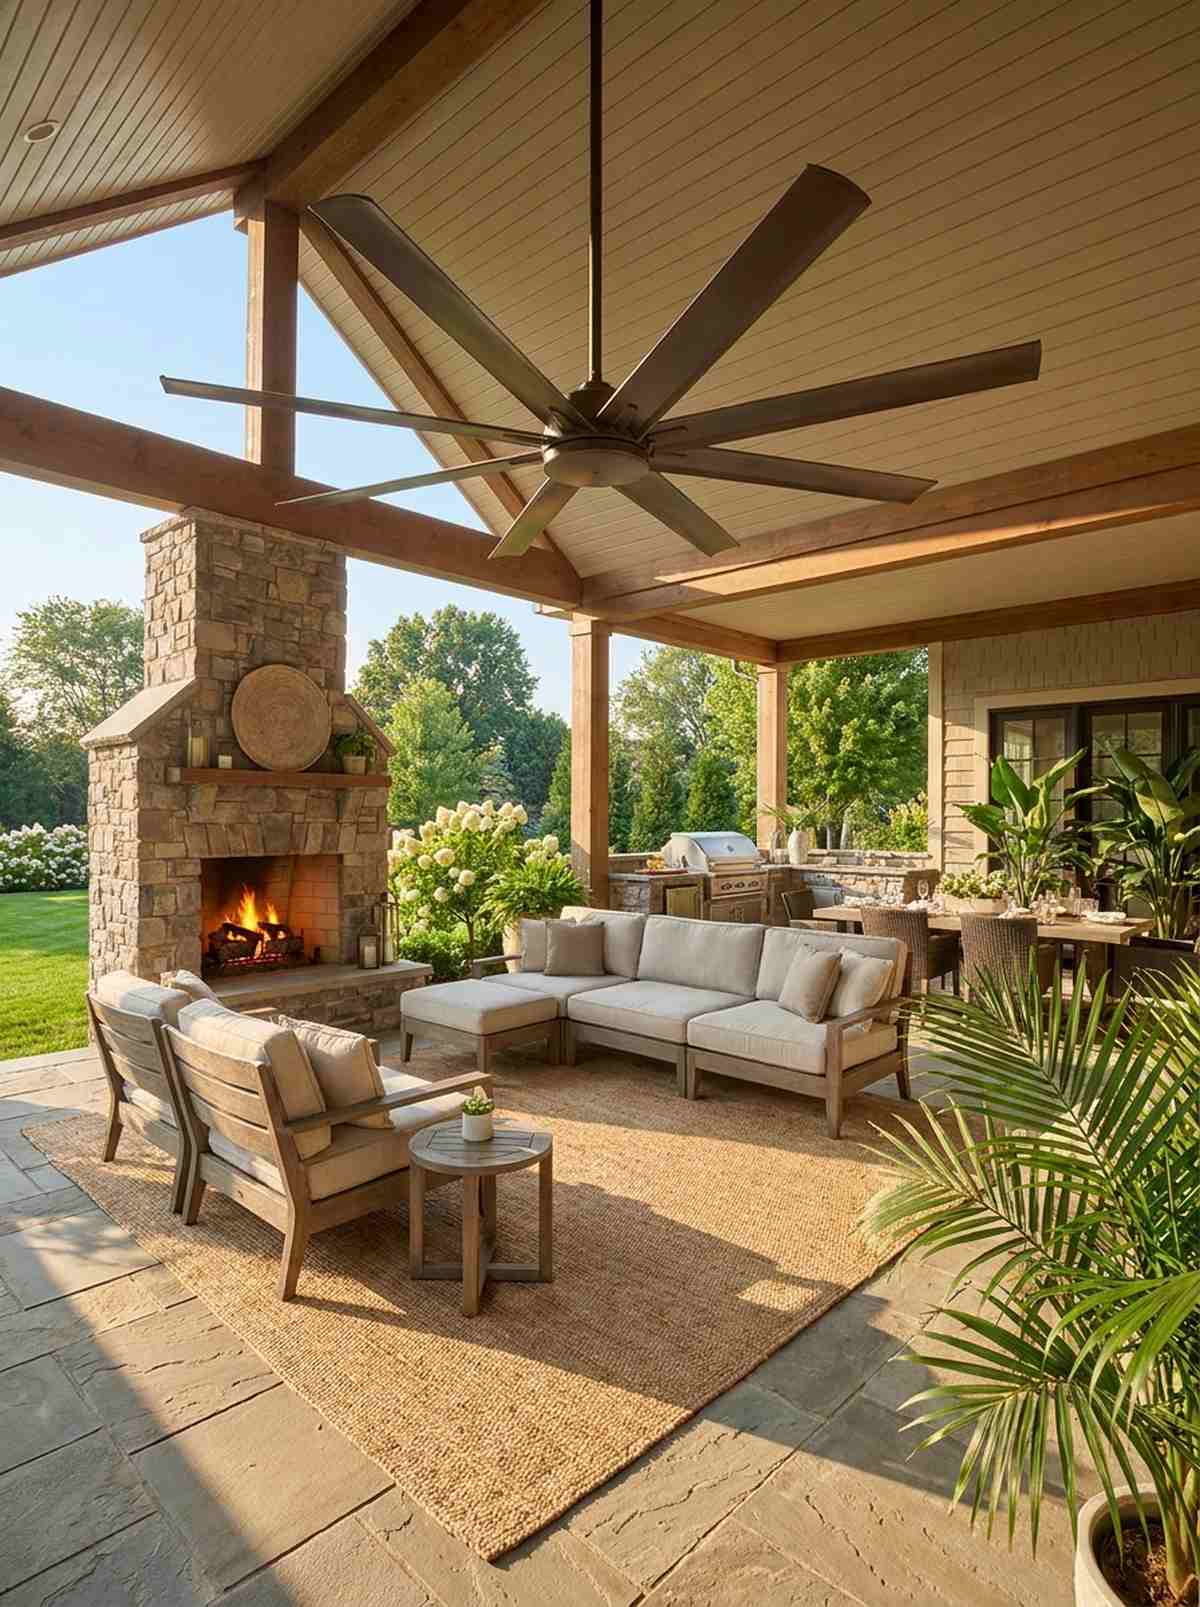
Pushes a massive, cooling breeze that chases away stifling humidity and mosquitoes. Large-blade wet-rated ceiling fans are an absolute necessity under any patio roof.
This layout completely destroys the myth that outdoor spaces have to be sweaty and miserable in August. Sourcing an oversized, modern metal fan gives a surprisingly premium look and drastically improves outdoor living room designs.
You can install a stunning wet-rated fan for $200–$400.
- Key Materials: Wet-rated motor, ABS plastic or metal blades.
- Vibe / Style: Breezy tropical veranda.
- Difficulty: Moderate electrical DIY.
- Budget Breakdown: Fan unit: $250 | Mounting box: $20.
- Creator’s Tip: Ensure the box says “Wet-Rated” if it can get rained on, or “Damp-Rated” if it’s fully covered by a solid roof.
- Smart Sourcing: Large-blade wet-rated outdoor ceiling fans and heavy-duty ceiling fan brace kits.
61. Outdoor Misting System
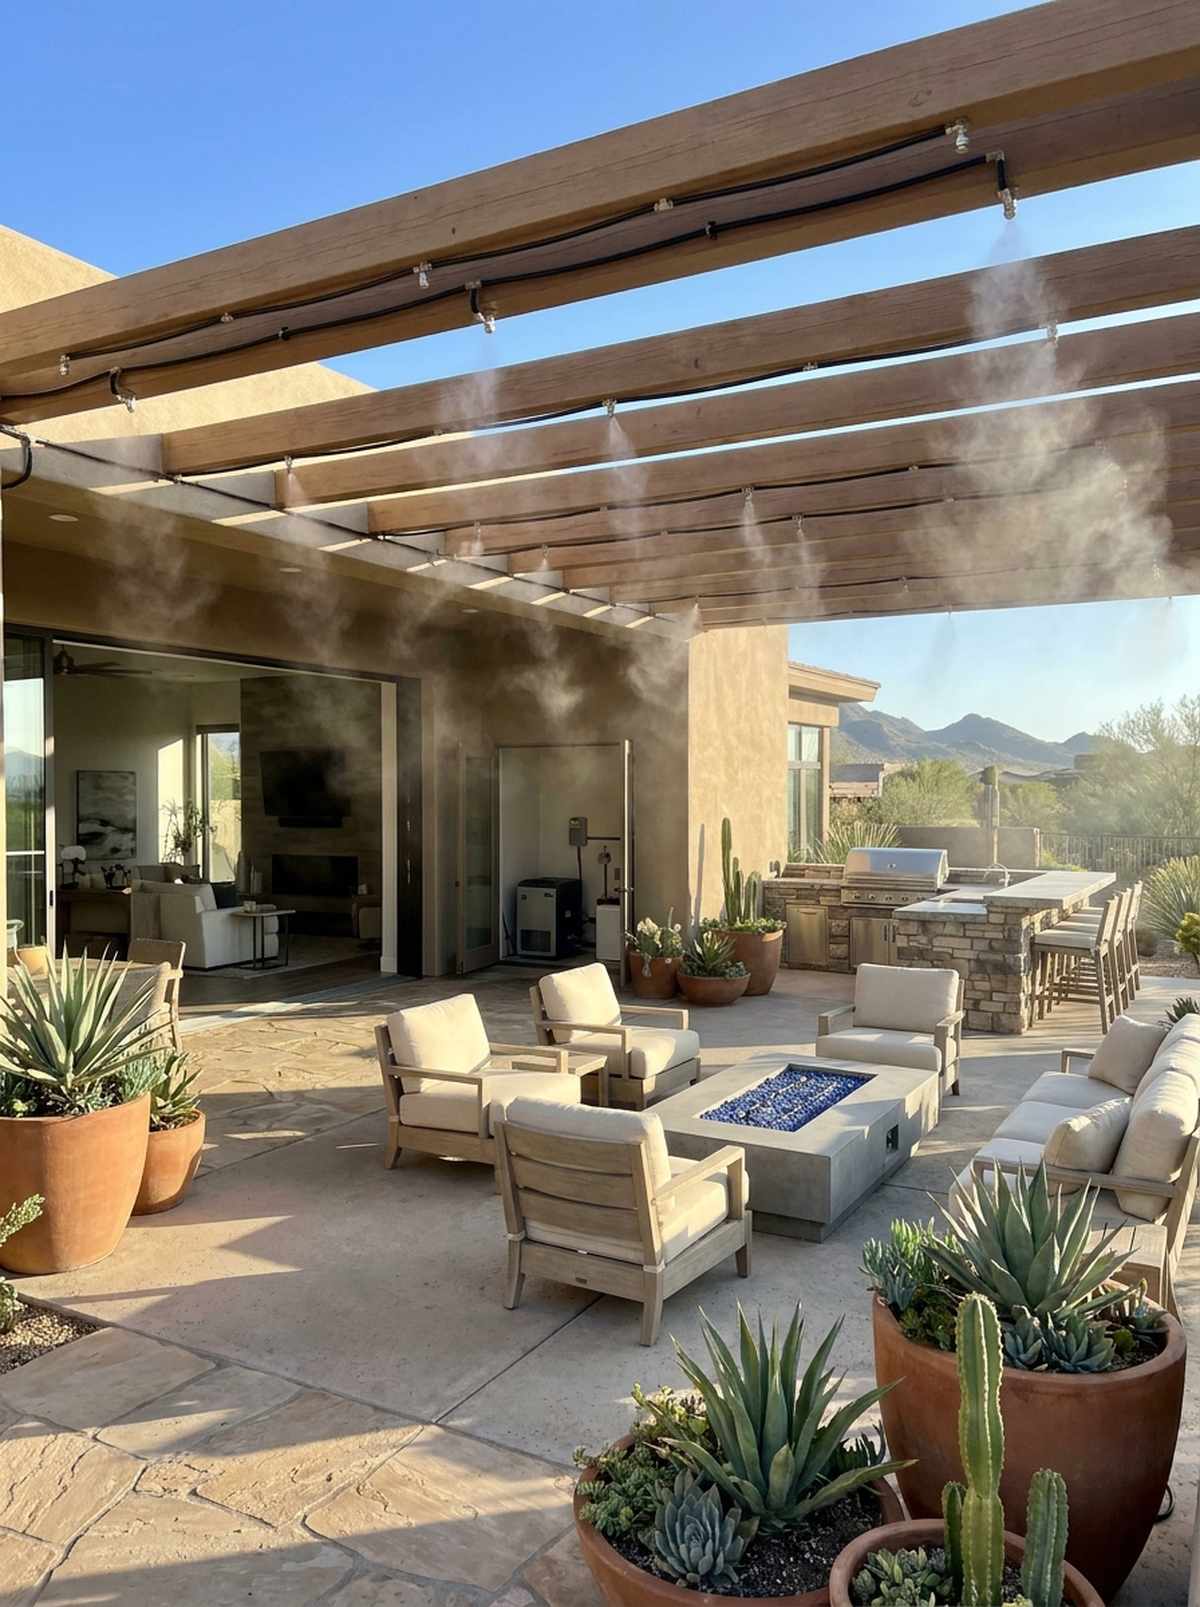
Drops the ambient temperature by 20 degrees, enveloping you in a refreshing, microscopic fog. High-pressure pump misting systems turn blistering concrete patios into cool, livable oases.
Amateurs often ruin their patios with cheap hose-attachment misters that soak everything. Investing in a high-pressure pump system delivers a designer-level finish by flashing the water to vapor instantly.
A proper high-pressure kit costs roughly $400–$800. Pin this for ultimate summer survival.
- Key Materials: High-pressure pump, stainless steel misting nozzles, nylon tubing.
- Vibe / Style: Cool luxury desert resort.
- Difficulty: Moderate plumbing setup.
- Budget Breakdown: Pump/Tubing kit: $500 | Extra nozzles: $50.
- Creator’s Tip: Install an inline calcium filter before the pump; hard water buildup will clog the microscopic nozzles in a matter of weeks.
- Smart Sourcing: High-pressure outdoor patio misting kits and inline calcium water filters (bulk pack).
62. Retractable Awning Over Patio
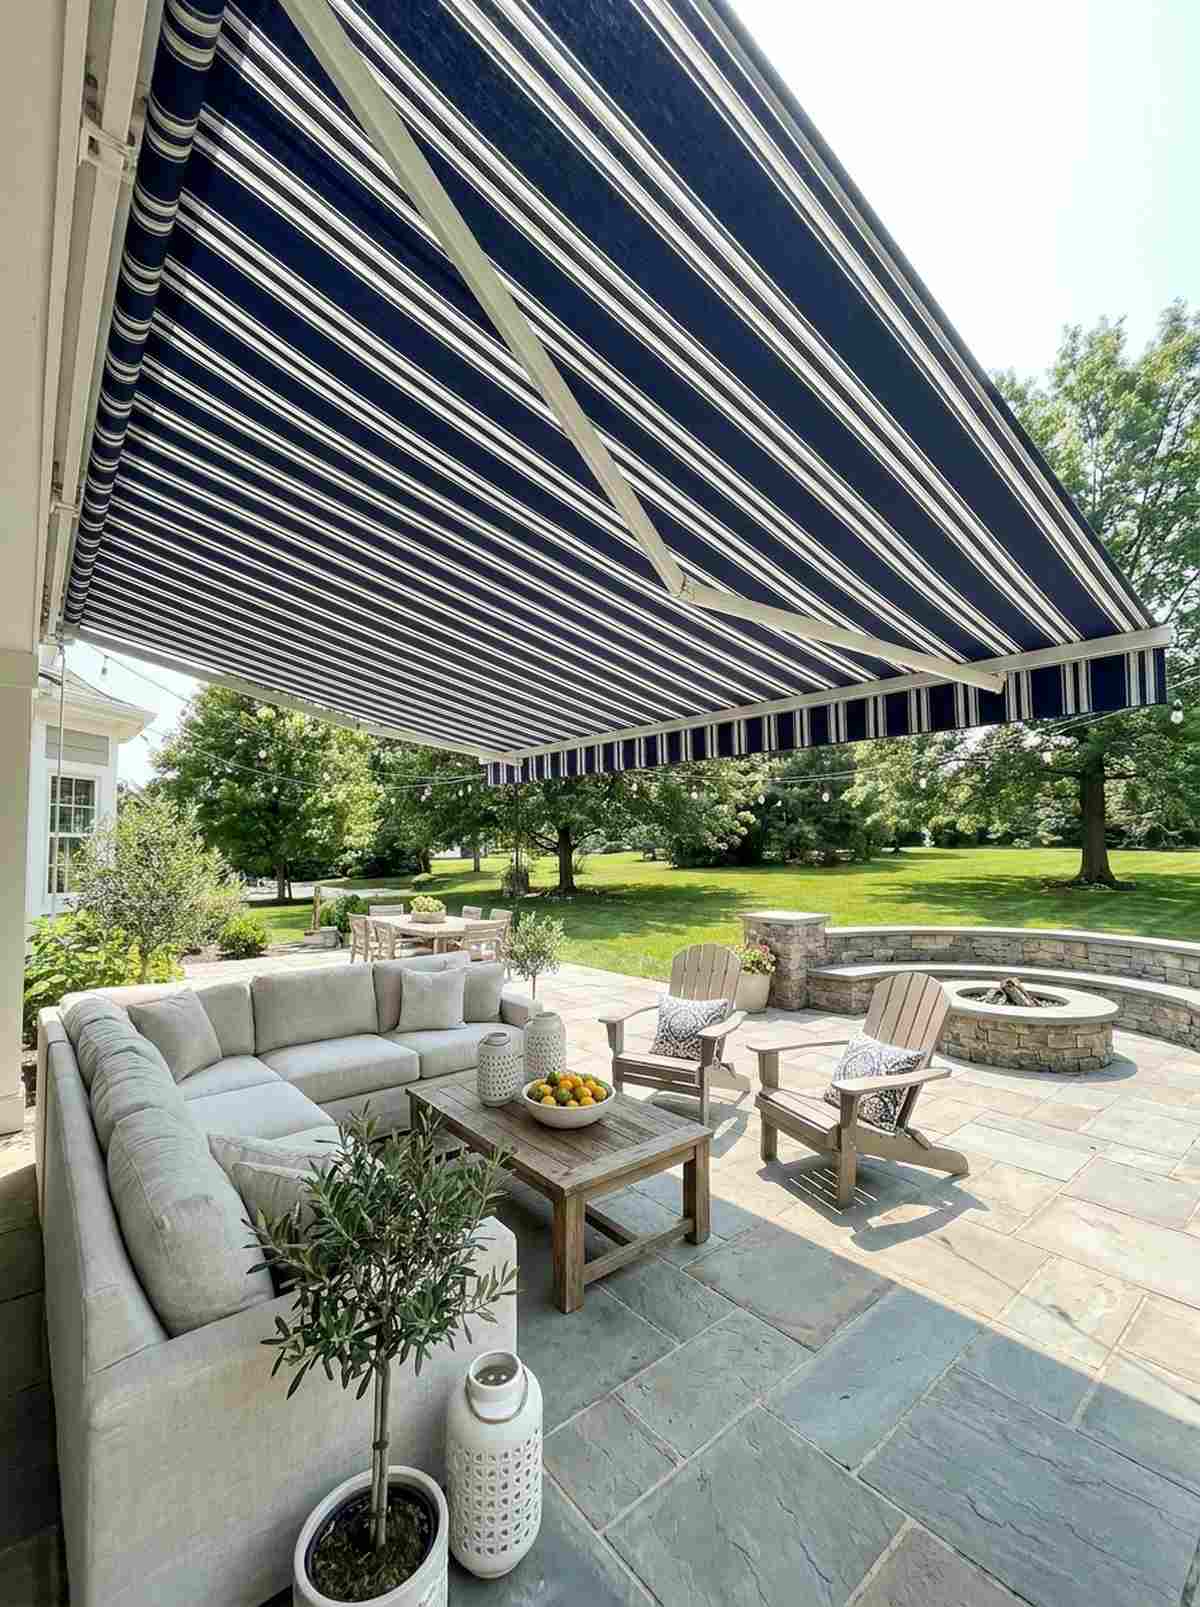
Extends out like a massive sail, instantly transforming a baking slab of concrete into a shaded lounge. Motorized lateral-arm awnings are perfect for retrofitting homes without built-in roofs.
Most contractors push expensive permanent roofs, but a retractable system completely flips the traditional script. It yields a premium aesthetic, letting you choose between full sun or deep shade instantly.
A quality motorized awning ranges from $800–$2,000.
- Key Materials: Solution-dyed acrylic fabric, folding aluminum arms.
- Vibe / Style: Chic European sidewalk cafe.
- Difficulty: Heavy two-person installation.
- Budget Breakdown: Awning unit: $1,200 | Mounting hardware: $80.
- Creator’s Tip: Always upgrade to a model with a built-in wind sensor so it automatically rolls itself up if a sudden storm hits while you aren’t home.
- Smart Sourcing: Motorized retractable patio awning kits and heavy-duty masonry lag bolts.
63. Outdoor Windbreak Panels
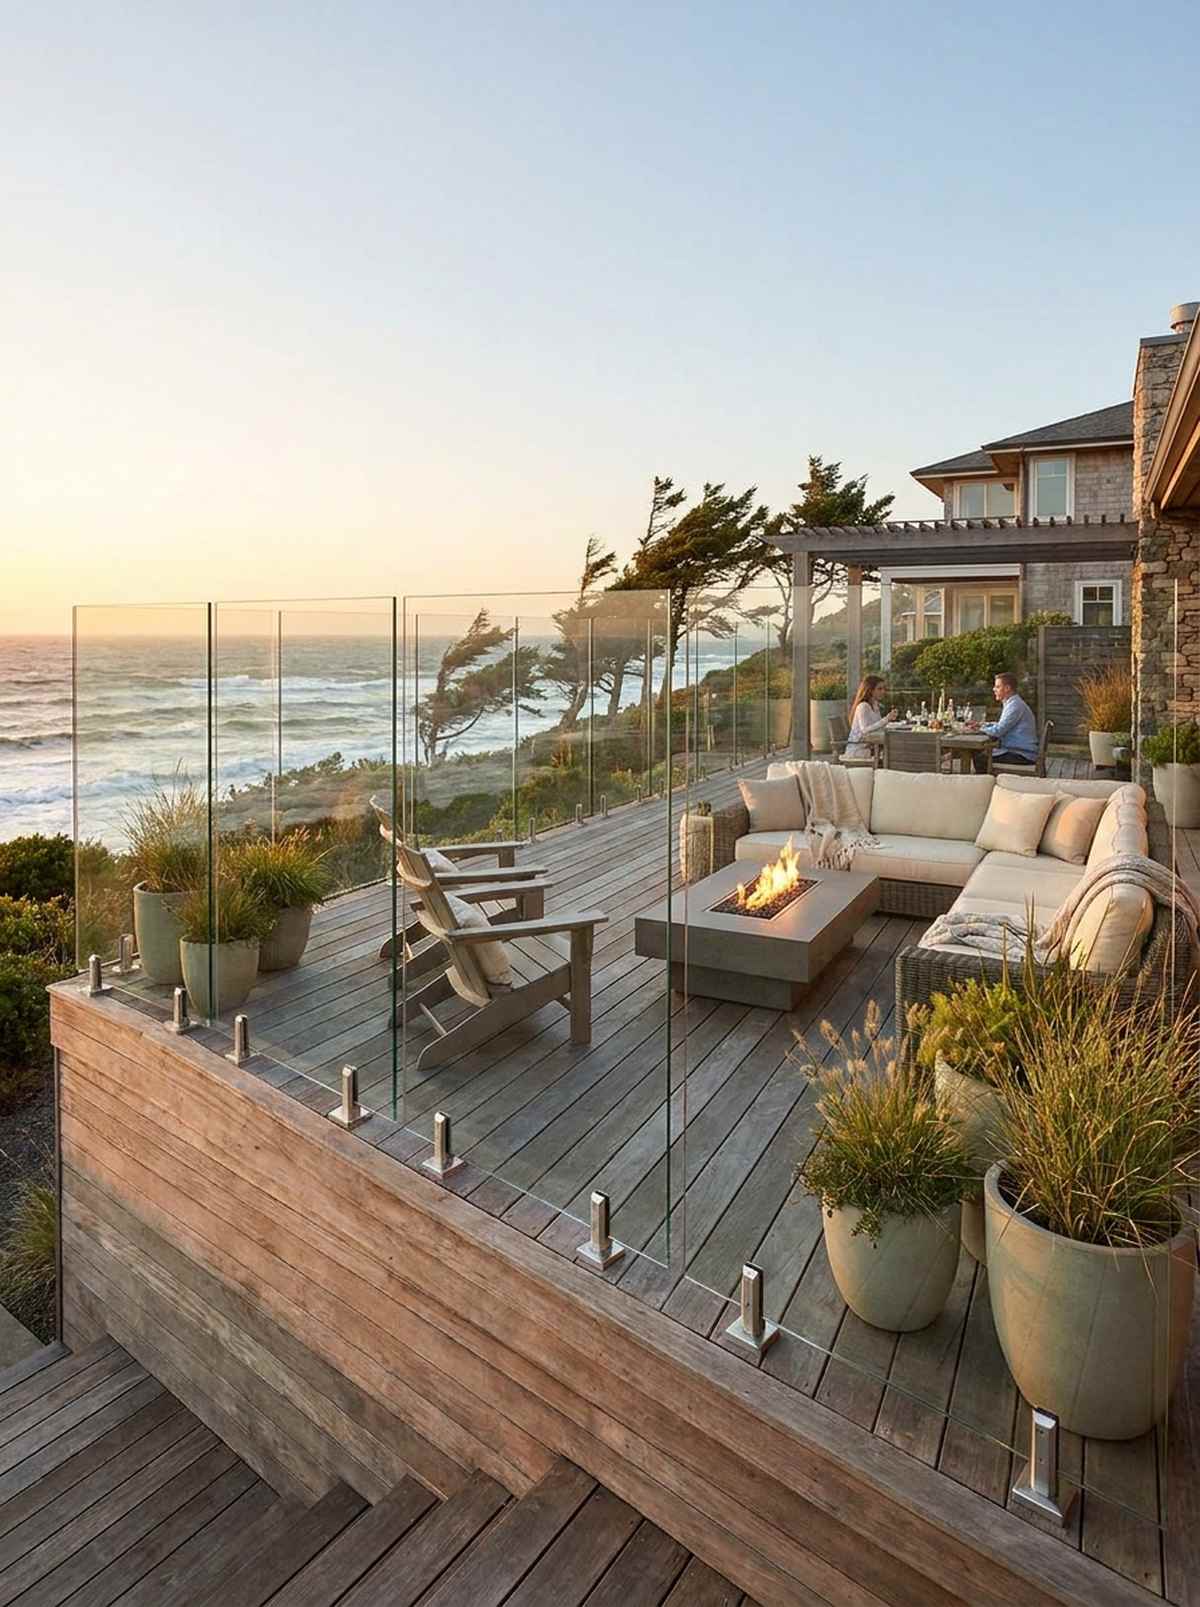
Acts as an invisible forcefield, turning a chaotic, windy deck into a dead-calm sanctuary. Tempered glass windbreak panels are the ultimate flex for coastal or high-elevation properties.
Professional designers gatekeep this specific technique: using frameless glass clamps instead of bulky metal frames. This layout looks far more expensive than it is and perfectly protects your outdoor living space without blocking the view.
Custom glass panels and hardware run about $150–$300 per linear foot. Save this to finalize your high-end blueprint.
- Key Materials: 1/2-inch tempered glass, stainless steel base spigots.
- Vibe / Style: Ultra-sleek coastal modern.
- Difficulty: Advanced professional installation.
- Budget Breakdown: Glass panels: $1,000 | Stainless spigots: $400.
- Creator’s Tip: Use a squeegee with a specialized rain-repellent glass treatment so the panels stay crystal clear even after heavy sea spray or rain.
- Smart Sourcing: Stainless steel frameless glass spigots (bulk pack) and premium rain-repellent glass treatment.
Conclusion
Implementing these 63 outdoor living concepts transforms backyards from seasonal spaces into permanent, high-end extensions of your home. By combining architectural blueprints with premium starter kits and UV-coated materials, you create outdoor living rooms that rival luxury interior comfort. Start with a solid foundation, prioritize the upgrades that fit your budget, and source your materials smartly to build an outdoor environment that dramatically boosts both your lifestyle and your property value.
Frequently Asked Questions
How much does it cost to build a luxury outdoor living space?
While a full custom architectural build can exceed $20,000, you can achieve a highly premium look for a fraction of that by utilizing pre-cut pergola starter kits and modular components. Strategic DIY installations usually bring costs down to the $2,000–$5,000 range while maintaining a high-end designer aesthetic.
What are the best materials to use for long-lasting outdoor furniture?
To avoid replacing items every year, you absolutely must source UV-coated resin wicker, powder-coated aluminum, or HDPE poly-lumber. Pairing these indestructible frames with solution-dyed acrylic fabrics (bulk pack) guarantees your outdoor living room designs will withstand harsh sun and heavy rain for decades.
Do I need a permit to build an outdoor patio or pergola?
Permit requirements vary heavily by local municipality. However, freestanding floating decks and modular gazebo kits often bypass strict zoning laws because they aren’t physically attached to the primary structure. Always double-check local codes before investing in massive structural timber or pouring permanent concrete footings.