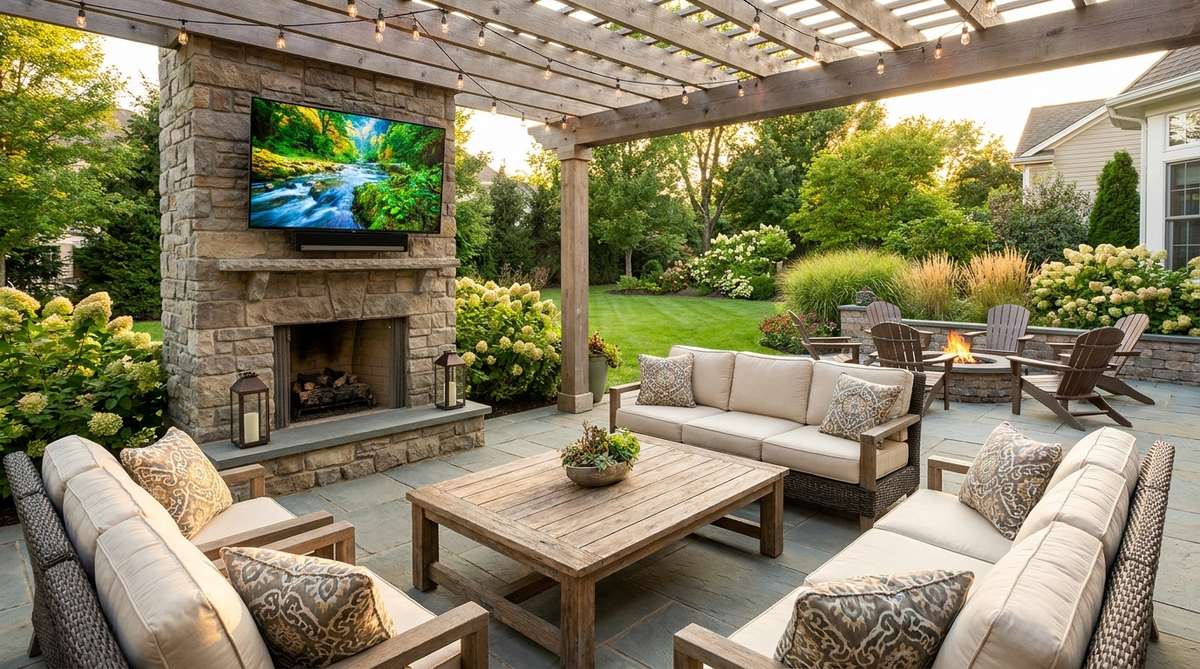
An outdoor patio tv instantly upgrades your backyard into a luxury entertainment space without requiring major renovations. Smart material sourcing and the right weatherproof mounts guarantee your screen survives harsh climates while looking incredibly high-end.
Design Snapshot Key Principles
- Weatherproofing First: Choose screens rated IP65 or higher with GFCI-protected outlets and UV-resistant cable management
- Viewing Angle Control: Install full-motion mounts or swivel systems to adjust for sun position and seating arrangements throughout the day
- Landscape Integration: Blend technology with natural elements through custom enclosures, plantings, and architectural features
- Seasonal Adaptability: Plan for changing sun paths and weather conditions with retractable covers or adjustable mounting systems
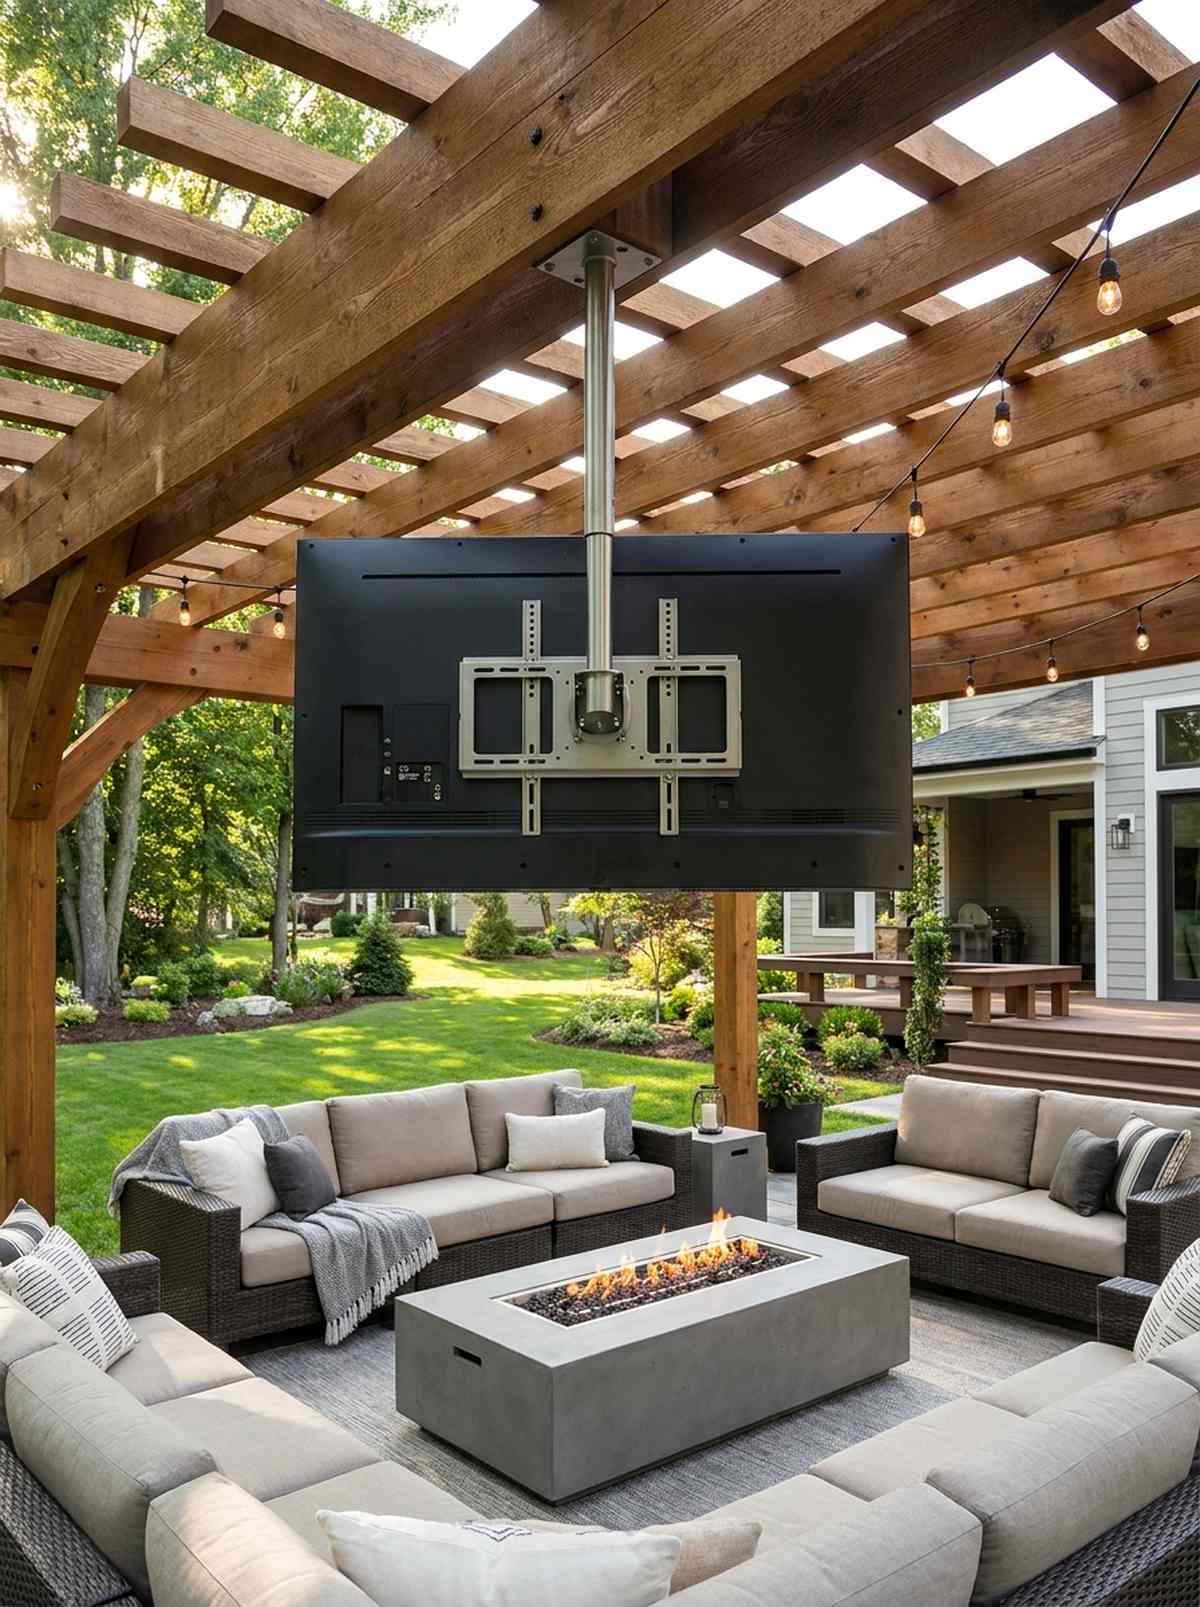
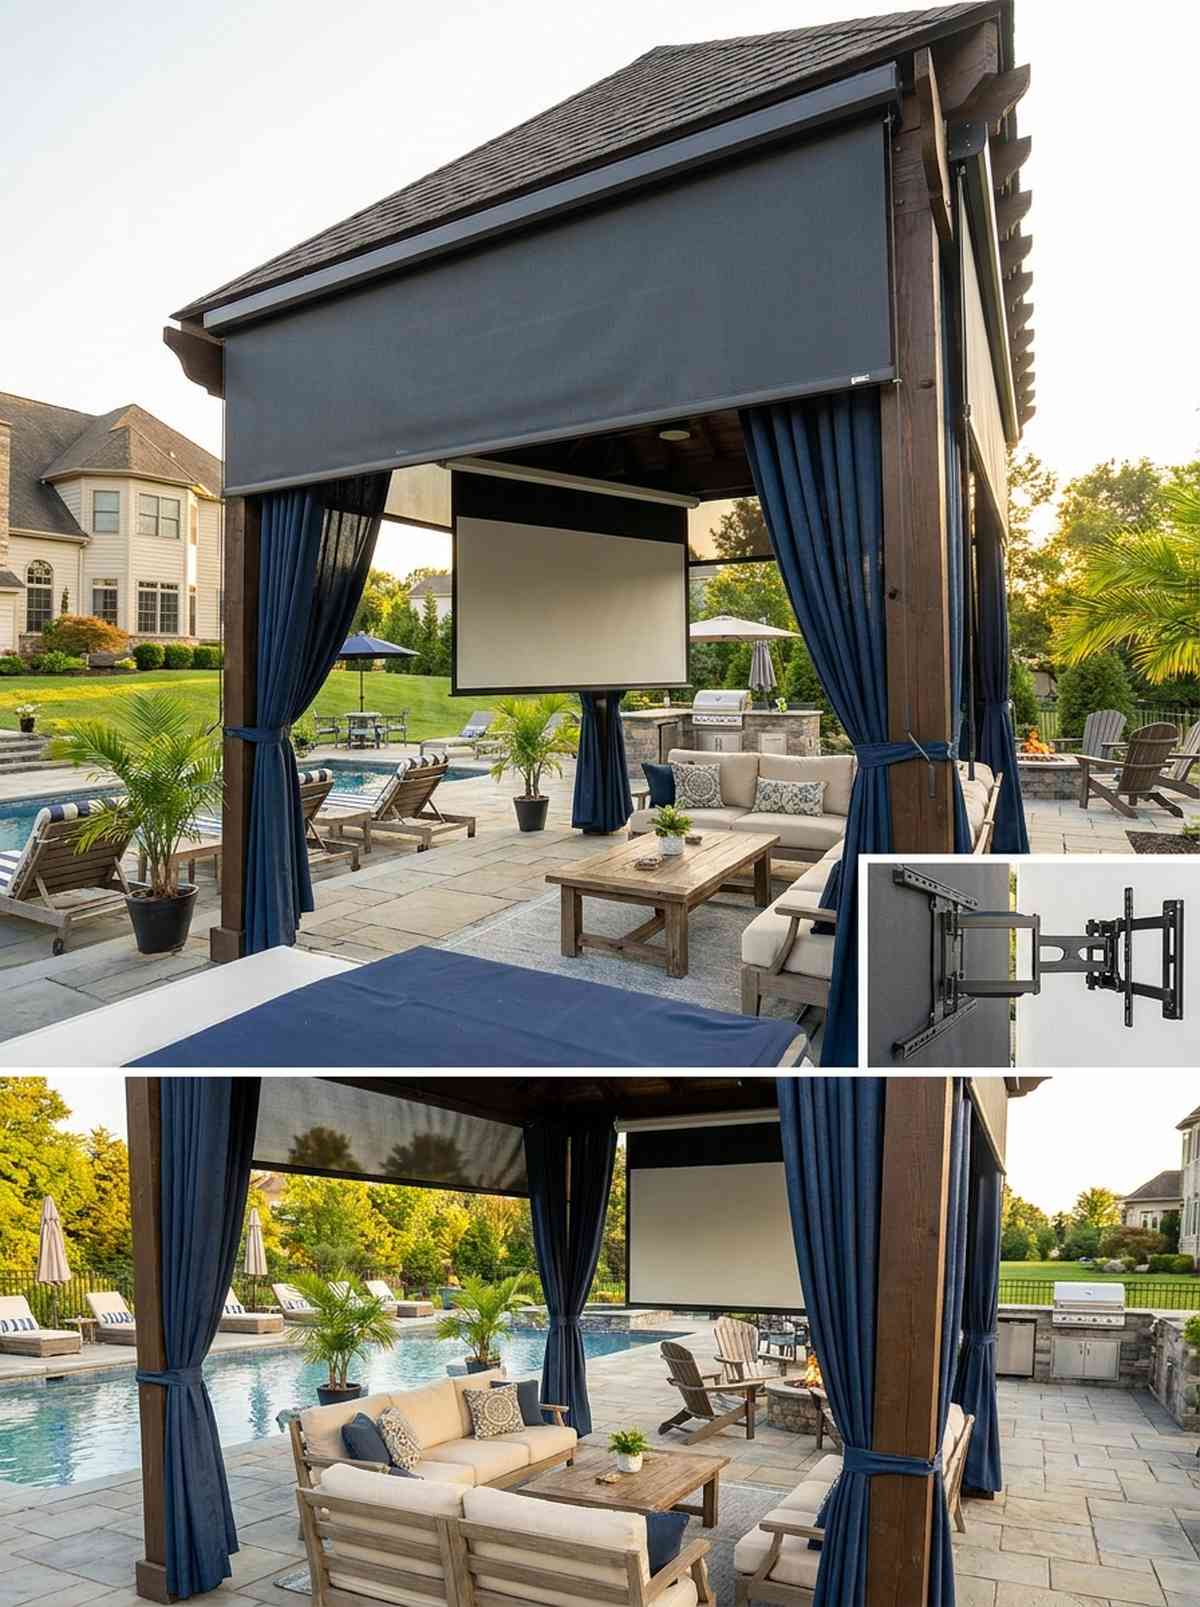
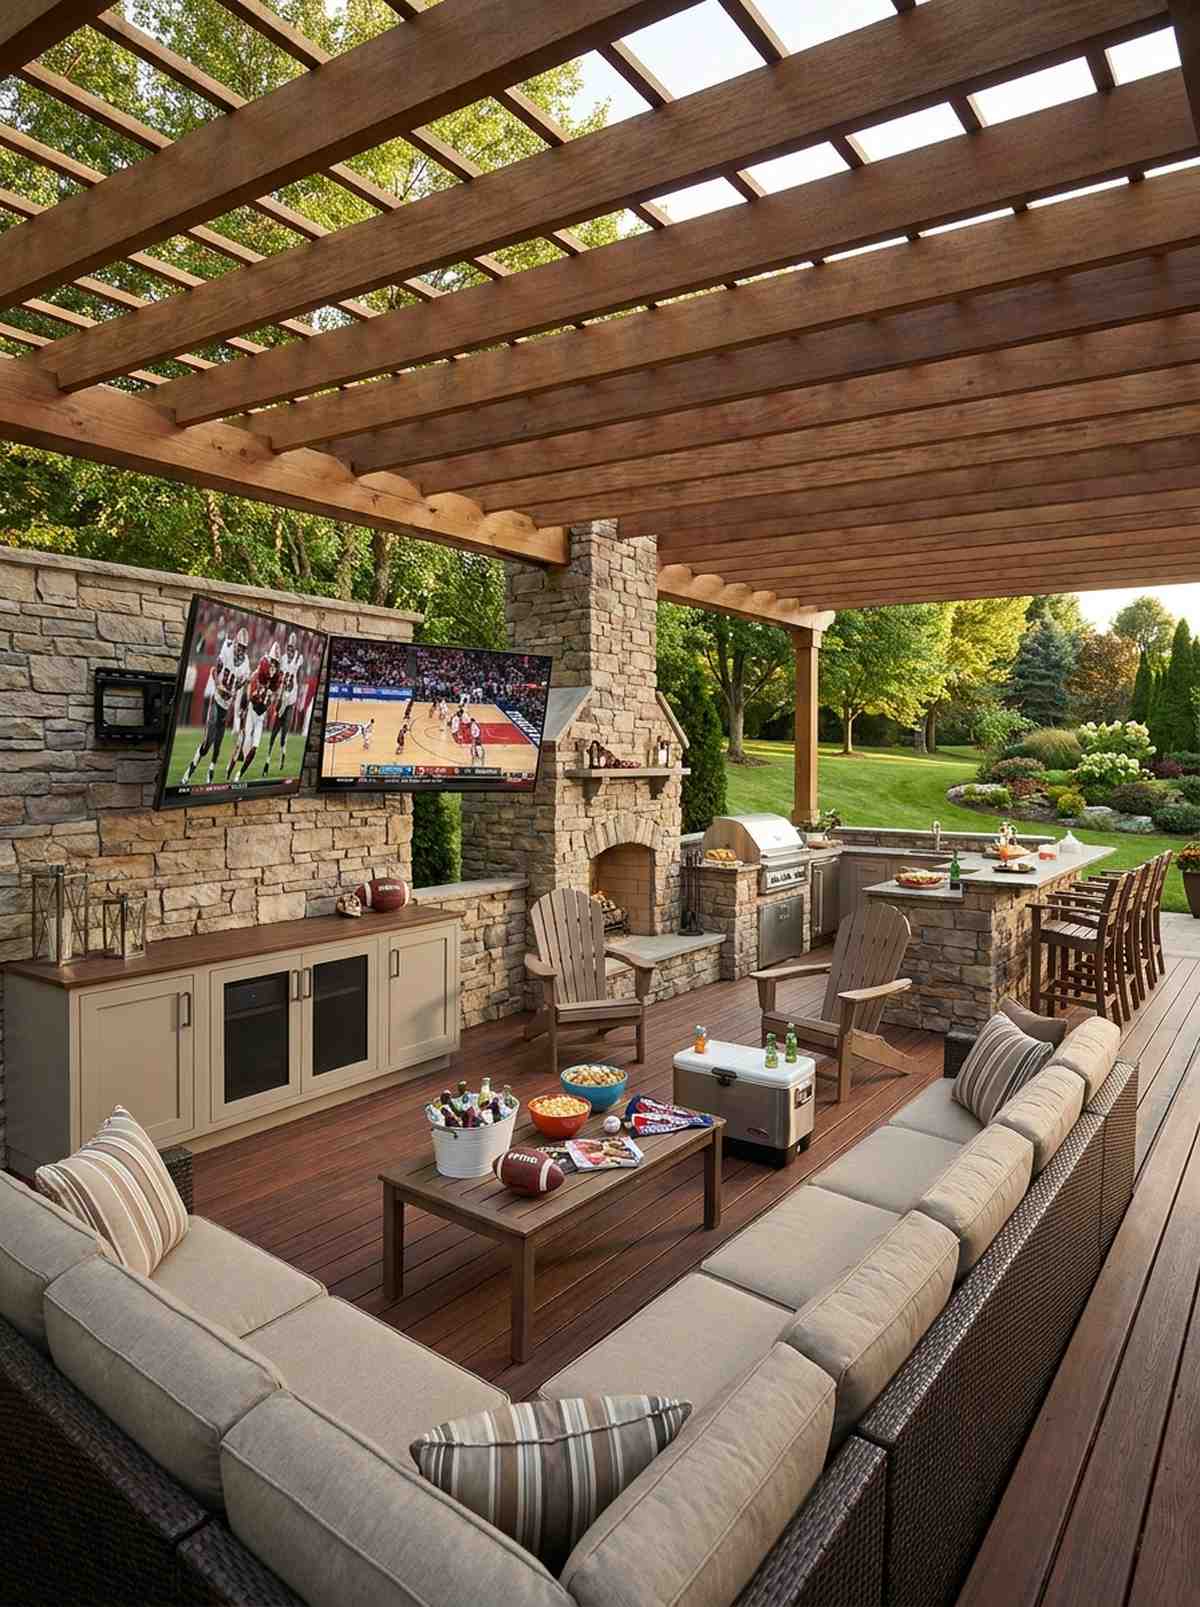
Covered Structure Installations for Year-Round Viewing
Pergolas, pavilions, and covered patios provide natural protection from elements while creating dedicated entertainment zones. These structures offer mounting surfaces and shade management that enhance both screen visibility and guest comfort.
1. Pergola Ceiling Mount with Swivel Bracket
Feels like your own private resort lounge. Hanging pergola TV decor works exceptionally well for open-air seating where sunlight and shadows shift rapidly throughout the afternoon.
Most backyard setups ignore glare completely, but this drop-pole layout delivers a surprisingly premium look while solving visibility issues. Integrating heavy-duty outdoor ceiling mounts with hollow cord management makes the final aesthetic indistinguishable from a professional luxury build.
You can easily pull this off for around $80–$150 depending on bracket quality. Save this to your DIY weekend backyard board for later reference.
- Key Materials: Weatherproof swivel ceiling bracket, stainless extension pole
- Vibe / Style: Modern luxury lounge
- Difficulty: Moderate weekend DIY
- Budget Breakdown: Mount System: $70 | Hardware: $15.
- Creator’s Tip: Thread an extra HDMI cord through the hollow tube during initial setup to save massive headaches later.
- Smart Sourcing: powder-coated stainless swivel mounts and UV-resistant cable sleeves (bulk pack).
2. Gazebo Entertainment Hub with Integrated Lighting

Straight out of an enchanted evening storybook. A gazebo theater setup is perfect for enclosed circular seating, bringing warmth and a cinematic glow to evening gatherings.
People often overcomplicate gazebo wiring, yet this straightforward post-anchored design gives a designer-level finish for pennies on the dollar. Wrapping weatherproof LED strip kits around the rafters adds high-end bias lighting that actively reduces eye strain.
Expect to spend about $45–$90 to get this exact glowing ambiance dialed in.
- Key Materials: Post-hugging TV strap mount, exterior-grade LED strips
- Vibe / Style: Cozy evening sanctuary
- Difficulty: Beginner-friendly installation
- Budget Breakdown: Bracket: $45 | LED Strips: $20.
- Creator’s Tip: Angle the screen slightly downward to completely eliminate light reflection from the gazebo roof.
- Smart Sourcing: post-hugging outdoor TV brackets and silicone-sealed LED light ribbons (starter kit).
3. Covered Deck Wall Integration
Feels like a seamless indoor-outdoor living room transition. Covered deck wall displays are the ultimate use-case for deep overhangs where the house naturally shields the elements.
Many homeowners assume they need extreme weather gear here, but this sheltered approach completely redefines budget luxury. Utilizing a basic weatherproof TV cover alongside an articulating arm elevates a basic layout into a versatile hosting hub.
This streamlined setup typically costs between $30–$75, making it a highly cost-effective upgrade. Pin this if you’re planning a small deck transformation.
- Key Materials: Tilting wall mount, exterior silicone sealant
- Vibe / Style: Sleek residential extension
- Difficulty: Quick afternoon project
- Budget Breakdown: Mount: $40 | Sealant: $10.
- Creator’s Tip: Apply clear exterior-grade silicone to every single bolt head after tightening to stop wall moisture creep.
- Smart Sourcing: rust-proof articulating wall arms and universal heavy-duty TV cover shells.
4. Pavilion Theater with Multiple Seating Zones
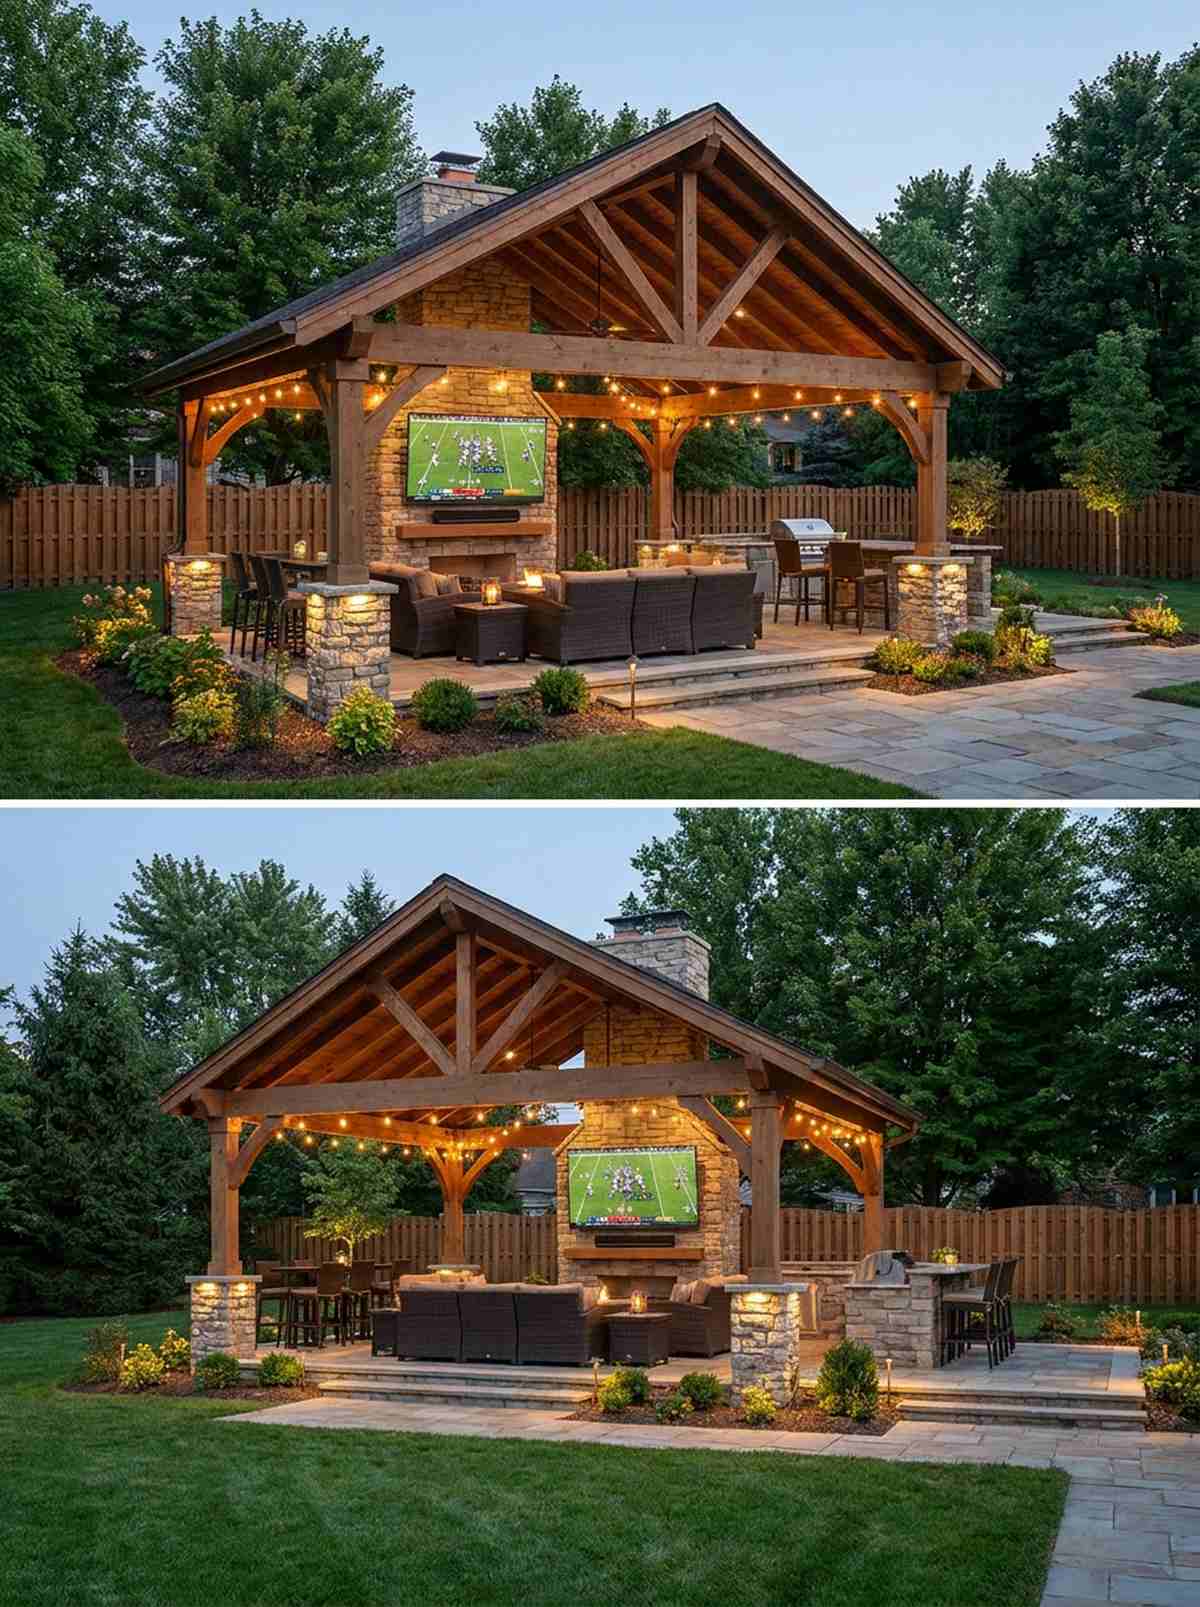
Gives the commanding presence of a grand outdoor amphitheater. A large pavilion viewing zone creates an unmatched stadium-like atmosphere perfect for hosting large fight nights or football Sundays.
Builders usually charge thousands for this specific integration, yet smart zoning looks far more expensive than it actually is. Implementing outdoor-rated soundbars below a massive screen ensures everyone hears the action without blasting out the neighbors.
You can achieve this robust audio-visual staging for roughly $150–$300 in mounting hardware.
- Key Materials: Heavy-capacity flat wall bracket, exterior soundbar brackets
- Vibe / Style: VIP sports bar terrace
- Difficulty: Advanced multi-person install
- Budget Breakdown: Heavy Mount: $100 | Audio Brackets: $40.
- Creator’s Tip: Mount the screen high enough to clear the heads of people standing near the front seating tier.
- Smart Sourcing: commercial-grade heavy-duty mounts and weatherproof soundbar attachment kits.
Most people get this completely wrong… until they try the exact layout coming up next.
5. Screened Porch Climate-Controlled Viewing
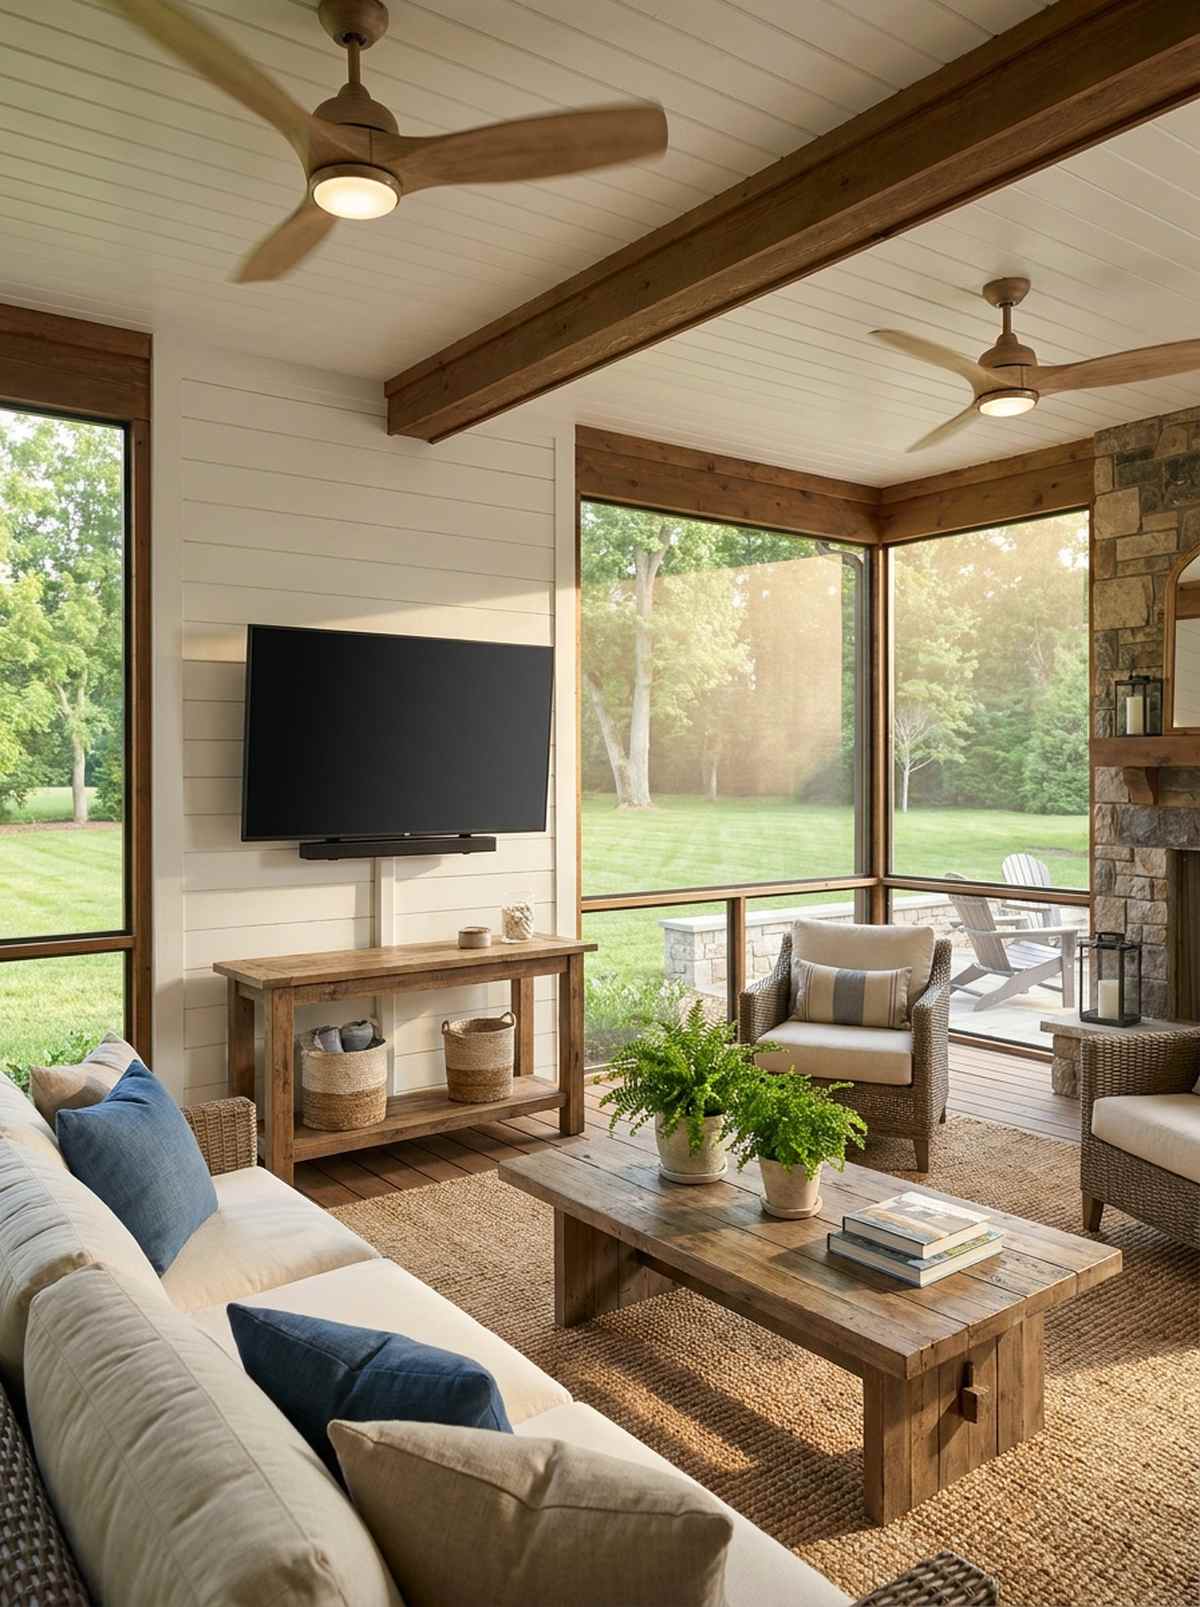
Feels like a breezy sanctuary hidden away from the bugs. Screened porch media centers are the absolute best placement for families wanting to bridge the gap between indoor comfort and fresh air.
This layout proves you don’t always need ruggedized equipment to achieve a high-end atmosphere. Because the mesh blocks driving rain, using standard articulating flat-panel mounts paired with gentle ceiling fans looks incredibly sophisticated.
Your hardware costs for this semi-indoor approach will likely hover around $40–$80. Highly recommended for a fast weekend win.
- Key Materials: Standard robust wall mount, cord concealer channels
- Vibe / Style: Relaxed summer lounge
- Difficulty: Easy beginner setup
- Budget Breakdown: Mount: $50 | Cord covers: $15.
- Creator’s Tip: Keep ceiling fan blades at least 3 feet away from the screen to prevent flickering shadows on the display.
- Smart Sourcing: low-profile articulating brackets and paintable cable raceway channels (bulk pack).
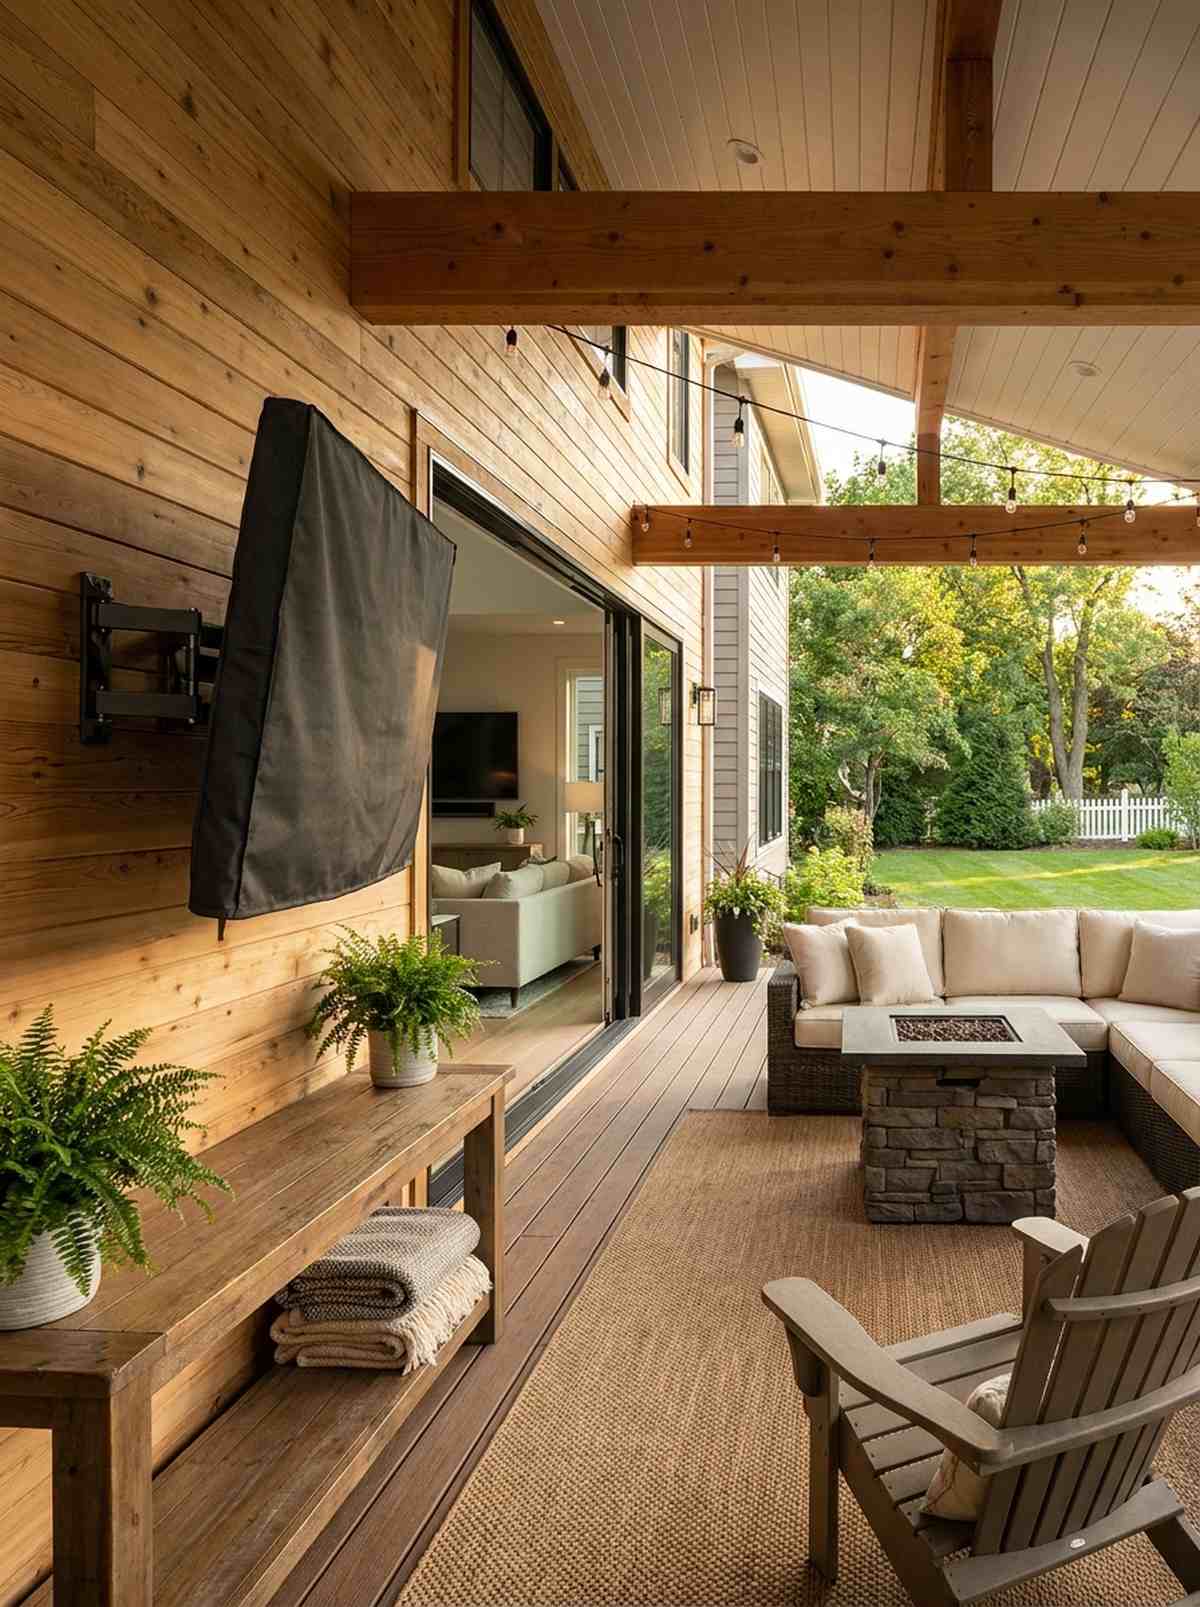
Wall-Mounted Outdoor Patio TV Ideas That Maximize Space
Direct wall mounting creates clean, permanent installations that preserve floor space and integrate with architectural features. These setups require careful planning for electrical access and structural support.
6. Brick Facade Heavy-Duty Mount
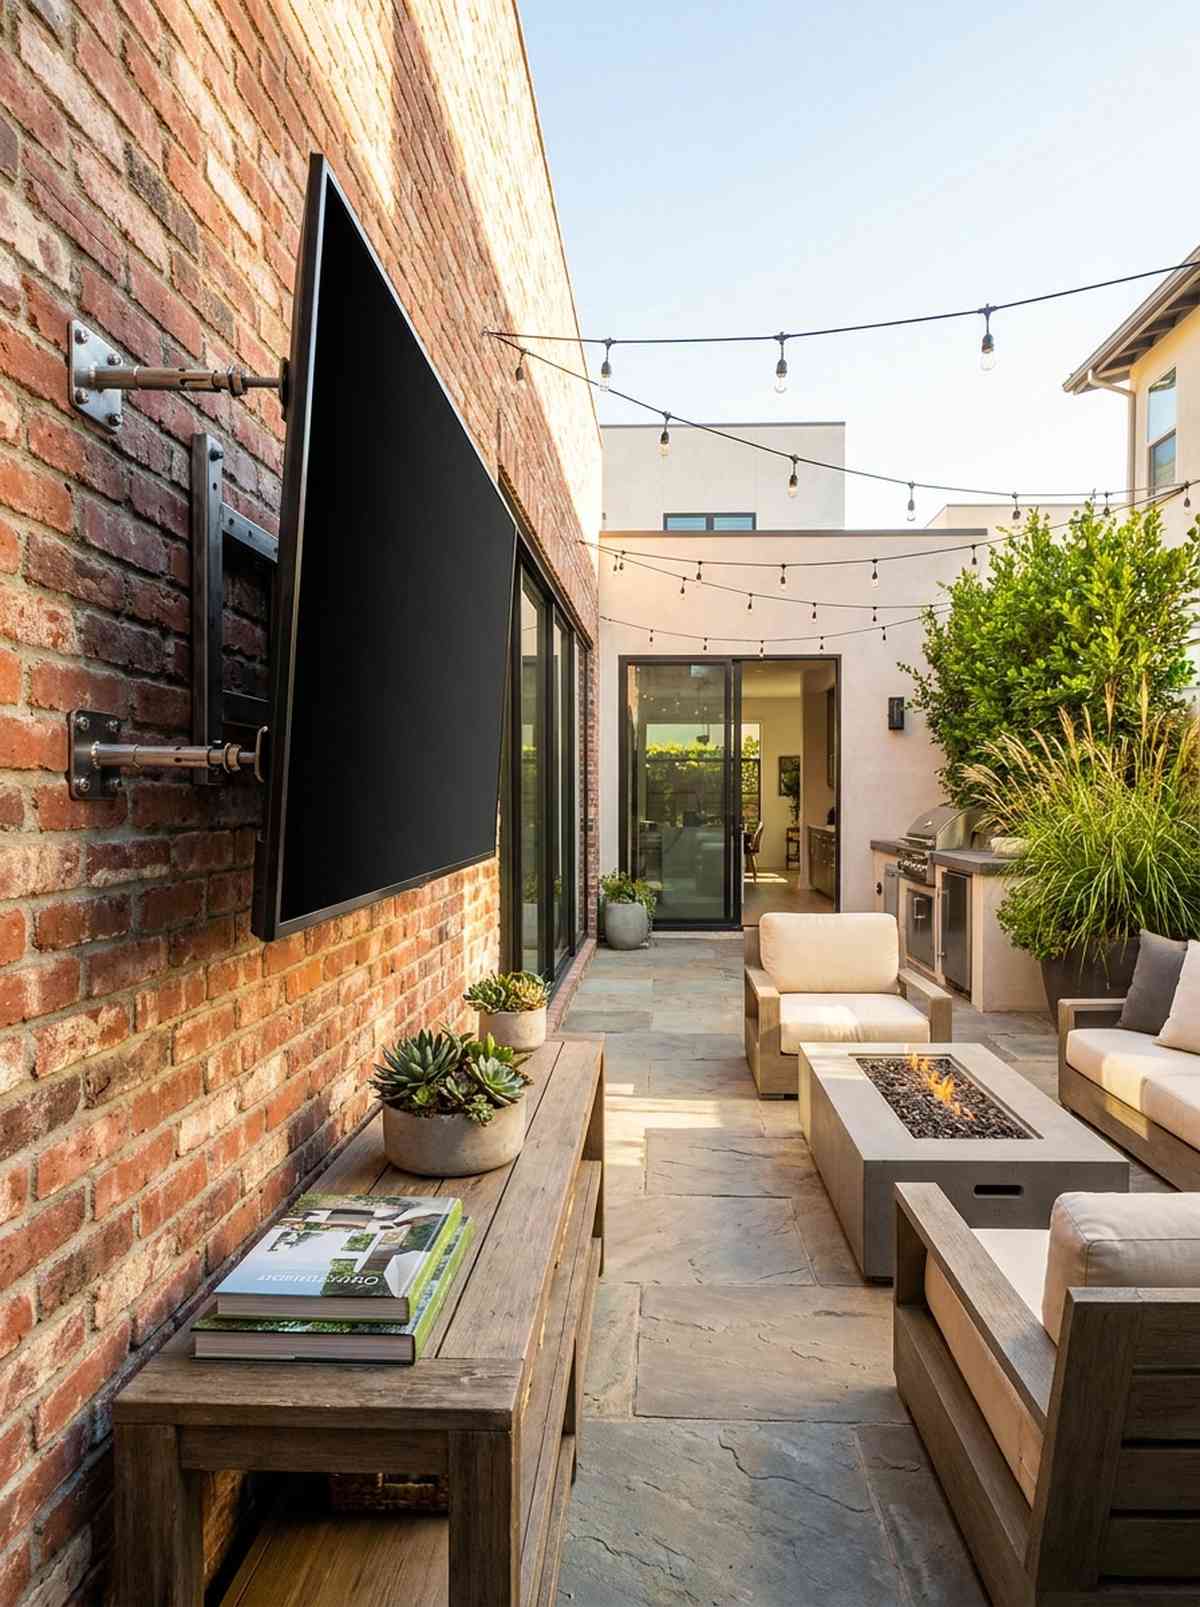
Projects an industrial chic permanence that demands attention. A brick wall TV anchor point anchors your entertainment strictly into the masonry, perfect for open courtyard patios.
Drilling into brick terrifies many DIYers, but using the correct anchors delivers a rock-solid, custom-built impression. Securing a mount with heavy-duty masonry anchor kits guarantees your expensive display won’t budge during a windstorm.
The specialized hardware and drill bits will run you about $50–$90. Save this to your hardcore home improvement board.
- Key Materials: Masonry drill bits, stainless expansion anchors
- Vibe / Style: Urban industrial courtyard
- Difficulty: Intermediate tool skills required
- Budget Breakdown: Anchors: $20 | Diamond Drill Bits: $25.
- Creator’s Tip: Always drill directly into the solid brick face, never into the softer mortar joints, to ensure maximum hold.
- Smart Sourcing: concrete expansion anchor starter kits and diamond-tipped masonry bit sets.
7. Siding Stud Mount with Backing Block
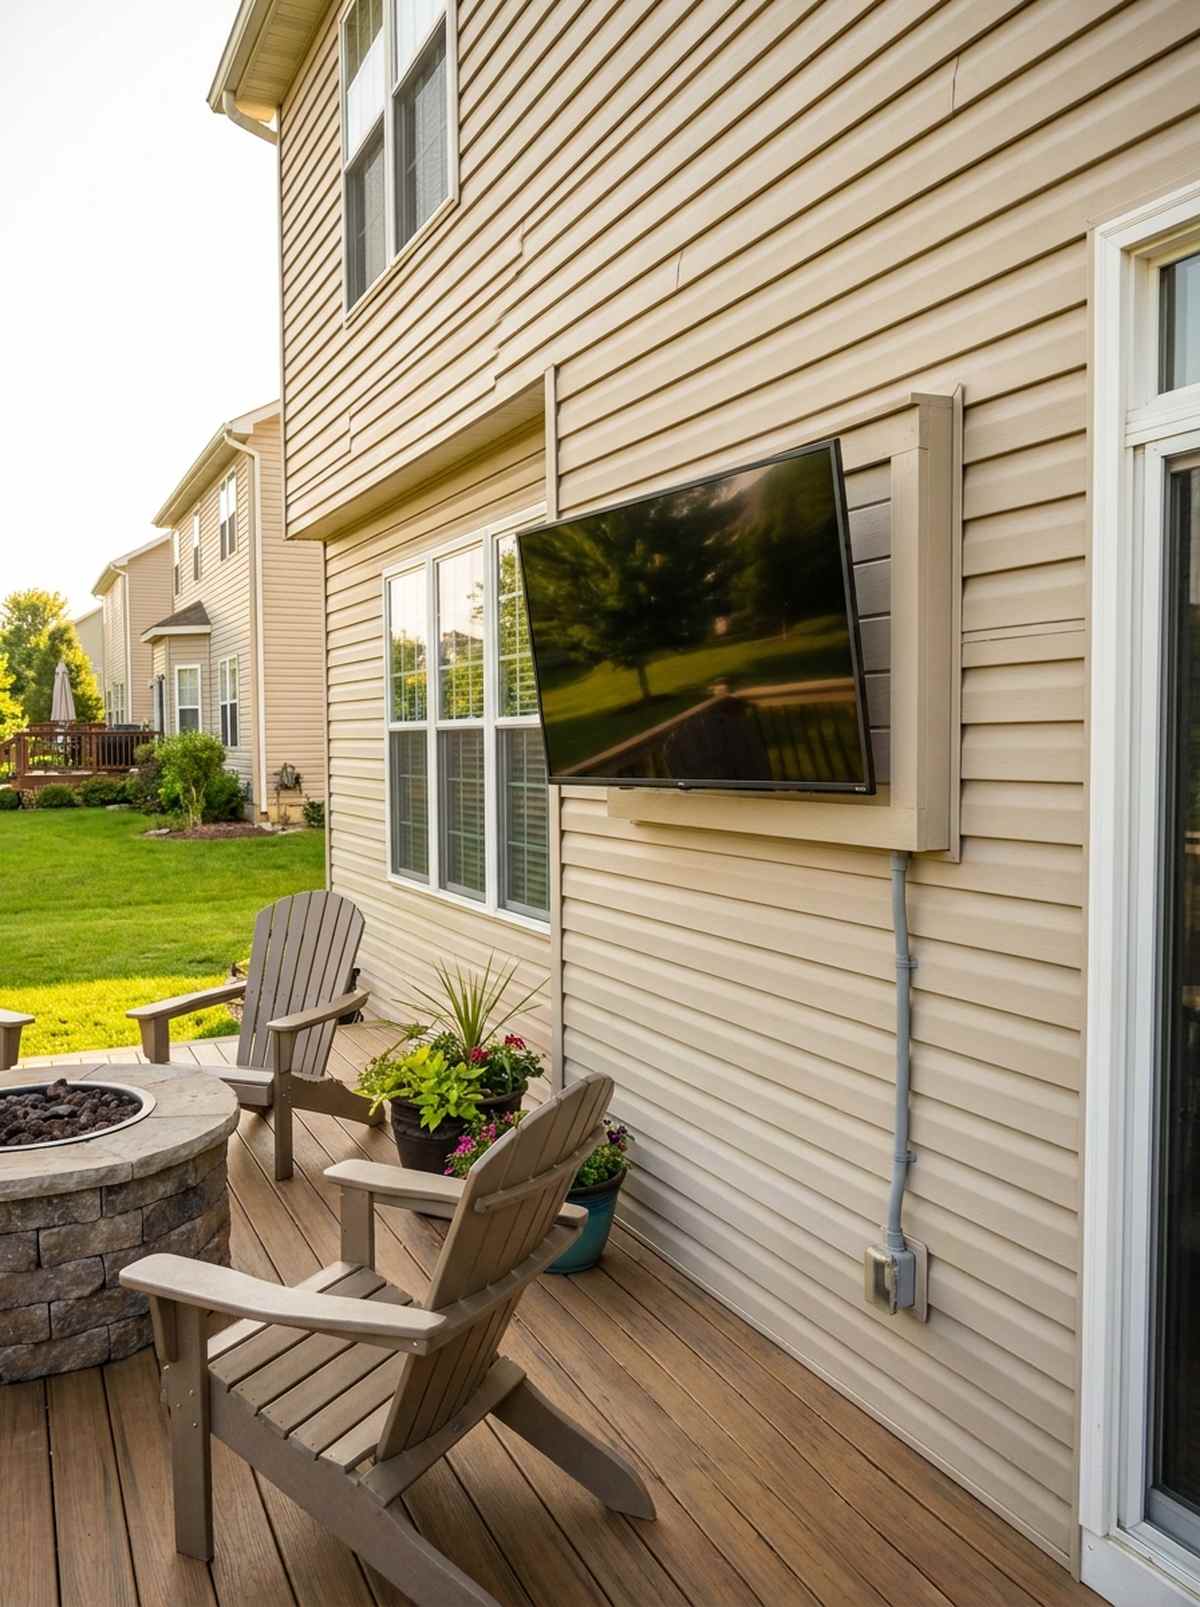
Gives a crisp, perfectly tailored facade integration. Using a siding standoff block creates a seamless aesthetic that works beautifully against vinyl or wooden house exteriors.
Crushing your house’s siding is a massive rookie mistake, yet this simple wooden spacer trick bypasses the issue entirely for a flawless finish. Incorporating weatherproof electrical conduit running from the block down to the baseboard screams professional craftsmanship.
You can execute this protective mounting strategy for roughly $35–$60.
- Key Materials: Treated lumber mounting block, exterior paint
- Vibe / Style: Tailored suburban modern
- Difficulty: Moderate precision DIY
- Budget Breakdown: Treated Wood: $10 | Hardware/Conduit: $25.
- Creator’s Tip: Paint the wooden backing block the exact same color as your siding before installing the TV bracket.
- Smart Sourcing: pre-cut treated mounting blocks and flexible weatherproof conduit tubing (pre-cut).
8. Privacy Fence Mounted Viewing Station
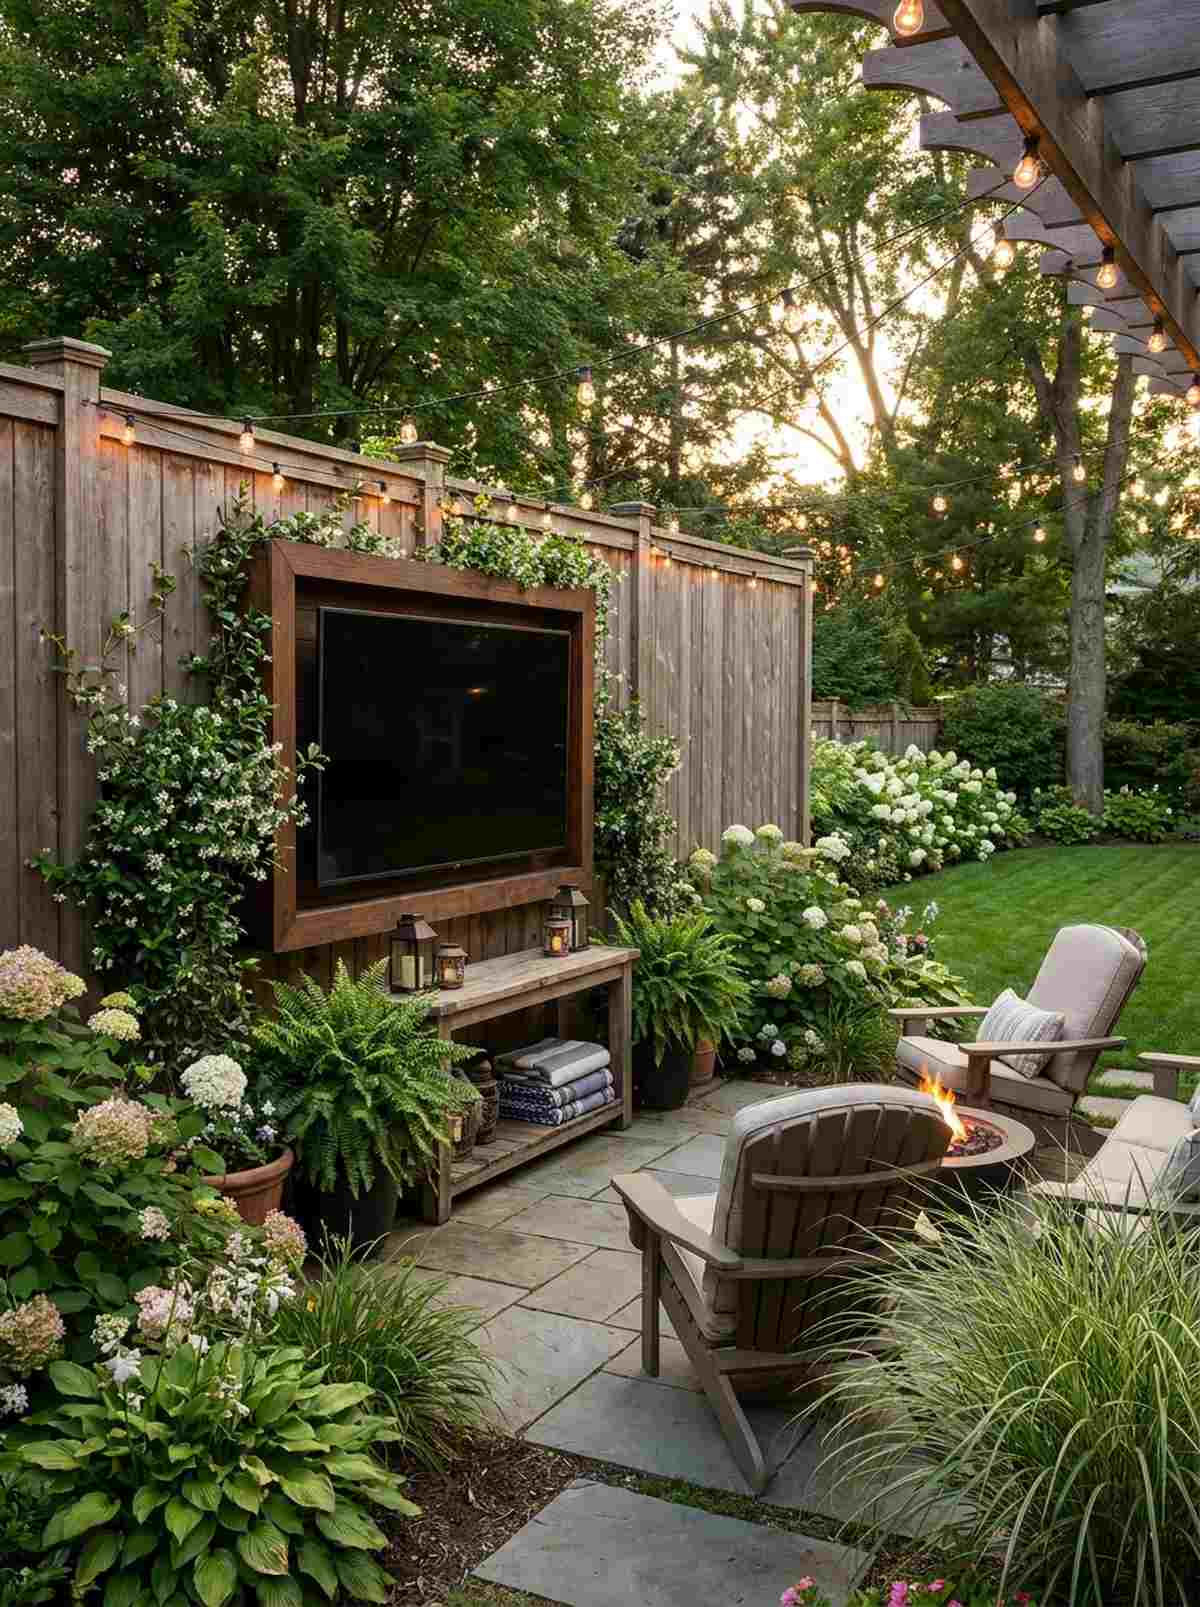
Feels like discovering a secret backyard getaway. Fence-mounted media screens push the entertainment zone away from the house, ideal for maximizing space in deep, narrow yards.
Attaching heavy electronics to a wobbly fence is asking for disaster, but reinforcing the posts cross-laterally creates an ultra-stable, high-end anchor. Integrating outdoor patio tv ideas with trailing greenery around the frame softens the aggressive look of modern technology.
Expect to spend $60–$100 on structural wood reinforcements and exterior brackets. Pin this if you’re trying to optimize a small backyard footprint.
- Key Materials: 2×6 pressure-treated braces, long exterior lag screws
- Vibe / Style: Secluded garden corner
- Difficulty: Intermediate carpentry
- Budget Breakdown: Lumber: $30 | Lag Screws/Bracket: $50.
- Creator’s Tip: Distribute the mount’s weight horizontally across at least three fence pickets and two main support posts.
- Smart Sourcing: galvanized exterior lag bolt packs and heavy-capacity cross-brace kits.
This next configuration is ridiculously cost-effective but looks like a $5,000 custom designer install…
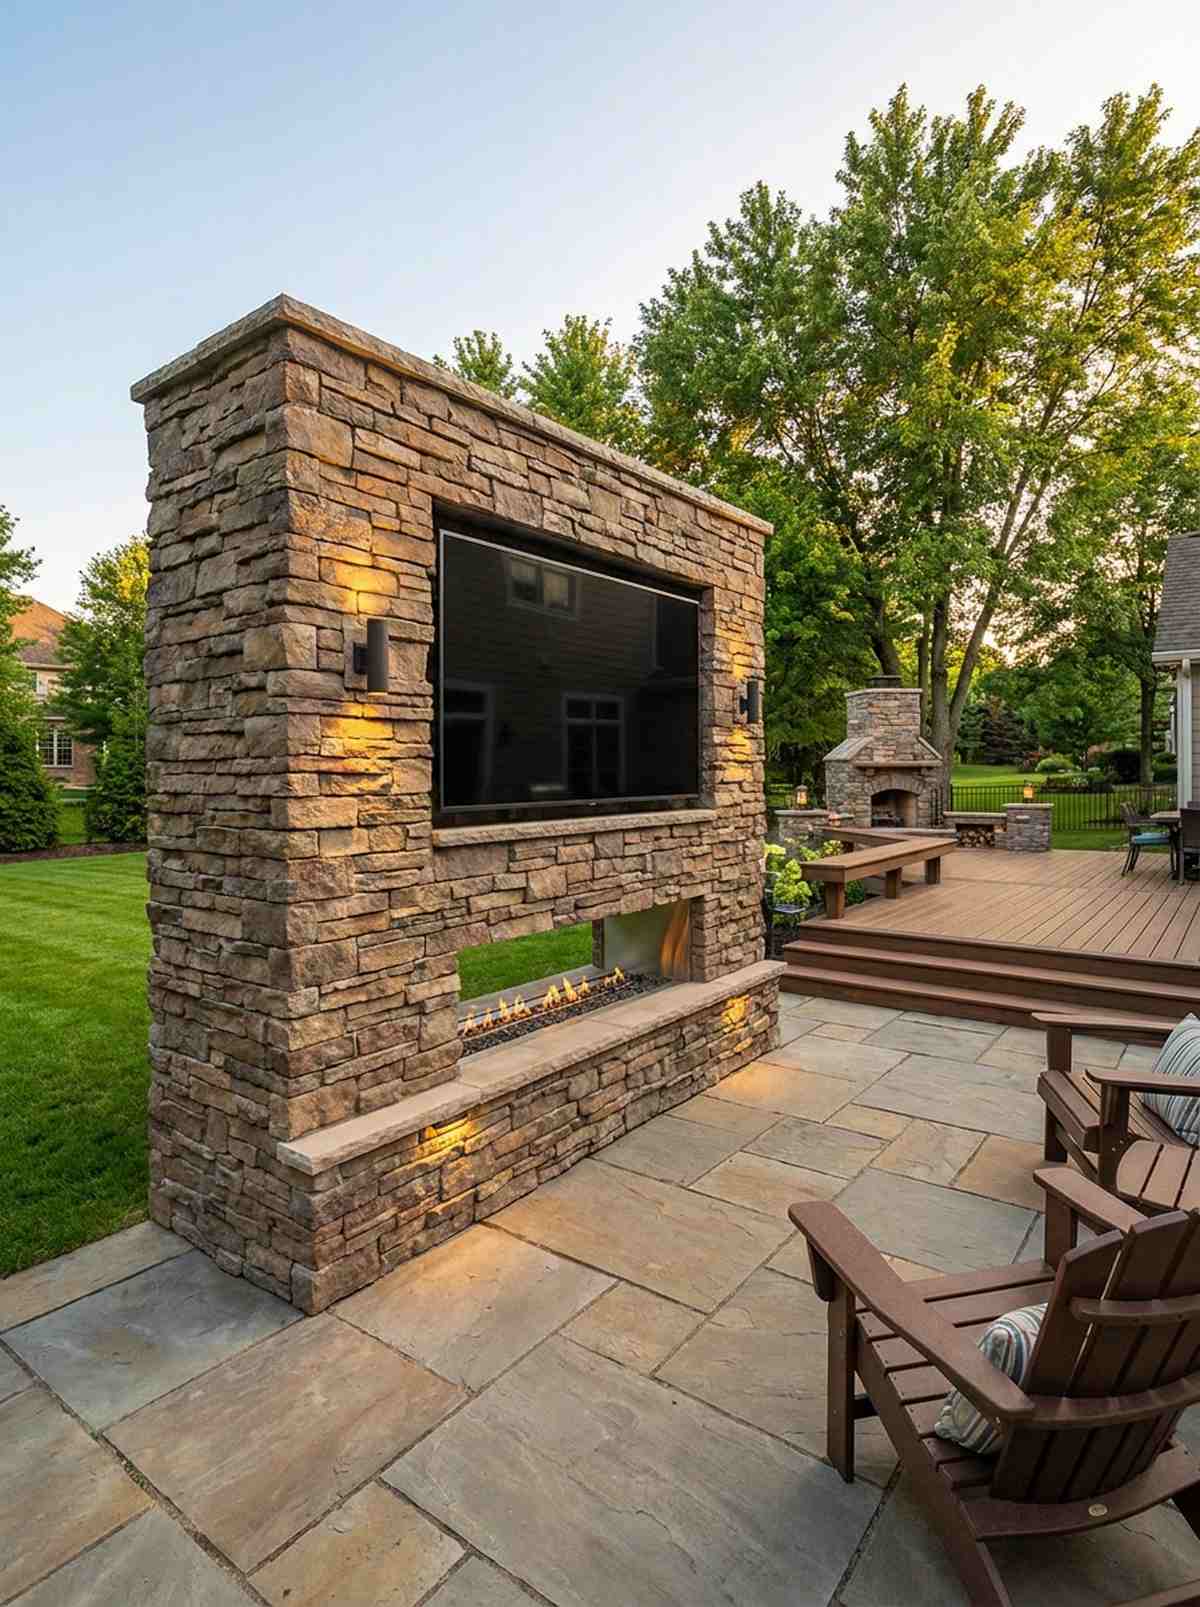
9. Retaining Wall Built-In Niche
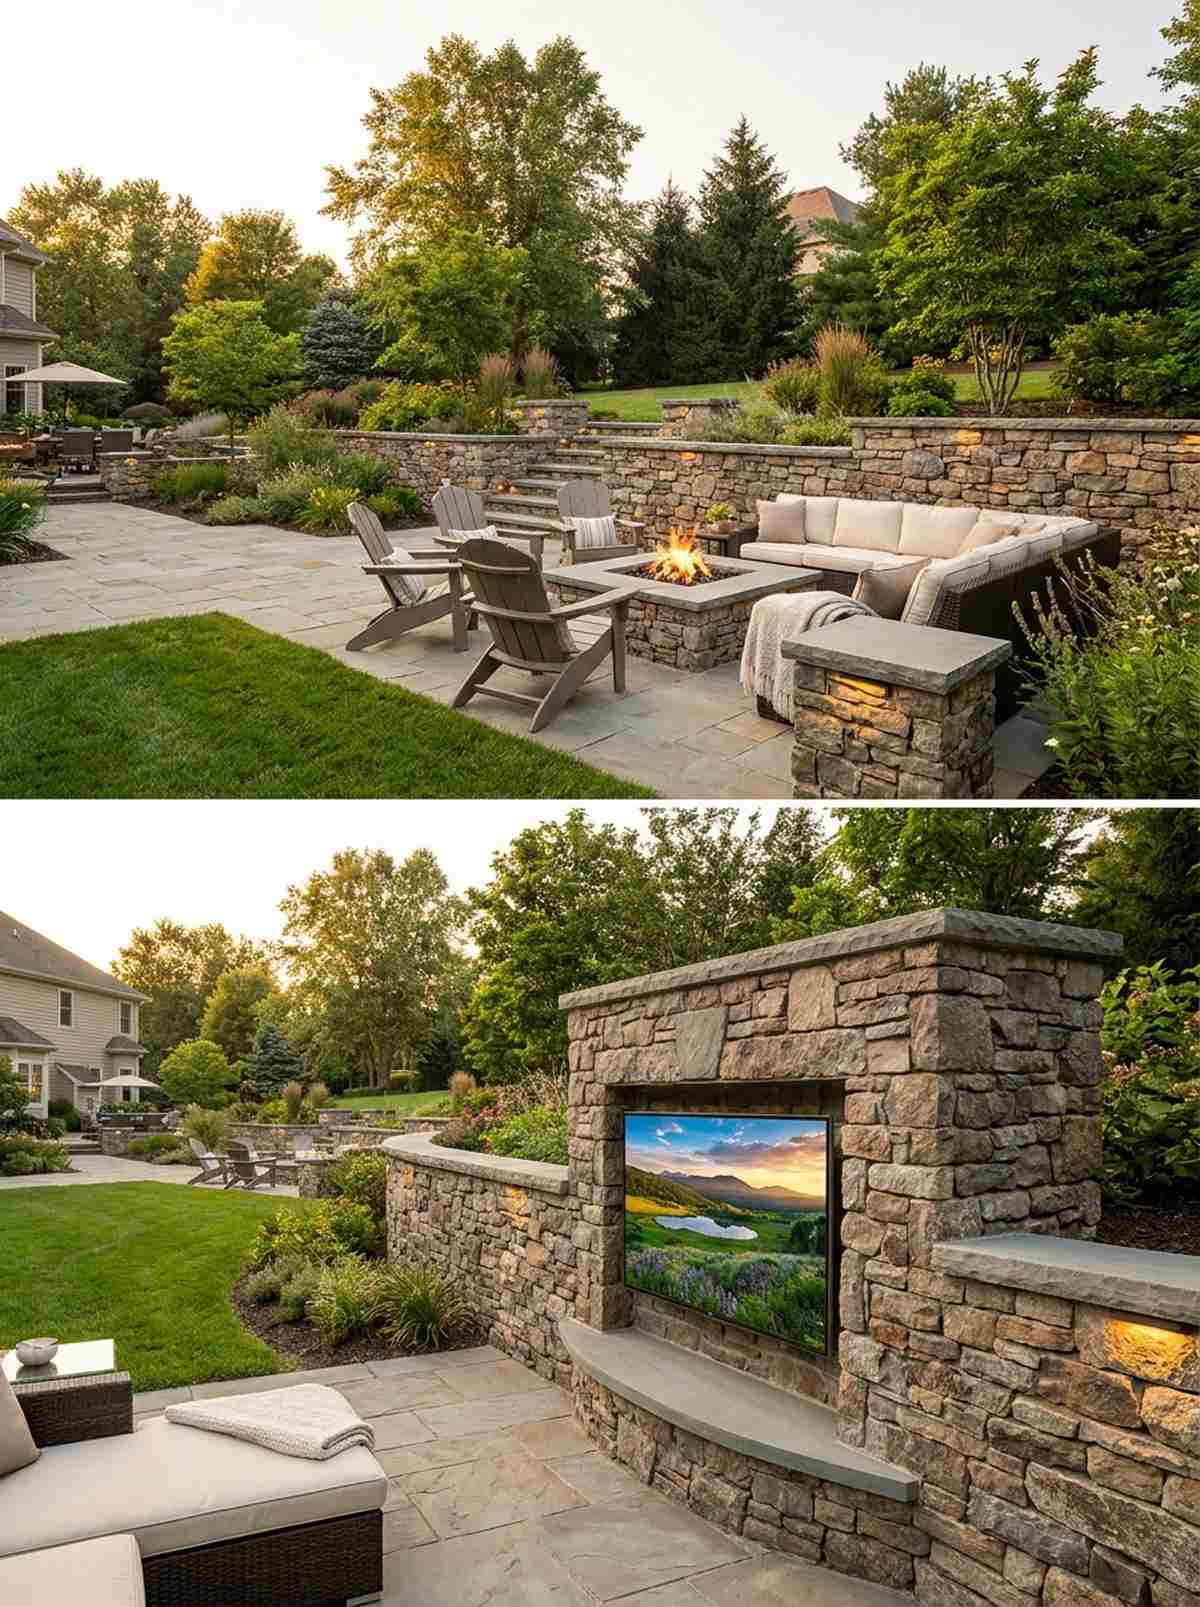
Straight out of a luxury architectural magazine. A recessed masonry screen niche turns rugged stone hardscaping into a custom-framed, wind-protected gallery for your display.
Most outdoor screens look like awkward add-ons, but this built-in approach delivers an intensely premium, integrated appearance. Utilizing a pull-out extension bracket inside the stone cavity allows you to access cables while keeping the screen flush.
If you’re building the wall anyway, creating the niche only adds about $100–$150 in extra materials.
- Key Materials: Dimensional stone caps, recessed pull-out mount
- Vibe / Style: High-end architectural hardscape
- Difficulty: Advanced masonry planning
- Budget Breakdown: Recessed Mount: $80 | Drainage/Lining: $30.
- Creator’s Tip: Slope the bottom sill of the stone niche outward by 2 degrees so rainwater naturally rolls away from the electronics.
- Smart Sourcing: low-profile pop-out TV brackets and waterproof masonry sealing spray (bulk pack).
10. Outdoor Kitchen Bar Mount
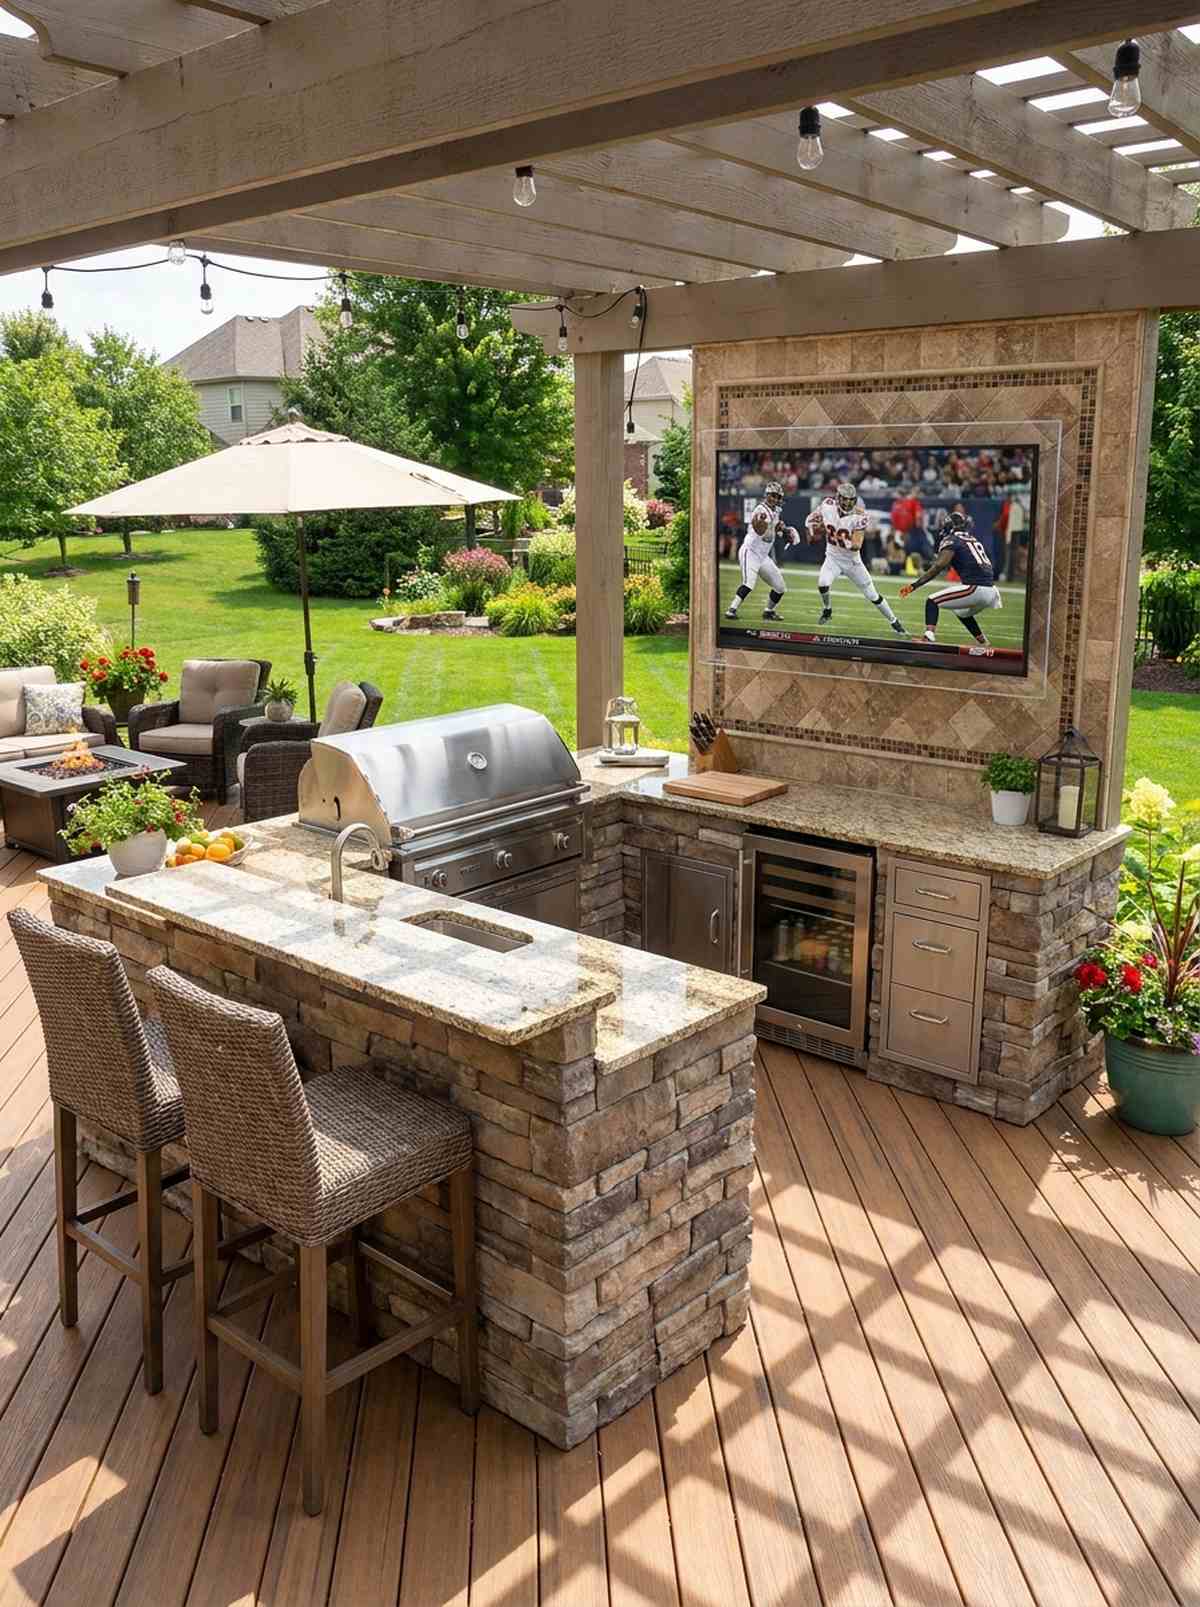
The ultimate host’s paradise for grilling and gathering. Outdoor kitchen backsplash mounts keep the chef engaged with guests and the game simultaneously.
Placing electronics near a grill often results in melted plastic, yet this highly strategic offset placement avoids the heat entirely. Incorporating grease-resistant screen protectors ensures your display stays pristine even during a heavy BBQ session.
This highly social layout usually costs $50–$90 in specialized low-profile hardware. Save this to your dream kitchen remodel board.
- Key Materials: Ultra-slim fixed mount, high-heat silicone sealant
- Vibe / Style: Energetic culinary patio
- Difficulty: Moderate DIY
- Budget Breakdown: Slim Mount: $40 | Screen Shield: $25.
- Creator’s Tip: Coordinate your range hood exhaust flow beforehand to guarantee zero smoke drift passes over the screen surface.
- Smart Sourcing: ultra-slim outdoor fixed mounts and acrylic anti-glare screen shields (pre-cut).
💡 Must-Have Supplies for High-End Setups
To build these entertainment hubs faster and ensure your electronics survive the seasons, skip the generic hardware aisles and invest in the right foundational kits.
- Base & Support: commercial-grade articulating outdoor mounts
- Setup Tools: masonry anchor starter kits
- Weather/Durability Protection: universal weatherproof TV enclosure shells
Poolside and Water Feature Setups for Aquatic Entertainment
Pool and spa areas demand the highest weatherproofing standards while creating resort-style atmospheres. These installations prioritize water resistance and viewing angles from wet environments.
11. Pool Deck High-Brightness Display
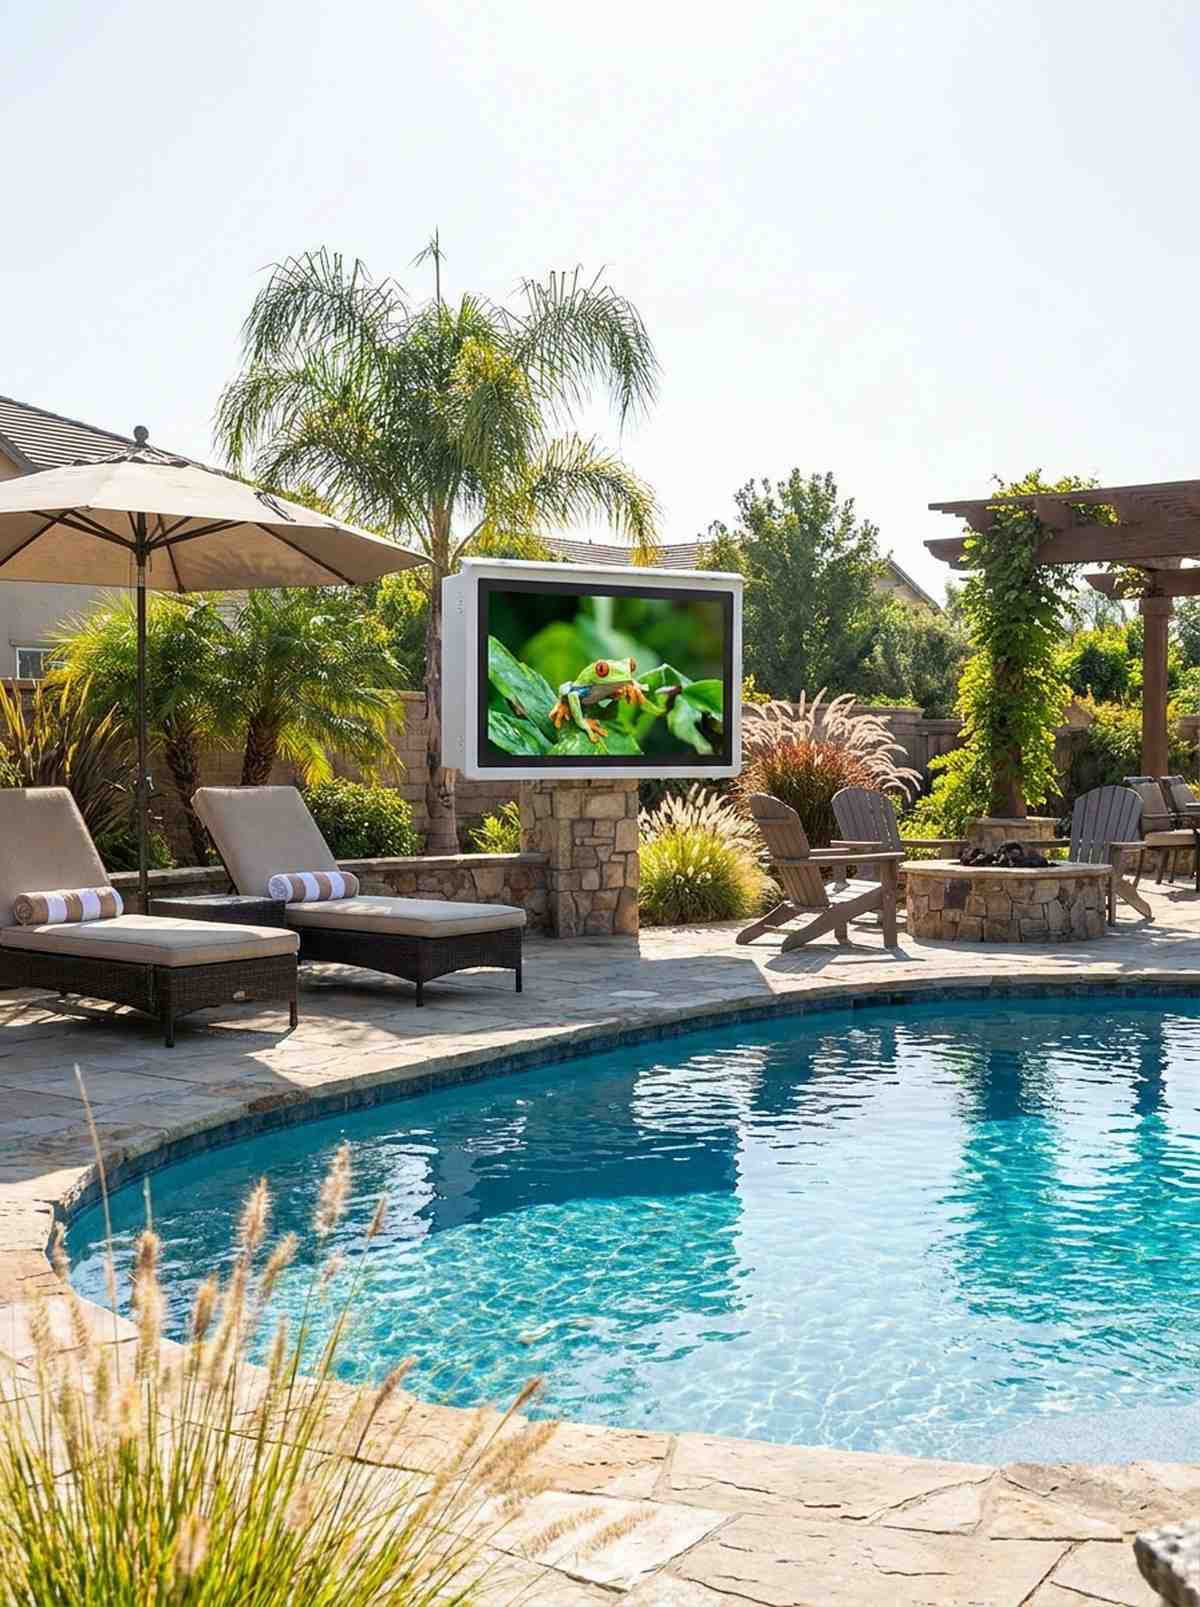
Feels exactly like renting a VIP cabana at a five-star resort. A high-output poolside monitor slices right through the glare of water reflections for perfect midday viewing.
Using a standard screen here is a guaranteed failure due to sun washout, but this specific luminous upgrade completely changes the game. Pairing a 1000-nit screen with IP65-rated waterproof enclosures makes the final setup practically indestructible against cannonball splashes.
While the specialized screen is an investment, the protective mounting gear itself is only around $120–$200.
- Key Materials: IP-rated enclosure, anti-reflective film
- Vibe / Style: Luxury daytime resort deck
- Difficulty: Intermediate to Advanced
- Budget Breakdown: Protective Shell: $150 | Glare Film: $30.
- Creator’s Tip: Position the screen exactly 15 feet from the water’s edge to negate 99% of accidental splash damage.
- Smart Sourcing: IP65-rated universal enclosure shells and anti-glare matte screen films (bulk pack).
12. Spa Adjacent Recessed Installation
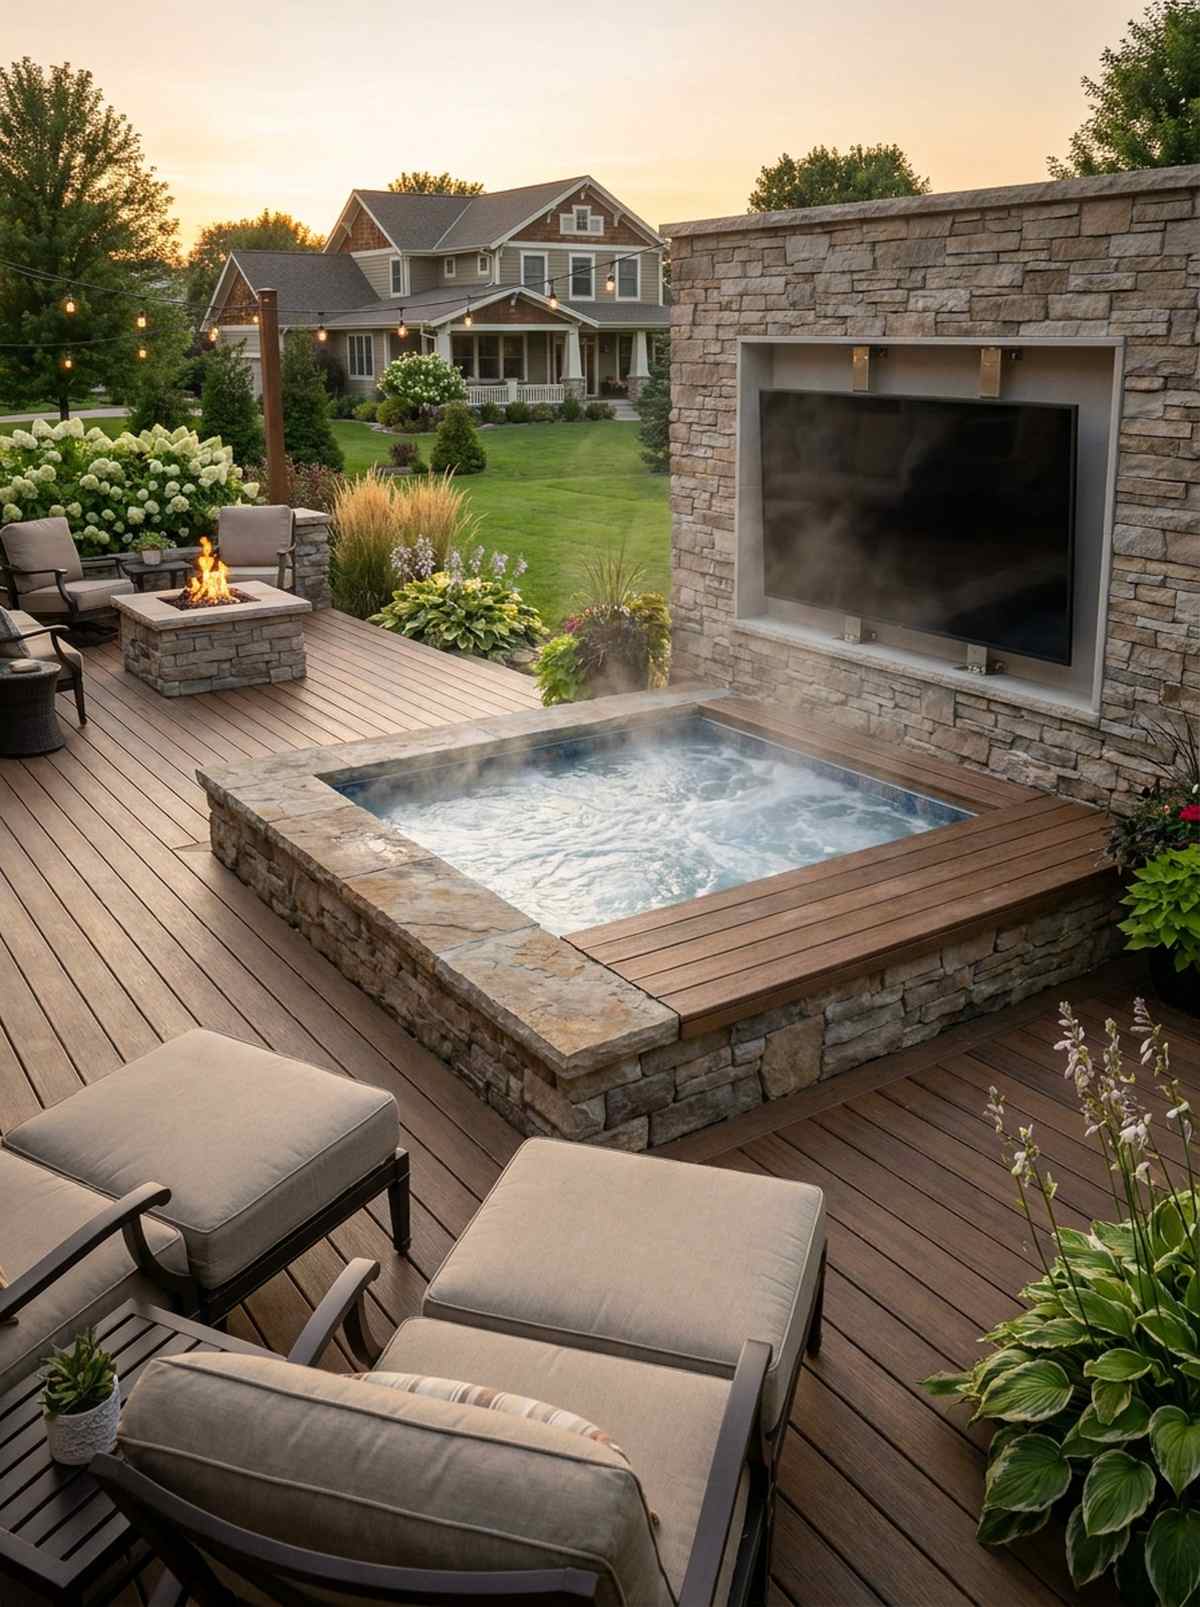
Transforms a basic hot tub into a steamy, cinematic private oasis. Spa-side recessed screens offer intimate viewing while soaking, heavily protected from the rising humidity.
Most hot tub owners ruin their screens with chlorine vapor, but creating a slight architectural recess acts as a clever vapor barrier. Adding stainless steel rust-proof hardware to the back-end ensures the chemical-heavy steam won’t eat through the mounting bolts.
You can retrofit a spa niche with proper moisture defense for around $80–$140. Pin this if you own a hot tub.
- Key Materials: Vapor barrier plastic, marine-grade steel bolts
- Vibe / Style: Intimate thermal spa
- Difficulty: Advanced moisture-proofing
- Budget Breakdown: Vapor Shield: $25 | Marine Hardware: $40.
- Creator’s Tip: Set up a small USB-powered fan inside the recess to actively push steam away from the screen’s vents.
- Smart Sourcing: marine-grade stainless bolt kits and heavy-duty vapor barrier rolls.
13. Poolside Cabana Shade-Integrated Screen
Offers the ultimate tropical vacation retreat vibe right in your backyard. Cabana fabric-shaded screens blend soft, breezy textiles with high-tech entertainment flawlessly.
Relying purely on the cabana roof isn’t enough for shifting afternoon rays, so this dynamic setup uses the structure to its full advantage. Integrating motorized roll-down outdoor shades directly above the screen frame lets you conquer the sun with the push of a button.
The shade mechanism and mount integration generally run between $100–$250.
- Key Materials: Articulating bracket, UV-blocking outdoor fabric
- Vibe / Style: Breezy tropical lounge
- Difficulty: Moderate DIY
- Budget Breakdown: UV Shade: $80 | Flexible Mount: $60.
- Creator’s Tip: Choose dark, tightly woven outdoor fabrics for the cabana sidewalls to drastically improve the screen’s contrast ratio.
- Smart Sourcing: UV-blocking motorized shade kits and rust-resistant articulating mounts.
14. Water Feature Backdrop Installation
Creates a mesmerizing Zen garden cinema experience. A fountain-backed display zone pairs the calming white noise of running water with your favorite evening films.
Combining water and electricity seems risky, but strategic spacing delivers an incredibly premium, dynamic aesthetic. Using waterproof cable management boxes safely routes the power lines far away from the fountain’s misting radius.
Safely separating the elements with protective gear will cost roughly $40–$75.
- Key Materials: IP67 junction boxes, watertight conduit connectors
- Vibe / Style: Dynamic contemporary Zen
- Difficulty: High-attention safety wiring
- Budget Breakdown: Junction Box: $25 | Conduit: $20.
- Creator’s Tip: Always place the TV mount strictly upwind from the water feature’s typical splash zone based on your yard’s prevailing breezes.
- Smart Sourcing: IP67 watertight junction boxes (starter kit) and heavy-duty outdoor extension cords.
If you think your space is too exposed for a screen, this upcoming trick changes everything…
Cabinet and Enclosure Solutions for Maximum Protection
Custom cabinets and weatherproof enclosures extend screen lifespan in harsh climates while adding storage and design elements. These options work well for seasonal climates or areas with extreme weather exposure.
15. Rustic Barn Door Cabinet

Brings a touch of modern farmhouse magic to the patio wall. A reclaimed wood sliding cabinet completely disguises your tech, turning an ugly black square into gorgeous organic art.
Standard plastic covers look incredibly cheap, but this custom woodwork trick looks far more expensive than it is. Lining the interior with marine-grade wood sealants ensures the cabinet won’t rot or warp when the winter rains hit.
Building this custom closure usually requires about $80–$160 in lumber and track hardware. Pin this if you love stealthy home decor.
- Key Materials: Reclaimed lumber, mini sliding barn door hardware
- Vibe / Style: Premium rustic farmhouse
- Difficulty: Intermediate woodworking
- Budget Breakdown: Track Kit: $45 | Wood & Stain: $60.
- Creator’s Tip: Cut discrete ventilation slits into the bottom panel so the TV doesn’t overheat when the doors are closed during operation.
- Smart Sourcing: mini barn door hardware starter kits and marine-grade clear wood sealant (bulk pack).
16. Louvered Enclosure with Airflow
Projects a sleek, highly architectural edge. A louvered aluminum TV enclosure offers the perfect balance of intense weather shielding and critical heat dissipation.
Trapping a TV in a sealed box will fry the motherboard fast, but these angled slats solve the thermal problem elegantly. Bolting together powder-coated aluminum louver panels creates an enclosure that deflects sideways rain while continuously breathing.
You can construct or buy this breathable metallic shell for around $150–$300.
- Key Materials: Aluminum louver slats, rust-proof corner brackets
- Vibe / Style: Modern architectural clean
- Difficulty: Advanced assembly
- Budget Breakdown: Louver Panels: $120 | Hardware: $40.
- Creator’s Tip: Angle the louvers downward at exactly 45 degrees so water instantly rolls off instead of blowing inside.
- Smart Sourcing: pre-cut aluminum louver panels and weather-resistant corner brace kits.
17. Freestanding Cabinet with Storage
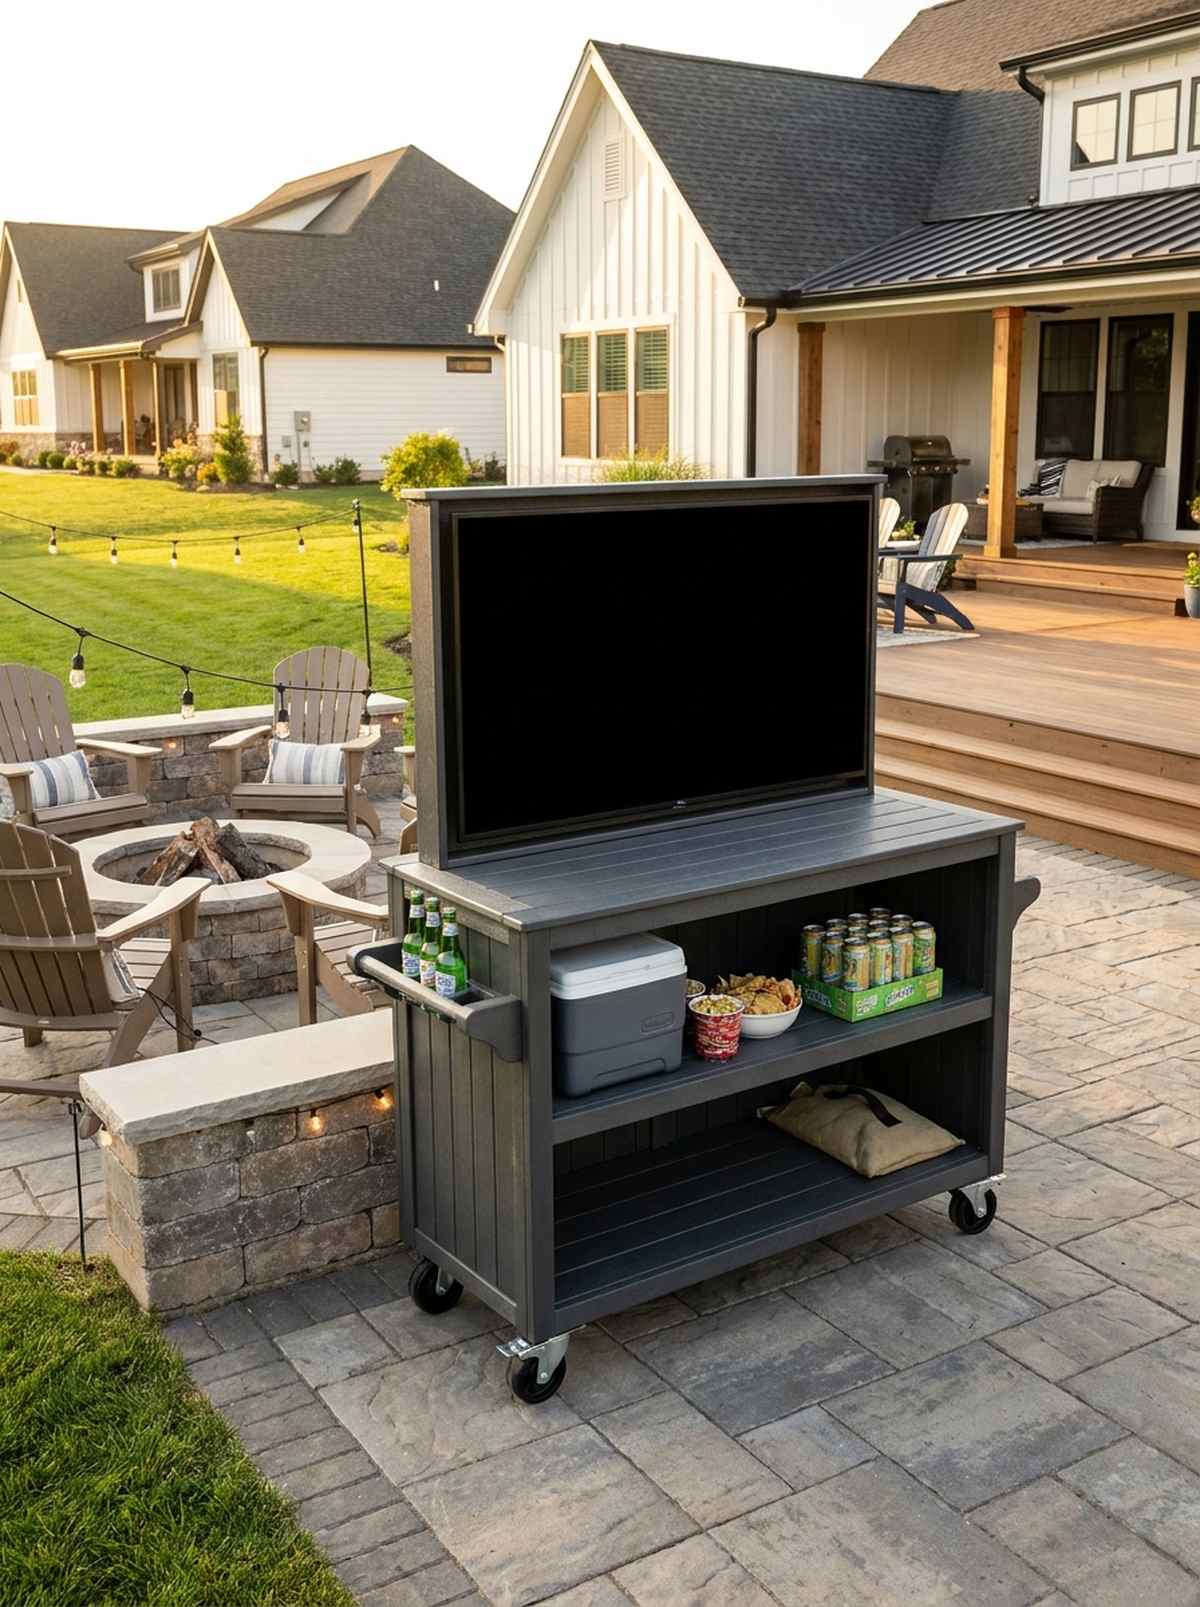
The ultimate adaptable party station on wheels. A rolling outdoor media cabinet lets you chase the shade or move the entertainment straight to the fire pit.
Fixed mounts lock you into one viewing arrangement, but this mobile beast offers total backyard freedom. Using heavy-duty locking caster wheels ensures the heavy unit won’t accidentally roll away during a windy tailgate party.
Retrofitting a solid cabinet with rugged mobility costs roughly $70–$120. Save this to your flexible patio layouts board.
- Key Materials: Marine-polymer cabinet, industrial swivel casters
- Vibe / Style: Versatile event host
- Difficulty: Easy modification project
- Budget Breakdown: Casters: $40 | Cabinet Weatherproofing: $35.
- Creator’s Tip: Add a heavy brick or sandbag to the absolute bottom shelf to lower the center of gravity and prevent tipping.
- Smart Sourcing: industrial locking caster wheels (bulk pack) and marine-grade polymer cabinet shells.
18. Stone Veneer Enclosure Wall
Feels like sitting in a rugged, million-dollar luxury lodge. A stacked-stone TV monument physically embeds the screen into the landscape for maximum visual impact.
Plain concrete walls are an eyesore, but wrapping the support structure in stone gives a designer-level finish that insulates the screen from extreme temperature swings. Applying pre-mixed exterior stone adhesives makes this faux-masonry project surprisingly achievable for a weekend warrior.
The faux-stone materials and adhesives will set you back around $200–$400, but the result is breathtaking.
- Key Materials: Faux stone veneer panels, high-tack exterior masonry adhesive
- Vibe / Style: Majestic mountain resort
- Difficulty: Labor-intensive DIY
- Budget Breakdown: Veneer Panels: $250 | Adhesive: $45.
- Creator’s Tip: Run PVC piping directly through the cinder block core before applying the stone to perfectly hide all electrical wires.
- Smart Sourcing: interlocking faux stone veneer kits and heavy-duty exterior construction adhesive (bulk pack).
Material Guide: Cheap vs. Premium Aesthetic
Knowing exactly where to save and where to spend makes all the difference in achieving that “expensive resort” vibe without draining your wallet.
- Standard Brackets vs. UV-Resistant Mounts: Generic mounts rust in weeks, while powder-coated, weatherproof hardware stops corrosion and prevents expensive screen damage.
- DIY Covers vs. Pre-made Enclosures: Snapping on a high-quality TV cover kit saves both time and money compared to building a fully ventilated wooden cabinet from scratch.
Specialty Viewing Experiences Beyond Standard Setups
Creative installations push beyond conventional mounting to create unique entertainment environments. These approaches blend technology with landscape design for memorable outdoor experiences.
19. Fire Pit Cinema Circle
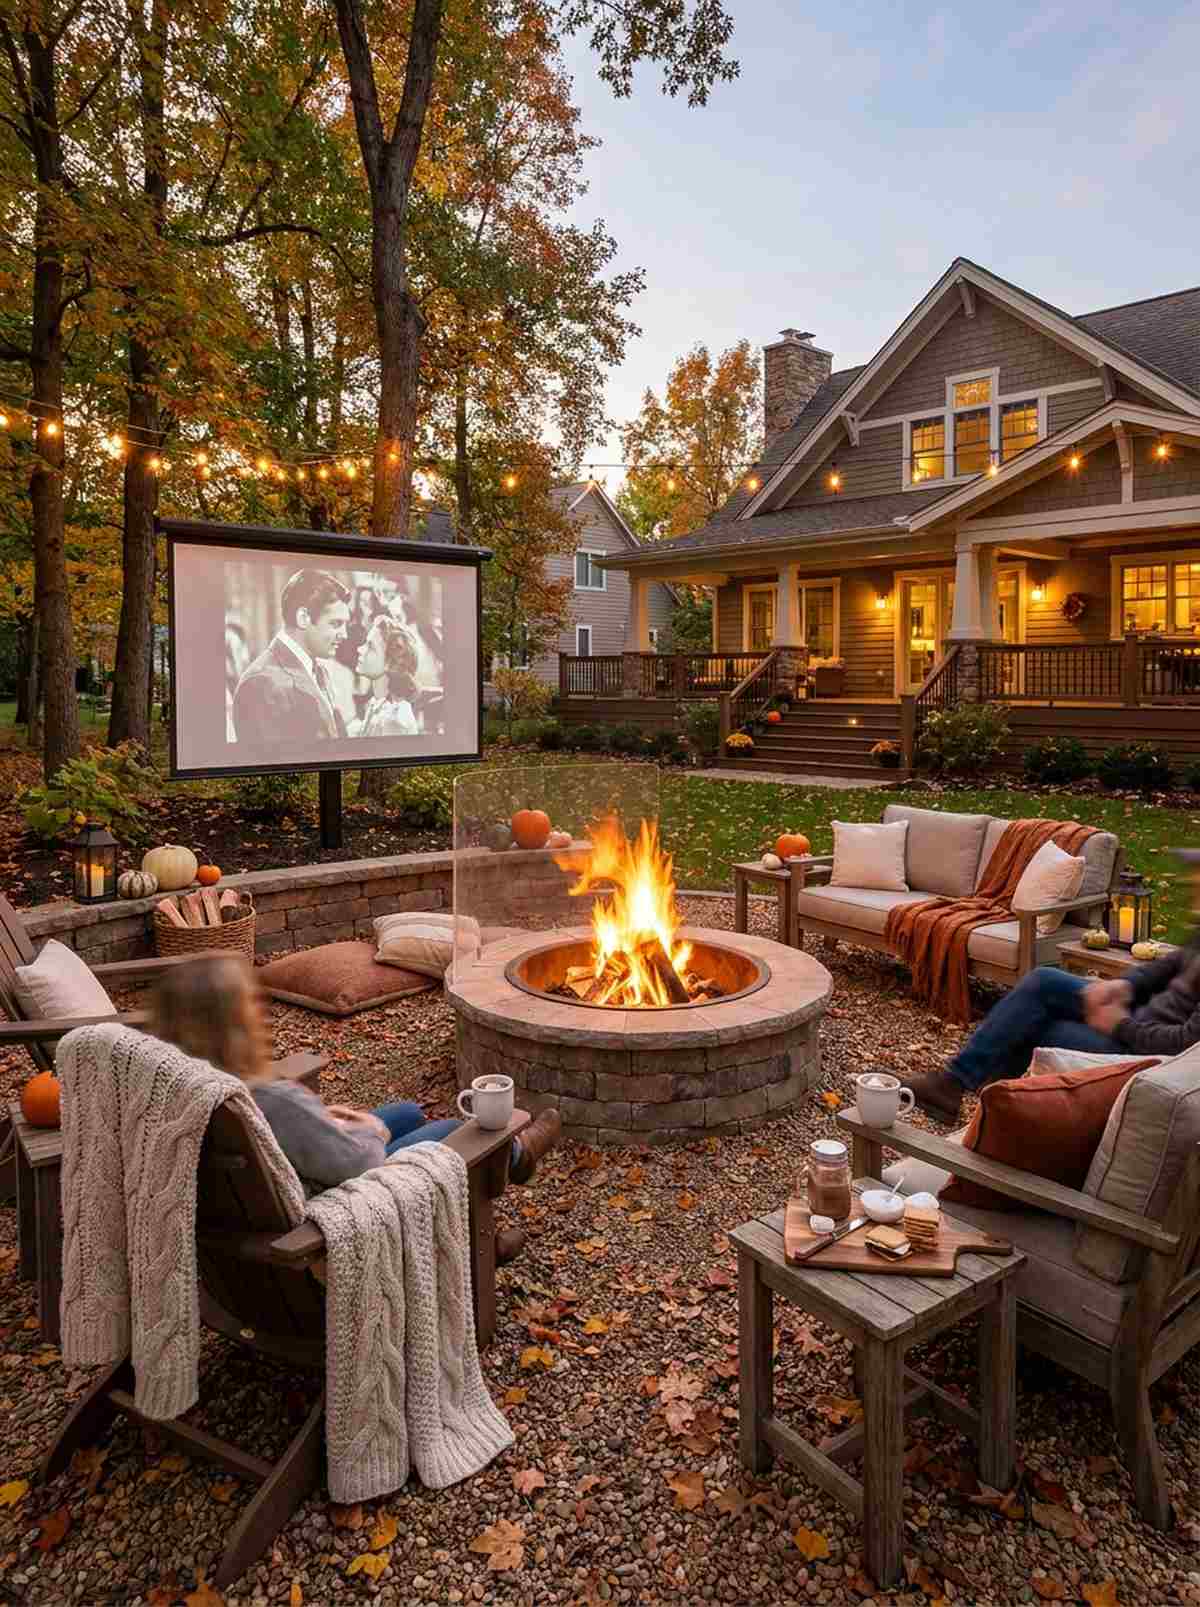
Provides the ultimate cozy campfire theater experience. A low-profile fire pit screen stretches the usable patio season deep into the chilly autumn months.
High wall mounts ruin the intimacy of a fire circle, but this clever ground-level berm approach changes the vibe completely. Installing heat-deflecting screen shields prevents the roaring fire from warping the delicate plastic bezel of your display.
You can execute this low-slung cinema setup for about $60–$110. Pin this if you love fall backyard gatherings.
- Key Materials: Short post mount, thermal deflection barrier
- Vibe / Style: Intimate autumn campfire
- Difficulty: Moderate landscaping
- Budget Breakdown: Short Post: $50 | Heat Shielding: $30.
- Creator’s Tip: Keep the screen exactly 18 inches off the ground to prevent tall grass interference without blocking across-yard sightlines.
- Smart Sourcing: short-profile outdoor pedestal mounts and thermal-resistant acrylic shields (pre-cut).
Don’t buy a single mounting bracket until you see how this next setup handles extreme weather and aesthetics.
20. Garden Wall Living Screen Surround
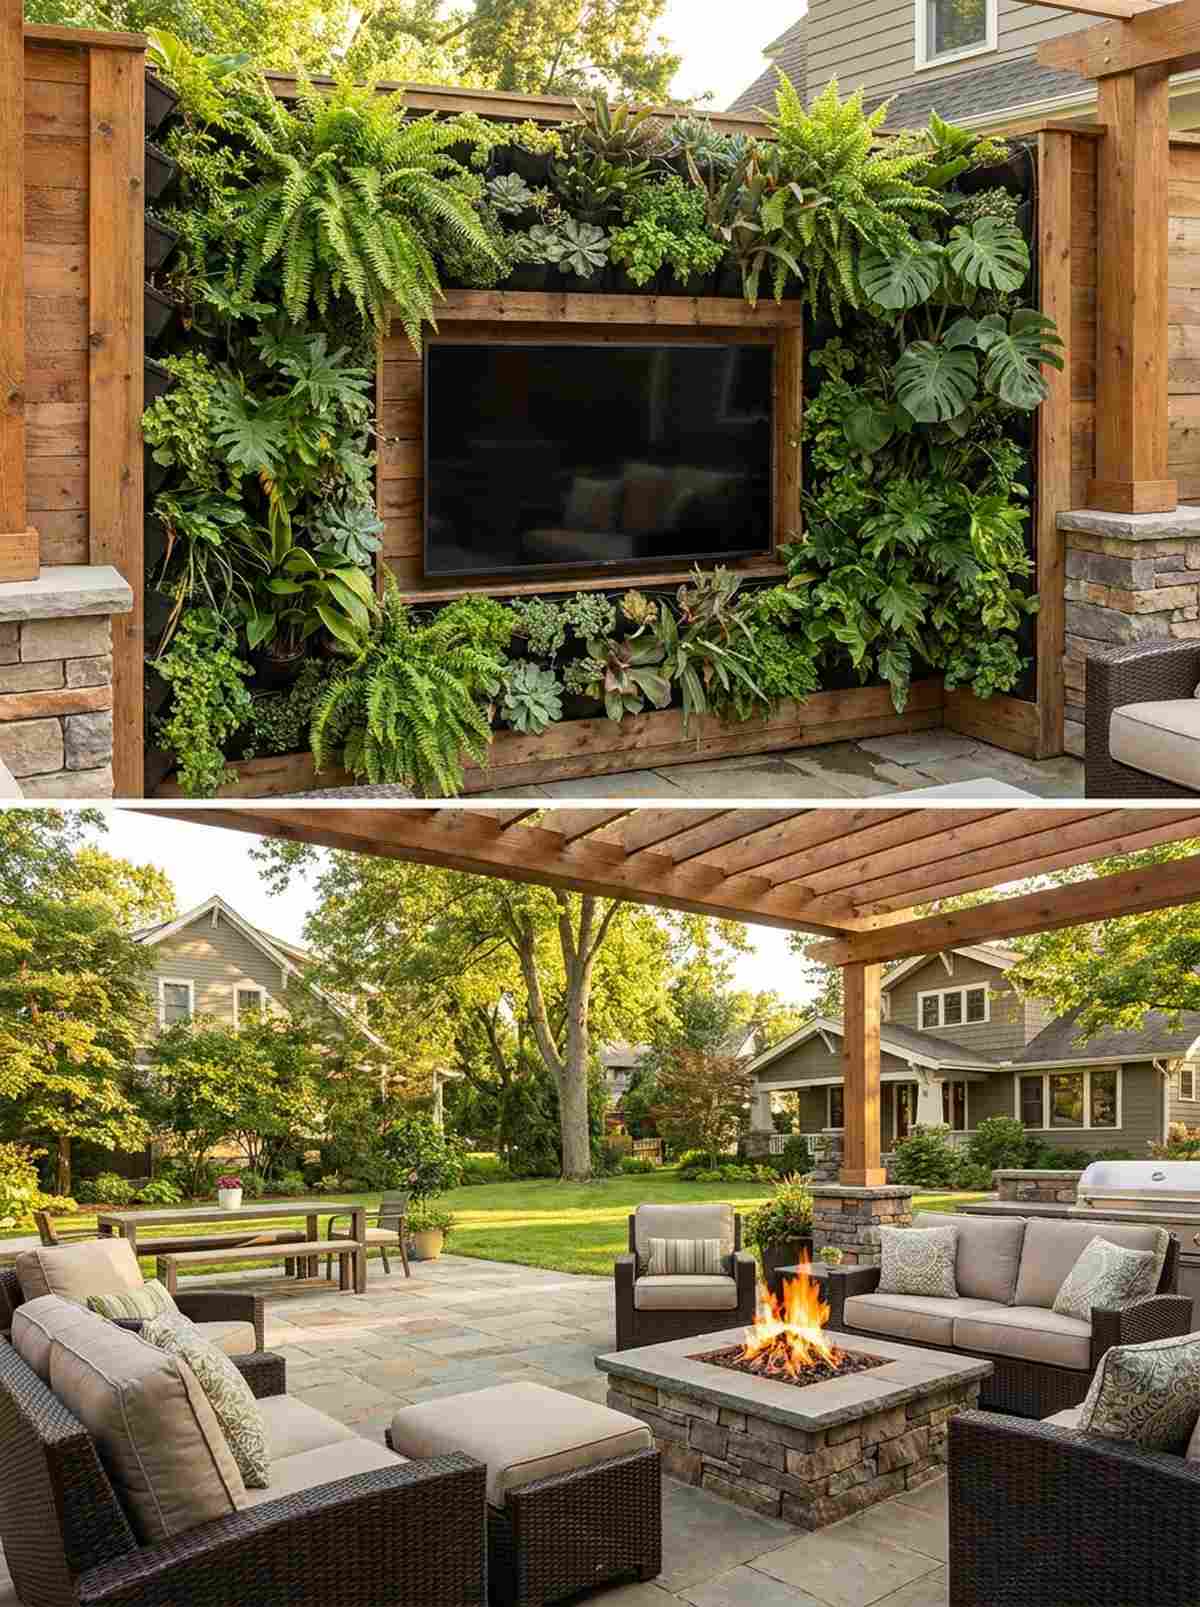
Feels like uncovering a lush botanical hideaway in the jungle. A living plant wall surround brilliantly camouflages the stark black electronics inside a sea of vibrant greenery.
Tech often clashes violently with nature, but this biophilic approach flawlessly blends the two. Using drip irrigation starter kits ensures your vertical garden thrives without ever accidentally spraying water onto the power outlets.
The framing and irrigation components will cost around $90–$150.
- Key Materials: Vertical planter pockets, micro-drip tubing
- Vibe / Style: Lush biophilic sanctuary
- Difficulty: Intermediate plumbing & planting
- Budget Breakdown: Planters: $60 | Drip Lines: $35.
- Creator’s Tip: Leave a strict 24-inch gap between the bottom of the planters and the top of the TV to prevent muddy runoff.
- Smart Sourcing: vertical wall planter pockets (bulk pack) and precision micro-drip irrigation kits.
21. Retractable Awning Shade System
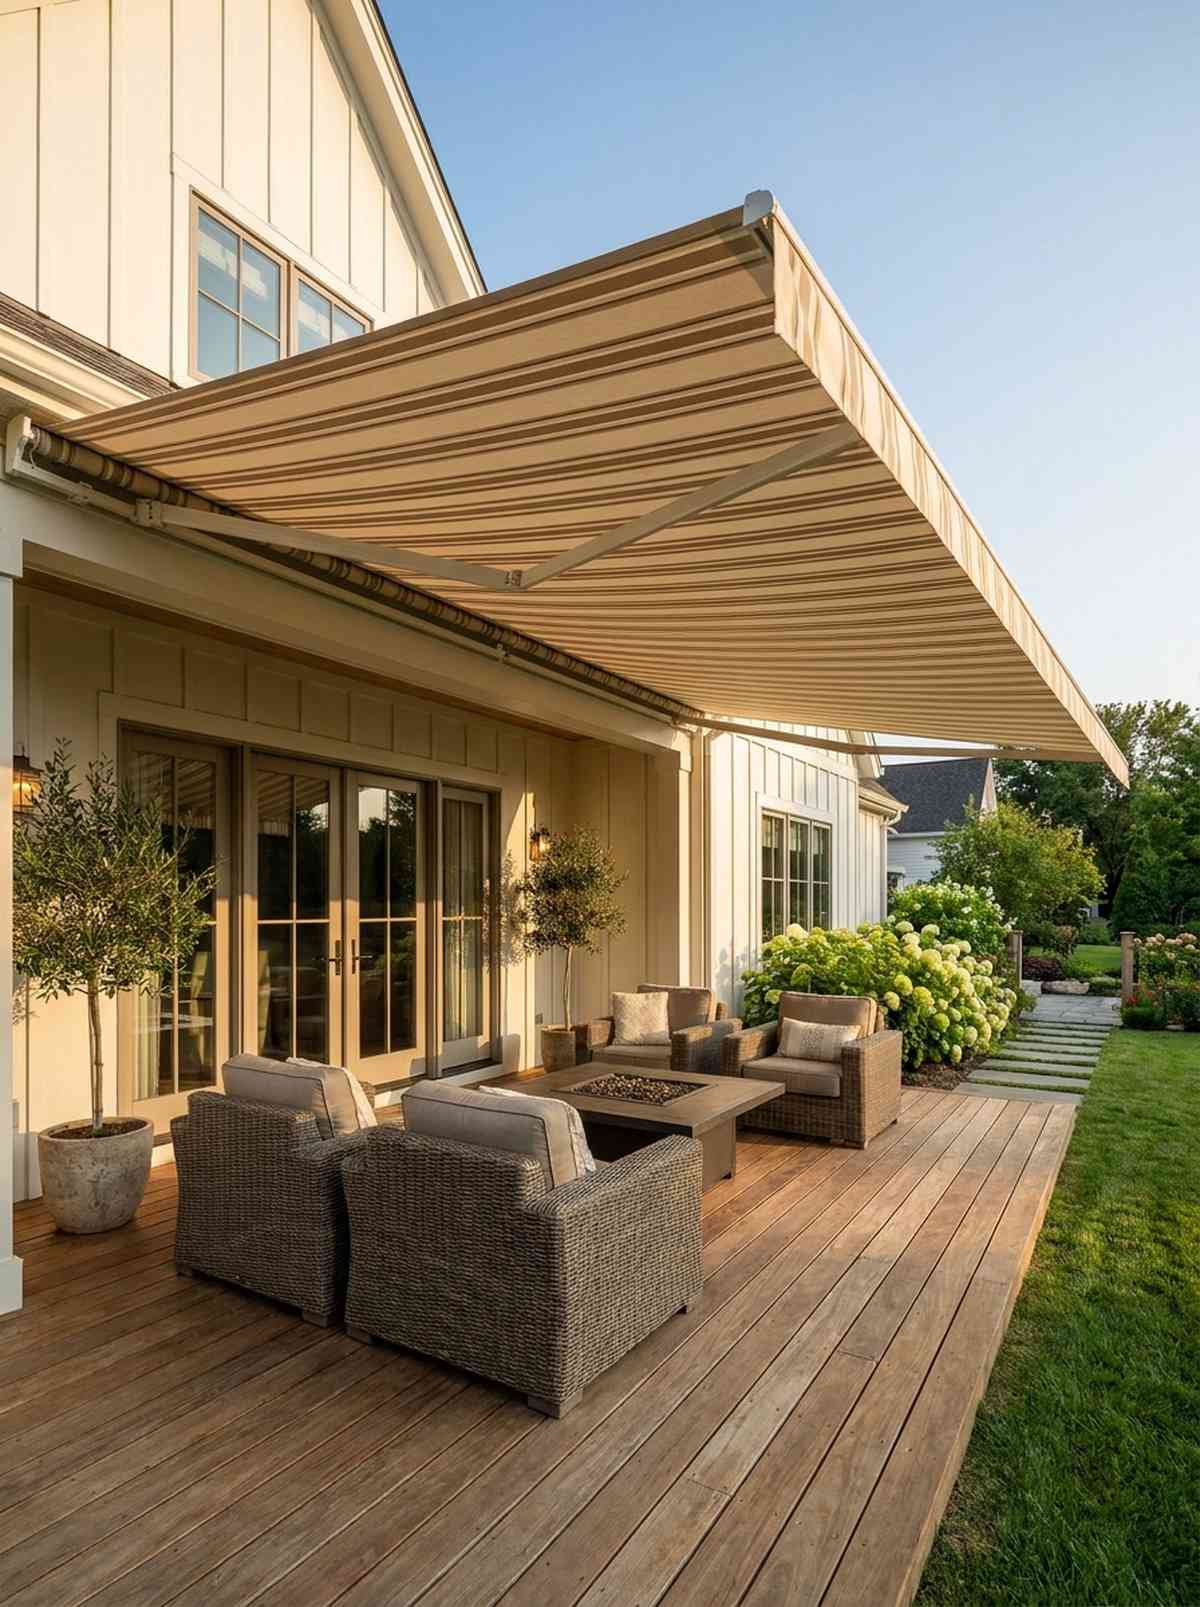
Brings a heavy dose of European cafe charm right to your back door. A motorized awning shade guard offers on-demand glare defense that vanishes into the wall when the stars come out.
Permanent roofs darken a house’s interior, but this adaptive canvas solution delivers a surprisingly premium look with total control. Pairing the screen with smart UV-sensor awning controllers means the shade automatically deploys the second the sun hits the screen.
While awnings are an investment, integrating the tech sync costs only $40–$80 in smart plugs.
- Key Materials: Motorized awning, smart outdoor plug
- Vibe / Style: Sophisticated adaptive terrace
- Difficulty: Advanced tech integration
- Budget Breakdown: Smart Plugs/Sensors: $50 | Cord Concealer: $20.
- Creator’s Tip: Pitch the awning at a steep 15-degree angle so it casts a longer, sharper shadow directly over the viewing area.
- Smart Sourcing: outdoor-rated smart plugs and motorized retractable awning kits.
22. Multi-Screen Sports Viewing Zone
Creates the high-energy pulse of a premium sports lounge. A dual-screen corner array ensures nobody misses a single touchdown during massive tournament weekends.
Hanging two TVs sounds chaotic, but this precise staggered L-shape elevates a basic layout into a professional-grade viewing matrix. Utilizing an outdoor audio zone controller lets you seamlessly flip the main speakers between the two different broadcasts.
Double the hardware means double the budget, running about $150–$250 in mounting gear. Save this to your ultimate man-cave board.
- Key Materials: Twin articulating mounts, audio zone switcher
- Vibe / Style: High-octane sports hub
- Difficulty: Complex alignment required
- Budget Breakdown: Twin Mounts: $120 | Audio Switcher: $60.
- Creator’s Tip: Mount the secondary screen exactly 6 inches lower and tilted inward to create a natural, distinct viewing lane.
- Smart Sourcing: twin-pack articulating outdoor mounts and multi-zone audio controller kits.
23. Outdoor Projector-Screen Hybrid
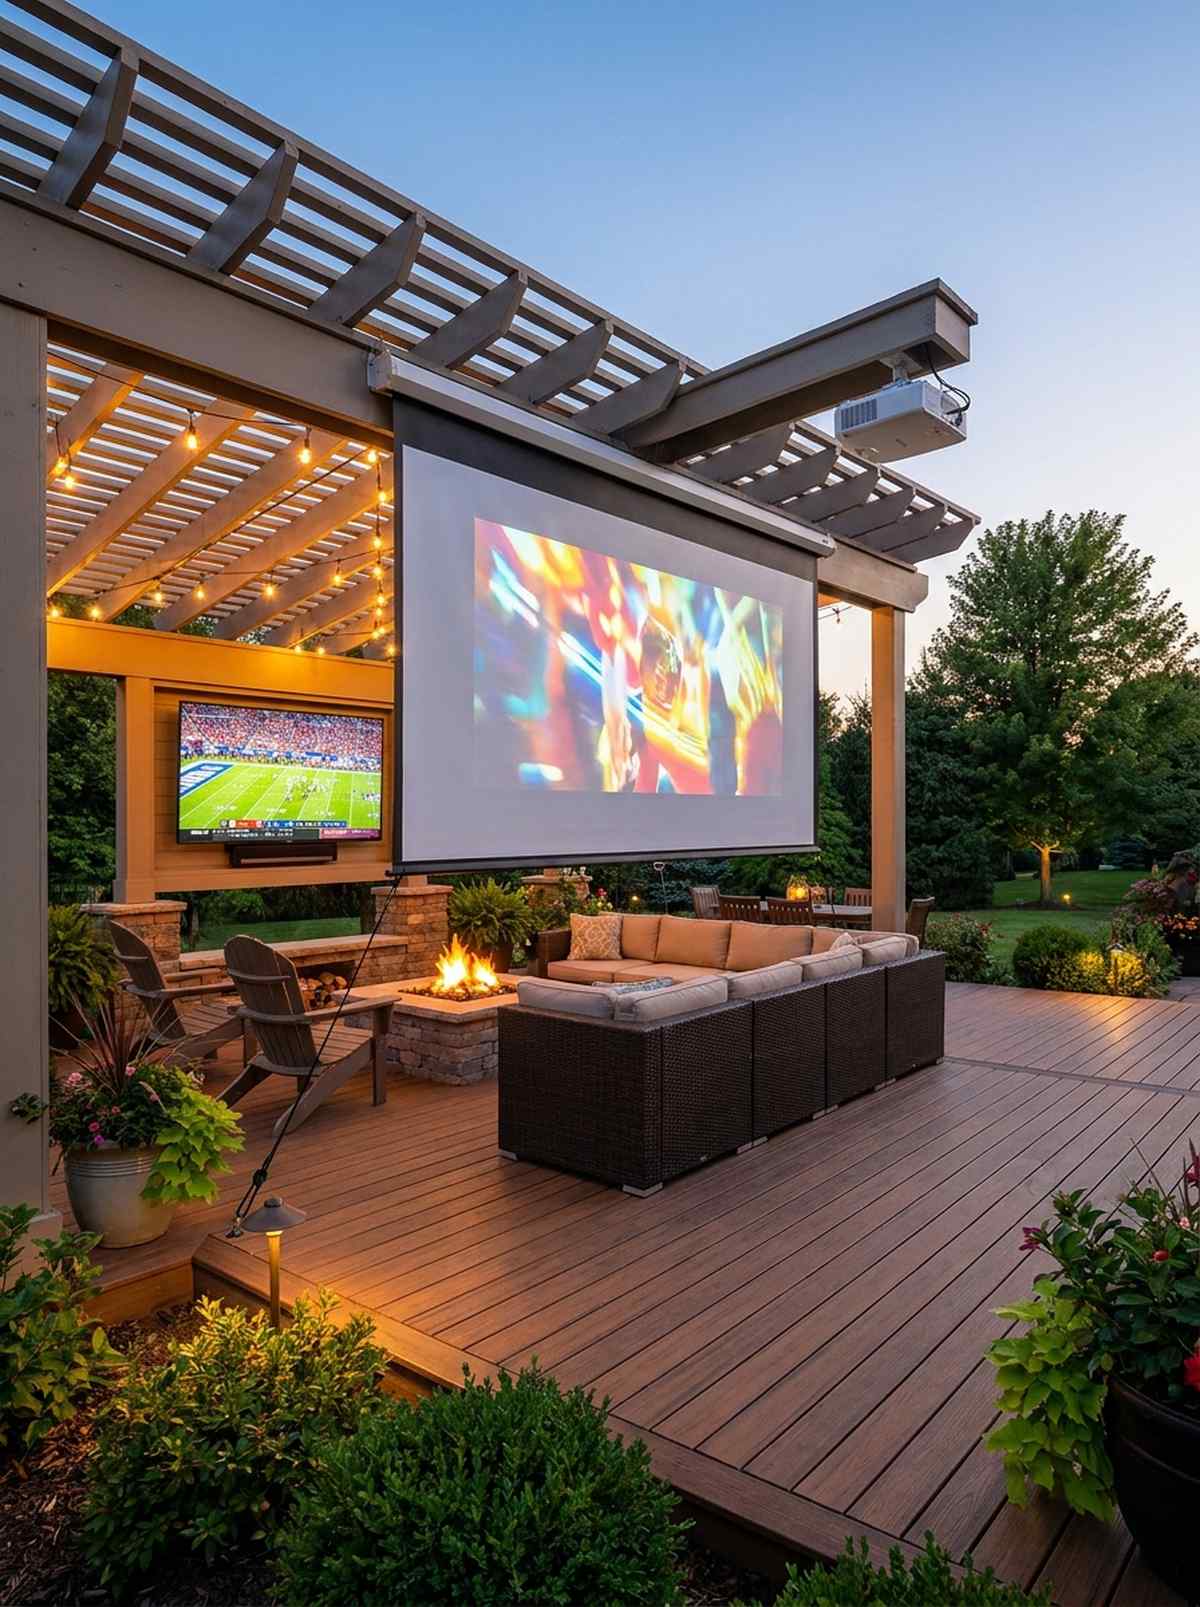
Delivers the starlit magic of a classic vintage drive-in. A dual TV-projector hybrid offers crisp daytime sports on a standard screen, then drops a massive canvas for nighttime blockbusters.
Why choose between daytime visibility and massive scale when this layered setup gives you both? Mounting a weatherproof retractable projection screen straight over the fixed TV creates an unbelievable, jaw-dropping transformation at dusk.
Adding the drop-down theater layer usually costs $100–$200. Highly recommended for avid movie buffs.
- Key Materials: Outdoor pull-down screen, ceiling hook anchors
- Vibe / Style: Ultimate twilight cinema
- Difficulty: Moderate dual-install
- Budget Breakdown: Projector Screen: $120 | Hooks/Anchors: $15.
- Creator’s Tip: Add small bungee cord loops to the bottom corners of the drop-down screen to tie it off and stop wind flapping.
- Smart Sourcing: weatherproof retractable projector screens and heavy-duty bungee tie-downs (bulk pack).
24. Dining Pergola Overhead Mount
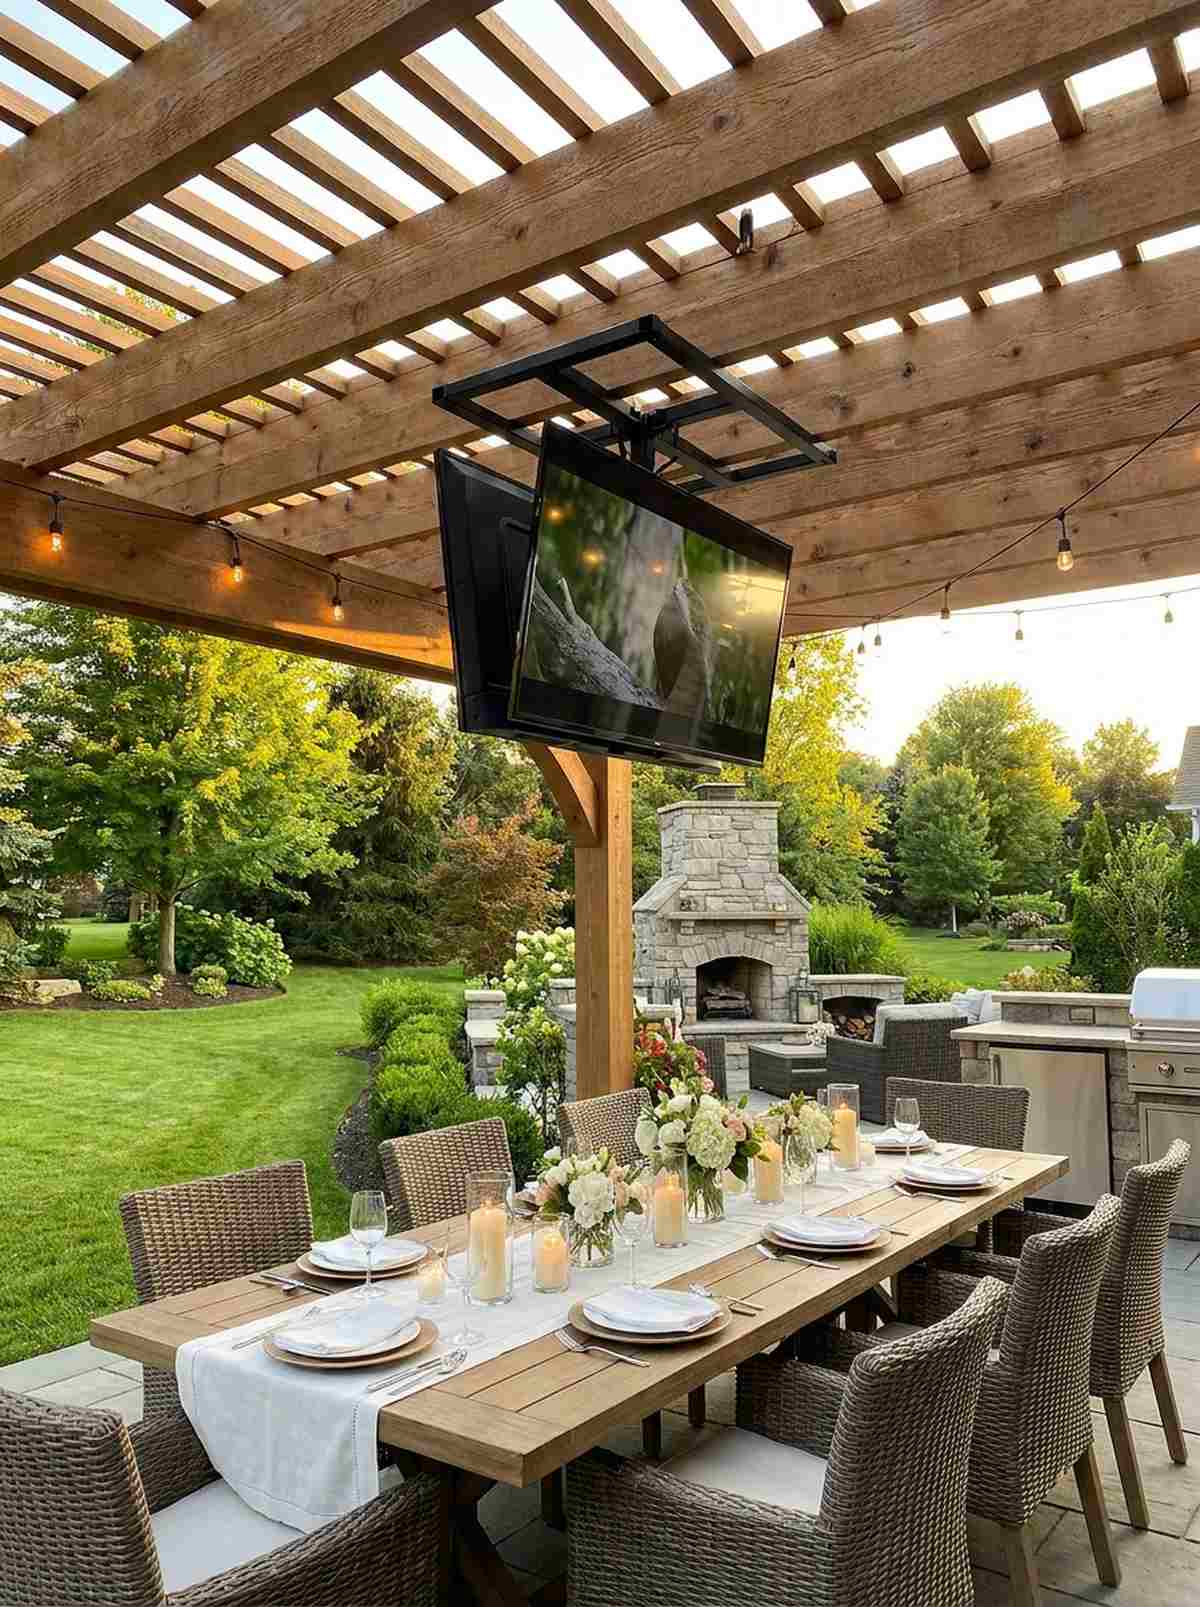
Feels like sitting in an exclusive al fresco banquet hall. An overhead dining display hovers discreetly above the table, ready to pivot into action the moment dessert is served.
Putting a TV near food usually clutters the table, but this suspended solution looks incredibly sophisticated while freeing up space entirely. Utilizing a 90-degree folding ceiling bracket allows you to literally tuck the screen flat against the roof when not in use.
You can achieve this space-saving magic for about $60–$110. Pin this if you love hosting dinner parties.
- Key Materials: Folding ceiling bracket, locking pins
- Vibe / Style: Elegant dual-purpose dining
- Difficulty: Intermediate overhead DIY
- Budget Breakdown: Folding Mount: $70 | Safety Straps: $20.
- Creator’s Tip: Ensure the drop length leaves at least 3 feet of clearance above the tallest centerpiece so views across the table remain unobstructed.
- Smart Sourcing: 90-degree folding ceiling mounts and nylon safety tether kits.
Conclusion
Creating the perfect outdoor patio tv setup balances weatherproof technology with thoughtful landscape integration. From pergola ceiling mounts to poolside high-brightness displays, each of these 24+ installation styles offers unique advantages for transforming your outdoor space into an entertainment destination. Start by evaluating your climate conditions, viewing patterns, and patio architecture, then select premium mounting hardware and protective enclosures that safeguard your investment while enhancing your outdoor living experience. Your backyard entertainment zone awaits—choose the setup that brings your vision to life and enjoy seasons of open-air viewing.
Frequently Asked Questions
What weatherproof rating should I look for in an outdoor patio TV?
Choose screens or protective enclosures with an IP65 rating or higher for open-air patio installations. This rating ensures defense against dust ingress and multidirectional water jets, easily handling heavy rain and snow. If you’re building near a spa or pool, upgrading to IP67-rated waterproof enclosures guarantees survival even with heavy moisture exposure. Always invest in weatherproof silicone sealants for your cable ports to ensure complete system protection.
How do I reduce glare on my outdoor TV during daytime viewing?
Install retractable awnings or use motorized shade kits that block direct sunlight while maintaining that breezy open-air ambiance. If you can’t build a roof, apply anti-glare matte screen films (bulk pack) to drastically cut down reflections by up to 70 percent. Position your display facing north or south to avoid the harsh direct paths of the rising and setting sun, and always rely on commercial-grade articulating mounts so you can physically tilt the screen away from the glare.
Can I use a regular indoor TV outdoors with a protective enclosure?
Yes, but you must pair it with a high-quality universal weatherproof TV enclosure shell. These heavy-duty cases protect fragile indoor screens from moisture, dust, and bug infestations. Keep in mind that standard indoor models lack the high-nit brightness required for direct sunlight, so this budget hack works best under deep covered porches. For exposed areas, using a heavy-duty TV cover kit combined with a shaded pergola is highly recommended.
What mounting hardware works best for outdoor TV installations?
Never use cheap indoor brackets outside; they will rust and fail. You need powder-coated stainless steel outdoor mounts specifically engineered to handle high wind shear and moisture. Full-motion articulating arms give you the best viewing flexibility, but they must be anchored using masonry anchor starter kits or heavy exterior lag bolts. Always apply clear exterior caulk around the bolt holes to prevent water from rotting your siding.
How far should the TV be from outdoor seating for optimal viewing?
Position the screen at a distance of about 1.5 to 2.5 times the diagonal measurement of your screen to prevent neck strain during long game days. For a 55-inch display, plan your seating 7–11 feet away. Because outdoor acoustics are difficult, pair your setup with weatherproof soundbar attachment kits so you don’t have to blast the volume. Mount the center of the TV strictly at eye level for seated guests to keep the aesthetic feeling like a luxury lounge.