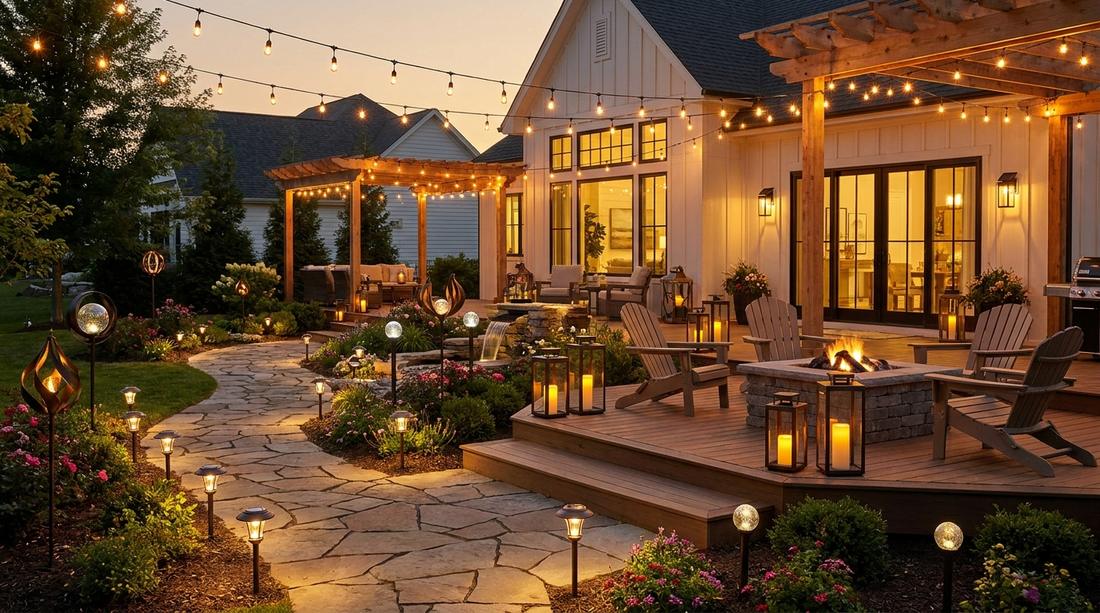
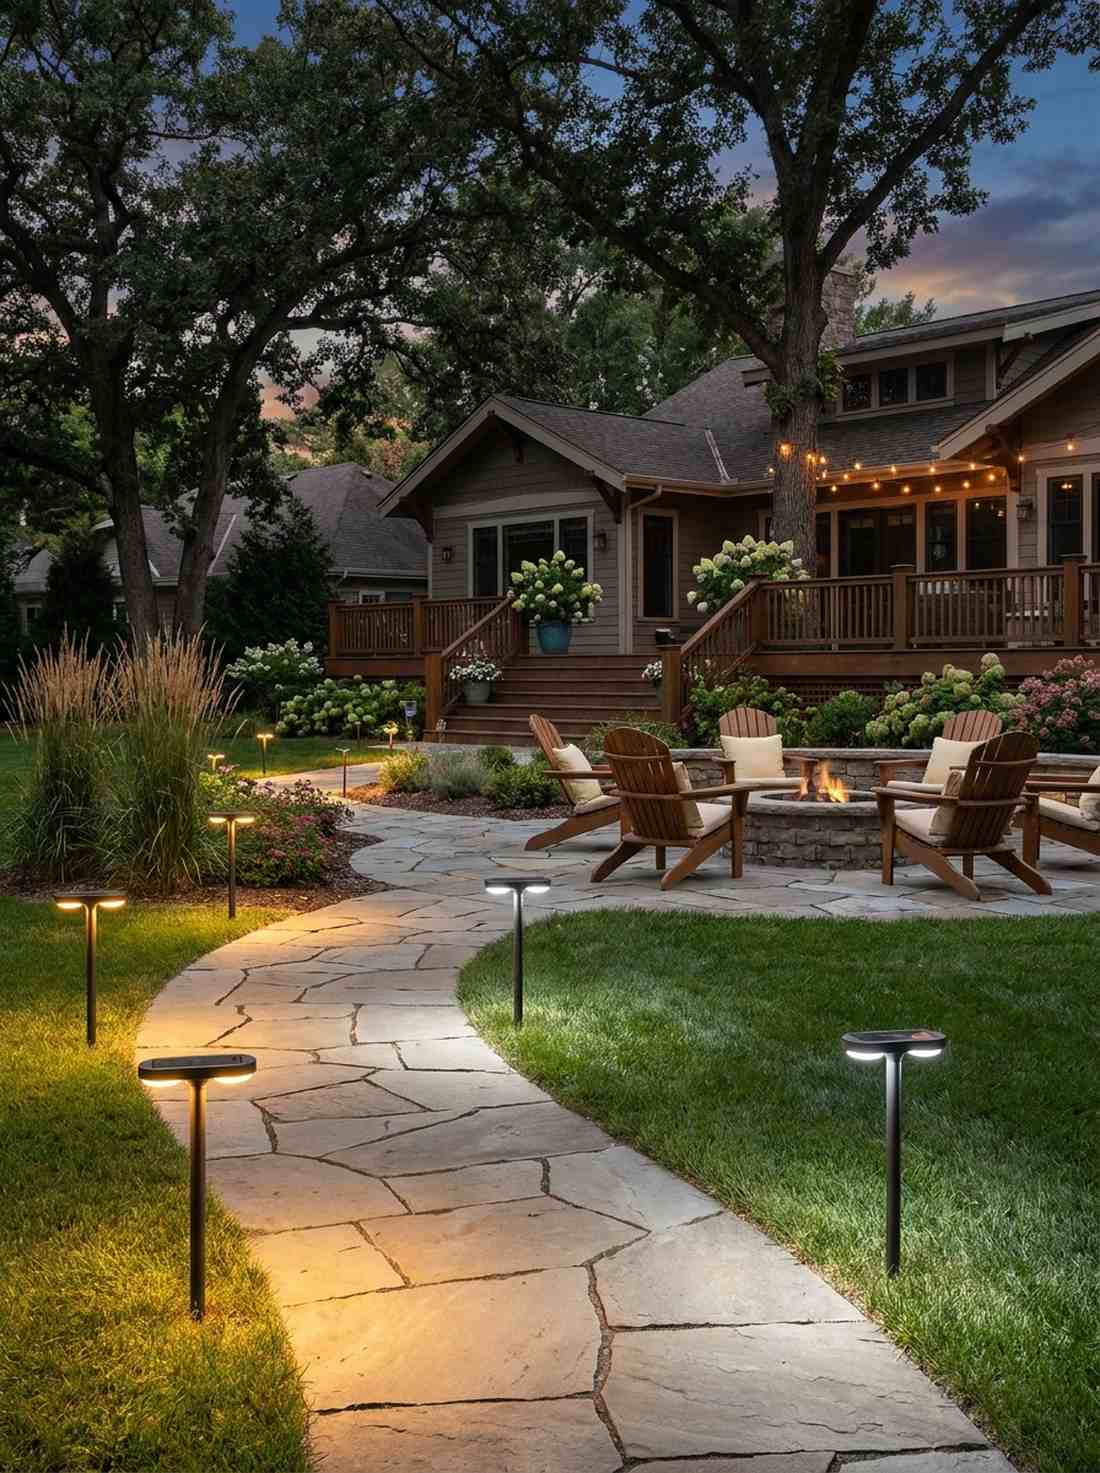
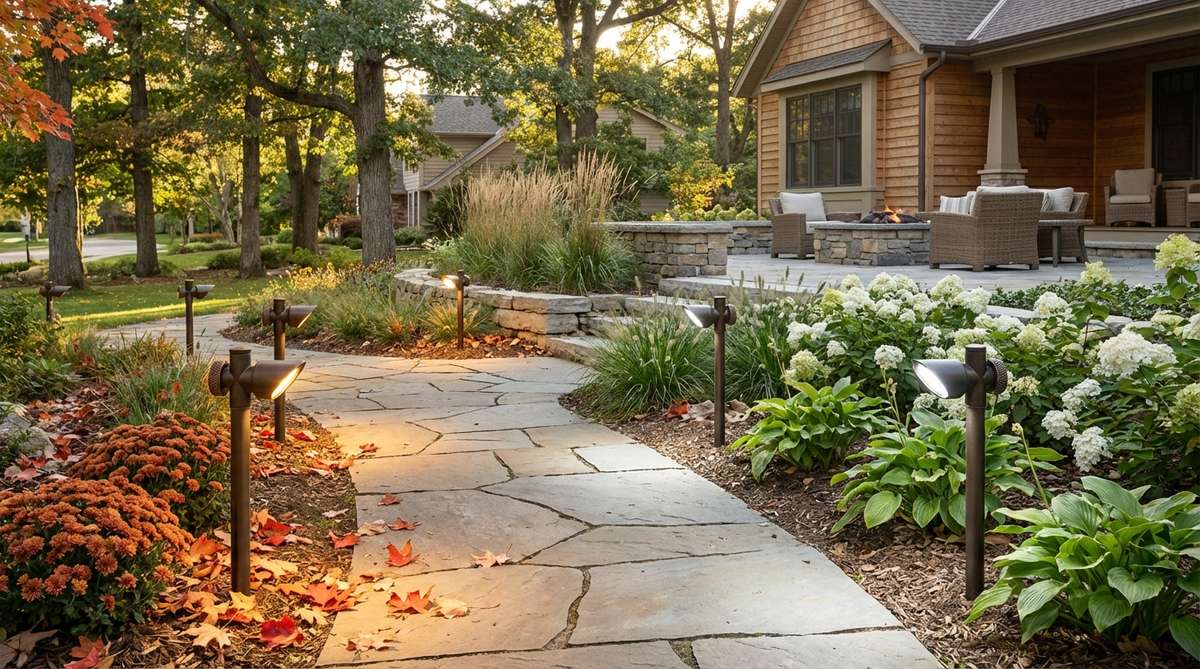
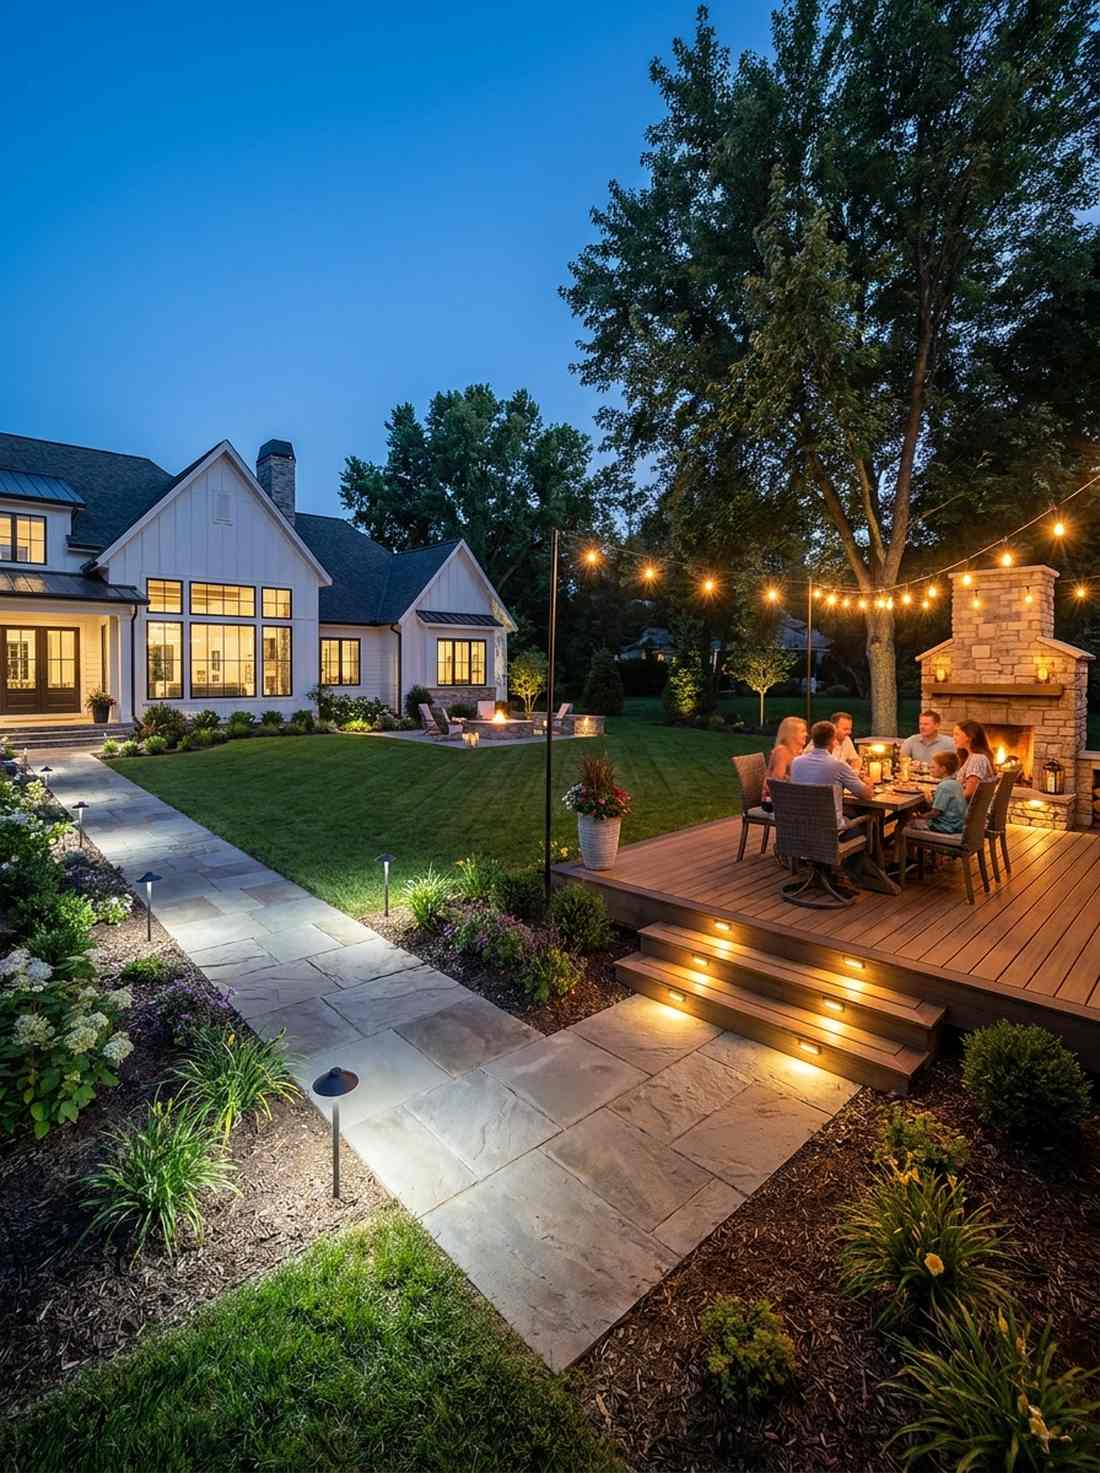
Transforming evening spaces starts with strategic outdoor decor lights. Discover exact budget breakdowns and premium material sourcing tricks right here. These layout blueprints deliver a stunning designer finish.
Design Snapshot: Key Principles
- Layered Illumination: Combine overhead, mid-level, and ground lighting for dimensional depth
- Energy Efficiency: Prioritize solar and LED systems to reduce operational costs by 50-80%
- Fixture Durability: Specify weather-rated materials (IP65+ rating) for year-round performance
- Color Temperature Control: Use 2700-3000K warm white for residential ambiance, 4000K for task lighting
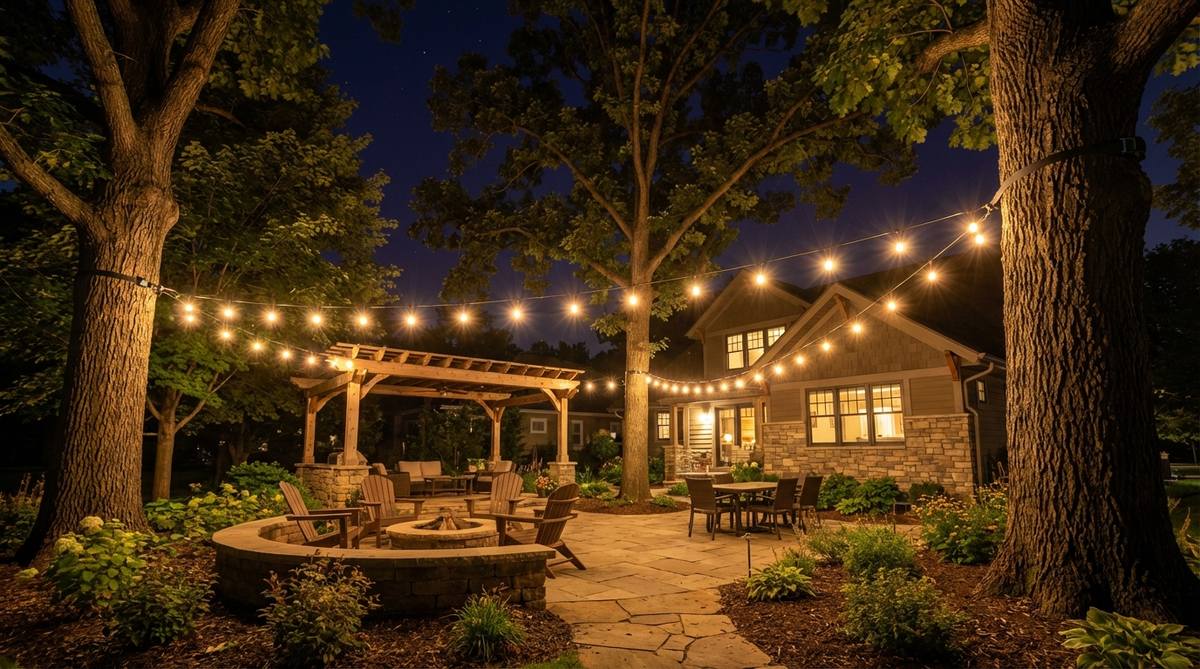
String Lighting Overhead Systems
1. Cafe-Style Bistro Strings
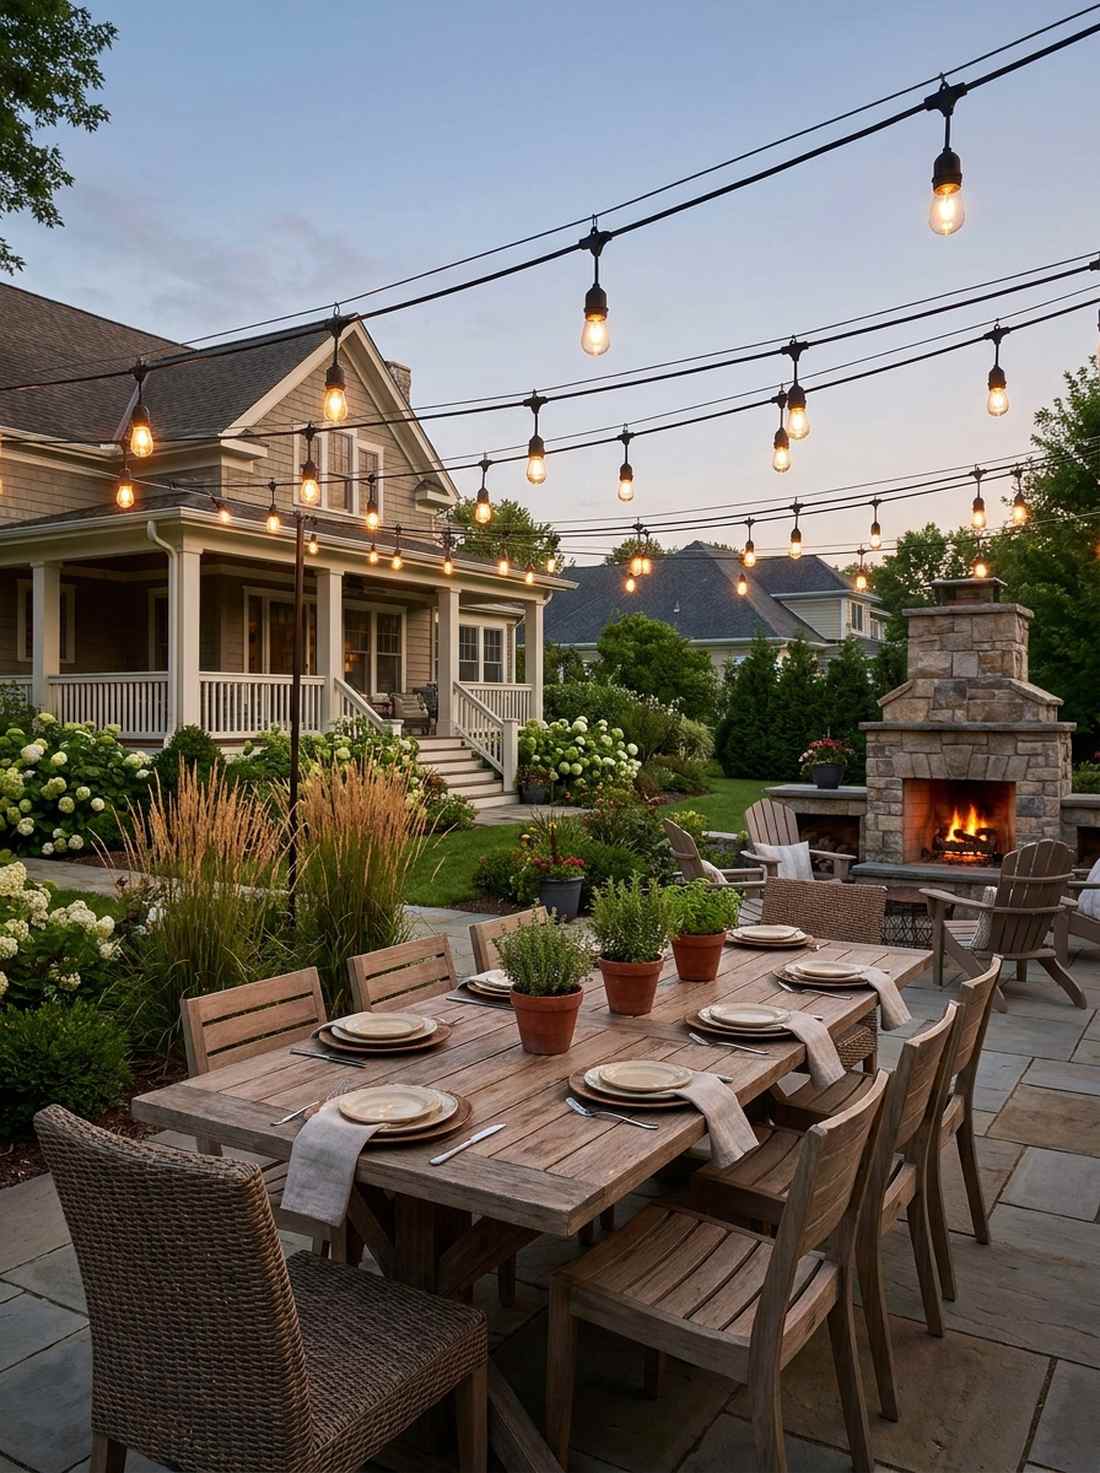
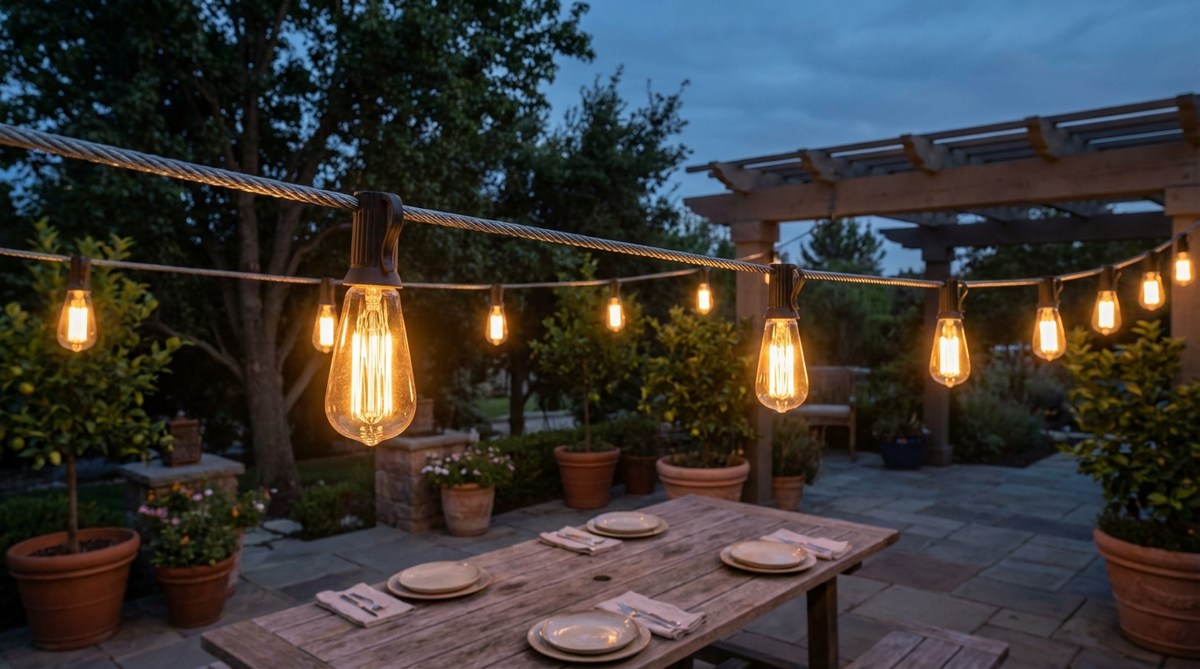
This setup feels like a bustling Parisian street corner you accidentally discovered. Using commercial-grade bistro lighting, it works exceptionally well for an open dining patio layout.
Most beginners hang these too loosely, but keeping adequate tension delivers a surprisingly premium look. Using commercial-grade string lights with shatterproof shells immediately elevates the entire aesthetic.
You can easily pull this off for around $40–$60. Pin this to your DIY weekend garden board for later!
- Key Materials: UV-coated shatterproof bistro bulbs
- Vibe / Style: European cafe elegance
- Difficulty: Intermediate hanging
- Budget Breakdown: Lights: $45 | Suspension Kit: $15
- Creator’s Tip: Use a steel guide wire to prevent the middle from sagging over time.
- Smart Sourcing: Grab a shatterproof LED string bundle (bulk pack) and a stainless steel suspension kit.
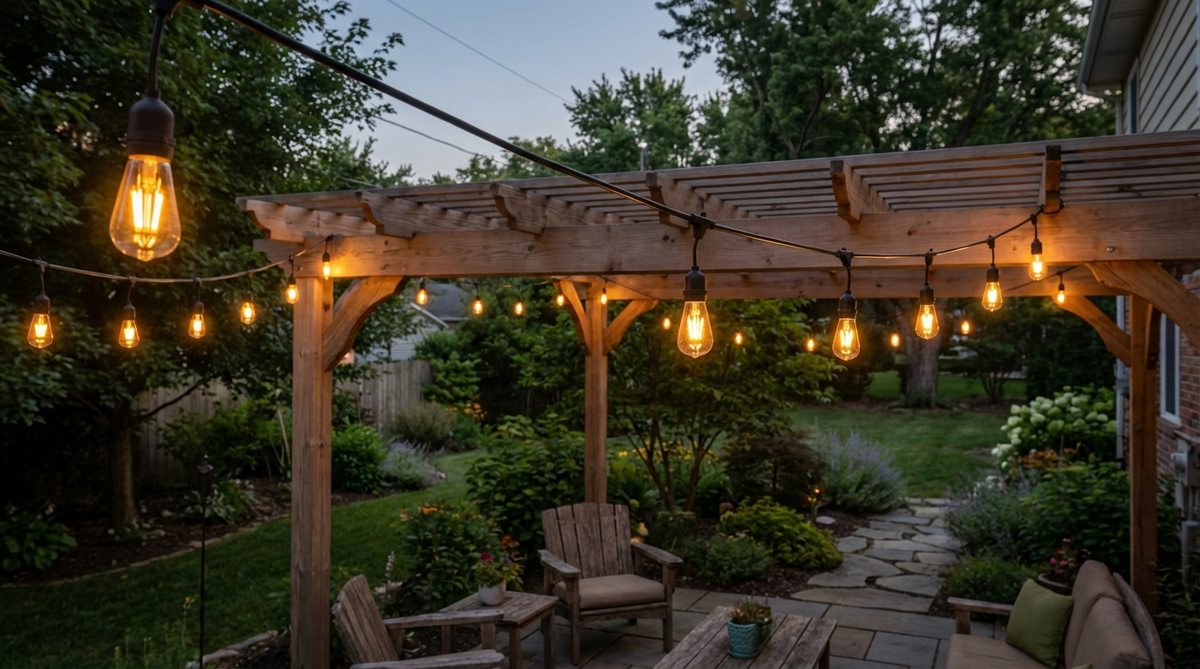
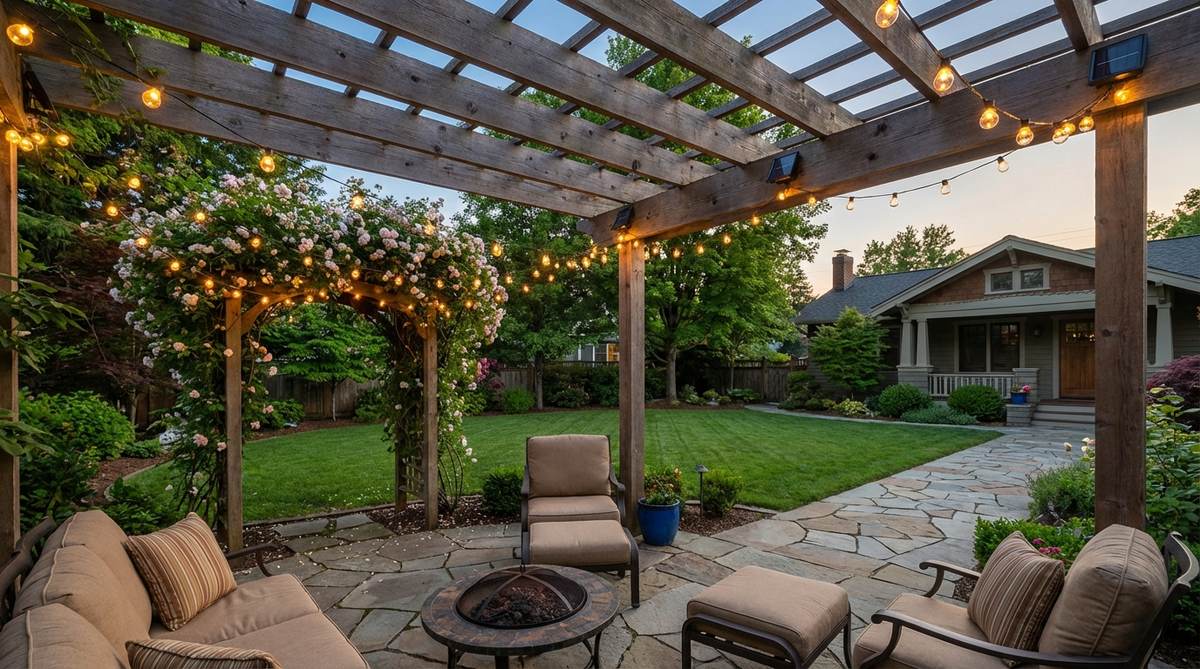
2. Pergola Woven Canopy Lights
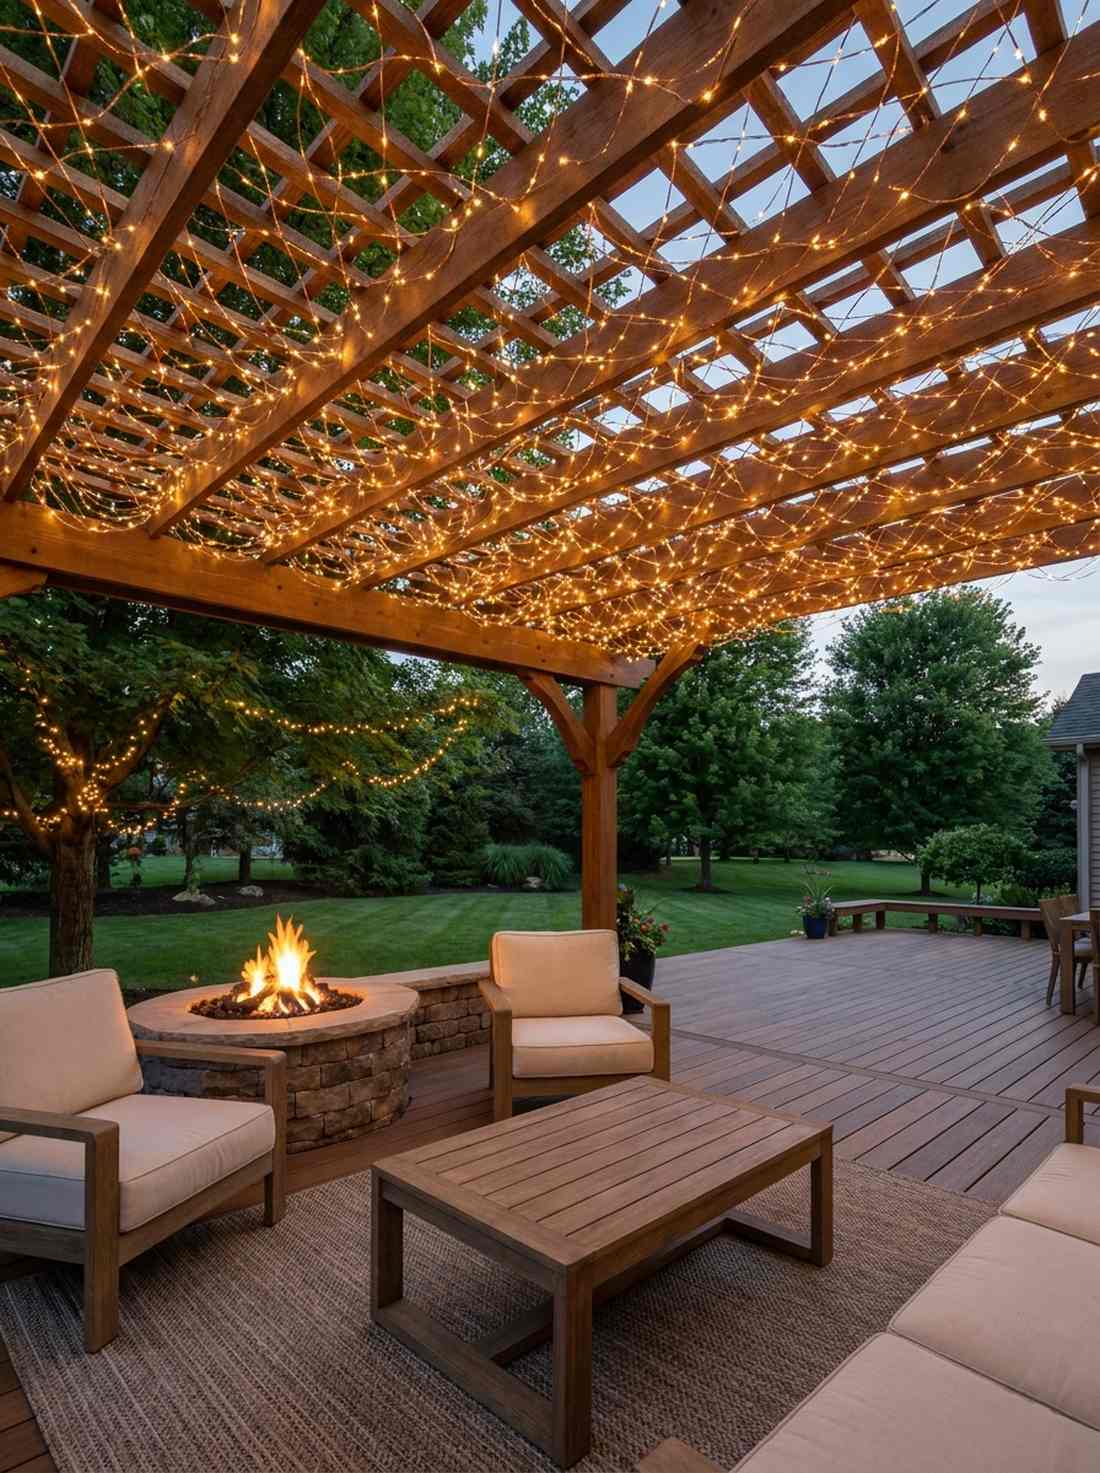
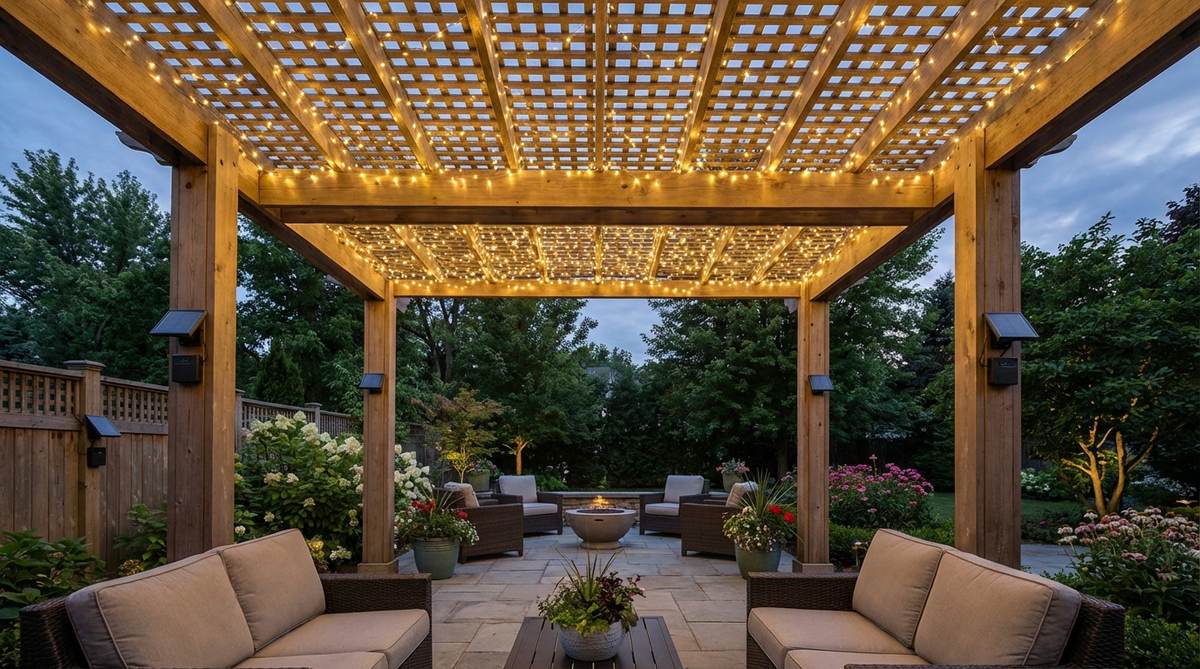
Weaving these creates an atmosphere that feels like a glowing constellation right above your head. Integrating overhead canopy lighting is perfect for wooden pergolas and shaded seating areas.
While some just drape wires lazily, threading them strictly through the lattice gives a designer-level finish. Snagging waterproof LED copper wires ensures they survive sudden rainstorms without shorting out.
Expect to spend about $25–$45 depending on the pergola size. It’s a fast upgrade that completely changes the vibe.
- Key Materials: Flexible LED copper wire strands
- Vibe / Style: Romantic starry night
- Difficulty: Easy weaving process
- Budget Breakdown: Lights: $30 | Cable Clips: $5
- Creator’s Tip: Zip-tie the strands to the top side of the beams so hardware remains invisible from below.
- Smart Sourcing: Pick up heavy-duty copper fairy strings (value pack) and UV-resistant zip ties.
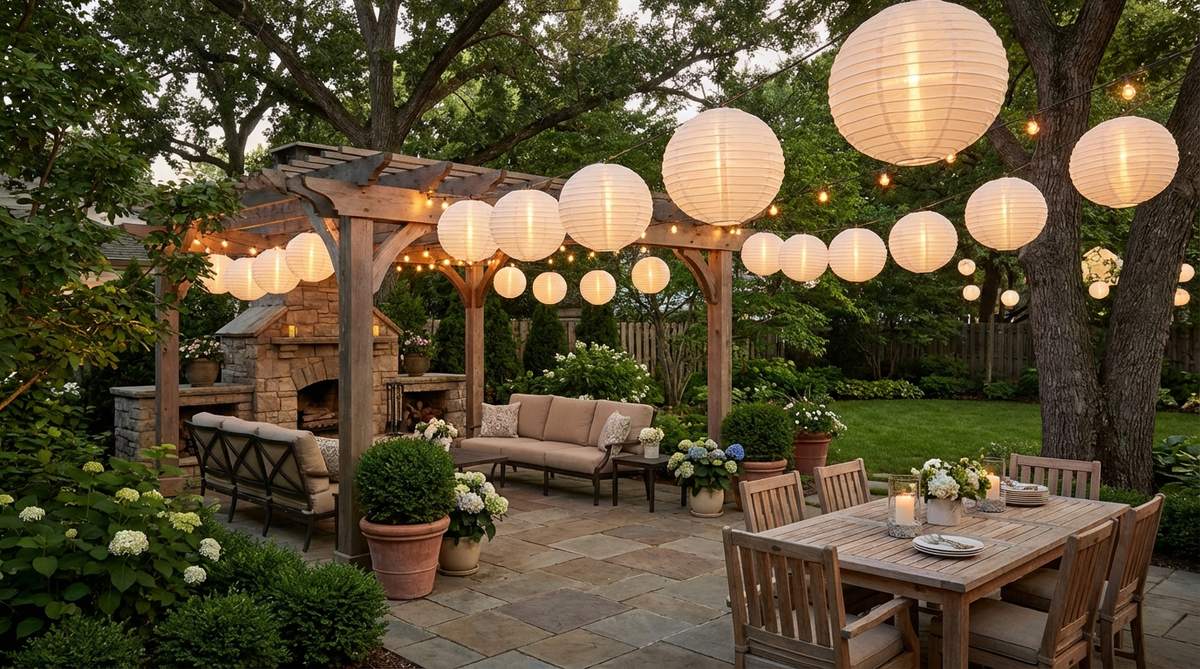
3. Globe Bulb Festoon Lighting

Emitting a soft, diffused glow, this arrangement feels straight out of a modern luxury resort. Opting for frosted globe festoon lights is highly effective for expansive backyard entertainment zones.
Clear bulbs often create harsh glare, so switching to opal or frosted finishes looks far more expensive than it is. Utilizing low-voltage transformers ensures safe, flicker-free operation during big gatherings.
A solid 50-foot run will cost roughly $50–$80. Save this idea if you are planning a massive backyard overhaul.
- Key Materials: Frosted G40 LED globes
- Vibe / Style: Modern luxury resort
- Difficulty: Moderate installation
- Budget Breakdown: Bulbs & Cord: $60 | Hardware: $15
- Creator’s Tip: Keep bulbs at least 8 feet high to maintain a spacious, unobstructed walkway.
- Smart Sourcing: Use frosted LED globe strands (commercial grade) and an outdoor-rated smart plug.
4. Zigzag Pattern String Installation
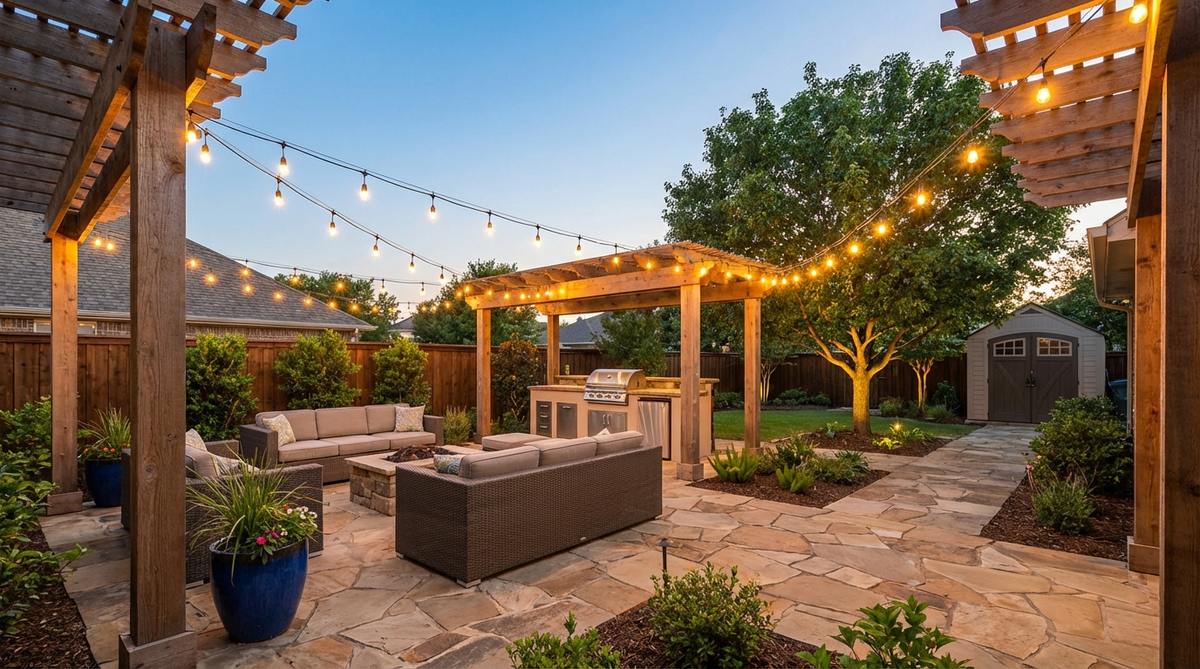
This dynamic geometry injects an energetic festival energy that feels completely immersive. The zigzag overhead light layout is the ultimate trick for defining boundaries in borderless outdoor spaces.
A standard parallel hang is boring, but crossing diagonal sightlines instantly upgrades the visual impact. Adding miniature garden supplies around the base posts grounds the entire installation beautifully.
Your total cost will hover around $35–$60 for standard backyards.
- Key Materials: Heavy-gauge light strings and anchor hooks
- Vibe / Style: Dynamic festival courtyard
- Difficulty: Intermediate geometry
- Budget Breakdown: String sets: $40 | Heavy anchors: $10
- Creator’s Tip: Measure diagonally before buying to ensure you have 20% more length than you think you need.
- Smart Sourcing: Invest in extended-length string lighting (100ft pack) and galvanized eye-hooks.
This next setup is ridiculously cheap but looks like a $100 custom display…
5. Tree Canopy Suspended Strings

Floating effortlessly, this design feels like an enchanted forest glowing from within. Utilizing branch-wrapped canopy lights works magically for mature trees sheltering a seating area.
Nailing directly into bark damages the tree, but using ratchet straps wrapped in soft sleeves solves this elegantly. Investing in IP65 rated landscape lights ensures the canopy stays illuminated through heavy seasonal storms.
You can set this up for as little as $30–$55. Highly recommended for a quick weekend win.
- Key Materials: IP65 rated LED strings, tree-safe straps
- Vibe / Style: Enchanted woodland retreat
- Difficulty: Easy with a ladder
- Budget Breakdown: Lights: $35 | Tree Straps: $15
- Creator’s Tip: Leave a little slack near the branches so the lights can sway safely in the wind.
- Smart Sourcing: Source weatherproof outdoor fairy lights (solar kit) and arborist-approved tie straps.
6. Vintage Filament Bulb Strings
The amber hues from this setup wrap the patio in a nostalgic, cinematic warmth. Hanging vintage Edison outdoor strings is the perfect use-case for rustic-themed outdoor kitchens.
Most cheap LEDs look icy and artificial, but sourcing 2200K ultra-warm filaments completely changes the atmosphere. Upgrading your outdoor decor lights with shatter-resistant polycarbonate shells ensures safety without losing the retro aesthetic.
Expect a budget of $45–$70 for a durable set. Pin this if you love that moody, speakeasy backyard vibe!
- Key Materials: Polycarbonate Edison-style LEDs
- Vibe / Style: Nostalgic rustic warmth
- Difficulty: Beginner-friendly
- Budget Breakdown: Retro bulbs: $50 | Mounting gear: $10
- Creator’s Tip: Use a dimmer module; the amber glow looks best when dialed down to 60% brightness.
- Smart Sourcing: Buy shatterproof Edison string lights (pre-wired pack) and a waterproof dimmer switch.
7. Adjustable Catenary Cable Systems
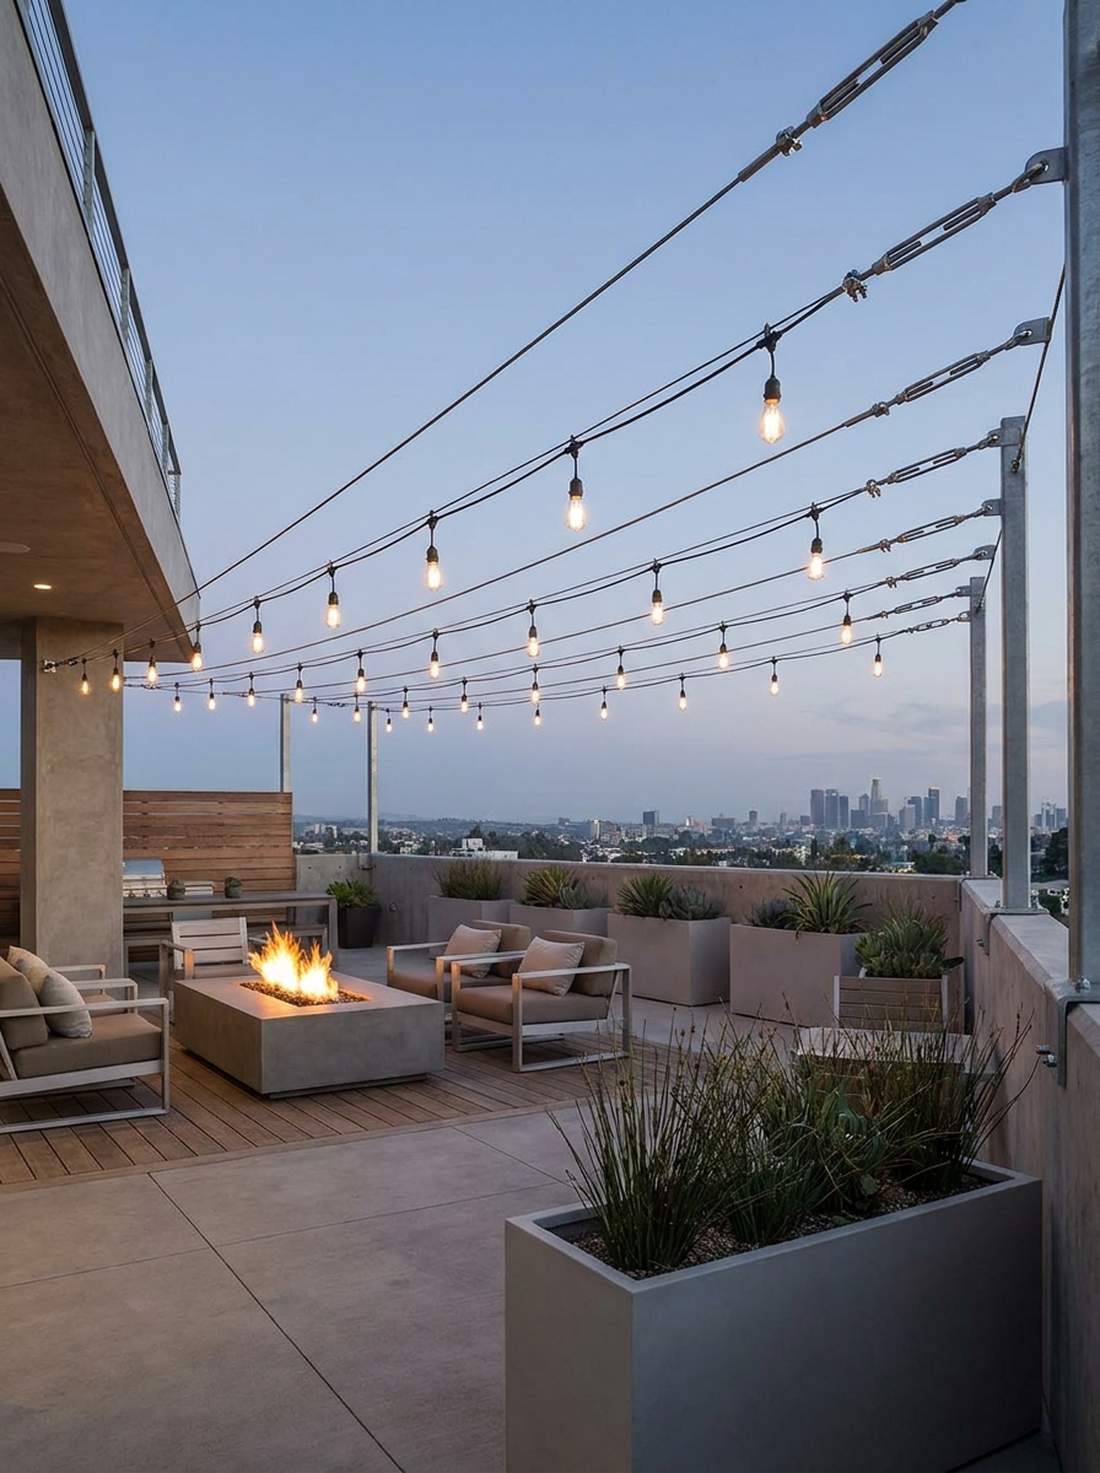
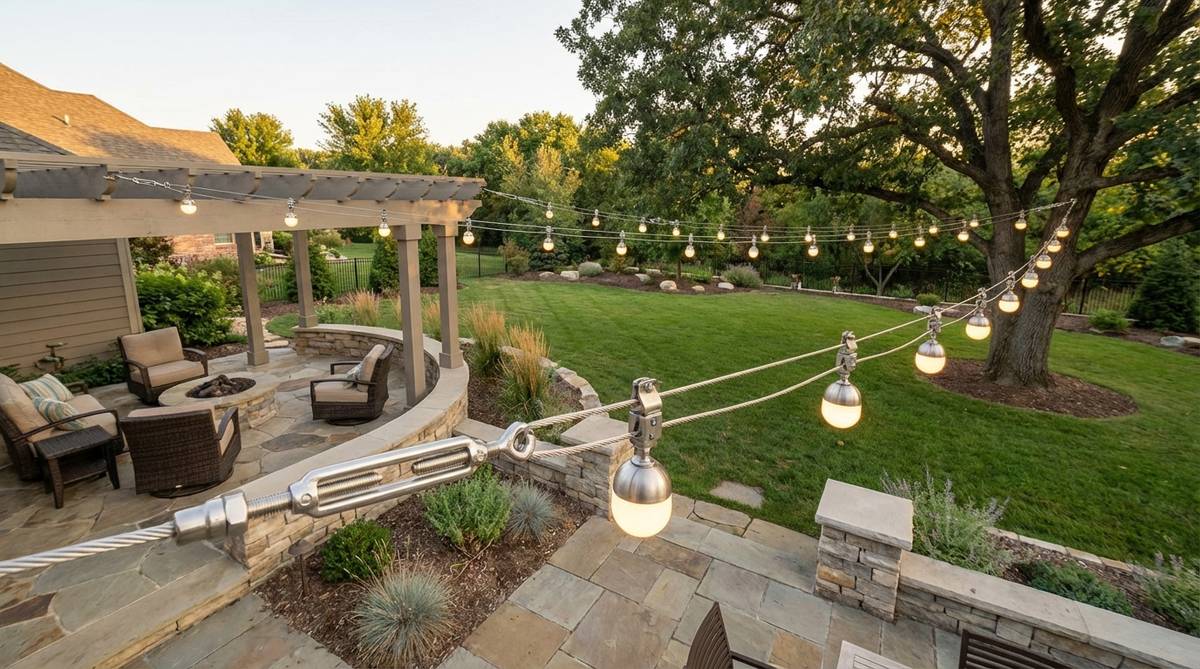
Offering sharp, industrial lines, this layout feels like a high-end architectural installation. A tension-cable lighting system is structurally ideal for windy, exposed roof decks or modern patios.
Loose wires look incredibly sloppy, but securing them to adjustable stainless tensioners gives a rigid, professional look. Incorporating heavy-duty wire rope clips ensures the array withstands aggressive wind loads.
This premium infrastructure will cost around $80–$120. It’s a permanent upgrade that drastically boosts home value.
- Key Materials: Stainless steel cables, turnbuckles
- Vibe / Style: Modern industrial precision
- Difficulty: Advanced hardware setup
- Budget Breakdown: Wire System: $60 | Lights: $40
- Creator’s Tip: Use turnbuckles at every anchor point to easily retighten the cables when seasons change.
- Smart Sourcing: Secure an outdoor wire tension kit (pro grade) and modular hanging light clips.
8. Color-Changing RGB LED Strings
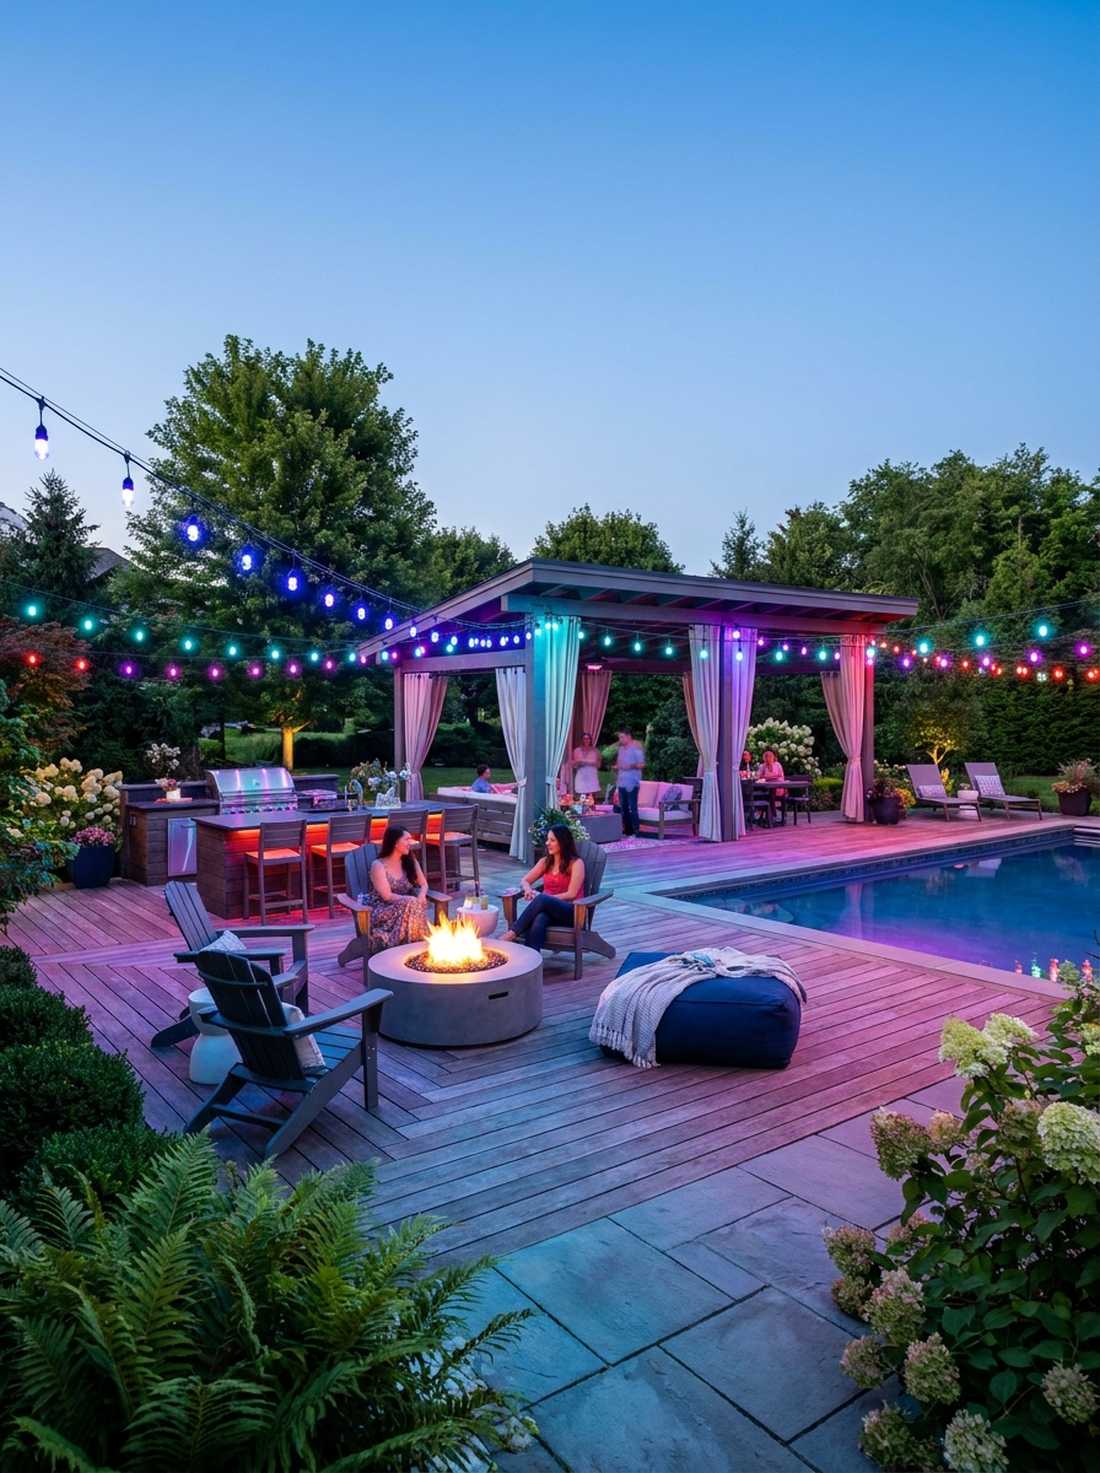
Instantly shifting the mood, this setup feels like a private VIP lounge in your own backyard. Installing smart RGB outdoor strings is an absolute game-changer for poolside cabanas and party decks.
Standard warm-white is classic, but having app-controlled spectrums delivers a customized, high-tech experience. Sourcing premium LED outdoor lighting with sync-to-music features transforms a boring patio into an entertainment hub.
You can wire this up for about $60–$90. Save this to your ultimate party-planning board!
- Key Materials: Bluetooth-enabled RGB string lights
- Vibe / Style: Vibrant party lounge
- Difficulty: Easy plug-and-play
- Budget Breakdown: RGB Lights: $70 | App Controller: Included
- Creator’s Tip: Hide the Bluetooth receiver box under a waterproof eave to maintain a strong signal.
- Smart Sourcing: Grab a smart RGB string set (app-controlled pack) and waterproof command hooks.
9. Solar Rechargeable String Sets
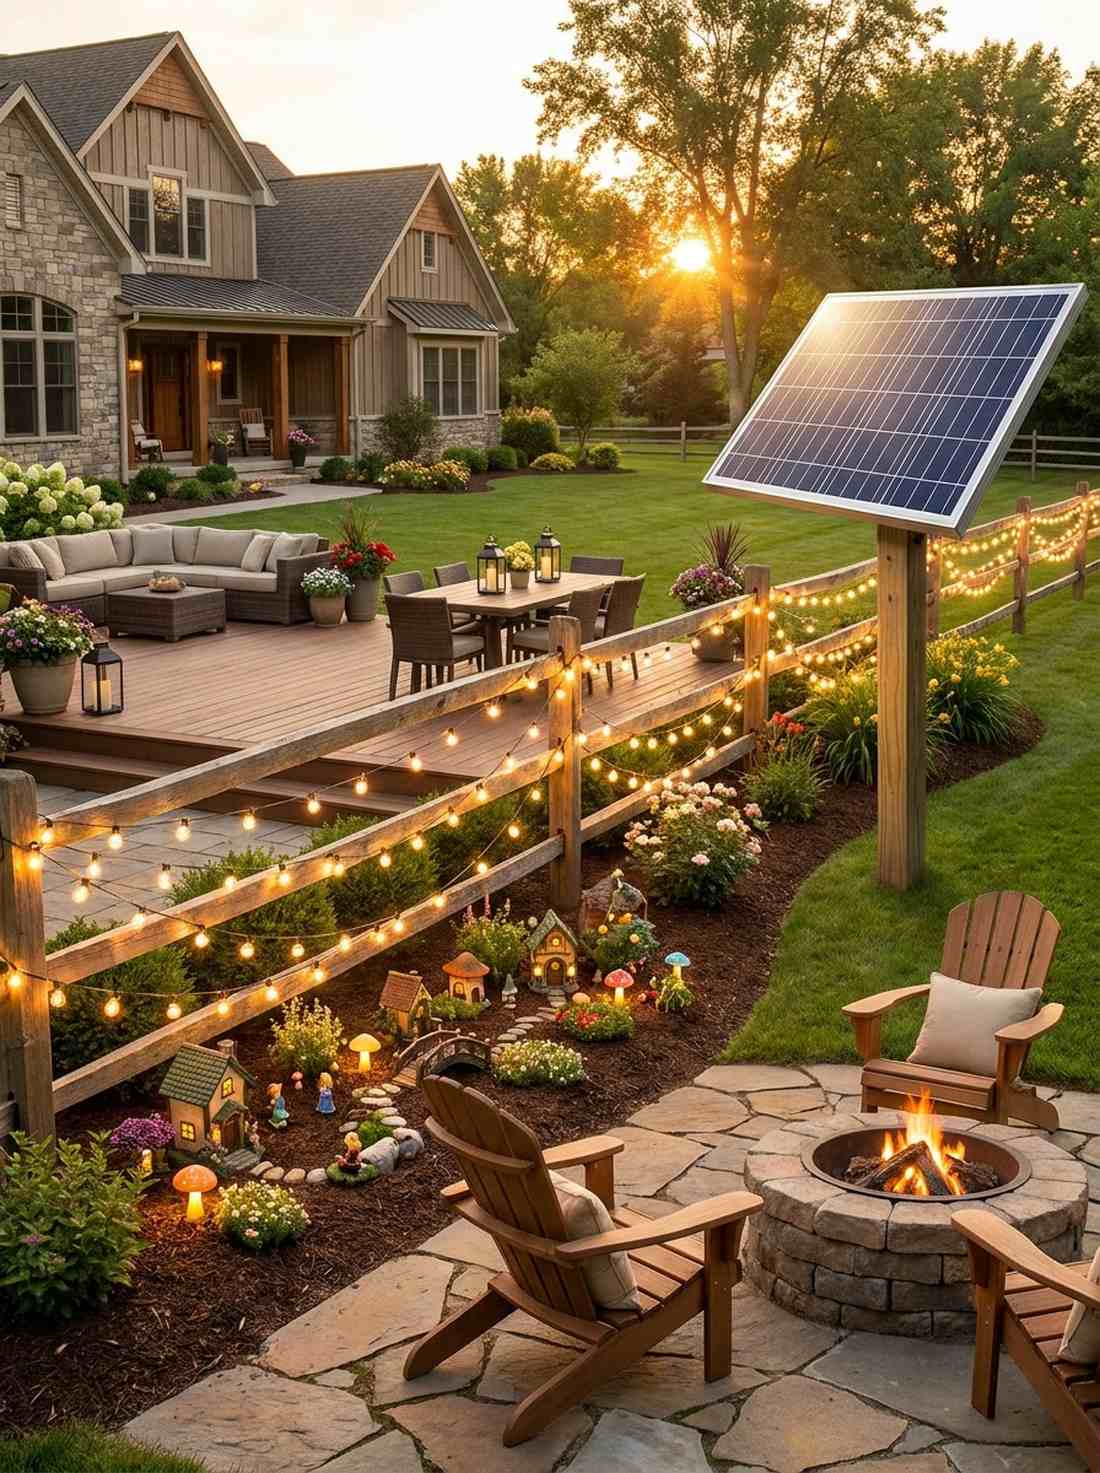
Operating completely off-grid, this glowing arrangement feels like eco-friendly magic. Wrapping solar-powered outdoor strings is the smartest solution for fences positioned far from electrical outlets.
Many complain about dim solar lights, but upgrading to oversized monocrystalline panels solves the power issue permanently. Embedding fairy garden kits nearby creates a whimsical scene powered entirely by the sun.
This off-grid fix costs a mere $20–$40.
- Key Materials: High-efficiency solar string kit
- Vibe / Style: Eco-friendly ambient glow
- Difficulty: Very easy
- Budget Breakdown: Solar Strings: $25 | Mounting clips: $5
- Creator’s Tip: Wipe the solar panel with a damp microfiber cloth monthly to maintain maximum charge efficiency.
- Smart Sourcing: Find an upgraded solar string kit (large panel) and clear outdoor zip ties.
Most people get this completely wrong… until they try the exact layout coming up next.
💡 Must-Have Supplies for High-End Setups
To build these setups faster and ensure they last, skip the generic craft aisles and invest in the right foundational kits.
- Base & Support: Stainless steel catenary tension kits
- Setup Tools: Waterproof silicone connector starter kits
- Weather/Durability Protection: IP67-rated dielectric grease sealants
10. Minimalist Linear LED Strings
Crisp and completely hidden by day, this border glow feels like a futuristic architectural render. Embedding linear LED tape lighting works beautifully under modern stair treads and sleek concrete benches.
Exposed tape looks cheap, but hiding it inside diffused aluminum channels gives a high-end, spotless finish. Sourcing waterproof extrusion tracking prevents moisture failure and ensures sharp, continuous light lines.
A full linear setup will run you $50–$85. Pin this if you want an ultra-modern hardscape upgrade.
- Key Materials: IP67 LED tape, aluminum diffusers
- Vibe / Style: Sleek architectural modernism
- Difficulty: Intermediate cutting/wiring
- Budget Breakdown: LED Tape: $35 | Channels: $25
- Creator’s Tip: Always use silicon end-caps glued with marine sealant to completely waterproof the cuts.
- Smart Sourcing: Use waterproof LED strip lights (silicone coated) and aluminum diffuser channels (pre-cut pack).
Solar-Powered Pathway Solutions
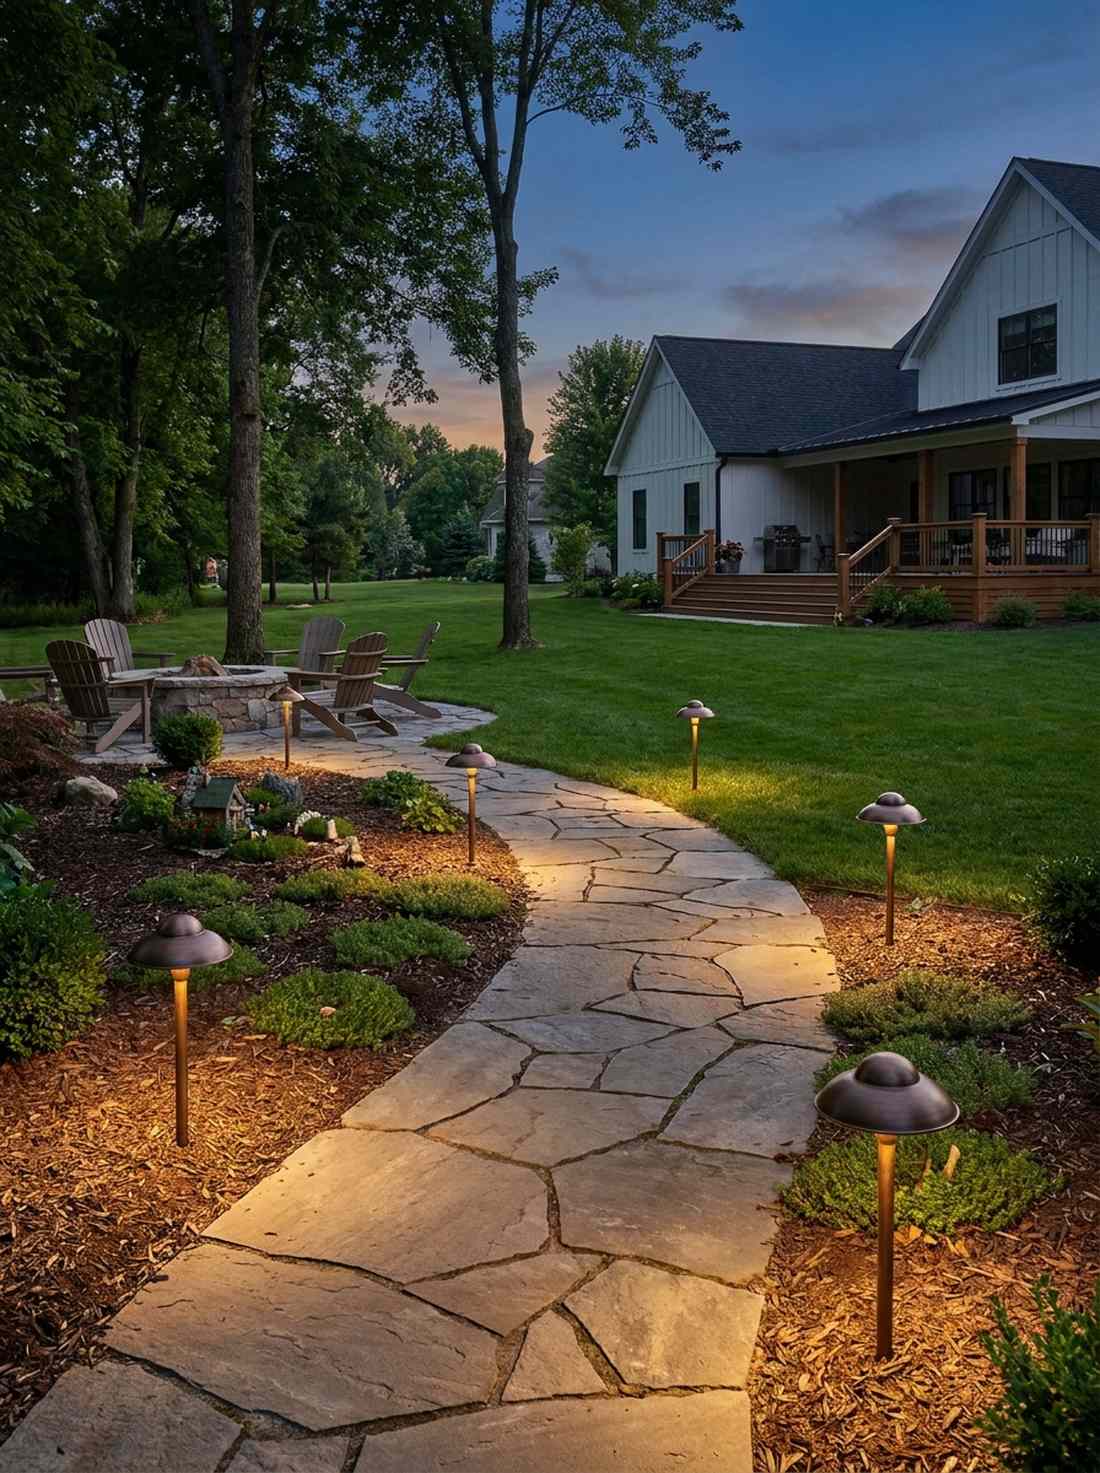
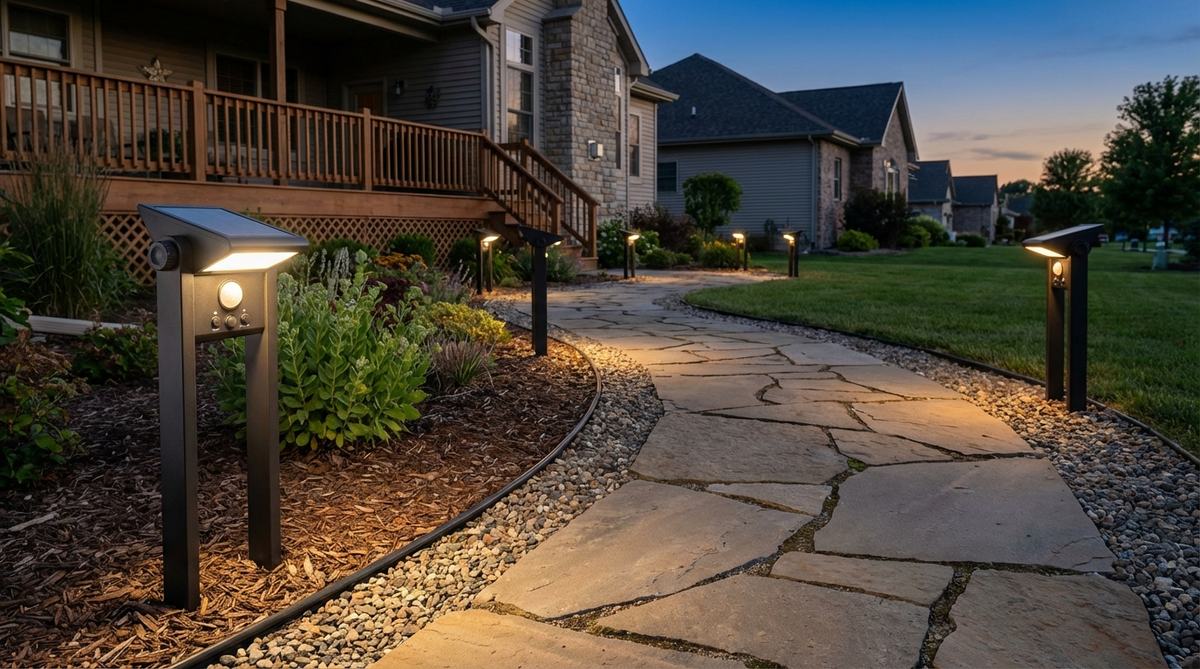
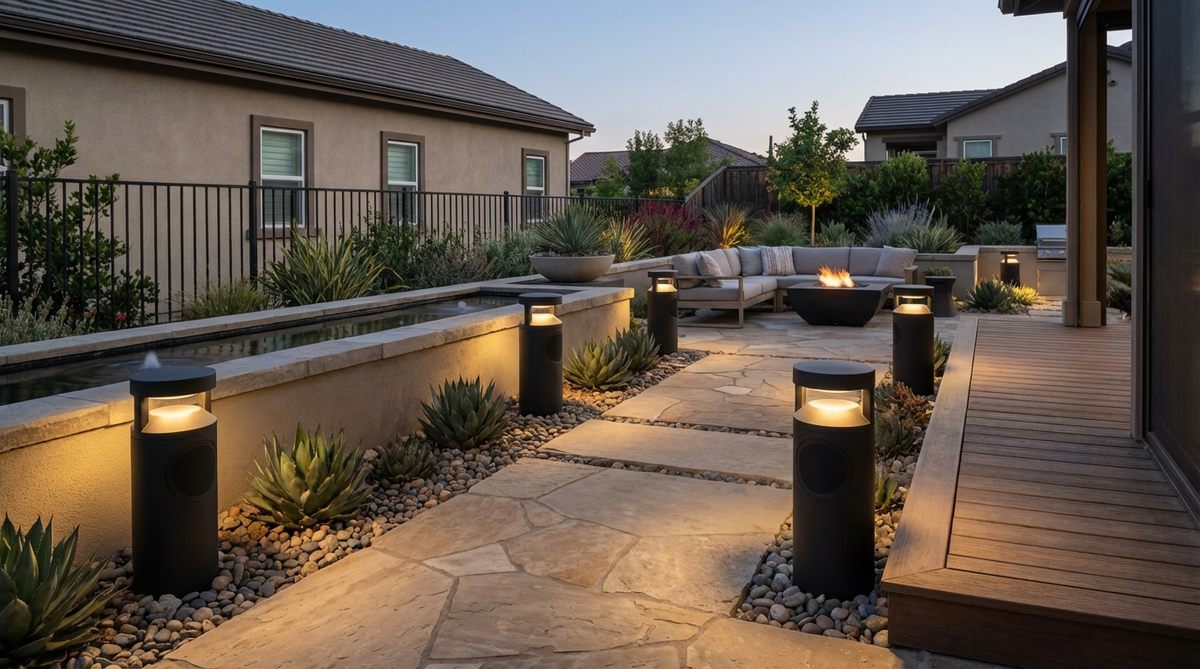
11. Stake-Mount Bollard Lights
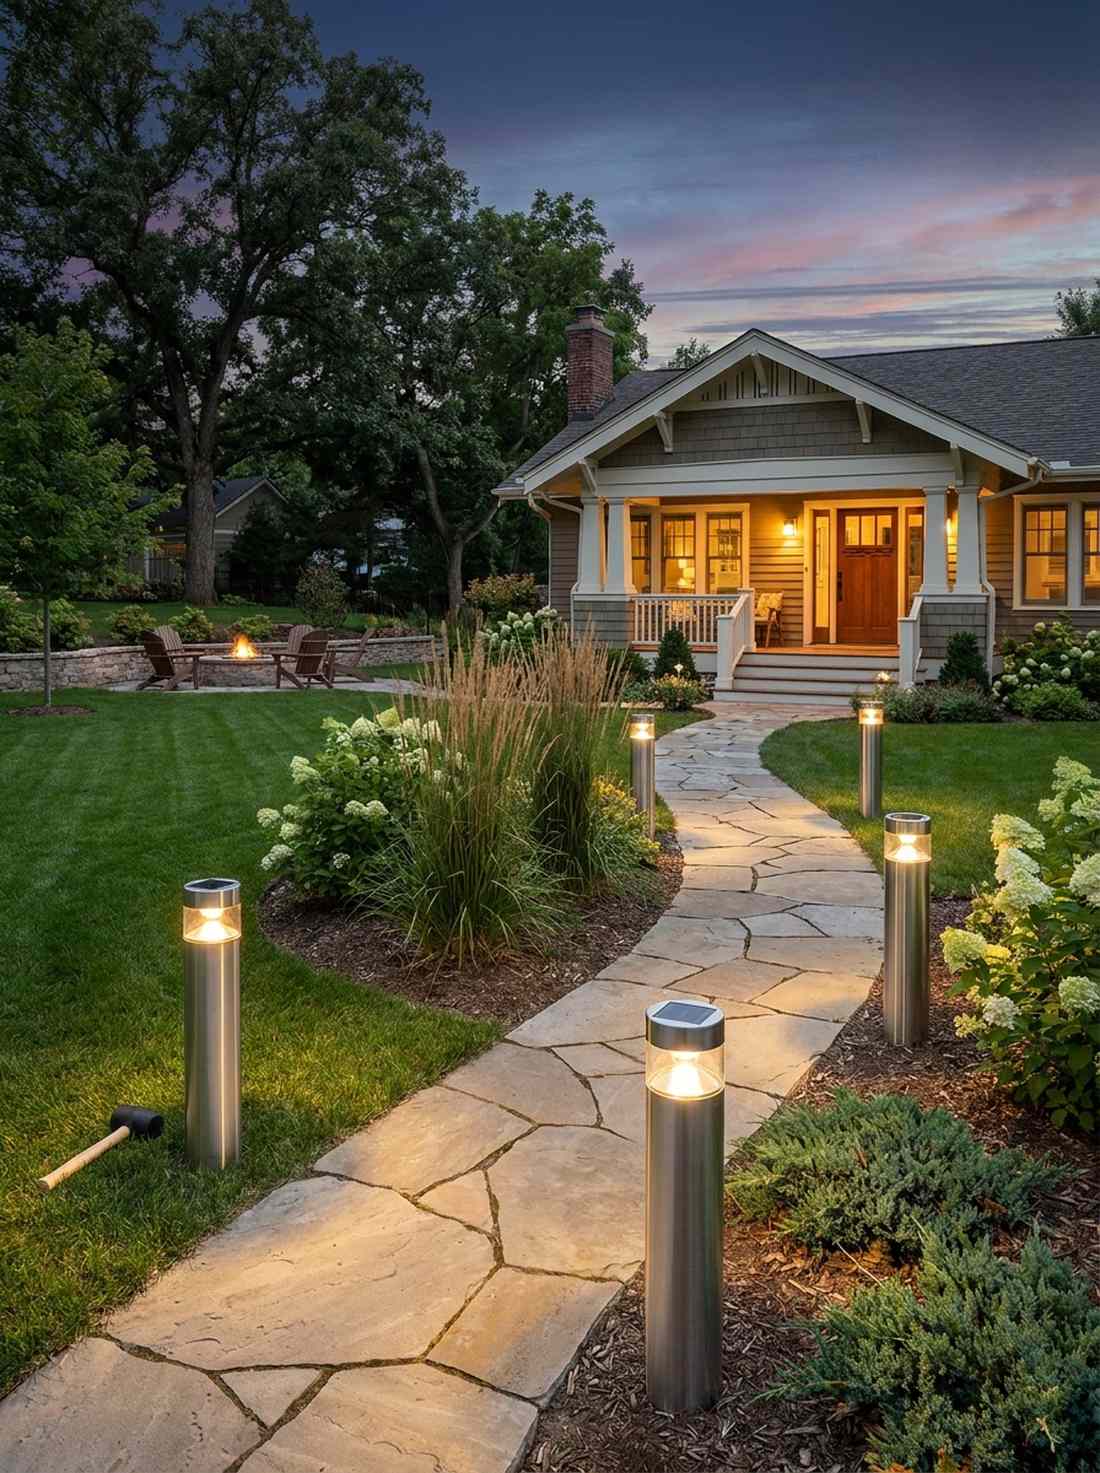
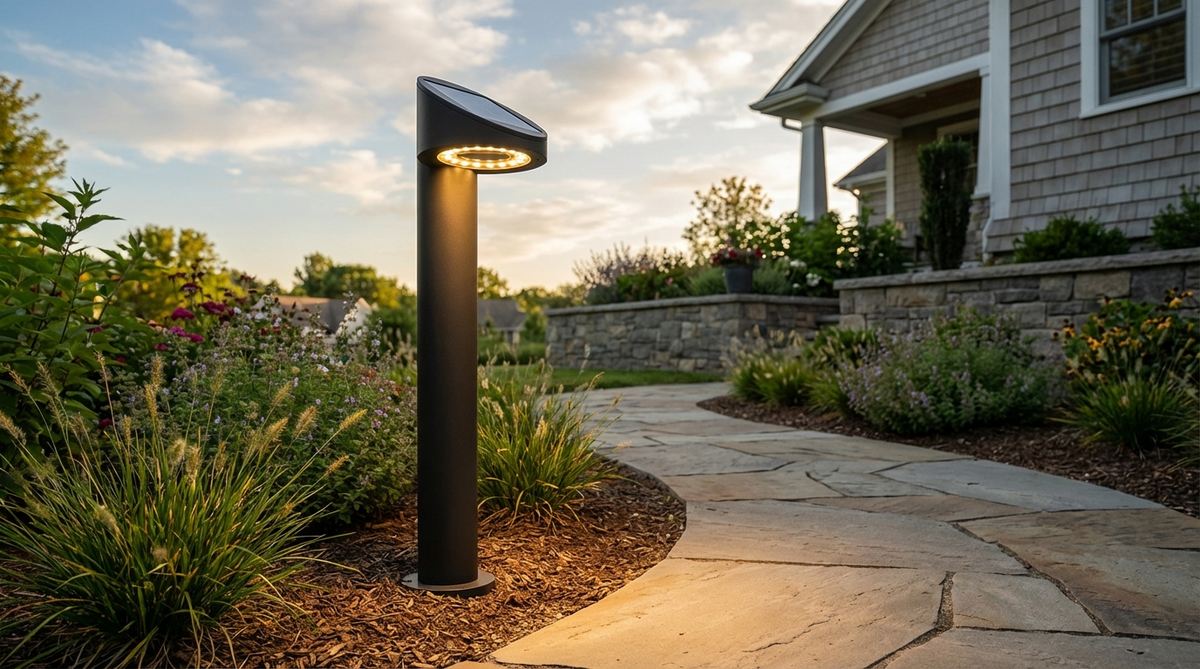
Standing like tiny modern sentinels, these path markers feel crisp and incredibly welcoming. Installing stake-mounted solar bollards is the most practical way to line a dark driveway or front walkway.
Flimsy plastic spikes break instantly, so grabbing stainless steel ground stakes ensures they survive lawnmower bumps. Utilizing modern LED arrays prevents the dull, blue glow associated with cheap dollar-store fixtures.
A set of six usually costs around $35–$60.
- Key Materials: Stainless steel solar bollards
- Vibe / Style: Clean modern navigation
- Difficulty: Push-in easy
- Budget Breakdown: Fixture set: $45 | Rubber mallet: $5
- Creator’s Tip: Wet the soil thoroughly before pushing the stakes in to prevent cracking the plastic anchor.
- Smart Sourcing: Look for metal solar bollard lights (6-pack bundle) and a soft-face deadblow hammer.
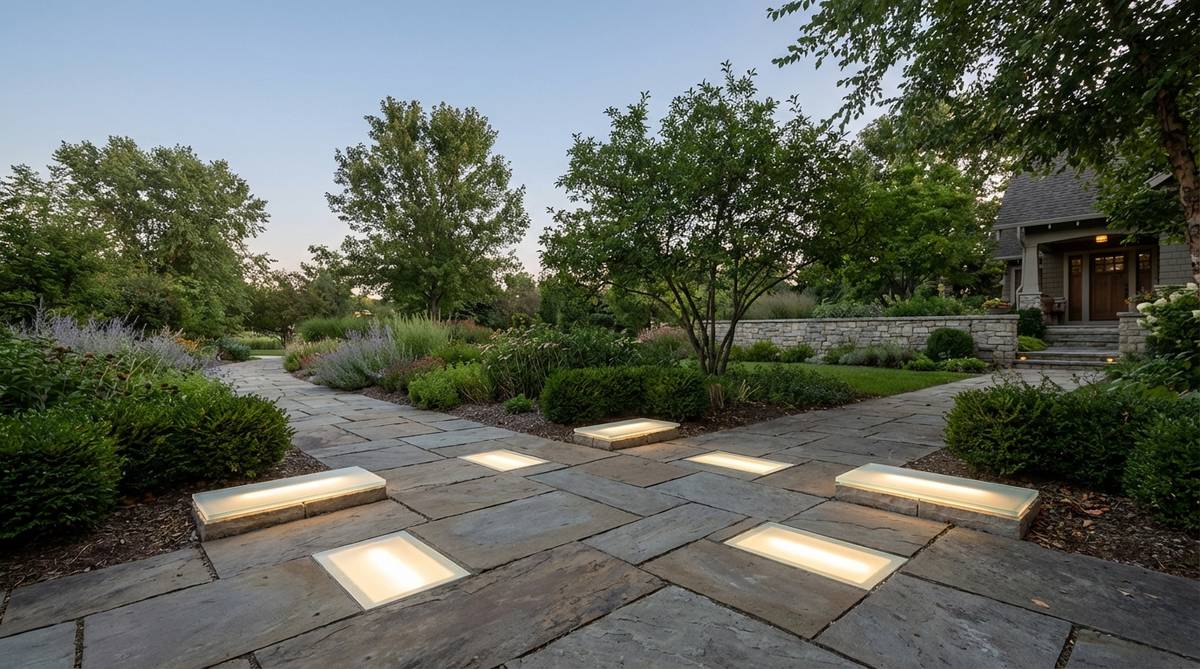
12. Flush Deck Solar Pavers

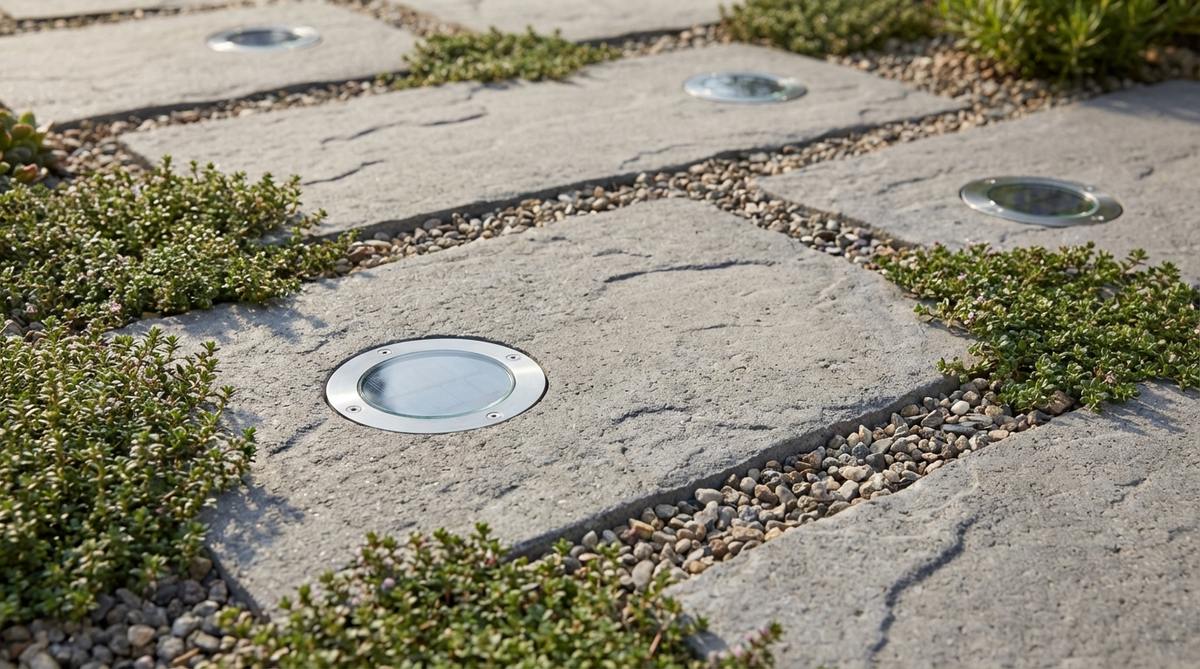
Creating a glowing runway effect, this flush design feels incredibly sophisticated and totally seamless. Integrating surface-mount solar discs is a genius hack for illuminating wooden deck borders without trip hazards.
Raised lights catch toes, but dropping these flush into the hardscape looks far more expensive than it is. Applying heavy-duty tempered glass models allows them to withstand foot traffic and harsh weather easily.
You can upgrade your deck for around $40–$75. Save this idea for your next patio renovation!
- Key Materials: Tempered glass solar discs
- Vibe / Style: Flush runway elegance
- Difficulty: Moderate recessing
- Budget Breakdown: Solar discs: $50 | Hole saw: $15
- Creator’s Tip: Use a perfectly sized hole saw bit so the light drops in snugly without needing messy adhesives.
- Smart Sourcing: Opt for flush mount solar deck lights (heavy-duty pack) and a diamond hole saw kit.
13. Decorative Solar Post Caps
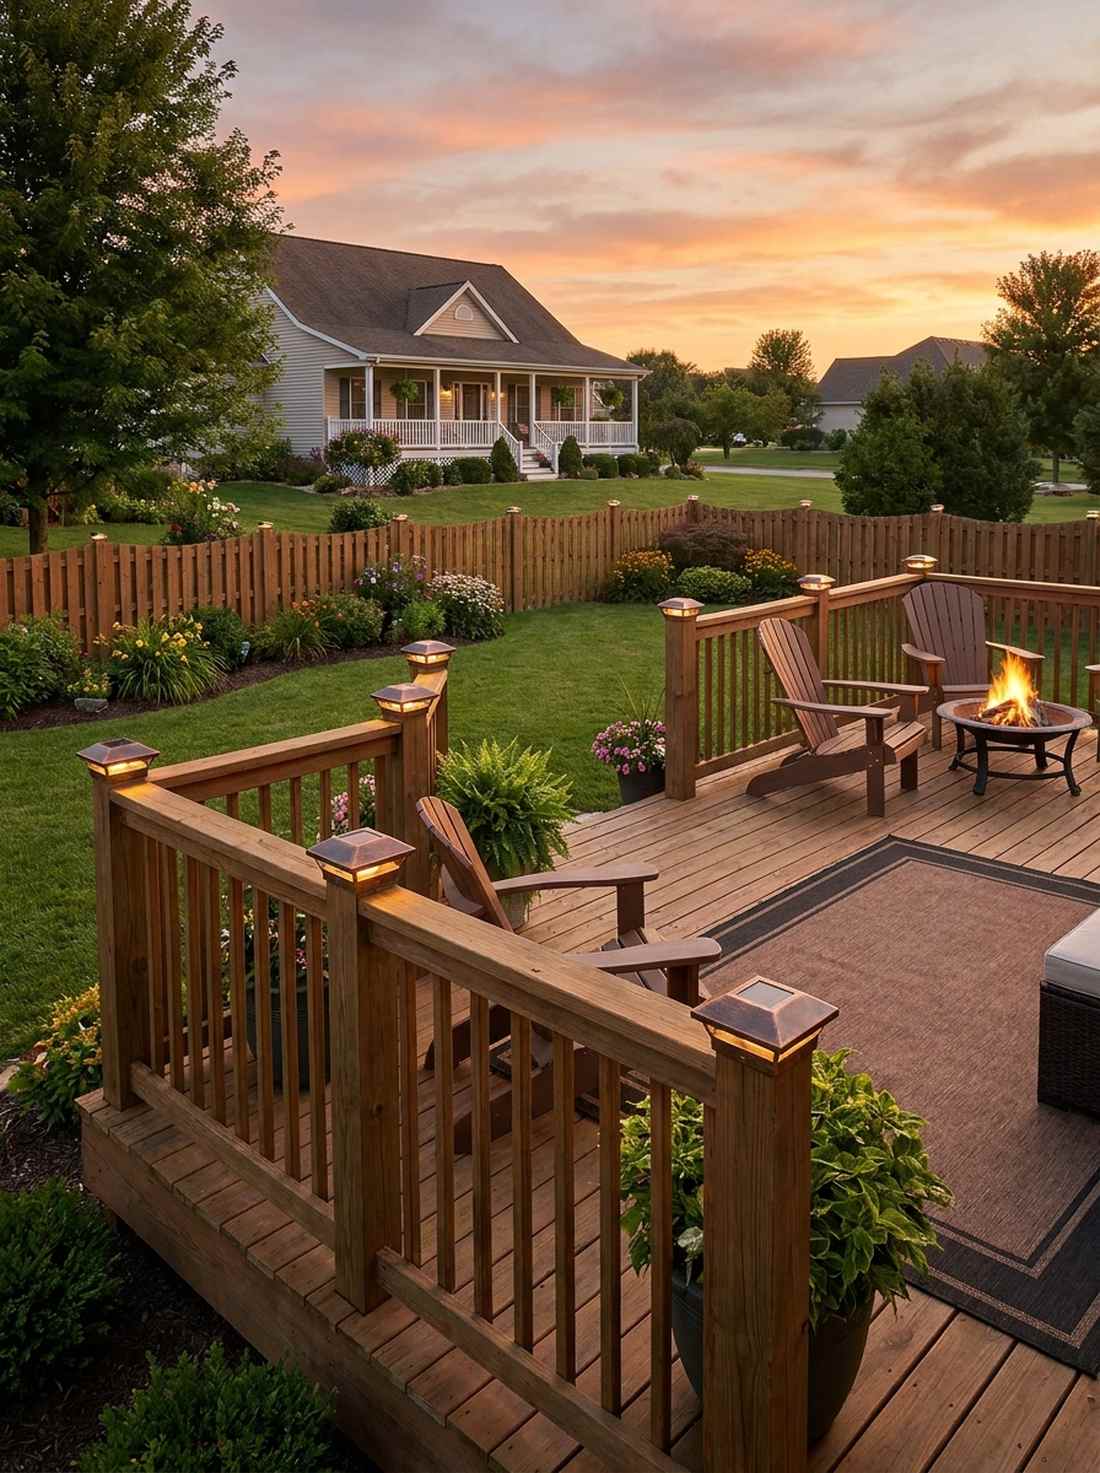

Crowning your fence line, these fixtures make the yard feel like a well-guarded, cozy sanctuary. Slipping on solar fence post caps is an instant upgrade for bare wooden deck railings and boundary fences.
Plain wood posts rot at the top, but capping them with weatherproof lights protects the wood while adding ambiance. Grabbing bronze or copper-finished units creates a natural patina that blends into the landscaping seamlessly.
Outfit your entire deck for just $30–$50.
- Key Materials: Weatherproof 4×4 solar caps
- Vibe / Style: Classic perimeter framing
- Difficulty: Easy screw-on
- Budget Breakdown: Post caps: $40 | Screws: $2
- Creator’s Tip: Apply a dab of exterior caulk under the rim before screwing them down to block water entirely.
- Smart Sourcing: Use copper-finish solar post caps (multi-pack) and exterior-grade wood screws.
14. Solar Brick Pavers
Scattered through the walkway, these glowing blocks feel like you’re stepping on actual light. Swapping standard stones for frosted solar brick lights works exceptionally well in gravel paths or stone patios.
Plastic lights look cheap during the day, but authentic textured glass pavers trick the eye beautifully. Integrating outdoor decor lights directly into the masonry pattern delivers a surprisingly premium look.
A few accent bricks will run about $35–$65. Pin this for a jaw-dropping pathway transformation.
- Key Materials: Glass block solar pavers
- Vibe / Style: Integrated hardscape glow
- Difficulty: Simple drop-in
- Budget Breakdown: Glass bricks: $55 | Leveling sand: $5
- Creator’s Tip: Ensure the brick sits exactly level with surrounding stones so water doesn’t pool on the solar panel.
- Smart Sourcing: Snag frosted solar glass bricks (masonry size) and polymeric leveling sand.
If you think those were good, this next lighting trick completely transforms dead corners.
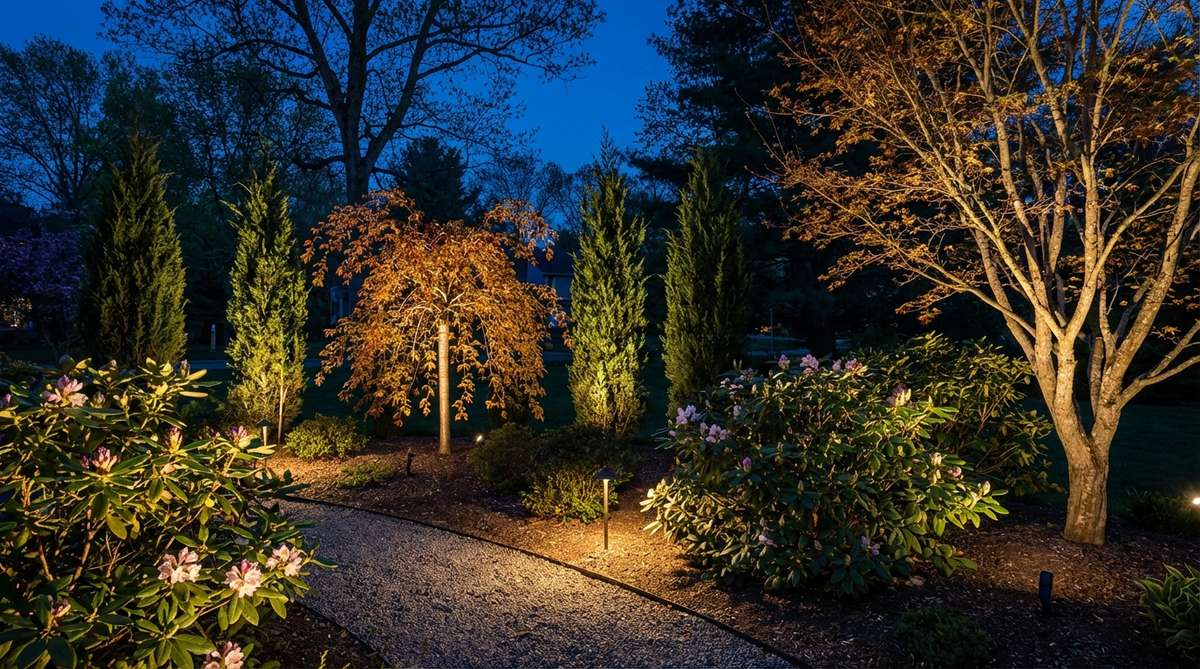
15. Mushroom Cap Pathway Markers
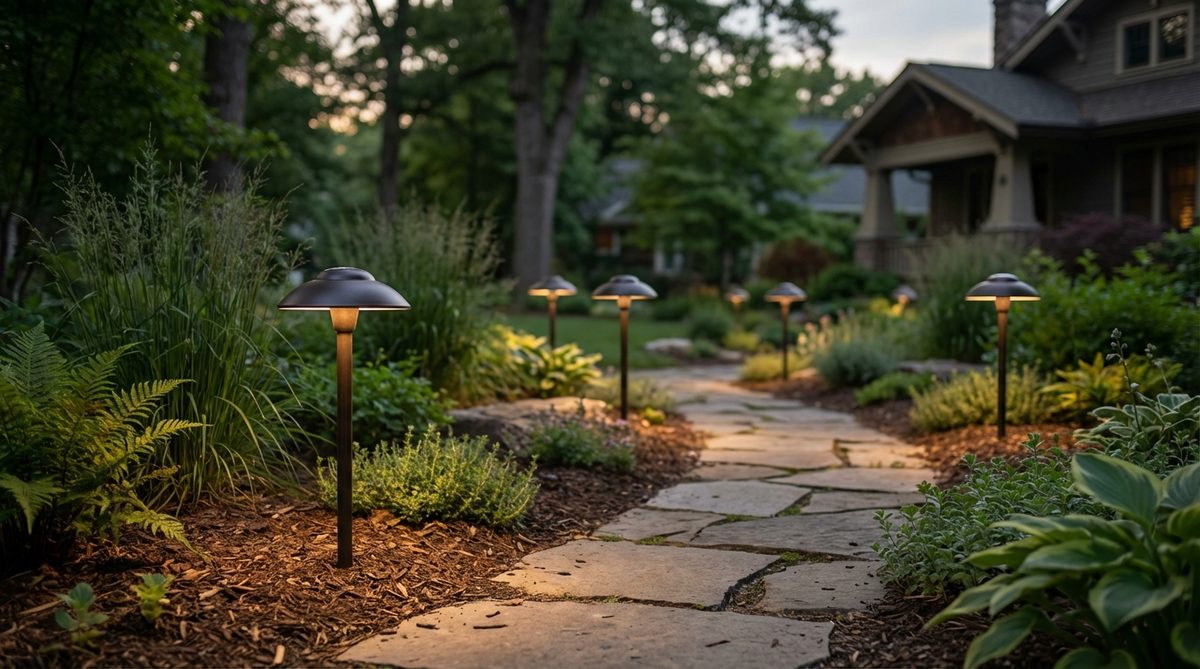
Casting light directly downward, this hooded design feels like a moody, professional landscape installation. The mushroom-style pathway lights are specifically designed to highlight groundcover without causing blinding glare.
Unshielded pathway lights cause terrible light pollution, but shielded dome tops direct the beam exactly where needed. Mixing these near miniature garden supplies creates a highly curated, dark-sky compliant aesthetic.
You can illuminate a garden bed for $45–$80.
- Key Materials: Bronze-finish mushroom solar stakes
- Vibe / Style: Curated professional landscaping
- Difficulty: Easy stake-in
- Budget Breakdown: Pathway stakes: $60 | Mulch: $10
- Creator’s Tip: Place them staggered on alternating sides of the path rather than straight across from each other.
- Smart Sourcing: Get bronze mushroom path lights (weatherproof kit) and a bulb planter tool.
16. Color Temperature Adjustable Path Lights
With a simple flick of a switch, this dynamic lighting feels adaptable to any season or mood. Deploying tunable-white solar path lights is perfect for transitioning from cool summer tones to warm autumn hues.
Being stuck with one color is restrictive, so having adjustable warmth gives a designer-level finish year-round. Investing in premium LED outdoor lighting with dual-mode functionality means you never have to replace fixtures to change the vibe.
This flexible system costs roughly $40–$70. Save this if you love changing your decor seasonally!
- Key Materials: Dual-LED solar path stakes
- Vibe / Style: Seasonally adaptive ambiance
- Difficulty: Beginner setup
- Budget Breakdown: Tunable lights: $55 | Setup: $0
- Creator’s Tip: Set them to 4000K in the winter to make snow pop, and 2700K in the summer for cozy warmth.
- Smart Sourcing: Grab color-tunable solar path lights (premium pack) and anti-corrosion spray.
17. Solar Rock Landscape Lights
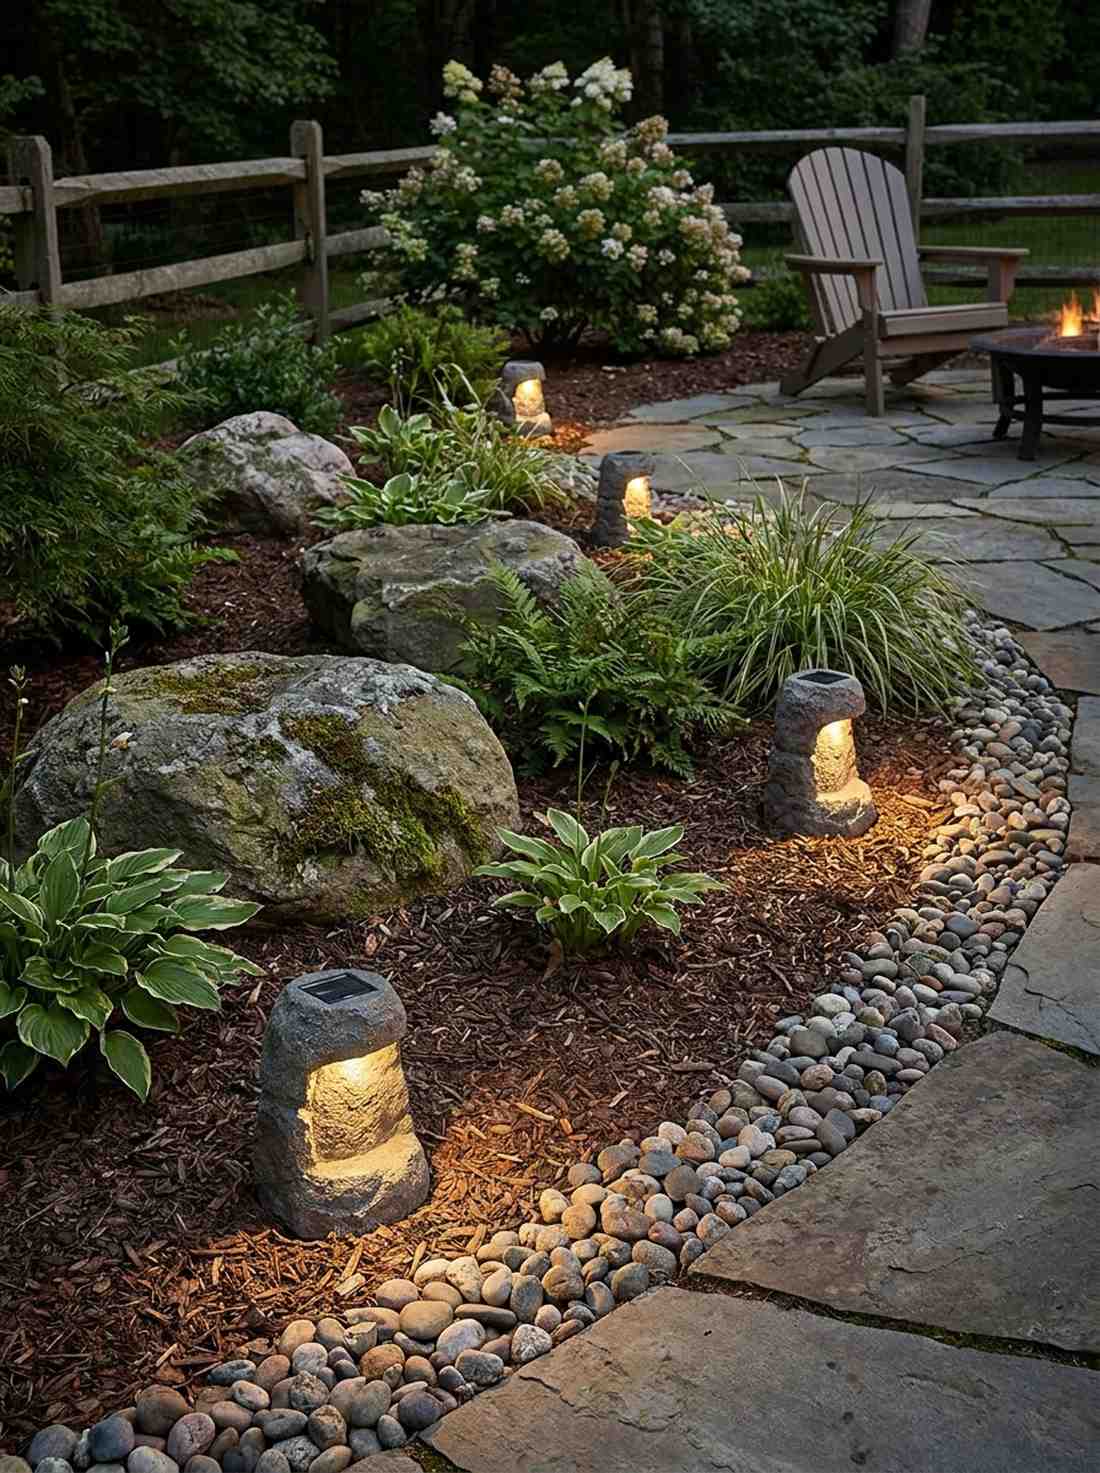
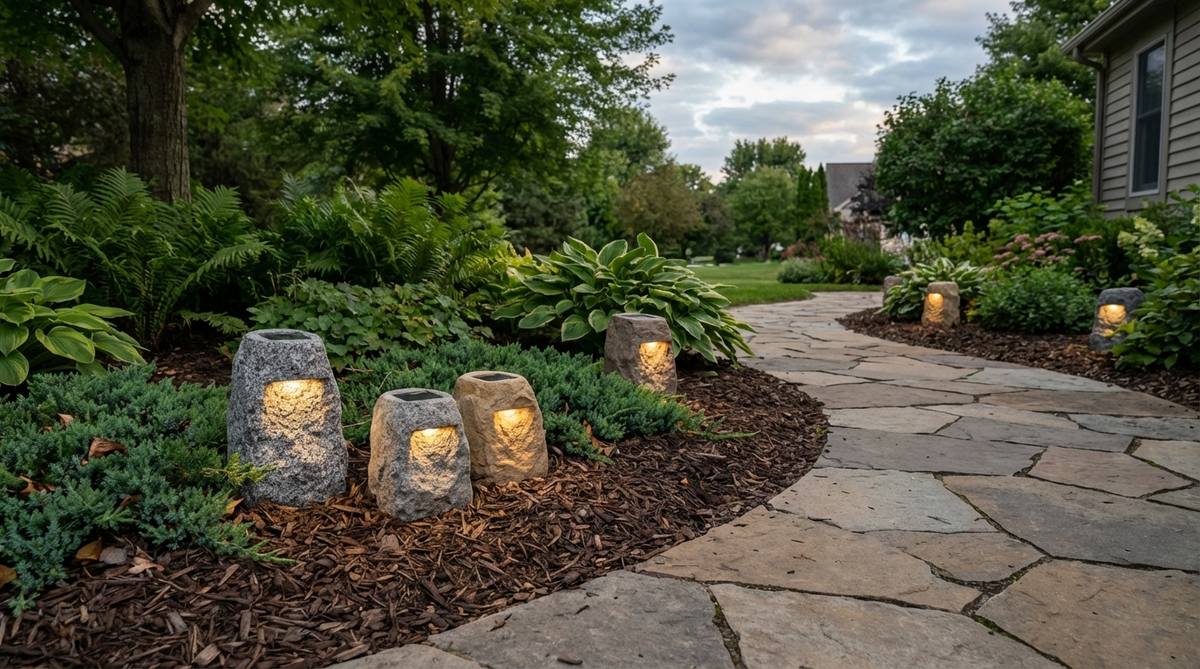
Disappearing by day and glowing by night, this hidden approach feels like the garden illuminates itself. Tucking faux stone solar lights into mulch beds works brilliantly for naturalistic, rugged garden designs.
Most path lights look like obvious plastic poles, but realistic resin rock housings blend invisibly into the terrain. Placing these next to terrarium accessories or large boulders delivers a surprisingly premium look.
A small rock cluster costs around $30–$55.
- Key Materials: Polyresin solar stone housings
- Vibe / Style: Invisible natural integration
- Difficulty: Zero-tool placement
- Budget Breakdown: Solar rocks: $45 | River stones: $5
- Creator’s Tip: Partially bury the bottom edge of the rock into the dirt so it doesn’t look like it was just dropped there.
- Smart Sourcing: Pick up resin solar rock lights (realistic finish) and decorative river pebbles.
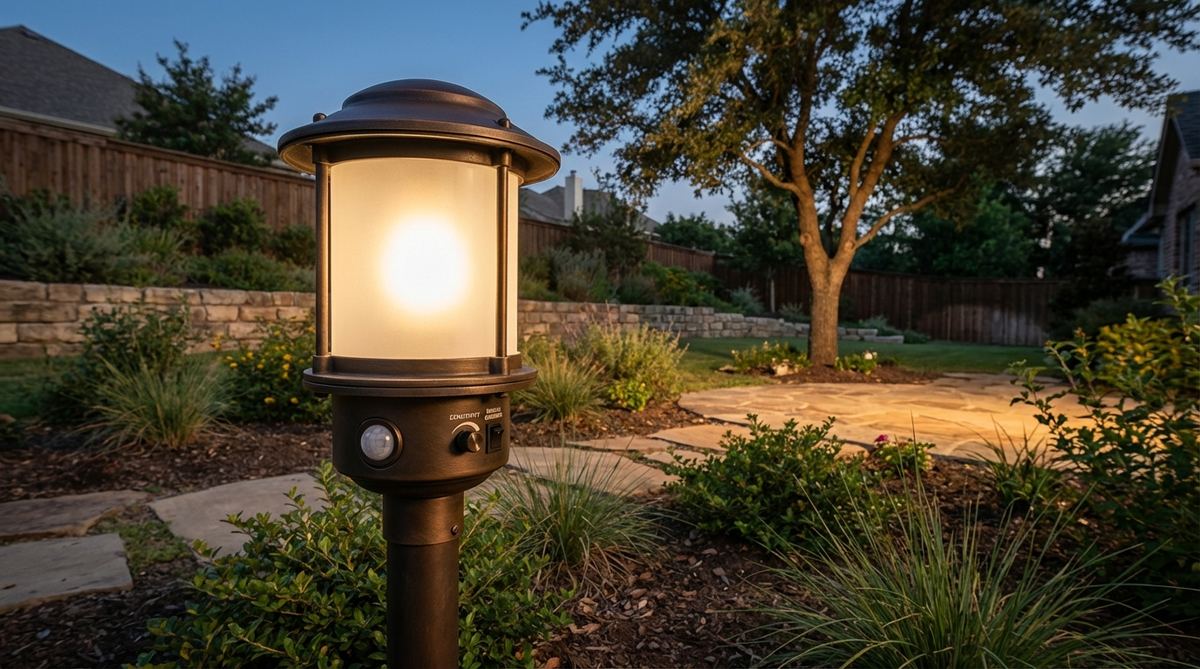
18. Motion-Activated Solar Path Lights
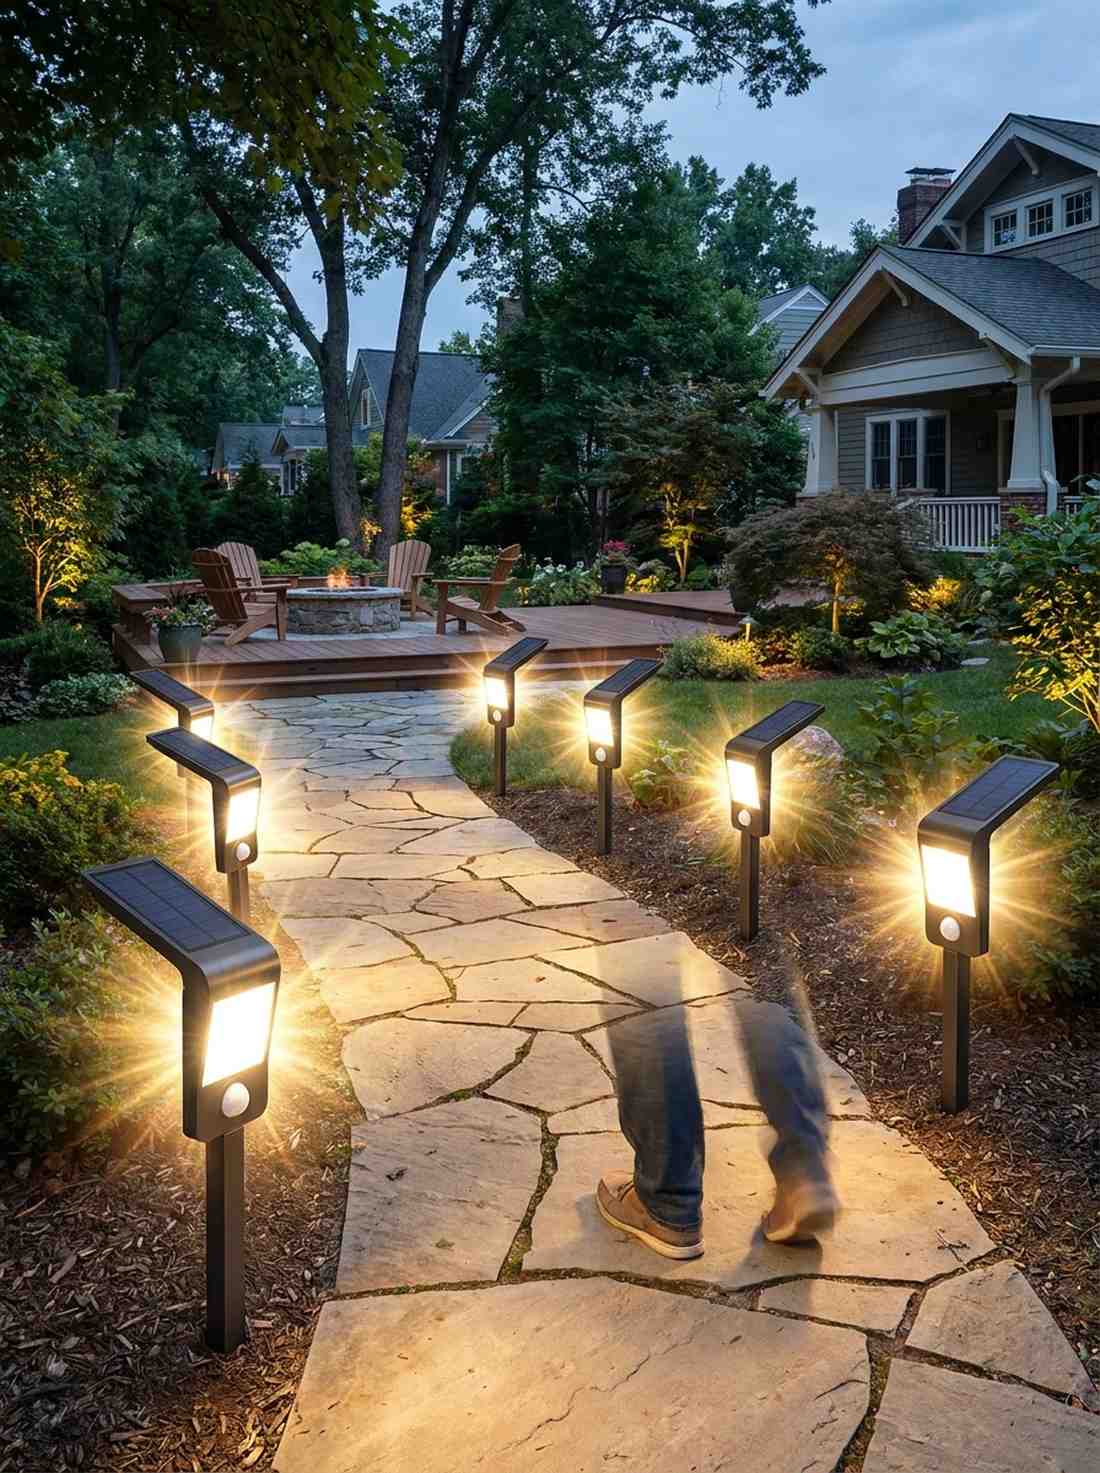
Flaring up as you approach, this responsive trail feels like a personalized VIP red carpet. Installing PIR motion-sensor pathway lights is an incredibly smart upgrade for dark side-yards and security zones.
Running lights at full blast all night kills the battery, but utilizing standby-dimming ensures they last until dawn. Opting for high-capacity solar setups provides intense, reliable illumination exactly when your footsteps need it.
Secure your side yard for about $35–$60. Pin this for a brilliant mix of safety and style!
- Key Materials: Motion-sensing solar stakes
- Vibe / Style: Responsive security glow
- Difficulty: Simple ground insertion
- Budget Breakdown: Sensor lights: $50 | Path clearing: $0
- Creator’s Tip: Angle the solar panels slightly southward to maximize winter sun absorption.
- Smart Sourcing: Buy motion-activated solar stakes (high lumen pack) and a lens cleaning cloth.
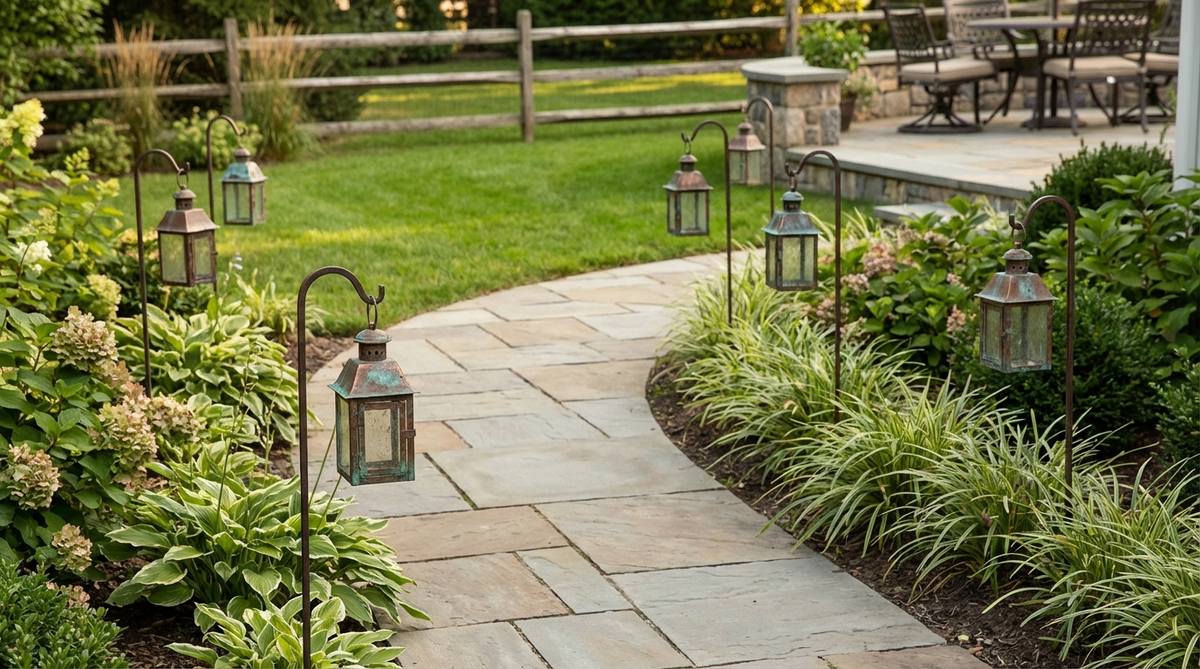
19. Shepherd Hook Hanging Solar Lanterns
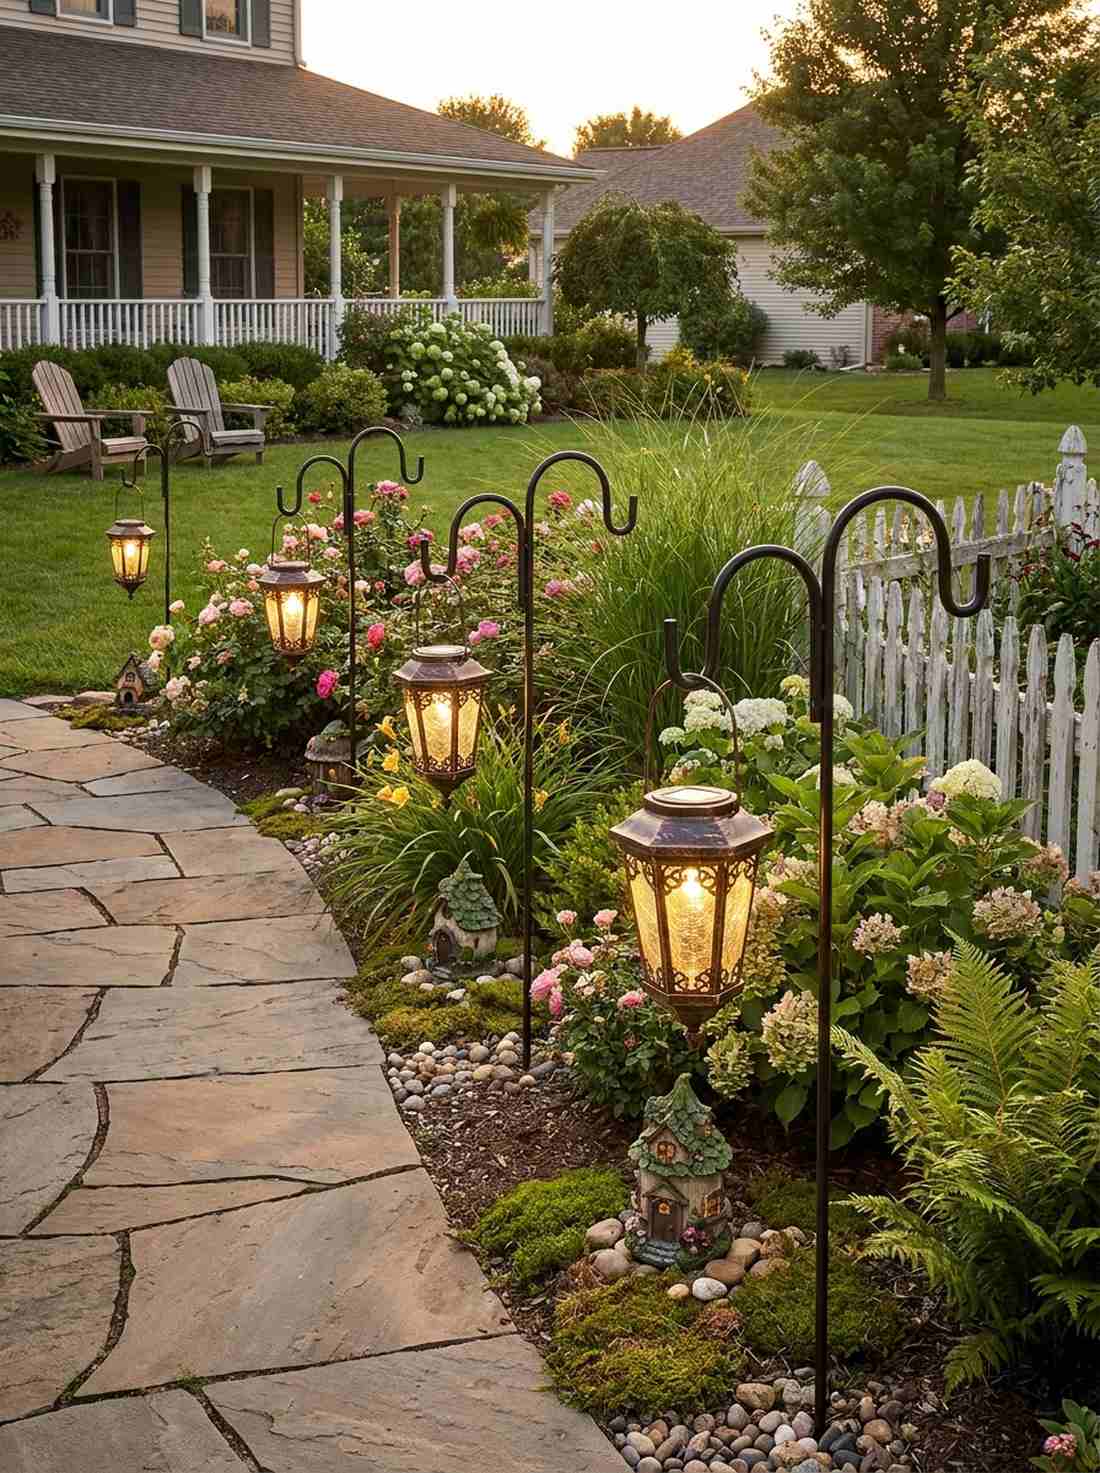
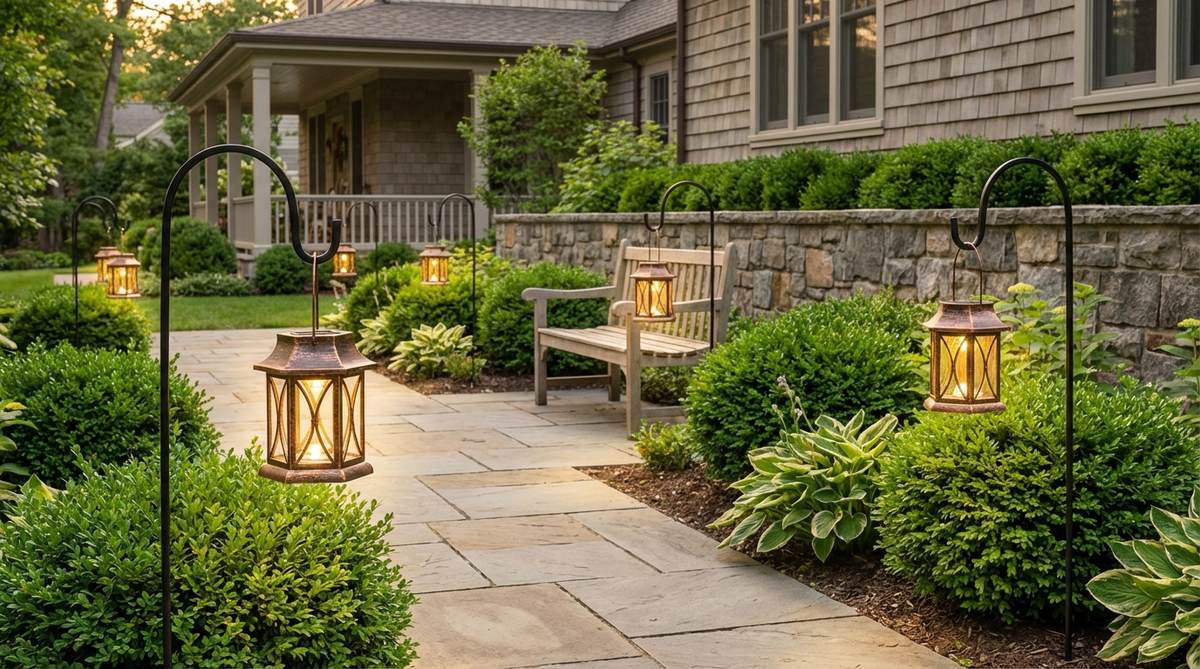
Suspended gracefully, this elevated setup feels like a stroll through a vintage Victorian botanical garden. Hanging outdoor decor lanterns from iron hooks works exceptionally well for framing entranceways and large perennial beds.
Standard ground stakes easily get swallowed by tall grass, but elevating them on curved hooks looks far more expensive than it is. Grabbing UV-coated resin fairy cottage kits to place beneath them creates a magical, tiered lighting effect.
You can achieve this timeless look for $40–$75.
- Key Materials: Iron shepherd hooks, vintage solar lanterns
- Vibe / Style: Classic Victorian romance
- Difficulty: Moderate leveling
- Budget Breakdown: Lanterns: $35 | Iron hooks: $25
- Creator’s Tip: Push the hooks deep enough so the prongs are fully submerged to prevent leaning over time.
- Smart Sourcing: Invest in hanging solar lanterns (crackled glass) and heavy-duty double-prong shepherd hooks.
Wait until you see how affordable this next high-end landscape secret actually is…
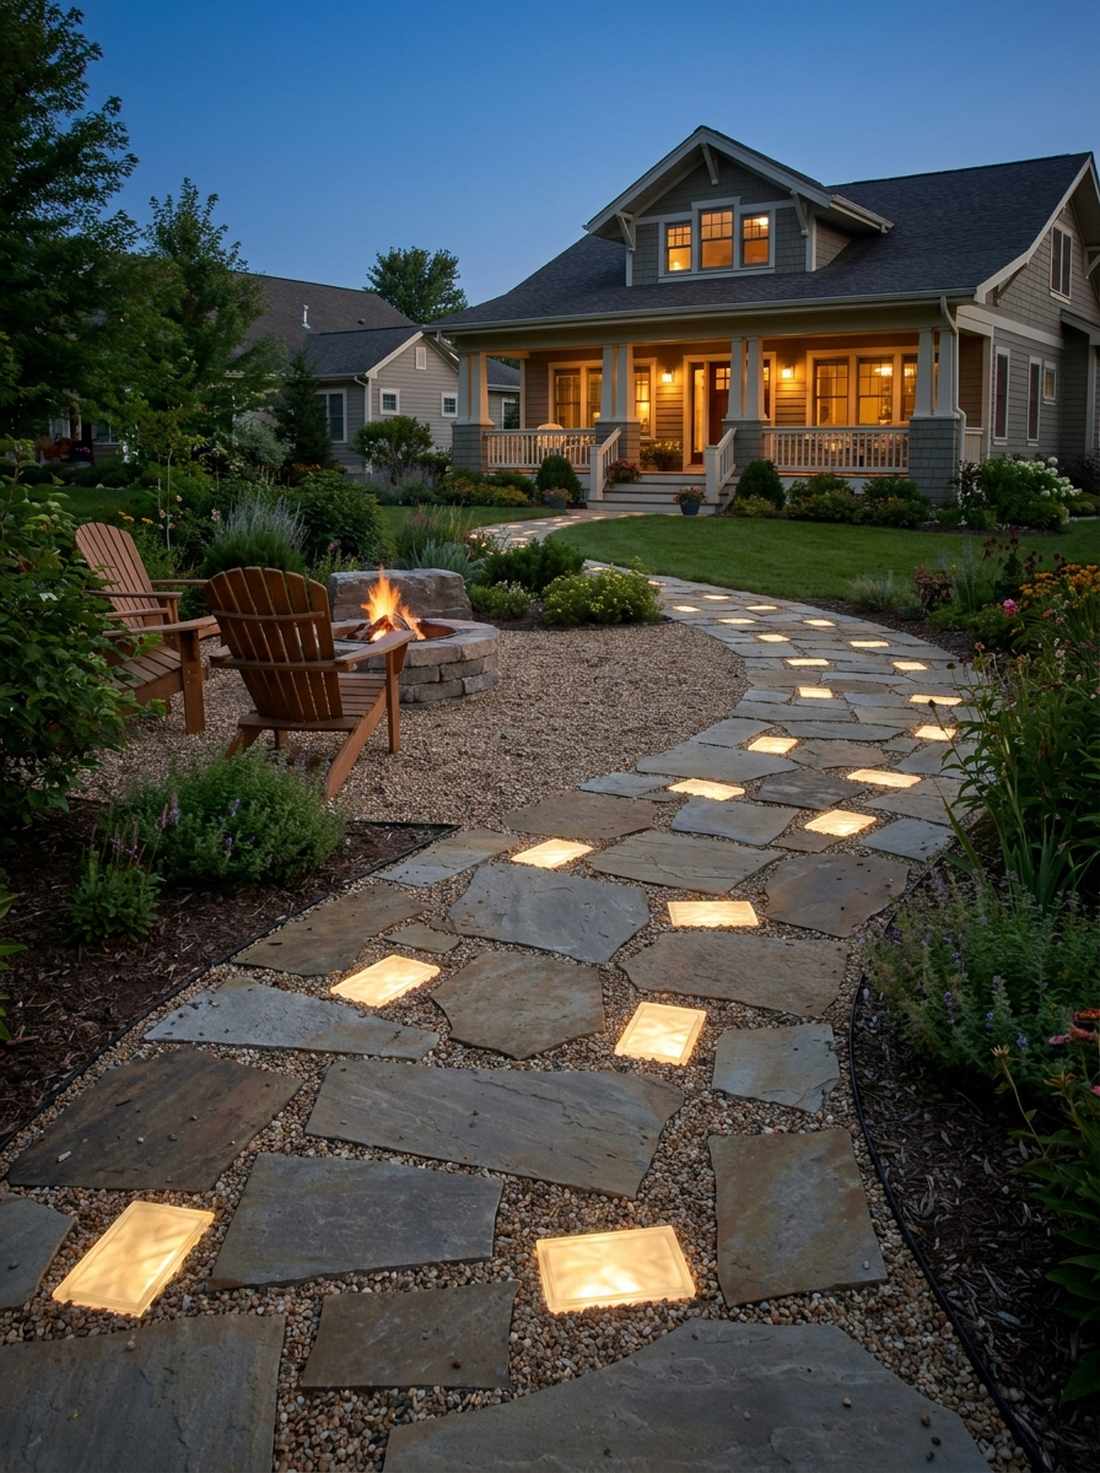
20. Solar Pathway Ribbon Strips
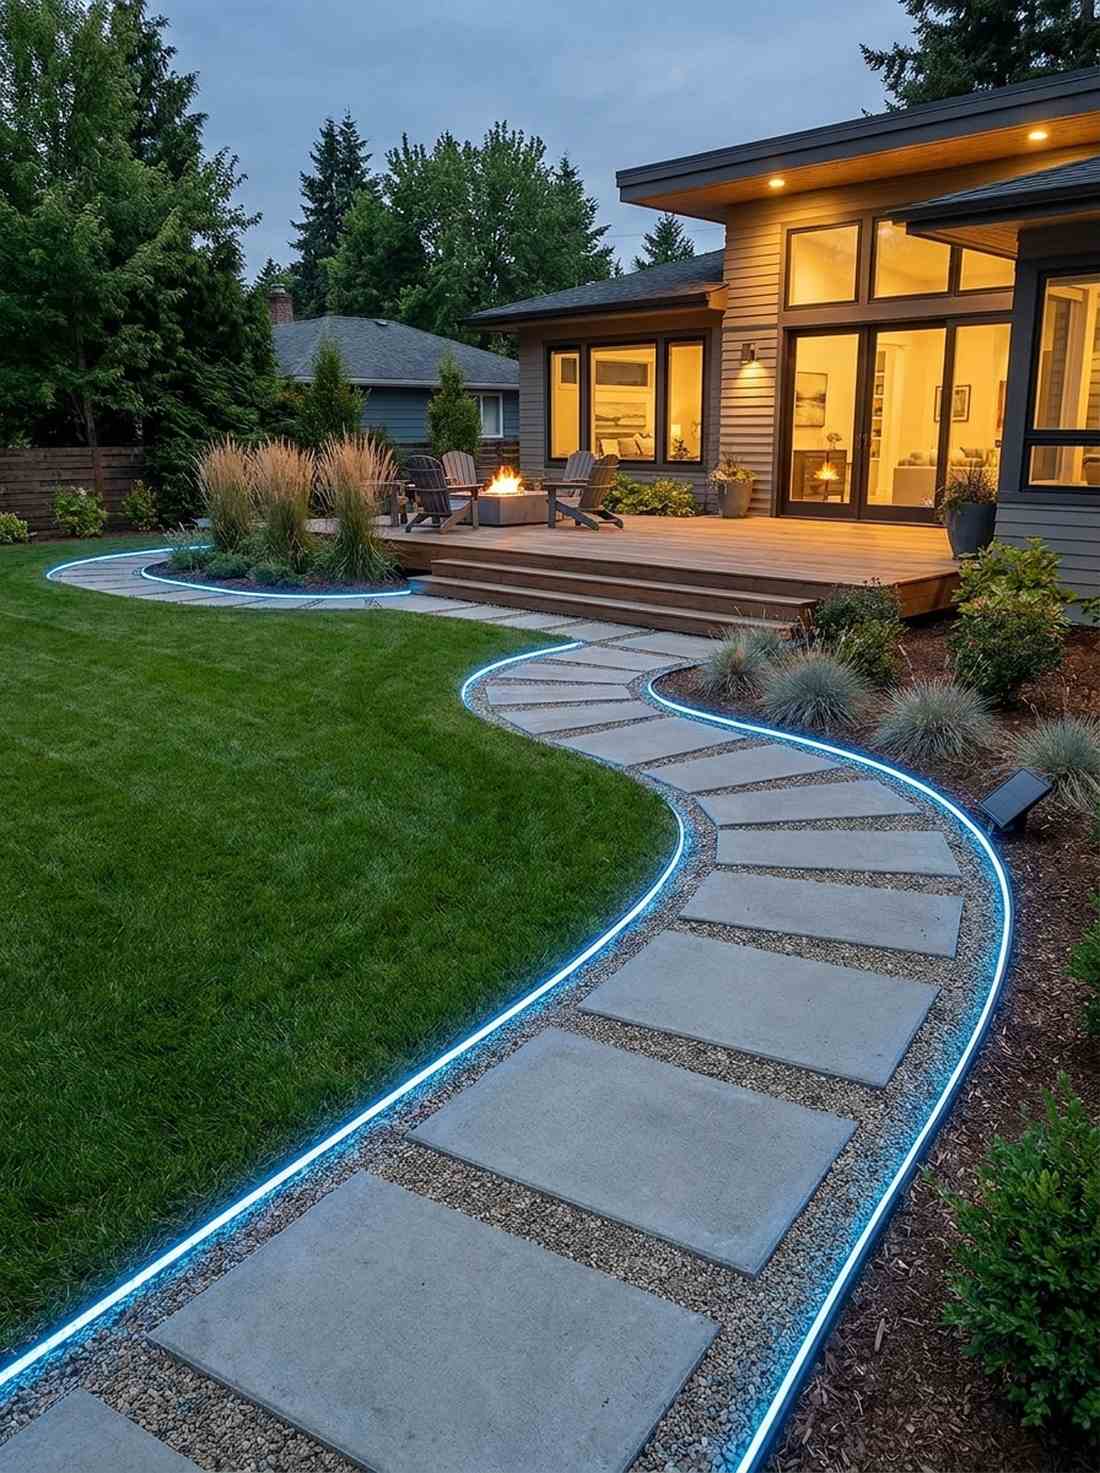
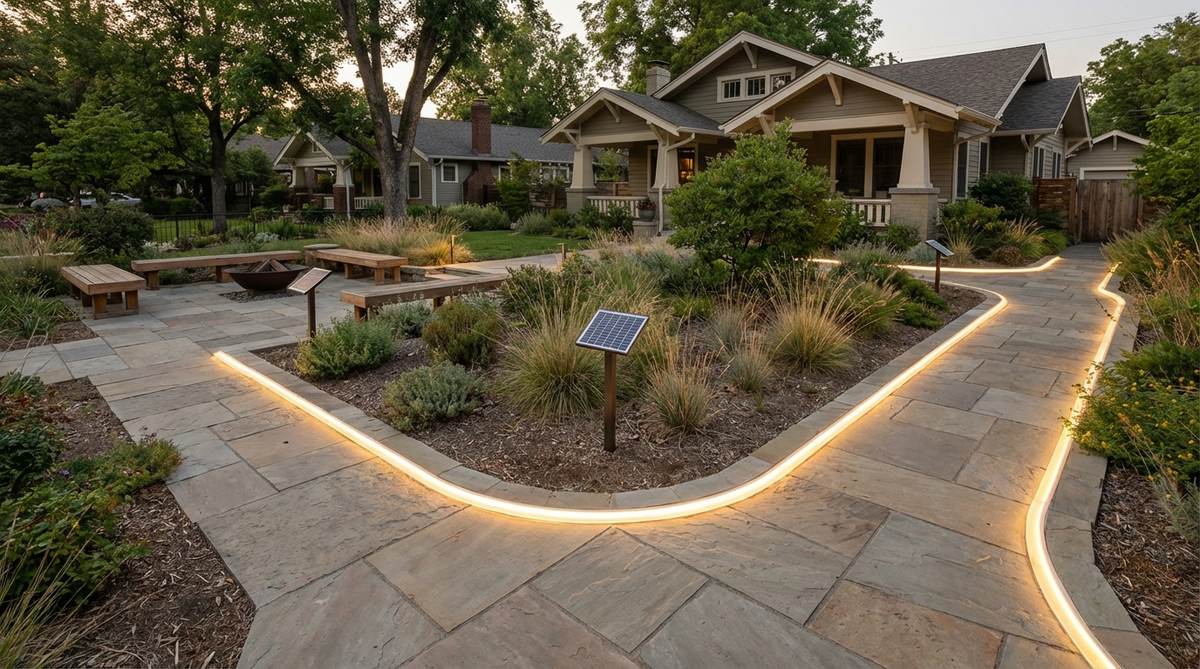
Tracing the garden’s curves, this continuous light line feels like a neon graphic brought to life. Laying down solar LED ribbon strips is the ultimate trick for highlighting modern concrete pavers and winding gravel paths.
Dotting individual lights can look disjointed, but a continuous illuminated border gives a designer-level finish. Utilizing waterproof silicone extrusion protects the delicate LEDs from lawnmowers and heavy rain.
A full 30-foot ribbon setup runs roughly $35–$65. Save this to your modern landscaping board!
- Key Materials: Flexible solar-powered LED strip
- Vibe / Style: Neon-edge modernism
- Difficulty: Simple trenching
- Budget Breakdown: Solar ribbon: $45 | Edge stakes: $10
- Creator’s Tip: Dig a shallow half-inch trench to seat the strip so it sits perfectly flush with the grass line.
- Smart Sourcing: Grab solar LED rope lights (waterproof roll) and u-shaped garden staples (bulk pack).
Decorative Lantern Installations
21. Moroccan Pierced Metal Lanterns
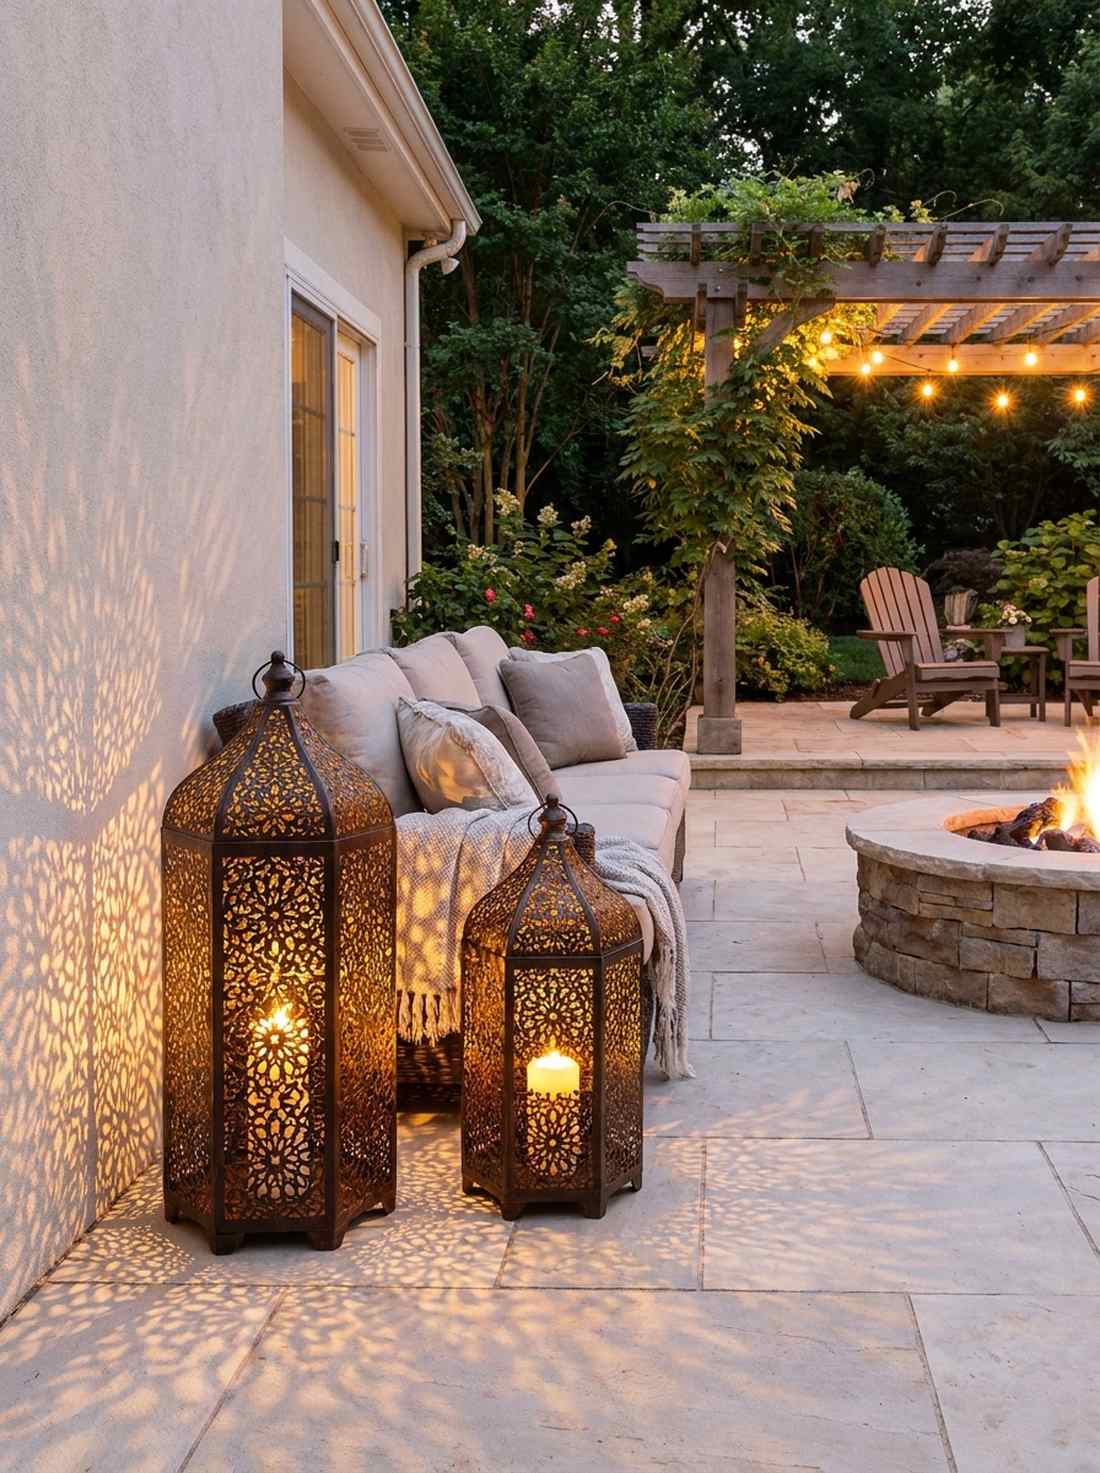
Casting intricate, lacy shadows, this setup feels like an exotic twilight retreat right on your patio. Showcasing Moroccan pierced outdoor decor lanterns is perfect for injecting rich texture into blank seating areas.
Plain glass lanterns are boring, but using laser-cut metal housings delivers a surprisingly premium look across your flooring. Slipping a flickering LED candle bulb inside safely mimics genuine flame without the fire hazard.
A pair of these stunning pieces costs around $45–$80.
- Key Materials: Powder-coated punched metal lanterns
- Vibe / Style: Exotic bohemian twilight
- Difficulty: Simple table styling
- Budget Breakdown: Metal lanterns: $60 | LED Candles: $15
- Creator’s Tip: Place them close to a pale wall or light-colored patio stones to maximize the shadow projections.
- Smart Sourcing: Get Moroccan style metal lanterns (rust-proof) and flickering LED pillar candles (remote controlled).
22. Hurricane Glass Candle Lanterns
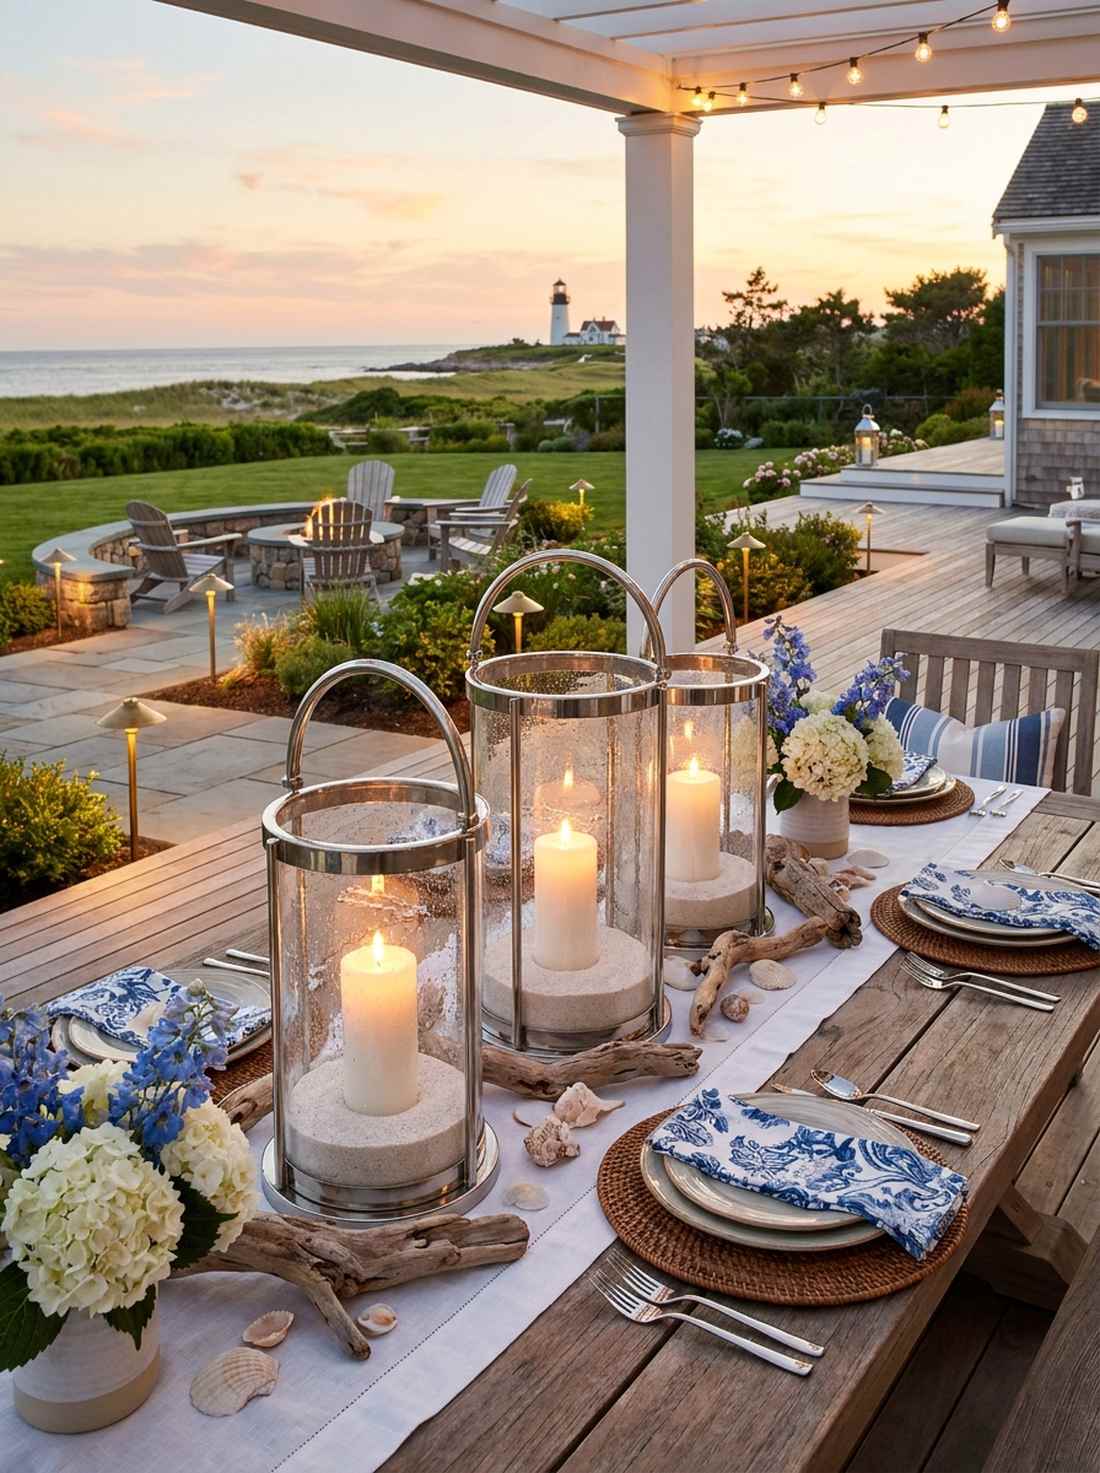
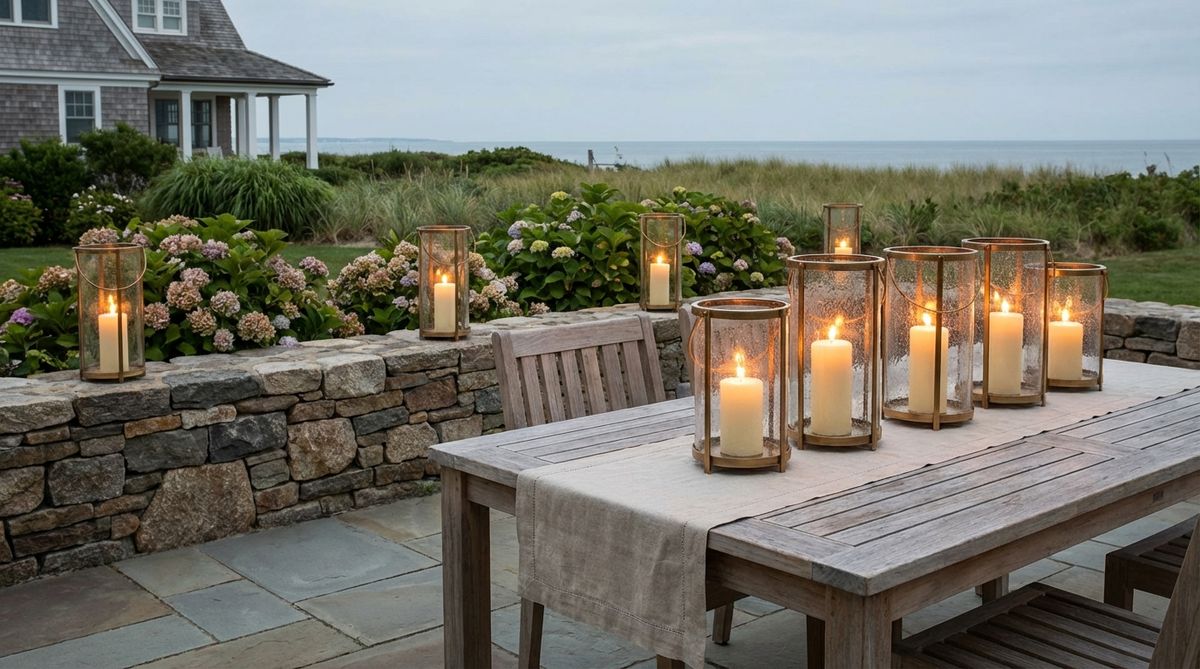
Protecting the glow with thick glass, this arrangement feels like a cozy evening on a coastal estate. Grouping nautical hurricane glass lanterns works beautifully as a centerpiece for long outdoor dining tables.
Open candles blow out instantly, but utilizing a tall cylindrical lens gives a designer-level finish that defies the wind. Integrating brass landscape lighting elements nearby completes the high-end maritime aesthetic.
A cluster of three will set you back roughly $50–$90. Pin this if you’re styling an elegant outdoor tablescape!
- Key Materials: Seeded glass cylinders, stainless frames
- Vibe / Style: Coastal New England elegance
- Difficulty: Easy arranging
- Budget Breakdown: Hurricane glasses: $65 | Bases: $15
- Creator’s Tip: Fill the bottom two inches with decorative white sand to stabilize the candle and prevent wax sticking.
- Smart Sourcing: Buy seeded glass hurricane lanterns (set of 3) and bulk decorative white sand.
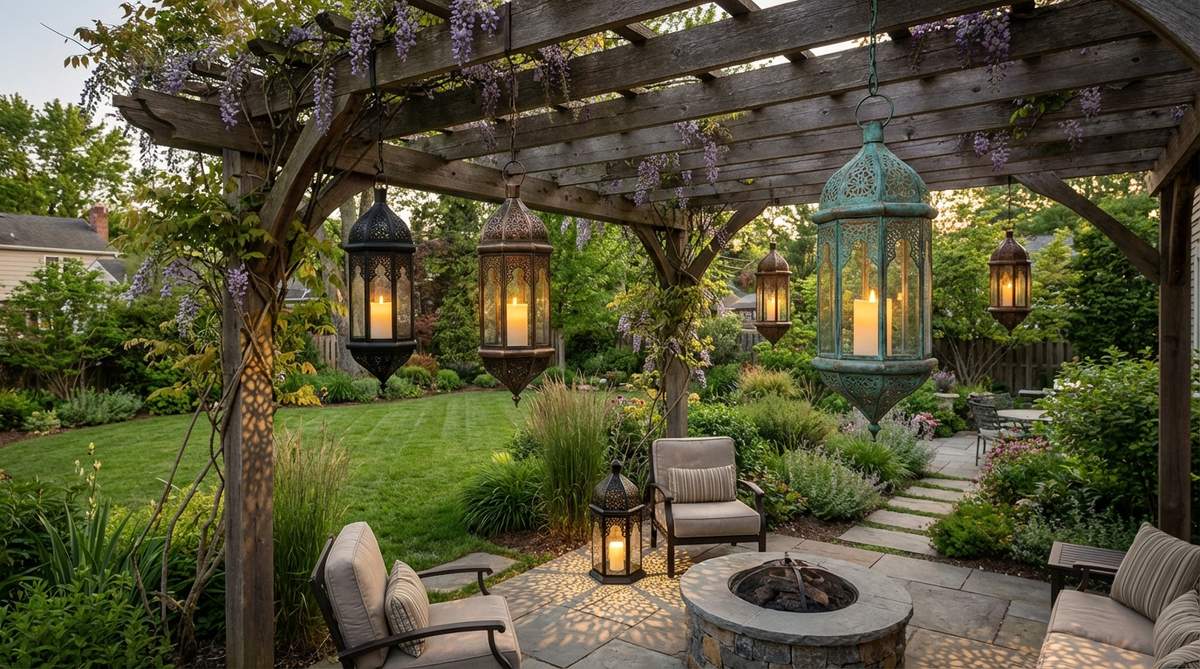
23. Bamboo Woven Solar Lanterns
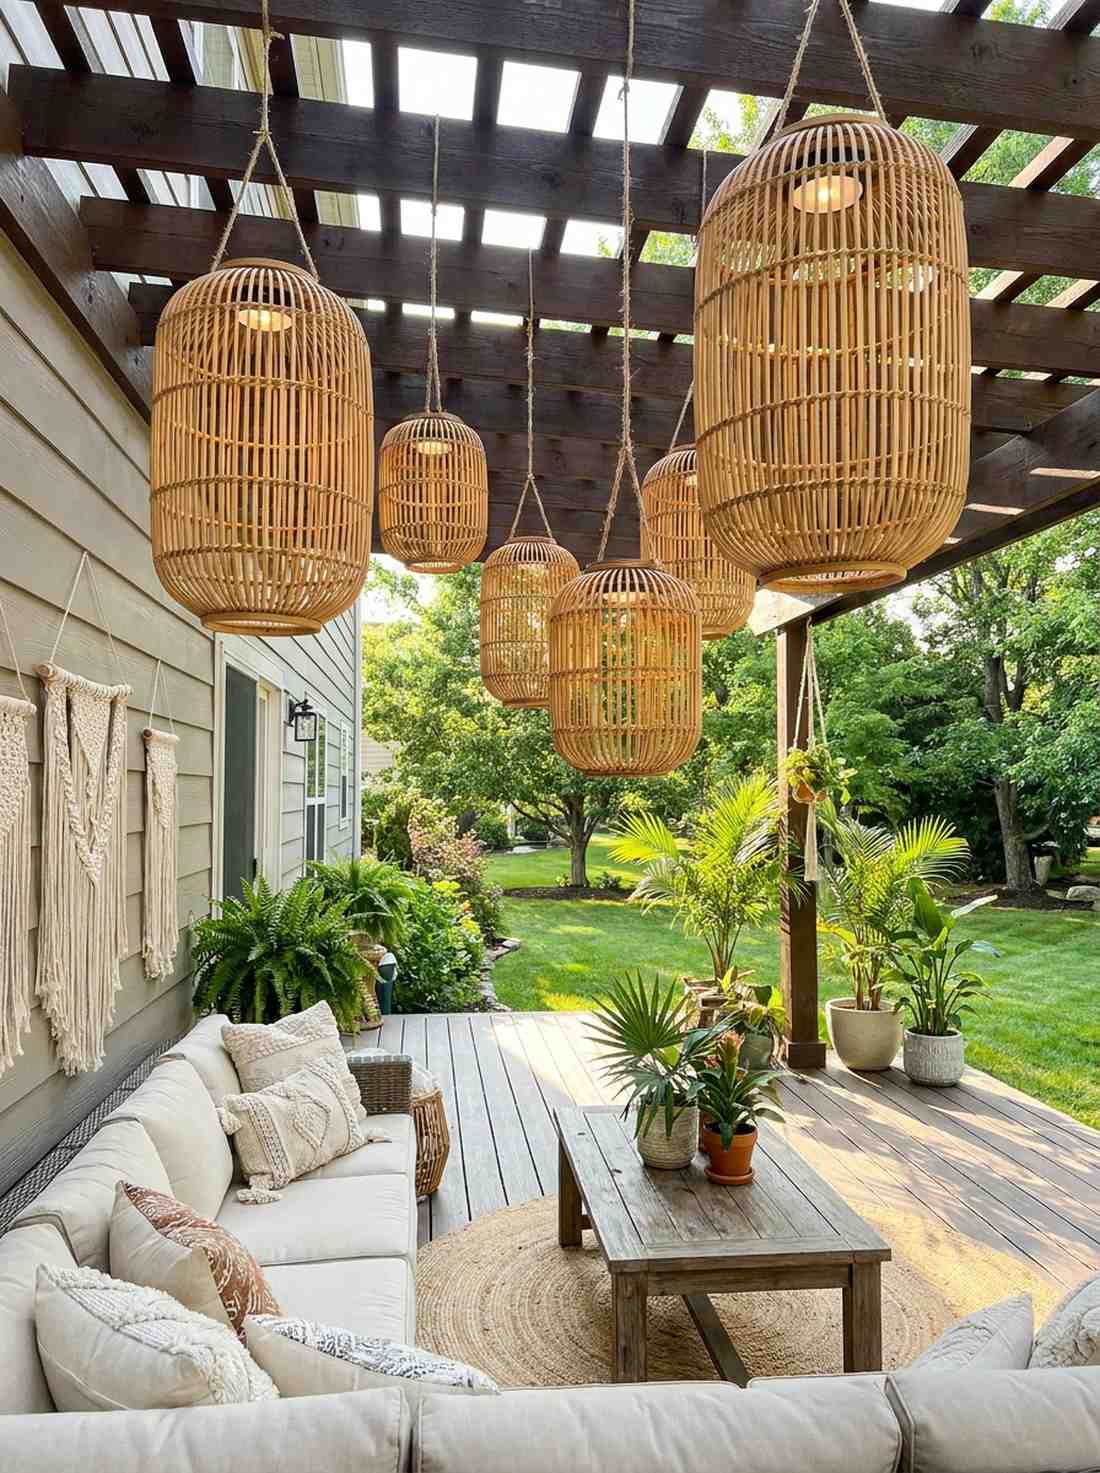
Filtering light through natural fibers, this organic aesthetic feels like a hidden tropical resort. Suspending woven bamboo outdoor decor lanterns is an amazing use-case for covered bohemian patios and pergolas.
Harsh metal fixtures clash with nature, so integrating rattan and bamboo looks far more expensive than it is. Because they feature integrated solar cells, you get the eco-friendly vibe without running a single ugly extension cord.
You can hang a few of these for about $40–$75.
- Key Materials: Natural rattan weaves, integrated solar pucks
- Vibe / Style: Tropical bohemian glow
- Difficulty: Beginner hanging
- Budget Breakdown: Woven lanterns: $55 | Twine: $5
- Creator’s Tip: Coat the bamboo lightly with a clear matte UV spray to prevent the fibers from drying and cracking.
- Smart Sourcing: Source bamboo solar hanging lanterns (weather-treated) and clear UV protective spray.
24. Stained Glass Hanging Lanterns
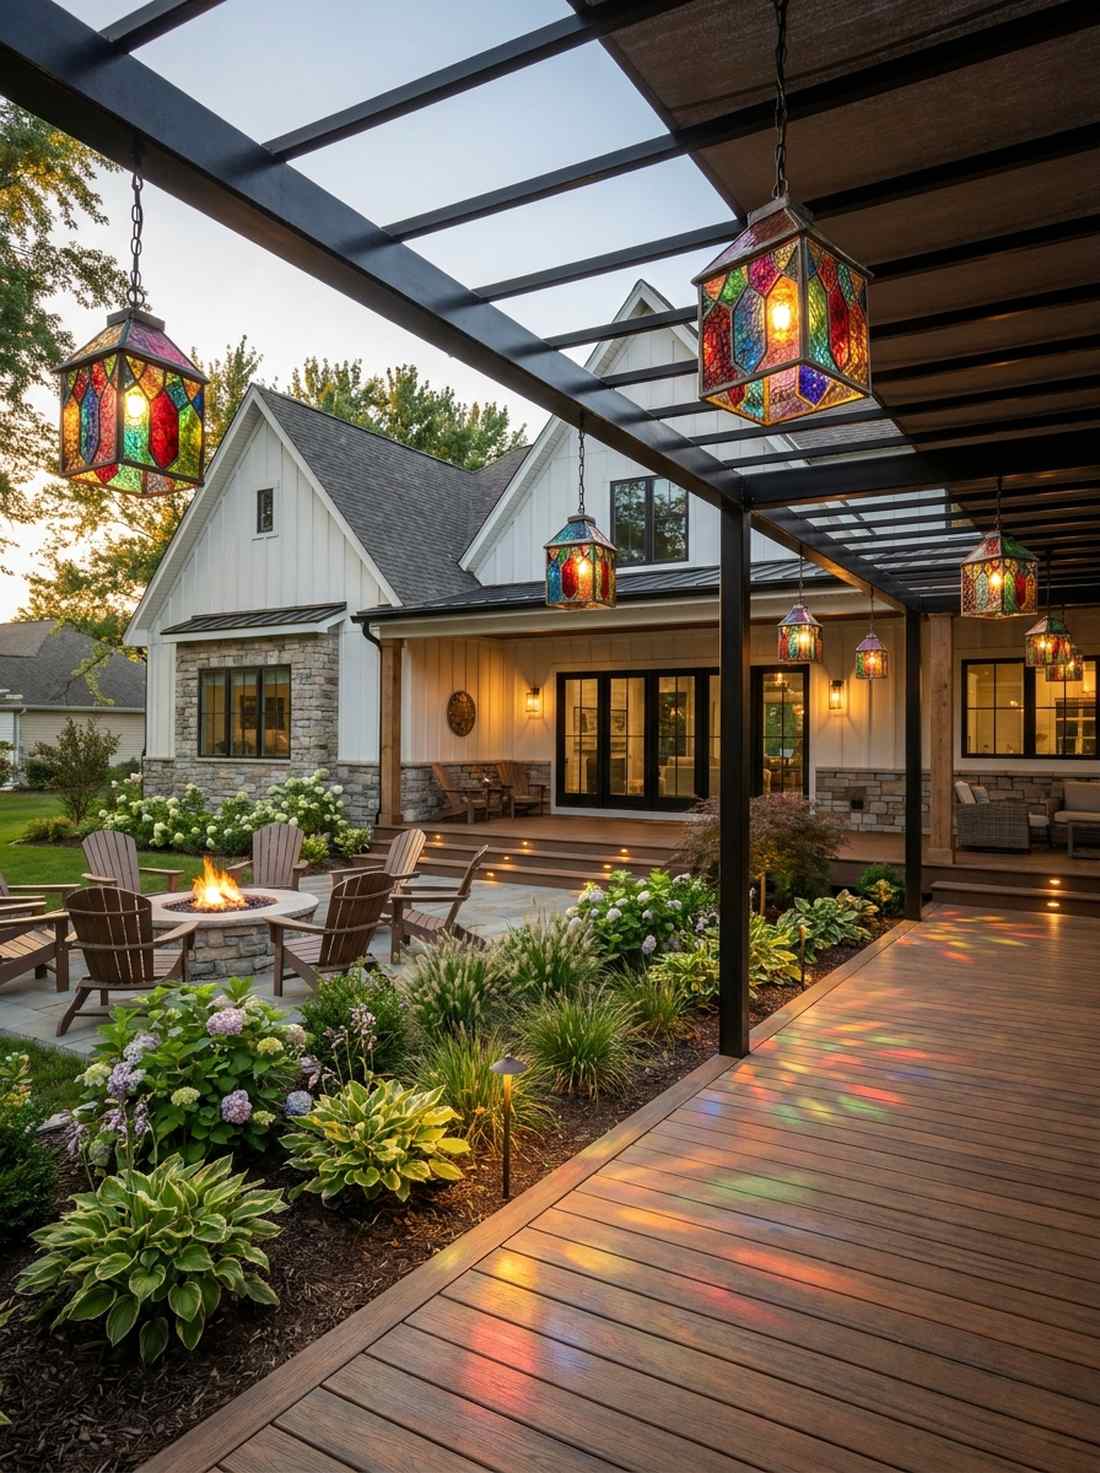
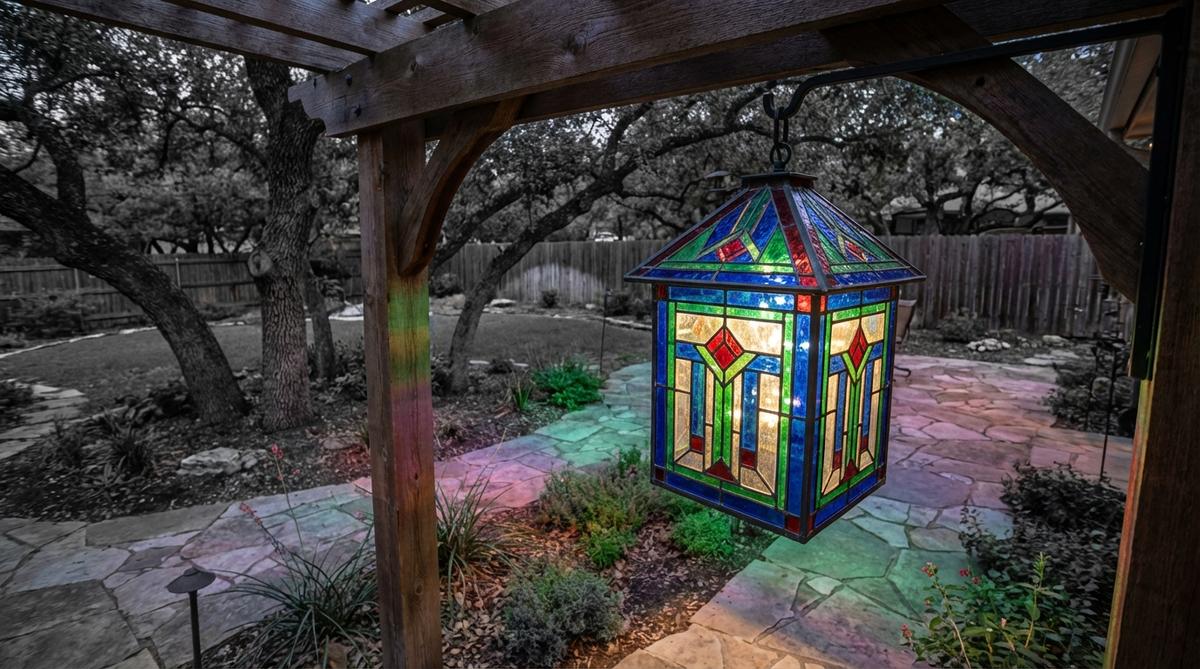
Splashing rich jewel tones across the space, this colorful glow feels like stepping inside an illuminated kaleidoscope. Displaying stained glass outdoor lanterns adds incredible artistic dimension to monochrome garden corners.
Standard white light can look clinical, but washing the area in chromatic hues delivers a surprisingly premium look. Using LED retrofits ensures the vintage glass panels never suffer heat damage while staying perfectly bright.
A beautiful artisan piece usually runs $60–$100. Save this idea for a unique pop of outdoor color!
- Key Materials: Colored art glass, zinc came frames
- Vibe / Style: Arts and Crafts vibrancy
- Difficulty: Secure chain mounting
- Budget Breakdown: Stained glass fixture: $75 | LED bulb: $5
- Creator’s Tip: Hang them where they can catch the late afternoon sun to double as gorgeous suncatchers before dusk.
- Smart Sourcing: Snag an art glass outdoor hanging lantern (pre-wired) and heavy-duty mounting chains.
You probably walk past materials to build this next piece every single day without realizing it…
25. Industrial Edison Cage Lanterns
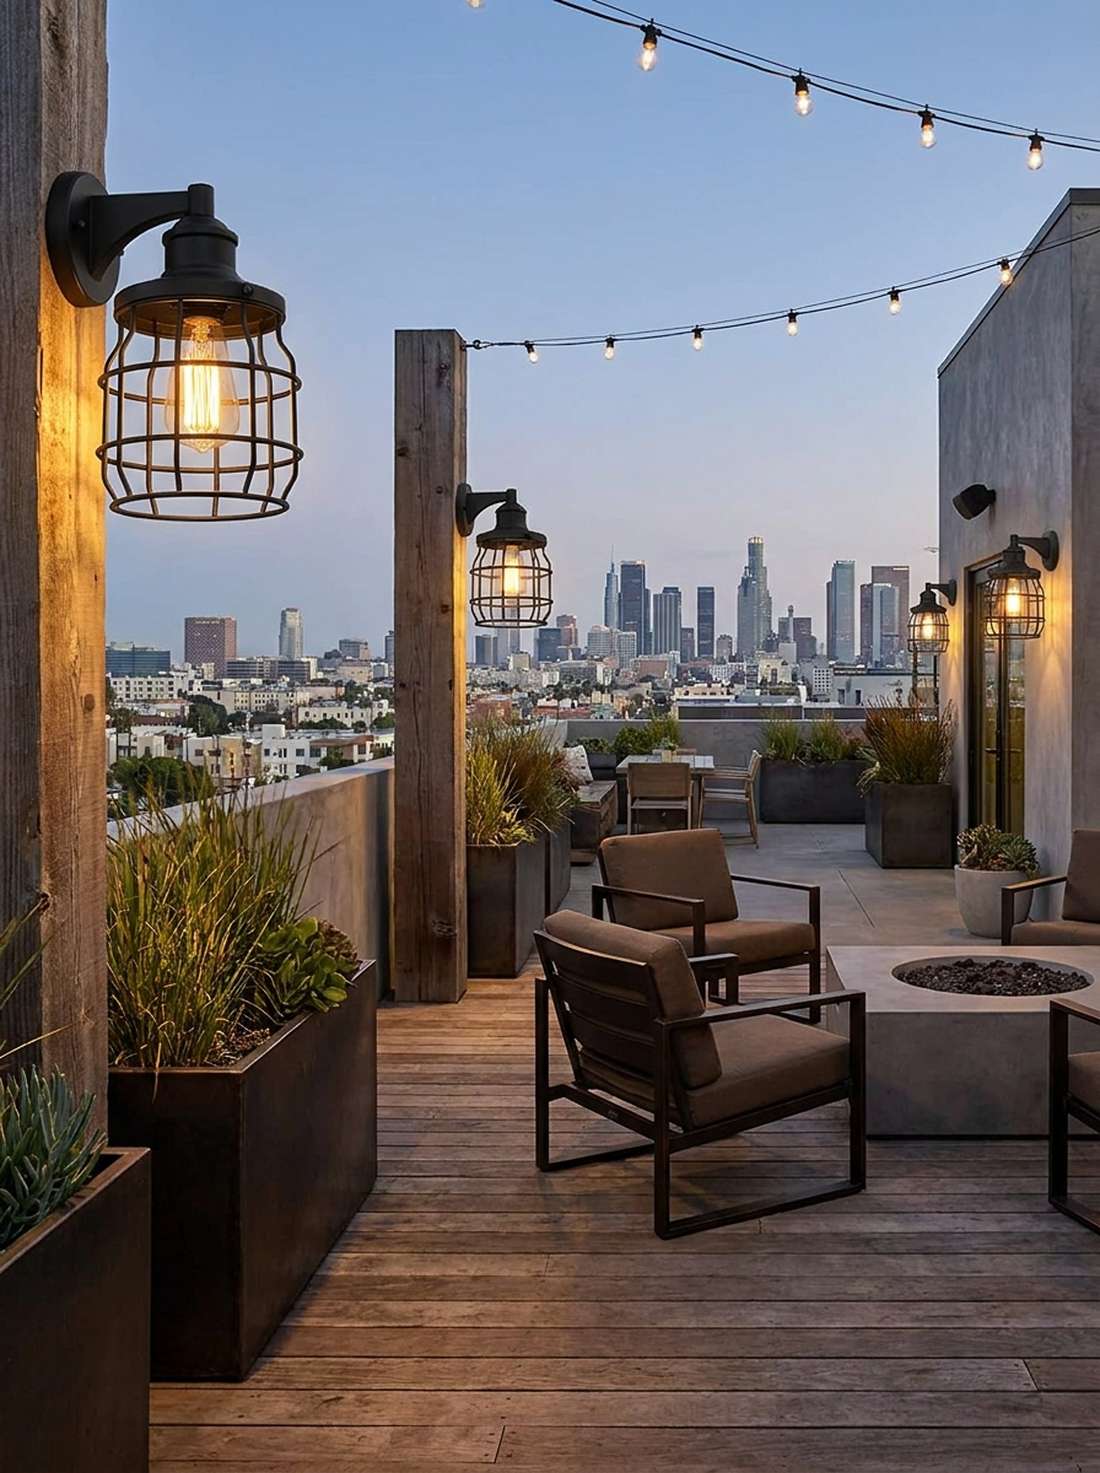
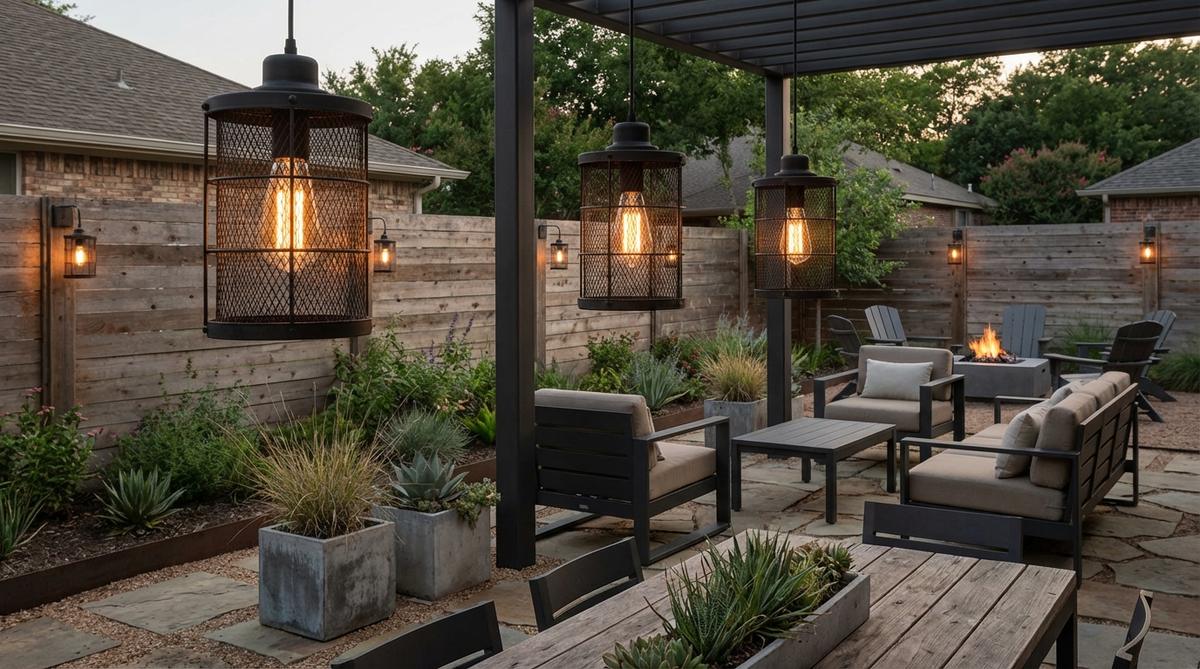
Encased in rugged wire, this robust fixture feels perfectly at home in an urban loft’s rooftop garden. Installing industrial wire-cage lanterns is the smartest pairing for concrete walls and reclaimed wood decks.
Delicate glass shatters easily in high-traffic zones, but adding a matte black wire mesh guard gives a designer-level finish and supreme protection. Throwing these outdoor decor lights into the mix instantly anchors a modern, mechanical aesthetic.
Equip your space for a highly reasonable $35–$65.
- Key Materials: Matte black wire cages, vintage LEDs
- Vibe / Style: Urban industrial chic
- Difficulty: Easy wall/post mount
- Budget Breakdown: Cage lanterns: $45 | Hardware: $10
- Creator’s Tip: Pair these with oil-rubbed bronze outdoor furniture to tie the mechanical aesthetic together perfectly.
- Smart Sourcing: Pick up industrial cage wall lanterns (2-pack) and matte black masonry screws.
26. Paper Lantern String Sets
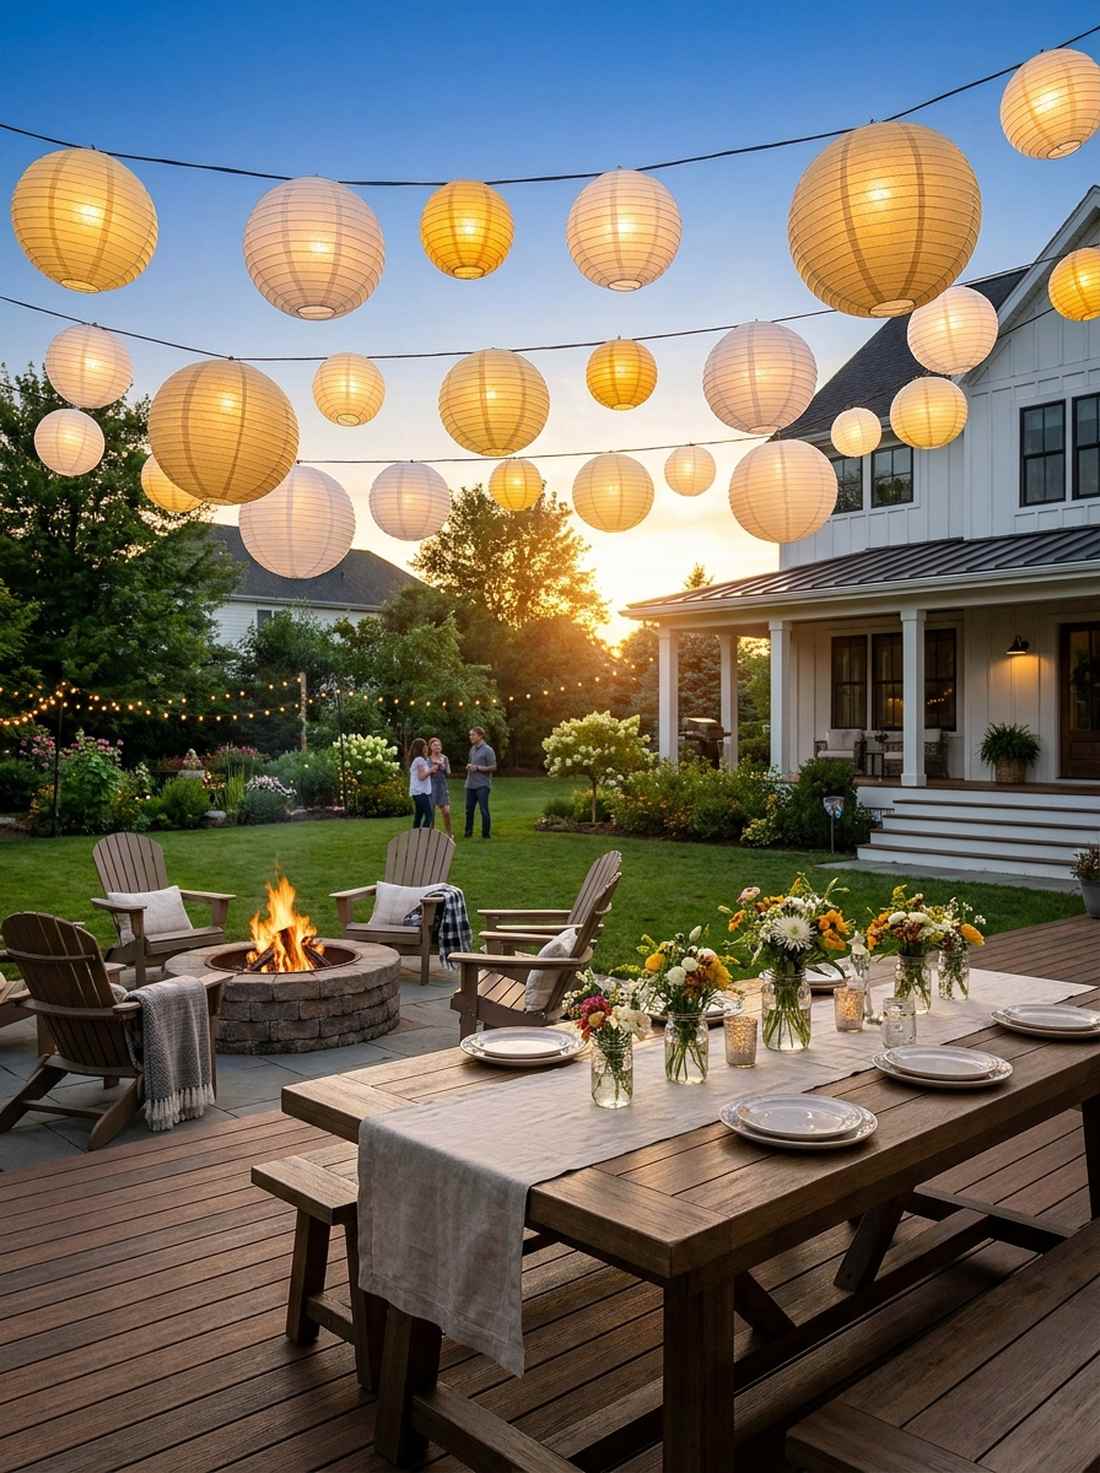
Floating lightly above the crowd, these glowing orbs feel like a joyous summer festival just waiting to start. Strung up as a canopy, nylon paper-style lanterns are unbeatable for temporary event lighting and backyard parties.
Real rice paper melts in the rain, but upgrading to weather-resistant synthetic spheres looks far more expensive than it is. They collapse flat in seconds, making them the ultimate high-impact, low-storage decor trick.
You can transform a yard for an event for just $20–$40. Pin this to your outdoor party planning board!
- Key Materials: Synthetic nylon spheres, LED string
- Vibe / Style: Festive summer celebration
- Difficulty: Very easy setup
- Budget Breakdown: Nylon lanterns: $25 | String wire: $10
- Creator’s Tip: Mix three different sizes (8″, 10″, and 12″) on the same string for a much more dynamic, professional look.
- Smart Sourcing: Buy weatherproof nylon lantern strings (multi-size pack) and removable outdoor hooks.
27. Copper Lantern Pathway Stakes

Glinting softly near the soil, these miniature beacons feel like the gateway to a secret fairy kingdom. Pushing in copper-finished outdoor decor lanterns works flawlessly for defining delicate floral borders without overpowering the plants.
Cheap plastic stakes fade terribly, but allowing natural copper to develop a green patina delivers a surprisingly premium look over time. Incorporating miniature garden supplies around the stakes creates a magical micro-landscape.
Outfit your flower beds for roughly $40–$70.
- Key Materials: Real or faux copper mini lanterns, metal stakes
- Vibe / Style: Enchanted botanical border
- Difficulty: Push-in simple
- Budget Breakdown: Copper stakes: $55 | Patina spray: $0
- Creator’s Tip: If you want them to stay shiny, spray them with a clear automotive lacquer before putting them outside.
- Smart Sourcing: Use miniature copper path lanterns (metal stake pack) and clear protective lacquer spray.
28. Nautical Ship Lanterns
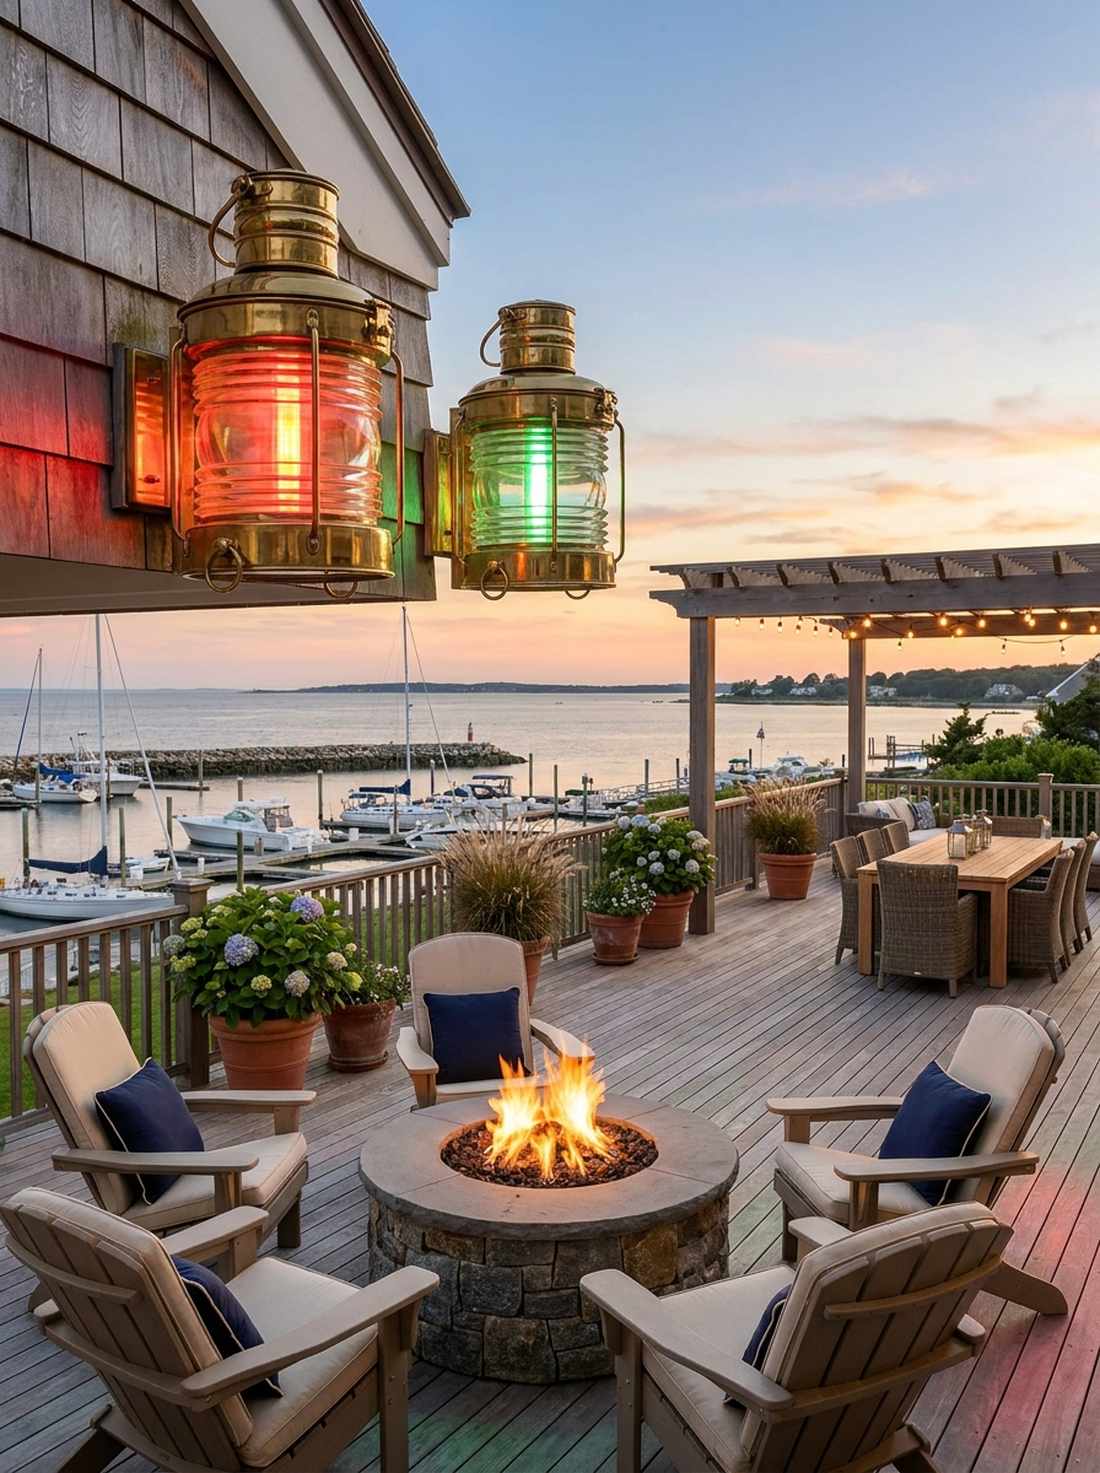
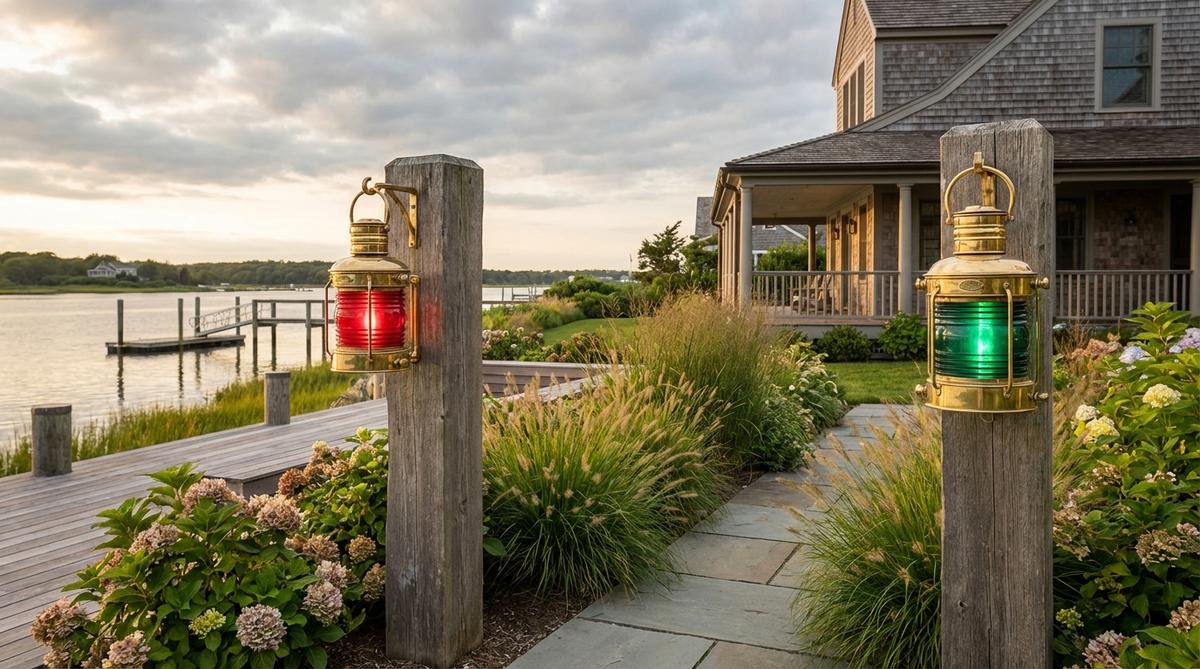
Featuring heavy glass and brass framing, this bold lighting feels like you’re docking at an exclusive seaside marina. Mounting reproduction maritime lanterns is a fantastic focal point for boathouses and waterfront patios.
Flimsy novelty lights look tacky, but sourcing solid brass and colored navigation lenses gives a designer-level finish. Integrating premium LED outdoor lighting inside these heavy historical frames bridges vintage style with modern efficiency.
A solid nautical replica costs about $60–$110. Save this if you are upgrading a coastal or lakehouse property!
- Key Materials: Solid brass frames, thick fresnel lenses
- Vibe / Style: Authentic maritime heritage
- Difficulty: Hardwired mounting
- Budget Breakdown: Brass lantern: $80 | LED bulb: $10
- Creator’s Tip: Use red and green LED bulbs to mimic authentic port and starboard ship navigation lighting.
- Smart Sourcing: Invest in a solid brass nautical wall lantern (weatherproof) and marine-grade silicone sealant.
29. Rattan Pendant Lanterns
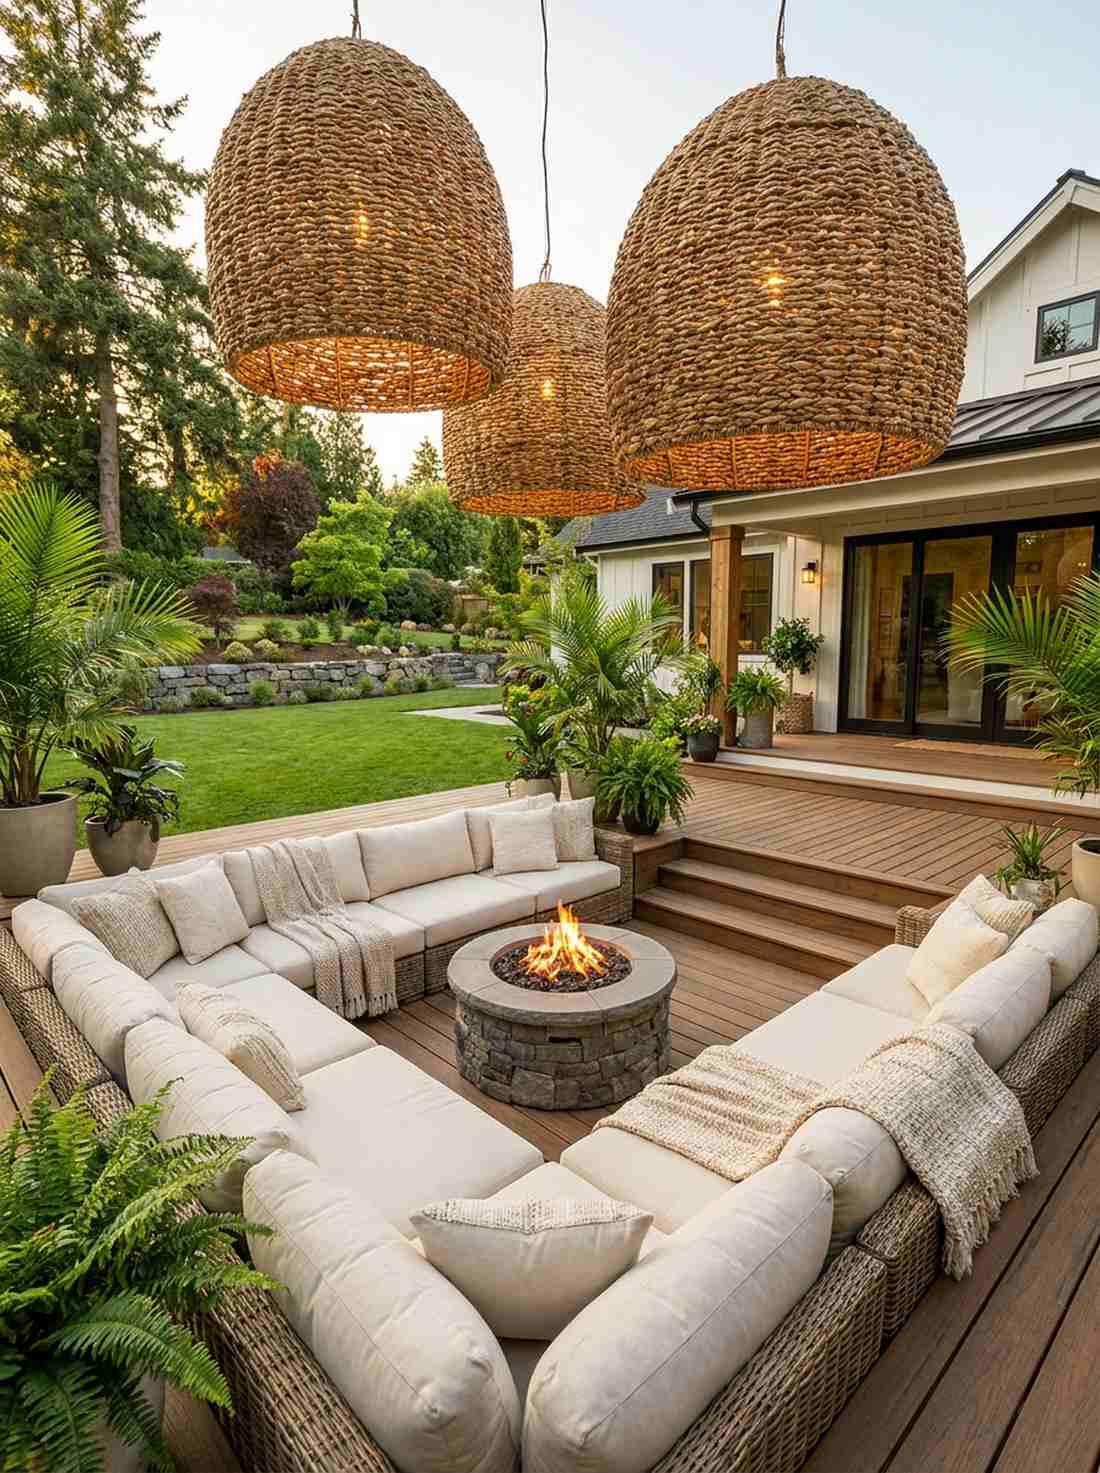

Oversized and deeply textured, this statement piece feels like a high-end Bali resort lounge. Dropping a giant woven rattan pendant light creates the ultimate centerpiece over an outdoor conversational sofa pit.
A bare bulb overhead is abrasive, but filtering it through chunky natural fibers looks far more expensive than it is. Using an outdoor-rated cord kit ensures this bohemian dream stays totally safe in high humidity.
Create this massive focal point for $75–$130.
- Key Materials: Large rattan basket shade, outdoor cord kit
- Vibe / Style: Balinese luxury lounge
- Difficulty: Intermediate overhead wiring
- Budget Breakdown: Rattan shade: $80 | Outdoor cord: $25
- Creator’s Tip: You can convert a cheap indoor rattan basket into a shade by cutting a hole in the bottom and sealing the fibers.
- Smart Sourcing: Grab an oversized rattan pendant shade (pre-treated) and an outdoor waterproof pendant cord kit.
Most beginners skip this technique, but doing it correctly gives a landscape architect finish…
30. Japanese Stone Lanterns
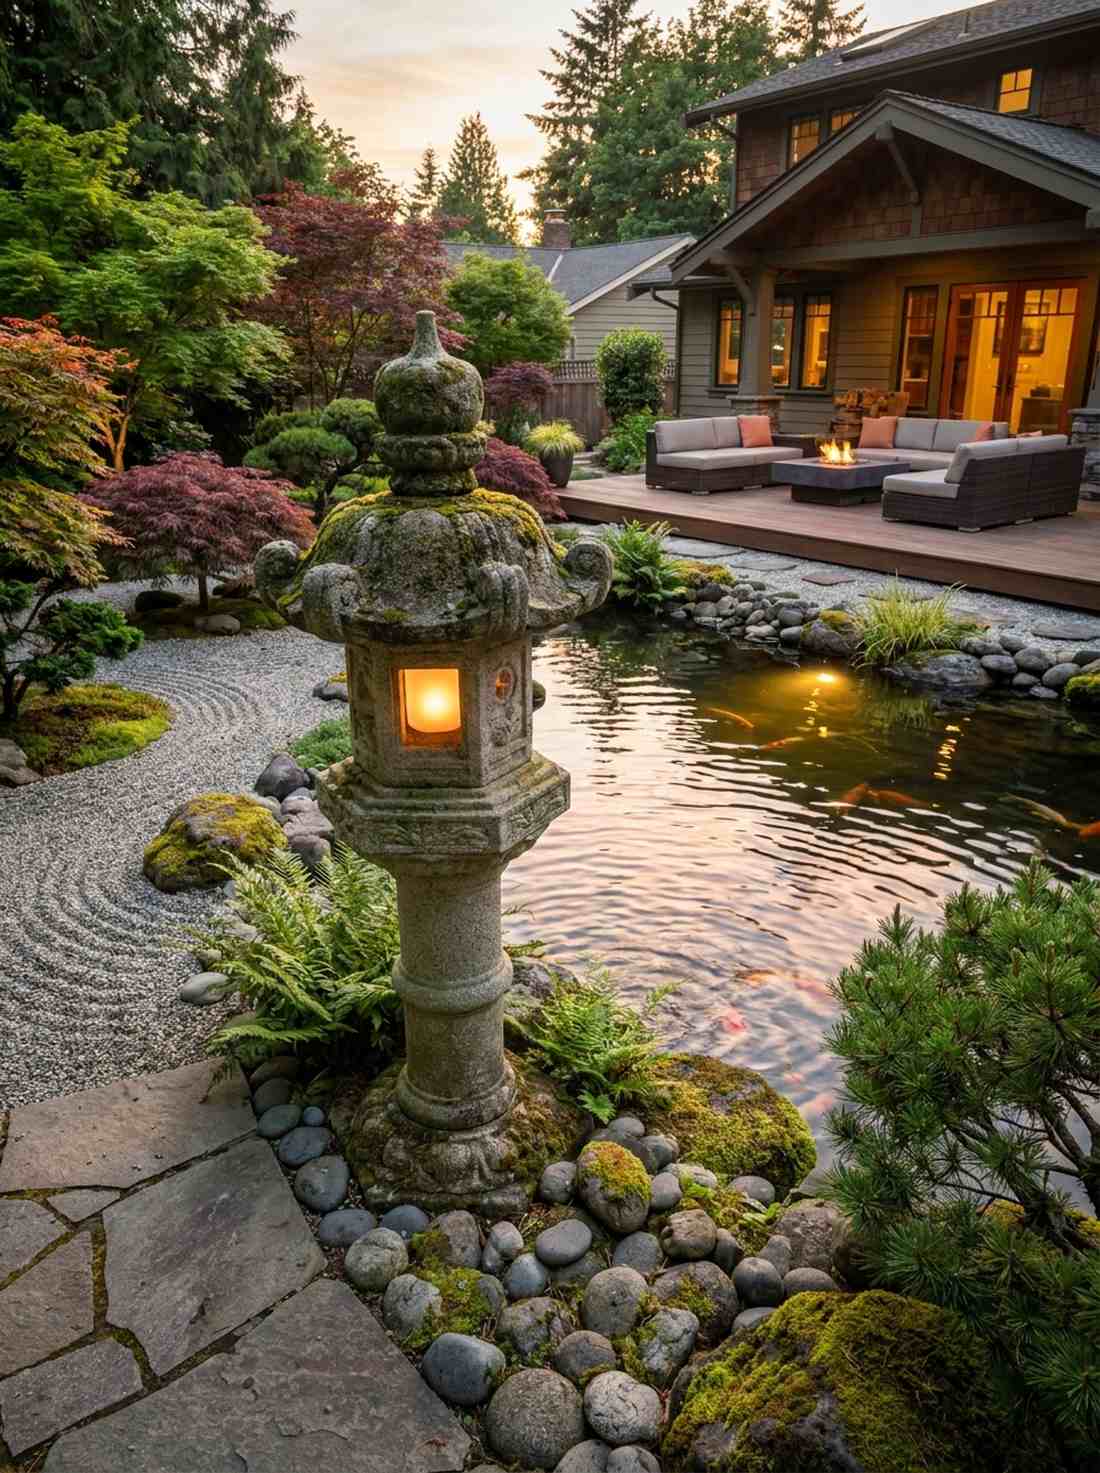
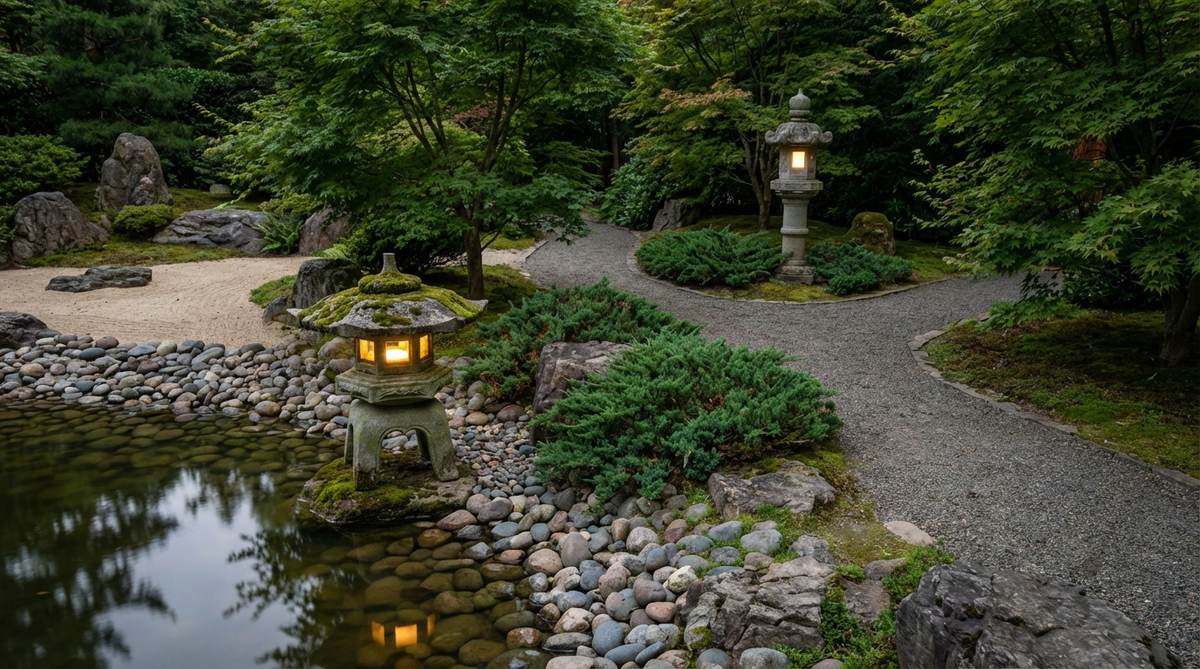
Grounded and utterly serene, this sculptural mass feels like an ancient meditation garden. Placing traditional carved stone pagoda lanterns is essential for authentic Asian-inspired koi ponds and Zen gravel gardens.
Cheap resin copies blow over in the wind, but investing in actual carved granite delivers a surprisingly premium look that lasts centuries. Snapping a waterproof LED puck light inside eliminates messy wax candle maintenance entirely.
Real stone fixtures range from $150–$300, but last forever. Pin this to your ultimate Zen garden board!
- Key Materials: Carved granite pagoda, waterproof LED puck
- Vibe / Style: Ancient Zen tranquility
- Difficulty: Heavy lifting required
- Budget Breakdown: Stone pagoda: $180 | LED Puck: $15
- Creator’s Tip: Place the lantern near the edge of a water feature so the light reflects beautifully off the ripples at night.
- Smart Sourcing: Find a cast-stone Japanese pagoda lantern (heavy-duty) and a submersible remote-control LED puck.
Accent & Spotlight Techniques
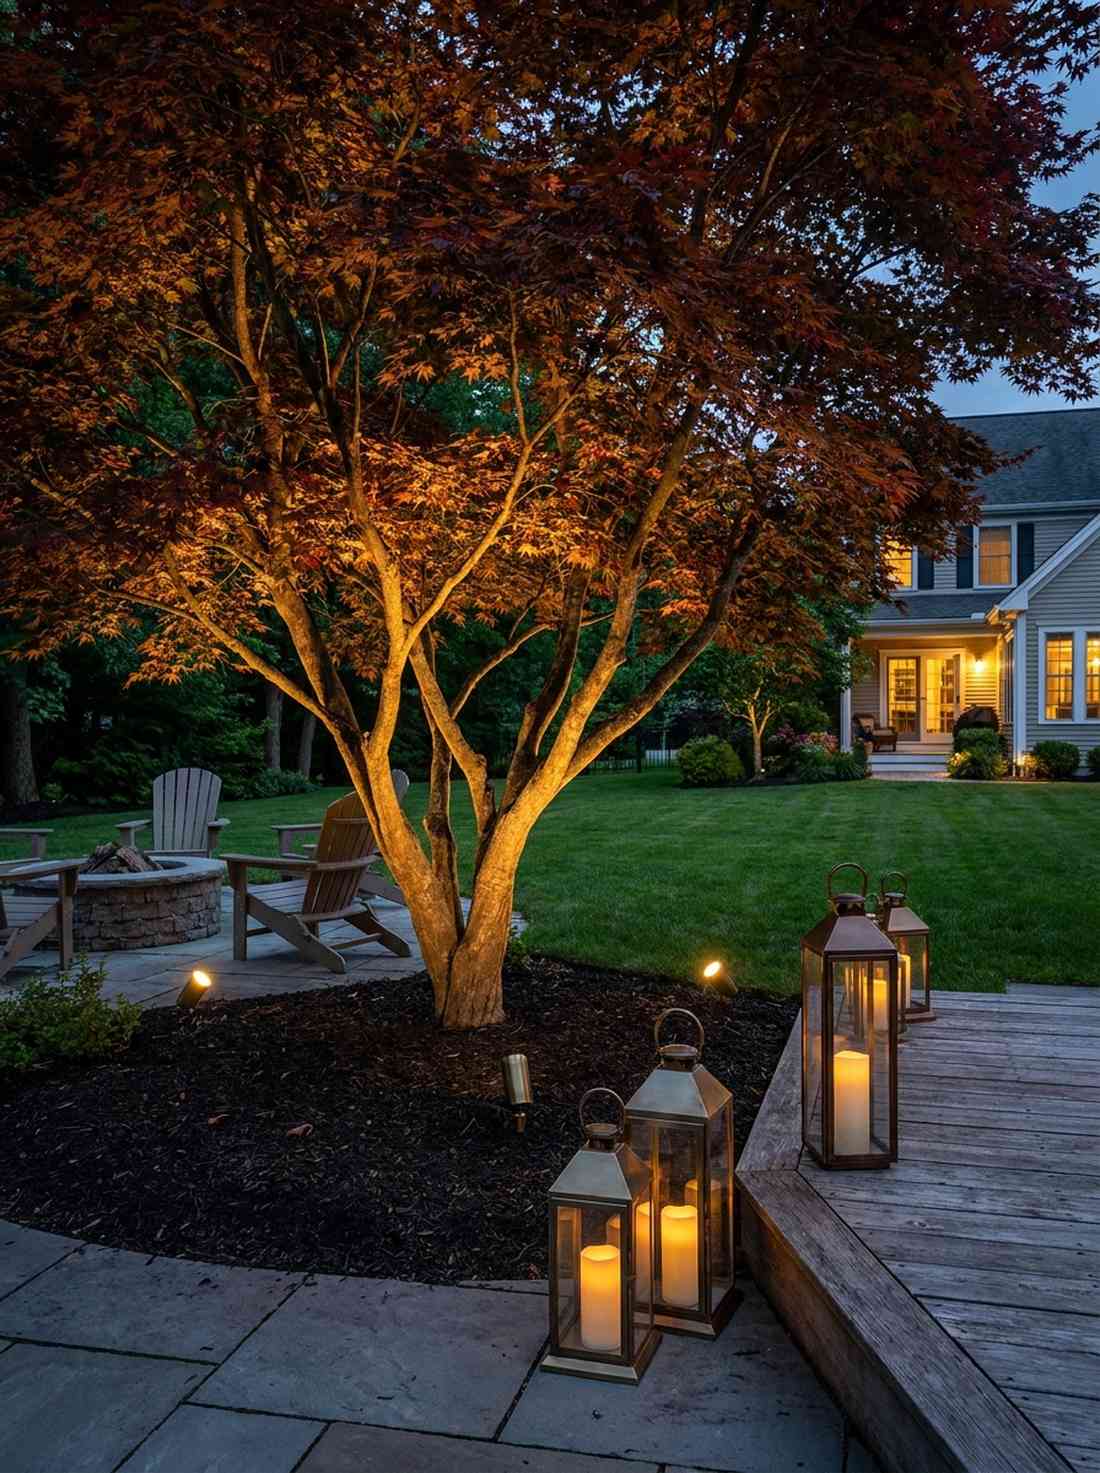
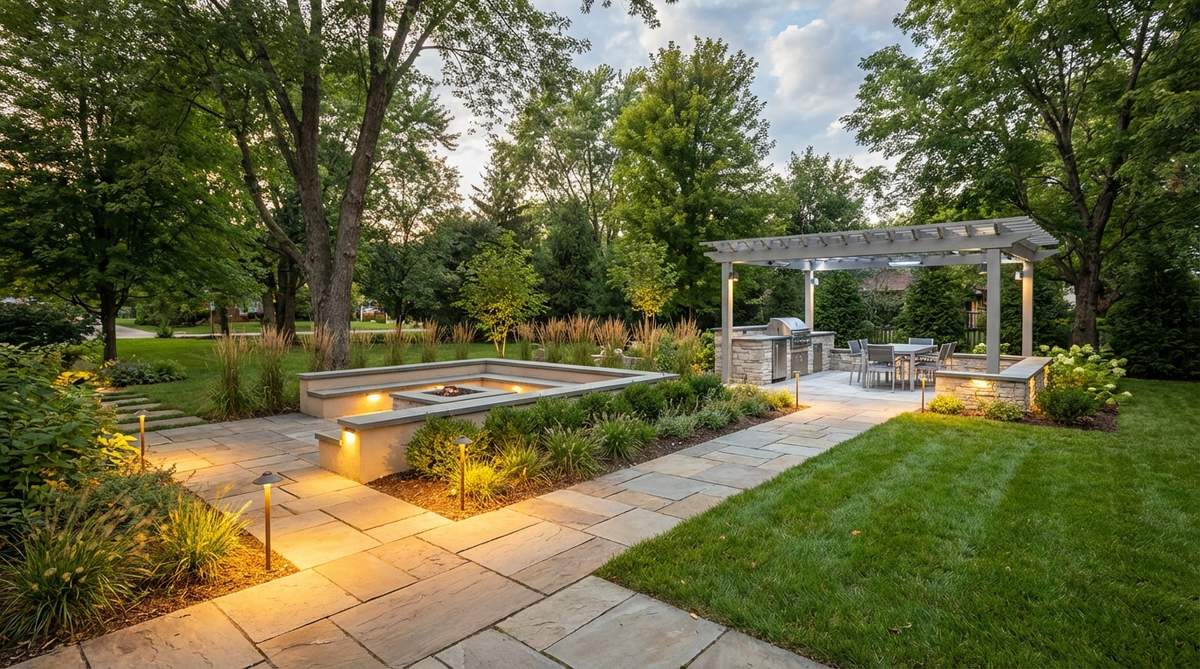
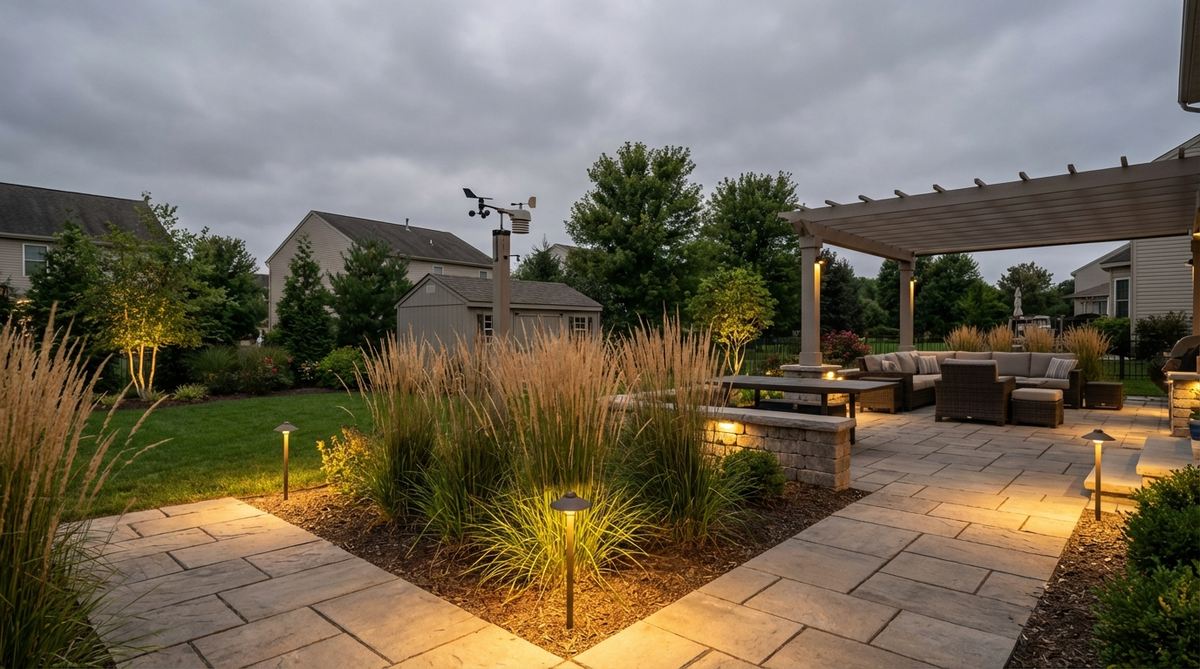
31. Tree Uplighting With Well Lights
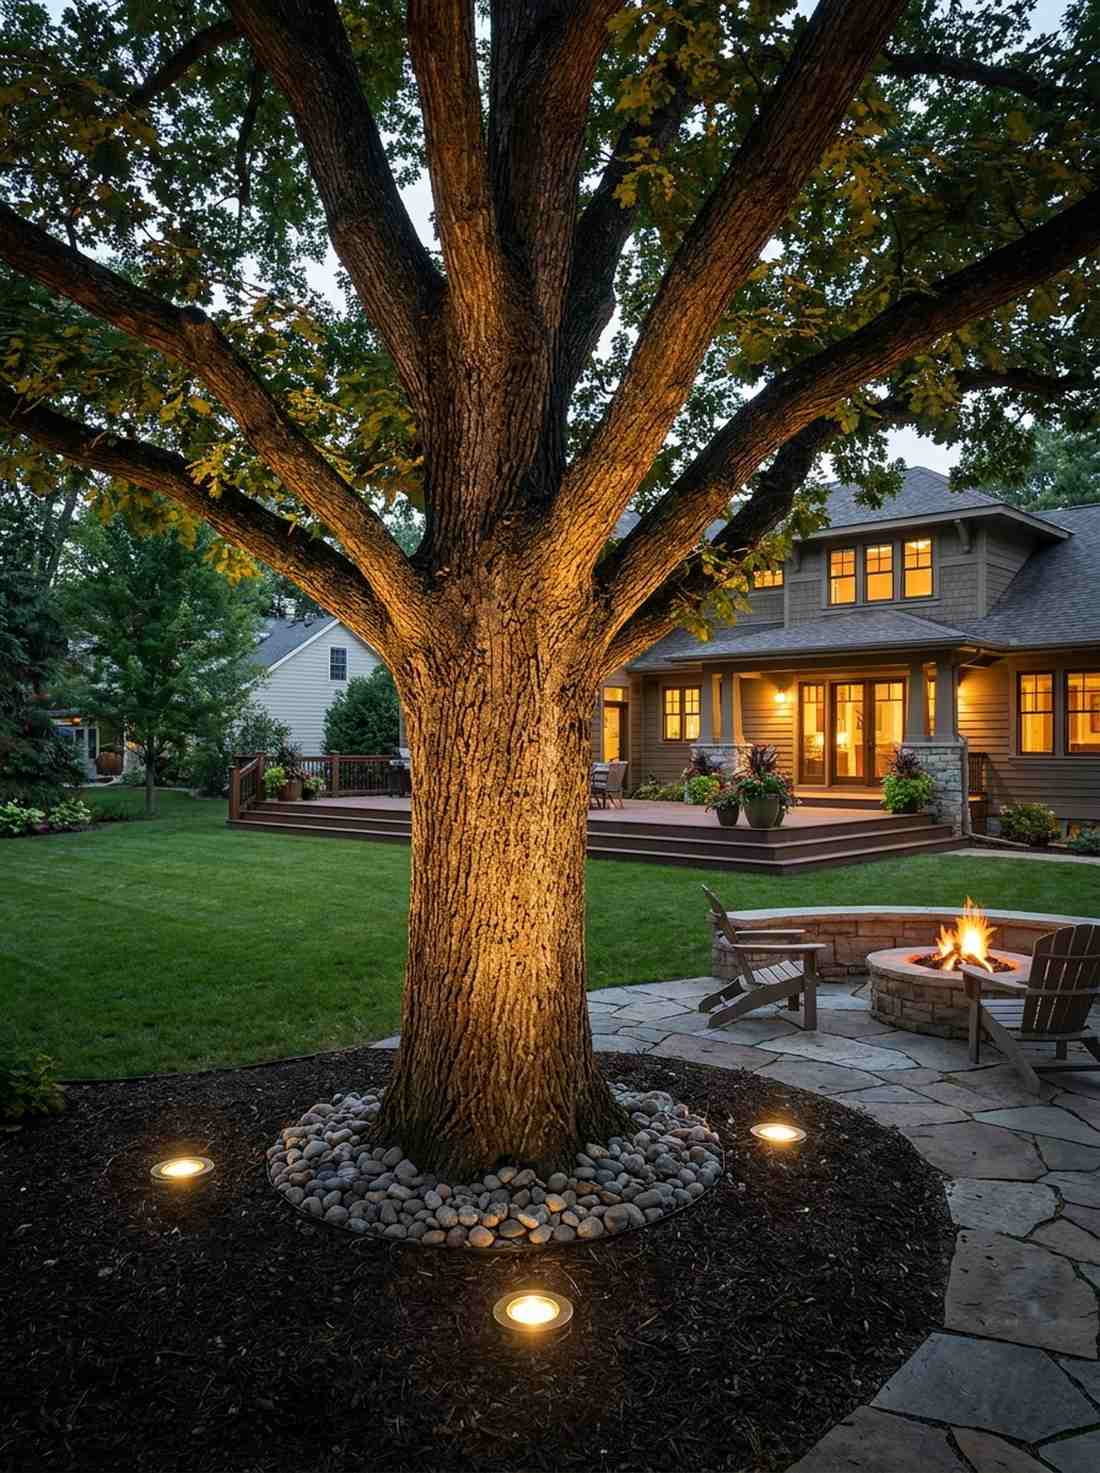
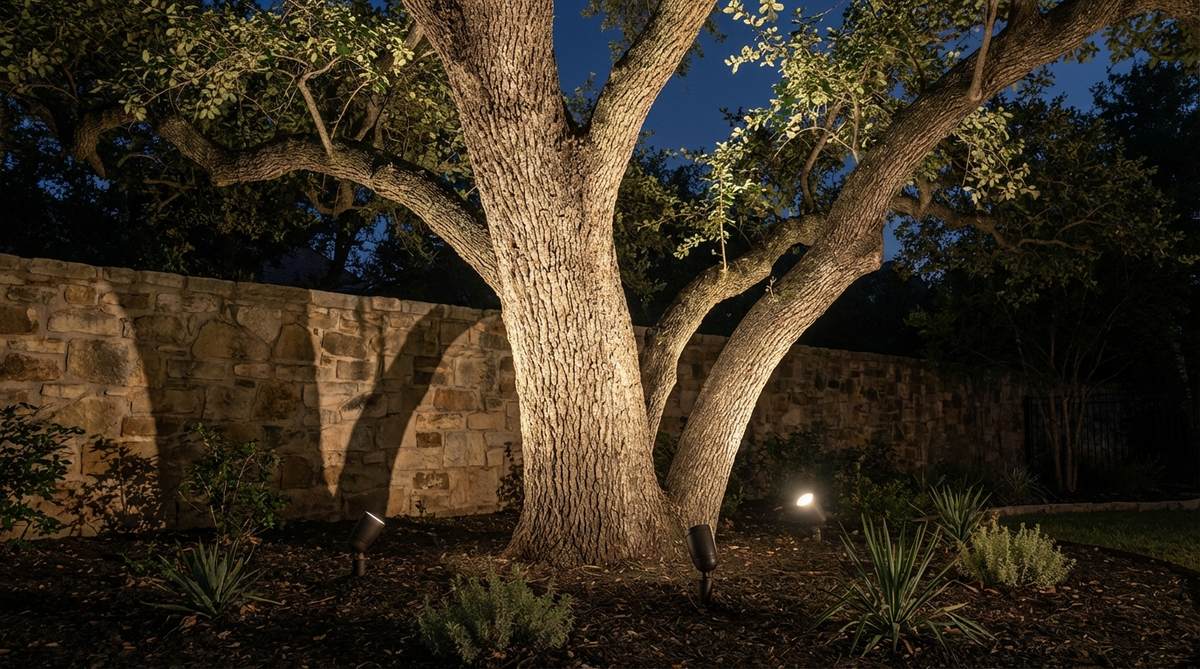
Shooting dramatic beams upward, this lighting trick makes the tree canopy feel massive and theatrical. Sinking in-grade well lights into the mulch is the absolute best way to highlight the bark texture of mature oaks.
Exposed spotlights get kicked or run over by mowers, but burying them flush gives a designer-level finish. Utilizing brass landscape lighting components prevents acidic soil from rotting the housing away after a single season.
You can uplift a specimen tree for around $50–$85.
- Key Materials: Composite or brass well light housings, LED floods
- Vibe / Style: Theatrical architectural drama
- Difficulty: Moderate digging/wiring
- Budget Breakdown: Well fixtures: $60 | Wiring caps: $5
- Creator’s Tip: Keep the fixture 18 to 24 inches away from the trunk so the beam has space to spread up the branches.
- Smart Sourcing: Pick up brass in-ground well lights (low voltage kit) and waterproof wire connectors (silicone filled).
32. Wall Wash Flood Lighting

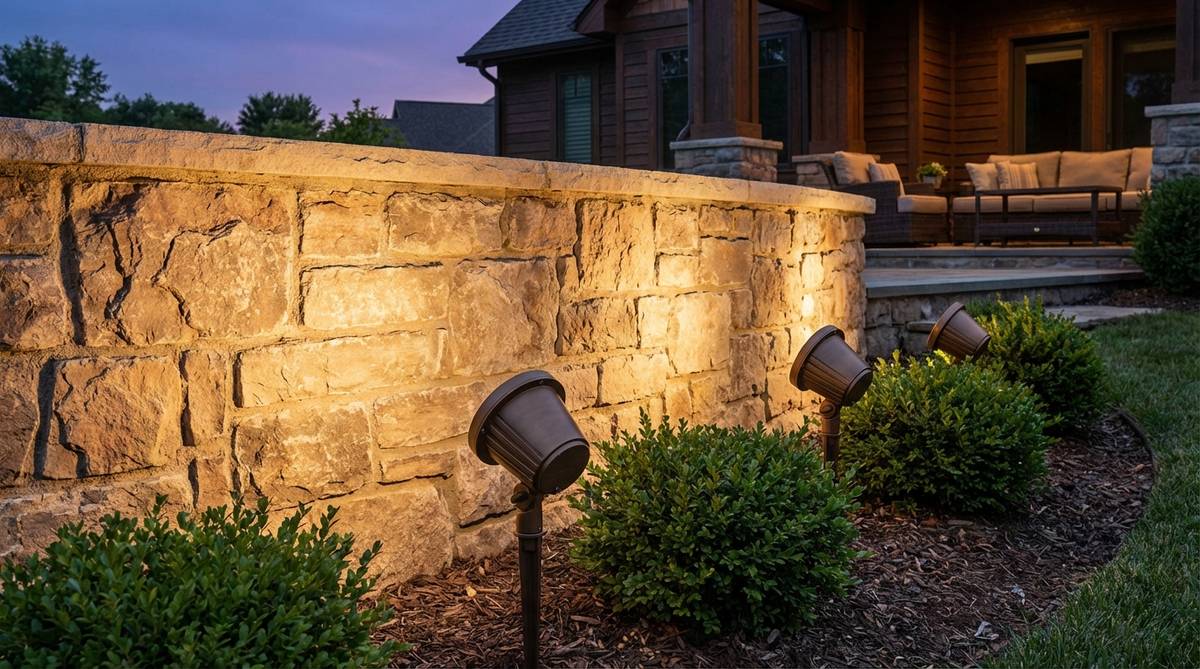
Bathing vertical surfaces in a soft glow, this technique makes your home’s exterior feel incredibly wide and luxurious. Positioning wide-beam flood lights against stucco or stone siding reveals deep, gorgeous material textures.
Pointing narrow spotlights at walls creates ugly hot spots, but overlapping wide 30-degree beams looks far more expensive than it is. Using commercial-grade low-voltage transformers ensures consistent brightness across the entire facade.
Washing an exterior wall runs roughly $60–$100. Save this for massive curb appeal upgrades!
- Key Materials: Wide-beam LED floods, ground stakes
- Vibe / Style: Luxurious estate facade
- Difficulty: Intermediate spacing
- Budget Breakdown: Flood lights: $70 | Stake mounts: $10
- Creator’s Tip: Mount the lights about 3 feet away from the wall to prevent harsh scalloping shadows.
- Smart Sourcing: Grab wide-angle outdoor flood lights (low voltage) and a 12V outdoor lighting transformer.
33. Sculpture Accent Spotlights
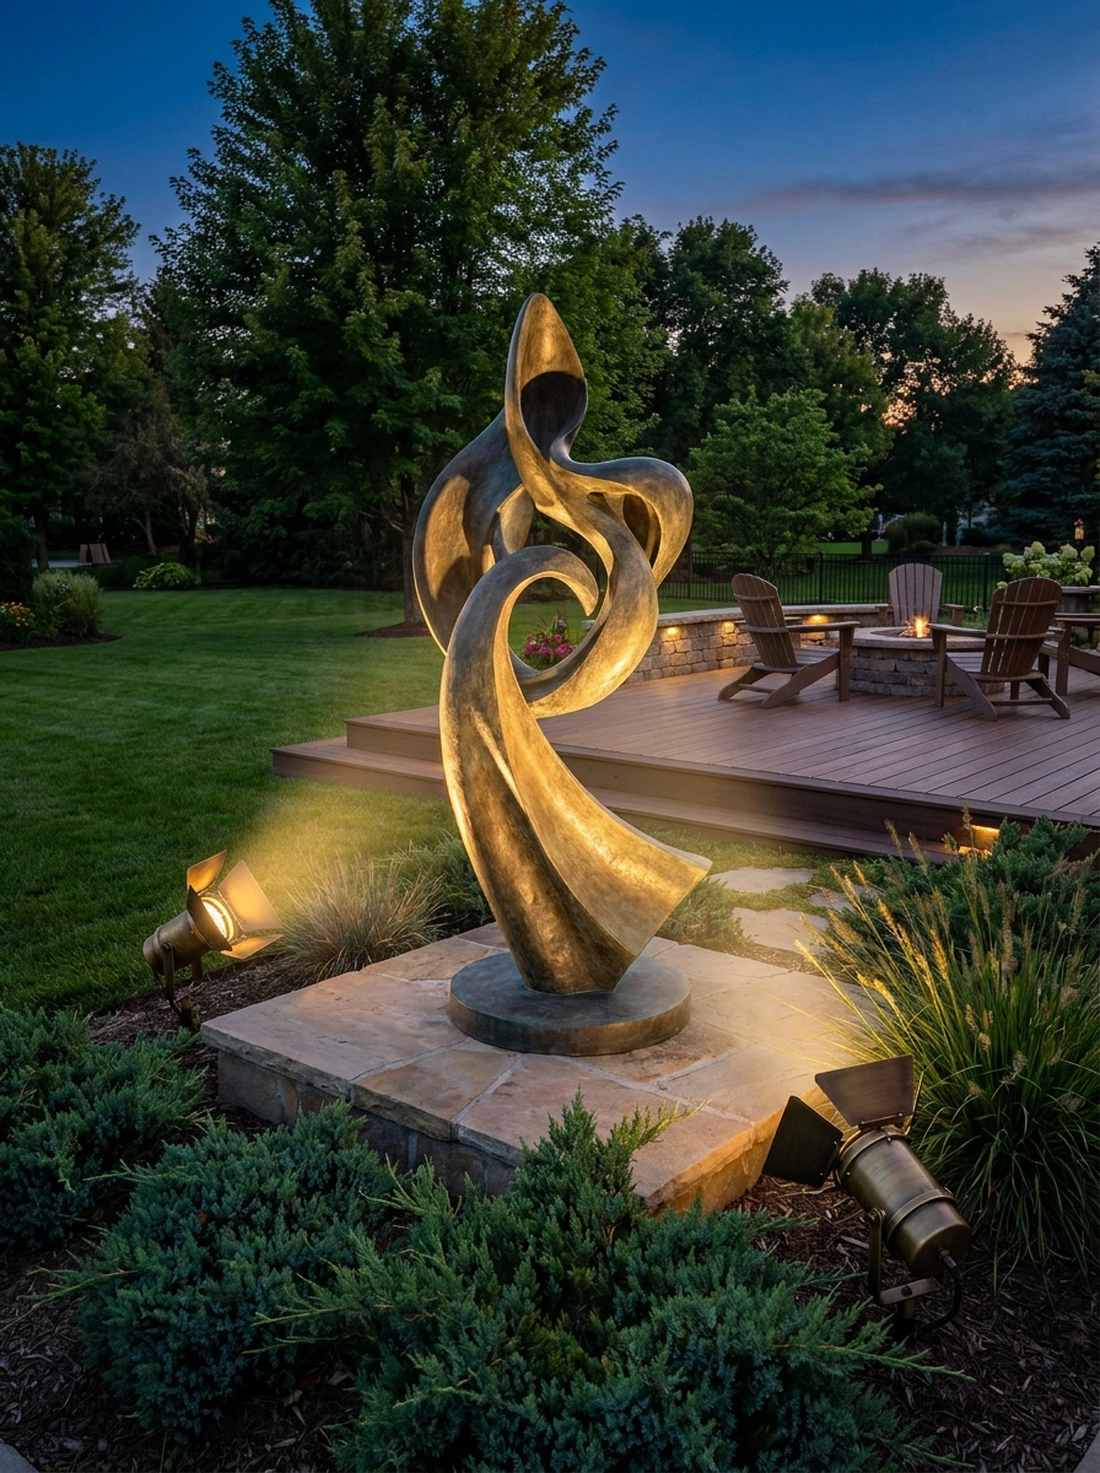
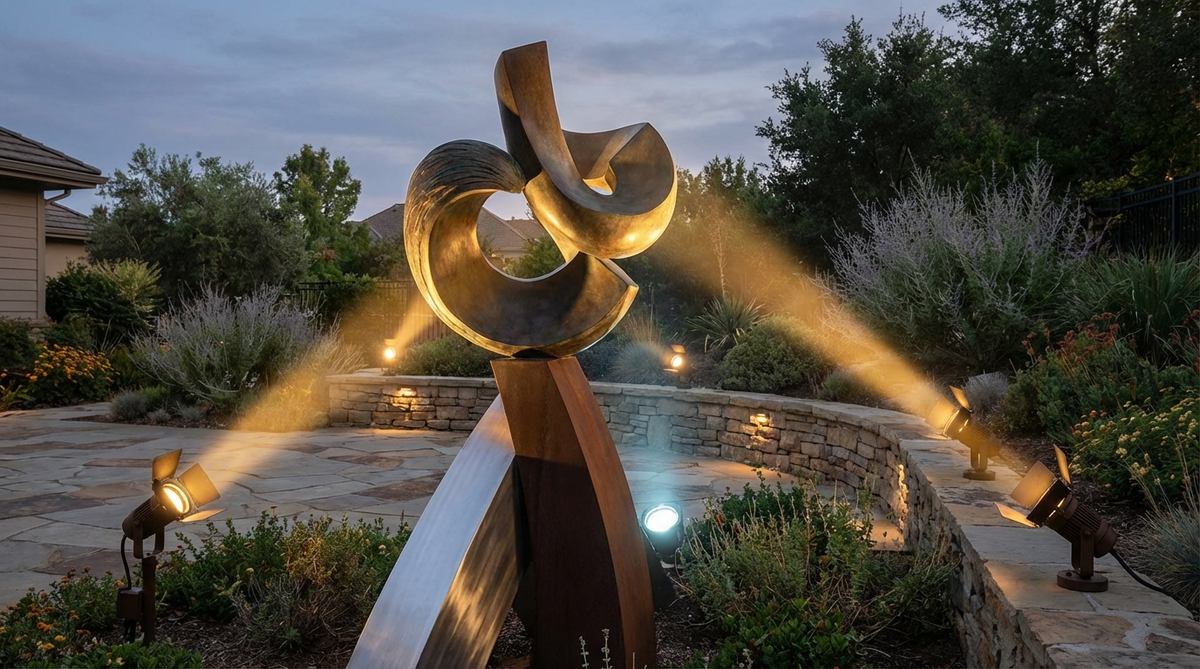
Slicing through the darkness precisely, this setup makes outdoor art feel like an exclusive museum exhibition. Dialing in narrow-beam accent spotlights is the perfect use-case for highlighting fountains or bronze statues.
A single spotlight creates harsh, flat shadows, but cross-lighting from two angles gives a designer-level finish. Wrapping the wires neatly and utilizing IP65 rated landscape lights keeps the focus completely on the artwork.
Showcase your garden art for $40–$75.
- Key Materials: 15-degree narrow spot fixtures, barn door shrouds
- Vibe / Style: Curated museum gallery
- Difficulty: Precise aiming required
- Budget Breakdown: Spotlights: $50 | Shrouds: $15
- Creator’s Tip: Use a 3000K bulb for warm bronze or stone sculptures, but a crisper 4000K bulb for modern steel pieces.
- Smart Sourcing: Use narrow-beam brass spotlights (directional kit) and glare-control hex louvers.
34. Silhouette Backlighting
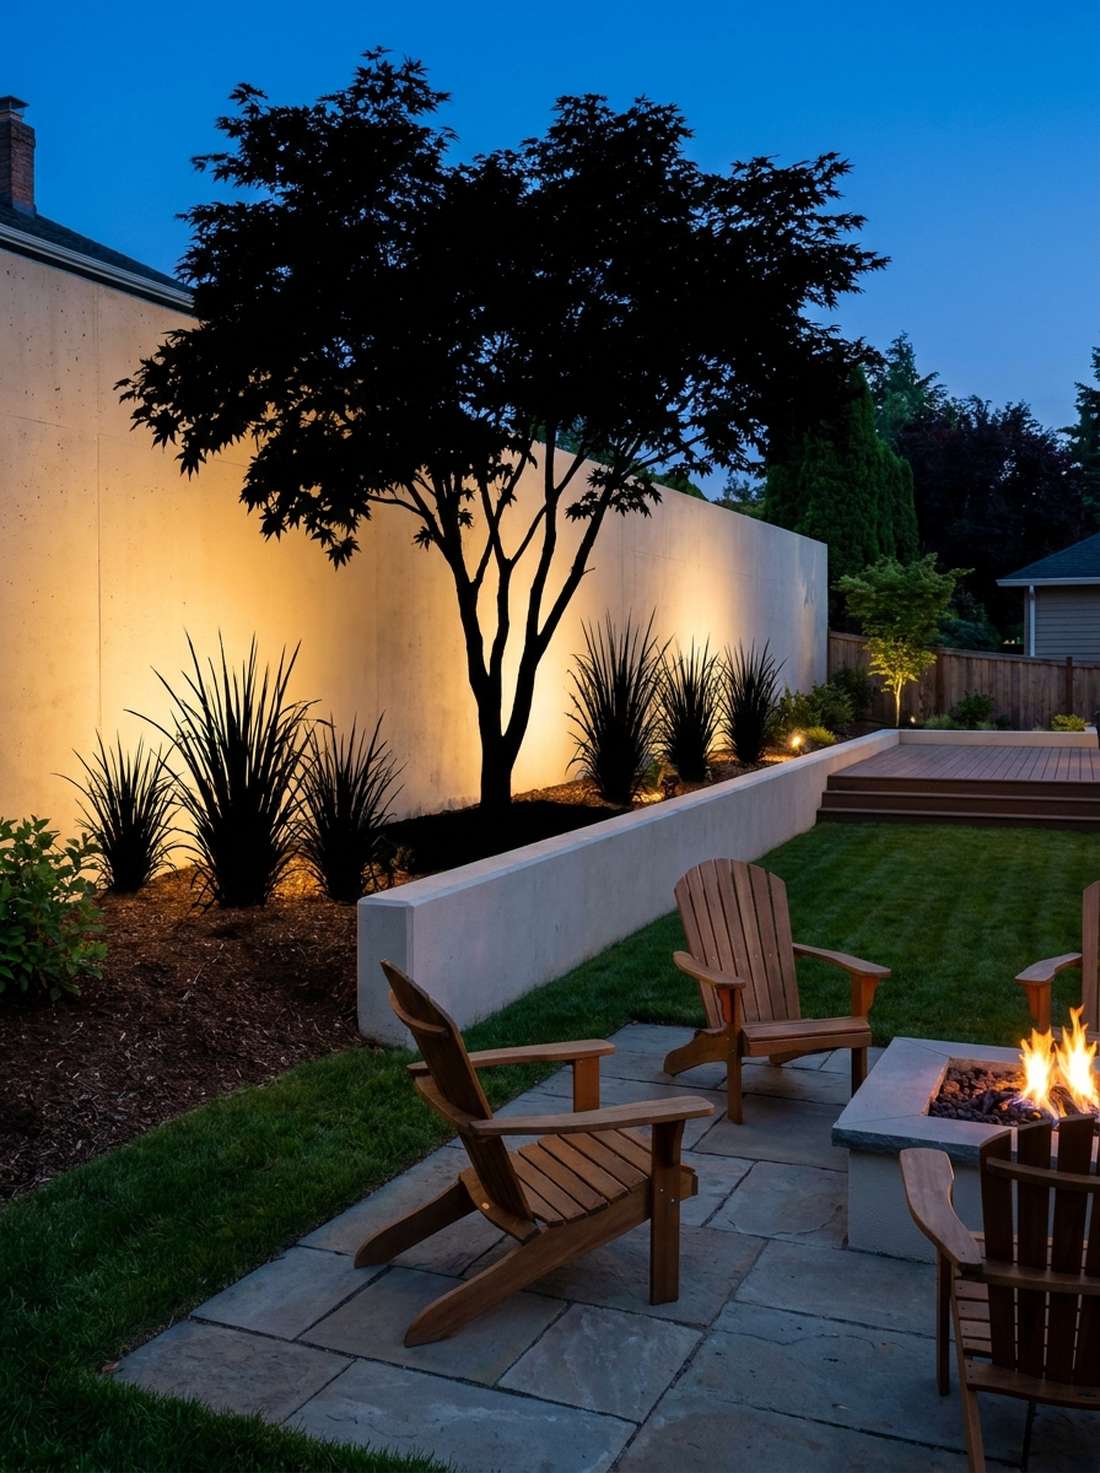
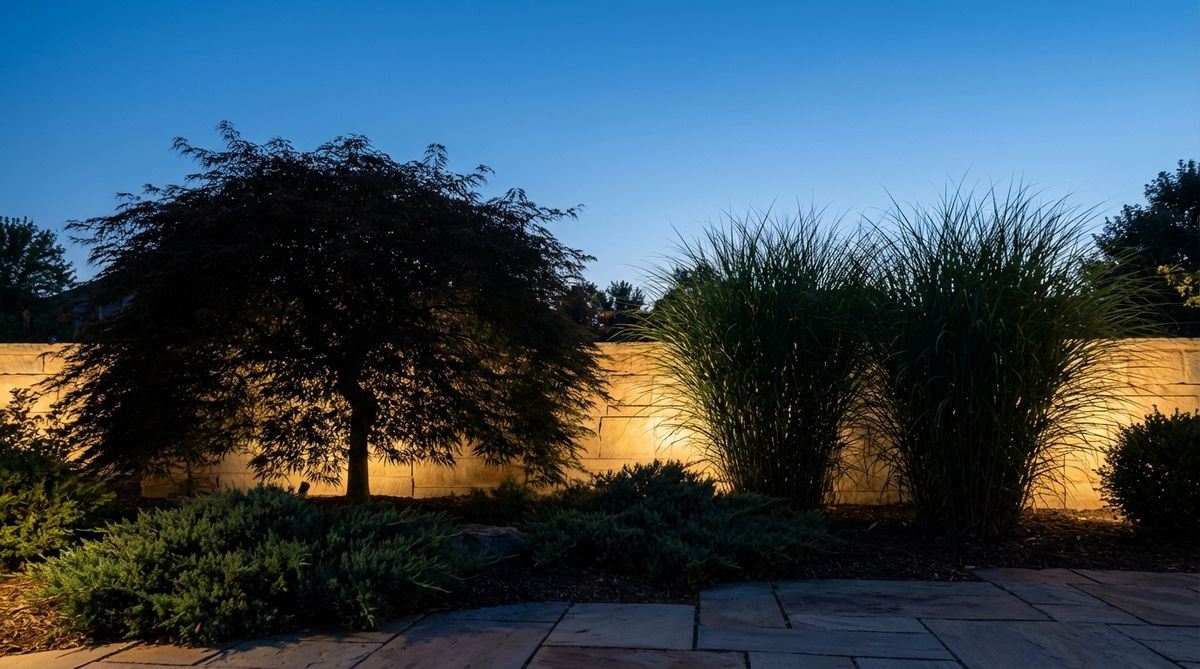
Projecting sharp black outlines against a glowing wall, this visual trick feels incredibly dramatic and modern. Hiding backlight spotlights behind ornamental grasses or Japanese maples emphasizes striking plant shapes flawlessly.
Most people front-light everything, but creating a backlit silhouette delivers a surprisingly premium look. Shoving outdoor decor lights out of direct view eliminates glare and makes the plants look like dark, living sculptures.
This striking technique costs just $35–$60 per plant. Pin this if you love high-contrast, modern landscapes!
- Key Materials: Shielded spotlights, backdrop wall
- Vibe / Style: High-contrast modern drama
- Difficulty: Simple positioning
- Budget Breakdown: Shielded spots: $45 | Wiring: $10
- Creator’s Tip: Aim the light entirely at the wall behind the plant, ensuring zero light hits the plant itself.
- Smart Sourcing: Snag low-voltage landscape spotlights (compact size) and direct burial outdoor wire.
You can actually mimic moonlight if you know exactly where to place this next fixture…
35. Moonlighting Downlight Systems
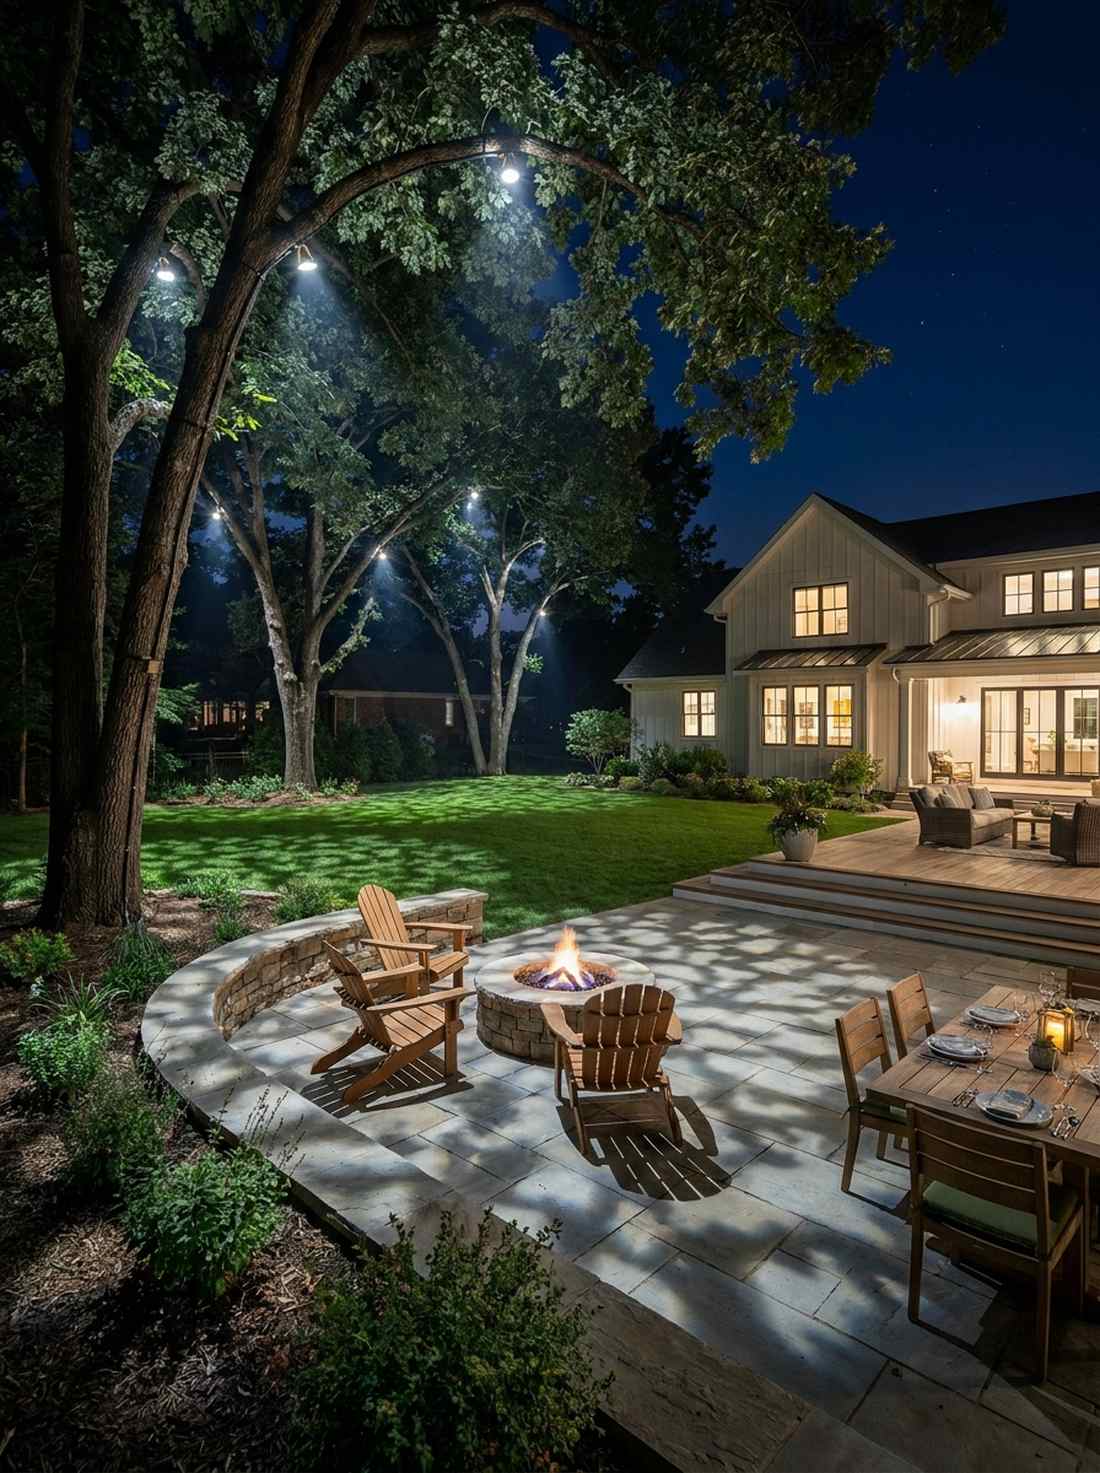
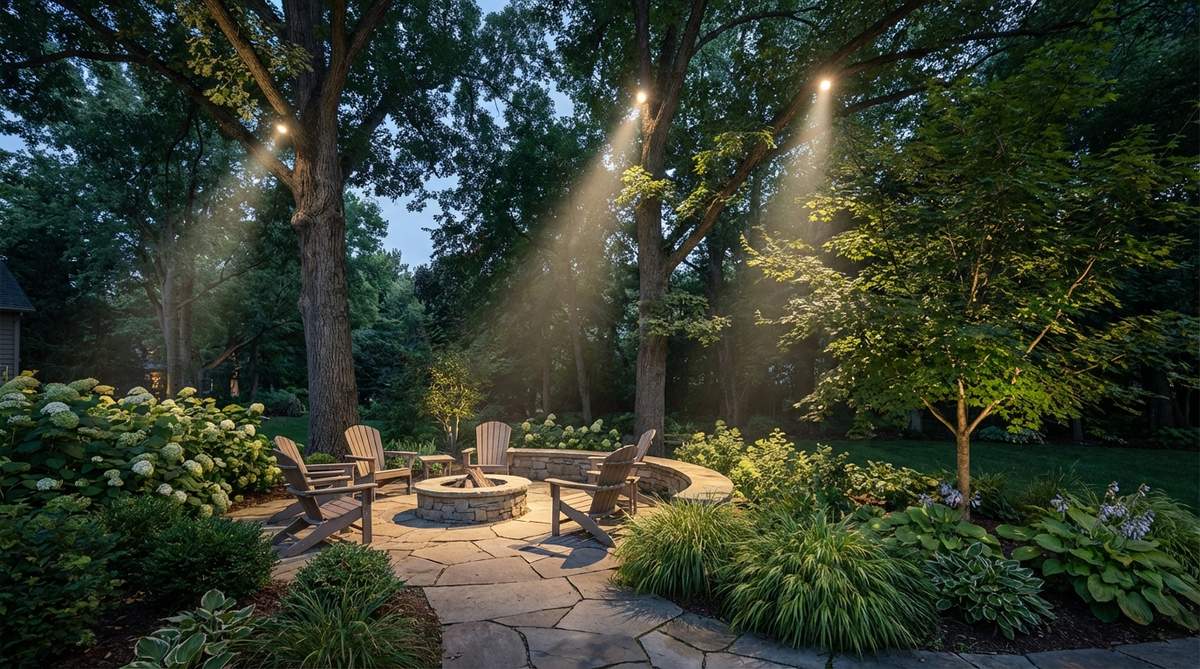
Casting dappled shadows across the lawn, this technique feels like a permanent full moon is shining on your patio. Mounting tree-mounted downlights high in the canopy is the ultimate trick for subtle, naturalistic illumination.
Ground-up lighting can sometimes feel artificial, but filtering light down through leaves looks far more expensive than it is. Tucking the wires tightly against the trunk using tree-safe clips ensures the illusion remains perfect.
Professional moonlighting usually costs $60–$95 per tree.
- Key Materials: Tree-mount spot fixtures, wire channels
- Vibe / Style: Natural dappled moonlight
- Difficulty: Ladder work required
- Budget Breakdown: Downlights: $65 | Tree mounts: $15
- Creator’s Tip: Use a cool-white 4000K bulb specifically for this; it mimics the silvery color of actual moonlight better than warm bulbs.
- Smart Sourcing: Invest in tree-mount landscape downlights (brass housing) and flexible tree-safe cable ties.
36. Graze Lighting For Textured Surfaces
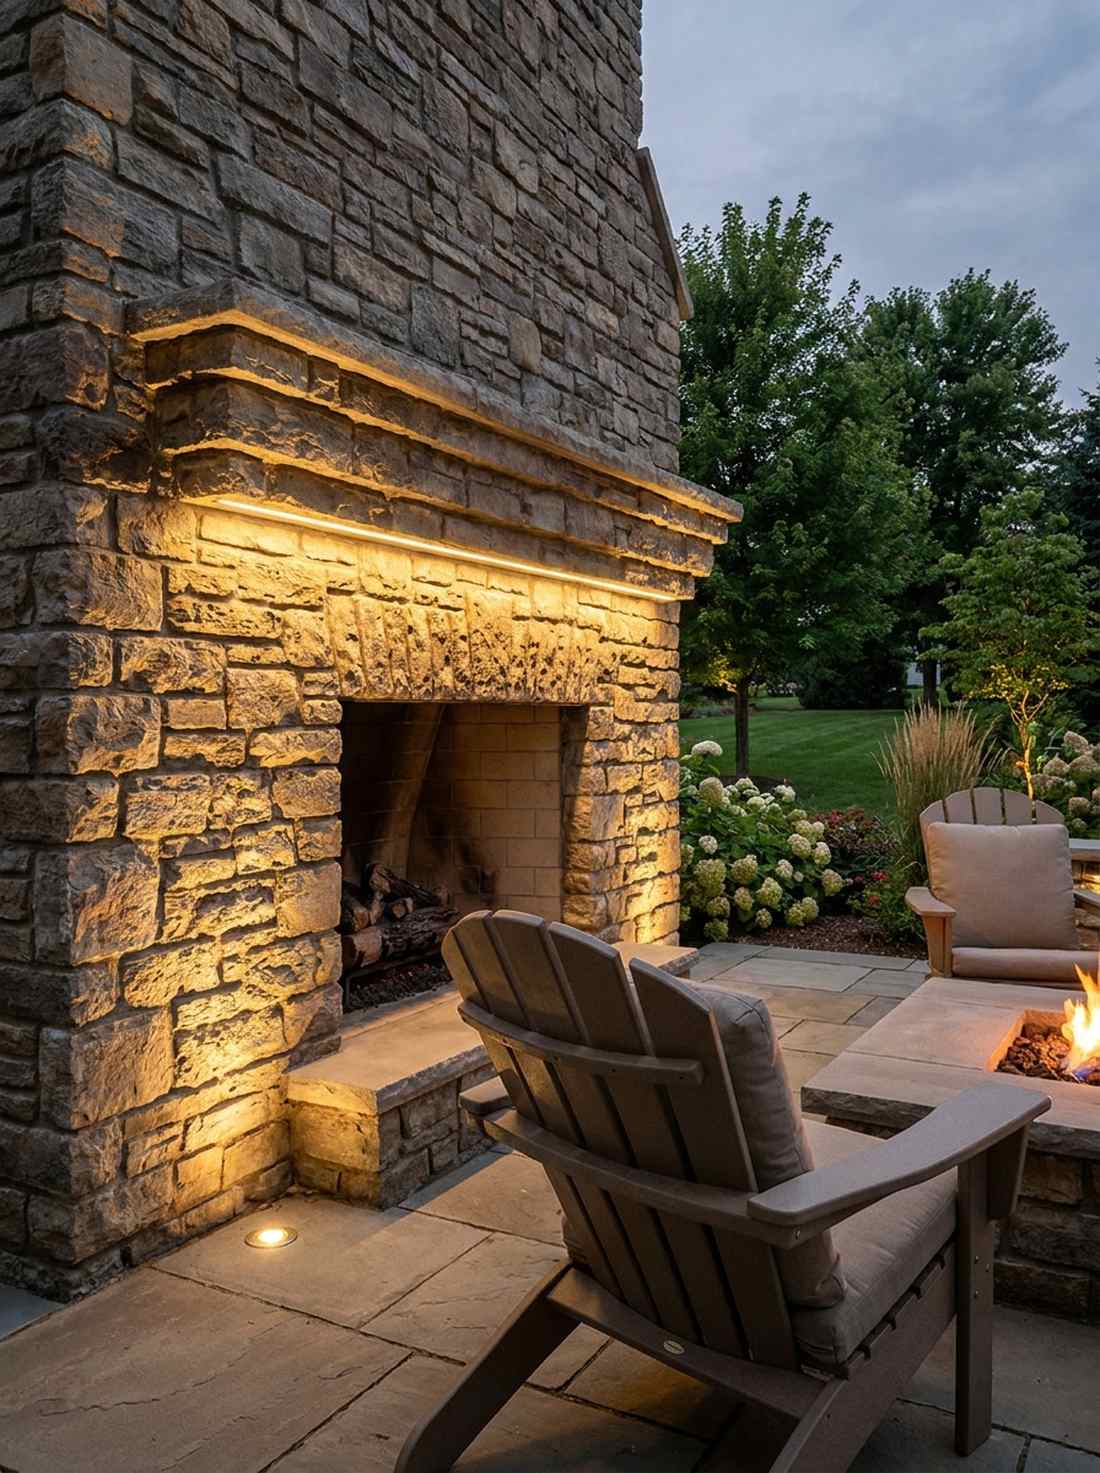

Revealing deep ridges and mortar lines, this tight lighting angle makes stone walls feel rugged and highly textured. Placing close-proximity graze lights is an outstanding strategy for outdoor fireplace surrounds and brick retaining walls.
Moving a light even two feet away destroys the shadow effect, so keeping fixtures within 6 inches gives a designer-level finish. Utilizing premium LED outdoor lighting strips inside a lip guarantees an intense, dramatic wall-washing effect.
Graze a feature wall for about $45–$80.
- Key Materials: Linear LED strips or tight spotlights
- Vibe / Style: Rugged architectural depth
- Difficulty: Precise fixture placement
- Budget Breakdown: Fixtures: $55 | Mounting brackets: $15
- Creator’s Tip: Install the lights at the absolute top or bottom edge of the wall to stretch the shadows as far as possible.
- Smart Sourcing: Grab hardscape retaining wall lights (low voltage) and a masonry drill bit set.
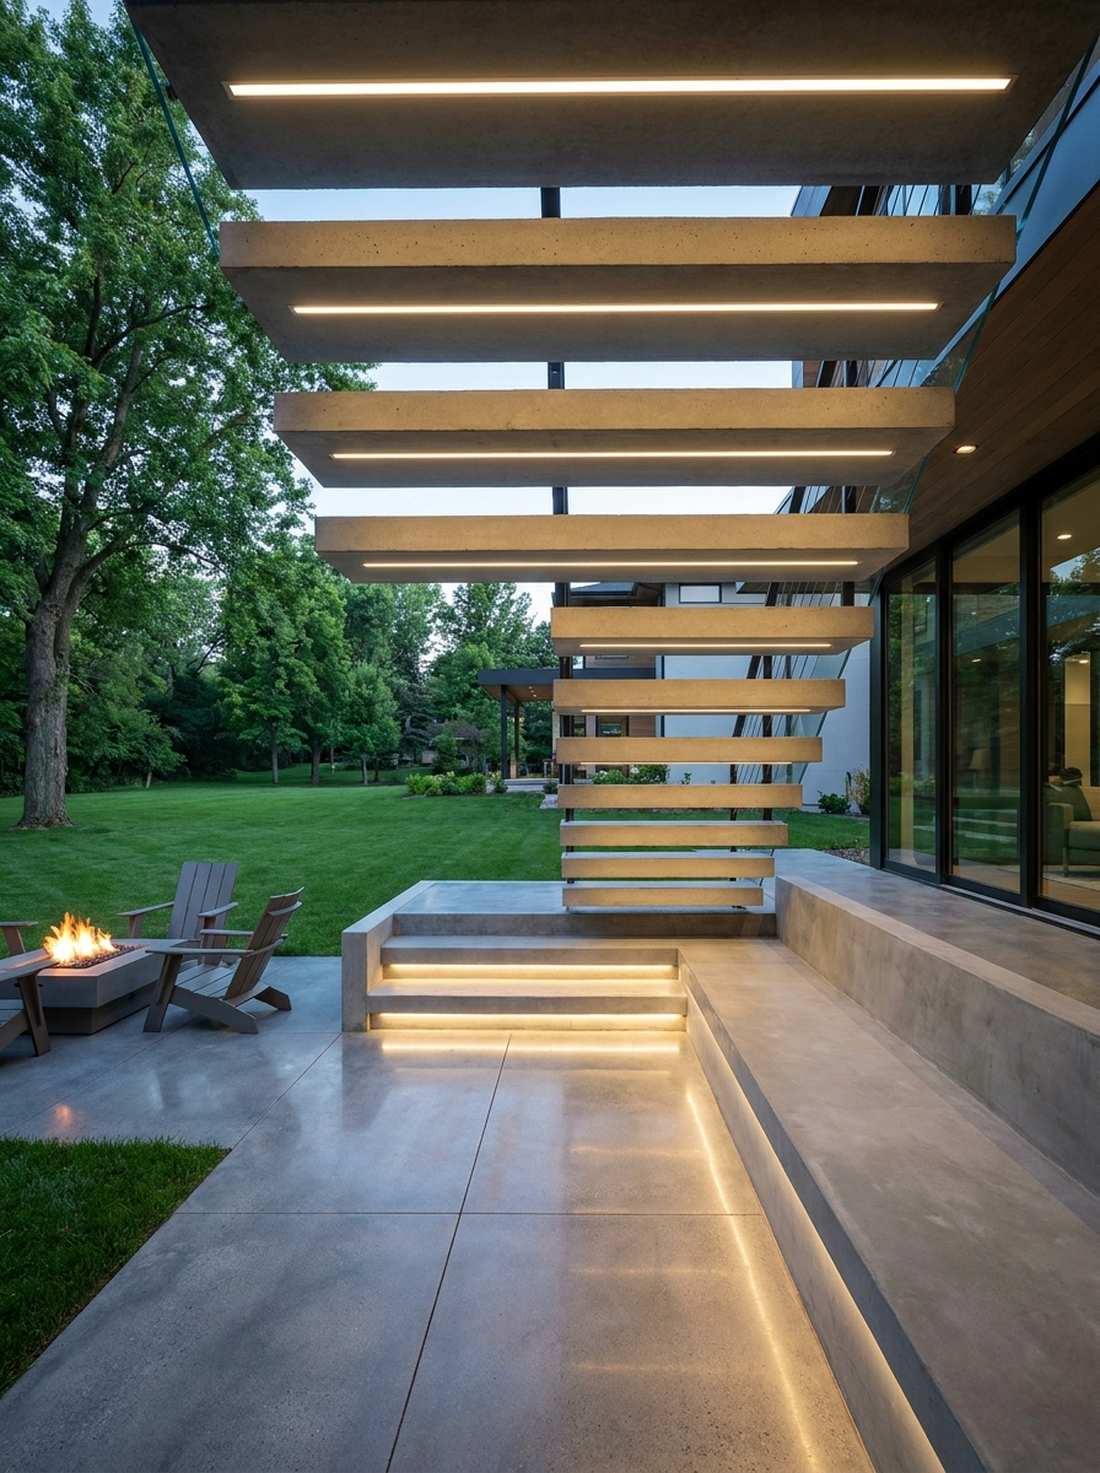
37. Step Lighting Integrated Fixtures
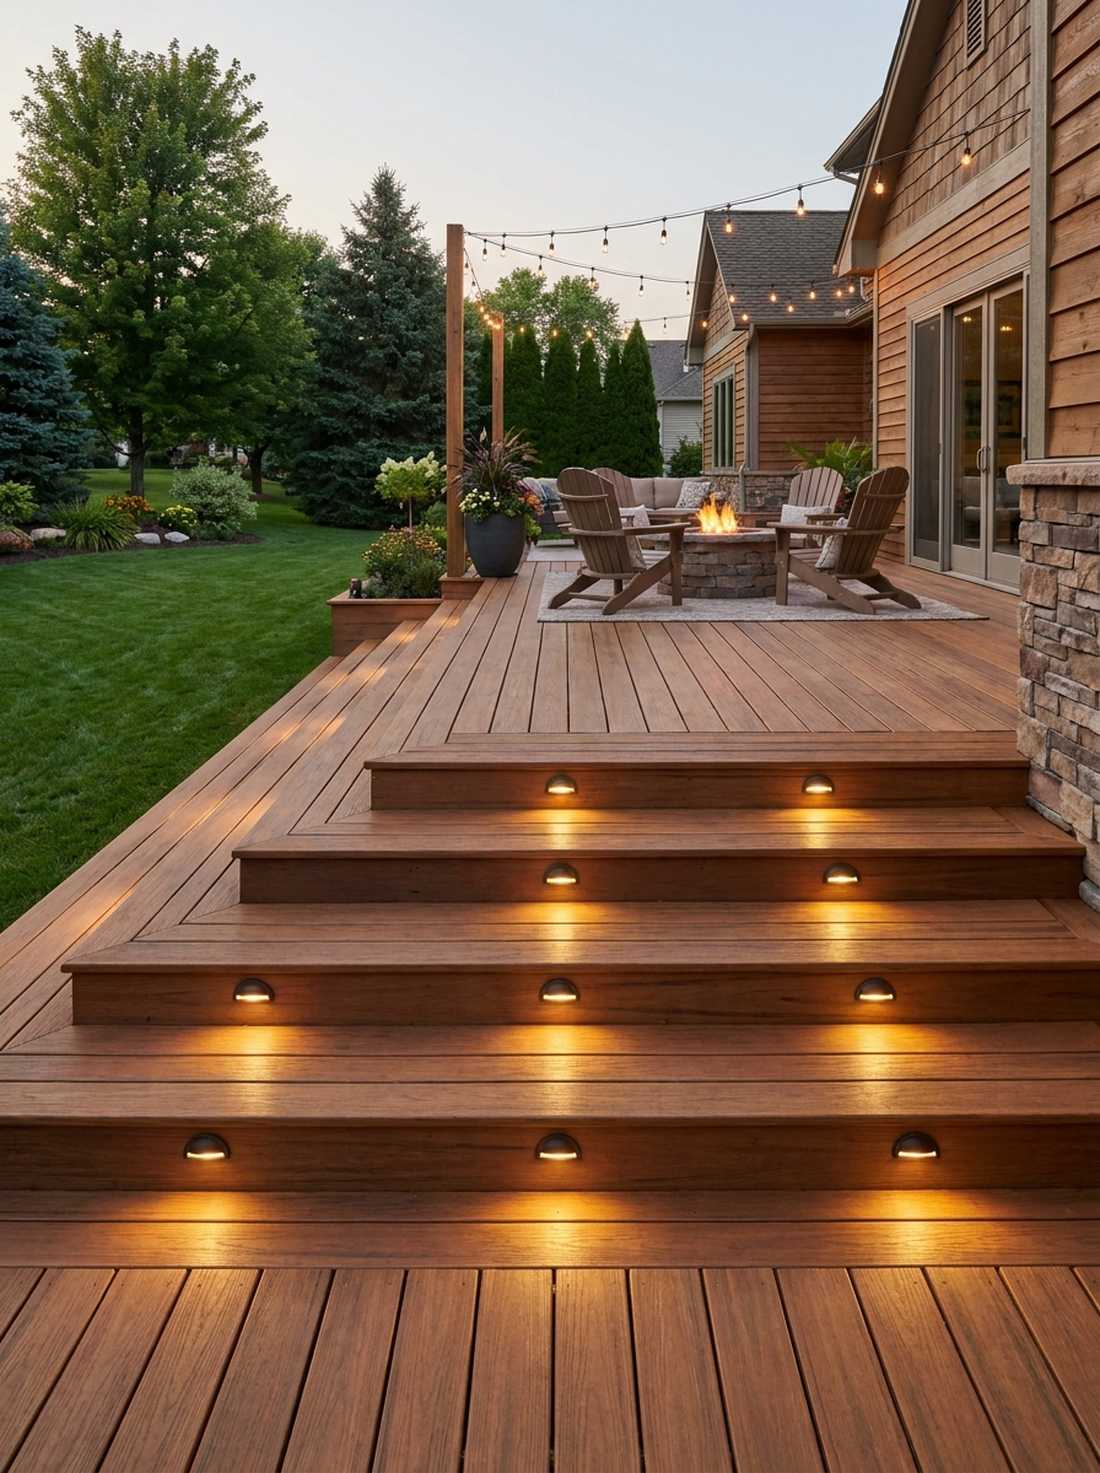
Glowing seamlessly beneath your feet, this recessed solution feels incredibly safe and upscale. Embedding riser-mount step lights eliminates trip hazards on dark deck stairs without protruding into the walking path.
Bulky surface-mounted lights catch on shoes, but routing the hardware flush into the wood looks far more expensive than it is. Linking these into your low-voltage transformers ensures the stairs light up automatically at dusk.
Upgrading a standard staircase costs roughly $70–$120. Pin this to your deck safety and styling board!
- Key Materials: Recessed louvered step lights
- Vibe / Style: Upscale safety navigation
- Difficulty: Advanced wood routing
- Budget Breakdown: Step fixtures: $85 | Wiring caps: $10
- Creator’s Tip: Center the light exactly on the riser, placing it one inch below the overhang of the tread to hide the hardware.
- Smart Sourcing: Buy recessed LED deck stair lights (half-moon trim) and an outdoor wire concealment kit.
38. Underwater Pool Accent Lights
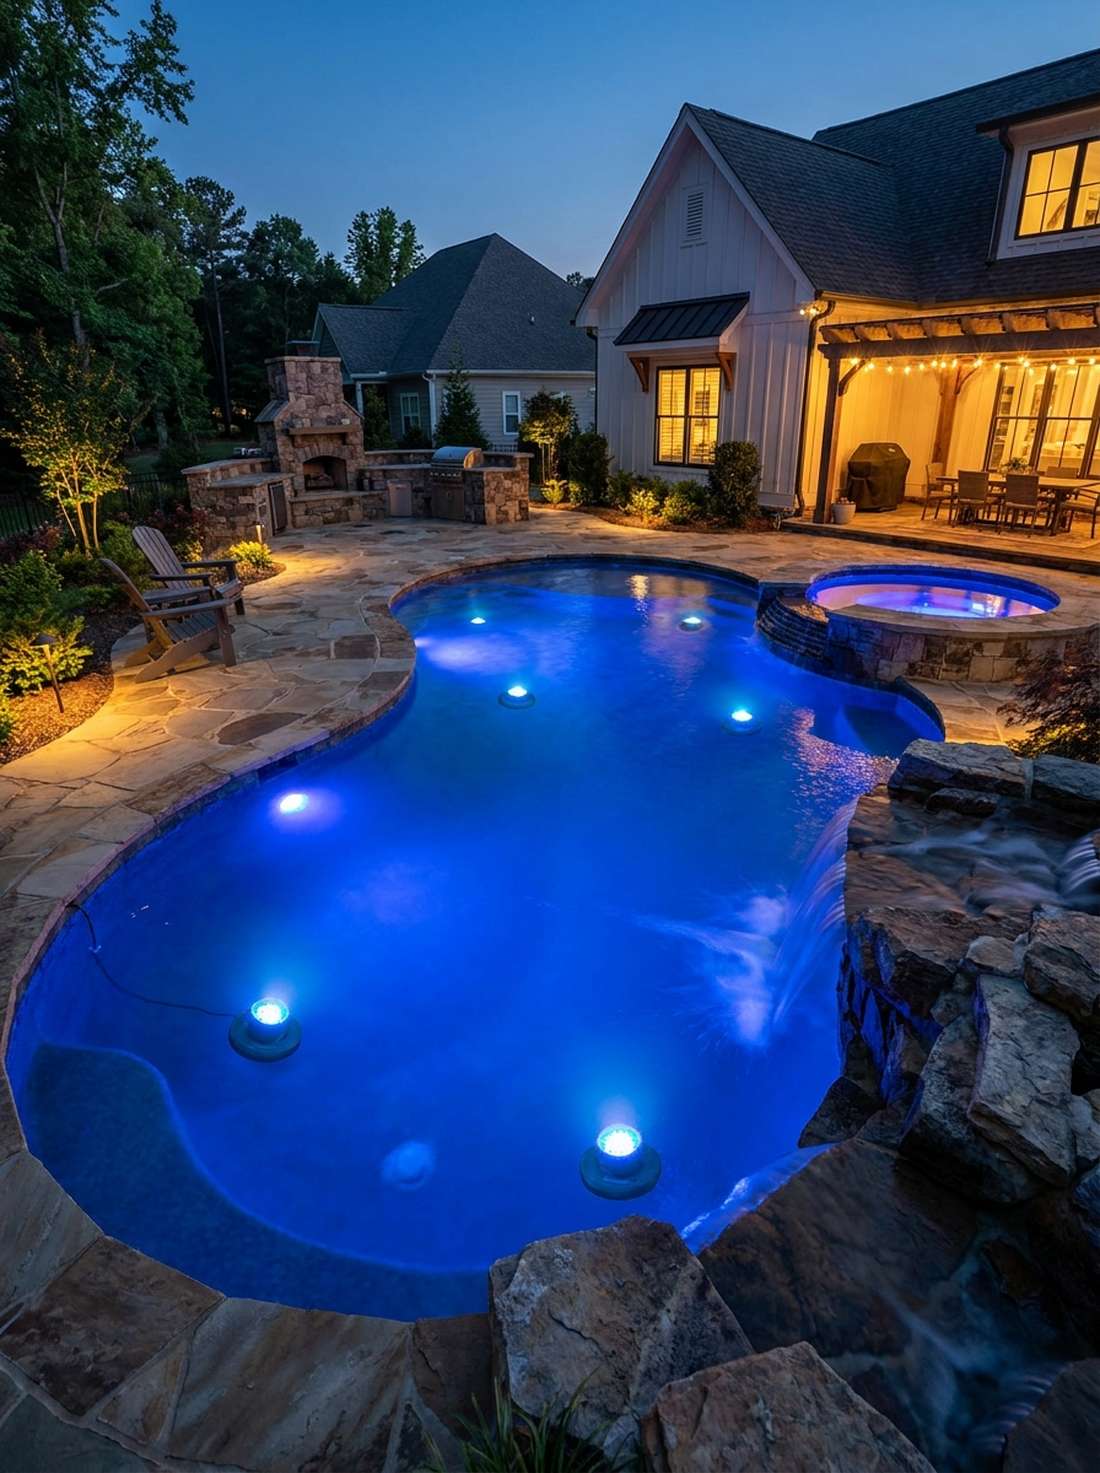
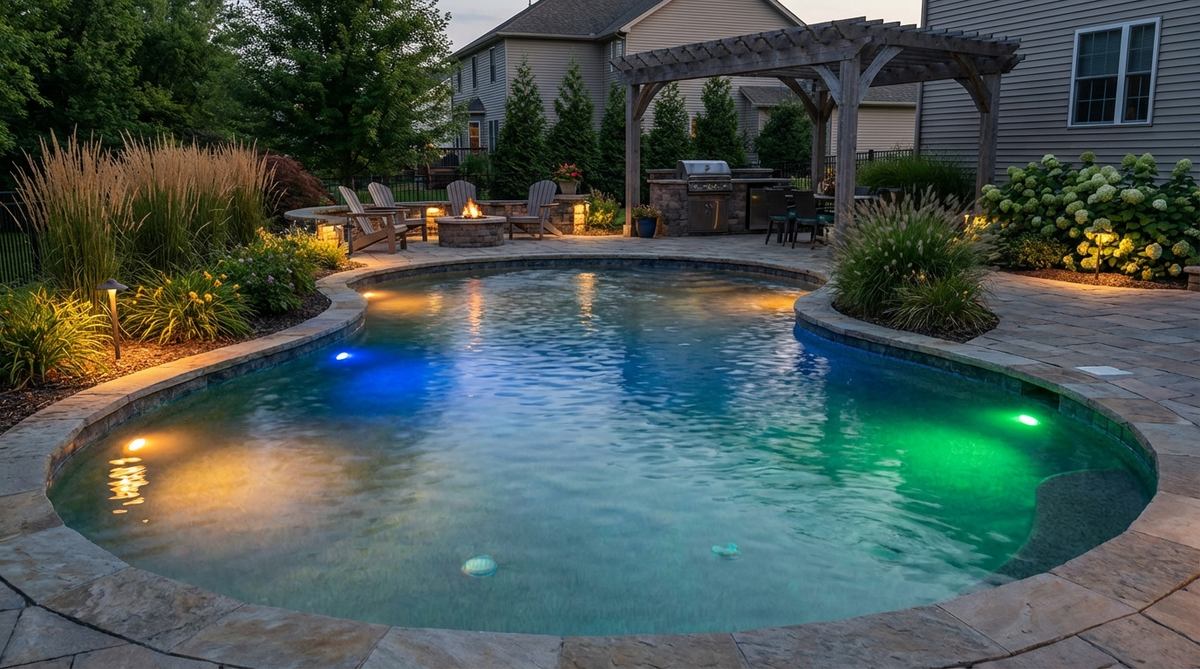
Transforming dark water into a glowing sapphire pool, this submerged setup feels like a luxury resort spa. Dropping in submersible RGB water lights is mandatory for highlighting fountains, waterfalls, and koi ponds.
Cheap waterproof seals fail instantly underwater, but utilizing heavy-duty marine-grade fixtures delivers a surprisingly premium look that survives. Throwing these outdoor decor lights under a waterfall jet makes the water itself appear illuminated.
A safe, sealed water kit runs about $50–$90.
- Key Materials: IP68 submersible RGB fixtures, weighted bases
- Vibe / Style: Luxury illuminated spa
- Difficulty: Simple submersion
- Budget Breakdown: Submersible lights: $65 | GFCI Outlet: $15
- Creator’s Tip: Leave a coiled slack of wire underwater so you can easily pull the fixture out to clean it without draining the pond.
- Smart Sourcing: Get IP68 submersible pond lights (weighted base) and a plug-in GFCI protector.
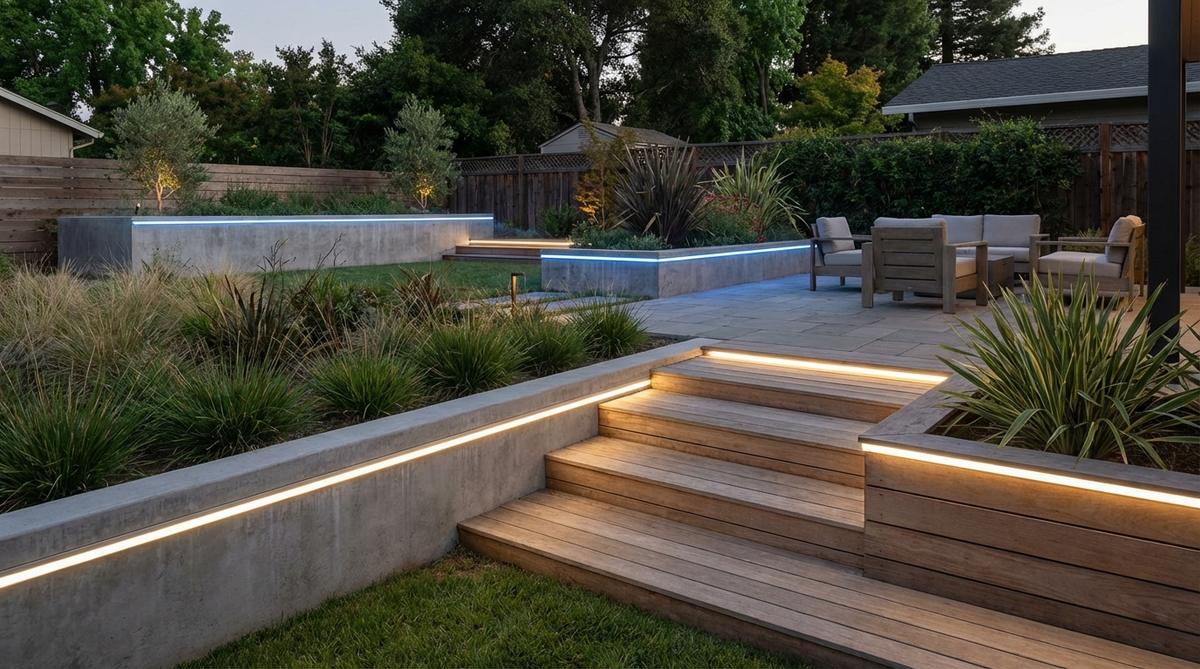
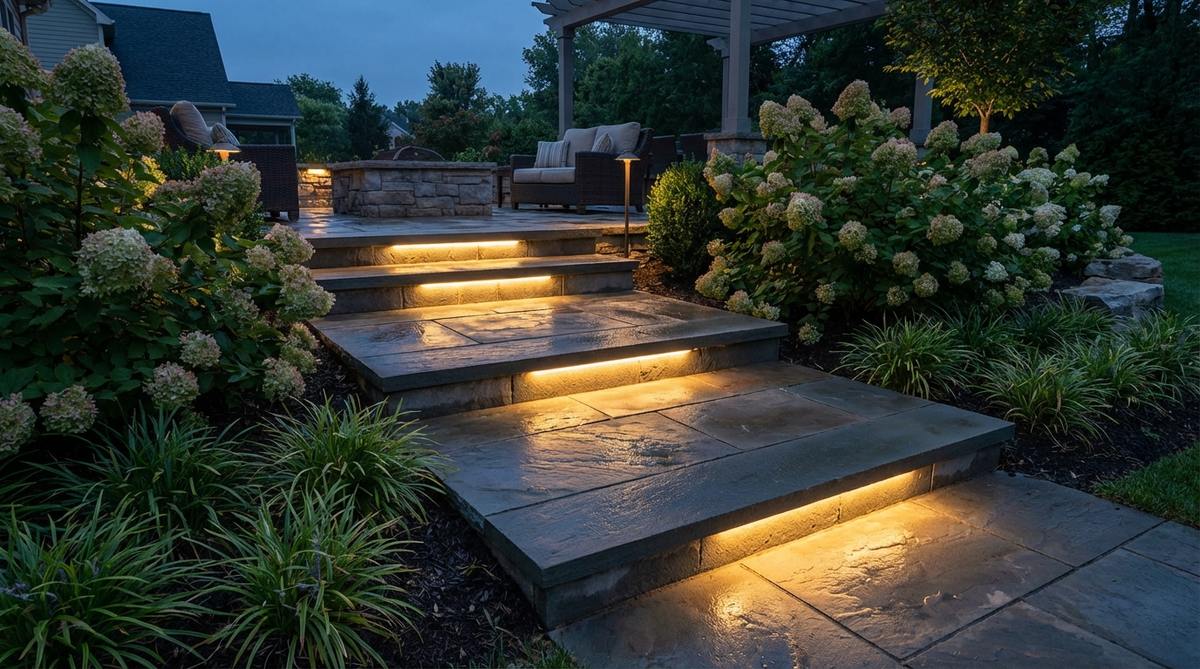
39. Pathway Edge Linear Strips
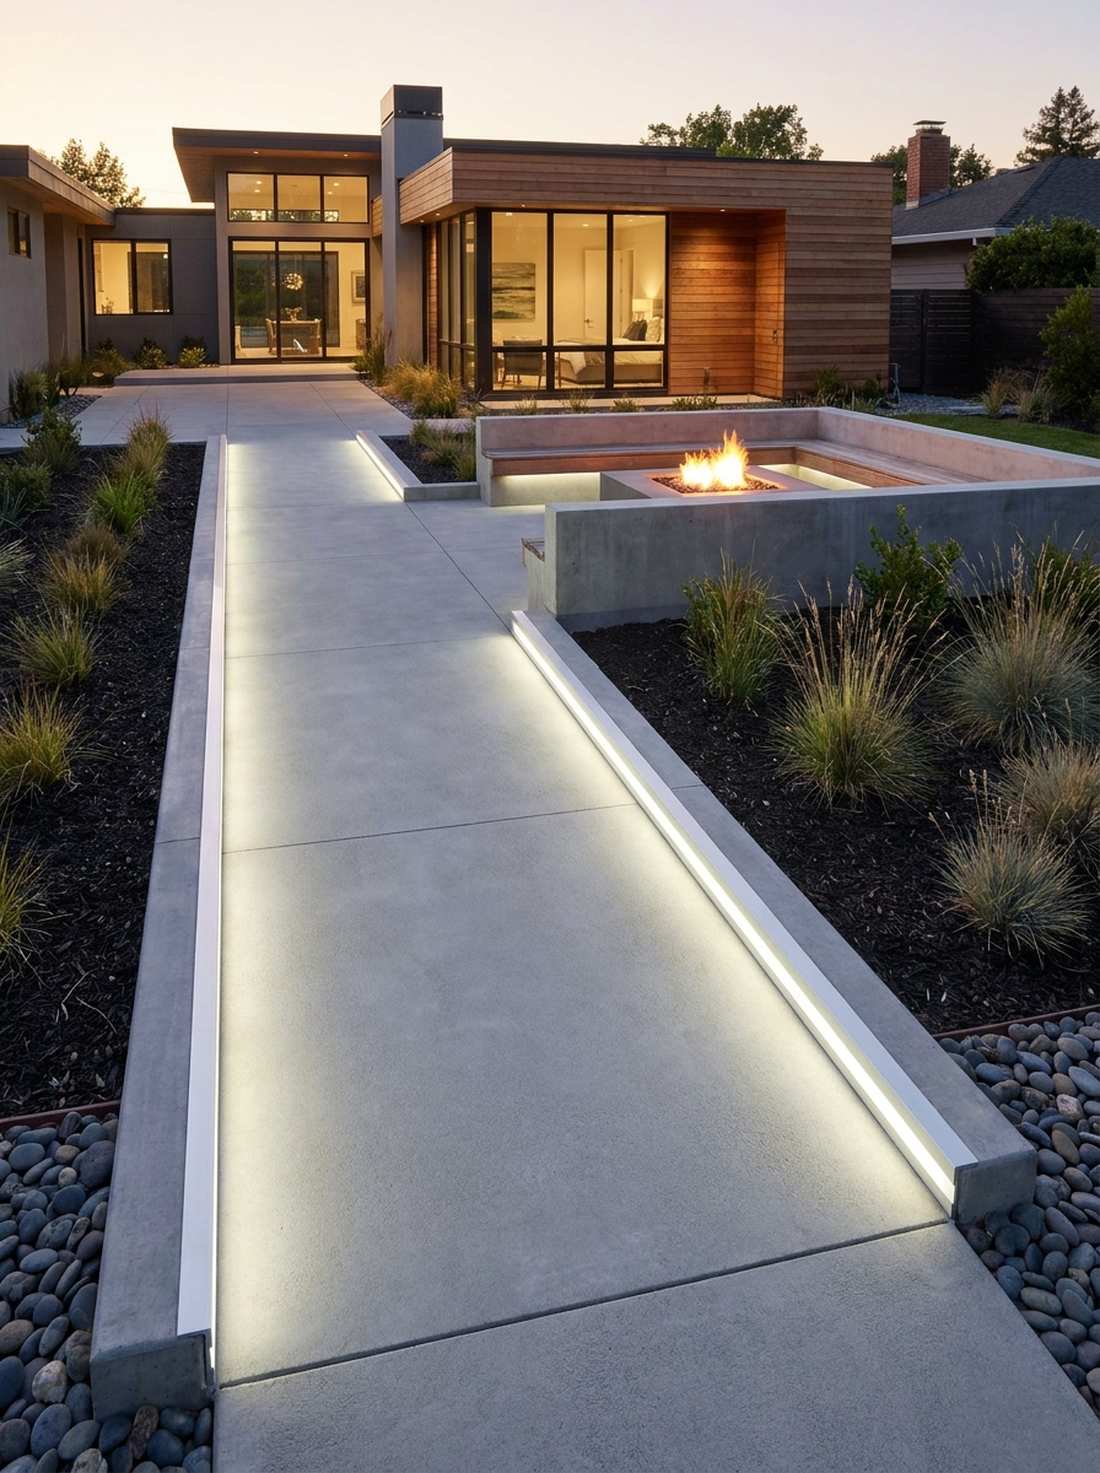
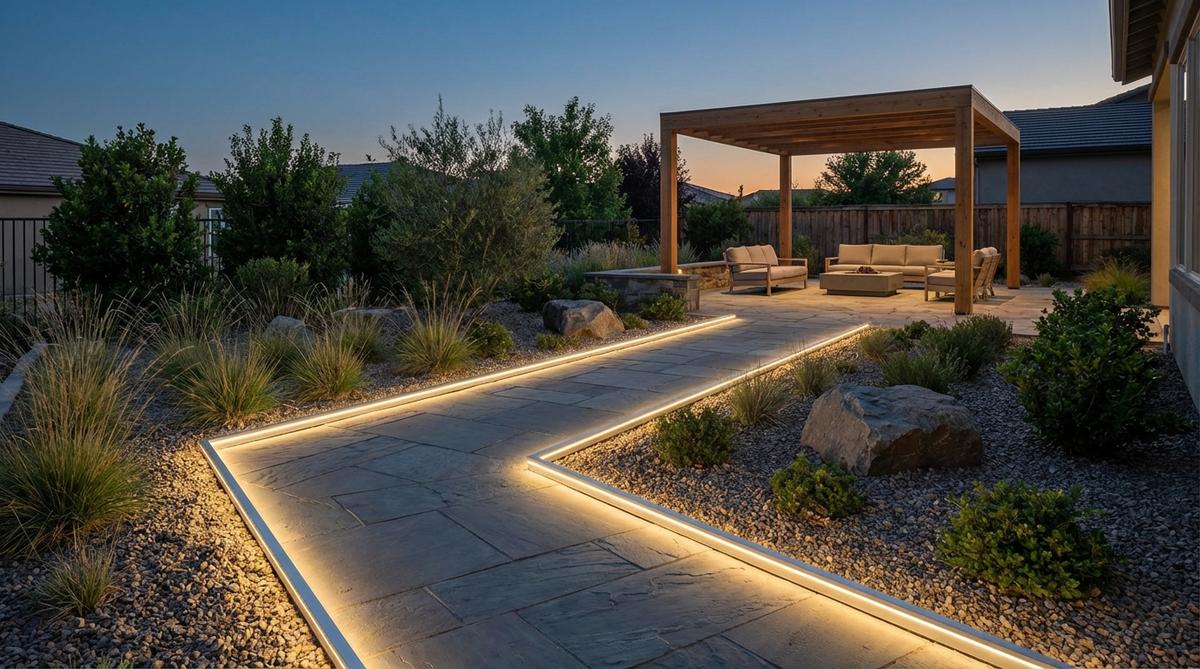
Drawing sharp, modern boundaries, this sleek installation feels like a high-tech architectural runway. Securing continuous LED edge strips perfectly defines poured concrete walkways and minimalist landscaping.
Dotting the path with stakes can feel cluttered, but a glowing rectilinear profile gives a designer-level finish. Snagging waterproof silicone tracking is crucial so the LEDs survive heavy foot traffic and pressure washing.
A sharp linear edge costs roughly $60–$95.
- Key Materials: IP67 linear LED tape, 90-degree aluminum curbs
- Vibe / Style: High-tech minimalist boundaries
- Difficulty: Moderate trenching/mounting
- Budget Breakdown: Edge strips: $70 | Curbs: $20
- Creator’s Tip: Mount the strip facing sideways against a vertical border rather than pointing straight up to reduce glare.
- Smart Sourcing: Use neon-style flexible outdoor LED rope (IP67 pack) and aluminum track mounting clips.
Most backyard designs fail because they ignore the next crucial step in material selection.
40. Specimen Plant Spotlighting
Isolating the most beautiful plant in the yard, this intense focus feels like a curated botanical gallery. Deploying individual plant spotlights ensures your prized Japanese maple or blooming agave commands nighttime attention.
Lighting everything equally washes out the yard, but creating a focal hierarchy looks far more expensive than it is. Hiding the wires under mulch and using outdoor decor lanterns nearby perfectly frames the featured specimen.
Highlight your best plant for $35–$60. Save this if you want museum-quality garden displays!
- Key Materials: Adjustable low-voltage spotlights
- Vibe / Style: Curated botanical exhibition
- Difficulty: Easy placement
- Budget Breakdown: Spotlight: $40 | Bulb: $10
- Creator’s Tip: Adjust the beam angle seasonally; point it at the spring blooms, then shift it to the bark in the winter.
- Smart Sourcing: Buy a solid brass adjustable landscape spotlight (pro grade) and LED MR16 bulbs (warm white).
Material Guide: Cheap vs. Premium Aesthetic
Knowing exactly where to save and where to spend makes all the difference in achieving that “looks expensive but isn’t” vibe.
- Standard vs. UV-Resistant/Premium: Cheap plastics turn gray and brittle after one summer. Spending 10% more on UV-coated resin or brass landscape lighting ensures fixtures survive extreme weather.
- Pre-made Kits vs. Sourcing Locally: Scavenging parts separately often leads to mismatched voltage. Buying starter kits with included transformers ensures compatibility and actually saves money.
Smart & Integrated Systems
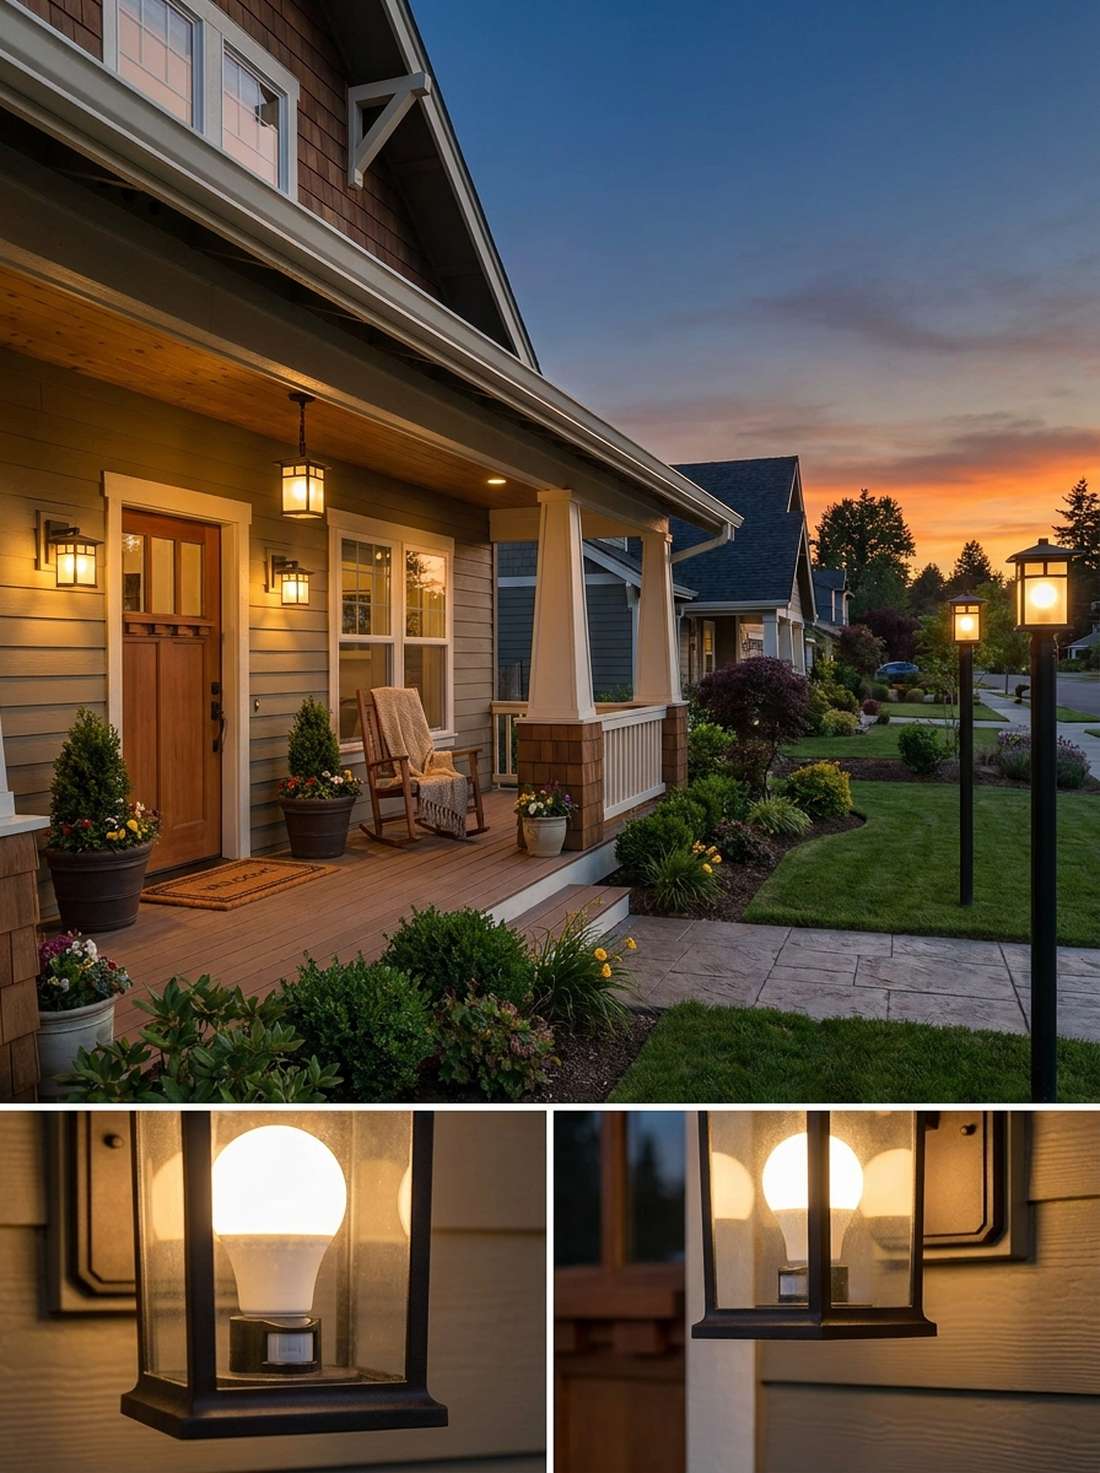
41. Voice-Controlled Smart Bulbs
Responding instantly to your commands, this tech-forward setup feels like living in a futuristic smart home. Swapping standard porch lights for WiFi-enabled smart bulbs allows completely hands-free adjustment when carrying groceries or grilling.
Manual switches are outdated, but yelling across the patio to dim the lights gives a designer-level finish to your daily routine. Leveraging smart ecosystem routines ensures the entire yard lights up right as you pull into the driveway.
A smart bulb upgrade costs a tiny $20–$40.
- Key Materials: Alexa/Google compatible LED outdoor bulbs
- Vibe / Style: Effortless futuristic convenience
- Difficulty: Simple twist-in
- Budget Breakdown: Smart bulbs: $30 | App setup: $0
- Creator’s Tip: Set a geofence routine on your phone so the lights automatically turn on when your car gets within 500 feet.
- Smart Sourcing: Grab outdoor-rated smart LED bulbs (Wi-Fi 2-pack) and an outdoor WiFi range extender.
42. Astronomical Timer Systems
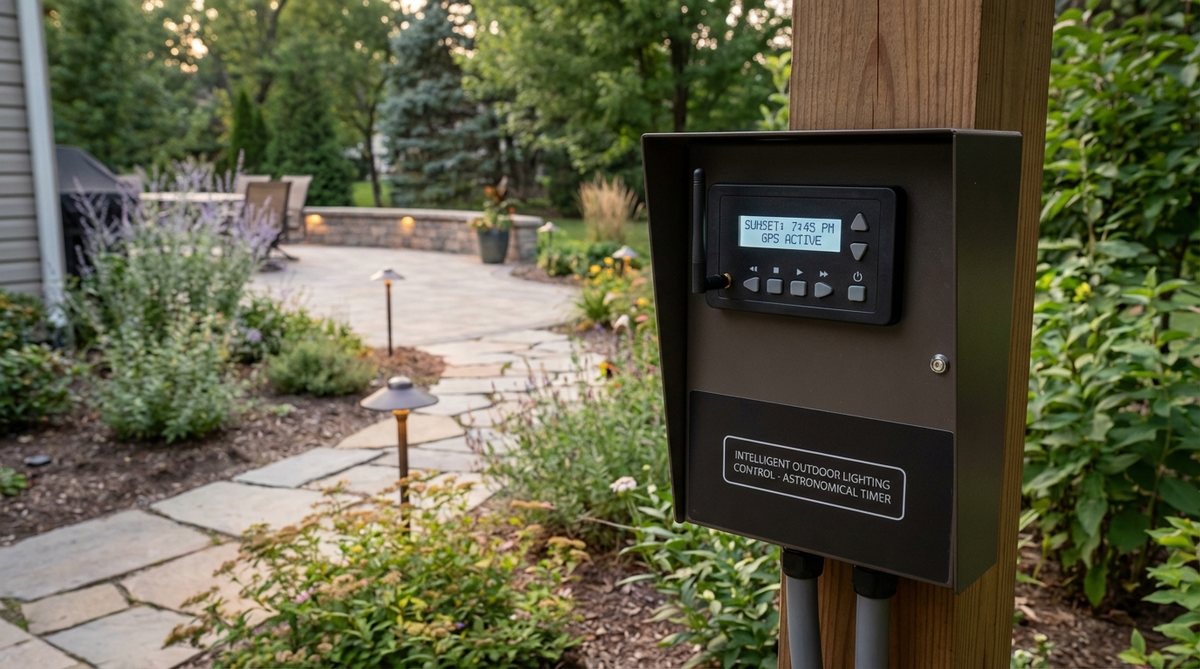
Adjusting perfectly to the shifting seasons, this invisible brain makes your yard feel completely autonomous. Upgrading to a GPS-coordinated astronomical timer means you never have to manually reprogram the lights after daylight saving time.
Standard timers get out of sync constantly, but tying activation to the exact local sunset looks far more expensive than it is. Swapping out a basic low-voltage transformer for a smart hub totally modernizes your infrastructure.
Automate your system for $50–$90. Pin this to stop wasting energy during the summer!
- Key Materials: Astronomical smart timer module
- Vibe / Style: Invisible autonomous precision
- Difficulty: Moderate wiring swap
- Budget Breakdown: Smart timer: $65 | Wire nuts: $5
- Creator’s Tip: Program a dimming curve to drop the brightness by 50% after midnight to save energy while maintaining security.
- Smart Sourcing: Invest in an astronomical outdoor lighting timer (plug-in module) and a weatherproof outlet cover.
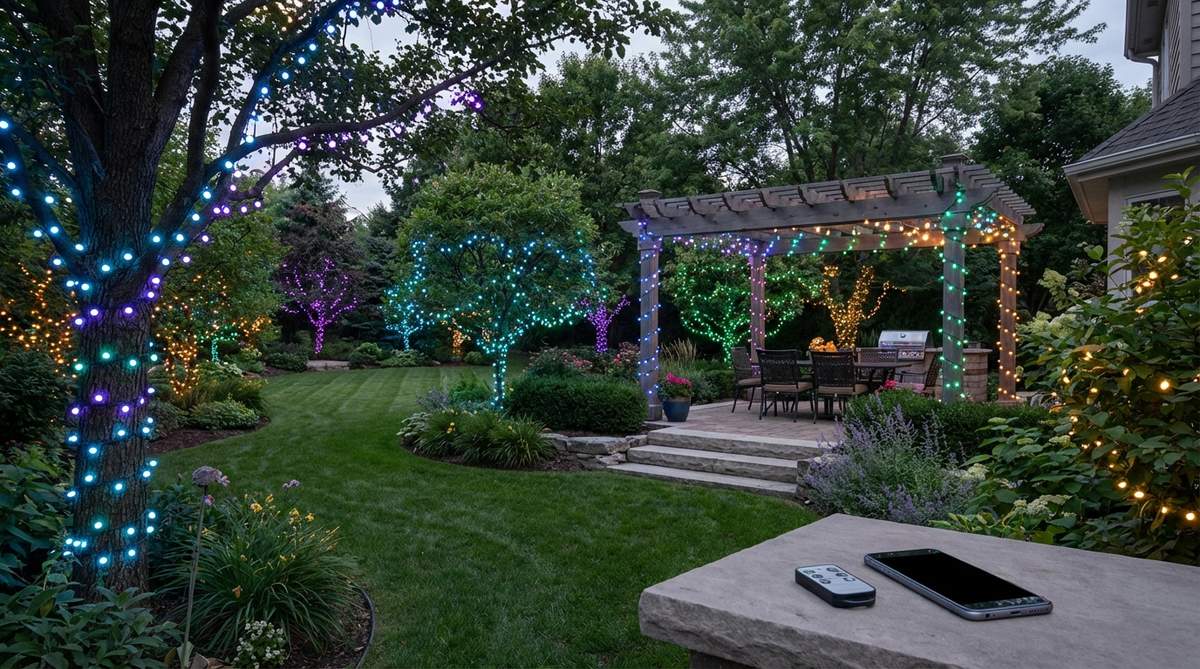
43. Color-Tunable LED Systems
Shifting from icy white to candlelight warm, this flexible glow feels custom-tailored to whatever you’re doing. Installing a tunable-white landscape lighting system allows you to shift from crisp task lighting to cozy dining ambiance seamlessly.
Static bulbs restrict your options, but dialing the exact kelvin temperature gives a designer-level finish for hosting events. Combining these with premium LED outdoor lighting fixtures guarantees accurate color rendering without an ugly green tint.
A tunable setup will cost around $70–$110.
- Key Materials: Full-spectrum tunable LED bulbs, smart bridge
- Vibe / Style: Custom-tailored atmosphere
- Difficulty: Easy app configuration
- Budget Breakdown: Tunable kit: $85 | Controller: $15
- Creator’s Tip: Set a circadian routine to slowly warm the color temperature as the evening progresses to help your brain wind down.
- Smart Sourcing: Pick up a tunable white landscape lighting kit (smart app control) and silicone grease for threads.
44. Integrated Audio Light Posts
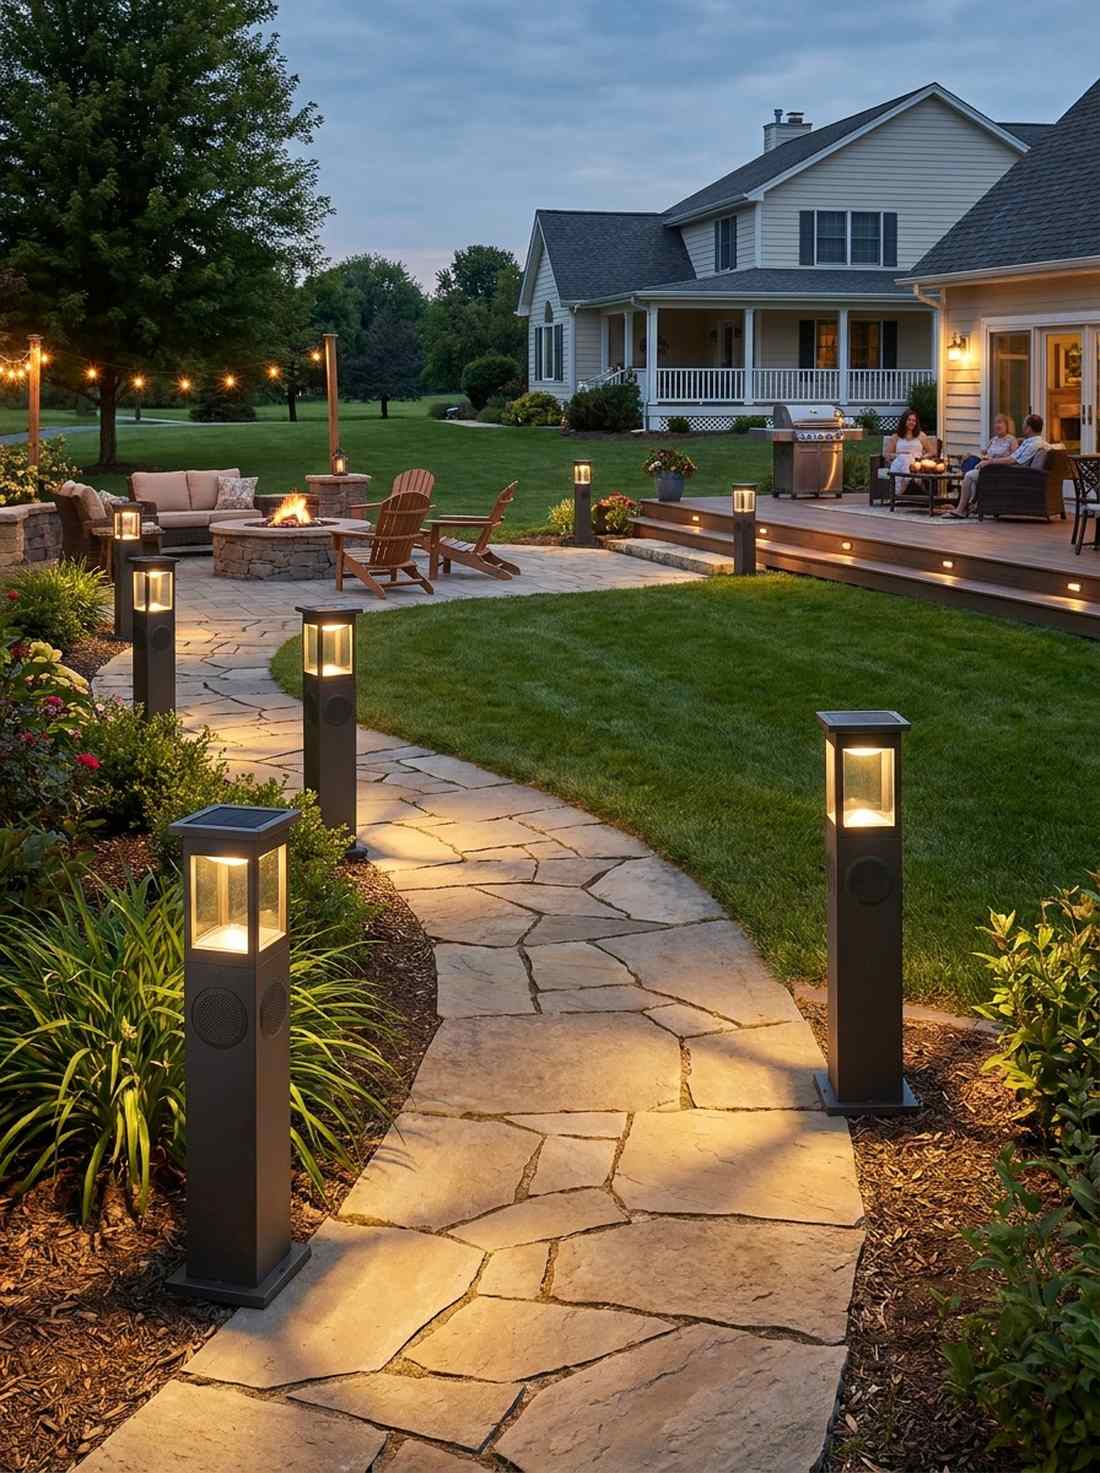
Filling the garden with synchronized music and light, this hybrid device feels like a professional entertainment install. Planting Bluetooth speaker path lights reduces visual clutter while delivering surround sound to patio guests.
Dragging portable speakers outside is annoying, but blending audio drivers directly into outdoor decor lights delivers a surprisingly premium look. The multi-room audio capabilities ensure consistent volume without deafening anyone near a single speaker.
Add sound and light for roughly $80–$140.
- Key Materials: Combo LED/Bluetooth path fixtures
- Vibe / Style: Invisible entertainment hub
- Difficulty: Simple staking and pairing
- Budget Breakdown: Audio stakes: $110 | Wiring: $0
- Creator’s Tip: Space them evenly around the perimeter facing inward so the sound is contained within your seating area.
- Smart Sourcing: Snag Bluetooth speaker outdoor lanterns (solar combo kit) and a sturdy rubber mallet.
You can dramatically lower your power bill by using this next security trick correctly…
45. Motion-Sensing Security Floods
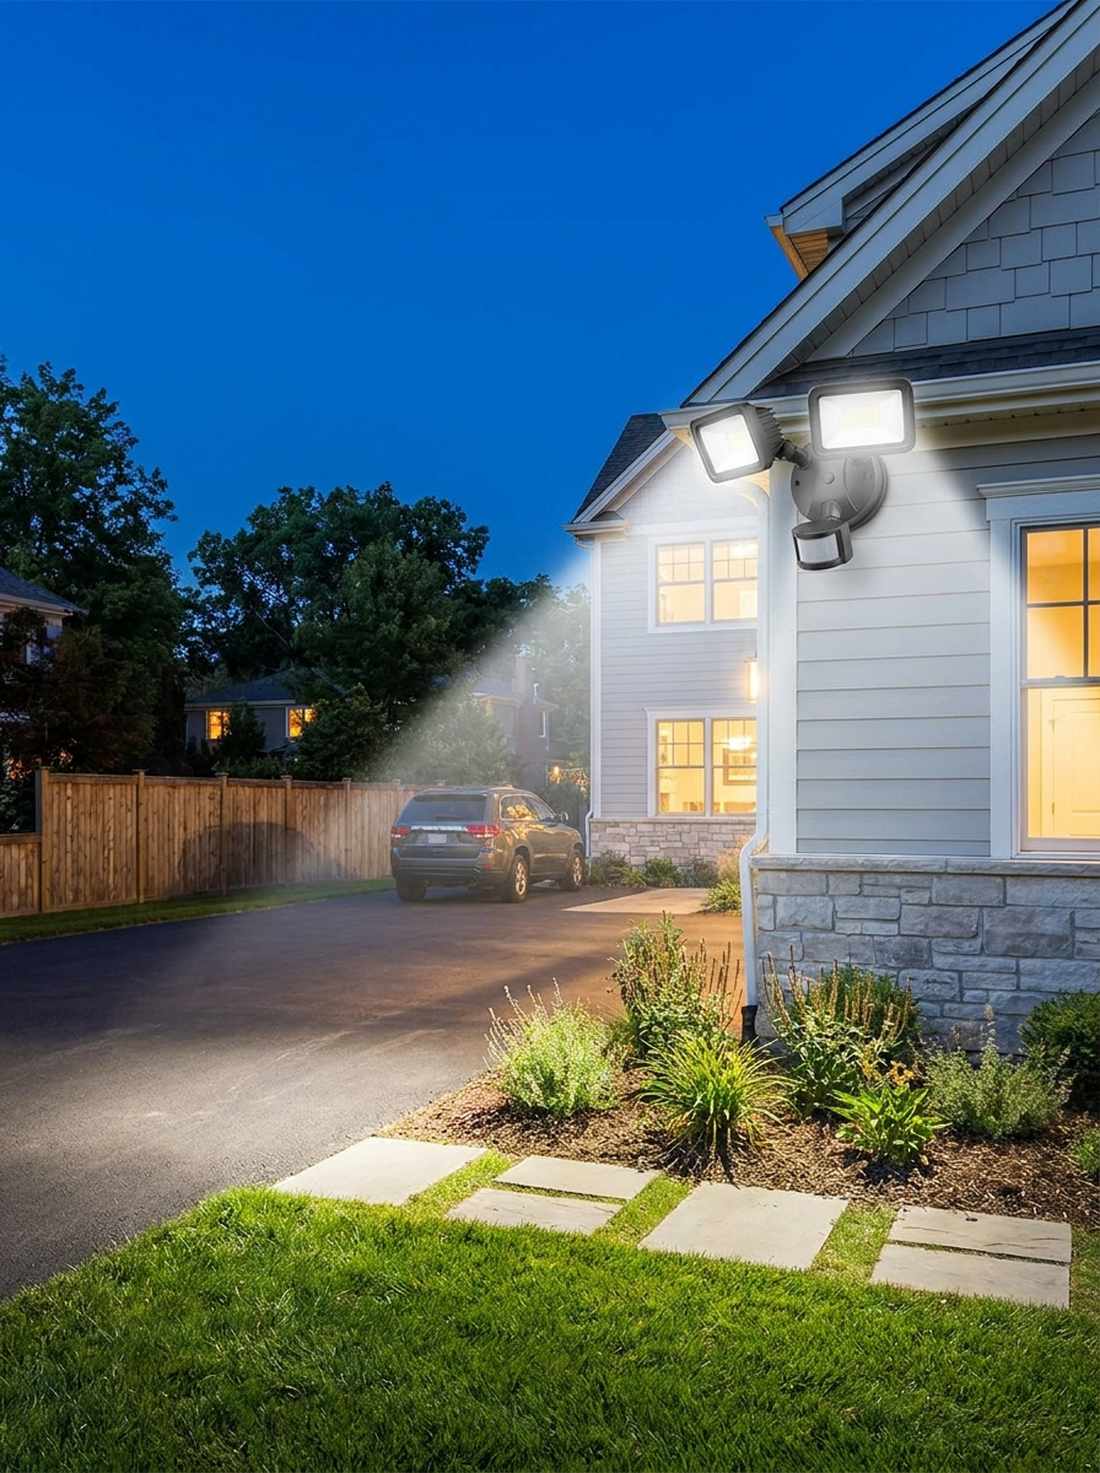
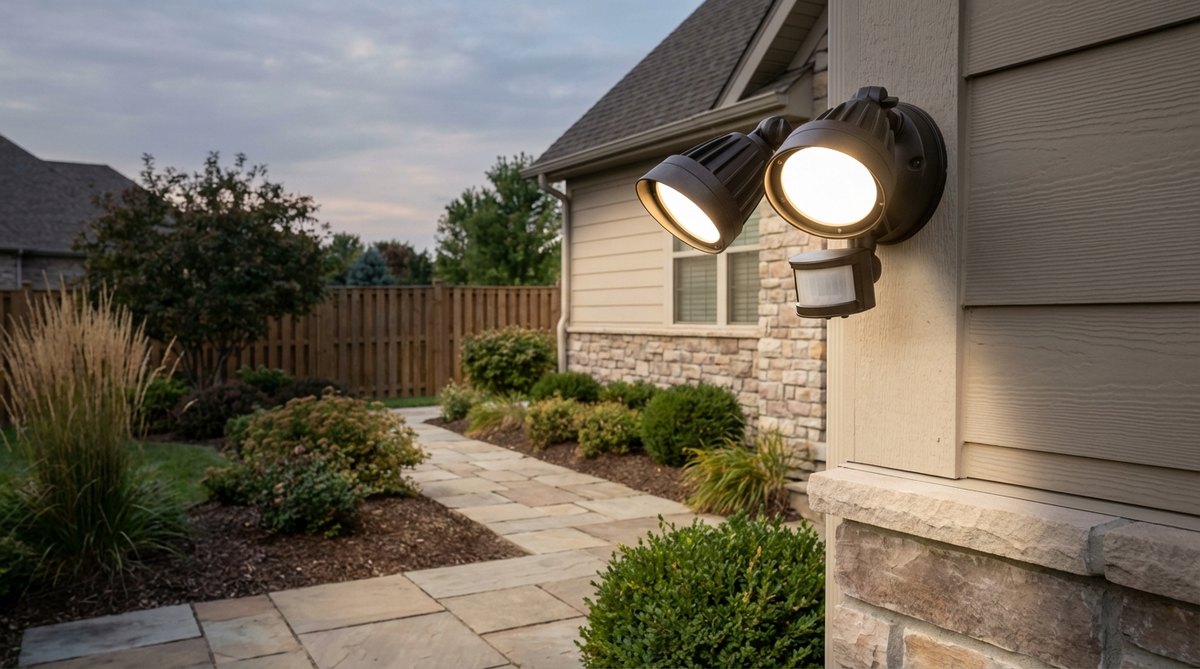
Flooding the approach with sudden daylight, this defensive shield feels like an absolute fortress. Mounting dual-head PIR security floods at the corners of your home is the best way to deter prowlers while lighting the driveway.
Leaving bright floods on all night annoys neighbors, but having them snap on only during movement looks far more expensive than it is. Tweaking the sensitivity perfectly prevents foxes and raccoons from triggering the massive LED arrays.
Secure the perimeter for $45–$80. Save this if home security is your priority!
- Key Materials: Adjustable dual-head LED floods with PIR sensors
- Vibe / Style: Responsive fortress security
- Difficulty: Hardwired mounting
- Budget Breakdown: Flood fixture: $55 | Silicone: $10
- Creator’s Tip: Aim the motion sensor slightly downward so it catches human foot traffic but ignores swaying tree branches.
- Smart Sourcing: Buy motion sensor outdoor security lights (high lumen) and exterior grade silicone caulk.
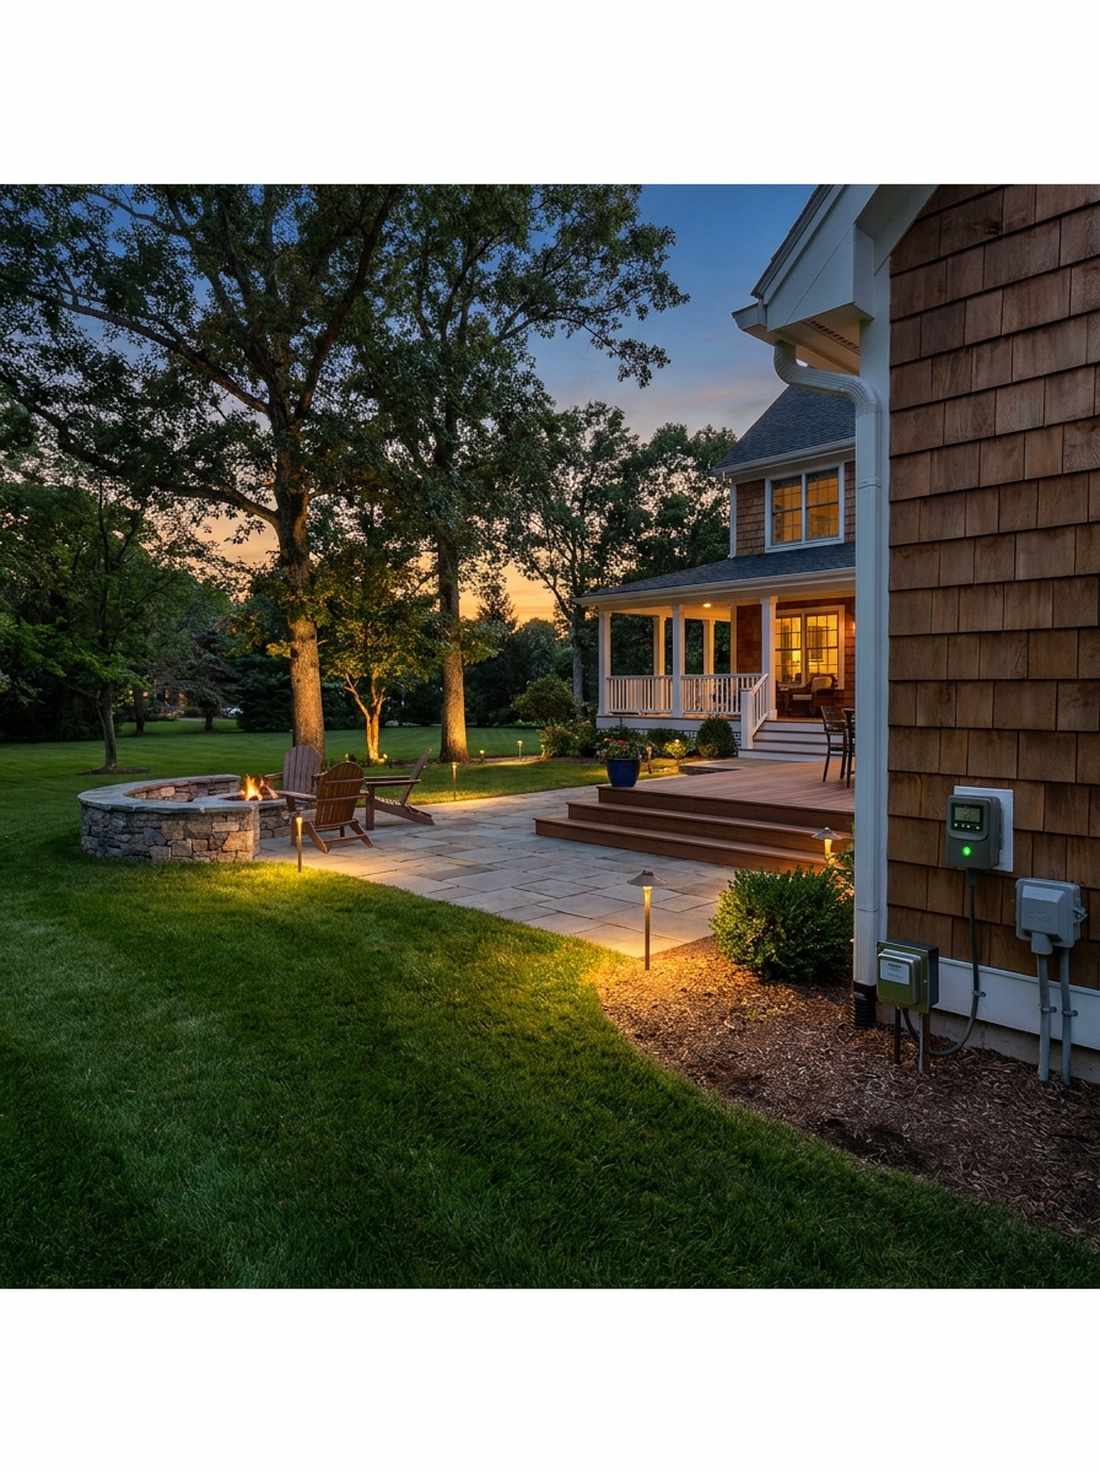
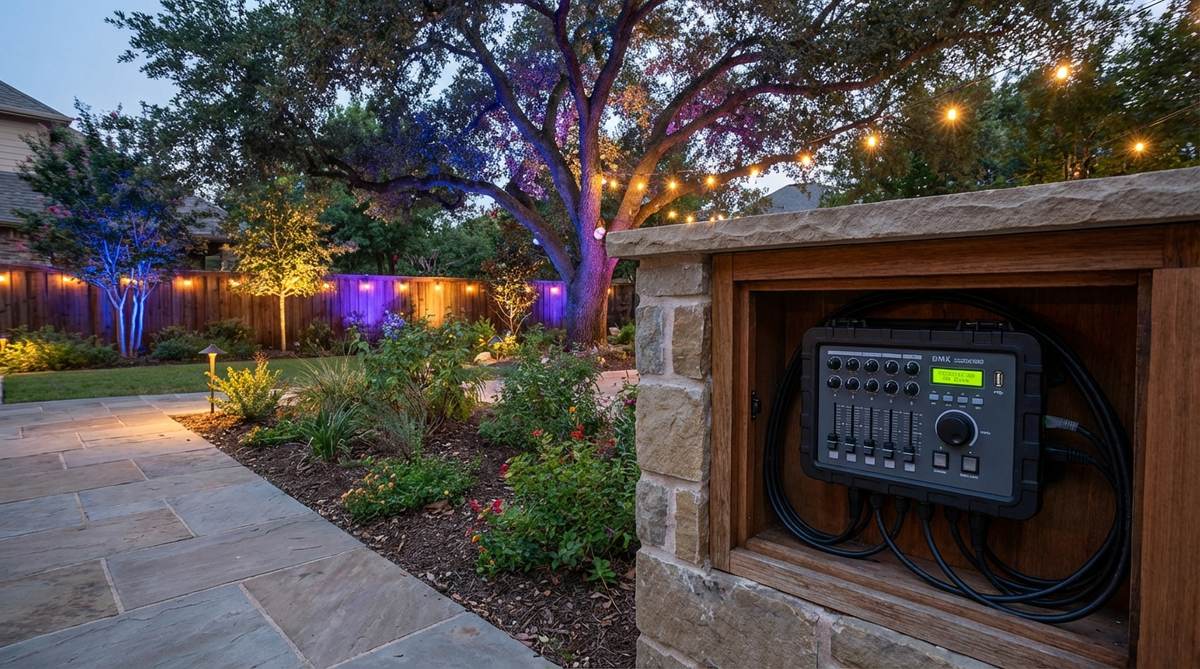
46. Low-Voltage Transformer Hubs
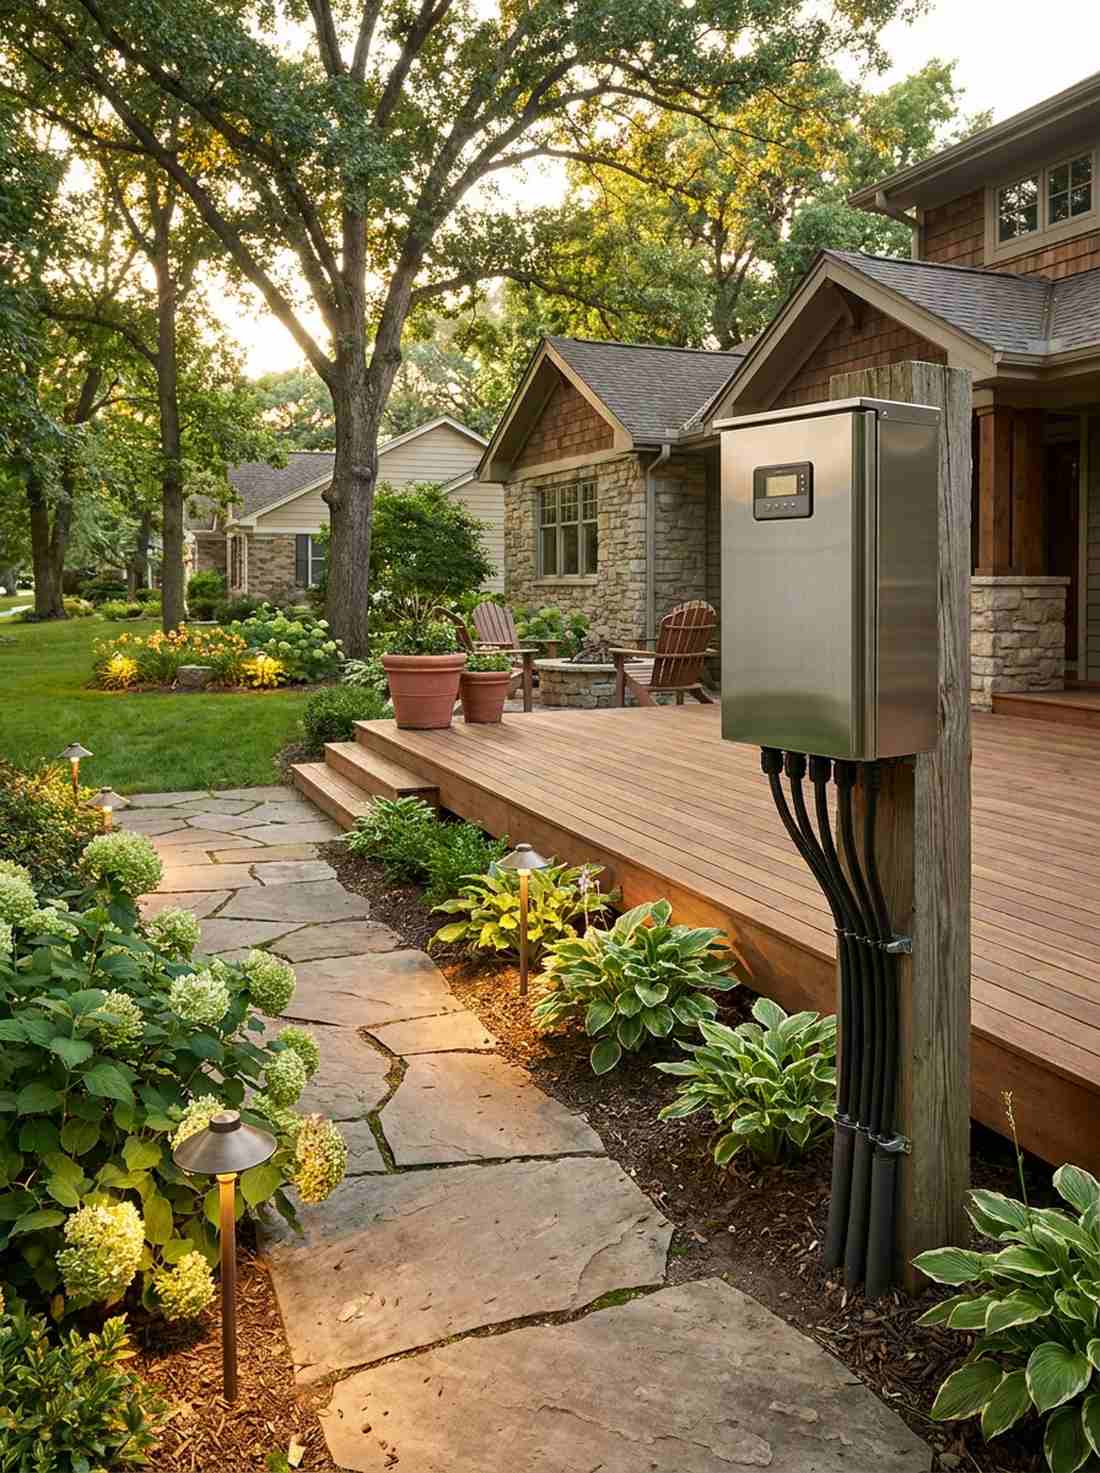
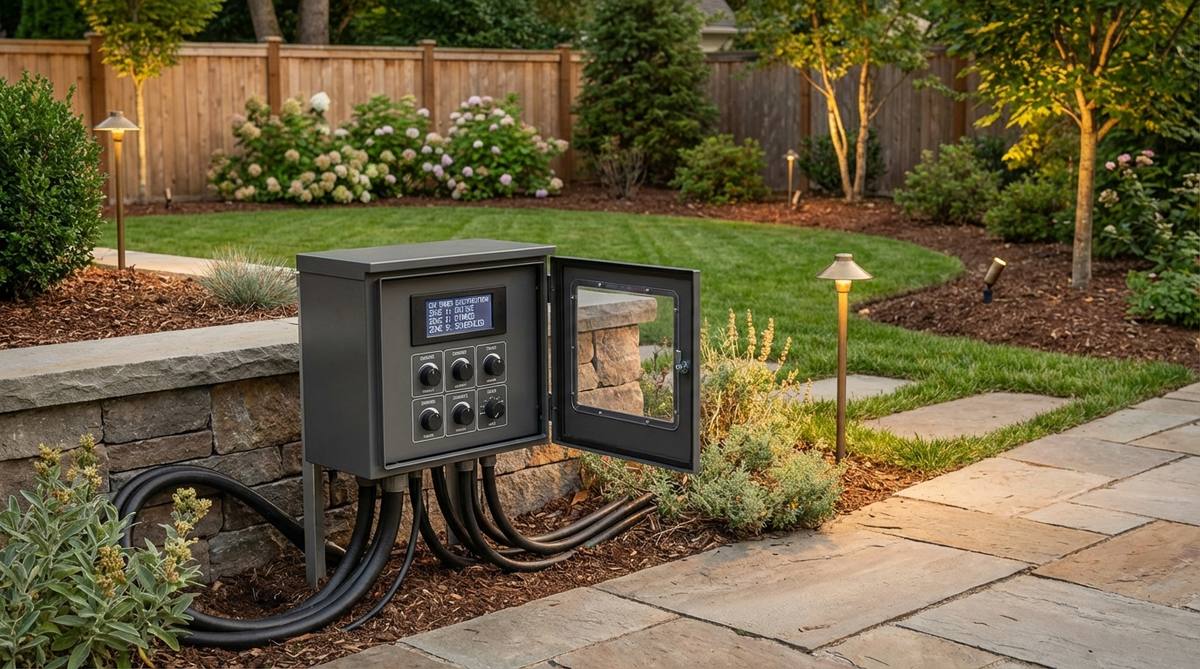
Powering everything safely from one box, this central nervous system feels like a commercial infrastructure upgrade. Screwing in a multi-zone digital low-voltage transformer guarantees that your distant pathway lights are just as bright as the ones near the house.
Overloading a cheap transformer causes flickering, but sizing up to a 300-watt digital hub gives a designer-level finish. This crucial piece of hardware is the absolute backbone of all premium LED outdoor lighting systems.
A quality power hub runs $80–$150.
- Key Materials: 300W digital stainless steel transformer
- Vibe / Style: Commercial-grade reliability
- Difficulty: Intermediate load calculation
- Budget Breakdown: Transformer hub: $110 | Mounting screws: $5
- Creator’s Tip: Always buy a transformer that is 20% larger than your total bulb wattage to allow for future garden expansion.
- Smart Sourcing: Invest in a multi-tap low voltage transformer (stainless housing) and heavy-duty wire strippers.
47. Photocell-Activated Dusk-To-Dawn Lights
Waking up perfectly as the sun sets, this classic automation feels incredibly reliable and zero-maintenance. Utilizing photocell light sensors means your front porch and outdoor decor lanterns turn on exactly when the darkness requires it.
Timers drift off schedule, but sensing actual light levels delivers a surprisingly premium look every single night. Shielding the sensor slightly prevents car headlights from tricking the system into shutting off momentarily.
Automate your fixtures for just $15–$35.
- Key Materials: Dusk-to-dawn photocell screw-in adapters or bulbs
- Vibe / Style: Seamless daily rhythm
- Difficulty: Beginner screw-in
- Budget Breakdown: Sensor bulbs: $20 | Setup: $0
- Creator’s Tip: Ensure the bulb’s sensor eye points outward toward the ambient light, away from the fixture’s shadow.
- Smart Sourcing: Use dusk-to-dawn sensor LED bulbs (outdoor rated) and dielectric bulb grease.
48. Wireless Remote Control Systems
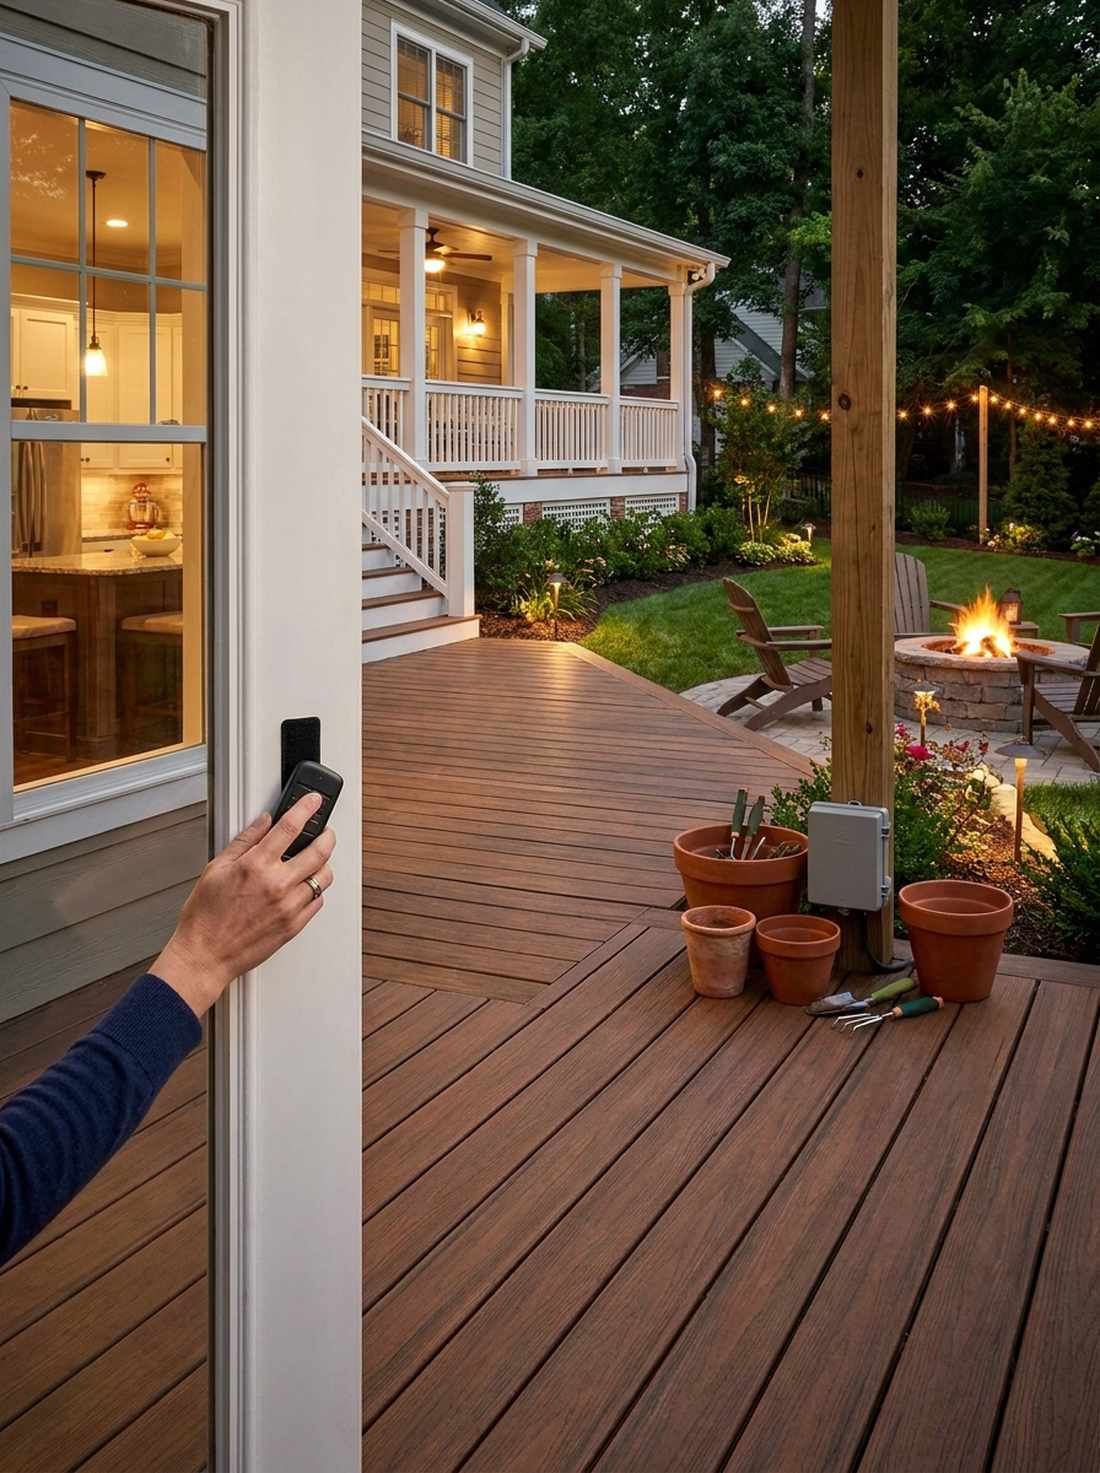

Clicking a button from the kitchen window, this manual override feels like the ultimate lazy luxury. Adding a long-range wireless relay lets you turn on the distant fire pit lights without trudging through wet grass with a smartphone.
App-only controls are annoying when your hands are wet, but keeping a tactile remote nearby looks far more expensive than it is. Using miniature garden supplies near the receiver box helps hide the plastic hardware from view.
Add remote capability for $30–$55. Pin this for the ultimate outdoor convenience!
- Key Materials: Radio-frequency outdoor outlet relay
- Vibe / Style: Instant tactile luxury
- Difficulty: Plug-and-play
- Budget Breakdown: Wireless relay: $35 | Remote mount: $5
- Creator’s Tip: Velcro the remote controller to the inside of your back door frame so it never gets lost in a drawer.
- Smart Sourcing: Grab an outdoor remote control outlet kit (heavy-duty) and industrial velcro strips.
49. DMX Theatrical Control Systems
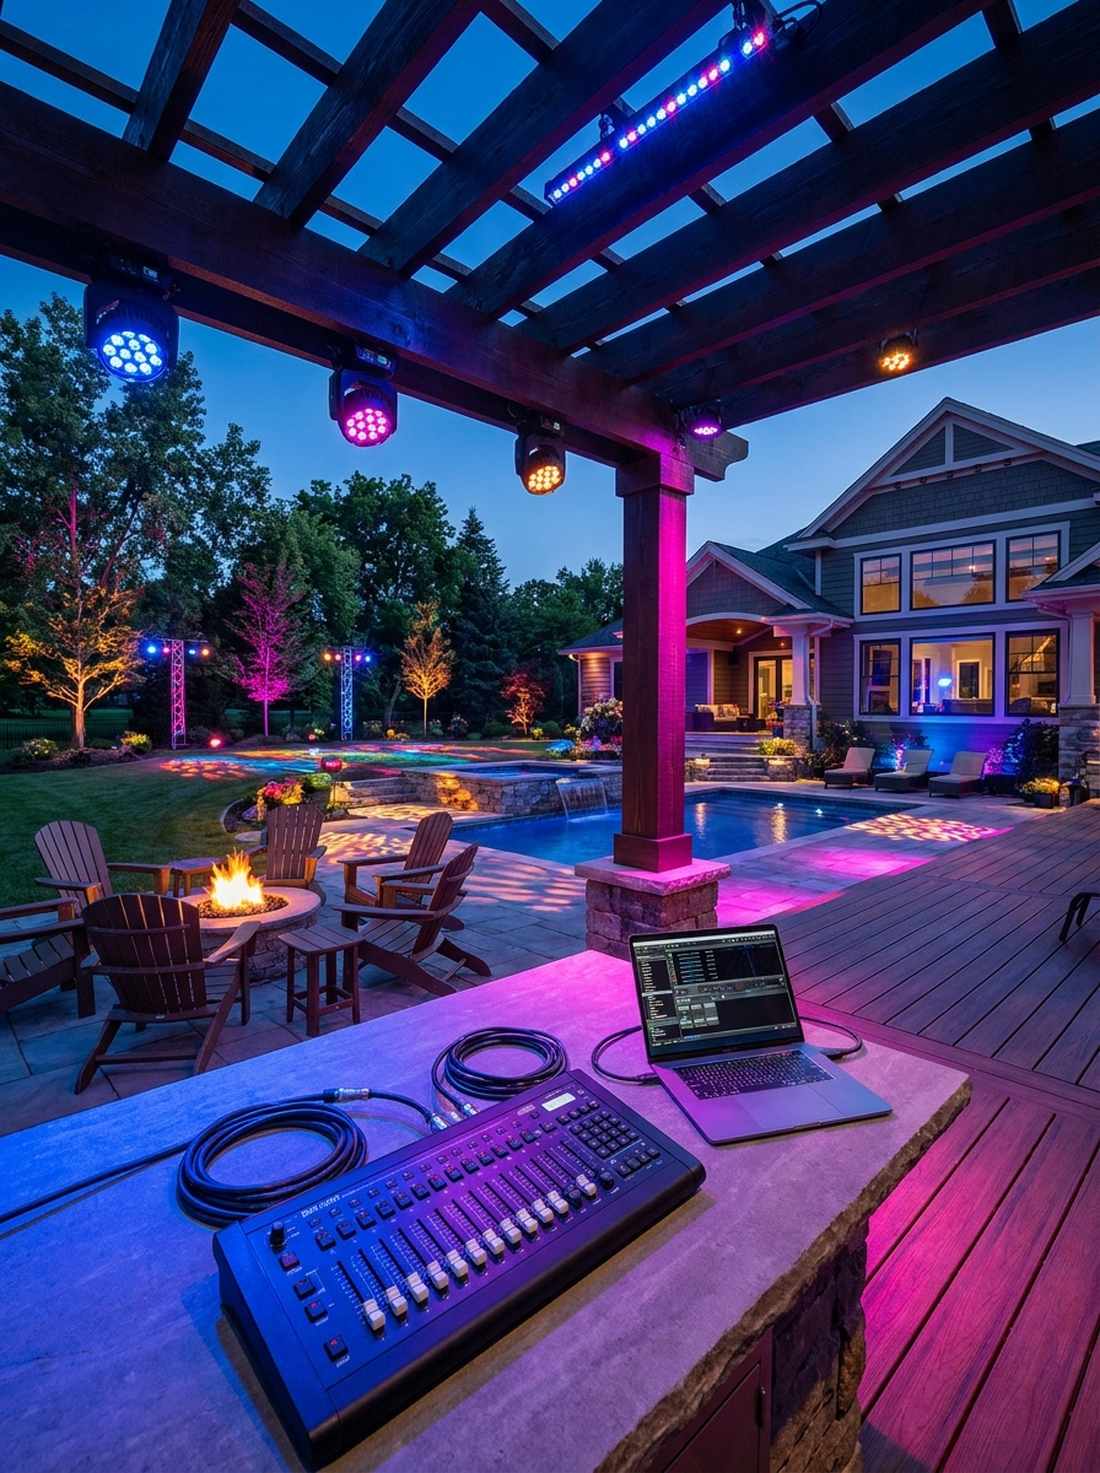
Pulsing exactly in time with complex sequences, this elite setup feels like a professional concert rig in your backyard. Integrating a DMX landscape control protocol is specifically designed for elaborate holiday light shows or massive estate events.
Standard color-changing bulbs lag, but using hardwired theatrical controls gives a designer-level finish with zero latency. Pushing IP65 rated landscape lights through this controller turns a static yard into a dynamic visual masterpiece.
Pro-level controllers cost $150–$300.
- Key Materials: DMX universe controller, shielded cables
- Vibe / Style: Professional event spectacular
- Difficulty: Advanced programming
- Budget Breakdown: DMX Hub: $180 | Shielded cables: $40
- Creator’s Tip: Use a USB-to-DMX interface to build and preview the light chase sequences comfortably on your laptop first.
- Smart Sourcing: Invest in a DMX lighting controller interface (USB compatible) and outdoor-rated DMX cables.
Most weather ruins electronics, but this final smart tech actually uses the weather to its advantage…
50. Weather-Responsive Smart Controls
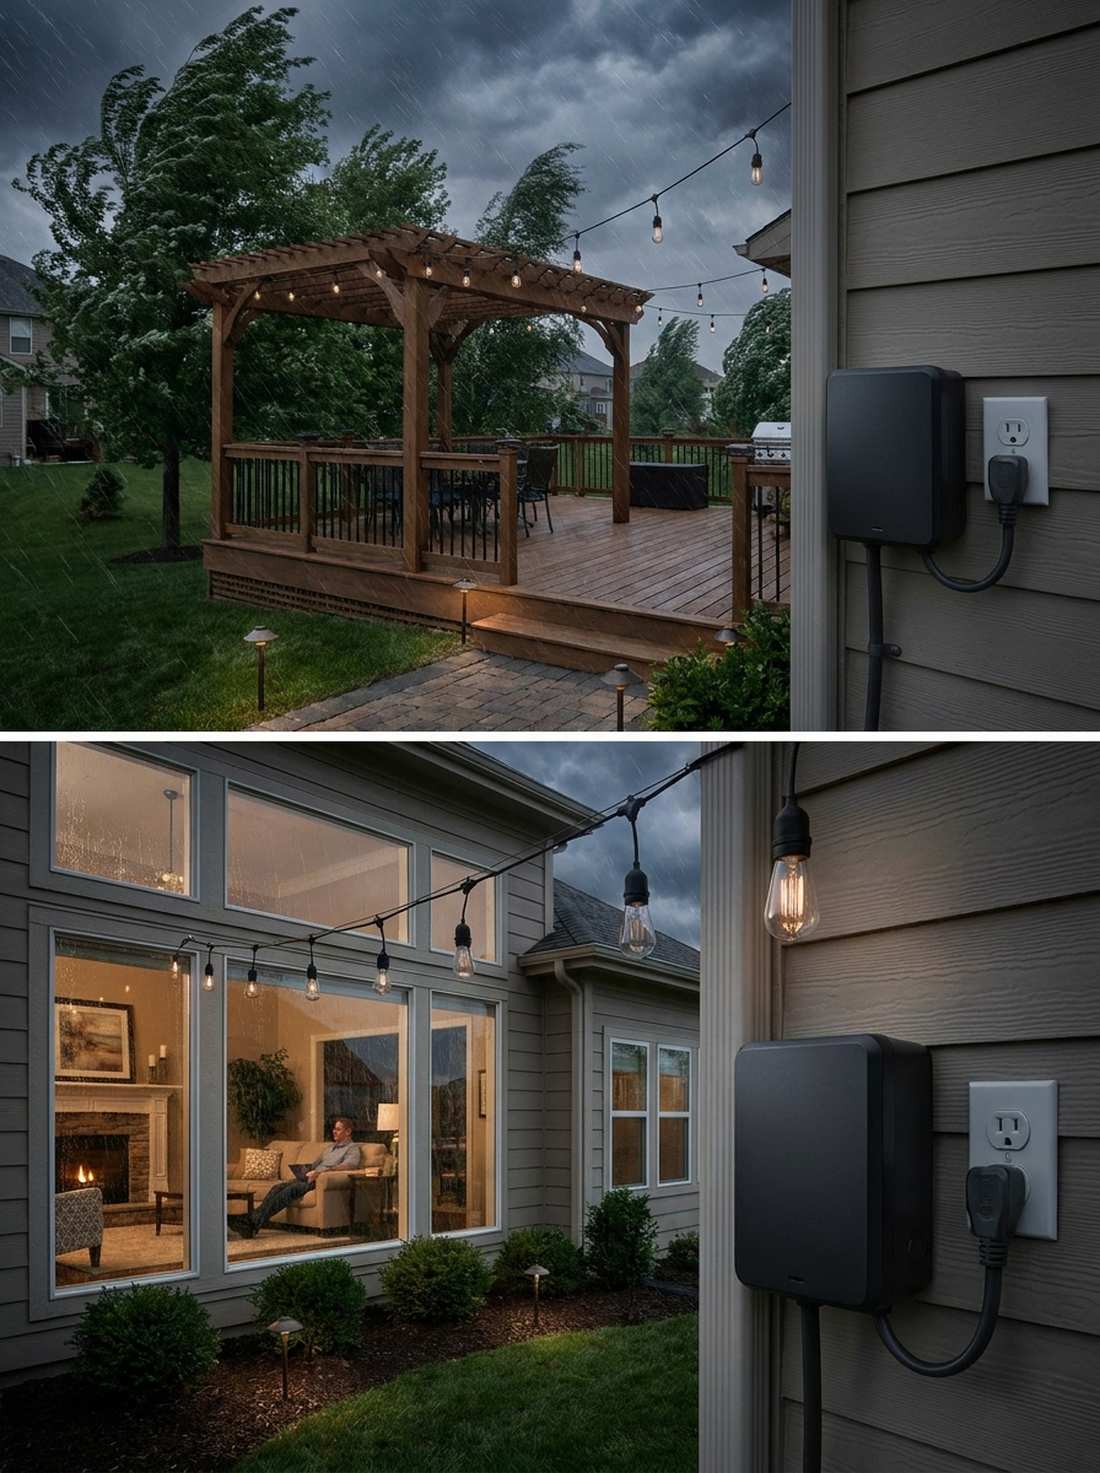
Adapting entirely on its own, this genius integration feels like the house has its own meteorologist. Tying your system to weather-responsive smart hubs ensures string lights automatically shut off to protect themselves when wind speeds hit 40mph.
Leaving fragile bulbs on during a hurricane causes shattering, but automated weather-defense delivers a surprisingly premium look. Hooking this into your outdoor decor lights guarantees the system only activates when conditions are actually pleasant.
A weather-integrated hub runs $90–$140.
- Key Materials: Weather-API integrated smart bridge
- Vibe / Style: Hyper-intelligent weather defense
- Difficulty: Intermediate software setup
- Budget Breakdown: Smart bridge: $110 | Weather app: $0
- Creator’s Tip: Set a routine to turn pathway lights on 30 minutes earlier than usual if the API detects heavy rain or overcast skies.
- Smart Sourcing: Buy an outdoor smart lighting bridge (weather compatible) and heavy-duty surge protectors.
Specialty & Water Feature Lighting
51. Floating Solar Pond Lights
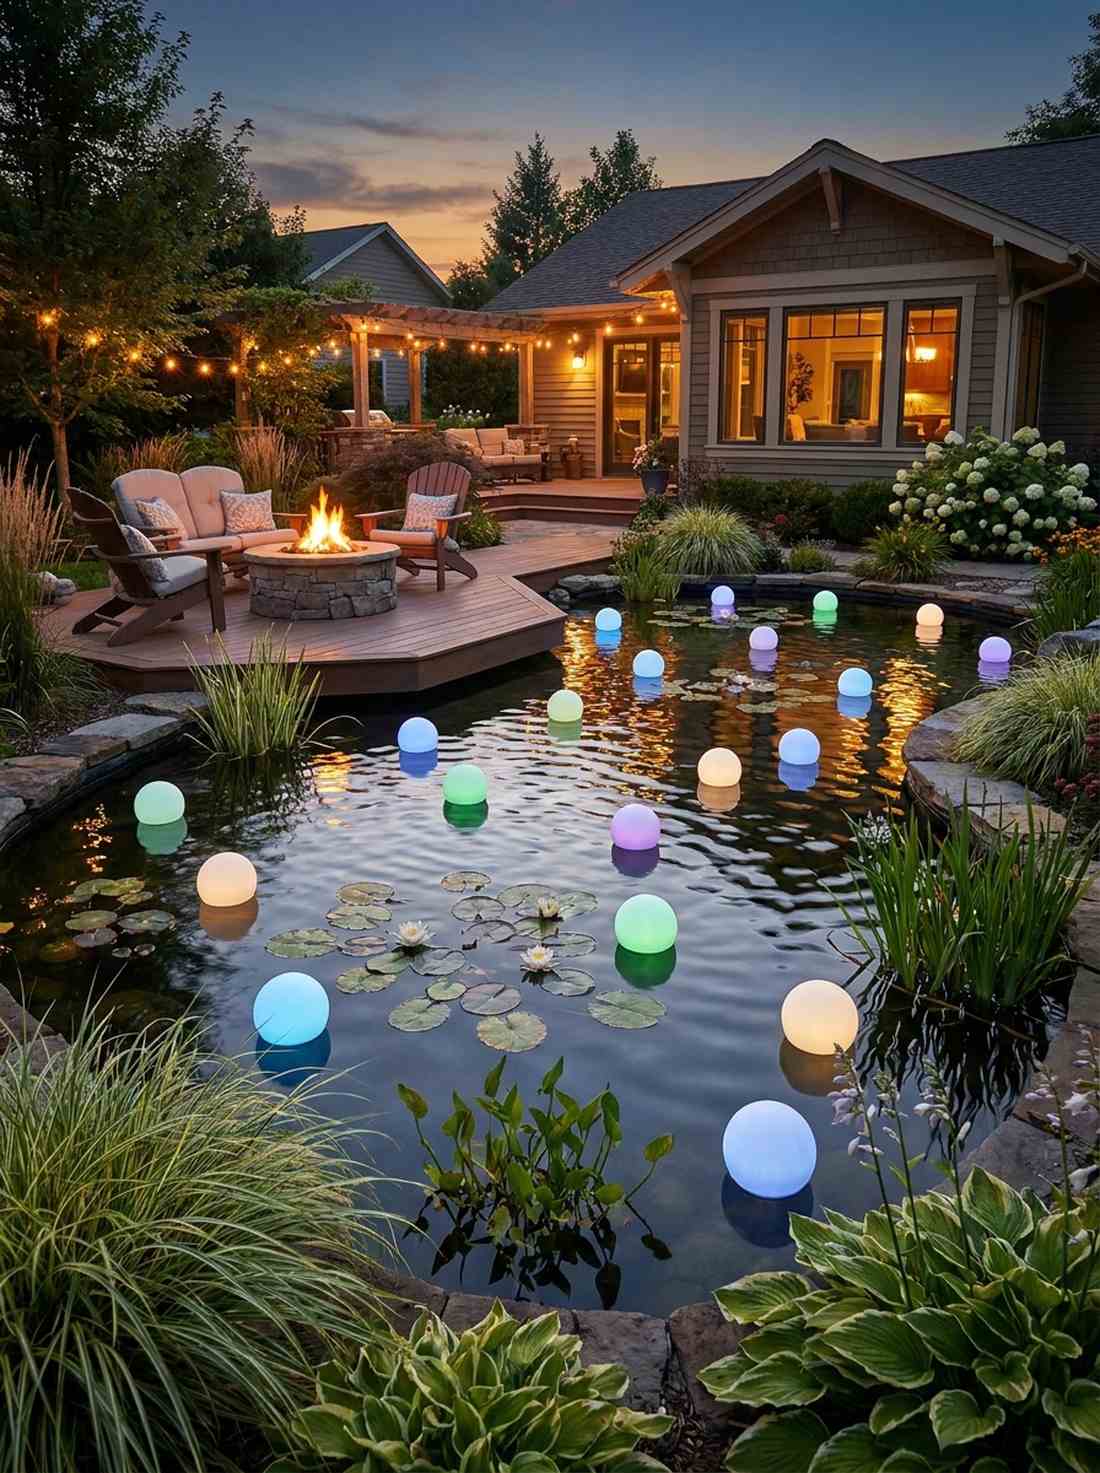
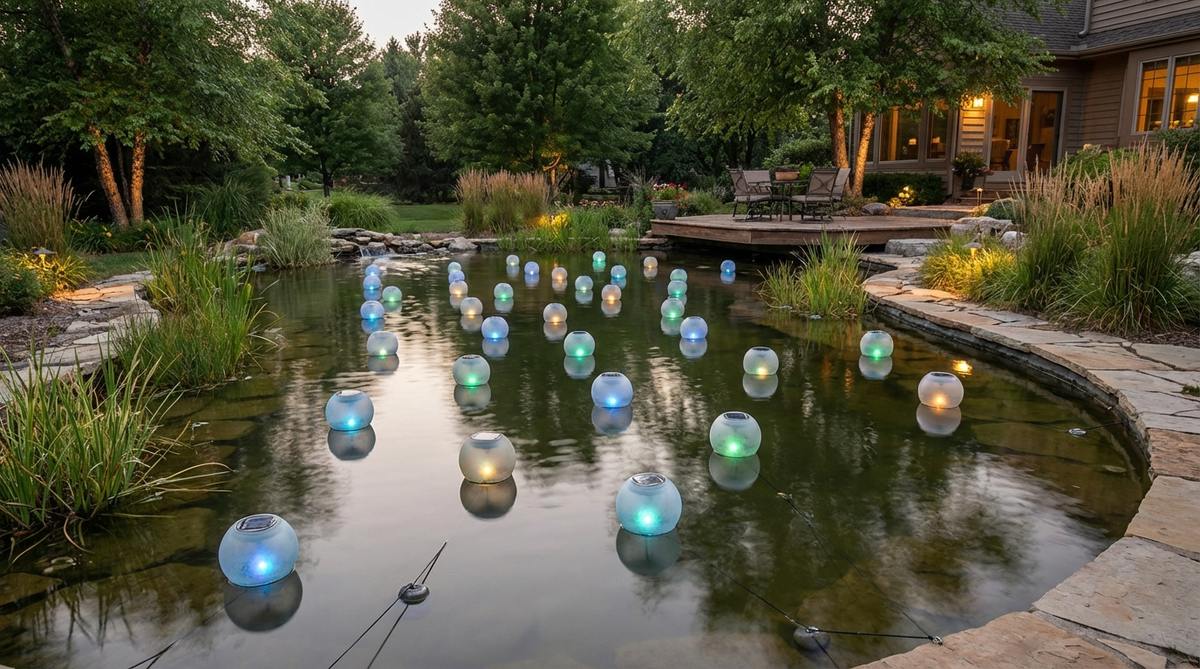
Drifting lazily across the ripples, this glowing arrangement feels like magical water lilies moving in the breeze. Tossing floating solar spheres into a dark koi pond completely eliminates the black-hole effect in the center of the yard.
Hardwiring underwater lights is exhausting, but using autonomous floating solar pods gives a designer-level finish instantly. Integrating these near terrarium accessories along the bank ties the water feature directly into the landscaping.
You can float a few of these for $35–$60. Pin this if you have a dark, boring water feature!
- Key Materials: Buoyant waterproof solar spheres
- Vibe / Style: Magical drifting reflections
- Difficulty: Toss-in easy
- Budget Breakdown: Solar floats: $45 | Fishing line: $5
- Creator’s Tip: Tie a small fishing weight to the bottom with clear line to keep them from clumping together in the wind.
- Smart Sourcing: Use floating solar pool lights (color changing pack) and clear monofilament fishing line.
52. Fountain RGB Submersible Lights
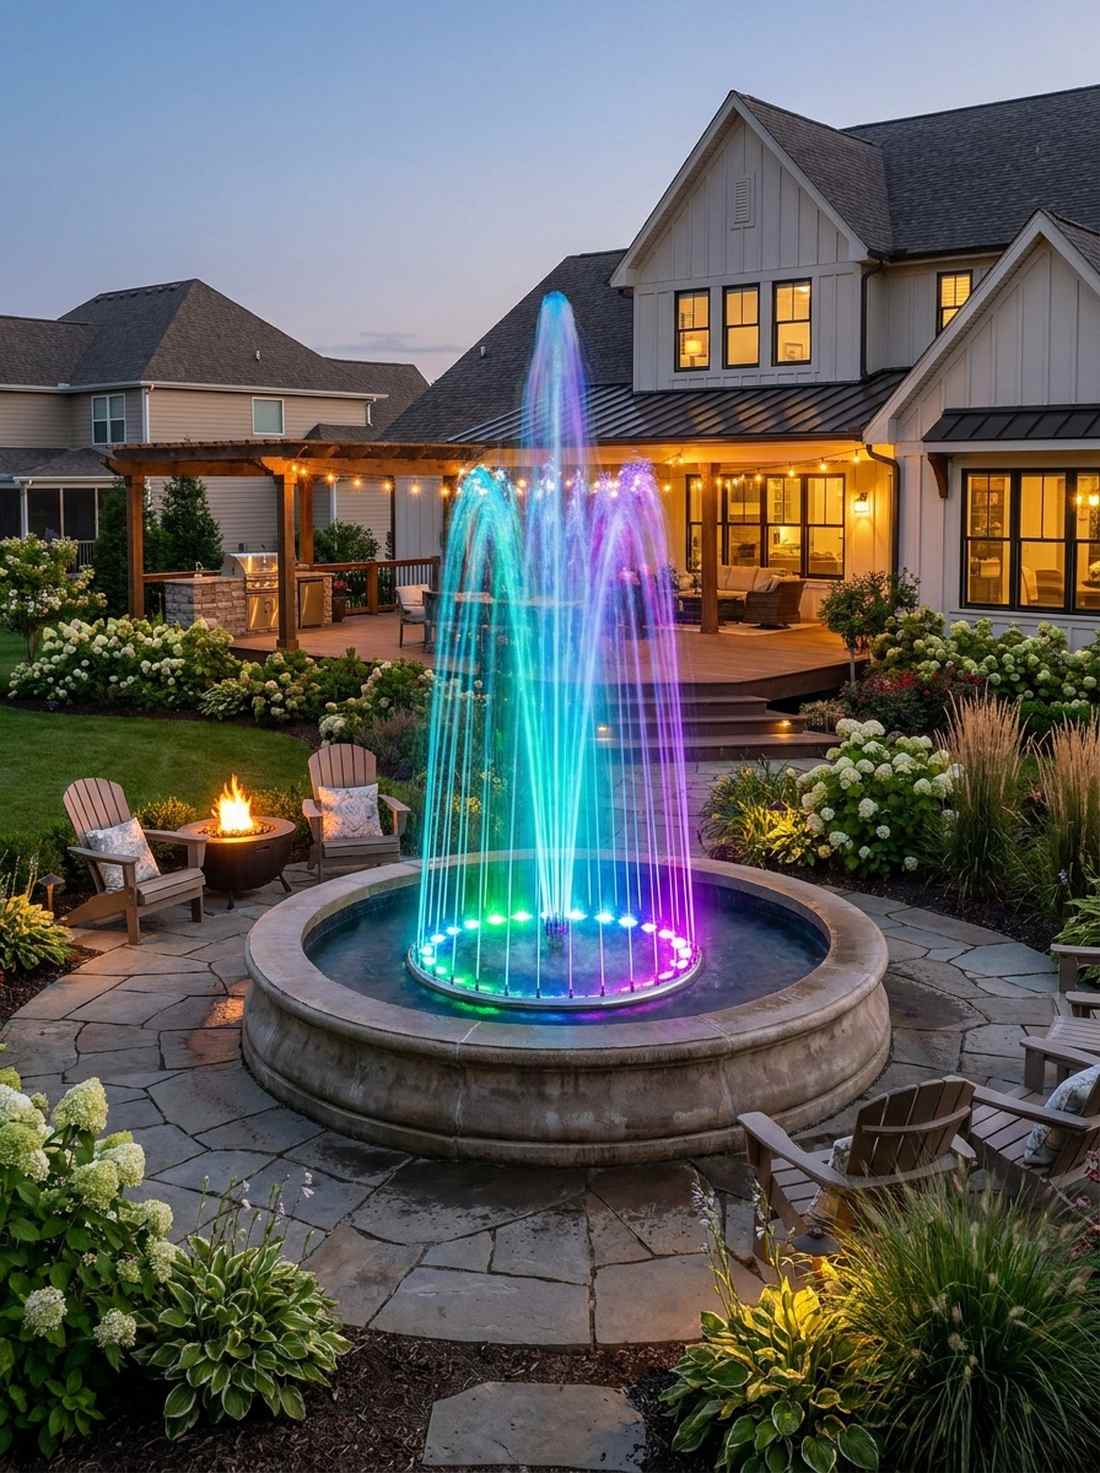
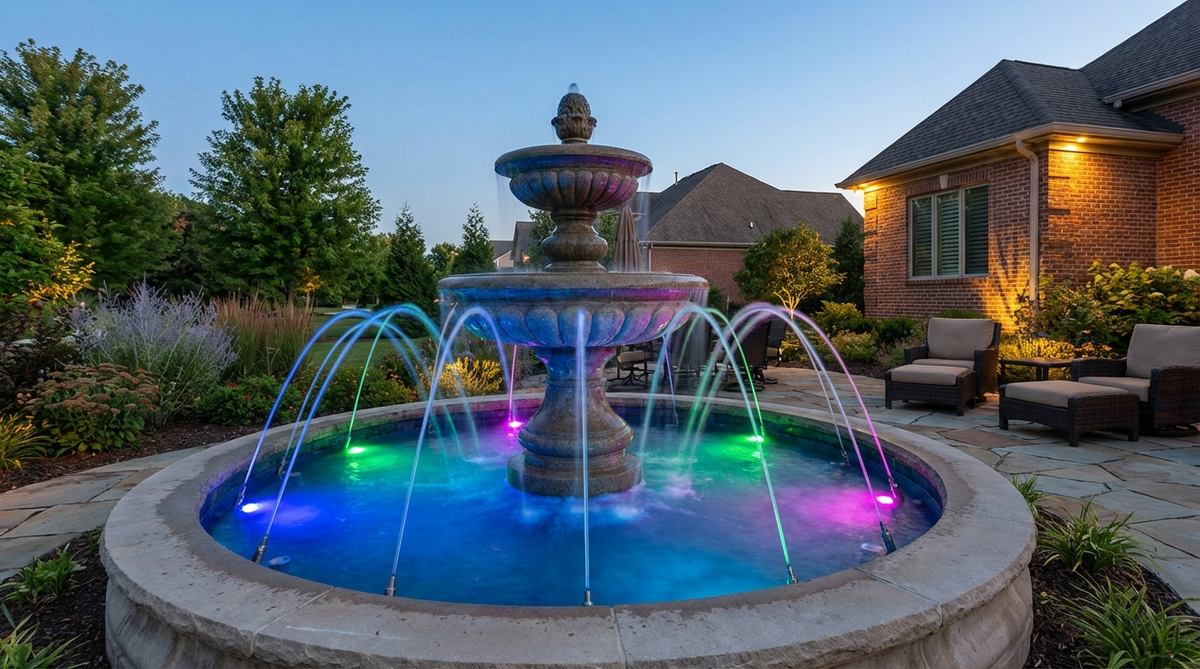
Illuminating the spray from underneath, this setup makes the falling water feel like liquid neon glass. Securing submersible RGB ring lights directly around the fountain nozzle creates a stunning, dynamic chromatic sculpture.
Lighting a fountain from the outside causes nasty glare, but pushing the beam up through the water looks far more expensive than it is. Grabbing IP68-rated stainless steel fixtures ensures they survive chlorine and heavy mineral deposits without corroding.
A professional fountain ring costs about $60–$95.
- Key Materials: IP68 LED nozzle ring, low-voltage wire
- Vibe / Style: Chromatic liquid sculpture
- Difficulty: Moderate plumbing integration
- Budget Breakdown: LED Ring: $75 | Sealant: $10
- Creator’s Tip: Wrap the underwater wire connections in self-fusing silicone tape to guarantee they never short out.
- Smart Sourcing: Pick up a submersible fountain LED ring light (stainless steel) and self-fusing silicone tape.
53. Deck Post Solar Caps With Planters
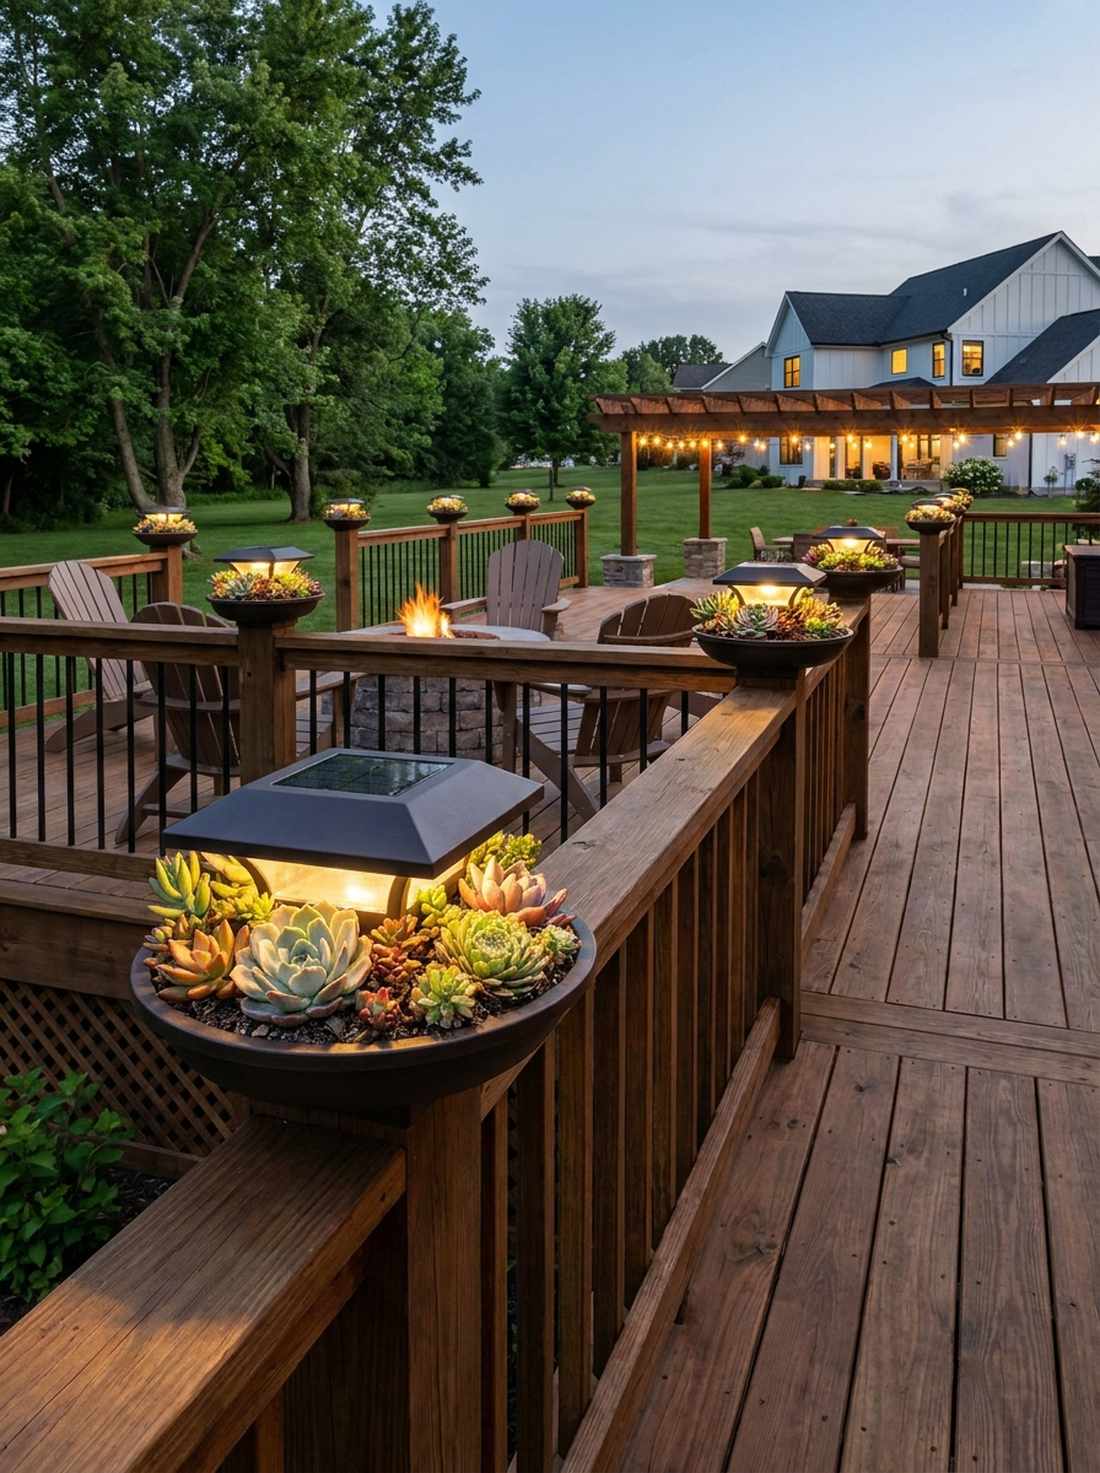
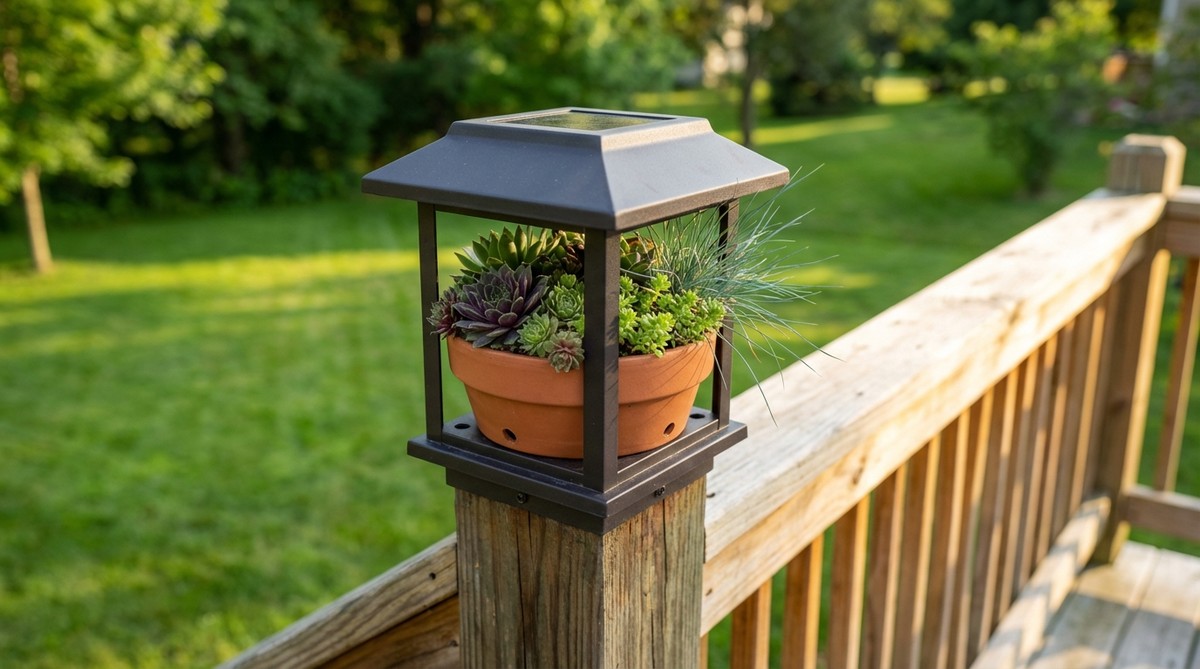
Combining lush greenery with soft ambiance, this hybrid feels like a brilliant fusion of nature and architecture. Sliding on solar planter post caps is the ultimate trick for adding succulents and light to bare deck railings simultaneously.
Standard post caps are boring, but adding living plants directly into the outdoor decor lights delivers a surprisingly premium look. Utilizing shallow drainage channels ensures the soil doesn’t rot the wood post underneath.
Upgrade your posts for roughly $40–$75.
- Key Materials: Solar caps with built-in shallow planters
- Vibe / Style: Horticultural architectural fusion
- Difficulty: Easy planting and capping
- Budget Breakdown: Planter caps: $55 | Succulents: $15
- Creator’s Tip: Use a fast-draining cactus mix to prevent water from pooling near the integrated solar panel electronics.
- Smart Sourcing: Grab solar post cap planters (weather-resistant kit) and premium cactus soil mix.
54. Fire Pit Perimeter Lighting
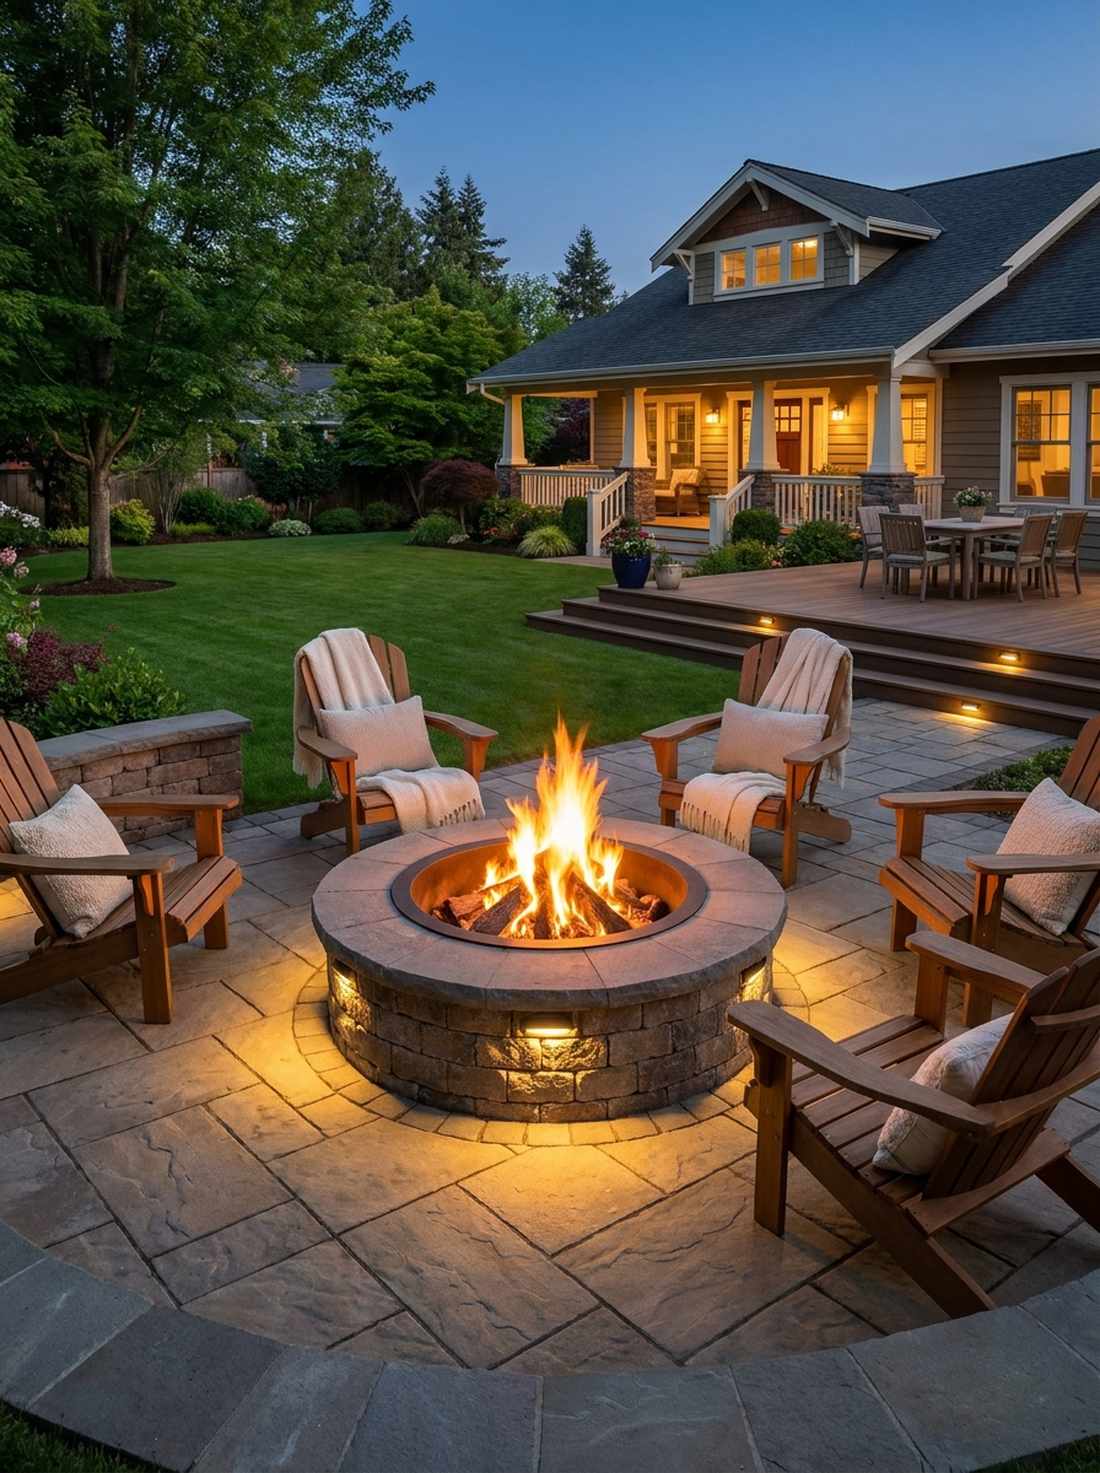
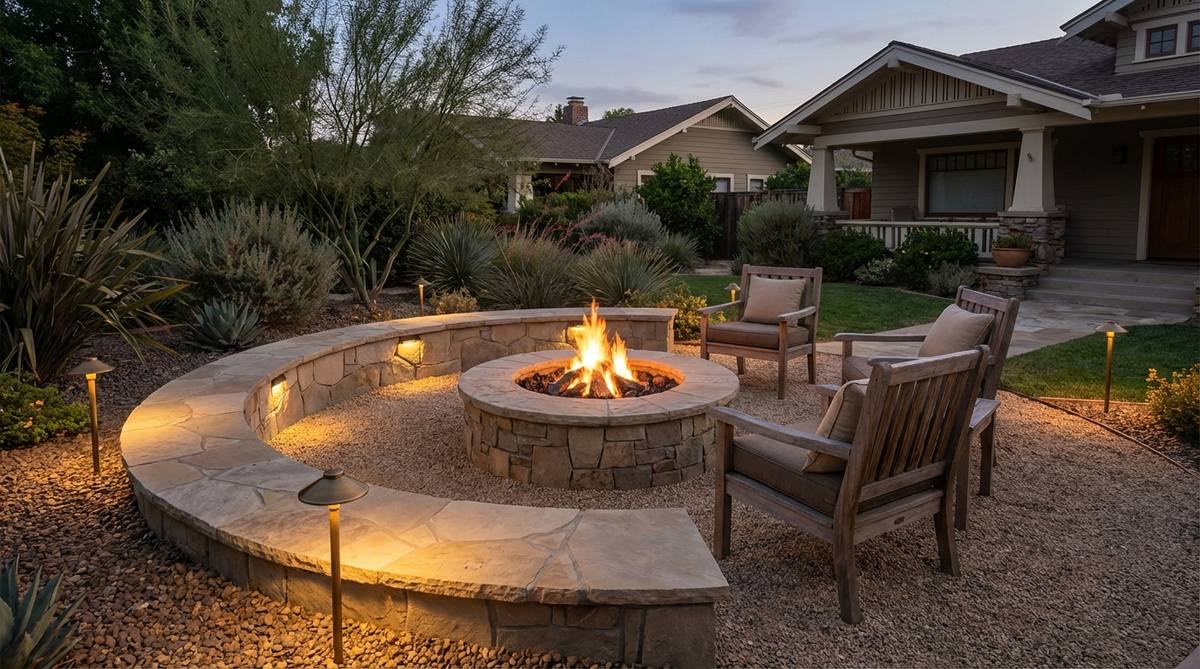
Glowing low to the ground, this subtle boundary feels like a safe, inviting campfire circle. Positioning low-glare perimeter seating lights ensures guests can navigate around a roaring fire without tripping over chairs.
Bright lights wash out the actual fire, but using ultra-warm 2200K downwards-facing LEDs gives a designer-level finish that compliments the flames. Keeping premium LED outdoor lighting safely outside the 36-inch heat radius prevents plastic housings from melting.
Circle the pit securely for about $50–$85. Save this for crucial backyard fire safety!
- Key Materials: Warm-white low-profile ground lights
- Vibe / Style: Cozy campfire safety
- Difficulty: Simple perimeter staking
- Budget Breakdown: Ground lights: $60 | Measuring tape: $5
- Creator’s Tip: Face the light beams strictly outward away from the fire pit so the area immediately around the flames stays dark.
- Smart Sourcing: Use low-profile hardscape paver lights (warm LED) and a fiberglass measuring tape.
Before you wrap up, this final integration completely eliminates ugly wires…
55. Trellis Integrated LED Strips
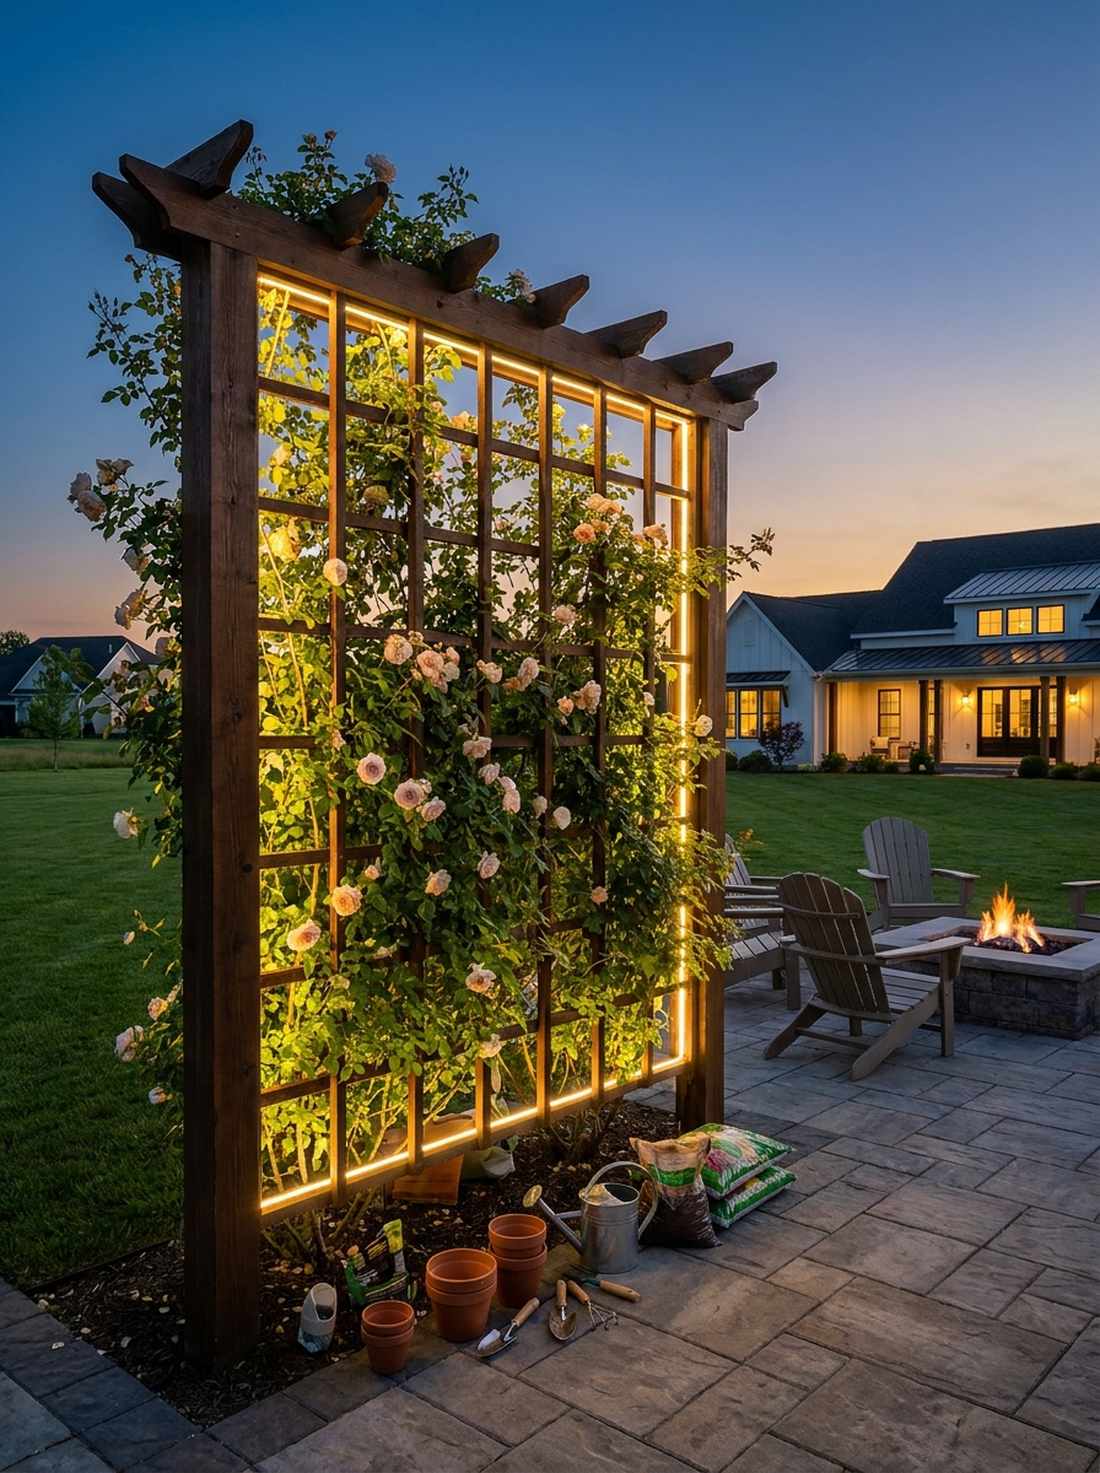
Weaving silently through the wood, this hidden strip makes climbing roses feel like they are glowing from within. Securing integrated trellis LED strips is a fantastic way to outline architectural frameworks while hiding the hardware completely.
Bulky fixtures ruin the delicate look of vines, but routing thin flexible ribbons along the back of the lattice looks far more expensive than it is. Adding miniature garden supplies at the base turns the entire trellis into a monumental feature wall.
You can backlight a trellis for roughly $45–$70.
- Key Materials: Flexible IP67 LED ribbons, UV-resistant zip ties
- Vibe / Style: Glowing botanical architecture
- Difficulty: Intermediate weaving
- Budget Breakdown: LED Ribbon: $45 | Zip ties: $5
- Creator’s Tip: Always secure the strips to the primary vertical structural members, not the thin diagonal lattice strips that can break.
- Smart Sourcing: Invest in flexible outdoor LED tape (cut-to-length) and brown UV-resistant cable ties.
Conclusion
Strategic implementation of these 50+ outdoor decor lights—from premium outdoor decor lanterns to smart-controlled architectural LED setups—completely revamps how your garden functions after dark. By utilizing the exact budget breakdowns and smart productized sourcing tricks provided, you can achieve that high-end landscape architect finish without overspending. Prioritize UV-resistant gear, IP65-rated durability, and layered illumination. Start with foundational smart path lighting, then add your visual hooks and decorative accents to transform your backyard into an expensive-looking evening retreat.
Frequently Asked Questions
What wattage LED outdoor lights should I choose for pathway illumination?
Pathway applications perform best using 3-5 watt premium LED outdoor lighting, producing about 50-100 lumens per fixture spaced 6-8 feet apart. This specific low-voltage calculation ensures highly visible navigation without causing blinding glare that ruins the nighttime aesthetic. For heavy-traffic main driveways, bumping up to 7-10 watt commercial-grade fixtures is smarter, while 1-3 watts is perfect for delicate fairy garden kits and subtle accent paths. Investing in a low-voltage transformer starter kit allows you to scale and adjust these wattages easily.
How long do solar outdoor lights operate on a full charge?
Quality fixtures using upgraded lithium batteries and oversized monocrystalline panels will reliably push 8-12 hours of light after just 6-8 hours of direct sun. Cheap generic plastics fail fast, but investing in premium solar starter kits ensures the batteries survive cold weather drops. Motion-sensor modes are a brilliant hack to conserve power, keeping the lights dim until activated. To maximize lifespan, periodically wipe the panels with a microfiber cloth and apply a UV-protective clear spray to prevent hazing.
What color temperature is best for outdoor entertaining areas?
For high-end dining and lounge areas, ultra-warm 2700-3000K LEDs are the absolute gold standard because they perfectly mimic the cozy vibe of authentic outdoor decor lanterns. This softer amber tone flatters skin and prevents the patio from feeling like a sterile hospital room. However, for outdoor BBQ grills or prep stations, utilizing a crisper 4000K bulb provides much-needed safety visibility. Buying a color-tunable smart lighting system is the ultimate hack, allowing you to instantly switch from crisp prep-light to warm party-glow from your phone.
How do I prevent voltage drop in low-voltage lighting systems?
The secret to preventing dim bulbs at the end of your yard is matching wire gauge to distance—use heavy 12 AWG bulk wire for 200-watt runs up to 100 feet, and upgrade to 10 AWG for anything pushing 150 feet. Stringing lights in a lazy daisy-chain guarantees failure; instead, use a “T-tap” method where you split the power evenly from the center of the yard out. Sourcing a high-quality multi-tap stainless steel transformer allows you to bump the voltage slightly on longer runs to compensate for the drop effortlessly.
Can I install outdoor lighting myself or should I hire an electrician?
Because low-voltage 12V systems pose zero shock hazard, anyone can install them safely using basic plug-and-play outdoor lighting kits and waterproof wire nuts without needing expensive permits. Solar options are even easier since they require no wiring at all. However, if you are installing hardwired 120V floodlights, adding new GFCI outlets, or tapping directly into the home’s main breaker, you must hire a licensed electrician. For DIYers, sticking to low-voltage transformer kits gives you a professional look at a fraction of the cost.