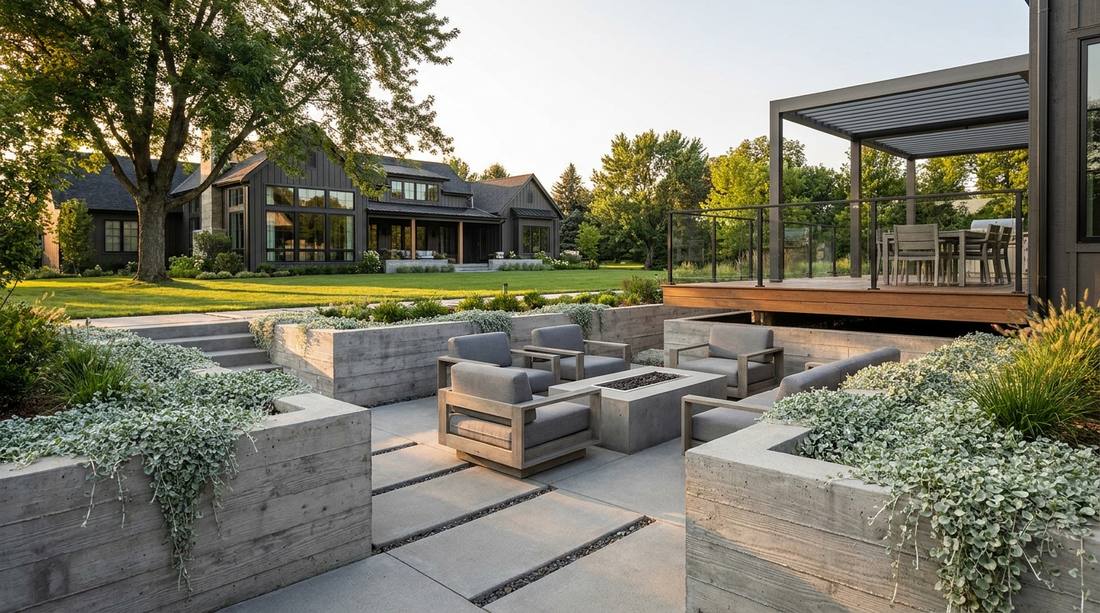
Running your hand across a freshly cured, board-formed concrete retaining wall reveals the exact moment industrial raw materials transform into high-end landscape architecture. The stark, intentional contrast between razor-sharp geometric edges and the wild, organic spill of silver ponyfoot is what separates a basic backyard from a designer sanctuary. This approach to garden design modern aesthetics isn’t just about pouring slabs; it’s about utilizing architectural restraint to manipulate space, shadow, and movement through highly curated, weather-defying materials.
Design Snapshot: Key Principles
- Geometric Precision: Straight pathways, rectangular planters, and linear borders create order and visual flow
- Material Contrast: Concrete paired with wood, gravel, or greenery adds depth without clutter
- Minimalist Restraint: Fewer elements used thoughtfully highlight individual features and maintain open space
- Functional Structure: Every hardscape element serves both aesthetic and practical purposes
Contemporary Garden Design Through Strategic Pathways
Pathways establish the foundation for modern garden layouts, guiding movement while defining spatial relationships. Concrete offers unmatched versatility in creating these circulation routes with materials that age gracefully and require minimal upkeep.
1. Grid Pattern Paver System
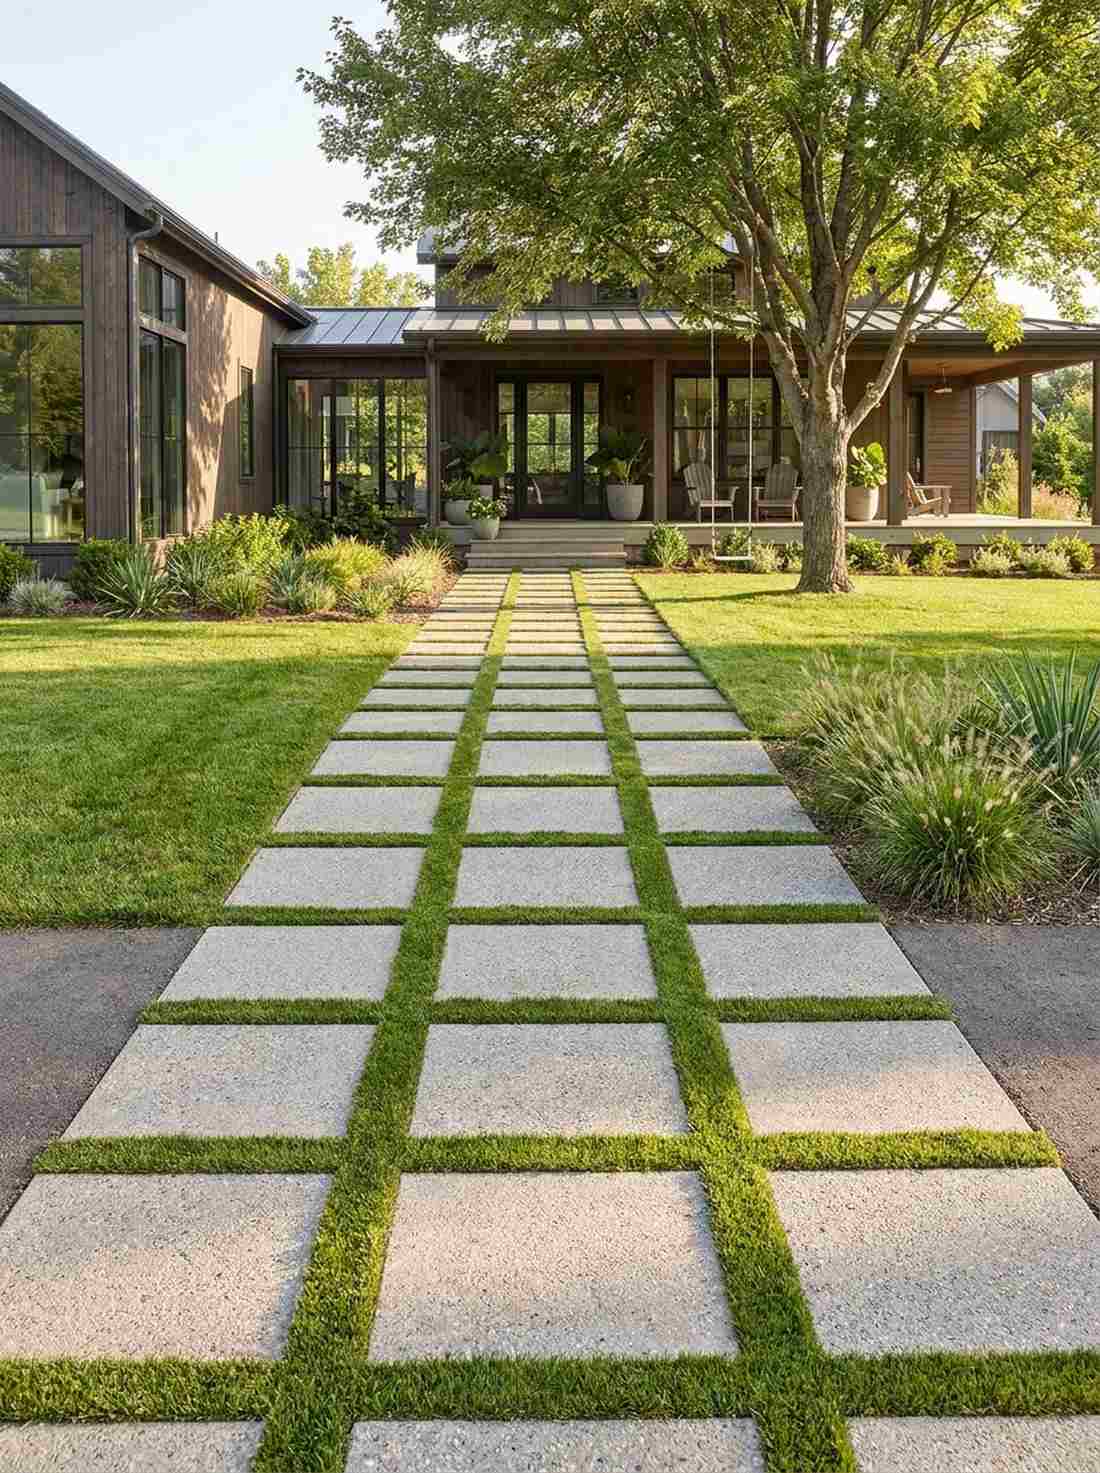
There is an undeniable satisfaction in seeing perfect symmetry that feels like a high-end architectural rendering come to life. This contemporary geometric landscape path is an absolute showstopper, working exceptionally well for wide, flat front-yard approaches where you want to make a massive first impression.
Ditching the traditional winding brick for a rigid grid delivers a surprisingly premium look that instantly elevates your home’s exterior. By setting pre-cast concrete blocks into a measured grid and filling the gaps with low-growing turf, you achieve that coveted garden design minimalist aesthetic without sacrificing green space.
You can easily pull this off for around $200–$400 depending on square footage. Save this to your DIY weekend garden board!
- Key Materials: 24×24 architectural concrete pavers, polymeric leveling sand
- Vibe / Style: Ultra-modern estate entrance
- Difficulty: Intermediate weekend project
- Budget Breakdown: Pavers: $250 | Base Sand: $50 | Turf Plugs: $40
- Creator’s Tip: Use a laser level; a 1/2-inch height difference will ruin the geometric illusion.
- Smart Sourcing: Pre-cast exposed aggregate pavers (pallet bundle) and heavy-duty landscaping base grids.
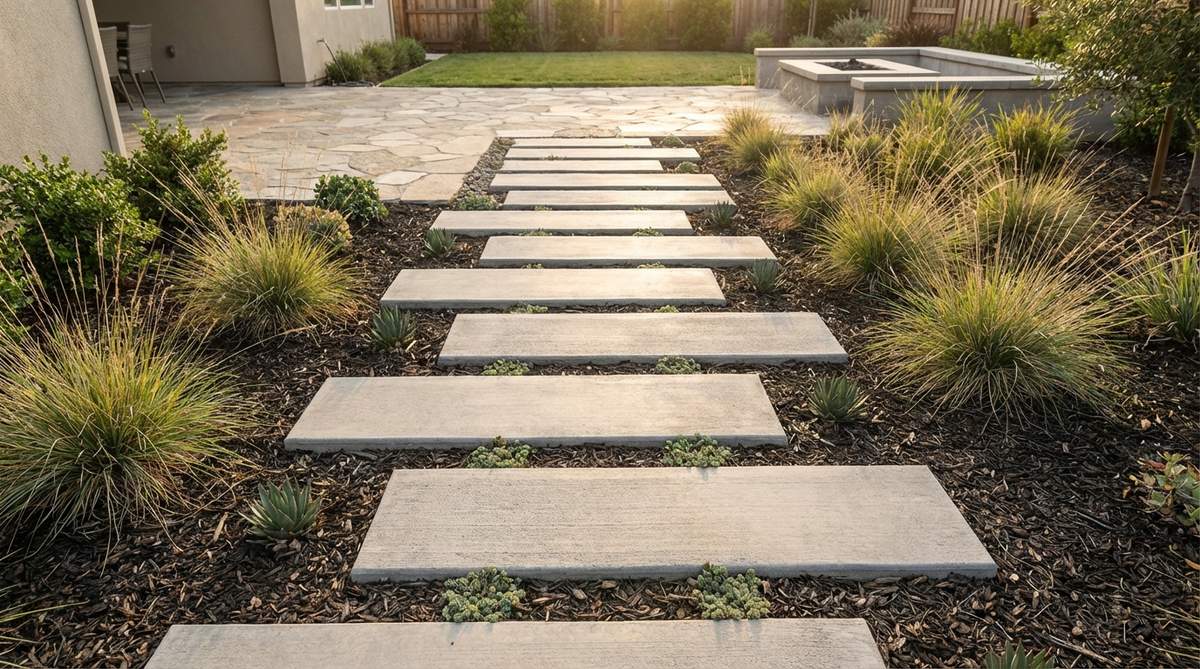
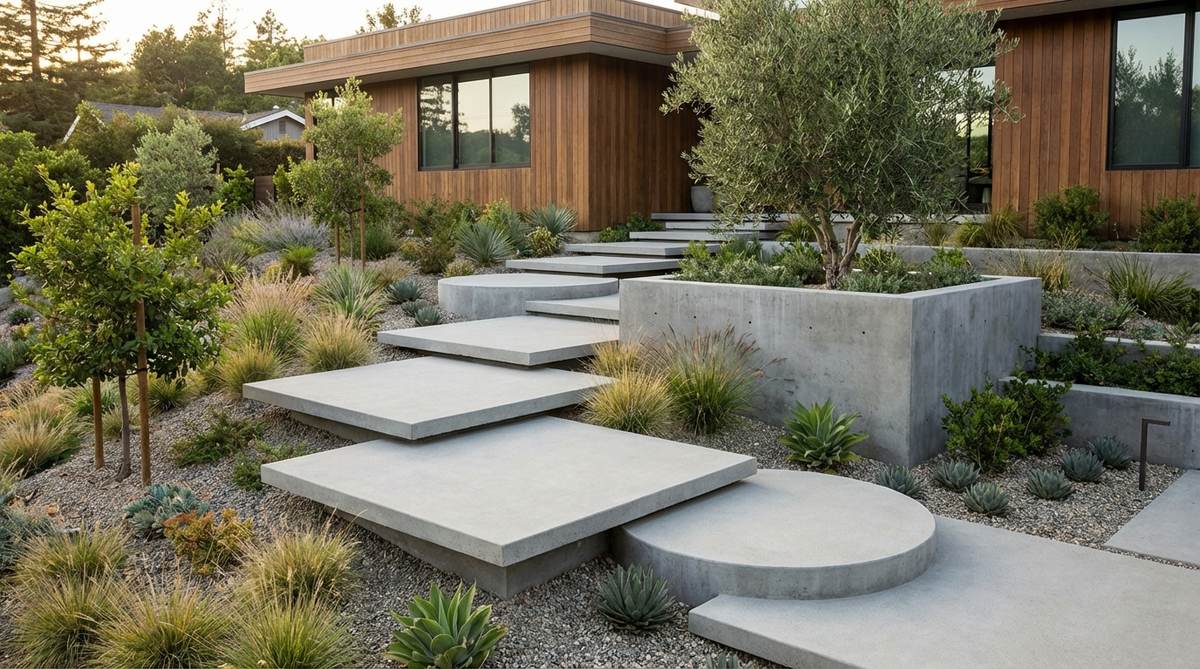
2. Floating Concrete Stepping Stones
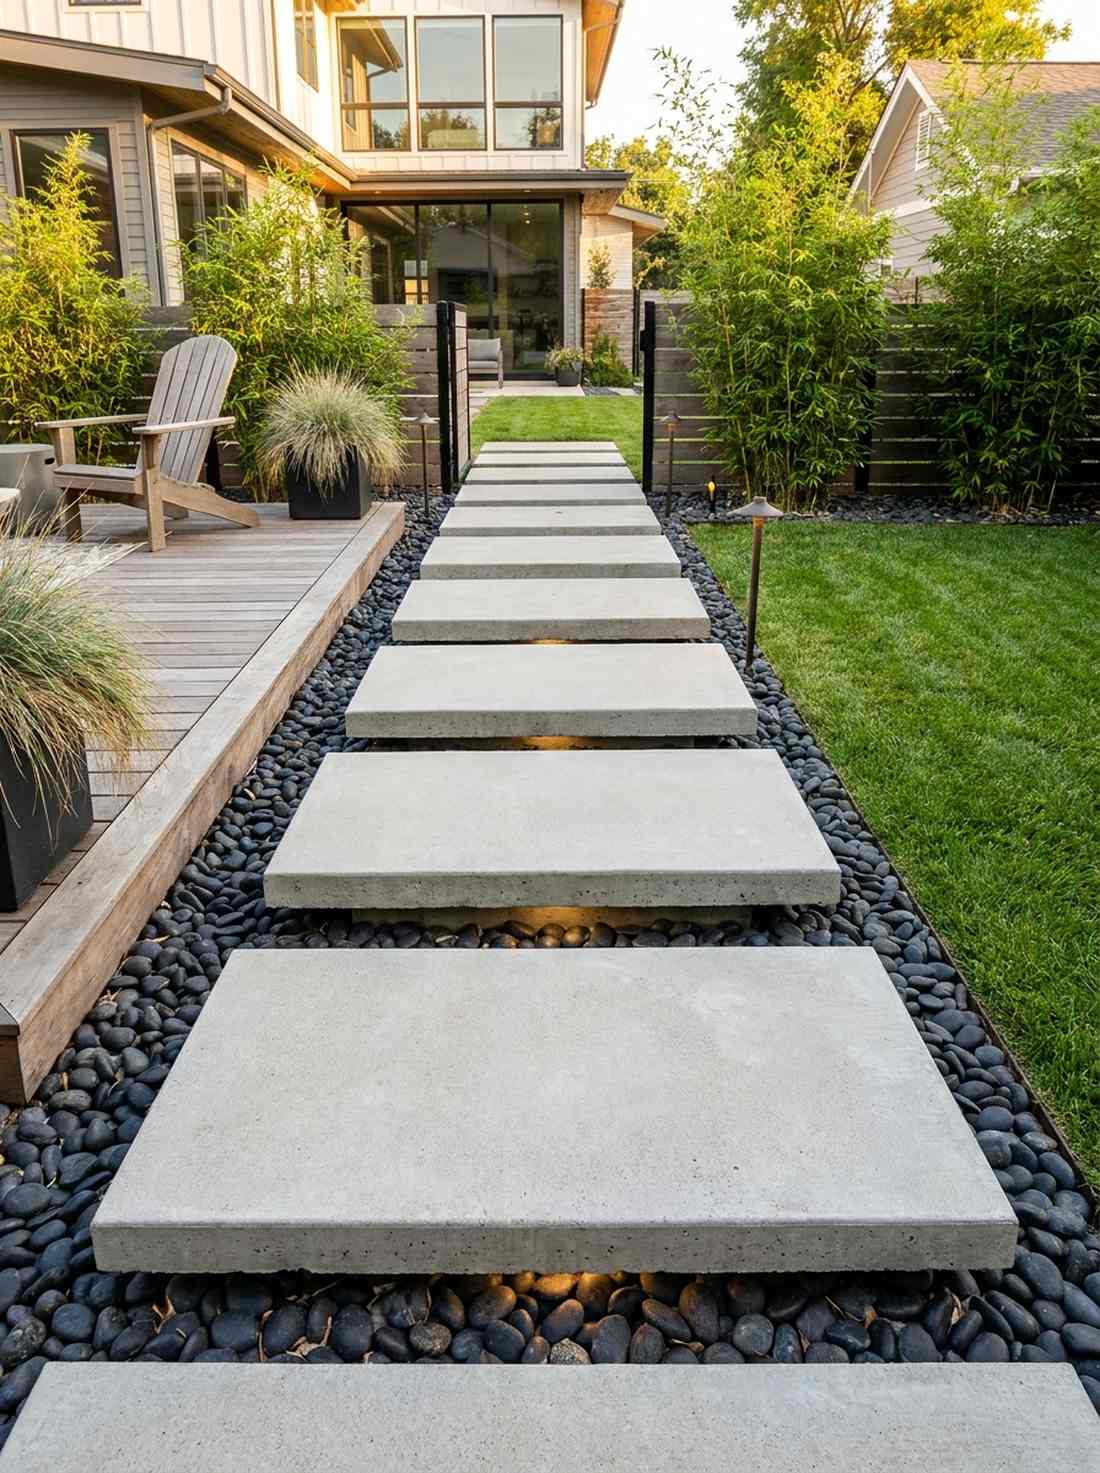
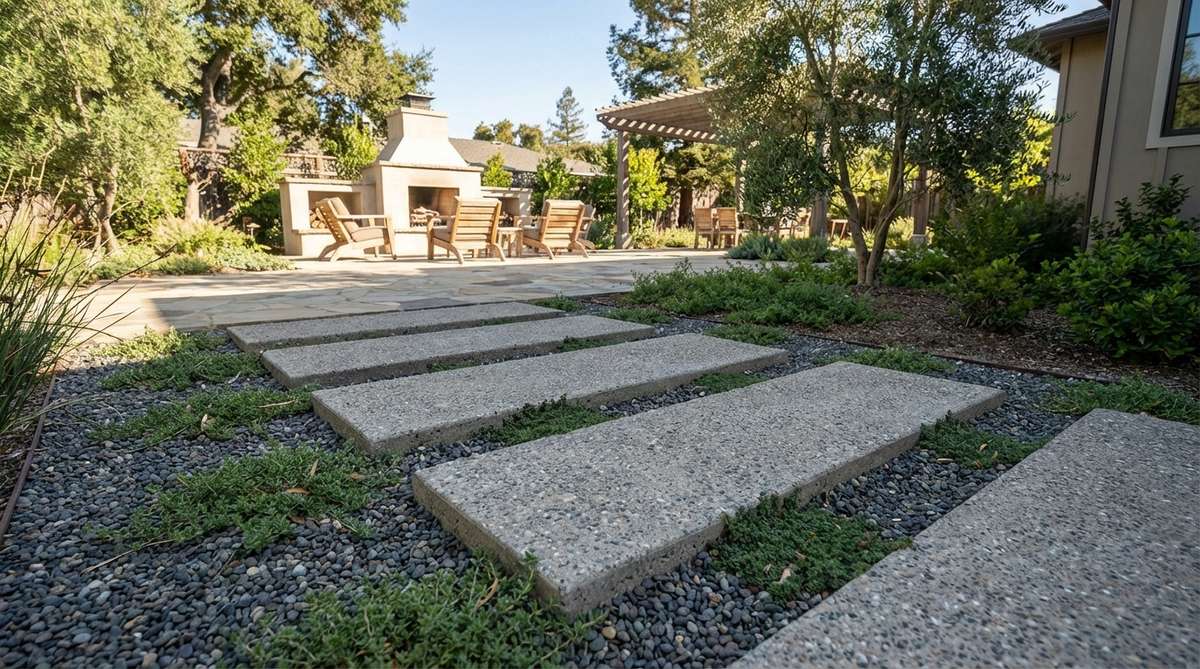
This layout gives off a gravity-defying illusion that feels straight out of an ultra-modern Zen retreat. As a minimalist gravel walkway design, it works exceptionally well for narrow side-yards or transitional spaces connecting patios to lawn areas.
Most beginners sink pavers directly into dirt, but elevating them on hidden mortar beds gives a designer-level finish that catches shadows perfectly. Utilizing heavy-duty outdoor construction adhesive on a cinderblock base creates that famous “floating” gap over your decorative river rock.
This optical illusion can be achieved for about $150 in raw materials. Highly recommended for a quick weekend win.
- Key Materials: Rectangular concrete slabs, black Mexican beach pebbles
- Vibe / Style: Japanese-inspired modern hardscape
- Difficulty: Moderate
- Budget Breakdown: Slabs: $80 | Hidden bases: $20 | Pebbles: $50
- Creator’s Tip: Paint the hidden concrete bases flat black to enhance the floating shadow effect.
- Smart Sourcing: High-strength architectural mortar mix and bulk black polished river rock.
3. Dual-Strip Driveway Approach
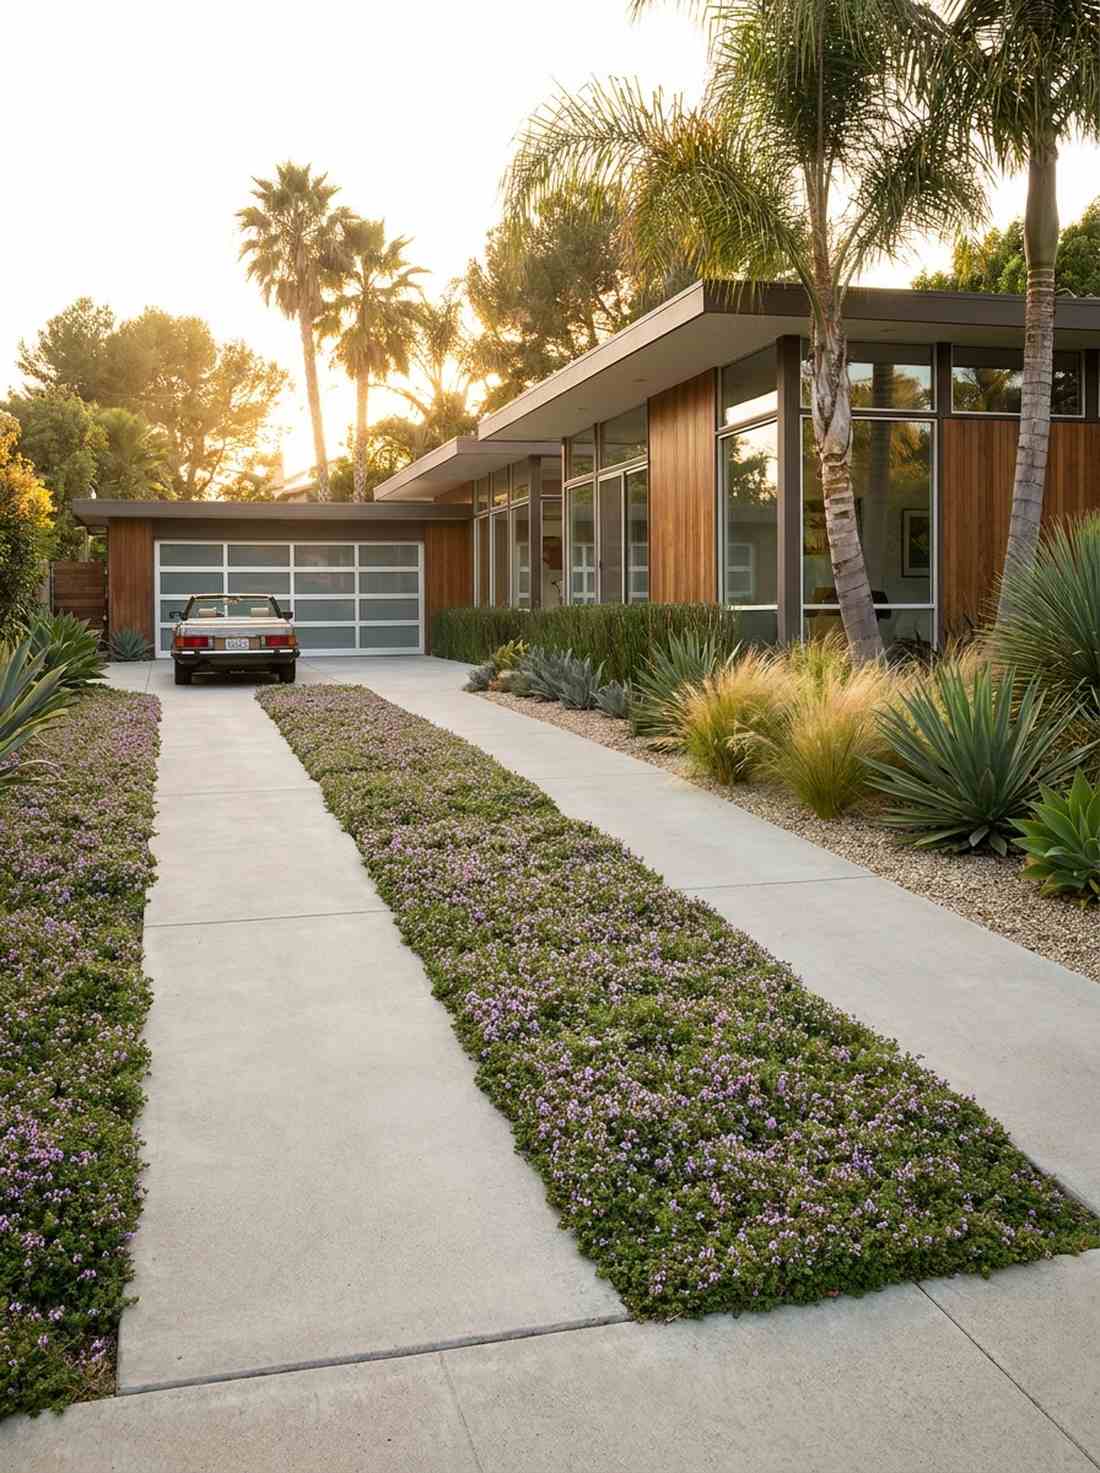
Evoking the effortless cool of mid-century Hollywood, this setup feels like pulling up to a private celebrity compound. This modern linear driveway concept is perfect for reducing the stark, hot mass of a solid concrete driveway while boosting property value.
Rethinking a massive slab into twin parallel lines looks far more expensive than it actually is, drastically cutting material costs. You’ll need premium contemporary garden design tools like heavy-duty form boards and high-PSI concrete to ensure vehicle weight doesn’t crack the strips.
Expect to spend around $500–$900 for a standard length. Pin this if you’re planning an exterior curb appeal upgrade!
- Key Materials: 4000 PSI concrete, rebar grid, creeping thyme
- Vibe / Style: Mid-century modern minimalist
- Difficulty: Advanced (requires pouring/leveling)
- Budget Breakdown: Concrete delivery: $600 | Rebar/Forms: $150 | Groundcover: $100
- Creator’s Tip: Widen the strips to at least 24 inches if you frequently host guests with larger SUVs.
- Smart Sourcing: Heavy-duty steel rebar grids (bulk pack) and commercial-grade concrete form release oil.
4. Scored Concrete Tile Effect
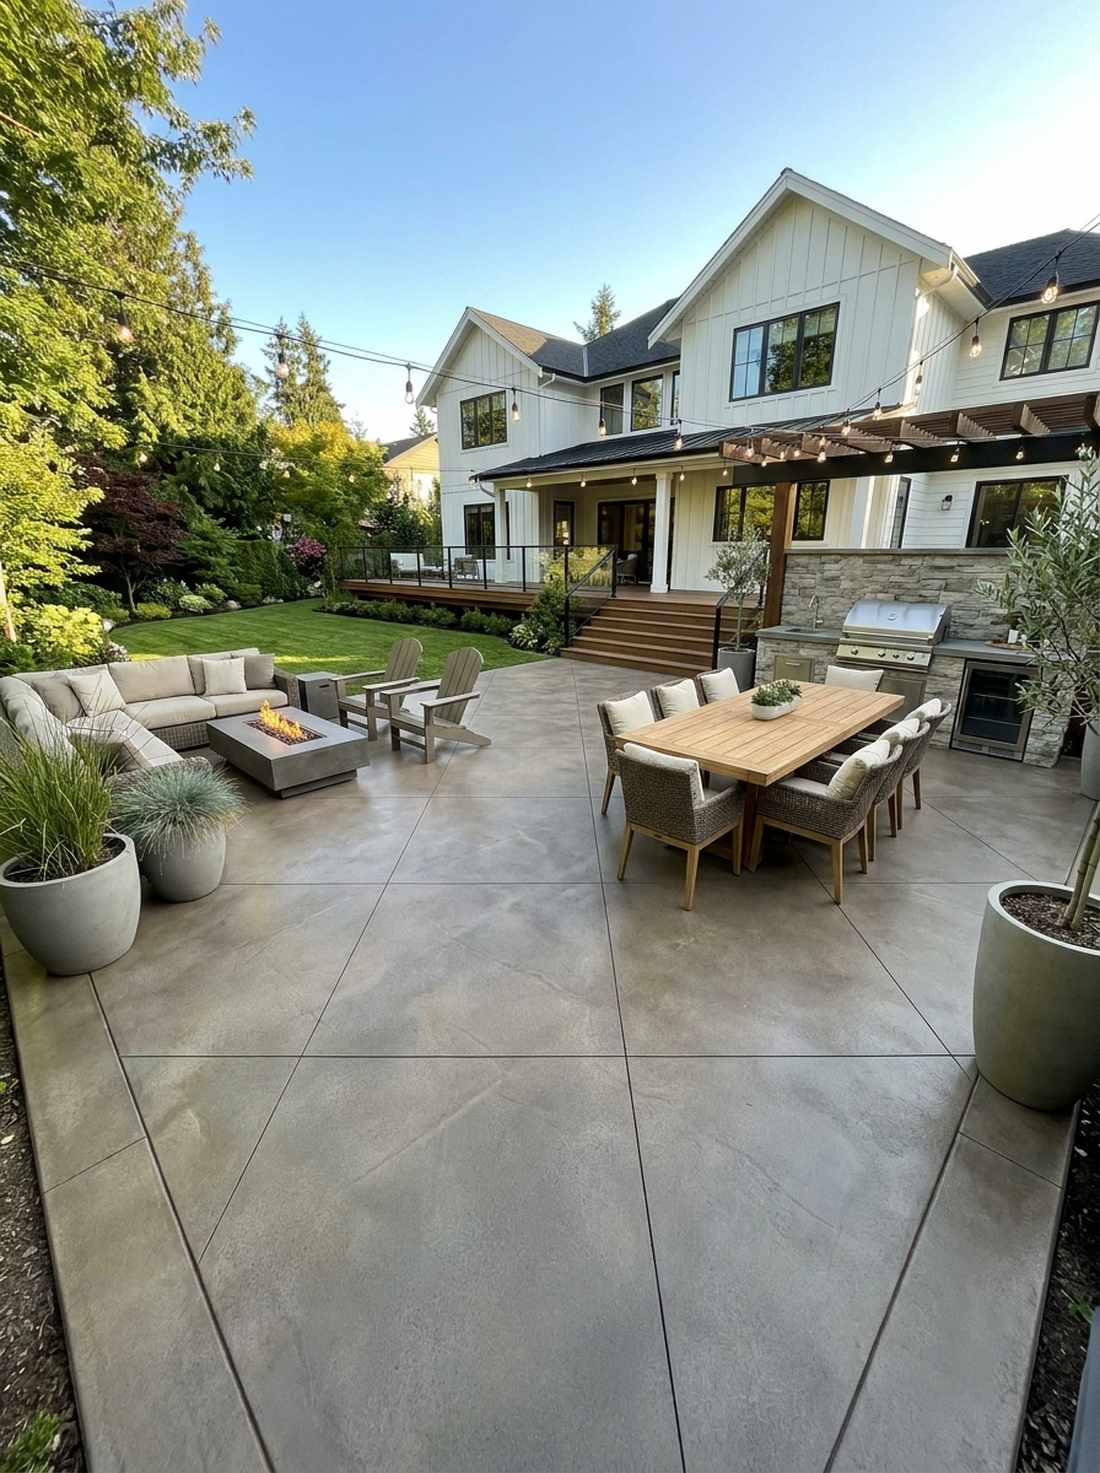
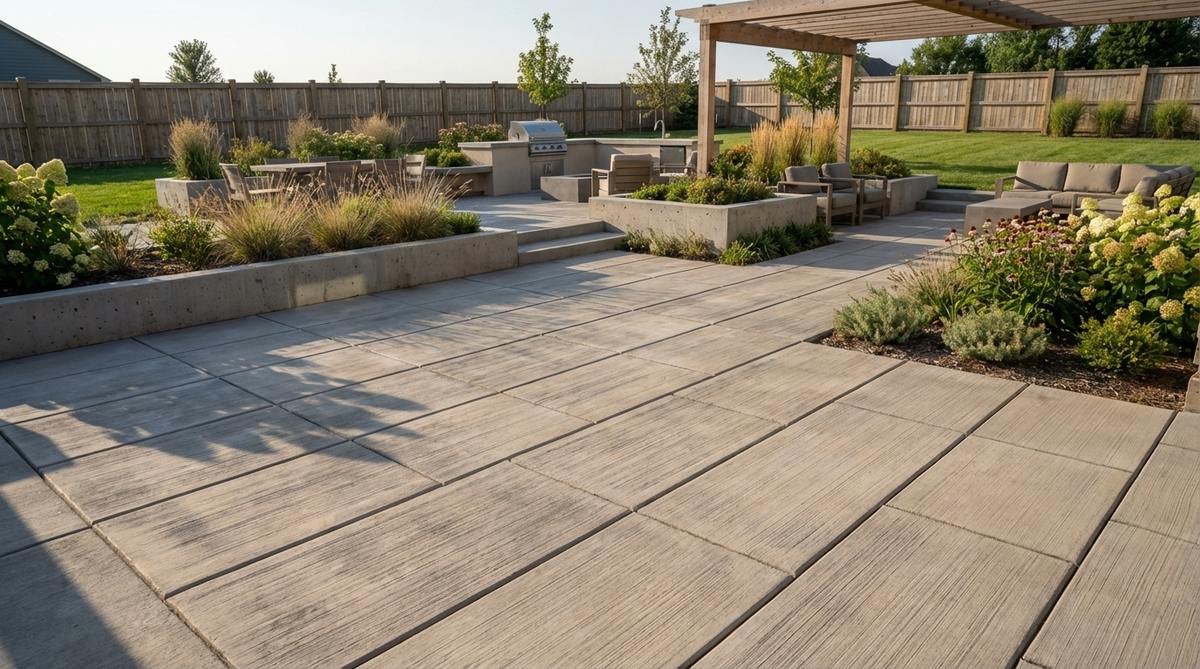
This seamless geometric pattern feels incredibly sleek, giving the illusion of imported oversized porcelain without the staggering price tag. This seamless concrete patio finish is ideal for massive backyard dining areas where individual pavers would look too busy.
Carving geometric lines into a freshly poured slab guarantees a high-end luxury resort aesthetic for pennies on the dollar. Applying an industrial-grade tinted concrete sealer transforms the boring grey base into a premium garden design modern surface that repels barbecue stains.
This finishing technique only adds about $60 to a standard pour cost. A brilliant hack for budget-conscious modernists.
- Key Materials: Wet concrete, grooving trowel, tinted acrylic sealer
- Vibe / Style: Luxury resort patio
- Difficulty: Intermediate (timing is critical)
- Budget Breakdown: Tooling: $35 | Sealer: $65
- Creator’s Tip: Use a straight-edge guide board when scoring; freehanding will immediately look cheap.
- Smart Sourcing: Professional concrete grooving trowel kit and UV-resistant tinted concrete sealer (gallon jug).
Most people blow their entire landscaping budget on expensive stones, but this next geometric layout proves you can get a magazine-cover look using the cheapest materials at the hardware store…
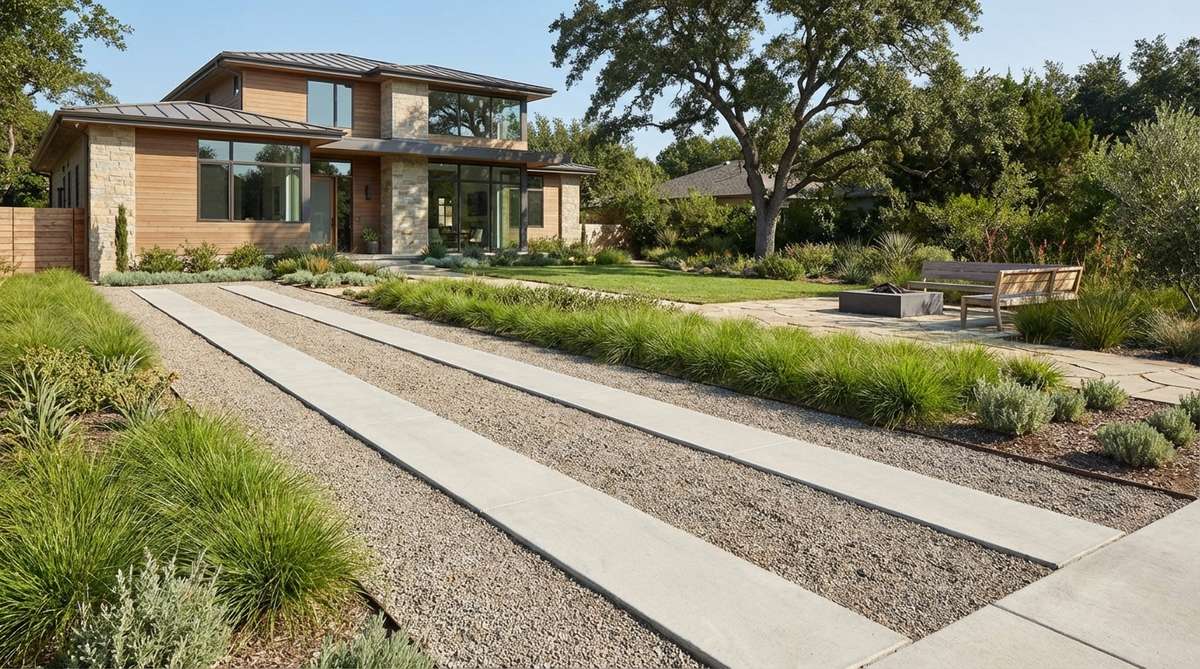
5. Staggered Rectangular Walkway
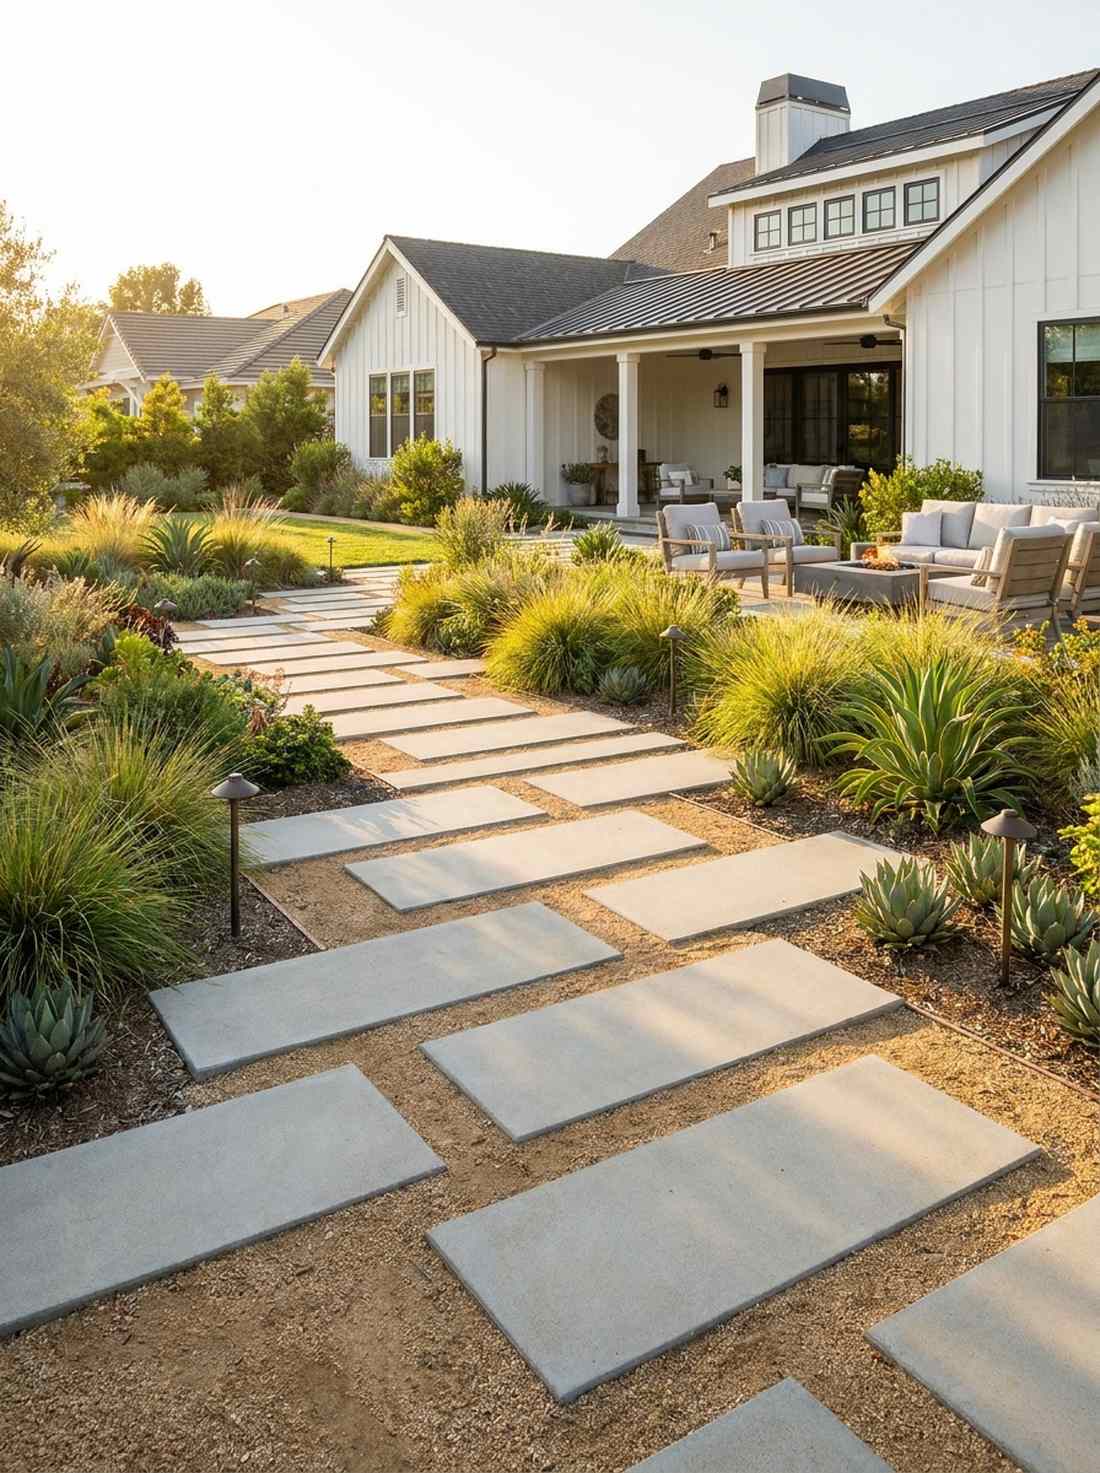
There’s a dynamic, restless energy to this layout that feels like walking through a contemporary art museum’s sculpture garden. This asymmetrical garden path concept works exceptionally well for long, narrow transition spaces that normally feel like boring corridors.
Breaking the rules of perfect symmetry and alternating length offsets delivers a highly curated, architect-designed vibe. By blending cheap, standard-width rectangular pavers with high-end hardscaping border supplies, you force the eye to zig-zag naturally through the landscape.
You can achieve this broken-line effect for around $120. Pin this to your modern landscape architecture board!
- Key Materials: 12×24 and 12×36 concrete treads, decomposed granite
- Vibe / Style: Urban contemporary path
- Difficulty: Beginner-friendly
- Budget Breakdown: Treads: $90 | Granite base: $30
- Creator’s Tip: Keep the width uniform; only stagger the lengths to maintain that modern clean-line aesthetic.
- Smart Sourcing: Pre-cut architectural concrete treads and commercial-grade weed barrier fabric (pro-roll).
6. Circular Concrete Medallion Inlay
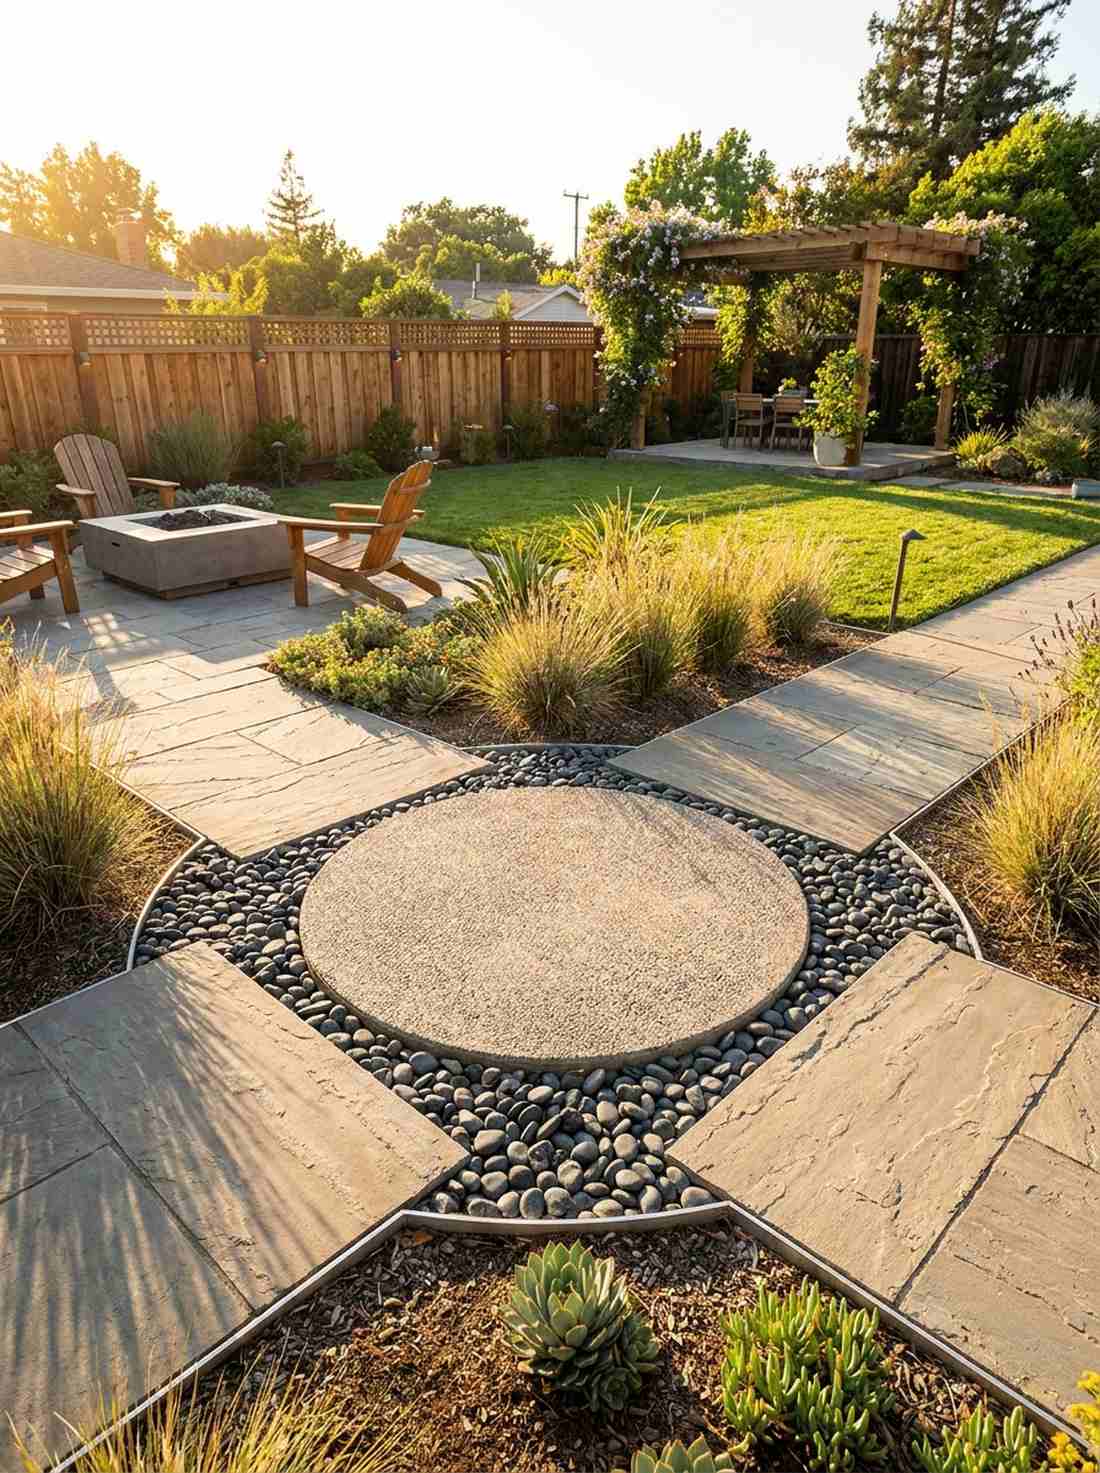
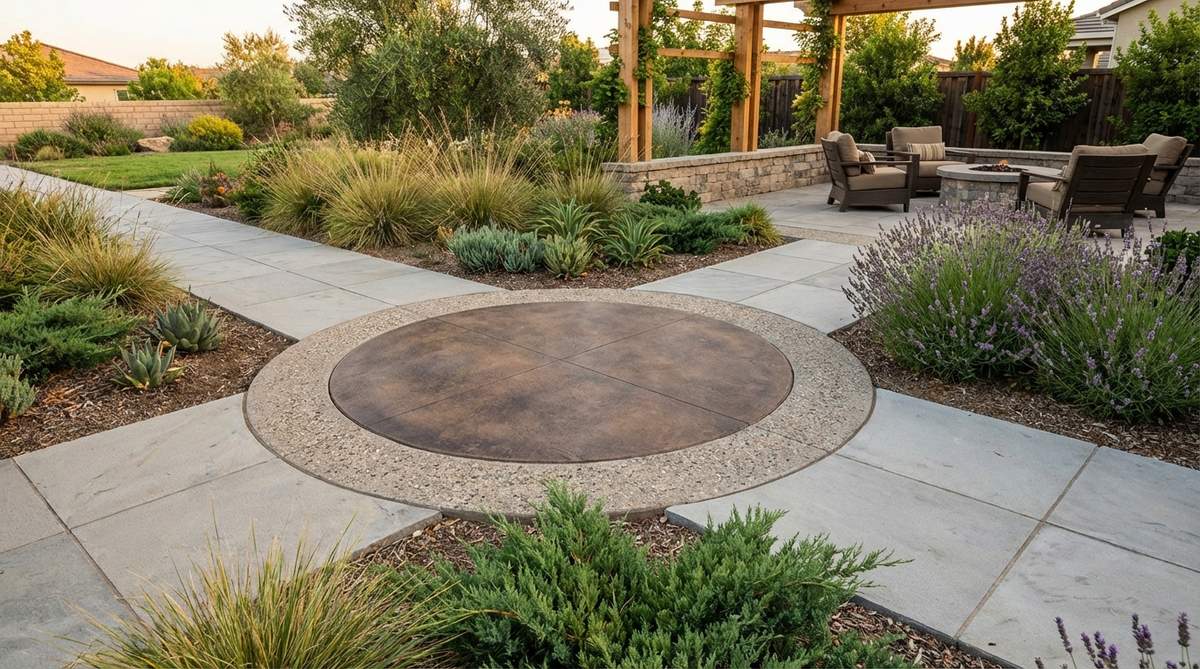
Injecting a stark, perfect circle into a sea of rigid rectangles feels unexpectedly dramatic and totally captivating. This geometric focal point paving is the perfect use-case for pathway intersections or the exact center of a courtyard.
Interrupting a linear path with a bold curve completely redefines the spatial energy of a backyard. Sinking a pre-cast concrete medallion into your contemporary garden design layout acts as an aesthetic anchor, guiding foot traffic without needing a physical wall.
You can execute this intersection upgrade for about $85. It’s a fast upgrade that completely changes the vibe.
- Key Materials: 36-inch concrete medallion, contrasting gravel, paver edging
- Vibe / Style: Architectural courtyard feature
- Difficulty: Easy
- Budget Breakdown: Medallion: $60 | Edging: $25
- Creator’s Tip: Choose a medallion with an exposed aggregate finish to contrast against smooth pathway slabs.
- Smart Sourcing: Pre-cast decorative concrete medallions and flexible aluminum landscape edging kits.
7. Overlapping Geometric Step Design
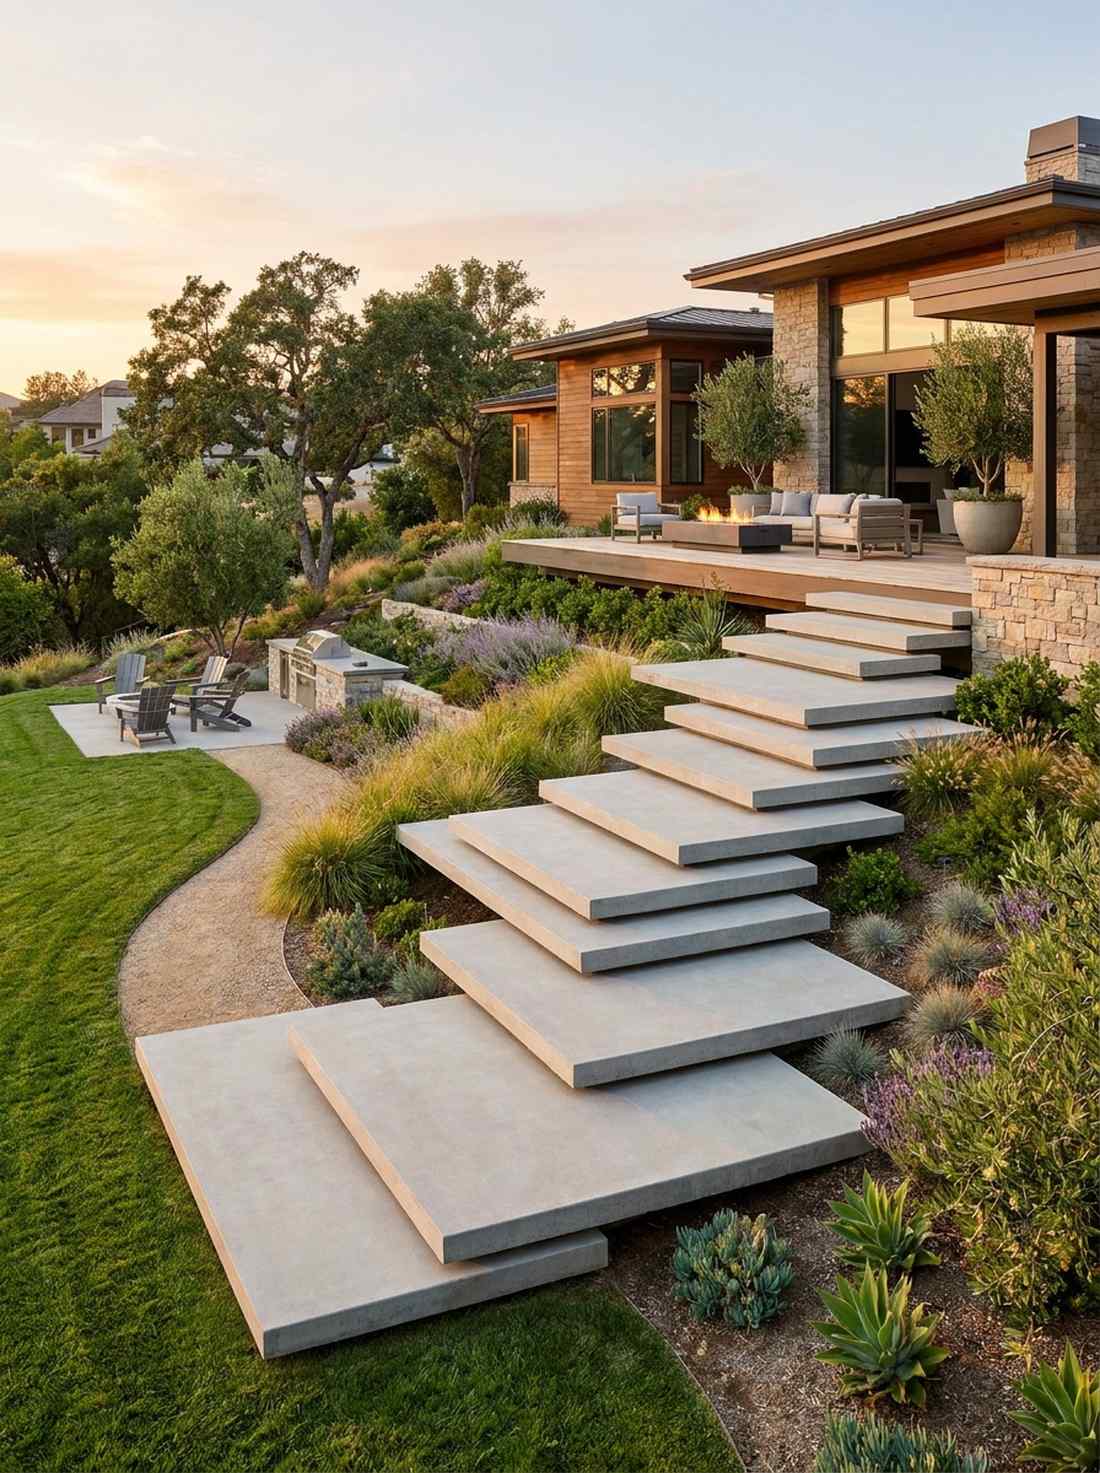
These massive, floating tiered layers feel like a dramatic entrance to a modern hillside fortress. This cantilevered outdoor stair concept is absolute perfection for sloping front yards where traditional stairs look incredibly boring.
Ignoring standard stair dimensions to create wide, overlapping platforms makes a steep incline look far more expensive than it is. Using hidden masonry supports allows these heavy garden design minimalist slabs to visually hover over the landscape.
Creating this terraced illusion costs roughly $400–$800. Save this if you are fighting a tricky sloped property!
- Key Materials: Oversized concrete slabs (4x4ft), block base, masonry adhesive
- Vibe / Style: High-end hillside modernism
- Difficulty: Advanced (very heavy lifting)
- Budget Breakdown: Concrete pads: $600 | Block supports: $150
- Creator’s Tip: Overlap each pad by at least 12 inches to ensure structural stability and a deep shadow line.
- Smart Sourcing: Industrial construction adhesive (bulk pack) and pre-cast oversized concrete landings.
Garden Design Minimalist Planting Strategies
Planting beds with defined geometric boundaries create visual order and simplify maintenance routines. Concrete edging establishes permanent demarcations that keep mulch, soil, and plants contained while providing clean transitions between garden zones.
8. Raised Rectangular Bed Modules
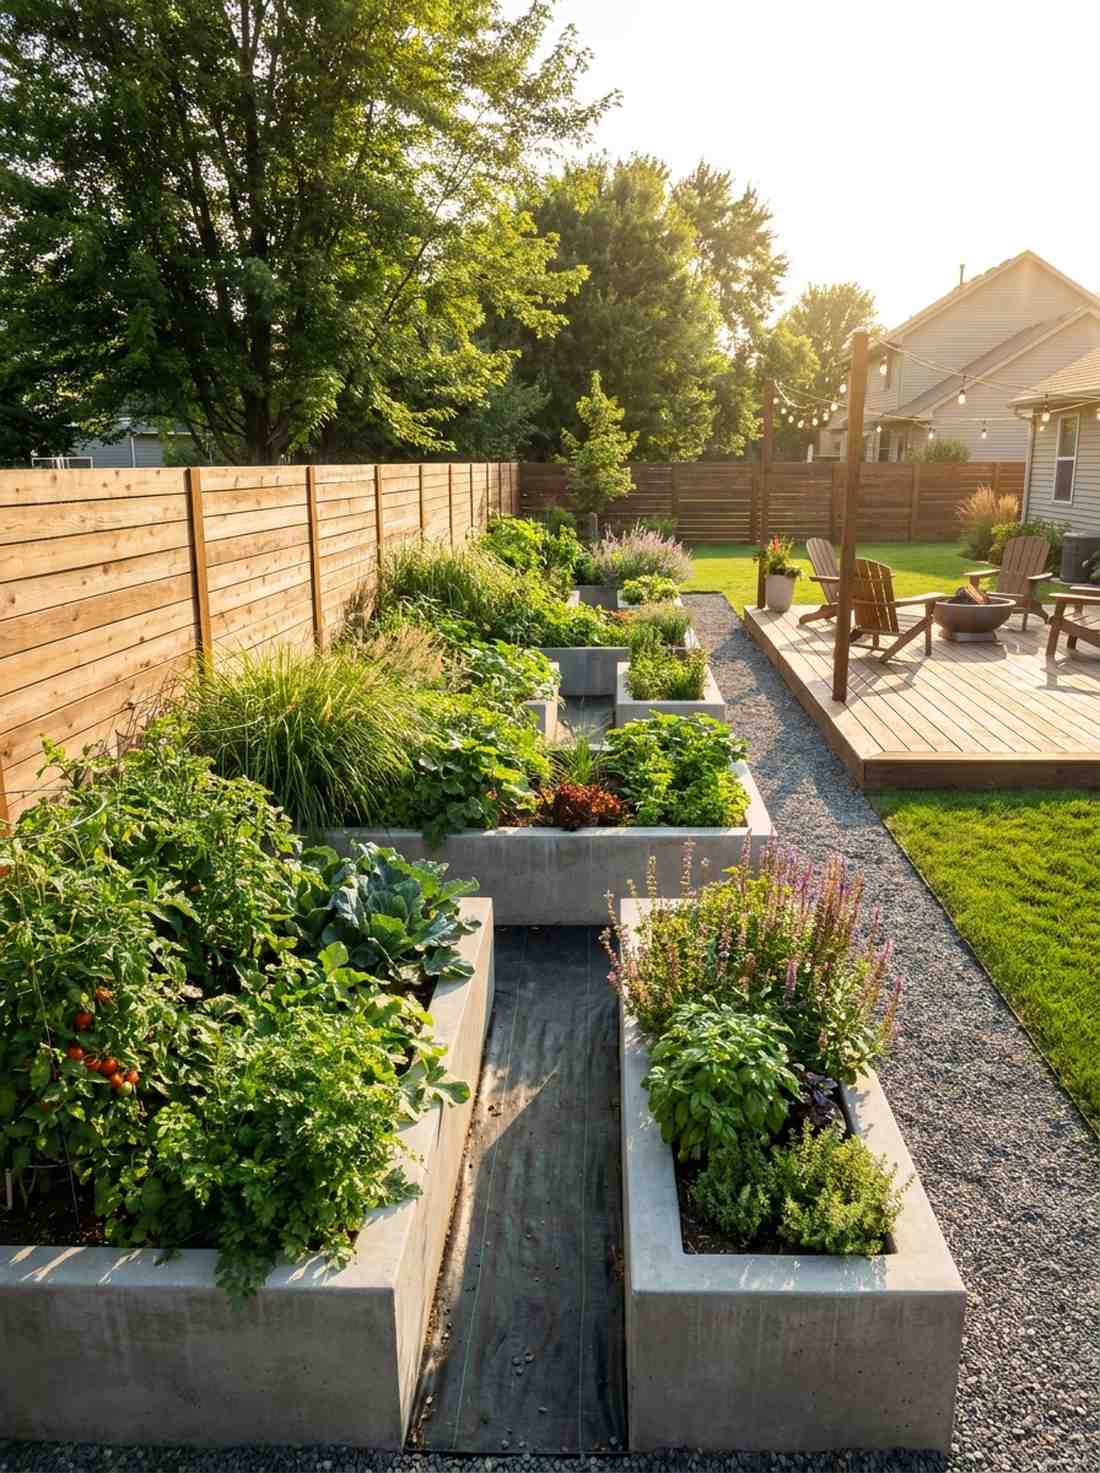
Clean, stark lines containing bursts of wild greenery feel incredibly balanced and deeply therapeutic. This modular concrete planter design works exceptionally well for creating a structured vegetable garden or a sleek perimeter along a privacy fence.
Swapping rotting wooden raised beds for brutalist concrete boxes provides an immediate, permanent designer-level finish. Integrating high-quality premium landscape fabric beneath these heavy modular borders ensures zero weed intrusion into your pristine growing zones.
Building these modules yourself runs about $150 per box. Pin this for the ultimate low-maintenance garden upgrade!
- Key Materials: Smooth-faced cinderblocks, concrete surface bonding cement
- Vibe / Style: Brutalist botanical garden
- Difficulty: Intermediate
- Budget Breakdown: Blocks: $60 | Bonding cement: $40 | Soil: $50
- Creator’s Tip: Coat the exterior of standard cinderblocks with surface bonding cement for a seamless, poured-concrete look.
- Smart Sourcing: Fiberglass-reinforced surface bonding cement and heavy-duty woven weed barrier fabric.
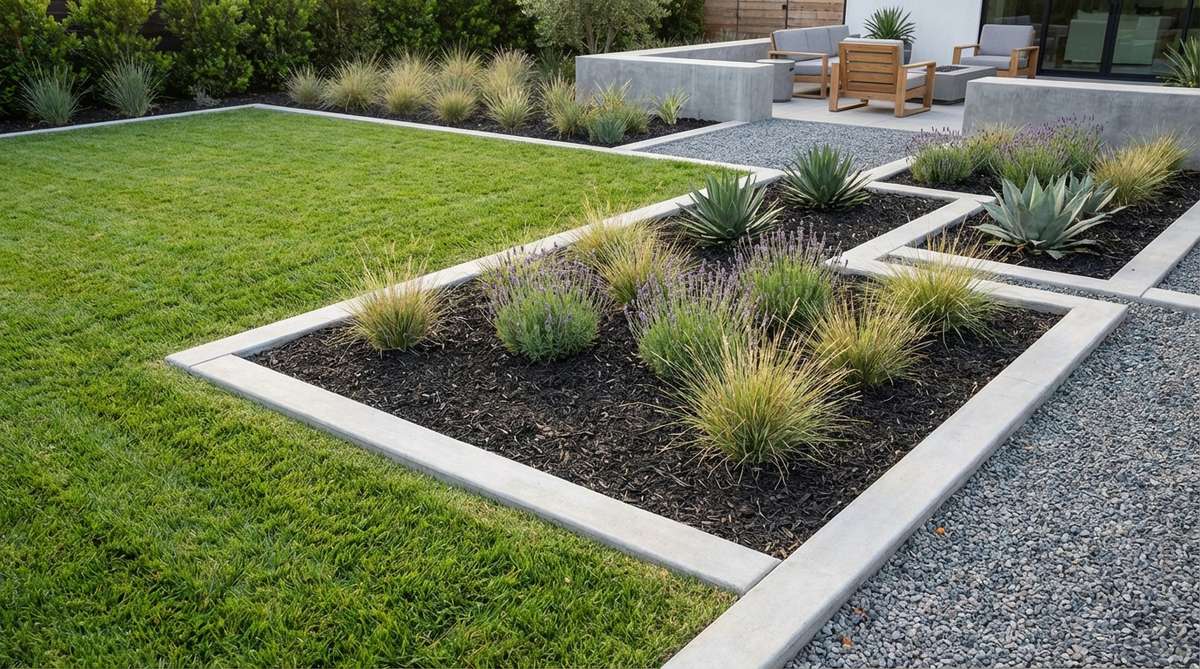
9. Linear Border Strips
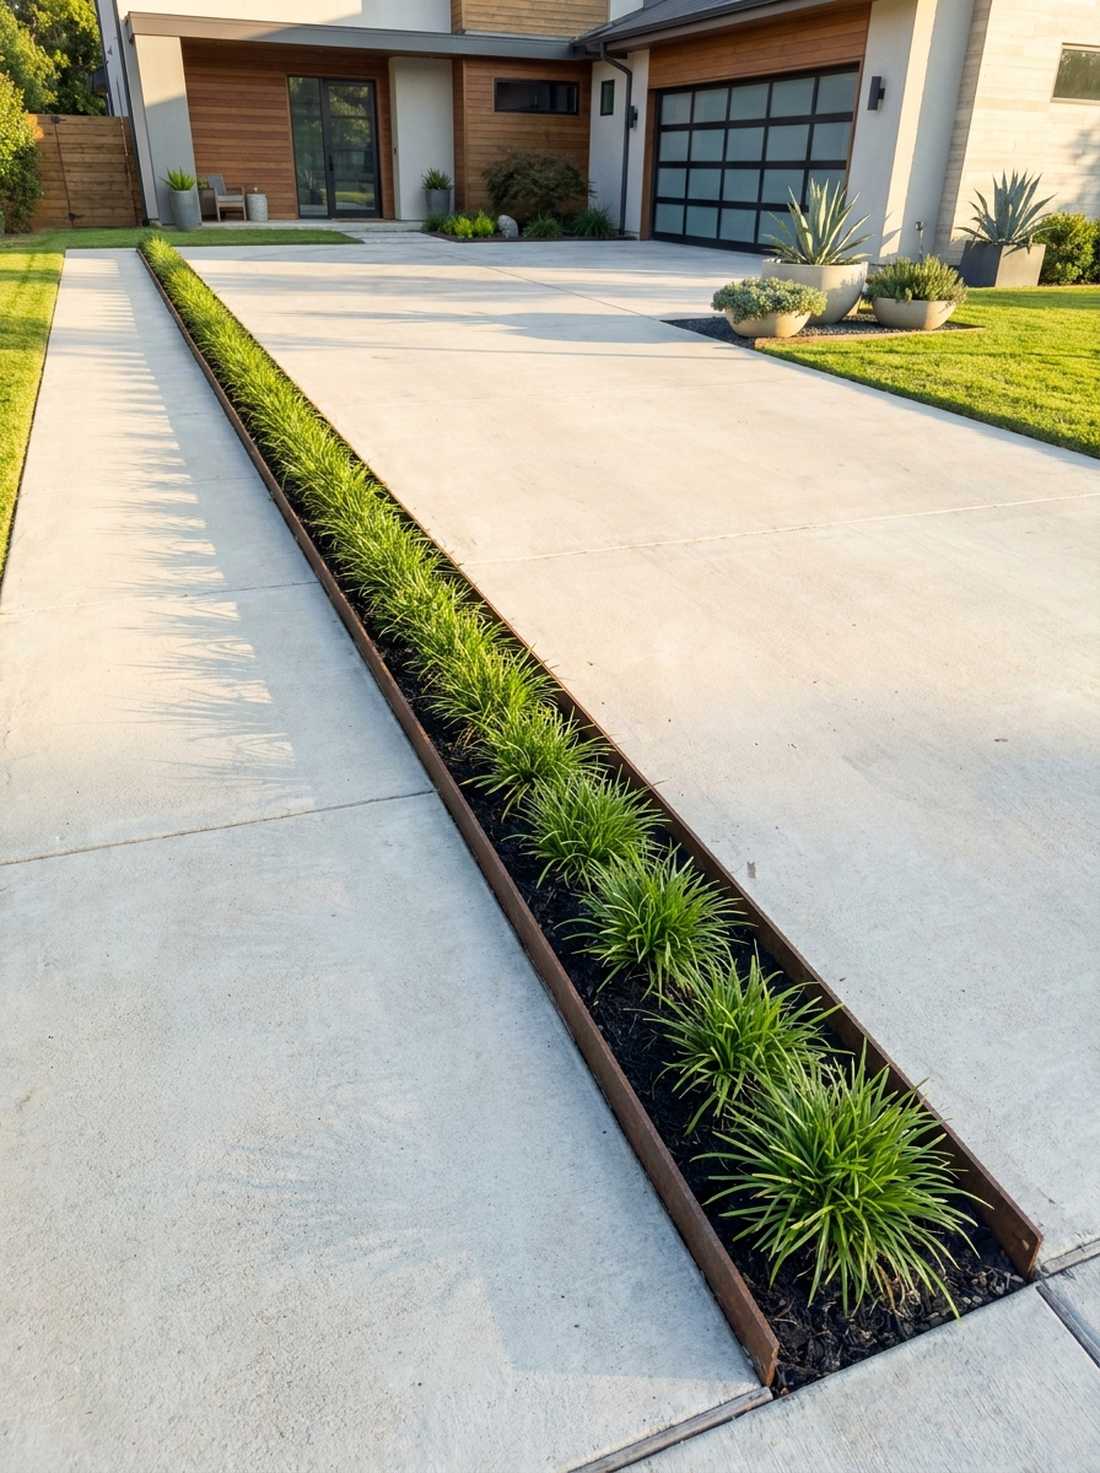
A razor-thin strip of vibrant green slicing through a sea of grey hardscape feels delightfully futuristic and highly controlled. This architectural block planting concept is the perfect use-case for running alongside a modern driveway or tight property lines.
Restricting plant life to extreme linear trenches creates a striking visual contrast that looks incredibly high-budget. Packing these narrow corridors with identical contemporary garden design ornamental grasses builds a rhythmic, uniform texture that demands attention.
You can execute these living borders for around $100 in plants and edging. It’s an inexpensive way to sharpen up lazy landscaping.
- Key Materials: Steel concrete forms, dwarf mondo grass, black soil
- Vibe / Style: Precision urban landscaping
- Difficulty: Easy
- Budget Breakdown: Plants: $70 | Soil: $30
- Creator’s Tip: Stick to exactly one plant species for the entire strip; mixing varieties ruins the modern aesthetic.
- Smart Sourcing: Pre-grown dwarf mondo grass flats (bulk) and rigid steel concrete edge forms.
💡 Must-Have Supplies for High-End Setups
To build these modern geometric setups faster and ensure they survive winter freezes without cracking, skip the generic craft aisles and invest in the right commercial-grade foundational kits.
- Base & Support: Professional heavy-duty hardscape base panels (bulk packs)
- Setup Tools: Laser-leveling starter kits and concrete grooving trowels
- Weather/Durability Protection: UV-resistant, deep-penetrating concrete sealers (gallon jugs)
If you are tired of weed-whacking the edges of your lawn every single week, the next geometric integration is going to blow your mind and save you hours of labor…
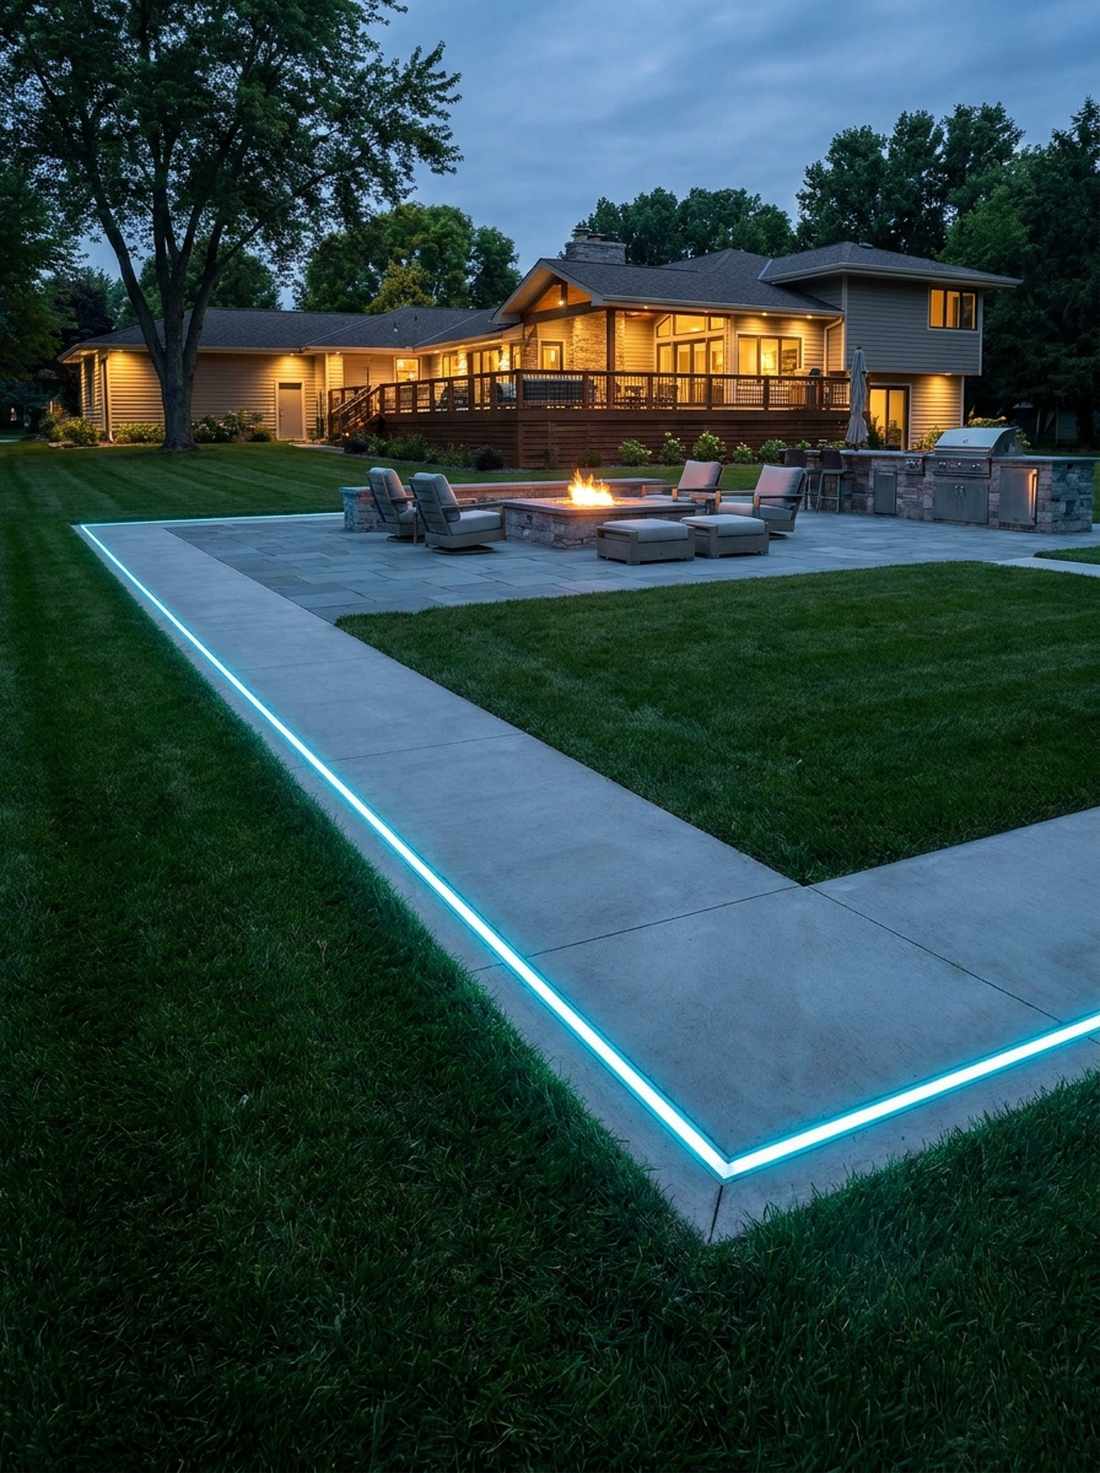
10. Concrete-Edged Lawn Panels
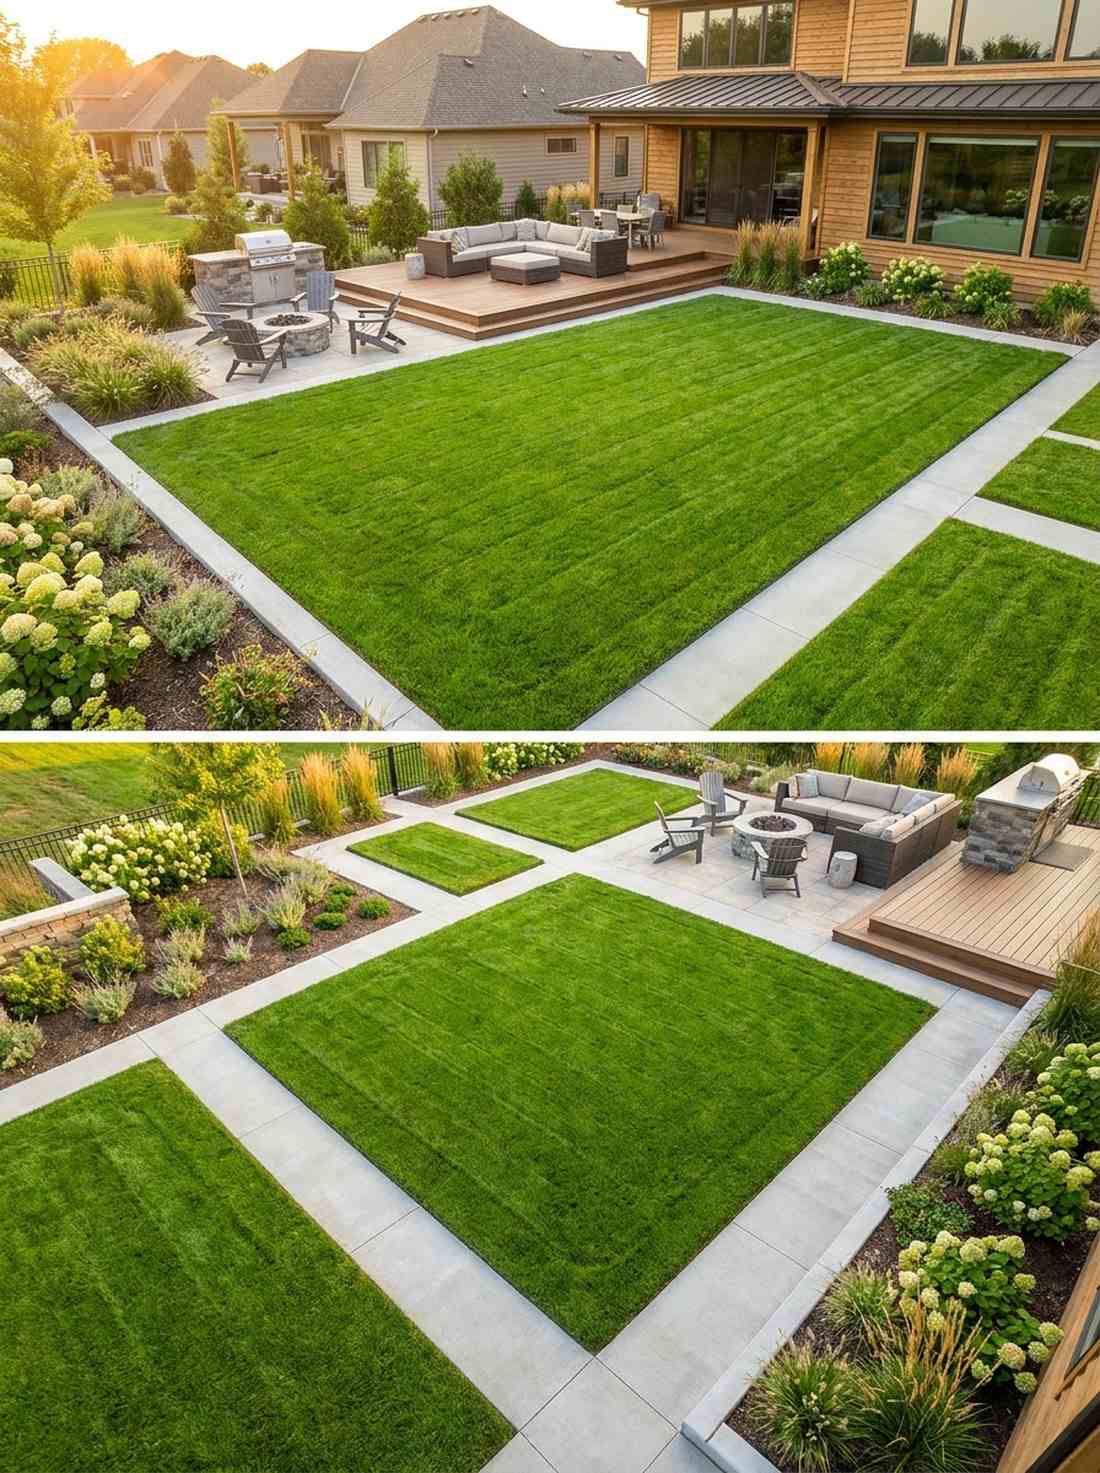
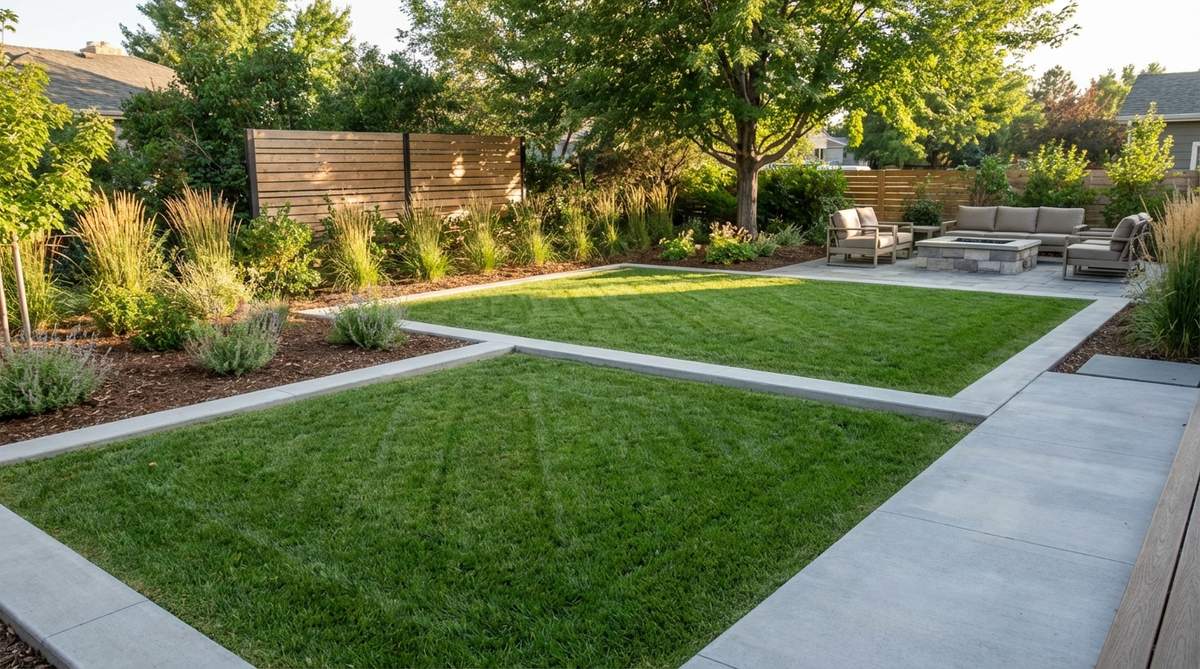
Framing a vibrant green lawn with a stark, flat concrete ribbon feels like putting a custom mat around a fine art print. This flush mower-strip layout works exceptionally well for framing a backyard entertainment space, keeping the grass perfectly contained.
Pouring a flush perimeter completely eliminates the need for string trimming while giving a highly manicured, designer-level finish. Integrating an invisible lawn boundary hardscape kit beneath the concrete ensures the turf never creeps over the geometric line.
A DIY poured edge costs about $3 per linear foot. Save this to your smart landscaping board!
- Key Materials: Fast-setting concrete mix, flexible bender board, edging trowel
- Vibe / Style: Zero-maintenance modern estate
- Difficulty: Intermediate
- Budget Breakdown: Concrete bags: $40 | Bender boards: $30
- Creator’s Tip: Set the concrete edge exactly 1/2 inch below the soil line so the mower wheels glide flawlessly over it.
- Smart Sourcing: Flexible bender board forms (pro-roll) and specialty concrete edging trowels.
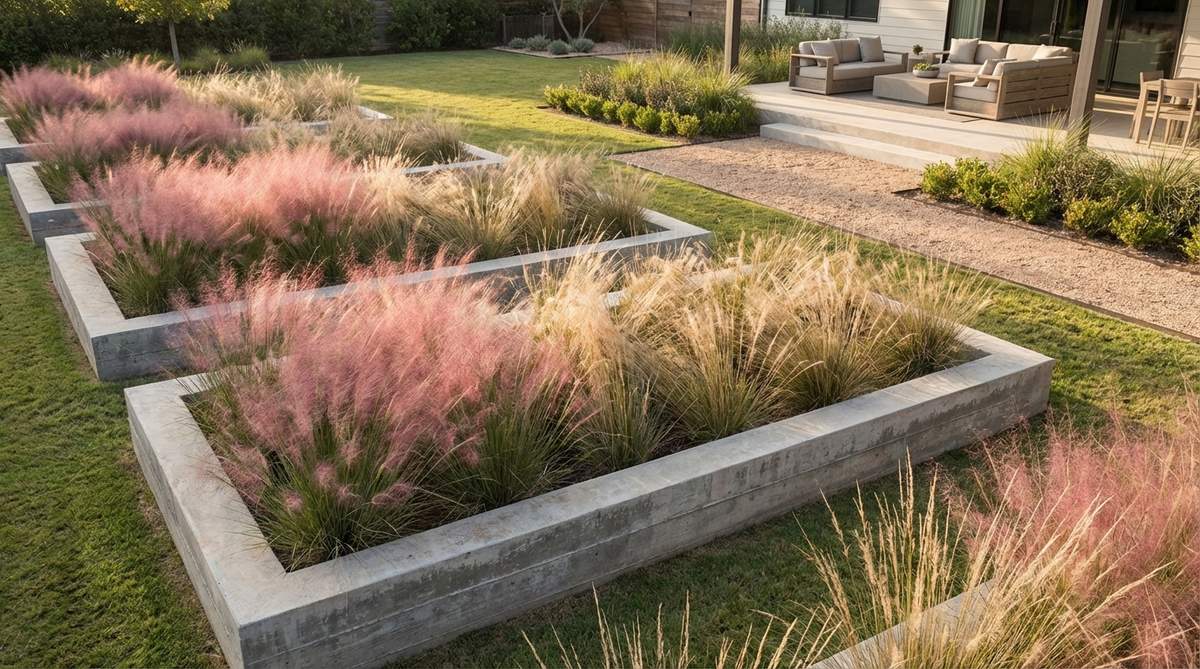
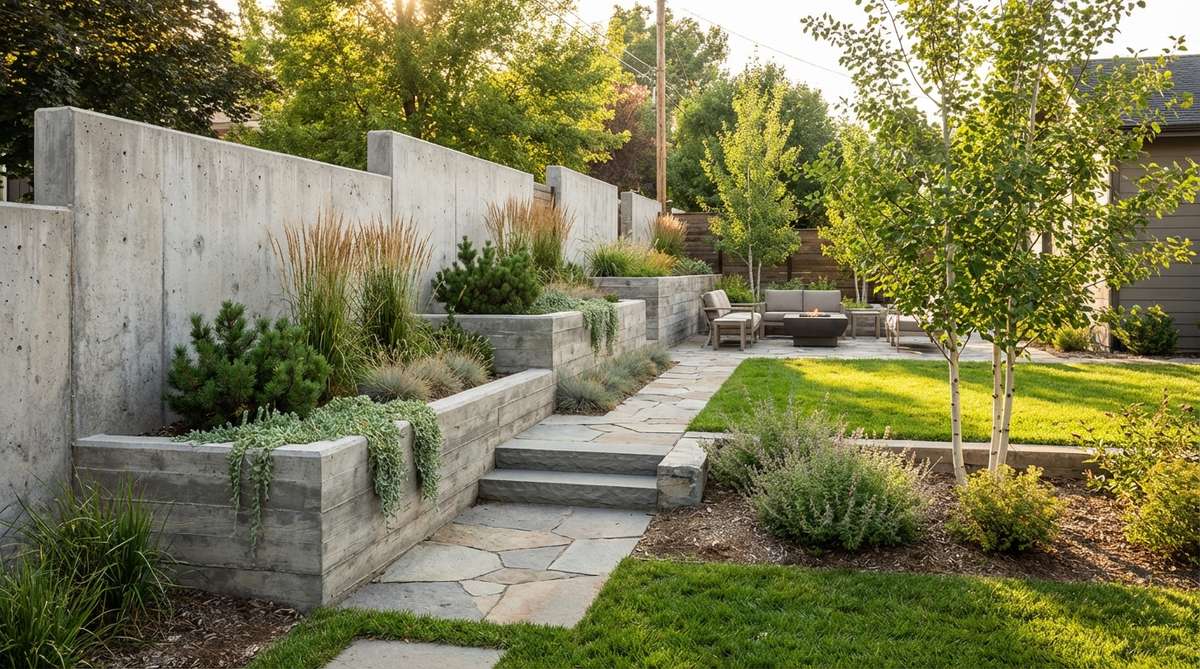
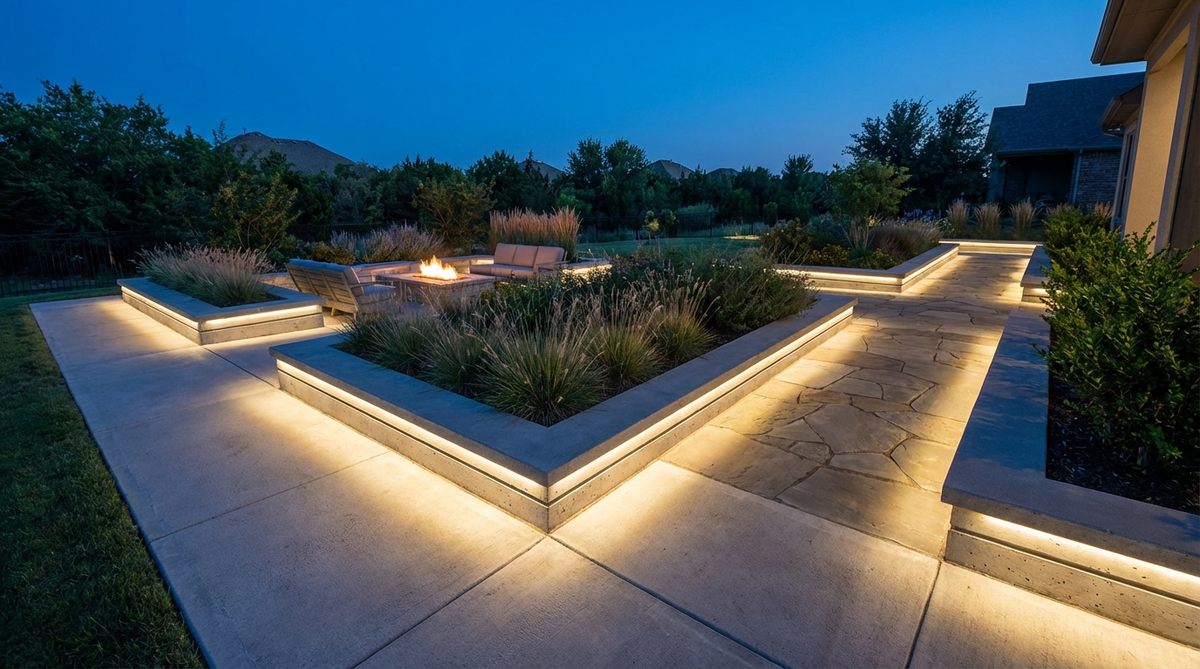
11. Terraced Geometric Garden Beds
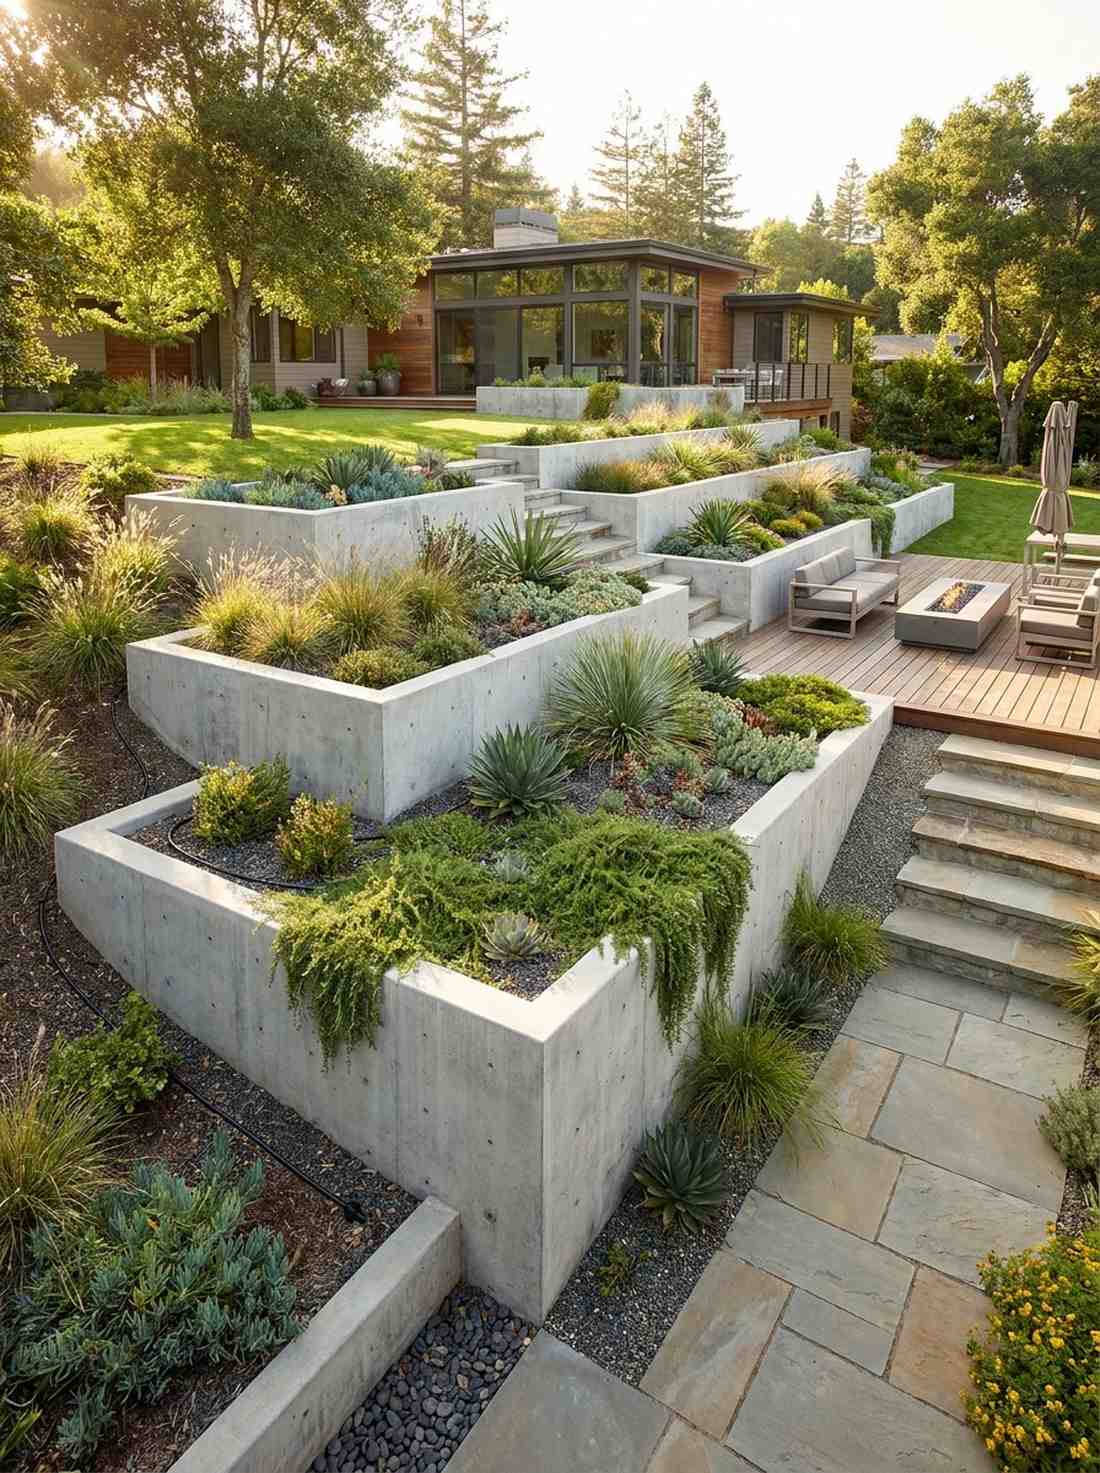
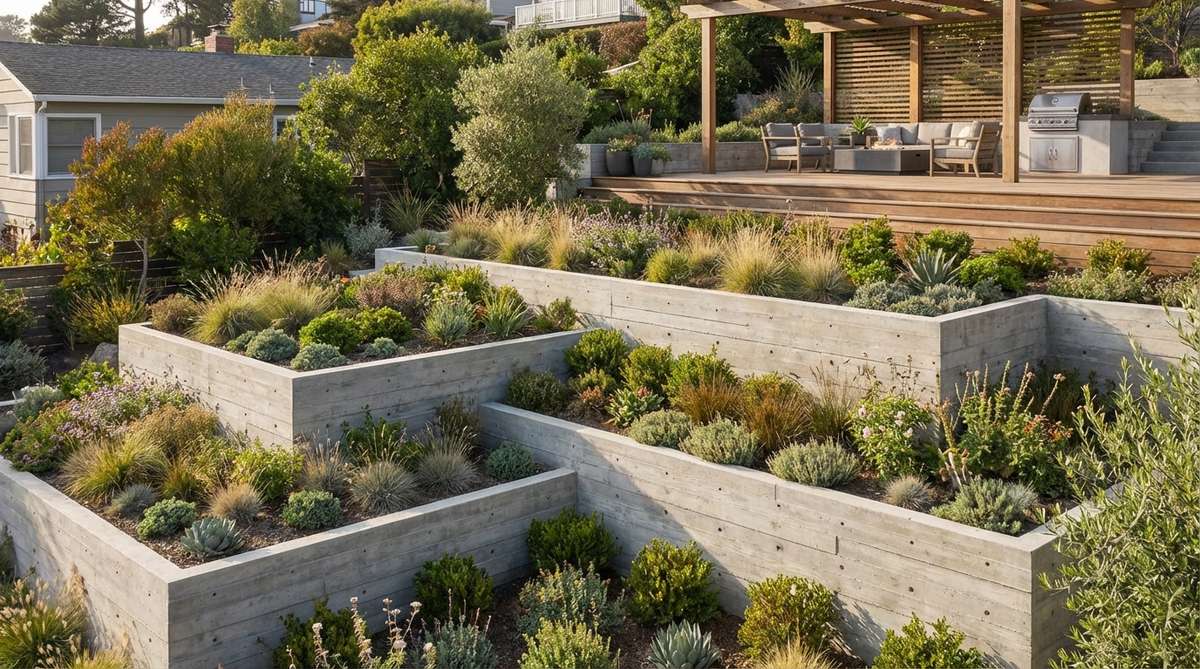
Turning a difficult, muddy slope into a series of crisp, cascading concrete boxes feels like a monumental architectural achievement. This multi-level modern retaining wall setup is the ultimate use-case for taming aggressively sloped backyards into usable planting zones.
Stepping the landscape down with brutalist right angles transforms a problem area into the focal point of the property. Using premium garden design modern waterproofing membranes behind the concrete ensures the pristine facade is never ruined by mineral leaching.
Creating two levels costs roughly $300–$500 in materials. Pin this if you’re dealing with a nightmare backyard hill!
- Key Materials: Poured concrete forms, rebar, gravel backfill, weep tubes
- Vibe / Style: Hillside architectural digest
- Difficulty: Advanced
- Budget Breakdown: Concrete: $250 | Drainage gravel: $100 | Lumber for forms: $150
- Creator’s Tip: Always install 1-inch PVC weep holes every 4 feet; trapped hydrostatic pressure will destroy modern straight walls.
- Smart Sourcing: Commercial-grade dimpled drainage board and high-yield concrete mix pallets.
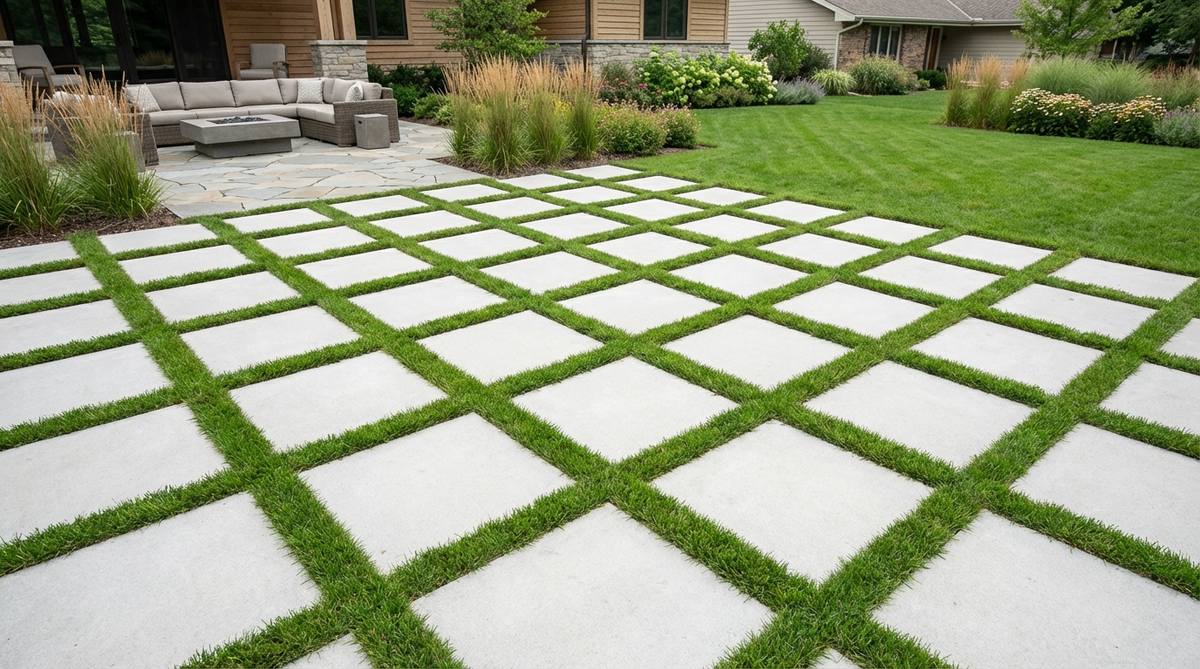
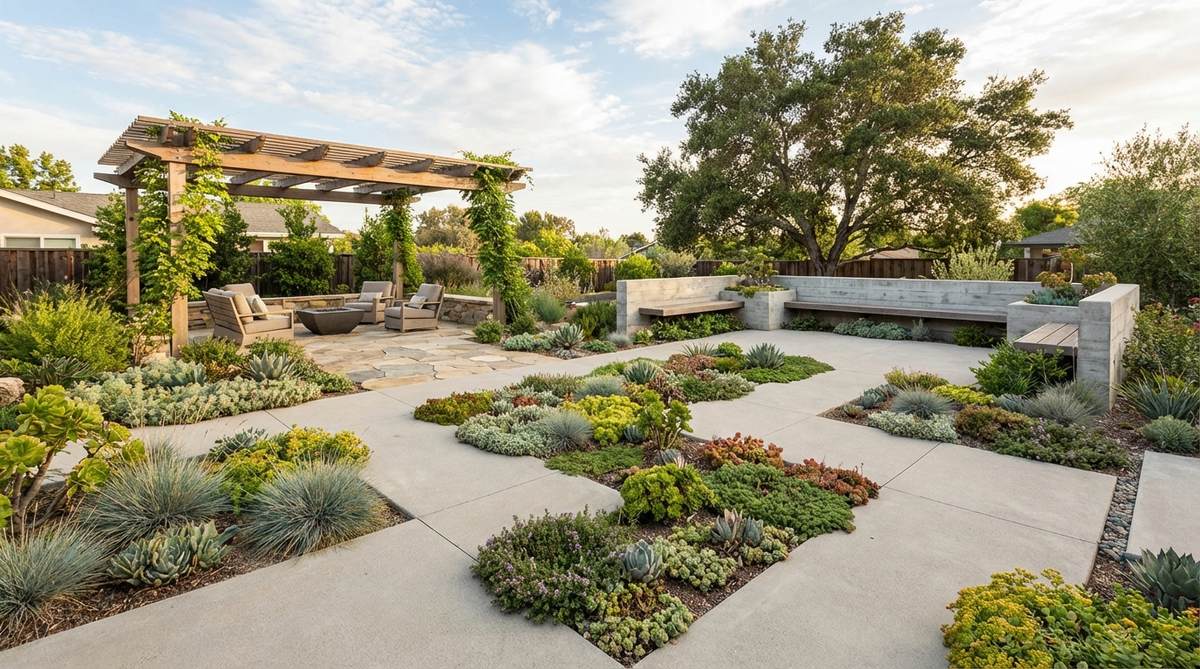
12. Square Planting Grid Layout

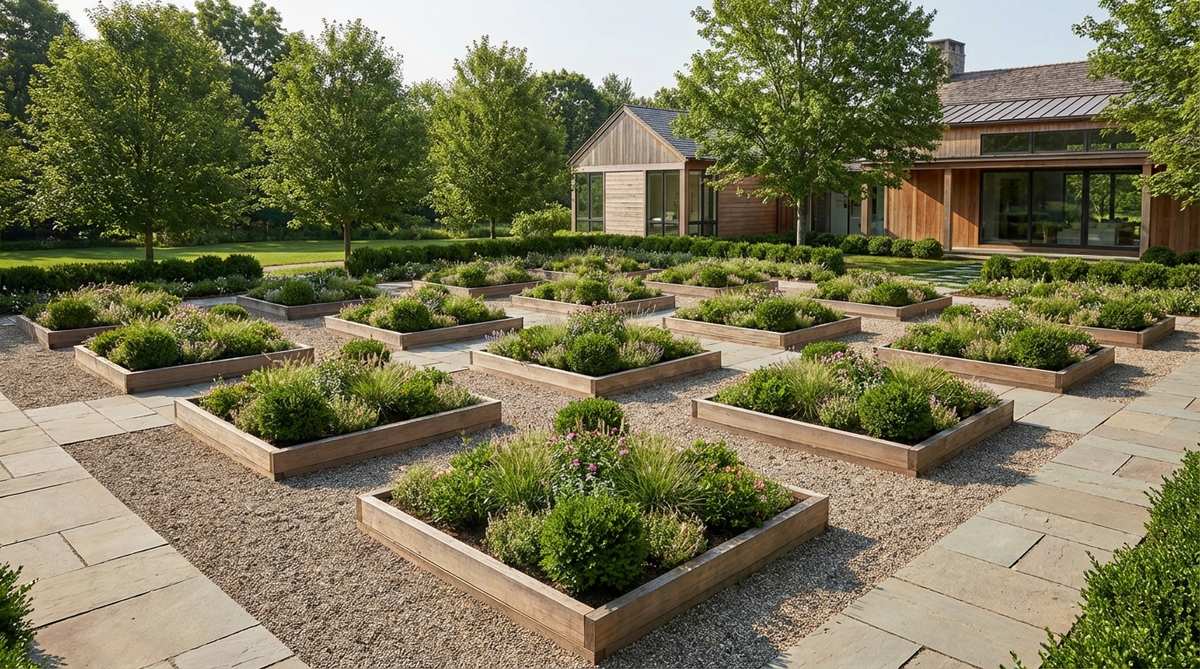
Walking past a perfectly uniform matrix of floating square beds feels incredibly calming, like stepping into a life-sized chessboard. This checkerboard courtyard garden is ideal for transforming a dead patio space into a lush, walkable botanical grid.
Breaking a massive patio into evenly spaced cutouts delivers a surprisingly premium look reminiscent of high-end commercial plazas. Filling these voids with architectural contemporary garden design specimens creates a rigid yet vibrant pattern.
You can retrofit an existing patio for about $200 using a concrete saw. Highly recommended for injecting life into concrete jungles.
- Key Materials: Concrete saw rental, rich topsoil, architectural agaves
- Vibe / Style: Modern botanical plaza
- Difficulty: Intermediate (requires heavy tool rental)
- Budget Breakdown: Saw rental: $80 | Soil/Plants: $120
- Creator’s Tip: Keep pathways between grids at least 36 inches wide to accommodate comfortable side-by-side walking.
- Smart Sourcing: Diamond blade concrete saw kits and bulk architectural succulent packs.
13. Concrete Inlay Planting Pockets
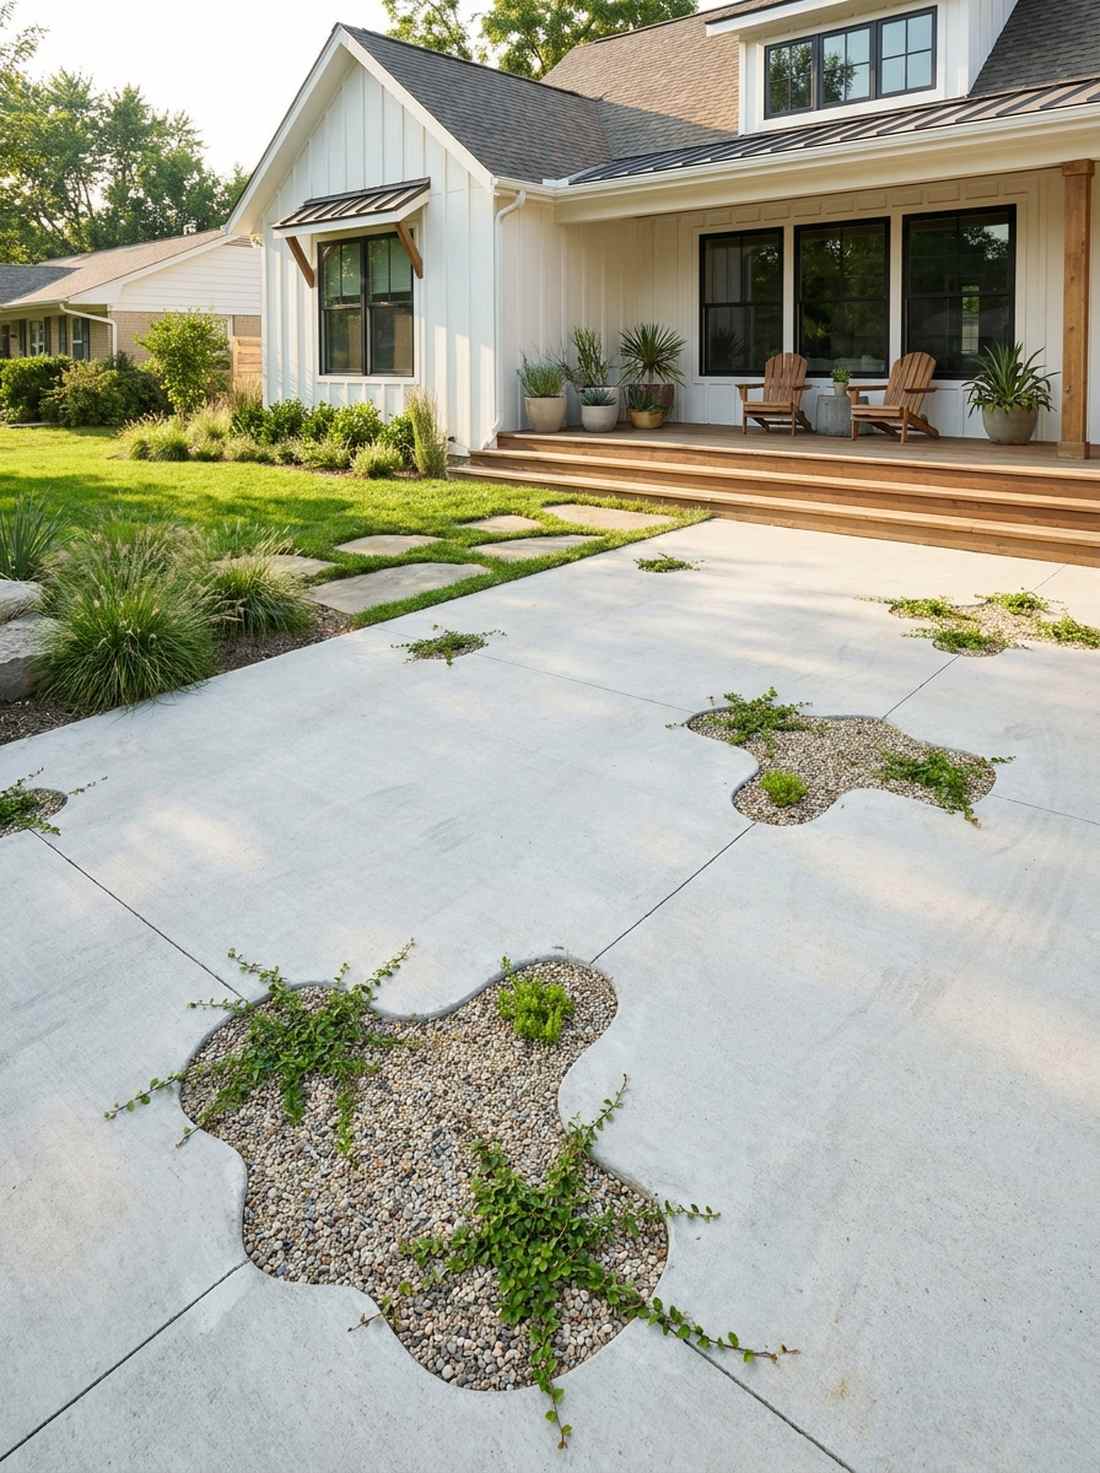
Discovering tiny bursts of resilient greenery pushing through solid stone feels like witnessing nature playfully conquer modern architecture. This micro-crevice planting design works exceptionally well for softening the harsh glare of a massive poured driveway or courtyard.
Leaving deliberate negative space during a concrete pour looks far more expensive than it is and creates immediate character. Filling these tiny voids with hardy drought-tolerant ground cover kits ensures continuous green texture that can survive getting stepped on.
These pockets cost virtually nothing if planned during the initial pour. Save this for your upcoming hardscape project!
- Key Materials: Foam blockouts, creeping wire vine, fine gravel topping
- Vibe / Style: Eco-brutalist harmony
- Difficulty: Easy (if planned ahead)
- Budget Breakdown: Foam inserts: $10 | Plants: $30
- Creator’s Tip: Use dense EPS foam blocks wrapped in packing tape to reserve the empty pockets during the wet pour.
- Smart Sourcing: High-density EPS foam blocks and walkable ground cover starter plugs.
14. Framed Ornamental Grass Blocks
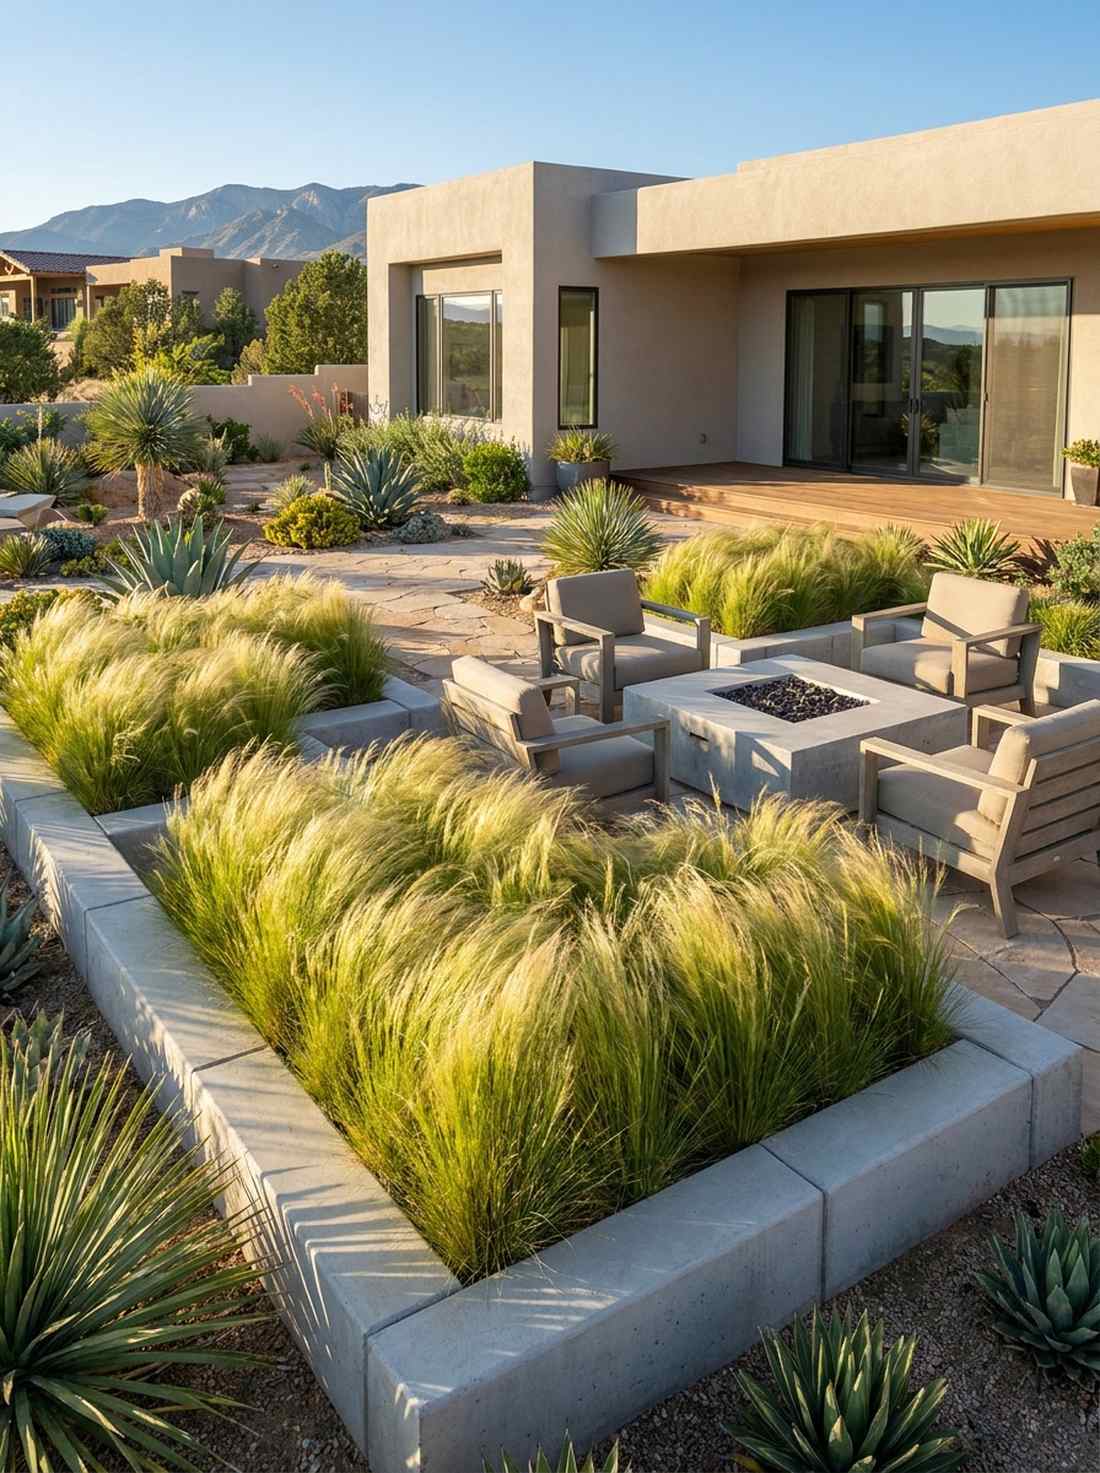
The contrast between the soft, swaying, feather-like grass and the cold, unyielding concrete frame feels deeply poetic and visually stunning. This framed botanical movement concept is perfect for creating low-level privacy screens around a sunken seating area.
Using rigid concrete curbs to lock in wild, voluminous plants gives a designer-level finish that balances hard and soft textures flawlessly. Sourcing premium ornamental grass starter kits ensures uniform height and color, maintaining that strict geometric discipline.
You can frame out a spectacular grass block for around $85. Pin this for high-impact, low-maintenance landscaping!
- Key Materials: Concrete curb blocks, Mexican feather grass
- Vibe / Style: High-desert modernism
- Difficulty: Easy
- Budget Breakdown: Curbing: $40 | Grass plugs: $45
- Creator’s Tip: Mass plant the grasses closer together than the nursery tag recommends to achieve an instant, solid block of texture.
- Smart Sourcing: Pre-cast concrete curb sections and live ornamental grass multipacks.
Most people think succulents belong in tiny pots on a windowsill, but scaling them up into massive geometric arrays creates a billionaire-level aesthetic…
15. Succulent Panel Gardens
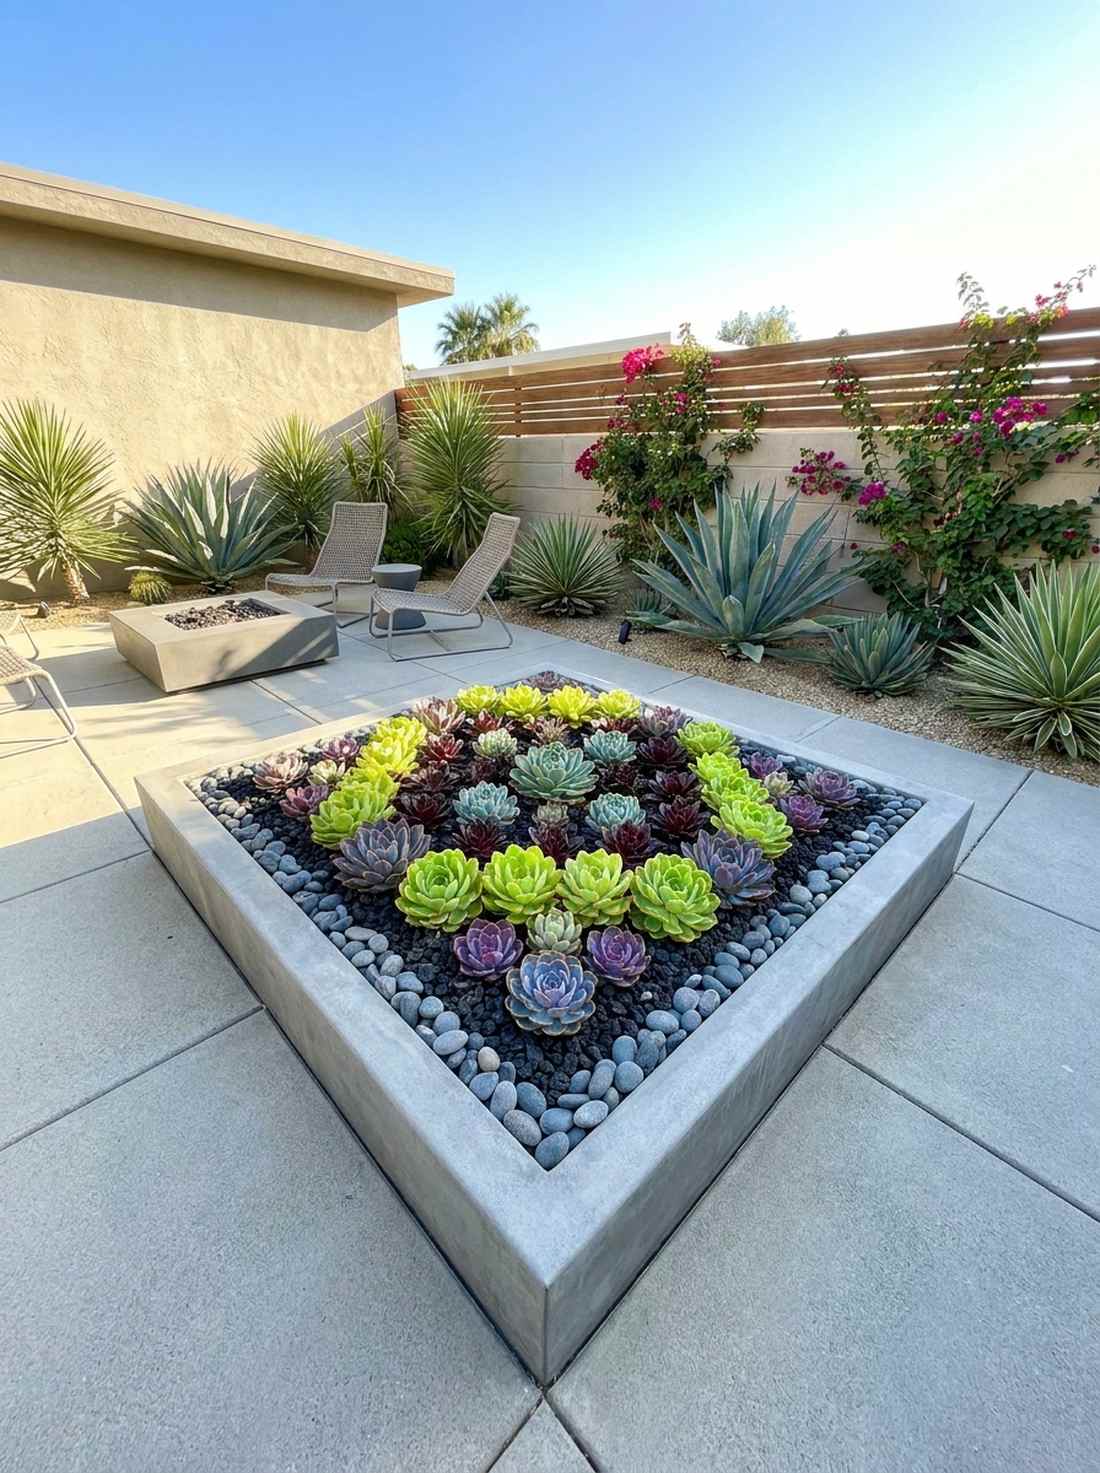

Looking down at a perfectly arranged mosaic of fleshy, alien-like plants framed in smooth grey stone feels like peering into a living jewelry box. This geometric succulent array works exceptionally well as a ground-level focal point in hot, sun-drenched courtyards.
Treating drought-resistant plants like tiles in a mosaic delivers a surprisingly premium look that requires almost zero watering. Utilizing specialized cactus soil base mixes ensures the shallow concrete pans drain rapidly, preventing root rot during sudden rainstorms.
You can construct a breathtaking 4×4 panel for about $150. Save this for your water-wise modern garden board!
- Key Materials: Low concrete basin, pumice-rich soil, varied echeveria and aeonium
- Vibe / Style: Palm Springs chic
- Difficulty: Easy
- Budget Breakdown: Basin materials: $60 | Premium soil: $20 | Succulents: $70
- Creator’s Tip: Top-dress the exposed soil with crushed black lava rock to make the neon greens and purples of the succulents pop.
- Smart Sourcing: Bulk professional succulent/cactus soil mix and premium black lava rock top-dressing.
Contemporary Garden Design With Concrete Water Elements
Water features constructed from concrete introduce tranquility while serving as sculptural focal points. The material’s moldability allows for custom shapes that align with modern design principles while its durability withstands constant water exposure.
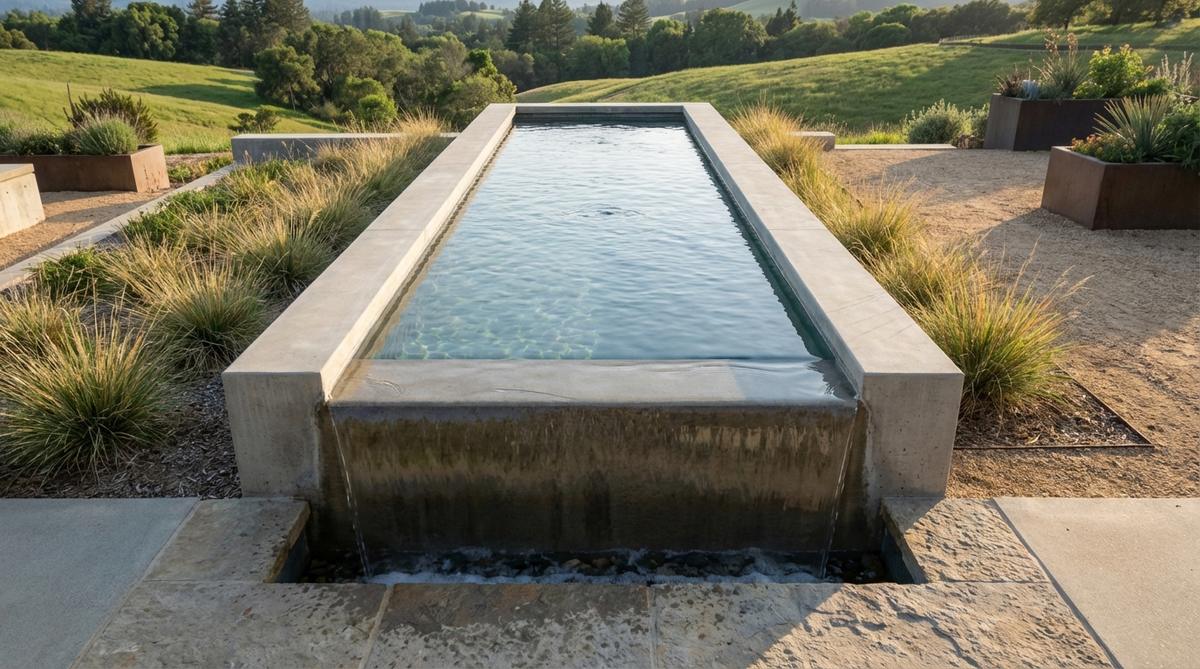
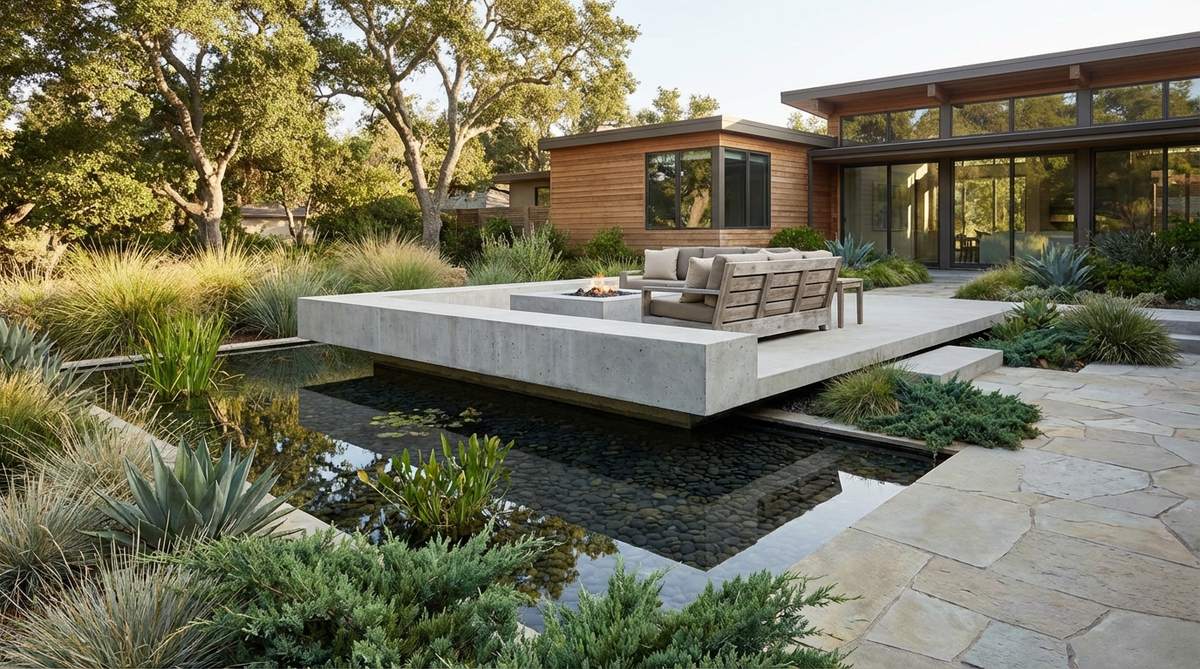
16. Rectangular Reflecting Pool
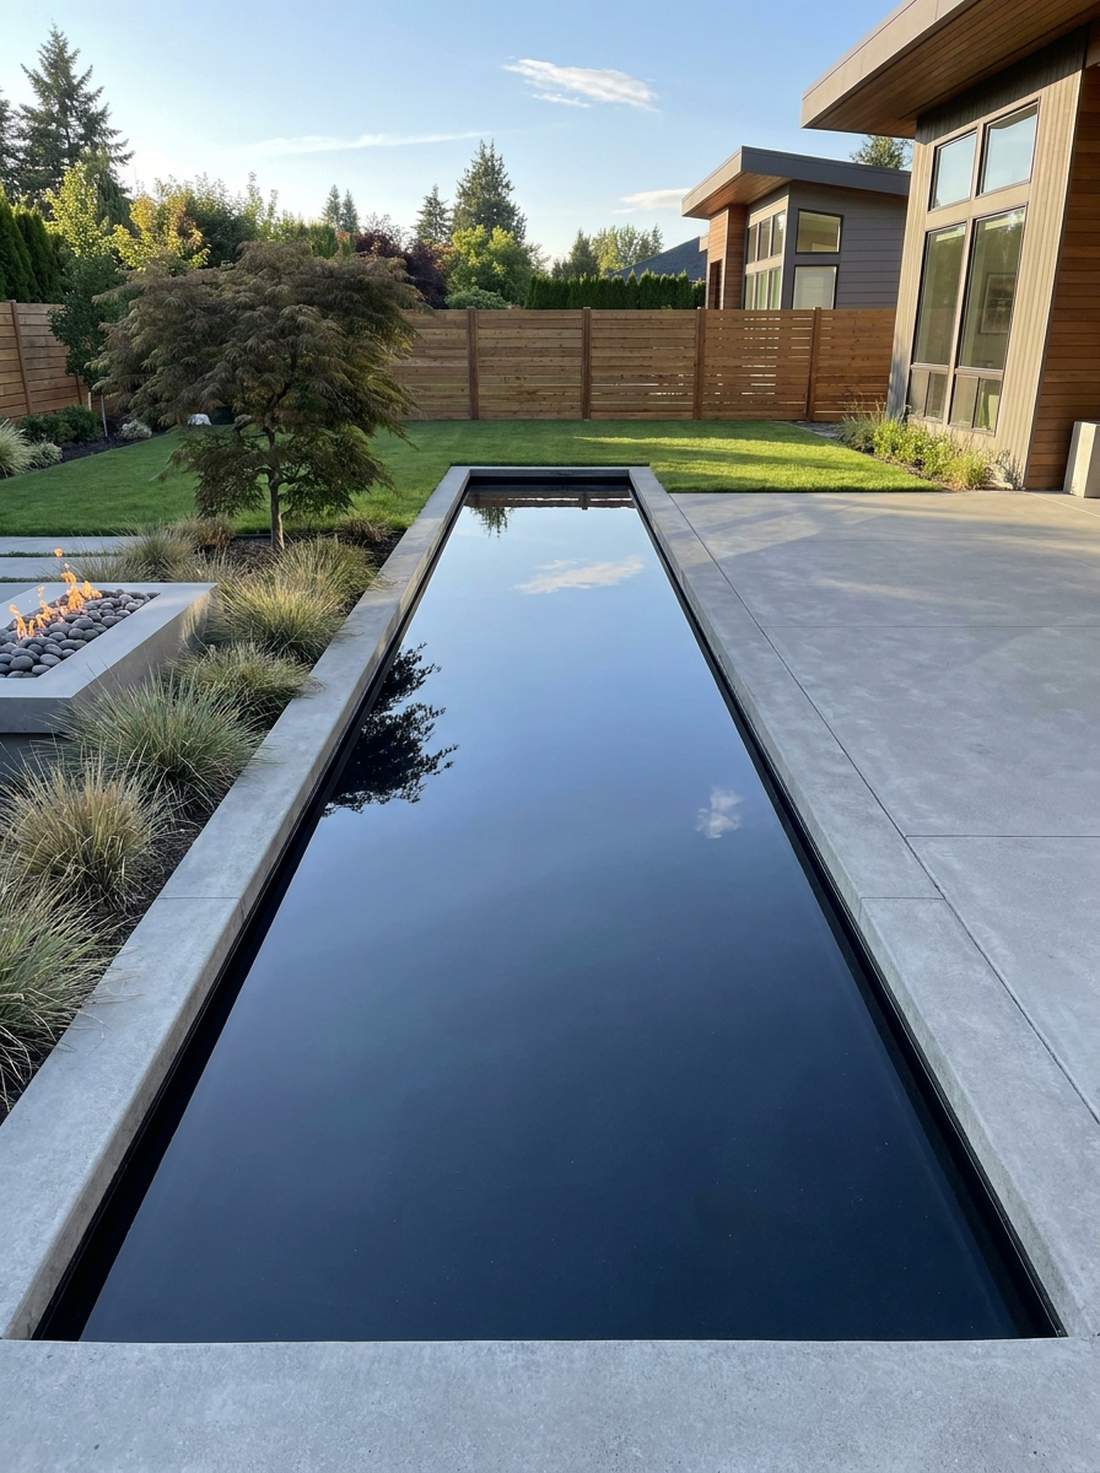
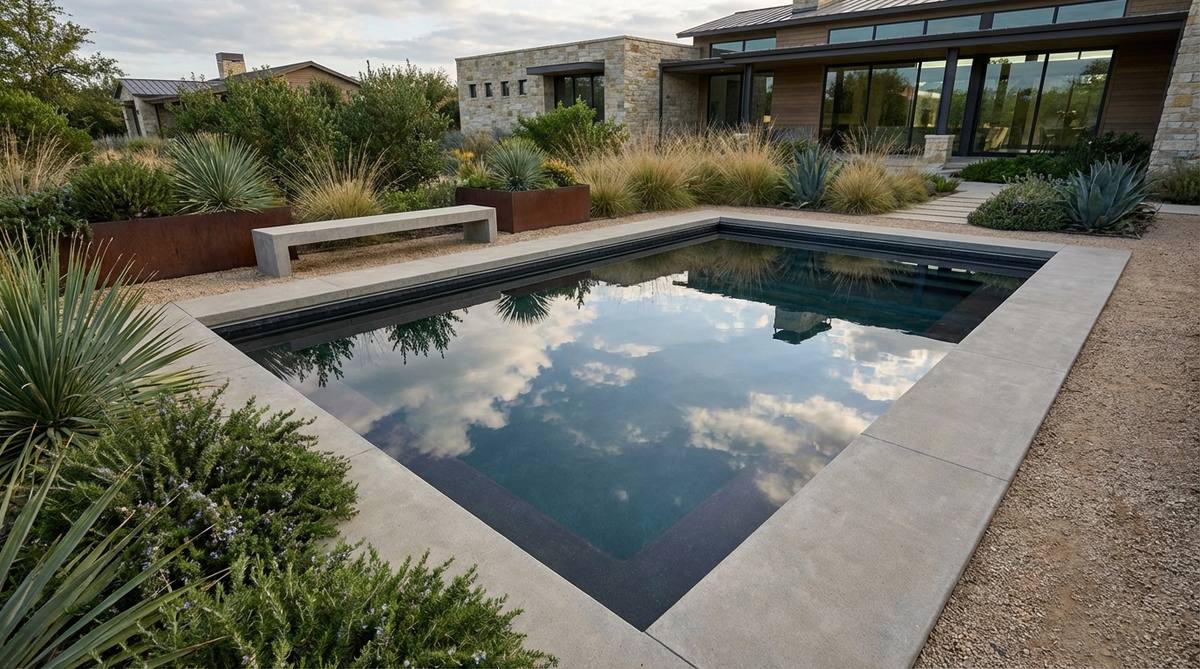
A razor-thin sheet of still water capturing the exact reflection of the sky above feels profoundly serene and mind-bendingly beautiful. This minimalist shallow water feature is the ultimate showpiece for a quiet, meditative backyard corner.
Avoiding tacky rock waterfalls for a stark, flat geometric basin gives a designer-level finish reminiscent of modern art museums. Applying a dark garden design modern waterproofing epoxy to the basin floor turns the shallow water into a perfect, dark mirror.
You can pour a sleek reflecting pool for roughly $250. Pin this if you want to create an outdoor sanctuary!
- Key Materials: Poured concrete, black waterproofing epoxy, hidden filtration
- Vibe / Style: Zen museum courtyard
- Difficulty: Advanced (requires absolute leveling)
- Budget Breakdown: Concrete: $100 | Black epoxy: $80 | Small pump: $70
- Creator’s Tip: Keep the water depth strictly between 2 to 4 inches; any deeper and you lose the crisp mirror reflection.
- Smart Sourcing: Marine-grade black waterproofing epoxy and ultra-quiet submersible water pumps.
17. Linear Channel Water Feature
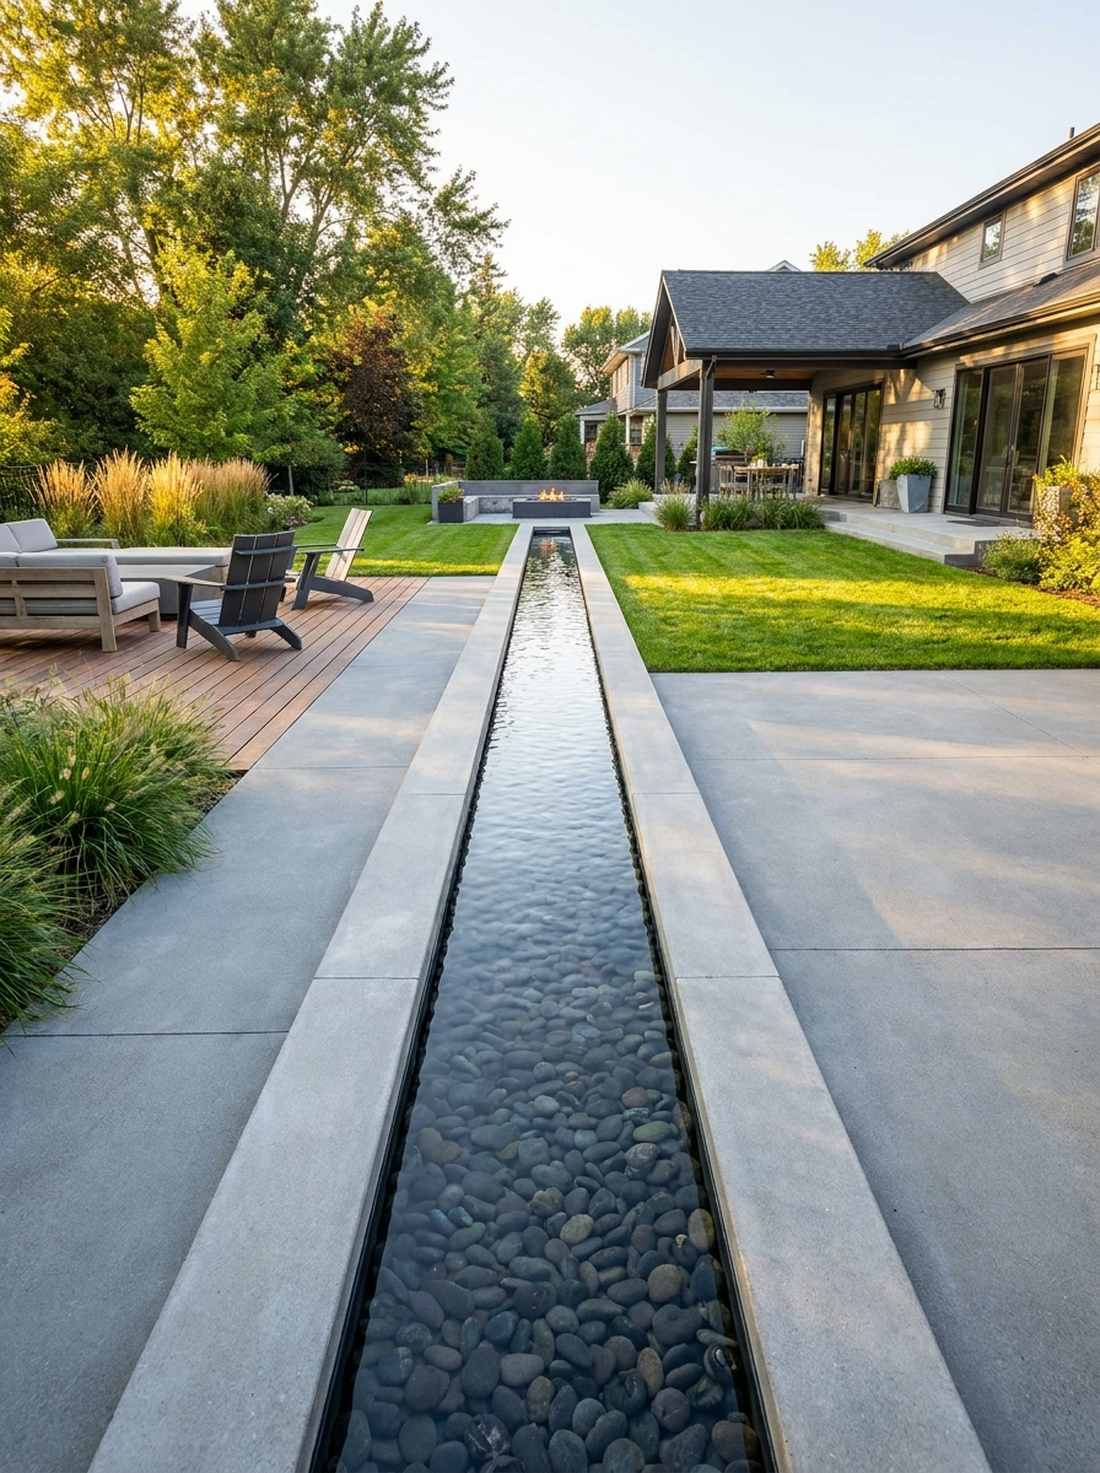
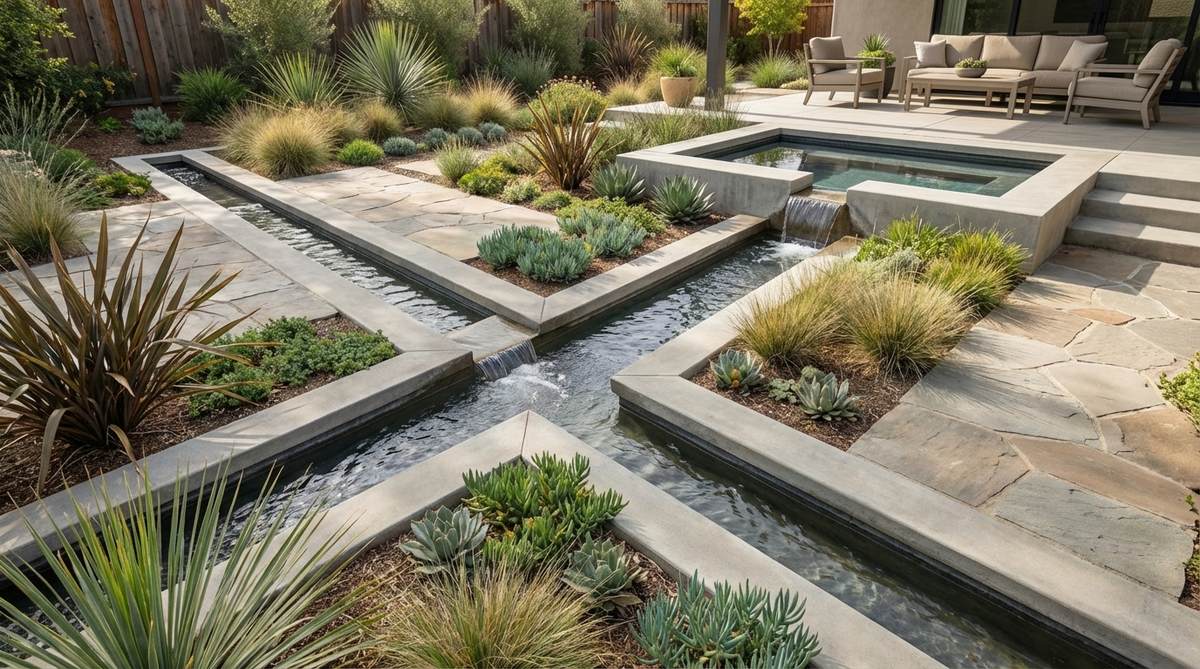
Watching a perfectly straight ribbon of water slice quietly through a modern concrete patio feels incredibly sophisticated and dynamic. This architectural water runnel design works exceptionally well for drawing the eye from the house straight down to the back of the property.
Embedding a mini-canal right into the hardscape looks far more expensive than it is and creates an amazing auditory experience. Incorporating premium pond filtration accessories hidden underground ensures the narrow channel stays crystal clear year-round.
This canal effect can be added to a patio pour for an extra $150. Highly recommended for a high-end sensory upgrade.
- Key Materials: PVC channel molds, recirculating pump, river rock
- Vibe / Style: High-end architectural runway
- Difficulty: Intermediate
- Budget Breakdown: Molds/PVC: $60 | Pump system: $90
- Creator’s Tip: Line the very bottom of the narrow channel with dark pebbles to hide the concrete seams and PVC returns.
- Smart Sourcing: Pre-formed linear drainage channels and heavy-duty underground pump vaults.
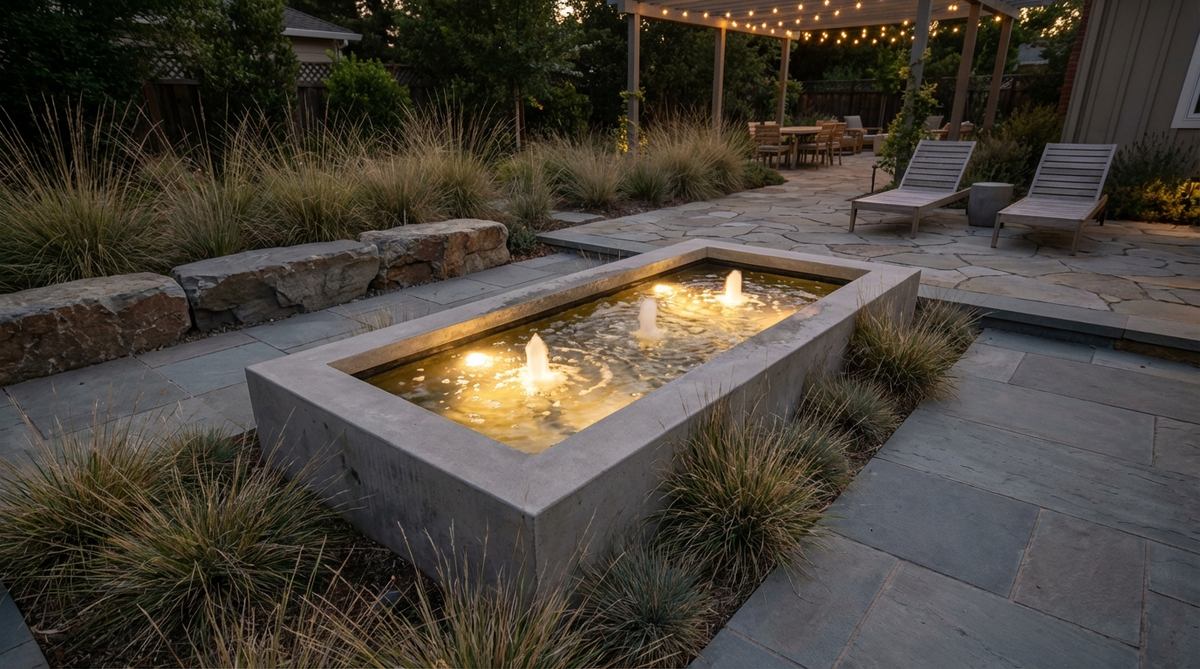
18. Concrete Fountain Basin
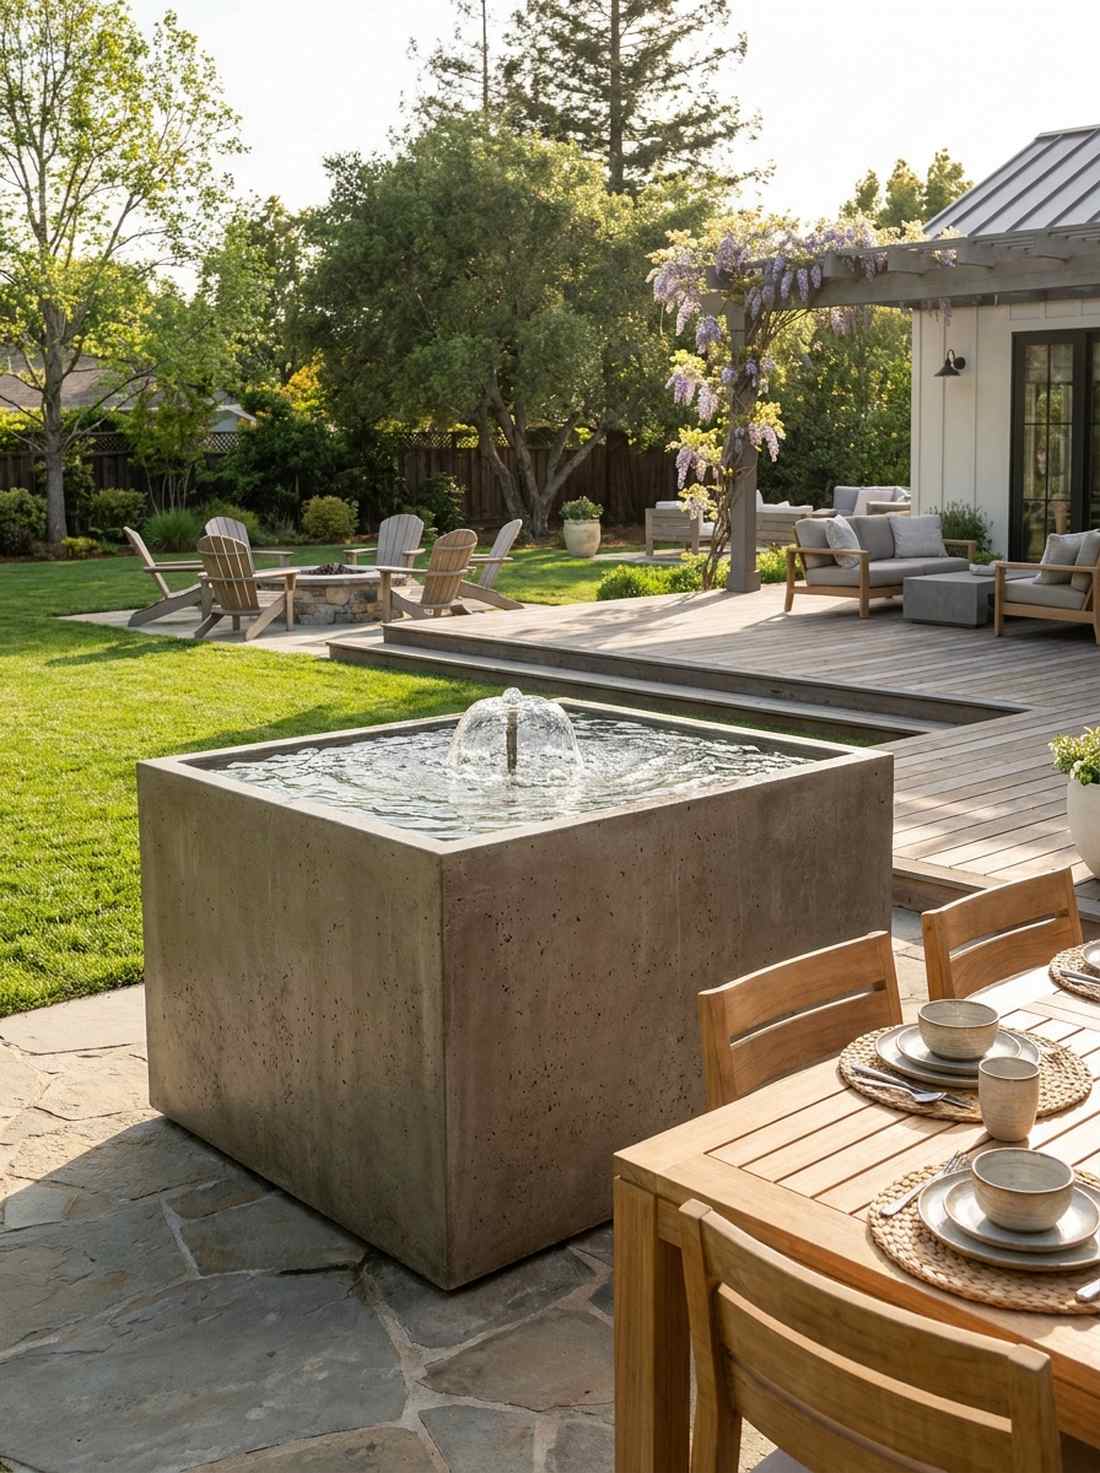
A perfectly cast concrete bowl overflowing with a gentle, bubbling crest of water feels like an ancient artifact dropped into a modern setting. This standalone geometric fountain is perfect for placing right near an outdoor dining table for soothing ambient noise.
Ditching ornate, tiered birdbaths for a raw, monolithic square or cylinder delivers a surprisingly premium look that anchors the space. Using pre-mixed contemporary garden design glass-fiber reinforced concrete (GFRC) allows you to mold a massive basin that isn’t impossibly heavy.
You can cast a custom basin for around $120 in materials. Save this for a brilliant weekend DIY project!
- Key Materials: GFRC mix, melamine molds, silicone sealant
- Vibe / Style: Wabi-sabi modernism
- Difficulty: Intermediate
- Budget Breakdown: GFRC mix: $50 | Molds: $30 | Pump: $40
- Creator’s Tip: Vibrate the exterior of the melamine mold with a random orbital sander to release all trapped air bubbles for a glass-smooth finish.
- Smart Sourcing: Glass-fiber reinforced concrete (GFRC) mix kits and 100% waterproof silicone sealant (bulk tubes).
19. Cascading Concrete Waterfall
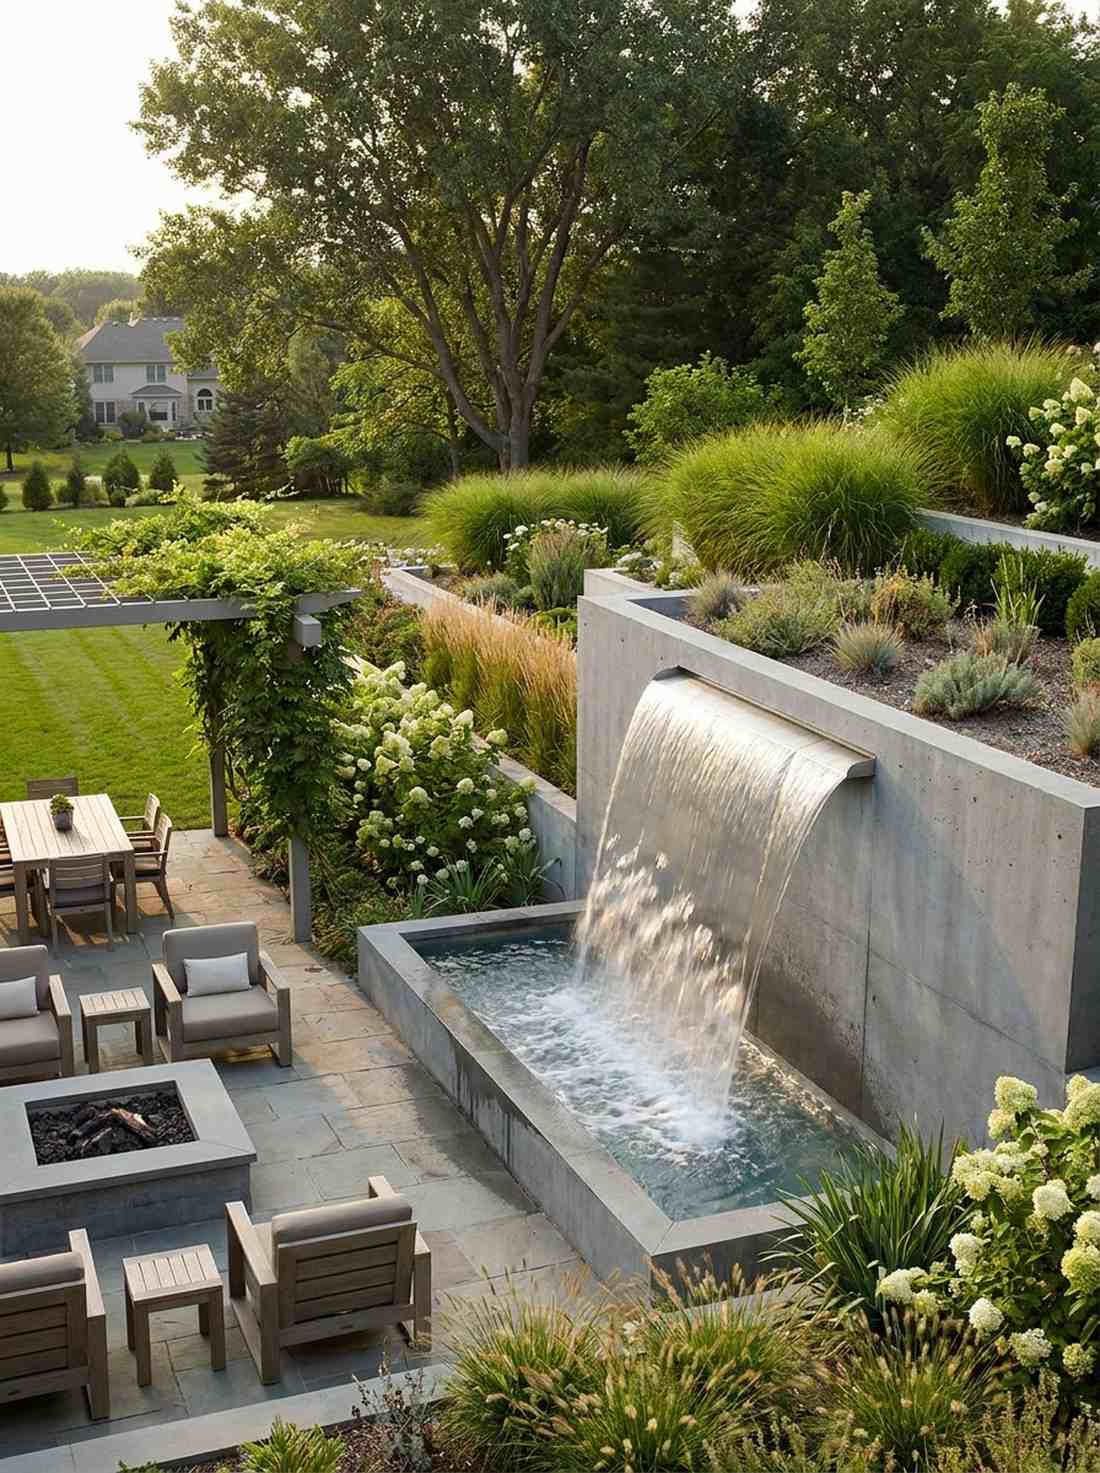
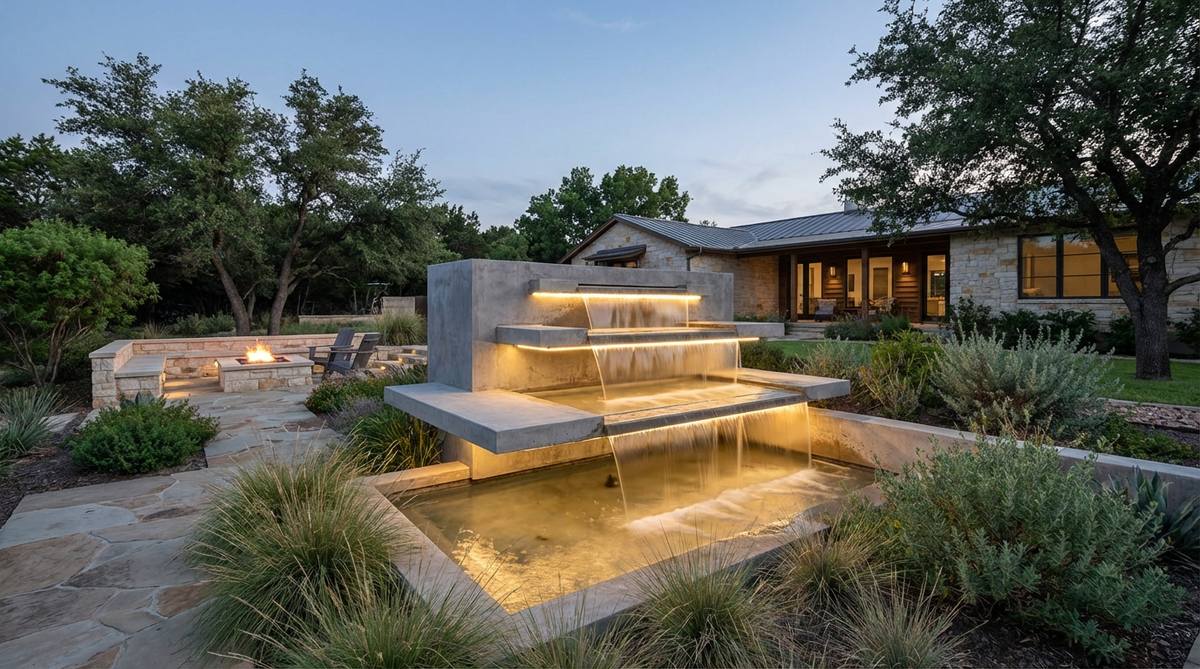
A broad, unbroken sheet of water plummeting over a sharp, flat concrete edge feels powerful and dramatically modern. This sheer descent water wall works exceptionally well as a stunning focal point built directly into a hillside retaining wall.
Swapping out messy, stacked boulders for precision-engineered concrete planes gives a designer-level finish that echoes luxury hotel lobbies. Integrating a stainless steel water feature sheer descent spillway ensures the water falls in a perfect, glass-like sheet rather than a messy splash.
Building this waterfall architecture costs about $400–$600. Pin this if you want the ultimate backyard showstopper!
- Key Materials: Cinderblock core, concrete stucco, stainless spillway, heavy-duty pump
- Vibe / Style: Luxury hotel terrace
- Difficulty: Advanced
- Budget Breakdown: Blocks/Concrete: $150 | Spillway blade: $200 | Pump/Plumbing: $250
- Creator’s Tip: Ensure the spillway lip extends at least 2 inches past the concrete face so water doesn’t wick backward and stain the wall.
- Smart Sourcing: Stainless steel sheer descent spillways and high-flow waterfall pump kits.
Most DIY water features end up looking like messy puddles because they ignore this one crucial geometric detail that billionaires use in their courtyards…
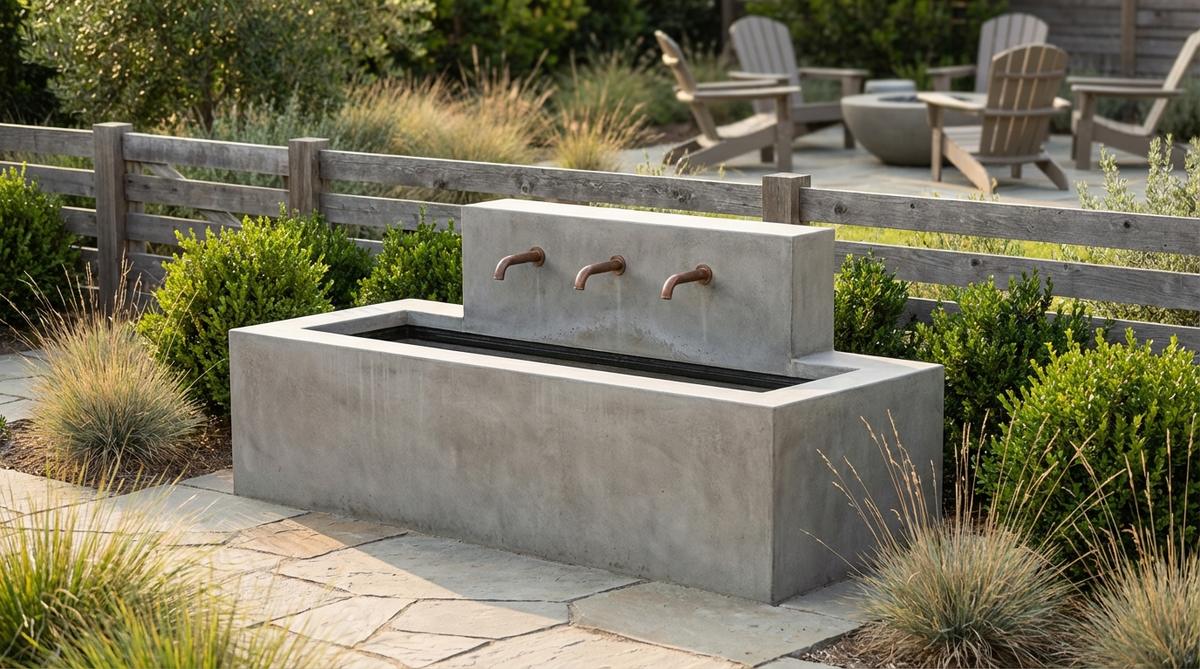
20. Wall-Mounted Water Spout
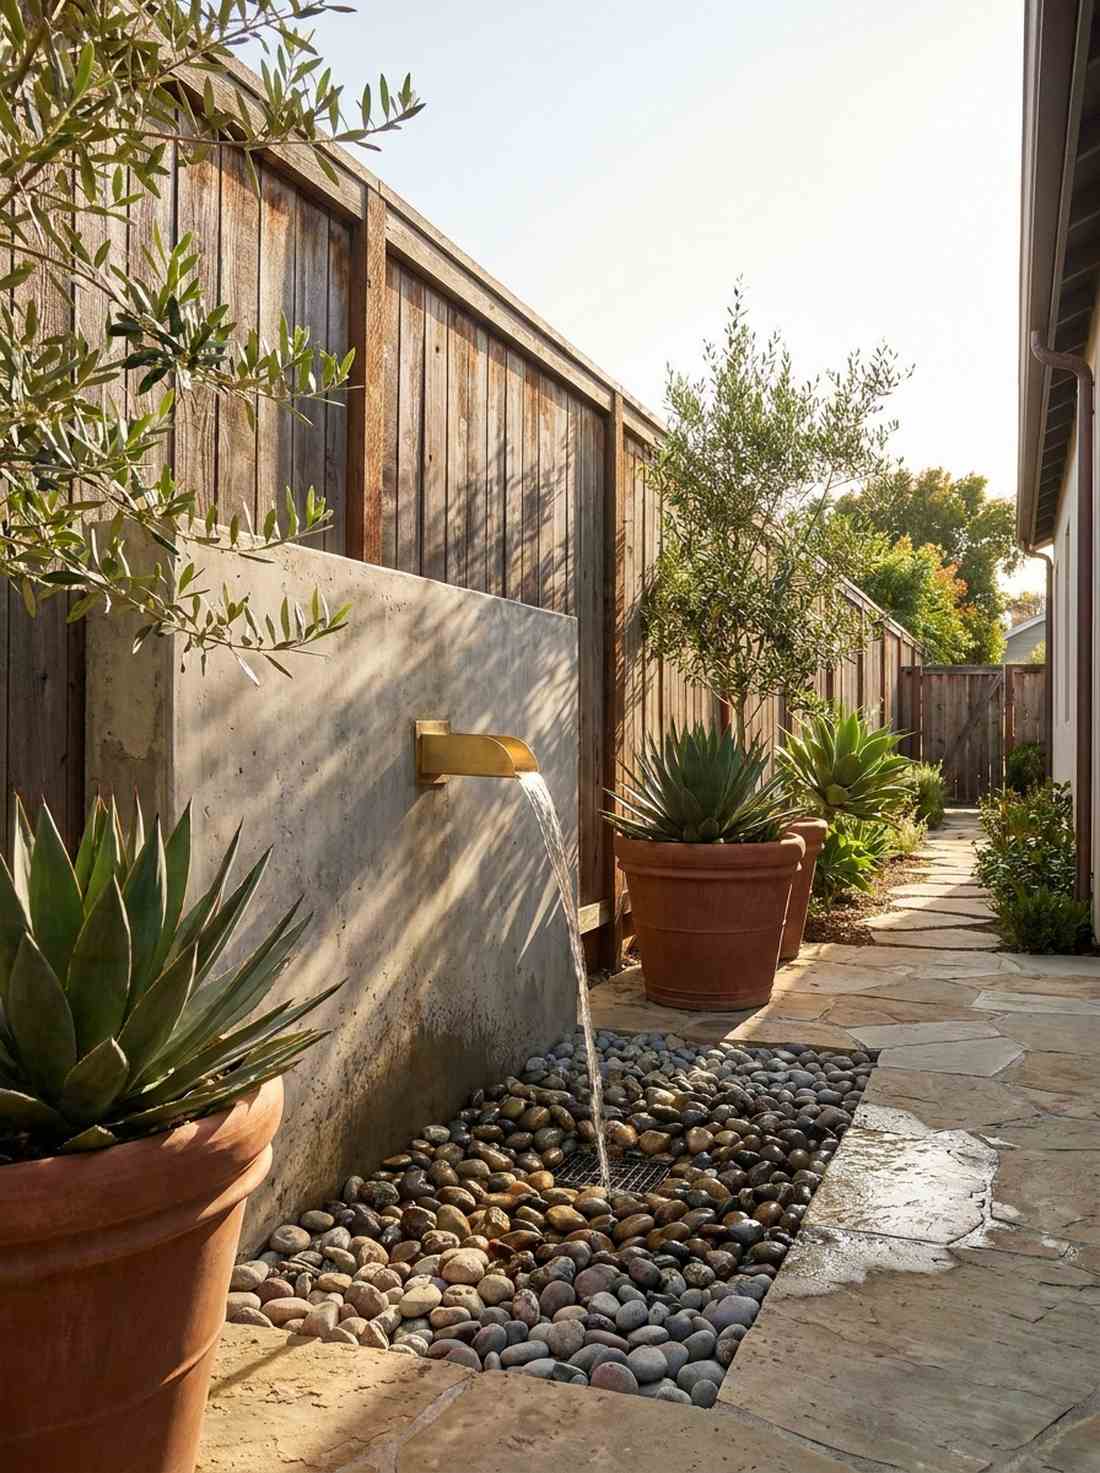

A solitary metal tube emerging from a blank concrete wall, pouring an endless stream into a hidden basin, feels mysteriously elegant. This minimalist wall fountain concept is the perfect use-case for incredibly narrow side-yards where floor space is at a premium.
Isolating the water source to a single, stark focal point delivers a surprisingly premium look with incredible acoustic presence. Sourcing heavy garden design minimalist brass or copper scuppers adds a touch of warm metallic contrast against the cold grey wall.
You can plumb this simple setup for about $180. Save this for a brilliant space-saving luxury upgrade!
- Key Materials: Brass scupper spout, hidden catch basin, vertical plumbing
- Vibe / Style: Mediterranean modern courtyard
- Difficulty: Intermediate
- Budget Breakdown: Spout: $80 | Hidden basin: $60 | Pump: $40
- Creator’s Tip: Bury an industrial plastic catch basin beneath decorative river rock to completely hide the water reservoir.
- Smart Sourcing: Solid brass architectural water scuppers and underground fountain basin kits.
21. Geometric Koi Pond
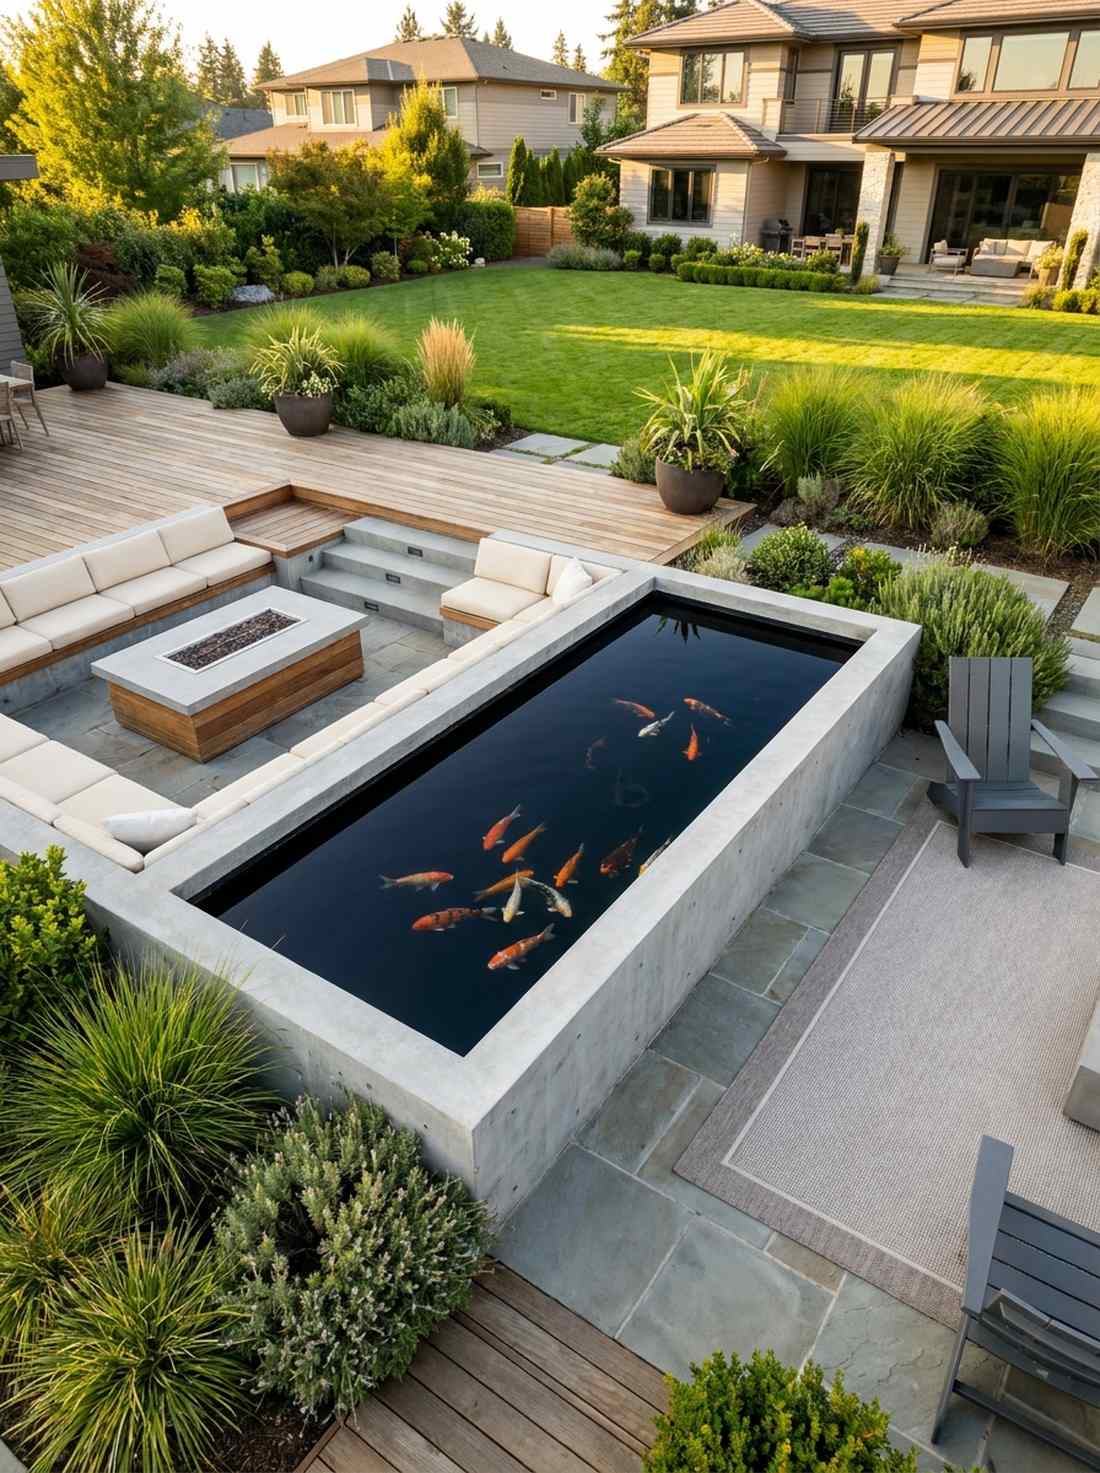
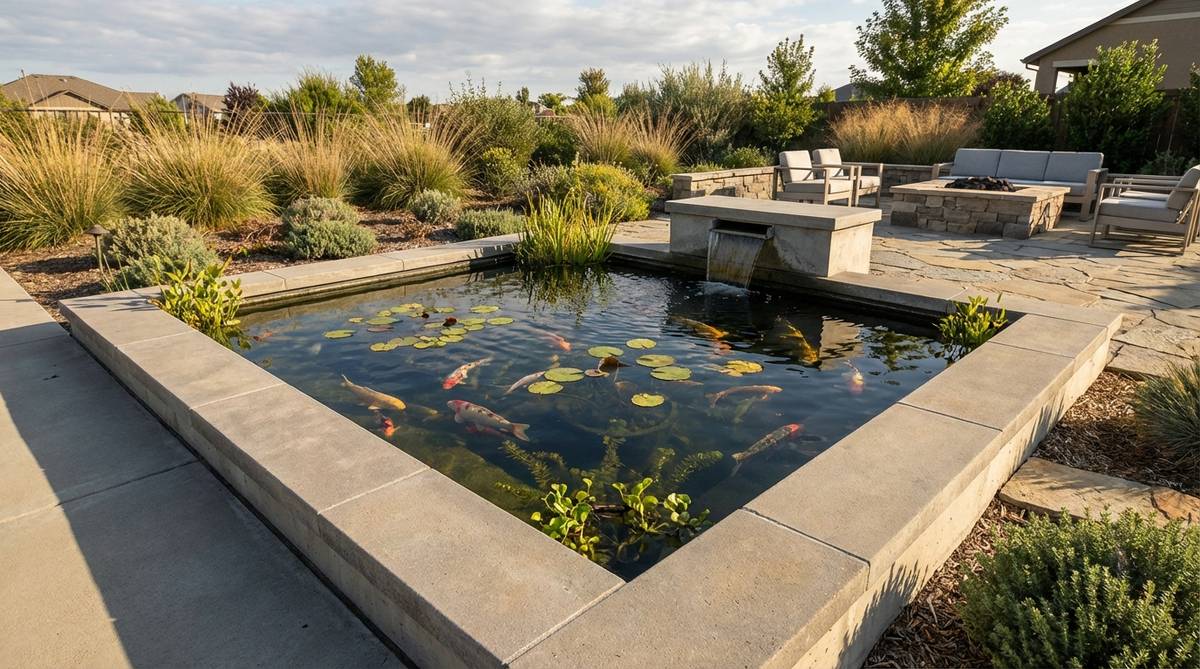
Watching vibrant flashes of orange and white swim within a stark, perfect black rectangle feels like viewing living art trapped in a frame. This formal aquatic habitat layout works exceptionally well as a massive centerpiece for a sunken outdoor lounge area.
Abandoning the traditional organic kidney-bean shape for a rigid concrete box gives a designer-level finish that modernizes traditional koi keeping. Incorporating advanced premium pond filtration kits behind false concrete walls keeps the water pristine without ruining the geometric aesthetic.
Constructing a formal concrete pond runs about $800–$1500. Pin this to your ultimate dream backyard board!
- Key Materials: Poured concrete walls, rubberized coating, bottom drain, bio-filter
- Vibe / Style: Architectural living gallery
- Difficulty: Advanced (requires extreme waterproofing)
- Budget Breakdown: Concrete: $400 | Waterproofing: $200 | Filtration: $800
- Creator’s Tip: Paint the entire interior with black fish-safe rubberized paint; it makes the depth look infinite and the fish colors pop.
- Smart Sourcing: Fish-safe black liquid rubber sealant (5-gallon pails) and pressurized bio-filtration pond kits.
22. Infinity Edge Water Basin
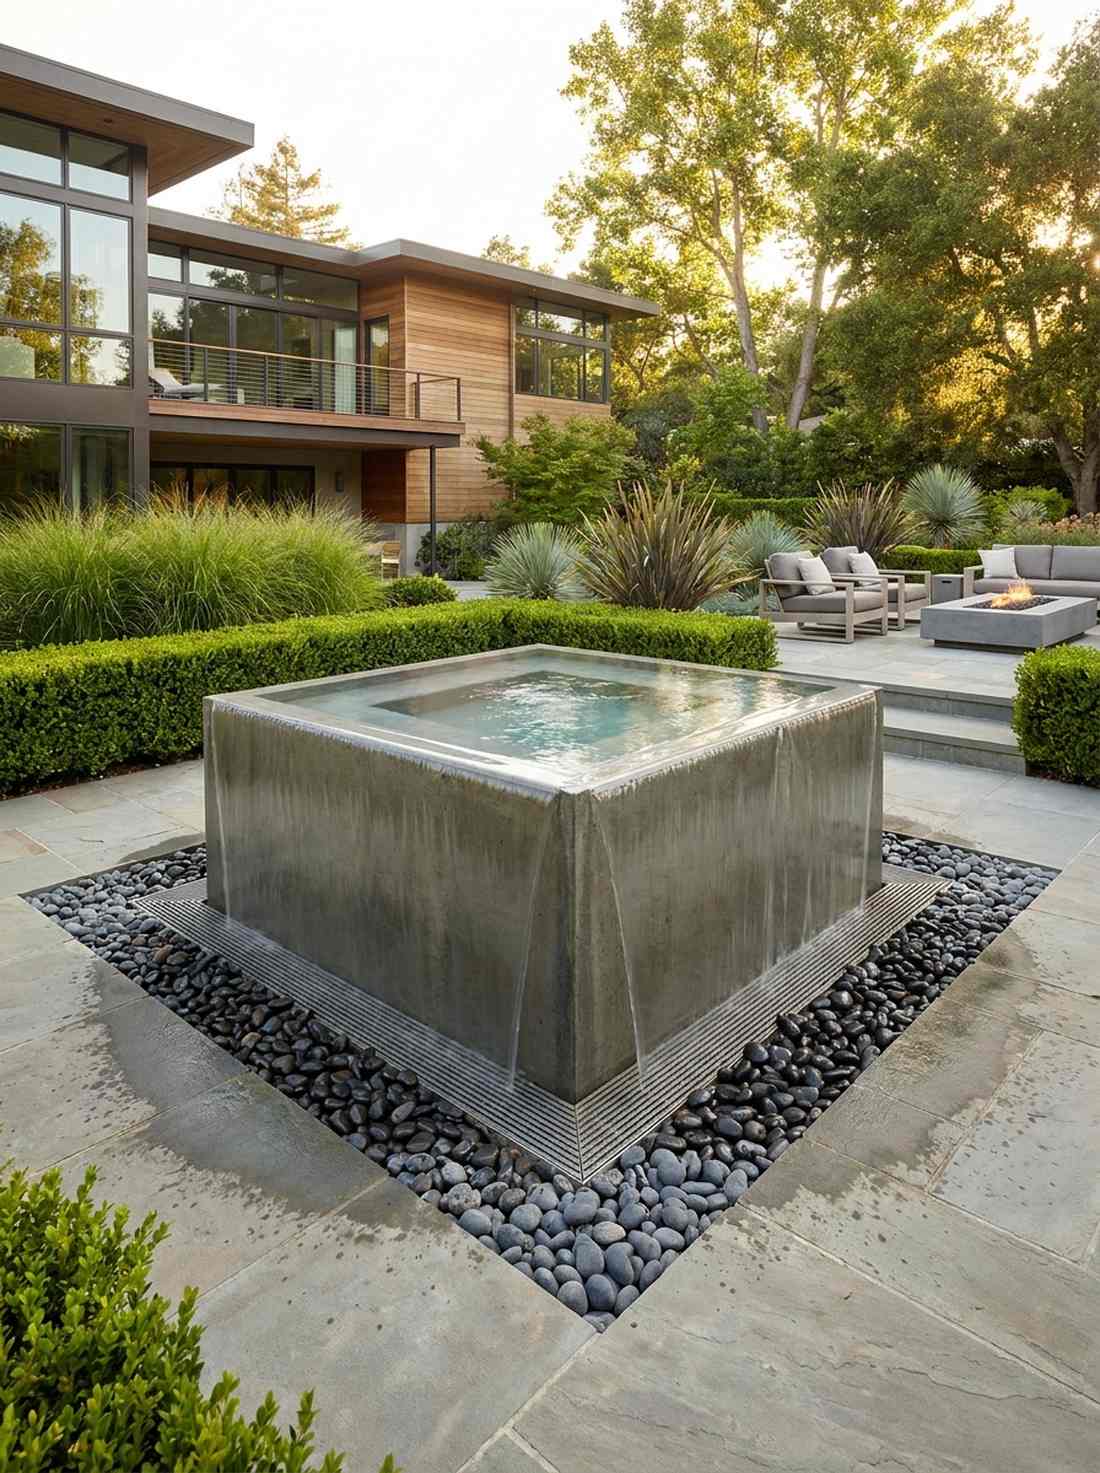
A raised concrete block where the water perfectly crowns and spills silently over the rim feels like a feat of impossible magic. This zero-edge water block design is the absolute pinnacle use-case for modern garden intersections where you want a 360-degree focal point.
Engineering a basin to overflow precisely evenly on all four sides looks far more expensive than it actually is, creating a mesmerizing glass-cube effect. Utilizing a concealed perimeter overflow grating system hidden beneath decorative stones catches and recirculates the water flawlessly.
This high-precision build costs around $500 to execute. It’s a mind-blowing feature that defines luxury.
- Key Materials: Precision-leveled block, auto-fill valve, perimeter catch trench
- Vibe / Style: Ultra-luxury modern estate
- Difficulty: Expert (requires 1/16th inch leveling)
- Budget Breakdown: Basin materials: $200 | Catch trench/Grates: $150 | Heavy pump: $150
- Creator’s Tip: You must use a diamond-cup grinding wheel on the top edge to achieve the absolute dead-level rim required for the infinity effect.
- Smart Sourcing: Diamond cup grinding wheels for concrete and heavy-duty hidden perimeter grates.
Modern Garden Borders And Enclosures
Boundaries in modern gardens extend beyond traditional fencing to include concrete walls, screens, and edging that define spaces while maintaining visual continuity. These elements provide privacy and structure without overwhelming the design.
23. Poured Concrete Retaining Walls
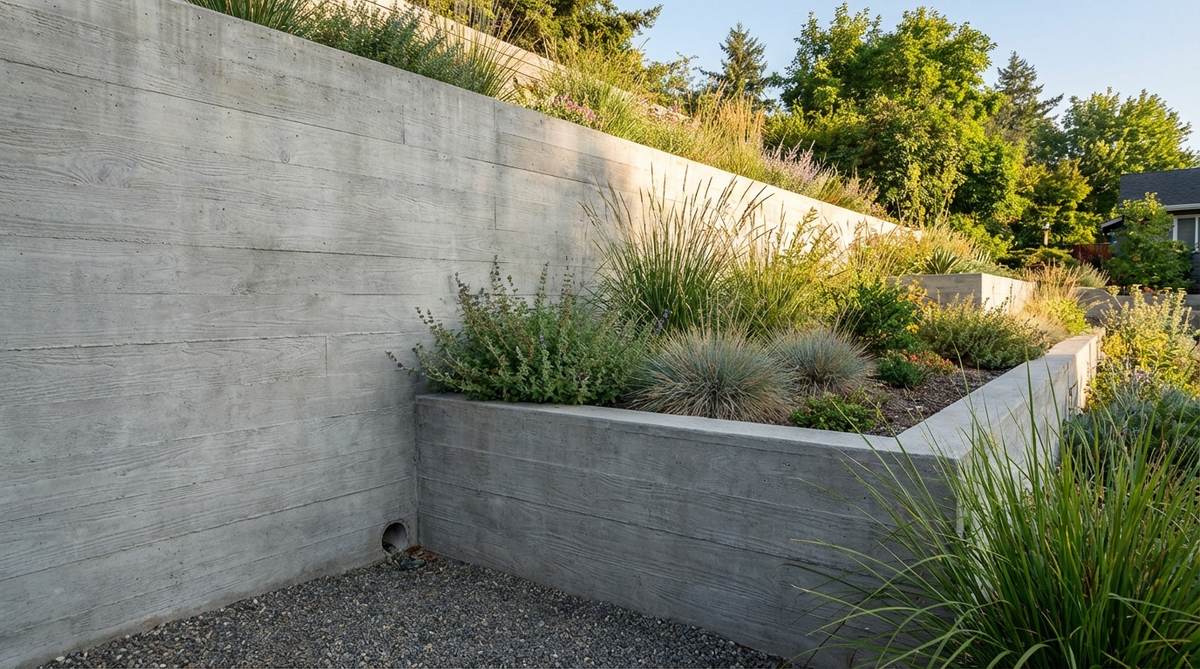
A massive, smooth expanse of grey stone pushing back a wall of earth feels incredibly dominant and beautifully industrial. This monolithic property boundary works exceptionally well for holding back large hillside cuts while creating an instant modern backdrop.
Foregoing cheap interlocking blocks for a seamless poured wall delivers a surprisingly premium look that will outlast your lifetime. Treating the forms with contemporary garden design architectural release agents ensures a perfectly smooth, blemish-free face when the wood is stripped away.
Pouring a professional-grade wall runs about $60 per linear foot. Save this for your major property overhaul!
- Key Materials: Poured concrete, heavy rebar cages, snap-tie forms
- Vibe / Style: Brutalist fortress
- Difficulty: Advanced (requires heavy machinery/concrete trucks)
- Budget Breakdown: Concrete/Delivery: $800 | Rebar/Forms: $400
- Creator’s Tip: Use rough-sawn lumber for the formwork to imprint a stunning, natural wood-grain texture directly into the finished concrete face.
- Smart Sourcing: Heavy-duty concrete snap-ties and wedges and architectural form release agents.
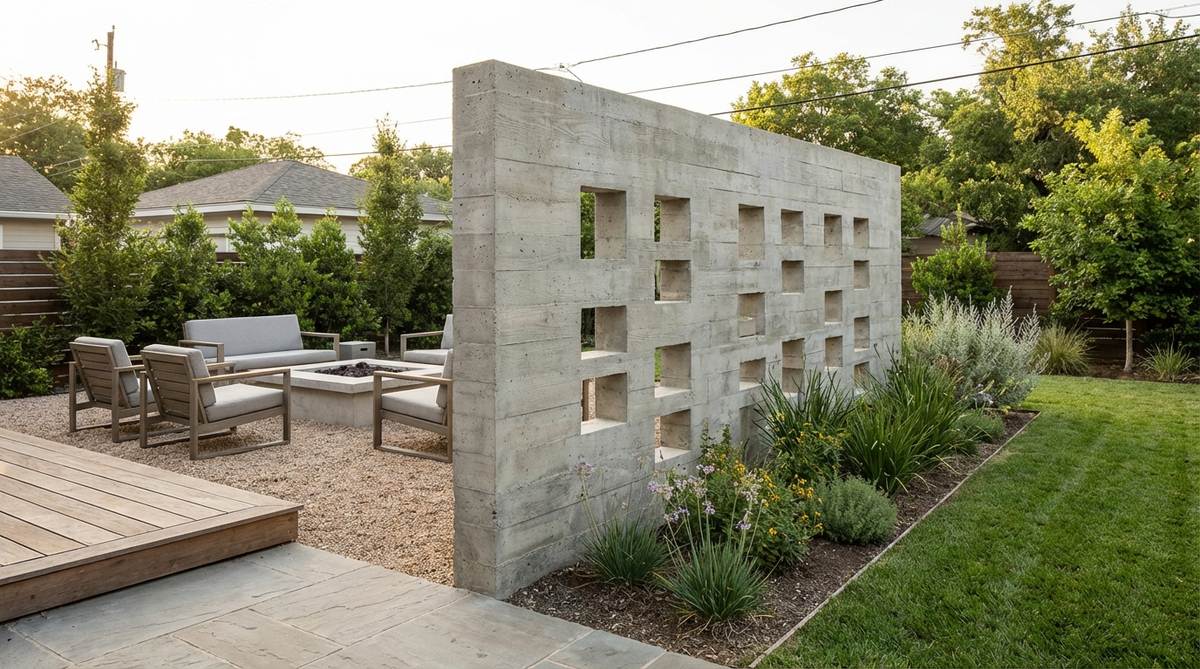
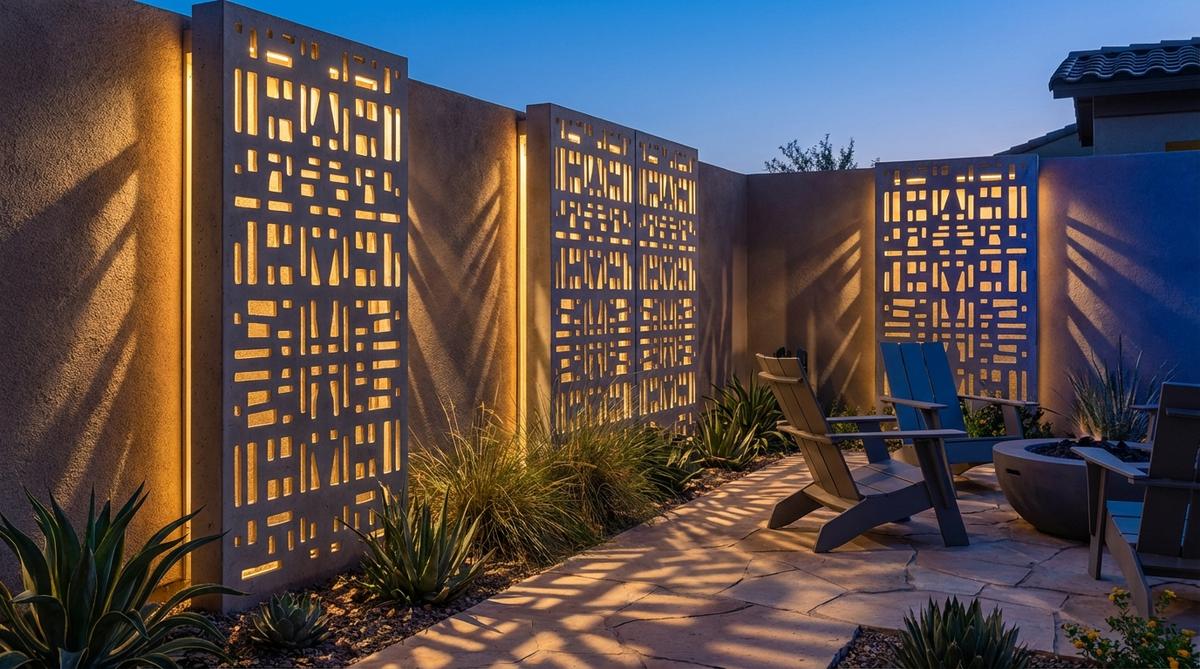
24. Concrete Block Privacy Screen
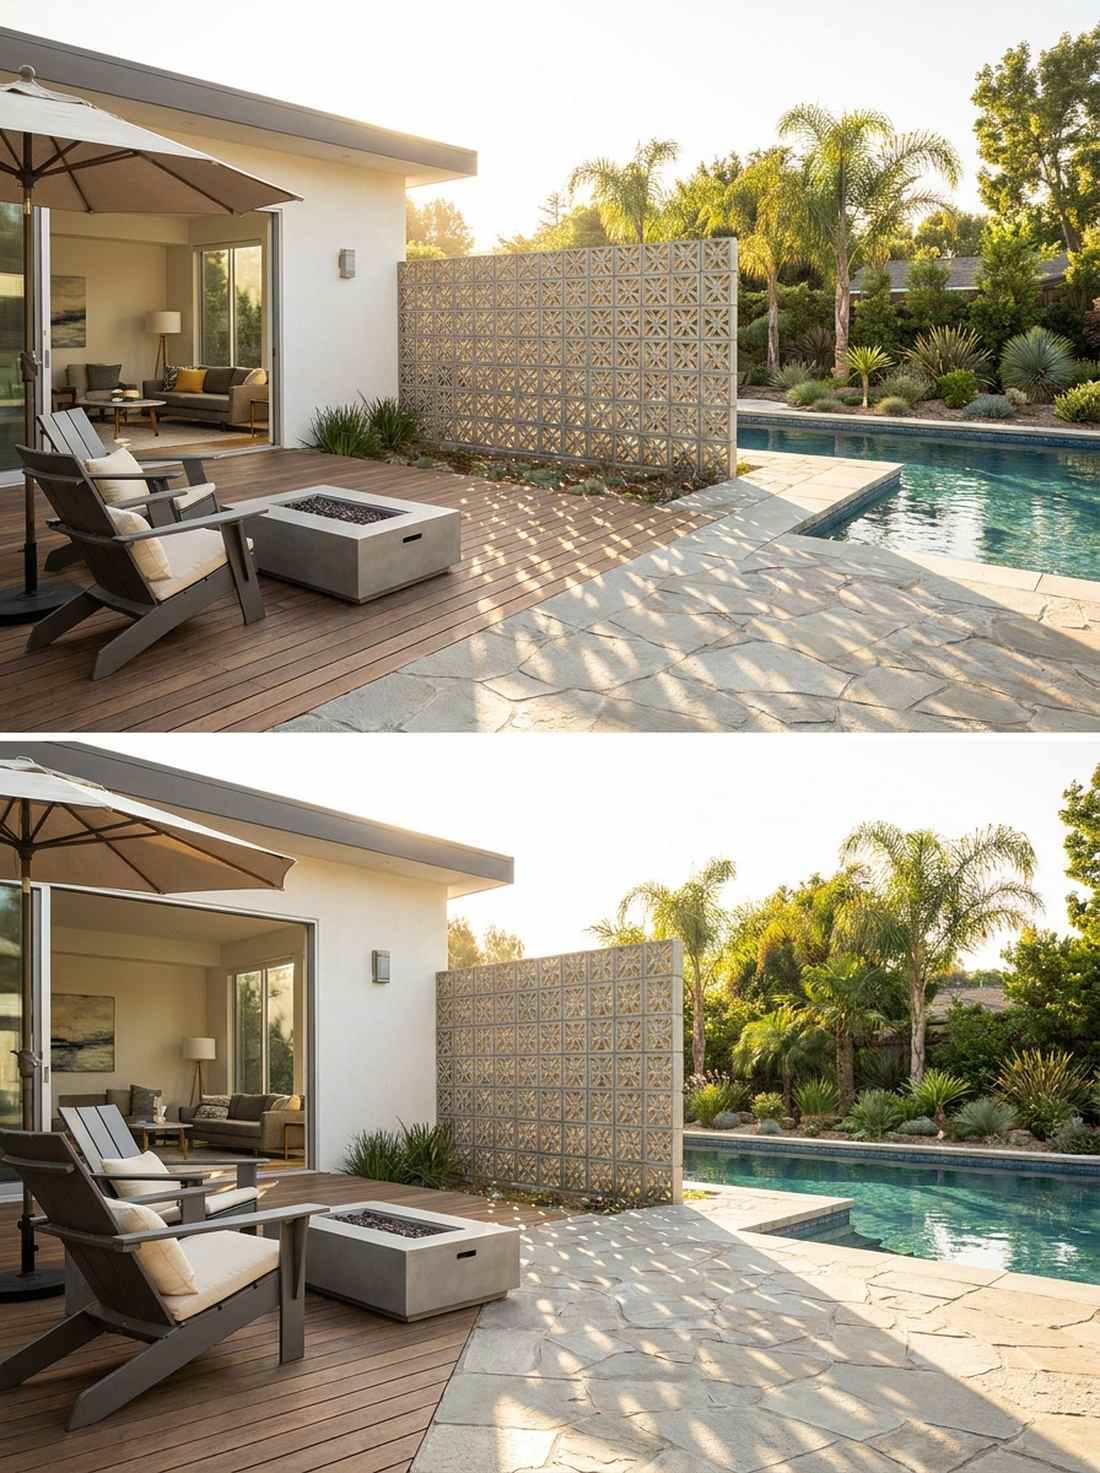
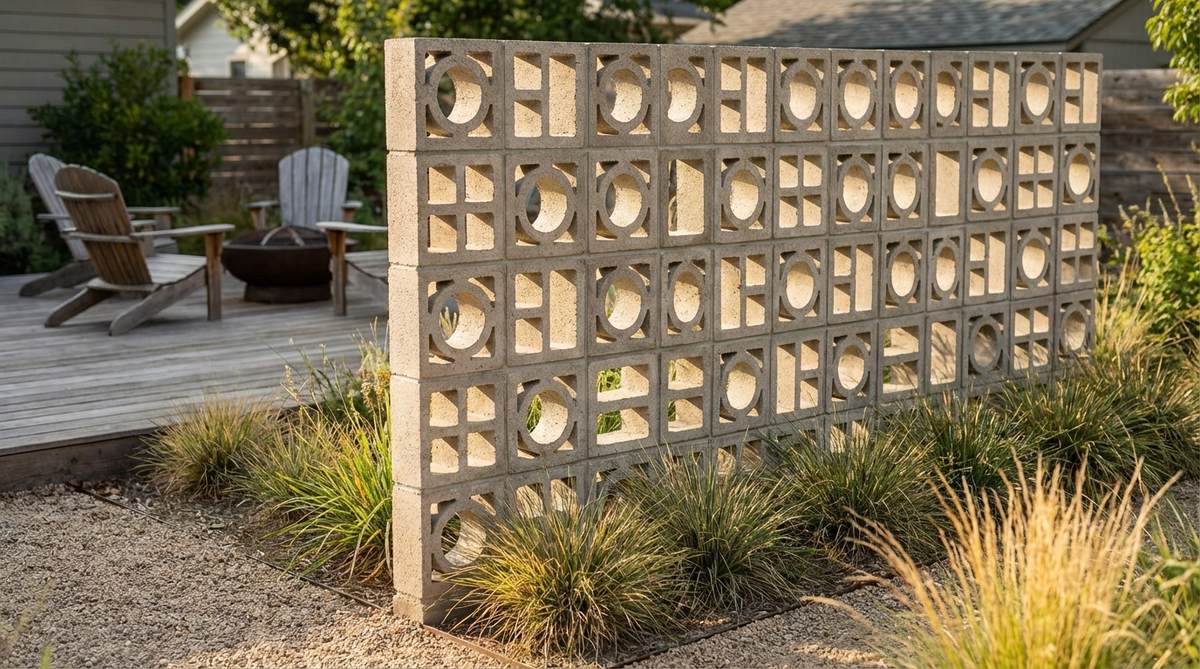
Sunlight filtering through an intricate grid of concrete cutouts casts mesmerizing, geometric shadows that dance across the patio. This breeze-block wall concept is the ultimate use-case for separating a pool area without completely blocking the airflow or the view.
Resurrecting retro architectural blocks gives a designer-level finish that flawlessly blends mid-century charm with modern security. Stacking these units using high-bond masonry construction adhesives instead of messy mortar keeps the lines impossibly clean and crisp.
You can build a stunning 6-foot screen for around $300. Pin this to your outdoor privacy solutions board!
- Key Materials: Decorative breeze blocks, rebar vertical supports, masonry adhesive
- Vibe / Style: Palm Springs mid-century
- Difficulty: Intermediate
- Budget Breakdown: Breeze blocks: $200 | Adhesive/Rebar: $100
- Creator’s Tip: Run vertical rebar through the hollow cores every third block to prevent the wall from turning into a sail during high winds.
- Smart Sourcing: Polyurethane masonry construction adhesive (bulk pack) and architectural breeze block pallets.
Before you buy expensive, flimsy wooden patio furniture, check out how this next permanent hardscape hack completely eliminates the need for chairs…
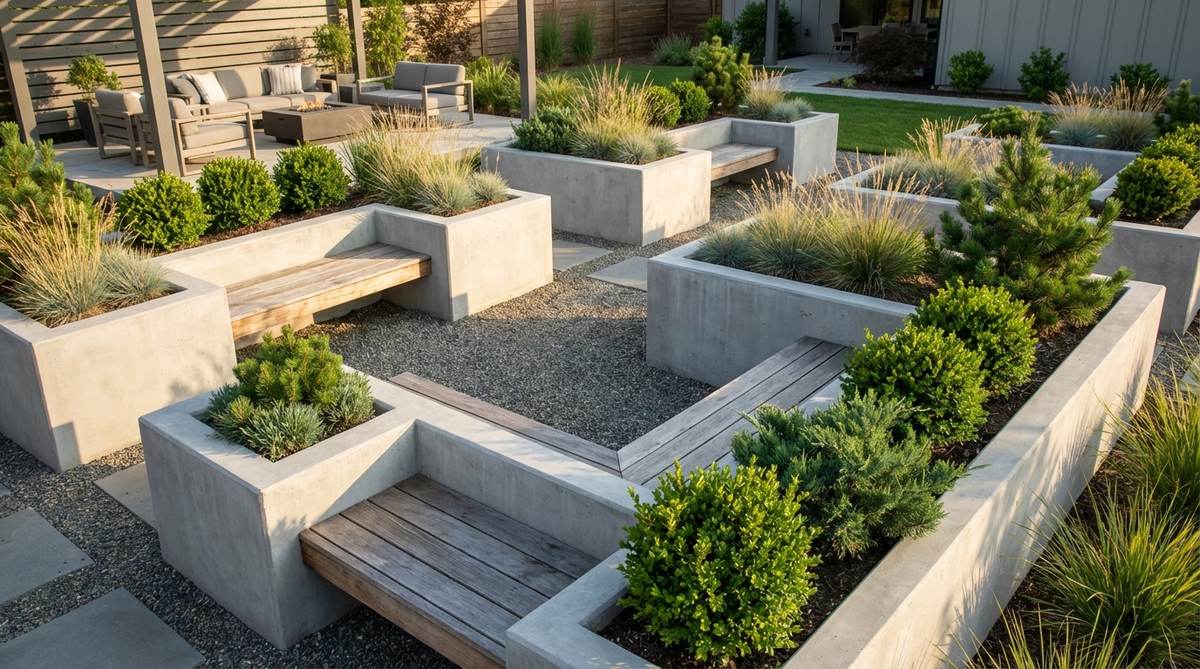
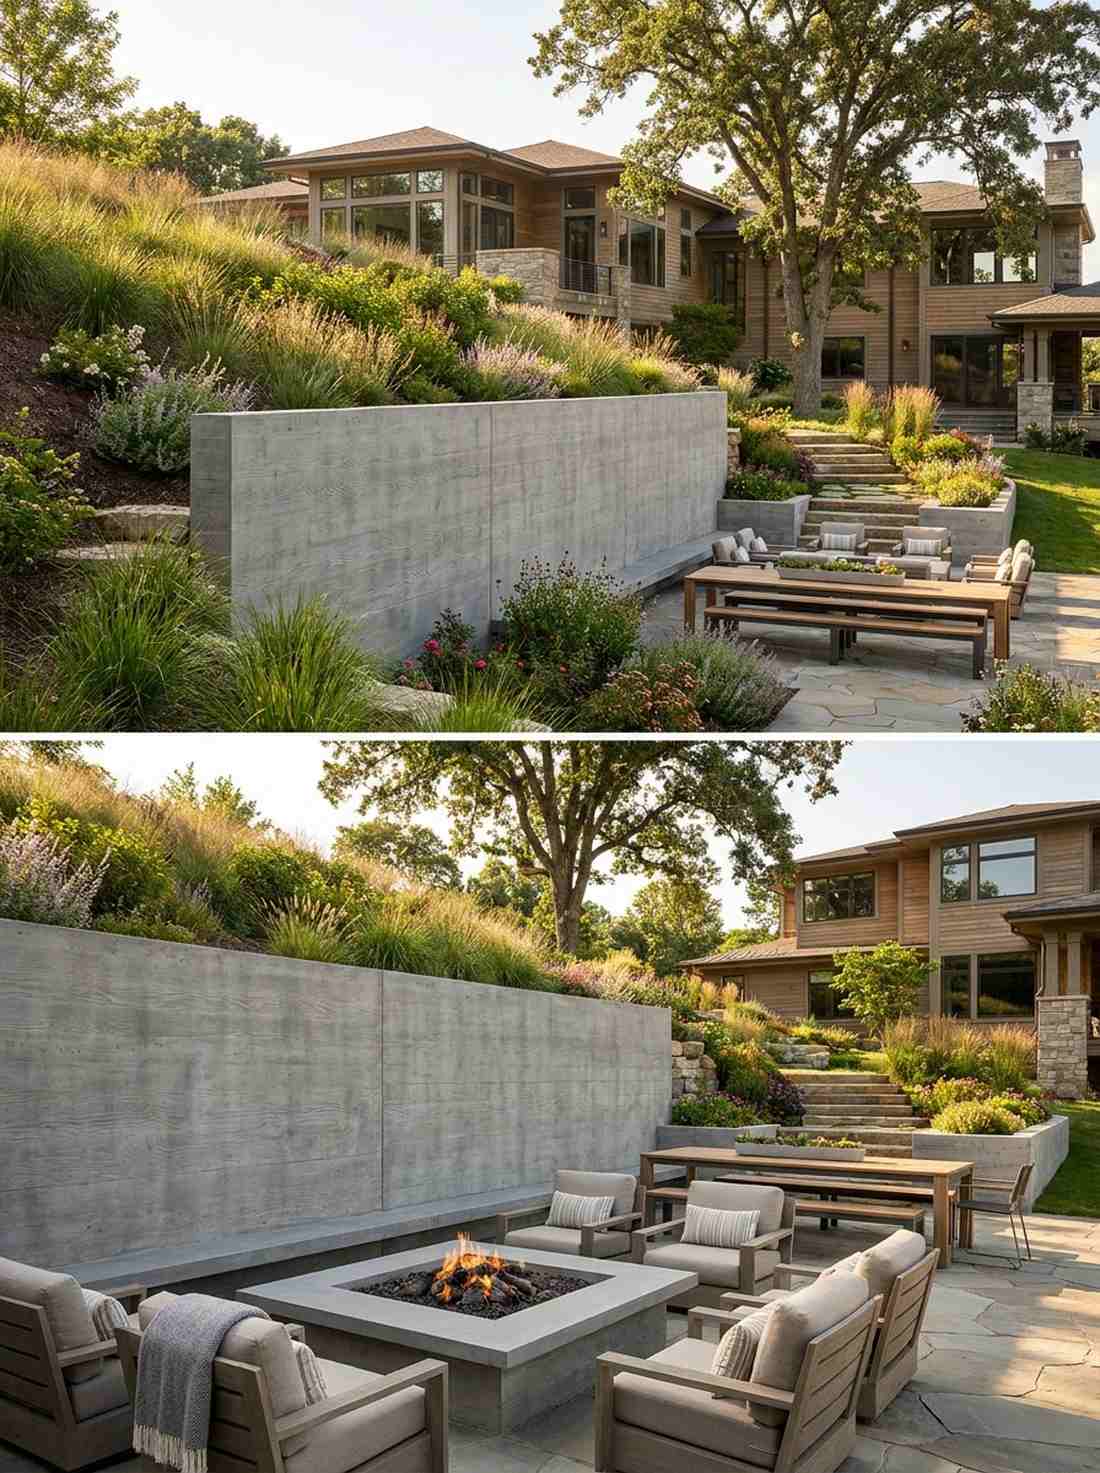
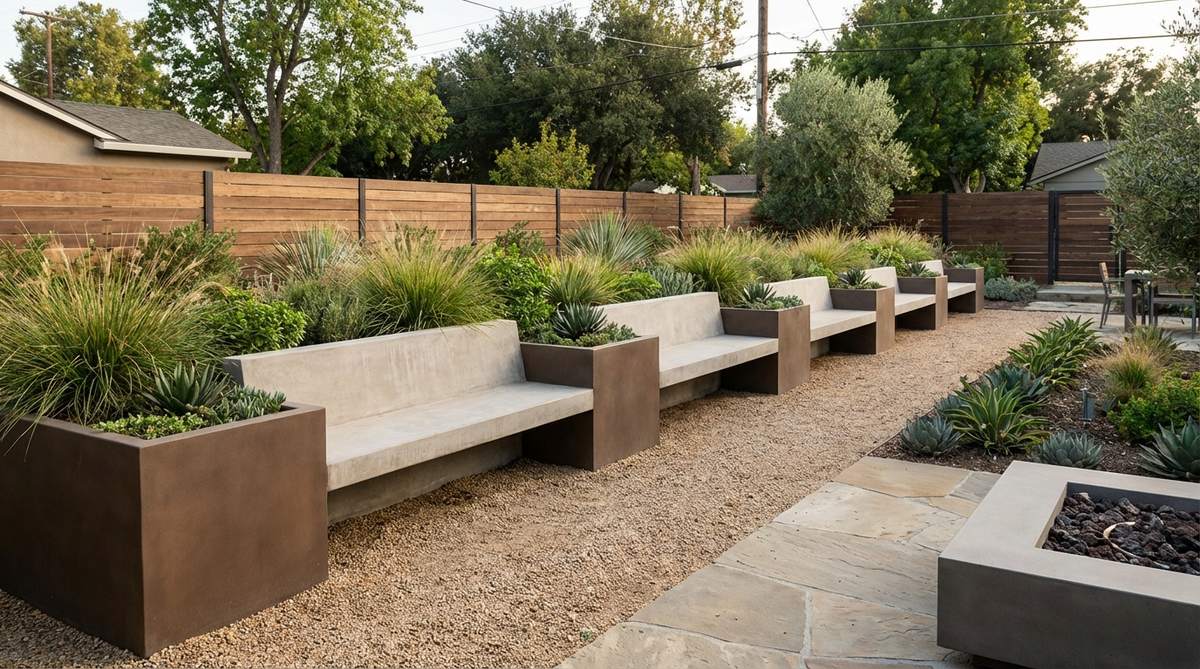
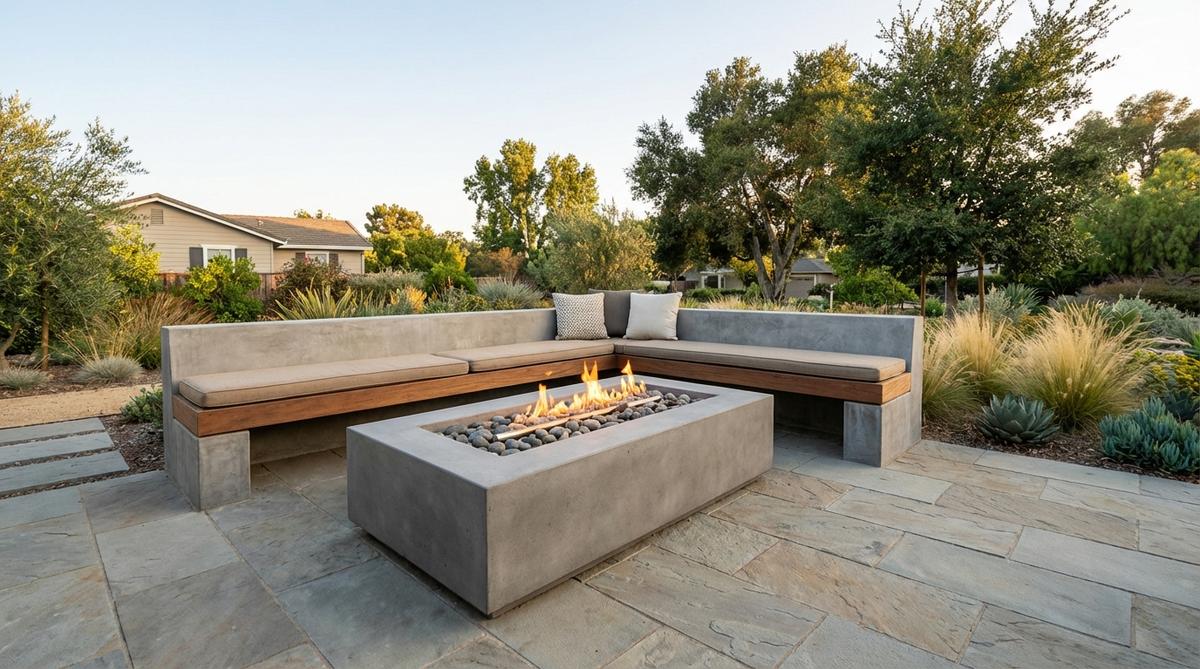
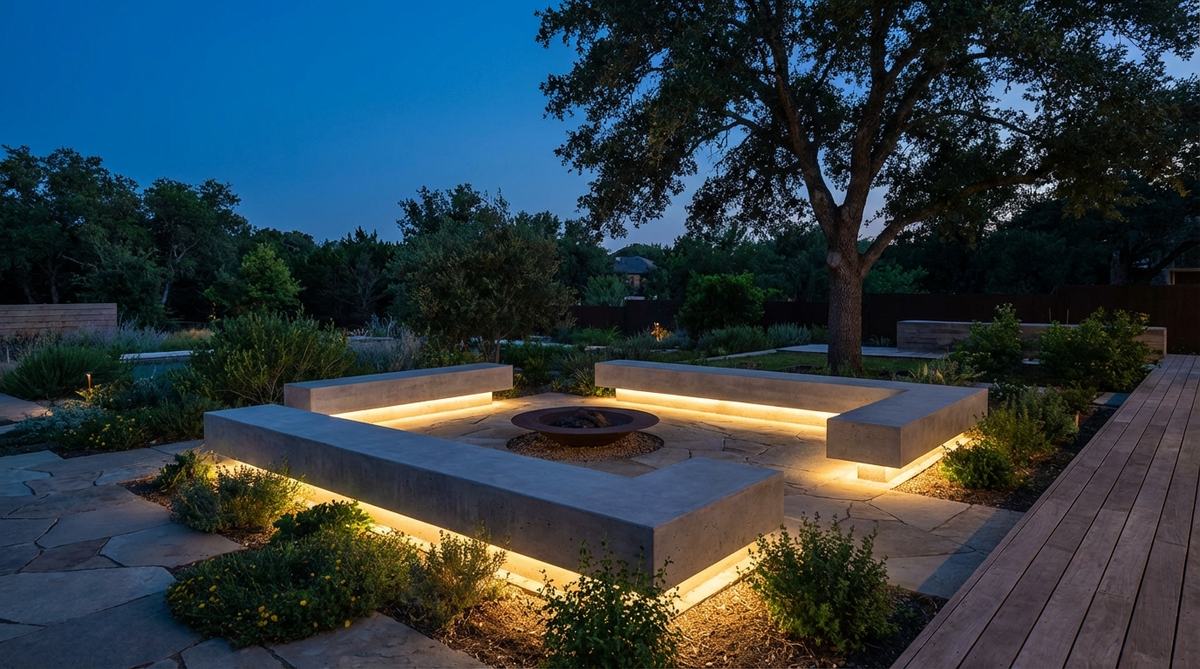
25. Low Concrete Seat Wall
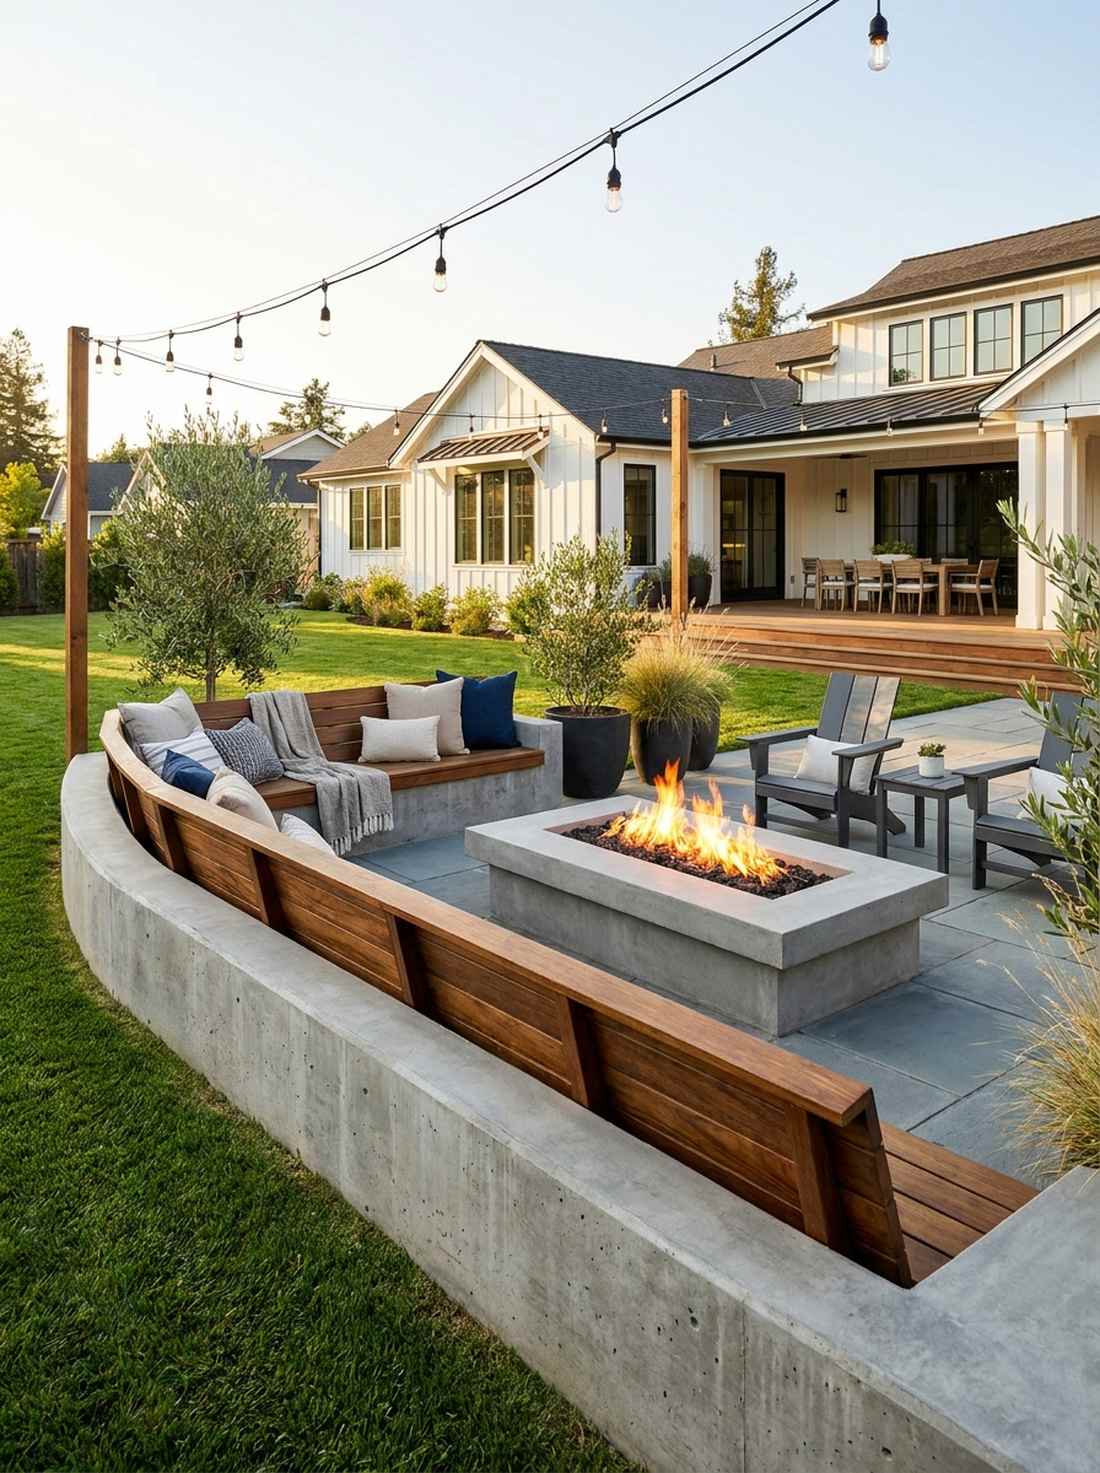
A sleek, 18-inch high ribbon of concrete wrapping around a fire pit feels incredibly grounded and endlessly inviting. This dual-purpose hardscape barrier works exceptionally well for defining patio boundaries while providing massive amounts of overflow seating for parties.
Thickening a standard garden border into a functional bench looks far more expensive than it is and maximizes usable square footage. Topping the raw concrete with premium garden design minimalist sealed timber slats adds vital warmth to the brutalist structure.
You can pour a custom seat wall for roughly $200 in materials. Highly recommended for avid backyard entertainers!
- Key Materials: Cinderblock core, concrete cap, ipe wood slats
- Vibe / Style: High-end resort lounge
- Difficulty: Intermediate
- Budget Breakdown: Blocks/Concrete: $120 | Wood caps: $80
- Creator’s Tip: Angle the top wood slightly backward (about 2 degrees) to shed rainwater quickly and prevent wood rot.
- Smart Sourcing: Pre-finished Ipe wood decking boards and heavy-duty concrete anchor bolts.
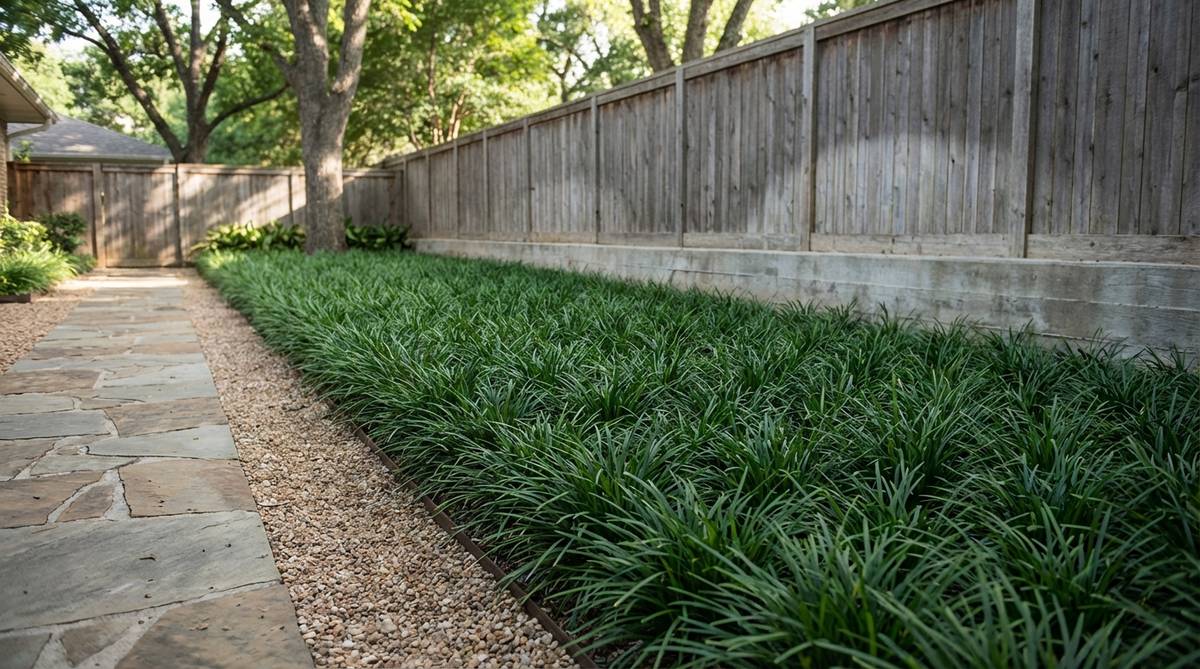
26. Linear Concrete Landscape Edging
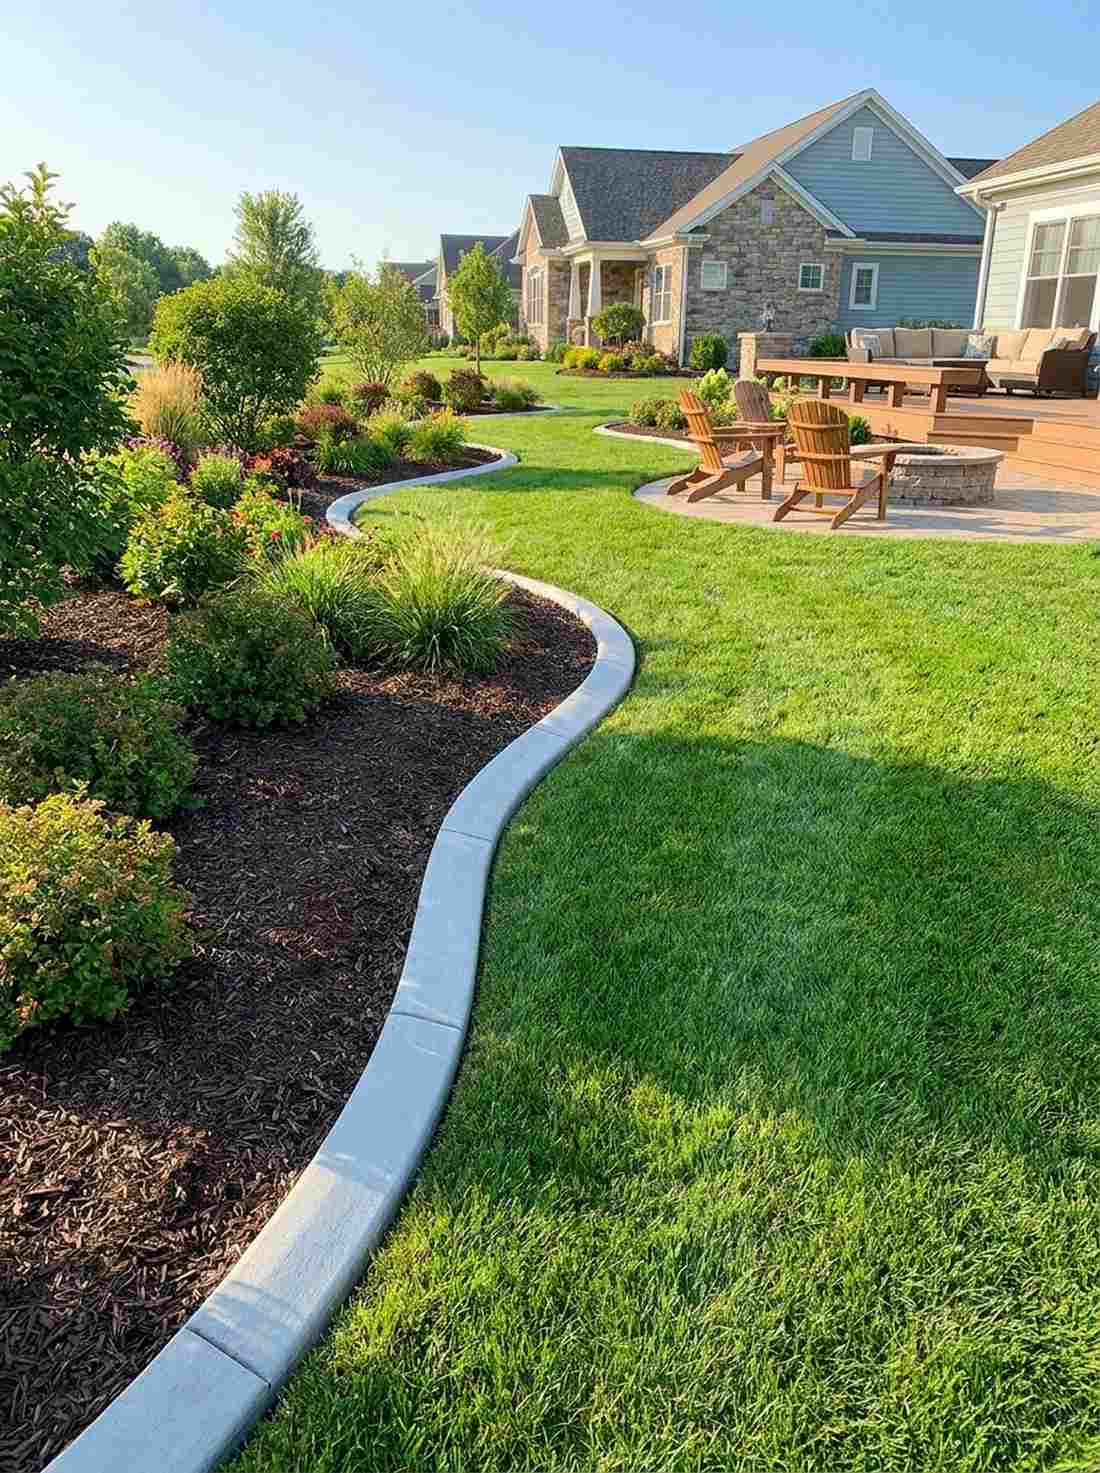
A crisp, unbroken grey line separating dark mulch from bright green turf feels like someone drew a permanent marker border around your garden. This continuous extruded border is the perfect use-case for massive winding garden beds that require aggressive weed control.
Ripping out cheap plastic edging for a permanent poured ribbon delivers a surprisingly premium look that withstands rogue lawnmowers. Using specialized landscape curbing equipment ensures you get a perfectly smooth, uniform height across hundreds of feet of yard.
DIY concrete edging costs mere pennies per foot. Save this to upgrade your basic garden borders!
- Key Materials: High-strength concrete, edging trowel, string line
- Vibe / Style: Manicured country club
- Difficulty: Beginner-friendly
- Budget Breakdown: Concrete bags: $40 | Trowel: $20
- Creator’s Tip: Cut control joints into the wet concrete every 4 feet with a margin trowel; otherwise, winter freezing will crack it randomly.
- Smart Sourcing: Professional concrete edging trowels and high-strength crack-resistant concrete mix.
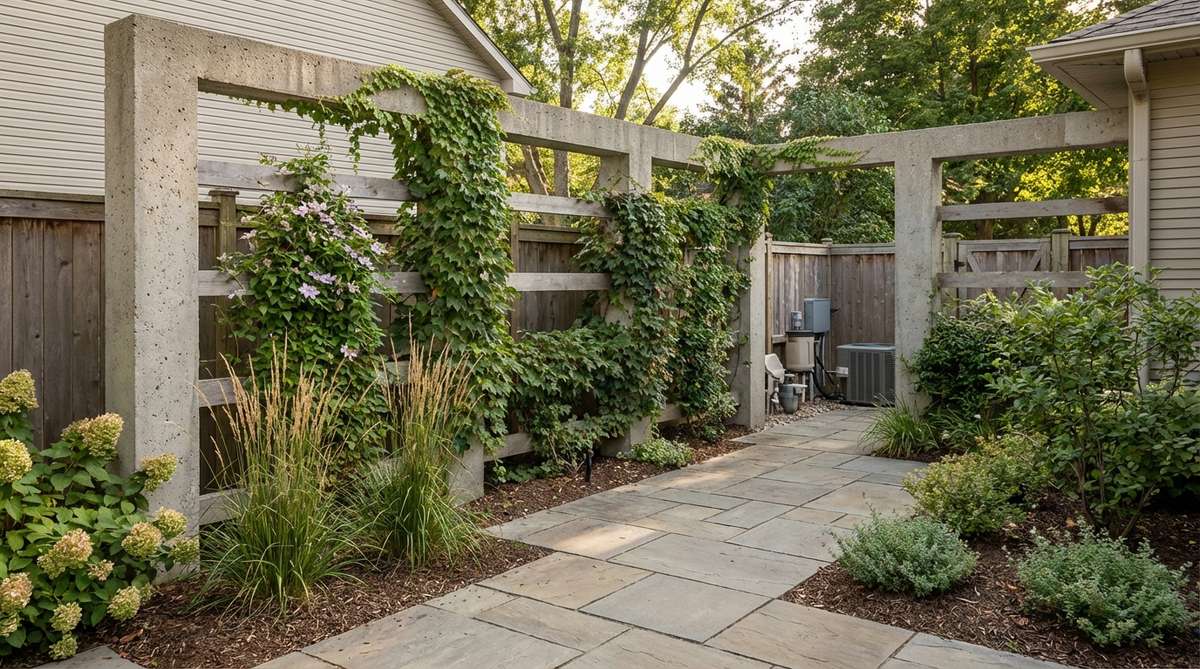
27. Concrete and Wood Composite Fence
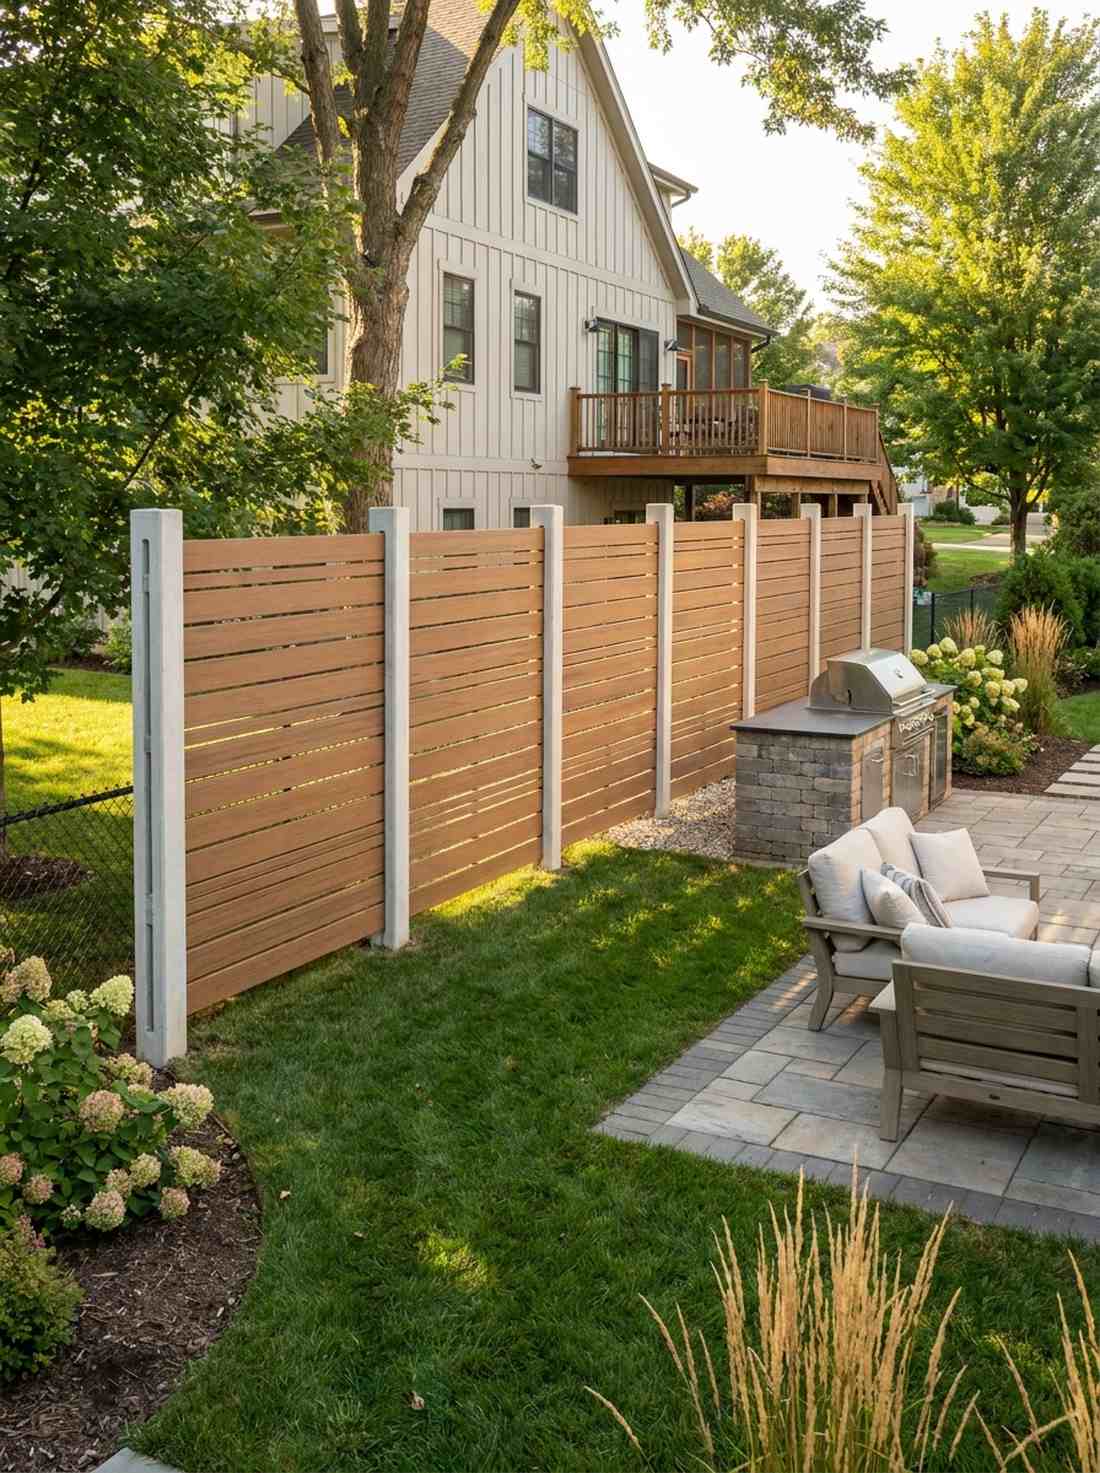
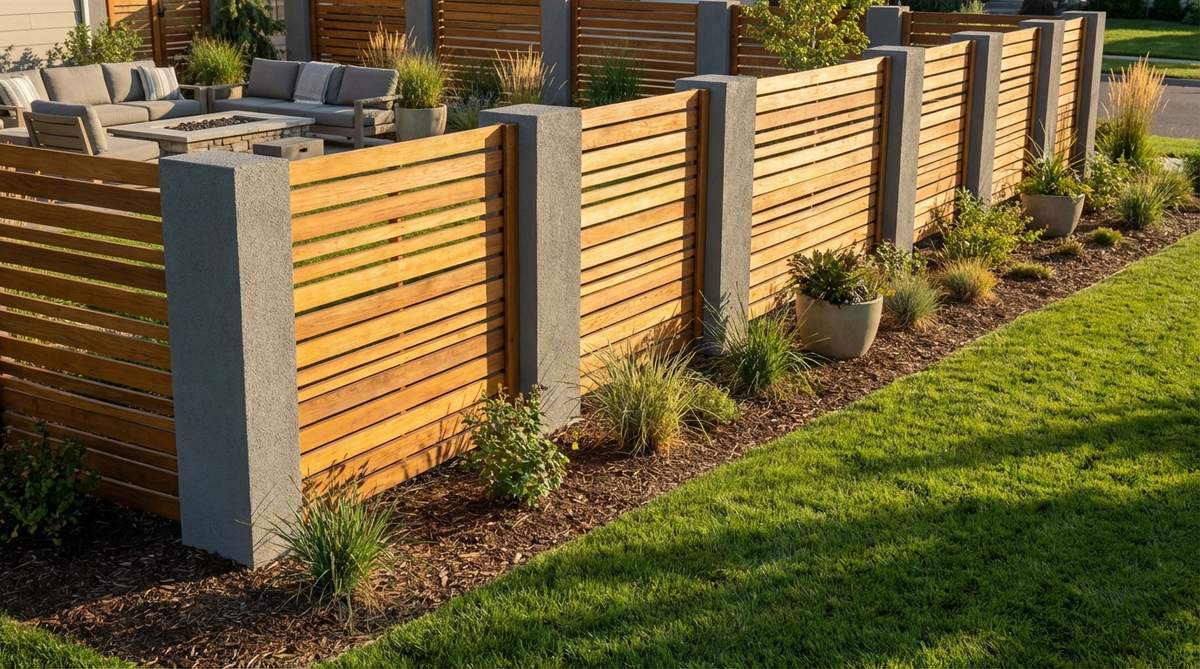
The stark, pale vertical concrete pillars clashing beautifully with warm, horizontal wooden slats feels incredibly secure yet visually lightweight. This hybrid material privacy fence works exceptionally well for modernizing suburban property lines where chain-link is an absolute eyesore.
Combining heavy masonry with slatted timber gives a designer-level finish that guarantees your fence posts will never rot underground. Sliding premium composite decking boards into the slotted concrete pillars creates an ultra-durable, zero-maintenance privacy barrier.
This premium fencing runs about $40 per linear foot. Pin this if you are tired of repairing rotting wooden fences!
- Key Materials: Slotted concrete fence posts, composite wood slats
- Vibe / Style: Contemporary urban fortress
- Difficulty: Advanced (requires extreme post alignment)
- Budget Breakdown: Concrete posts: $200 | Composite slats: $300
- Creator’s Tip: Leave a 1/4 inch gap between the composite boards and the concrete slot to allow for thermal expansion during summer heat.
- Smart Sourcing: Pre-cast slotted concrete fence posts and UV-protected composite fascia boards (bulk bundle).
28. Stepped Concrete Boundary Wall
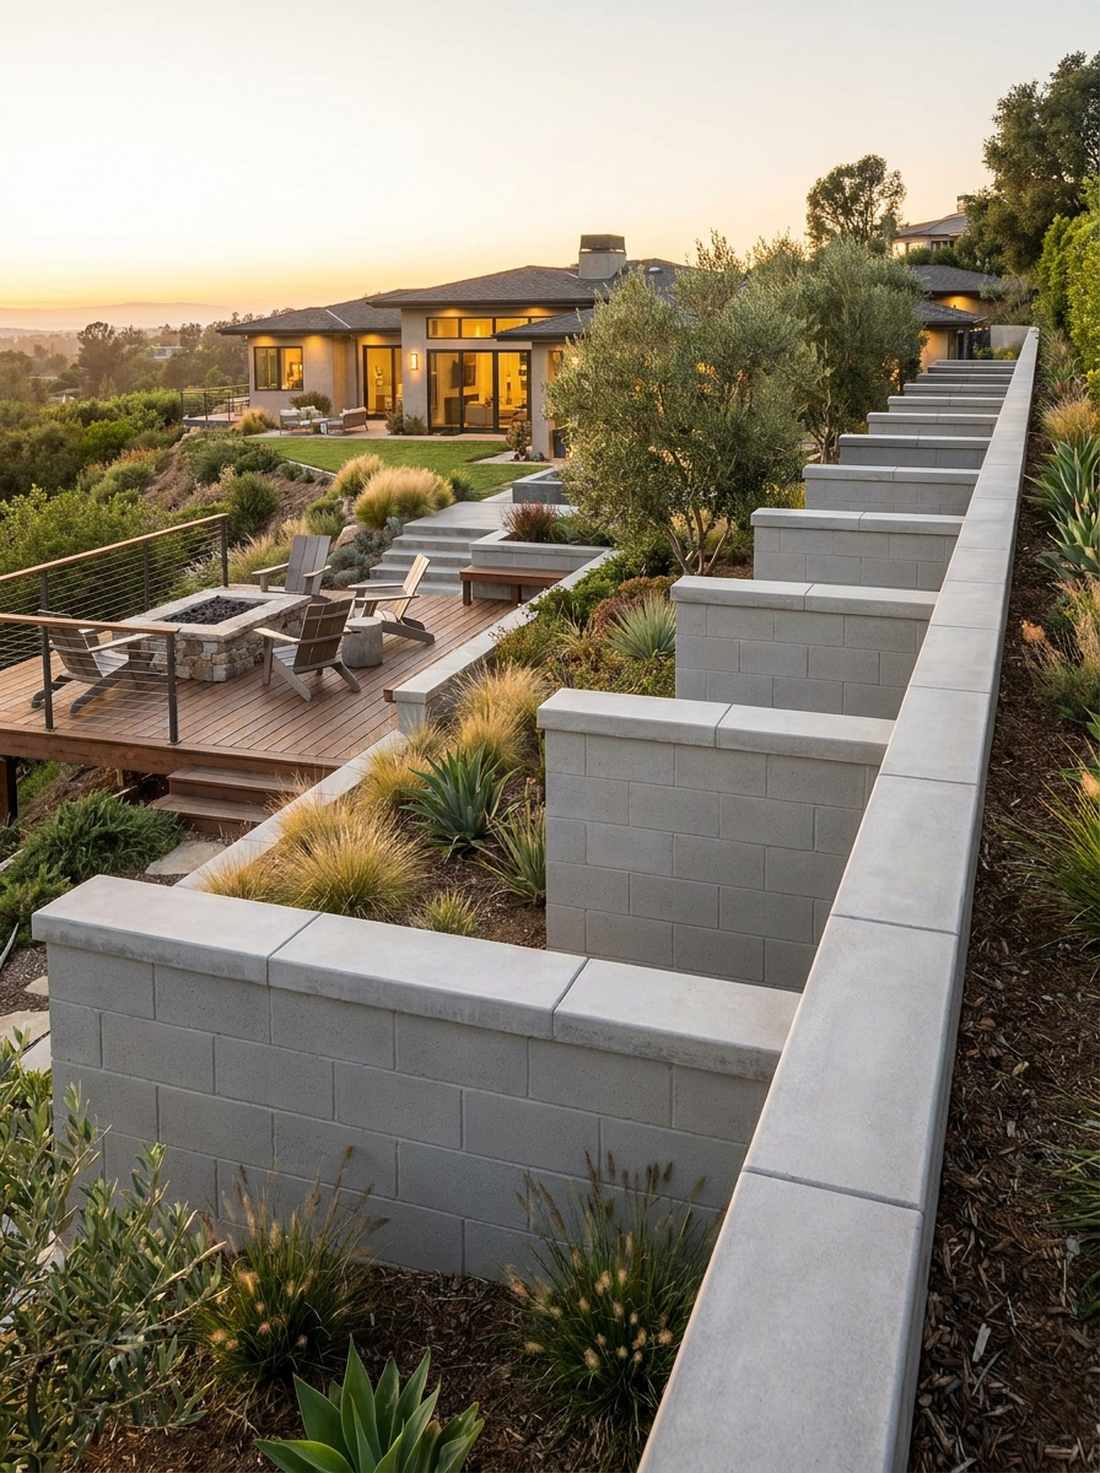
A massive, staggered wall dropping neatly down a sloping property line feels like ancient Incan architecture updated for the 21st century. This terraced perimeter defense is the ultimate use-case for securing hillside properties without building an ugly, slanted fence.
Stepping the top edge perfectly level rather than following the ground slope looks far more expensive than it is and reinforces geometric discipline. Topping the staggered columns with sleek contemporary garden design flat concrete caps ties the entire massive structure together seamlessly.
Building a stepped masonry wall costs roughly $50 per foot. Save this for a massive curb-appeal transformation!
- Key Materials: Cinderblocks, surface bonding cement, flat coping stones
- Vibe / Style: Geometric hillside estate
- Difficulty: Advanced
- Budget Breakdown: Blocks: $300 | Cement: $150 | Coping caps: $200
- Creator’s Tip: Keep every step increment exactly equal (e.g., exactly 16 inches drop per step) to maintain rigid modern symmetry.
- Smart Sourcing: Pre-cast flat concrete wall caps and fiber-reinforced surface bonding cement (bulk pails).
Built-In Concrete Seating Solutions
Integrated seating carved from concrete provides permanent gathering spaces that reinforce geometric design intentions. These features eliminate the need for movable furniture while defining functional zones within gardens.
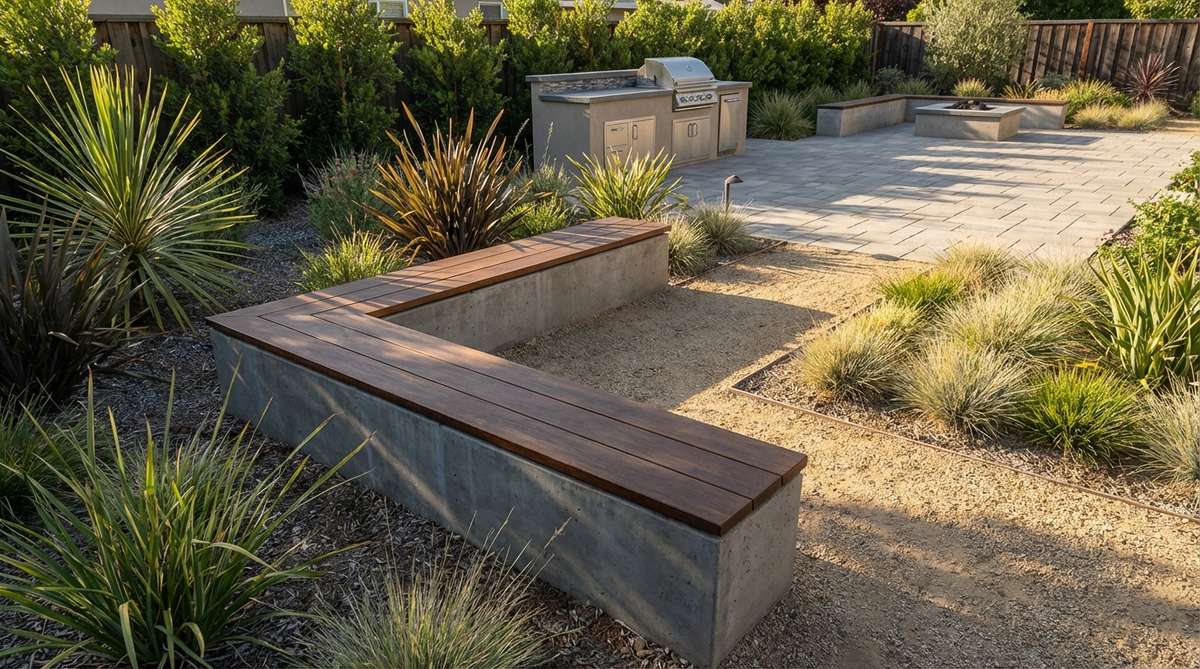
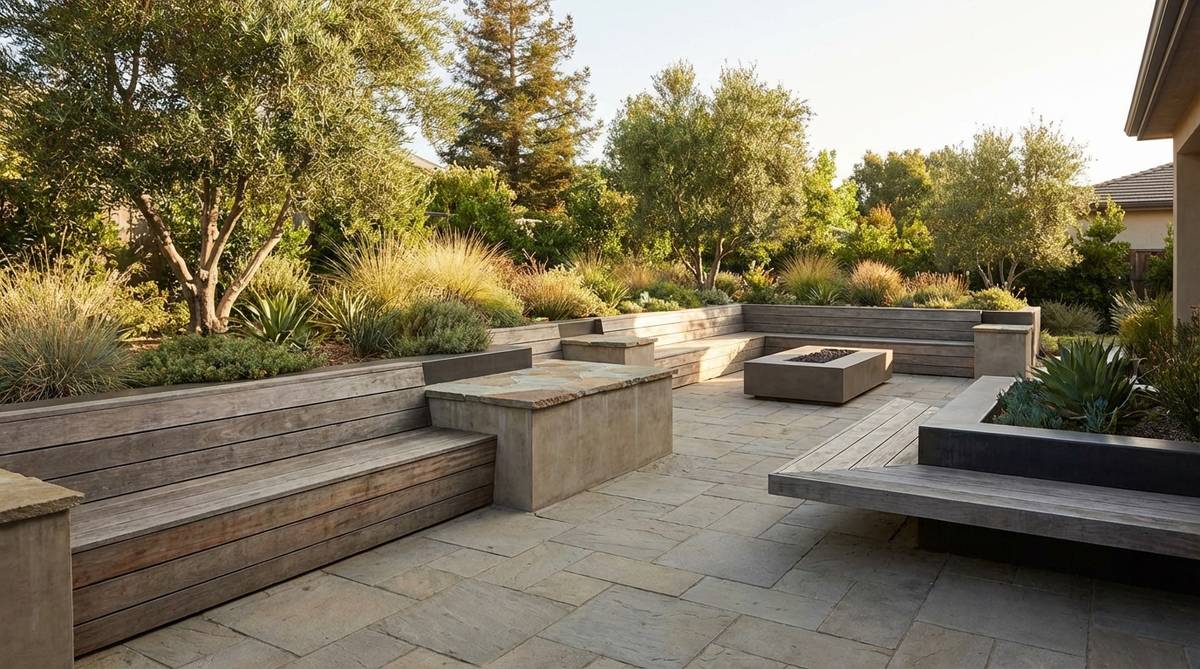
29. L-Shaped Bench Configuration

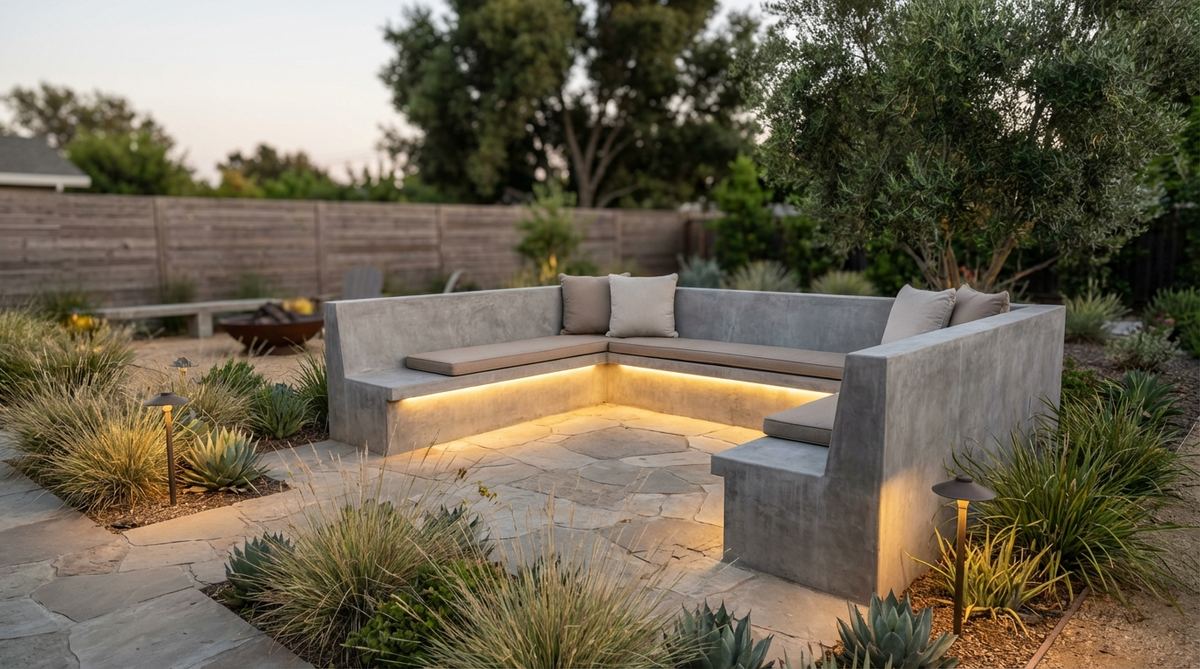
A heavy, right-angled mass of smooth concrete anchoring the corner of a patio feels like the ultimate VIP lounge in a modern nightclub. This permanent corner seating plan works exceptionally well for defining an intimate fire-pit zone without cluttering the deck with chairs.
Casting a monolithic L-shape into your hardscape delivers a surprisingly premium look that instantly delineates conversation areas. Upgrading the raw seat with custom-cut premium waterproof outdoor cushions transforms the brutalist structure into an incredibly comfortable hangout spot.
You can build this structural bench for about $250. Pin this to your outdoor living room mood board!
- Key Materials: Concrete blocks, mortar, smooth stucco finish, custom cushions
- Vibe / Style: Minimalist luxury lounge
- Difficulty: Intermediate
- Budget Breakdown: Block core: $100 | Stucco/Finish: $50 | Cushions: $100
- Creator’s Tip: Slope the seat exactly 1 inch back toward the heel so guests naturally lean into the backrest.
- Smart Sourcing: Custom-cut high-density outdoor foam and waterproof acrylic canvas covers.
Most backyards look chaotic because they have too many separate elements. This next trick combines two major features into one brilliant geometric form…
30. Linear Bench With Planters
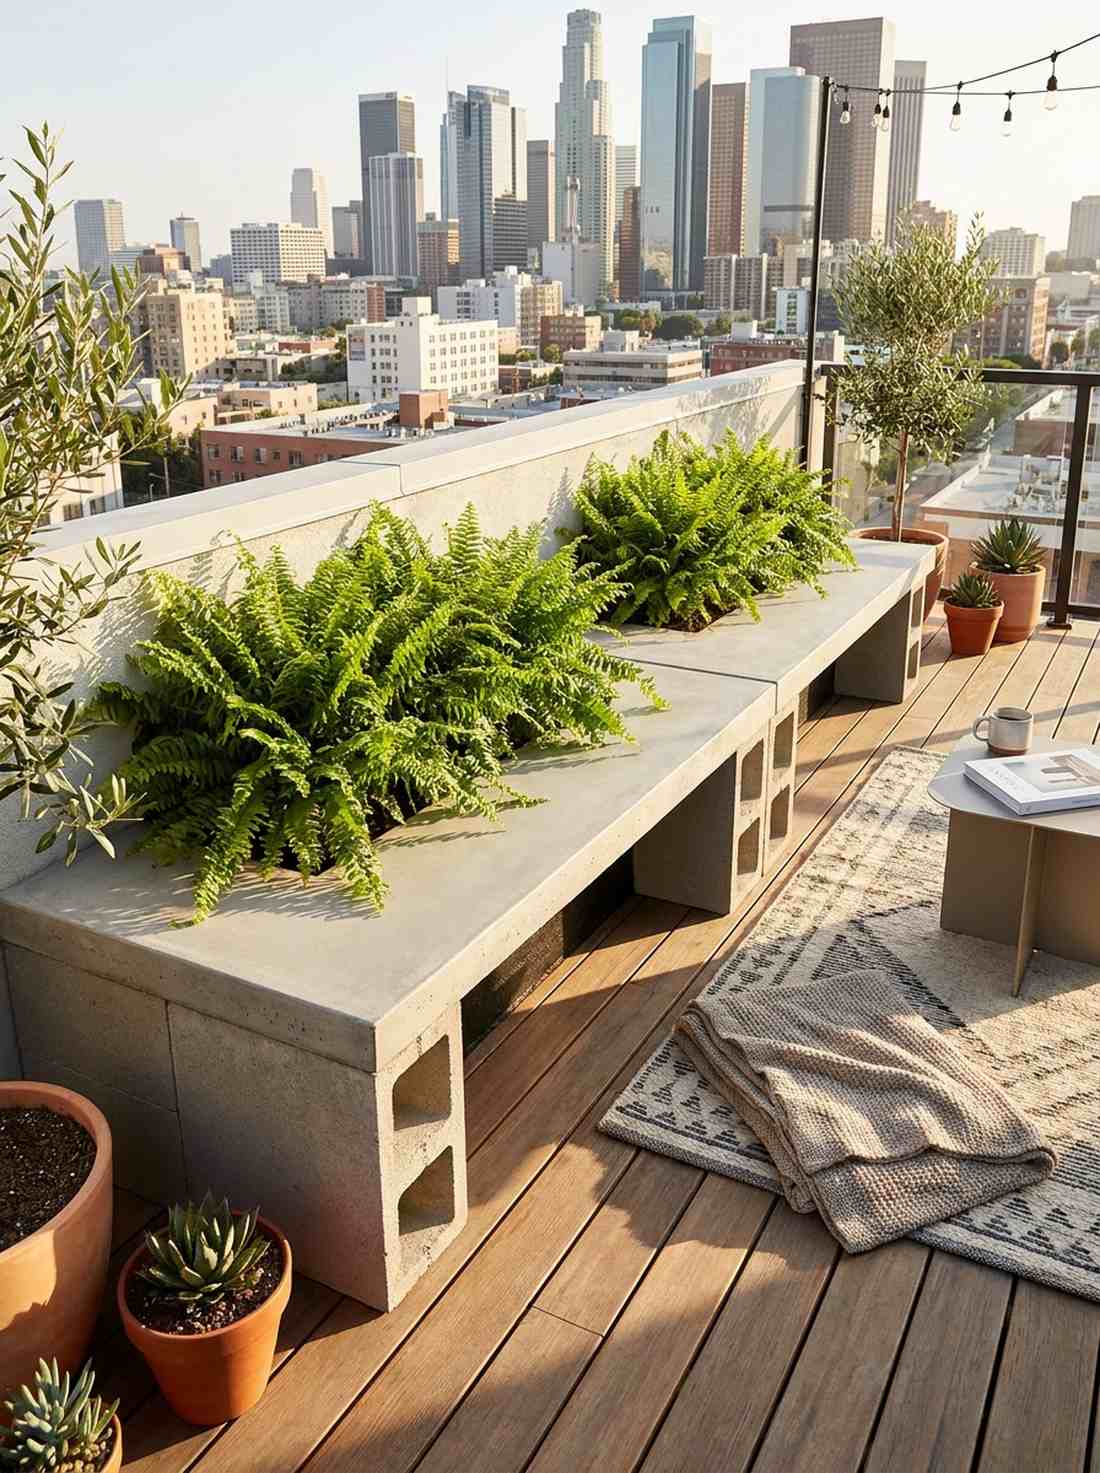
A stark concrete bench that suddenly hollows out to burst with vibrant ferns feels like a masterclass in organic architecture. This integrated seating and greenery layout is the perfect use-case for long, narrow balconies where standalone planters and chairs won’t fit.
Merging your plant life directly into your seating structures looks far more expensive than it is and creates incredible spatial efficiency. Coating the planter voids with heavy-duty garden design modern liquid rubber ensures the wet soil never compromises the structural seating area.
This hybrid feature costs around $180 to construct. Highly recommended for small-space modernists!
- Key Materials: Hollow cinderblocks, concrete cap stones, liquid waterproofing
- Vibe / Style: Urban eco-balcony
- Difficulty: Intermediate
- Budget Breakdown: Blocks: $80 | Caps: $60 | Waterproofing: $40
- Creator’s Tip: Ensure the planter sections have drainage holes that pipe water out the back, away from where people are sitting.
- Smart Sourcing: Pre-cast smooth concrete bench caps and brush-on liquid rubber sealant.
31. Floating Concrete Bench Slab
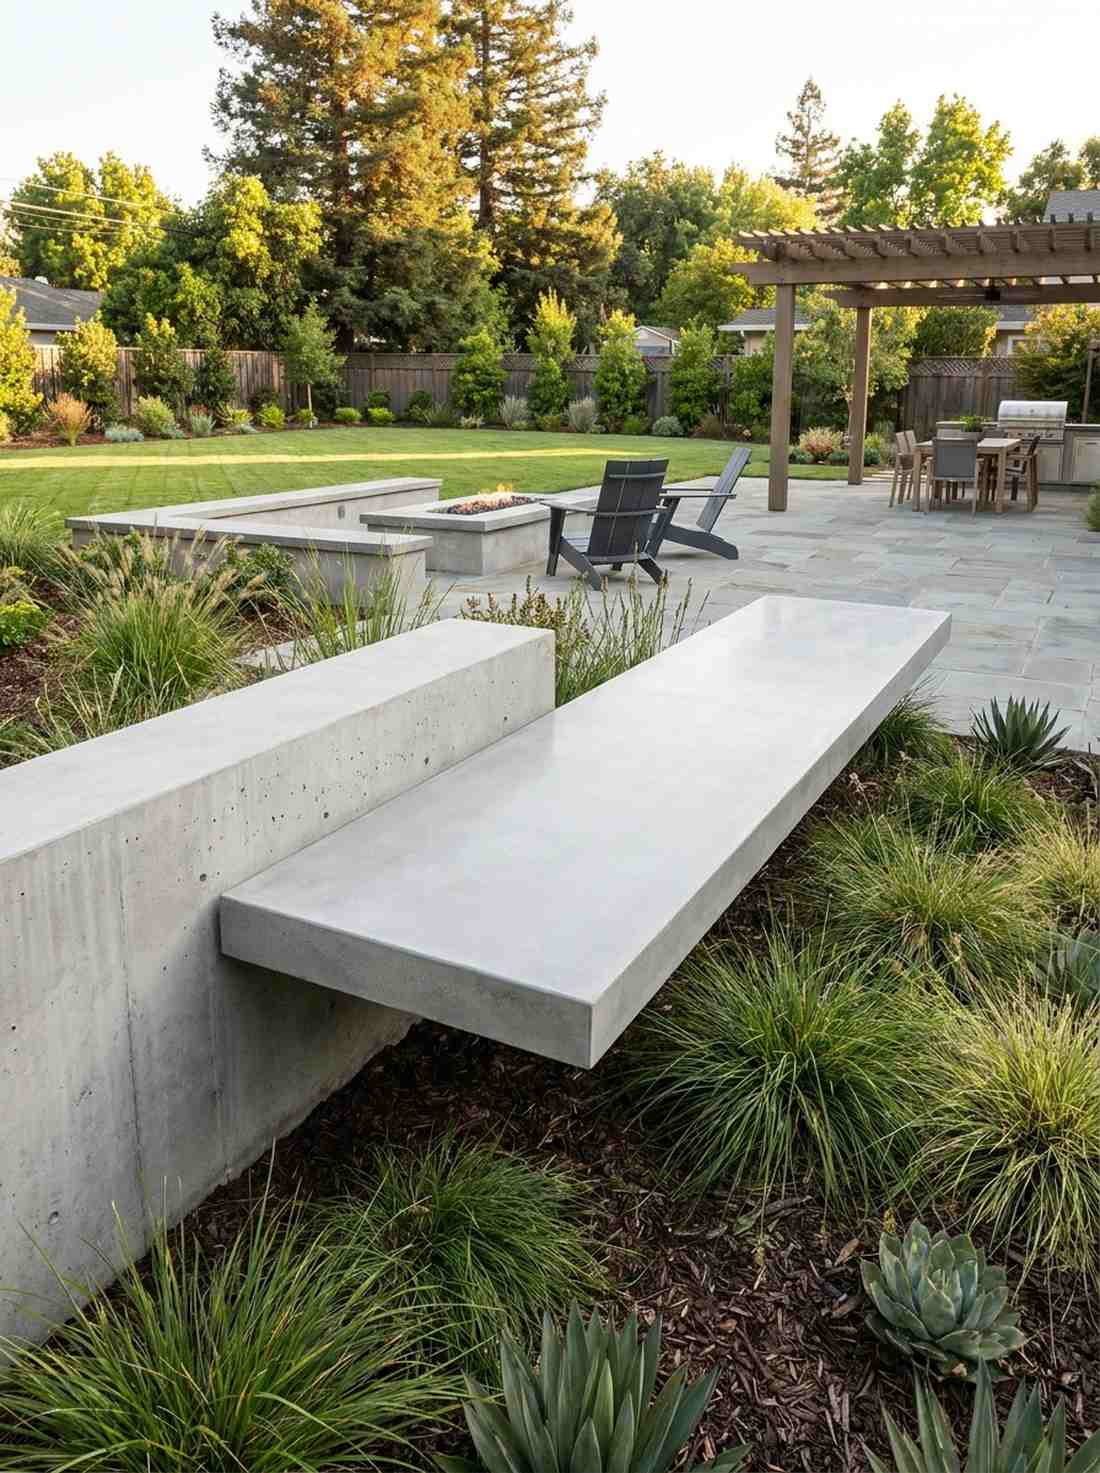
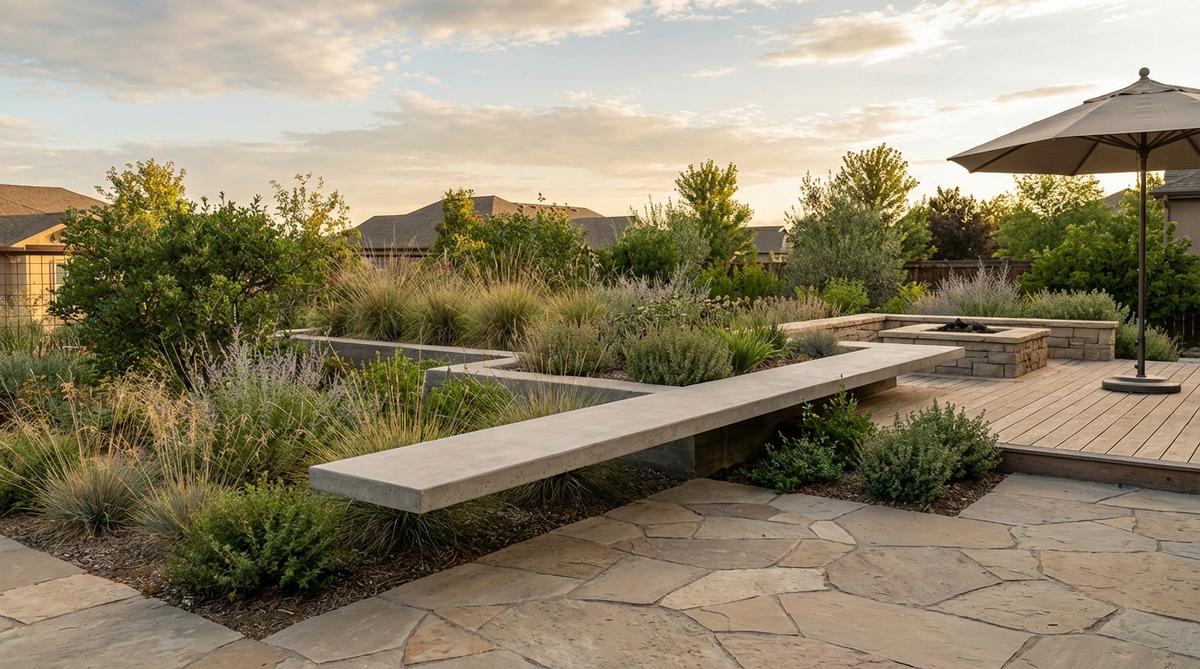
A massive, heavy slab of stone hovering effortlessly in mid-air off a retaining wall feels like an anti-gravity magic trick. This cantilevered minimalist seating works exceptionally well for creating a dramatic focal point along a raised garden bed.
Hiding massive steel brackets inside the concrete wall gives a designer-level finish that baffles guests and creates an incredibly sleek profile. Securing a polished high-strength GFRC concrete slab to these invisible mounts ensures it holds the weight of multiple people without snapping.
Executing this illusion costs about $300 in heavy-duty hardware and concrete. Save this for a mind-blowing structural upgrade!
- Key Materials: Heavy-duty steel L-brackets, GFRC bench slab, masonry bolts
- Vibe / Style: Architectural digest centerpiece
- Difficulty: Advanced (requires serious structural anchoring)
- Budget Breakdown: Steel brackets: $150 | GFRC Slab: $100 | Bolts: $50
- Creator’s Tip: You must anchor the steel brackets directly into the solid core of the wall before pouring the final concrete face to hide them completely.
- Smart Sourcing: Heavy-duty 1/2-inch steel cantilever brackets and glass-fiber reinforced concrete slab molds.
32. Modular Cube Seating
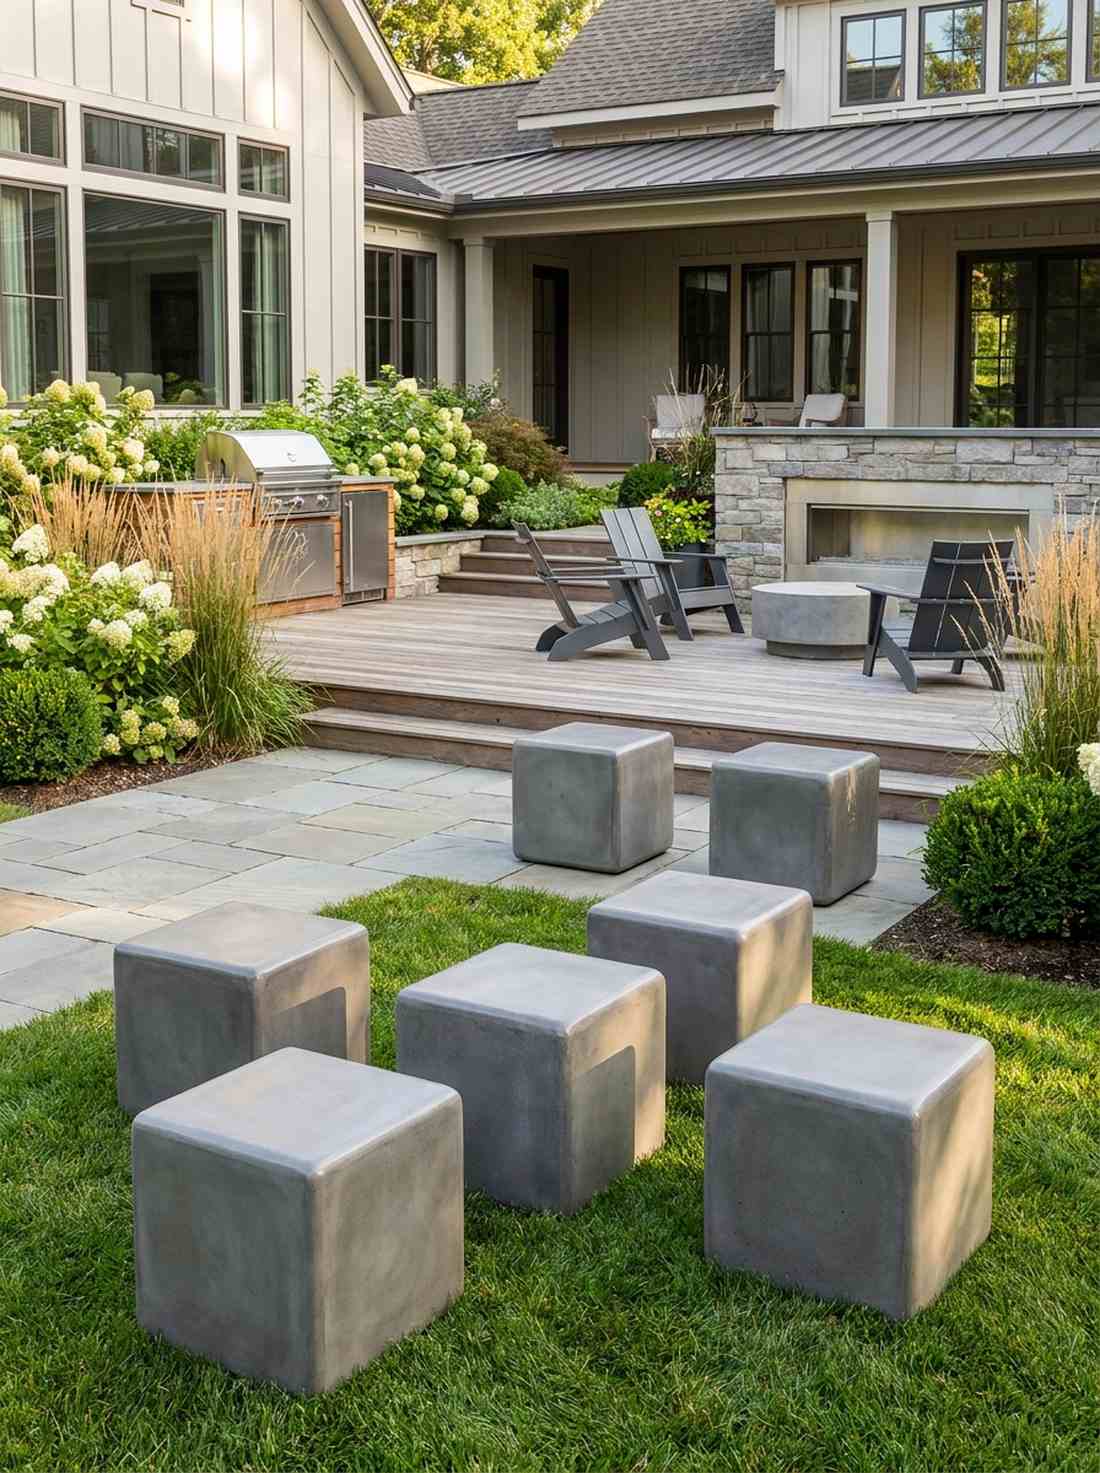
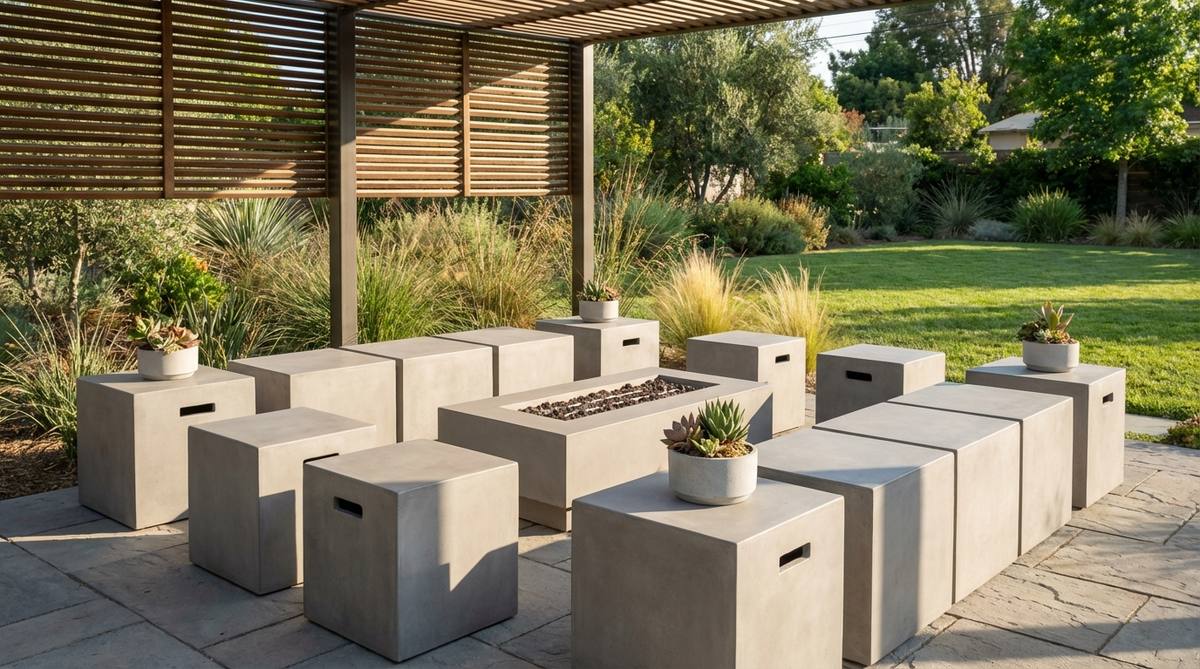
Scattering perfectly smooth, heavy grey cubes across a manicured lawn feels playful yet strictly disciplined, like giant dice in a modern art exhibit. This flexible geometric seating array is the ultimate use-case for dynamic courtyards where party layouts constantly shift.
Casting identical solid blocks instead of buying fragile patio chairs delivers a surprisingly premium look that literally cannot blow away in a storm. Applying a polished contemporary garden design epoxy finish turns rough concrete into silky-smooth, stain-resistant side tables or stools.
You can cast a set of 4 cubes for roughly $80. Pin this for the ultimate indestructible patio furniture!
- Key Materials: 18×18 melamine box molds, high-flow concrete, orbital sander
- Vibe / Style: Modern art gallery courtyard
- Difficulty: Easy
- Budget Breakdown: Melamine wood: $40 | Concrete: $40
- Creator’s Tip: Chamfer the inside edges of your mold with silicone caulk so the final concrete cube has slightly rounded, comfortable edges.
- Smart Sourcing: High-flow self-leveling concrete mix and 100% silicone corner caulking tools.
33. Circular Conversation Pit

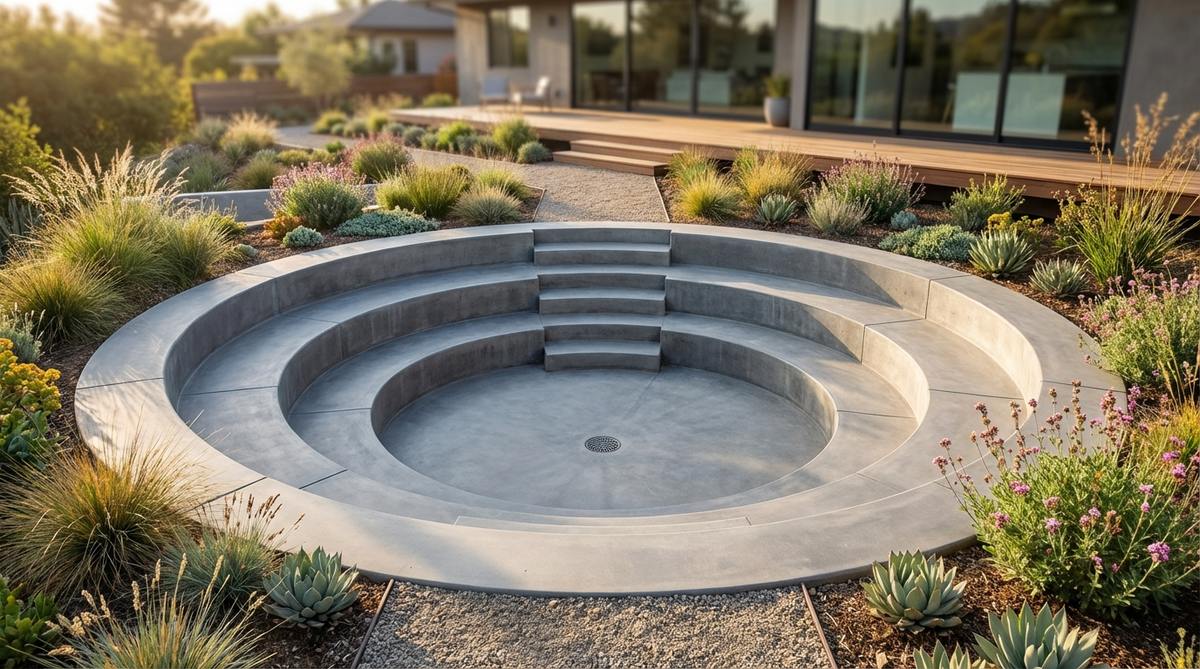
Descending into a massive, sunken concrete bowl feels incredibly intimate and protected, reminiscent of iconic 1970s luxury estates. This sunken fire-pit amphitheater works exceptionally well for large, flat backyards where you want to build a destination zone without blocking views.
Digging down instead of building up looks far more expensive than it is and creates a natural windbreak for the fire. Utilizing premium heavy-duty French drain kits at the lowest point is absolutely critical to ensure your luxury lounge doesn’t turn into a swimming pool.
Excavating and pouring this pit runs about $800–$1500. Save this if you are ready for a legendary backyard feature!
- Key Materials: Excavator rental, retaining wall blocks, gravel base, drainage pipe
- Vibe / Style: Retro-modern luxury lounge
- Difficulty: Expert (heavy excavation and drainage required)
- Budget Breakdown: Digging equipment: $300 | Blocks/Concrete: $600 | Drainage: $100
- Creator’s Tip: The center floor must slope at a 2% grade toward a massive central French drain or an active sump pump.
- Smart Sourcing: Corrugated perforated French drain piping (pro-roll) and heavy-duty catch basin grates.
34. Perimeter Bench Border
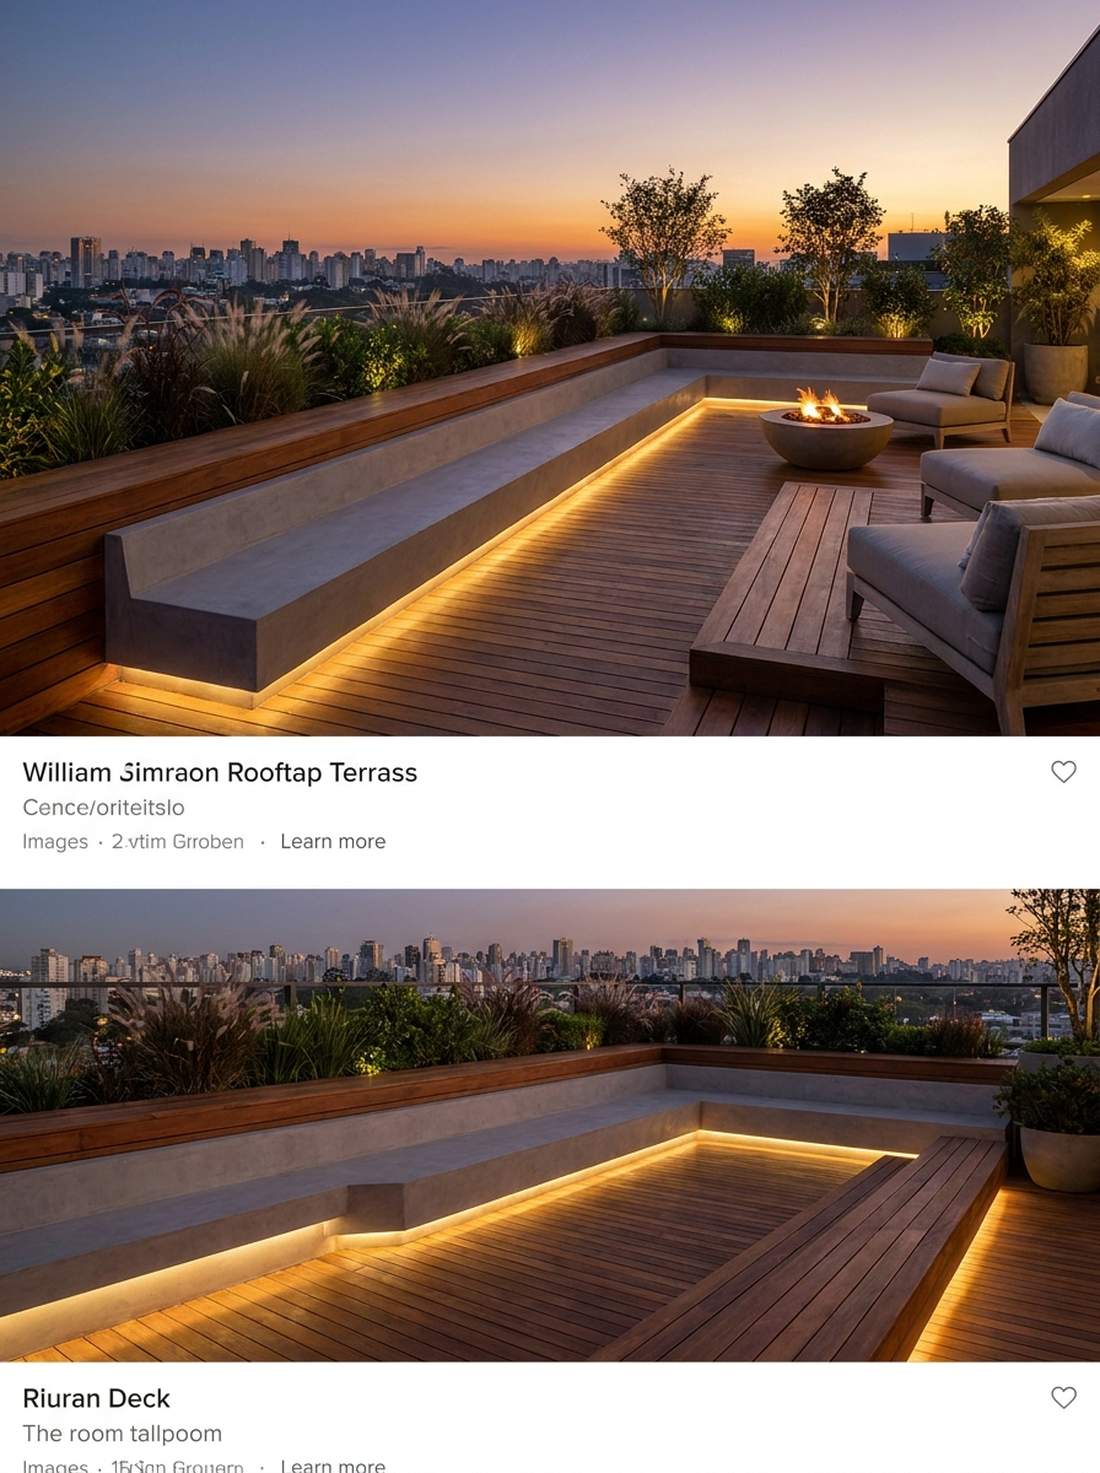
A low, unbroken concrete ledge hugging the absolute edge of a wooden deck feels incredibly grounding and visually expands the space. This boundary-defining seating structure is the perfect use-case for rooftop patios where traditional railings ruin the panoramic view.
Converting a safety barrier into a massive, continuous bench gives a designer-level finish that maximizes guest capacity. Adding subtle garden design minimalist LED light strips under the lip of the bench makes the massive structure appear to float at night.
You can pour this perimeter ledge for about $300. Highly recommended for seamless deck upgrades.
- Key Materials: Concrete blocks, stucco coat, LED light strips
- Vibe / Style: Sleek penthouse terrace
- Difficulty: Intermediate
- Budget Breakdown: Blocks/Cement: $200 | Lighting: $100
- Creator’s Tip: Cap the bench with the exact same wood used on your deck floor to create a stunning, seamless waterfall effect.
- Smart Sourcing: Outdoor-rated waterproof LED strip lights and fiberglass-reinforced stucco mix.
Material Guide: Cheap vs. Premium Aesthetic
Knowing exactly where to save and where to spend makes all the difference in achieving that “looks expensive but isn’t” geometric vibe.
- Standard vs. UV-Resistant Sealers: Cheap sealers turn yellow and flake off after one summer. Investing in premium deep-penetrating acrylics keeps concrete looking stark and intentional.
- Hand-mixed vs. Pre-cast Medallions: While pouring a simple slab is cheap, trying to hand-carve perfect circles or infinity edges will always look DIY. Buy pre-cast premium elements to anchor your cheap foundational pours.
Vertical Features And Sculptural Accents
Upright concrete elements add three-dimensional interest to garden designs while serving functional roles. These vertical features draw the eye upward, creating focal points that balance horizontal planes.
35. Concrete Column Planters

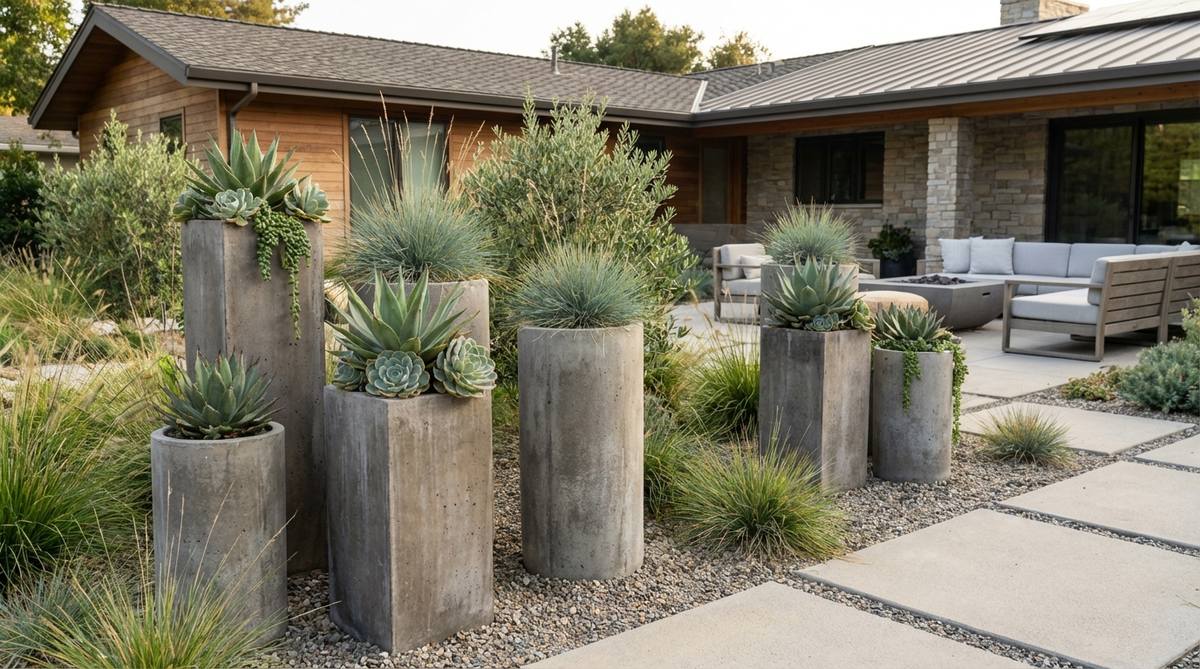
Towering, stark grey cylinders exploding with trailing vines at the top feel like modern ruins reclaimed by a lush jungle. This vertical botanical pillar concept works exceptionally well to frame an entryway or add dramatic height to a flat, boring patio.
Using standard building tubes to cast massive pillars looks far more expensive than it is and creates instant architectural hierarchy. Sourcing heavy-duty sonotube concrete forms allows you to achieve perfectly smooth, towering geometric shapes with minimal effort.
You can cast a pair of these pillars for roughly $60. Pin this to your high-impact DIY yard art board!
- Key Materials: 12-inch cardboard forming tubes, concrete, trailing ivy
- Vibe / Style: Modernist botanical pillars
- Difficulty: Easy
- Budget Breakdown: Forming tubes: $20 | Concrete: $25 | Plants: $15
- Creator’s Tip: Insert a cheap plastic bucket at the top of the wet concrete to create the perfect pre-sized void for dropping in potted plants later.
- Smart Sourcing: Heavy-duty cardboard concrete forming tubes and drought-resistant trailing plant flats.
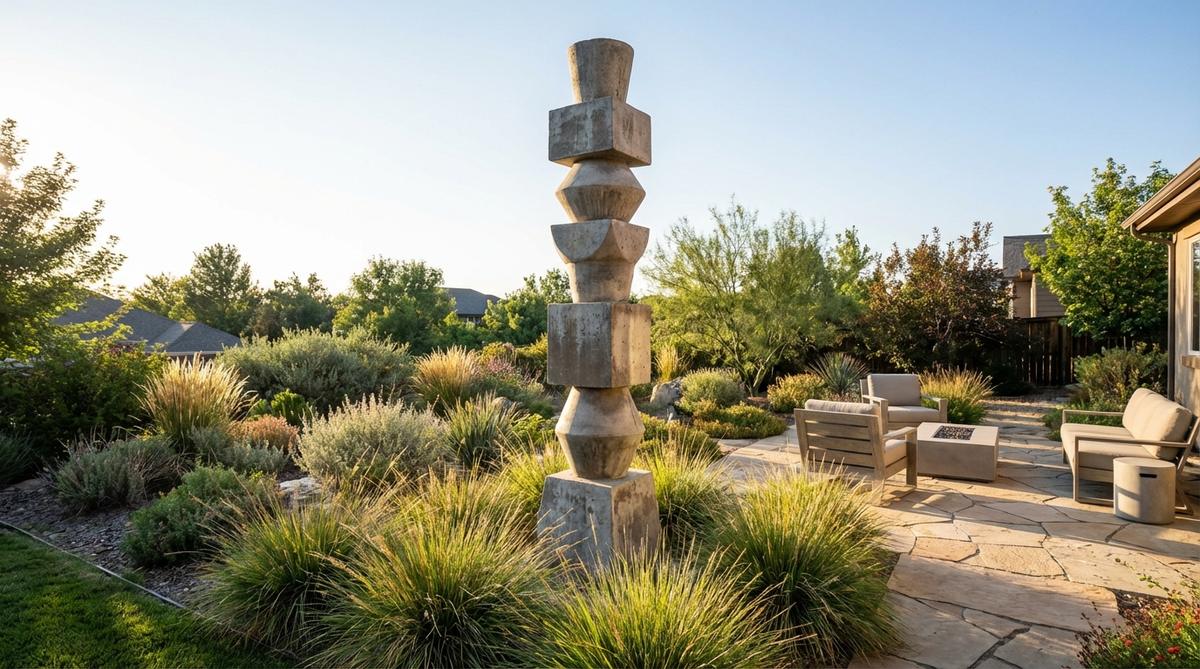
36. Geometric Concrete Sculpture

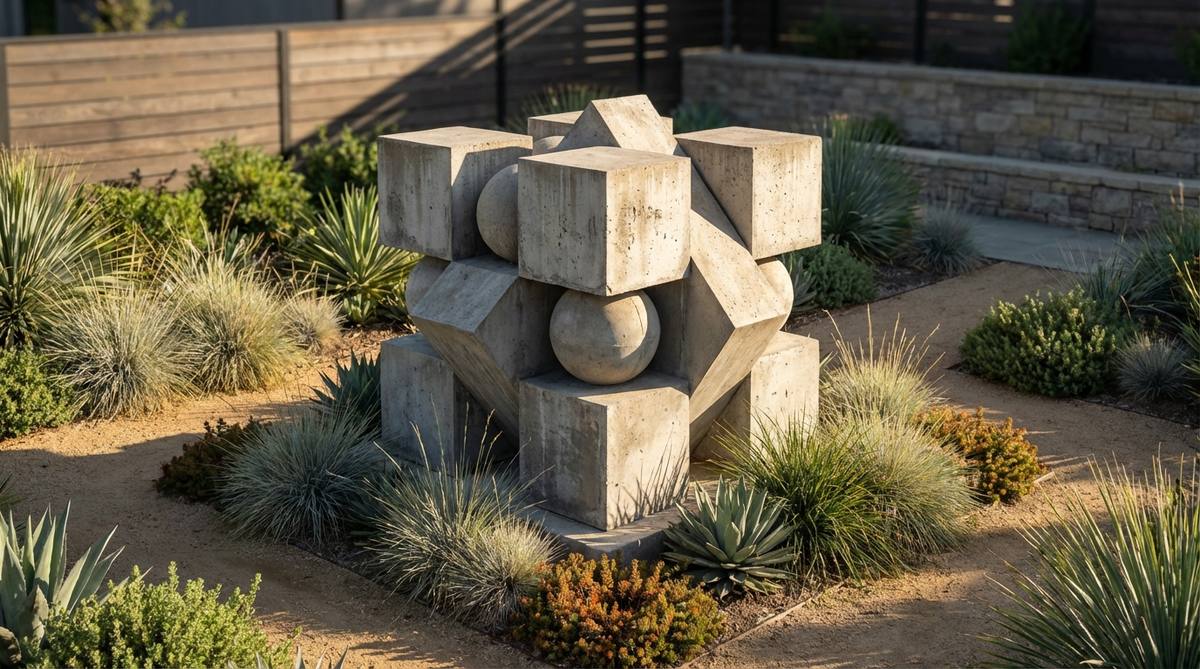
A solitary, angled mass of grey stone sitting silently in a bed of raked gravel feels profoundly intellectual and intensely meditative. This abstract hardscape art piece is the ultimate use-case for a dead corner of the yard that needs a stark, beautiful focal point.
Casting your own abstract shapes using scrap wood delivers a surprisingly premium look comparable to expensive gallery installations. Utilizing high-strength contemporary garden design anchoring epoxies allows you to stack crazy geometric angles without fear of them toppling over.
You can create a custom sculpture for about $40 in materials. Save this for a brilliant creative weekend!
- Key Materials: Scrap plywood for molds, fine-finish concrete, masonry epoxy
- Vibe / Style: Museum courtyard installation
- Difficulty: Intermediate
- Budget Breakdown: Concrete: $20 | Epoxy: $20
- Creator’s Tip: Sand the inside of your plywood molds and coat them with paste wax to achieve a glass-like finish on the final concrete sculpture.
- Smart Sourcing: High-strength masonry construction epoxy and fine-finish countertop concrete mix.
37. Vertical Concrete Screen Wall
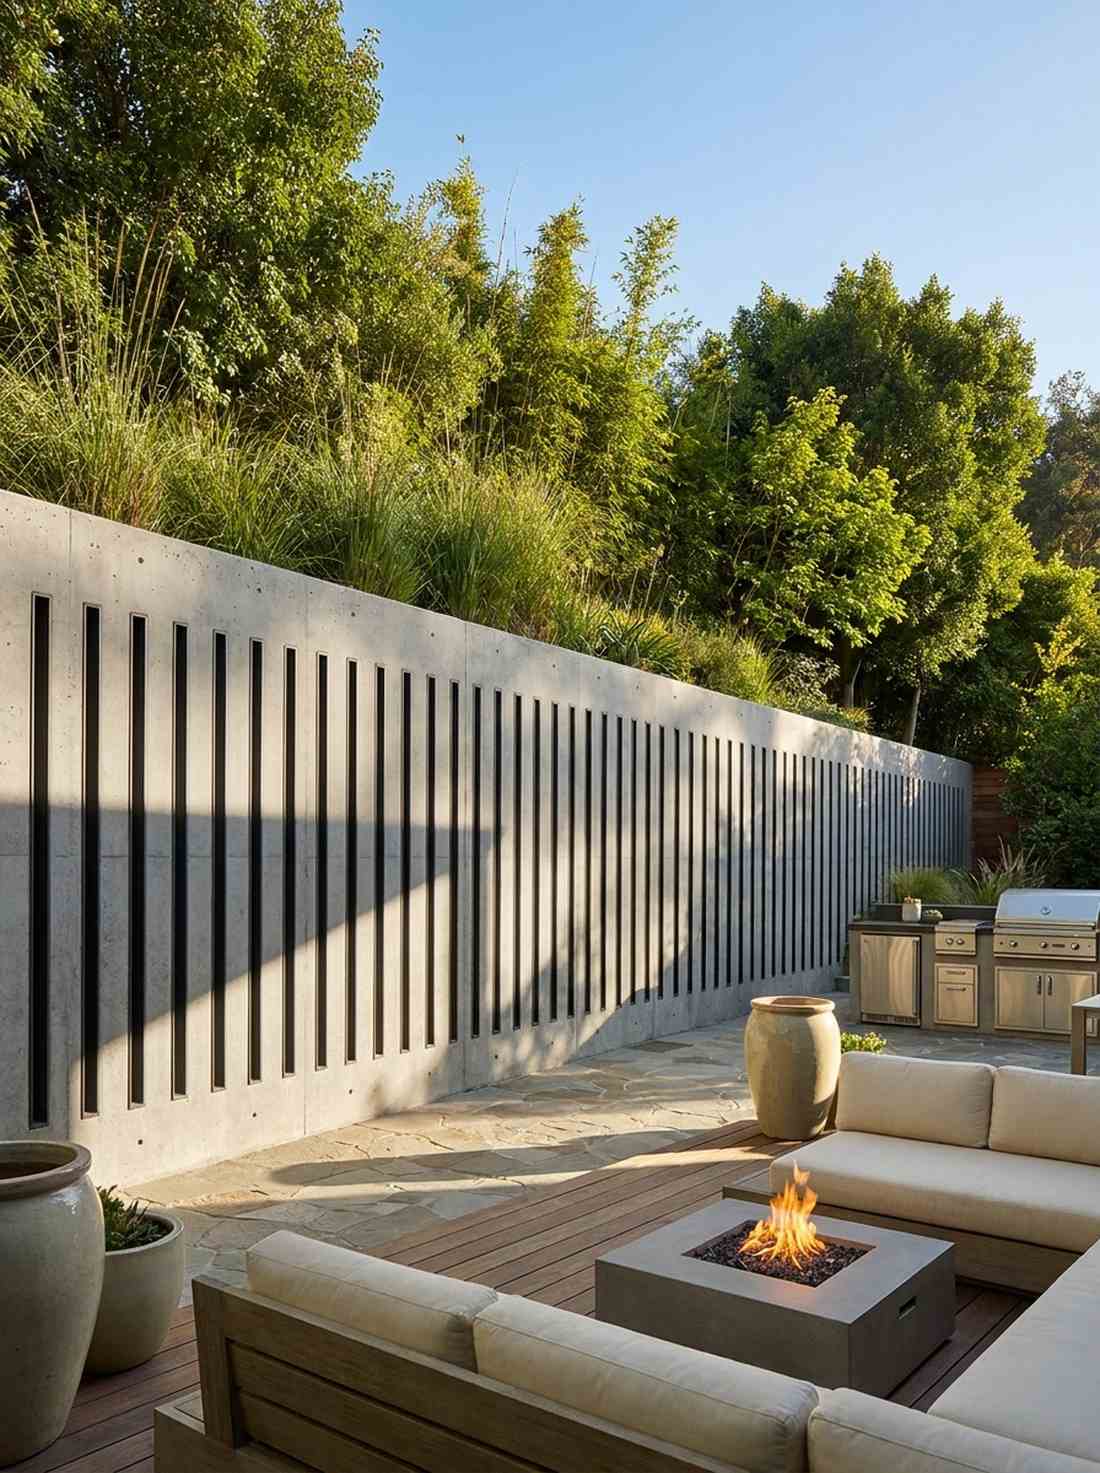
A massive, commanding grey wall punctuated by perfectly repeating slit windows feels like a chic barricade protecting a secret garden. This architectural partitioned enclosure works exceptionally well for blocking an ugly view while still allowing wind and slivers of light to pass through.
Leaving strategic voids in a poured wall gives a designer-level finish that breaks up the oppressive mass of solid stone. Integrating premium garden design modern aluminum inserts into the cutouts ensures the edges stay perfectly sharp and won’t crumble over time.
Building a custom screen wall runs about $400. Pin this to your ultimate outdoor privacy board!
- Key Materials: Poured concrete, foam blockouts, rebar grid
- Vibe / Style: Ultra-modern privacy fortress
- Difficulty: Advanced
- Budget Breakdown: Concrete/Forms: $300 | Foam inserts: $100
- Creator’s Tip: Use a hot wire cutter on dense foam to make the void inserts; they are much easier to rip out of the dried wall than wooden boxes.
- Smart Sourcing: High-density polystyrene foam blocks and hot wire foam cutting tools.
38. Concrete Obelisk Marker
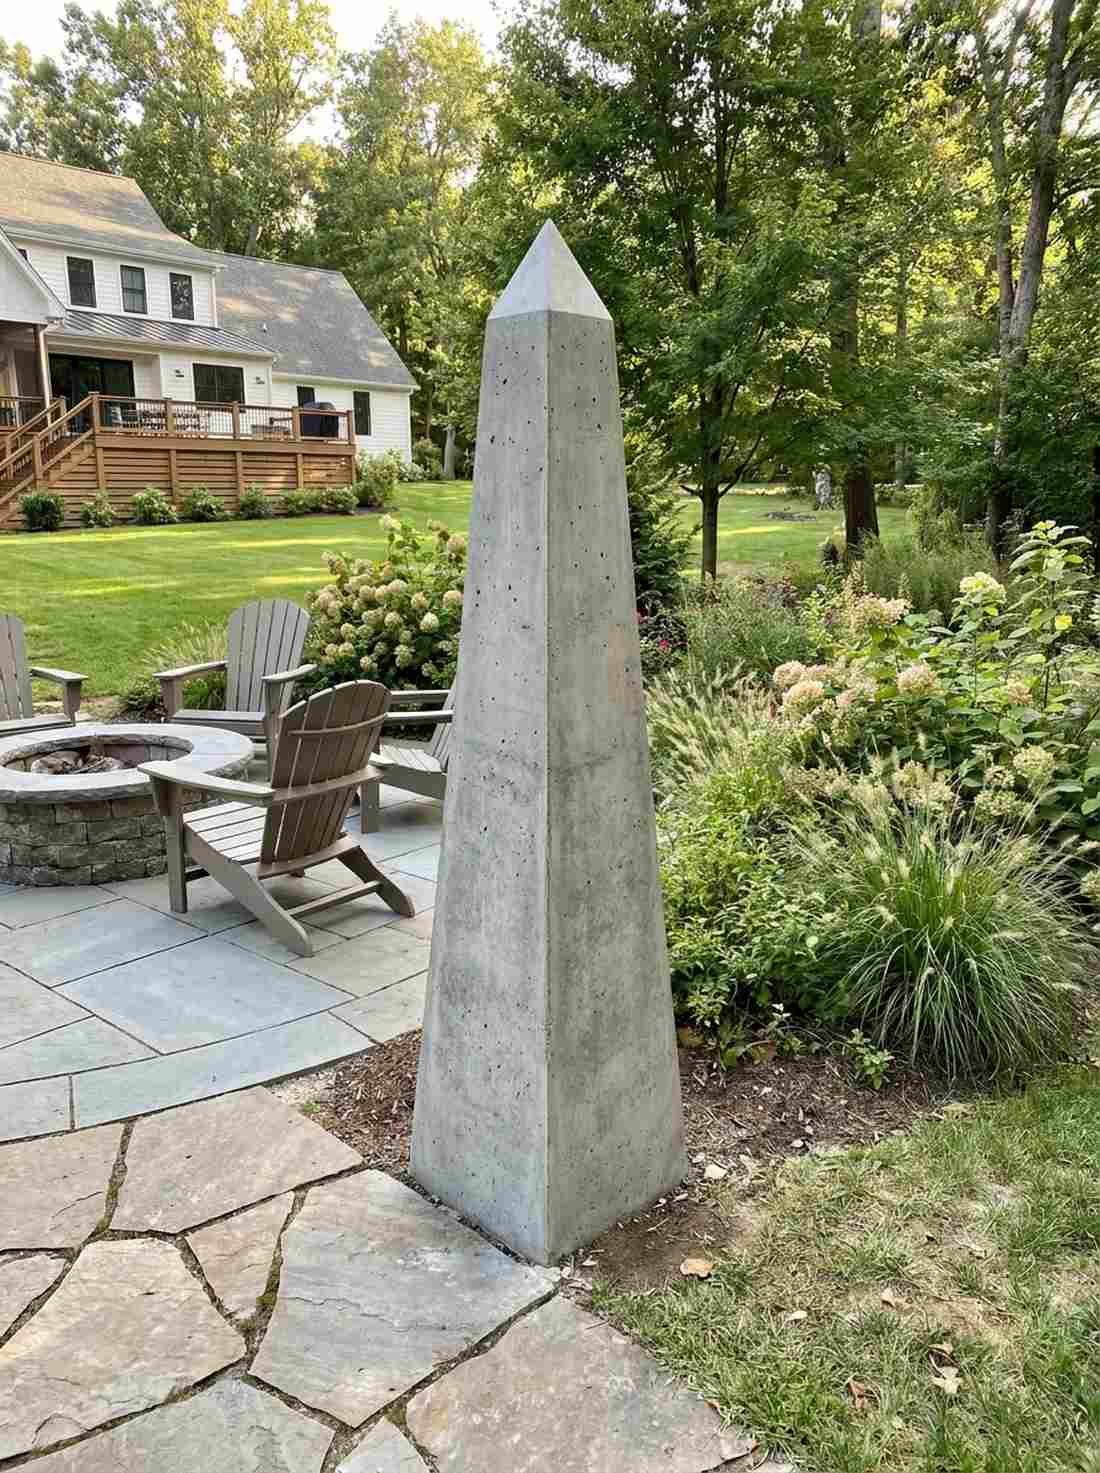
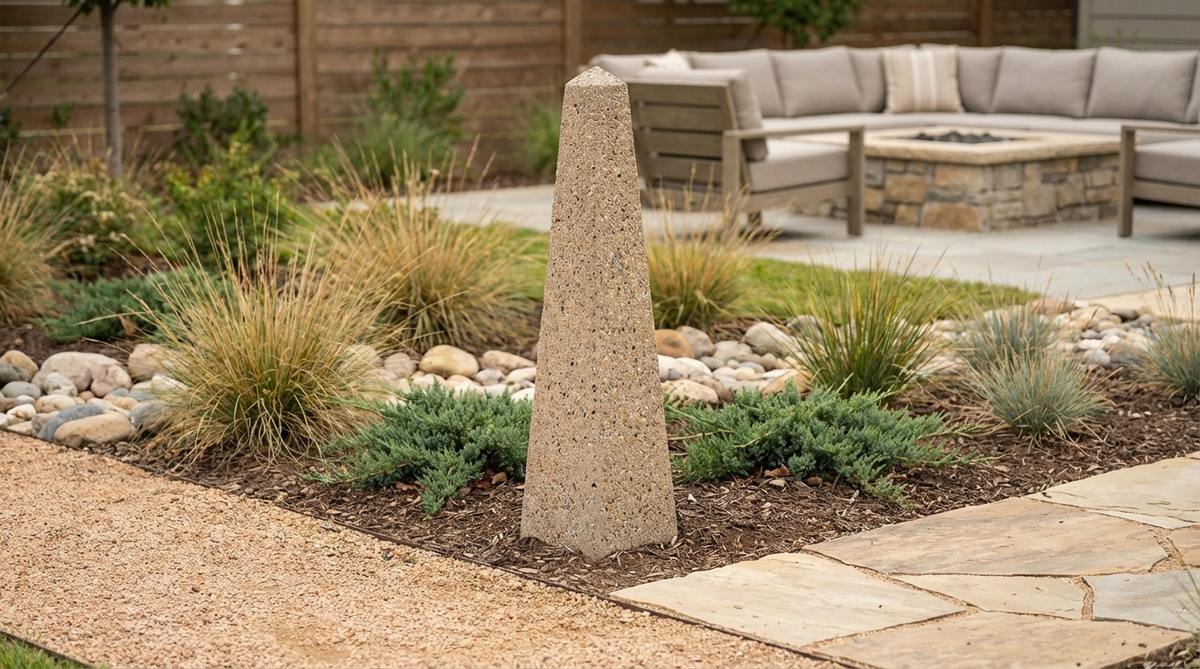
A sharp, tapering concrete pyramid standing like a silent sentinel at the corner of a pathway feels incredibly majestic and classical. This geometric wayfinding structure is the perfect use-case for marking the transition from a formal patio into a wilder garden space.
Updating the classic Egyptian obelisk with raw, brutalist concrete looks far more expensive than it is and adds severe vertical drama. Sourcing specialized pyramid cap stone molds ensures the tapered tip is perfectly symmetrical and razor-sharp.
You can cast a stunning 5-foot obelisk for roughly $70. Highly recommended for adding architectural hierarchy to your paths.
- Key Materials: Plywood mold, concrete mix, releasing oil
- Vibe / Style: Neo-classical modernism
- Difficulty: Intermediate
- Budget Breakdown: Plywood: $40 | Concrete: $30
- Creator’s Tip: Cast the obelisk upside down; the sheer weight of the concrete will force the tip to form perfectly sharp at the bottom of the mold.
- Smart Sourcing: Pre-formed polyurethane pyramid molds and professional concrete form release spray.
Most people think vertical height requires expensive mature trees. This next stackable concrete trick adds 6 feet of height in under an hour…
39. Stacked Concrete Totem
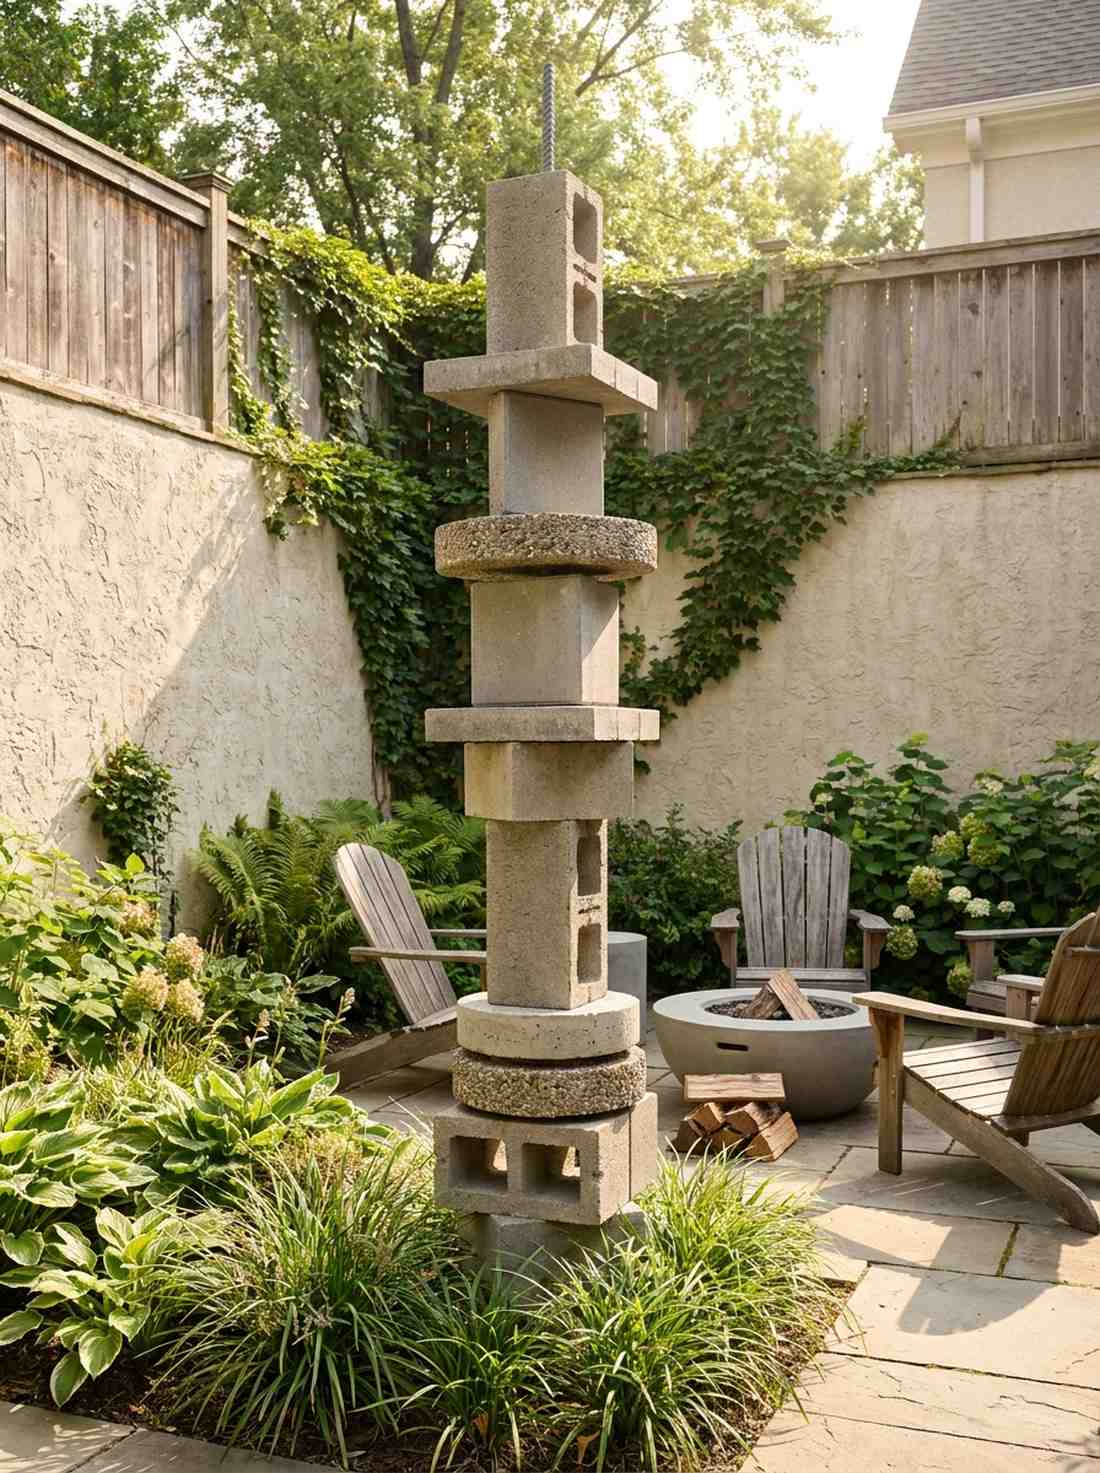
Balancing heavy, varied geometric shapes on top of each other feels playfully dangerous and wildly creative, like a massive game of modern Jenga. This modular vertical focal point works exceptionally well for drawing the eye up in small courtyards surrounded by high, boring walls.
Using standard hardware store pavers and blocks to create a towering sculpture delivers a surprisingly premium look for almost zero effort. Driving a massive galvanized steel rebar stake down the center of the drilled blocks ensures the structure is completely earthquake and child-proof.
You can build a towering totem for about $40. Save this for an instant, foolproof garden art upgrade!
- Key Materials: Assorted concrete blocks/pavers, 1-inch masonry drill bit, thick rebar stake
- Vibe / Style: Playful brutalist art
- Difficulty: Easy
- Budget Breakdown: Assorted blocks: $25 | Rebar/Bit: $15
- Creator’s Tip: Mix textures by alternating between smooth pavers, rough cinderblocks, and exposed aggregate stones in the stack.
- Smart Sourcing: 1-inch SDS masonry drill bits and galvanized steel rebar sections.
40. Concrete Trellis Support

A rigid, heavy concrete frame enveloped by a chaotic explosion of blooming climbing vines feels like a beautiful battle between architecture and nature. This permanent botanical framework is the perfect use-case for growing heavy wisteria or grapes without the structure collapsing.
Replacing flimsy wooden lattices with a permanent masonry grid gives a designer-level finish that will outlast the house itself. Stringing premium stainless steel architectural cable between the concrete posts creates an invisible, indestructible net for the vines to climb.
Building this permanent trellis frame costs around $200. Pin this to your high-end vertical gardening board!
- Key Materials: Concrete posts, stainless steel wire rope, turnbuckles
- Vibe / Style: Modern vineyard chic
- Difficulty: Intermediate
- Budget Breakdown: Posts: $100 | Cable kit: $100
- Creator’s Tip: Use turnbuckles on every single cable run so you can re-tighten the wires when heavy vines cause them to sag in the summer.
- Smart Sourcing: Stainless steel wire rope trellis kits and heavy-duty marine-grade turnbuckles.
Statement Features With Maximum Impact
Focal points in modern gardens often rely on singular dramatic elements rather than collections of objects. Concrete’s versatility enables creation of oversized planters, fire features, and architectural accents that command attention.
41. Oversized Concrete Planter Box
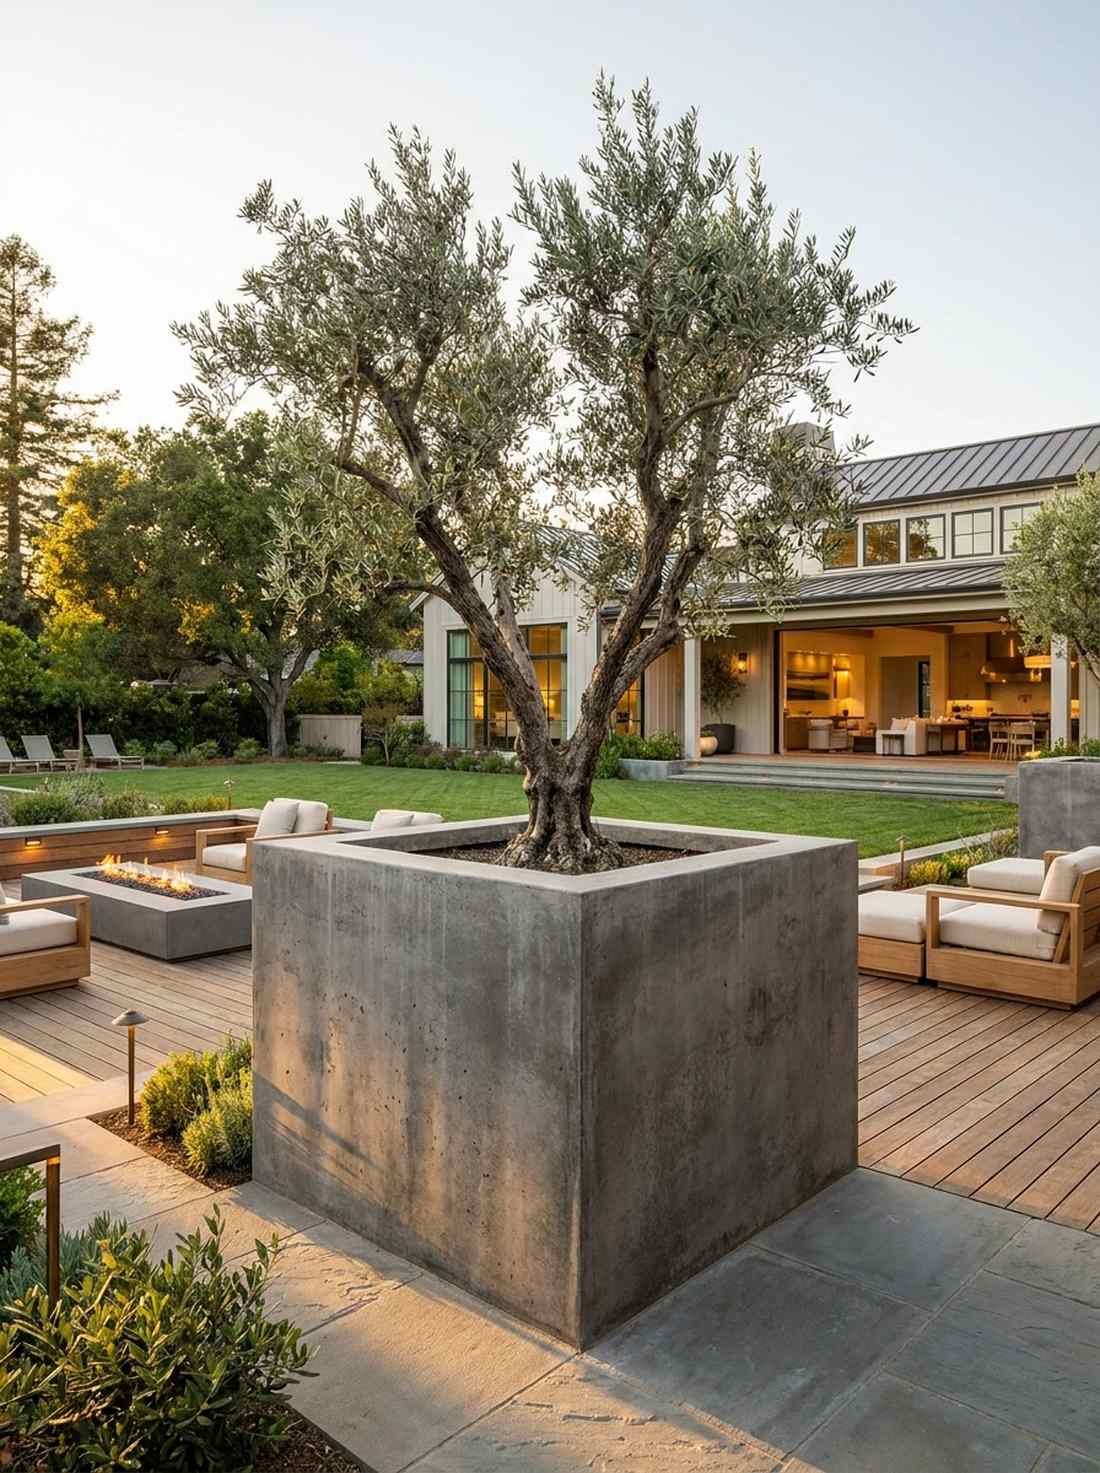
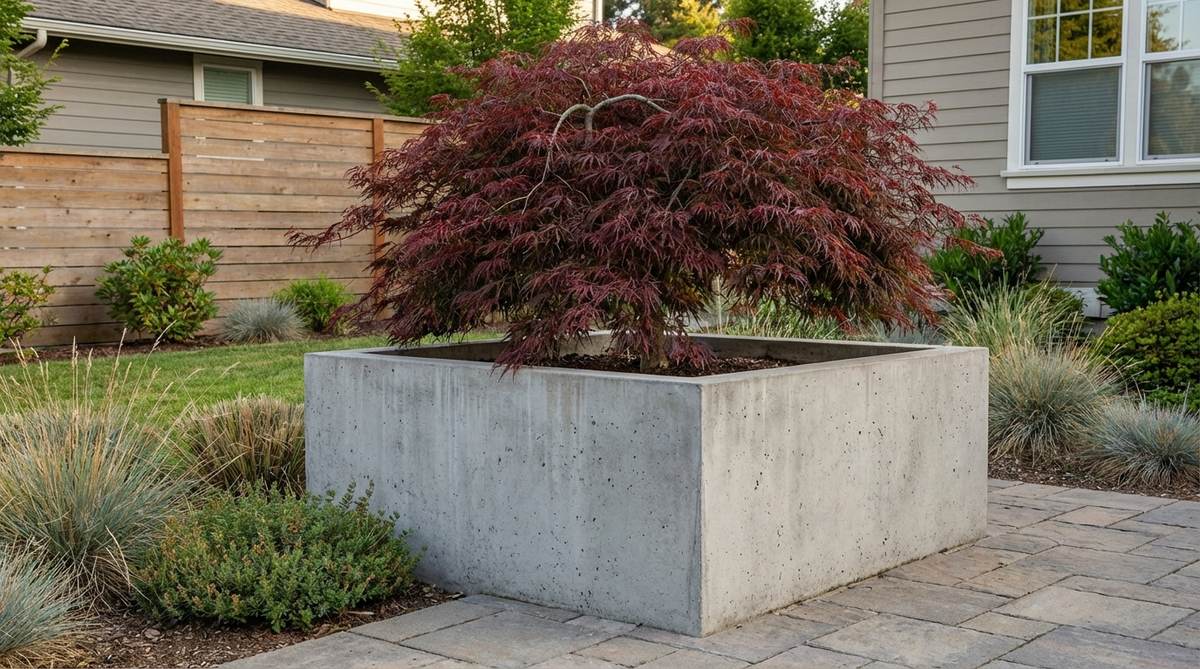
A massive, chest-high grey cube commanding the center of a patio with a solitary, sculptural olive tree feels like ultimate billionaire minimalism. This monolithic botanical anchor works exceptionally well for scaling down a massive, empty driveway or patio to human proportions.
Building one giant, heavy container instead of scattering ten small pots delivers a surprisingly premium look that demands respect. Utilizing lightweight contemporary garden design foam cores inside the concrete walls ensures the box is massive without weighing 5,000 pounds.
You can construct a hyper-massive planter for roughly $150 in raw materials. Save this if you want to make a massive statement!
- Key Materials: Rigid foam insulation, fiberglass mesh, surface bonding cement
- Vibe / Style: High-end commercial plaza
- Difficulty: Intermediate
- Budget Breakdown: Foam boards: $60 | Cement/Mesh: $90
- Creator’s Tip: Fill the bottom third of the massive box with crushed plastic bottles before adding soil; this saves a fortune on dirt and keeps the planter movable.
- Smart Sourcing: Alkali-resistant fiberglass reinforcing mesh (pro-roll) and rigid XPS foam insulation panels.
42. Concrete Fire Pit Square
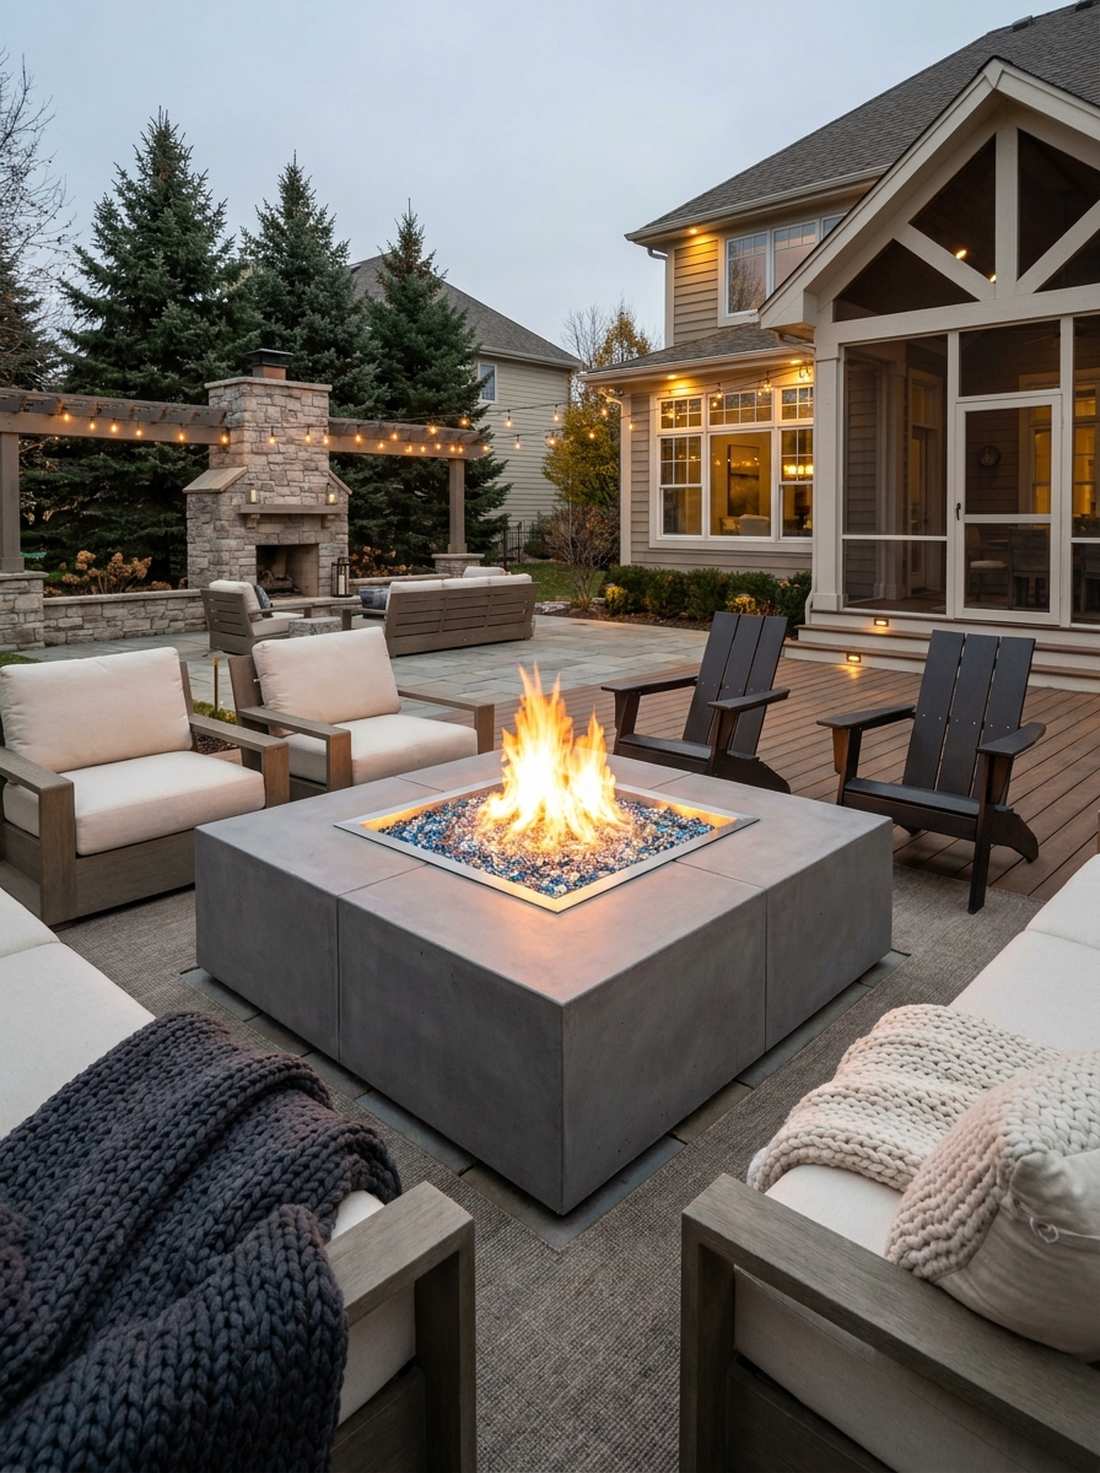
A stark, low-profile square of smooth grey stone bursting with roaring orange flames feels primal yet flawlessly sophisticated. This geometric fire feature layout is the absolute pinnacle use-case for anchoring a massive outdoor entertainment lounge on chilly nights.
Skipping the rustic camp-style rocks for a sharp, brutalist box looks far more expensive than it is and totally modernizes the space. Dropping a premium stainless steel drop-in burner pan into the concrete void converts a messy wood pit into a flawless, smoke-free gas feature.
Casting your own gas fire pit costs about $300–$500. Pin this to your luxury backyard lounge board!
- Key Materials: Concrete blocks, stucco, stainless burner pan, fire glass
- Vibe / Style: Luxury ski-lodge terrace
- Difficulty: Intermediate (requires gas line plumbing)
- Budget Breakdown: Concrete core: $150 | Burner kit: $200 | Fire glass: $100
- Creator’s Tip: Always line the interior with actual firebrick; standard concrete will violently crack and explode under direct flame heat.
- Smart Sourcing: Stainless steel rectangular drop-in fire pit pans and reflective tempered fire glass (bulk bucket).
43. Monolithic Concrete Table
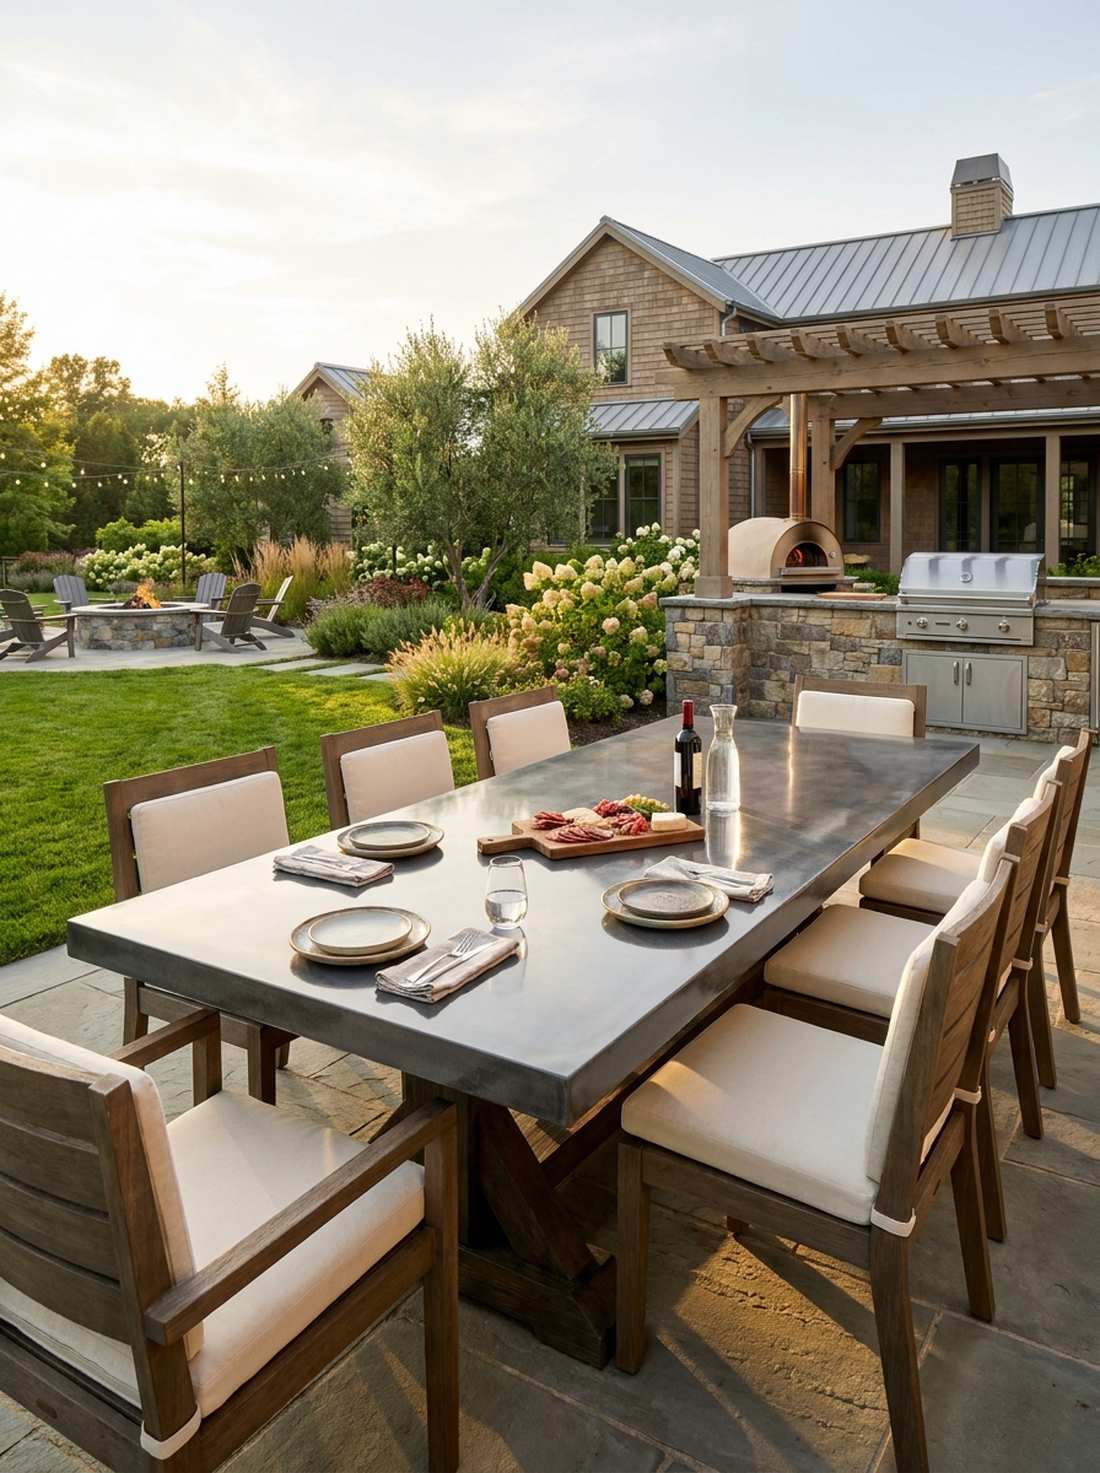
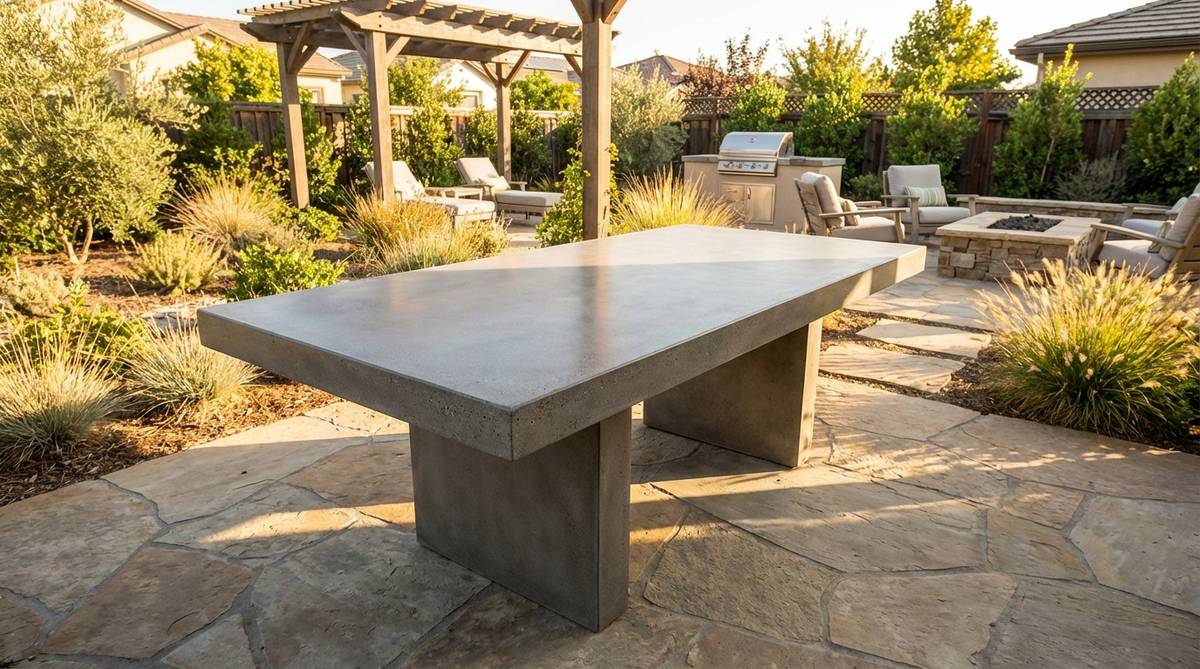
A massive, indestructible slab of polished stone resting heavily in the garden feels like an ancient dining table fit for modern royalty. This permanent outdoor dining structure works exceptionally well for large families who are tired of replacing rusted or blown-away patio furniture.
Pouring your own dining surface gives a designer-level finish that brings interior kitchen luxury directly into the wilderness. Treating the cured top with a garden design minimalist food-safe carnauba wax ensures red wine and barbecue sauce wipe off effortlessly.
You can pour a massive dining table for around $250. Highly recommended for the ultimate outdoor kitchen!
- Key Materials: Melamine form, rebar grid, countertop concrete, heavy wooden base
- Vibe / Style: Tuscan modernist dining
- Difficulty: Advanced (requires extreme heavy lifting)
- Budget Breakdown: Concrete: $100 | Melamine: $50 | Base timber: $100
- Creator’s Tip: Polish the cured slab with a wet-polisher up to 3000 grit; the concrete will literally reflect light like a black mirror.
- Smart Sourcing: Food-safe concrete countertop wax and diamond wet-polishing pad kits.
44. Concrete Sphere Accent
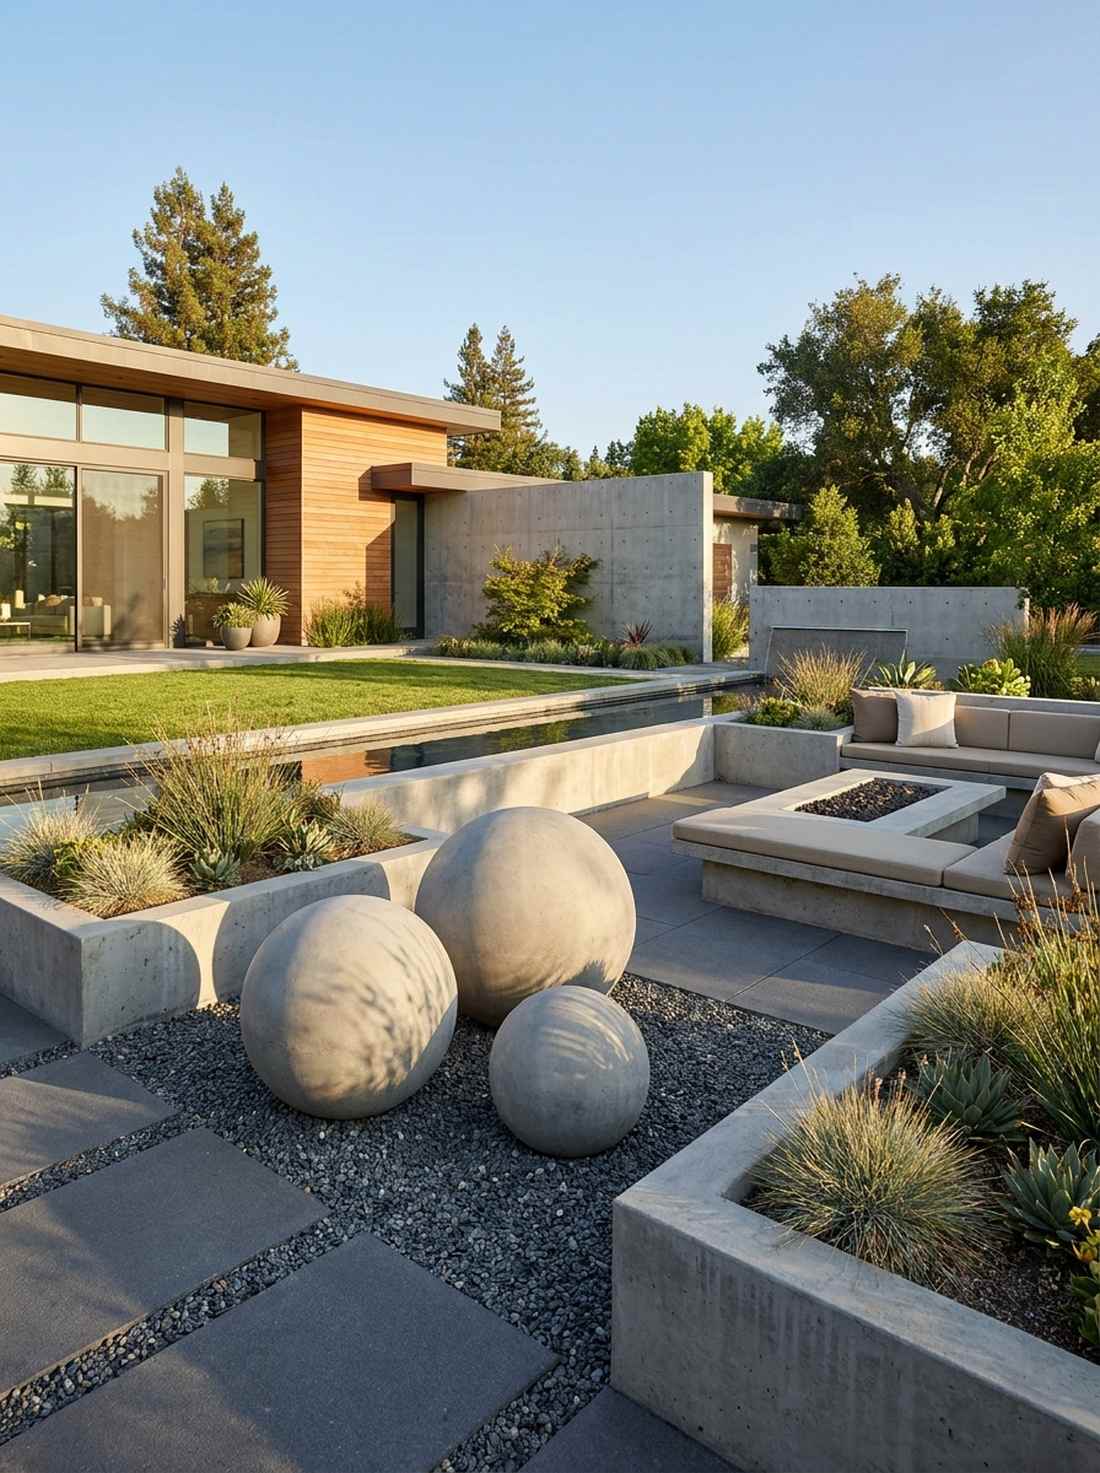
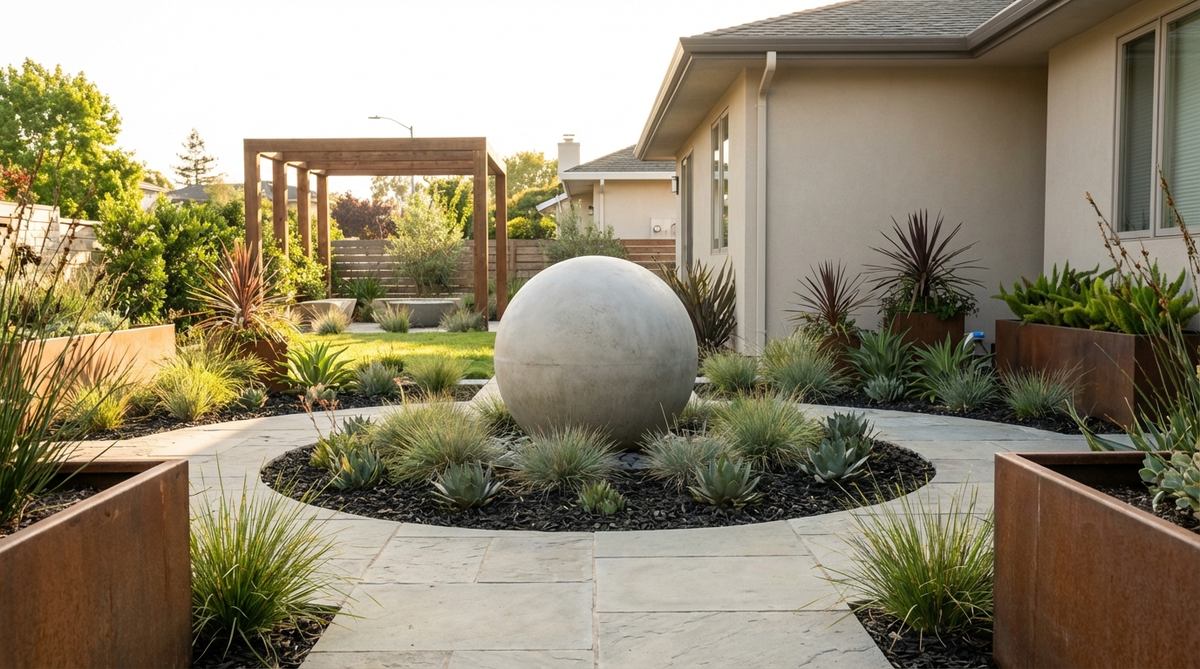
Discovering perfectly round, heavy stone orbs resting silently in a bed of linear geometric pathways feels delightfully unexpected and mystical. This spherical hardscape contrast is the perfect use-case for breaking up the aggressive straight lines of a hyper-modern yard.
Contrasting sharp angles with heavy, flawless globes delivers a surprisingly premium look reminiscent of high-end corporate art. Casting these massive orbs using cheap round glass lighting globes as a breakaway mold is an insider trick that saves hundreds of dollars.
You can cast a stunning 16-inch orb for about $30. Save this for a brilliant, low-cost architectural accent!
- Key Materials: Glass light fixture globes, fine concrete, hammer
- Vibe / Style: Zen corporate courtyard
- Difficulty: Easy
- Budget Breakdown: Glass globe: $15 | Concrete: $15
- Creator’s Tip: Spray the inside of the glass globe with cooking oil before pouring; it makes shattering and peeling the glass off the cured concrete much safer.
- Smart Sourcing: Replacement glass lighting globes (various sizes) and fine-aggregate concrete mix.
Most patios are just boring flat slabs poured directly on the dirt. This next engineering trick makes your entire deck look like it’s hovering in mid-air…
45. Cantilevered Concrete Platform
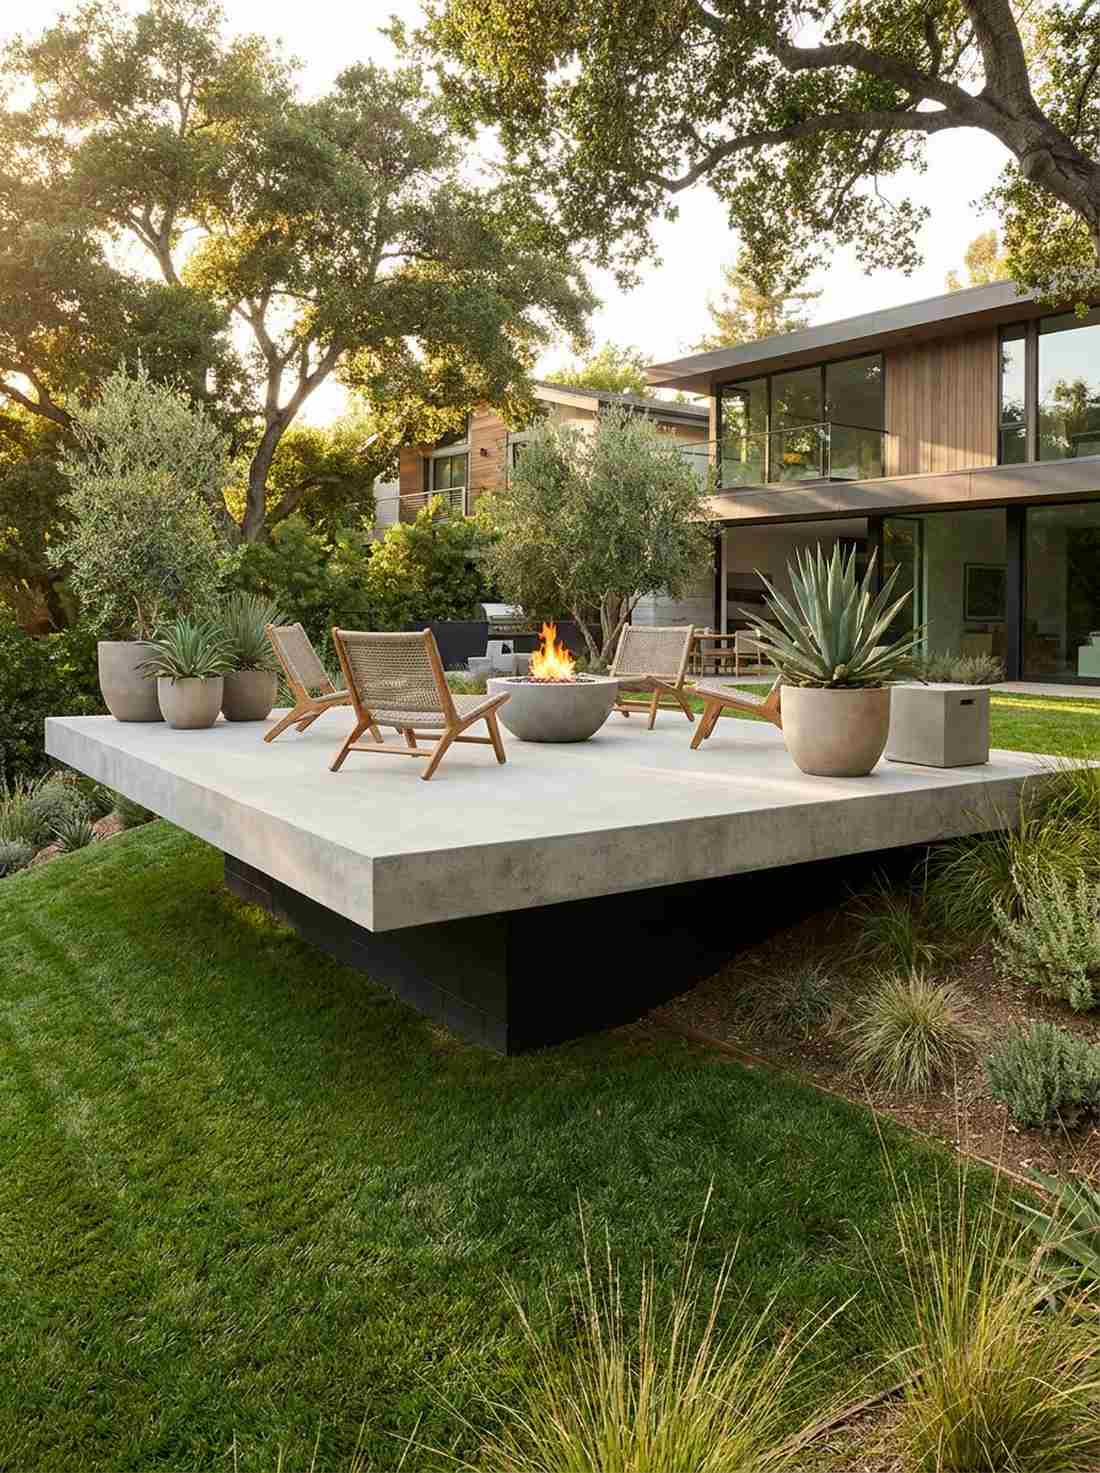
A massive pad of solid concrete jutting out aggressively over a sloped lawn without any visible legs feels like a breathtaking architectural triumph. This levitating deck footprint works exceptionally well for extending a flat patio out over a steep backyard drop-off.
Recessing the foundation block far beneath the deck edge looks far more expensive than it is, creating a severe, dramatic shadow line that makes the pad float. Sourcing heavy structural engineering grid supports is mandatory here to ensure the overhanging lip doesn’t snap off.
Pouring a floating deck effect adds about $300 to a standard pour. Pin this for the ultimate mid-century modern vibe!
- Key Materials: Recessed cinderblock base, heavy rebar cantilever cage, high-PSI concrete
- Vibe / Style: Hollywood hills mid-century
- Difficulty: Expert
- Budget Breakdown: Block base: $100 | Extreme rebar: $200
- Creator’s Tip: Paint the recessed foundation block ultra-flat black; this completely hides the support structure in shadow, selling the levitation illusion.
- Smart Sourcing: High-strength structural rebar cages and ultra-flat black exterior masonry paint.
46. Geometric Concrete Pergola
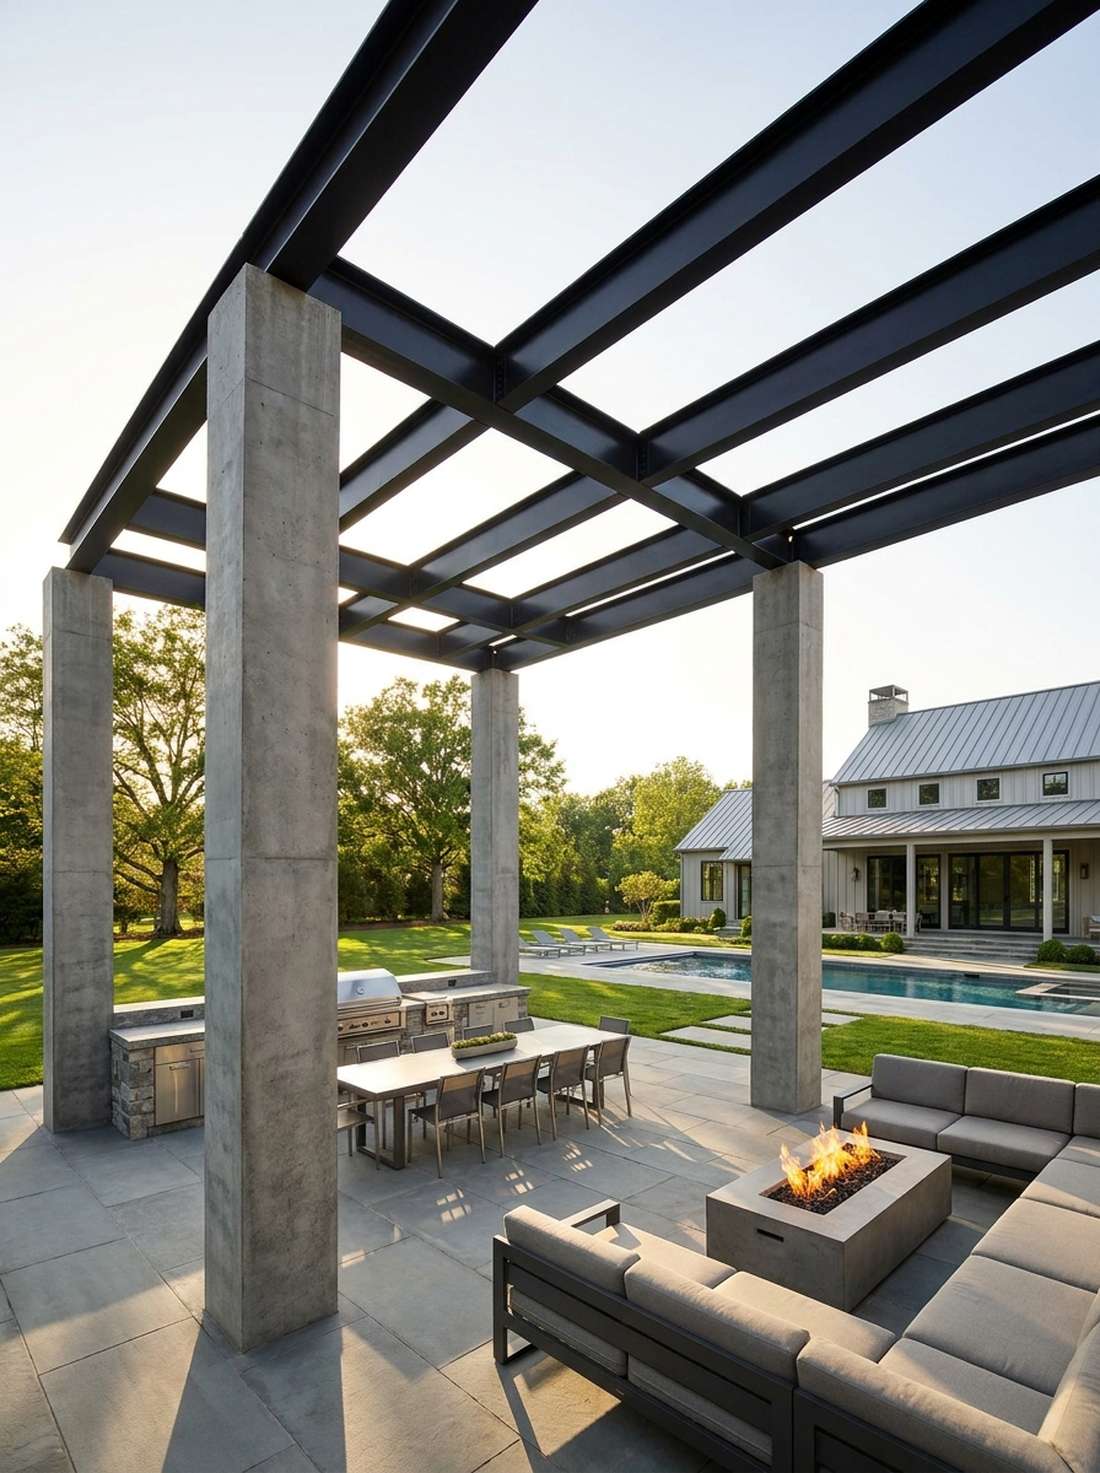
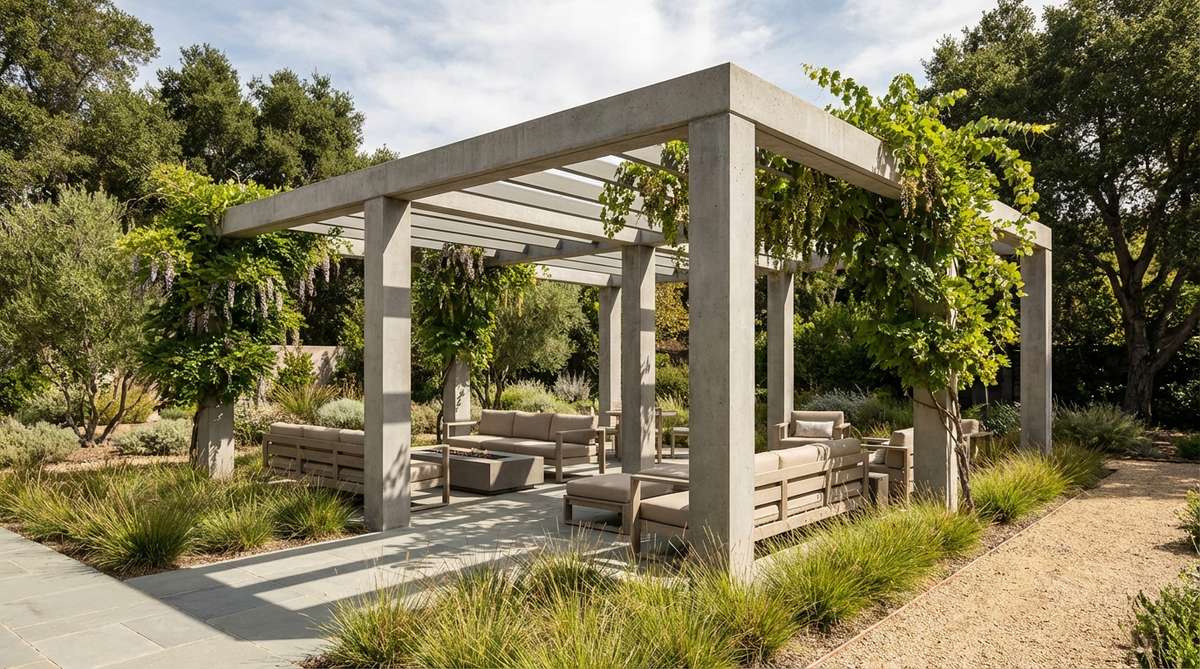
Massive, towering pillars of grey stone supporting a stark grid of overhead beams feel like walking through an ancient, monumental temple rebuilt for the future. This monolithic shade structure is the ultimate use-case for large, sun-baked estates where flimsy wooden gazebos look cheap.
Swapping rotting timber posts for indestructible concrete columns gives a designer-level finish that will literally survive a hurricane. Connecting the heavy columns with sleek, black contemporary garden design steel I-beams creates a hyper-industrial, deeply satisfying aesthetic.
Building a permanent concrete pavilion runs roughly $1500–$3000. Save this if you are planning a massive architectural overhaul!
- Key Materials: Formed concrete pillars, steel I-beams, heavy lifting equipment
- Vibe / Style: Monumental industrial chic
- Difficulty: Expert (requires cranes and engineering)
- Budget Breakdown: Concrete pillars: $800 | Steel beams: $1500 | Machinery: $500
- Creator’s Tip: Embed heavy steel anchor plates directly into the wet top of the concrete pillars so bolting the roof beams later is flawless.
- Smart Sourcing: Heavy-duty steel beam connector brackets and commercial concrete column forming tubes.
Illumination Strategies For Modern Gardens
Lighting integration within concrete elements extends garden usability into evening hours while highlighting architectural features. Strategic illumination emphasizes geometry and creates dramatic shadow play.
47. Recessed Pathway Lighting
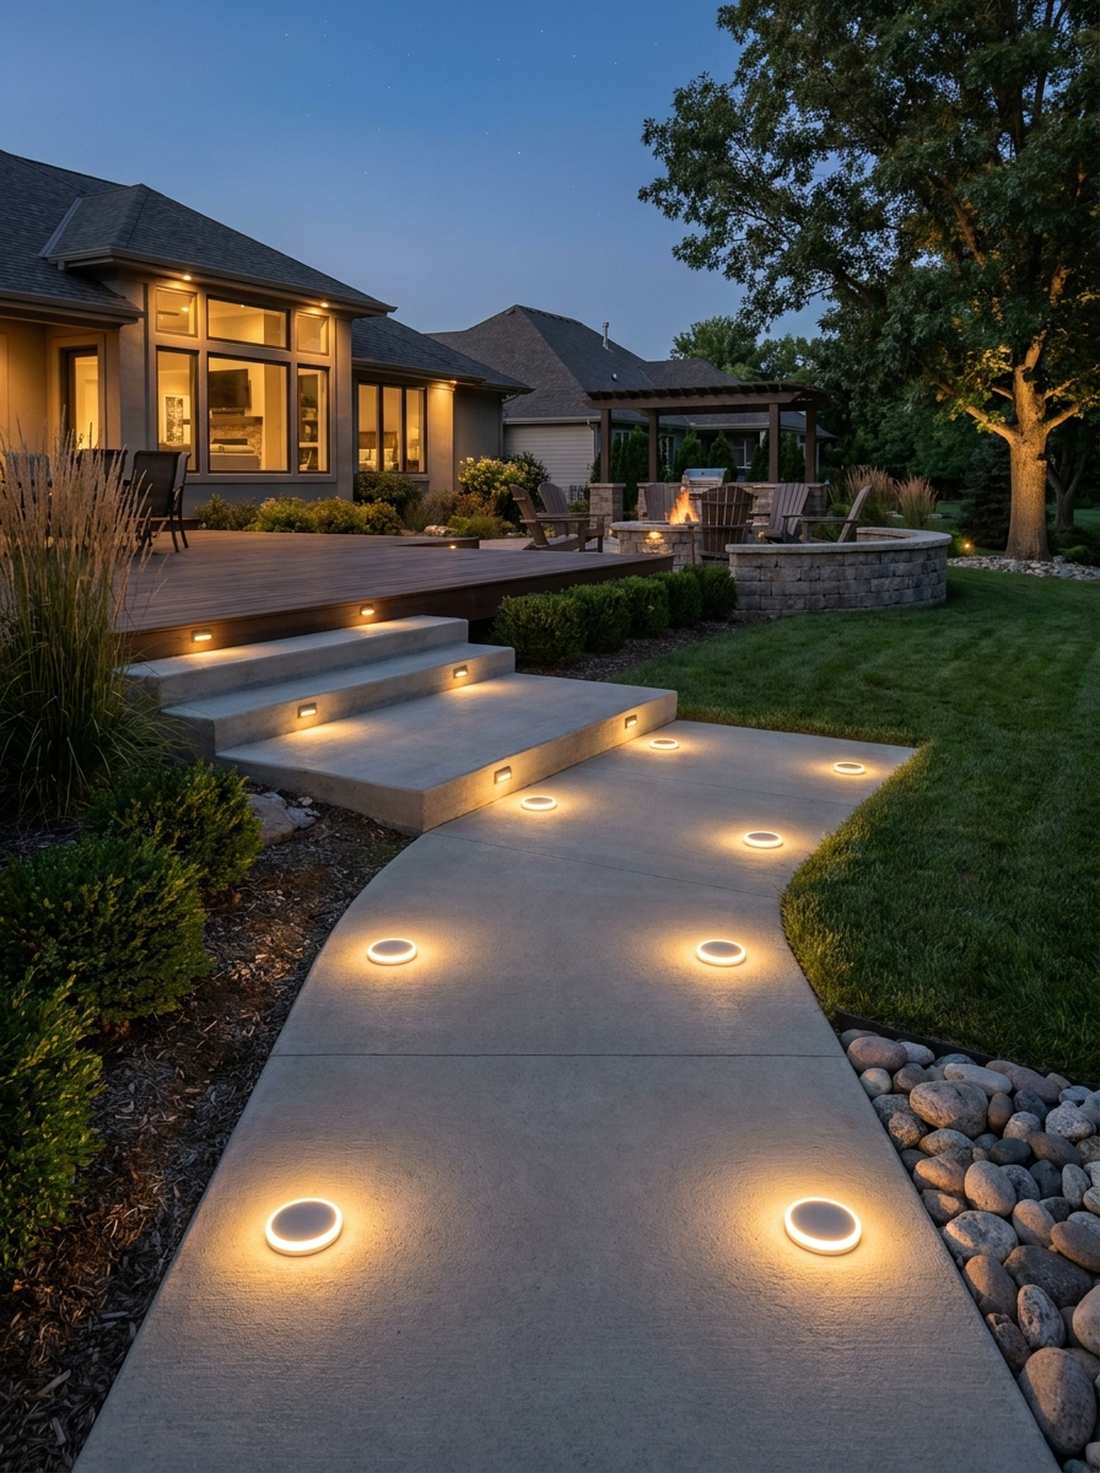
Tiny, flush-mounted discs of warm light glowing directly out of the solid ground feel incredibly sleek and guide your feet like an airport runway. This flush-integrated path illumination works exceptionally well for ensuring safety on stark concrete steps without tripping over ugly stake lights.
Casting lights directly into the slab delivers a surprisingly premium look that makes the walkway feel like a five-star resort. Utilizing low-voltage premium architectural deck light kits ensures the fixtures can be driven over by cars or power-washed without failing.
You can embed these lights during a pour for about $150. Pin this for a flawless nighttime aesthetic!
- Key Materials: PVC sleeves, flush LED puck lights, low-voltage transformer
- Vibe / Style: Modern luxury resort
- Difficulty: Intermediate
- Budget Breakdown: PVC sleeves: $20 | LED kit: $100 | Transformer: $30
- Creator’s Tip: Set 2-inch PVC pipe scraps into the wet concrete to act as placeholder sleeves; drop the light fixtures in after the concrete cures.
- Smart Sourcing: Flush-mount drive-over LED well lights and weatherproof low-voltage landscape transformers.
48. Uplighting Beneath Concrete Benches
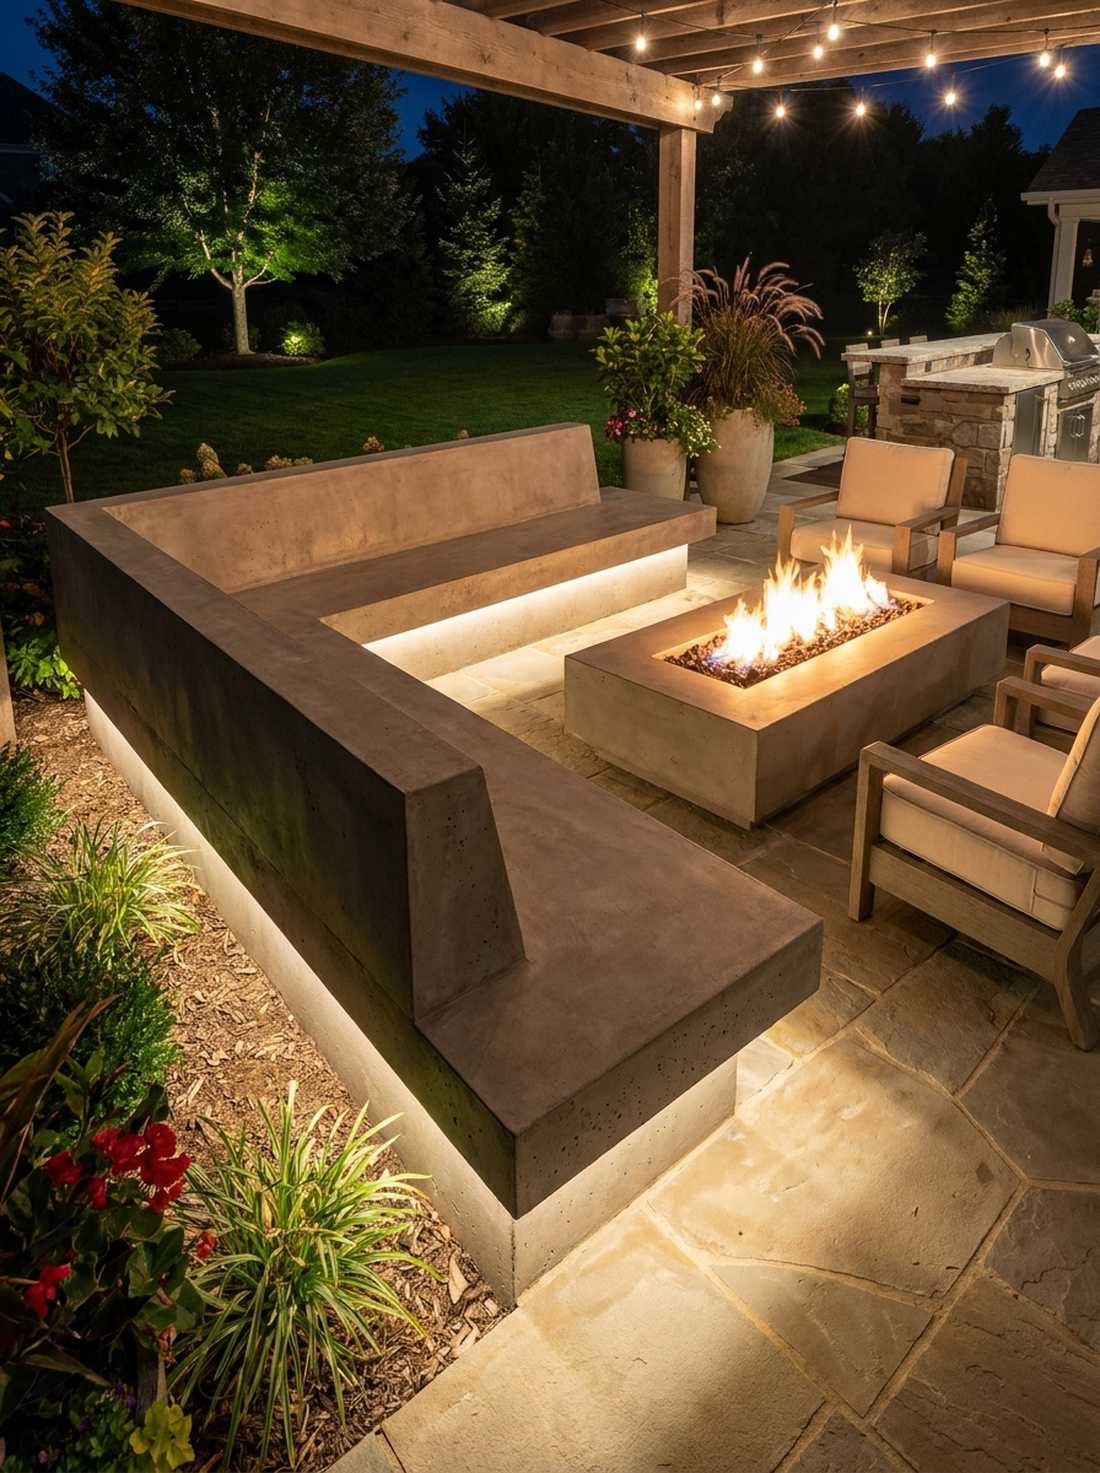
A soft, mysterious halo of light spilling out from beneath a heavy concrete ledge makes the massive stone appear completely weightless at night. This hidden hardscape glow effect is the perfect use-case for lighting a dark patio seating area without blinding your guests.
Concealing light strips under architectural overhangs looks far more expensive than it is and creates incredible ambient mood lighting. Snapping heavy-duty waterproof LED neon flex ropes into hidden aluminum channels ensures the light is perfectly diffused and completely weatherproof.
This floating light effect costs around $80 to install. Save this for the ultimate outdoor party atmosphere!
- Key Materials: Aluminum diffuser channels, IP68 waterproof LED strips
- Vibe / Style: High-end nightclub lounge
- Difficulty: Easy
- Budget Breakdown: Aluminum channels: $30 | LED ropes: $50
- Creator’s Tip: Never expose the actual LED diodes; always use a frosted diffuser channel so the light bounces softly against the ground.
- Smart Sourcing: IP68 waterproof outdoor LED neon rope lights and aluminum LED channel diffusers (bulk pack).
Most people ruin the serene aesthetic of their expensive water features at night by using cheap, blinding spotlights. This next technique creates a glowing liquid magic trick…
49. Illuminated Water Feature Basin
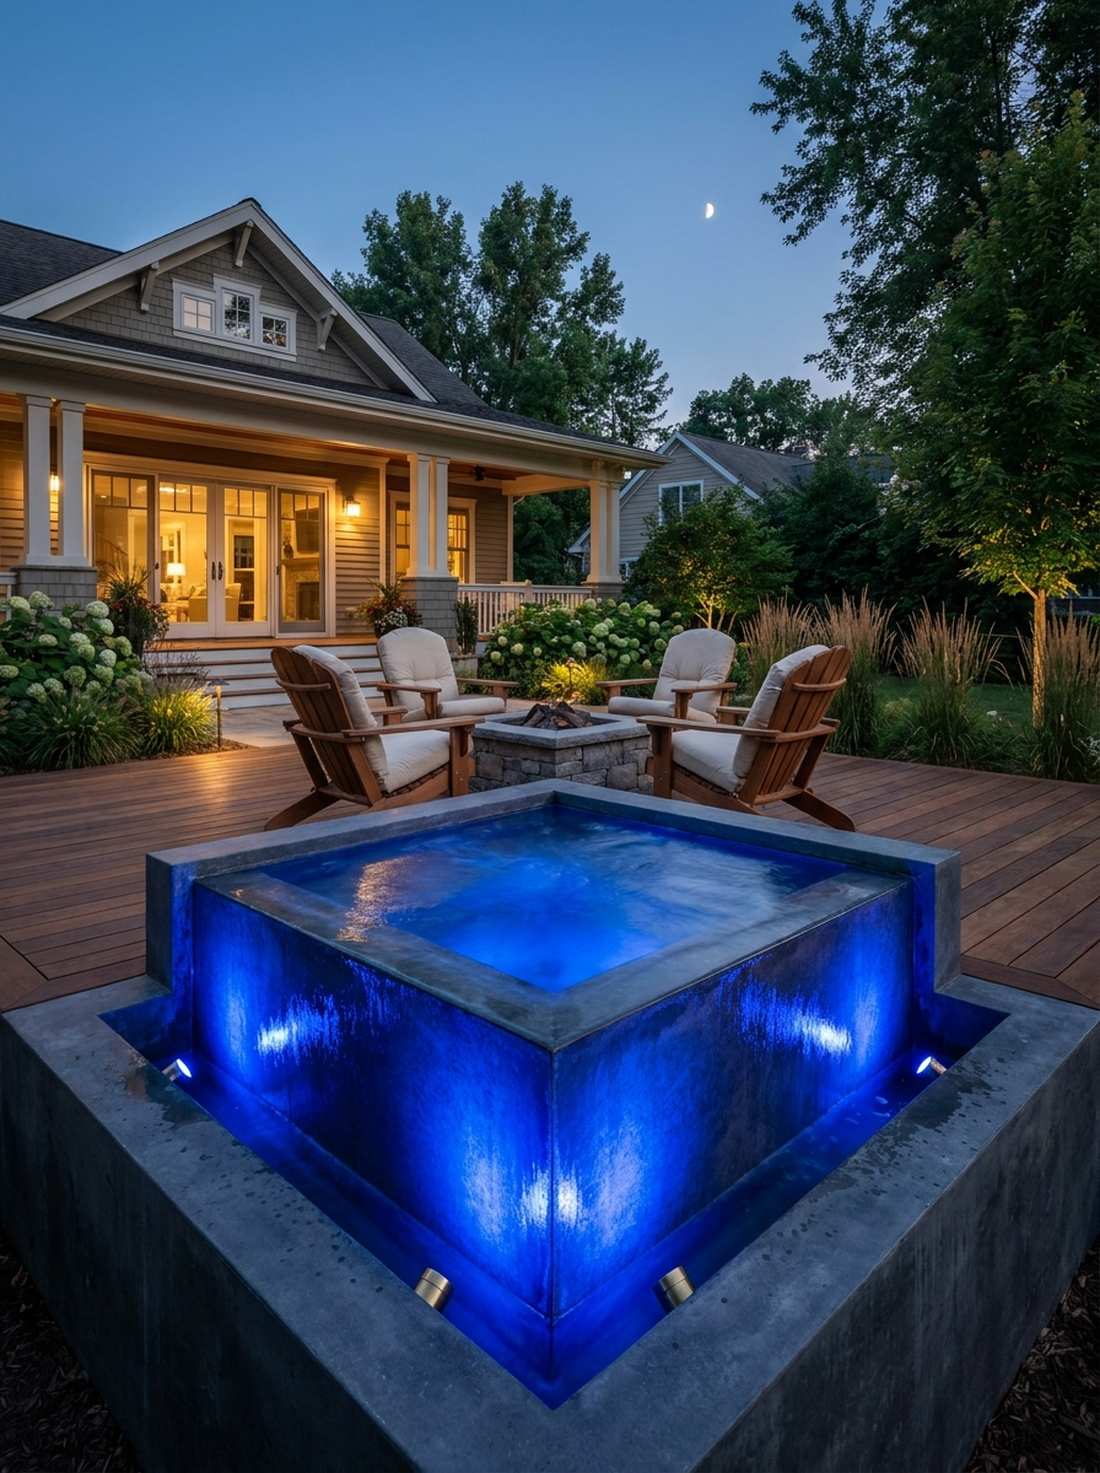
Watching a dark concrete pool transform into a glowing, vibrant blue cube of liquid light feels utterly mesmerizing. This submerged geometric lighting design works exceptionally well for turning a quiet daytime fountain into the absolute center of attention at night.
Sinking lights to the very bottom of the basin gives a designer-level finish where the moving water itself acts as a massive, shimmering lampshade. Sourcing heavy garden design modern cast-brass submersible spot fixtures ensures the lights won’t float to the top or corrode.
You can light up a basin for about $120. Highly recommended for injecting night-time drama!
- Key Materials: Submersible brass LED spots, weighted bases, waterproof wire splicing
- Vibe / Style: Luxury hotel reflecting pool
- Difficulty: Easy
- Budget Breakdown: Brass fixtures: $90 | Waterproof connectors: $30
- Creator’s Tip: Aim the underwater lights at the corners of the geometric basin, not straight up; it catches the sharp edges and defines the shape.
- Smart Sourcing: Cast brass submersible pond lights and gel-filled waterproof wire connectors.
50. Backlit Concrete Screen Panels
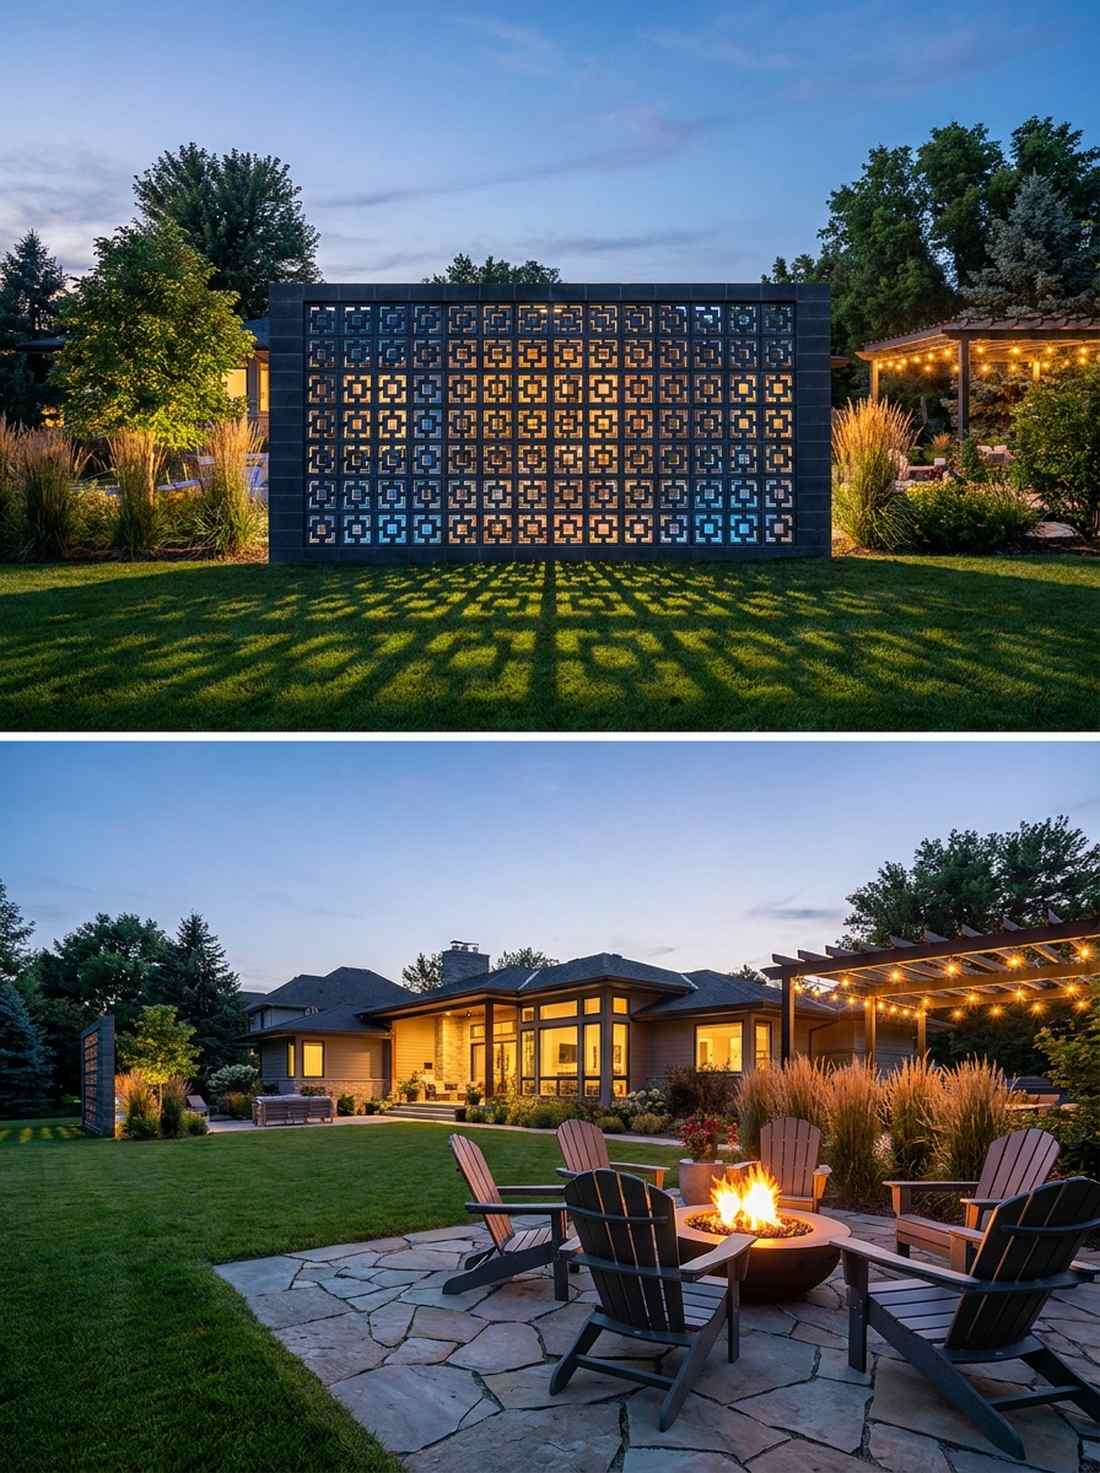
A massive, dark wall glowing fiercely from behind, projecting sharp, dramatic geometric shadows across the lawn, feels like an outdoor cinematic experience. This silhouette hardscape illumination is the ultimate use-case for highlighting a breeze-block wall without shining lights directly into your eyes.
Placing powerful floods exclusively behind a perforated structure looks far more expensive than it is, turning a simple wall into a massive lantern. Upgrading to smart RGB outdoor floodlights allows you to change the entire mood and color of the garden with your phone.
Creating this massive lantern effect costs roughly $100. Pin this to your landscape lighting masterclass board!
- Key Materials: High-lumen LED floodlights, breeze block wall, smart controller
- Vibe / Style: Dramatic architectural theater
- Difficulty: Easy
- Budget Breakdown: LED Floods: $80 | Smart plug: $20
- Creator’s Tip: Keep the light source extremely close to the back of the wall (within 12 inches) to make the shadow edges razor-sharp.
- Smart Sourcing: Smart RGBW outdoor LED floodlights and heavy-duty outdoor smart plugs.
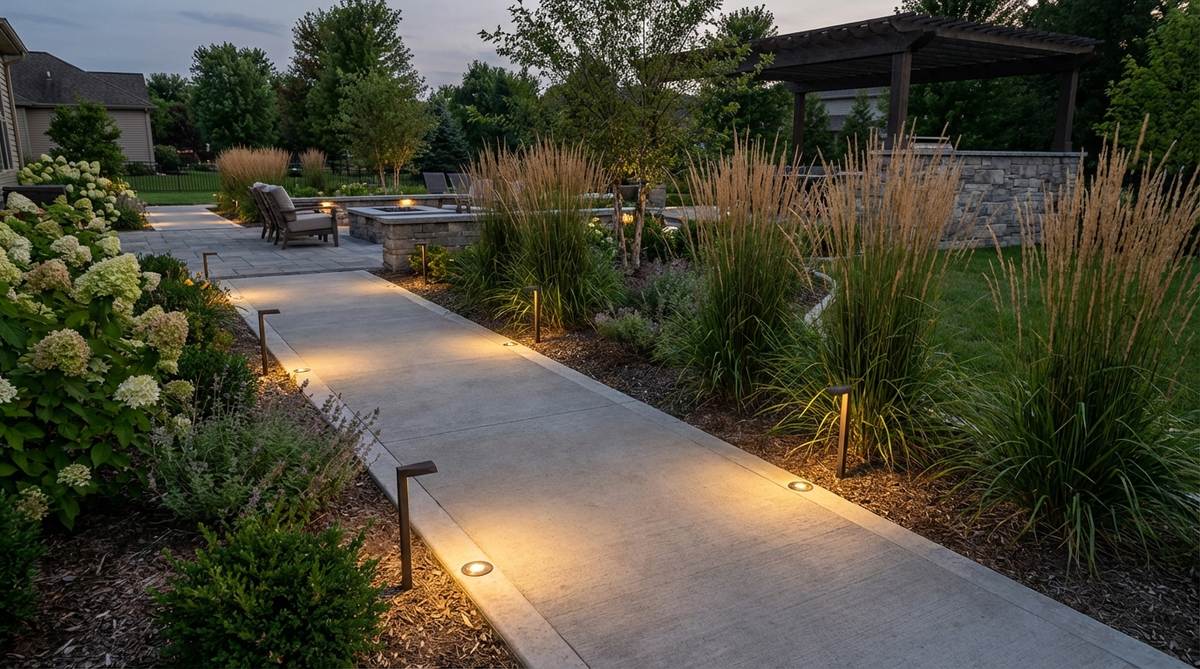
51. Linear LED Concrete Edging
A razor-thin, unbroken line of neon light slicing through the dark grass feels incredibly futuristic, like walking on a sci-fi movie set. This luminous border definition concept works exceptionally well for framing long, straight pathways or highlighting severe right angles in the dark.
Recessing lighting directly into the concrete mower edge gives a designer-level finish that is impossible to achieve with standard garden stakes. Pressing premium silicone-encased continuous light strips into a pre-cut groove ensures the lawnmower can roll right over it without damage.
You can border your path with light for about $150. Save this for a truly cutting-edge property upgrade!
- Key Materials: Masonry saw, silicone neon strip, outdoor adhesive
- Vibe / Style: Cyberpunk luxury estate
- Difficulty: Intermediate
- Budget Breakdown: Blade/Saw: $50 | Neon strips: $80 | Adhesive: $20
- Creator’s Tip: Use a masonry blade to cut a 1/2-inch deep channel into the cured concrete edge, then glue the silicone light strip perfectly flush with the surface.
- Smart Sourcing: Continuous run silicone outdoor LED neon (100ft spool) and clear exterior construction adhesive.
52. Illuminated Step Risers
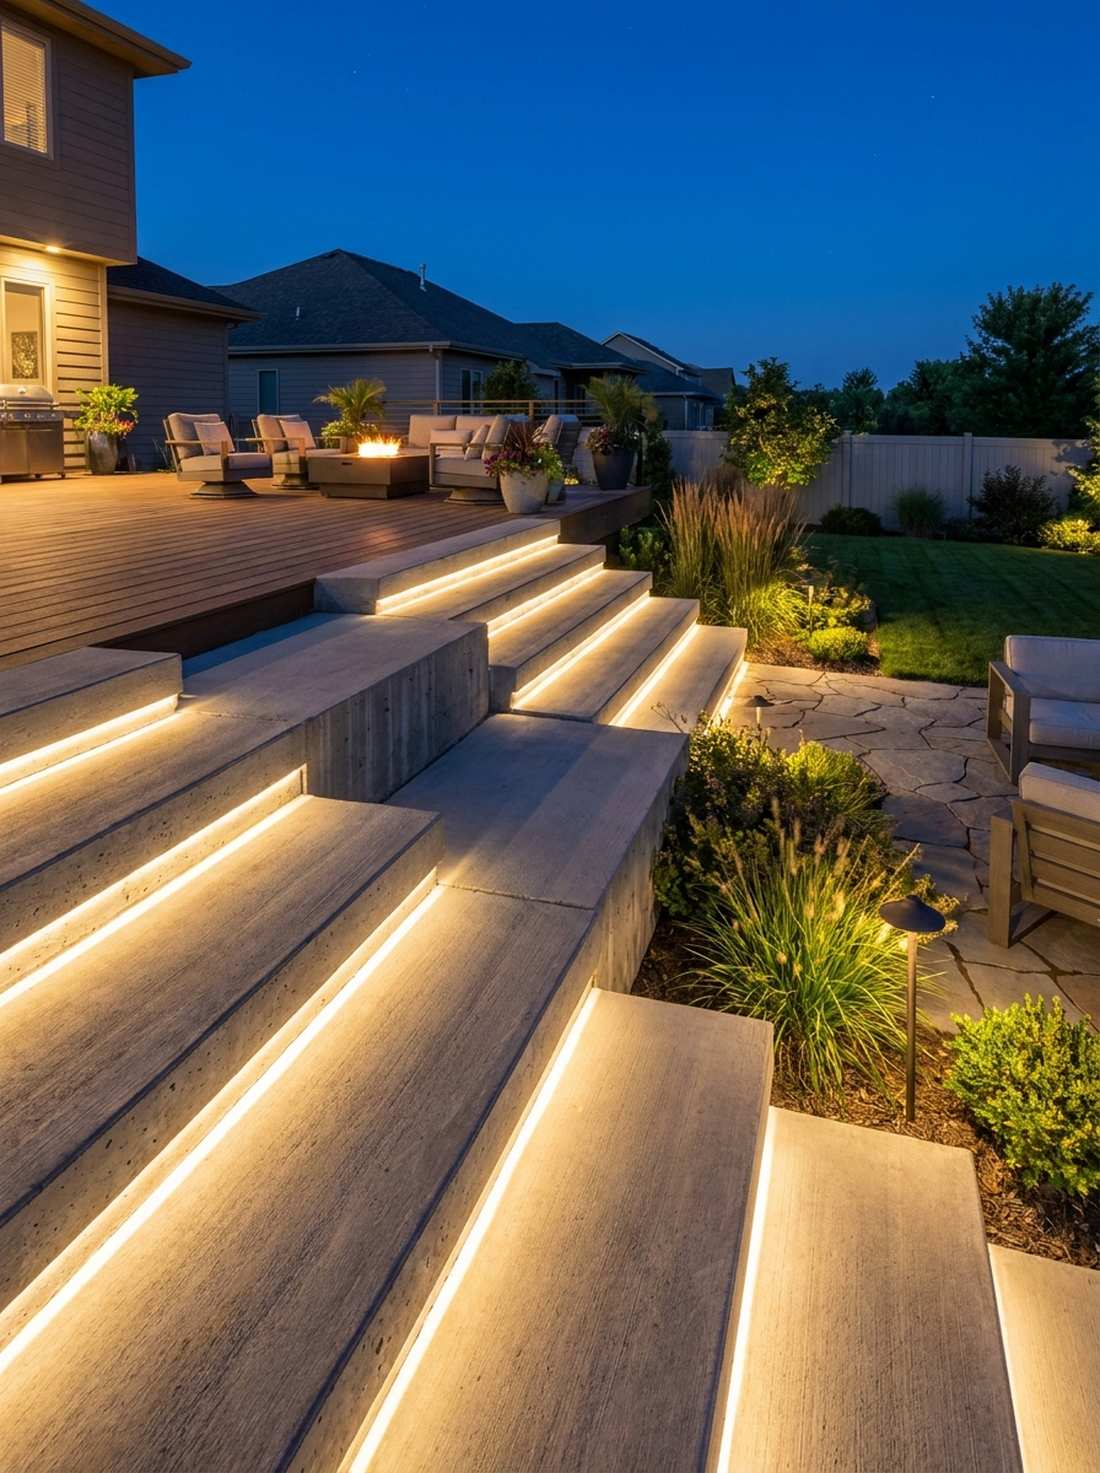
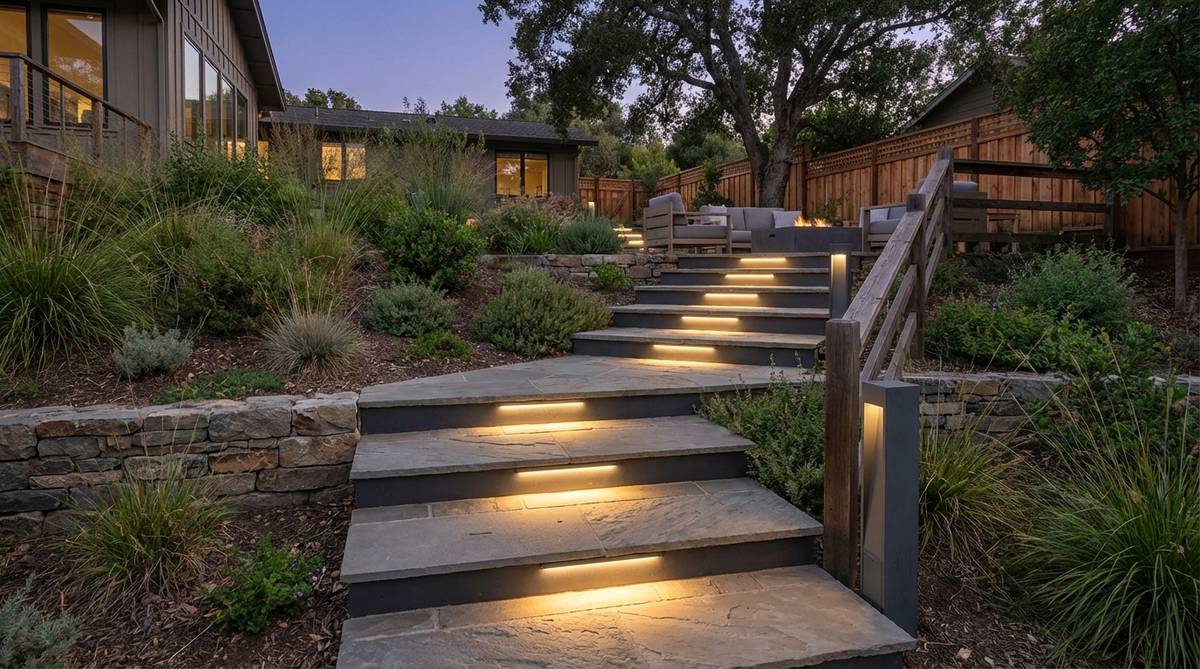
The stark, vertical face of each concrete step glowing with a crisp line of warm light feels incredibly safe and architecturally profound. This integrated stair tread lighting is the perfect use-case for massive concrete staircases that become hazardous black holes at night.
Hiding the light strip directly under the overhanging lip of the concrete tread delivers a surprisingly premium look that emphasizes the heavy geometry. Installing contemporary garden design low-voltage step lights drastically reduces trip hazards while looking like a million bucks.
Wiring an entire staircase runs about $200. Pin this for a brilliant mix of high-end design and home safety!
- Key Materials: Hardscape retaining wall lights, masonry drill bit, transformer
- Vibe / Style: High-end commercial entrance
- Difficulty: Intermediate
- Budget Breakdown: Under-lip fixtures: $150 | Wire/Accessories: $50
- Creator’s Tip: Drill the wire holes through the concrete block before capping the stairs, so all electrical wires are permanently hidden inside the masonry core.
- Smart Sourcing: Slimline hardscape LED retaining wall lights (bulk pack) and direct-burial low voltage landscape wire.
53. Spotlight on Concrete Sculpture
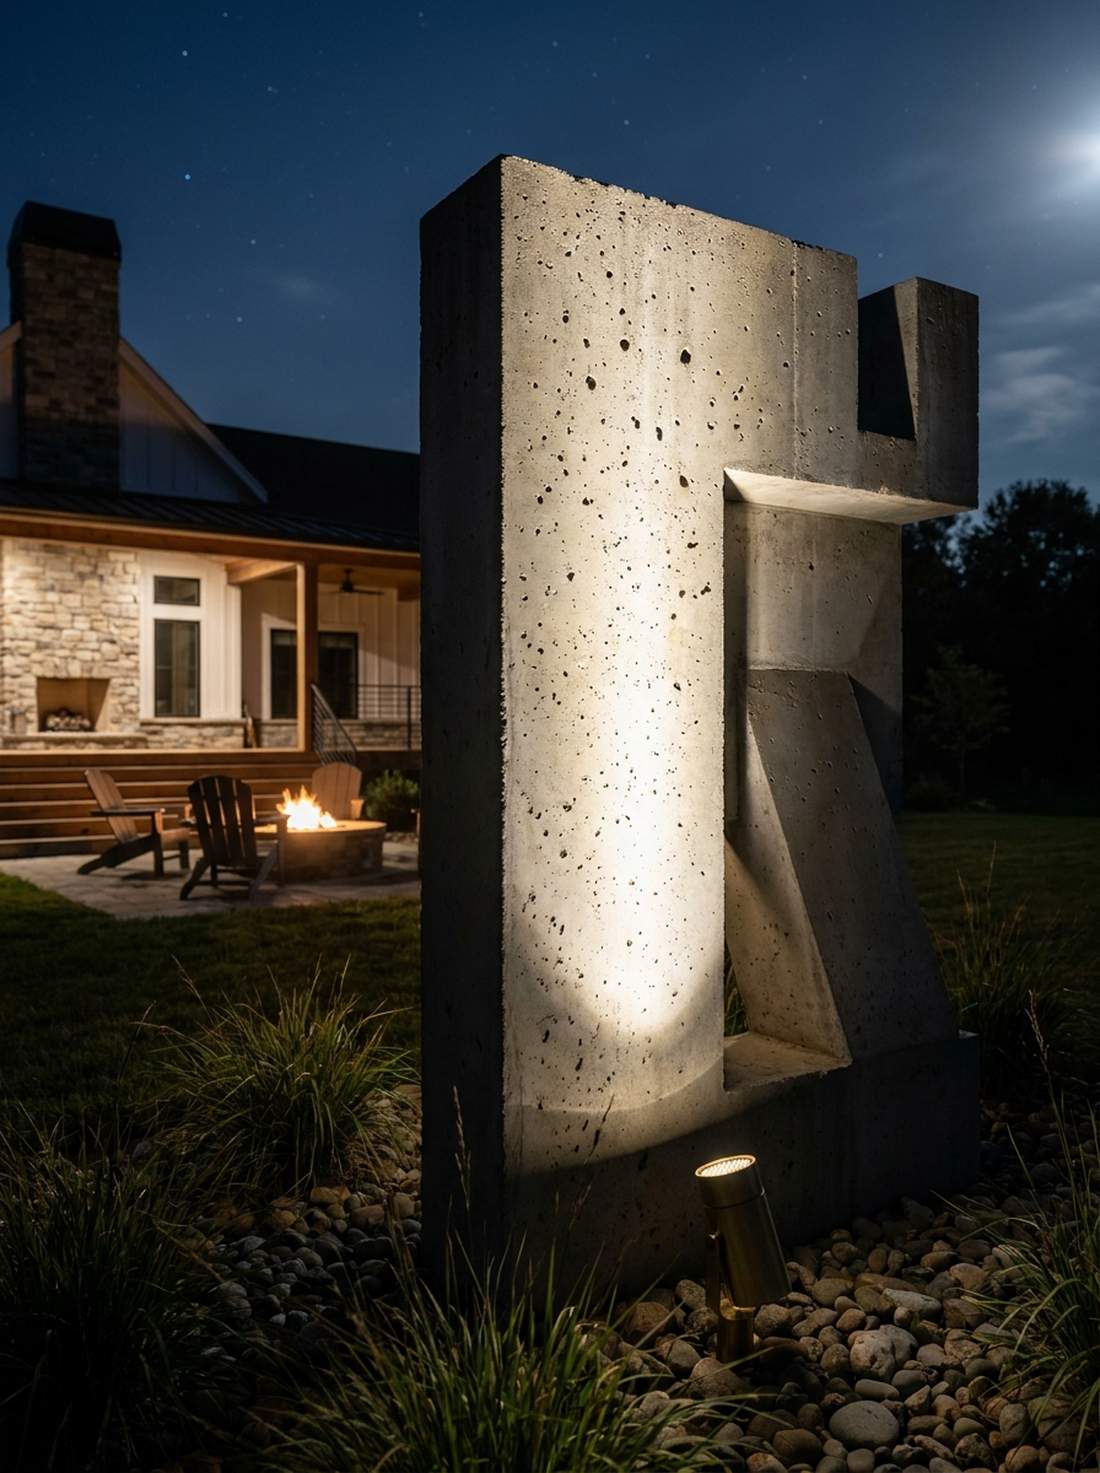
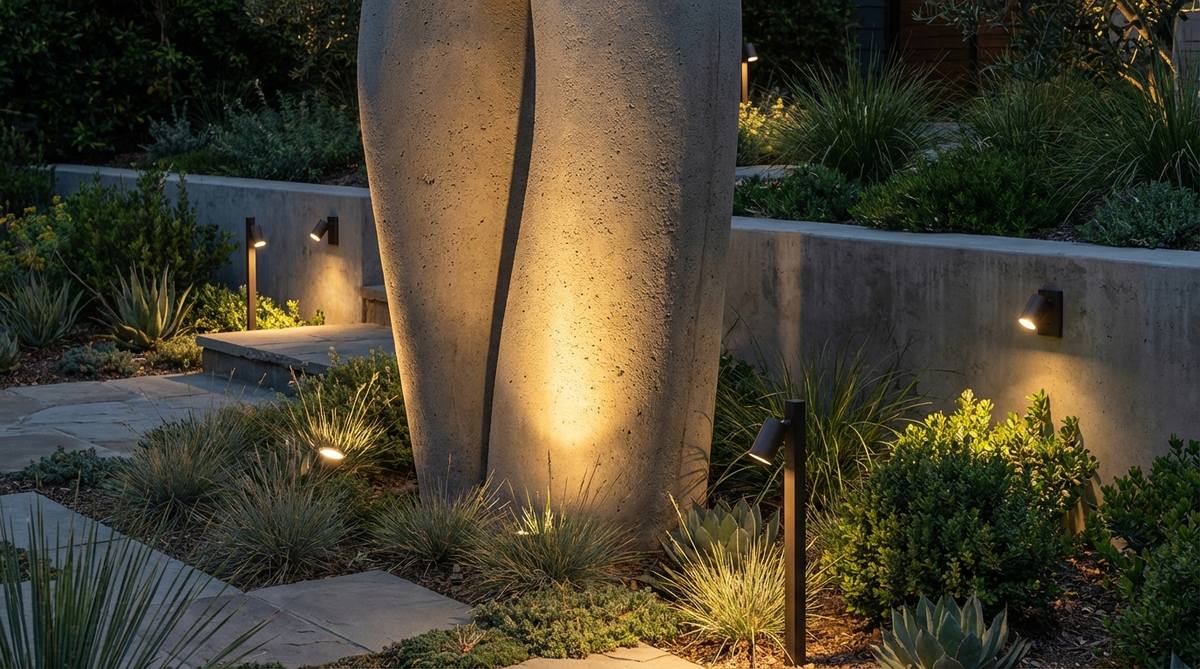
A harsh, narrow beam of bright light cutting through the darkness to illuminate the raw, pitted texture of a brutalist sculpture feels wildly dramatic. This high-contrast focal grazing technique works exceptionally well to command attention to your favorite geometric centerpiece.
Shooting light almost parallel to the surface of the concrete looks far more expensive than it is, instantly highlighting every tiny imperfection and shadow. Sourcing premium narrow-beam architectural bullet lights ensures the light hits the sculpture perfectly without bleeding out into the rest of the yard.
You can set up this museum-quality lighting for roughly $60. Save this to make your garden art pop at night!
- Key Materials: 15-degree beam bullet spotlight, anti-glare hex louver
- Vibe / Style: Nighttime museum exhibition
- Difficulty: Easy
- Budget Breakdown: Bullet fixture: $45 | Hex louver: $15
- Creator’s Tip: Always install a honeycomb hex louver inside the light fixture; it completely eliminates the blinding glare if someone looks back toward the light source.
- Smart Sourcing: Solid brass narrow-beam bullet spotlights and glare-reducing honeycomb hex louvers.
54. Overhead String Lights With Concrete Posts
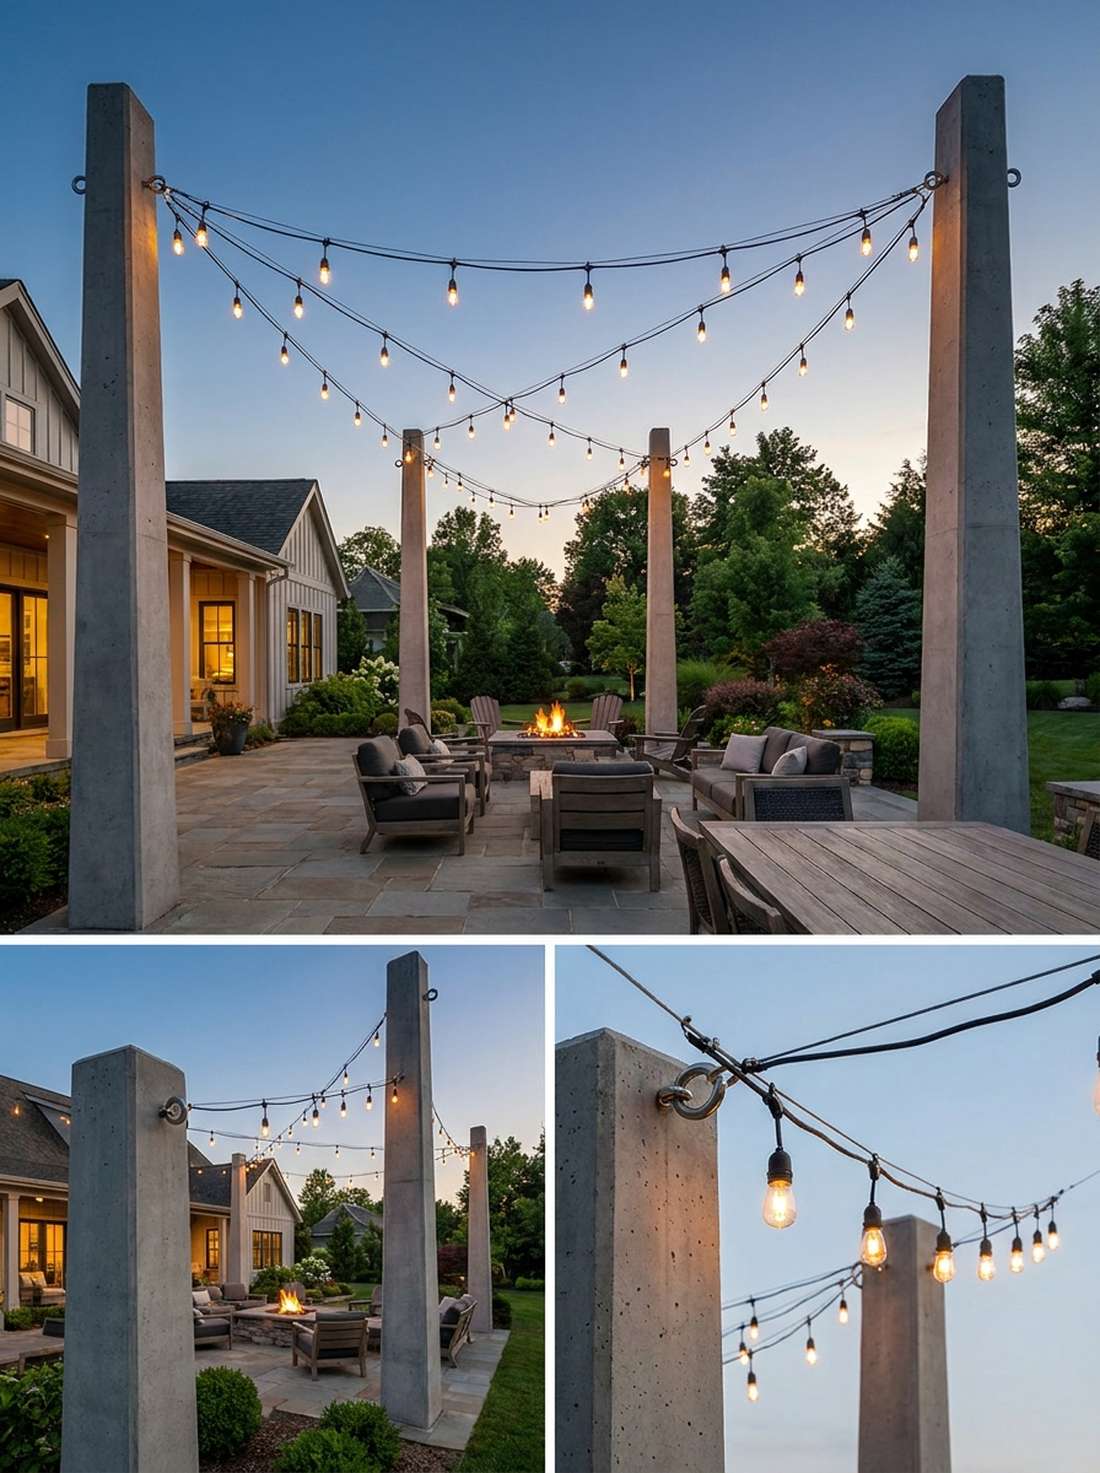
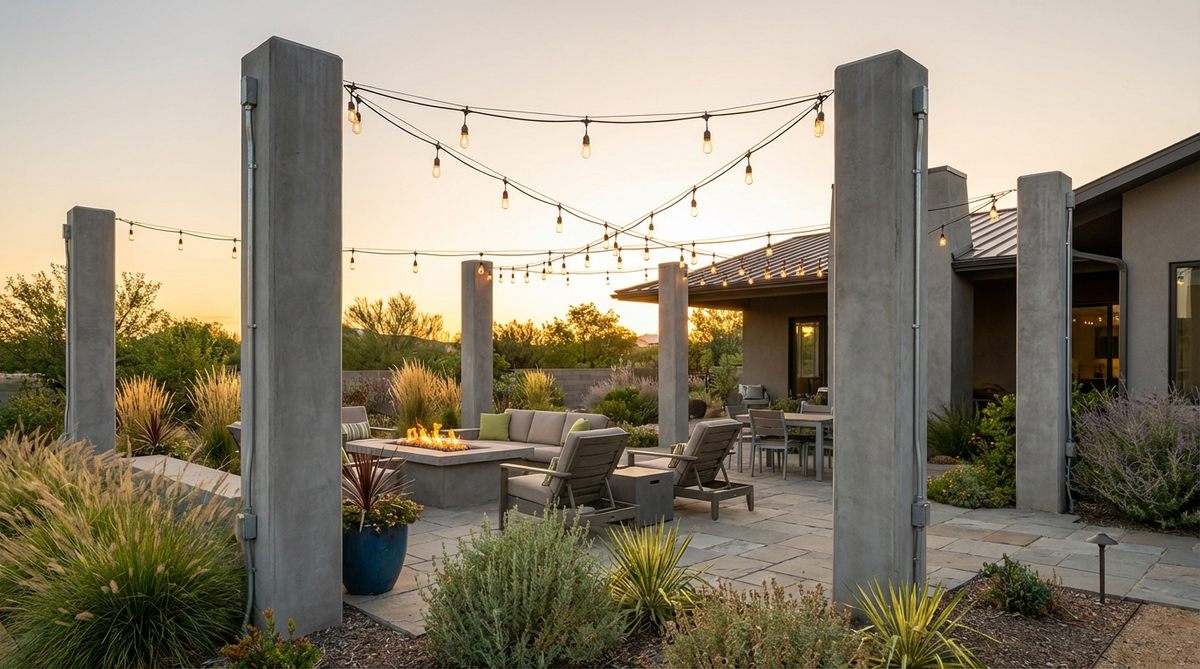
A warm canopy of glowing cafe bulbs suspended effortlessly between towering, monolithic concrete pillars feels like the ultimate hip urban beer garden. This permanent overhead festival lighting is the absolute pinnacle use-case for massive open patios lacking any tall trees to hang lights from.
Casting heavy concrete obelisks instead of using flimsy wooden poles gives a designer-level finish that will never bend, warp, or rot under the immense tension of heavy commercial wire. Embedding garden design minimalist heavy-duty stainless eye-bolts directly into the wet concrete guarantees a permanent, indestructible anchor point.
You can build these indestructible light towers for about $250. Pin this to complete your ultimate outdoor entertaining oasis!
- Key Materials: Sonotubes, heavy concrete, commercial string lights, stainless eye-bolts
- Vibe / Style: Urban industrial beer garden
- Difficulty: Intermediate
- Budget Breakdown: Concrete/Tubes: $100 | Commercial lights: $120 | Hardware: $30
- Creator’s Tip: Sink the concrete posts at least 3 feet into the ground; the lateral tension from heavy suspended cables will pull shallow posts straight over.
- Smart Sourcing: Commercial-grade shatterproof LED string lights (100ft) and heavy-duty stainless steel anchor eye-bolts.
Bringing Modern Precision To Your Garden
These exactly 54 garden design modern blueprints prove that achieving a high-end, geometric landscape doesn’t require a millionaire’s budget—it requires architectural discipline and smart material sourcing. By upgrading flimsy garden center staples into commercial-grade concrete, UV-resistant sealants, and premium hardscape starter kits, you lock in a pristine, low-maintenance aesthetic that outlasts the seasons. Whether you are pouring a single geometric path or executing a massive multi-level terrace overhaul, combining the stark lines of concrete with the right foundational products delivers a flawless, contemporary masterpiece.
Frequently Asked Questions
What concrete finish works best for modern garden pathways?
For an ultra-premium aesthetic, smooth troweled finishes offer a sleek contemporary appearance, though exposed aggregate is vastly superior for slip resistance in wet climates. The secret to making either finish look expensive is immediately applying a premium deep-penetrating concrete sealer. This small investment completely stops the concrete from turning chalky or absorbing ugly brown dirt stains, maintaining that stark modern geometry.
How do I prevent concrete from looking too cold or institutional?
The ultimate contemporary garden design trick is forced material contrast. Never let concrete exist entirely on its own; intersect it with warm, pre-finished ipe wood slats, bulk ornamental grasses, and strategic low-voltage LED uplighting kits. Capping a brutalist grey wall with a rich, waterproof composite timber board instantly shifts the vibe from a parking garage to a high-end luxury resort.
Can concrete work in small urban gardens?
Concrete is actually the ultimate hack for tiny urban spaces because it establishes severe, multi-functional boundaries. By utilizing pre-cast modular retaining block kits, you can build vertical planters that double as massive seating areas, completely eliminating the need for bulky patio furniture. Keeping the concrete dyed in lighter, reflective colors also forces the tiny courtyard to feel exponentially larger.
What plants complement geometric concrete designs?
You must select plants that act as architectural sculptures. Architectural bulk starter kits of agave, yucca, and ornamental Mexican feather grass contrast flawlessly against rigid 90-degree concrete corners. To soften harsh transitions, buying flats of creeping thyme or silver ponyfoot allows a controlled, organic spill over the pristine concrete edges without creating a messy, overgrown nightmare.
How does concrete garden design perform in freeze-thaw climates?
It performs flawlessly if—and only if—you use commercial-grade preparation. Standard concrete cracks because water gets inside, freezes, and expands. By utilizing high-strength air-entrained concrete mixes and installing heavy-duty French drainage rolls behind every wall, you eliminate trapped moisture. Always cut expansion joints every 8 feet and seal the surface heavily before the first winter snow.