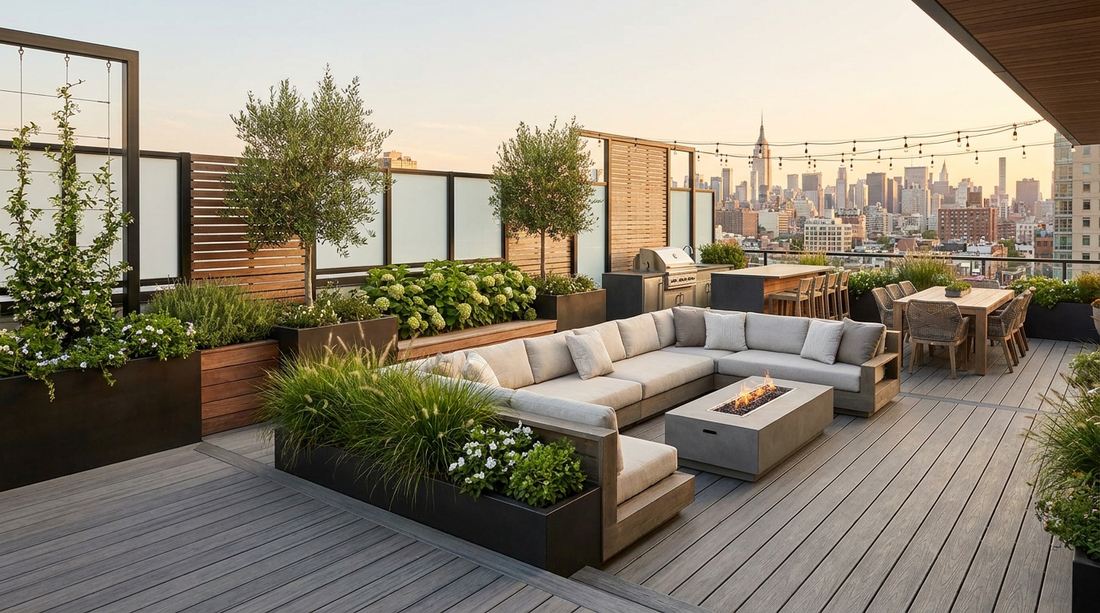
Stepping onto a bare concrete slab suspended fifty feet above the street often feels like confronting a giant, expensive void. Yet, the sharpest urban decorators know that a strategic terrace garden design isn’t about hauling tons of dirt upstairs—it’s about manipulating sightlines with commercial-grade composites and vertical tension systems. By deploying ultra-durable, weather-resistant materials, a wind-whipped rooftop transforms into a hyper-functional private lounge. Whether you are mapping out an intimate garden design terrace retreat or conceptualizing a sprawling garden design patio for entertaining, these exact visual blueprints reveal how to force maximum architectural impact out of minimal square footage without draining your bank account.
Design Snapshot: High-End Principles
- Load Balancing: Rooftop environments demand lightweight, engineered soil matrices and premium fiberglass vessels to bypass structural limitations.
- Microclimate Mastery: Extreme sun and wind exposure require UV-treated fabrics and drought-hardy foundation plantings to survive.
- Automated Hydration: Integrating discrete drip-line starter kits completely prevents surface pooling while dramatically cutting maintenance hours.
- Spatial Zoning: Leveraging modular hardscaping divides compact footprints into designated dining, lounging, and heavy-foliage sectors.
Vertical Space Maximization
Exploiting vertical real estate is the undisputed secret to multiplying planting volume. High-end designers use modular grids and tensioned wire structures to draw the eye upward, instantly making confined floors feel infinitely larger.
1. Living Wall Panel Systems
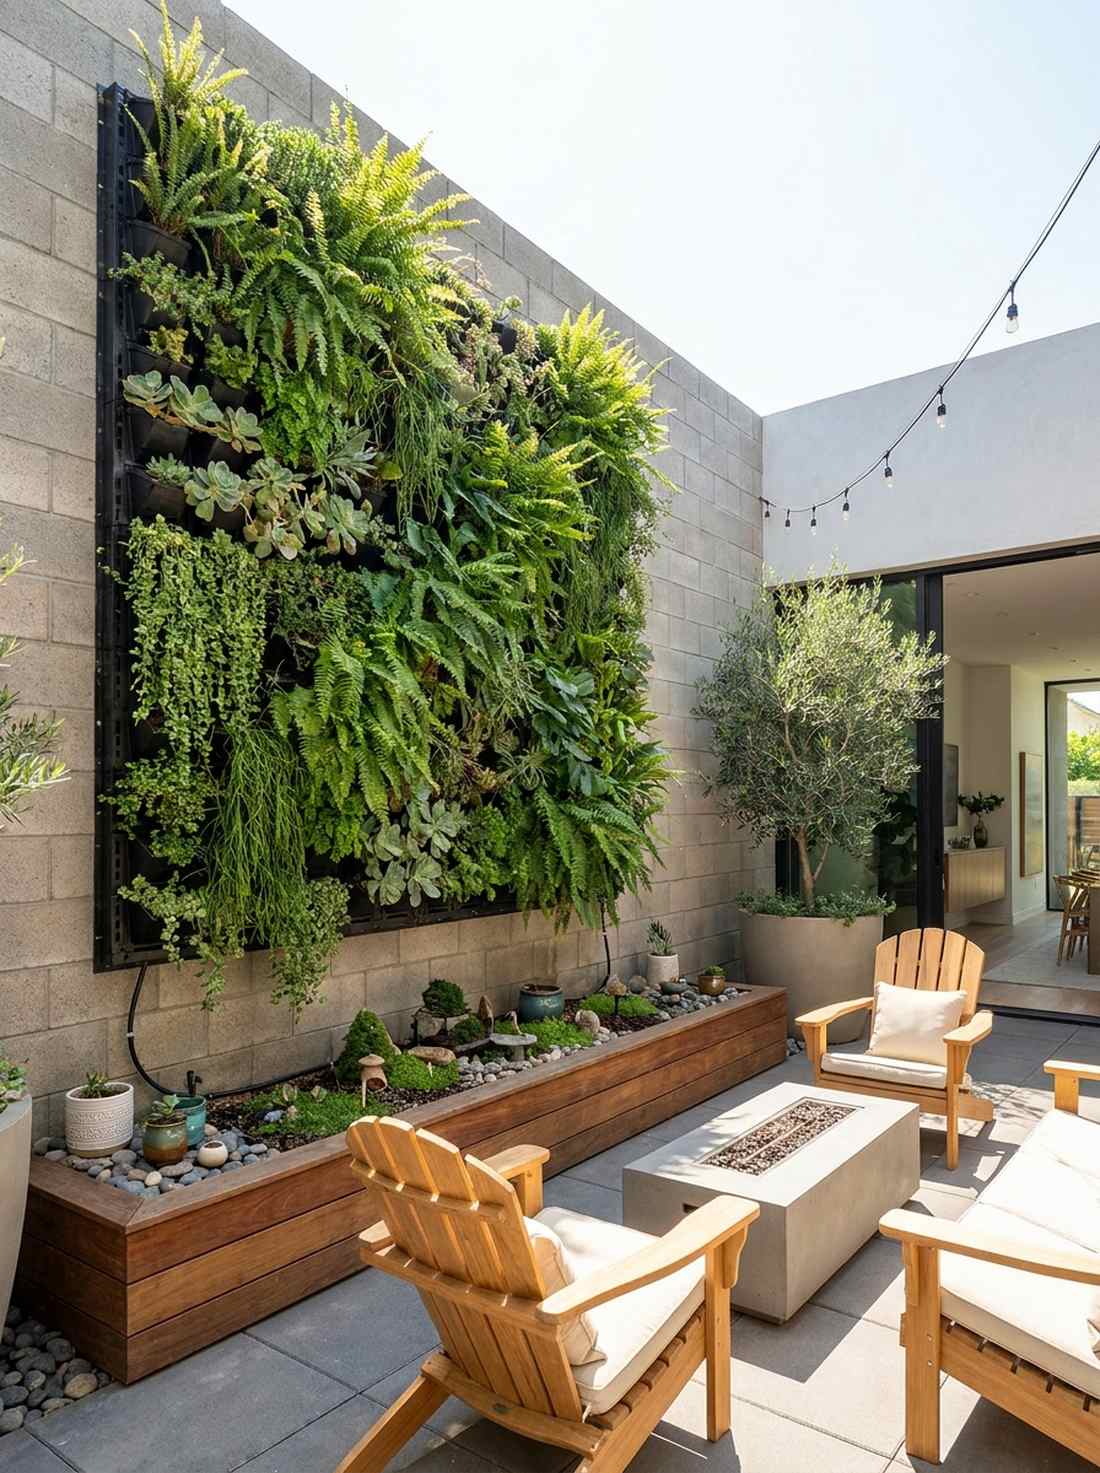
Visually feels like a lush, breathing rainforest creeping up a modern masonry canvas. Vertical patio planting decor. Flawlessly suited for blinding, south-facing courtyard walls that desperately need temperature regulation.
Amateur DIYers often ruin this by choosing cheap felt that rots in a week; swapping to rigid, moisture-retaining grid frames guarantees a designer-level finish. Integrating premium miniature garden supplies into the lower tiers adds an unexpected layer of depth to the entire installation.
You can easily pull this off for around $45–$85 per modular section. Pin this visual if you are planning a drastic small-space upgrade.
- Key Materials: Rigid plastic vertical grids, moisture-control potting matrix
- Vibe / Style: Modern botanical sanctuary
- Difficulty: Moderate weekend build
- Budget Breakdown: Frame: $35 | Irrigation: $20 | Soil/Plants: $30.
- Creator’s Tip: Run a discrete 1/4-inch drip line directly behind the top panel to let gravity do the watering work for you.
- Smart Sourcing: UV-coated modular living wall kits | Automated micro-drip starter bundles
2. Trellis Arches for Climbing Vegetables
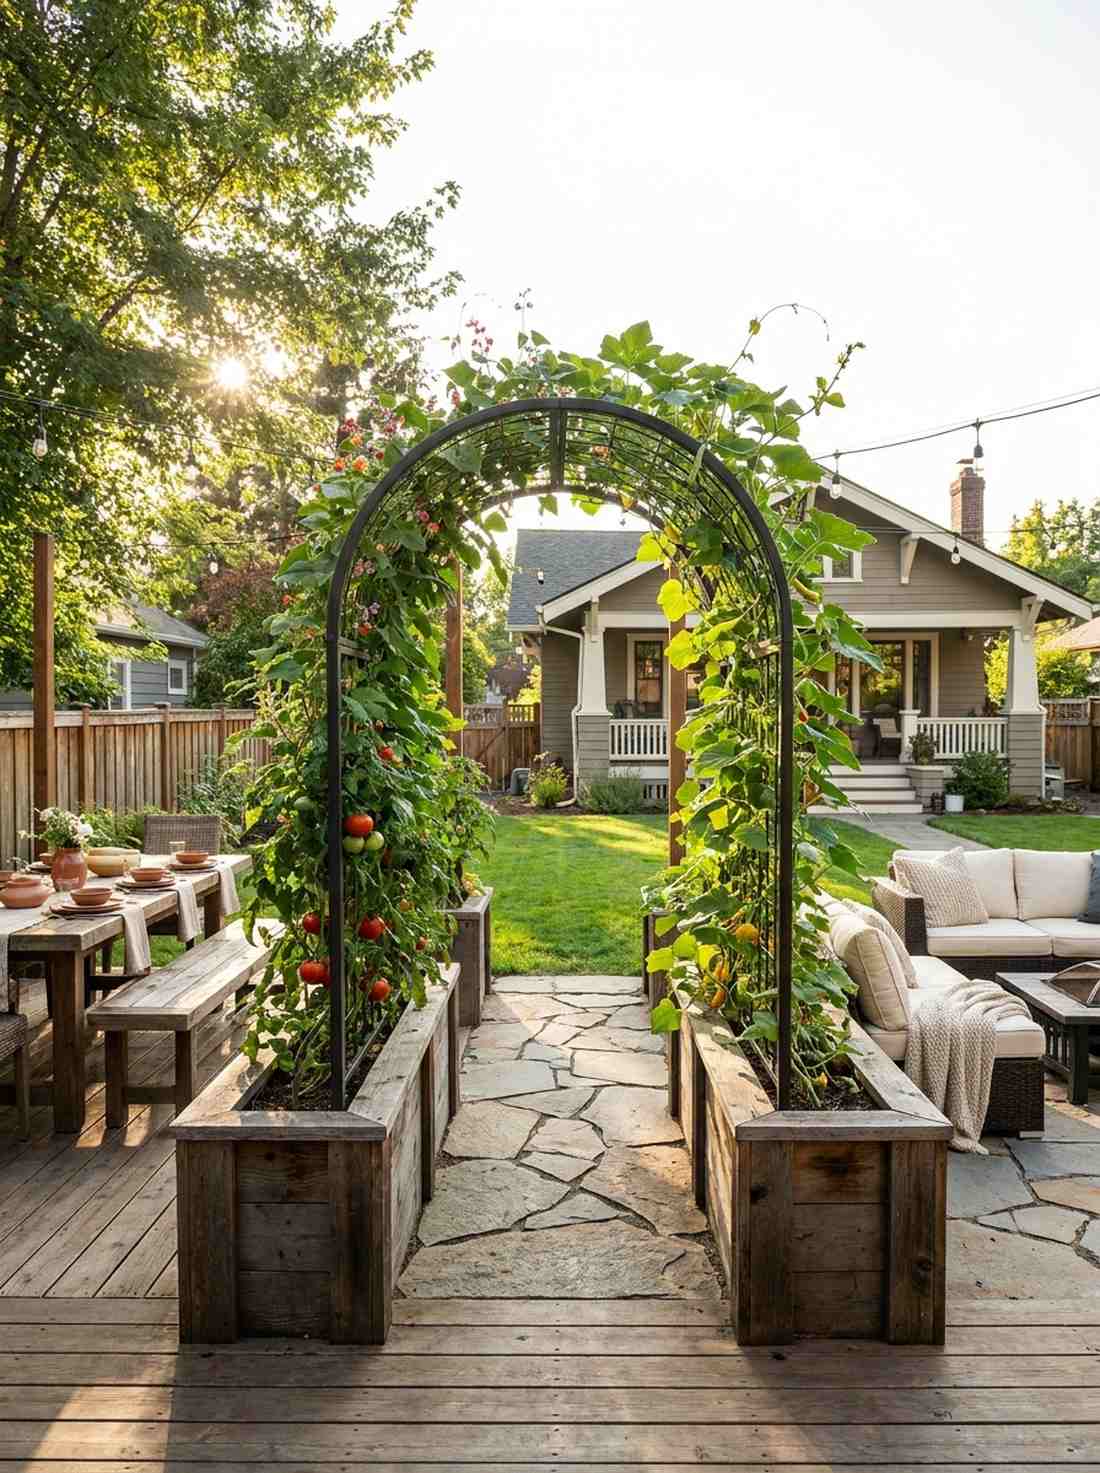
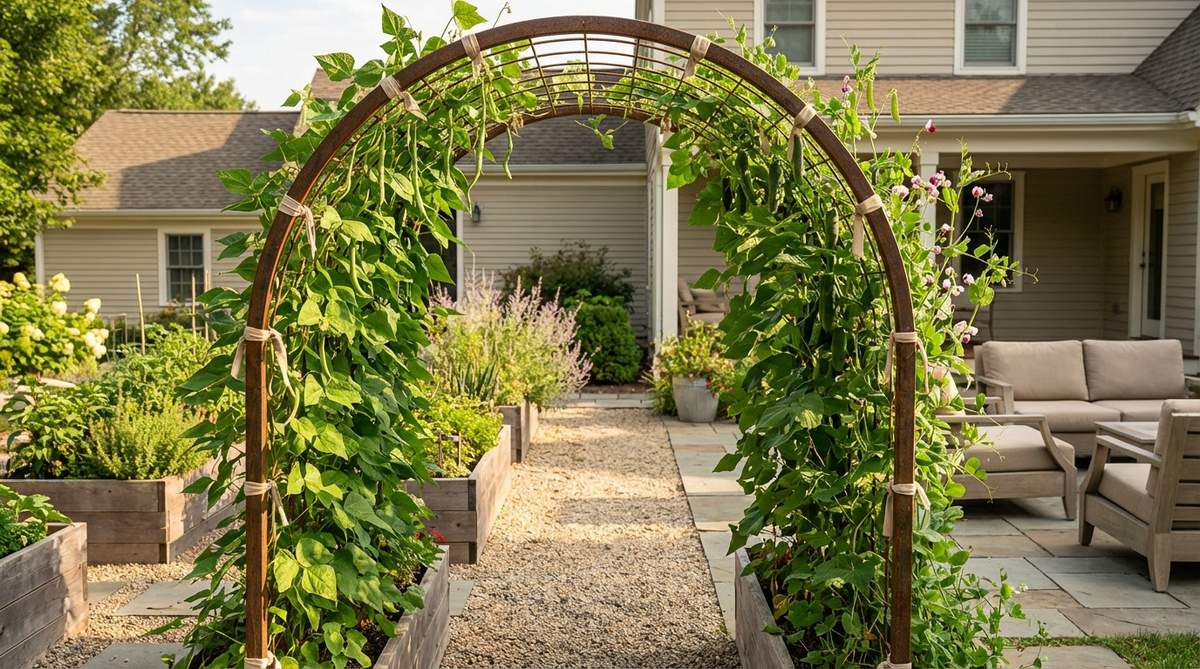
Instantly projects the feeling of a sun-drenched Italian vineyard right outside your sliding doors. Edible rooftop archway ideas. A brilliant use-case for dividing a dining sector from a lounging area without building a solid wall.
While generic bamboo stakes look flimsy and temporary, anchoring a heavy-gauge steel arch creates an immediate architectural statement that commands attention. Selecting high-yield, compact climbing varieties turns a basic walkway into a hyper-productive focal point.
Expect to spend about $60–$110 for a structurally sound archway. It’s a remarkably fast visual upgrade that reshapes the entire layout.
- Key Materials: Powder-coated steel arch, soft garden ties
- Vibe / Style: Rustic urban homestead
- Difficulty: Easy beginner setup
- Budget Breakdown: Metal Arch: $70 | Seeds/Soil: $25.
- Creator’s Tip: Bind the base of the arch directly to heavy flanking planter boxes so wind gusts cannot tip the structure over.
- Smart Sourcing: Heavy-duty powder-coated garden arches | Pre-mixed climbing vegetable seed vaults
3. Ladder Shelf Planter Displays
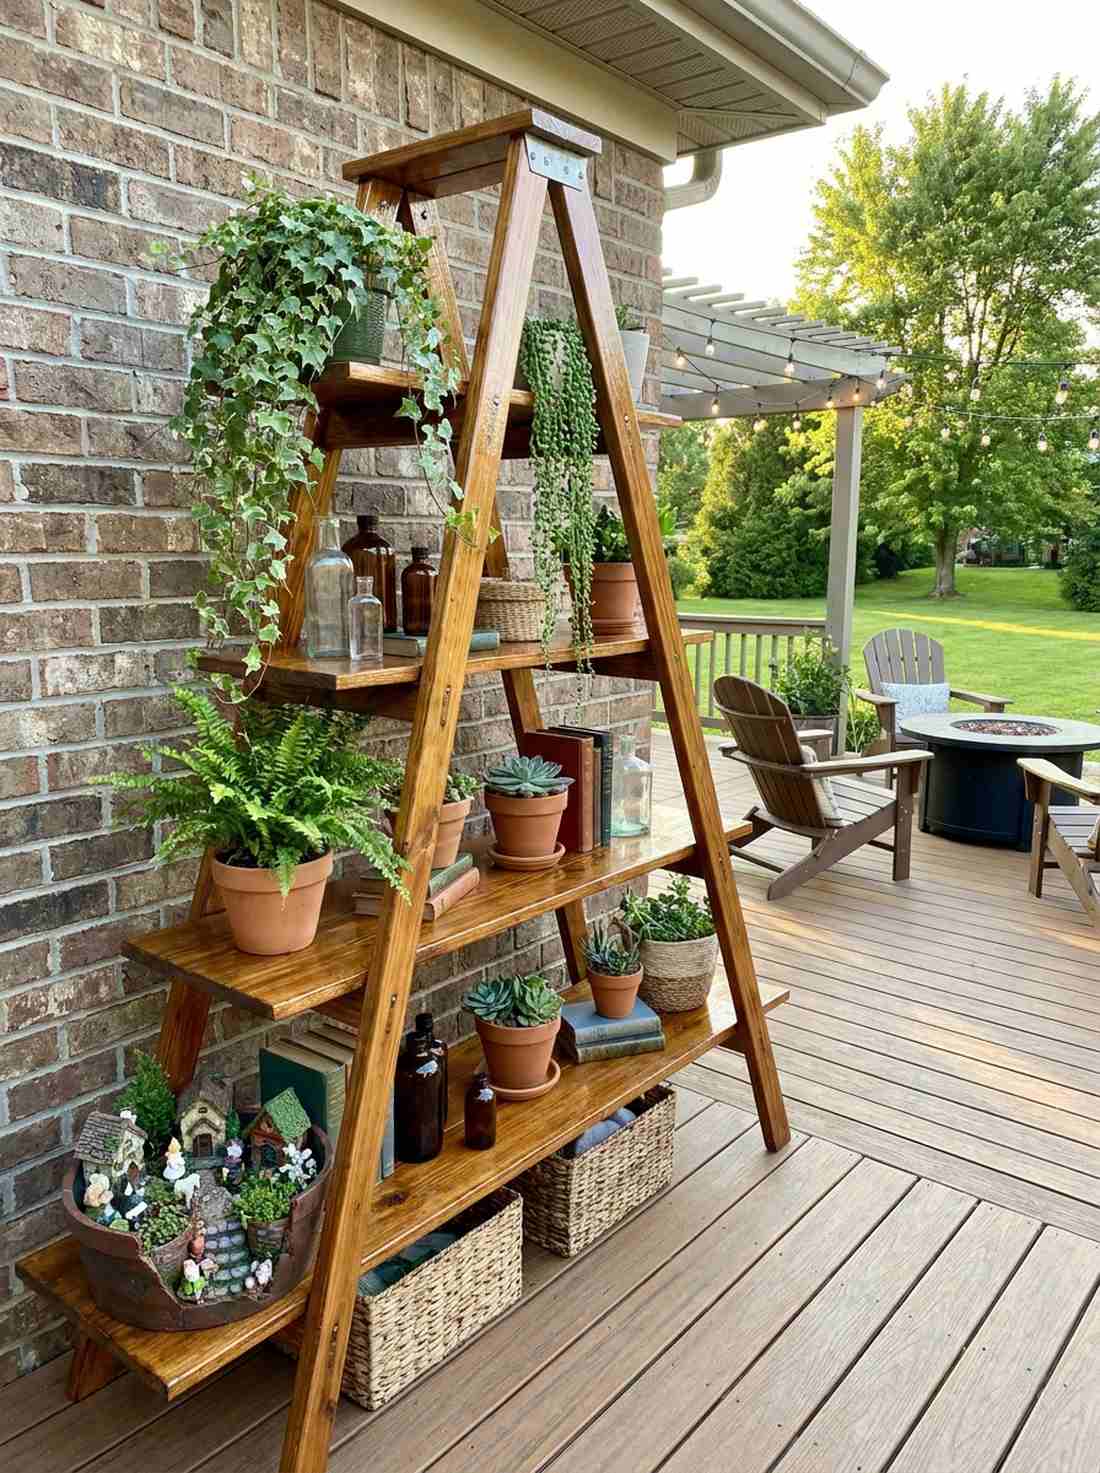
Brings a charming, curated apothecary vibe to an otherwise sterile corner. Tiered balcony plant shelving. Works exceptionally well for renters who need massive visual impact without drilling a single hole into the brickwork.
The biggest mistake is leaving raw wood exposed to rain; applying an exterior marine varnish delivers a surprisingly premium look that survives brutal weather. Layering varied textures—from cascading ivies at the top to heavy terracotta fairy garden kits at the base—forces dynamic visual movement.
You can construct this striking display for around $30–$50 using upcycled materials. Save this directly to your budget-friendly DIY board.
- Key Materials: Upcycled wooden A-frame, marine-grade clear sealant
- Vibe / Style: Boho-chic vintage curation
- Difficulty: Very beginner friendly
- Budget Breakdown: Ladder: $15 | Sealant: $15 | Hardware: $10.
- Creator’s Tip: Always place your heaviest stone or ceramic containers on the absolute lowest rung to lock down the center of gravity.
- Smart Sourcing: Pre-cut wooden ladder shelf kits | Weather-proof marine wood sealants
4. Hanging Gutter Garden Rows
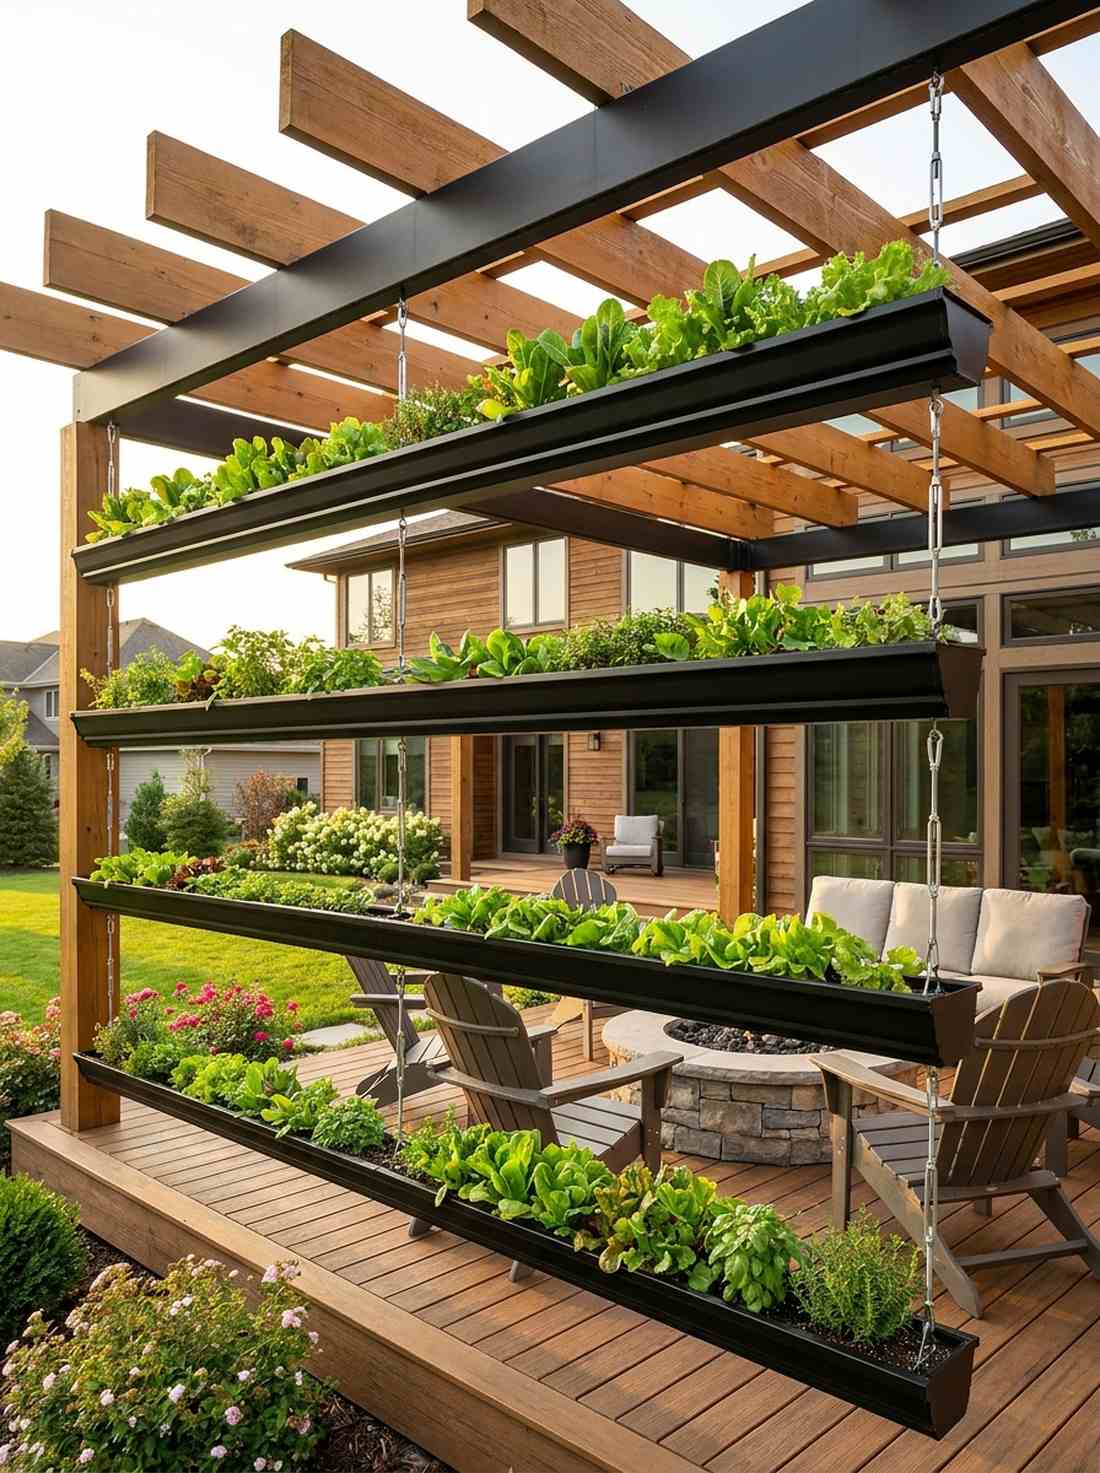
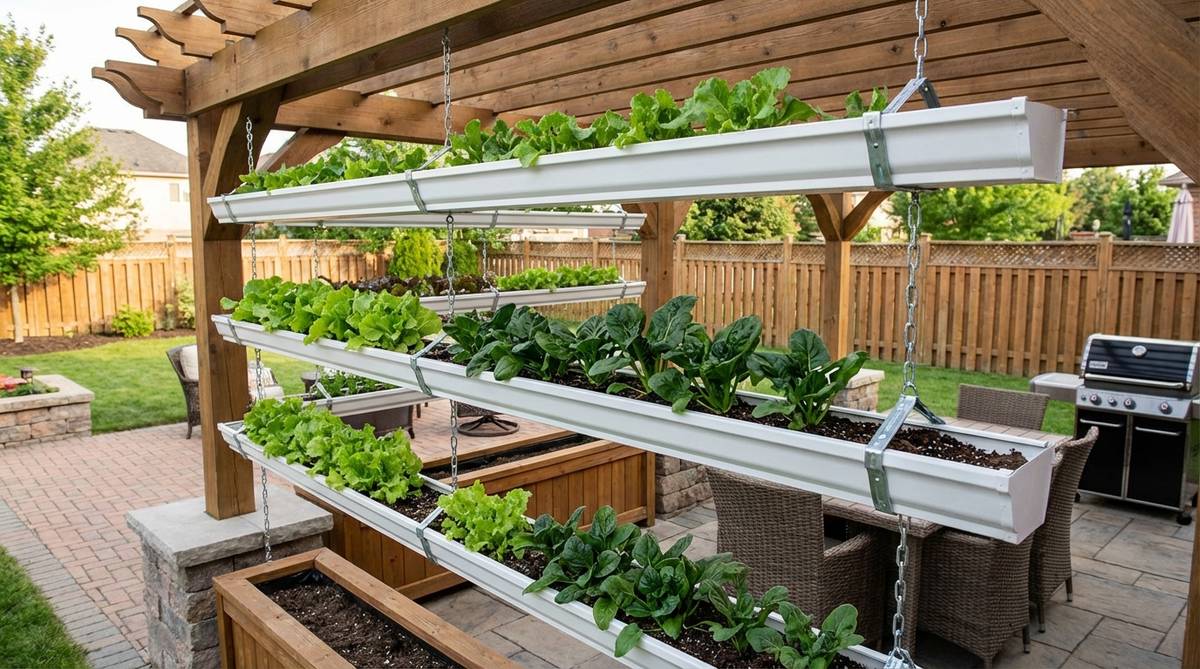
Looks like a sleek, suspended hydroponic farm suspended in mid-air. Overhead linear planter ideas. The ultimate placement hack for under-utilized pergola crossbeams where floor space is virtually non-existent.
People assume gutters look tacky, but spraying them with a matte-black rust-oleum finish completely disguises their origin, resulting in a hyper-modern industrial aesthetic. This specific trough design is the ideal environment for fast-growing, shallow-rooted salad greens.
This layout is aggressively cheap, typically costing only $20–$40 per row to fully implement.
- Key Materials: Vinyl gutter segments, steel suspension cables
- Vibe / Style: Urban industrial functionalism
- Difficulty: Intermediate drilling required
- Budget Breakdown: Gutters: $15 | Cables/Mounts: $15 | Matte Paint: $8.
- Creator’s Tip: Drill quarter-inch drainage weep holes exactly every six inches so the soil never becomes anaerobic during heavy rainstorms.
- Smart Sourcing: Pre-cut vinyl gutter troughs (bulk pack) | Heavy-duty steel suspension wire kits
Most beginners skip this next technique entirely… until they realize it’s the exact secret to making a bland wall look like a $500 custom installation.
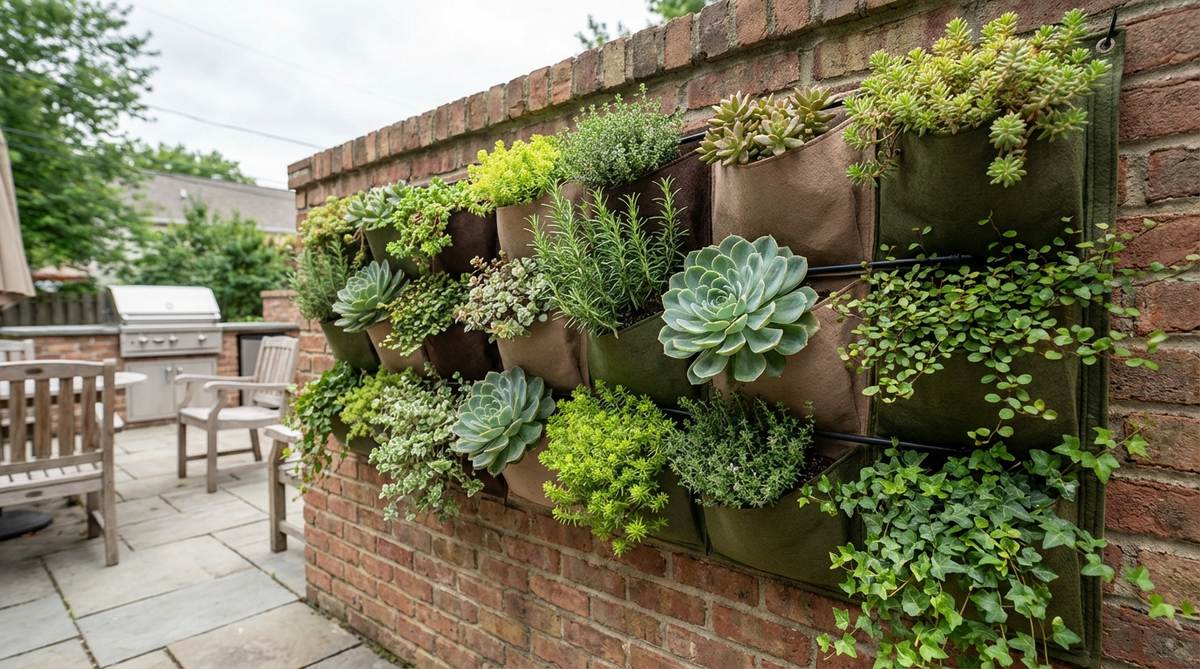
5. Wire Grid Wall Planters

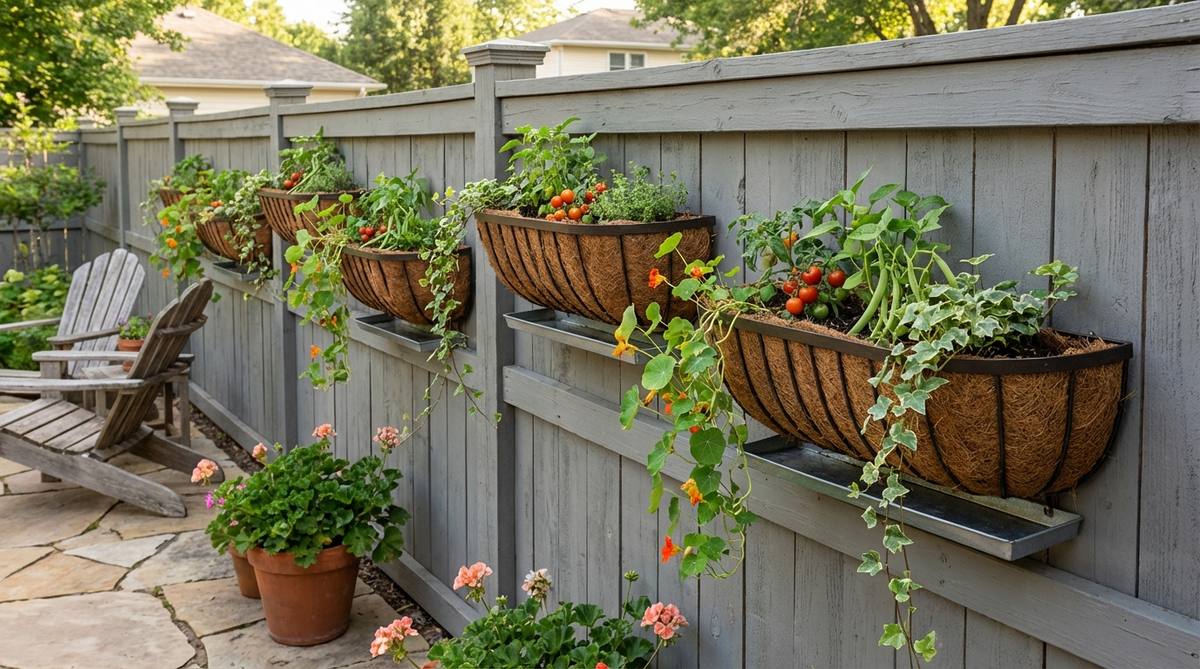
Evokes the feeling of a floating botanical gallery suspended directly on your fencing. Modular wire fence planting. Perfectly purposed for covering ugly chain-link dividers or blank stucco exteriors.
Relying on cheap plastic pots here looks instantly messy; securing uniform, coir-lined iron baskets looks far more expensive than it is and ensures superior root aeration. Tucking small terrarium accessories into the trailing vines adds a whimsical, high-retention visual element.
You can execute an entire wall section for roughly $40–$75. Pin this idea to remember how easily you can hide ugly boundary walls.
- Key Materials: Flat-backed wire baskets, compressed coconut coir
- Vibe / Style: English cottage floating garden
- Difficulty: Quick afternoon project
- Budget Breakdown: Baskets: $40 | Coir Liners: $15 | Mounts: $10.
- Creator’s Tip: Soak your coir liners in a bucket of water for an hour before planting to pre-hydrate the fibers and prevent soil runoff.
- Smart Sourcing: Rust-proof grid wall baskets (bulk pack) | Pre-formed thick coconut coir liners
Container & Planter Strategies
Mastering container selection is the dividing line between thriving gardens and constant replanting. Premium setups rely on intelligent reservoirs and breathable fabrics to dramatically reduce the daily watering grind.
6. Self-Watering Container Systems
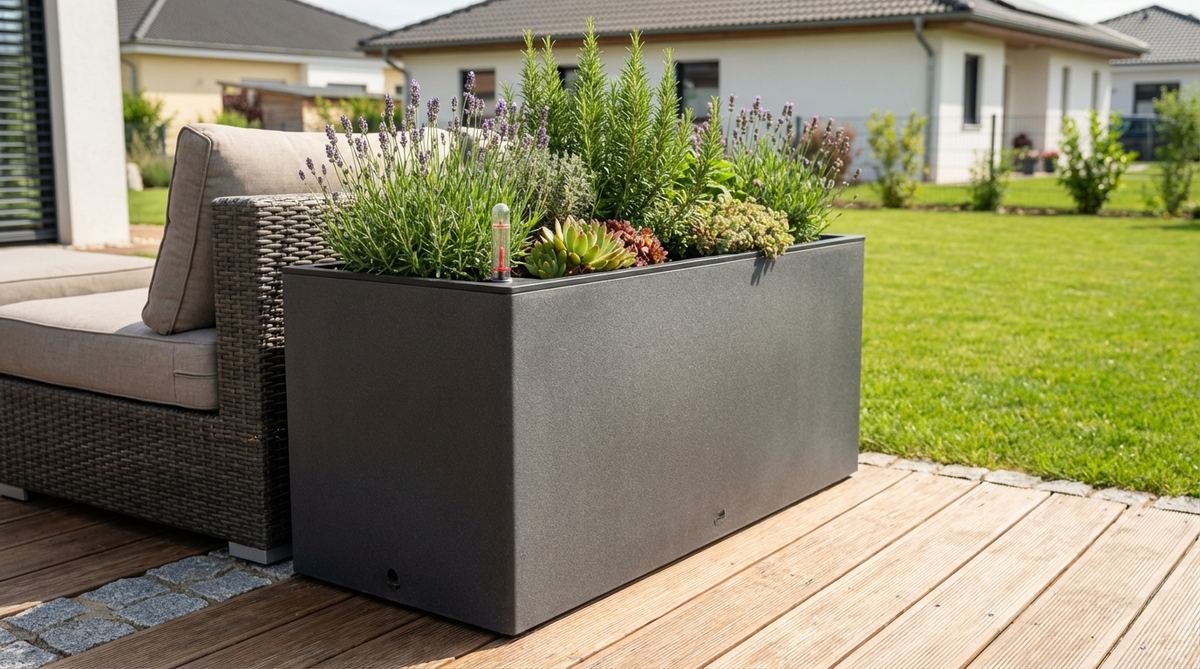
Feels like having a silent, invisible gardener tending to your greenery while you’re away. Automated patio planter boxes. An absolute lifesaver for fully-exposed concrete sun traps where evaporation happens in minutes.
Standard pots bake roots to death in July; upgrading to double-walled, reservoir-equipped composite vessels guarantees a thriving, stress-free display. This smart upgrade practically eliminates the heartbreak of returning from a long weekend to crispy, dead foliage.
These advanced units generally cost around $45–$90 each depending on scale.
- Key Materials: Poly-resin double-walled planters, capillary wicking mats
- Vibe / Style: Sleek contemporary efficiency
- Difficulty: Zero-effort setup
- Budget Breakdown: Premium Planter: $60 | Premium Soil Mix: $15.
- Creator’s Tip: Always verify the overflow drain plug is removed if you are placing these outdoors so heavy rains don’t drown the reservoir.
- Smart Sourcing: UV-coated self-watering planters | Commercial-grade moisture wicking mats
7. Fabric Grow Bag Clusters
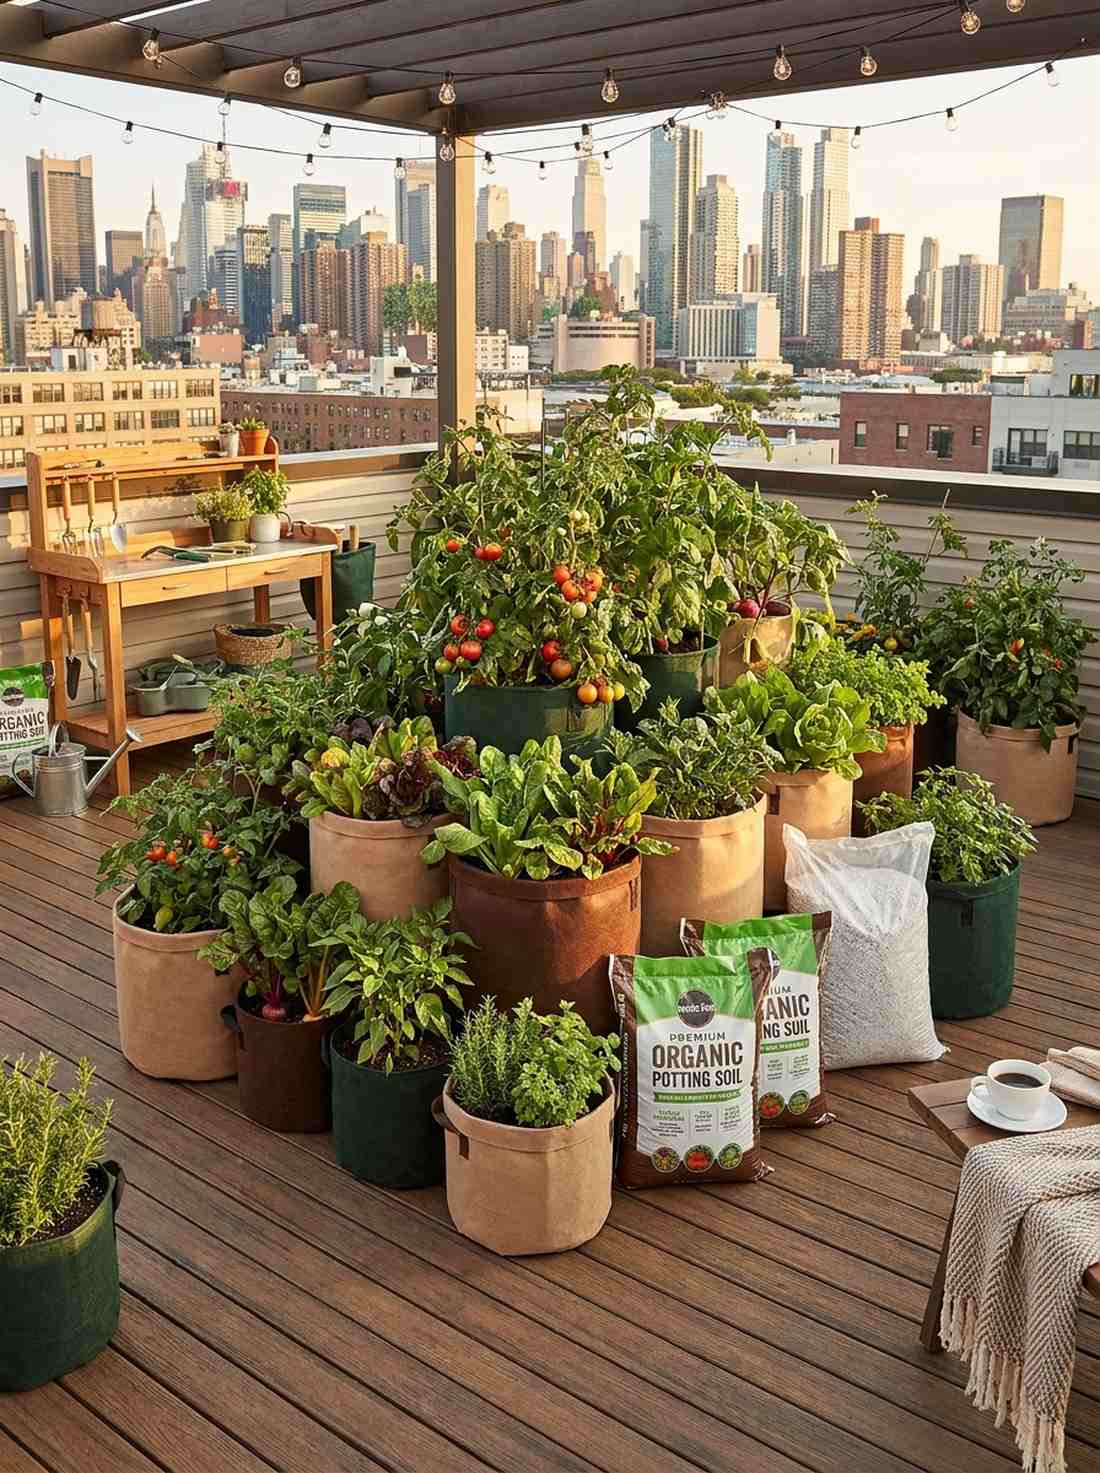
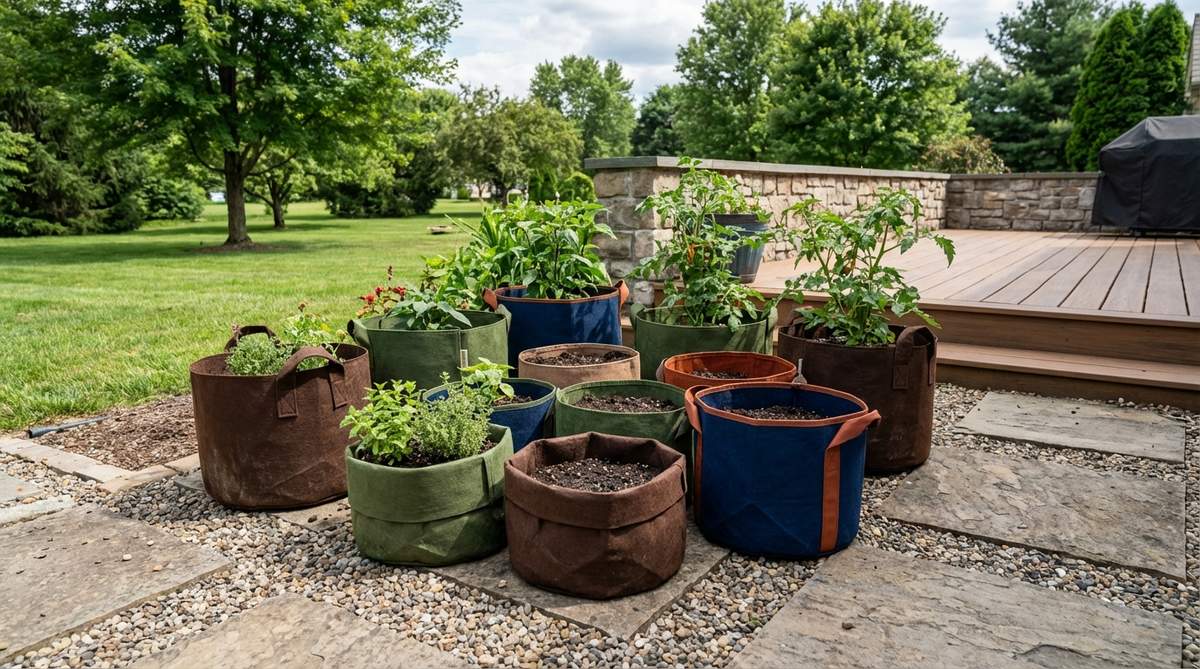
Presents a relaxed, organic harvest aesthetic that feels wonderfully unpretentious. Breathable rooftop grow bag setups. The smartest strategy for renters who need a massive garden footprint that can be easily folded up and moved on moving day.
Using rigid plastic tubs often leads to dreaded root-circling; opting for heavy-duty aerated fabric delivers explosive root growth and screams high-end functional agriculture. Grouping them tightly together creates a lush, micro-climate canopy that traps ambient humidity.
A complete clustered layout can be achieved for a mere $25–$40. Pin this to your urban farming inspiration board.
- Key Materials: Non-woven landscape fabric bags, perlite-heavy soil
- Vibe / Style: High-yield urban farm
- Difficulty: Beginner-friendly filling
- Budget Breakdown: Bag Multipack: $20 | Soil/Amendments: $20.
- Creator’s Tip: Roll the top edges of the bags down slightly to create a rigid rim that keeps the sides from collapsing during heavy watering.
- Smart Sourcing: Heavy-duty aerated fabric grow bags (bulk pack) | Premium organic potting perlite
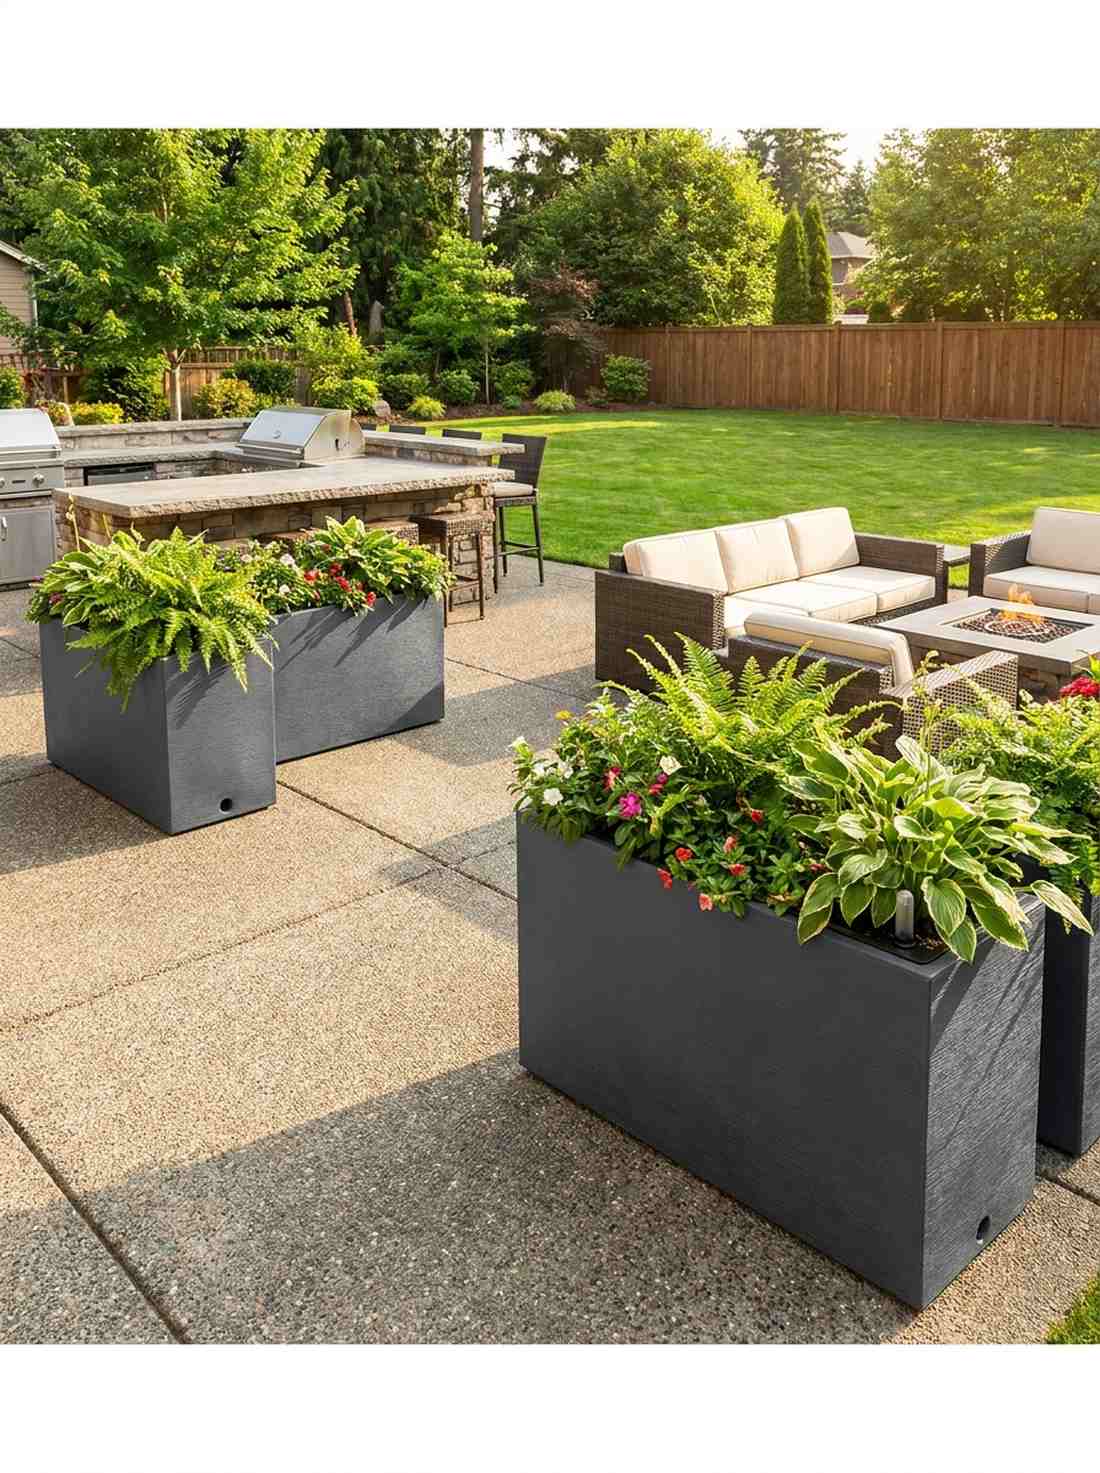
8. Raised Bed Perimeter Borders
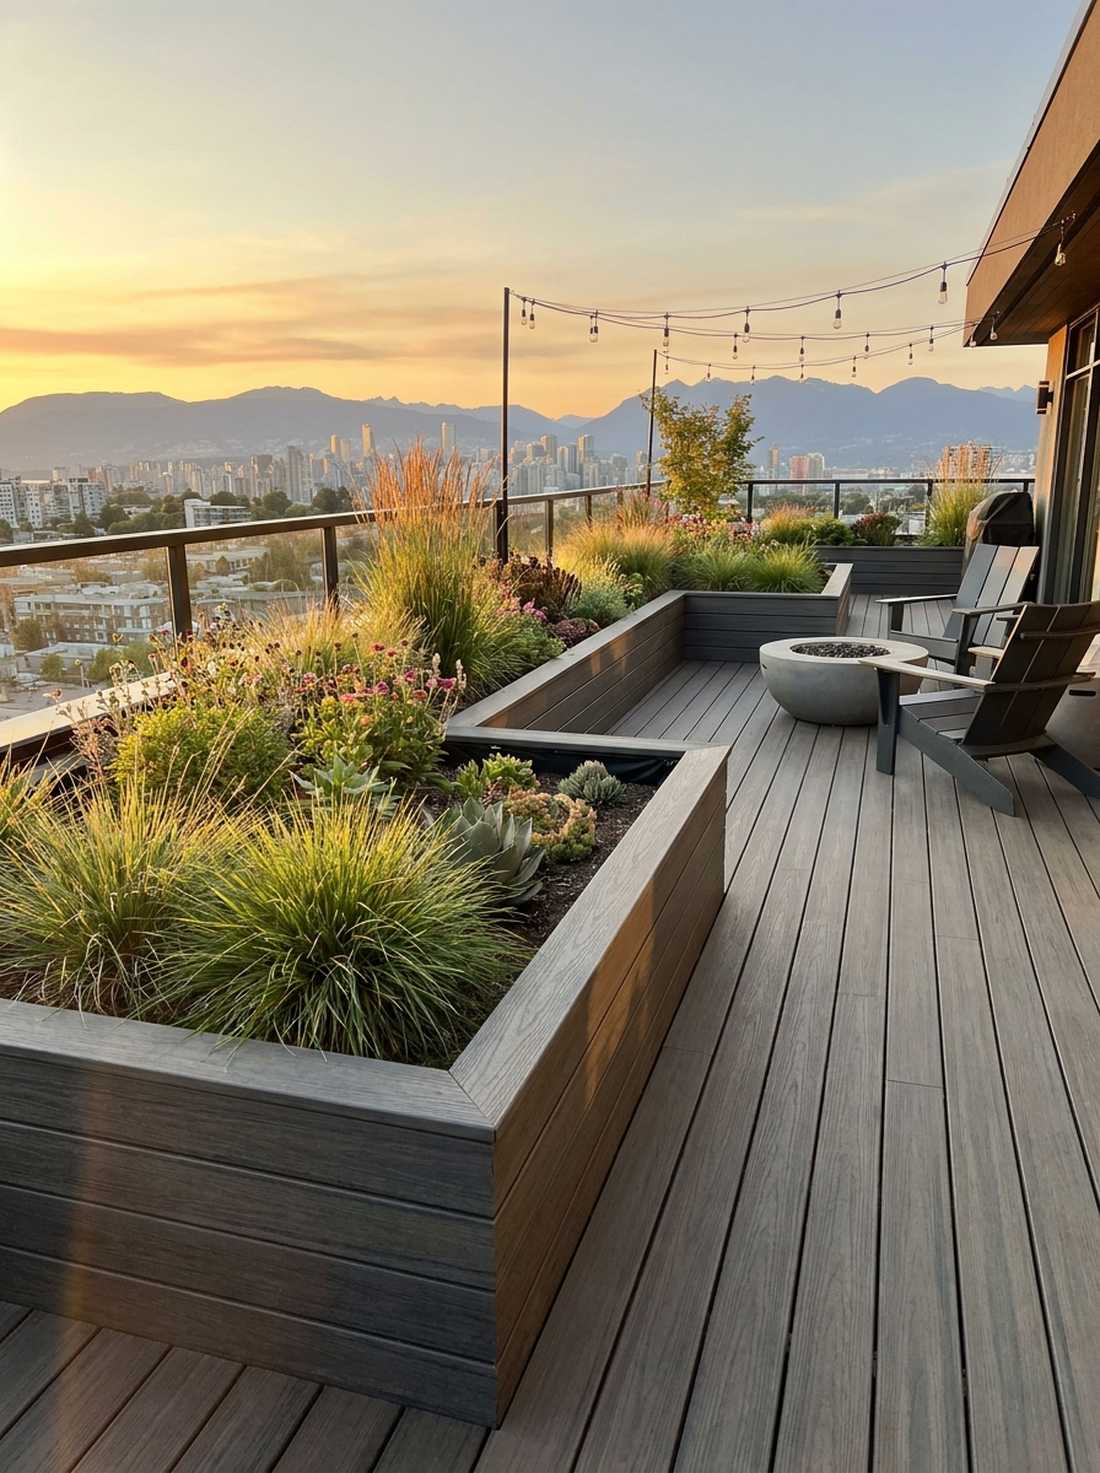
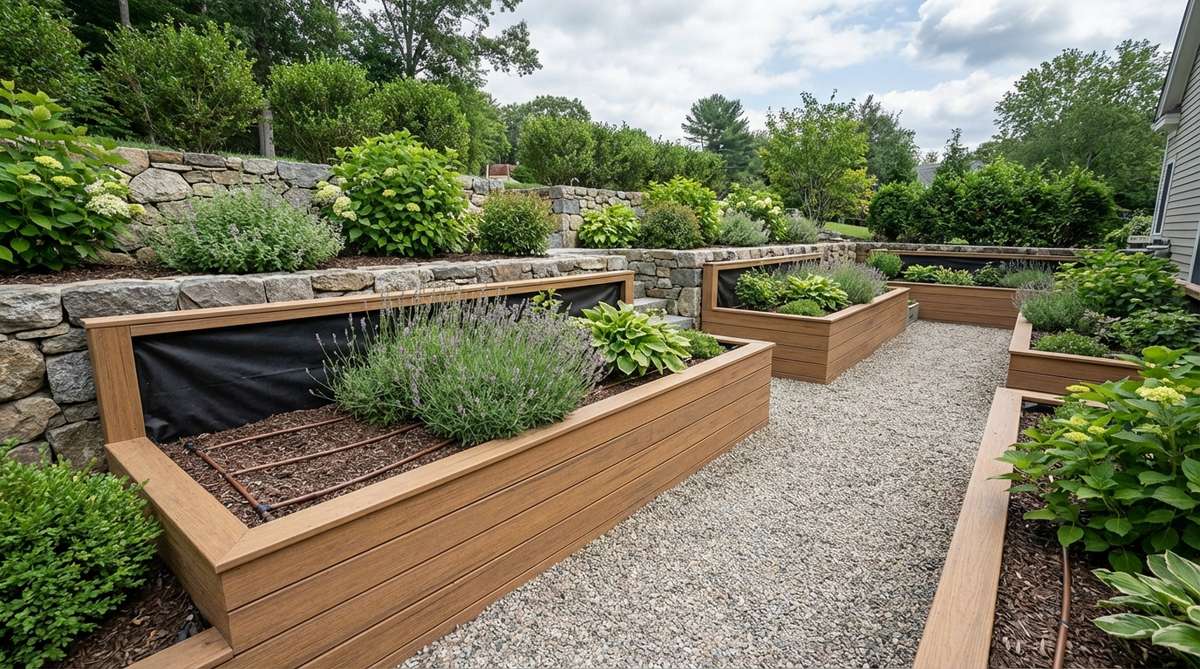
Transforms raw edges into tailored, architectural green belts that frame the sky perfectly. Custom balcony raised boundary beds. Brilliantly serves as both a lush planting zone and a psychological safety barrier near high ledges.
Flimsy softwood beds rot out in a single season; constructing borders from composite lumber or corten steel brings an instant architectural quality that lasts decades. Lining the interior with a root-blocking membrane ensures the structural integrity of your expensive hardscaping.
Materials for a high-end perimeter bed typically run $150–$300 depending on length. It’s a permanent upgrade that redefines the property value.
- Key Materials: Composite decking boards, waterproof liner membrane
- Vibe / Style: Structured modern landscape
- Difficulty: Intermediate carpentry
- Budget Breakdown: Composite Lumber: $120 | Liner: $30 | Fasteners: $20.
- Creator’s Tip: Install a one-inch foam insulation board against the side of the bed facing the sun to prevent roots from baking against the hot material.
- Smart Sourcing: Pre-cut composite raised bed kits | Heavy-duty dimpled drainage membranes
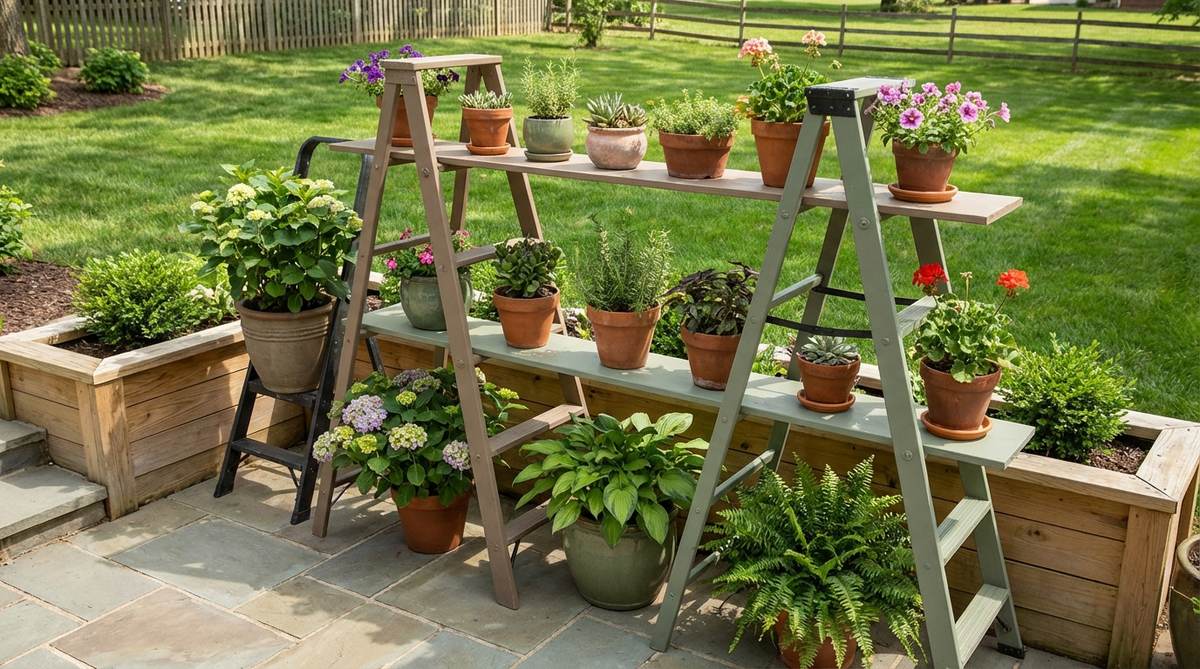
9. Terracotta Pot Graduated Arrangements

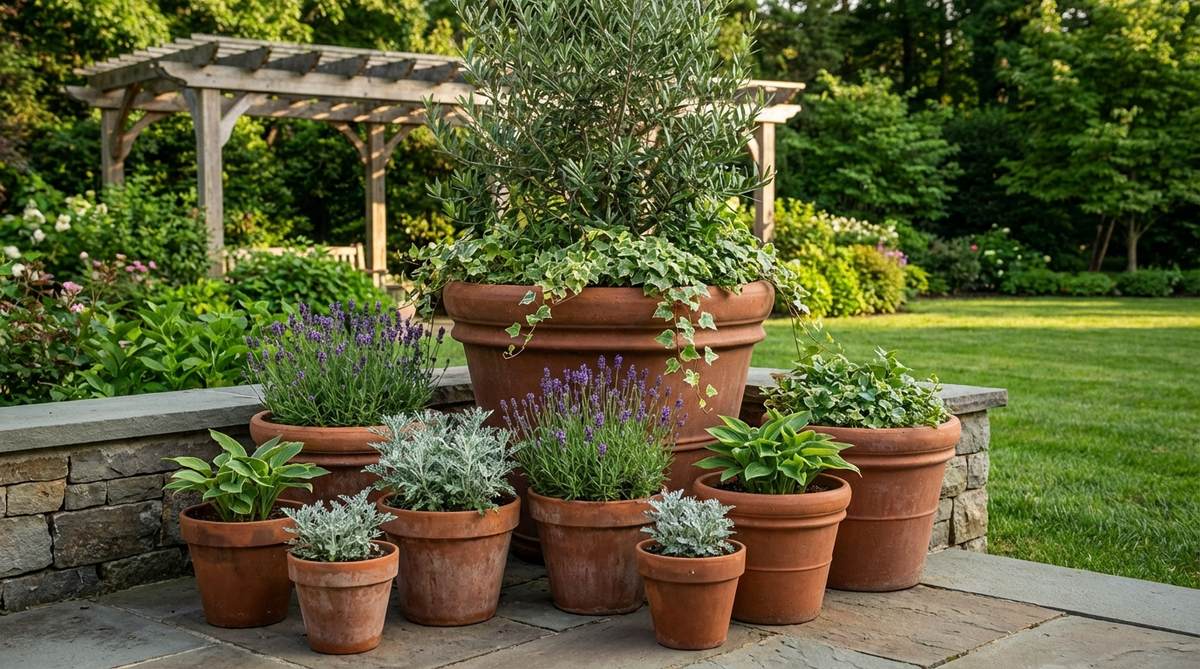
Radiates the timeless, sun-baked warmth of a secluded Mediterranean villa. Classic clay pot patio styling. Perfect for anchoring empty, windswept corners where lightweight plastics would simply blow away.
A scattering of identical pots looks incredibly boring; forcing a strict descending-scale arrangement creates a sculptural, highly-curated designer aesthetic. Mixing in dedicated miniature garden supplies around the soil lines adds an intricate, high-value finishing touch.
You can source a beautiful graduated set for about $50–$90. Pin this if you love timeless, heavy-textured garden vibes.
- Key Materials: Natural Italian terracotta vessels, coarse drainage gravel
- Vibe / Style: Tuscan courtyard elegance
- Difficulty: Easy arrangement
- Budget Breakdown: Graduated Pots: $70 | Potting Mix: $15.
- Creator’s Tip: Elevate each heavy pot on three discrete “pot feet” to guarantee rapid water escape and prevent nasty staining on your stone pavers.
- Smart Sourcing: Frost-resistant terracotta planter sets | Invisible rubber pot feet (bulk pack)
💡 Must-Have Supplies for High-End Setups
To build these setups faster and ensure they last, skip the generic craft aisles and invest in the right foundational kits.
- Base & Support: Pre-cut commercial-grade landscape fabric
- Setup Tools: Automated Wi-Fi drip irrigation starter kits
- Weather/Durability Protection: UV-coated clear marine sealant sprays
If you think your rental floor is too ugly to save, this upcoming surface hack will completely blow your mind…
10. Window Box Railing Installations
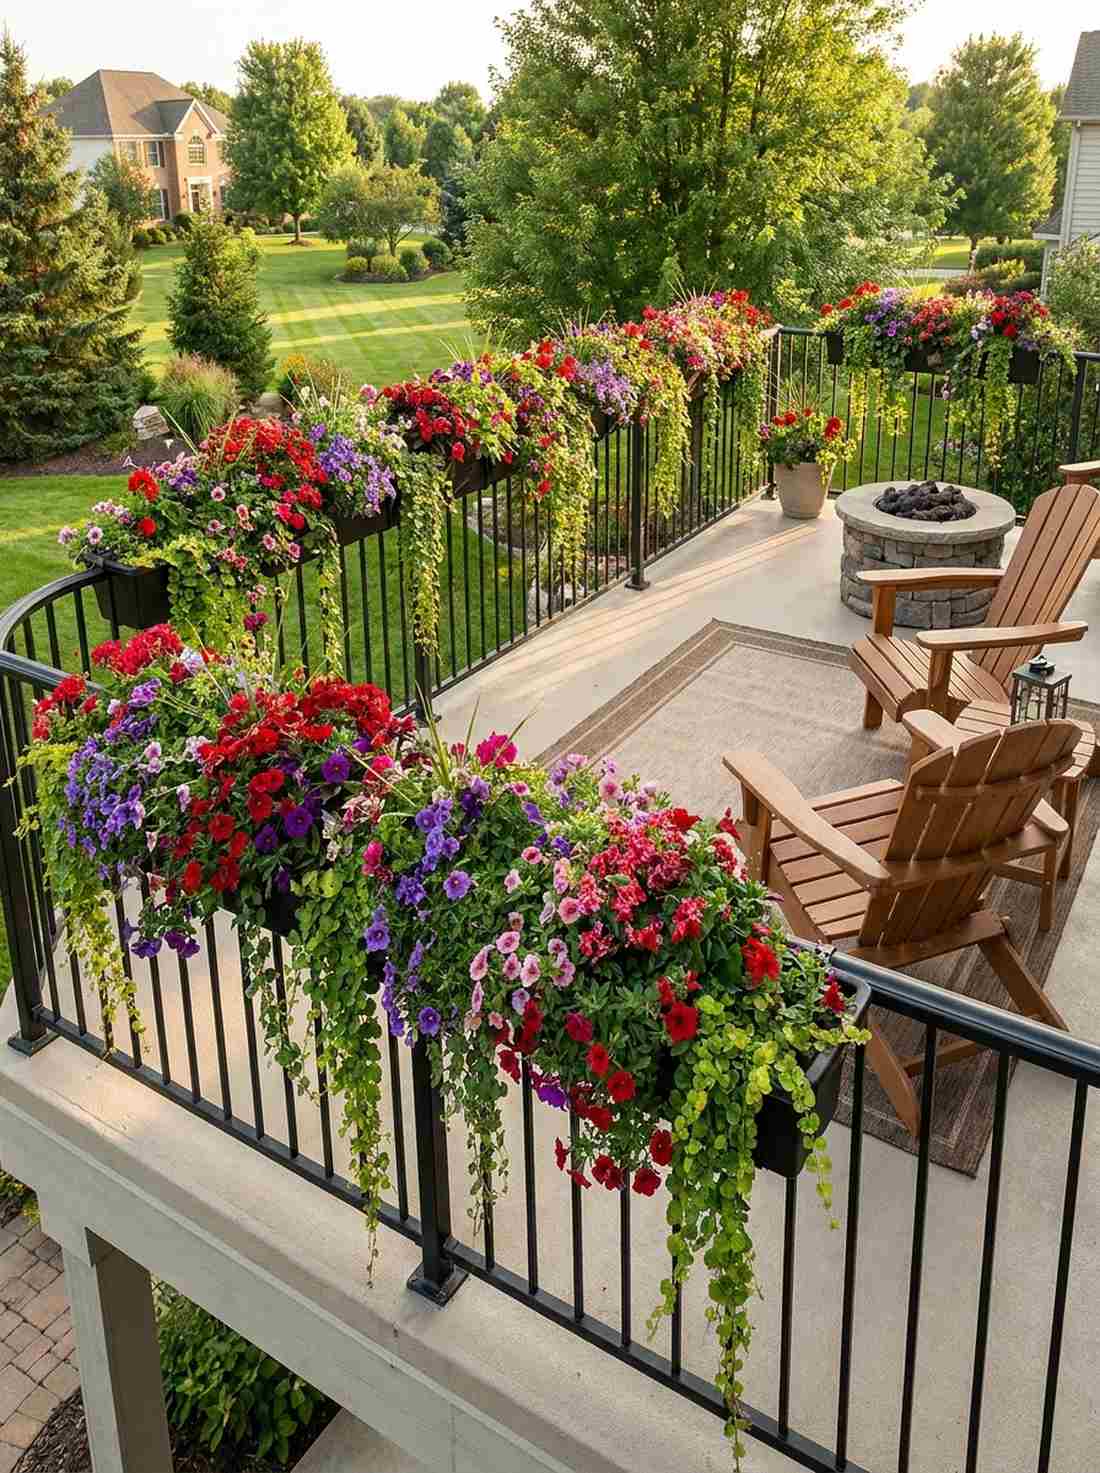
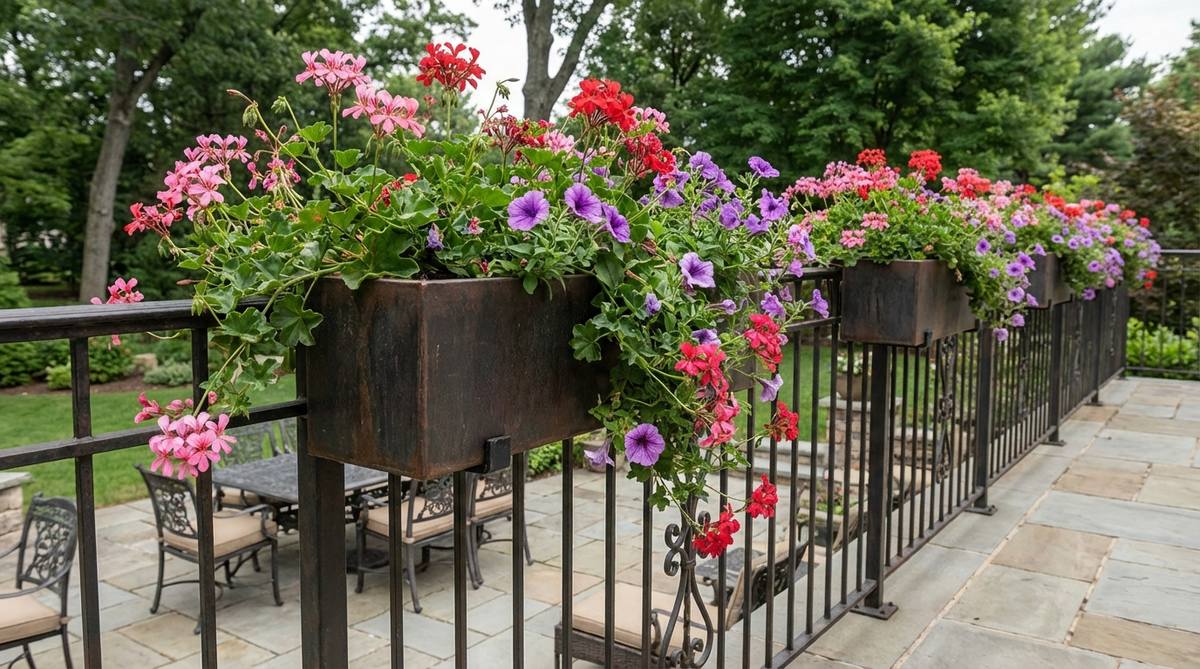
Looks like a vibrant, spilling waterfall of color wrapping entirely around your perimeter. Balcony railing planter displays. The absolute best way to maximize edge real estate without eating up a single inch of usable floor space.
Flimsy plastic saddles warp under the summer sun; locking down powder-coated steel bracket boxes looks dramatically more expensive and ensures zero wind-displacement. Draping trailing ivies over the edge softens harsh metal railings instantly.
Expect to invest around $35–$65 per railing box. It’s an instant face-lift for bleak iron fences.
- Key Materials: Adjustable steel bracket saddles, fiberglass box liners
- Vibe / Style: European street-side café
- Difficulty: Quick bolt-on assembly
- Budget Breakdown: Metal Brackets: $25 | Trough Liner: $15 | Trailing Flora: $20.
- Creator’s Tip: Always double-check your building’s HOA rules on outward-facing planters, and use locking zip-ties on the brackets for secondary fail-safe security.
- Smart Sourcing: Heavy-duty adjustable railing planter brackets | UV-resistant window box trough kits
Hardscaping & Surface Solutions
The foundation beneath your feet dictates the entire mood of the terrace. High-impact surface upgrades completely mask ugly concrete while solving crucial drainage and heat-retention issues.
11. Interlocking Deck Tile Systems
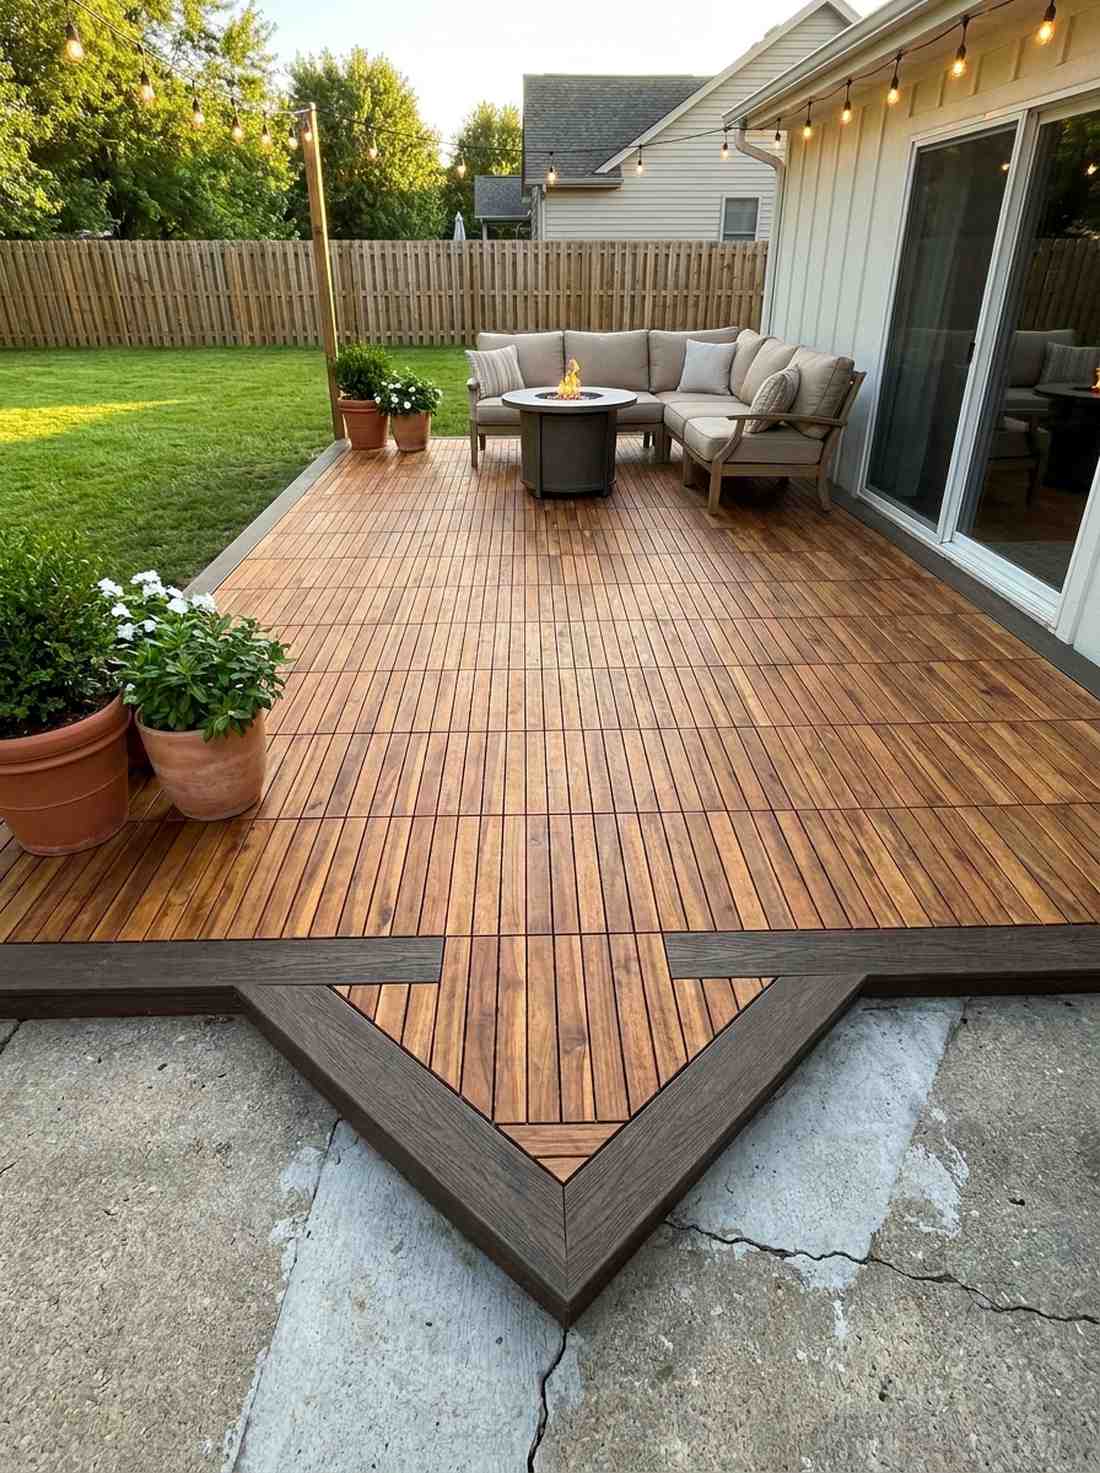
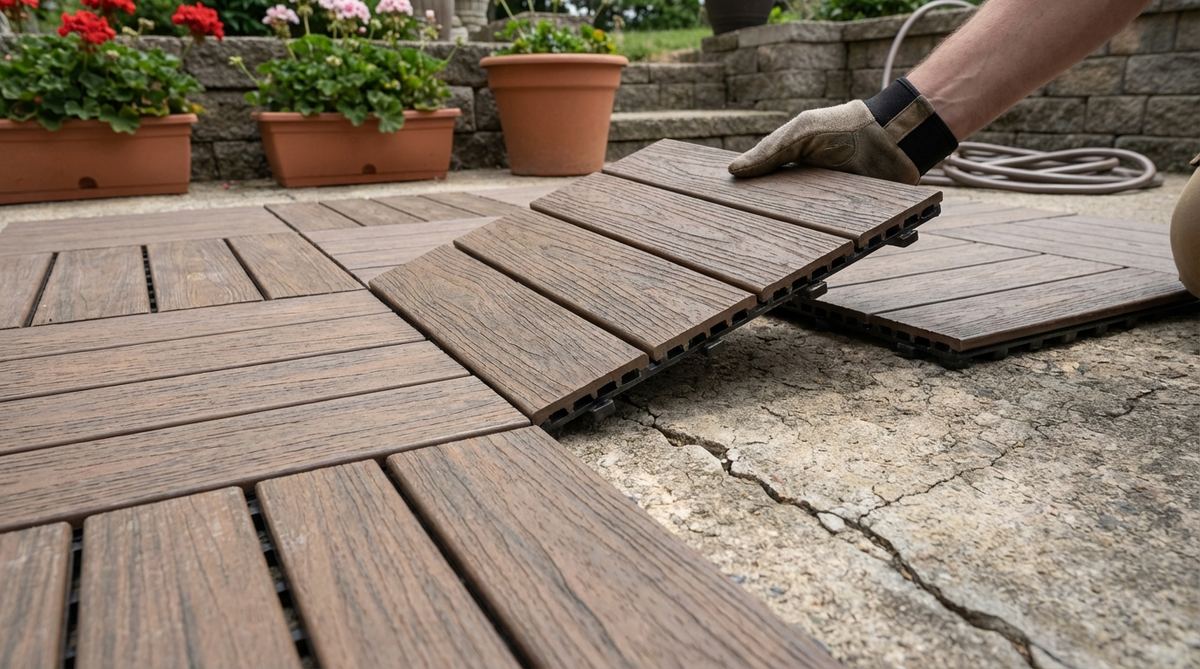
Instantly morphs a cracked, stained concrete slab into a pristine, barefoot-friendly resort deck. Snap-together patio flooring ideas. The ultimate zero-damage upgrade for leaseholders who are strictly forbidden from altering base structures.
Painting old concrete usually chips within months; laying down thick, composite wood-grain tiles screams high-end luxury and allows rainwater to flow freely underneath. The tactile warmth of the wood finish completely alters the micro-vibe of the space.
This floating floor solution runs roughly $4–$8 per square foot. Save this directly to your apartment upgrade board.
- Key Materials: Acacia or composite interlocking tiles, rubberized base grids
- Vibe / Style: Modern spa-like warmth
- Difficulty: Easy puzzle-snap installation
- Budget Breakdown: Tiles (per 10sq ft): $60 | Edge Trims: $15.
- Creator’s Tip: Buy exactly 15% more tiles than your floor measures to account for custom edge cuts around weird corners or drain pipes.
- Smart Sourcing: Pre-finished composite interlocking deck tiles (bulk pack) | Heavy-duty tile cutting sheer tools
12. Permeable Paver Inlays
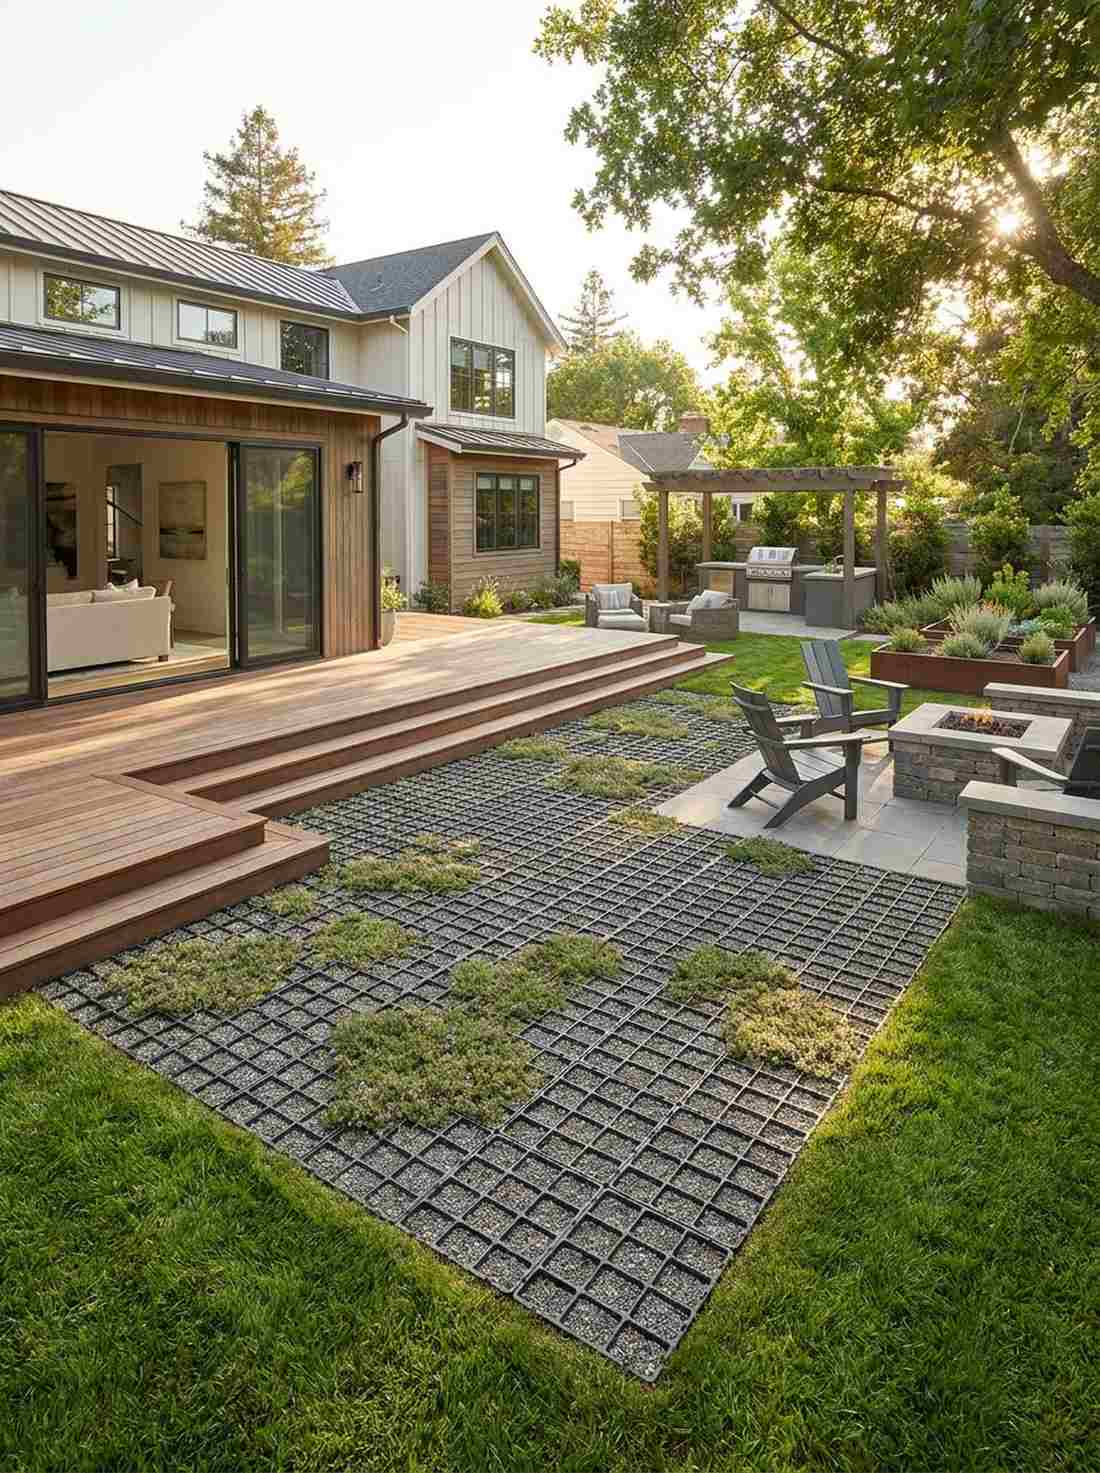
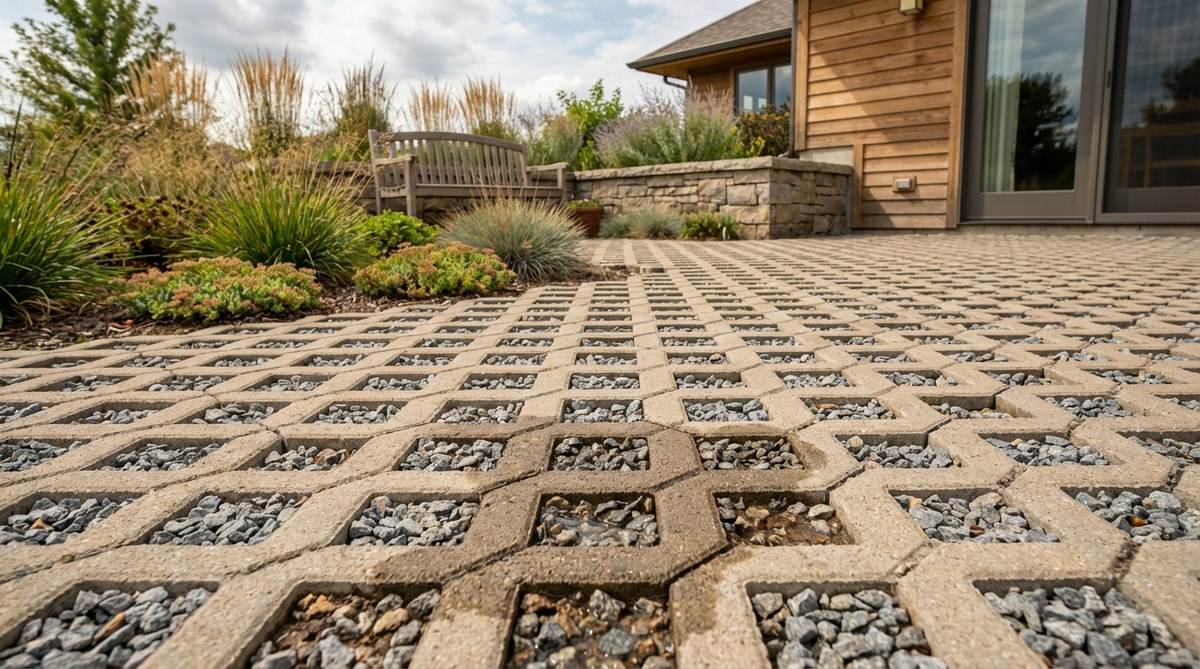
Creates a hyper-modern, geometric grid that feels distinctly architectural and grounded. Eco-friendly courtyard grid paving. Vital for large, flat spaces that desperately need fast storm-water absorption to prevent nasty flooding.
Pouring solid concrete slabs creates a heat-island nightmare; installing open-cell grids packed with micro-gravel delivers a surprisingly premium look while remaining completely environmentally responsible. Seed the gaps with creeping thyme for a fragrant, living floor mosaic.
Installing this grid system costs around $10–$15 per square foot. It is a brilliant weekend transformation.
- Key Materials: High-density polyethylene grid panels, crushed filler aggregate
- Vibe / Style: Sustainable modern geometry
- Difficulty: Labor-intensive leveling
- Budget Breakdown: Grid Base: $8/sq ft | Aggregate Fill: $4/sq ft.
- Creator’s Tip: Use a plate compactor on the base sand before laying the plastic grids to guarantee the final surface won’t develop sunken dips over time.
- Smart Sourcing: Heavy-duty permeable paver grid systems | Commercial-grade weed barrier fabric
13. Decorative Gravel Bed Pathways

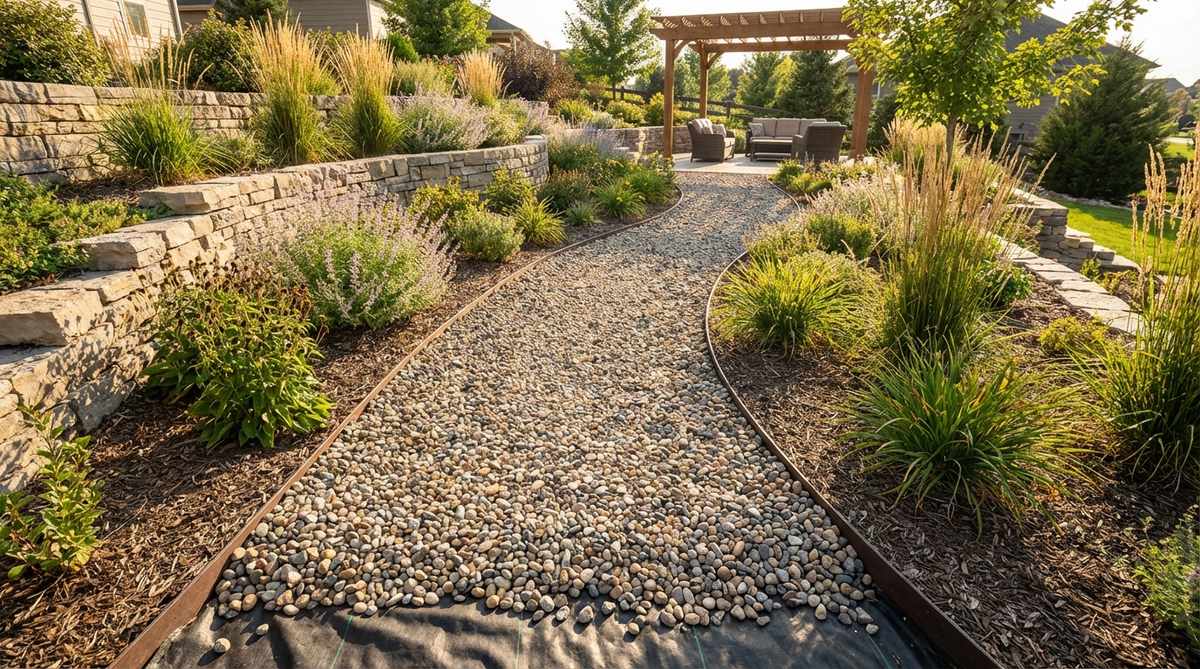
Sounds like a satisfying, crunchy stroll through a hidden Parisian courtyard. Crushed stone terrace walkway ideas. Visually brilliant for breaking up large, monotonous square footage with beautiful textural contrast.
Leaving loose dirt turns into a muddy disaster instantly; trenching sleek steel edging and filling it with bright pea gravel creates an immaculate, designer-level finish. Integrating small fairy garden accessories along the borders elevates the pathway into a focal feature.
You can execute stunning gravel pathways for roughly $30–$60 per stretch. Pin this for high-texture hardscaping inspiration.
- Key Materials: Washed pea gravel, rigid steel border edging
- Vibe / Style: French provincial crunch
- Difficulty: Moderate shoveling effort
- Budget Breakdown: Edging: $25 | Gravel Bags: $30 | Fabric: $10.
- Creator’s Tip: Never skip the high-density landscape fabric beneath the stones, or you will be pulling deep-rooted weeds out of your gravel every single weekend.
- Smart Sourcing: Flexible steel landscape edging kits | Heavy-duty spun-bound weed barrier (bulk roll)
14. Large Format Porcelain Slabs
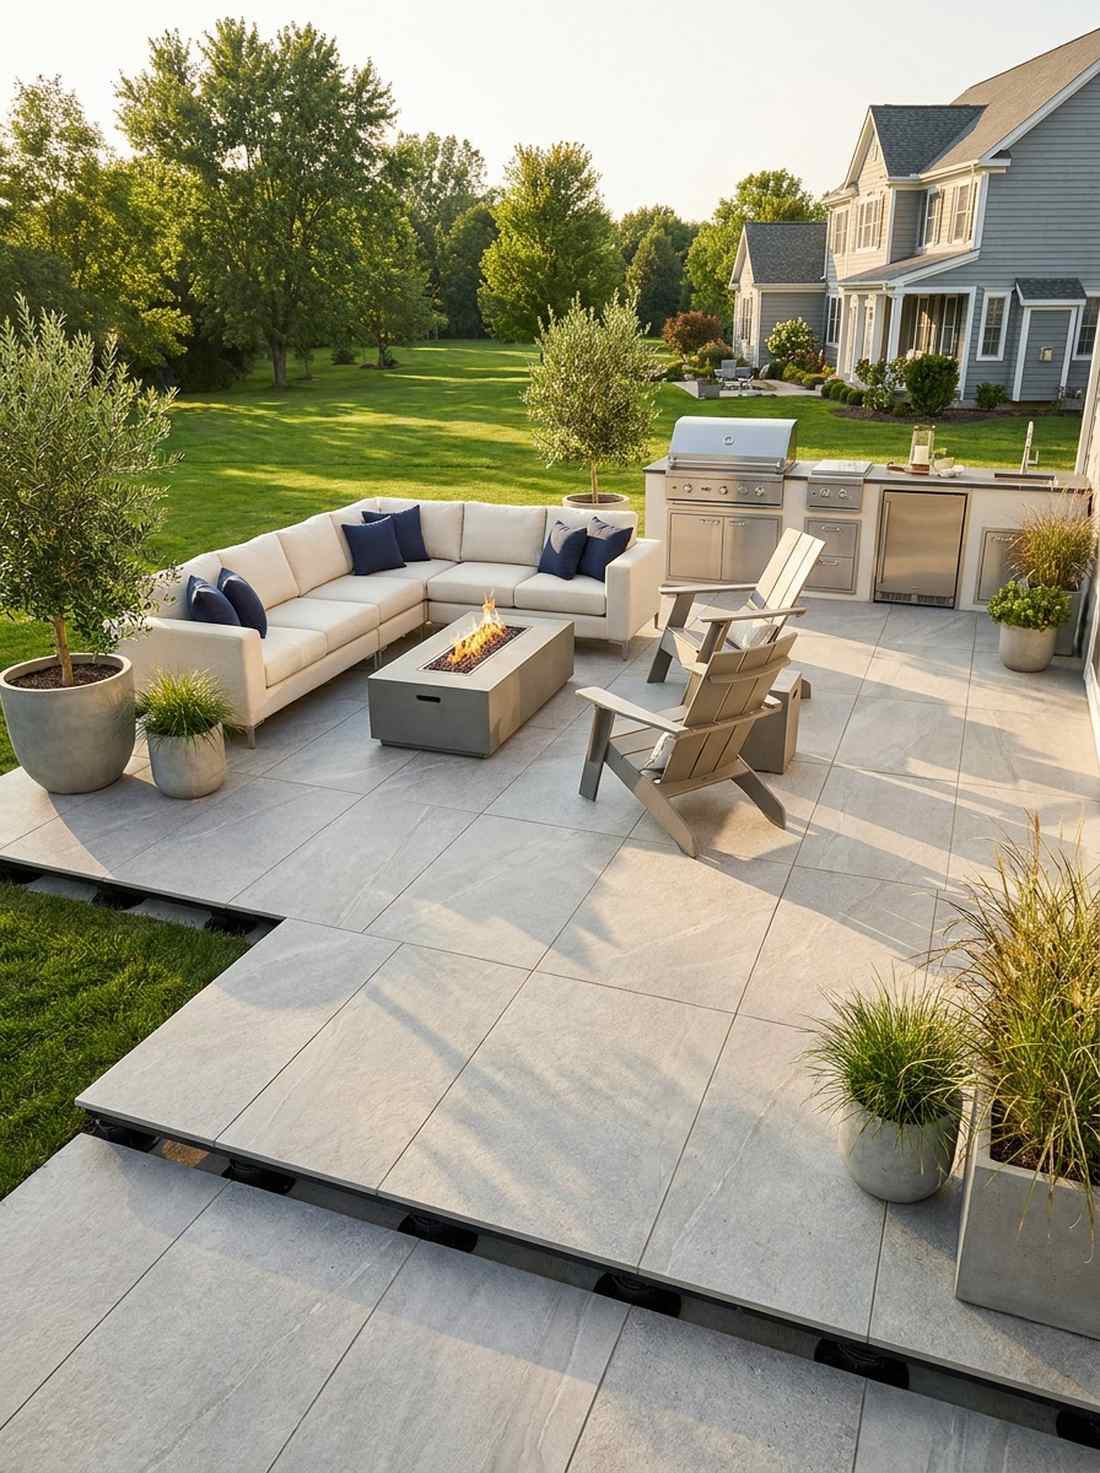
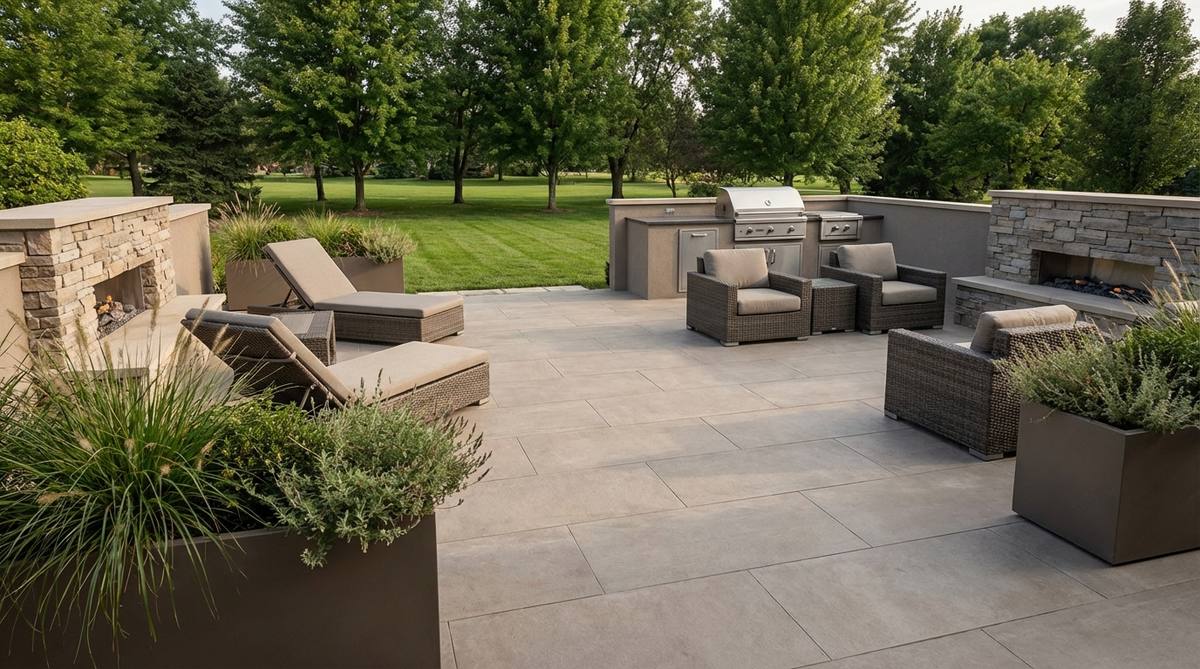
Radiates the ultra-clean, seamless majesty of a five-star hotel penthouse. Oversized modern patio paving. Flawlessly suited for elevated decks that demand a heavy-stone aesthetic without the crushing structural weight.
Using tiny, busy tiles makes small areas feel claustrophobic; floating massive, 24×48 inch engineered slabs looks far more expensive than it is while vastly expanding the perceived visual space. The minimal grout lines keep the entire floor looking impossibly sleek.
This premium flooring upgrade usually demands $15–$25 per square foot installed.
- Key Materials: 2cm thick outdoor porcelain pavers, adjustable leveling pedestals
- Vibe / Style: Penthouse ultra-luxury
- Difficulty: Advanced precision required
- Budget Breakdown: Porcelain Slabs: $15/sq ft | Pedestals: $5/sq ft.
- Creator’s Tip: Use the adjustable pedestal system to float the slabs completely level, hiding all ugly cables and drainage pipes cleanly underneath.
- Smart Sourcing: Adjustable heavy-duty paving pedestals (bulk pack) | Textured outdoor porcelain slab kits
The layout tactic coming up next is how high-end decorators fake a sprawling backyard on a tiny city roof…
15. Synthetic Turf Lawn Panels
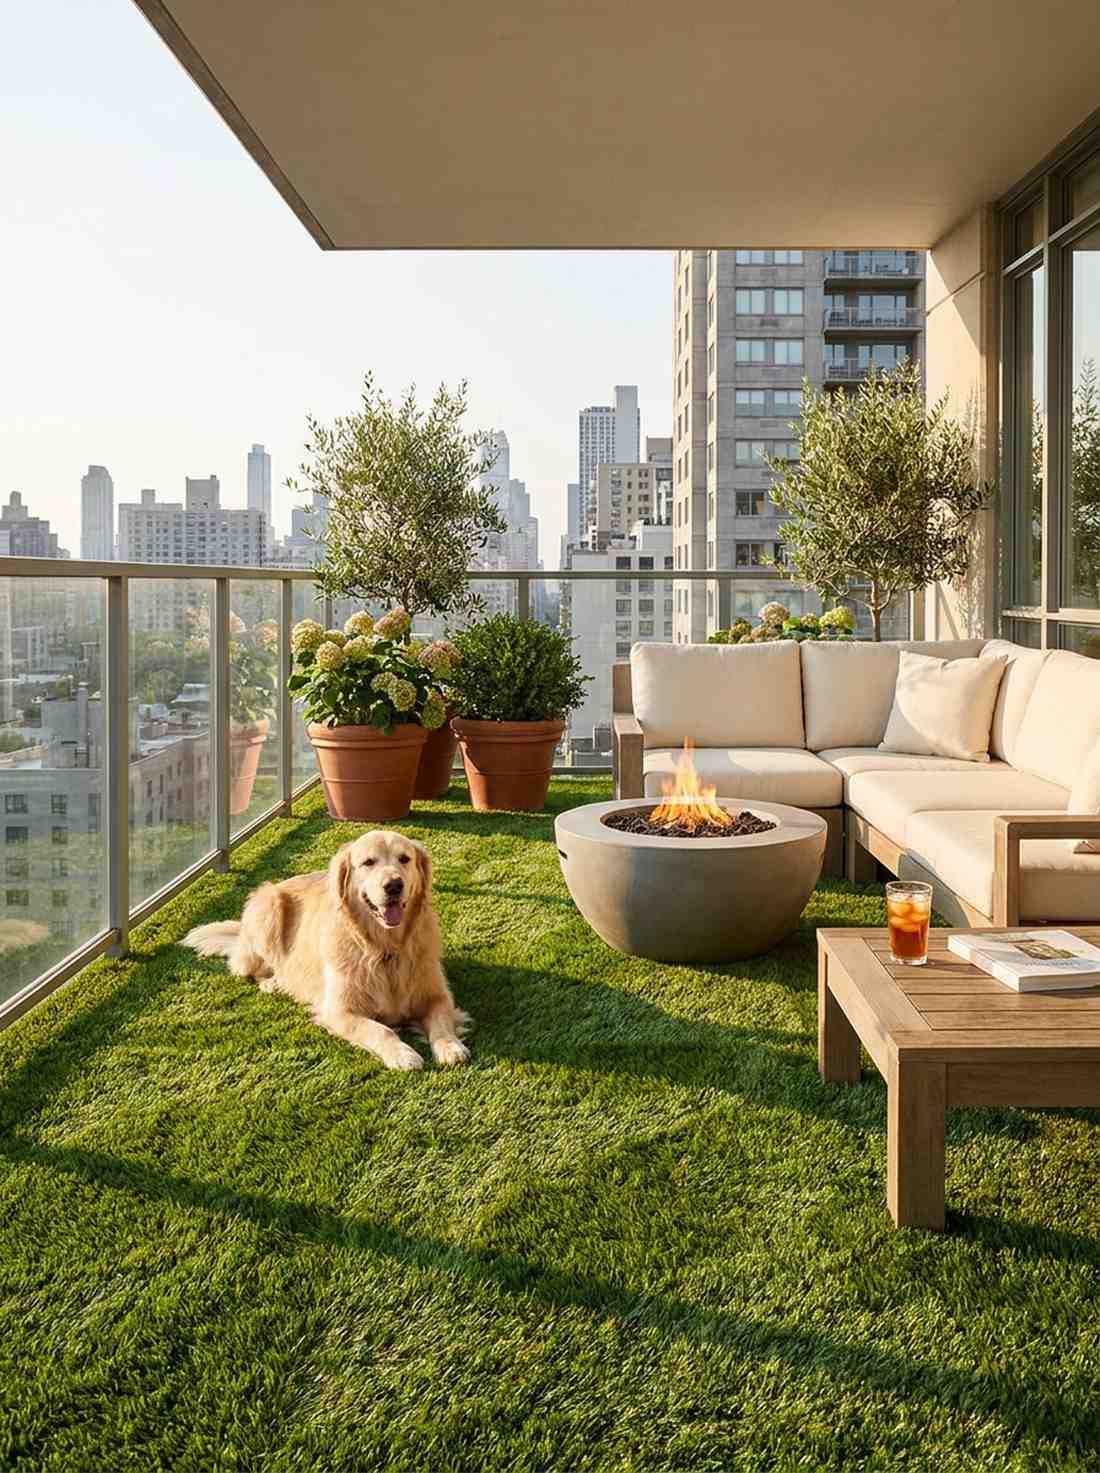
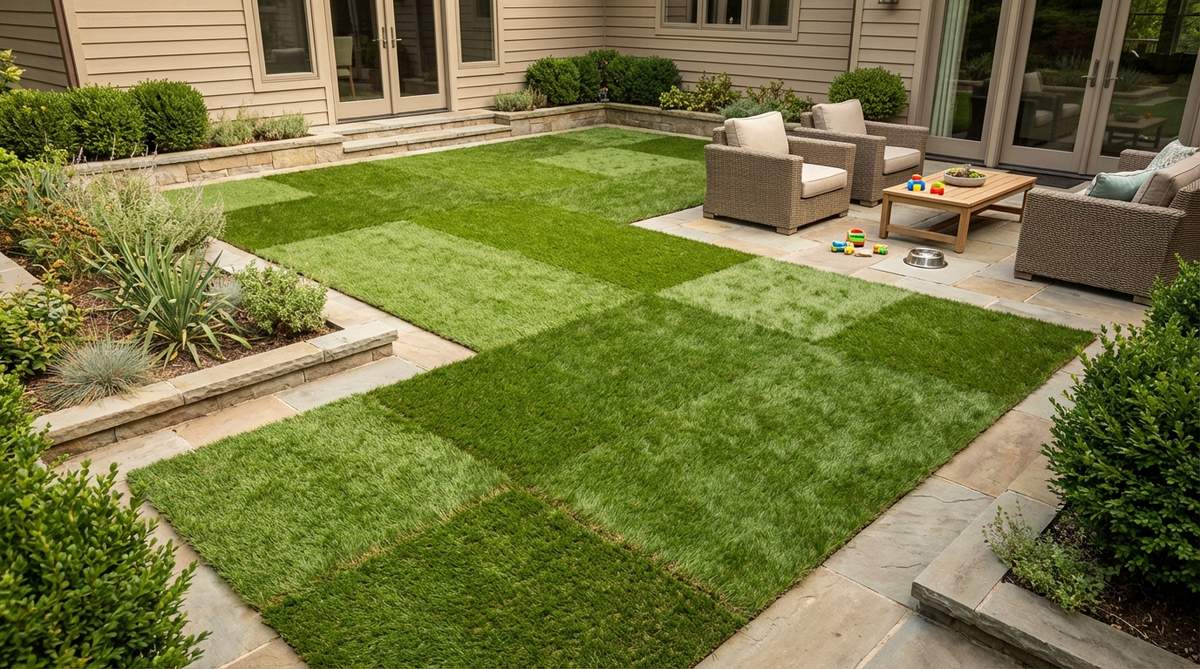
Injects a startling, impossibly green oasis into an otherwise grey concrete jungle. Artificial grass balcony flooring. The ultimate texture cheat-code for pet owners or anyone craving the soft feeling of a backyard lawn miles above the ground.
Cheap neon turf looks like a mini-golf course nightmare; rolling out high-pile, multi-toned synthetic thatch screams high-end luxury and feels exactly like natural spring grass. The advanced drainage backing ensures zero puddles even after a torrential downpour.
Premium faux-lawn setups cost roughly $5–$12 per square foot. Save this if you crave year-round, maintenance-free greenery.
- Key Materials: Multi-height artificial turf rolls, specialized drainage underlayment
- Vibe / Style: Perpetual spring oasis
- Difficulty: Simple roll-and-trim
- Budget Breakdown: Turf Roll: $80 | Seam Tape: $15 | Drainage Mat: $25.
- Creator’s Tip: After unrolling, aggressively brush the fibers backward with a stiff push-broom to stand the flattened blades completely upright.
- Smart Sourcing: Pre-cut premium synthetic turf rolls | Commercial-grade turf drainage mats
Garden Design Terrace Furniture & Layout
Brilliant furniture scaling separates a cluttered storage balcony from a functional outdoor living room. The right modular shapes maximize flow and comfort while surviving intense elemental abuse.
16. Modular Sectional Corner Arrangements
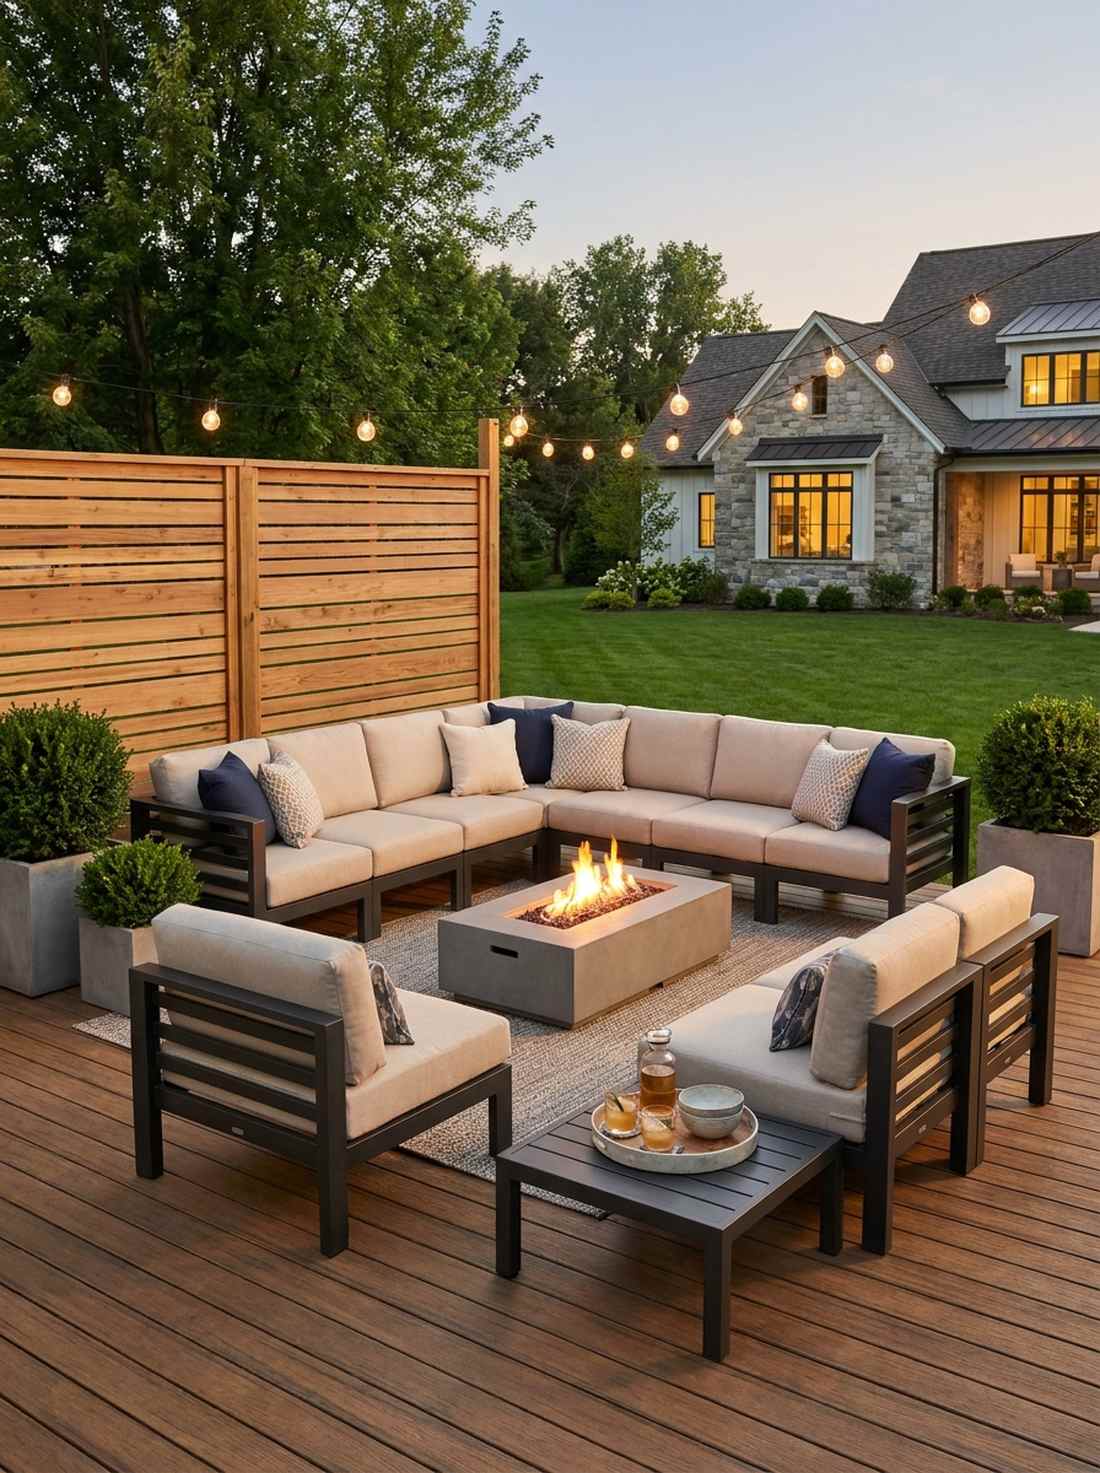
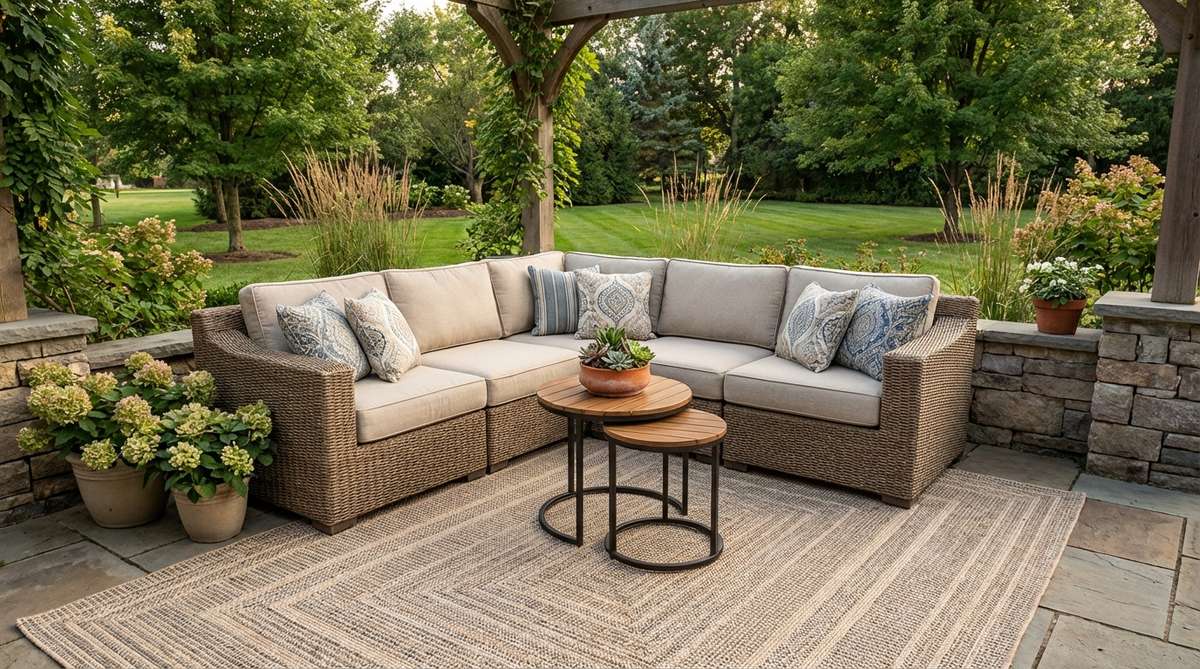
Creates a deeply inviting, sunken-lounge atmosphere perfect for midnight conversations. L-shaped patio seating layouts. Strategically brilliant for pushing bulky lounging mass into dead corners, keeping the valuable center space entirely open.
Cramming individual chairs together looks chaotic and disorganized; locking down a cohesive, weather-resistant corner sectional delivers a surprisingly premium look that anchors the whole zone. Adding plush, solution-dyed acrylic cushions guarantees the setup won’t fade into a sad grey after one summer.
A quality modular arrangement can range from $300 to $800 depending on frame material.
- Key Materials: Powder-coated aluminum frames, UV-resistant acrylic cushions
- Vibe / Style: Cozy VIP lounge
- Difficulty: Easy hex-key assembly
- Budget Breakdown: Base Sectional: $400 | Premium Covers: $50.
- Creator’s Tip: Use discrete heavy-duty zip ties to bind the modular frame legs together on the underside so the couch doesn’t drift apart during use.
- Smart Sourcing: UV-coated modular outdoor sectional kits | Heavy-duty waterproof furniture covers
17. Bistro Set Intimate Dining
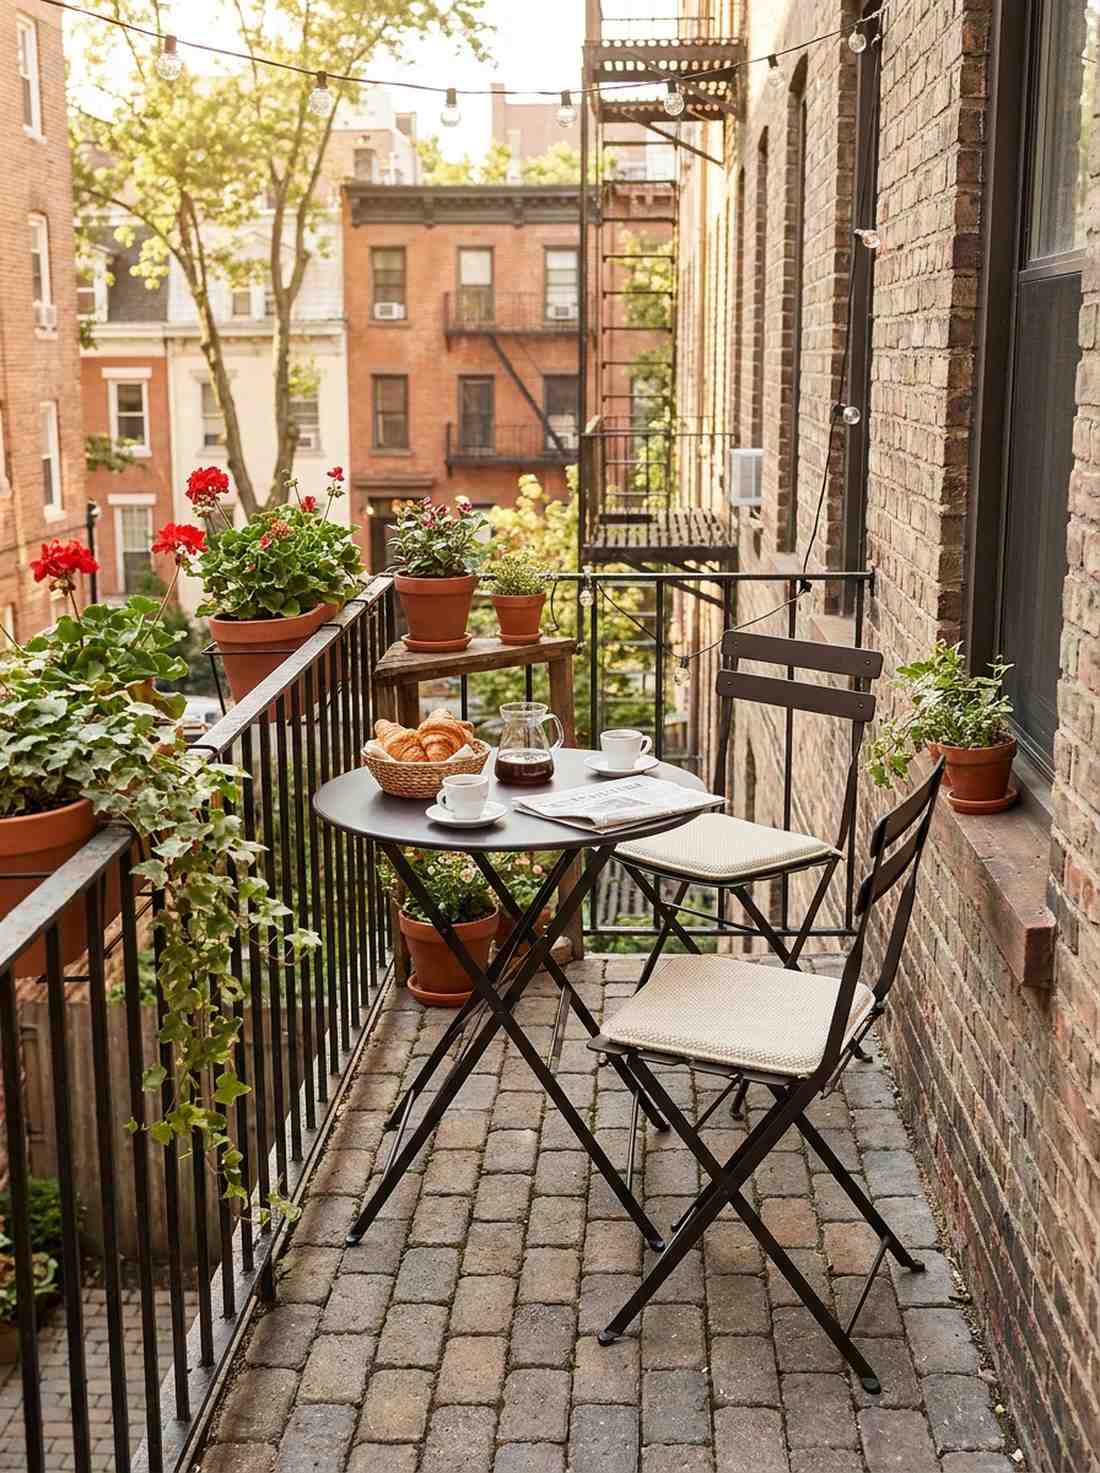
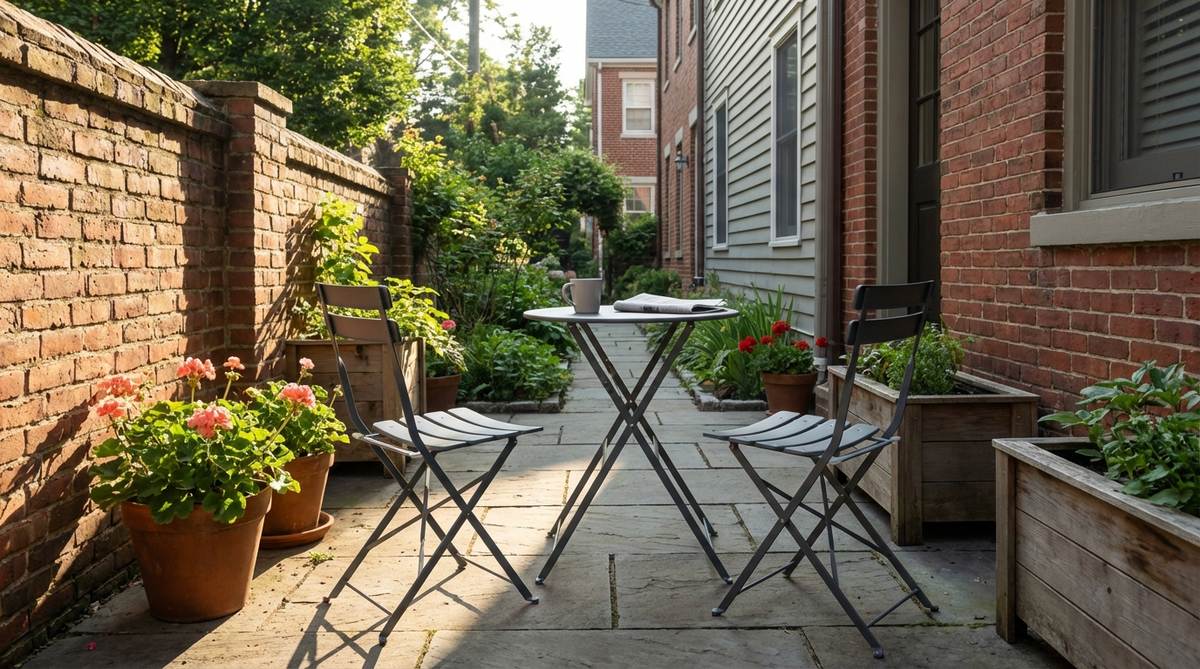
Captures the charming, espresso-sipping magic of a tiny European alleyway cafe. Compact balcony dining ideas. The absolute best layout choice for narrow fire-escape terraces where full-sized tables are physically impossible.
Bulky wooden sets completely choke out small footprints; utilizing slim, foldable metallic bistro frames brings an instant architectural quality that feels light and airy. They tuck away seamlessly into the wall when you need standing room for guests.
You can grab a stunning, durable bistro trio for around $70–$130. Pin this to your tiny-space styling board.
- Key Materials: Powder-coated folding steel table and chairs
- Vibe / Style: Parisian morning coffee spot
- Difficulty: Instant pop-up
- Budget Breakdown: 3-Piece Set: $90 | Seat Cushions: $20.
- Creator’s Tip: Apply a light coat of automotive wax to the painted metal frames at the start of the season to drastically reduce water spotting and rust.
- Smart Sourcing: Foldable powder-coated bistro sets | UV-resistant magnetic seat cushions
18. Built-In Bench Perimeter Seating
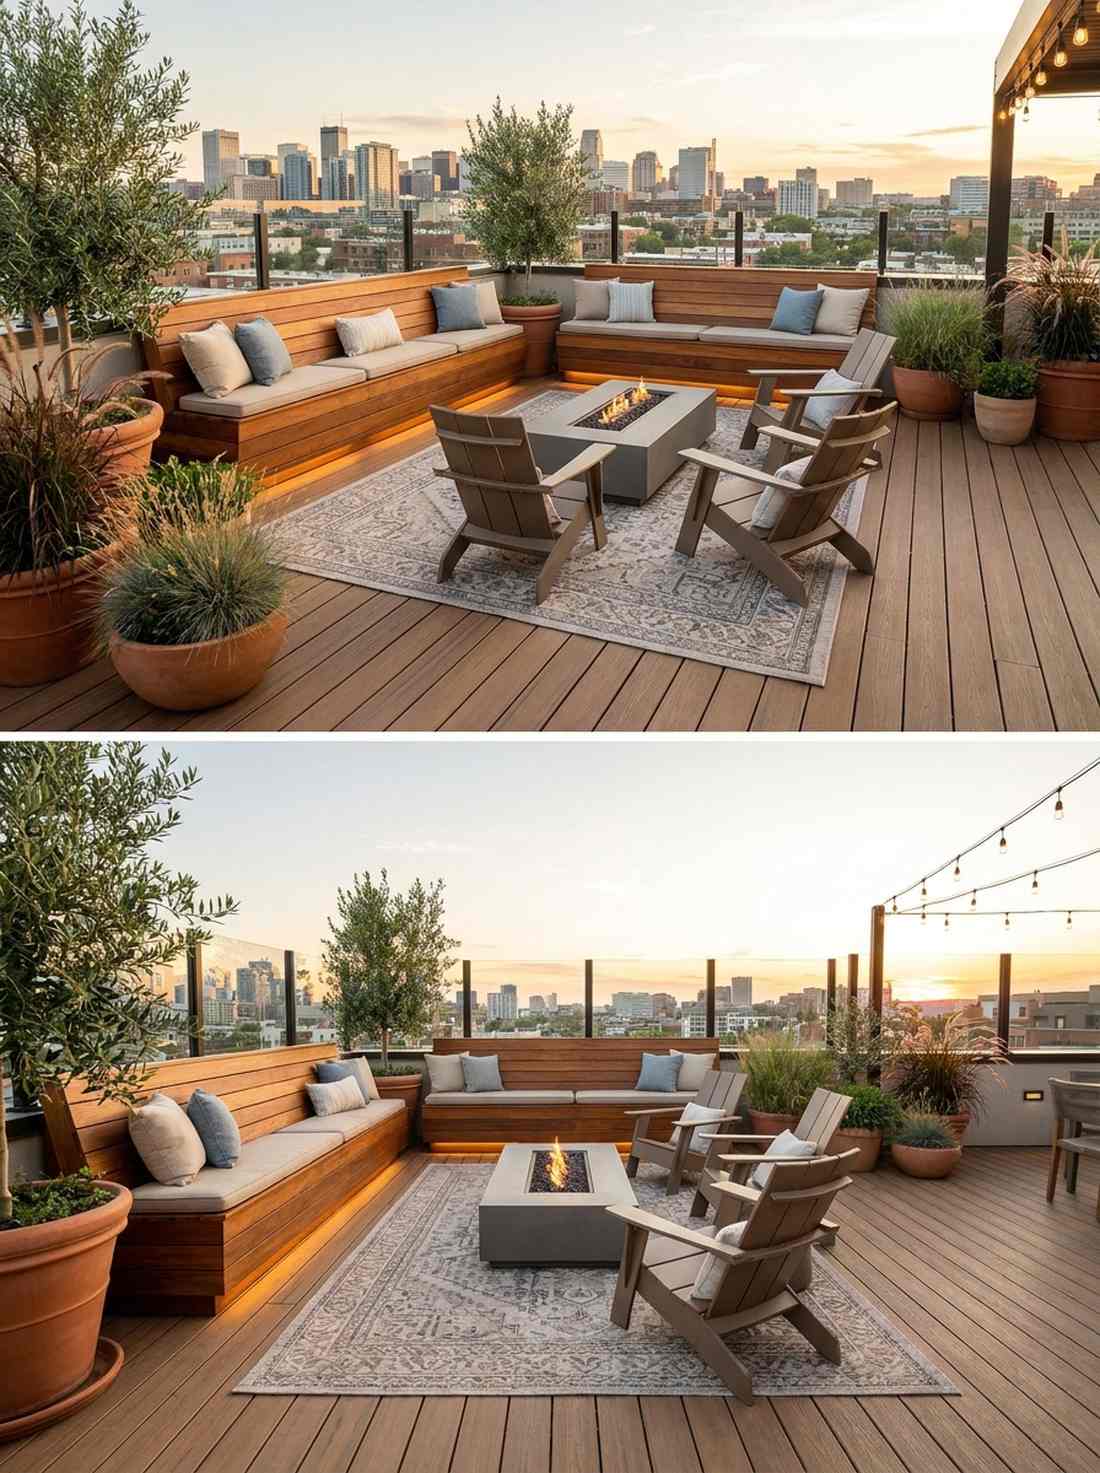

Exudes the clean, permanent structural elegance of a high-end architectural digest feature. Custom rooftop perimeter benches. Unbeatable for maximizing seating capacity along structural walls without dropping a massive footprint into the middle of the deck.
Cluttering the edges with mismatched chairs ruins visual flow; constructing seamless, floating wooden benches looks far more expensive than it is while hiding massive storage bays underneath. Dropping bulk garden supplies directly into the hidden bench voids keeps the deck immaculately clean.
Building custom perimeter seating usually costs $150–$300 in premium lumber.
- Key Materials: Cedar or composite decking, heavy-duty hidden hinges
- Vibe / Style: Clean architectural minimalism
- Difficulty: Intermediate custom build
- Budget Breakdown: Framing Lumber: $80 | Top Decking: $100 | Hinges: $30.
- Creator’s Tip: Angle the backrest of the bench exactly 15 degrees backward from 90 degrees; this slight tilt makes a massive difference in long-term sitting comfort.
- Smart Sourcing: Pre-cut composite decking boards (bulk pack) | Heavy-duty gas strut hinges for bench lids
19. Round Table Central Anchoring
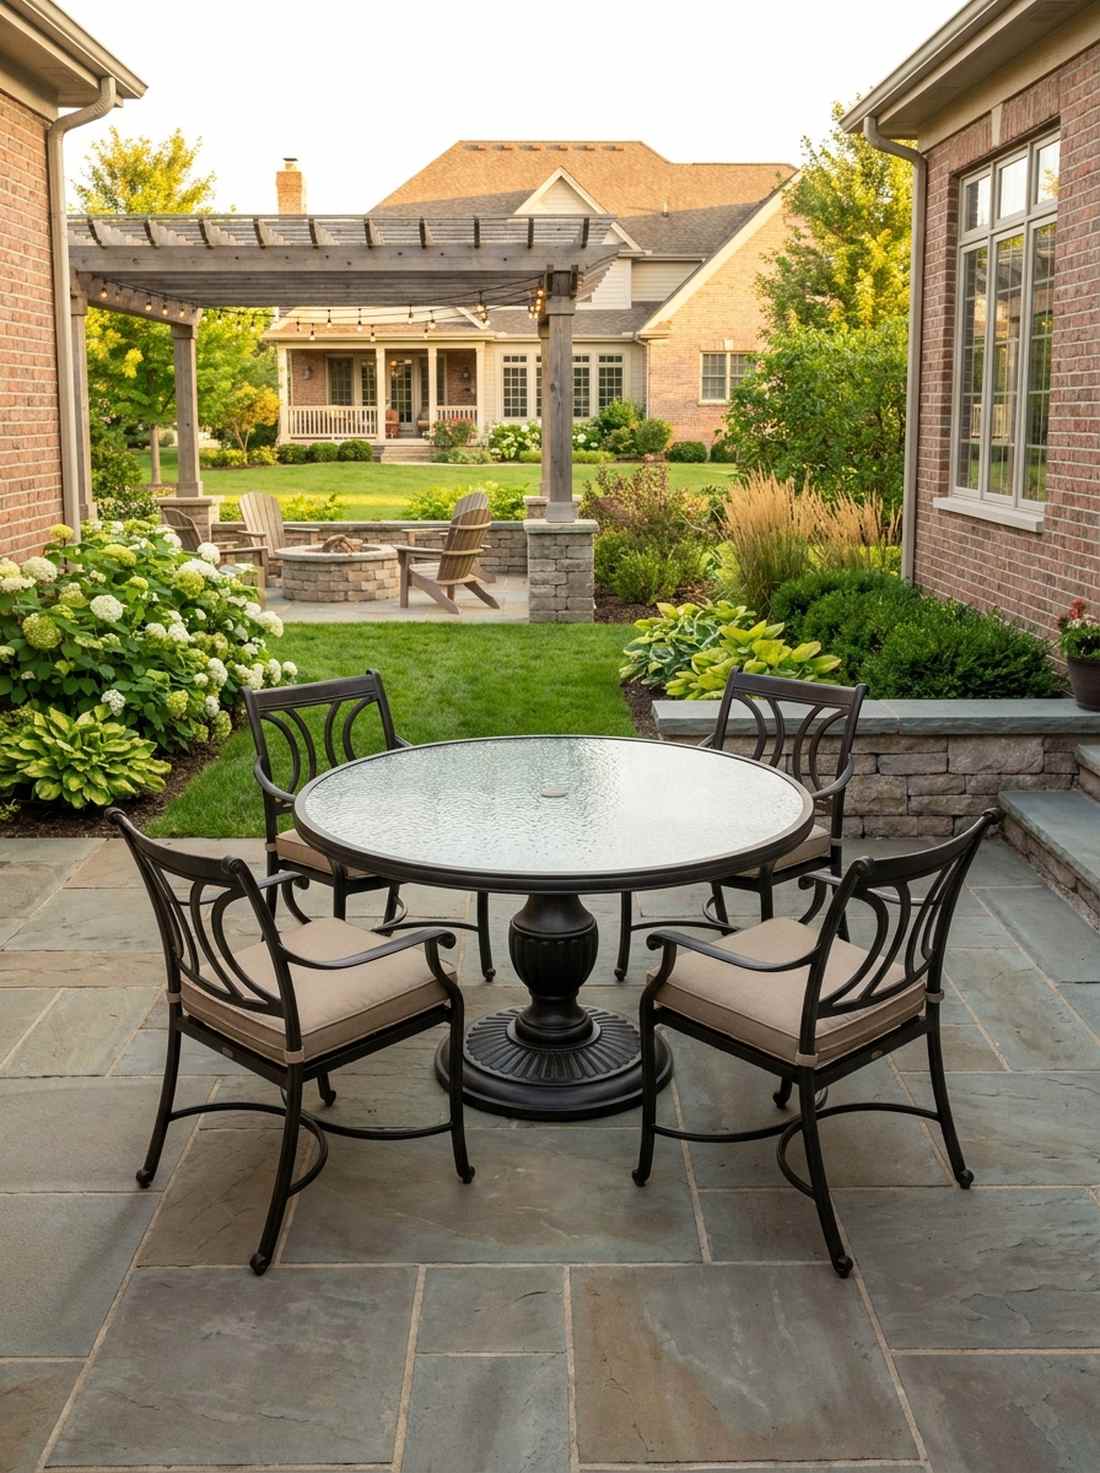

Forces a wonderfully inclusive, flowing dynamic where every guest is part of the central conversation. Circular patio dining configurations. Flawlessly designed for boxy, square courtyards to physically soften the harsh 90-degree architectural angles.
Shoving a long rectangular table into a square space creates awkward, impassable choke points; centering a sleek pedestal table creates a fluid, designer-level finish that allows traffic to glide around it naturally. A heavy stone or tempered glass top ensures zero wobbling in high winds.
A solid round dining centerpiece will run about $200–$450. Save this if you love hosting outdoor dinner parties.
- Key Materials: Cast aluminum pedestal base, tempered glass or mosaic top
- Vibe / Style: Elegant alfresco dining
- Difficulty: Heavy lifting required
- Budget Breakdown: Pedestal Table: $250 | Matching Chairs (x4): $200.
- Creator’s Tip: Always choose a table base with a central pedestal rather than four corner legs to prevent guests from aggressively knocking their knees while sitting down.
- Smart Sourcing: Heavy-duty cast aluminum dining tables | UV-coated stacking outdoor dining chairs
If you think your patio is just for eating, this next luxury upgrade will make you want to sleep outside every night…
20. Daybed Lounge Retreat Zones
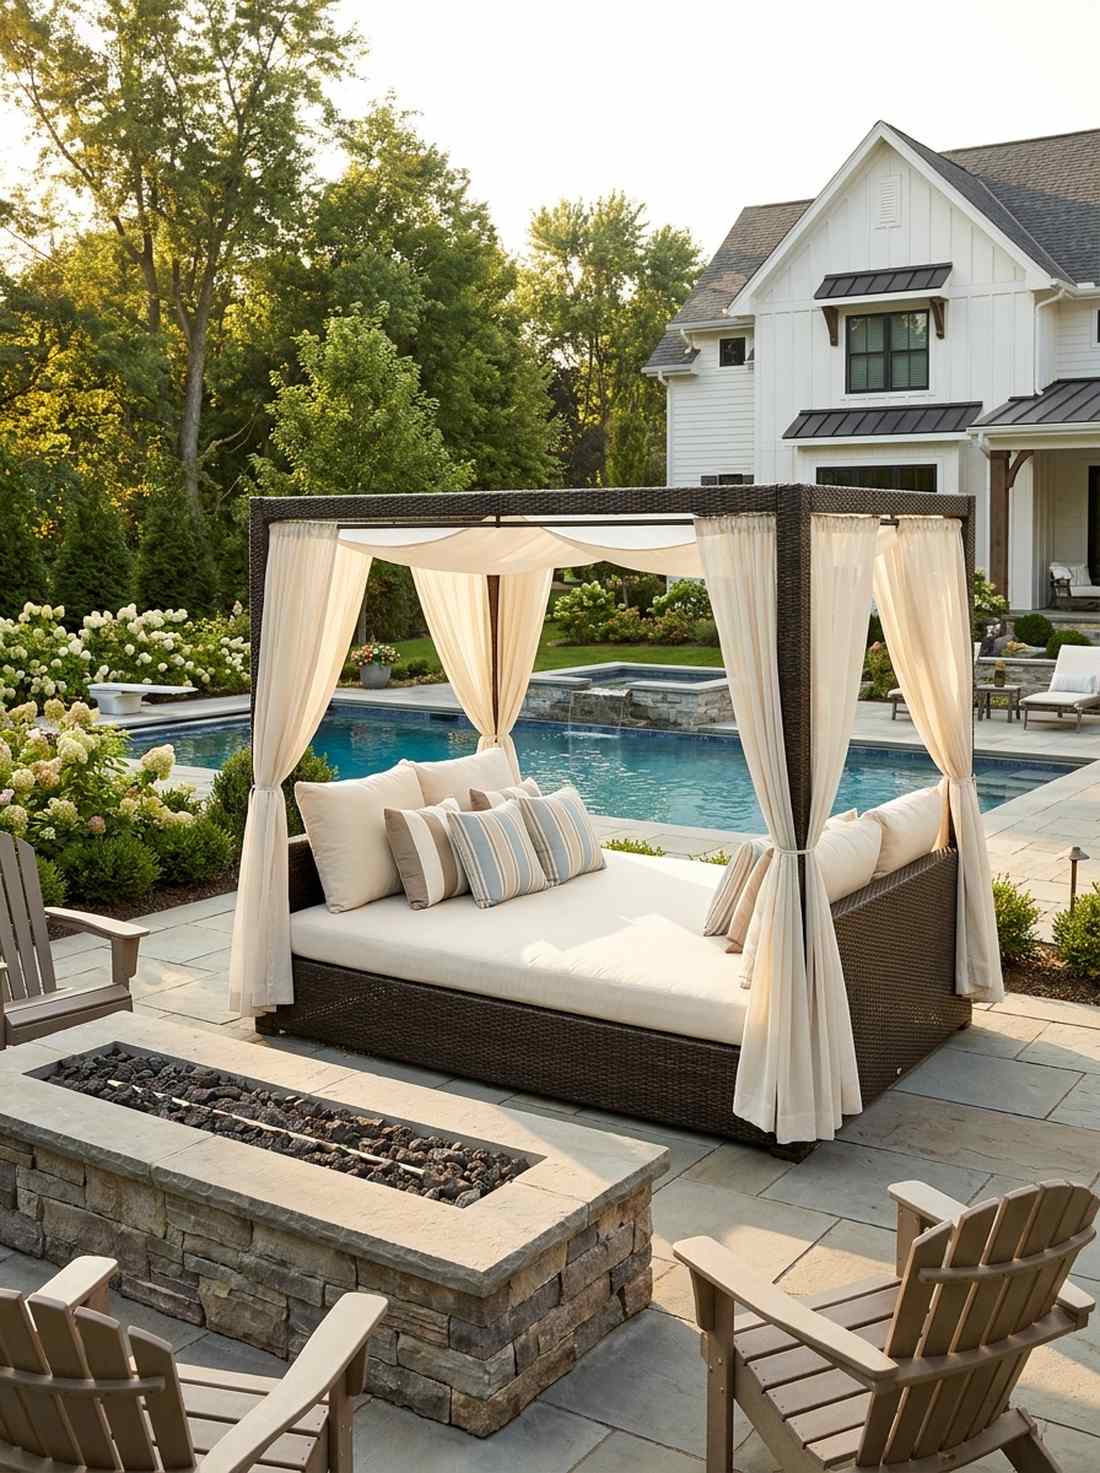
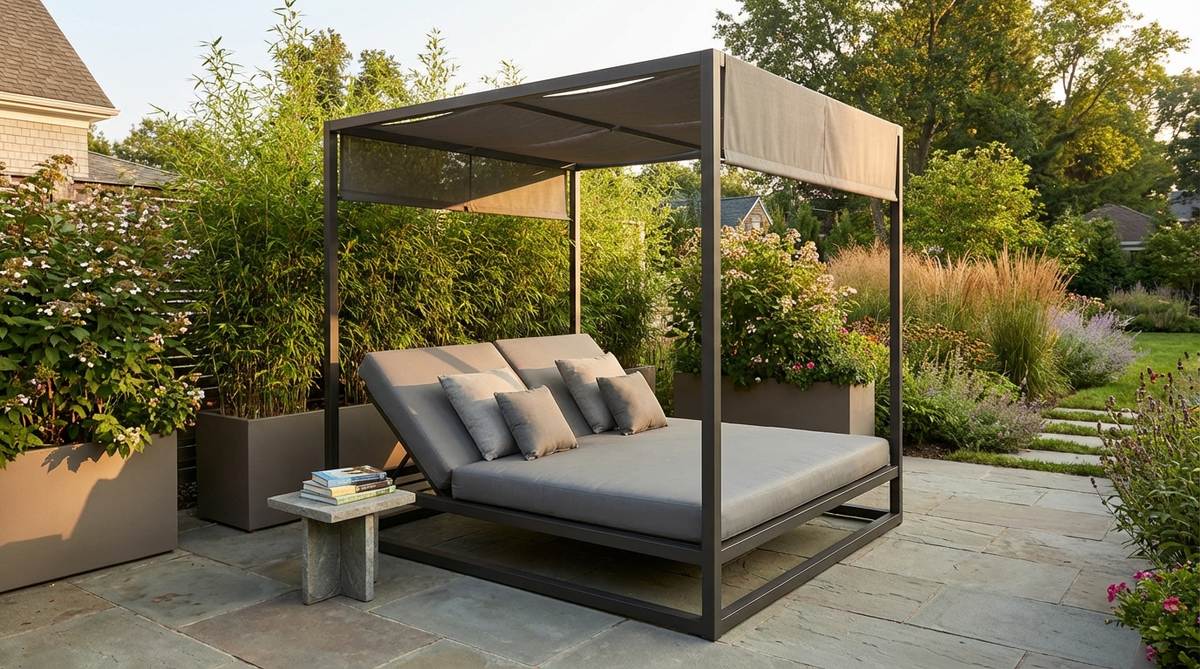
Delivers the overwhelming luxury of a private cabana at a five-star tropical resort. Outdoor shaded daybed cabanas. The absolute pinnacle of terrace relaxation, designed specifically for lazy, sun-drenched afternoon naps.
Using standard lounge chairs feels expected and boring; anchoring a massive, canopy-draped daybed screams high-end luxury and establishes an undeniable focal point. The retractable sunshade allows you to instantly dial in the exact ratio of breeze and shadow.
These statement pieces range widely from $400 to over $1,200 depending on canopy complexity.
- Key Materials: Woven resin wicker frame, quick-dry marine foam mattress
- Vibe / Style: Elite resort cabana
- Difficulty: Requires a large footprint
- Budget Breakdown: Frame Base: $350 | Mattress/Canopy: $150.
- Creator’s Tip: Make sure the cushions feature a fast-draining mesh bottom layer, otherwise the massive mattress will become a waterlogged sponge after the first rain.
- Smart Sourcing: Pre-assembled resin wicker daybed kits | Commercial-grade quick-dry outdoor foam
Shade & Pergola Structures
Without overhead protection, a terrace becomes an unusable solar oven by noon. Striking shade structures not only block UV rays but architecturally define the “ceiling” of your outdoor living room.
21. Retractable Canopy Pergola Systems
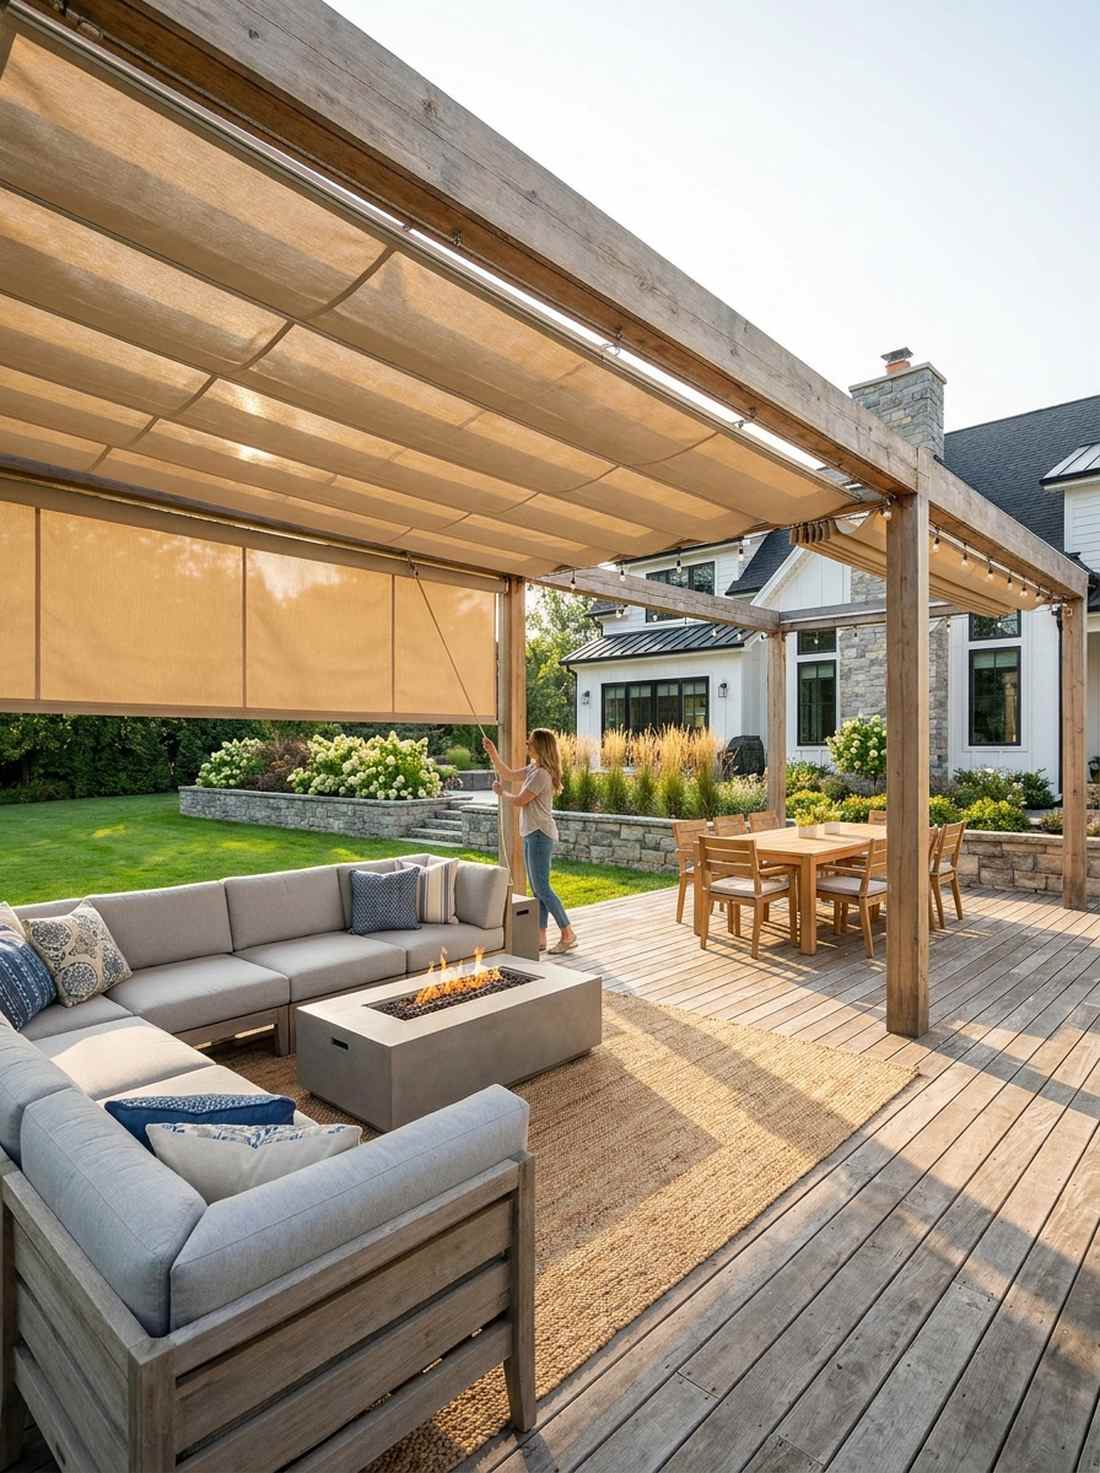

Feels like commanding the weather with a simple tug of a heavy-duty cord. Adjustable sliding patio shades. Perfectly engineered for dynamic climates where you want blazing morning sun but desperately need afternoon shadow.
Fixed wooden slats offer zero protection from surprise rain; installing smooth-gliding, UV-treated track fabrics delivers a surprisingly premium look and supreme functional control. Sliding the heavy canvas shut instantly transforms an exposed deck into a cozy, sheltered room.
Quality retractable track systems typically run $250–$600 per bay. Pin this to your ultimate backyard makeover board.
- Key Materials: Marine-grade awning fabric, stainless steel wire tracks
- Vibe / Style: Dynamic modern comfort
- Difficulty: Intermediate hardware mounting
- Budget Breakdown: Fabric Panels: $150 | Track Hardware: $80.
- Creator’s Tip: Install a slight one-inch drop on one side of the sliding wires so that unexpected rainwater naturally sheets off instead of pooling heavily in the fabric bellies.
- Smart Sourcing: Pre-cut sliding wave canopy kits | Heavy-duty stainless pergola track hardware
22. Louvered Roof Pergola Designs
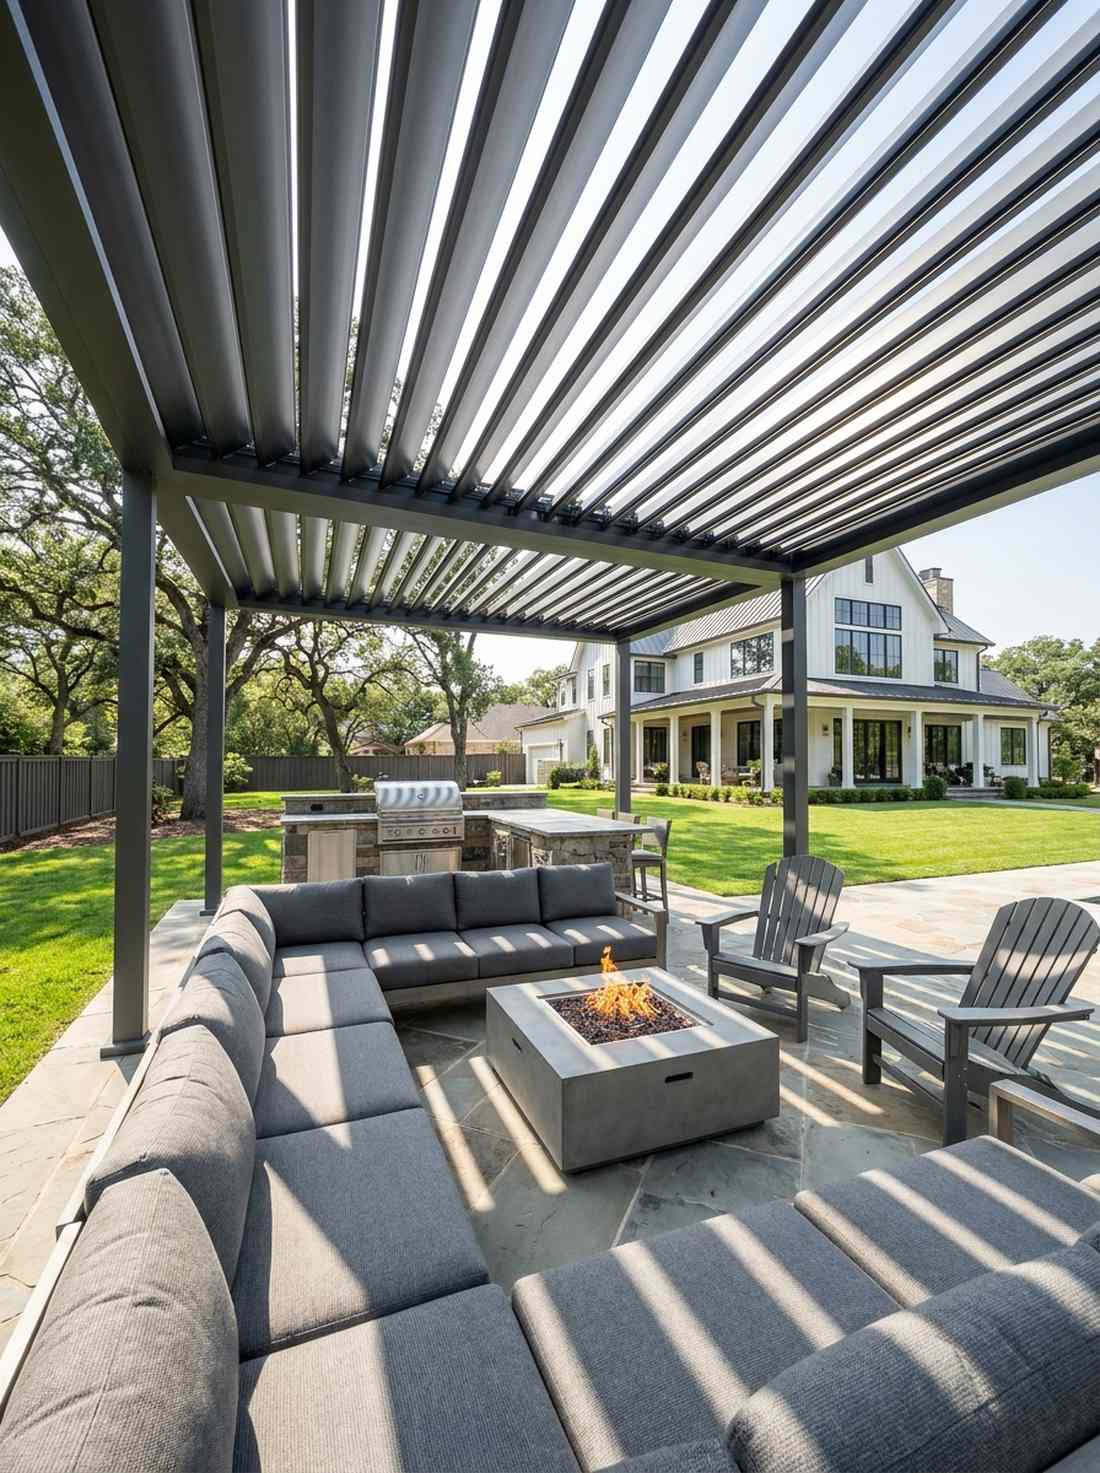
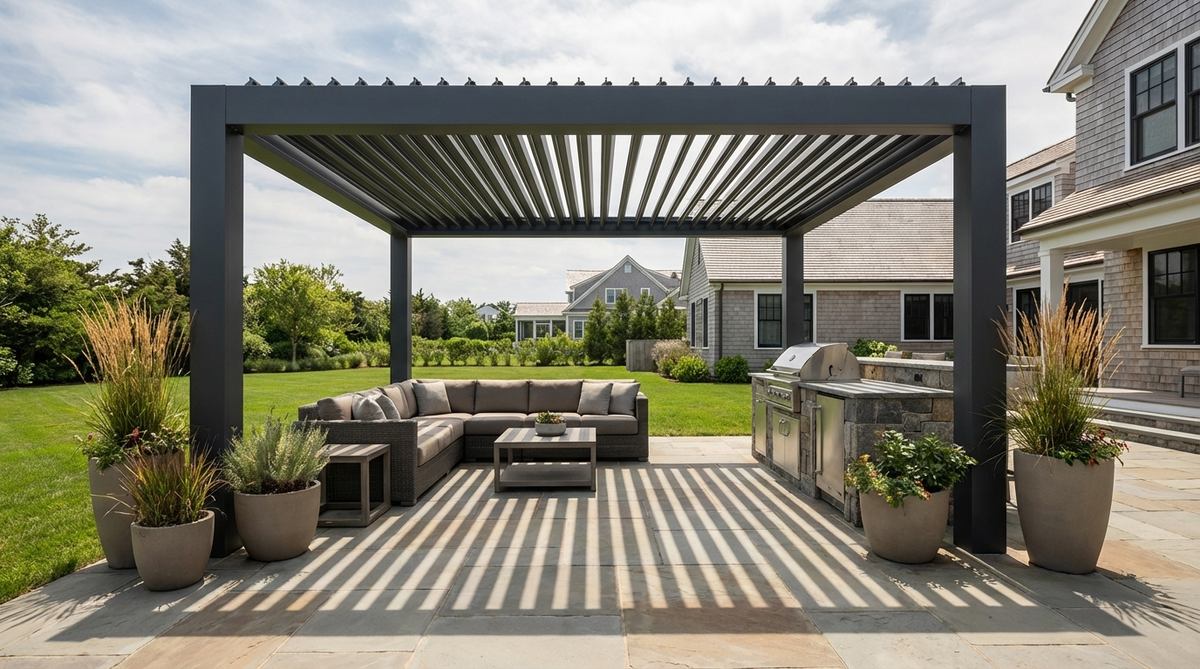
Projects an ultra-sleek, precision-engineered aesthetic that looks incredibly expensive. Adjustable aluminum pergola louvers. The most commanding structural upgrade for turning a basic patio into a hyper-modern, weather-proof bunker.
Canvas shades whip violently in storms; upgrading to heavy-gauge, rotating aluminum slats creates an immediate architectural statement that stands up to hurricane-force winds. The ability to angle the metallic louvers precisely blocks glaring light while still allowing trapped heat to vent upward.
These premium structural kits start around $1,500 and go up significantly based on motorization.
- Key Materials: Powder-coated extruded aluminum, internal gutter systems
- Vibe / Style: Ultra-premium modernism
- Difficulty: Advanced structural assembly
- Budget Breakdown: Louver Kit: $1,200 | Hardware/Anchors: $100.
- Creator’s Tip: Always coat the rotating hinge pins with a dry-teflon lubricant during assembly so the heavy slats open silently without grinding for years.
- Smart Sourcing: Pre-engineered aluminum louvered pergola kits | Dry-teflon weather-proof hinge lubricants
23. Polycarbonate Panel Solid Covers
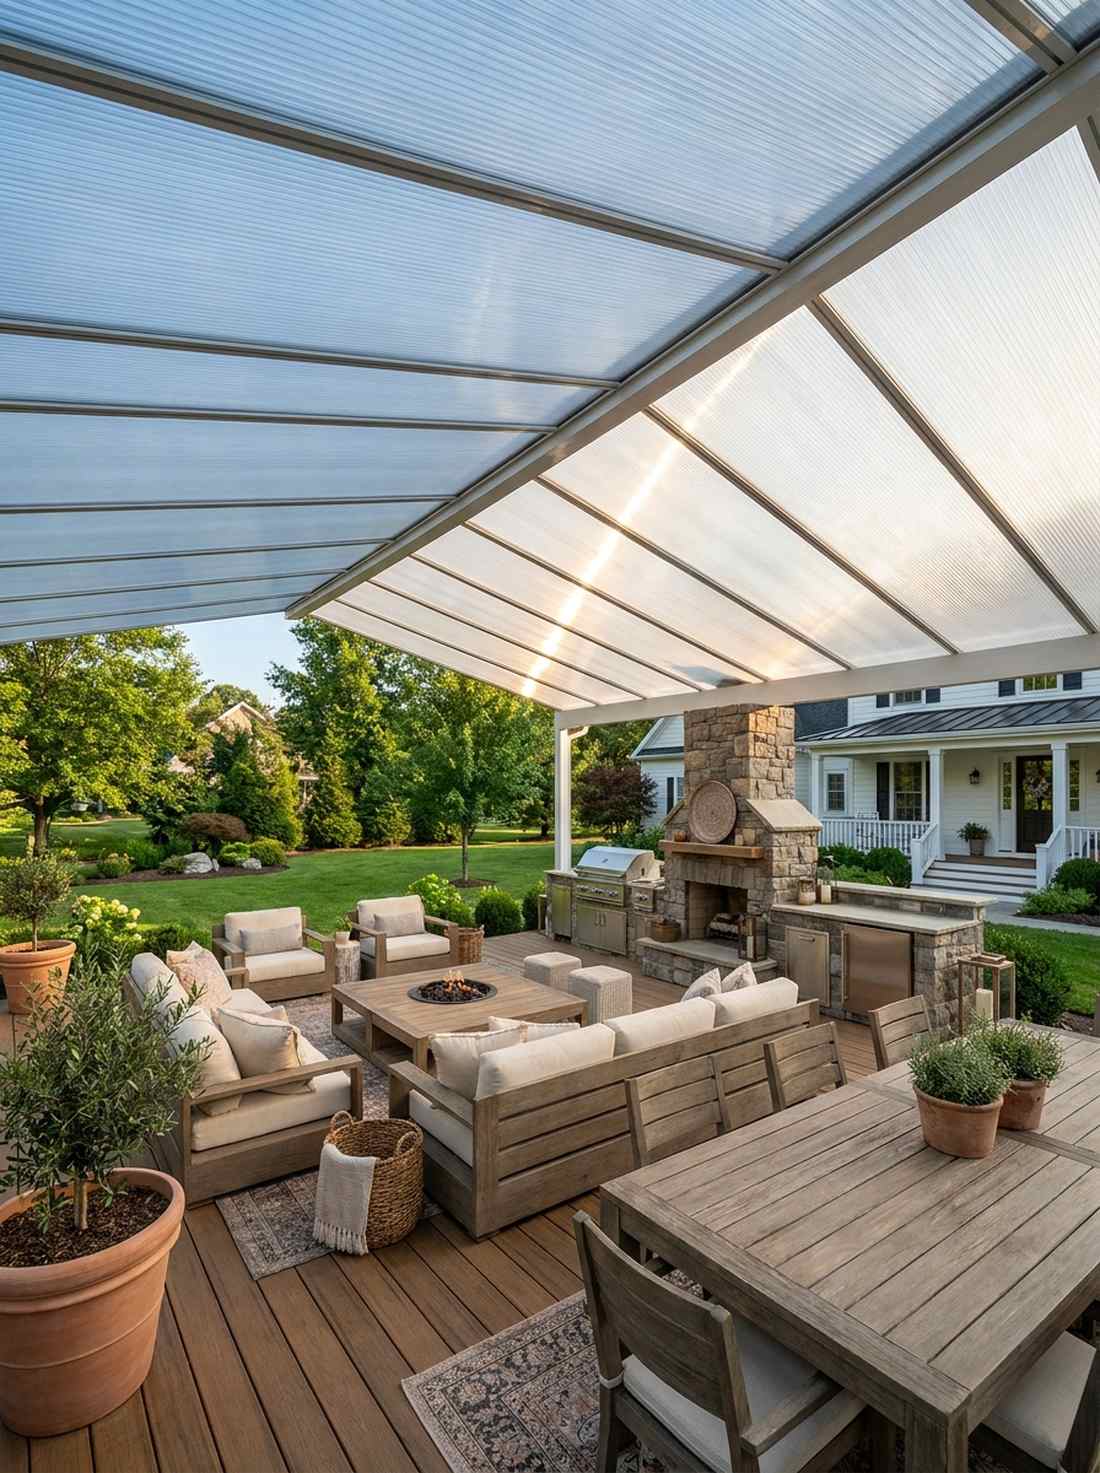
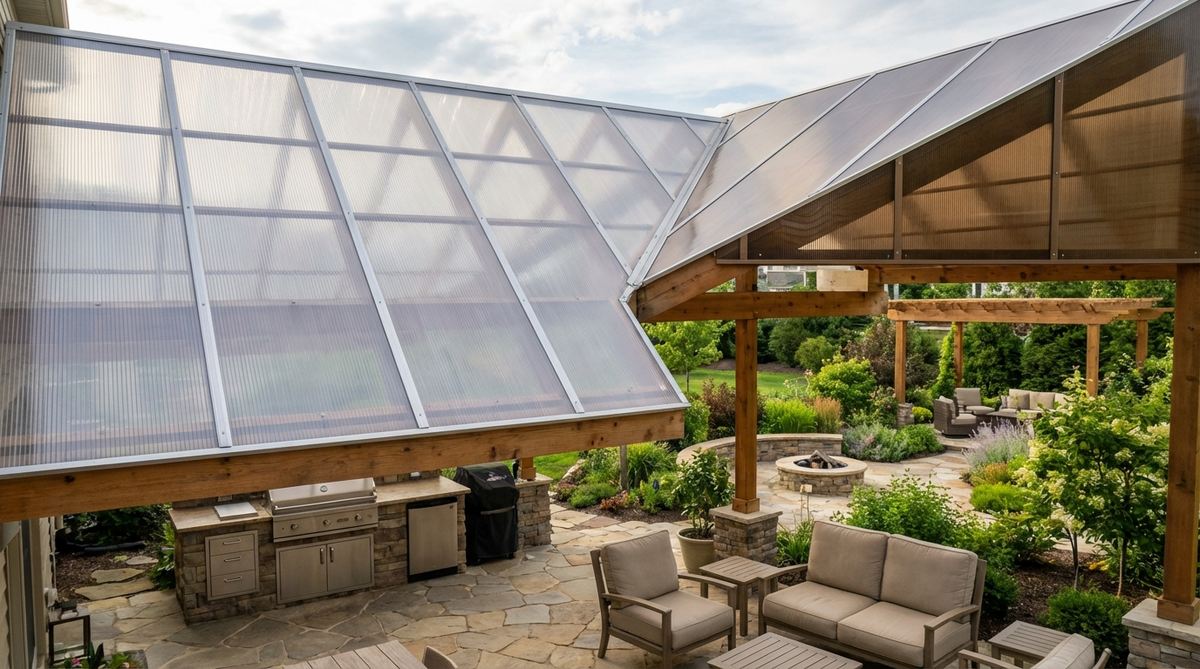
Glows with a soft, diffused ambient light while completely stopping harsh UV radiation in its tracks. Translucent outdoor roof panels. The smartest play for covering sensitive, high-end furniture that would otherwise be destroyed by rain and hail.
Corrugated tin roofs look cheap and sound deafening during a storm; fastening multi-wall tinted polycarbonate panels looks far more expensive than it is and provides massive thermal insulation. The sleek, glass-like finish keeps the space feeling open to the sky without the sunburn.
A full panel roofing system will cost approximately $200–$500 in materials.
- Key Materials: Multi-wall polycarbonate sheets, aluminum joining profiles
- Vibe / Style: Sleek greenhouse hybrid
- Difficulty: Moderate overhead labor
- Budget Breakdown: Panels: $250 | H-Channel Joins: $60 | Gasket Screws: $30.
- Creator’s Tip: You must pre-drill the screw holes slightly wider than the fastener shank to allow the plastic panels to aggressively expand and contract during extreme temperature swings without cracking.
- Smart Sourcing: UV-coated multi-wall polycarbonate panels (bulk pack) | Weather-proof neoprene roofing screws
24. Climbing Vine Green Roof Pergolas
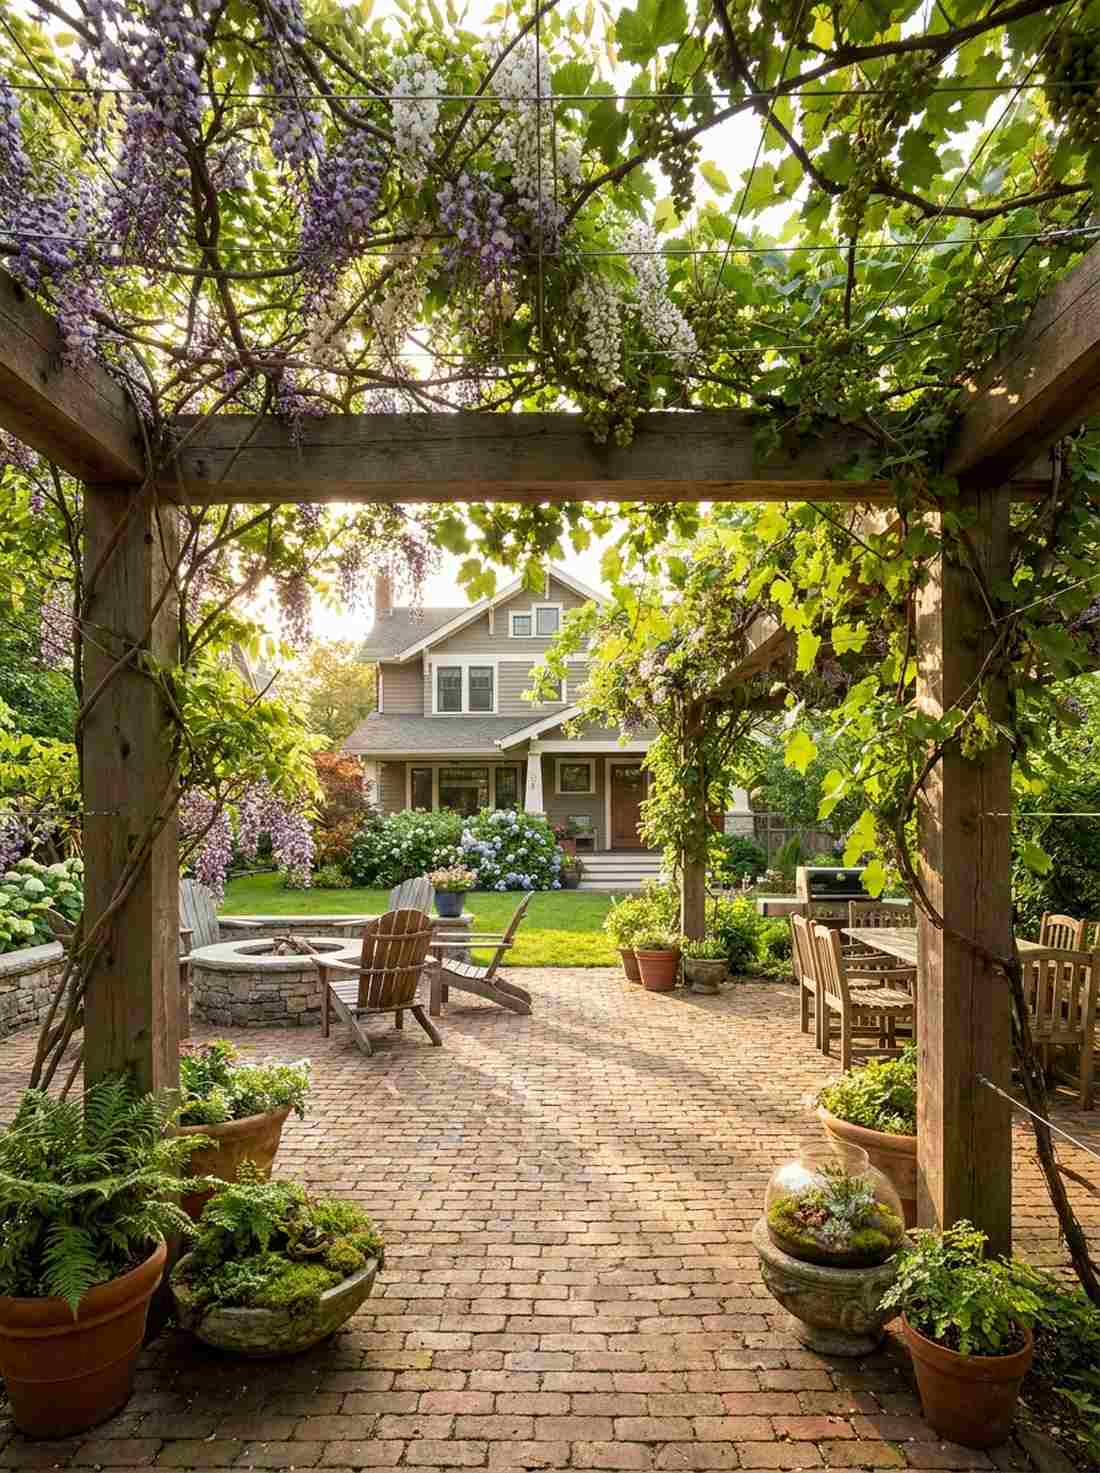
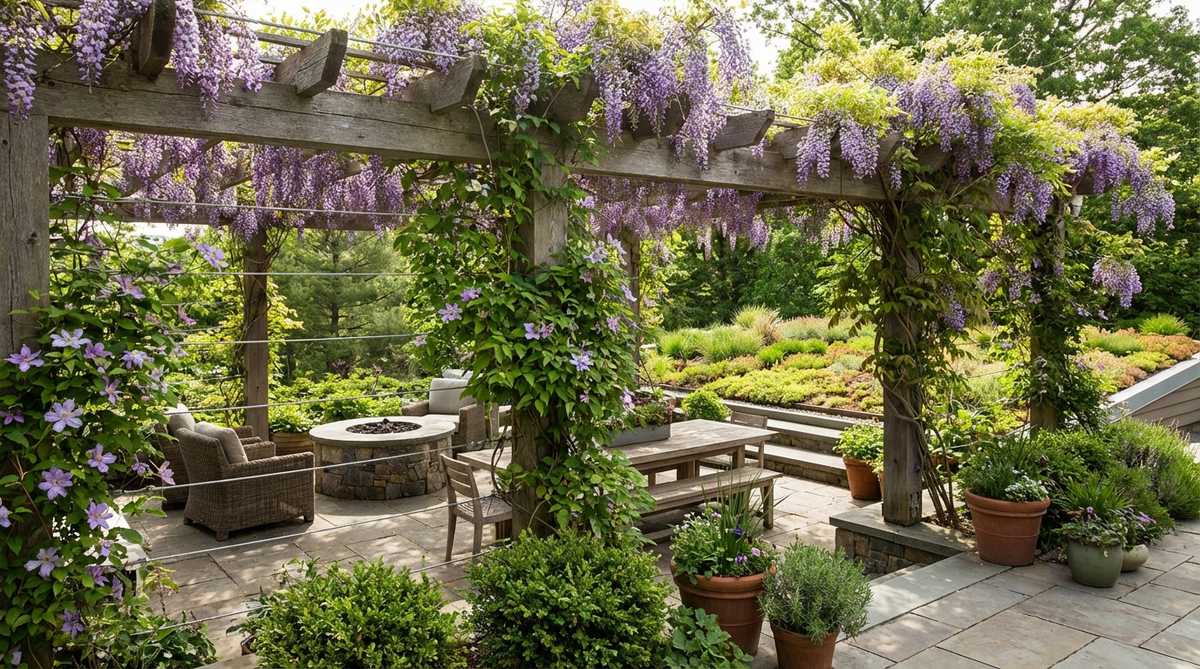
Surrounds you in a deeply romantic, dappled shade that feels lifted directly from a fairytale. Living canopy garden structures. An exceptional, eco-friendly way to naturally drop the ambient temperature of a blazing hot brick courtyard.
Leaving overhead beams naked wastes massive potential; weaving fast-growing wisteria or grapevines through overhead tension wires brings an instant architectural quality that gets denser and more beautiful every single year. Layering terrarium accessories at the anchor base roots the entire narrative visually.
You can establish this living ceiling for as little as $50–$100 in initial plant costs. Save this if you love wildly romantic greenery.
- Key Materials: Sturdy wooden pergola frame, stainless training wire
- Vibe / Style: Enchanted fairytale canopy
- Difficulty: Requires long-term patience
- Budget Breakdown: Training Wire: $30 | Mature Climbers: $60.
- Creator’s Tip: Select deciduous vines that drop their leaves in winter; this brilliantly provides dense, cooling shade in July but lets warming sunlight flood the terrace in December.
- Smart Sourcing: Heavy-duty stainless trellis wire kits | Pre-rooted fast-growing climbing vines
Most people just use standard umbrellas, completely missing this high-tension trick that makes your space look like a modern art museum…
25. Sail Shade Tension Structures
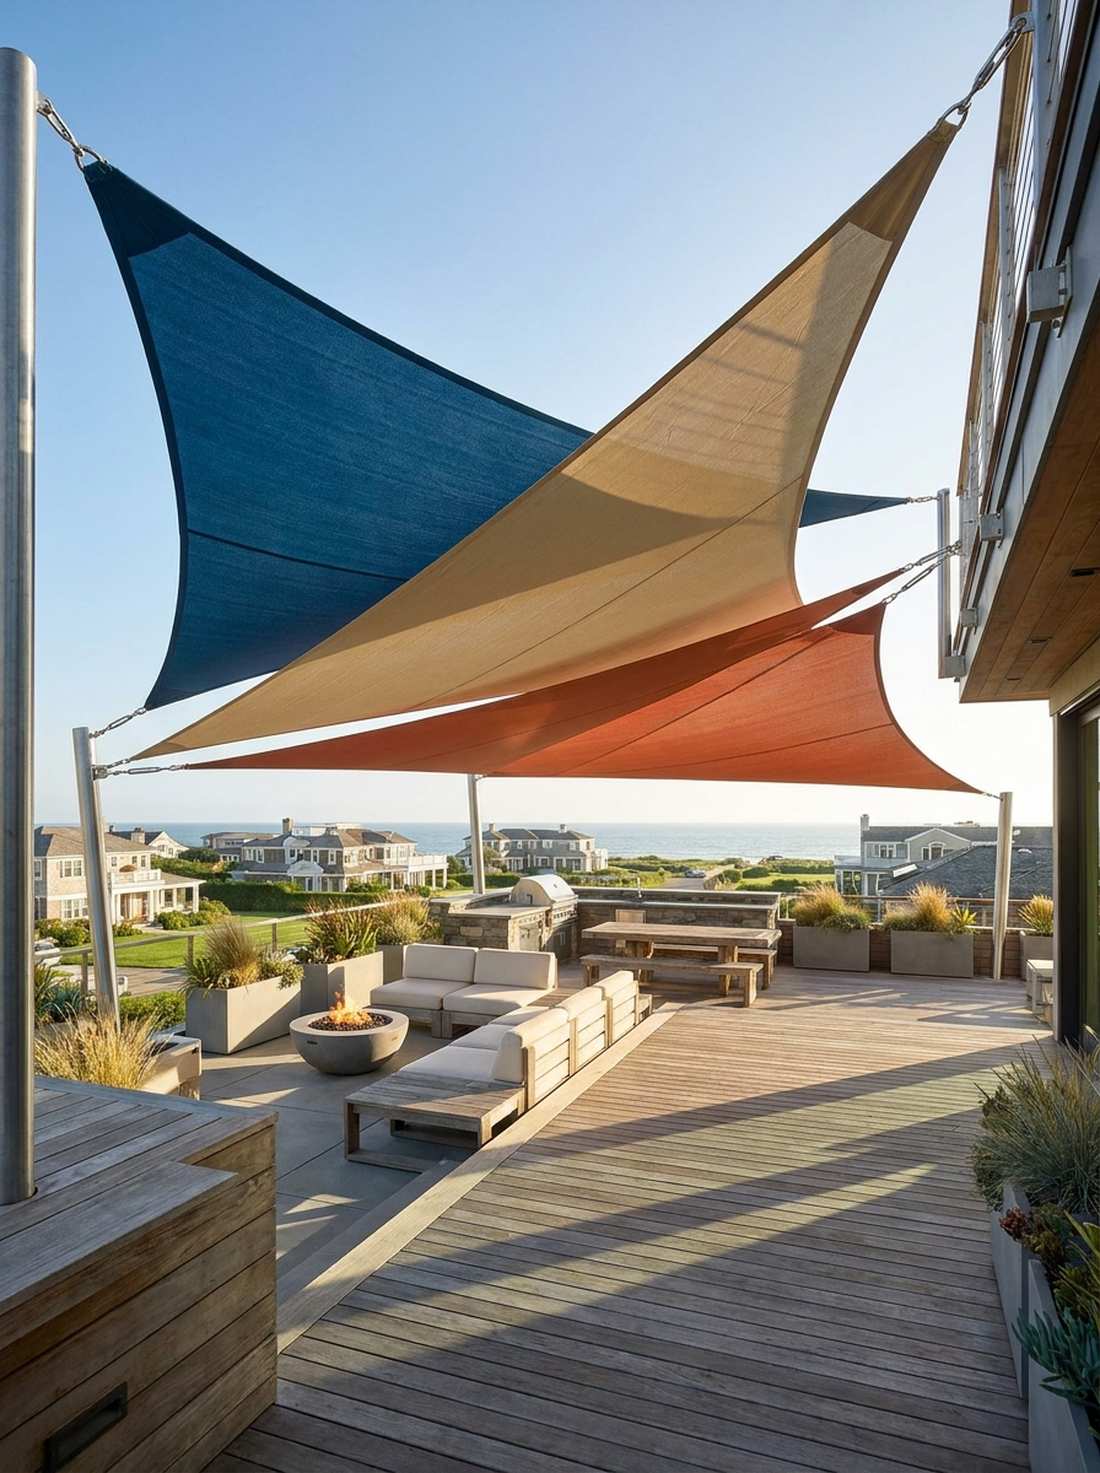
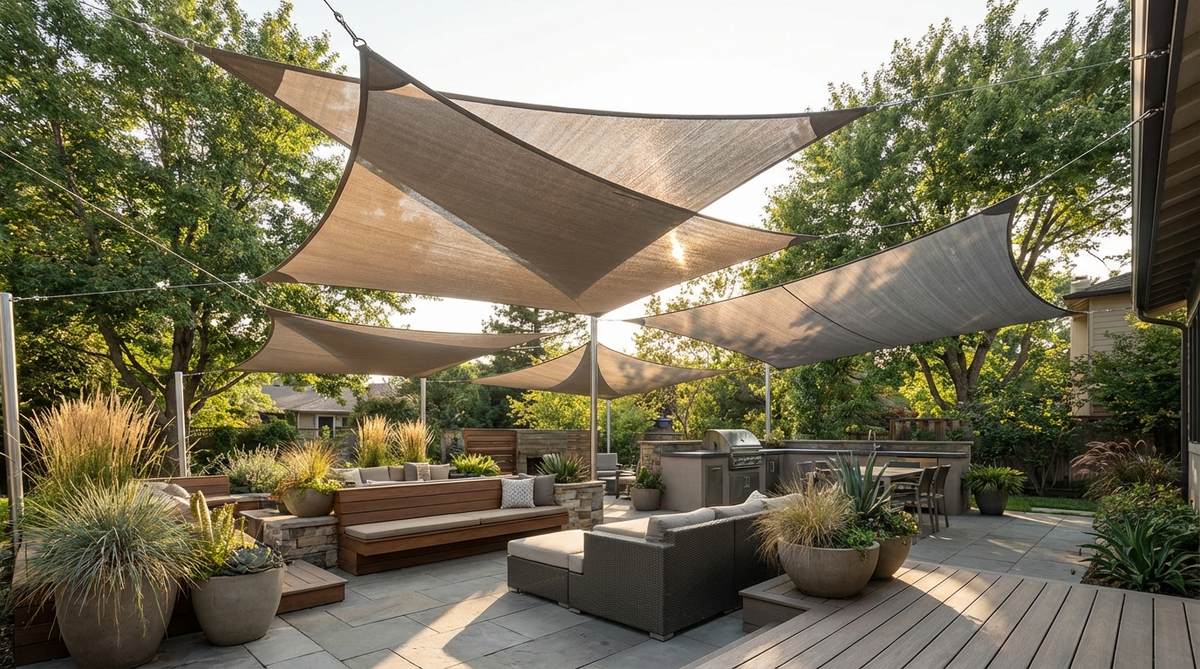
Cuts through the sky with sharp, sculptural geometry that instantly modernizes the entire skyline. Suspended architectural sun sails. The cheapest and fastest way to cast massive, dramatic shadows across weirdly shaped, asymmetric rooftops.
Flimsy patio umbrellas snap backward at the first gust of wind; ratcheting heavy-duty HDPE fabric sails between fixed anchor points delivers a surprisingly premium look that shrugs off heavy gales. Overlapping three different colored triangles creates a striking, multi-dimensional overhead canopy.
A high-tension sail setup costs around $60–$150 depending on the hardware quality.
- Key Materials: High-density polyethylene (HDPE) sails, stainless turnbuckles
- Vibe / Style: Modern coastal geometry
- Difficulty: High-tension hardware mounting
- Budget Breakdown: Fabric Sail: $50 | Heavy Hardware: $40.
- Creator’s Tip: Never mount the sail totally flat; drastically lower one corner by at least two feet to create a steep pitch that sheds rain instantly instead of stretching into a giant water balloon.
- Smart Sourcing: UV-coated commercial sun sails | Heavy-duty stainless steel turnbuckle kits
Lighting & Ambiance Design
Strategic illumination completely alters the nighttime geometry of a space. Layering hidden spots, soft overheads, and warm pathway markers shifts the vibe from a dark, scary roof to an exclusive VIP lounge.
26. LED String Light Canopy Installations
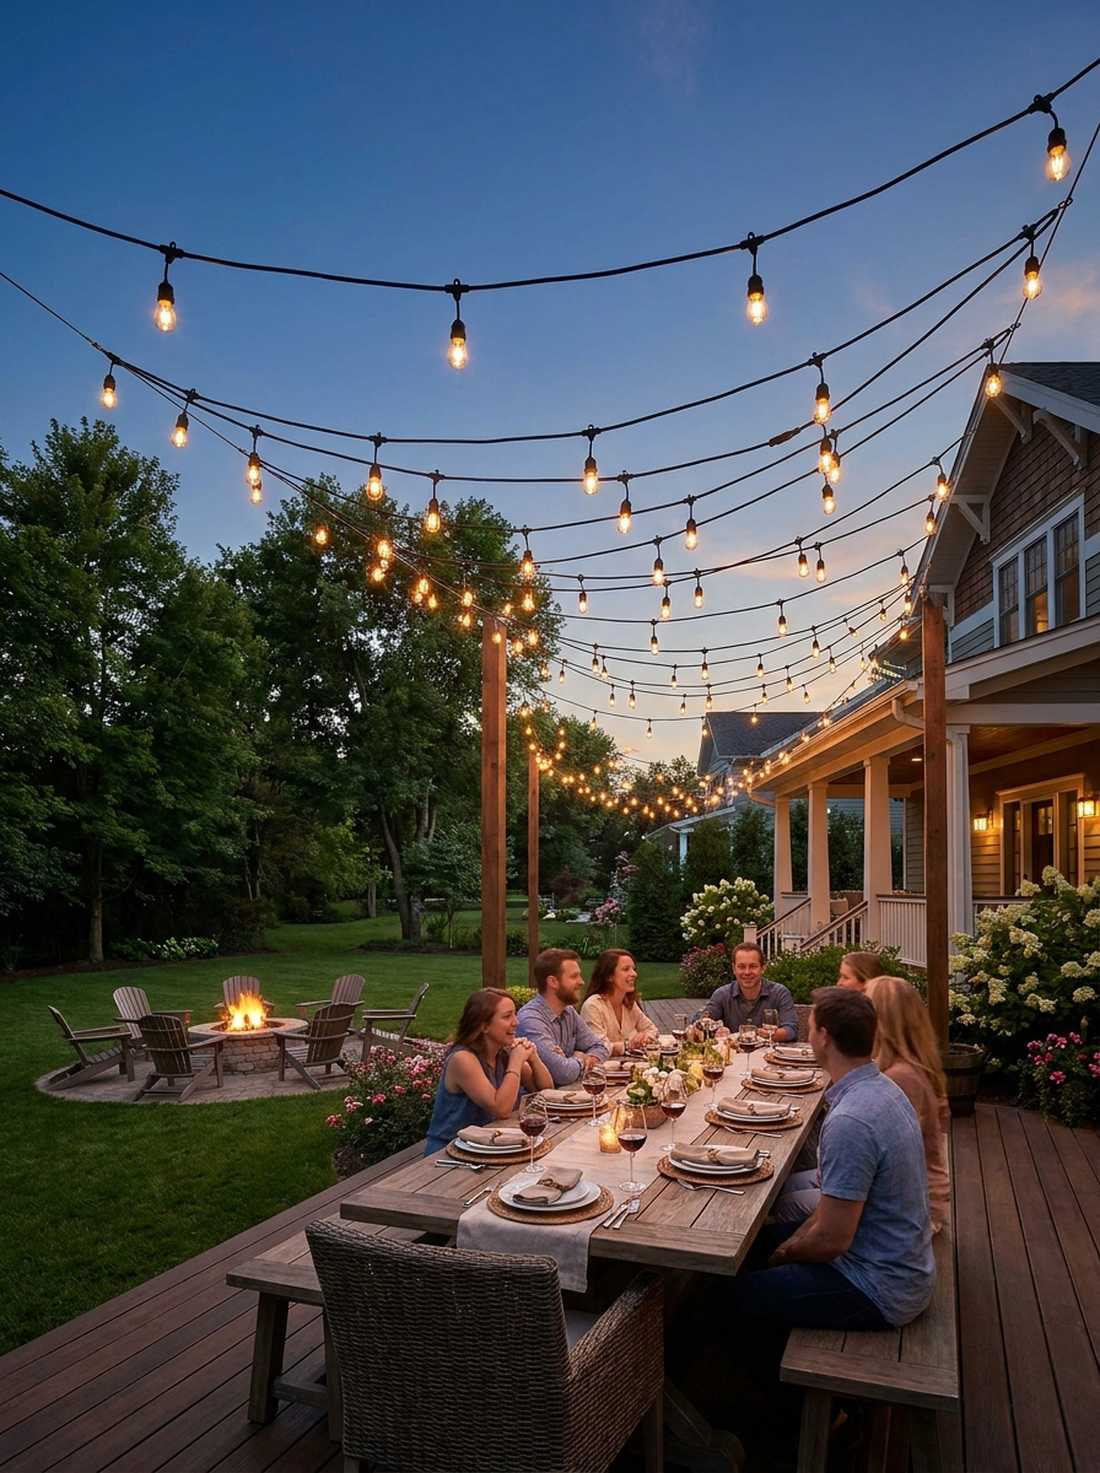
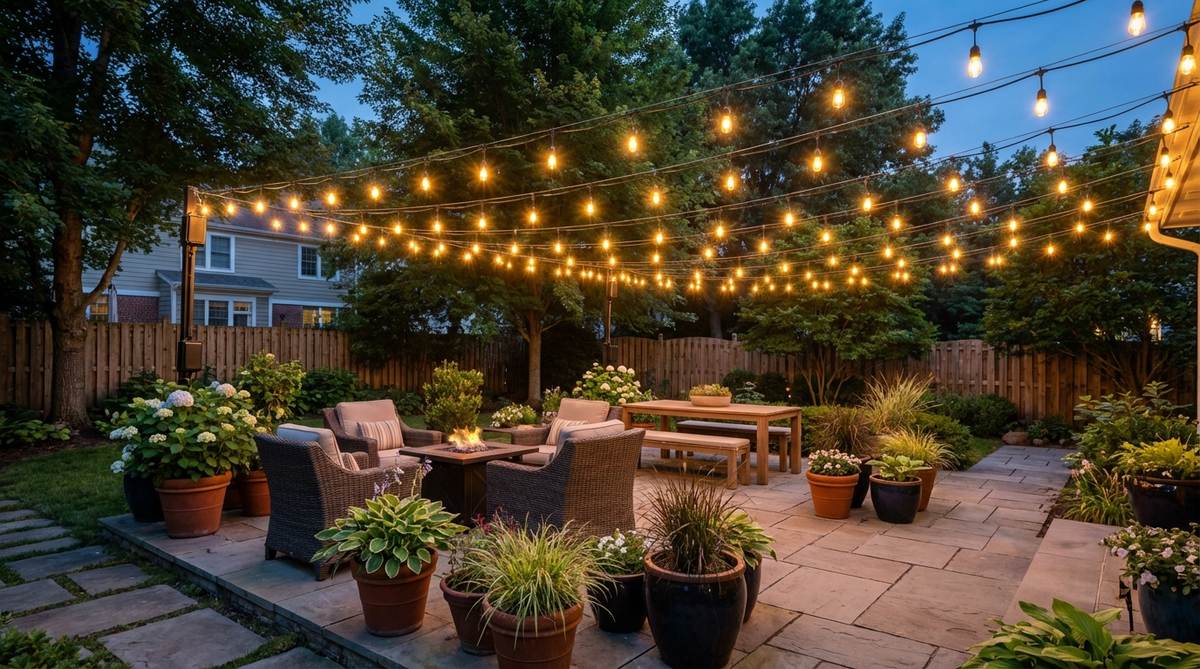
Drapes the sky in a warm, festive constellation of golden fireflies. Overhead cafe string lighting. The absolute fastest, most effective way to establish a deeply romantic, celebratory mood for evening dinner parties.
Stringing up cheap, thin Christmas lights looks sad and amateurish; suspending thick-gauge, shatterproof Edison bulb cords creates an immediate architectural statement that feels highly curated. Criss-crossing them tightly overhead drops a stunning, soft ambient glow that flatters everyone underneath.
A heavy-duty string light canopy can be rigged for $40–$90. Pin this to your outdoor evening inspiration board.
- Key Materials: Commercial-grade outdoor LED strings, guide wire
- Vibe / Style: Warm bohemian festival
- Difficulty: Simple overhead stringing
- Budget Breakdown: 50ft LED String: $45 | Suspension Kit: $20.
- Creator’s Tip: Always run a steel tension guide-wire first and clip the lights to it; never use the actual electrical cord to bear the tension weight across a wide span.
- Smart Sourcing: Shatterproof commercial-grade LED cafe lights | Steel cable string light suspension kits
27. Recessed Deck Floor Lighting
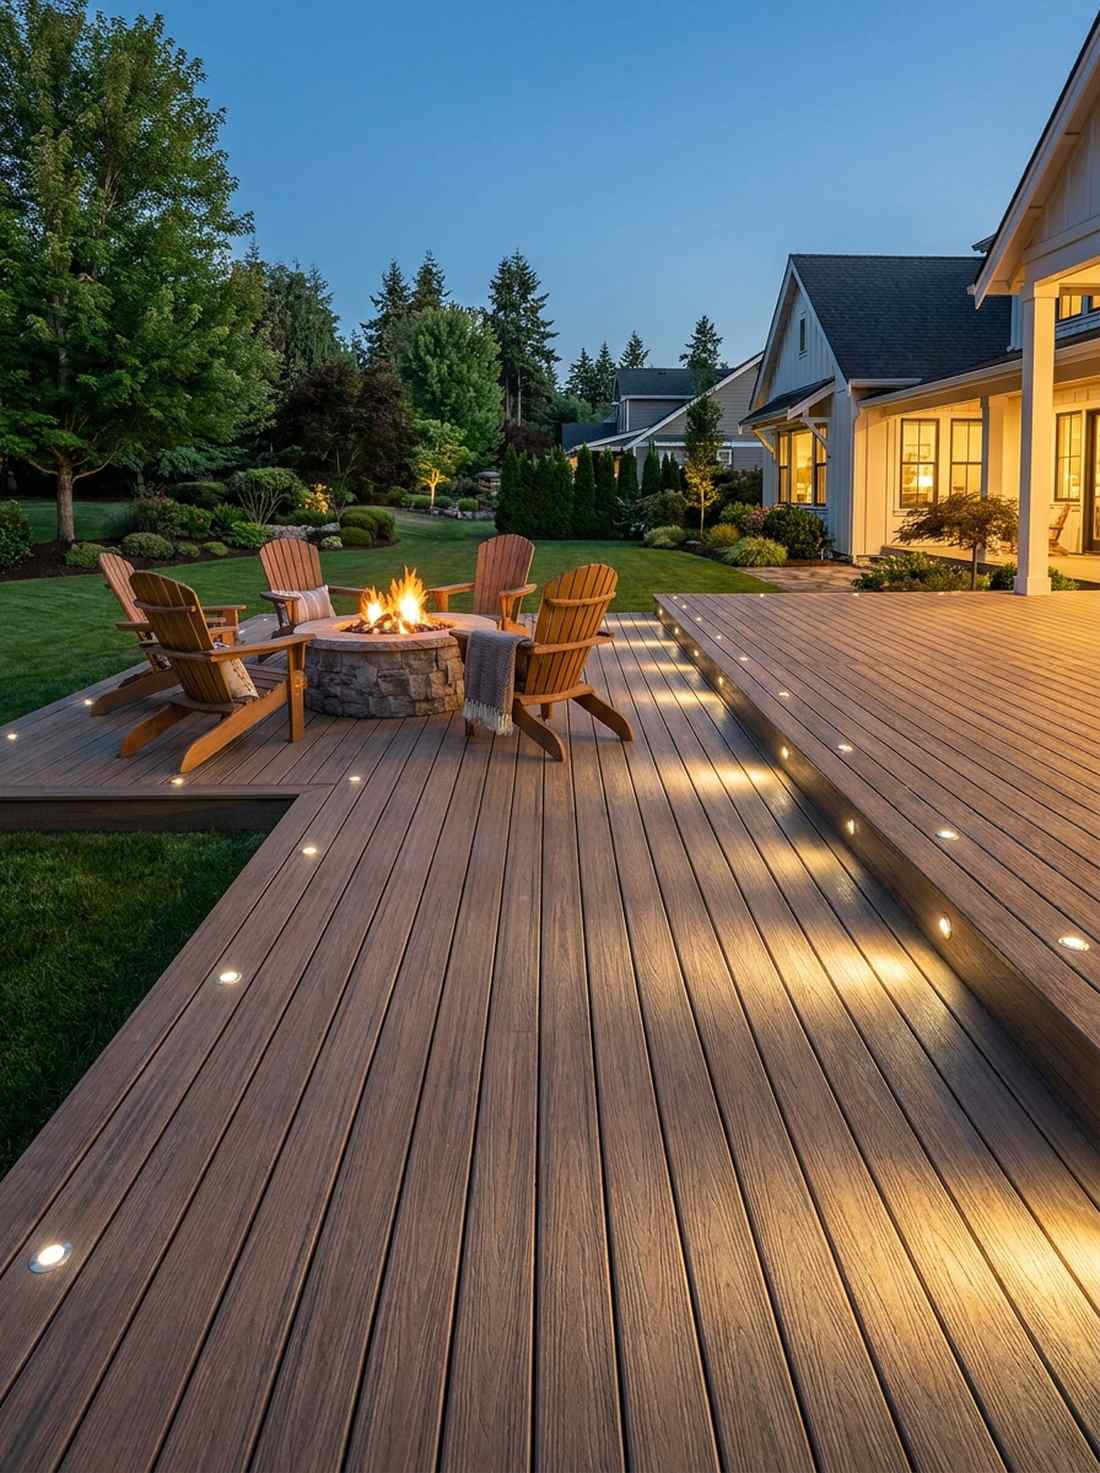
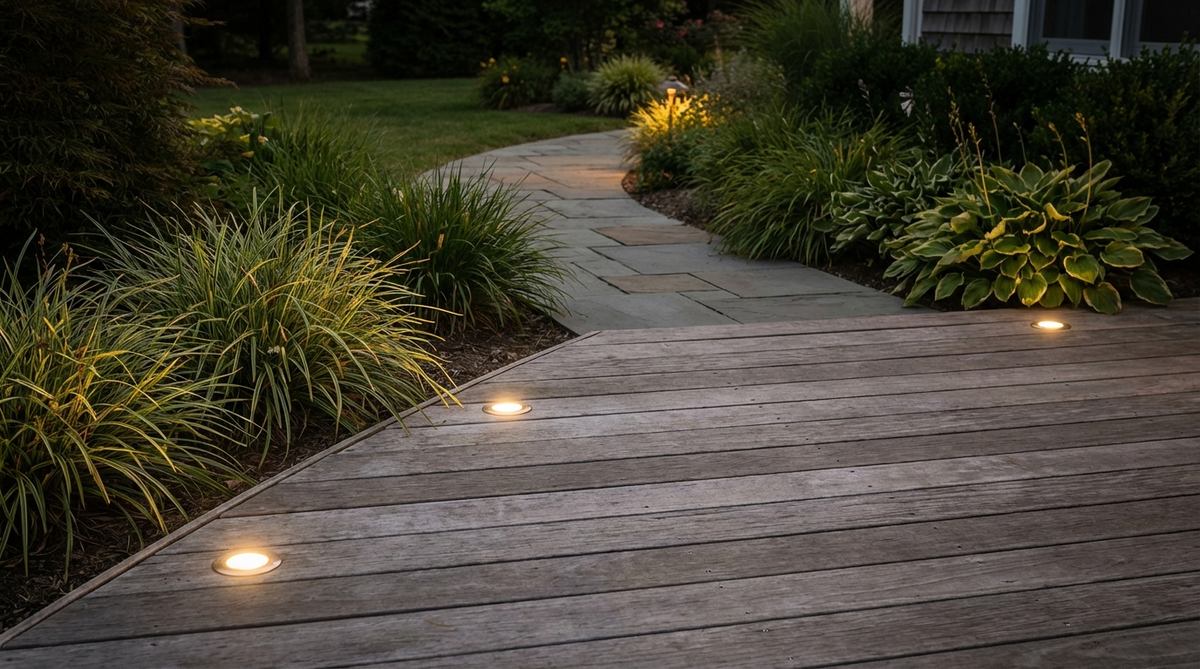
Shoots sleek, low-profile beams across the wood grain that makes the deck look like a futuristic runway. Flush-mount patio floor lights. Essential for safely illuminating subtle step-downs or hidden borders without blinding your guests with harsh spotlights.
Clunky solar stakes look messy when shoved into deck planters; drilling tiny, flush LED pucks directly into the flooring looks far more expensive than it is and creates an incredibly sleek, hazard-free surface. Aiming them slightly to wash across the wood texture highlights the beautiful grain of your hardscaping.
This integrated lighting upgrade costs roughly $80–$150 for a multi-light kit.
- Key Materials: Low-voltage LED deck pucks, waterproof wiring harnesses
- Vibe / Style: Ultra-sleek architectural safety
- Difficulty: Intermediate wiring and hole-sawing
- Budget Breakdown: 10-Pack LED Kit: $70 | Transformer: $30.
- Creator’s Tip: Seal the edges of every drilled hole with clear silicone before pushing the light fixture in to completely prevent water from rotting the core of your deck boards.
- Smart Sourcing: Low-voltage recessed LED deck lighting kits | Weather-proof outdoor silicone sealants
28. Solar Powered Pathway Markers
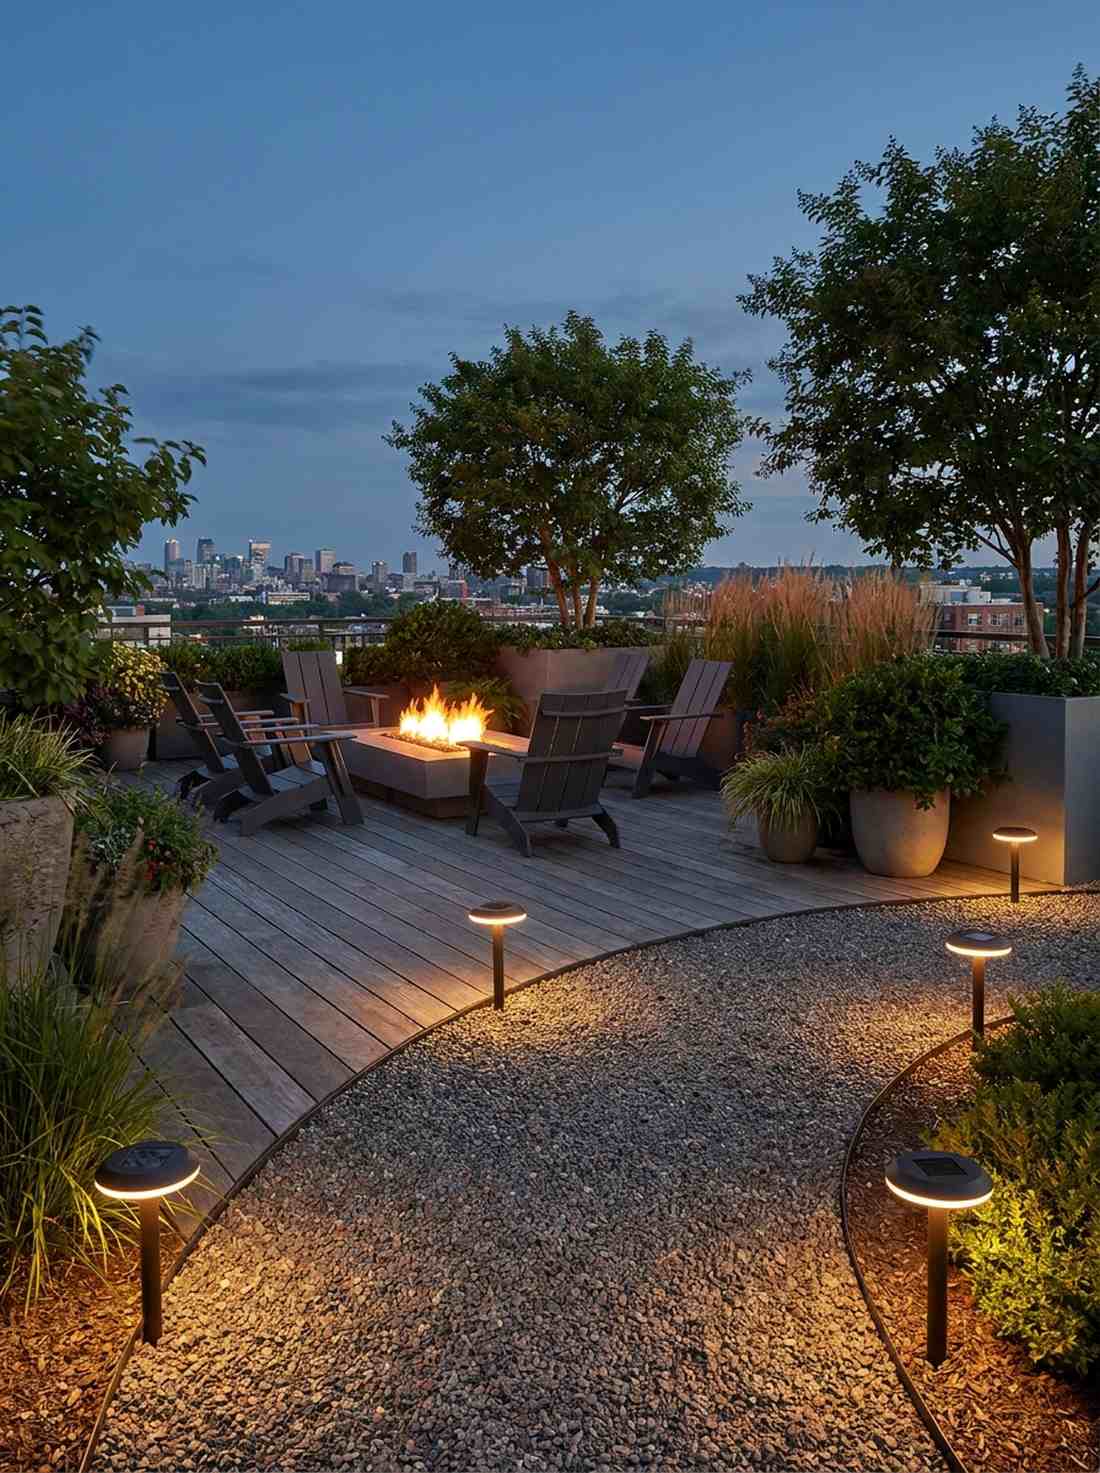
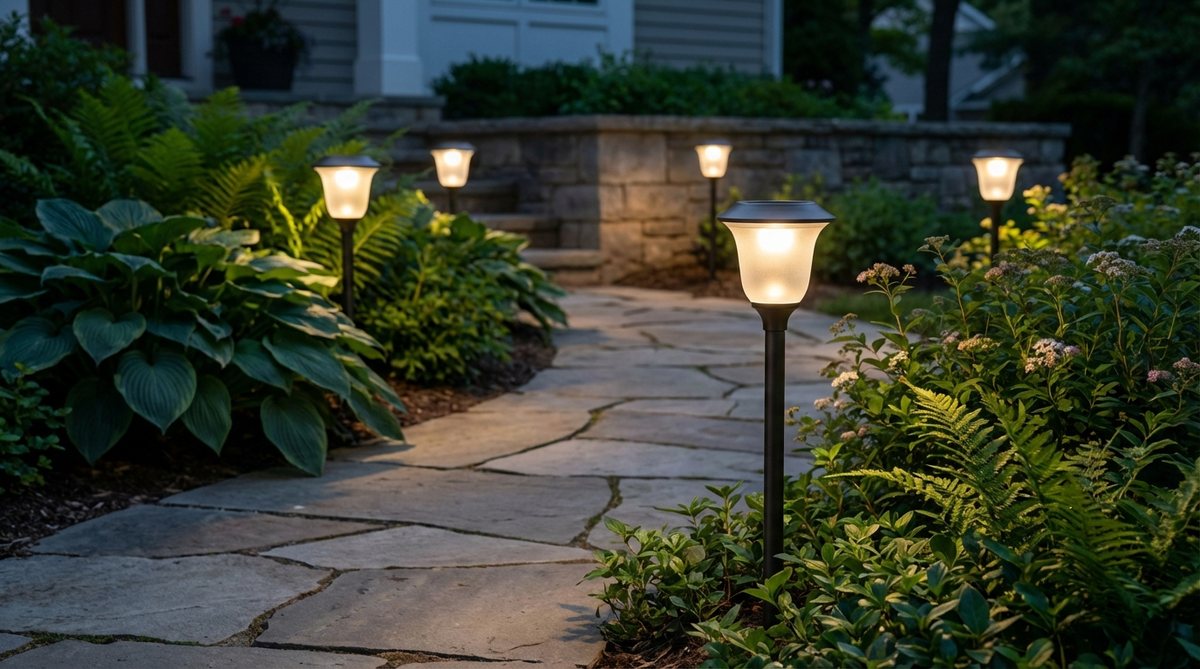
Projects a warm, glowing perimeter that feels like an exclusive, hidden nighttime lounge. Ambient deck boundary lighting. Essential for defining safe walking borders on expansive rooftop pavements without ever hiring a costly electrician.
Far too many layouts rely on harsh, blinding floodlights that totally ruin the mood; choosing warm-toned, heavy-metal stake markers delivers a surprisingly premium look that charges invisibly by day. Sinking them into gravel beds completely disguises the stakes, leaving only a floating disc of light.
You can easily pull this off for around $35–$65 a dozen. Save this if you need fast, wire-free ambiance.
- Key Materials: Cast-aluminum solar stake lights, rechargeable battery cores
- Vibe / Style: Relaxed modern resort
- Difficulty: Instant push-in setup
- Budget Breakdown: 8-Pack Solar Stakes: $50.
- Creator’s Tip: Wipe the solar charging panels with a damp cloth once a month; a tiny layer of city dust will cut their glowing time by more than half.
- Smart Sourcing: UV-coated commercial solar stakes (bulk pack) | High-capacity outdoor rechargeable batteries
29. Wall Sconce Accent Lighting
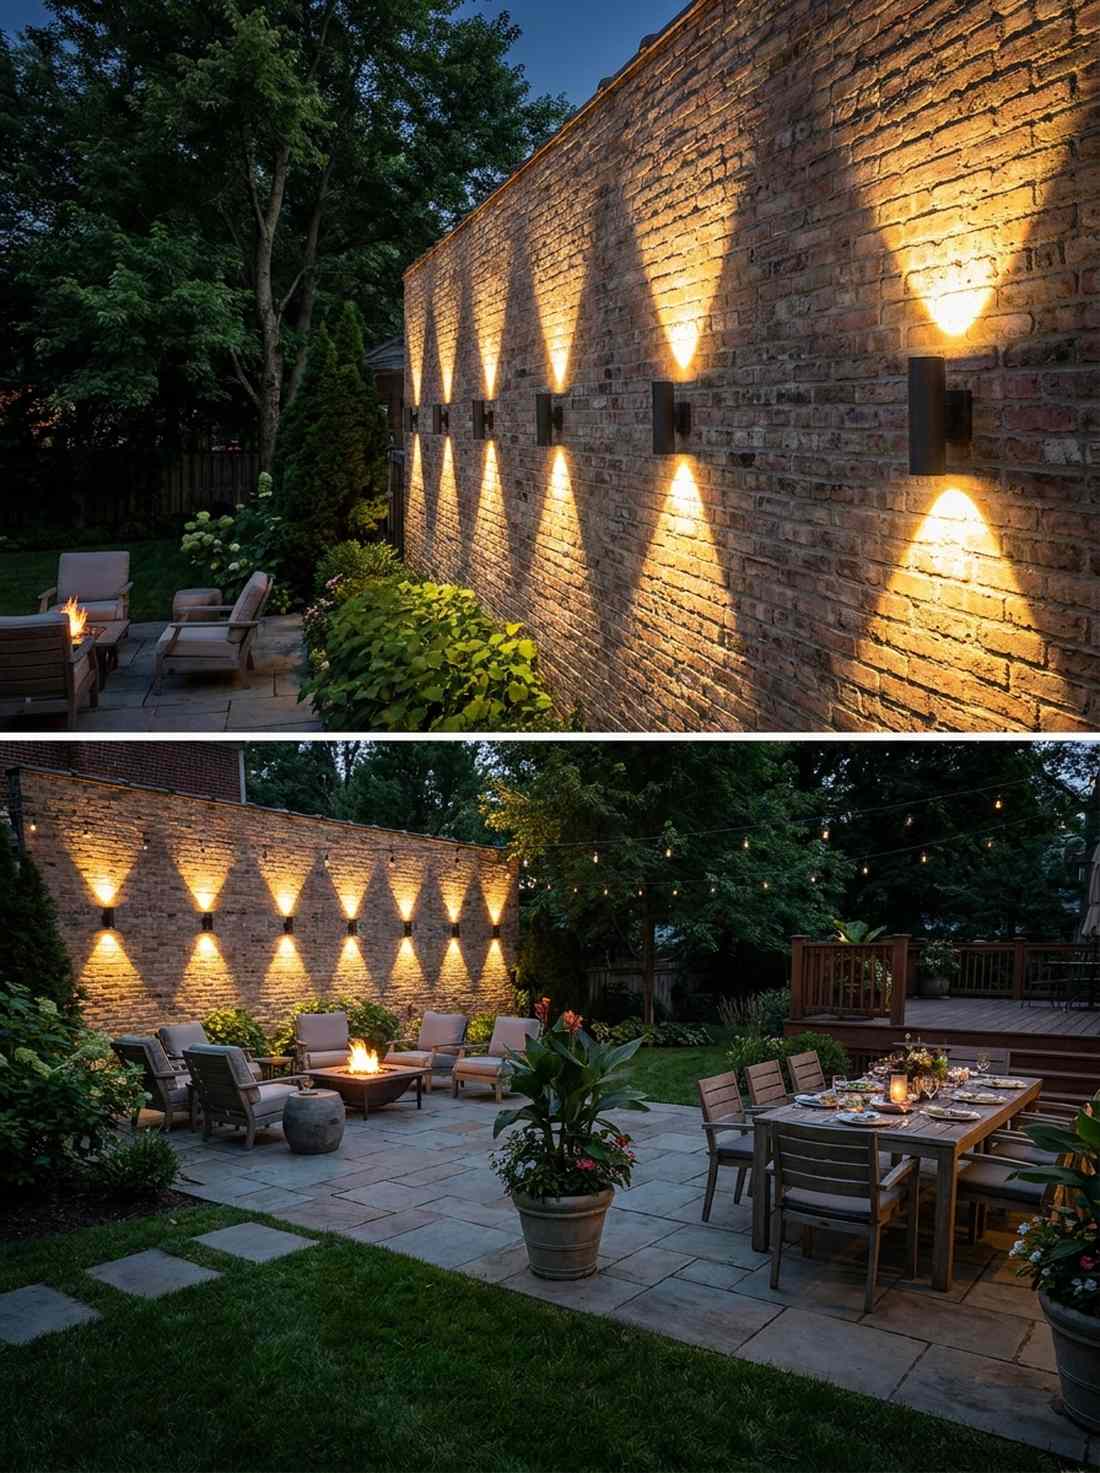
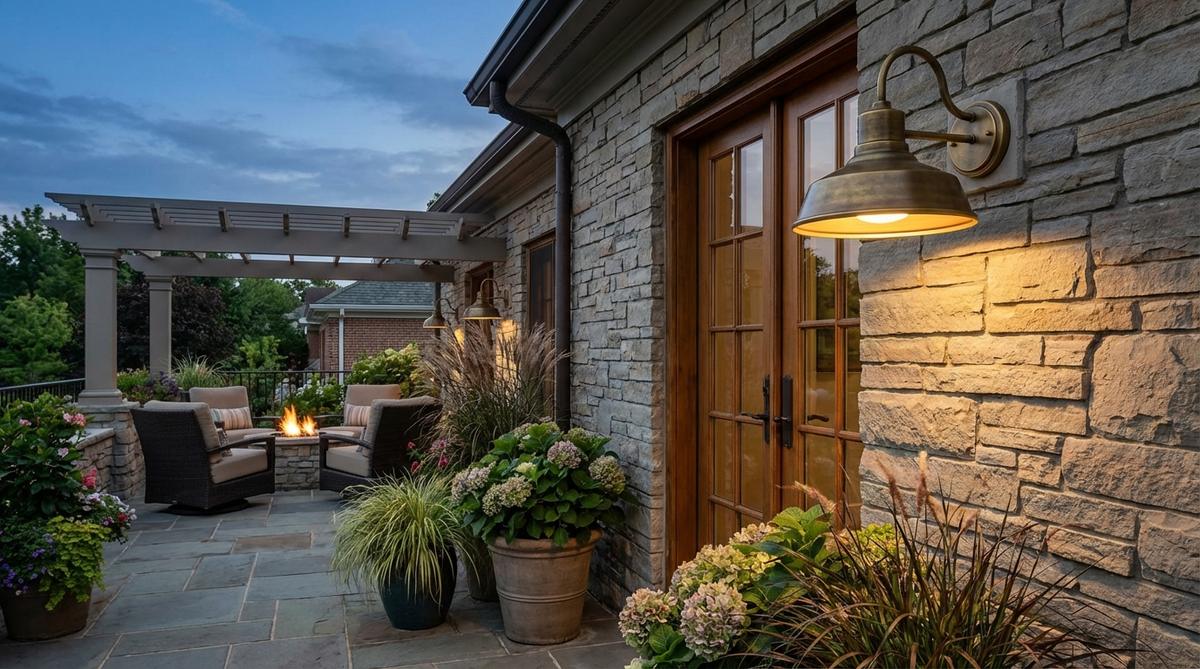
Washes stark, ugly masonry in dramatic, V-shaped beams of cinematic light. Vertical wall illumination accents. The absolute best technique for drawing the eye upward and making a claustrophobic courtyard feel intensely tall and grand.
Leaving brick walls dark at night makes the space feel like a prison yard; mounting sleek, dark-metal up-and-down sconces brings an instant architectural quality that transforms the wall into a textured canvas. Choosing warm 2700K bulbs ensures the light flatters skin tones during late-night dinners.
These architectural fixtures cost about $40–$90 each.
- Key Materials: Weather-sealed aluminum sconces, warm LED bulbs
- Vibe / Style: High-end cinematic drama
- Difficulty: Basic wall mounting
- Budget Breakdown: Sconce Fixture: $45 | Smart Bulb: $15.
- Creator’s Tip: If you don’t have hardwired electricity on the wall, use the “magic light trick” by sticking rechargeable, remote-controlled LED pucks directly inside the sconce housings.
- Smart Sourcing: Weather-proof architectural wall sconces | Remote-controlled rechargeable LED pucks (bulk pack)
Material Guide: Cheap vs. Premium Aesthetic
Knowing exactly where to aggressively save cash and where to spend makes all the difference in achieving that “looks expensive but isn’t” vibe on a harsh rooftop.
- Standard vs. UV-Resistant/Premium: Cheap plastics fade to brittle grey in 60 days of direct sun. Upgrading to UV-coated resins or heavy-gauge steel stops fading and completely prevents wind-shattering.
- Pre-made Kits vs. Sourcing Locally: Buying individual pieces from big-box stores often leads to mismatched hardware. Investing in complete starter kits guarantees cohesive alignment, saving hours of frustrating return trips.
Most DIYers completely ignore the base of their expensive plants, totally missing out on this dramatic high-end lighting trick…
30. Up-Lighting for Specimen Plants
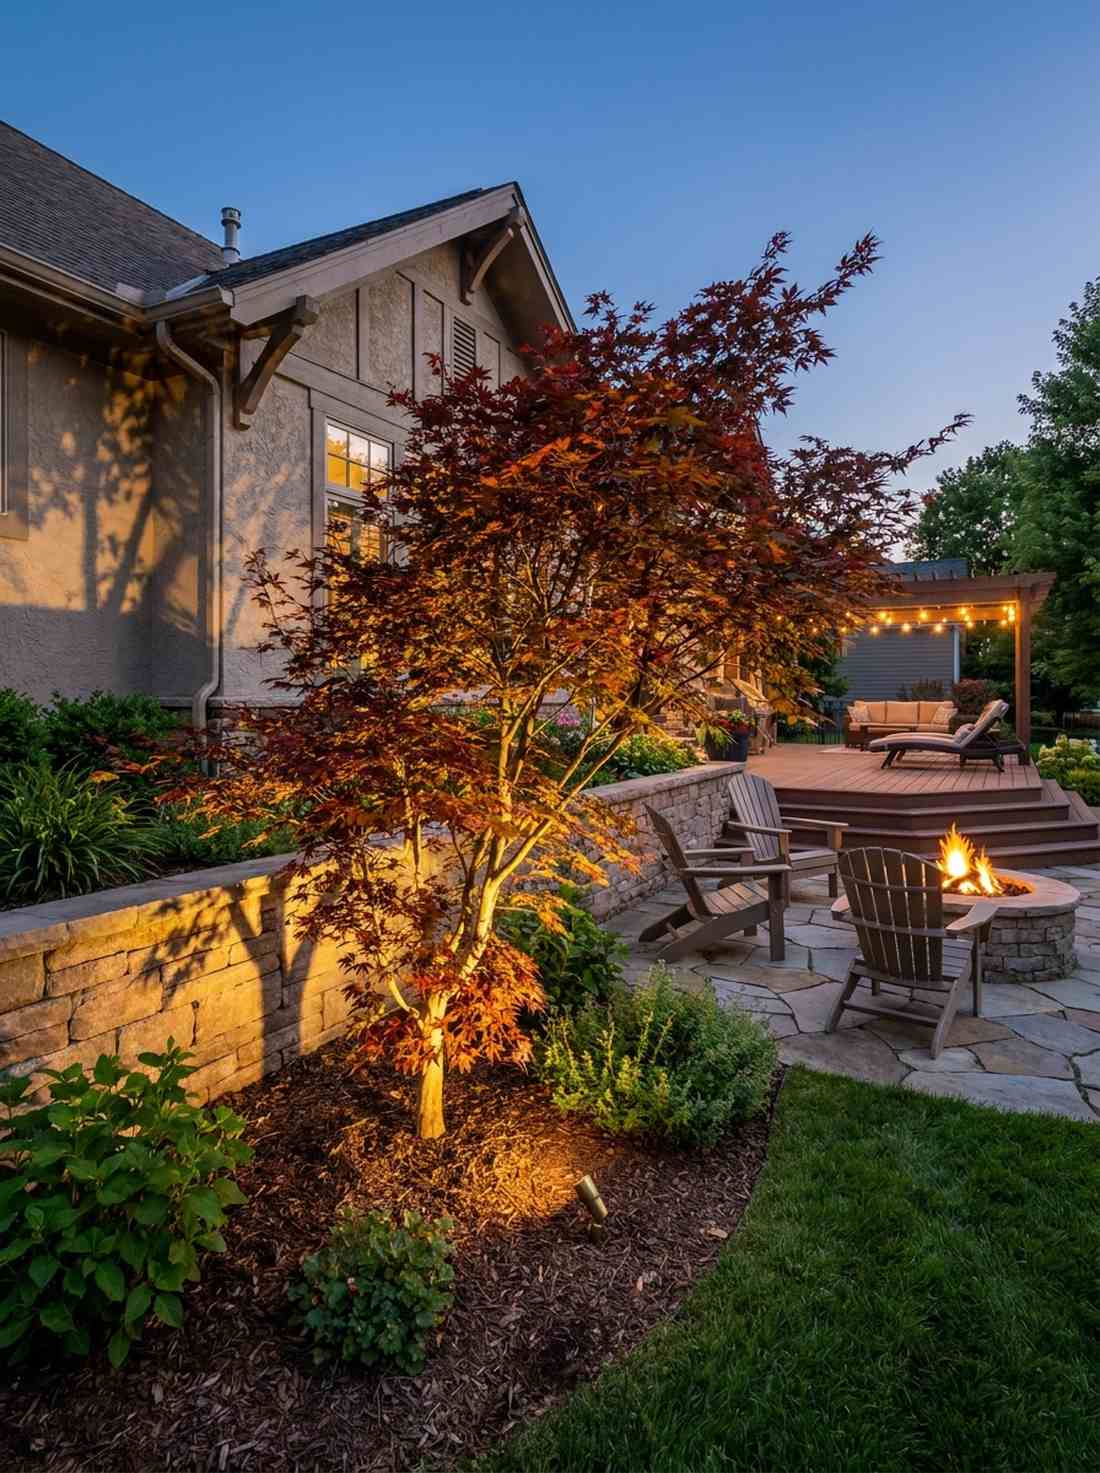
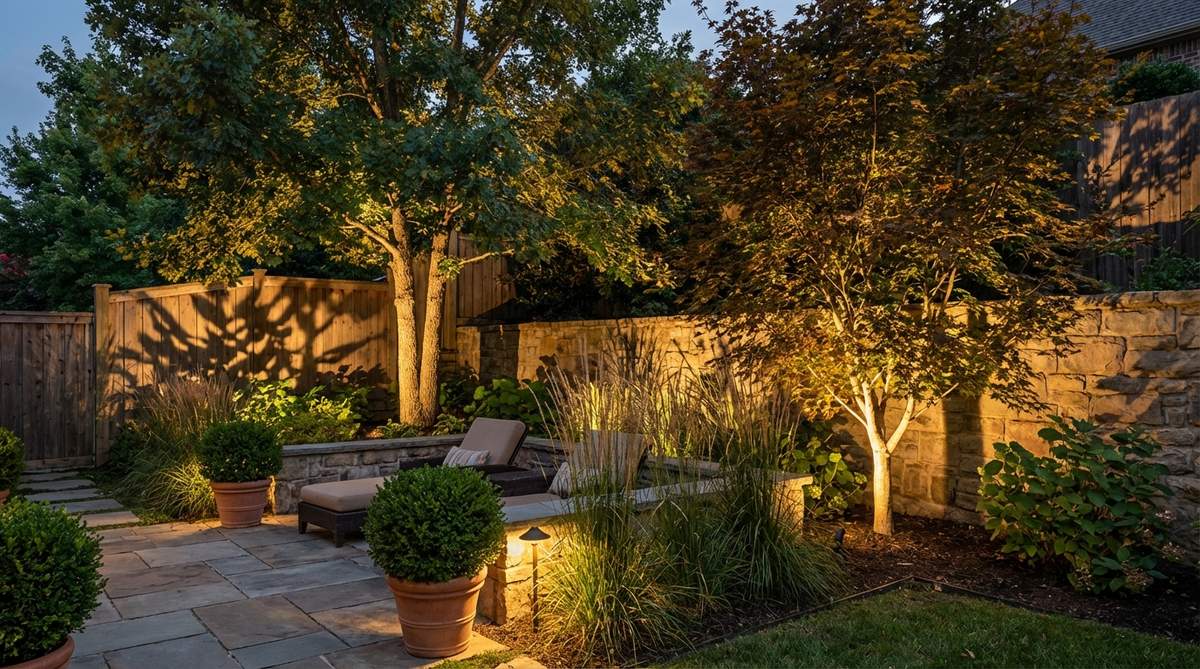
Casts massive, wildly dancing shadows across your ceilings and walls. Dramatic botanical spotlighting. Perfectly engineered for highlighting expensive, sculptural Japanese maples or massive agave plants.
Lighting a plant from above flattens its texture entirely; sinking a sharp, narrow-beam spotlight directly into the soil pointing straight up screams high-end luxury and turns a basic shrub into a living art installation. Using low-voltage miniature garden supplies ensures you don’t accidentally fry the root system.
A sleek spotlight system can be added for roughly $25–$55 per plant.
- Key Materials: Low-voltage brass spotlights, waterproof soil stakes
- Vibe / Style: Dramatic living sculpture
- Difficulty: Easy soil-sinking
- Budget Breakdown: Spot Fixture: $30 | Wiring: $15.
- Creator’s Tip: Place the light fixture slightly behind the main trunk pointing up into the canopy to hide the actual bulb housing from the seating area’s direct line of sight.
- Smart Sourcing: Heavy-duty low-voltage landscape spotlights | Automated photocell outdoor timers
Sustainable & Eco-Friendly Systems
Modern layouts demand brilliant water and nutrient management. Integrating hidden ecological systems dramatically lowers your utility bills while allowing your plants to thrive on autopilot.
31. Rainwater Harvesting Barrel Systems
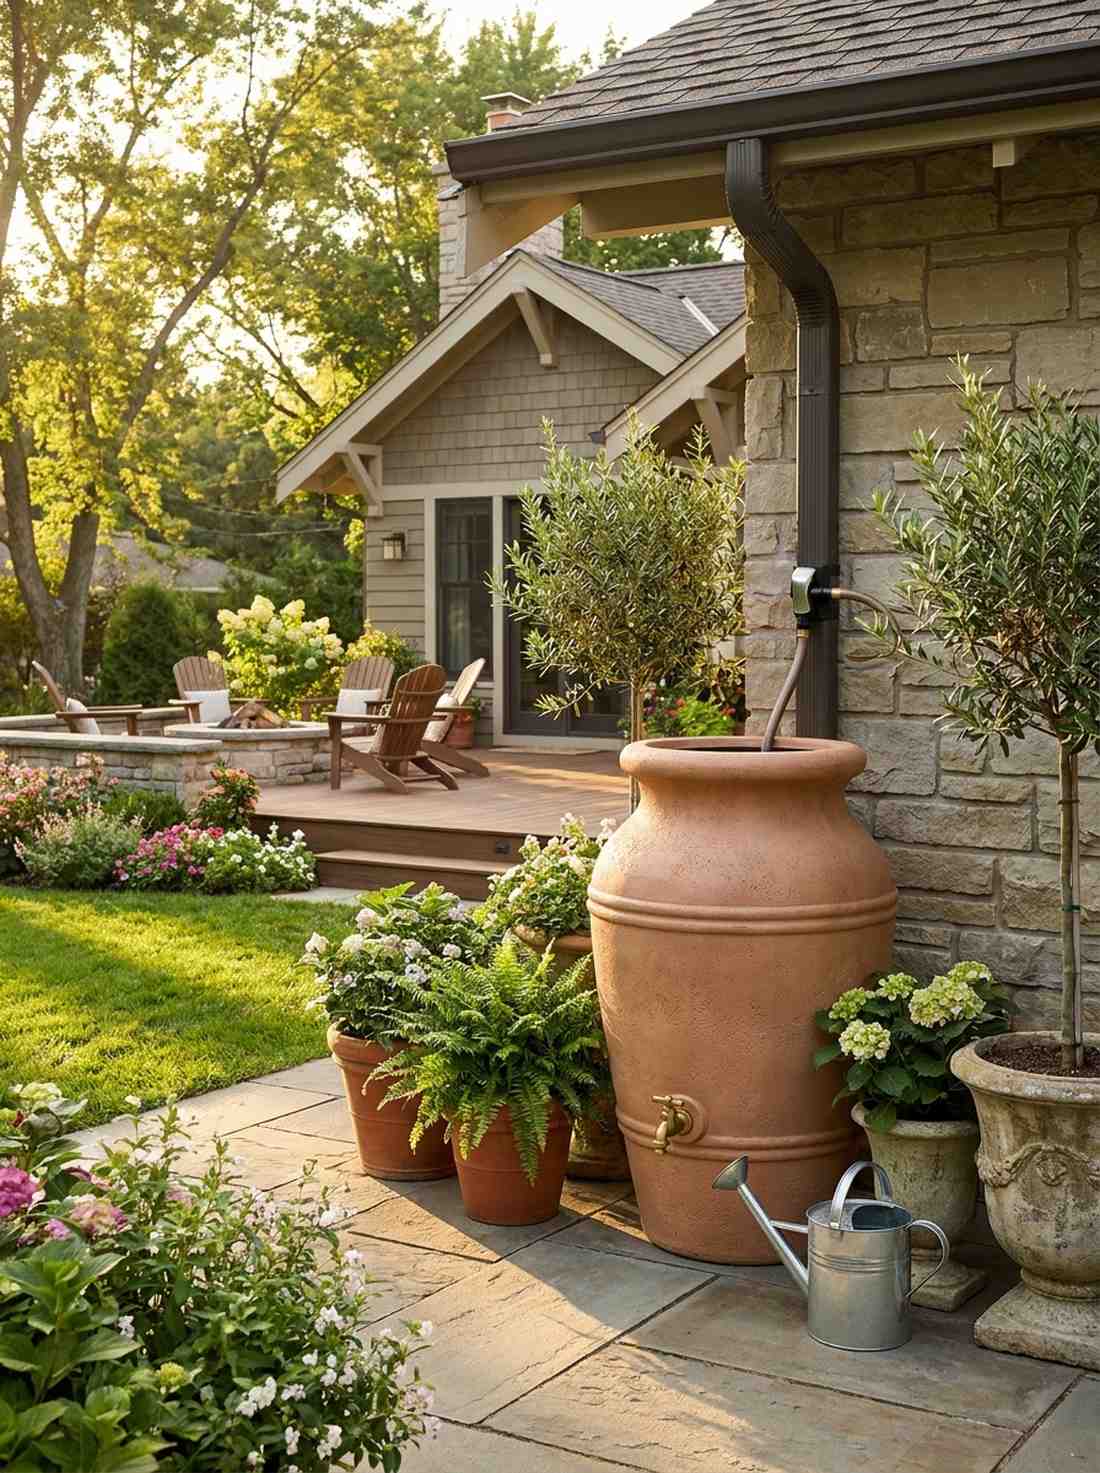
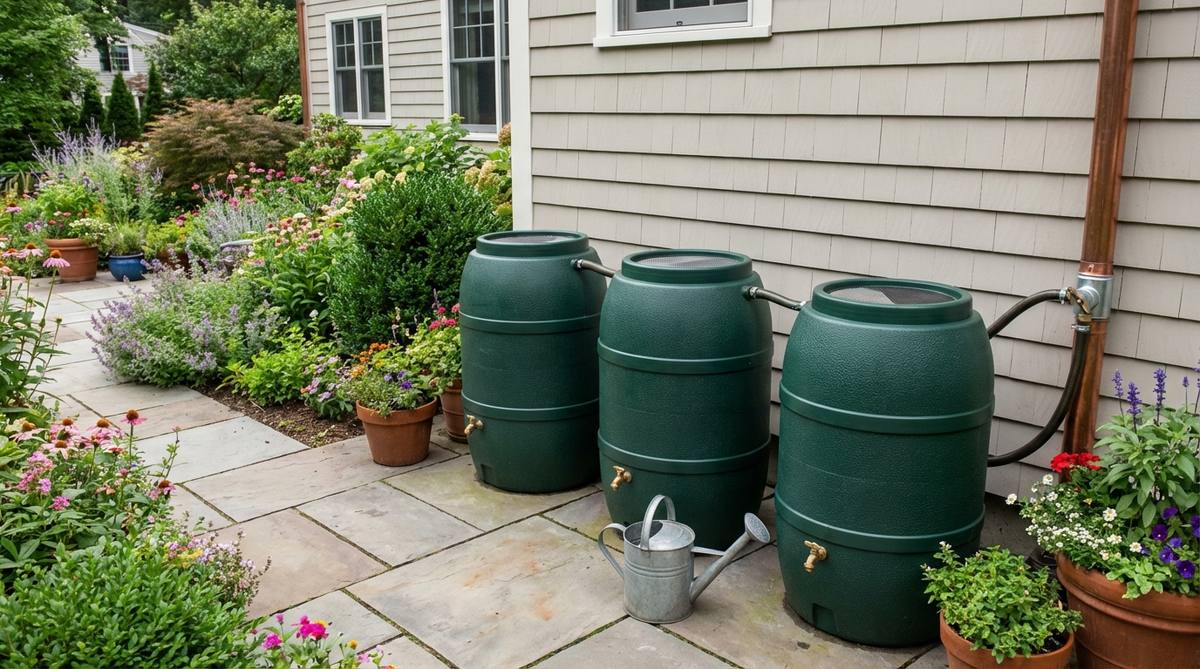
Acts like a massive, hidden reservoir of free, chemical-free hydration for your prized plants. Eco-friendly rooftop rain collection. Essential for massive container gardens where using the municipal hose everyday sends water bills through the roof.
Ugly blue plastic drums ruin the aesthetic of a curated space instantly; linking a sleek, faux-terracotta or wood-grain amphora looks far more expensive than it is while secretly hoarding gallons of pure rain. Adding a heavy brass spigot at the bottom makes filling watering cans feel incredibly satisfying.
You can set up a stunning, high-capacity collection urn for about $100–$200. Pin this if you love cutting your water bills to zero.
- Key Materials: UV-stable decorative rain urn, downspout diverter valve
- Vibe / Style: Sustainable Grecian utility
- Difficulty: Quick downspout hacking
- Budget Breakdown: Decorative Barrel: $120 | Diverter Kit: $30.
- Creator’s Tip: Always install a fine-mesh screen over the intake hole; a single mosquito slipping inside can breed hundreds of pests in a matter of days.
- Smart Sourcing: UV-coated decorative rain barrel kits | Heavy-duty downspout rain diverters
32. Native Pollinator Meadow Plantings
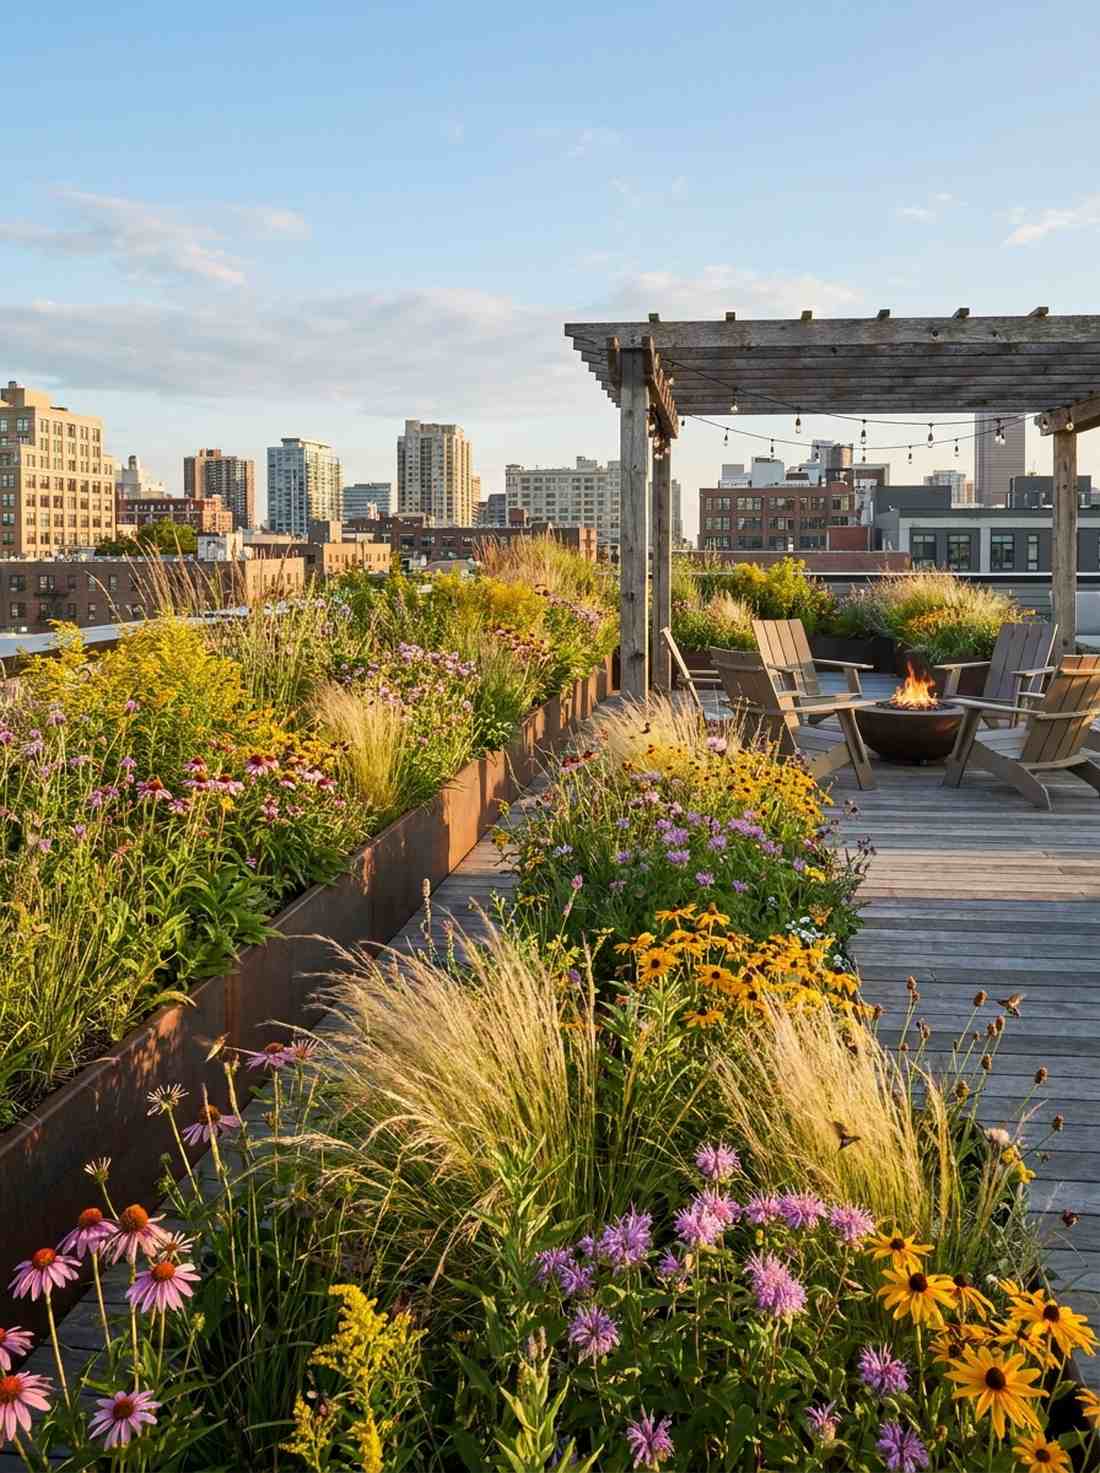
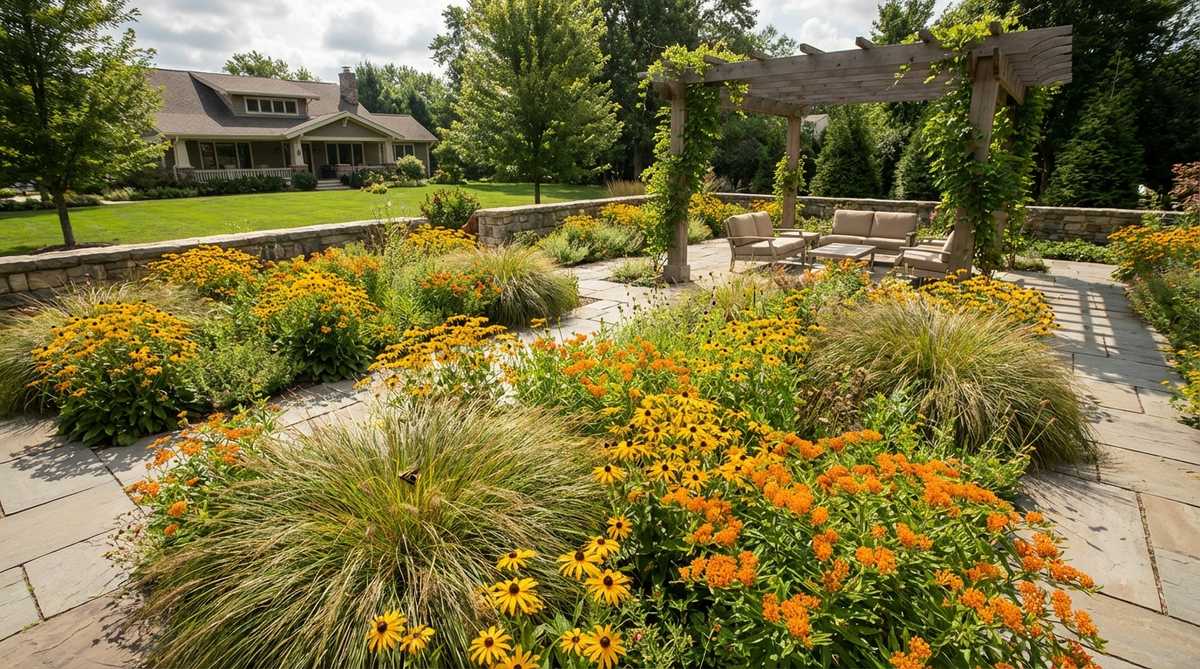
Explodes into a wild, untamed sea of texture that hums with vibrant life and color. Urban balcony wildlife habitats. The ultimate hands-off planting strategy for blazing hot rooftops where delicate exotics instantly crisp up and die.
Fighting the climate with thirsty, high-maintenance tropicals is an expensive losing battle; packing wide troughs with resilient, deep-rooted native grasses brings an instant architectural quality that practically thrives on neglect. These hardy species naturally resist pests without requiring a single drop of harsh chemicals.
Seeding a native trough costs practically nothing, usually around $15–$30. Save this to your low-maintenance gardening board.
- Key Materials: Regional wildflower seed mixes, deep trough planters
- Vibe / Style: Wild urban prairie
- Difficulty: Just scatter and wait
- Budget Breakdown: Seed Mix: $15 | Deep Planter: $40.
- Creator’s Tip: Do not cut the dead, brown stalks down in late autumn; those exact stalks provide critical winter insulation and food sources for local birds.
- Smart Sourcing: Pre-mixed regional native pollinator seeds (bulk pack) | Deep-root commercial trough planters
33. Drip Irrigation Smart Controllers
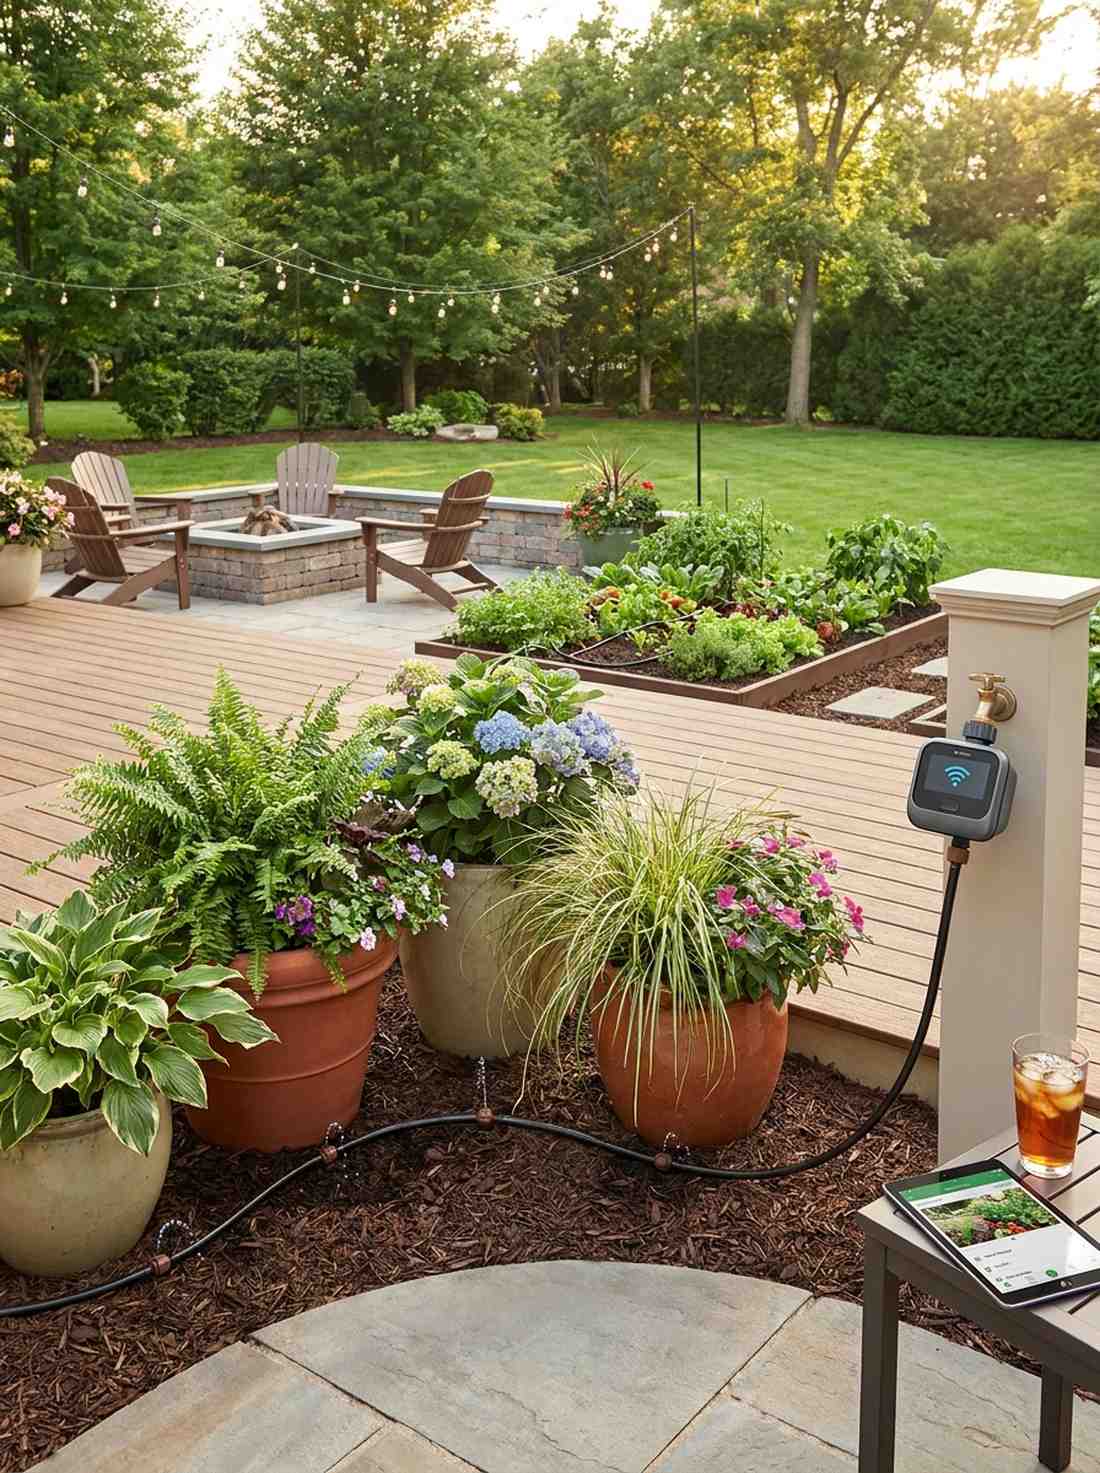
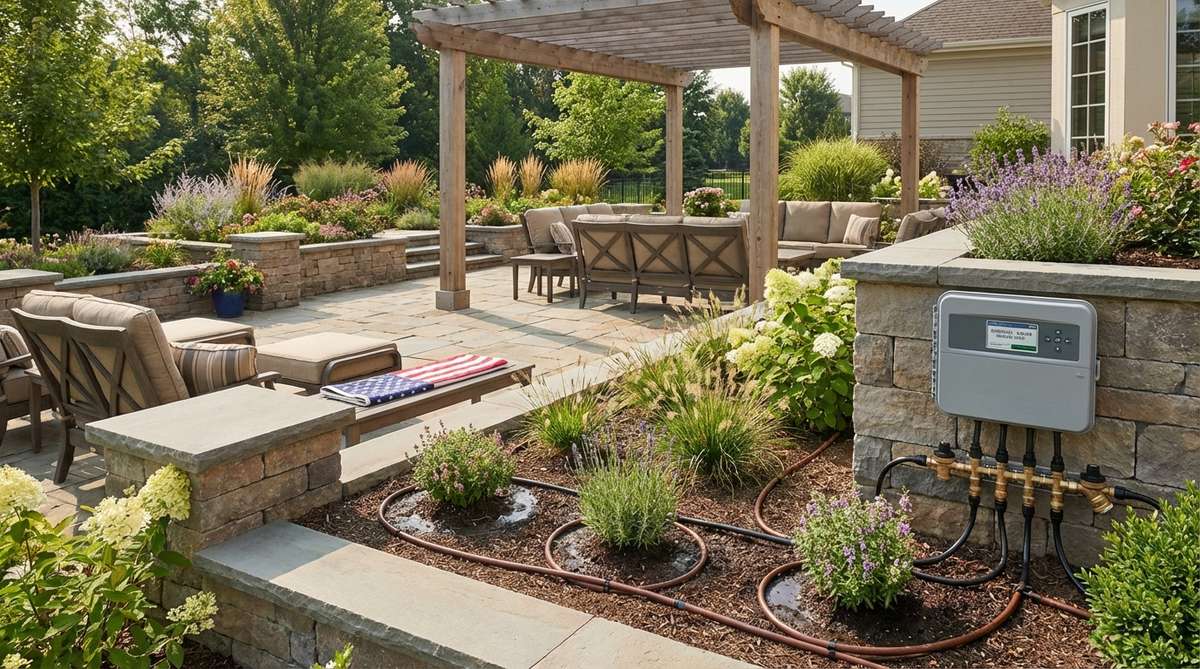
Feels like having an invisible, hyper-accurate robot butler managing your entire garden’s thirst. Automated Wi-Fi patio watering. The absolute holy grail for frequent travelers who want lush, massive foliage without being tied to a daily hose routine.
Blasting containers with a heavy hose washes all the expensive nutrients right out the bottom; weaving discrete, pressure-regulated micro-lines delivers a surprisingly premium look by hiding the plumbing beneath the mulch. The smart controller checks local weather data via Wi-Fi and automatically cancels watering if rain is coming.
A complete smart-drip system can be installed for $70–$150. It pays for itself in saved plants within one season.
- Key Materials: Wi-Fi enabled hose timer, 1/4-inch micro-drip tubing
- Vibe / Style: High-tech botanical efficiency
- Difficulty: Fun puzzle-like assembly
- Budget Breakdown: Smart Timer: $80 | Tubing Kit: $30.
- Creator’s Tip: Soak the ends of the black plastic tubing in a mug of boiling water for ten seconds before pushing them onto the barbed fittings; they slide on effortlessly and shrink-wrap tight.
- Smart Sourcing: Automated Wi-Fi smart hose timers | Pre-cut micro-drip irrigation starter kits
34. Compost Bin Integrated Systems
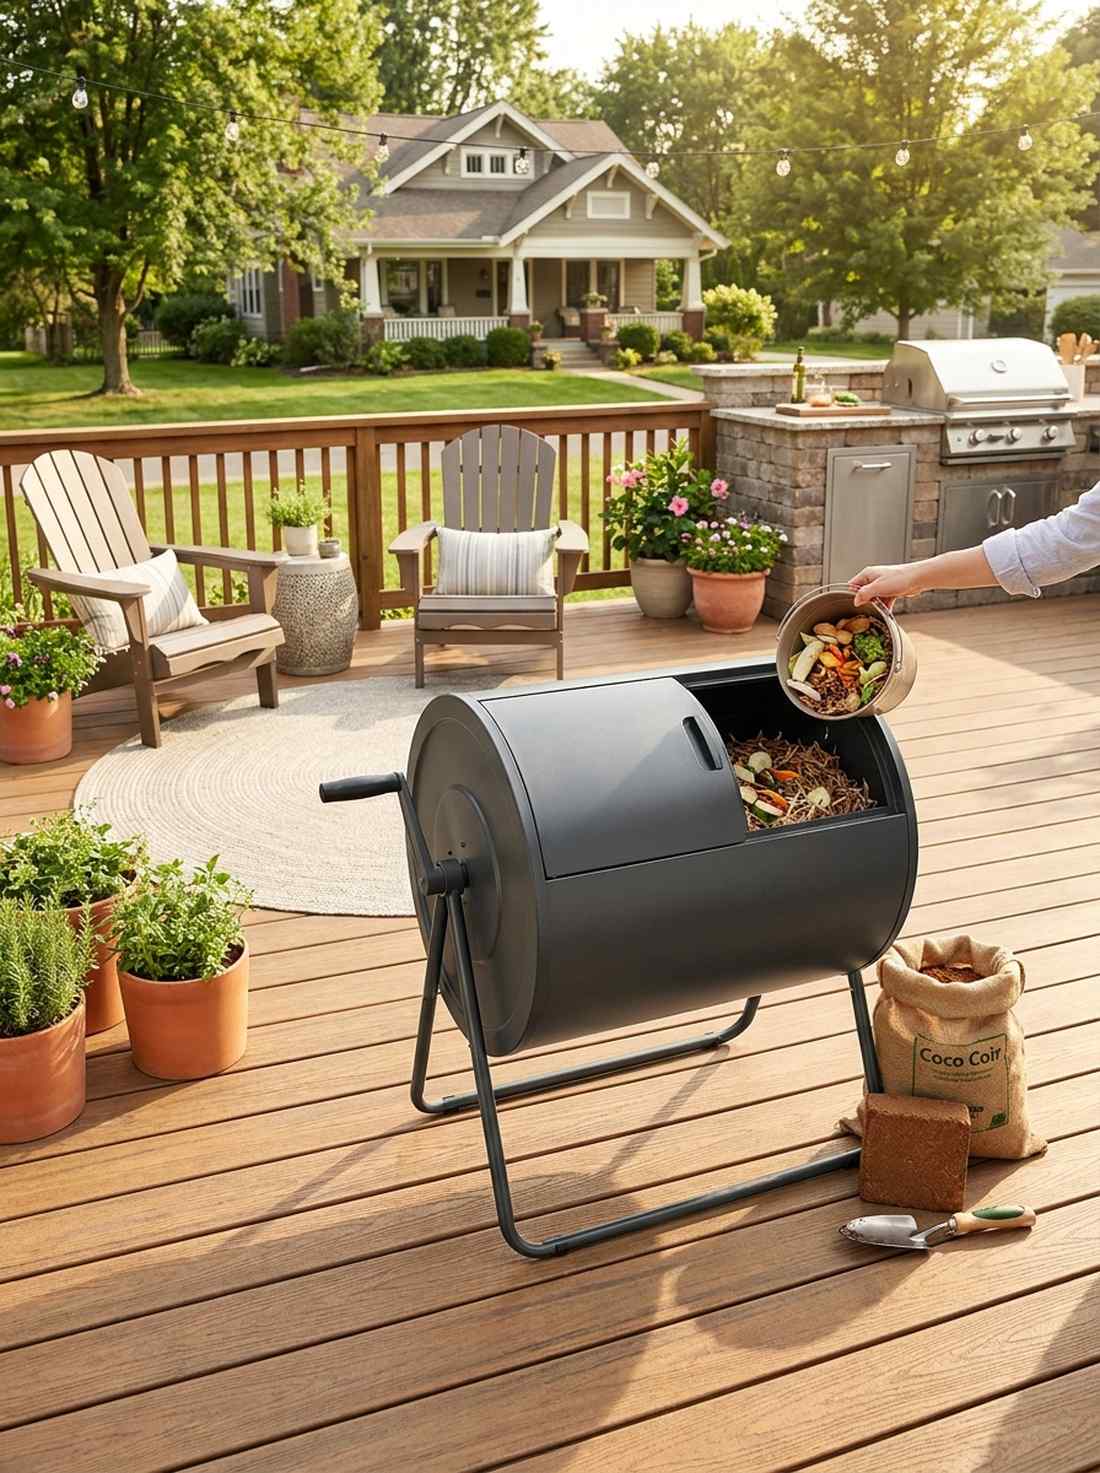
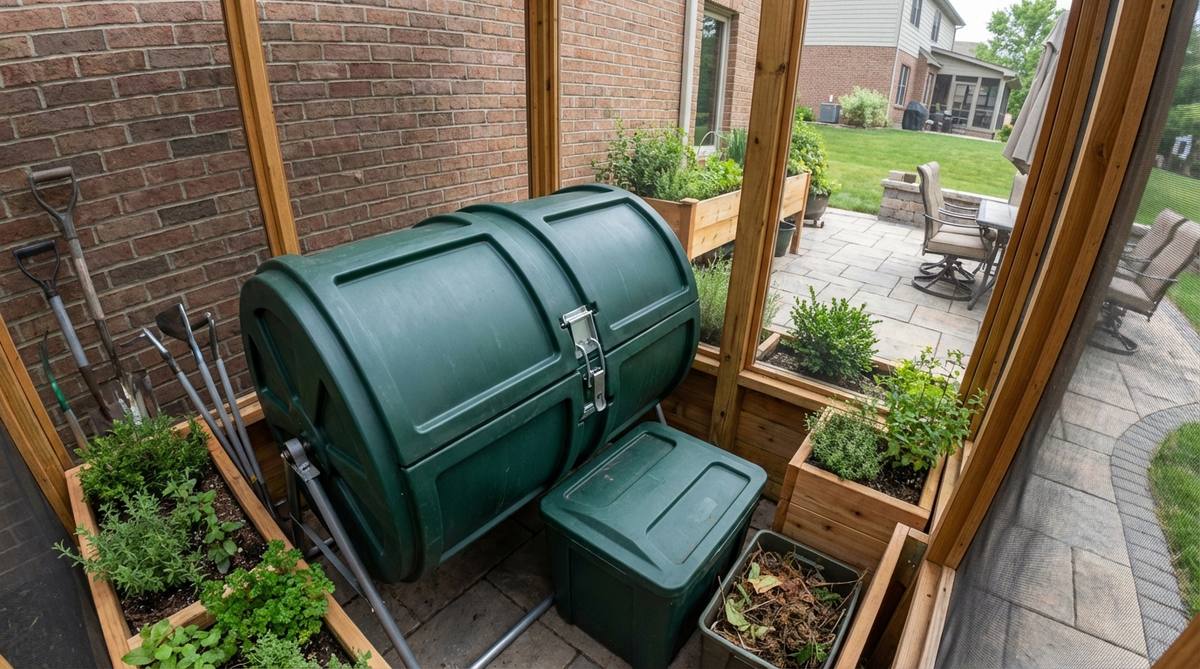
Quietly churns your morning coffee grounds into dark, incredibly expensive, nutrient-dense soil. Odorless patio composting stations. A genius play for turning annoying kitchen waste into pure botanical fuel right on your deck.
Open compost piles look disgusting and attract every rat in the neighborhood; locking down a sleek, dual-chamber tumbling bin looks far more expensive than it is while completely sealing in odors and heat. This rapid-breakdown method yields rich, black amendment in just weeks instead of months.
You can grab a high-efficiency tumbler for about $60–$100. Pin this to your zero-waste lifestyle board.
- Key Materials: Dual-chamber tumbling composter, carbon-rich brown matter
- Vibe / Style: Clean eco-efficiency
- Difficulty: Spin it once a week
- Budget Breakdown: Tumbler Bin: $80 | Coco Coir (Browns): $15.
- Creator’s Tip: Always keep a bag of dry shredded paper or sawdust next to the bin; tossing a handful in every time you add wet kitchen scraps totally prevents the sludge from smelling bad.
- Smart Sourcing: Heavy-duty dual-chamber compost tumblers | Pre-formed thick coconut coir blocks (bulk pack)
If you have a balcony that feels like the surface of the sun, do not buy another plant until you see this next layout…
35. Drought Tolerant Succulent Collections
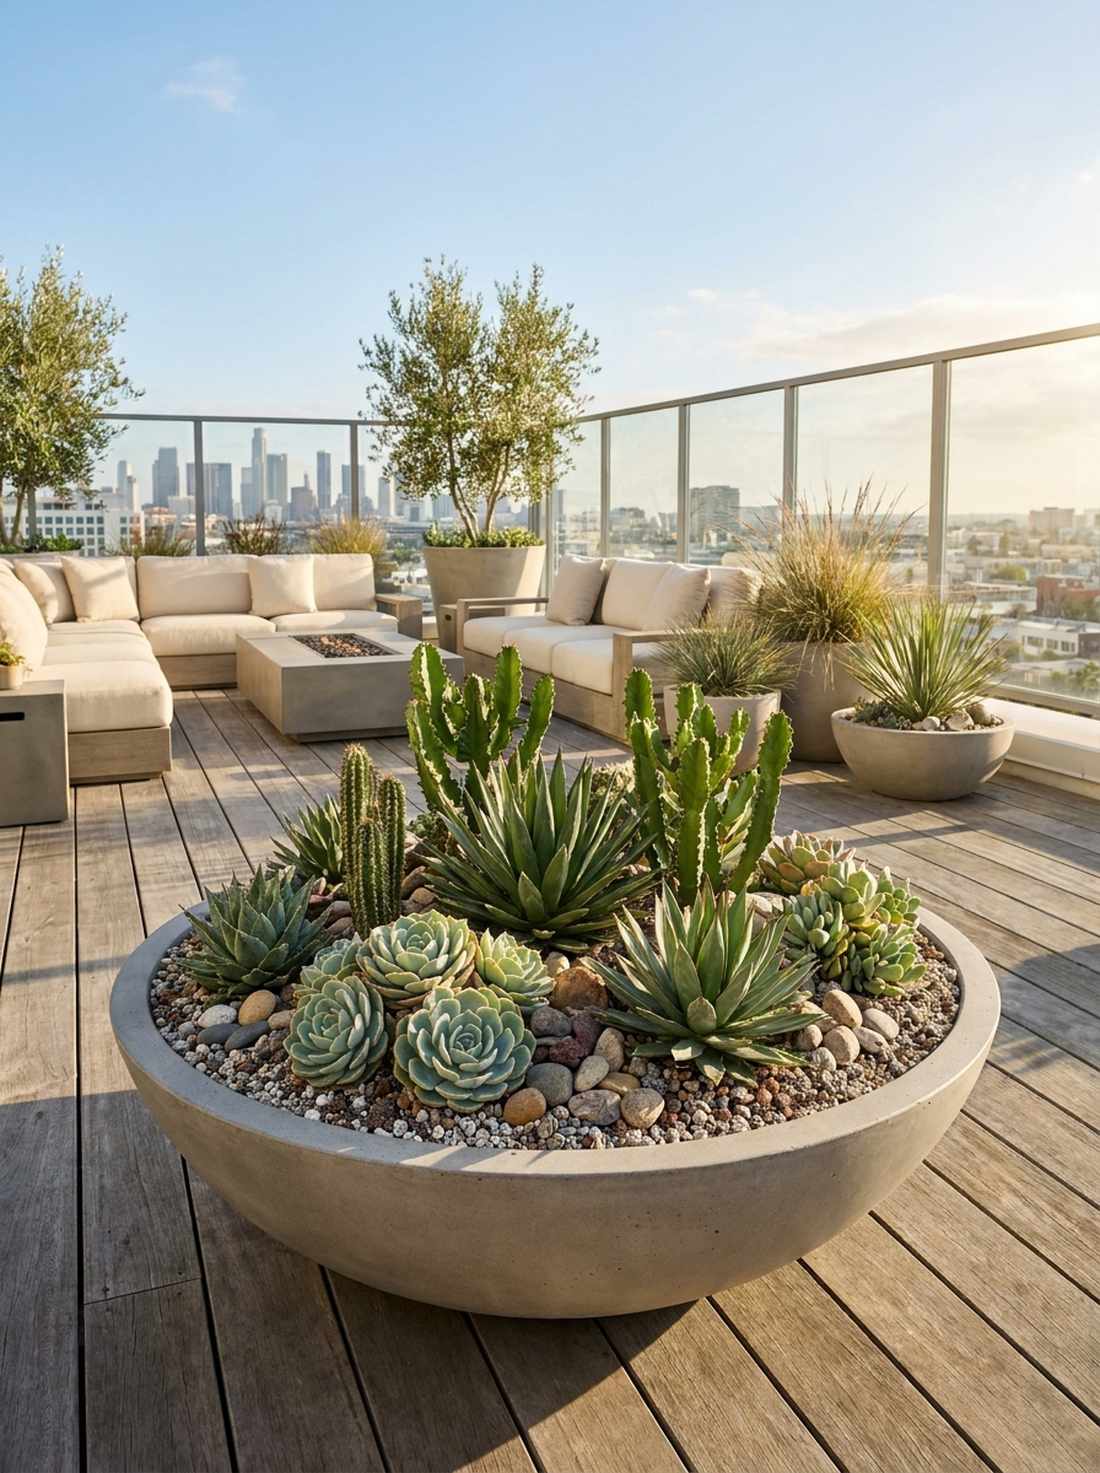
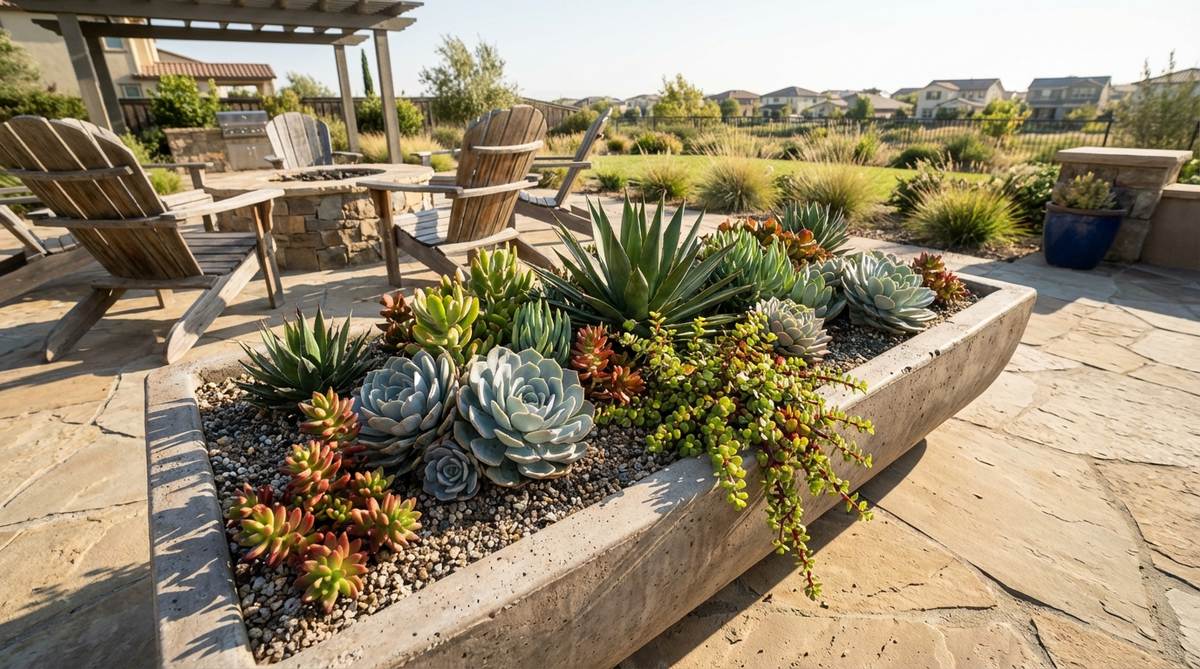
Looks like a curated gallery of weird, alien-like geometries bursting from shallow stone bowls. Modern succulent bowl arrangements. The ultimate cheat code for hyper-exposed, blistering rooftops where normal plants bake to death by noon.
Drowning these desert survivors in standard, heavy potting soil is a guaranteed death sentence; packing them into ultra-gritty, fast-draining pumice mixes creates an immediate architectural statement that thrives on extreme neglect. Layering premium terrarium accessories between the fleshy leaves adds massive visual interest to the arid landscape.
A stunning, crowded succulent bowl costs around $40–$80 to assemble.
- Key Materials: Low-profile concrete bowls, gritty cactus soil matrix
- Vibe / Style: Desert architectural modernism
- Difficulty: Extremely low maintenance
- Budget Breakdown: Shallow Bowl: $30 | Specialty Soil: $15 | Plants: $30.
- Creator’s Tip: Never water succulents immediately after repotting; wait a full week to let damaged roots heal, otherwise the raw roots will suck up water and rot instantly.
- Smart Sourcing: Pre-mixed ultra-gritty succulent soil | Low-profile concrete planter bowls
Specialty & Themed Gardens
Theming your space completely removes the guesswork from buying materials. By strictly adhering to a single narrative—like culinary production or tropical resort—you guarantee a highly cohesive, immersive visual experience.
36. Culinary Herb Kitchen Garden
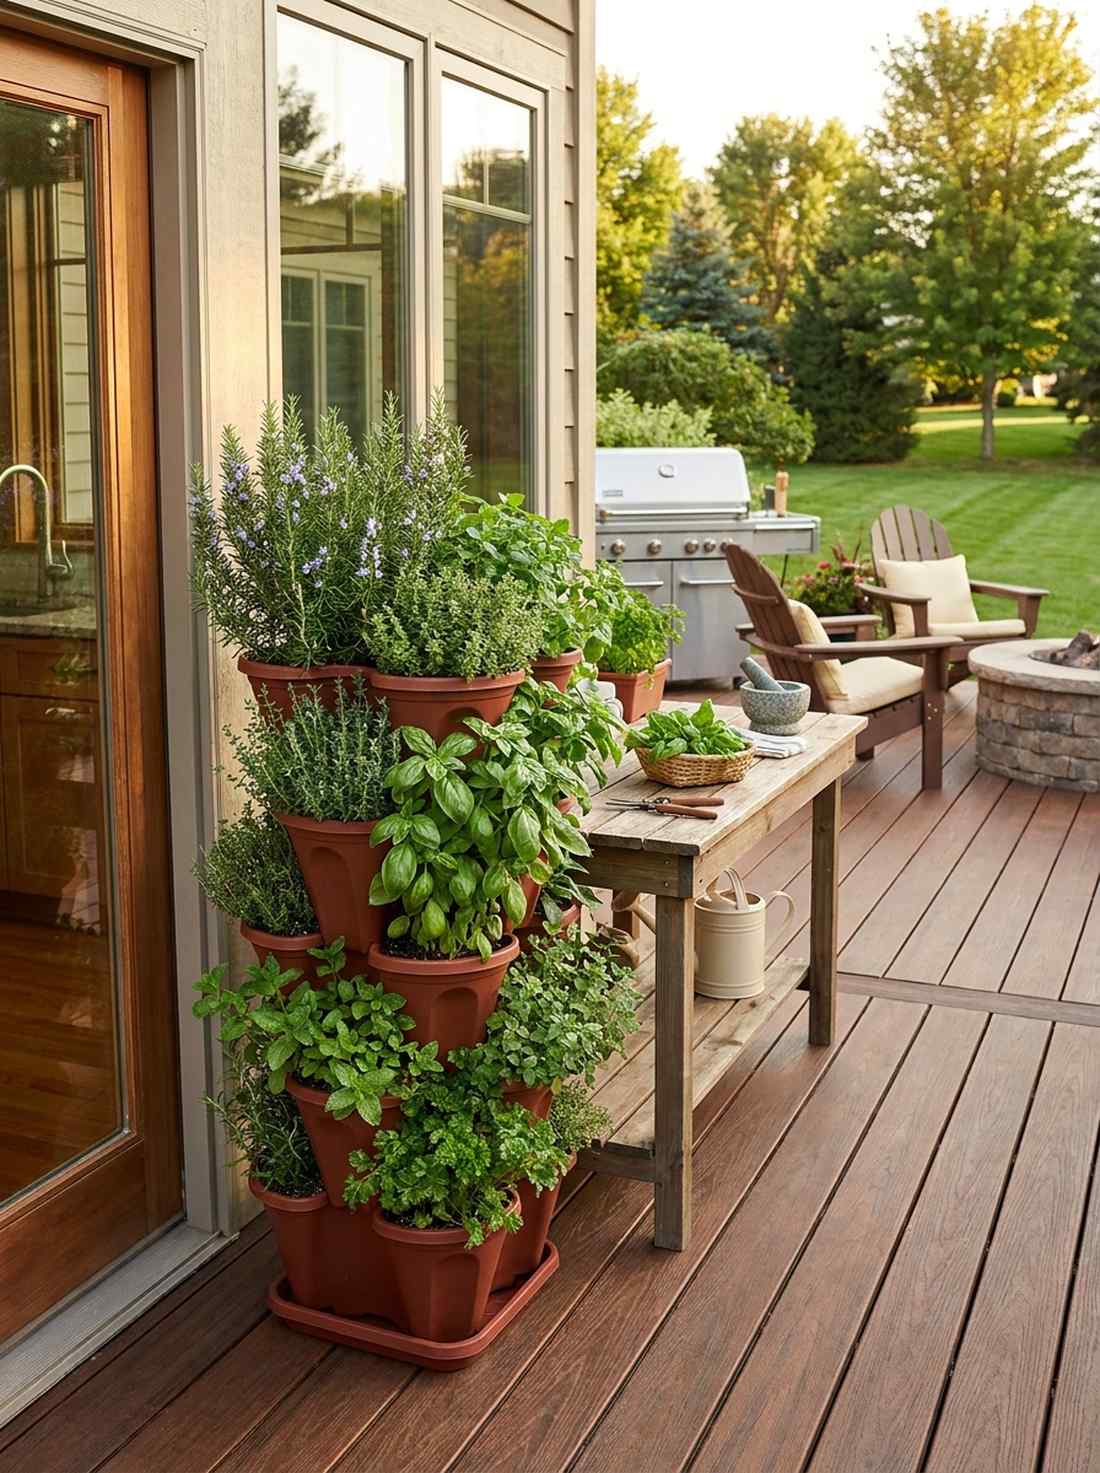
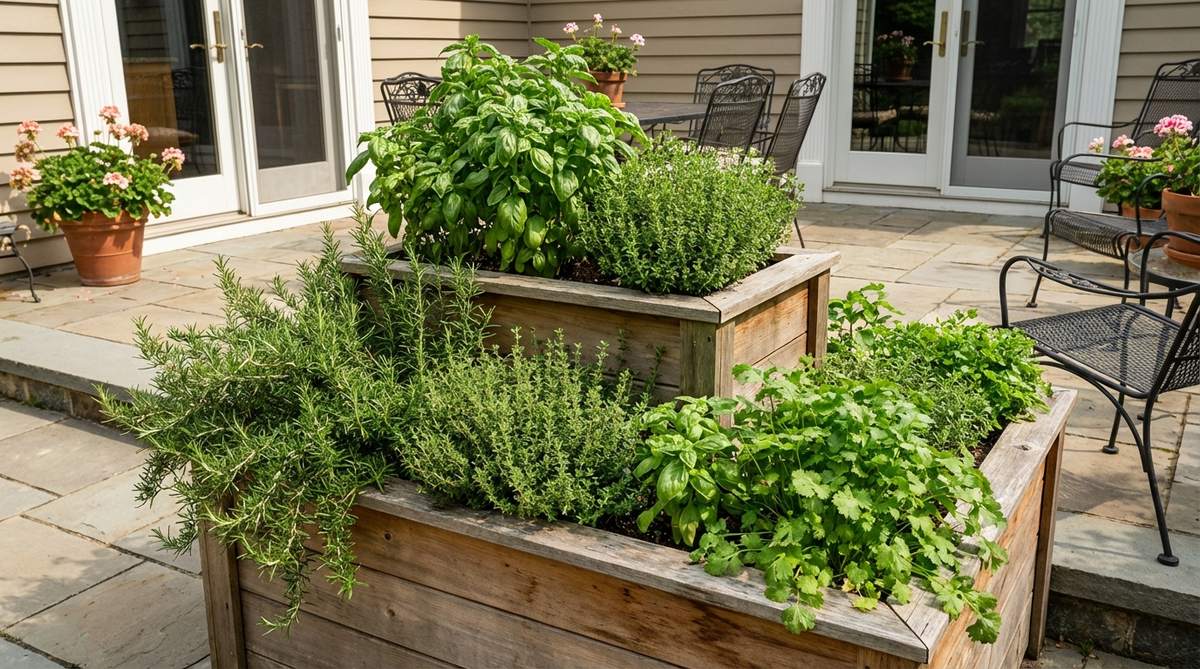
Explodes with the sharp, intoxicating aroma of fresh rosemary and basil every time the wind blows. Tiered culinary herb planters. The most functionally rewarding setup to position right next to the kitchen door for instant dinner upgrades.
Scattering tiny pots all over the floor looks messy and annoying to water; consolidating them into a towering, multi-level tiered planter delivers a surprisingly premium look while keeping everything perfectly organized by water needs. Mediterranean herbs actually develop stronger flavors when subjected to intense terrace heat and slight water stress.
You can build a high-yield herb tower for roughly $35–$60. Pin this to your ultimate outdoor cooking board.
- Key Materials: Stackable vertical planters, organic starter plants
- Vibe / Style: Chef’s private aromatic reserve
- Difficulty: Easy beginner setup
- Budget Breakdown: Tiered Planter: $35 | Organic Soil: $10 | Starters: $15.
- Creator’s Tip: Aggressively pinch off the top leaves of your basil every week; this forces the plant to bush outwards instead of growing into one tall, spindly stalk that eventually flowers and dies.
- Smart Sourcing: UV-coated stackable vertical planters | Organic culinary herb seed vaults
37. Meditation Zen Minimalist Space
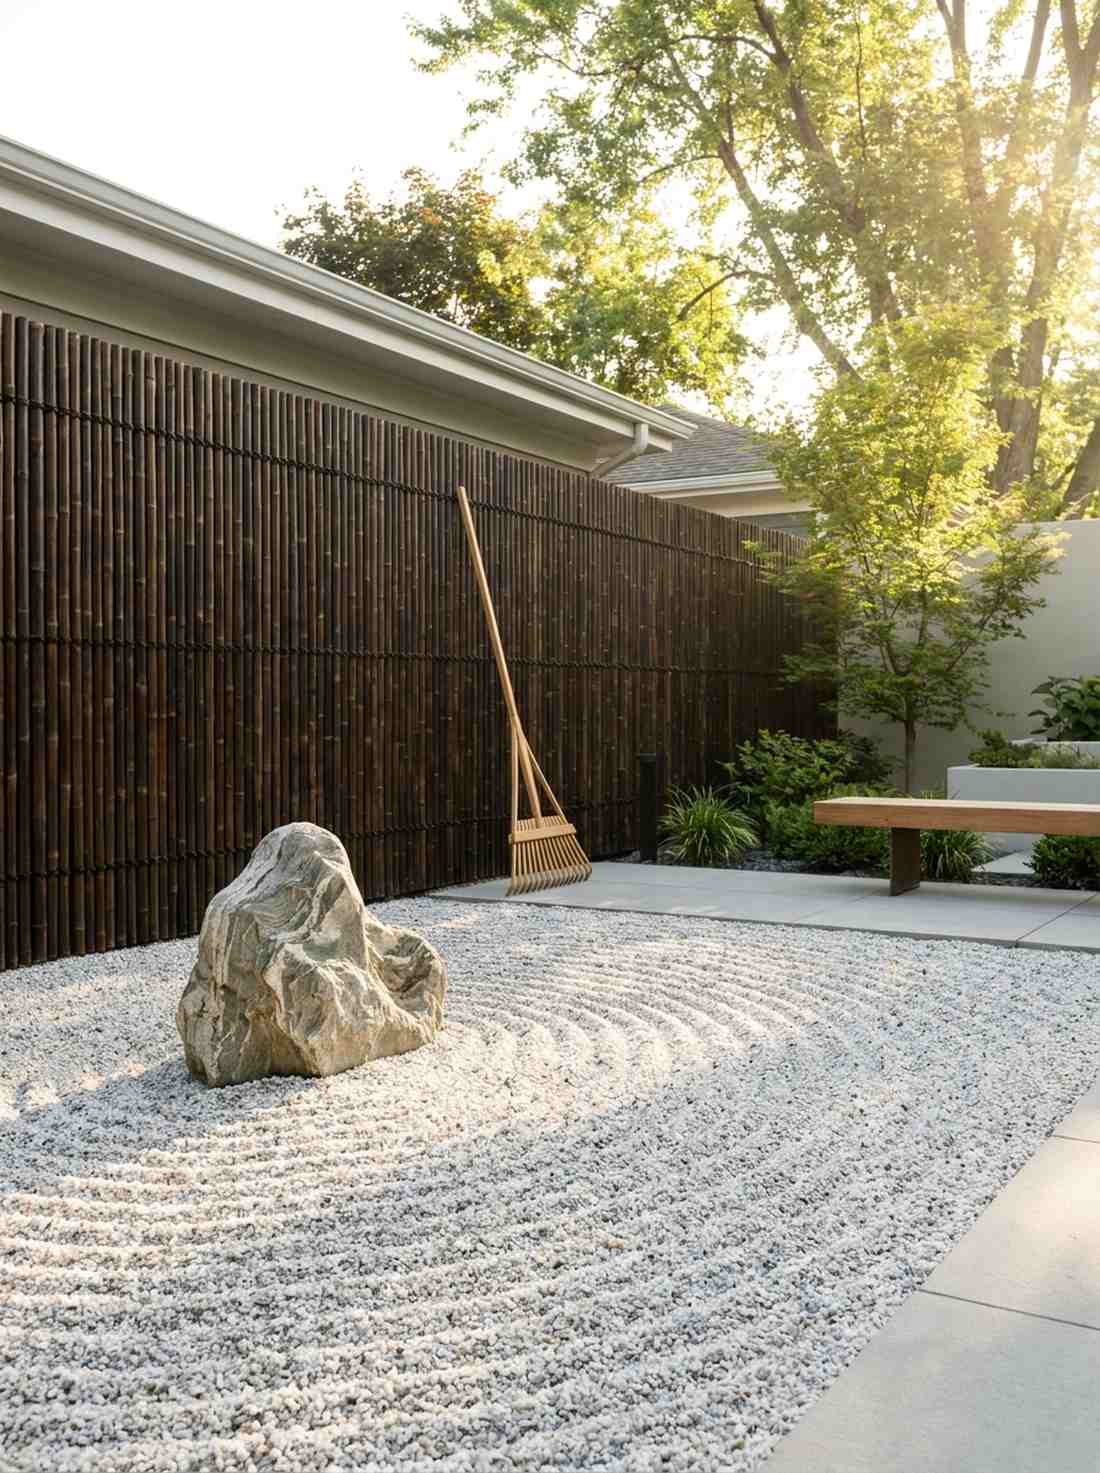
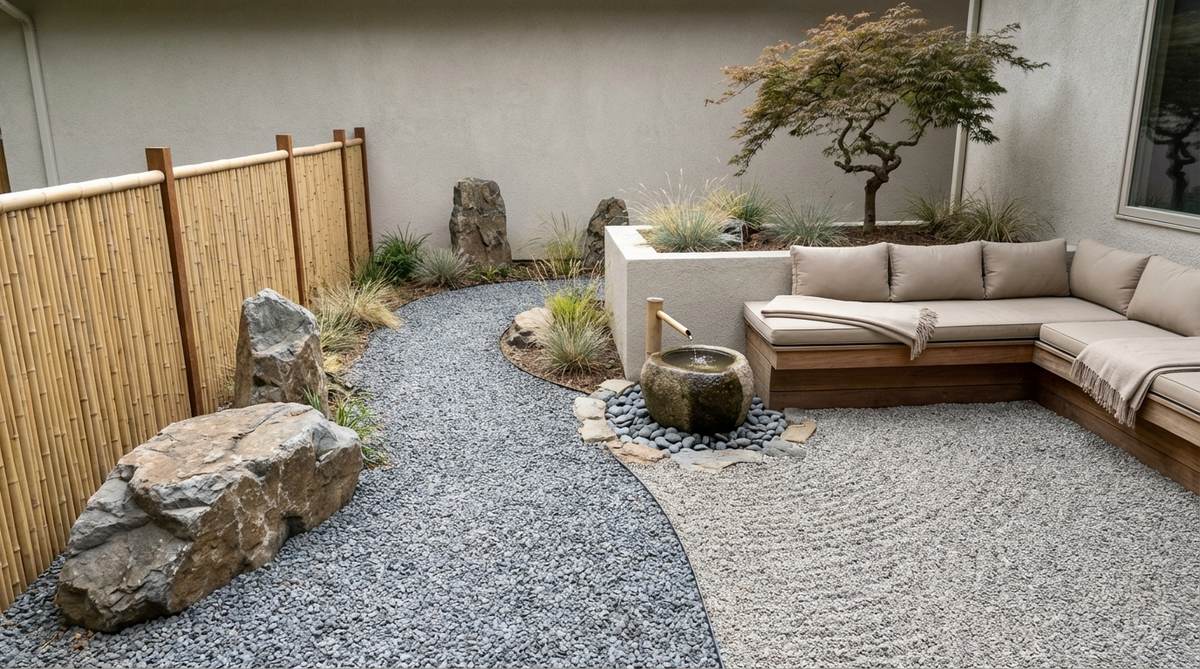
Radiates a stark, razor-sharp tranquility that instantly lowers your blood pressure. Minimalist Japanese courtyard styling. Flawlessly engineered for stressful urban environments where you desperately need to subtract visual noise rather than add it.
Cramming a space with too many colors creates chaotic anxiety; limiting the palette strictly to raked white gravel, dark bamboo, and a single specimen stone brings an instant architectural quality that feels deeply grounded. The extreme restraint in plant selection forces the negative space to do all the heavy visual lifting.
A stunning, minimalist rock garden setup can be executed for $80–$150.
- Key Materials: Crushed white granite, dark bamboo fencing, specimen stones
- Vibe / Style: Hyper-focused Zen clarity
- Difficulty: Easy material layout
- Budget Breakdown: Bamboo Screen: $60 | White Gravel: $40 | Stones: $20.
- Creator’s Tip: Use a specialized, wide-toothed wooden rake to carve deep, deliberate lines into the gravel; cheap metal yard rakes will just scramble the rocks into a messy blur.
- Smart Sourcing: Pre-cut dark bamboo privacy screens | Heavy-duty Japanese garden rakes
38. Cutting Flower Production Garden
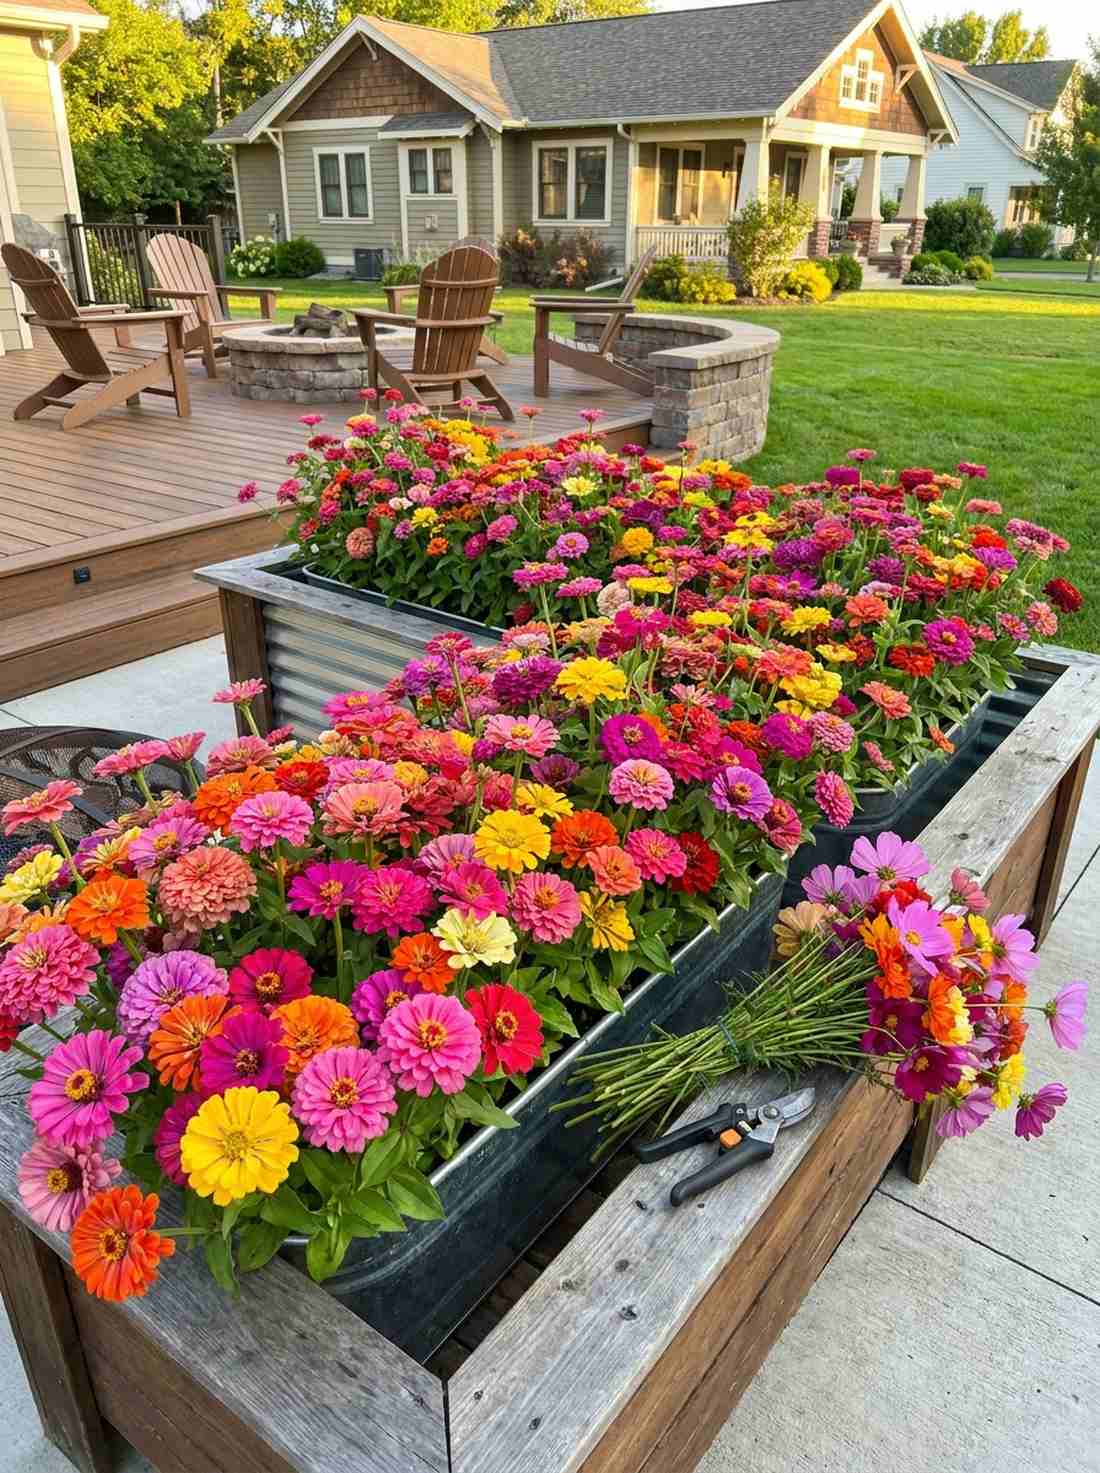
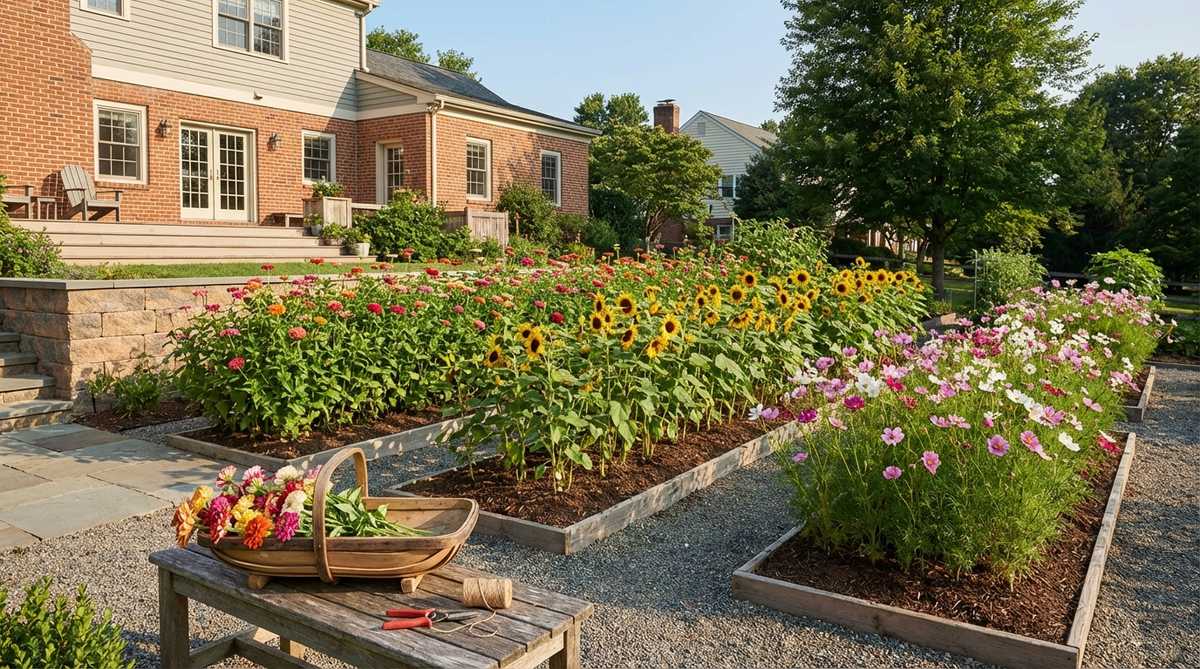
Looks like a wildly vibrant, chaotic explosion of neon colors ready to be bundled into expensive bouquets. High-yield patio flower rows. The ultimate flex for decorators who want fresh, free centerpieces on their dining table every single week of the summer.
Planting random, low-growing border flowers yields nothing you can actually put in a vase; cramming deep troughs with specialized, long-stemmed zinnias and cosmos looks far more expensive than it is while producing an endless supply of massive blooms. The tighter you pack these production rows, the more they physically support each other against harsh winds.
This endless flower factory costs practically nothing, roughly $20–$40 in seeds and soil. Save this if you love bringing the outdoors inside.
- Key Materials: Long-stem seed varieties, deep rectangular troughs
- Vibe / Style: English manor cutting patch
- Difficulty: Requires aggressive cutting
- Budget Breakdown: Seed Packets: $15 | Trough: $25.
- Creator’s Tip: Cut your blooms aggressively in the absolute coolest part of the early morning; the stems are fully hydrated then, meaning the flowers will last twice as long in a vase.
- Smart Sourcing: Pre-mixed cut-flower seed vaults (bulk pack) | Heavy-duty floral snip tools
39. Wildlife Habitat Sanctuary Garden
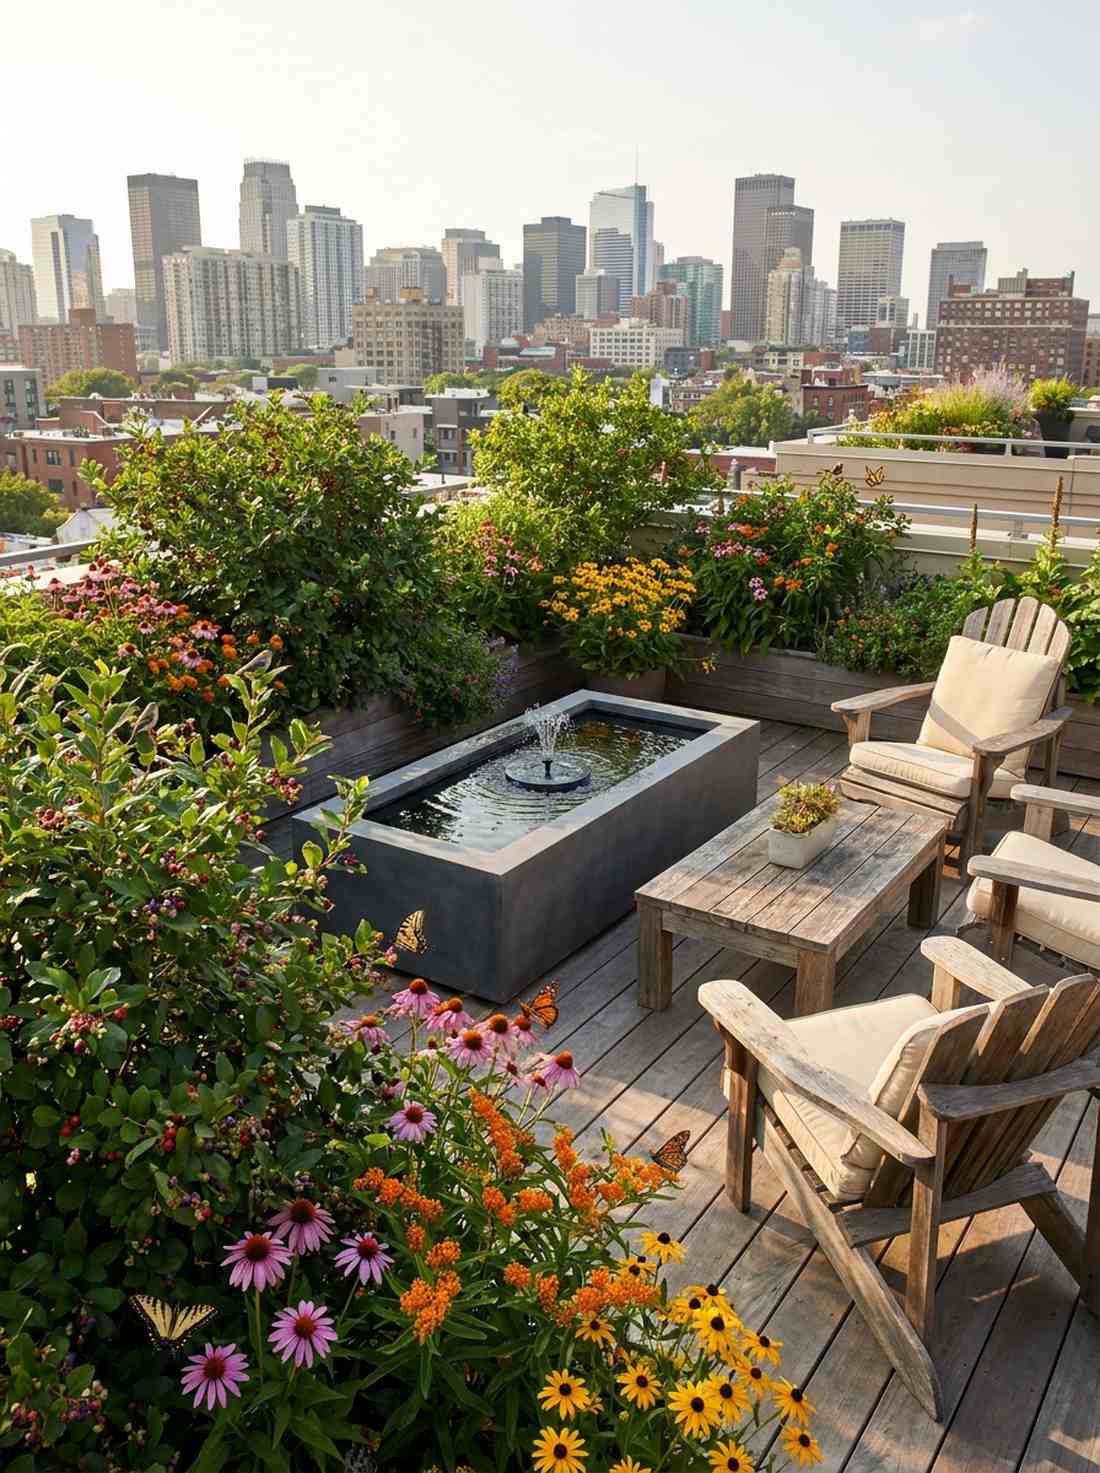
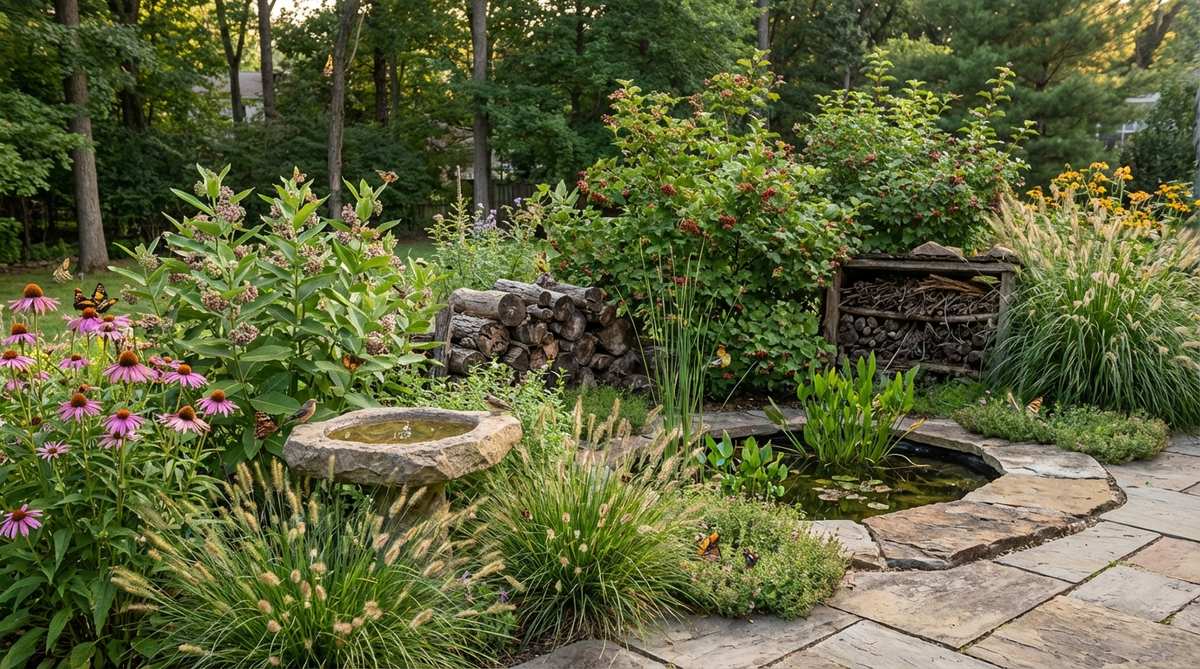
Transforms a dead, concrete box into a humming, buzzing theater of natural activity. Urban rooftop bird and butterfly habitats. A deeply rewarding project for nature lovers trapped in the middle of a sterile city grid.
Using sterile, non-native hybrid flowers offers zero nutritional value to local fauna; layering berry-producing shrubs and heavy nectar sources screams high-end luxury while acting as a critical oasis for migrating butterflies. Integrating sleek, modern water features provides vital hydration without looking like a messy swamp.
You can establish this bustling micro-ecosystem for about $50–$90.
- Key Materials: Native berry shrubs, solar-powered bird bath fountains
- Vibe / Style: Bustling ecological oasis
- Difficulty: Simple strategic placement
- Budget Breakdown: Native Shrubs: $45 | Solar Fountain Kit: $25.
- Creator’s Tip: Never use any chemical pesticides in this specific layout; rely entirely on introducing ladybugs or letting natural predators handle the aphid population.
- Smart Sourcing: Solar-powered floating fountain kits | Pre-mixed butterfly nectar seed blends
Most beginners settle for boring greenery, completely missing the fact that this final layout turns a cramped patio into a $1,000-a-night vacation rental…
40. Tropical Paradise Resort Style Oasis
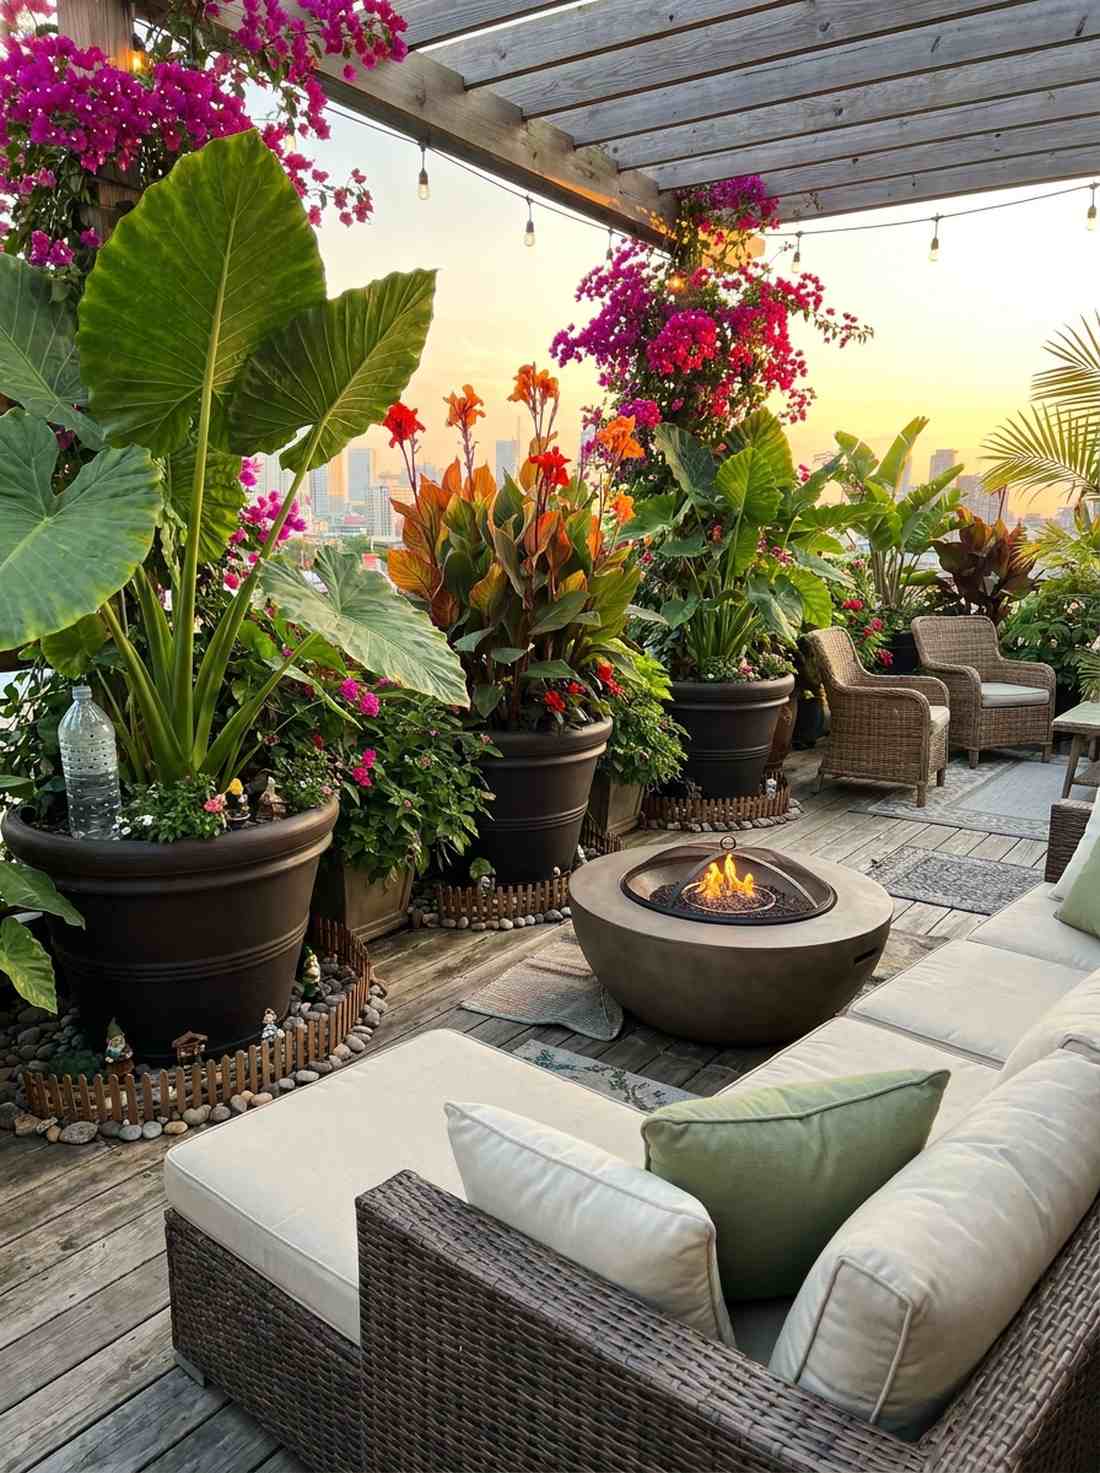
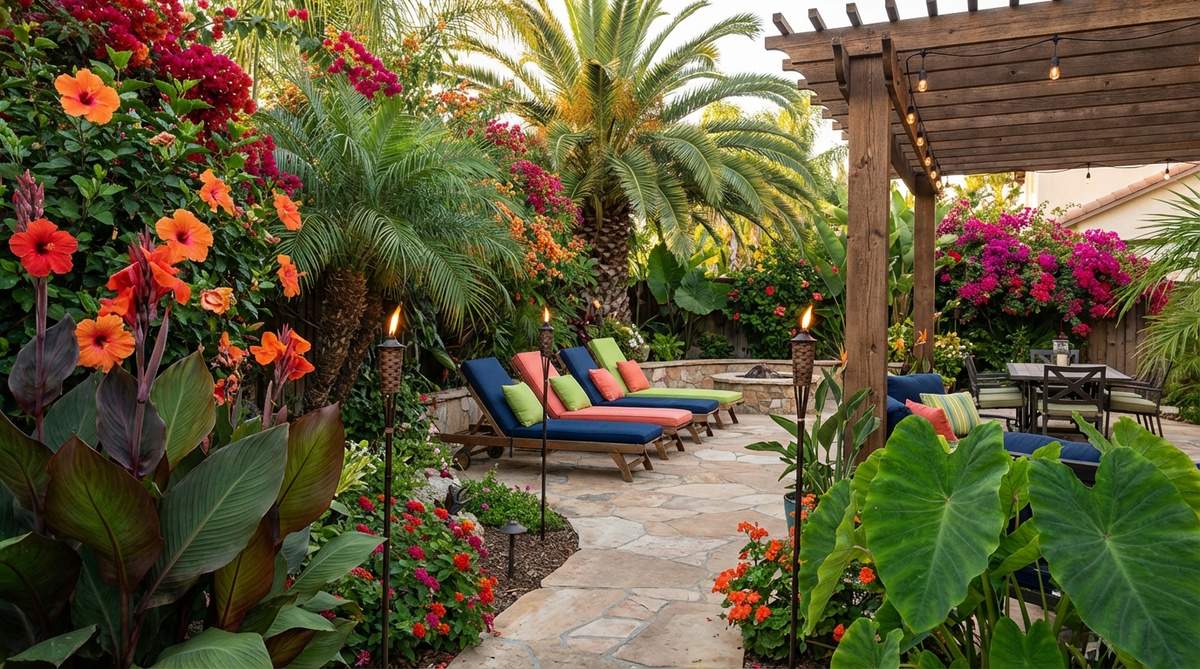
Surrounds you in massive, prehistoric-looking leaves that completely block out the ugly city skyline. Bold tropical balcony foliage. The absolute best technique for creating overwhelming, dense privacy walls that make you feel like you’re lost in a jungle.
Relying on tiny, delicate ferns looks sparse and weak; hauling in massive Elephant Ears, Cannas, and bright Bougainvillea delivers a surprisingly premium look that instantly commands the entire vertical space. Slipping subtle fairy garden supplies at the base of these giants gives the massive scale a whimsical, grounded touch.
A lush, instant-jungle effect will cost roughly $100–$250 in large specimen plants. Pin this to your ultimate vacation-at-home board.
- Key Materials: Oversized resin planters, heavy moisture-retaining soil
- Vibe / Style: Five-star Balinese resort
- Difficulty: Requires heavy watering
- Budget Breakdown: Giant Resin Pot: $60 | Tropical Bulb/Plant: $50 | Moisture Soil: $15.
- Creator’s Tip: Tropicals drink an absurd amount of water; bury a plastic water bottle with tiny holes poked in the bottom directly into the soil next to the root ball for deep, slow-release hydration.
- Smart Sourcing: UV-coated oversized resin planters | Pre-mixed moisture control potting soils (bulk pack)
Bringing Your Terrace Garden Vision to Life
Executing a flawless terrace garden design isn’t about blind luck; it’s about weaponizing commercial-grade materials and spatial psychology to fake a massive footprint. Whether you are locking down tensioned shade sails, installing smart-drip Wi-Fi hubs, or curating a premium tropical privacy wall, these exact 40 blueprints give you the unfair advantage to build a high-end escape. Stop letting your outdoor square footage sit empty. Grab a bulk pack of UV-resistant grids or a heavy-duty container kit, pick your favorite layout, and force that space to become the luxury retreat you actually deserve.
Frequently Asked Questions
What structural considerations are necessary before creating a rooftop terrace garden?
Never start hauling heavy materials before verifying your load limits. Standard concrete pots and water-logged soil will collapse a weak deck. You must pivot to ultra-lightweight fiberglass vessels and specialized, perlite-heavy rooftop soil mixes. Distribute your heaviest modular setups—like custom composite beds or large starter kits—directly over the structural load-bearing beams to ensure total safety and a professional build.
How do I protect terrace plants from intense wind exposure?
Do not let your expensive foliage get shredded by high-altitude gales. You need to anchor heavy-duty windbreak systems using UV-coated lattice panels or thick, tempered glass barriers. If you are buying plants, strictly source wind-hardy ornamentals like thick grasses or heavy rosemary bushes. Using heavy-duty commercial garden ties from a reliable bulk pack will keep taller specimens locked safely in place during storms.
What are the best container materials for terrace gardens in extreme climates?
Cheap plastics and raw terracotta are guaranteed to crack during a hard freeze or fade in blistering sun. The absolute best investment you can make is sourcing premium, double-walled poly-resin or commercial-grade fiberglass planters. These materials look expensive, weigh practically nothing, and easily survive decades of UV abuse. Snagging these in a bulk pack often saves you hundreds over buying single pots.
How can I maintain privacy on an exposed rooftop terrace?
Stop feeling like your neighbors are watching you. Instantly block sightlines by deploying tall, heavy-duty bamboo screens or tensioning marine-grade outdoor fabric panels along your railing. For a living wall effect, pack commercial trough planters with fast-growing evergreen shrubs like Boxwood. Using a premium starter kit for your vertical privacy screens ensures the entire barrier stays structurally sound in high winds.
What drainage solutions prevent water damage in paved courtyard gardens?
Trapped water will destroy your expensive hardscaping in a single season. You must elevate every single container using heavy-duty rubber pot feet to allow rapid airflow and stop nasty rings from forming on your stone. If you’re redesigning the floor, skip solid concrete and invest in permeable paver grids that swallow storm water instantly. Upgrading to a Wi-Fi drip irrigation starter kit also guarantees you never accidentally flood the deck.
Which plants thrive best in hot, sunny terrace conditions?
Frail, water-loving plants will literally bake to death on a southern exposure. You must build your foundation around bulletproof Mediterranean natives like lavender and rosemary, or thick, architectural succulents like Agave and Sedum. To keep them looking lush without a massive water bill, always blend your dirt with a premium, water-retaining matrix and rely on a smart-drip system built from a commercial bulk pack.