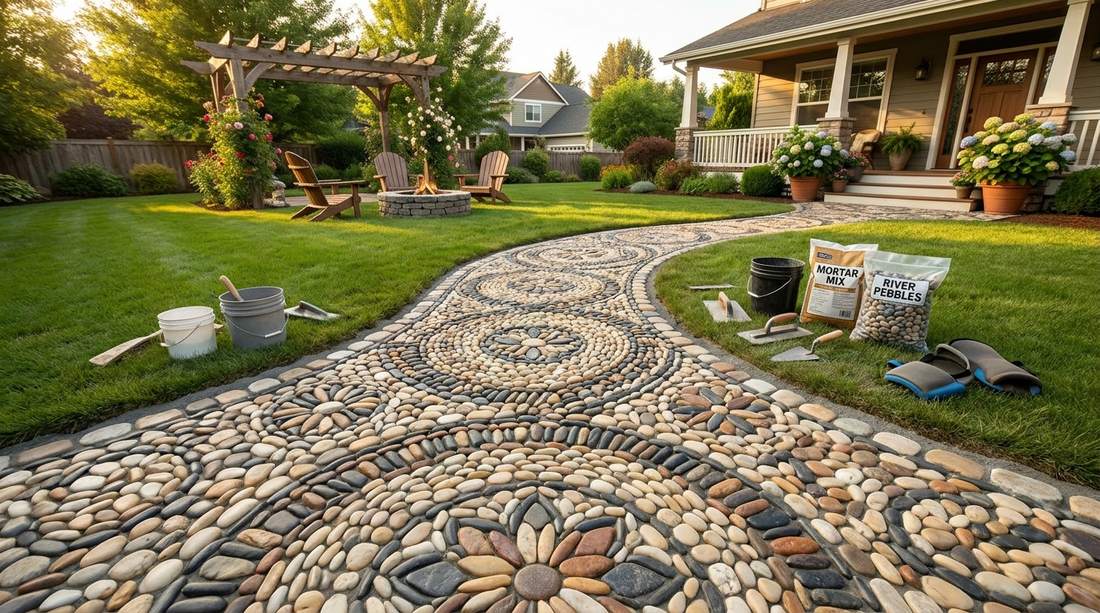
Transforming dull dirt into premium hardscape relies heavily on a solid stone garden mosaic. Sourcing bulk polished rocks and commercial-grade mortar yields elite designer walkways cheaply. Skip expensive contractors entirely using these exact blueprints.
Design Snapshot Key Principles
- Material Selection: Procure sorted pebble bulk packs for flawless thickness and level surfaces.
- Contrast & Color: Leverage pre-dyed aggregate bags to force striking visual separation in the layout.
- Proper Base: Compact premium base rock beneath heavy-duty masonry mortar for indestructible drainage.
- Tight Spacing: Utilize fine-grade polymer sand to hide joints and deliver a high-end finish.
Classic Geometric Stone Designs
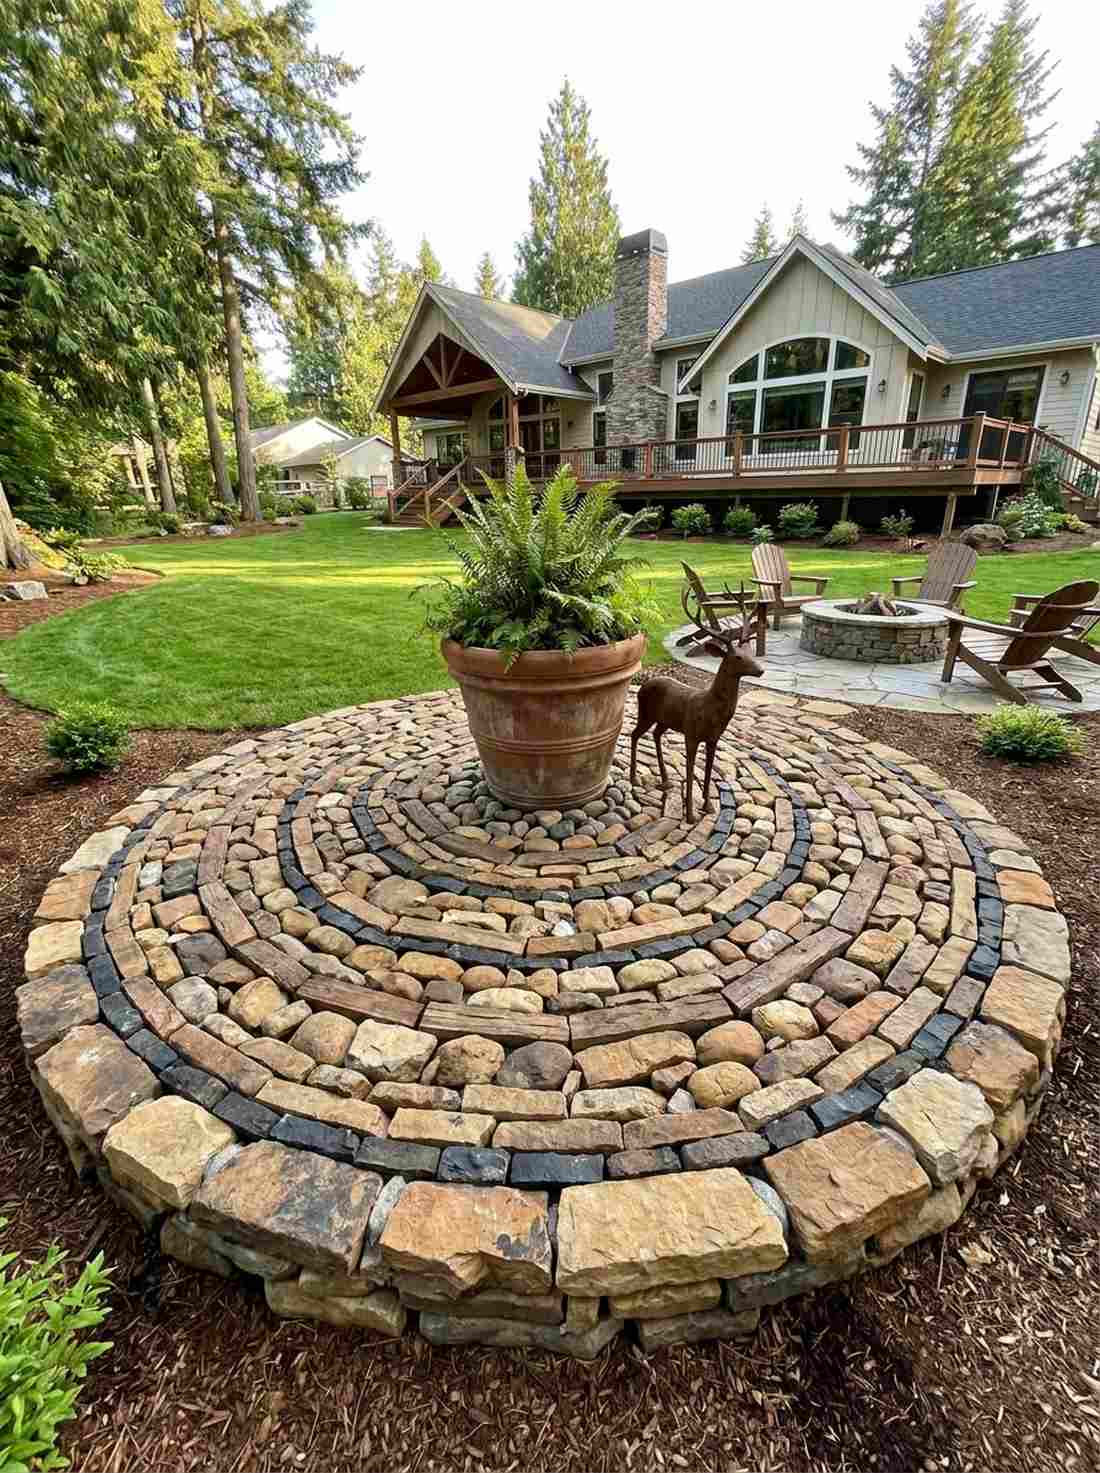
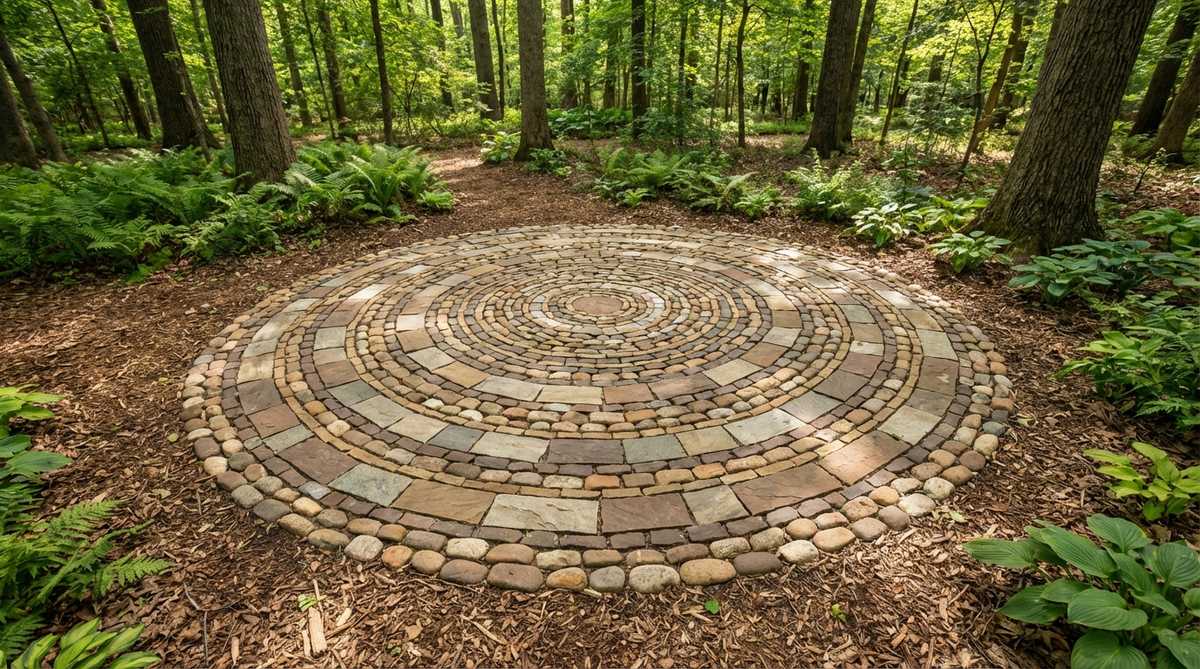
1. Centered Spiral Vortex
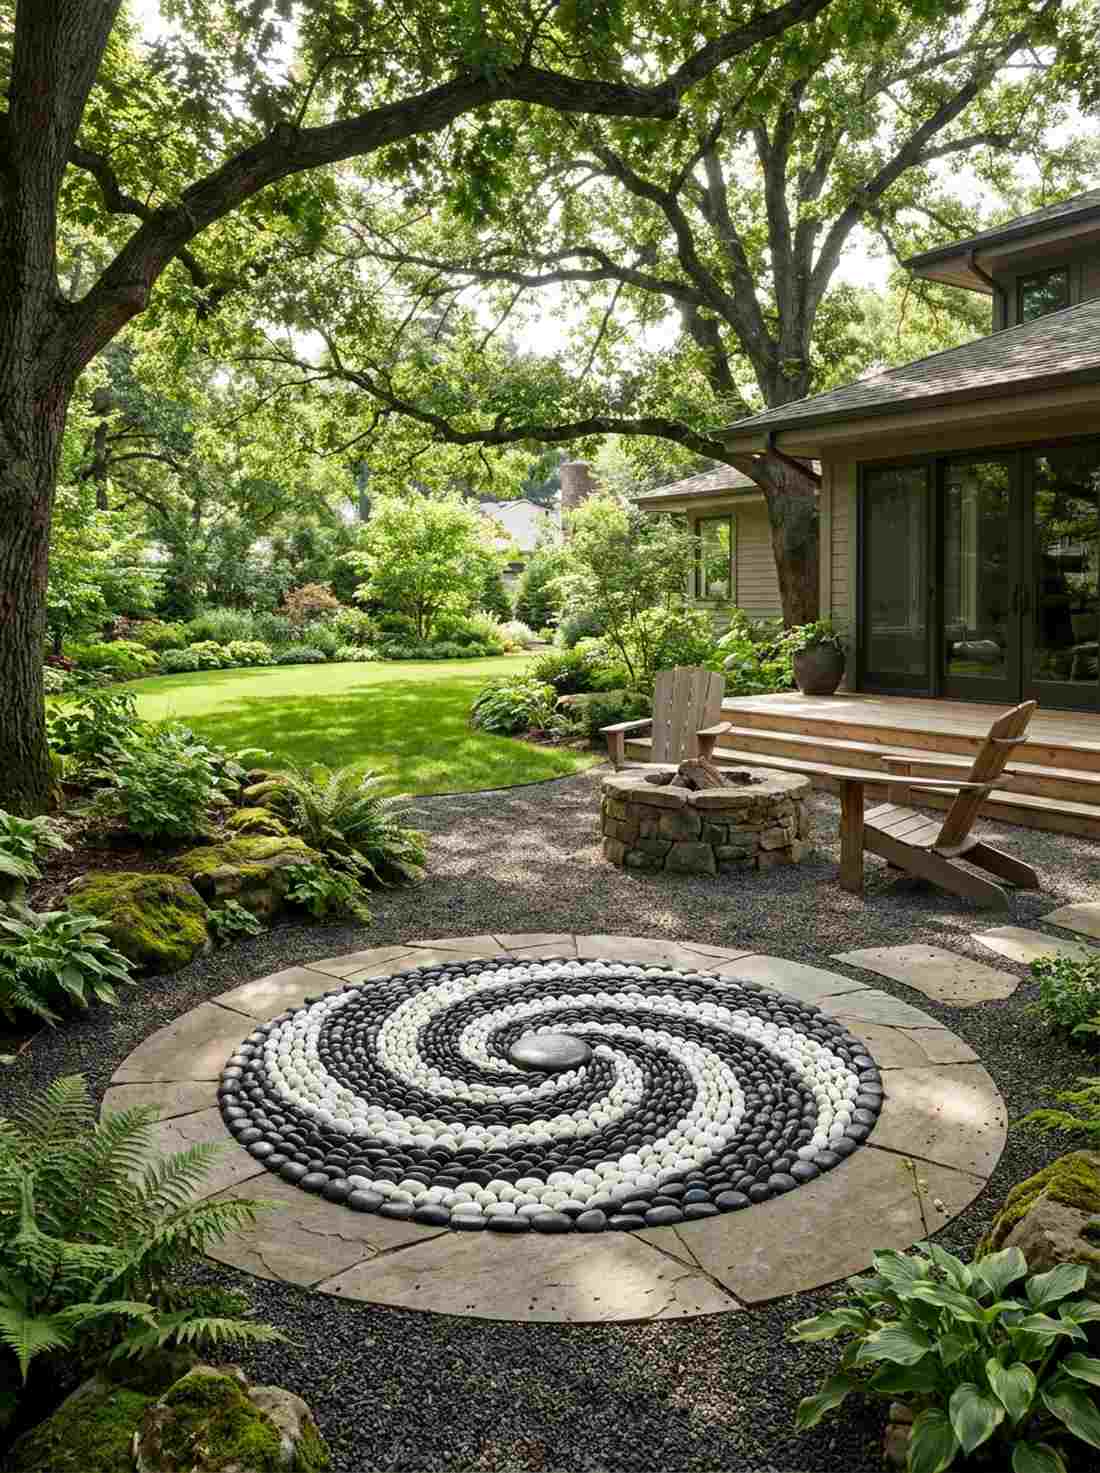
This layout radiates pure calmness and feels like a hidden monastery meditation zone you accidentally discovered. The zen courtyard stone focal point works exceptionally well for a shaded backyard patio or under a heavy oak canopy.
Working outward from a central anchor point delivers a surprisingly premium look without requiring professional masonry skills. Sourcing high-contrast polished river rocks guarantees the concentric rings pop with intense visual depth.
You can easily pull this off for around $45–$60 depending on your aggregate supplier. Pin this if you’re planning a small space upgrade this weekend!
- Key Materials: Sorted black and white polished river stones
- Vibe / Style: Modern minimalist meditation space
- Difficulty: Moderate weekend build
- Budget Breakdown: Materials: $40 | Base Mortar: $15
- Creator’s Tip: Set the center stone slightly higher to assist with micro-drainage during heavy rain.
- Smart Sourcing: pre-sorted polished river rocks (bulk pack) and heavy-duty landscape fabric backing
2. Sunburst Medallion
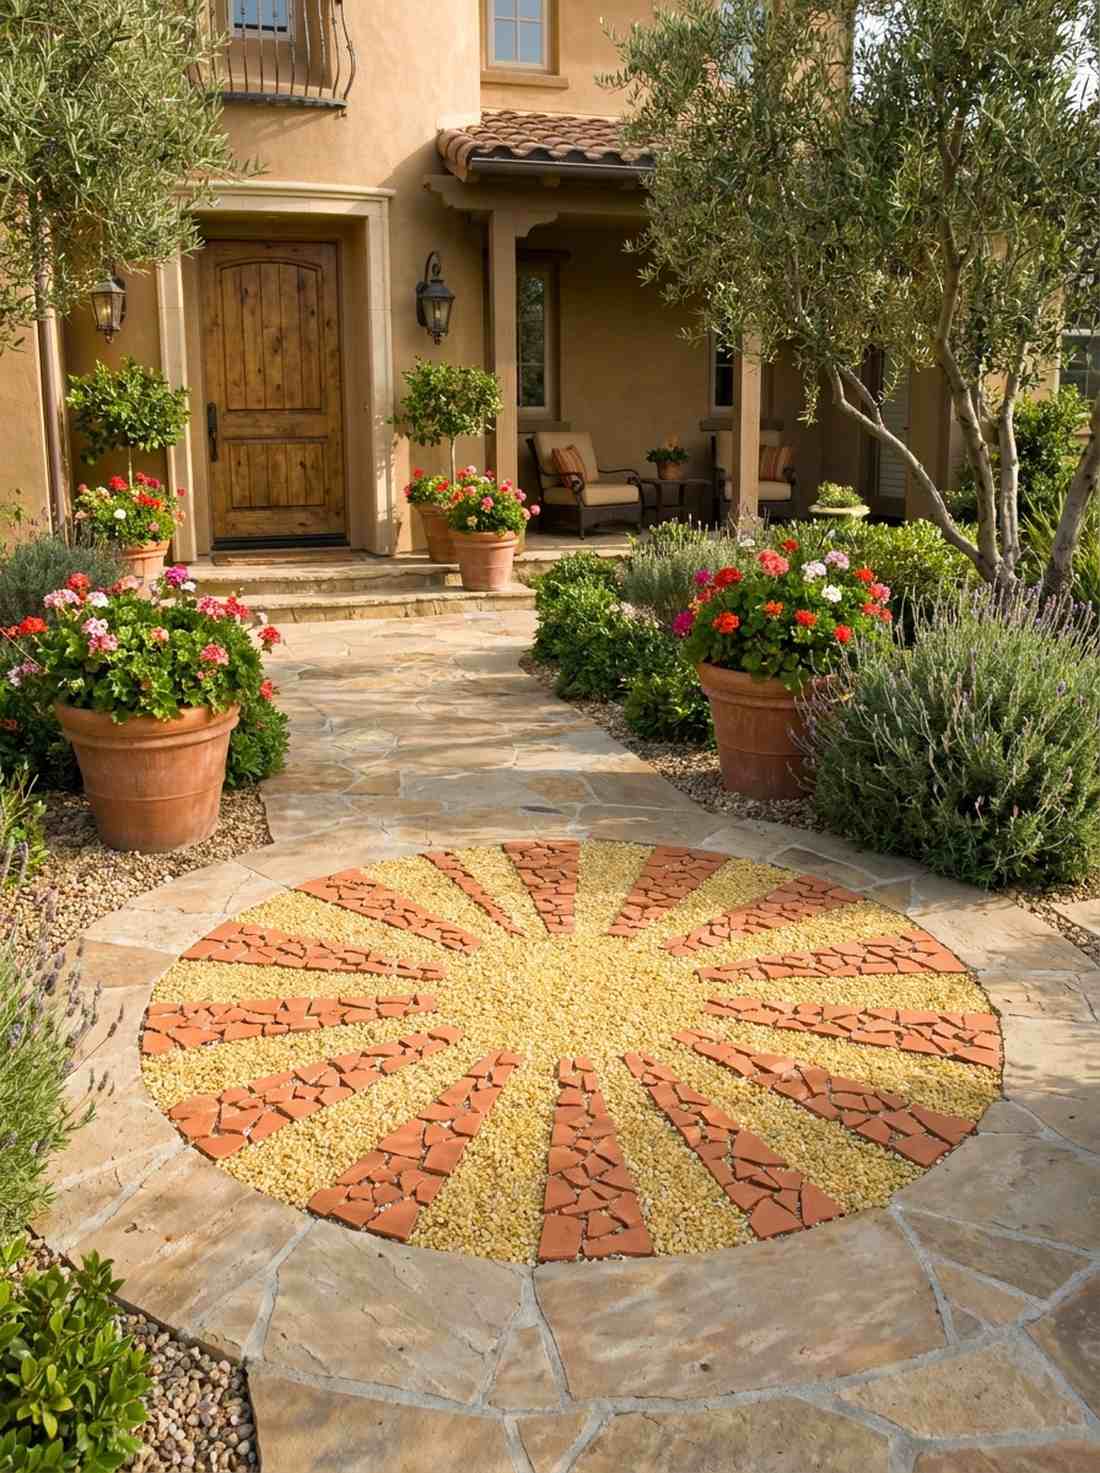

Bursting with energetic geometry, this feels straight out of a luxury Mediterranean villa courtyard. A radiant pathway entryway decor installation creates an undeniable welcoming statement right at your front gate.
This specific wedge arrangement looks far more expensive than it actually is, completely fooling neighbors into thinking you hired a landscape architect. Incorporating bright terra cotta shards alongside standard pebbles maximizes the high-end custom aesthetic.
Expect to spend roughly $35–$50 for the complete setup. It’s a fast upgrade that completely changes the front yard vibe.
- Key Materials: Yellow quartz pebbles and broken terra cotta
- Vibe / Style: Warm Tuscan villa entrance
- Difficulty: Easy beginner setup
- Budget Breakdown: Materials: $25 | Base Mortar: $15
- Creator’s Tip: Use cardboard wedges as temporary spacers to keep your sun rays perfectly symmetrical.
- Smart Sourcing: crushed yellow quartz aggregate (50lb bag) and high-adhesion outdoor mortar
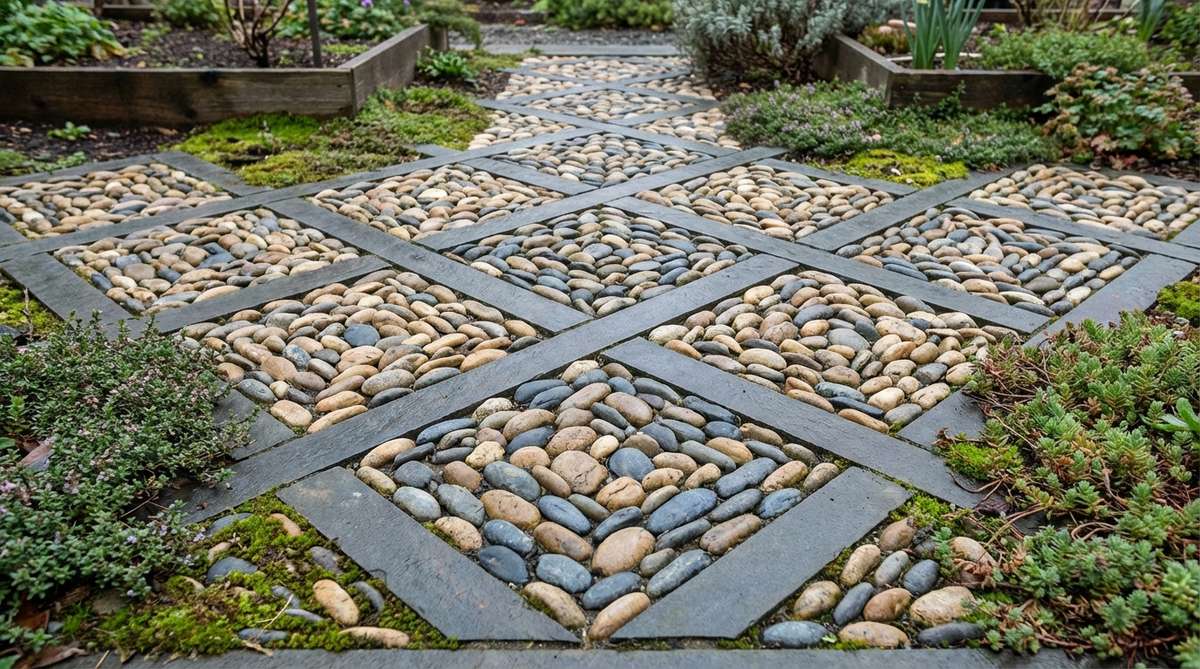
3. Checkerboard Grid
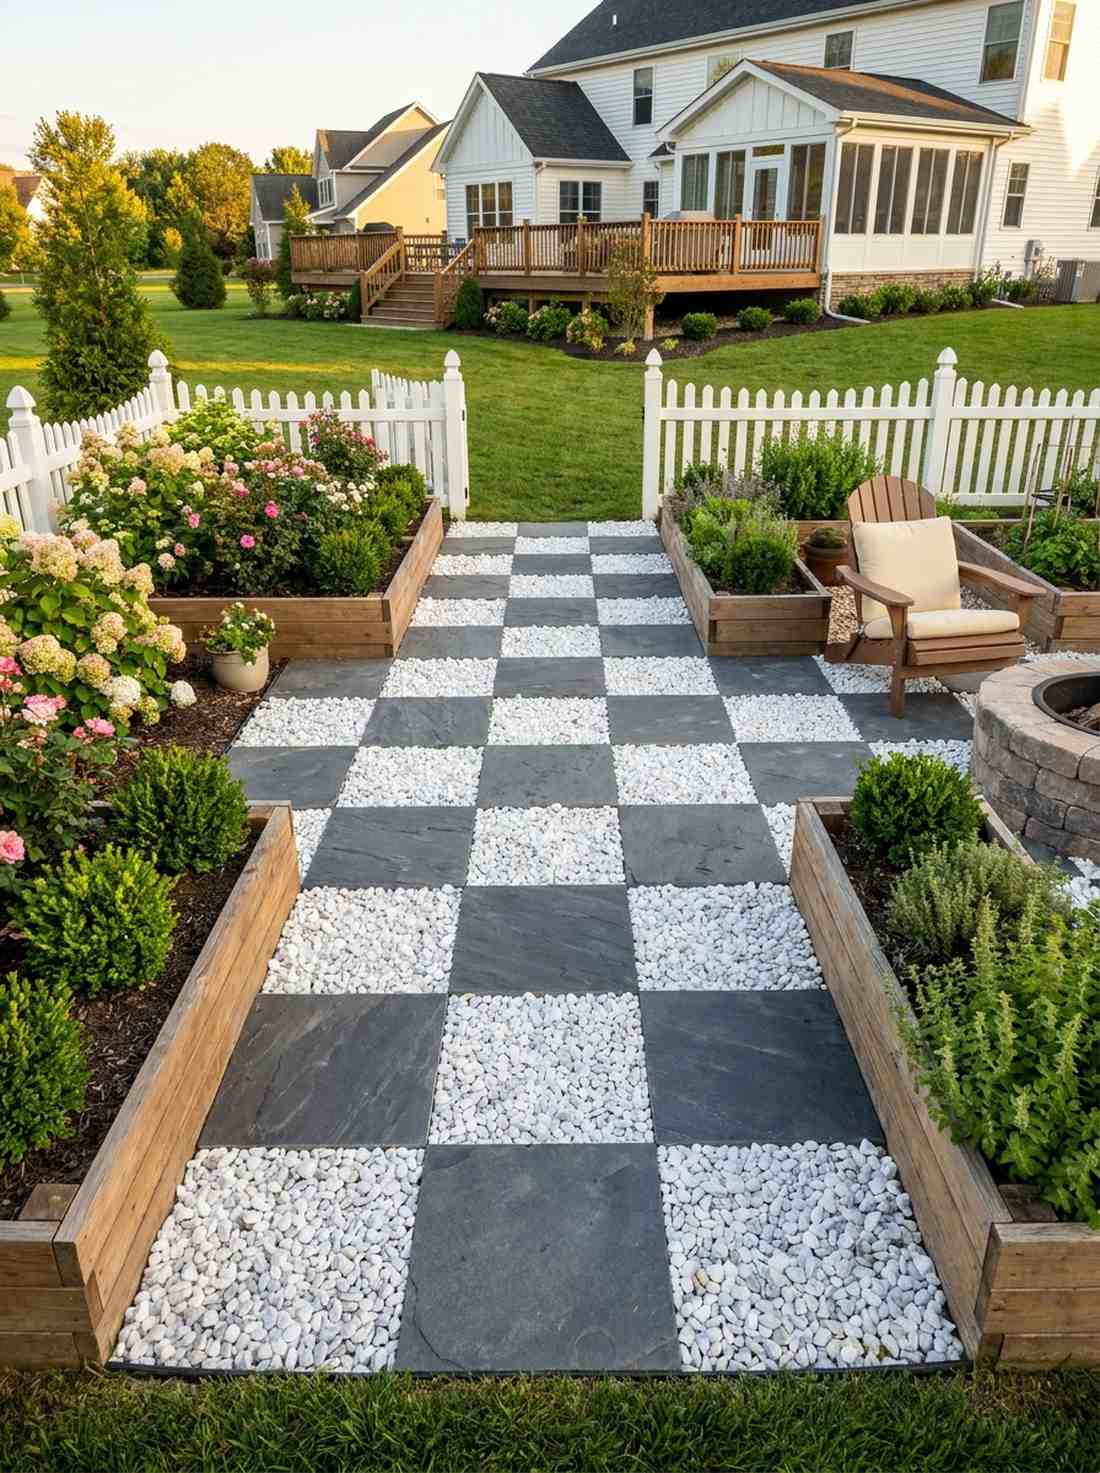
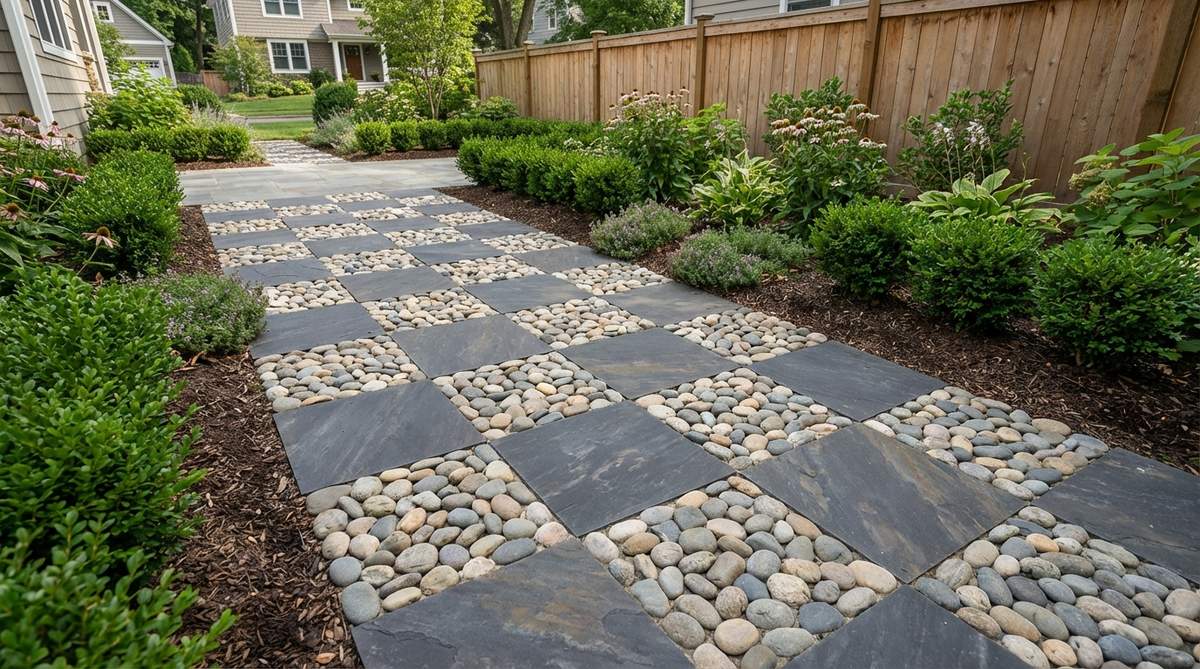
This rigid yet playful aesthetic gives off major historical English estate energy. Creating a vintage cottage stepping grid serves perfectly as a transition path down narrow side yards or between raised garden beds.
Alternating precise square sections gives a designer-level finish that instantly elevates plain dirt tracks. Pairing smooth Mexican beach pebbles with sharp slate tiles provides unbeatable tactile contrast.
Building this grid costs between $50–$75 for a standard walkway stretch. Save this to your DIY weekend garden board so you do not lose the layout!
- Key Materials: Square slate tiles and white marble chips
- Vibe / Style: Structured English garden
- Difficulty: Detail-oriented grid work
- Budget Breakdown: Materials: $55 | Base: $20
- Creator’s Tip: Stake out neon string lines to ensure your grid remains flawlessly straight over long distances.
- Smart Sourcing: pre-cut outdoor slate tiles (multi-pack) and bright white landscaping marble chips
4. Diamond Lattice
Crisscrossing lines evoke the feeling of walking through a royal botanical garden‘s private sector. A structured geometric garden pathway matrix is highly recommended for defining the edge of an outdoor dining perimeter.
Locking stones into diagonal frameworks creates an incredibly durable surface that bypasses expensive stamped concrete completely. Wrapping miniature garden supplies like moss plugs inside the diamond centers softens the sharp masonry.
This sophisticated matrix runs about $60 for a medium patio section. Highly recommended if you want maximum durability and style.
- Key Materials: Elongated gray cobbles and moss plugs
- Vibe / Style: Sophisticated botanical grid
- Difficulty: Intermediate leveling required
- Budget Breakdown: Materials: $45 | Base: $15
- Creator’s Tip: Set the boundary stones first to establish your angles before filling in the diamond centers.
- Smart Sourcing: uniform gray cobblestone bulk boxes and live creeping thyme plug flats
This next setup is ridiculously cheap but looks exactly like a $5,000 custom hardscape display…
5. Hexagonal Honeycomb
Pulling inspiration straight from nature’s flawless math, this feels deeply organic yet structurally modern. The organic modern patio paving layout shines brilliantly when used to expand a tiny apartment ground-floor terrace.
Interlocking six-sided cells effortlessly bridges the gap between chaotic nature and luxury design. Snapping together pre-made templates ensures the geometry stays sharp without manual measuring.
You can execute this organic grid for under $40 using local materials. Save this idea before you pour another boring concrete slab!
- Key Materials: Mixed earth-tone river rocks
- Vibe / Style: Eco-modern geometric blend
- Difficulty: Easy with template molds
- Budget Breakdown: Materials: $25 | Base: $15
- Creator’s Tip: Build a custom wooden hexagon frame to drop your stones into for rapid, identical pacing.
- Smart Sourcing: reusable hexagonal concrete molds and mixed river rock starter kits
Nature-Inspired Mosaic Motifs
6. Cobbled Blooms
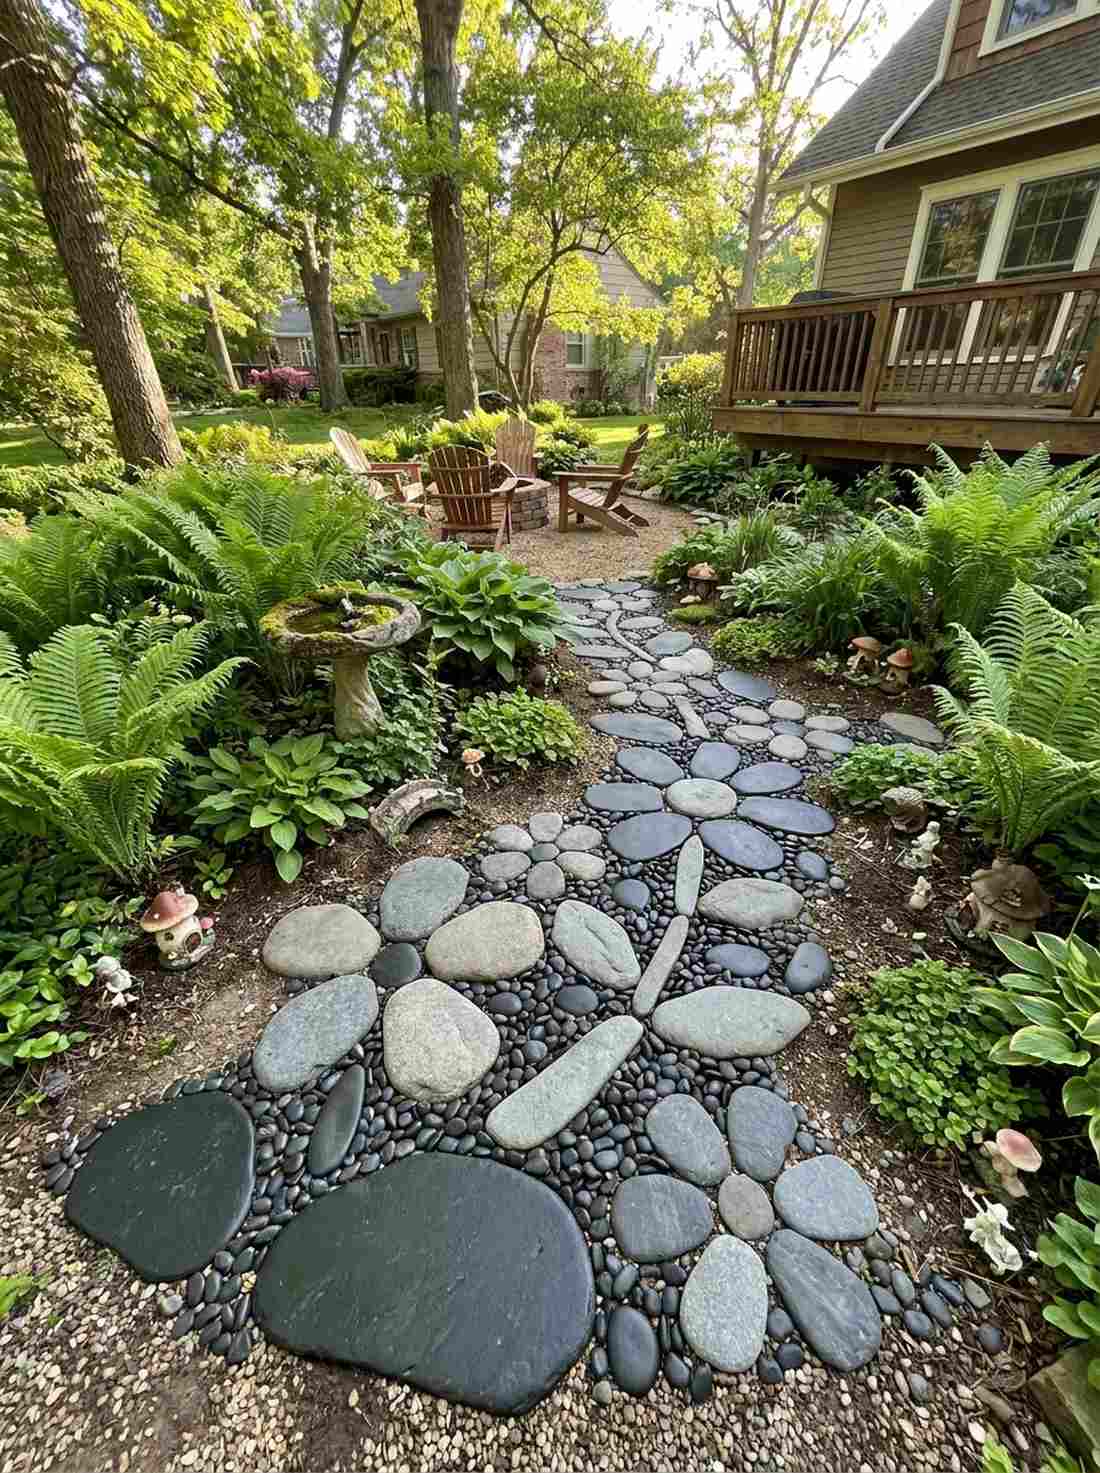
Walking over these stylized petals feels like strolling through an enchanted fairy tale forest. Utilizing a whimsical floral ground cover acts as a beautiful surprise accent hidden beneath large fern fronds or near birdbaths.
Arranging oversized stones into botanical shapes upgrades plain gravel paths into whimsical art installations instantly. Grabbing premium fairy garden kits and scattering small resin accents near the stone petals enhances the magical aesthetic.
Crafting a cluster of these stone flowers costs a mere $15–$25. It is the perfect afternoon project for bringing life to dead garden corners.
- Key Materials: Flat oversized skipping stones and tiny black pebbles
- Vibe / Style: Enchanted woodland walkway
- Difficulty: Super fast beginner project
- Budget Breakdown: Materials: $15 | Base: $5
- Creator’s Tip: Select stones that are naturally flat on top to prevent tripping hazards in high-traffic zones.
- Smart Sourcing: smooth flat black basalt stones (bulk) and UV-coated resin fairy garden kits
7. Leaf Imprint Accents
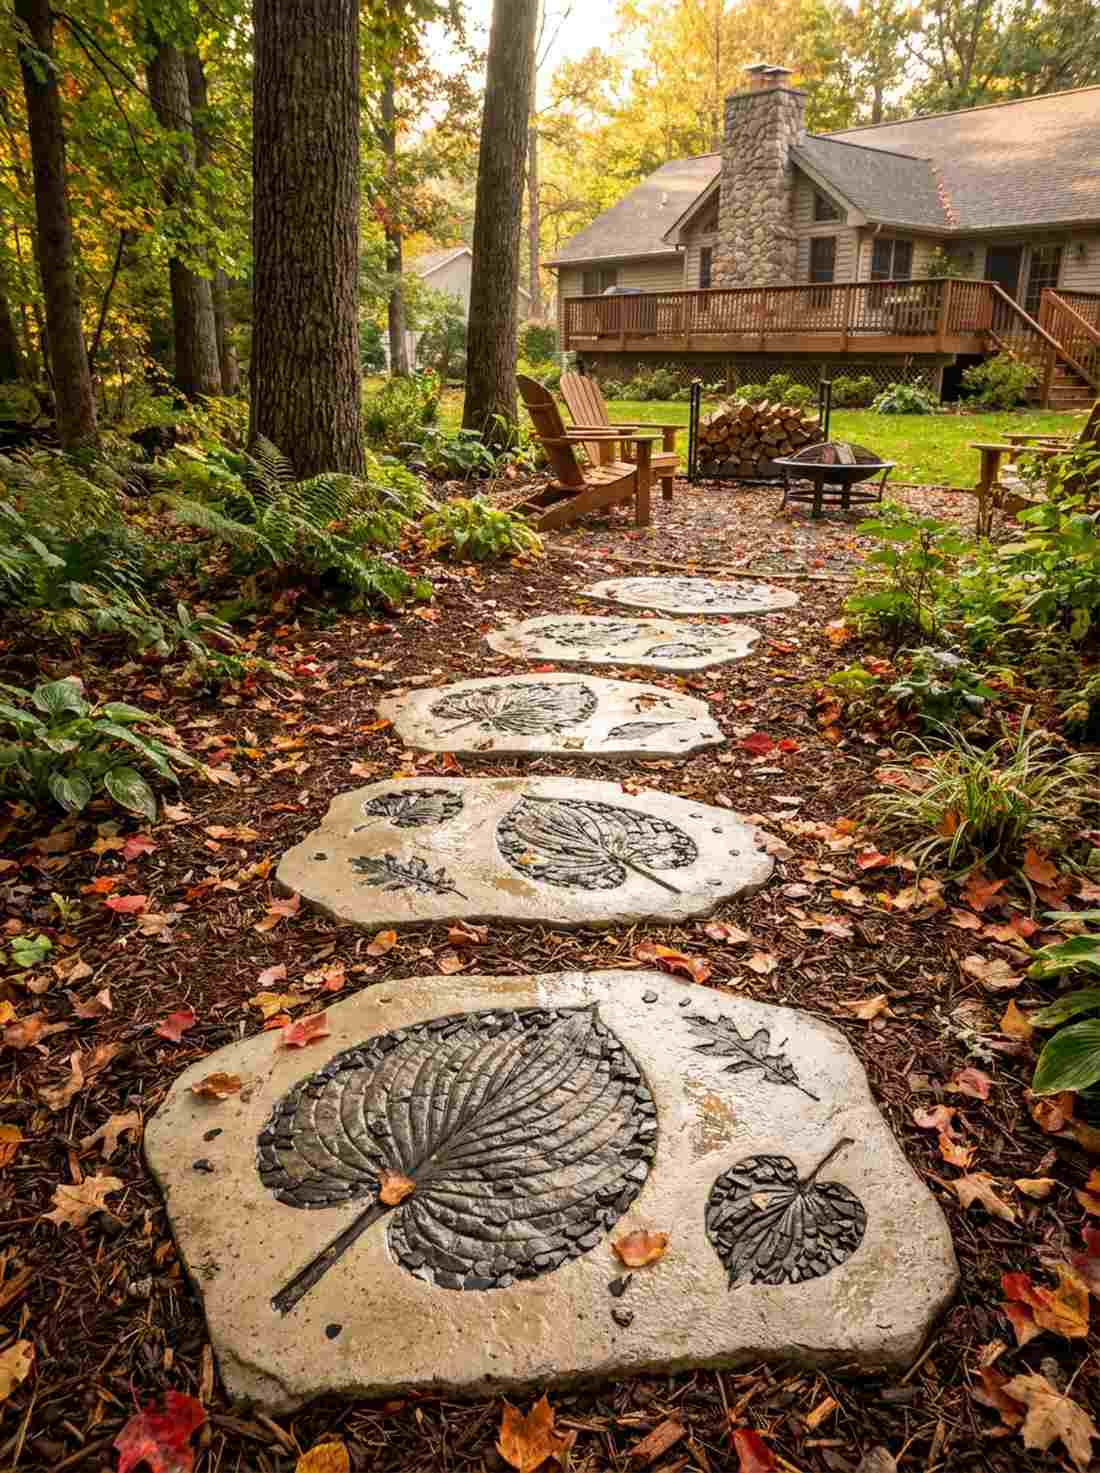
Capturing the essence of a crisp autumn morning, this embedded design feels incredibly nostalgic and earthy. Implementing an autumnal woodland path feature brings incredible character to shady side yards where grass refuses to grow.
Contrasting dark pebble silhouettes against lighter mortar beds delivers a striking visual pop that commands attention. Pressing actual giant hosta leaves into wet cement before laying the stones guarantees hyper-realistic sizing.
Achieve this leafy look for around $30 for a set of five large imprints. Pin this if you love bringing natural woodland vibes into suburban spaces!
- Key Materials: Small dark pebbles and light setting mortar
- Vibe / Style: Rustic forest floor aesthetic
- Difficulty: Requires quick timing with wet mortar
- Budget Breakdown: Materials: $20 | Base: $10
- Creator’s Tip: Spray the real leaves with cooking oil before pressing them into the mortar so they peel out cleanly.
- Smart Sourcing: miniature dark slate chips (bagged) and rapid-setting white outdoor mortar
8. River Flow Curves
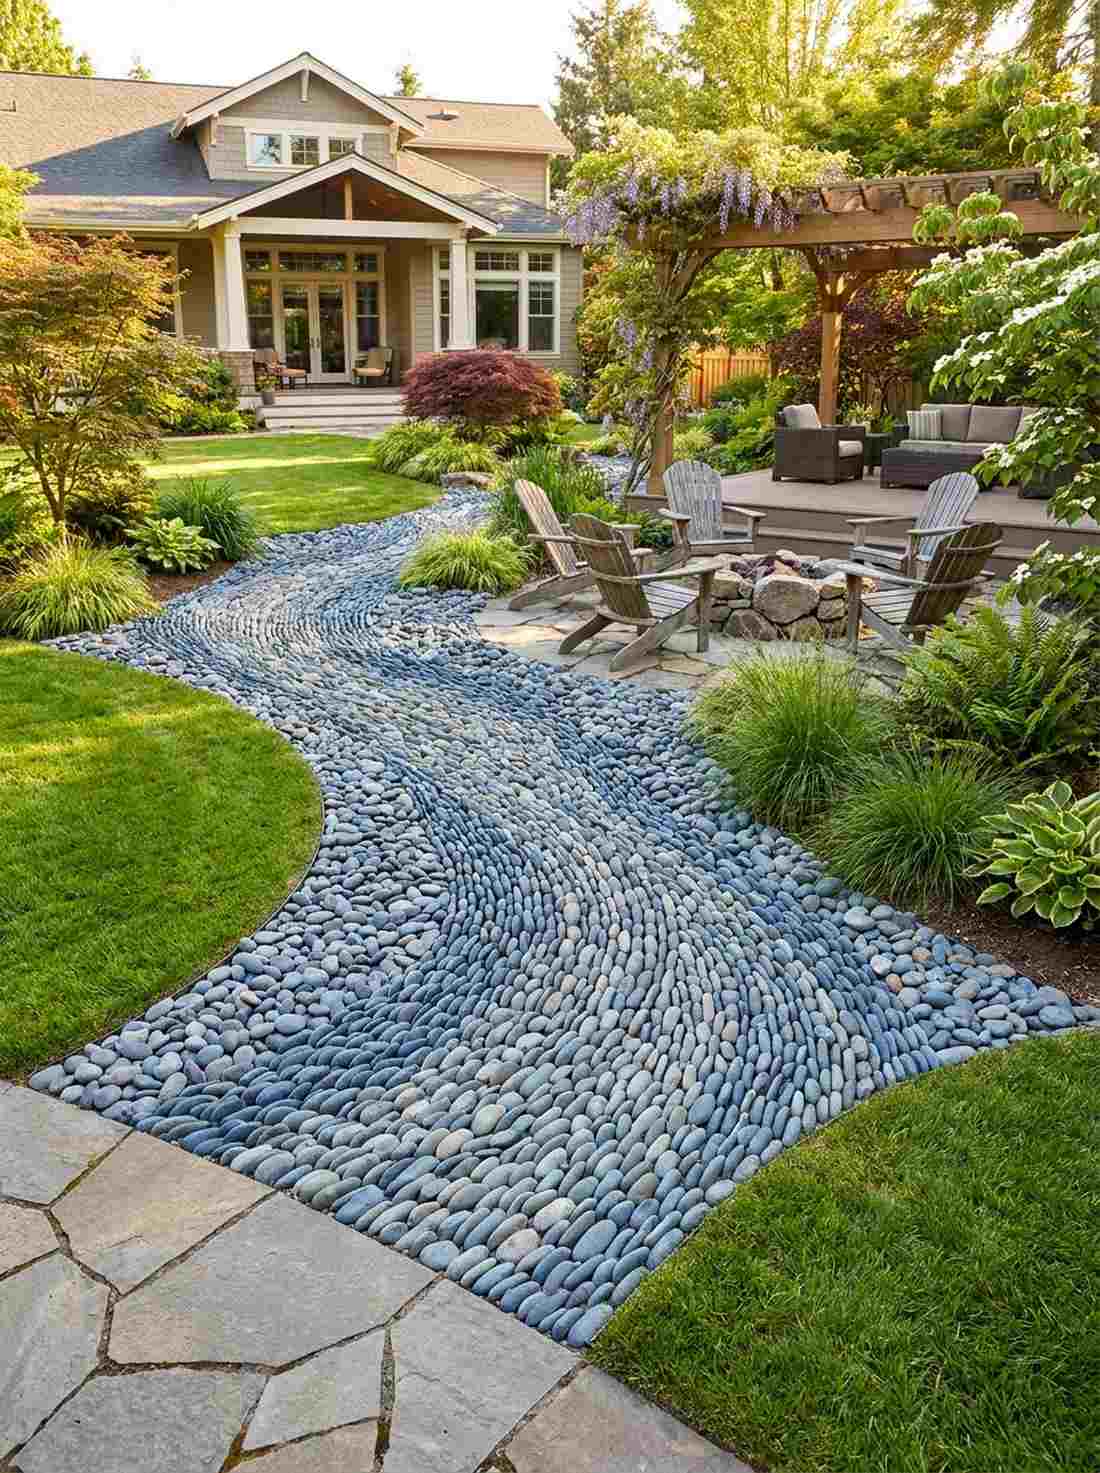
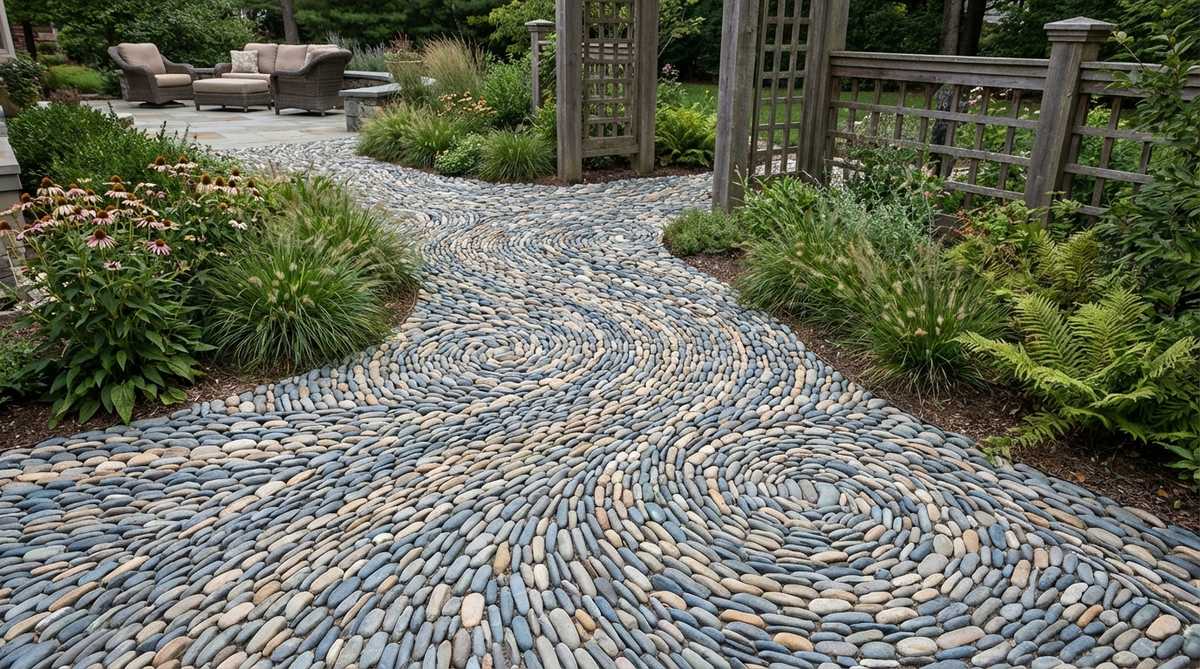
Mimicking the serene movement of a winding brook, this undulating design creates instant psychological calm. A flowing dry creek mosaic acts as the ultimate eye-catching feature to guide guests from the driveway to the backyard.
Aligning elongated stones in parallel sweeping lines completely tricks the eye into seeing actual rushing water. Utilizing a gradient of blue and gray stones makes the installation look remarkably expensive and professionally curated.
Creating this flowing illusion requires roughly $50–$80 depending on the length. It is a stunning visual anchor for any modern landscape.
- Key Materials: Blue-gray beach pebbles in varying sizes
- Vibe / Style: Serene Japanese water garden
- Difficulty: Moderate pacing and alignment
- Budget Breakdown: Materials: $60 | Base: $20
- Creator’s Tip: Stand elongated pebbles on their edges rather than laying them flat to simulate realistic rippling water.
- Smart Sourcing: premium blue Mexican beach pebbles (bulk) and commercial-grade polymer sand
9. Tree Ring Circles
This rustic layout feels like examining the massive cross-section of an ancient redwood tree. Installing rustic timber-look stone rounds provides a stunning base to highlight massive planters or standalone garden sculptures.
Varying the thickness of each concentric stone band guarantees a rugged, highly authentic organic finish. Skipping uniform spacing in favor of chaotic, natural rings outshines basic mulch circles by a mile.
You can build an impressive faux-wood ring for about $35–$50. Pin this to your rustic backyard makeover board today!
- Key Materials: Tan, brown, and charcoal river rocks
- Vibe / Style: Pacific Northwest cabin aesthetic
- Difficulty: Easy and forgiving layout
- Budget Breakdown: Materials: $35 | Base: $15
- Creator’s Tip: Intentionally mix chipped and imperfect stones into the bands to mimic natural wood rot and bark texture.
- Smart Sourcing: earth-tone mixed pebble bags (50lbs) and heavy-duty weed barrier rolls
💡 Must-Have Supplies for High-End Setups
To build these setups faster and ensure they last, skip the generic craft aisles and invest in the right foundational kits.
- Base & Support: commercial-grade structural base panels
- Setup Tools: ergonomic masonry trowel starter kits
- Weather/Durability Protection: high-gloss UV-resistant stone sealant spray
Most people get their drainage completely wrong… until they try the exact layout coming up next.
10. Pebble Stream Bed
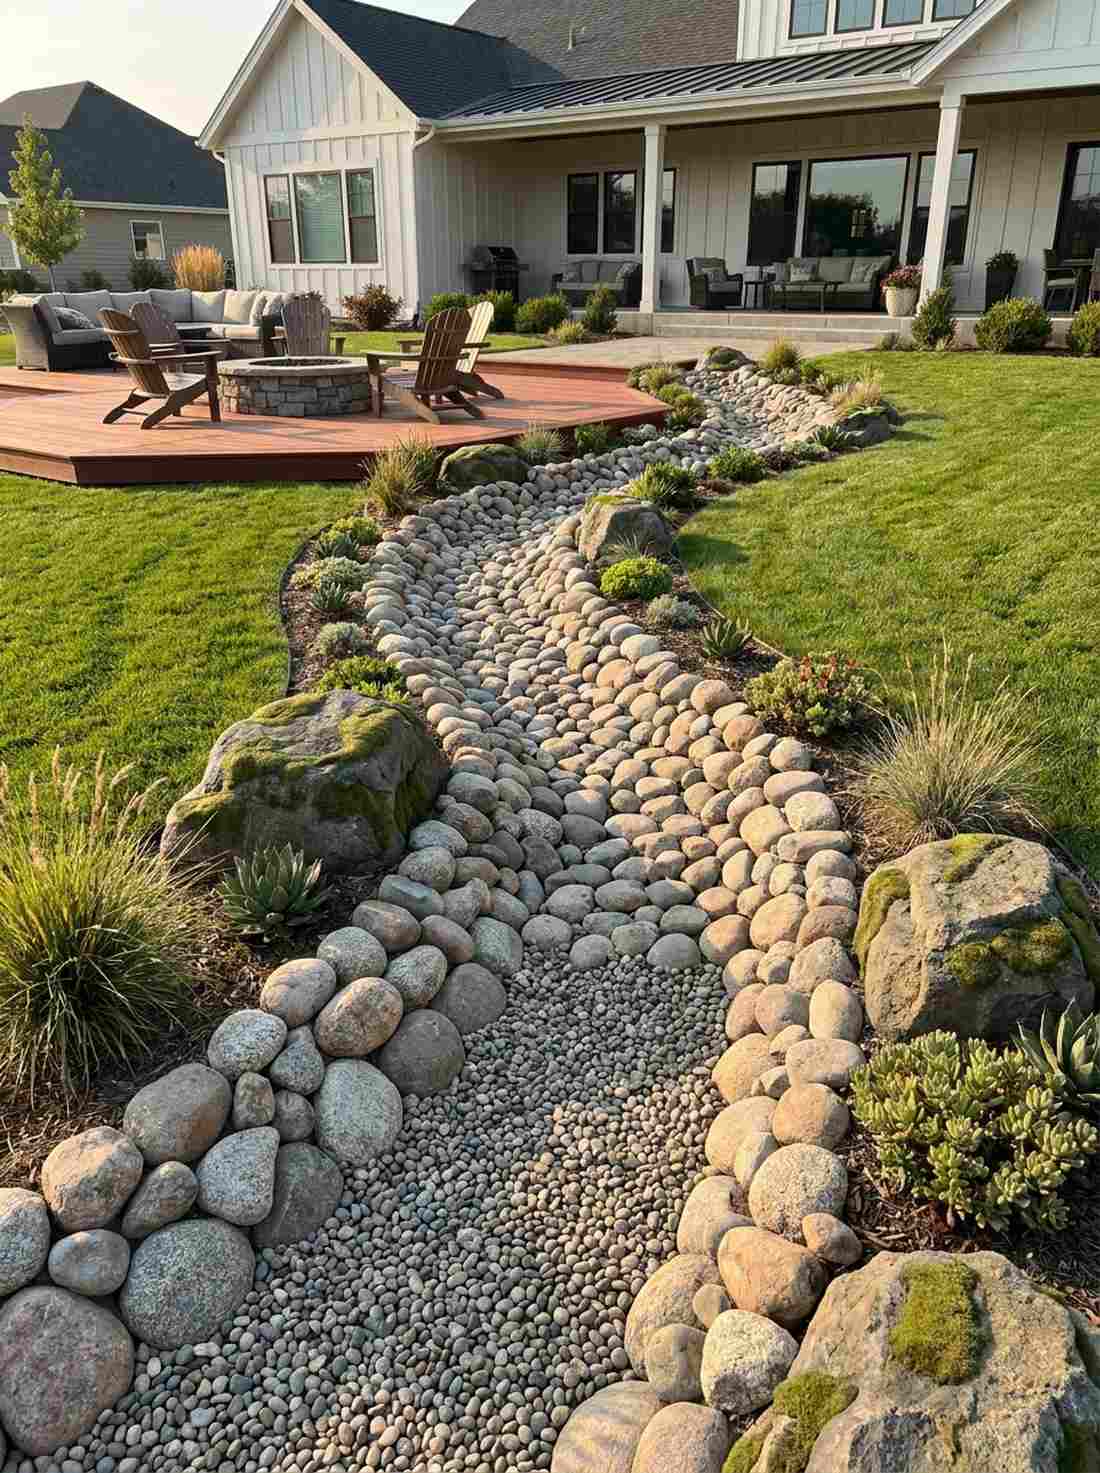
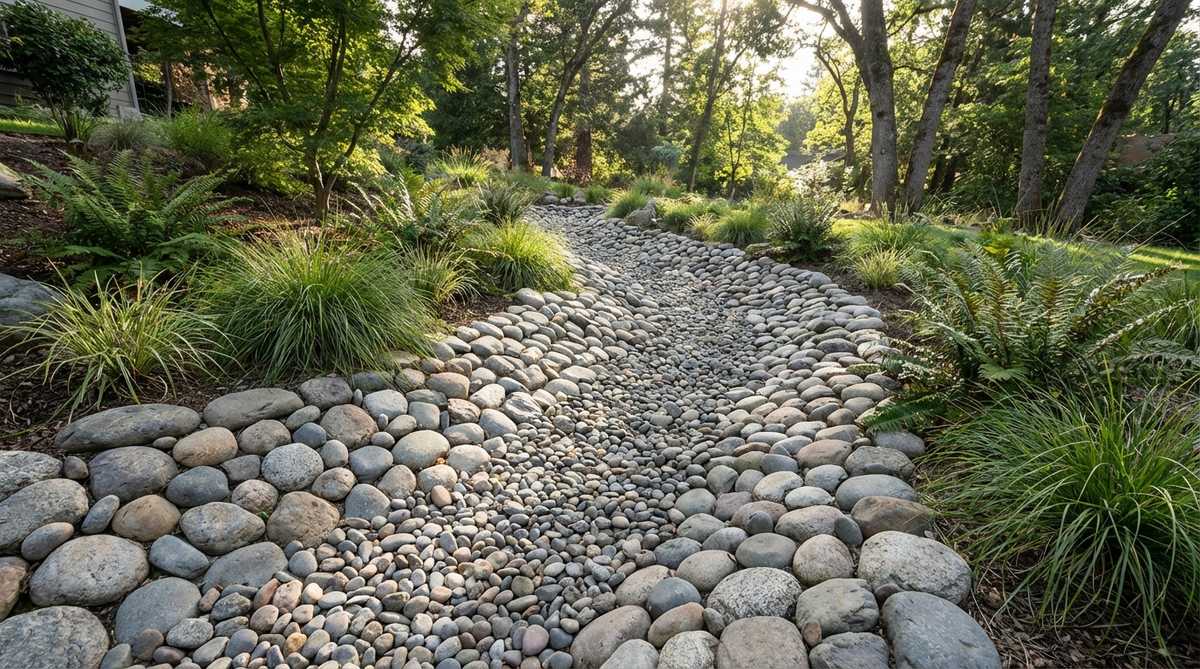
Function meets pure rugged beauty in a layout that feels like a dried-up alpine riverbed. A naturalistic drainage landscape art installation is absolutely mandatory for masking ugly drainage slopes or muddy backyard trenches.
Grading massive cobbles down to tiny center pebbles solves erosion nightmares while delivering a resort-quality aesthetic. Tucking hardy terrarium accessories or faux moss rocks along the shoreline elevates the realism instantly.
This functional art piece costs around $70–$100 to armor a small slope. Save this genius drainage hack before the next heavy storm hits!
- Key Materials: Large granite cobbles and fine pea gravel
- Vibe / Style: Rugged mountain stream
- Difficulty: Heavy lifting required
- Budget Breakdown: Materials: $75 | Base Fabric: $25
- Creator’s Tip: Dig the center trench at least four inches deeper than the edges to guarantee water actually channels through it.
- Smart Sourcing: mixed size granite landscape cobbles (bulk) and commercial woven geotextile fabric
Cultural & Artistic Patterns
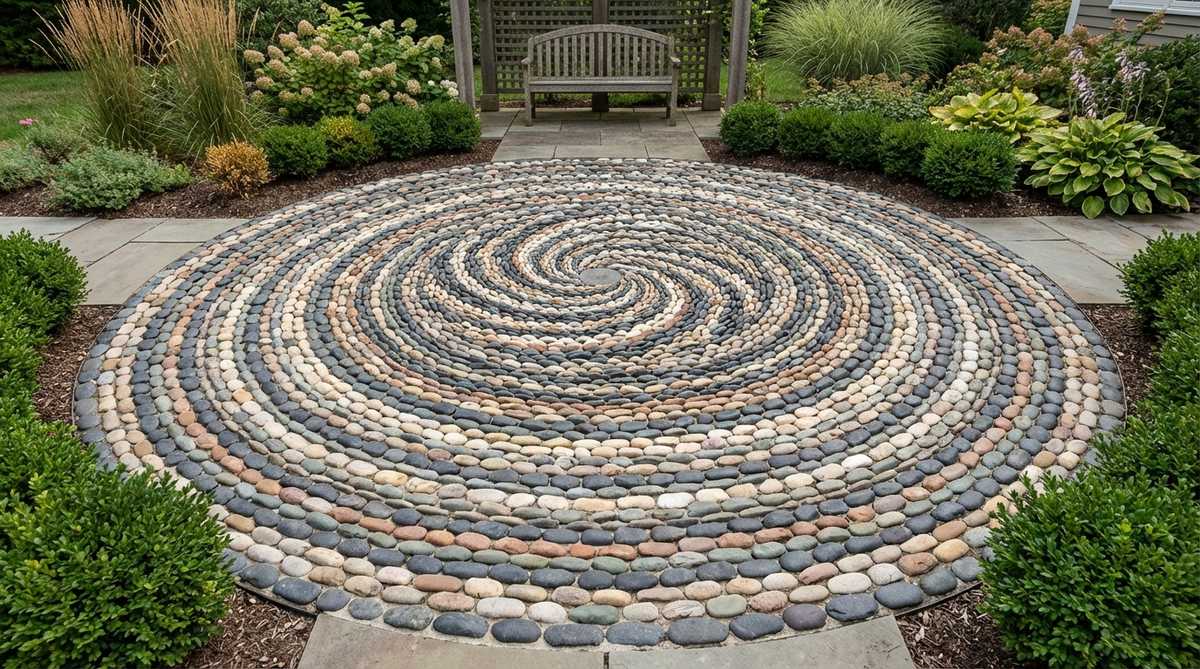
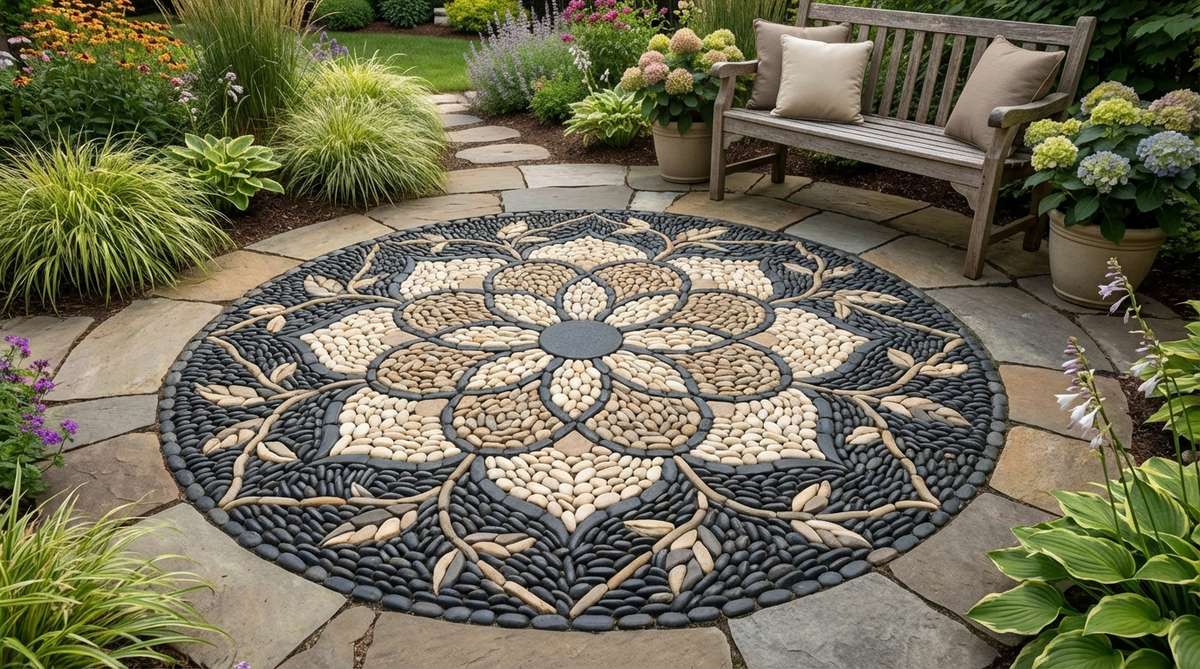
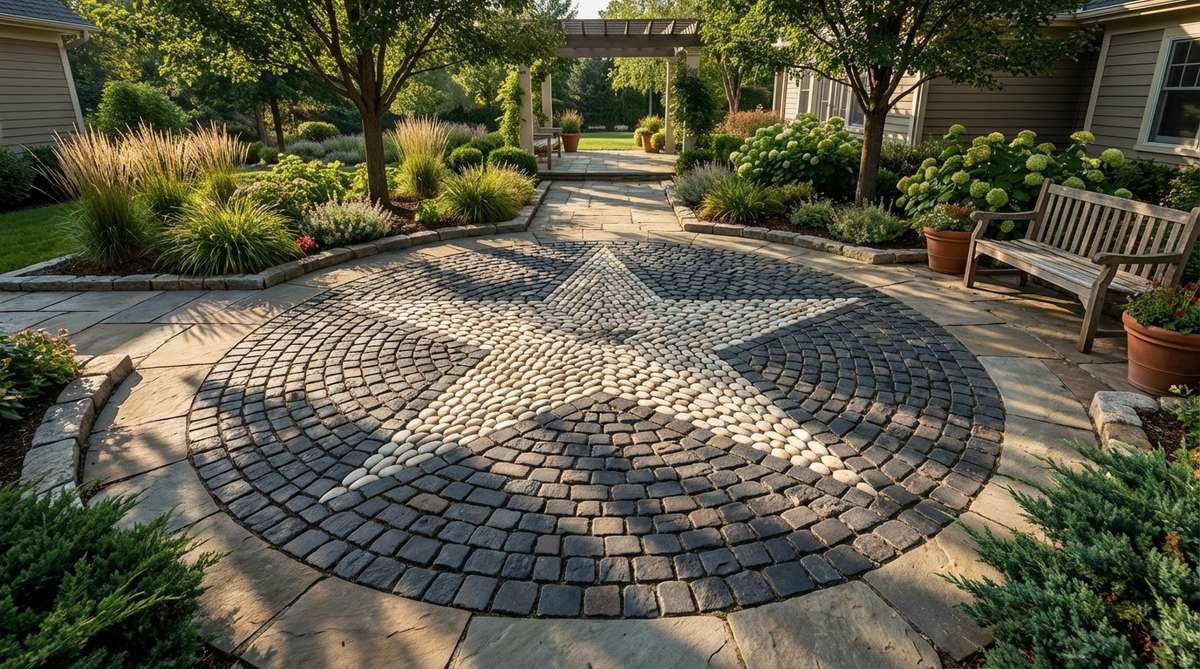
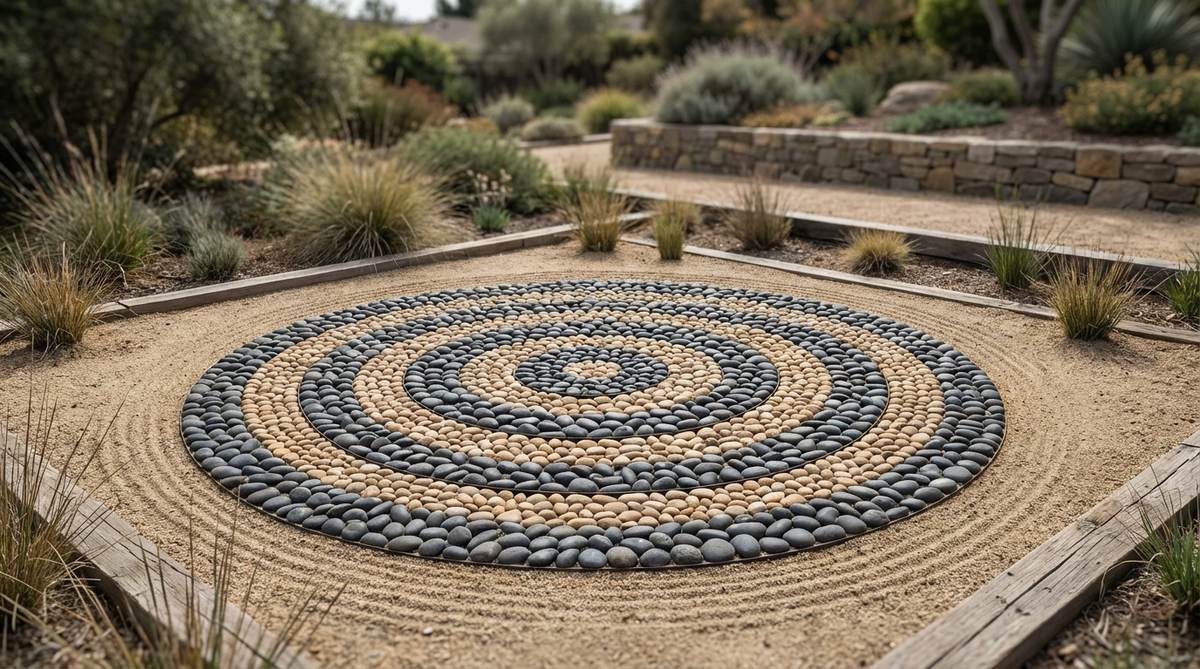
11. Mandala Mosaic Circle
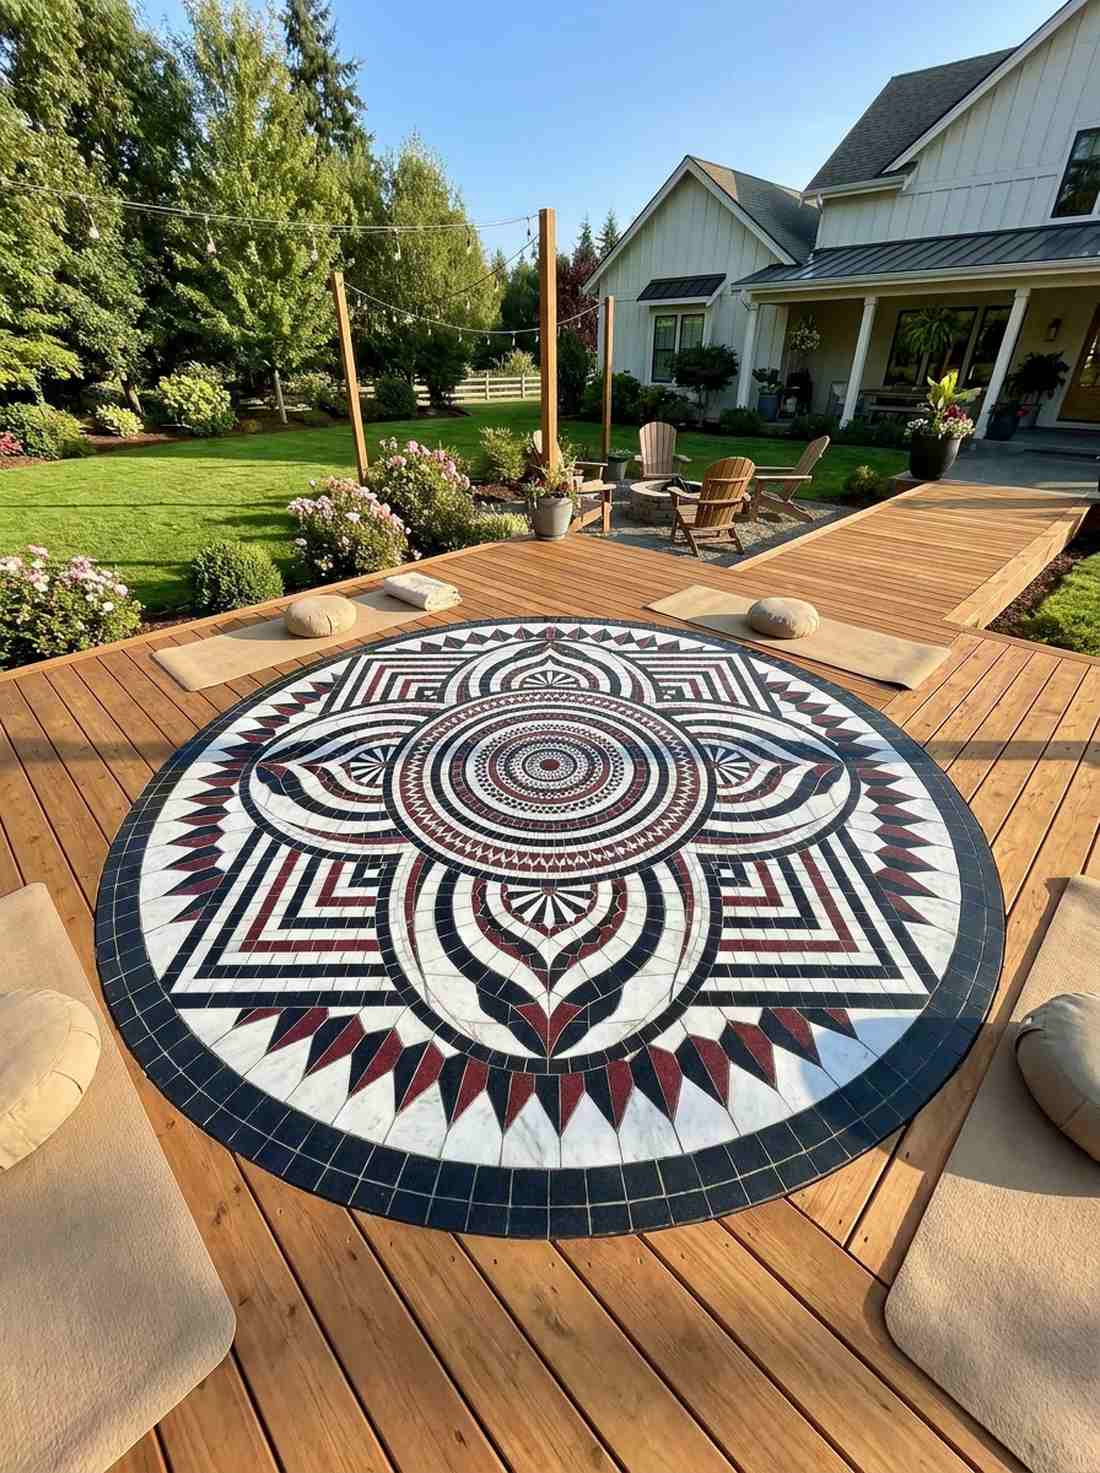
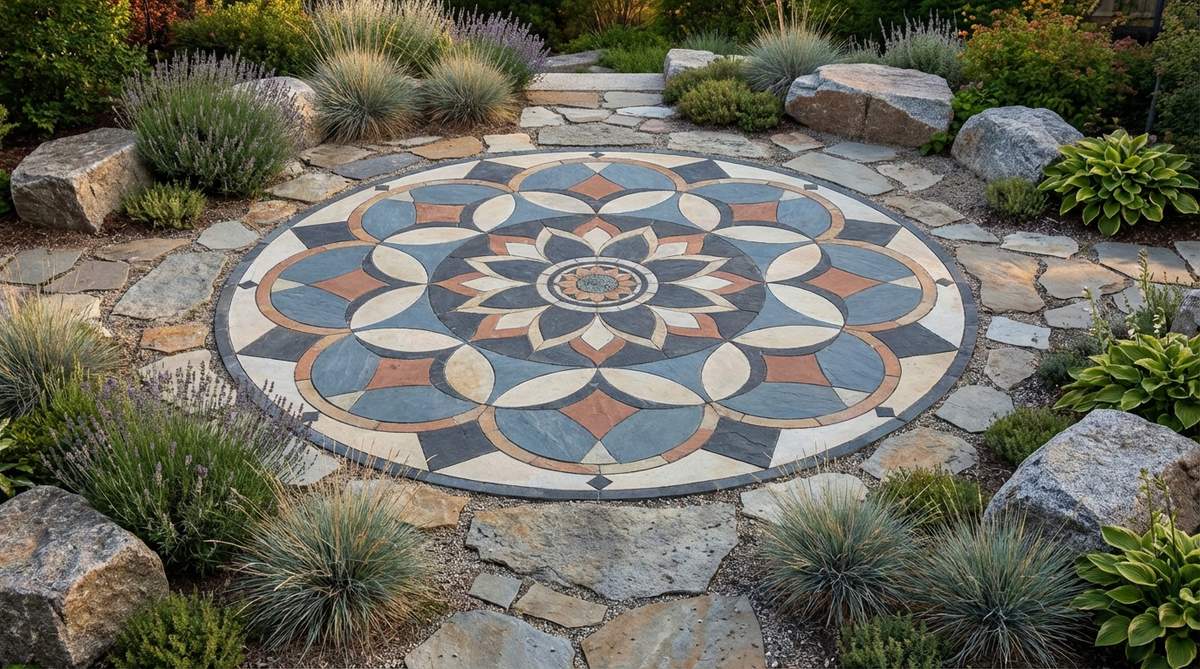
Radiating pure spiritual symmetry, stepping into this space feels like walking onto a sacred temple floor. A sprawling meditation mandala stone feature works wonders as the focal centerpiece for a private backyard yoga deck.
Executing perfectly balanced geometric quadrants yields a breathtaking visual that commands the entire yard’s energy. Sourcing premium miniature garden supplies to detail the innermost rings gives the piece a stunning jewelry-box finish.
A full-scale mandala layout runs approximately $60–$90 to complete properly. Pin this layout to inspire your ultimate backyard sanctuary build.
- Key Materials: High-contrast black, white, and red stones
- Vibe / Style: Sacred bohemian sanctuary
- Difficulty: Advanced symmetrical measuring
- Budget Breakdown: Materials: $65 | Base Mortar: $25
- Creator’s Tip: Drive a stake in the center and use a string as a compass to score perfectly round guide lines into the wet mortar.
- Smart Sourcing: pre-sorted ruby red landscape glass drops and precision masonry chalk line kits
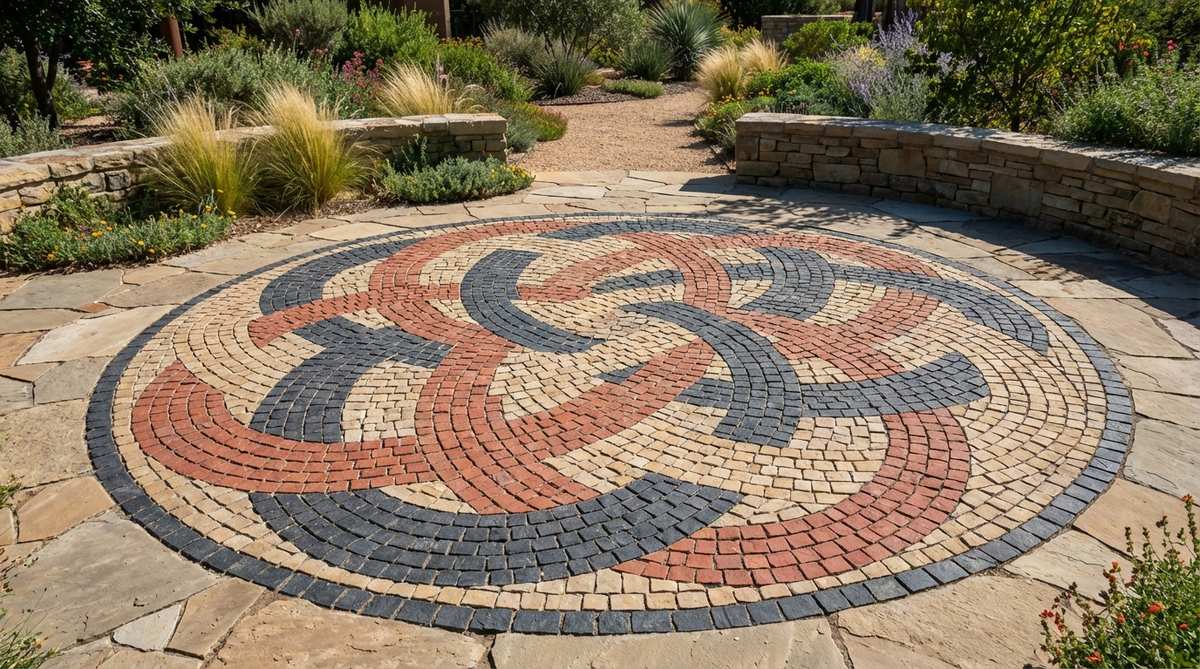
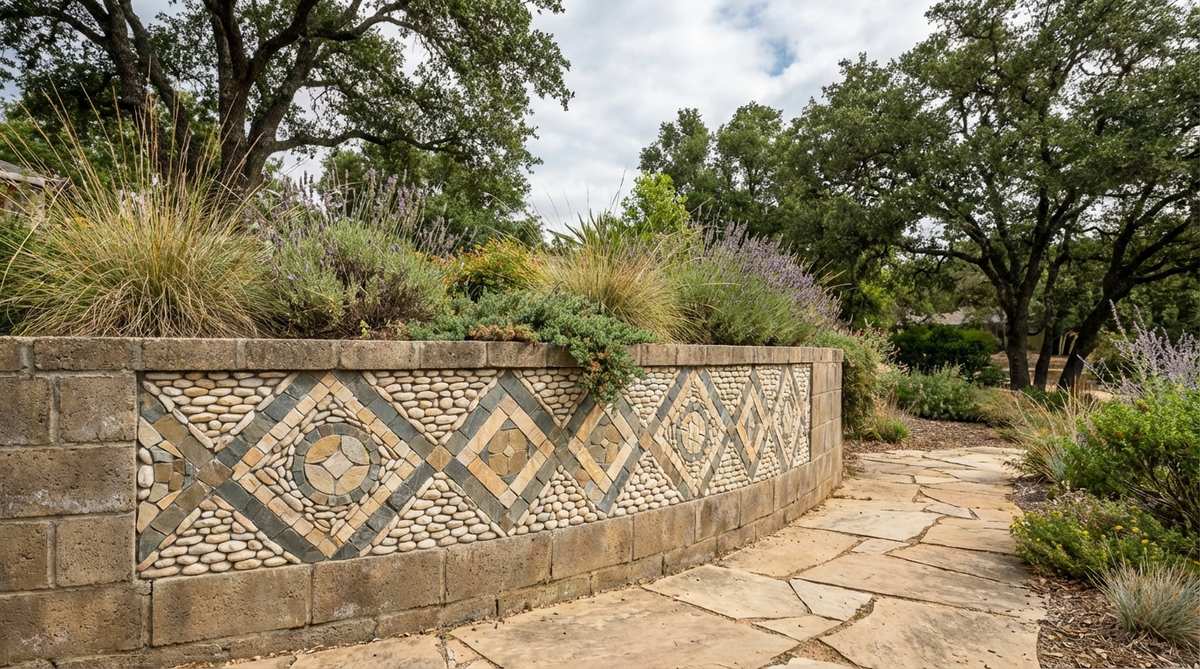
12. Greek Key Border
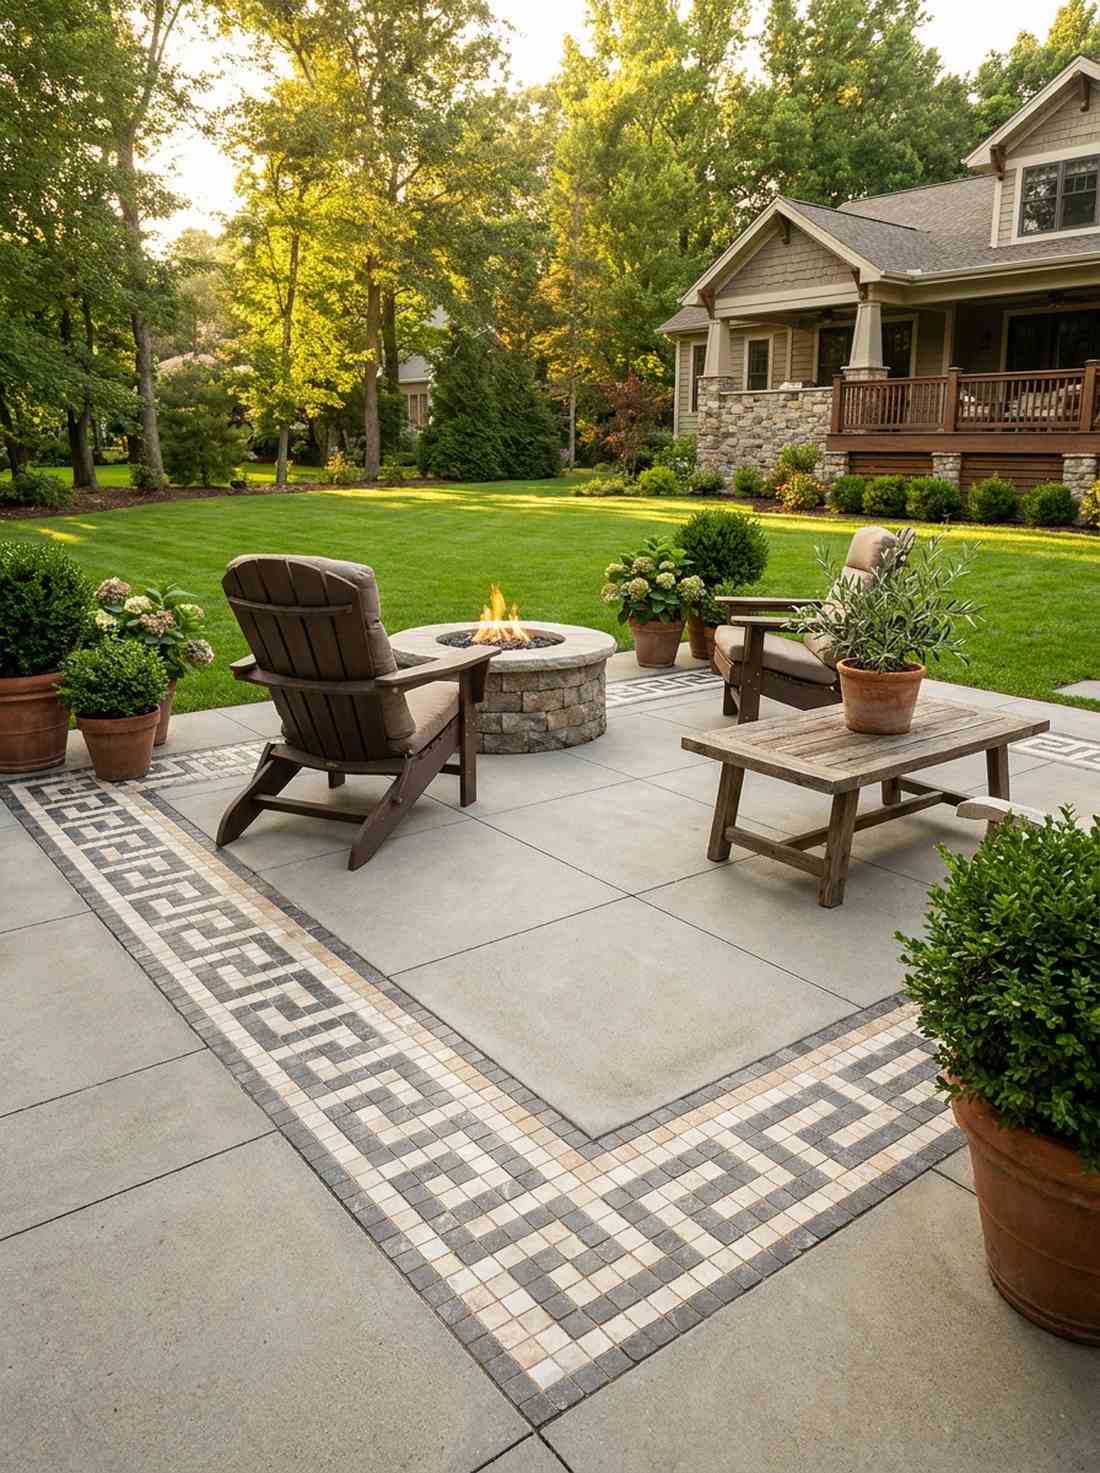
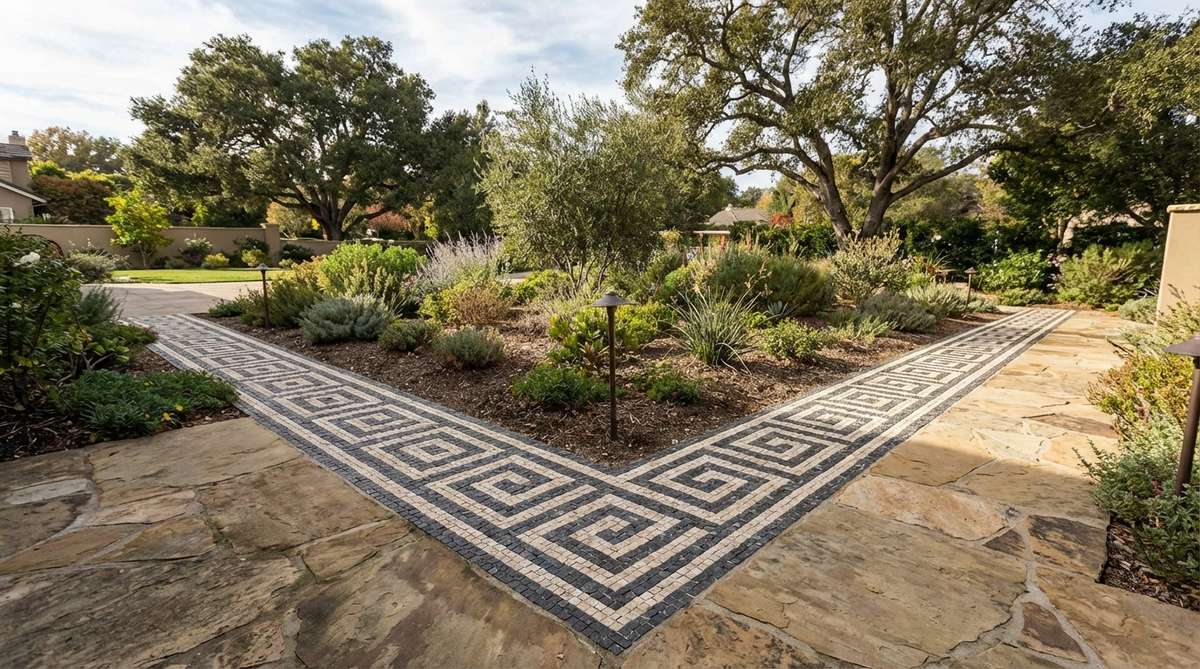
Sharp, continuous, and legendary, this architectural border feels lifted directly from ancient Athenian ruins. Framing a standard patio with a classical labyrinth stone edging instantly injects heavy historical prestige into mundane concrete spaces.
Constructing tight right angles with stones bypasses the look of cheap plastic edging entirely. Utilizing precisely cut square stone tiles instead of rounded pebbles ensures the maze pattern remains razor-sharp.
Framing a small seating area with this border costs roughly $45. It is an amazing way to make a cheap patio look incredibly expensive.
- Key Materials: Square-cut marble or slate mosaic pieces
- Vibe / Style: Ancient Mediterranean luxury
- Difficulty: Detail-heavy precision work
- Budget Breakdown: Materials: $35 | Base: $10
- Creator’s Tip: Draw the continuous key pattern on a roll of mesh backing indoors, glue the stones down, and then transfer the whole sheet outside.
- Smart Sourcing: pre-cut marble square mosaic tiles (bulk packs) and weatherproof outdoor construction adhesive
13. Celtic Knot Weave
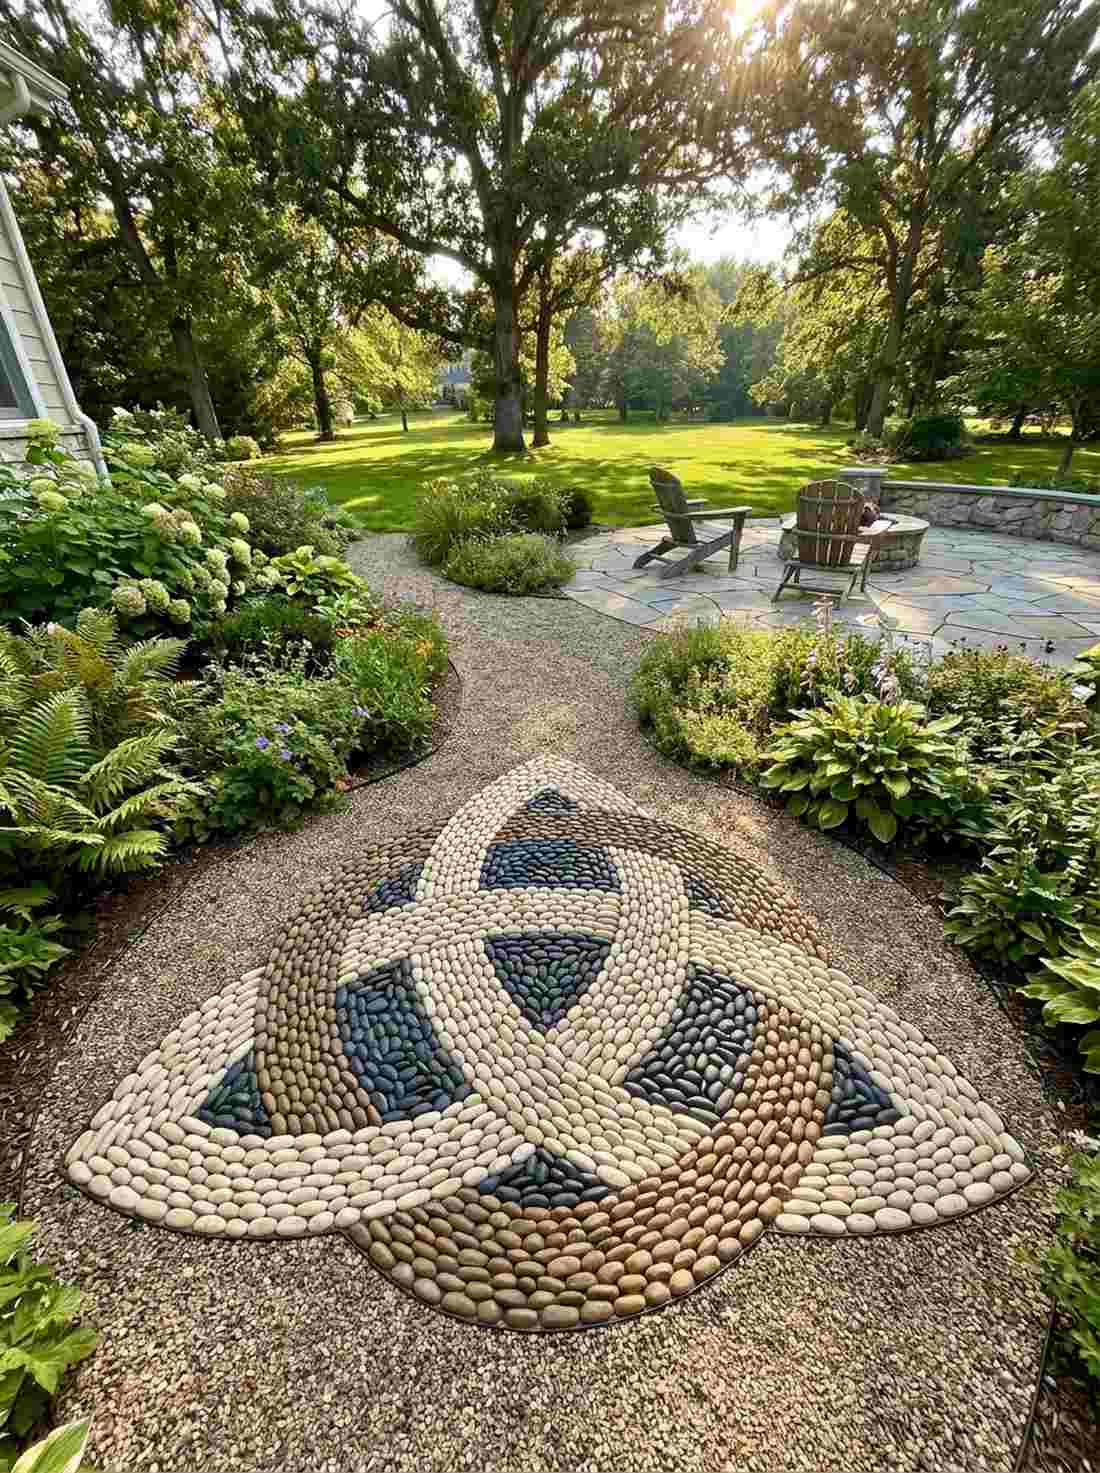
Endlessly looping and mathematically fascinating, staring at this layout feels like deciphering ancient folklore. A tight interwoven stone knot emblem serves as a gorgeous secret discovery at the dead-end of a meandering garden path.
Strategically alternating light and dark stones creates a convincing optical illusion of physical overlapping. This intricate bravery completely destroys the stereotype that DIY stone projects have to look sloppy or amateur.
Crafting a singular massive knot costs just $30 in raw stones. Save this to your garden artistry board to tackle when you have a free weekend!
- Key Materials: Three distinct colors of uniform pebbles
- Vibe / Style: Mystical Scottish highlands
- Difficulty: Tricky optical illusion planning
- Budget Breakdown: Materials: $25 | Base: $5
- Creator’s Tip: Lay out the entire knot design on a tarp first, take a photo, and use it as a map while setting the stones in mortar.
- Smart Sourcing: tri-color polished river rock sets and clear UV-protective stone sealer
14. Moroccan Zellige Inspired
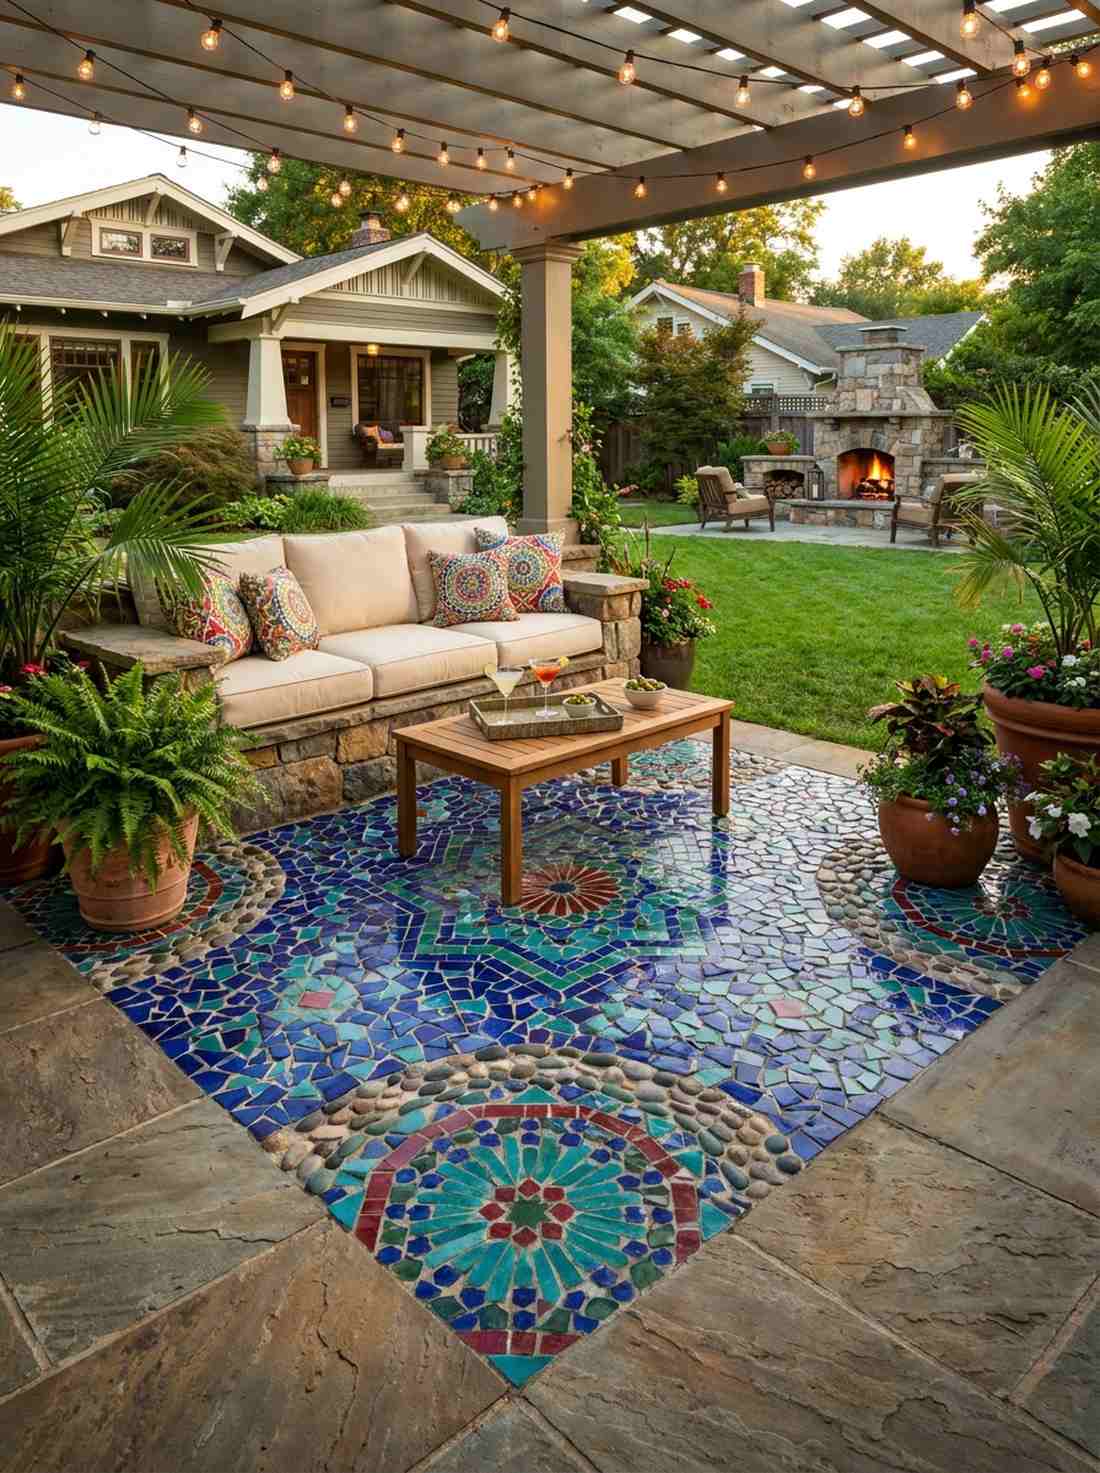
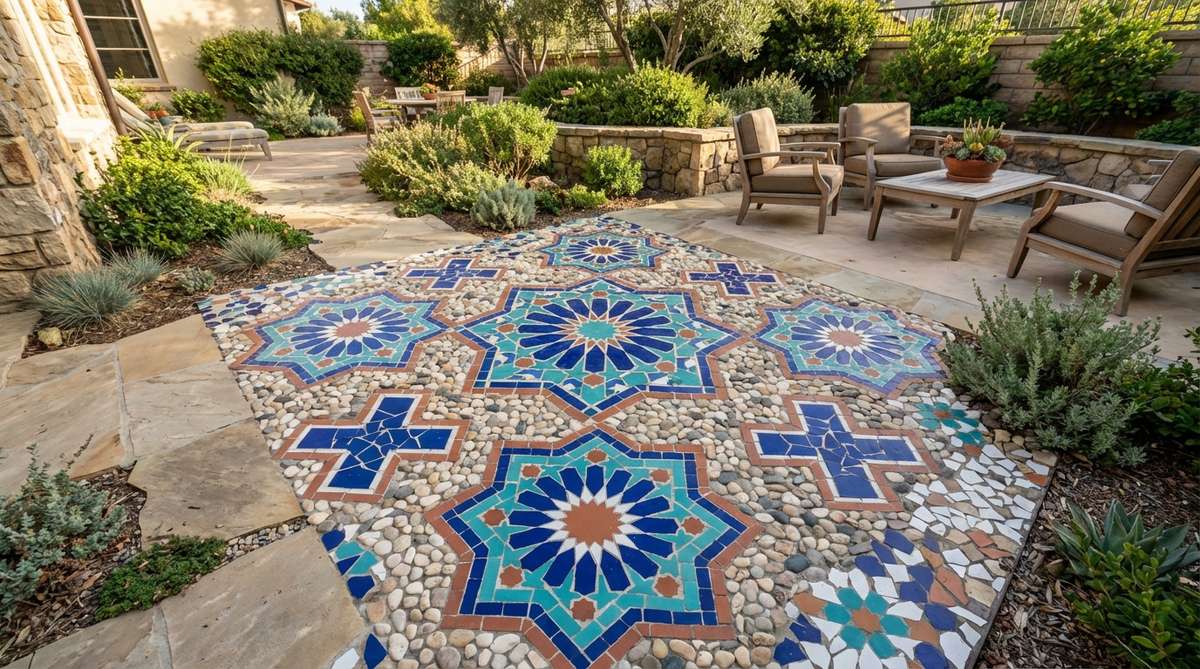
Dripping with vibrant jewel tones, this installation feels like a sultry evening in a Marrakech courtyard. The exotic geometric tile ground cover turns a boring, shaded patio corner into an exotic destination for evening cocktails.
Shattering cheap glazed ceramic pots to mix with natural stones guarantees an elite, bespoke texture nobody else has. Upgrading to UV-resistant acrylic sealants ensures those vibrant cobalt and turquoise colors never fade in the sun.
This exotic shattered look can be achieved for around $40–$60. It is the ultimate upcycling project for broken ceramics.
- Key Materials: Smashed glazed pottery and neutral background pebbles
- Vibe / Style: Vibrant North African oasis
- Difficulty: Safety gear required for smashing
- Budget Breakdown: Materials: $40 | Sealant: $20
- Creator’s Tip: Place broken tile edges facing down into the mortar so nobody cuts their bare feet walking over the mosaic.
- Smart Sourcing: assorted glazed mosaic tile shards (bulk bags) and heavy-duty tile nipper tools
If you think luxury landscaping requires a contractor, the next star-studded layout is going to blow your mind…
15. Star Struck Medallion
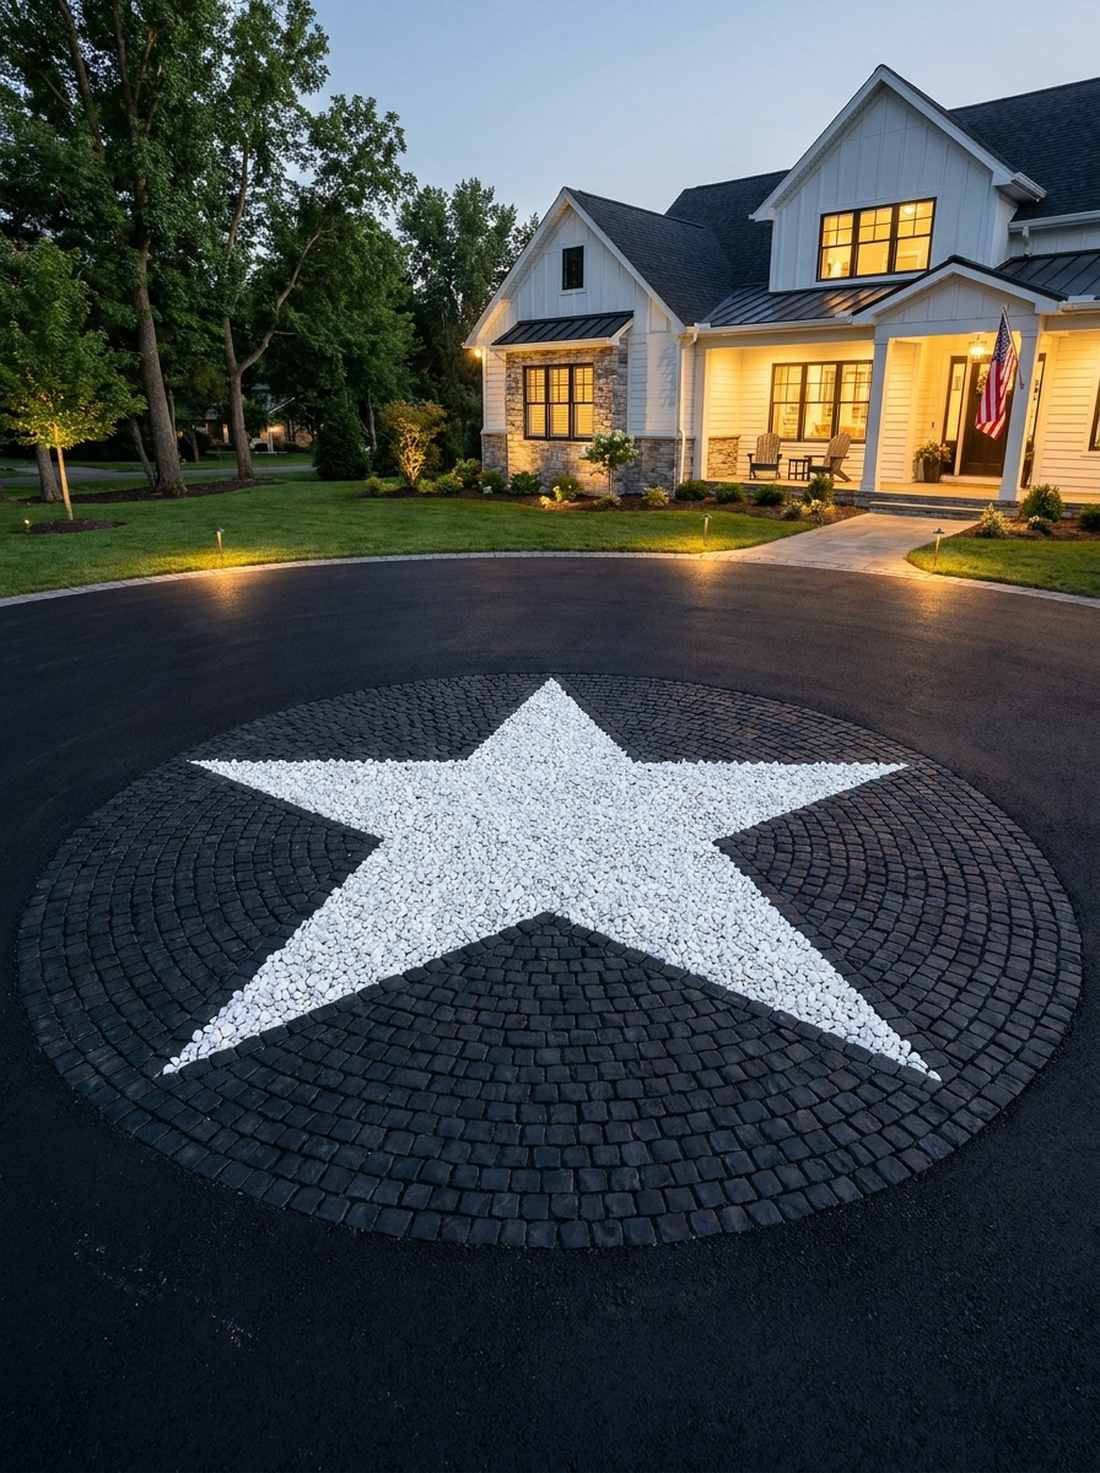
Bold and highly graphic, this contrasting layout feels like a Hollywood walk of fame meets rustic country estate. Dropping a celestial courtyard star centerpiece directly in the middle of a driveway turnaround demands immediate respect.
Setting stark white quartz stars against a void of pitch-black basalt cobbles produces maximum dramatic tension. This high-contrast approach gives a designer-level finish that looks spectacular under harsh outdoor security lighting.
You can construct a massive glowing star for about $55. Pin this idea to upgrade your plain asphalt or concrete driveway entrance!
- Key Materials: Brilliant white quartz and black basalt
- Vibe / Style: Dramatic celestial farmhouse
- Difficulty: Moderate point alignment
- Budget Breakdown: Materials: $45 | Base: $10
- Creator’s Tip: Use a physical cardboard star cutout as a hard stencil to keep the five points perfectly crisp while packing the black stones around it.
- Smart Sourcing: pure white quartz landscaping pebbles (bulk) and matte black basalt base stones
Modern & Contemporary Layouts
16. Free-Form Stone Carpet
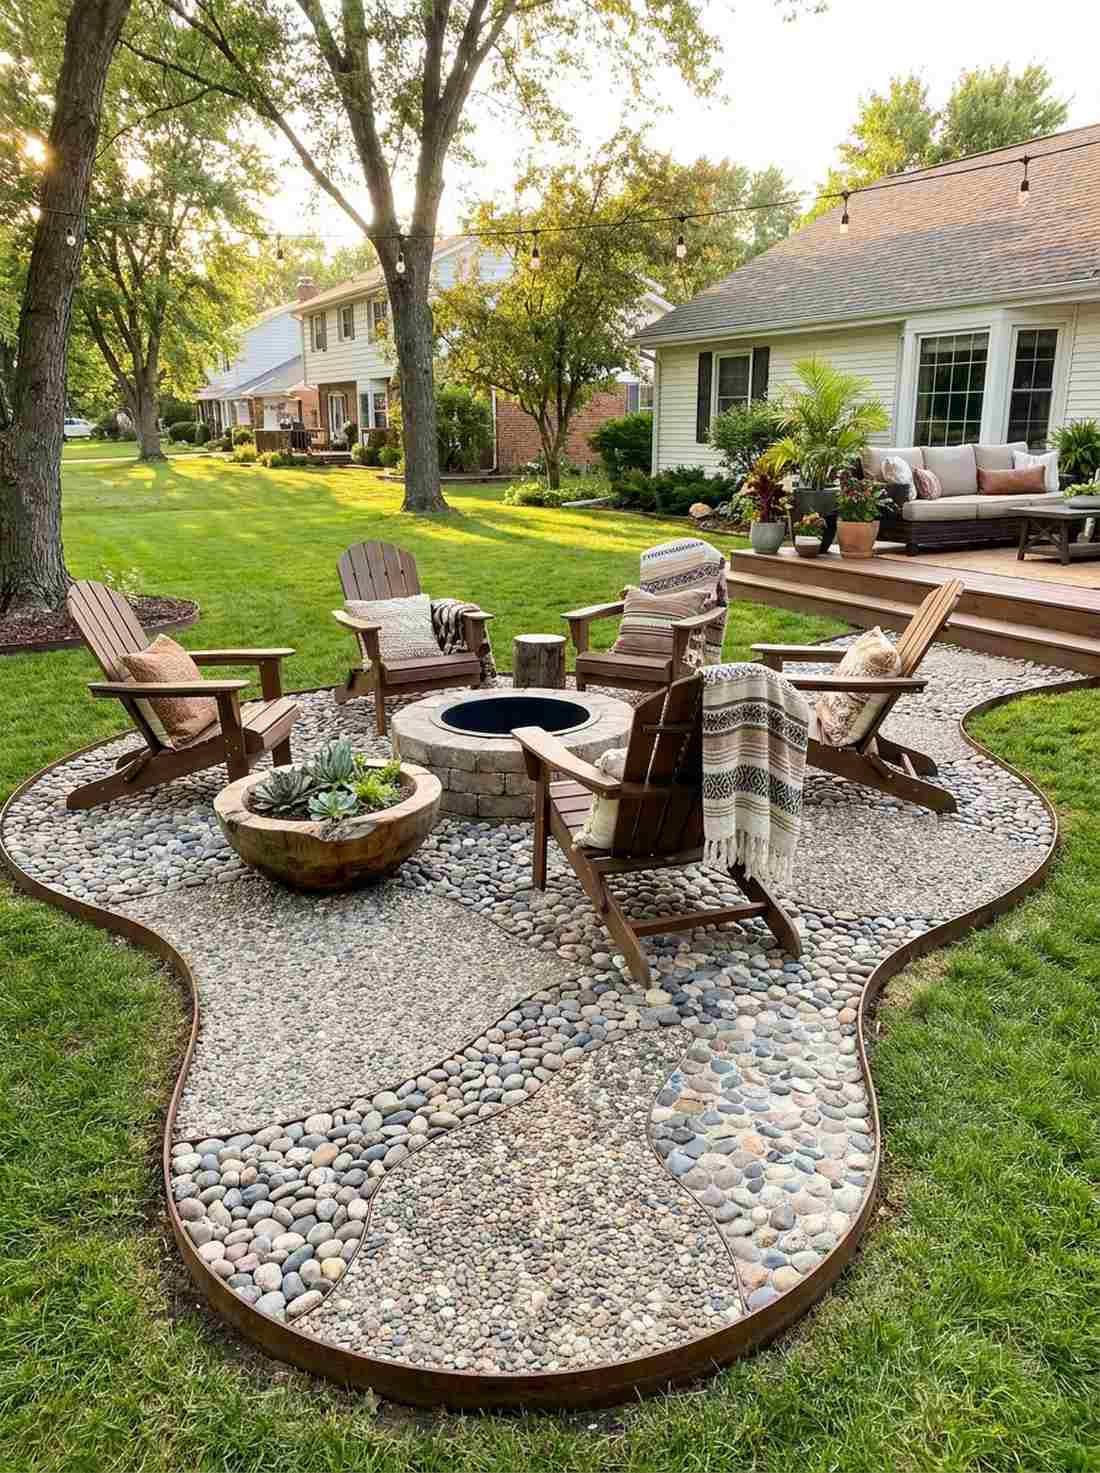
Shedding all strict boundaries, this flowing arrangement feels like a plush bohemian rug thrown onto the dirt. A curved abstract stone rug layout perfectly grounds a cluster of modern Adirondack chairs around a fire pit.
Ditching right angles for undulating, organic borders completely changes the rigid rules of outdoor masonry. Blending varied sizes of aggregate mimics a heavy textile weave, tricking the brain into seeing a soft surface.
Laying down a stone rug of this scale costs roughly $70–$90. Save this if you want a permanent patio rug that never needs washing!
- Key Materials: Mixed grade pebbles and steel landscape edging
- Vibe / Style: Relaxed bohemian fire pit
- Difficulty: Free-flowing and forgiving
- Budget Breakdown: Materials: $65 | Edging: $25
- Creator’s Tip: Install a heavy steel or flexible plastic border first to act as a retaining wall for your flowing stone carpet.
- Smart Sourcing: flexible corten steel landscape edging and mixed grade river cobble bulk bags
17. Linear Stripe Modern
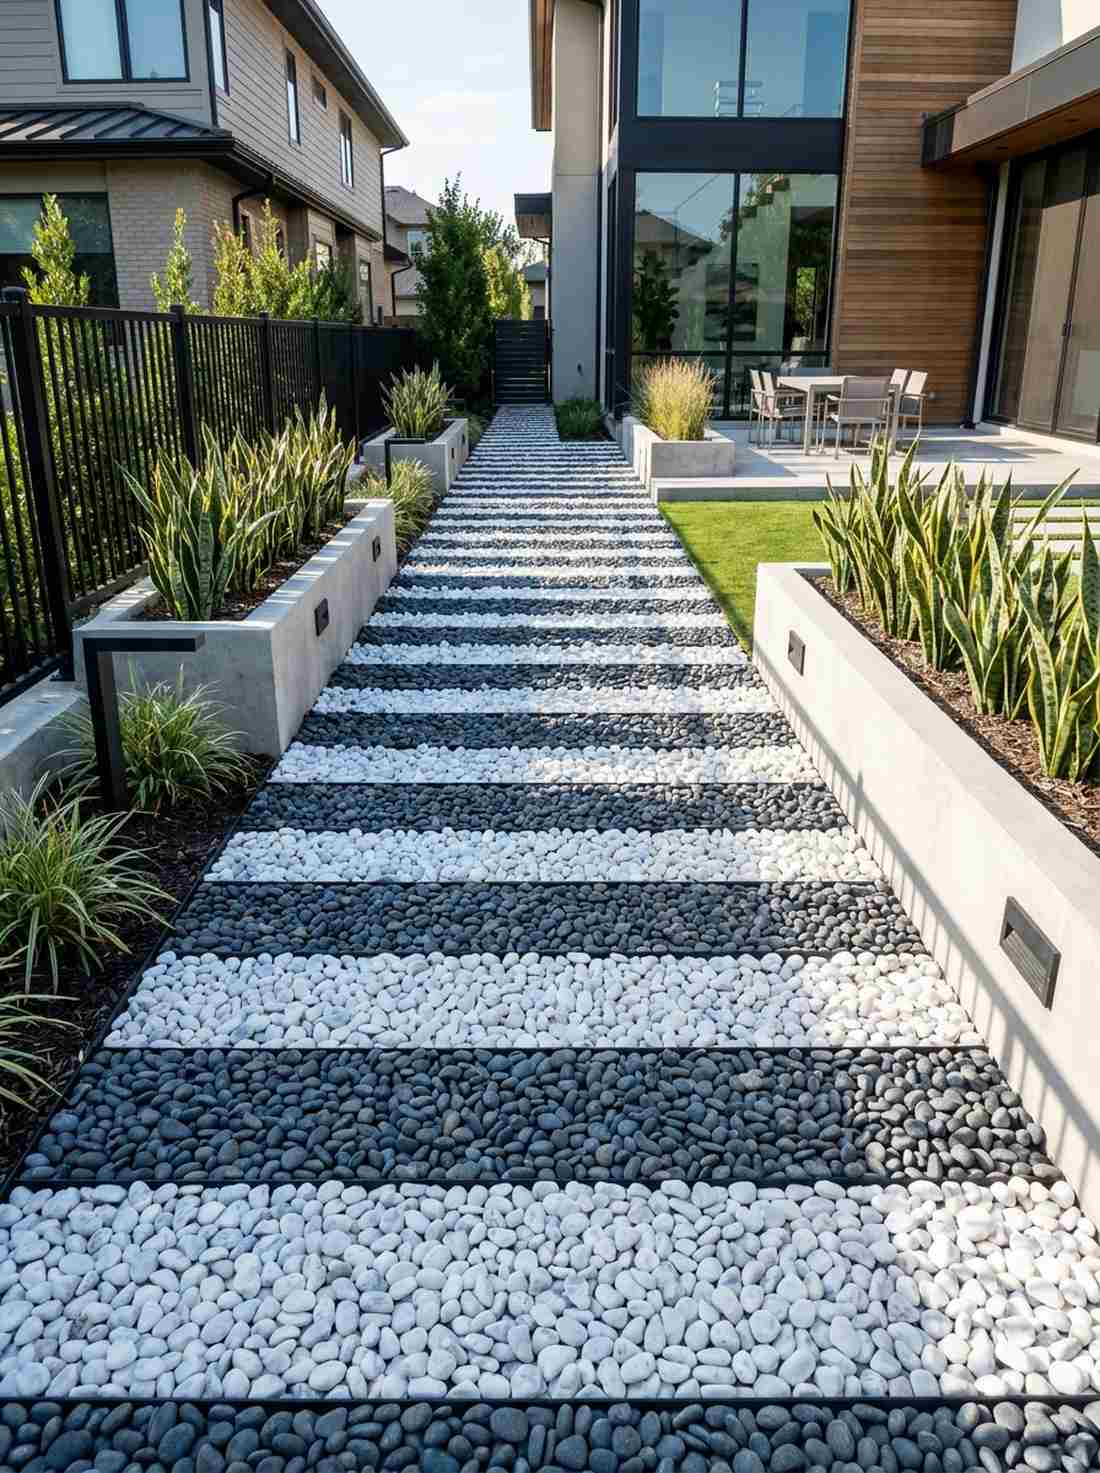
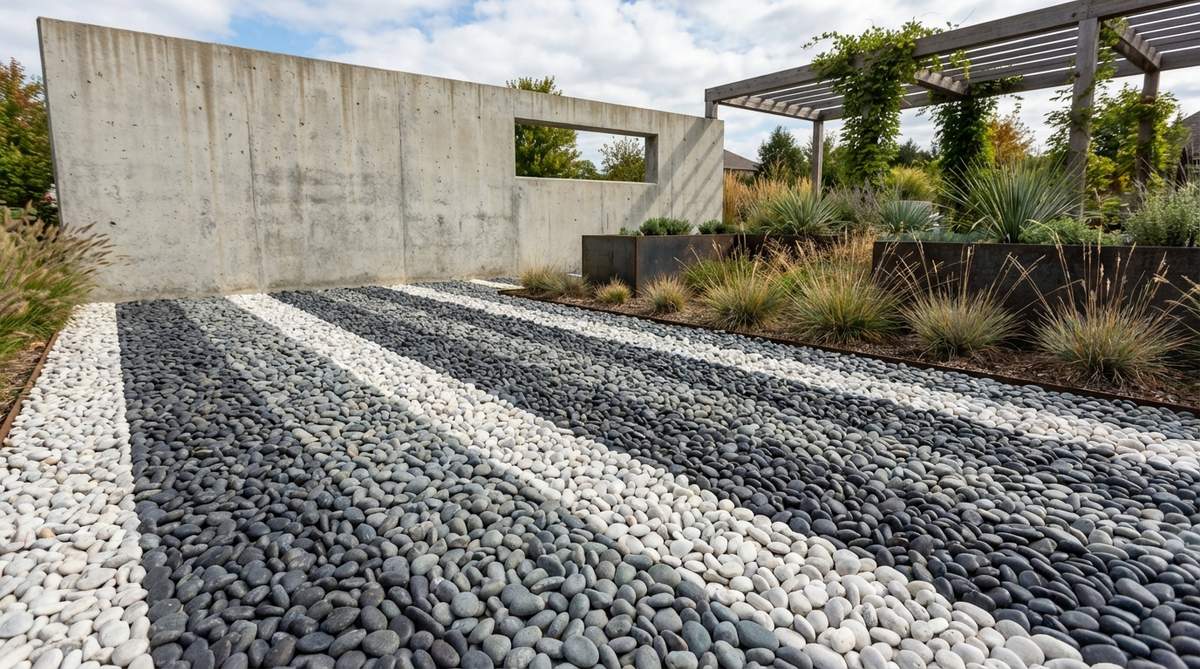
Sleek, directional, and hyper-organized, this stark design feels right at home outside a multimillion-dollar architectural mansion. The contemporary striped walkway paving creates an aggressive optical illusion that makes narrow side yards look incredibly wide.
Alternating thick bands of charcoal and white stones effortlessly achieves that coveted ultra-modern minimalist aesthetic. Maintaining mathematically perfect stripe widths delivers a surprisingly premium look that shames standard poured concrete.
This barcode-style pathway runs about $50 per pathway section. Highly recommended for upgrading newly built, modern suburban homes.
- Key Materials: Charcoal gray stones and bright white pebbles
- Vibe / Style: Ultra-modern architectural minimalism
- Difficulty: Requires rigid straight-line guides
- Budget Breakdown: Materials: $40 | Base: $10
- Creator’s Tip: Use two parallel wooden 2×4 boards to temporarily frame each stripe, packing the stones tightly before lifting the boards away.
- Smart Sourcing: premium black polished pebbles (50lbs) and snow white marble rock (bulk pack)
18. Asymmetric Color Blocks
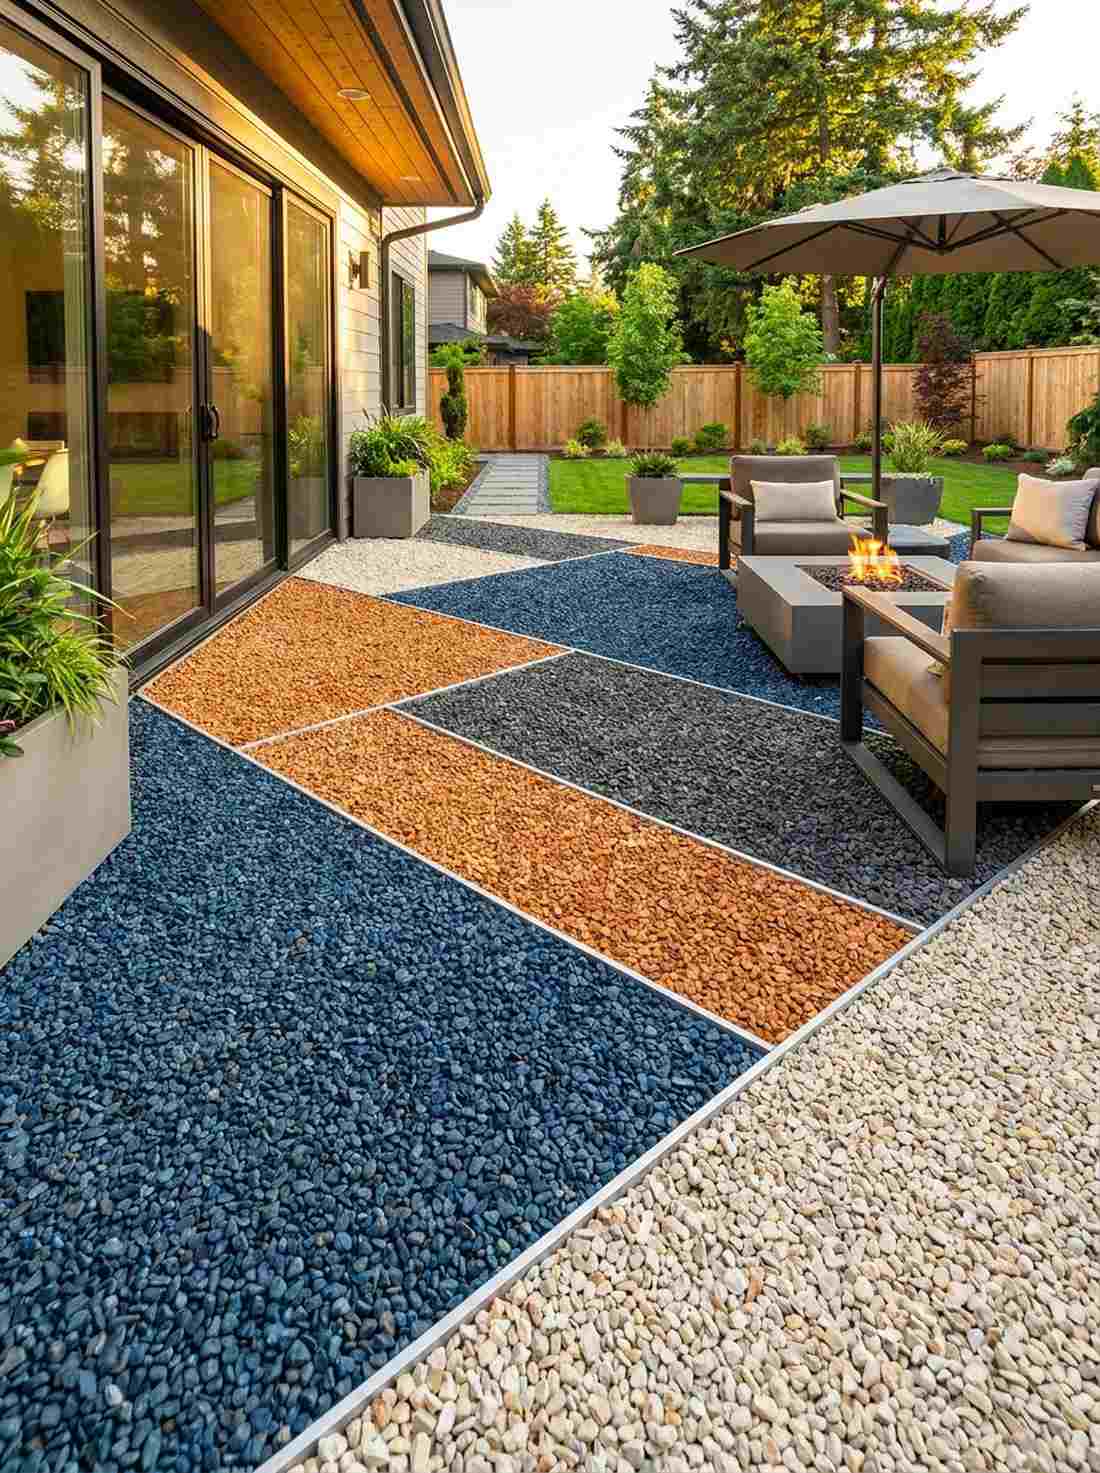
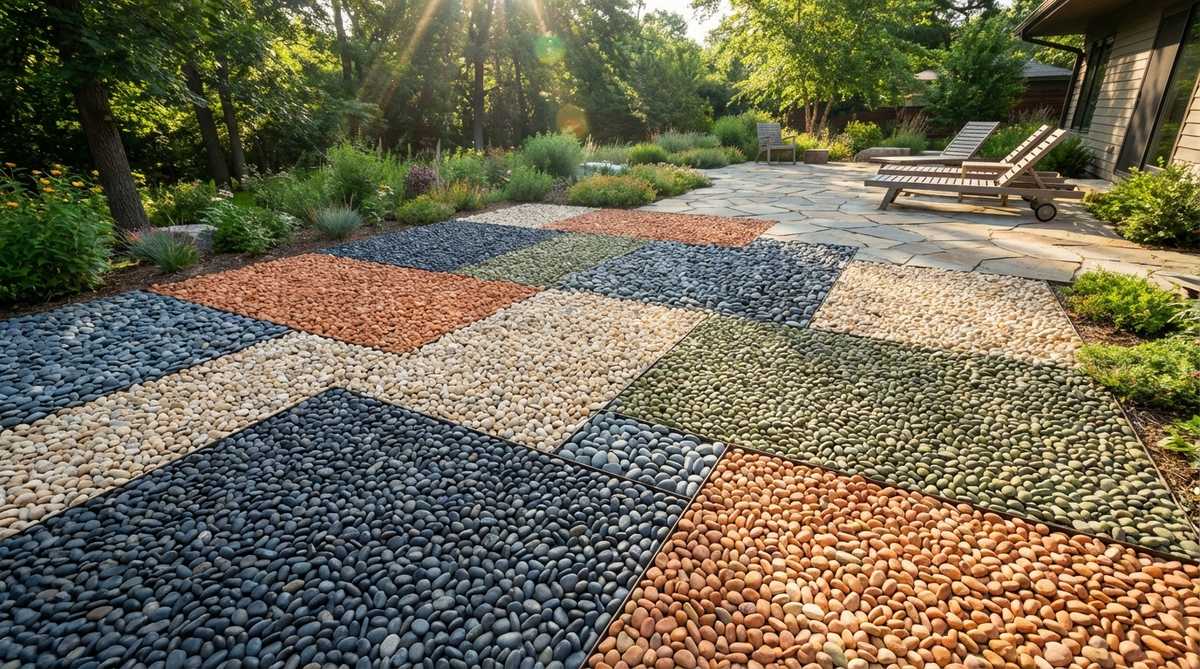
Completely ignoring symmetry, this chaotic yet balanced approach feels like walking over a modern abstract painting. A bold geometric color block patio floor acts as an intense conversation starter right outside large glass sliding doors.
Smashing jagged blocks of solid color together creates dynamic visual tension that modern landscape architects charge thousands to design. Utilizing straight metal dividers between the colored stones keeps the abstract shapes aggressively sharp.
Building this abstract floor costs around $60–$85 for a seating area. Pin this to your modern landscape architecture inspiration board!
- Key Materials: Four distinct solid color stone batches
- Vibe / Style: Avant-garde museum courtyard
- Difficulty: Fun and creative balancing act
- Budget Breakdown: Materials: $70 | Dividers: $15
- Creator’s Tip: Map out the geometric blocks on paper first to ensure no two identical colors ever touch at the borders.
- Smart Sourcing: colored aquarium-grade large gravel sets and aluminum straight-edge landscape dividers
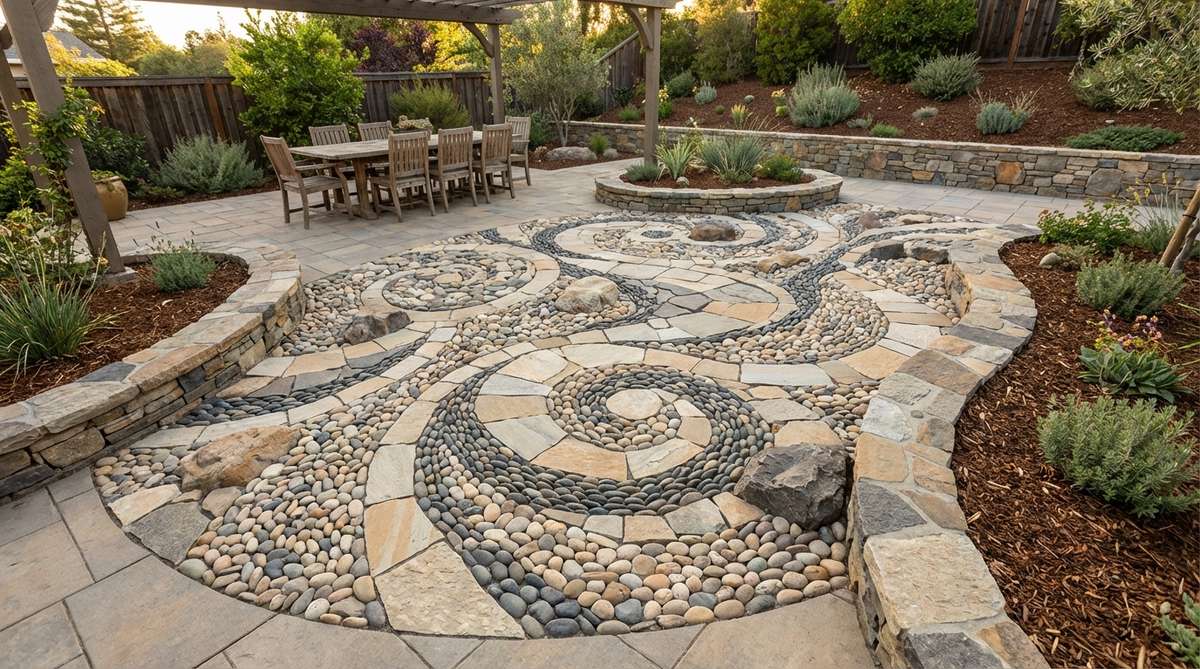
19. Galaxy Swirl Abstract
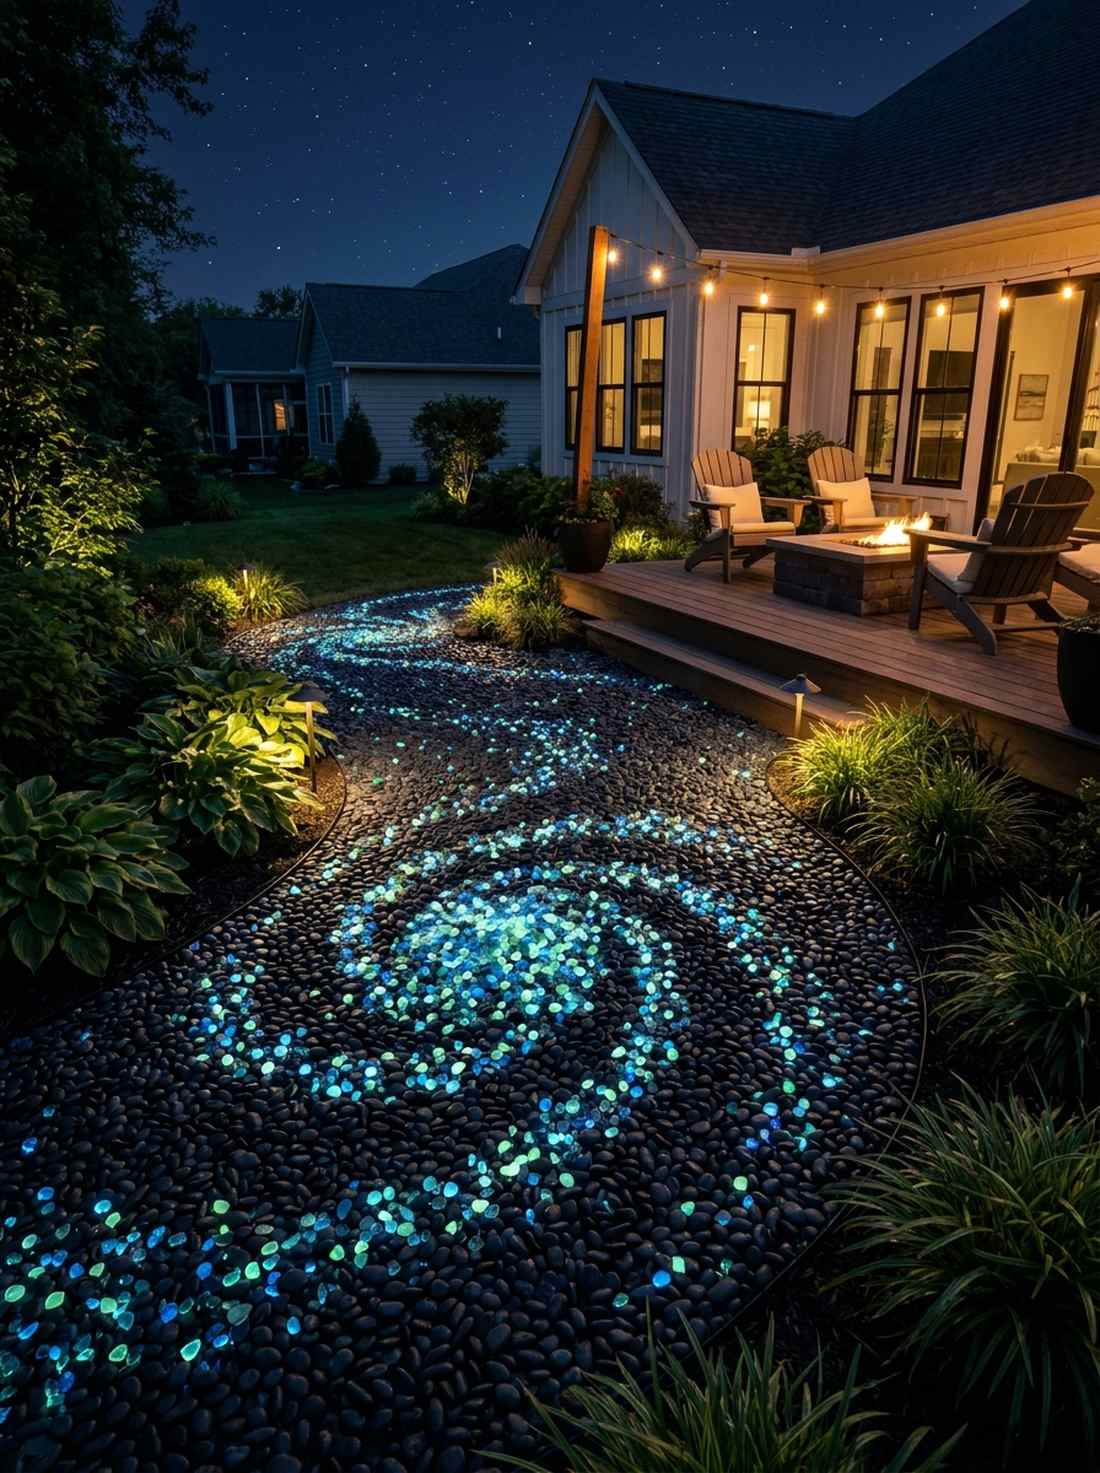
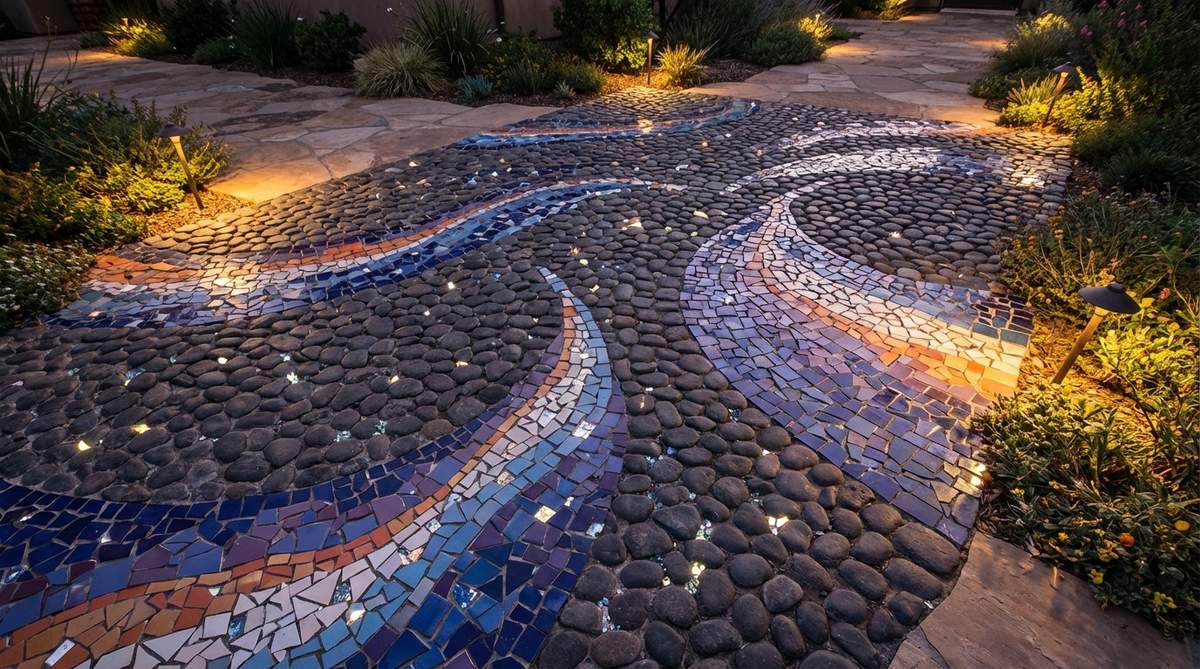
Deep, mysterious, and swirling with light, gazing at this floor feels like staring into the Milky Way. An illuminated cosmic starry night pathway looks absolutely jaw-dropping when paired with low-voltage landscape lighting at night.
Scattering highly reflective glass beads amongst pitch-black pebbles creates an astronomical illusion that is guaranteed to stop visitors in their tracks. Upgrading generic rocks to glow-in-the-dark resin stones takes this celestial aesthetic to an untouchable level.
Creating this glowing galaxy costs around $55–$75. It is the ultimate show-stopping upgrade for evening entertainers.
- Key Materials: Black base pebbles and glow-in-the-dark glass chips
- Vibe / Style: Celestial night-garden magic
- Difficulty: Easy scattering technique
- Budget Breakdown: Materials: $45 | Glow Chips: $30
- Creator’s Tip: Focus the dense cluster of glowing chips in the center of the swirl, gradually scattering them thinner toward the edges to mimic a real galaxy.
- Smart Sourcing: luminous glow-in-the-dark garden pebbles (bulk) and reflective crushed glass landscaping fire-glass
Most backyard DIYs look cheap within a month… until you lock in the exact minimalist setup coming up next.
20. Minimalist Zen Circles
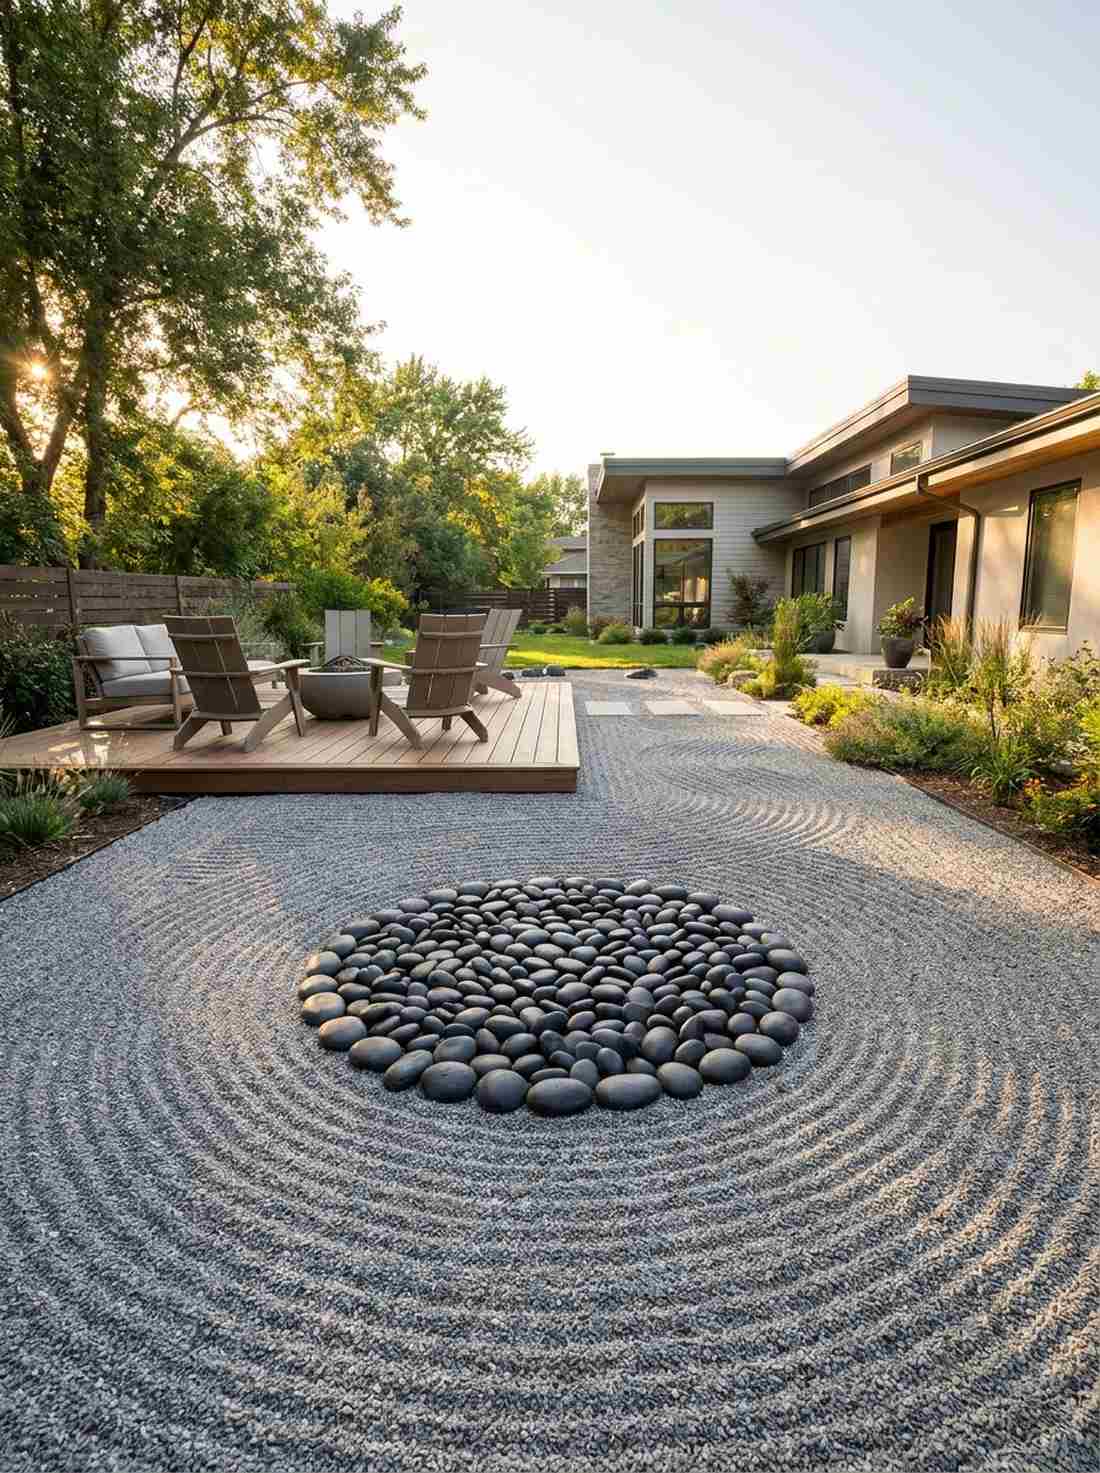
Vast, empty, and deeply intentional, this layout feels like breathing in crisp, clean mountain air. Placing a singular floating zen circle focal point in a sea of raked gravel creates the ultimate stress-free meditation zone.
Relying heavily on negative space yields a resort-quality aesthetic effortlessly. Using heavy-duty landscape fabric underneath prevents weeds from ruining the pristine, uninterrupted field of background stones.
This high-end minimalist look is incredibly cheap, costing roughly $25–$40. Pin this layout if you need a calming outdoor retreat right now!
- Key Materials: Fine gray gravel and a handful of large black stones
- Vibe / Style: Pristine Japanese rock garden
- Difficulty: Easiest layout on the list
- Budget Breakdown: Materials: $20 | Fabric: $20
- Creator’s Tip: Do not mortar the background gravel; leave it loose so you can actively rake patterns around the solid mosaic circles for daily meditation.
- Smart Sourcing: fine granite zen garden sand (bulk bags) and premium weed barrier landscape fabric rolls
Material Guide: Cheap vs. Premium Aesthetic
Knowing exactly where to save and where to spend makes all the difference in achieving that “looks expensive but isn’t” vibe.
- Standard vs. UV-Resistant/Premium Sealer: Skipping sealant leads to chalky, faded rocks within one summer. A high-gloss UV-protective spray locks in that wet, vibrant color forever.
- Pre-made Kits vs. Sourcing Locally: While finding rocks in the woods is free, buying pre-sorted, machine-tumbled bulk rock packs ensures uniform thickness, drastically cutting down installation time and preventing toe-stubbing hazards.
Functional Pathway Mosaics
21. Pebbled Pathway Traditional
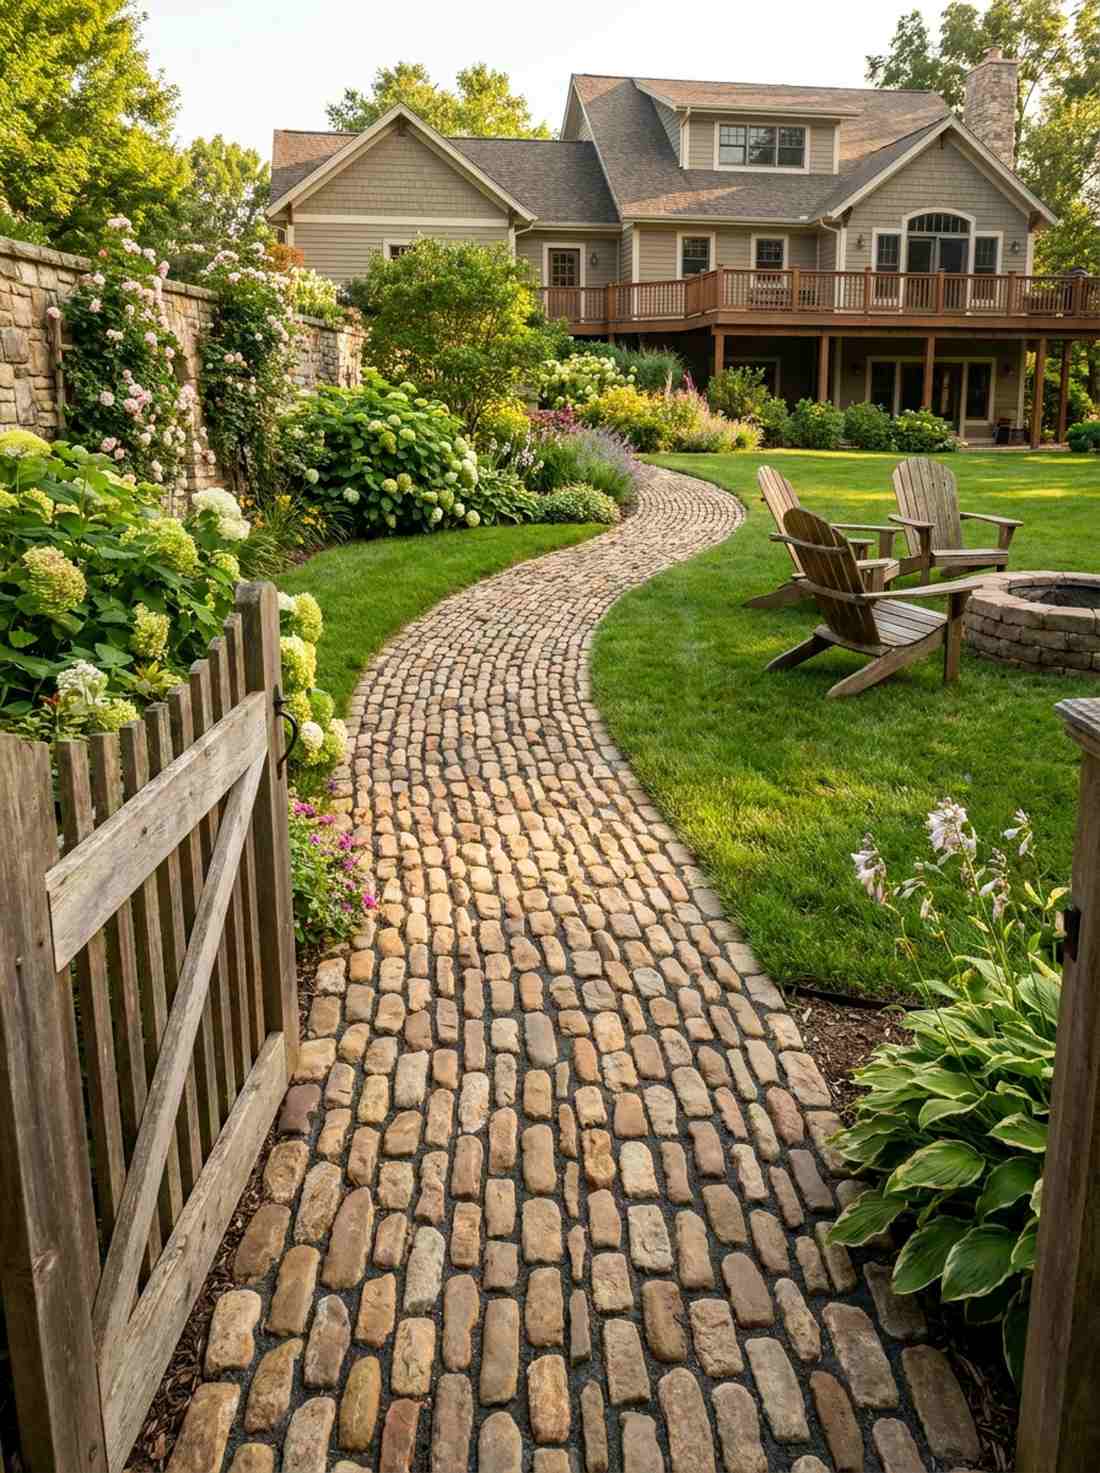
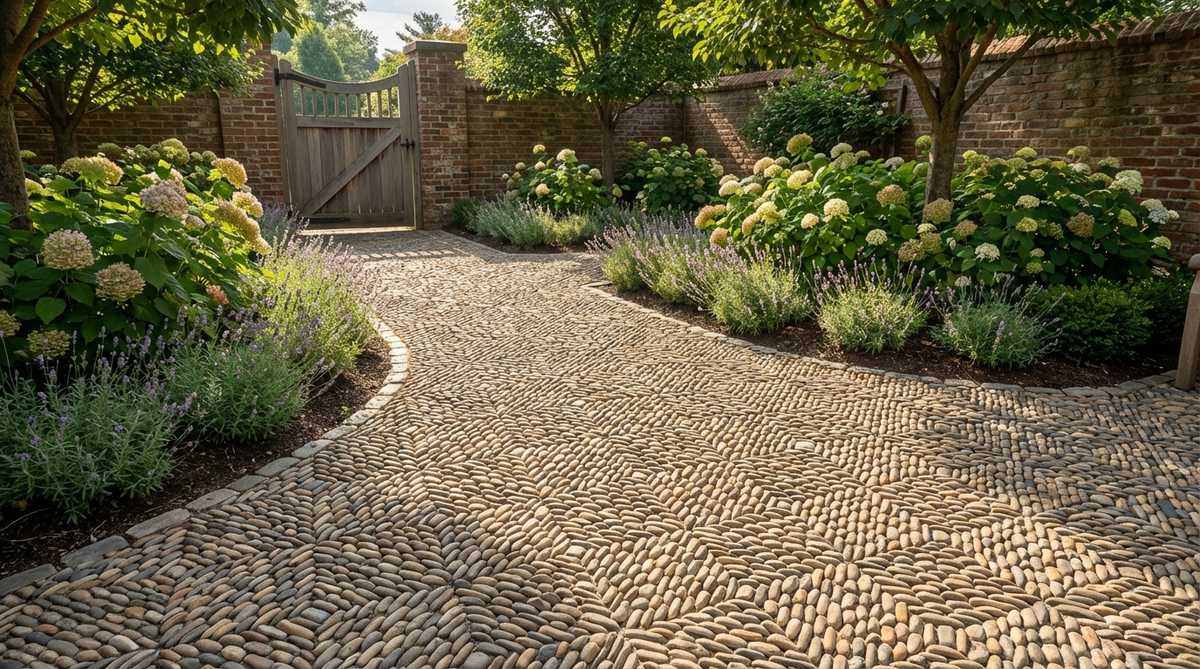
Sturdy and time-tested, walking on this surface feels exactly like exploring a historic European village square. A tightly packed traditional cobblestone garden path handles heavy daily foot traffic without ever shifting or sinking.
Setting the stones vertically on their edges rather than flat completely defies the messy DIY stereotype, creating an indestructible walking surface. Using commercial-grade masonry sealant locks the tightly packed stones together against brutal freeze-thaw cycles.
A durable, traditional stretch of pathway costs about $60–$80 per yard. Save this functional blueprint for your primary garden walkways.
- Key Materials: Elongated river stones and high-strength mortar
- Vibe / Style: Historic European village
- Difficulty: Labor-intensive packing
- Budget Breakdown: Materials: $50 | Base Mortar: $30
- Creator’s Tip: Tamp the stones down with a heavy wooden board wrapped in a towel to ensure a perfectly flat, trip-free walking surface.
- Smart Sourcing: elongated river stones (contractor bulk bags) and high-strength outdoor masonry mortar mix
22. Stepping Stone Accents

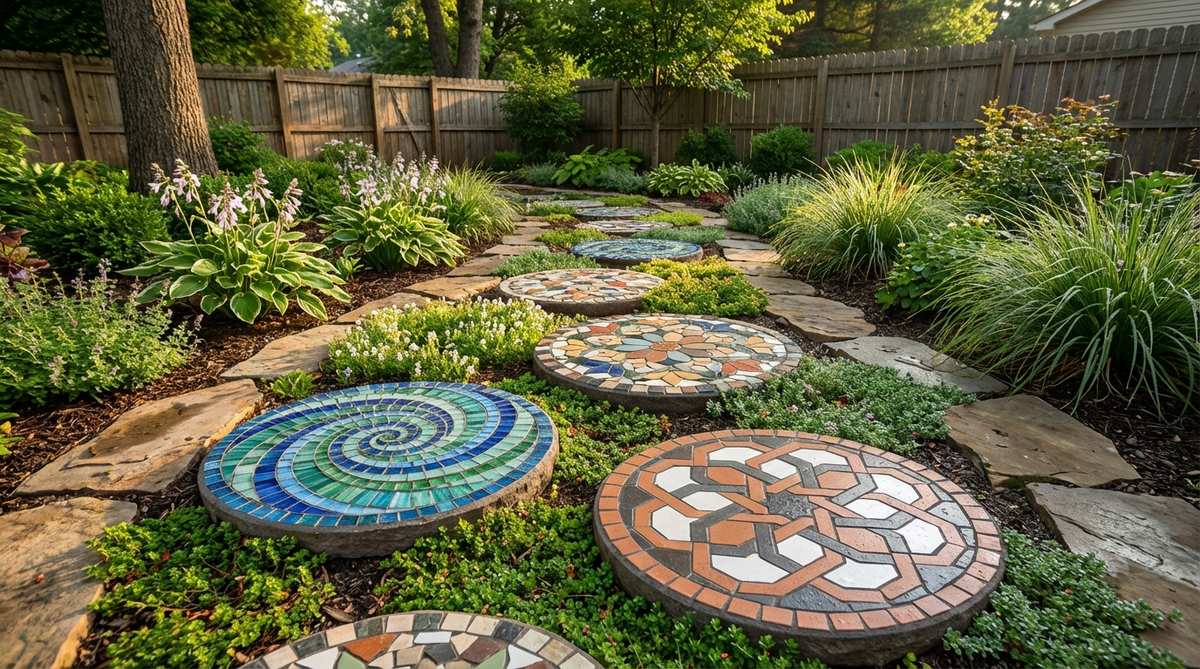
Scattered and portable, these bite-sized art pieces feel like secret treasures hiding in the grass. Dropping freestanding mosaic stepping pads through a lush lawn protects your turf while adding whimsical ground-level detailing.
Casting these in plastic molds first allows you to create high-end boutique stones from the comfort of a garage workbench. Slipping pre-cut mosaic mesh backing into the molds ensures the pebbles stay perfectly arranged while the concrete cures.
Creating a set of five custom pavers costs a tiny $20–$35. Pin this idea for a fast, mess-free weekend crafting session!
- Key Materials: Quick-set concrete and mixed decorative glass/stones
- Vibe / Style: Playful cottage garden trail
- Difficulty: Fun beginner mold project
- Budget Breakdown: Materials: $15 | Molds: $20
- Creator’s Tip: Grease your plastic molds with petroleum jelly before pouring the concrete so the finished stones pop out effortlessly.
- Smart Sourcing: heavy-duty plastic stepping stone molds and pre-cut mosaic fiberglass mesh backing
23. Rustic Brick & Stone Mix
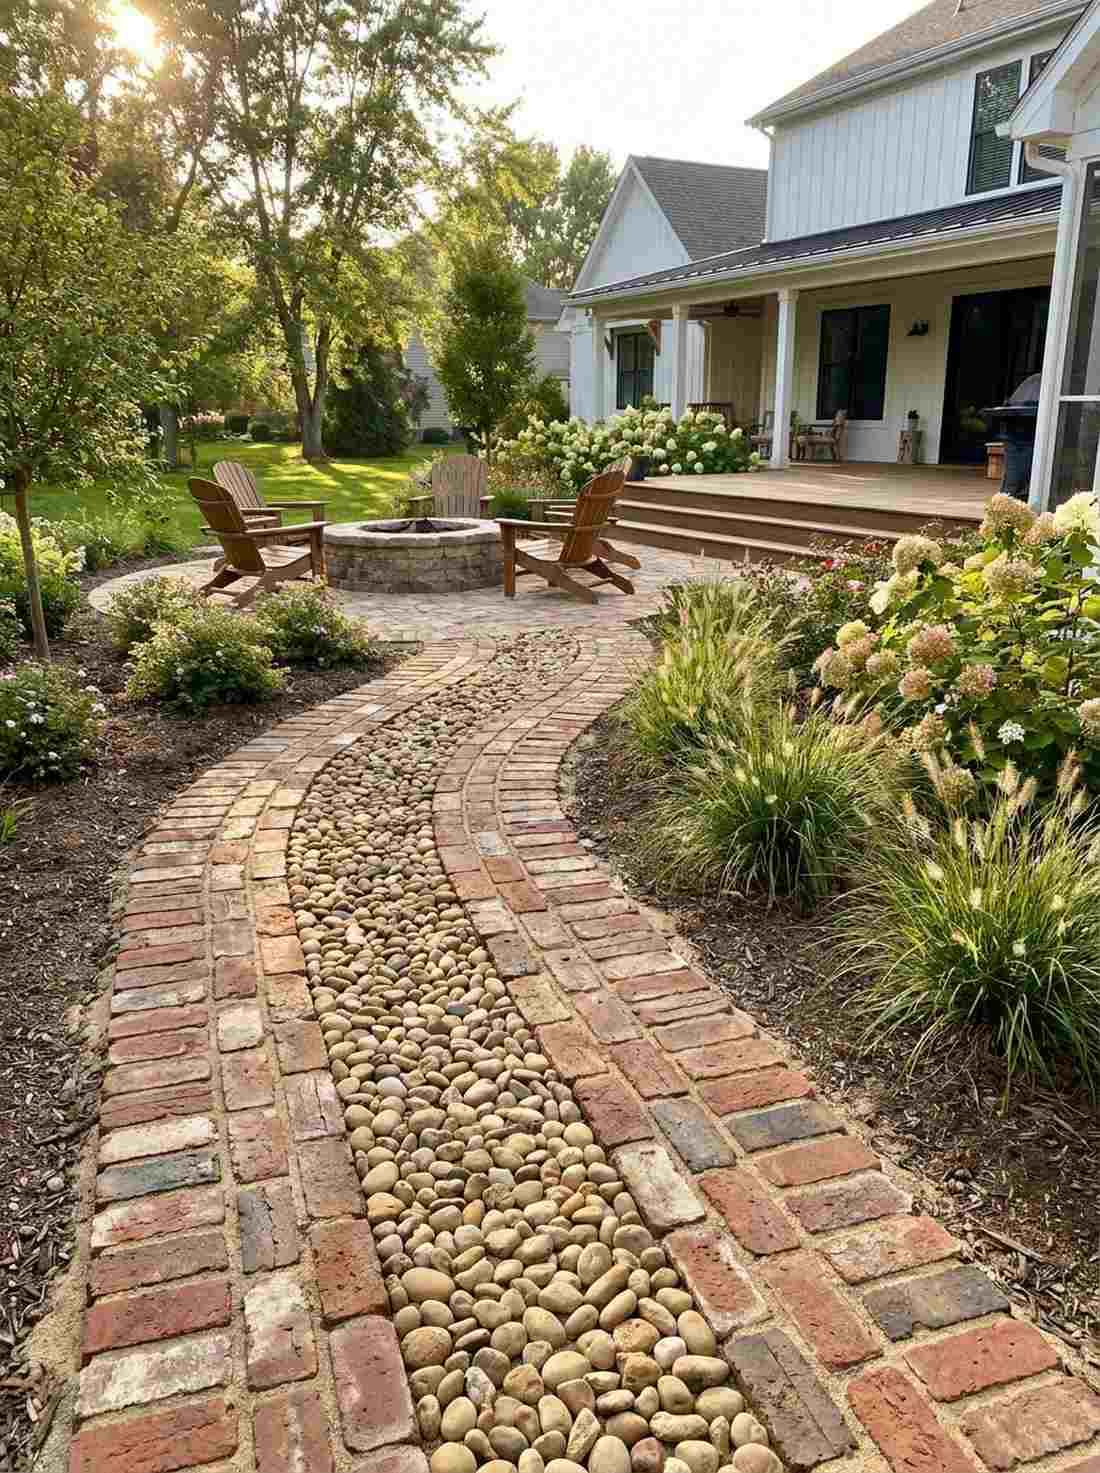
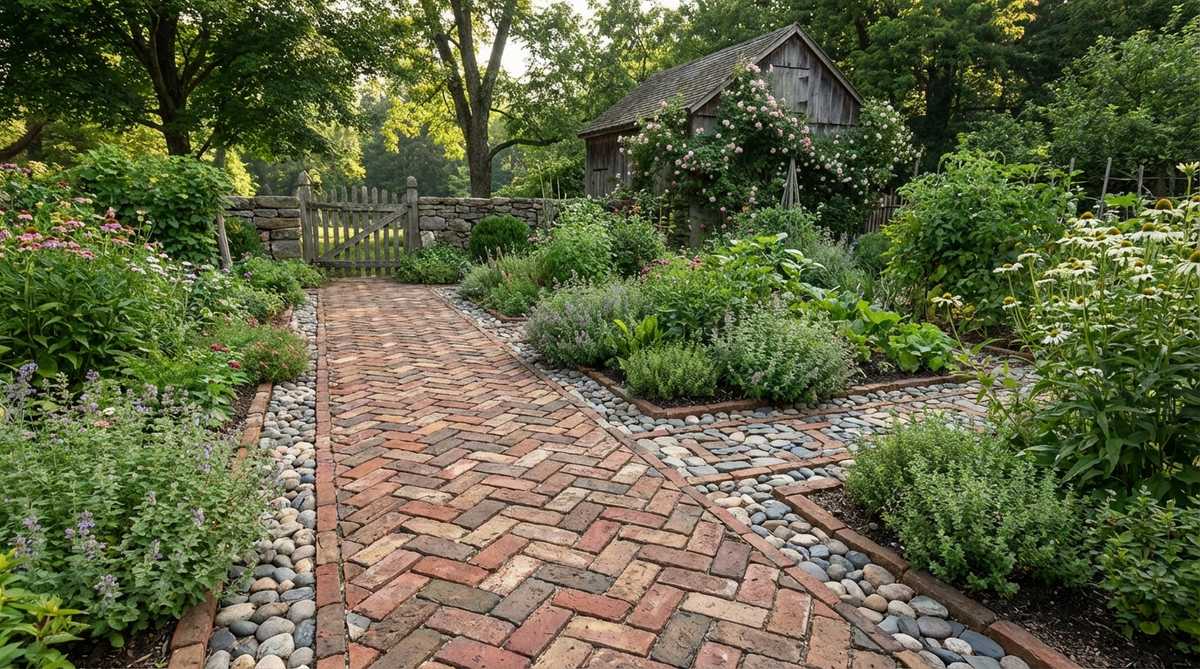
Warm, weathered, and highly textured, this combination feels like a reclaimed farm path from the 1800s. A mixed masonry farmhouse pathway perfectly bridges the gap between old-world architecture and natural landscaping.
Injecting smooth pebbles into the harsh rectangular gaps of reclaimed bricks gives a designer-level finish that softens the entire yard. The contrast between jagged red brick and smooth river rock completely masks any DIY imperfections.
This hybrid material path runs around $50–$75 if you source salvaged bricks. Highly recommended for adding instant heritage charm to new builds.
- Key Materials: Salvaged red clay bricks and smooth tan pebbles
- Vibe / Style: Weathered country farmhouse
- Difficulty: Moderate mixed-material leveling
- Budget Breakdown: Materials: $45 | Sand: $15
- Creator’s Tip: Lay the bricks first as the rigid skeleton of the path, then pour and pack the loose stones into the remaining voids.
- Smart Sourcing: polymeric sand jointing compound (50lb bag) and tumbled landscape brick pavers
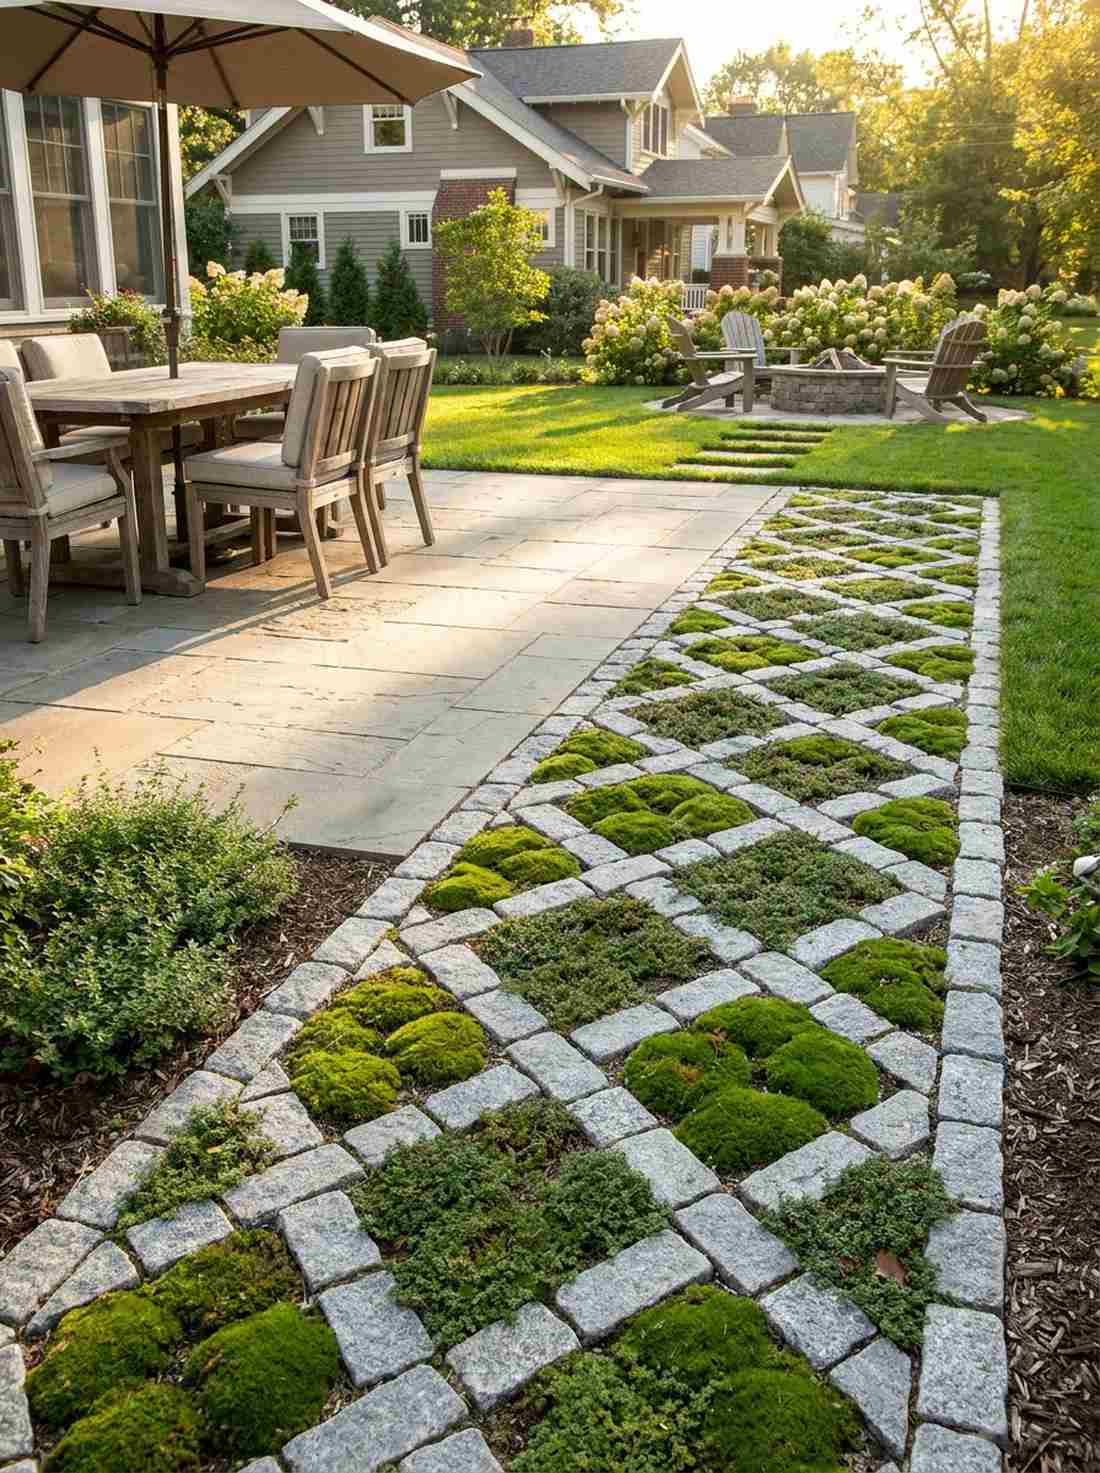
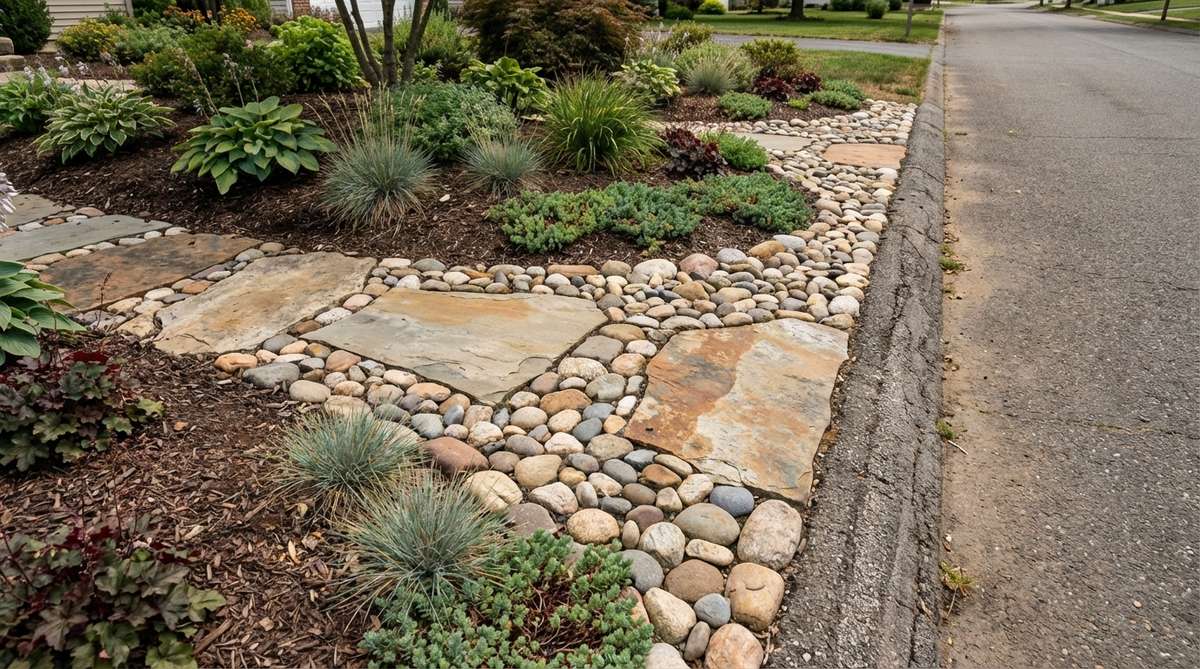
24. Gravel & Stone Border
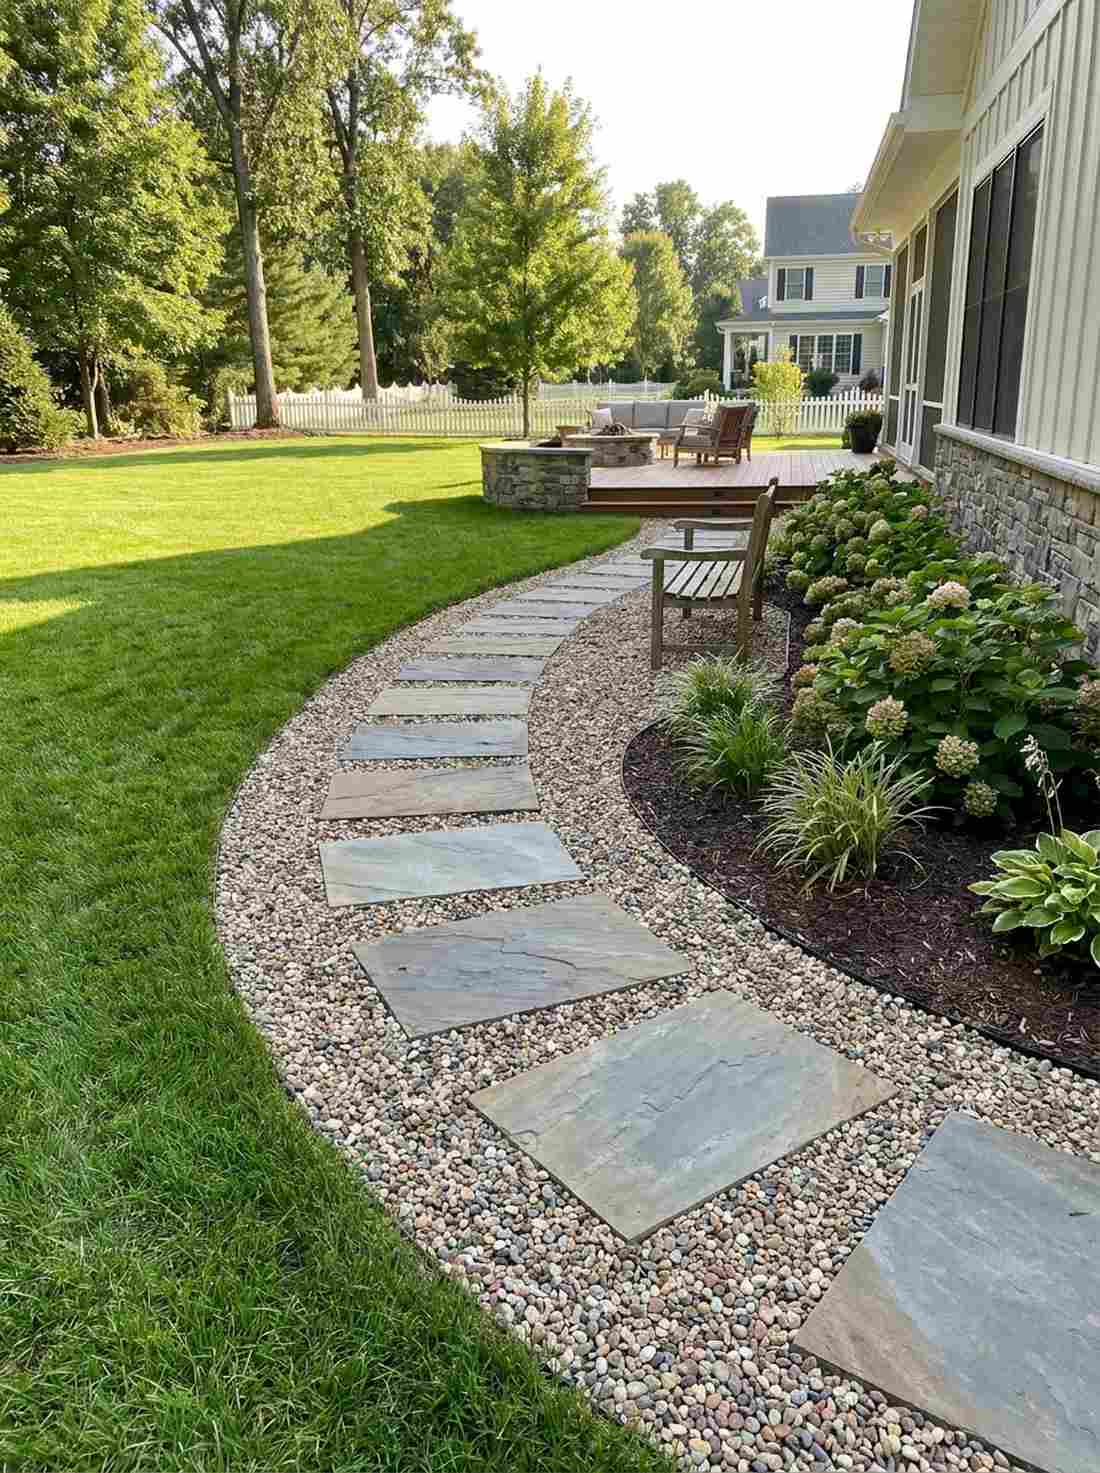
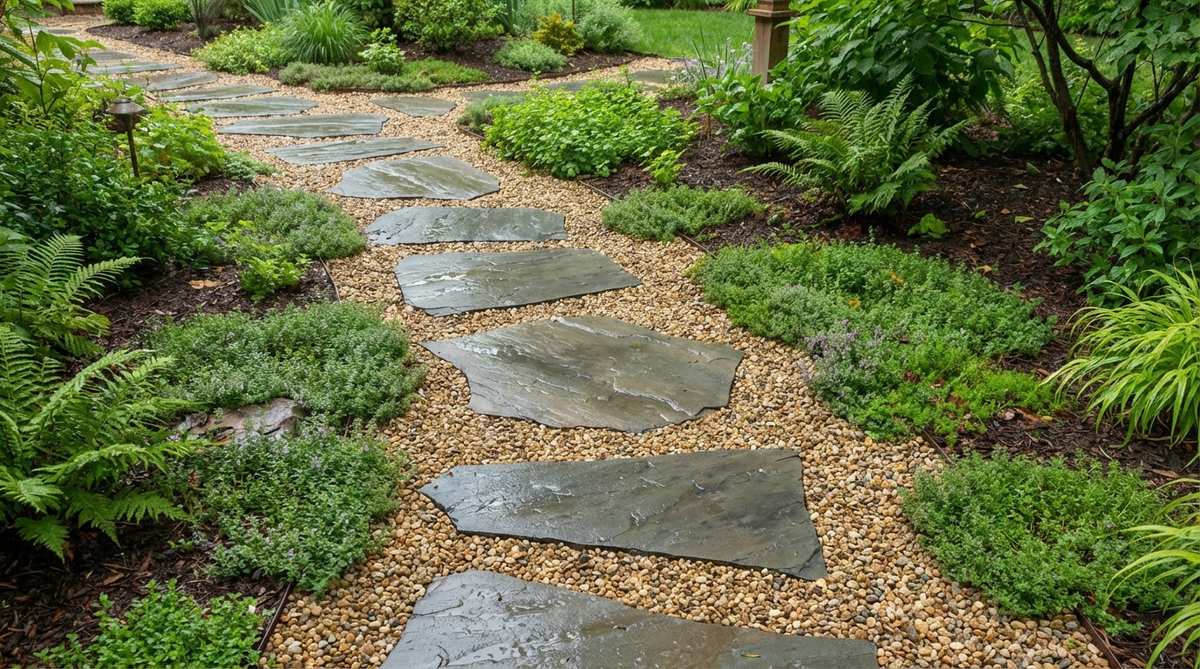
Clean, permeable, and highly functional, this setup feels like an elite country club walking trail. Implementing a flagstone and gravel drainage border keeps your feet perfectly dry while directing heavy rainwater away from the foundation.
Embedding massive flat slabs inside a sea of tiny crushed gravel yields a stunning visual separation that requires almost zero mortar. This highly permeable design prevents mud accumulation, making it the ultimate fix for soggy side yards.
You can execute this drainage-friendly path for about $65–$90. Save this life-saving layout before the spring rains destroy your lawn!
- Key Materials: Massive flat flagstones and crushed pea gravel
- Vibe / Style: Clean utilitarian estate trail
- Difficulty: Easy dry-lay installation
- Budget Breakdown: Materials: $55 | Fabric: $20
- Creator’s Tip: Dig the flagstones down so their tops are perfectly flush with the gravel; this prevents kicking stones out of place when walking.
- Smart Sourcing: natural slate flagstone stepping pieces (multi-pack) and bulk washed pea gravel bags
Most basic garden borders look like cheap plastic trash… until you see the genius upgrade coming up next.
25. Cobblestone Edging
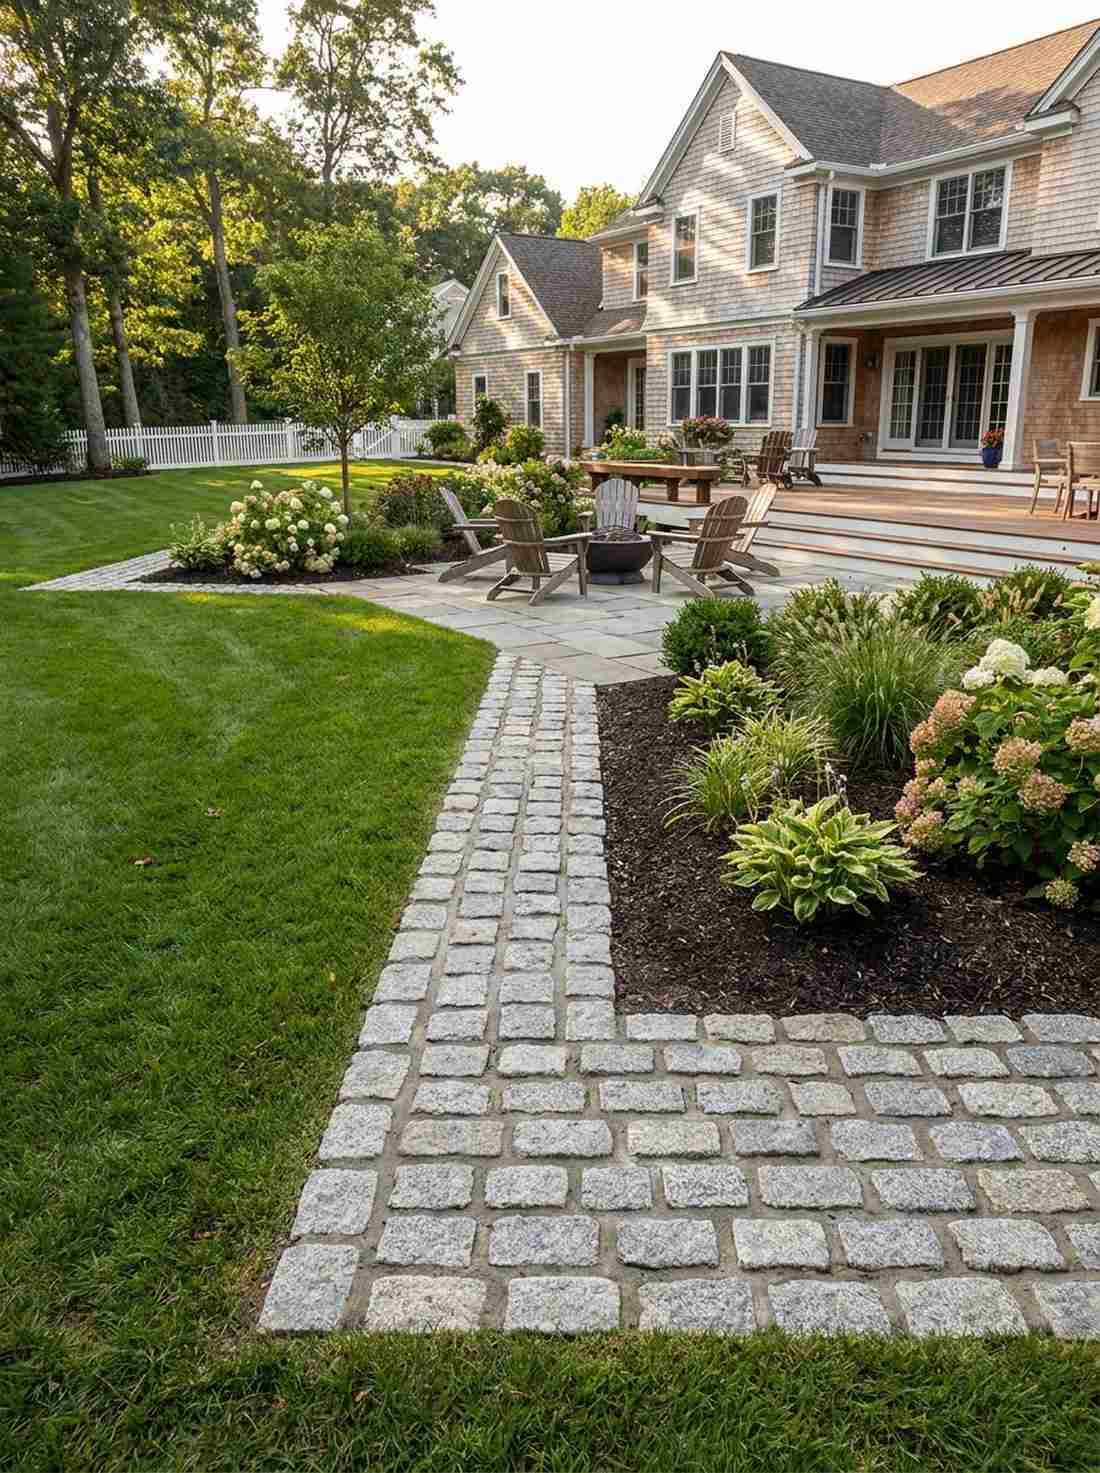
Acting as the perfect visual frame, this thick border feels like a tailored suit for your garden beds. Laying down a heavy stone mosaic landscape border cleanly separates messy mulch from pristine green lawns.
Replacing flimsy plastic borders with heavy, mortared cobblestone completely elevates the property value instantly. Incorporating waterproof masonry adhesive ensures the mower wheels will not knock the boundary stones loose during yard work.
Upgrading your garden edging costs roughly $40 for a 10-foot stretch. Pin this to permanently eliminate annoying plastic lawn edging!
- Key Materials: Medium cobbles and heavy-duty concrete mix
- Vibe / Style: Tailored manicured estate
- Difficulty: Straightforward trenching
- Budget Breakdown: Materials: $25 | Concrete: $15
- Creator’s Tip: Dig a shallow U-shaped trench and fill it with wet concrete first, then press the cobbles into the wet base for a permanent lock.
- Smart Sourcing: pre-mixed high-strength concrete bags and uniform granite border cobbles (bulk)
Specialty Installation Techniques
26. Vertical Wall Mosaic
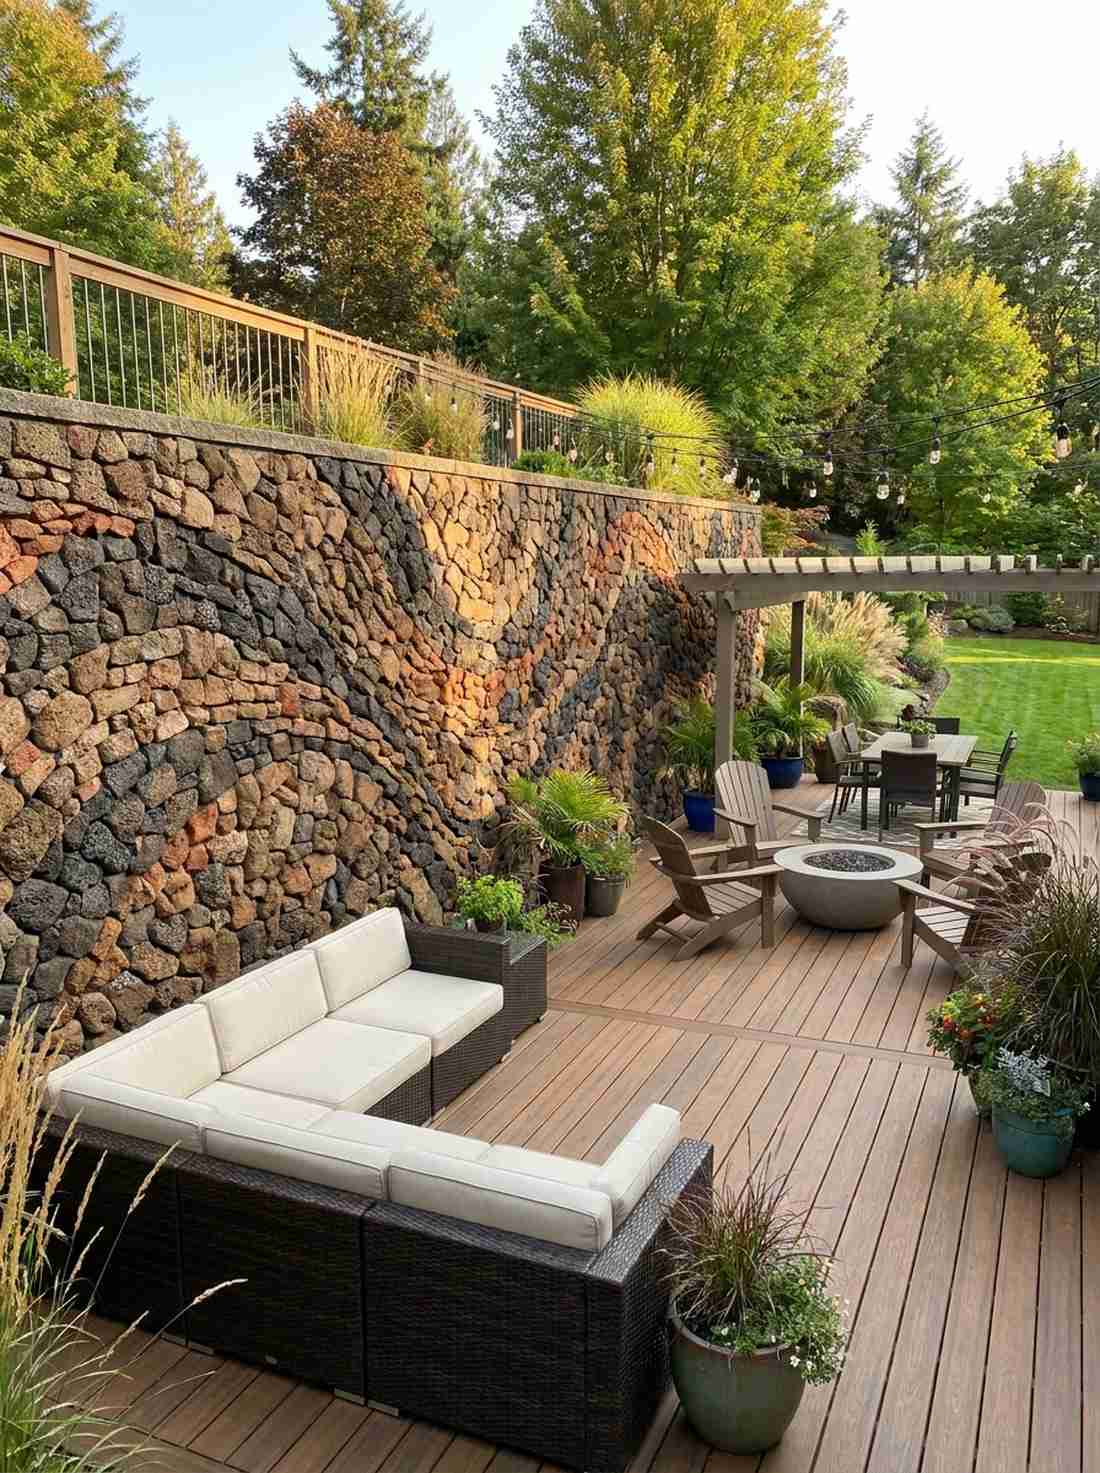
Defying gravity entirely, this awe-inspiring feature feels like a permanent art exhibit on your patio. Applying a vertical stone retaining wall mural transforms ugly concrete block walls into massive, textured masterworks.
Sticking heavy stones to a vertical plane looks incredibly intimidating but is easily conquered with modern chemical adhesives. Utilizing specialized waterproof masonry adhesive prevents the stones from sliding down the wall while the mortar cures.
A vertical mural project runs about $70–$110 depending on the adhesive quality. It is a phenomenal way to hide ugly foundational walls.
- Key Materials: Lightweight porous stones and rapid-grab wall adhesive
- Vibe / Style: High-end architectural art piece
- Difficulty: Advanced vertical masonry
- Budget Breakdown: Materials: $50 | Adhesive: $40
- Creator’s Tip: Work in very small horizontal rows from the bottom up, letting the lower rows cure to act as a shelf for the upper stones.
- Smart Sourcing: industrial-grade vertical masonry adhesive tubs and lightweight porous lava rock bags
27. Fountain & Pool Surround
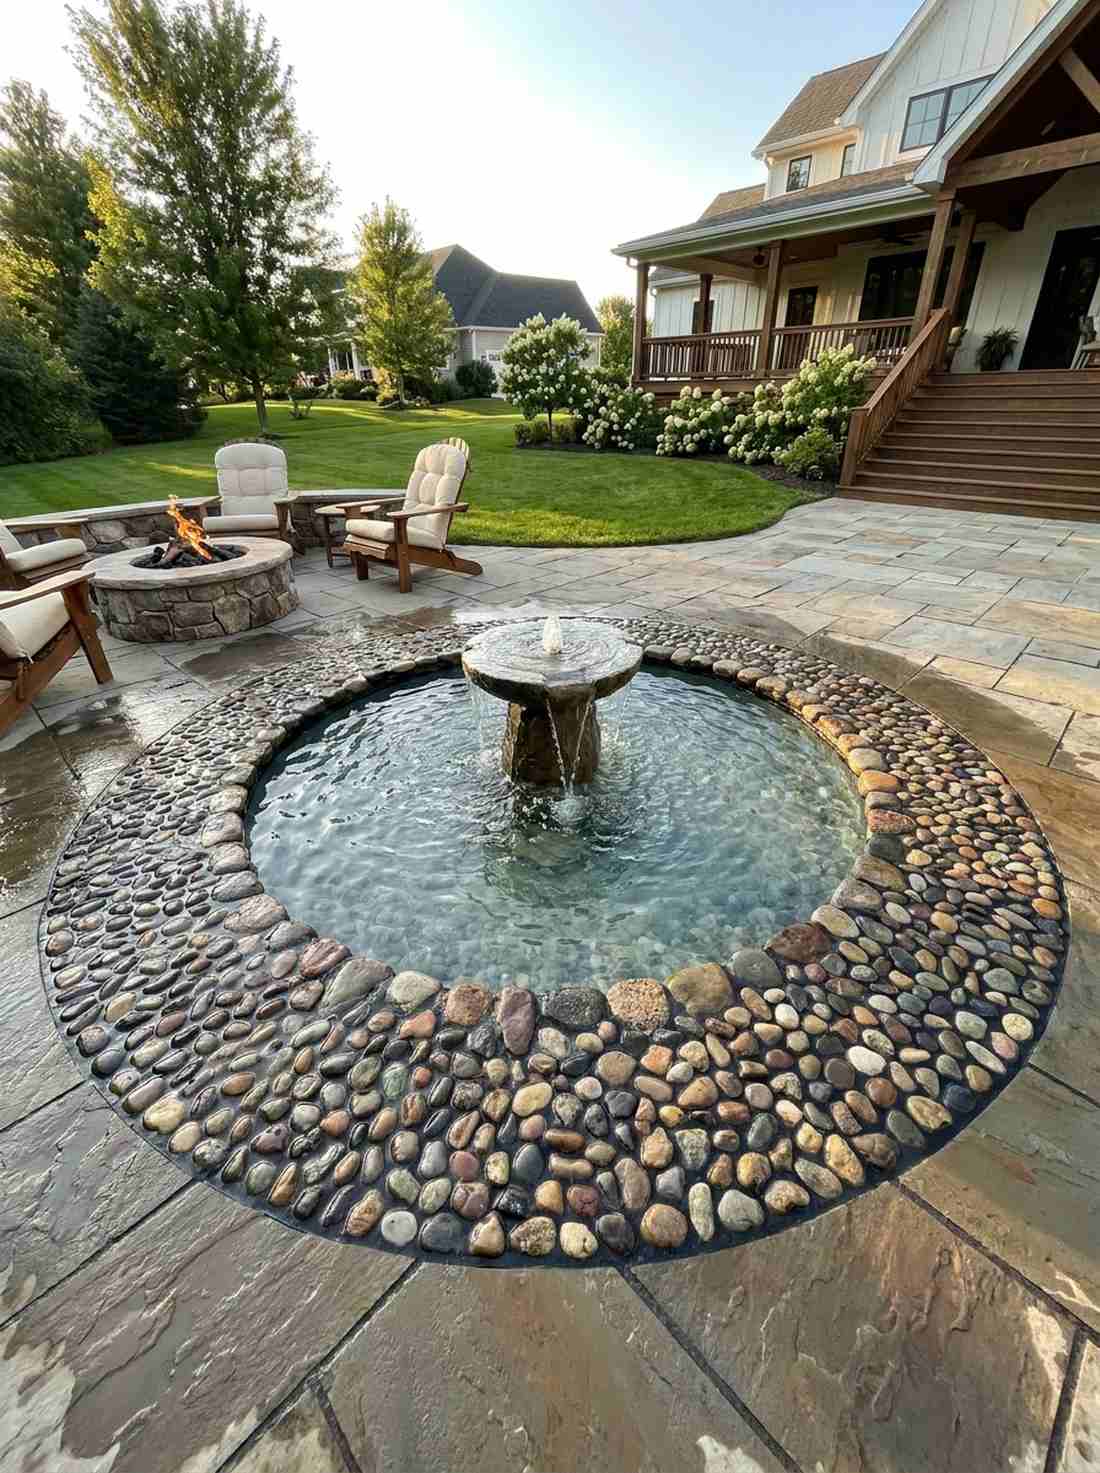
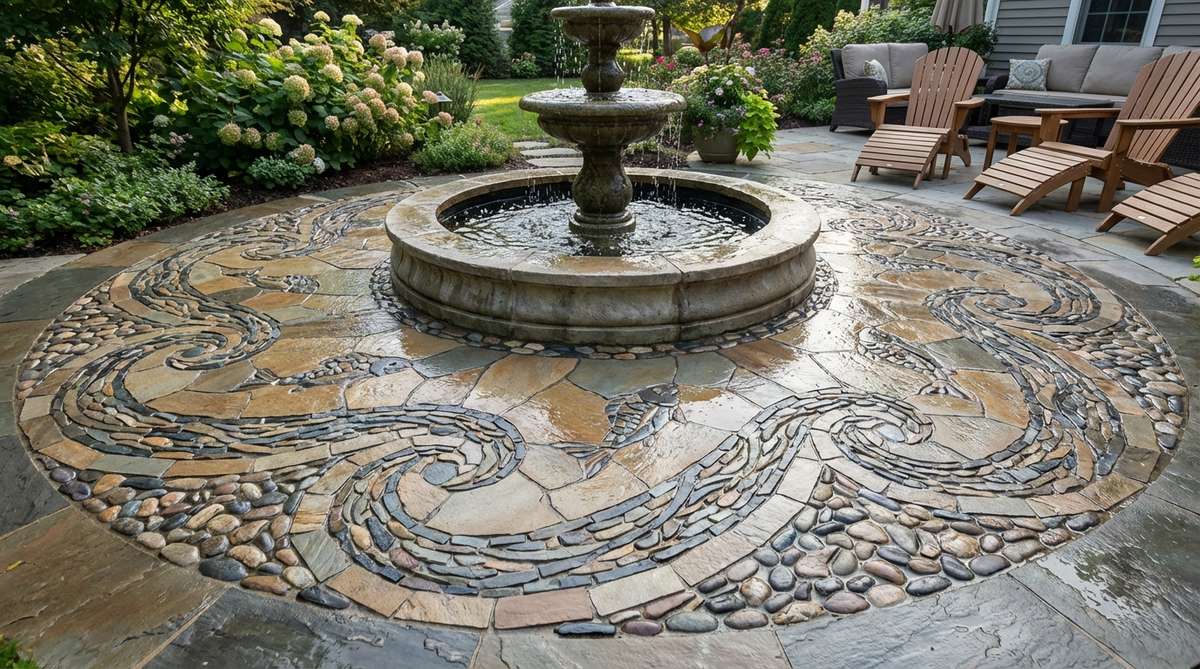
Sleek, wet, and shimmering, this border feels like the edge of a luxury resort spa. Installing a water-resistant stone pool border beautifully frames backyard fountains while providing critical slip resistance for wet feet.
Wrapping water features in textured pebble rings delivers a surprisingly premium look that integrates the plastic fountain seamlessly into the earth. Applying premium outdoor grout bags designed for total water submersion ensures the pool chemicals won’t eat away your hard work.
Trimming a small water feature costs around $45–$65. Pin this layout to upgrade your boring plastic backyard pond!
- Key Materials: Non-porous river rocks and waterproof grout
- Vibe / Style: Luxury resort water feature
- Difficulty: Moderate waterproofing required
- Budget Breakdown: Materials: $30 | Grout/Sealer: $35
- Creator’s Tip: Only use totally smooth, non-porous stones here; porous rocks will absorb algae and become impossible to clean.
- Smart Sourcing: waterproof submersible pool grout (pre-mixed) and high-gloss wet-look stone sealer
28. Herb & Groundcover Gaps
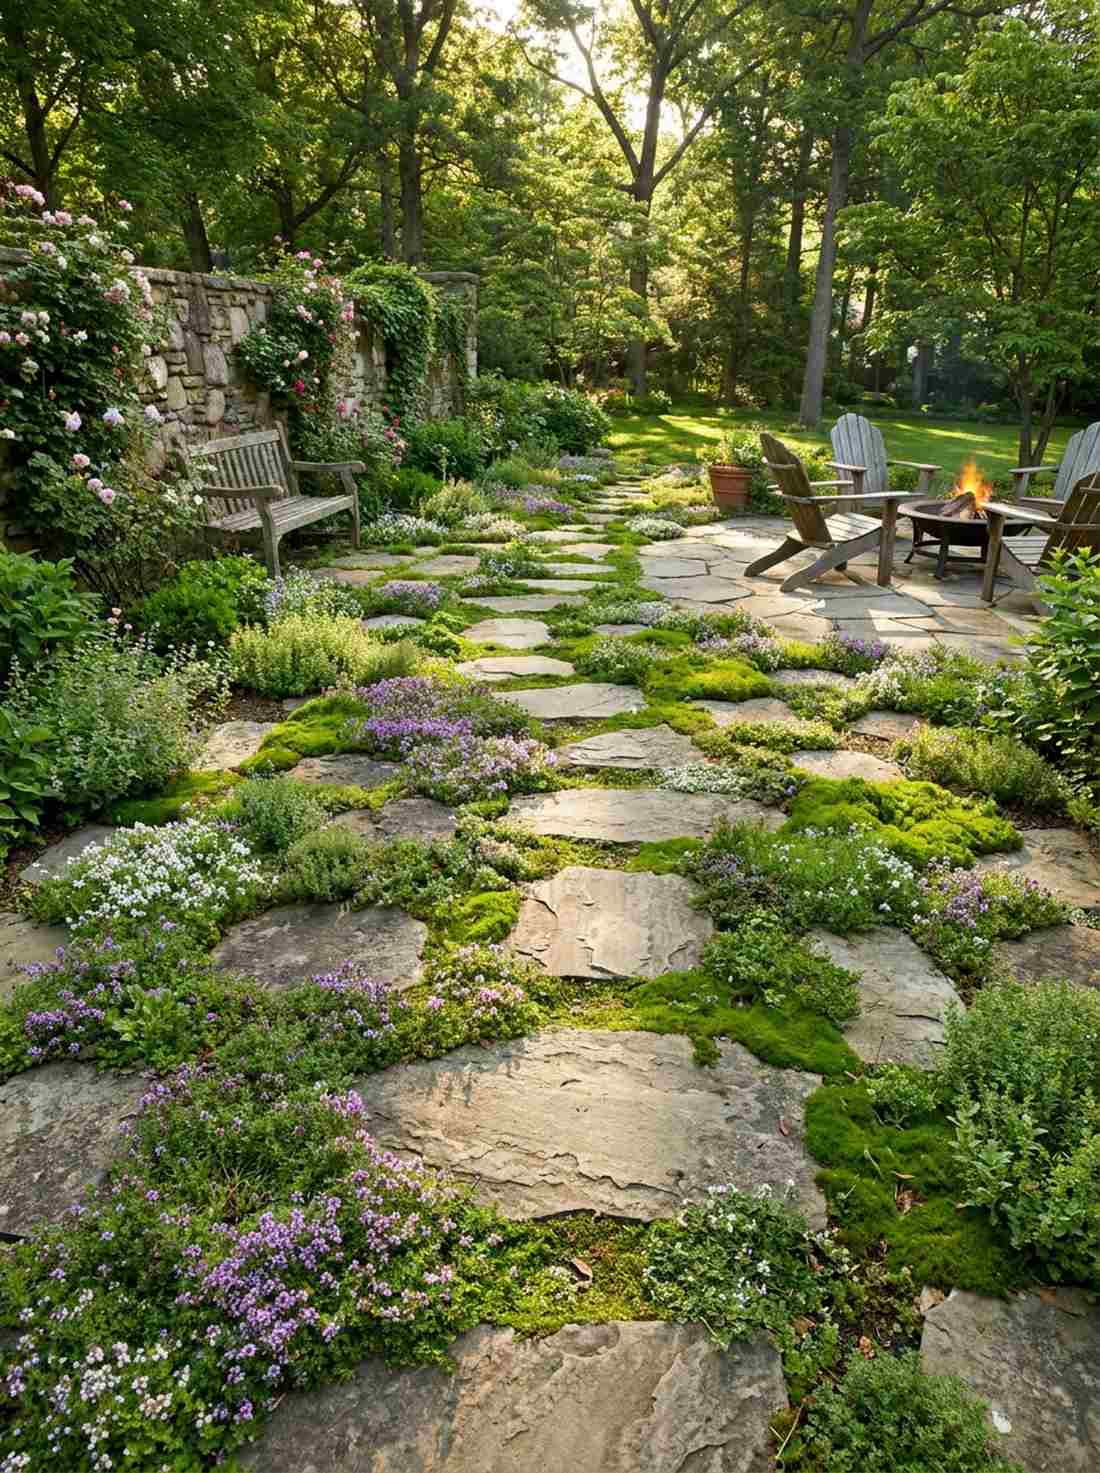

Breathing with life, this bio-integrated design feels like an ancient ruin being reclaimed by a lush forest. Leaving strategic living plant mosaic pockets introduces incredible aromatics every time you accidentally step on the herbs.
Fusing permanent hardscape with creeping thyme completely destroys the sterile vibe of solid concrete patios. Sourcing premium miniature garden supplies like live moss slurry forces the green filler to spread rapidly between the stone gaps.
This living pathway costs about $55–$80 to establish. Save this eco-friendly blueprint to your sustainable landscaping board!
- Key Materials: Flat stepping stones and creeping groundcover flats
- Vibe / Style: Wild overgrown fairytale path
- Difficulty: Requires ongoing plant care
- Budget Breakdown: Materials: $40 | Plants/Soil: $30
- Creator’s Tip: Mix a handful of moisture-retaining soil polymers into the dirt gaps to keep the shallow-rooted herbs alive during hot summers.
- Smart Sourcing: live creeping thyme starter flats (bulk tray) and moisture-control garden soil bags
29. Patchwork Squares Eclectic
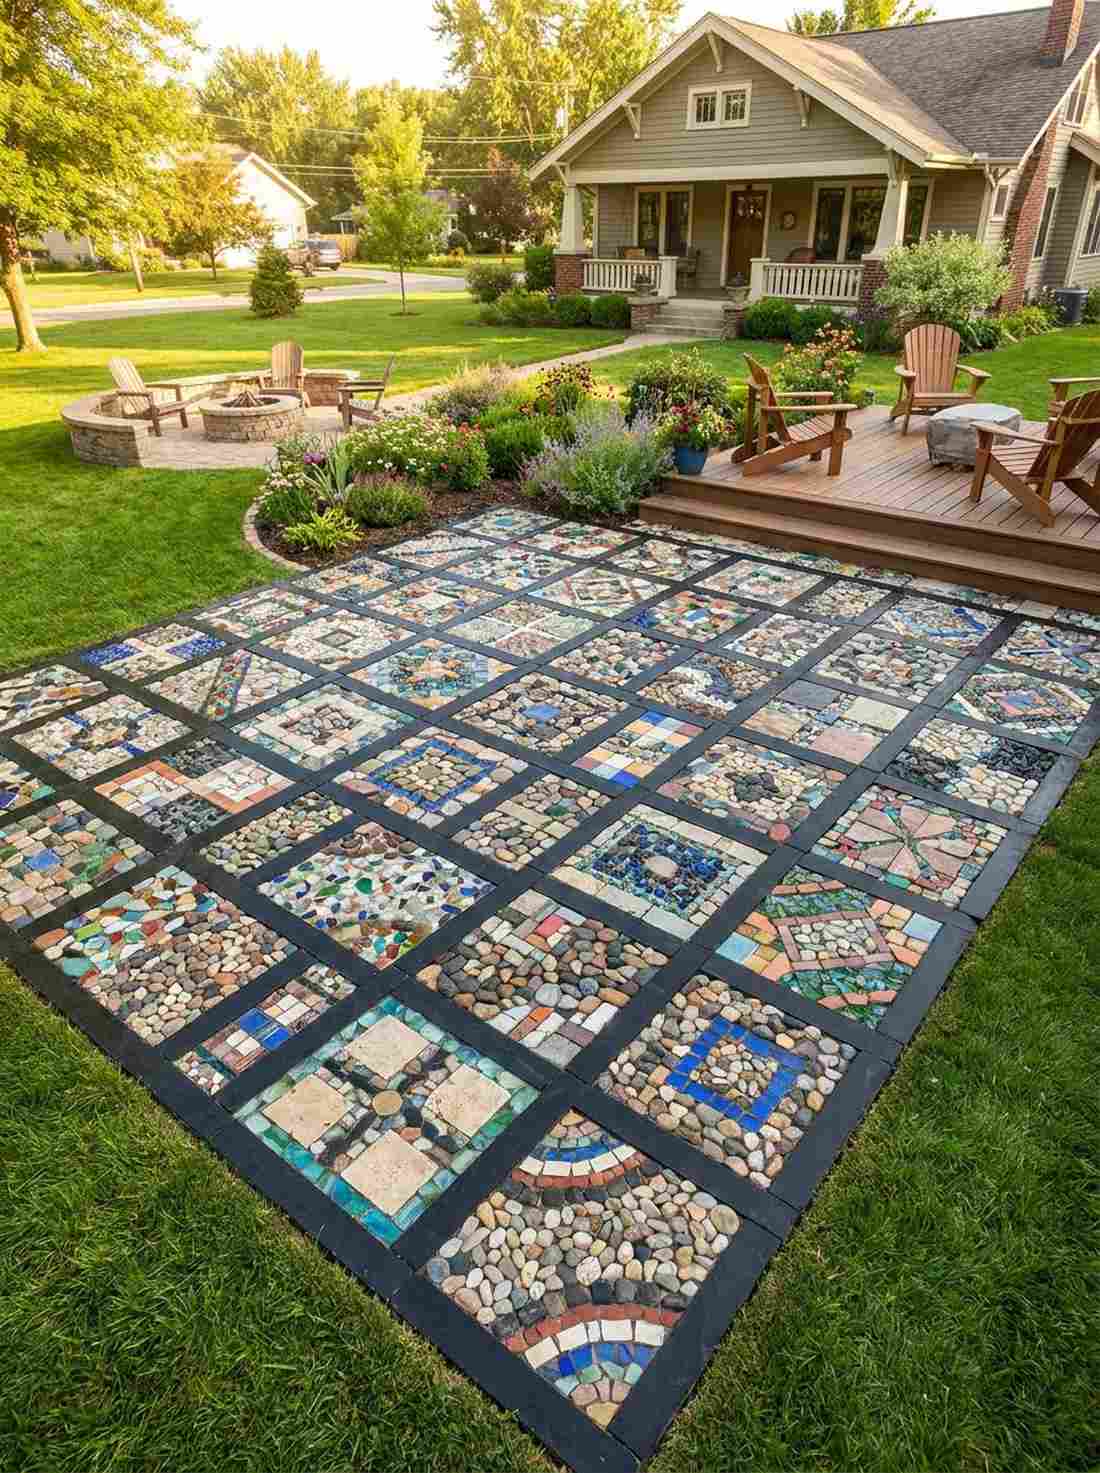
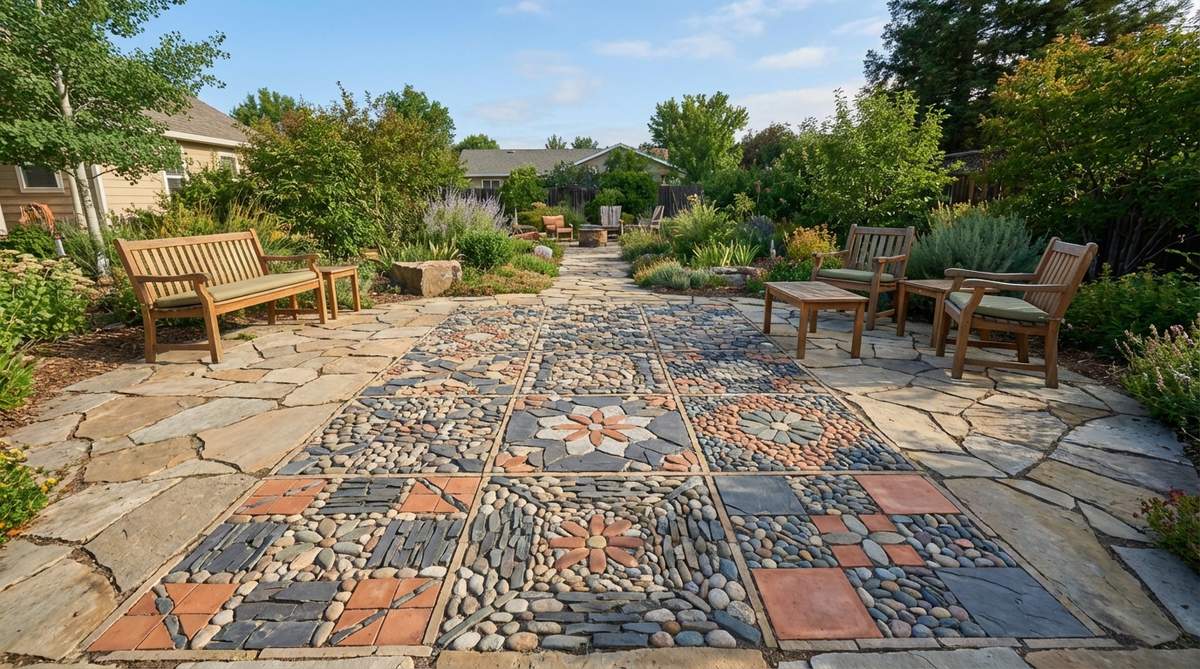
Wildly creative and highly personal, stepping back to look at this feels like viewing a massive handmade quilt. Building a multi-pattern eclectic stone grid allows the whole family to design their own individual permanent tile.
Smashing entirely different layouts next to each other creates a bohemian masterpiece that defies boring, uniform patio rules. Using pre-cut mosaic mesh backing for each separate square makes assembling the giant puzzle incredibly easy.
A large family patchwork patio costs roughly $80–$120. Pin this as the ultimate summer backyard family bonding project!
- Key Materials: Massive variety of contrasting stones and glass
- Vibe / Style: Bohemian handmade family quilt
- Difficulty: Time-consuming but highly creative
- Budget Breakdown: Materials: $80 | Base Grid: $30
- Creator’s Tip: Keep the border stones of every square the exact same color (like solid black) to visually tie the chaotic interior patterns together.
- Smart Sourcing: mixed assorted glass mosaic tile kits and fiberglass tile backing mesh rolls
30. Broken Pottery Patchwork
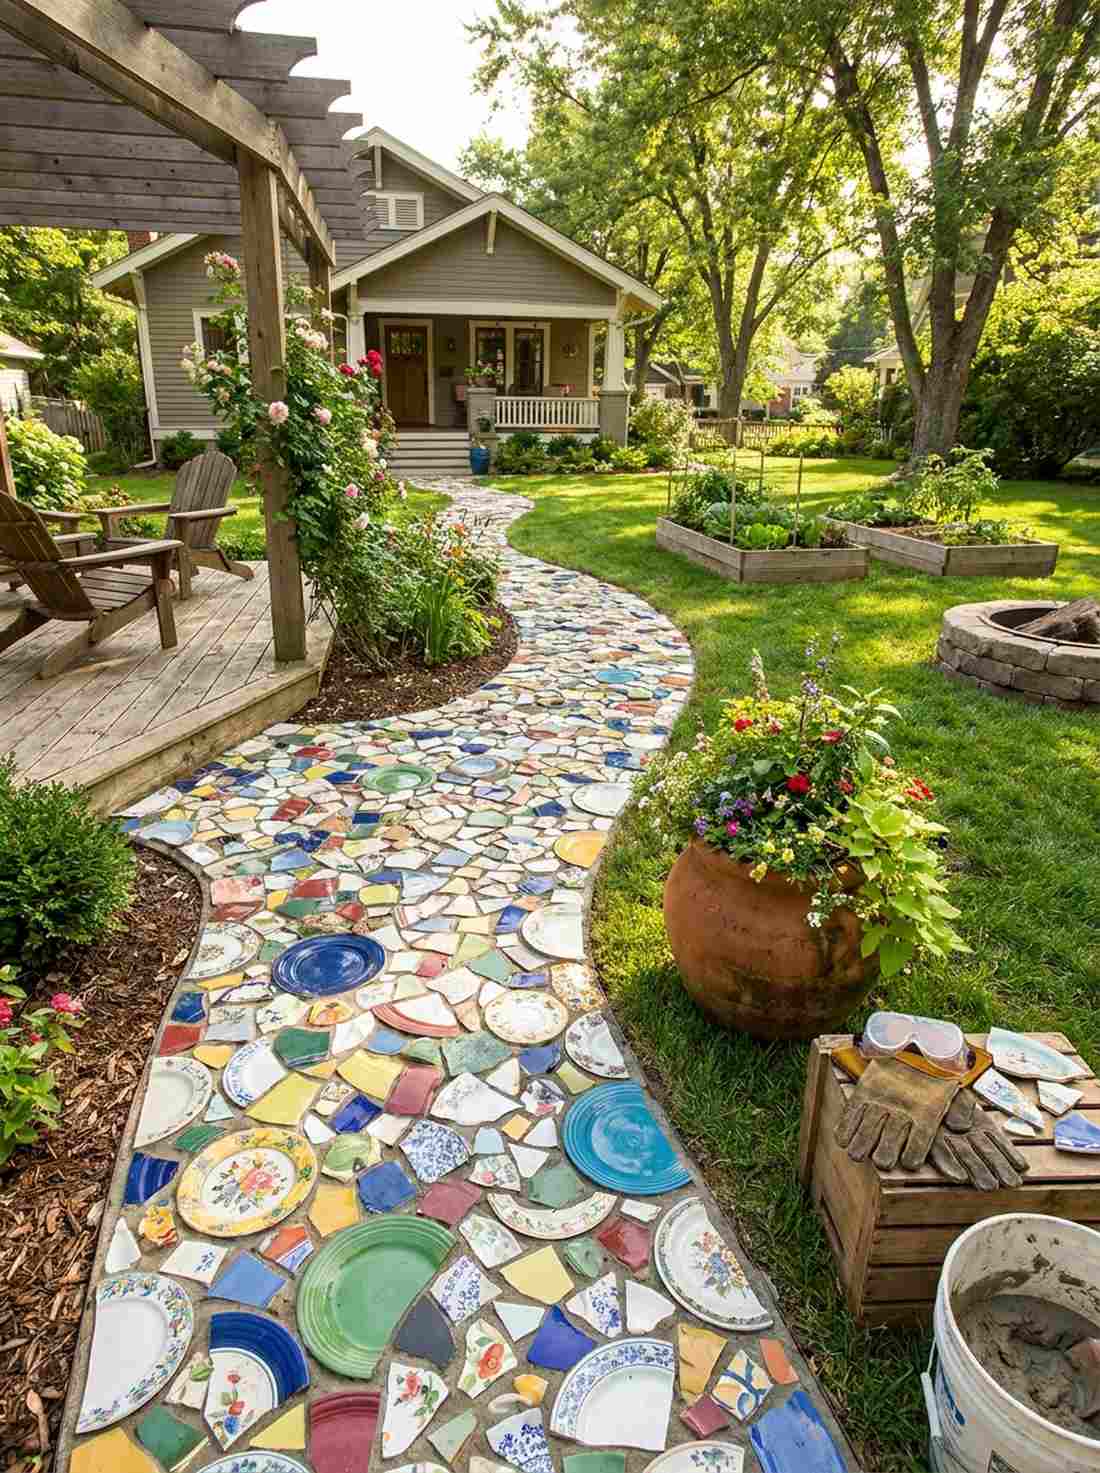
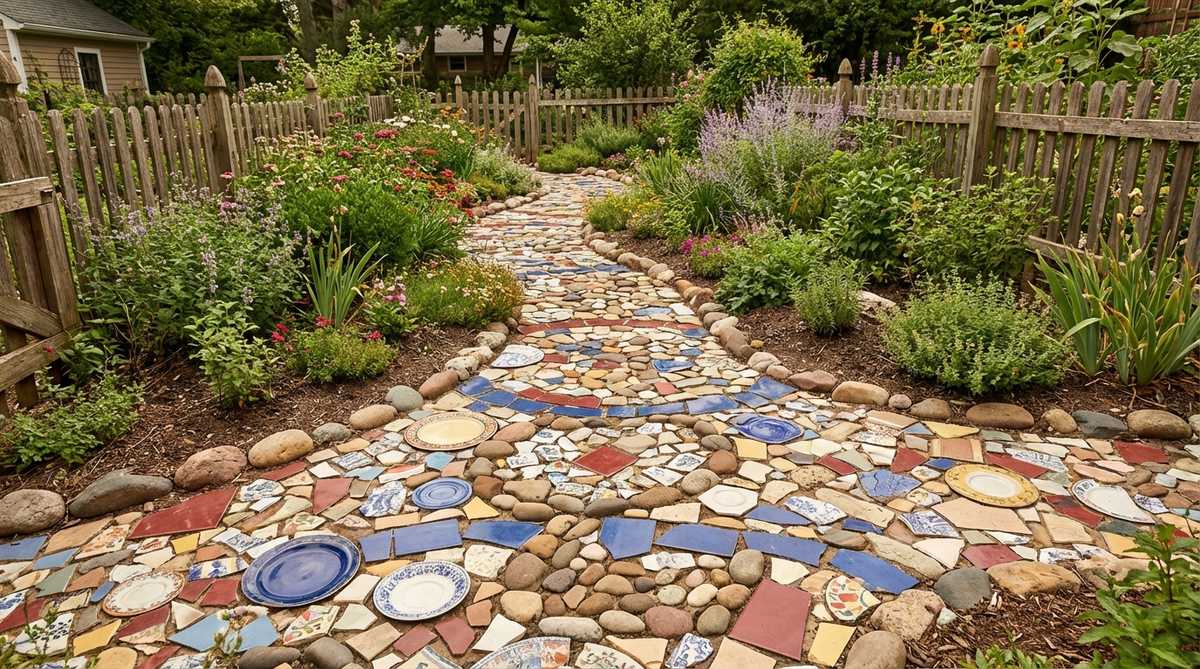
Vibrant, sustainable, and unapologetically bold, this upcycled masterpiece feels like a quirky local art gallery floor. A shattered ceramic upcycled garden path brilliantly recycles thrift store junk into an indestructible, colorful hardscape.
Smashing old chipped plates and mixing them into mortar looks far more expensive than it is, giving off heavy custom artisan vibes. Sourcing bulk packs of broken commercial tiles guarantees you have enough heavy-duty shards to handle foot traffic.
This zero-waste project can cost as little as $25 for the mortar if you source the plates for free. It’s an insanely cheap way to add massive color to dead zones.
- Key Materials: Smashed ceramic plates and basic mortar
- Vibe / Style: Quirky upcycled eco-art
- Difficulty: Easy but requires careful breaking
- Budget Breakdown: Materials: $5 | Base Mortar: $20
- Creator’s Tip: Wrap the old plates in a heavy towel before hitting them with a hammer to prevent dangerous ceramic splinters from flying everywhere.
- Smart Sourcing: tumbled sea glass bulk mix (safe edges) and heavy-duty safety goggles & leather gloves kit
Transform Your Landscape With Stone Garden Mosaics
These exactly 30 stone garden mosaic blueprints prove that securing a premium, high-end landscape doesn’t require a bloated contractor budget. By strategically sourcing bulk river stones, commercial-grade masonry sealant, and pre-cut layout meshes, you can engineer an indestructible hardscape that outlives standard concrete. Stop settling for plain dirt paths and upgrade your outdoor aesthetics using these exact visual layouts and buyer-smart materials.
Frequently Asked Questions
What type of mortar should I use for garden stone mosaics?
Skip generic concrete and immediately invest in high-strength, commercial-grade masonry mortar or pre-mixed outdoor polymer sand. Standard concrete contains large gravel chunks that will ruin your delicate pebble layouts. A premium masonry mix ensures a buttery, high-adhesion grip that locks UV-resistant stone sealant in place. Buying in bulk bags saves massive overhead costs for larger patio installations.
How do I prepare the base for a stone mosaic pathway?
Never lay mosaic directly on dirt; you must build a bulletproof foundation using commercial woven geotextile fabric topped with compacted crushed gravel. This base stops weeds dead while providing critical drainage underneath the mortar bed. Utilizing heavy-duty landscape edging acts as a rigid mold to keep the whole structure from sliding outward over the years.
What stones work best for garden mosaic patterns?
Ditch the jagged yard rocks and source pre-sorted, polished river rocks or tumbled basalt bulk bags. Purchasing pre-graded starter kits guarantees that every single stone has the exact same thickness, which entirely prevents uneven, toe-stubbing hazards. For ultra-premium aesthetics, mix in glowing resin garden stones or crushed reflective fire-glass for striking nighttime visibility.
How long does a stone garden mosaic last?
When built with heavy-duty weed barrier rolls and sealed with high-gloss UV-resistant stone sealer, these installations easily outlast poured concrete by decades. The modular flexibility of the pebbles prevents the massive, ugly cracking that plagues solid concrete slabs during winter freeze-thaw cycles. Premium sealing stops the colors from fading, keeping the layout looking wet and expensive year-round.
Can I install stone mosaics directly on existing concrete?
Absolutely, overlaying is the ultimate backyard hack to bypass heavy excavation. You must heavily score the old slab and apply an industrial-grade masonry bonding agent before laying your fresh mortar. Dropping pre-cut mosaic mesh backing directly onto prepared concrete turns a grueling week-long demolition job into a rapid two-day luxury upgrade.
How do I maintain proper drainage in stone mosaic installations?
Always angle your setup with a 2-percent slope facing away from your home’s foundation to force heavy water runoff. For extreme weather zones, skip solid mortar entirely and lock the stones in place using commercial-grade polymer sand that remains perfectly permeable. Coating the finished piece in a breathable, waterproof masonry sealer prevents the stones from popping loose during heavy flood conditions.