Strategic outdoor lighting halloween rigs instantly turn basic yards into cinematic thriller sets. Master these high-end setups using commercial-grade projectors and weather-sealed smart LED kits. The result commands attention while saving you hundreds on premium neighborhood displays.
Design Snapshot: Key Principles
- Layered Illumination: Combine uplighting, downlighting, and accent lights at varying heights to create depth and shadow play
- Color Temperature Control: Use cool tones (blue, green, purple) for eerie effects and warm tones (orange, red) for classic Halloween ambiance
- Strategic Placement: Position lights at low angles to cast elongated shadows that enhance the spooky atmosphere
- Dynamic Elements: Incorporate motion-activated sensors, color-changing sequences, and fog integration for multi-sensory experiences
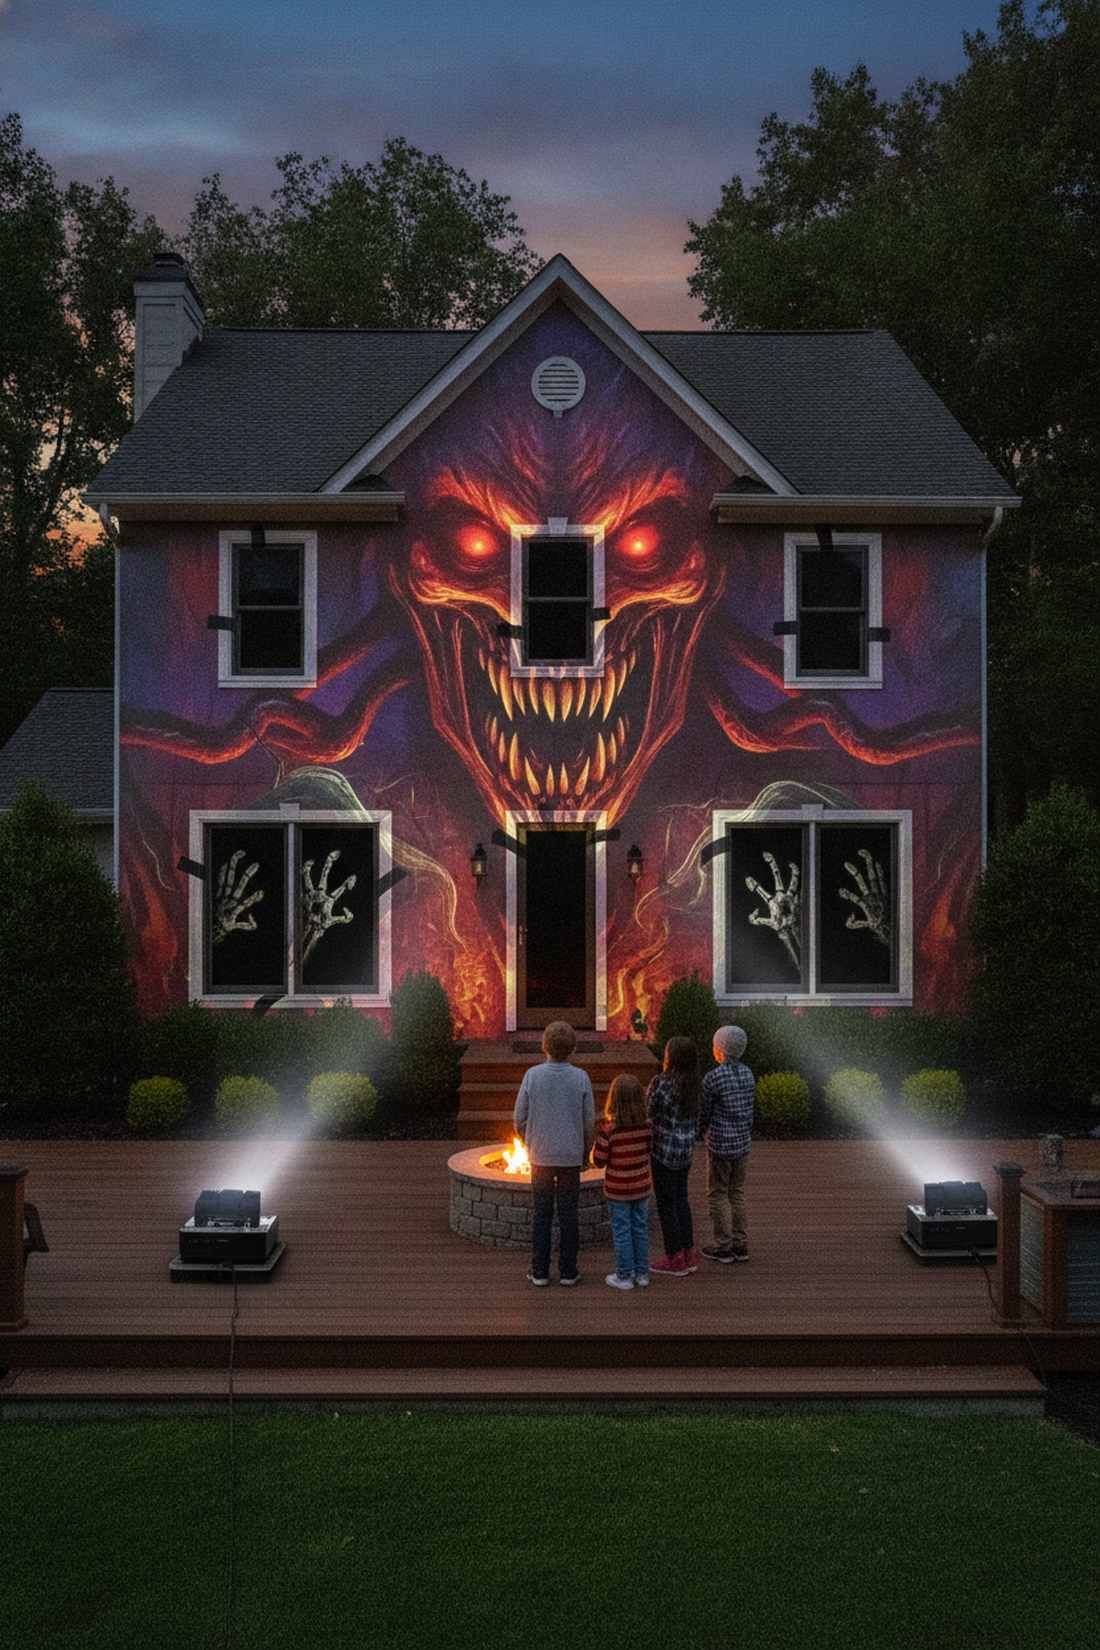
Projection Mapping & Architectural Effects
Projection mapping transforms entire building facades into animated canvases, allowing designers to overlay digital content that appears to interact with architectural features. This technique has become the centerpiece of professional Halloween displays because it delivers high-impact visual storytelling without permanent installation.
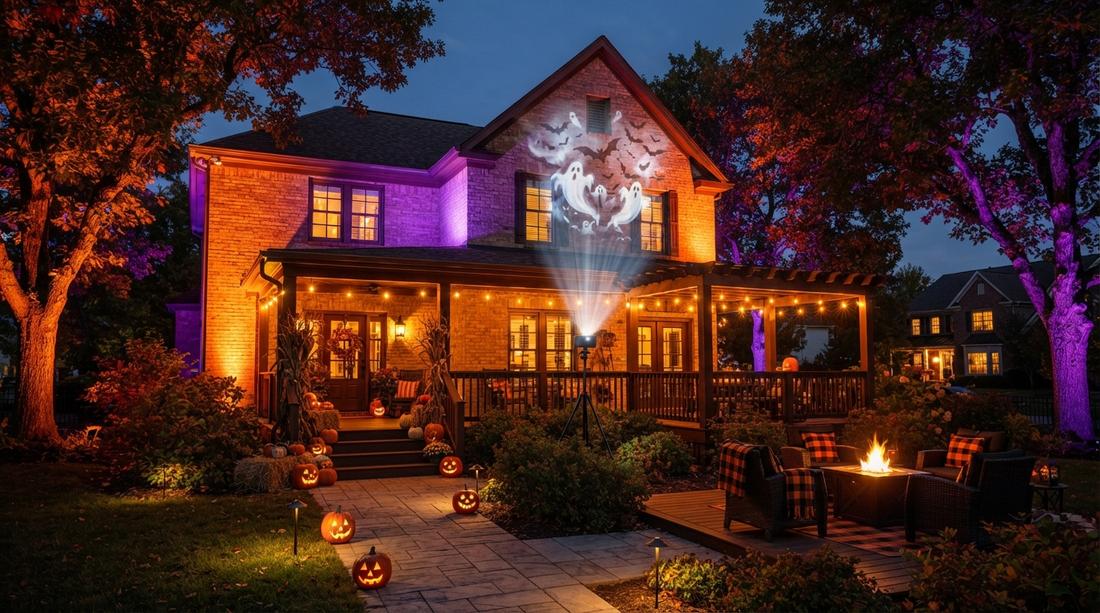
1. Full House Facade Mapping
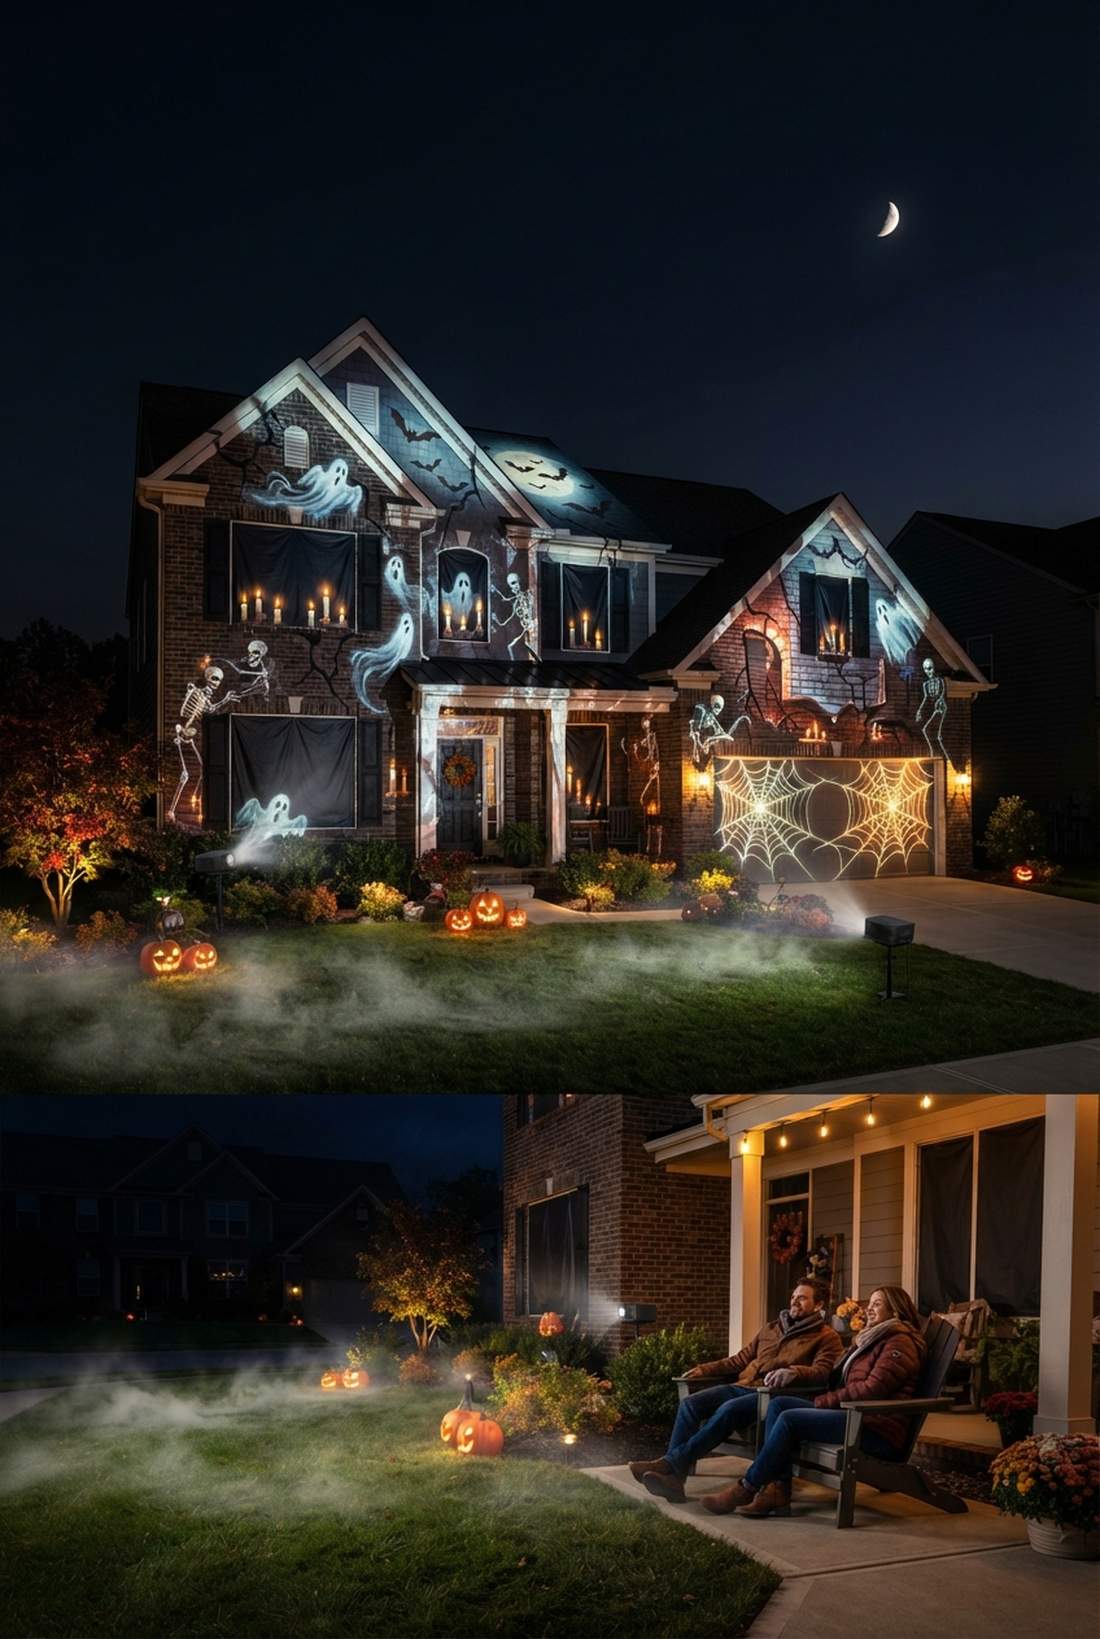
Straight out of a theme park nightmare. Architectural projection mapping works exceptionally well for large two-story house fronts.
Most homeowners waste money on weak bulbs, but a high-lumen short-throw rig delivers a surprisingly premium look. Syncing commercial Halloween projection video kits gives a designer-level finish instantly without drilling into your siding.
You can easily pull this off for around $150–$300. Pin this if you’re planning a massive whole-house upgrade!
- Key Materials: High-lumen projectors, weather-proof housing, digital mapping loops
- Vibe / Style: Immersive cinematic thriller
- Difficulty: Advanced tech setup
- Budget Breakdown: Hardware: $200 | Digital Assets: $50
- Creator’s Tip: Cover bright white window trims with dark matte tape to stop light bleeding and keep the image sharp.
- Smart Sourcing: 3500-lumen short-throw projector (refurbished kit) and pre-cut projection mesh fabric.
2. Garage Door Horror Scenes
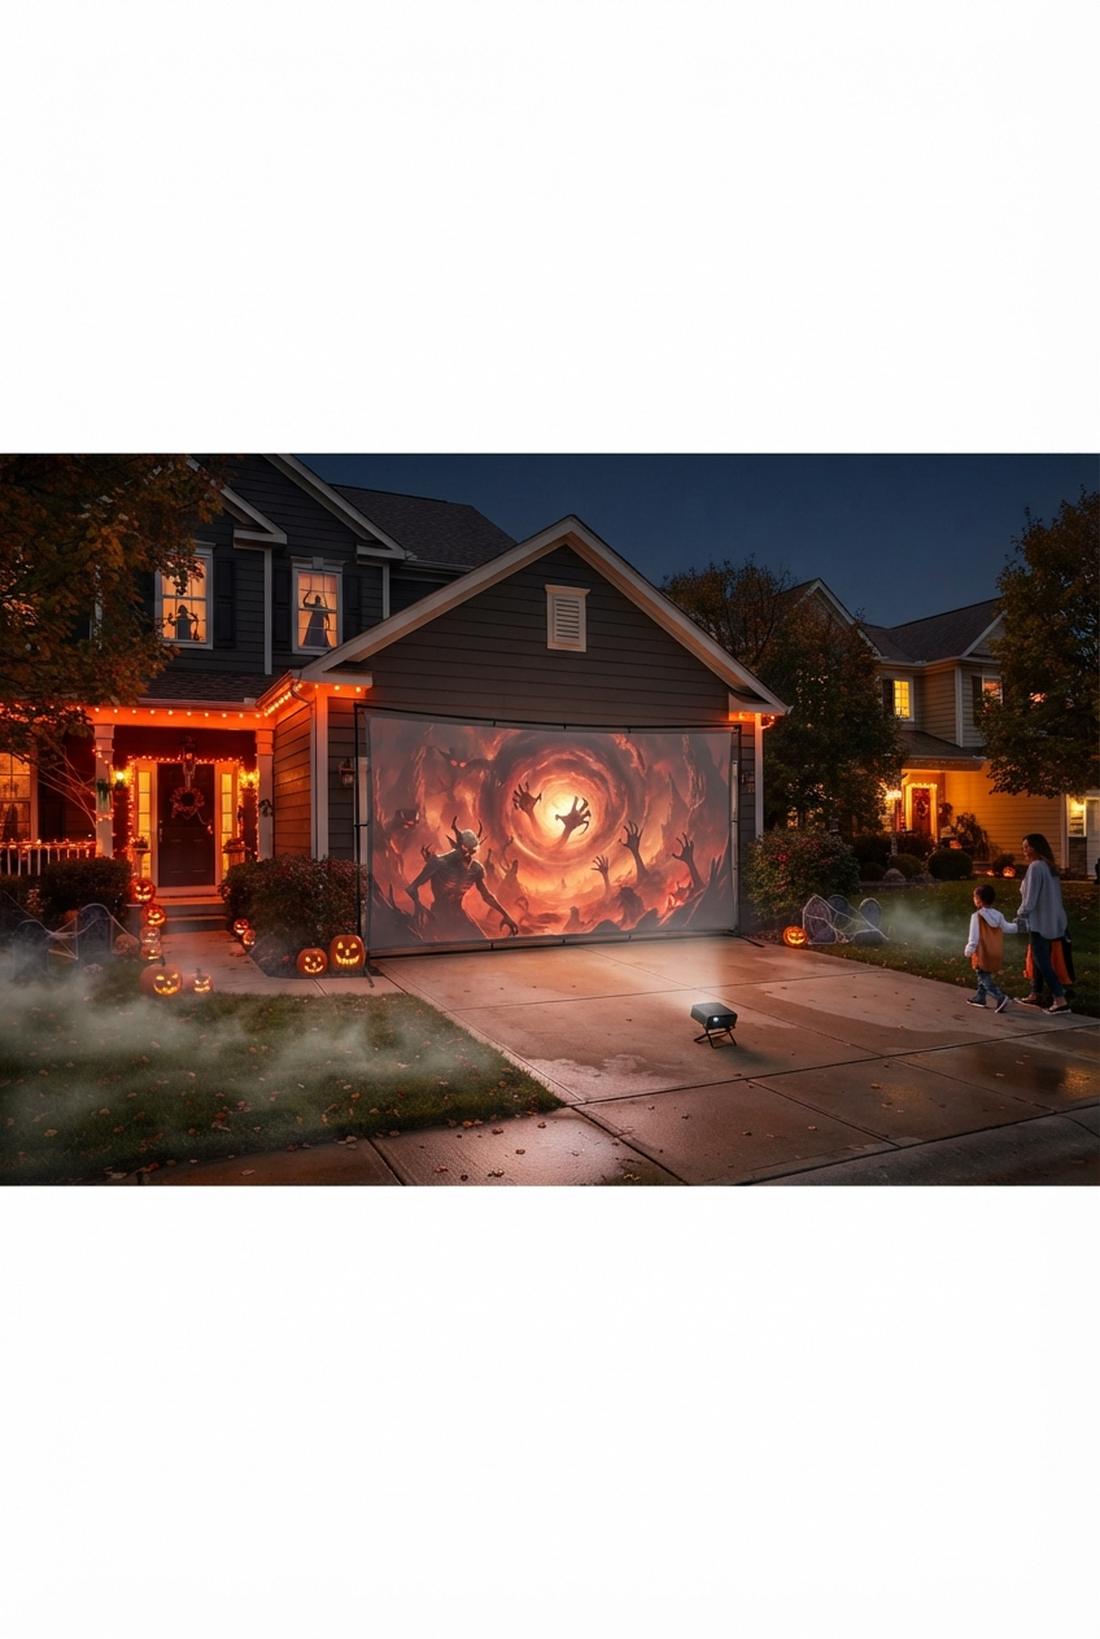
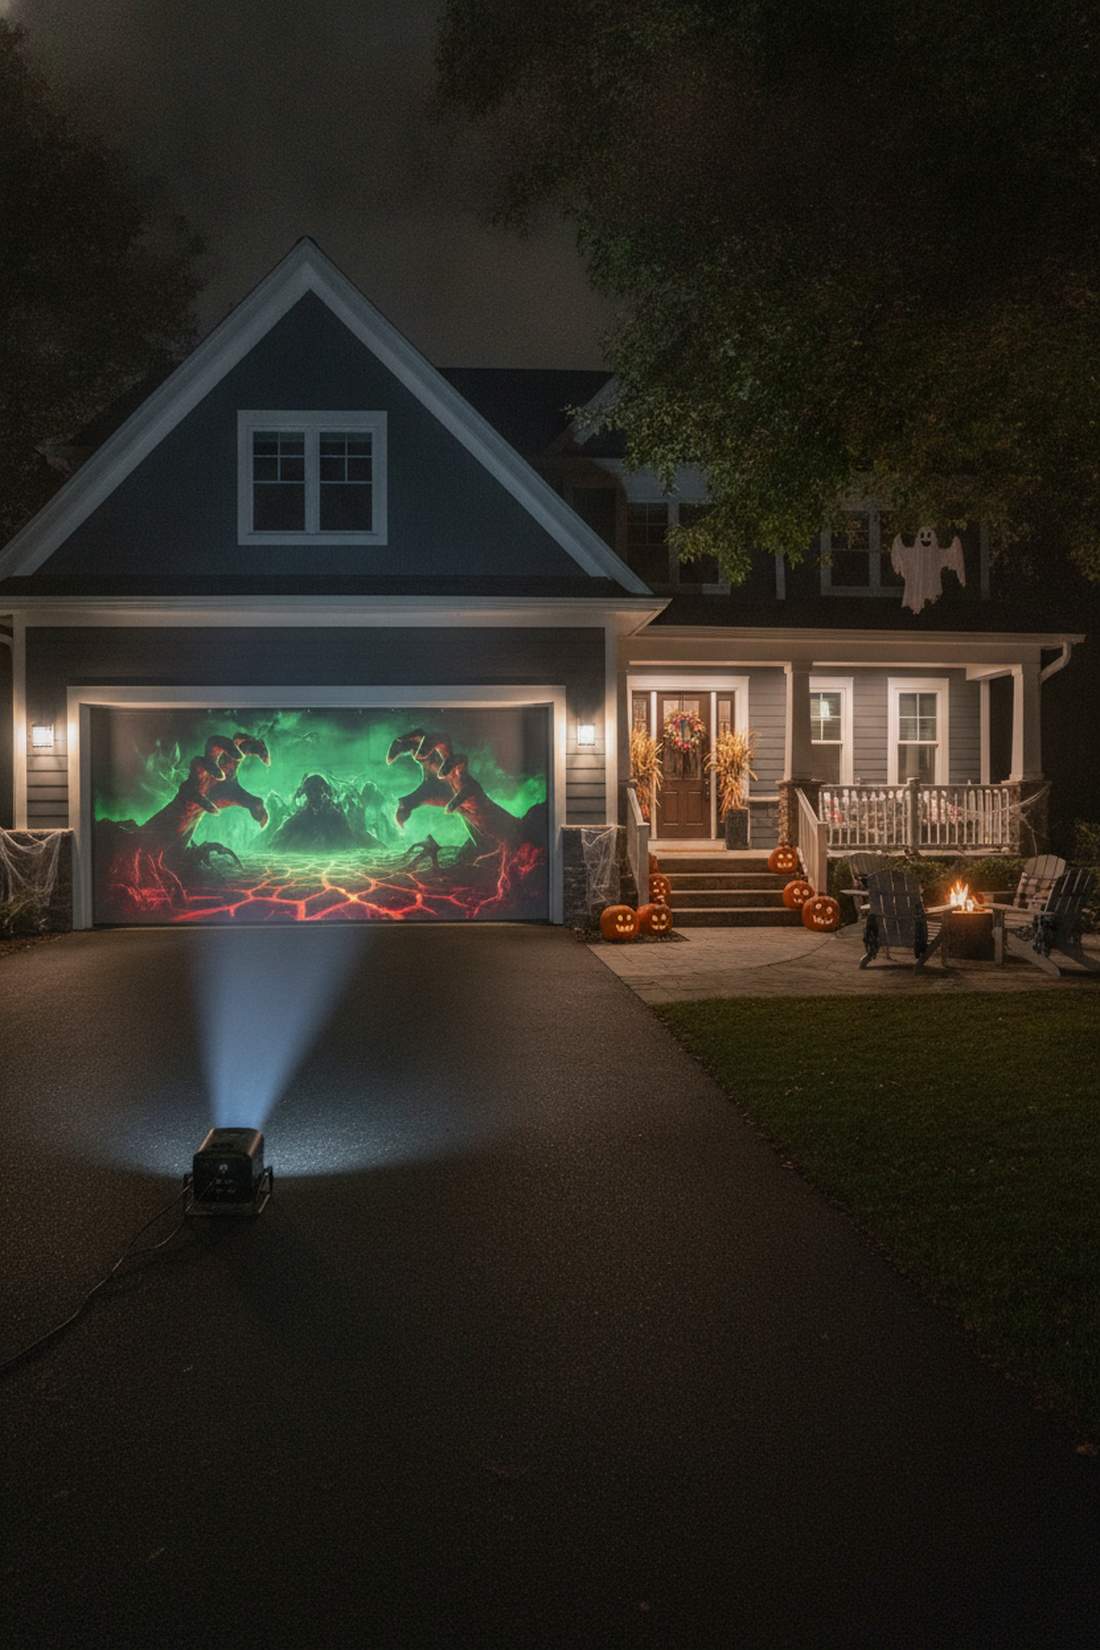
Feels like a glowing portal to the underworld. A garage door horror display is perfect for flat, windowless driveway staging.
Standard decorations look cheap during the day, yet a focused projection loop commands absolute attention at night. Investing in weather-resistant digital decoration kits prevents frustrating hardware failures when the October rain hits.
Expect to spend roughly $60–$90 for the digital assets and screen. It’s a fast upgrade that completely changes the property vibe.
- Key Materials: Garage screen fabric, tension rods, mini projector
- Vibe / Style: High-impact jump scare
- Difficulty: Easy beginner setup
- Budget Breakdown: Tension Screen: $30 | Scene Loop: $40
- Creator’s Tip: Angle the projector slightly upward from the driveway base to prevent casting your own shadow as you walk by.
- Smart Sourcing: heavy-duty tension screen (bulk pack) and UV-coated hardware mounts.
3. Window Silhouette Projections
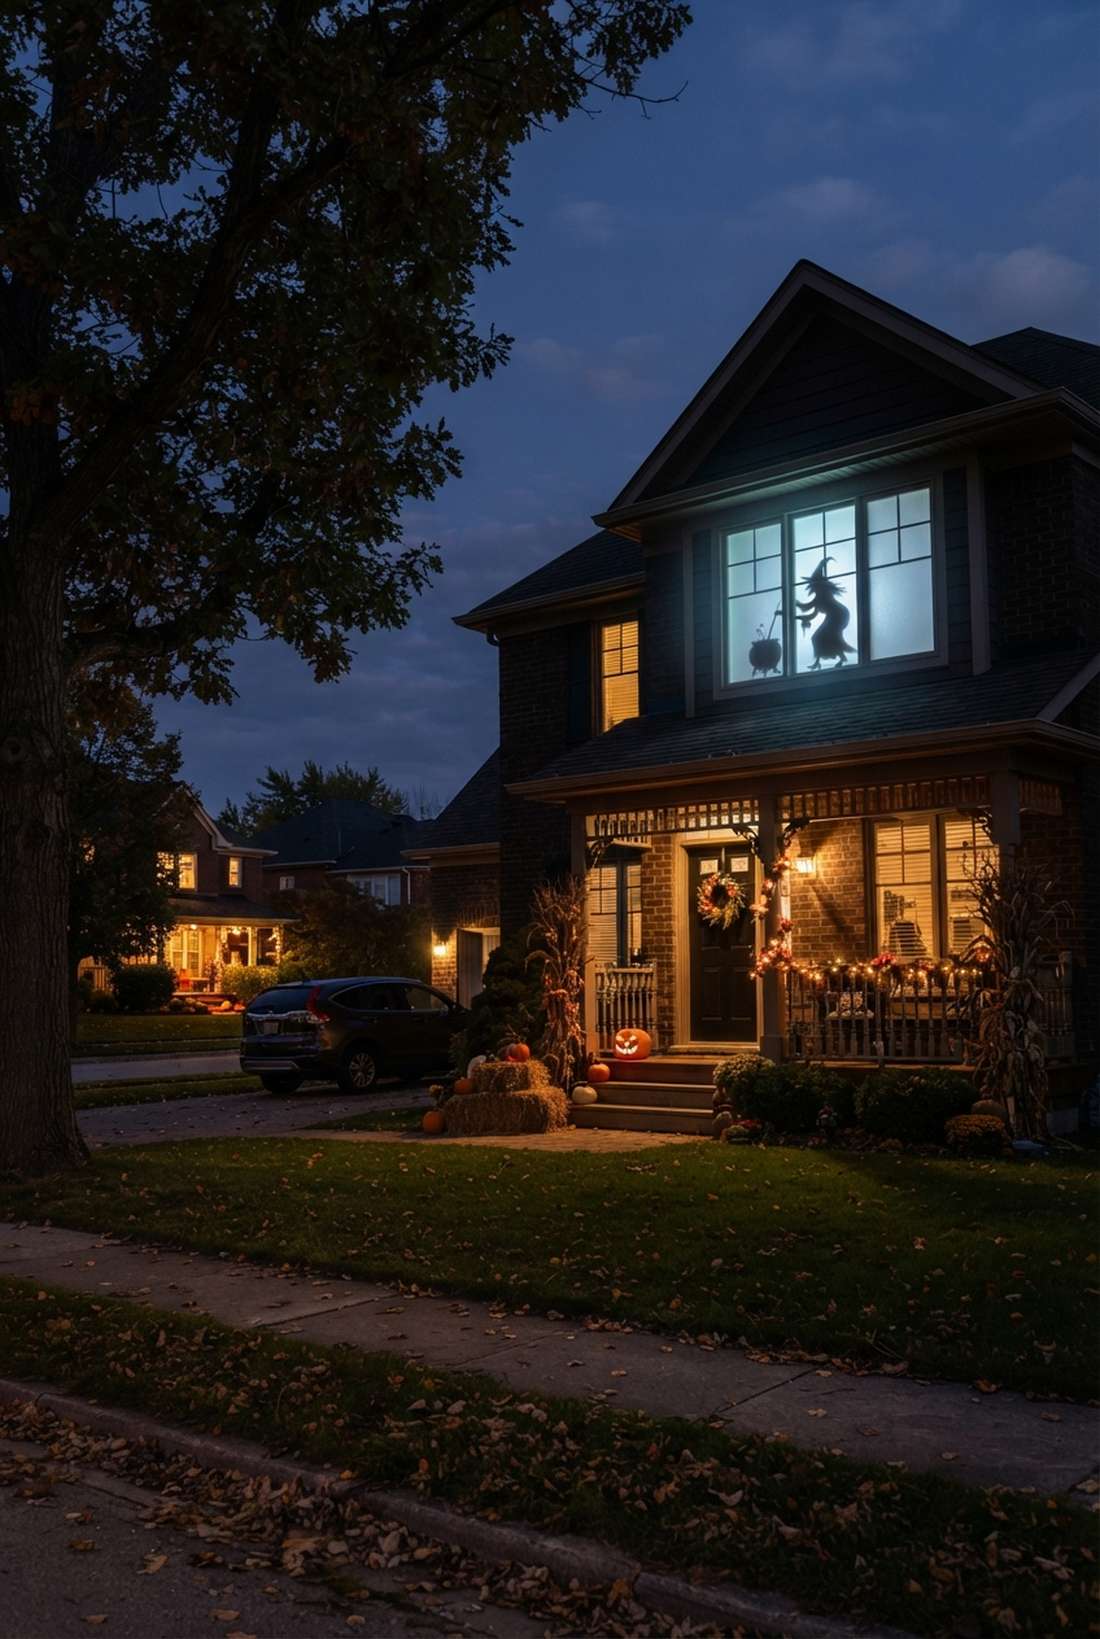
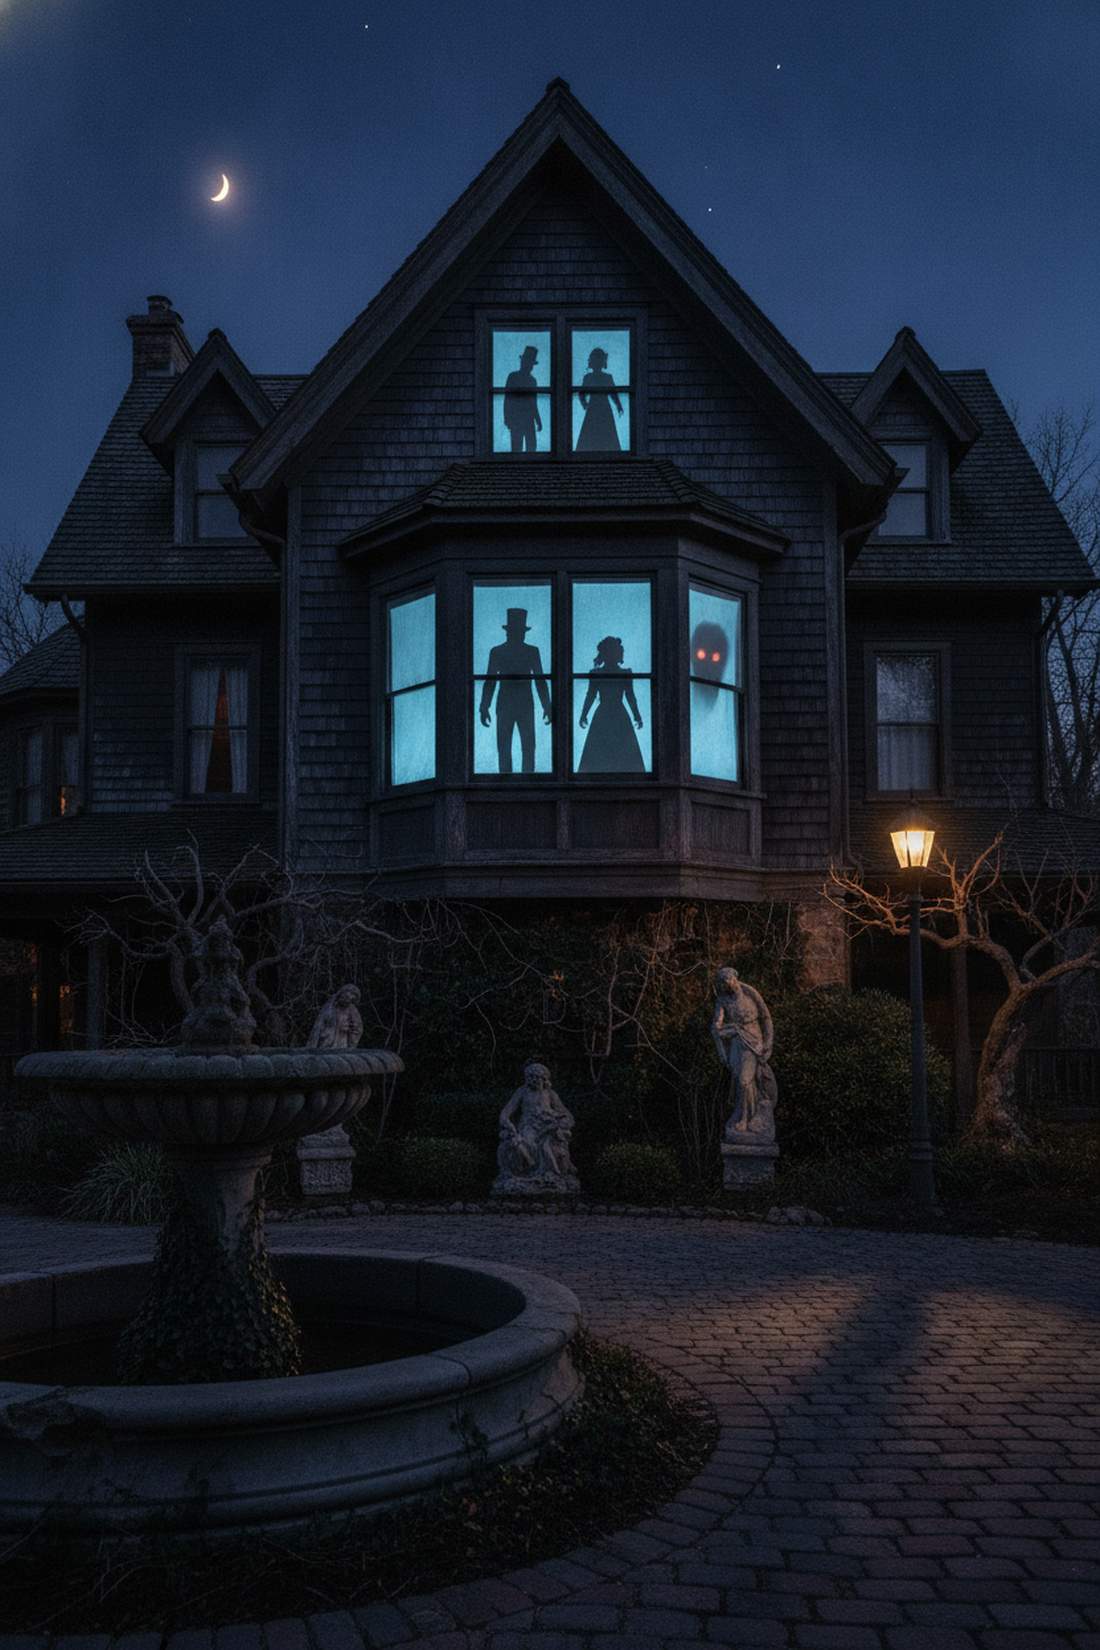
Creates that chilling sensation of being watched from the dark. Second-story window silhouettes fit brilliantly inside shaded bedroom or attic windows.
Hanging static paper cutouts is outdated; rear-projecting restless shadows looks far more expensive than it is. Using specialized translucent rear-projection material ensures the eerie image pops sharply from the street below.
This high-impact trick runs about $40–$70 per window. Save this to your DIY weekend garden board for quick reference.
- Key Materials: Rear-projection film, indoor projector, silhouette loops
- Vibe / Style: Classic haunted mansion
- Difficulty: Moderate alignment
- Budget Breakdown: Window Film: $20 | Projector: $45
- Creator’s Tip: Use double-sided translucent tape so the screen stays perfectly flat without sagging in the corners.
- Smart Sourcing: frosted rear-projection vinyl (bulk roll) and budget-friendly indoor mini projector.
4. Tree Shadow Animation
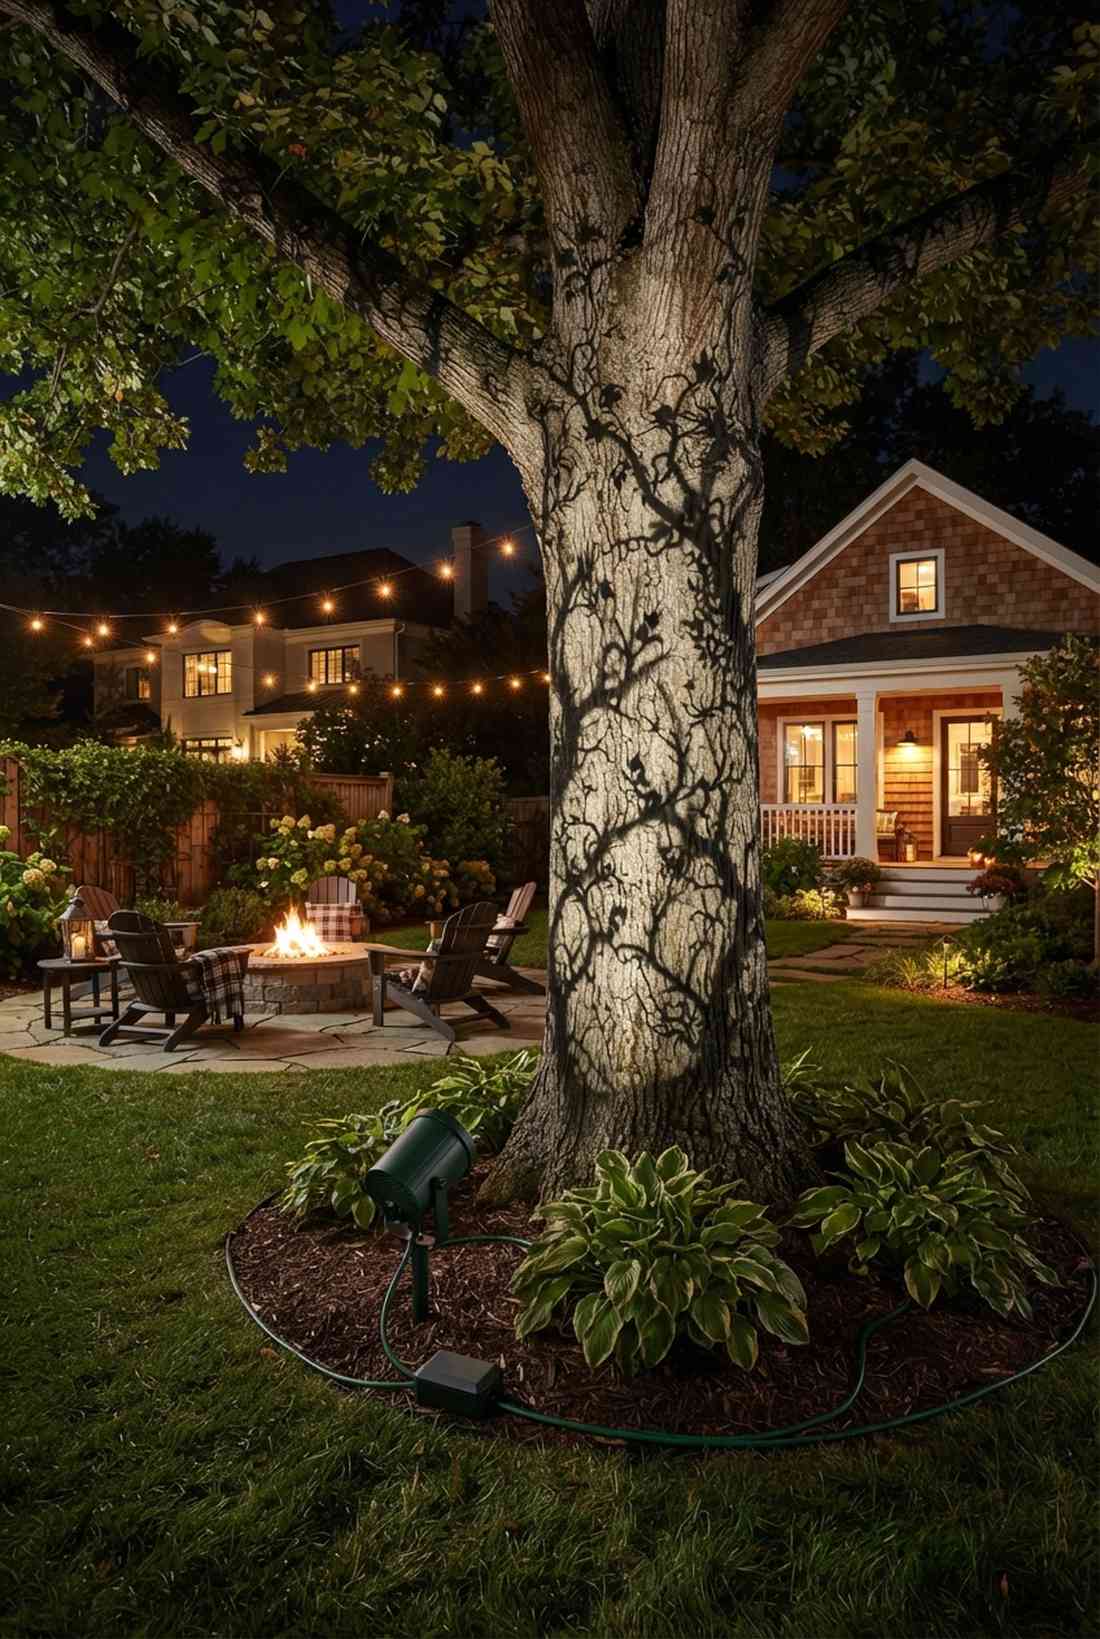
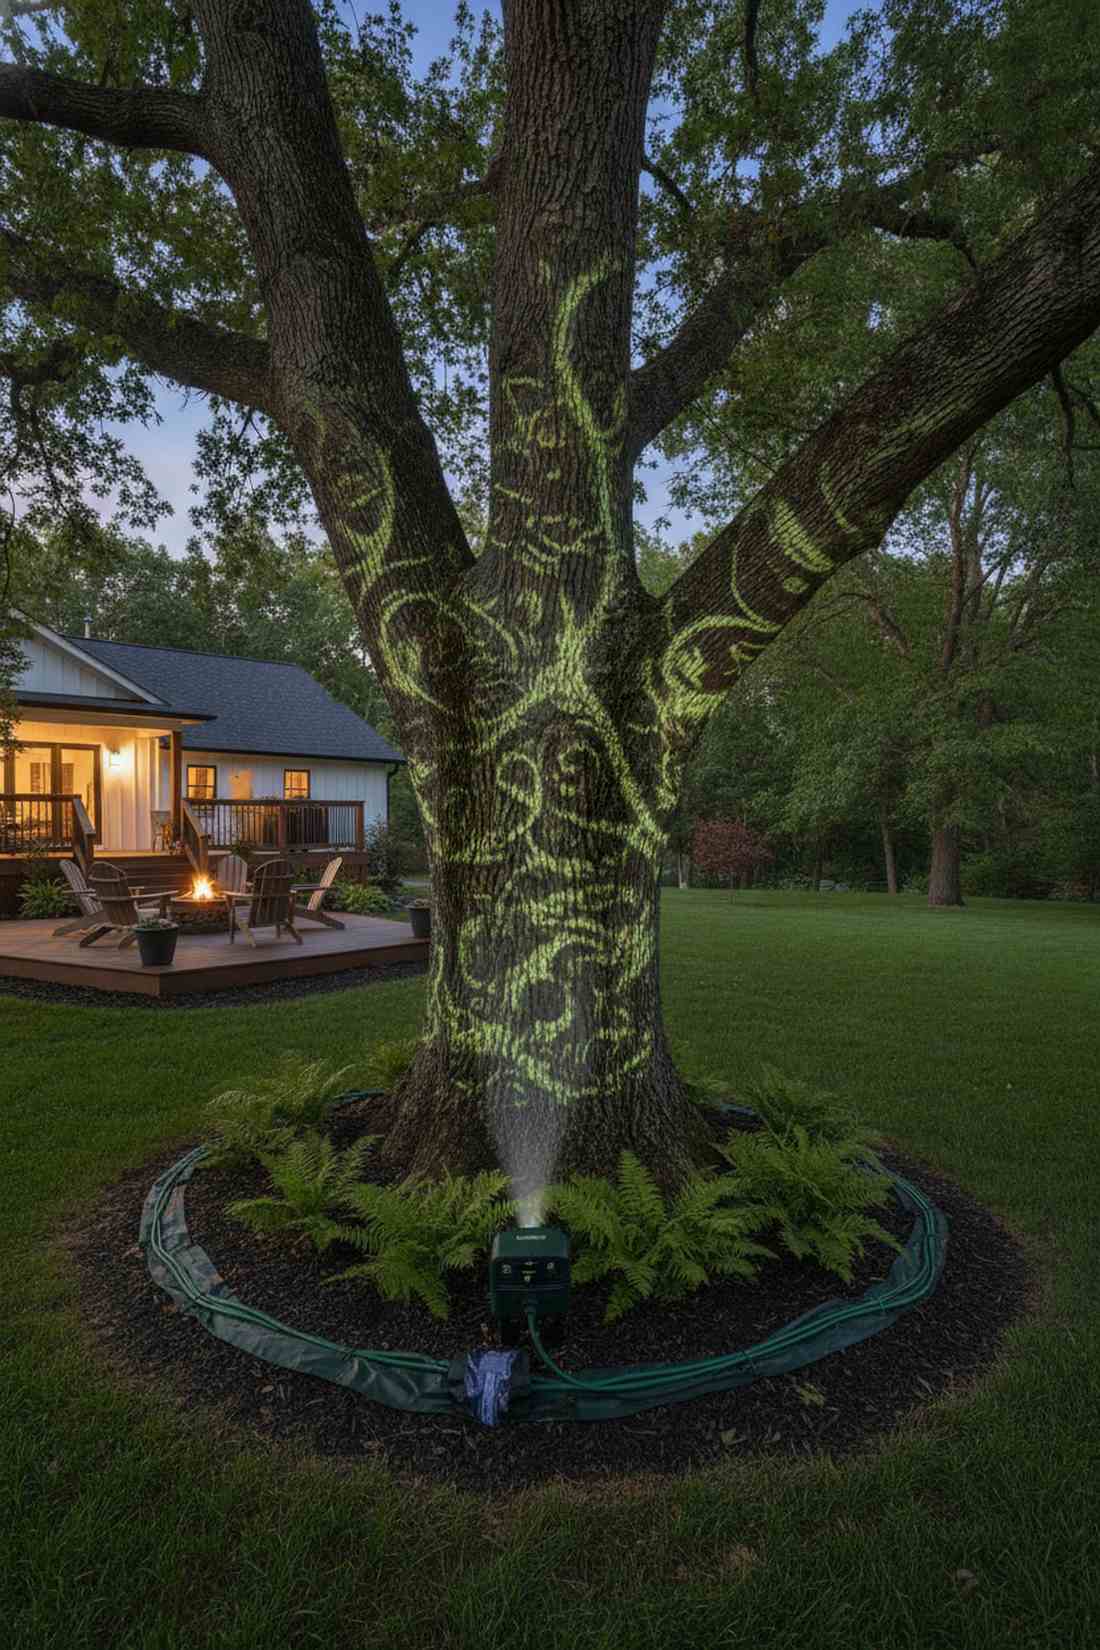
Feels like an ancient haunted forest waking up. Animated tree shadow mapping creates incredible depth for properties with large oak or maple trees.
People mistakenly ignore their natural landscaping, but layering digital creeping vines over bark creates a truly cinematic environment. Grabbing an outdoor-rated miniature garden projector bundle makes hiding the equipment effortless.
Total material cost usually sits right around $80–$120. Highly recommended for a quick weekend win.
- Key Materials: Ground-stake projector, waterproof cord covers, vine animations
- Vibe / Style: Enchanted creeping woods
- Difficulty: Easy plug-and-play
- Budget Breakdown: Stake Projector: $60 | Extension Cords: $30
- Creator’s Tip: Aim for the thickest part of the trunk rather than the leaves to keep the illusion sharp and readable.
- Smart Sourcing: IP66-rated landscape projector kits and green heavy-duty extension cables.
The next lighting blueprint is ridiculously cheap but visually tricks the eye into thinking it’s a $500 custom installation…
Color-Changing LED Installations
Smart RGB LED systems offer programmable color sequences, dimming control, and remote operation that traditional lighting cannot match. These installations deliver professional-grade effects while consuming minimal electricity and generating almost no heat.
5. Programmable Roofline Accent Lighting
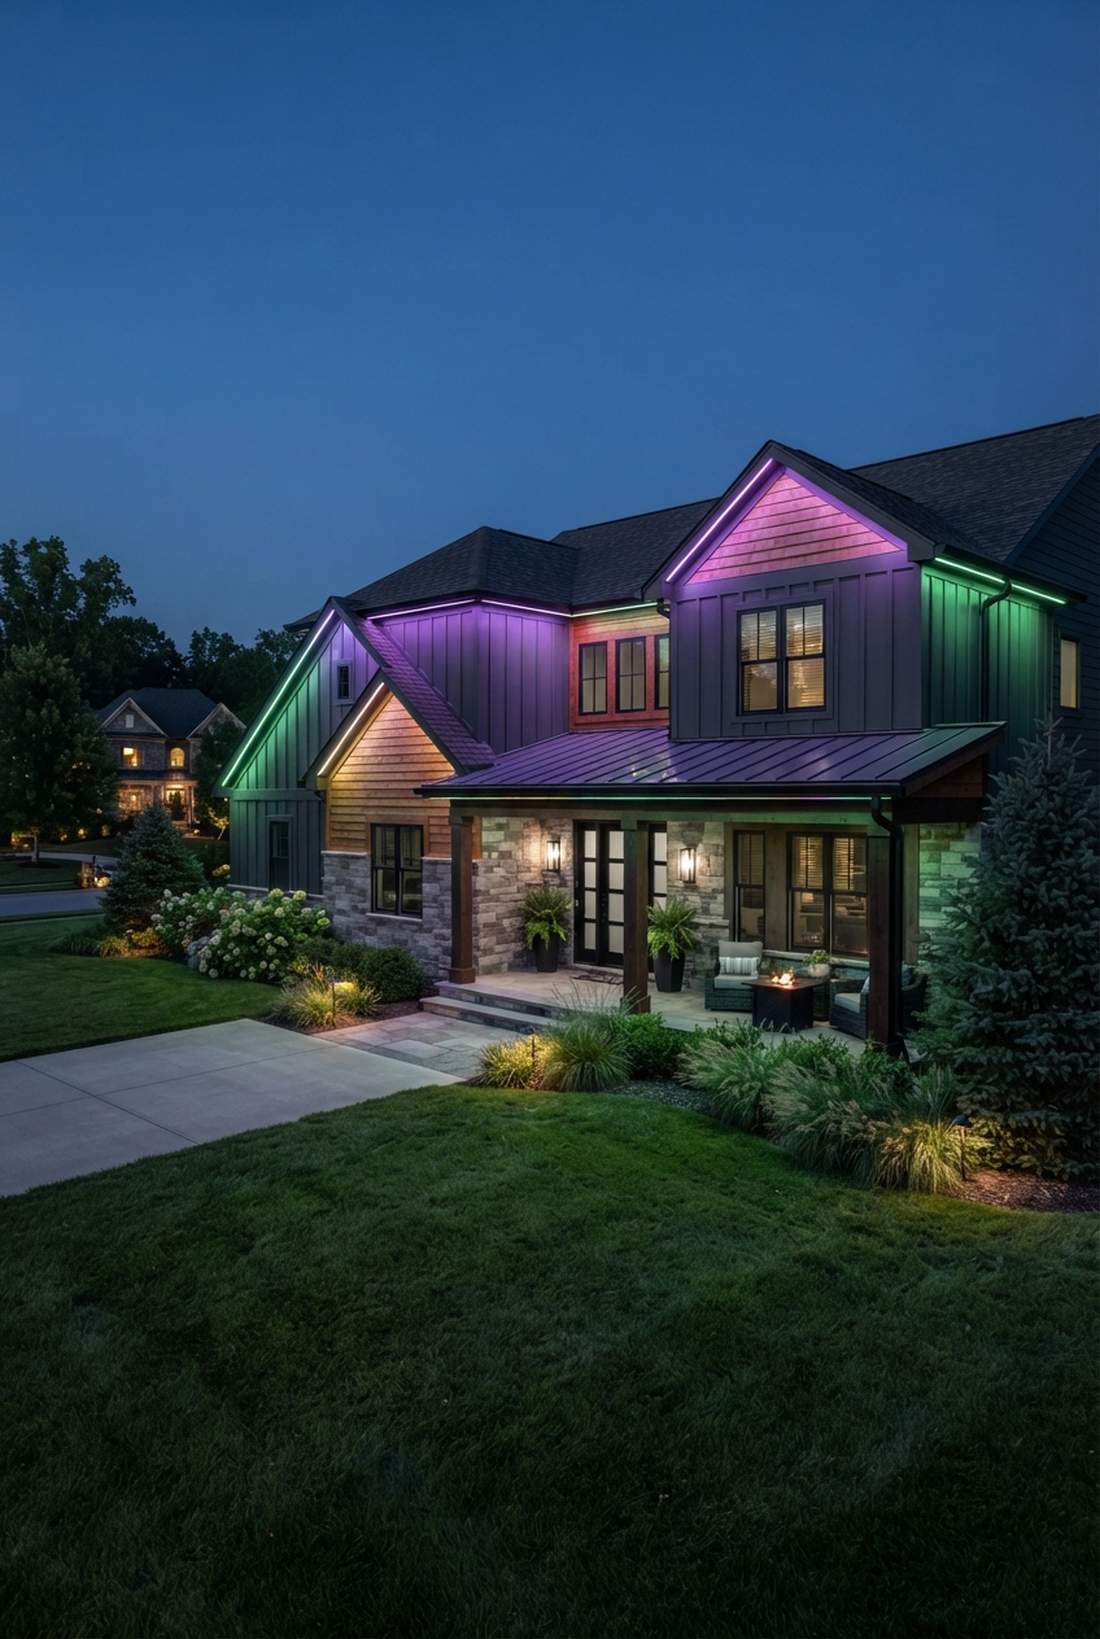
Gives off an intensely moody, neighborhood-dominating glow. Smart RGB roofline tracking works beautifully along extended eaves and front porches.
Stringing cheap holiday lights annually is a massive hassle, while permanent architectural tracks provide an elite, seamless aesthetic. Integrating smart home lighting controllers lets you automate deep purples and toxic greens directly from your phone.
Upfront costs range from $150–$400 depending on linear footage. Pin this setup if you want year-round curb appeal.
- Key Materials: RGB LED strips, aluminum tracking, smart controller
- Vibe / Style: Modern architectural dread
- Difficulty: Advanced ladder work
- Budget Breakdown: Track Kit: $200 | Controller Hub: $50
- Creator’s Tip: Mount the tracks pointing downward against the wall rather than outward to create a softer, high-end wash effect.
- Smart Sourcing: pre-cut aluminum LED channels and weather-sealed smart RGB starter kits.
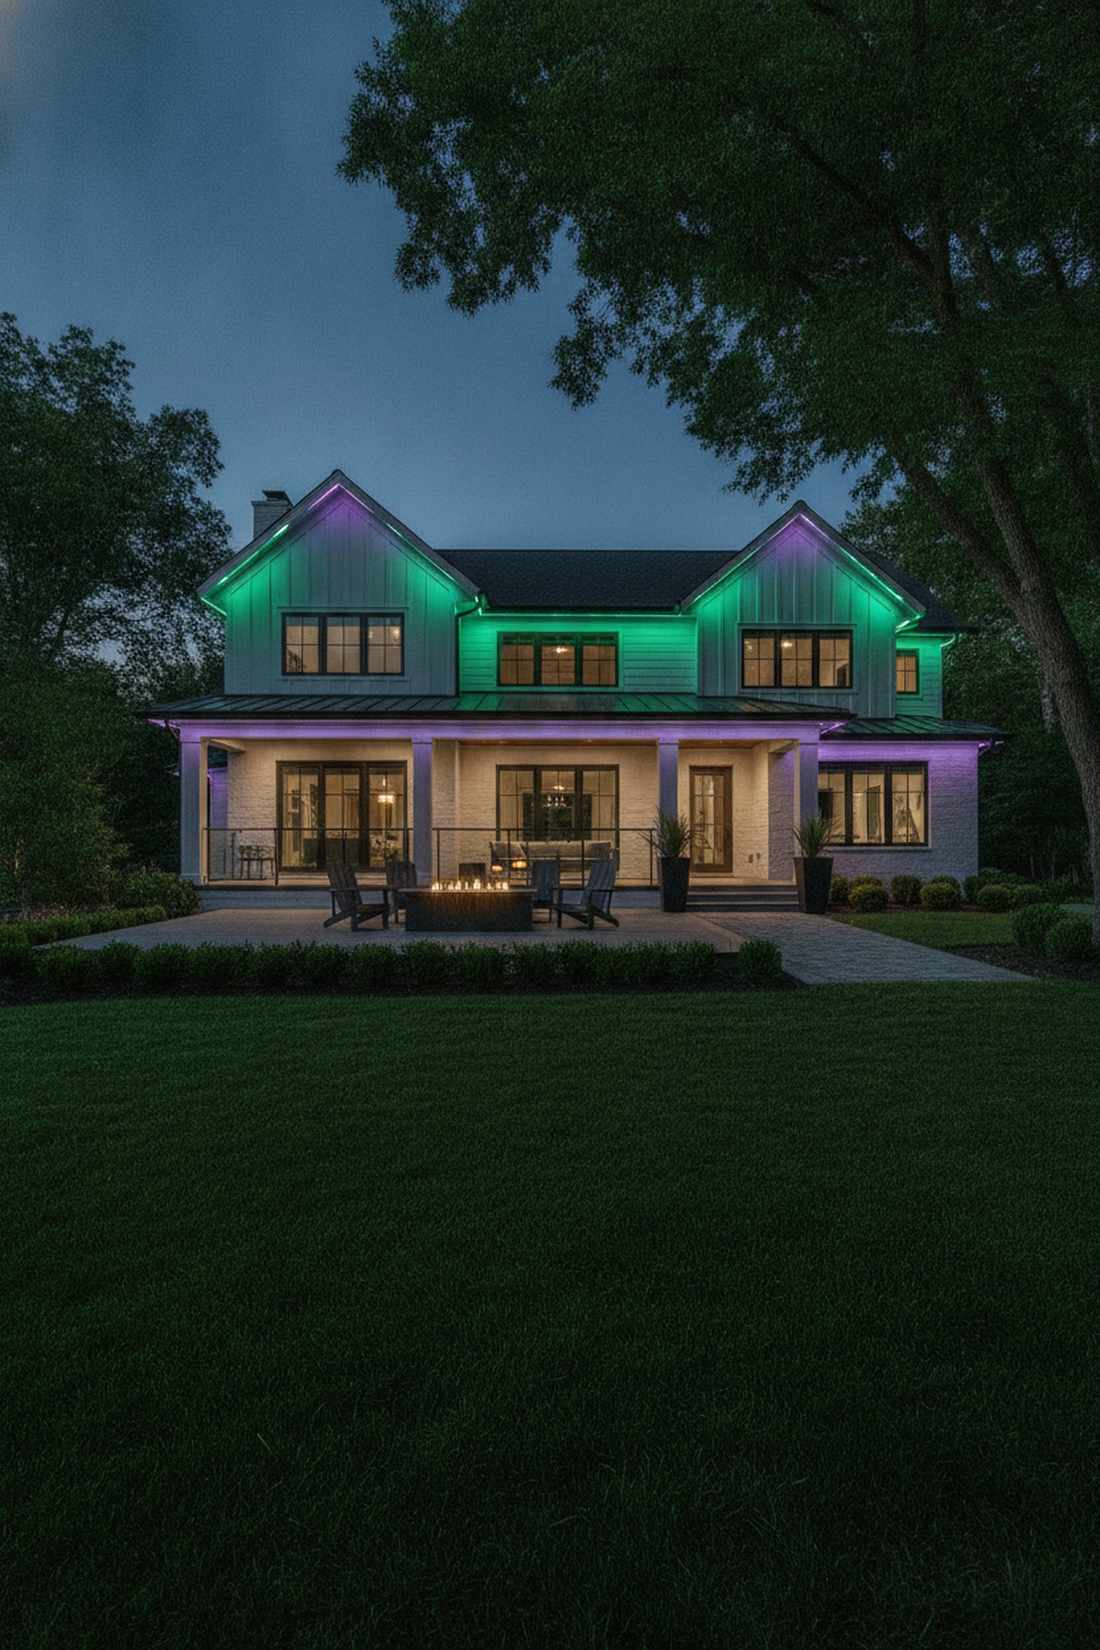
6. RGB Flood Light Landscape Washing

Drowns your yard in an eerie, cinematic color bath. RGB landscape flood washing is the ultimate base layer for wide front lawns.
Relying solely on localized props leaves dead space, whereas high-wattage color washes completely alter the property’s atmosphere. Utilizing IP66-rated smart floodlights guarantees they survive heavy October rainstorms without shorting out.
You can easily execute this foundational layer for just $45–$85.
- Key Materials: Smart RGB floodlights, ground stakes, outdoor timers
- Vibe / Style: Vast neon wasteland
- Difficulty: Easy beginner placement
- Budget Breakdown: Floodlight 2-Pack: $50 | Cables: $20
- Creator’s Tip: Overlap a blue wash with a green wash from opposite sides of the yard to create dynamic, unnatural shadows.
- Smart Sourcing: IP66-rated smart LED floods (twin pack) and heavy-duty outdoor timer boxes.
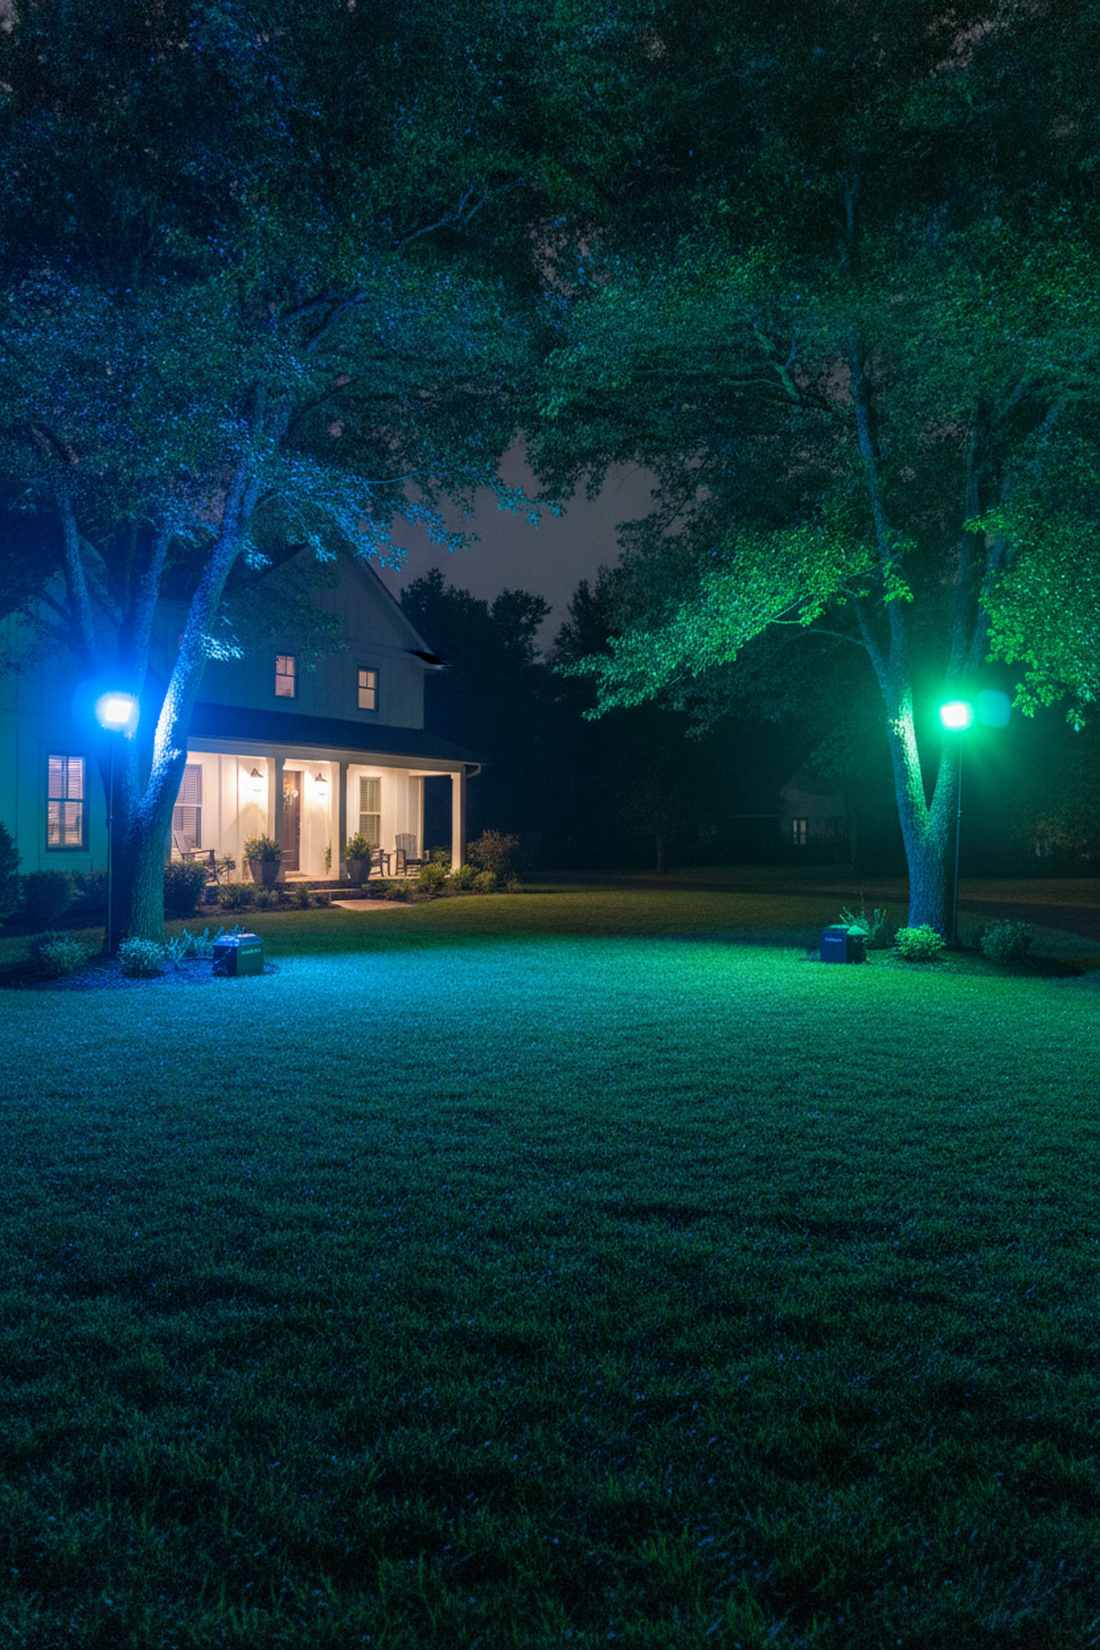
7. Color-Coordinated Spotlight Zones
Feels like stepping through different horror movie sets. Thematic spotlight zoning creates perfect isolated focal points for sprawling garden beds.
A rookie mistake is washing the entire yard in one flat color; however, clashing red and blue zones forces dramatic shadow lines. Snagging heavy-duty die-cast aluminum fixtures prevents the usual cracked plastic headaches associated with miniature garden supplies.
Budget roughly $30–$60 per distinct color zone. Highly recommended for highlighting specific animatronics.
- Key Materials: Die-cast spotlights, colored gel filters, focal props
- Vibe / Style: Isolated terror zones
- Difficulty: Moderate balancing
- Budget Breakdown: Spotlights: $40 | Gel Filters: $15
- Creator’s Tip: Keep the light source hidden behind a rock or bush so the viewer only sees the creepy illumination, not the bulb.
- Smart Sourcing: die-cast metal spotlight starter kits and heat-resistant color gel packs.
8. Jellyfish Outdoor Lighting Permanent Systems
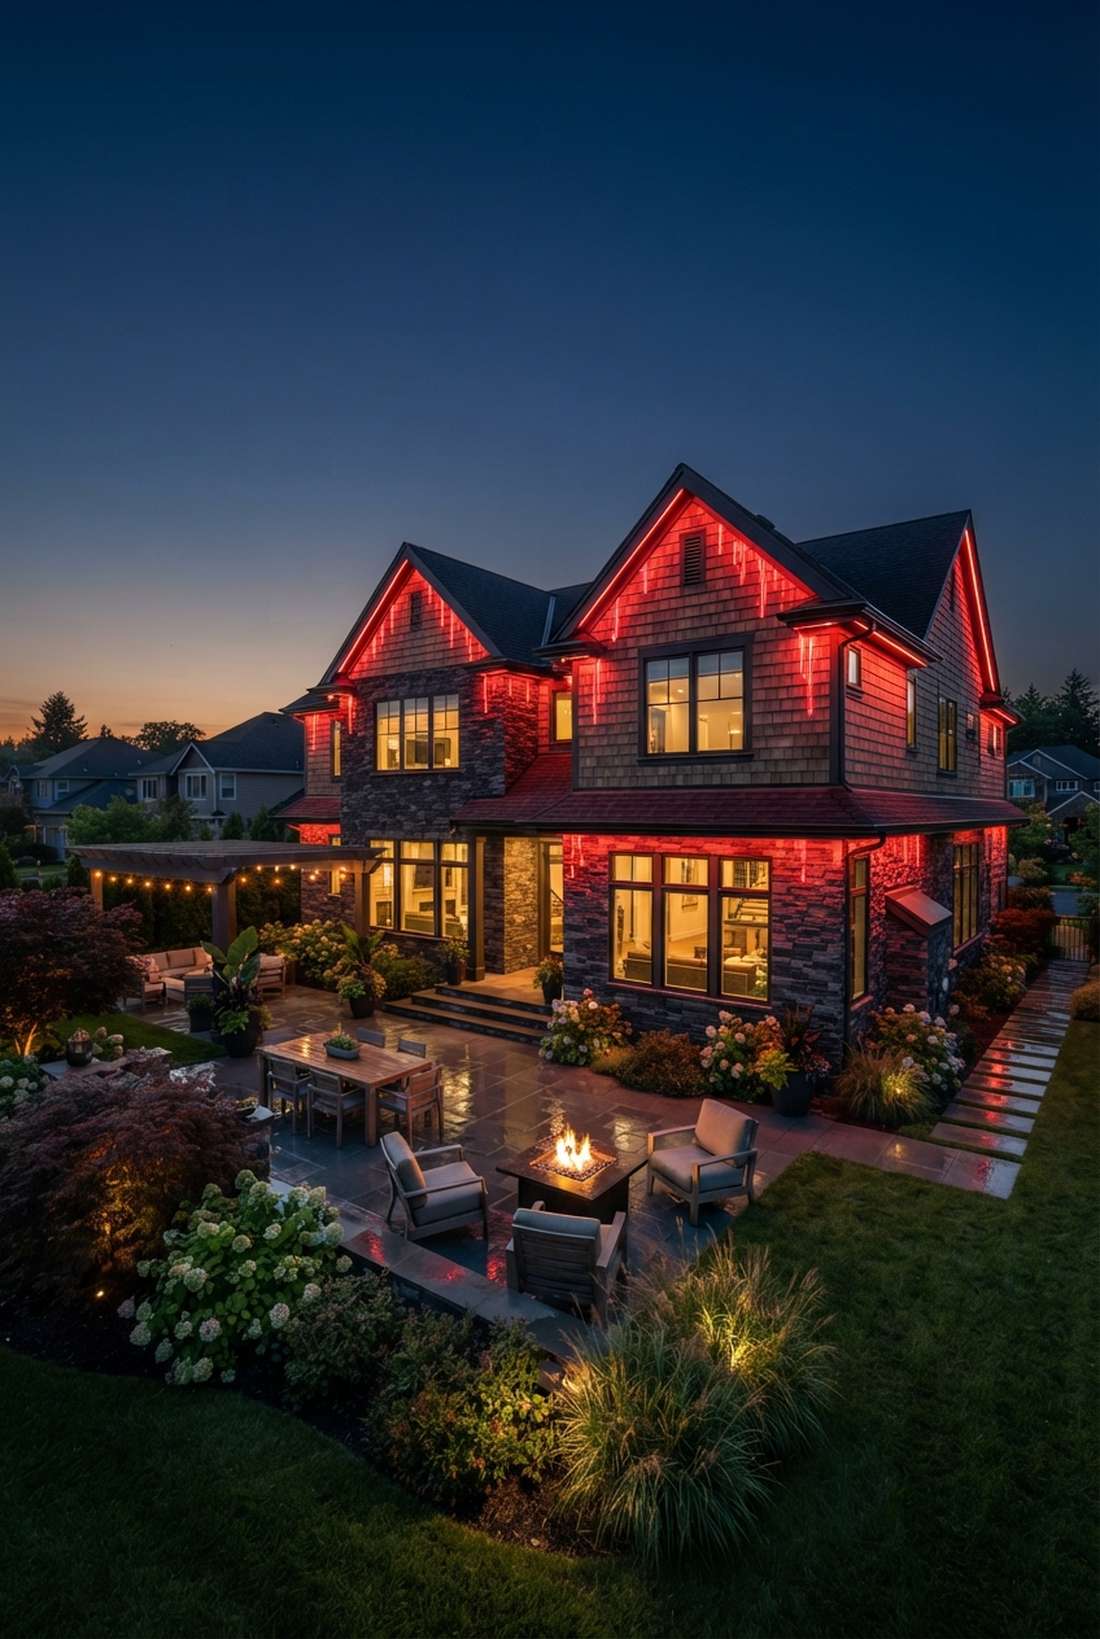
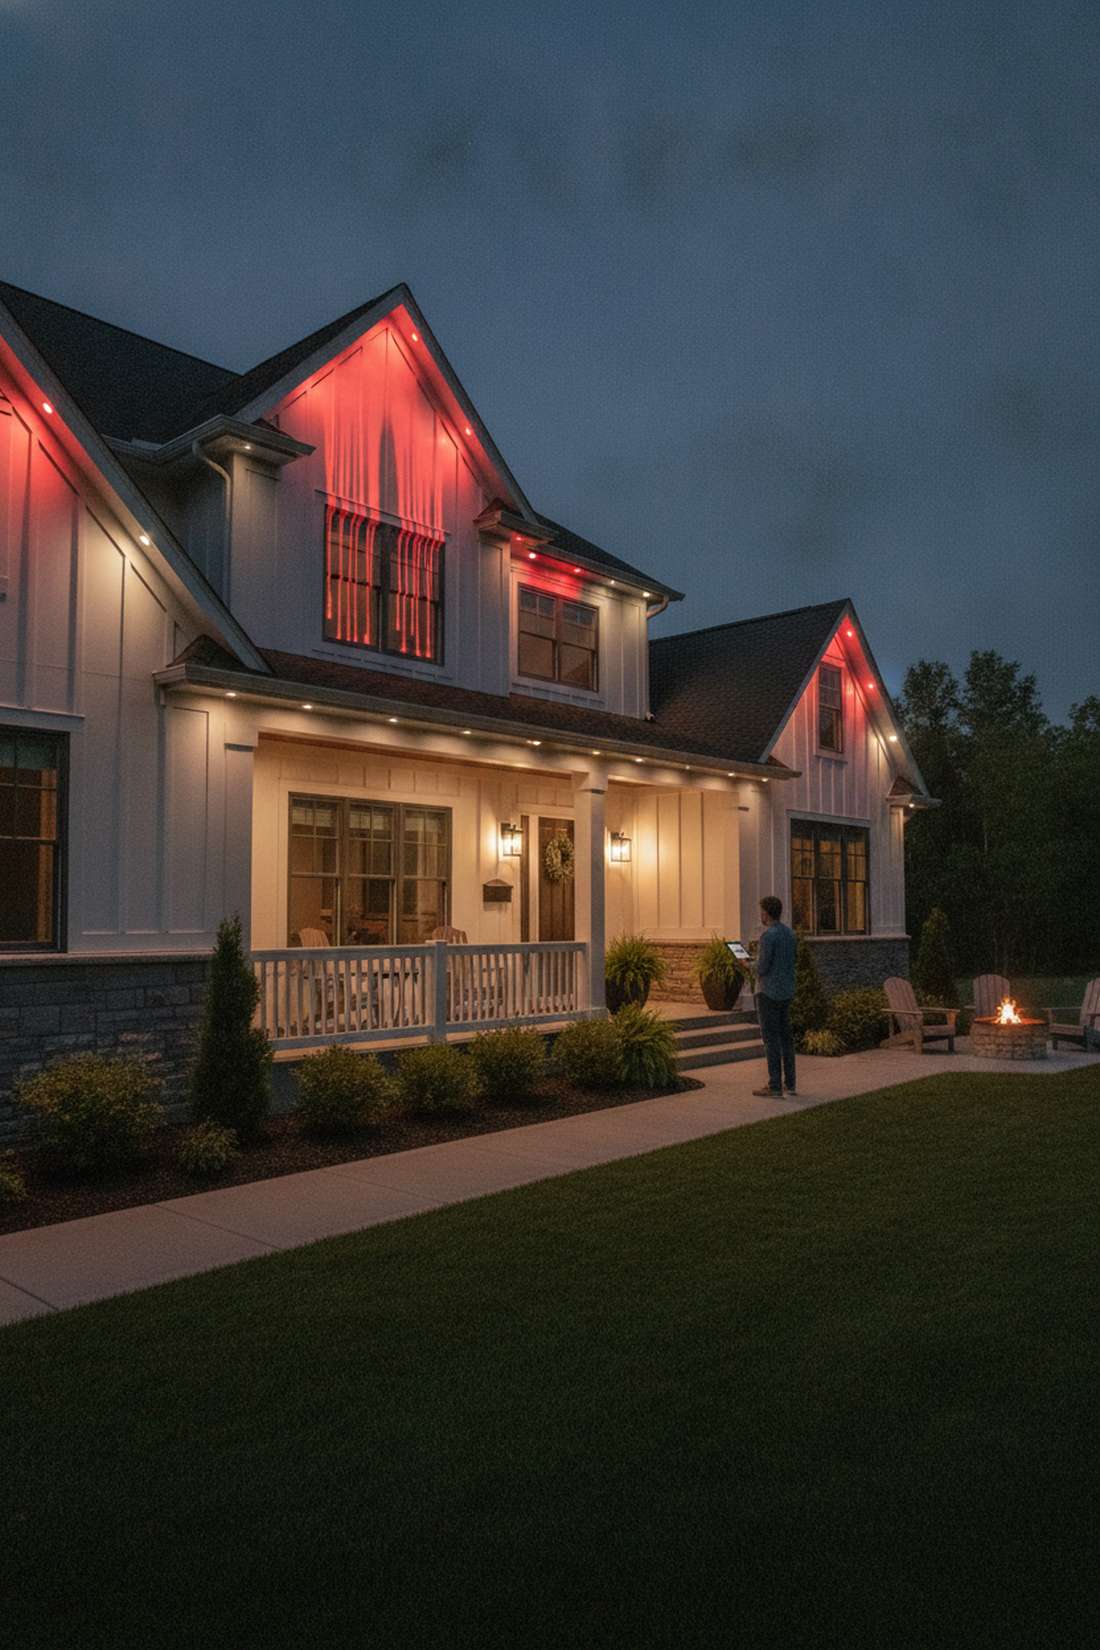
Delivers a futuristic yet hauntingly fluid cascade of light. Jellyfish outdoor lighting is a game-changer for HOA-restricted properties needing stealthy setups.
Many communities ban bulky October decor, but this permanent, low-profile track system completely skirts those strict rules while looking incredible. These commercial-grade LED kits sync flawlessly for animated, dripping-blood visual effects that look far more expensive than they are.
Professional kits start around $200–$500 but last for years. Save this idea if you hate climbing ladders every single season.
- Key Materials: Jellyfish track system, app controller, hidden wiring
- Vibe / Style: Stealthy premium aesthetic
- Difficulty: Advanced DIY installation
- Budget Breakdown: System Base: $300 | Connectors: $50
- Creator’s Tip: Program the app to cycle a slow “breathing” red animation to make the house feel like a living entity.
- Smart Sourcing: color-matched stealth track bundles and jellyfish lighting controller nodes.
Most people get their pathway lighting completely wrong… until they try the exact graveyard layout coming up next.
Graveyard & Pathway Illumination
Strategic lighting transforms walkways and cemetery scenes from simple decorations into immersive environments that guide visitors through intentionally designed experiences. Pathway illumination serves both functional safety requirements and atmospheric storytelling objectives.
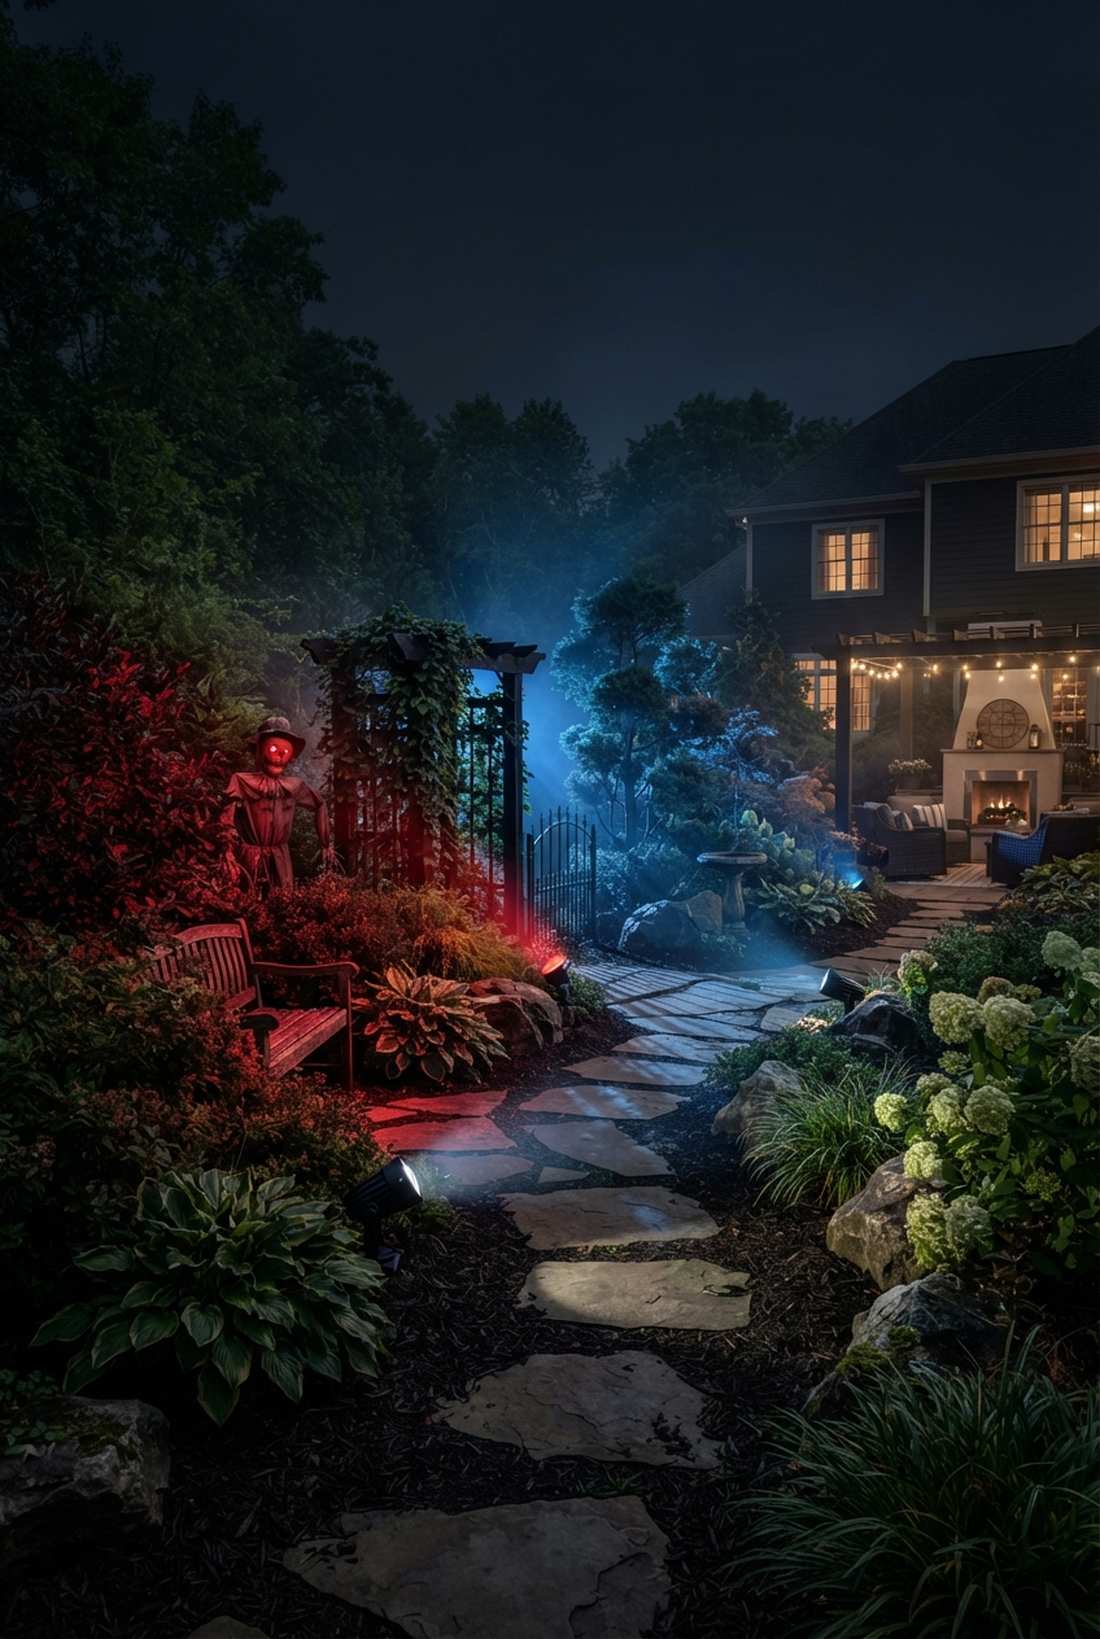
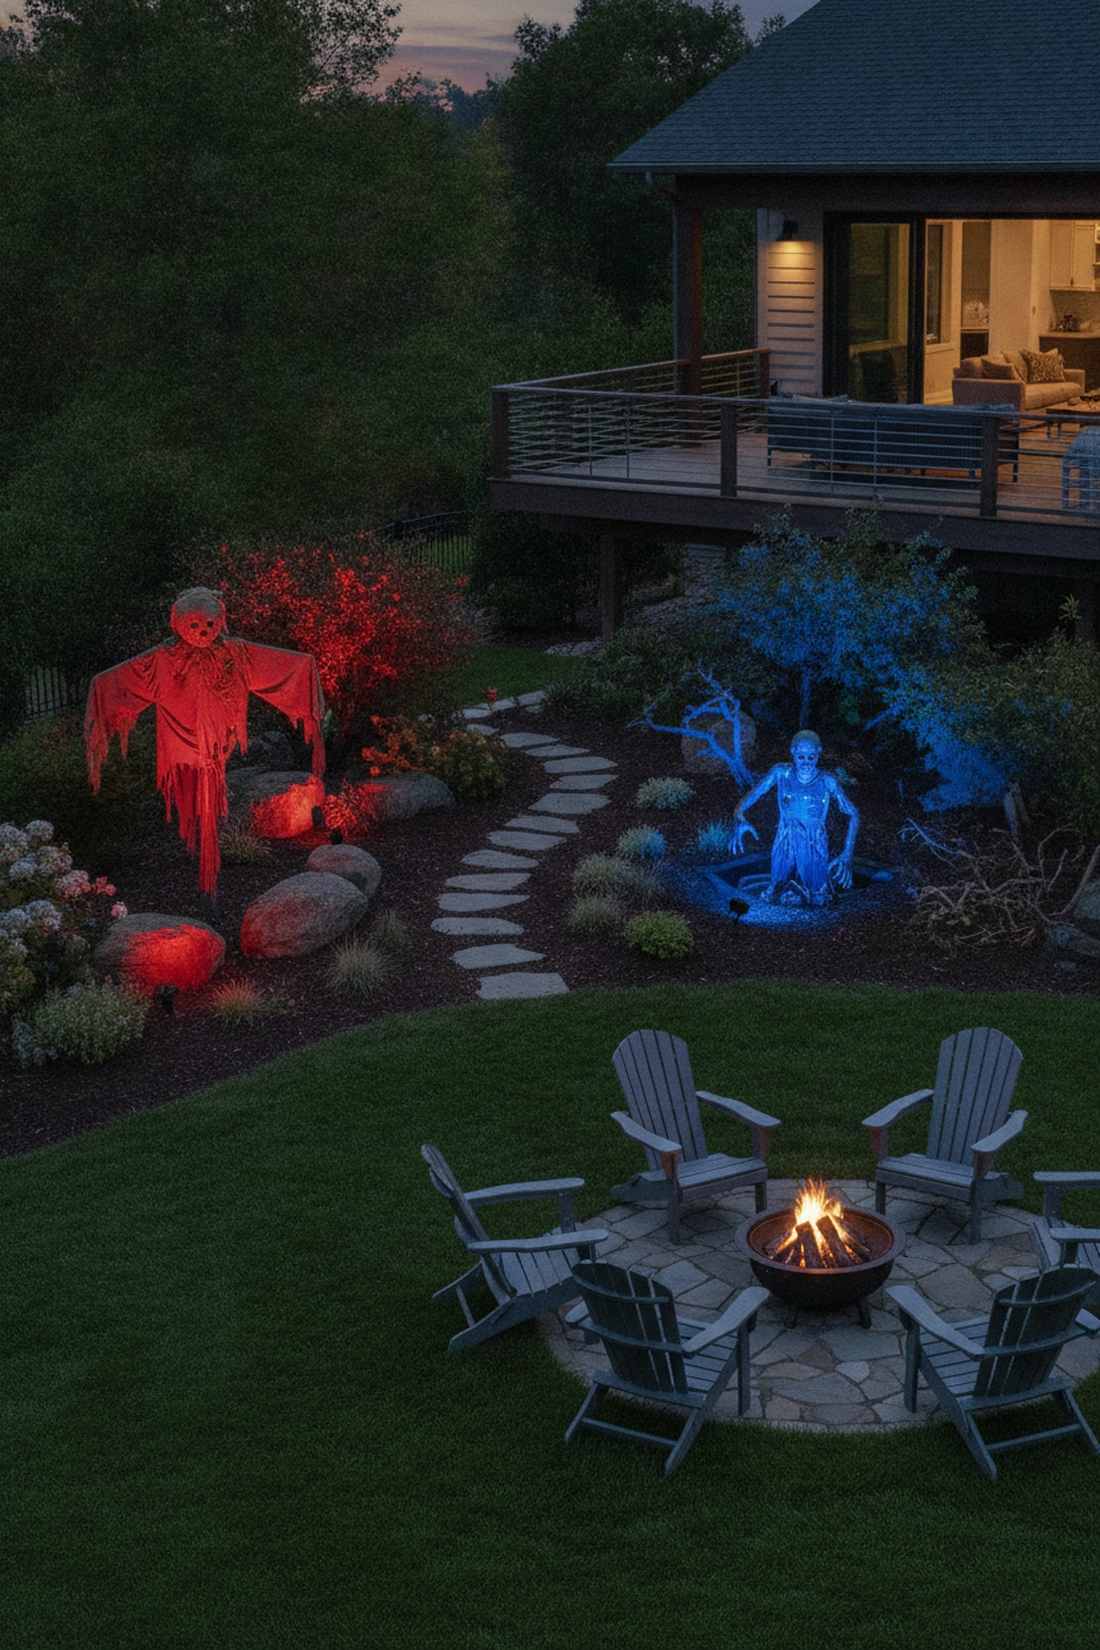
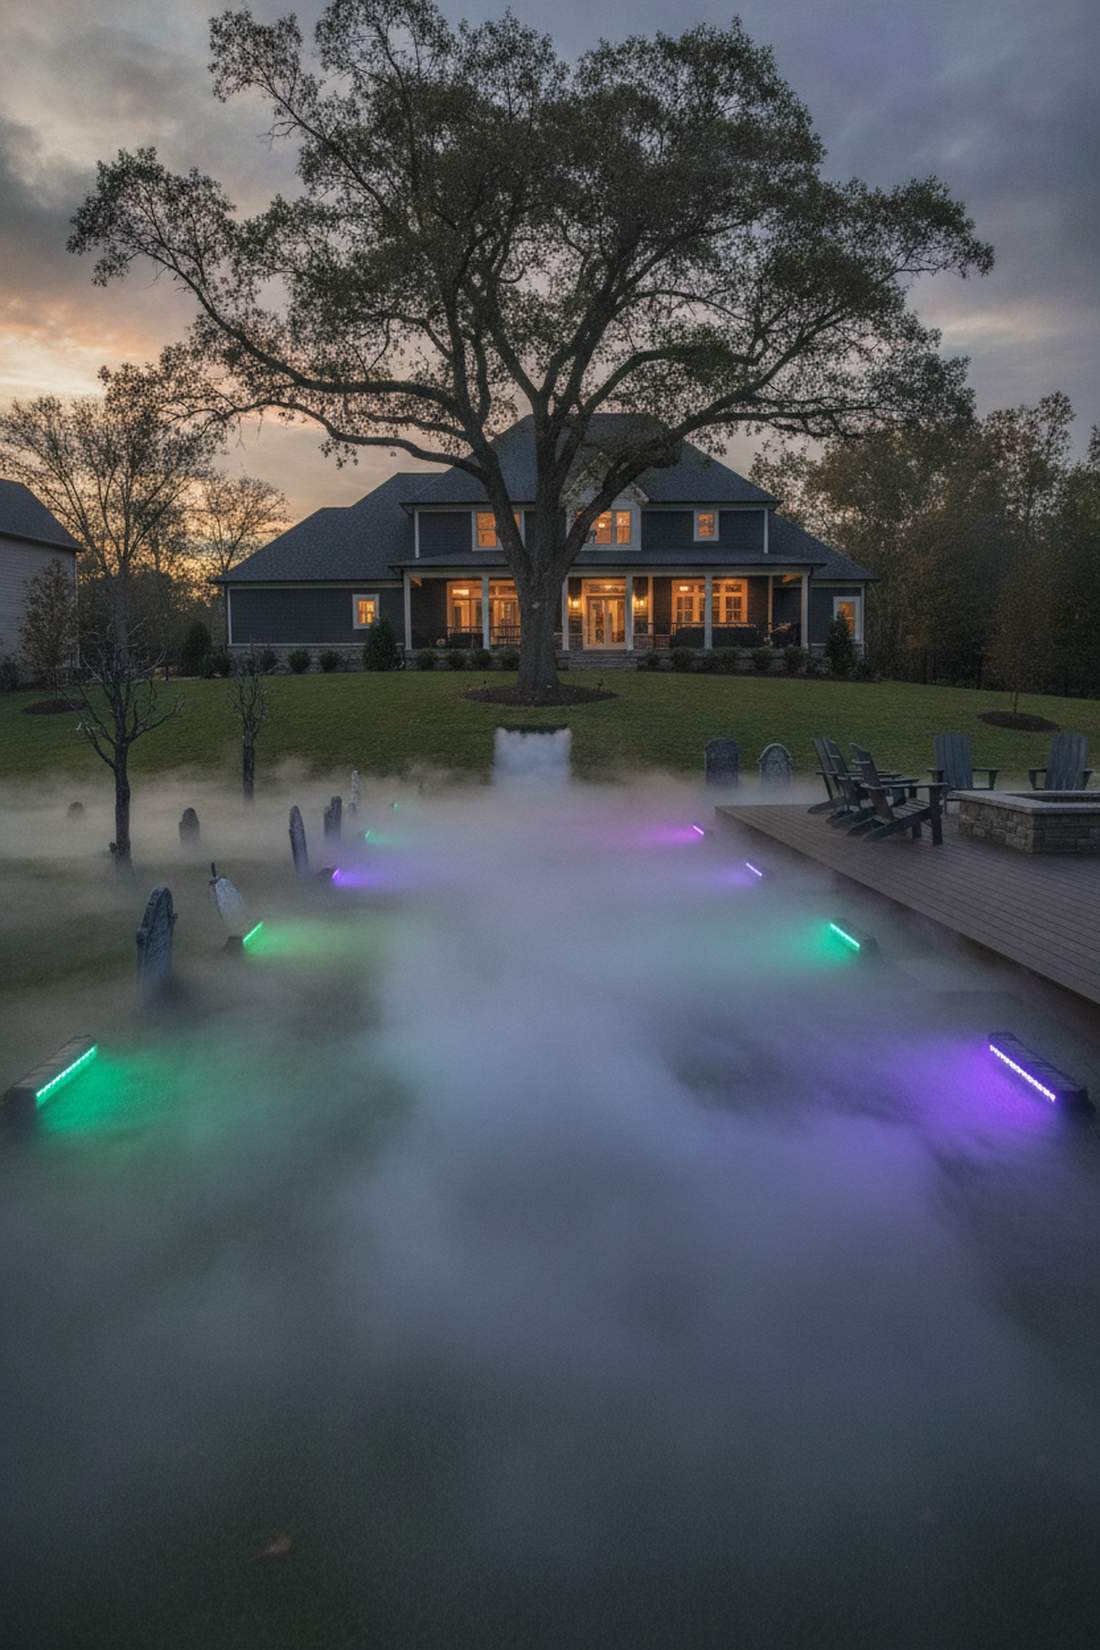
9. Tombstone Uplighting with Colored Spots
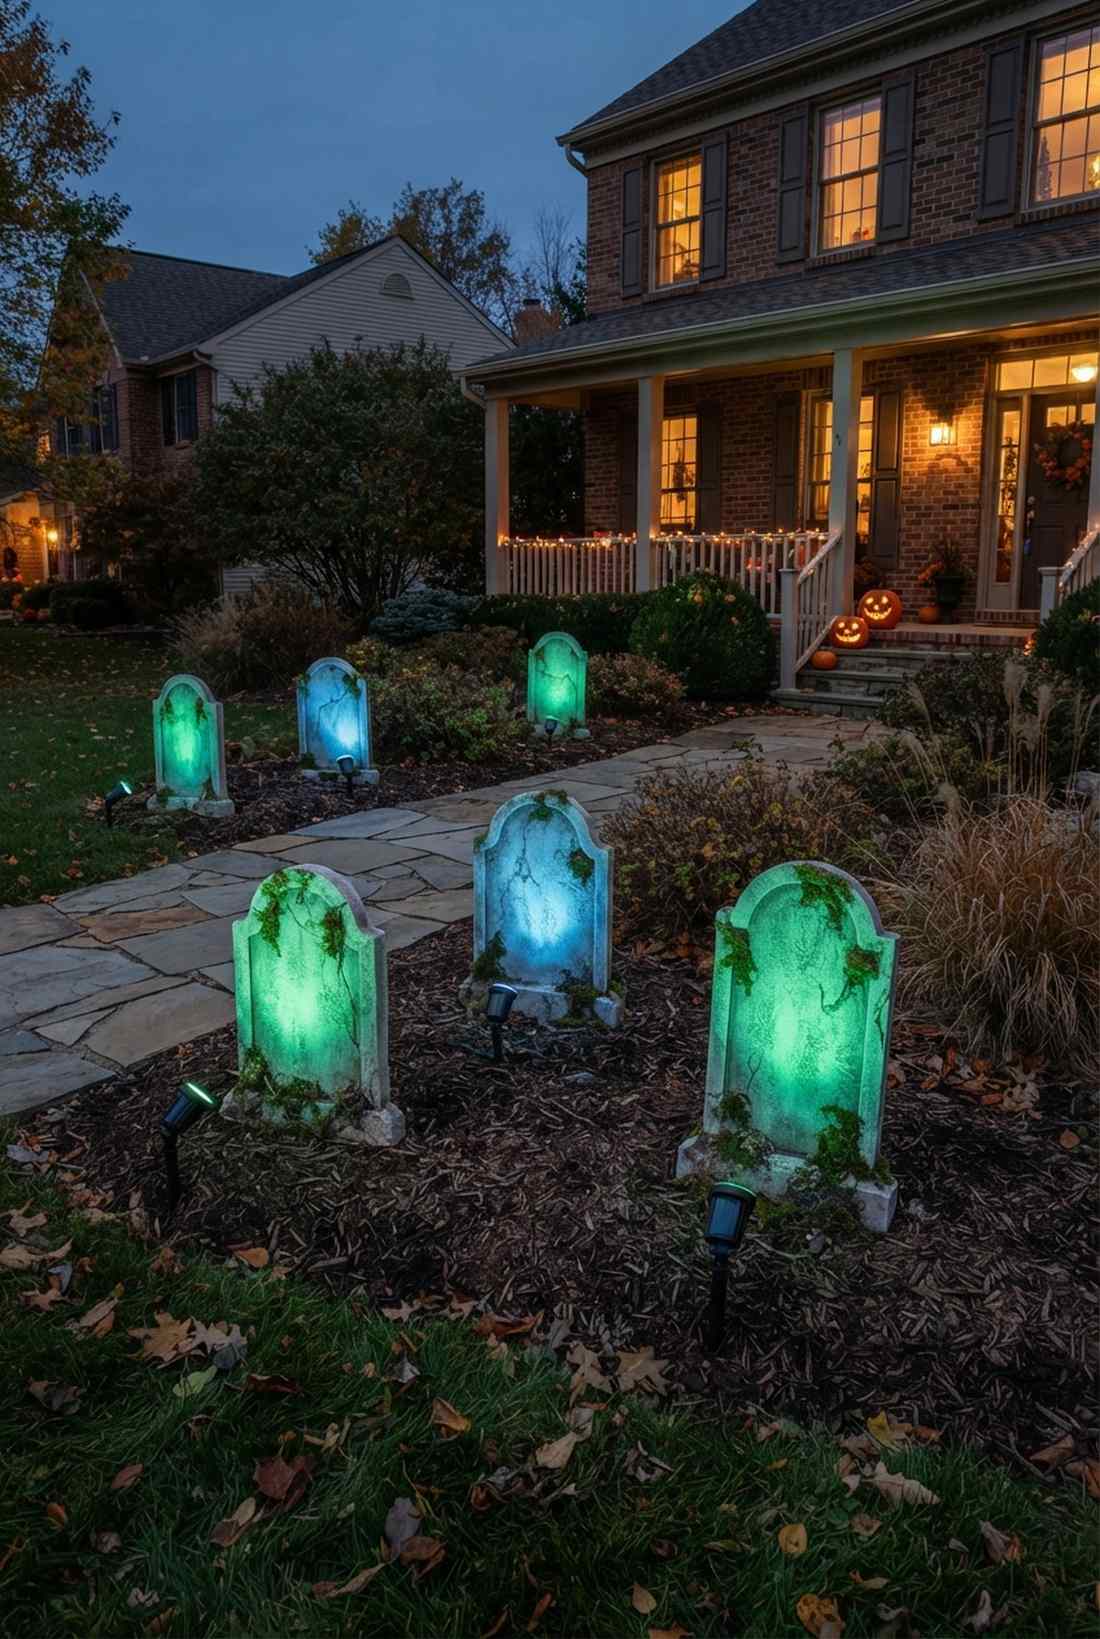
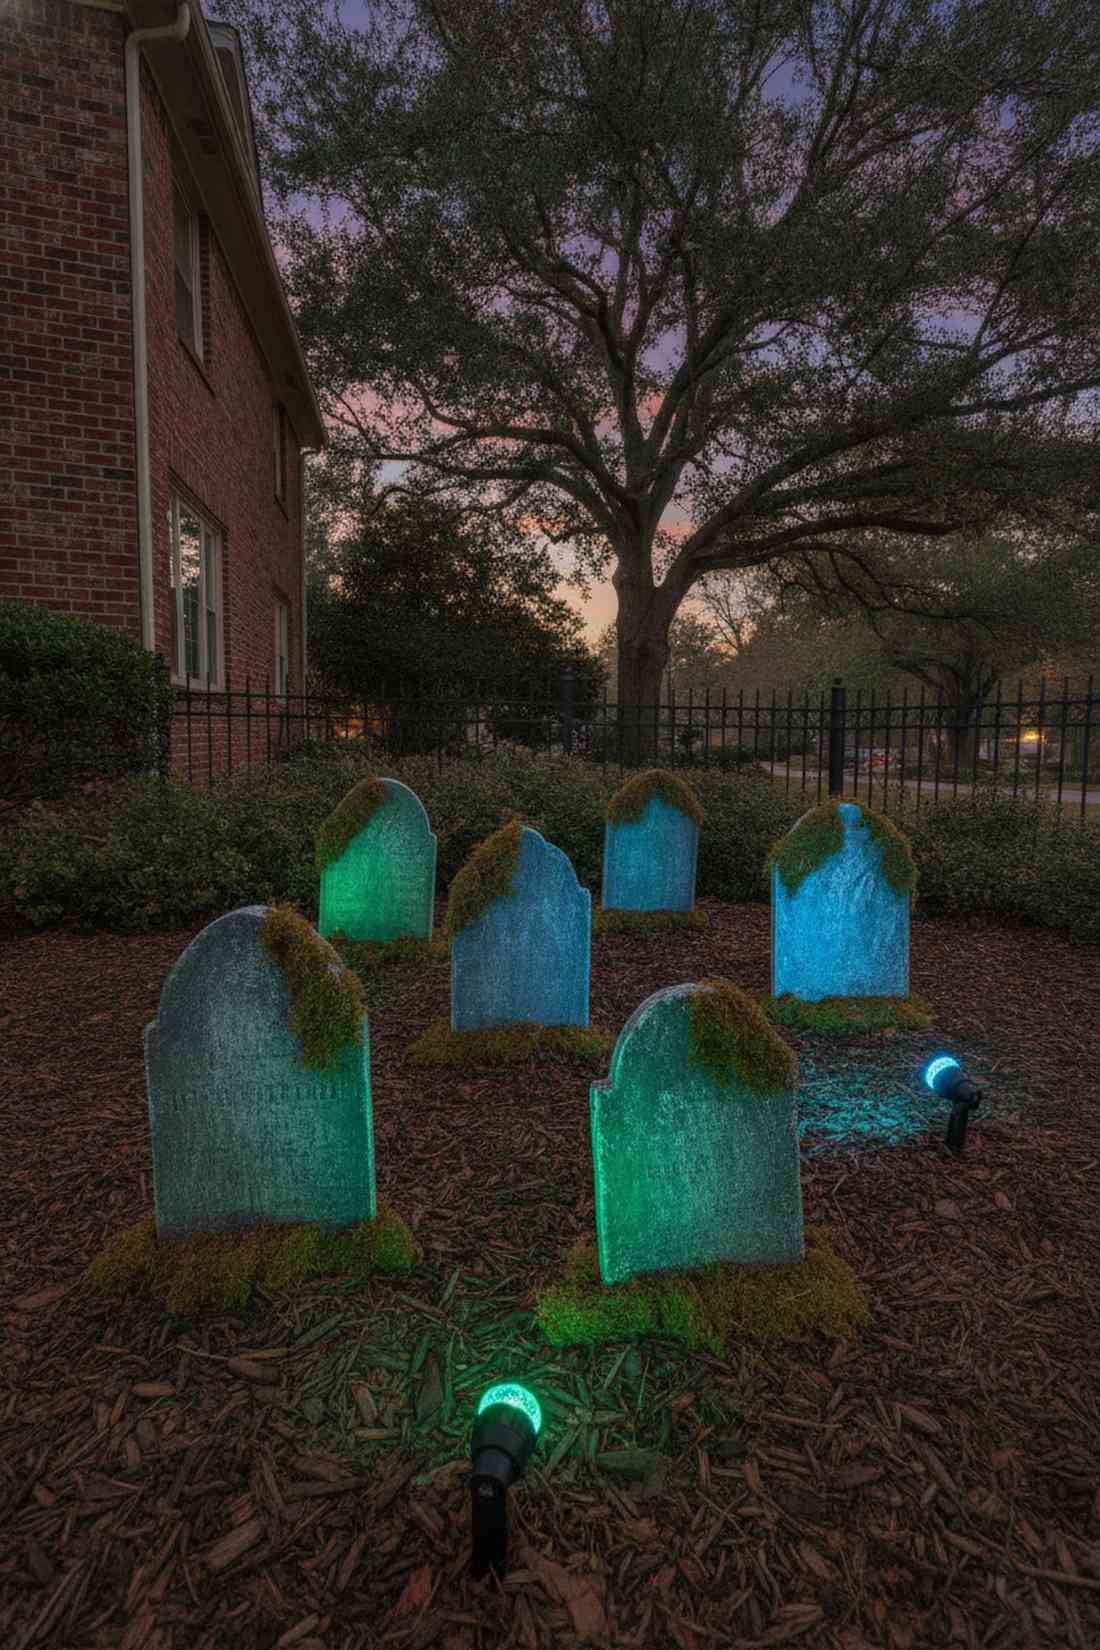
Creates that chilling, freshly dug cemetery aesthetic. Graveyard foam uplighting works flawlessly for tight front-yard mulch beds.
Flat overhead lighting ruins the illusion of depth, yet low-angle green and blue spots make cheap props look incredibly realistic. Using stakes with adjustable solar heads means zero tripping hazards from extension cords, delivering a clean, designer-level finish.
Pull this classic look off for as little as $25–$45.
- Key Materials: Mini solar spotlights, foam tombstones, fake moss
- Vibe / Style: Classic gothic cemetery
- Difficulty: Easy staging
- Budget Breakdown: Solar Lights: $30 | Moss: $10
- Creator’s Tip: Brush real dirt over the base of the foam tombstone to blend it perfectly with the illuminated shadow.
- Smart Sourcing: miniature solar uplights (bulk pack) and pre-cut preserved moss sheets.
💡 Must-Have Supplies for High-End Setups
To build these setups faster and ensure they last, skip the generic craft aisles and invest in the right foundational kits.
- Base & Support: Heavy-duty die-cast aluminum mounting stakes
- Setup Tools: Weather-sealed smart LED starter kits
- Weather/Durability Protection: IP66-rated silicone outdoor cord covers
10. Solar Lantern Graveyard Borders
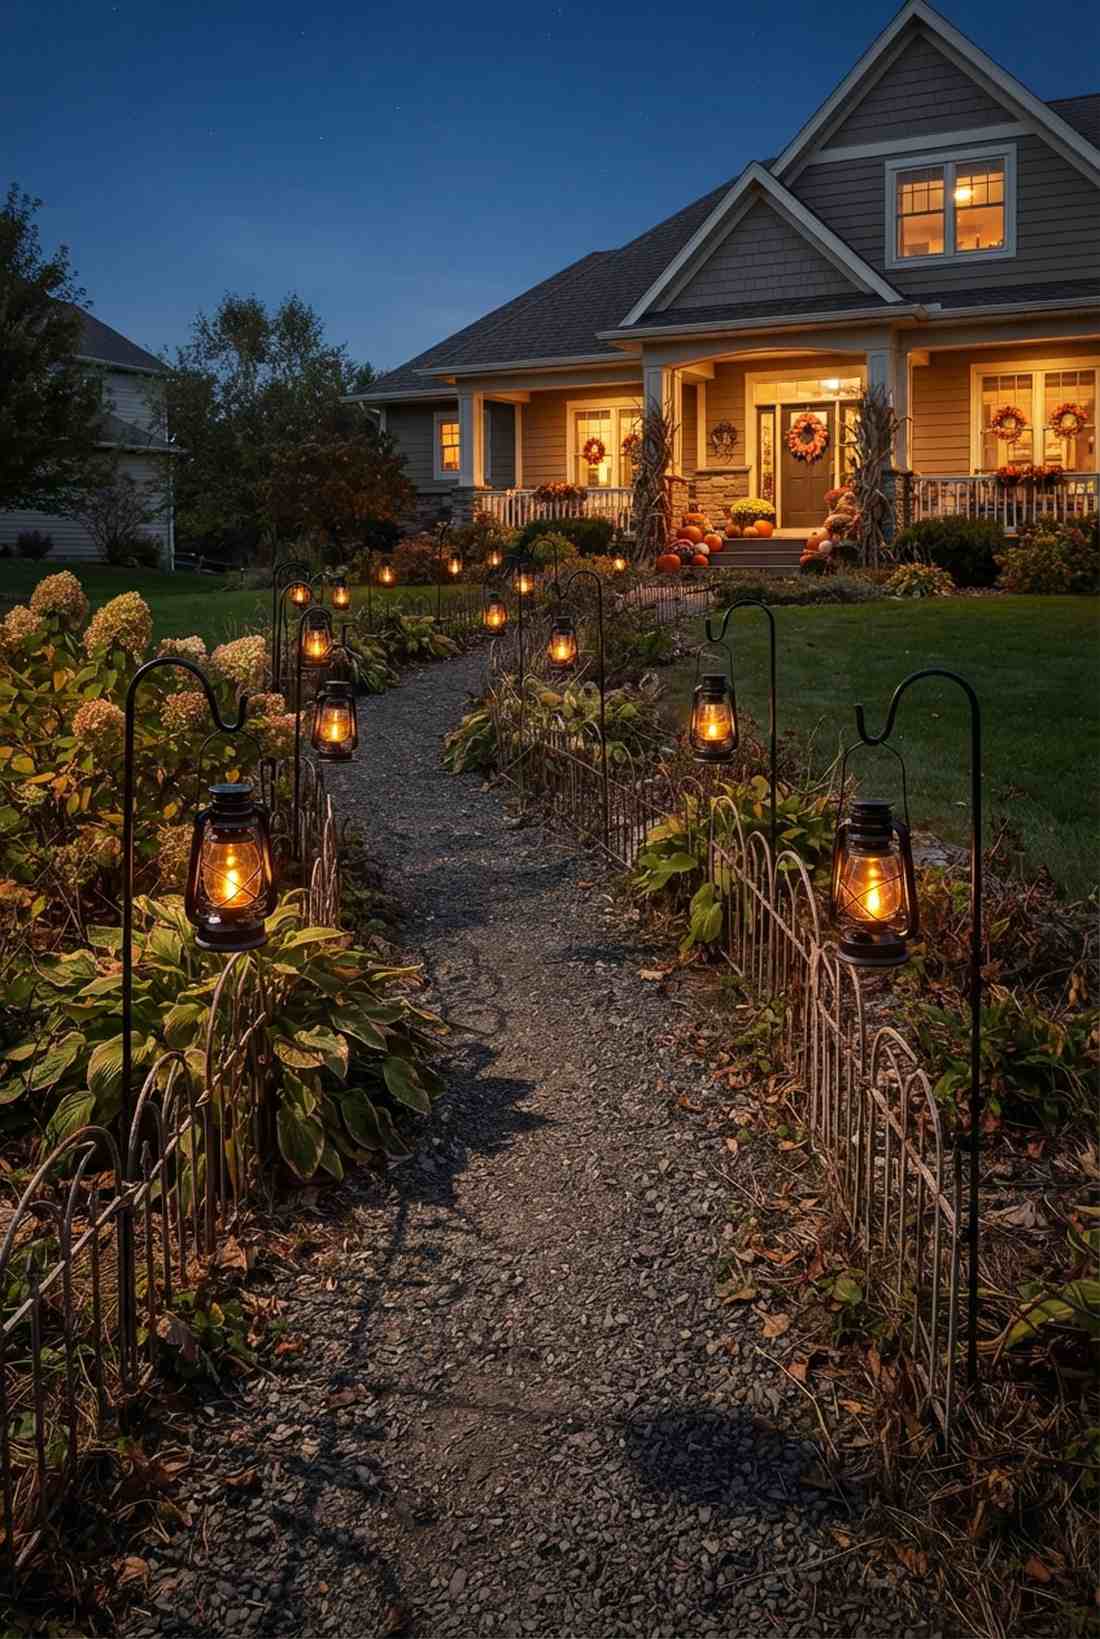
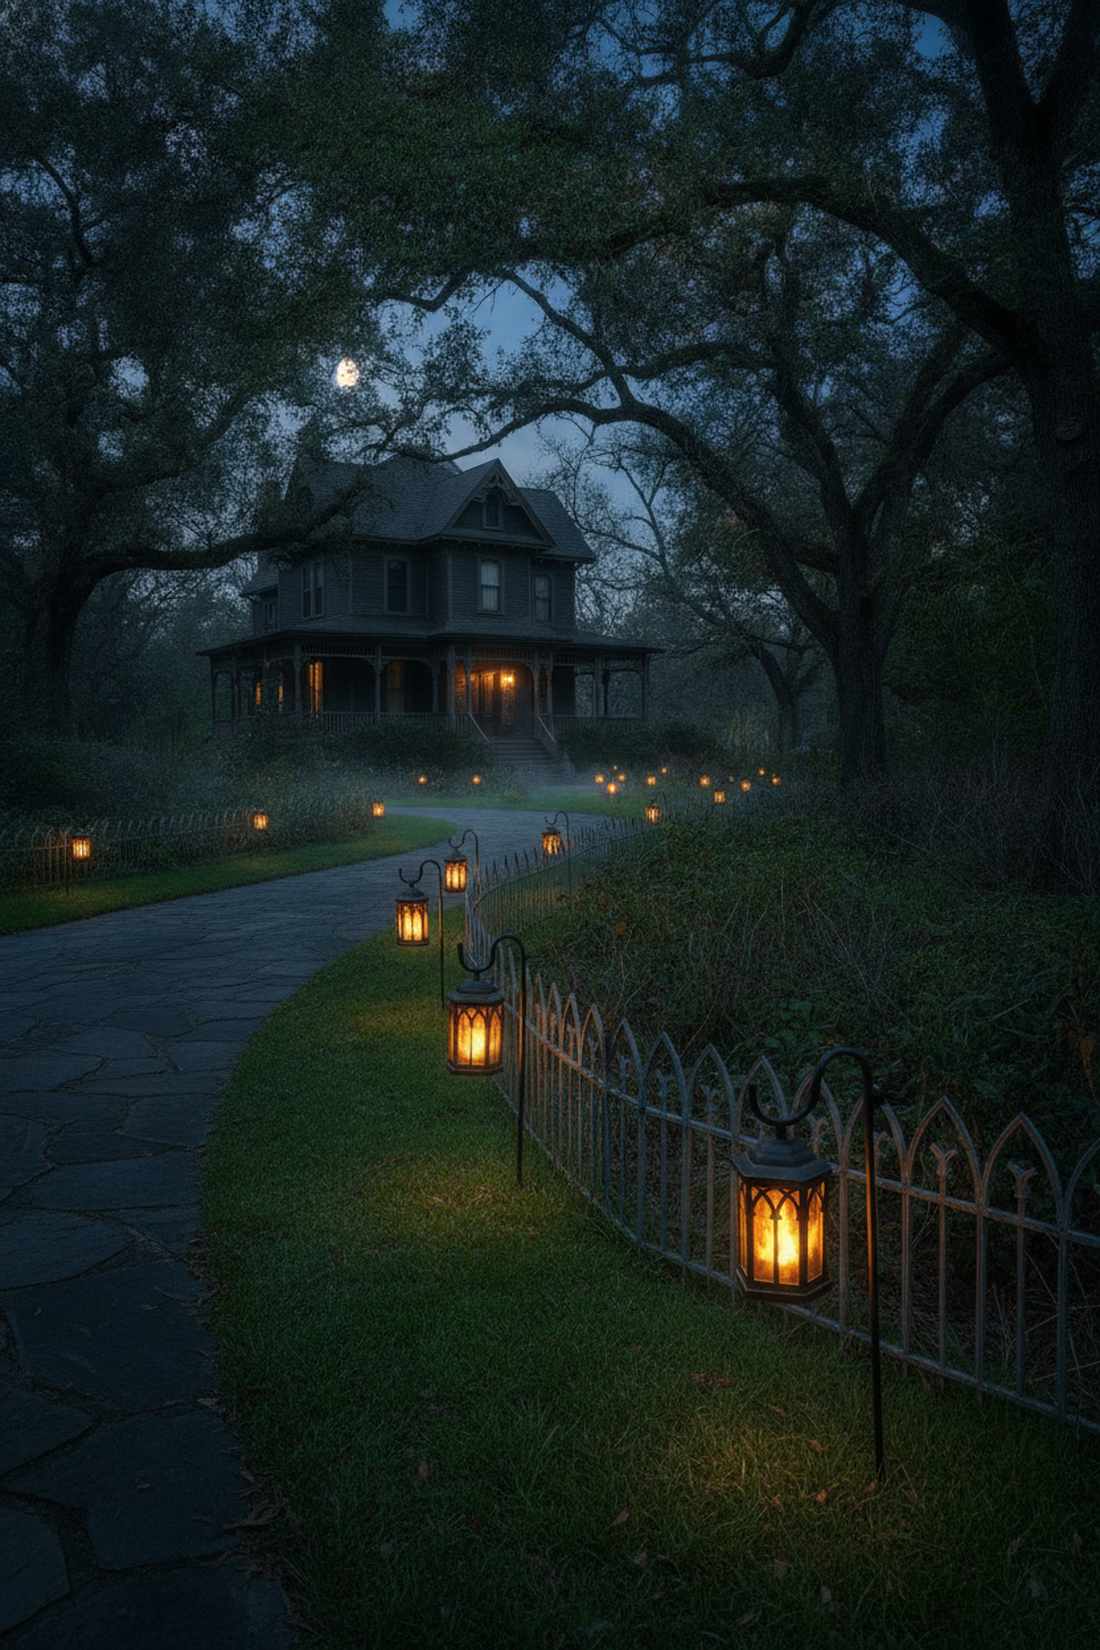
Evokes the quiet dread of a 19th-century burial ground. Flickering solar border lanterns are fantastic for lining dark residential sidewalks.
Modern bright-white LEDs instantly kill the vintage vibe, but amber flame-simulation bulbs deliver a surprisingly premium, antique look. Sourcing a bulk pack of weather-sealed pathway markers saves significant cash while ensuring consistent lighting across the property.
You can complete a long driveway border for $40–$75. Pin this if you want maximum impact with zero wiring.
- Key Materials: Shepherd hooks, solar flame lanterns, border fencing
- Vibe / Style: Antique haunted walkway
- Difficulty: Easy push-in setup
- Budget Breakdown: Lantern Set: $45 | Hooks: $20
- Creator’s Tip: Stagger the height of the shepherd hooks slightly to mimic the uneven, sinking ground of an old graveyard.
- Smart Sourcing: flickering solar lantern kits (bulk pack) and rust-resistant iron shepherd hooks.
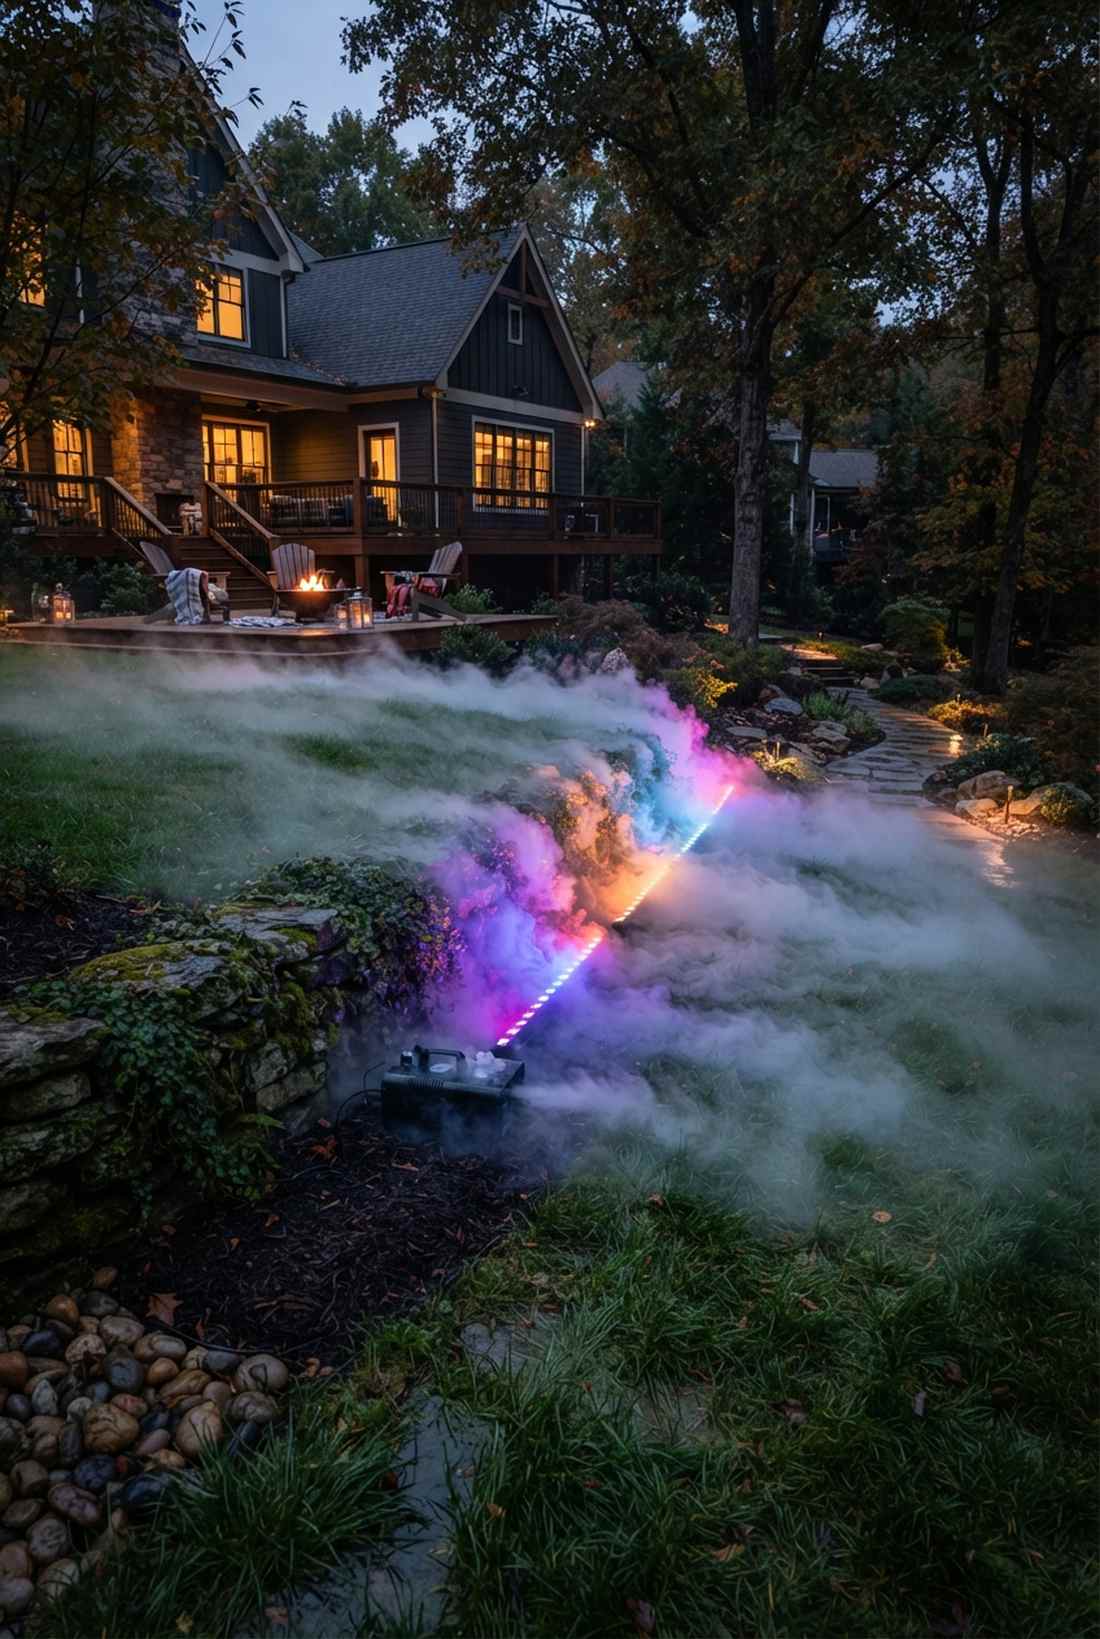
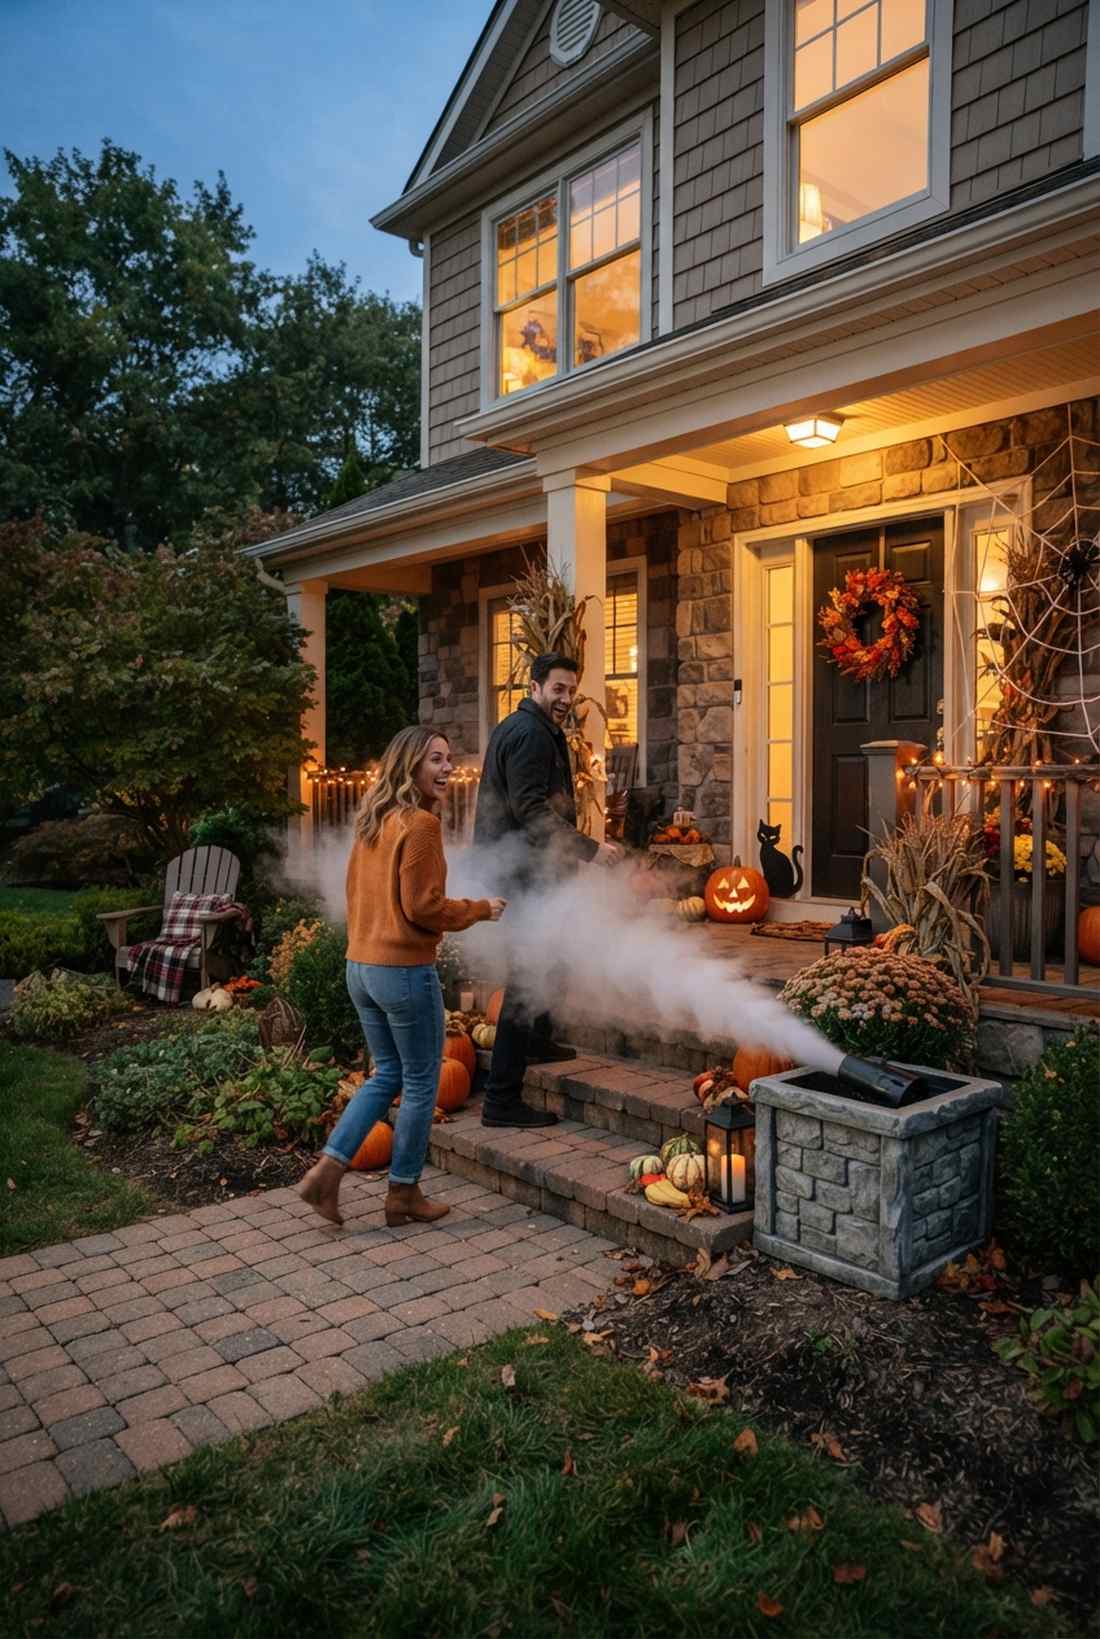
11. Fog Machine Integrated Walkway Lighting
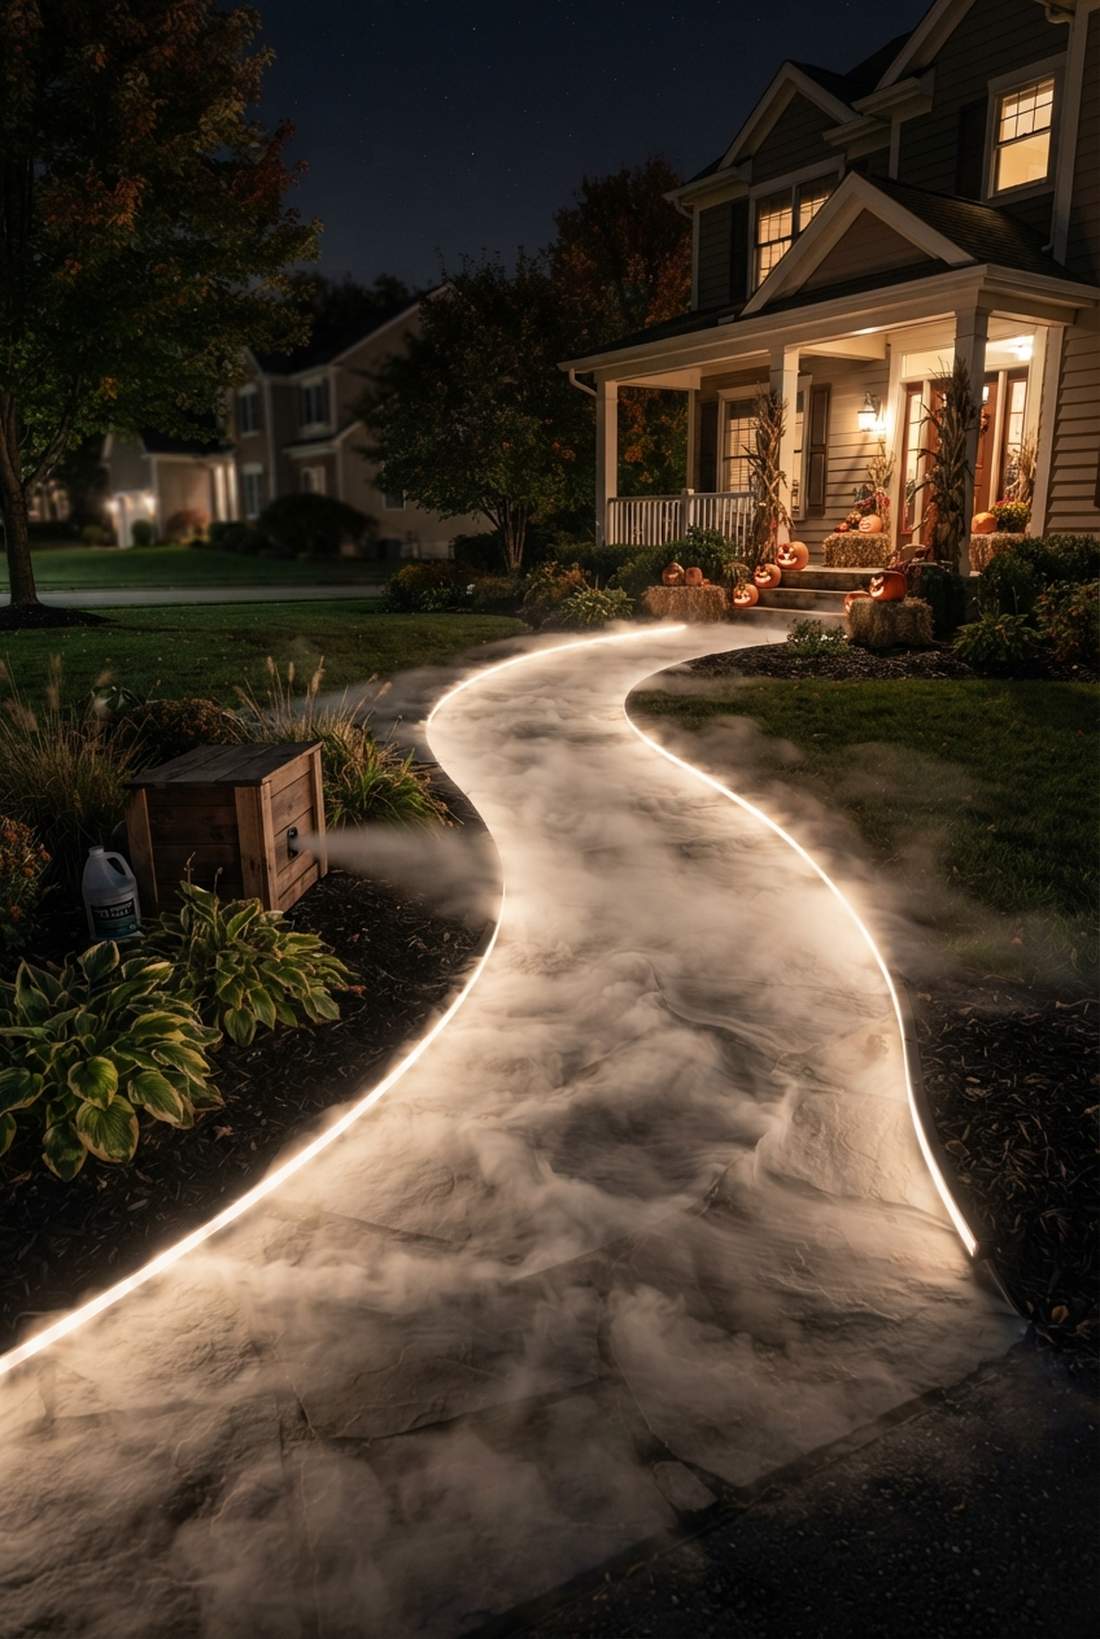
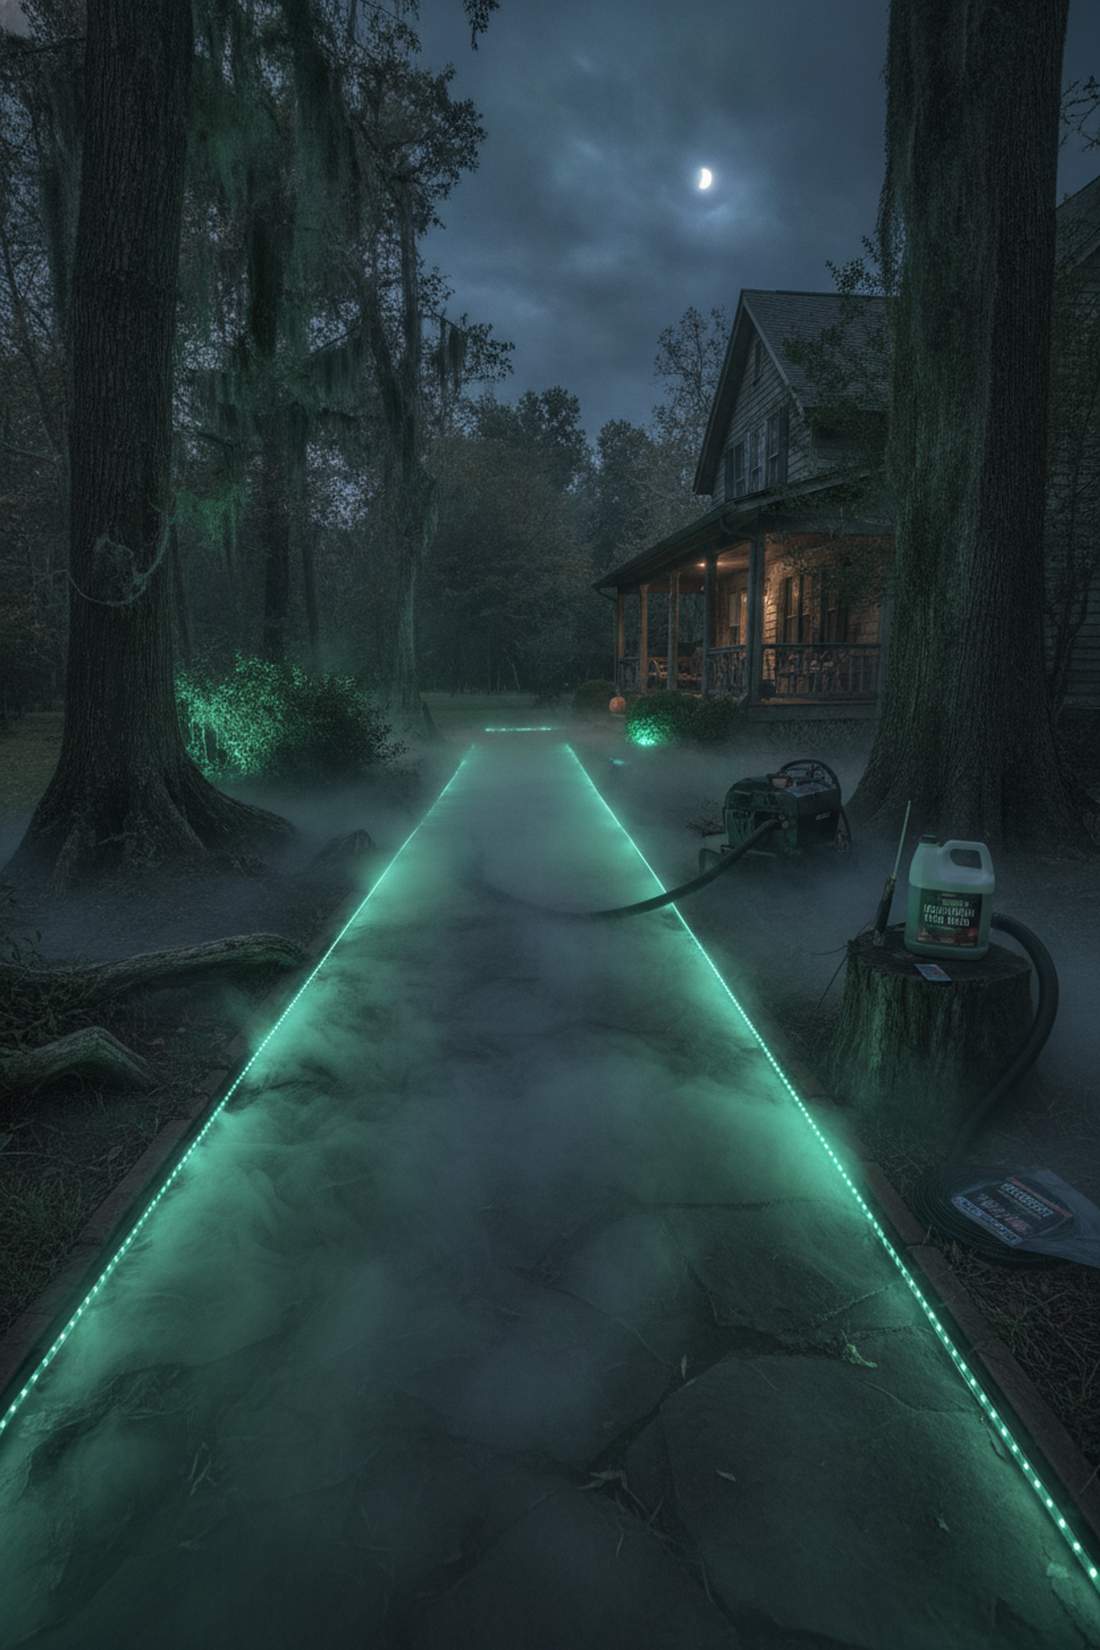
Feels like walking through an actively haunted swamp. Illuminated low-lying ground fog is the ultimate trick for enclosed entryway paths.
Standard fog just floats away instantly, but forcing it through an ice chiller while cross-lighting it with LEDs creates a dense, magical carpet. Grabbing a high-output fog machine with a timer remote ensures the mist stays thick all night without constant button mashing.
Setup costs hover around $80–$130 including the cooling rig.
- Key Materials: Fog machine, PVC ice chiller, low-profile LED strips
- Vibe / Style: Thick swampy dread
- Difficulty: Moderate plumbing DIY
- Budget Breakdown: Fogger: $60 | Chiller DIY: $30
- Creator’s Tip: Point the LED lights completely flat along the ground to highlight the ripples in the fog rather than the grass.
- Smart Sourcing: high-density outdoor fog fluid (gallon jug) and waterproof LED pathway strips.
12. Skeleton Crew Shadow Projection
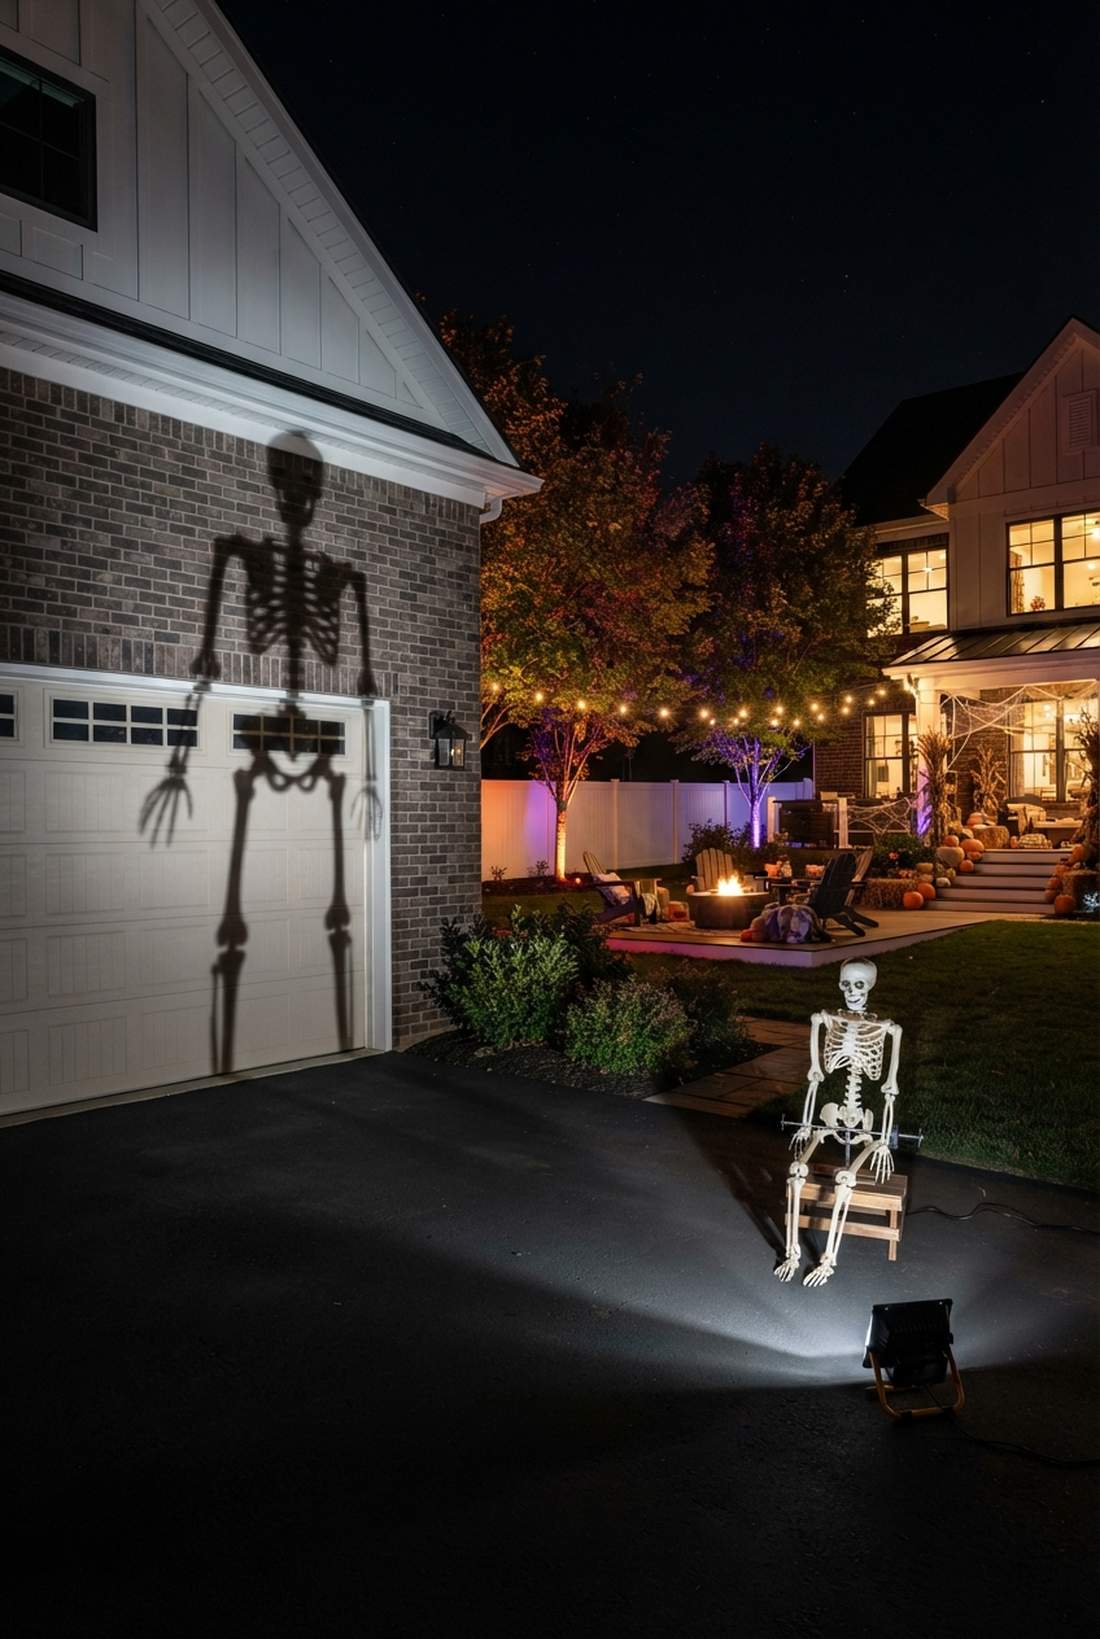
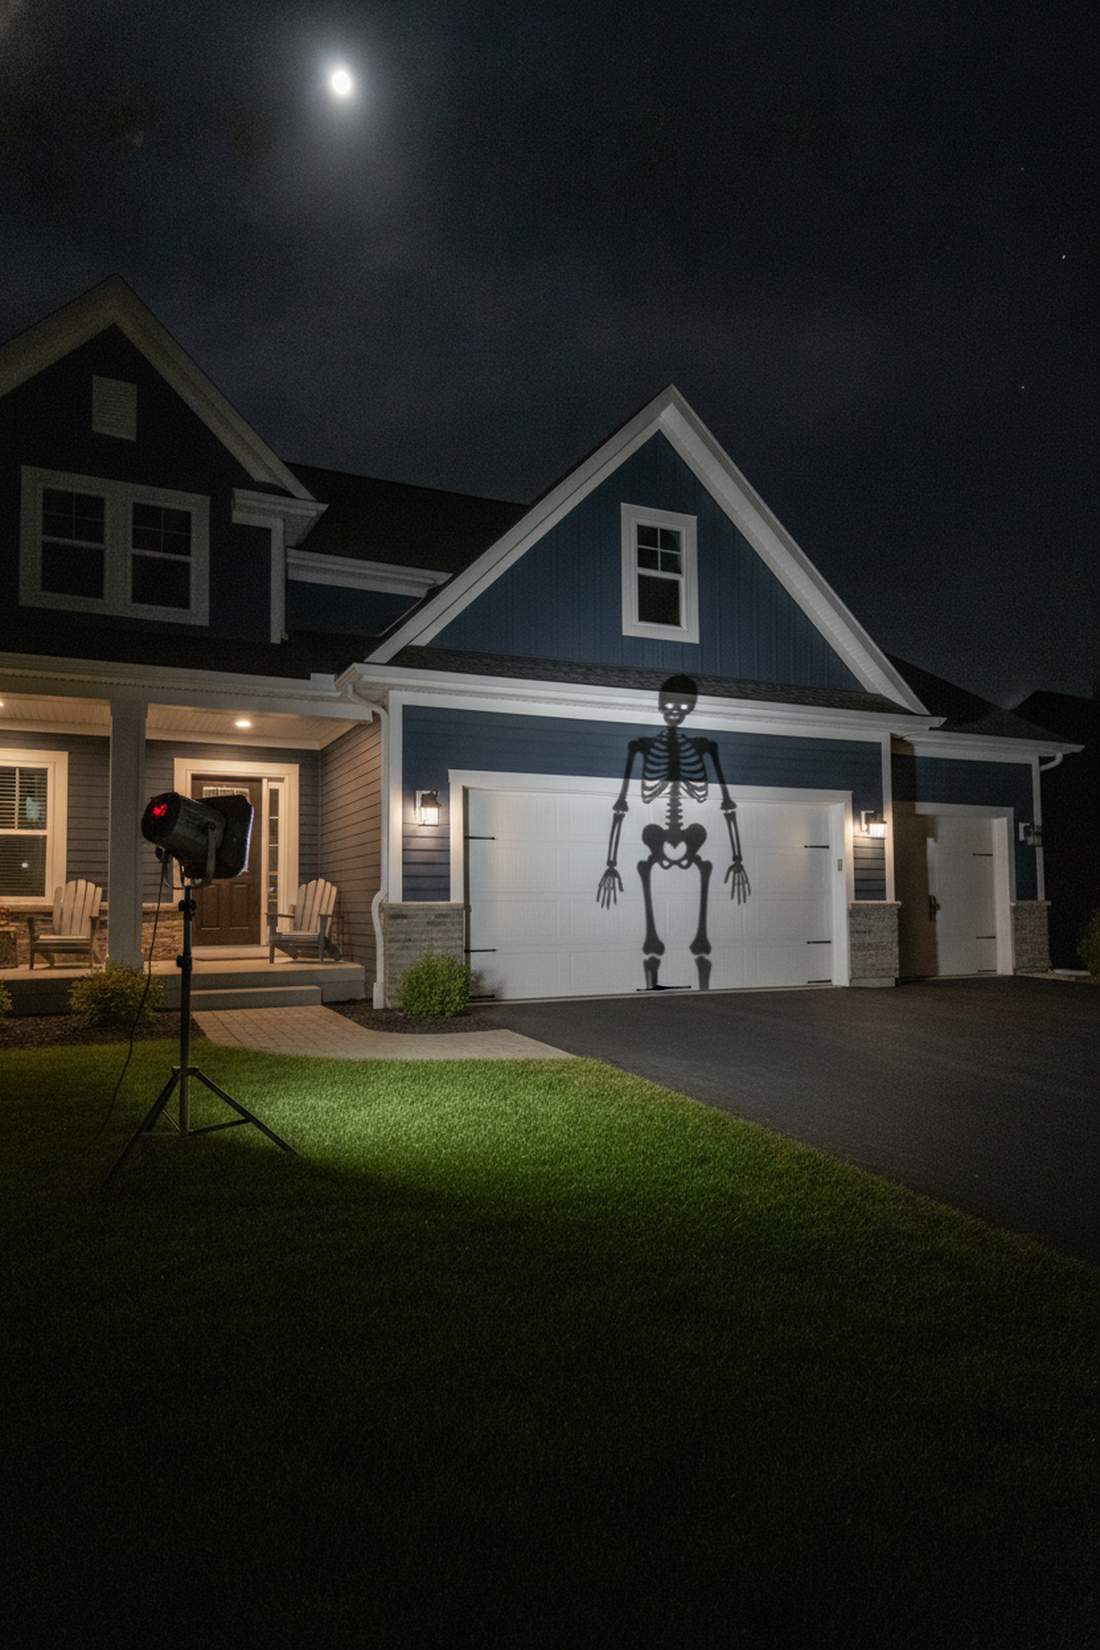
Throws towering, menacing figures across your architecture. Static shadow casting thrives when pointed at large blank garage doors or privacy fences.
Expensive animatronics break easily, yet casting a 15-foot shadow using a cheap plastic skeleton gives a designer-level finish. Integrating a slow-moving battery rotisserie motor makes the shadow giants sway menacingly in the background.
You can assemble this massive effect for just $15–$35.
- Key Materials: Halogen spotlight, plastic skeleton, rotating motor
- Vibe / Style: Looming gigantic threats
- Difficulty: Moderate alignment
- Budget Breakdown: Spotlight: $20 | Prop: $15
- Creator’s Tip: The closer the skeleton is to the light source, the larger and more intimidating the projected shadow becomes.
- Smart Sourcing: heavy-duty halogen work lights and battery-operated spinner motors.
If you think those shadows were intense, wait until you see the absolute visual chaos of this next floating setup…
Outdoor Lighting Unique Installations
Innovative outdoor lighting unique designs move beyond conventional applications to create memorable visual surprises that distinguish your display from neighborhood competitors. These installations combine unexpected materials, placements, or effects.
13. Floating Ghost Fabric Backlighting
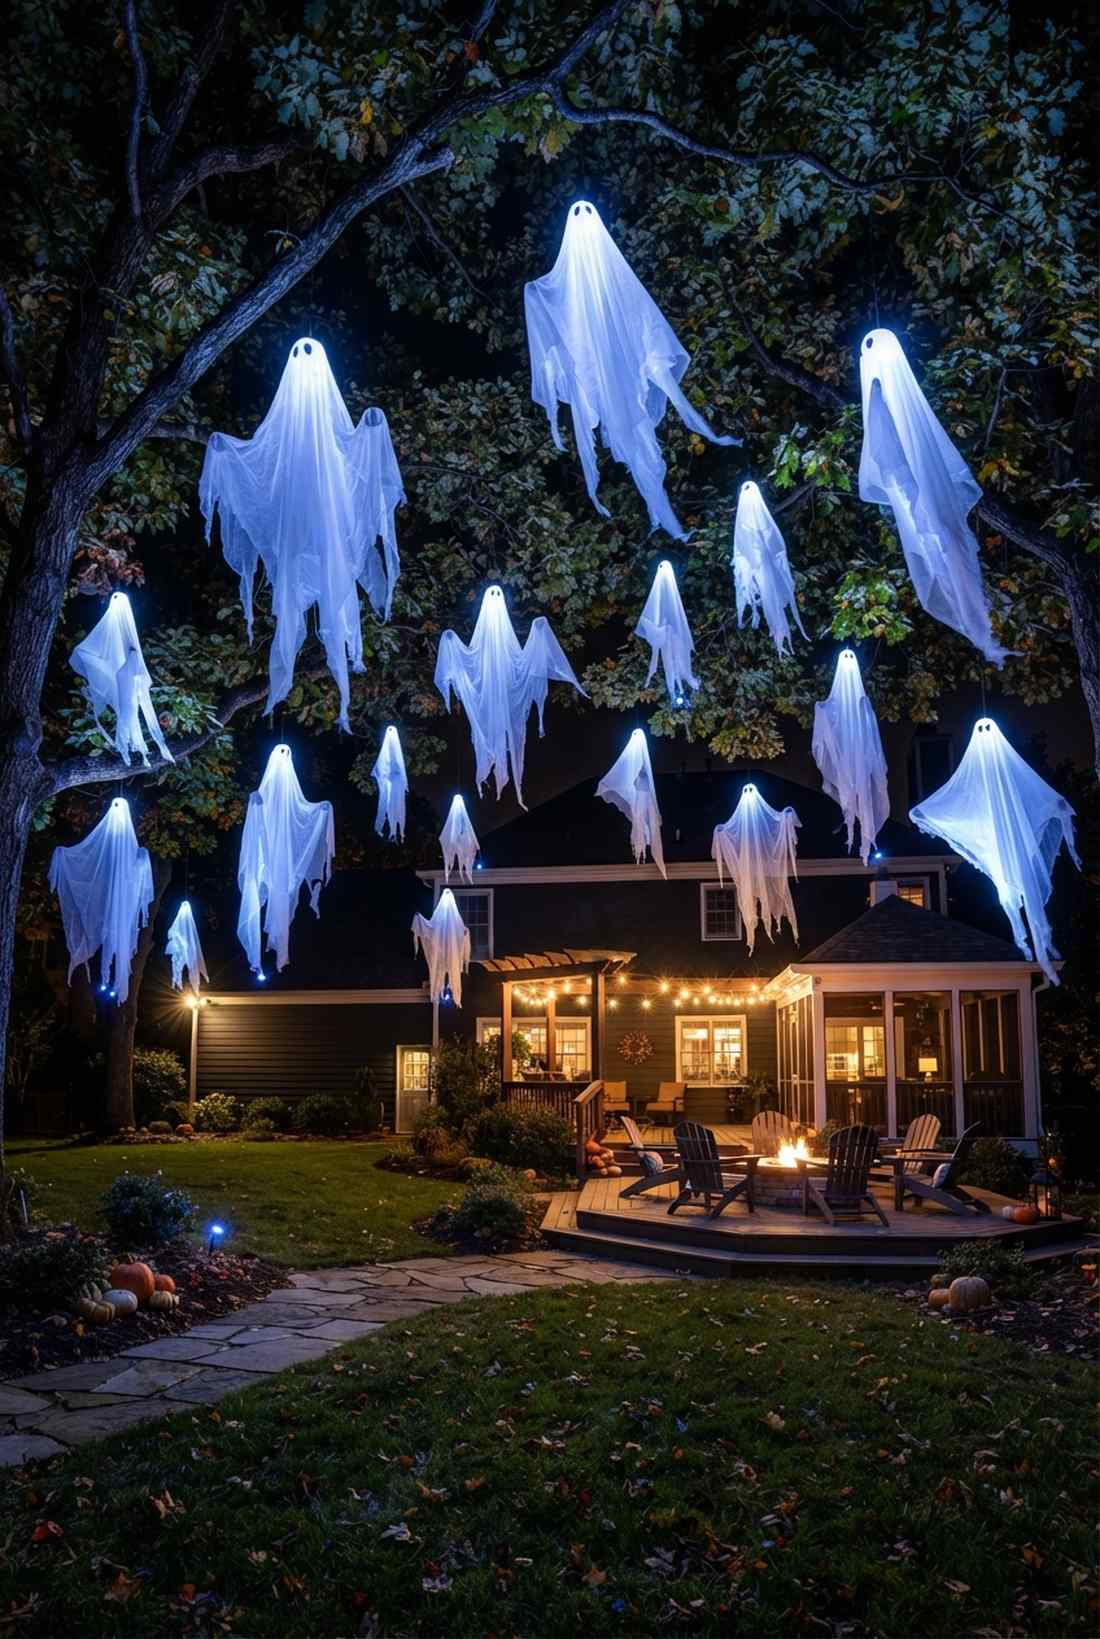
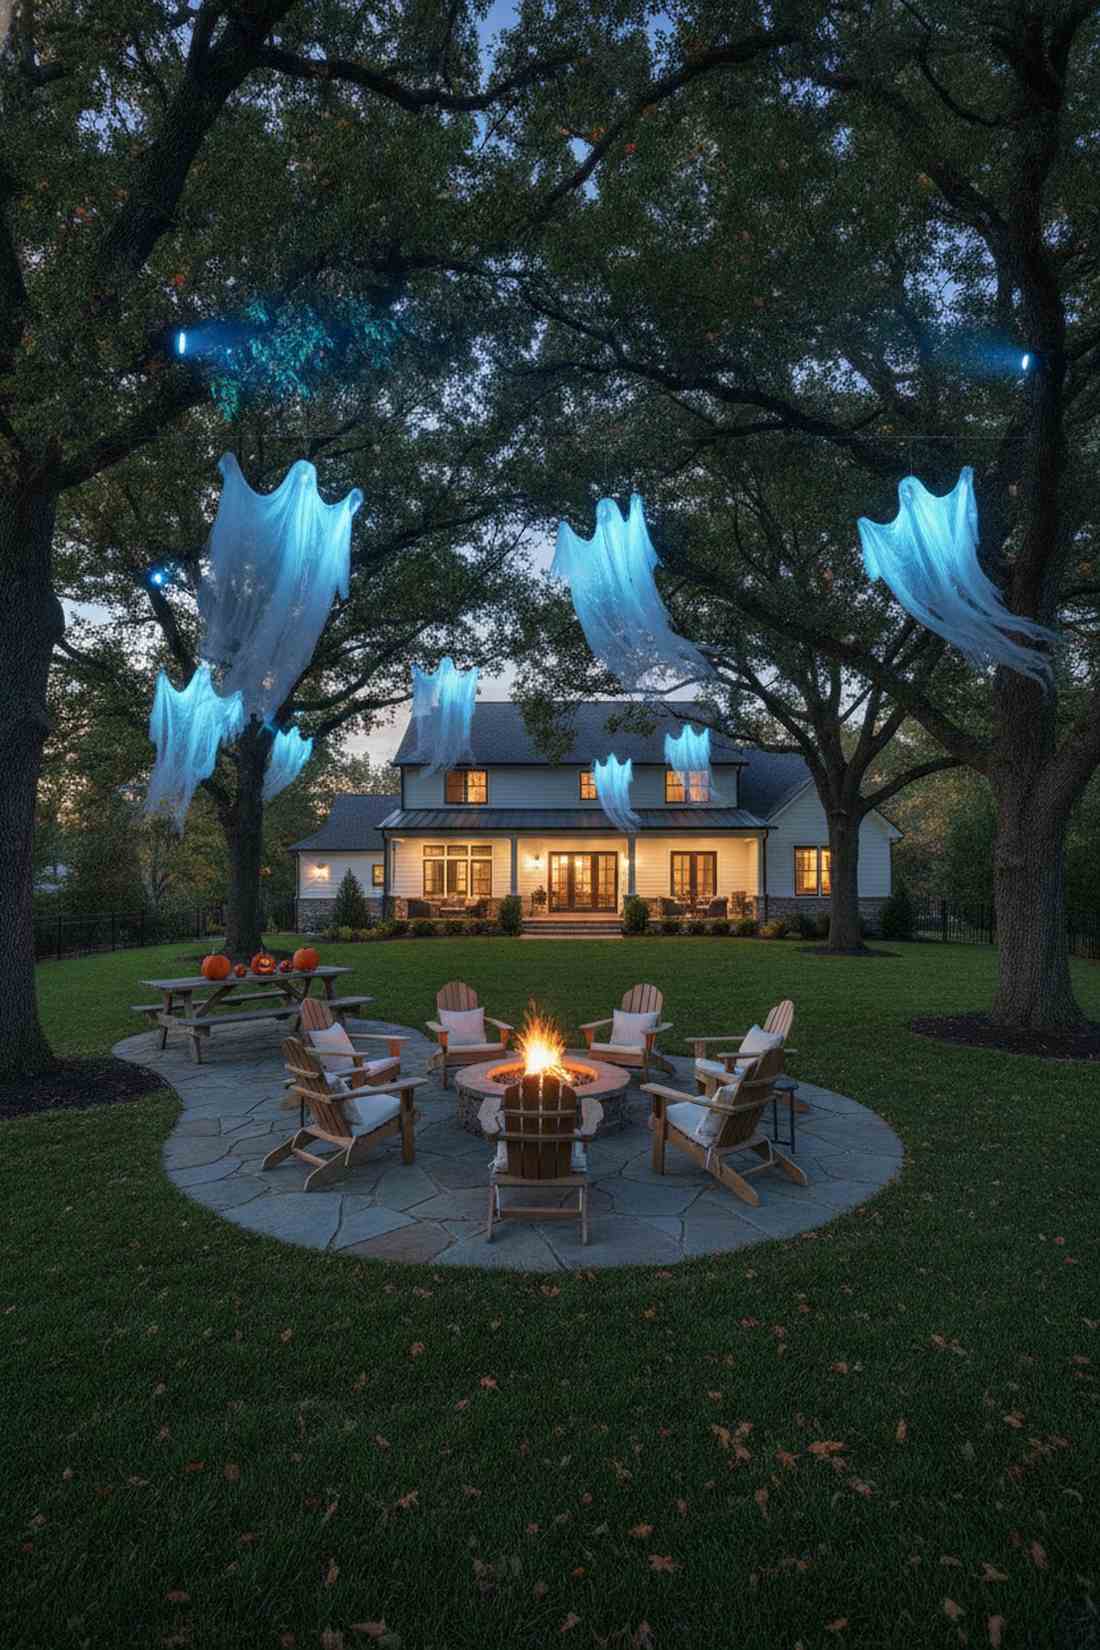
Looks like trapped souls hovering above your lawn. Backlit ethereal fabric hanging is absolutely perfect for properties with dense, mature tree canopies.
Tying trash bags to trees looks sloppy, but illuminating UV-reactive cheesecloth with pinpoint spotlights creates a genuinely terrifying optical illusion. Using ultra-lightweight sheer drapes ensures they catch even the slightest autumn breeze to mimic flight.
This cinematic illusion costs roughly $20–$40 to complete. Save this to your spooky yard inspiration board!
- Key Materials: UV cheesecloth, fishing line, mini blue spotlights
- Vibe / Style: Restless floating spirits
- Difficulty: Easy ladder rigging
- Budget Breakdown: Fabric: $15 | Spotlights: $20
- Creator’s Tip: Soak the cheesecloth in fabric whitener containing optical brighteners before hanging to make it explode under blue light.
- Smart Sourcing: pre-cut sheer ghost drapery and high-tension invisible fishing line.
14. Witch Cauldron with Bubbling LED Effects
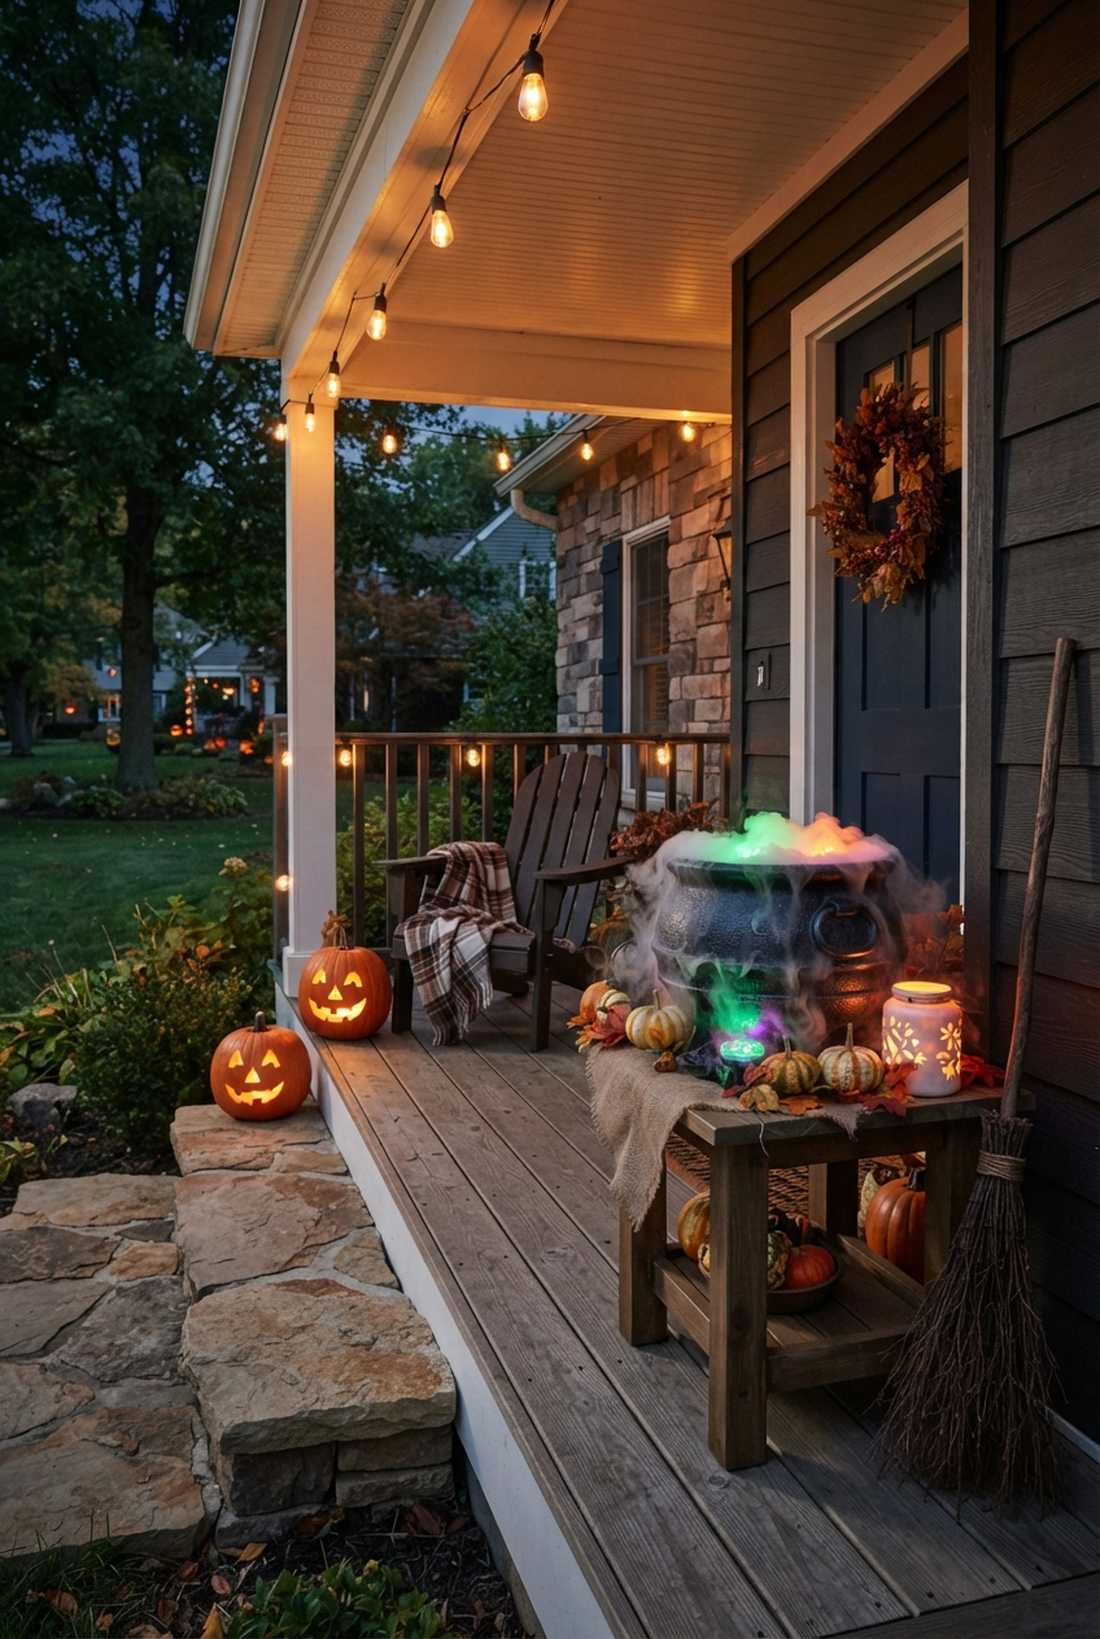
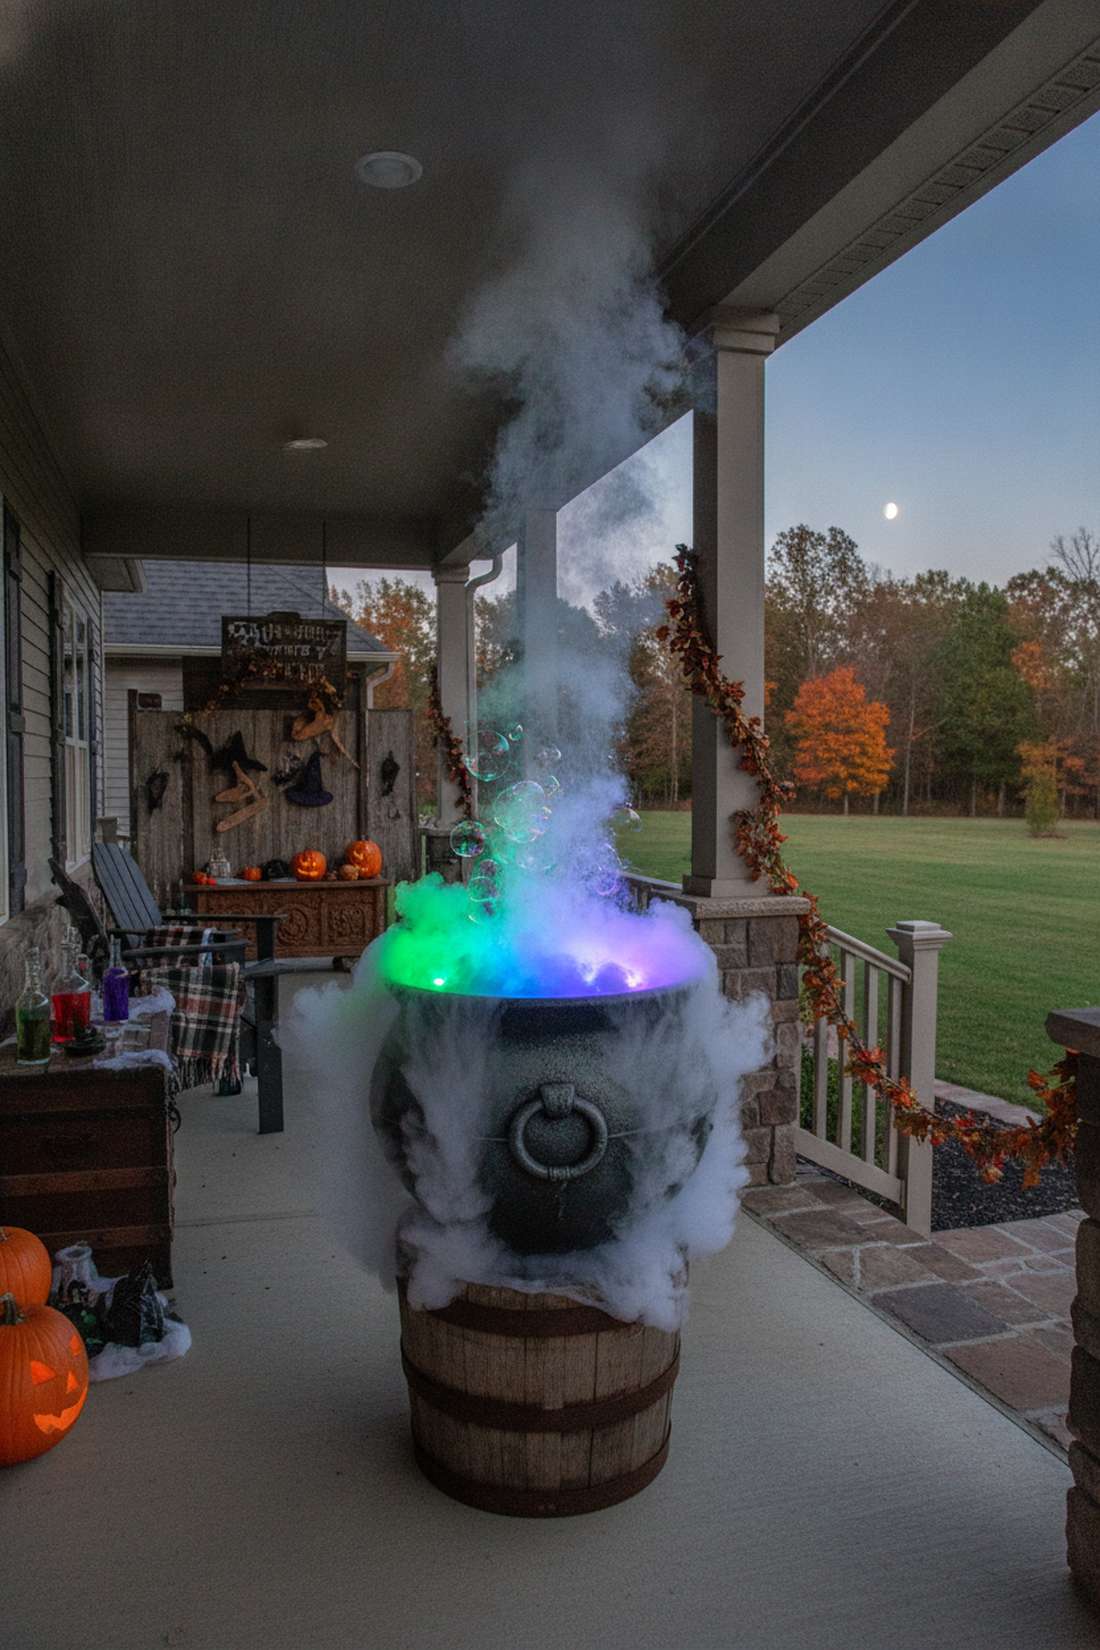
Bubbles with toxic, eye-catching energy that kids love. A glowing dry ice cauldron serves as a brilliant focal point for covered front porches.
Plain plastic cauldrons blend into the darkness, whereas stuffing them with waterproof RGB pucks and dry ice forces a vibrant, overflowing glow. Snagging a heavy-duty resin kettle prevents cracking when the freezing dry ice hits the warm water.
Pulling off this bubbling centerpiece runs about $35–$60.
- Key Materials: Resin cauldron, submersible LEDs, dry ice bucket
- Vibe / Style: Magical potion station
- Difficulty: Easy assembly
- Budget Breakdown: Cauldron: $30 | LED Pucks: $20
- Creator’s Tip: Use a smaller plastic bucket inside the large cauldron to hold the dry ice, saving you from buying excessive amounts of ice.
- Smart Sourcing: submersible remote-control LED pucks (bulk pack) and UV-coated resin cauldron kits.
15. Haunted Tree Spiral Wrapping
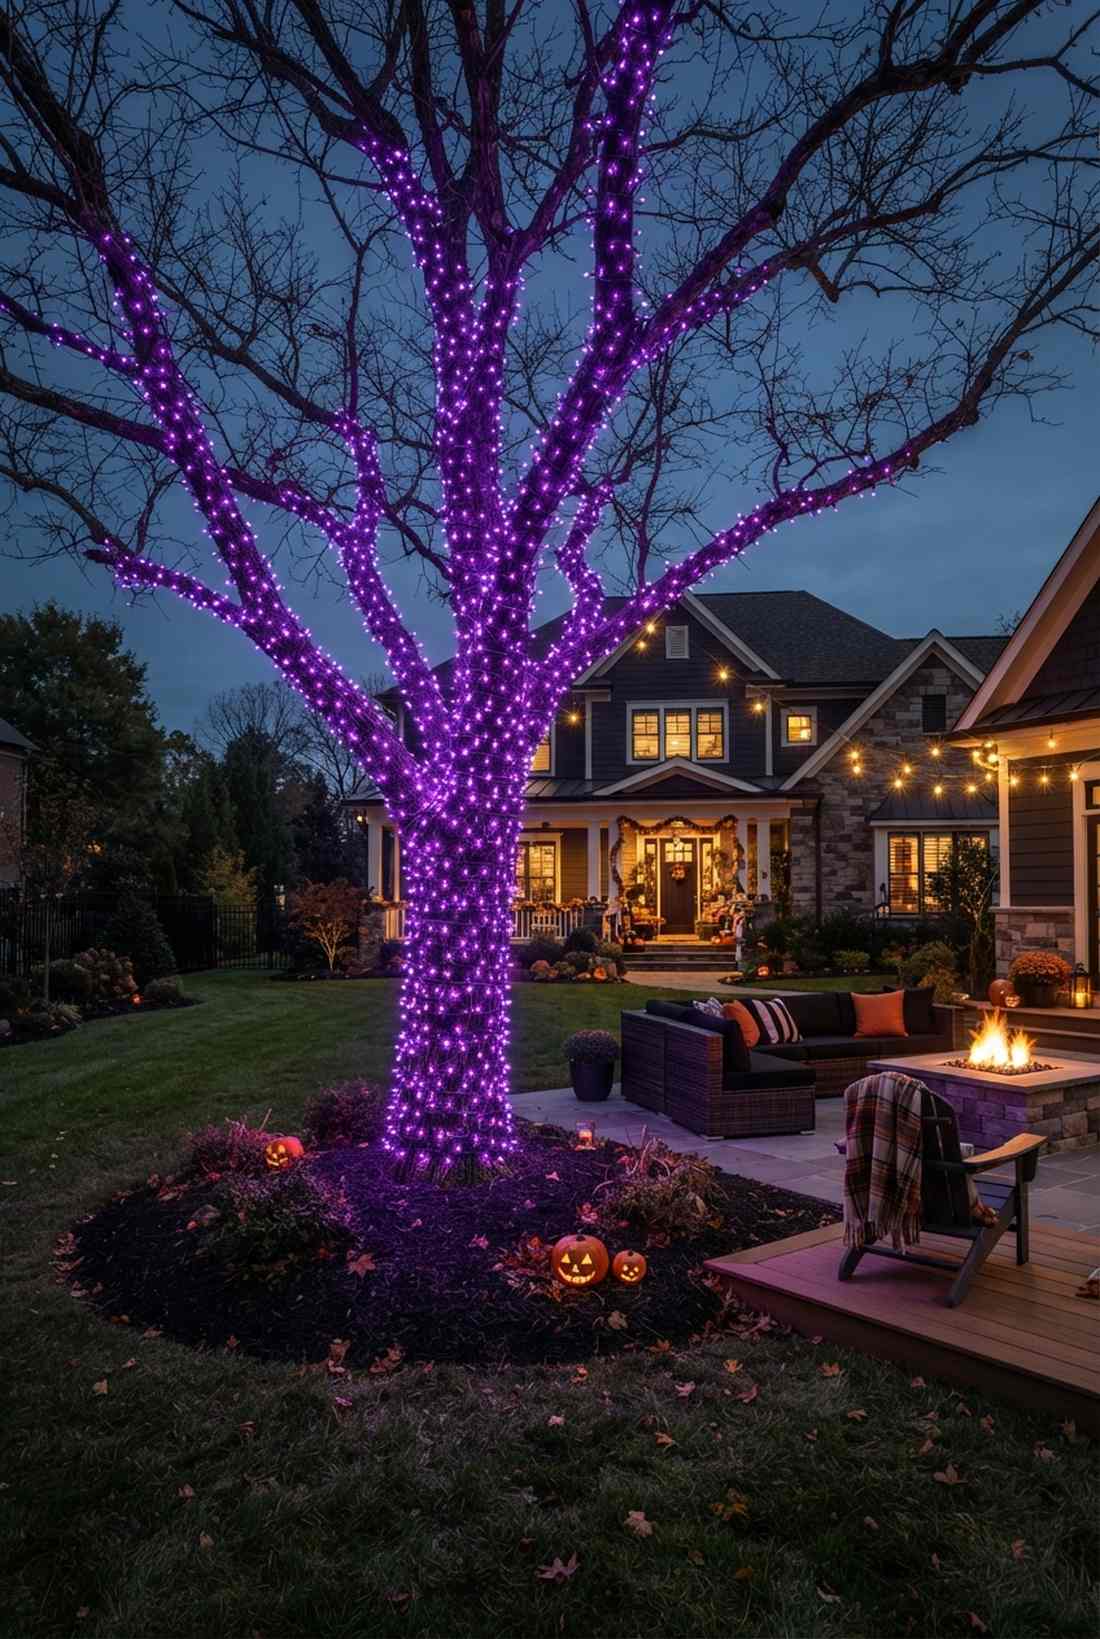
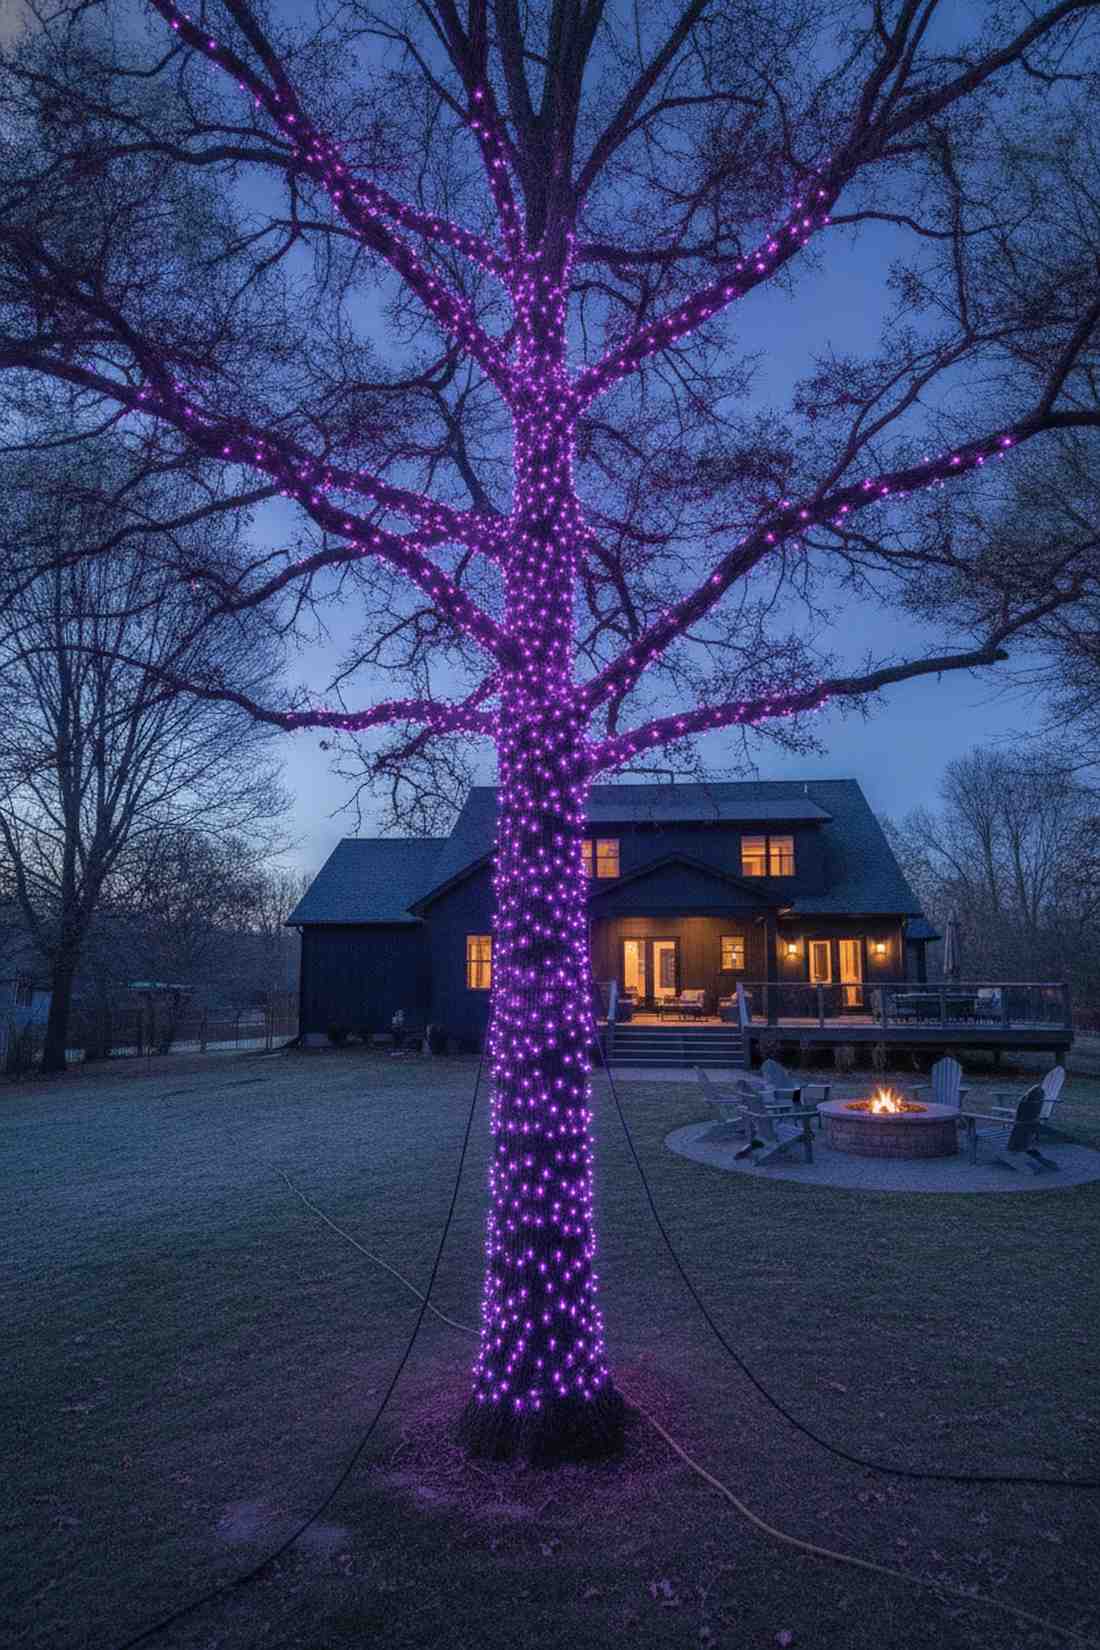
Transforms ordinary oak trees into twisted, glowing columns. Vertical branch spiral wrapping works exceptionally well for bare, leafless winter trees.
Randomly tossing lights into bushes is a lazy habit; conversely, tightly coiling commercial-grade purple strands emphasizes the natural, creepy structure of the bark. Investing in UV-coated wire strings ensures they won’t fade or snap in harsh weather.
Expect to spend $40–$90 depending on tree height.
- Key Materials: Commercial-grade mini LEDs, zip ties, outdoor extension cords
- Vibe / Style: Twisted glowing woods
- Difficulty: Moderate ladder wrapping
- Budget Breakdown: LED Strings: $60 | Zip Ties: $10
- Creator’s Tip: Wrap branches all the way out to the thin tips to make the tree look like glowing, reaching fingers.
- Smart Sourcing: commercial-grade purple LED spools (bulk pack) and UV-resistant black zip ties.
16. Glowing Pumpkin Pathway Markers
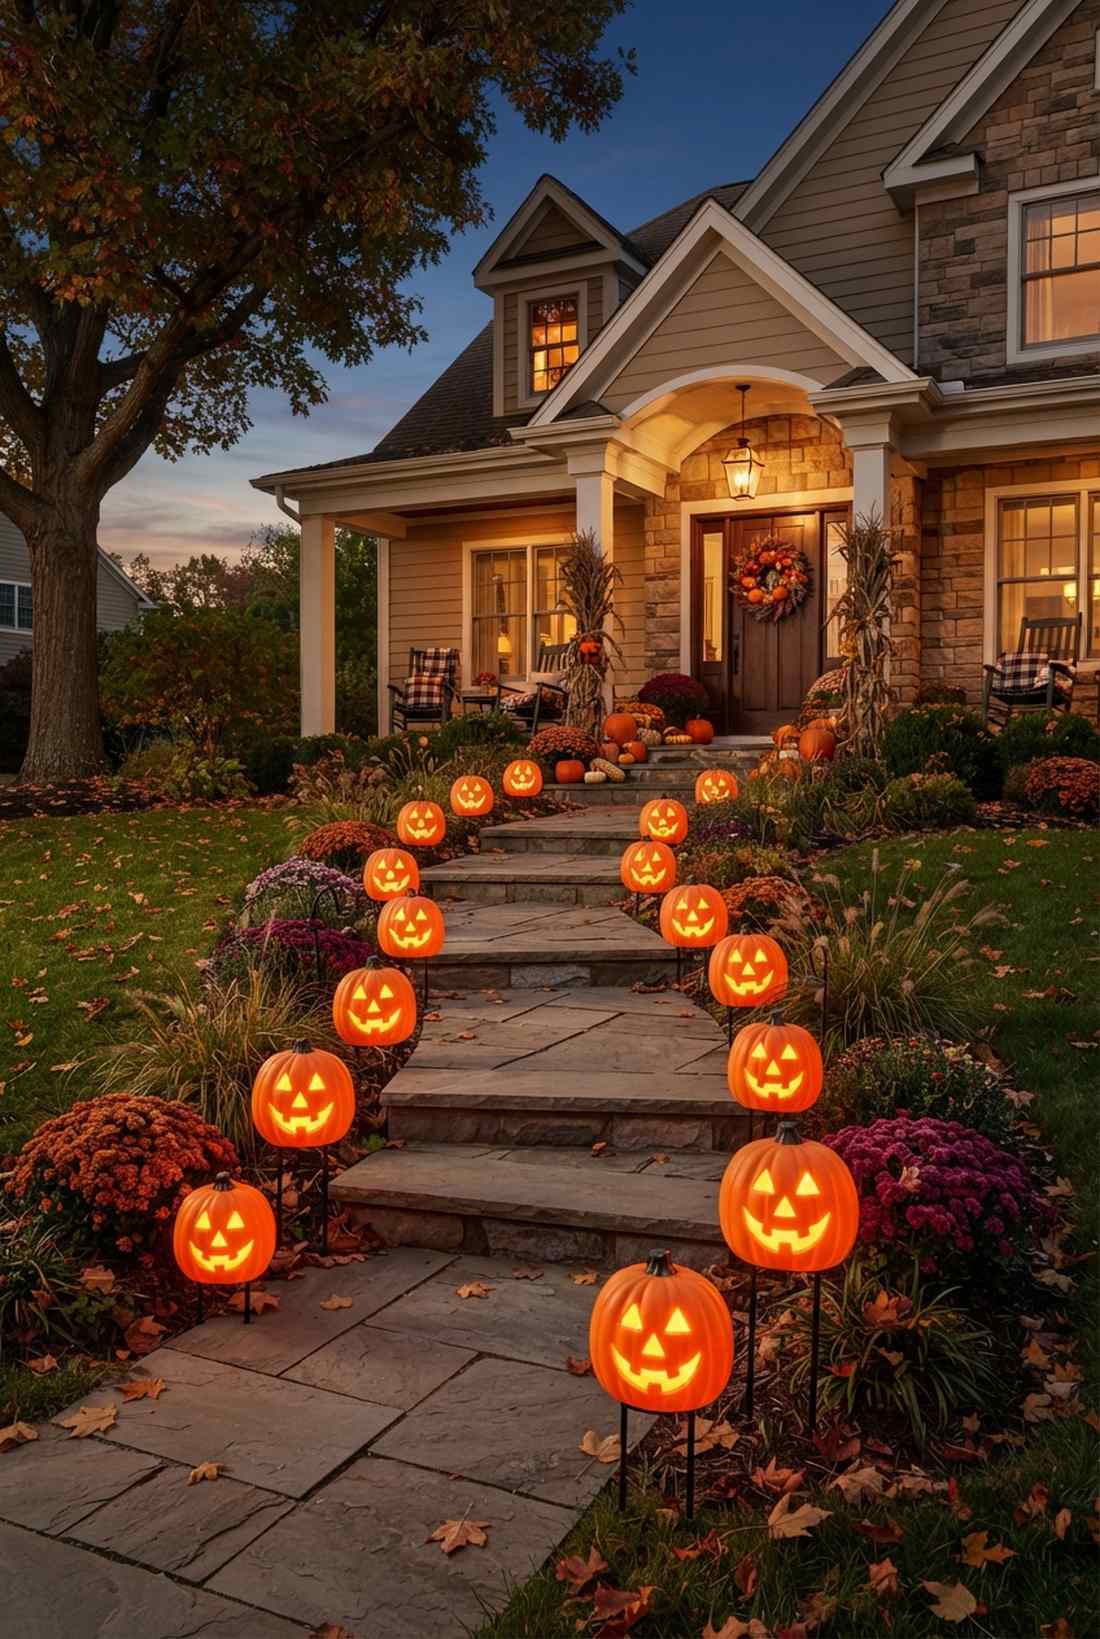
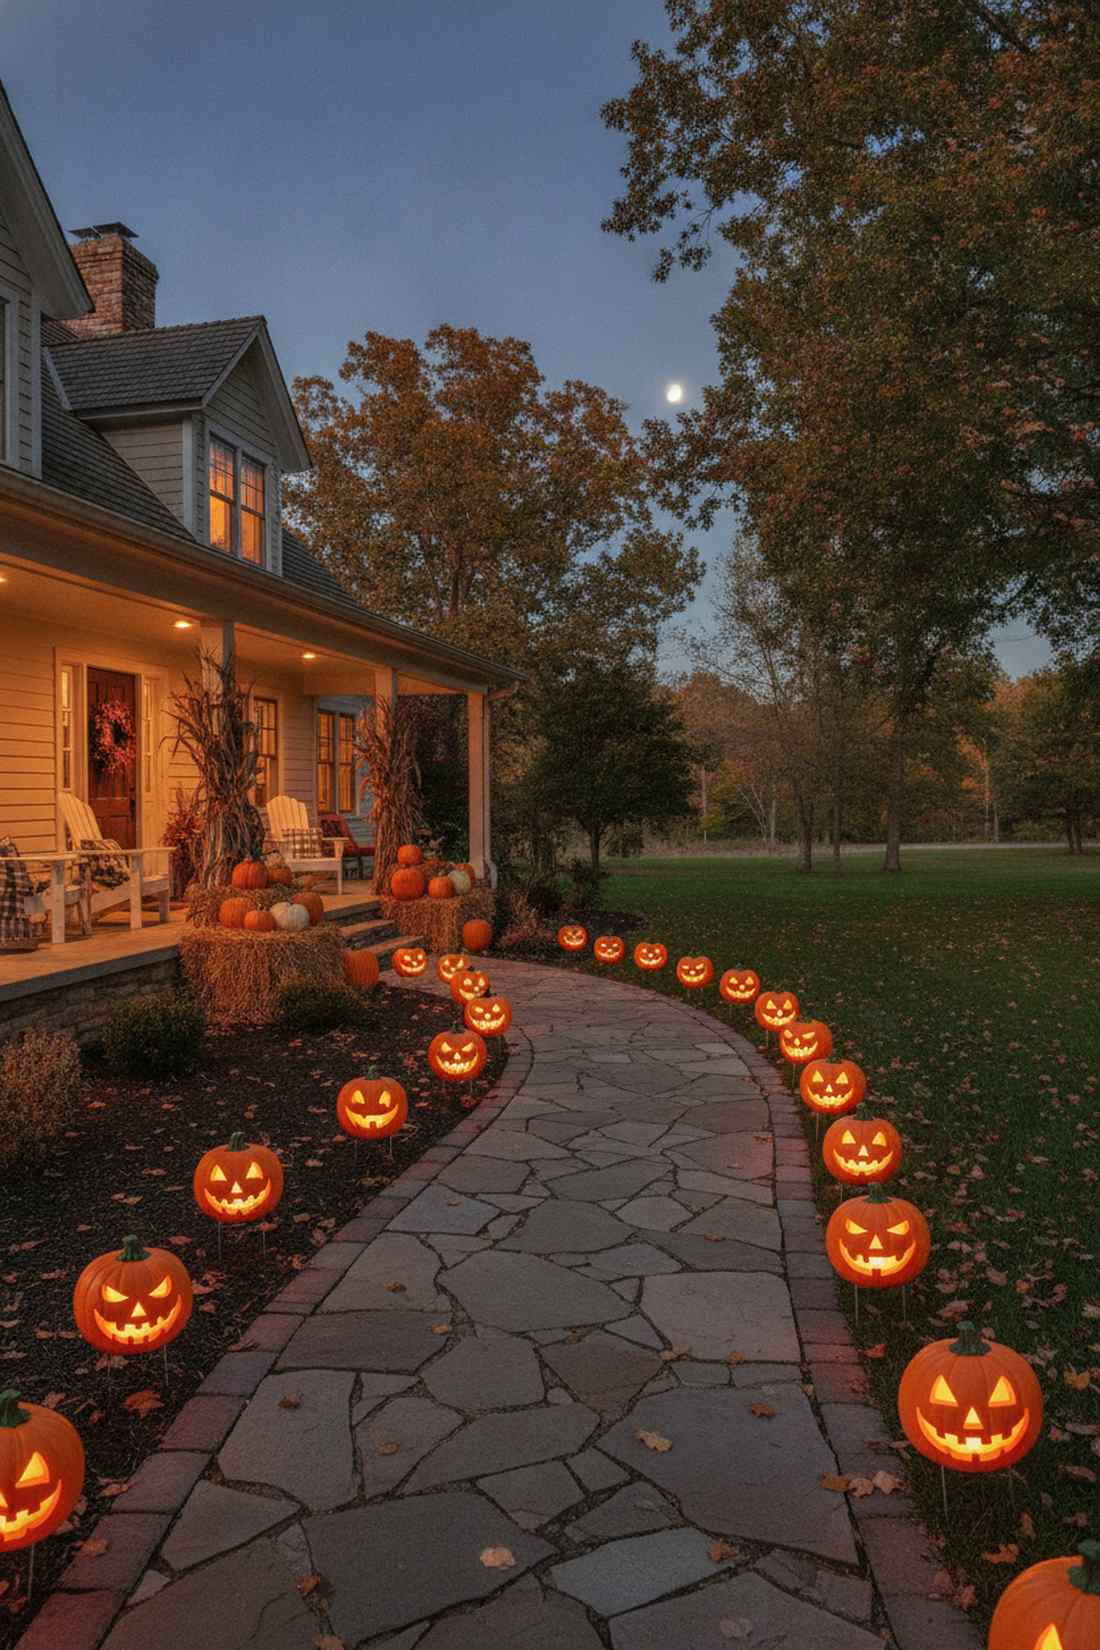
Radiates pure, nostalgic autumn comfort with a wicked twist. Illuminated jack-o’-lantern trails are a mandatory addition for winding front garden steps.
Real candles blow out in five minutes, but dropping waterproof strobe LEDs inside plastic pumpkins guarantees hours of reliable, flickering brilliance. Sourcing a bulk set of pre-lit foam pumpkins saves you from the nightmare of rotting gourds on your porch.
You can easily pull this off for around $45–$85. Pin this if you love that classic trick-or-treat aesthetic!
- Key Materials: Foam pumpkins, waterproof LED strobes, metal stakes
- Vibe / Style: Classic nostalgic harvest
- Difficulty: Easy placement
- Budget Breakdown: Foam Pumpkins: $60 | LED Candles: $20
- Creator’s Tip: Weigh down the hollow foam pumpkins with a handful of gravel so the autumn wind doesn’t blow them into the street.
- Smart Sourcing: pre-carved foam pumpkin sets (bulk pack) and waterproof LED flicker candles.
Material Guide: Cheap vs. Premium Aesthetic
Knowing exactly where to save and where to spend makes all the difference in achieving that “looks expensive but isn’t” vibe.
- Standard vs. UV-Resistant/Premium: Upgrading to UV-coated plastics and IP66-rated electronics stops sun fading and prevents water damage, meaning you only buy materials once.
- Pre-made Kits vs. Sourcing Locally: Commercial starter kits often save both time and money because they include necessary mounting hardware and synced controllers that retail store pieces lack.
17. Spider Web LED Net Lights
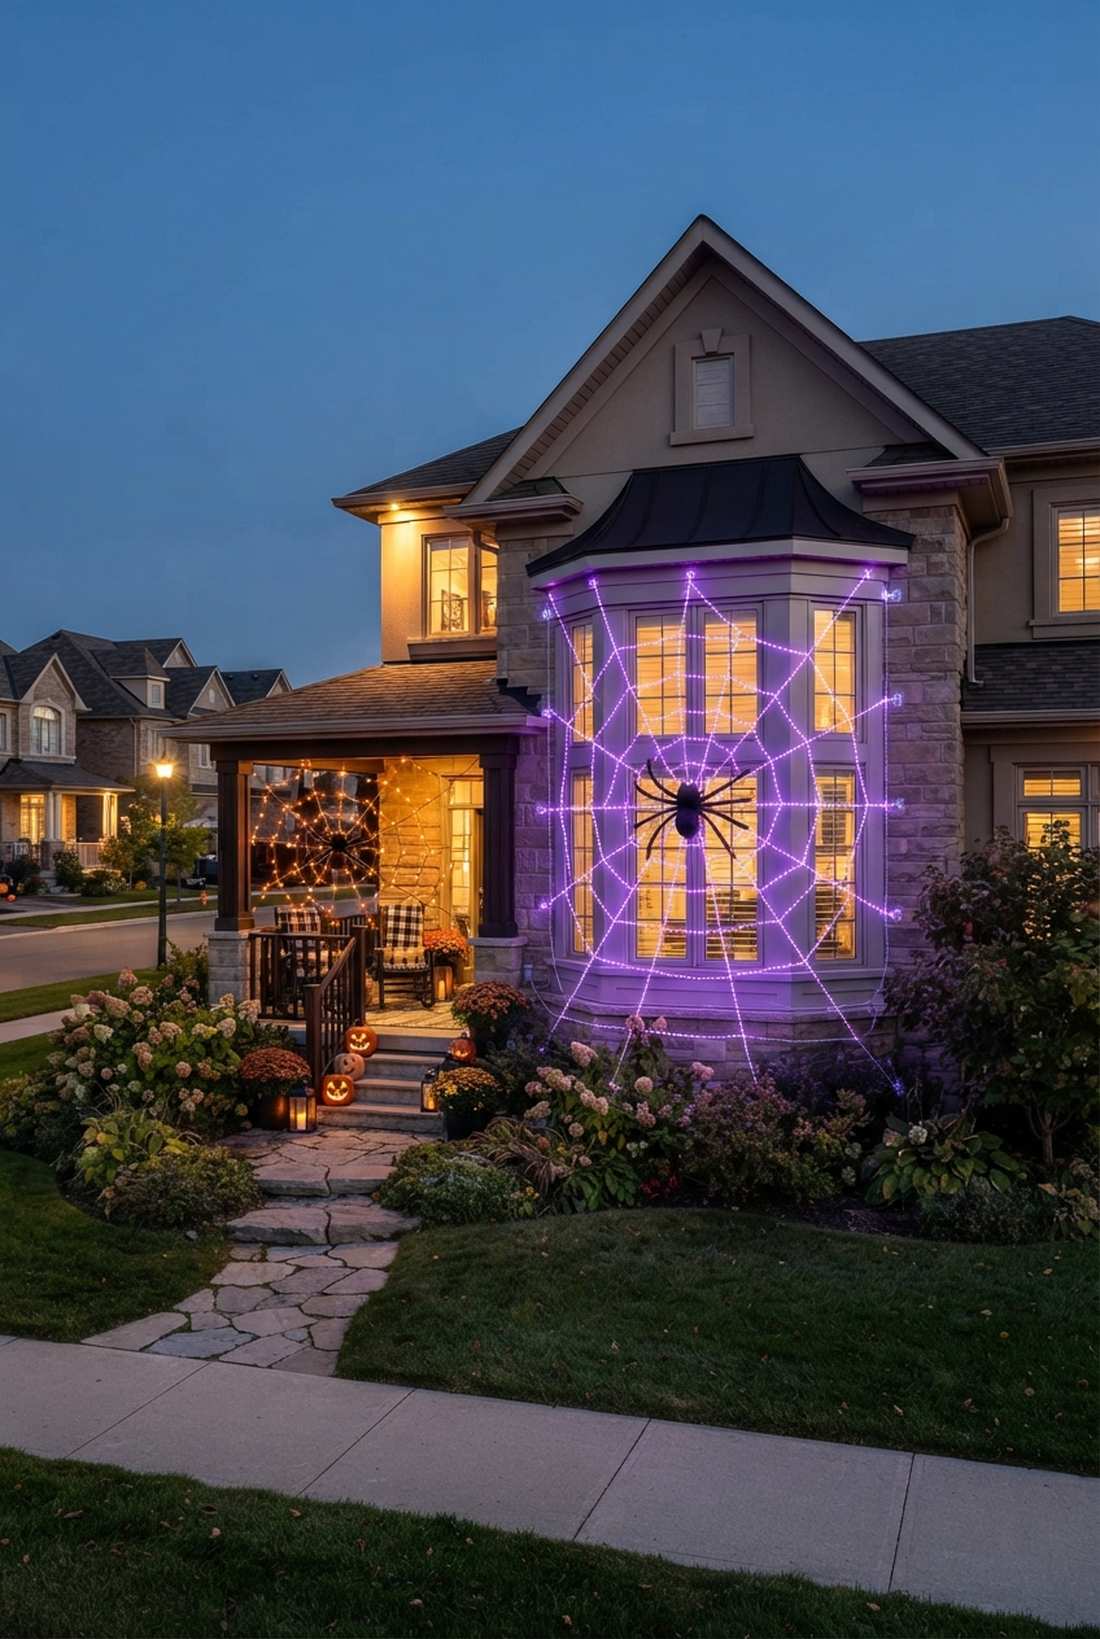
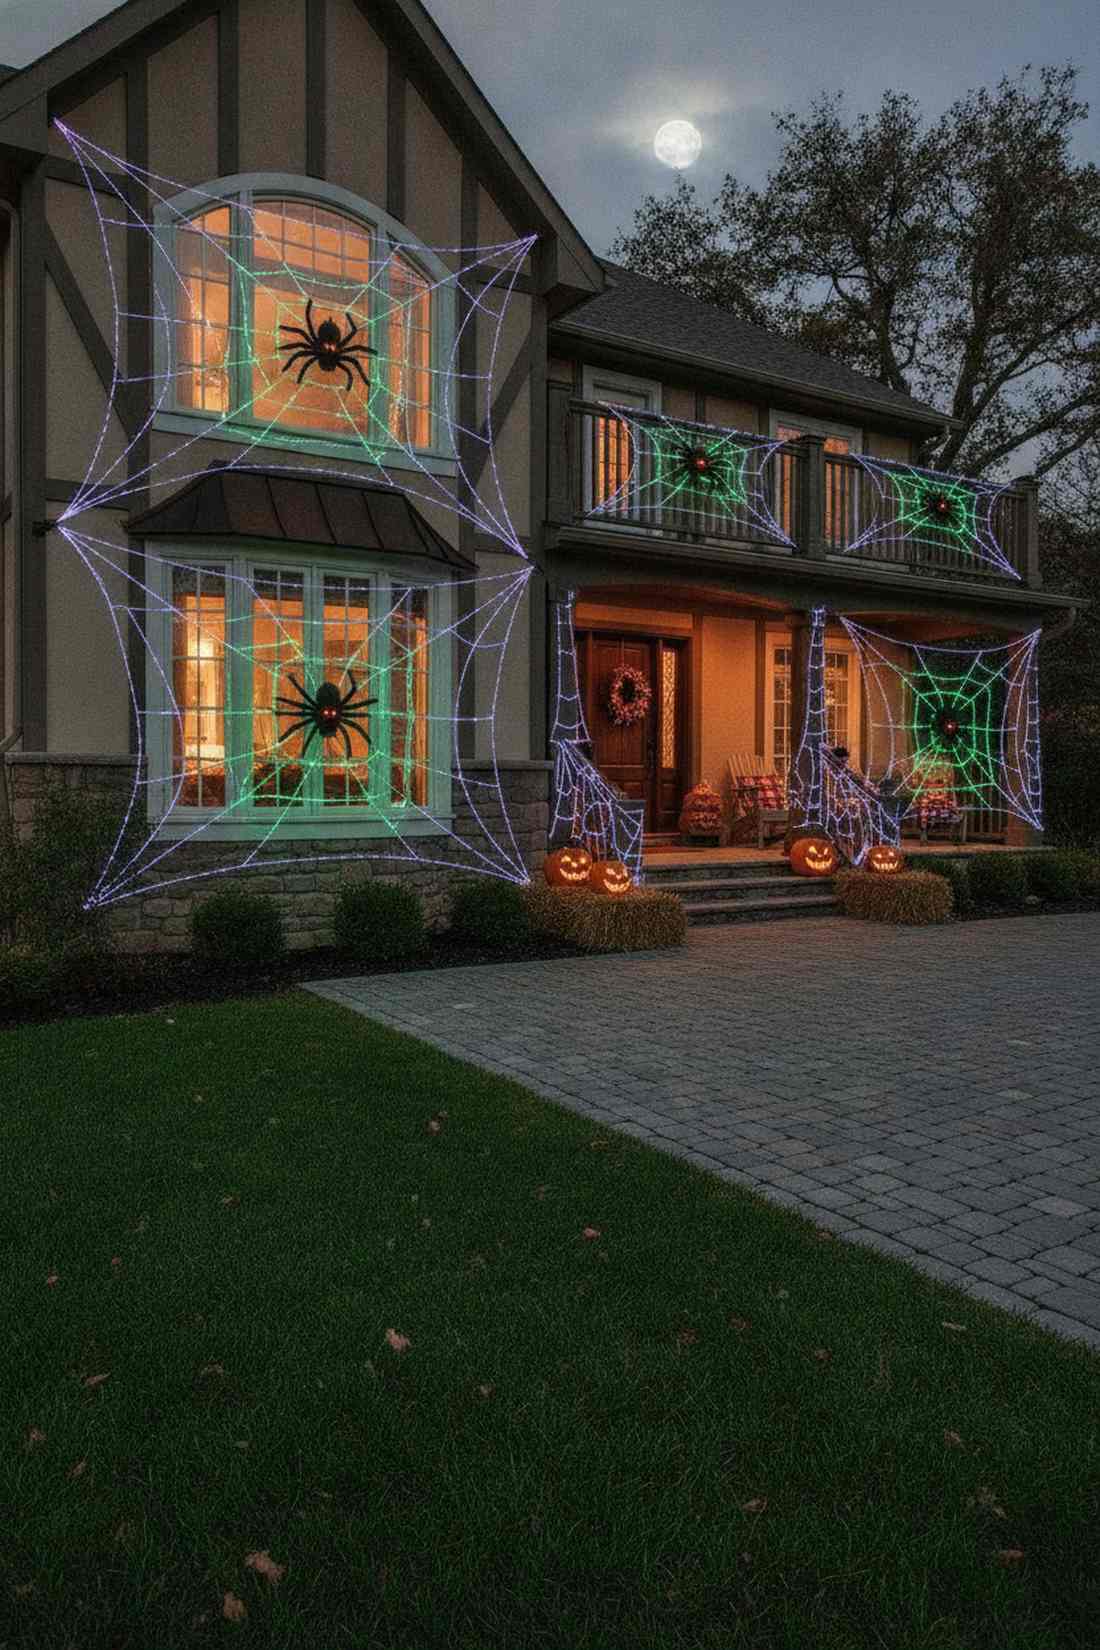
Stretches an electrifying, venomous trap across your architecture. Illuminated geometric cobwebs fit perfectly over large bay windows or dark porch railings.
Cotton webs turn into a soggy mess after one rainstorm, while a pre-wired LED net delivers a crisp, hyper-visible outline from down the street. Securing these terrarium accessories with heavy-duty exterior hooks keeps your paint job perfectly intact.
These plug-and-play nets usually cost between $25–$50.
- Key Materials: LED web nets, exterior command hooks, giant plastic spider
- Vibe / Style: Infested arachnid lair
- Difficulty: Easy hanging
- Budget Breakdown: Web Light: $30 | Hooks: $10
- Creator’s Tip: Pull the net extremely tight from all corners to make the geometric web pattern pop; loose nets just look like tangled Christmas lights.
- Smart Sourcing: pre-wired LED spider web kits and damage-free exterior mounting hooks.
Stop scrolling for a second. The UV trick coming up next is how pro-haunters make their setups look violently radioactive…
18. Glow-in-the-Dark Web with Blacklight
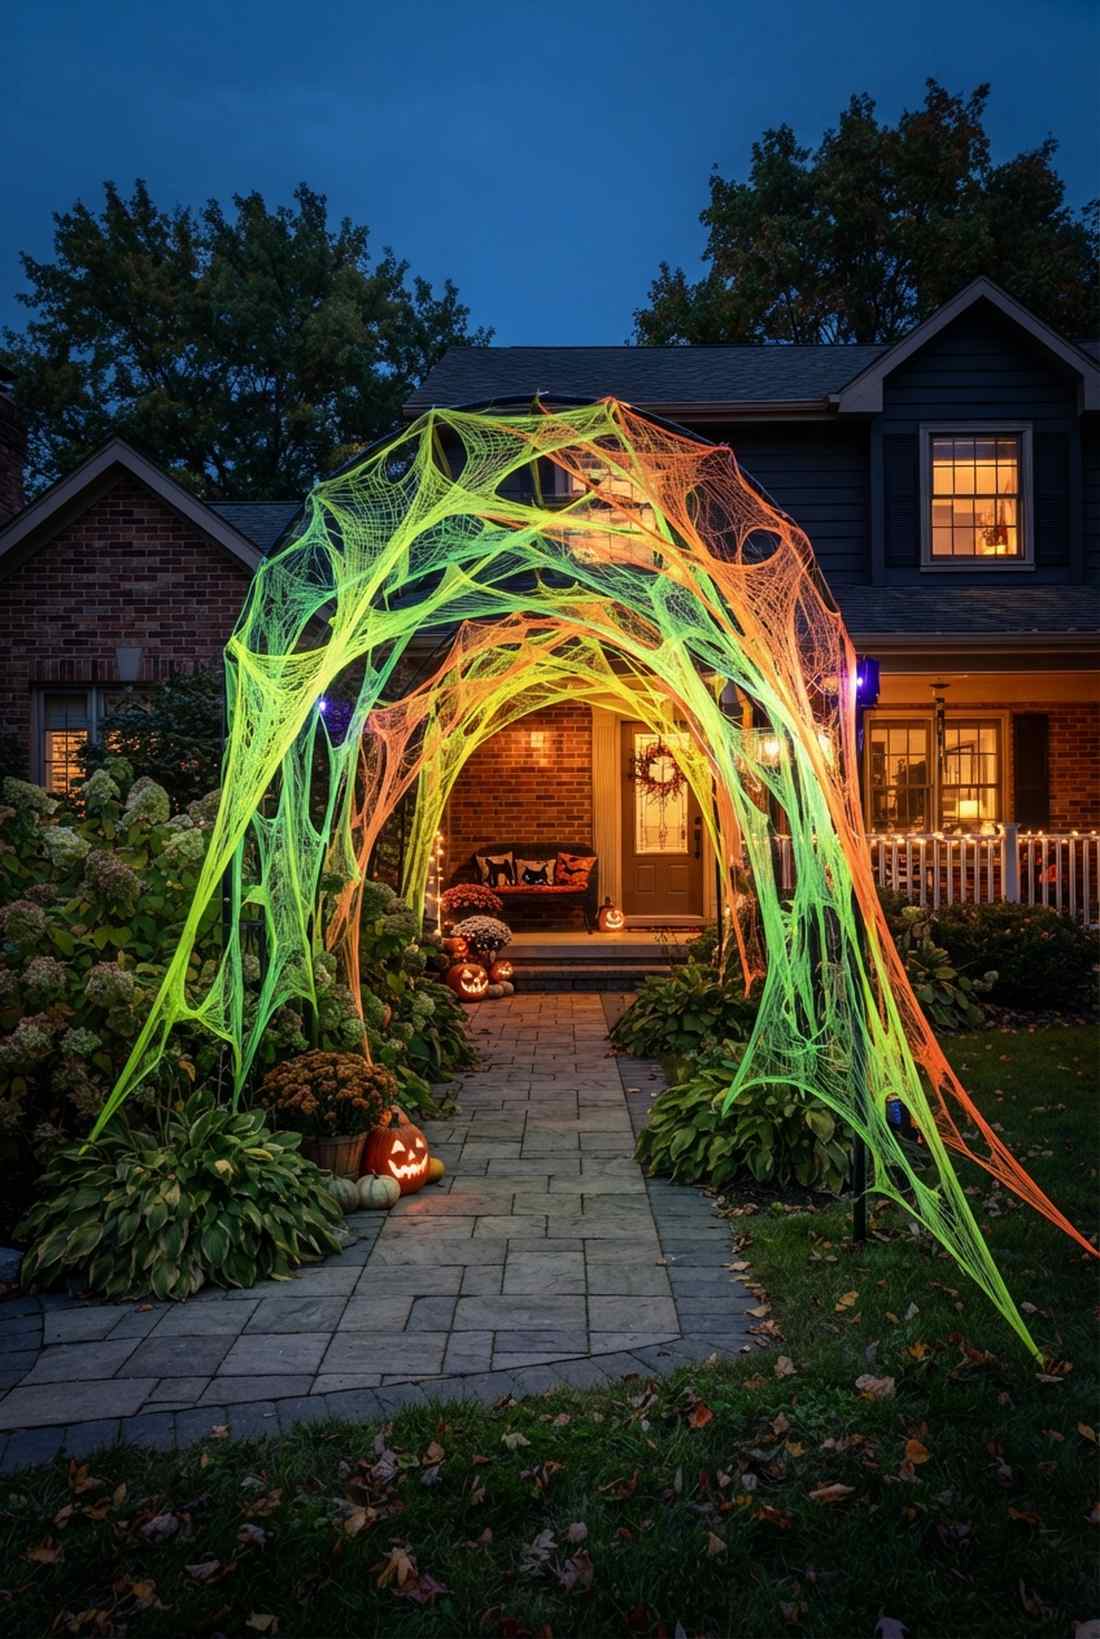
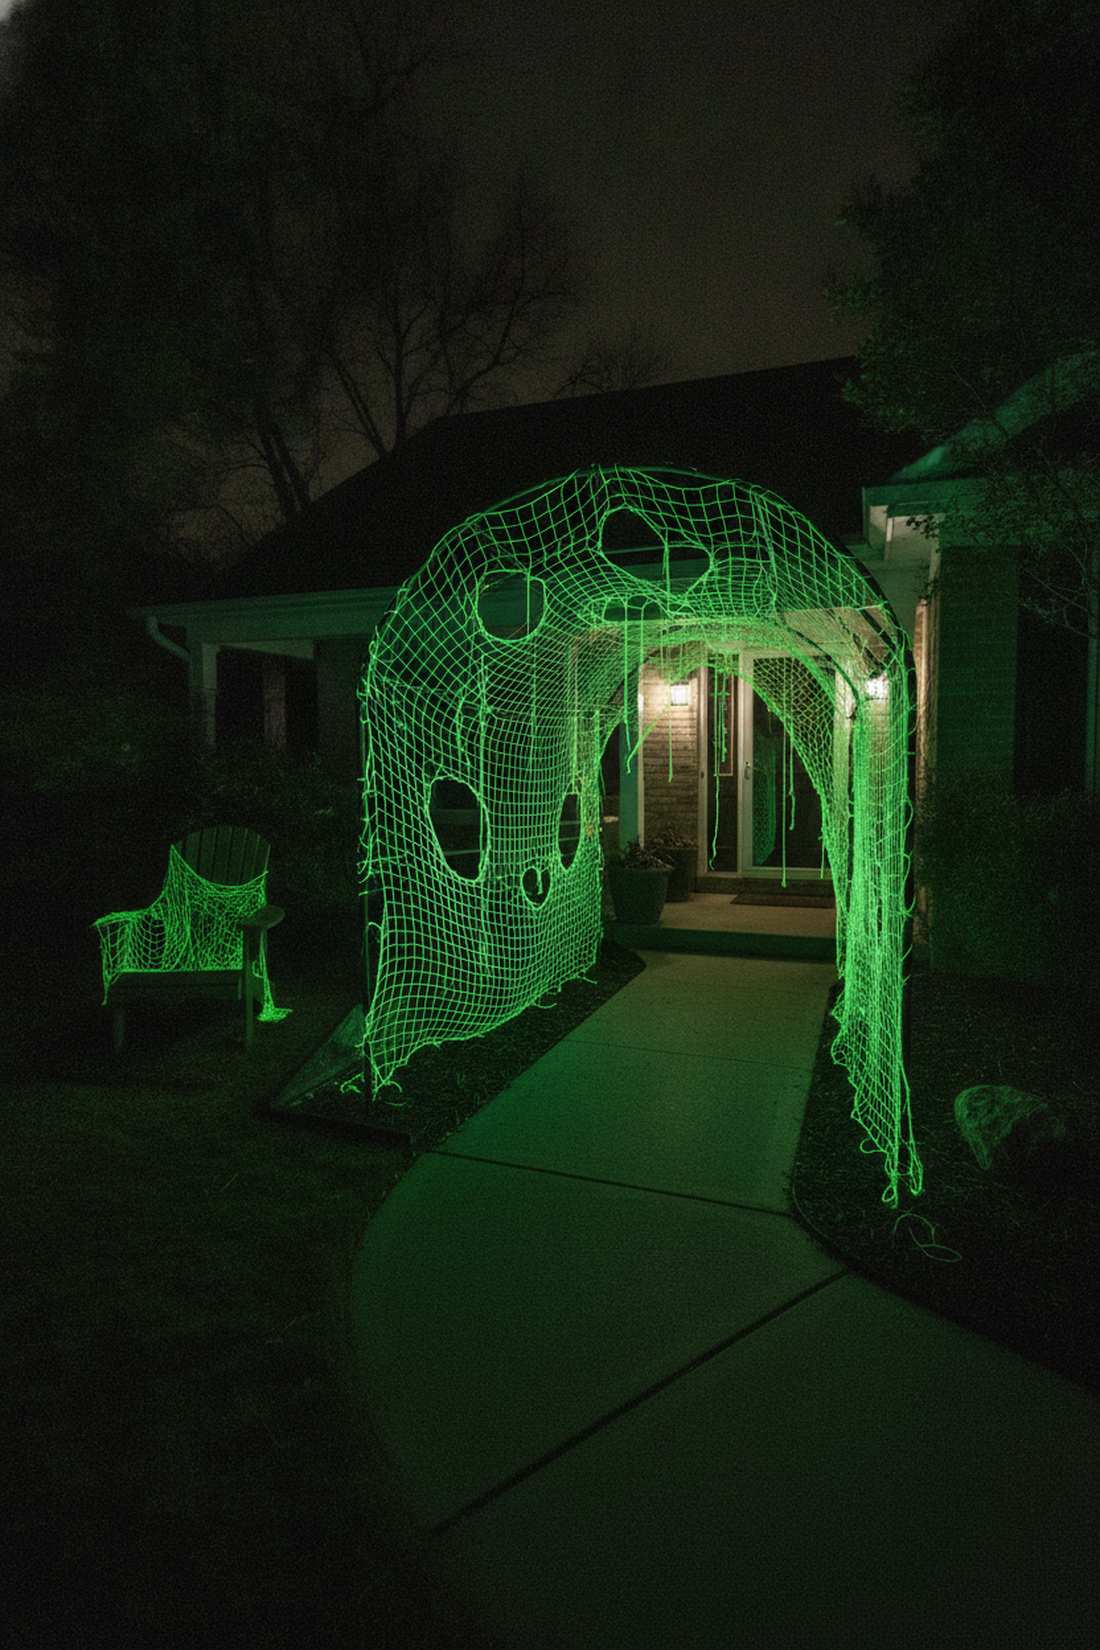
Ignites your yard with a radioactive, mind-bending glow. UV-reactive web tunneling is an incredible addition for enclosed front walkways or archways.
Standard lighting washes out fine details, but hitting neon beef-netting with a massive LED blacklight cannon makes the strands seemingly float in mid-air. Grabbing true 365nm wavelength UV floods ensures maximum fluorescence without that distracting purple glare.
The total cost for this immersive tunnel is roughly $50–$95.
- Key Materials: Neon beef-netting, high-output UV LED flood, zip ties
- Vibe / Style: Radioactive mutant nest
- Difficulty: Moderate stretching
- Budget Breakdown: UV Floodlight: $45 | Beef-netting: $30
- Creator’s Tip: Cut holes of varying sizes into the stretched fabric to make it look authentically torn and ancient.
- Smart Sourcing: 365nm true-UV LED floods and heavy-duty neon beef-netting (bulk roll).
Atmospheric Fog Integration
Fog machines add dimensional depth to lighting designs by making light beams visible and creating mysterious obscured views. Strategic fog deployment transforms flat lighting into volumetric effects that occupy physical space.
19. Ground-Level Fog with Color Wash
Creates a sinister, creeping tide of illuminated vapor. Color-washed ground mist works brilliantly on sloped lawns where the fog can roll downward.
Pointing lights downward flattens the landscape, whereas side-lighting the chilled fog from the grass level highlights every swirling current of the mist. Pairing a high-wattage fogger with waterproof LED bars creates an unstoppable visual tidal wave.
Budget around $100–$160 for the machine and the lighting bars. Save this if you want to be the most popular house on the block.
- Key Materials: High-output fogger, ice chiller box, RGB light bars
- Vibe / Style: Creeping graveyard mist
- Difficulty: Advanced DIY setup
- Budget Breakdown: Fog Machine: $80 | Light Bars: $50
- Creator’s Tip: Place the fog output tube directly into a trench or behind a low retaining wall to hide the hardware completely.
- Smart Sourcing: high-wattage fog machine starter kits and waterproof RGB ground wash bars.
20. Backlit Fog Wall Effects
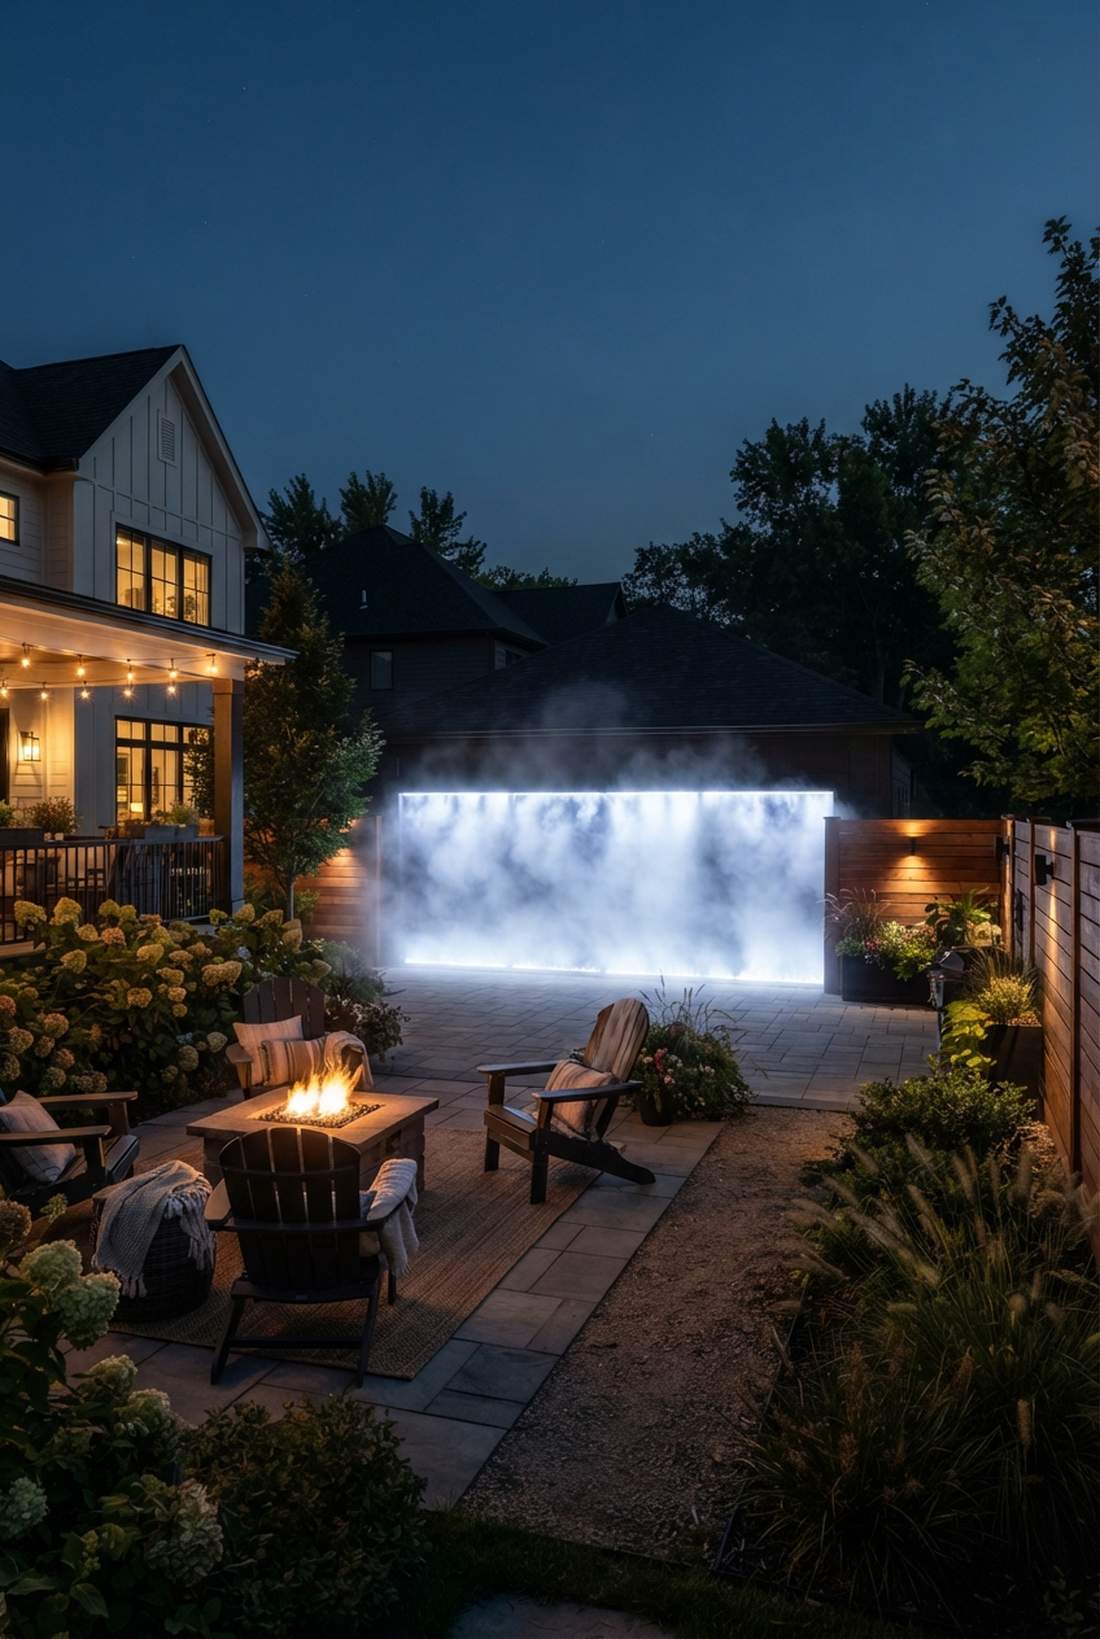
Builds an impenetrable, glowing barrier of pure mystery. Rear-illuminated fog screens are ideal for hiding ugly garage doors or staging dramatic backyard entrances.
Most DIYers let their fog dissipate randomly; however, trapping it behind a fence and blasting it from behind gives a blinding, professional haunted house aesthetic. Using a rapid-dissipating fog fluid ensures the wall looks dense without blinding actual street traffic.
You can construct this glowing barrier for about $85–$140.
- Key Materials: Fogger, rapid-dissipating fluid, high-intensity backlights
- Vibe / Style: Blinding alien abduction
- Difficulty: Moderate wind-balancing
- Budget Breakdown: Fog Base: $70 | Backlights: $40
- Creator’s Tip: This effect requires absolutely still wind conditions; set up temporary transparent windbreaks if you live in a breezy area.
- Smart Sourcing: rapid-dissipating theatrical fog fluid and high-intensity LED backlighting kits.
21. Motion-Activated Fog Bursts
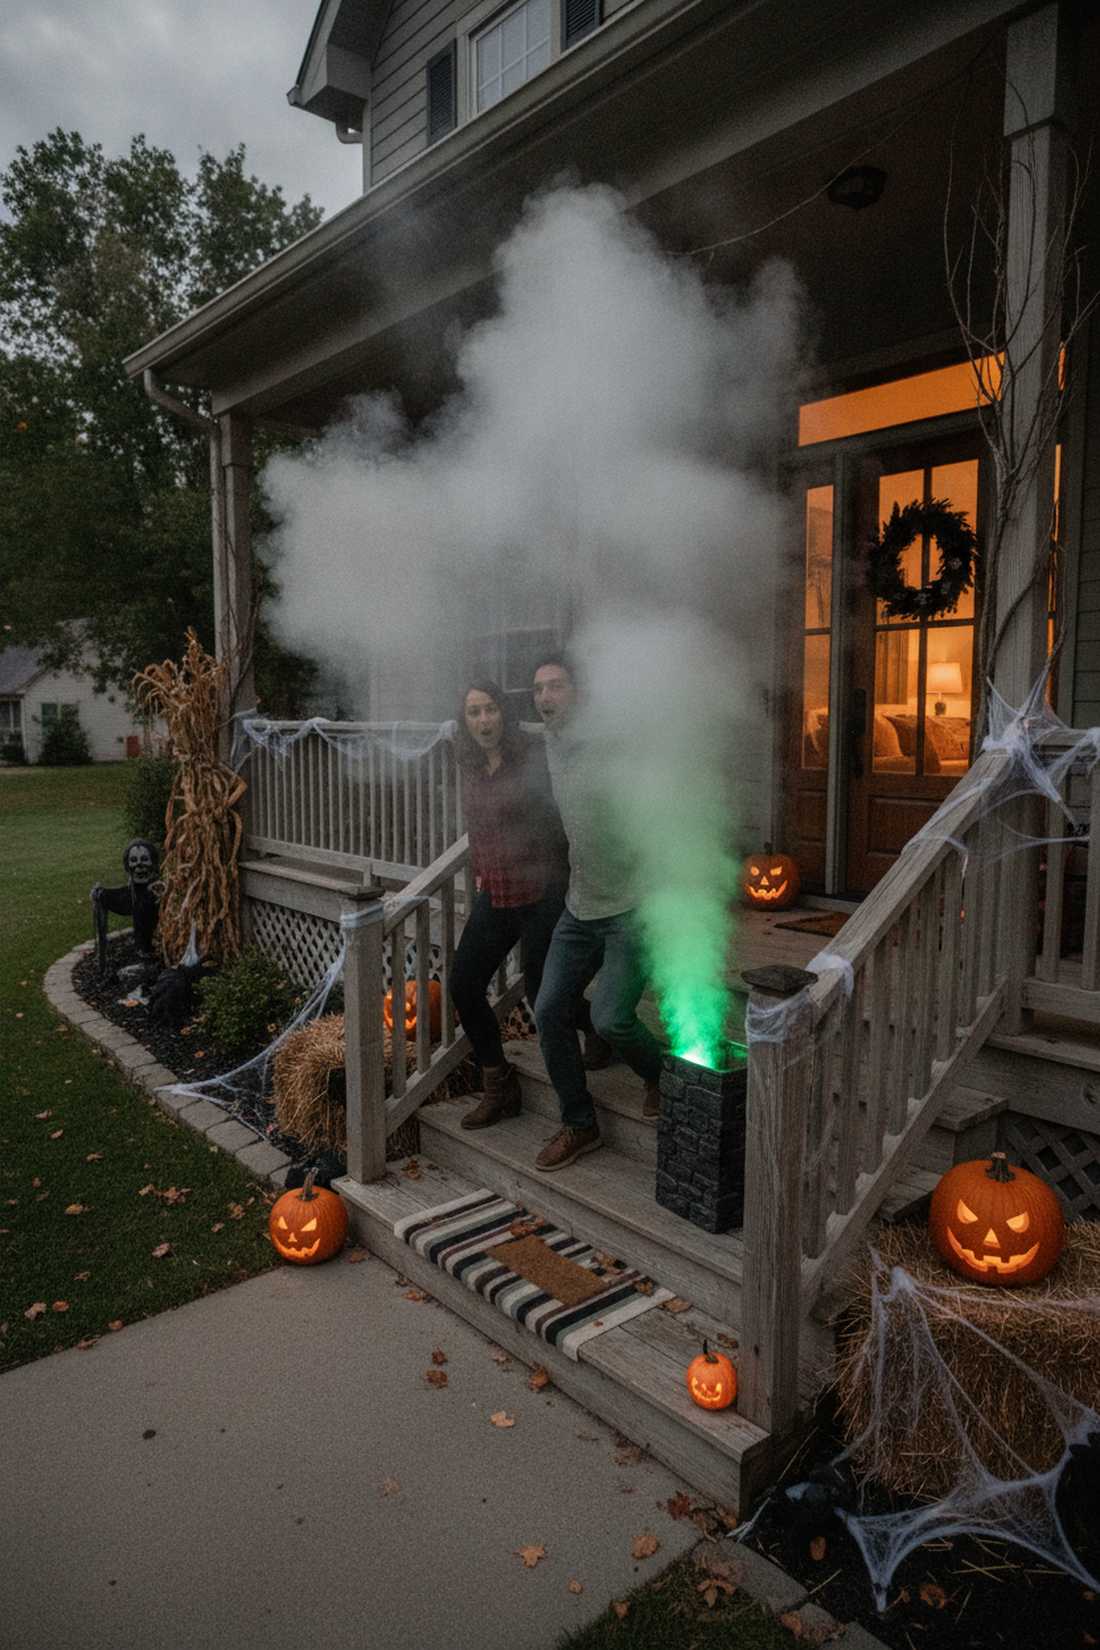
Triggers a terrifying, interactive blast right when visitors get comfortable. Sensor-triggered vapor cannons are flawless for narrow porch steps or blind corners.
Continuous fog gets boring and wastes expensive fluid, while a sudden, motion-triggered burst delivers a massive adrenaline spike. Wiring a passive infrared sensor to a fast-heating fog core ensures the jump scare hits exactly on time.
This interactive upgrade will cost you roughly $70–$110.
- Key Materials: Fog machine, PIR motion trigger, nozzle extension
- Vibe / Style: High-tension interactive scare
- Difficulty: Moderate wiring
- Budget Breakdown: Fogger: $60 | Motion Sensor: $25
- Creator’s Tip: Hide the fog machine inside a faux-stone box or a hollowed-out prop so the blast appears to come from nowhere.
- Smart Sourcing: PIR motion sensor trigger attachments and fast-heating fog machine kits.
This final atmospheric effect is the absolute pinnacle of unique lighting designs. You don’t want to miss this…
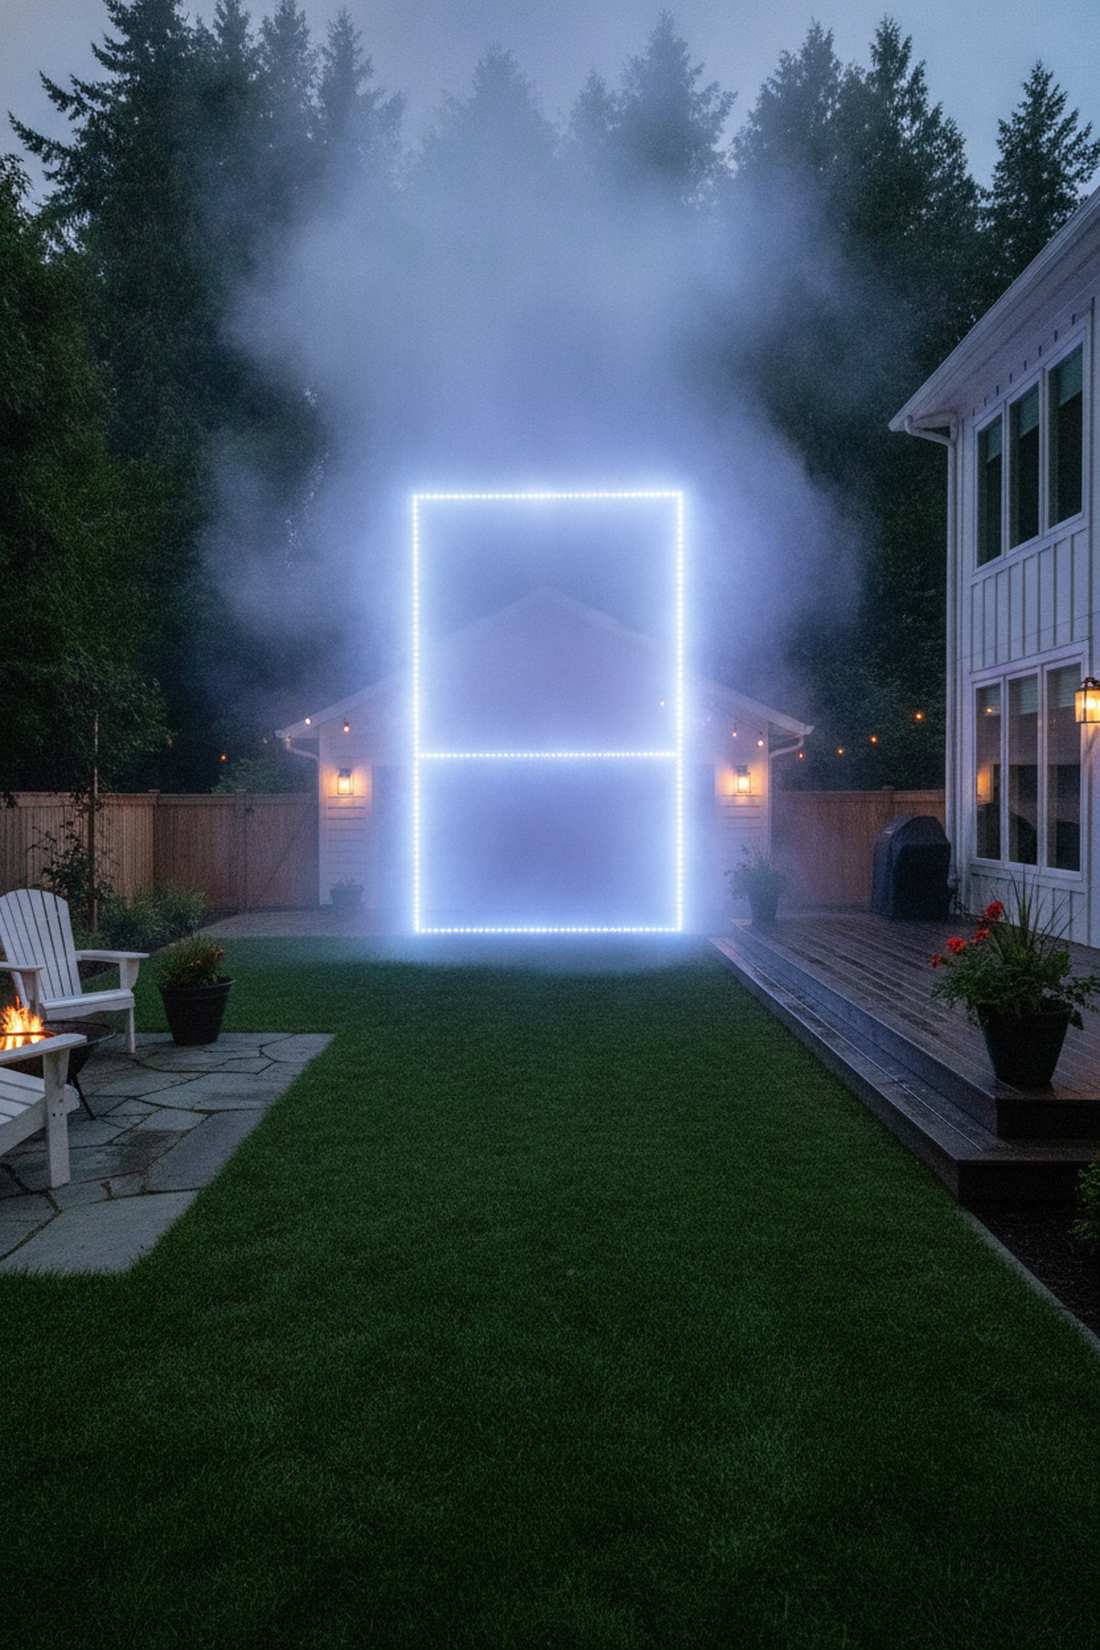
22. Fog-Filled Light Columns
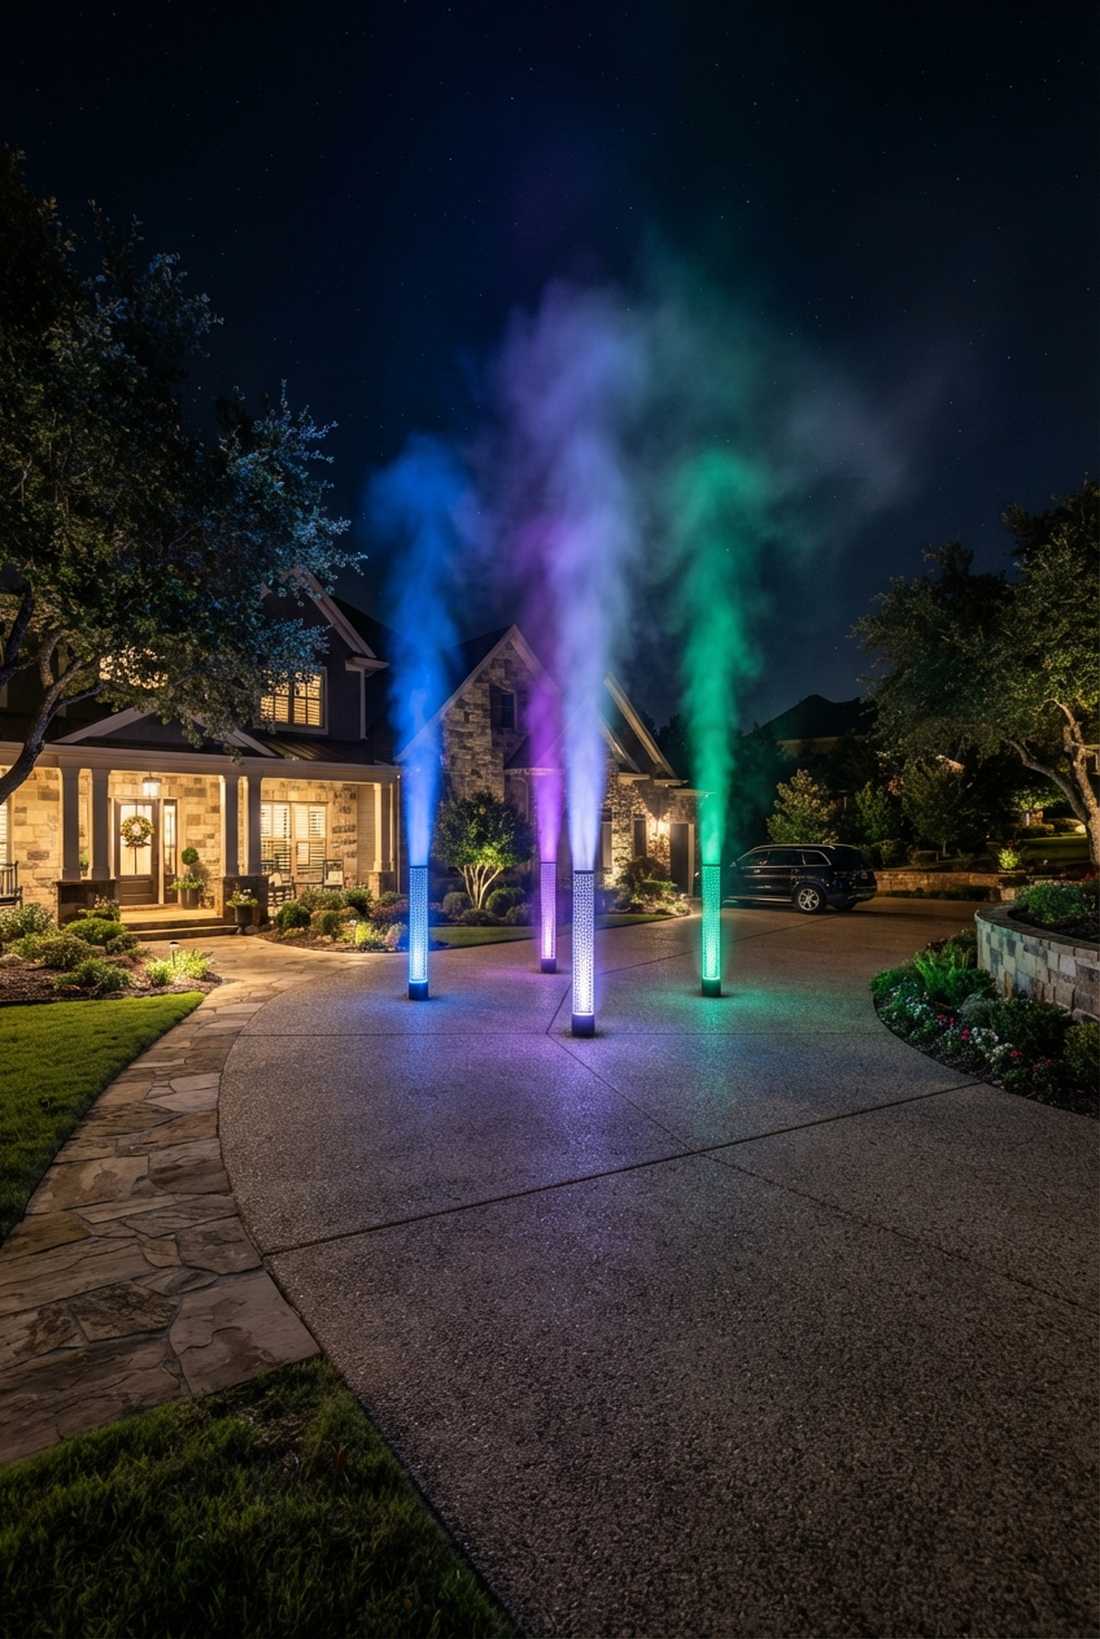
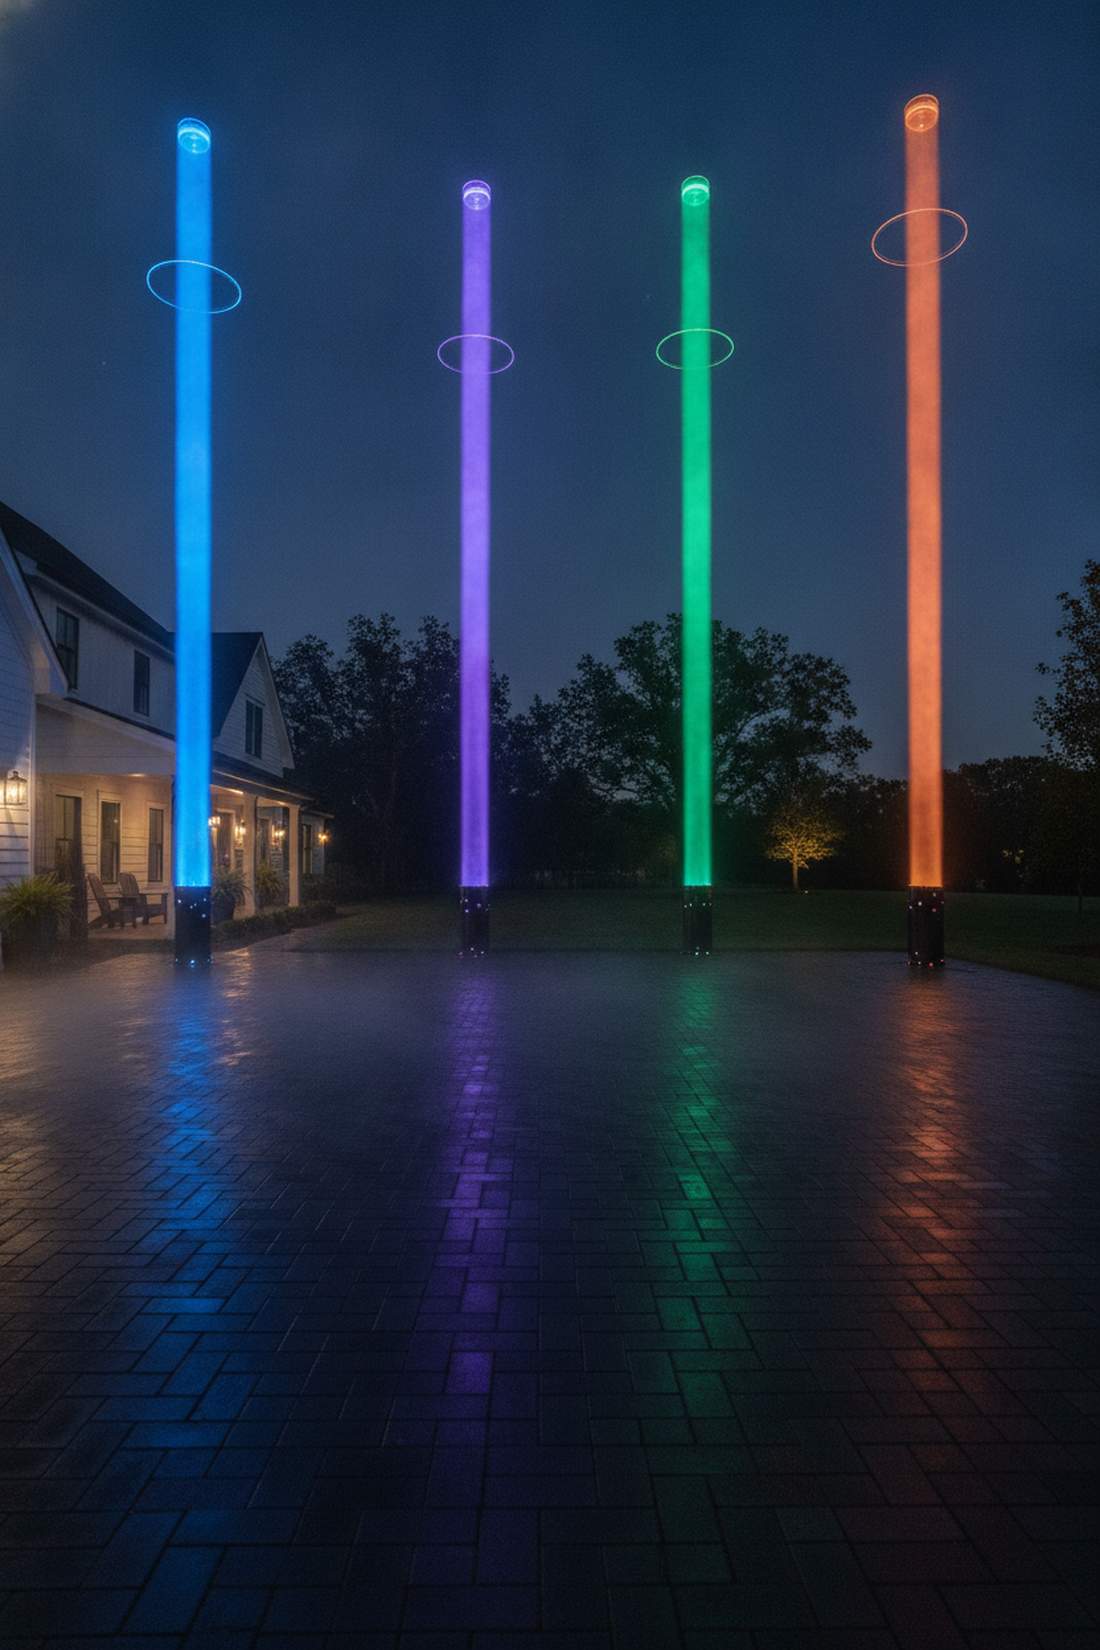
Shoots towering pillars of colorful light straight into the night sky. Vertical illuminated fog shafts create an alien, supernatural vibe for large, open driveway spaces.
Using standard floods just scatters the light endlessly, but placing an upward-facing spotlight directly under a fog nozzle traps the beam into a solid, glowing cylinder. Snagging a heavy-duty par-can fixture with a narrow beam angle is the secret to this razor-sharp effect.
Complete this striking architectural illusion for around $60–$100.
- Key Materials: Narrow-beam par cans, fog machine, vertical PVC tube
- Vibe / Style: Sci-fi supernatural columns
- Difficulty: Advanced alignment
- Budget Breakdown: Par Can Light: $40 | PVC/Hardware: $20
- Creator’s Tip: Drill holes along the sides of a vertical PVC pipe to create a multi-beam, laser-cage effect when the fog rises through it.
- Smart Sourcing: narrow-beam LED par can lights and fog machine vertical output adapters.
Conclusion
Mastering these 22 high-end outdoor lighting halloween blueprints completely changes how your neighborhood experiences the season. By focusing on smart sourcing—like grabbing pre-cut projection mesh, UV-coated hardware, and commercial-grade starter kits—you avoid the trap of generic craft aisles. Start with a foundational color wash, layer in high-CPC concepts like projection mapping or interactive fog, and always prioritize durable, IP66-rated materials. Fresh Garden Ideas recommends beginning with 3-5 core visual setups and expanding your premium display annually as you unlock the true potential of professional yard aesthetics.
Frequently Asked Questions
What brightness level do I need for outdoor Halloween projection mapping?
To avoid a washed-out look, you absolutely need a minimum of 3,000-3,500 lumens. Sourcing a high-quality refurbished short-throw projector kit is a smart budget move that ensures crisp visuals even against ambient street lights. Dark-colored houses will absorb light, so invest in premium, temporary projection mesh fabric to make those digital assets pop vibrantly without breaking the bank.
How do I keep Halloween fog close to the ground instead of rising?
The secret is rapidly cooling the vapor. Run your fog machine output through a DIY ice chiller or a pre-made PVC cooler tube packed with frozen water bottles. Buying a high-density, low-lying fog fluid in a bulk jug is highly recommended, as it naturally clings to the ground much better than standard formulas. Always account for wind, as even perfectly chilled fog will scatter in a heavy breeze.
Can I control multiple colored LED lights independently?
Yes, but relying on cheap daisy-chained analog strings is a mistake. To achieve that looks-expensive-but-isn’t vibe, upgrade to smart WiFi-enabled LED starter kits where every bulb is individually addressable. This allows you to program complex, sweeping color changes directly from your phone without rewiring multiple circuits or struggling with clunky remote controls.
What color combinations create the spookiest Halloween lighting effects?
Ditch the warm, welcoming yellow bulbs immediately. High-end setups rely on toxic greens, deep purples, and icy blues to trigger an unnatural, eerie response. For contrast, mix these cool tones with a sharp, localized amber or orange to highlight specific props. Purchasing heavy-duty die-cast spotlights with interchangeable color gel packs is the most cost-effective way to test multiple dramatic combinations.
How do I power outdoor Halloween lights without visible extension cords?
Exposed orange cables instantly ruin the premium aesthetic of your display. Instead, bury outdoor-rated extension cords 2-3 inches under your mulch beds, or invest in IP66-rated silicone outdoor cord covers to camouflage them across pathways. If wiring is impossible, grabbing a bulk pack of premium solar-powered uplights is a fast, grid-free alternative that still delivers incredible shadow-casting results.