A custom backyard garden greenhouse instantly elevates your outdoor space. Secure premium UV-coated structural kits to stretch your growing season dramatically. High-end backyard cultivation starts with precise, budget-friendly blueprints.
Design Snapshot: Core Upgrades
- Orientation & Light: Position structures facing south or southeast to capture maximum solar radiation throughout the day, especially critical during short winter months
- Thermal Mass: Incorporate water barrels, stone floors, or masonry walls to absorb daytime heat and release it gradually after sunset, reducing temperature fluctuations
- Ventilation Strategy: Plan for both passive vents and active airflow systems to prevent overheating and manage humidity levels that can invite disease
- Material Selection: Balance initial costs with longevity, insulation values, and light transmission rates to match your climate zone and growing objectives
Traditional Structure Styles That Stand The Test Of Time
Classic greenhouse architectures evolved over centuries to solve specific climate challenges while maximizing interior growing space. These proven forms remain popular because they balance structural integrity with efficient construction methods.
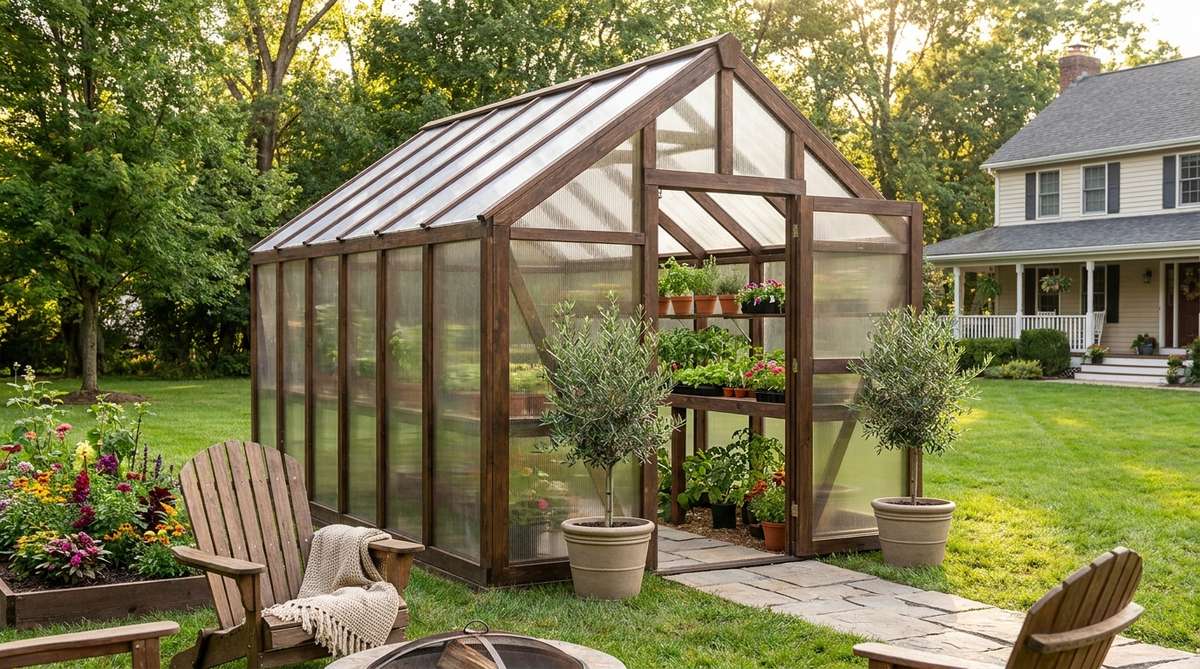
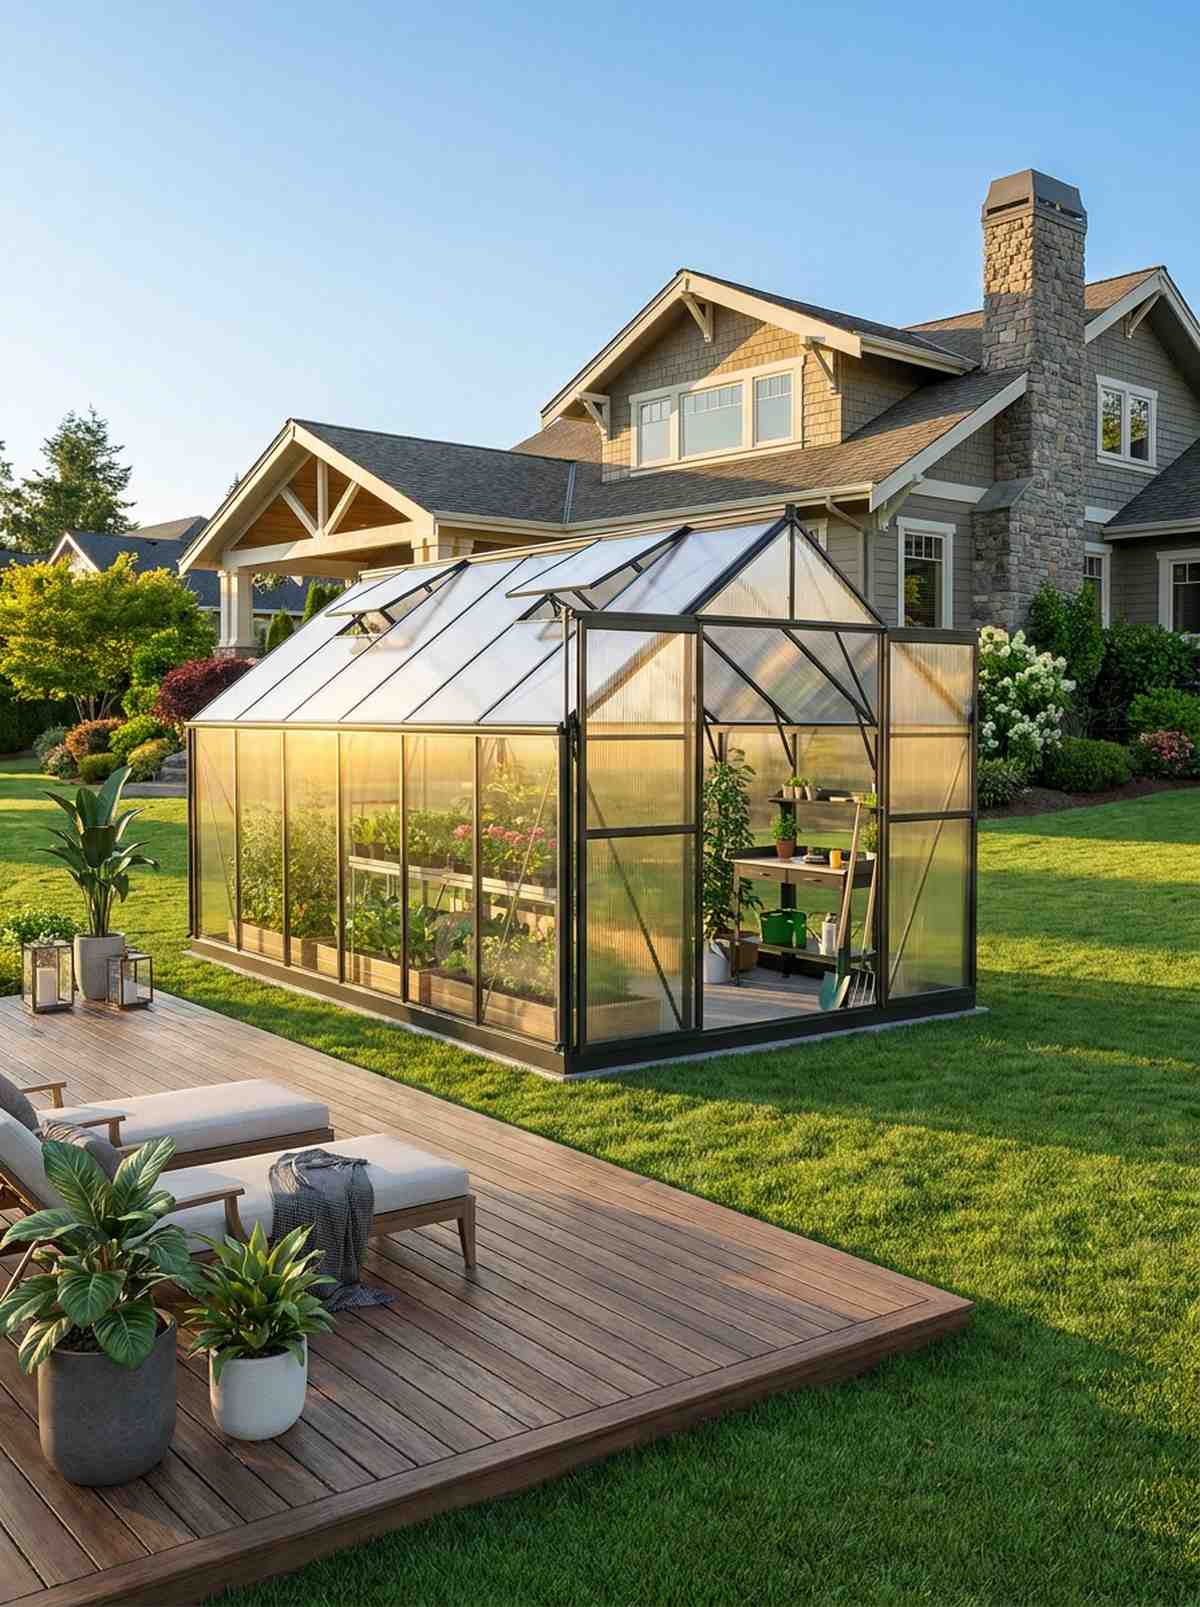
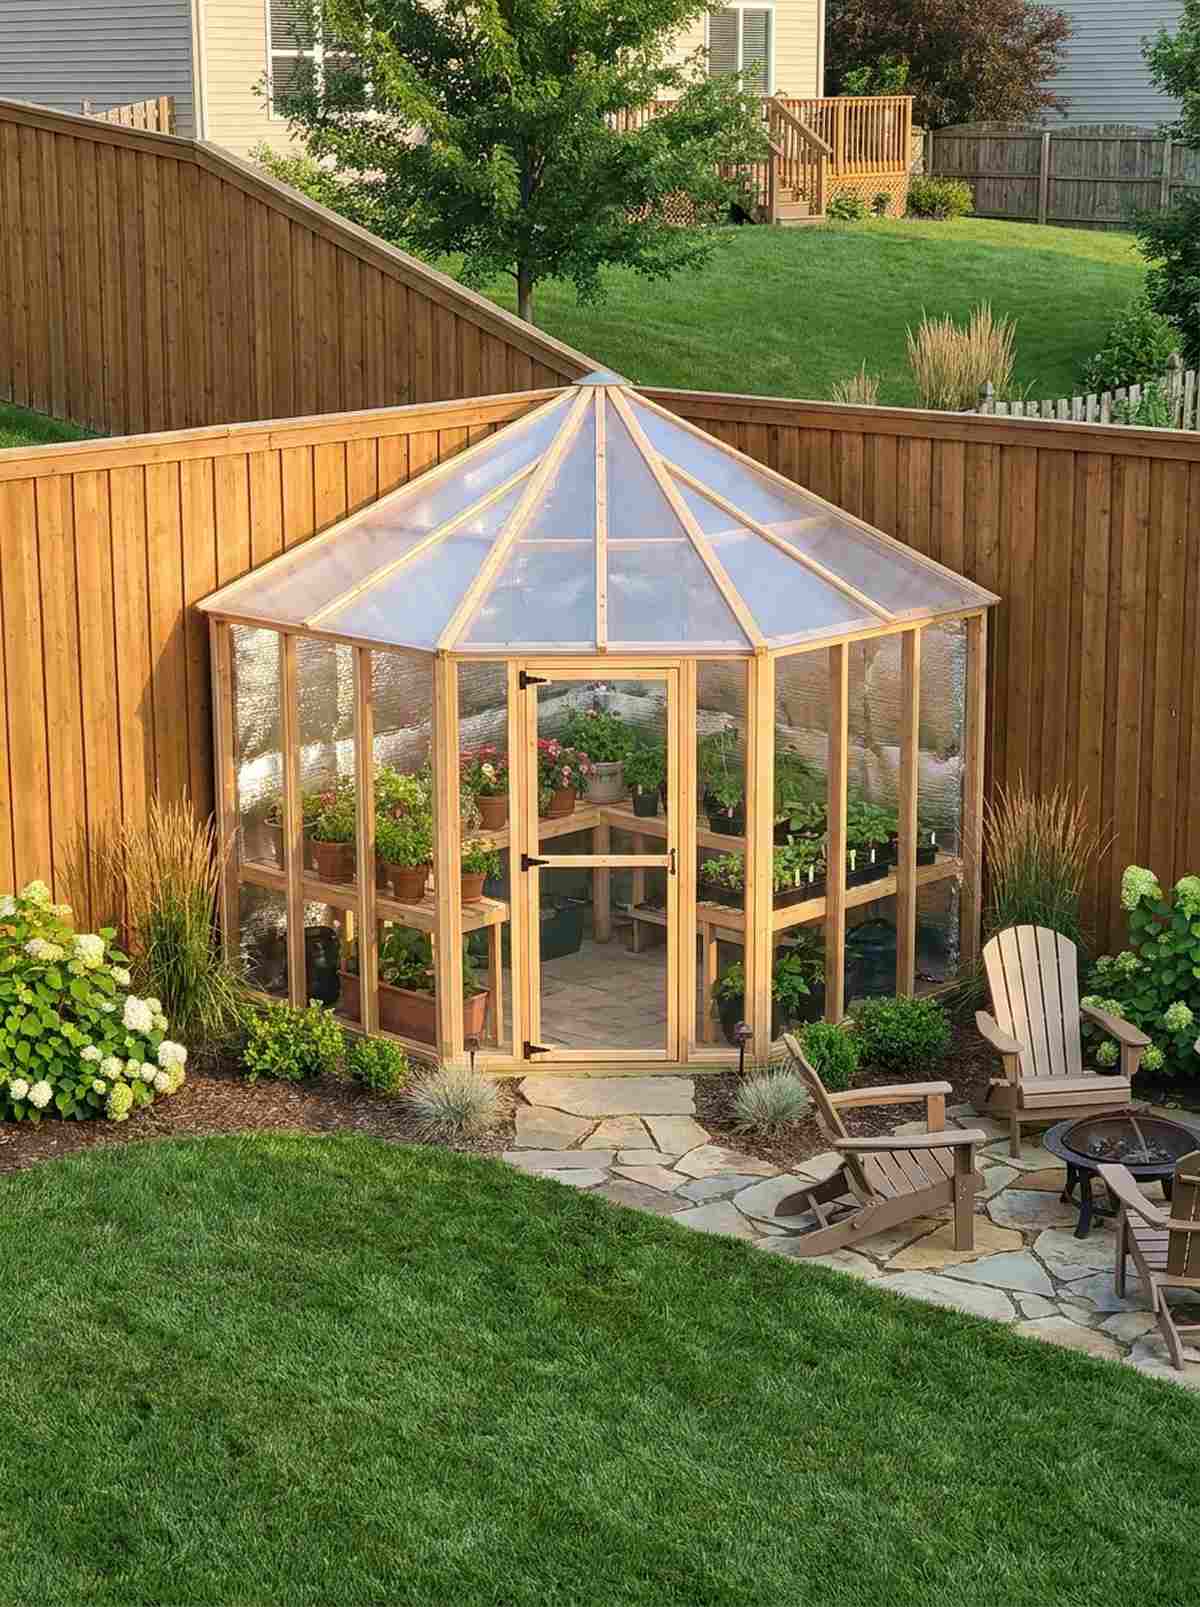
1. Gable Roof Greenhouse
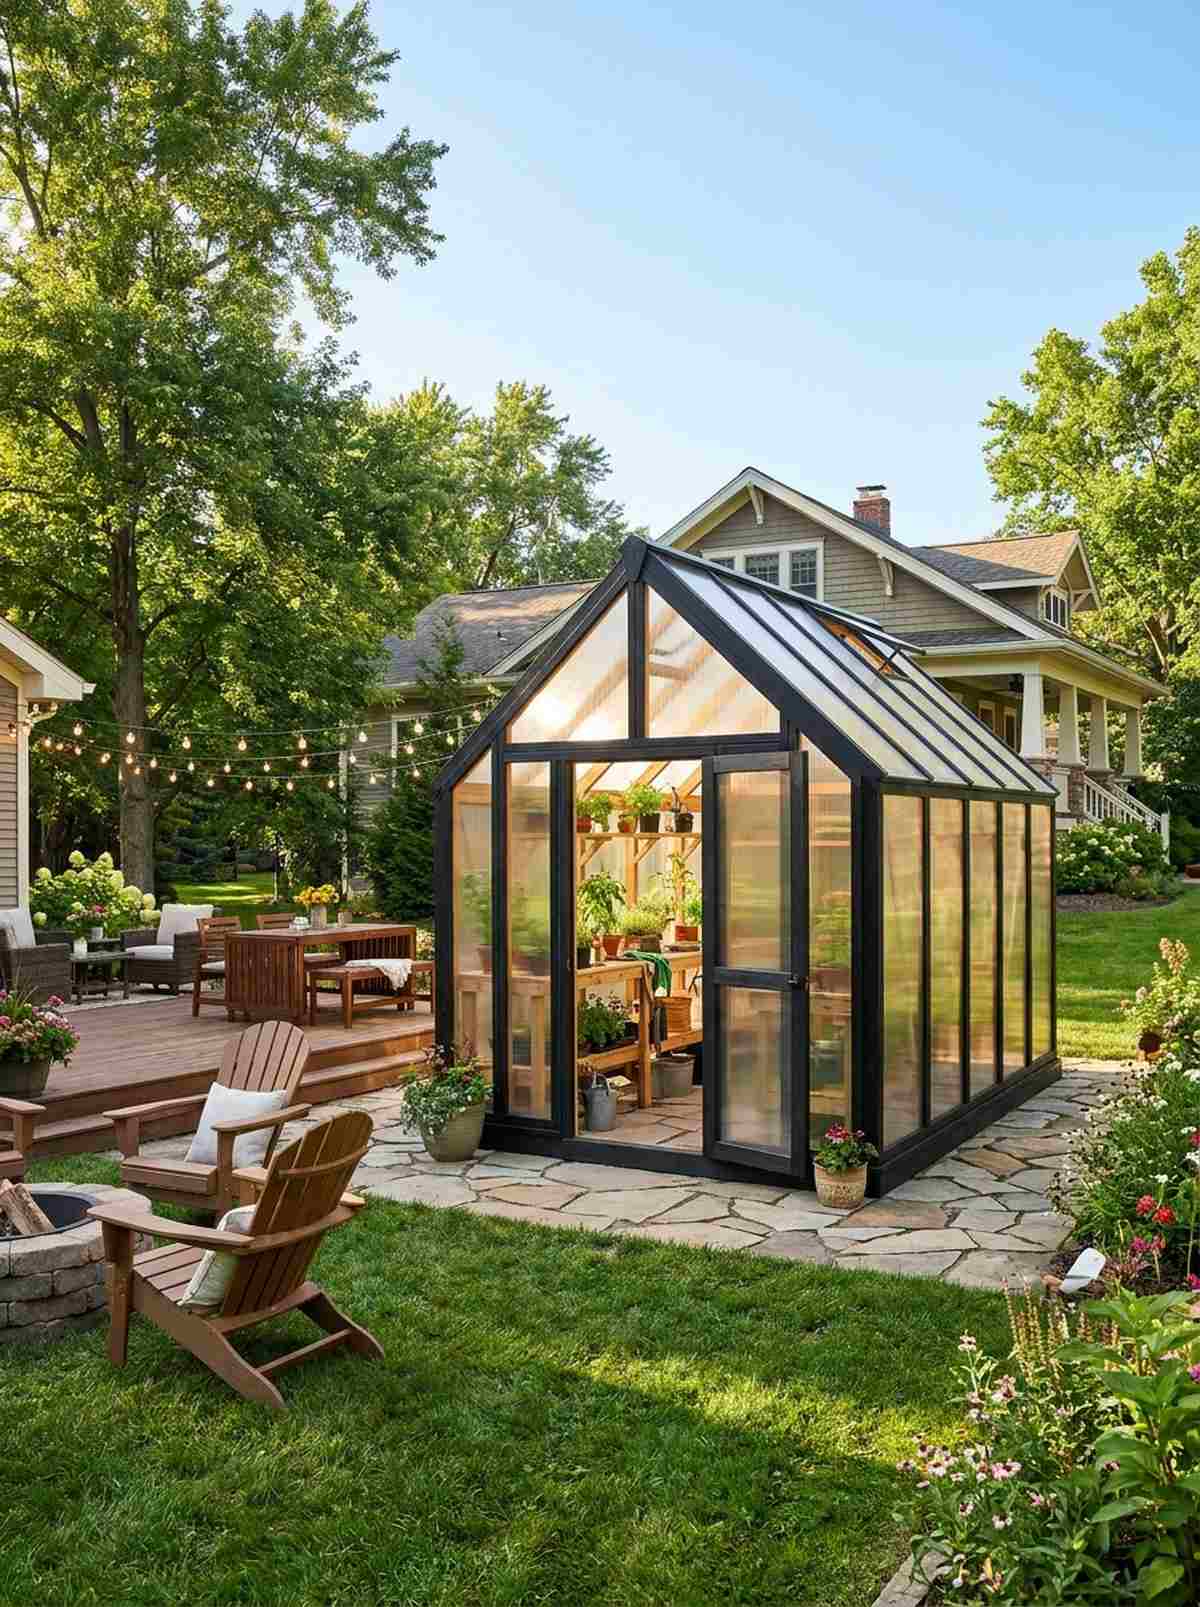
This traditional backyard greenhouse decor feels like a timeless country estate waiting for your morning coffee. Works flawlessly for a spacious backyard focal point where aesthetics matter just as much as function.
Upgrading from standard pine to treated timber delivers a surprisingly premium look that anchors your entire landscape. By integrating heavy-duty backyard garden greenhouse kits, you eliminate the guesswork of roof pitch and guarantee aggressive snow shedding.
You can easily pull this off for around $800–$1,500 depending on your timber and panel choices. Save this to your ultimate garden planning board for spring!
- Key Materials: Pre-cut cedar framing and twin-wall panels
- Vibe / Style: Classic botanical estate
- Difficulty: Intermediate weekend build
- Budget Breakdown: Frame materials: $400 | Glazing: $500 | Hardware: $100.
- Creator’s Tip: Paint the wooden frame a striking matte black before installing panels for an instant modern-farmhouse aesthetic.
- Smart Sourcing: Pre-cut twin-wall polycarbonate sheets (bulk pack) and heavy-duty galvanized steel anchor brackets.
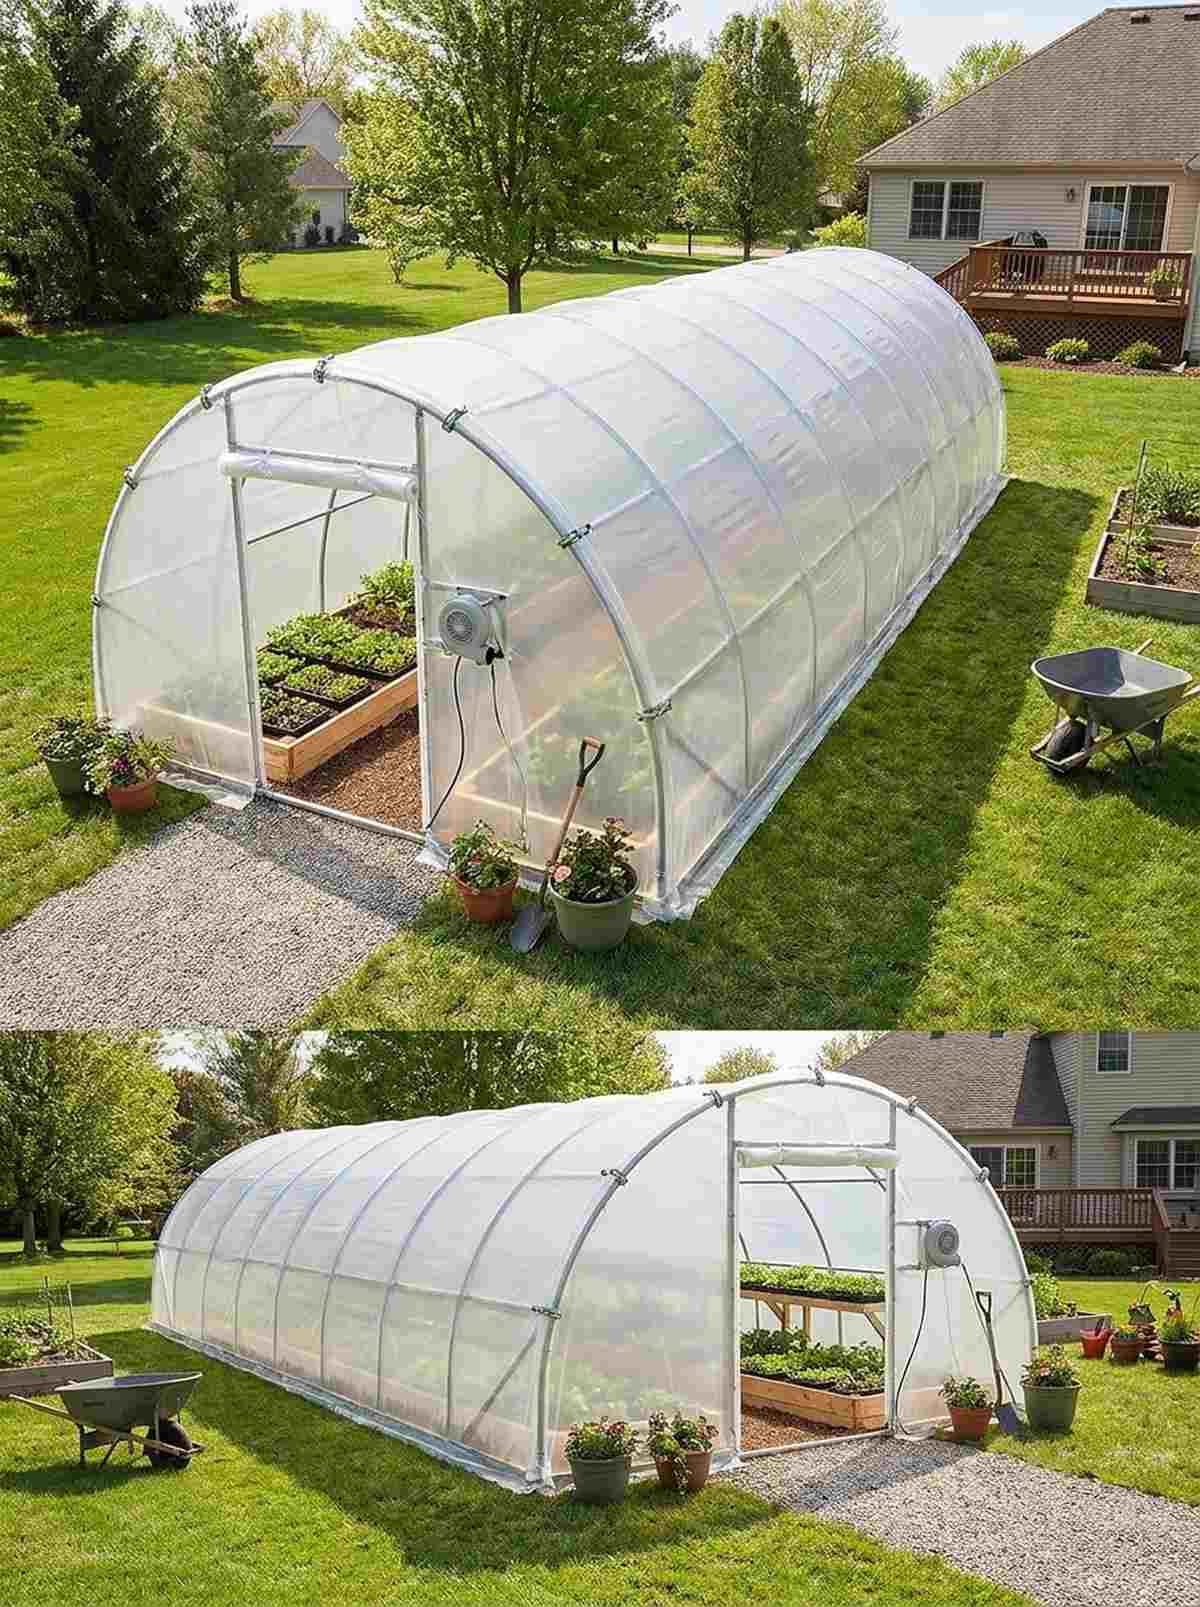
2. Quonset Hoop Greenhouse
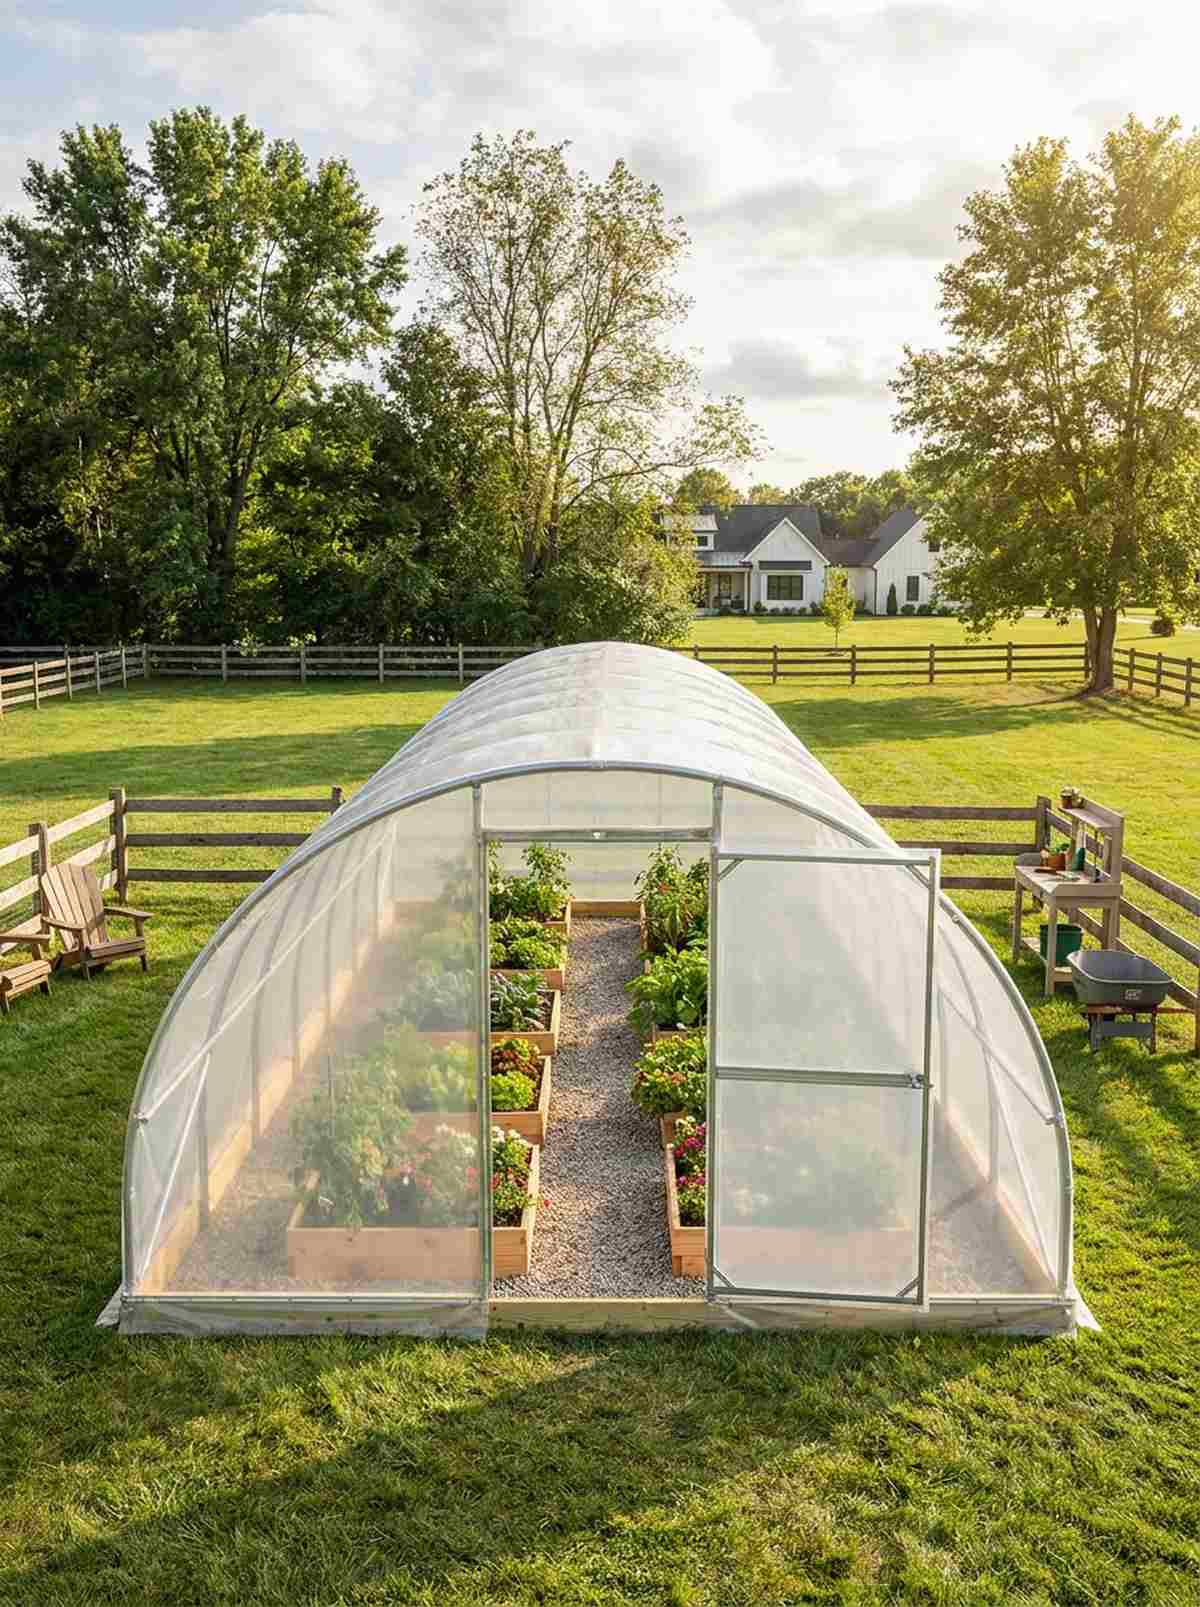
The curved outdoor plant tunnel feels like stepping into a hidden professional farm right behind your fence. Perfect for vast, wind-prone open plots where you need massive growing volume.
Most beginners suffer from cheap, saggy plastic, but using commercial tensioning techniques gives a designer-level finish to an otherwise basic structure. Utilizing professional greenhouse plastic supplies ensures aerodynamic wind deflection and maximum solar retention.
Expect to invest around $200–$500 for a solid, weather-resistant layout. It’s a massive volume upgrade that completely changes the growing game.
- Key Materials: Galvanized steel tubing and UV-resistant poly film
- Vibe / Style: Commercial market gardener
- Difficulty: Easy beginner setup
- Budget Breakdown: Steel hoops: $150 | Plastic film: $100 | Anchors: $50.
- Creator’s Tip: Always install a baseboard; it stops the plastic from tearing at ground level during harsh storms.
- Smart Sourcing: Commercial-grade 6-mil UV clear greenhouse film rolls and aluminum wiggle wire locking channels.
3. Gothic Arch Greenhouse
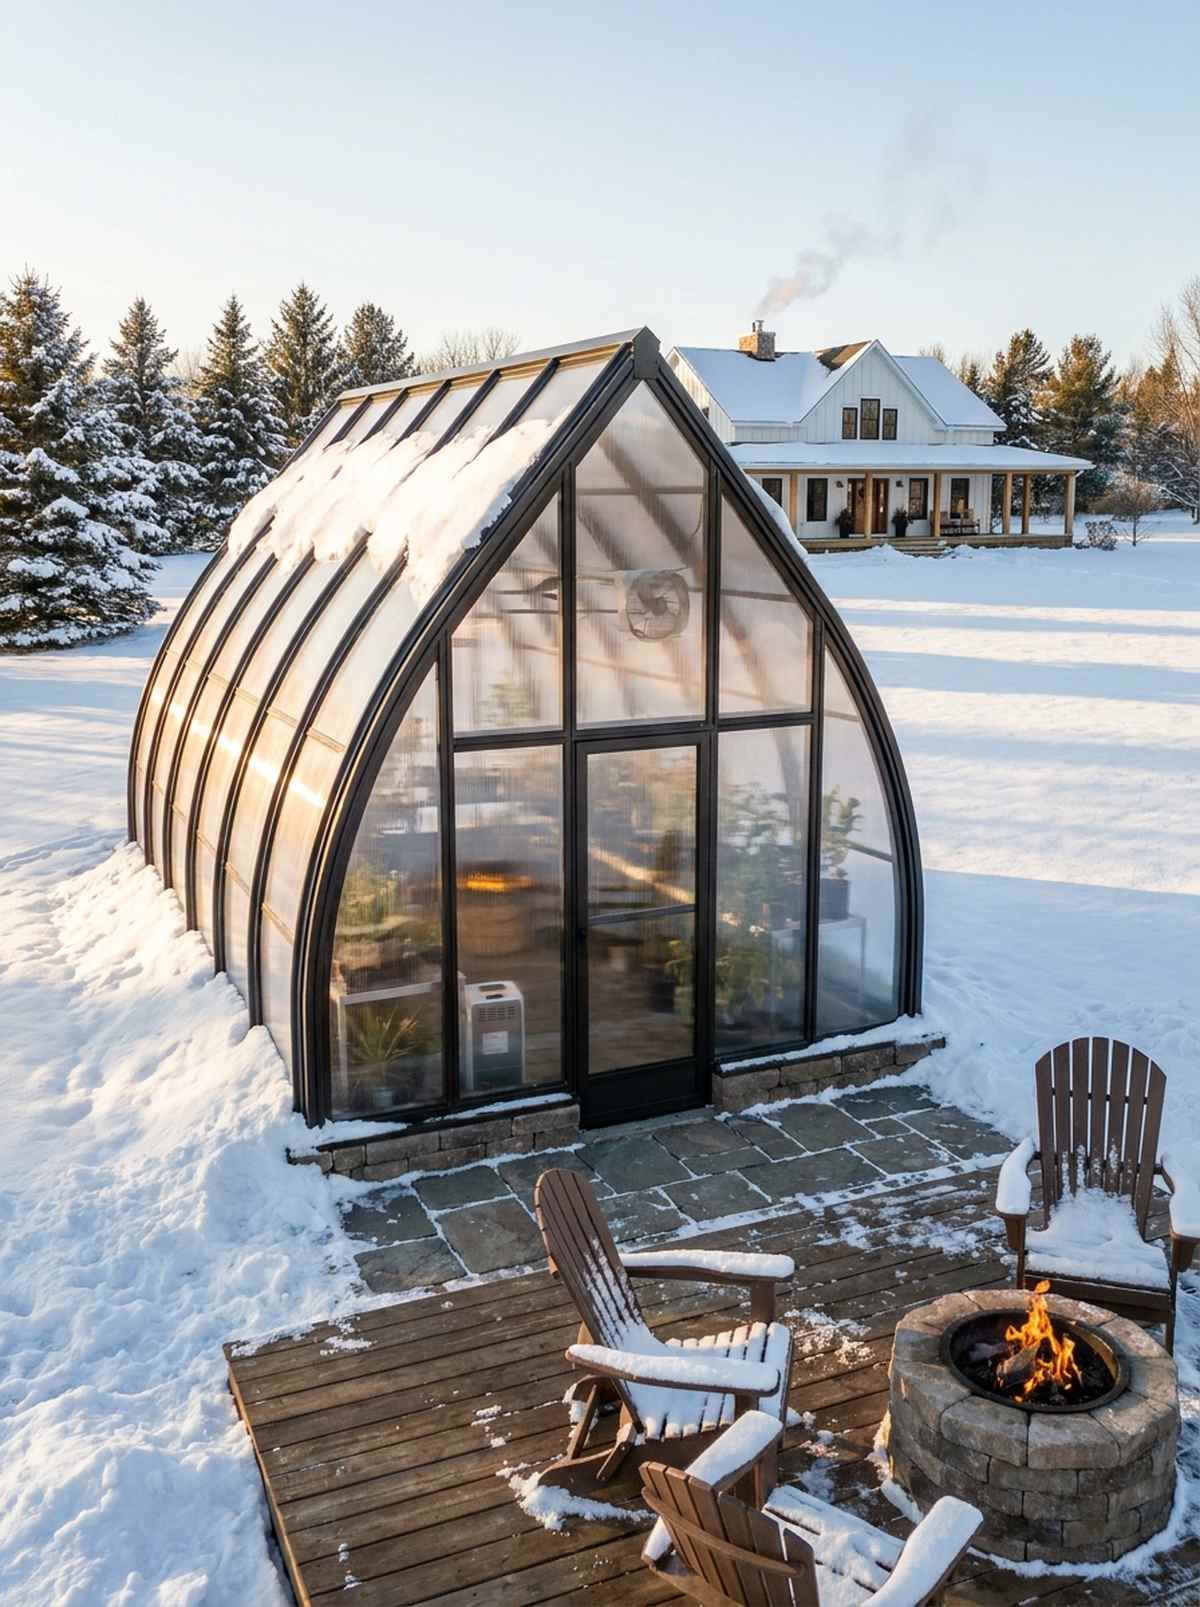
This pointed-roof winter garden feels like an enchanting sanctuary straight out of a storybook. Works exceptionally well for northern homesteads that face brutal winter snowfalls.
Swapping a standard curve for an apex peak creates an architectural statement that looks far more expensive than it is. Investing in rigid winter greenhouse accessories transforms this historical geometry into an unyielding four-season fortress.
You can assemble a robust arch system for roughly $600–$1,200. Pin this if you’re planning a severe-weather garden upgrade!
- Key Materials: Pre-bent metal arches and insulated panels
- Vibe / Style: Homestead fortress
- Difficulty: Moderate team build
- Budget Breakdown: Arch kit: $700 | Insulation panels: $400 | Hardware: $100.
- Creator’s Tip: Use double-layer inflation fans between the plastic to create a dead-air insulation barrier that drastically cuts heating bills.
- Smart Sourcing: Pre-bent gothic arch starter kits and weather-sealed ridge vent kits.
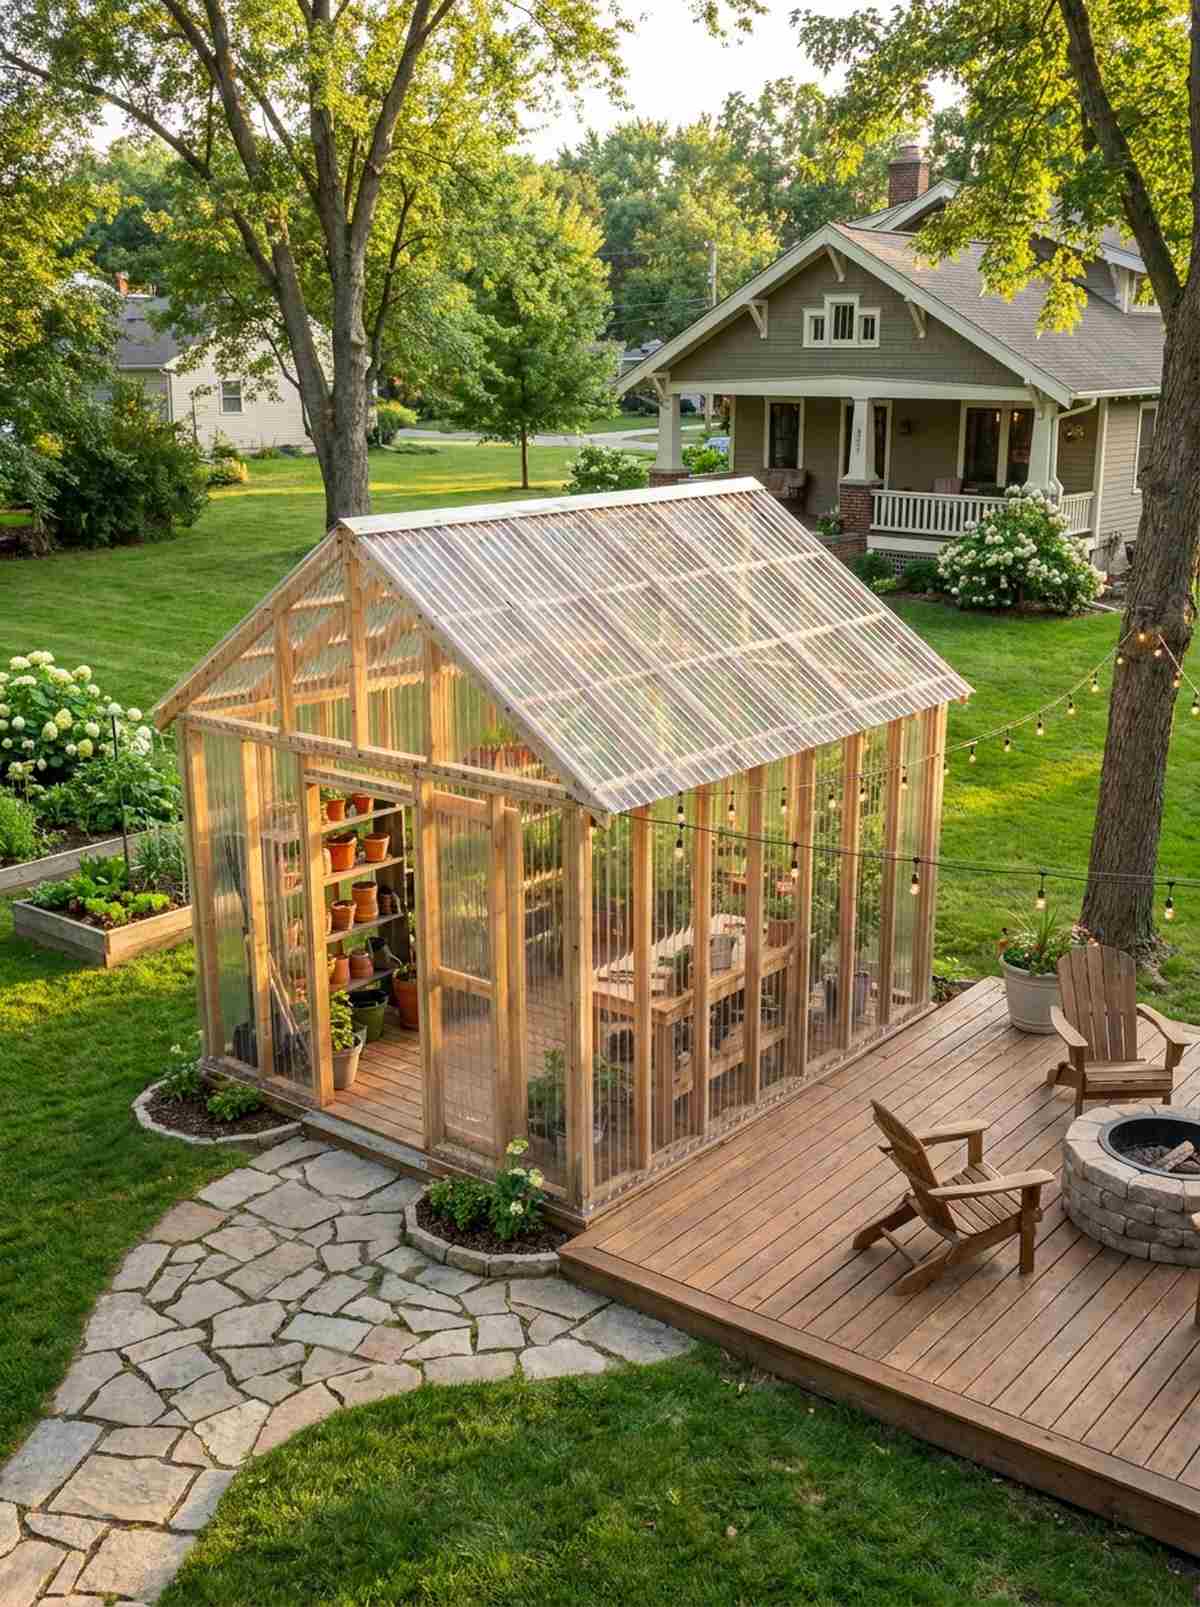
4. A-Frame Greenhouse
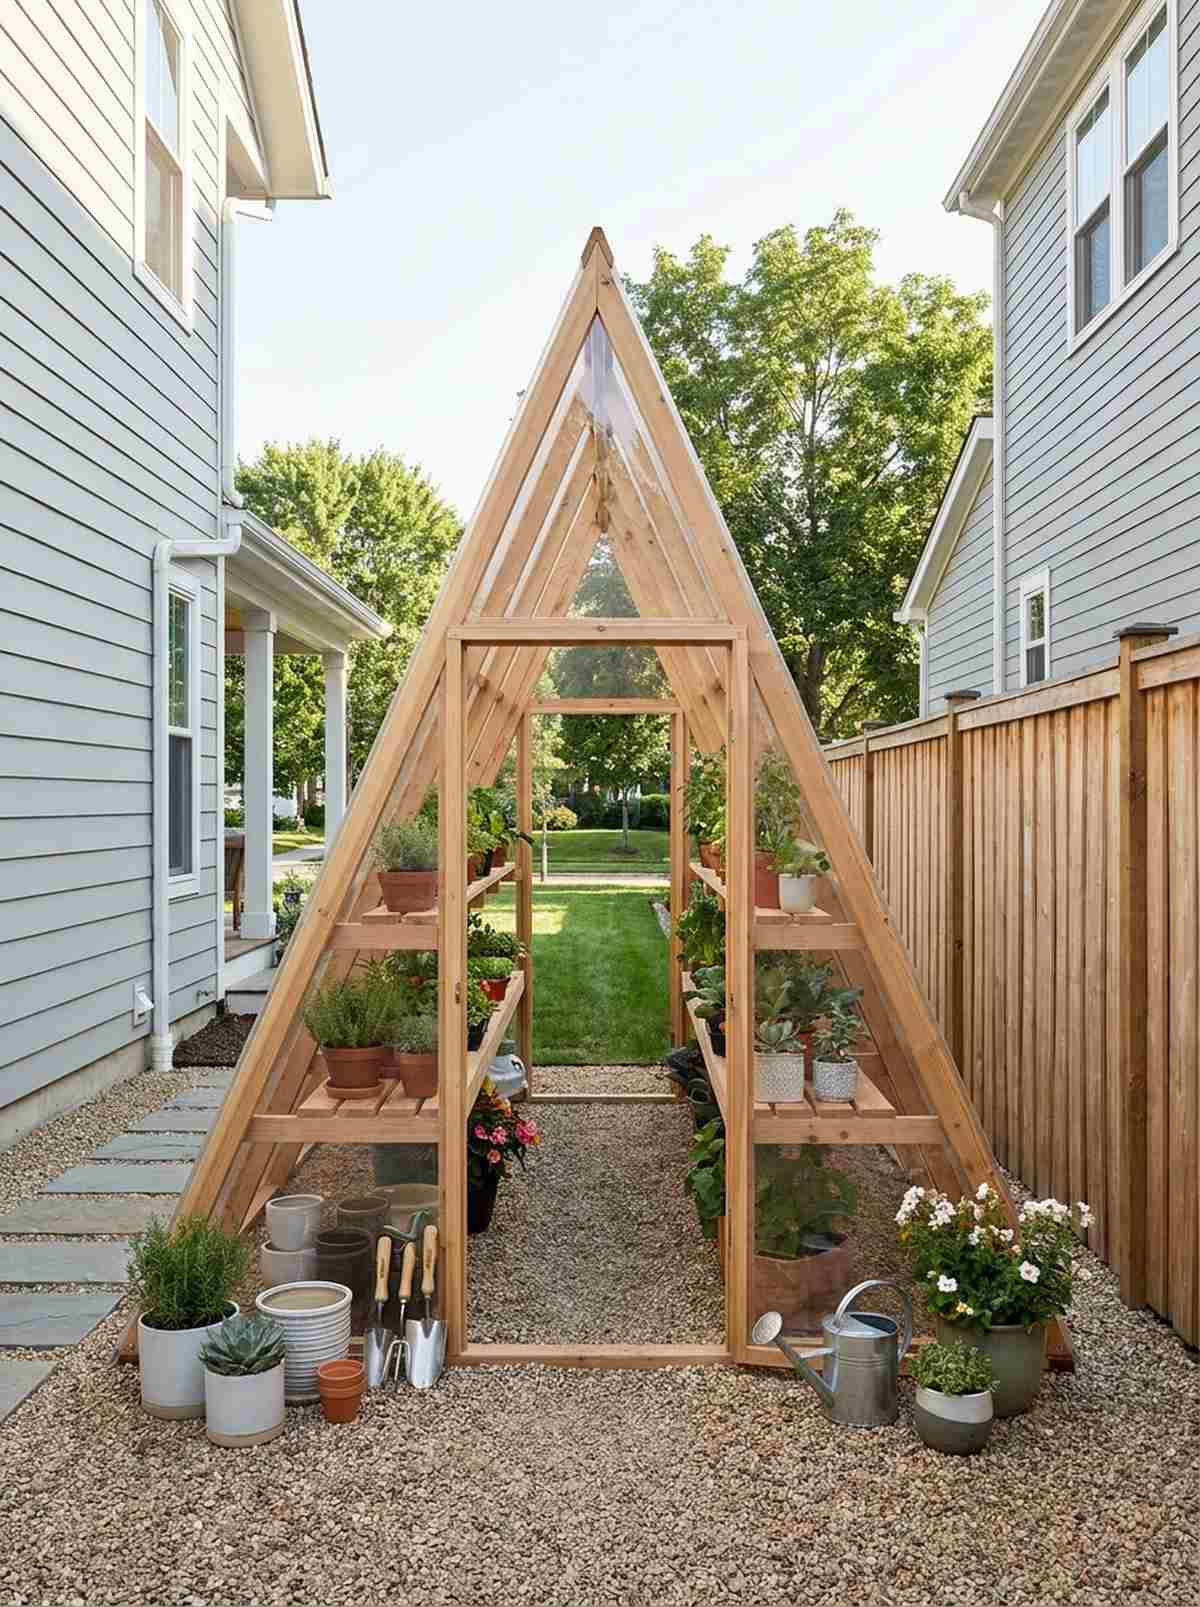
A minimalist triangular garden shelter feels like a chic, modern cabin shrunk down for your plants. A brilliant fit for narrow side yards where vertical space is the only option.
This layout instantly solves heavy rain pooling and elevates the entire aesthetic without requiring complex wall framing. Securing premium miniature greenhouse supplies ensures the acute angles remain perfectly watertight through heavy monsoons.
You can easily put this together for under $300. Highly recommended for a quick, stylish weekend win.
- Key Materials: Angled rafters and clear acrylic sheets
- Vibe / Style: Scandinavian minimalism
- Difficulty: Beginner-friendly carpentry
- Budget Breakdown: Lumber: $100 | Glazing: $150 | Fasteners: $30.
- Creator’s Tip: Maximize the interior by installing tiered stair-step shelving directly onto the slanted A-frame legs.
- Smart Sourcing: Pre-drilled heavy-duty corner brackets and shatterproof clear acrylic replacement panels.
5. Barn-Style Greenhouse
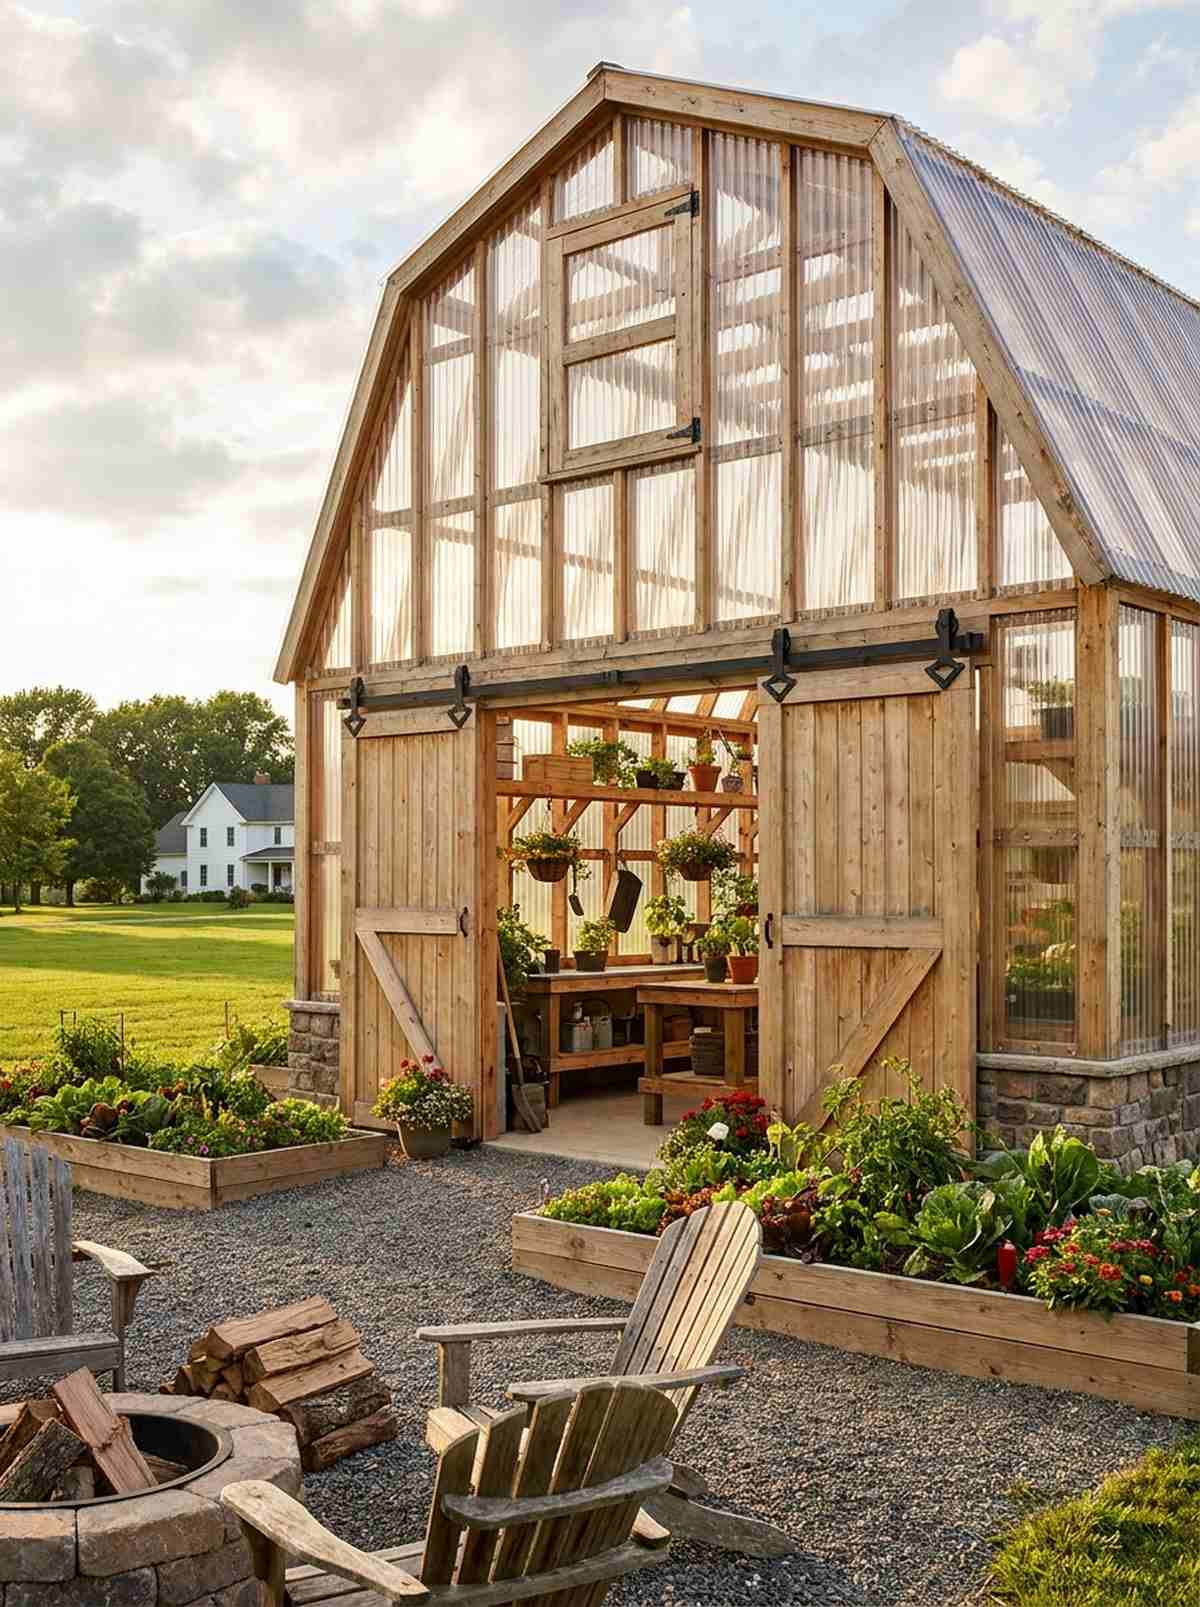
A towering rustic plant barn feels like stepping into a heritage farm’s bustling potting shed. Ideal for expansive rural properties demanding a space that doubles as a functional workshop.
Integrating gambrel rooflines delivers a bespoke architectural piece rather than a basic plastic box. Outfitting the interior with heavy-duty potting benches and overhead staging fully exploits the massive headroom this structure naturally provides.
Plan for a budget of $1,500–$3,000 for this large-scale build. Save this layout for your dream property vision board!
- Key Materials: Framing lumber, gambrel trusses, and polycarbonate
- Vibe / Style: Rustic farmhouse utility
- Difficulty: Advanced DIY framing
- Budget Breakdown: Wood framing: $800 | Roof panels: $900 | Barn doors: $300.
- Creator’s Tip: Install sliding track doors instead of swinging ones to save space and prevent wind damage during sudden gusts.
- Smart Sourcing: Heavy-duty sliding barn door hardware kits and corrugated clear roofing panels (bulk pack).
Most beginners completely ignore this next structural setup, missing out on a designer look that costs pennies on the dollar…
Material-Driven Designs For Performance & Budget
Glazing choices profoundly influence thermal performance, light quality, durability, and long-term maintenance requirements. Experienced growers select materials that align with climate conditions and crop demands.
6. Polycarbonate Panel Greenhouse
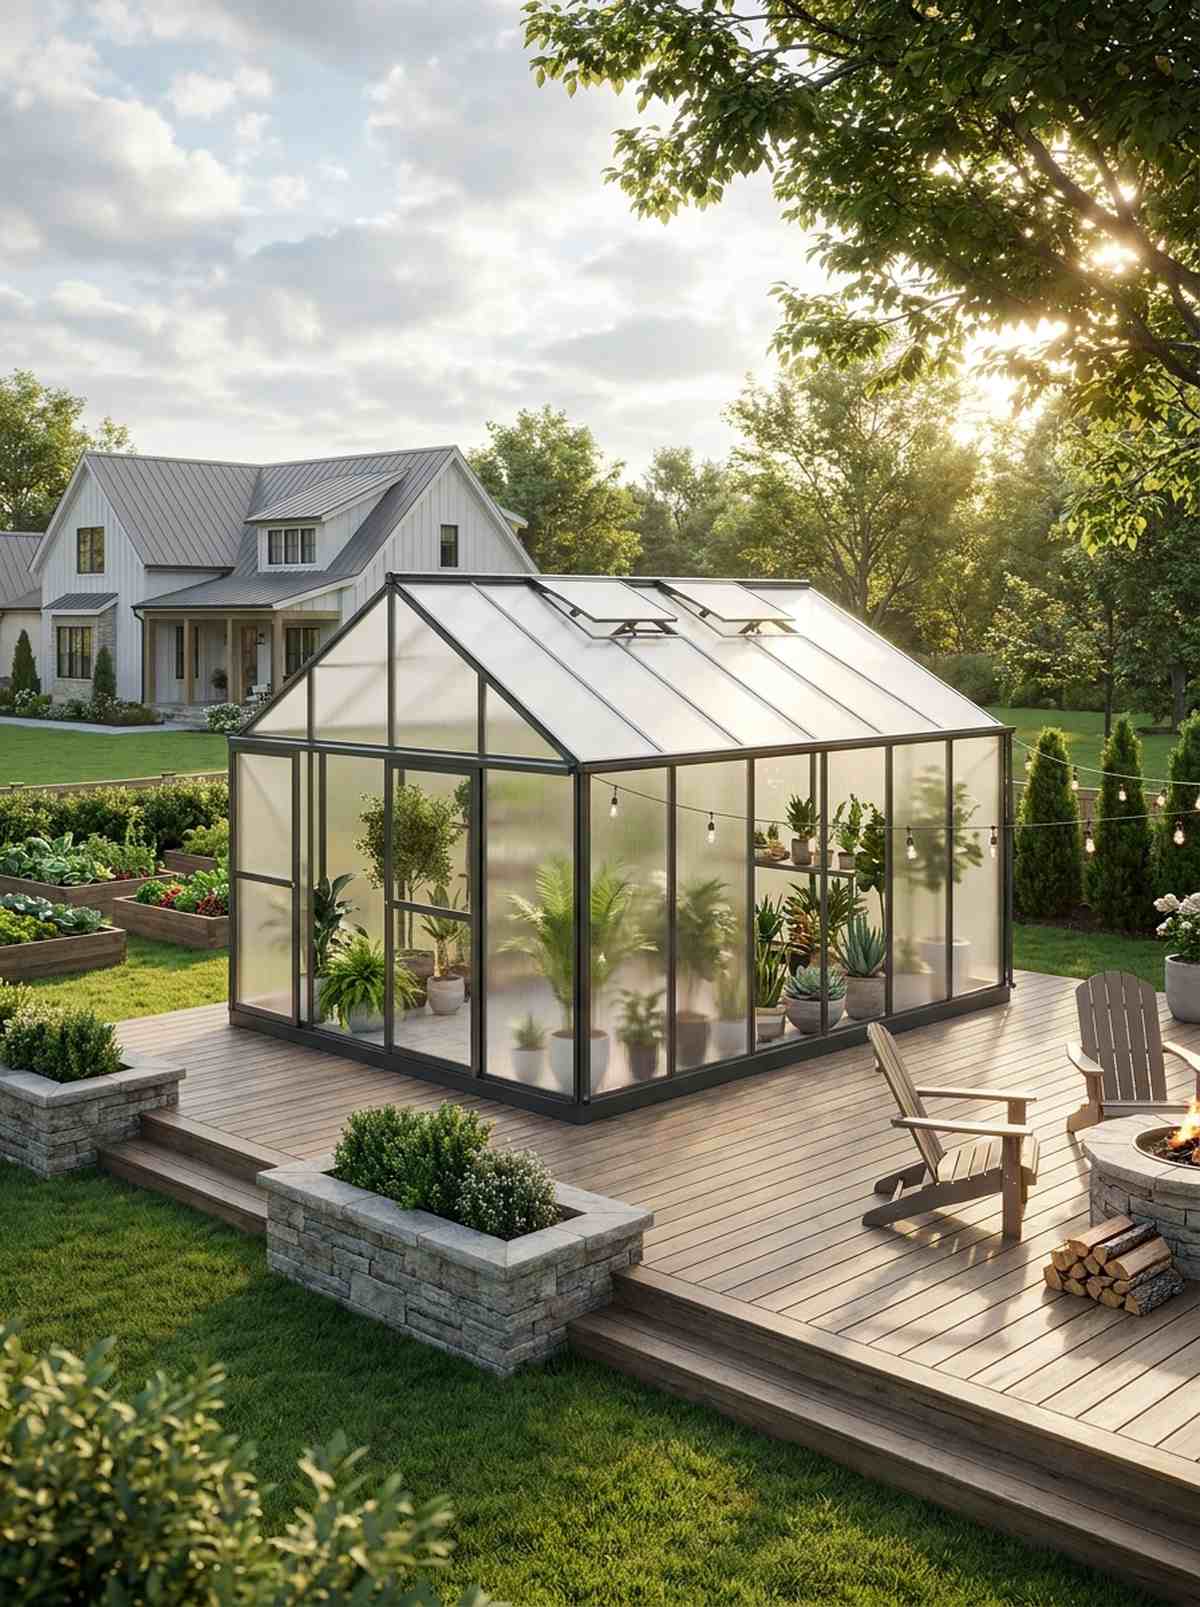
The frosted multi-wall plant house feels like a glowing, diffused sanctuary of calm when the sun hits it. Works exceptionally well for freezing climates demanding serious insulation without sacrificing light.
This material completely outclasses traditional single-pane setups, giving a high-tech, modern finish to any simple frame. Snapping together UV-coated polycarbonate sheets ensures you never deal with yellowing panels or shattered glass after a bad hailstorm.
You can retrofit an existing frame for about $400–$800. It’s a fast upgrade that completely changes the temperature vibe inside.
- Key Materials: Twin-wall polycarbonate and H-channel connectors
- Vibe / Style: Sleek functional modernism
- Difficulty: Easy panel installation
- Budget Breakdown: Panels: $500 | Aluminum tracks: $150 | Sealant: $50.
- Creator’s Tip: Always seal the top edge of the panels with foil tape and the bottom with breathable tape to stop internal algae growth.
- Smart Sourcing: Pre-cut UV-resistant twin-wall polycarbonate sheets and breathable anti-dust vent tape rolls.
7. Tempered Glass Greenhouse
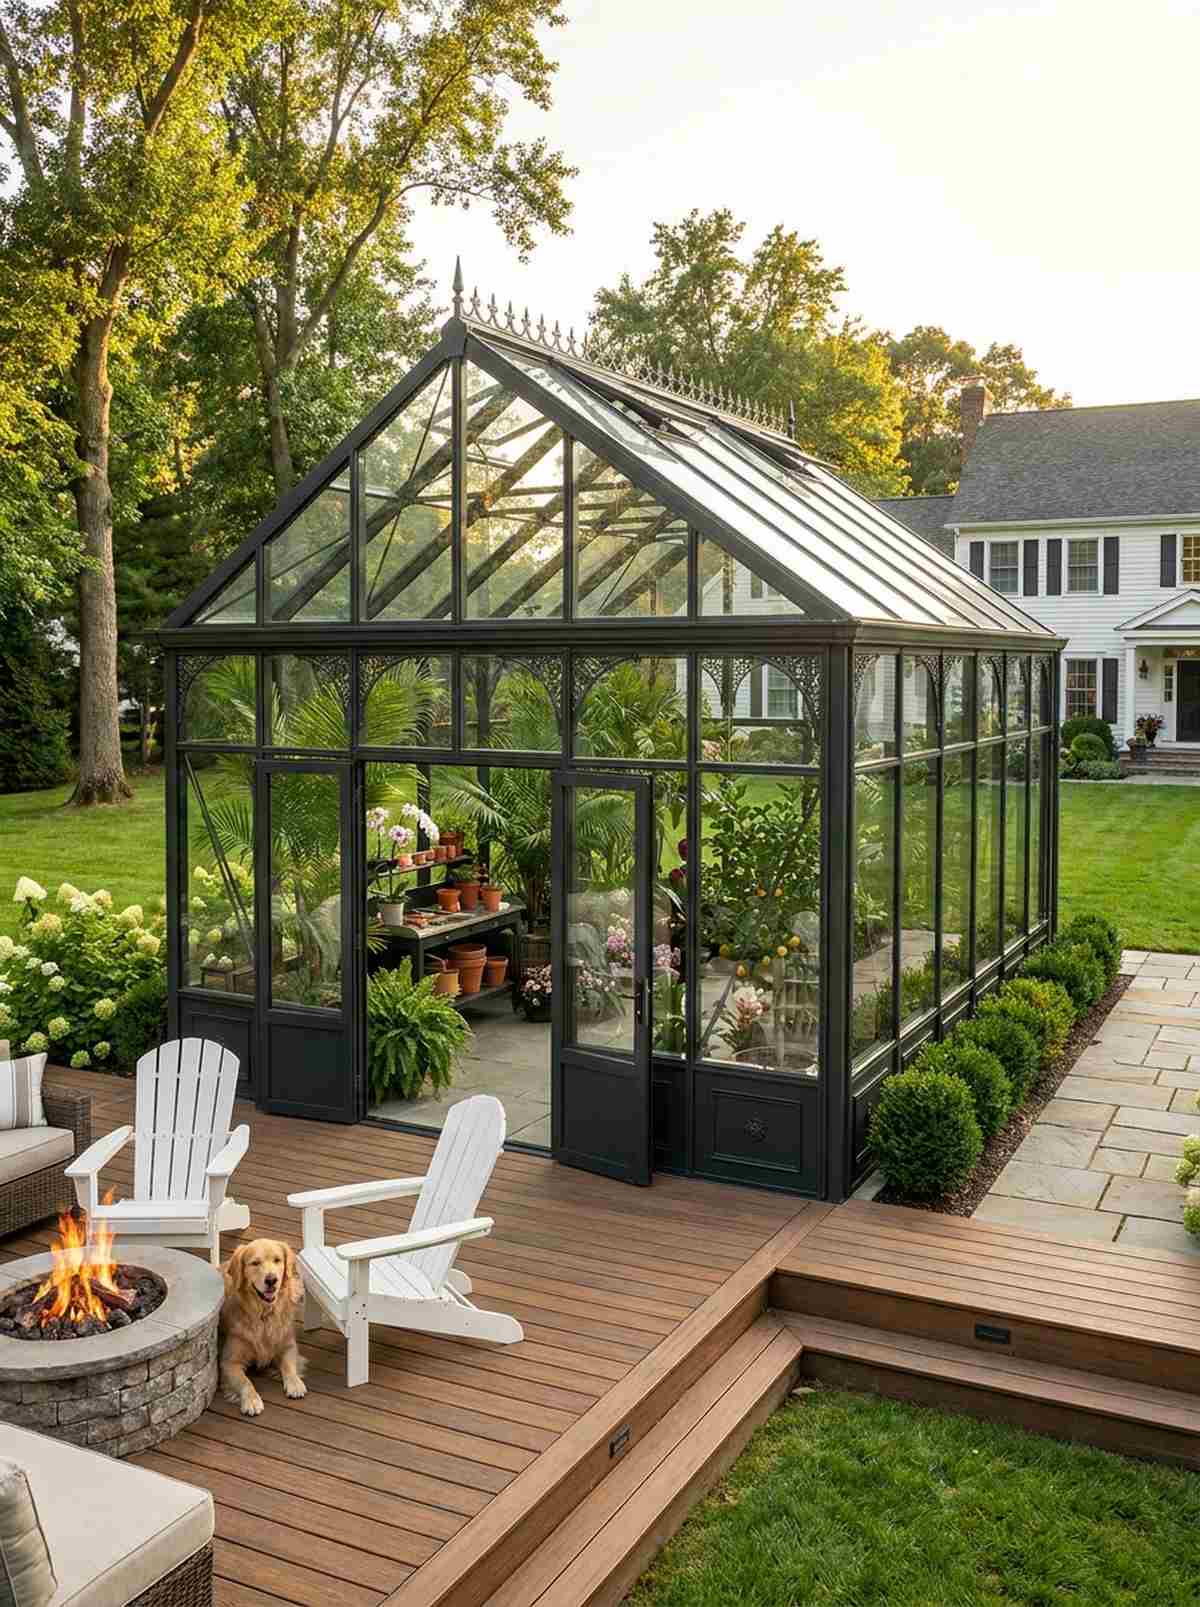
A crystal-clear glass botanical conservatory feels like an opulent Victorian sunroom attached to your lawn. Perfect for serious hobbyists aiming to maximize light transmission for sun-hungry exotic crops.
While heavier to handle, skipping plastic for real glass creates a luxury, bespoke architectural piece that lasts decades. Utilizing premium greenhouse glass gaskets stops thermal expansion cracks and elevates a DIY build to a professional standard.
This premium route usually costs between $2,000 and $5,000. Save this to your luxury garden goals board!
- Key Materials: Tempered safety glass and aluminum extrusions
- Vibe / Style: Victorian luxury conservatory
- Difficulty: Advanced handling required
- Budget Breakdown: Glass panes: $1,500 | Aluminum framing: $1,000 | Rubber seals: $200.
- Creator’s Tip: Only use tempered safety glass; standard window glass is a deadly hazard if a falling branch strikes the roof.
- Smart Sourcing: Pre-cut tempered safety glass bundles and weather-resistant EPDM rubber glazing gaskets.
8. Polyethylene Film Greenhouse
A taut wrapped garden tunnel feels like a hidden, warm oasis protecting your spring seedlings. A brilliant fit for market gardeners needing massive coverage on an ultra-tight budget.
Most people associate plastic with a cheap look, but a dual-layer inflated setup provides a surprisingly premium, pillowy aesthetic. Adding a simple greenhouse inflation blower kit completely changes the game, adding rigid strength and an invisible blanket of insulation.
You can cover a massive frame for just $100–$300. Highly recommended if you want maximum square footage for minimum cash.
- Key Materials: 6-mil poly film and snap clamps
- Vibe / Style: Pragmatic crop protection
- Difficulty: Very easy beginner setup
- Budget Breakdown: Film roll: $120 | Wiggle wire: $80 | Blower fan: $60.
- Creator’s Tip: Install the plastic on a warm, sunny day so the material stretches fully; when it cools, it will pull drum-tight.
- Smart Sourcing: UV-stabilized 6-mil greenhouse film rolls and dual-layer greenhouse inflation fan kits.
9. Corrugated Polycarbonate Greenhouse
The wavy textured transparent garden shed feels like a retro-chic sun trap hiding in the backyard corner. Works flawlessly for DIY builders wanting to use standard roofing techniques with a modern twist.
The ridged profile effortlessly spans longer gaps, transforming a basic lumber frame into an incredibly rigid structure. Tossing in weatherproof neoprene sealing washers guarantees a leak-proof finish that looks professionally installed.
You can glaze a medium structure for roughly $300–$600. Pin this if you want an indestructible, easy-to-clean setup!
- Key Materials: Corrugated clear panels and roofing screws
- Vibe / Style: Retro industrial chic
- Difficulty: Easy weekend roofing
- Budget Breakdown: Corrugated panels: $350 | Roofing screws: $40 | Flashing: $60.
- Creator’s Tip: Pre-drill your panels slightly larger than the screw shaft to allow the plastic to expand in the summer heat without cracking.
- Smart Sourcing: Corrugated clear polycarbonate roofing panels and self-tapping screws with neoprene washers (bulk pack).
💡 Must-Have Supplies for High-End Setups
To build these stunning environments faster and ensure they withstand extreme weather, skip the generic hardware aisles and invest directly in proper horticultural kits.
- Base & Support: Heavy-duty galvanized steel anchor ground kits
- Setup Tools: Pre-calibrated digital greenhouse hygrometer starter sets
- Weather/Durability Protection: Commercial-grade UV-resistant greenhouse film rolls
10. Twin-Wall Acrylic Greenhouse
This ultra-clear insulated plant room feels like a pristine jewel box glowing in the afternoon sun. Perfect for high-end growers who refuse to compromise on light transmission but desperately need winter insulation.
Swapping standard plastic for acrylic delivers a bespoke architectural piece with unmatched optical clarity and UV resistance. Utilizing proper premium greenhouse aluminum extrusions keeps the material securely locked in while accommodating its unique thermal expansion rate.
This luxury glazing typically runs $1,500–$3,000. It’s a permanent upgrade that completely redefines your backyard aesthetic.
- Key Materials: Twin-wall acrylic sheets and specialty edging
- Vibe / Style: Pristine modern luxury
- Difficulty: Moderate careful handling
- Budget Breakdown: Acrylic sheets: $1,800 | Extrusions: $600 | Base frame: $400.
- Creator’s Tip: Leave a 1/8-inch gap at all edges when framing; acrylic expands more than polycarbonate and will bow if installed too tight.
- Smart Sourcing: Pre-cut high-clarity twin-wall acrylic sheets and aluminum H-channel connector kits.
The upcoming material choice literally transforms a cheap plastic vibe into a high-end conservatory aesthetic overnight…
Space-Efficient Structures For Compact Properties
Urban and suburban gardens with limited square footage require creative approaches that maximize vertical growing capacity or integrate with existing architecture. These designs prove you don’t need acreage to enjoy protected cultivation.
11. Lean-To Greenhouse
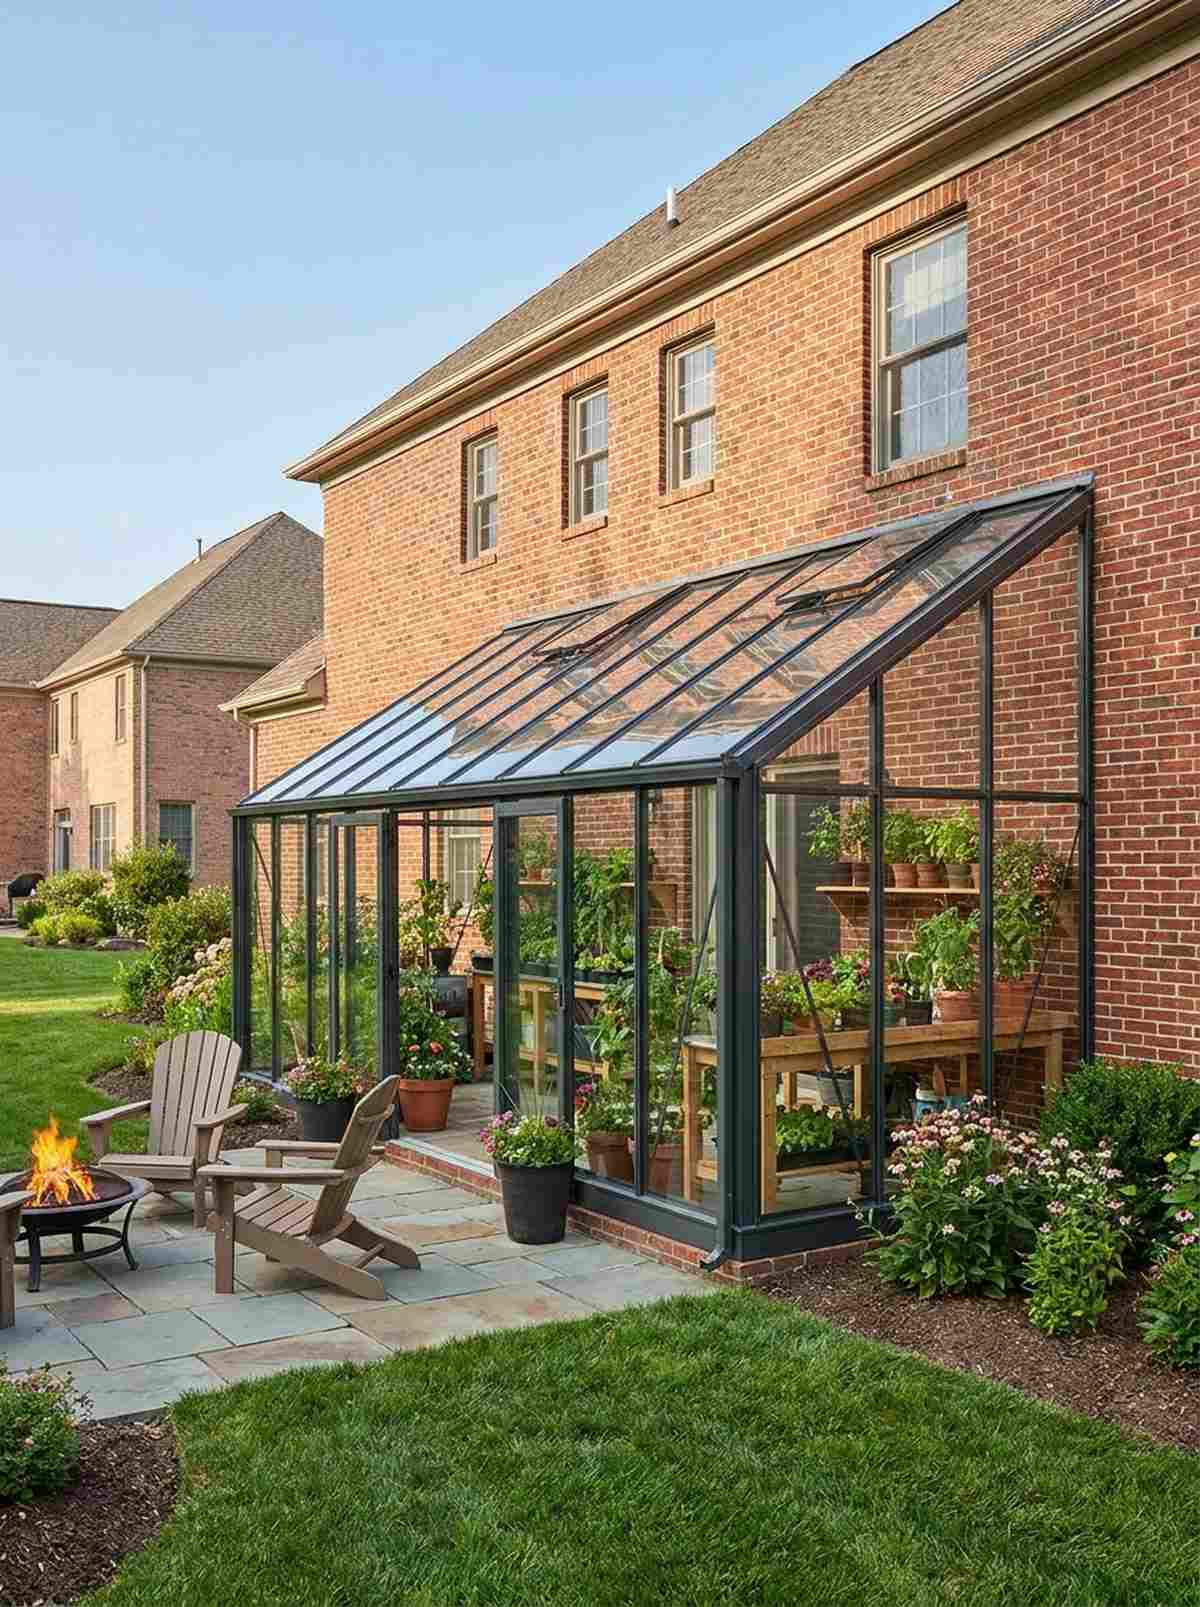
A sleek attached sunroom garden feels like a cozy, hidden extension of your living room. Works exceptionally well for tight suburban yards where connecting to a heated brick wall offers massive thermal advantages.
This setup bypasses the need for a freestanding base, giving a designer-level finish while slashing your material bill in half. Incorporating heavy-duty structural ledger boards turns an unused exterior wall into a highly productive, year-round growing chamber.
You can easily pull this off for around $400–$900. Pin this if you want to upgrade your home’s exterior instantly!
- Key Materials: Sloped rafters and ledger boards
- Vibe / Style: Integrated home extension
- Difficulty: Intermediate wall-mounting
- Budget Breakdown: Lumber/Ledger: $150 | Glazing: $300 | Masonry anchors: $50.
- Creator’s Tip: Position this on a south-facing brick wall; the brick absorbs solar heat all day and radiates it into the greenhouse at night.
- Smart Sourcing: Heavy-duty masonry lag bolt kits and pre-sloped aluminum greenhouse roof kits.
12. Window Box Greenhouse
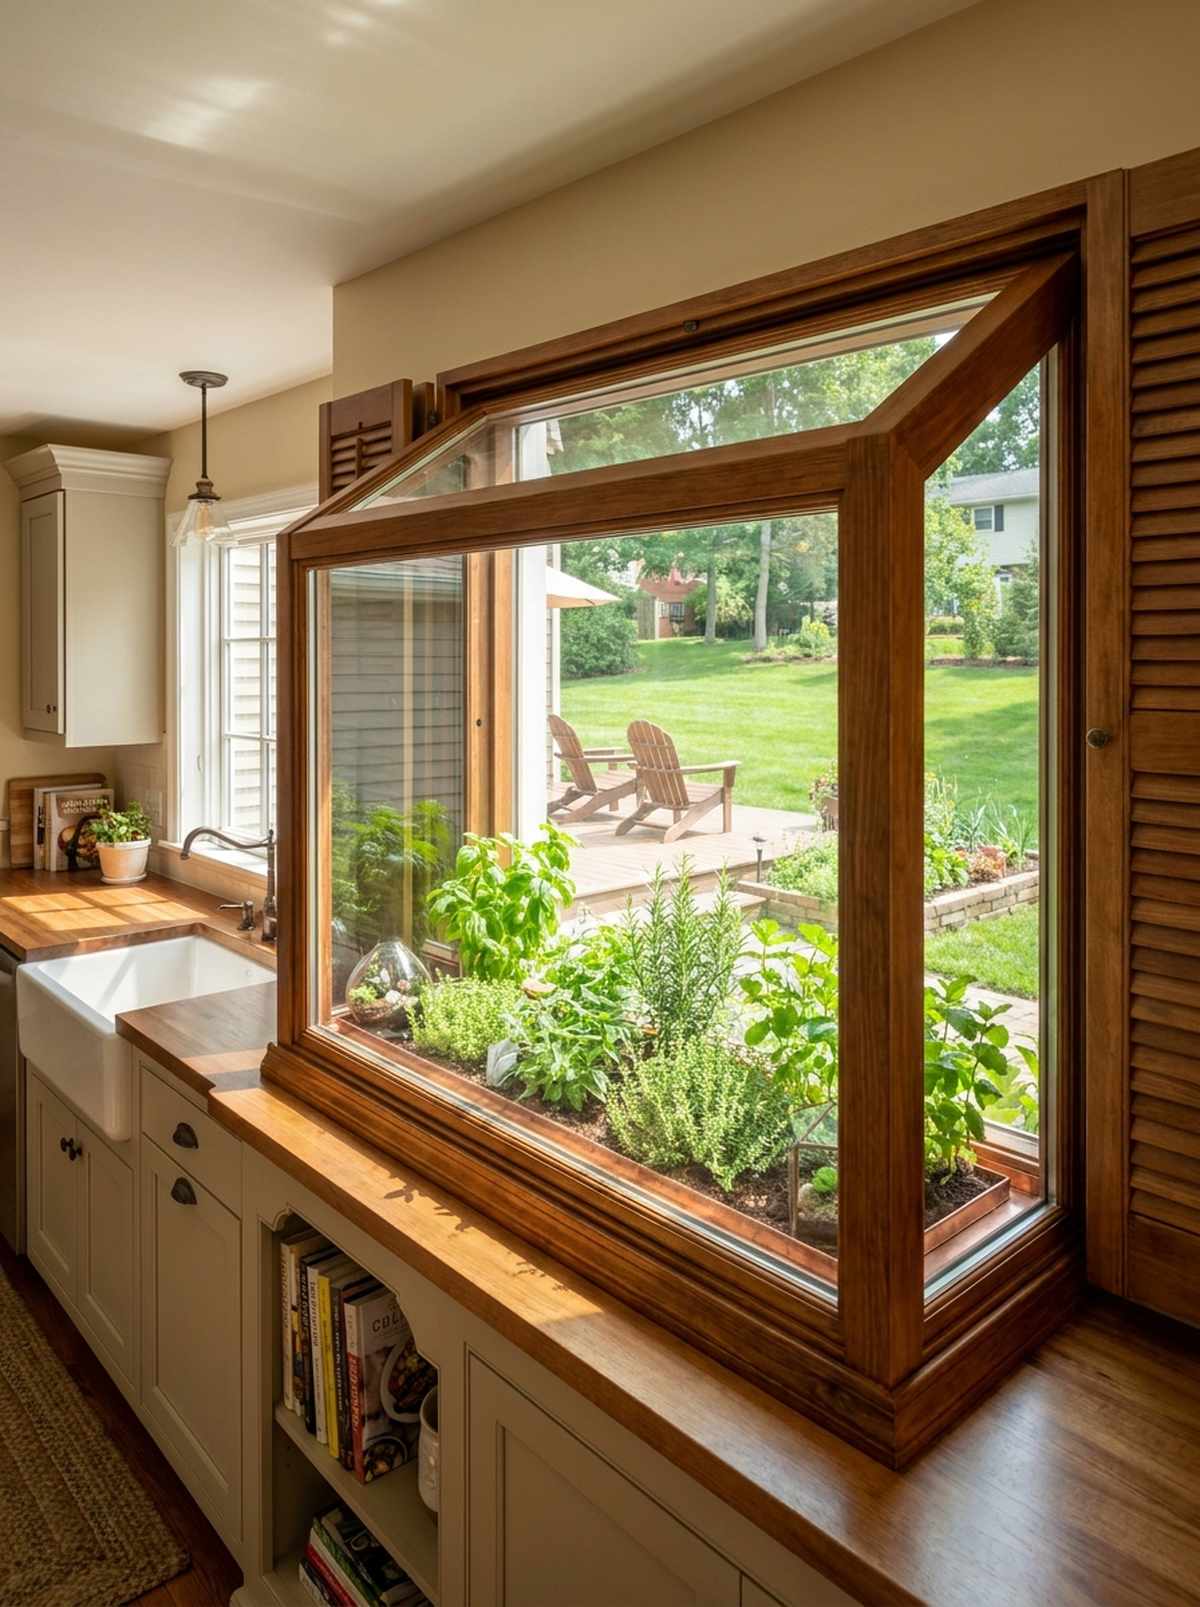
This protruding glass mini-garden feels like a tiny magical terrarium extending right out of your kitchen. Ideal for apartment renters or condo owners who want instant fresh herbs without sacrificing floor space.
Skipping a massive backyard build for a window unit delivers a surprisingly premium look that brings the outdoors inside. Using indoor terrarium accessories and custom insulated shutters keeps the microclimate perfectly stable even during a blizzard.
Setup costs barely scratch $100–$250. Highly recommended for a quick, space-saving weekend win.
- Key Materials: Box framing and tempered glass panes
- Vibe / Style: Culinary chef’s window
- Difficulty: Easy beginner DIY
- Budget Breakdown: Box frame: $50 | Glass/Acrylic: $80 | Weatherstripping: $20.
- Creator’s Tip: Line the bottom with a custom copper drip tray to protect your wooden window sill from accidental overwatering.
- Smart Sourcing: Pre-cut shatterproof acrylic window panels and heavy-duty copper plant drip trays.
13. Vertical Tower Greenhouse
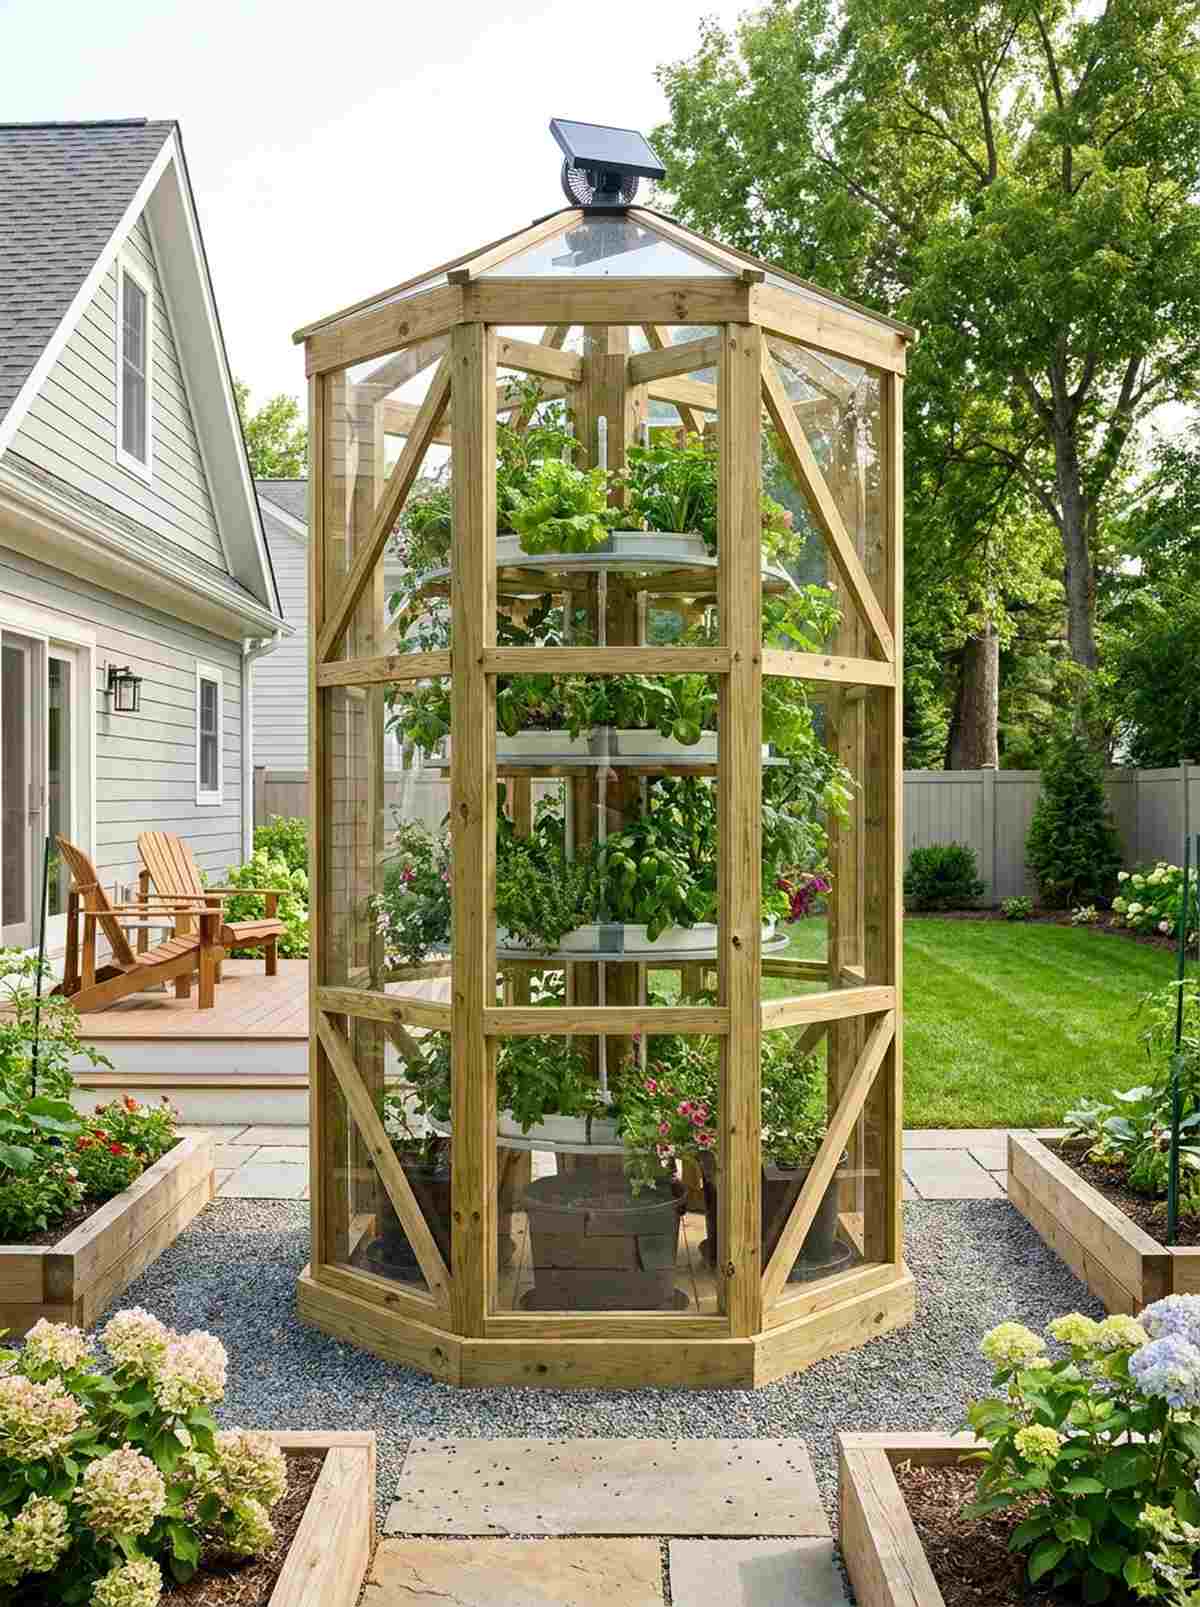
An eye-catching octagonal plant pillar feels like a modern art sculpture bursting with greenery. Perfect for narrow side yards where growing up is the only way to maximize your harvest.
Most urban setups look cluttered, but a towering geometric design transforms a basic frame into a luxury conservatory feature. Integrating vertical hydroponic tower supplies within the shell allows you to grow dozens of crops in a microscopic footprint.
You can build this striking tower for around $300–$600. Save this to your small-space garden board!
- Key Materials: Treated corner posts and rotating shelves
- Vibe / Style: Urban architectural focal point
- Difficulty: Moderate vertical framing
- Budget Breakdown: Posts & Bracing: $150 | Glazing: $200 | Shelving hardware: $100.
- Creator’s Tip: Install a solar-powered vent fan at the very peak to actively pull cool air from the bottom vents upwards.
- Smart Sourcing: Heavy-duty lazy susan rotating hardware (bulk pack) and solar-powered greenhouse vent fan kits.
14. Balcony Mini Greenhouse
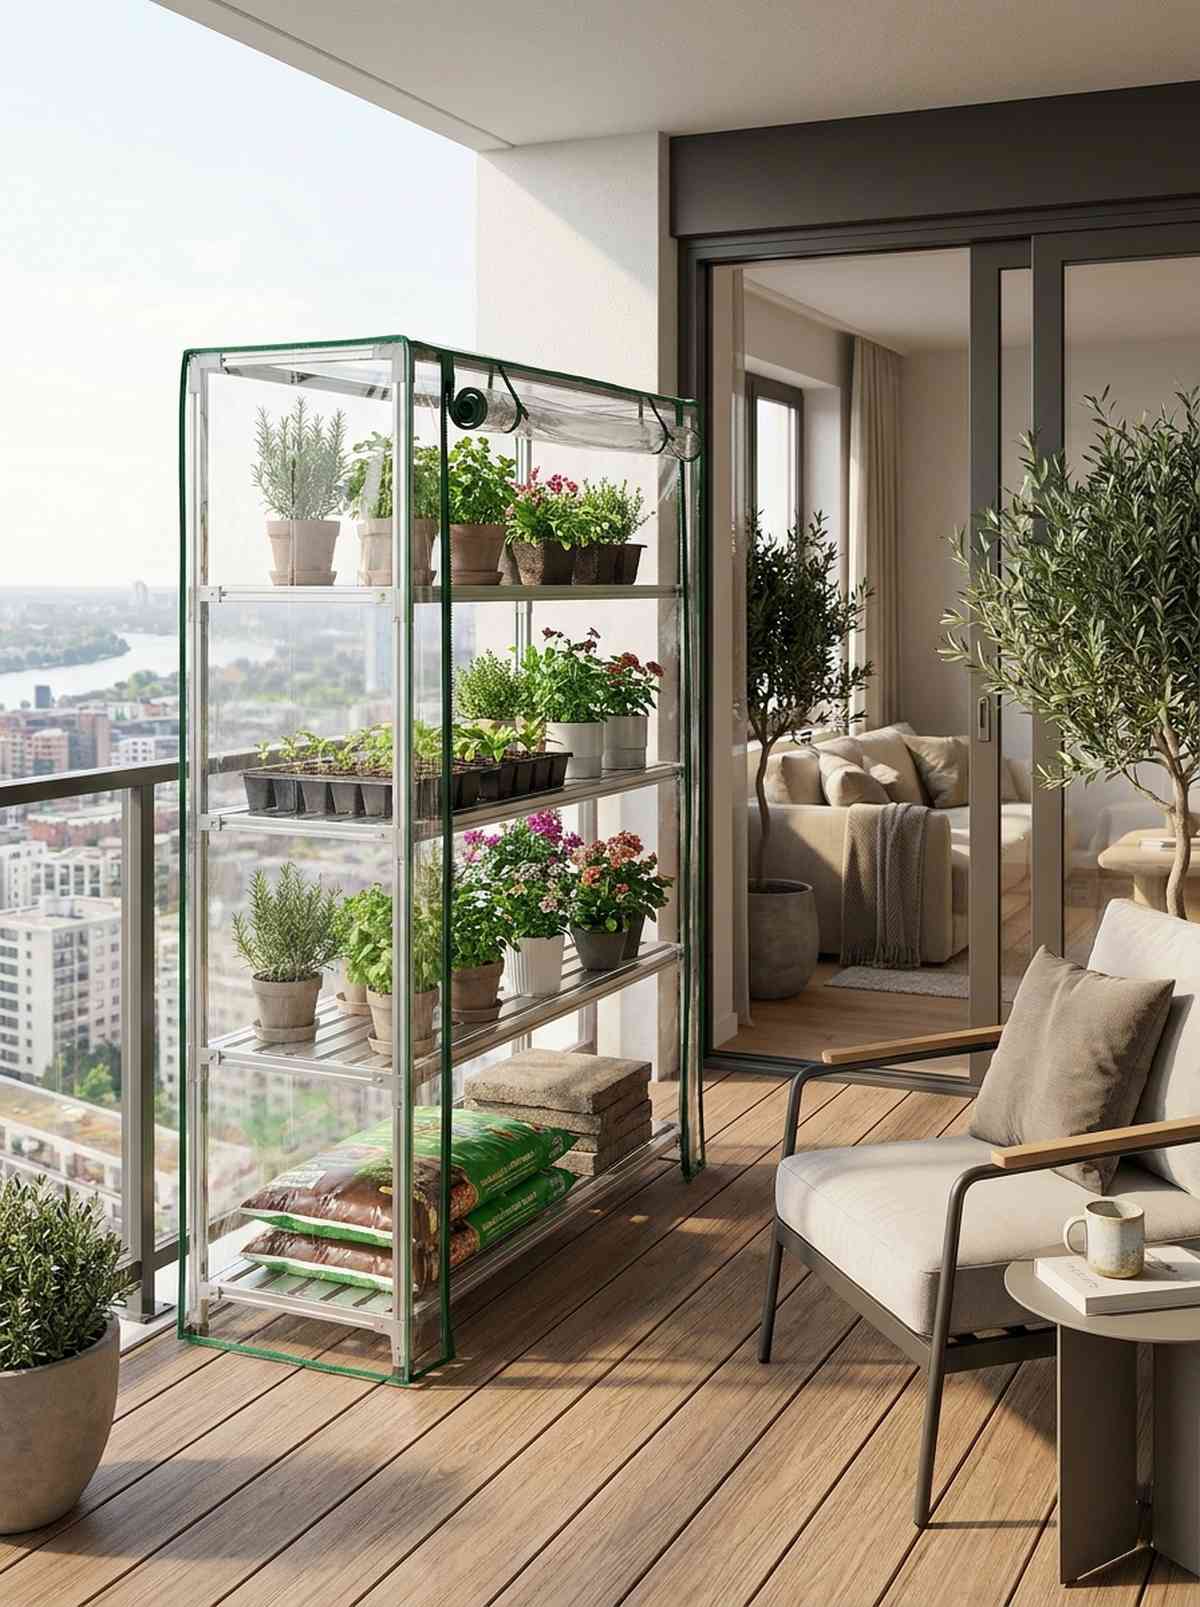
This tiered zip-up patio plant shelter feels like a bustling miniature nursery right outside your sliding glass door. Works flawlessly for high-rise balconies needing instant wind and frost protection.
Opting for a structured tier system looks far more expensive than scattering random pots across your deck. Snagging portable seed starting greenhouse kits provides an immediate, tool-free setup that can be disassembled the moment you move.
You can easily grab one of these for $40–$100. It’s a fast upgrade that completely changes your balcony vibe.
- Key Materials: Aluminum shelving and zippered PVC cover
- Vibe / Style: High-density urban green space
- Difficulty: Zero-tool assembly
- Budget Breakdown: Shelf frame: $40 | PVC cover: $30 | Zip ties: $5.
- Creator’s Tip: Place heavy paving stones or bags of potting soil on the bottom shelf to anchor the unit against strong balcony wind gusts.
- Smart Sourcing: Portable 4-tier mini greenhouse starter kits and heavy-duty clear PVC replacement covers.
15. Corner Wedge Greenhouse
The clever triangular corner sun trap feels like a secret garden pocket hidden away from the wind. A brilliant fit for dead L-shaped corners along privacy fences that usually go completely unused.
Transforming dead space into a glowing wedge provides a boutique nursery feel while naturally blocking harsh weather. Using space-saving garden accessories ensures you get maximum internal volume without dominating your usable lawn area.
You can easily frame this out for around $200–$500. Pin this if you want to reclaim your dead backyard corners!
- Key Materials: Corner studs and custom angled roofing
- Vibe / Style: Clever geometric hideaway
- Difficulty: Intermediate custom framing
- Budget Breakdown: Wood framing: $150 | Polycarbonate: $200 | Hinges: $30.
- Creator’s Tip: Use the existing fence as your back walls, but line them with reflective foil bubble wrap to bounce sunlight back onto the plants.
- Smart Sourcing: Reflective double-bubble foil insulation rolls and custom angle framing bracket kits.
Wait until you see this next space-saving hack—it’s the exact reason urban growers are out-producing massive traditional plots…
Season Extension Systems For Cold Climate Gardening
Protective structures that bridge the gap between outdoor gardening and full greenhouse cultivation extend harvests by 6 to 8 weeks in spring and fall. These economical systems deliver impressive results without the investment required for year-round structures.
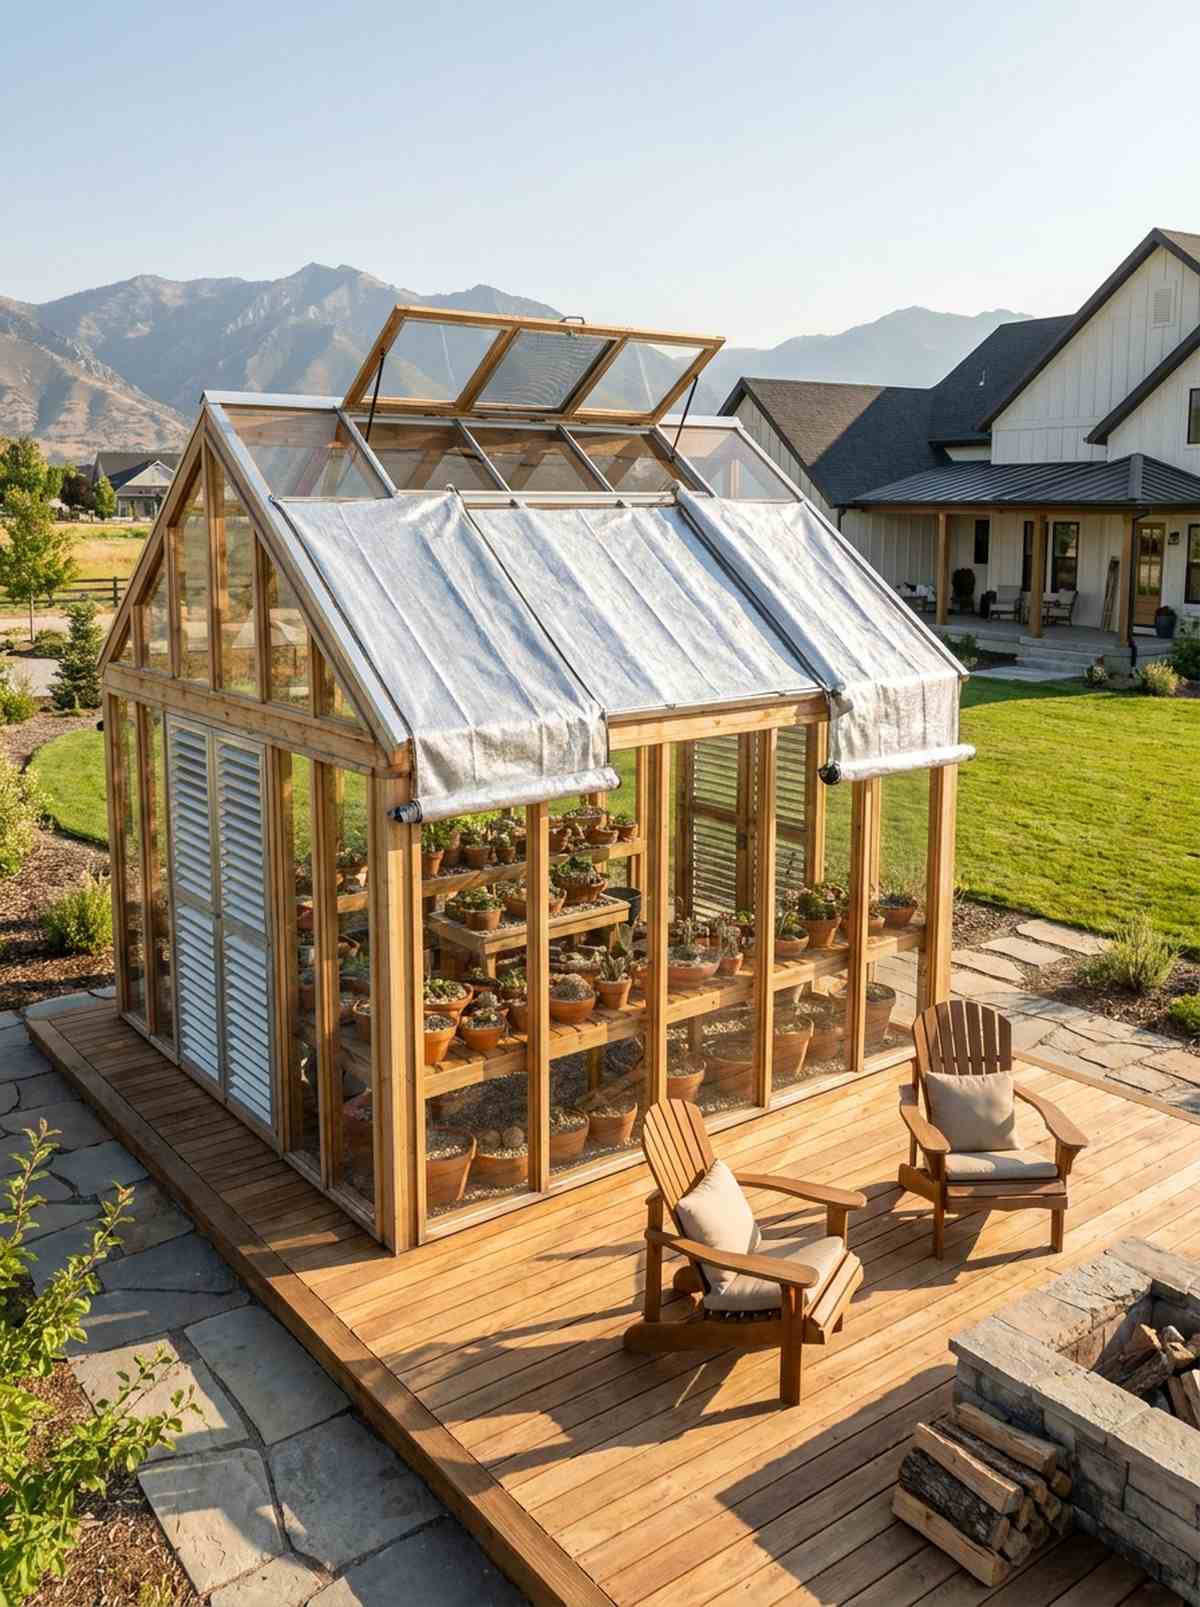
16. Cold Frame Structure
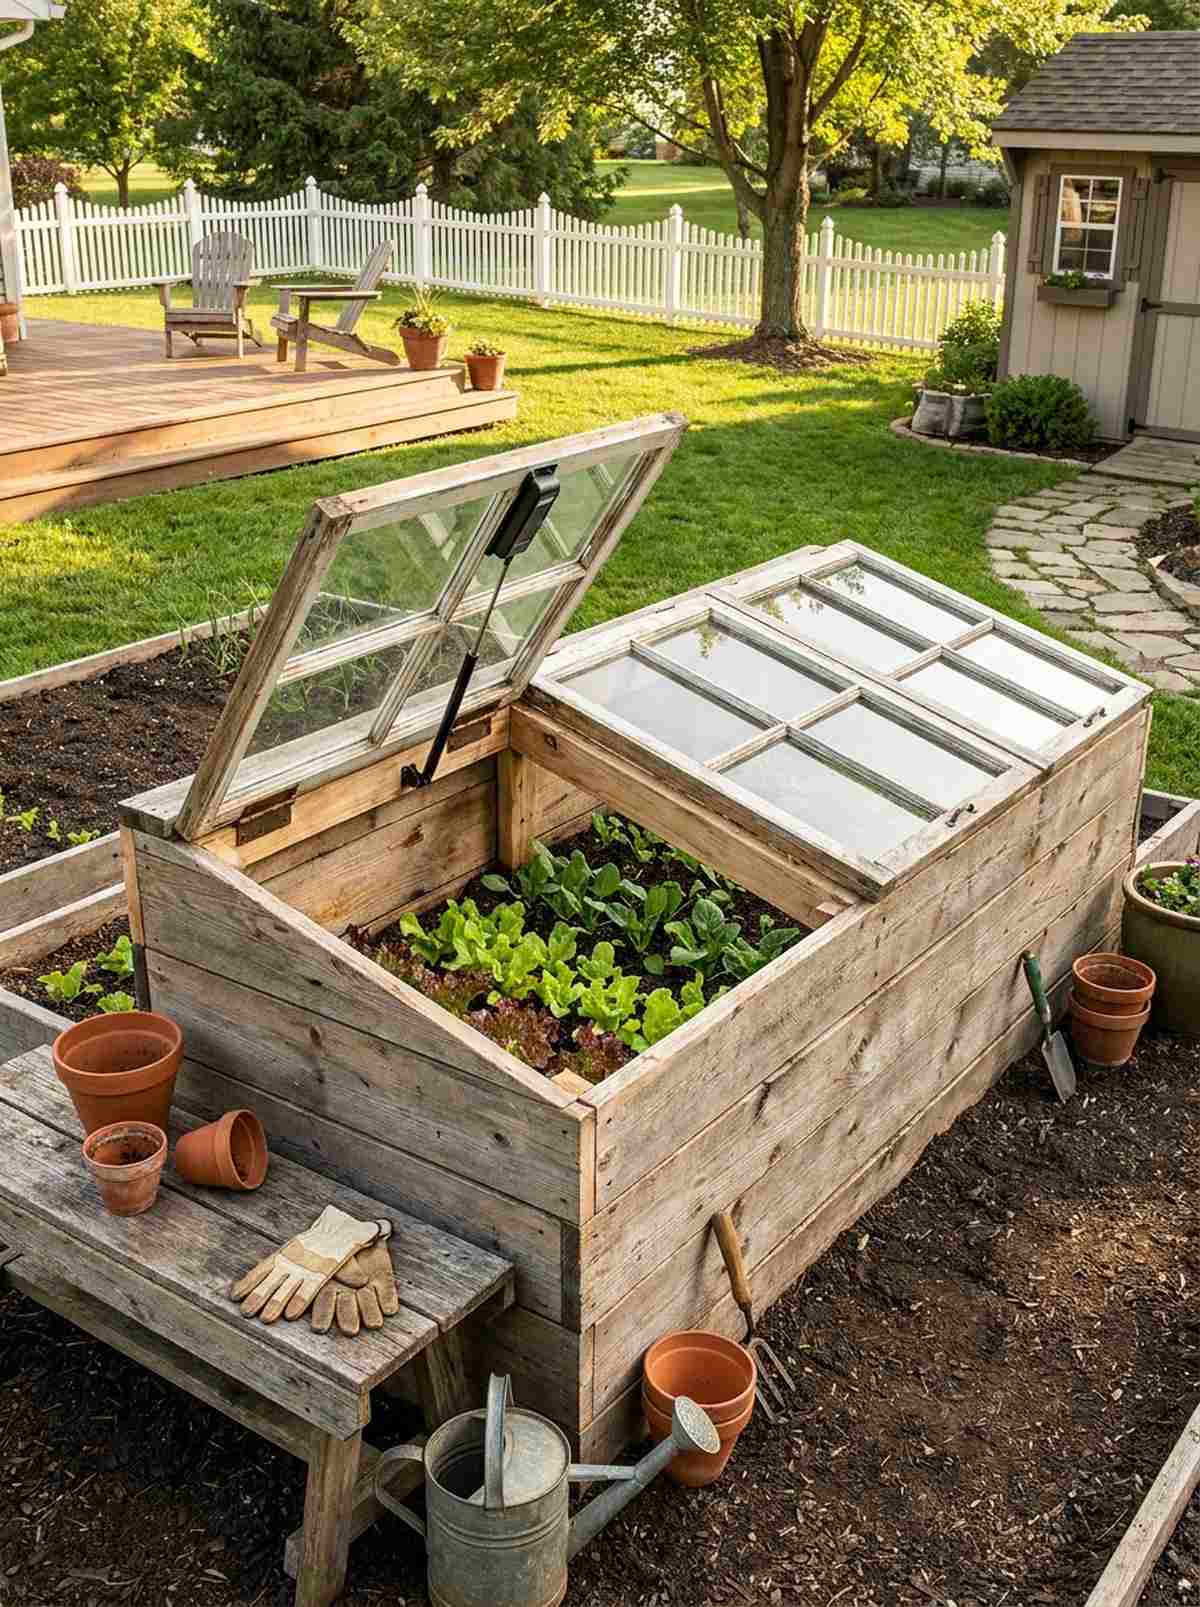
This slanted solar-heated garden box feels like a rugged little armor shell protecting your most delicate greens. Perfect for chilly spring mornings when you want to jumpstart your lettuce and spinach harvests.
Repurposing old window sashes gives a designer-level finish while keeping the build entirely off the grid. Upgrading to an automatic thermal vent opener ensures your precious seedlings never accidentally roast when the afternoon sun peaks.
You can throw this together for under $50 if you upcycle materials. Highly recommended for a practically free season extension.
- Key Materials: 2×12 lumber and transparent lids
- Vibe / Style: Rustic upcycled utility
- Difficulty: Easy beginner build
- Budget Breakdown: Lumber: $40 | Hinges: $15 | Glass lid: Free (upcycled).
- Creator’s Tip: Angle the box precisely at your latitude degree facing true south to absorb the maximum amount of weak winter sunlight.
- Smart Sourcing: Solar-powered automatic greenhouse window openers and heavy-duty rust-proof exterior hinges.
17. Low Tunnel Greenhouse
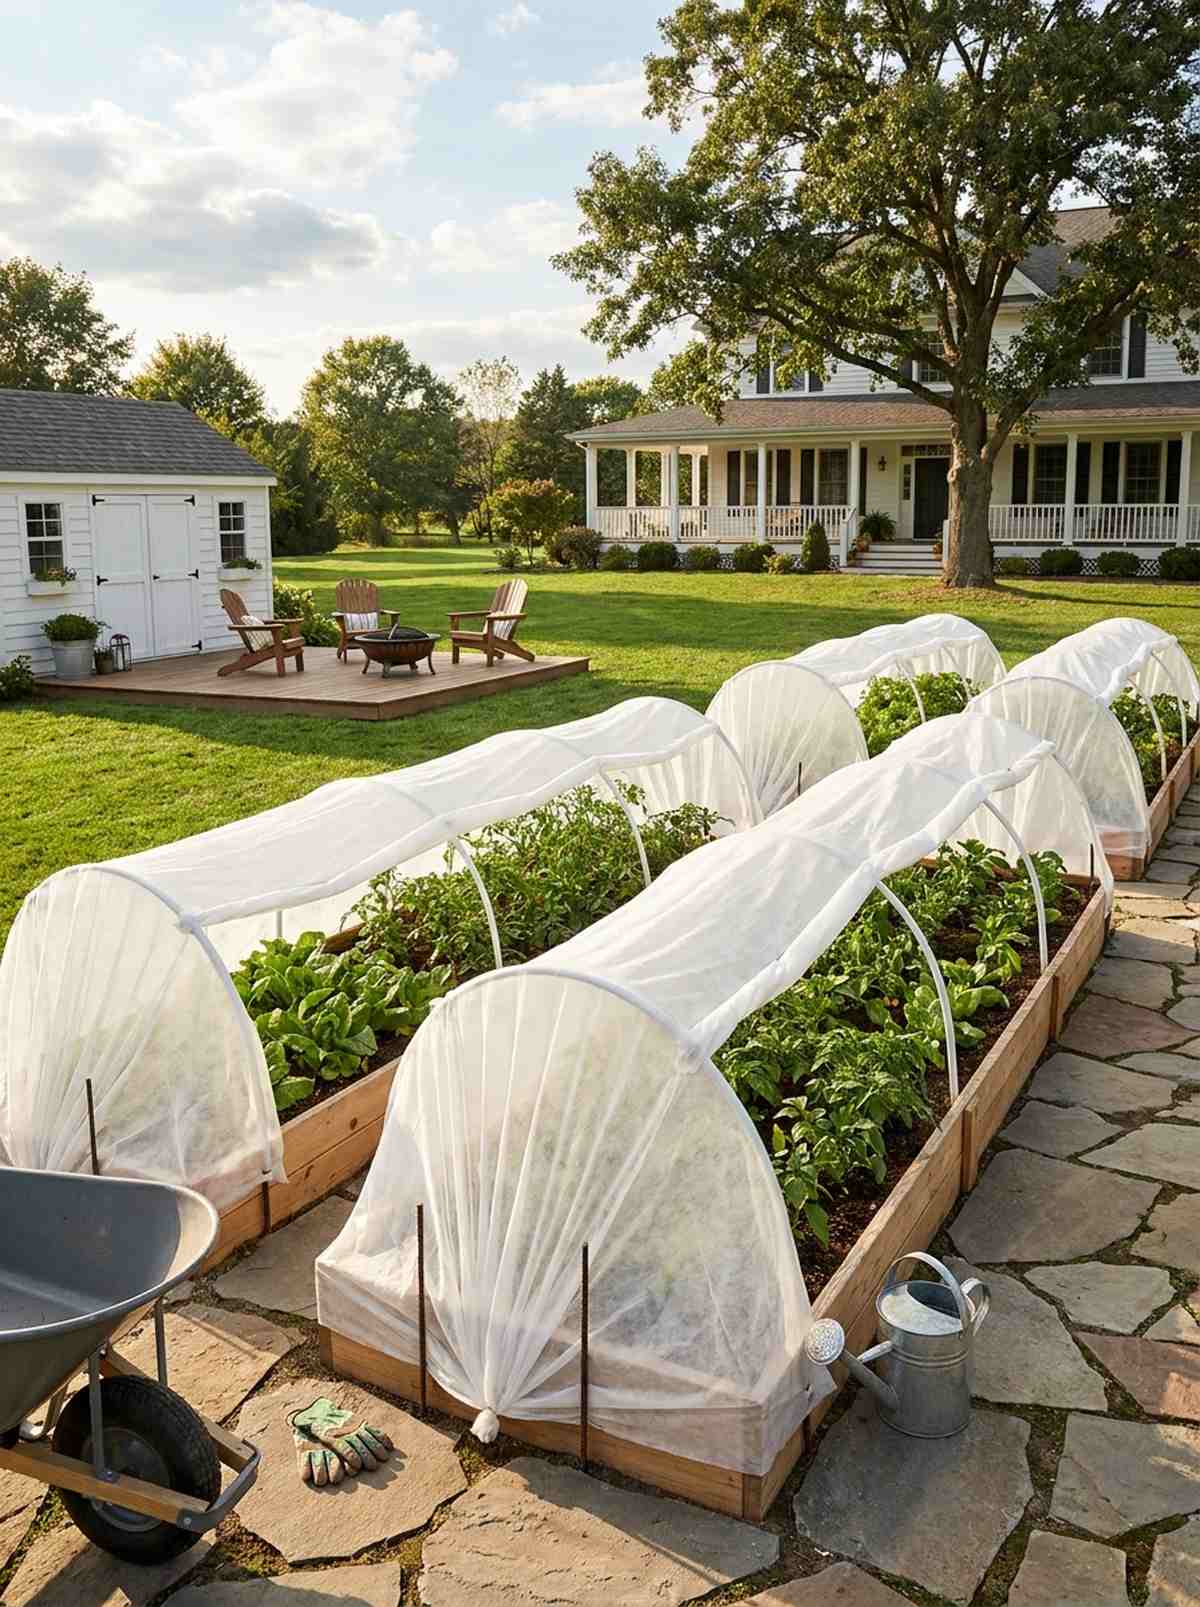
A continuous hooped row cover feels like a professional protective blanket draped over your raised beds. Works flawlessly for market farmers needing to shield long rows of crops from sudden overnight frosts.
This layout instantly solves freezing problems and looks far more expensive than it is if you keep the hoops perfectly aligned. Using high-quality heavy-duty frost blanket rolls rather than cheap plastic prevents condensation rot and lets the soil breathe perfectly.
Setup costs sit happily around $30–$80 per row. Save this to your frugal gardening hacks board!
- Key Materials: PVC arches and spun-bond fabric/plastic
- Vibe / Style: Efficient row-crop farming
- Difficulty: Very easy instant setup
- Budget Breakdown: PVC pipes: $20 | Frost fabric: $30 | Ground stakes: $10.
- Creator’s Tip: Slip the PVC pipe ends over 12-inch rebar stakes pounded into the ground; they won’t blow away, and you can pull them up instantly.
- Smart Sourcing: Heavy-duty floating row cover frost blankets (bulk pack) and galvanized steel rebar ground stakes.
18. High Tunnel Greenhouse
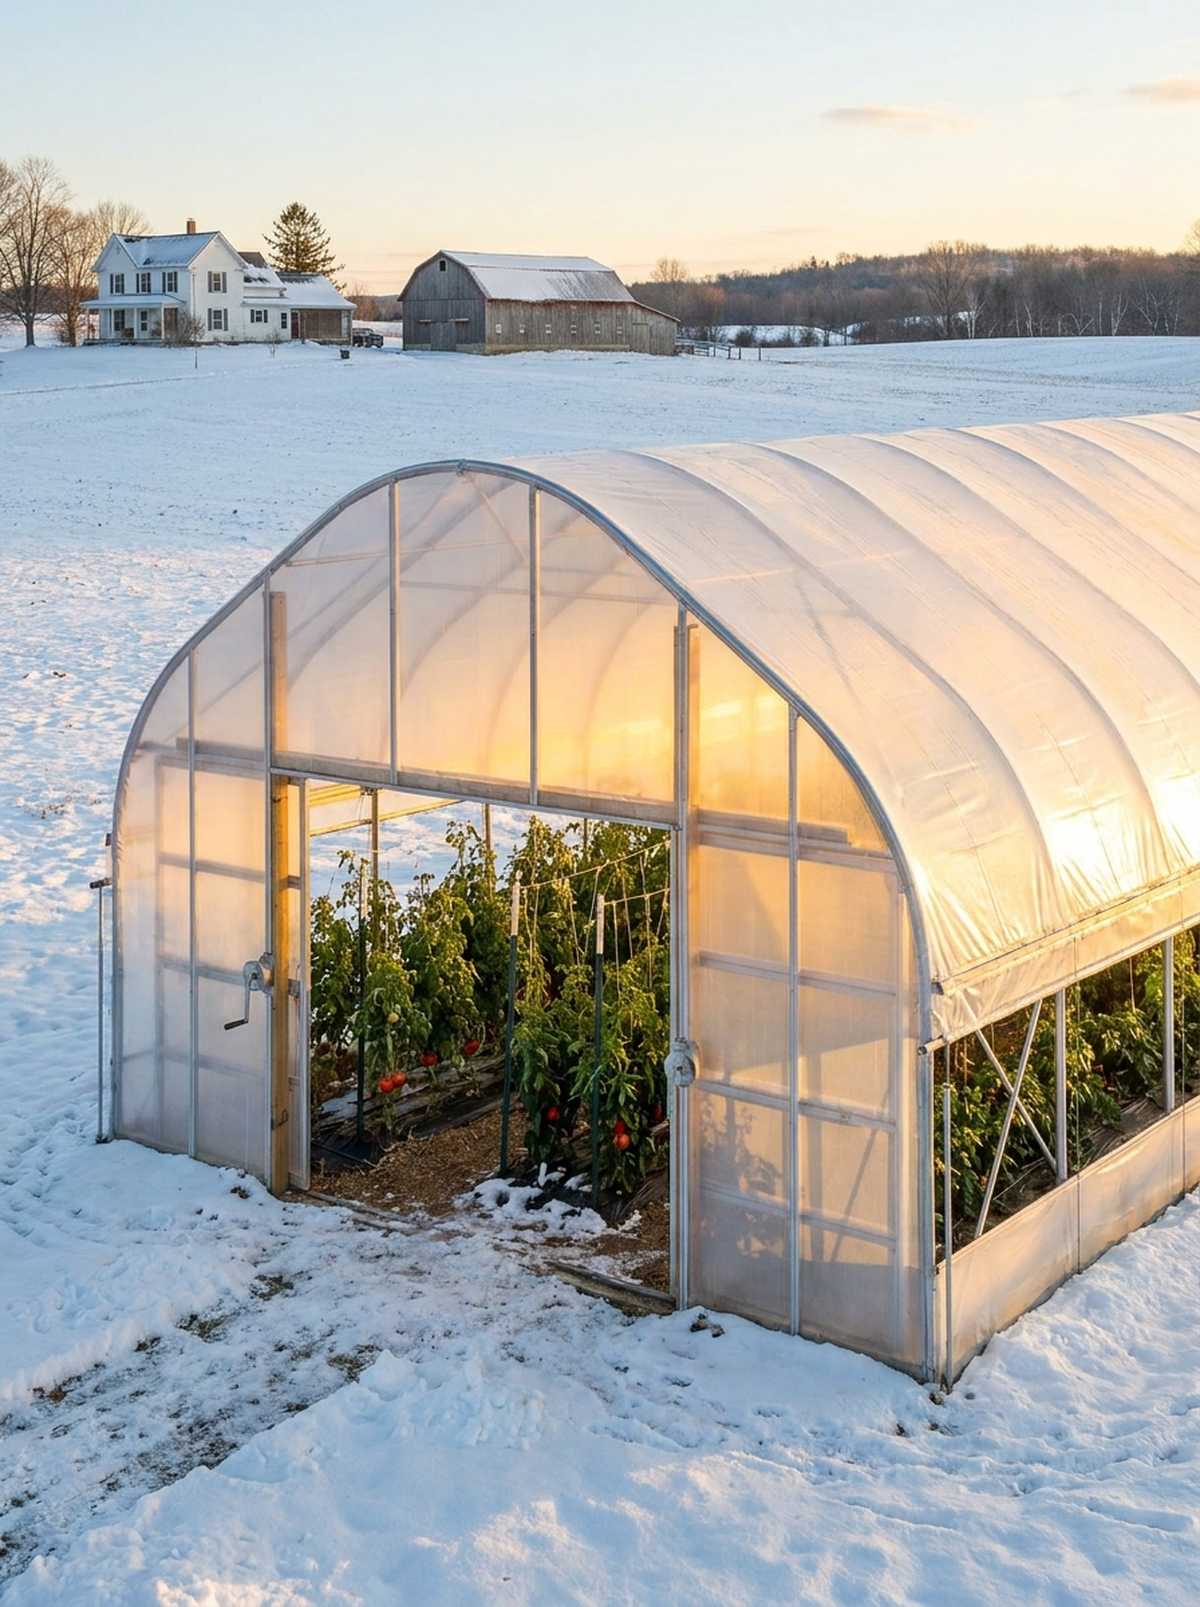
A towering unheated hooped walk-in feels like a warm, glowing cavern hidden in the middle of a snowy field. Ideal for homesteaders wanting massive tomato and pepper yields long after the first frost hits.
Skipping costly electrical heating delivers a surprisingly premium look fueled purely by passive solar energy. Installing commercial roll-up sidewall kits turns a stifling hot box into a breezy, perfectly ventilated growing paradise with the crank of a handle.
You can erect a sprawling tunnel for roughly $500–$1,200. It’s a massive volume upgrade that pays for itself in one season.
- Key Materials: Large metal hoops and ground stakes
- Vibe / Style: Professional off-grid farm
- Difficulty: Moderate team assembly
- Budget Breakdown: Frame: $600 | Poly film: $200 | Sidewall cranks: $150.
- Creator’s Tip: Dig a shallow trench around the perimeter and bury the edges of the plastic film to lock out drafts and ground pests.
- Smart Sourcing: Manual roll-up greenhouse sidewall crank kits and anti-drip UV greenhouse film rolls.
19. Cloche-Style Greenhouse

These individual glass plant domes feel like elegant Victorian display cases scattered across your spring soil. A brilliant fit for guarding singular, high-value transplants against aggressive wind and garden pests.
Trading a massive structure for targeted micro-domes elevates the entire aesthetic of your garden beds instantly. Sourcing vented plastic garden cloches gives you the classic glass look without the fear of shattering them with a rogue garden hose.
You can grab a set of these for around $20–$50. Pin this if you love that pristine, manicured cottage garden look!
- Key Materials: Glass bell jars or rigid plastic domes
- Vibe / Style: Vintage European cottage
- Difficulty: Zero-tool instant placement
- Budget Breakdown: Plastic cloches (6-pack): $30 | Anchoring pegs: $5.
- Creator’s Tip: Always buy cloches with adjustable top vents; a sealed dome will literally cook a tender seedling by noon on a sunny day.
- Smart Sourcing: Reusable vented plastic garden cloche domes (bulk pack) and heavy-duty steel landscape anchoring pins.
Forget everything you know about season extension; this next method is ridiculously cheap but protects like a $500 custom shield…
20. Umbrella Frame Greenhouse
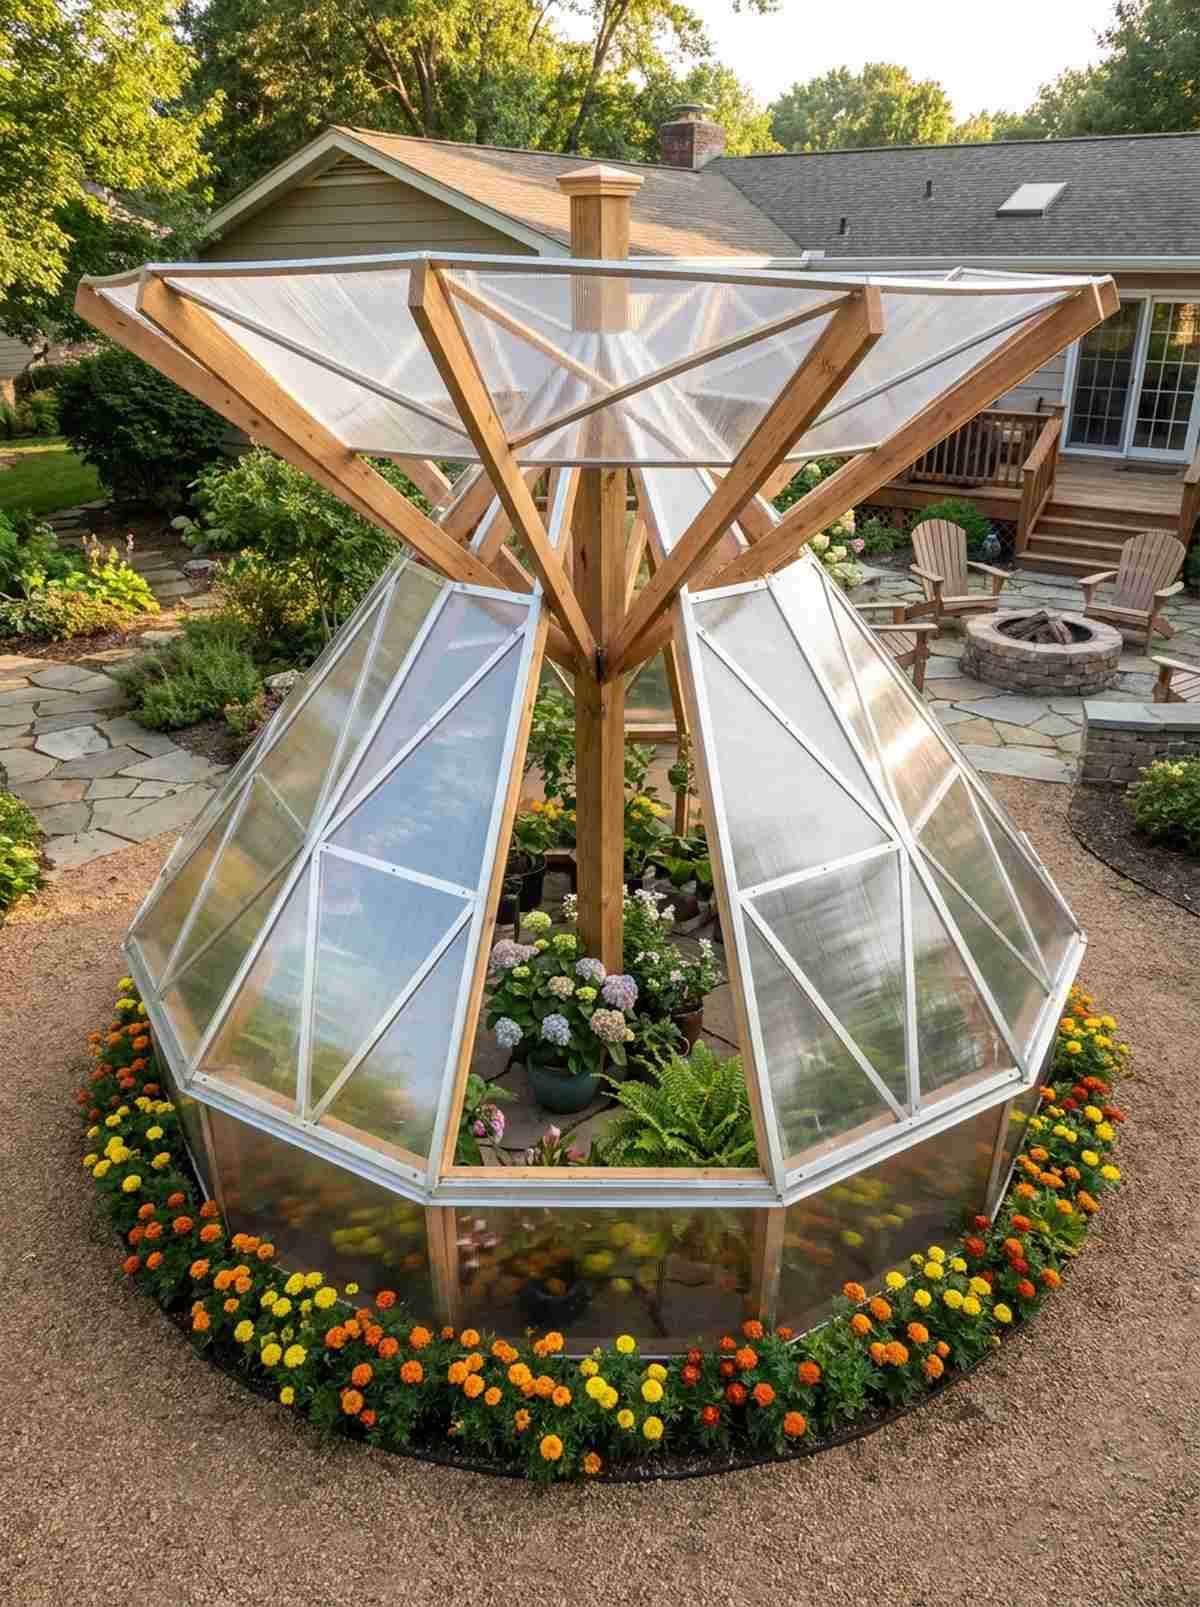
This radiating conical garden canopy feels like a whimsical clear circus tent shielding your prized flower bed. Works exceptionally well for circular courtyard gardens where a standard square frame would ruin the landscaping flow.
Ditching standard boxy frames for a central-pole design gives a designer-level finish that doubles as backyard art. Using custom triangular polycarbonate kits forces heavy rain to sheet off beautifully to the perimeter without pooling.
You can build this sculptural piece for roughly $150–$350. Save this layout to your unique garden architecture board!
- Key Materials: Central 4×4 post and radiating support arms
- Vibe / Style: Whimsical sculptural garden
- Difficulty: Intermediate radial framing
- Budget Breakdown: Center post: $30 | Framework arms: $80 | Poly wedges: $150.
- Creator’s Tip: Plant a ring of pest-repellent marigolds directly under the drip line where the water sheds to create a natural bug barrier.
- Smart Sourcing: Heavy-duty steel gazebo hub brackets and pre-cut triangular clear acrylic panels.
Advanced & Modern Concepts Pushing Design Boundaries
Innovative architects and engineers continue developing greenhouse technologies that improve energy efficiency, structural performance, and aesthetic appeal. These cutting-edge approaches represent the future of controlled environment agriculture.
21. Geodesic Dome Greenhouse
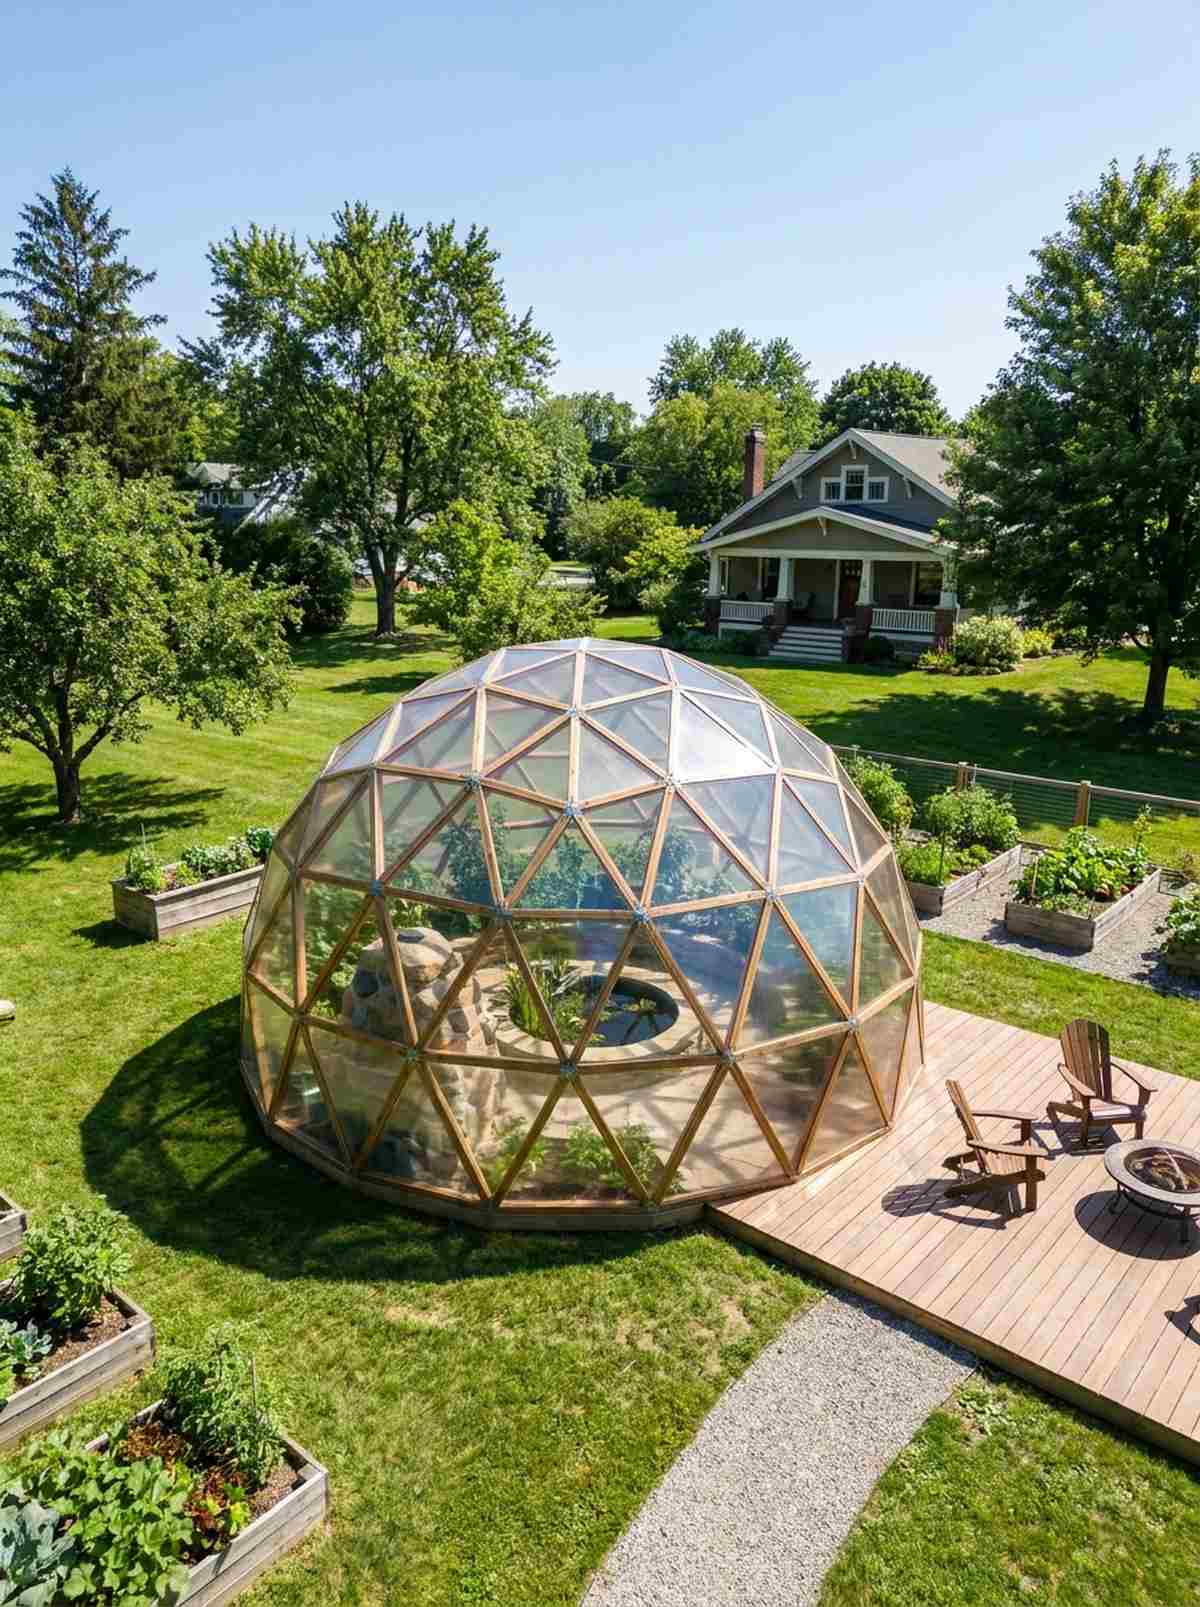
A striking geometric garden dome feels straight out of a futuristic eco-village hidden in the woods. Works exceptionally well for high-wind suburban lots demanding a striking centerpiece that won’t blow over.
This layout completely eliminates flat-roof snow collapse risks, providing a bespoke architectural piece with maximum internal thermal volume. Sneaking in heavy-duty geodesic greenhouse kits saves you from complex mathematical timber cuts and guarantees perfect joint alignment.
You can easily pull this off for around $900–$2,500 depending on diameter. Pin this to your ultimate homesteading board!
- Key Materials: Precision-cut struts and specialized hub connectors
- Vibe / Style: Futuristic eco-resilience
- Difficulty: Advanced geometric assembly
- Budget Breakdown: Hub kit: $300 | Lumber struts: $400 | Glazing: $800.
- Creator’s Tip: Install a central water pond or massive stone thermal mass in the middle of the dome to stabilize the rapid temperature swings.
- Smart Sourcing: Pre-engineered geodesic dome hub connector kits and custom-cut polycarbonate triangle bundles.
22. Earth-Sheltered Walipini
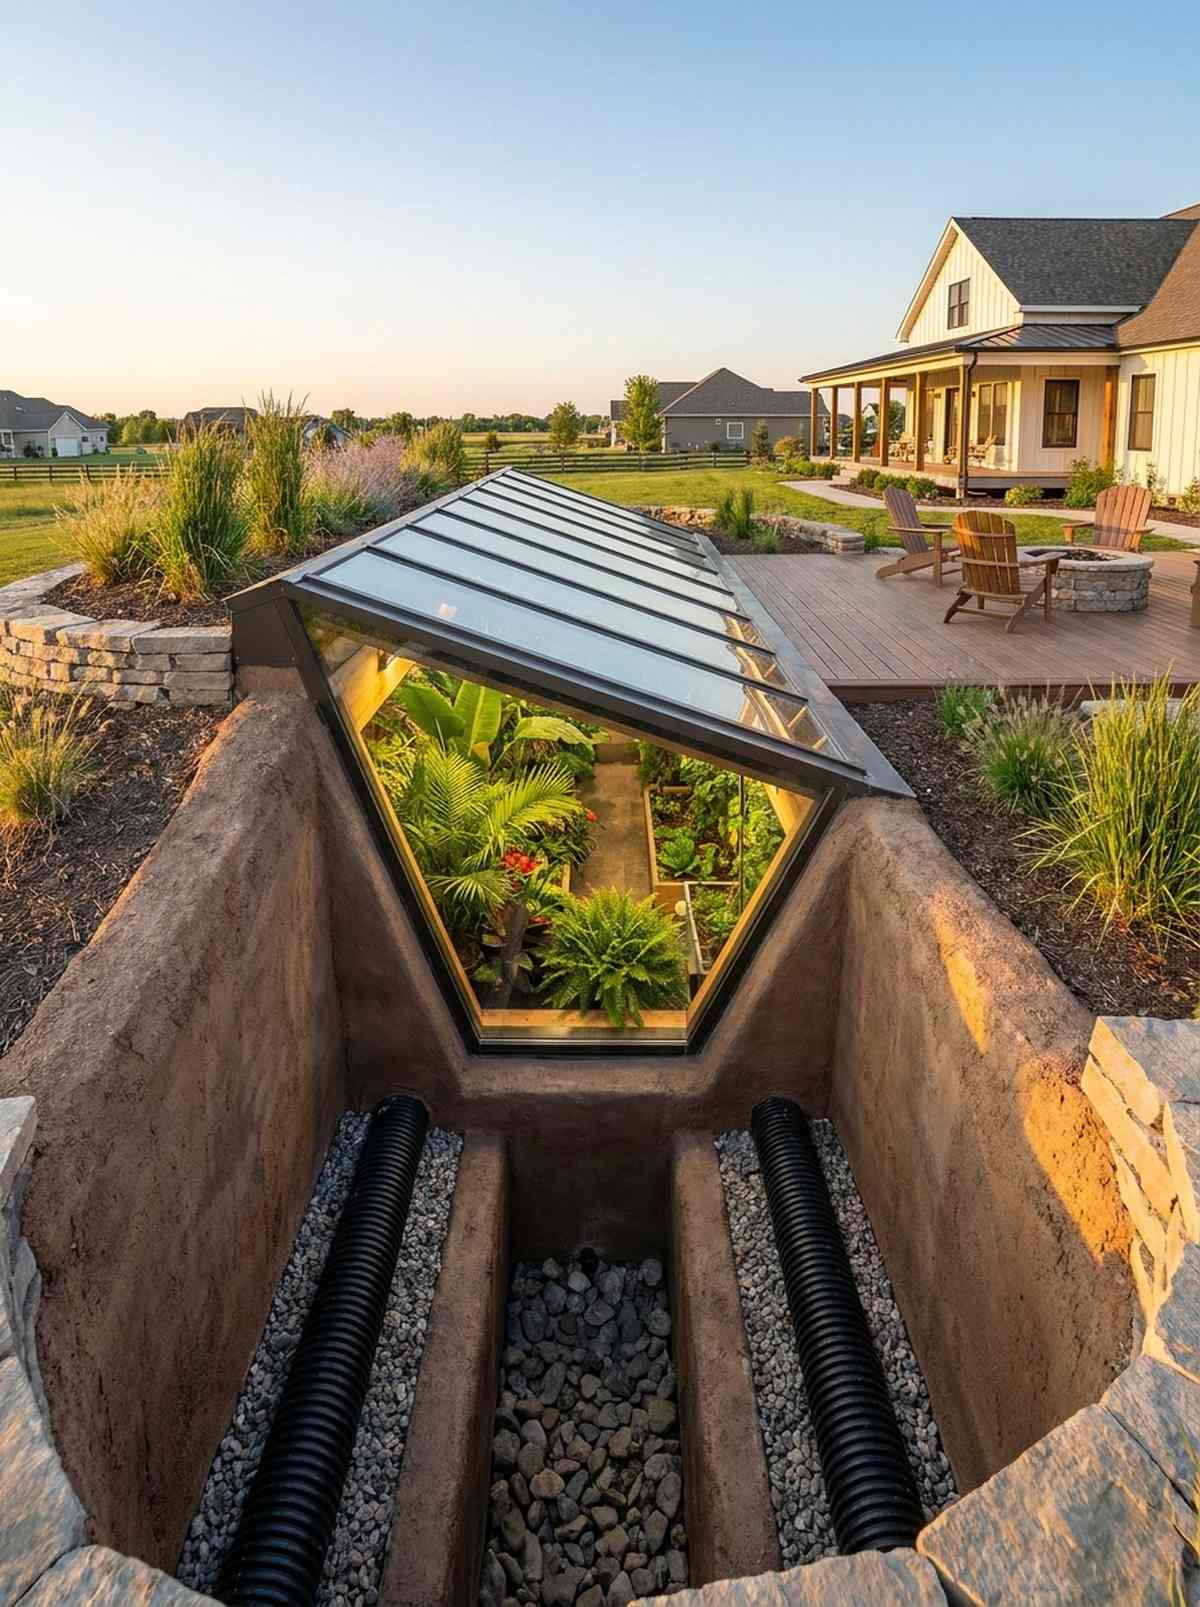
This underground sunken pit greenhouse feels like a secret subterranean jungle glowing beneath the frost line. Perfect for arid, extreme climates where surface winds would shred a traditional glass structure.
Burying your walls leverages the earth’s stable 50-degree temperature, transforming a basic hole into a luxury conservatory that requires zero heating fuel. Installing heavy-duty greenhouse French drain supplies is mandatory here to ensure your underground haven doesn’t turn into a muddy swimming pool.
Excavation and roofing typically cost around $1,000–$3,000. It’s an intense upgrade that completely changes winter survival gardening.
- Key Materials: Excavated earth berms and ground-level sloped glazing
- Vibe / Style: Ancient survivalist bunker
- Difficulty: Extreme excavation & drainage
- Budget Breakdown: Excavator rental: $500 | Retaining walls: $600 | Roof glazing: $800.
- Creator’s Tip: Always dig a cold sink (a deeper trench at the lowest point) so that heavy, freezing air rolls away from your plant beds.
- Smart Sourcing: Heavy-duty corrugated perforated drainage pipes and commercial-grade EPDM pond liner rolls.
23. Solar-Powered Automated Greenhouse
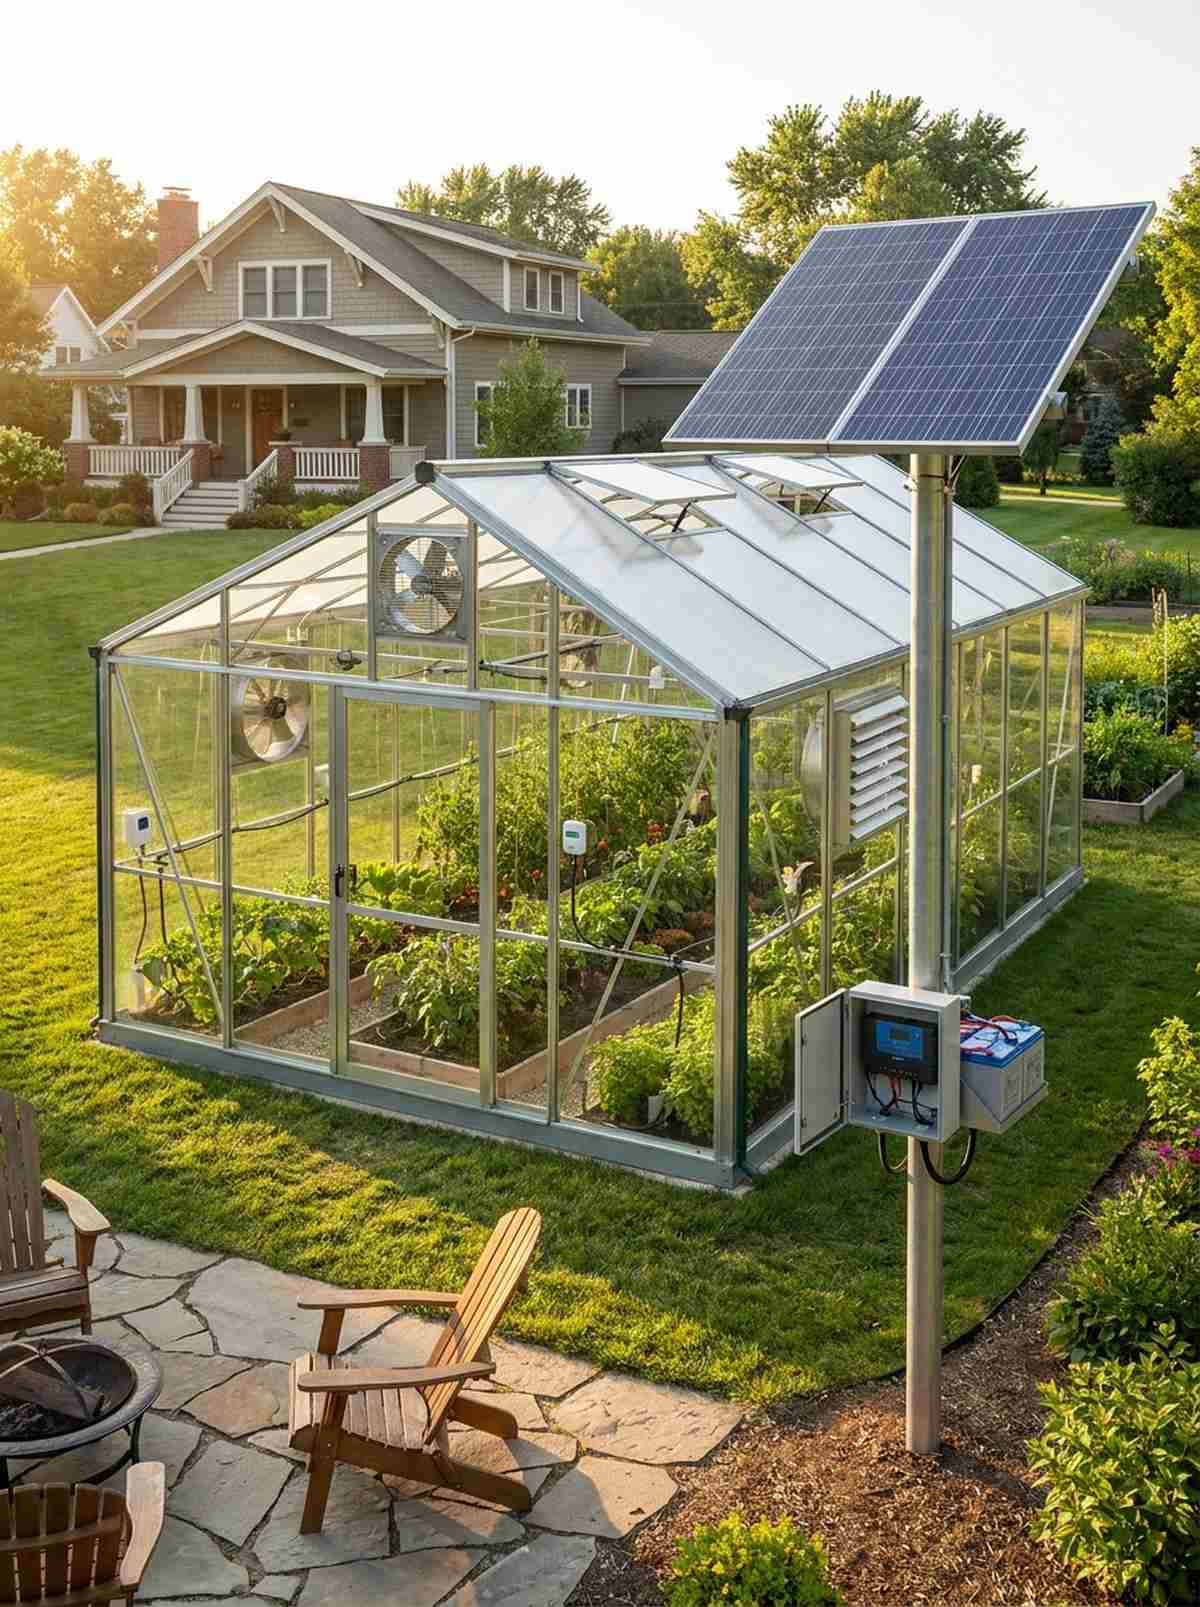
An advanced off-grid smart greenhouse feels like a self-sufficient spaceship sustaining life completely on its own. Ideal for busy professionals who want perfect climate control without digging trenches for electrical wires.
Most setups require constant manual venting, but integrating smart tech gives a designer-level finish that practically runs itself. Hooking up solar greenhouse ventilation kits ensures your fans and drip lines fire up automatically, even if you’re miles away at work.
You can retrofit an existing frame with solar tech for about $400–$800. Highly recommended for a high-tech weekend win.
- Key Materials: Photovoltaic panels, battery banks, and smart controllers
- Vibe / Style: High-tech autonomous farming
- Difficulty: Moderate electrical wiring
- Budget Breakdown: Solar panel kit: $250 | Smart controller: $100 | Fans/Pumps: $150.
- Creator’s Tip: Mount the solar panel on a separate pole outside the greenhouse to avoid shading your crops while catching the optimal southern angle.
- Smart Sourcing: Off-grid solar panel starter kits with charge controllers and automated smart greenhouse climate sensors.
24. Living Roof Greenhouse
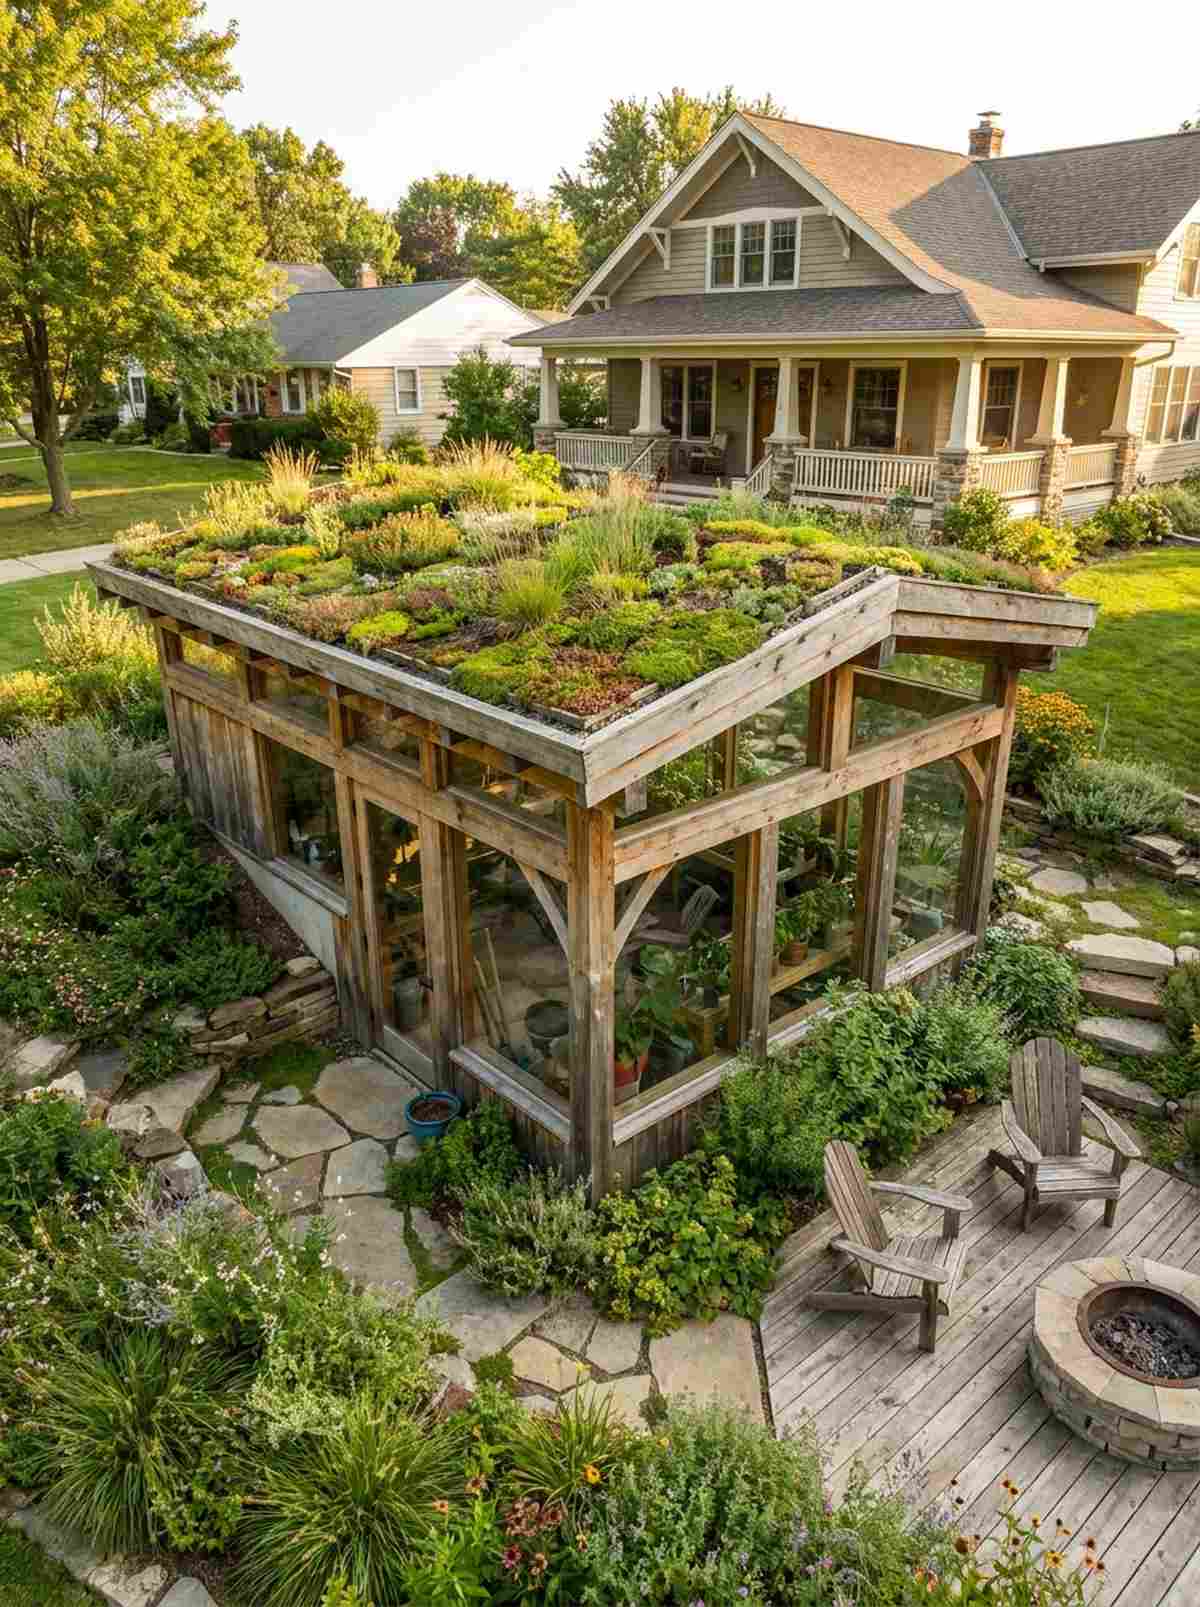
This lush vegetated roof plant house feels like a hobbit sanctuary perfectly camouflaged into the natural landscape. Works exceptionally well for eco-conscious builders wanting to blend structure with pollinator habitats.
Trading a stark plastic roof for living sedum elevates the entire aesthetic while offering incredible natural overhead insulation. Incorporating heavy-duty root barrier membranes is critical to stop aggressive roots from literally tearing your roof framing apart from the inside.
Expect to invest around $1,500–$2,800 for the reinforced structural needs. Save this layout for your ultimate eco-friendly build!
- Key Materials: Reinforced rafters, waterproof membranes, and sedum trays
- Vibe / Style: Eco-integrated sanctuary
- Difficulty: Advanced structural engineering
- Budget Breakdown: Reinforced frame: $800 | Waterproofing: $400 | Sedum mats: $500.
- Creator’s Tip: Use a lightweight expanded shale or perlite soil mix on the roof to drastically cut down the dead weight when the soil gets saturated.
- Smart Sourcing: Commercial-grade waterproof roof membrane rolls and pre-grown lightweight sedum roof mats (bulk pack).
Material Guide: Cheap vs. Premium Aesthetic
Knowing exactly where to save and where to spend makes all the difference in achieving that high-end structural vibe without blowing your budget.
- Standard vs. UV-Resistant/Premium: Upgrading to multi-wall UV-coated polycarbonate sheets stops the dreaded yellowing effect, keeping your space looking pristine while drastically lowering heating bills.
- Pre-made Kits vs. Sourcing Locally: While scratch-building sounds cheaper, utilizing pre-cut gothic arch starter kits often saves weeks of labor and prevents costly structural failures during winter storms.
This next hybrid concept is sweeping Pinterest right now because it solves the biggest temperature control problem effortlessly…
25. Aquaponic-Integrated Greenhouse
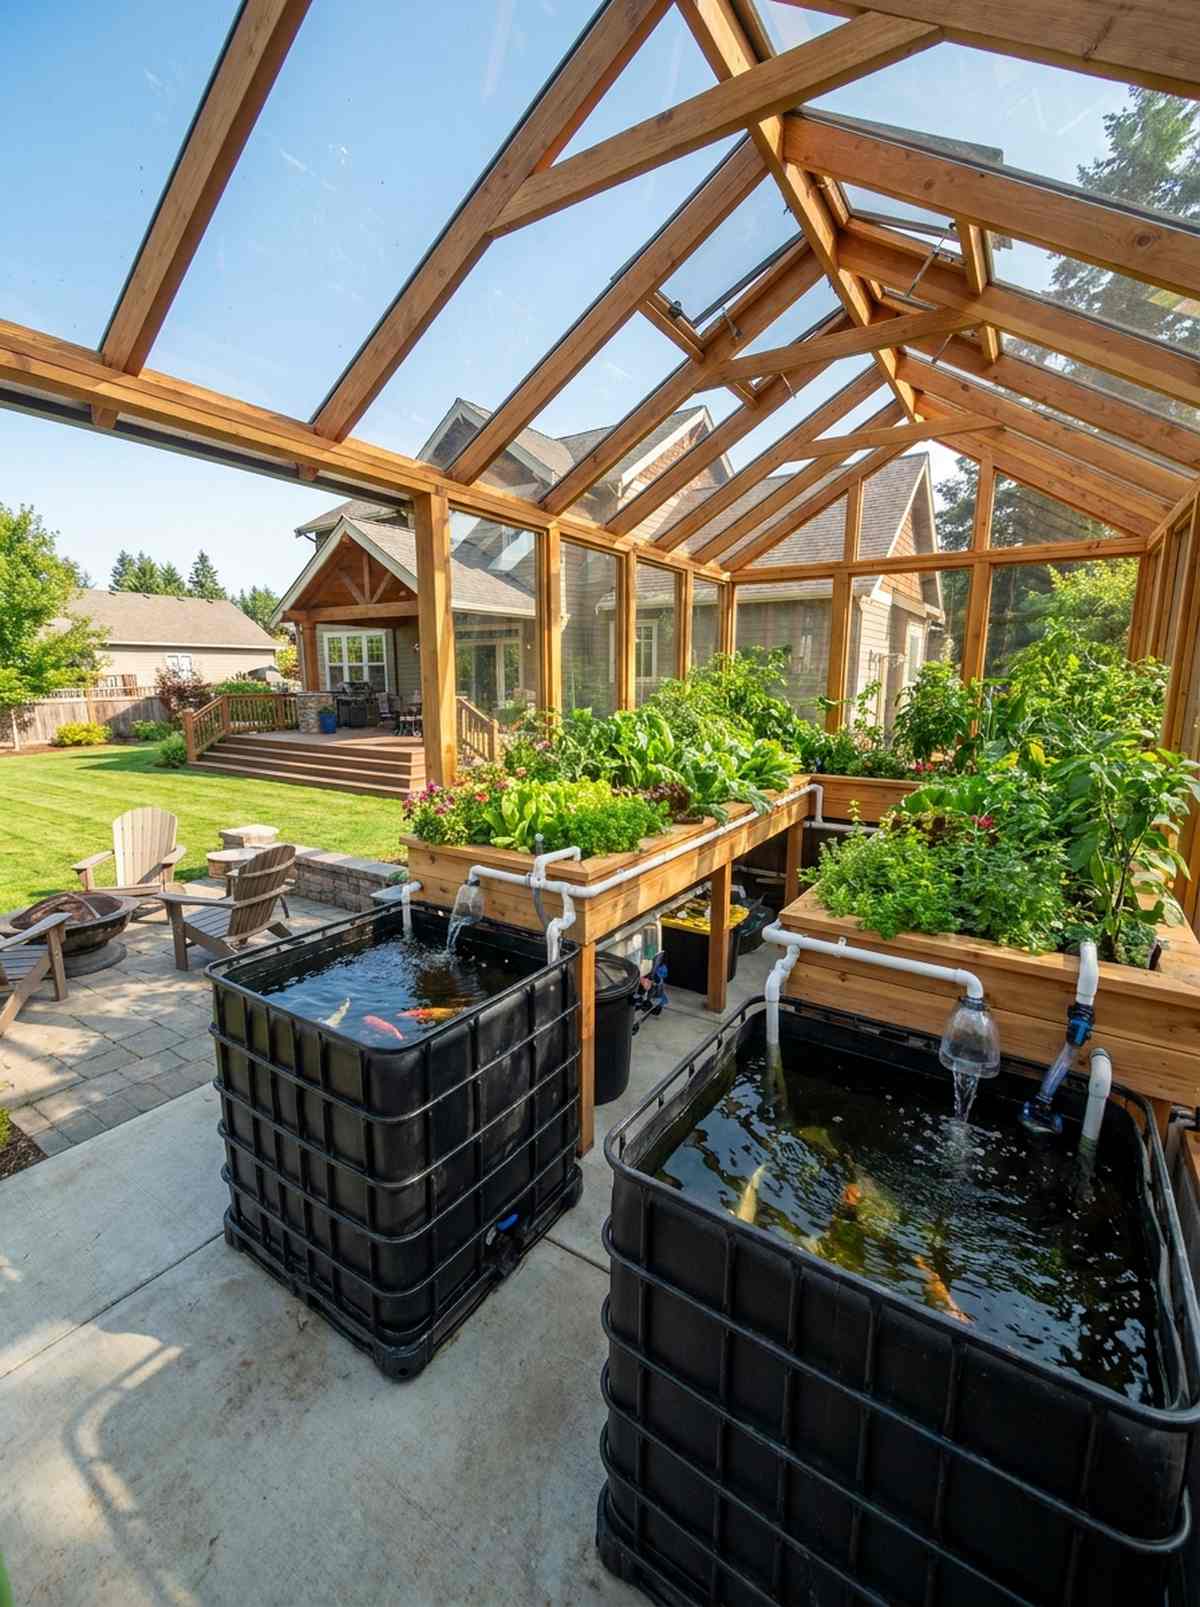
A closed-loop water-based ecosystem greenhouse feels like a vibrant, breathing laboratory producing both fresh greens and fish. Perfect for intensive homesteaders demanding maximum calorie output from a tiny footprint.
Most people rely on chemical fertilizers, but this biological engine provides a boutique nursery feel driven purely by nature. Setting up hydroponic bell siphon kits creates the perfect flood-and-drain rhythm, turning massive water tanks into the ultimate thermal heat sink.
You can plumb this setup together for roughly $800–$1,500. Pin this if you’re ready to completely ditch grocery store produce!
- Key Materials: Fish tanks, grow beds, and submersible pumps
- Vibe / Style: Symbiotic homestead engine
- Difficulty: Intermediate plumbing & biology
- Budget Breakdown: IBC totes/tanks: $300 | Pumps & Piping: $200 | Grow media: $300.
- Creator’s Tip: Paint the exterior of your fish tanks black to absorb winter solar heat, or insulate them with foam board if you live in a deep freeze zone.
- Smart Sourcing: Heavy-duty submersible aquaponic pump kits and pre-calibrated auto-siphon plumbing sets.
26. Retractable Roof Greenhouse
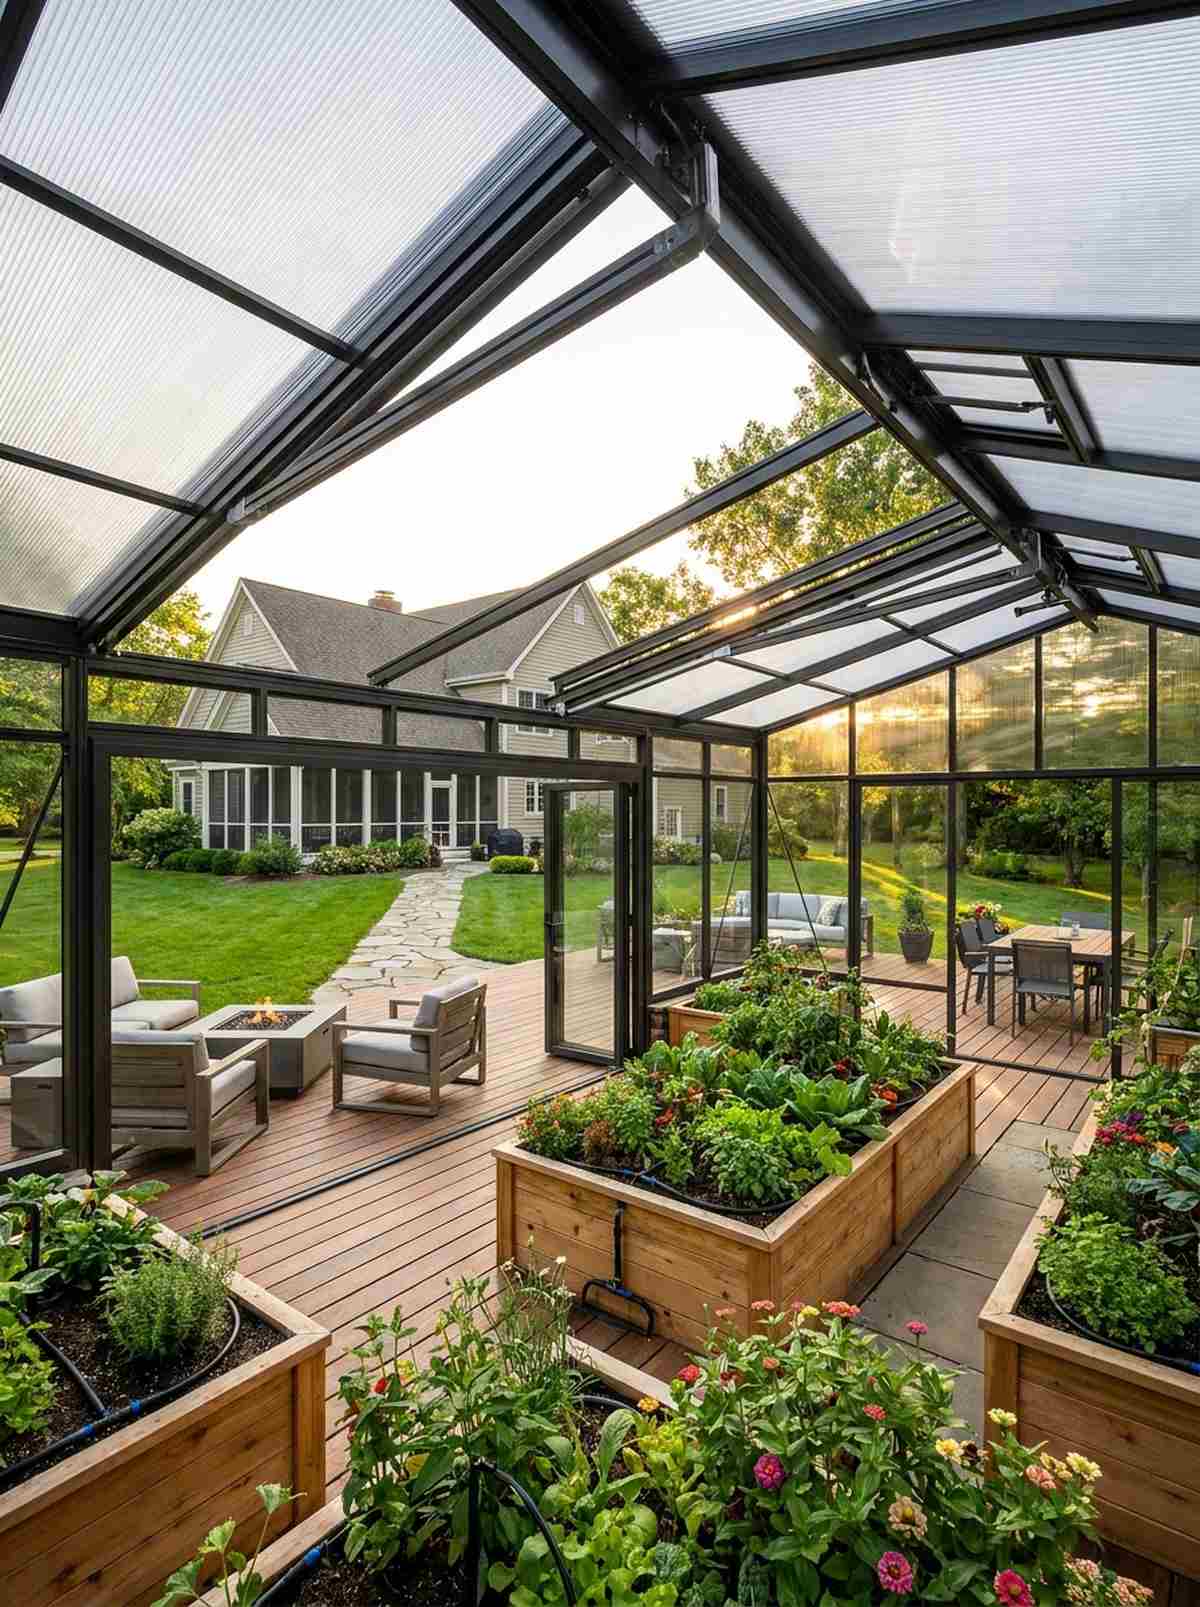
A dynamic convertible open-air greenhouse feels like an elite resort cabana that adapts instantly to the weather. Works flawlessly for transition climates where blistering summer heat would normally fry your indoor crops.
Ditching a fixed roof for a motorized slide gives a designer-level finish that guarantees your plants get natural rainfall and unfiltered hardening. Integrating motorized greenhouse roof track kits transforms a stagnant hotbox into a versatile, breezy pavilion at the push of a button.
Expect to spend $2,000–$4,500 for a smooth, weather-tight track system. It’s a massive upgrade that completely changes summer growing.
- Key Materials: Aluminum sliding tracks and nested roof panels
- Vibe / Style: Dynamic climate-controlled pavilion
- Difficulty: Advanced mechanical installation
- Budget Breakdown: Track system: $1,200 | Motors: $600 | Roof panels: $1,000.
- Creator’s Tip: Hook the retraction motor to a smart rain sensor so the roof automatically closes the second a sudden summer thunderstorm hits.
- Smart Sourcing: Automated greenhouse track actuator kits and smart weather station sensor bundles.
27. Multi-Bay Gutter-Connected Greenhouse
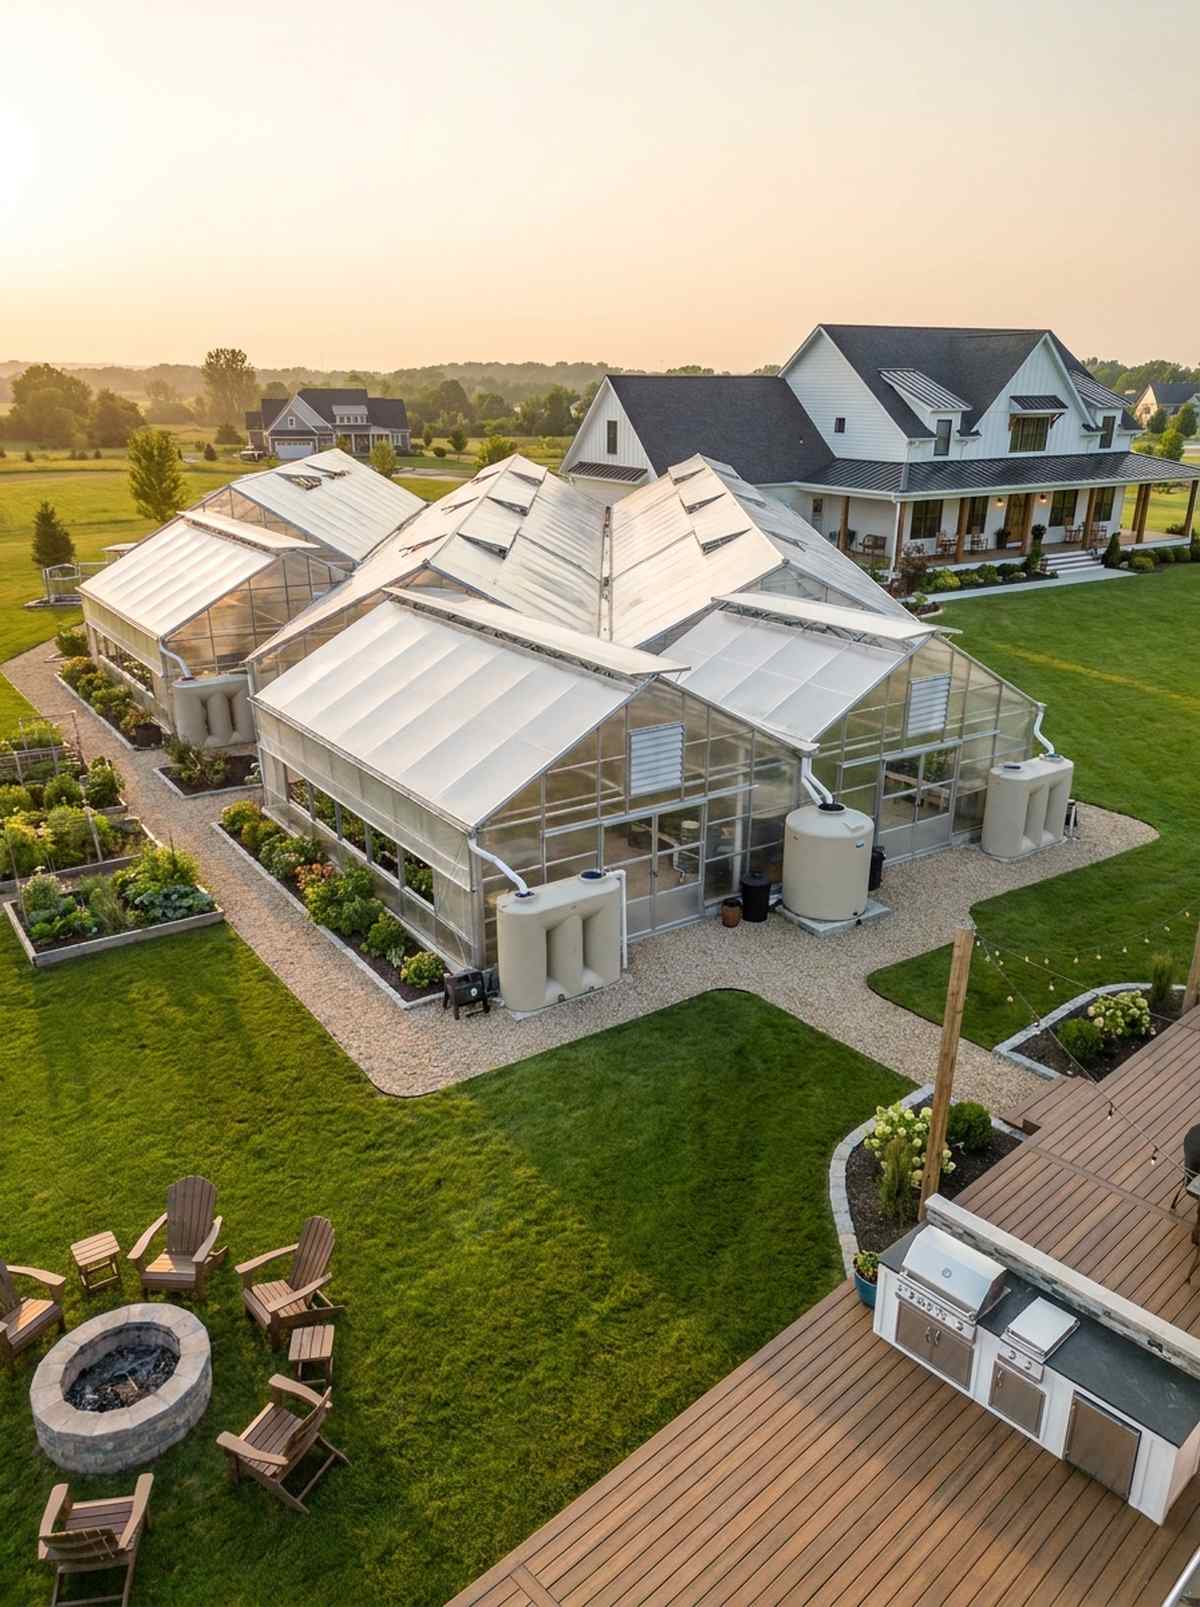
A sprawling connected multi-zone greenhouse feels like stepping onto a massive, professional botanical campus. Ideal for aggressive market gardeners who need to scale their square footage without wasting land on space between buildings.
Fusing multiple frames together looks far more expensive than it is by completely eliminating redundant side walls. Utilizing commercial greenhouse gutter systems channels thousands of gallons of rainwater directly into storage cisterns rather than flooding your pathways.
You can scale this up starting around $3,000 per bay. Save this to your large-scale farming inspiration board!
- Key Materials: Shared central gutters and modular gable frames
- Vibe / Style: Commercial agricultural campus
- Difficulty: Advanced commercial assembly
- Budget Breakdown: Shared gutters: $800 | Bay frames: $1,500 | Poly film: $500.
- Creator’s Tip: Use the massive shared gutter downspouts to directly feed a 1,000-gallon internal water tank, providing free, room-temperature irrigation water.
- Smart Sourcing: Heavy-duty extruded aluminum greenhouse gutters and high-capacity rainwater collection cisterns.
Specialized Growing Environments For Unique Crops
Certain plants demand specific conditions that generic greenhouses cannot efficiently provide. Purpose-built structures optimized for orchids, alpines, cacti, or tropical species deliver the precise microclimates these specialists require.
28. Alpine House Greenhouse
This breezy high-altitude plant shelter feels like a crisp mountain peak captured behind glass. Perfect for rock garden enthusiasts cultivating delicate species that rot instantly in typical humid conditions.
Swapping solid walls for massive louvers delivers a bespoke architectural piece focused entirely on dry, freezing airflow. Equipping the layout with premium greenhouse shade cloth rolls ensures your high-altitude beauties never scorch during a low-altitude summer heatwave.
You can retrofit a small frame for this purpose for about $300–$700. Pin this if you’re obsessed with rare mountain flora!
- Key Materials: Screened sidewalls and oversized roof vents
- Vibe / Style: Crisp mountain conservancy
- Difficulty: Intermediate ventilation framing
- Budget Breakdown: Louver vents: $200 | Shade cloth: $80 | Benches: $150.
- Creator’s Tip: Top-dress all your pots with a thick layer of crushed granite; it perfectly mimics the rapid-draining scree slopes of their natural habitat.
- Smart Sourcing: UV-reflective 50% aluminized shade cloth rolls and heavy-duty aluminum louver vent kits.
29. Orchid Conservatory
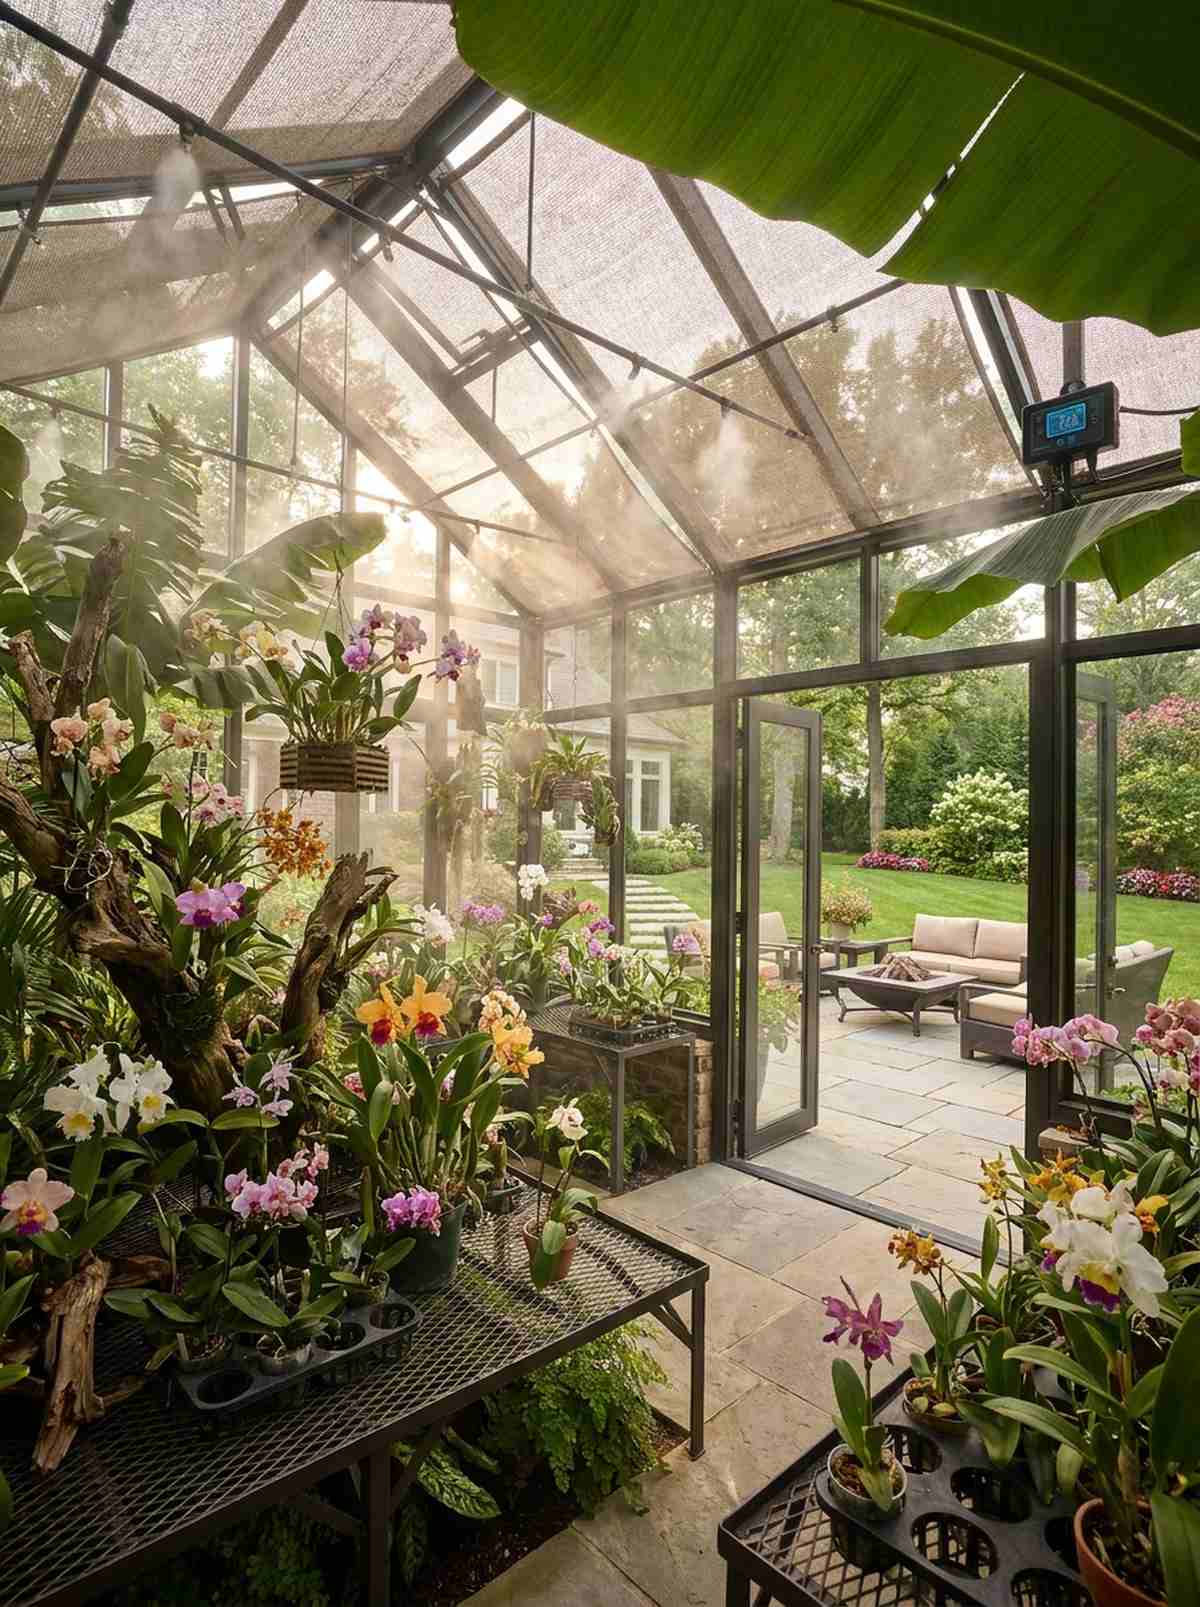
A lush, humid tropical flower conservatory feels like a steamy, shaded jungle canopy blooming in your backyard. Works flawlessly for serious orchid collectors demanding exact humidity and diffused light.
Most setups dry out too fast, but adding automated climate controls transforms a basic frame into a luxury conservatory. Installing professional greenhouse misting systems keeps the aerial roots perfectly hydrated without ever leaving stagnant water on the fragile blooms.
Expect to invest $800–$2,000 in specialized climate tech. It’s an environmental upgrade that completely changes flower yields.
- Key Materials: Evaporative coolers, misting lines, and expanded metal benches
- Vibe / Style: Steamy tropical canopy
- Difficulty: Moderate plumbing & electrical
- Budget Breakdown: Misting system: $150 | Humidistat: $80 | Metal benches: $300.
- Creator’s Tip: Use expanded metal grates for your shelving instead of wood; it allows crucial upward airflow to reach the delicate epiphytic root systems.
- Smart Sourcing: Automated high-pressure greenhouse misting kits and pre-calibrated digital humidistat controllers.
If you think specialized environments cost thousands, the upcoming climate trick will completely change your entire strategy…
30. Cactus & Succulent Greenhouse
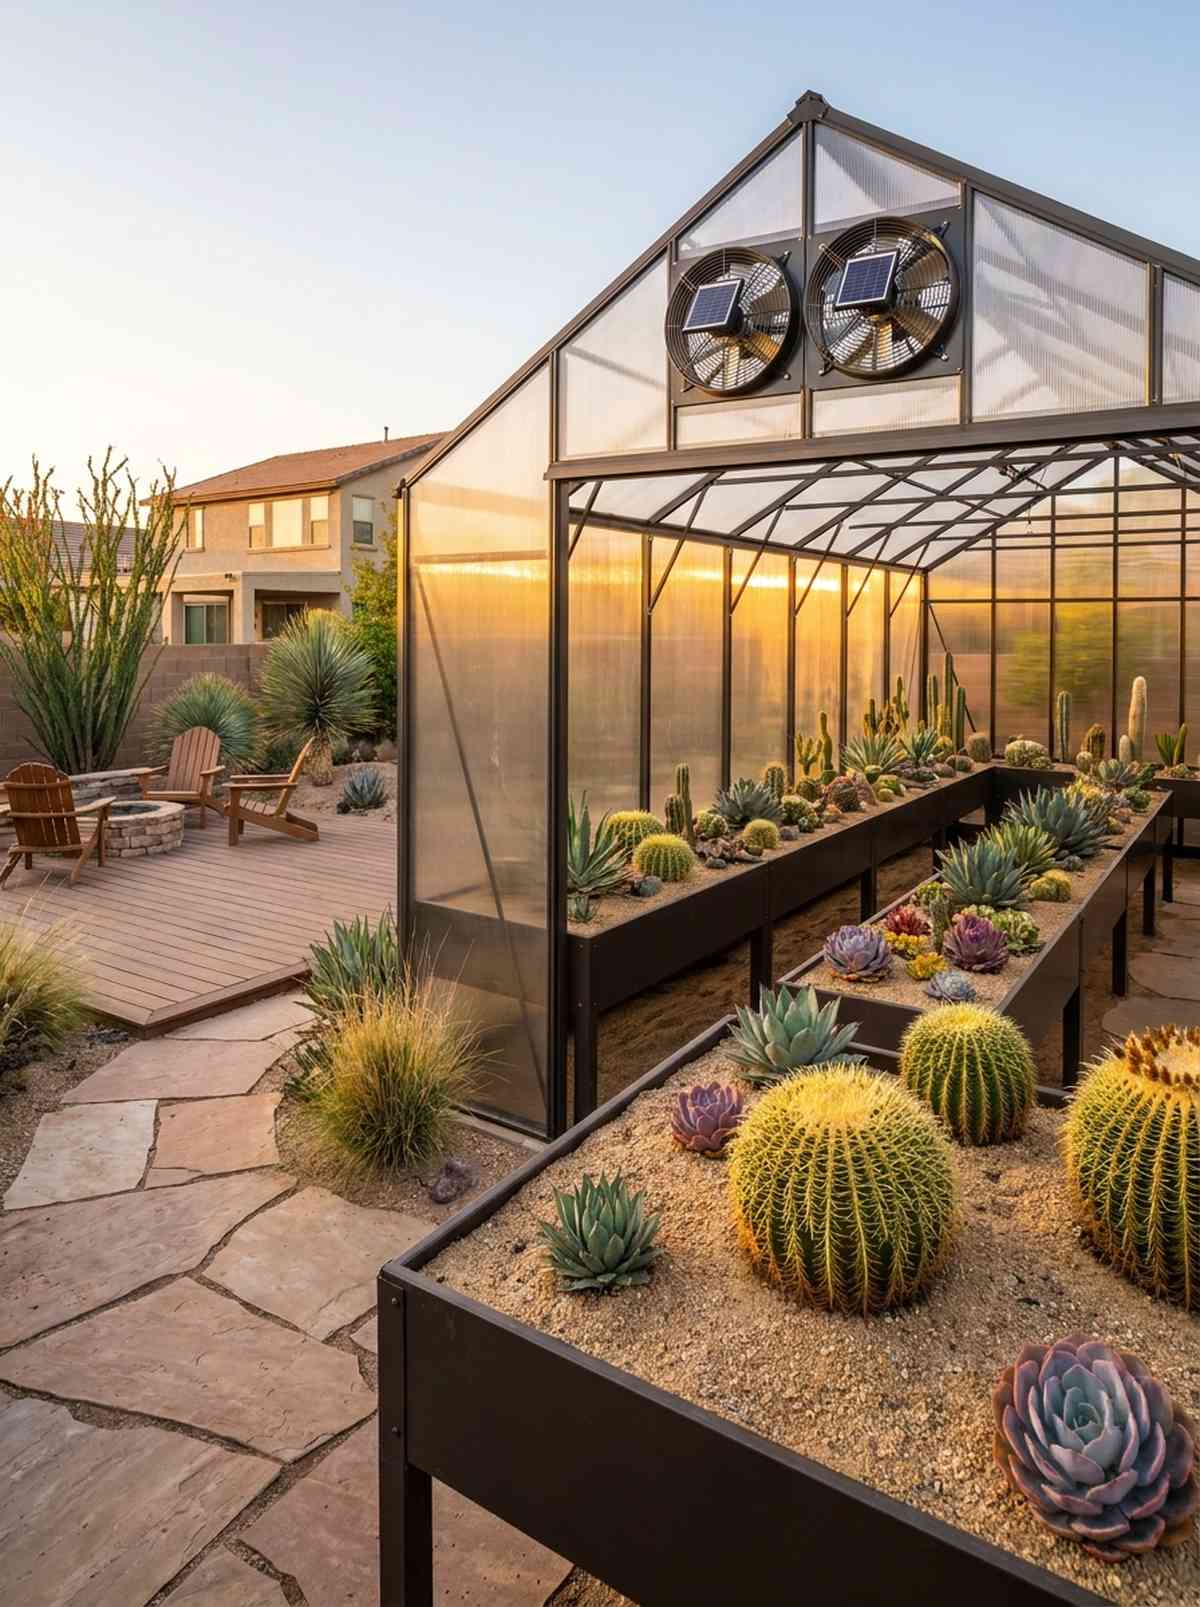
A sun-drenched arid desert glasshouse feels like a pristine slice of the Mojave transplanted into your yard. A brilliant fit for succulent hoarders who need maximum light intensity with absolutely zero trapped moisture.
Trading standard wet potting benches for dry sand beds gives a designer-level finish that practically eliminates fungal rot. Utilizing ultra-clear greenhouse polycarbonate panels ensures the maximum spectrum of hard UV light hits the plants, keeping their colors vibrant and shapes compact.
You can outfit a dry structure for roughly $500–$1,000. Save this to your ultimate rare succulent board!
- Key Materials: Maximum clear glazing and high-capacity exhaust fans
- Vibe / Style: Sun-baked arid sanctuary
- Difficulty: Easy arid setup
- Budget Breakdown: High-CFM fans: $200 | Clear panels: $600 | Sand beds: $100.
- Creator’s Tip: Position oversized exhaust fans at the highest peak to aggressively suck out any rogue humidity after a heavy rainstorm.
- Smart Sourcing: High-CFM solar exhaust fan kits and ultra-clear UV-coated acrylic replacement sheets.
31. Propagation Greenhouse
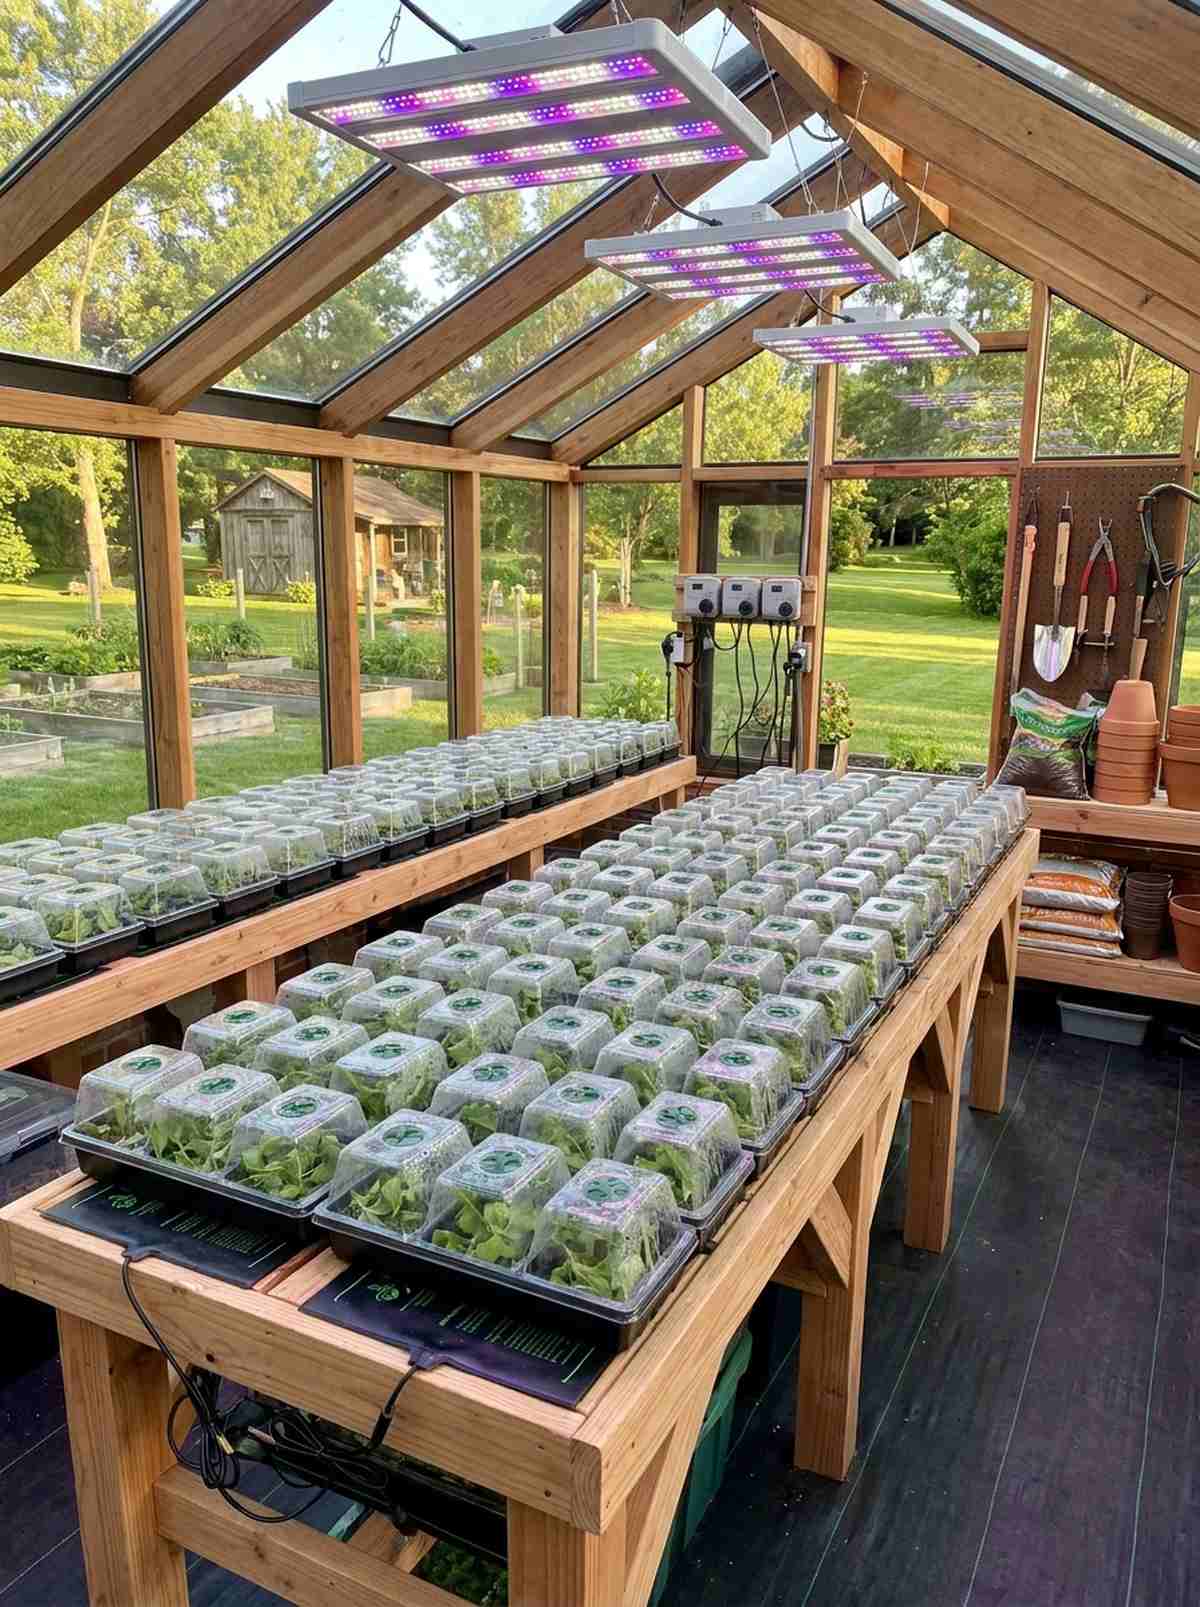
This humid, warm seedling nursery hub feels like a high-speed cloning laboratory humming with new life. Perfect for small-scale nurseries needing to churn out thousands of cuttings with a near 100% success rate.
Adding localized root warmth looks far more expensive than it is but completely slashes your rooting time in half. Snagging waterproof seedling heat mat kits provides pinpoint temperature control to the soil without wasting money heating the surrounding air.
You can build out a pro-level bench for around $200–$500. Highly recommended for a massive return on investment.
- Key Materials: Heated bench cables, humidity domes, and misting timers
- Vibe / Style: High-efficiency botanical lab
- Difficulty: Moderate precise setup
- Budget Breakdown: Heat mats: $120 | Misting timer: $60 | LED grow lights: $150.
- Creator’s Tip: Tent your propagation benches with a second layer of thin plastic film to create an ultra-humid micro-chamber right over the cuttings.
- Smart Sourcing: Commercial-grade waterproof seedling heat mats (bulk pack) and programmable seconds-interval misting timers.
32. Tropical Palm House

A towering vaulted exotic plant house feels like an immersive, sweeping jungle pathway inside a botanical garden. Ideal for obsessive collectors cultivating massive tree ferns and palms that demand 15-foot clearances.
Skipping standard benches for in-ground planting delivers a bespoke architectural piece that completely blurs the line between indoors and outdoors. Upgrading your heating with heavy-duty greenhouse radiant heaters guarantees those deep tropical roots never feel a winter chill.
This massive scale requires a serious budget of $5,000+. Pin this if you’re dreaming of an ultimate indoor jungle!
- Key Materials: Extra-tall framing, high-volume heaters, and winding pathways
- Vibe / Style: Immersive botanical jungle
- Difficulty: Advanced massive construction
- Budget Breakdown: Tall framing: $2,000 | Glazing: $2,000 | Radiant heating: $1,000.
- Creator’s Tip: Bury a layer of rigid foam insulation two feet deep around the entire perimeter foundation to stop subterranean frost from killing tropical roots.
- Smart Sourcing: Heavy-duty 240V greenhouse radiant heaters and underground perimeter foam insulation boards.
33. Carnivorous Plant Bog Greenhouse
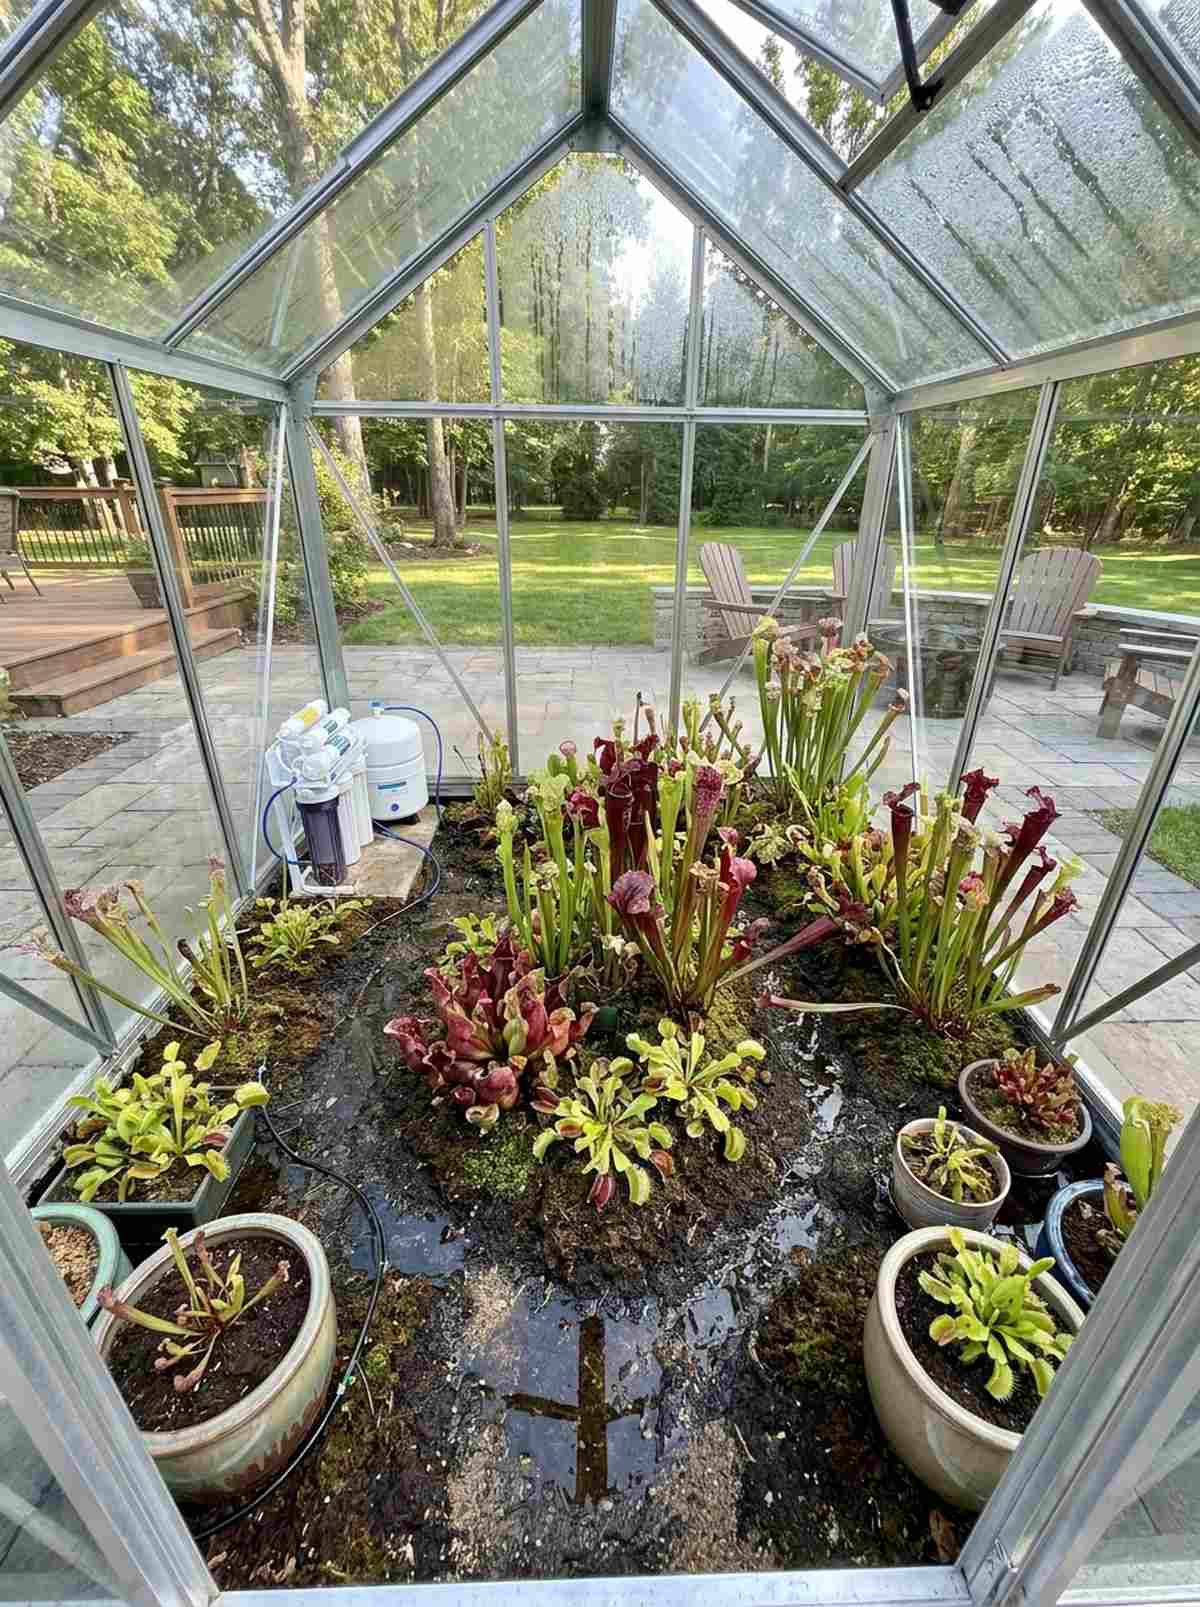
An acidic saturated wetland glasshouse feels like a bizarre, fascinating alien landscape brimming with pitcher plants. Works flawlessly for oddity collectors requiring extreme water chemistry control.
Ditching standard dirt for nutrient-dead peat transforms a basic frame into a highly specialized ecosystem. Relying entirely on zero-TDS reverse osmosis water filters ensures you never accidentally poison your flytraps with municipal tap water minerals.
You can line and outfit a bog setup for about $300–$600. Save this layout to your weird and wonderful plant board!
- Key Materials: Pond liners, peat moss/sand mix, and RO water systems
- Vibe / Style: Fascinating alien wetland
- Difficulty: Intermediate ecosystem balancing
- Budget Breakdown: Pond liner: $100 | Peat/Sand bulk: $150 | RO Filter: $150.
- Creator’s Tip: Never use terracotta or clay pots in this setup; they leach fatal minerals into the pure water. Stick exclusively to glazed ceramics or plastic.
- Smart Sourcing: Heavy-duty waterproof EPDM pond liners and multi-stage reverse osmosis water filter kits.
Conclusion
The incredible range of these 30+ backyard garden greenhouse structures proves that a premium, high-yielding controlled environment is entirely within reach, no matter your budget or property size. From upcycling a $50 cold frame to investing in smart-solar kits and UV-coated polycarbonate sheets, upgrading your space is all about smart sourcing. Start by pinpointing your specific climate challenges, grab the high-quality base materials recommended above, and skip the cheap plastic alternatives that fail after one season. Once you experience the designer-level finish and the massive ROI of year-round harvesting, you’ll wonder how you ever survived the winter without a dedicated, high-end growing space.
Frequently Asked Questions
What size backyard garden greenhouse should I build for a family of four?
An 8×10-foot or 10×12-foot layout is the sweet spot for a family of four, providing roughly 80 square feet of high-yield growing space. To maximize this footprint, invest in heavy-duty vertical greenhouse shelving kits to double your square footage for herbs and greens. If you plan on serious winter canning, sizing up to a 12×16 frame using a bulk pack of UV-coated polycarbonate panels keeps construction costs surprisingly low while offering massive production capacity.
Do I need a building permit to construct a greenhouse in my backyard?
Permit rules vary, but many cities exempt freestanding, temporary structures under 120 square feet if they utilize a non-permanent base like heavy-duty galvanized steel ground anchors instead of poured concrete. However, lean-to designs attached directly to your home almost always require permits. Grabbing a pre-engineered greenhouse starter kit often helps with HOA approvals, as they look far more professional and structurally sound than a completely scratch-built timber frame.
Which greenhouse material works best in cold climates with heavy snow?
For brutal winters, you absolutely must upgrade from single-layer plastic to premium twin-wall polycarbonate sheets, which offer an R-value of 1.5 to 2.0 while effortlessly shedding snow loads. Pair these panels with a gothic arch or steep gable roof pitch exceeding 6:12. Don’t skip the weather-sealed aluminum H-channel connector kits—they lock the panels tightly, preventing icy drafts and keeping your expensive heating bills dramatically lower.
How much does it cost to heat a backyard greenhouse during winter?
Heating a standard 10×12-foot space in Zone 6 to 50°F can run $150 to $300 a winter, but you can slash this drastically by using smart design. Applying reflective double-bubble foil insulation rolls on the north-facing wall and installing solar-powered automatic vent kits traps daytime heat and acts as a massive thermal battery. If you grow cold-hardy greens, an unheated, well-sealed structure costs exactly $0 to run all winter.
Can I grow tropical plants year-round in a backyard greenhouse?
Absolutely, provided you maintain 60 to 80°F temperatures and high humidity. The secret to keeping this affordable is partitioning your greenhouse with clear vinyl thermal divider curtains so you only heat the specific tropical zone. Equip that section with a programmable digital humidistat controller and proper insulation, allowing you to cultivate exotic orchids and citrus while keeping the rest of the space cool for standard vegetables.