
Elevate your outdoor space into a breathtaking floral sanctuary with these proven garden design roses strategies that look straight out of a botanical magazine. Curating a high-end english rose garden design doesn’t require a royal budget when you know exactly how to leverage smart sourcing hacks and affordable structural frameworks. By combining bulk climbing supports, UV-coated trellises, and strategic layouts, you can seamlessly integrate basic materials to achieve a custom, premium designer-level finish that delivers endless blooms year after year.
Design Snapshot: Key Principles
- Horizontal Training: Train climbing roses sideways across structures to trigger multiple bloom points along each cane, maximizing flower density
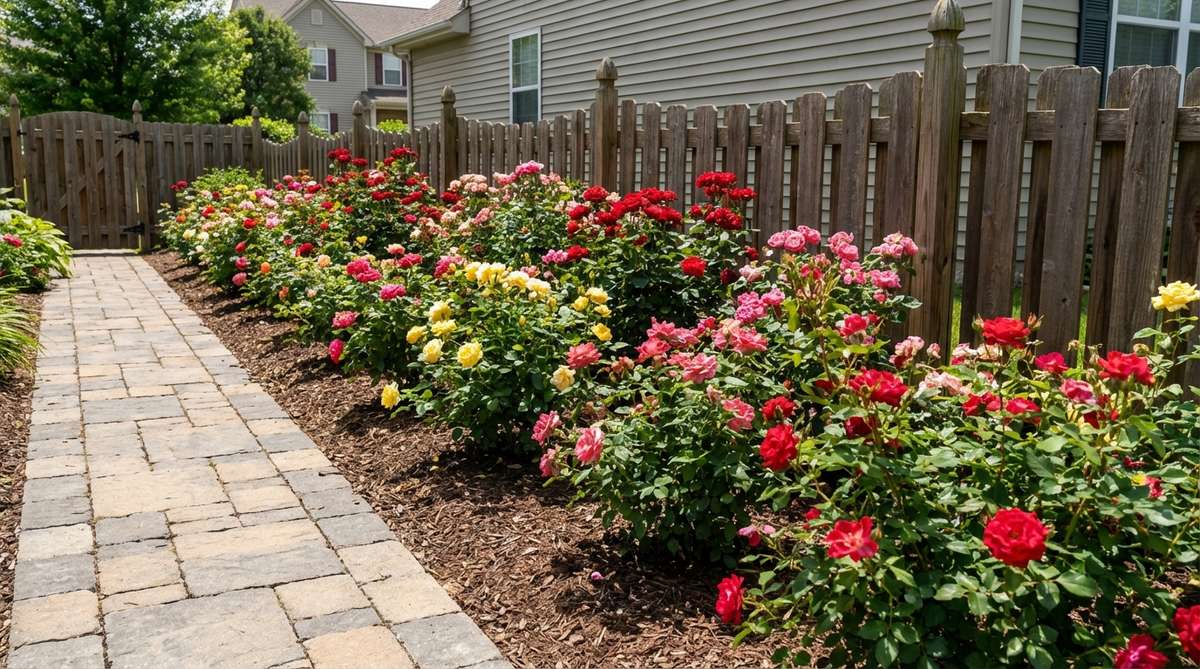
- Air Circulation: Space bush roses 2-3 feet apart and climbers 6-10 feet apart to prevent fungal diseases while promoting healthy growth
- Layered Heights: Plant in drifts of 3-5 specimens at varying elevations to create depth and visual continuity throughout the garden
- Structural Scale: Match rose vigor to framework size—obelisks accommodate 6-8 foot varieties while pergolas demand larger ramblers
Arbor & Arch Frameworks That Frame Garden Entrances
Arched structures create dramatic thresholds that transform ordinary pathways into memorable garden experiences. These frameworks work best when positioned to allow viewing from multiple angles, with sufficient surrounding clearance for rose blooms to cascade freely.
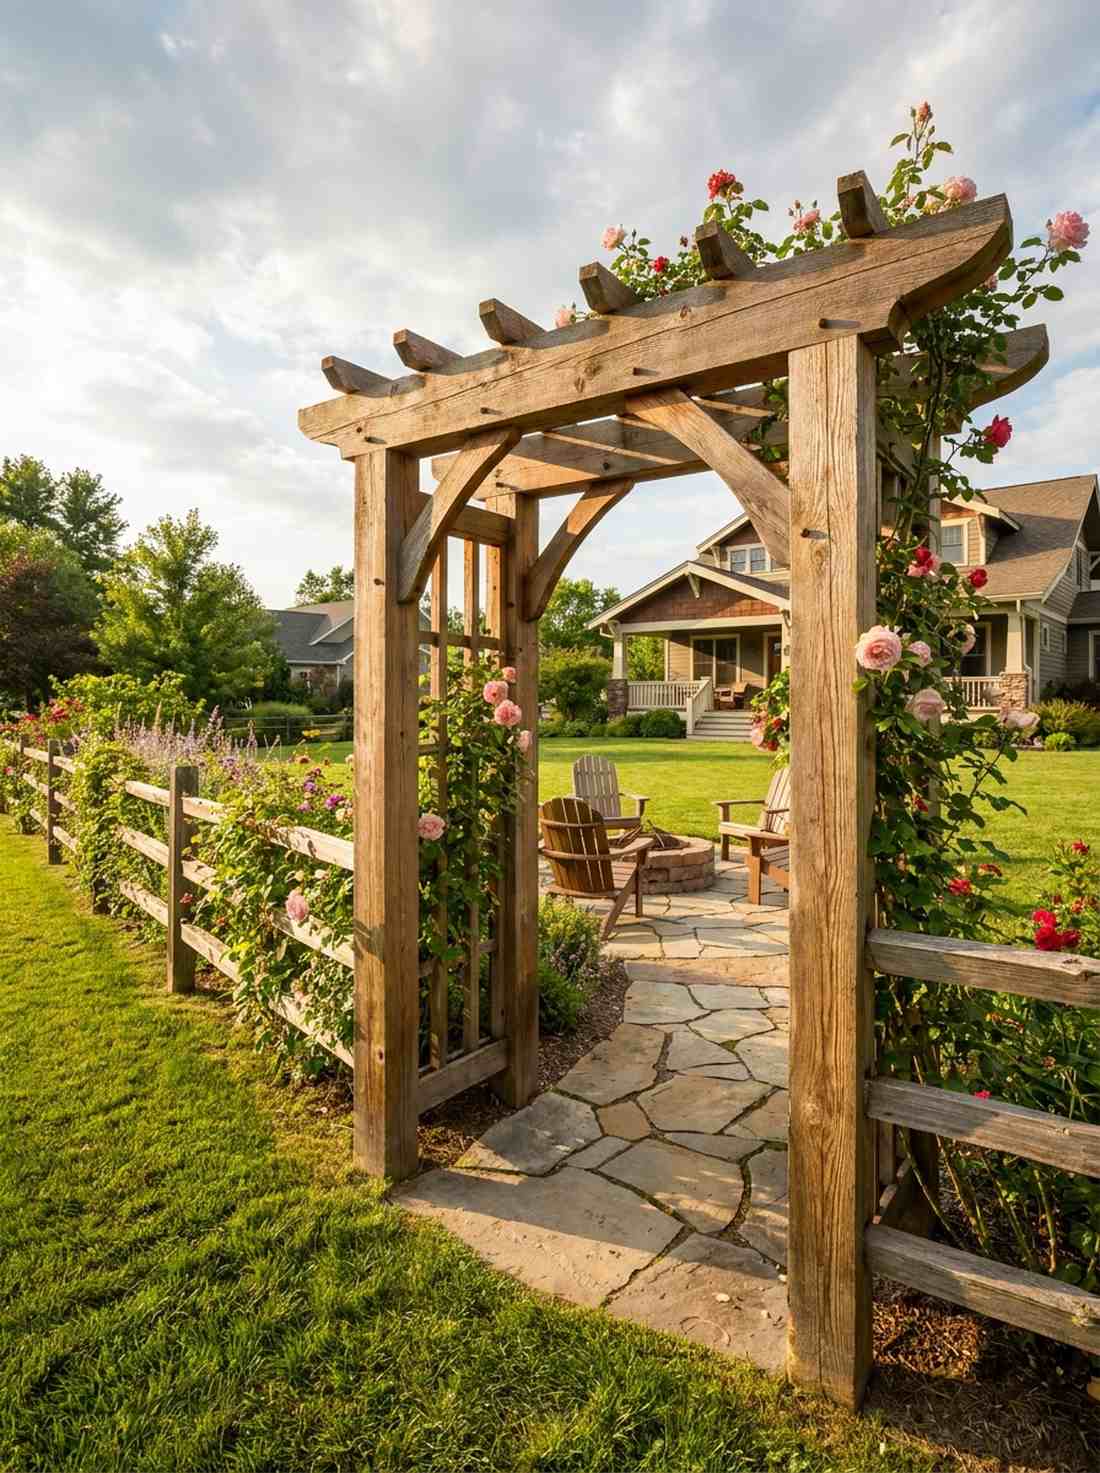
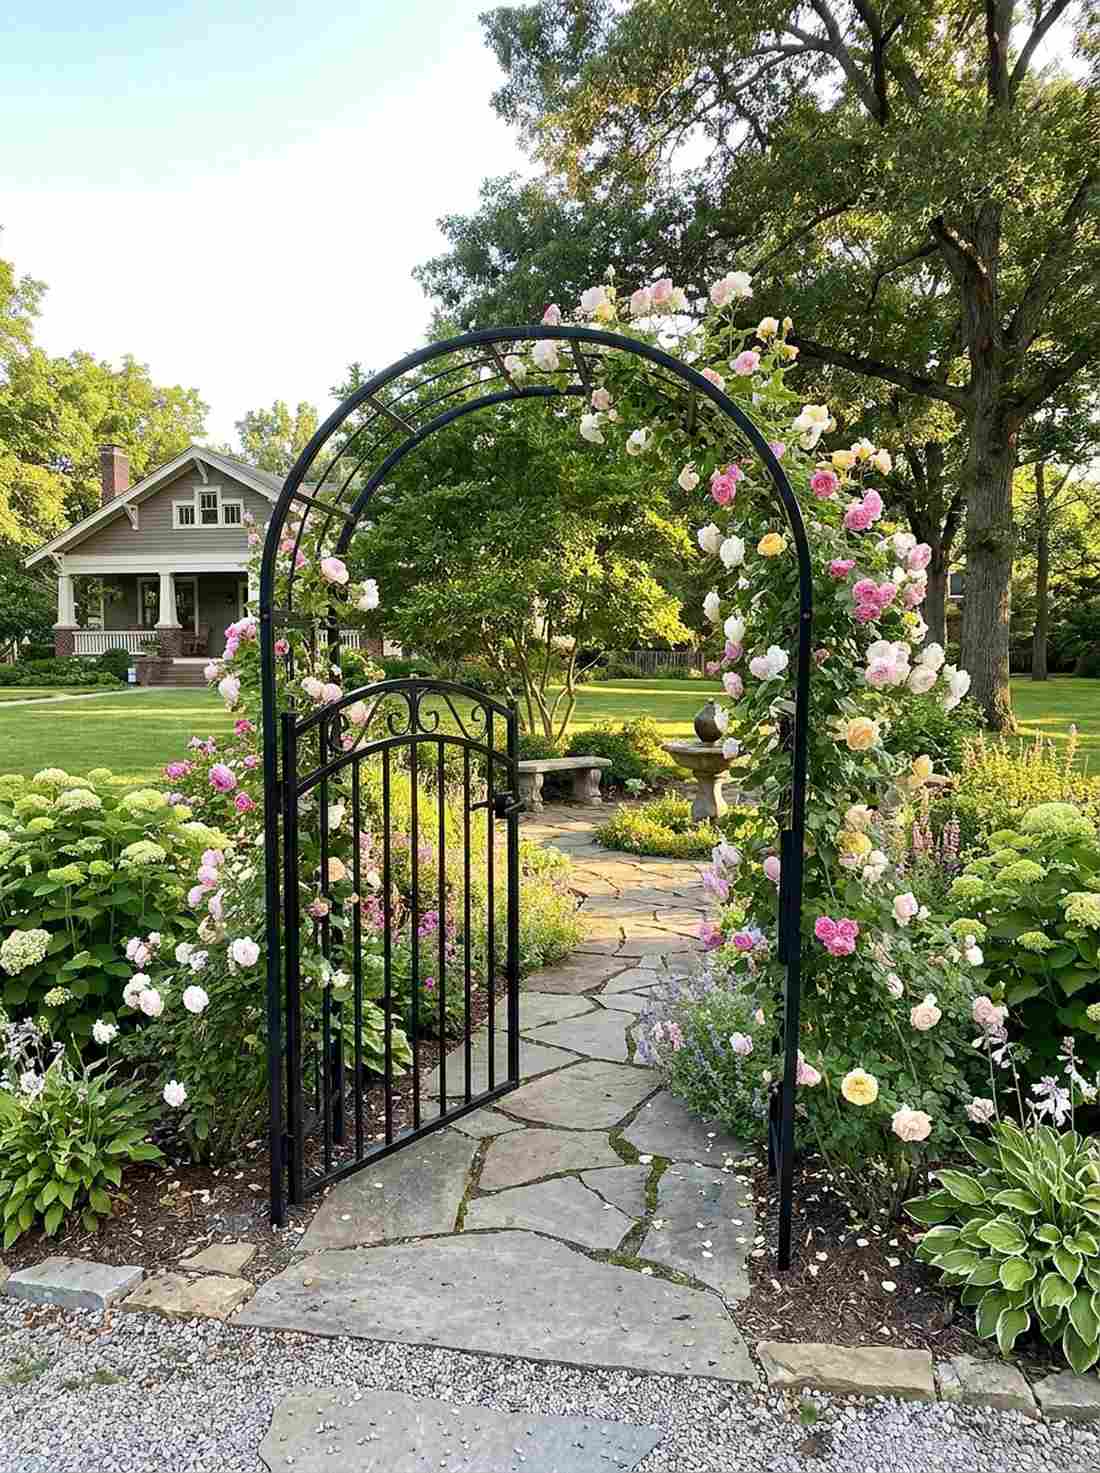
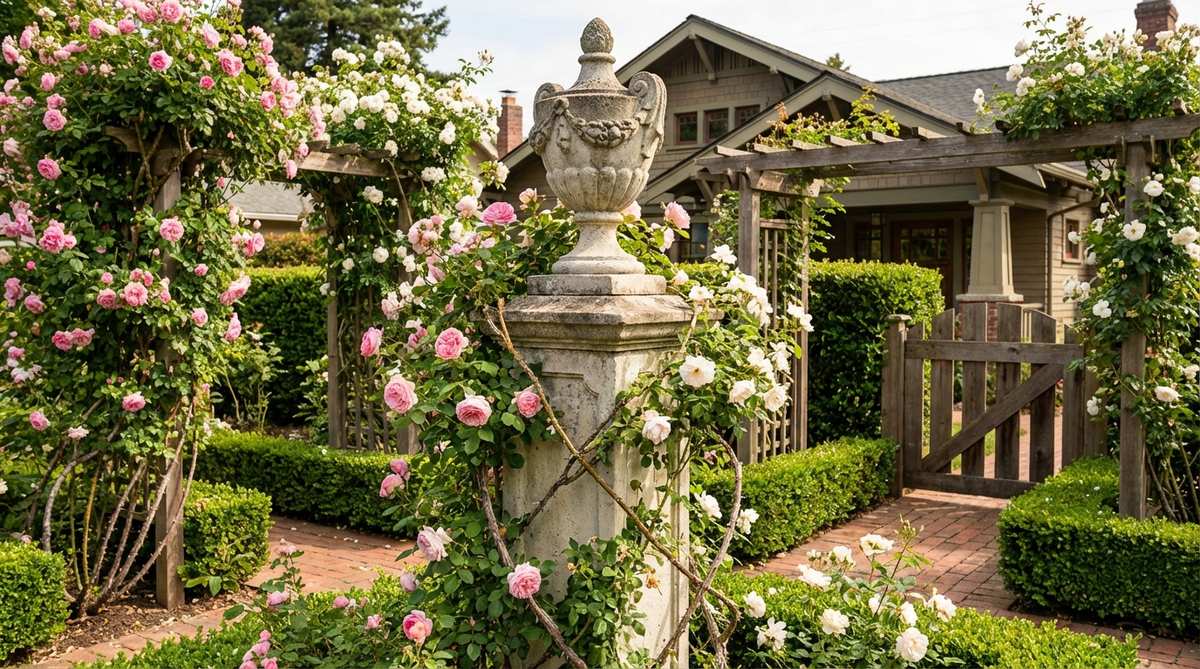
1. Classic Metal Arch Entrance
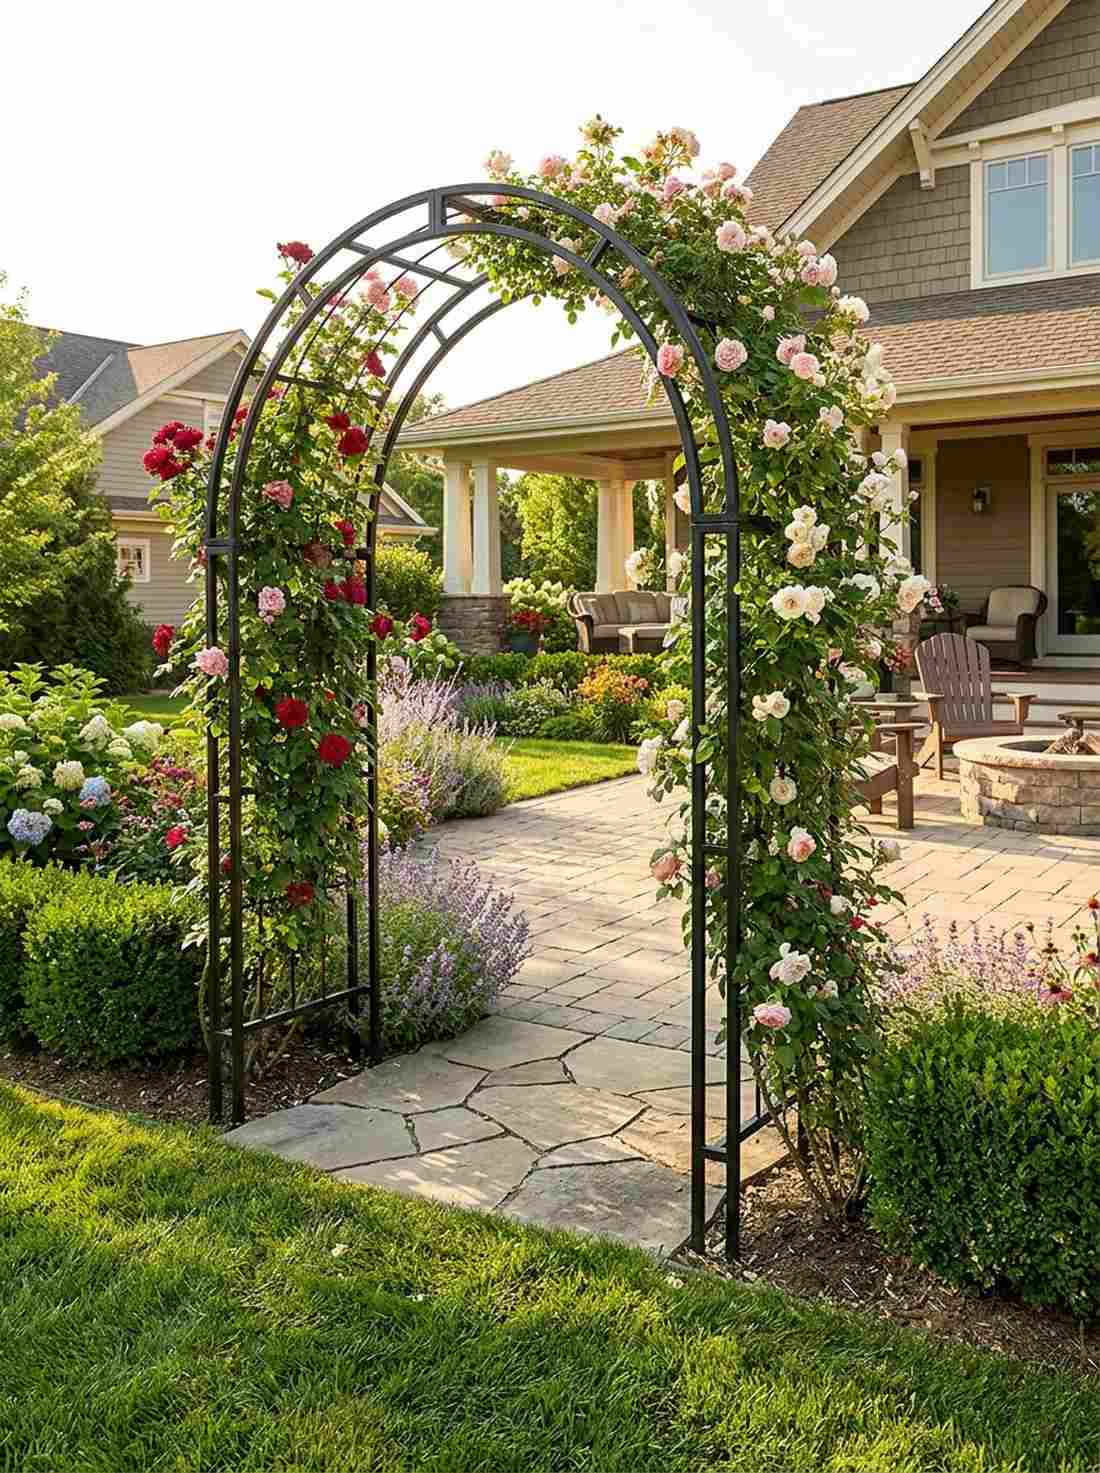
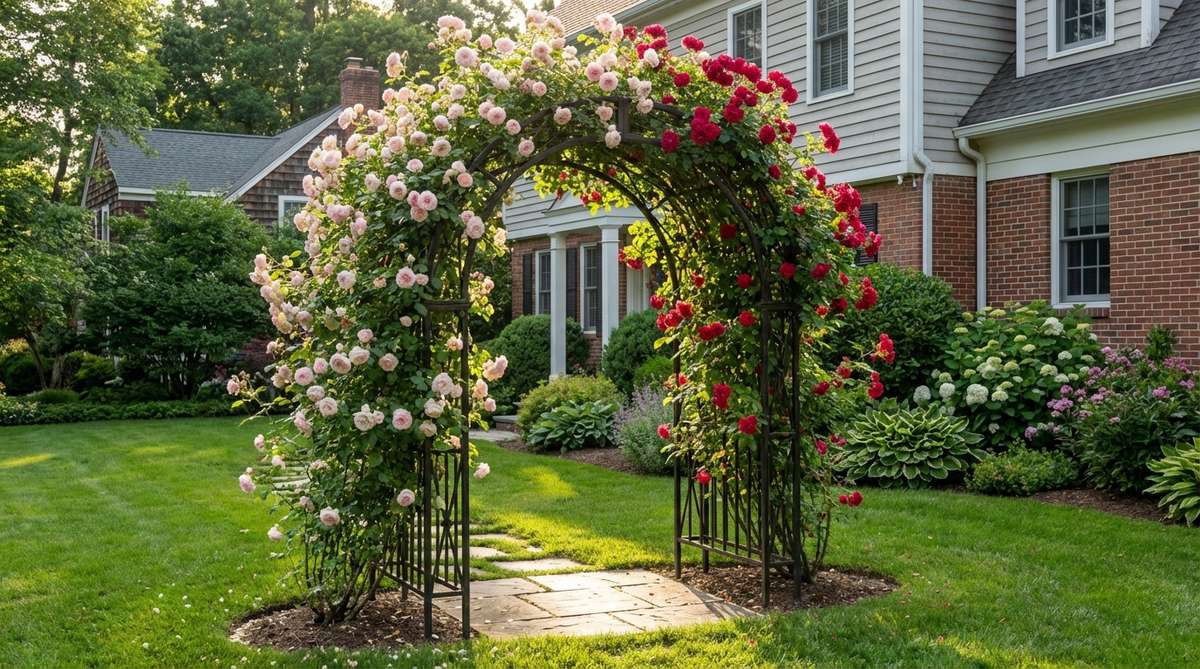
Transform your front walkway with a formal rose garden design archway that feels like stepping into a romantic European estate. This sweeping focal point works exceptionally well for framing main garden entrances or highlighting a transition from patio to lawn.
While most homeowners settle for flimsy garden store hoops, anchoring a heavy-duty frame delivers a surprisingly premium look that handles mature climbing canes effortlessly. By integrating heavy-gauge steel garden arch kits, you create a robust, wind-resistant structure that looks far more expensive than it actually is.
You can easily pull this off for around $150–$250 depending on the metal thickness. Save this to your DIY weekend garden board for your next massive curb appeal upgrade!
- Key Materials: Powder-coated steel arch kits, concrete footings
- Vibe / Style: Classic European Romance
- Difficulty: Easy beginner setup
- Budget Breakdown: Arch Kit: $120 | Anchors & Soil: $40
- Creator’s Tip: Weave canes horizontally before letting them grow over the top to triple the bloom count.
- Smart Sourcing: Grab a rust-proof metal arbor (bulk pack) or UV-coated flexible garden tie rolls.
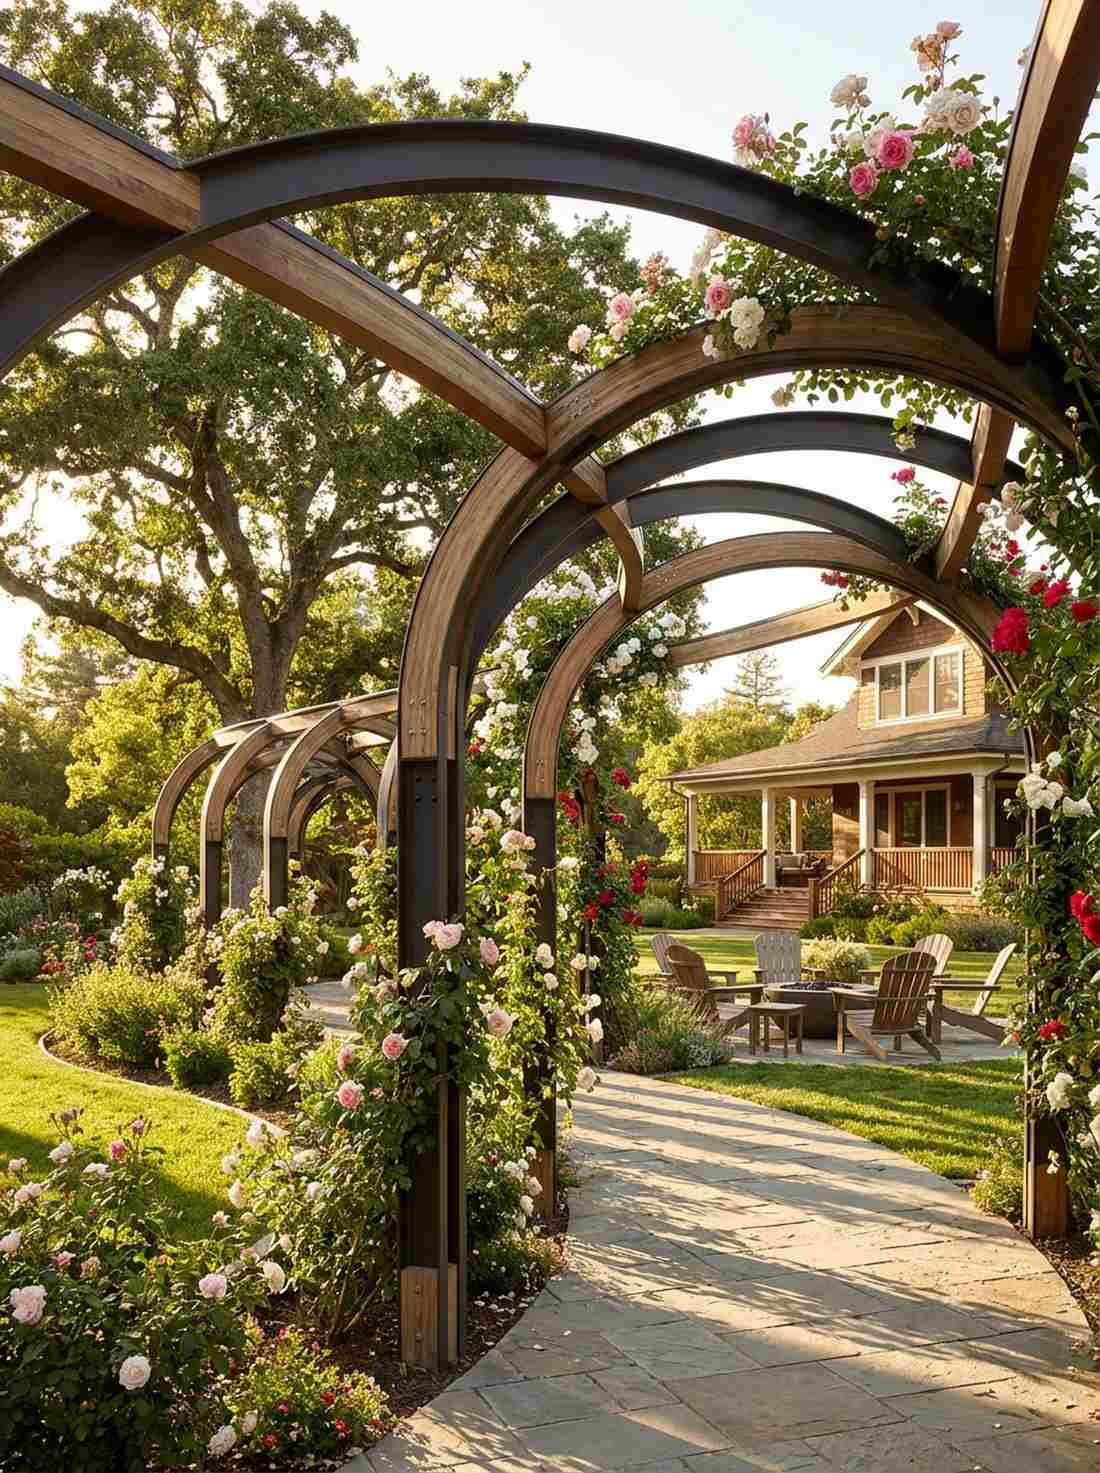
2. Double Arch Garden Corridor
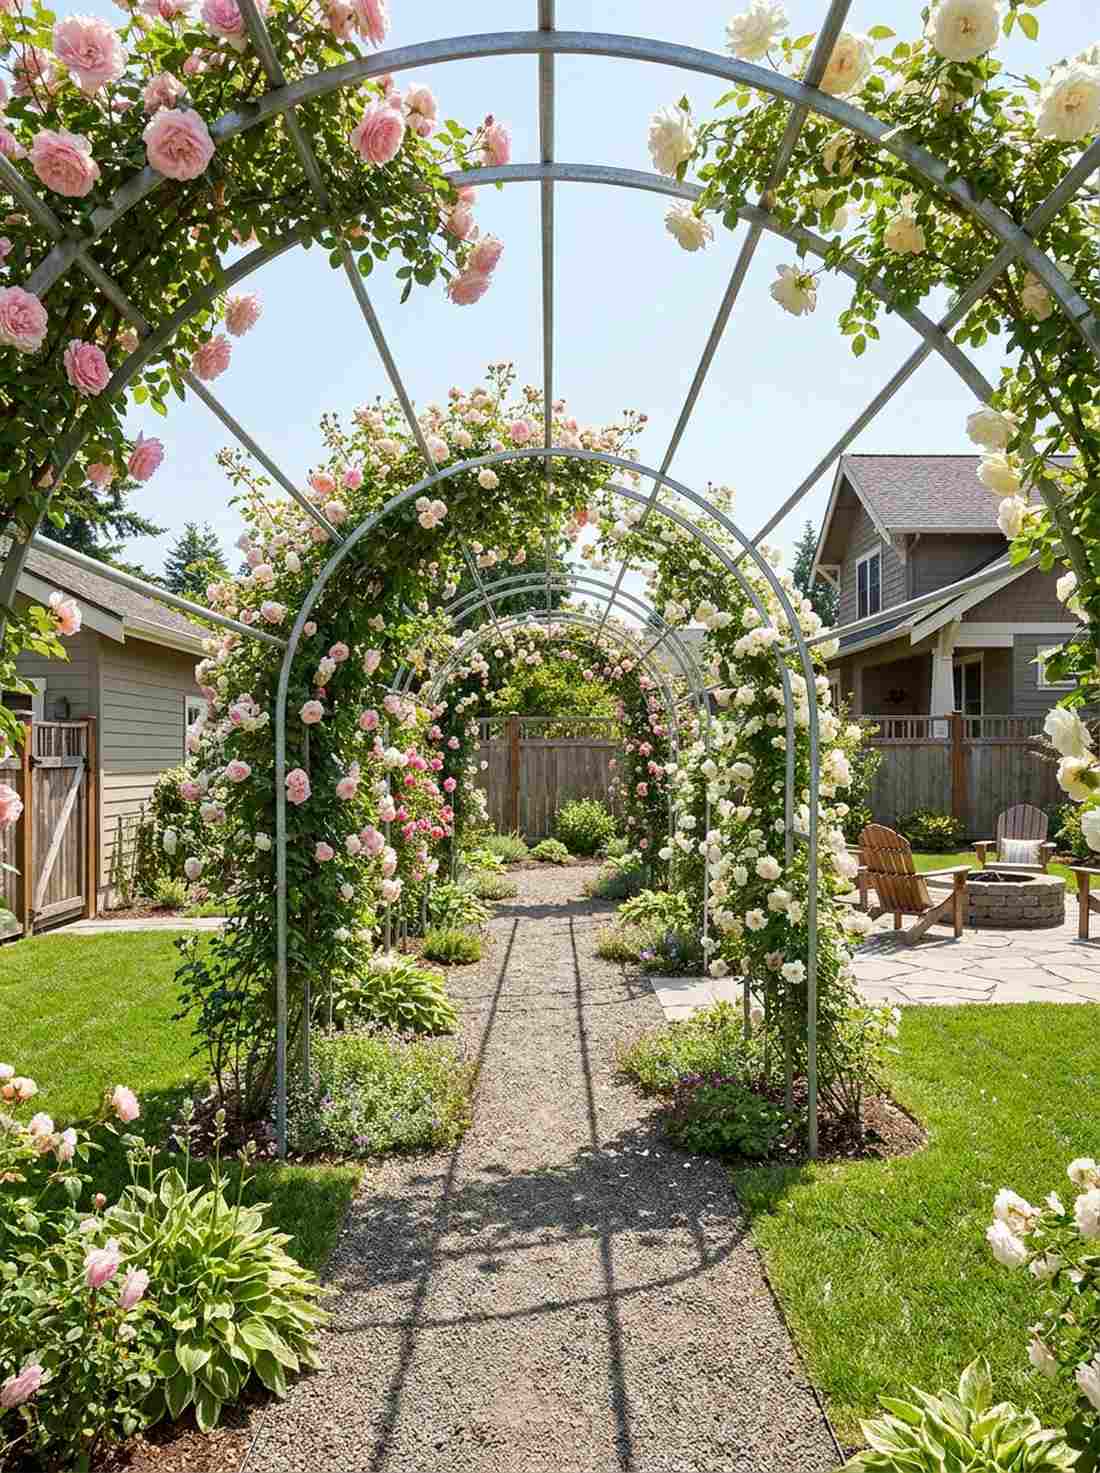
Create a mesmerizing floral tunnel with a rose garden landscape design that feels like a hidden fairytale pathway. This multi-arch setup is perfect for connecting side yards to backyard entertainment zones.
Many beginners make the mistake of using single, disconnected structures, but clustering arches gives a designer-level finish and immense depth. By investing in modular garden tunnel kits, you can weave standard climbing canes perfectly across the span for high-impact overhead blooms.
A stunning sequential setup like this typically runs between $200–$400 total. It’s a fast upgrade that completely changes the spatial dynamics of any long, narrow walkway.
- Key Materials: Matching modular garden arches, connecting crossbars
- Vibe / Style: Secret Garden Pathway
- Difficulty: Intermediate weekend project
- Budget Breakdown: Arches: $250 | Plant Supports: $30
- Creator’s Tip: Alternate two complementary rose colors (like pink and white) for a striking layered effect.
- Smart Sourcing: Use pre-cut galvanized steel tubing and heavy-duty modular joint brackets.
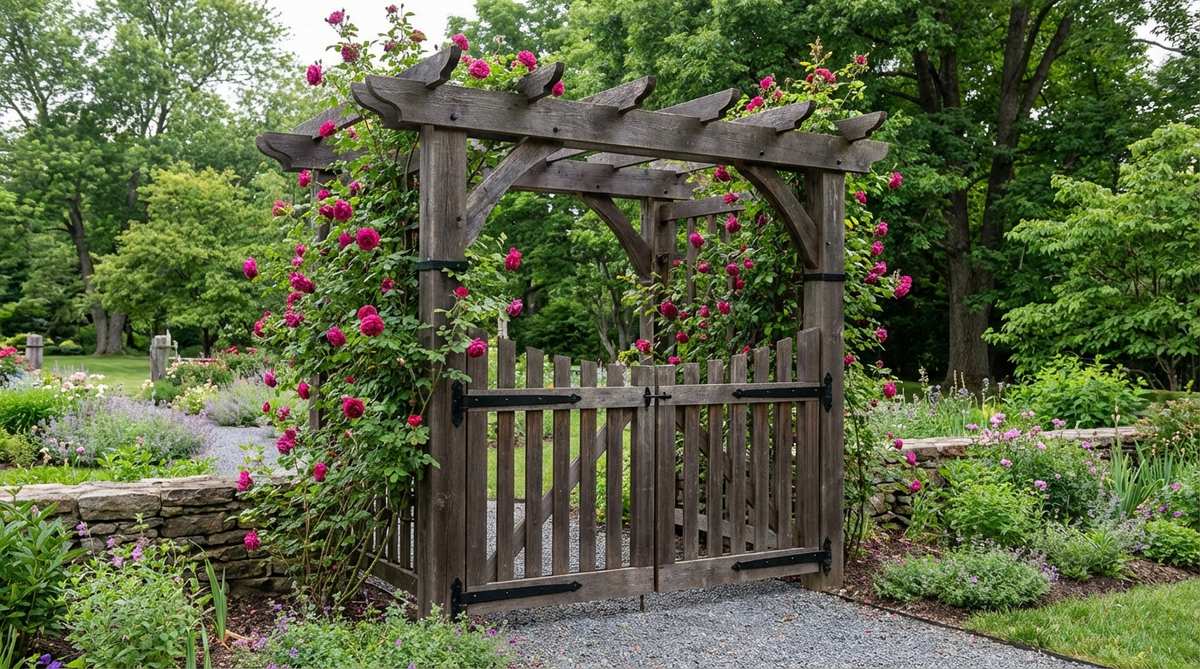
3. Rustic Timber Arbor Gateway
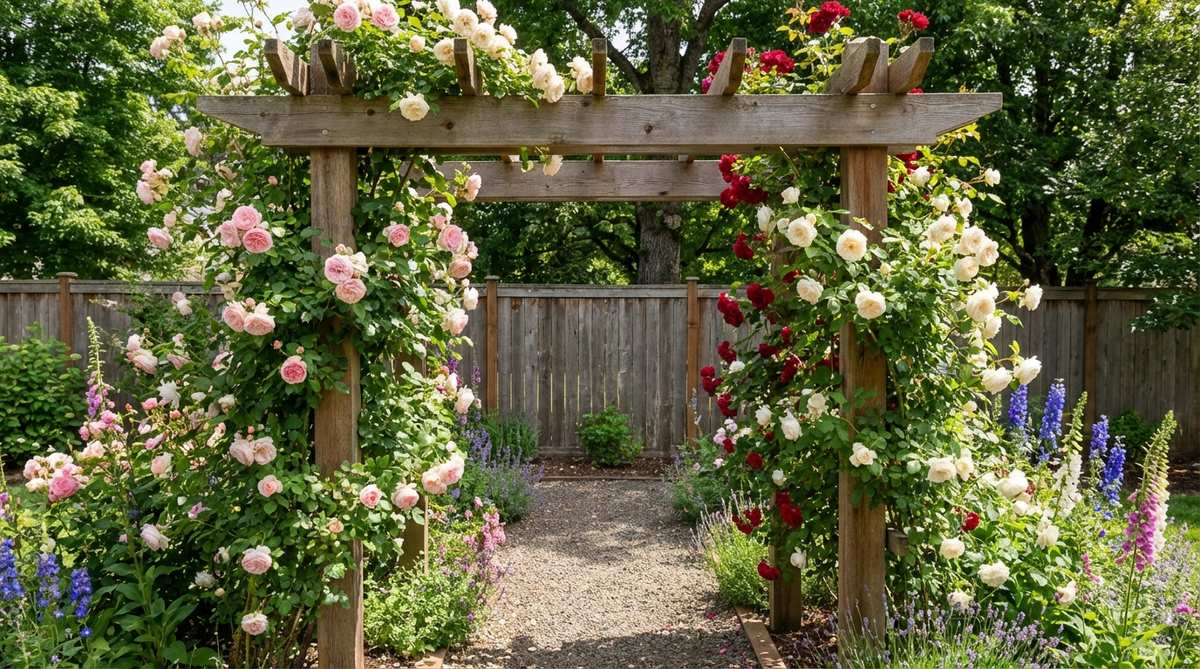
Inject massive warmth into your exterior with a cottage garden wood arbor that feels like a cozy country retreat. This organic framework is ideal for framing a rustic backyard fence or trailing over a stone walking path.
Ditching standard metal for thick, natural wood instantly upgrades your space to a premium aesthetic without the luxury price tag. Utilizing pre-cut cedar arbor kits ensures the wood weathers beautifully while providing the immense strength needed for heavy heritage rose canes.
Building this robust entrance usually costs around $180–$300 for quality wood. Highly recommended for a quick weekend win if you love earthy aesthetics.
- Key Materials: Pre-cut cedar lumber kits, exterior wood screws
- Vibe / Style: Warm Rustic Cottage
- Difficulty: Intermediate woodworking
- Budget Breakdown: Lumber: $200 | Hardware: $40
- Creator’s Tip: Treat the buried posts with ground-contact wood preservative to double the lifespan.
- Smart Sourcing: Order pre-drilled pergola hardware kits and weather-resistant wood sealants.
4. Gothic Pointed Arch Structure
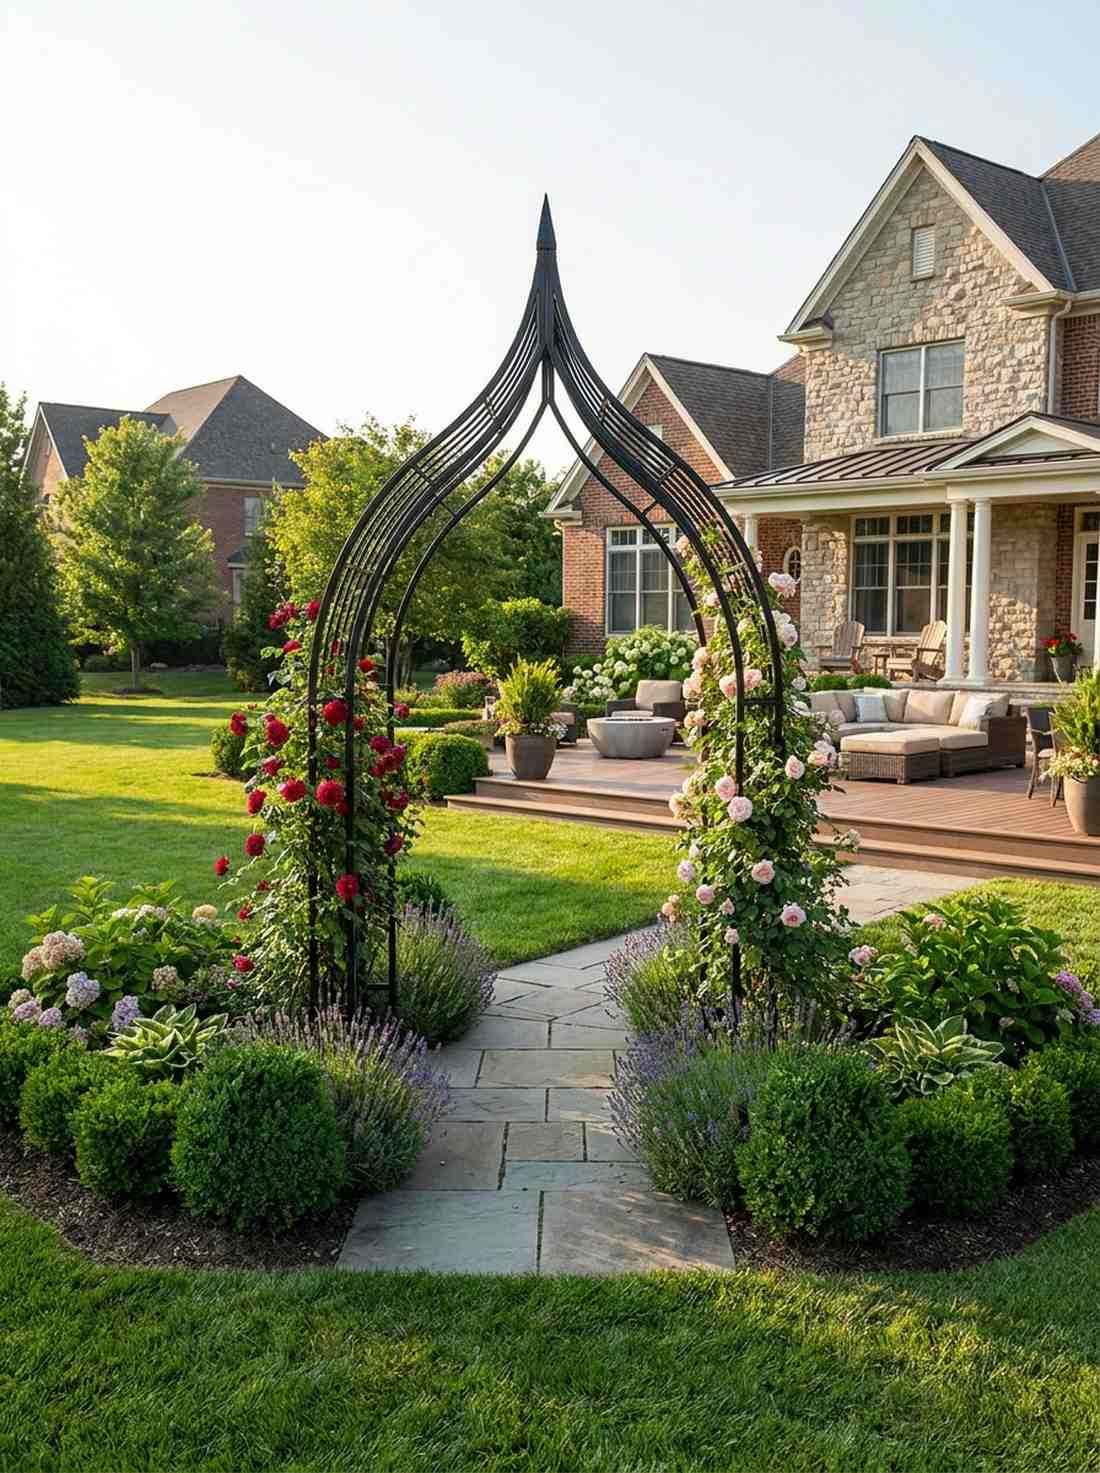
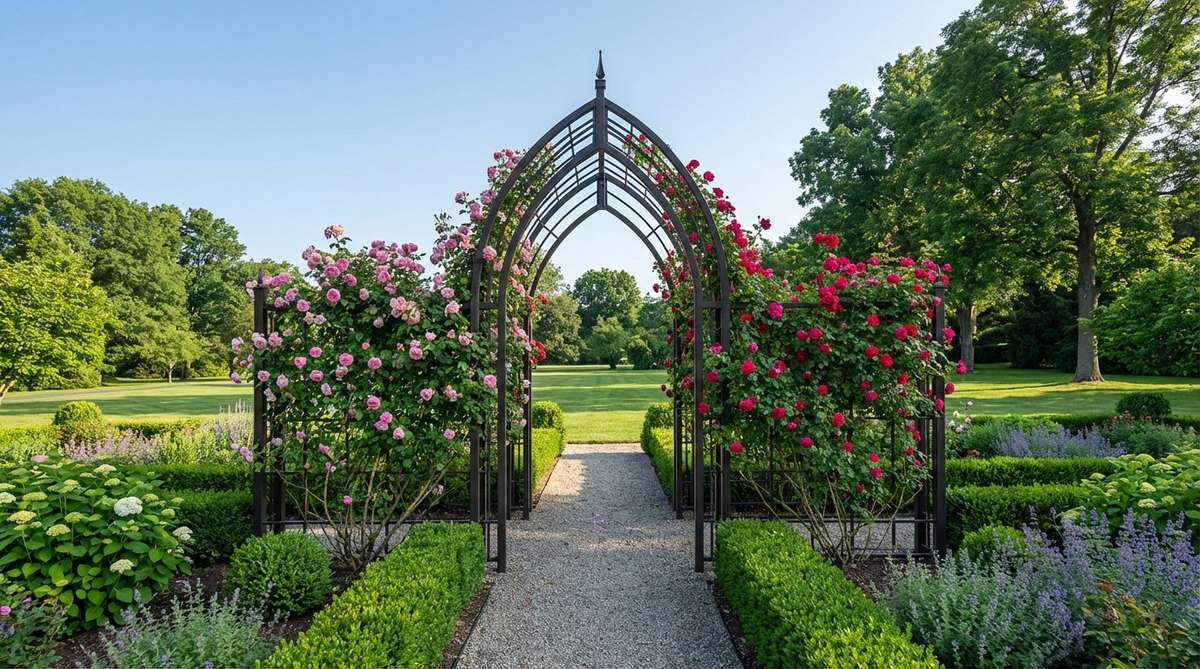
Bring striking architectural flair to your yard with a gothic garden design with roses that feels effortlessly regal and dramatic. The pointed apex makes this the ultimate centerpiece for a formal, symmetrical flower bed layout.
Instead of rounded curves, the sharp gothic peak creates a controversial but undeniably high-end focal point that draws the eye upward. Incorporating wrought-iron style gothic arch kits gives your landscape a bespoke, historical feel that perfectly frames 10-foot climbing varieties.
This dramatic installation will set you back around $130–$280. Pin this if you’re planning a sophisticated, structured garden overhaul!
- Key Materials: Pointed gothic metal arches, decorative finials
- Vibe / Style: Dark Academia / Formal Estate
- Difficulty: Easy snap-together assembly
- Budget Breakdown: Arch structure: $150 | Base anchors: $25
- Creator’s Tip: Train one vigorous climber per side to meet exactly at the sharp apex for perfect symmetry.
- Smart Sourcing: Look for powder-coated gothic garden trellises and heavy-duty ground spikes.
This next setup is ridiculously cheap but looks like a $500 custom display…
5. Arbor with Integrated Gate
Establish clear, beautiful boundaries with an arbor and gate combo that feels like unlocking a secret botanical world. This functional beauty works wonders for keeping pets out of specific flower zones while maintaining open sightlines.
While building a custom gate from scratch is expensive, utilizing an all-in-one system delivers a remarkably premium look for a fraction of the cost. Using pre-built metal arbor-gate kits creates a sturdy, swing-ready entrance that perfectly anchors thornless rose varieties.
You can seamlessly install this entire setup for $160–$350. It’s the smartest functional upgrade you can make for property zoning.
- Key Materials: Integrated metal arbor gates, rust-proof hinges
- Vibe / Style: Secret Garden Entrance
- Difficulty: Intermediate leveling required
- Budget Breakdown: Arbor/Gate Kit: $220 | Leveling Sand: $15
- Creator’s Tip: Always install the gate swinging inward to keep the front-facing rose display completely pristine.
- Smart Sourcing: Buy pre-assembled steel arbor gates and weatherproof hinge lubricant sprays.
6. Wide-Span Ceremonial Arch
Make a massive floral statement with a wide-span rose garden arch that feels like walking into a luxury outdoor wedding venue. This ultra-wide structure is practically designed to span over driveways, wide patios, or accessible garden carts.
Standard arches look tiny over large paths, but a wide-span layout looks intensely expensive and custom-made. By securing heavy-duty wide-span pergola frames, you can support multiple vigorous ramblers without the frame buckling under the weight.
A grand setup of this magnitude costs around $300–$600 but adds thousands in perceived property value. Save this to your master garden layout board!
- Key Materials: Wide-span steel or timber frames, concrete anchors
- Vibe / Style: Luxury Ceremonial Grandeur
- Difficulty: Advanced (requires two people)
- Budget Breakdown: Wide Arch Kit: $400 | Concrete: $30
- Creator’s Tip: Plant two roses per side to ensure the massive overhead span fills in completely within three years.
- Smart Sourcing: Purchase commercial-grade steel arch bases and bulk training wire spools.
Trellis & Vertical Structures For Wall Climbing Roses
Trellises maximize vertical growing space along walls, fences, and standalone installations, transforming flat surfaces into living tapestries. Proper trellis design incorporates accessibility for pruning and air circulation behind the structure.
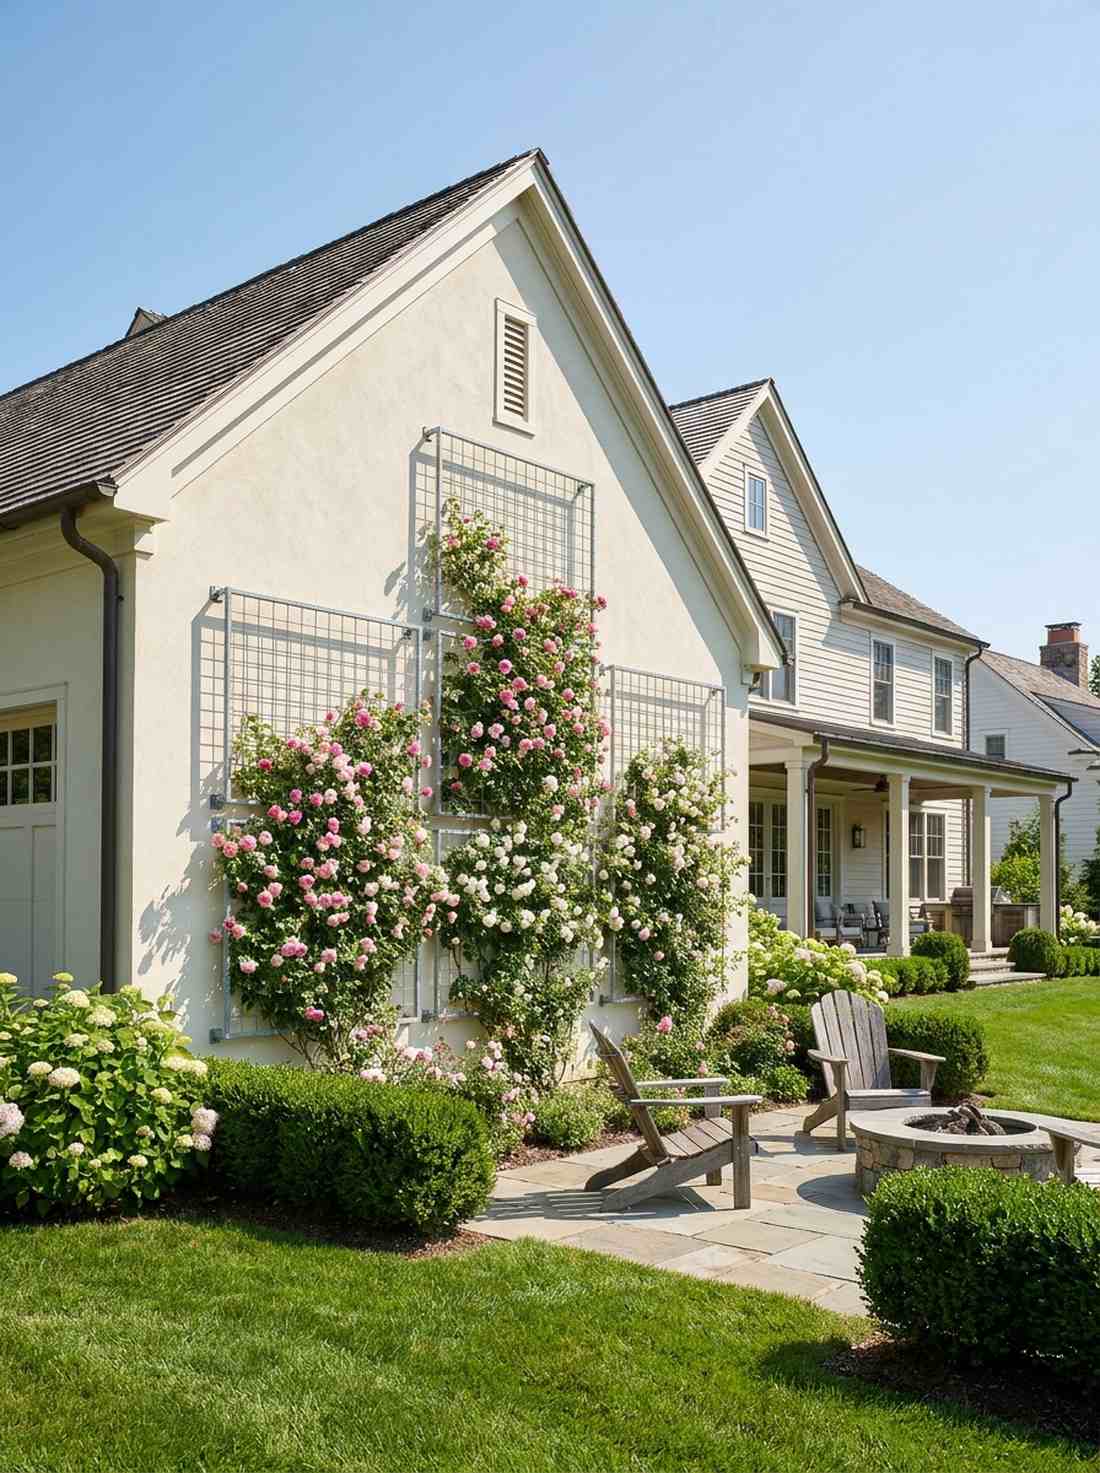
7. Fan Trellis Wall Mount
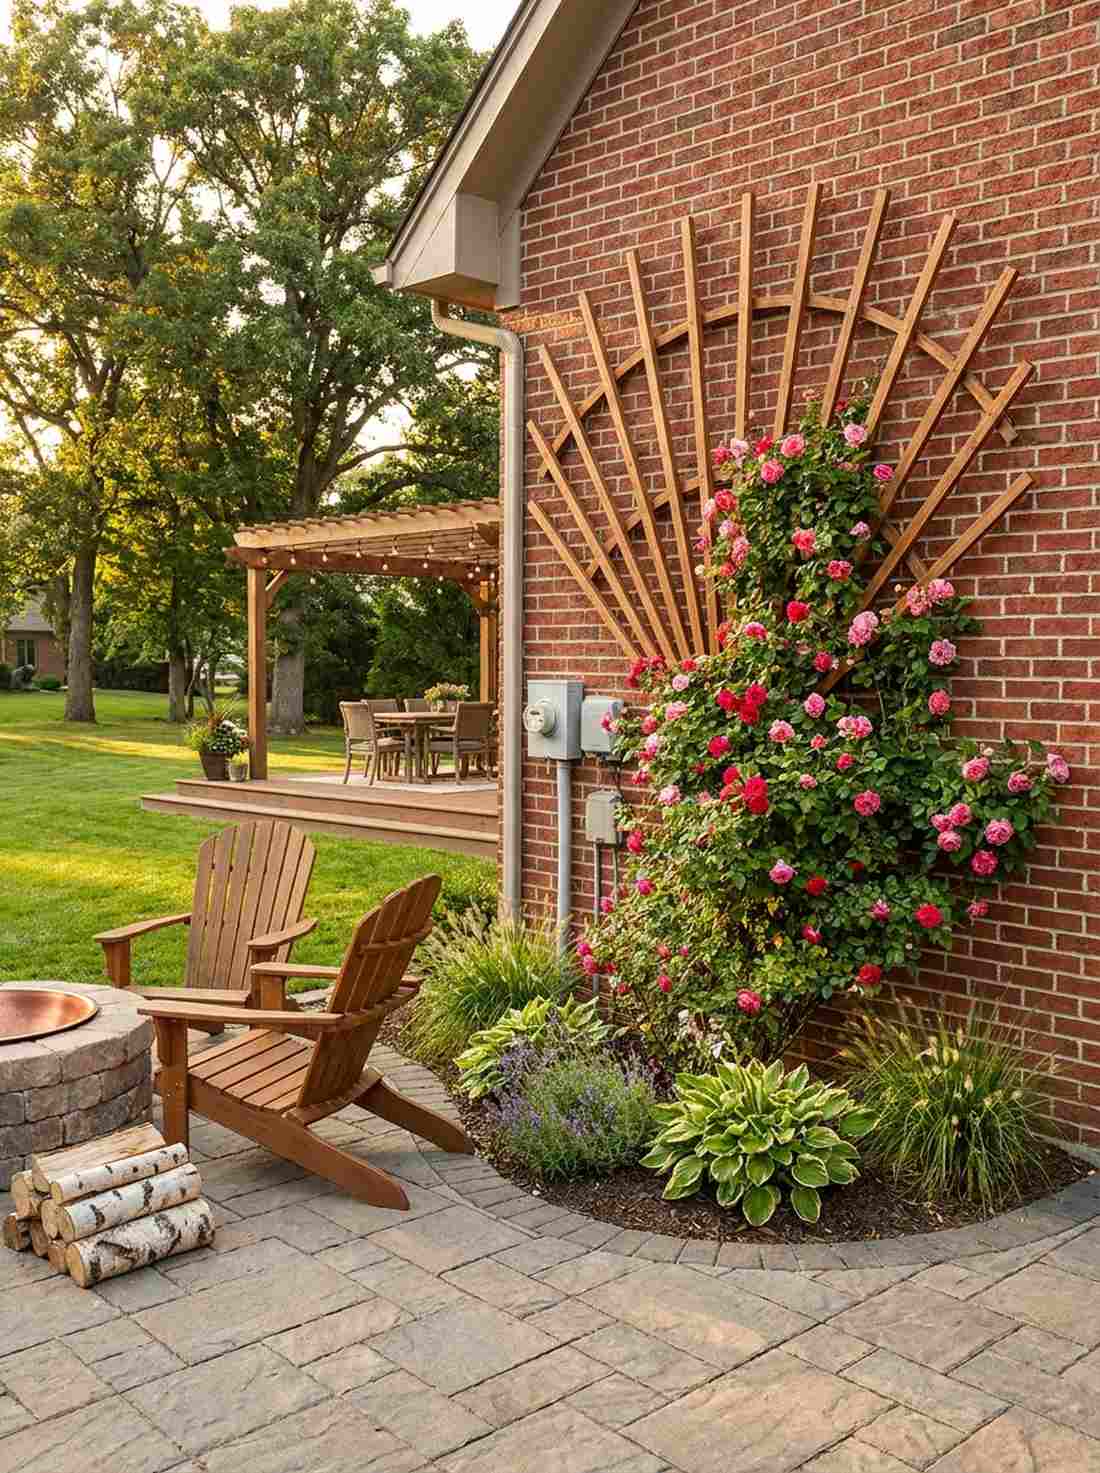
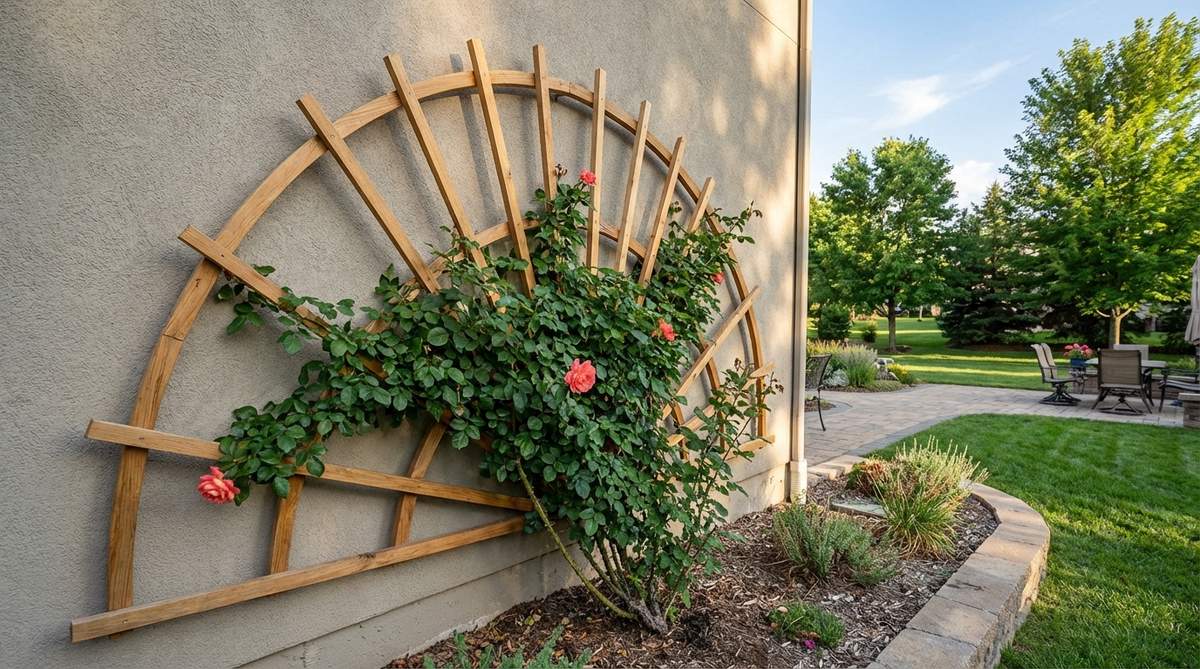
Turn a blank exterior wall into a living masterpiece with a wall-mounted rose trellis that feels like a cascade of color bursting outward. This specific shape is absolutely perfect for breaking up the boring brickwork on the side of a house.
Flat grids can look rigid, but a radiating fan layout gives a designer-level finish that mimics the plant’s natural upward reach. Incorporating expandable wooden fan trellises provides instant, elegant architecture while ensuring maximum airflow between the brick and the blooms.
You can snag these materials for as little as $30–$70 per panel. It’s an incredibly affordable way to hide ugly utility walls.
- Key Materials: Expandable willow/wood fan trellises, masonry wall spacers
- Vibe / Style: Vibrant Vertical Art
- Difficulty: Easy drill installation
- Budget Breakdown: Fan Trellis: $40 | Spacer Blocks/Screws: $15
- Creator’s Tip: Mount the trellis exactly 3 inches off the wall to prevent moisture damage and mildew on the roses.
- Smart Sourcing: Use pre-treated wood fan trellises and rust-proof masonry mounting kits.
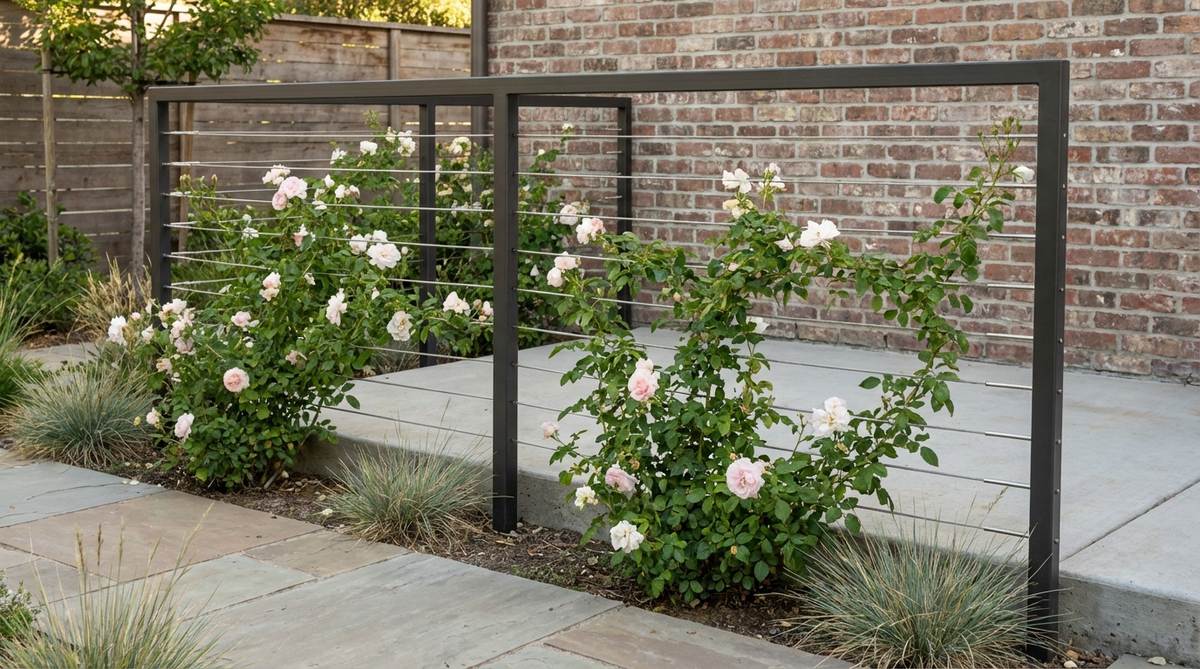
8. Diamond Lattice Panel
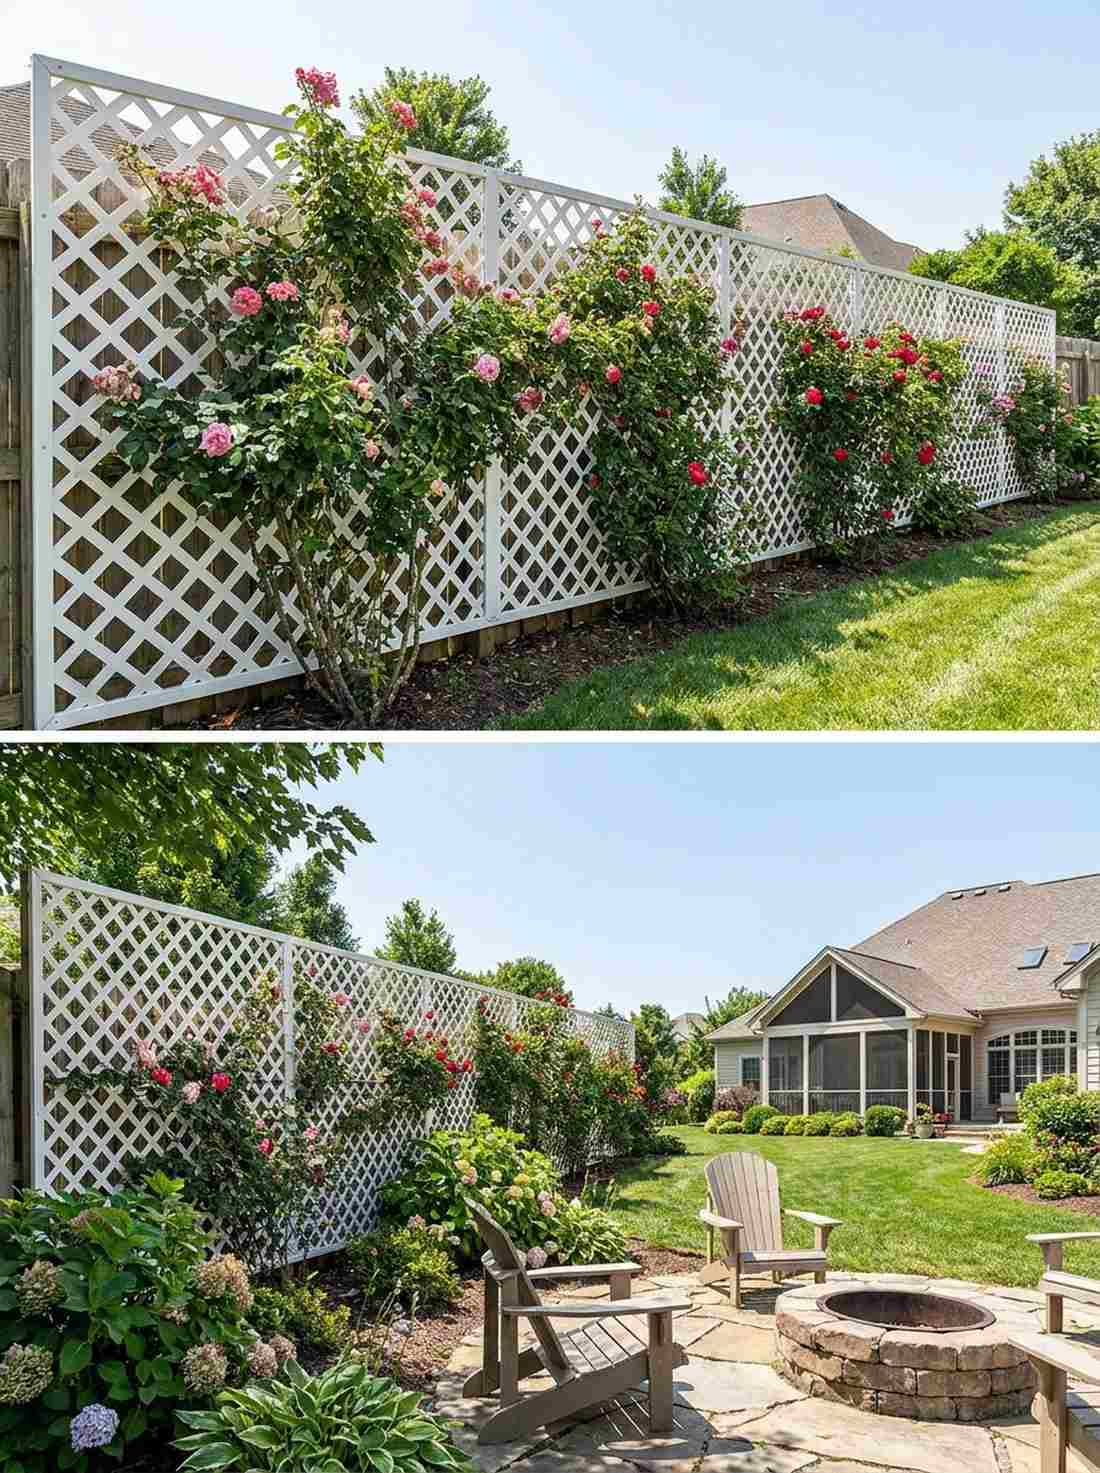
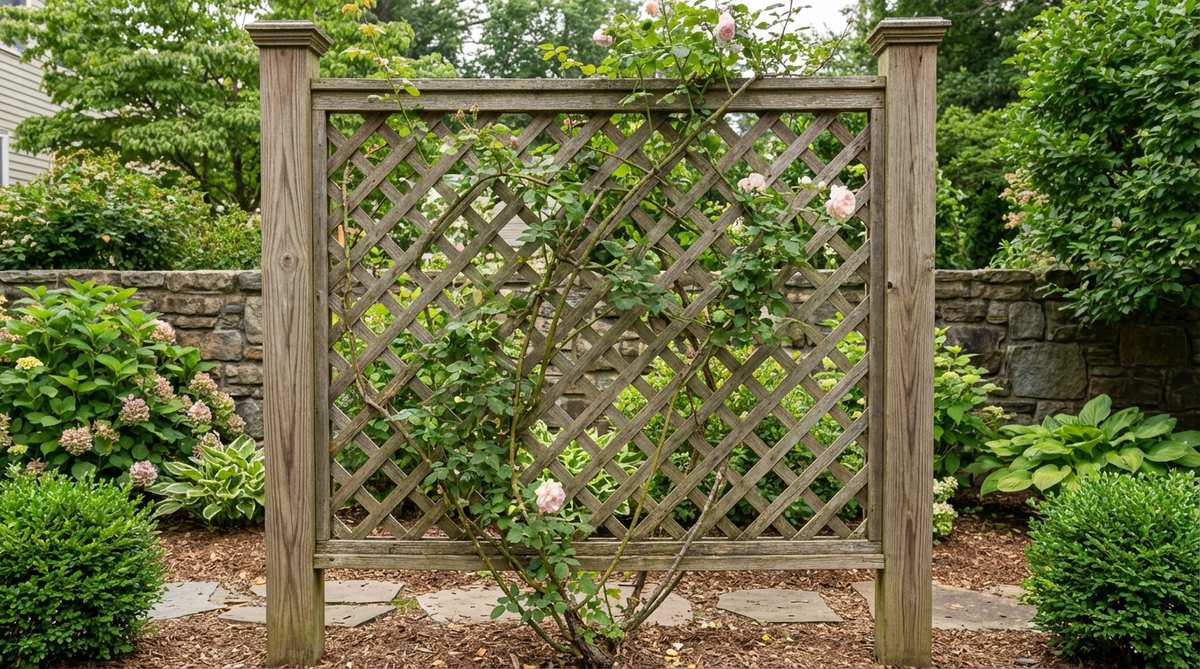
Create a classic, full-coverage privacy screen with diamond lattice rose supports that feel like a traditional English manor wall. Ideal for transforming chain-link fences or plain wooden borders into lush, blooming barricades.
While square grids look a bit industrial, the diagonal diamond pattern delivers a surprisingly premium look that creates visual interest even in winter. By using heavy-duty vinyl lattice sheets, you avoid wood rot entirely while getting infinite tie-points for your climbing roses.
A beautiful 4×8 panel setup will cost you about $40–$80 per section. Pin this if you need an instant privacy wall solution!
- Key Materials: Pre-cut vinyl lattice panels, framing channel strips
- Vibe / Style: Timeless English Garden
- Difficulty: Easy weekend border project
- Budget Breakdown: Lattice Panel: $45 | Furring strips: $20
- Creator’s Tip: Buy lattice with at least 4-inch gaps to comfortably thread thick mature rose canes without snapping them.
- Smart Sourcing: Invest in UV-resistant vinyl lattice panels (bulk) and color-matching outdoor screws.
9. Horizontal Rail Contemporary Trellis
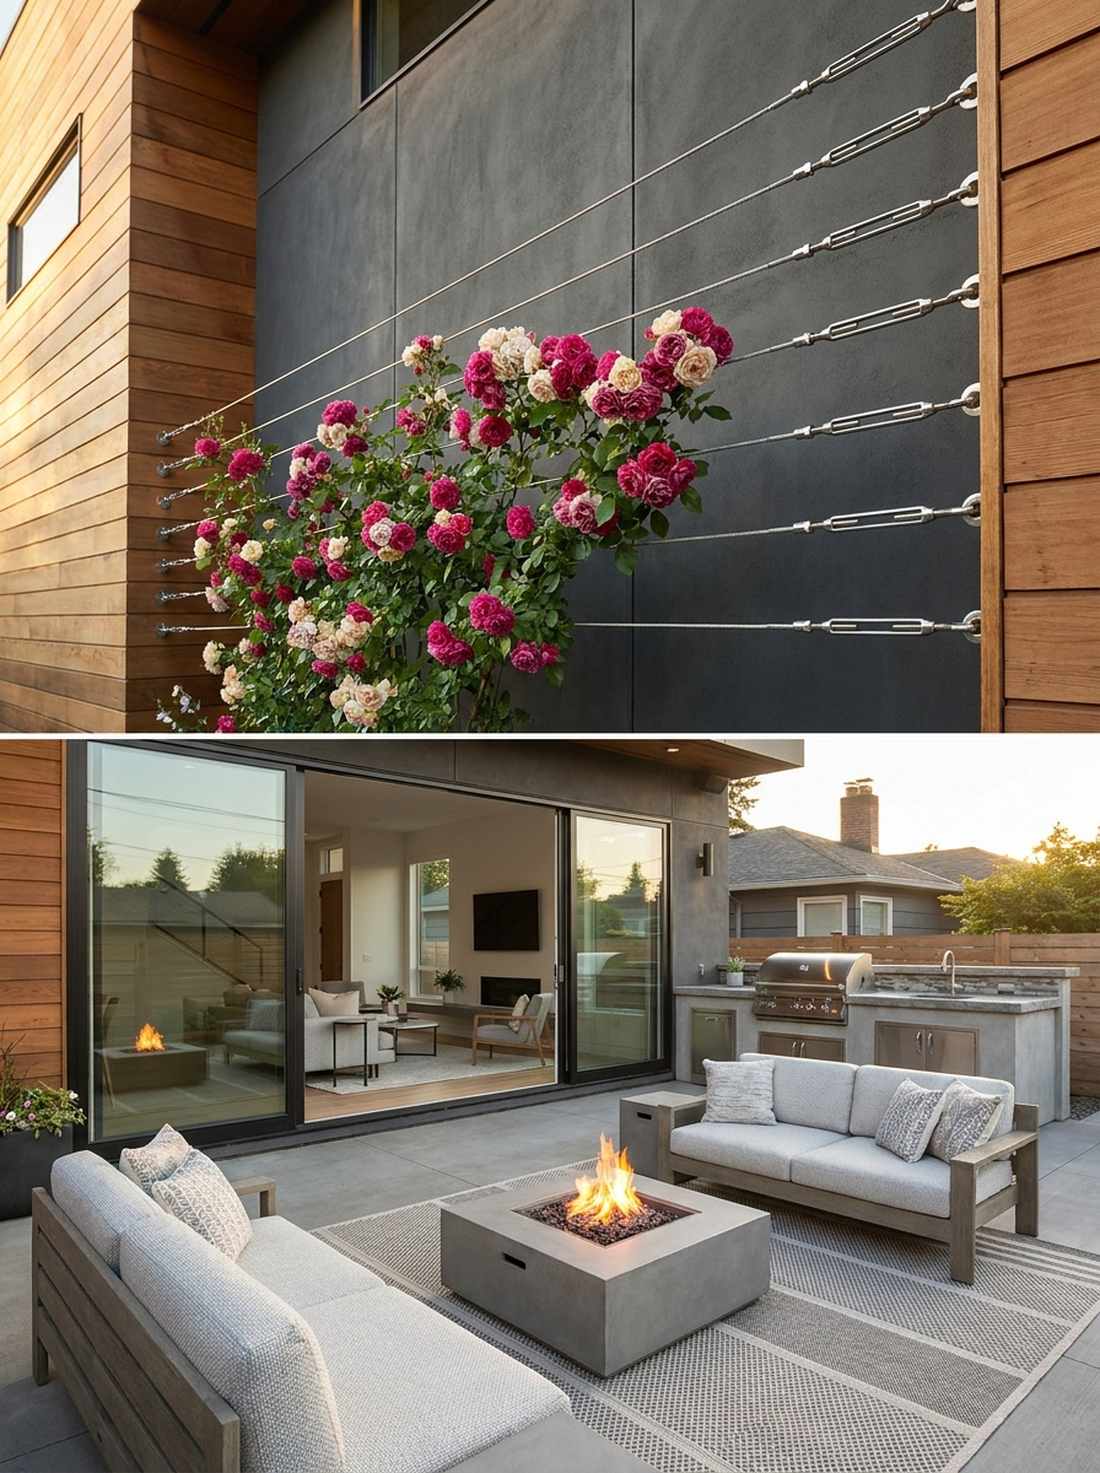
Modernize your floral displays with a contemporary wire trellis system that feels like a sleek, architectural art gallery. This minimalist setup works exceptionally well for urban patios or stark, modern home exteriors.
Chunky wooden frames can look dated, but a sleek horizontal cable system looks incredibly expensive and visually floats the roses in mid-air. Tapping into stainless steel cable trellis kits ensures a clean, indestructible framework that forces roses into high-yield lateral blooming.
You can mount a professional-looking cable grid for about $80–$150. Highly recommended if you want your blooms, not the wood, to be the star.
- Key Materials: Stainless steel wire rope kits, tensioners/turnbuckles
- Vibe / Style: Sleek Urban Modernist
- Difficulty: Intermediate measuring and tensioning
- Budget Breakdown: Steel Cable Kit: $90 | Anchor Bolts: $25
- Creator’s Tip: Space the horizontal cables exactly 18 inches apart to perfectly support the natural weight of clustered blooms.
- Smart Sourcing: Order marine-grade stainless steel trellis kits and heavy-duty turnbuckle sets.
💡 Must-Have Supplies for High-End Setups
To build these setups faster and ensure they last, skip the generic craft aisles and invest in the right foundational kits.
- Base & Support: Commercial-grade modular garden arches (heavy-gauge steel)
- Setup Tools: Pro-grade silicone plant tie starter kits (UV-resistant)
- Weather/Durability Protection: Clear outdoor rust-blocking sealant sprays
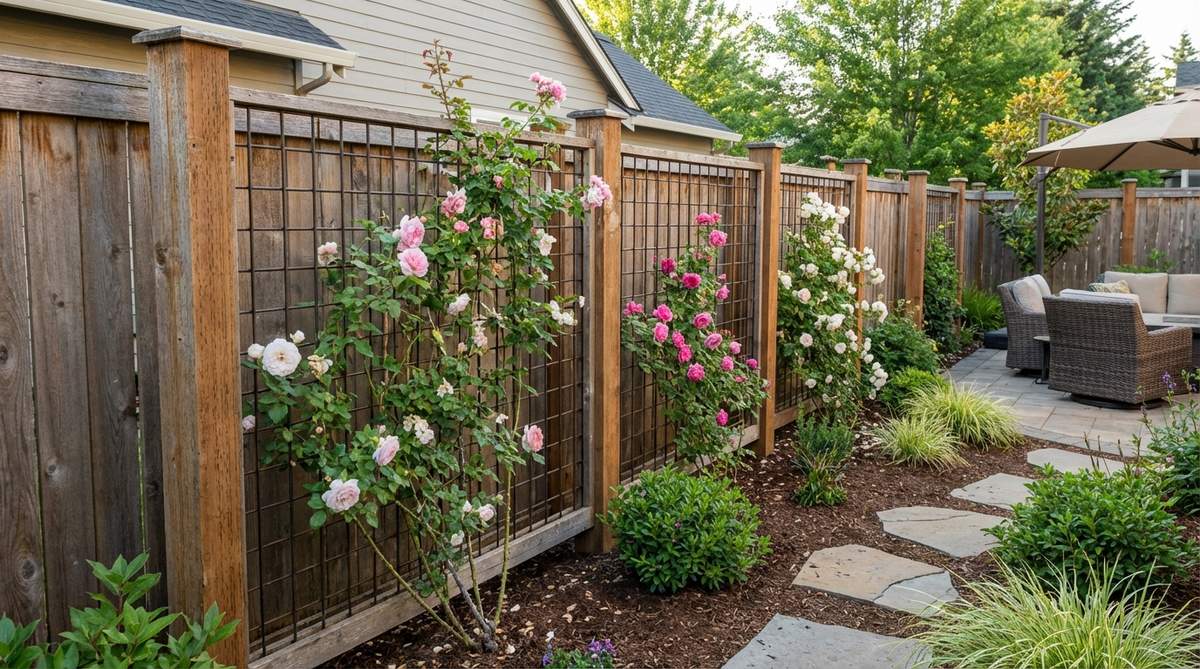
10. Espalier Grid Framework
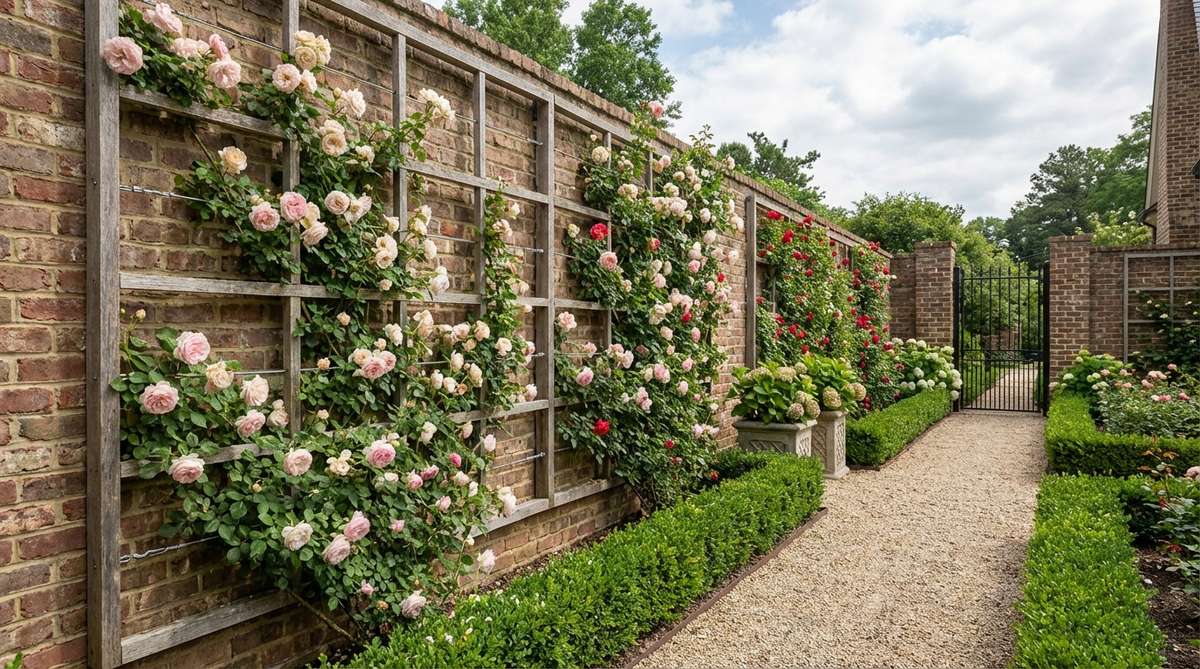
Master the art of high-density blooming with a formal rose garden design espalier that feels like walking the grounds of Versailles. This highly structured geometric layout is the ultimate flex for narrow side-yards or blank garage walls.
Growing wild roses can look messy, but restricting them to a rigid grid delivers an undeniably designer-level finish that commands attention. By setting up pre-welded galvanized wire grids, you provide the exact right angles needed to meticulously train your roses for maximum petal output.
A beautiful espalier frame costs roughly $60–$120 to install. Save this to your advanced gardening techniques board!
- Key Materials: Heavy-gauge wire grid panels, wall stand-offs
- Vibe / Style: High-Society Formal
- Difficulty: Advanced pruning required
- Budget Breakdown: Wire Grid: $50 | Stand-offs: $30
- Creator’s Tip: Choose roses with flexible, moderate growth habits; stiff hybrid teas will break when bent into espalier shapes.
- Smart Sourcing: Use pre-cut galvanized cattle panels and heavy-duty wall offset brackets.
11. Fence-Line Integrated Trellis
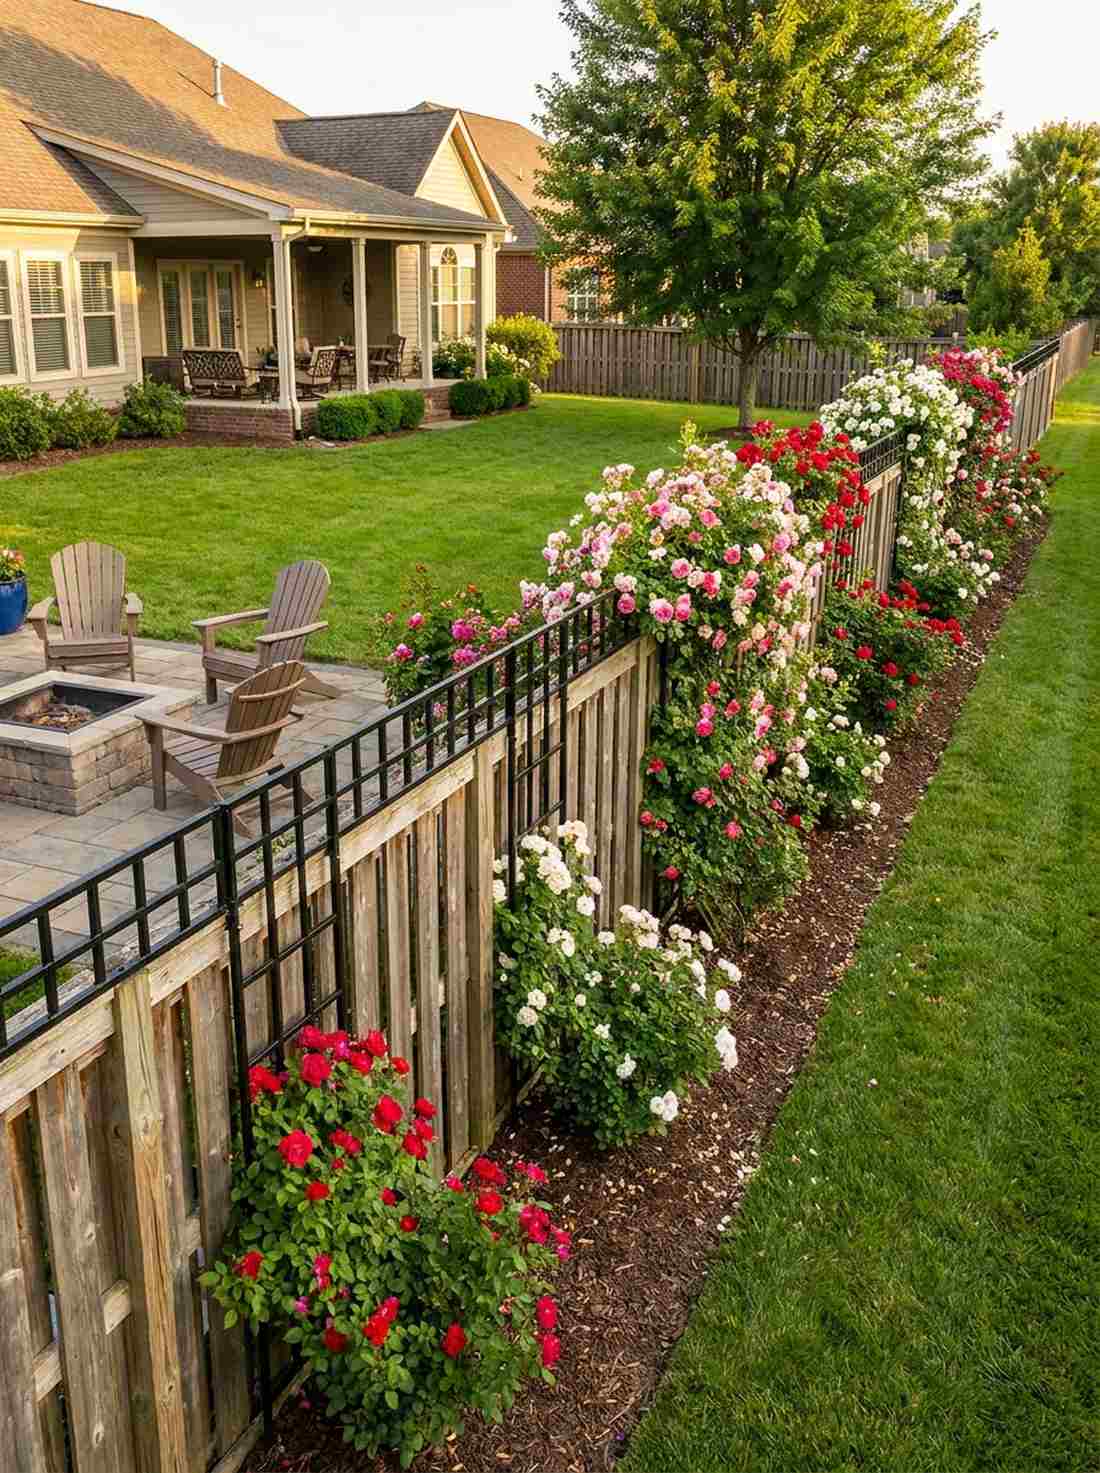
Elevate your property perimeter with a fence line rose trellis that feels like a lush, never-ending ribbon of flowers. This functional hack is brilliant for maximizing vertical growth on basic, boring privacy fences.
Most fences are dead space, but bolting on trellis toppers looks far more expensive than it is and creates an incredible neighborhood display. Utilizing bolt-on metal fence extenders allows you to rapidly add 2-3 feet of climbing space without replacing your existing wooden fence.
You can easily retrofit a 20-foot fence line for around $100–$200. It’s a fast weekend upgrade that completely changes your yard’s borders.
- Key Materials: Trellis fence toppers, mounting brackets
- Vibe / Style: Blooming Neighborhood Border
- Difficulty: Easy screw-on addition
- Budget Breakdown: Trellis Toppers: $120 | Brackets/Screws: $25
- Creator’s Tip: Plant the roses strictly on your side of the fence to avoid thorny neighbor disputes when pruning time comes!
- Smart Sourcing: Grab pre-assembled fence trellis extensions and weatherproof outdoor zip ties (bulk pack).
Pergola & Canopy Designs Creating Overhead Rose Gardens
Pergolas elevate roses to canopy level, providing shade structures while showcasing blooms against the sky. These substantial frameworks demand roses with significant vigor and benefit from viewing positions that allow appreciation of overhead flowers.
12. Linear Pathway Pergola
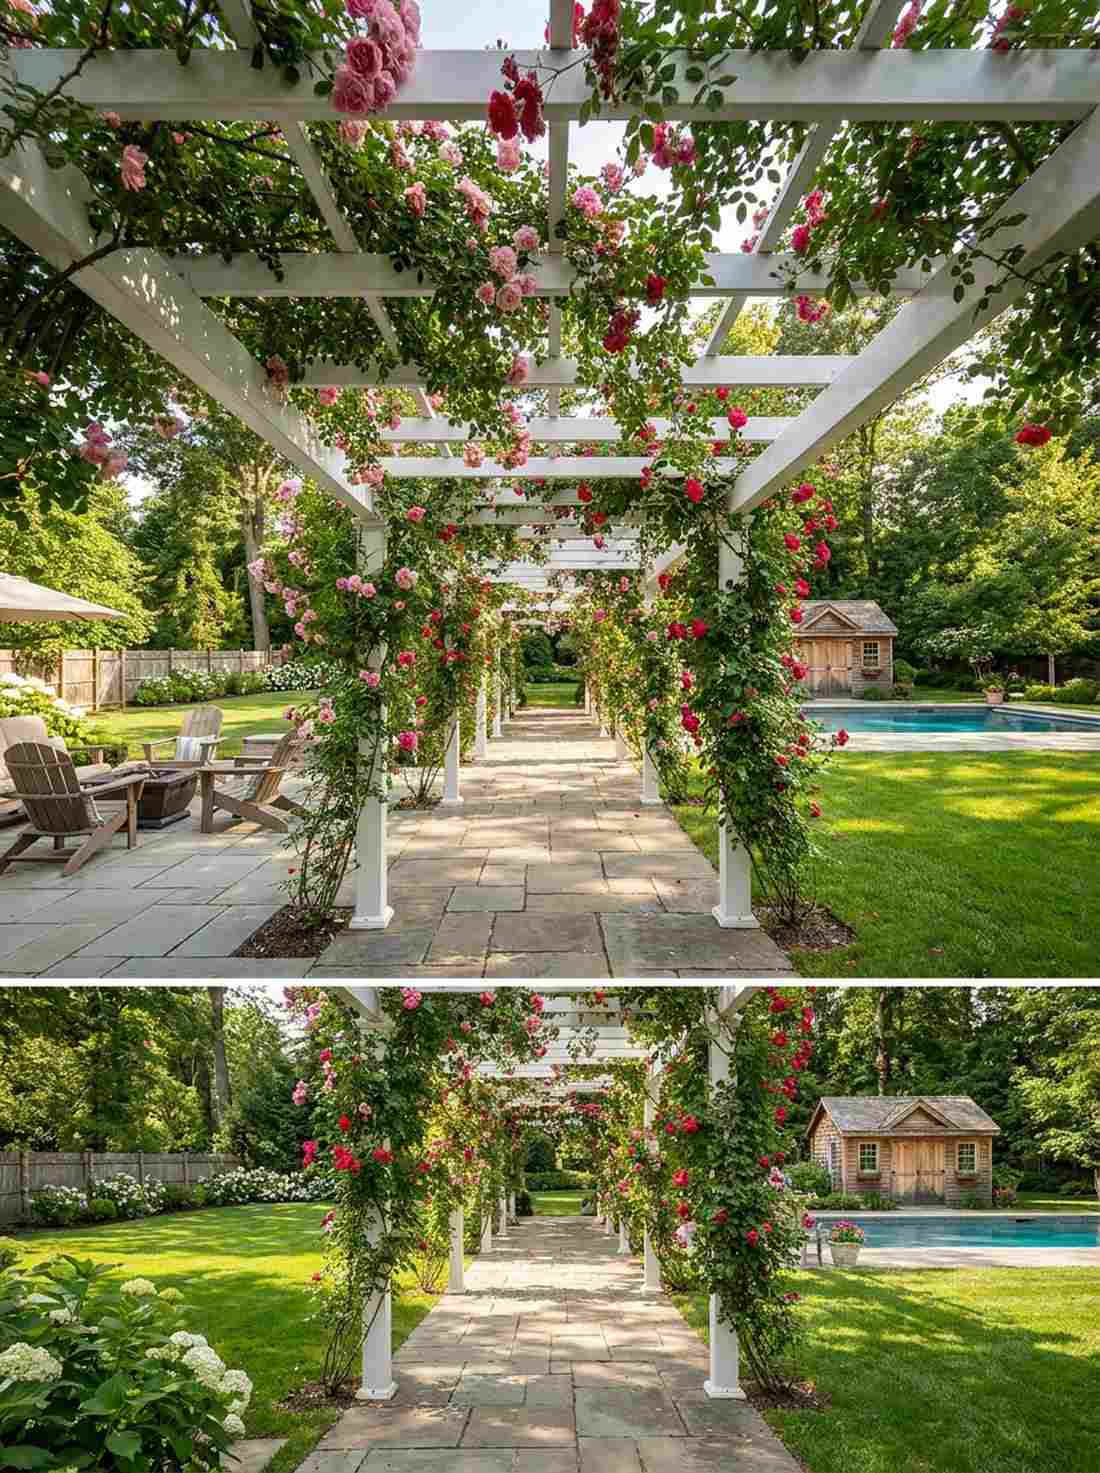
Build a breathtaking overhead journey with a linear rose pergola walkway that feels like a shaded, aromatic oasis. Perfect for bridging the gap between a back patio and a detached garden shed or pool area.
Basic walkways are forgettable, but an overhead floral canopy delivers a shockingly premium look that transforms how you experience your yard. Securing heavy-duty aluminum pergola kits gives you a rot-proof structure capable of supporting the massive weight of overhead rambler roses.
A full pathway kit can range from $500–$1,200 depending on length. Pin this if you want to create an unforgettable backyard destination!
- Key Materials: Aluminum or vinyl pergola kits, base plates
- Vibe / Style: Shaded Floral Corridor
- Difficulty: Advanced building project
- Budget Breakdown: Pergola Kit: $800 | Concrete Bases: $50
- Creator’s Tip: Plant roses at alternating posts rather than every single one to prevent the canopy from becoming an overgrown, tangled mess.
- Smart Sourcing: Order UV-coated vinyl pergola systems and heavy-duty structural post brackets.
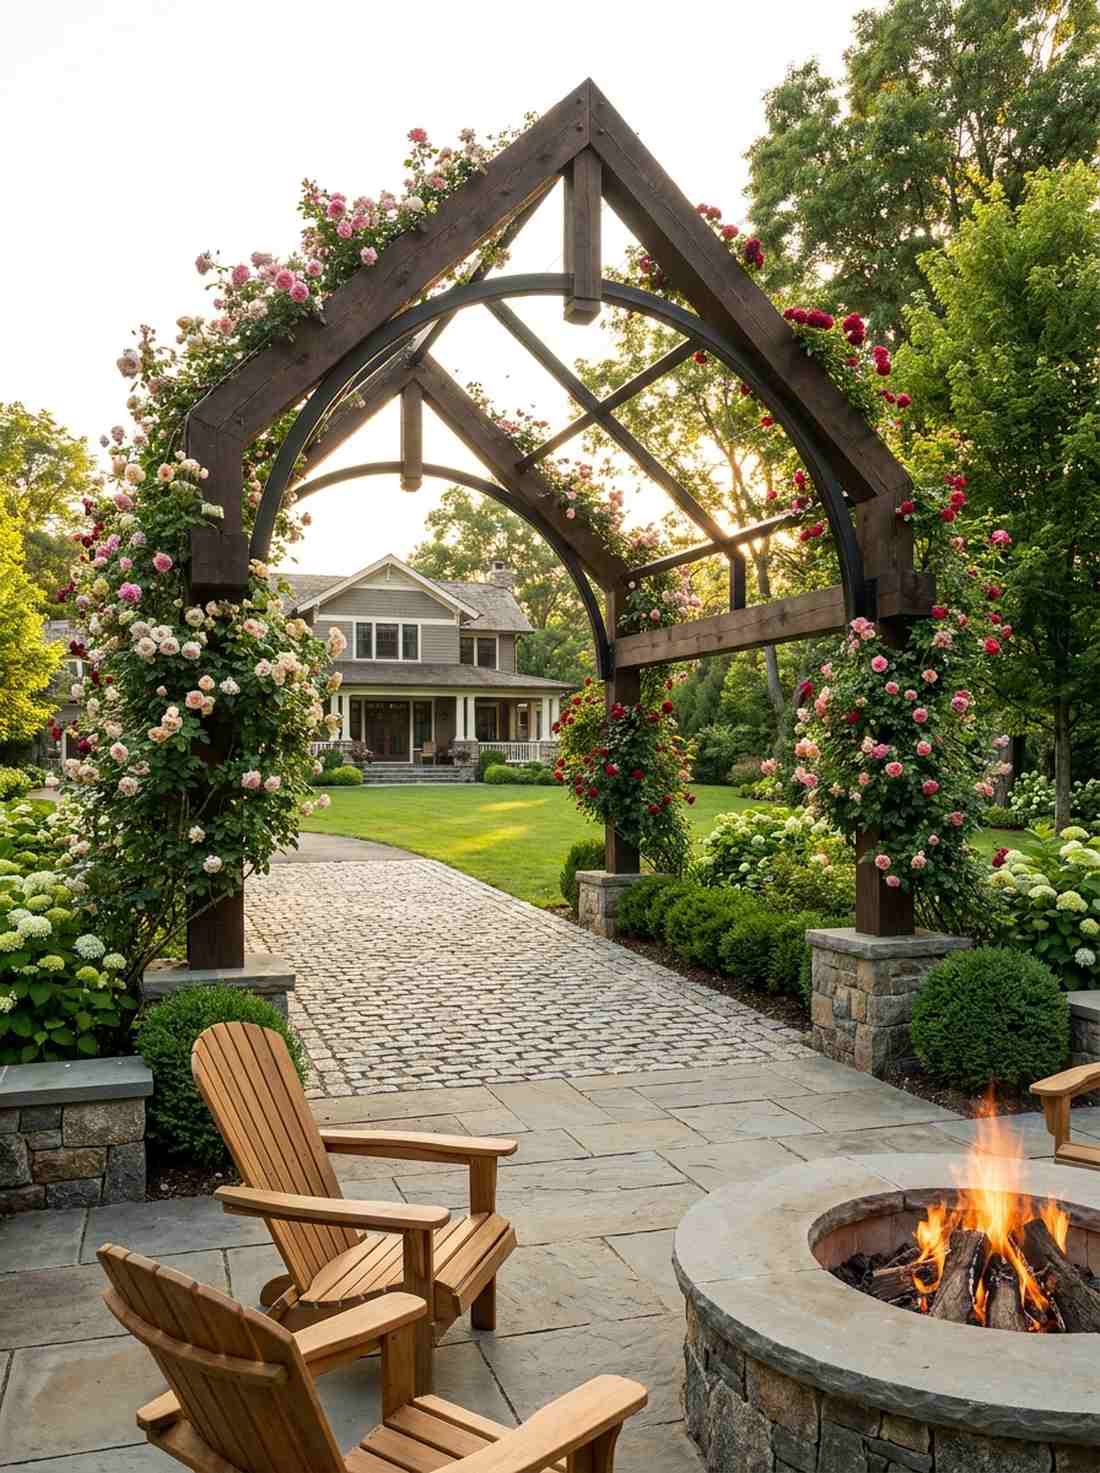
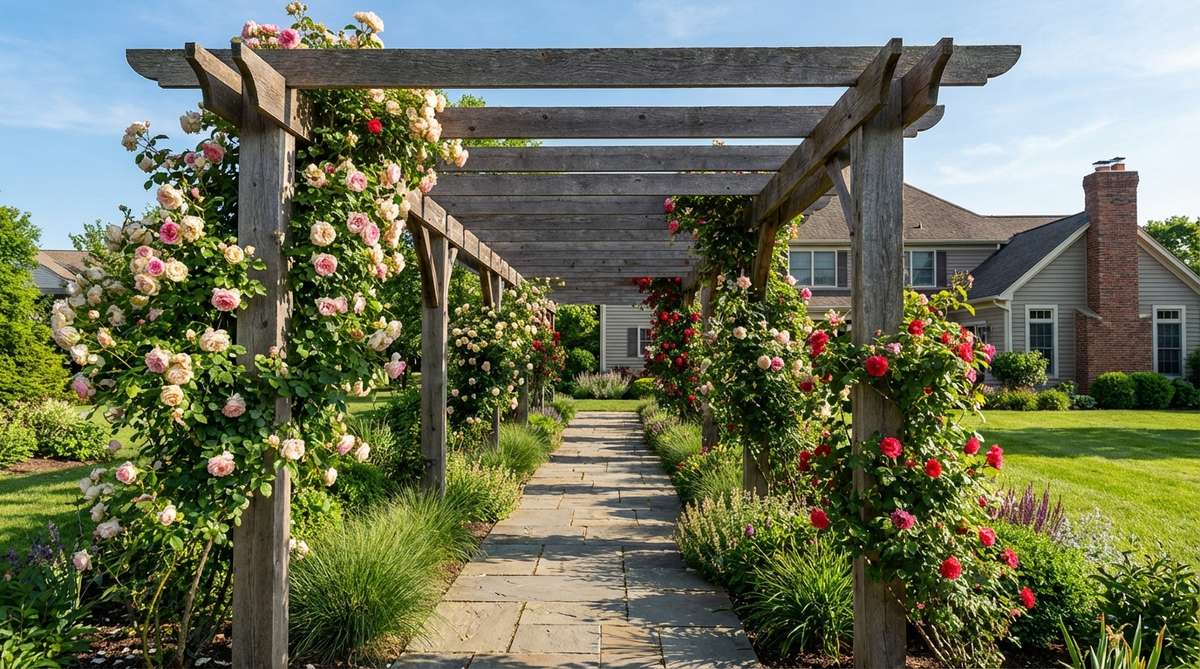
13. Curved Pergola Walkway
Add incredible flow to your landscape with a curved rose garden design layout that feels delightfully mysterious and organic. This sweeping shape works magic when winding through natural landscape contours or around large oak trees.
While straight lines are common, adding a curve is a controversial but brilliant way to make a space look architecturally custom-built. Opting for flexible metal framing or laminated beam kits allows you to bend the canopy, perfectly matching the organic flow of the garden beds.
This bespoke curved look typically costs around $600–$1,500. It’s a high-impact architectural move that softens rigid property lines.
- Key Materials: Laminated curved beams, metal uprights
- Vibe / Style: Sweeping Botanical Mystery
- Difficulty: Expert level installation
- Budget Breakdown: Curved Timbers: $900 | Hardware: $100
- Creator’s Tip: Layout your curve with a simple garden hose first to ensure the walking path feels natural before digging any post holes.
- Smart Sourcing: Source pre-bent tubular steel arches and heavy-duty ground anchors.
14. Square Pavilion Pergola
Anchor your outdoor dining area with a square rose pavilion that feels like a luxury VIP cabana wrapped in nature. This defined room is the ultimate setup for hosting summer dinners underneath dangling, fragrant blooms.
A bare patio can feel exposed, but enclosing it in a 360-degree flowering grid gives a designer-level finish that screams luxury living. Sourcing a pre-cut 12×12 pergola pavilion kit creates the perfect architectural cube to let highly-fragrant David Austin roses colonize the roof.
You can establish this outdoor room for about $400–$900. Save this to your outdoor living space mood board!
- Key Materials: Square pavilion pergola kits, shade cloths
- Vibe / Style: Luxury Alfresco Dining
- Difficulty: Advanced two-person build
- Budget Breakdown: Pavilion Kit: $600 | Top Grid: $100
- Creator’s Tip: Use roses with intense scents like ‘Gertrude Jekyll’ so the fragrance is heavily concentrated within the seating area.
- Smart Sourcing: Look for pre-cut cedar pavilion kits (12×12) and sun-blocking canopy shades.
Stop wasting money on flimsy trellises! The trick coming up next will outlast your house…
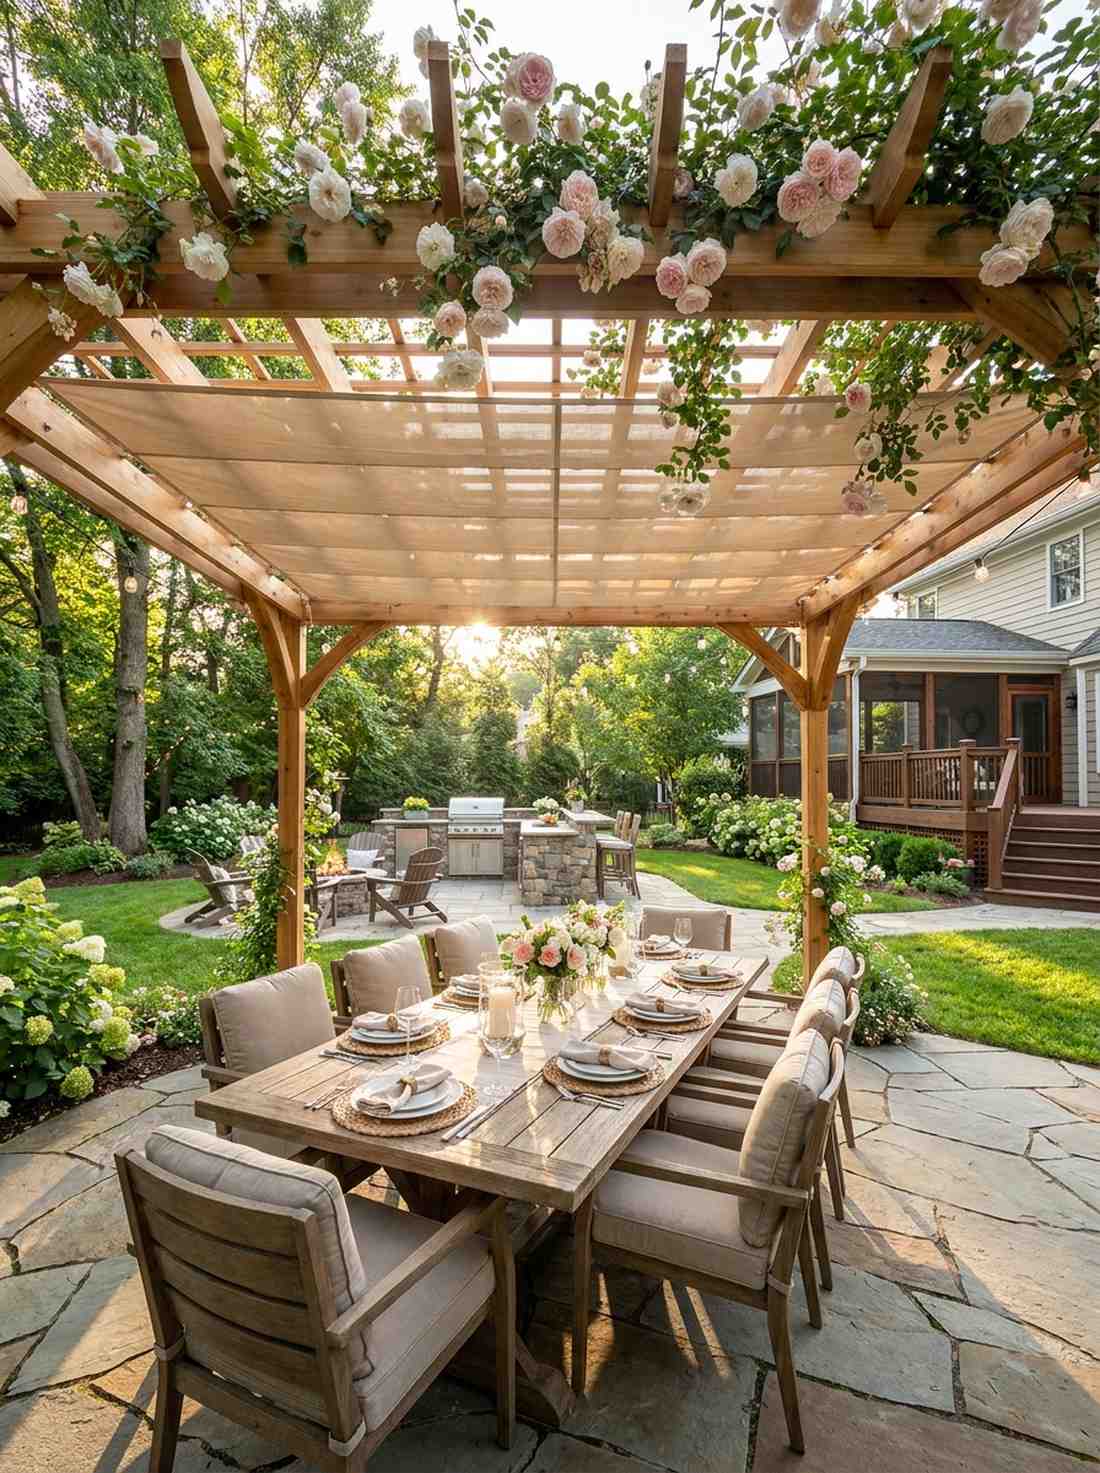
15. Attached Patio Pergola
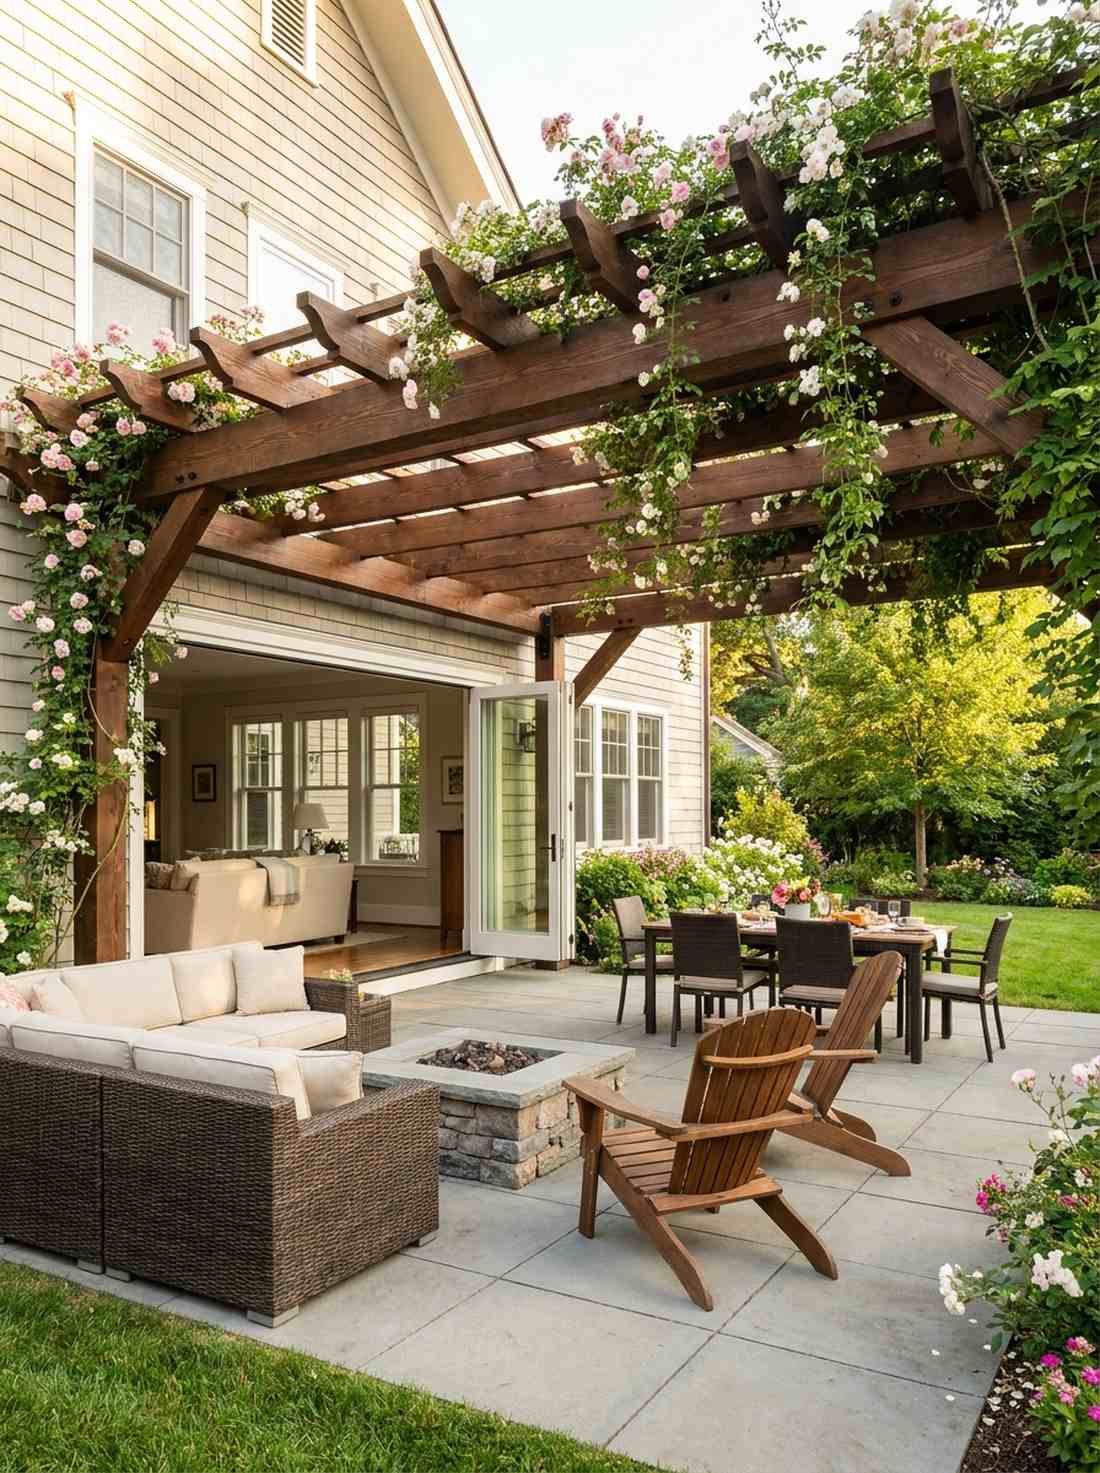
Seamlessly extend your home’s footprint with an attached patio rose canopy that feels like an organic extension of your living room. Perfect for small backyards where you want lush greenery without sacrificing floor space.
Freestanding units take up valuable yard real estate, but a ledger-attached design looks incredibly expensive and integrated. By utilizing wall-mounted pergola hardware kits, you can safely attach the roof directly to your house, training roses up the outer posts.
This space-saving extension generally runs between $300–$700. Highly recommended to cool down a sun-baked concrete patio.
- Key Materials: Ledger board brackets, pergola rafters
- Vibe / Style: Indoor-Outdoor Harmony
- Difficulty: Advanced (requires locating wall studs)
- Budget Breakdown: Lumber: $350 | Ledger Hardware: $80
- Creator’s Tip: Keep the house-side completely free of rose canes to prevent moisture trapping and to allow easy access for exterior painting.
- Smart Sourcing: Purchase heavy-duty ledger board fastener kits and pre-cut roof rafter packs.
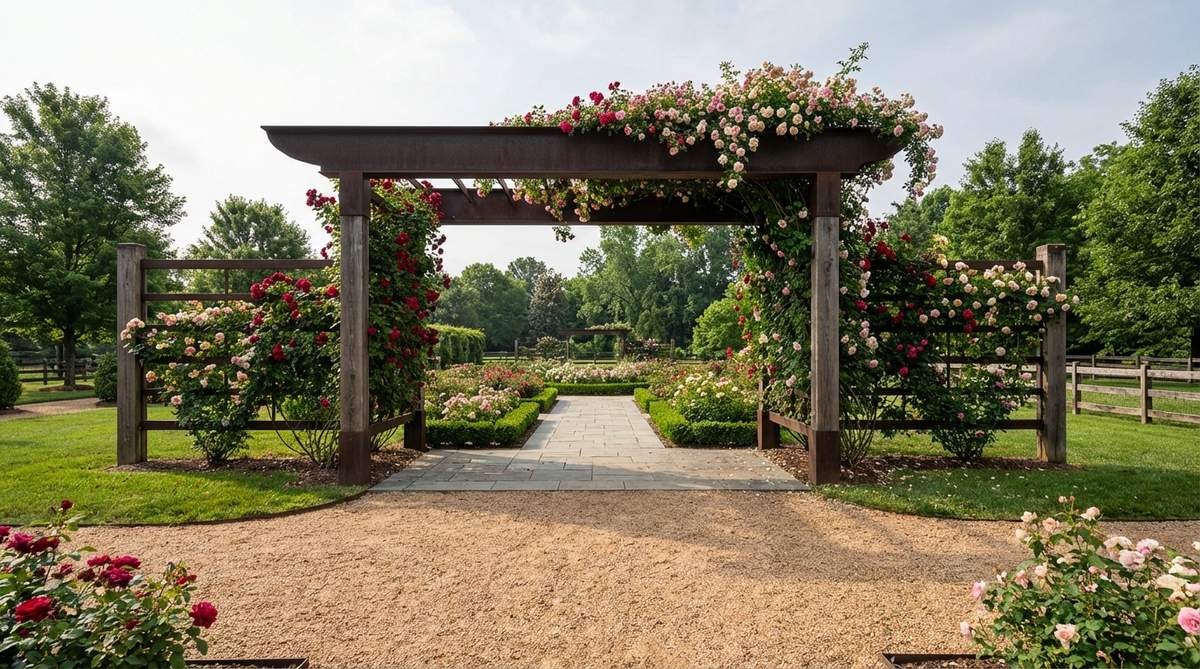
16. Octagonal Centerpiece Pergola
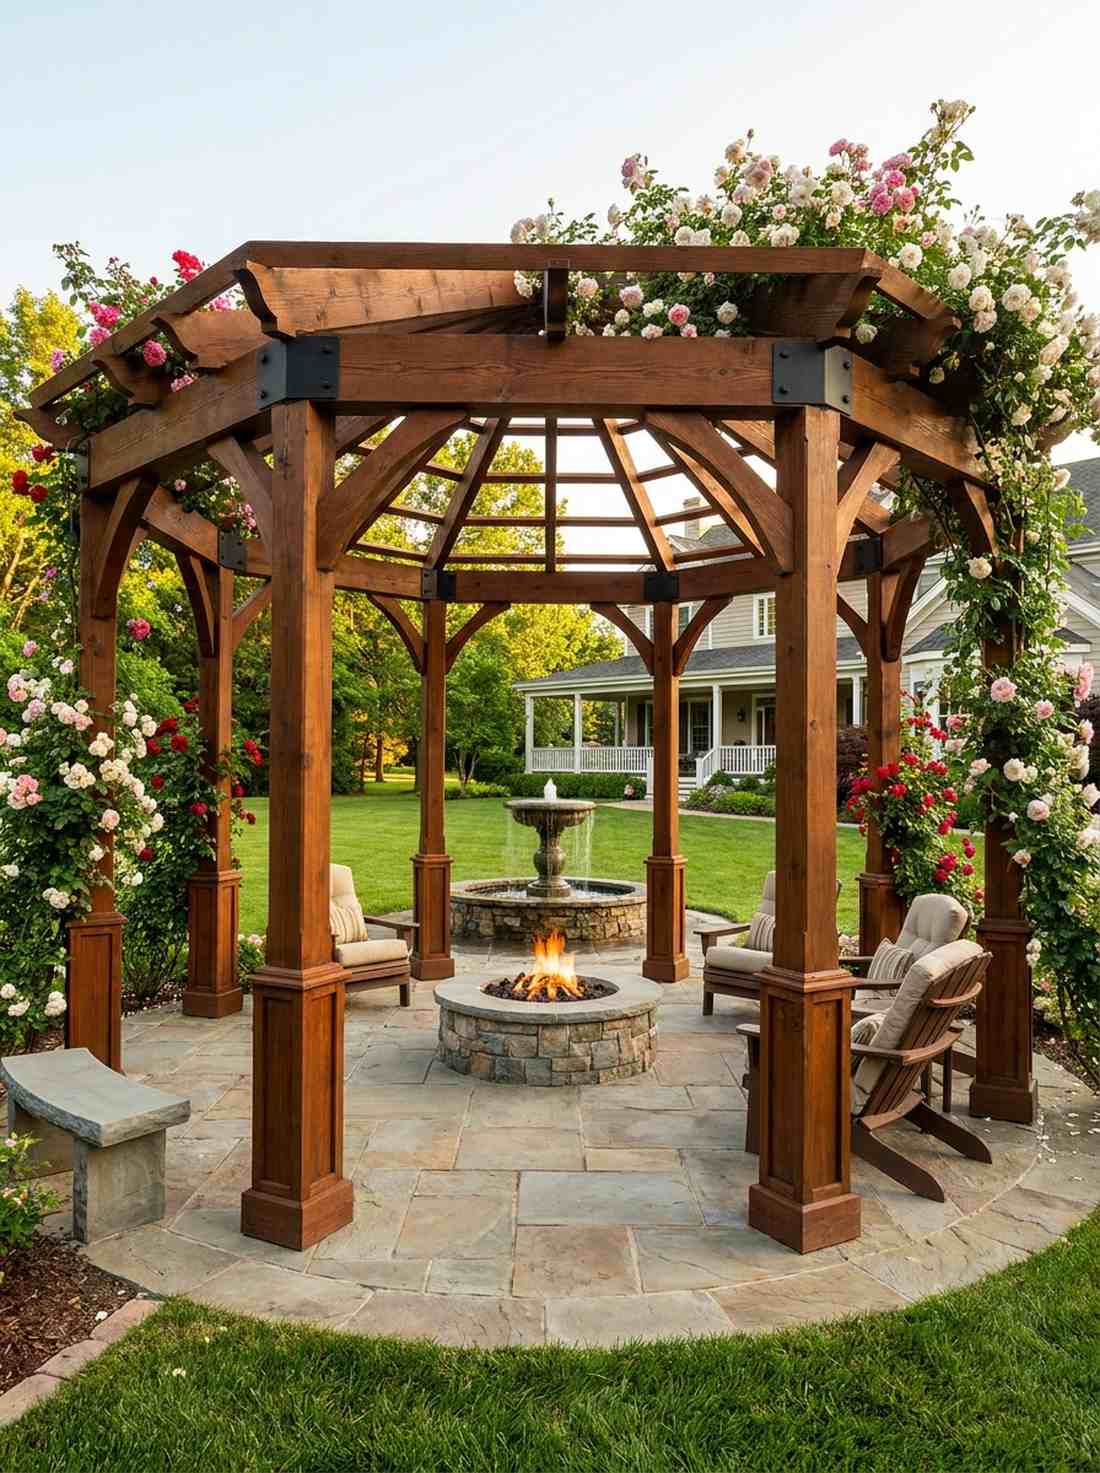
Create a jaw-dropping garden hub with an octagonal rose pergola that feels like a royal botanical gazebo. This multi-sided masterpiece is meant to sit dead-center in a landscape, often framing a fountain or fire pit.
A standard square can look blocky, but an eight-sided structure gives a designer-level finish that looks flawless from absolutely every angle. Leveraging an octagonal gazebo hardware kit allows you to easily connect the complex roof angles and create a stunning floral crown.
Building this architectural gem costs about $800–$1,800. Pin this if you want the ultimate centerpiece for a massive backyard!
- Key Materials: Octagonal pergola hub brackets, timber posts
- Vibe / Style: Grand Estate Gazebo
- Difficulty: Expert level geometry required
- Budget Breakdown: Bracket Hubs: $200 | Wood/Metal: $800
- Creator’s Tip: Alternate vigorous roses with slightly slower-growing varieties on the 8 posts so the structure doesn’t get overwhelmed and collapse.
- Smart Sourcing: Use pre-welded 8-way roof hub brackets and heavy-duty decorative post skirts.
Pillar & Obelisk Supports For Vertical Rose Displays
Freestanding pillars and obelisks provide vertical punctuation throughout garden beds, supporting moderately vigorous roses without overwhelming them. These structures bring blooms to eye level while occupying minimal ground space.
17. Traditional Garden Obelisk
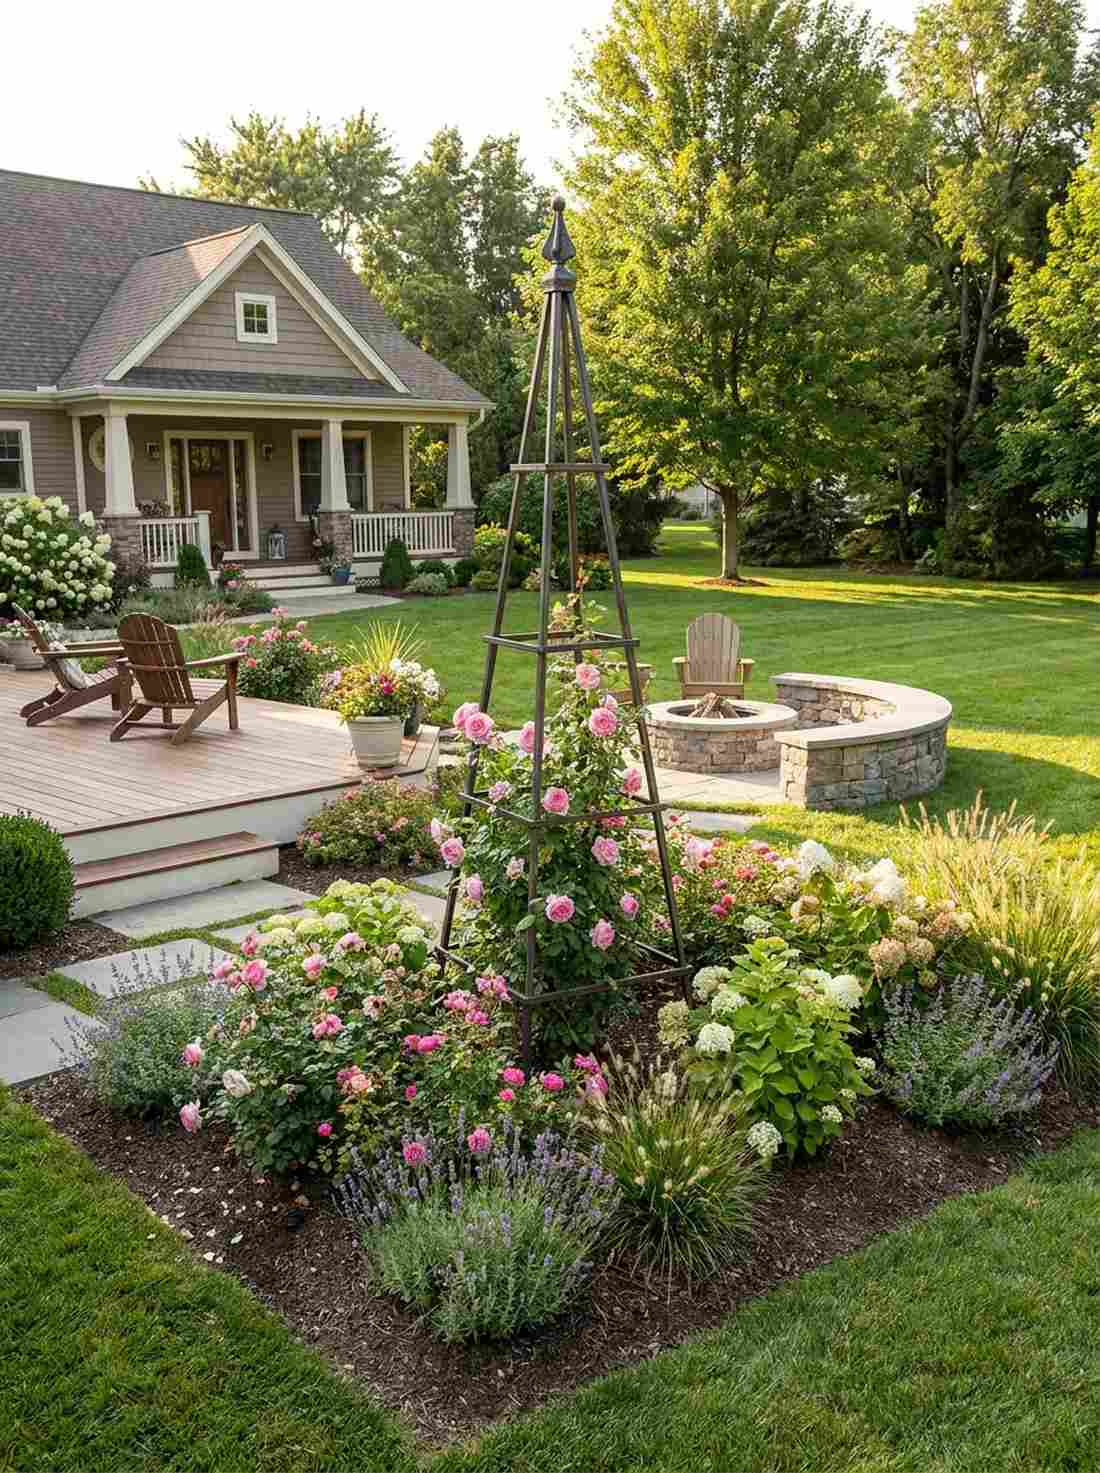
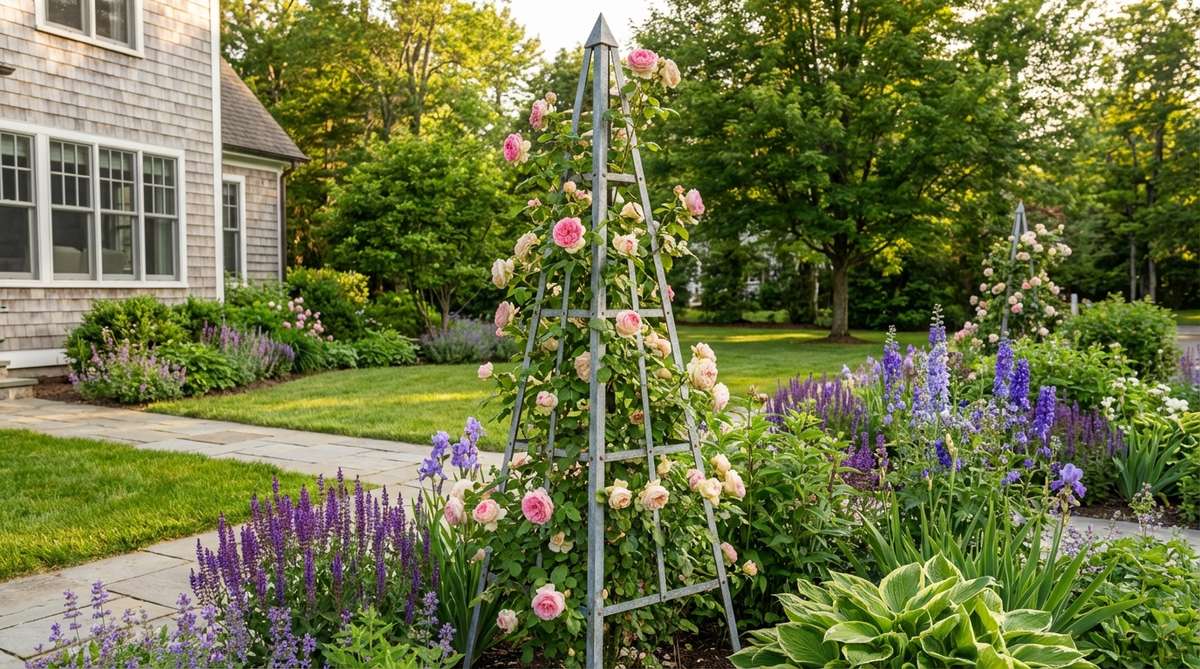
Add elegant vertical height to flat flower beds with a classic rose garden obelisk that feels like a polished botanical spire. This tapered structure is an absolute lifesaver for adding height to the middle of sprawling perennial borders.
Letting roses flop over wastes space, but a classic pyramid form looks far more expensive than it is while providing graduate, tier-by-tier support. Investing in galvanized steel garden obelisks guarantees a rust-free focal point that elegantly showcases 6-8 foot varieties without constant pruning.
You can easily slide these into your beds for $40–$90 each. Save this for your spring garden restructuring plans!
- Key Materials: Pre-assembled metal obelisks, ground stakes
- Vibe / Style: Polished Vertical Elegance
- Difficulty: Zero-effort drop-in
- Budget Breakdown: Metal Obelisk: $60 | Plant Ties: $10
- Creator’s Tip: Plant exactly one moderately-sized pillar rose per obelisk; forcing a massive climber onto this frame will turn it into a wind-sail.
- Smart Sourcing: Buy rust-proof steel garden obelisks (2-pack) and soft silicone plant ties.
18. Cylindrical Rose Pillar
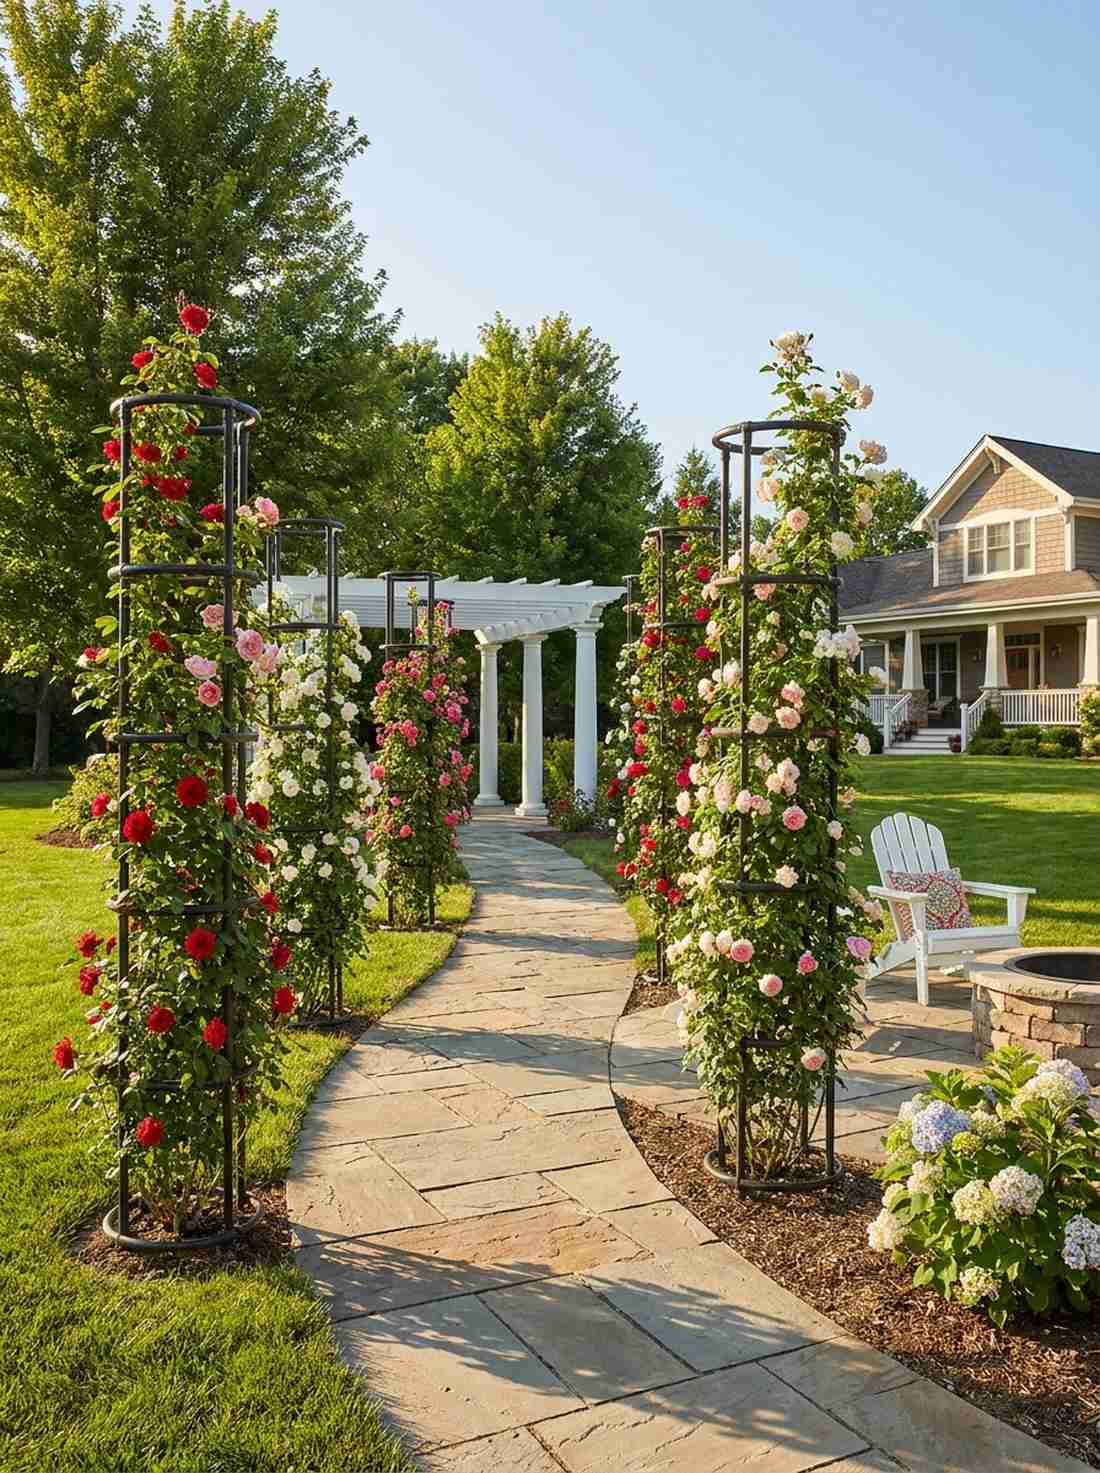
Line your walkways with rhythmic precision using a standard roses garden design pillar that feels like a processional pathway in a public park. Perfect for flanking entryways or creating repeating vertical columns down a long lawn.
Wide trellises can block views, but a sleek cylindrical frame delivers a surprisingly premium look that keeps the plant’s footprint incredibly tight. By using metal ring pillar supports, you can wrap pillar roses spirally around the column, forcing continuous blooms from the soil to the tip.
These slender pillars cost around $30–$70 each. It’s a fast upgrade that completely changes the rhythm of your garden path.
- Key Materials: Tubular pillar supports with rings
- Vibe / Style: Rhythmic Formal Columns
- Difficulty: Easy push-in installation
- Budget Breakdown: Pillar Frame: $45 | Base anchor: $15
- Creator’s Tip: Space the support rings exactly 18 inches apart to comfortably catch and train new seasonal growth.
- Smart Sourcing: Look for vinyl-coated cylindrical plant supports and heavy-duty ground auger stakes.
19. Tripod Larch Pole Support
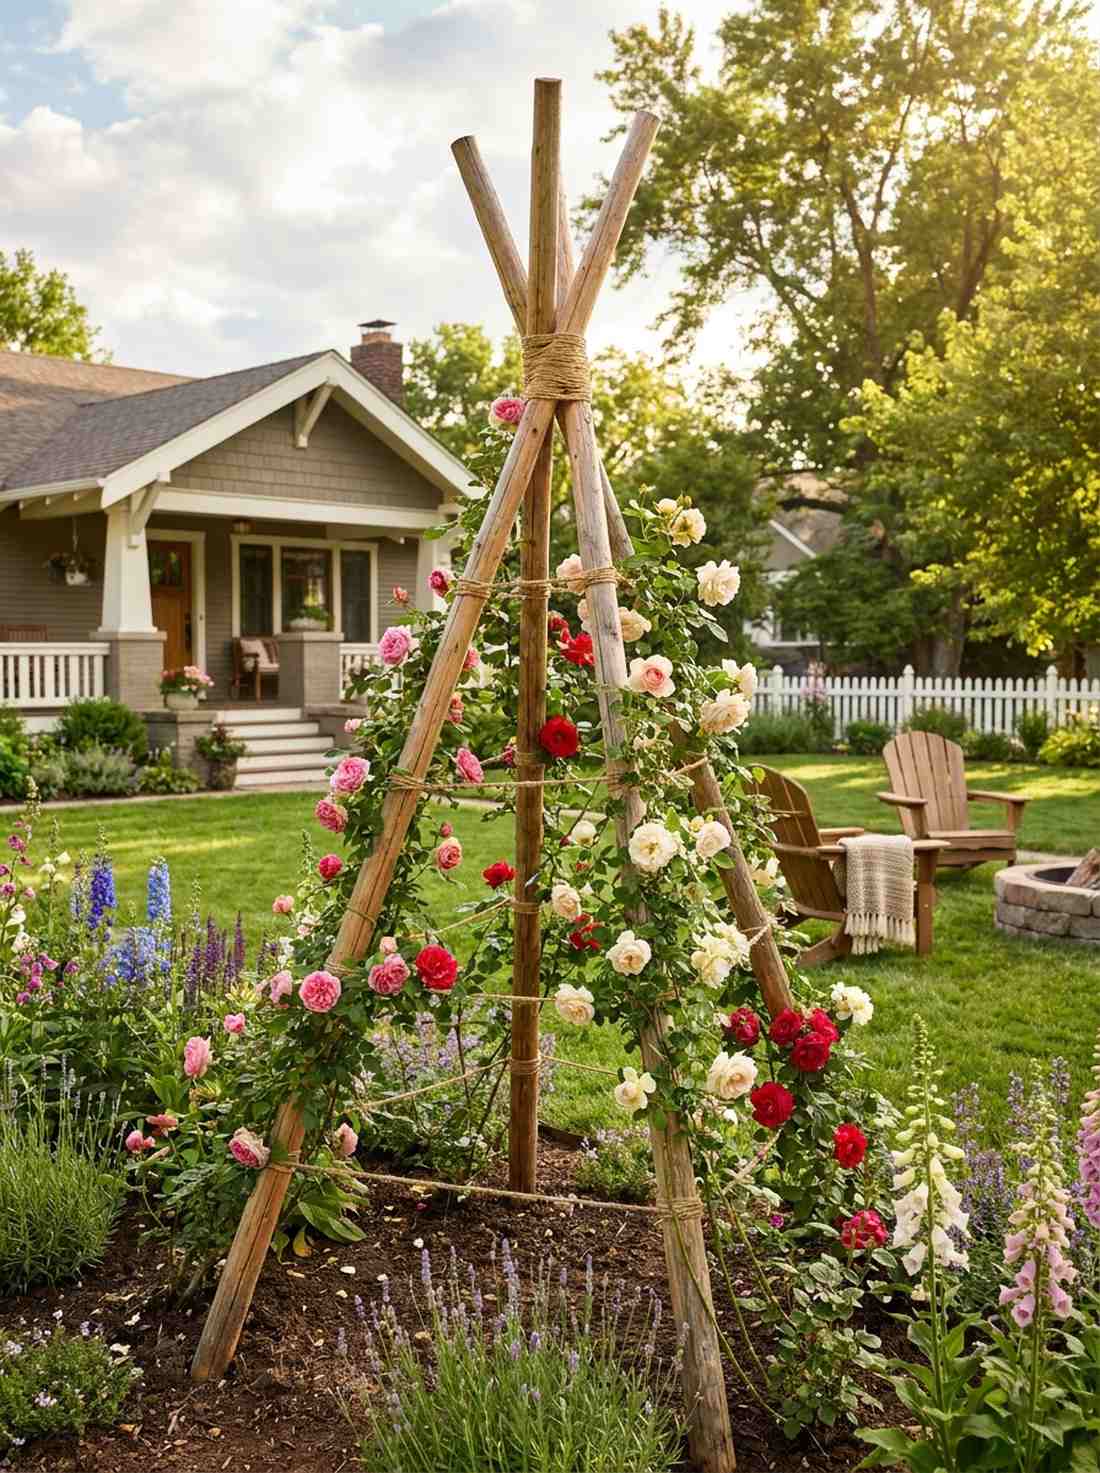
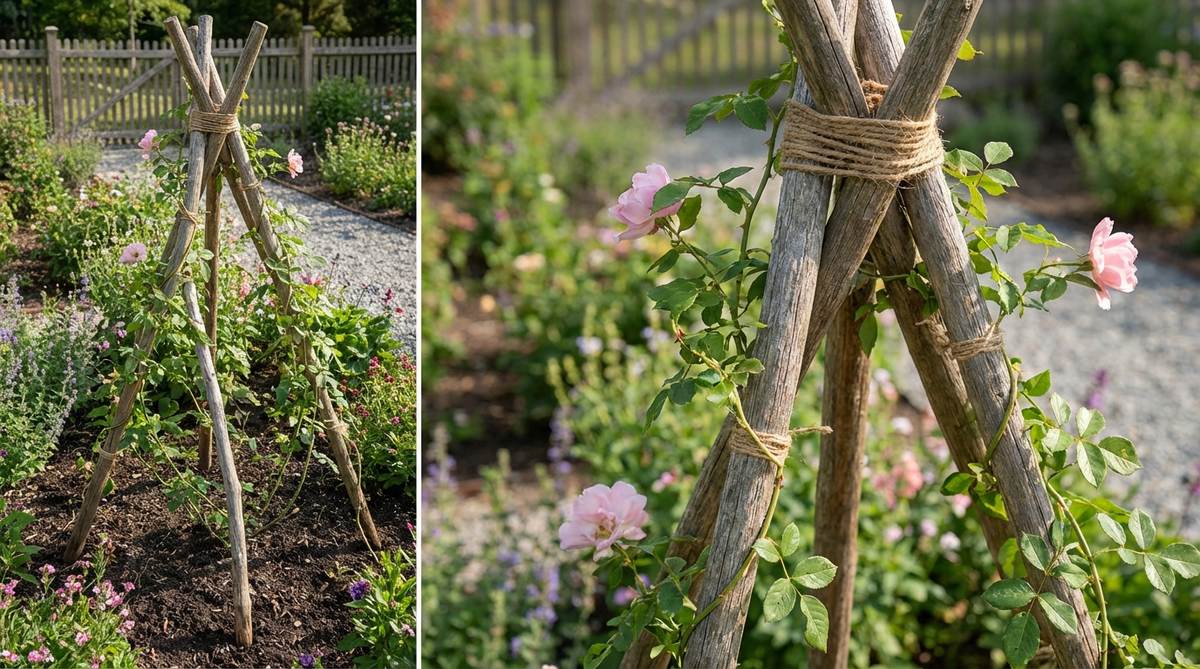
Infuse organic charm into your beds with a rustic garden design ideas with roses tripod that feels like a foraged woodland creation. This highly affordable setup is perfect for relaxed, chaotic cottage gardens where metal structures look too stiff.
Expensive metal towers aren’t always necessary; lashing raw timber together gives a designer-level finish that screams authentic country charm. Using a bamboo or larch pole tripod kit gives you immense structural stability without needing concrete footings or guy wires.
You can easily build one of these from scratch for under $20! Pin this to your budget-friendly DIY gardening board.
- Key Materials: Sturdy bamboo/larch poles, natural twine
- Vibe / Style: Earthy Cottage Core
- Difficulty: Easy DIY lashing
- Budget Breakdown: Wood Poles: $15 | Twine: $5
- Creator’s Tip: Push the pole ends at least 12 inches deep into the soil and splay them 30 inches apart to prevent wind from tipping the heavy roses.
- Smart Sourcing: Snag heavy-duty bamboo poles (bulk pack) and weather-resistant garden twine spools.
Most homeowners totally ignore the ground layout. The geometric hack coming next is a total game-changer…
20. Steel Tube Minimalist Pillar
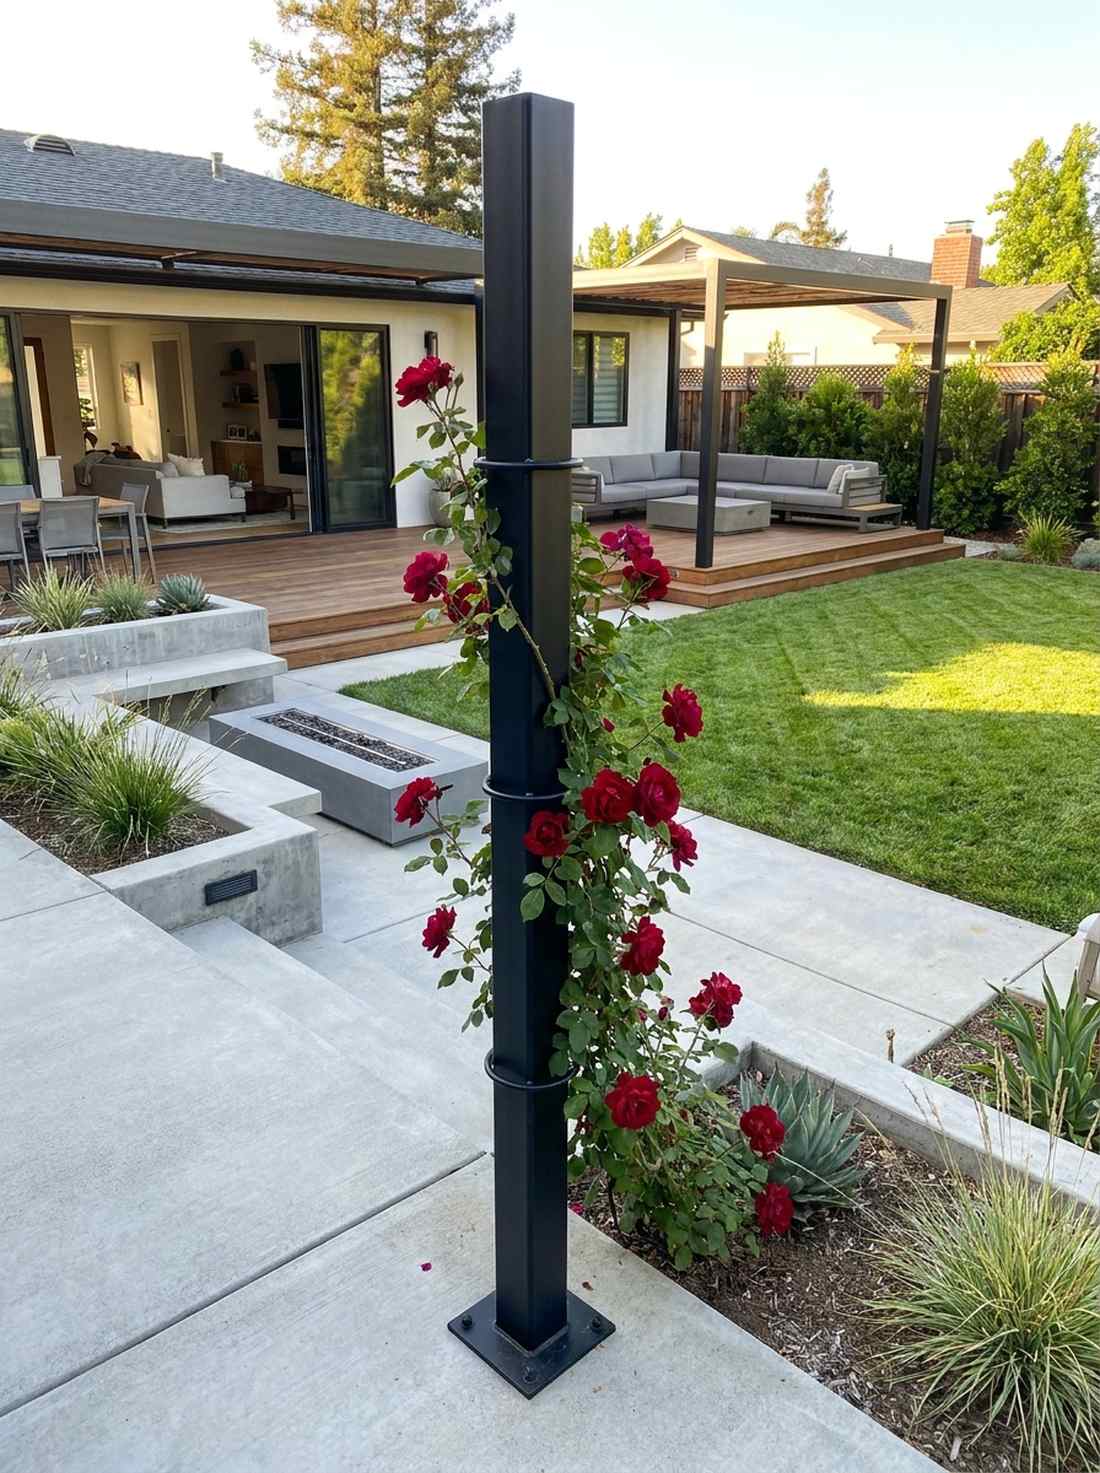
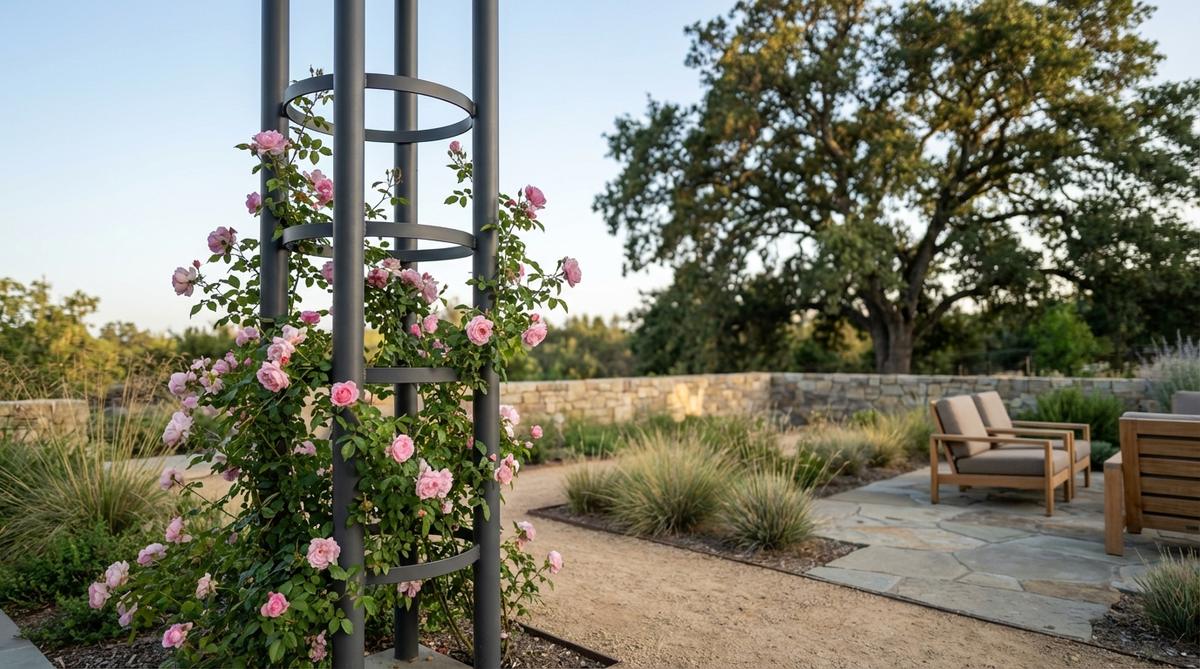
Showcase the flowers, not the frame, with a minimalist rose support system that feels like a modern floating illusion. This ultra-sleek layout is the best way to integrate roses into a highly modern, concrete-heavy landscape.
Bulky wooden obelisks distract from the plant, but a single, powder-coated pole creates a controversial but undeniably high-end aesthetic that nearly disappears. Sinking a heavy-duty steel monolith pole straight into concrete allows the rose to become a bold, architectural column of pure color.
This hyper-modern setup runs around $50–$100. Highly recommended if you hate the look of traditional garden clutter.
- Key Materials: Powder-coated steel tube, welded support rings
- Vibe / Style: Sleek Modernist Illusion
- Difficulty: Intermediate (requires concrete footing)
- Budget Breakdown: Steel Tube: $60 | Quikrete: $10
- Creator’s Tip: Paint the steel pole matte black or dark green so it visually vanishes into the foliage as the rose fills out.
- Smart Sourcing: Buy pre-cut thick-walled steel tubes and fast-setting concrete mix.
21. Decorative Finial-Topped Pillar

Crown your flower beds with a finial-topped rose garden pillar that feels like a piece of vintage estate jewelry. This elegant touch is perfect for marking the corners of a formal parterre or highlighting a garden intersection.
Standard flat-top pillars look unfinished, but adding an ornamental sphere or urn delivers a surprisingly premium look even in the dead of winter. By utilizing decorative pillar caps and finial kits, you visually cap the plant’s height, telling the eye exactly where the design stops.
These decorative pillars cost roughly $60–$130. Save this idea to add instant luxury to your basic climbing supports!
- Key Materials: Metal pillar frames, screw-on decorative finials
- Vibe / Style: Vintage Estate Luxury
- Difficulty: Easy assembly
- Budget Breakdown: Pillar Base: $70 | Finial Top: $25
- Creator’s Tip: The finial actually serves a purpose: it prevents the rose from becoming top-heavy and physically stops canes from flailing wildly at the top.
- Smart Sourcing: Use cast-iron garden finial tops and rust-resistant pillar obelisks.
Raised & Ground Bed Layouts For Rose Collections
Strategic bed configurations showcase rose collections while addressing practical concerns like drainage, access, and companion planting. Designers use bed geometry to create visual cohesion and practical maintenance corridors.
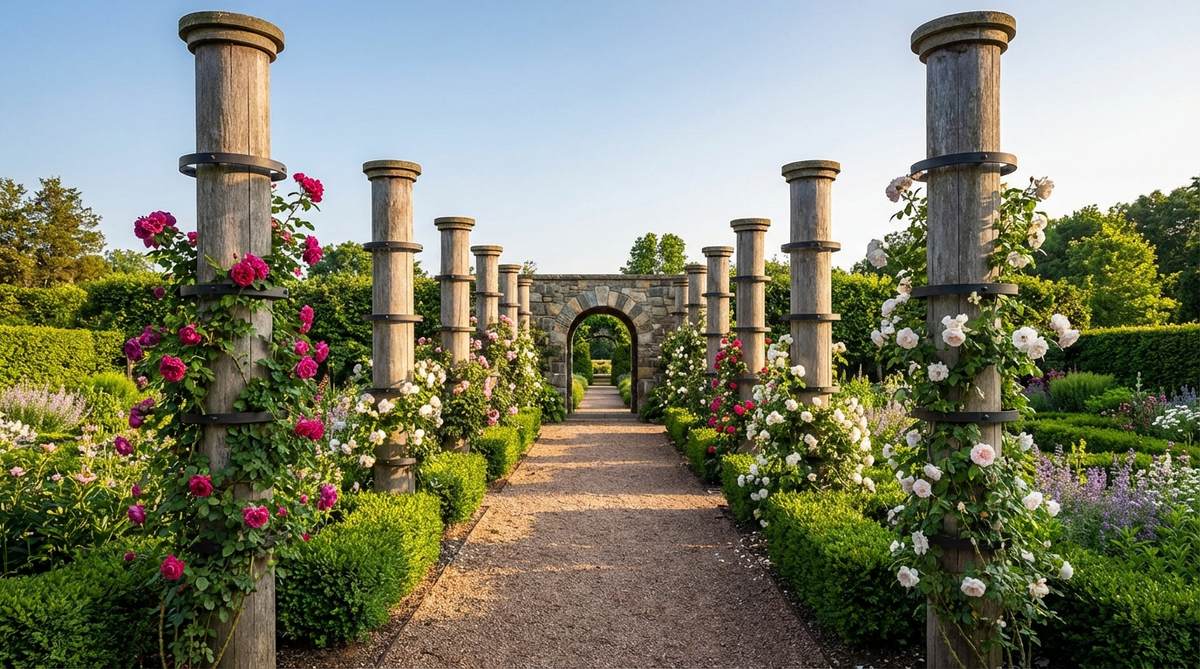
22. Formal Geometric Parterre
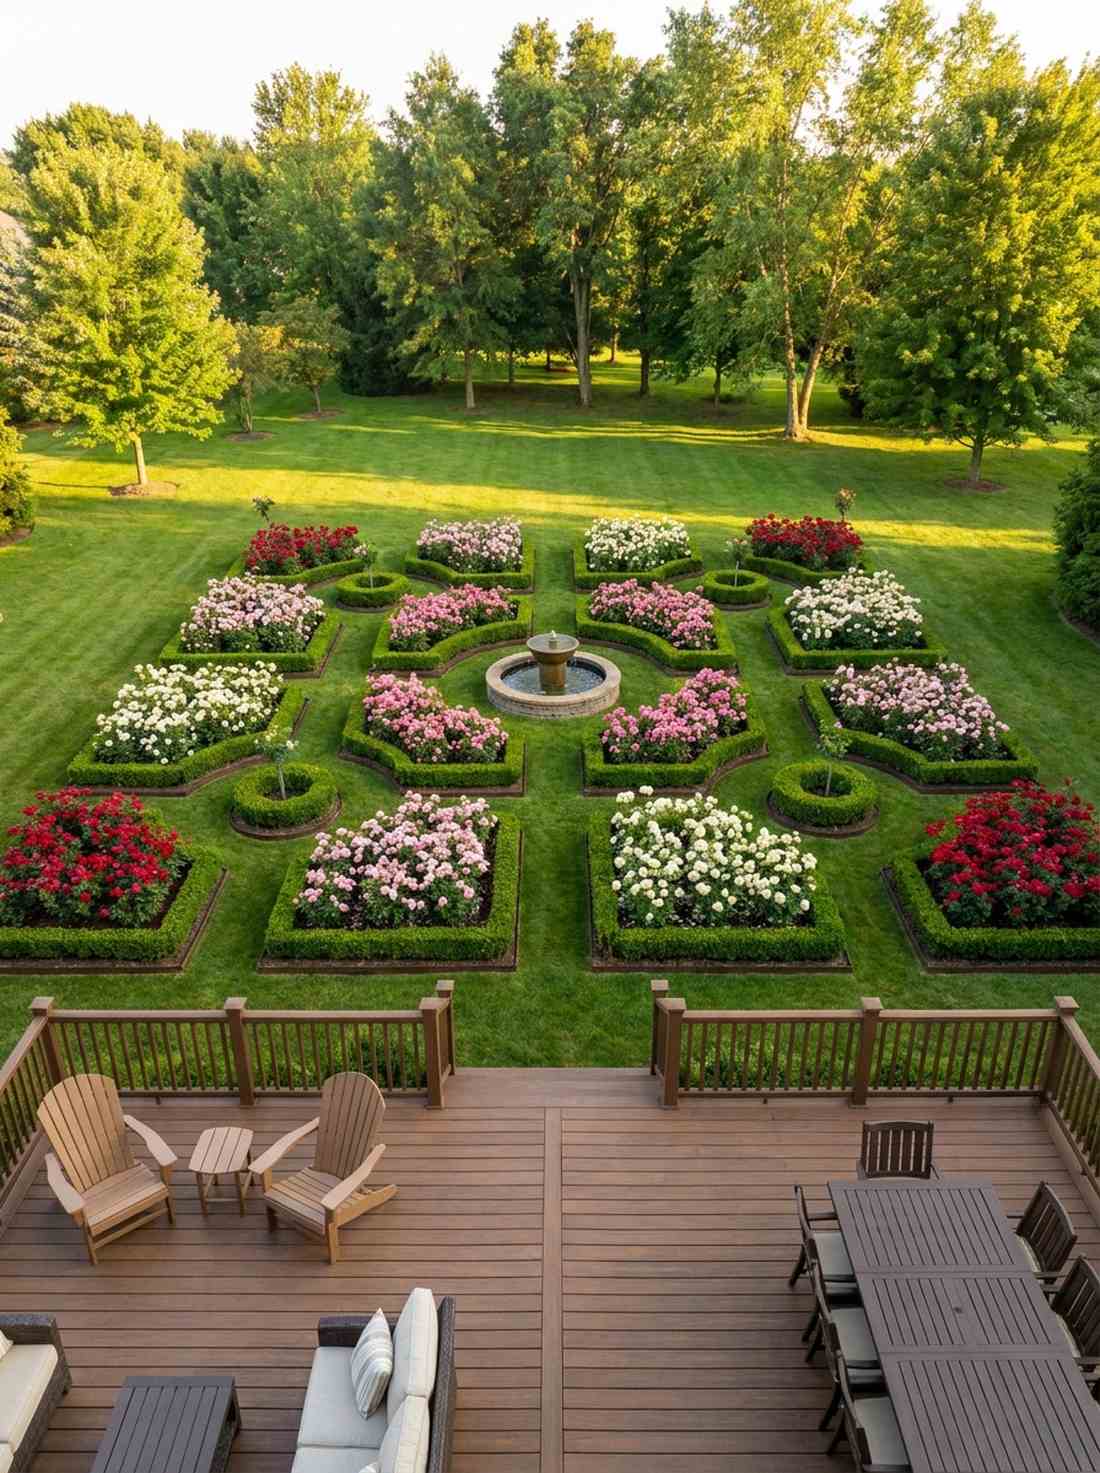
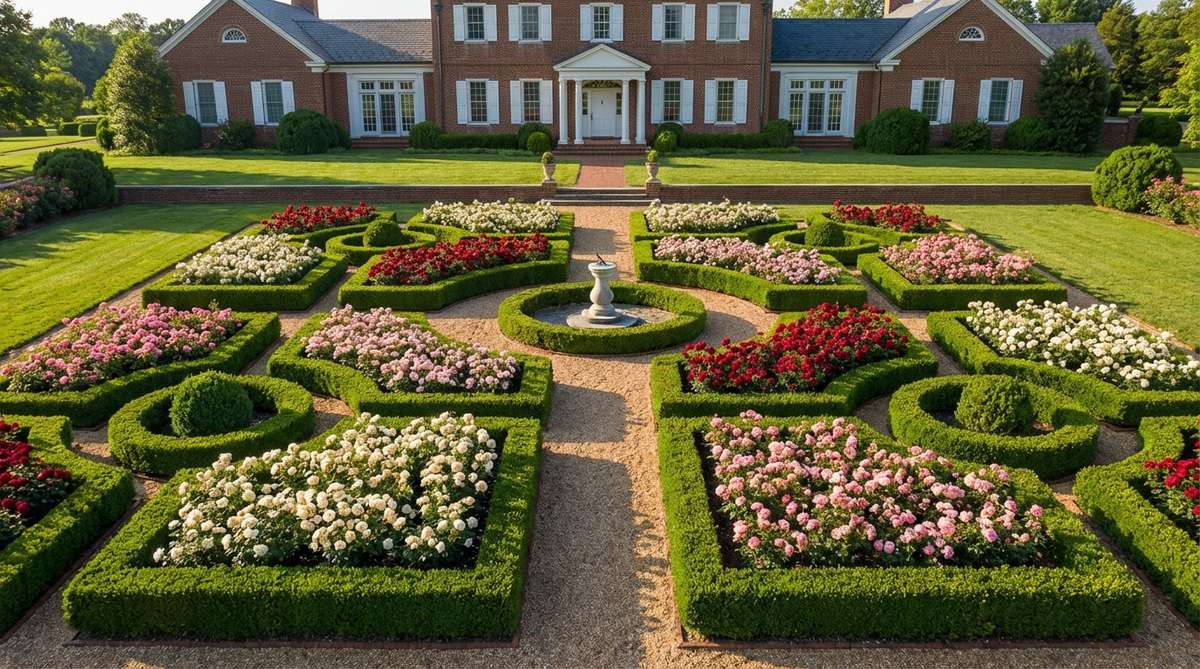
Design a breathtaking aerial view with a formal rose garden design layout that feels like a miniature French chateau ground. This highly structured geometric pattern is incredible when viewed from second-story windows or elevated decks.
Randomly scattered bushes look messy, but framing them with low evergreen hedging gives a designer-level finish that provides structure 365 days a year. Incorporating flexible landscaping edge kits allows you to perfectly map out crisp squares, rectangles, or circles before planting your color-blocked roses.
Laying out a formal parterre grid costs about $100–$300 in hardscaping materials. Pin this if you crave extreme botanical symmetry!
- Key Materials: Metal landscaping edging, boxwood border plants
- Vibe / Style: French Chateau Symmetry
- Difficulty: Advanced measuring and planning
- Budget Breakdown: Edging Kits: $150 | Soil Amendments: $80
- Creator’s Tip: Keep the internal roses uniformly pruned to exactly the same height so the geometric illusion remains completely flawless.
- Smart Sourcing: Invest in bendable steel landscape edging (bulk roll) and pre-cut weed barrier fabric.
23. Island Bed Surrounded by Lawn
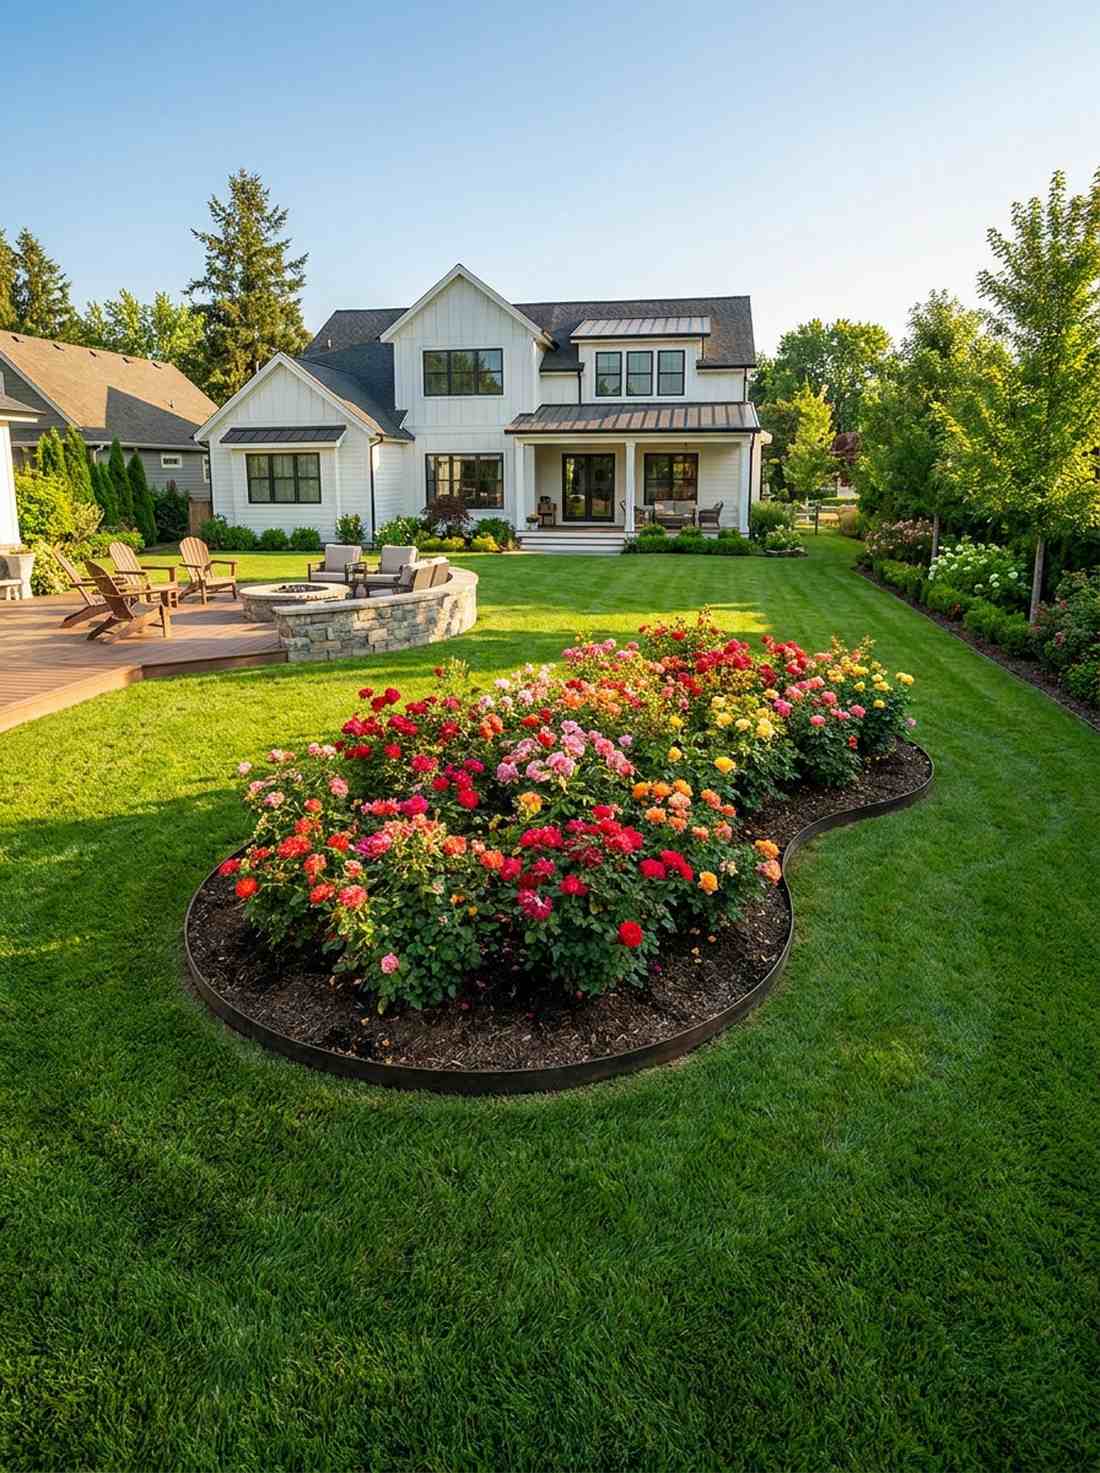
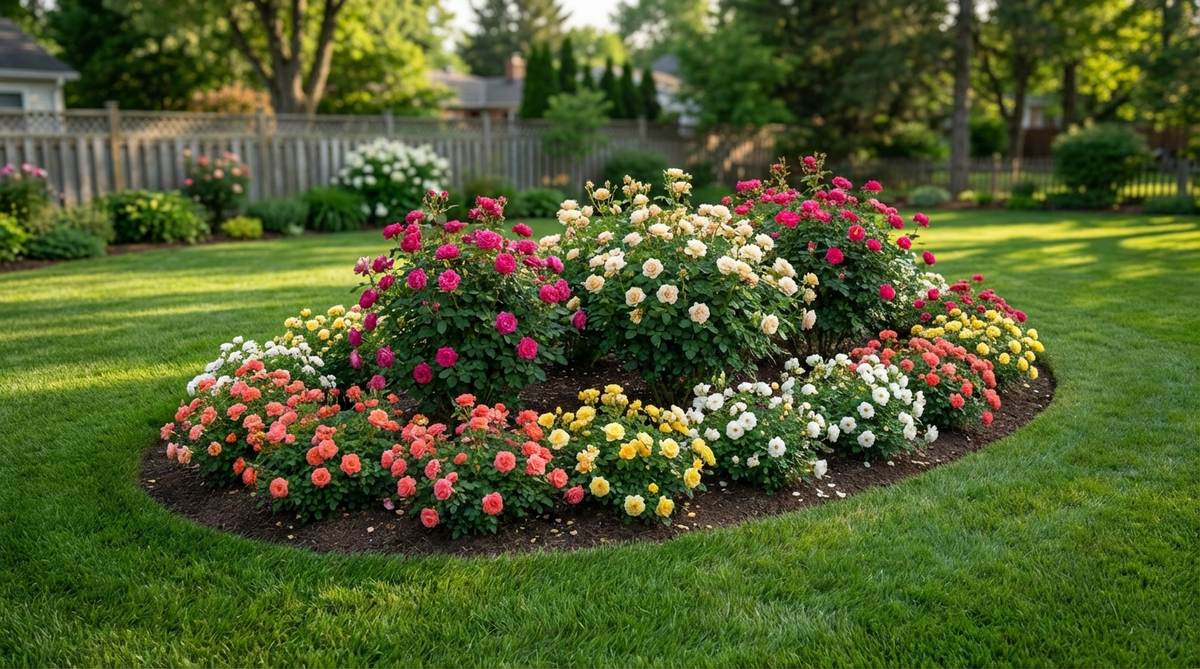
Break up a boring sea of grass with an island rose bed that feels like a floating burst of vibrant color. This 360-degree focal point is perfect for the dead center of a large front yard or backyard expanse.
While most people push flowers against the fence, floating a bed in the middle of the lawn looks incredibly expensive and allows for easy maintenance access from all sides. Using a heavy-duty lawn edging ring ensures the grass never encroaches into your premium rose soil.
Carving out this island oasis only costs about $40–$90. It’s a fast upgrade that completely changes the layout of a flat yard.
- Key Materials: Spade shovels, heavy-duty border rings
- Vibe / Style: Floating Floral Oasis
- Difficulty: Intermediate turf removal
- Budget Breakdown: Border Ring: $40 | Premium Compost: $30
- Creator’s Tip: Design the bed with gently swooping, curved edges so you can easily push a lawnmower around it without stopping.
- Smart Sourcing: Purchase no-dig interlocking landscape edging and bulk organic rose compost.
24. Raised Timber Frame Bed
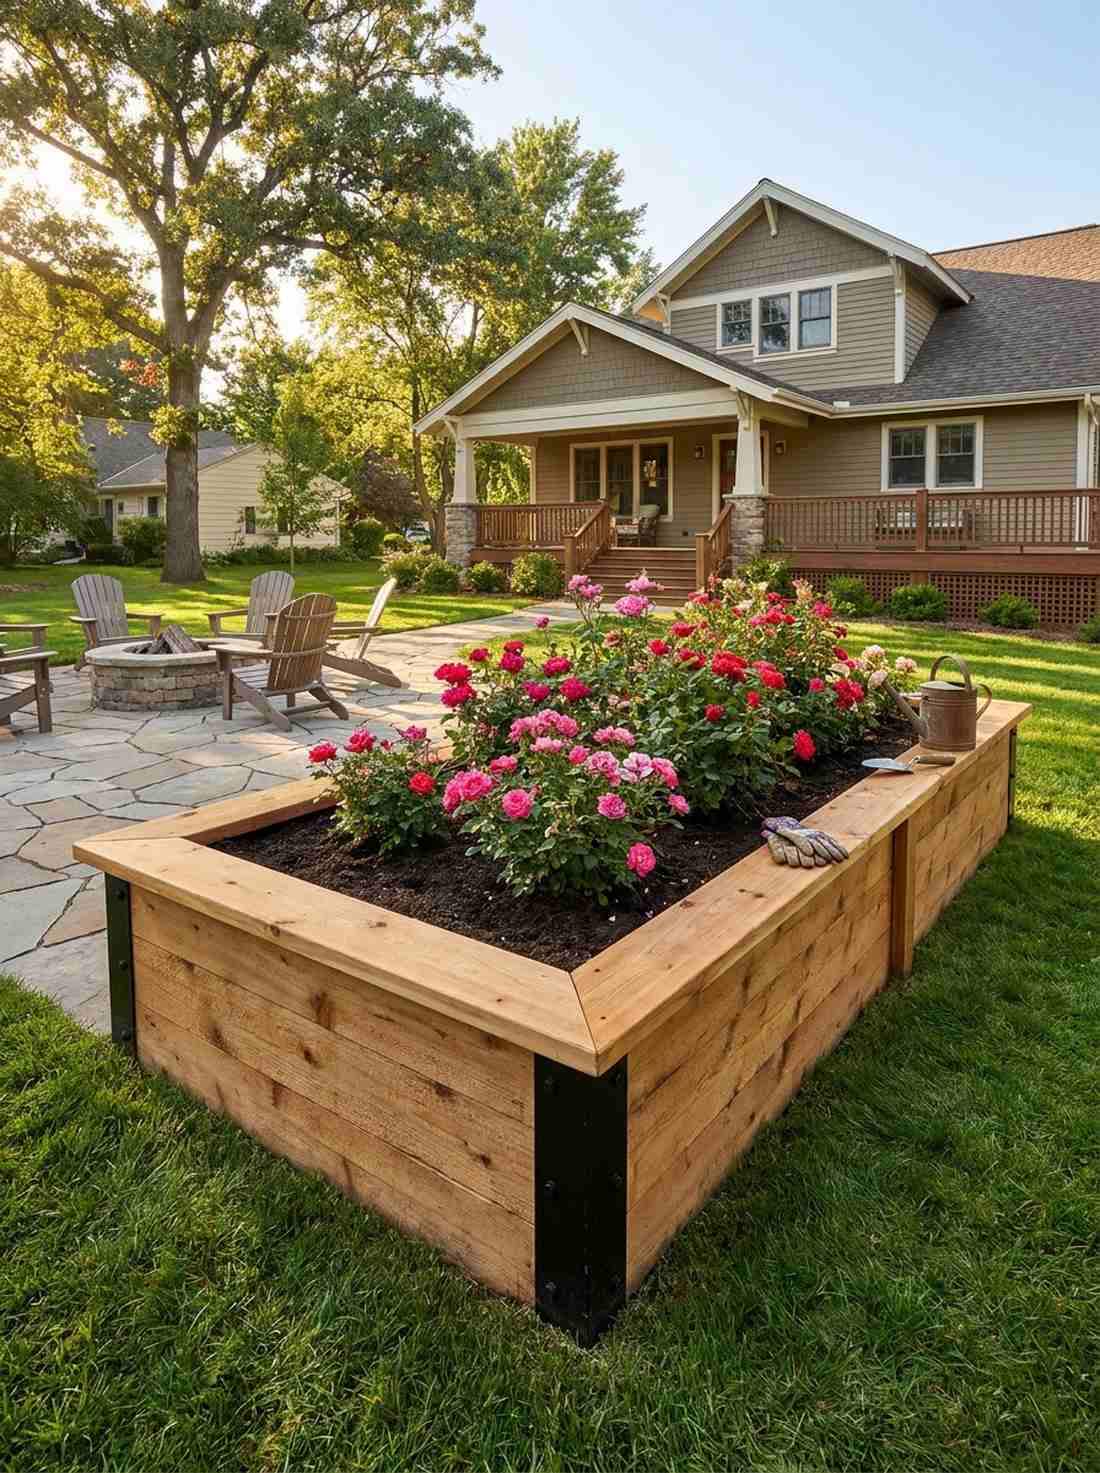
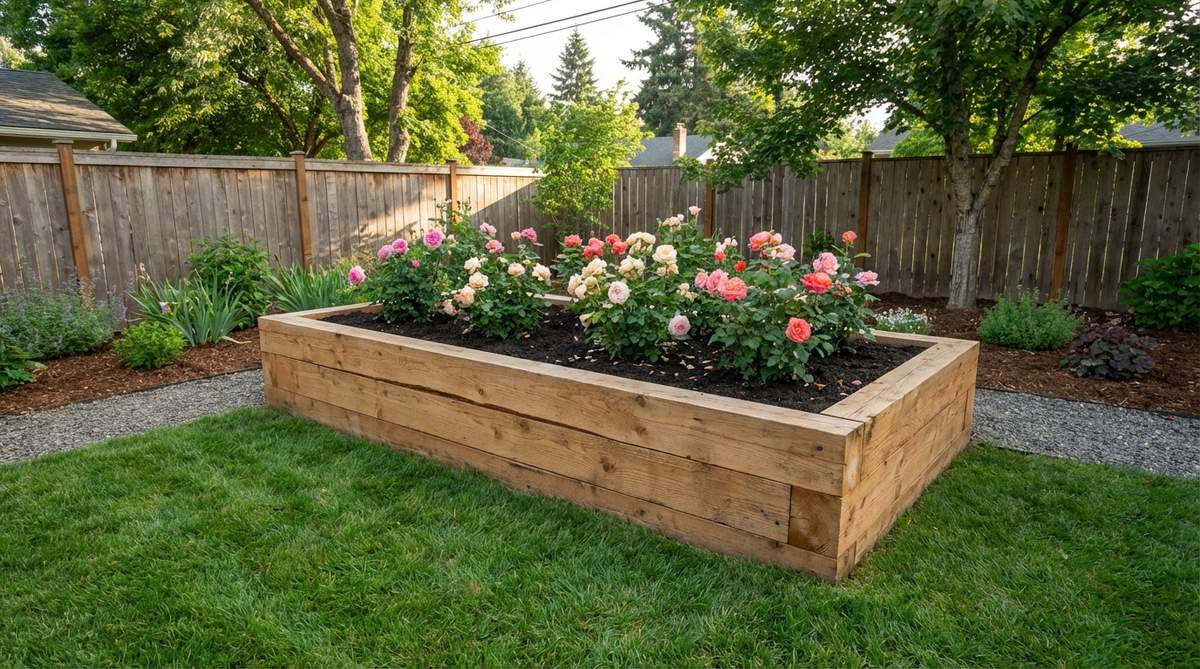
Solve terrible soil problems instantly with a raised timber rose planter that feels like a clean, custom-built farming box. If your yard suffers from heavy, unworkable clay or standing water, this elevation hack is absolutely mandatory.
Planting directly into bad dirt guarantees root rot, but lifting the bed 18 inches delivers a surprisingly premium look while creating the perfect drainage environment. By snapping together modular cedar raised bed kits, you save hours of carpentry and instantly create a deep, nutrient-rich home for your bushes.
You can build a stunning raised timber bed for $80–$150. Save this to your practical garden solutions board!
- Key Materials: Cedar raised bed kits, corner bracket joints
- Vibe / Style: Clean Custom Architecture
- Difficulty: Easy drill-free assembly
- Budget Breakdown: Cedar Kit: $120 | Corner Brackets: $20
- Creator’s Tip: The wide wooden edges double as a comfortable bench seat, saving your knees when you have to deadhead and prune for hours.
- Smart Sourcing: Buy tool-free modular cedar bed kits and heavy-duty structural corner brackets.
Material Guide: Cheap vs. Premium Aesthetic
Knowing exactly where to save and where to spend makes all the difference in achieving that “looks expensive but isn’t” vibe for your rose garden landscape design.
- Standard vs. UV-Resistant/Premium: Upgrading to UV-coated ties and powder-coated steel prevents winter rust and stops the sun from degrading your support structures, saving you massive replacement costs.
- Pre-made Kits vs. Sourcing Locally: High-end modular trellis starter kits often save both time and money compared to buying raw lumber and hardware piece by piece, preventing measuring errors.
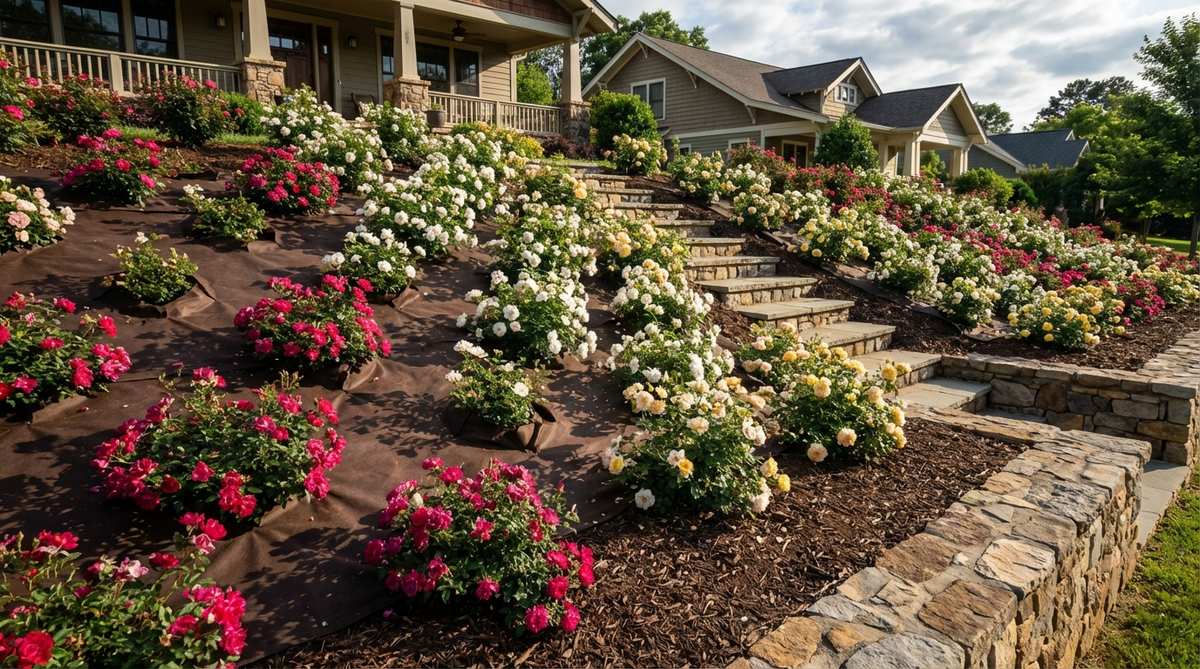
25. Terraced Slope Rose Garden
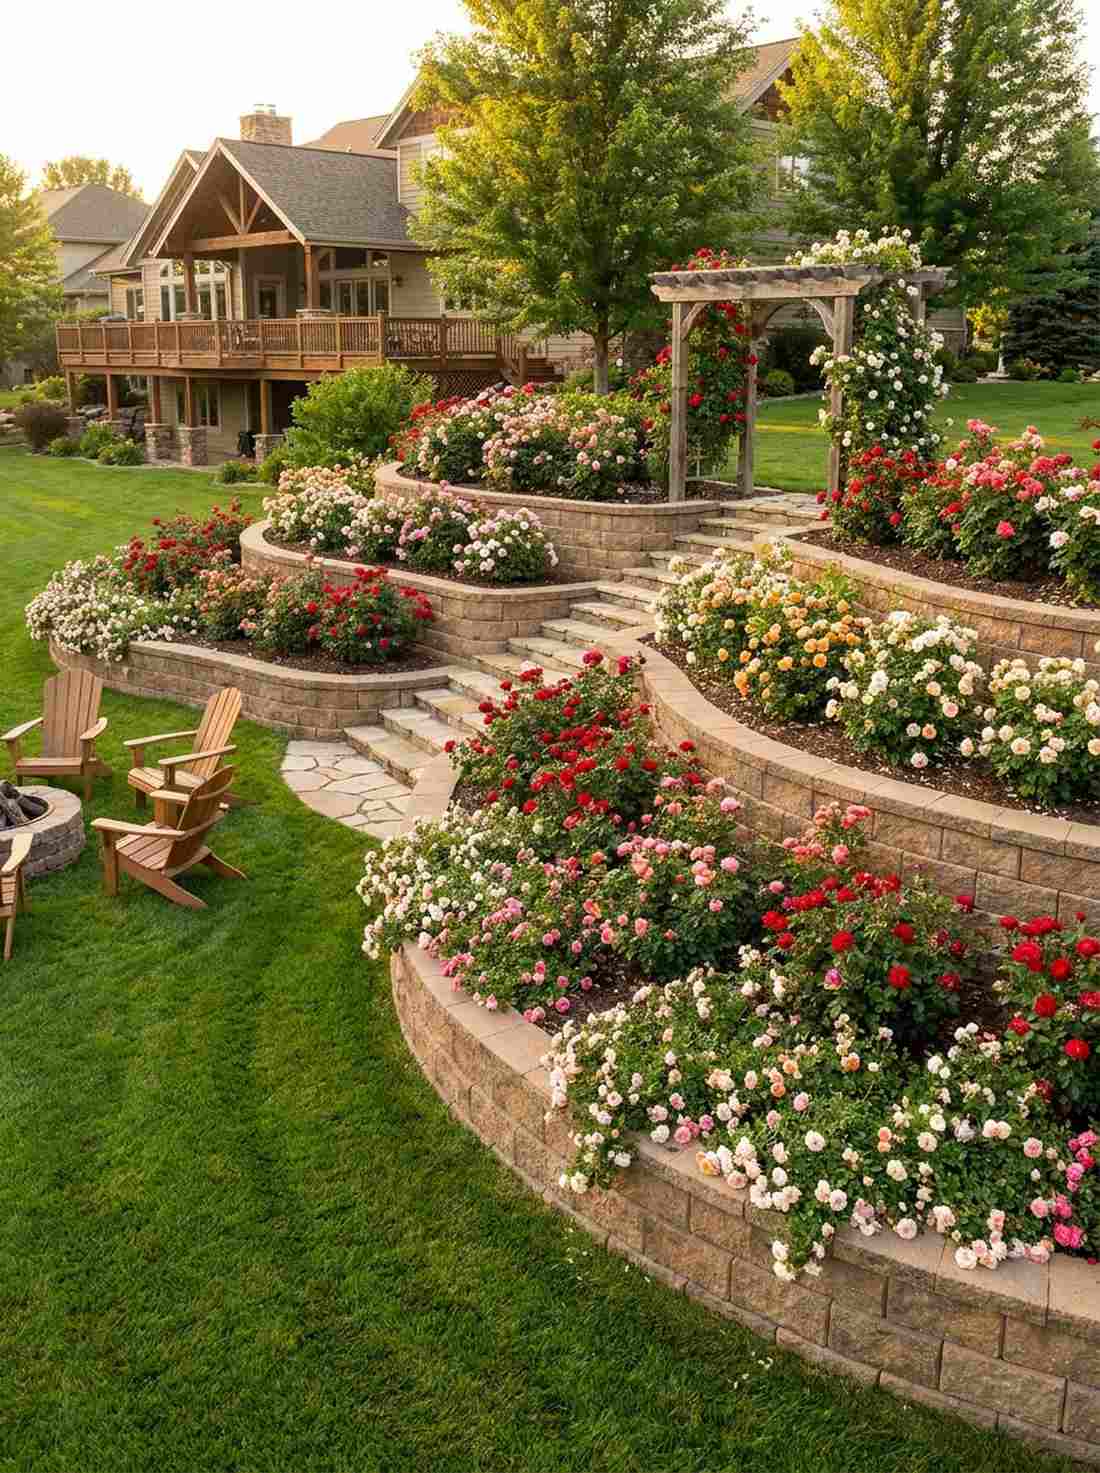
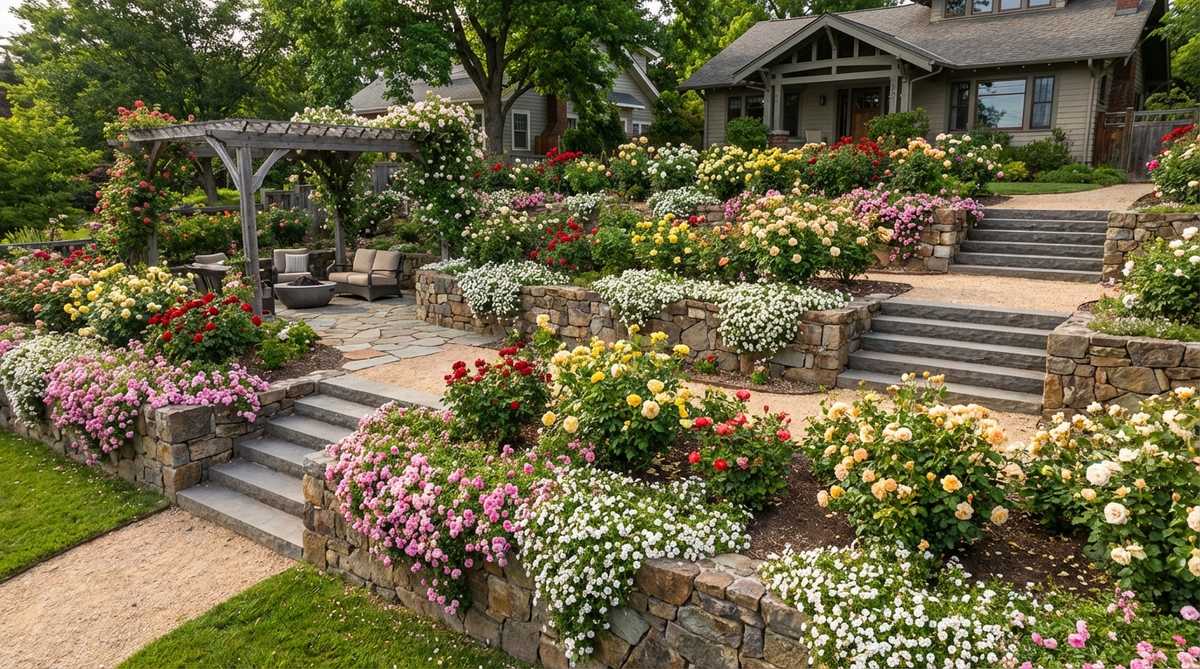
Transform a useless, eroding hill into a terraced rose garden landscape design that feels like a cascading Mediterranean villa. This multi-level strategy is the absolute best way to utilize steep, hard-to-mow property slopes.
Leaving a hill bare leads to mudslides, but cutting in stepped retaining walls gives a designer-level finish that puts blooms at multiple eye levels. Using interlocking retaining wall block kits allows you to easily build flat planting shelves that perfectly hold moisture for deep rose roots.
Terracing a slope is an investment, usually costing $300–$800. Pin this if you’re ready to conquer that nightmare hillside!
- Key Materials: Interlocking stone blocks, landscape fabric
- Vibe / Style: Cascading Mediterranean Hillside
- Difficulty: Advanced heavy lifting required
- Budget Breakdown: Stone Blocks: $400 | Leveling Sand/Gravel: $100
- Creator’s Tip: Plant spreading, groundcover roses right at the edge of each terrace so they spill elegantly over the harsh stone faces.
- Smart Sourcing: Use heavy-duty woven landscape fabric (bulk roll) and pre-cast retaining wall blocks.
26. Circular Focal Point Bed
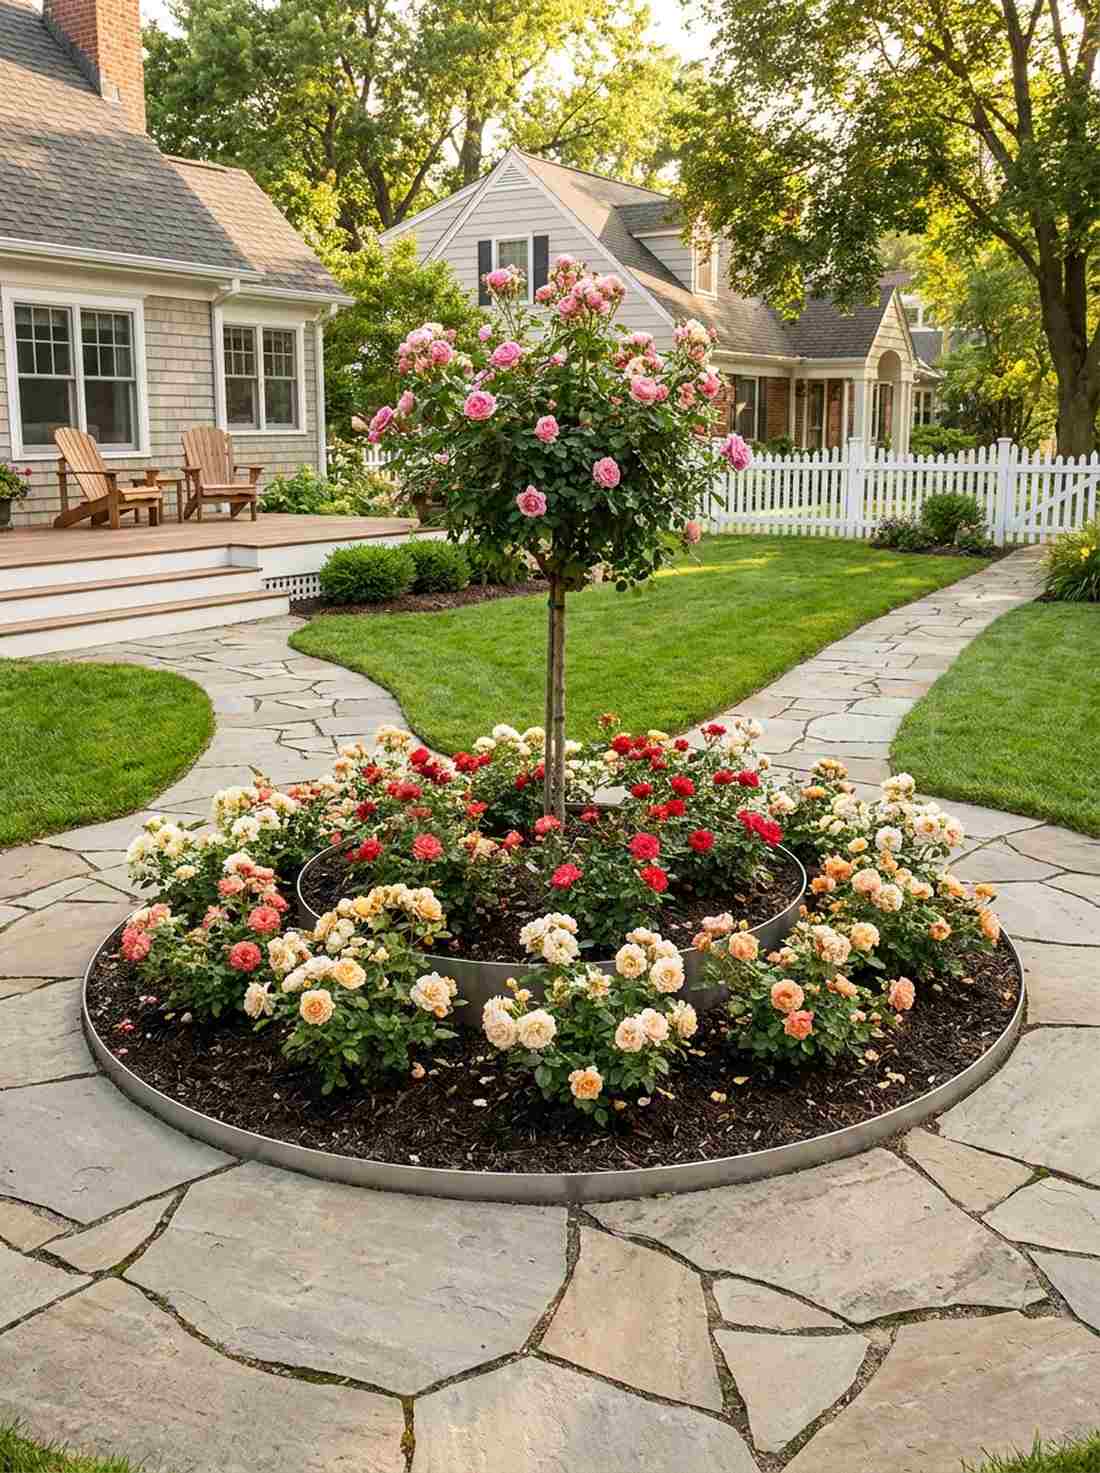
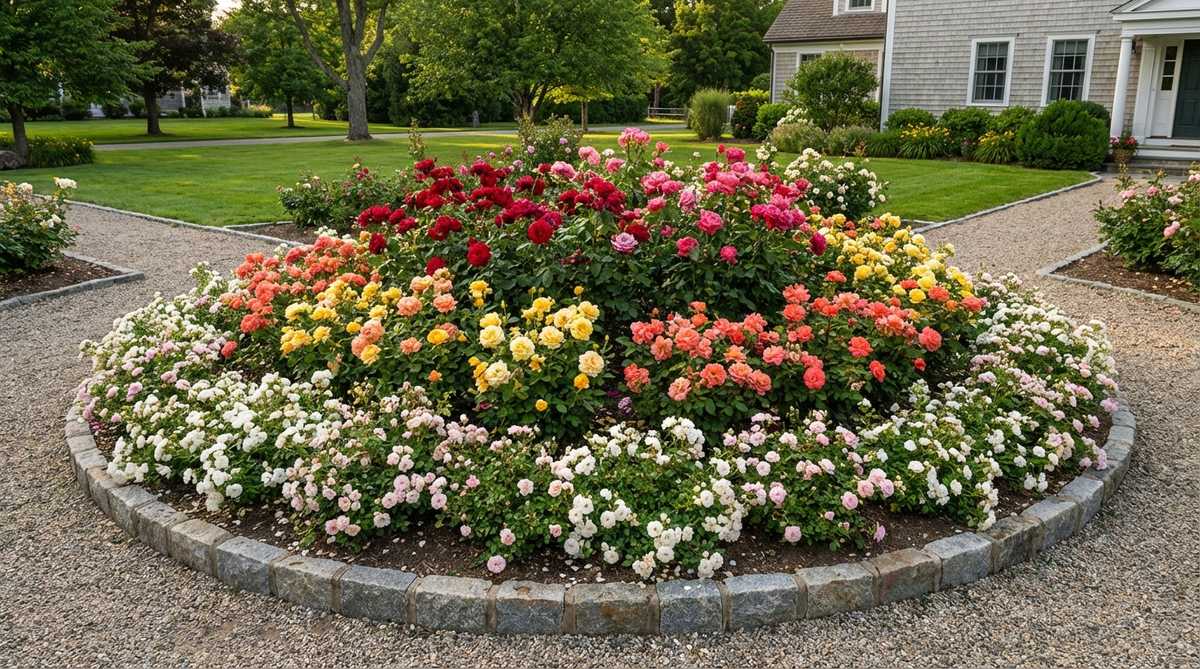
Command attention from every angle with a circular rose focal point bed that feels like a botanical bullseye. Position this perfectly round bed exactly where two pathways intersect to force guests to pause and admire.
Square intersection beds feel clunky, but a perfect circle looks incredibly expensive and mathematically satisfying. Utilizing a flexible metal border ring kit guarantees a flawless geometric circle that you can easily fill with a tiered arrangement of blooms.
You can carve out this perfect circle for about $50–$100. It’s a fast upgrade that completely changes the flow of foot traffic.
- Key Materials: Flexible steel lawn edging, center stake string compass
- Vibe / Style: Precision Botanical Display
- Difficulty: Easy weekend shaping
- Budget Breakdown: Steel Edging: $60 | Weed Barrier: $20
- Creator’s Tip: Plant a towering standard (tree) rose dead center, surrounded by concentric rings of lower-growing floribundas for a stunning wedding-cake effect.
- Smart Sourcing: Order pre-curved steel border rings and heavy-duty edging stakes.
27. Pathway Border Foundation Bed
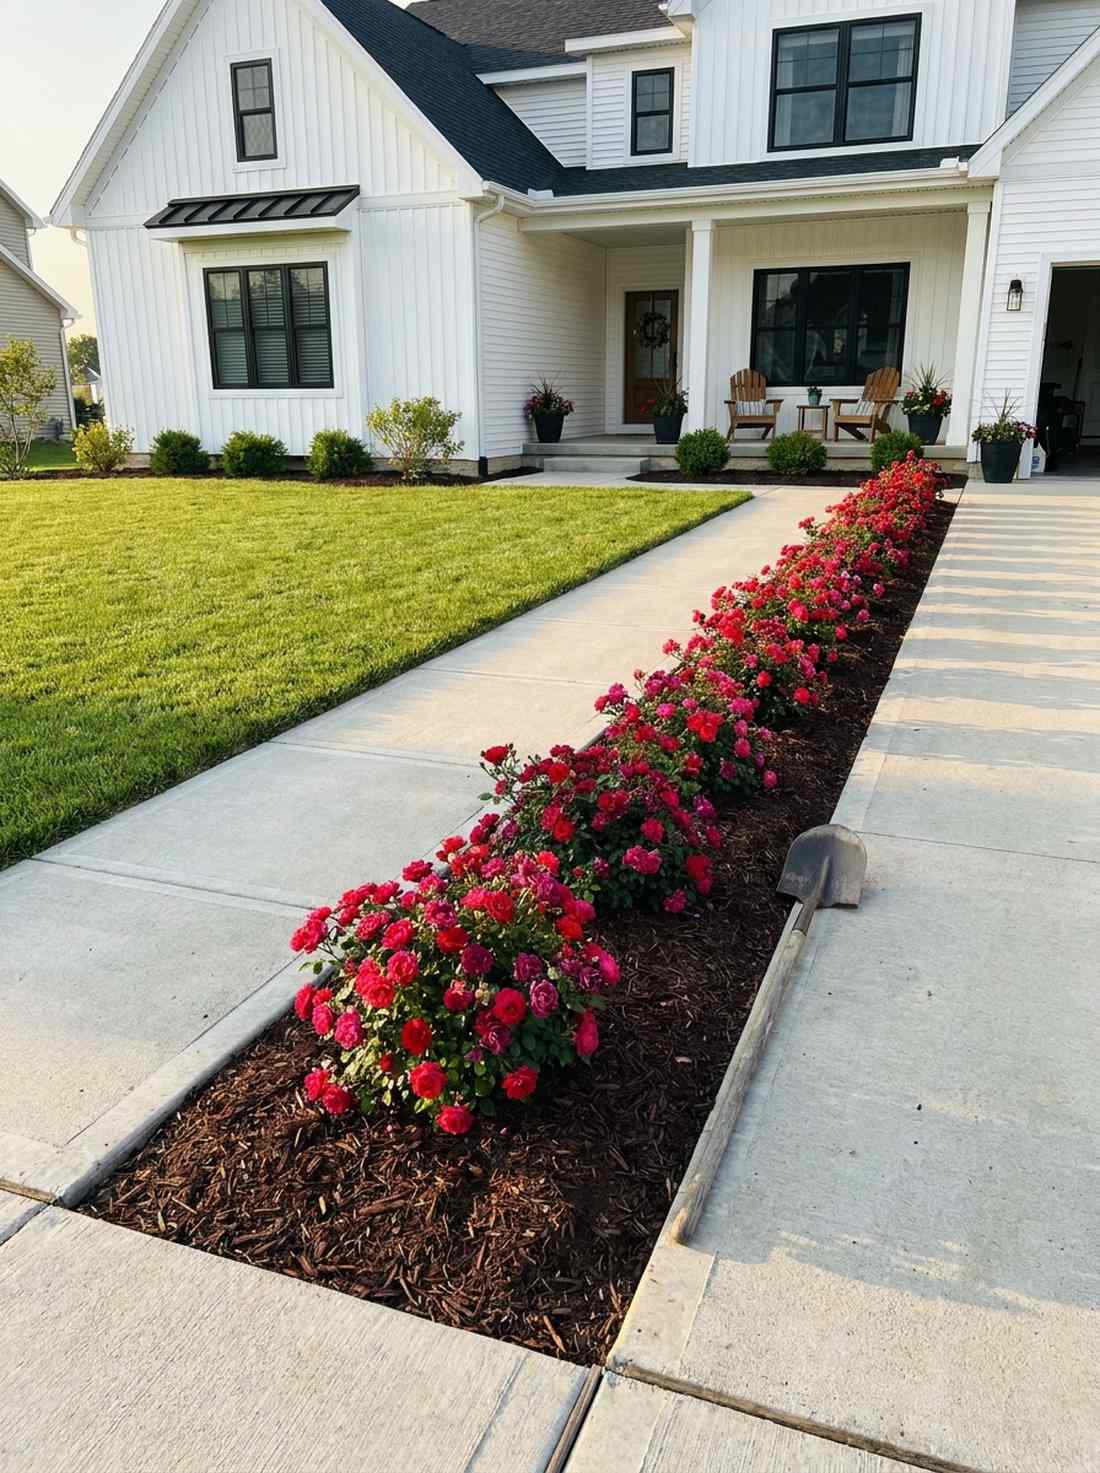
Guide your guests beautifully with a linear pathway rose border that feels like a fragrant red carpet walkway. This narrow, shallow layout is ideal for sandwiching between a concrete sidewalk and the house foundation.
Planting massive bushes near paths leads to scratched legs, but maintaining a strict 3-foot deep border gives a designer-level finish that looks meticulously kept. By relying on compact shrub rose varieties and a clean mulch line, you prevent the bed from violently encroaching on your walking space.
Creating this clean border edge costs around $60–$120. Save this idea for a massive front-yard curb appeal boost!
- Key Materials: Spade edgers, dyed premium mulch
- Vibe / Style: Meticulous Walkway Red Carpet
- Difficulty: Easy trench edging
- Budget Breakdown: Premium Mulch: $50 | Soil amendments: $30
- Creator’s Tip: Strictly stick to compact hybrid teas or floribundas; sprawling ramblers will rapidly turn your walkway into an impassable thorny jungle.
- Smart Sourcing: Buy bulk organic dyed garden mulch and heavy-duty half-moon step edgers.
Specialty Framework Concepts For Unique Rose Applications
Beyond standard structures, innovative frameworks adapt roses to specific landscape challenges or creative design visions. These applications demonstrate rose versatility across diverse garden scenarios.
28. Swag Rope Between Posts

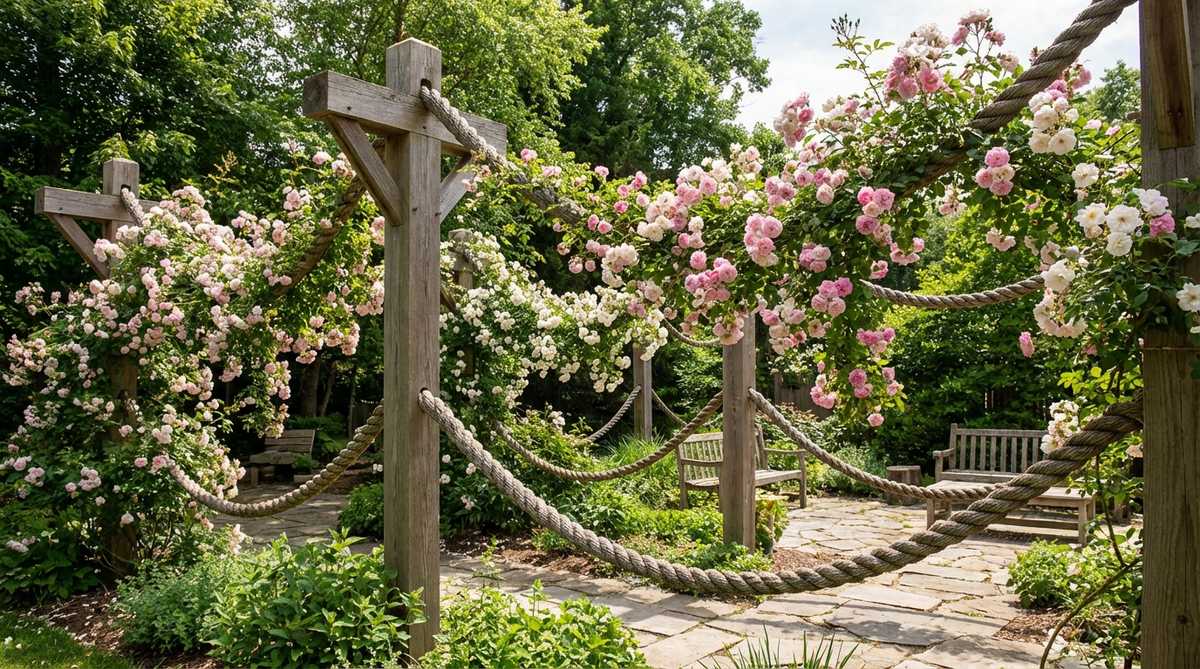
Channel historic nautical elegance with a rope swag garden design roses layout that feels like a romantic coastal estate. This gracefully dipping design perfectly accommodates the wild, flowing habit of heavy rambler roses.
Stiff wooden fences are boring, but suspending heavy marine rope creates a controversial but undeniably high-end catenary curve that looks effortlessly poetic. Utilizing thick manila rope and heavy-duty post rings allows the heavy canes to drape naturally, creating waterfalls of spring blooms.
You can set up this romantic coastal look for around $80–$150. Pin this if you want an alternative to rigid wooden fences!
- Key Materials: Thick marine-grade manila rope, heavy timber posts
- Vibe / Style: Coastal Historic Romance
- Difficulty: Intermediate post-setting
- Budget Breakdown: Thick Rope: $60 | Post Hardware: $40
- Creator’s Tip: Let the rope sag heavily in the center before planting; as the roses grow and add weight, it will pull tighter, so give it slack initially.
- Smart Sourcing: Source thick natural manila rope (bulk spool) and heavy-duty galvanized post rings.
29. Tree Stump Conversion Planter


Turn a massive yard headache into a feature with a hollowed tree stump planter that feels like a magical woodland fairy setup. This is the ultimate, free solution for dealing with an expensive-to-remove dead tree.
Paying a stump grinder $300 is painful, but carving out the center delivers a surprisingly premium look that naturally elevates the root zone for incredible drainage. By treating the inside with non-toxic wood sealers, you create a rustic, organic vase that holds a vibrant shrub rose perfectly.
This genius upcycle costs practically nothing—just $20 in soil! It’s a fast upgrade that completely changes a landscape eyesore.
- Key Materials: Chainsaw/mattock for hollowing, rich potting soil
- Vibe / Style: Enchanted Woodland Upcycle
- Difficulty: Physically demanding excavation
- Budget Breakdown: Wood Sealer: $15 | Potting Mix: $10
- Creator’s Tip: You must drill heavy-duty drainage holes through the sides of the stump, or the basin will fill with water and drown your rose instantly.
- Smart Sourcing: Grab extra-long heavy-duty auger drill bits and eco-friendly wood basin sealers.
If you’re gardening on a budget, this next livestock hack will blow your mind…
30. Wall-Mounted Espalier Ladder
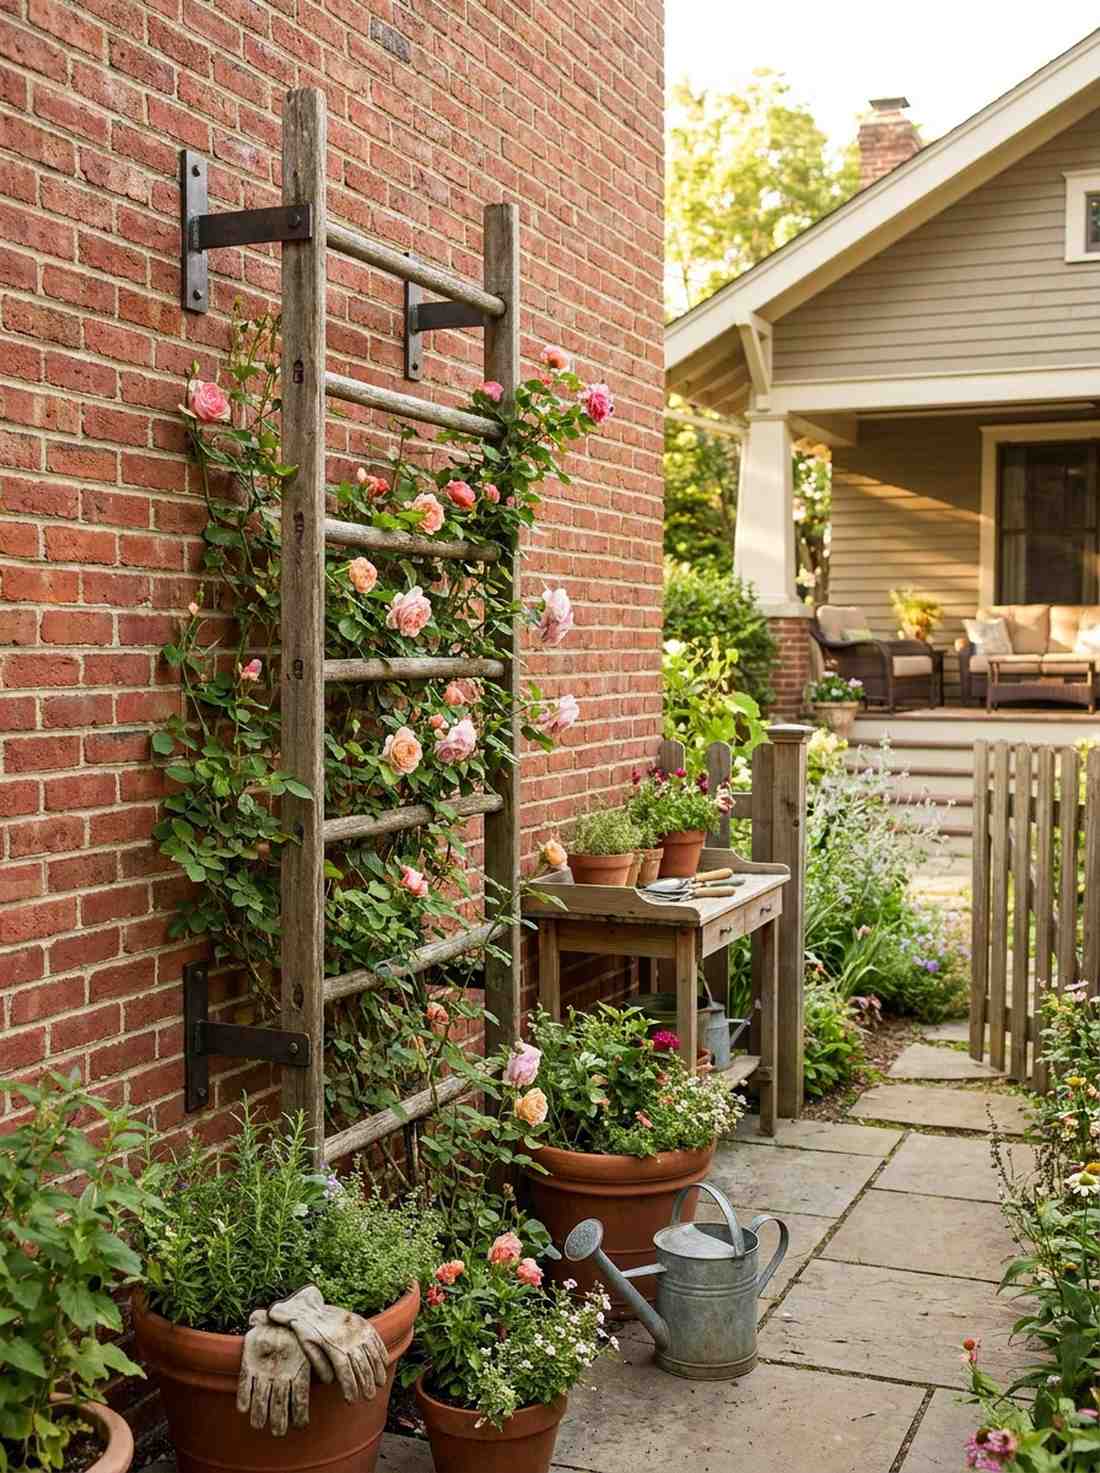
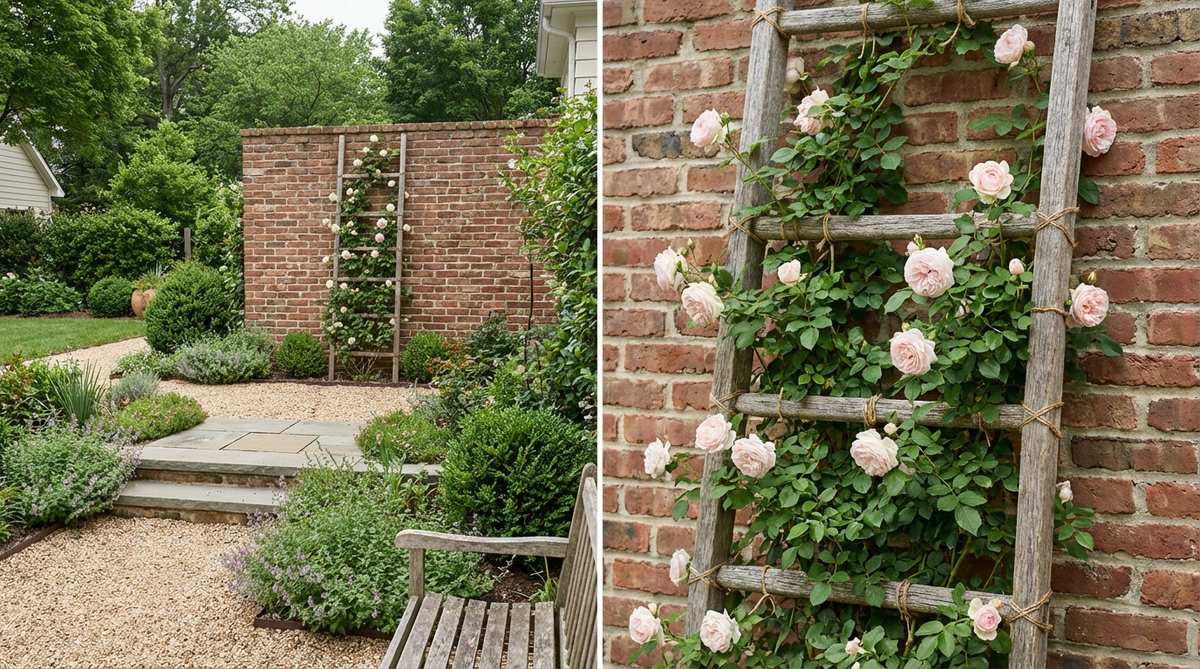
Inject instant vintage character with a wall-mounted wooden ladder trellis that feels like a rustic antique shop display. This clever repurposing hack is perfect for narrow alleyways or thin stretches of exterior wall.
Custom ironwork is pricey, but bolting an old wooden ladder vertically looks far more expensive than it is and provides perfectly spaced, ready-made rungs for tying canes. Using heavy-duty masonry standoffs, you can securely float the ladder off the wall, preserving the wood while giving the roses room to breathe.
You can achieve this vintage look for $30–$60. Save this to your genius DIY upcycling board!
- Key Materials: Vintage wooden ladder, deep wall brackets
- Vibe / Style: Rustic Antique Chic
- Difficulty: Easy wall-mounting
- Budget Breakdown: Thrifted Ladder: $20 | Wall Brackets: $25
- Creator’s Tip: Train one main climbing cane straight up each side rail, then weave the lateral blooming shoots horizontally across the rungs.
- Smart Sourcing: Use heavy-duty exterior L-brackets and clear outdoor waterproofing wood spray.
31. Livestock Panel Modern Grid
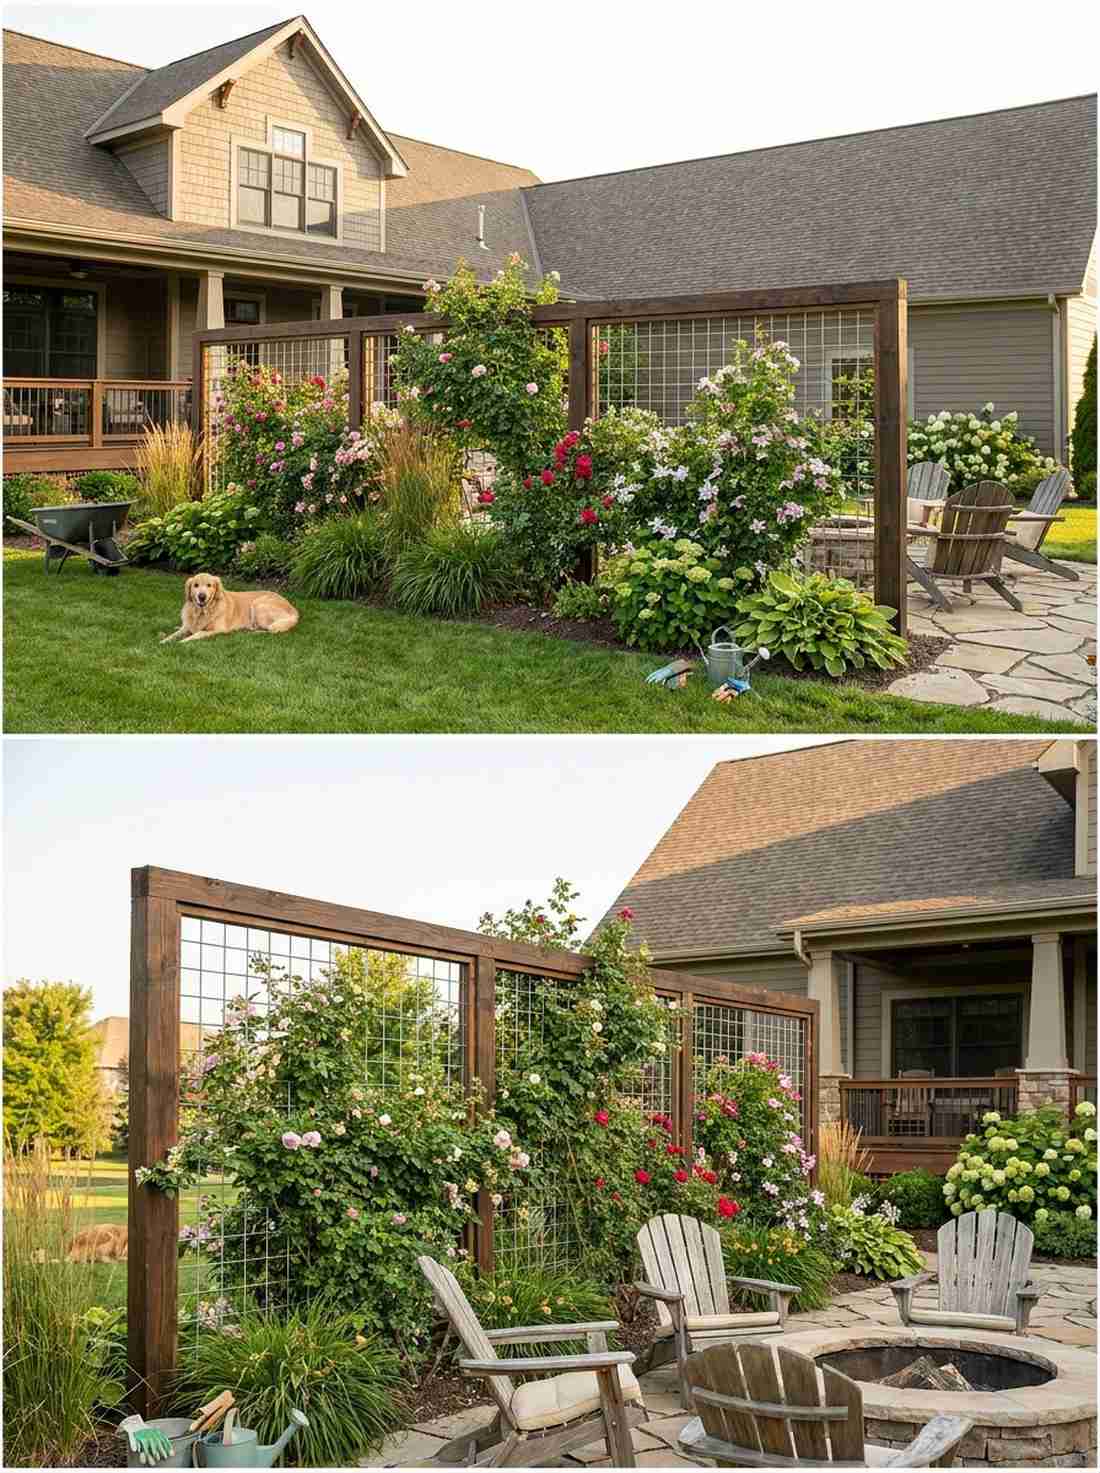
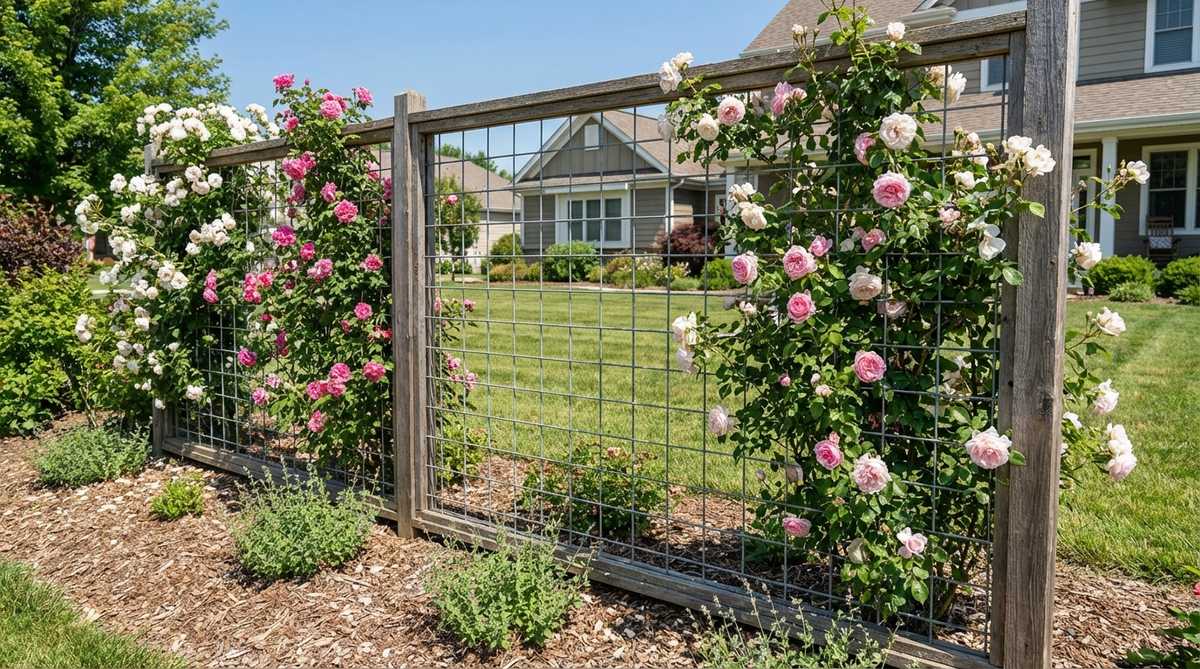
Cover massive areas for cheap with a livestock panel garden design that feels like a brilliant agricultural hack. This indestructible, budget-friendly setup is the absolute best way to build massive 16-foot climbing walls on a dime.
Custom large-scale trellises cost thousands, but using galvanized cattle panels gives a designer-level finish that handles the heaviest climbing varieties without bowing. By framing the massive steel grids in simple pre-treated 2×4 lumber, you hide the farm look and create a sleek, modern architectural grid.
You can build a massive 16-foot trellis for under $75! Highly recommended for large-scale landscaping on a tight budget.
- Key Materials: 16ft galvanized cattle panels, timber framing
- Vibe / Style: Modern Industrial Agri-Chic
- Difficulty: Intermediate framing
- Budget Breakdown: Cattle Panel: $35 | Wood Frame: $40
- Creator’s Tip: The 4-inch square gaps in livestock panels are the exact perfect size for weaving thick rose canes without needing supplementary zip ties.
- Smart Sourcing: Order heavy-duty galvanized fencing staples and weather-treated framing lumber kits.
32. Groundcover Slope Stabilization

Stop dangerous soil erosion with a groundcover rose slope layout that feels like a rolling carpet of intense color. This highly functional design is the ultimate savior for steep, ugly hillsides that are too dangerous to mow.
Throwing down basic grass seed washes away in the rain, but pegging a framework of heavy-duty fabric and creeping roses delivers a surprisingly premium look that locks the dirt in place permanently. By utilizing heavy-duty commercial weed barrier rolls, you stop weed competition while the spreading roses root downward, creating a living net.
Stabilizing a slope this way costs about $100–$250. Pin this if you need a zero-maintenance hillside solution!
- Key Materials: Commercial-grade landscape fabric, steel ground staples
- Vibe / Style: Flowing Floral Carpet
- Difficulty: Labor intensive fabric pinning
- Budget Breakdown: Heavy Fabric Roll: $70 | Steel Staples: $30
- Creator’s Tip: Cut bold X-shaped pockets into the fabric exactly 3 feet apart to give the creeping varieties enough room to spread and lock hands.
- Smart Sourcing: Purchase heavy-duty woven landscape fabric (bulk) and 6-inch galvanized sod staples.
33. Container Trellis Mobility System
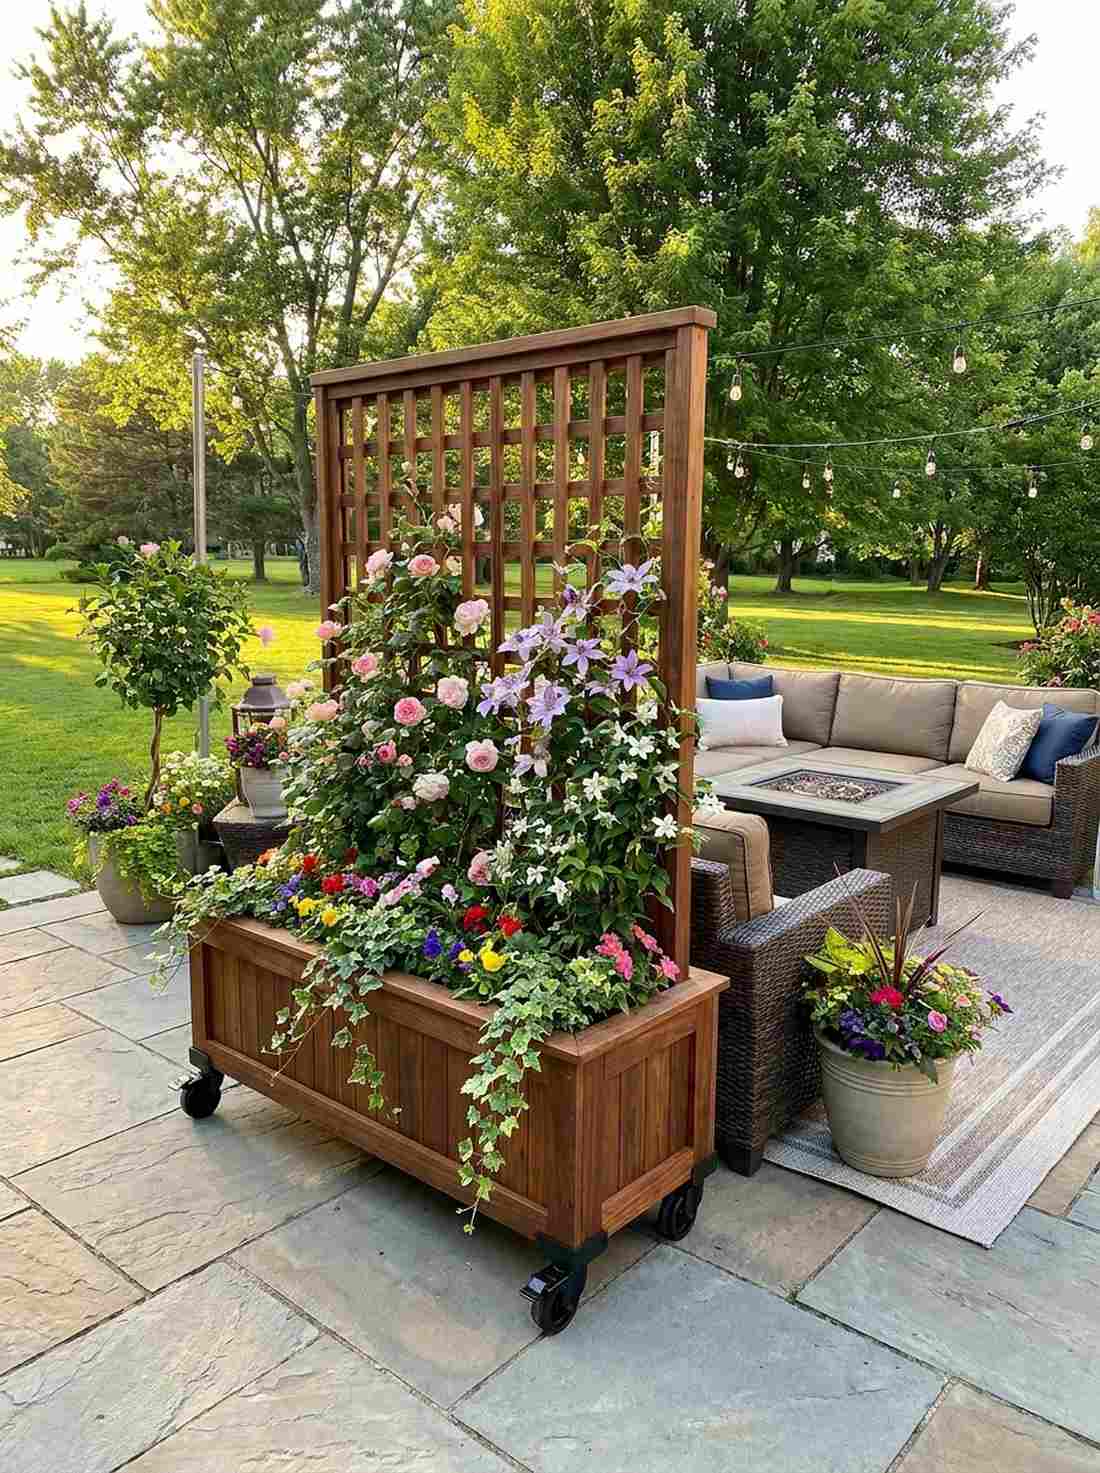
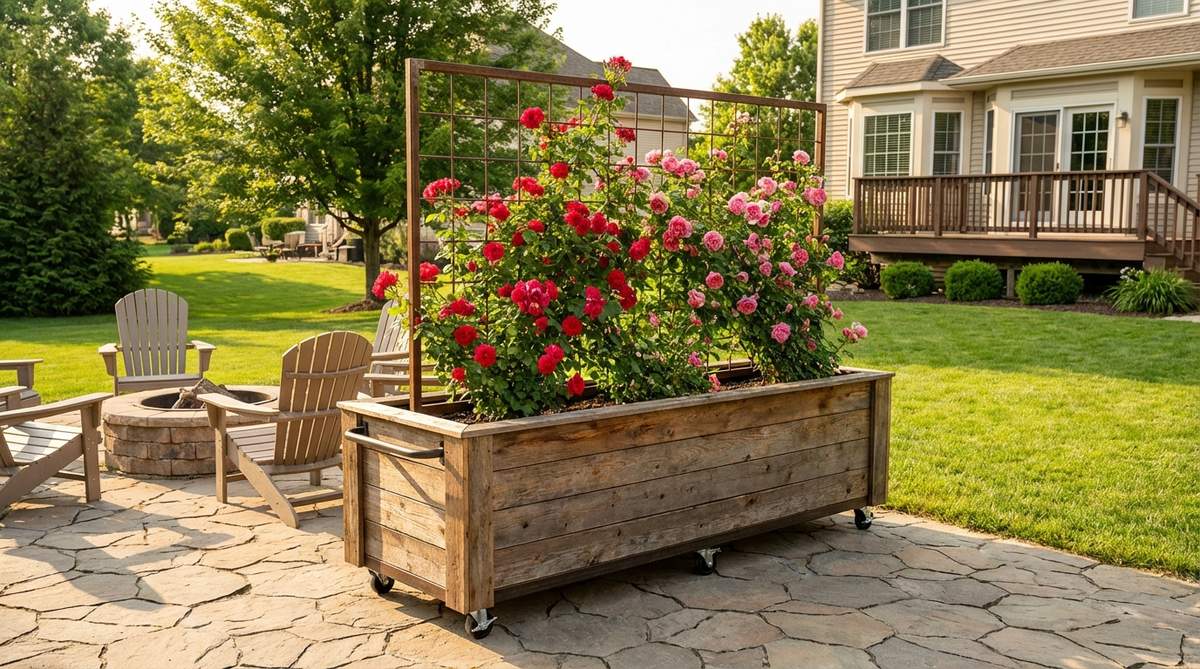
Take your blooms anywhere with a mobile container trellis system that feels like a portable slice of paradise. This is the absolute best layout for apartment renters, small balconies, or harsh winter climates.
Planting directly in the ground is permanent, but an integrated planter box with wheels looks incredibly expensive and allows you to chase the sun across your patio. By investing in heavy-duty planter boxes with built-in trellises, you restrict the roots perfectly while giving miniature climbers the exact support they need.
You can build a mobile blooming wall for around $80–$150. It’s a fast upgrade that completely changes a boring apartment balcony.
- Key Materials: Large planter box trellis kits, heavy-duty caster wheels
- Vibe / Style: Portable Patio Paradise
- Difficulty: Easy box assembly
- Budget Breakdown: Planter Kit: $90 | Caster Wheels: $20
- Creator’s Tip: Use a minimum 20-gallon pot and install heavy-duty locking casters so the tall trellis doesn’t blow across the deck during a storm.
- Smart Sourcing: Look for pre-assembled wooden planter trellis boxes and heavy-duty locking caster wheels (4-pack).
Bringing Your Rose Framework Vision to Life
Implementing these 33 strategic garden design with roses frameworks will completely transform ordinary backyard plantings into spectacular architectural features that define your outdoor living spaces. Whether you implement cheap but sturdy obelisks within borders, construct massive wide-span pergolas for overhead drama, or design formal geometric beds with precision, choosing the right structural backbone amplifies your rose performance while slashing long-term maintenance time. Start with just one framework type—like a simple livestock panel or an arbor kit—that addresses your most annoying garden challenge, then expand your high-end aesthetic as the plants establish. Relying on smart, bulk sourcing and premium starter kits ensures your beautiful displays will survive harsh weather and perform at their absolute peak year after year.
Frequently Asked Questions
What spacing should I use between rose framework structures?
To achieve a high-end rose garden landscape design, always allow 8-10 feet between substantial frameworks like heavy-duty pergola posts or large commercial-grade arbors to provide adequate root space and prevent visual crowding. Smaller structures like rust-proof steel obelisks can be positioned 4-6 feet apart within raised beds. Consider mature rose spread when planning—vigorous climbers may span 10-12 feet on a wide-span trellis kit, while standard pillar roses typically remain tightly confined within a 3-4 foot diameter.
How do I train climbing roses horizontally for maximum blooms?
Secure main rose canes horizontally along premium UV-resistant trellis rails, arbor beams, or modular fence extensions using pro-grade flexible silicone ties spaced 12-18 inches apart. Horizontal orientation restricts growth hormones that suppress lateral bud development, instantly triggering multiple flowering shoots along each cane for that designer-level finish. Begin training young canes using soft starter-kit ties while they are still highly flexible, typically during their first or second growing season to avoid snapping.
Which rose types work best for different framework structures?
Always match rose vigor to your specific structure size to prevent collapse. Ramblers and massive climbers perfectly suit heavy-duty pavilion kits and tall commercial arbors reaching 12-15 feet. Standard climbing roses flawlessly fit pre-built arch kits and vinyl lattice trellises at 8-10 feet. Pillar roses adapt beautifully to galvanized obelisks and minimalist metal columns at 6-8 feet. Finally, compact shrub roses fill formal geometric parterre beds at 3-5 feet, while groundcover roses spread out perfectly across heavy-duty landscape fabric on slopes at 18-24 inches height.
How long before framework roses reach mature display quality?
Expect 2-3 growing seasons for climbing roses to establish sufficient thick cane structure for complete framework coverage across your pergolas and arches, with the explosive peak bloom density arriving in years 3-5. The first-year focus should always be on root development using premium organic compost. The second-year produces primary long canes, and the third-year generates those highly-desired lateral flowering shoots. Shrub and groundcover roses reach their mature proportions much faster, typically displaying full, expensive-looking character by their second season.
What maintenance do rose frameworks require annually?
Inspect your structural supports each spring before growth resumes, tightening hardware and replacing any damaged wood or metal components with weather-resistant upgrades. Train new canes in late spring after the primary flowering flush, securing them to heavy-duty support points using UV-coated zip ties or soft wire while they are still pliable. Remove dead or diseased canes during dormant pruning in late winter. Check tie points monthly during the growing season, loosening any that dangerously constrict expanding canes. Premium coated frameworks themselves need minimal care beyond an annual inspection and occasional clear rust-blocking sealant renewal.