
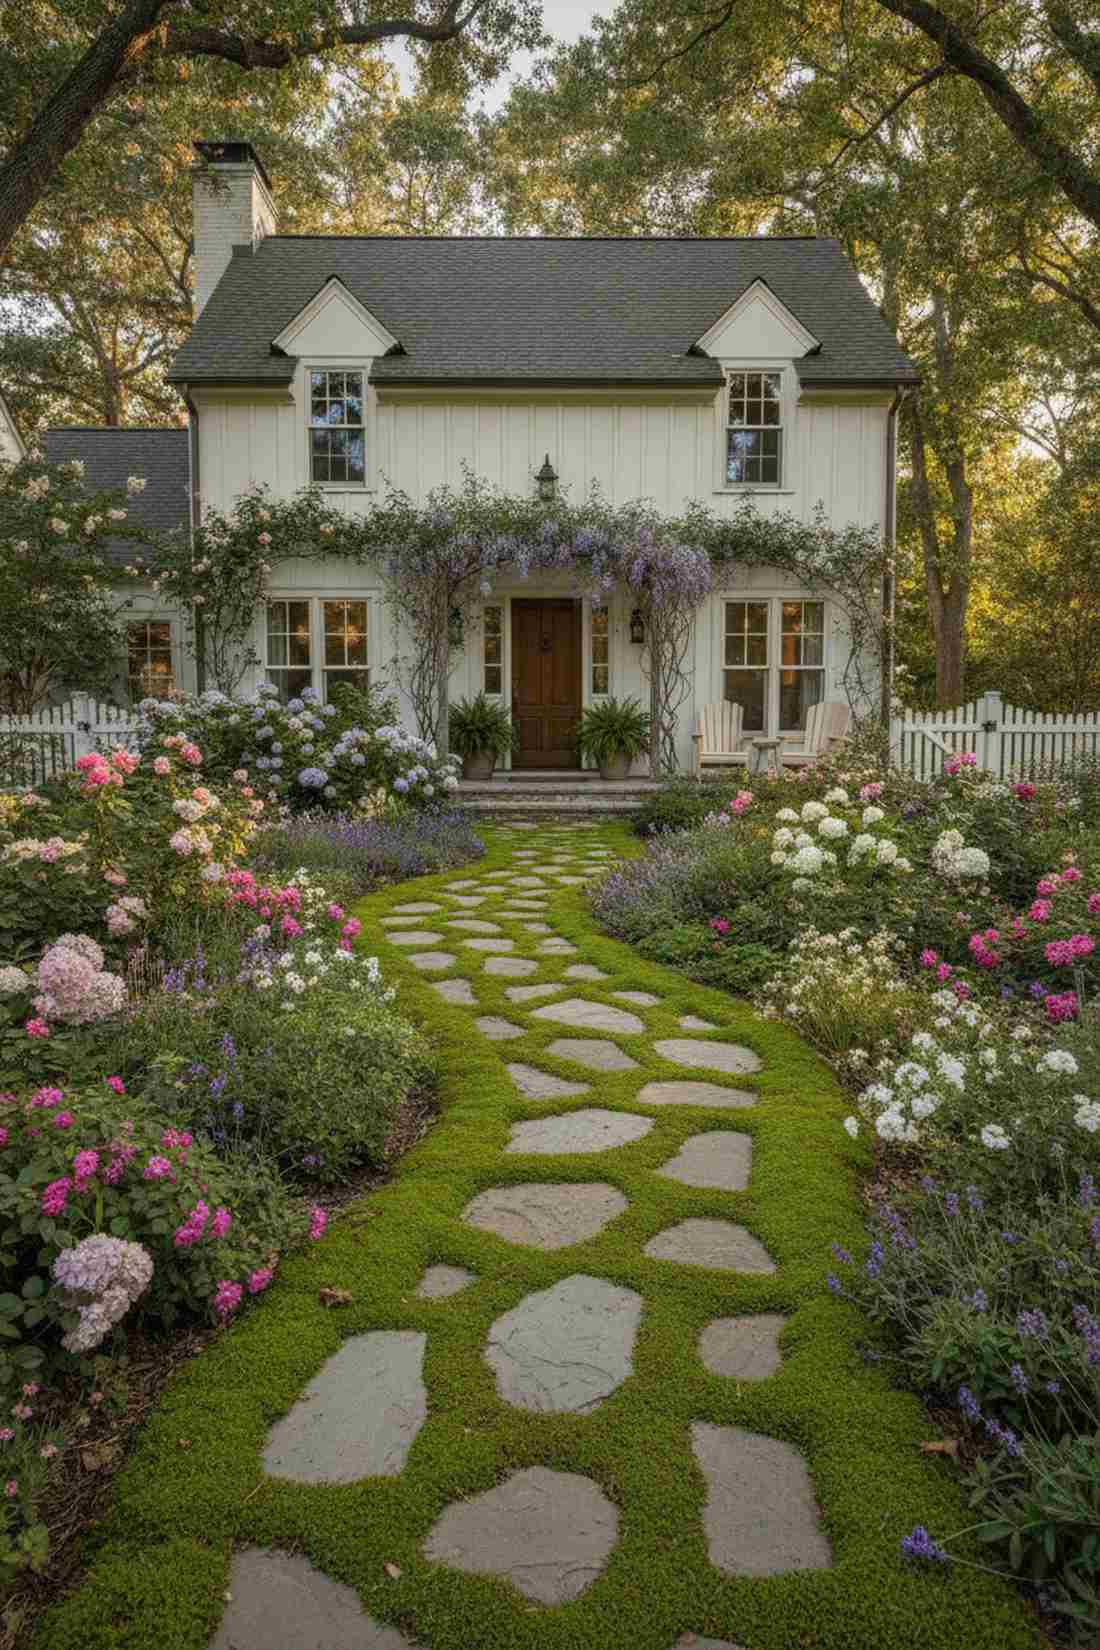
Transforming an outdoor space is simple when you execute a clever stepping stones patio layout. By sourcing pre-cut UV-resistant materials, you easily mimic expensive designer landscapes on a tight budget. Grab these exact blueprints for a high-end upgrade.
Design SnapshotKey Principles
- Spacing Consistency: Maintain 12-18 inches between stone centers for comfortable walking rhythm and universal accessibility
- Material Continuity: Match or complement patio materials in stepping stones to create cohesive visual flow across zones
- Structural Foundation: Install 2-inch gravel base topped with leveling sand to prevent shifting and ensure long-term stability
- Edge Integration: Use restraint systems and borders to secure transitions and prevent lateral movement between surfaces
Patio-to-Lawn Transitions That Soften Hard Edges
Abrupt endings between patio surfaces and lawn create disjointed outdoor spaces that feel incomplete. Designers use matching paver materials extended into turf zones to establish visual continuity while maintaining distinct functional areas. The following transitions eliminate harsh boundaries and invite exploration across your landscape.
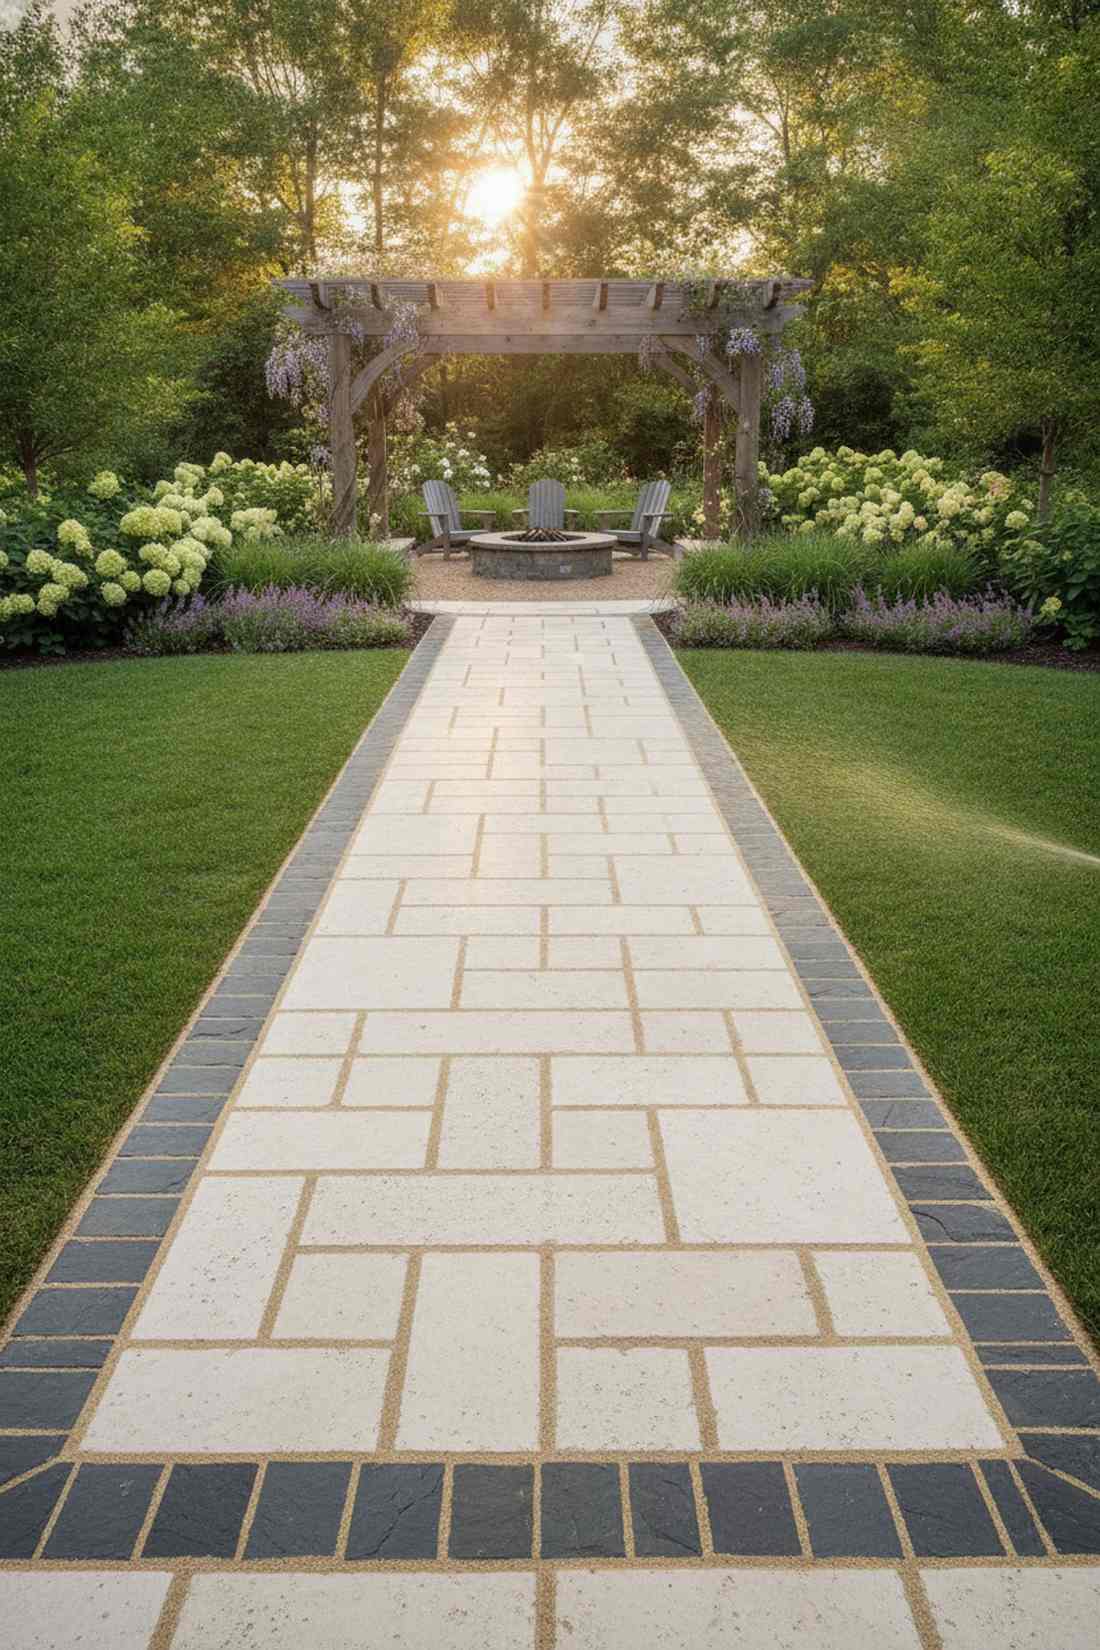
1. Matching Paver Stepping Path
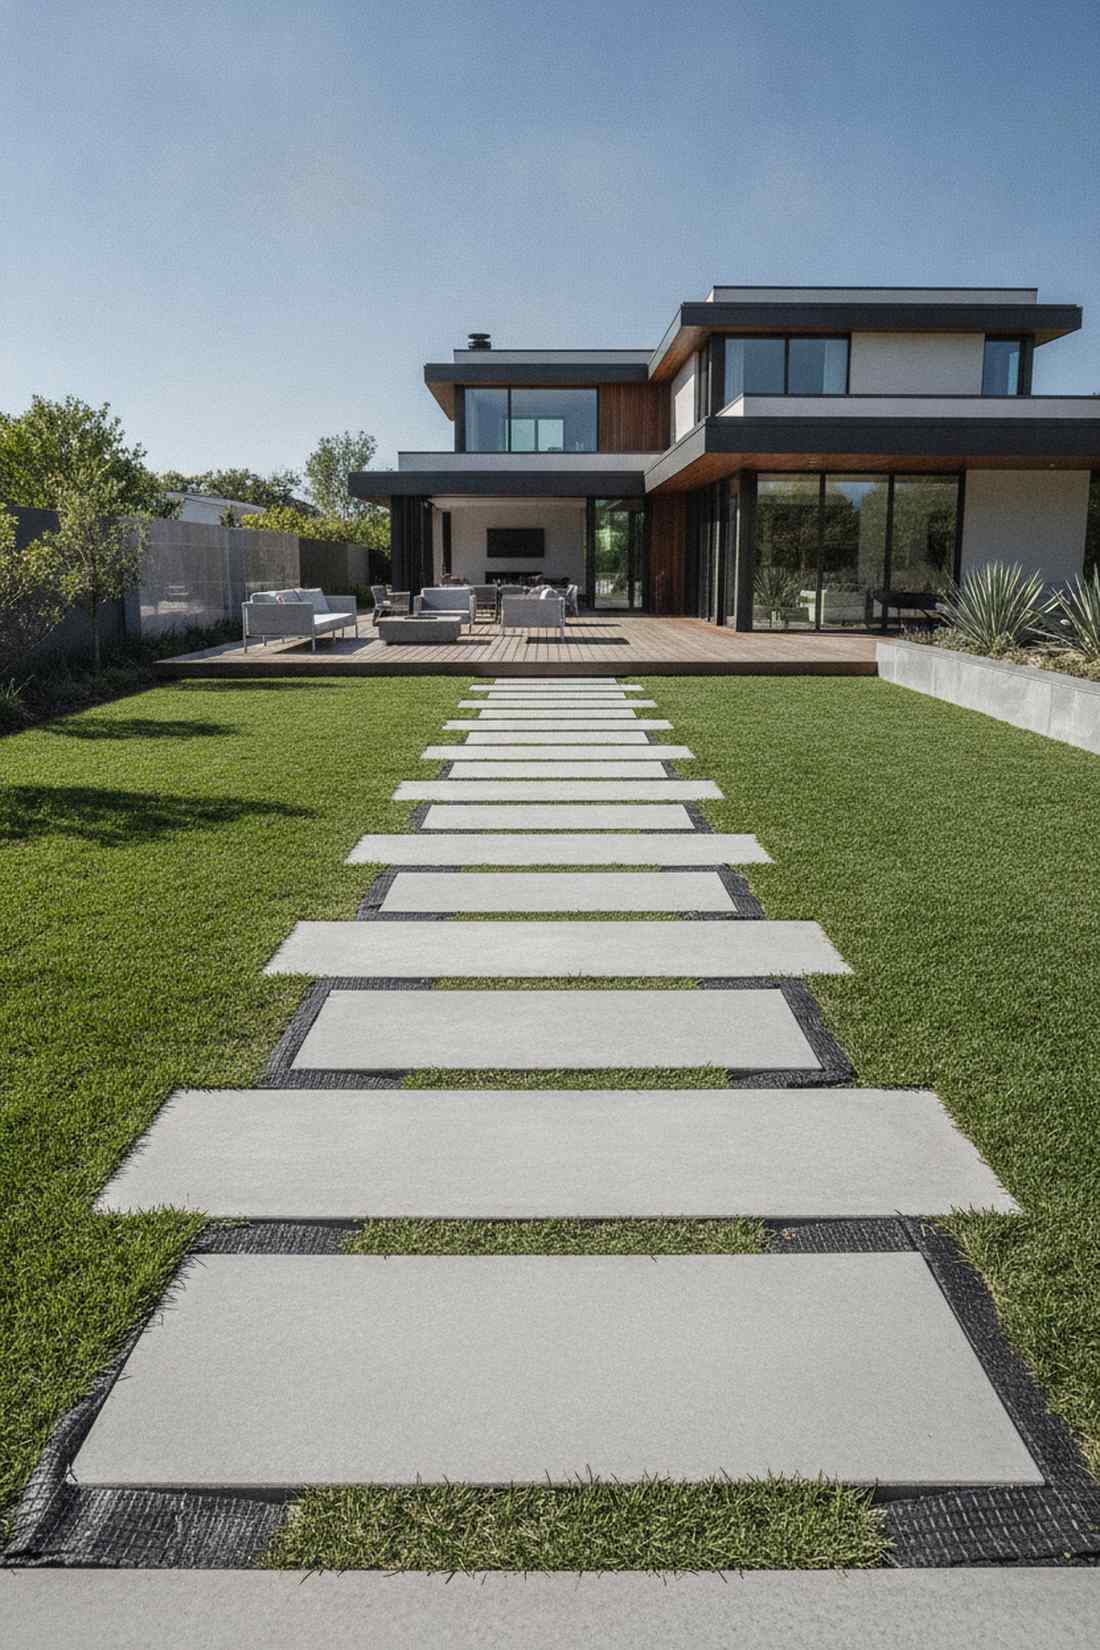
Feels incredibly cohesive and satisfyingly neat. This seamless lawn border transition works exceptionally well for a modern backyard where the hardscape meets lush green turf.
It completely eliminates the disjointed, amateur look most DIYers fall victim to. By extending identical pavers, it gives a designer-level finish that connects your main lounging area directly to the yard. Sneak in heavy-duty commercial weed barrier underneath to stop overgrowth.
You can easily pull this off for around $40–$75 depending on the stone quality. Pin this if you’re planning a small space upgrade this weekend!
- Key Materials: Large-format concrete slabs, joint sand
- Vibe / Style: Clean architectural modernism
- Difficulty: Beginner weekend project
- Budget Breakdown: Materials: $40 | Base Setup: $15
- Creator’s Tip: Set stones flush with the turf height to allow lawn mowers to glide right over them without chipping the blades.
- Smart Sourcing: heavy-duty commercial weed barrier (bulk roll) and pre-cut leveling sand bags
2. Checkerboard Herb Garden Extension
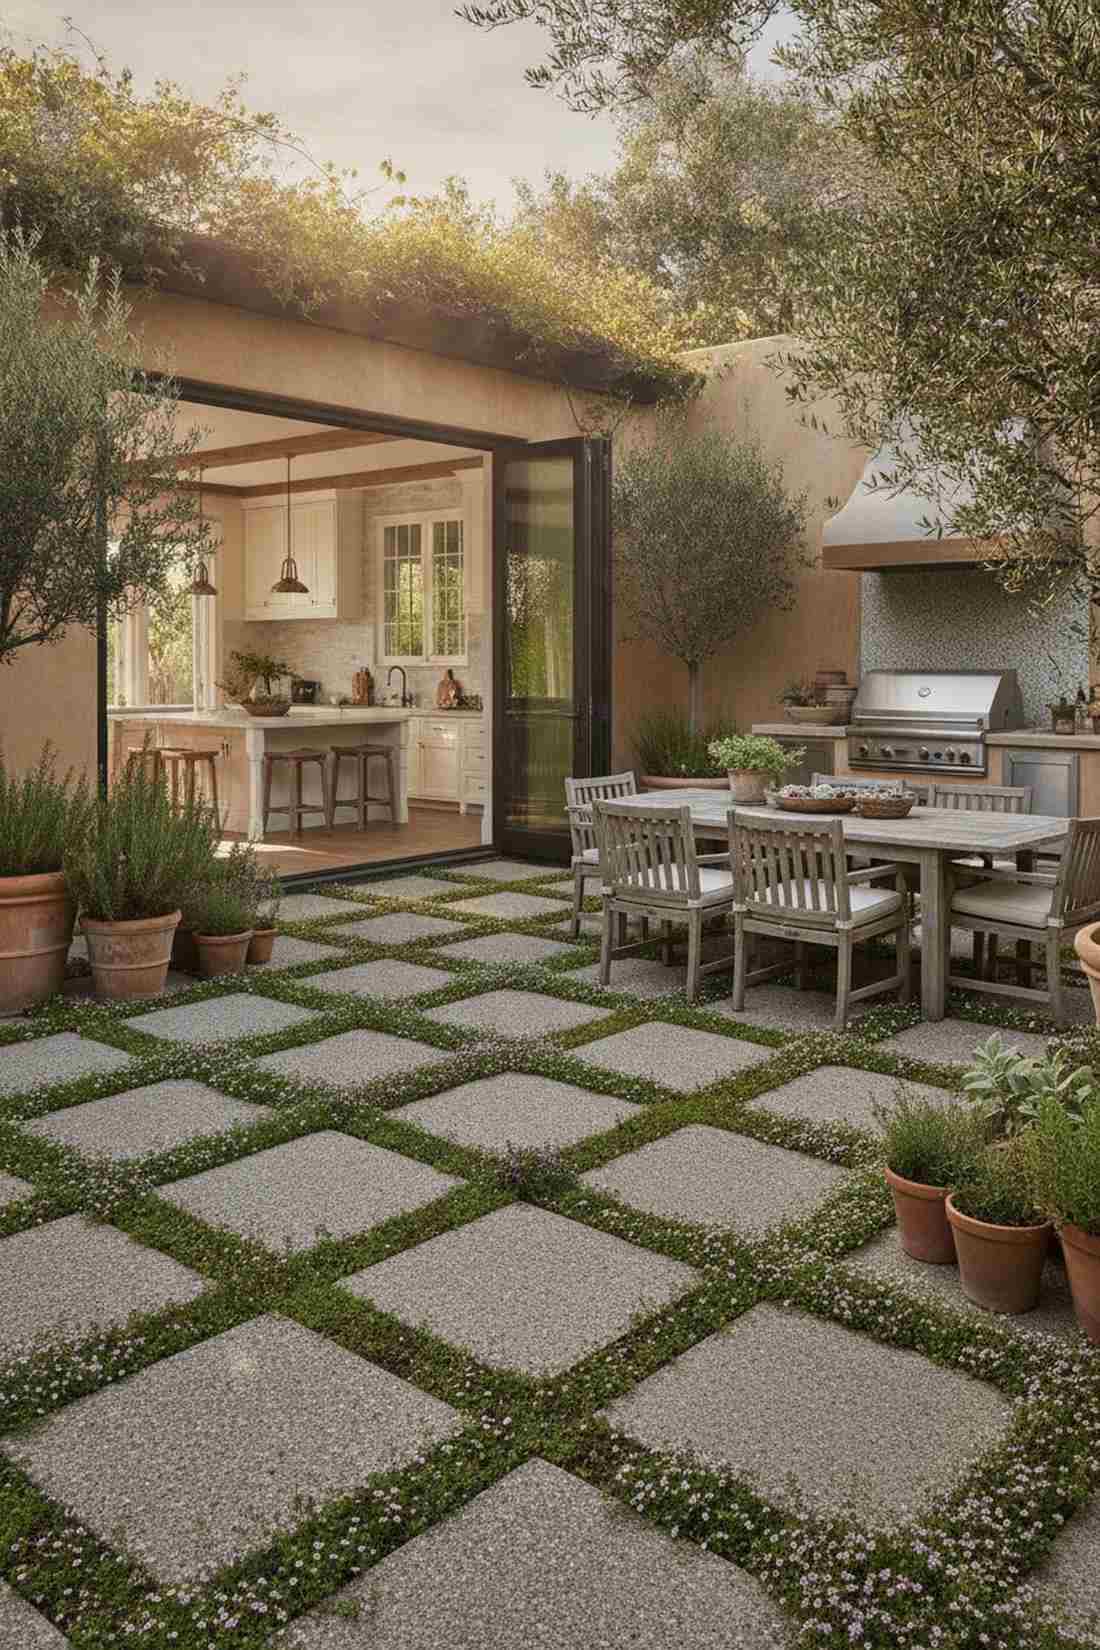
Smells like a hidden botanical retreat every time you step. This fragrant sensory garden grid is the perfect placement for sunny kitchen-side patios.
Most people waste space with boring grass, but this setup delivers a surprisingly premium look while remaining fully functional. Using creeping thyme starter plugs between 16×16-inch concrete squares builds a lush, interactive floor that tolerates heavy foot traffic.
Expect to spend roughly $30–$60 for the stones and live plants. It’s a fast upgrade that completely changes the vibe of your cooking area.
- Key Materials: Square pavers, trailing herb plants
- Vibe / Style: Lush Mediterranean courtyard
- Difficulty: Easy planting setup
- Budget Breakdown: Pavers: $30 | Live Plants: $25
- Creator’s Tip: Choose drought-tolerant herbs so the grid doesn’t require constant, annoying manual watering during summer.
- Smart Sourcing: creeping thyme starter plugs (multi-pack) and organic moisture-control potting soil
3. Diagonal Runner with Gravel Fill
Feels like walking through a contemporary art gallery outdoors. This geometric diagonal path layout is brilliant for elongating tight side yards or narrow garden walkways.
Flipping the stones to a 45-degree angle completely tricks the eye, making the area look far more expensive than it is. Fill the negative spaces with a contrasting bulk pack of polished Mexican beach pebbles to guarantee perfect drainage and high-end visual punch.
The materials run about $50–$90, making it an incredibly affordable luxury.
- Key Materials: Rectangular cut stones, decorative gravel
- Vibe / Style: High-contrast modern art
- Difficulty: Moderate alignment required
- Budget Breakdown: Stones: $50 | Decorative Fill: $35
- Creator’s Tip: Lay commercial weed fabric before dropping the gravel to ensure you aren’t plucking dandelions out of the rocks every weekend.
- Smart Sourcing: polished Mexican beach pebbles (bulk pack) and heavy-duty landscaping fabric rolls
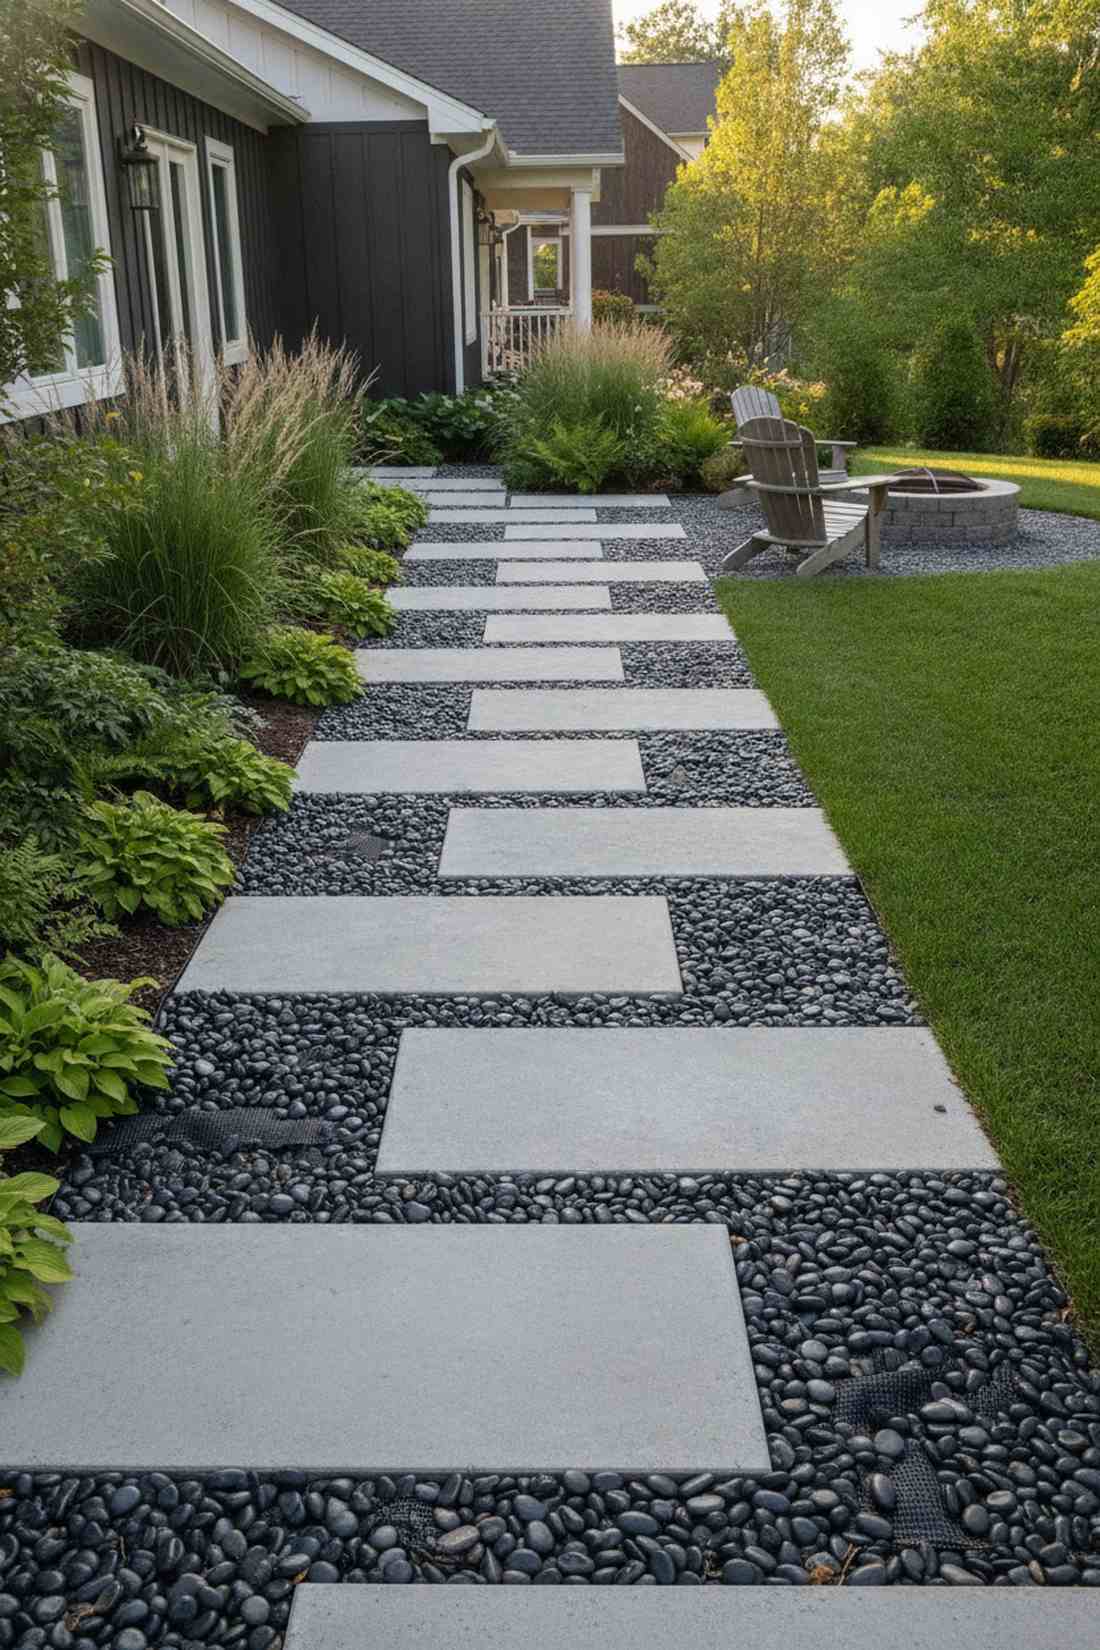
4. Staggered Organic Pathway
Looks straight out of a whimsical woodland storybook. This naturalistic offset stone trail is ideal for navigating softly shaded garden rooms without harsh, rigid lines.
The asymmetrical arrangement forgives mistakes and guarantees a custom, organic flow. To ensure it doesn’t sink into the mud, laying a foundation using a premium paver base starter kit keeps everything leveled for years.
Costs sit beautifully around $25–$45 if you source local fieldstone. Save this to your DIY weekend garden board!
- Key Materials: Irregular fieldstone, local moss
- Vibe / Style: Enchanted forest trail
- Difficulty: Forgiving and beginner-friendly
- Budget Breakdown: Natural Stone: $25 | Base Sand: $15
- Creator’s Tip: Vary the spacing slightly to mimic a natural walking stride rather than a rigid marching sequence.
- Smart Sourcing: premium paver base starter kit and live shade-tolerant moss sheets
This next setup completely redefines front yard curb appeal… and it costs less than a single trip to a fancy nursery.
Stepping Stones House Entrances That Welcome Guests
Front walkways establish first impressions and guide visitors to your entry with clarity and style. Strategic stepping stone placement from driveway or street to front door creates anticipation while accommodating casual foot traffic patterns. These entrance configurations balance formality with approachability.
5. Wide-Format Entry Sequence
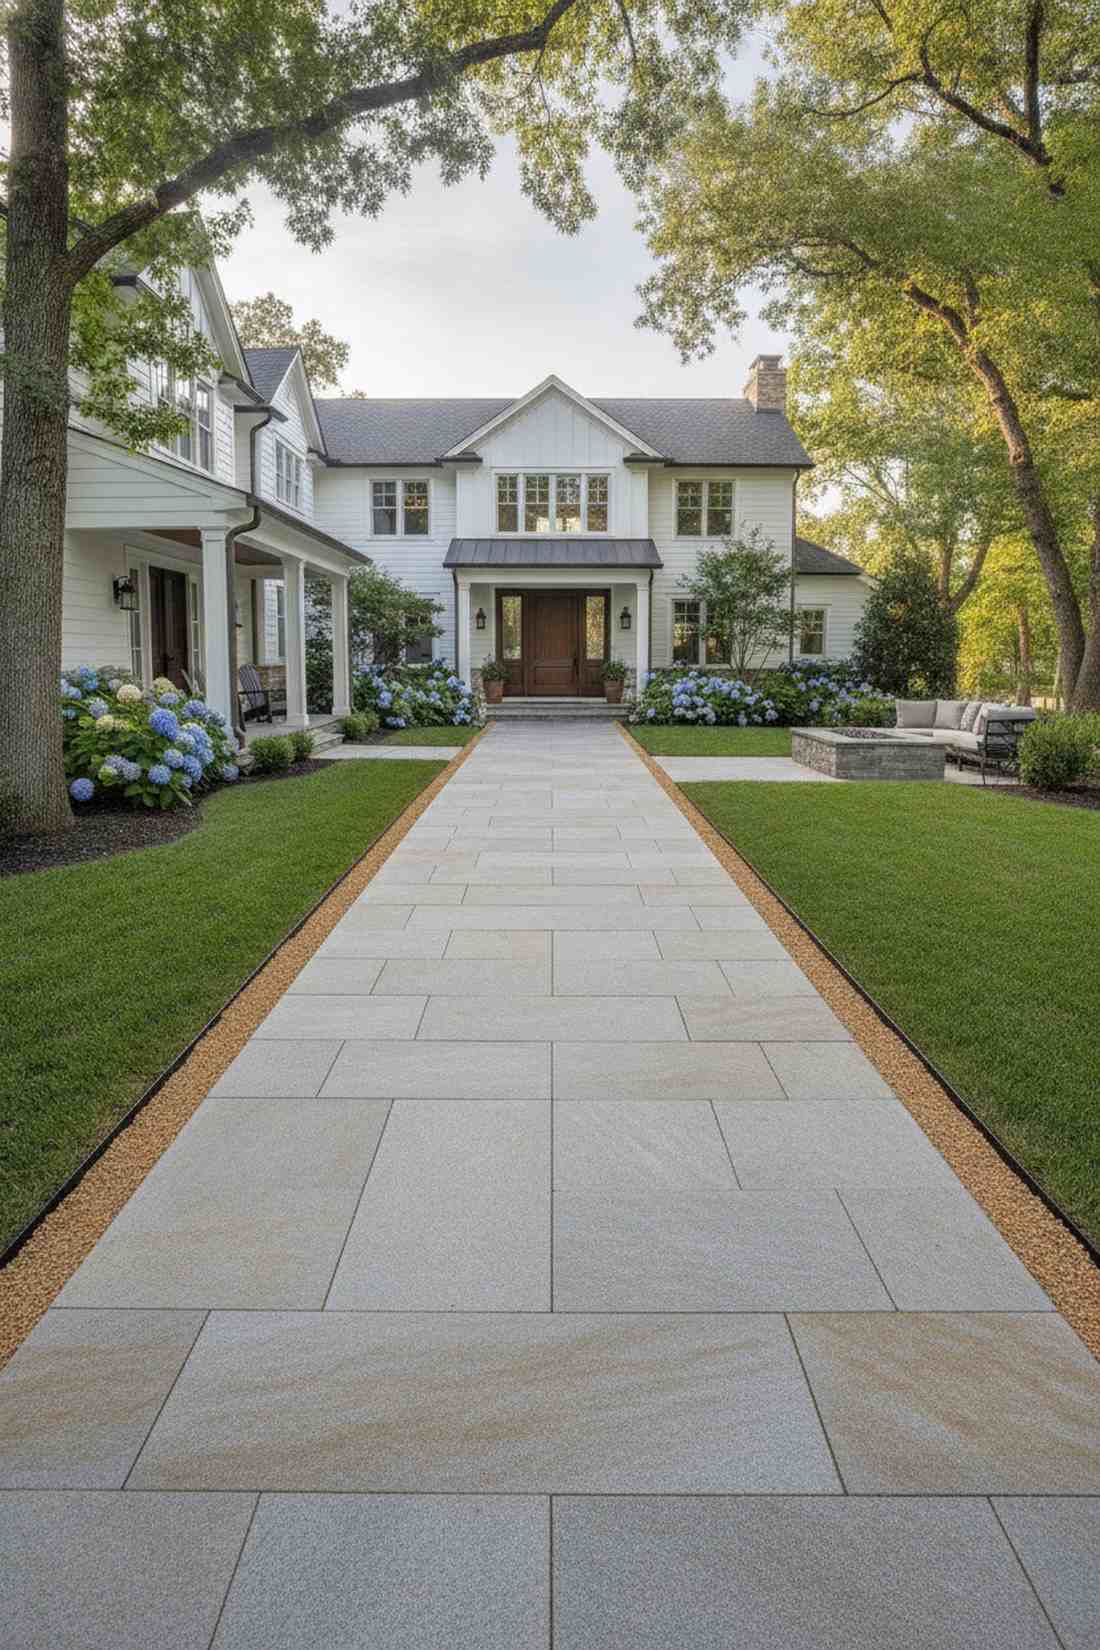
Exudes an aura of confident, luxurious hospitality. This oversized monolithic entry path transforms any stepping stones house approach into a grand, welcoming statement.
Skimping on path width is a rookie mistake that makes front yards feel cramped. Installing 24-inch wide slabs guarantees an upscale architectural aesthetic, especially when bordered by UV-coated weather-resistant landscape edging to keep the aggregate perfectly contained.
Prepare to budget around $100–$150 for oversized, premium slabs.
- Key Materials: 24-inch architectural pavers, fine aggregate
- Vibe / Style: Bold luxury estate
- Difficulty: Requires heavy lifting
- Budget Breakdown: Giant Slabs: $100 | Edging: $25
- Creator’s Tip: Enlist a friend for this one—oversized architectural slabs are incredibly heavy and require two people to set smoothly without ruining the sand base.
- Smart Sourcing: UV-coated weather-resistant landscape edging and decomposed granite base mix (bulk bags)
6. Curved Cottage Approach
Feels like a gentle hug welcoming you home. A sweeping romantic cottage walkway provides the ultimate inviting use-case for homes with deep, heavily planted front yards.
Straight lines often feel too institutional, but this soft arc delivers undeniable storybook charm. Planting bulk Irish moss seeds between weathered limestone creates a lush, living carpet that looks professionally installed.
This stunning feature costs approximately $40–$80 to establish. Highly recommended for a quick weekend win.
- Key Materials: Weathered limestone, groundcover seeds
- Vibe / Style: English countryside romance
- Difficulty: Moderate shaping required
- Budget Breakdown: Limestone: $50 | Moss Seed: $15
- Creator’s Tip: Use a garden hose to mock up the curve on your lawn before doing any actual digging to ensure the sweeping angle looks natural.
- Smart Sourcing: bulk Irish moss seeds (high-germination pack) and flexible edging stakes kit
7. Geometric Grid Entry Court

Sharp, precise, and effortlessly sophisticated. This modern minimalist entry plaza acts as the ultimate transition zone between a public sidewalk and a private, contemporary doorstep.
A tightly structured layout immediately signals high property value. By setting the pavers on 4-inch centers and filling the joints with crushed black granite bulk bags, you achieve a dramatic contrast that never fades.
The precision materials will run about $80–$120. Pin this to your modern exterior mood board!
- Key Materials: 18×18 square pavers, dark gravel
- Vibe / Style: High-end urban minimalism
- Difficulty: Precision measuring critical
- Budget Breakdown: Precision Pavers: $80 | Contrast Fill: $30
- Creator’s Tip: Use wooden spacer blocks during installation to guarantee the gaps between every single stone are identical.
- Smart Sourcing: crushed black granite bulk bags and heavy-duty aluminum square levels
8. Tiered Landing Steps
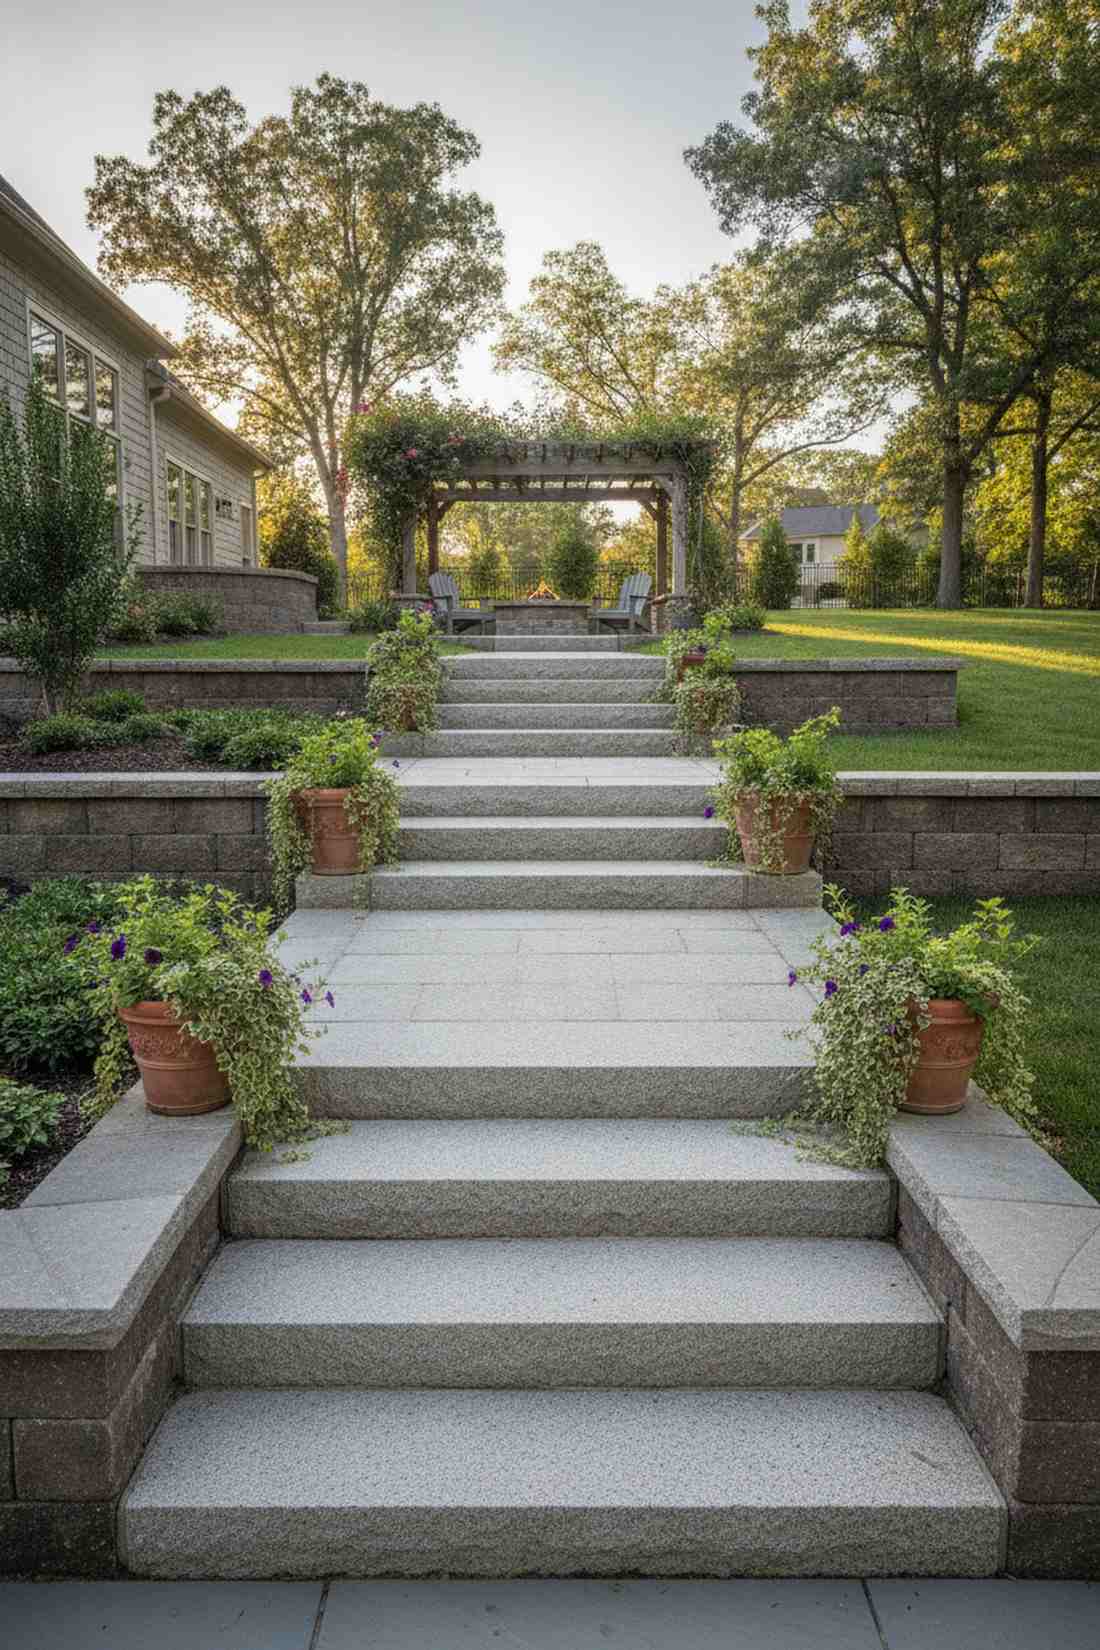
Feels like a majestic ascent to a hillside villa. This multi-level stone stairway layout beautifully handles tricky slope gradients leading up to an elevated patio.
Ignoring gradual elevation changes results in dangerous, awkwardly steep yards. Using deep, monolithic treads creates a highly stable, terraced effect that practically begs for pre-potted trailing plants to soften the structural edges.
The investment here is higher, around $150–$250, but it fundamentally solves erosion issues.
- Key Materials: Thick stone treads, retaining block
- Vibe / Style: Elevated terraced elegance
- Difficulty: Advanced grade work
- Budget Breakdown: Stone Treads: $160 | Support Base: $40
- Creator’s Tip: Ensure each landing has a slight 1% forward pitch so rainwater naturally rolls off instead of pooling in the middle.
- Smart Sourcing: pre-potted trailing plants (nursery pack) and construction-grade exterior landscape adhesive
Most people get their water feature crossings completely wrong… until they try the exact bridge layout coming up next.
Stepping Stones Bridge Designs for Water Features
Water features gain interactive appeal when stepping stone bridges invite crossing and closer engagement. These structures transform ponds and streams from passive viewing elements into participatory landscape experiences. Proper installation ensures safety while maintaining the whimsical quality of stone-to-stone navigation.
9. Flat Boulder Water Crossing
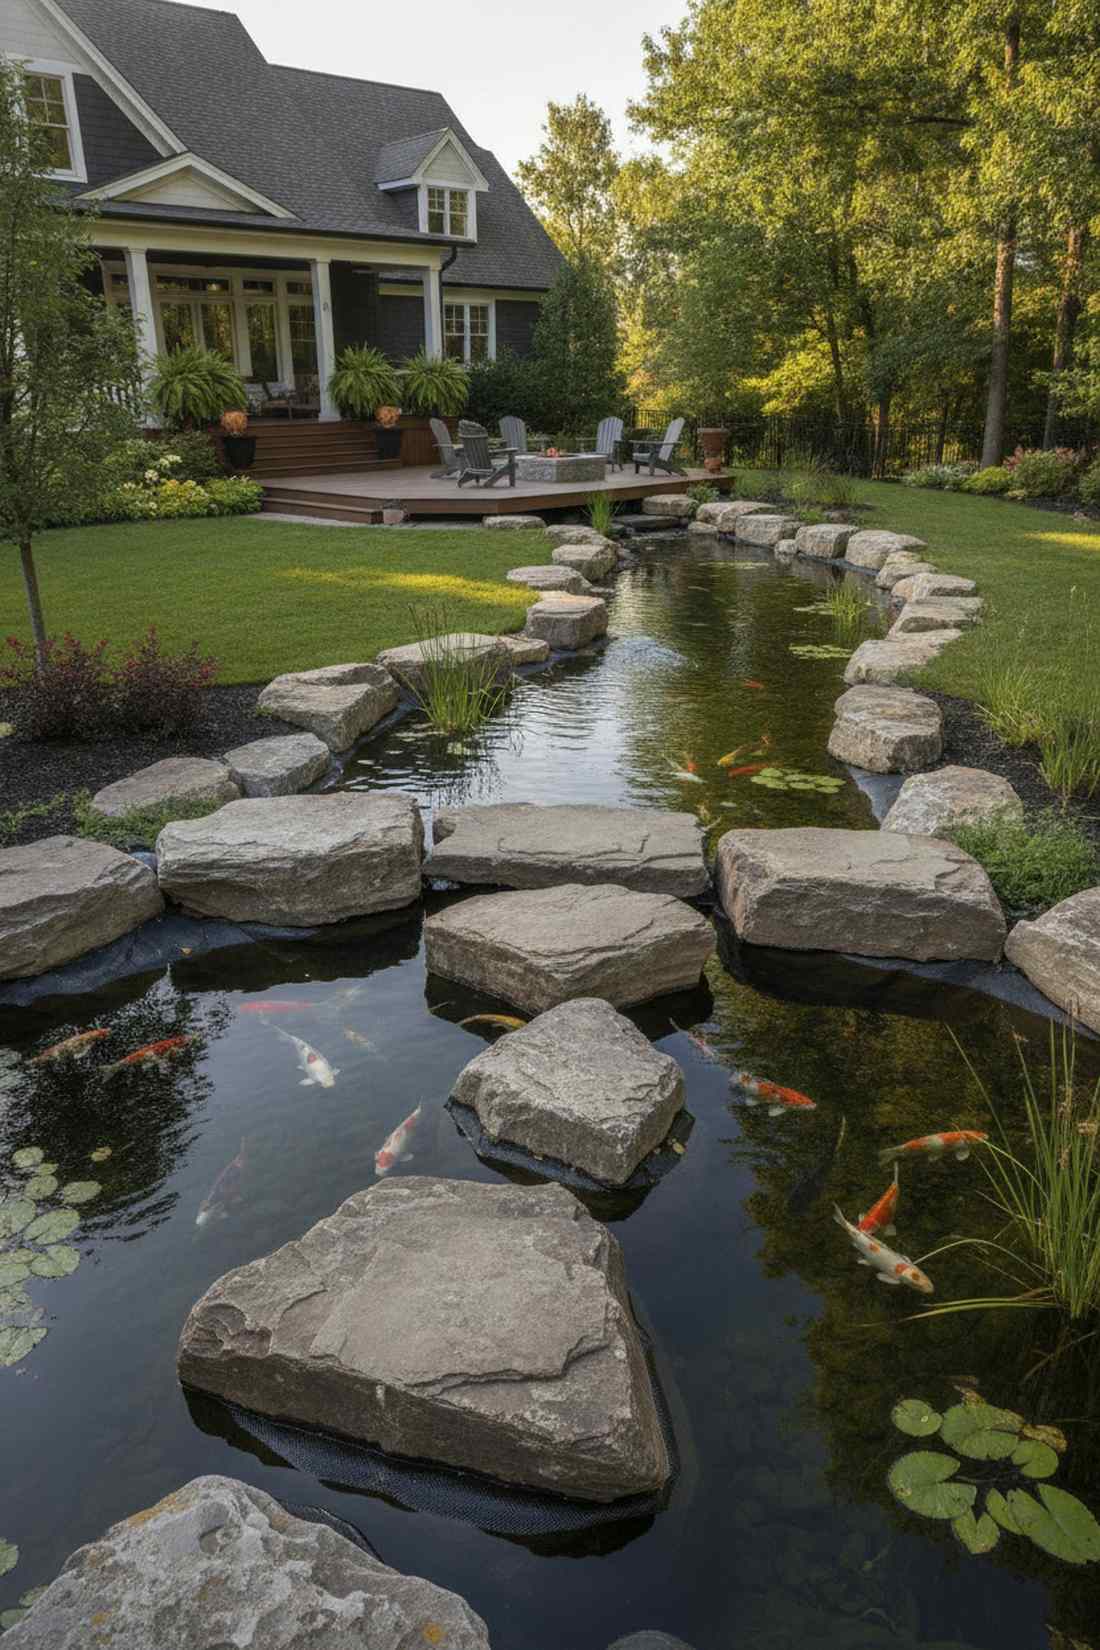
Gives you the thrilling sensation of hiking through an untouched alpine creek. This rustic stepping stones bridge is an absolute must-have for crossing shallow backyard koi ponds.
A standard wooden bridge often rots, but massive flat boulders provide permanent, slip-resistant interactivity. Securing them on submerged concrete footings wrapped in aquatic-safe pond liner patching ensures they never shift under weight.
Budget roughly $75–$130 for heavy-duty natural boulders.
- Key Materials: Flat-top natural boulders, concrete base
- Vibe / Style: Rugged mountain stream
- Difficulty: Advanced heavy lifting
- Budget Breakdown: Boulders: $90 | Footings: $30
- Creator’s Tip: Wash the boulders thoroughly before installation to prevent dirt and sediment from clouding your pond’s ecosystem.
- Smart Sourcing: aquatic-safe pond liner patching kits and waterproof underwater epoxy resin
💡 Must-Have Supplies for High-End Setups
To build these setups faster and ensure they last, skip the generic craft aisles and invest in the right foundational kits.
- Base & Support: commercial-grade structural paver base mats
- Setup Tools: heavy-duty aluminum landscape edging kits
- Weather/Durability Protection: UV-resistant wet-look stone sealant
10. Geometric Slab Pond Bridge
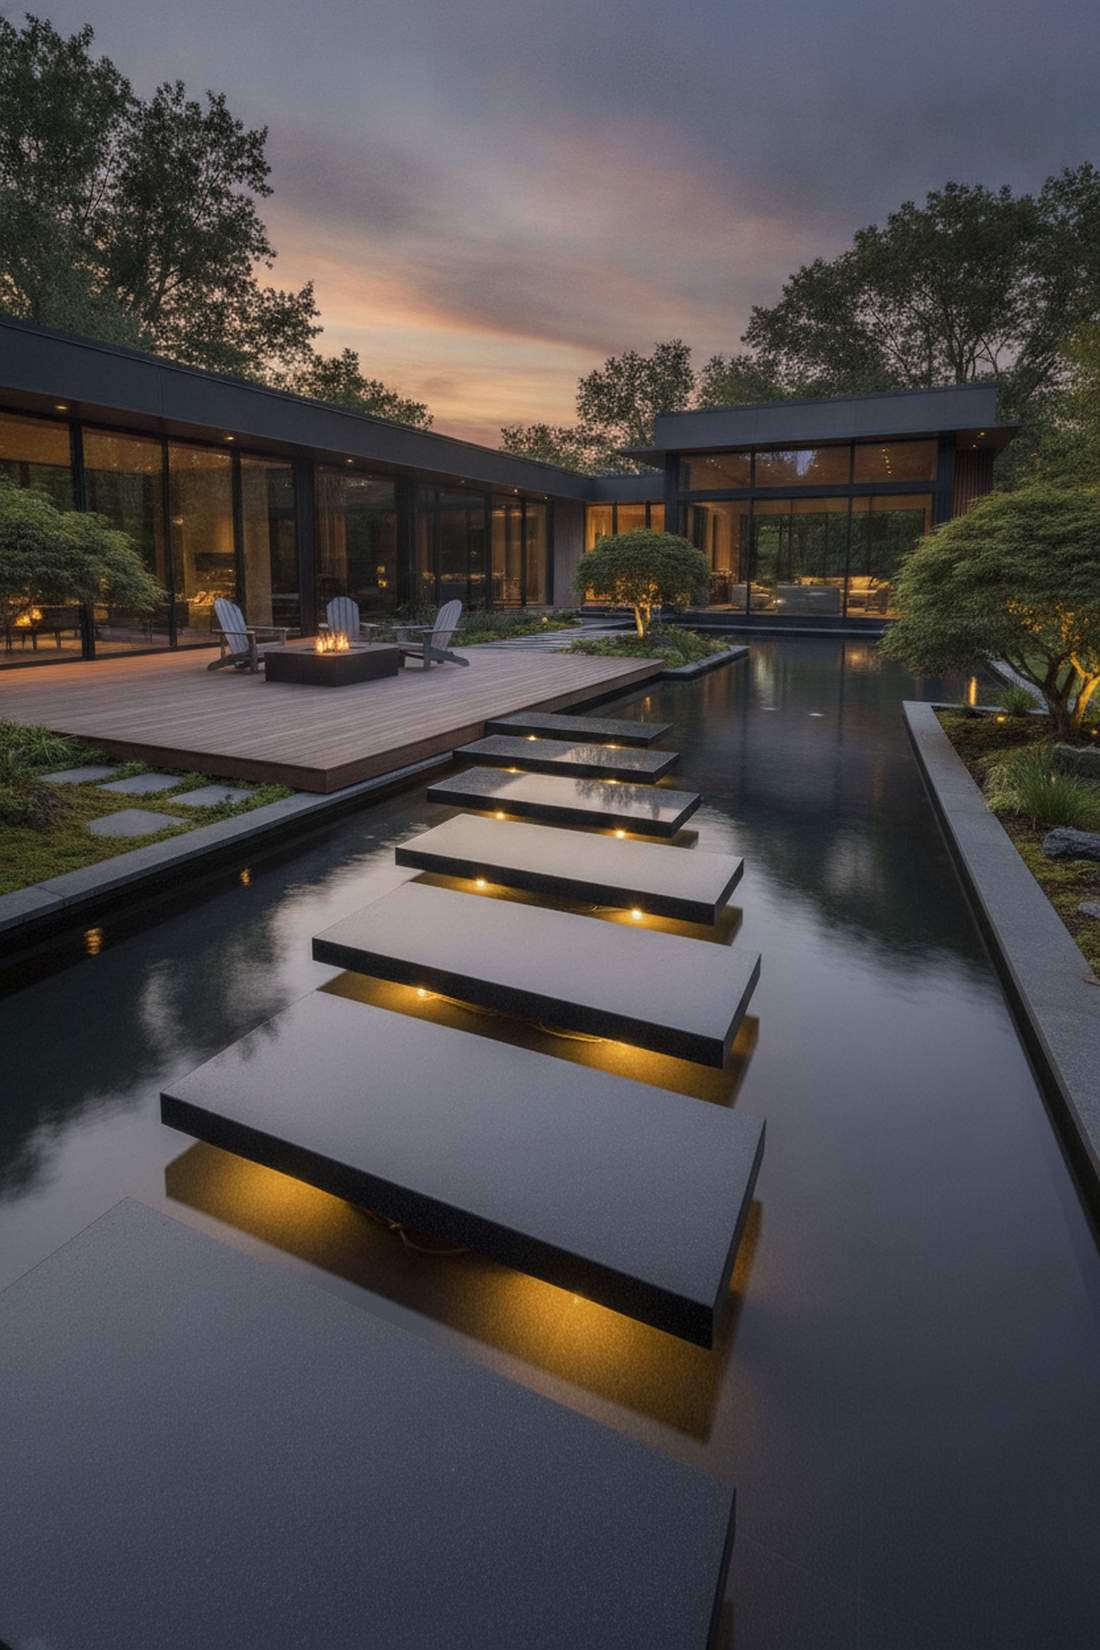
Reflects a serene, zen-like mastery of the elements. This floating modern water pathway looks breathtaking when suspended over a geometric reflection pool.
The sharp, clean lines beautifully contrast the fluidity of the water below. By supporting 24-inch polished granite on engineered piers and installing waterproof submersible LED puck lights underneath, you create a jaw-dropping nighttime glow.
Expect to spend $200–$300 for the structural supports and lighting kits. Save this for your dream backyard renovation!
- Key Materials: Polished granite slabs, underwater piers
- Vibe / Style: Luxury resort reflection pool
- Difficulty: Expert level engineering
- Budget Breakdown: Granite Slabs: $150 | Submerged Lights: $60
- Creator’s Tip: Hide the wiring for the underwater LEDs directly inside the concrete piers during the pouring phase for a fully invisible setup.
- Smart Sourcing: waterproof submersible LED puck lights (starter kit) and heavy-duty underwater conduit tubing
11. Staggered Stream Steps
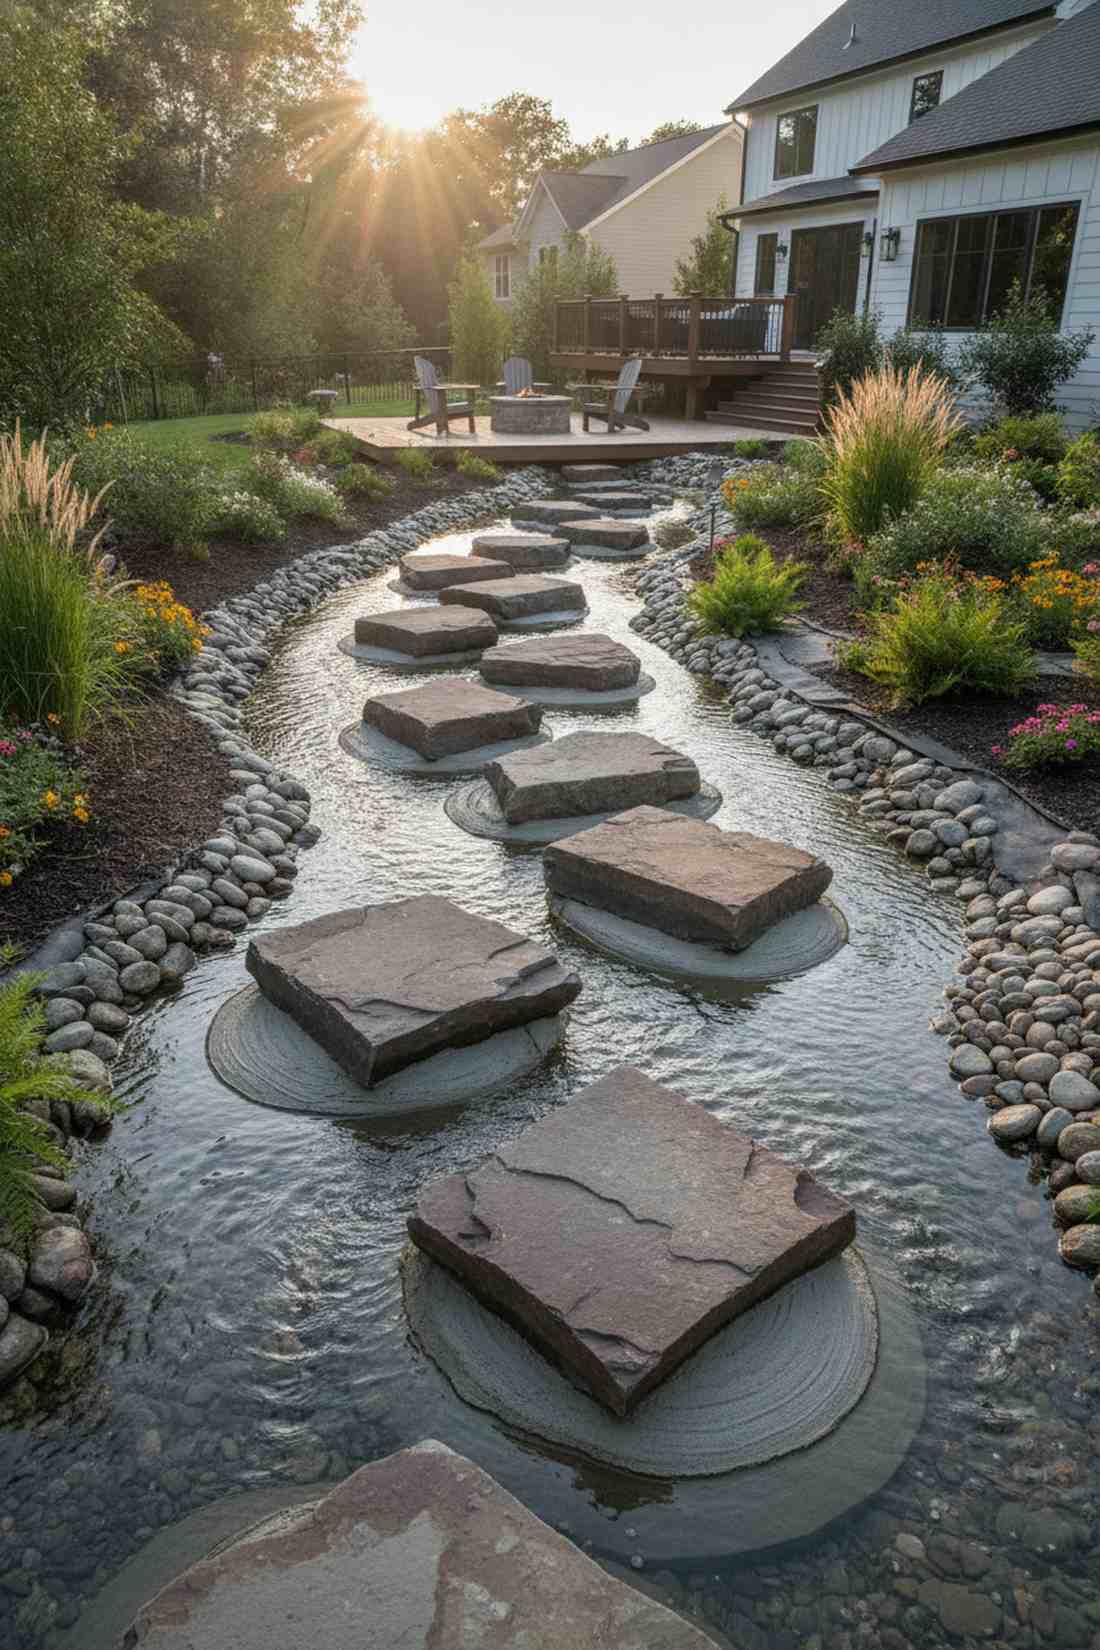
Feels delightfully playful, like skipping across a babbling brook. The zigzag stream crossing design encourages visitors to slow down and truly interact with the water flow.
A straight path across water is boring; this offset approach adds incredible kinetic energy. Lock the irregular flagstone into place using a high-strength hydraulic water-stop cement kit so the rushing current never undermines the foundation.
You can build this engaging feature for just $50–$90.
- Key Materials: Irregular flagstone, aquatic cement
- Vibe / Style: Playful interactive garden
- Difficulty: Moderate water manipulation
- Budget Breakdown: Flagstone: $50 | Cement Base: $20
- Creator’s Tip: Set the stones just high enough to stay dry during normal flow, but low enough to let water dramatically rush over them during heavy rain.
- Smart Sourcing: high-strength hydraulic water-stop cement kit and pre-cut moisture barrier fabric
Structural Edge Connections That Lock Systems Together
Successful transitions require secure edge treatments that prevent paver migration and maintain clean boundaries between materials. Professional-grade restraint systems and border details transform amateur installations into durable, shift-resistant landscapes. These structural solutions address the mechanics of surface transitions.
12. Concrete Edge Restraint Border
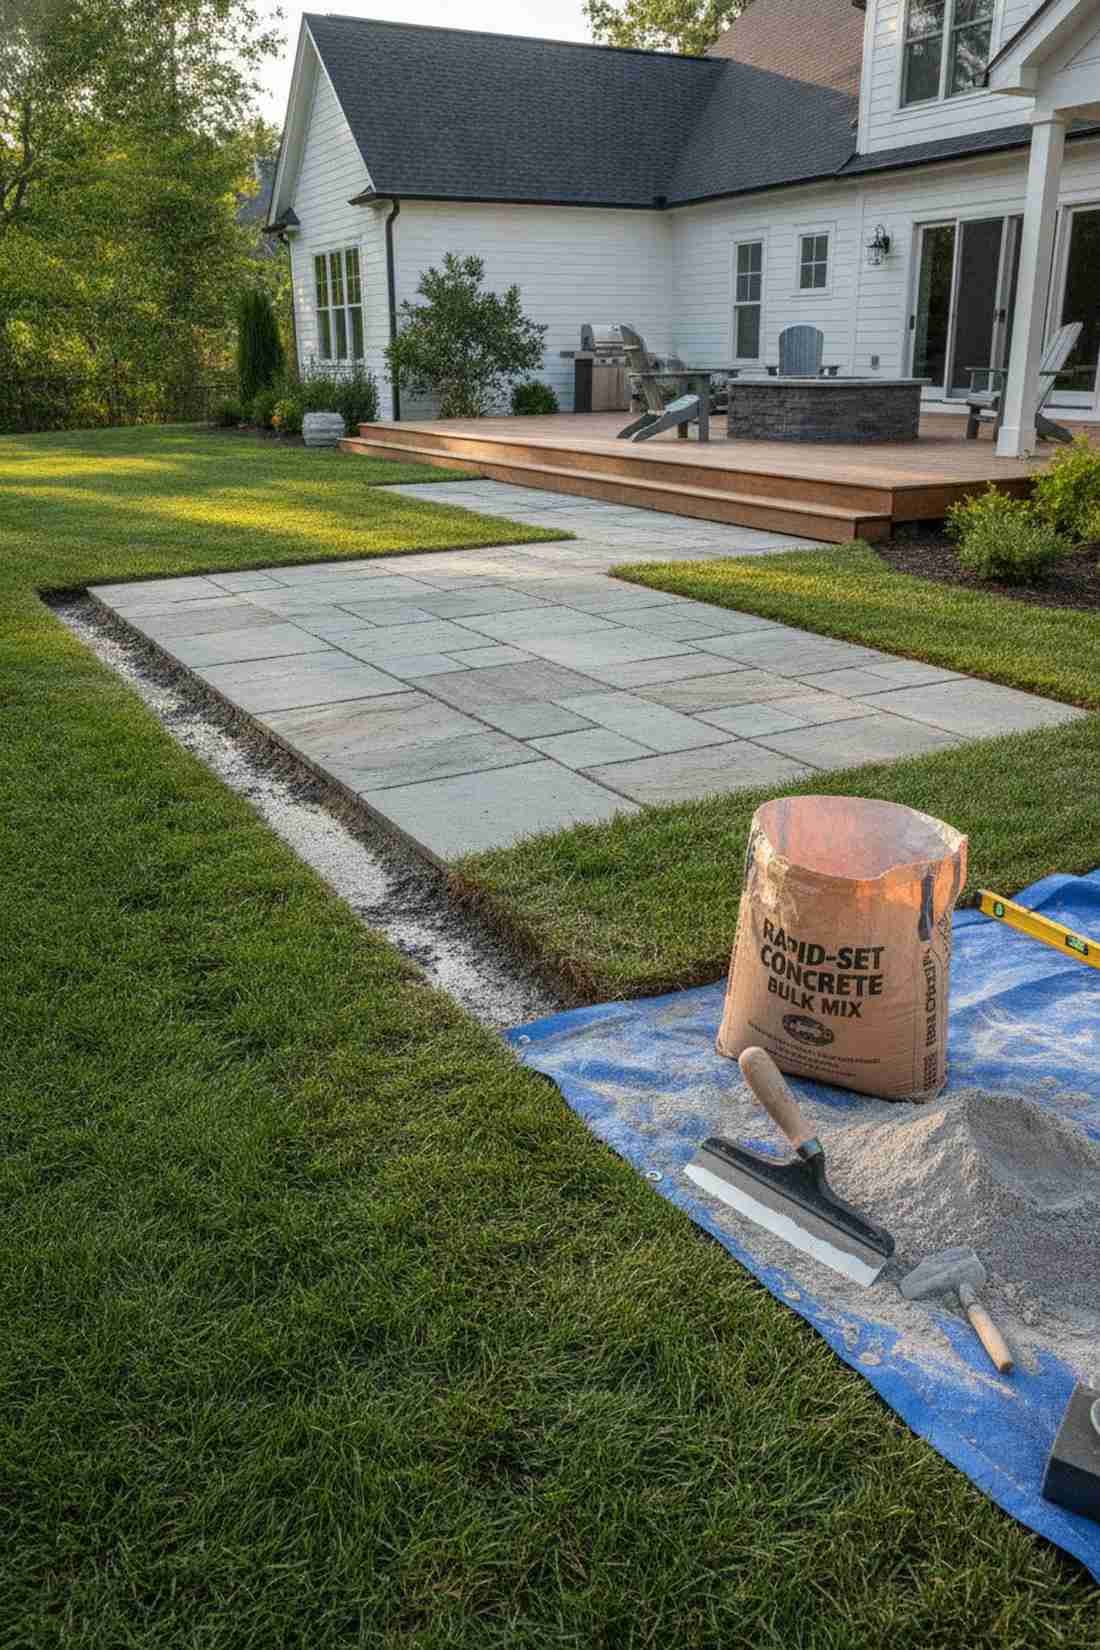
Acts as an invisible fortress for your hardscape. This concealed structural lock system is exactly what you need for high-traffic zones that seamlessly meet rolling lawns.
Without a hard edge, expensive stone layouts slowly bleed into the mud over time. Pouring a hidden concrete trench guarantees zero lateral movement, acting as the ultimate upgrade over flimsy plastic spikes—grab a rapid-set concrete bulk mix to knock this out in an hour.
The concrete supplies cost a mere $15–$30, making it an essential longevity step.
- Key Materials: Concrete mix, trowel tools
- Vibe / Style: Invisible seamless support
- Difficulty: Moderate labor
- Budget Breakdown: Concrete: $20 | Tools: $10
- Creator’s Tip: Trowel the top of the concrete wedge slightly below the grass root line so it completely vanishes once the lawn grows back.
- Smart Sourcing: rapid-set concrete bulk mix and ergonomic masonry edge trowels
13. Aluminum Paver Edging System
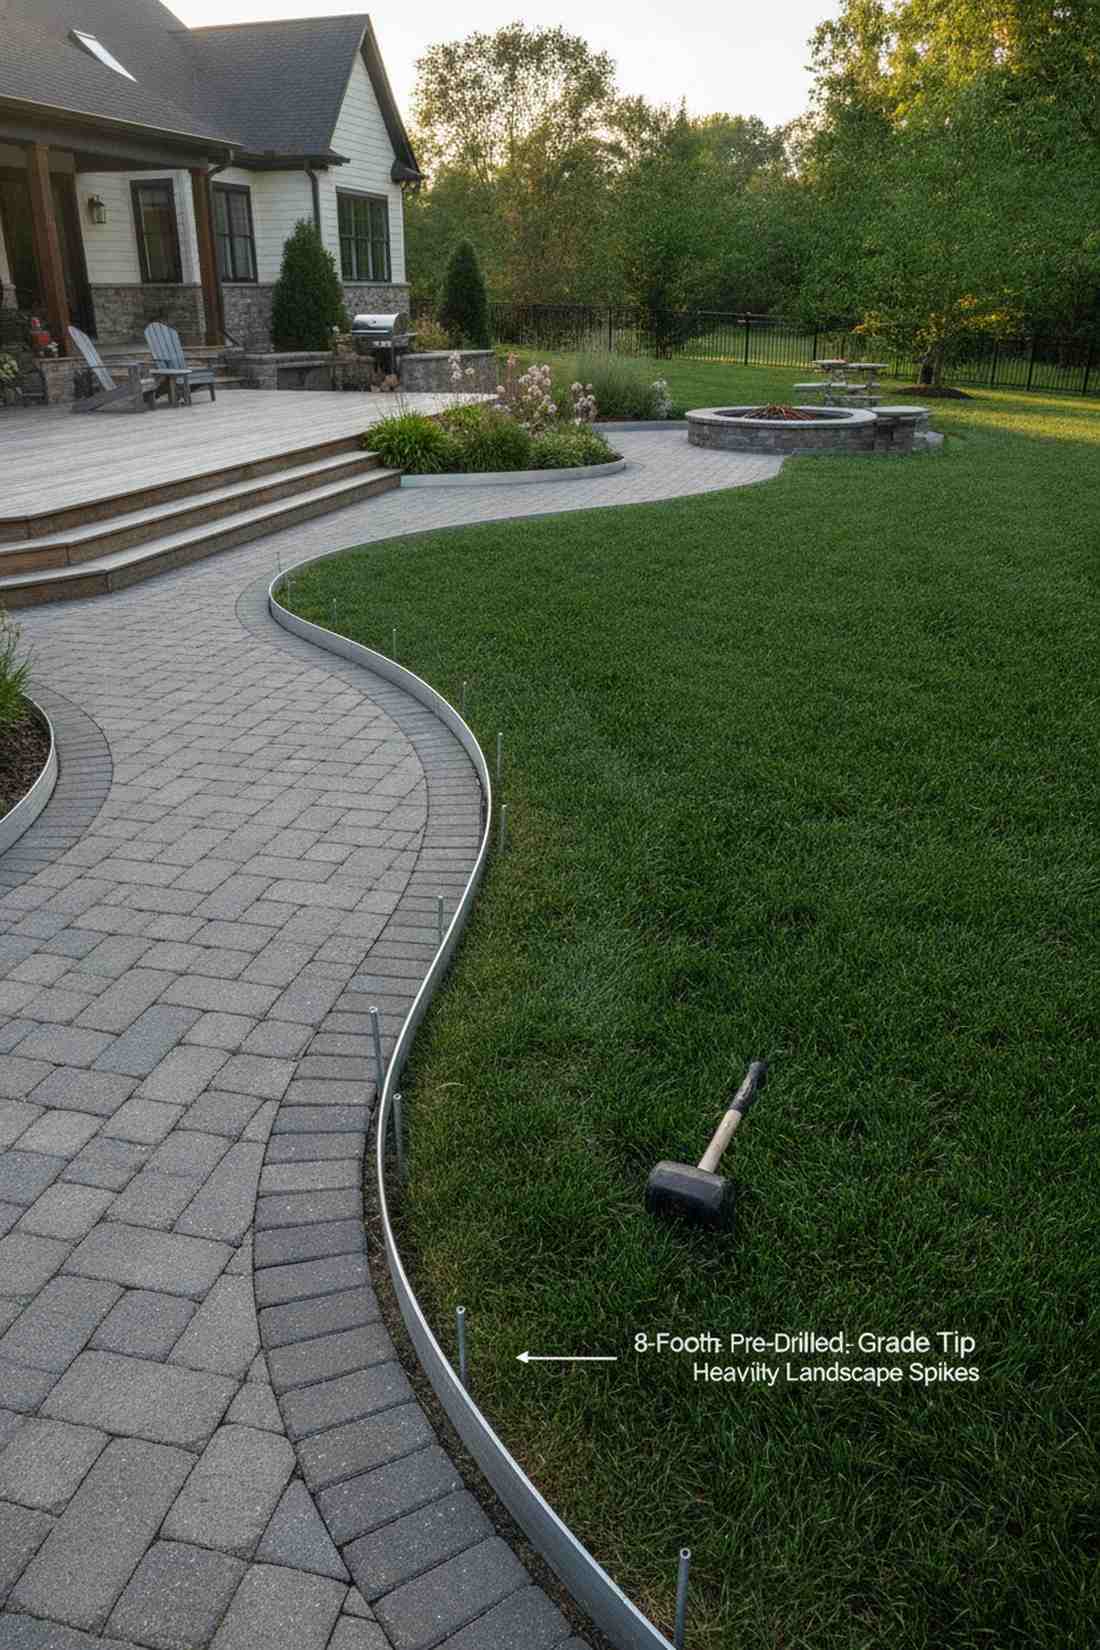
Clean, sleek, and practically indestructible. This flexible metal perimeter restraint easily handles sweeping curves without compromising a single ounce of holding power.
Plastic edging snaps in freezing weather, but commercial-grade aluminum gives a designer-level finish that lasts decades. Snagging an 8-foot pre-drilled aluminum edging kit lets you easily pin down the perimeter with zero specialized tools.
This rust-proof upgrade costs about $40–$70. Pin this if you hate re-doing backyard chores!
- Key Materials: Aluminum edging, heavy-duty spikes
- Vibe / Style: Commercial sleek durability
- Difficulty: Fast beginner installation
- Budget Breakdown: Aluminum Kit: $45 | Spikes: $15
- Creator’s Tip: Use a heavy rubber mallet to drive the spikes—a steel hammer will dent and ruin the sleek aluminum profile.
- Smart Sourcing: 8-foot pre-drilled aluminum edging kit and heavy-duty galvanized landscape spikes (bulk pack)
Don’t even think about buying expensive premium stones until you see how this cheap border hack changes everything…
14. Soldier Course Transition Border
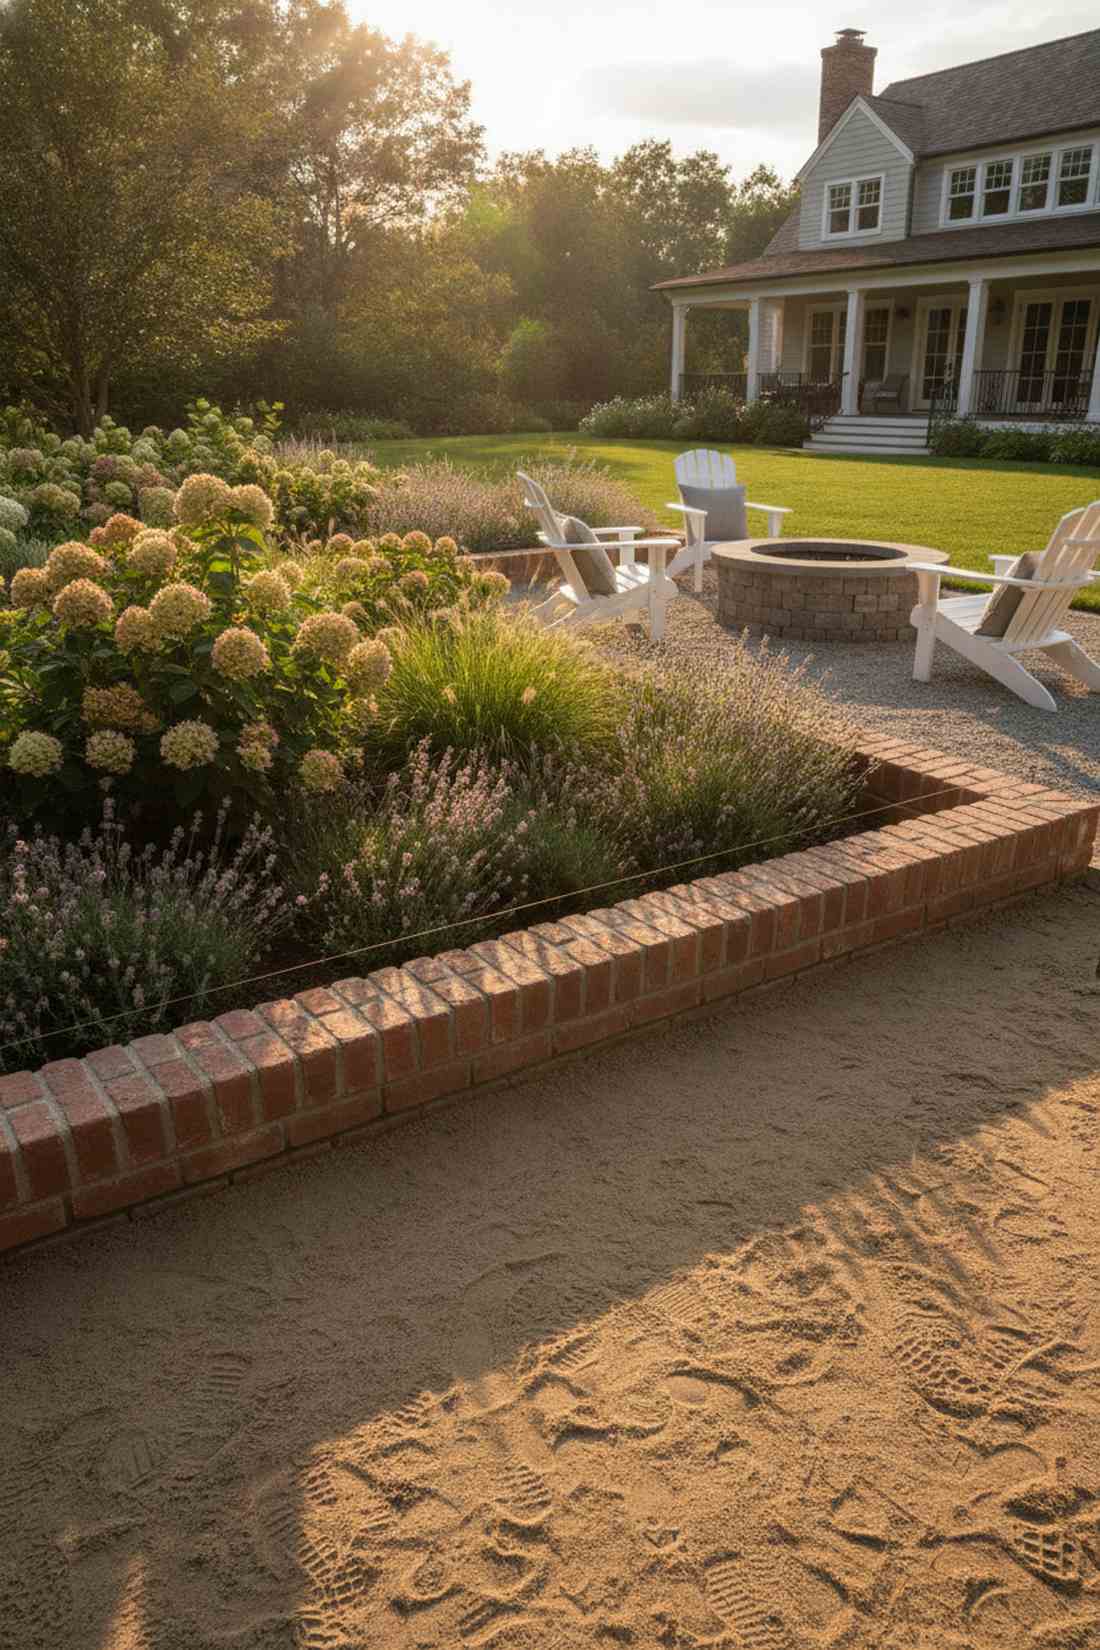
Casts crisp, beautiful shadow lines as the sun sets. This raised vertical boundary layout beautifully separates wild garden beds from meticulously swept lounging areas.
Laying pavers flat on the edge looks unfinished, but standing them vertically instantly injects architectural framing. Bed them deeply using a pre-mixed paver leveling sand kit to ensure the height remains perfectly consistent across the entire span.
Adds about $30–$50 to your overall project cost.
- Key Materials: Vertical brick pavers, firm base
- Vibe / Style: Classic estate garden framing
- Difficulty: Moderate trenching required
- Budget Breakdown: Border Brick: $35 | Base Sand: $15
- Creator’s Tip: Bury at least 40% of the brick’s total height in the ground to guarantee it won’t tip over when bumped by a lawnmower.
- Smart Sourcing: pre-mixed paver leveling sand kit and high-tension masonry string line
Material Guide: Cheap vs. Premium Aesthetic
Knowing exactly where to save and where to spend makes all the difference in achieving that “looks expensive but isn’t” vibe.
- Standard vs. UV-Resistant/Premium: Standard sealants yellow over time. Using UV-coated protection stops sun-fading and ensures your dark aggregates pop with high contrast forever.
- Pre-made Kits vs. Sourcing Locally: While finding rocks in the woods is free, buying pre-cut paver starter kits saves hours of frustrating leveling and guarantees professional symmetry.
Material Mixing Techniques for Visual Richness
Combining different stone types, colors, and textures within stepping stone layouts adds complexity and custom character to standard installations. Strategic material mixing elevates basic pathways into distinctive landscape features. These approaches demonstrate how thoughtful material selection creates layered visual interest.
15. Contrasting Border Accent Stones
Delivers the sharp, tailored look of a custom-tailored suit. This dual-tone perimeter styling works wonderfully for widening narrow paths without buying massive, oversized slabs.
Running a dark slate boundary next to a pale limestone center creates an incredibly striking visual boundary. Use a commercial-grade polymeric joint sand to lock both colors together, preventing any annoying weed breakthrough in the transition seam.
The accent stones usually run $25–$50 per yard.
- Key Materials: Dual-colored stone, locking sand
- Vibe / Style: Tailored high-contrast pathway
- Difficulty: Easy visual upgrade
- Budget Breakdown: Accent Stones: $35 | Sand: $20
- Creator’s Tip: Wet the polymeric sand with a light misting setting on your hose; a heavy stream will wash the sand completely out of the joints.
- Smart Sourcing: commercial-grade polymeric joint sand (bulk pack) and color-enhancing stone sealant spray
16. Mosaic Insert Pattern
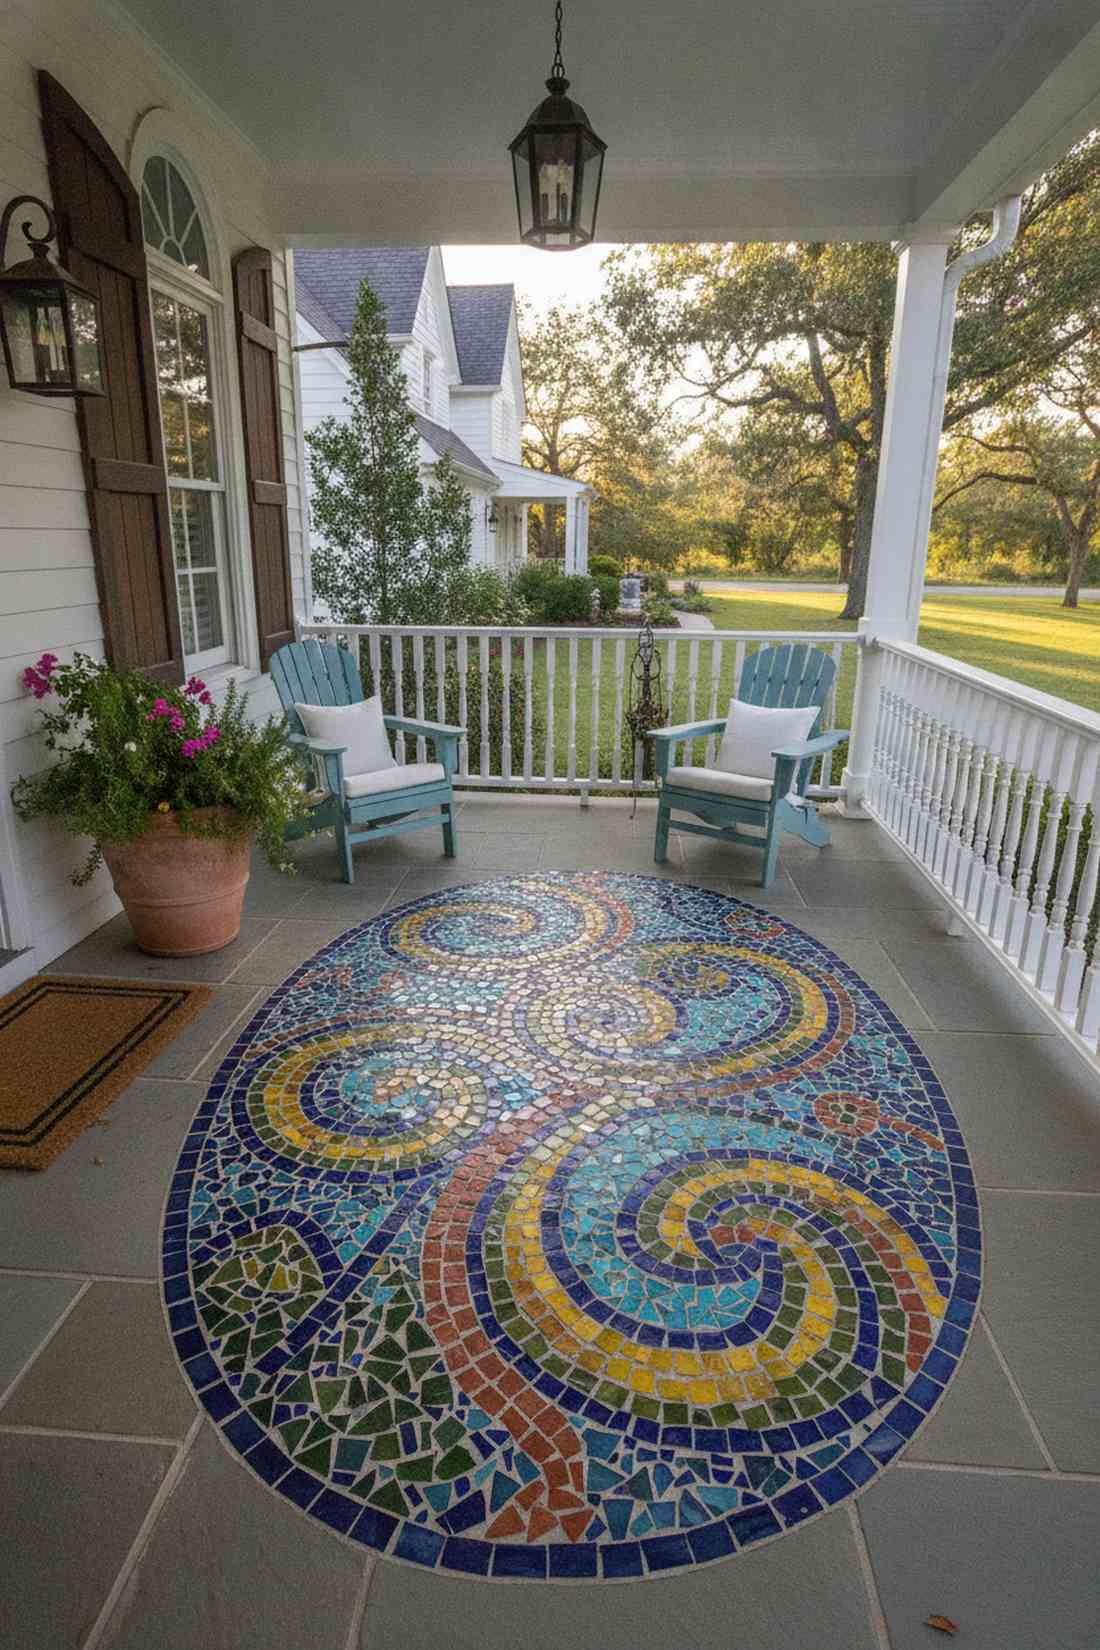
Exudes exotic, artisanal charm like a hidden Mediterranean courtyard. A mixed-media decorative stone insert turns a boring functional entryway into a massive conversation starter.
Standard paths are everywhere, but embedding intricate tile fragments creates a masterpiece that looks far more expensive than it is. Using a weatherproof thin-set mortar starter kit ensures your glass or ceramic pieces survive the harsh winter freezes.
This artistic endeavor costs around $40–$80 in materials. Save this idea for a customized front porch upgrade!
- Key Materials: Tile fragments, outdoor mortar
- Vibe / Style: Artisan Mediterranean mosaic
- Difficulty: Detail-oriented craftwork
- Budget Breakdown: Glass Fragments: $20 | Mortar: $25
- Creator’s Tip: Arrange your mosaic pattern on a piece of cardboard first before transferring it to the wet mortar to prevent messy mistakes.
- Smart Sourcing: weatherproof thin-set mortar starter kit and tumbled sea glass bulk mix
17. Graduated Size Sequence
Plays a brilliant psychological trick on the eye. This forced perspective walking path is the ultimate hack for making a tiny, cramped backyard feel deep and expansive.
Fading from massive 24-inch slabs near the patio down to 12-inch stones in the garden creates an illusion of a much longer journey. Buy a multi-size patio paver bundle to get the exact varying dimensions without paying custom cutting fees.
The stone package generally runs $80–$140 depending on the texture.
- Key Materials: Mixed-size pavers, gravel base
- Vibe / Style: Expansive optical illusion
- Difficulty: Requires careful spacing math
- Budget Breakdown: Mixed Pavers: $110 | Base: $25
- Creator’s Tip: Keep the center line of the path completely straight; only the width of the individual stones should shrink to sell the illusion.
- Smart Sourcing: multi-size patio paver bundles and heavy-duty landscaping measuring tapes
18. Mixed Aggregate Joint Fill
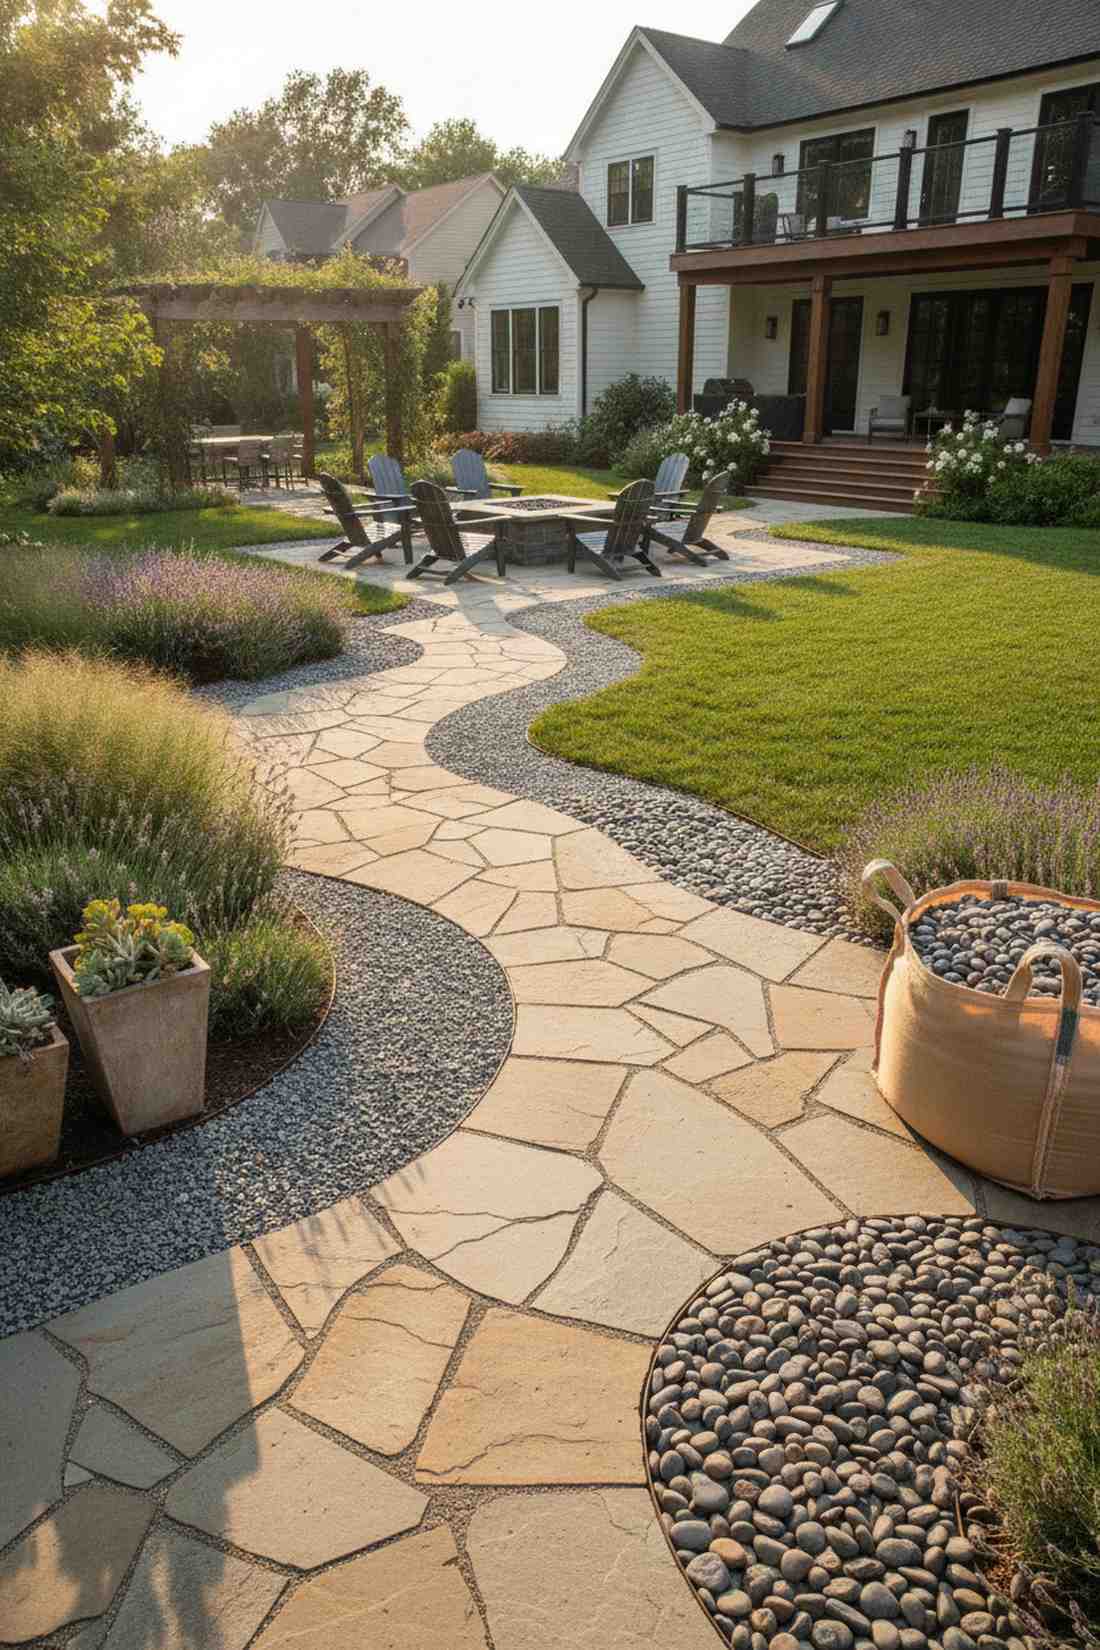
Provides an incredibly rich, layered textural experience underfoot. This multi-fill zone separator layout allows you to subtly change the mood of the garden without changing the main stones.
Using a uniform gap fill everywhere can get visually exhausting. Alternating between crushed granite and a premium bulk bag of polished river pebbles creates discrete outdoor “rooms” with a designer-level finish.
Aggregate fills are highly budget-friendly, costing around $15–$35. It’s a fast upgrade that completely changes the vibe.
- Key Materials: Varied stone fills, rigid edging
- Vibe / Style: Highly textured zoning
- Difficulty: Quick and satisfying
- Budget Breakdown: Pebble Fill: $20 | Granite Fill: $15
- Creator’s Tip: Use hidden metal dividers between the different aggregate zones so the small rocks don’t eventually mix into a messy blur.
- Smart Sourcing: premium bulk bags of polished river pebbles and invisible metal landscape dividers
Building Seamless Outdoor Connections
Strategic stepping stones patio transitions and structural connections transform disconnected outdoor zones into cohesive landscape experiences. By meticulously applying these 18 premium layouts, from oversized entry paths to interactive pond bridges, you bypass amateur mistakes and lock in designer-level durability. Attention to high-end material selection—like UV-coated edgings and commercial-grade paver bases—ensures your DIY budget yields a magnificent, shift-resistant landscape that effortlessly commands attention.
Frequently Asked Questions
How far apart should stepping stones be spaced for comfortable walking?
Space stepping stones 12-18 inches apart measured from center to center for average adult stride length. Lock your path in place using a heavy-duty paver starter kit so you never trip. Tighter spacing at 12-14 inches accommodates children and cautious walkers, while 16-18 inch spacing suits longer strides and faster pace. Maintain consistent intervals along each path to establish predictable walking rhythm.
What base material provides the best foundation for stepping stones?
A two-layer system of 2 inches of compacted gravel topped with 1-2 inches of leveling sand. Upgrade to commercial-grade structural paver base mats if you want to skip the heavy lifting and ensure perfect leveling. The gravel layer ensures drainage and prevents frost heaving, while the sand layer allows precise stone adjustments. In softer soil, increase gravel depth to 3-4 inches.
Can I install stepping stones directly on existing lawn without excavation?
Surface-laid stepping stones on turf will sink, tilt, and create tripping hazards. Using a pre-cut landscape excavation kit ensures proper depth quickly. Proper installation requires excavating to stone thickness plus 3 inches minimum to accommodate base layers. Attempting to skip excavation results in unstable pavers that require future correction, ultimately costing more time and materials.
What materials work best for stepping stone bridges over water features?
Natural stone options like granite, slate, and fieldstone provide the best slip resistance for water crossings. Securing them with waterproof submersible bonding epoxy guarantees long-term safety. Select stones with naturally flat surfaces at least 24 inches in diameter for stable footing. Each stone requires a concrete pier foundation below the waterline to prevent settling.
How do I prevent weeds from growing between stepping stones?
Install heavy landscape fabric beneath stones to block weed seeds. Locking gaps with premium polymeric jointing sand (bulk pack) completely chokes out new growth while hardening to a cement-like finish. Alternatively, use 3-4 inches of compacted gravel that creates an inhospitable environment for roots. Avoid organic mulches between pavers as they decompose into weed-friendly soil.