Mastering stepping stones round designs instantly upgrades basic backyards into high-end landscape features. Smart material sourcing saves hundreds while delivering premium, weather-resistant walkways. Skip the generic layout and build durable paths that look professionally installed.
Design Snapshot Key Principles
- Shape Psychology: Round stones create organic flow, while geometric shapes establish structure and formality
- Spacing Strategy: Standard stride length of 24-30 inches determines placement for comfortable walking
- Visual Weight: Larger stones anchor designs, smaller stones create delicate transitions
- Material Harmony: Match stone texture and color to existing hardscape for cohesive design
Classic Round Stepping Stones for Natural Flow
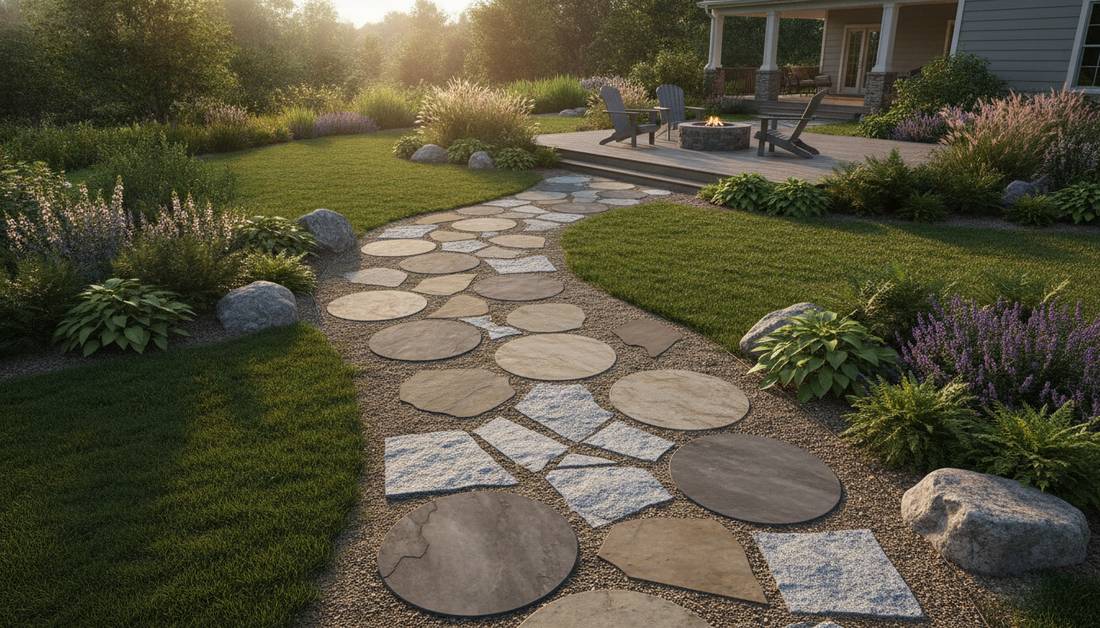
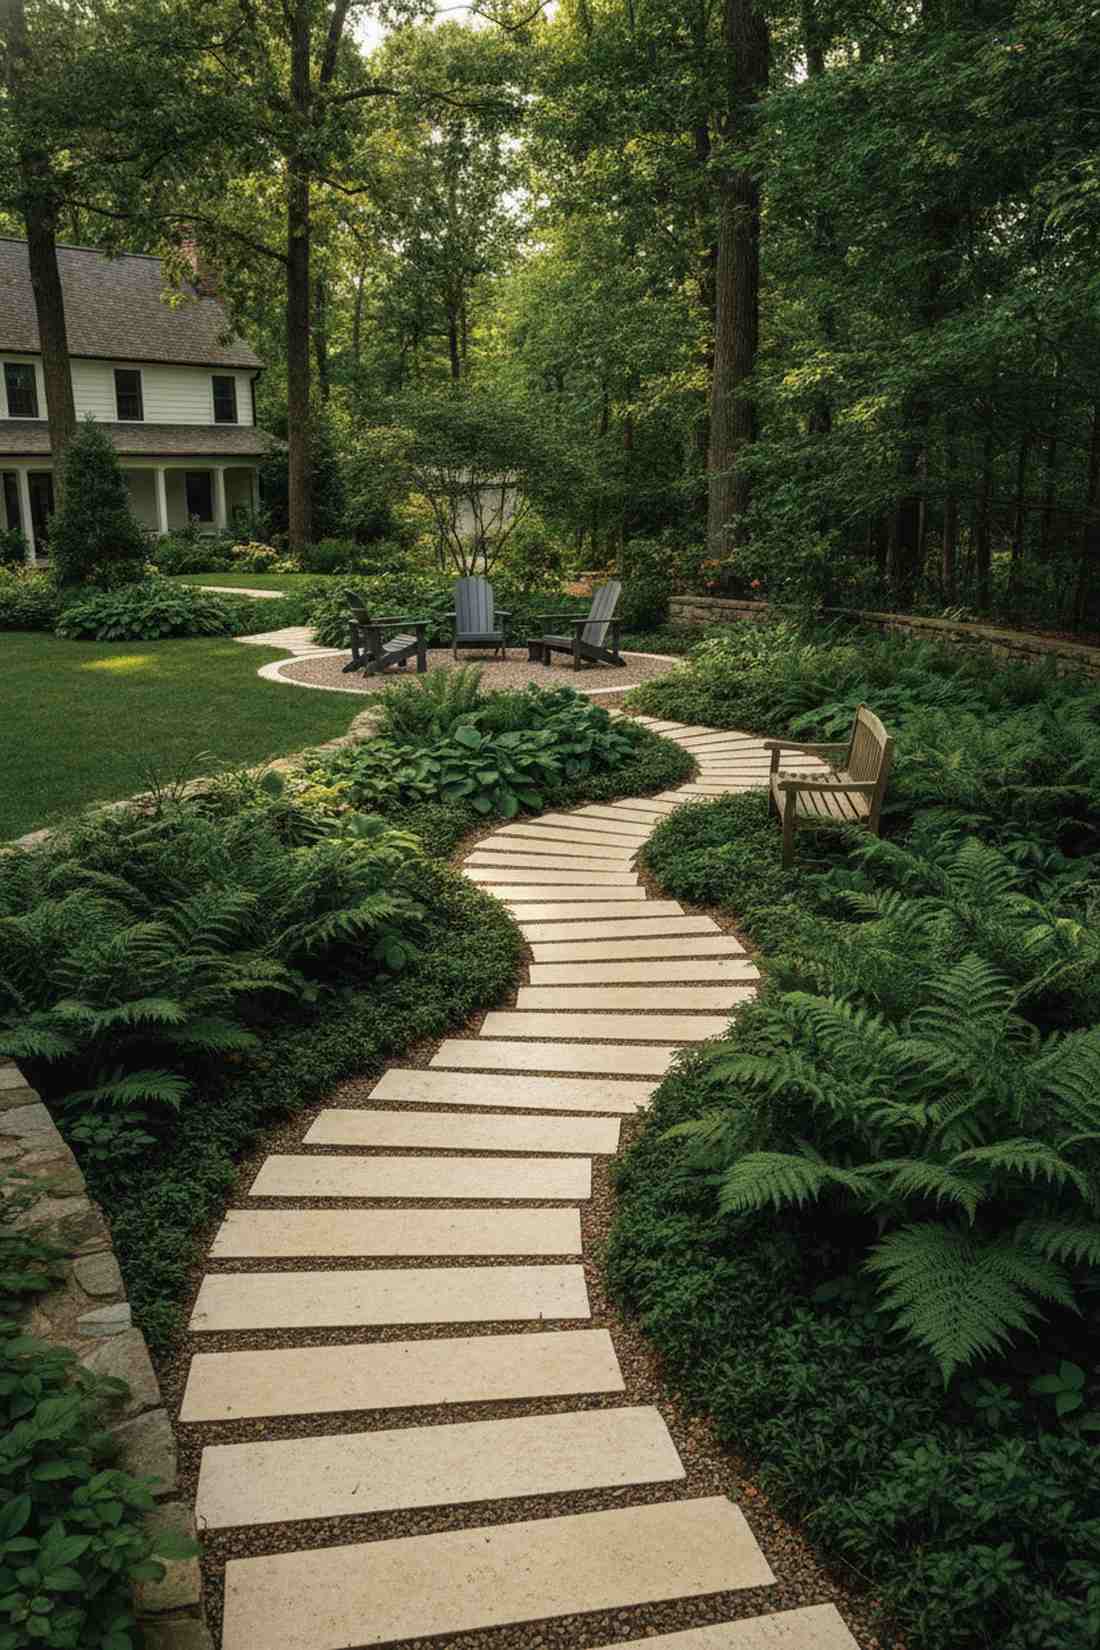
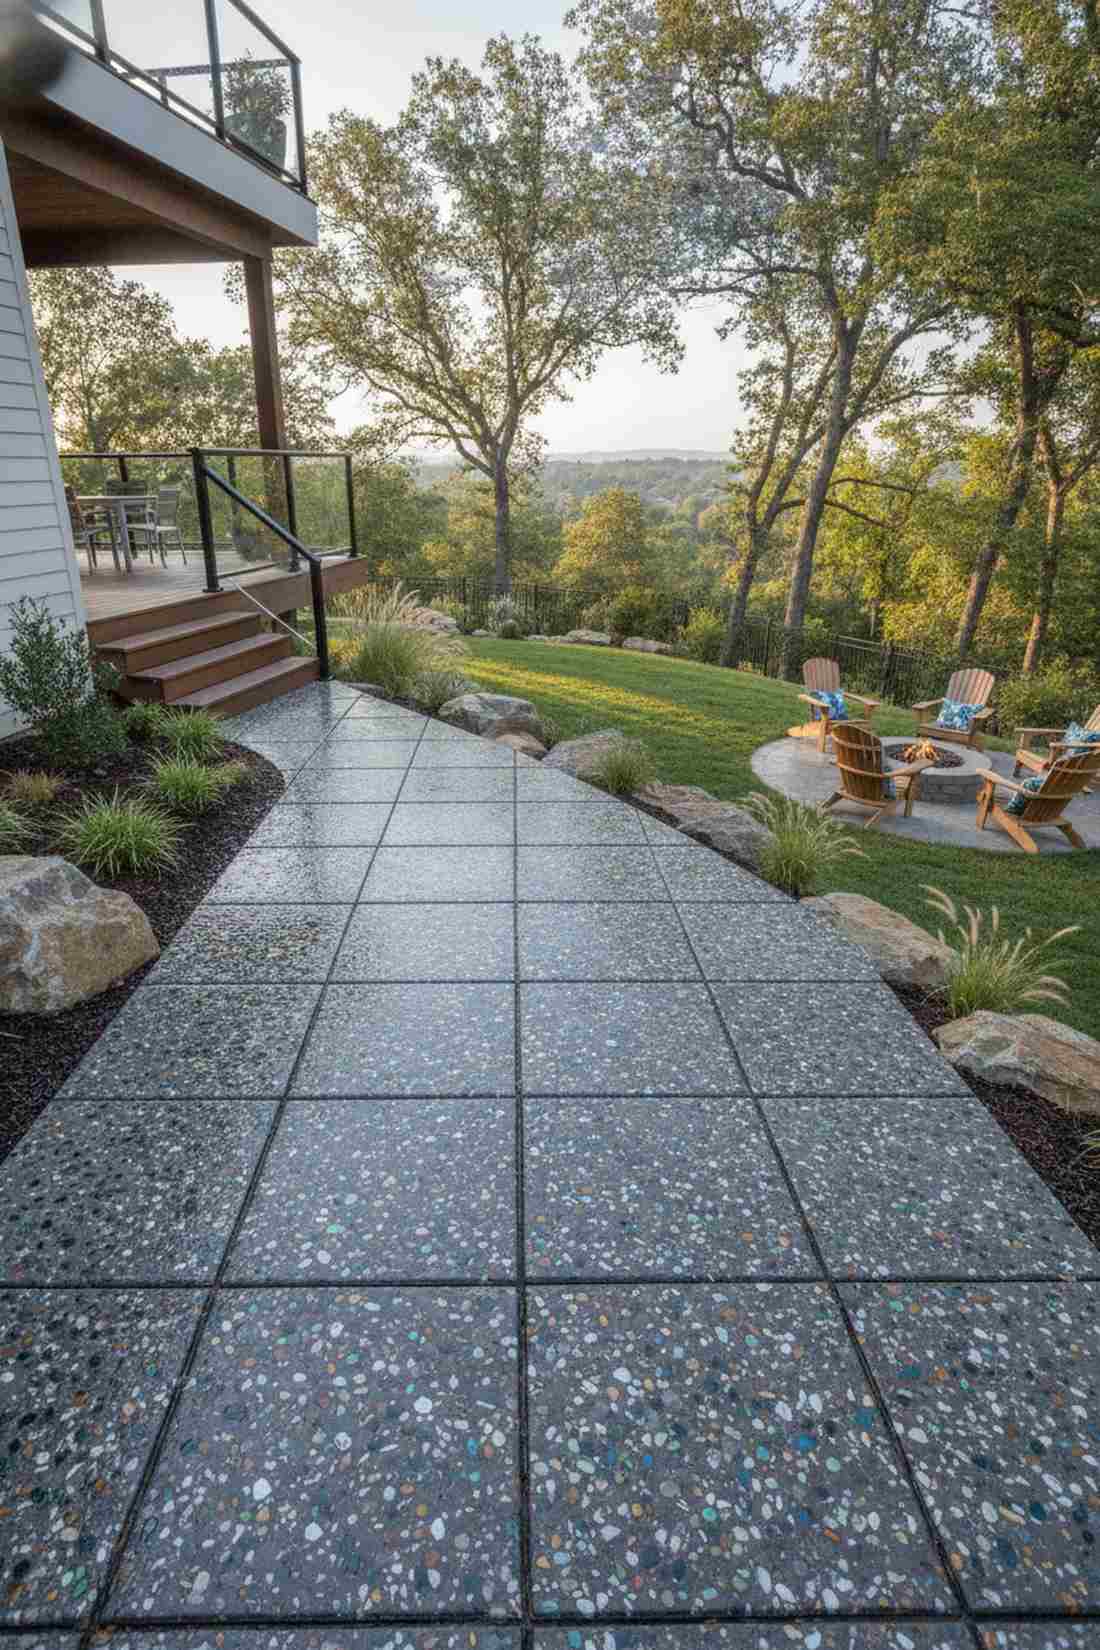
1. River Pebble Aggregate Rounds

Captures a serene, organic flow that feels like a hidden woodland sanctuary. Natural pebble pathway designs like this are brilliant for guiding foot traffic across densely shaded side yards.
A lot of homeowners overpay for custom pours, but this textured aesthetic delivers a shockingly premium finish. Lock the river rock down with UV-coated resin clear sealants so the surface remains walkable and weed-free year-round.
You can easily pull this off for around $15–$25 per disc. Pin this to your DIY weekend garden board!
- Key Materials: UV-stable river rock bags and heavy-duty concrete forms
- Vibe / Style: Zen cottage core
- Difficulty: Easy beginner setup
- Budget Breakdown: Materials: $18 | Base Prep: $7.
- Creator’s Tip: Tamp the base sand aggressively to prevent wobbly stones after rain.
- Smart Sourcing: pre-cut path alignment templates or a bulk pack river pebble kit.
2. Smooth Concrete Stepping Discs
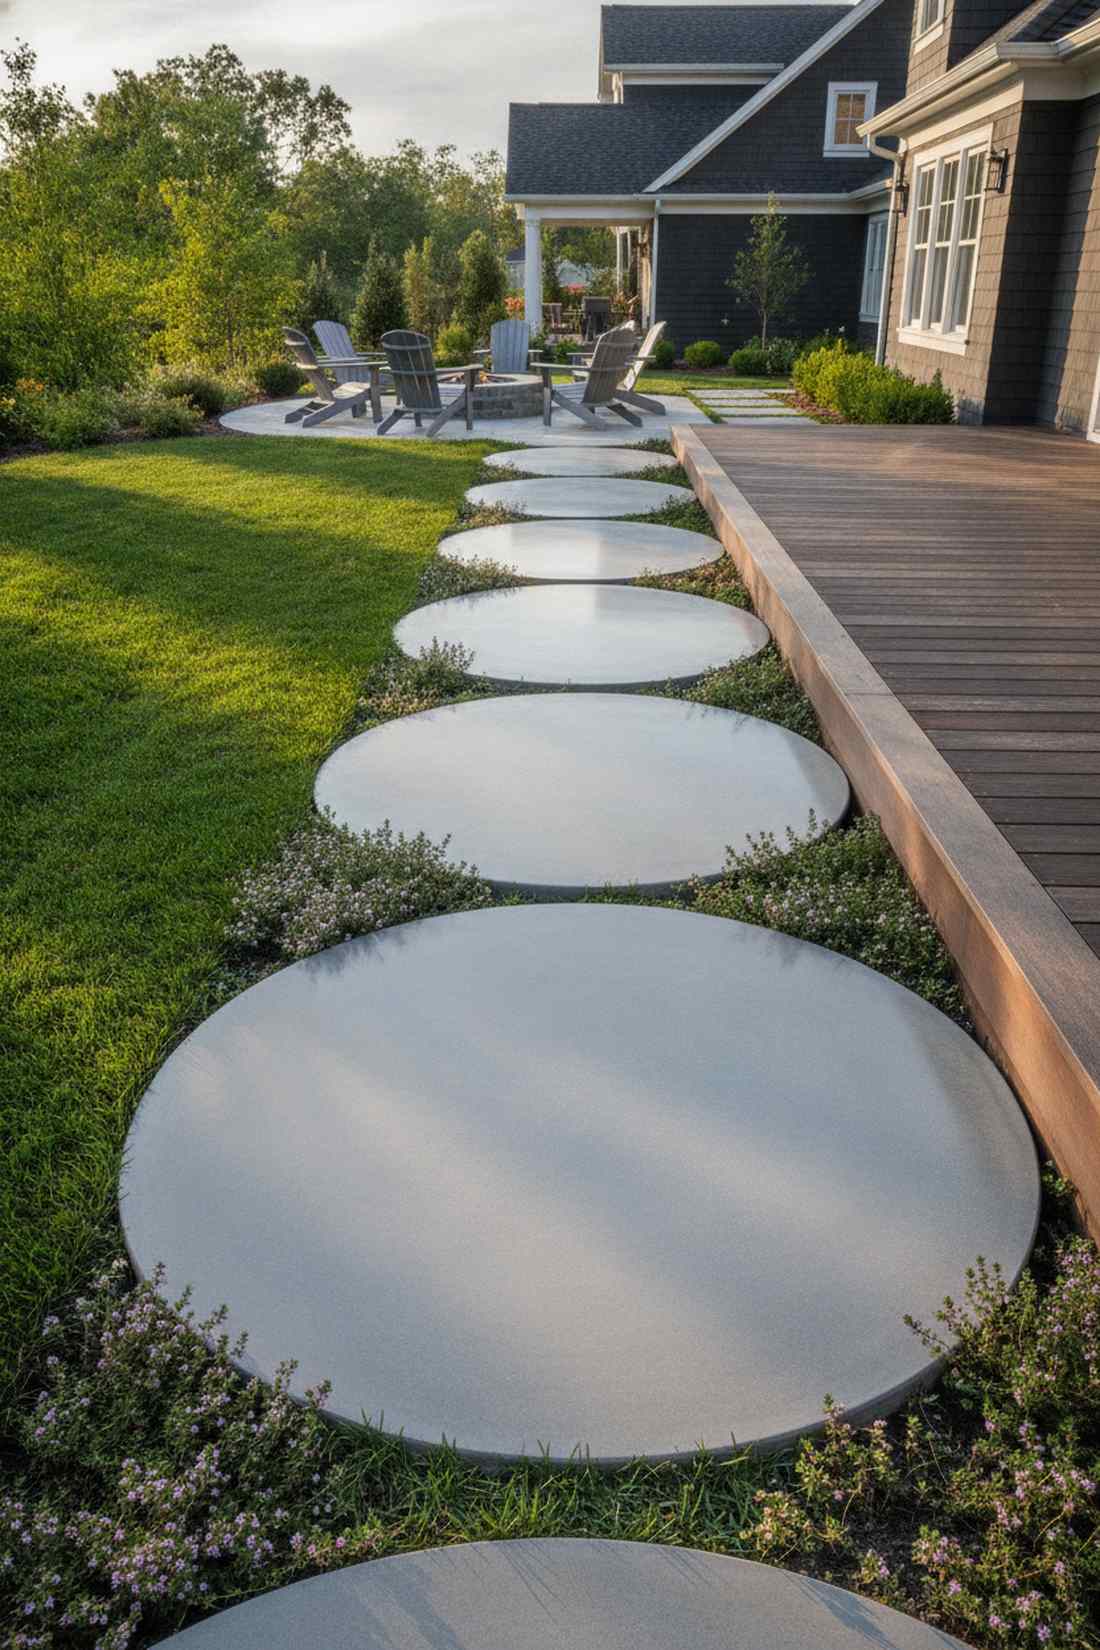
Delivers a sharp, minimalist vibe that feels straight out of a modern architectural magazine. Minimalist concrete hardscaping is absolutely perfect for bridging the gap between a grassy lawn and a modern patio deck.
People assume sleek concrete is a complex job, but using basic commercial pathway molds gives a designer-level finish for pennies. Toss in premium miniature garden supplies like low-growing thyme around the edges to soften the stark industrial look.
This layout sits beautifully at about $10 per round. Highly recommended for a quick weekend win.
- Key Materials: High-strength concrete mix and edge trowels
- Vibe / Style: Ultra-modern chic
- Difficulty: Beginner friendly
- Budget Breakdown: Concrete: $8 | Mold: $12 (reusable).
- Creator’s Tip: Vibrate the sides of the mold gently to release trapped air bubbles for a glass-like finish.
- Smart Sourcing: reusable silicone pathway molds and pre-mixed fast-set cement bags.
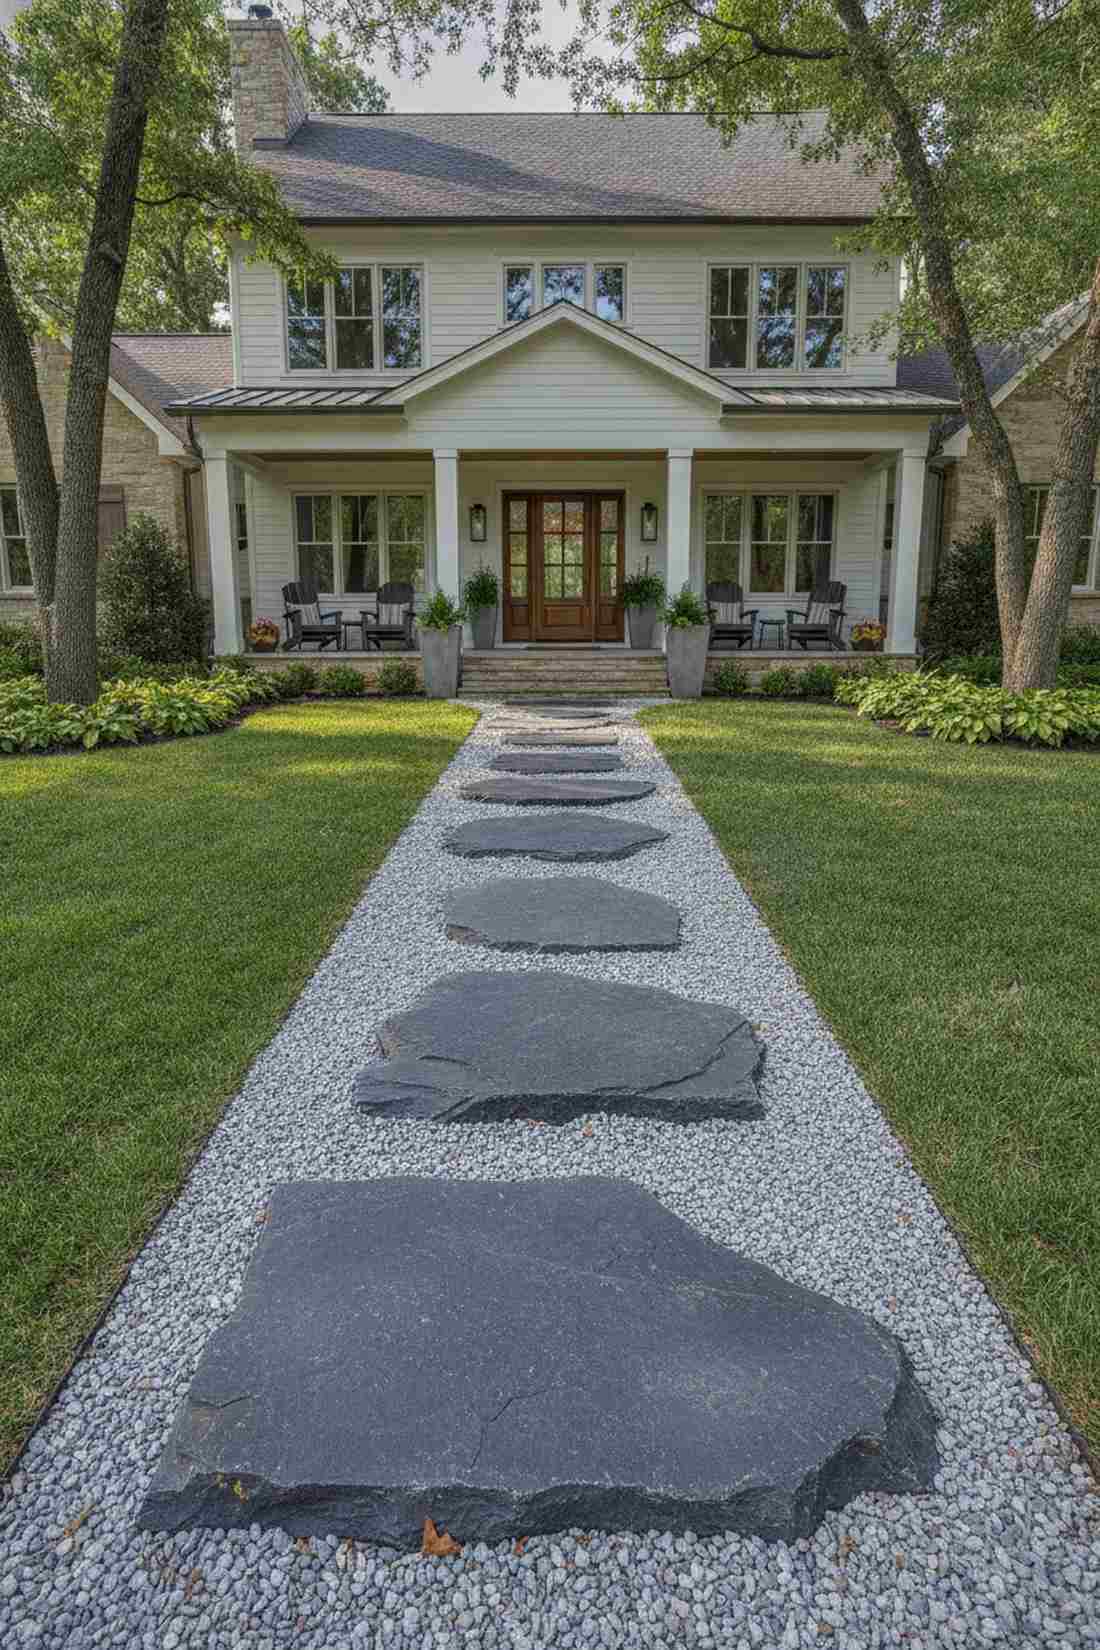
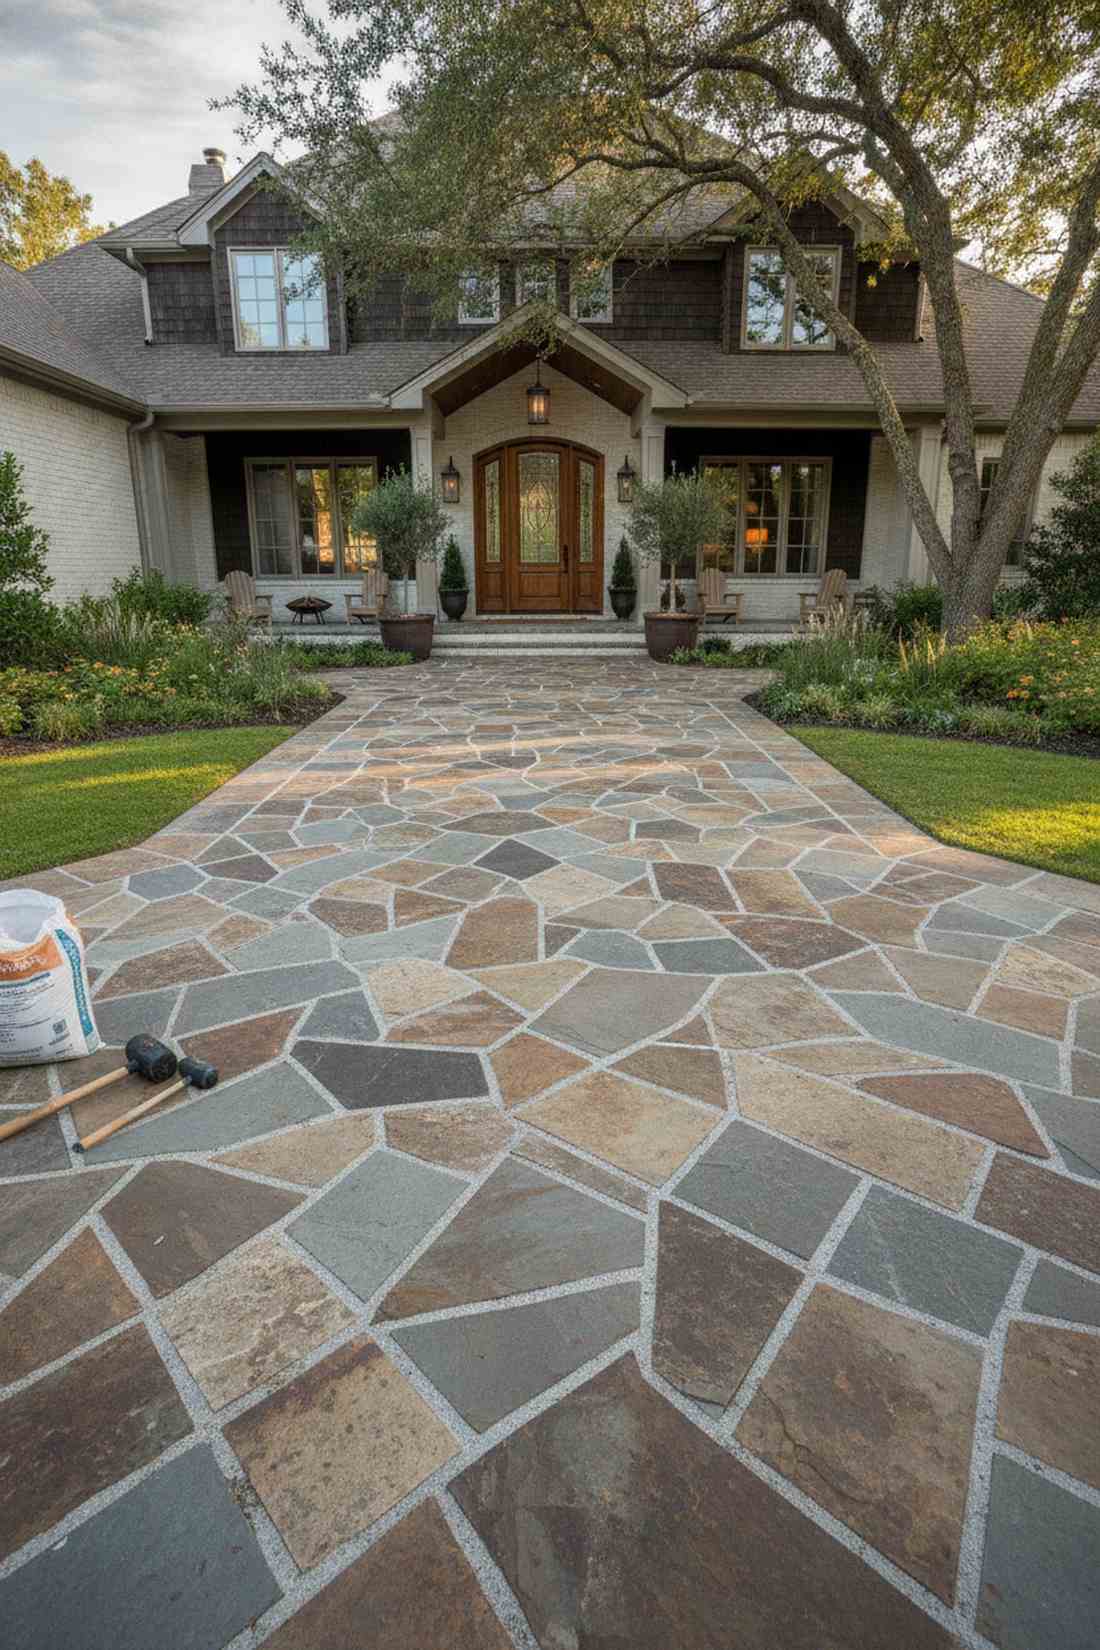
3. Flagstone Natural Rounds
Brings a rugged, timeless energy that feels like a centuries-old European estate. Natural flagstone landscaping is an elite choice for heavily trafficked outdoor dining areas or fire pit zones.
While structured pavers look rigid, the irregular edges here look far more expensive than they actually are. Skip the fragile pieces and source dense, premium-grade cleft stones that naturally resist slippery moss buildup.
Expect to drop around $25–$40 per large piece, depending on local quarry access.
- Key Materials: 2-inch thick natural bluestone or flagstone
- Vibe / Style: Rustic heritage
- Difficulty: Intermediate lifting required
- Budget Breakdown: Stone: $30 | Leveling Sand: $5.
- Creator’s Tip: Dig the base half an inch deeper than the stone to keep lawnmower blades safe.
- Smart Sourcing: commercial-grade landscape fabric rolls and heavy-duty leveling sand bags.
4. Mosaic Pattern Circles
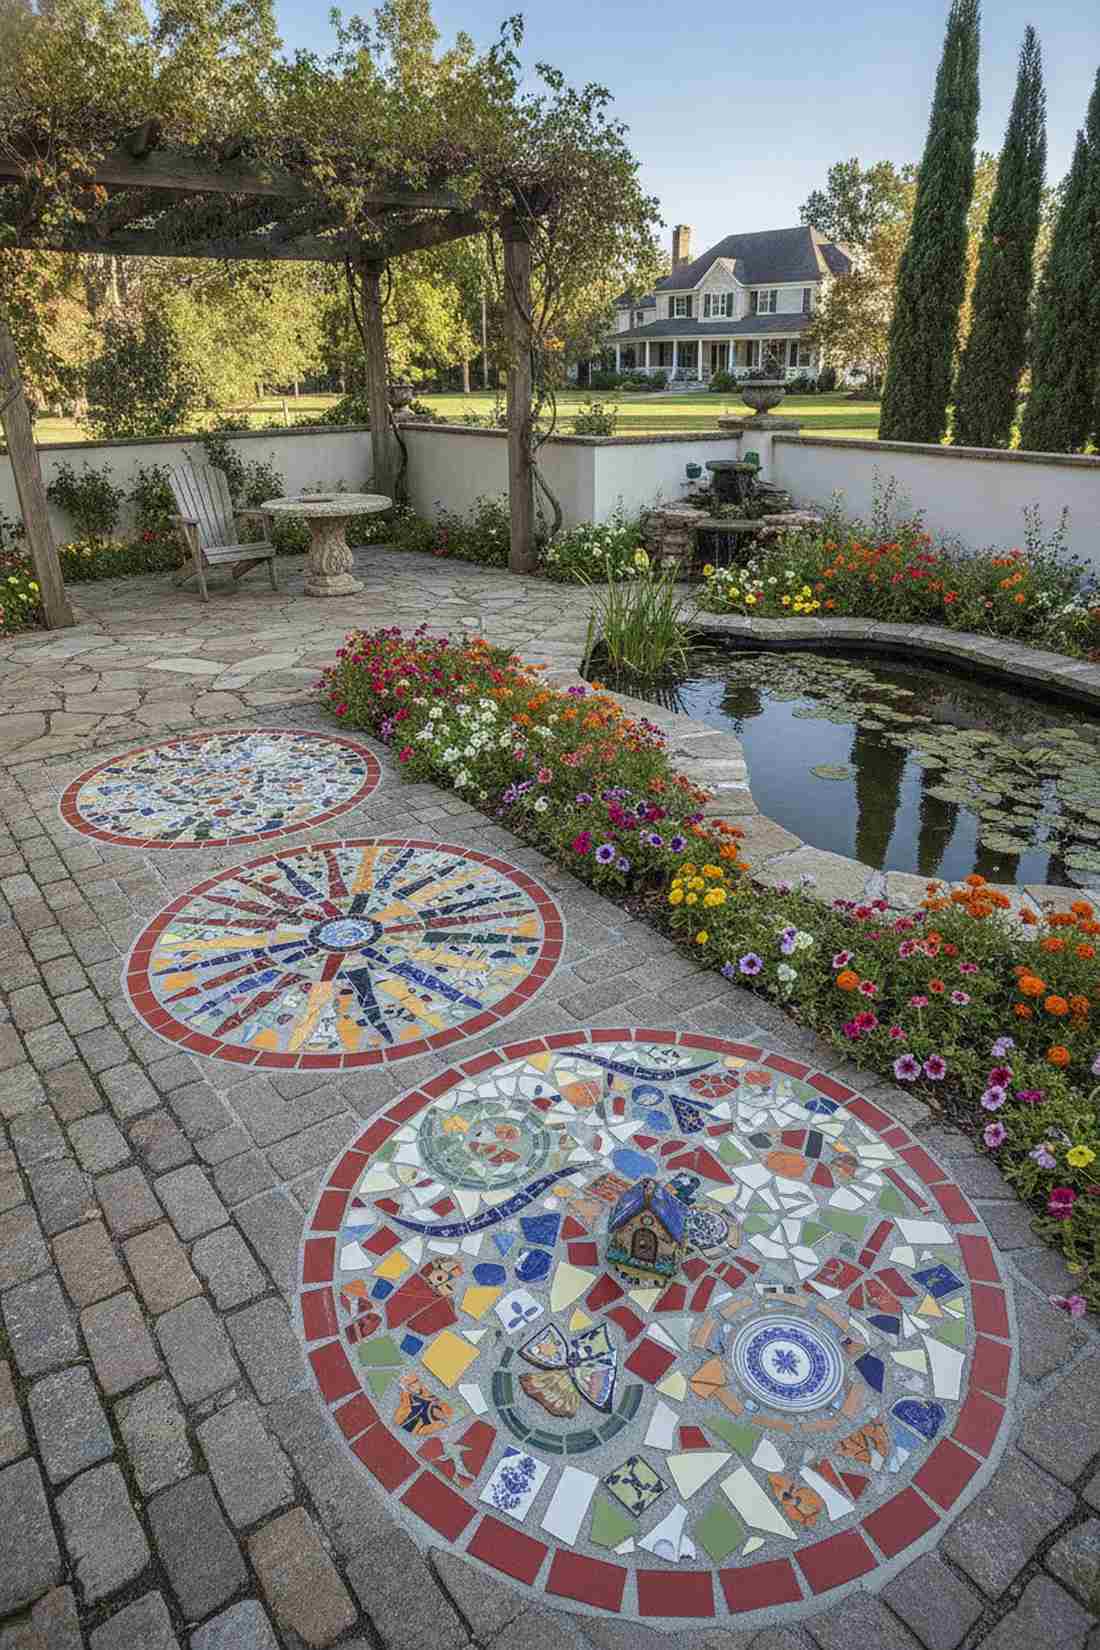
Bursts with vibrant color and feels like discovering a hidden artisan treasure on your property. Broken tile garden mosaics work exceptionally well as standalone art pieces near a blooming flower bed or water feature.
Many think mosaics won’t survive winter, but setting them into specialized frost-proof thinset mortar completely eliminates cracking. You can even upcycle fairy garden accessories and broken ceramics into the mix for a truly bespoke landscape detail.
A fun upcycling project that rarely costs more than $20 in base materials. Save this if you love vibrant backyard art!
- Key Materials: Exterior-grade grout and shattered ceramic tiles
- Vibe / Style: Mediterranean artisan
- Difficulty: Medium craft focus
- Budget Breakdown: Base Concrete: $5 | Grout & Sealer: $15.
- Creator’s Tip: Keep the tile pieces perfectly flat across the top to avoid trip hazards.
- Smart Sourcing: pre-mixed waterproof exterior grout and UV-coated mosaic sealant kits.
This next setup is ridiculously cheap but looks like a $100 custom landscape display…
5. Stained Concrete Color Wheels
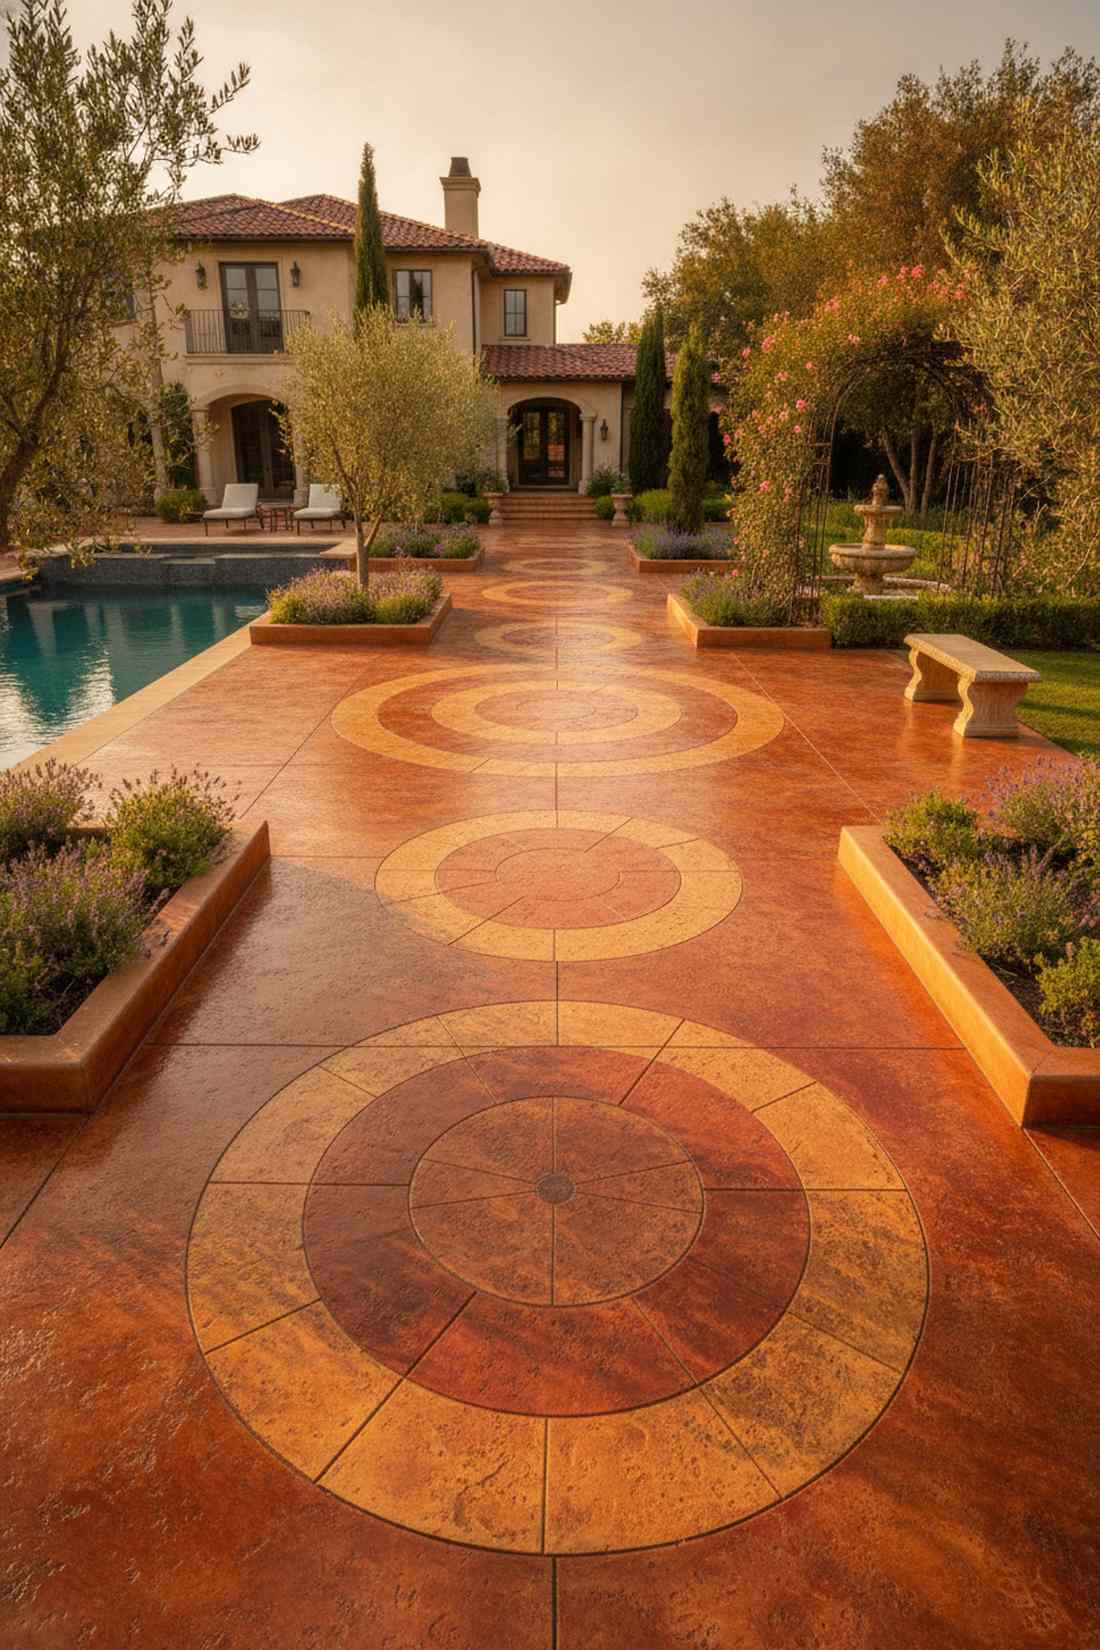
Radiates warmth and dimension that feels like expensive imported terracotta. Acid-stained pathway designs are ideal for connecting sun-drenched pool decks to backyard gardens.
Traditional dye fades quickly, but using industrial-strength acid stain literally reacts with the concrete for a permanent, fade-proof finish. This technique completely bypasses the need for costly natural stone while maintaining a rich, organic color gradient.
You can treat an entire path of basic stones for under $50 in supplies.
- Key Materials: Reactive acid concrete stain and clear topical sealer
- Vibe / Style: Tuscan villa
- Difficulty: Intermediate
- Budget Breakdown: Stain Kit: $35 | Sealer: $15.
- Creator’s Tip: Always apply stain to fully cured concrete (at least 28 days old) for the best color reaction.
- Smart Sourcing: acid-stain starter kits and high-gloss UV concrete sealers.
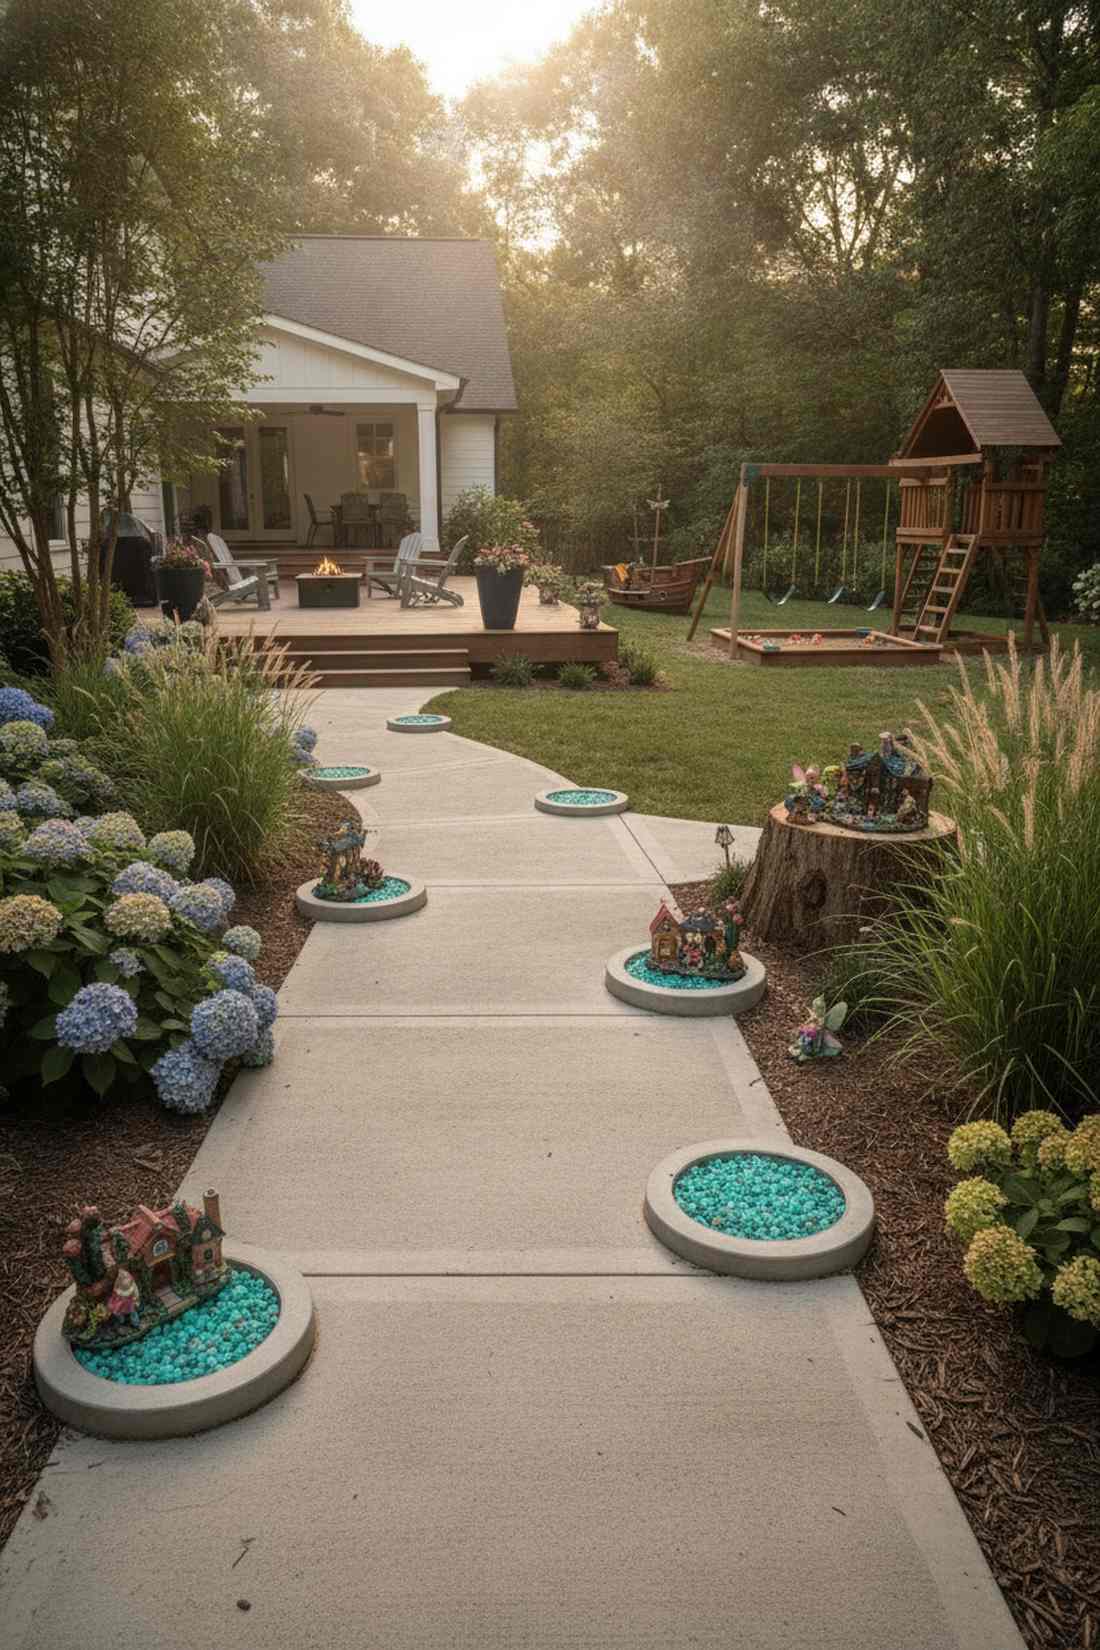
6. Stepping Stone Rounds with Planted Centers
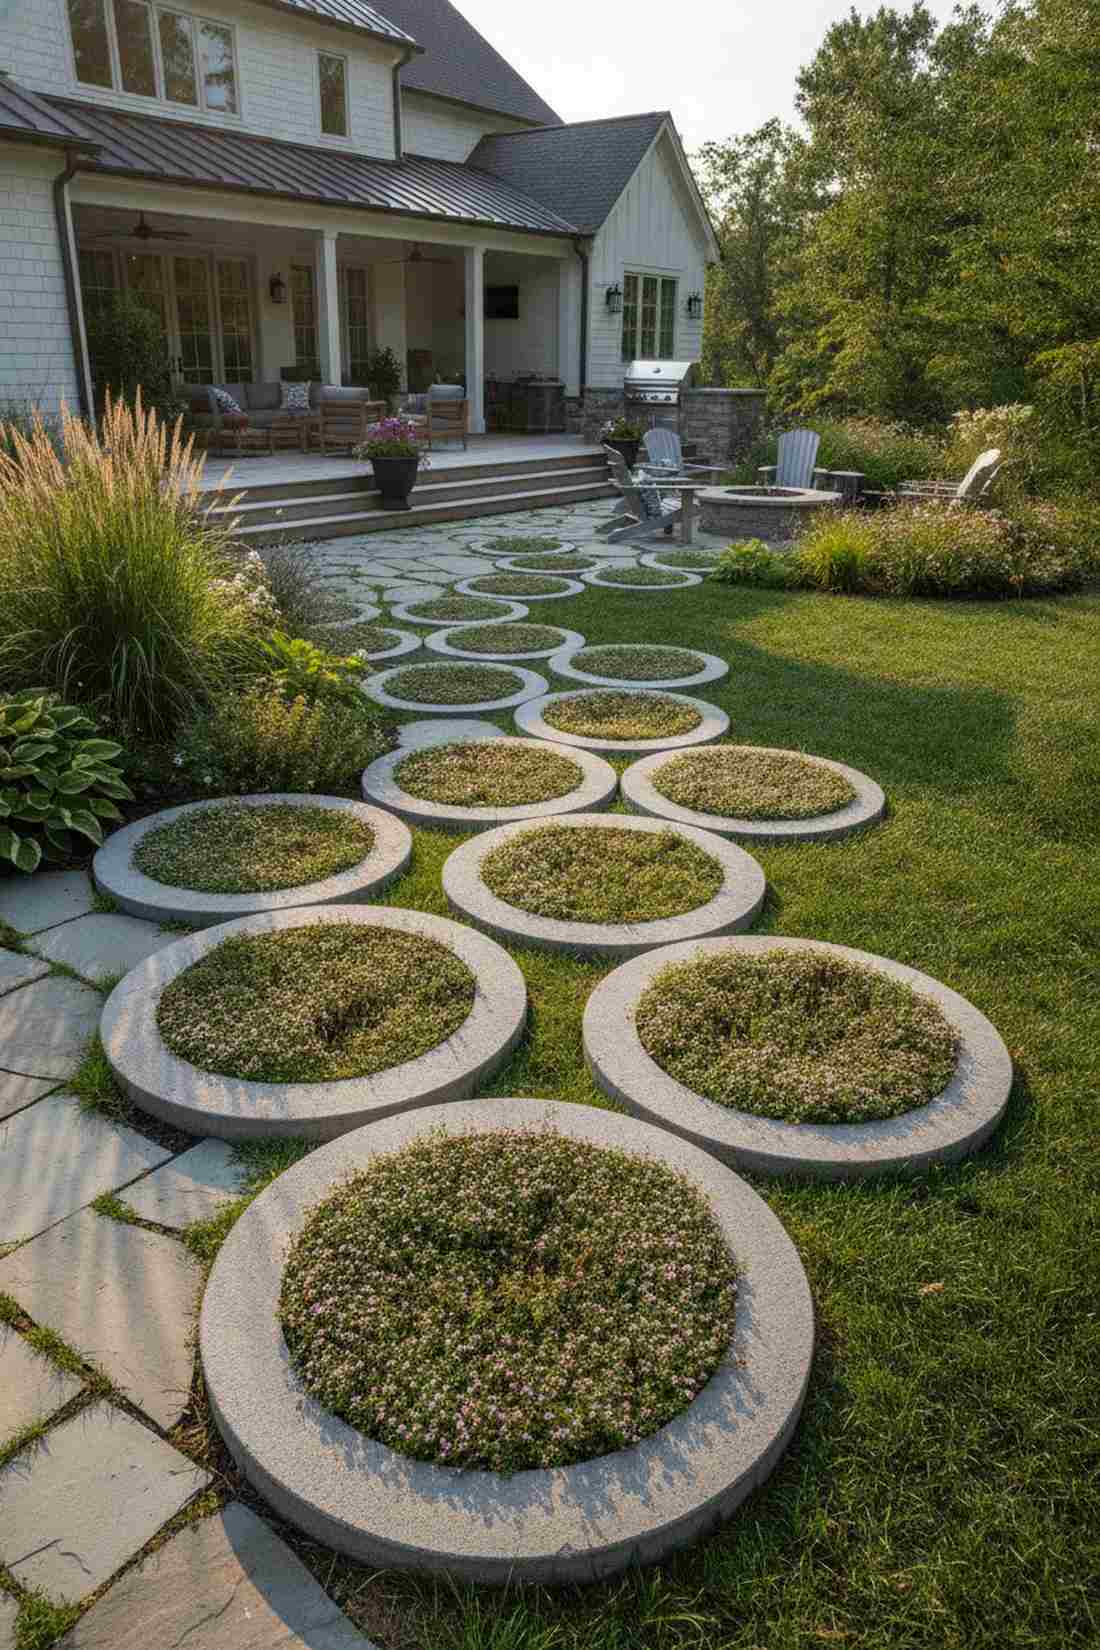
Creates a lush, living hardscape that feels like nature is slowly reclaiming the yard. Planted paver layouts are the ultimate solution for bare, awkward gaps between patio edges and grassy lawns.
Most solid paths cause annoying water runoff issues, but the open-center layout provides natural drainage while looking highly architectural. Fill the donut holes with premium terrarium accessories or walkable creeping thyme to instantly elevate the curb appeal.
The forms and plants together keep this around $20 per unit. Pin this to your ultimate outdoor living board!
- Key Materials: Ring-shaped concrete molds and creeping groundcover
- Vibe / Style: Eco-modern oasis
- Difficulty: Easy
- Budget Breakdown: Cement: $8 | Plants: $12.
- Creator’s Tip: Use a weed barrier directly beneath the soil core to stop deep-rooted weeds from ruining the look.
- Smart Sourcing: walkable groundcover seed bulk packs and heavy-duty landscaping fabric.
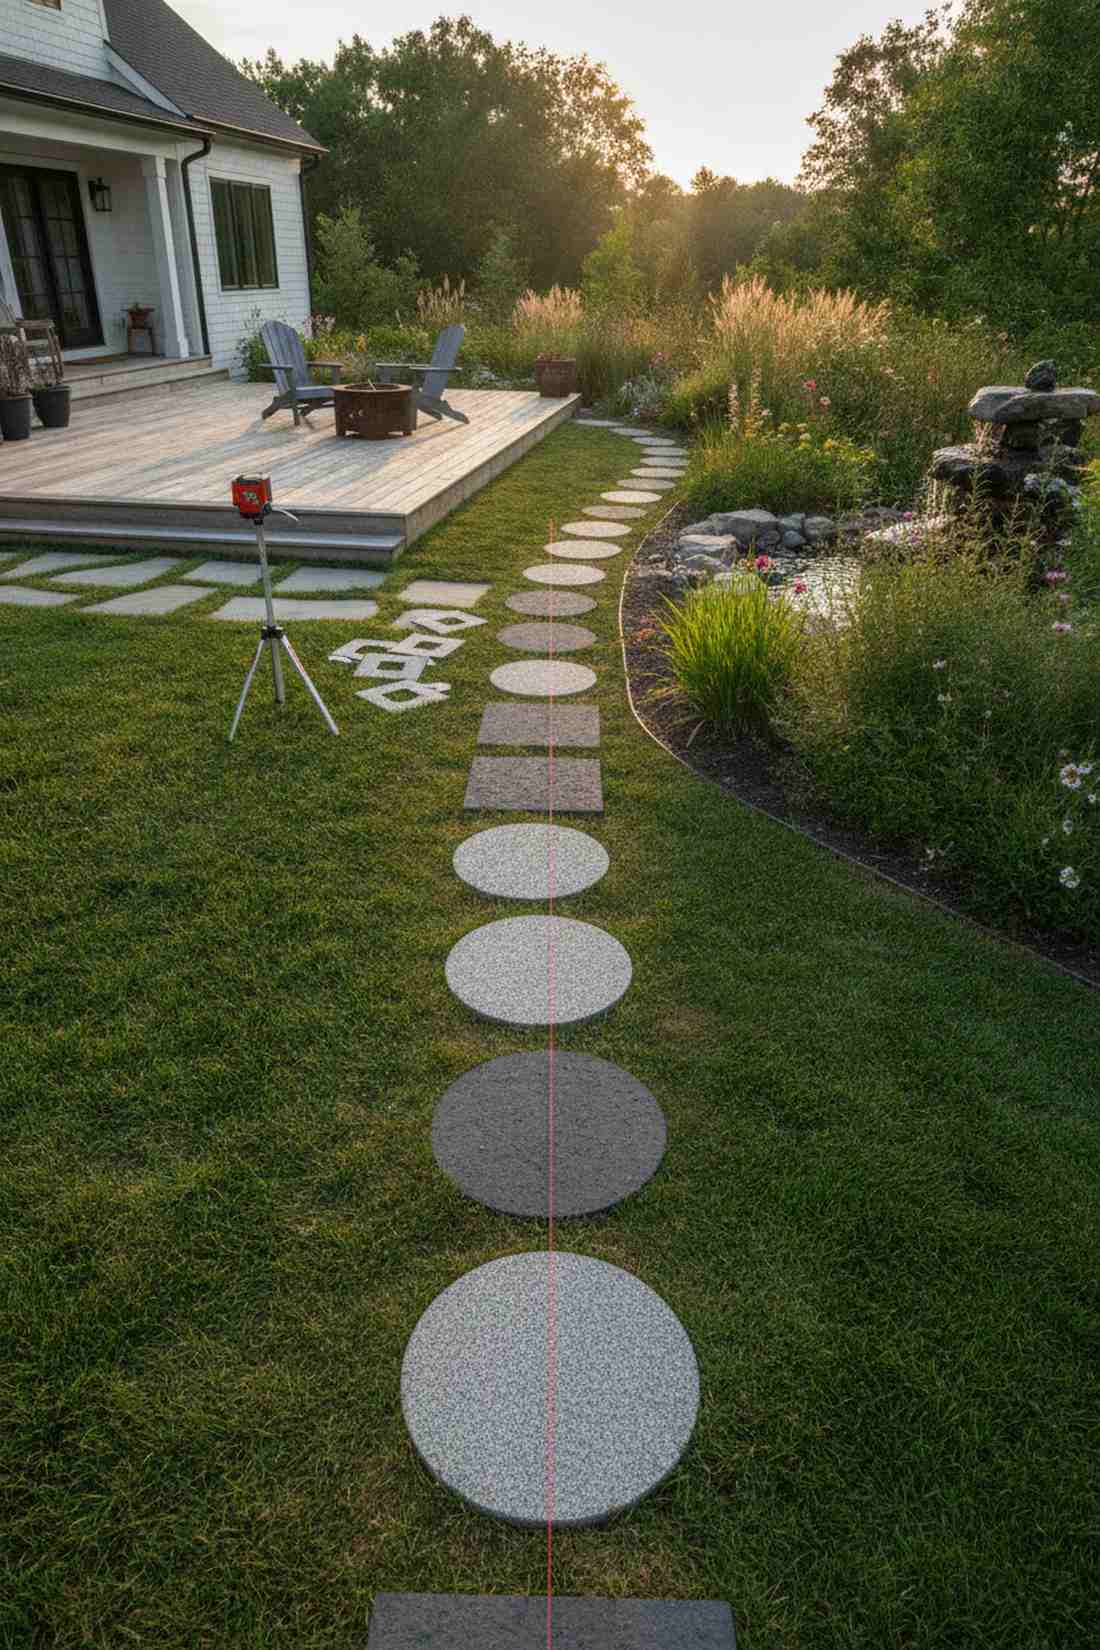
7. Graduated Size Round Pathway
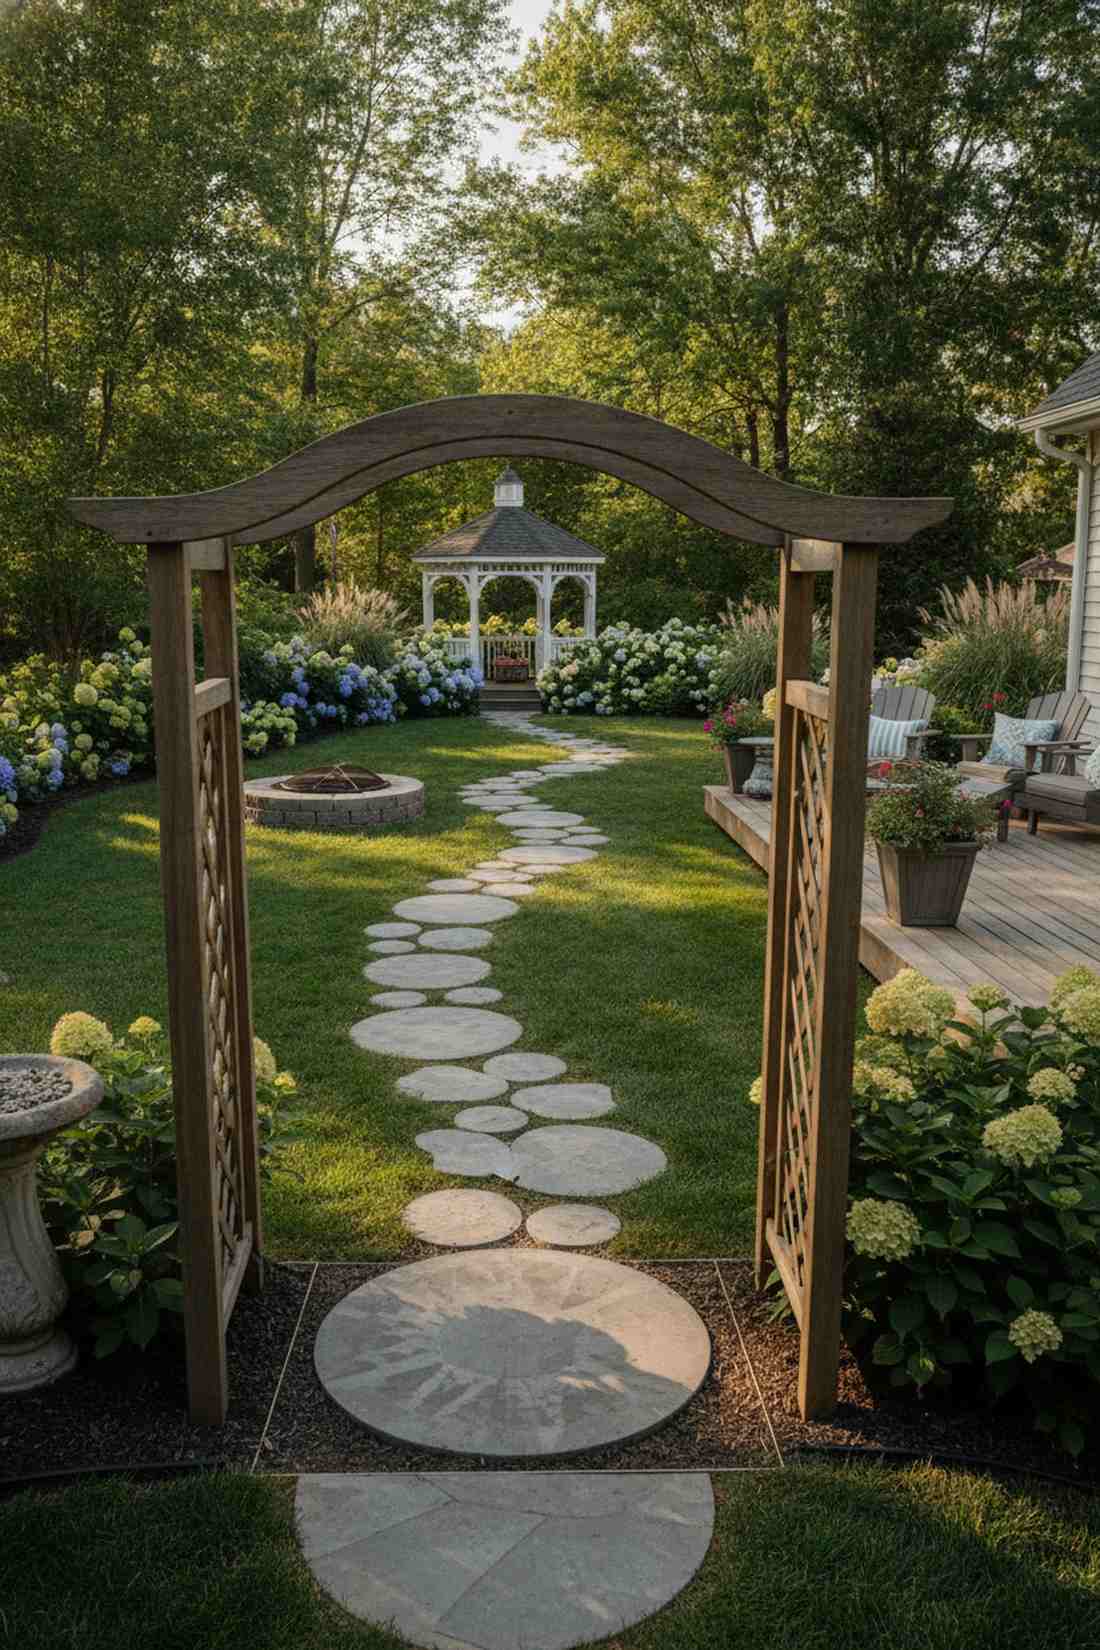
Plays with scale and perspective to make your outdoor space feel magically expansive. Tapered garden paths do an incredible job of drawing the eye toward a distant gazebo or secret seating nook.
Instead of rigid symmetry, this optical illusion shrinks the stones as you walk, delivering a surprisingly premium look that tricks the brain. It’s an old landscape architect secret that turns a cramped backyard into a sweeping estate.
Gathering three different mold sizes will put you around $40 for the toolkit.
- Key Materials: 12″, 18″, and 24″ concrete circular molds
- Vibe / Style: Whimsical estate
- Difficulty: Medium planning required
- Budget Breakdown: Assorted Molds: $35 | Concrete: $25.
- Creator’s Tip: Start the largest stones at the main entrance and slowly taper down to create forced perspective.
- Smart Sourcing: nested silicone paver mold sets and pre-cut alignment string lines.
8. Carved Relief Circle Stones
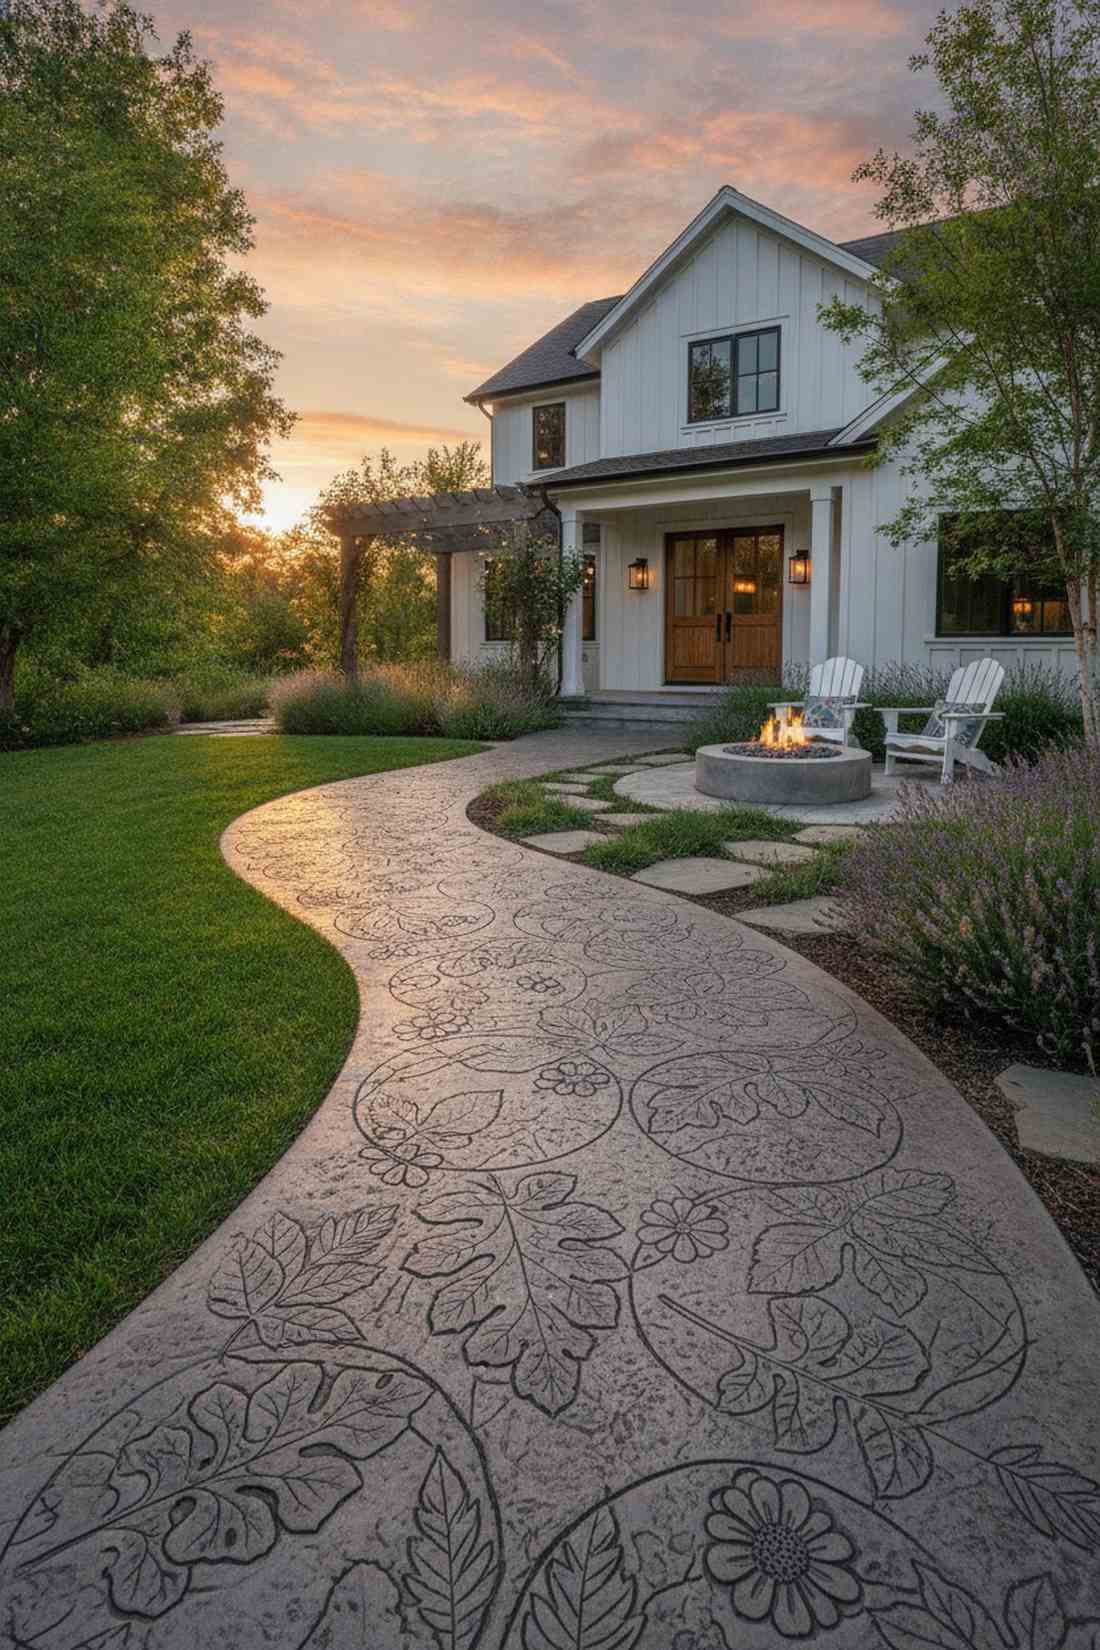
Injects incredible tactile texture that feels like a custom sculptural installation. Stamped concrete pathway art is absolutely brilliant for entryways where guests naturally pause and look down.
Standard flat steps can be a slip hazard, but pressing botanical stamps into wet concrete gives a designer-level finish and excellent wet-weather traction. These subtle shadows catch the evening light beautifully, making your lawn glow at golden hour.
Stamps and materials keep this high-end look firmly around $15 per stone.
- Key Materials: Polyurethane relief stamps and release powder
- Vibe / Style: Custom botanical
- Difficulty: Intermediate timing
- Budget Breakdown: Stamp Kit: $45 | Materials: $10 per stone.
- Creator’s Tip: Use a liquid release agent on your stamps so they don’t pull up chunks of wet cement.
- Smart Sourcing: botanical concrete stamp starter kits and commercial-grade release powder.
Most backyard DIYs look cheap after a single winter, but the heavyweight strategy coming up next is practically bulletproof.
💡 Must-Have Supplies for High-End Setups
To build these setups faster and ensure they last, skip the generic craft aisles and invest in the right foundational kits.
- Base & Support: heavy-duty woven landscape fabric (commercial grade)
- Setup Tools: laser-level starter kits for path alignment
- Weather/Durability Protection: industrial-strength clear stone sealants
Bold Large Format Stones for Statement Paths
9. Jumbo Slate Slabs
Commands immediate attention with a monolithic presence that feels incredibly grounded. Implementing stepping stones large slate pieces is the ultimate power move for broad, sweeping front yard entrances.
Flimsy garden paths sink over time, but these massive heavyweight slabs provide an architectural edge that outsmarts soil erosion entirely. You won’t be constantly pulling weeds because the sheer size eliminates unnecessary joint gaps.
Expect premium slabs to run $60–$90 each, but the zero-maintenance payoff is massive. Save this if you want permanent curb appeal!
- Key Materials: 36-inch natural slate slabs and crushed gravel base
- Vibe / Style: Modern monolithic
- Difficulty: Hard (requires heavy lifting)
- Budget Breakdown: Slab: $75 | Gravel Base: $15.
- Creator’s Tip: Always use a thick layer of angular crushed rock underneath so these beasts never rock underfoot.
- Smart Sourcing: bulk pack crushed leveling gravel and heavy-duty lifting straps.
10. Poured Concrete Mega Rounds
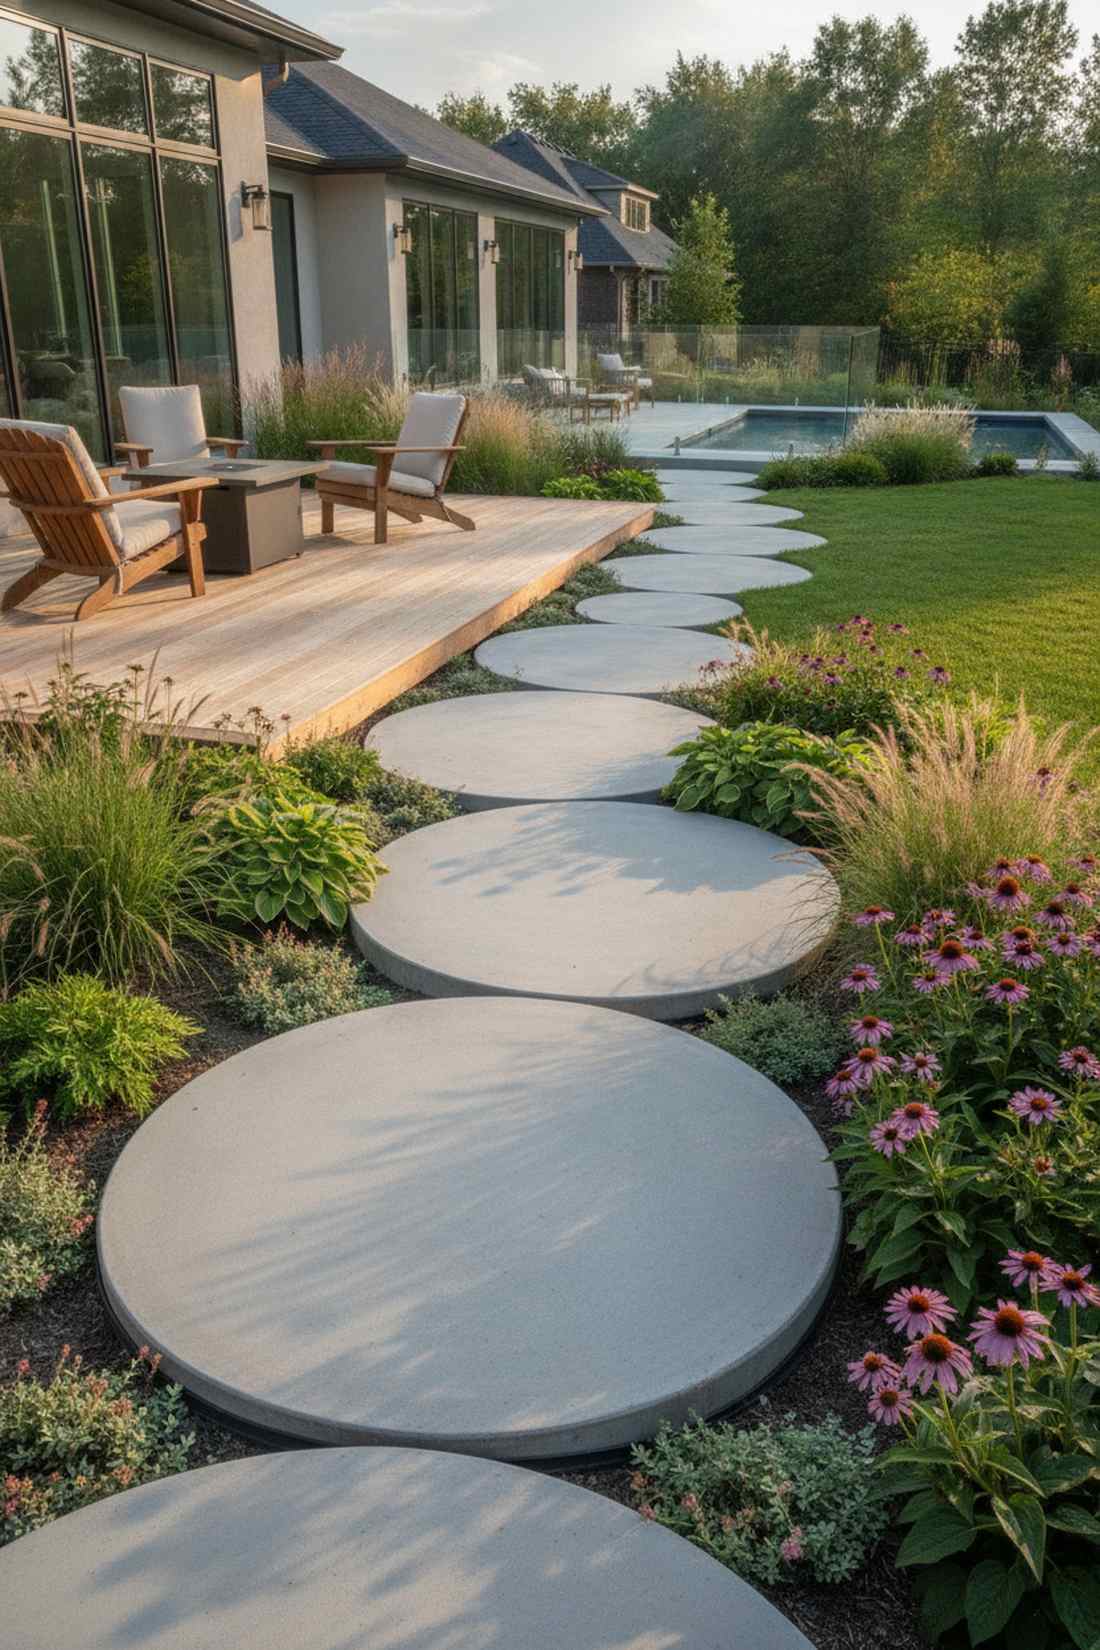
Exudes a custom resort-style luxury that feels simultaneously sleek and substantial. Oversized poured concrete pads are the perfect transition pieces for intersecting garden walkways.
Transporting 3-foot stones is a nightmare, so casting these mega rounds in place is a genius hack that looks far more expensive than it is. Adding hidden wire mesh during the pour guarantees they won’t snap during brutal winter freezes.
You get a massive $100 look for roughly $30 in bagged concrete per pad.
- Key Materials: Flexible landscape edging for forms, wire mesh
- Vibe / Style: Contemporary resort
- Difficulty: Intermediate
- Budget Breakdown: Form Edging: $15 | Concrete & Mesh: $25.
- Creator’s Tip: Keep the top covered with plastic for 48 hours so the concrete cures slowly without surface cracking.
- Smart Sourcing: flexible bender board bulk rolls and pre-cut galvanized wire mesh.
11. Granite Millstone Replicas

Infuses incredible historical character that feels anchored in deep, pastoral roots. Antique landscape features like these shine when placed as a centerpiece in a sprawling country garden.
Genuine antiques cost a fortune, but sourcing durable granite replicas gives you the exact same historical prestige for a fraction of the price. The central hole is a brilliant spot to tuck some high-end miniature garden supplies or a subtle uplight fixture.
Replicas typically range from $150 to $300 but act as permanent property assets.
- Key Materials: Cast or carved granite millstones
- Vibe / Style: Heritage estate
- Difficulty: Hard (extremely heavy)
- Budget Breakdown: Millstone: $200 | Installation Base: $30.
- Creator’s Tip: Sink the stone 2 inches below the grass line so you can mow cleanly right over the edges.
- Smart Sourcing: replica stone garden ornaments and low-voltage landscape uplight kits.
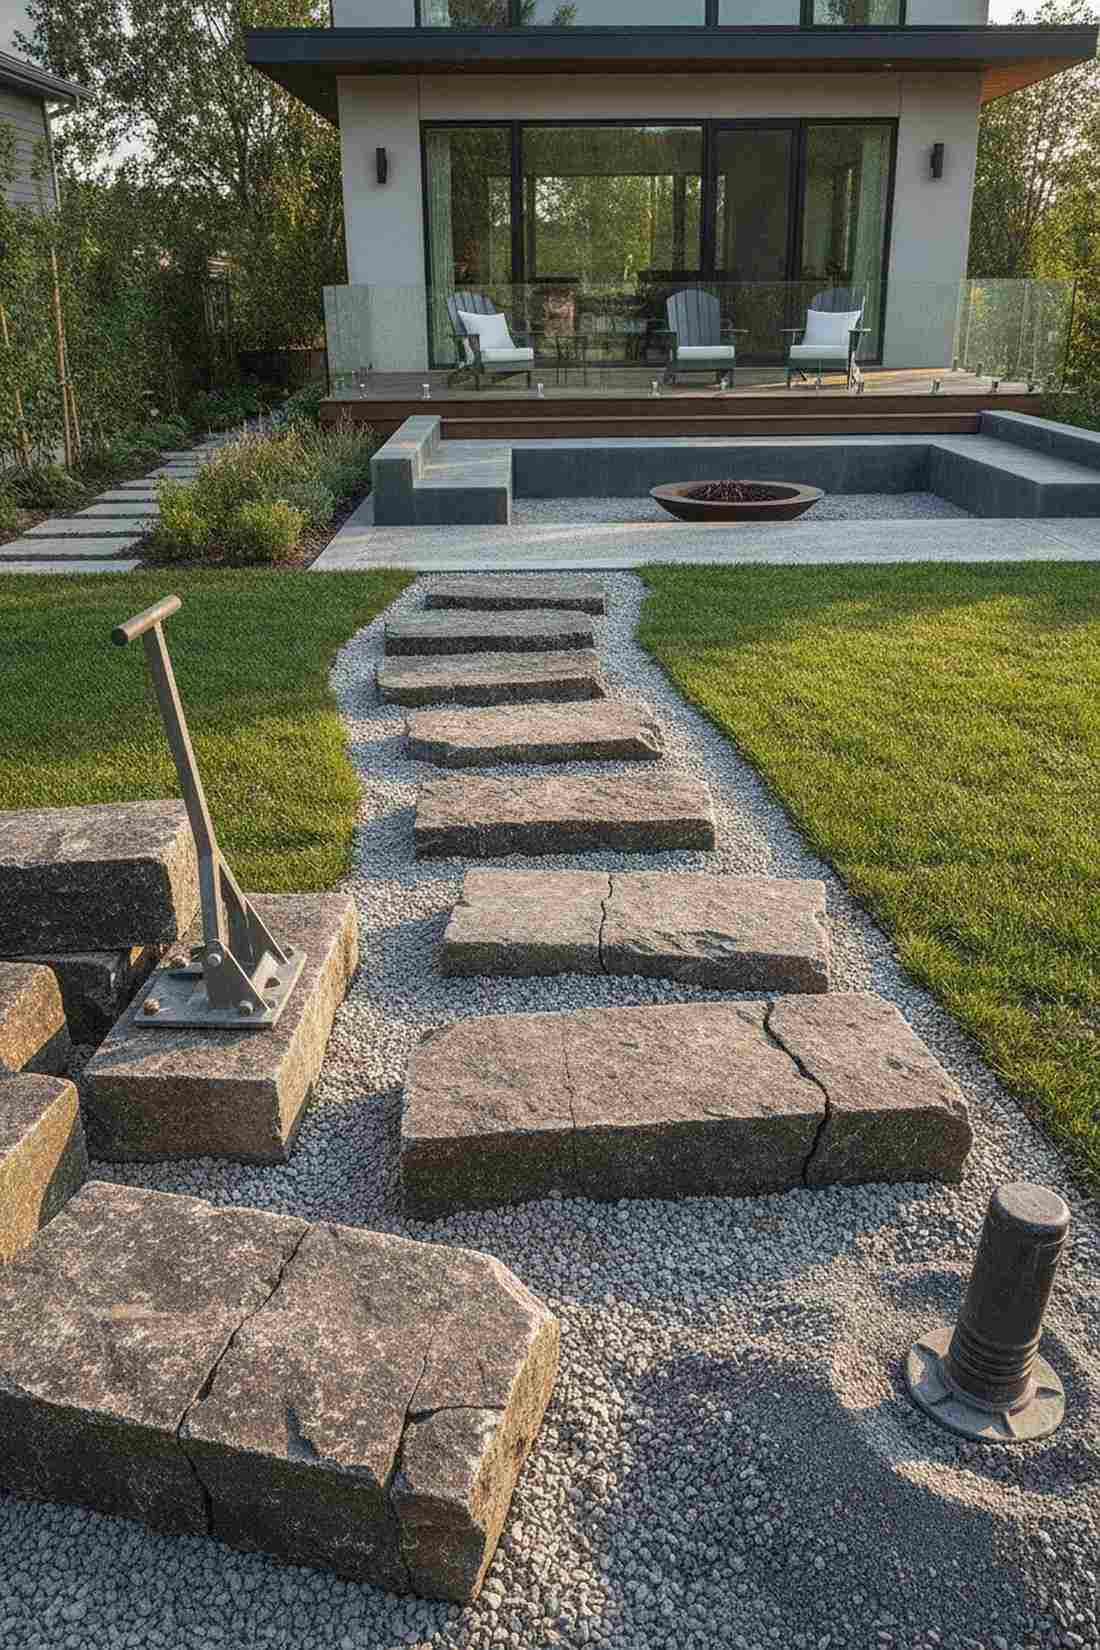
12. Layered Stone Platforms
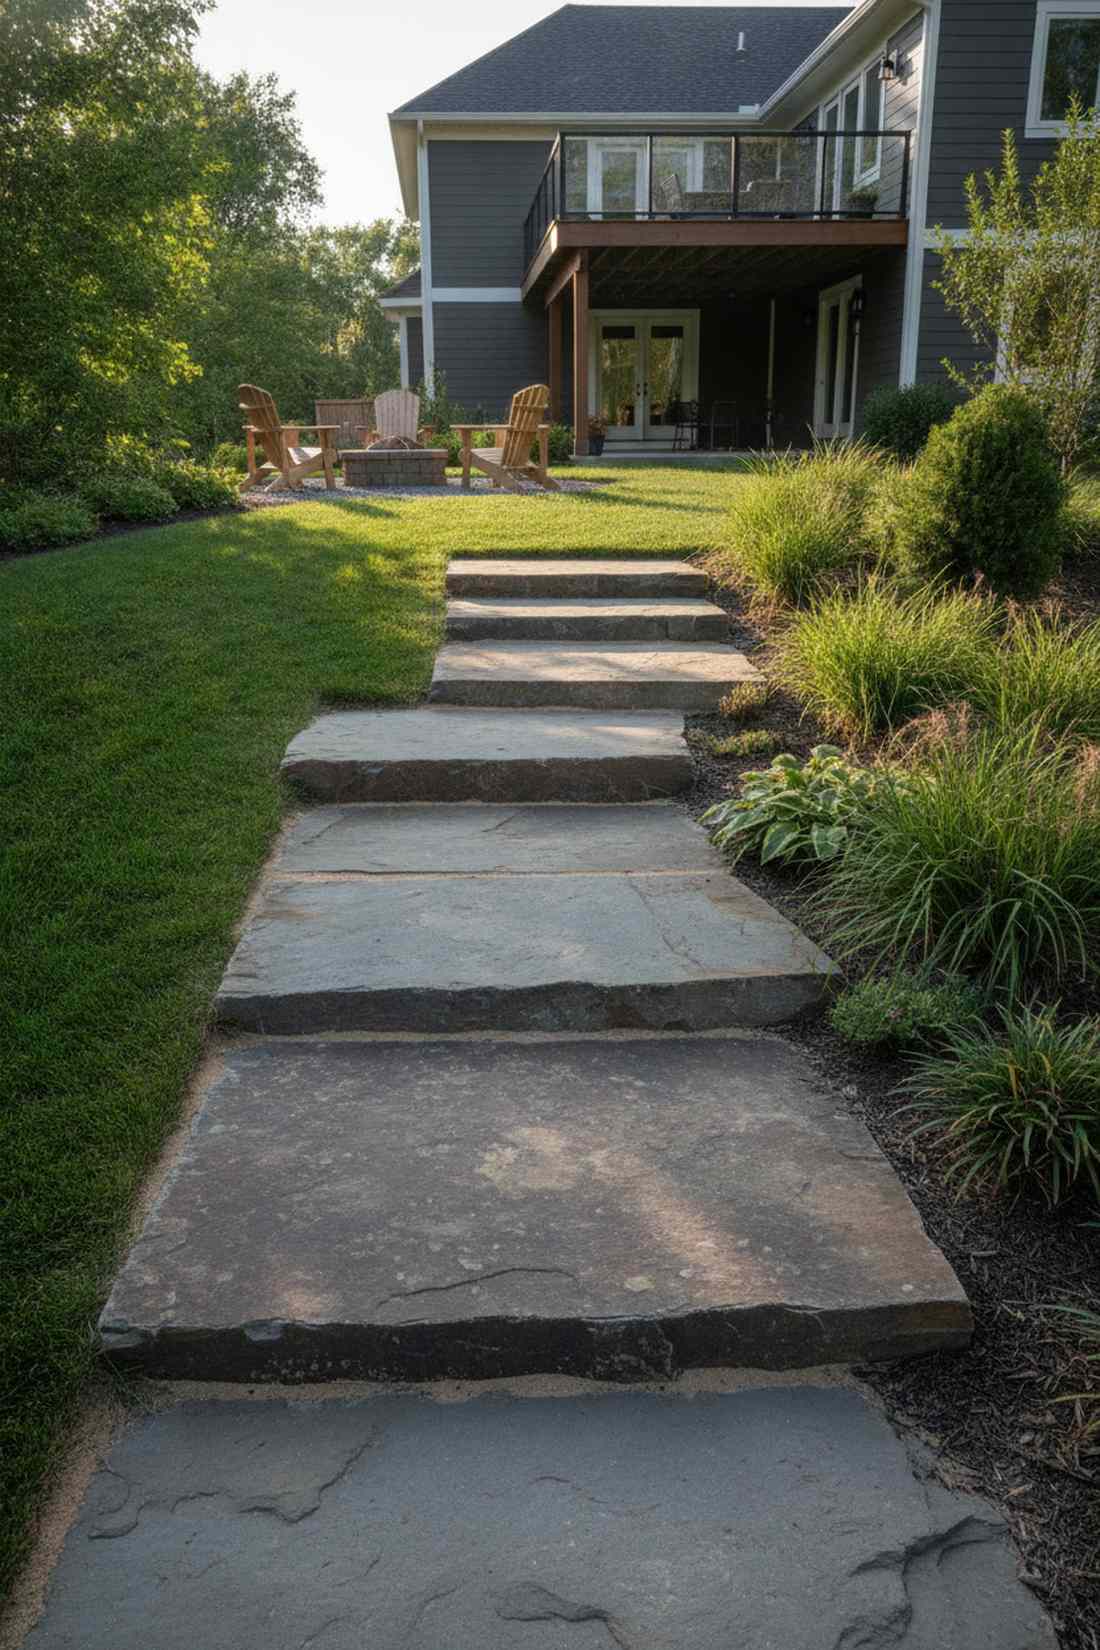
Adds dramatic vertical dimension that feels like an intentional architectural staircase. Tiered pathway landscaping works wonders on mildly sloped yards where a flat path would wash out.
Most sloped paths just look messy, but stacking these large slabs creates deliberate elevation changes that secure the soil perfectly. It completely bypasses the need for retaining walls while delivering a striking, staggered aesthetic.
Budget around $80 per tiered stack for high-quality natural stone.
- Key Materials: Flat natural fieldstone or large flagstone pieces
- Vibe / Style: Zen terrain
- Difficulty: Medium
- Budget Breakdown: Stone Set: $70 | Polymeric Sand: $10.
- Creator’s Tip: Overlap each layer by at least 6 inches and use landscape adhesive to lock them permanently together.
- Smart Sourcing: exterior-grade landscape block adhesive and premium leveling stone dust.
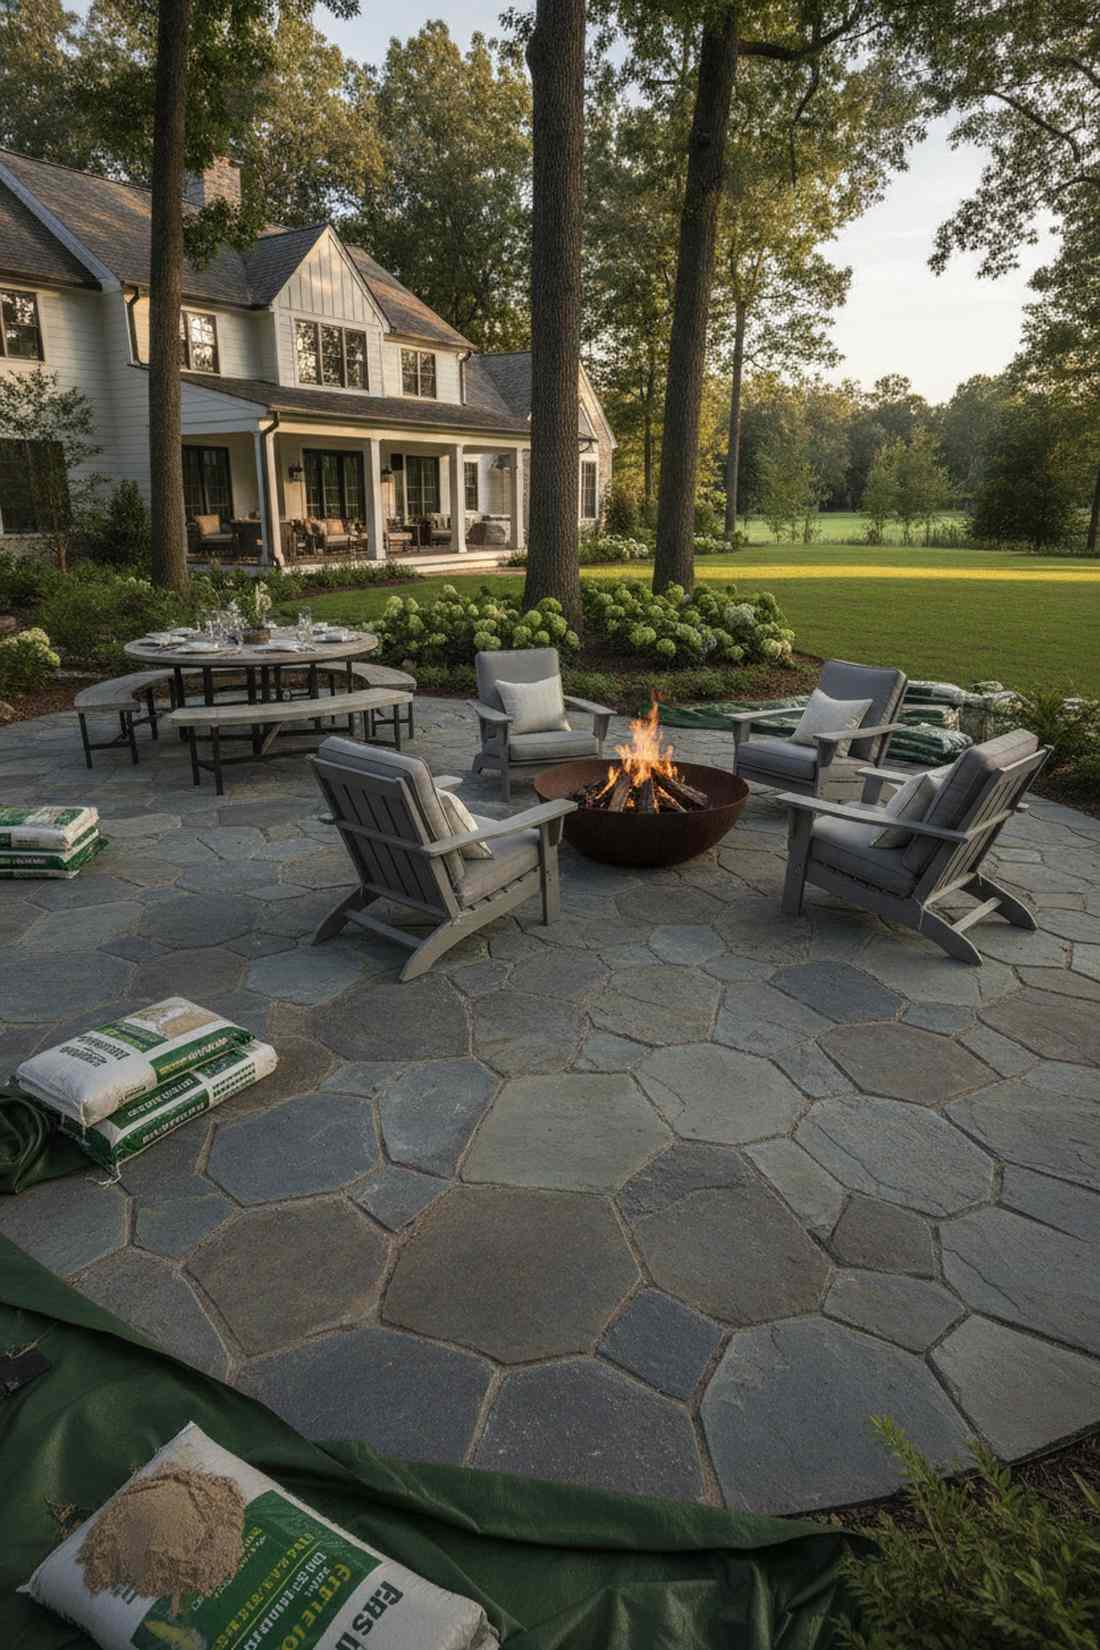
13. Oversized Hexagonal Pavers
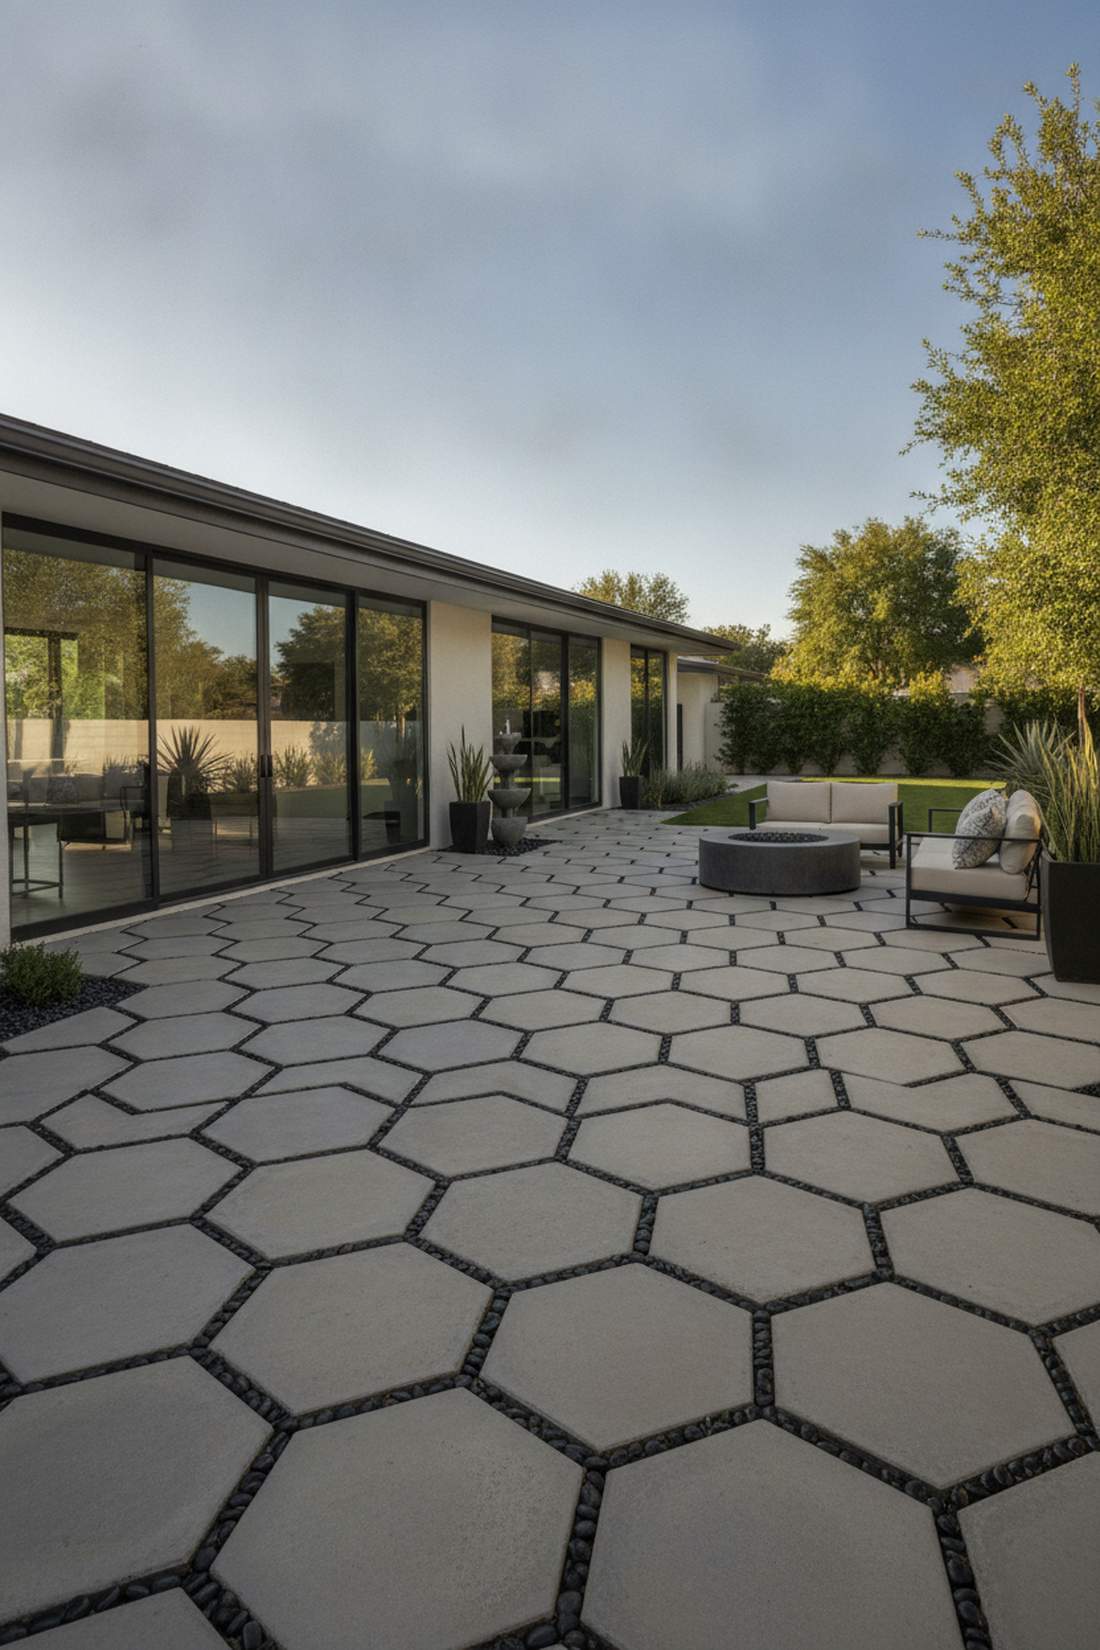
Packs a geometric punch that feels wildly futuristic yet incredibly grounded. Honeycomb hardscape designs are absolute magic when breaking up rigid straight lines in a minimalist courtyard.
While everyone else uses boring squares, this angular format creates a mesmerizing interlocking rhythm that looks professionally drafted. Leaving a two-inch gap filled with black river rock delivers a surprisingly premium finish with incredible contrast.
Commercial hex stones run about $18 a piece. Pin this if you love geometric outdoor vibes!
- Key Materials: 24-inch concrete hexagons and decorative gap gravel
- Vibe / Style: Modern geometric
- Difficulty: Medium precise leveling
- Budget Breakdown: Paver: $18 | Contrast Gravel: $5.
- Creator’s Tip: Use a custom wood spacer block to ensure the gaps between every single hexagon are mathematically perfect.
- Smart Sourcing: commercial hexagonal paver molds and bulk pack polished black river stones.
14. Boulder Stepping Sequence
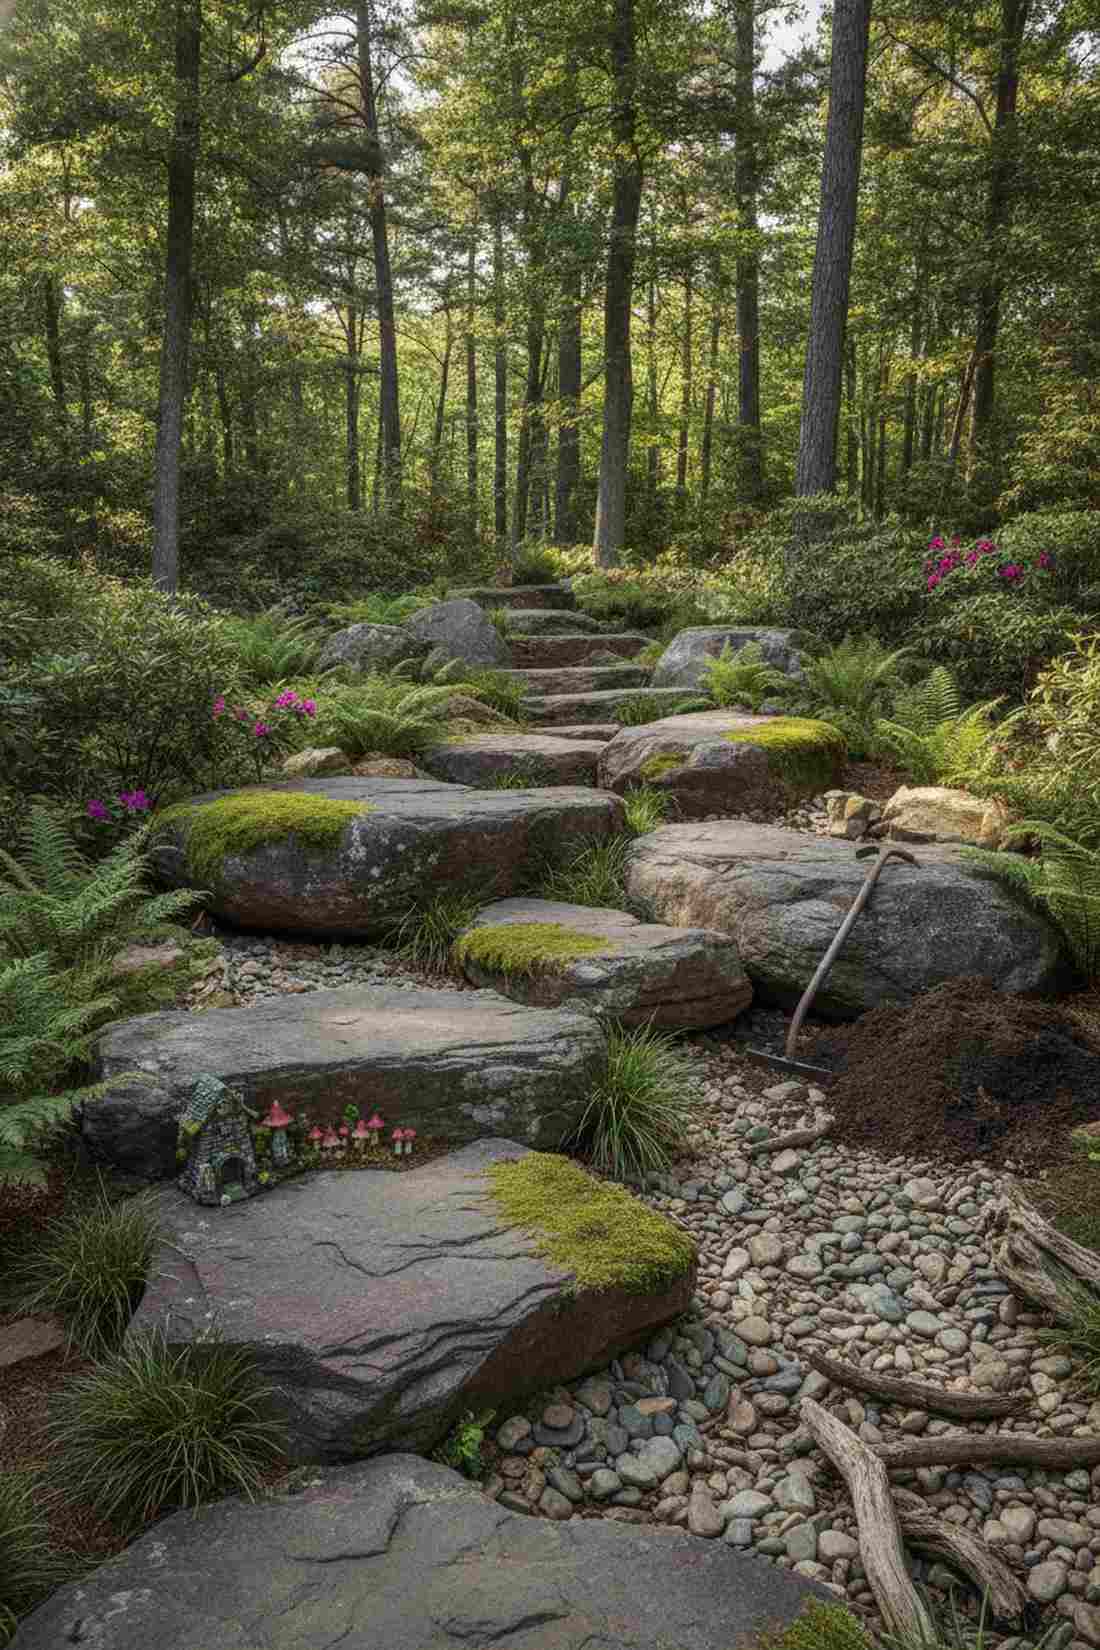
Brings a rugged, unpolished energy that feels like a natural alpine hiking trail. Natural boulder walkways are the only true choice when navigating through untamed woodland gardens or dry creek beds.
Standard pavers look silly in wild landscaping, but sinking massive flat-topped boulders partially into the earth creates a highly organic, immovable route. Grab some fairy garden kits and tuck tiny mossy elements at the base of the rocks for a magical woodland touch.
Sourcing local boulders keeps costs incredibly low, usually just $10–$20 per rock.
- Key Materials: Flat-topped natural boulders (30-48 inches wide)
- Vibe / Style: Alpine wildscape
- Difficulty: Hard (machinery often needed)
- Budget Breakdown: Boulder: $20 | Soil Prep: $0.
- Creator’s Tip: Bury exactly one-third of the boulder below grade so it naturally looks like an exposed bedrock outcropping.
- Smart Sourcing: heavy-duty landscaping pry bars and live moss starter kits.
Forget everything you know about straight walkways. The upcoming geometric shift is what landscape architects use to make tiny yards look massive.
Rectangular Stepping Stones for Linear Path Design
15. Bluestone Rectangular Treads
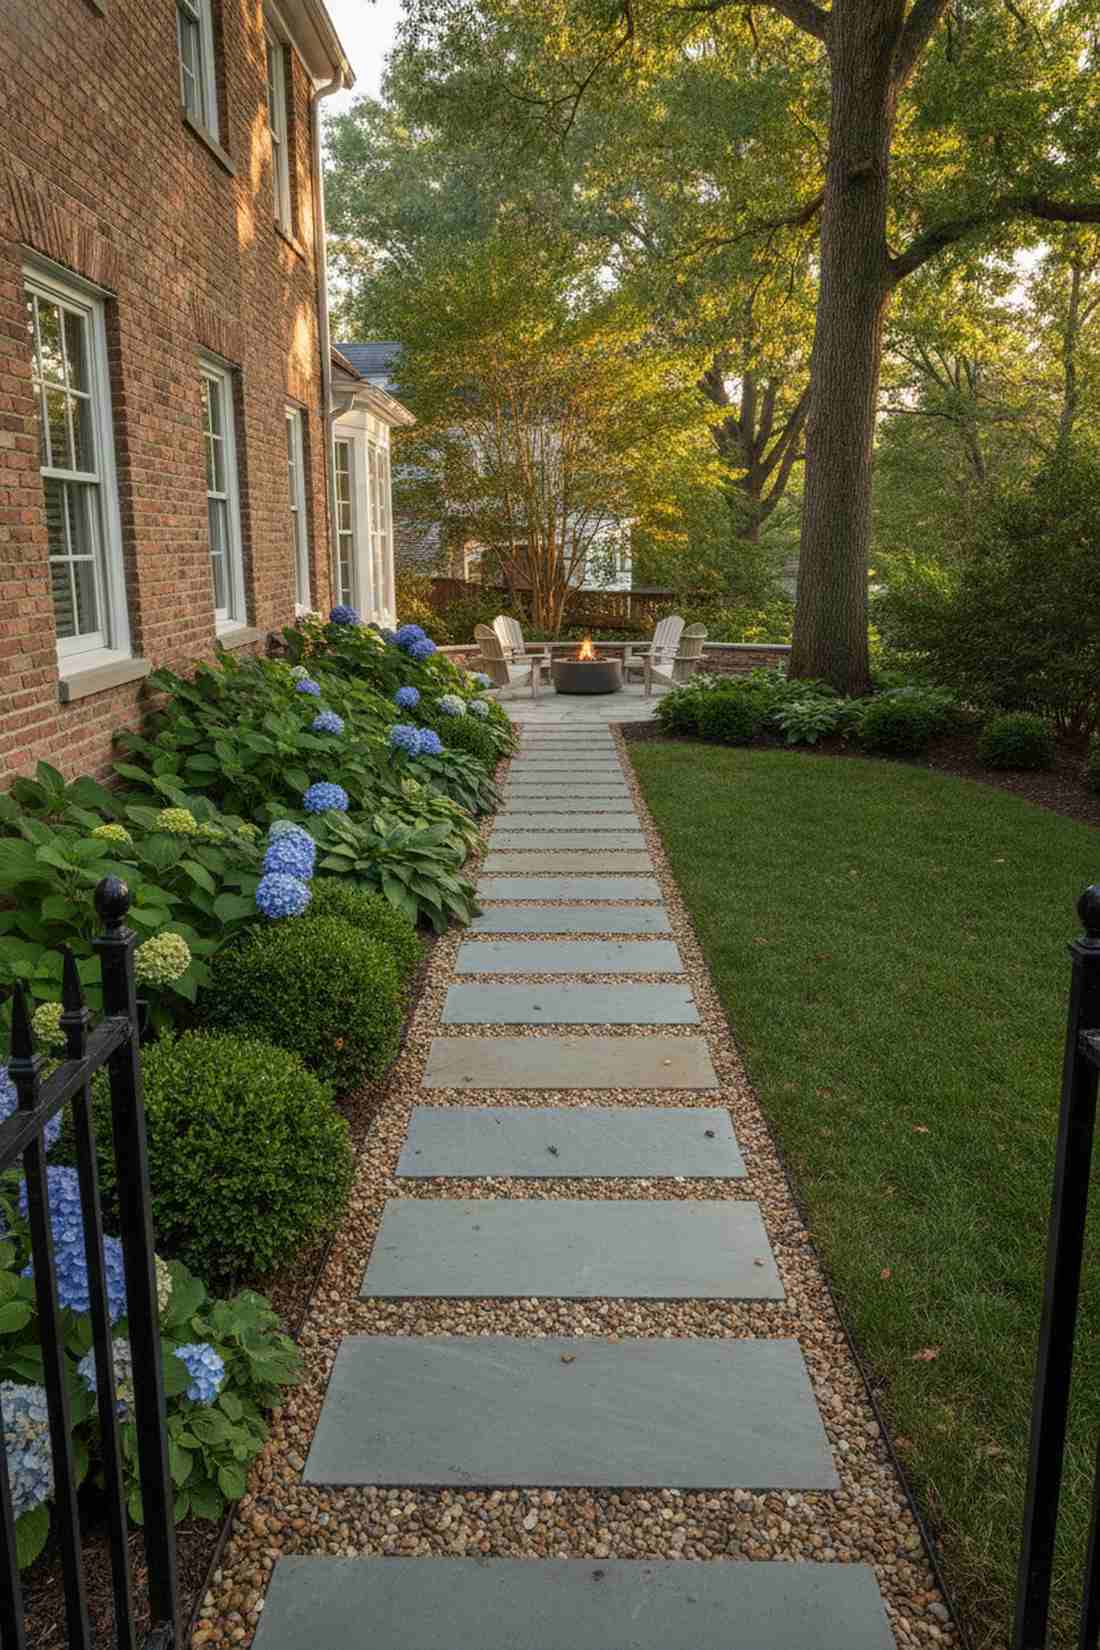
Cuts a striking, clean line that feels incredibly refined and intentional. Implementing stepping stones rectangular profiles adds instant structural elegance along the side of a traditional brick home.
Curved paths can feel messy, but these thermal-finished elongated cuts provide an architectural edge that outsmarts visual clutter. Running them perpendicular to the walking direction subtly tricks the eye, making narrow side-yards feel significantly wider.
Premium bluestone treads cost about $30–$45 each, but the value boost to your property is undeniable.
- Key Materials: 12×24 inch thermal-finish bluestone slabs
- Vibe / Style: Classic transitional
- Difficulty: Medium
- Budget Breakdown: Stone: $35 | Base: $5.
- Creator’s Tip: Space them exactly 6 inches apart to accommodate an average walking stride without breaking rhythm.
- Smart Sourcing: commercial path leveling guides and premium bluestone sealer kits.
16. Railroad Tie Style Concrete
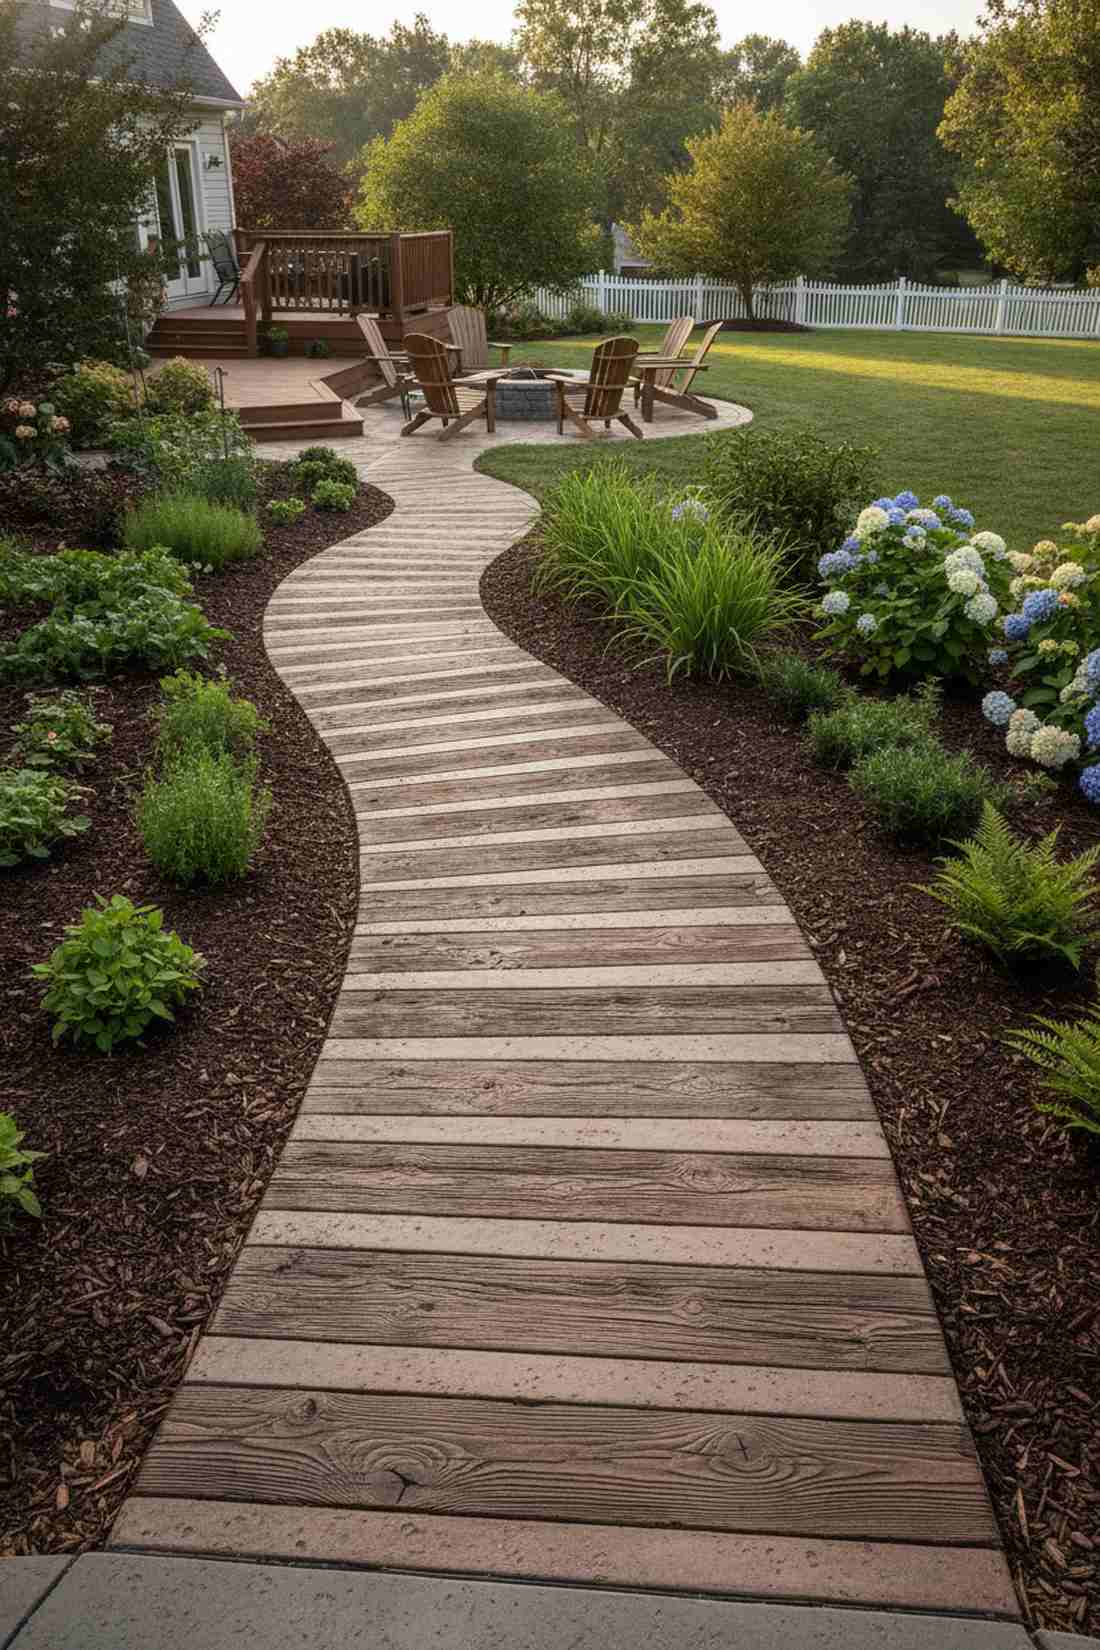
Radiates a vintage, weathered charm that feels completely authentic without the chemical drawbacks. Faux wood concrete pavers are perfect for meandering routes through heavy mulch beds or vegetable patches.
Real timber rots and leaches toxic creosote, but pouring stamped concrete planks delivers a surprisingly premium look that lasts for decades. Staining them with varied walnut tones makes them utterly indistinguishable from antique reclaimed timber.
You can cast these yourself for under $8 a plank. Save this for your rustic garden overhaul!
- Key Materials: Concrete mix, wood-grain texture stamps, and brown acid stain
- Vibe / Style: Vintage industrial
- Difficulty: Medium
- Budget Breakdown: Concrete: $6 | Stain/Stamp: $2.
- Creator’s Tip: Sweep dark brown antiquing powder into the wood grain lines before sealing to make the “bark” pop.
- Smart Sourcing: wood-grain concrete stamp starter kits and water-based exterior concrete stain.
17. Brick Pattern Rectangular Pavers
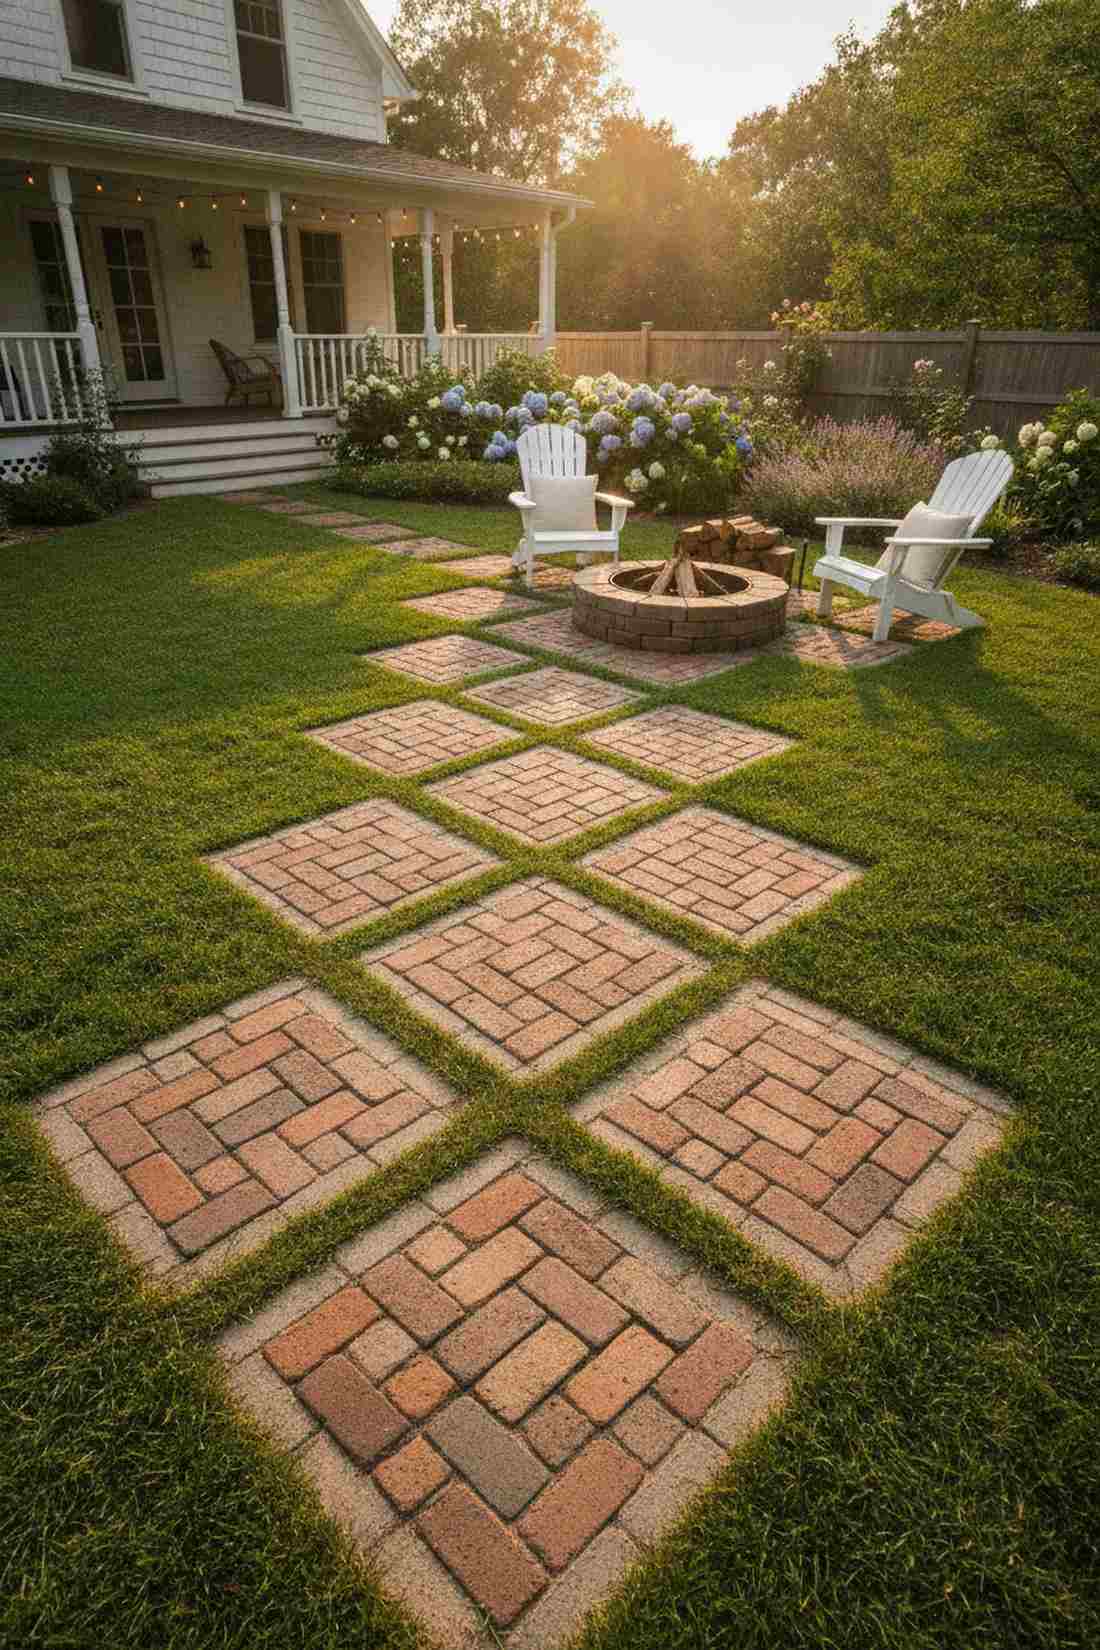
Evokes a cozy, cottage warmth that feels deeply nostalgic and inviting. Traditional brick hardscaping is an absolute classic for tying a backyard fire pit area to the main house.
Laying a massive brick patio is exhausting, but grouping three or four bricks together to form individual stepping pads gives a designer-level finish in half the time. The basketweave mini-patterns add complex visual texture while keeping the grass ratio high.
Grouping standard pavers keeps this budget firmly around $5 per stepping zone.
- Key Materials: Standard 4×8 concrete brick pavers and polymeric sand
- Vibe / Style: Cottage core
- Difficulty: Easy
- Budget Breakdown: Bricks: $4 | Sand: $1.
- Creator’s Tip: Dig out a tight, exact square in the turf so the grass naturally holds the bricks tight without plastic edging.
- Smart Sourcing: polymeric sand bulk packs and heavy-duty rubber mallets.
18. Limestone Rectangular Strips
Creates a delicate, elongated ribbon effect that feels incredibly elegant and airy. Narrow stone pathways work beautifully when navigating through densely planted, shadowy fern gardens.
Chunky squares can overpower delicate plants, but these slim limestone strips completely bypass the bulky aesthetic, letting the greenery shine. The bright cream tones reflect ambient light, instantly brightening up those notoriously dark landscape corners.
These specialized cuts usually run about $25 per strip. Pin this to your shade garden board!
- Key Materials: 6×24 inch cut limestone strips
- Vibe / Style: Luminous garden ribbon
- Difficulty: Easy to Medium
- Budget Breakdown: Limestone: $25 | Base Sand: $4.
- Creator’s Tip: Lay these lengthwise parallel to the path flow to artificially stretch the perceived distance of the walkway.
- Smart Sourcing: pre-cut limestone sealant packs and commercial weed barrier fabric rolls.
19. Staggered Plank Stepping Stones
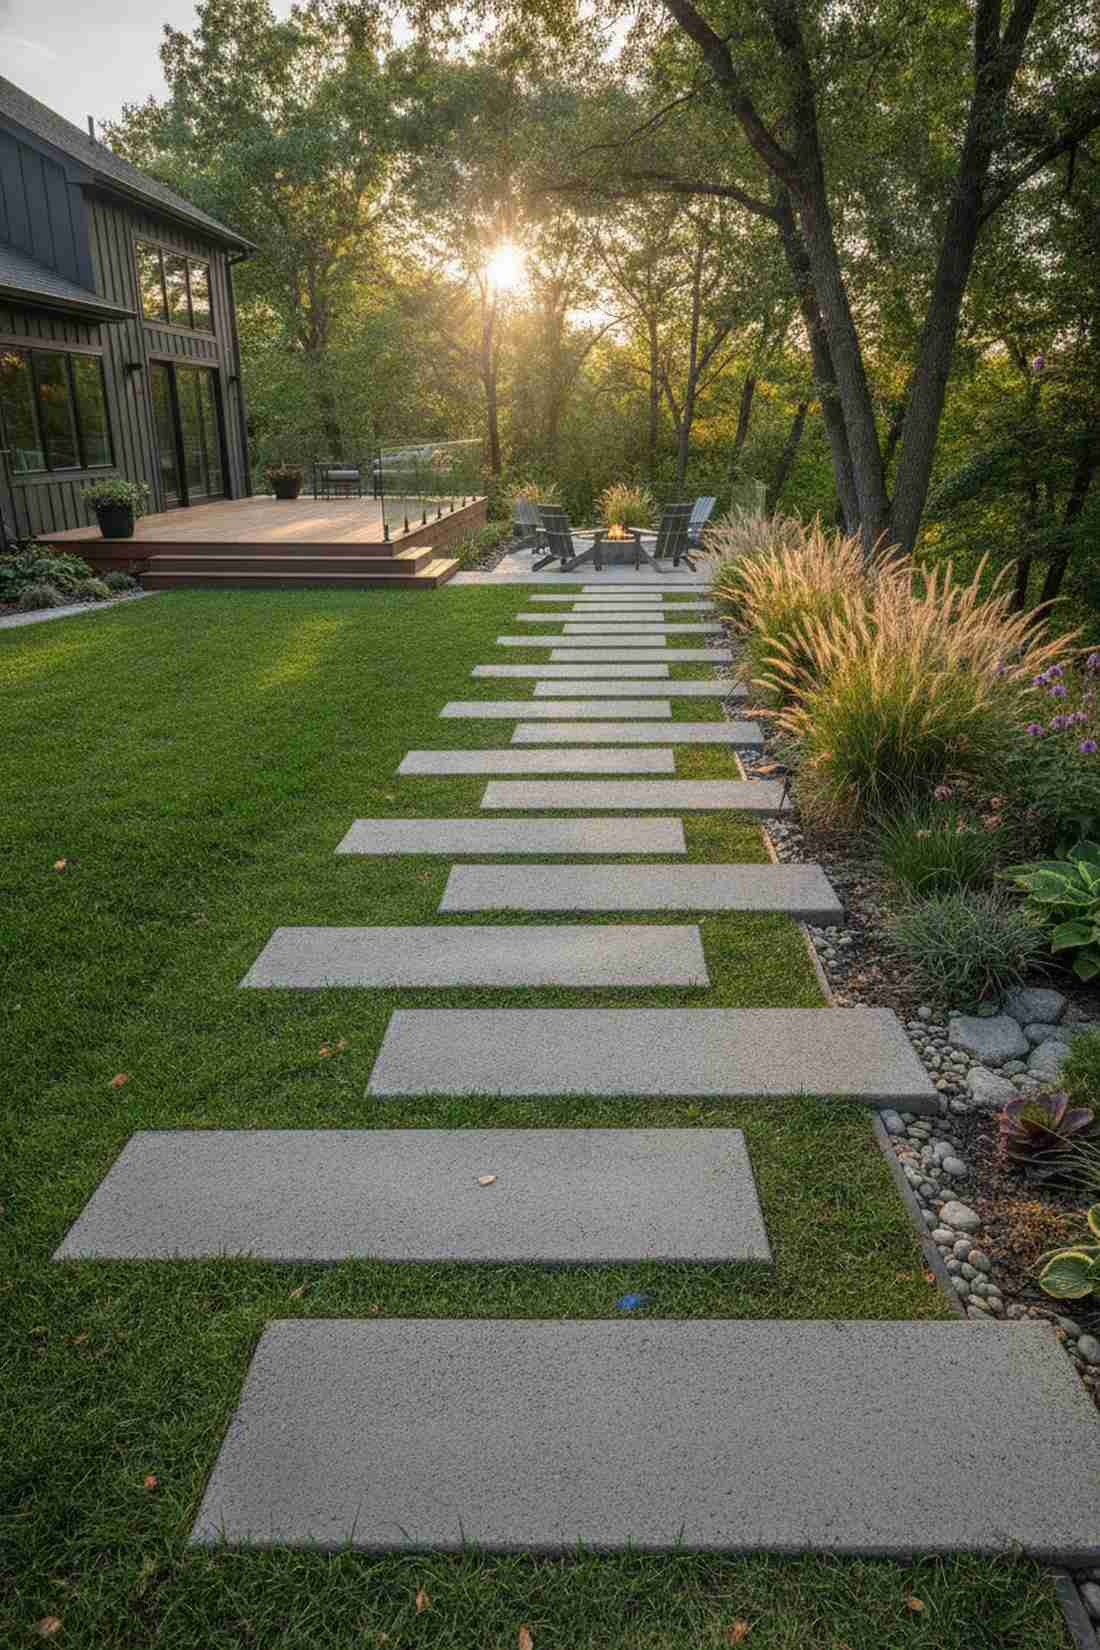
Injects an energetic, dynamic rhythm that feels modern and delightfully unpredictable. Asymmetrical paver layouts are the ultimate cheat code for making a boring, straight side-yard feel like a boutique hotel entrance.
Lining pavers up perfectly straight is incredibly tedious, but this staggered offset method looks far more expensive than it is while hiding alignment flaws. It naturally forces visitors to slow their pace and admire your surrounding landscape architecture.
A brilliant high-impact trick that costs exactly the same as a boring straight path.
- Key Materials: 8×30 inch concrete planks
- Vibe / Style: Boutique contemporary
- Difficulty: Easy layout
- Budget Breakdown: Concrete Planks: $20 each | Base: $5.
- Creator’s Tip: Offset each plank by exactly 50% of its length from the previous one for a flawless, intentional zig-zag.
- Smart Sourcing: pre-cast concrete plank molds and laser level starter kits.
If you’re tired of pulling weeds between pavers, this next modular hack is an absolute lifesaver.
20. Granite Curb Sections
Emanates an industrial-chic toughness that feels rooted in urban history. Reclaimed granite hardscaping provides a massively durable stepping solution for high-traffic utility paths.
Standard patio stones crack under pressure, but using salvaged 8-inch thick city curbing provides an architectural edge that outsmarts literal vehicles. The heavily weathered patina adds instant vintage street cred to ultra-modern backyard redesigns.
Salvage yards sell these chunks for roughly $40 each, but they will survive the next apocalypse.
- Key Materials: Salvaged granite street curbing
- Vibe / Style: Urban industrial
- Difficulty: Hard (extreme weight)
- Budget Breakdown: Granite Curb: $40 | Crushed Rock: $10.
- Creator’s Tip: Bury the rough, uneven bottom edge deep into compacted gravel so only the smooth, traffic-worn top is exposed.
- Smart Sourcing: heavy-duty stone lifter tools and bulk pack tamper base gravel.
21. Scored Concrete Rectangles
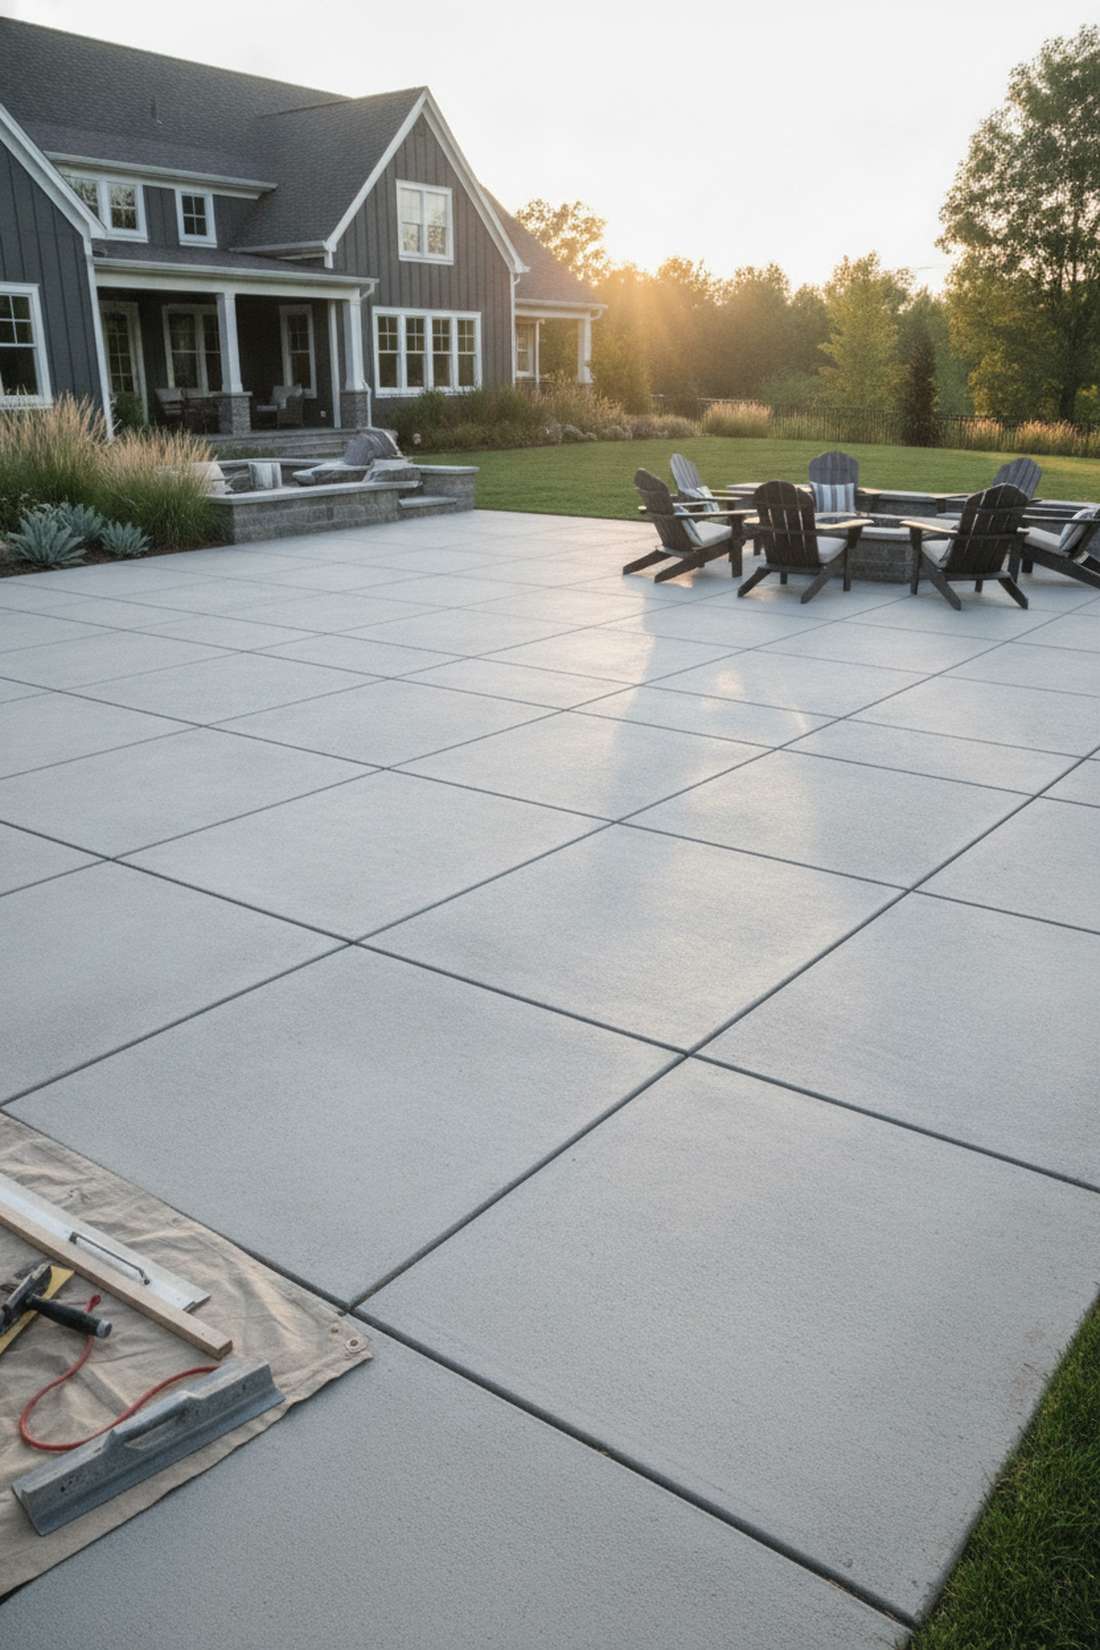
Delivers an ultra-sleek, continuous grid that feels incredibly bespoke and high-end. Custom scored walkways are the smart builder’s choice for massive backyard patios on a tight budget.
Laying hundreds of individual rectangles takes weeks, but pouring a solid pad and grooving the wet cement delivers a surprisingly premium finish in one afternoon. Using a specialized groover tool completely bypasses the nightmare of leveling individual stones.
Cover massive ground for merely $3–$5 per square foot. Save this genius builder hack!
- Key Materials: Ready-mix concrete and a 3/4-inch concrete grooving tool
- Vibe / Style: Seamless modern
- Difficulty: Medium timing
- Budget Breakdown: Concrete Mix: $45 | Hand Tools: $25.
- Creator’s Tip: Run the groover along a straight 2×4 piece of lumber while the concrete is firm but still wet for razor-sharp lines.
- Smart Sourcing: professional concrete groover kits and heavy-duty magnesium hand floats.
Square Stepping Stones for Grid Patterns
22. Checkerboard Square Layout
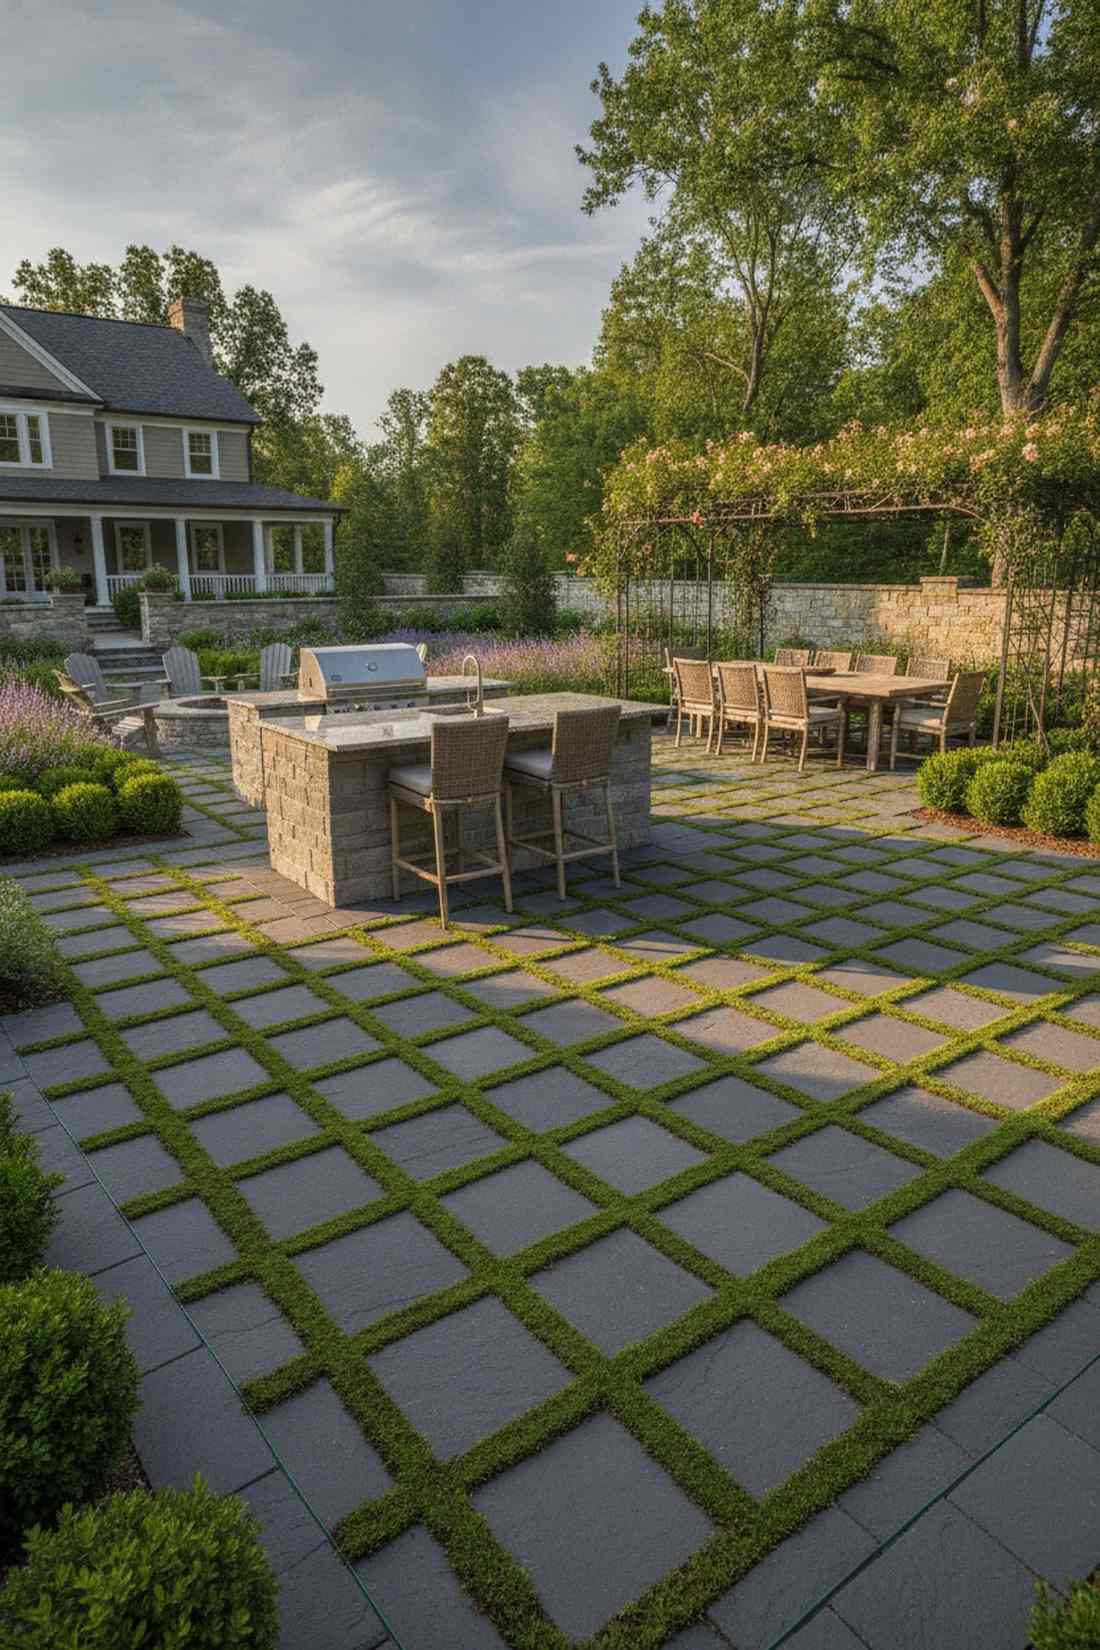
Creates a striking, highly organized visual that feels like a classic European courtyard. Utilizing stepping stones square profiles in a tight grid is perfect for defining sophisticated outdoor kitchen spaces.
Most folks default to solid concrete slabs, but alternating dark square pavers with dense green moss looks far more expensive than it is. The porous, plant-filled gaps prevent rainwater pooling while delivering an upscale, highly tailored botanical aesthetic.
This layout runs about $15 per square. Pin this if you love organized, formal landscaping!
- Key Materials: 12×12 inch charcoal pavers and Irish moss plugs
- Vibe / Style: Formal English garden
- Difficulty: Medium precision
- Budget Breakdown: Pavers: $10 | Moss Plugs: $5.
- Creator’s Tip: Install an invisible plastic edge restraint around the entire grid boundary to keep the squares from drifting over time.
- Smart Sourcing: pre-cut moss panels (bulk pack) and invisible landscape edging kits.
23. Offset Square Stepping Sequence
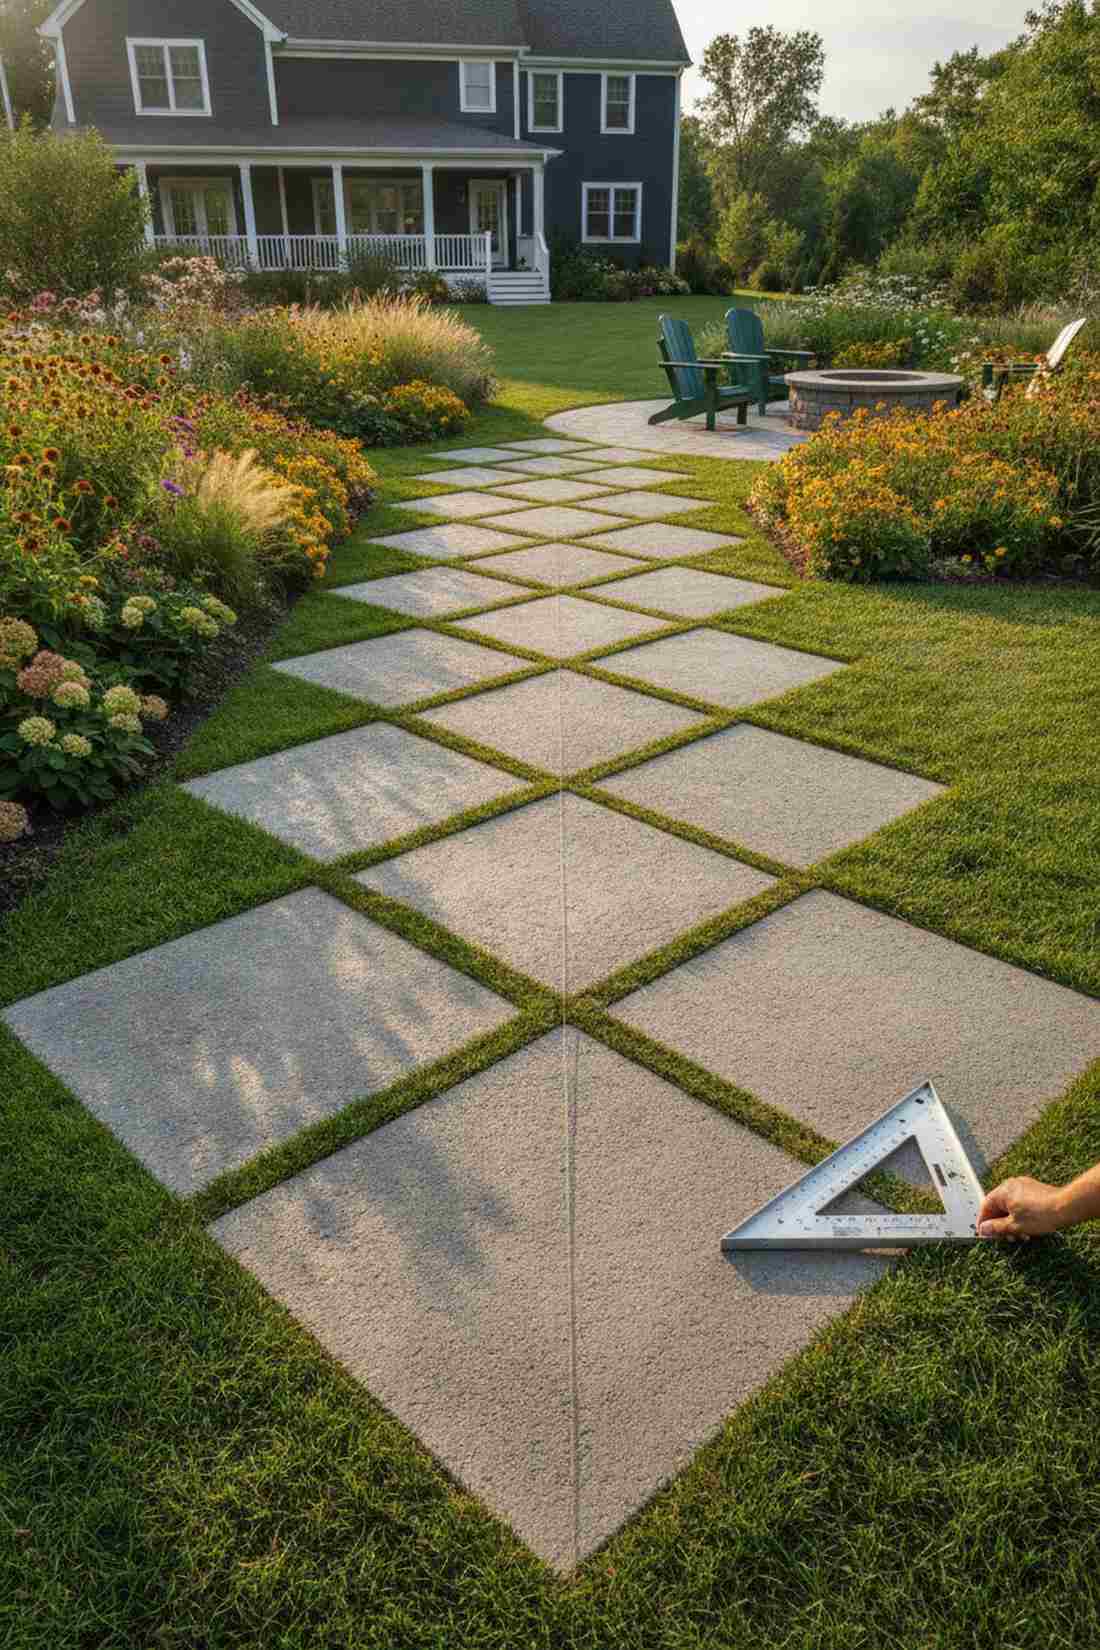
Rotates the perspective to create a dynamic diamond effect that feels incredibly energetic. Diagonal pathway layouts are a brilliant optical trick to seamlessly connect two unrelated garden zones.
Rigid square paths can feel like a boring sidewalk, but angling them 45-degrees provides an architectural edge that outsmarts predictable designs. The diamond points naturally encourage a slower, more mindful walking pace through your flower beds.
Zero extra cost compared to a straight lay, making this a pure aesthetic win.
- Key Materials: 15×15 inch square cast stones
- Vibe / Style: Dynamic diamond
- Difficulty: Easy
- Budget Breakdown: Stones: $15 each | Base Prep: $3.
- Creator’s Tip: Use a speed square tool to ensure the tips of every diamond align perfectly with your center string line.
- Smart Sourcing: heavy-duty aluminum speed squares and UV-resistant paver sealer.
24. Tiered Square Platforms
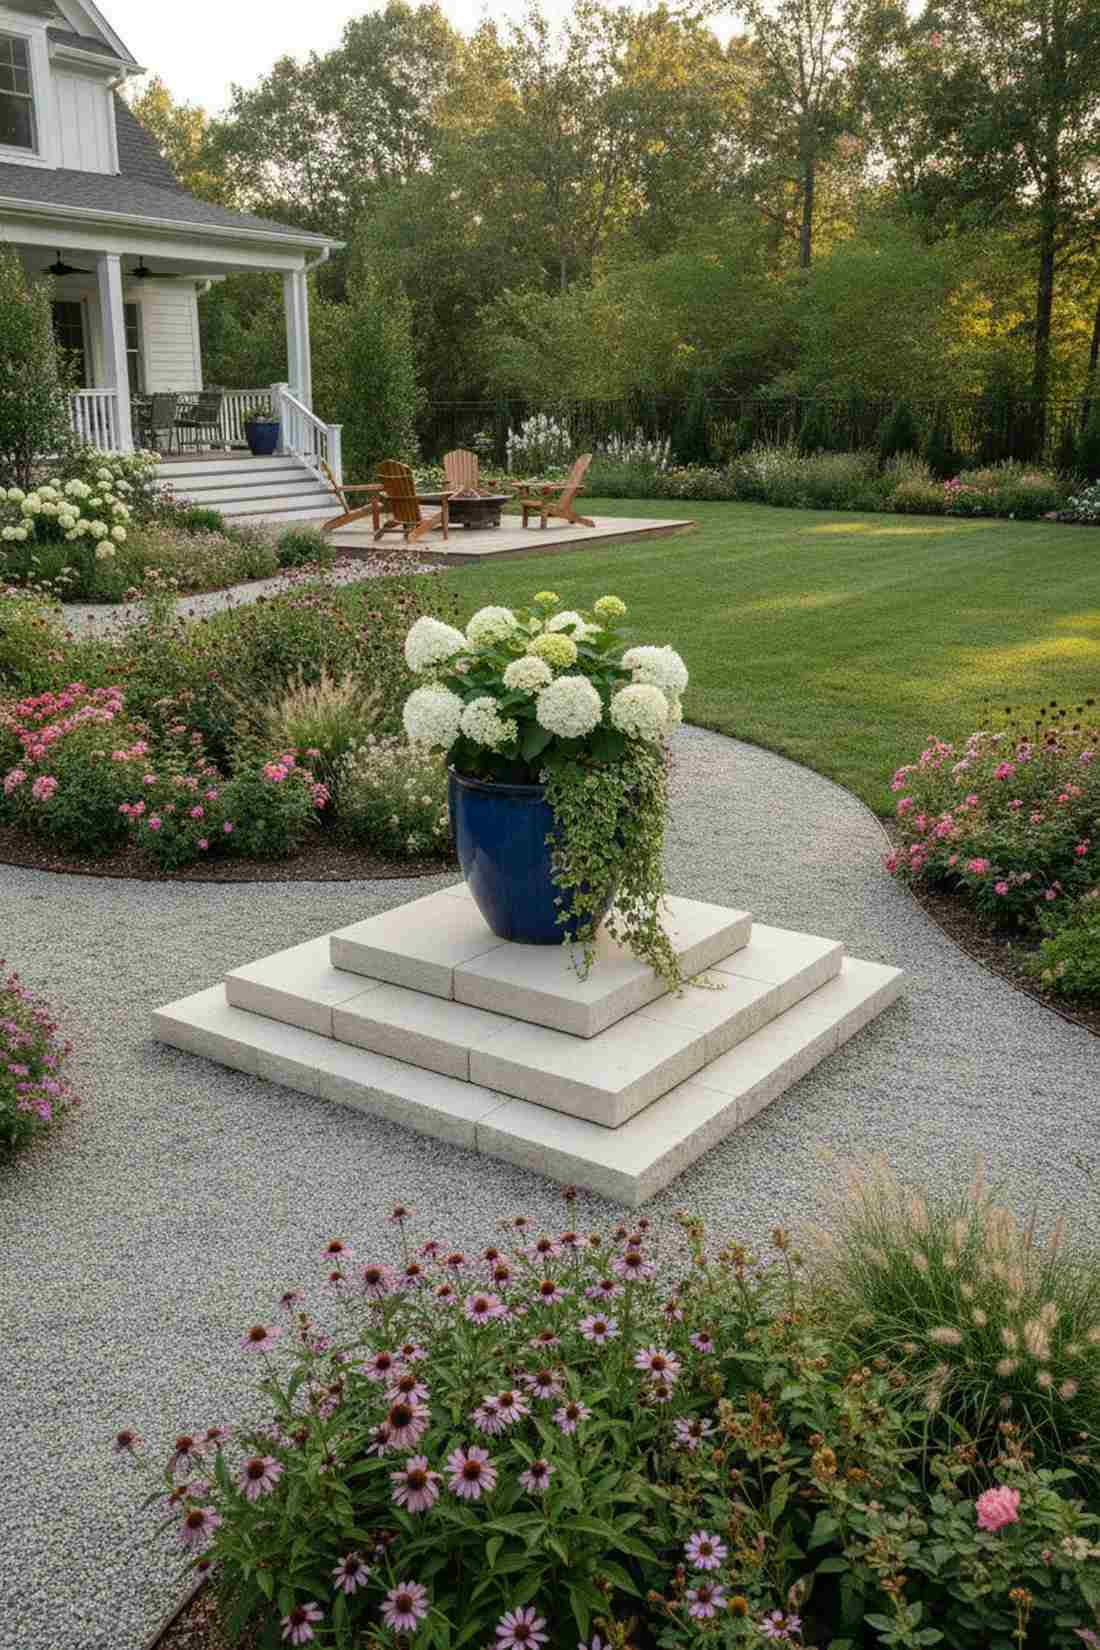
Builds bold, step-pyramid geometry that feels like a modern landscape monument. Raised platform hardscaping is an absolute showstopper when placed at the exact intersection of two garden paths.
Flat yards lack visual interest, but stacking descending squares delivers a surprisingly premium finish that doubles as a pedestal for giant ceramic planters. This completely bypasses the need to dig deep footings while instantly adding expensive vertical architecture.
Stacking three premium squares will cost around $60 per node.
- Key Materials: 18″, 15″, and 12″ square paver slabs
- Vibe / Style: Architectural pedestal
- Difficulty: Easy stacking
- Budget Breakdown: Paver Trio: $50 | Construction Glue: $10.
- Creator’s Tip: Hide the adhesive strictly in the center rings so no glue squeezes out and ruins the clean geometric edges.
- Smart Sourcing: exterior-grade landscape block adhesive and pre-cut square paver molds.
25. Interlocking Modular Squares
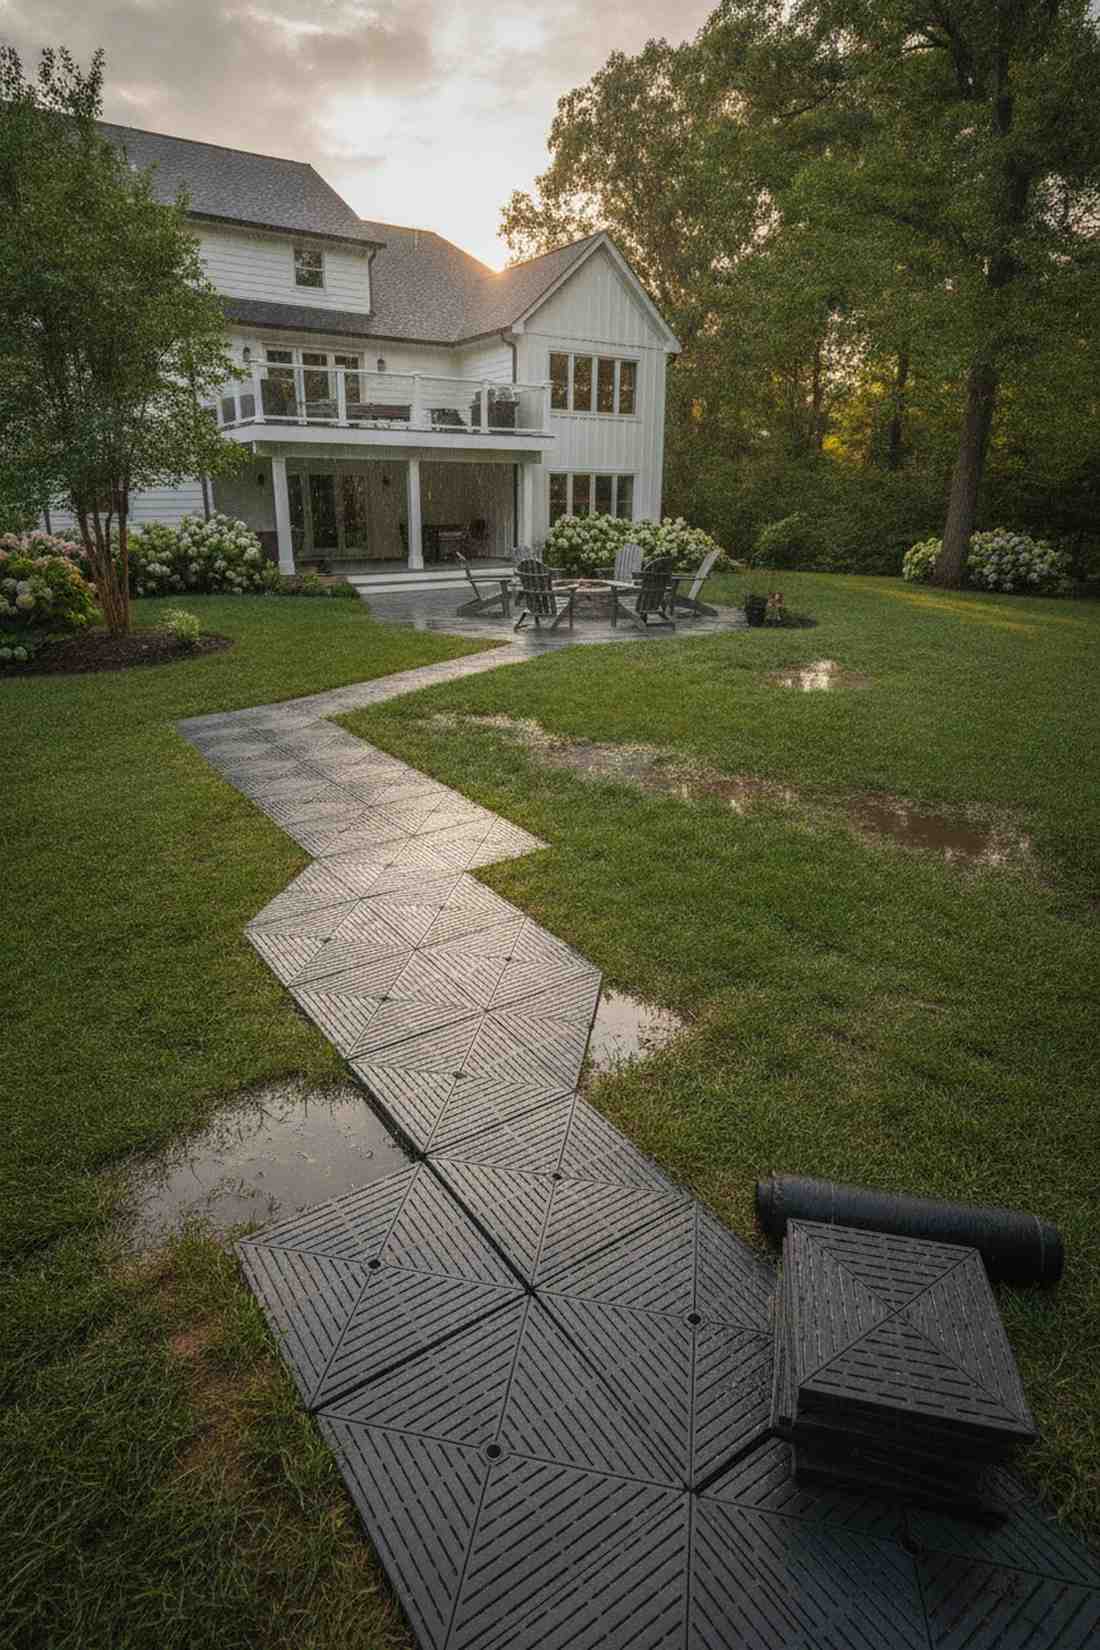
Provides a flawless, high-tech grid that feels perfectly engineered and zero-maintenance. Modular pathway systems are a lifesaver for soggy, low-lying backyards that turn into mud pits after rain.
Traditional stone inevitably shifts and wobbles, but locking composite squares together guarantees a designer-level finish that will never sink. Many of these eco-friendly grids contain built-in drainage channels, keeping your shoes perfectly dry all year long.
These snap-together systems run about $10–$15 per square. Save this for instant mud-free walkways!
- Key Materials: Interlocking composite or rubber square tiles
- Vibe / Style: High-performance utility
- Difficulty: Ultra-easy (snap together)
- Budget Breakdown: Modular Tiles: $12 | Weed Fabric: $2.
- Creator’s Tip: Ensure your dirt base is relatively flat before snapping them together; they contour slightly, but sharp dips will pop the locks.
- Smart Sourcing: interlocking composite paver kits (bulk pack) and heavy-duty weed barrier fabric.
Stop scrolling if you have a modern exterior—the upcoming minimalist grid is guaranteed to double your curb appeal.
Material Guide: Cheap vs. Premium Aesthetic
Knowing exactly where to save and where to spend makes all the difference in achieving that “looks expensive but isn’t” vibe.
- Standard vs. UV-Resistant/Premium: Upgrading to UV-coated sealants stops your concrete from chalking and fading under harsh summer sun.
- Pre-made Kits vs. Sourcing Locally: Bulk pack commercial molds often save hours of manual leveling compared to sourcing random irregular stones.
26. Square Aggregate Panels
Brings a rough, glittering texture that feels incredibly tactile and high-end. Exposed aggregate paver setups are brilliant for sloping areas where you need maximum foot traction.
Smooth concrete is a slip hazard when wet, but washing away the top layer to reveal glass or polished stone aggregates provides an architectural edge that outsmarts rainy days. The geometric precision of the square combined with the chaotic texture is visually stunning.
Casting these custom panels costs around $18 each.
- Key Materials: Concrete mix, colored decorative aggregate, and surface retarder
- Vibe / Style: Textured contemporary
- Difficulty: Medium
- Budget Breakdown: Cement: $6 | Aggregate & Retarder: $12.
- Creator’s Tip: Spray the surface retarder immediately after troweling, then simply hose off the top cream layer the next morning.
- Smart Sourcing: exposed aggregate surface retarder spray and bulk pack polished decorative pebbles.
27. Minimalist Smooth Concrete Squares

Projects a serene, gallery-like emptiness that feels intensely refined. Ultra-smooth concrete layouts thrive in minimalist Japanese-inspired gardens where less is definitively more.
Most DIYers over-texture their cement, but using a steel trowel to achieve a glass-like finish looks far more expensive than it is. Keeping the color totally monochromatic light gray allows your vibrant plants and architectural features to loudly dominate the space.
An ultra-cheap $8 per stone solution with maximum aesthetic return.
- Key Materials: Fine-finish concrete mix and steel finishing trowel
- Vibe / Style: Zen gallery
- Difficulty: Medium (troweling skill)
- Budget Breakdown: Concrete: $6 | Sealer: $2.
- Creator’s Tip: Mist the curing concrete with water and cover with plastic sheeting to prevent tiny micro-cracks on the smooth surface.
- Smart Sourcing: professional steel finishing trowels and high-gloss concrete sealer kits.
28. Sandstone Cut Squares
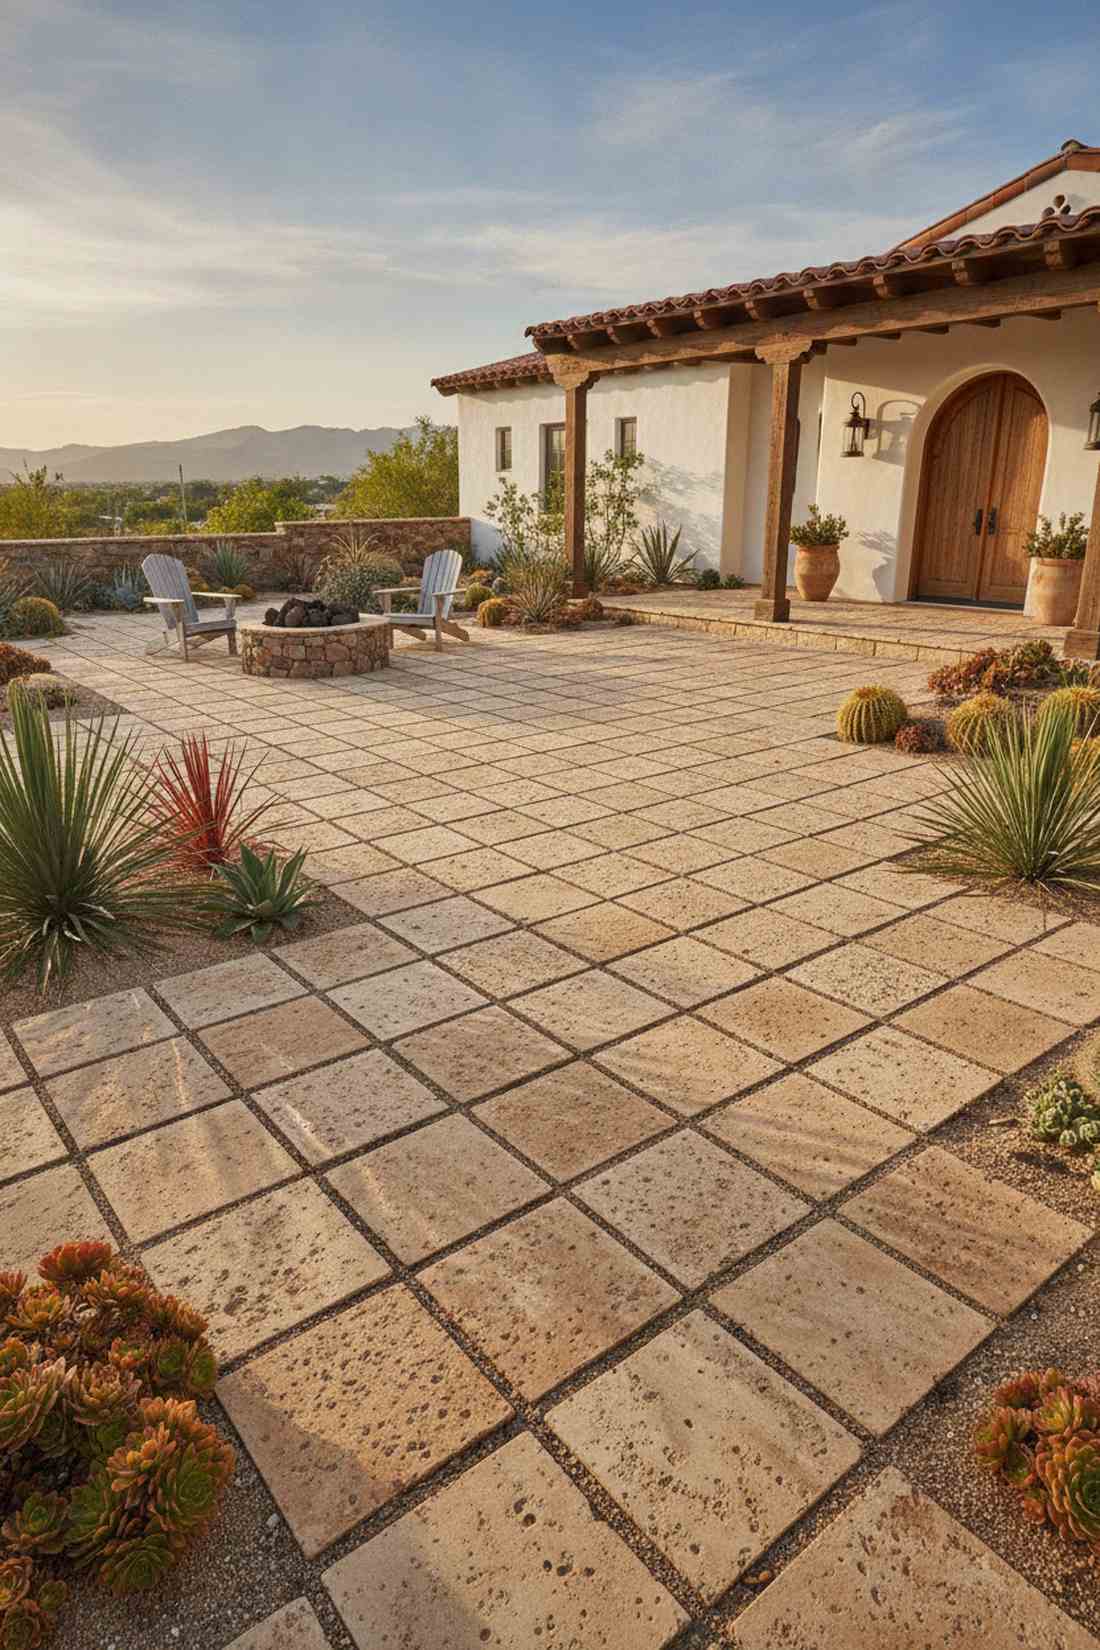
Radiates a warm, sun-baked energy that feels native to desert and Mediterranean villas. Natural cut sandstone grids are an absolute dream for pairing with succulents, agave, and dry garden beds.
While gray concrete looks harsh in arid setups, the buff and tan tones of sandstone completely bypass the sterile look for something highly organic. The porous nature of the stone acts as a natural sponge, beautifully managing stormwater runoff.
Expect premium cut sandstone to run about $25 per square.
- Key Materials: 16-inch uniform sandstone squares
- Vibe / Style: Desert Mediterranean
- Difficulty: Easy
- Budget Breakdown: Sandstone: $22 | Sand Base: $3.
- Creator’s Tip: Never use a pressure washer on natural sandstone; it will blast away the protective patina and gouge the surface.
- Smart Sourcing: breathable natural stone sealer and commercial weed barrier rolls.
Wait until you see this hybrid geometric layout—it’s the exact secret designers use to break up boring, flat lawns.
Mixed Geometric Combinations for Dynamic Designs
29. Round and Square Alternating Pattern
Introduces a playful, rhythmic pulse that feels delightfully unconventional. Hybrid geometric pathways are fantastic for transitional zones that connect a formal patio to a wild garden.
Using one shape gets monotonous, but alternating these two distinct profiles delivers a surprisingly premium finish that keeps the eye fully engaged. Maintaining exactly identical spacing between the alternating shapes ensures the quirky layout still feels mathematically unified.
Cost averages around $15 per stepping point. Pin this for a unique backyard twist!
- Key Materials: 16-inch round discs and 14-inch square pavers
- Vibe / Style: Playful transitional
- Difficulty: Easy layout
- Budget Breakdown: Stones: $15 | Base Prep: $3.
- Creator’s Tip: Center every stone on a single stretched string line so the varied shapes don’t make the path look crooked.
- Smart Sourcing: laser-level starter kits and pre-cut pathway templates.
30. Rectangular Frame with Round Center
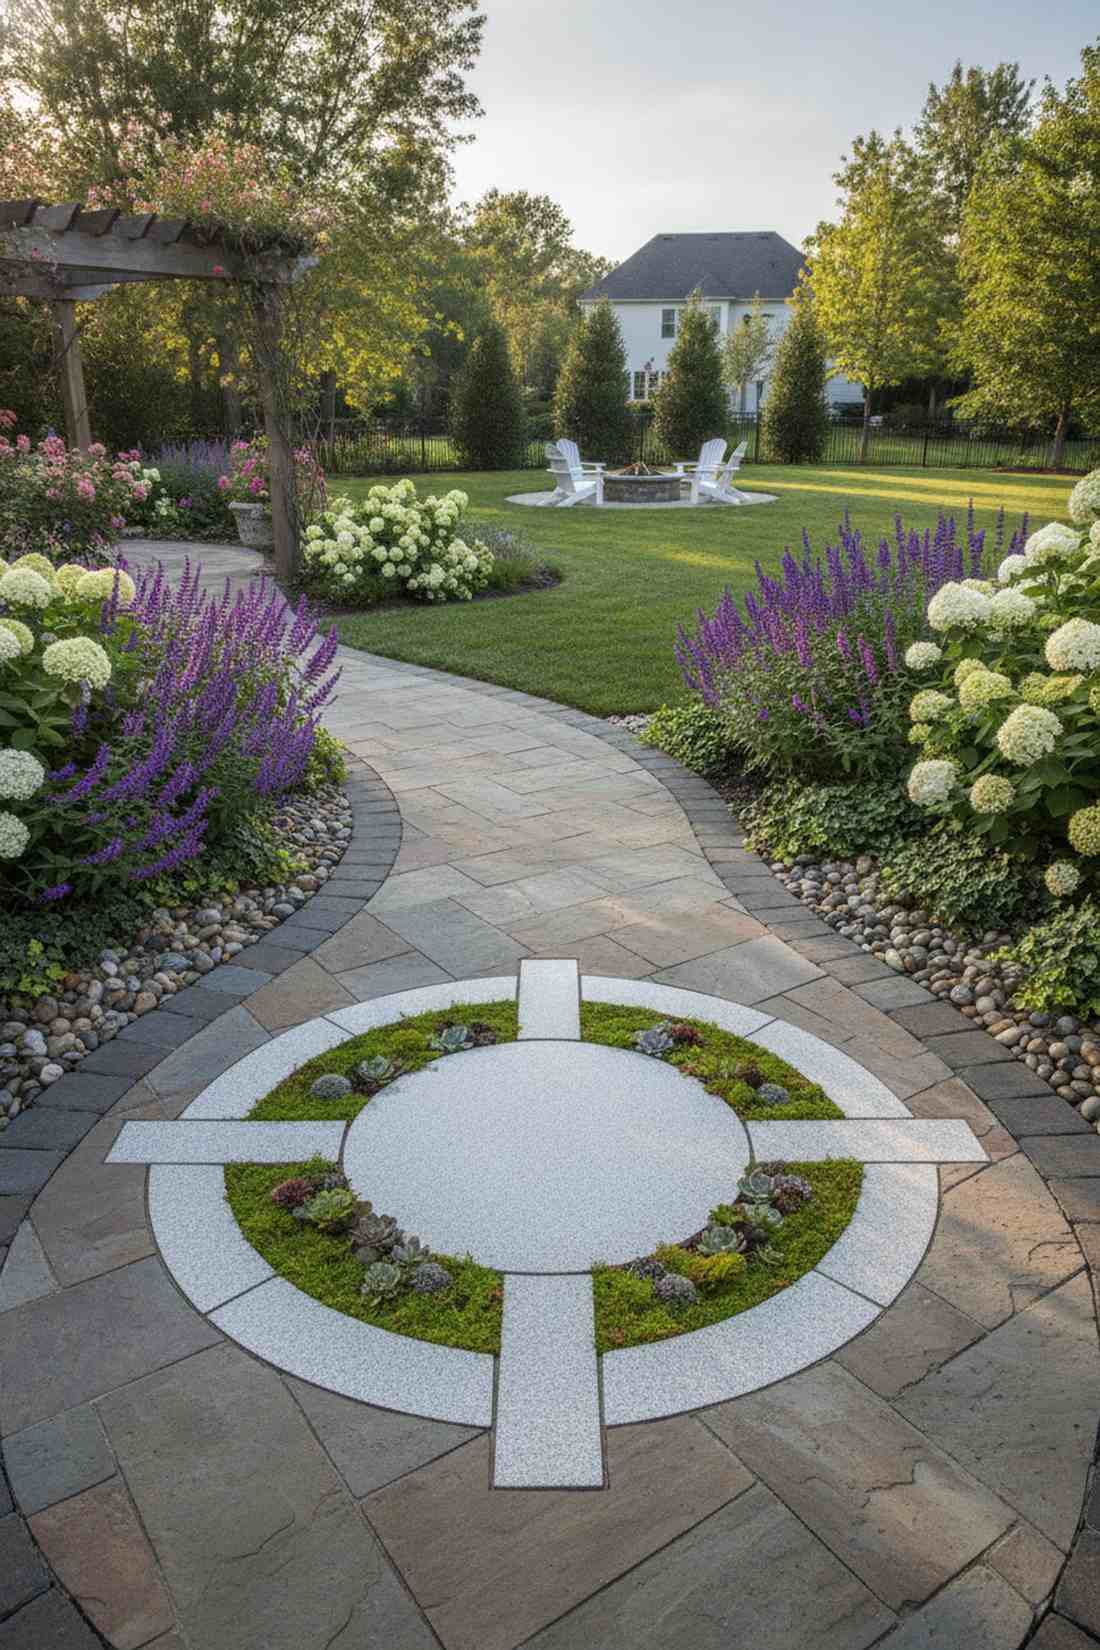
Constructs an ornate, medallion-like focal point that feels incredibly majestic. Framed landscape nodes act as the perfect visual “pause button” at the exact spot a pathway changes direction.
Most DIYers just lay a curve, but framing a large circular stone with four rectangular borders provides an architectural edge that outsmarts basic designs. Leaving a 2-inch gap between the inner circle and outer frame to pack with miniature garden supplies or moss creates a stunning halo effect.
This complex 5-piece node usually costs around $45 total.
- Key Materials: 30-inch center round and four 6×18 inch rectangular borders
- Vibe / Style: Majestic intersection
- Difficulty: Medium precision
- Budget Breakdown: Center Round: $25 | Border Frames: $20.
- Creator’s Tip: Dry-fit the entire five-piece formation on your driveway first to ensure the gap spacing is perfectly symmetrical.
- Smart Sourcing: bulk pack polished river rock and heavy-duty landscaping templates.
31. Geometric Mosaic Pathway
Explodes with complex puzzle-like energy that feels intensely artistic and customized. Mixed shape crazy paving is the ultimate flex for a highly visible courtyard or grand entrance.
Uniform grids can feel clinical, but combining sharp triangles, squares, and rectangles looks far more expensive than it is by mimicking shattered Roman ruins. The chaotic interlocking pattern actually disguises minor leveling mistakes, making it deceptively DIY-friendly.
Using broken or discounted remnant slabs drops this to $10 per square foot.
- Key Materials: Varied geometric cut flagstone or concrete pieces
- Vibe / Style: Modern Roman ruins
- Difficulty: Medium puzzle solving
- Budget Breakdown: Stone Remnants: $8/sq ft | Polymeric Sand: $2/sq ft.
- Creator’s Tip: Keep the joint width absolutely consistent (around 1 inch) across all the chaotic shapes to visually tie the madness together.
- Smart Sourcing: polymeric joint sand (bulk pack) and heavy-duty rubber mallets.
32. Large Squares with Small Round Accents
Creates a whimsical “parent-child” relationship between the stones that feels deeply charming. Accent-stone path layouts are an incredibly sweet addition for side paths leading to a children’s play area.
Massive squares alone are imposing, but tucking tiny 8-inch accent rounds asymmetrically near the corners completely bypasses the sterile formality. Those tiny accent dots practically beg to be customized with colorful fairy garden kits or glow-in-the-dark aggregate.
The extra accent stones only add about $5 to the primary paver cost.
- Key Materials: 20-inch primary squares and 8-inch concrete rounds
- Vibe / Style: Whimsical family garden
- Difficulty: Easy
- Budget Breakdown: Main Square: $15 | Accent Round: $5.
- Creator’s Tip: Stagger the tiny rounds on alternating sides of the main path (left, right, left) to create a natural walking bounce.
- Smart Sourcing: glow-in-the-dark aggregate bags and miniature garden supplies.
33. Hexagonal and Rectangular Combination
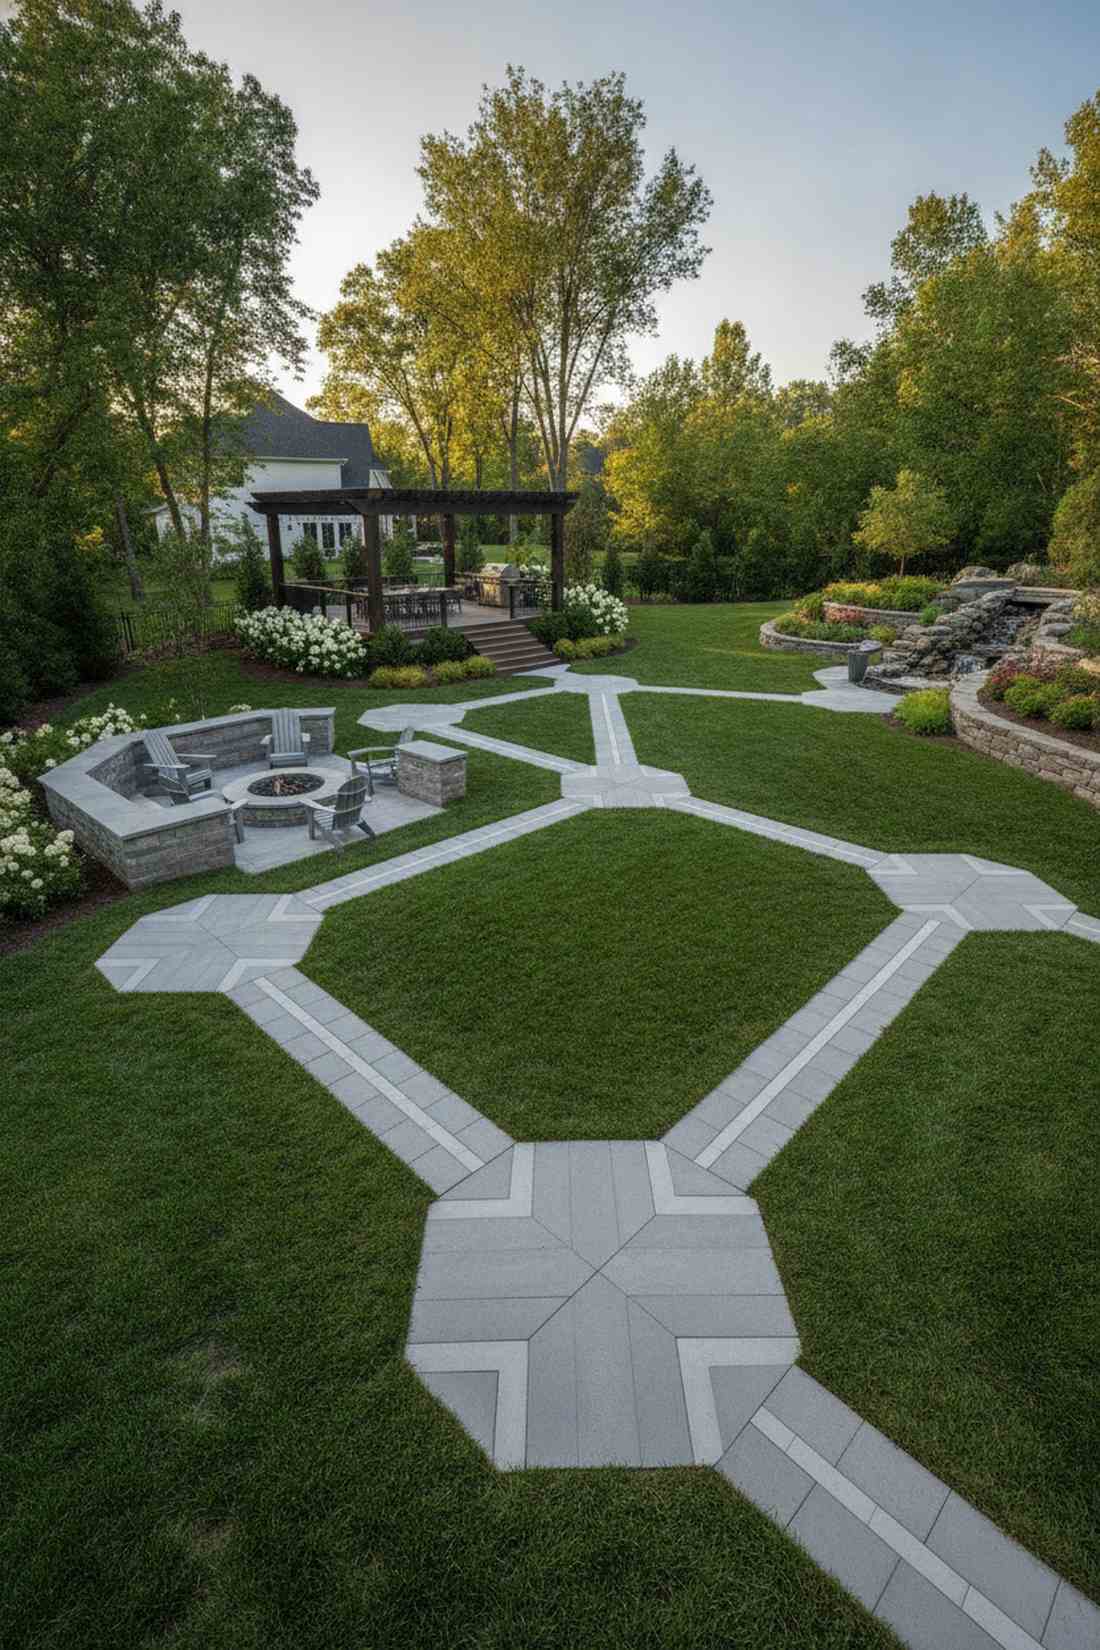
Acts as an unspoken traffic director that feels highly intuitive and beautifully designed. Directional wayfinding hardscaping is a genius tactic for massive yards with multiple branching destinations.
Using the exact same stones everywhere gets confusing, but placing a hexagon at intersection points and rectangles for the straights gives a designer-level finish. The geometry itself communicates circulation patterns clearly, moving guests without them even realizing it.
A highly customized layout that only costs standard paver prices (around $15 per zone).
- Key Materials: 20-inch hexagonal nodes and 10×24 inch rectangular connectors
- Vibe / Style: Intuitive resort
- Difficulty: Medium planning
- Budget Breakdown: Hex Nodes: $18 | Connector Planks: $12.
- Creator’s Tip: Always align the points of the hexagon perfectly parallel to the rectangular planks connecting to them.
- Smart Sourcing: commercial hexagonal paver molds and pre-cut rectangular alignment boards.
The final few ideas on this list are so wildly creative, your neighbors will literally ask who you hired.
Specialty Shapes and Unique Applications
34. Leaf-Shaped Stepping Stones
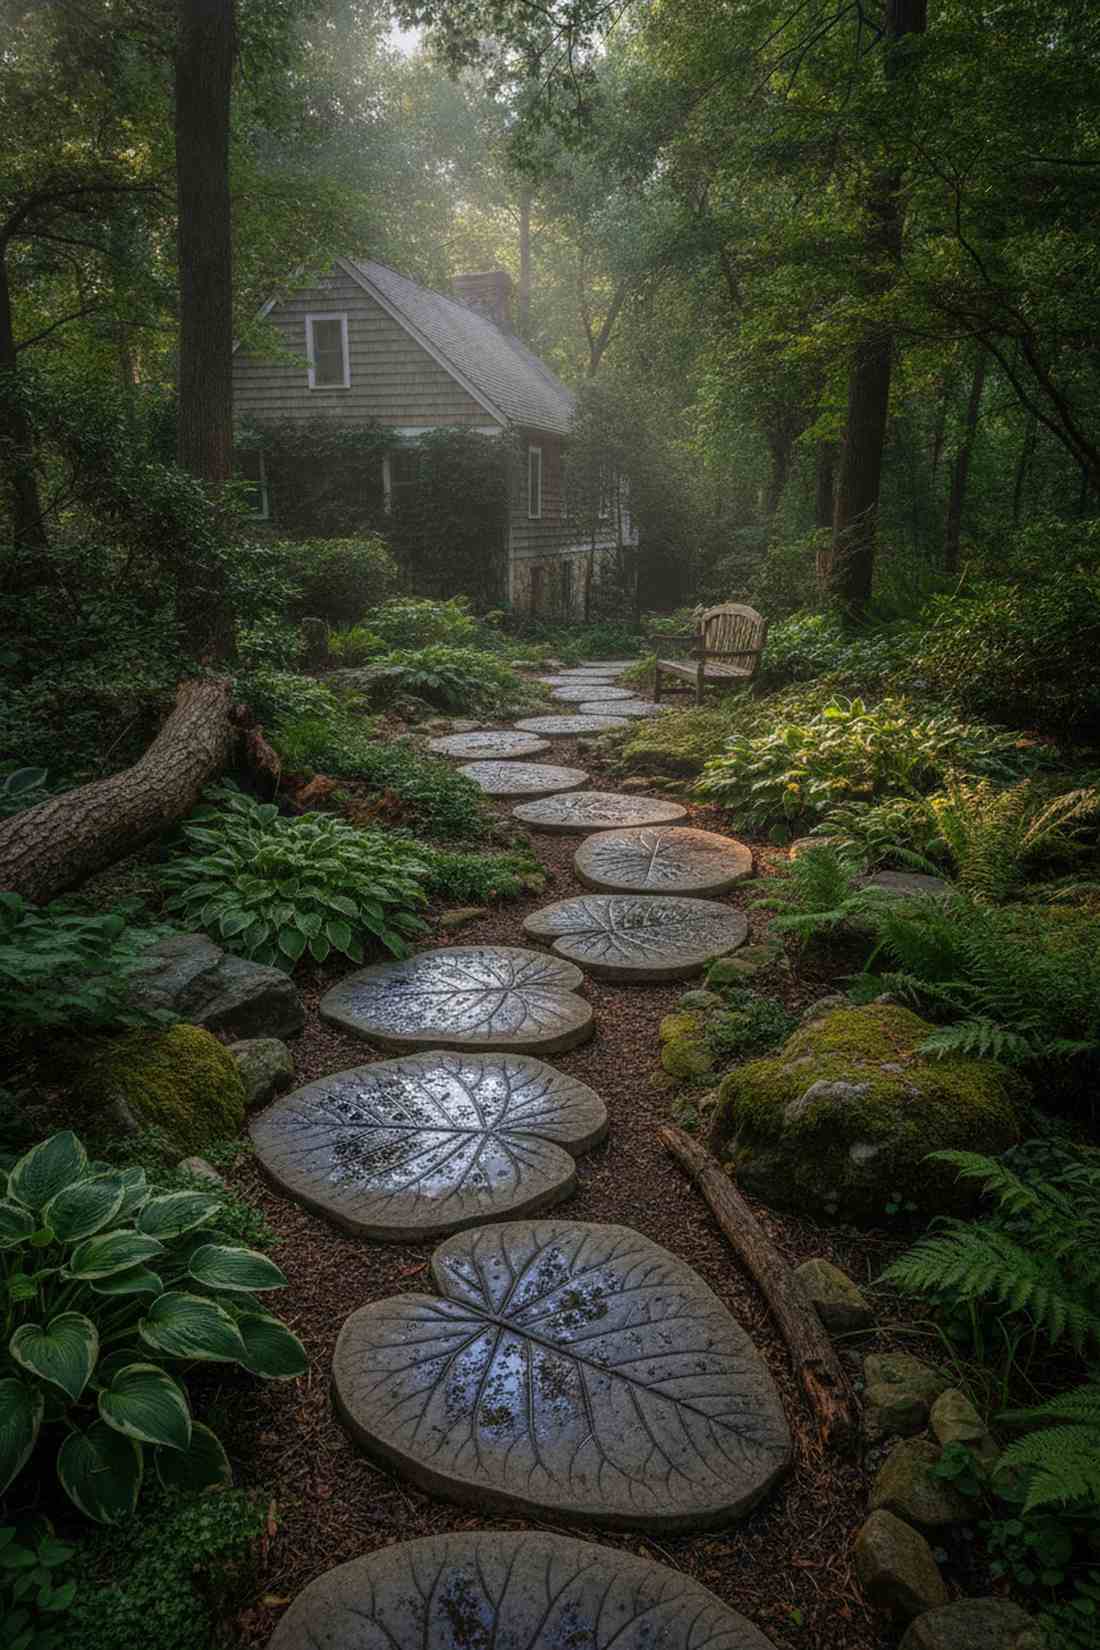
Delivers a hyper-organic woodland aesthetic that feels like a fairy tale come to life. Botanical cast walkways are absolutely stunning when winding through heavily shaded hosta or fern beds.
Generic rounds feel out of place in deep woods, but pressing massive gunnera or elephant ear leaves into wet cement looks far more expensive than it is. The captured vein texture collects tiny pools of morning dew, transforming the path into literal landscape art.
Casting your own leaf molds costs under $6 per stone. Save this for ultimate garden magic!
- Key Materials: Large live foliage leaves, sand mound base, and fine-finish concrete
- Vibe / Style: Enchanted forest
- Difficulty: Medium craft project
- Budget Breakdown: Concrete: $4 | Leaf: Free | Sealer: $2.
- Creator’s Tip: Form the concrete over a mound of wet sand rather than flat ground so the finished leaf has a realistic, curved 3D arch.
- Smart Sourcing: fine-finish concrete mix bags and matte clear concrete sealers.
35. River Stone Pathway
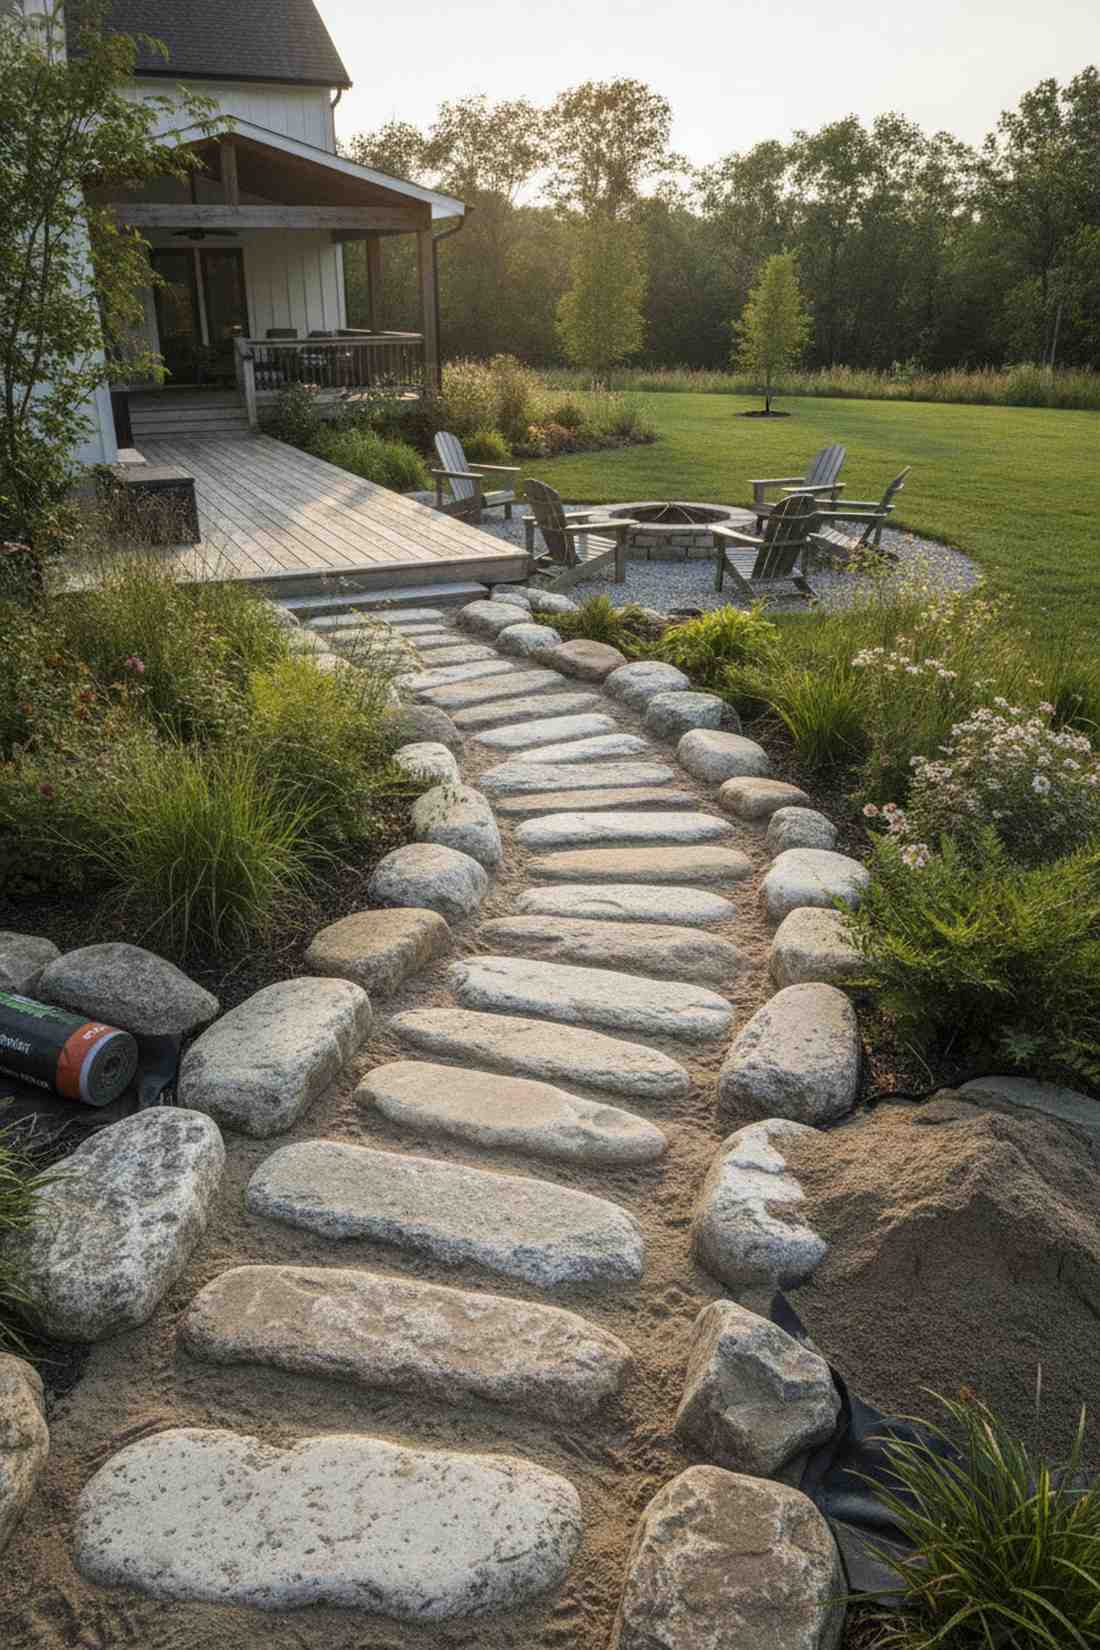
Channels the serene flow of a dried creek bed that feels deeply tranquil and grounded. Oversized oval stepping layouts are a budget-friendly powerhouse for casual, native plant landscapes.
Sharp geometric pavers ruin natural vibes, but these elongated, smooth oval rocks completely bypass structural rigidity for an organic flow. Orienting the long axis perpendicular to your walking direction provides excellent foot placement while mimicking natural water currents.
Sourcing these at local rock yards drops the price to a stunning $8 per stone.
- Key Materials: 8-12 inch smooth oval river rocks
- Vibe / Style: Native creek bed
- Difficulty: Easy
- Budget Breakdown: River Rock: $8 | Sand Base: $2.
- Creator’s Tip: Submerge the bottom half of the oval rock deep into compacted sand so it doesn’t roll when stepped on.
- Smart Sourcing: bulk pack leveling sand and heavy-duty weed barrier fabric.
36. Custom Cast Logo Stones
Projects an exclusive, estate-level identity that feels incredibly personalized. Monogrammed hardscaping elements are the ultimate flex to place directly at the entry gate of your property.
A blank path is boring, but utilizing 3D-printed foam inserts in your mold provides an architectural edge that outsmarts generic neighborhood designs. You can embed family crests, house numbers, or customized premium fairy garden accessories directly into the entrance node.
Custom casting usually runs about $30 per signature stone.
- Key Materials: Custom 3D printed molds and high-strength concrete
- Vibe / Style: Custom estate
- Difficulty: Hard (custom molding)
- Budget Breakdown: Custom Mold: $20 | Concrete: $10.
- Creator’s Tip: Coat your custom plastic or foam logo inset with cooking spray so the wet concrete releases flawlessly without chipping.
- Smart Sourcing: custom silicone monogram molds and high-strength concrete mix bags.
37. Integrated Lighting Stones
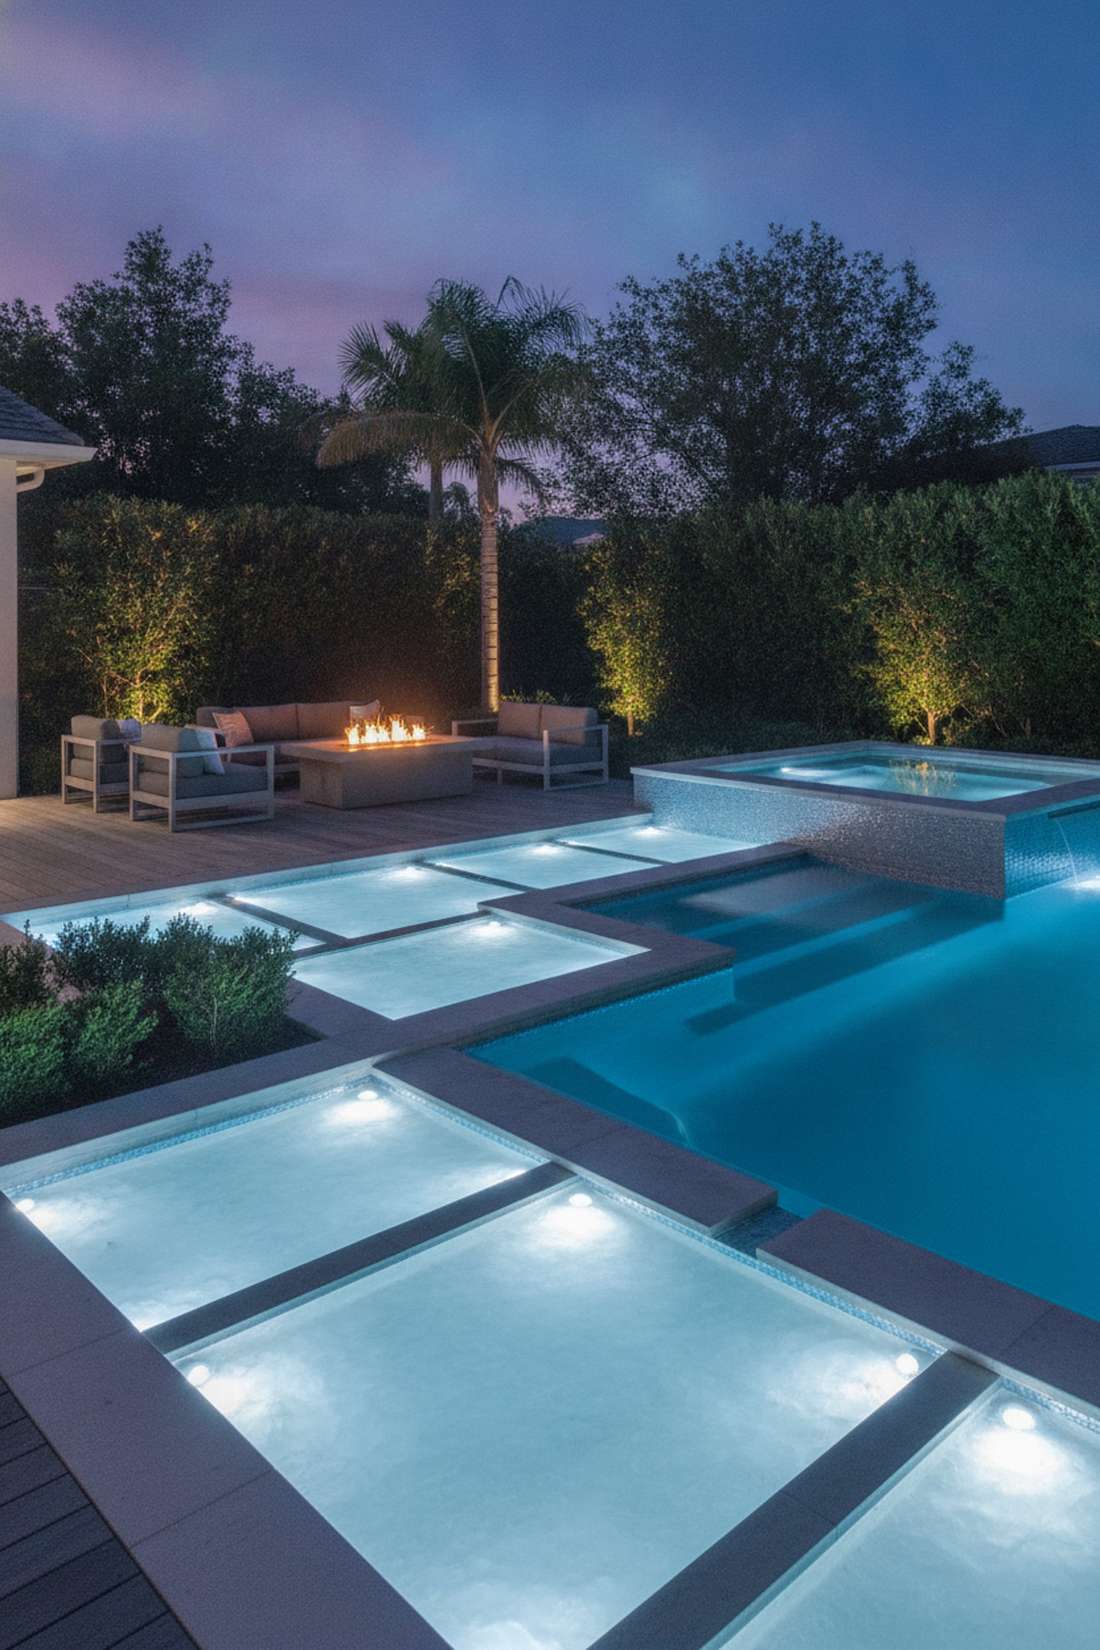
Emanates a sci-fi, luxurious glow that feels like a multi-million dollar resort after dark. Illuminated pathway hardscaping is an absolute game-changer for backyard pool decks and nighttime entertaining zones.
Trip-hazard stake lights are obsolete; embedding LED strips directly under frosted glass aggregate delivers a surprisingly premium finish that glows from within. Solar-powered or low-voltage setups completely bypass the need to hire an expensive electrician.
Upgrading to glowing stones costs about $40 per unit. Pin this to your luxury backyard board!
- Key Materials: Hollow-core concrete molds, translucent resin, and LED puck lights
- Vibe / Style: Luxury nighttime resort
- Difficulty: Hard (wiring involved)
- Budget Breakdown: Stone Shell: $15 | LED/Solar Unit: $25.
- Creator’s Tip: Always run your low-voltage wiring through PVC conduit beneath the path so you don’t accidentally sever it with a shovel later.
- Smart Sourcing: solar-powered LED paver light kits and translucent resin bulk packs.
38. Permeable Grid Pavers
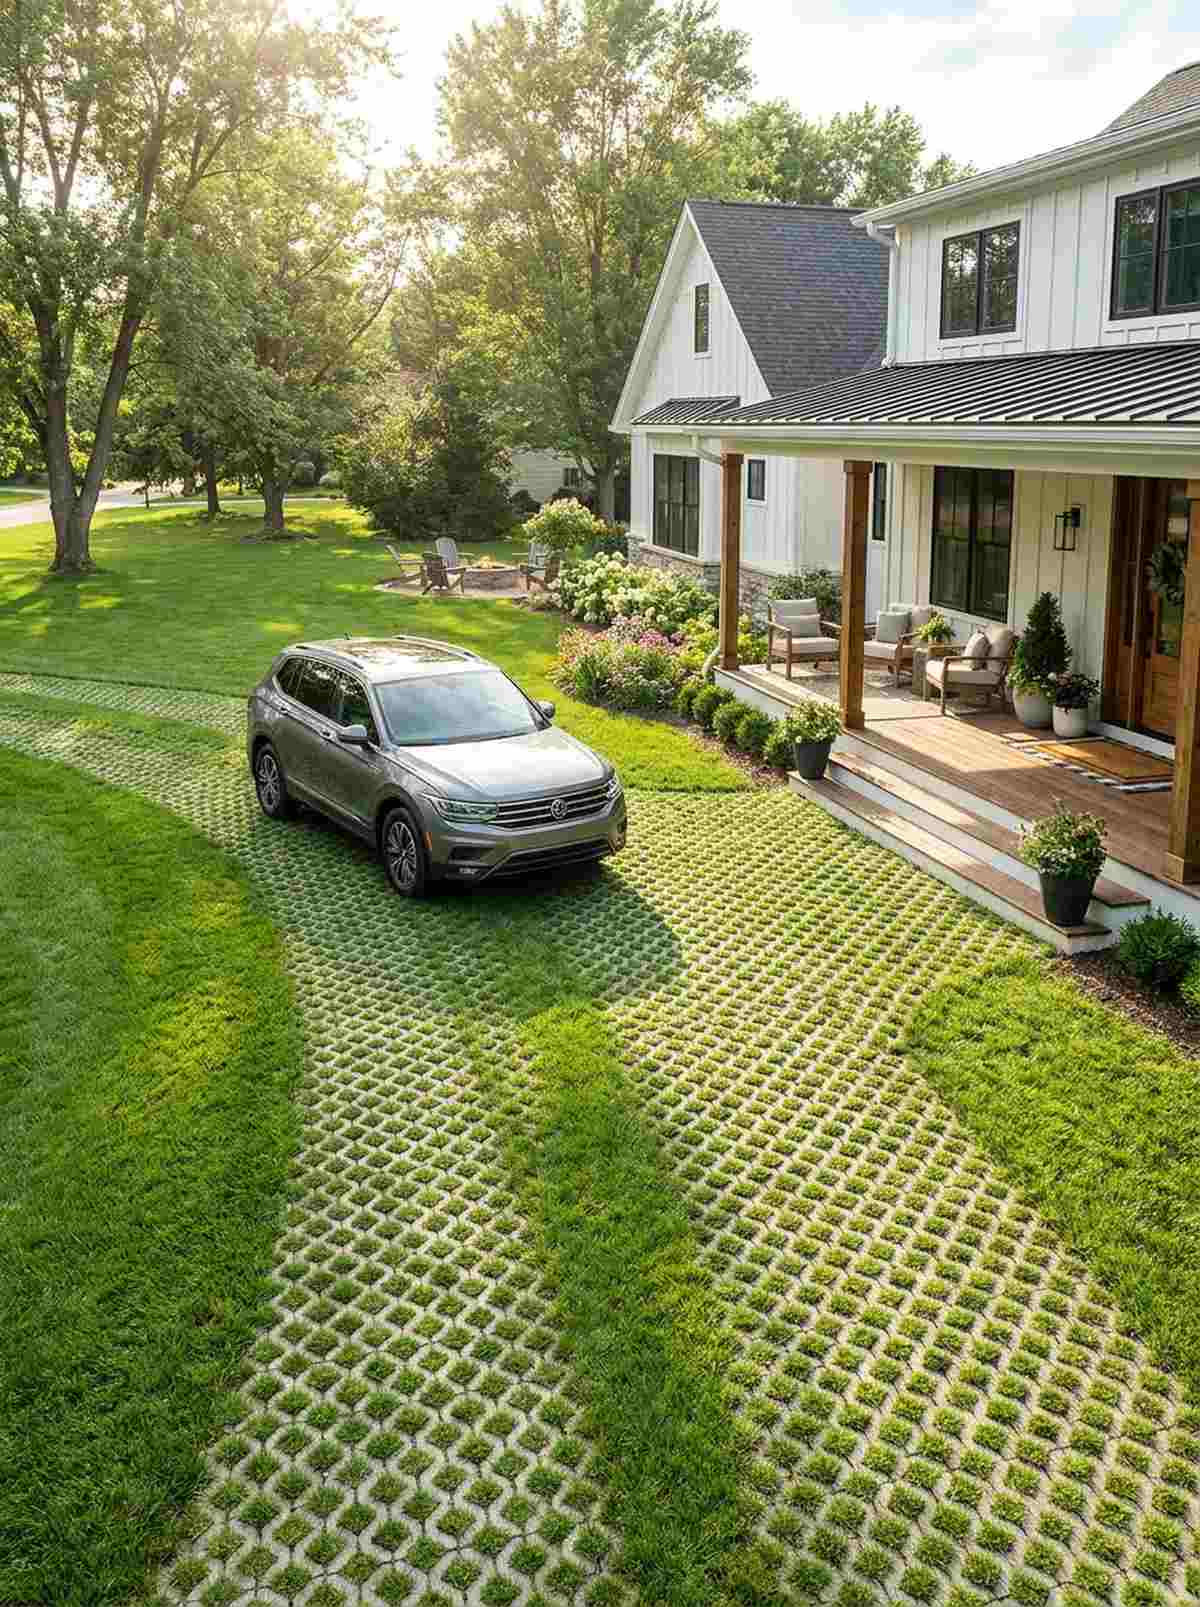
Blends raw utility with an invisible footprint that feels incredibly eco-conscious. Stormwater management hardscaping is the absolute smartest choice for driveways or paths located in flood-prone zones.
Solid concrete forces massive water runoff, but these 50/50 open cellular grids completely bypass drainage issues by letting the ground drink the rain directly. The plastic honeycomb framework absorbs the crushing weight of foot traffic, allowing delicate grass to grow through unharmed.
A highly functional, eco-friendly system that averages $4 per square foot.
- Key Materials: Heavy-duty plastic permeable grid panels and turf seed
- Vibe / Style: Invisible eco-utility
- Difficulty: Easy (snap and fill)
- Budget Breakdown: Grid Panel: $3/sq ft | Soil & Seed: $1/sq ft.
- Creator’s Tip: Fill the grids slightly below the top rim with dirt so foot traffic never actually touches the crown of the grass blades.
- Smart Sourcing: heavy-duty permeable paver grids (bulk pack) and high-traffic turf seed bags.
Bring Your Path Vision to Life
Transforming your outdoor space with these 38 exact pathway variations means you never have to settle for boring, cracked concrete ever again. Whether you choose classic stepping stones round setups for organic flow, or heavily structured grids for modern impact, the right sourcing completely upgrades the final result. Leverage premium kits, bulk paver base materials, and UV-resistant sealants to ensure your custom landscape holds up against extreme weather year after year. Start small with a single focal path, test your selected design, and watch your backyard instantly elevate.
Frequently Asked Questions
What size stepping stones work best for garden paths?
Standard stepping stones measure 12-18 inches in diameter or width, providing adequate foot placement while fitting standard walking strides. To achieve a high-end look, sourcing bulk paver packs of larger stones (20-30 inches) works flawlessly for main pathways, while smaller stones (8-12 inches) paired with miniature garden supplies suit narrow side paths. Space your stones 24-30 inches apart center-to-center to match the average adult stride length perfectly.
How deep should I set stepping stones in the ground?
Set stepping stones with their top surface 1-2 inches above the surrounding grade when installing in lawn areas. For premium setups, excavate 4-6 inches deep to accommodate a commercial-grade weed barrier and a heavy-duty base kit of leveling gravel (2-3 inches). This ensures complete stability and proper drainage beneath each stone, preventing the expensive material from sinking into mud over time.
Can I mix round and square stepping stones in the same path?
Mixing shapes creates incredible visual interest and works exceptionally well in eclectic or transitional garden styles. Maintain consistent, high-quality materials (like UV-coated concrete starter kits or premium natural stone) when combining different geometries. Use shape changes intentionally to mark transition points, path intersections, or to separate different garden zones rather than randomly alternating shapes, which can look cheap.
What prevents stepping stones from shifting over time?
Proper base preparation provides bulletproof long-term stability. Excavate 4-6 inches deep, add a compacted heavy-duty gravel base kit, and use commercial landscape fabric to stop stone settling dead in its tracks. For loose soil conditions, increase gravel depth to 6-8 inches and utilize invisible plastic edging restraints around pathway perimeters to permanently lock the stones into their designated layout.
Which stepping stone shapes work best for curved paths?
Round stepping stones follow curves most naturally since they have no directional orientation and require zero awkward angular cuts. Pre-cut small to medium squares (12-16 inches) also work beautifully when slightly offset along sweeping backyard curves. Avoid long rectangles on tight curves; instead, utilize bulk pack circular molds to maintain a smooth, expensive-feeling walking rhythm around sharp bends.
How do I choose between natural stone and concrete stepping stones?
Natural stone offers unique character, varied colors, and premium appearance but costs significantly more and requires selective sizing. Upgrading to high-end poured concrete utilizing professional stamp starter kits and UV-resistant sealers provides customizable colors, lighter weight, and massive budget savings. Consider sourcing bulk commercial molds if you want the exact look of natural flagstone at a fraction of the cost.