Upgrading to an outdoor living pool instantly elevates your backyard. These proven layouts blend smart material sourcing with high-end blueprints. Discover seamless designs maximizing both spatial flow and aesthetic value.
Design SnapshotKey Principles
- Visual Continuity: Match materials, colors, and finishes across pool decks and patio surfaces to establish a single design language
- Functional Zoning: Define distinct areas for swimming, dining, and lounging without physical barriers that disrupt sightlines
- Transition Spaces: Employ sun shelves, graduated steps, and deck-level edges to soften boundaries between water and hardscape
- Smart Technology: Integrate automated lighting, heating controls, and water-feature systems for seamless operation
Geometric Pools for Modern Outdoor Living
Rectangular and L-shaped pools dominate contemporary design because they maximize swim length while simplifying patio transitions. Clean angles align with modern architecture and allow decking materials to extend flush to the pool coping without awkward curves.
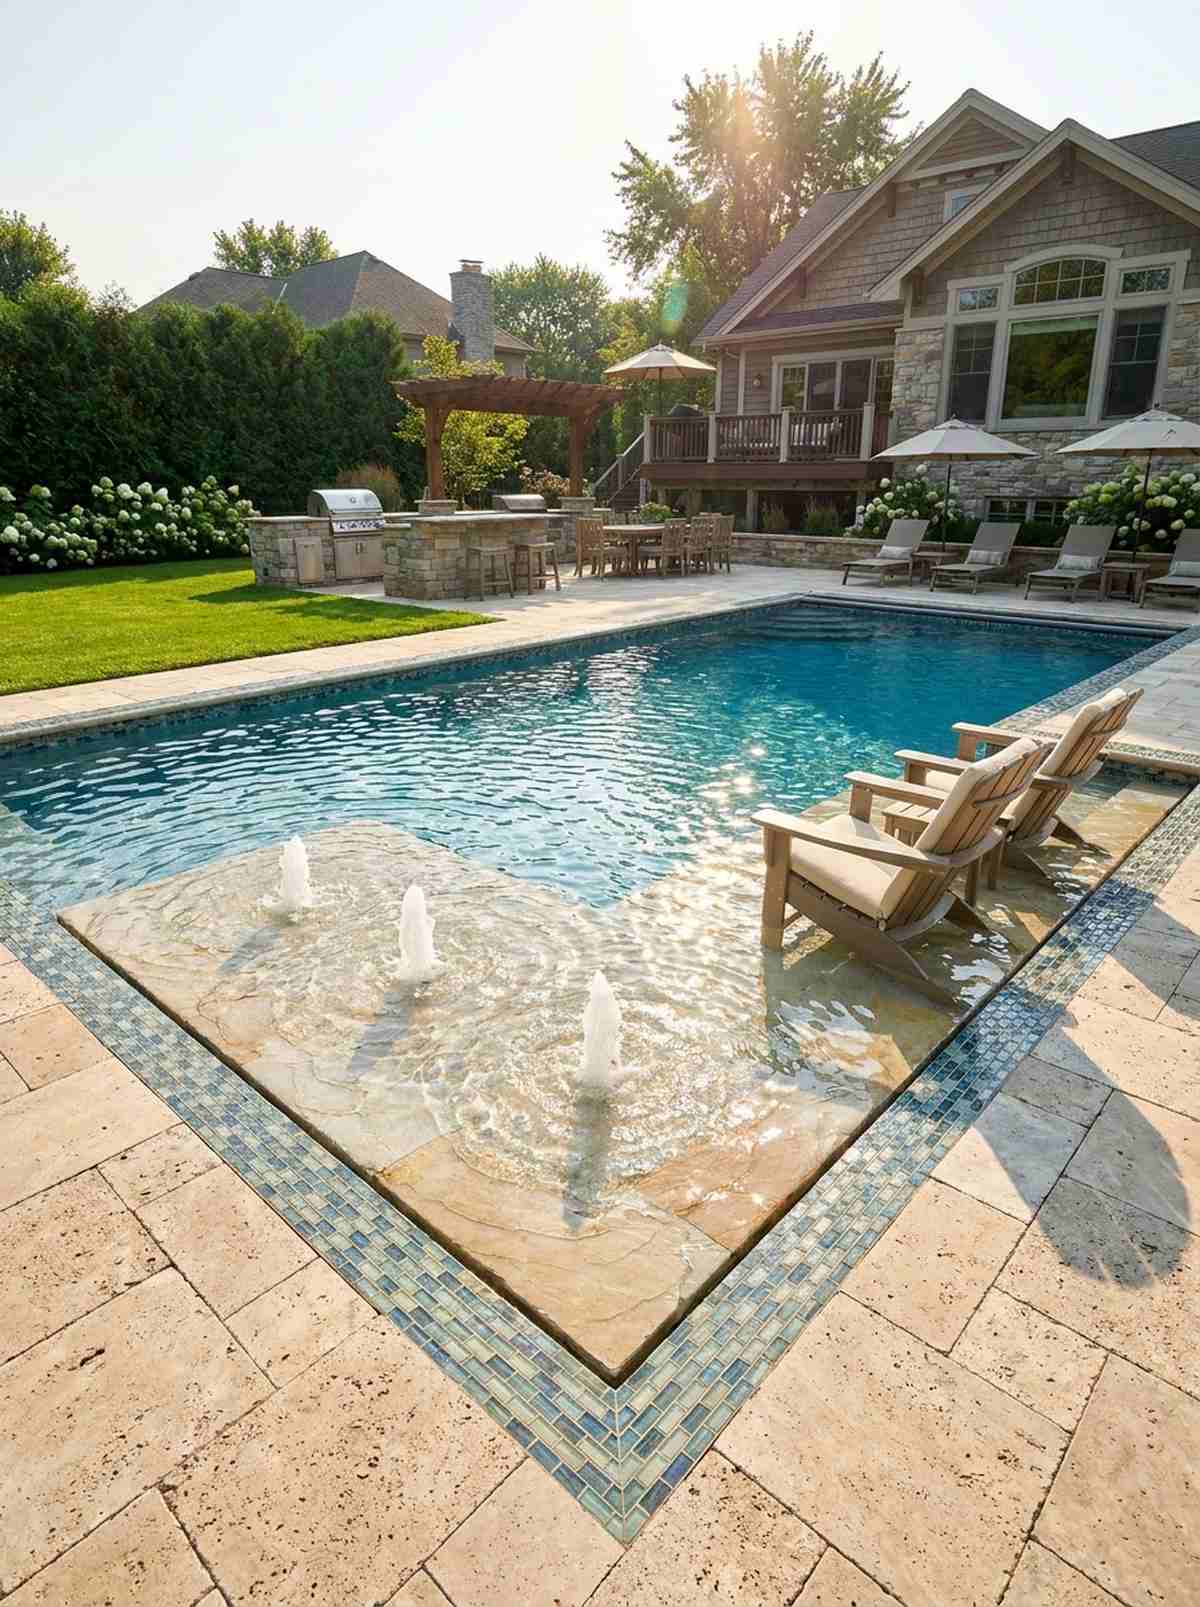
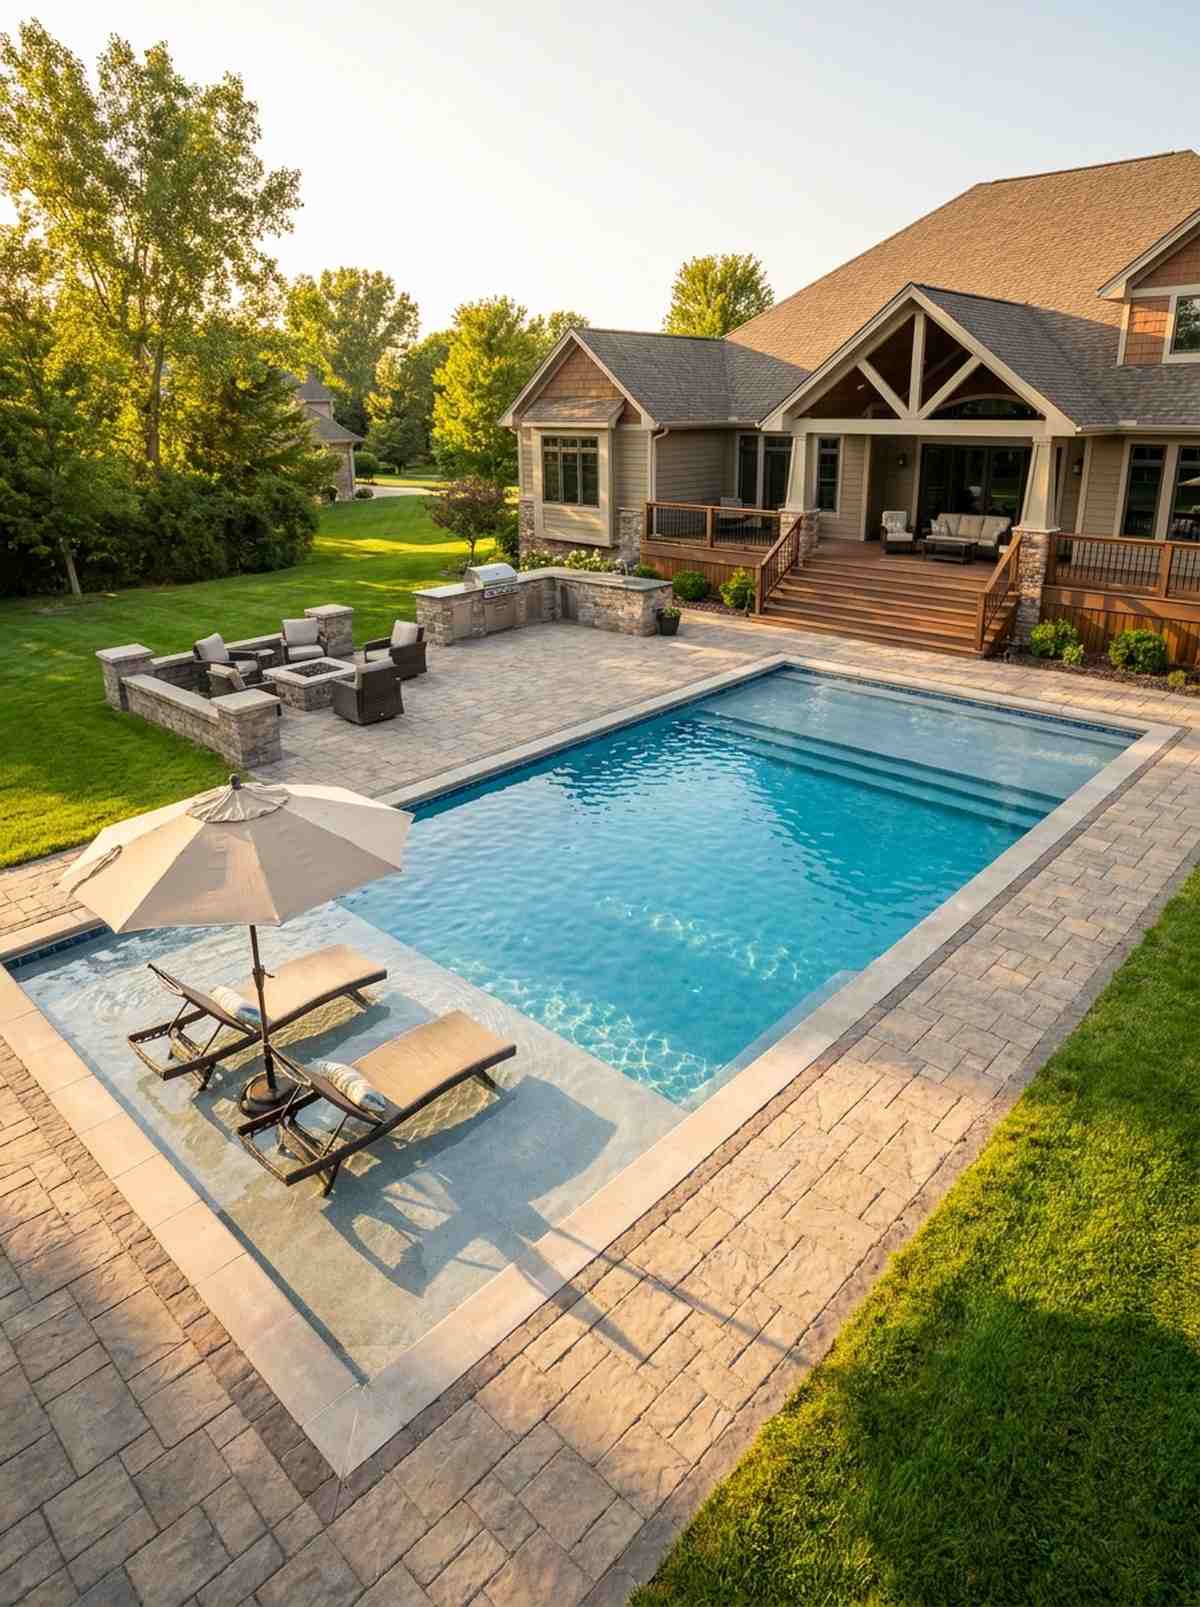
1. Classic Rectangular Pool with Cantilevered Deck
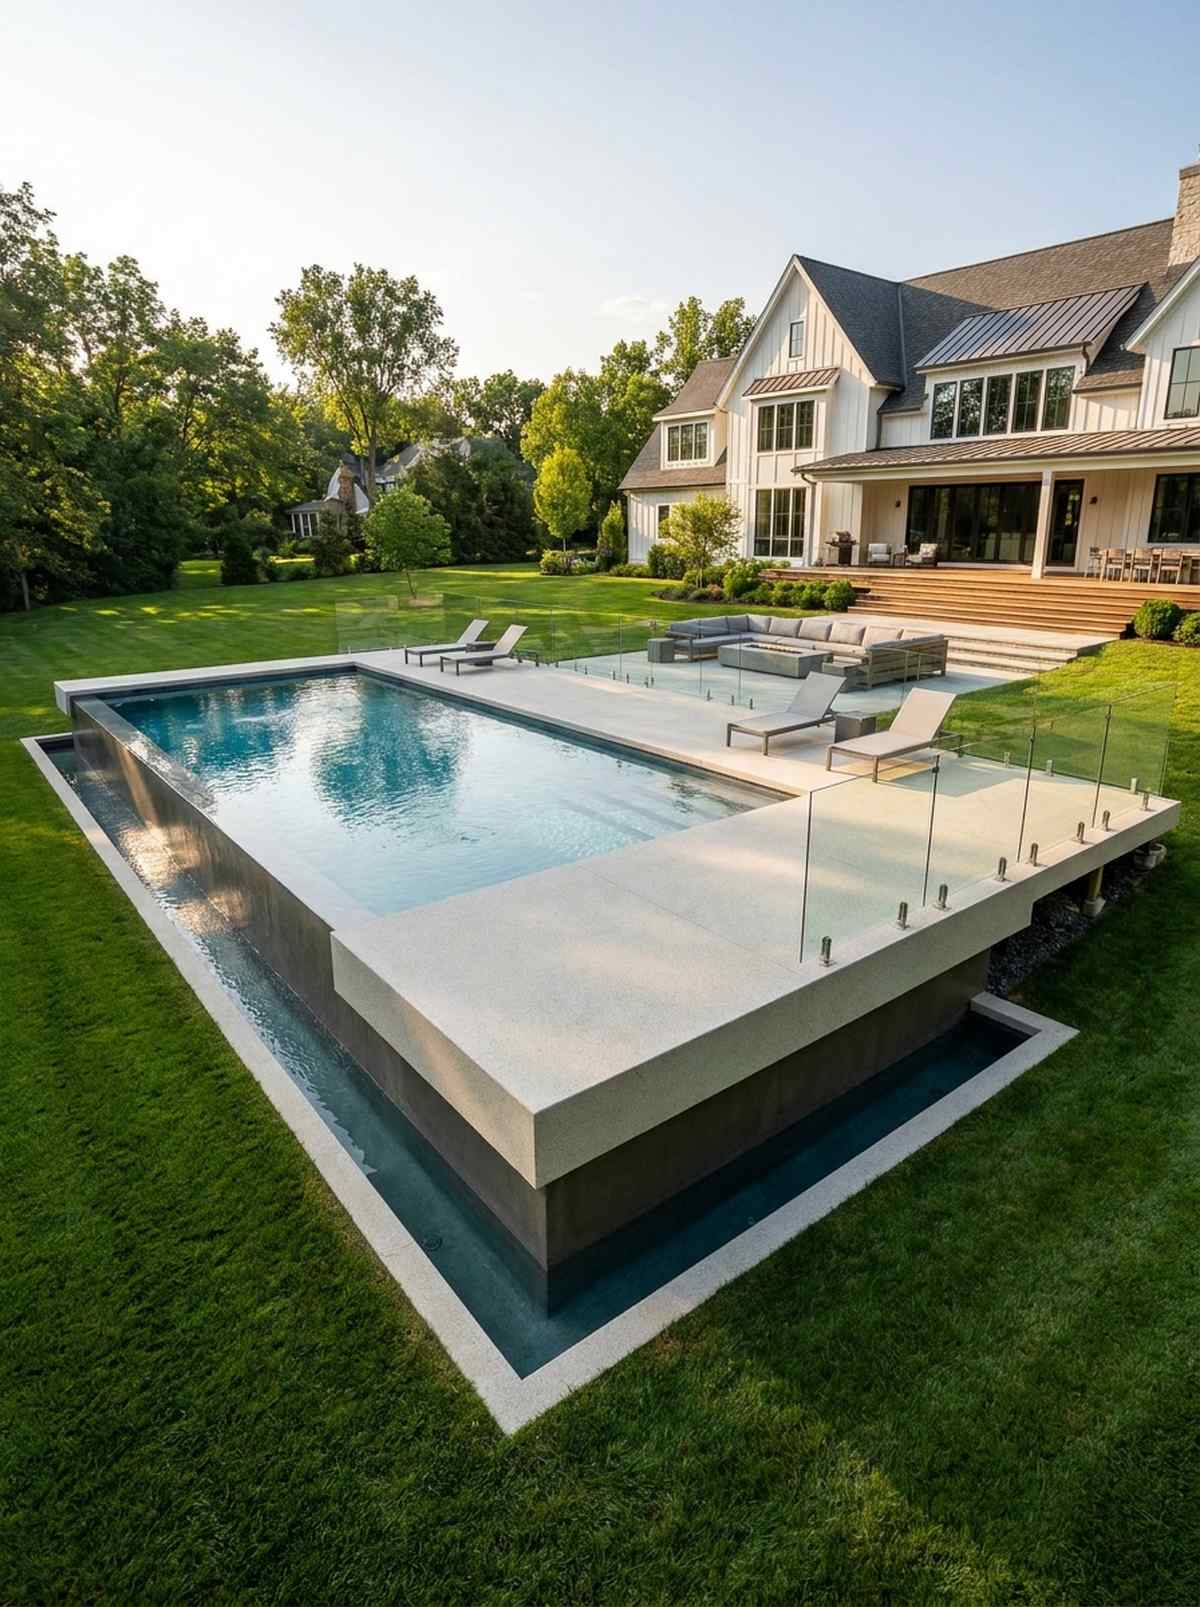
This layout feels like a private luxury resort you accidentally stumbled into. Featuring a cantilevered modern pool deck, it perfectly functions as an unbroken social zone for hosting elite outdoor gatherings.
The straight-edged geometry delivers a surprisingly premium look by overlapping the water slightly to create natural shade. By using commercial-grade structural supports beneath the overhang, the finish remains entirely flush with the interior flooring.
You can achieve this structural base for around $4,500 over standard decking costs. Save this to your backyard renovation board for your architect!
- Key Materials: UV-coated slip-resistant aggregate mix
- Vibe / Style: Minimalist luxury retreat
- Difficulty: Advanced professional build
- Budget Breakdown: Aggregate: $1,200 | Glass Railings: $3,000 | Support Framing: $1,500.
- Creator’s Tip: Use frameless glass perimeters to maximize the unbroken visual plane.
- Smart Sourcing: pre-mixed exposed aggregate (bulk pack) and heavy-duty glass spigot kits.
2. L-Shaped Pool Defining Two Patio Zones
This setup brings a boutique hotel atmosphere right to your back door. The L-shaped patio pool design is an absolute game-changer, acting as an organic divider for high-traffic family yards.
Separating the splash zones from the adult lounging areas completely transforms the yard’s functionality. Sourcing premium outdoor living kits for the interior corner seating makes the transition feel built-in rather than afterthought.
Expect to invest approximately $3,000 for high-end corner paver installations. It’s an architectural upgrade that completely shifts the space’s energy.
- Key Materials: Large-format porcelain outdoor tiles
- Vibe / Style: Family-friendly resort chic
- Difficulty: Moderate contractor setup
- Budget Breakdown: Tiles: $1,800 | Mortar/Base: $500 | Furniture: $1,200.
- Creator’s Tip: Keep the short leg shallow enough for toddler play without disrupting lap swimmers.
- Smart Sourcing: anti-slip porcelain pavers (bulk crate) and weatherproof sectional starter kits.
3. Squared Plunge Pool Surrounded by Wide Pavers
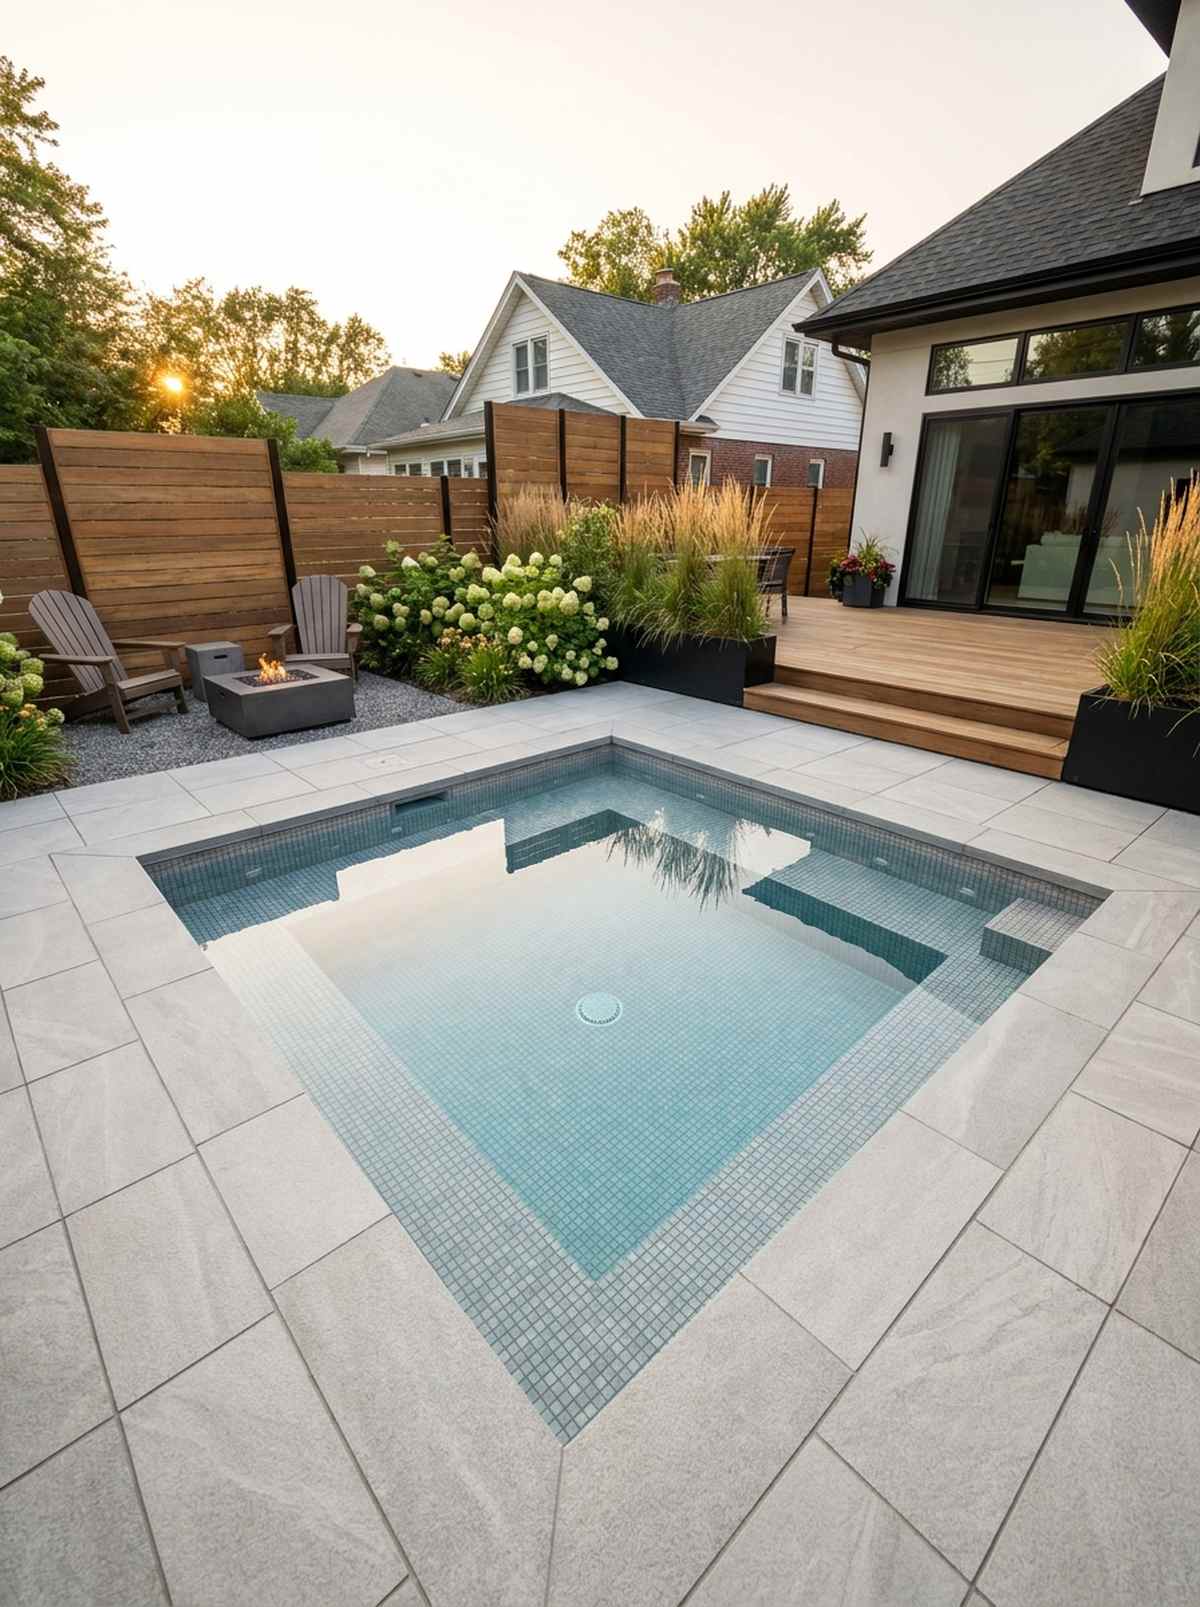
Immaculate and intensely calming, this geometric symmetry feels straight out of an architectural digest. This compact urban plunge pool works exceptionally well for space-limited city lots craving a high-end oasis.
Most designers overcomplicate small yards, but this grid format looks far more expensive than it is. Running identical weatherproof mosaic tiles from the pool base up onto the surrounding deck blurs the footprint beautifully.
You can seamlessly lock down this monochromatic aesthetic for around $5,500 in tile work. Pin this if you’re plotting a small space luxury upgrade!
- Key Materials: Matching interior/exterior porcelain squares
- Vibe / Style: High-density urban sanctuary
- Difficulty: Moderate layout precision
- Budget Breakdown: Coping: $1,000 | Pavers: $3,000 | Benches: $1,500.
- Creator’s Tip: Build submerged benches into the structure to minimize deck furniture clutter.
- Smart Sourcing: frost-proof porcelain tiles (bulk pack) and pre-cut edge coping stones.
4. Linear Lap Pool Flanked by Dual Patios
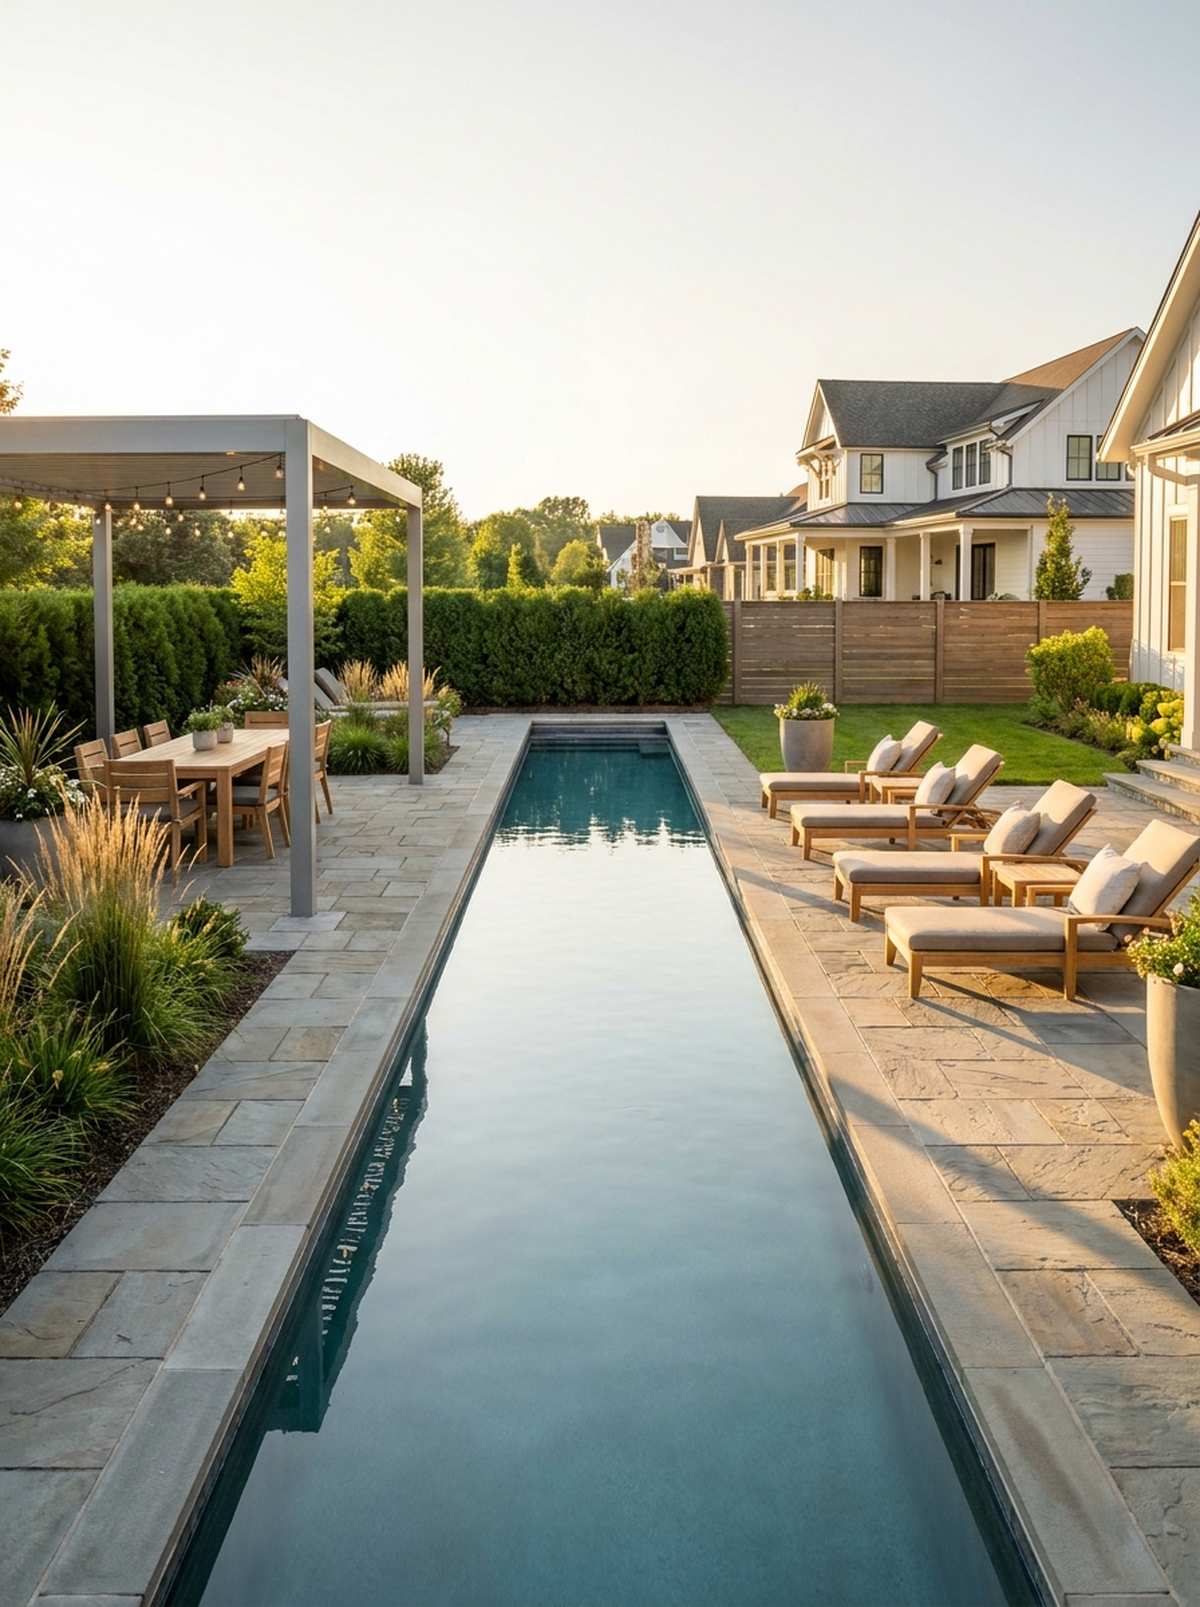
Radiating pure modern elegance, this long visual line acts as a backyard spine. The linear lap pool layout creates dynamic mirror zones, making it perfect for long, narrow property lines.
Positioning passive relaxation against active training spaces yields a designer-level finish every single time. By integrating a pergola hardware kit over the dining side, you balance the visual weight of the sun-drenched lounge side.
Securing the dual-patio hardscaping typically runs about $6,000 depending on the stone chosen. Highly recommended for optimizing dead side-yard space.
- Key Materials: Teak loungers and modular pergolas
- Vibe / Style: Olympic-inspired modernism
- Difficulty: Extensive grading required
- Budget Breakdown: Decking: $4,000 | Pergola: $1,500 | Lighting: $500.
- Creator’s Tip: Align the pool strictly parallel to the property line to amplify the perception of length.
- Smart Sourcing: aluminum pergola starter kits and UV-resistant teak oil.
This next setup completely breaks the traditional backyard layout rules, but it looks like a $100k custom display…
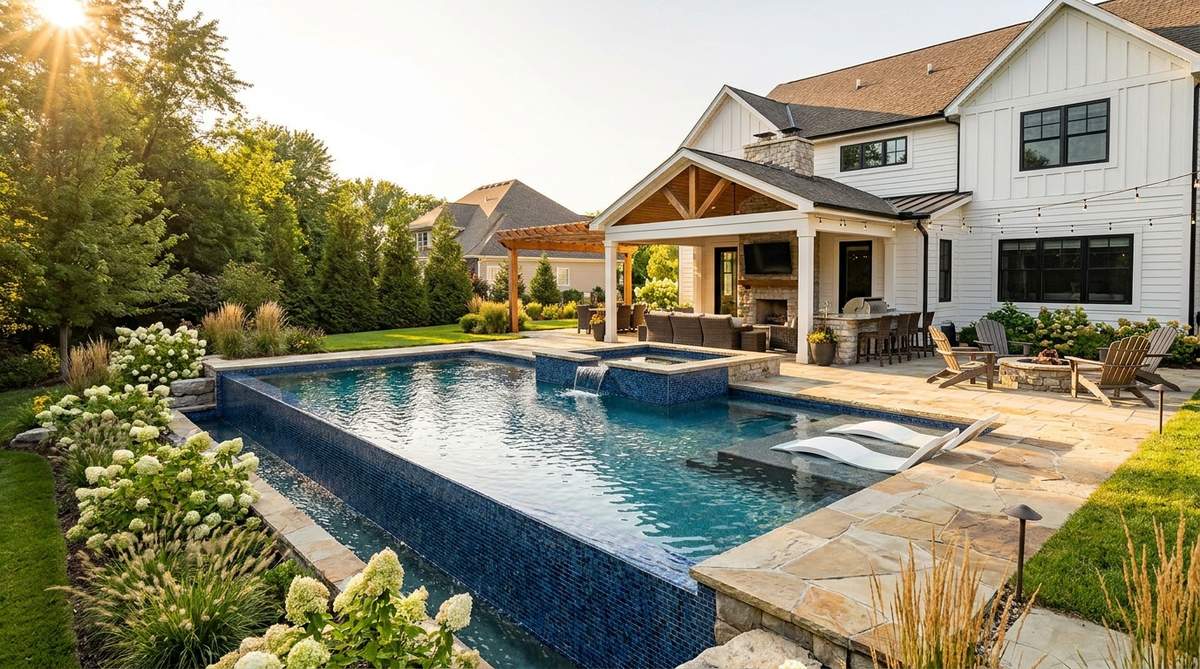
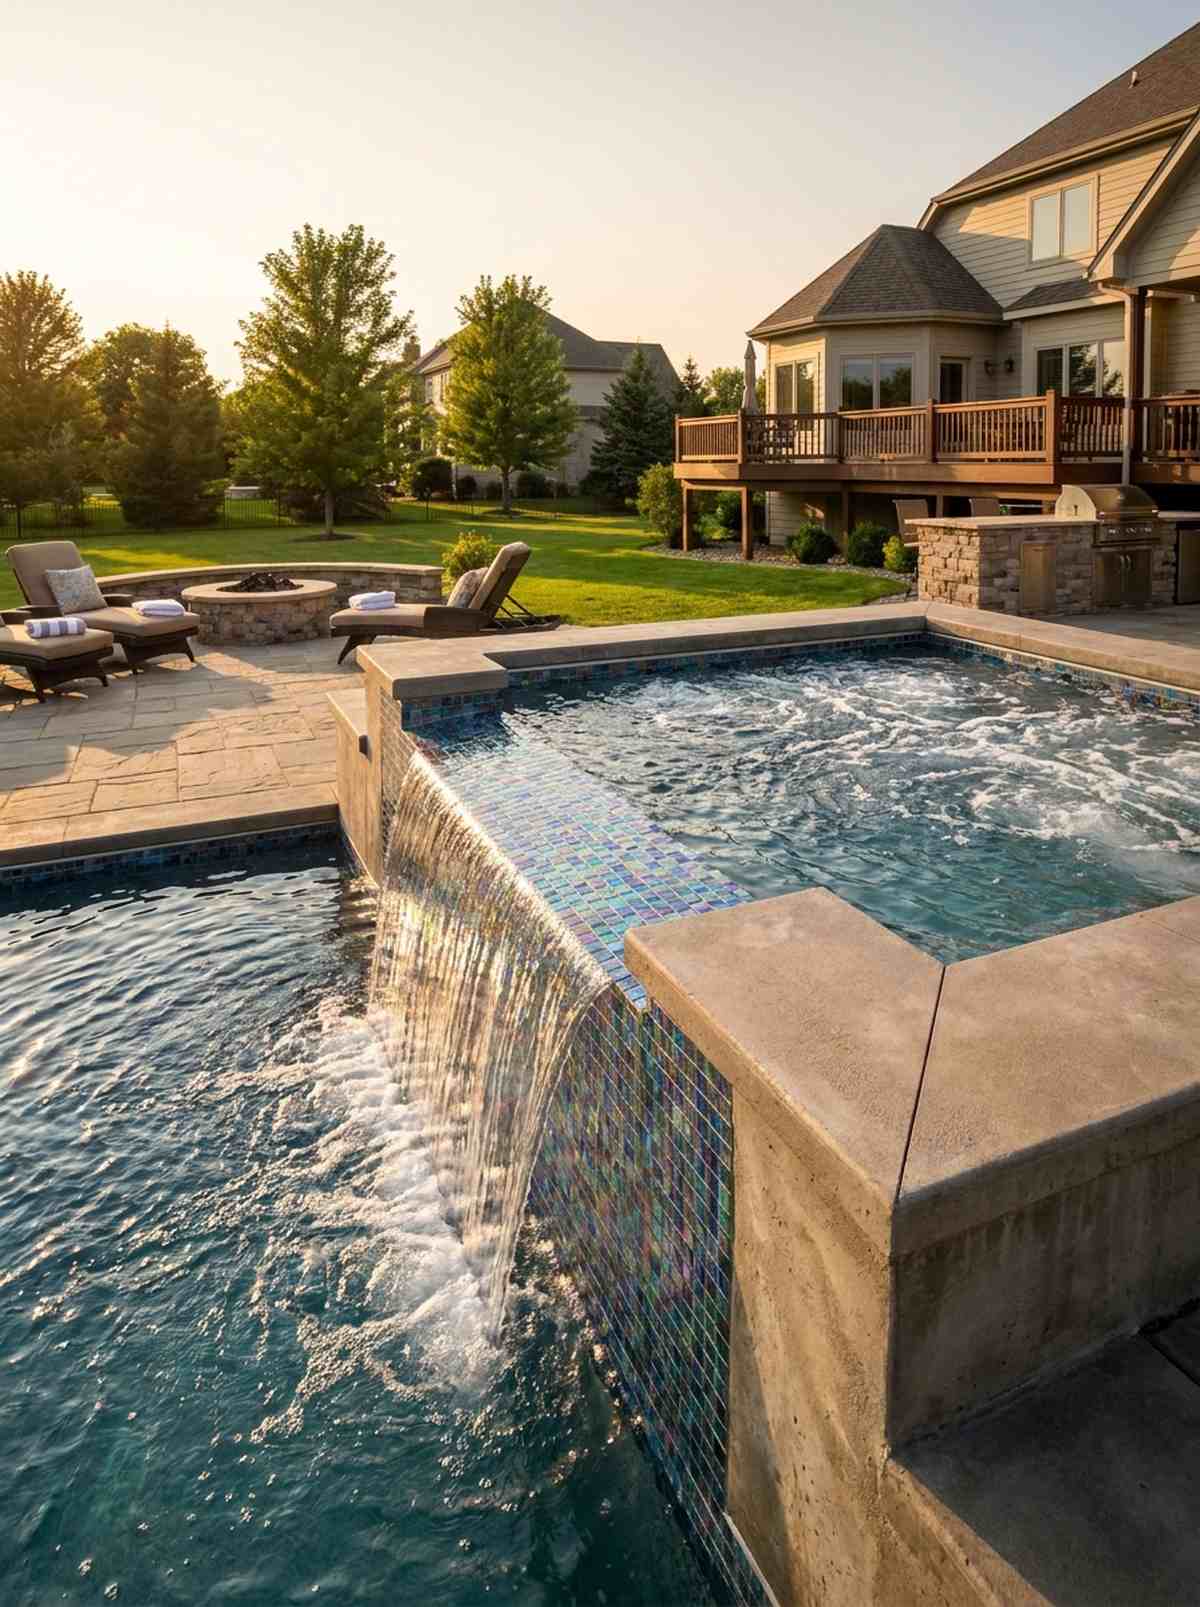
5. Geometric Pool with Integrated Spa Corner
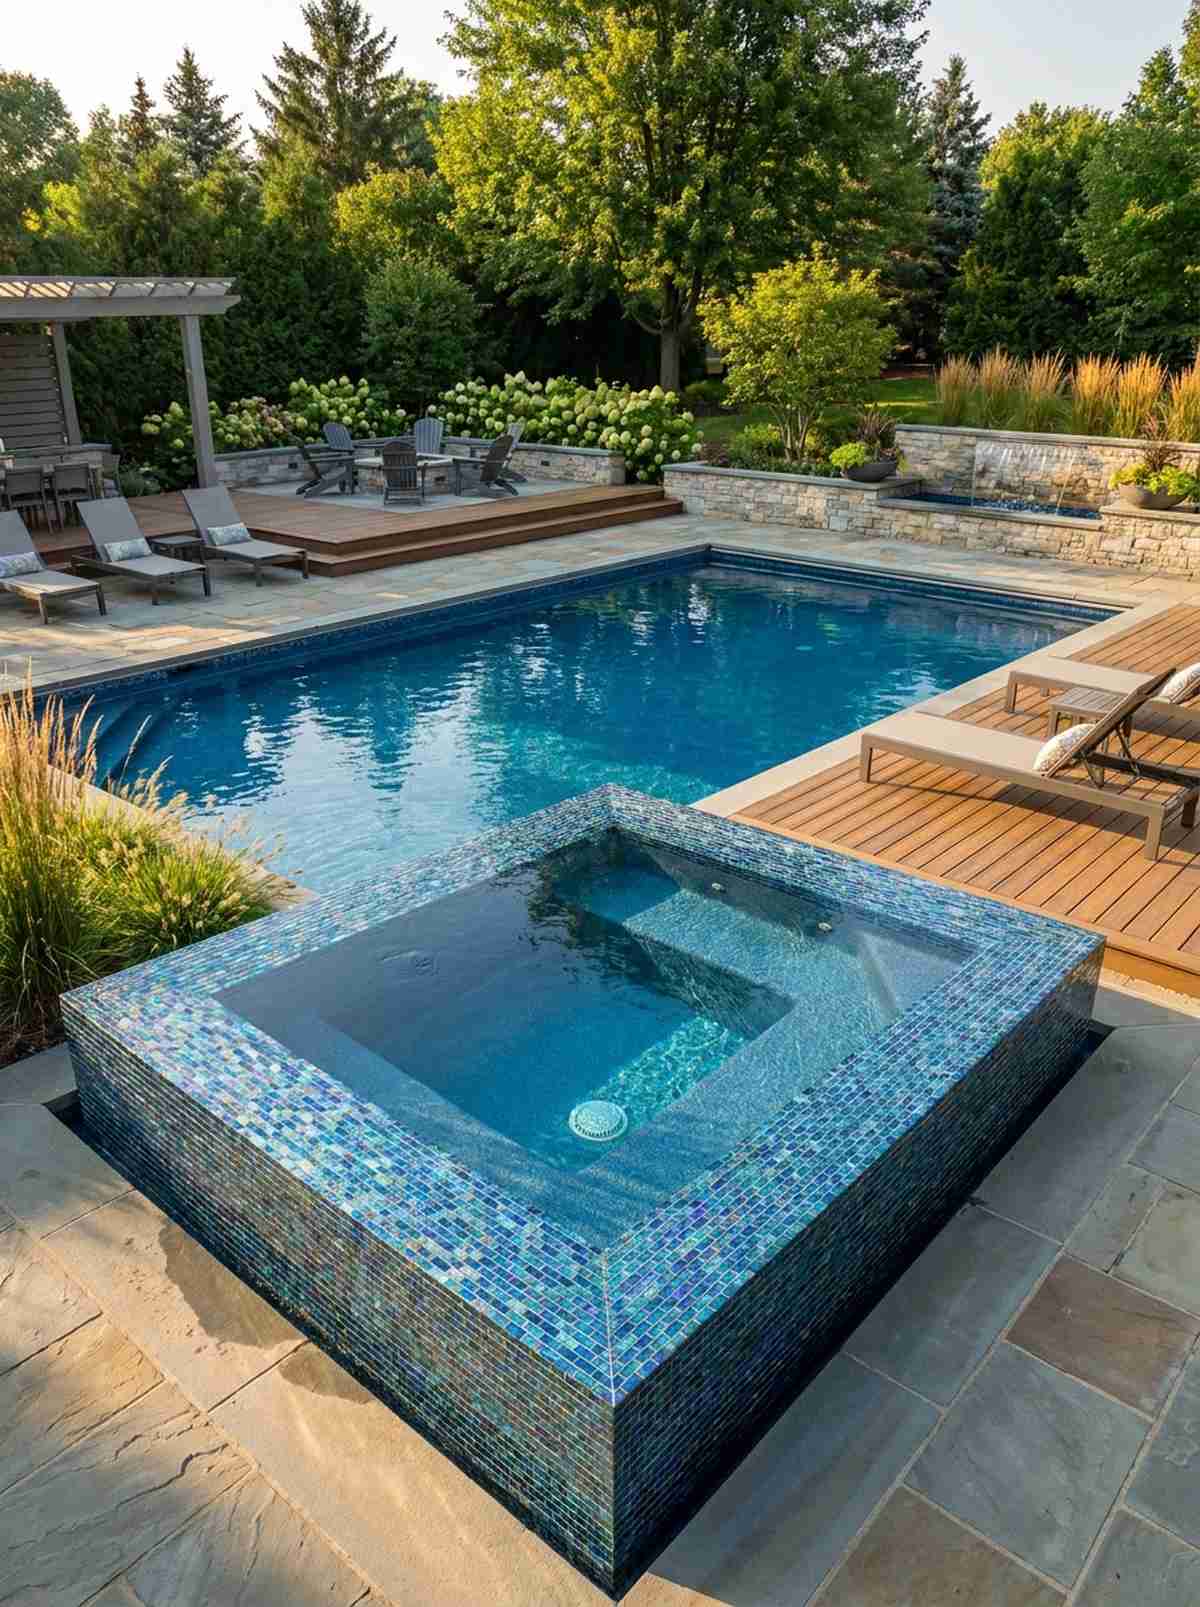
A mesmerizing blend of fire-and-ice aesthetics that commands immediate attention. This integrated spillover spa pool setup functions flawlessly as a noisy-neighborhood sound barrier.
Elevating the hot tub just eighteen inches provides an auditory focal point that punches way above its weight class. Covering the spill wall in glass mosaic pool tiles catches the sunlight and masks nearby traffic completely.
Adding the raised spa edge generally costs an extra $2,500–$4,000 during the initial pour. Save this idea if you need a clever acoustic solution!
- Key Materials: Iridescent glass wall tiles
- Vibe / Style: Acoustic luxury retreat
- Difficulty: Advanced plumbing setup
- Budget Breakdown: Glass Tile: $800 | Extra Plumbing: $1,500 | Concrete Work: $1,200.
- Creator’s Tip: Use a unified tile color between both vessels to keep the composition strictly geometric.
- Smart Sourcing: mesh-backed glass mosaic sheets (bulk pack) and high-flow spillway kits.
6. Offset Rectangular Pool and Patio Grid
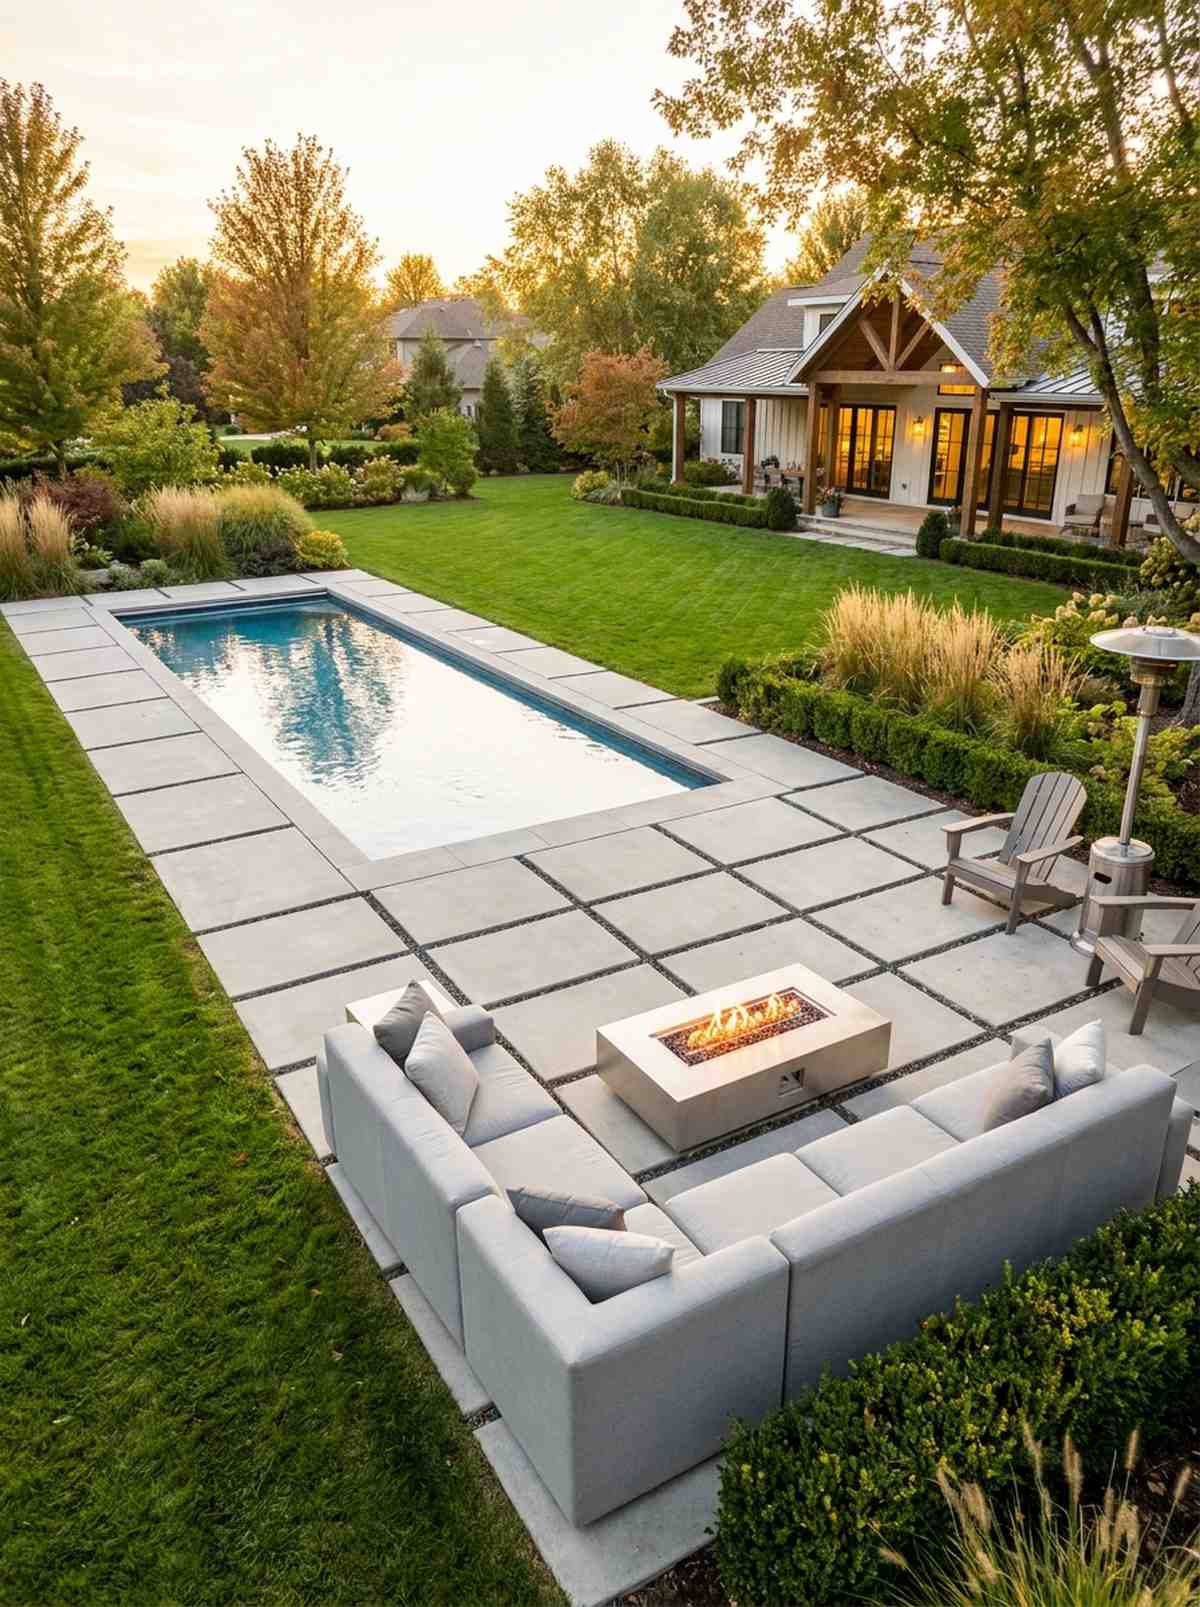
Boasting a deliberate, artsy imbalance, this layout feels incredibly bespoke and thoughtfully curated. This asymmetrical patio pool decking setup is the ultimate hack for dividing up massive, featureless lawns.
Shifting the main volume off-center instantly creates a high-end architectural tension. Framing the wider side with premium outdoor heating equipment transforms it into an intentional nighttime gathering space rather than just an empty deck.
This layout doesn’t cost extra to execute, it just requires brilliant spatial planning. It’s a zero-cost upgrade that completely changes the vibe.
- Key Materials: Oversized concrete pavers
- Vibe / Style: Asymmetrical modern living
- Difficulty: Beginner-friendly planning
- Budget Breakdown: Pavers: $2,500 | Fire Table: $800 | Sectional: $1,500.
- Creator’s Tip: Use the six-foot narrow side exclusively as a clean maintenance and transit path.
- Smart Sourcing: pre-cast concrete stepping stones (bulk pallet) and stainless gas fire pit kits.
Tanning Ledges and Shallow Lounge Zones
Baja shelves and sun ledges blur the line between poolside seating and in-water relaxation. These shallow platforms typically hold six to nine inches of water and accommodate lounge chairs, umbrellas, and even small tables.
7. Full-Width Baja Shelf with Umbrella Sleeves
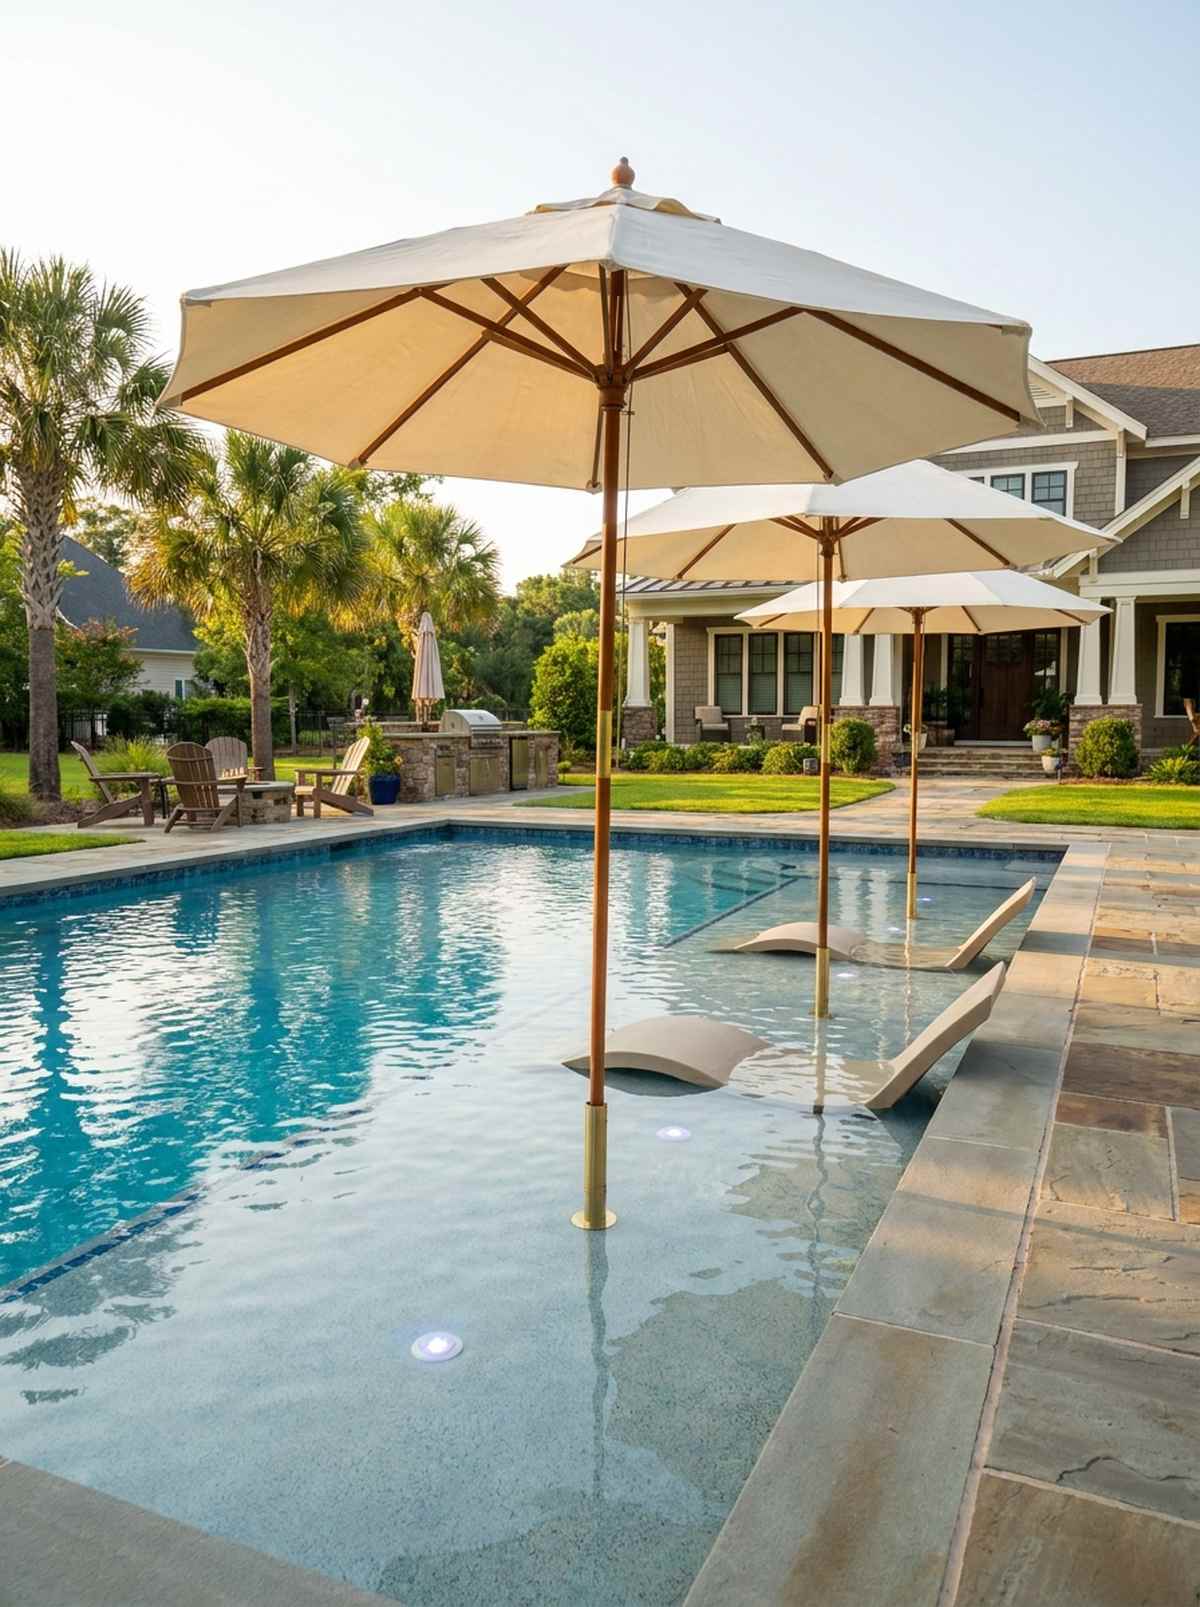
Evoking major tropical vacation vibes right in your own yard. The full-width Baja shelf design acts as the ultimate multi-generational social hub during hot summer afternoons.
While many add tiny ledges, stretching it across the entire shallow end gives a remarkably opulent finish. Installing heavy-duty umbrella sleeves directly into the gunite eliminates tripping hazards and ugly metal bases.
You can usually add these sleeves during the build for under $100 each. Pin this to your dream pool blueprint board!
- Key Materials: Submerged PVC umbrella sleeves
- Vibe / Style: Five-star resort lounging
- Difficulty: Requires pre-pour planning
- Budget Breakdown: Shelf Pour: $1,500 | Sleeves: $150 | LED Pucks: $400.
- Creator’s Tip: Sink the sleeves completely flush to avoid toe-stubbing when umbrellas are removed.
- Smart Sourcing: brass-capped flush umbrella sleeves (3-pack) and waterproof LED puck kits.
8. Corner Tanning Ledge with Bubbler Jets
Playful yet sophisticated, this feature feels like an interactive water sculpture. The corner shallow bubbler ledge works wonderfully for integrating gentle movement into stagnant yard designs.
Adding vertical water elements elevates the visual dynamic without demanding massive rock waterfalls. Pairing flush-mount bubbler fountain kits with a contrasting mosaic border creates a distinct visual boundary for safety and style.
Incorporating simple bubblers generally adds around $600–$900 to the plumbing bill. A highly effective trick to keep the water feeling alive.
- Key Materials: Deck-mounted fountain bubblers
- Vibe / Style: Playful modern splash zone
- Difficulty: Moderate plumbing task
- Budget Breakdown: Bubblers: $400 | Tile Border: $300 | Valve Control: $150.
- Creator’s Tip: Set the bubblers on a variable speed controller so you can adjust the fountain height.
- Smart Sourcing: LED pool bubbler kits and contrasting edge mosaic tiles (bulk roll).
Most backyard renovators get this completely wrong… until they try the exact hybrid layout coming up next.
9. Integrated Ledge and Steps in One Platform
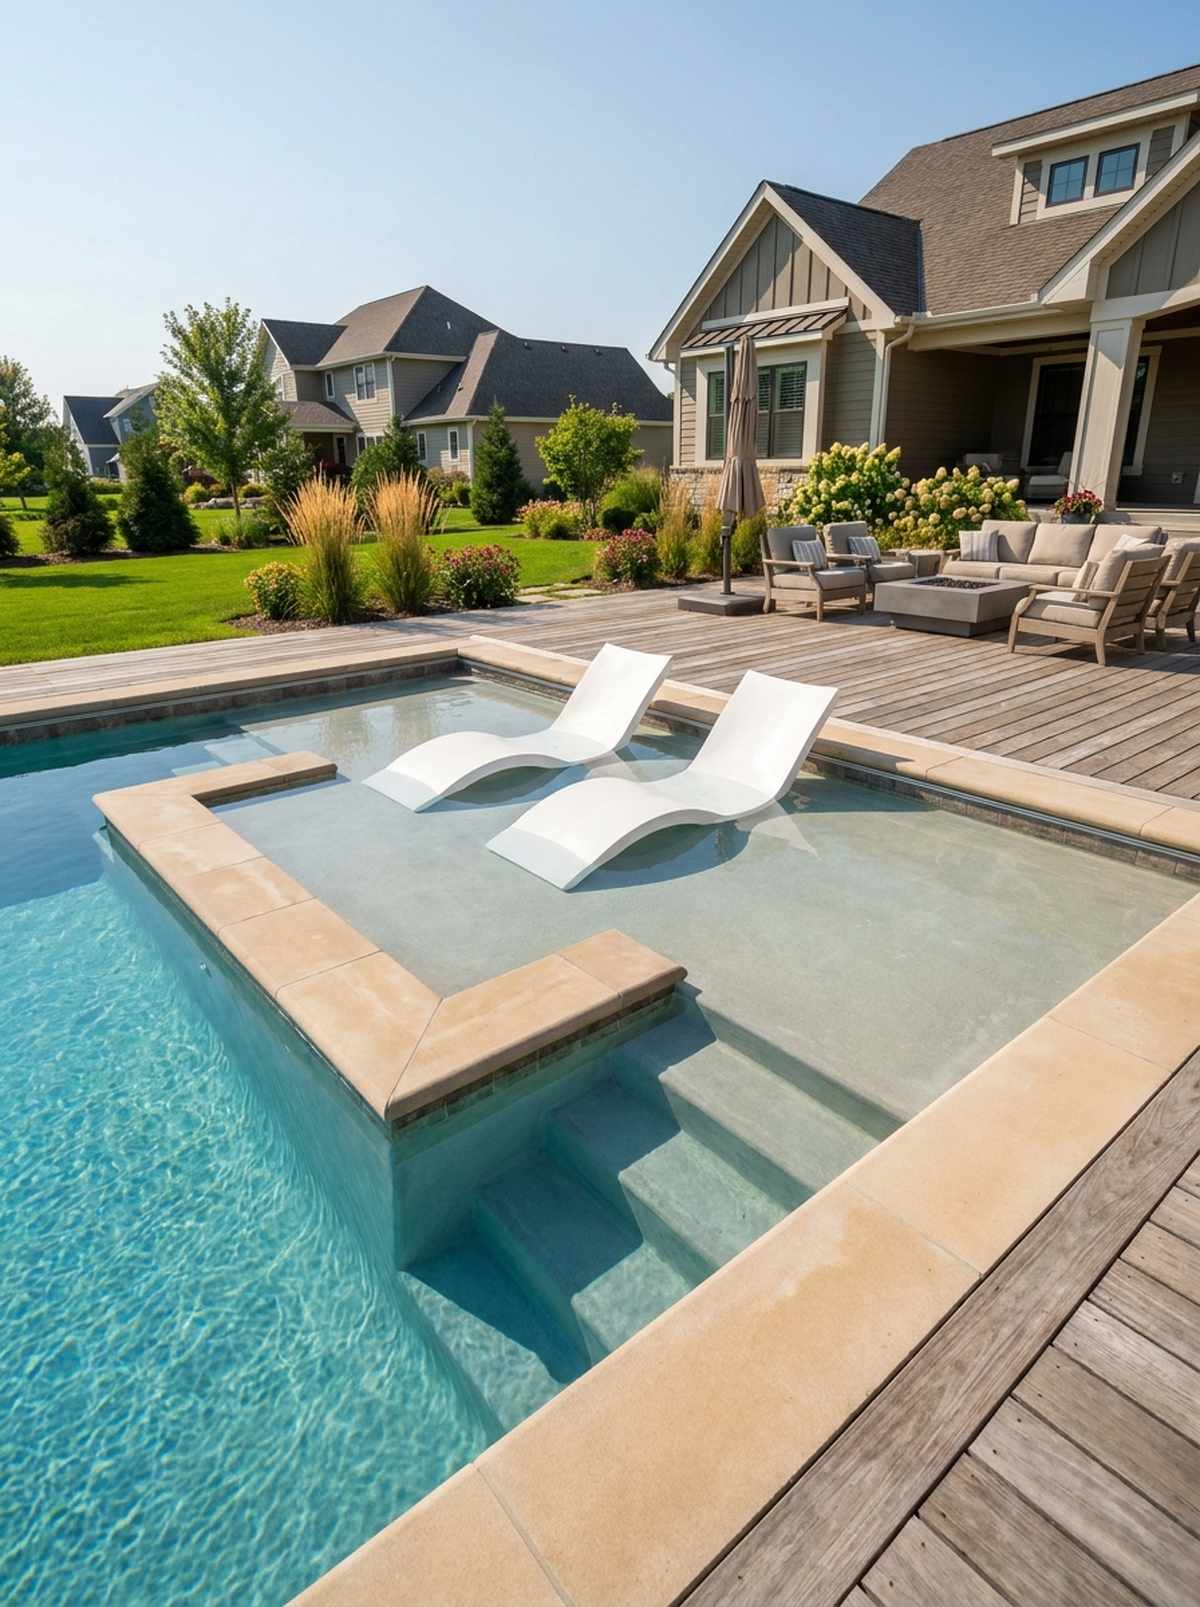
Sleek, incredibly space-efficient, and feeling like a genius architectural hack. The hybrid pool entry ledge is the absolute perfect solution for maximizing compact pool footprints.
Instead of cramming stairs into one corner and a shelf in another, this unified approach delivers a surprisingly premium look. Utilizing a wide pre-cut bullnose coping across the extended first step ensures seamless entry and massive lounging real estate.
Merging these features actually saves on gunite forming costs, keeping it budget-friendly. Save this brilliant space-saving idea for your pool contractor!
- Key Materials: Wide-format platform concrete
- Vibe / Style: Ultra-efficient modernism
- Difficulty: Smart standard pour
- Budget Breakdown: Framing Labor: $500 | Concrete: $800 | Finish: $400.
- Creator’s Tip: Keep the front half exactly six inches deep to perfectly fit standard in-water loungers.
- Smart Sourcing: UV-resistant in-water lounge chairs (2-pack) and bullnose coping kits.
💡 Must-Have Supplies for High-End Setups
To build these setups faster and ensure they last, skip the generic craft aisles and invest in the right foundational kits.
- Base & Support: commercial-grade structural leveling kits
- Setup Tools: professional concrete stamping starter kits
- Weather/Durability Protection: UV-blocking heavy-duty stone sealant
10. Island Tanning Shelf in Freeform Pool
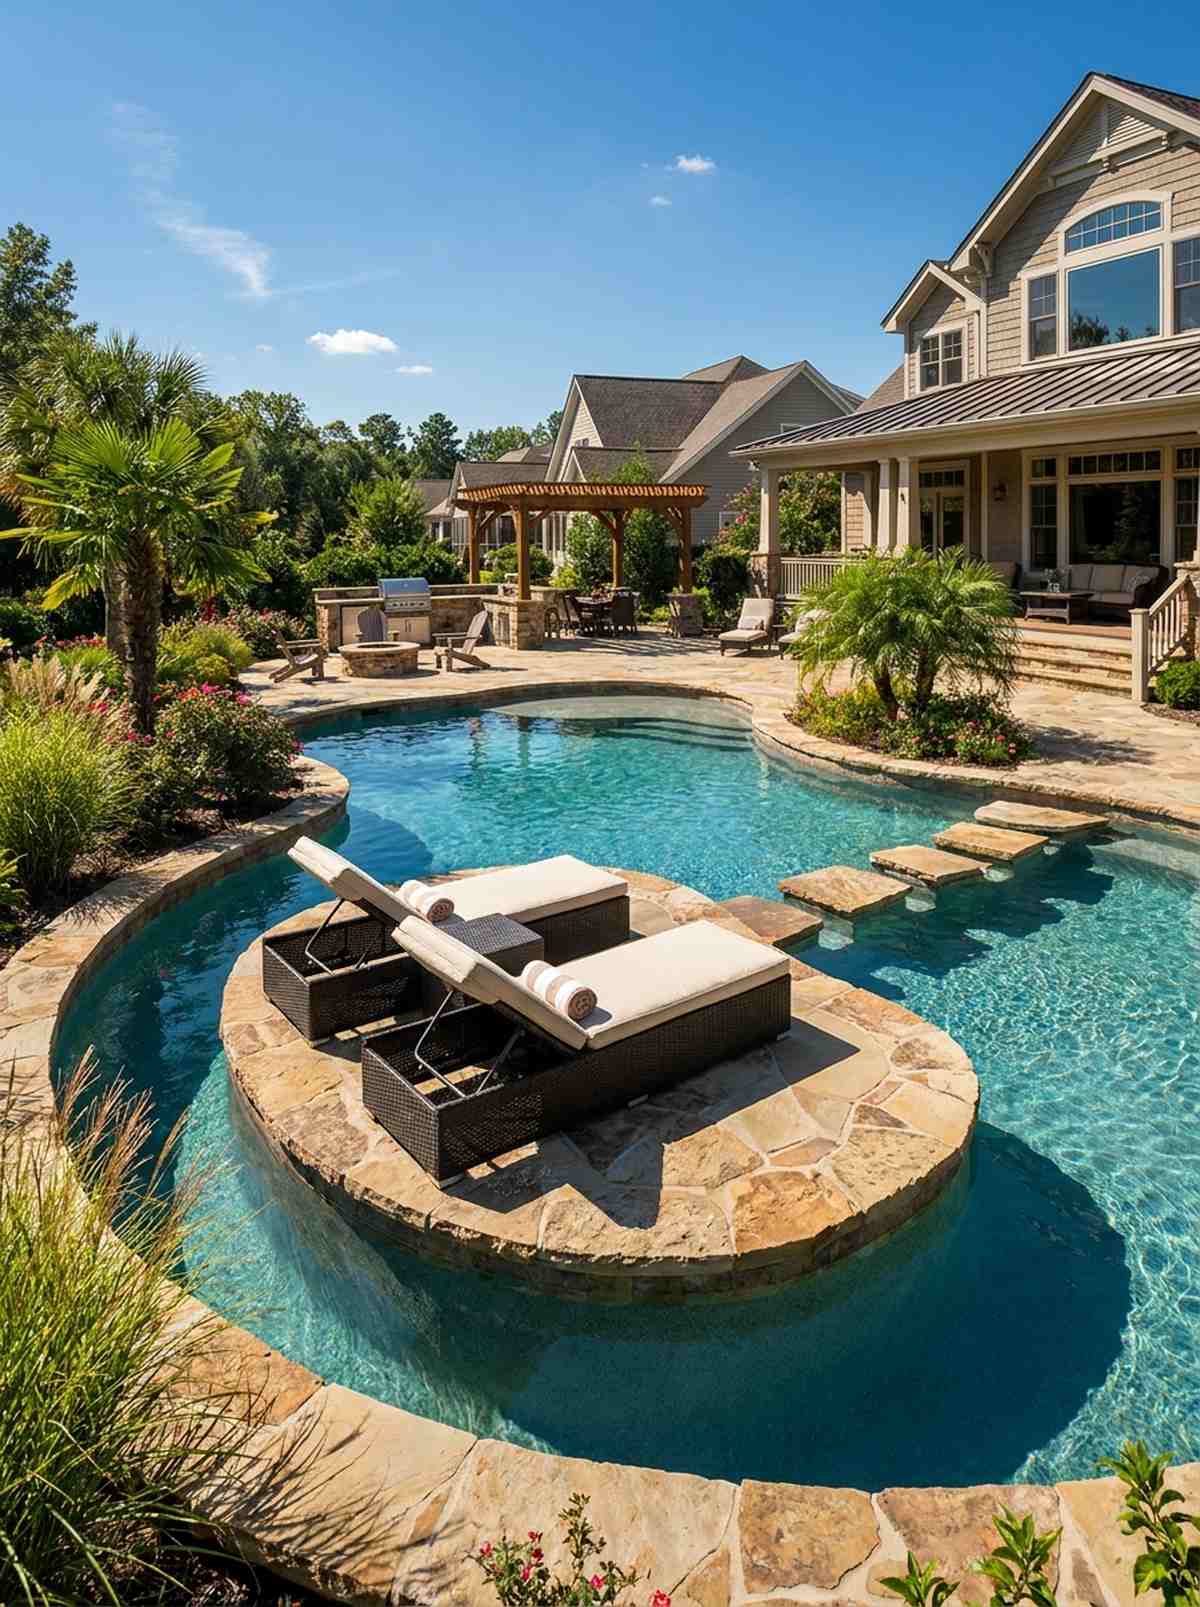
Evoking a secluded, castaway sanctuary right in your backyard. A floating island pool shelf serves as an incredible isolated escape for avid sunbathers wanting total separation.
Most ledges cling to the pool edge, but severing that connection makes the setup look far more expensive than it is. Wrapping the island in a consistent natural stone pool coping makes it feel like an organic geological formation.
Forming a central island typically adds about $2,000 to a freeform build. It’s an unforgettable centerpiece that dictates the entire yard’s flow.
- Key Materials: Central gunite pillar and natural stone
- Vibe / Style: Private tropical lagoon
- Difficulty: Advanced structural engineering
- Budget Breakdown: Center Support: $1,200 | Coping: $600 | Plaster: $400.
- Creator’s Tip: Ensure the island is positioned where it receives unbroken sunlight during peak afternoon hours.
- Smart Sourcing: tumbled natural stone coping (bulk pallet) and floating pool lounge kits.
11. Beach-Entry Slope Replacing Traditional Steps
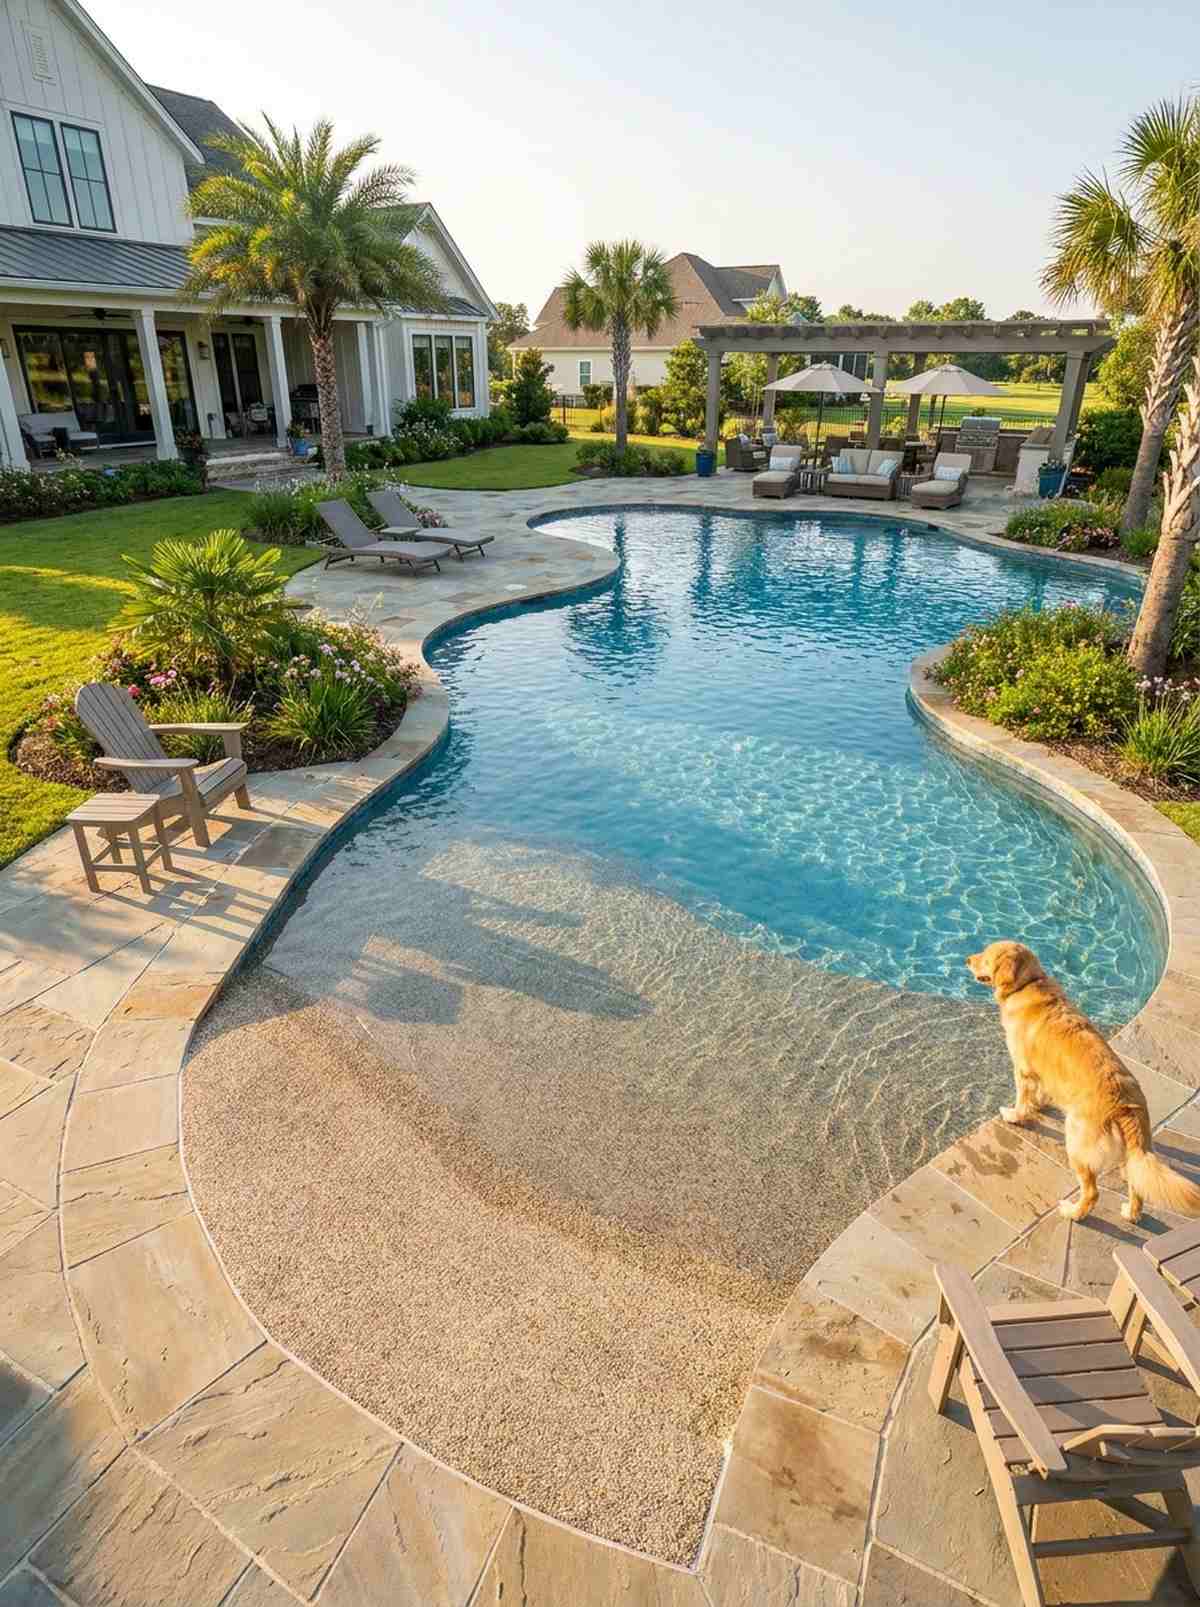
Immensely relaxing and carrying the gentle rhythm of an ocean shoreline. The zero-entry pool slope acts as an ideal handicap-accessible and pet-friendly entry mechanism.
Ditching harsh stairs for a graduated descent delivers a designer-level finish that elevates the whole property. Coating the slope in a specialized slip-resistant pebble aggregate guarantees safety while mimicking natural beach sand texturally.
Because it requires a longer footprint, grading this slope costs roughly $3,000 to $5,000 extra. Pin this if you want a seamless, trip-free water transition!
- Key Materials: Textured pebble pool finish
- Vibe / Style: Natural coastal shoreline
- Difficulty: Extensive slope grading
- Budget Breakdown: Excavation: $1,500 | Pebble Finish: $2,000 | Grading: $1,000.
- Creator’s Tip: Gradually increase the texture grit as the water gets shallower to prevent algae slips.
- Smart Sourcing: slip-resistant pebble aggregate (bulk bags) and underwater slope markers.
12. Dual Ledges on Opposite Pool Ends
Striking perfect visual balance while feeling incredibly majestic. This dual-ended pool ledge layout is brilliant for accommodating varied guest activities simultaneously during large parties.
Varying the depth between the two platforms completely breaks the monotonous mold of standard pools. Dropping the deep-end shelf to eighteen inches using high-compression concrete forms creates a fantastic standing rest zone for active swimmers.
Adding a second resting ledge usually runs around $1,500 during the initial shell phase. Highly recommended to maximize usability on both sides of the water.
- Key Materials: Depth-specific plaster forms
- Vibe / Style: Symmetrical grand estate
- Difficulty: Moderate secondary pouring
- Budget Breakdown: Secondary Pour: $1,000 | Extra Plaster: $300 | Finishing: $200.
- Creator’s Tip: Keep the shallow side for sunbathing chairs and the deep side bare for quick swim breaks.
- Smart Sourcing: reusable concrete step forms (starter kit) and waterproof depth marker tiles.
If you think standard pool edges are fine, this next gravity-defying trick will completely ruin regular pools for you…
Infinity Edges and Vanishing Perimeters
Negative-edge and zero-edge pools extend the visual horizon by allowing water to spill over one or more sides. These designs excel on sloped lots or properties with distant views.
13. Single Vanishing Edge Facing Hillside View

Gives you that breathtaking, edge-of-the-world sensation you only find in luxury travel brochures. A hillside infinity pool edge operates flawlessly for properties overlooking valleys or steep terrain drops.
This optical illusion is a masterclass in making a standard pool look far more expensive than it is. Utilizing hidden low-profile scupper kits in the catch basin silences the rushing water, maintaining a deeply zen atmosphere.
Infinity edges require complex engineering, starting around $8,000 for the catch basin system alone. Save this to your ultimate dream home board!
- Key Materials: Concealed lower catch basin and pump
- Vibe / Style: Cliffside modern luxury
- Difficulty: High-end professional engineering
- Budget Breakdown: Catch Basin: $4,000 | Scuppers: $1,500 | Variable Pump: $2,500.
- Creator’s Tip: Always angle your main patio furniture directly toward the vanishing line to maximize the visual impact.
- Smart Sourcing: low-noise copper scuppers (bulk pack) and heavy-duty infinity pump kits.
14. Perimeter-Overflow Pool with Deck-Level Rim
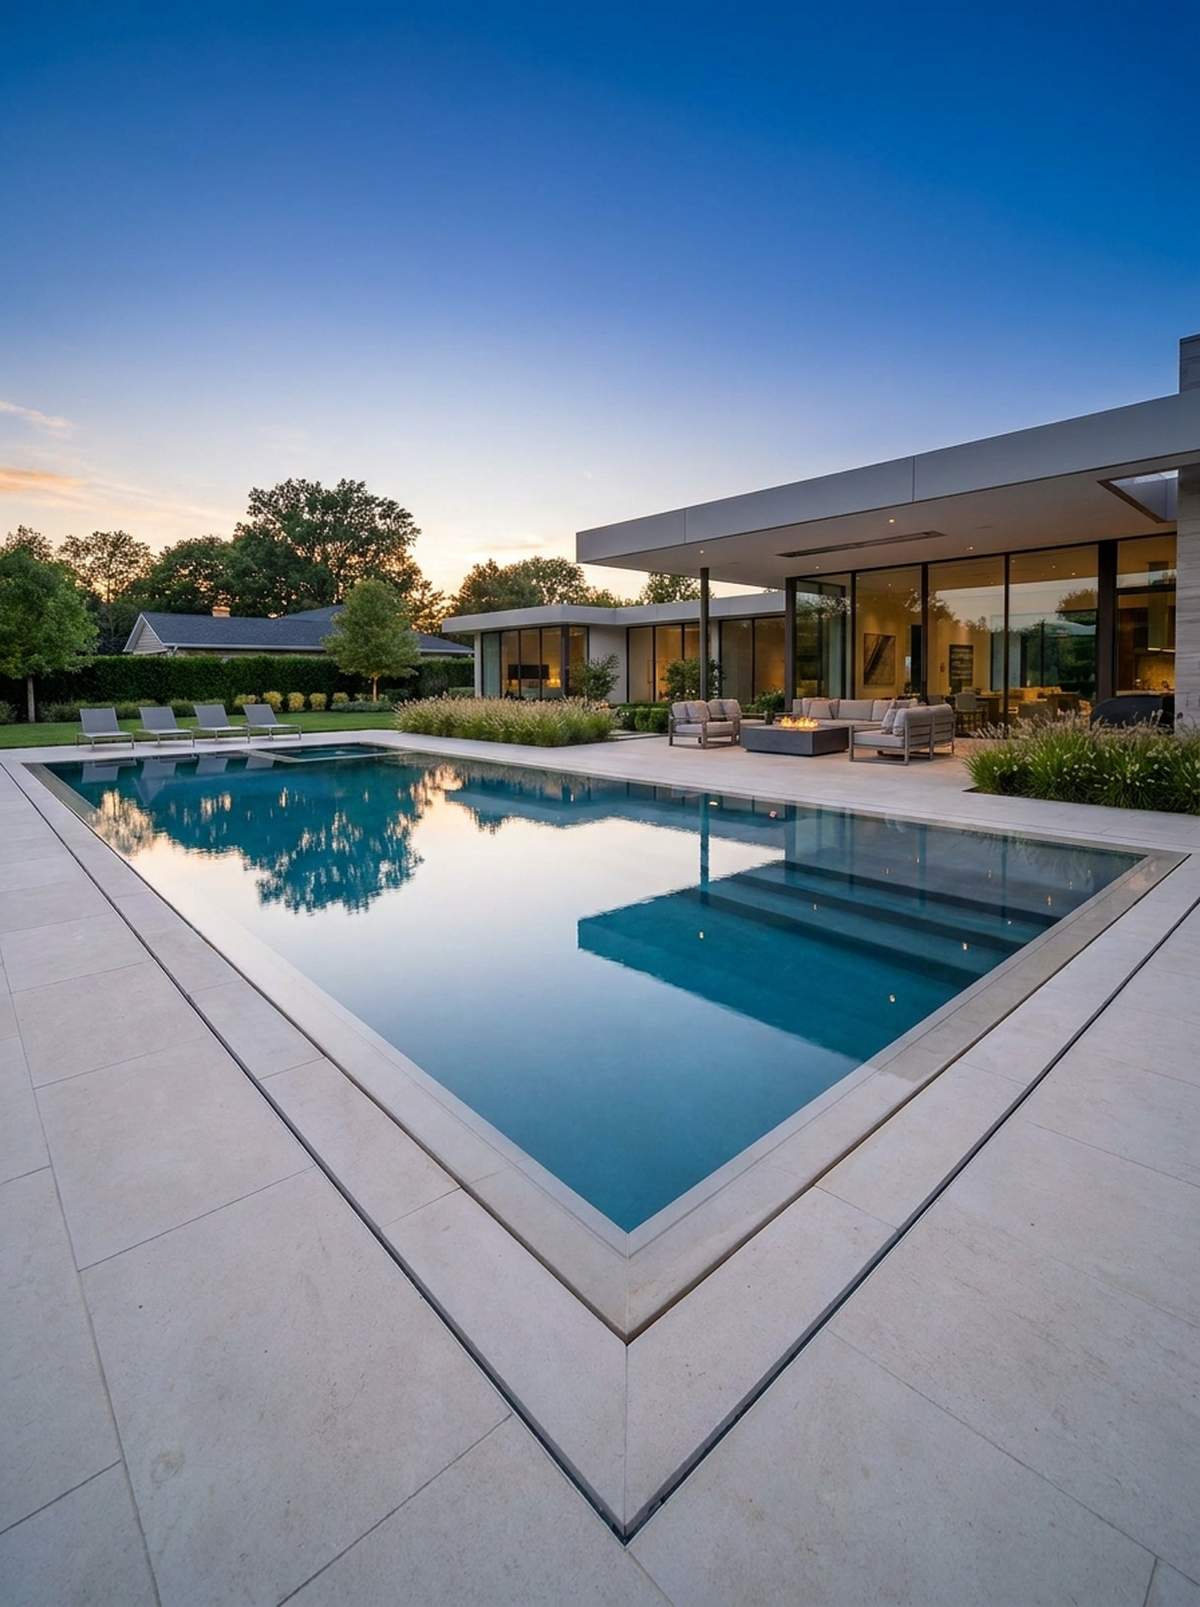
Feels like a sheet of pure glass levitating flawlessly on your patio. The zero-edge perimeter pool provides an ultra-minimalist, mirror-like reflection that reflects the sky beautifully.
Erasing the traditional pool lip delivers a surprisingly premium look favored by elite modern estates. You must install a precise perimeter hidden drainage grate around the entire boundary to manage the continuous overflow.
This level of millimeter-perfect grading will easily add $15,000 to a build. It’s a massive investment that yields flawless architectural perfection.
- Key Materials: Concealed slot drain systems
- Vibe / Style: Ultra-sleek architectural minimalism
- Difficulty: Extreme precision grading required
- Budget Breakdown: Slot Drains: $5,000 | Surge Tank: $4,000 | Leveling: $6,000.
- Creator’s Tip: The water level must be perfectly calibrated daily; invest in an automated water-leveling system.
- Smart Sourcing: hidden slot drain grates (bulk pack) and auto-fill pool valve kits.
15. Infinity Edge with Fire Bowls on Catch Wall
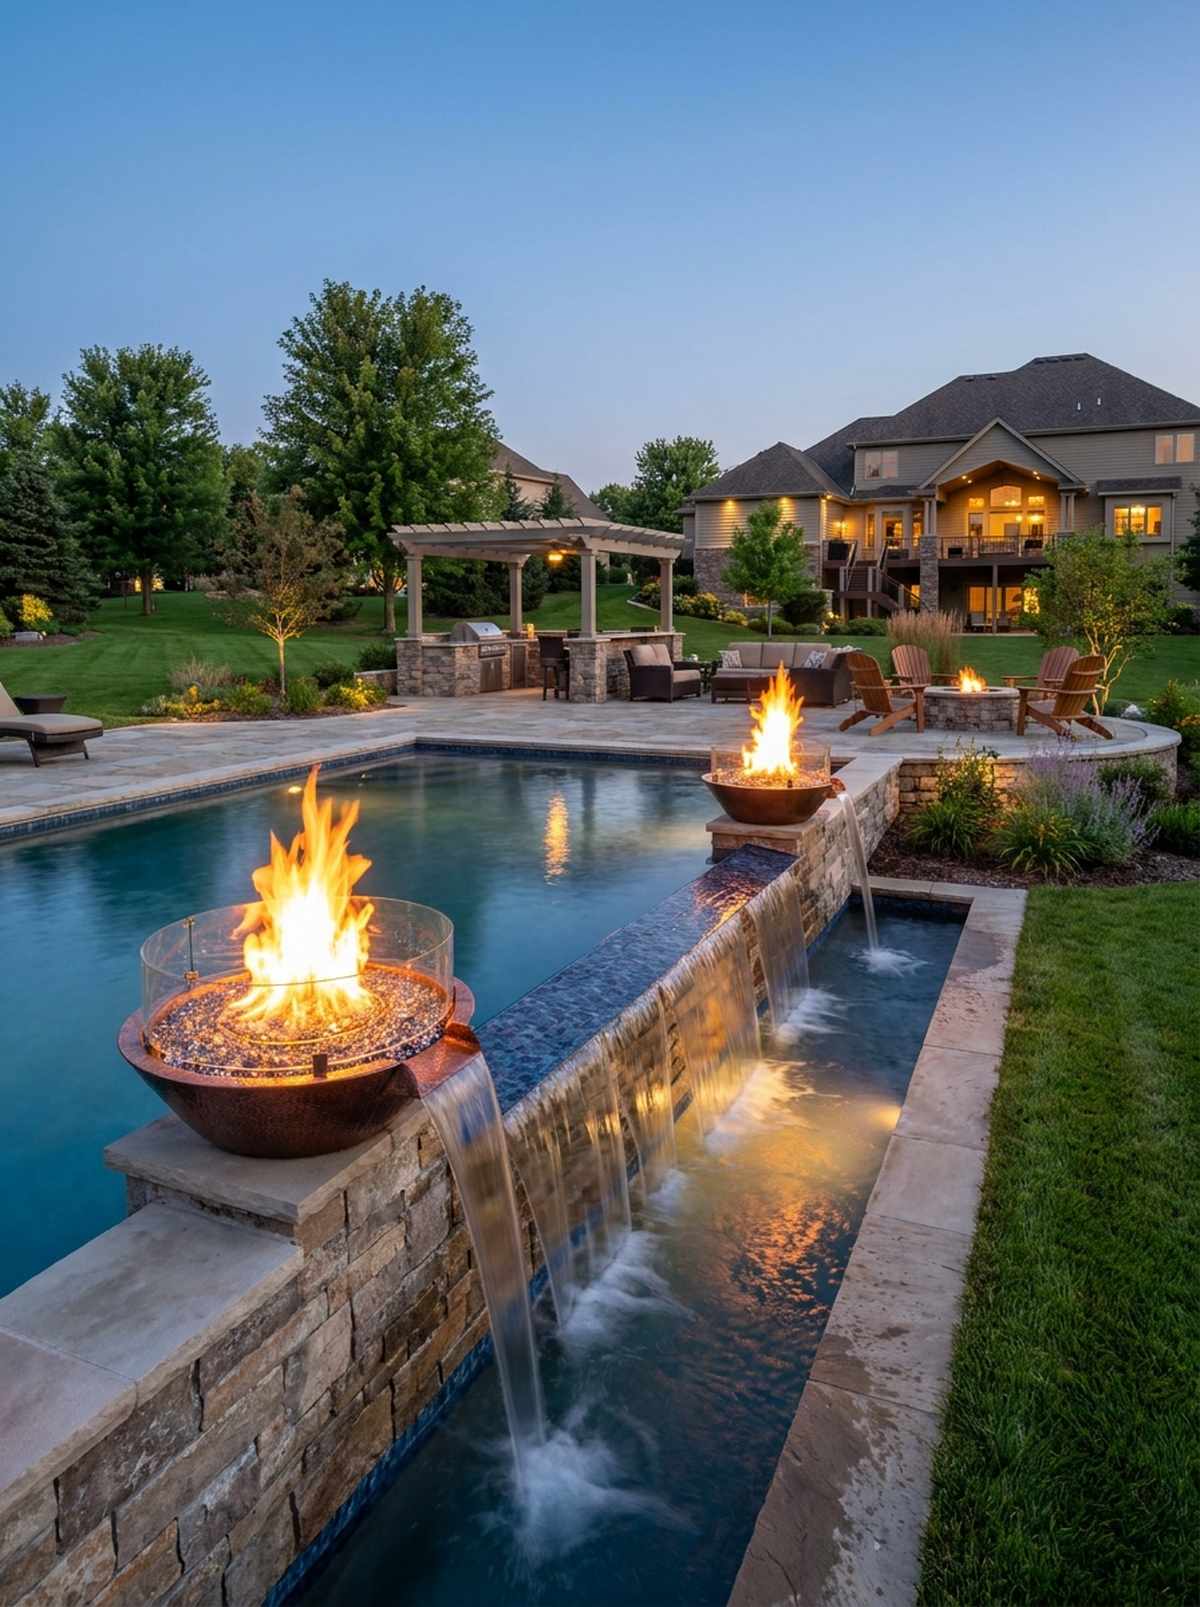
Radiates an intense, dramatic energy that completely transforms the night landscape. Combining a vanishing edge with fire features creates an unforgettable visual spectacle for evening entertaining.
Mixing the elements of fire and falling water instantly creates a designer-level finish. Mounting striking copper pool fire bowls right on the lower catch wall doubles the impact as flames reflect off the cascading water.
Plumbing dedicated gas lines during excavation adds about $3,500, plus the cost of the bowls. Pin this if you love high-drama backyard aesthetics!
- Key Materials: Copper gas fire vessels
- Vibe / Style: High-drama elemental contrast
- Difficulty: Advanced gas and water routing
- Budget Breakdown: Copper Bowls: $1,500 | Gas Lines: $1,200 | Glass Windshields: $600.
- Creator’s Tip: Always use tempered glass windscreens to keep the flames dancing evenly without blowing out.
- Smart Sourcing: hammered copper fire bowls (2-pack) and tempered fire glass (bulk bag).
16. Dual Vanishing Edges Forming Corner Waterfall
Feels incredibly powerful, acting as a massive living art piece in the yard. This corner waterfall infinity setup is brilliant for corner-lot elevations where two angles are visible from below.
Directing two separate flow plains into a single corner drop completely breaks the mold of boring flat pools. Framing this cascade with heavy natural stone veneer panels grounds the aggressive water feature perfectly into the landscape.
Expect a custom corner catch basin to run upwards of $10,000 due to the complex hydraulics. A true show-stopper that redefines outdoor architecture.
- Key Materials: Corner surge tank and stone veneer
- Vibe / Style: Monumental cascading luxury
- Difficulty: Complex hydraulic engineering
- Budget Breakdown: Corner Tank: $4,500 | Stone Veneer: $2,500 | Dual Pumps: $3,000.
- Creator’s Tip: Cap the flanking columns with lighting to spotlight the falling water curtain at night.
- Smart Sourcing: pre-stacked stone veneer panels (bulk pack) and waterproof spotlight starter kits.
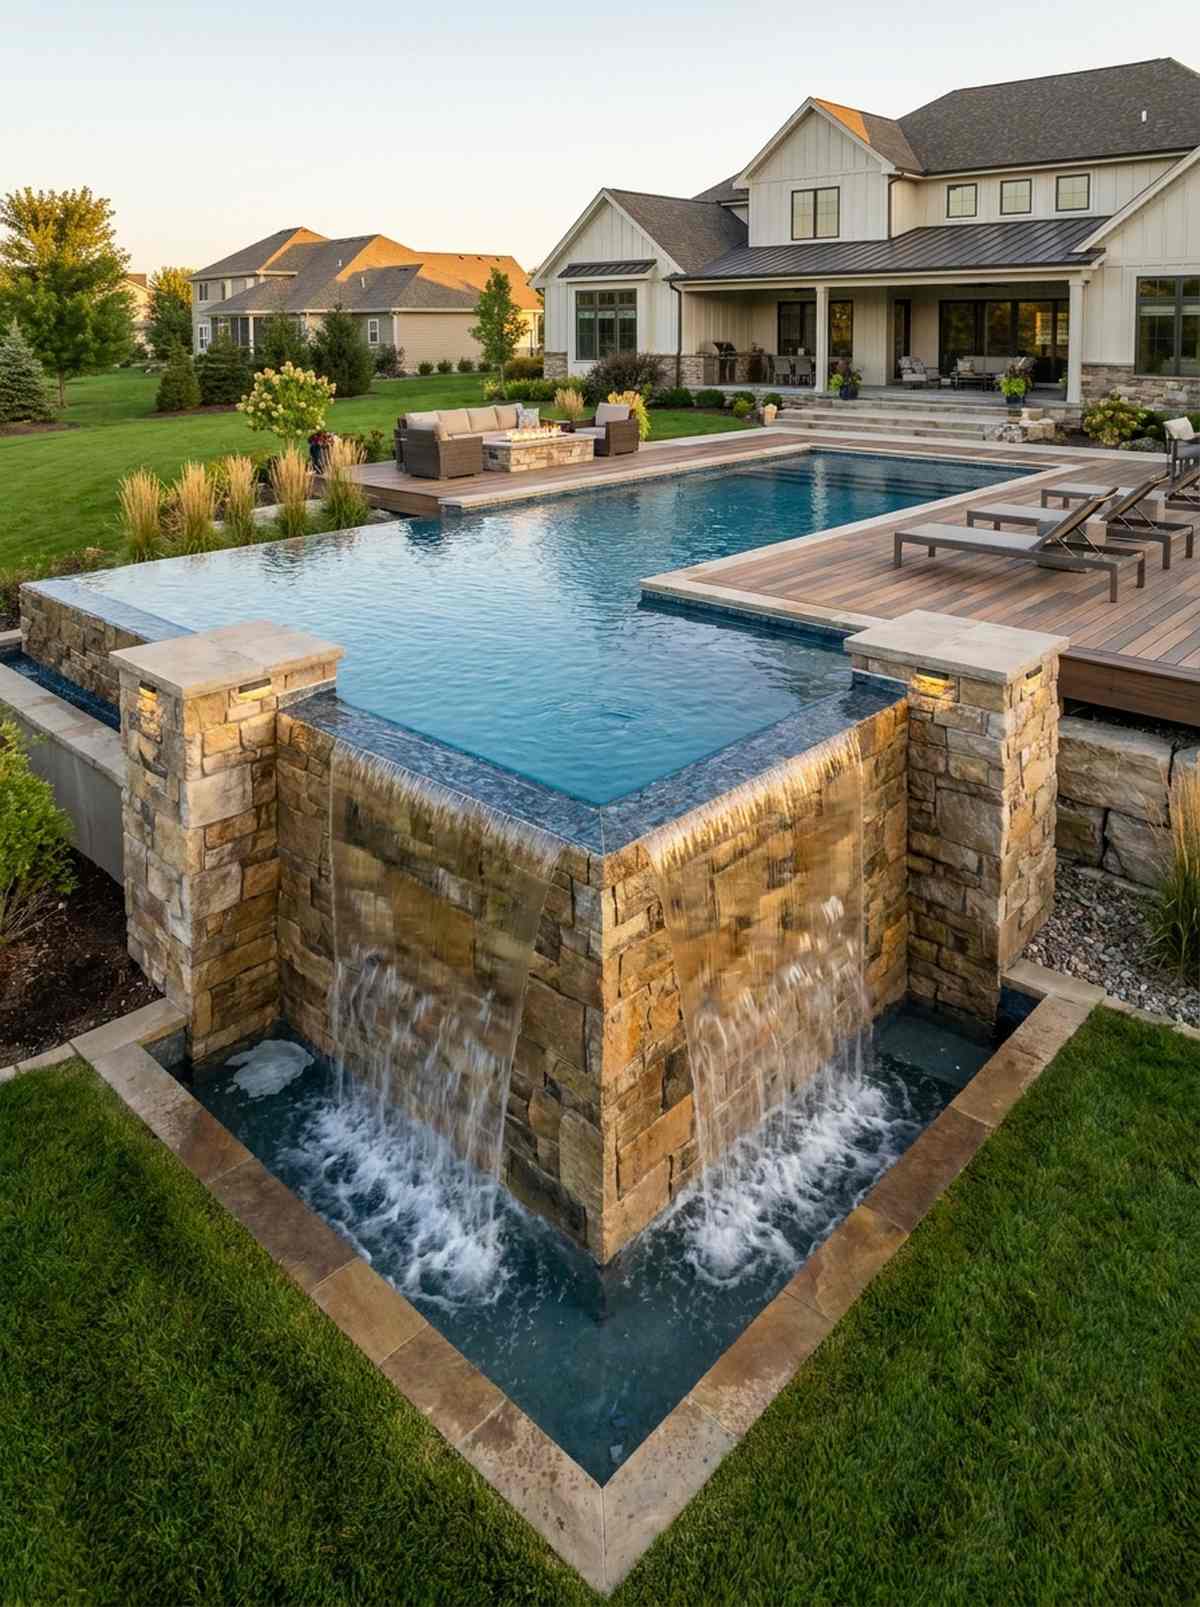
17. Raised Infinity Pool Above Lower Patio
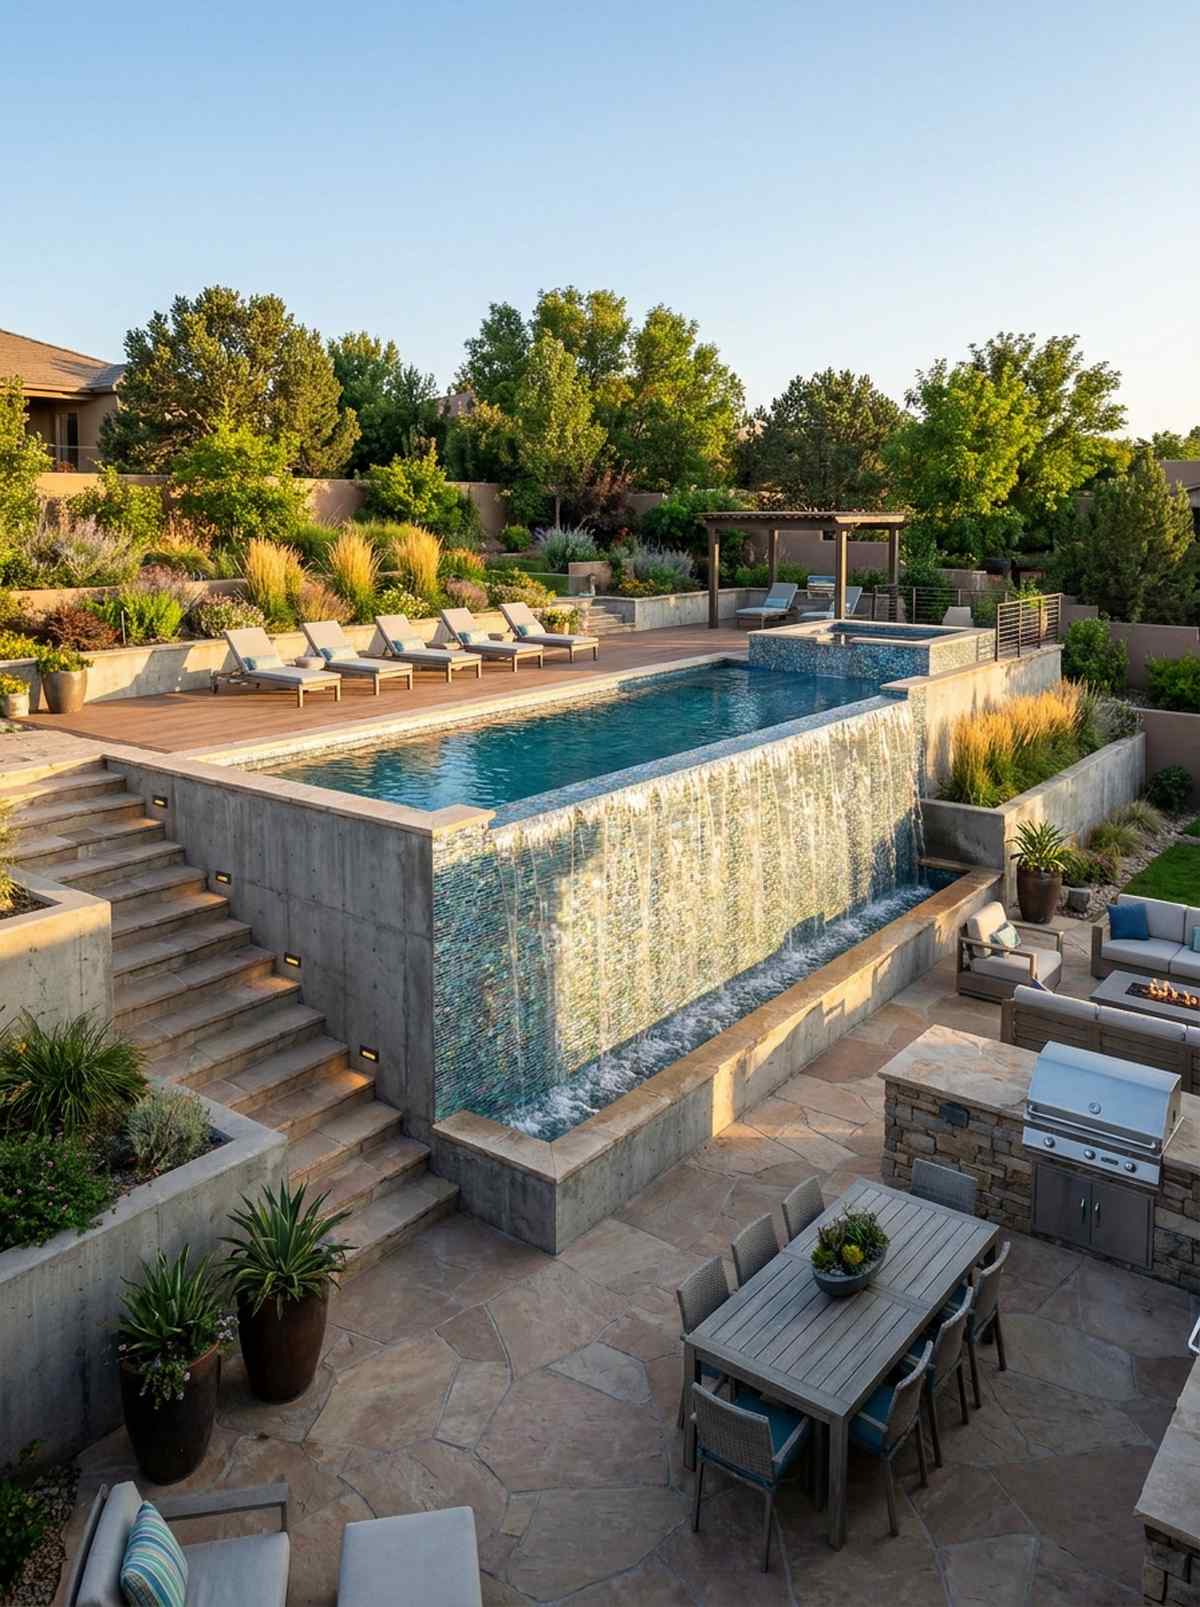
Provides a majestic, throne-like separation from the main entertainment zone. The elevated infinity spillover pool works exceptionally well for heavily sloped yards requiring extensive retaining walls anyway.
Turning a necessary retaining wall into a glowing water feature yields a surprisingly premium look. By utilizing a translucent glass tile mosaic on the spill wall, you animate the lower patio with shimmering light and soothing ambient sound.
Because you’re combining a retaining wall and a pool shell, this structural upgrade costs around $12,000. Save this idea if you’re battling a multi-level terrain problem!
- Key Materials: Reinforced concrete retaining shell
- Vibe / Style: Terraced resort amphitheater
- Difficulty: Heavy structural retaining required
- Budget Breakdown: Retaining Wall: $6,000 | Glass Tile: $3,500 | Stairs: $2,500.
- Creator’s Tip: Use the height difference to hide the pool equipment underneath the upper deck structure.
- Smart Sourcing: translucent mosaic wall tiles (bulk sheets) and commercial waterproofing sealant kits.
Most backyard builds stay completely flat, but this next multi-level trick creates zones so cozy you’ll never want to go inside…
Multi-Level Decks and Raised Patios
Sloped terrain and grade changes become design assets when you introduce multiple deck elevations. Raised platforms provide elevated views, separate activity zones, and architectural drama.
18. Two-Tier Deck with Sunken Conversation Pit
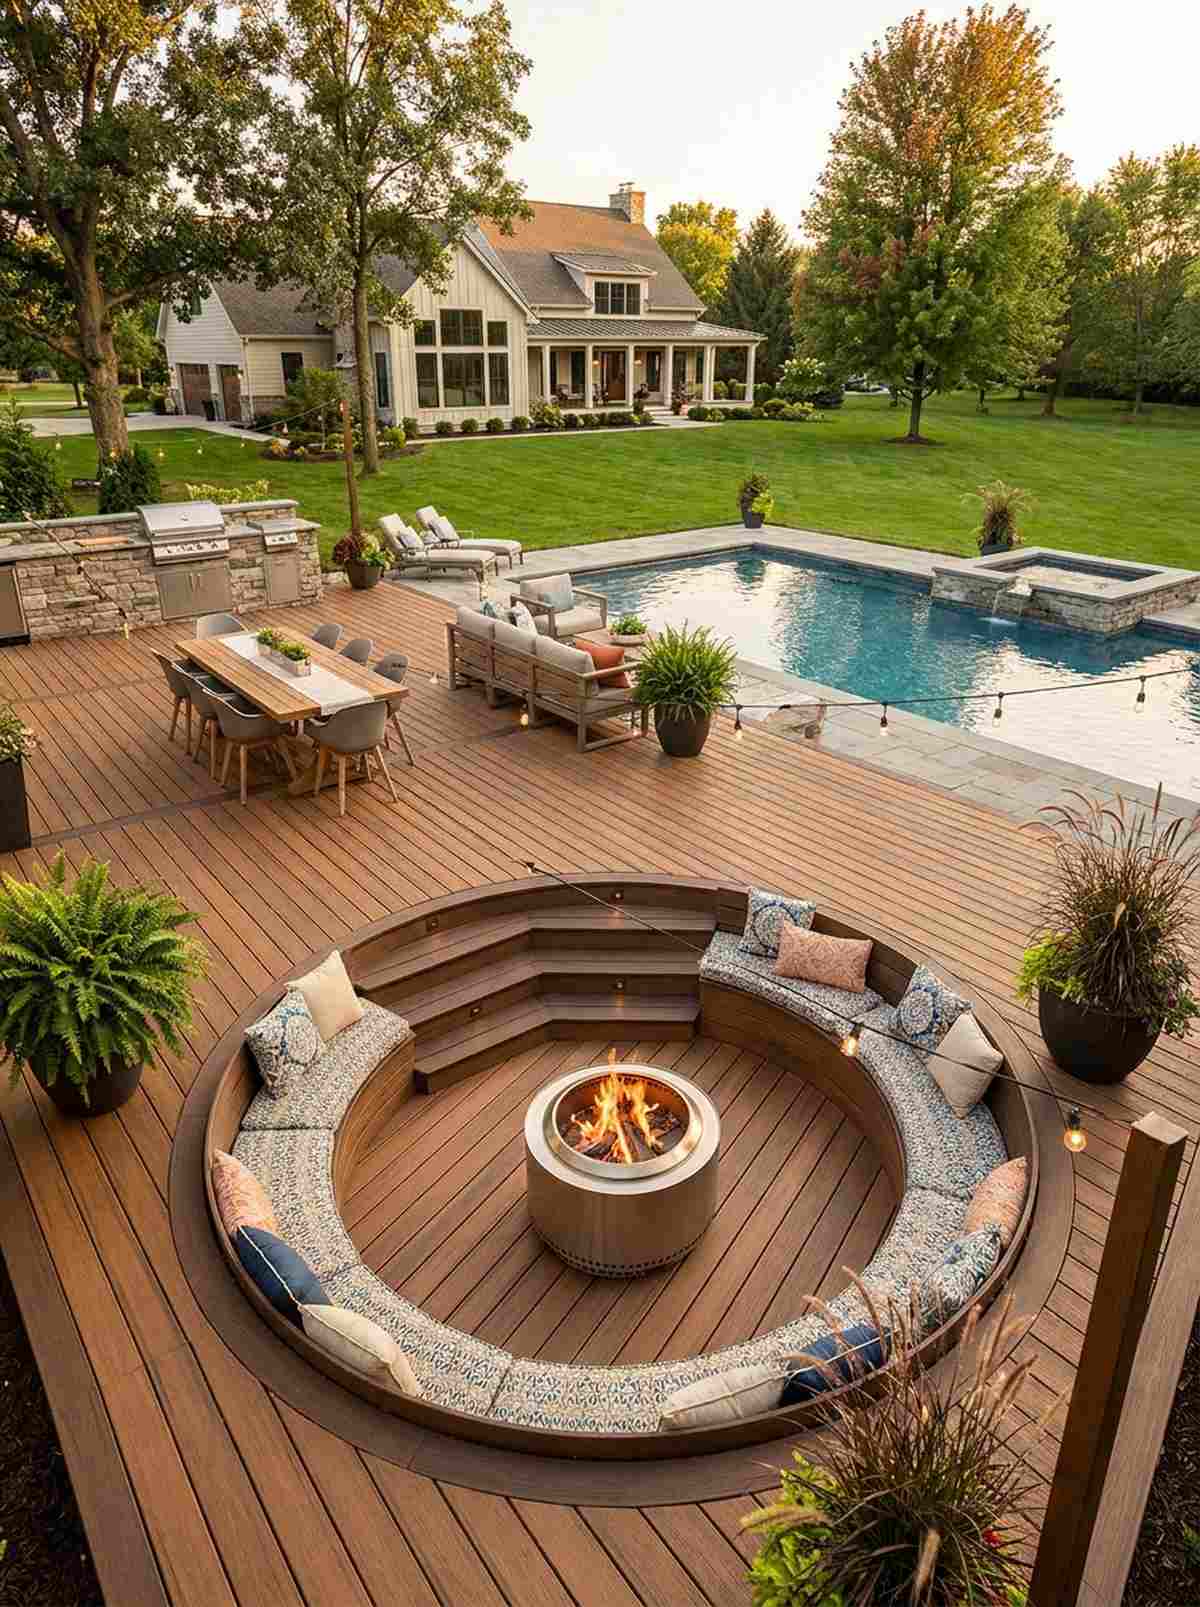
Oozes a retro-chic intimacy that makes every evening feel like a private VIP party. A sunken patio conversation pit located near the pool acts as an ultimate wind-protected lounge space.
Creating a secondary dropped elevation looks far more expensive than it is, completely avoiding the boring flat-patio syndrome. Integrating a smokeless fire pit insert into the center ensures cozy gatherings without blinding swimmers with smoke.
Digging and retaining a sunken pit adds roughly $4,000 to a standard deck build. Pin this layout to secure the ultimate outdoor hosting spot!
- Key Materials: Matching composite decking across tiers
- Vibe / Style: Mid-century modern intimate
- Difficulty: Advanced framing and drainage
- Budget Breakdown: Framing/Digging: $1,500 | Decking: $1,500 | Fire Insert: $1,000.
- Creator’s Tip: Ensure proper drainage is installed in the pit floor; otherwise, it becomes a puddle during heavy rains.
- Smart Sourcing: smokeless drop-in fire pit kits and hidden deck fastener systems (bulk pack).
19. Raised Pool Deck with Underwater Viewing Window
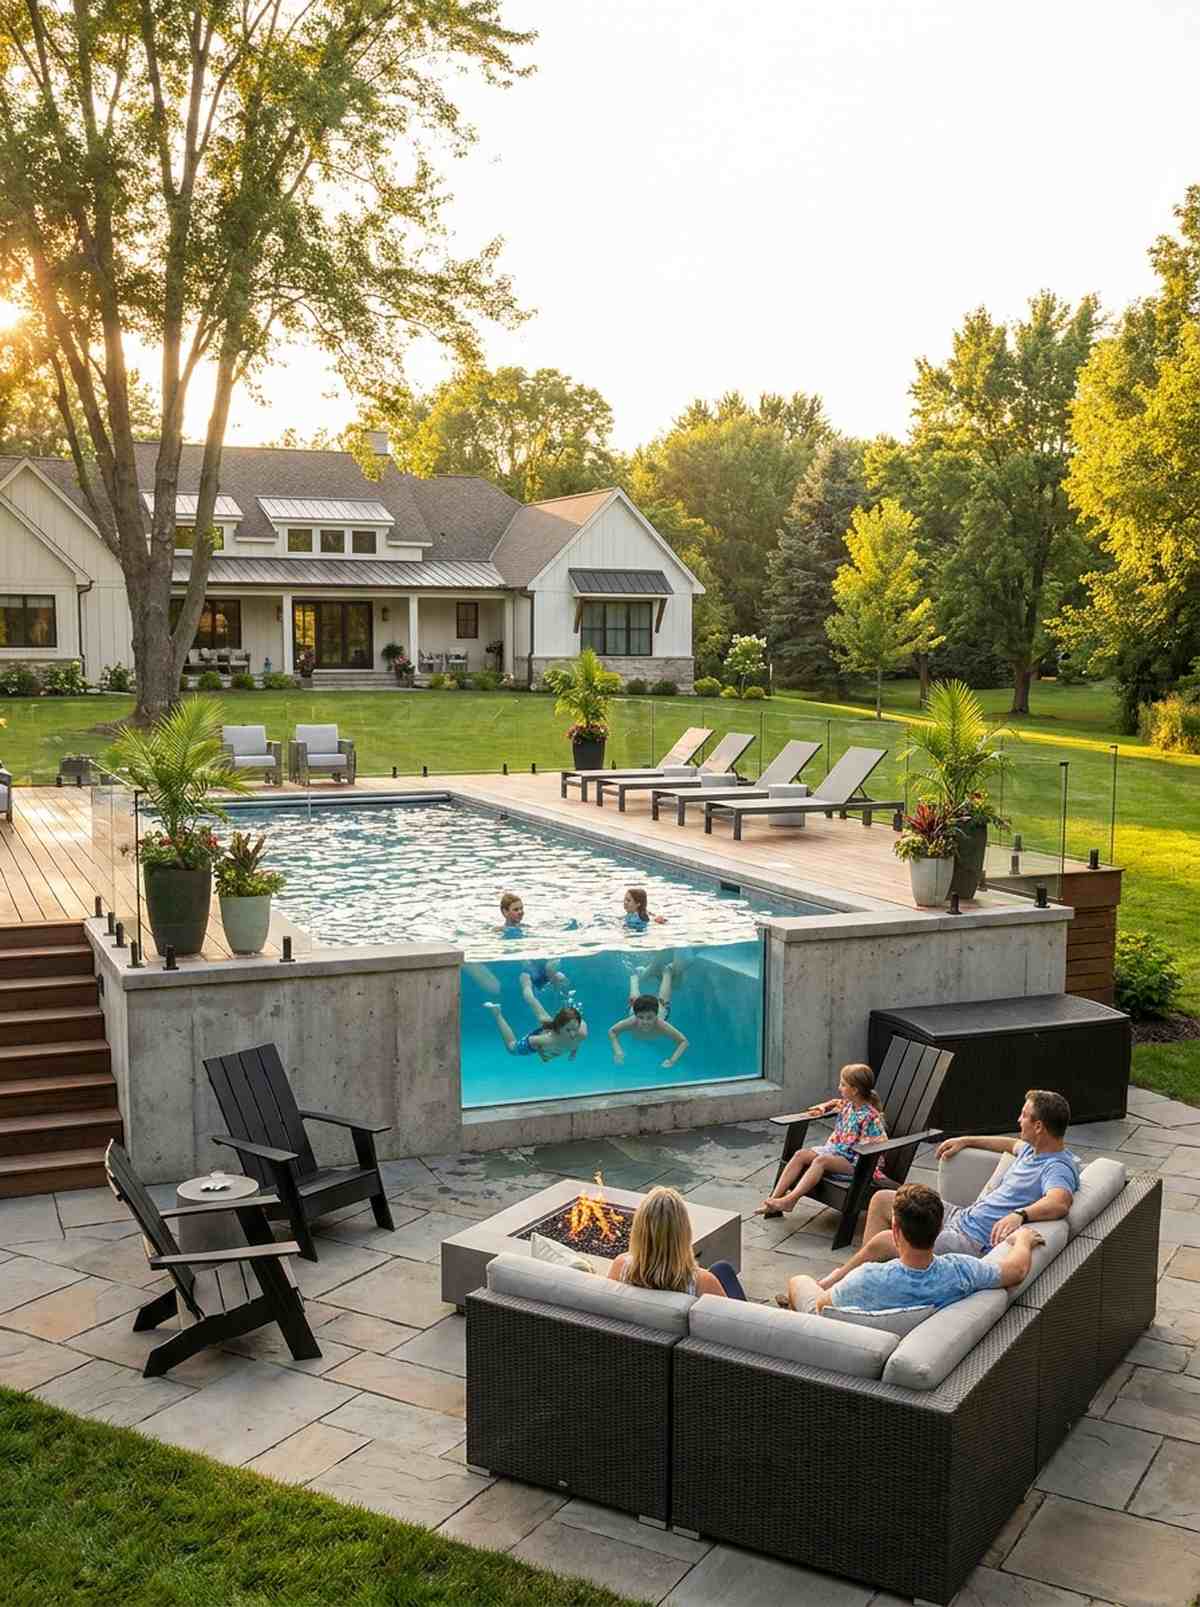
Feels like owning your own personal aquatic museum exhibit. Integrating an acrylic underwater pool window operates as a mind-blowing theatrical feature for elevated backyard designs.
This trick absolutely guarantees a designer-level finish and is a massive hit with kids and guests. Securing thick commercial-grade acrylic panels into the concrete shell lets lower-patio observers watch the underwater action live.
Acrylic pool windows and their specialized watertight seals will cost between $8,000 and $15,000. It’s an elite, jaw-dropping installation that defines the entire property.
- Key Materials: Thick tempered acrylic paneling
- Vibe / Style: Avant-garde aquatic theatrical
- Difficulty: Extreme specialty sealing
- Budget Breakdown: Acrylic Panel: $6,000 | Custom Sealant: $1,500 | Concrete Rebate: $2,000.
- Creator’s Tip: Position the window facing the primary lower seating area to maximize the viewing experience.
- Smart Sourcing: marine-grade acrylic cleaner kits and heavy-duty underwater epoxy (bulk pack).
20. Stepped Patio Tiers Descending to Pool Edge
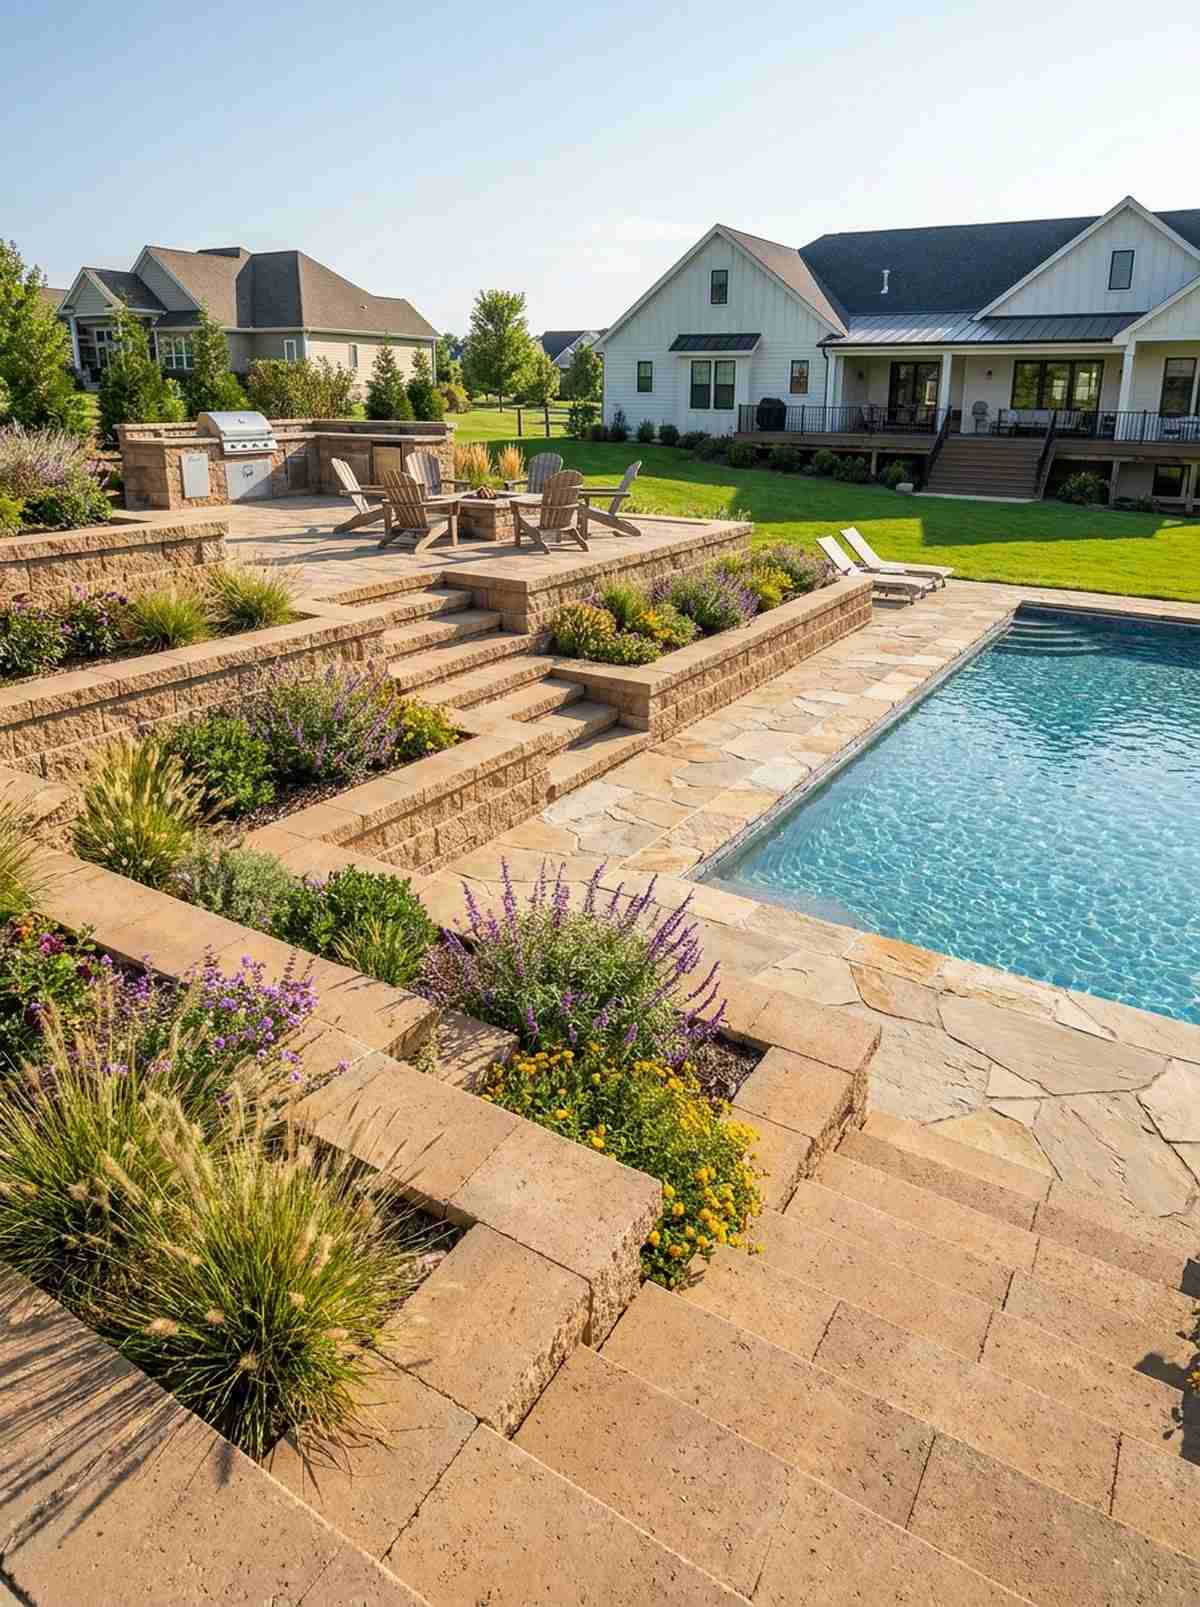
Gives the yard a majestic, amphitheater-like descent straight into the water. This stepped landscape terrace setup is perfect for gently guiding foot traffic down steep, problematic slopes.
Breaking a massive slope into broad, usable tiers delivers a surprisingly premium look while solving horrible erosion issues. Slipping drought-tolerant ornamental grasses into the crevices softens the hard stone geometry with lovely organic movement.
Terracing a slope costs around $5,000 depending on the width and material of the steps. Save this if you’re struggling with unusable hilly terrain!
- Key Materials: Broad masonry blocks and plantings
- Vibe / Style: Mediterranean terraced gardens
- Difficulty: Heavy landscaping and retaining
- Budget Breakdown: Masonry Blocks: $2,500 | Earth Moving: $1,500 | Plants/Soil: $1,000.
- Creator’s Tip: Make the steps at least 24 inches deep so they naturally double as casual stadium seating during parties.
- Smart Sourcing: pre-cast retaining wall blocks (bulk pallet) and ornamental grass seed starter kits.
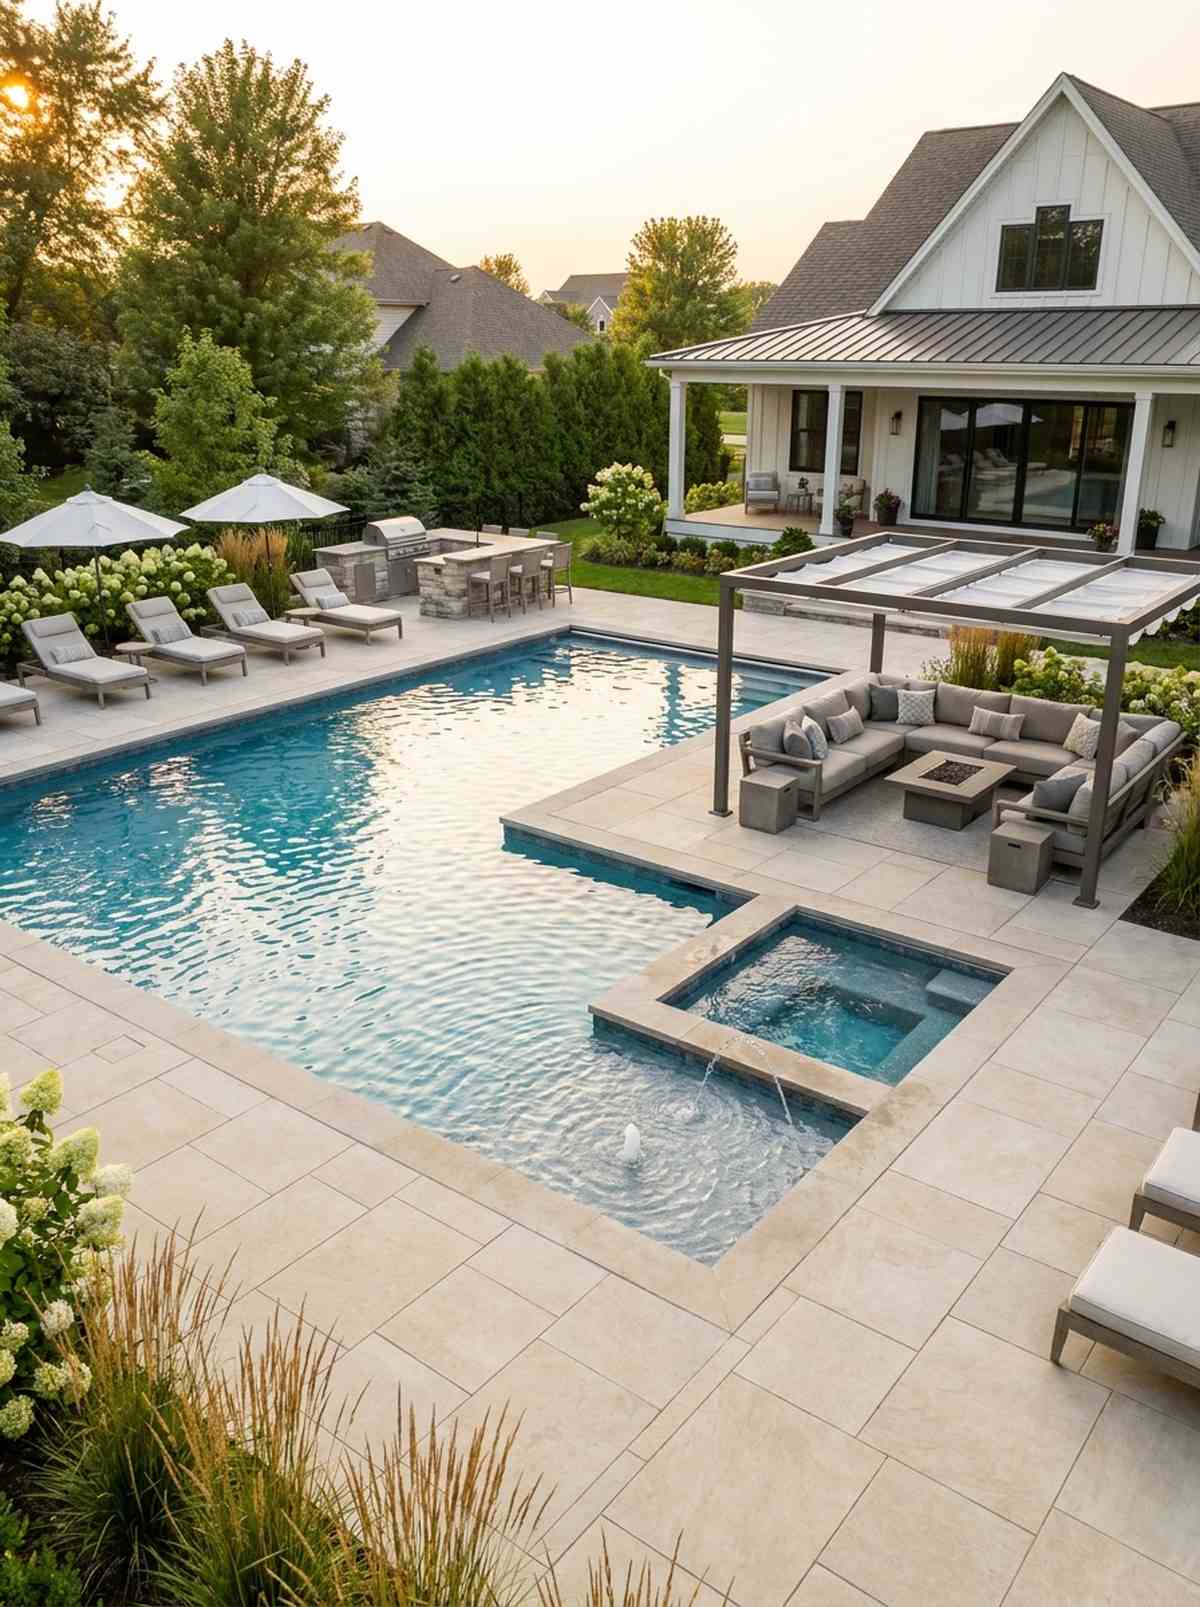
21. Elevated Spa Deck Overlooking Main Pool
Radiates a commanding, spa-day energy with superior vantage points of the entire yard. The raised hot tub overlook perfectly delineates the warm therapeutic zone from the active cool-down pool.
Separating the spa via elevation shifts completely transforms how guests navigate the space. Coating the spillway transition in iridescent glass pool tiles catches the sun, creating a glittering waterfall feature all day long.
Building this elevated sub-deck typically runs around $3,500 over a standard flush spa design. A highly effective way to create distinct mood zones.
- Key Materials: Raised concrete platform framing
- Vibe / Style: Elevated therapeutic retreat
- Difficulty: Moderate concrete forming
- Budget Breakdown: Platform Build: $1,500 | Spillway Tile: $1,000 | Extra Pump: $1,000.
- Creator’s Tip: Use the elevation to tuck all messy pool plumbing and spa heaters completely out of sight.
- Smart Sourcing: iridescent spillway tile sheets (bulk pack) and high-temp spa lighting kits.
22. Bridge Walkway Connecting Dual Patios Over Pool
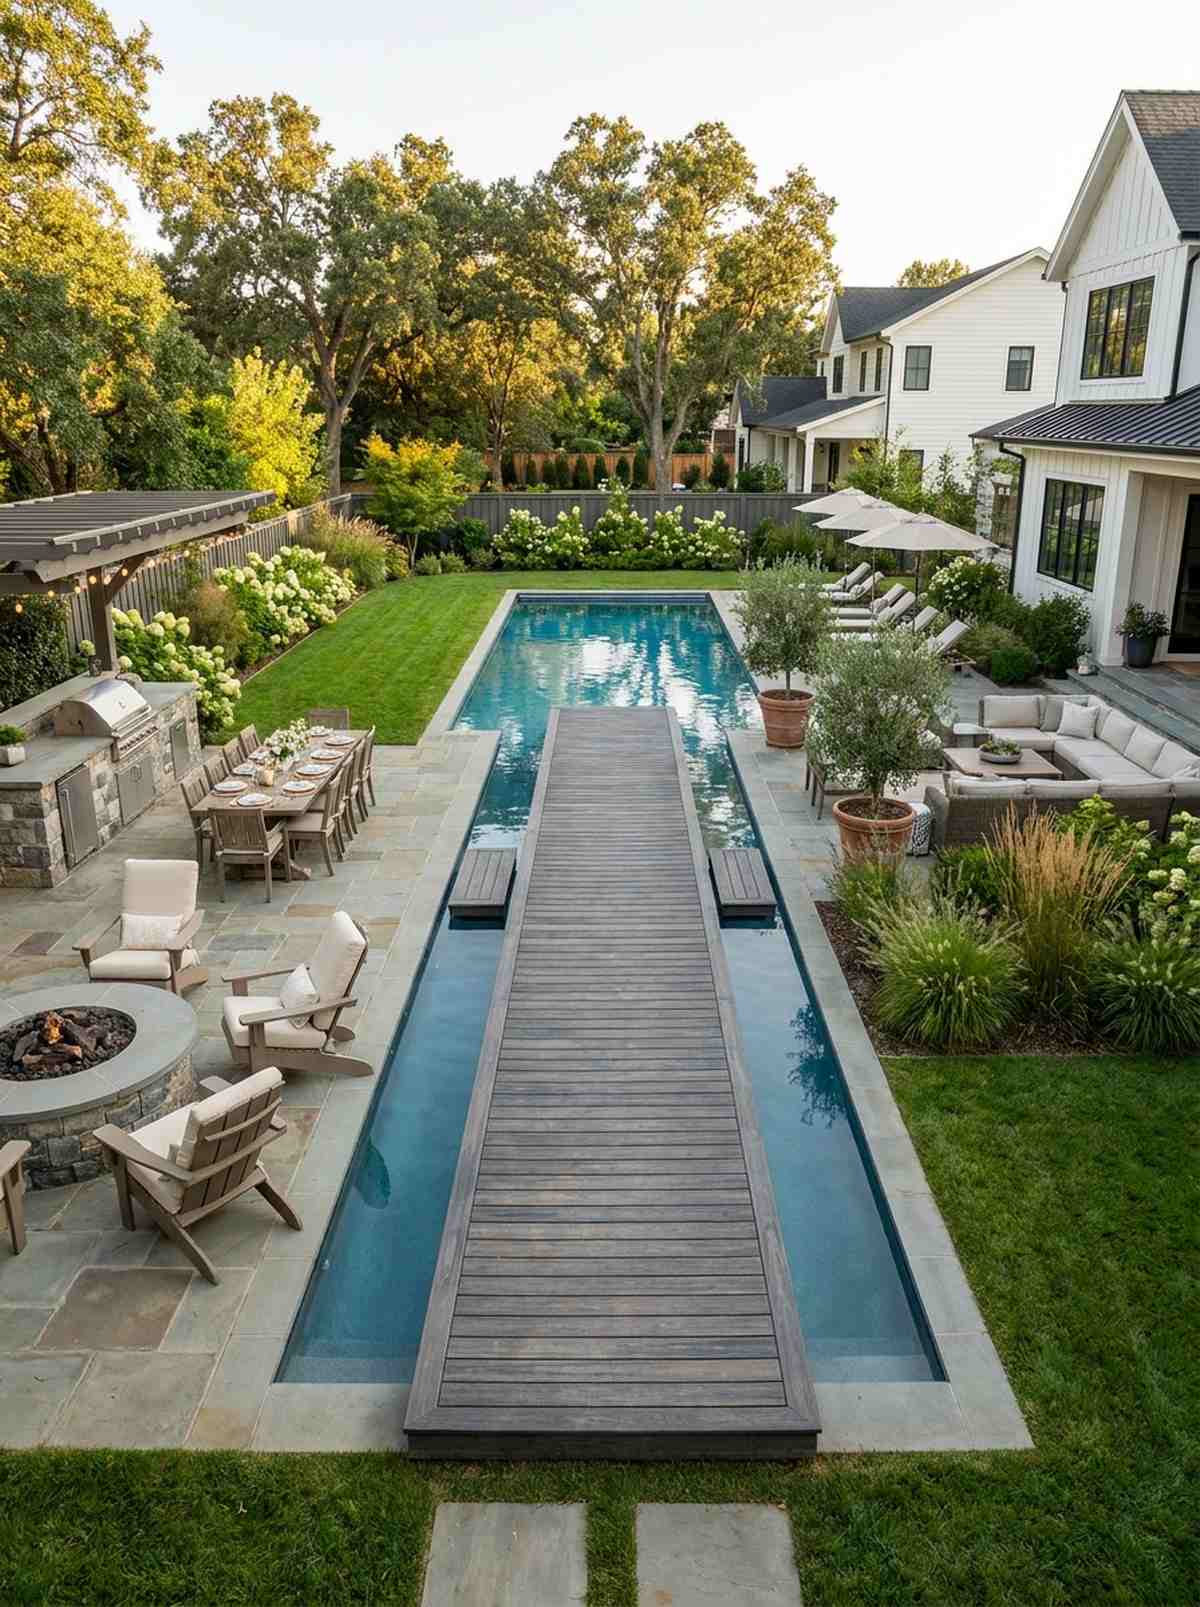
Feels like a secret architectural passageway connecting two distinct worlds. This floating pool bridge walkway works exceptionally well for adding immense visual interest to long, boring rectangular pools.
Spanning the water directly looks far more expensive than it is and saves crucial ground space on narrow lots. Using pre-treated composite decking boards for the bridge surface ensures it easily handles constant moisture without warping or rotting.
A simple decorative span bridge can be fabricated and installed for roughly $2,500. Pin this to your board for a highly unique yard feature!
- Key Materials: Moisture-resistant composite decking
- Vibe / Style: Modern floating architecture
- Difficulty: Precision span engineering
- Budget Breakdown: Steel Stringers: $1,000 | Composite Boards: $1,000 | Hardware: $500.
- Creator’s Tip: Keep the bridge exactly 12 inches above the waterline to create the illusion of floating without safety rails.
- Smart Sourcing: moisture-shield composite decking (bulk pack) and stainless steel hidden fasteners.
Cooking outdoors usually means staring at a fence… until you seamlessly merge your kitchen and pool like this coming up.
Outdoor Kitchens Adjacent to Swim Areas
Positioning cooking and prep stations near the pool streamlines outdoor entertaining and keeps the chef engaged with swimmers. Weatherproof appliances and strategic layouts are essential.
23. Linear Kitchen Island Parallel to Pool Edge
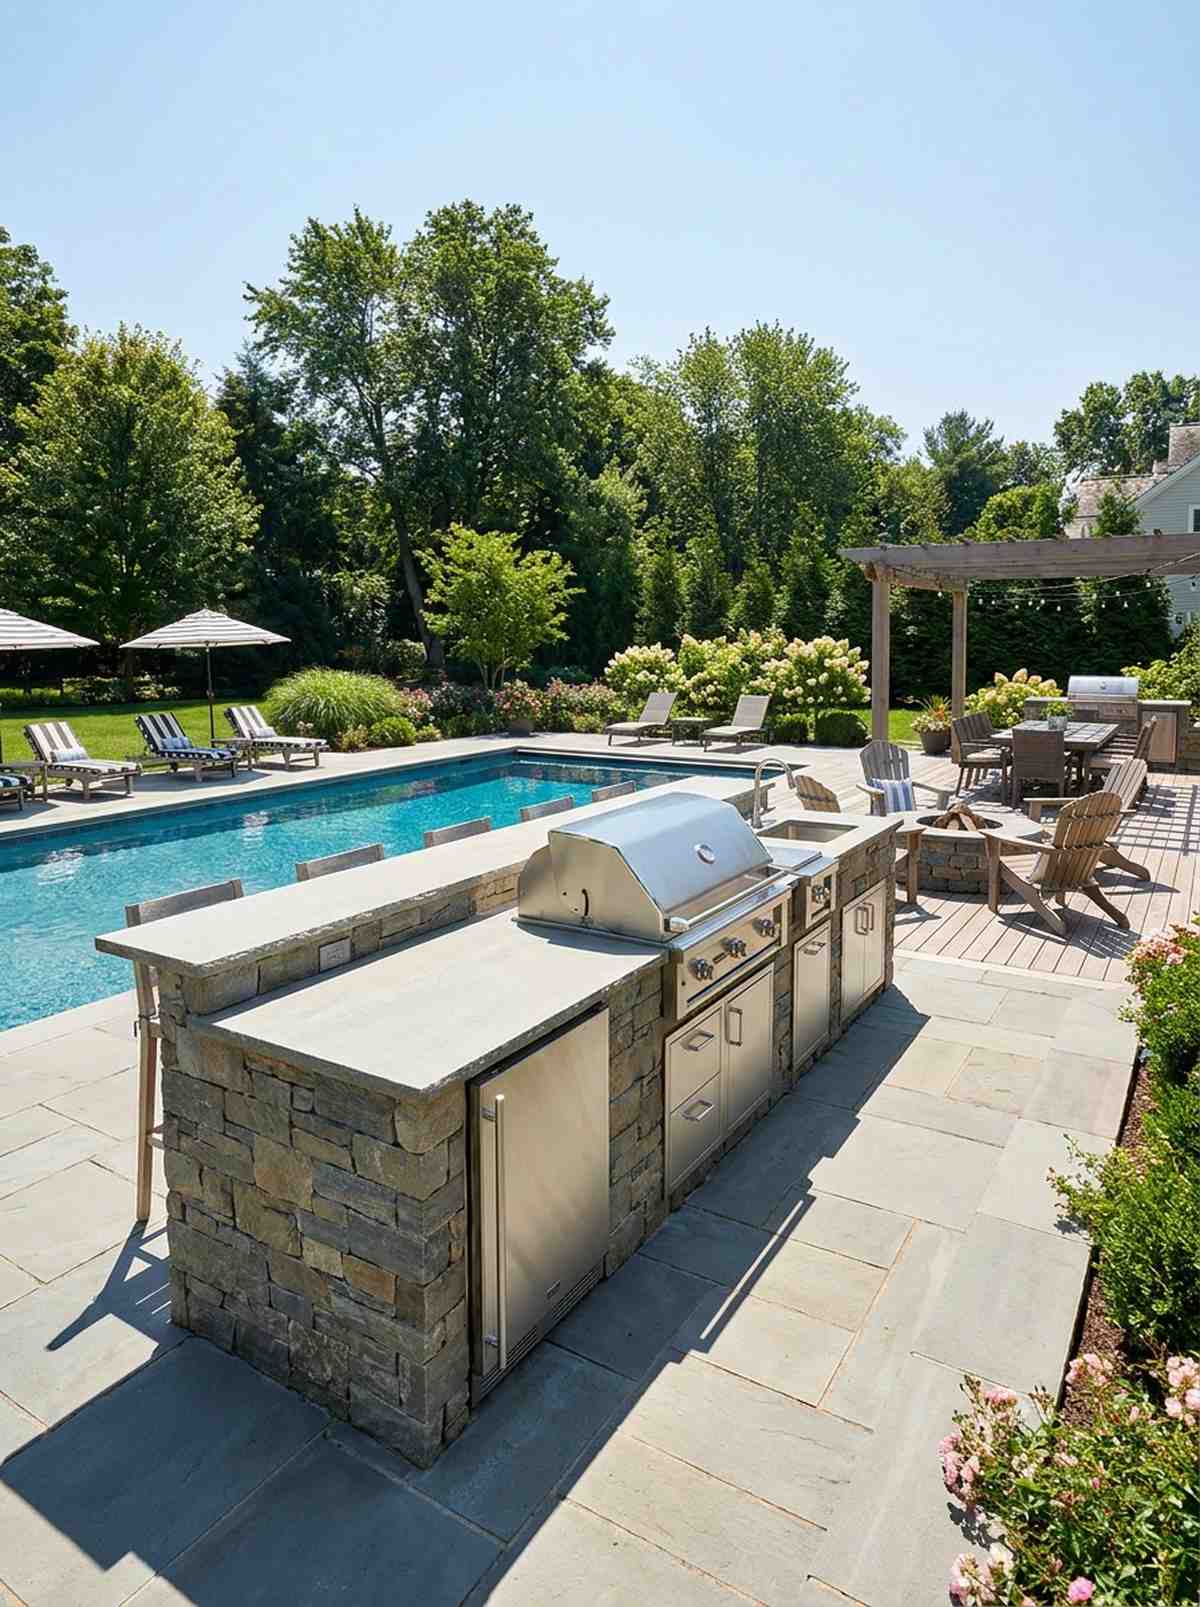
Creates an inclusive, high-energy entertainment hub where the chef is part of the party. The poolside linear kitchen island is explicitly designed so the host never turns their back on the swimming action.
Aligning the grill directly with the pool’s long edge yields a designer-level finish that screams luxury hosting. Utilizing a consistent natural bluestone paver base underneath the entire cooking and swimming zone visually locks the two areas together seamlessly.
A fully equipped stainless linear island usually starts around $8,000. Highly recommended for households that constantly host summer cookouts.
- Key Materials: Stainless steel built-in appliances
- Vibe / Style: High-end culinary entertainer
- Difficulty: Advanced gas and electric routing
- Budget Breakdown: Island Framing: $2,000 | Grill/Fridge: $4,000 | Stone Top: $2,000.
- Creator’s Tip: Always keep the grill at least 8 feet back to prevent grease splatters from hitting the pool deck.
- Smart Sourcing: drop-in stainless outdoor grills and weatherproof kitchen drawer kits.
24. L-Shaped Kitchen Wrapping Pool Corner
Feels like a dedicated outdoor sports bar tucked right into your own landscape. An L-shaped corner outdoor kitchen perfectly commands the dead space at the edge of a geometric pool layout.
This wrapped layout acts as a protective barrier, shielding the main cooking flames from rogue splashes and heavy winds. Integrating modular outdoor kitchen frames allows you to build this custom shape without hiring expensive custom masonry teams.
You can DIY the base frame structure for about $2,000 before adding appliances. Save this layout to maximize your patio corners!
- Key Materials: Galvanized steel modular kitchen frames
- Vibe / Style: Protective culinary corner
- Difficulty: Moderate modular assembly
- Budget Breakdown: Frame Kits: $1,500 | Cement Board: $500 | Finishes: $1,500.
- Creator’s Tip: Put the sink on the leg facing the pool so you can wash and prep while watching the kids swim.
- Smart Sourcing: modular kitchen island frame kits and outdoor-rated drop-in sinks.
25. Covered Kitchen Pavilion with Pool View
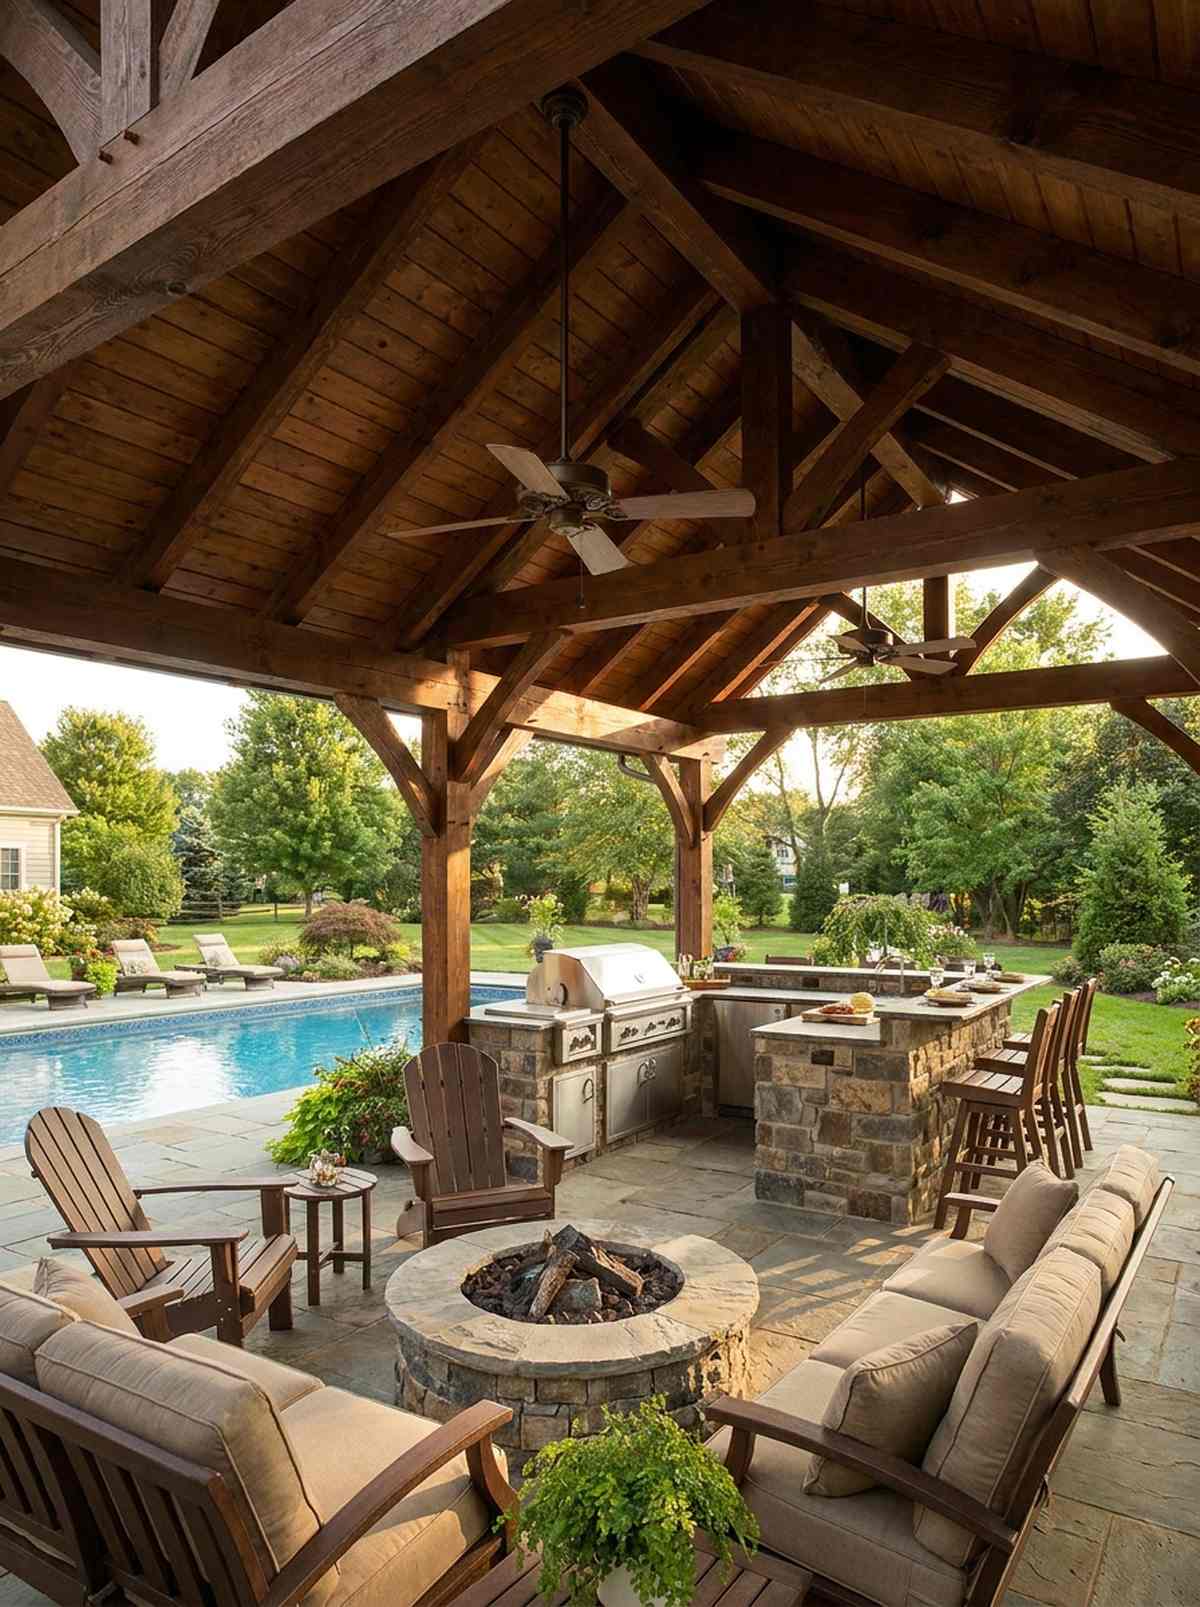
Radiates the heavy, permanent luxury of a dedicated backyard pool house. A timber-frame kitchen pavilion provides crucial overhead shade, extending your grilling season through rain and blistering heat.
Framing an open-faced roof over the cook station looks far more expensive than it is and defines the space perfectly. Adding simple outdoor ceiling fan kits under the timber canopy creates a massive airflow advantage on stagnant July days.
Erecting a solid timber pavilion usually costs between $5,000 and $9,000. An absolute necessity for serious pitmasters in harsh climates.
- Key Materials: Heavy timber framing and roof decking
- Vibe / Style: Rustic luxury pool house
- Difficulty: Heavy carpentry and roofing
- Budget Breakdown: Timber Kit: $4,000 | Roofing: $1,500 | Electrical: $1,000.
- Creator’s Tip: Run all your electrical lines inside the timber posts during construction to hide ugly conduit pipes.
- Smart Sourcing: pre-cut timber pavilion kits and damp-rated outdoor ceiling fans.
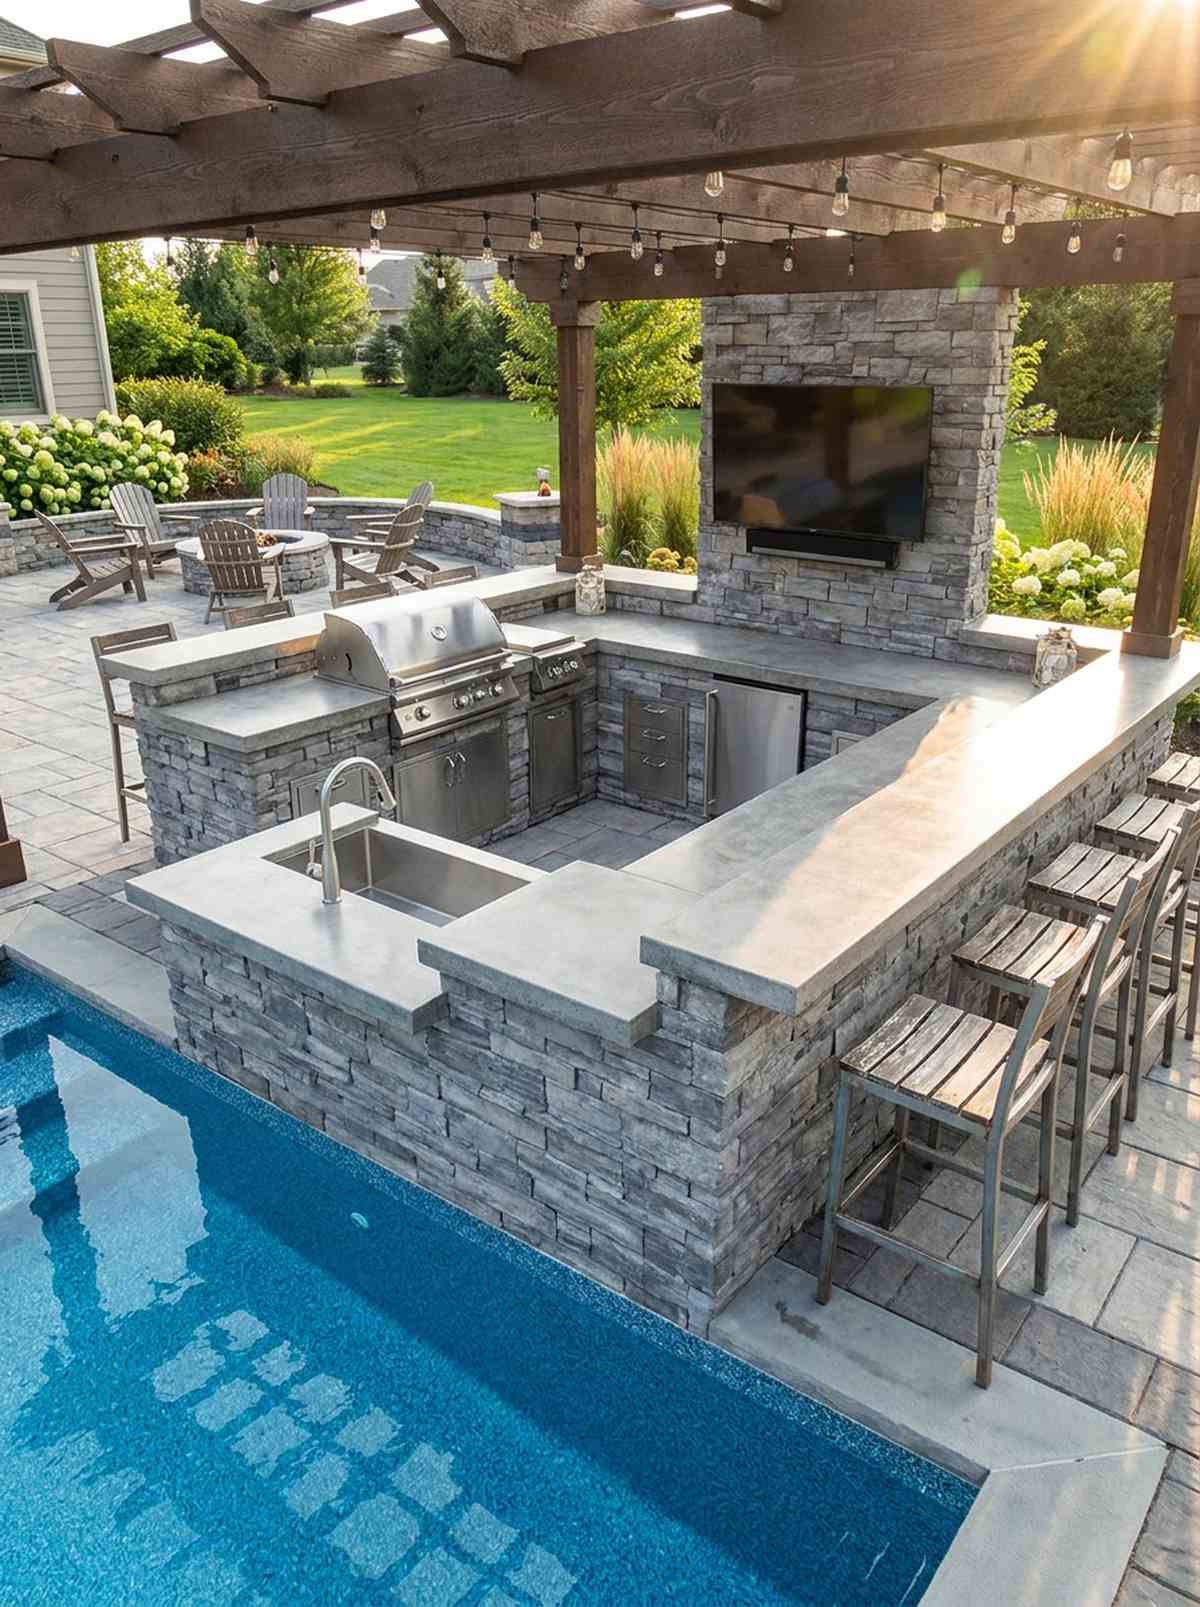
26. Swim-Up Bar with Submerged Seating
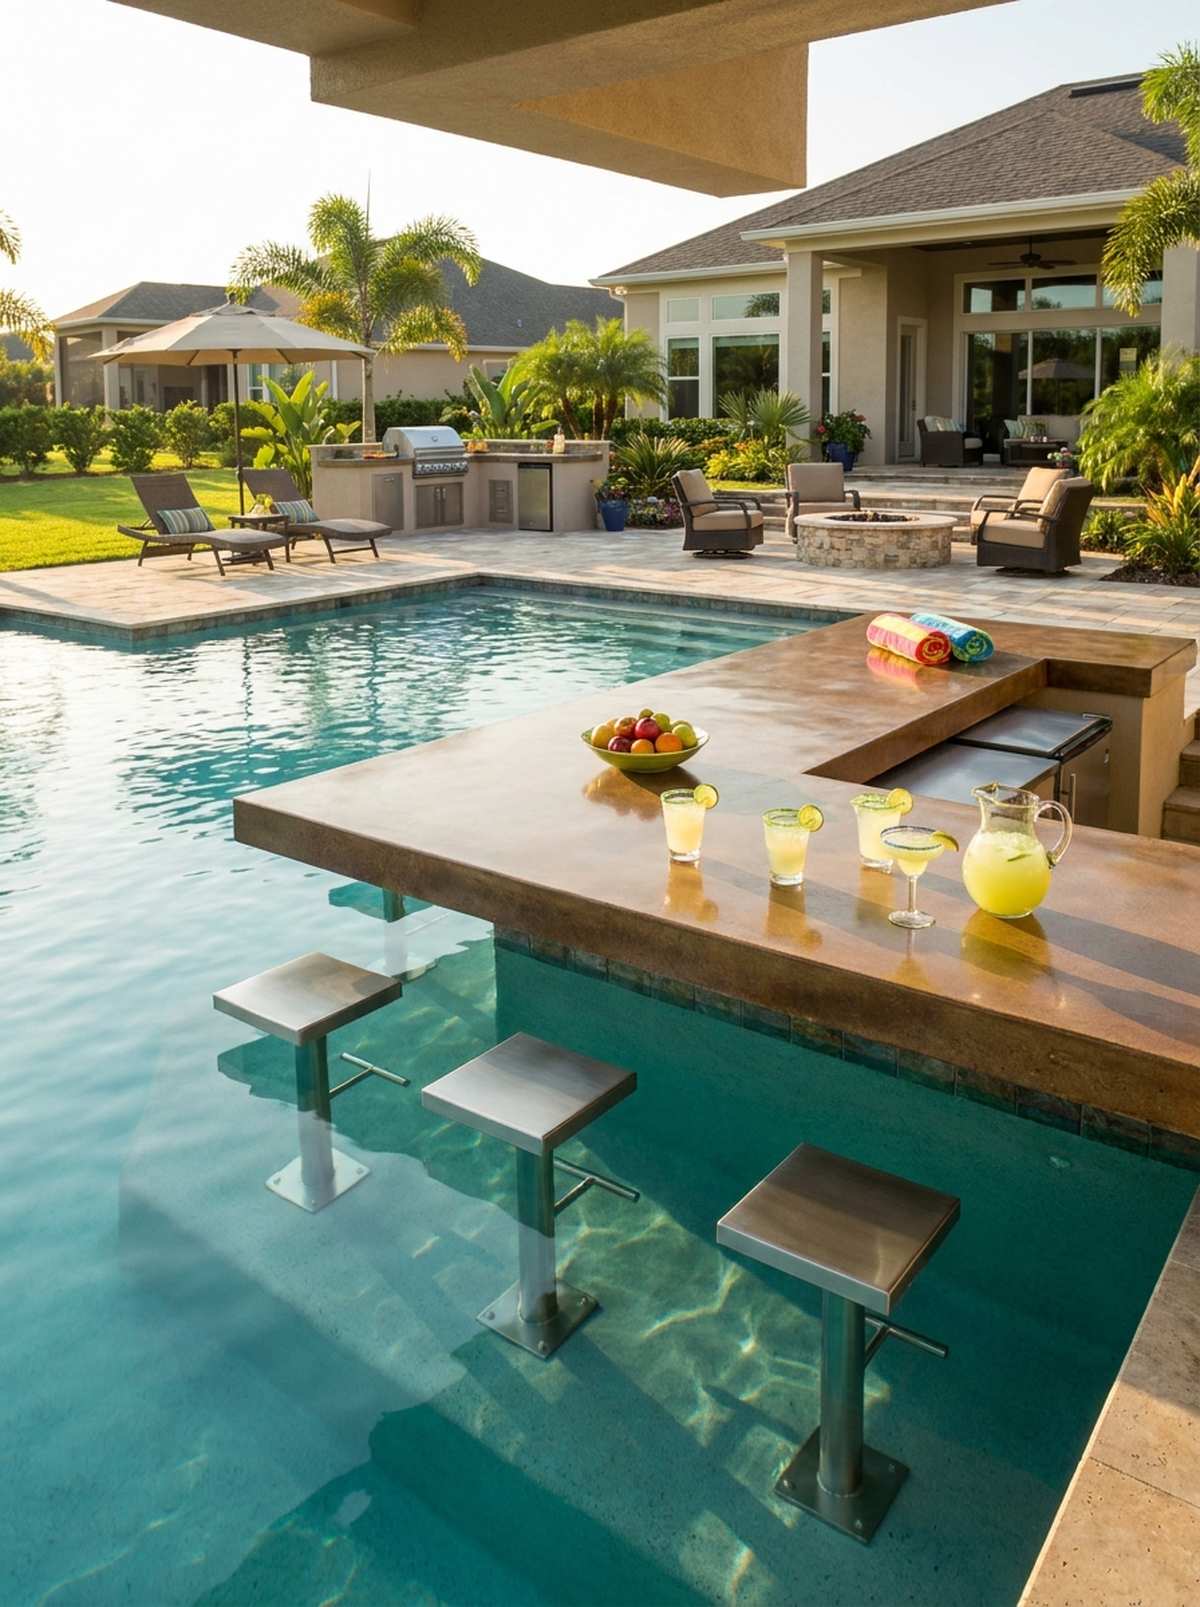
Delivers the ultimate, unmistakable resort-style bragging rights for your backyard. The cantilevered swim-up pool bar guarantees guests will never want to leave the water during summer parties.
While most homeowners just put chairs near the edge, sinking stools directly into the floor completely elevates the property’s value. Pouring the overhanging counter in a polished waterproof concrete mix ensures it survives constant chlorine splashing and drink spills.
Adding the reinforced overhang and submerged stools adds about $4,500 to the shell cost. Pin this immediately if you want the ultimate party yard!
- Key Materials: Submerged stainless bar stools
- Vibe / Style: Five-star tropical party hub
- Difficulty: Advanced structural cantilever pouring
- Budget Breakdown: Concrete Overhang: $2,000 | Submerged Stools: $1,500 | Polishing: $1,000.
- Creator’s Tip: Ensure the submerged stools are anchored deeply into the gunite *before* the final plaster is applied.
- Smart Sourcing: in-pool stainless steel bar stools (2-pack) and concrete countertop polishing kits.
Material Guide: Cheap vs. Premium Aesthetic
Knowing exactly where to save and where to spend makes all the difference in achieving that “looks expensive but isn’t” vibe.
- Standard vs. UV-Resistant/Premium: Always upgrade to UV-coated aggregates and sealants; cheap standard options fade rapidly and crack under pool water chemistry.
- Pre-made Kits vs. Sourcing Locally: Using modular starter kits for outdoor kitchens or pergolas saves thousands in custom labor while delivering identical structural stability.
27. Pizza Oven Station Near Shallow End
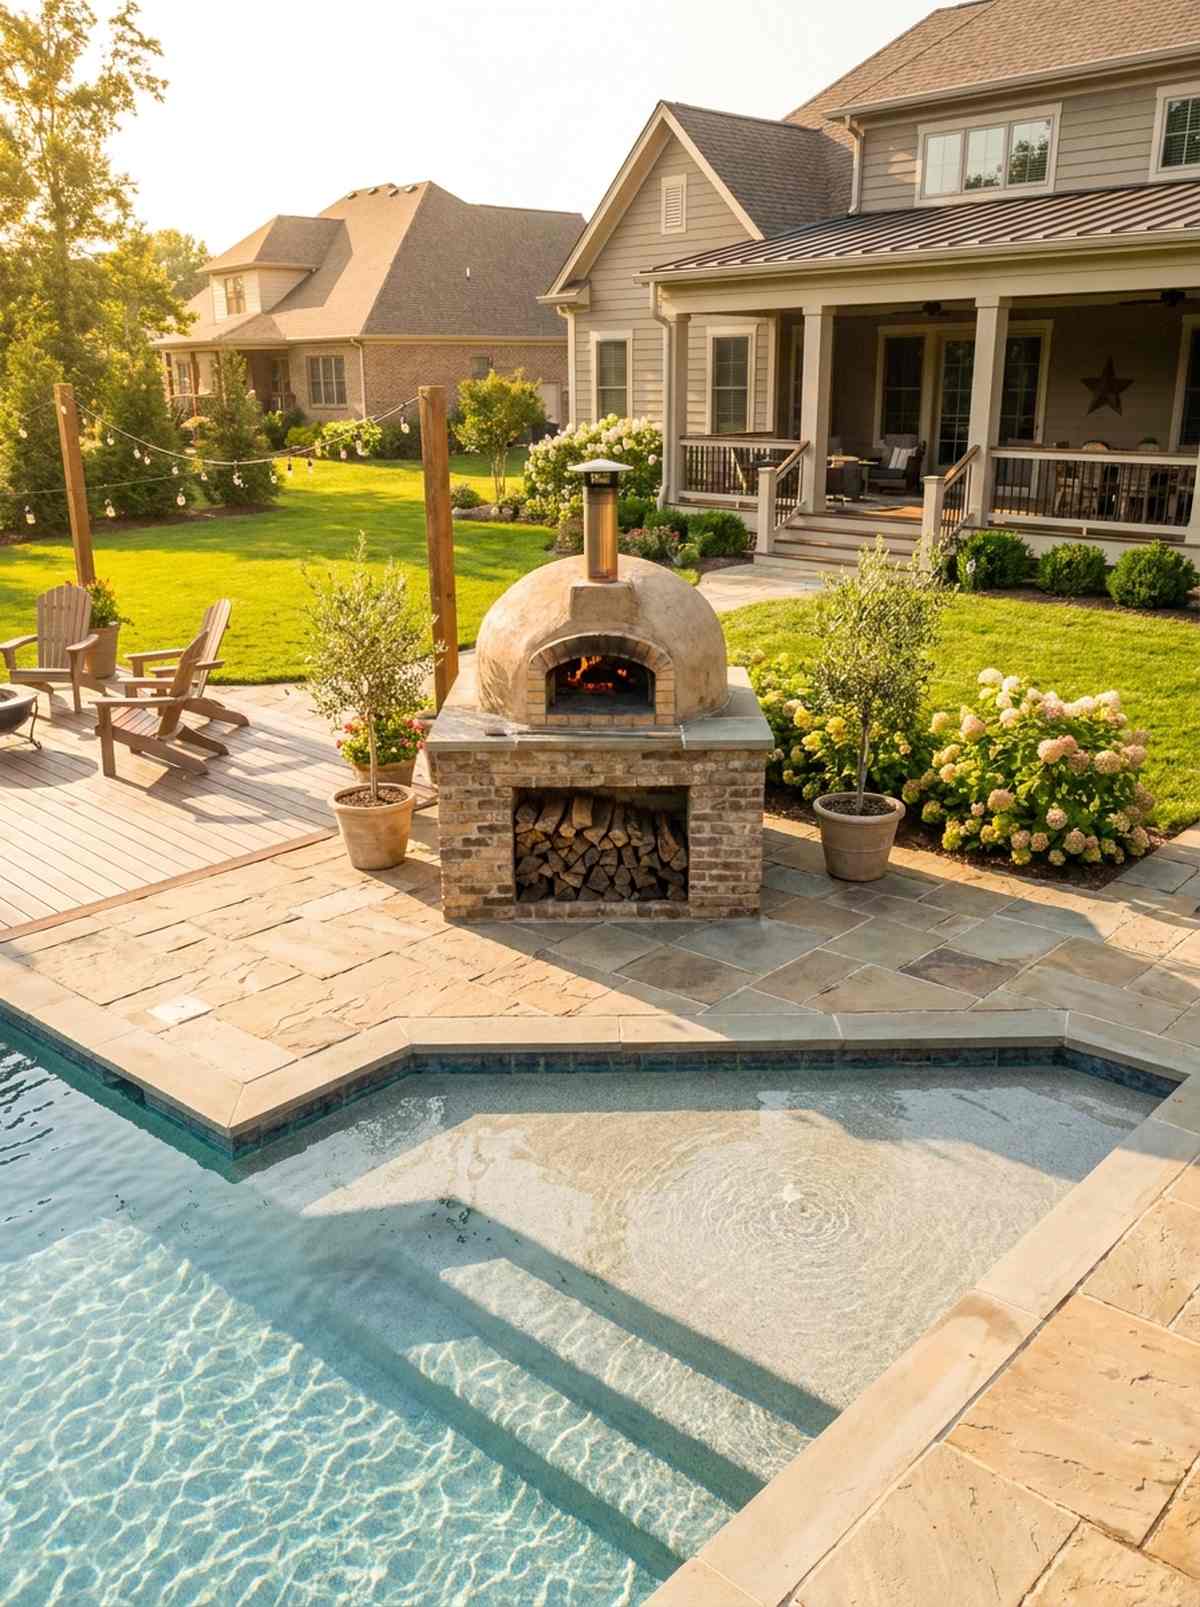
Infuses the air with a rustic, mouth-watering aroma that immediately gathers a crowd. Setting a wood-fired pizza oven right near the pool’s shallow entry acts as a glowing, interactive gathering spot.
This specific setup delivers a designer-level finish while extending your yard’s usability deep into the cooler autumn months. Snagging a pre-cast refractory oven kit lets you build the dome in a weekend instead of hiring a master mason.
You can easily pull off a dedicated pizza station base and oven for under $3,000 using kits. A brilliant way to add culinary theater to the patio.
- Key Materials: High-heat refractory brick and mortar
- Vibe / Style: Tuscan culinary warmth
- Difficulty: Moderate kit assembly
- Budget Breakdown: Oven Kit: $1,800 | Base Blocks: $400 | Finish Stone: $600.
- Creator’s Tip: Always build a dedicated firewood storage niche directly under the oven slab to keep logs perfectly dry.
- Smart Sourcing: DIY wood-fired pizza oven kits and high-heat refractory mortar (bulk tub).
Water and fire are a notoriously tricky combination to nail down, but these next few layouts balance them with mind-blowing precision…
Integrated Fire Features and Water
Fire and water pairings add drama and extend usability across seasons. Gas fire pits, bowls, and linear burners create ambiance and warmth adjacent to cool pool zones.
28. Fire Pit Lounge Five Feet from Pool Coping
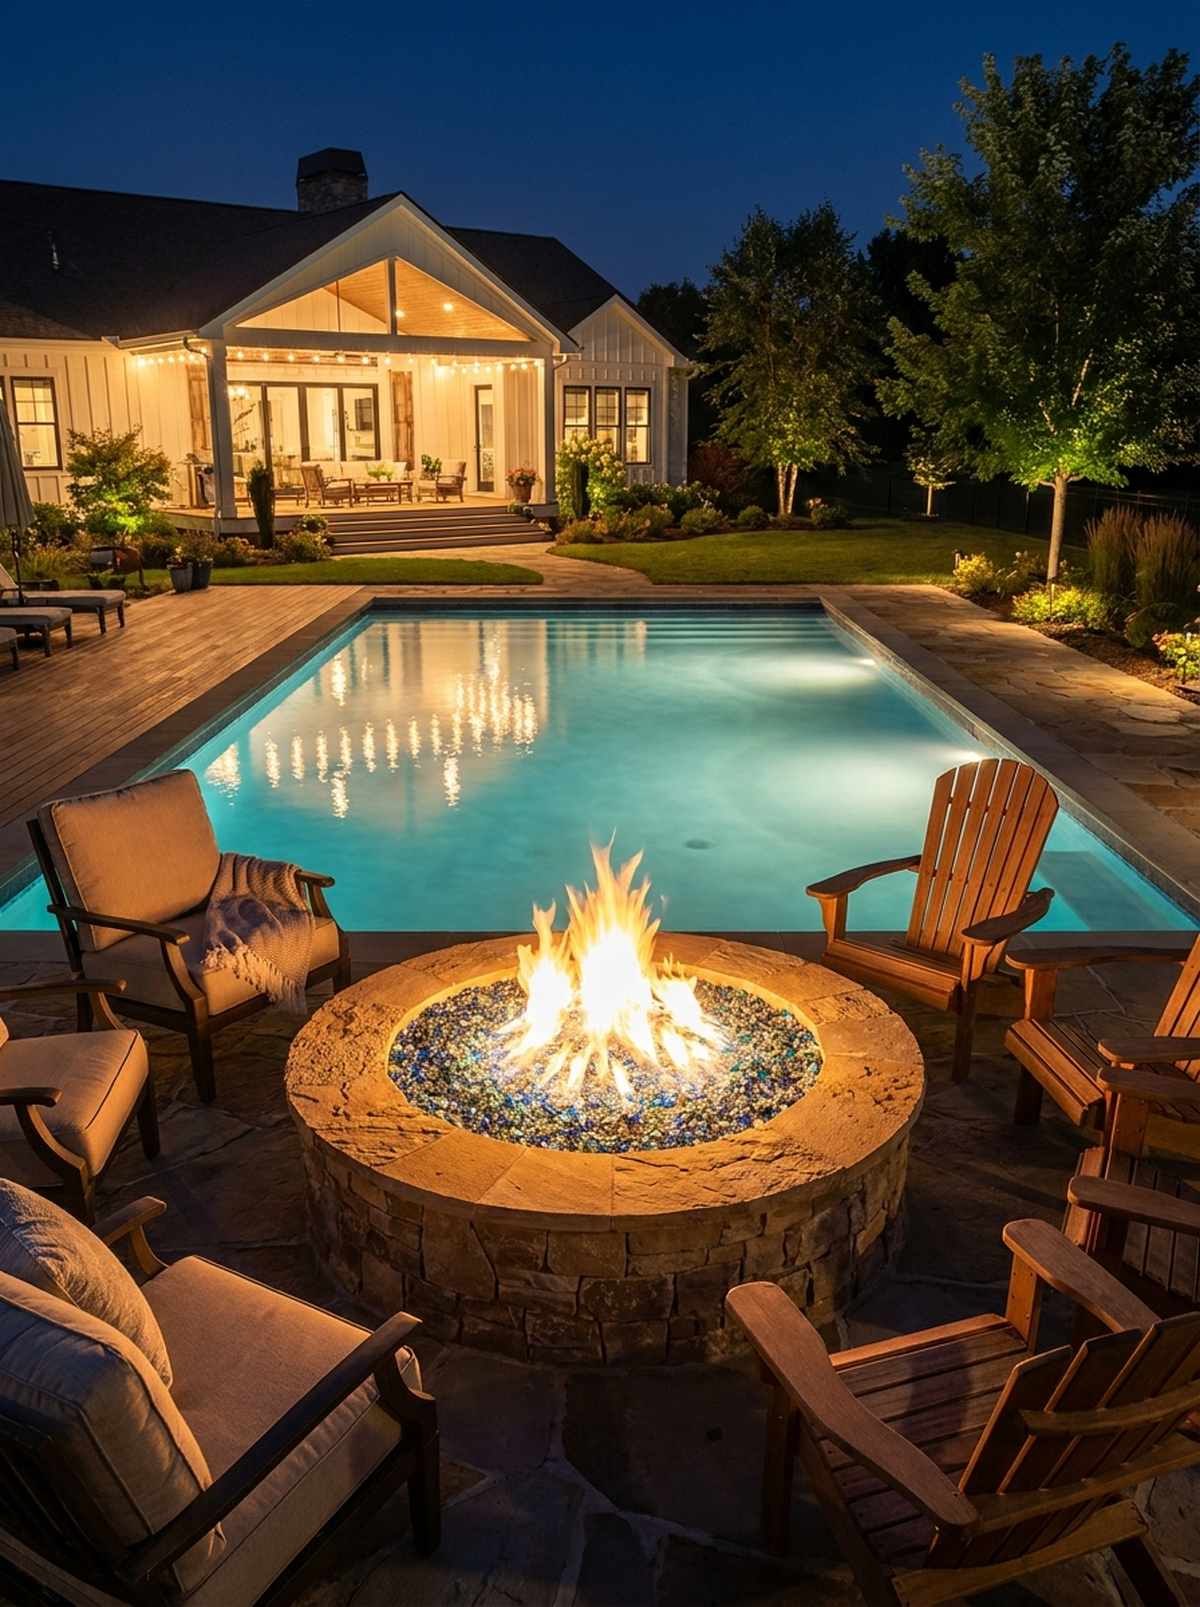
Radiates a deeply comforting warmth that makes exiting a night swim completely painless. A poolside stone fire pit lounge operates as the definitive year-round anchor for outdoor living.
Keeping the flames just five feet from the water yields a surprisingly premium look by reflecting the firelight across the pool’s surface. Filling the pit basin with highly reflective crushed tempered fire glass amplifies the glow without producing dirty ash or smoke.
Trenching the gas line and building the pit usually runs about $2,500 total. Save this for your ultimate backyard nightscape plan!
- Key Materials: Natural gas burner ring and stone veneer
- Vibe / Style: Cozy year-round anchor
- Difficulty: Requires licensed gas trenching
- Budget Breakdown: Gas Line: $1,000 | Burner Kit: $500 | Stone/Build: $1,000.
- Creator’s Tip: Install an electronic push-button ignition system so you don’t have to fumble with lighters in the dark.
- Smart Sourcing: stainless drop-in fire pit burner kits and reflective fire glass (bulk bag).
29. Linear Fire Trough Along Pool Perimeter
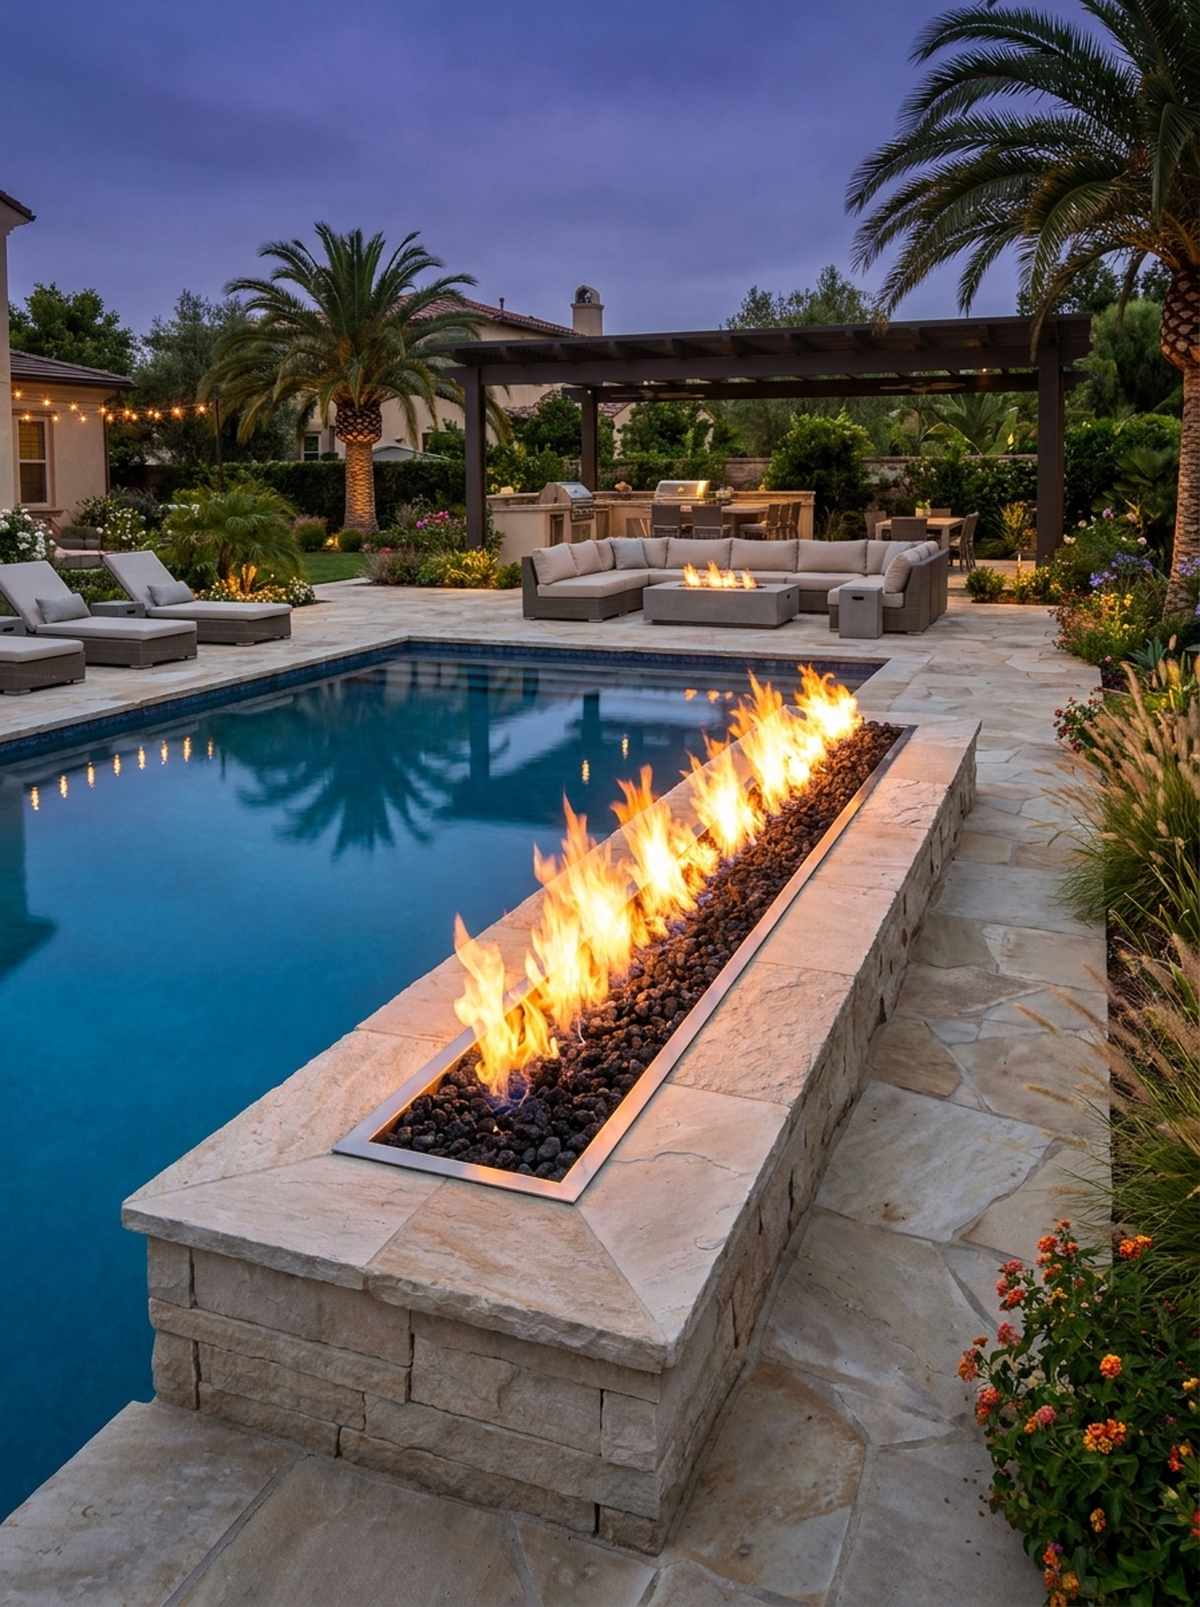
Creates an absolutely stunning wall of flames that looks like a high-end Vegas resort feature. A linear gas fire trough running parallel to the water’s edge commands instant architectural respect.
Stretching the fire out instead of using a standard round pit completely redefines the landscape’s geometry. Mounting the trough on a raised stone plinth and utilizing heavy-duty linear burner manifolds separates the heat from the water while tying them together visually.
Long linear fire setups are premium, often costing $4,000 to $7,000 depending on length. A massive visual flex that elevates the whole yard.
- Key Materials: Long stainless linear fire manifolds
- Vibe / Style: Modern architectural drama
- Difficulty: Advanced masonry and gas routing
- Budget Breakdown: Linear Burner: $2,500 | Plinth Build: $2,000 | Lava Rock: $500.
- Creator’s Tip: Use black lava rock as a base filler beneath the flames to create a striking contrast against bright pool water.
- Smart Sourcing: stainless linear fire pan kits and black lava rock filler (bulk bag).
30. Fire Bowls on Raised Columns Flanking Entry
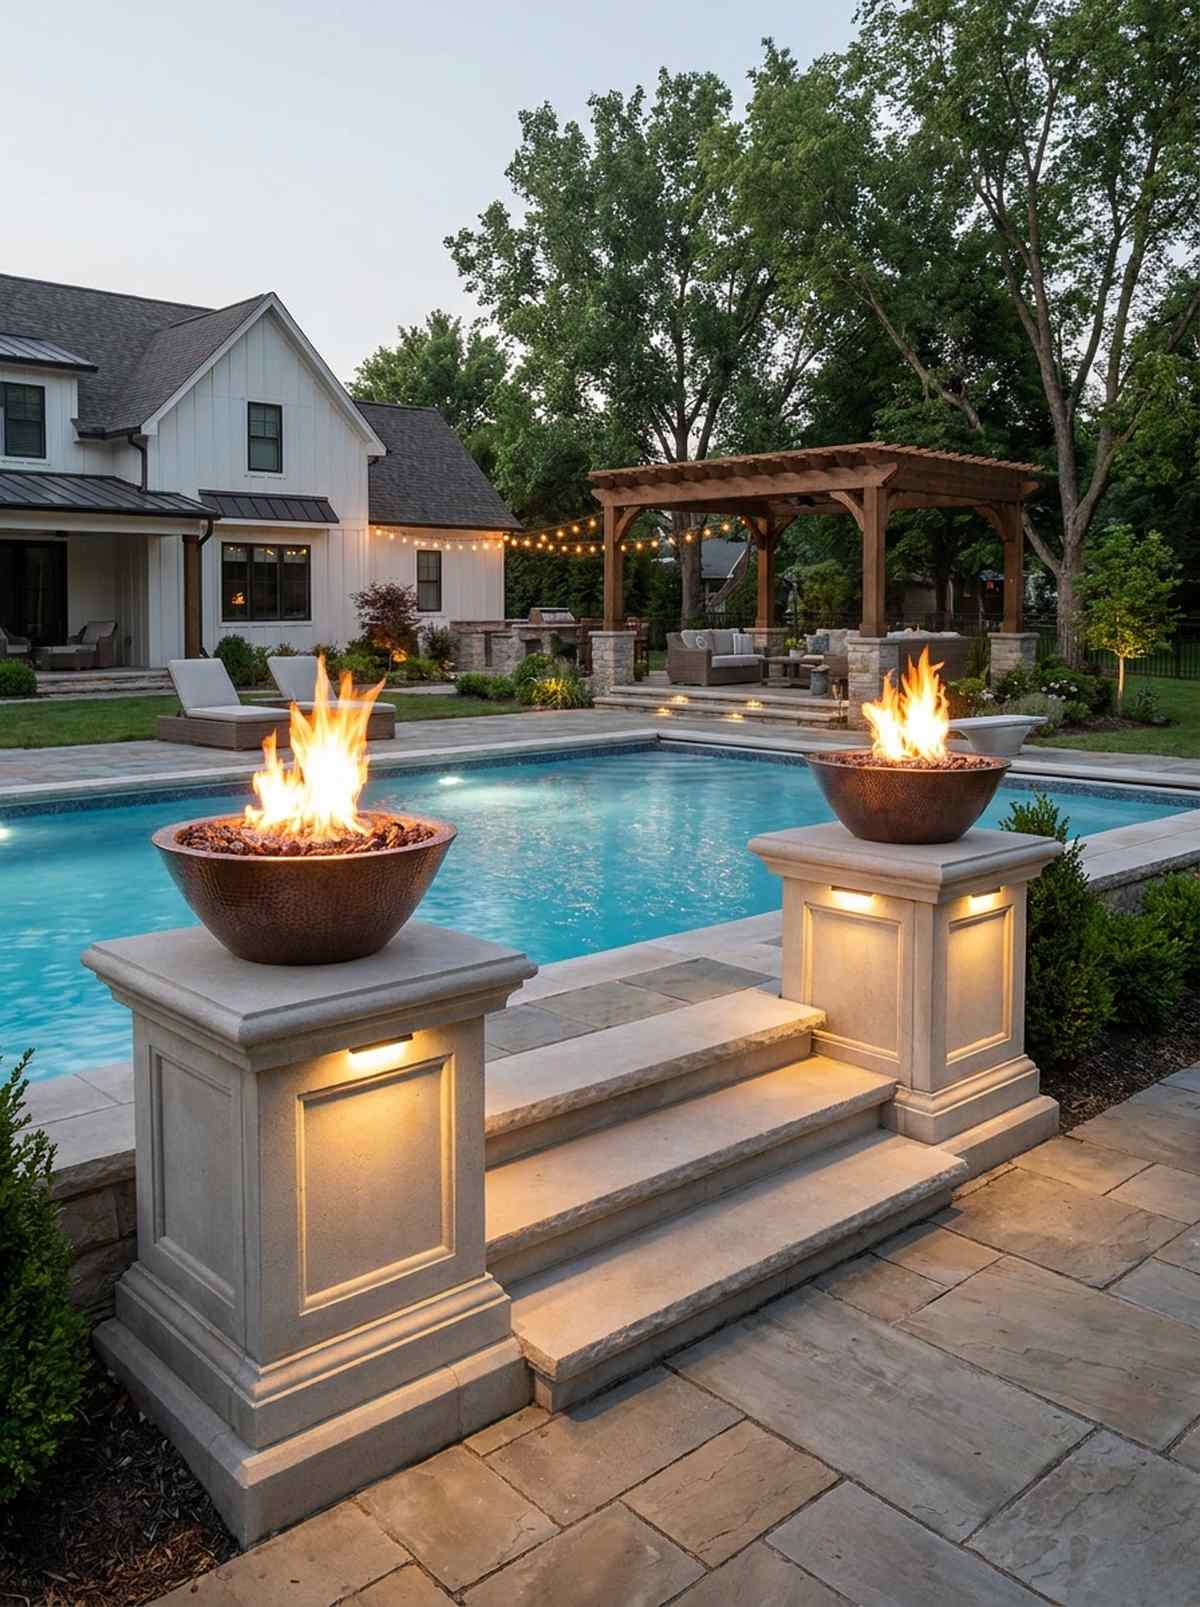
Feels like entering an ancient, majestic palace every time you step into the shallow end. Flanking the pool stairs with elevated copper fire columns creates an unforgettable, ceremonial gateway.
Lifting the fire off the ground immediately draws the eye upward, giving the space a designer-level finish. Integrating an automated smart ignition module allows you to spark both bowls simultaneously straight from your phone.
Building the columns and wiring the smart gas modules generally costs about $5,000. Pin this if you want maximum visual impact with minimal footprint!
- Key Materials: Pre-cast stone columns and copper bowls
- Vibe / Style: Ceremonial grand entrance
- Difficulty: Advanced gas and low-voltage wiring
- Budget Breakdown: Copper Bowls: $1,500 | Columns: $1,500 | Smart Ignition: $2,000.
- Creator’s Tip: Treat the copper bowls quarterly with a specialized polish to prevent them from turning entirely green.
- Smart Sourcing: hammered copper fire bowl kits and outdoor smart ignition modules.
31. Fire-and-Water Fountain Hybrid Feature
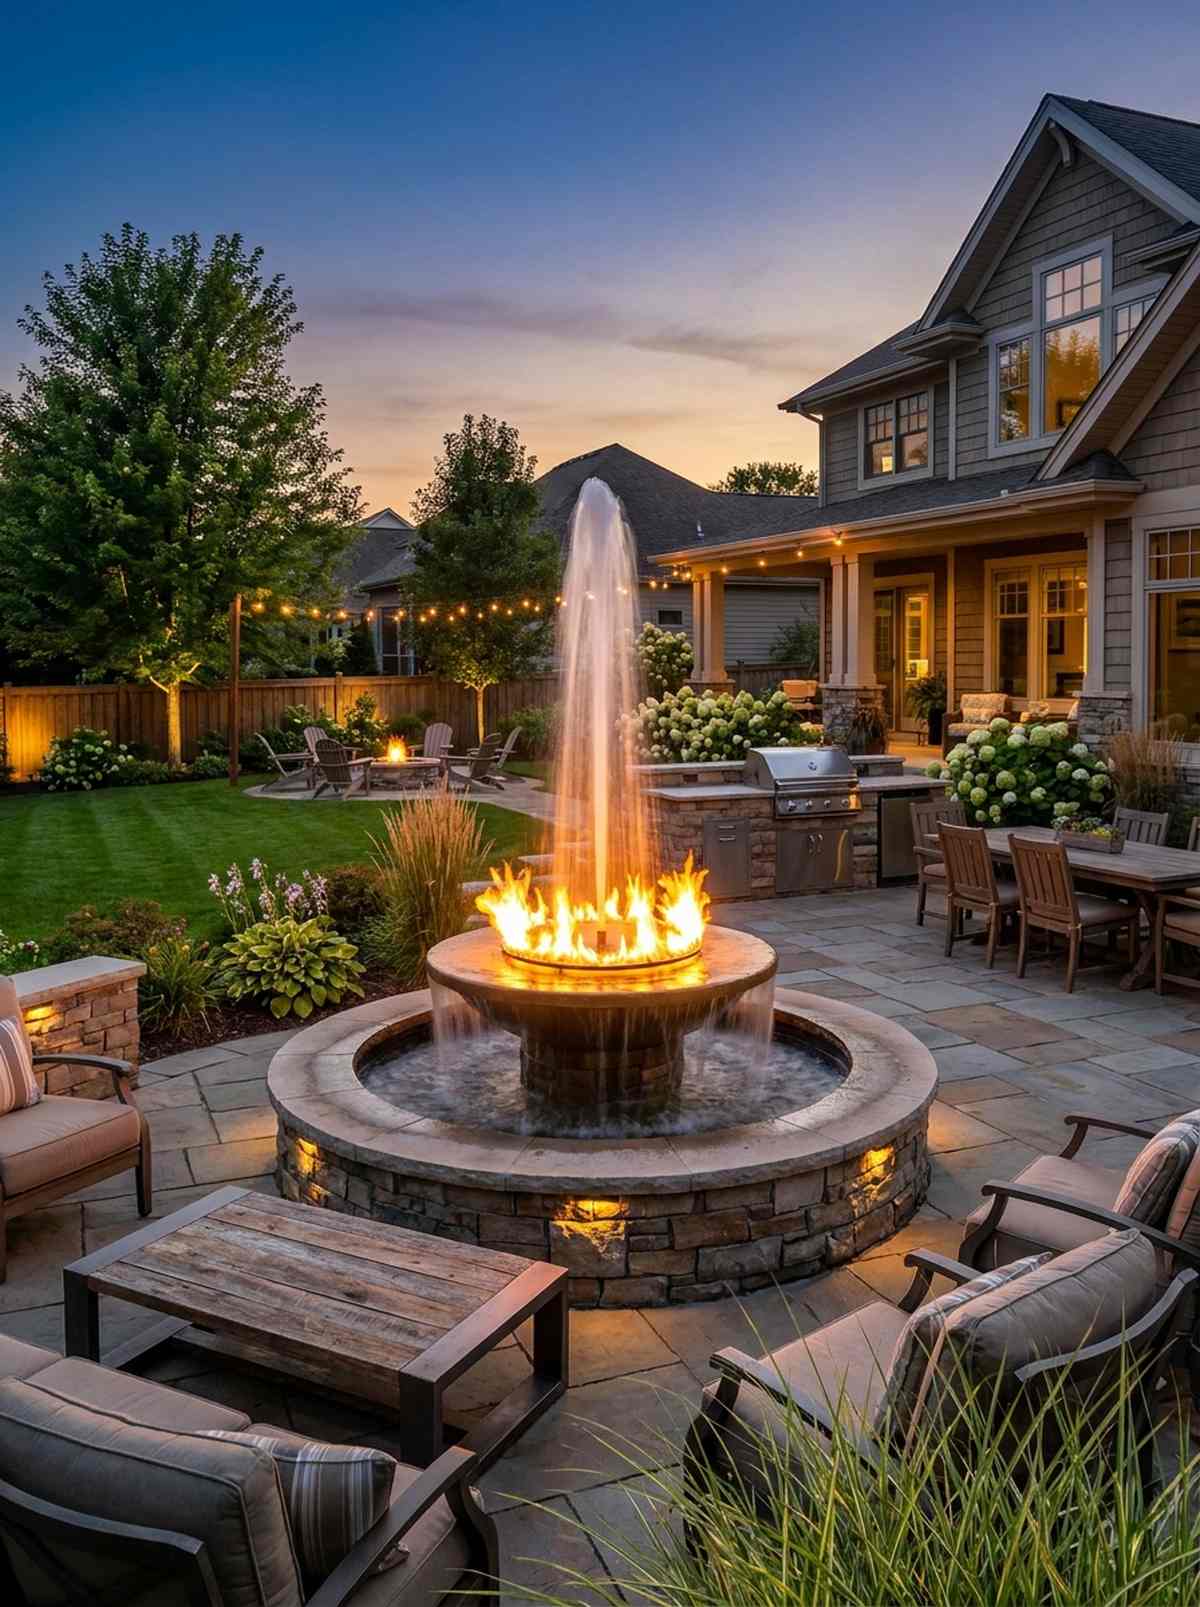
A mesmerizing, physics-defying centerpiece that leaves every single guest speechless. This hybrid fire-water fountain pedestal operates flawlessly as the ultimate focal point for luxury settings.
Shooting water through a ring of actual fire looks far more expensive than it is if you buy an integrated unit. Picking up a pre-built fire-water hybrid kit drastically reduces the intense custom plumbing costs usually associated with this trick.
A high-quality hybrid unit and installation will set you back around $3,500. An absolute showpiece that demands attention day or night.
- Key Materials: Specialized hybrid fountain manifolds
- Vibe / Style: Elemental luxury spectacle
- Difficulty: High precision plumbing integration
- Budget Breakdown: Hybrid Unit: $2,000 | Plumbing: $800 | Gas Line: $700.
- Creator’s Tip: Wire the water pump and the gas ring on separate circuits so you can run the fountain during the day without the fire.
- Smart Sourcing: integrated fire-water bowl starter kits and high-capacity fountain water pumps.
You can have the best layout in the world, but if you screw up the flooring materials like most people do, the whole aesthetic falls apart…
Natural Stone and Material Harmony
Matching or complementing materials across pool coping, decking, and patio surfaces creates visual unity. Stone, concrete, and composite options each offer distinct textures and maintenance profiles.
32. Travertine Pavers Throughout Pool and Patio
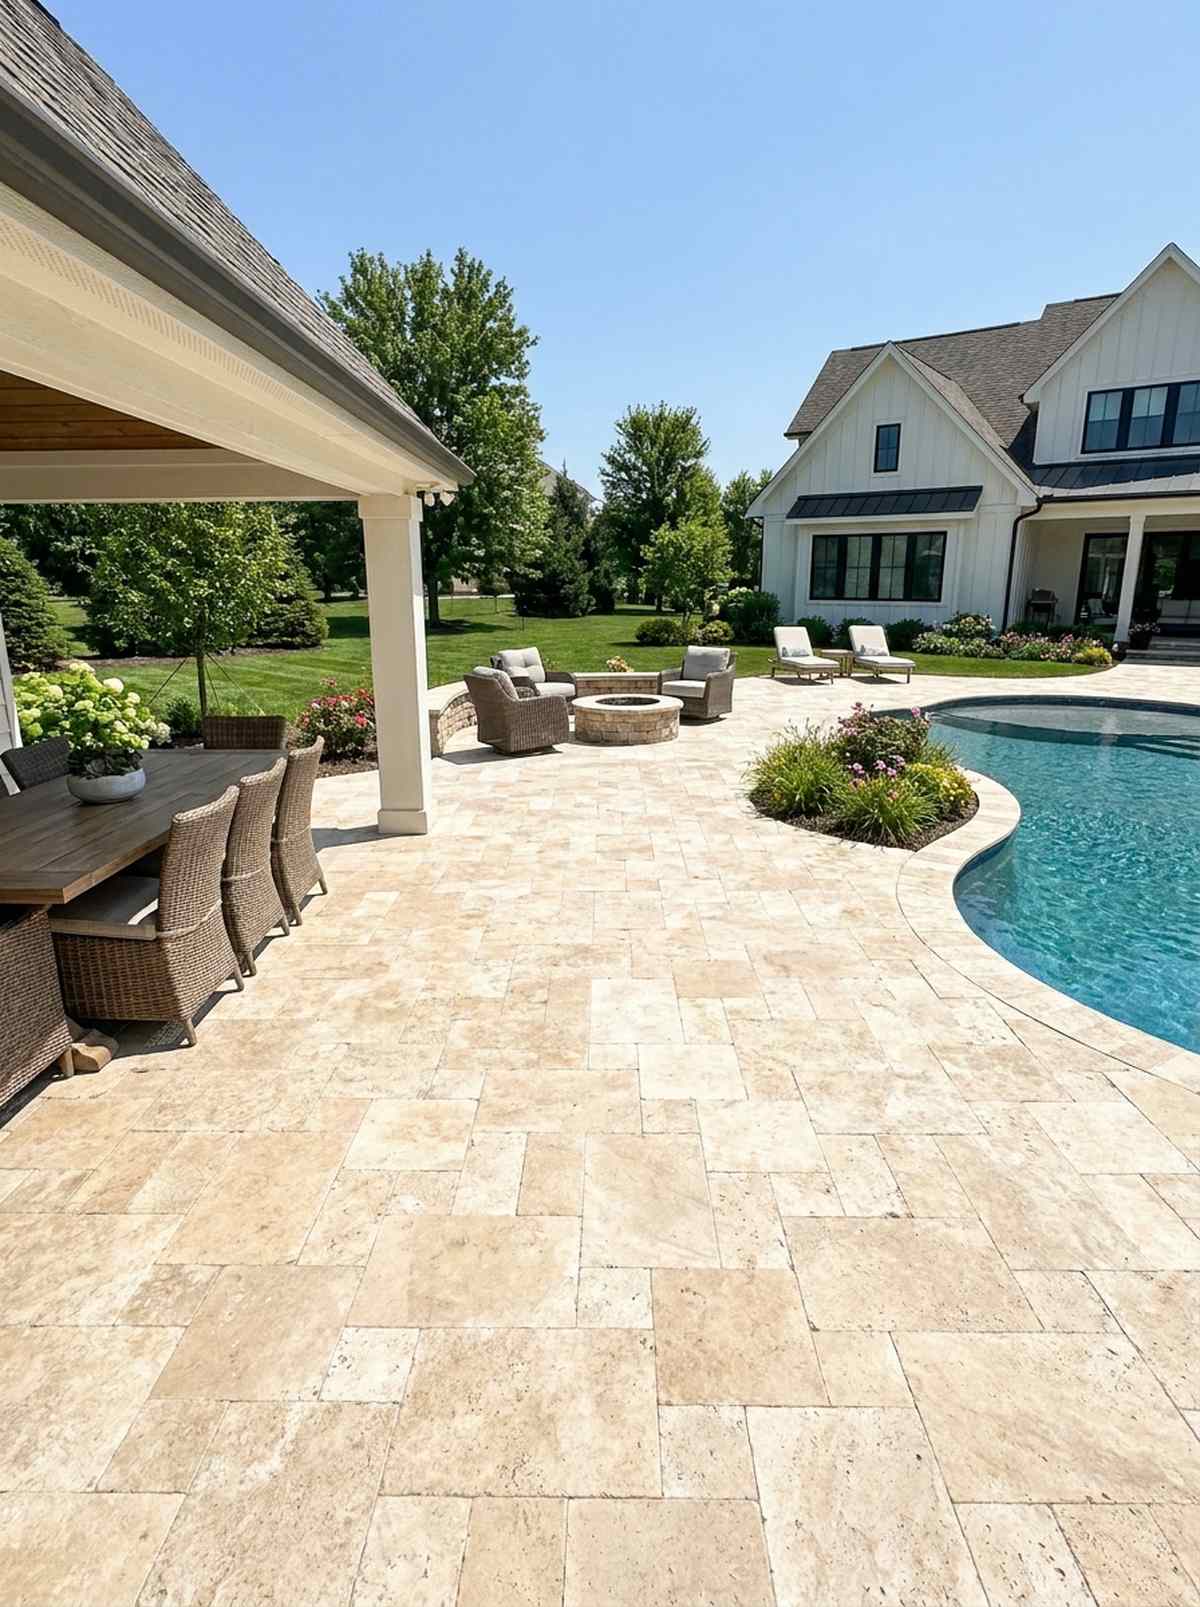
Delivers a timeless, sun-bleached Mediterranean elegance that feels effortlessly cool under barefoot traffic. Running a continuous travertine patio layout solves the nightmare of hot, blister-inducing summer pool decks.
Using the exact same stone from the dining table right to the water’s edge completely unifies the chaotic yard visually. Sourcing a bulk French-pattern paver pallet gives you that erratic, high-end custom look without paying custom cutting fees.
Travertine decking generally costs between $10 and $15 per square foot installed. Save this to your essential materials board immediately!
- Key Materials: Tumbled light-colored travertine stone
- Vibe / Style: Timeless Mediterranean cooling
- Difficulty: Moderate masonry leveling
- Budget Breakdown: Stone: $4,500 | Base Sand: $500 | Sealant: $300.
- Creator’s Tip: Travertine is porous; you absolutely must seal it annually to stop pool chemicals from pitting the stone.
- Smart Sourcing: French-pattern travertine pavers (bulk pallet) and penetrating stone sealer kits.
33. Bluestone Coping with Concrete Aggregate Deck
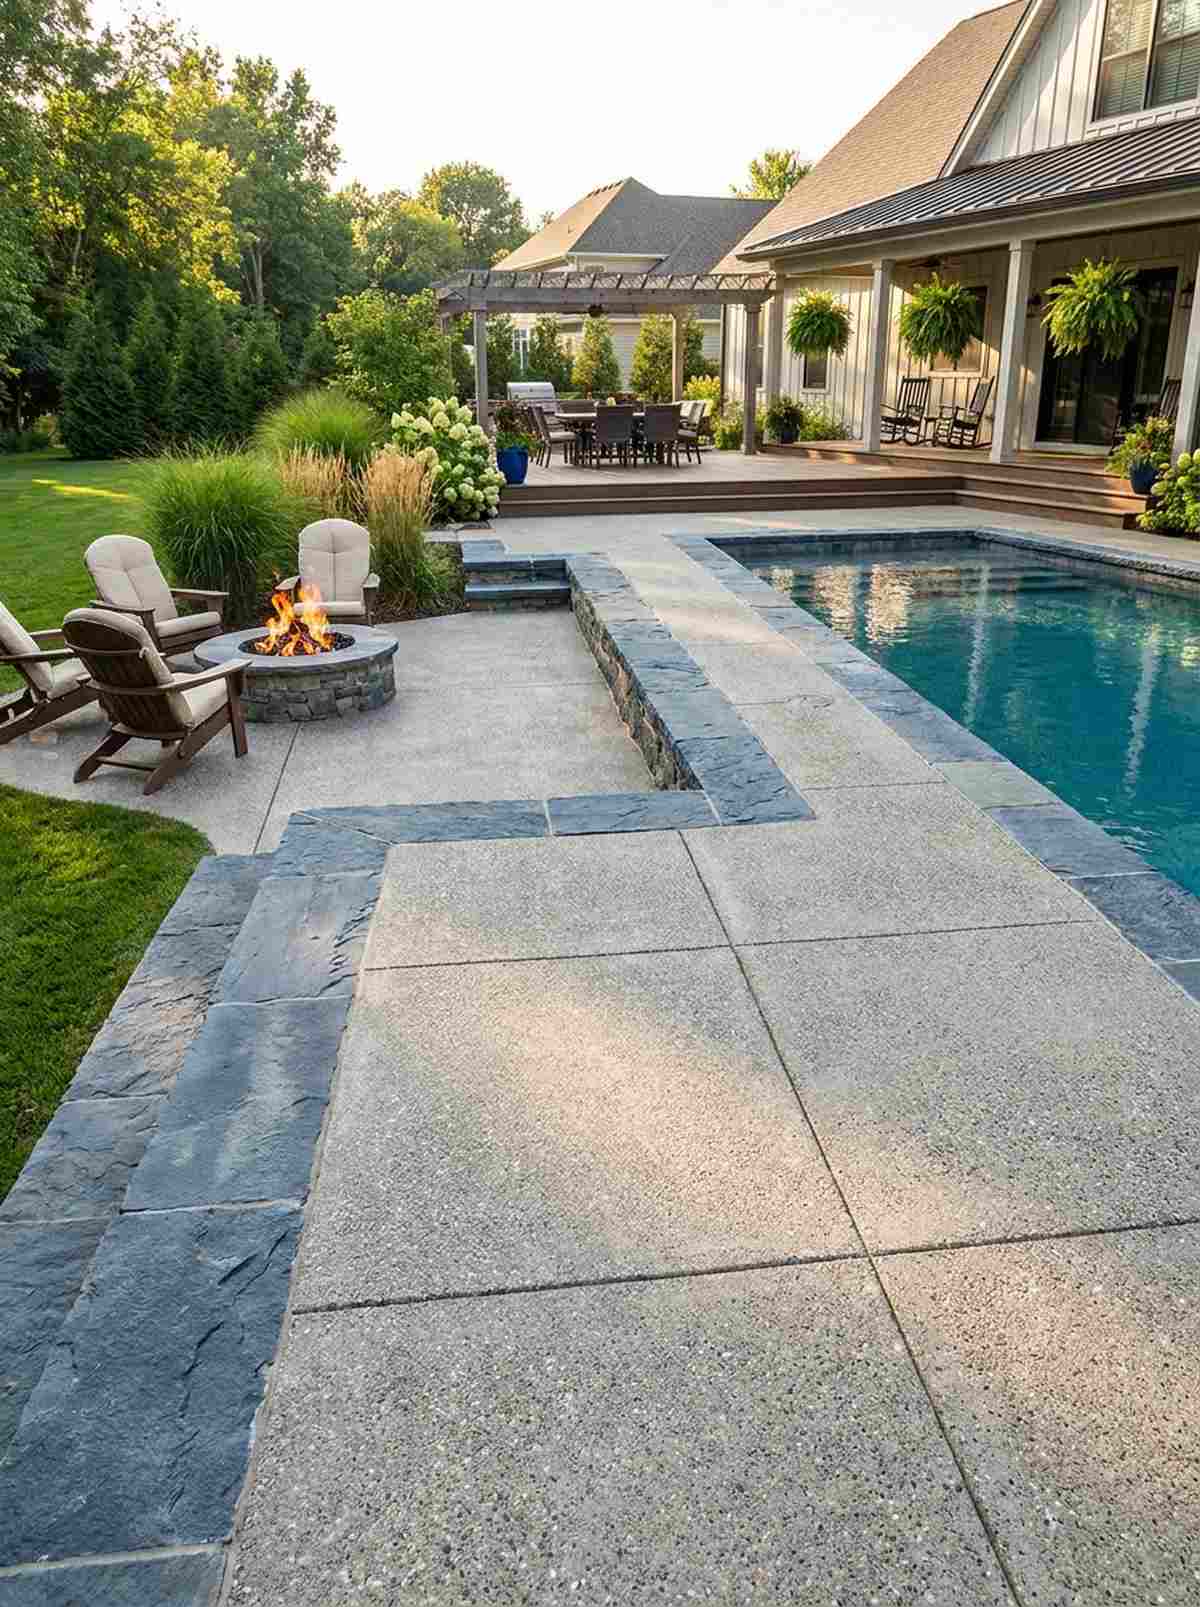
Strikes a perfect balance of rugged coastal texture and crisp architectural framing. The bluestone edge and aggregate deck combo is brilliant for keeping costs down while maintaining a premium water border.
Instead of paving the whole yard in expensive stone, framing just the lip delivers a designer-level finish. Utilizing a salt-finish concrete stamping kit for the main deck matches the stone’s rustic texture perfectly at a fraction of the price.
Mixing these materials slashes your hardscaping budget by almost 40%. A highly recommended trick for massive square-footage patios.
- Key Materials: Thermal bluestone caps and poured concrete
- Vibe / Style: Rugged coastal modern
- Difficulty: Standard concrete pouring skills
- Budget Breakdown: Bluestone Coping: $2,000 | Concrete Pour: $3,500 | Salt Finish: $200.
- Creator’s Tip: Tool large grid joints into the concrete while it dries to mimic the look of massive, expensive stone slabs.
- Smart Sourcing: thermal bluestone coping (bulk pack) and professional concrete finishing tool kits.
34. Porcelain Tile Unifying Indoor-Outdoor Zones
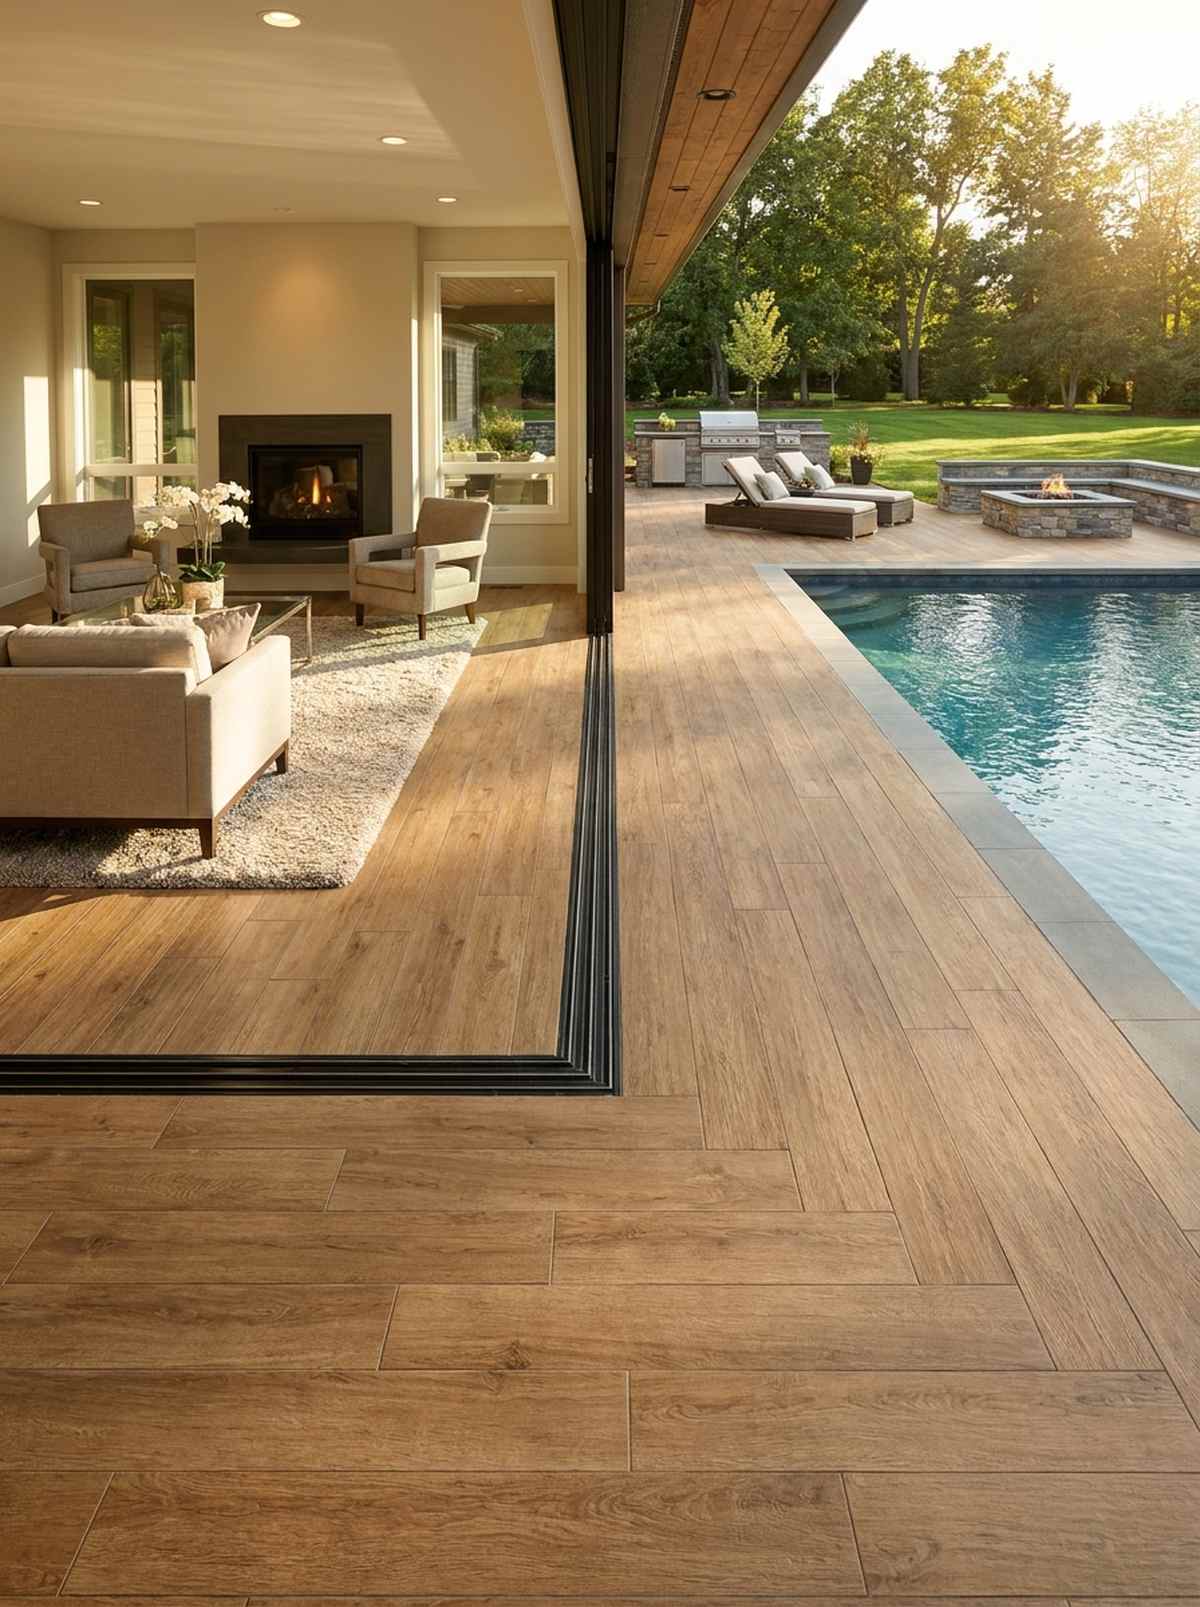
Creates a mind-bending illusion where your living room simply dissolves into the backyard. This indoor-outdoor continuous porcelain layout acts as the ultimate modern boundary-eraser for luxury homes.
Running wood-look planks straight through sliding glass doors directly to the pool edge looks far more expensive than it is. Opting for thick, outdoor-rated textured porcelain planks ensures the outside portion doesn’t become a lethal slip hazard when wet.
Premium outdoor porcelain runs about $12 per square foot. Pin this if you want to completely reinvent your home’s footprint!
- Key Materials: Large-format wood-look porcelain
- Vibe / Style: Seamless modern expansion
- Difficulty: High precision tile alignment
- Budget Breakdown: Porcelain Tile: $5,000 | Waterproof Thinset: $800 | Grout: $400.
- Creator’s Tip: You must use the exact same color of grout inside and out; otherwise, the seamless illusion is instantly broken.
- Smart Sourcing: anti-slip wood-look porcelain tiles (bulk crate) and epoxy outdoor grout kits.
35. Composite Decking Around Naturalistic Pool
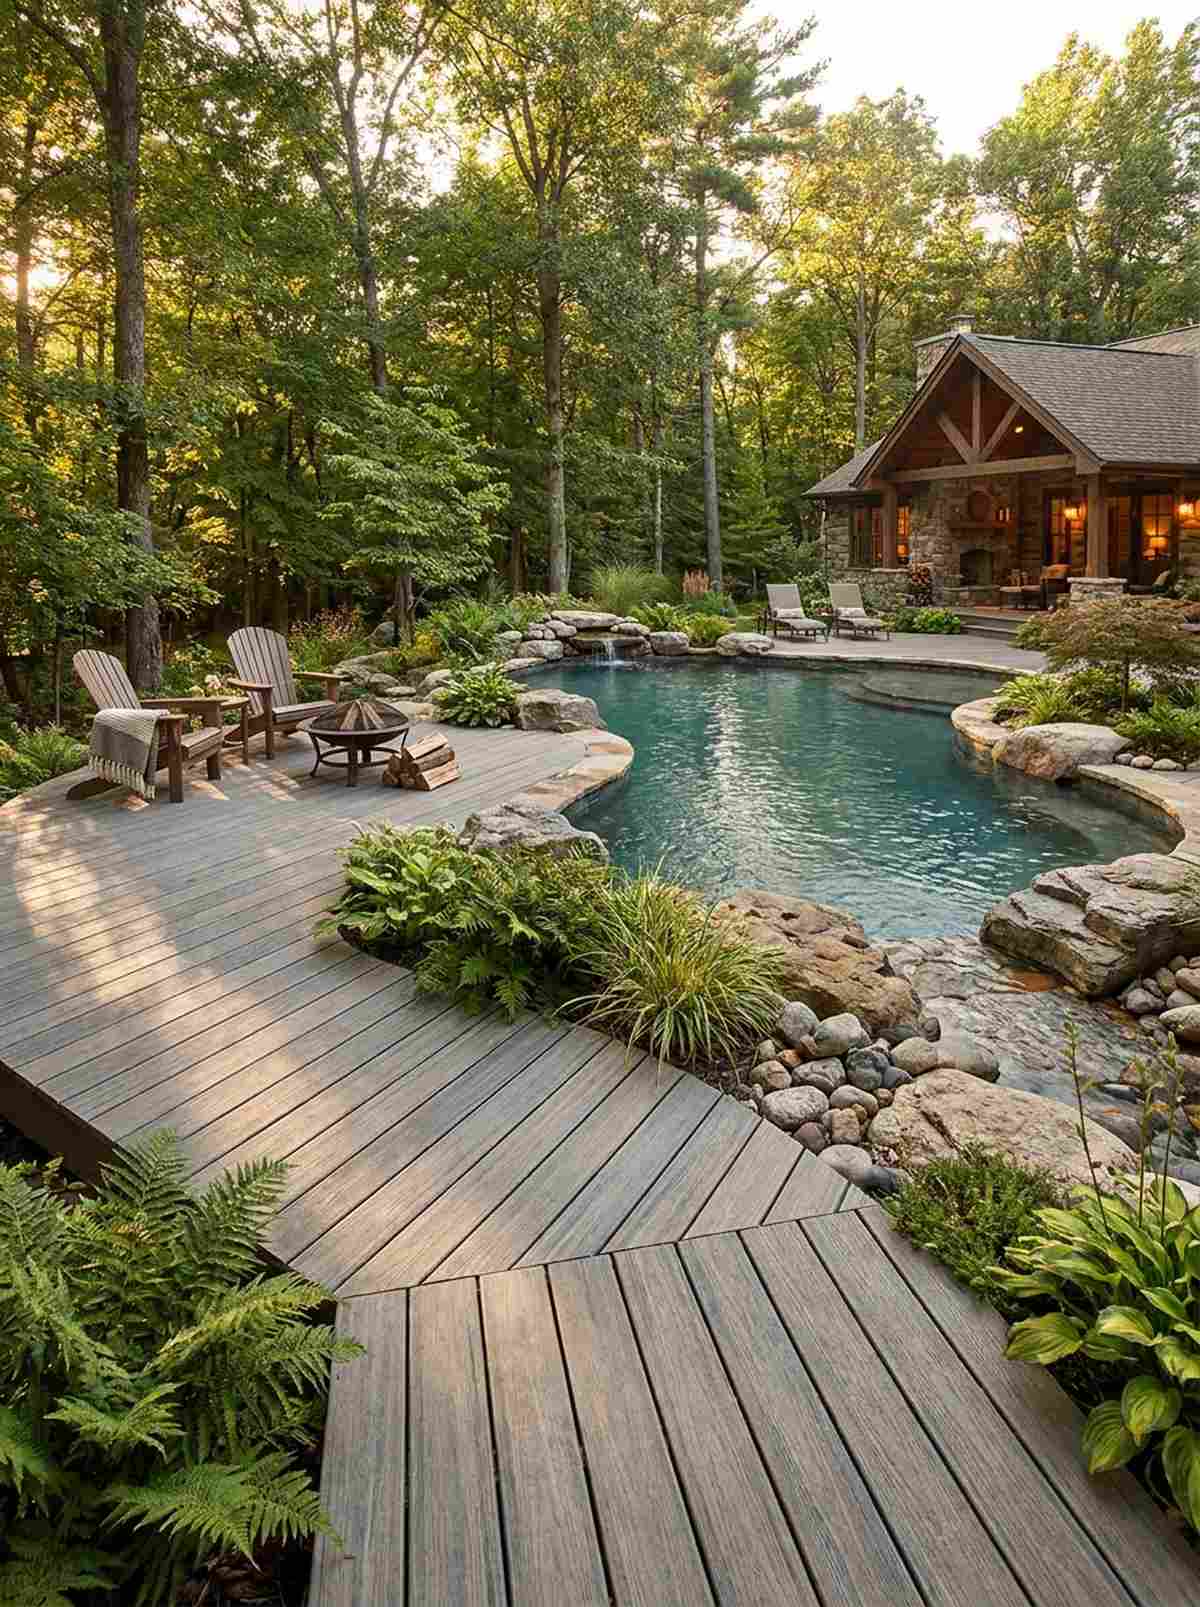
Offers the earthy warmth of a remote cabin dock without the nightmare of constant splintering. Using a composite wood pool deck framing is perfect for blending organic, freeform pool shapes into dense woodland yards.
Real wood rots violently near chlorinated water, so this upgrade guarantees a pristine finish for decades. Securing the boards with hidden universal deck fasteners leaves the surface completely clean, mimicking a high-end interior hardwood floor.
High-tier composite boards cost around $9 to $12 per square foot. A fantastic, zero-maintenance alternative for rustic property vibes.
- Key Materials: Moisture-capped composite lumber
- Vibe / Style: Pristine woodland cabin dock
- Difficulty: Beginner-friendly carpentry
- Budget Breakdown: Composite Boards: $3,500 | Joists: $1,000 | Fasteners: $300.
- Creator’s Tip: Pick a board color that already has gray undertones so it visually blends with surrounding natural rocks.
- Smart Sourcing: capped composite deck boards (bulk pack) and hidden deck fastener starter kits.
36. Stamped Concrete Mimicking Flagstone Pattern
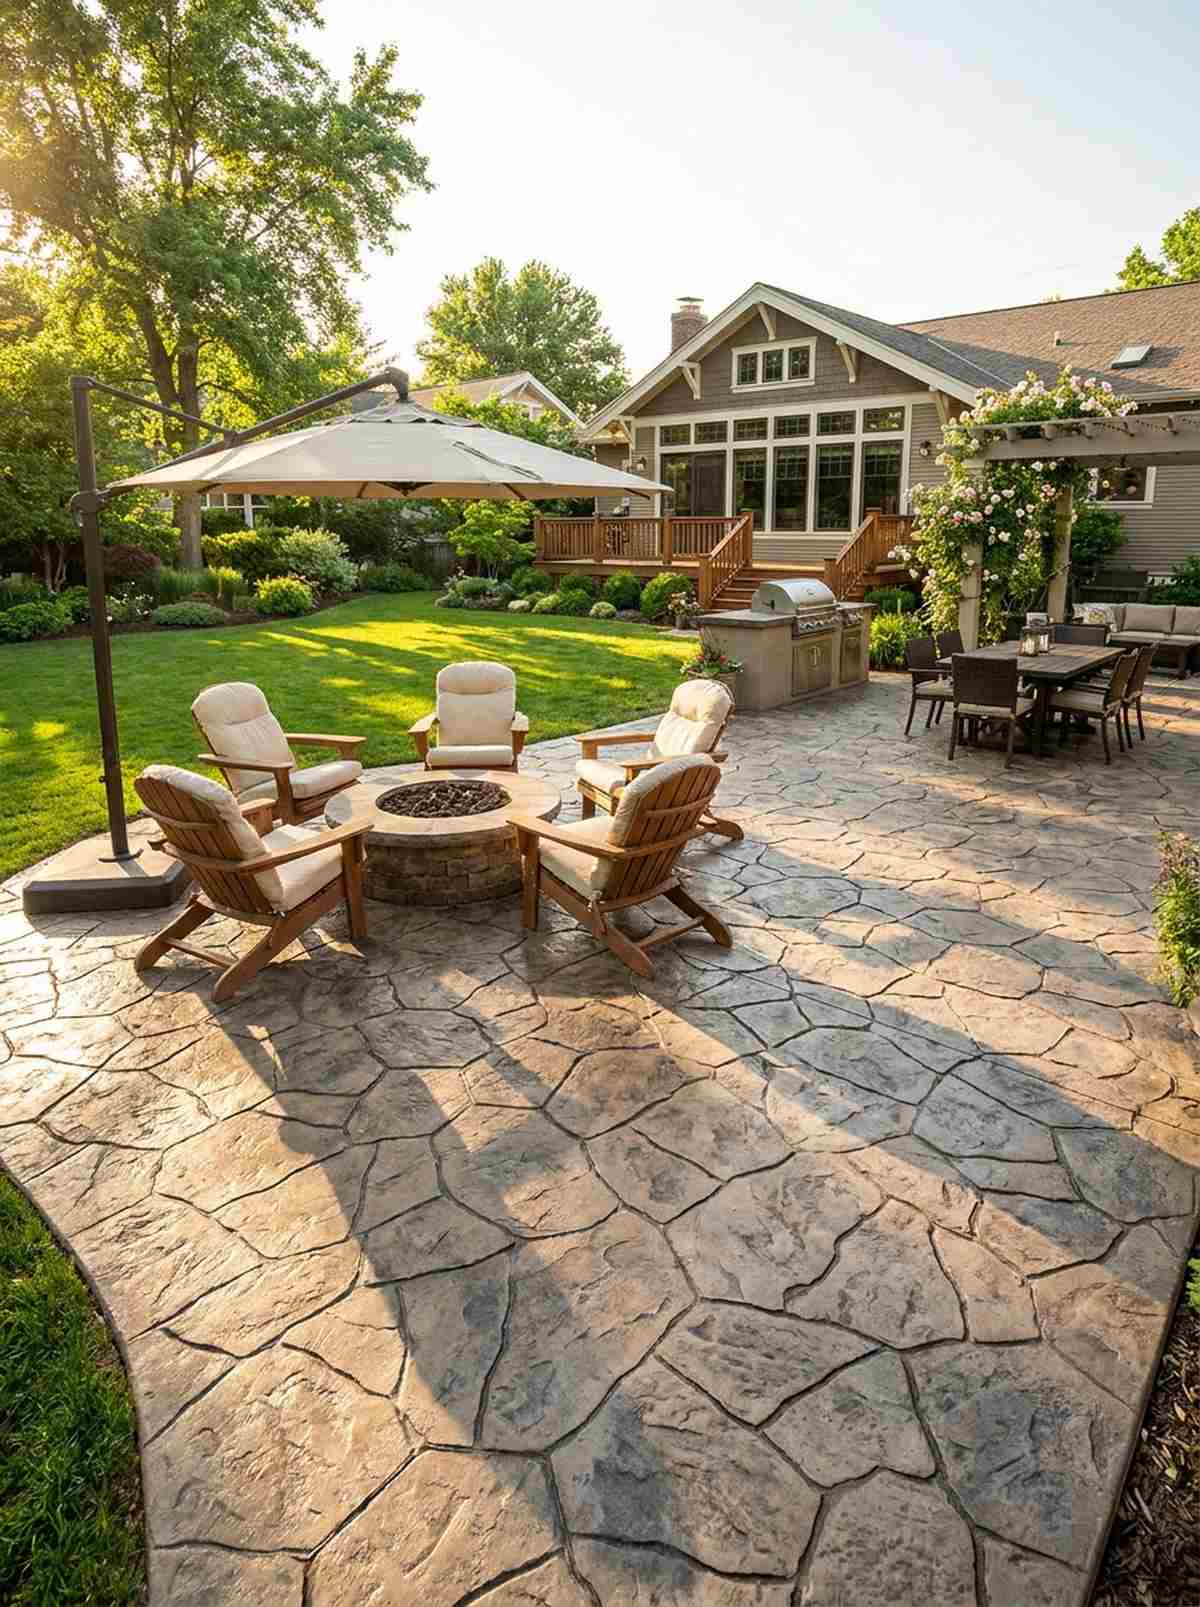
Delivers heavy, rich stonework aesthetics without the miserable weed-pulling between joints. This stamped flagstone concrete deck is the ultimate hack for budget-conscious homeowners wanting an organic estate feel.
Pouring a monolithic slab completely bypasses the awful settling issues associated with individually laid stones. Utilizing high-contrast concrete antiquing release powders deeply accents the faux grout lines, fooling everyone who steps on it.
Stamping usually costs between $8 and $12 per square foot, making it radically cheaper than real flagstone. Save this to your smart budget building board!
- Key Materials: Colored concrete mix and stamping mats
- Vibe / Style: Classic estate grounds on a budget
- Difficulty: Fast-paced professional stamping required
- Budget Breakdown: Concrete Pour: $3,000 | Stamp Labor: $1,500 | Sealer: $200.
- Creator’s Tip: Apply a slip-resistant grit additive directly into the final clear sealer layer to prevent the stamped surface from getting dangerously slick.
- Smart Sourcing: concrete antiquing release powder (bulk bucket) and anti-slip concrete sealer kits.
Conclusion
Integrating swim zones with patios demands intentional material choices, thoughtful zoning, and a clear vision for how your household uses outdoor space. The 36 exact blueprints and material concepts above demonstrate that an outdoor living pool succeeds when hardscape, commercial-grade kits, and recreational zones operate as a unified system rather than isolated elements. Start by mapping your family’s priorities—lap swimming versus lounging, intimate gatherings versus large parties—then select the layouts, bulk-pack finishes, and premium features that align with those goals. With careful planning and smart sourcing, your backyard transforms into a year-round destination that elevates daily life and property value alike.
Frequently Asked Questions
What is the ideal distance between a pool edge and a patio dining area?
Maintain at least eight feet between the pool coping and your patio furniture to prevent aggressive splash zones from reaching guests. To maximize this setup efficiently, look into waterproof outdoor dining sets and utilize a continuous run of anti-slip porcelain pavers (bulk crate) to give swimmers and diners plenty of safe, cohesive transit space.
Can you add a tanning ledge to an existing pool?
Adding a Baja shelf to an existing gunite pool is entirely possible by constructing a raised platform right within the shell. To keep costs manageable and guarantee a premium aesthetic, contractors often rely on reusable concrete step forms and finish the ledge with UV-resistant pool mosaic tile kits to separate the old structure from the new addition visually.
Which decking material stays coolest in direct sun?
Travertine and light-colored exposed aggregates remain significantly cooler than dark stones or standard composite wood because they reflect solar heat naturally. For the best thermal performance on a budget, sourcing a bulk pallet of French-pattern travertine paired with a penetrating heat-reflective stone sealant ensures barefoot comfort during peak summer months.
How do infinity-edge pools handle water loss?
Infinity pools utilize a dedicated catch basin that collects the overflow and pumps it right back into the main vessel, meaning they don’t waste water beyond normal evaporation. To maintain this illusion perfectly, you need highly reliable equipment like heavy-duty variable speed pool pumps and auto-fill pool valve kits to keep the water precisely at the edge.
What clearance is required between a pool and an outdoor kitchen?
Always position grills and cooking stations a minimum of six feet from the pool edge to keep grease splatters away from your water chemistry. Utilizing modular outdoor kitchen island kits helps you easily plan this safe distance while keeping the footprint tight, and installing drop-in stainless outdoor grills ensures your setup remains completely weatherproof.
Are multi-level pool decks more expensive than single-elevation designs?
Yes, multi-level decks generally increase costs by 15% to 30% due to the necessary excavation, retaining walls, and structural leveling required. However, you can offset these custom labor costs by utilizing pre-cast retaining wall blocks (bulk pallet) and commercial-grade deck leveling kits to execute the elevation changes safely and affordably.