
Building a gorgeous gravel garden path instantly upgrades your exterior property value. Smart sourcing of crushed stone foundations slashes landscape costs overnight. This exact architectural strategy delivers premium hardscaping on a surprisingly tight budget.
Design Snapshot Key Principles
- Base depth matters: Install 4–6 inches of compacted crushed stone for primary paths; 3–4 inches suffices for light-use garden spurs
- Edge for longevity: Steel, granite, or pressure-treated wood edging prevents gravel migration and defines clean borders
- Choose topping wisely: Pea gravel suits barefoot comfort; angular crushed gravel locks better on slopes
- Layer for drainage: Woven landscape fabric beneath the base blocks weeds while maintaining permeability
Classic Pea Gravel Pathways for Timeless Appeal
1. Straight Formal Entry Path
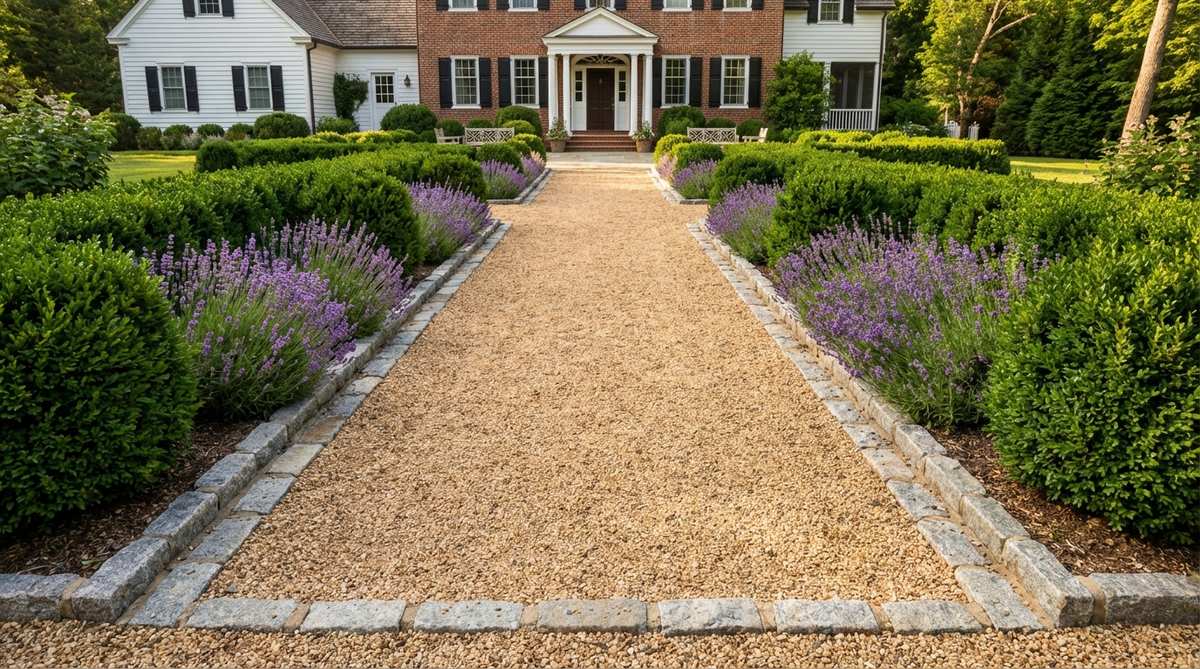
Showcasing a formal estate front walk, this layout feels like approaching a stately grand manor. It works exceptionally well for anchoring symmetrical, high-end front yards.
Most beginners skip rigid bordering, but enforcing strict linear containment delivers a surprisingly premium look. By securing the edges flawlessly, you bypass the messy scattering common in amateur setups.
You can easily pull this structural masterpiece off for around $40–$80 per section. Pin this if you’re planning a massive curb appeal upgrade!
- Key Materials: Pre-cut granite setts
- Vibe / Style: High-society elegance
- Difficulty: Intermediate structural setup
- Budget Breakdown: Stone: $35 | Aggregate: $25
- Creator’s Tip: Compact the foundation in thin layers to stop future sinking.
- Smart Sourcing: Commercial-grade weed barrier rolls and UV-coated steel edge strips.
2. Meandering Cottage Garden Walk
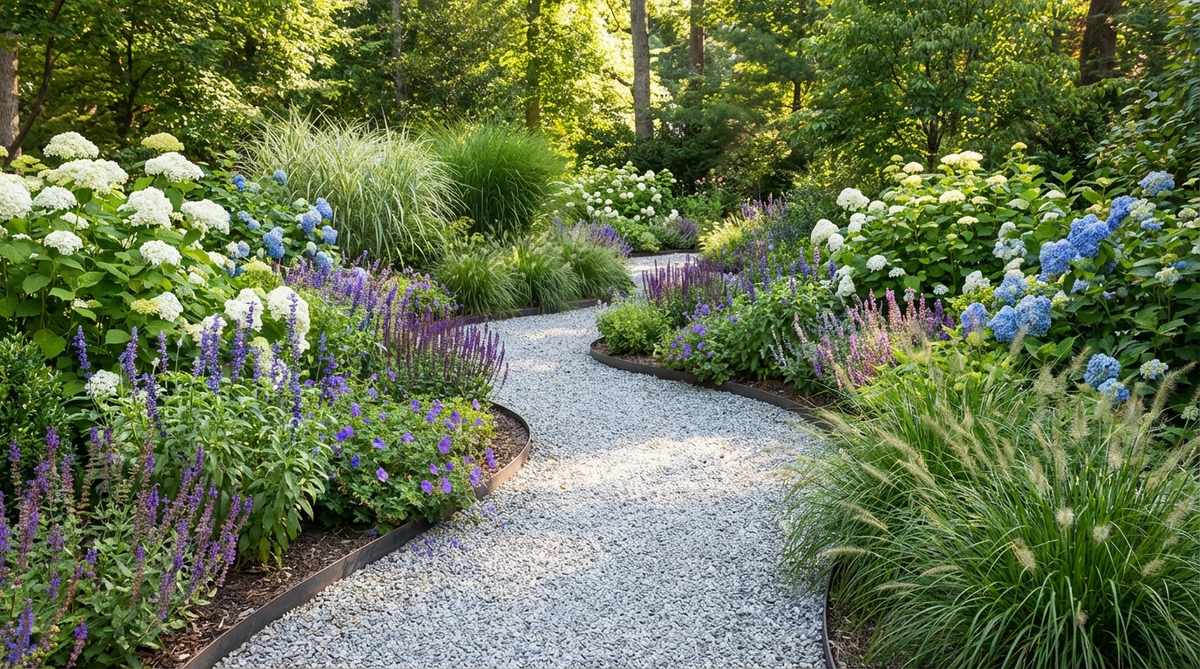
Creating a whimsical floral corridor, this design looks straight out of an old-world storybook. It is perfectly designed for weaving through dense, blooming backyard foliage.
Using sweeping, flexible lines instead of harsh geometry instantly makes the space look far more expensive than it is. The soft curvature tricks the eye, giving off a designer-level finish without major excavation.
Expect to spend a highly reasonable $30–$50 to achieve this romantic aesthetic.
- Key Materials: Bulk-pack light-reflecting pea stone
- Vibe / Style: English garden charm
- Difficulty: Easy weekend project
- Budget Breakdown: Base fill: $20 | Edging: $15
- Creator’s Tip: Use bright white stone to reflect sunlight into shadowed planting corners.
- Smart Sourcing: Flexible acrylic bendable borders and pre-mixed gravel stabilization kits.
3. Kitchen Garden Aisle
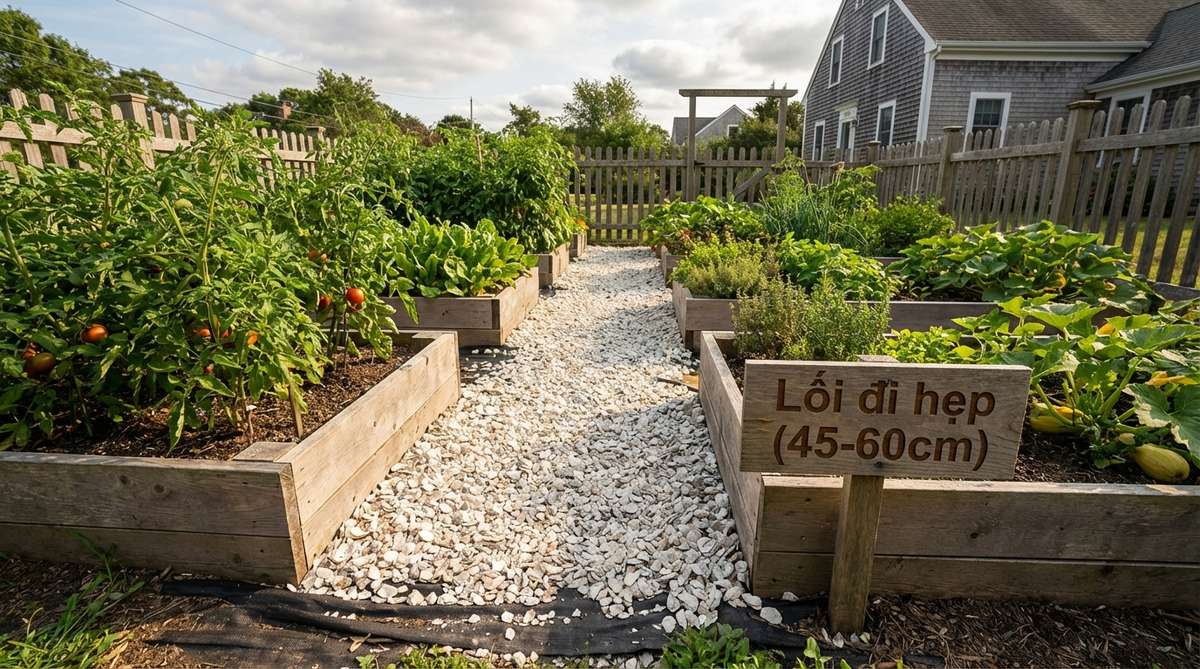
Highlighting a rustic vegetable promenade, this aesthetic gives off deep rural farmhouse vibes. It serves as the ultimate practical access route between raised cedar planter boxes.
Ditching standard messy mulch for a tightly tamped stone surface creates an unexpectedly luxurious harvest zone. This simple swap eliminates mud tracking and transforms a basic garden into a miniature garden supply haven.
This functional revamp will run you roughly $20–$45 per aisle. Save this to your DIY weekend garden board!
- Key Materials: Pre-washed oyster shell aggregate
- Vibe / Style: Homestead practical chic
- Difficulty: Beginner-friendly execution
- Budget Breakdown: Shell blend: $25 | Sub-base: $10
- Creator’s Tip: Avoid treated lumber near food crops to prevent chemical leaching.
- Smart Sourcing: Eco-friendly organic weed fabrics and bulk cedar raised bed brackets.
4. Side Yard Utility Corridor
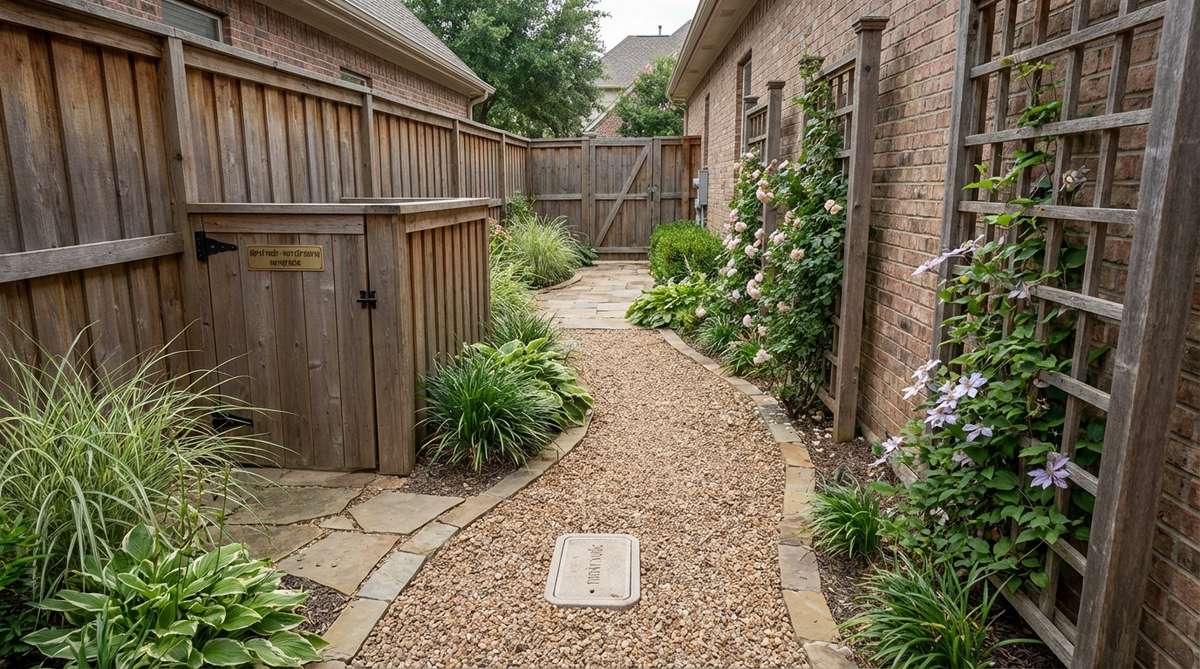
Acting as a hidden architectural alley, this pathway feels like discovering a structured secret passage. It completely revitalizes neglected, narrow spaces between the house and fencing.
Rather than letting weeds claim the gap, laying a sharp angular stone base elevates the entire property’s perceived value. A properly sloped utility walk proves that even service zones can achieve high-end functionality.
You can execute this hidden gem for incredibly cheap, usually under $35. Highly recommended for a quick weekend win.
- Key Materials: Heavy-duty angular trap rock
- Vibe / Style: Industrial neatness
- Difficulty: Moderate grading required
- Budget Breakdown: Stone: $20 | Grading tools: $15
- Creator’s Tip: Pitch the sub-grade away from your foundation to bulletproof your drainage.
- Smart Sourcing: Pre-sloped drainage pipe sleeves and commercial-grade geotextile mesh.
Most people get this completely wrong… until they try the exact layout coming up next.
5. Zen Meditation Loop
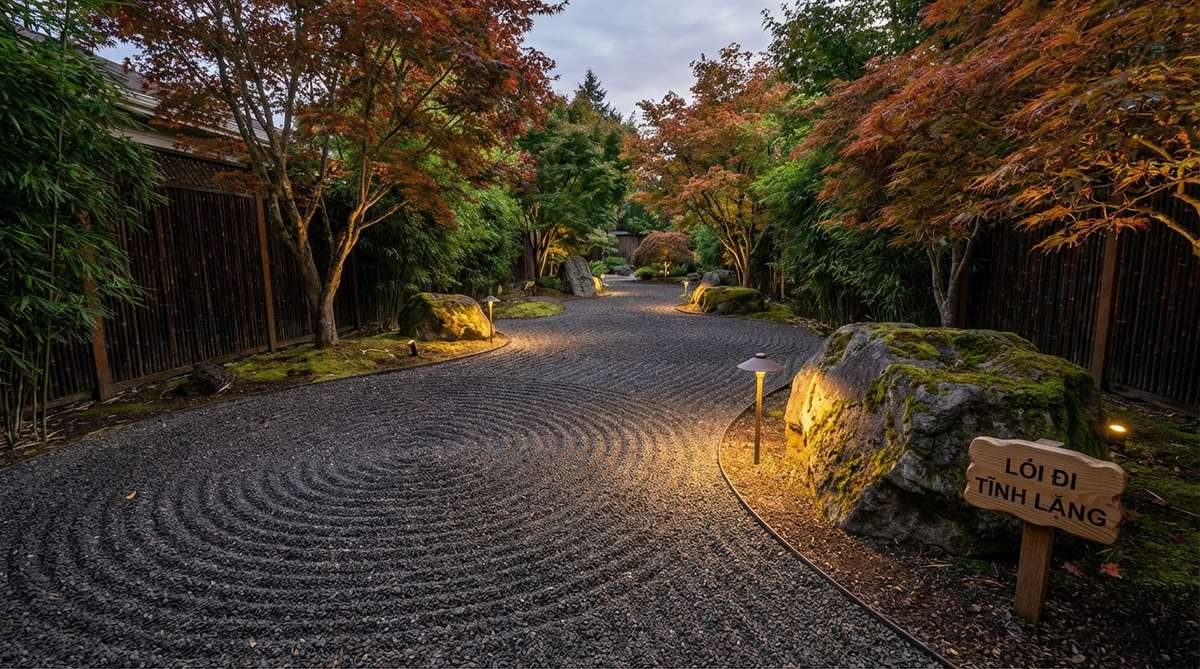
Featuring a tranquil backyard circuit, this setup feels like a serene sanctuary you accidentally stumbled upon. It is uniquely tailored for quiet, shaded relaxation corners.
Raking larger circular patterns over a dense foundation produces a surprisingly sophisticated landscape trick. This minimalist approach requires very few elements but visually dominates, offering an exotic escape.
Crafting this peaceful retreat typically costs around $50–$90. Pin this to your dream backyard mood board!
- Key Materials: Premium zen garden sand kits
- Vibe / Style: Minimalist Asian-inspired
- Difficulty: Easy to lay, ongoing upkeep
- Budget Breakdown: Specialty gravel: $50 | Accent boulders: $30
- Creator’s Tip: Position oversized specimen stones at intersecting points for dramatic flair.
- Smart Sourcing: UV-resistant bamboo privacy screens and pre-sealed decorative boulder sets.
Crushed Stone Walkways for High-Traffic Zones
6. Garage to Backyard Connector
Serving as a rugged transit artery, this functional build feels tough, intentional, and highly organized. It is ideal for bearing the brunt of heavy wheelbarrows and constant footfall.
Failing to lock down high-use zones is a common error, but using jagged limestone instantly bulletproofs the route. The sharp edges naturally interlock, providing an ultra-stable platform that outperforms basic dirt paths.
This indestructible pathway setup generally runs $60–$100. A true set-and-forget investment!
- Key Materials: Bulk compacted #4 stone base
- Vibe / Style: Utilitarian strength
- Difficulty: Heavy manual labor
- Budget Breakdown: Base rock: $40 | Topping: $35
- Creator’s Tip: Excavate deeper than you think is necessary to accommodate heavy equipment weight.
- Smart Sourcing: Heavy-duty steel corner brackets and pre-cut pressure-treated timber beams.
7. Hillside Switchback Trail
Transforming into an alpine terrace trek, this winding setup feels like a rugged mountain trail right at home. It functions flawlessly on difficult, steeply graded properties.
Ignoring slope dynamics destroys average paths, but integrating flush check bars creates a fiercely resilient and expensive-looking trail. Stepping the descent down strategically arrests erosion dead in its tracks.
You can tame a wild hill for approximately $70–$120. Save this if you struggle with sloped yard landscaping!
- Key Materials: Pre-formed concrete check bars
- Vibe / Style: Natural mountain resort
- Difficulty: Advanced leveling technique
- Budget Breakdown: Retaining materials: $60 | Angular fill: $40
- Creator’s Tip: Over-compact the outer edges of your curves where water runoff hits hardest.
- Smart Sourcing: Bulk-pack groundcover seed kits and heavy-gauge erosion control netting.
8. Dog Run Perimeter Path
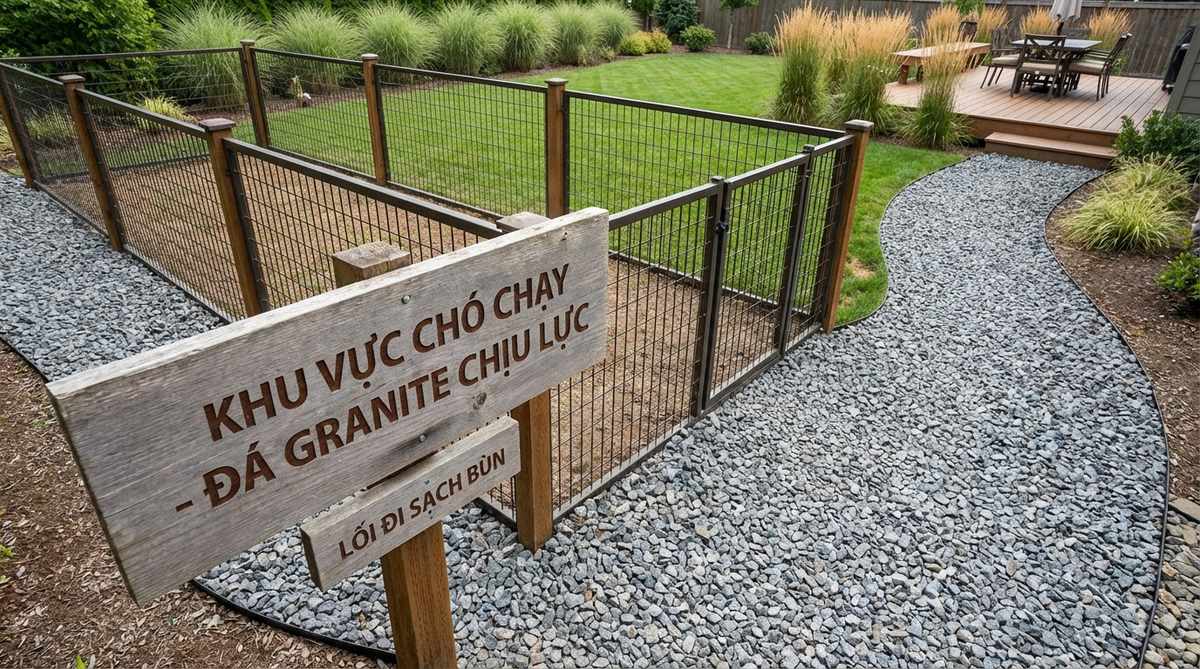
Operating as a canine-friendly boundary, this specialized zone keeps the area looking remarkably pristine. It is the ultimate solution for shielding fences from energetic, digging pets.
Lawns inevitably turn to mud pits under paws, but transitioning to a coarse trap rock border delivers a flawlessly clean aesthetic. This firm perimeter prevents messy tracking and neutralizes typical backyard destruction.
Creating this pet-proof barrier costs roughly $45–$75. It is a massive time-saver for pet owners.
- Key Materials: Paw-safe crushed granite chips
- Vibe / Style: Clean structural boundary
- Difficulty: Beginner setup
- Budget Breakdown: Granite filler: $45 | Base fabric: $15
- Creator’s Tip: Avoid tiny pea gravel that gets stuck between paw pads; stick to half-inch sizes.
- Smart Sourcing: UV-coated commercial pet fencing rolls and heavy-duty drainage weed mats.
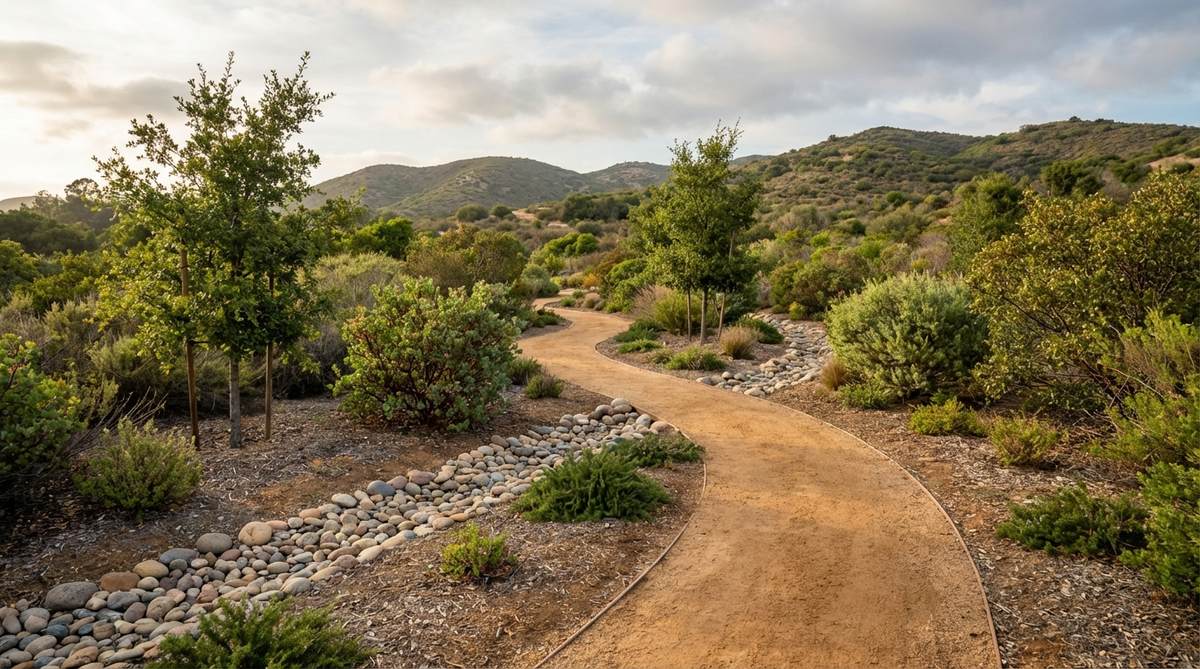
9. Woodland Hiking Path
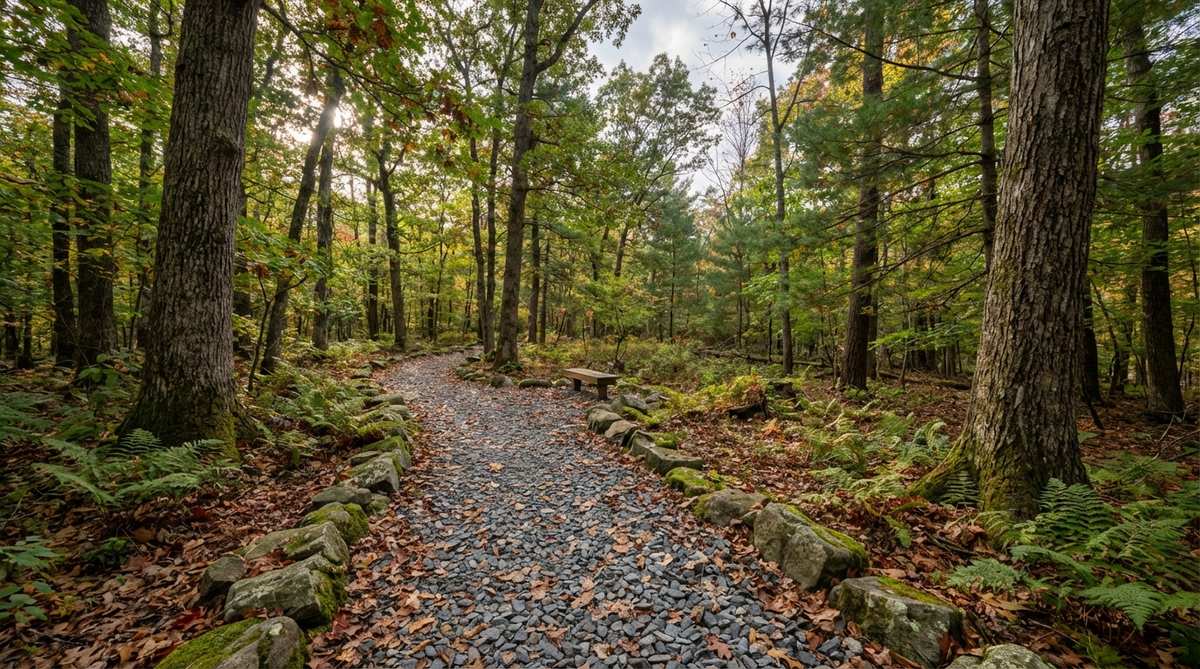
Mimicking a shaded forest floor trail, this organic pathway feels like a private nature preserve. It seamlessly integrates into tree-heavy borders and wild, undisturbed landscape patches.
Using stark white stone ruins natural vibes, but blending earthy gray aggregate perfectly mimics high-end park trails. Stripping it down to mineral soil ensures the surface remains reliably firm without disrupting ancient roots.
Establish this quiet getaway for barely $30–$60 per section. Pin this for your ultimate backyard forest transformation!
- Key Materials: Earth-toned angular woodland gravel
- Vibe / Style: Untamed natural wonder
- Difficulty: Easy surface clearing
- Budget Breakdown: Natural aggregate: $35 | Organic compost: $15
- Creator’s Tip: Let local moss species naturally creep into the edges to soften the border line.
- Smart Sourcing: Bulk shade-tolerant fern bulbs and pre-cut native fieldstone borders.
💡 Must-Have Supplies for High-End Setups
To build these setups faster and ensure they last, skip the generic craft aisles and invest in the right foundational kits.
- Base & Support: Pre-cut heavy-duty landscape stabilization grids
- Setup Tools: Professional grade tampers and edge-setter kits
- Weather/Durability Protection: UV-coated acrylic sealant sprays for border stones
This next setup is ridiculously cheap but looks like a $1,000 custom masonry job…
Edging and Border Techniques That Define Structure
10. Steel Landscape Edging
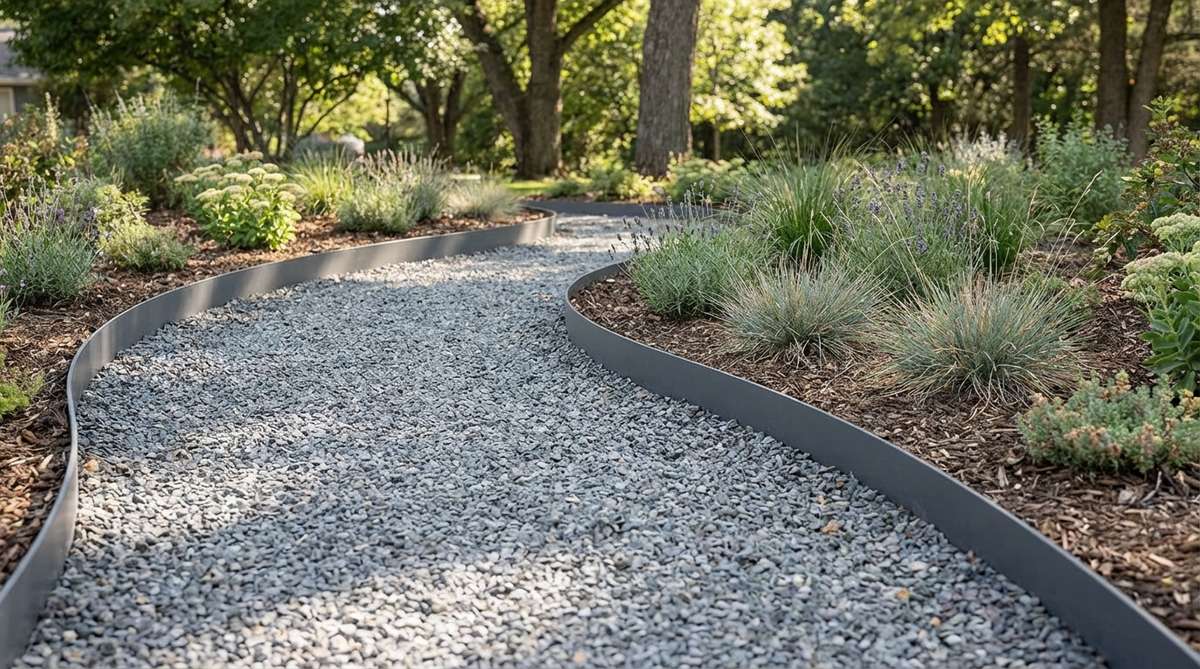
Showcasing a razor-sharp modern border, this invisible framing feels sleek and architectural. It is the go-to layout for minimalist gravel garden walkway designs requiring pristine geometry.
Bulky plastic completely cheapens a yard, whereas thin powder-coated steel establishes a surprisingly elite, contemporary aesthetic. Sinking the metal just below the sightline commands a sharp contrast that looks meticulously planned.
Locking down this modern edge will cost about $60–$100. Save this for your high-contrast courtyard planning!
- Key Materials: Powder-coated flexible steel strips
- Vibe / Style: Ultra-modern precision
- Difficulty: Intermediate staking
- Budget Breakdown: Steel rolls: $70 | Anchor stakes: $15
- Creator’s Tip: Overlap metal joints by at least two inches to prevent frost heaving separation.
- Smart Sourcing: Pre-painted rust-proof steel edging kits and bulk heavy-duty ground spikes.
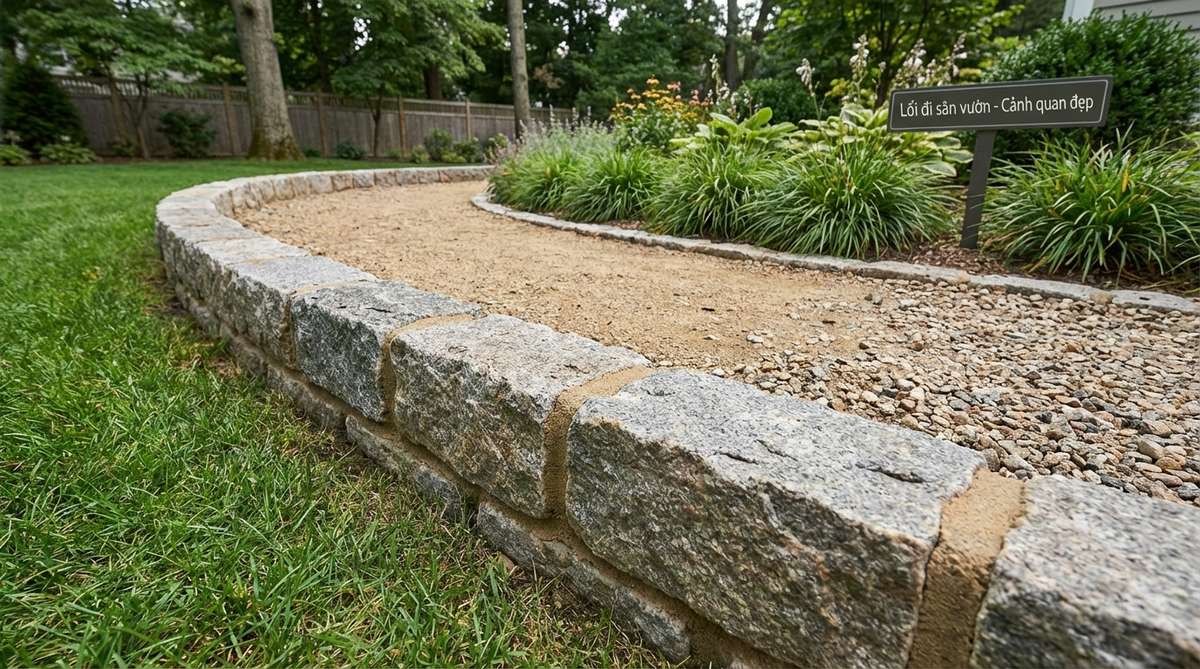
11. Granite Cobble Border
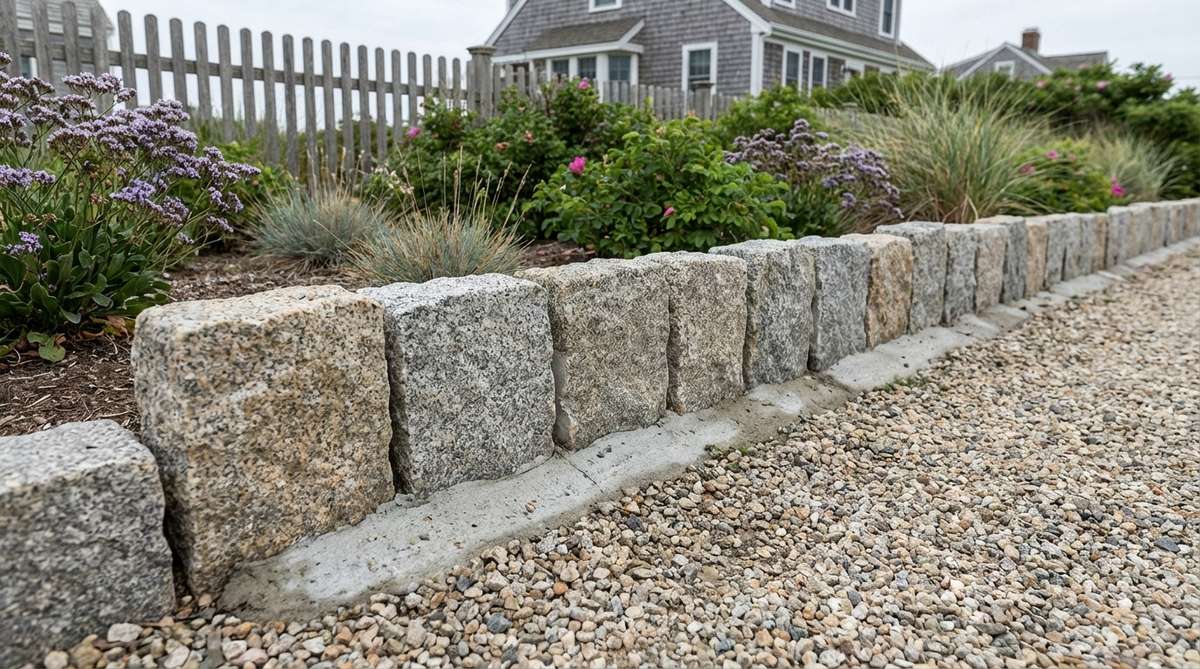
Radiating a historic coastal charm, this blocky perimeter feels like walking through an old New England seaport. It works gorgeously when wrapping around historic or shingle-style architecture.
Pouring a hidden concrete wedge to lock the stones is a professional secret that guarantees an absolutely bulletproof, expensive facade. Reclaimed street setts elevate an ordinary gravel pour into luxury masonry.
This heritage upgrade demands around $90–$150. A fantastic permanent investment for front yards.
- Key Materials: Reclaimed granite paving setts
- Vibe / Style: Wealthy heritage estate
- Difficulty: Advanced mortar work
- Budget Breakdown: Cobblestones: $90 | Mortar mix: $30
- Creator’s Tip: Angle the concrete haunching at 45 degrees so soil easily covers the messy mechanics.
- Smart Sourcing: Bulk-pack rapid-set concrete mixes and pre-sealed granite border stones.
12. Brick Soldier Course
Displaying a classic sawtooth boundary, this vertical masonry technique feels remarkably timeless. It pairs seamlessly with lush English cottage environments and dense floral beds.
Laying standard bricks flat is boring, but standing them vertically creates a jagged, highly textured profile that dramatically spikes curb appeal. Using hard-fired clay ensures the border fiercely resists cracking during winter freezes.
You can execute this traditional framing for approximately $50–$80. Pin this if you love timeless brickwork!
- Key Materials: Hard-fired ground-contact bricks
- Vibe / Style: Classic colonial elegance
- Difficulty: Moderate trenching
- Budget Breakdown: Paver bricks: $60 | Base dust: $15
- Creator’s Tip: Pack stone dust tightly between the bricks to lock them in place without cement.
- Smart Sourcing: UV-resistant clay paver bundles and pre-mixed polymeric jointing sand.
13. Pressure-Treated Timber Frame
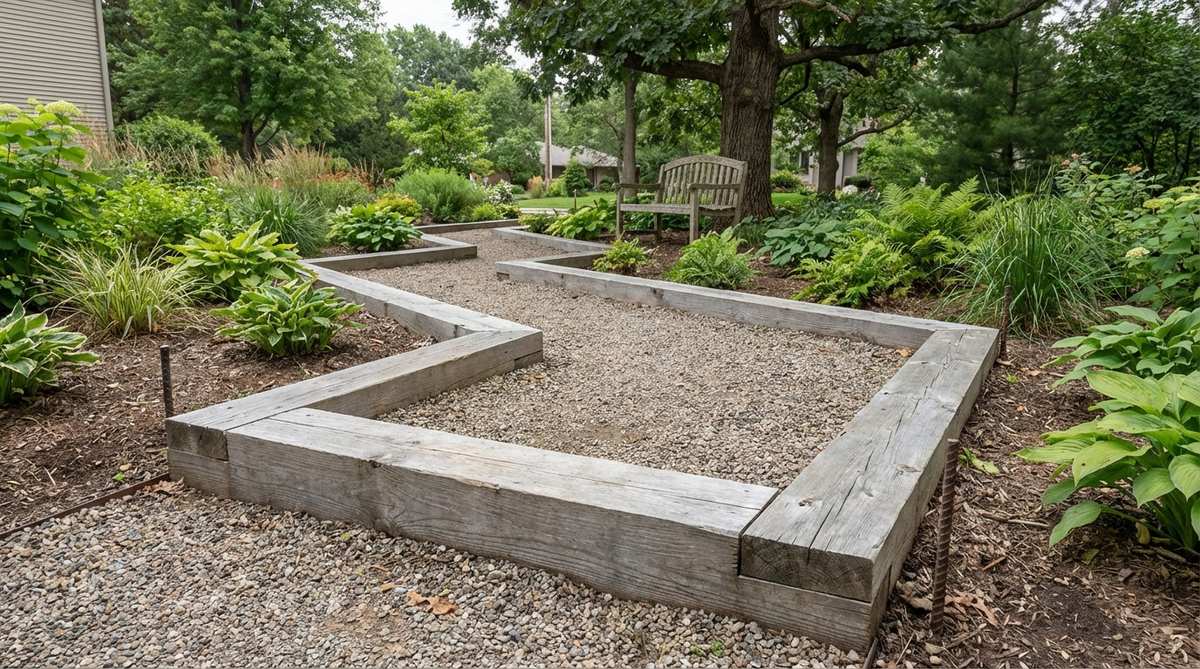
Emitting a warm woodland structure, this heavy lumber framing feels deeply grounded and cozy. It serves as the ultimate affordable spine for sprawling backyard trail networks.
Flimsy plastic borders bend and snap, but securing thick wood beams delivers a brilliantly rugged, long-lasting hardscape. Letting the timber weather naturally to silver-gray blends it effortlessly into the surrounding environment.
Constructing this sturdy frame runs a budget-friendly $40–$70. Highly recommended for heavy-duty paths.
- Key Materials: Ground-contact rated 4×4 timbers
- Vibe / Style: Rugged cabin aesthetic
- Difficulty: Intermediate carpentry
- Budget Breakdown: Timbers: $45 | Rebar pins: $15
- Creator’s Tip: Miter your 90-degree corners to instantly upgrade the carpentry from basic to custom.
- Smart Sourcing: Pre-cut heavy-duty rebar anchor stakes and bulk-pack timber bracket ties.
14. Belgian Block Curbing
Featuring a chunky masonry transition, this heavy border feels imposing and incredibly secure. It is the perfect raised barrier to stop aggressive lawns from swallowing your stone.
Submerging massive granite blocks creates a visually dominant line that effortlessly mimics elite suburban country clubs. Sweeping specialized polymer dust into the cracks cements a completely weed-free, high-end barrier.
This premium bordering option sits around $100–$180. Save this for definitive lawn separation!
- Key Materials: Oversized Belgian granite blocks
- Vibe / Style: Prestigious country club
- Difficulty: Heavy lifting required
- Budget Breakdown: Stone blocks: $130 | Setting dust: $20
- Creator’s Tip: Use a rubber mallet to level each block perfectly on its dust bed.
- Smart Sourcing: Pre-mixed polymeric binding sand and heavy-duty rubber deadblow hammers.
If you think standard gravel is boring, wait until you see how these mixed-material hybrid designs perform.
Multi-Material Combinations for Visual Interest
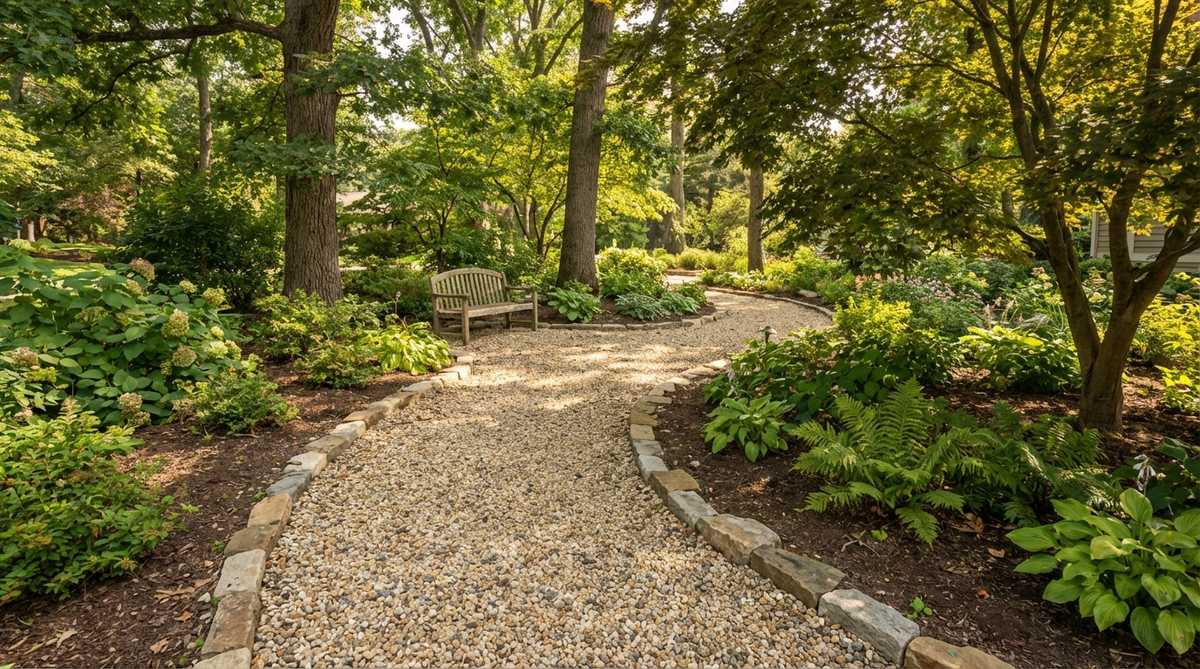
15. Stepping Stone Gravel Path
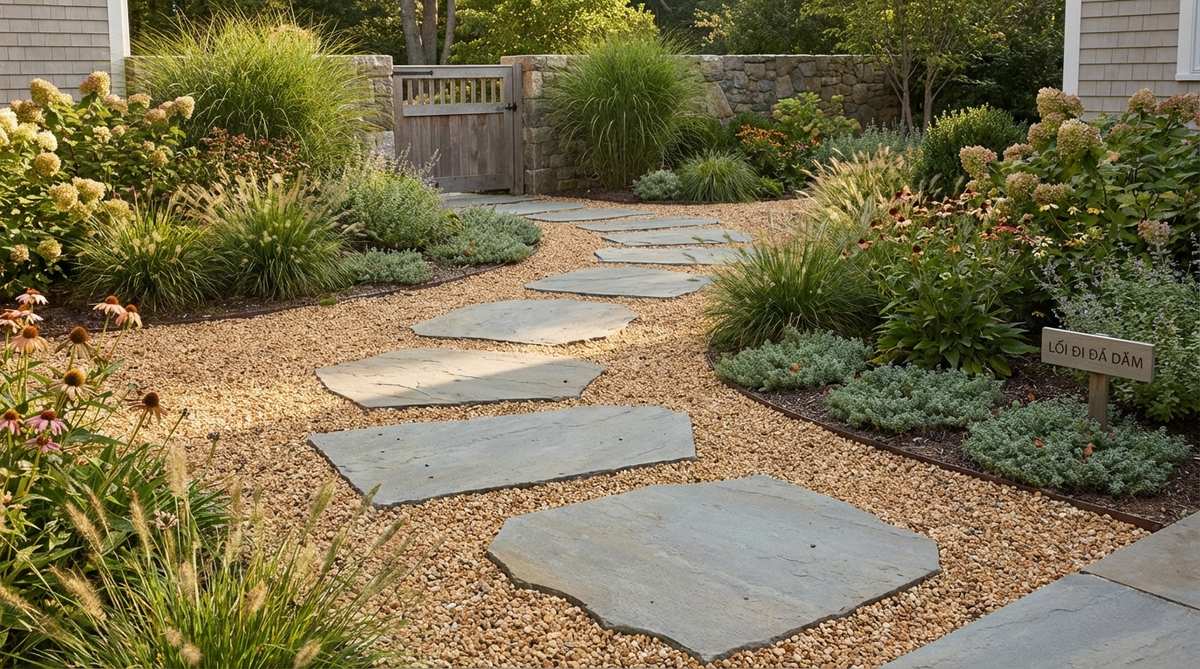
Highlighting a floating rock pathway, this mixed media setup feels both grounded and magically light. It drastically improves navigation comfort across long, informal garden stretches.
Relying solely on loose stones can be exhausting, but sinking broad flagstones creates an unexpectedly comfortable, premium pacing experience. Popping the stones slightly above the aggregate keeps footwear spotless while maintaining high-end drainage.
You can seamlessly blend this for about $60–$110. Pin this for the perfect barefoot backyard upgrade!
- Key Materials: Large format bluestone flats
- Vibe / Style: Relaxed organic luxury
- Difficulty: Easy spacing and leveling
- Budget Breakdown: Stepping stones: $70 | Surrounding pea rock: $30
- Creator’s Tip: Space the stone centers exactly 24 inches apart to perfectly match an adult stride.
- Smart Sourcing: Pre-cut natural flagstone palettes and bulk-pack large river pebbles.
16. Paver and Gravel Checkerboard
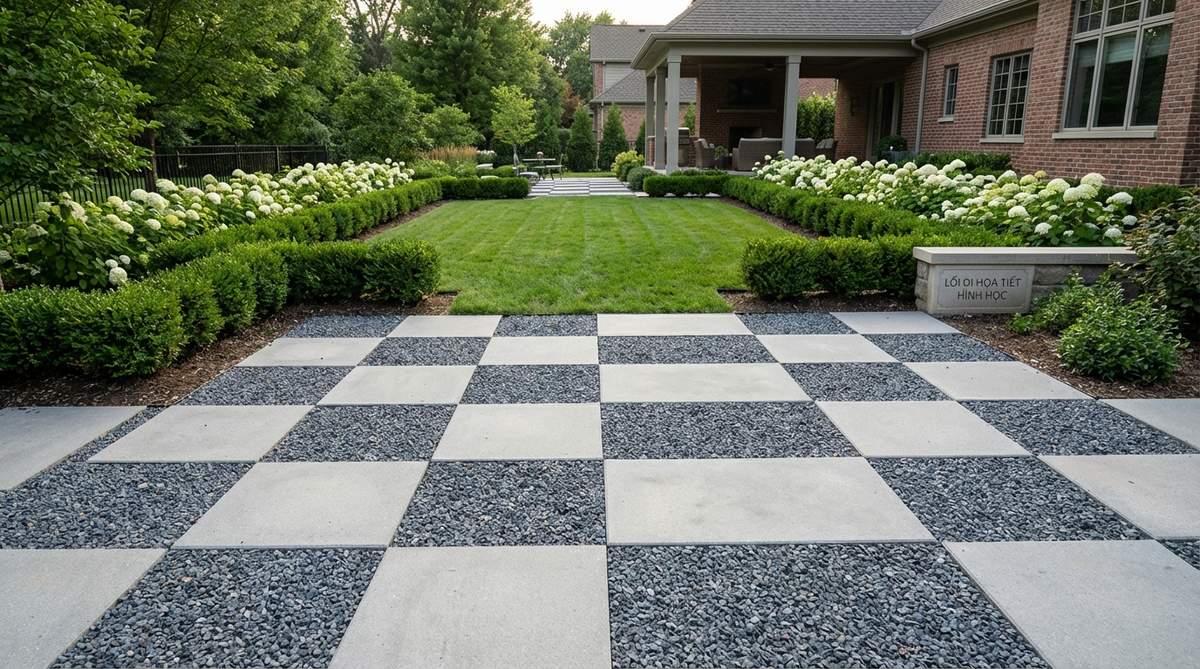
Projecting a geometric grid matrix, this strict pattern feels intensely modern and deliberately planned. It totally revitalizes barren courtyard floors and minimalist patio zones.
Randomly placing stones looks amateurish, but forcing a rigid alternating grid establishes a jaw-dropping, resort-quality optical illusion. The solid concrete squares effortlessly stabilize patio furniture while the porous infill eliminates water pooling.
This architectural masterpiece costs roughly $80–$140. A brilliant hack to avoid pouring a full concrete slab.
- Key Materials: Uniform 16×16 concrete pavers
- Vibe / Style: High-end modern courtyard
- Difficulty: Precision measuring critical
- Budget Breakdown: Pavers: $90 | Contrast gravel: $35
- Creator’s Tip: Use stark black or brilliant white gravel to hyper-accentuate the checkerboard contrast.
- Smart Sourcing: Pre-sealed concrete square pavers and bulk-pack pure white marble chips.
17. Railroad Tie and Crushed Stone
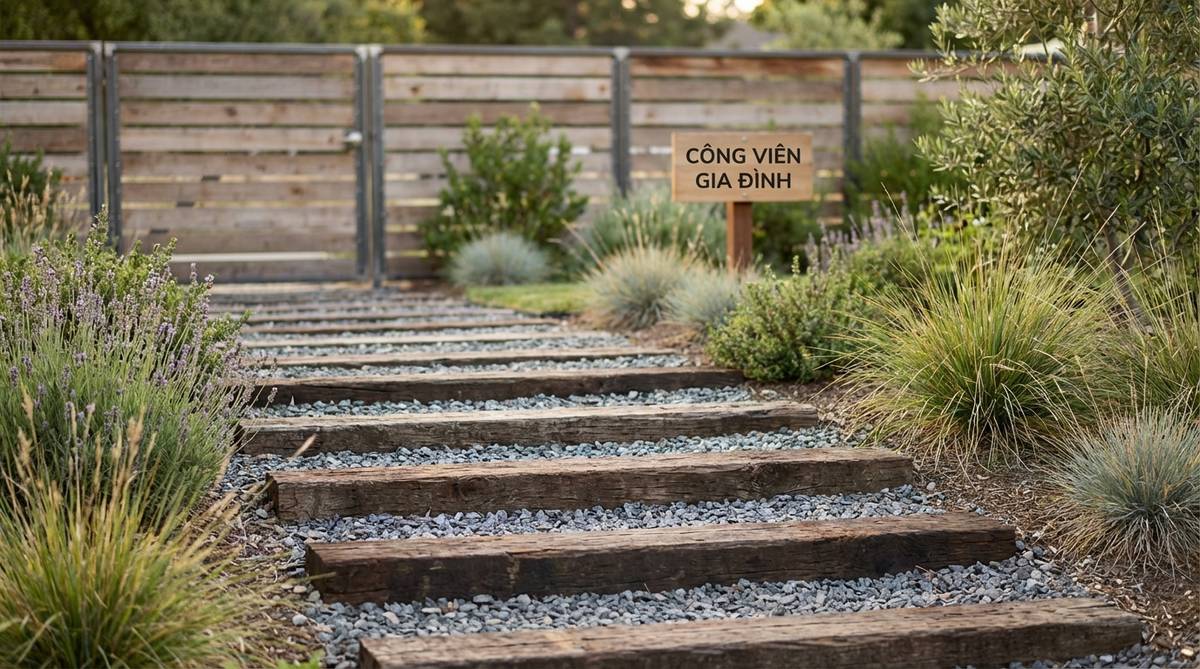
Embodying a rugged industrial track, this cross-hatched design feels bold, weathered, and unyielding. It beautifully anchors transitional spaces in contemporary farmhouse layouts.
Many struggle with mild slopes, but dropping heavy reclaimed ties as micro-steps immediately injects a highly expensive, structured contour. Notching them flush ensures they act as brilliant textural interruptions rather than tripping hazards.
You can execute this heavily textured run for $50–$90. Pin this to your farmhouse exterior board!
- Key Materials: Reclaimed or composite railroad ties
- Vibe / Style: Weathered industrial chic
- Difficulty: Heavy material handling
- Budget Breakdown: Wood ties: $50 | Base infill: $30
- Creator’s Tip: Drill tiny weeping holes through the back of the timber to stop rain from pooling.
- Smart Sourcing: UV-resistant composite landscape timbers and heavy-duty auger drill bits.
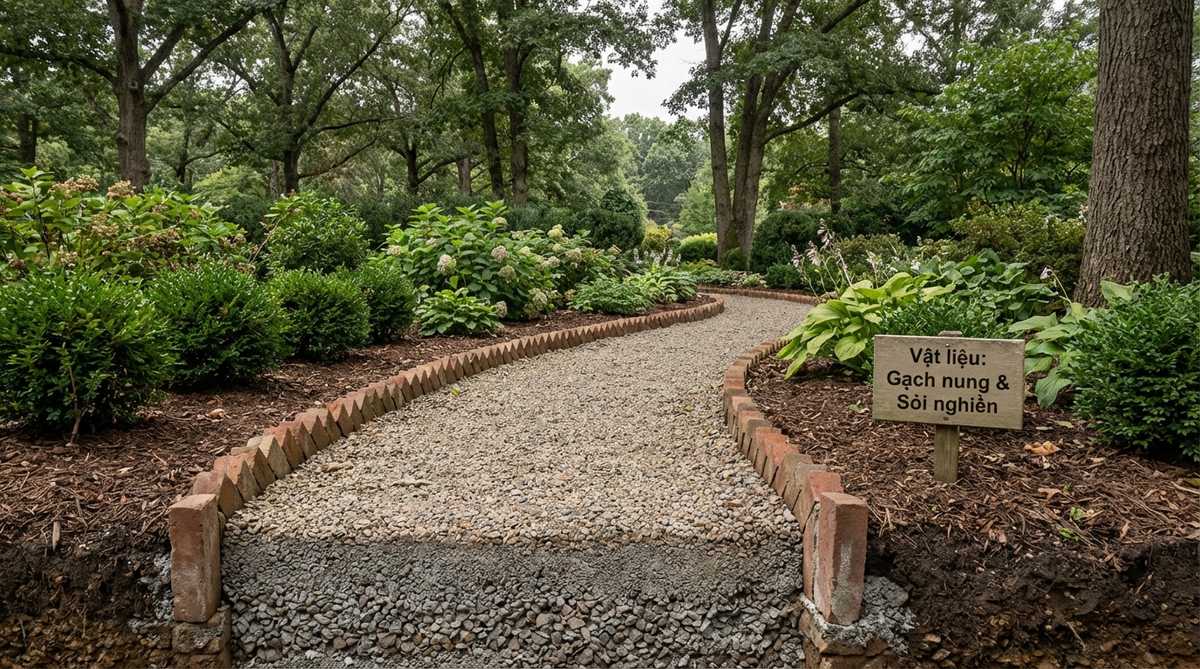
18. Oyster Shell and Brick Path
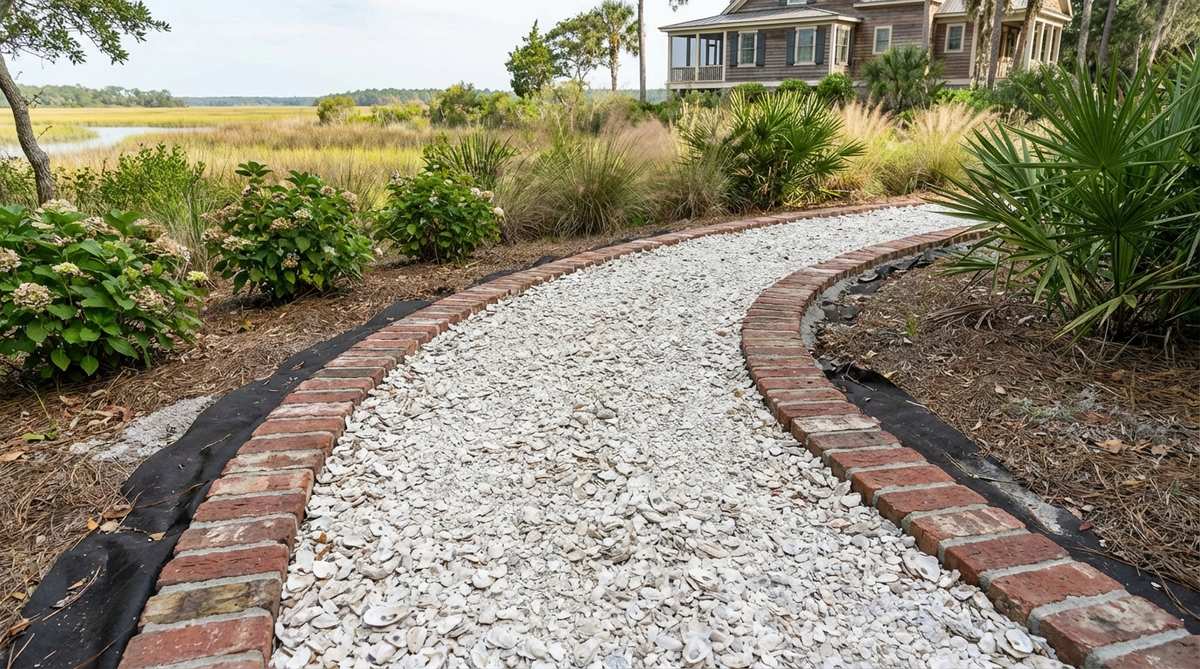
Capturing a brilliant coastal walkway, this bright, crushed aesthetic feels like a breezy beachside resort. It absolutely transforms Mid-Atlantic and Southern outdoor entertainment zones.
Standard brown rocks look incredibly dull, whereas brilliant white crushed shells framed in red clay deliver a surprisingly opulent, high-contrast visual shock. As they compact, the shells lock into a brilliant white pavement that drains flawlessly.
This stunning beachside aesthetic typically runs $70–$110. A fantastic way to brighten up dark yard corners.
- Key Materials: Crushed local oyster shells
- Vibe / Style: Bright coastal luxury
- Difficulty: Easy surface spreading
- Budget Breakdown: Shell crush: $60 | Brick border: $40
- Creator’s Tip: Top-dress the layout every spring as the organic shells slowly compress into the soil.
- Smart Sourcing: Bulk-pack crushed white oyster shells and pre-cut running bond brick forms.
19. Wood Round and Pea Gravel
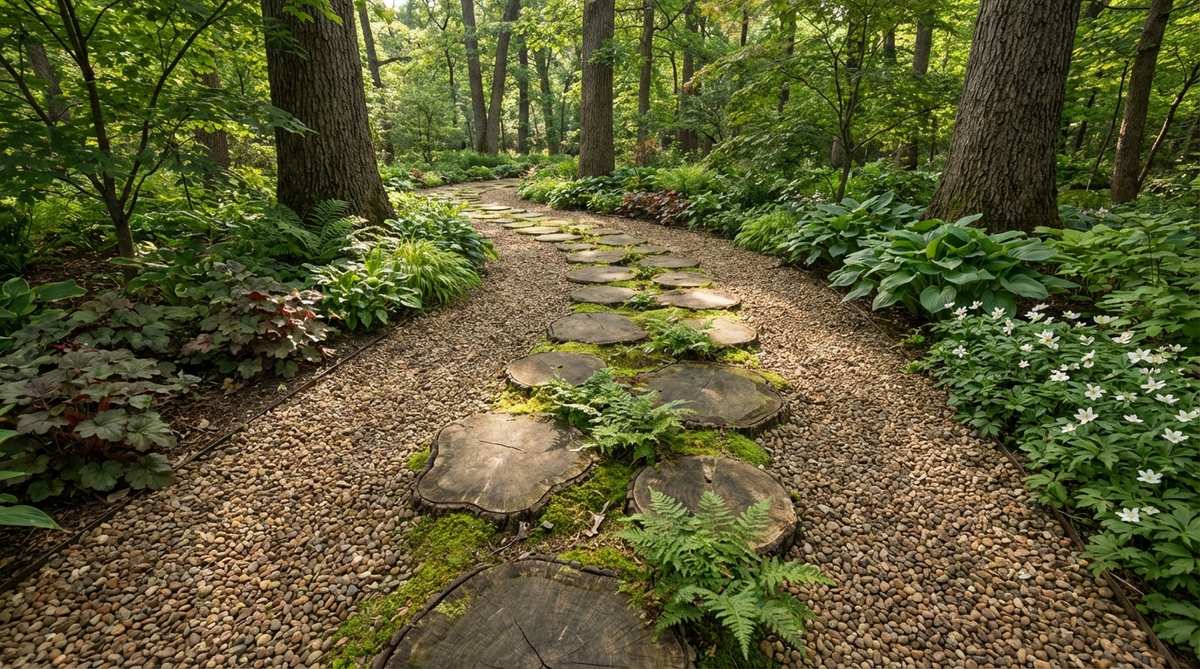
Presenting a fairy garden pathway, this whimsical mix feels like a bridge into a mythical enchanted forest. It works exceptionally well in heavy shade under thick tree canopies.
Generic stepping stones can feel cold, but slicing thick organic logs creates an incredibly charming, storybook terrain. Pairing them with miniature garden supplies transforms an ordinary trail into an interactive, magical landscape feature.
Crafting this whimsical trail costs a mere $20–$50. Pin this if you love enchanting garden designs!
- Key Materials: Thick natural tree trunk slices
- Vibe / Style: Enchanted woodland dream
- Difficulty: Simple drop-and-place
- Budget Breakdown: Wood slices: $25 | Fine gravel: $20
- Creator’s Tip: Coat the bottom of the wood slices in a marine sealant to stop soil rot.
- Smart Sourcing: Pre-cut kiln-dried log slices and UV-coated clear wood preservative sprays.
Most designers charge thousands for minimalist designs, but you can copy this exact modern technique for pennies.
20. Linear Strip Walkway
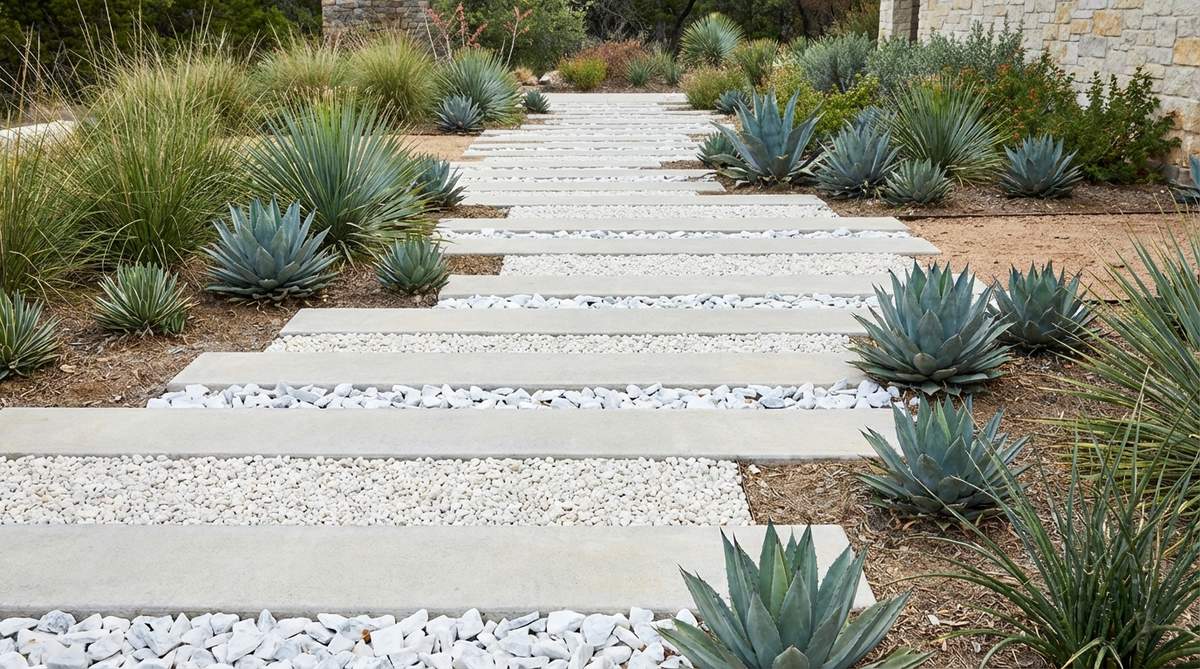
Showcasing a bold parallel runway, this high-contrast layout feels sleek, elongated, and highly controlled. It perfectly directs traffic flow toward stark, architectural home entrances.
A massive concrete pour looks heavily industrial, but splitting it into slender ribbons packed with bright chips yields an elite, gallery-like walkway. The bold horizontal lines trick the eye into thinking narrow side yards are vastly wider.
You can pour and fill this runway for roughly $90–$150. Save this for extreme modern makeovers!
- Key Materials: Bright white angular marble chips
- Vibe / Style: Architectural gallery approach
- Difficulty: Advanced concrete forming
- Budget Breakdown: Concrete mix: $60 | Marble chips: $50
- Creator’s Tip: Use a push broom on the wet cement to add slip-resistant texture to the ribbons.
- Smart Sourcing: Bulk-pack pure white marble gravel and pre-cut flexible formwork boards.
21. Monolithic Poured Edge Path
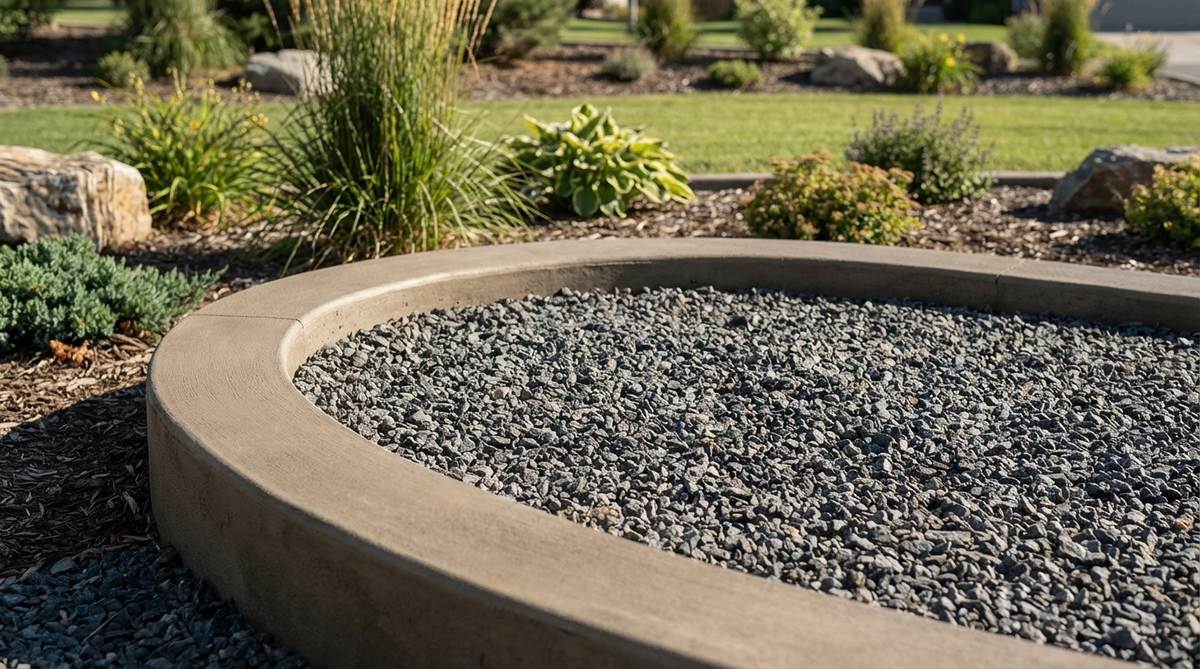
Creating a seamless fluid channel, this continuous border feels unbelievably smooth and refined. It is tailored for sweeping lawns that need a definitive, unbreakable boundary.
Cobbling together tiny plastic strips looks cheap, but pouring a single fluid ribbon of concrete completely elevates the yard to a custom-built status. It acts as an invincible containment wall that doubles as a zero-maintenance mower track.
This custom-poured upgrade requires an investment of $100–$200. A permanent fix for messy edges.
- Key Materials: Continuous poured concrete curbing
- Vibe / Style: Fluid custom engineering
- Difficulty: Complex continuous pouring
- Budget Breakdown: Cement: $90 | Dark granite fill: $60
- Creator’s Tip: Soak hardboard strips in water overnight to easily bend them into perfect, sweeping curves.
- Smart Sourcing: Pre-mixed high-strength concrete bags and flexible wet-pour concrete forms.
22. Decomposed Granite Minimalist Path
Highlighting a compacted earthen floor, this hyper-smooth surface feels like a high-end desert oasis track. It thrives brilliantly in drought-tolerant, xeriscaped front yards.
Loose gravel kicks up everywhere, but heavily misting and tamping crushed fines creates a shockingly resilient, faux-pavement finish. The naturally binding dust particles fuse together, locking out weeds while remaining entirely permeable to rainwater.
This bound-surface technique costs around $50–$90. Pin this for the ultimate low-water landscape plan!
- Key Materials: Finely crushed decomposed granite (DG)
- Vibe / Style: Sun-baked desert modern
- Difficulty: Heavy tamping required
- Budget Breakdown: DG bulk bags: $60 | Binder spray: $20
- Creator’s Tip: Use a heavy mechanical plate compactor rather than a hand tool for a rock-solid finish.
- Smart Sourcing: Pre-mixed liquid granite binders and bulk-pack premium DG dust.
23. Black Basalt Gravel Accent
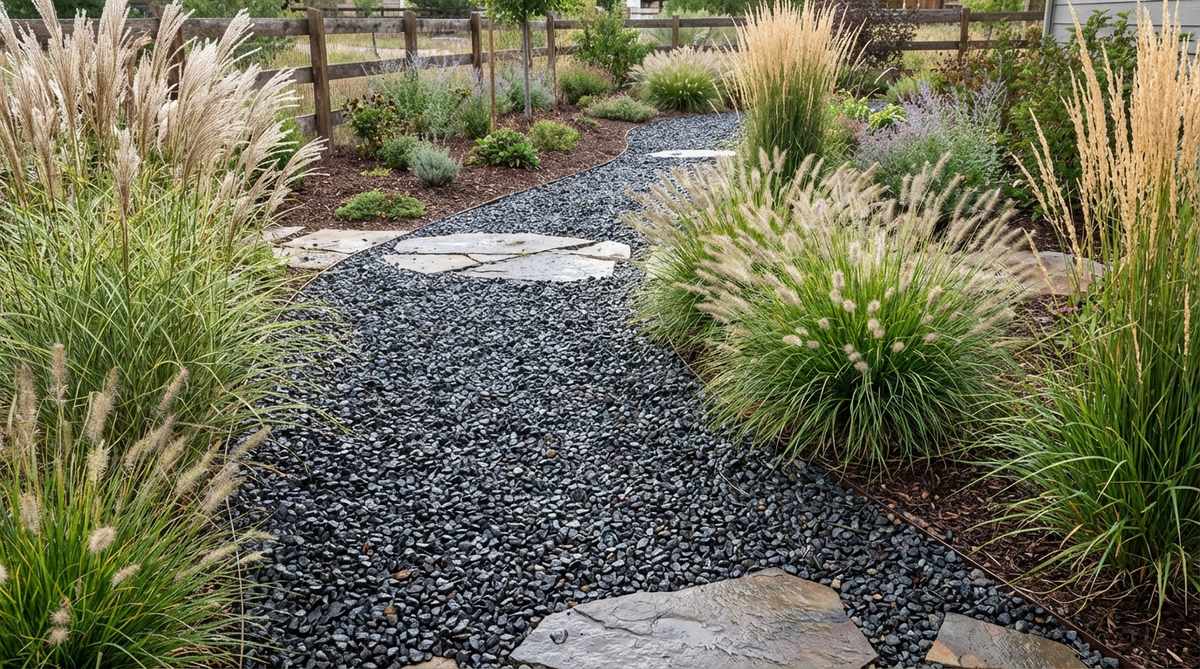
Deploying a dramatic volcanic runway, this dark aesthetic feels intensely moody and spectacularly sharp. It serves as an explosive visual contrast against bright white stucco architecture.
Light rocks wash out in the sun, whereas black jagged rock provides a shockingly expensive, high-definition pop to your greenery. When hit by rain, the volcanic surface turns glossy, turning a basic path into a dramatic water feature.
You can achieve this dark, moody vibe for $60–$100. Save this for high-impact curb appeal.
- Key Materials: Angular dark basalt volcanic rock
- Vibe / Style: High-definition moody contrast
- Difficulty: Simple spreading
- Budget Breakdown: Basalt rock: $70 | Underlayment: $20
- Creator’s Tip: Pair the black stone with bright green ornamental grasses to maximize the color pop.
- Smart Sourcing: Bulk-pack crushed black lava rock and heavy-duty white contrast edging.
24. Grid Paver Gravel Walkway
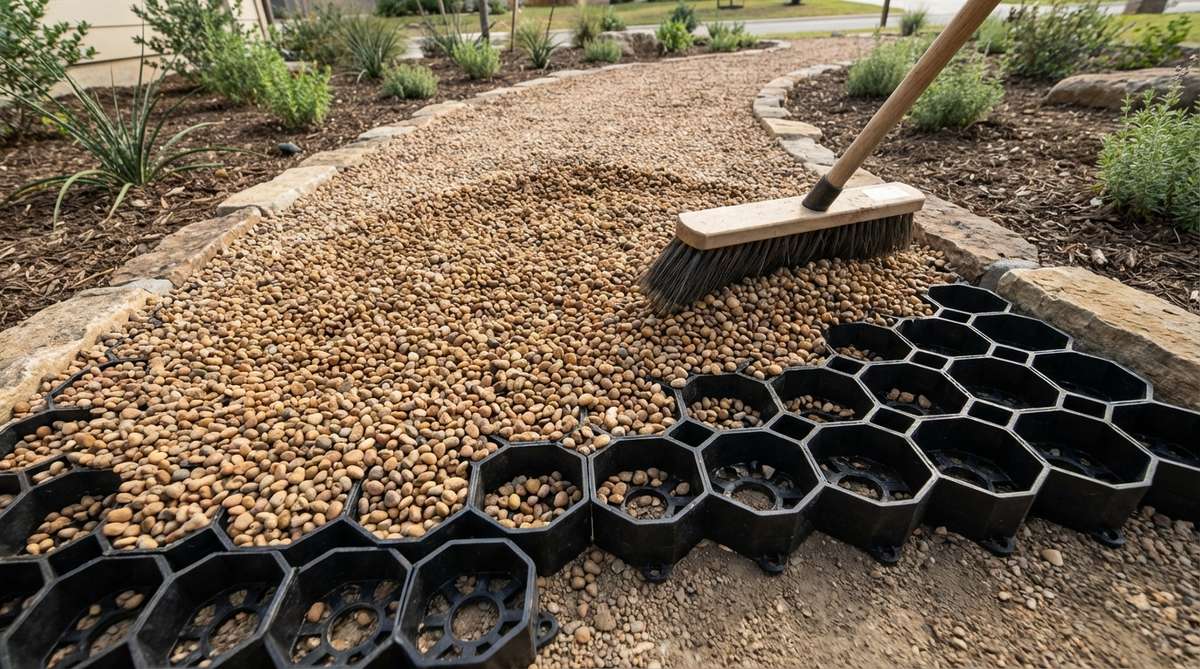
Engineering a honeycomb structural floor, this hidden system feels magically firm yet completely soft to the eye. It is the absolute holy grail for wheelchair, stroller, or high-heel accessibility.
Deep gravel usually feels like walking in quicksand, but snapping down cellular plastic grids creates an impossibly stable, bounce-free surface. The matrix entirely halts stone migration, delivering a pristine visual that never requires raking.
This tech-forward stabilization runs $120–$180. A total game-changer for heavy-traffic zones!
- Key Materials: Cellular plastic stabilization grids
- Vibe / Style: Invisible high-tech structure
- Difficulty: Moderate base leveling
- Budget Breakdown: Grid panels: $110 | Rock infill: $50
- Creator’s Tip: Overfill the honeycomb cells slightly and sweep the excess off to hide the plastic completely.
- Smart Sourcing: Pre-cut heavy-duty gravel stabilizer mats and bulk-pack fine pea gravel.
Material Guide: Cheap vs. Premium Aesthetic
Knowing exactly where to save and where to spend makes all the difference in achieving that “looks expensive but isn’t” vibe.
- Standard vs. UV-Resistant Weed Barrier: Upgrading to a premium commercial-grade fabric stops aggressive weeds from punching through and ruining the pristine aesthetic.
- Loose Sand vs. Polymeric Jointing: Swapping cheap sand for polymeric dust chemically locks your border stones together, preventing total washout during heavy rainstorms.
Wait until you see how easily you can solve massive yard drainage issues with the next layout…
25. ADA-Compliant Firm Surface
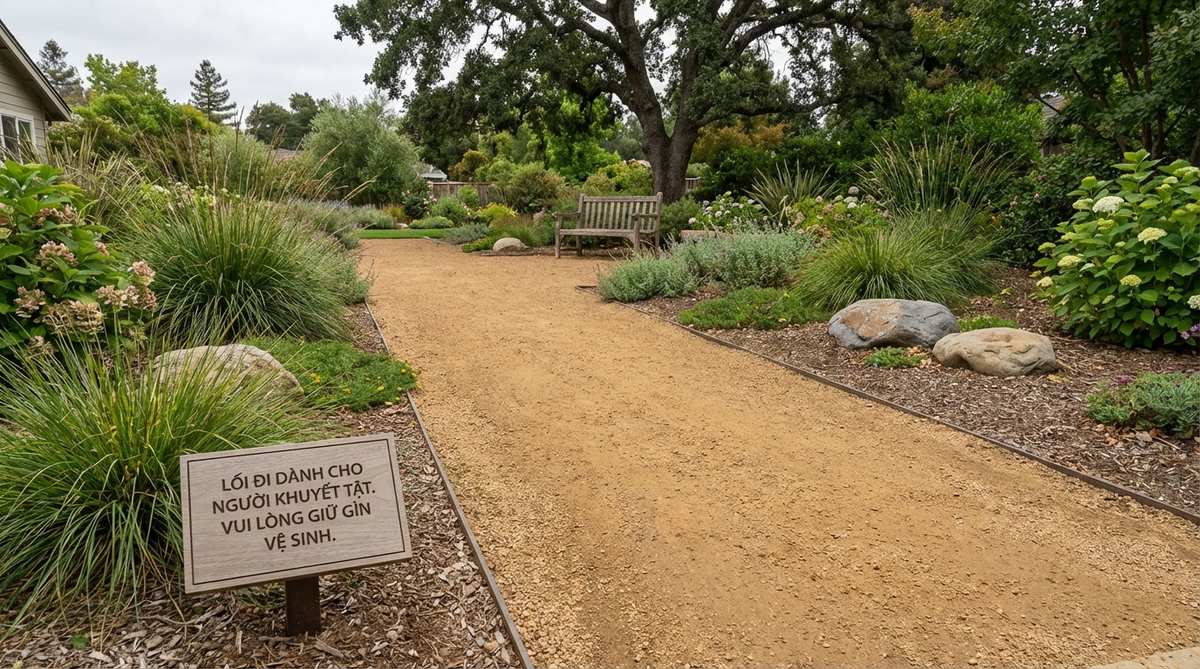
Establishing an accessible bound corridor, this rigid layout feels incredibly safe and thoughtfully engineered. It provides life-changing mobility access for backyards without pouring ugly asphalt.
Loose pathways alienate guests with mobility aids, but mixing liquid resin into crushed fines delivers a shockingly smooth, wheelchair-approved runway. This binding technique bridges the gap between natural aesthetics and rigid commercial safety codes.
Creating this compliant surface costs roughly $90–$140. Save this if you need a smooth, rollable yard.
- Key Materials: Resin-bound fine aggregate mixes
- Vibe / Style: Smooth seamless accessibility
- Difficulty: Strict grading and rolling
- Budget Breakdown: Aggregate fines: $60 | Resin binder: $60
- Creator’s Tip: Ensure a maximum two percent cross-slope so wheelchairs and walkers won’t drift laterally.
- Smart Sourcing: Pre-mixed eco-friendly gravel binders and heavy-duty commercial tampers.
26. Rain Garden Swale Path
Acting as an eco-filtration channel, this dual-purpose swale feels like a lush, sunken oasis. It brilliantly resolves soggy, flooded property lines by capturing massive roof runoffs.
Ignoring standing water ruins foundations, but trenching a sloped rock bed creates a highly functioning bioswale that looks entirely deliberate. The heavy washed stone traps pollutants while safely navigating stormwater away from the house.
This brilliant drainage hack costs about $70–$130. Pin this to permanently solve your swampy yard!
- Key Materials: Large washed drainage rocks
- Vibe / Style: Lush functional eco-system
- Difficulty: Heavy trench excavation
- Budget Breakdown: Washed stone: $60 | Compost amendment: $30
- Creator’s Tip: Pitch the swale walls at a gentle three-to-one ratio to stop muddy banks from collapsing.
- Smart Sourcing: Bulk-pack moisture tolerant sedge seeds and heavy-duty perforated drain pipes.
27. Fire Pit Access Ring
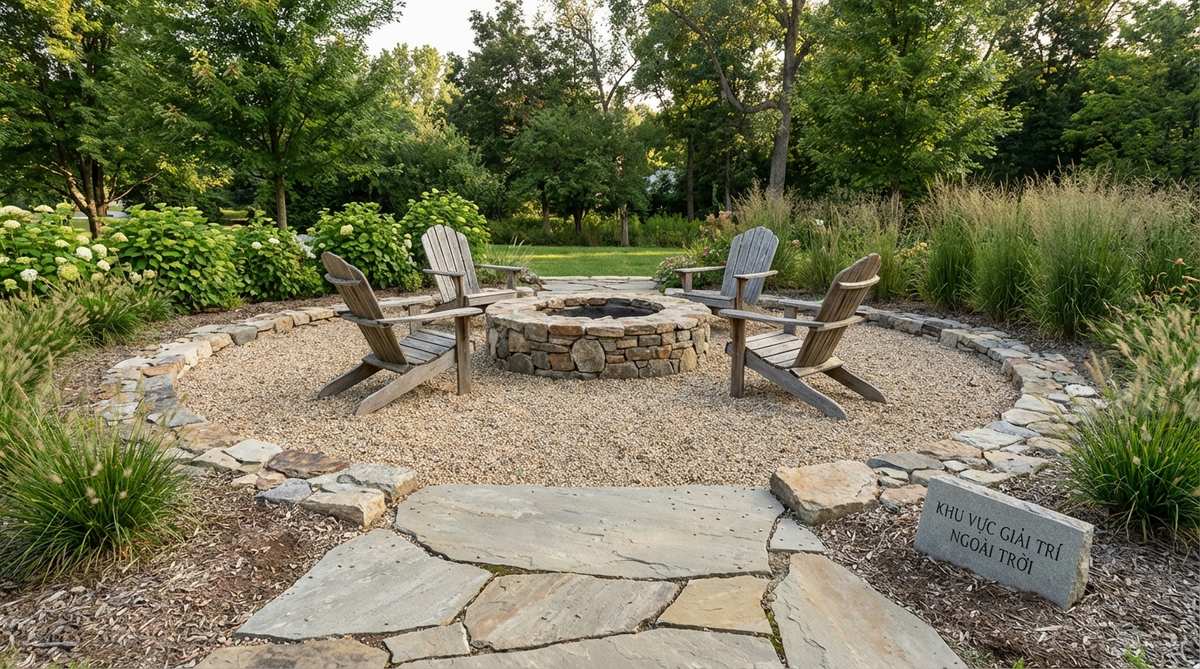
Carving out a social entertainment circle, this crushed perimeter feels cozy, safe, and highly inviting. It perfectly houses heavy Adirondack chairs around a roaring backyard fire feature.
Placing fire pits on grass creates dangerous scorch zones, but an expansive stone ring instantly establishes a fireproof, premium entertainment lounge. The heavy jagged rocks bite together, preventing chairs from sinking or wobbling when guests shift.
You can build this stunning hangout zone for $80–$120. A must-have for summer evening hosting.
- Key Materials: Fire-safe angular crushed stone
- Vibe / Style: Rustic evening lounge
- Difficulty: Easy circular mapping
- Budget Breakdown: Fire-safe stone: $70 | Steel border: $40
- Creator’s Tip: Install an underground weeping tile beneath the ring to ensure the fire pit never floods.
- Smart Sourcing: Pre-cut circular steel fire pit borders and bulk-pack high-heat lava rocks.
28. Greenhouse Service Walk
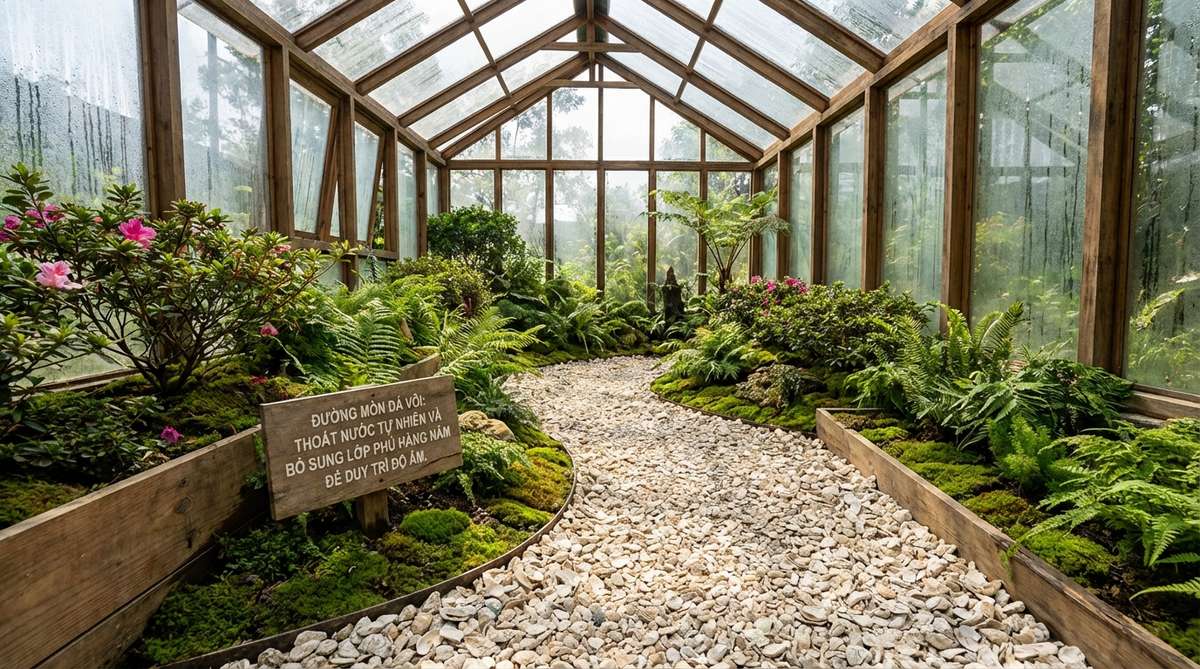
Building an interior horticultural aisle, this specialized floor feels incredibly bright and climate-controlled. It is essential for managing moisture inside damp hoop houses and glass garden rooms.
Pouring concrete inside a greenhouse traps stagnant water, but dropping a bright shell floor creates a shockingly effective, natural humidity regulator. The white crushed surface bounces vital sunlight directly upward into the plant canopies.
This climate-boosting hack runs a meager $30–$60. Save this for your ultimate greenhouse setup!
- Key Materials: Light-reflecting crushed limestone
- Vibe / Style: Brilliant botanical nursery
- Difficulty: Simple interior spreading
- Budget Breakdown: Limestone dust: $35 | Base mat: $15
- Creator’s Tip: The natural alkalinity of the limestone actively combats sour, acidic soil buildup indoors.
- Smart Sourcing: Bulk-pack bright white crushed limestone and commercial greenhouse weed fabrics.
29. Pet Relief Area Path
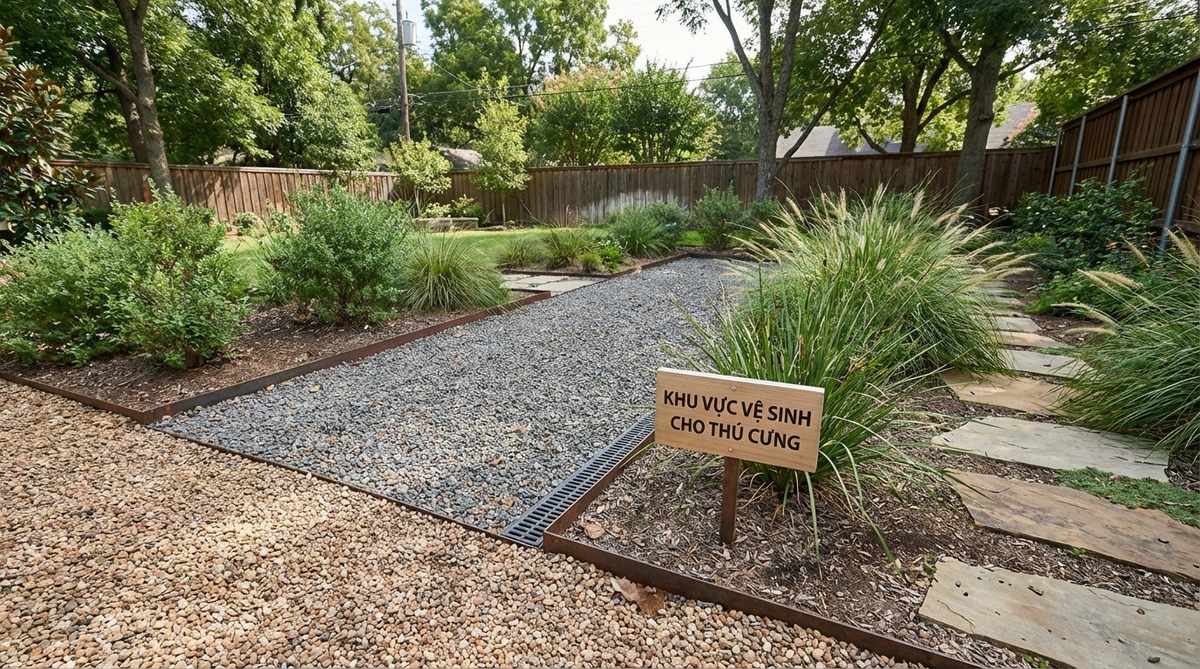
Designing a sanitized waste zone, this highly practical corridor feels impeccably clean and incredibly organized. It drastically isolates odors and protects the main lawn from toxic urine burn.
Letting dogs ruin the grass is a massive headache, but excavating a dedicated coarse stone trap delivers a surprisingly hygienic, maintenance-free potty zone. The large gaps in the aggregate allow liquids to drain instantly away from paws.
Creating this sanitary relief zone costs roughly $50–$90. A massive quality-of-life upgrade for dog owners.
- Key Materials: Coarse rapid-drain crushed rock
- Vibe / Style: Ultra-clean utility boundary
- Difficulty: Deep excavation required
- Budget Breakdown: Drainage rock: $45 | Base pipe: $25
- Creator’s Tip: Hose the area down weekly with a natural enzyme cleaner to completely obliterate deep odors.
- Smart Sourcing: Pre-mixed pet yard enzyme cleaners and bulk-pack heavy drainage gravel.
Most DIY paths wash away after one bad storm. Here is the exact blueprint to make yours bulletproof.
Drainage Solutions for Sloped and Wet Sites
30. French Drain Integrated Path

Concealing a subsurface water vacuum, this hidden infrastructure feels like an absolute lifesaver during monsoon season. It is the definitive cure for chronic yard flooding and soggy walkways.
Building a path over a swamp guarantees it will sink, but wrapping a perforated pipe inside the rock foundation permanently weaponizes your walkway against water. This invisible system sucks moisture from the soil, delivering a rock-solid, expensive-feeling surface.
This heavy-duty water mitigation costs $100–$160. Pin this to save your yard from drowning!
- Key Materials: Fabric-wrapped perforated drainage pipes
- Vibe / Style: Bulletproof property protection
- Difficulty: Advanced trenching and pitching
- Budget Breakdown: Core pipe: $60 | Washed rock: $70
- Creator’s Tip: Ensure a pitch of at least one-eighth inch per foot so gravity forces the water to the exit.
- Smart Sourcing: Pre-wrapped corrugated french drain pipes and bulk-pack large drainage rocks.
31. Crown-Graded Pathway
Shaping a convex watershed contour, this simple geometrical trick feels incredibly clever and highly effective. It flawlessly repels standing puddles without requiring expensive underground piping.
Flat pathways inevitably turn into muddy birdbaths, but slightly crowning the center forces water to cascade gently into the side gardens. This zero-cost architectural technique proves that smart grading instantly creates a designer-level finish.
Executing this geometric trick costs $0 in extra materials. Highly recommended for every single gravel install.
- Key Materials: Wooden screed shaping board
- Vibe / Style: Subtle structural perfection
- Difficulty: Moderate surface shaping
- Budget Breakdown: Aggregate: $40 | Shaping tools: $15
- Creator’s Tip: Work the finishing stone strictly from the outer edges inward to preserve the center hump.
- Smart Sourcing: Heavy-duty aluminum landscape rakes and bulk-pack top-dressing stone.
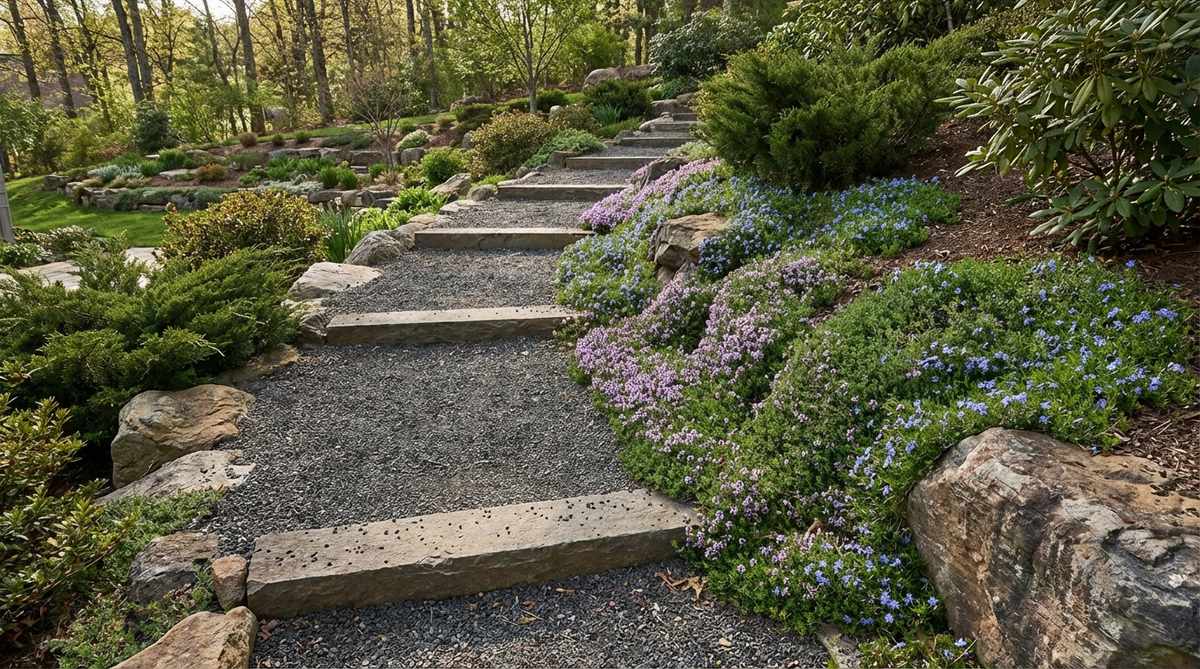
32. Check Dam Slope Control
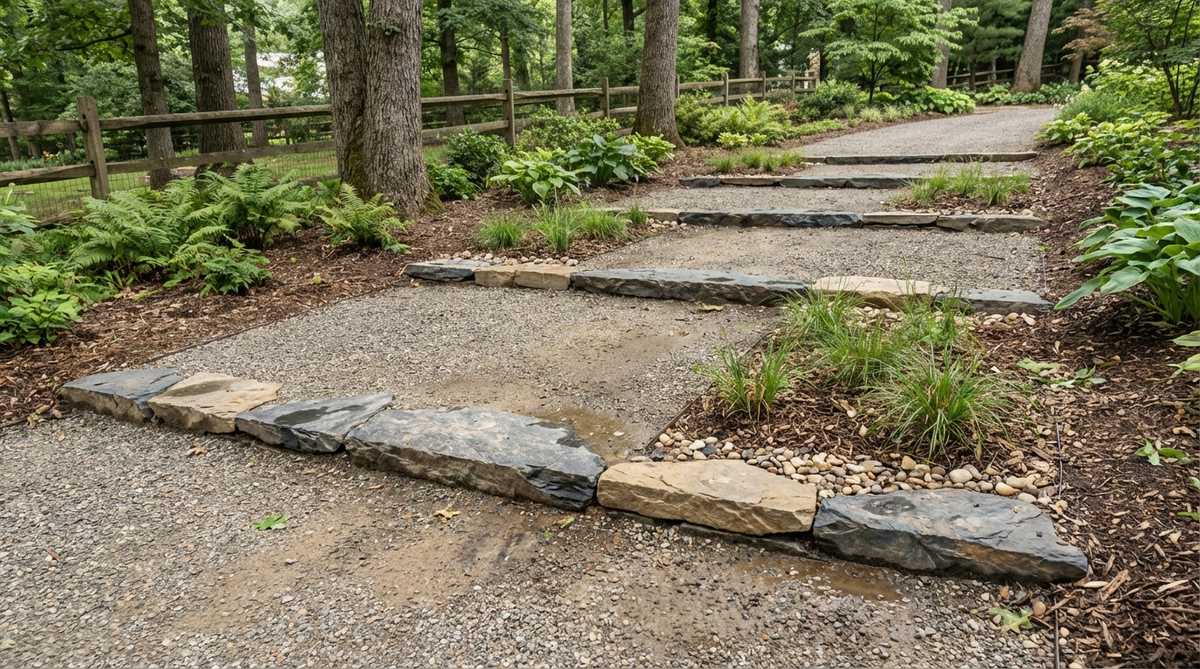
Installing a terraced anti-erosion system, this rugged framework feels brilliantly adaptive and incredibly secure. It stops gravity from dragging your beautiful new path down a steep hill.
Leaving a sloped path unchecked results in a massive landslide, but embedding perpendicular barriers creates a surprisingly premium, staggered contour. These hidden dams act as invisible brakes, catching migrating stones before a blowout occurs.
You can reinforce a steep grade for just $40–$80. Save this if you’re battling severe yard slopes!
- Key Materials: Submerged flat stone blocks
- Vibe / Style: Staggered hillside engineering
- Difficulty: Intermediate tier building
- Budget Breakdown: Barrier stones: $45 | Backfill: $20
- Creator’s Tip: Bank the uphill side of each dam slightly higher to create a beautiful terraced visual.
- Smart Sourcing: Pre-cut heavy stone check blocks and bulk-pack angular locking gravel.
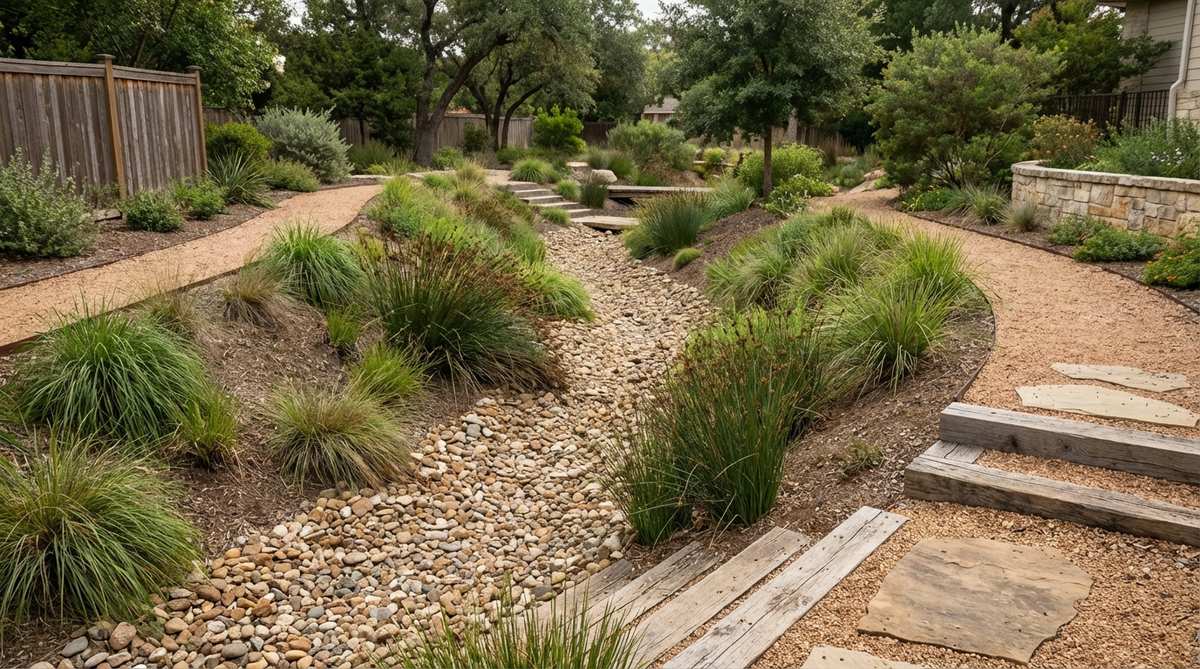
33. Dry Creek Bed Transition
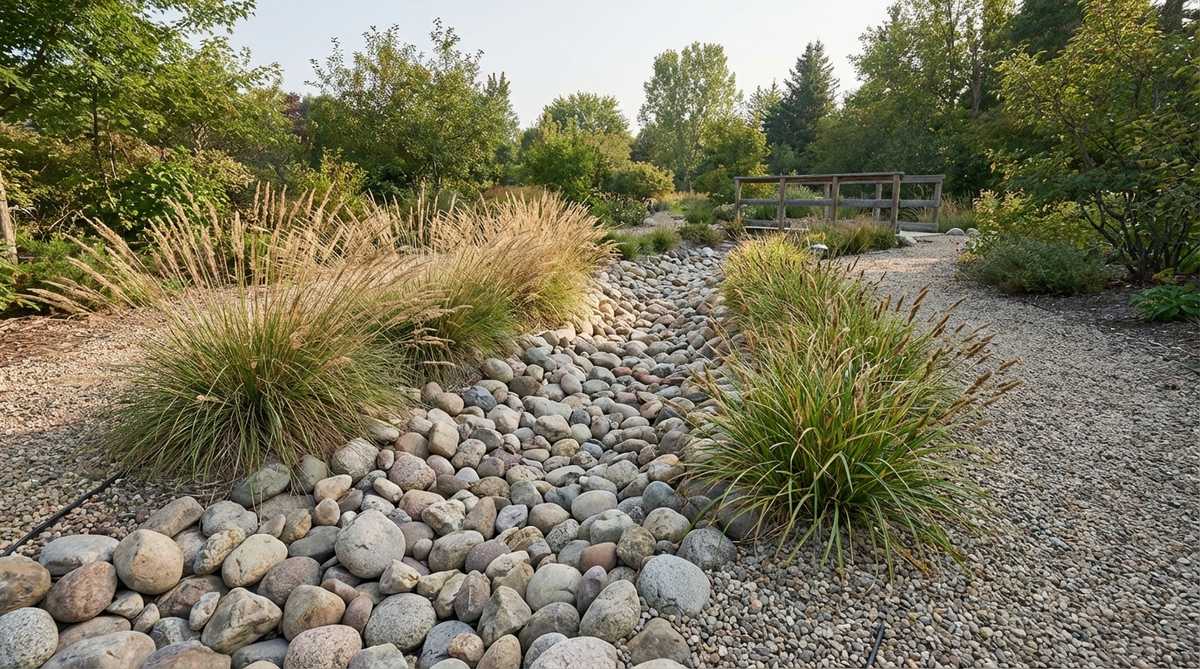
Carving a faux river crossing, this stunning rock integration feels incredibly organic and wildly dramatic. It transforms problematic low-lying washouts into a breathtaking focal point.
Trying to fight a natural water channel is useless, but widening the path with massive river boulders turns a flooding nightmare into an elite fairy garden walkway feature. The varied stone sizes happily handle flash floods while maintaining dry foot access.
This naturalistic watershed design costs around $70–$120. A gorgeous way to embrace bad weather.
- Key Materials: Oversized smooth river boulders
- Vibe / Style: Dramatic natural landscape
- Difficulty: Heavy boulder placement
- Budget Breakdown: Large boulders: $80 | Fine river rock: $30
- Creator’s Tip: Mix three vastly different sizes of stone to accurately mimic how a real wild creek flows.
- Smart Sourcing: Pre-sorted smooth river rock palettes and bulk-pack decorative landscape boulders.
The biggest mistake beginners make is ignoring what goes *underneath* the rocks. Let’s fix that.
Low-Maintenance Strategies for Year-Round Beauty
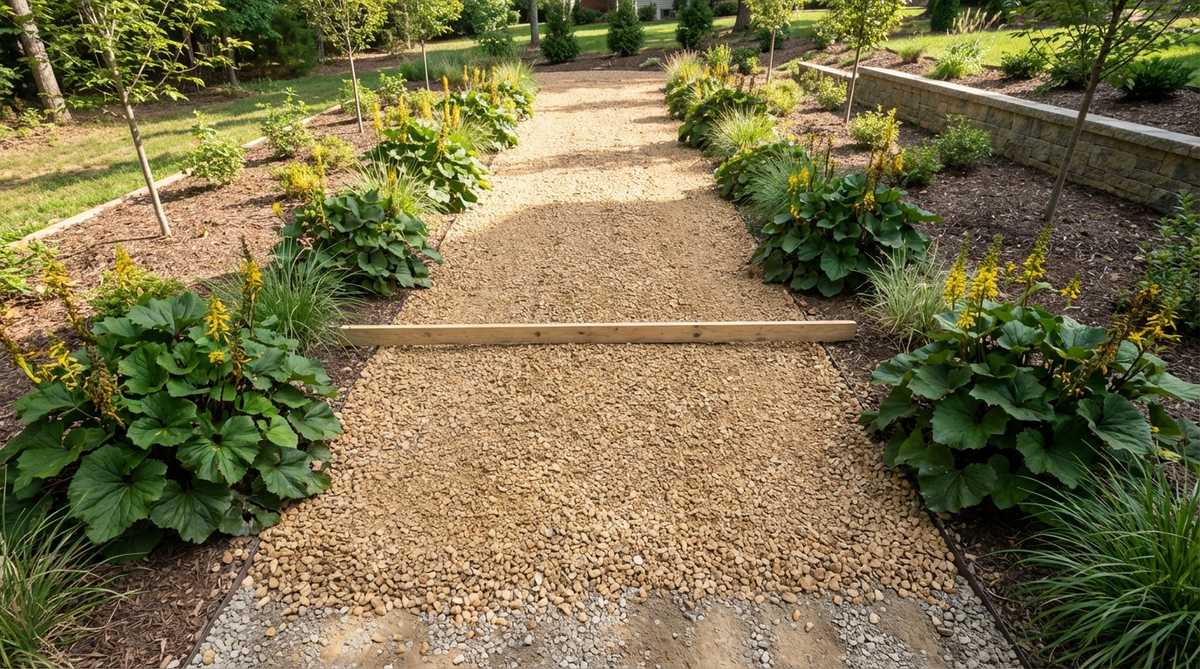
34. Deep Base Installation
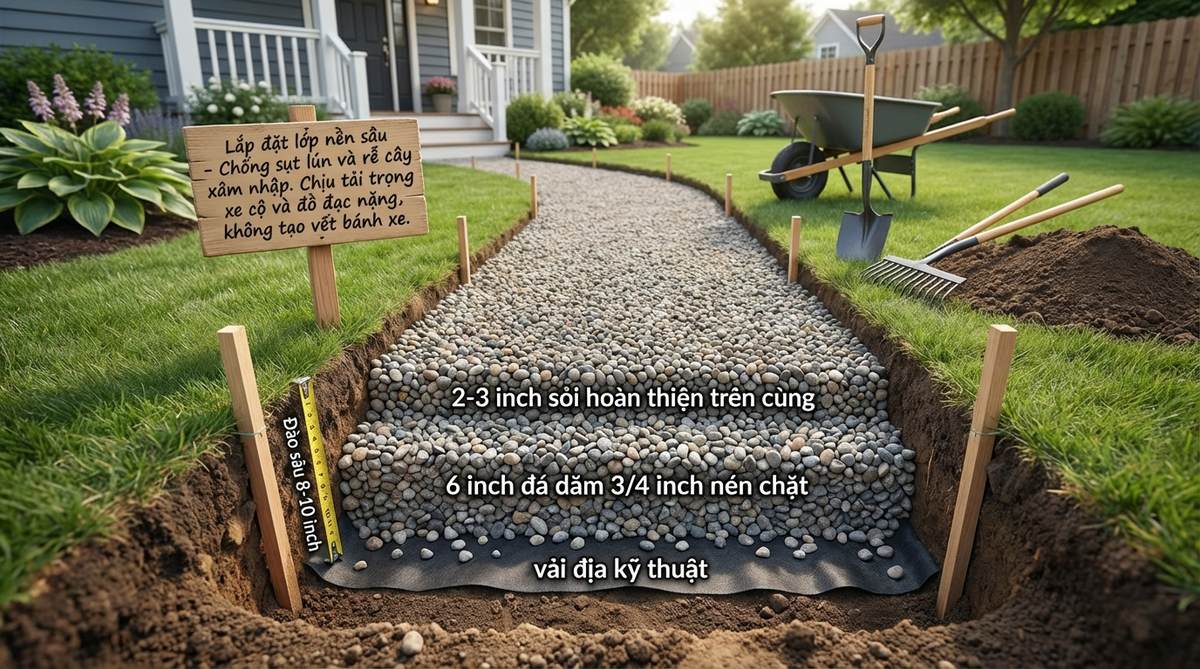
Committing to an extreme sub-surface foundation, this invisible powerhouse feels rock-solid under any weight. It guarantees your gravel garden walkway will easily survive decades without rutting.
Skimping on the trench depth guarantees a wobbly, sinking disaster, but compacting a massive 8-inch base yields a surprisingly premium, commercial-grade walkway. The upfront sweat equity completely eradicates future weed infiltration and soft spots.
This heavy-duty baseline investment runs $90–$150. Save this to bulletproof your home exterior!
- Key Materials: Heavy compacted #3 crushed stone
- Vibe / Style: Commercial indestructible strength
- Difficulty: Intense manual excavation
- Budget Breakdown: Deep base rock: $90 | Top layer: $40
- Creator’s Tip: Rent a mechanical plate compactor; hand tamping a deep trench will literally break your back.
- Smart Sourcing: Bulk-pack heavy foundational crushed rock and commercial woven geotextile fabric rolls.
35. Stabilizer Grid System
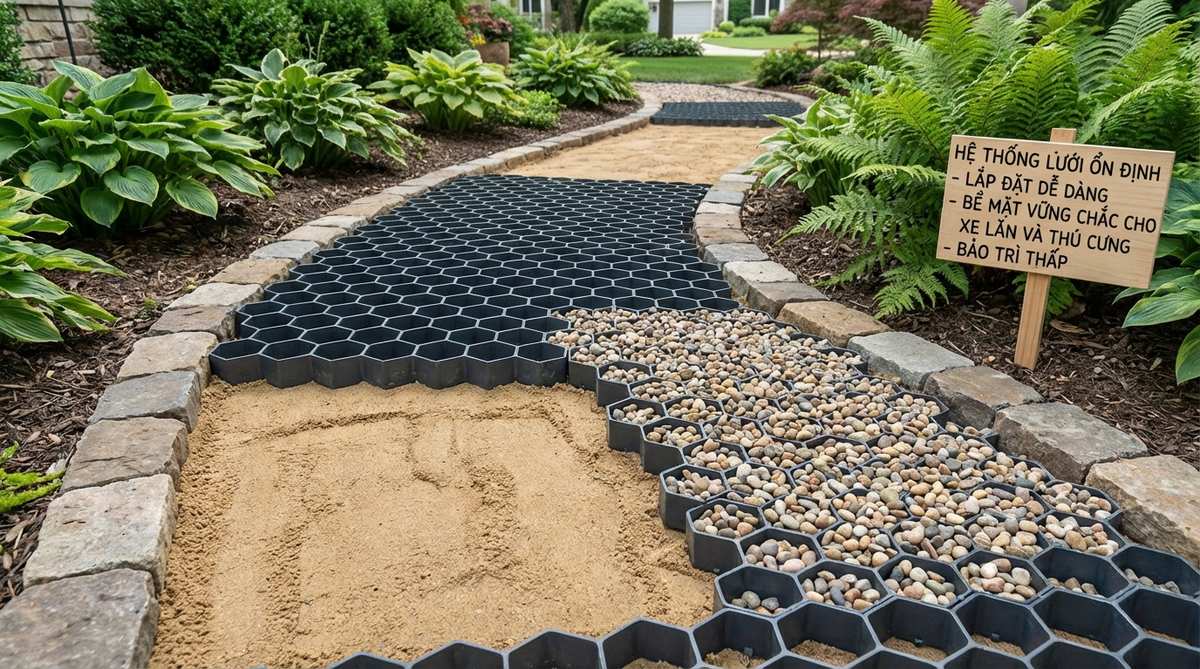
Integrating a hidden lock-in matrix, this cellular technology feels unbelievably firm yet entirely invisible. It totally eliminates the agonizing weekly chore of raking kicked-up rocks.
Standard loose fills scatter everywhere, but dropping a honeycomb grid stops migration instantly, creating an insanely expensive-feeling, rigid platform. This is the absolute best way to make a loose surface feel like solid pavement.
This advanced stabilization system generally costs $130–$200. Pin this if you hate yard maintenance!
- Key Materials: Interlocking plastic honeycomb mats
- Vibe / Style: Zero-maintenance perfection
- Difficulty: Simple click-and-fill
- Budget Breakdown: Grid system: $140 | Infill gravel: $40
- Creator’s Tip: Stagger the joints of the plastic grids like brickwork to drastically increase overall path strength.
- Smart Sourcing: Pre-cut interlocking gravel stabilizer grids and bulk-pack tiny aggregate filler.
36. Pre-Emergent Herbicide Protocol
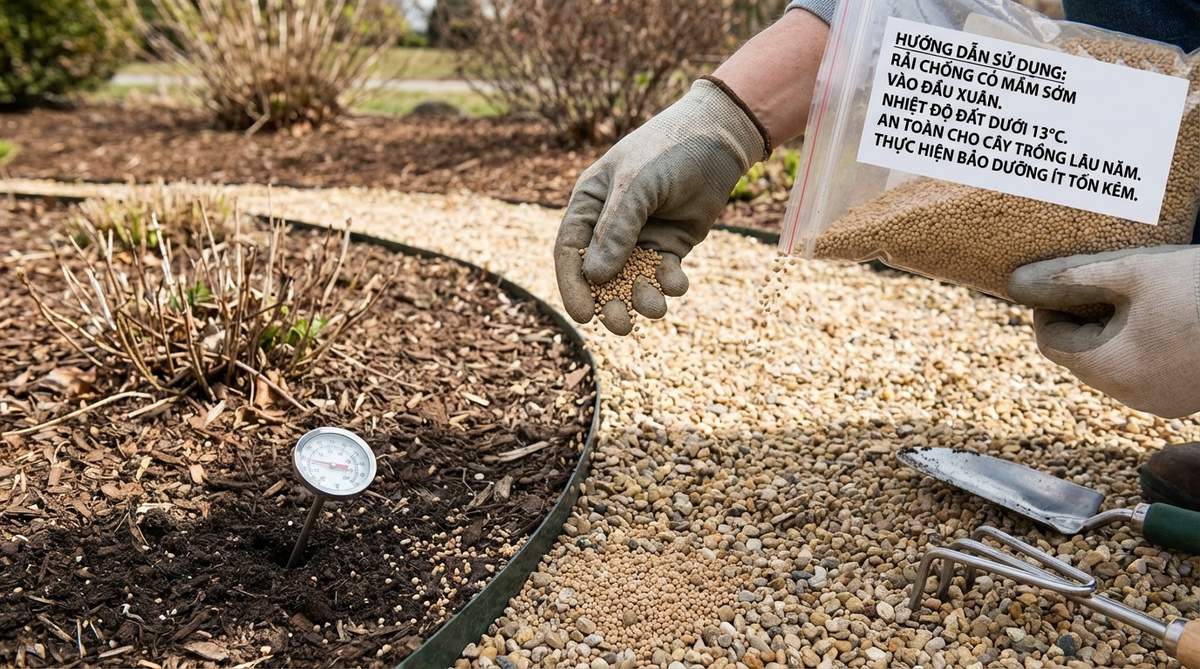
Executing a chemical weed blockade, this preventative maintenance step feels like pure magic in the springtime. It keeps the aesthetic flawlessly clean without back-breaking pulling.
Weed barriers eventually fail as dirt blows in from above, but spreading a granular shield preemptively massacres seeds before they even sprout. Coupling smart chemistry with terrarium accessories style precision keeps the trail looking pristine year-round.
This invisible chemical shield costs a tiny $15–$30. A massive return on a microscopic investment.
- Key Materials: Granular pre-emergent weed preventer
- Vibe / Style: Immaculate pristine hardscape
- Difficulty: Easy seasonal broadcasting
- Budget Breakdown: Pre-emergent bag: $25 | Spreader: $5
- Creator’s Tip: Apply the granules right before a light rain so the chemical washes deep into the stone layer.
- Smart Sourcing: Pre-mixed granular landscape herbicides and bulk-pack commercial hand spreaders.
Conclusion
A thoughtfully designed gravel garden path delivers decades of reliable service when built on proper foundations and maintained with minimal effort. The exact 36 blueprints presented here demonstrate how wildly versatile and premium this material can be when sourced smartly. Stop overpaying for generic concrete pours—start utilizing heavy-duty bases, UV-coated border kits, and proper drainage slopes. Your new luxury pathway will drastically enhance your property value, creating a stunning outdoor flow that looks incredibly expensive without breaking the bank.
Frequently Asked Questions
What is the best depth for a gravel garden path base?
To avoid a sinking, rutted disaster, you absolutely must dig deep. Primary pathways require 4 to 6 inches of compacted crushed stone base, followed by a premium 1½ to 2-inch finish layer. Do not skip the foundation; skipping it guarantees expensive repairs later. Using bulk-pack heavy foundational crushed rock ensures the path survives heavy storms and foot traffic without turning into a muddy swamp.
Should I choose pea gravel or crushed stone for my garden walkway?
It completely depends on the vibe and the slope. Pea rock is a stunning, soft option for flat barefoot areas, perfectly matching high-end cottage setups. However, crushed stone is the undisputed king of durability; its jagged edges lock together fiercely under a heavy tamper. For the ultimate hybrid, lay a cheap crushed base and top it with a thin layer of premium pre-washed pea stone kits.
How do I prevent weeds in my gravel pathway?
Tearing up weeds by hand is a nightmare. You must lay a heavy-duty, commercial-grade UV-resistant geotextile barrier roll directly over the dirt before dropping a single rock. Combine this physical shield with a seasonal broadcast of pre-emergent granules to nuke seeds from above. A deep, heavily compacted base naturally suffocates root systems, keeping your aesthetic flawless.
What edging works best to contain gravel and prevent spreading?
Flimsy plastic edging completely ruins a high-end look. Opt for sleek, powder-coated steel landscape edging kits to achieve an invisible, ultra-modern hold that won’t snap in the winter. For a wealthier, classic aesthetic, cement heavy granite blocks or reclaimed bricks. Always set the top of your border exactly half an inch below the stones to hide the mechanics while maintaining a sharp, expensive line.
How often does gravel need replenishing?
A poorly built path scatters instantly, but a properly trenched and bordered setup only needs a microscopic top-up every 2 to 3 years. If you use round pea rock on a slope, it will migrate terribly. To eliminate replenishing entirely, invest upfront in pre-cut interlocking gravel stabilizer grids. These honeycomb mats lock the rocks into an indestructible matrix that literally never needs to be refilled.
Can I install a gravel path directly over existing grass?
Absolutely not. Dumping expensive rocks over living grass is a guaranteed way to waste your money. The organic matter decays, creating a squishy, sinking sponge that swallows your stone and feeds massive weed blooms. You must rip the sod out completely, dig down at least 5 inches, and lay a proper heavy-duty commercial weed fabric. Doing it right the first time saves you from re-buying materials next spring.