Building a stunning japanese garden pond demands strategic material sourcing and smart layout techniques. We reveal exact DIY blueprints that deliver a premium aesthetic without the luxury cost. Master these high-end visual configurations today.
Design SnapshotKey Principles
- Natural Balance: Combine rocks, water, plants, and wooden elements to mimic natural ecosystems
- Depth Requirements: Maintain 3-5 feet depth for koi health and seasonal temperature stability
- Plant Integration: Use oxygenating, floating, and marginal plants for natural filtration and shade
- Irregular Shapes: Favor kidney or asymmetrical forms that replicate natural water bodies
Traditional Koi Pond Foundations With Natural Stone Arrangements
Traditional Japanese koi pond designs emphasize harmony between water, stone, and living elements. These foundational layouts establish the framework for successful long-term pond ecosystems that support healthy koi populations.
1. Kidney-Shaped Pond With Boulder Perimeter
Feels like a hidden forest oasis you accidentally stumbled upon during a morning hike. This classic natural stone water feature works exceptionally well for tucked-away backyard corners.
Many beginners overcomplicate edging, but heavy organic boulders deliver a surprisingly premium look with minimal digging. Pairing this layout with commercial-grade pond liners prevents costly foundational leaks down the road.
You can easily pull this off for around $300–$600 depending on rock sourcing. Pin this if you’re planning a massive backyard upgrade this spring!
- Key Materials: Heavy-duty EPDM liner, local granite boulders
- Vibe / Style: Authentic mountain stream
- Difficulty: Intermediate DIY weekend project
- Budget Breakdown: Liner: $150 | Stone: $200 | Pump: $80
- Creator’s Tip: Bury the liner at least one foot behind the boulders to hide synthetic edges completely.
- Smart Sourcing: pre-cut EPDM liner rolls and heavy-duty biological filter kits.
2. Mirror Pond With Central Island
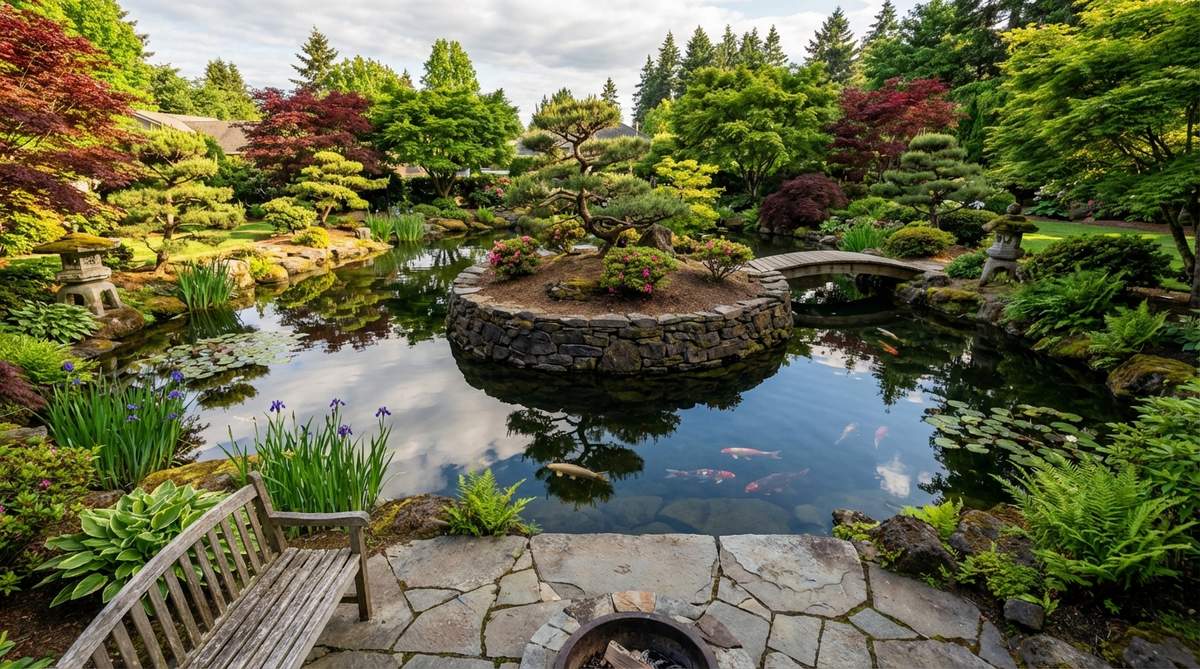
Emanates pure tranquility and feels straight out of an ancient Kyoto temple grounds. This reflective courtyard focal point is perfect for framing large architectural windows.
People assume islands require massive concrete foundations, but compacted clay provides a designer-level finish at a fraction of the cost. A dedicated skimmer system keeps that mirror surface free from floating debris.
Expect to invest $400–$800 for proper excavation and skimmer tech. It’s a fast visual upgrade that completely changes the property’s vibe.
- Key Materials: Submerged retaining rings, clay-heavy soil, surface skimmer
- Vibe / Style: Zen meditation retreat
- Difficulty: Advanced leveling required
- Budget Breakdown: Skimmer: $120 | Soil structure: $50 | Marginals: $60
- Creator’s Tip: Use dark bottom coloring to enhance the mirror-like reflection of the sky.
- Smart Sourcing: floating surface skimmer boxes and bulk aquatic planting clay.
3. Asymmetrical Free-Form Pond
Gives the illusion of wild, untamed nature gracefully carving its own path over centuries. This organic backyard water garden is ideal for blending seamlessly into existing mature landscaping.
Rigid geometric basins always look artificial, whereas sweeping asymmetrical curves look far more expensive than they actually are. Integrating professional koi pond kits ensures the varying depths remain structurally sound.
Basic material costs hover right around $250–$500 if you do the digging yourself.
- Key Materials: Flexible PVC liner, river rock, marginal irises
- Vibe / Style: Untamed natural wonder
- Difficulty: Labor-intensive digging
- Budget Breakdown: Excavation rental: $80 | PVC Base: $100 | Rocks: $150
- Creator’s Tip: Map the curves with a garden hose before you ever touch a shovel.
- Smart Sourcing: flexible heavy-duty PVC liners and pre-mixed aquatic fertilizer tablets.
4. Gravel Beach Entry Pond
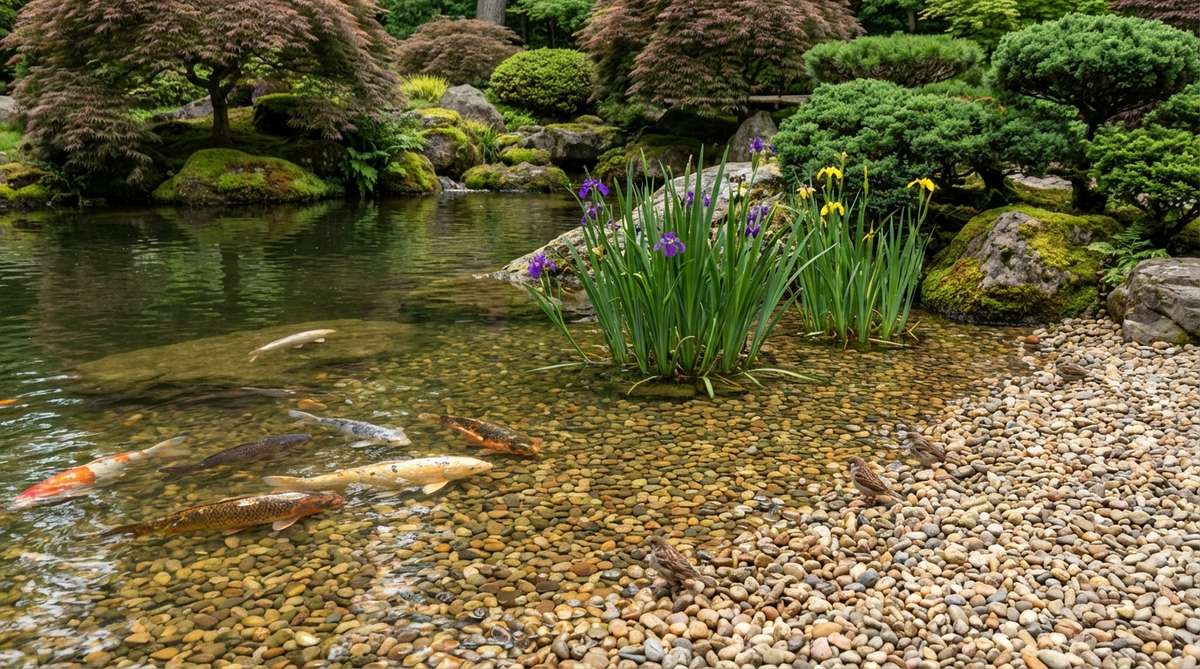
Captures the gentle aesthetic of a shallow riverbank inviting wildlife to pause and drink. This sloped pebble water entry works beautifully for properties attracting local birds and amphibians.
Steep drop-offs can be dangerous and stark, but a gradual gravel transition yields a high-end resort finish. Upgrading to UV-resistant landscape fabric beneath the pebbles stops aggressive weeds from piercing the barrier.
Sourcing bulk gravel drops the price to a highly manageable $150–$300. Save this to your DIY garden layouts board for future reference!
- Key Materials: Pea gravel, landscape fabric grid, edging stones
- Vibe / Style: Soft coastal transition
- Difficulty: Easy beginner setup
- Budget Breakdown: Gravel: $60 | Fabric: $30 | Edging: $80
- Creator’s Tip: Wash the pea gravel thoroughly before installation to prevent murky water.
- Smart Sourcing: commercial-grade underlayment fabric and bulk washed river pebbles.
Most people get this completely wrong… until they try the exact cascading layout coming up next.
5. Raised Stone Wall Pond
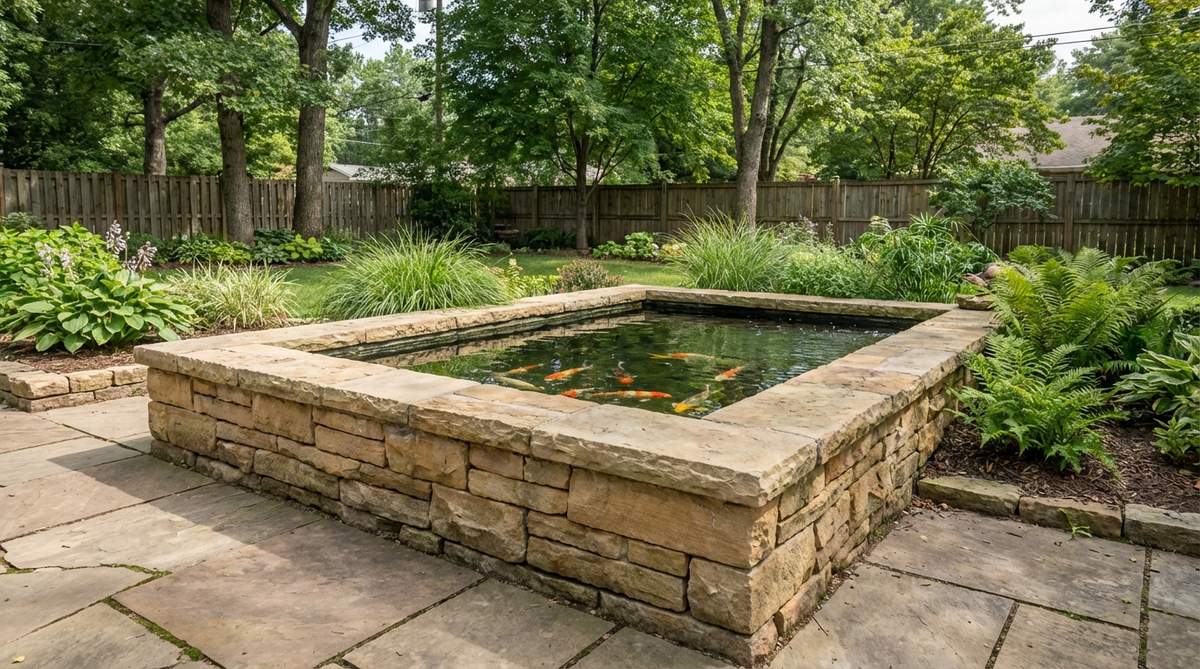
Radiates formal elegance and feels like a luxury estate centerpiece. This elevated masonry water basin is the ultimate solution for flat yards lacking natural terrain changes.
In-ground builds face constant runoff pollution, yet a raised retaining wall instantly solves drainage while looking like a custom architectural masterpiece. Securing the structure with construction-grade waterproof garden sealants prevents weeping joints.
Material costs sit around $500–$1,000 depending on your choice of facing stone.
- Key Materials: Cinderblock core, natural stone veneer, waterproof sealant
- Vibe / Style: Formal estate elegance
- Difficulty: Requires masonry skills
- Budget Breakdown: Blocks: $100 | Veneer: $300 | Sealant: $50
- Creator’s Tip: Cap the wall with wide, flat flagstones to create instant integrated seating.
- Smart Sourcing: marine-grade masonry sealants and pre-cut stone veneer panels.
Japanese Garden Koi Pond Waterfall and Cascade Designs
Waterfalls introduce movement and sound while aerating pond water for improved koi health. Strategic waterfall placement creates focal points that draw the eye through the garden composition.
6. Single-Drop Natural Cascade
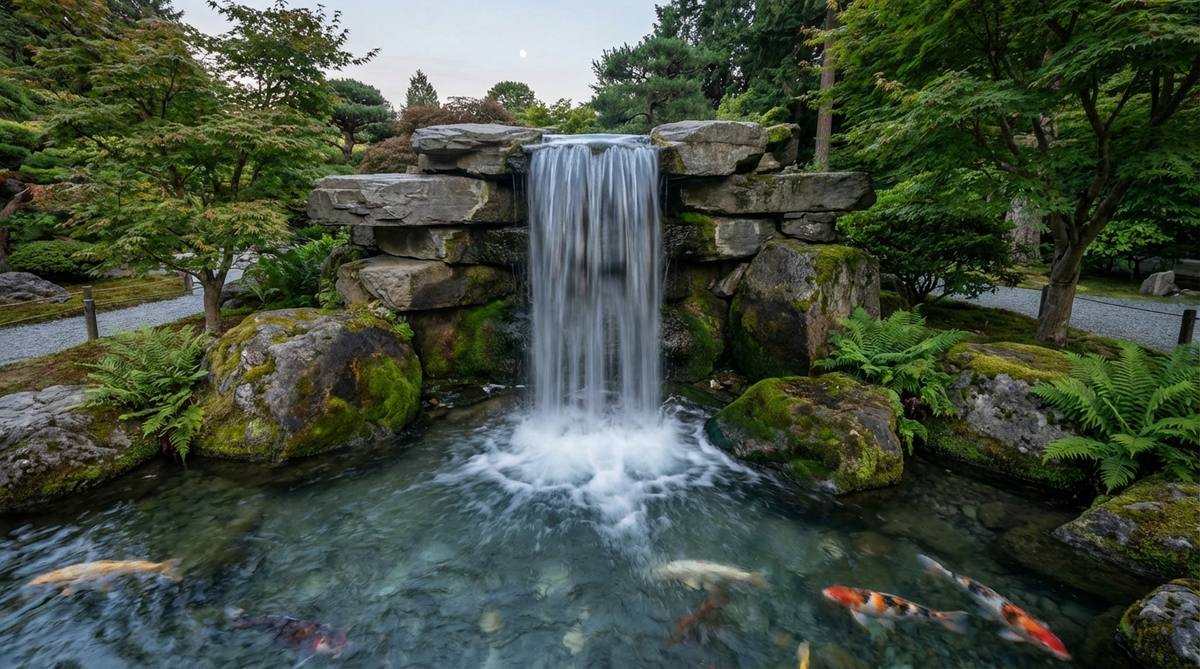
Commands attention with a dramatic vertical plunge that feels powerful yet deeply meditative. This bold rock waterfall feature serves as an incredible focal point for outdoor dining areas.
Trickling features often get lost in background noise, but a sheer single drop delivers an aggressively premium sound profile. Hiding a professional biological filter box right behind the spillway stone is an insider trick for ultimate clarity.
Pump and filtration setups run roughly $250–$600 for a robust, reliable flow.
- Key Materials: Flat weir stone, high-flow submersible pump, hidden bio-filter
- Vibe / Style: Striking vertical drama
- Difficulty: Moderate plumbing knowledge needed
- Budget Breakdown: Pump: $150 | Filter Box: $120 | Weir Stone: $80
- Creator’s Tip: Use expanding foam specifically made for waterfalls to force water over the rock, not under it.
- Smart Sourcing: submersible heavy-duty pond pumps and black waterfall foam cans.
7. Multi-Tier Mountain Stream
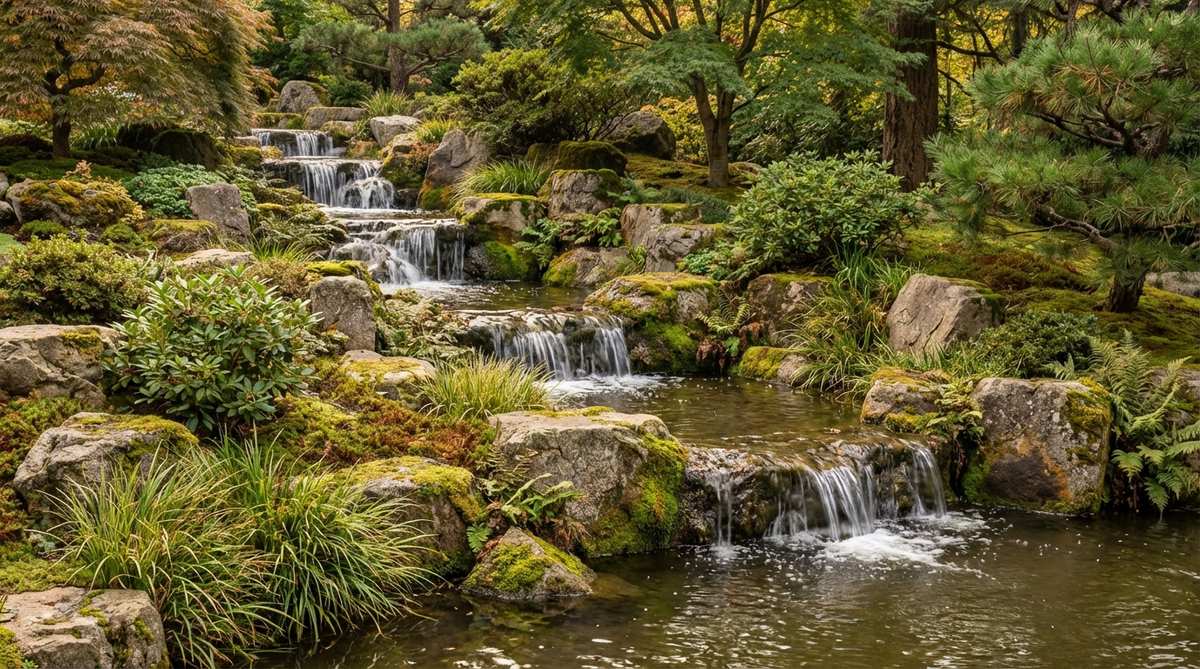
Replicates the gentle, babbling journey of a mountain spring winding through the forest floor. This stepped rock waterway is perfect for navigating sloped residential properties.
A single steep drop can erode landscapes, but stepping the water down incrementally creates a multi-layered, highly engineered visual masterpiece. Tucking miniature garden supplies like mossy logs into the crevices amplifies the authenticity.
Lining a longer stream path costs around $400–$800. Highly recommended for a massive weekend transformation.
- Key Materials: Long liner strip, stepping boulders, moss patches
- Vibe / Style: Meandering woodland brook
- Difficulty: Requires careful leveling
- Budget Breakdown: Stream liner: $100 | Rocks: $200 | Pump tubing: $60
- Creator’s Tip: Overlap liners at each tier so gravity prevents any backward leaks.
- Smart Sourcing: kink-free corrugated pump tubing and live aquatic moss bulk packs.
8. Broad Curtain Waterfall
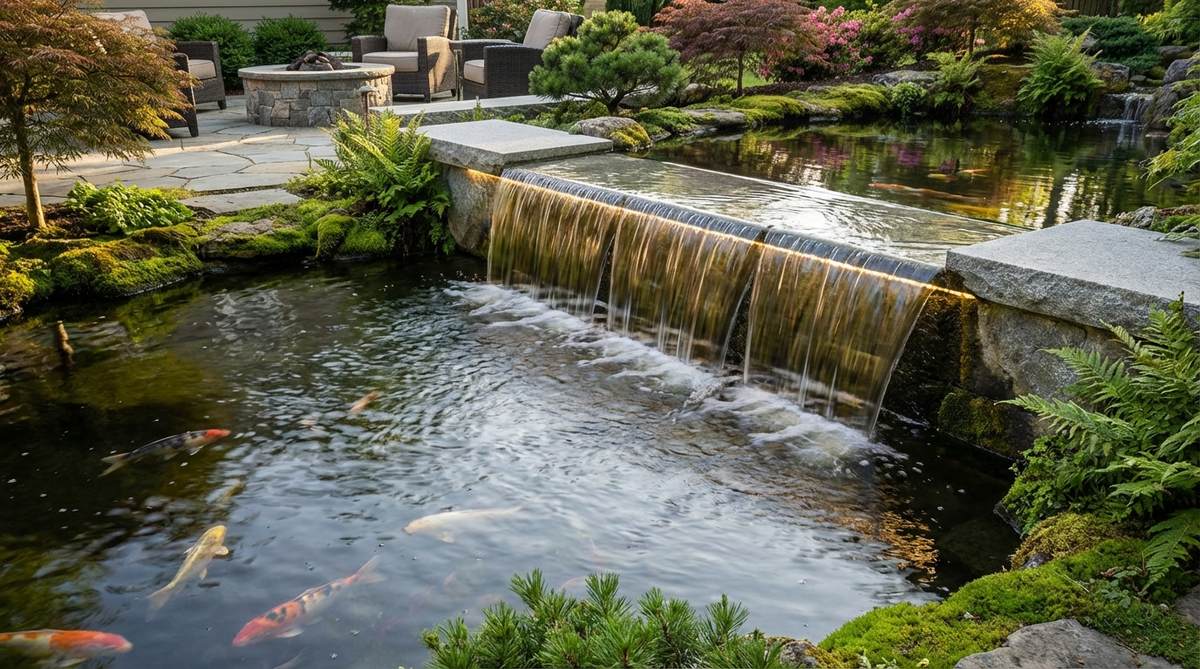
Showcases a mesmerizing, glass-like sheet of water that feels incredibly modern and sleek. This wide sheer descent feature is a stunning upgrade for modern minimalist patios.
Ragged stone waterfalls can look messy, but a perfectly leveled sheer curtain provides a flawless, designer-level finish. Integrating a stainless steel spillway lip guarantees that crisp water break every single time.
A manufactured spillway system usually runs $200–$450. Pin this if you love a clean architectural look!
- Key Materials: Stainless steel spillway lip, level concrete base, LED strip
- Vibe / Style: Sleek contemporary zen
- Difficulty: Precision leveling mandatory
- Budget Breakdown: Spillway: $150 | Base material: $50 | LED lighting: $40
- Creator’s Tip: Install an accessible ball valve on the hose to fine-tune the water flow to a perfect sheet.
- Smart Sourcing: stainless steel waterfall spillways and waterproof LED light strips.
This next setup is ridiculously cheap but looks like a $5,000 custom waterfall display…
9. Split-Stream Dual Waterfall

Creates dynamic cross-currents that feel like an intricate natural river delta. This bifurcated flowing water design brings exceptional energy to wider, sprawling garden layouts.
A single entry point often leaves stagnant dead zones, but splitting the flow immediately eliminates debris buildup while looking like a high-budget custom install. Using a sturdy Y-splitter valve ensures perfect pressure distribution across both falls.
The extra plumbing adds a minimal $50–$100 to the total build cost.
- Key Materials: Y-splitter valve, secondary tubing, dividing boulders
- Vibe / Style: Dynamic rushing river
- Difficulty: Moderate plumbing balancing
- Budget Breakdown: Splitter: $25 | Extra tubing: $30 | Feature rocks: $100
- Creator’s Tip: Make one side slightly larger than the other to avoid an unnatural, perfectly symmetrical look.
- Smart Sourcing: heavy-duty brass Y-valves and kink-resistant PVC pond hoses.
💡 Must-Have Supplies for High-End Setups
To build these setups faster and ensure they last, skip the generic craft aisles and invest in the right foundational kits.
- Base & Support: Professional EPDM 45-mil rubber pond liners
- Setup Tools: Complete Japanese garden koi pond starter kits
- Weather/Durability Protection: UV-resistant clear aquatic sealants
10. Underground Spring Bubbler
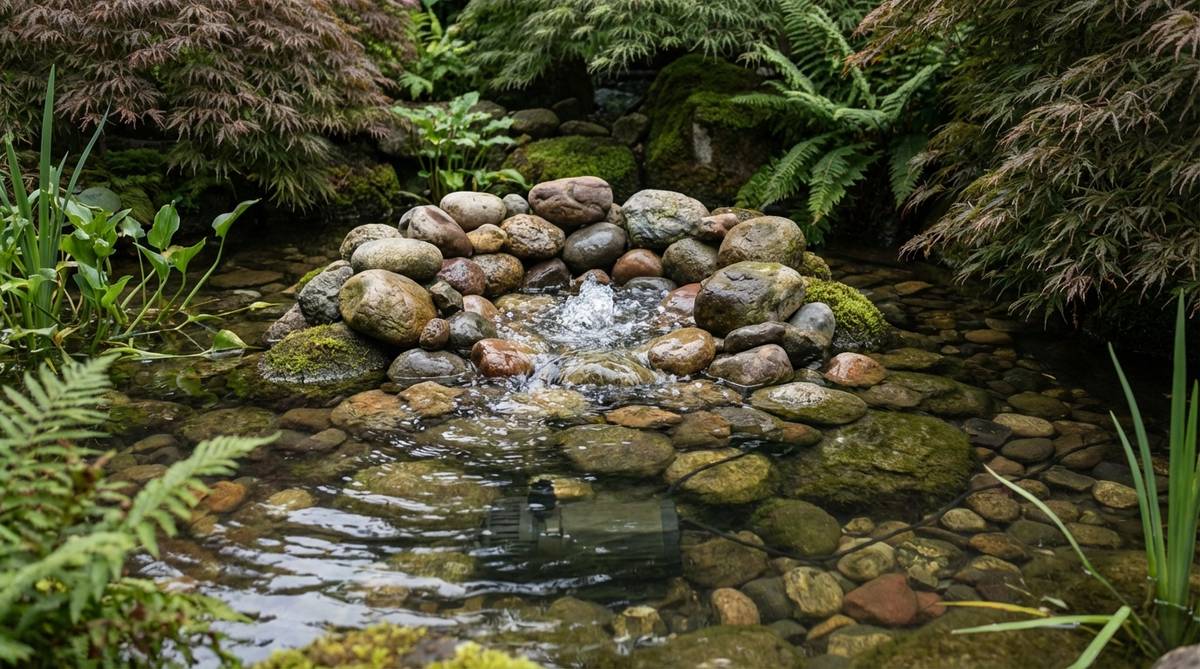
Emanates a gentle, churning calm that feels like witnessing a natural aquifer breaking the surface. This subsurface bubbling rock feature acts as a perfect subtle centerpiece for quiet reflection areas.
Towering waterfalls can overpower small spaces, but an upwelling spring offers mesmerizing movement with zero splash. Concealing the plumbing inside a pre-drilled boulder gives a flawless, magic-trick finish.
Creating this subtle magic only costs about $100–$250 in total parts.
- Key Materials: Pre-drilled boulder, small submersible pump, gravel bed
- Vibe / Style: Secret forest spring
- Difficulty: Easy one-day project
- Budget Breakdown: Drilled rock: $80 | Pump: $40 | Basin: $60
- Creator’s Tip: Surround the water exit point with dark polished stones to make the bubbling water pop visually.
- Smart Sourcing: pre-drilled natural basalt columns and compact fountain pump kits.
Water Plant Integration Systems For Japanese Garden Ponds
Aquatic plants provide essential filtration, oxygen production, and shade while enhancing the natural aesthetic of koi ponds. Strategic plant selection creates balanced ecosystems that reduce maintenance requirements and support fish health.
11. Floating Plant Coverage Zones
Transforms the water surface into a lush, dappled canopy that feels like an untouched tropical lagoon. This surface shading aquatic greenery provides ultimate protection and stress relief for sensitive koi.
Leaving a pond entirely exposed invites brutal algae blooms, whereas a strategic floating canopy naturally starves out the green water while looking incredibly lush. Utilizing floating containment rings keeps the plants from completely suffocating the viewing areas.
A robust starter pack of floaters will only run you $20–$40. Save this trick for your summer pond maintenance strategy!
- Key Materials: Water hyacinth, water lettuce, floating plant rings
- Vibe / Style: Lush protective canopy
- Difficulty: Practically zero effort
- Budget Breakdown: Plants: $25 | Containment rings: $15
- Creator’s Tip: Anchor the floating rings to the pond bottom with fishing line to keep them in the perfect viewing spot.
- Smart Sourcing: floating aquatic plant islands and bulk water hyacinth bundles.
12. Marginal Plant Filtration Ring
Softens the hard edges of the basin, creating a gradient that feels like a natural marshland blending into the earth. This perimeter bog planting layout is the ultimate biological filter for high-waste fish.
Relying solely on mechanical filters gets expensive fast, but a dense ring of hungry marginal roots delivers commercial-grade water polishing for pennies. Securing the roots in mesh planting baskets stops aggressive koi from uprooting your hard work.
Establishing a full border of marginals usually costs $50–$120 depending on plant size.
- Key Materials: Aquatic soil, mesh planting baskets, water irises
- Vibe / Style: Softened transitional shoreline
- Difficulty: Beginner-friendly
- Budget Breakdown: Baskets: $20 | Aquatic soil: $30 | Plants: $50
- Creator’s Tip: Top the soil in the baskets with heavy river pebbles so the dirt doesn’t float away into the pond.
- Smart Sourcing: mesh aquatic planting baskets (bulk pack) and heavy calcined clay aquatic soil.
13. Submerged Oxygenator Beds

Creates a swaying underwater forest that feels like a thriving, untouched marine ecosystem. This deep-water oxygenating greenery is the invisible hero of crystal-clear japanese garden ponds.
Many beginners skip submerged greens out of sight, yet these dense bottom-dwellers provide a designer-level biological balance that destroys algae at the source. Tying bundles of hornwort to small lead weights ensures they stay grounded where they belong.
A massive bundle of oxygenators can be deployed for roughly $30–$50.
- Key Materials: Hornwort, anacharis, plant weights
- Vibe / Style: Swaying underwater jungle
- Difficulty: Drop and go
- Budget Breakdown: Oxygenator bundles: $35 | Lead weights: $10
- Creator’s Tip: Drop these behind larger rocks to protect them from larger, hungry koi who love to nibble.
- Smart Sourcing: live submerged oxygenator plant kits and aquarium-safe plant anchor weights.
Stop scrolling if you want to know the secret behind crystal-clear water—this next plant layout changes everything.
14. Water Lily Focal Points
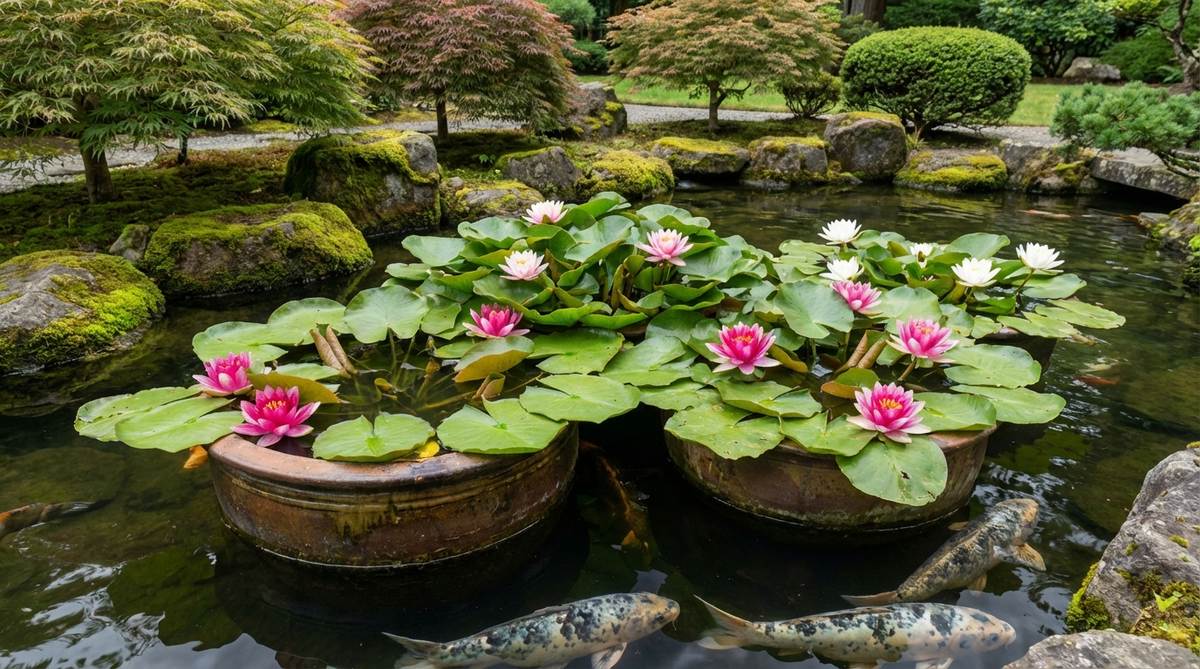
Delivers that iconic, floating masterpiece aesthetic that feels incredibly regal and historic. This classic floating blossom setup provides a jaw-dropping visual anchor in the deepest zones of the basin.
Scattered, random planting often looks messy, but an isolated, contained lily display gives a highly curated, premium landscape architecture vibe. Using heavy, nutrient-dense fertilizer spikes pushes out massive, vibrant blooms all summer long.
A premium hardy lily tuber and basket setup will cost around $40–$80. Pin this to your floral landscaping board!
- Key Materials: Hardy lily tuber, large low-profile tub, fertilizer spikes
- Vibe / Style: Iconic garden royalty
- Difficulty: Moderate seasonal maintenance
- Budget Breakdown: Lily tuber: $35 | Planting tub: $15 | Fertilizer: $10
- Creator’s Tip: Start the lily basket shallow in spring, and slowly lower it as the stems grow toward the sun.
- Smart Sourcing: hardy water lily starter kits and aquatic slow-release fertilizer tabs.
15. Lotus Meditation Display
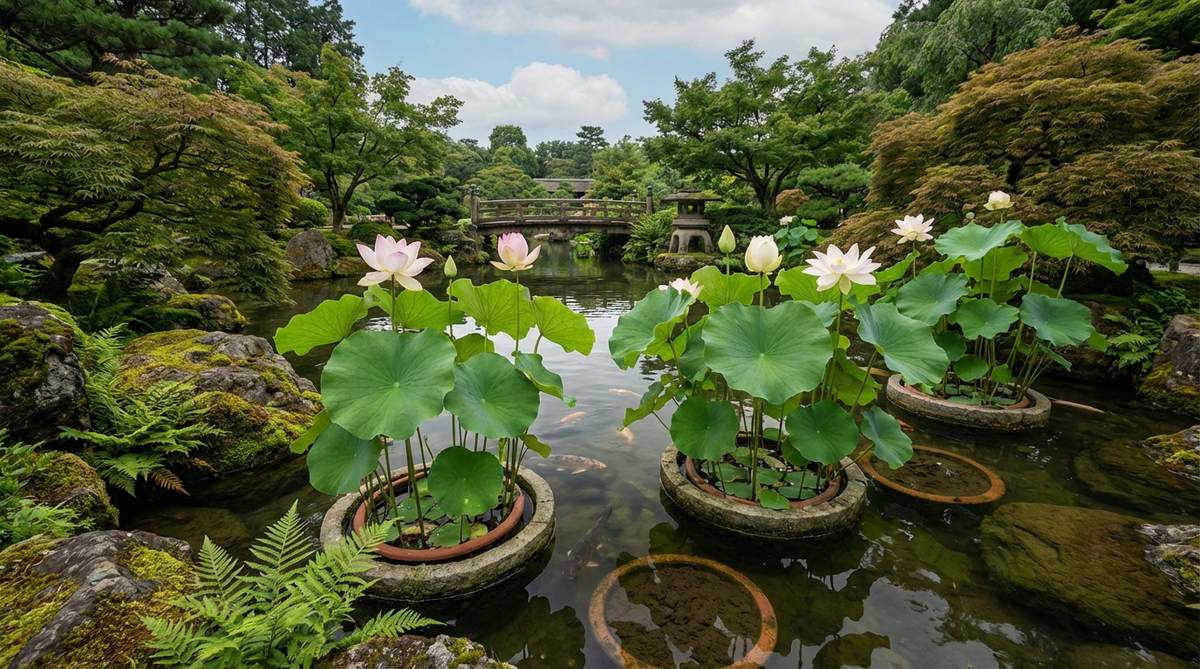
Rises majestically above the waterline, radiating a spiritual energy that feels profoundly calming. This elevated botanical focal feature immediately commands respect and awe from any visitor.
Most water plants hug the surface, but the towering foliage of a sacred lotus adds a surprising architectural height that looks expensive and highly exotic. Containing their aggressive rhizomes in solid, no-hole pots prevents them from completely taking over the ecosystem.
Securing a healthy lotus rhizome and thick clay runs about $60–$100.
- Key Materials: Lotus rhizome, solid container, heavy loam soil
- Vibe / Style: Sacred zen architecture
- Difficulty: Careful handling required
- Budget Breakdown: Rhizome: $50 | Solid tub: $20 | Loam: $15
- Creator’s Tip: Never break the growing tip of a lotus rhizome; handle it like fragile glass during planting.
- Smart Sourcing: solid plastic aquatic lotus tubs and premium sacred lotus rhizomes.
16. Duckweed Nutrient Control Layer
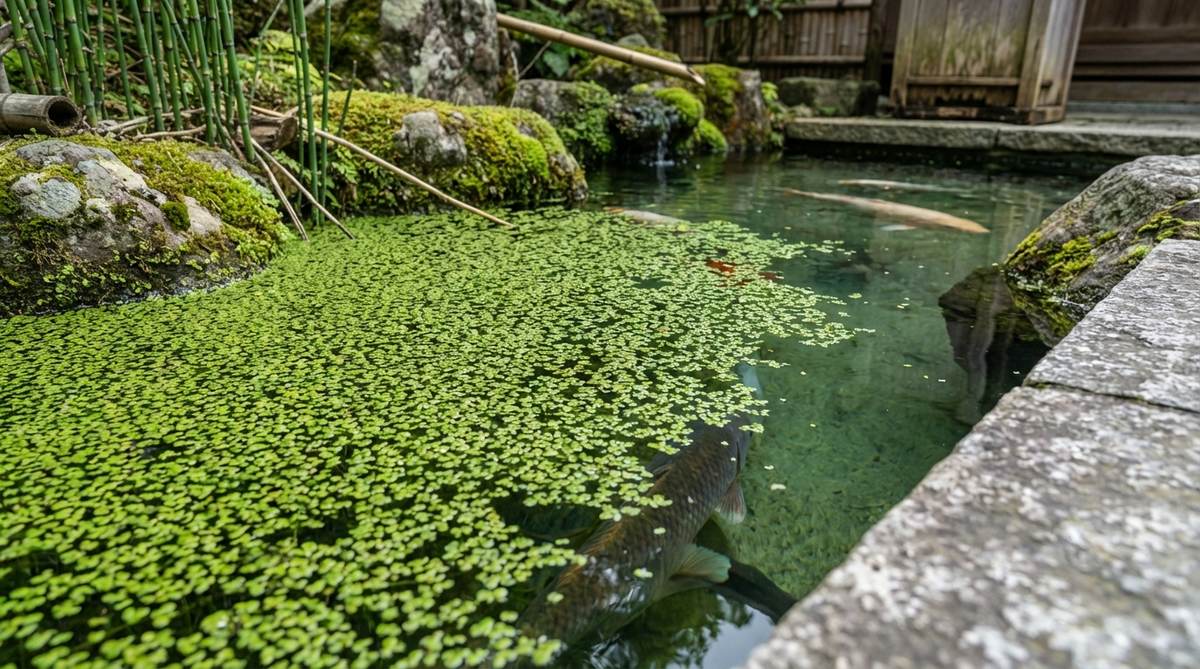
Forms a vibrant, textured green carpet across still waters that feels incredibly natural and established. This micro-floating vegetation barrier acts as an endless free salad bar for happy koi.
Chemical algae destroyers are toxic and pricey, but a controlled layer of fast-growing duckweed naturally strips out harmful nitrates while giving a designer-level rustic charm. Scooping out the excess weekly turns this invasive grower into brilliant garden compost.
You can buy a starter culture for literally $10–$15. It’s a fast upgrade that completely changes the vibe.
- Key Materials: Duckweed culture, fine mesh skimmer net
- Vibe / Style: Rustic green carpet
- Difficulty: High maintenance removal
- Budget Breakdown: Starter culture: $10 | Skimmer net: $15
- Creator’s Tip: Keep this away from heavy waterfalls; duckweed thrives strictly in stagnant or slow-moving water.
- Smart Sourcing: live duckweed starter cultures and fine-mesh pond skimming nets.
Bridge and Stepping Stone Features For Koi Pond Gardens
Bridges and stepping stones provide access points while creating dimensional layers that enhance garden depth. These structural elements guide movement through the space and establish distinct viewing perspectives.
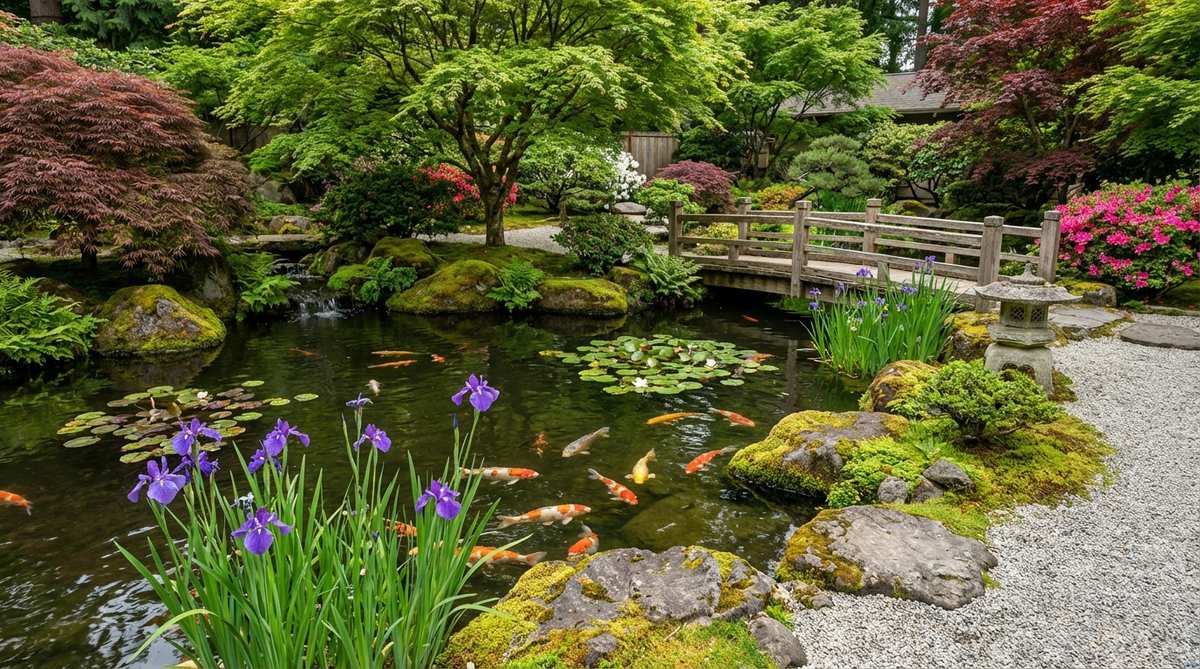
17. Arched Wooden Bridge
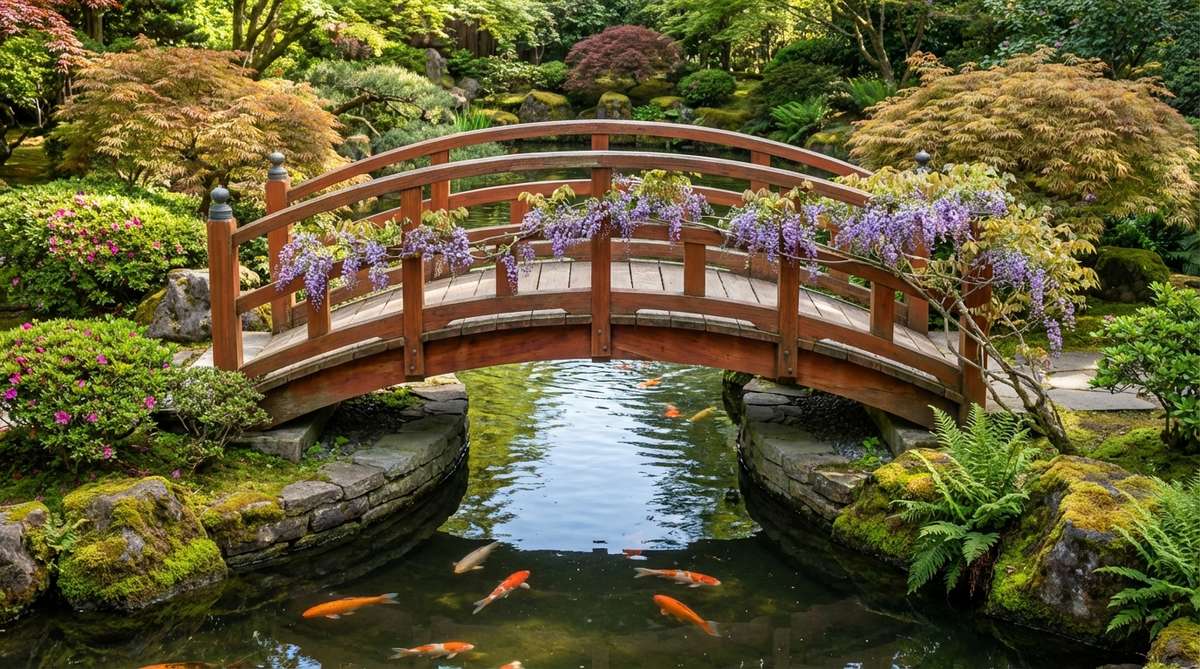
Evokes the romance of a timeless painting, offering a grand crossover that feels like a portal to another world. This curved timber walking feature guarantees incredible photo opportunities from every angle.
Flat planks get the job done, but a perfectly pitched arch elevates the entire yard into a multi-million-dollar estate aesthetic. Coating the cedar structure with UV-resistant wood sealer protects the rich color from fading into dull gray.
Pre-fab kits start at $200, while custom builds can hit $800+. Save this if you love grand backyard transformations!
- Key Materials: Weather-treated cedar, marine bolts, wood sealer
- Vibe / Style: Grand storybook crossing
- Difficulty: Intermediate assembly
- Budget Breakdown: Wood kit: $250 | Hardware: $30 | Sealer: $40
- Creator’s Tip: Add a subtle strip of warm-white LED tape under the handrails for breathtaking night illumination.
- Smart Sourcing: pre-cut arched wooden garden bridge kits and UV-resistant marine timber sealers.
18. Flat Stone Slab Bridge

Offers a rugged, grounded pathway that feels effortlessly forged by nature itself. This minimalist monolithic crossing bridges the gap between rugged landscaping and modern simplicity.
Elaborate wooden bridges can visually clutter a small space, whereas a massive single stone slab delivers a surprisingly premium look with quiet authority. Resting the edges on deeply buried cinderblocks ensures the slab never shifts under heavy foot traffic.
Sourcing a massive slab can run $300–$700, mostly in delivery fees.
- Key Materials: Heavy granite slab, cinderblock footings, leveling sand
- Vibe / Style: Minimalist ancient strength
- Difficulty: Requires heavy lifting equipment
- Budget Breakdown: Stone slab: $400 | Delivery: $100 | Footings: $20
- Creator’s Tip: Ensure the slab sits at least two inches above the maximum waterline to prevent moss-induced slipping.
- Smart Sourcing: heavy-duty landscaping block adhesive and anti-slip stone treatment spray.
Think pathways have to be boring? The crossing design up next completely shatters that myth.
19. Zigzag Yatsuhashi Bridge
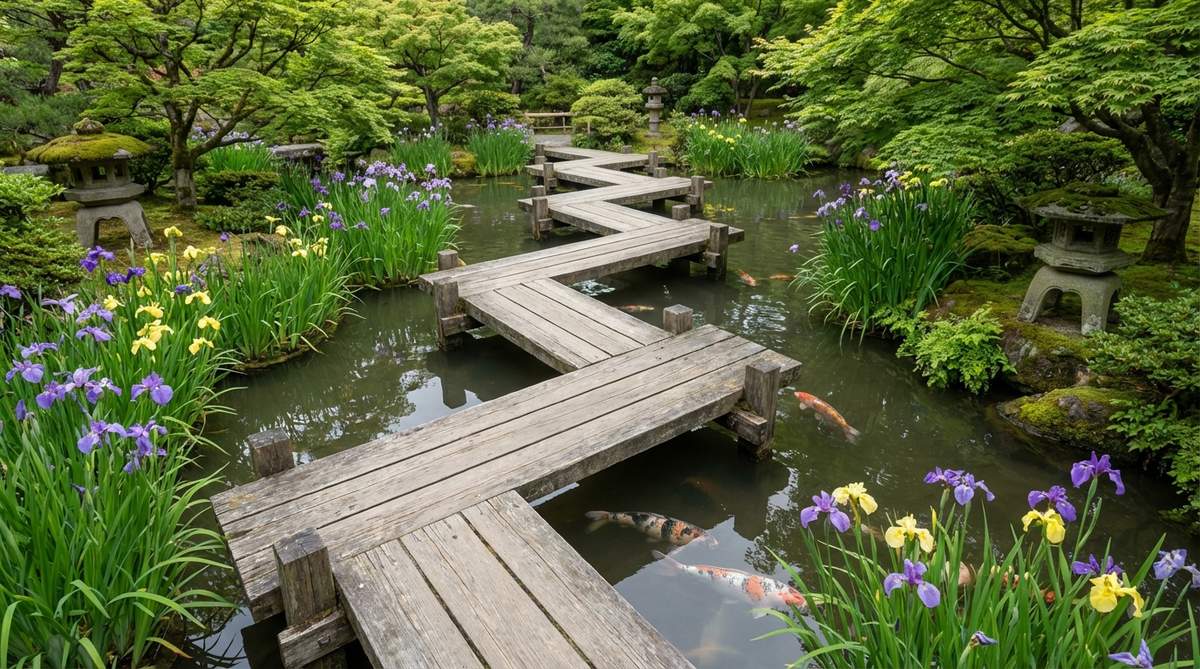
Forces the wanderer to slow down and breathe, feeling like a deliberate meditative puzzle. This meandering angled boardwalk forces viewers to admire different sections of your prized koi collection.
Straight paths make visitors rush through the garden, but a traditional zigzag layout looks far more expensive while manipulating the flow of foot traffic perfectly. Using pre-treated composite decking guarantees zero rot even in highly humid marsh zones.
Material costs range from $150–$400 depending on board quality.
- Key Materials: Composite deck boards, sturdy driven pilings, stainless brackets
- Vibe / Style: Meditative philosophical journey
- Difficulty: Requires precise cutting
- Budget Breakdown: Decking: $200 | Hardware: $50 | Pilings: $80
- Creator’s Tip: Keep the boards low to the water to amplify the feeling of walking directly on the surface.
- Smart Sourcing: composite waterproof decking boards and stainless steel right-angle brackets.
20. Round Concrete Stepping Stones
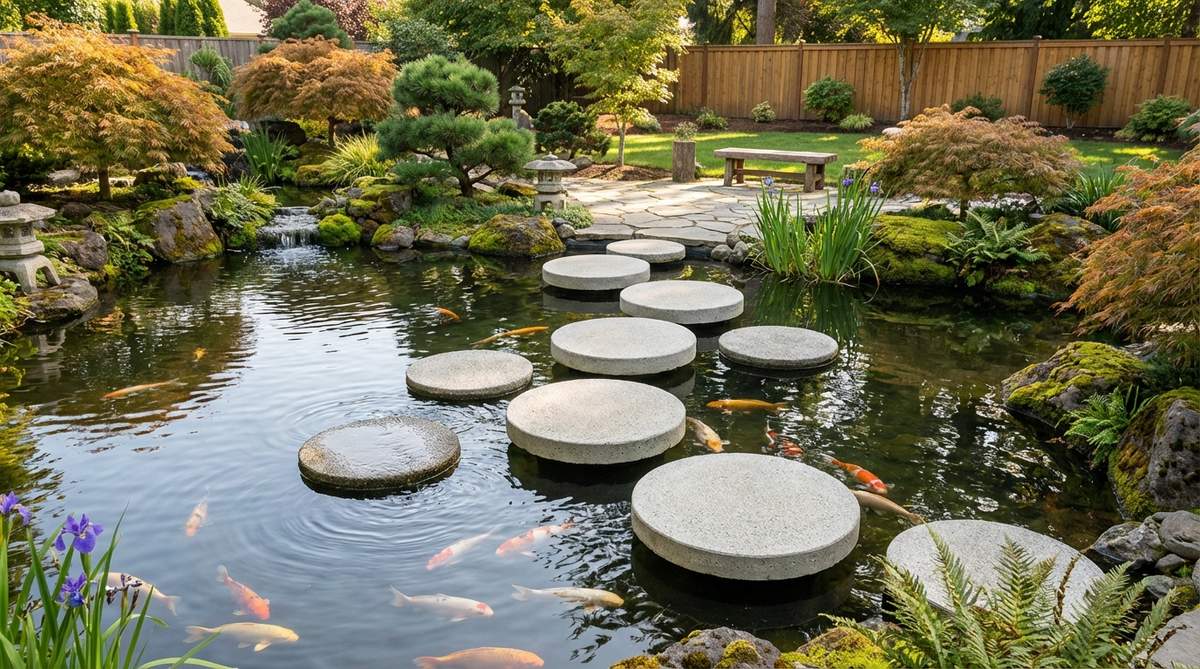
Creates a whimsical, floating illusion that feels playful yet highly intentional. This circular hover-path design is a brilliant way to add geometric contrast to an organic water shape.
Standard square pavers look cheap and industrial, but custom-poured round columns rising just barely above the water give a designer-level finish. Integrating structural rebar into the concrete columns ensures they won’t snap under winter ice pressure.
You can pour these yourself for a highly budget-friendly $50–$100. Pin this to your weekend concrete projects board!
- Key Materials: Sonotube concrete forms, quick-set concrete, rebar
- Vibe / Style: Floating geometric magic
- Difficulty: Moderate concrete mixing
- Budget Breakdown: Concrete bags: $40 | Tube forms: $30 | Rebar: $20
- Creator’s Tip: Dye the concrete with a charcoal additive before pouring to make the stones blend into the dark water.
- Smart Sourcing: cardboard concrete pouring tubes and liquid cement color dyes.
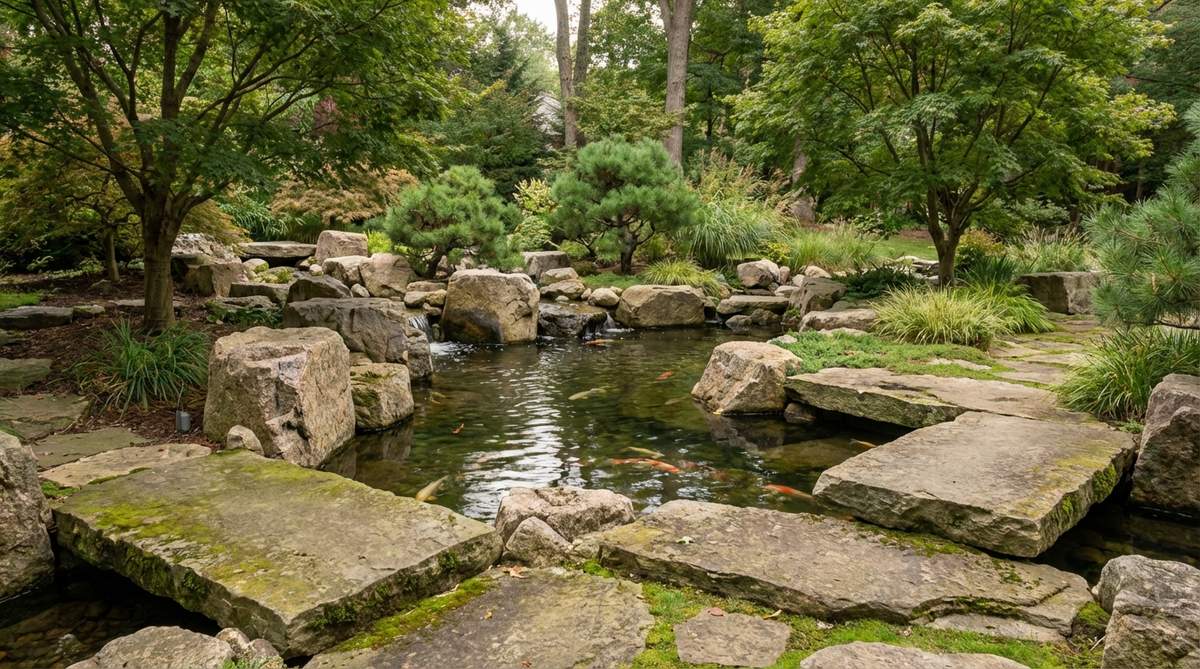
21. Natural Boulder Stepping Path
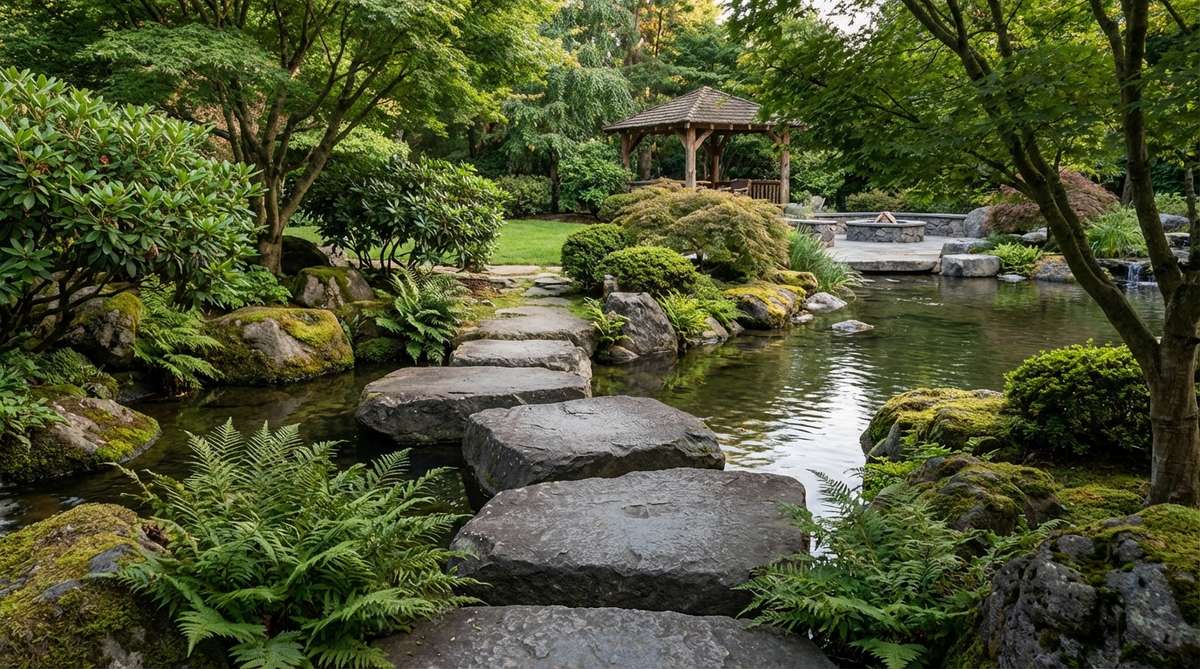
Begs to be explored, feeling like a rugged adventure through an untouched alpine gorge. This irregular stone hopscotch layout brings out the inner child of anyone walking through your yard.
Perfectly uniform paths often feel sterile, whereas giant flat-topped boulders set at irregular intervals deliver a surprisingly premium look straight out of a national park. Bedding the stones in a thick layer of crushed gravel underwater prevents dangerous wobbling.
Boulder pricing varies wildly, but expect to drop $200–$500 for large, flat steppers.
- Key Materials: Flat-topped boulders, crushed gravel base, waders for install
- Vibe / Style: Rugged alpine adventure
- Difficulty: Physically demanding
- Budget Breakdown: Boulders: $300 | Base gravel: $50
- Creator’s Tip: Space them exactly one average stride apart so visitors don’t have to leap awkwardly.
- Smart Sourcing: flat-top landscaping boulders (pallet) and heavy-duty pond waders.
Modern Japanese-Inspired Koi Pond Designs
Contemporary interpretations blend traditional Japanese principles with current materials and geometric forms. These designs appeal to homeowners seeking cultural authenticity within modern architectural contexts.
22. Minimalist Rectangular Pond
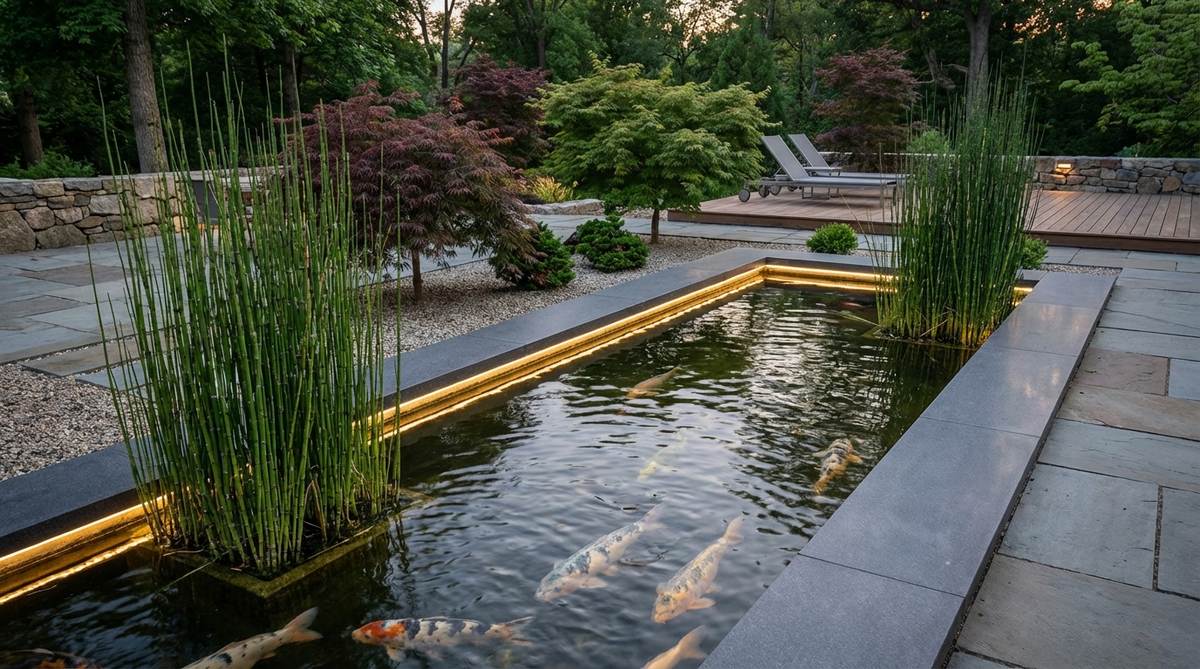
Strikes a fierce contrast between sharp architecture and fluid, living movement. This crisp geometric water basin is the ultimate flex for upscale modern courtyard renovations.
Curved edges can look messy against sharp home exteriors, but a razor-sharp poured concrete rectangle delivers a surprisingly premium look that screams luxury real estate. Sourcing waterproof terrarium accessories and structural papyrus plants enhances the stark, clean lines.
Professional concrete forming usually sets you back $1,000–$3,000. Save this if you are planning a high-budget modern remodel.
- Key Materials: Poured concrete, epoxy water sealant, minimalist reeds
- Vibe / Style: Ultra-modern museum courtyard
- Difficulty: Professional installation recommended
- Budget Breakdown: Concrete forming: $1500 | Epoxy: $200 | Filtration: $400
- Creator’s Tip: Hide the skimmer and pump completely under an overlapping hardwood deck edge for zero visual clutter.
- Smart Sourcing: black epoxy pond armor sealant and submersible compact pond skimmers.
23. Raised Steel Water Basin
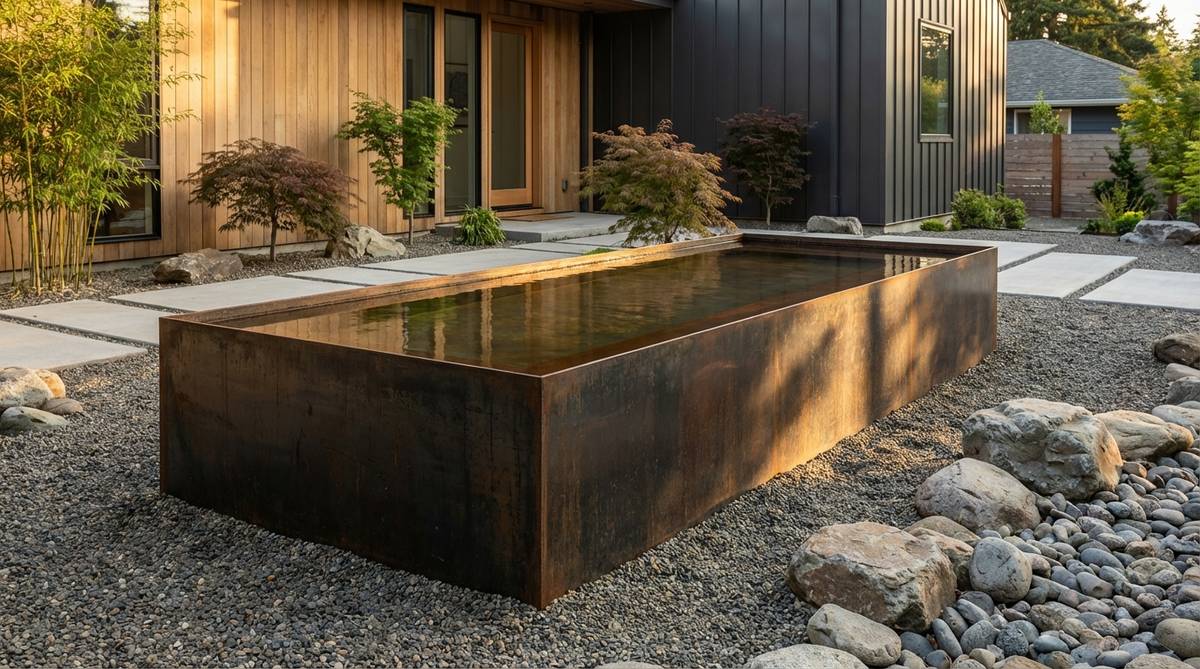
Develops a rich, fiery patina that feels like a piece of heavy industrial art standing the test of time. This weathering steel elevated tank brings an edgy, modern twist to traditional koi keeping.
Plastic stock tanks degrade and crack, whereas a custom Corten steel basin looks far more expensive than it is and lasts for decades. Lining the interior wall with insulation foam prevents the summer sun from cooking your fish in a hot metal box.
Fabricated steel rings run about $600–$1,200 depending on the gauge and diameter.
- Key Materials: Corten steel ring, EPDM liner, rigid foam insulation
- Vibe / Style: Industrial modern chic
- Difficulty: Easy drop-in setup
- Budget Breakdown: Steel ring: $800 | Insulation: $60 | Liner: $100
- Creator’s Tip: Let the steel weather naturally for two weeks before sealing the outside to lock in that perfect rust color.
- Smart Sourcing: pre-rolled weathering steel planter rings and rigid waterproof foam insulation sheets.
Material Guide: Cheap vs. Premium Aesthetic
Knowing exactly where to save and where to spend makes all the difference in achieving that “looks expensive but isn’t” vibe.
- Standard vs. UV-Resistant/Premium: Standard plastic liners crack after one hard winter. Upgrading to commercial-grade 45-mil EPDM rubber guarantees decades of leak-free performance.
- Pre-made Kits vs. Sourcing Locally: Buying pumps and filters separately often causes compatibility headaches. Professional starter kits ensure flow rates perfectly match filter capacity, saving both time and money.
If you’re obsessed with high-end modern architecture, this next sleek water feature will blow your mind.
24. Infinity Edge Koi Pond

Blurs the line between the water and the horizon, making it feel like the basin spills over the edge of the world. This vanishing horizon water feature is the absolute pinnacle of luxury hillside property design.
Standard contained ponds block the view, but a flawlessly leveled infinity edge gives a designer-level finish that drops jaws instantly. You must oversize the hidden catch basin to ensure the pump never runs dry when the wind picks up.
Due to complex engineering, expect to spend upwards of $2,000–$5,000. Highly recommended for a massive property glow-up!
- Key Materials: Precision concrete weir, massive catch basin, auto-fill valve
- Vibe / Style: Billionaire hillside resort
- Difficulty: Expert engineering required
- Budget Breakdown: Concrete work: $2000 | High-flow pump: $400 | Catch basin: $300
- Creator’s Tip: Install a mechanical auto-fill valve in the lower basin to counteract rapid evaporation on the exposed waterfall face.
- Smart Sourcing: brass mechanical auto-fill float valves and high-volume continuous duty pond pumps.
25. Black Bottom Reflection Pond
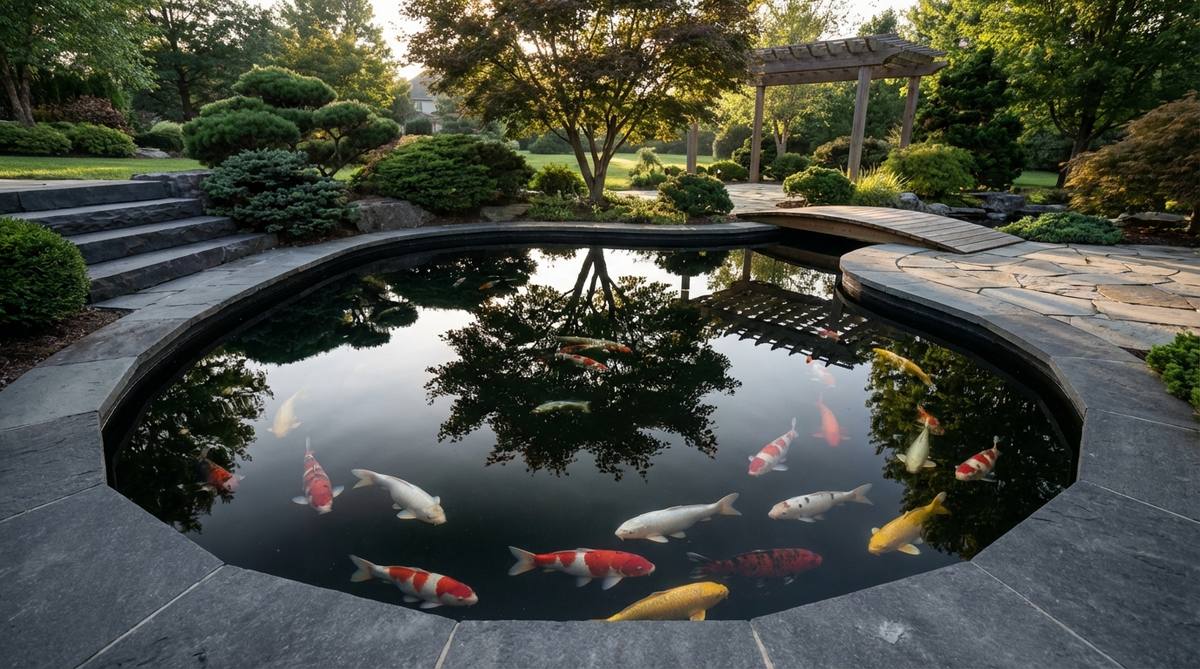
Turns the water into a flawless dark mirror, making the bright oranges and whites of the koi explode with color. This high-contrast dark basin layout creates a moody, dramatic aesthetic perfect for shaded areas.
Light-colored liners make the water look murky and green, whereas a pitch-black foundation delivers a surprisingly premium look that fakes immense depth. Using non-toxic black pond dye can enhance this effect without harming a single fish or plant.
You can achieve this for practically $50 if you just use dye, or $300 for a permanent black liner.
- Key Materials: Black EPDM liner, dark river stones, aquatic shading dye
- Vibe / Style: Deep moody mystery
- Difficulty: Beginner-friendly
- Budget Breakdown: Black liner: $150 | Black gravel: $100 | Dye: $30
- Creator’s Tip: Avoid adding any light-colored sand or white rocks to the bottom; they will instantly ruin the illusion.
- Smart Sourcing: fish-safe black pond reflection dye and matte black EPDM pond liners.
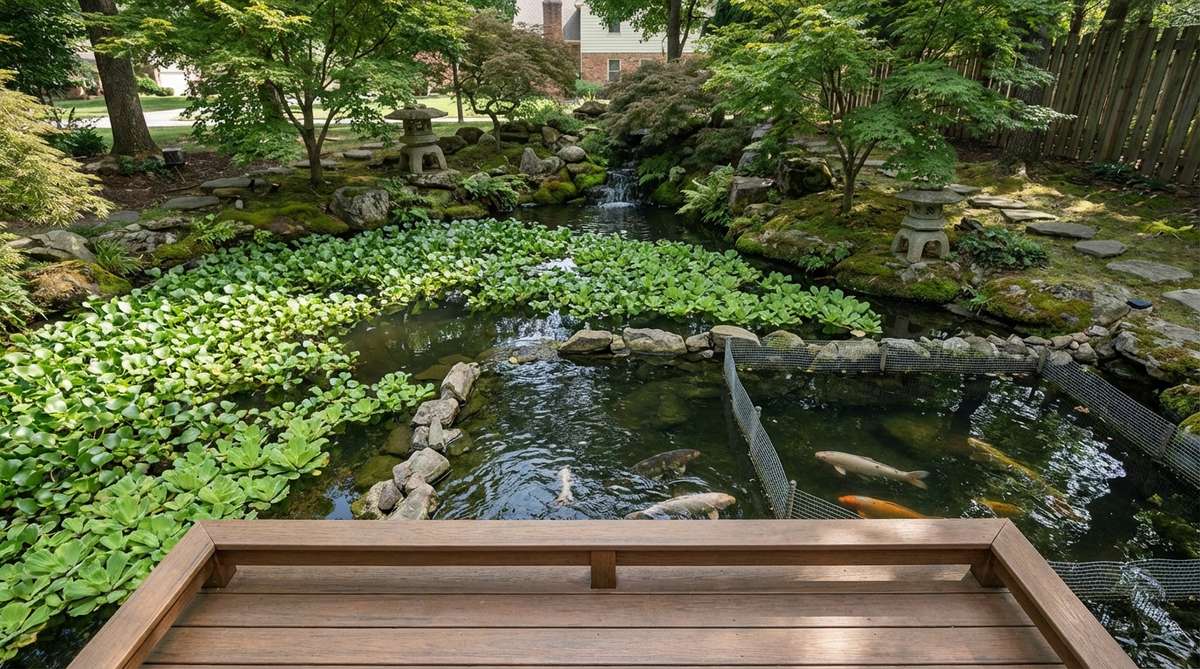
26. Courtyard Viewing Pond
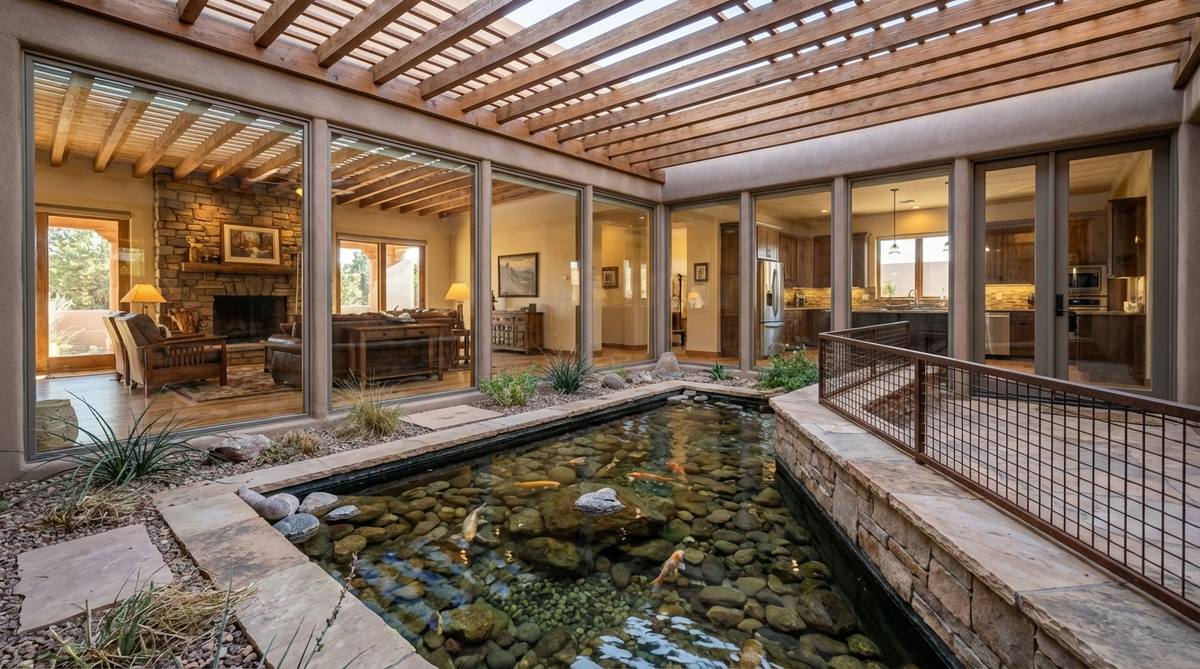
Transforms the center of your home into a living gallery, feeling like an exclusive private museum exhibit. This enclosed central water display brings peaceful movement into almost every room of the house.
Deep outdoor ponds battle predators daily, but a shallow, protected courtyard basin looks far more expensive while keeping your prized fish entirely safe. Installing submersible LED pond lights turns the courtyard into a glowing centerpiece at night.
Building within an enclosed patio costs roughly $800–$2,000 depending on tile work.
- Key Materials: Low-profile basin, decorative tiling, UV sterilizer system
- Vibe / Style: Exclusive interior gallery
- Difficulty: Moderate indoor/outdoor plumbing
- Budget Breakdown: Tiling: $500 | Waterproofing: $200 | UV Light: $150
- Creator’s Tip: Ensure your filtration system is whisper-quiet, as enclosed courtyards naturally amplify the hum of cheap pumps.
- Smart Sourcing: ultra-quiet variable speed water pumps and submersible color-changing LED pond pucks.
Multi-Level Pond Configurations For Japanese Gardens
Connecting multiple ponds at different elevations creates dynamic water movement and expands habitat diversity. These complex systems offer varied environments for different koi life stages and plant species.
27. Upper and Lower Connected Ponds
Creates a rich, multi-habitat ecosystem that feels like a thriving natural watershed breaking through the terrain. This dual-basin cascading system separates the dense jungle filtration from the pristine viewing area.
Relying on a single tub means plants and fish compete for space, whereas splitting the system gives a designer-level finish with unmatched biological clarity. Injecting premium koi pond kits with built-in spillways makes connecting the two tiers totally foolproof.
Creating two distinct basins will cost around $800–$1,500. Save this to your master landscaping board!
- Key Materials: Two liner sections, spillway connector, heavy marginal plants
- Vibe / Style: Engineered natural watershed
- Difficulty: Advanced leveling and plumbing
- Budget Breakdown: Liners: $300 | Spillway: $150 | Pump: $200
- Creator’s Tip: Plant the upper pond so densely with roots that the water must physically push through them to reach the waterfall.
- Smart Sourcing: pre-formed waterfall spillway boxes and heavy-duty biological pond starter kits.
28. Terraced Hillside Ponds

Turns a frustrating, unusable slope into a magnificent cascading spectacle that feels like an Asian rice terrace. This stepped multi-pool layout maximizes vertical property while delivering incredible soothing acoustics.
Most homeowners just plant grass on steep hills, but a terraced water feature looks far more expensive than it is and stops soil erosion dead. Using pre-formed fiberglass basins for the smaller upper tiers dramatically speeds up the installation process.
Combining multiple tubs and rocks runs about $1,000–$2,500.
- Key Materials: Pre-formed upper basins, large lower liner, retaining boulders
- Vibe / Style: Dramatic cascading terraces
- Difficulty: Labor-intensive hillside work
- Budget Breakdown: Basins: $400 | Retaining rocks: $500 | Plumbing: $150
- Creator’s Tip: Dig the basins slightly tilted back into the hill to ensure water only spills strictly forward over the designated rock lips.
- Smart Sourcing: pre-formed heavy-duty fiberglass pond basins and waterfall landscaping foam sealants.
Wait until you see how this biological filtration trick saves thousands on mechanical equipment…
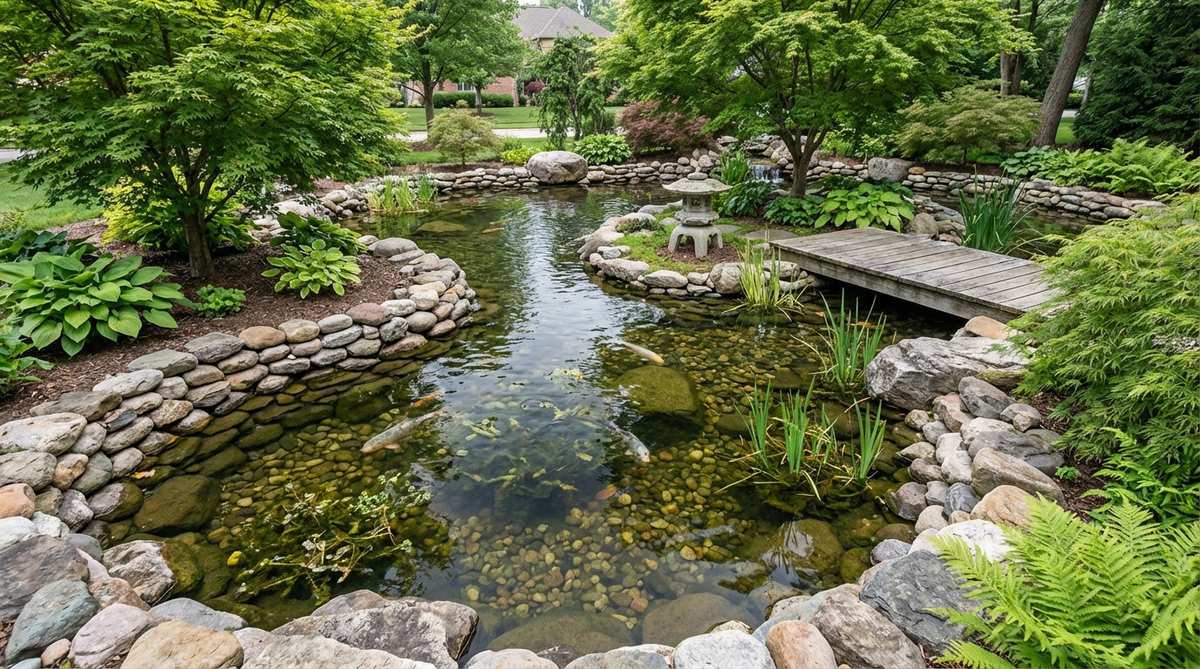
29. Kidney Filter Stream System

Disguises heavy-duty water polishing as a beautiful winding creek that feels entirely organic to the yard. This integrated botanical bog filter eliminates the need for ugly plastic boxes ruining your aesthetic.
Bulky plastic filters destroy the natural illusion, but a gravel-filled kidney wetland delivers a surprisingly premium look while naturally destroying fish waste. Pumping water up through the gravel bed (up-flow wetland) creates a massive colony of beneficial bacteria.
Building a bog filter adds about $300–$600 to your overall build. Highly recommended for a quick weekend win.
- Key Materials: Centipede module manifold, pea gravel, aggressive bog plants
- Vibe / Style: Invisible eco-engineering
- Difficulty: Moderate plumbing skills needed
- Budget Breakdown: Manifold pipes: $150 | Gravel: $100 | Bog plants: $100
- Creator’s Tip: Install a clean-out pipe at the bottom of the gravel bed so you can easily backwash the sludge once a year.
- Smart Sourcing: up-flow bog filter manifold kits and bulk aquatic gravel media.
30. Meditation Pool With Koi Pond
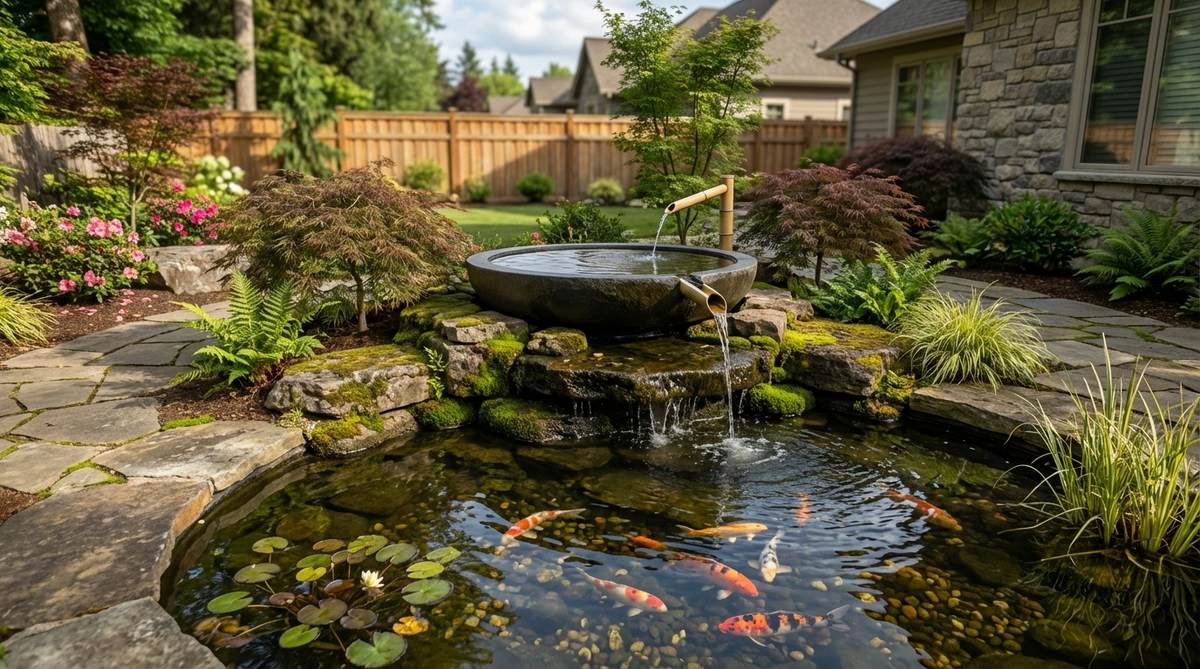
Offers a serene, still-water sanctuary hovering beautifully above the bustling, colorful energy of the fish below. This split-atmosphere zen layout provides the perfect sensory balance for outdoor yoga spaces.
Mixing aggressive splashing with quiet reflection doesn’t work, whereas physically separating the pools looks far more expensive while satisfying both moods perfectly. Using a traditional bamboo deer chaser (shishi-odoshi) to connect them adds an iconic acoustic element.
Adding the upper reflection pool costs roughly $200–$500.
- Key Materials: Bamboo water spout, small upper basin, minimalist edging
- Vibe / Style: Dual-mood sanctuary
- Difficulty: Intermediate structural setup
- Budget Breakdown: Bamboo feature: $60 | Upper tub: $100 | Edging: $150
- Creator’s Tip: Keep the upper pool absolutely free of fish and heavy plants to maintain a flawless, glass-like reflection.
- Smart Sourcing: traditional bamboo water fountain kits and compact submersible circulation pumps.
31. Circular Pondless Basin Feeder
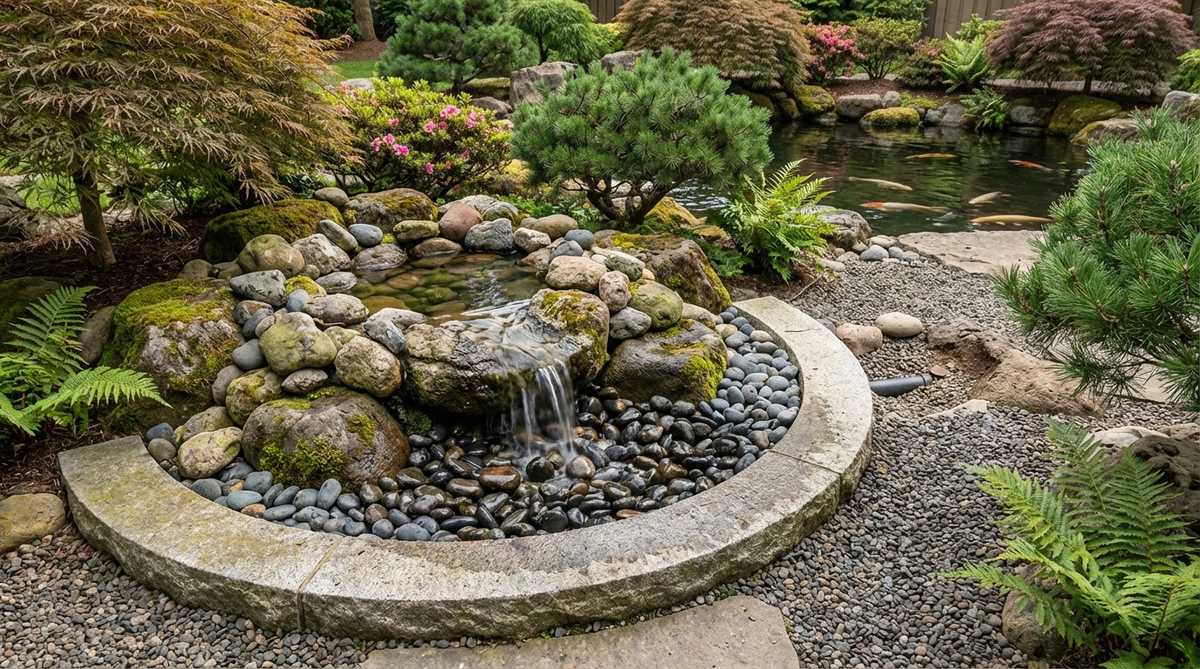
Delivers the incredible sights and sounds of rushing water without the deep-water safety hazard for toddlers. This hidden reservoir gravel feature connects beautifully to larger systems or stands alone perfectly.
Deep water features can be a liability, but a pondless rock pit delivers a surprisingly premium look while being 100% child-safe. Throwing in a few fairy garden kits and miniature garden supplies among the rocks makes it incredibly charming.
A complete pondless kit usually runs $300–$700. Pin this if you have small kids but still want water decor!
- Key Materials: Underground water matrix blocks, heavy-duty grate, feature urn
- Vibe / Style: Safe architectural centerpiece
- Difficulty: Beginner-friendly digging
- Budget Breakdown: Reservoir blocks: $150 | Grate: $80 | Urn/Rock feature: $150
- Creator’s Tip: Cover the top grate with varying sizes of river stone to completely mask the plastic grid underneath.
- Smart Sourcing: pondless waterfall pump vault kits and structural underground water matrix blocks.
Seasonal Planting Strategies For Japanese Koi Ponds
Strategic plant selection ensures year-round visual interest while maintaining water quality through changing seasons. Coordinating bloom times and foliage changes creates an evolving garden that never appears static.
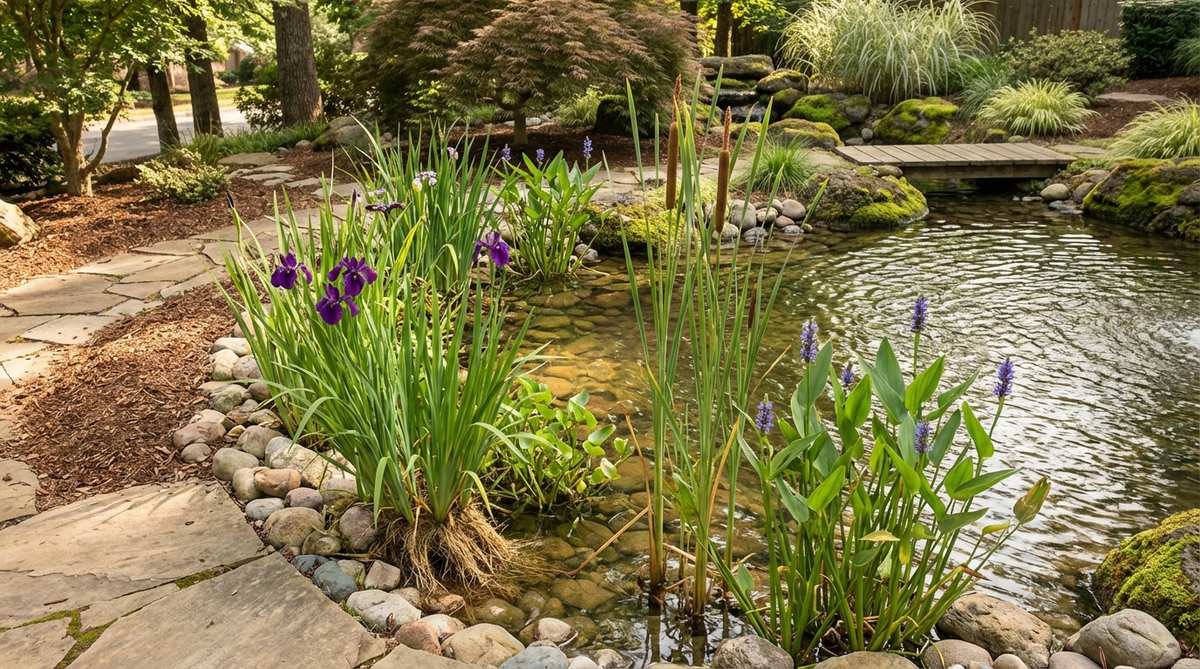
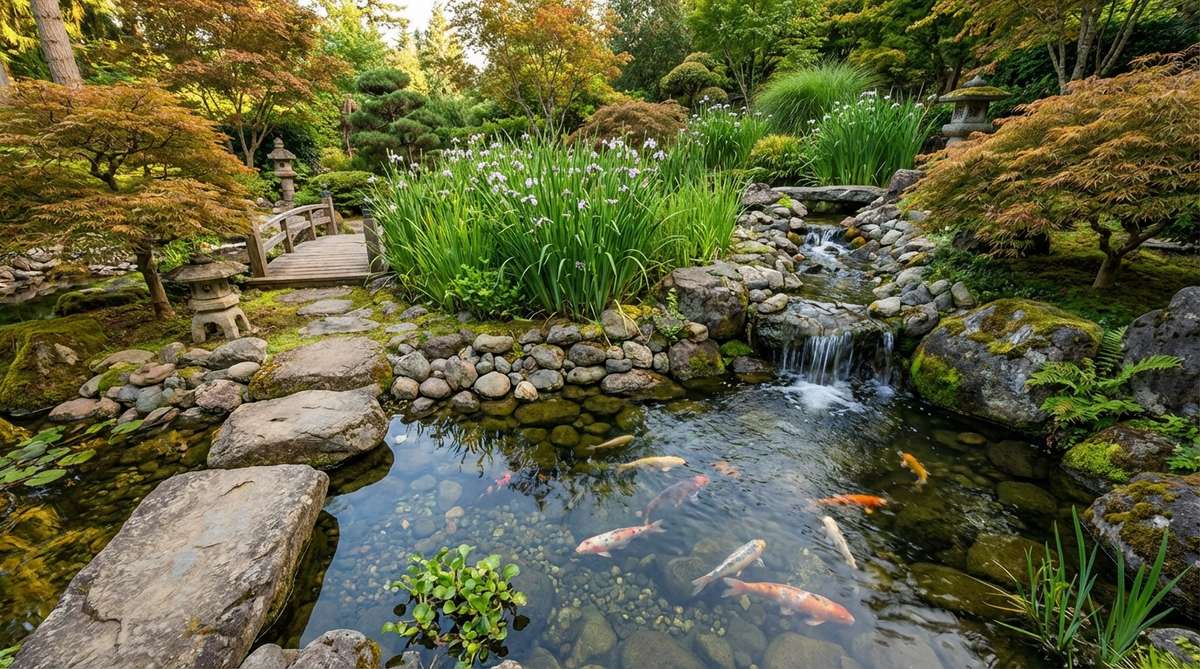
32. Spring Iris Display
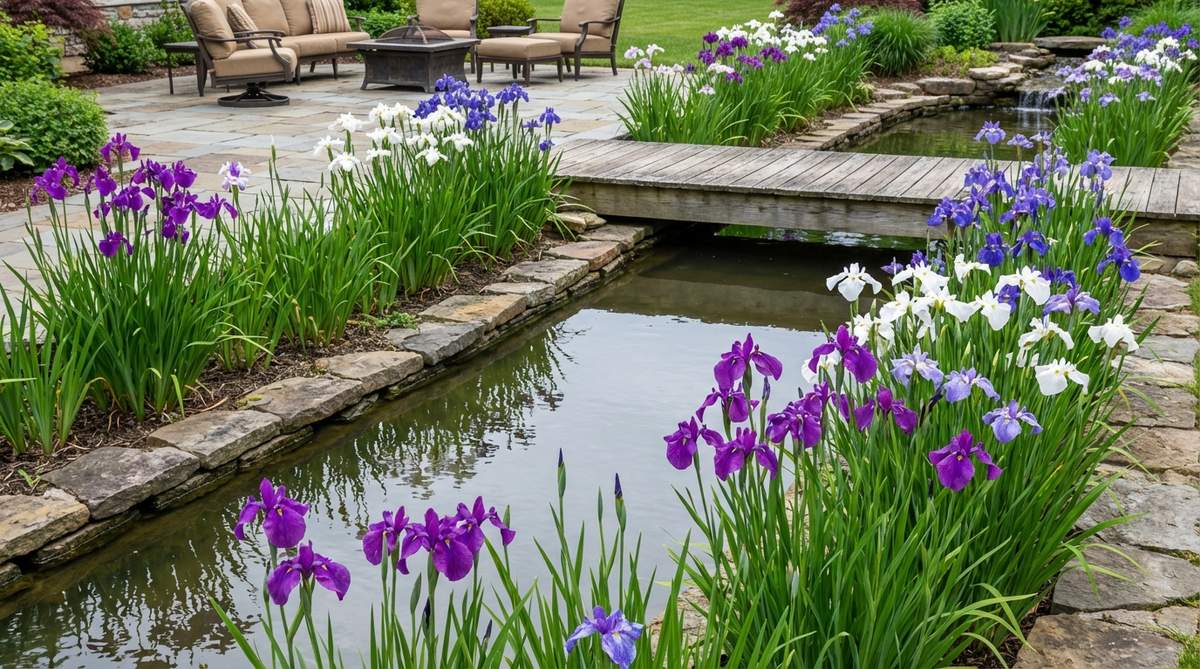
Explodes with vibrant purples and whites that feel like a cheerful celebration of the melting frost. This early-blooming marginal border wakes up the entire yard with towering, sword-like elegance.
Waiting until summer for color is a rookie mistake, whereas banking on spring irises looks far more expensive and signals an early start to patio season. Purchasing dormant bare-root bundles in bulk guarantees a massive color wall for a fraction of nursery prices.
A dense planting of bare roots will cost about $40–$80.
- Key Materials: Japanese water iris bare roots, shallow planting shelves
- Vibe / Style: Vibrant spring awakening
- Difficulty: Very easy planting
- Budget Breakdown: Bare roots: $45 | Planting media: $20
- Creator’s Tip: Plant them exactly at the waterline—irises love wet feet but despise having their main crowns fully submerged deep underwater.
- Smart Sourcing: bulk Japanese water iris bare roots and shallow marginal aquatic planter pots.
33. Summer Lotus Bloom Sequence
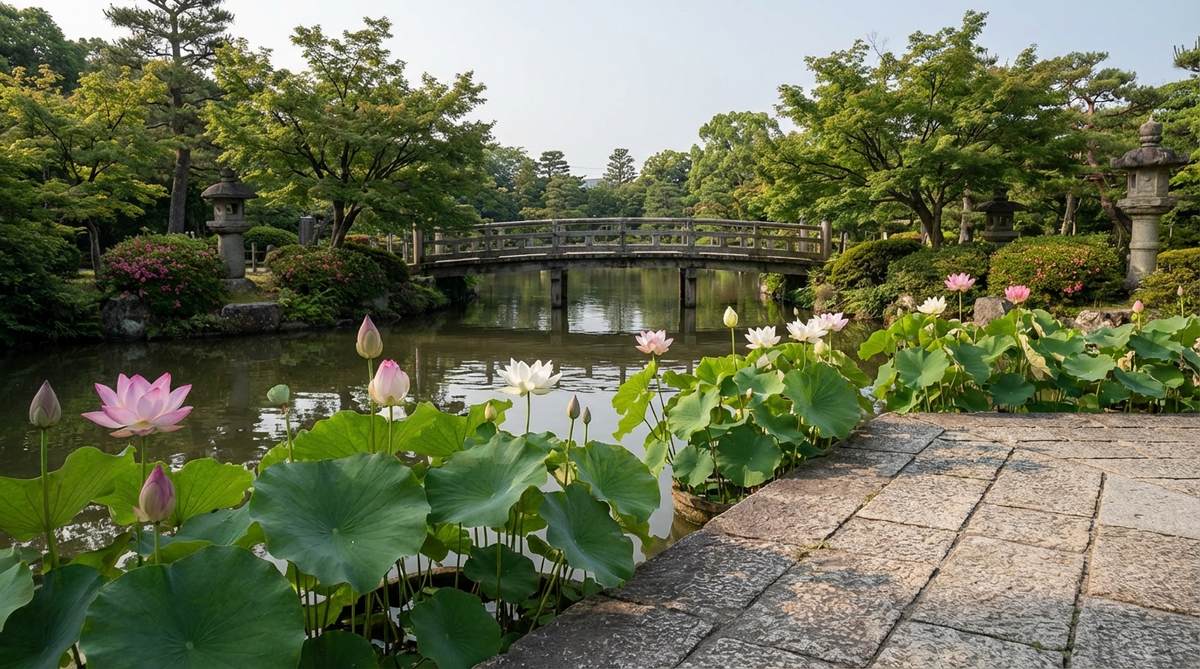
Generates a rolling wave of massive, fragrant blossoms that feels like a non-stop tropical botanical show. This staggered blooming aquatic sequence ensures your water feature is never without a stunning focal point.
Relying on a single plant variety leaves the yard dead in August, but staggering early and late bloomers gives a designer-level finish that lasts all summer long. Utilizing heavy clay tabs loaded with micro-nutrients pushes the flowers to grow absurdly large.
Investing in multiple lotus varieties runs about $100–$150. Save this for your ultimate summer garden masterplan!
- Key Materials: Early, mid, and late-season lotus tubers, nutrient tabs
- Vibe / Style: Endless summer luxury
- Difficulty: Requires meticulous tracking
- Budget Breakdown: Assorted tubers: $90 | Fertilizer: $25
- Creator’s Tip: Label the exterior of the submerged pots with a waterproof marker so you know exactly which variety is blooming.
- Smart Sourcing: multi-season aquatic lotus tuber packs and high-phosphorus aquatic blooming fertilizer.
Almost nobody considers seasonal color mapping, but this upcoming trick guarantees year-round visual impact.
34. Autumn Foliage Reflection
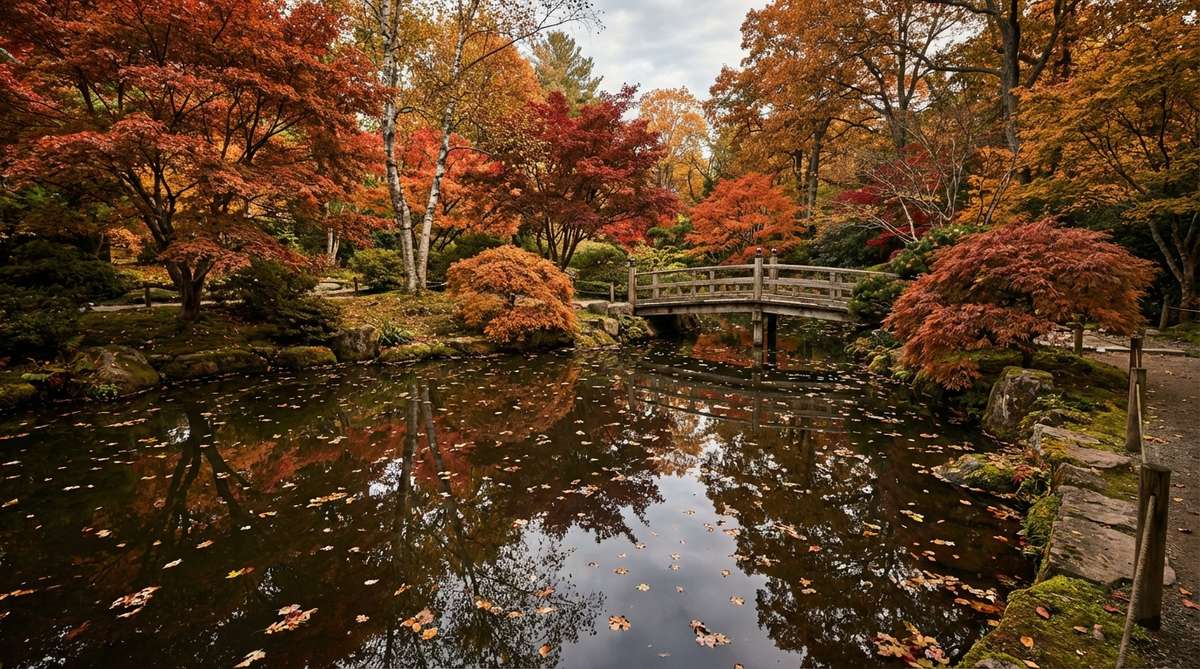
Paints the dark water surface with blazing oranges and reds that feel like a breathtaking harvest festival. This mirrored fall color layout doubles the visual impact of your prized Japanese maples.
Leaving trees unpruned near the water causes nightmare cleanup, but strategically hanging a single vibrant branch over the basin delivers a surprisingly premium look for autumn photography. Installing a heavy-duty skimmer net right as the leaves drop prevents toxic tannin spikes in the water.
Strategic placement costs nothing, but a good skimmer runs $100–$250.
- Key Materials: Japanese maple trees, pond netting, surface skimmer
- Vibe / Style: Fiery autumn mirror
- Difficulty: High seasonal maintenance
- Budget Breakdown: Maple sapling: $120 | Pond net cover: $30 | Skimmer: $150
- Creator’s Tip: Stretch a fine mesh net tightly over the pond just before the first frost to catch the bulk of the falling leaves.
- Smart Sourcing: heavy-duty autumn pond netting and professional surface debris skimmers.
35. Winter Evergreen Structure
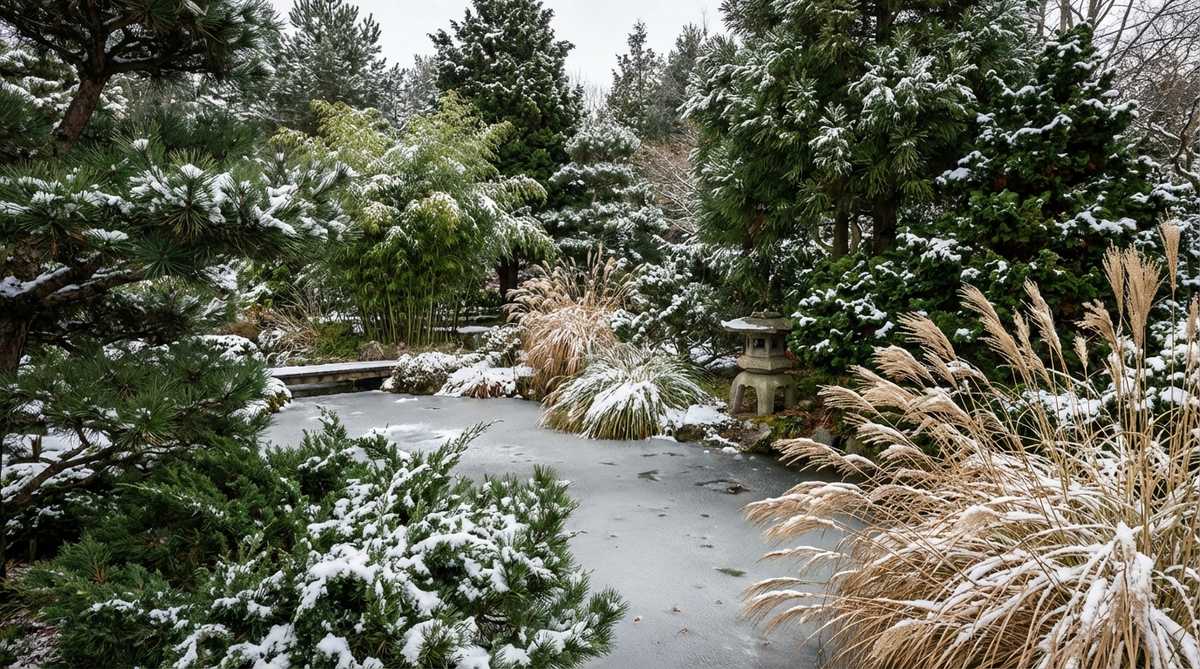
Provides striking, snow-dusted silhouettes that feel incredibly peaceful during the coldest, grayest months of the year. This dormant-season architectural framing ensures your yard never looks barren or abandoned.
Most gardens completely disappear in January, whereas integrating sculpted evergreens and bamboo gives a designer-level finish that looks spectacular covered in frost. Floating a thermostatically controlled de-icer ensures toxic gases escape even when the surface freezes solid.
Winterizing properly and adding structural plants costs around $100–$300.
- Key Materials: Dwarf pines, floating pond heater/de-icer, cold-weather bacteria
- Vibe / Style: Frozen structural elegance
- Difficulty: Requires winter prep
- Budget Breakdown: De-icer: $60 | Structural evergreens: $150 | Winter bacteria: $25
- Creator’s Tip: Never smash the ice on a frozen pond; the shockwaves can actually injure or kill dormant koi. Let the heater do the work.
- Smart Sourcing: thermostatic floating pond de-icers and cold-water beneficial bacteria blends.
36. Four-Season Rotation Beds
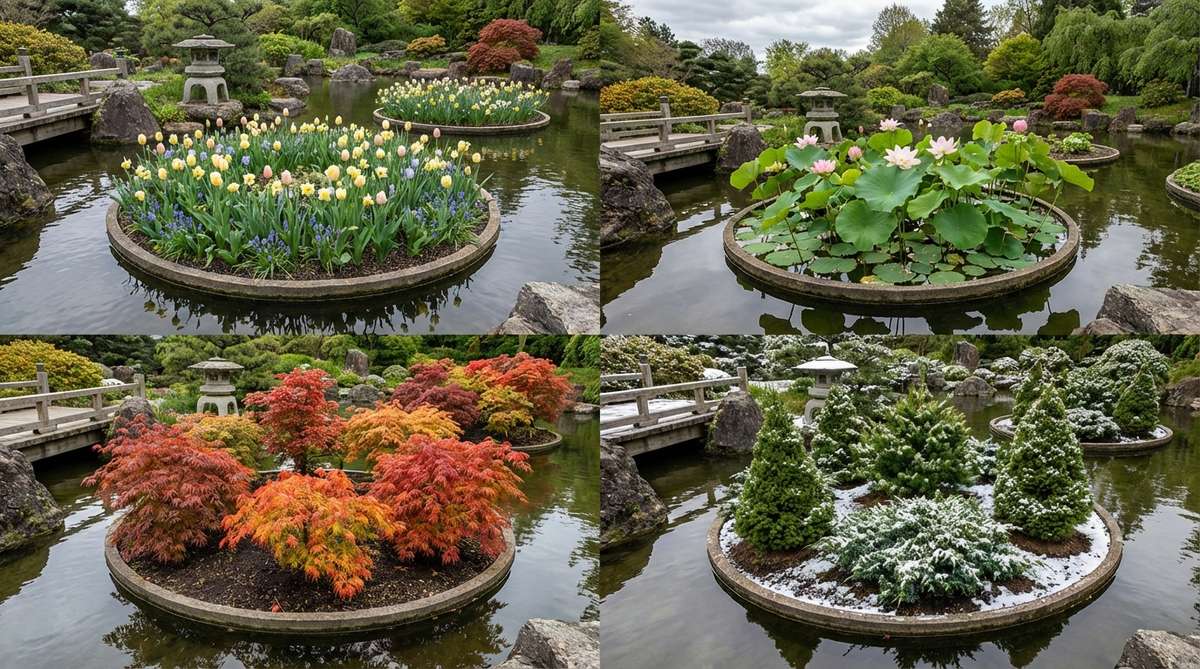
Acts as a living, breathing calendar that feels like an ever-changing art installation right in your backyard. This rotational aquatic planting zone is the masterclass secret to elite landscape design.
Planting everything permanently leads to overgrown messes, but utilizing modular, swapable planter baskets delivers a surprisingly premium look that you can change on a whim. Swapping spring bulbs for summer lilies ensures maximum visual impact every single week of the year.
A set of rotational baskets and varied plants costs about $150–$250. Pin this if you want the ultimate dynamic garden layout!
- Key Materials: Identical drop-in planting baskets, seasonal bulb/tuber rotation
- Vibe / Style: Evolving masterpiece
- Difficulty: Ongoing seasonal effort
- Budget Breakdown: Drop-in baskets: $40 | Seasonal plants: $150
- Creator’s Tip: Build a shallow hidden “nursery tub” behind a bush to hold the dormant baskets while they aren’t in season.
- Smart Sourcing: rigid plastic aquatic planting baskets (bulk) and multi-season water garden plant assortments.
Bringing Your Japanese Garden Pond Vision To Life
Creating a successful japanese garden koi pond demands more than just digging a hole; it requires blending premium visual aesthetics with commercial-grade material sourcing. The exactly 36 high-end blueprints detailed above prove that you don’t need a luxury budget to achieve a spectacular, balanced water feature. Whether you opt for a sleek minimalist basin or a sprawling terraced stream, the secret lies in leveraging professional kits, UV-resistant liners, and strategic plant placement. Take action on these blueprints, invest in the right foundational tech, and watch as your outdoor space evolves into an elite, living masterpiece that will thrive for decades to come.
Frequently Asked Questions
What is the minimum depth for a japanese garden pond with koi?
A japanese garden pond requires a minimum depth of 3 feet, but pushing for 4-5 feet using professional EPDM liners is highly recommended for premium koi health. Deeper basins prevent extreme temperature swings, keep fish safe from aggressive predators, and allow you to hide heavy-duty water pumps seamlessly at the bottom. Investing in a deeper excavation upfront saves you thousands in sick fish and algae-fighting chemicals later.
Which water plants work best in koi ponds without being eaten?
Tough-stemmed varieties like mature water lilies, lotus, and water irises easily survive hungry fish. If you want a designer-level finish without the constant replanting, protect the root zones by utilizing heavy mesh planting baskets topped with large river rock. Alternatively, buying bulk floating plants like water lettuce serves as a cheap, natural snack for the koi while keeping your expensive focal-point plants completely untouched.
How many koi can I keep in a 1000-gallon japanese garden pond?
A 1000-gallon setup safely supports 5-7 adult fish, assuming you have installed a commercial-grade biological filter system to handle the heavy bio-load. Beginners often overstock their basins, leading to murky water and rapid filter clogs. To make your japanese garden koi pond look expensive and crystal clear, keep the fish count low and invest in premium UV sterilizer kits to obliterate green water before it starts.
Do I need a waterfall in my japanese koi pond design?
While not strictly required, adding a cascading feature using a pre-formed waterfall spillway box is the absolute easiest way to inject life, massive oxygenation, and high-end aesthetics into your setup. Stagnant water breeds mosquitoes and algae. If a large waterfall doesn’t fit your budget, compact fountain pump kits or hidden underground bubblers provide the exact same water-polishing aeration at a fraction of the cost.
When is the best time to build a japanese garden pond?
Spring and fall are the ultimate building windows. Digging in the sweltering summer heat makes liner manipulation frustrating, while freezing winter ground is impossible to excavate. Snagging complete japanese garden koi pond starter kits in early spring ensures your biological filters and aquatic plants are fully established and thriving well before the stressful mid-summer heatwaves hit.